Knowledge base
1000 FAQs, 500 tutorials and instructional videos. Here, there are only solutions!
This guide explains how to modify access rights to products for a user in your Organization on the Infomaniak Manager.
Preamble
- Since you opened your account with Infomaniak, you are part of at least one Organization.
- If you were alone and it was not an invitation, an Organization was created in your name and you automatically become the legal representative.
- Otherwise, you belong to the Organization that invited you (to join its kSuite, to manage a product, etc.).
- It is possible to modify a user's role within your Organization.
- You can then define whether a user…
- … is part of your Organization and should become:
- Legal representative
- Administrator
- Collaborator (this is the part that is detailed below…)
- … is external to your Organization (limited rights):
- External users are not included in the sharing of calendars and address books for the entire Organization.
- … is part of your Organization and should become:
Who can access what…
Prerequisites
- Switch beforehand to the desired Organization if you do not find the expected list of users.
- Be Administrator or Legal representative within the Organization.
- Have added a user as a collaborator.
The guide below allows you to manage access to products for collaborators and external users. Indeed, a legal representative or an Administrator already has access to all existing products within the Organization and visible on the Infomaniak Manager.
To modify the product access of an Organization user:
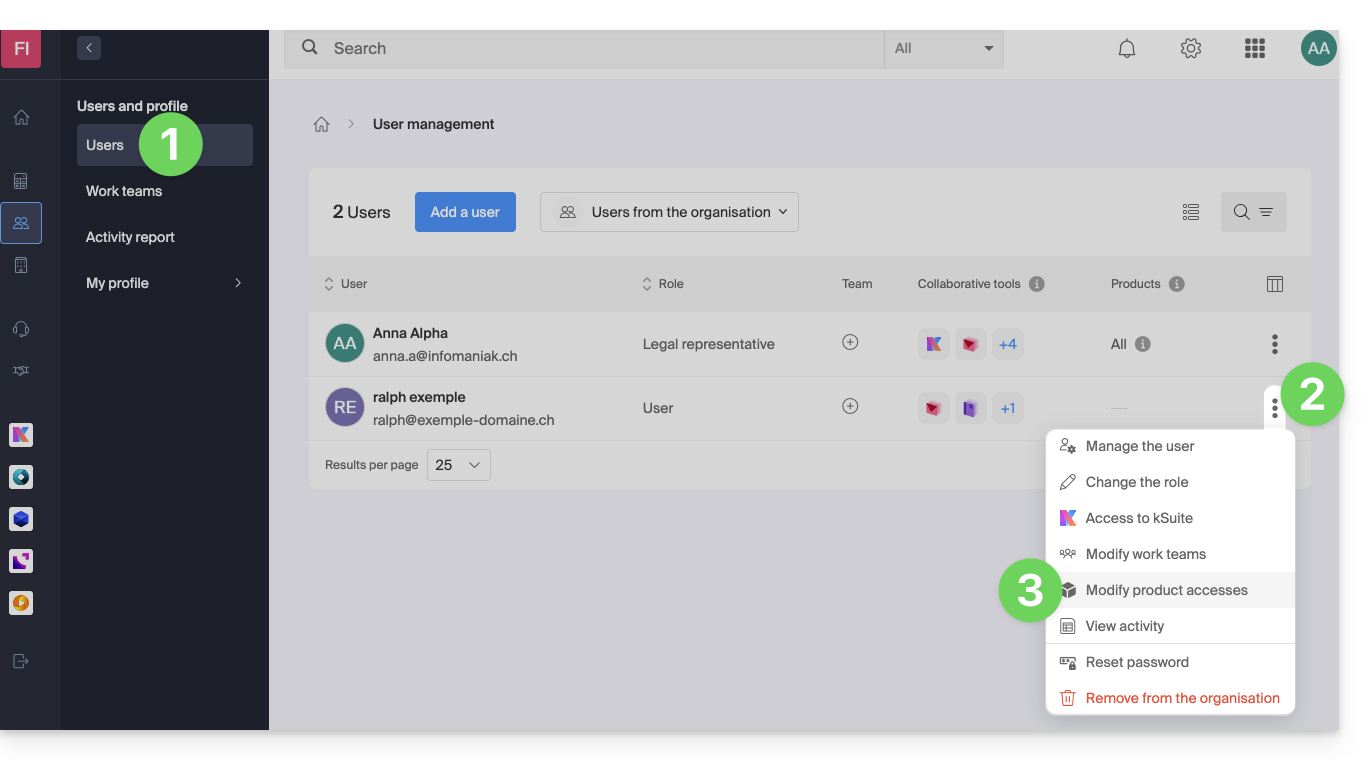
- Click here to access user management on the Infomaniak Manager (need help?).
- Click on the action menu ⋮ located to the right of the user concerned.
- Click on Modify product access:
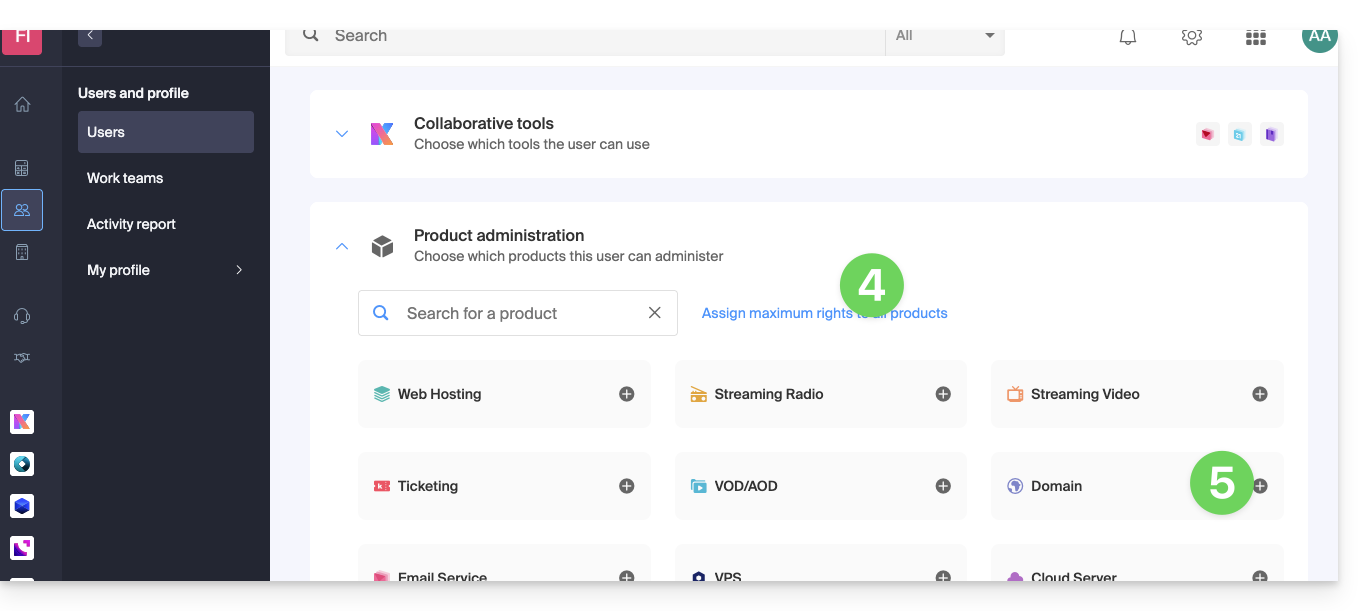
- You can grant access to everything with maximum permissions in 1 click.
- Otherwise, click on the product category to which you want to grant access.
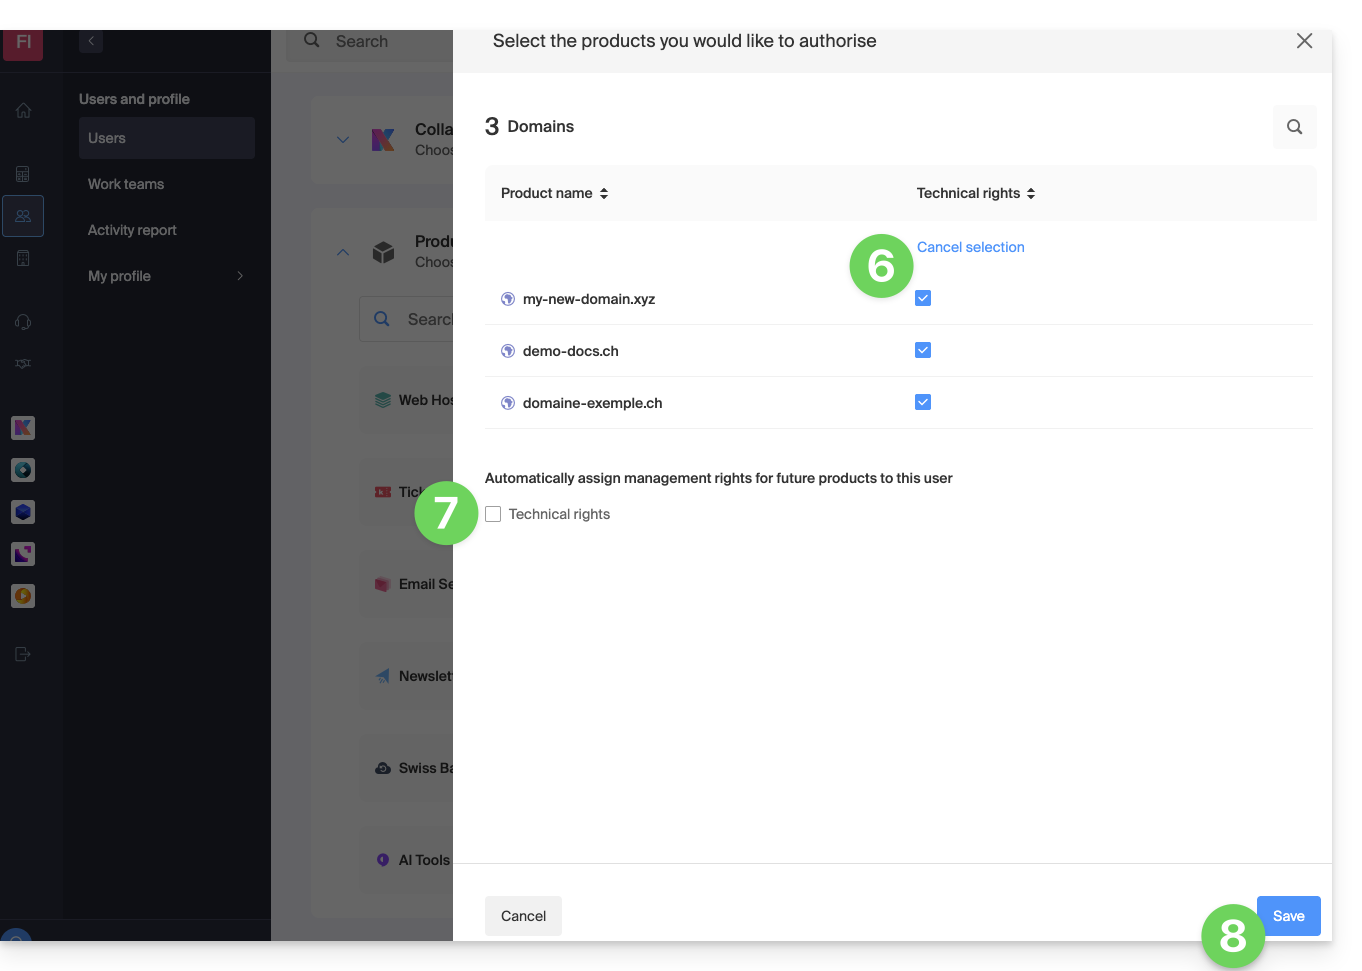
- Select the necessary product(s).
- If you have selected multiple products, decide whether a future additional product should automatically be visible to the user (and with what type of permissions).
- Click the Save button:
- Rights are granted immediately.
- Click the pencil icon ✎ to modify permissions:
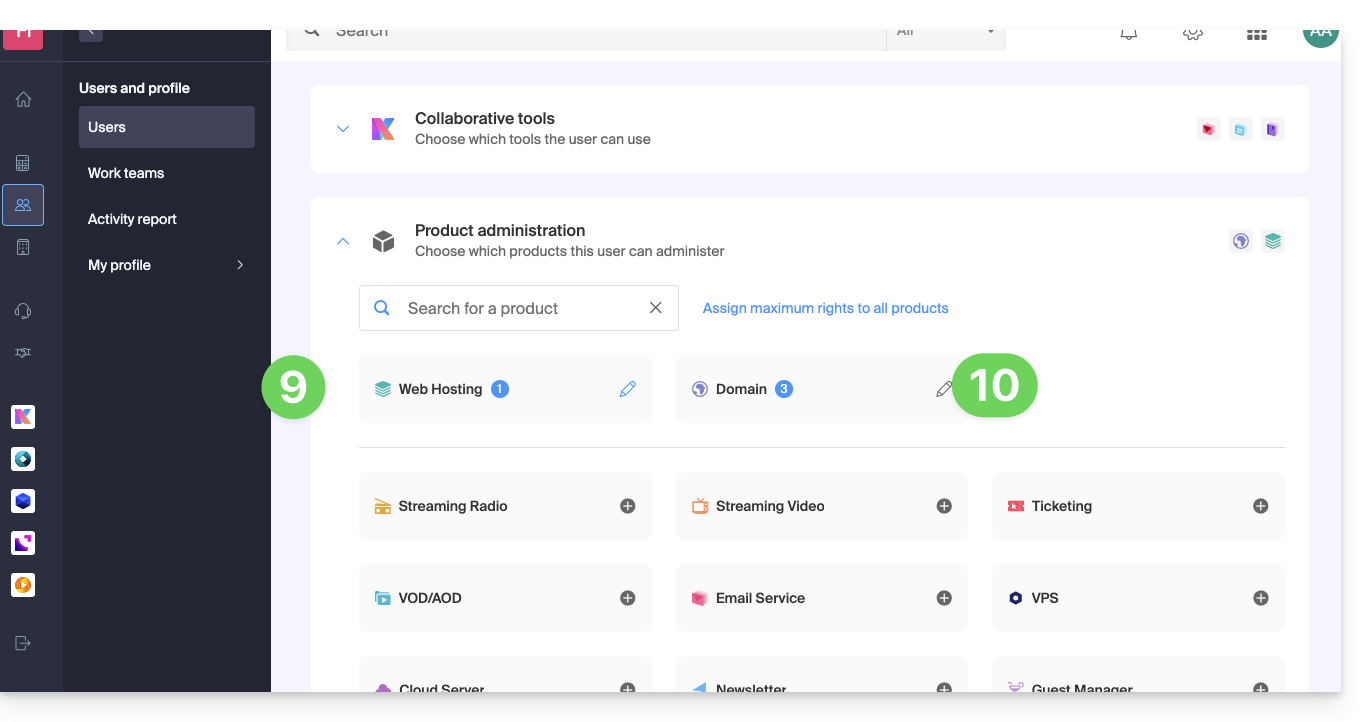
- Restart at step 5 if you need to grant access to multiple products.
Service usage / Service management
Be careful, on your product table, it is important to distinguish between product access (type kDrive for example, within the kSuite) and product management access: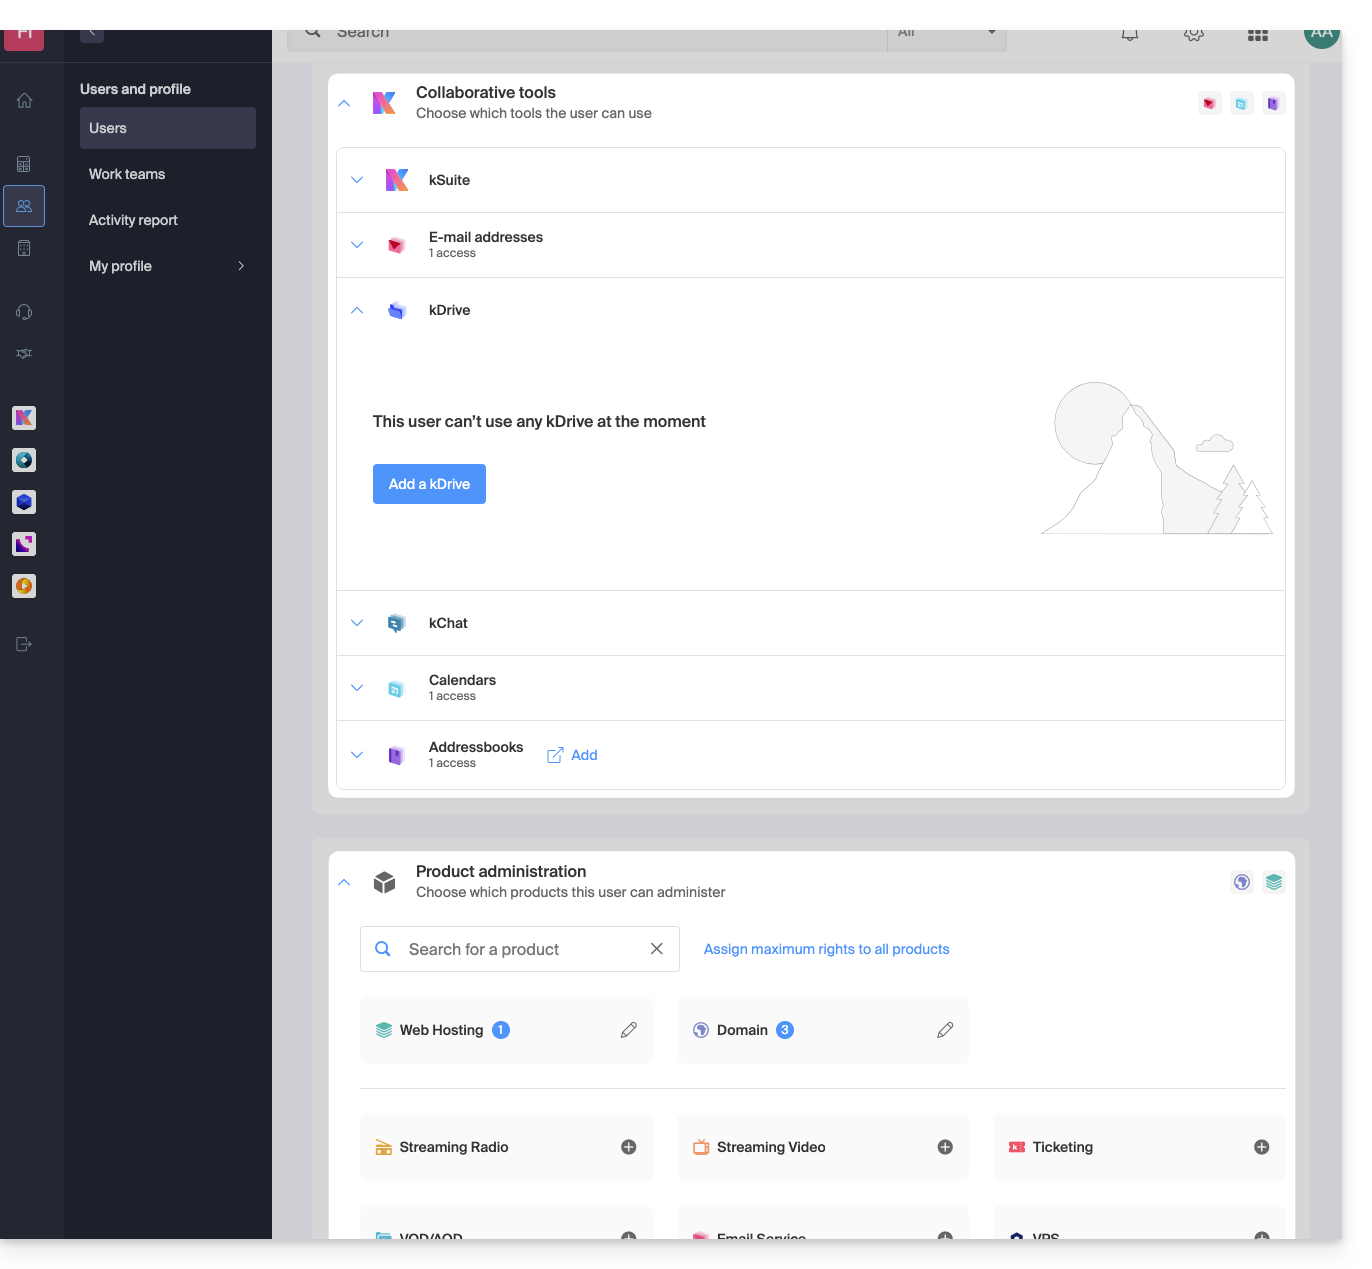
It is possible to authorize a user to use kDrive (they will be able to create a PDF for example) without granting them kDrive service management rights (they will not be able to change the offer, invite a new user, terminate, etc.).
Technical rights / Statistical rights
With certain services like kDrive, it is possible to give a collaborator TECHNICAL and/or STATISTICAL rights (adds access to the dashboard, share links, storage statistics, active users, connected devices, activity on kDrive):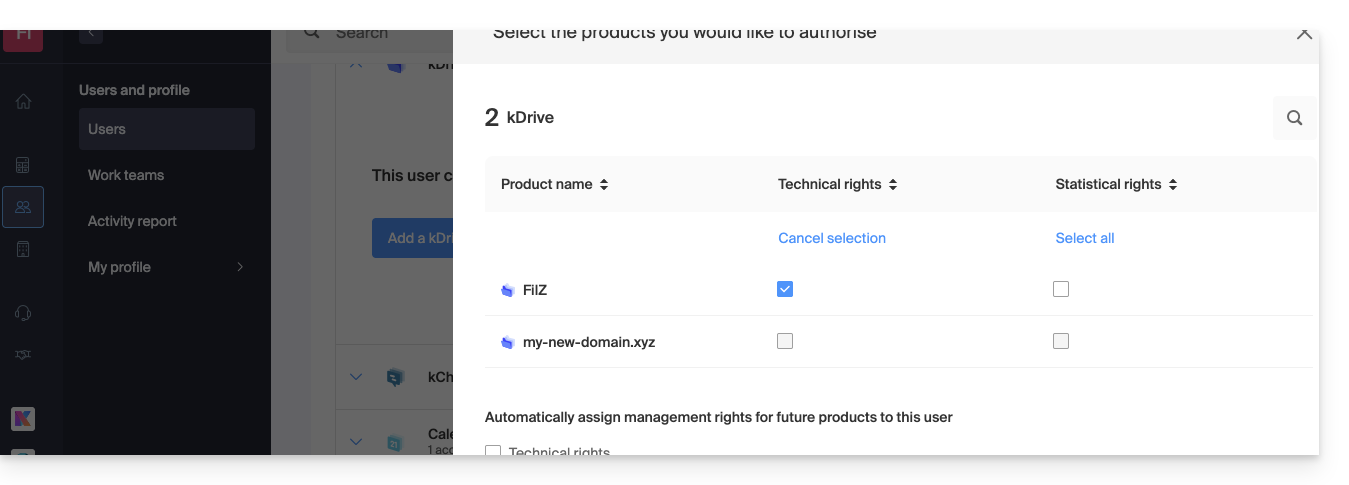
Other services like domain names do not have a STATISTICAL section: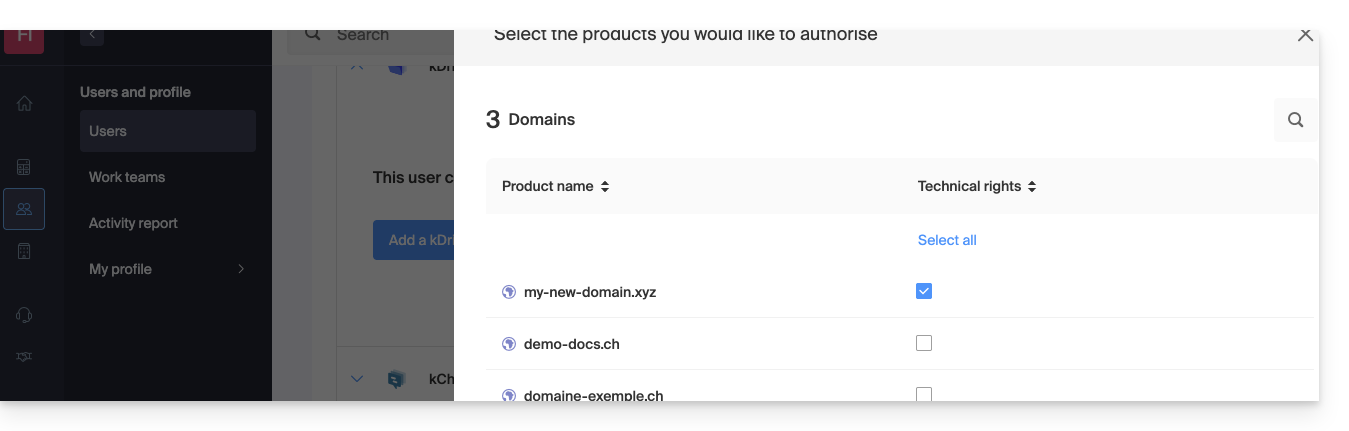
Certain specific services like ticketing allow granting even more detailed rights: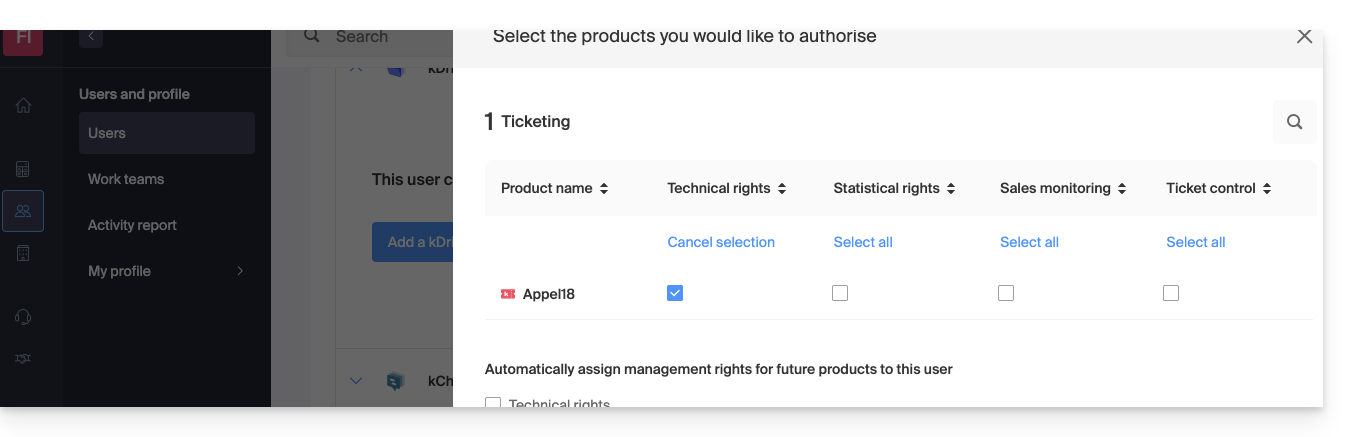
Easier access: Work Teams
To facilitate the addition of access rights to a product that is on your Organization, there are Work Teams. These allow you to create groups that are linked to Infomaniak products with the desired rights, very practical for giving a new collaborator in your Organization access to the products they will need in their daily activities.
Link to this FAQ:
Has this FAQ been helpful?
This guide explains how to access your e-mails hosted by Infomaniak.
Infomaniak Mail Guides
Click here to open the Infomaniak Assistant to configure synchronization on macOS, Windows, Linux, Android, iOS of common mail software/clients (Outlook, Microsoft 365, Thunderbird, Apple Mail, eM Client, etc.).
Use directly mail in a web browser thanks to the Web app Mail Infomaniak (online service ksuite.infomaniak.com/mail) and/or download the mobile app Infomaniak Mail (application for iOS / Android smartphone or tablet).
Otherwise, here are manual procedures offered in the form of guides:
| OS | Application to synchronize |
|---|---|
| Outlook New / Microsoft 365 MSO / 2019 ( Windows) | |
| Outlook Microsoft 365 MSO ( macOS) | |
| Apple Mail (configuration profile macOS) | |
| Apple Mail (configuration profile iOS: iPhone, iPad, etc.) | |
| Mail ( Android: Huawei, Samsung, Sony, etc.) | |
| Outlook ( iOS + Android) | |
| Gmail ( iOS + Android) | |
| Mozilla Thunderbird |
For synchronization of your contacts & calendars refer to this other guide.
Recommended IMAP settings
Username = the complete & full email address (? )
Password = the one created/generated for the email address you want to consult
Incoming IMAP server = mail.infomaniak.com
IMAP port = 993 (with SSL)
Recommended SMTP settings
Username = full & complete email address ( ? )
Password = the one created/generated for the email address you want to access
Outgoing SMTP server = mail.infomaniak.com
SMTP port & encryption protocol and command/method to activate this protocol:
- Prioritize the port
587+ STARTTLS: this is the official technical standard and the most compatible method with the majority of modern systems for authenticated submission. - Tolerate the port
465+ SSL/TLS only as a compatibility option or alternative, specifying that it is implicit encryption, but that 587 remains the recommended choice.
Authentication required to send emails:
- It is activated in the SMTP settings of your application.
- Check "use the same parameters as the incoming server" or depending on the software/email clients, enter a username (= full & complete email address) and its password.
In case of problem
- POP3 protocol not recommended (POP server = mail.infomaniak.com and POP port = 995 with SSL).
- Refer to this other guide if you encounter errors, to check the essential points!
- Refer to this other guide if you are looking for information about other compatible email ports and protocols.
Change an email password
Passwords for email addresses can be multiple, have nothing to do with your Infomaniak login password, and cannot be retrieved after their first display. You must therefore (re)create them as soon as you need them, specifying the device (computer, mobile, etc.) and/or the user concerned, in order to be able to distinctly manage the elements on the day you need to manage a specific connection.
Manage passwords:
- from the Manager on the Mail Service
- from the Infomaniak Web app Mail
Apply the new email password
If you have deleted an existing password to create a new one, you will need to update your applications & devices that were using this password. Refer to these specific guides:
- Apple Mail (macOS / iOS)
- Android Mail / Gmail (different versions)
- Microsoft Outlook (different versions)
- Mozilla Thunderbird
Don't manage your emails with Infomaniak yet?
Link to this FAQ:
Has this FAQ been helpful?
Infomaniak is an independent technology company based in Switzerland. It was founded in 1994 in Geneva and develops digital services for individuals, organizations, and businesses. The company is majority-owned by its employees and operates from Geneva and Zurich.
The infrastructure
Infomaniak designs, develops, and fully manages its own infrastructure, which includes data centers in Switzerland and all the servers installed there. The data entrusted to it is hosted and processed exclusively in Switzerland, ensuring the sovereignty, confidentiality, and security of the information.
The company offers a wide range of services, including website hosting, domain name registration and management, cloud solutions, collaborative suites, messaging services, and audio/video broadcasting and streaming tools. These services are designed to be high-performing, scalable, and suitable for both beginners and professional users.
Infomaniak's data centers are recognized for their energy efficiency and ecological design. Infomaniak has notably inaugurated a data center capable of recycling 100% of the energy it consumes to heat local housing, demonstrating a concrete commitment to ecology and sustainability.
Infomaniak emphasizes data protection and privacy. The services are designed and operated without advertising, without data analysis for commercial purposes, and in strict compliance with Swiss data protection laws and European standards such as the GDPR.
The services offered by Infomaniak include:
- web hosting and online stores with CMS support and automated backups
- domain name registration and management
- high-performance cloud solutions for hosting applications, servers, and data
- the collaborative suite kSuite including email, storage, calendar, video conferencing, AI assistant, and communication tools
- audio and video streaming solutions for media, radio, and events.
Infomaniak offers local and multilingual customer support, available with a comprehensive knowledge base, guides, tutorials, and direct assistance to help users with the use and configuration of their services.
By choosing Infomaniak, users benefit from a sovereign, reliable infrastructure, compliant with international standards, respectful of privacy, and committed to a responsible environmental and social approach.
Certifications
Infomaniak is certified according to several international standards that attest to the quality, security, energy management, and environmental impact of its activities. These certifications are regularly renewed and improved to ensure high performance standards.
The certification ISO 27001:2022 attests to the implementation of an information security management system covering data protection and defense against intrusions and information loss. The certification ISO 9001:2015 focuses on quality management, ensuring that the products and services provided meet customer needs and strict quality requirements. The certification ISO 14001:2015 concerns environmental management, with criteria for measuring and reducing the impact of activities on the environment. The certification ISO 50001:2018 aims to measure and continuously improve the energy efficiency of facilities and operations.
Infomaniak also compensates 200% of its CO₂ emissions through certified projects with high environmental and social value, demonstrating a proactive approach to reducing its ecological footprint.
Several Swiss labels reinforce this approach: the Swiss Made Software label, which certifies that the majority of software developments are carried out in Switzerland, the Swiss Hosting label, which confirms that customer data and online services are physically hosted in Switzerland, and the Swiss Made label, which emphasizes the Swiss origin of the services and the maintenance of all jobs in the country, particularly in Geneva and Zurich.
In 2025, Infomaniak also obtained the B Corp™ certification, an international label that recognizes companies meeting high standards in terms of social and environmental impact, governance, and transparency. This certification attests to a sustainable and ethical commitment that takes into account the needs of employees, customers, the community, and the planet.
Measures are being taken to obtain other certifications, required, among other things, for the PCI-DSS certification planned for the future. However, it is not planned to be certified as a Health Data Host (HDS).
Link to this FAQ:
Has this FAQ been helpful?
This guide concerns the configuration of the mobile app Infomaniak Mail (app for iOS/Android smartphone or tablet).
The language of the application is based on the language of your device on which the Infomaniak Mail mobile app is installed and not on the configured language on your user account.
Access the application settings
To open the settings of the mobile app Infomaniak Mail (app for iOS/Android smartphone or tablet) on your device:
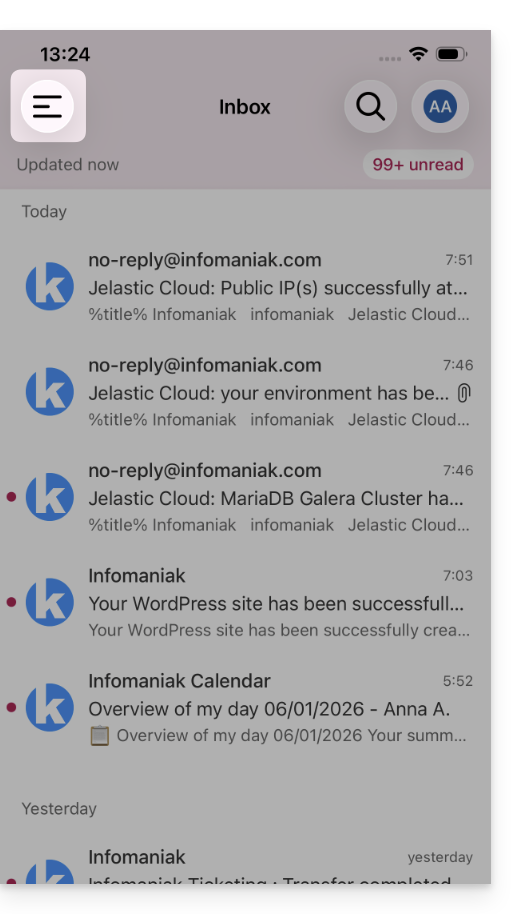
- Tap at the top left of your inbox:
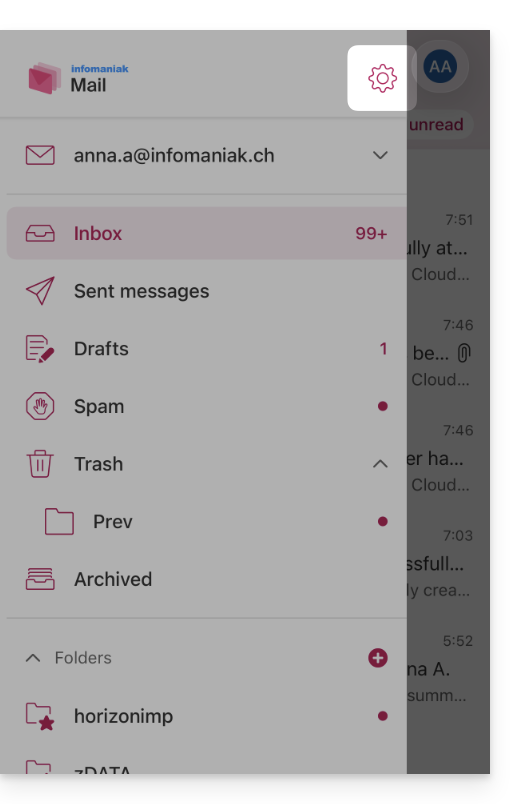
- Click on the Settings icon at the top right of the pane that opened:
- You can manage the settings from the screen that appears:
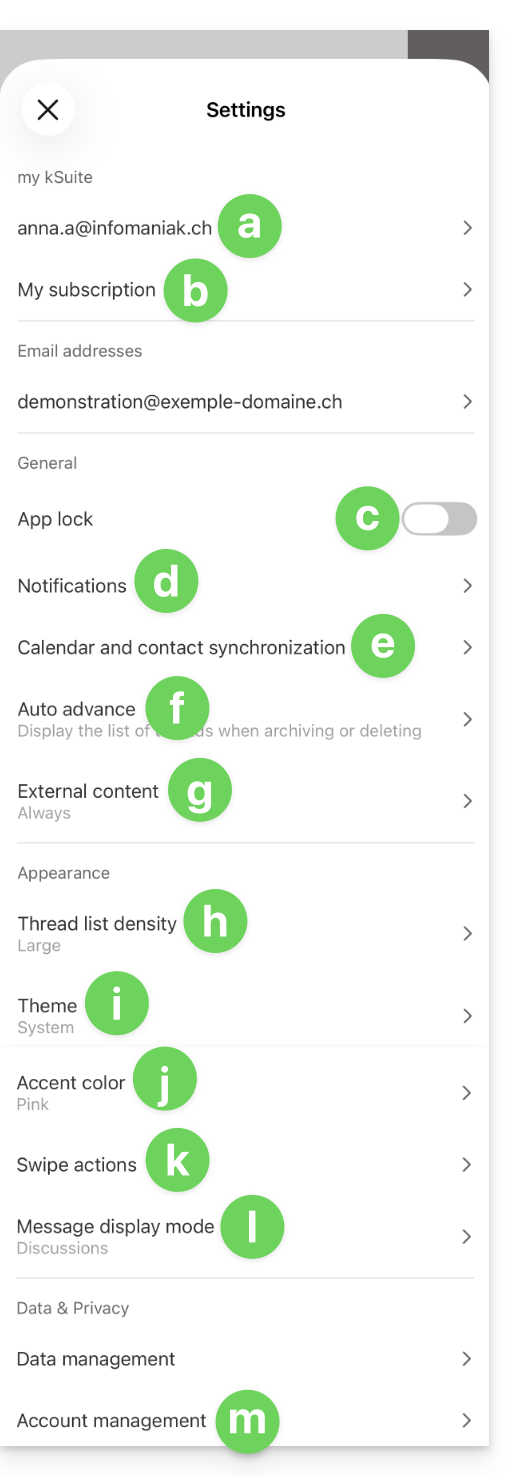
a. Signature selection
If you have multiple email addresses linked to your account, tap on the email address for which you want to change the signature. Then choose another signature from those configured.
On iOS, you can also manage your read receipt requests.
b. my kSuite only
Allows you to get information about the current subscription.
c. Application lock
This option allows you to protect the application by one of the locking methods of your device, which allows you to stay connected to Infomaniak messaging with your user account but prevents access to Infomaniak Mail by a third party when the app is no longer in the open applications.
If your device has a fingerprint reader, you can use this method to activate the lock. Same for Face ID on iOS: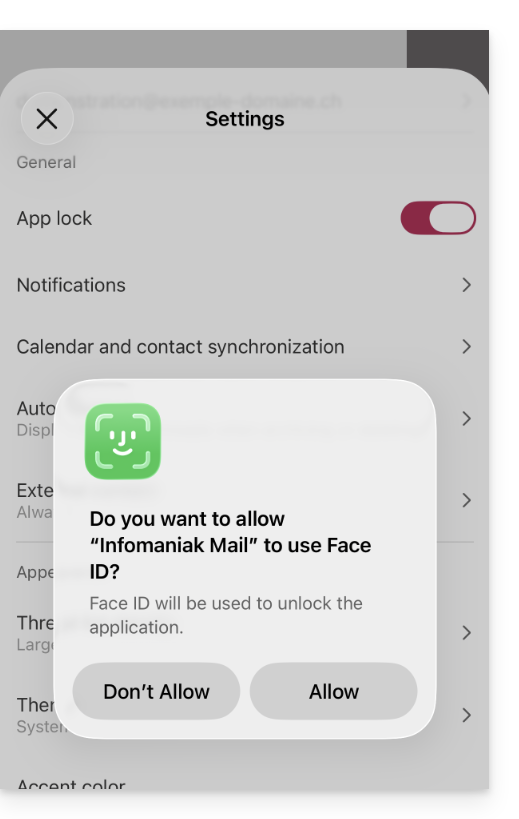
Upon reopening the application, authentication will be required.
d. Notifications on the device
You can configure the notifications for each of the email addresses linked in the application.
e. Synchronization of contacts & calendars
For now, this synchronization is managed externally; refer to the assistant https://config.infomaniak.com/.
f. Automatic advance
This section allows you to choose the action to be taken after archiving or deleting an email: open the next message, or the previous one, or return to the message list.
g. External content
This section allows you to choose whether to automatically display all external content present within an incoming email you are reading, or whether you prefer to hide it and only display it on demand.
h. Conversion list density
The display mode can be compact, normal, or large.
i. Theme
The theme allows you to choose a display type dark mode (dark) or conversely, a bright display black on white. This display can also be defined based on the device's theme (thus allowing for any system setting that might vary the display based on the time).
j. Accent color
The accent color is either blue or pink.
k. Swipe actions
Swipe actions allow you to define what operation my kSuite Mail should perform if you swipe your finger across a message from right to left or left to right: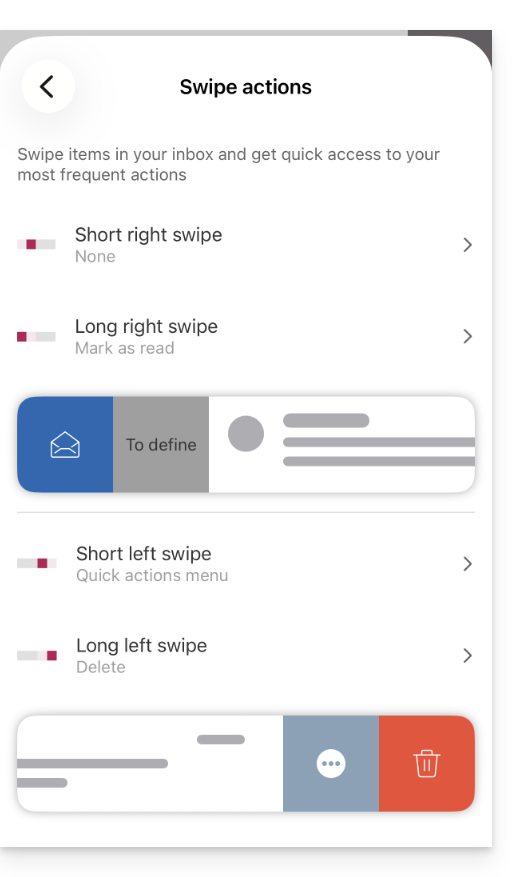
The possible actions are:
- delete the message (it goes to the trash)
- archive the message (it goes to an archive folder)
- mark it as read or unread
- move the message (and in this case the list of folders is displayed after a swipe)
- favorites (to activate a follow-up on the message)
- report as spam
- quick action menu (also accessible from reading the message and which offers to write a reply, perform a transfer, deletion, printing, etc.)
and it is also possible to choose "none" to avoid operations that would not be desired if your device is not suitable for swiping: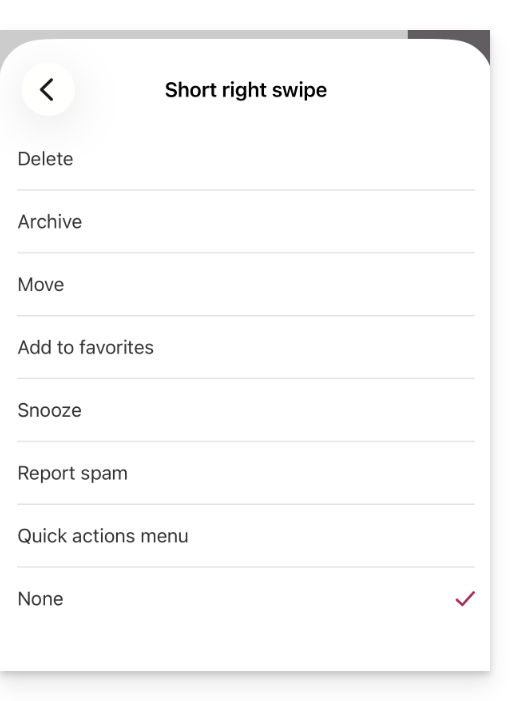
l. Message display mode
Choose between an individual display of messages or a “discussion” / “conversation” mode, which allows you to group your emails by subjects/senders, i.e., group the emails received based on the discussion topic, thus the display of the inbox is lighter and it is easier to follow the messages from the different participants in the conversation:
m. Account management
Allows you to delete the Infomaniak account (after confirming you have read the important warning). Also refer to this other guide.
Link to this FAQ:
Has this FAQ been helpful?
This guide explains how to contact and authorize Infomaniak Support to access your online products, and more specifically their content, and provide useful details when requesting assistance.
Contact Infomaniak Support
Some email addresses, such as support@infomaniak.com, are not intended to receive direct support requests.
Messages sent to these addresses are not processed by the teams and do not allow for tracking the request.
To ensure proper handling, each request must be submitted via the support center:
- This process allows for generating a ticket, automatically directing the request to the relevant team, and ensuring complete follow-up until resolution.
- Once the request is recorded, exchanges can then continue directly by email with support.
Before contacting support, it is also recommended to consult the knowledge base, which includes numerous guides and answers to frequently asked questions.
Authorize Support to access a type of content
Infomaniak Support may ask you to grant temporary access to part of your content; this saves time in diagnosing by avoiding unnecessary back and forth:
- This access is strictly limited to the analysis context and is used solely to identify the source of the problem encountered:
- Only Infomaniak employees handling your support request directly.
- Access is granted only from Infomaniak's controlled facilities.
- In accordance with Infomaniak's privacy policy, your data will never be used for other purposes:
- You can revoke this access at any time.
- Otherwise, it expires automatically after 7 days.
To authorize Infomaniak to access a specific part of your services (authorizing access to content never opens access to others; each authorization is specific and independent):
- Click here to access helpdesk access management on the Infomaniak Manager.
- Click the toggle switch to authorize access to the content of…
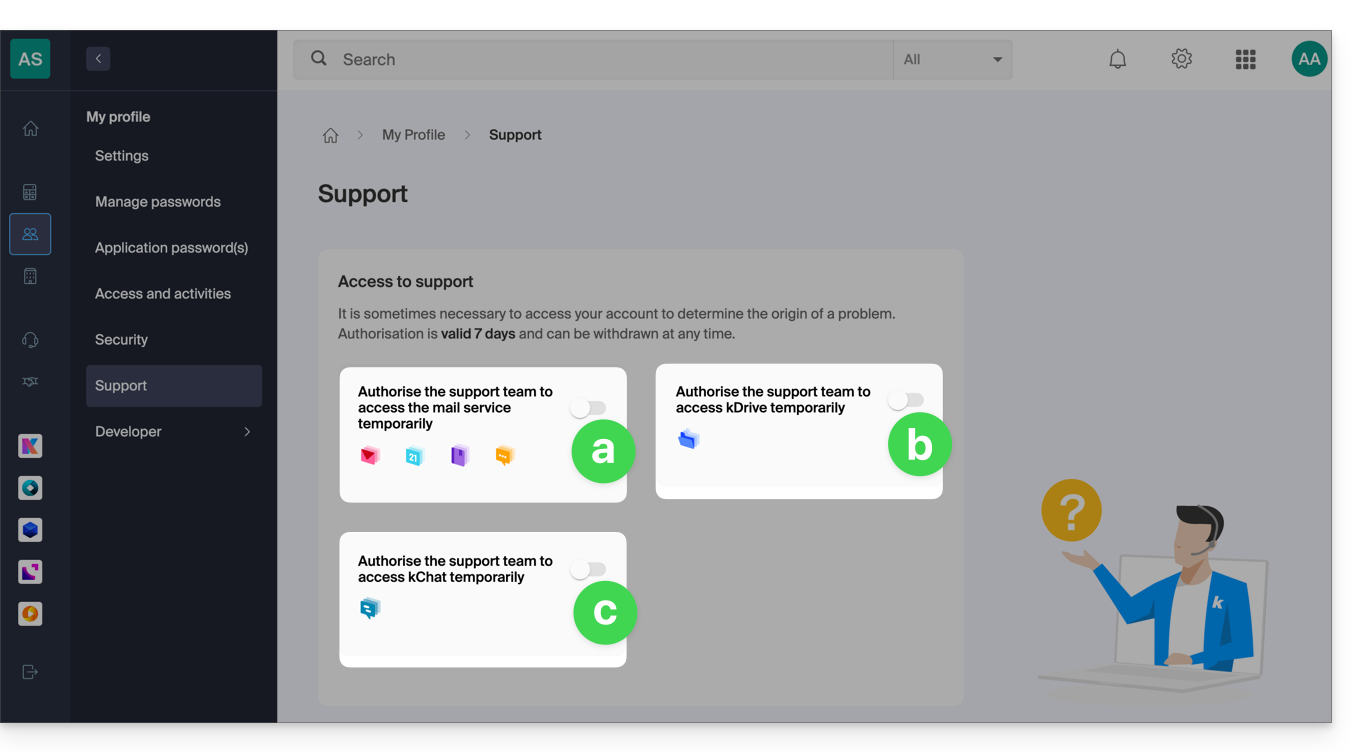
- … email addresses linked to the Mail Infomaniak web app (online service ksuite.infomaniak.com/mail) + contacts & calendars,
- … folders among the existing kDrive in the Organizations of which the current user is a member,
- … discussions among the existing kChat products in the Organizations of which the current user is a member.
With my kSuite+, you can also do this by clicking here or proceed as follows to get there:
- Click on the Settings icon at the top right of your kSuite window.
- Click on Support in the left sidebar:
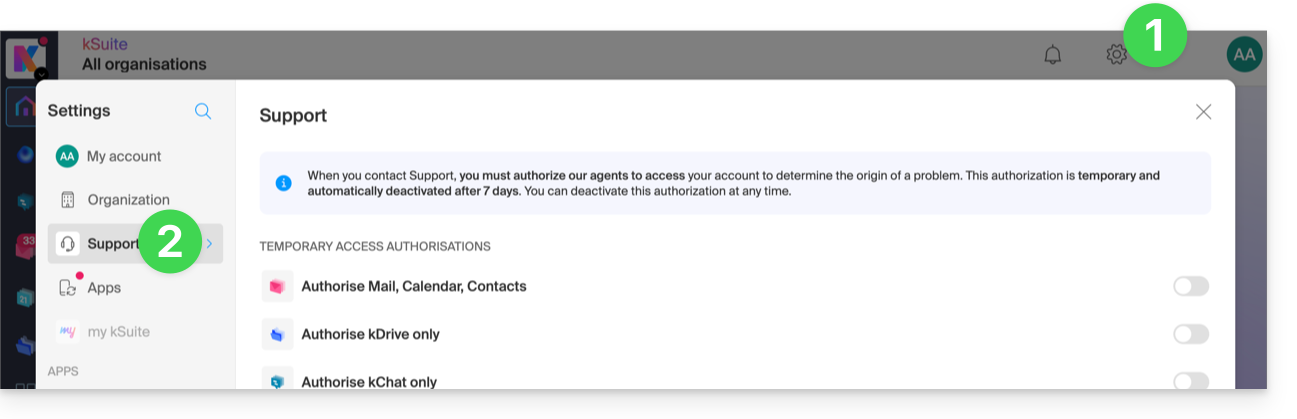
- Click on the toggle switch to allow access to the content of…
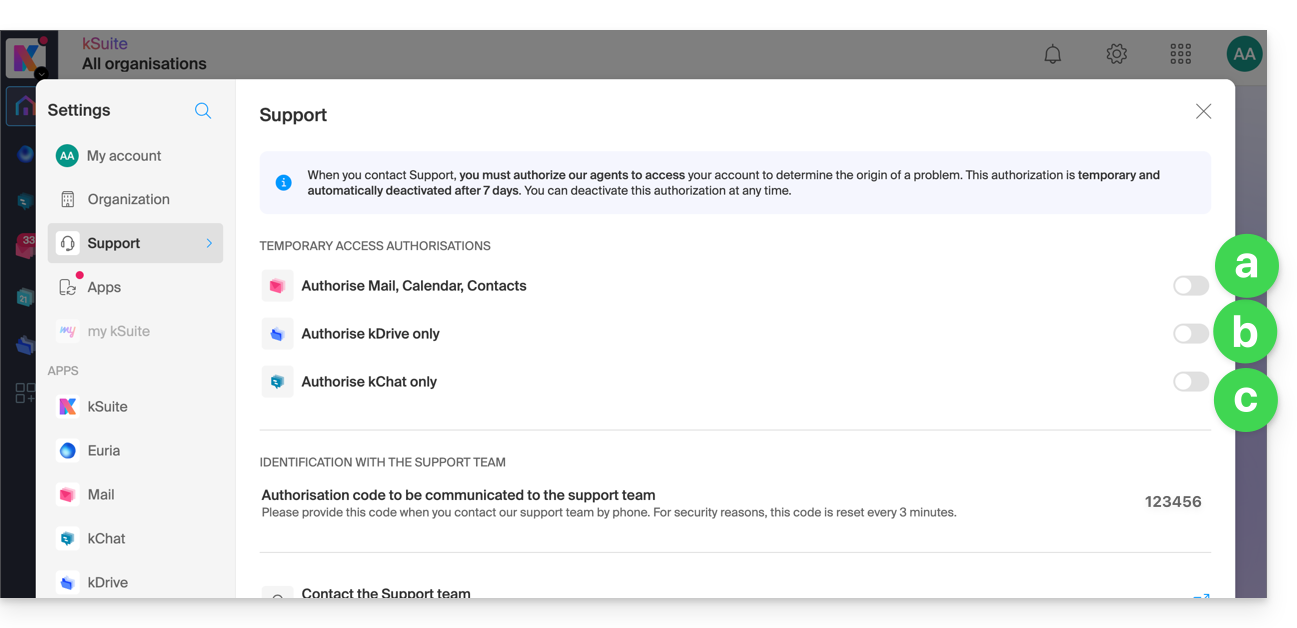
You can also share a specific email very easily.
Take screenshots
… on Windows
Microsoft provides a pre-installed software dedicated to screenshots. But to do it manually:
- Display what you want/need to transmit on the screen.
- Press the PRINTSCREEN key on your keyboard (or
PRTSCR,IMPR. ECRAN, etc.) once. - In Microsoft Word (or similar), go to "Edit" -> "Paste" to place your image on the page.
- Save your file.
- Repeat the operation from step 1 to step 5 as many times as the number of desired screenshots.
… on macOS
- Press the "
CMD" + "shift" (the hollow upward arrow — caps lock) + the "3" keys simultaneously. - Each time you press these keys, an image file is created on your computer's desktop.
… on iOS (iPhone, iPad...)
- Press the "
Power" + "Home" (the two only physical buttons) buttons simultaneously. - Retrieve the screenshots in the "Photos" app of your device.
… on Android (for example Samsung, LG or Huawei)
- Press the "Volume Down" (on the edge) and the lock key simultaneously.
- The captured image is thus automatically saved in a Screenshots folder in the gallery.
Copy the content of an alert window
… on Windows
To copy-paste as text an error message present in a Windows “popup” window, a simple press on the CTRL + C key on your keyboard is enough to copy the message to the clipboard. You will then be able to paste it (CTRL + V) into the body of the message you are sending.
Obtain the browser's JavaScript console
… on Windows
Chrome, Firefox and Safari: enter the key combination CTRL + SHIFT + i
Internet Explorer and Edge: press the F12 key
… on macOS
Chrome: enter the key combination ⌘ + ⌥ + J
Safari: enter the key combination ⌘ + ⌥ + C
- Then, click on the crossed-out circle icon or similar to reset the log.
- Display the page of your site concerned by the issue.
- The console tab displays the JavaScript errors and online resources not found.
Link to this FAQ:
Has this FAQ been helpful?
This guide is for you if you want to change your current email provider and host your emails with Infomaniak.
Preamble
- To help you identify the offer best suited to your needs, refer to this other guide.
- To avoid losing any messages and experiencing any interruptions:
- Follow the different links provided in order; they will open in a new tab of your browser, and return to this main guide after each completed step.
- If necessary, you can also migrate your:
You order a Mail Service only
Below are the different steps to migrate your mail service to Infomaniak securely.
Step 1
It is necessary to order the mail service by following this guide.
At the time of ordering, you can choose to transfer the domain name at the same time or order the mail service alone.
You can then import the content of your old addresses to Infomaniak: refer to this other guide.
Step 2
Once the addresses are configured and your old content imported, you will be able to link your external domain name to your Infomaniak Mail Service to start receiving emails at Infomaniak. You will need to follow the chapter "Link the external domain to your Mail Service" of this guide.
You will find here the MX / SPF to add in the DNS zone of your domain name:
SPF
Type: TXT
Host: Leave blank
Target: v=spf1 include:spf.infomaniak.ch -all
MX
Priority: 5
Host: Leave blank
Target: mta-gw.infomaniak.ch (for Gandi, it is necessary to add a dot at the end "mta-gw.infomaniak.ch." )
Step 3 (optional)
Once everything is working correctly and if it hasn't been done already, you can transfer your domain name: refer to this other guide.
As soon as the transfer is initiated, you should have access to the DNS zone of your domain name on the Infomaniak Manager. You can therefore check…
1. … in the DNS diagnostic if there are any corrections to be made and if necessary add the DNS entries that might be necessary for other services used with your domain name (newsletter or other).
2. … in the global security tab of your mail service if DKIM is properly activated.
If emails arrived during the migration with your previous provider, you can import the content of your old addresses to Infomaniak again by following this guide (duplicates are managed).
You order a kSuite
Here are the different steps to migrate your external mail service to an Infomaniak kSuite securely.
Step 1
Order kSuite from this page.
Once the order is completed, access your kSuite and add your domain name to it.
You can then create your email addresses and even import the content of your old addresses: refer to this other guide.
Step 2
Once the addresses are configured and your old content imported, link your external domain name to your Infomaniak Mail Service to start receiving emails at Infomaniak. Refer to the chapter "Link the external domain to your Mail Service" of this other guide.
You will find here the MX / SPF to add in the DNS zone of your domain name:
SPF
Type: TXT
Host: Leave blank
Target: v=spf1 include:spf.infomaniak.ch -all
MX
Priority: 5
Host: Leave blank
Target: mta-gw.infomaniak.ch (for Gandi, it is necessary to add a dot at the end "mta-gw.infomaniak.ch." )
Step 3 (optional)
Once everything is working correctly and if it hasn't been done already, you can transfer your domain name: refer to this other guide.
As soon as the transfer is initiated, you should have access to the DNS zone of your domain name on the Infomaniak Manager. You can therefore check…
1. … in the DNS diagnostic if there are any corrections to be made and if necessary add the DNS entries that might be necessary for other services used with your domain name (newsletter or other).
2. … in the global security tab of your mail service if DKIM is properly activated.
If emails arrived during the migration with your previous provider, you can import the content of your old addresses to Infomaniak again by following this guide (duplicates are managed).
Link to this FAQ:
Has this FAQ been helpful?
This guide explains how to recover lost emails, especially after accidental deletion.
Preamble
- Infomaniak backs up each email address once a day (usually early in the morning).
- You can thus restore your mailbox to its exact state at the time of the backup.
- RECOVERED ITEMS:
- Emails (present at the time of the backup) that no longer exist (at the time of the restoration request) will be returned to their original location.
- Certain parameters (answering machine and redirection in particular) will be restored if they have changed in the meantime.
- NON-RECOVERED ITEMS:
- Moved emails (subfolders, trash): they still exist in your account and must be searched.
- The restoration does not include the calendar nor the address book.
- Messages absent at the time of the daily backup (see POP3 chapter); example:
- Restoration requested at 10 AM (backup at 5 AM) for an email received at 8 AM and deleted at 9:30 AM: it will not be recovered because it was not yet present at the 5 AM backup.
- UNMODIFIED ITEMS:
- Emails received, created, or stored between the backup date and the execution of the restoration remain in your mailbox.
Backup retention period
Infomaniak makes the backup of your mailbox available for a certain number of days depending on your offer.
⚠ Duration in days:
| kSuite | * | |
| Standard | 30 | |
| Business | 30 | |
| Enterprise | 30 | |
| * | ||
| my kSuite+ | 30 | |
| Mail Service | * | |
| Premium 5 min. addresses | 30 |
* By upgrading a free offer, you will be able to access backups for up to 30 days.
Refer to this other guide on the storage limits of your messages.
Restore from the Infomaniak Web Mail app
Prerequisites
- Ensure that the deletion occurred less than 30 days ago (or within the period included with your offer - see above).
- Have permission to manage backups: if you had been invited to the Infomaniak Web Mail app (online service ksuite.infomaniak.com/mail) to manage your address, it is possible that the Mail Service manager has revoked this right from their admin account.
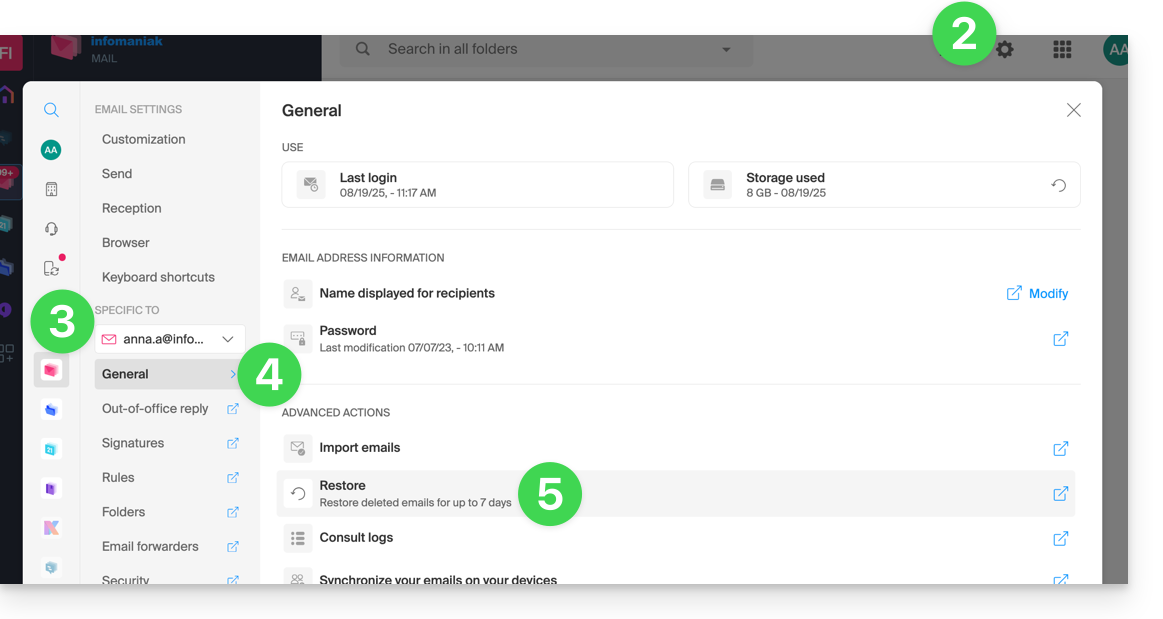
To restore emails:
- Click here to access the Infomaniak Web Mail app (online service ksuite.infomaniak.com/mail).
- Click on the Settings icon at the top right.
- Check or select the email address concerned in the dropdown menu of the left sidebar.
- Click on General.
- Click on Restore:
- Choose a Restore date.
- Click on Restore emails:
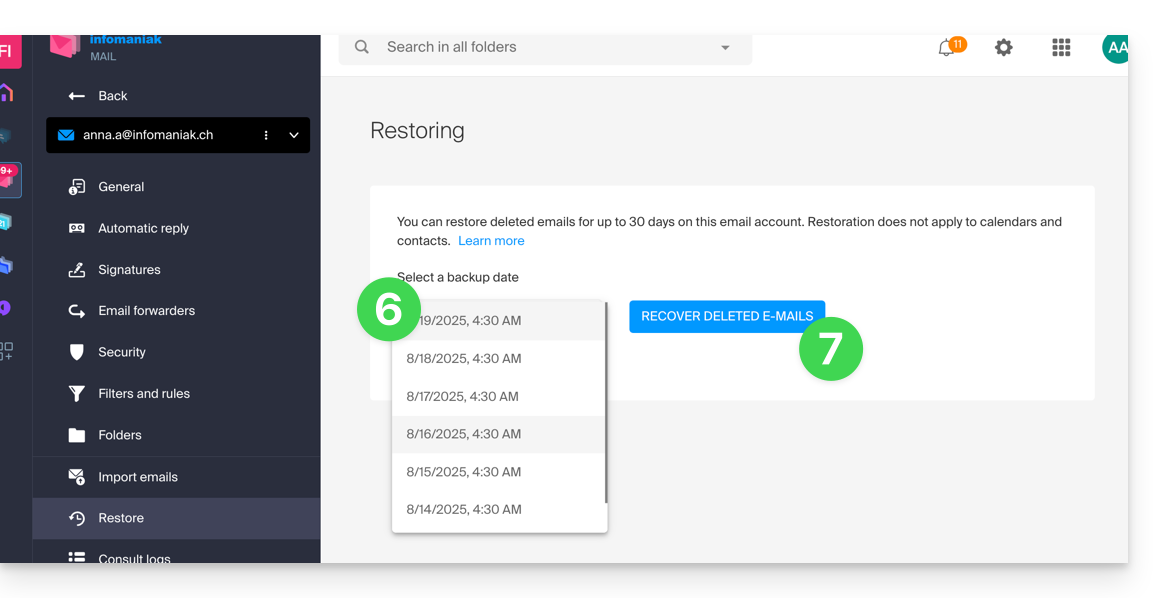
- Once the restoration is complete, an informational email is sent.
Restore from the Mail Service
Prerequisites
- Be Administrator or Legal Representative within the Organization that manages the Mail Service.
- Ensure that the deletion occurred less than 30 days ago (or within the period included with your offer - see above).
To restore emails from a Mail Service:
- Click here to access the management of your product on the Infomaniak Manager (need help?).
- Click directly on the name assigned to the product concerned.
- Click on the concerned email address in the displayed table.
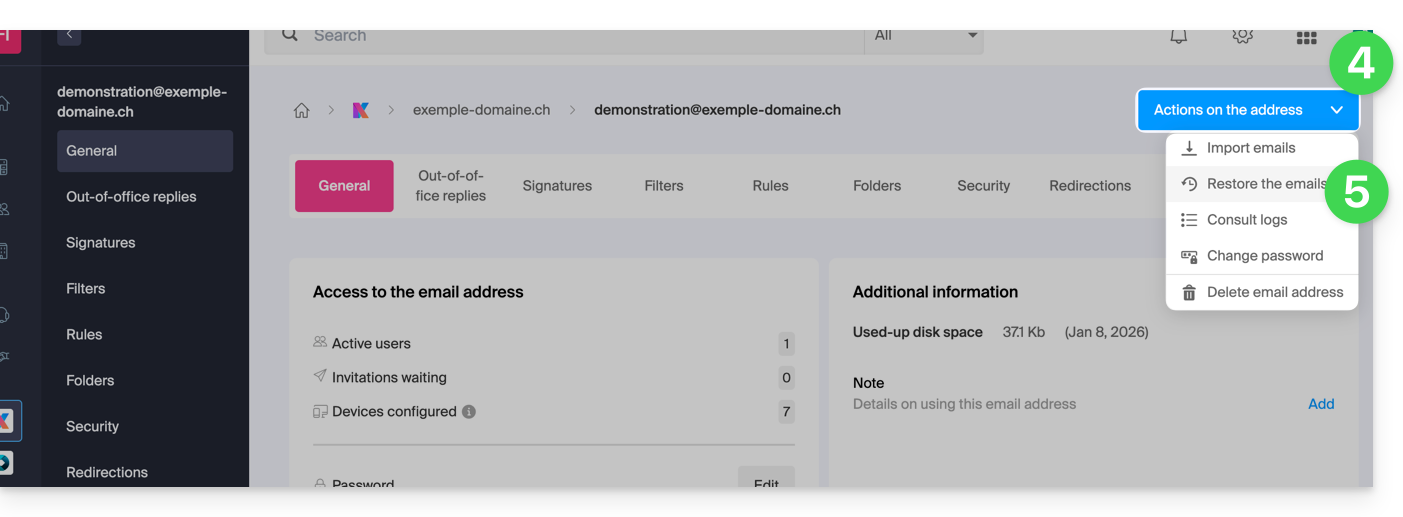
- Click on the Actions on the address button at the top right.
- Click on Restore emails:
- Choose a Restore date.
- Click on Restore emails.
- Once the restoration is complete, an information email is sent to you.
Emails placed in the trash
Unless otherwise configured, an email deleted by the user is moved to a trash can, and it is only after a delay of several days or weeks that the trash can is automatically emptied (it can also be emptied by a user click). Therefore, during a restoration operation:
- Emails currently in the trash will remain as they are, regardless of the restoration date.
- Emails deleted from the trash will be restored to their original location, where they were when they were deleted (whether in the inbox folders or in the trash).
Emails placed in non-conventional folders
If you intentionally store your messages in folders with unusual names (for example, folders named Junk or Spam) take note of the important information in this other guide.
Email software/client configured in POP3
If you are used to checking your email with software/email client like Outlook and the latter is configured with the POP / POP3 protocol, it will not be possible to restore everything since the backup is done once a day, it only keeps the messages that were at the time of the backup in the Infomaniak inbox; the same applies to your other folders (Sent messages, for example) present in the POP3 application: these are not synchronized with Infomaniak and therefore are not backed up; it is therefore necessary in the future to prefer the IMAP protocol in your email software/client.
Link to this FAQ:
Has this FAQ been helpful?
This guide allows you to manage external applications with kChat using webhooks.
Preamble
- A webhook is a method that allows an application to be immediately informed when a particular event occurs in another application, rather than constantly asking this application if something new has happened ("polling").
- Outgoing webhook: kChat communicates information to other apps when an event occurs in kChat.
- Incoming webhook: kChat receives information from other apps to trigger actions in kChat.
- It is not possible to import the chat history from another application (Slack, Teams, Jabber, etc.) or from another Organization.
⚠ Max. number of incoming/outgoing webhooks:
| kSuite | free | 1 / 1 |
| Standard | 20 / 20 | |
| Business | unlimited | |
| Enterprise | unlimited | |
Access the kChat webhooks interface
Prerequisites
- Not being an external user (this user will not see the menu Integrations).
To configure a webhook, find self-hosted or third-party applications and integrations:
- Click here to access the Web app kChat (online service ksuite.infomaniak.com/kchat) or open the desktop app kChat (desktop application on macOS / Windows / Linux).
- Click on the New icon next to your kChat organization's name.
- Click on Integrations:
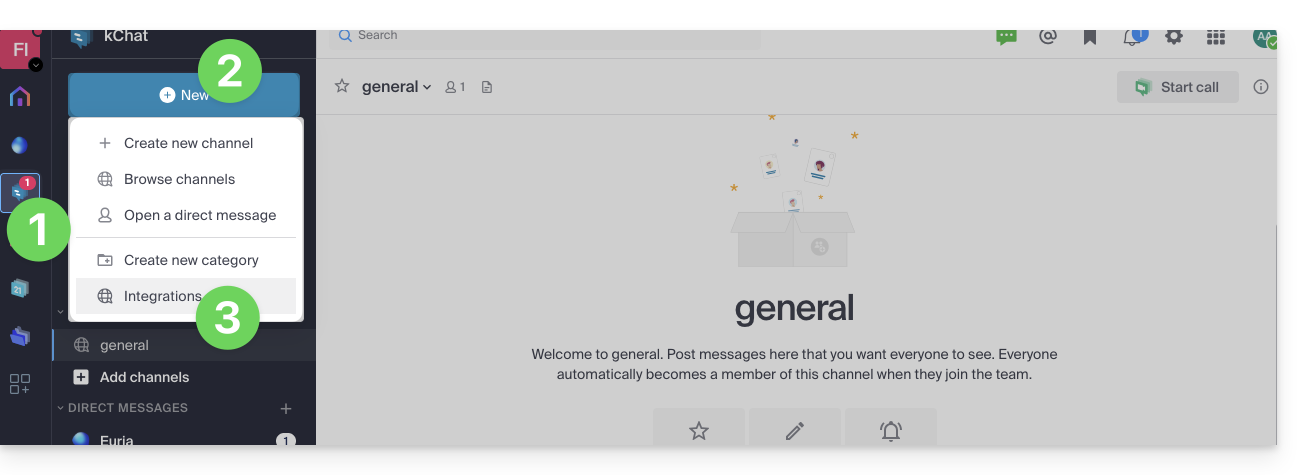
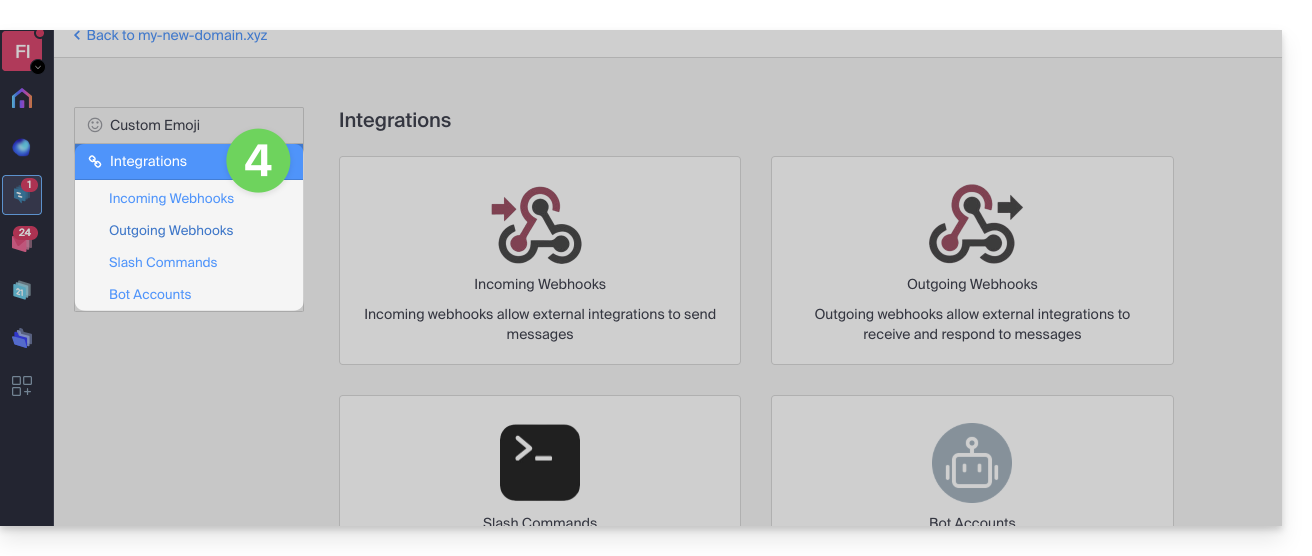
- Access the categories:
Specific guides
Integration examples on kChat:
- Calendar Infomaniak: display an event reminder on kChat
- application n8n: trigger sending a message on kChat
Guides for any other use
To create an incoming webhook (to display an external event on kChat):
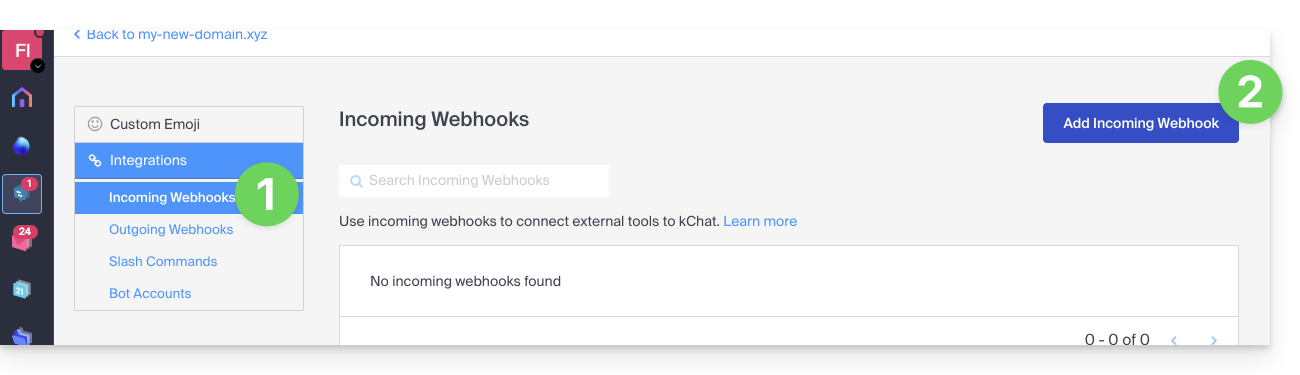
- Click on the Incoming Webhooks category.
- Click on the blue button Add incoming webhooks:
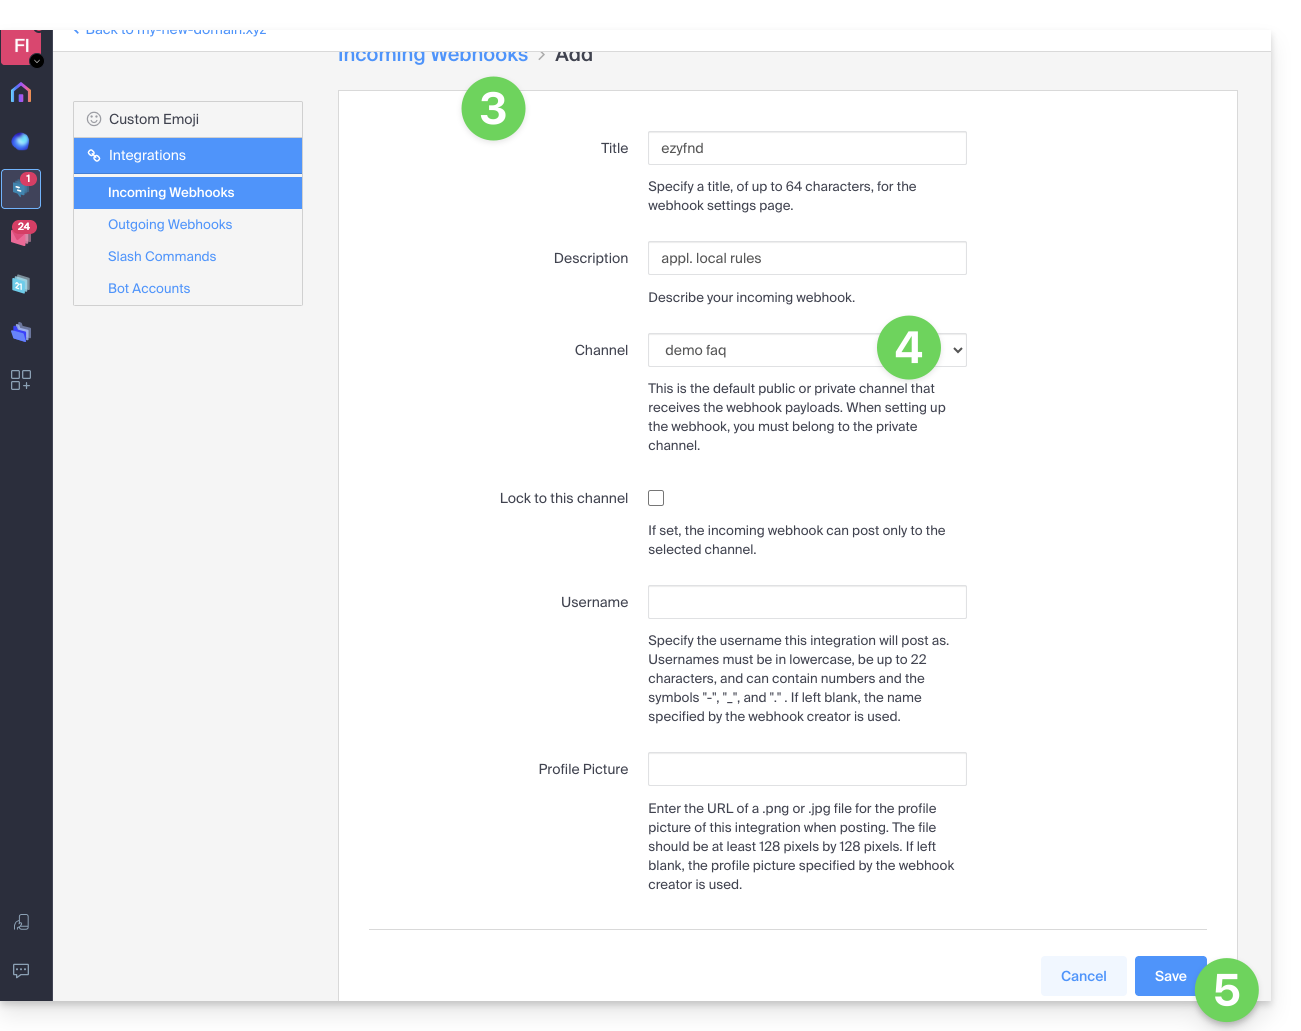
- Add a name and description for the webhook.
- Select the channel that will receive the messages.
- Click on the button to Save:
- The URL to keep for your developments is displayed (do not disclose it publicly); example “
https://your-server-kchat.xyz/hooks/xxx-key-generated-xxx”: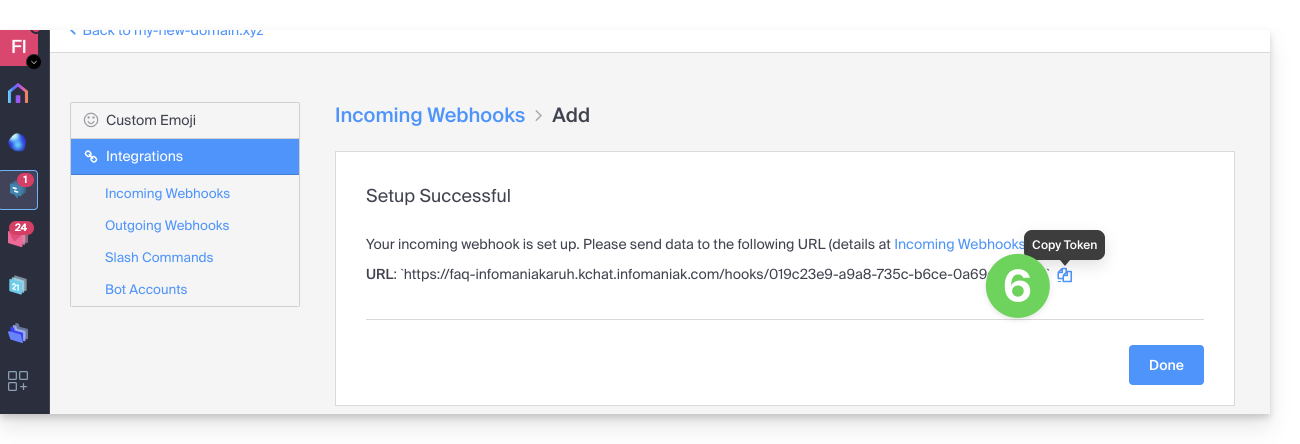
Webhook usage
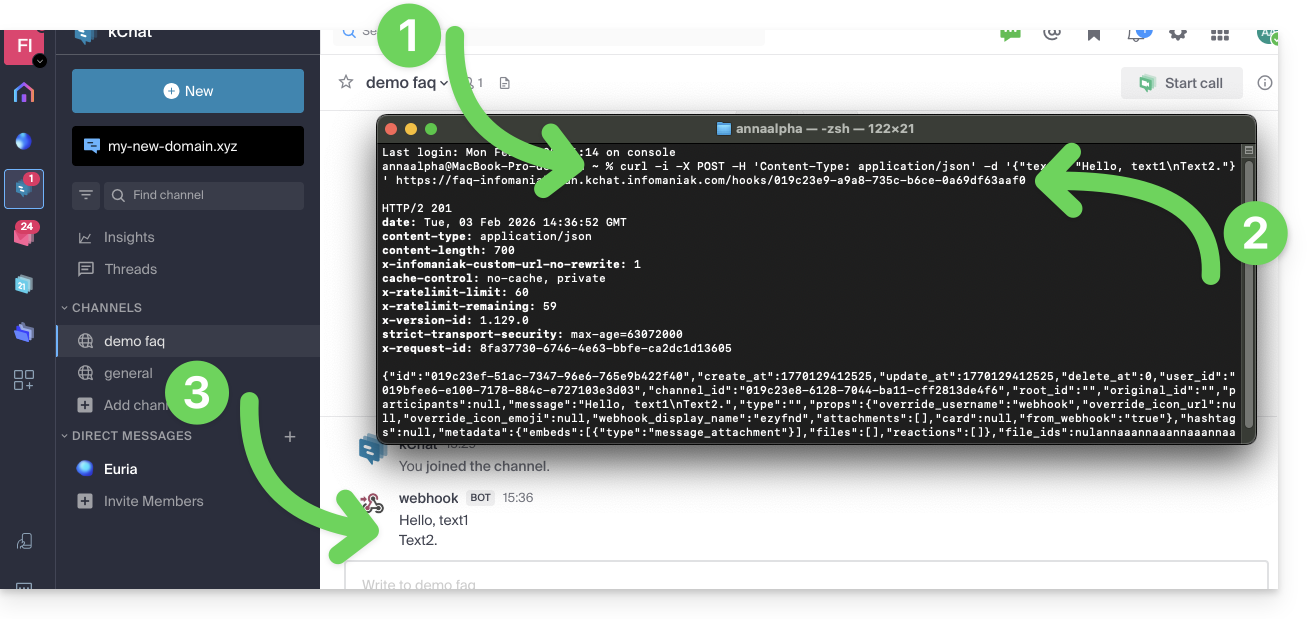
Quick example
- A specific
curlcommand (detailed below) is entered in a terminal. - The command contains the URL obtained in point 6 above.
- The command will result in posting a message in the channel specified in point 4 above:
Details
On the application that needs to post on kChat:
Adjust the code below according to the URL obtained on kChat:
POST /hooks/xxx-key-generated-xxx HTTP/1.1
Host: your-server-kchat.xyz
Content-Type: application/json
Content-Length: 63
{
    "text": "Hello, text1\nText2."
}
Optionally, use the same request but in
curl(to test from aTerminaltype application (command line interface,CLI / Command Line Interface) on your device) as in the image example above:curl -i -X POST -H 'Content-Type: application/json' -d '{"text": "Hello, text1\nText2."}' https://your-server-kchat.xyz/hooks/xxx-key-generated-xxx
The BOT indication is added next to the username on kChat for security reasons.
If no Content-Type header is defined, the request body must be preceded by payload= as follows:
payload={"text": "Hello, text1\nText2."}A successful request will receive the following response:
HTTP/1.1 200 OK
Content-Type: application/json
X-Version-Id: 4.7.1.dev.12799dvd77e172e8a2eba0f4041ec1471.false
Date: Sun, 01 Jun 2023 17:00:00 GMT
Content-Length: 58

{
    "id":"x",
    "create_at":1713198308869,
    "update_at":1713198308869,
    "delete_at":0,
    "user_id":"x",
    "channel_id":"x",
    "root_id":"",
    "original_id":"",
    "participants":null,
    "message":"test",
    "type":"",
    "props":{
        "override_username":"webhook",
        "override_icon_url":null,
        "override_icon_emoji":null,
        "webhook_display_name":"test",
        "attachments":[

        ],
        "card":null,
        "from_webhook":"true"
    },
    "hashtags":null,
    "metadata":{
        "embeds":[
            {
                "type":"message_attachment"
            }
        ],
        "files":[

        ],
        "reactions":[

        ]
    },
    "file_ids":null,
    "has_reactions":false,
    "edit_at":0,
    "is_pinned":false,
    "remote_id":null,
    "reply_count":0,
    "pending_post_id":null,
    "is_following":false
}
If you want to have the same response format as Slack:
HTTP/1.1 200 OK
Content-Type: text/plain
X-Request-Id: hoan69ws7rp5xj7wu9rmystry
X-Version-Id: 4.7.1.dev.12799dvd77e172e8a2eba0f4041ec1471.false
Date: Sun, 01 Jun 2023 17:00:00 GMT
Content-Length: 2
ok
you must add ?slack_return_format=true to the webhook URL.
Parameters
In addition to the text field, here is the complete list of supported parameters:
| Parameter | Description | Required |
|---|---|---|
text | Markdown-formatted message to display in the post. To trigger notifications, use “@<username>”, “@channel” and “@here” as you would in other kChat messages. | If attachments is not defined, yes |
channel | Replaces the channel in which the message is posted. Use the channel name, not the display name, for example “town-square”, not “Place de la ville”. Use “@” followed by a username to send a direct message. By default, uses the channel defined when the webhook was created. The webhook can post in any public and private channel where the webhook creator is present. Posts in direct messages will appear in the direct message between the targeted user and the webhook creator. | No |
username | Replaces the username under which the message is posted. By default, uses the username defined when the webhook was created; if no username was defined during creation, uses webhook. | No |
icon_url | Replaces the profile picture with which the message is posted. By default, uses the URL defined when the webhook was created; if no icon was defined during creation, the standard webhook icon () is displayed. The configuration parameter Allow integrations to replace profile picture icons must be enabled for the icon replacement to take effect. | No |
icon_emoji | Replaces the profile picture and the parameter icon_url.By default, nothing is defined when creating the webhook. The expected value is the name of an emoji as it is typed in a message, with or without colons ( :).The configuration parameter Allow integrations to replace profile picture icons must be enabled for the replacement to take effect. | No |
attachments | Attachments to the message used for richer formatting options. | If text is not defined, yes |
type | Defines the type of publication, mainly for use by plugins.If not empty, must start with " custom_". | No |
Example code with parameters
Here is how to generate a more complete message with parameters, some of which can replace parameters already set when creating the webhook (username, preferred channel, avatar...) as indicated in the table above:
curl -i -X POST -H 'Content-Type: application/json' \
-d '{
"username": "System Monitor",
  "icon_url": "https://cdn-icons-png.flaticon.com/512/5971/5971593.png",
  "text": "### System Status Report\nEnvironment: PRODUCTION\nStatus: SUCCESSFUL\n\n---\n\n| Component | Version | Build ID | Status |\n|:----------|:-------:|:---------|:-------|\n| API-Core  | 2.4.1   | #88421   | OK     |\n| Web-UI    | 1.9.0   | #88425   | OK     |\n| Database  | 14.5    | N/A      | OK     |\n\n---\n\n**Commit Reference:**\n`git-ref: a7f8e9c21b` \n\n**Summary:**\nAll automated integration tests passed successfully. No manual intervention is required. Please contact the DevOps team for further details regarding this release."
}' \
https://faq-infomaniakaruh.kchat.infomaniak.com/hooks/019c23e9-a9a8-735c-b6ce-0a69df63aaf0
Result of a similar example in image: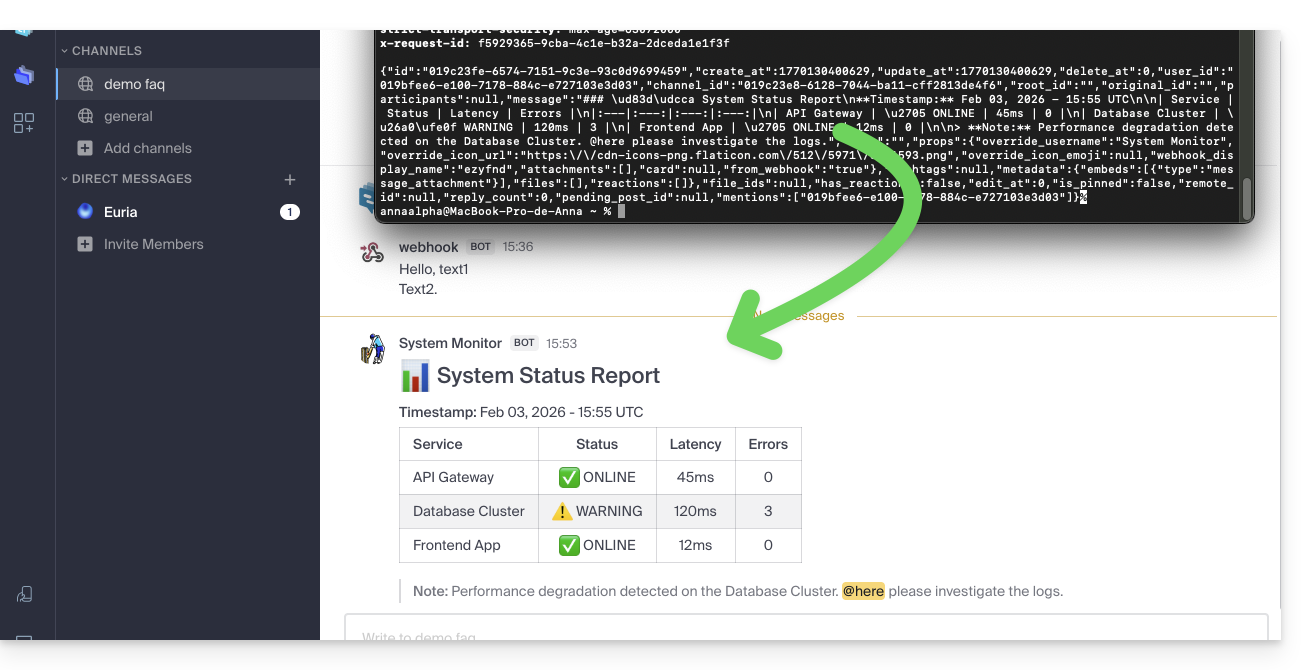
Link to this FAQ:
Has this FAQ been helpful?