Knowledge base
1000 FAQs, 500 tutorials and instructional videos. Here, there are only solutions!
This guide details the integration of the ASP / ASP.NET environment within the Infomaniak ecosystem.
Compatibility & Infrastructure
Web Hosting and Managed Cloud Server solutions are optimized for Linux/Apache environments. Therefore, the Apache::ASP module is not natively supported on these shared offers.
Alternatives & Cloud solutions
To deploy your ASP applications smoothly, several options are available to you:
- VPS Cloud: install and configure your own ASP/IIS stack or use Mono/Core on a distribution of your choice.
- Jelastic Cloud (PaaS) : deploy your ASP.NET Core applications via Docker containers in a few clicks with automatic horizontal scaling.
- Public Cloud: for high-availability infrastructures using OpenStack, ideal for microservices architectures.
Link to this FAQ:
Has this FAQ been helpful?
This guide allows you to “unlock” any Windows parameter blocked by the message “Some settings are hidden or managed by your organization” (such as changing the desktop background, for example) and to lift these restrictions that are in place by default on the VPS Cloud / VPS Lite offer.
Reset local group policy settings
To reset all local group policy settings to their default values:
- Open Command Prompt as an administrator.
Enter the following commands:
RD /S /Q "%windir%\System32\GroupPolicyUsers" RD /S /Q "%windir%\System32\GroupPolicy" gpupdate /force- Restart the machine.
Link to this FAQ:
Has this FAQ been helpful?
This guide explains how to work without the PECL SSH2 client module, which is unavailable on Infomaniak Web Hosting and Cloud Servers, by using the phpseclib library instead. This library works with native PHP without requiring any specific extension.
Preamble
- The use of
PECL SSH2 clientresults in errors of typeNo compatible key exchange algorithms foundorUnable to exchange encryption keysin its latest available version. Phpsecliballows:- SSH authentication via password or private key.
- Remote command execution.
- Secure file transfer (SFTP).
- SSH key management.
Using phpseclib
To integrate an SSH connection into a PHP script, use phpseclib as follows:
use phpseclib3\Net\SSH2;
use phpseclib3\Crypt\PublicKeyLoader;

$ssh = new SSH2('domain.xyz');
$key = PublicKeyLoader::load(file_get_contents('/path/to/private_key'));

if (!$ssh->login('utilisateur', $key)) {
    exit('Authentication Failed');
}

echo $ssh->exec('ls -la');
Link to this FAQ:
Has this FAQ been helpful?
This guide details the features available for managing relational databases on Infomaniak hosting.
Use of Views, Triggers, Stored Procedures, and Routines
Regarding the management of relational databases, the view functionality ("views") is available by default, allowing users to create views to simplify data management and presentation.
However, some advanced features that allow for more precise and complex data manipulation, such as…
- “triggers (triggers)
- stored procedures ("stored procedures")
- routines
- and the creation of functions
… are only available on Managed Cloud Servers.
They are not allowed on shared servers.
This restriction is mainly due to potential risks to the stability of the infrastructure. Poor configuration or excessive use of these features could create infinite loops or significant overloads, affecting not only the performance of the affected server but also the experience of all clients hosted on the same infrastructure.
Resolving a MySQL/MariaDB dump import issue
When exporting and then re-importing a MySQL or MariaDB database via the Infomaniak hosting interface, it may happen that the operation fails due to errors related to the DEFINER of triggers or views. This occurs when the database objects were created with a specific user (called definer) who no longer exists at the time of import.
Concretely, the export and import process uses a temporary user, used only during these operations. After this user is deleted, the views or triggers defined with this account as DEFINER become invalid, causing errors of the type:
General error: 1449 The user specified as a definer ('xxxx_temp_1'@'%') does not existTo avoid this problem, it is possible to correct the backup file (dump.sql or dump.sql.gz) before importing it by replacing the definer definitions with CURRENT_USER. This automatically attaches the triggers and views to the current user at the time of import.
Here is an example of a command to modify the dump before import:
sed -E 's/DEFINER=`[^`][^`]*`@`[^`][^`][^`]*`/DEFINER=CURRENT_USER/g' dump.sql > dump-corrected.sqlOnce this replacement is done, the corrected file can be imported normally via the Infomaniak Manager. This behavior is known and related to the operation of temporary users during dump/restore. No changes to the export/import process are planned in the short term, but the subject remains under evaluation on the infrastructure side.
For more information about the CURRENT_USER variable, refer to the official documentation of:
Link to this FAQ:
Has this FAQ been helpful?
This guide explains how to start a content analysis of a Web Hosting to detect and clean files containing viruses and other malicious scripts that could threaten the security of websites.
Preamble
- You receive an email when the operation is complete (the antivirus scan may take some time; the Manager can be closed).
- Infomaniak ensures the protection of hostings by analyzing exclusively the folders of the sites (webroot); outside of this, no synchronous scan is performed on the rest of the hosting.
- Also consider the vulnerability detection tool to monitor potential vulnerabilities automatically corrected on your websites.
Start an antivirus analysis of the sites
To analyze potentially infected content:
- Click here to access the management of your hosting on the Infomaniak Manager (need help?).
- Click directly on the name assigned to the hosting concerned.
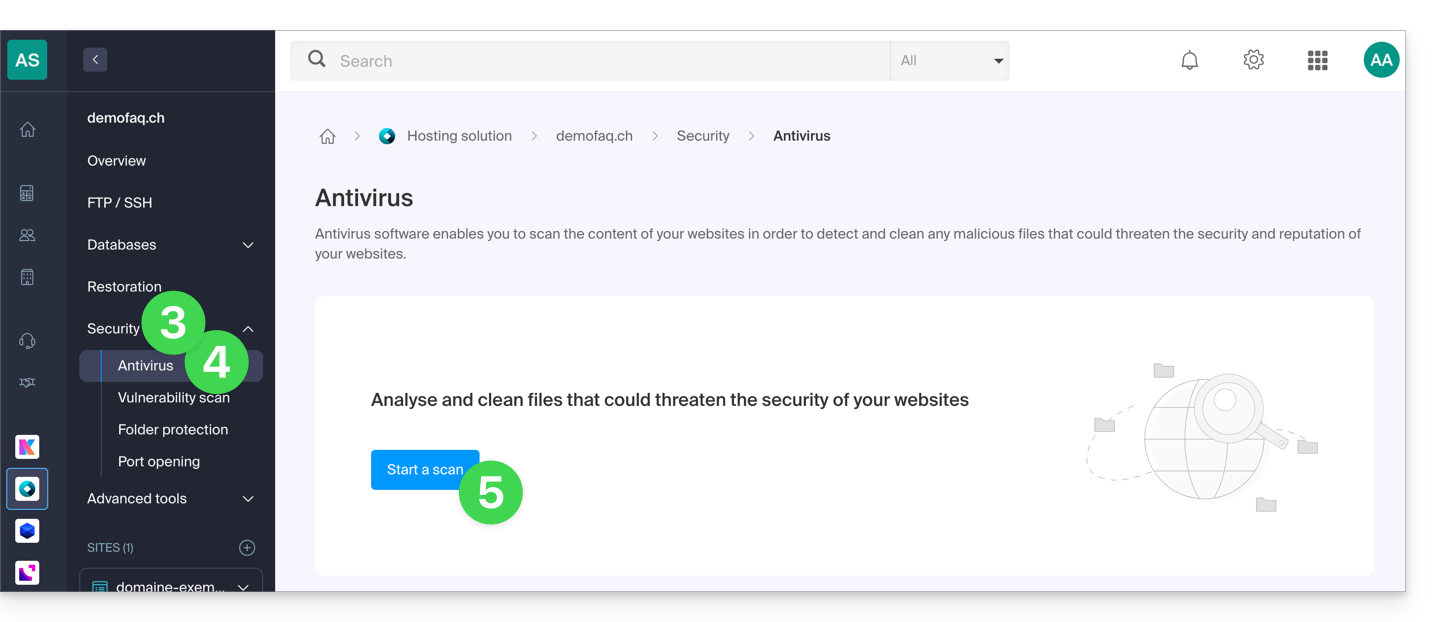
- Click on Security in the left sidebar.
- Click on Antivirus in the left sidebar.
- Click on the blue button Analyze:
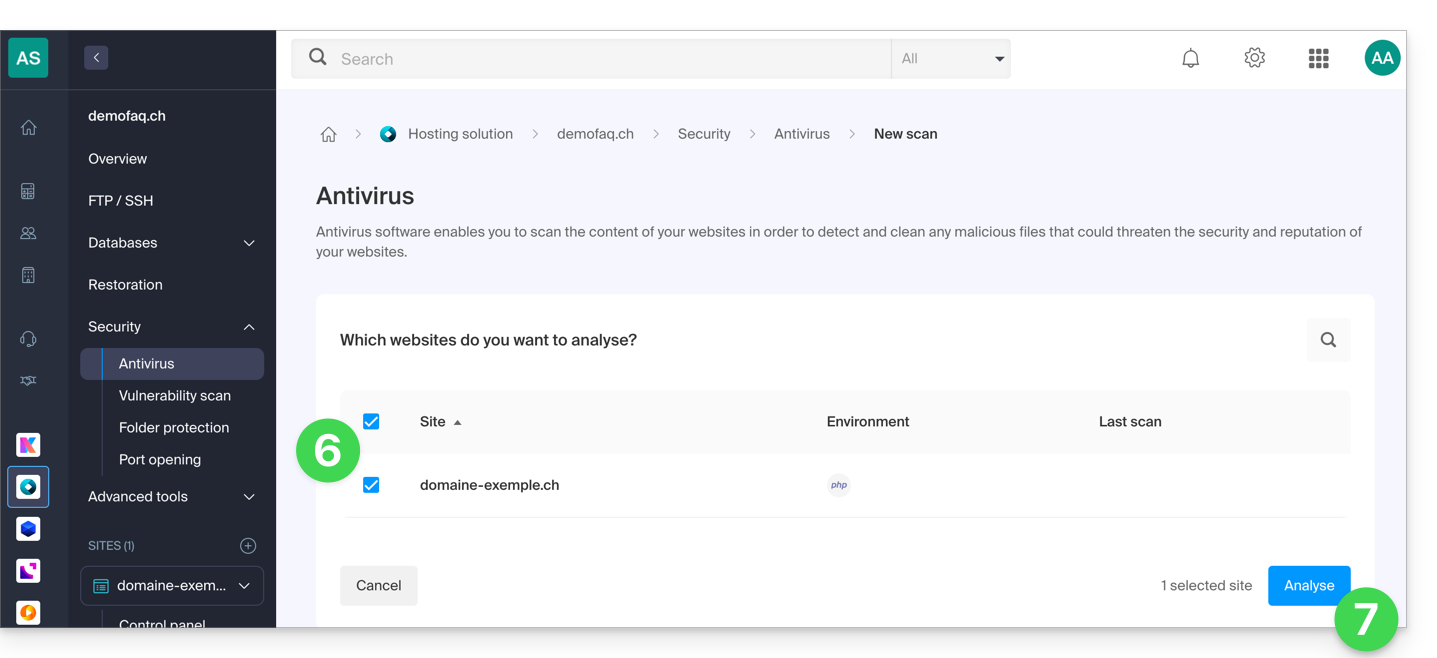
- Select the site(s) to analyze.
- Click on the blue button Start analysis:
- Follow the procedure until the file analysis starts.
Link to this FAQ:
Has this FAQ been helpful?
This guide explains how to quickly install applications, PHP extensions, and technologies (non-exhaustive list below) in a few clicks on Managed Cloud Server only.
Refer to this other guide if you are looking for information about additional Web Applications that can be installed on any type of hosting, including standard/shared offers.
Install (or uninstall) apps / PHP extensions…
To find the list of technologies and proceed with their installation:
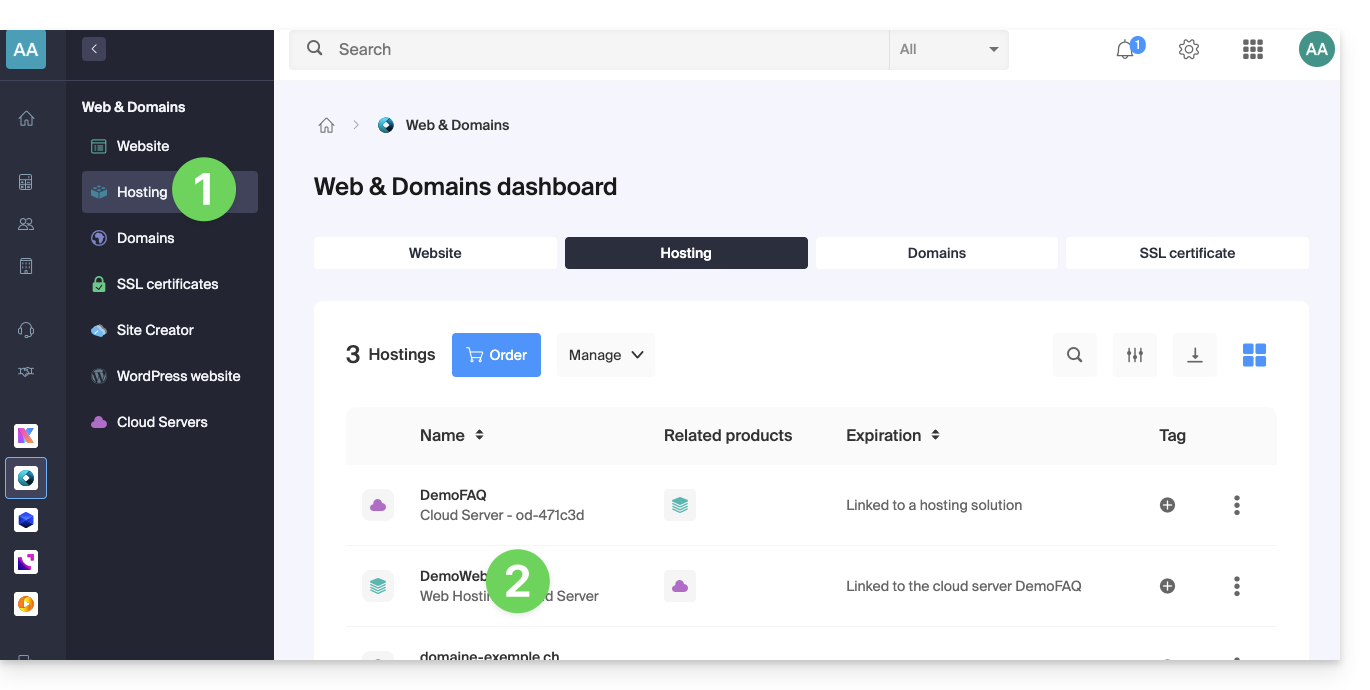
- Click here to access the management of your Managed Cloud Server on the Infomaniak Manager (need help?).
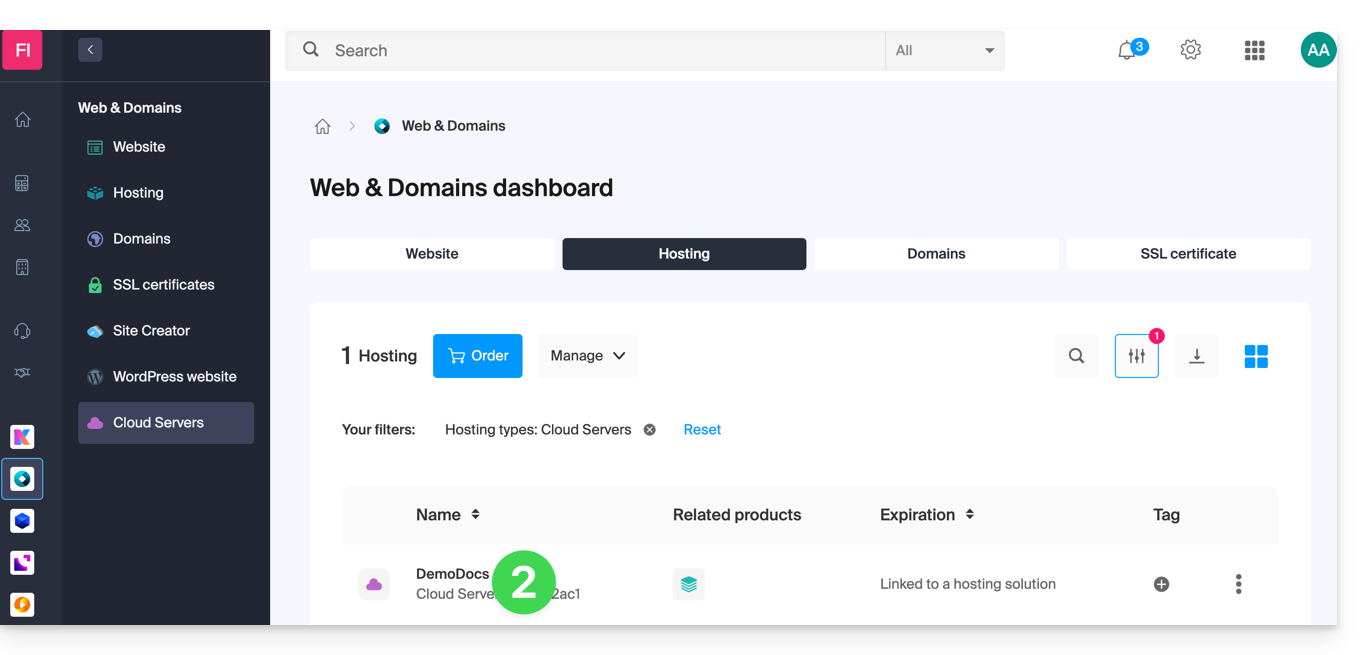
- Click directly on the name assigned to the Managed Cloud Server concerned:
- Click in the left sidebar:
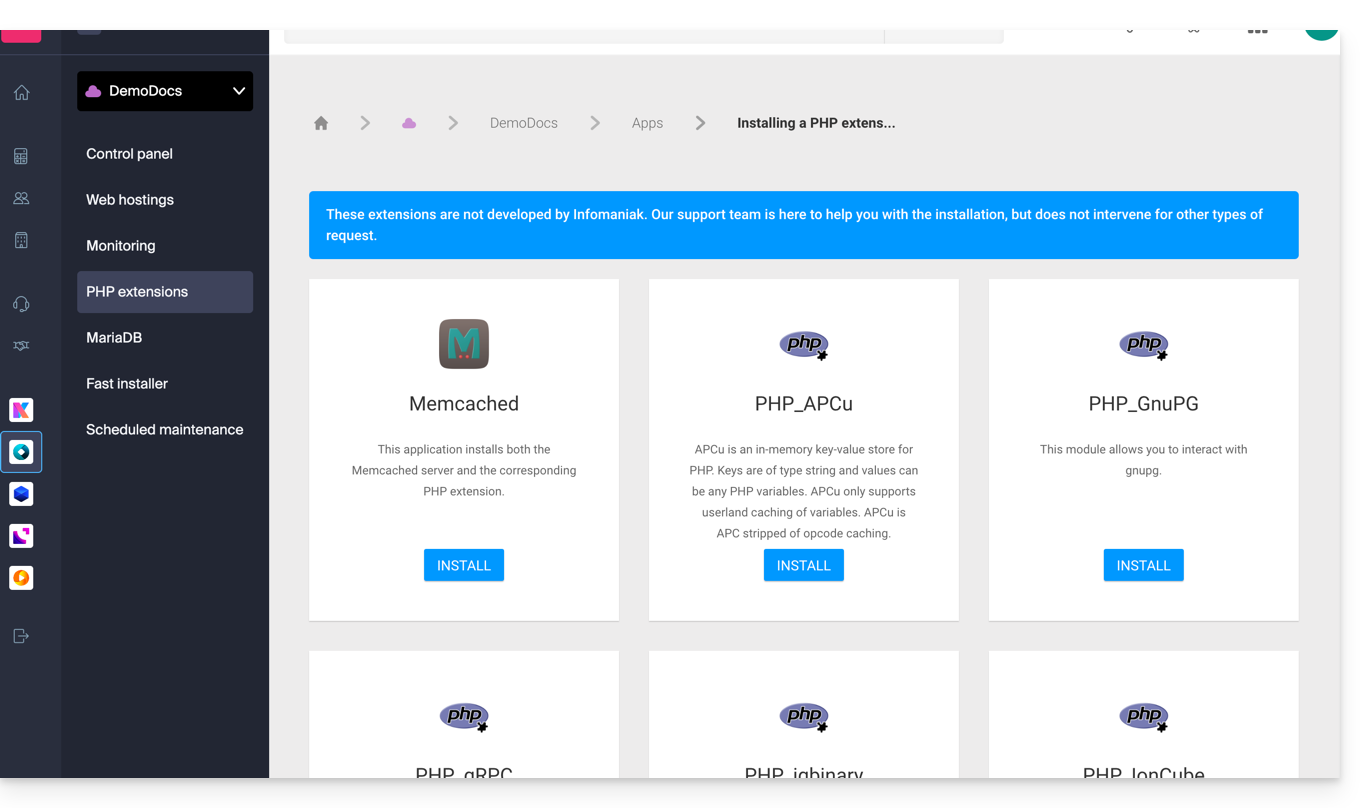
- PHP Extensions
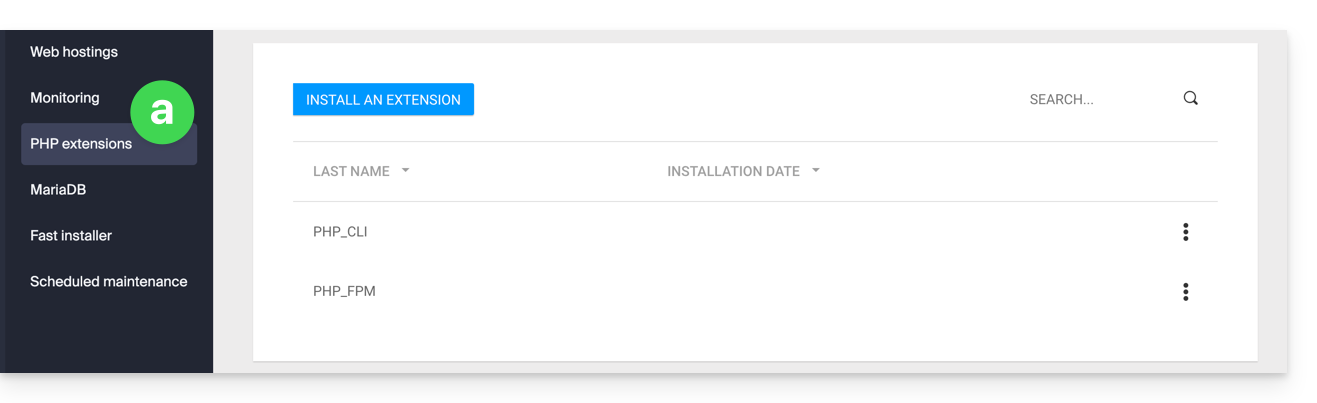
- Fast Installer
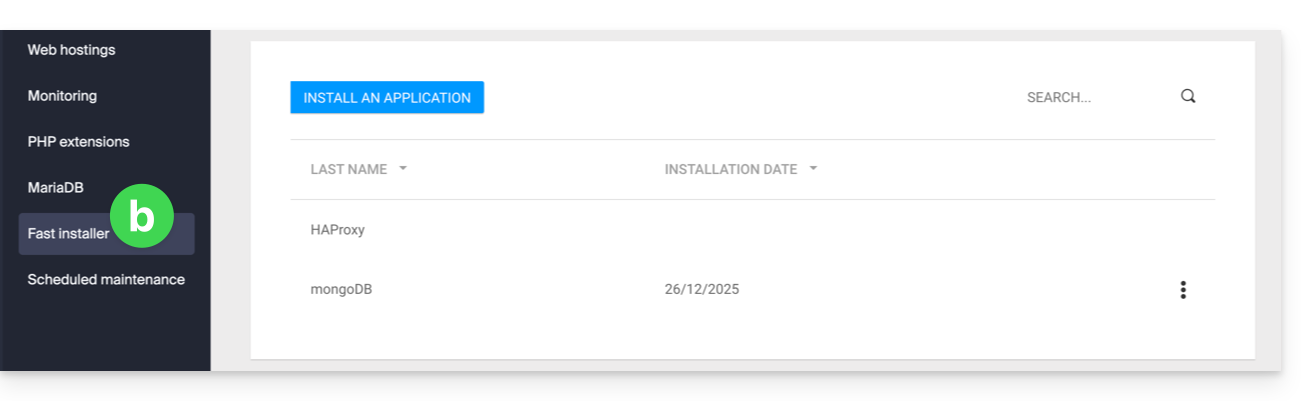
- PHP Extensions
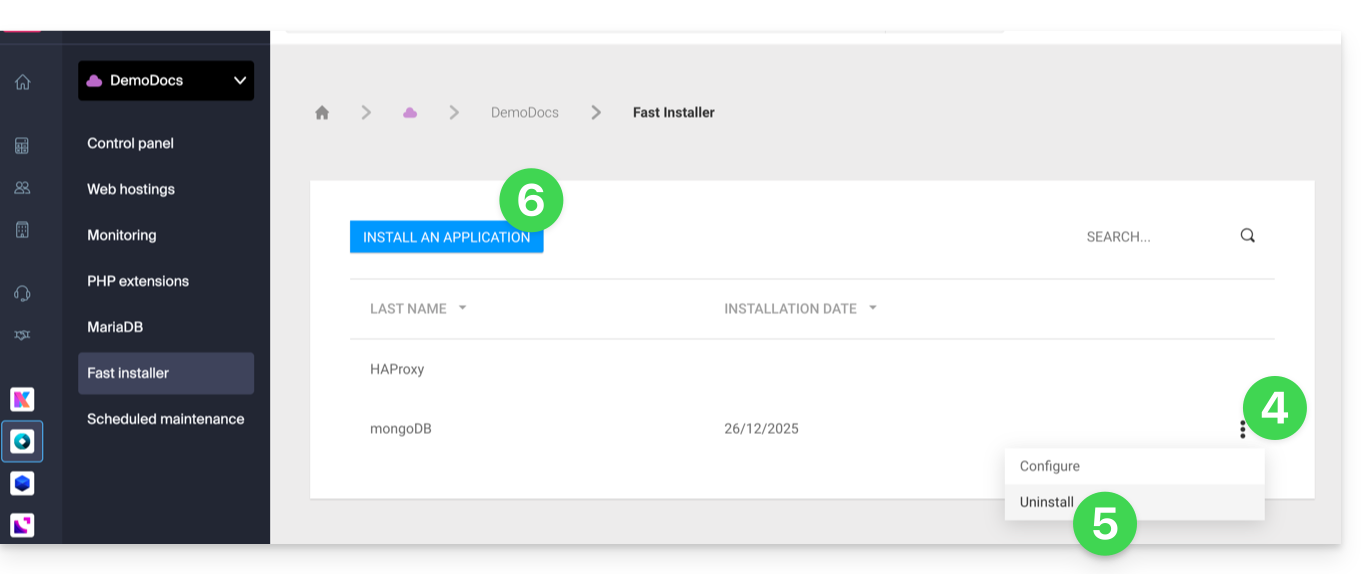
- Click on the action menu ⋮ to the right of the extension you want to uninstall in the table that appears.
- Click on Uninstall.
- Otherwise, click on the blue button Install an extension / Install an application:
- Then make your choice for a new installation:
Non-exhaustive list of available apps & extensions
AdvanceCOMPBuildEssentialelectron_devExifToolFFmpeg↗ guideGhostscriptGifsicleGraphicsMagickHAProxyImagemagick↗ guideJpegoptimlibjpeg_turbolibqrencodelibX11_xcb1MidnightCommanderMemcached↗ guidemongoDB↗ guideNVM Node Version ManagerOptiPNGp7zipPDFtkPHP_APCuPHP_CLI↗ guidePHP_FPMPHP_GnuPGPHP_gRPCPHP_igbinaryPHP_IonCube↗ guidePHP_OPcachePHP_PDFPHP_PDO_ODBC↗ guidePHP_SwoolepipPngcrushPngquantRedis↗ guideRRDTool The Round Robin Database ToolRubyCompasssystemd↗ guidetesseract_ocrvarnish↗ guidevirtualenvWebPxauthxpdfxvfbZSH
Link to this FAQ:
Has this FAQ been helpful?
This guide explains how to connect to an external database from a Cloud Server.
Preamble
- It is possible to connect to MySQL (external or not) via SSL - to be specified when establishing the connection.
- The MySQL port
3306is closed by default - to open it, refer to this other guide. - Infomaniak does not install
PDO_DBLIB.
Install PHP_PDO_ODBC
Prerequisites
- Have the PHP Extensions menu on the Infomaniak Manager in the Cloud Server section (otherwise, it will be necessary to upgrade the Cloud Server).
It is possible to install the PHP_PDO_ODBC extension from the PHP Extensions menu of your Cloud Server:
- Click here to access the management of your product on the Infomaniak Manager (need help?).
- Click directly on the name assigned to the product concerned.
- Click on PHP Extensions in the left sidebar.
- Click on the blue button Install an extension.
- Choose the
PHP_PDO_ODBCextension. - Confirm the installation.
Configure the connector
The driver configuration is already defined in /etc/odbcinst.ini:
[FreeTDS]
Description = MS SQL database access with Free TDS Driver
Driver = /usr/lib/x86_64-linux-gnu/odbc/libtdsodbc.so
Setup = /usr/lib/x86_64-linux-gnu/odbc/libtdsS.so
There is no need to redefine it statically in the .odbc.ini or in the user's home ~~/.odbc.ini~~ or also dynamically in the PHP code.
Example with the FreeTDS driver defined in advance, the version of the driver must also be specified at the end of the pdo object declaration:
$con = new PDO('odbc:Driver=FreeTDS;Server=__SERVER IP__;Port=3306;DATABASE=__DATABASE NAME__;UID=__USERNAME__;PWD=__PASSWORD__;TDS_Version=8.0');Link to this FAQ:
Has this FAQ been helpful?
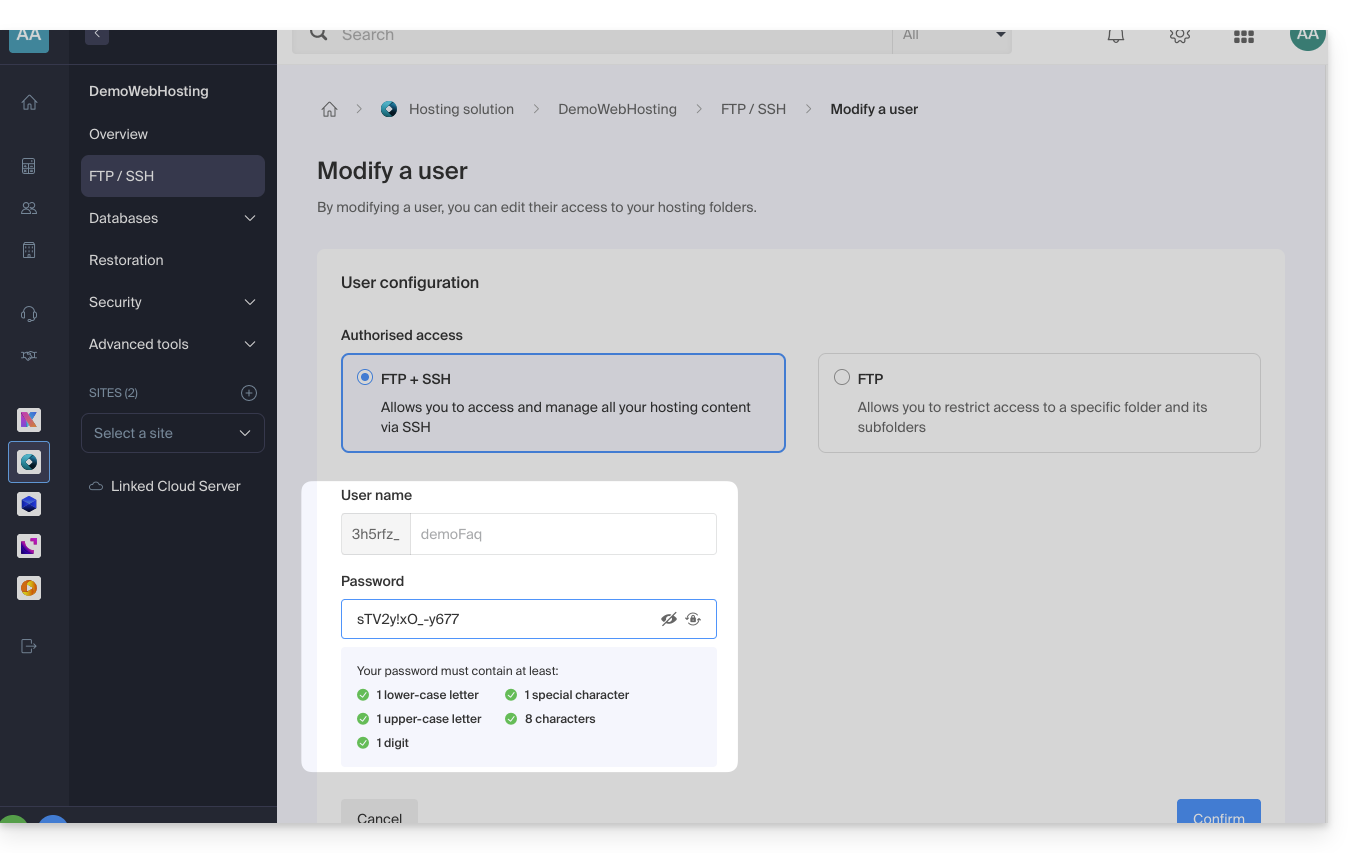
This guide explains how to change the password of an FTP or FTP/SSH account for an Infomaniak Web Hosting site.
Change the password of an existing FTP user
To access the site on Web Hosting to modify its FTP access:
- Click here to access the management of your hosting on the Infomaniak Manager (need help?).
- Click directly on the name assigned to the hosting concerned:
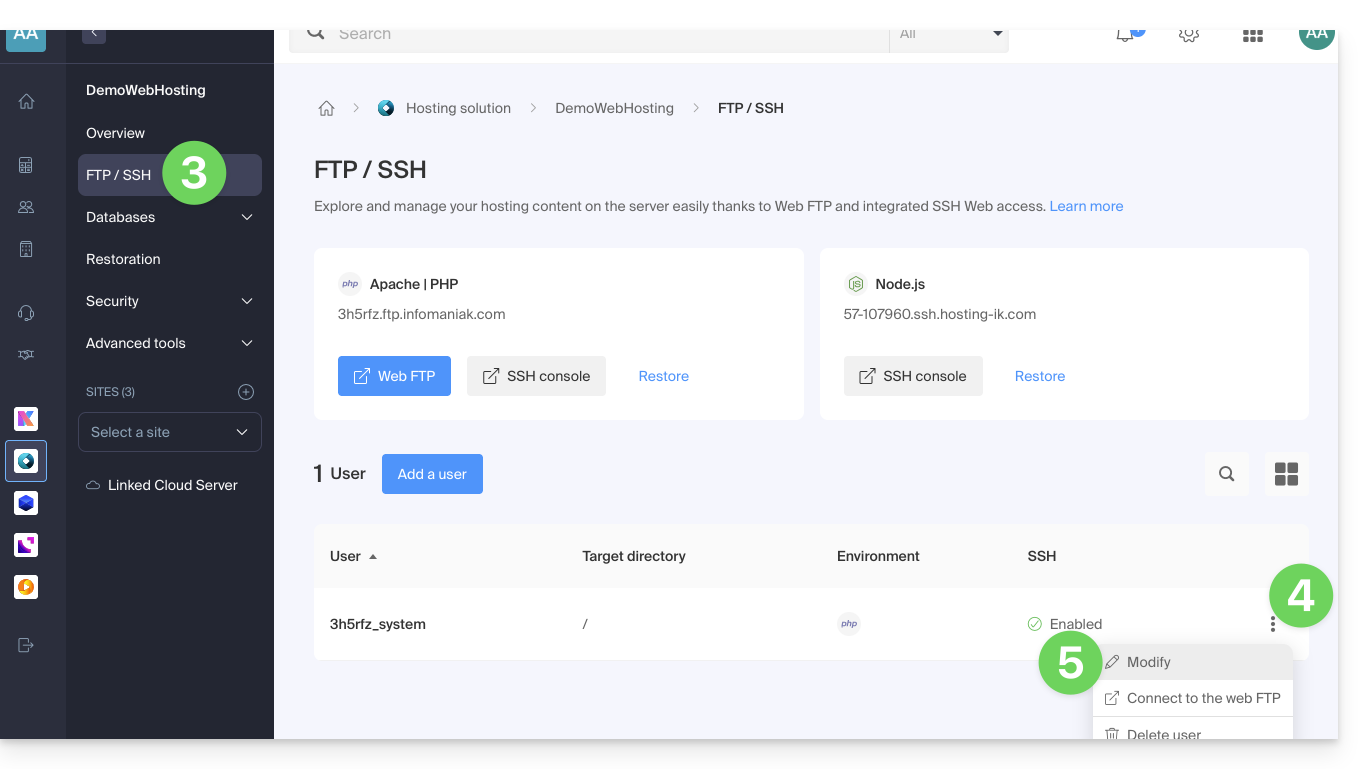
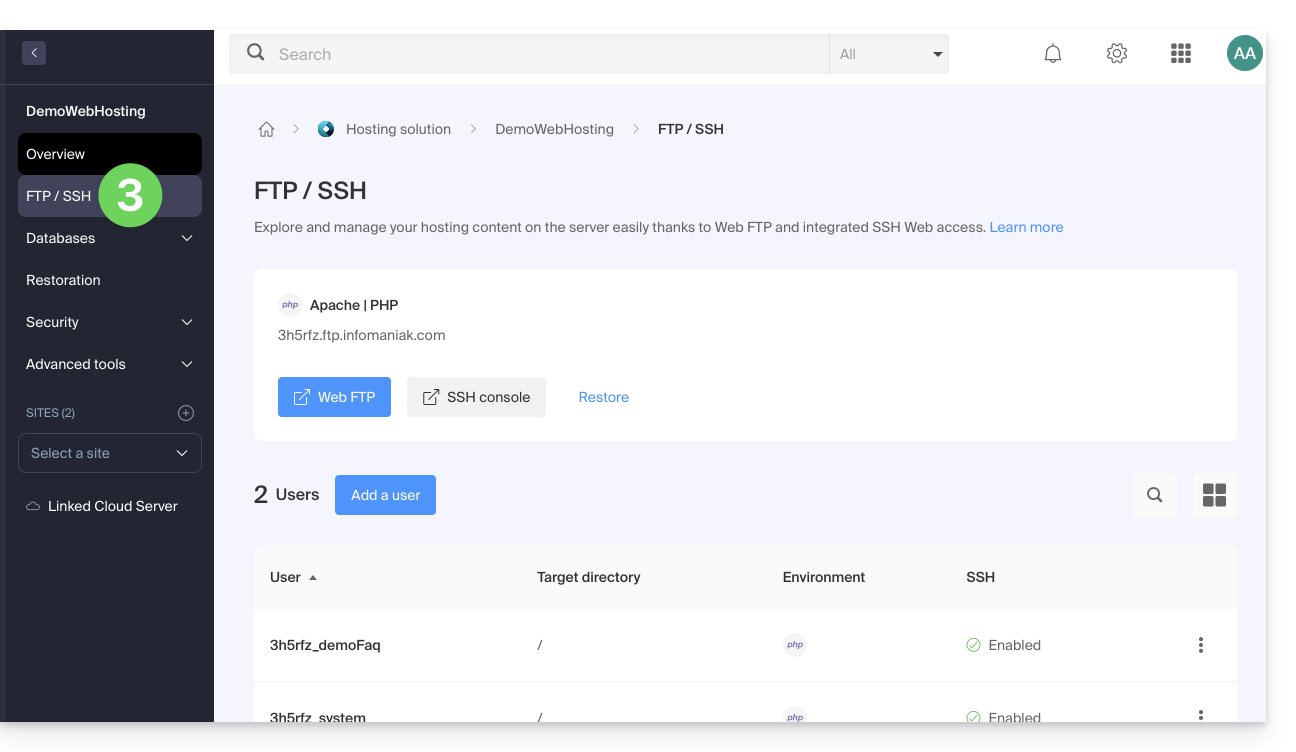
- Click on FTP/SSH in the left sidebar menu.
- Click on the action menu ⋮ to the right of an existing account.
- Click on Modify:
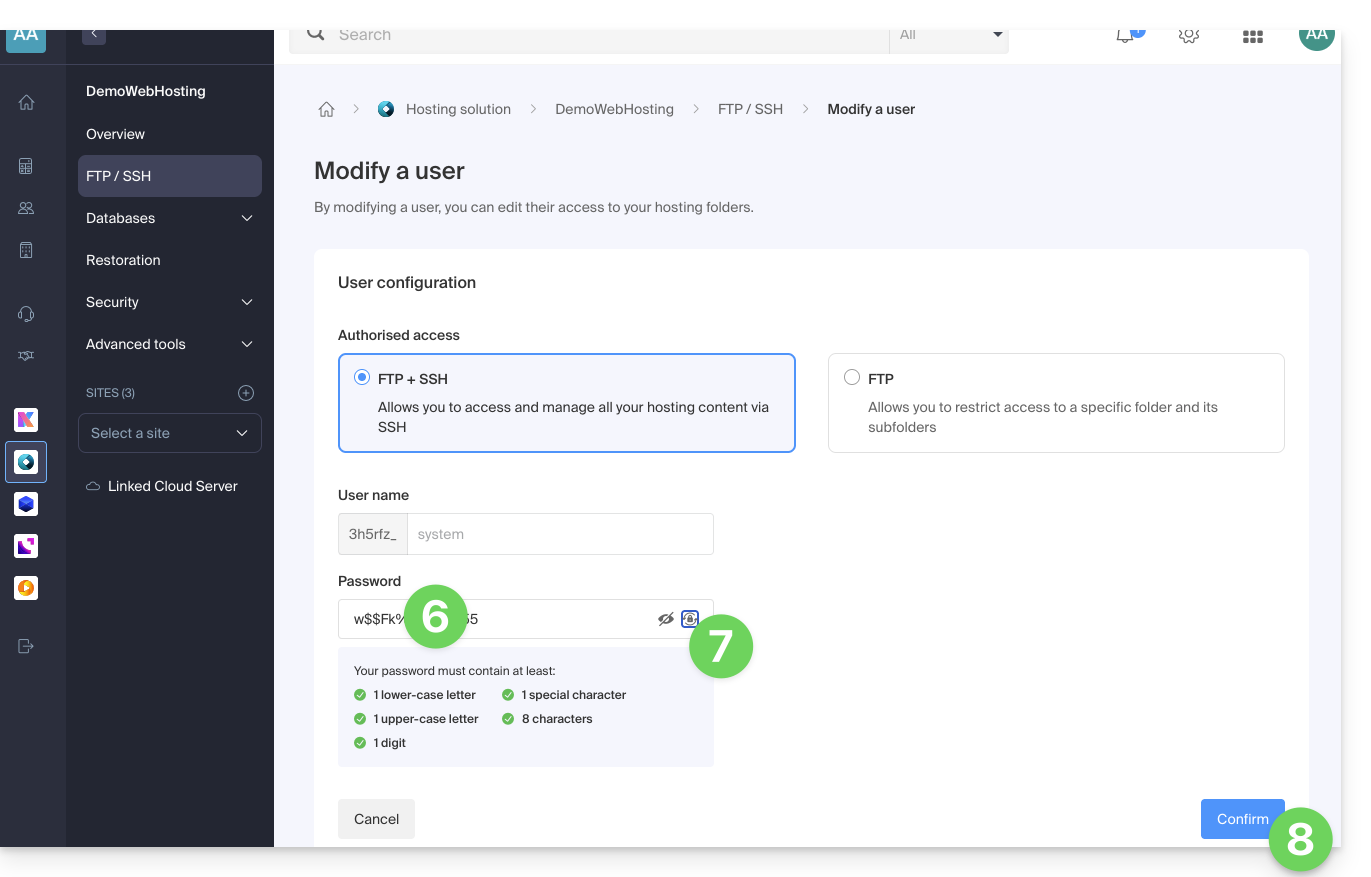
- Enter the new password that will be used for your FTP or SSH access directly.
- If necessary, you can generate a strong password.
- Confirm the changes:
Link to this FAQ:
Has this FAQ been helpful?
This guide explains how to use GnuPG / PGP with PHP on an Infomaniak Cloud Server, following the obsolescence of the native extension (pure PHP alternatives or modern wrappers are preferred).
Preamble
- The system extension
PHP_GnuPGis no longer maintained by the PHP community and is therefore no longer available on recent environments. - Two main alternatives in Pure PHP (installable via Composer) allow you to continue signing or encrypting your data securely.
Option 1: Crypt_GPG (Recommended)
This library acts as a wrapper: it communicates directly with the gpg binary installed on your Cloud Server. It is the most performant and stable solution.
To install it, connect via SSH and run this command at the root of your project:
# Install the PEAR Crypt_GPG package via Composer
composer require pear/crypt_gpg
Example of usage to encrypt a message (object-oriented approach):
<?php
require_once 'vendor/autoload.php';

try {
    // Initialize the GPG object
    $gpg = new Crypt_GPG();

    // Set the recipient email (must match a public key already imported on the server)
    $gpg->addEncryptKey('contact@example.com');

    $message = "This is a secret message.";

    // Encrypt the data
    $enveloppe = $gpg->encrypt($message);

    echo $enveloppe;
} catch (Exception $e) {
    // Handle potential encryption errors
    echo "Error: " . $e->getMessage();
}
Option 2: OpenPGP.php (Independent)
This library is entirely written in PHP. Its main advantage is that it does not depend on the server's gpg binary, ensuring total portability of your code across different environments.
# Install the OpenPGP.php library
composer require singpolyma/openpgp-php
Example of basic structure:
<?php
require_once 'vendor/autoload.php';

// Use the library classes to handle OpenPGP packets
// directly in PHP without system calls to the GPG binary.
// Example: $msg = OpenPGP_Message::parse(OpenPGP::unarmor($data));
Link to this FAQ:
Has this FAQ been helpful?
This guide details the management of access and security for your databases (MySQL, MariaDB, and MongoDB) on a Managed Cloud Server.
Preamble
- The firewall is accessible in your Manager even if no Apache site is configured (useful for Node.js-only projects, for example).
- Regarding access to MySQL databases from another Infomaniak Web Hosting, refer to this other guide.
- Regarding MongoDB:
- To ensure the security of your data, the system blocks registration if you attempt to disable
local_onlymode without enablingauthentication. - Infomaniak's automatic backups do not include MongoDB databases.
- To ensure the security of your data, the system blocks registration if you attempt to disable
Allow outgoing access (Infomaniak → external)
From an Infomaniak Web Hosting or Cloud Server, requests to external databases are allowed by default without port restrictions.
Allow incoming access (external → Infomaniak)
To access your databases from the outside, you must have a Cloud Server and open the corresponding ports in the firewall of your server:
- MySQL / MariaDB: port
3306(TCP) - MongoDB: port
27017(TCP)
Configure remote access for MongoDB
By default, MongoDB only accepts local connections.
Before making your instance public (remote access), you must create a user within your database.
To allow remote access via Fast Installer, you must adjust the configuration while adhering to strict security rules.
- Click here to access the management of your Cloud Server on the Infomaniak Manager (need help?).
- Click directly on the name assigned to the Cloud Server in question.
- Click on Fast Installer in the left sidebar.
- Click on MongoDB.
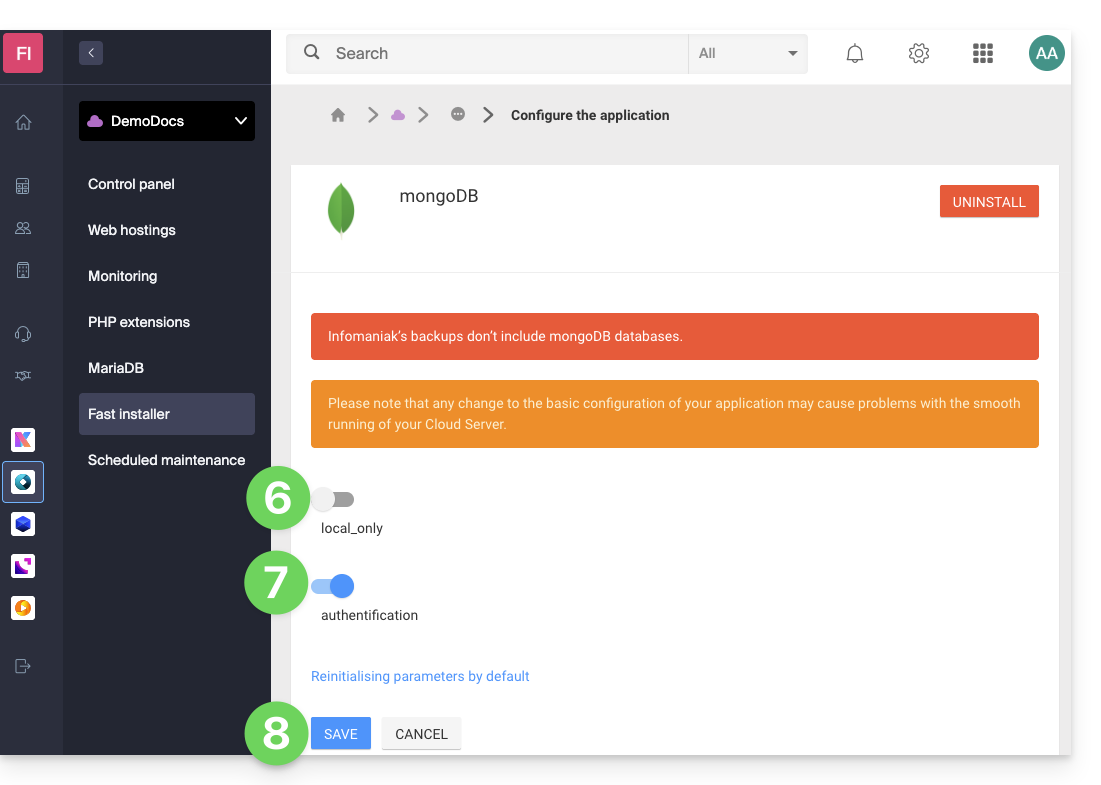
- Click on the action menu ⋮ to the right of the instance and choose Configure.
- Disable the
local_onlyoption. - Enable the
authentificationoption. - Save the changes:
Link to this FAQ:
Has this FAQ been helpful?
This guide explains how to resolve access errors to your Web Hosting following an IP address change (e.g., server migration).
Preamble
- To save time, your system maintains a lookup table between domain names and IP addresses.
- If the site changes "home" (IP), your computer tries to knock on the old door.
- Clearing the cache forces it to request the new address from the DNS servers.
If your computer retains the old address in memory, clearing the DNS cache allows you to restore the connection.
Clear the DNS cache…
… on Windows
Use the command prompt to refresh your network settings:
- Open the Start menu.
- Type cmd and validate.
- In the black window that opens, type the following command and press Enter:
ipconfig /flushdns
… on macOS
On recent versions of macOS, the procedure is done via the Terminal:
- Open the Terminal (via Spotlight or Applications > Utilities).
- Copy and paste the following command:
sudo dscacheutil -flushcache; sudo killall -HUP mDNSResponder - Enter your session password (it will not be displayed during entry) and validate.
… on Linux
Most modern distributions use systemd-resolved. Open your terminal and run:
sudo resolvectl flush-caches
Note: If you are using an older service, the command sudo systemctl restart nscd is still valid.
Link to this FAQ:
Has this FAQ been helpful?
This guide provides solutions to errors of the type “Malicious site! The website has been reported as a malicious site and has been blocked based on your security preferences” ("STOP! This Website Can Harm Your Computer!" in English).
Who put this message?
This error message or warning…
- ... IS NOT added by Infomaniak.
- ... is generated by Google based on https://www.stopbadware.org/.
- ... may no longer appear directly because…
- ... you are no longer indexed by Google.
- ... you are using a browser that does not rely on Google's checks.
What to do?
If this does not concern the site you are managing, refer to Google's help on the subject.
If the site is yours, refer to the advice below:
- Check the source code of the published page: there is surely additional code compared to still healthy pages; it may be a malicious iframe or any inclusion…
- On the page in question, click on the "Why was this site blocked" button and follow the instructions…
- Refer to the Google documentation on the subject.
- Monitor the vulnerability detection tool which may resolve the issue in the meantime.
Link to this FAQ:
Has this FAQ been helpful?
This guide helps resolve a potential error 530 by reducing the number of simultaneous FTP connections to Web Hosting.
Resolve error 530
The number of FTP connections that can be established simultaneously to the FTP space of a hosting is limited to 25.
The error message 530 Sorry, the maximum number of clients (25) for this user are already connected generally appears following multiple and simultaneous connections with an FTP software/client that poorly manages disconnections or attempts to open multiple connections at once thinking it will speed up the download.
Once you have encountered this error, you need to close the FTP program and wait 30 minutes so that the server terminates the active connections and you can reconnect.
You can also create a new FTP user and connect with it.
To avoid this situation with FileZilla, go to the menu Edit -> Settings then under the Transfers tab and set the number of simultaneous transfers to 2.
It is recommended to use the Web FTP on the Manager.
Link to this FAQ:
Has this FAQ been helpful?
This guide explains how to manage the files of a Web Hosting with an FTP software/client.
Preamble
- To easily & quickly manage the files of your web hosting without having to install an application or enter FTP credentials, use the Web FTP on the Manager (it allows, among other things, CHOWN and file compression/decompression
zip). - Regarding the protocols supported by Infomaniak (FTP, SFTP, etc.) depending on your hosting offer (Starter, Node.js, etc.), refer to this other guide.
Parameters to provide for FTP software
Prerequisites
- Create an FTP/SSH account.
- Install an FTP software/client like Filezilla, Cyberduck, Commander One, Transmit, etc.
Regardless of your FTP software/client, the 3 essential parameters for configuring FTP access are always:
- Hostname: FTP server address
- Username: FTP account name
- Password: that of the FTP account
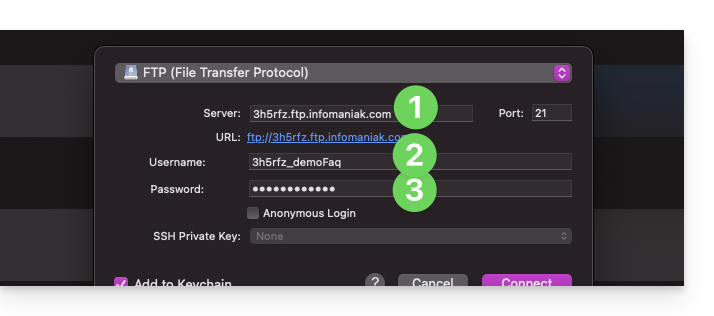
- The port number is usually left at default.
- The type and connection mode are usually left at default.
- If a limit on the number of simultaneous connections is offered, it is recommended to activate it.
Obtain the connection information to the hosting
You will find all the information on your Infomaniak Manager:
- Click here to access the management of your hosting on the Infomaniak Manager (need help?).
- Click directly on the name assigned to the hosting concerned:

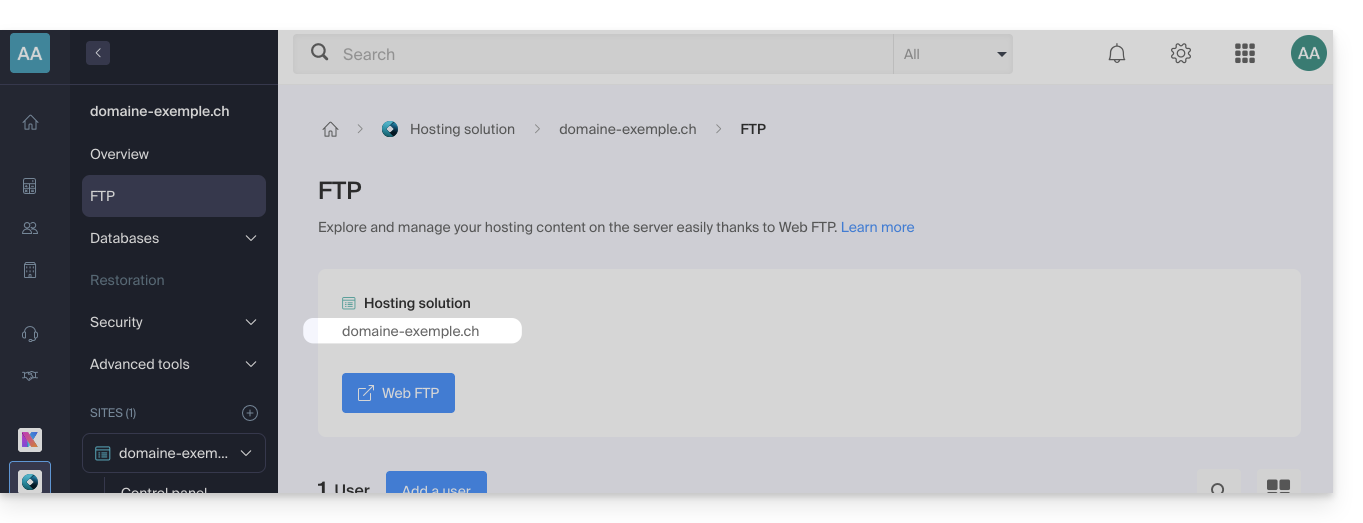
- Click on FTP (or FTP / SSH) in the left sidebar
1. FTP hostname
The hostname to use in your FTP software/client is specified at the top of the page obtained in point 3 above and an icon allows you to copy the address to the clipboard.
Starter Offer - Basic Web Page
If the specified domain is not functional (does not point to the hosting IP address, for example), then use the IP address as the host name, in the form 123.45.678.123 (refer to this other guide).
Paid Web Hosting
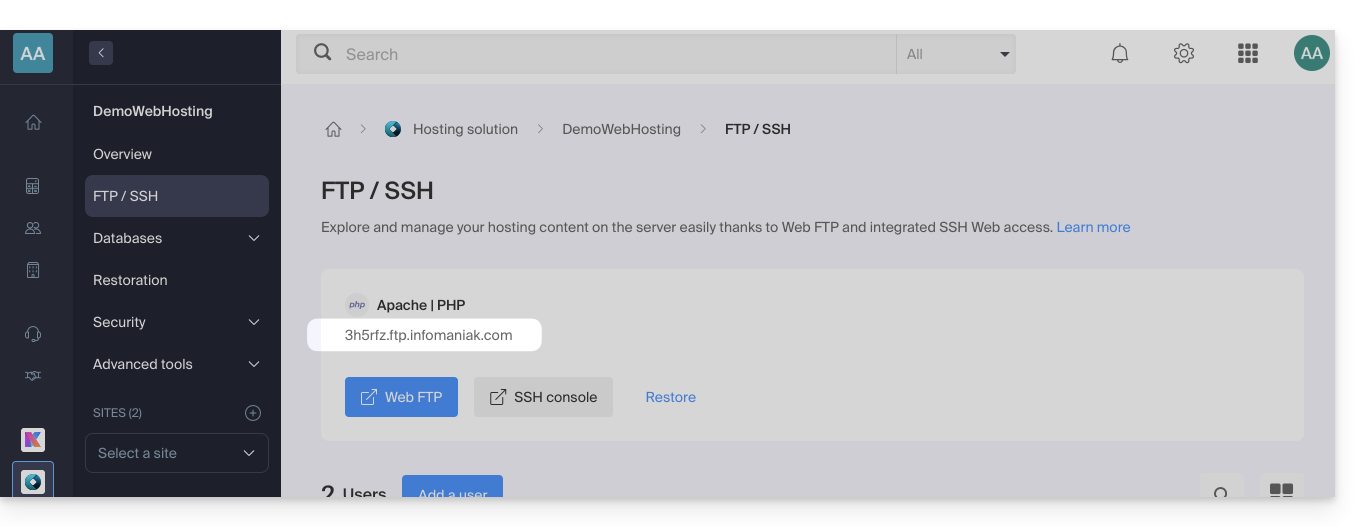
Use the host name in the form xyzb.ftp.infomaniak.com, for example.
2. FTP Username
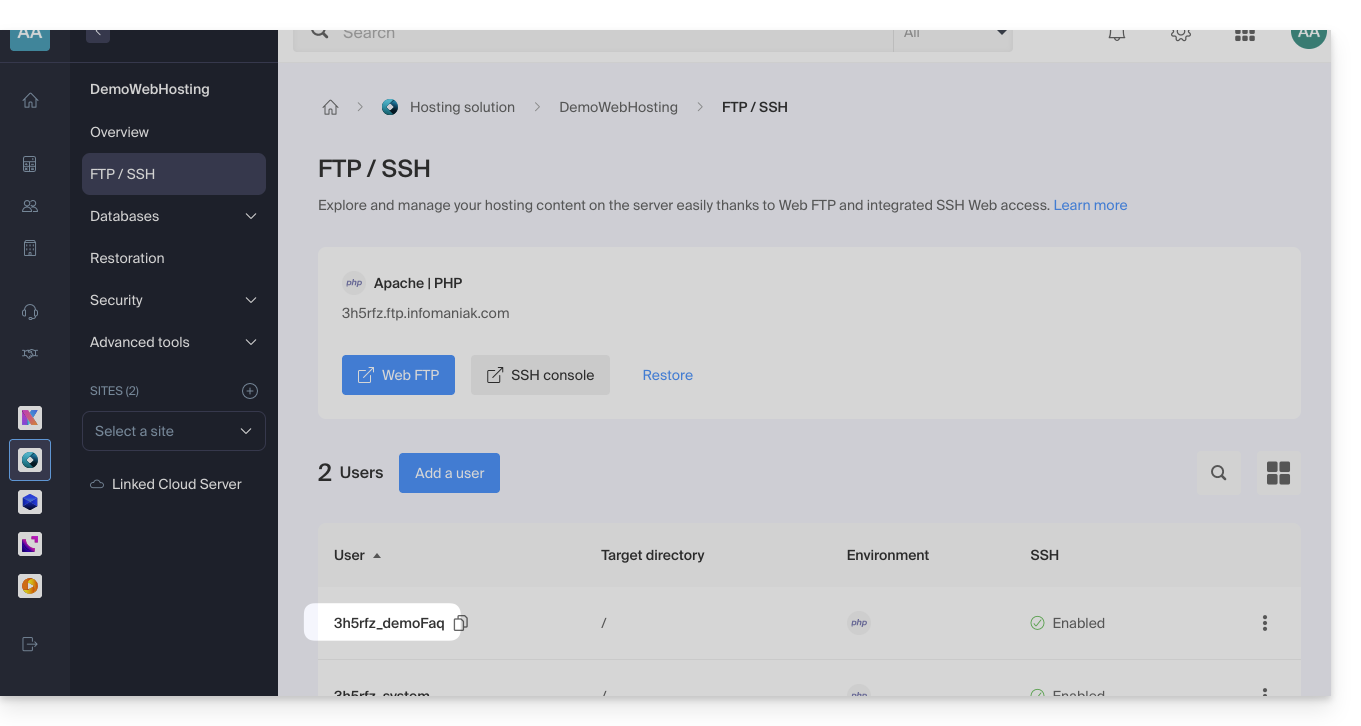
The username is the name of the account to be created in your Manager: xyzb_abcdefg, for example.
3. FTP User Password
The FTP user password is set by the creator of the FTP account. If you forget it, edit the FTP account by clicking on it and set a new password.
It is not possible to display an already applied password; you must reapply a new password if you no longer have the currently defined password.
Once the connection is established…
When you enter the 3 required parameters, your FTP application should display the directory structure of your hosting: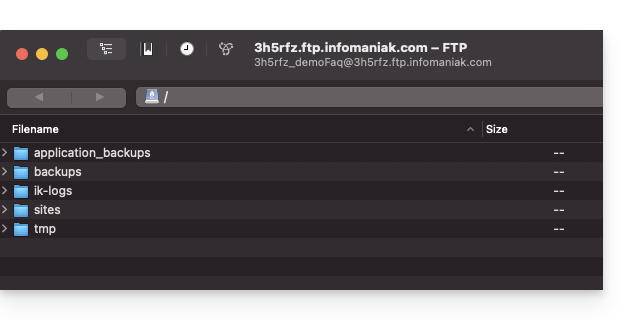
Link to this FAQ:
Has this FAQ been helpful?
This guide explains how to restart an Infomaniak VPS Cloud / VPS Lite and what you can do if you no longer have access to the server.
Reboot VPS Cloud / VPS Lite
The classic mode allows you to restart your server normally. To access the VPS Cloud / VPS Lite:
- Click here to access the management of your product on the Infomaniak Manager (need help?).
- Click directly on the name assigned to the product in question.
- Click on the Manage button.
- Click on Restart (classic mode):

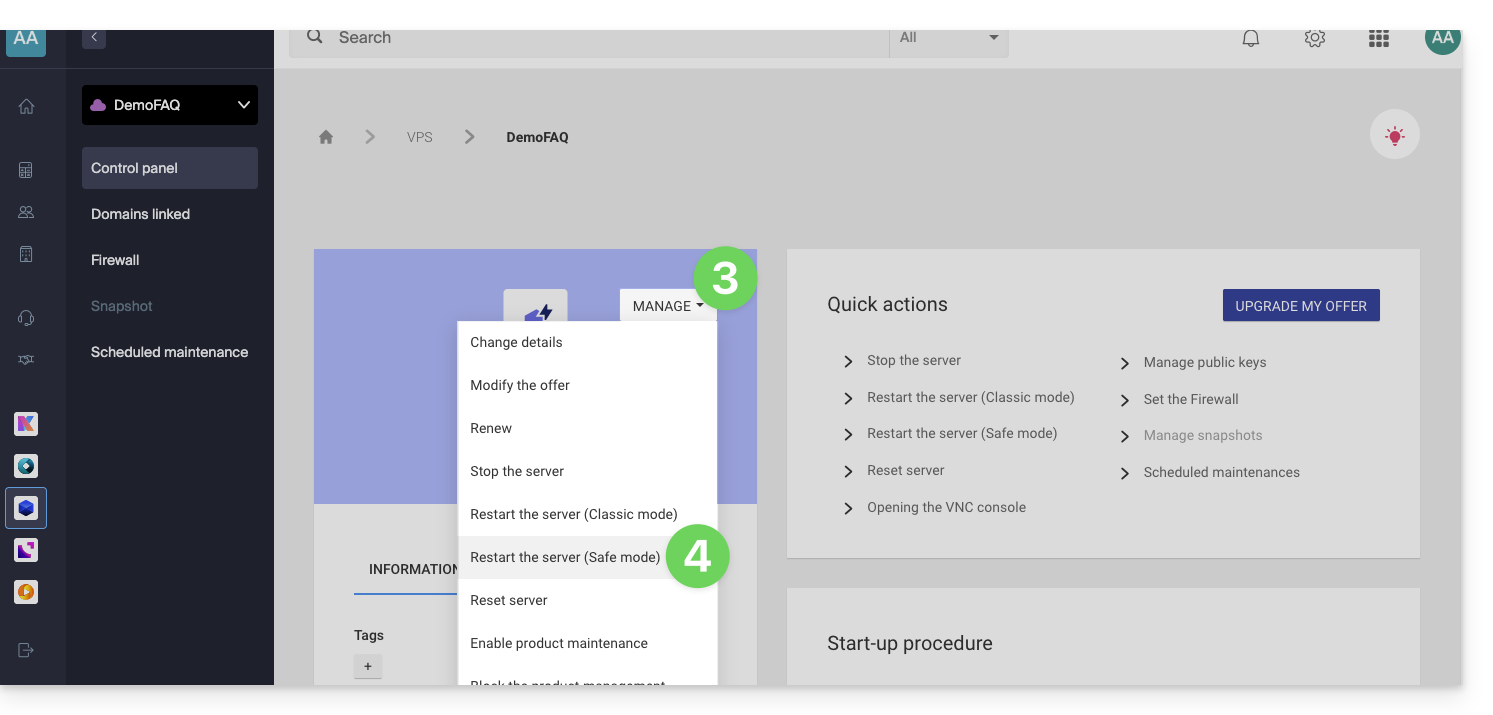
Enable/disable safe mode
If you have lost your SSH key, or made a configuration error, etc.
You have the possibility to restart in rescue mode. This consists of restarting from a base image from which you can mount the partitions of your cloud. In this way, you will be able to modify/repair your configuration.
Warning: depending on the operating system installed, the system volume may be named /dev/sda, /dev/sda1 or /dev/vda; the same for the data volume /dev/sdb, /dev/sdb2 or /dev/vdb! It is therefore necessary to replace these indications with those corresponding to your situation.
To activate rescue mode:
- Click here to access the management of your product on the Infomaniak Manager (need help?).
- Click directly on the name assigned to the product in question.
- Click on the Manage button.
- Click on Restart (safe mode):
Warning: Your data disk is not accessible when your VPS Cloud / VPS Lite is in safe mode. Only the system disk is accessible.
Perform operations
Once safe mode is active, access your Cloud via SSH, either with your ssh key, or with the temporary password available in the interface.
Once connected, switch to root user:
sudo -iThen list the available partitions (replace ov-abcd with your hostname):
[root@ov-abcd ~]# lsblk
NAME    MAJ:MIN RM  SIZE RO TYPE MOUNTPOINT
vda     253:0    0    8G  0 disk
└─vda1  253:1    0    8G  0 part /
vdb     253:16   0   20G  0 disk
└─vdb1  253:17   0   20G  0 part
vdb corresponds to the disk of your cloud (your usual system to repair).
To access it in write mode, you must mount it:
[root@ov-abcd ~]# mount /dev/vdb1 /mnt/You can then modify the files on your disk:
[root@ov-abcd ~]# ls /mnt/
bin  boot  dev  etc  home  lib  lib64  lost+found  media  mnt  opt  proc  root  run  sbin  srv  sys  tmp  usr  var
Depending on the operating system of your cloud, you can also perform a chroot to work directly in your usual environment:
[root@ov-abcd ~]# chroot /mnt/
root@ov-abcd:/# export PATH="$PATH:/usr/sbin:/sbin:/bin"
root@ov-abcd:/# ls
Once the necessary modifications have been made, deactivate safe mode from the Manager to restart your cloud on the original disk.
Link to this FAQ:
Has this FAQ been helpful?
This guide explains how to modify the value of the PHP directive include_path.
Modify the include_path
Like any other PHP parameter, include_path is defined in the .user.ini file.
Here is an example of a path to use in your .user.ini file:
include_path = ".:/home/clients/123456789a12345b12fc345d/web/www.domain.xyz/include"- The dot (
.) at the beginning allows you to keep the current directory in the search. - The colon (
:) is used as a separator between the different folders.
Refer to this other guide about phpinfo to verify that your new directive has been taken into account (the modification may take a few minutes to appear).
Although this method is still functional, using theautoloader of Composer is now the preferred solution for managing inclusions.
Link to this FAQ:
Has this FAQ been helpful?
This guide shows you how to modify the error_reporting() directive on your website.
Enable error reporting
Enter the following 2 pieces of information in your .user.ini file:
display_errors=on
error_reporting=E_ALL & ~E_NOTICE & ~E_STRICT
If your browser does not display any errors or warnings, then there are none.
Disable PHP error display
For WordPress, edit the wp-config.php file and replace the line:
define('WP_DEBUG', false);with:
ini_set('display_errors','Off');
ini_set('error_reporting', E_ALL );
define('WP_DEBUG', false);
define('WP_DEBUG_DISPLAY', false);Otherwise, you can add the following code to the .user.ini file:
display_errors=offLink to this FAQ:
Has this FAQ been helpful?
This guide explains how to optimize a website hosted on a Web Hosting service to make it faster and provide a smooth navigation experience for all your visitors, regardless of their connection speed.
The role of the host
The loading speed of a website depends on many factors: server performance, host network infrastructure, visitor's internet connection, and site optimization itself.
As a host, Infomaniak strives to offer the best in hosting by continuously evolving its products and infrastructure:
- All hosting services run on the latest generation of SSD drives.
- The infrastructure benefits from over 70 Gbit/s of interconnection and redundancy with partners like Cogent or Level3.
- To handle traffic spikes, servers use regularly renewed 64-bit Intel Xeon processors. Shared servers use, on average, only 40% of their CPU power.
When you submit a support request regarding slowness, Infomaniak checks the following points:
- Your hosting server is functioning normally and has not encountered any incidents in the last 48 hours.
- The network infrastructure has not experienced any disruptions during this same period.
The role of the site owner and the webmaster
Infomaniak does not intervene on the content of the servers or the development of the sites. The creation and maintenance of a site are distinct professions, although they use the tools and services provided by the host.
Analyze the cause of slowness
Here are the actions to take if you notice slowness on your site:
- Apply the Google PageSpeed Insights recommendations. These points concern the design of the site and not the server configuration. Refer to this other guide if the test recommends enabling resource compression.
- If slowness is noticed from abroad, activate DNS Fast Anycast.
- Install a caching system to reduce redundant database accesses and speed up display.
- Consider using a CDN.
- Test the server response time or TTFB.
- Scan your hosting to detect any potential viruses.
- Purge your databases regularly by deleting unnecessary entries.
- Use the latest PHP version compatible with your site or CMS.
- Avoid images, counters, or media hosted on external servers: if they are unreachable, your site will appear slow.
- Deactivate unnecessary or resource-intensive WordPress extensions.
- Keep your CMS and web applications regularly updated.
- Limit the impact of overly aggressive indexing robots by configuring a Crawl-delay.
- Analyze the error-logs: correcting the errors generated by your site improves its performance.
- Review the slowlogs to identify SQL queries taking more than 5 seconds to execute and optimize them (optimization examples).
- Add a server cache engine like Memcached (available on Cloud servers only).
- Increase the max_children value (only on Cloud servers).
If the problem persists
If you or your webmaster cannot find the source of the slowdowns, contact Infomaniak support in writing by providing the following information:
- Name of the hosted site.
- Exact dates and times of the slowdowns.
- Name of the database or FTP account potentially involved.
- Your public IP address during tests (visible on https://www.infomaniak.com/ip).
- Type of slowdown (display, FTP transfers, etc.).
- Indicate if you can normally access the Infomaniak site during these episodes.
- Complete result of a traceroute to
84.16.66.66. - Result of a speed test on speedtest.net by selecting Infomaniak as the destination server.
If your needs evolve
If shared hosting is no longer sufficient, consider switching to a Managed Cloud Server. Your site can be easily migrated to take advantage of dedicated resources and advanced caching technologies.
Link to this FAQ:
Has this FAQ been helpful?
This guide details the use of DELIMITER to create MySQL functions on Infomaniak Cloud Server.
Preamble
- When creating functions or stored procedures in MySQL, it is crucial to understand the role of delimiters.
- The correct use of delimiters is essential to avoid syntax errors that can occur due to the presence of multiple SQL statements in a single function or procedure definition.
Understanding the Delimiter
A delimiter is a character or sequence of characters used to separate SQL statements in a script. By default, MySQL uses the semicolon (;) as a delimiter. However, when creating functions, stored procedures, or triggers that contain multiple SQL statements, it is necessary to temporarily change the delimiter to avoid syntax errors.
When you create a function, procedure, or trigger, you often need to use multiple SQL statements within the BEGIN...END block. Since the semicolon (;) is also used to terminate these internal statements, MySQL might interpret the first semicolon as the end of the function definition, resulting in a syntax error. To work around this issue, you must change the delimiter during the function definition.
Creating a Simple Function Using Custom Delimiters
Before defining the function, you must tell MySQL that you will be using a different delimiter. In the example below, $$ is used as the new delimiter:
DELIMITER $$With the new delimiter in place, you can now define your function. The CREATE FUNCTION includes the function body, where you can use internal SQL statements separated by semicolons without any issues:
CREATE FUNCTION hello_world()
RETURNS TEXT
LANGUAGE SQL
BEGIN
RETURN 'Hello World';
END;
$$
In this example:
CREATE FUNCTION hello_world(): declares the start of the definition of the functionhello_world.RETURNS TEXT: specifies the data type that the function returns.LANGUAGE SQL: indicates that the language used for the function is SQL.BEGIN ... END: encapsulates the function code. Inside, the semicolon is used to separate SQL statements.RETURN 'Hello World';: SQL statement that returns the stringHello World.
After defining the function, reset the delimiter to its default state (the semicolon). This allows you to continue executing regular SQL statements in your subsequent scripts:
DELIMITER ;Link to this FAQ:
Has this FAQ been helpful?
This guide explains how to view file activity on your Infomaniak hosting server.
FTP space activity logs
To know the activity of exchanges on your FTP space, contact Infomaniak support to request FTP logs by first authenticating with the credentials corresponding to the management of your web hosting.
The log is only updated if there has been FTP activity.
Help reading logs: http://www.castaglia.org/proftpd/doc/xferlog.html
Link to this FAQ:
Has this FAQ been helpful?