Base de conhecimento
1000 perguntas frequentes, 500 tutoriais e vídeos explicativos. Aqui, você encontra apenas soluções!
Este guia explica como aumentar a sua produtividade com o aplicativo Web Mail da Infomaniak (serviço online ksuite.infomaniak.com/mail) utilizando os seus atalhos de teclado, funções que permitem realizar certas ações sem utilizar o cursor do rato.
Ativar ou desativar os atalhos
Para ativar ou desativar os atalhos de teclado em toda a interface do Mail Infomaniak:
- Clique aqui para acessar o aplicativo web Mail Infomaniak (serviço online ksuite.infomaniak.com/mail).
- Clique no ícone Configurações no canto superior direito da interface.
- Clique em Atalhos.
- Ative ou desative o uso de atalhos:
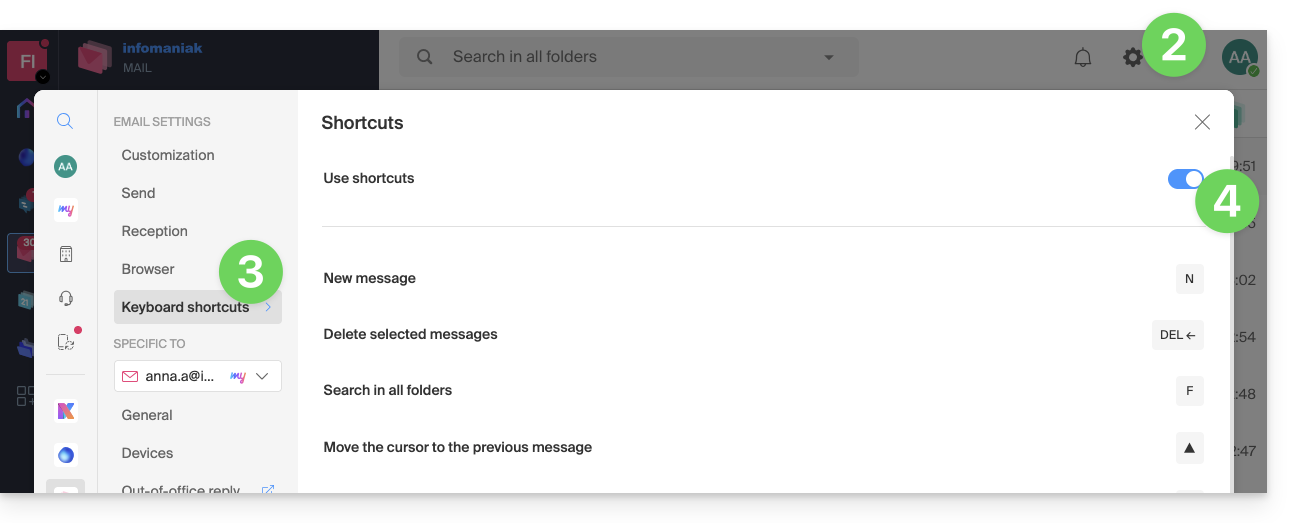
Você também pode acessá-lo usando a combinação de teclas SHIFT+ALT+H (OPTION+MAJ+H no macOS).
Exemplos de atalhos de teclado
A seguir, alguns atalhos de teclado (consulte os capítulos acima para acessar diretamente a lista completa):
| Atalhos de teclado | Definição | Ação |
|---|---|---|
SHIFT+ALT+H | Lista de atalhos | Permite exibir a lista completa dos atalhos de teclado disponíveis no Webmail. |
! | Primeira mensagem | Permite selecionar a primeira mensagem na pasta atual. |
SHIFT+LT+A | Todas as mensagens | Permite selecionar todas as mensagens na pasta atual. |
| DOWN | Mensagem seguinte | Permite mover o cursor para a mensagem seguinte. |
| UP | Mensagem anterior | Permite mover o cursor para a mensagem anterior. |
| LEFT | Voltar à lista de mensagens | Permite retornar à lista de mensagens |
SHIFT+CLICK | Selecionar várias mensagens | Permite selecionar vários e-mails em sequência. |
CMD/WINDOWS+CLICK | Selecionar/desmarcar um e-mail. | Permite selecionar/desselecionar uma mensagem |
SHIFT+R | Responder à mensagem | Permite responder ao remetente da mensagem |
SHIFT+ALT+R | Responder a todos | Permite responder ao remetente e a todas as pessoas em cópia da mensagem. |
SHIFT+ALT+N | Nova mensagem | Permite criar uma nova mensagem |
SHIFT+ALT+DEL | Exclui as mensagens selecionadas | Permite excluir todos os e-mails selecionados de uma só vez. |
SHIFT+ALT+E | Arquivar e-mail | Permite classificar a mensagem na pasta de arquivo. |
Link para esta FAQ: https://faq.infomaniak.com/1890
Esta seção de perguntas frequentes foi útil?
Este guia explica como ativar a autenticação de dois fatores, ou verificação em duas etapas, para proteger o acesso à sua conta Infomaniak (e, consequentemente, o acesso às ferramentas kSuite, hospedagens, etc.).
Introdução
- Esta validação em duas etapas, também chamada de autenticação multifatorial/de dois fatores (A2F, em inglês two-factor authentication, 2FA), protege o acesso à sua conta Infomaniak através de:
- a senha de sua escolha
- e um segundo método de verificação de identidade, um código a ser obtido em seu dispositivo móvel, por exemplo.
- Se uma pessoa mal-intencionada conseguir decifrar ou roubar sua senha, ela ainda precisará de um código de validação que apenas o usuário legítimo pode obter em seu dispositivo móvel.
- Consulte este outro guia se for administrador de uma Organização e desejar impor a autenticação de dois fatores (2FA) a todos os utilizadores que ainda não a tenham ativado.
- Não é necessário contactar a Infomaniak, pois esta não tem acesso a nenhum dos seus códigos e palavras-passe.
- Para qualquer pedido de ajuda sobre a autenticação de dois fatores, consulte este outro guia.
Ativar a autenticação de dois fatores
Para aumentar o nível de segurança da sua conta Infomaniak:
- Clique aqui para iniciar sessão e aceder à gestão da autenticação de dois fatores no Manager Infomaniak:
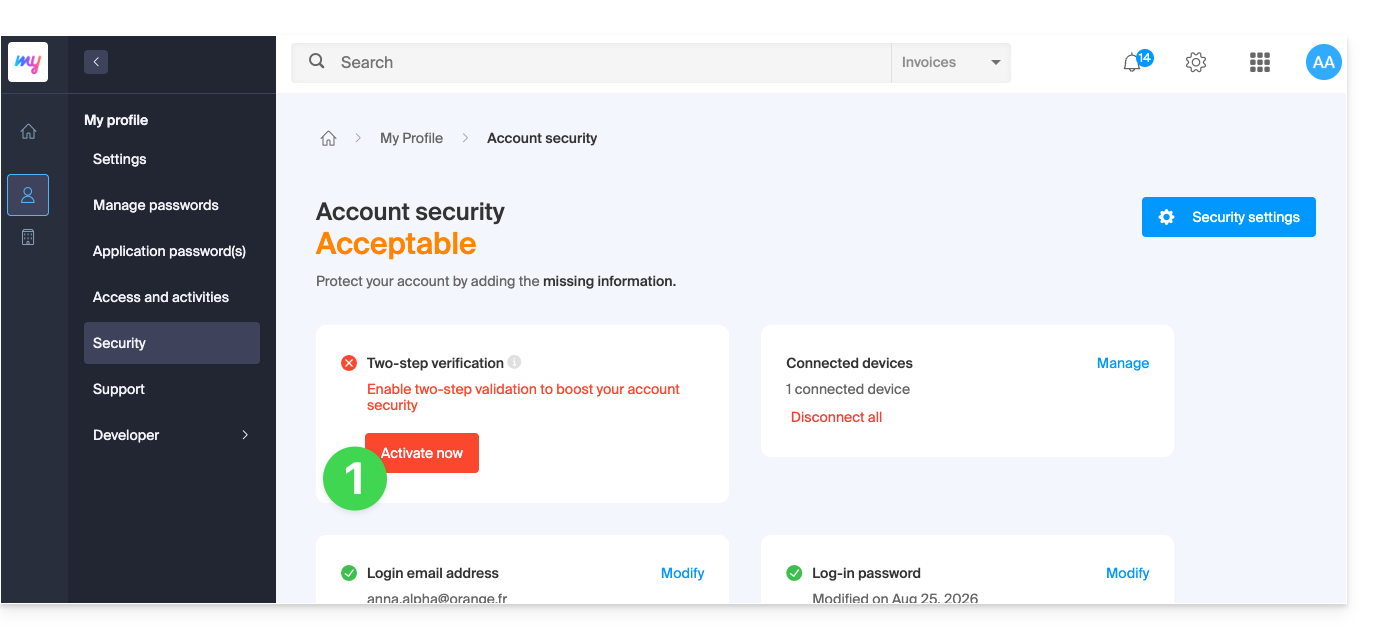
- Após iniciar sessão, pode escolher um método de autenticação de dois fatores (2FA):
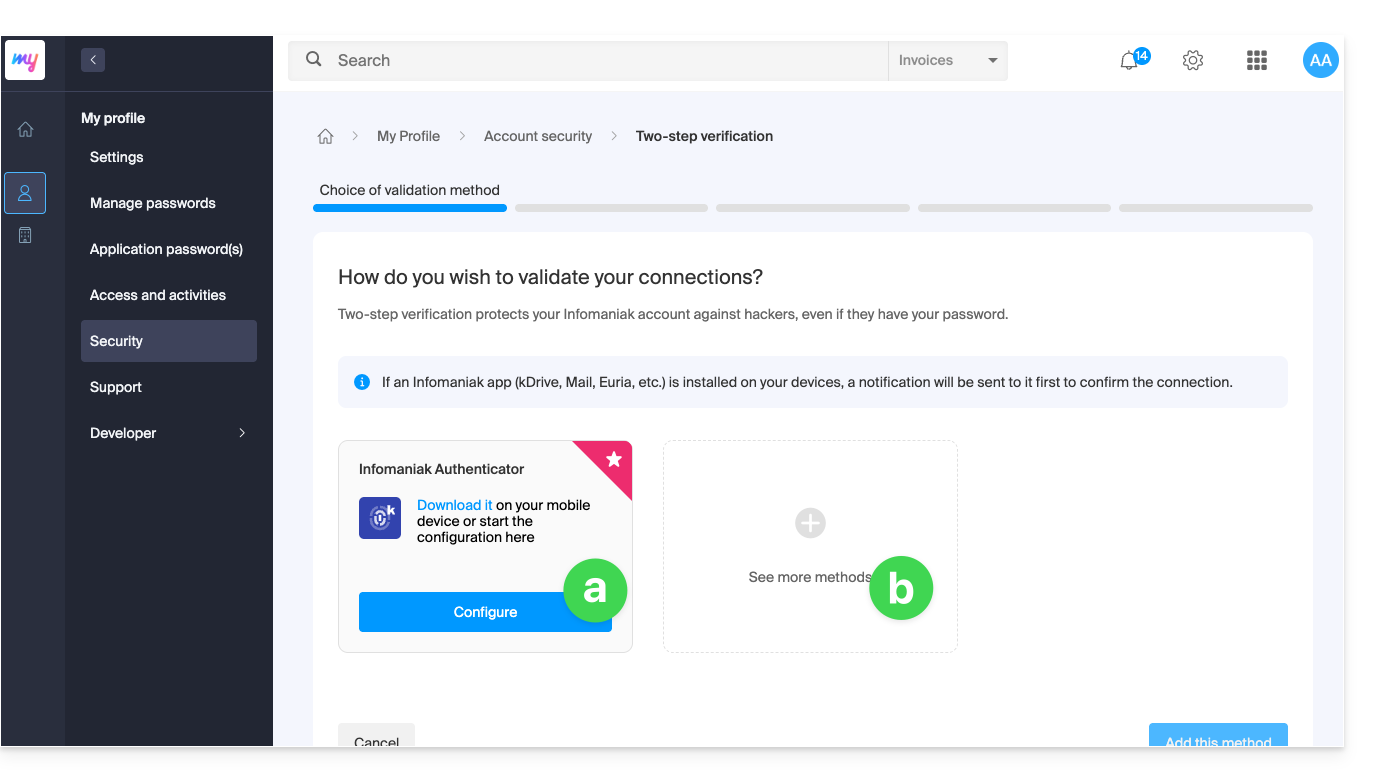
- a aplicação Infomaniak Authenticator para dispositivos iOS / Android (consulte este outro guia sobre o assunto),
- outro método entre:
- qualquer aplicação OTP (como Authy, por exemplo) para obter um código de uso único,
- YubiKey (da Yubico); consulte este outro guia sobre o assunto,
- SMS (apenas para os países CH / FR / BE / DE) para obter um código de uso único.
- Clique no botão para configurar o método adicional selecionado:
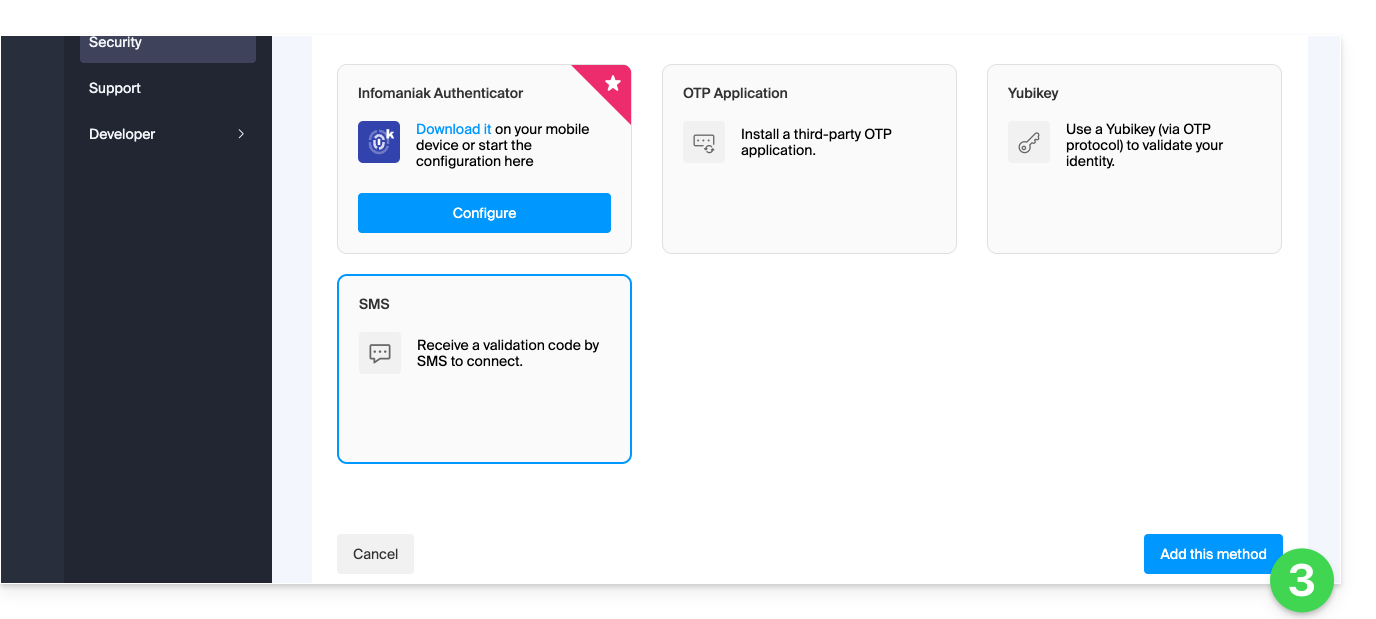
- Siga as instruções apresentadas no ecrã para concluir a configuração.
Atenção às sincronizações já existentes
Após ativar a autenticação de dois fatores, algumas ferramentas de sincronização, como as que utilizam os protocolos CardDAV ou CalDAV, exigem uma senha de aplicativo para substituir a senha anterior e, assim, continuar a conectar-se diretamente em intervalos regulares.
Os serviços de e-mail não são afetados, pois os protocolos IMAP, POP e SMTP funcionam com senhas de dispositivo, que permanecem as mesmas antes ou depois da ativação de um método de autenticação de dois fatores.
Alterar a opção predefinida ou removê-la
Se tiver ativado vários métodos de validação (SMS, aplicação OTP…), pode definir qual será proposto por predefinição em cada sessão de início de sessão.
Note, no entanto, que o método principal por padrão continuará sendo o da validação no aplicativo Infomaniak instalado (Mail, kChat, kDrive…) nos seus dispositivos.
- Clique aqui para se conectar e acessar o gerenciamento da autenticação de dois fatores no painel de controle Infomaniak.
- Clique no botão para definir como padrão.
- Clique no ícone da lixeira para remover e não mais apresentar o método selecionado (isso só funciona se existir outro método):
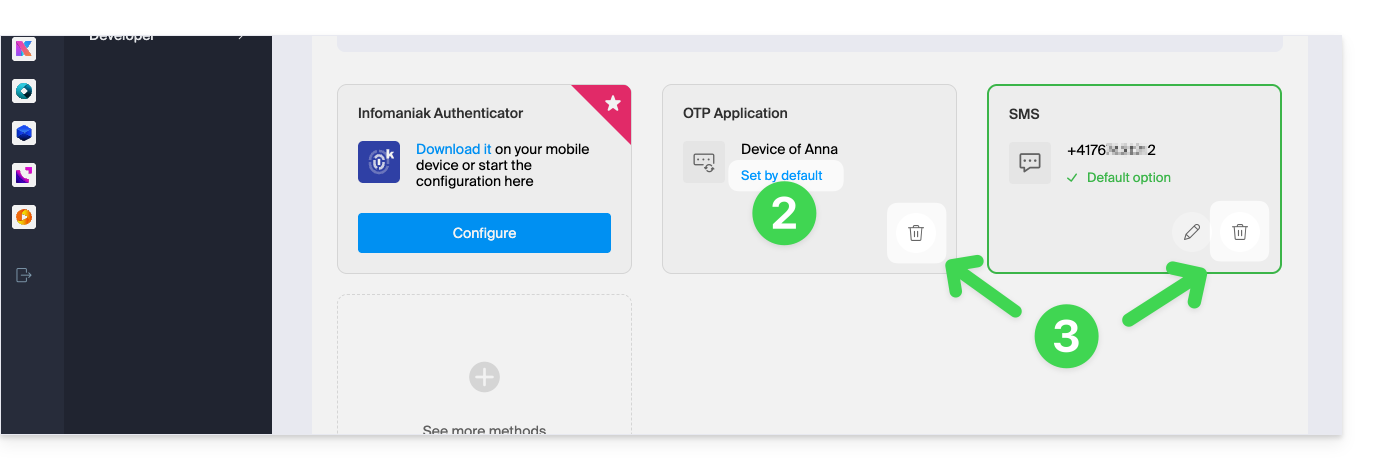
Para remover completamente a autenticação de dois fatores, consulte este outro guia.
Autenticar-se a cada abertura do navegador
Para configurar o navegador de forma a não guardar cookies ao fechar as janelas, e, assim, solicitar a autenticação a cada acesso ao painel de controlo Infomaniak ao reiniciar o navegador…
… no Chrome
Nas configurações do Google Chrome (chrome://settings/content/siteData – cole este endereço na barra de endereços ou consulte a documentação oficial), especifique o endereço [*.]infomaniak.com: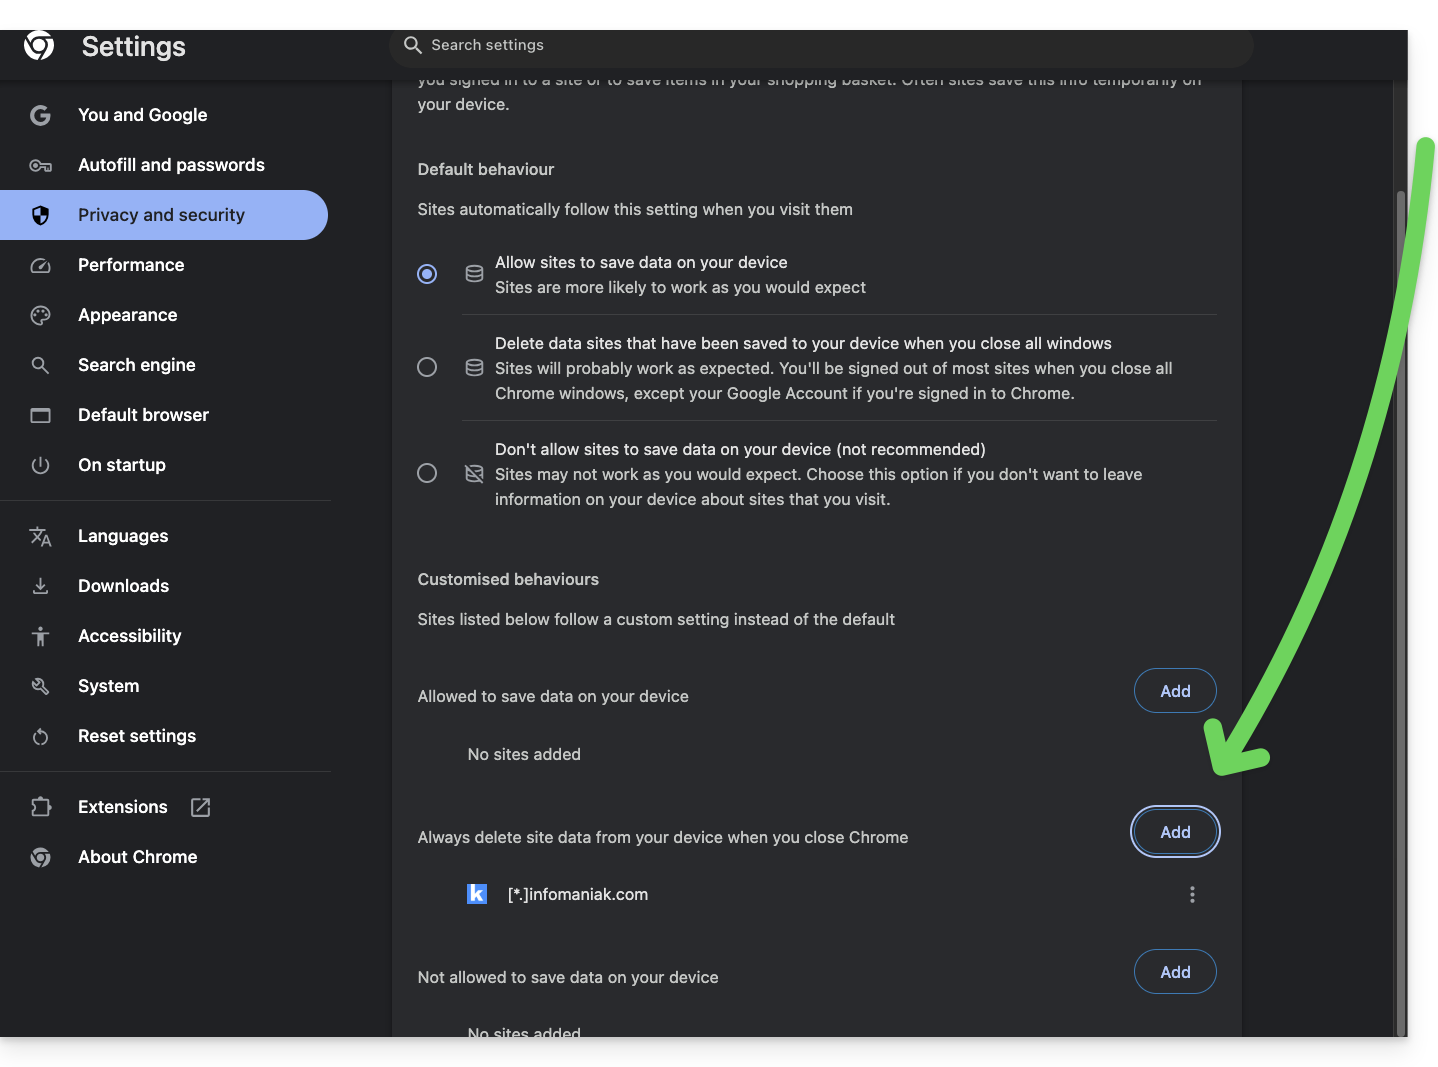
Link para esta FAQ: https://faq.infomaniak.com/1940
Esta seção de perguntas frequentes foi útil?
Este guia explica como obter o(s) seu(s) endereço(s) de e-mail junto ao provedor de hospedagem suíço Infomaniak.
Introdução
- Com exceção de algumas ofertas gratuitas, um endereço de e-mail na Infomaniak é sempre criado dentro de um Serviço de E-mail.
- Este Serviço de E-mail é estruturado em torno de um nome de domínio personalizado que deve existir e estar configurado para que o serviço de e-mail funcione.
- Exemplo: se você deseja o endereço
jean.dupont@domain.xyz, então é necessário:- Possuir o nome de domínio “
domain.xyz”. - Obter um Serviço de E-mail “
domain.xyz”. - Criar o endereço de e-mail “
jean.dupont”.
- Possuir o nome de domínio “
- Tudo isso é oferecido e solicitado no processo de pedido em infomaniak.com, precedido pela criação de uma conta de usuário obrigatória (para a qual você deverá indicar seu endereço de e-mail pessoal ou endereço já existente, em todos os casos).
- Se o seu nome de domínio já estiver registrado em um registrador externo, você deverá, se necessário, inserir o MX correto na zona DNS.
Encomendar endereços de e-mail em um domínio personalizado
Antes ou depois de seu registro:
- Leia este outro guia para escolher a oferta de e-mail que melhor se adapta às suas necessidades e deixe-se guiar no processo para começar a usar os serviços.
- Depois que o Serviço de E-mail for encomendado, você poderá criar os endereços de e-mail e, em seguida, as senhas associadas, se necessário.
Depois que o Serviço de E-mail for ativado
- Crie os seus endereços de e-mail.
- Configure os seus e-mails no seu computador e dispositivos.
- Sincronize os seus contactos e calendários nos seus dispositivos.
- Transfira o conteúdo (incluindo o que está num outro fornecedor).
Adicionar um Serviço de E-mail adicional
Para adicionar um novo Serviço de E-mail (para obter novos endereços num domínio diferente):
- Clique aqui para aceder à gestão do seu produto no Manager Infomaniak (precisa de ajuda?).
- Clique no botão Encomendar acima da tabela que aparece:
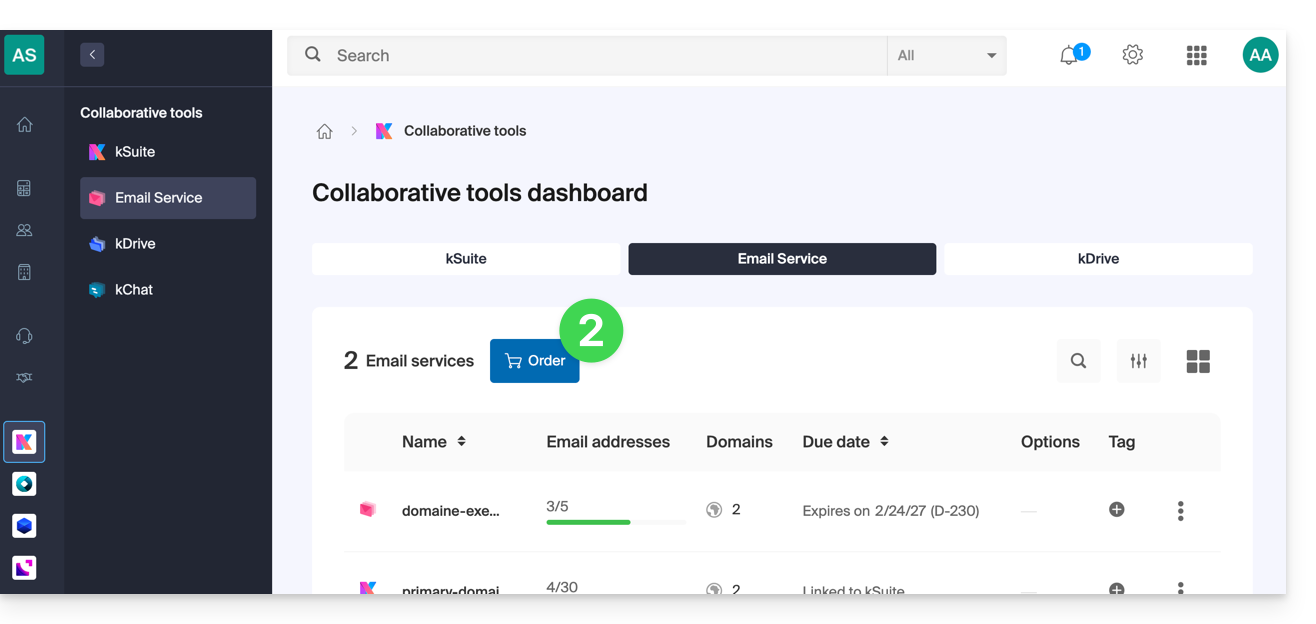
Aumentar o número de endereços de e-mail disponíveis num Serviço de E-mail existente
Para aumentar, se necessário, o número de endereços disponíveis, consulte este outro guia.
Link para esta FAQ: https://faq.infomaniak.com/1944
Esta seção de perguntas frequentes foi útil?
Este guia detalha os dois tipos principais de identificadores. Eles são distintos, mesmo que o formato do endereço possa ser o mesmo.
Conta Infomaniak vs. Endereço de e-mail
Aqui está um resumo destes 2 tipos de identificadores:
| Tipo de identificador | Utilização | Onde utilizar | Senha associada |
|---|---|---|---|
| Conta Infomaniak (identificador de login) | Aceda a todos os seus serviços Infomaniak. | Conecte-se a: | Senha definida durante a criação da conta de usuário. ⚠️ Diferente da senha dos seus endereços de e-mail. |
| Endereço de e-mail hospedado na Infomaniak | Enviar e receber e-mails. | Conexão SMTP/IMAP…
| Senha específica para cada endereço de e-mail (pode haver várias). ⚠️ Diferente da senha da conta Infomaniak. |
O que fazer em caso de problemas de conexão?
Não é necessário entrar em contato com o Suporte da Infomaniak (que não tem acesso a nenhuma das suas senhas)...
- Problema com a sua conta Infomaniak? Redefina a senha da conta.
- Problema com um endereço de e-mail? Redefina a senha do e-mail.
Explicações
- Tal como acontece com muitos outros serviços online, registou-se na Infomaniak com um endereço de e-mail pessoal.
- Este endereço de e-mail pessoal serve como seu identificador de login quando pretende aceder aos serviços Infomaniak.
- Este identificador de login tem a sua própria senha (definida durante a criação da sua conta de usuário Infomaniak – o seu endereço de e-mail pessoal, veja acima).
Não existe qualquer ligação entre…
- … este par de identificação/palavra-passe descrito nos pontos 1/2/3 acima…
- … e os endereços de e-mail que criou ou obteve posteriormente na Infomaniak.
Poderá existir uma ligação se o endereço for idêntico (por exemplo, registou-se com o endereço de e-mail toto@abc.xyz e também gere este mesmo endereço de e-mail na Infomaniak), mas mesmo nesse caso, a palavra-passe será provavelmente diferente — uma vez para o identificador de início de sessão toto@abc.xyz e outra para o endereço de e-mail toto@abc.xyz.
Outros identificadores?
Adquirir outros produtos Infomaniak implica obter outros identificadores, como os necessários para as conexões FTP, MySQL, SSH, etc., mas esses identificadores são totalmente independentes dos dois tipos descritos acima.
Link para esta FAQ: https://faq.infomaniak.com/1980
Esta seção de perguntas frequentes foi útil?
Este guia explica como criar um endereço de e-mail a partir do Serviço de E-mail Infomaniak, a solução eficiente e segura para hospedar seus endereços de e-mail.
Introdução
- Para criar vários endereços de e-mail em lote, consulte este outro guia.
- Para excluir um ou mais endereços de e-mail, consulte este outro guia.
Criar um endereço em um Serviço de E-mail
Pré-requisitos
- Possuir um Serviço de E-mail em seu Gerenciador Infomaniak.
- Ser Administrador ou Responsável legal dentro da Organização.
- Dispor de uma quota de endereços disponíveis ou ajustá-la previamente, se necessário.
Em seguida, para criar um novo endereço de e-mail:
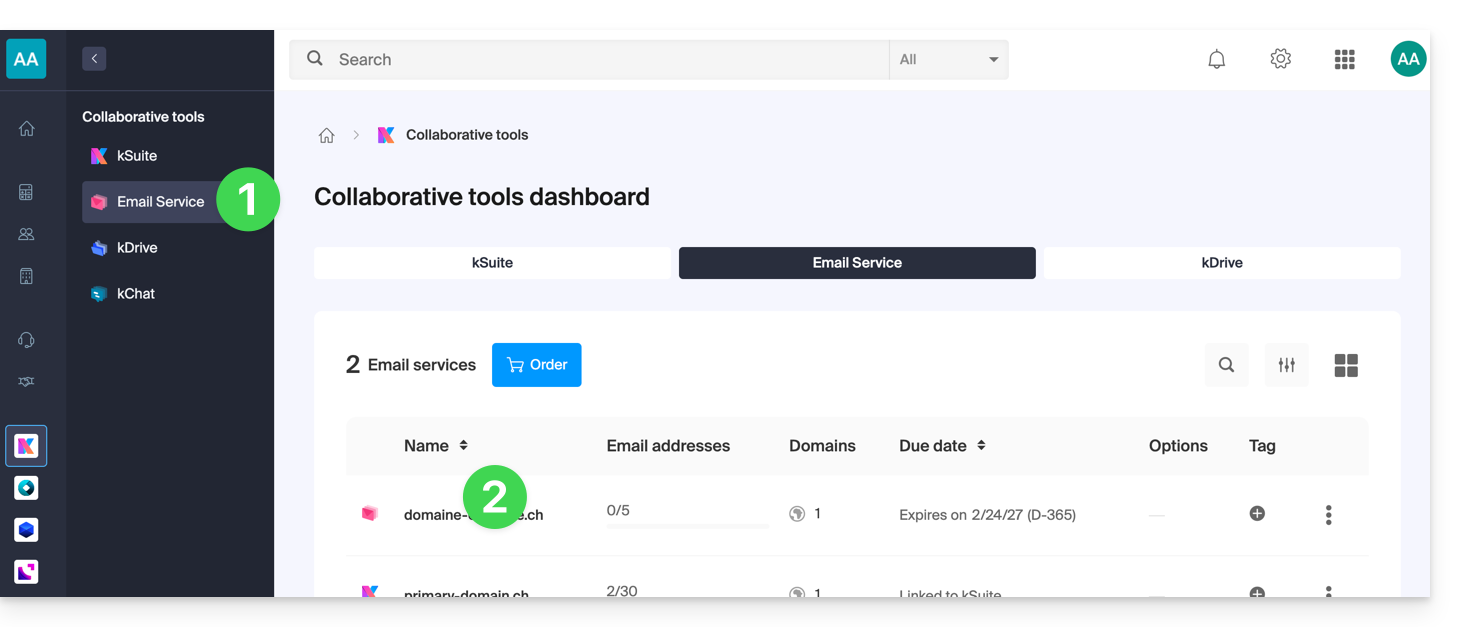
- Clique aqui para acessar o gerenciamento do seu Serviço de E-mail no Gerenciador Infomaniak (precisa de ajuda?).
- Clique diretamente no nome atribuído ao Serviço de E-mail em questão:
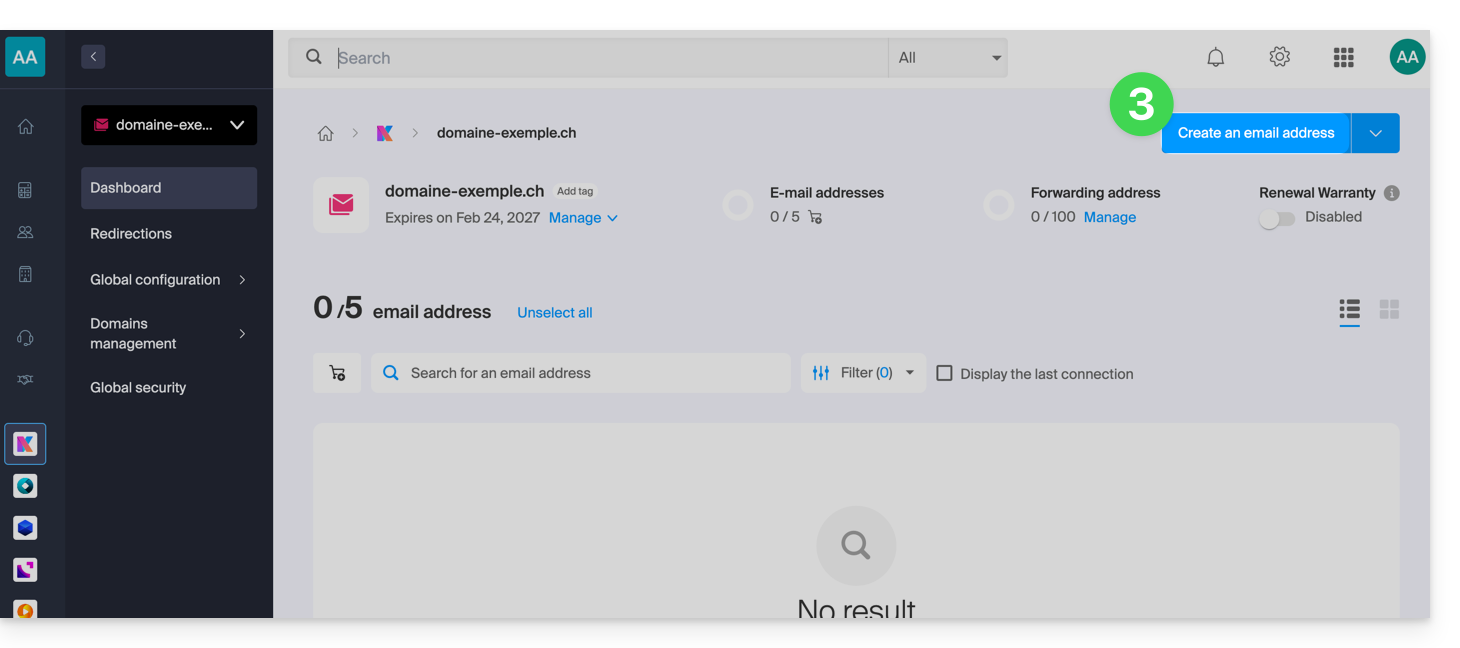
- Clique no botão azul Criar um endereço de e-mail no canto superior direito:
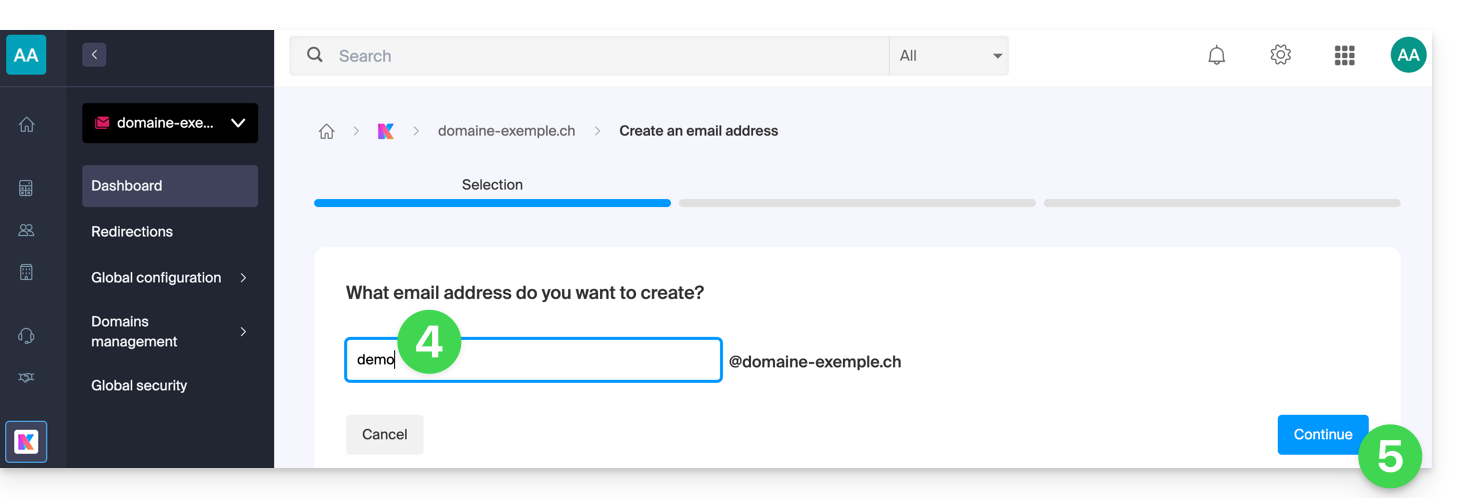
- Insira o nome que comporá o endereço de e-mail.
- Clique no botão para continuar:
- Selecione o modo de criação adequado à sua situação:
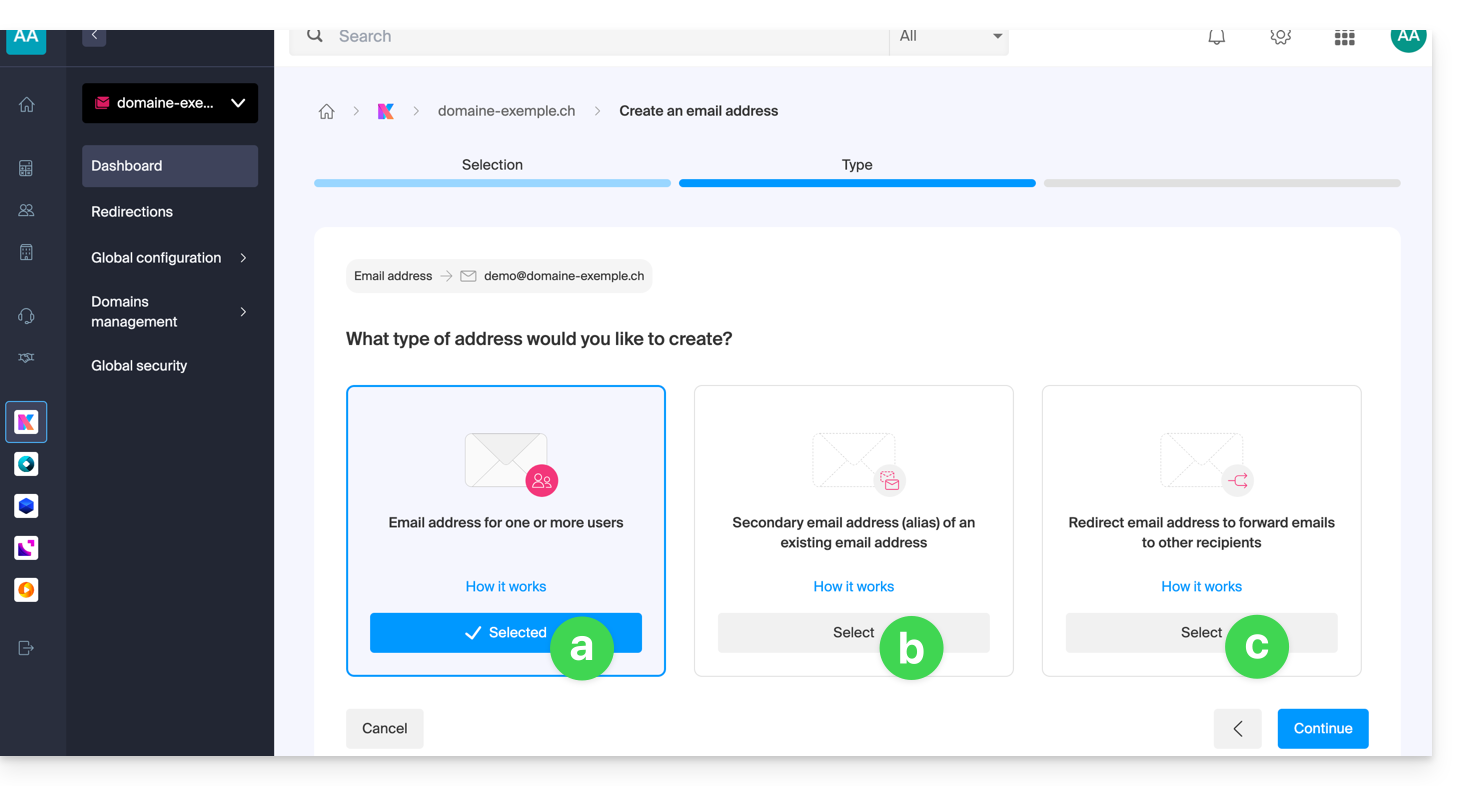
Um endereço para você ou outros usuários [ ☍ ]
- Exemplo: tornar o endereço diretamente visível na sua interface de e-mail ou enviar convites para que outros possam usá-lo.
Um endereço secundário (alias) [ ☍ ] que não será descontado da quota principal
- Requer que você possua um primeiro endereço de e-mail, ao qual o novo nome será associado.
Um endereço que serve apenas para redirecionar e-mails [ ☍ ] e que não será descontado da quota principal
- Você não poderá enviar mensagens a partir deste endereço, apenas redirecionar os e-mails recebidos para o endereço existente de sua escolha.
- Clique no botão para continuar após fazer sua escolha.
Ações adicionais (botão )
Clique na seta à direita do botão Criar um endereço de e-mail para acessar as ações adicionais: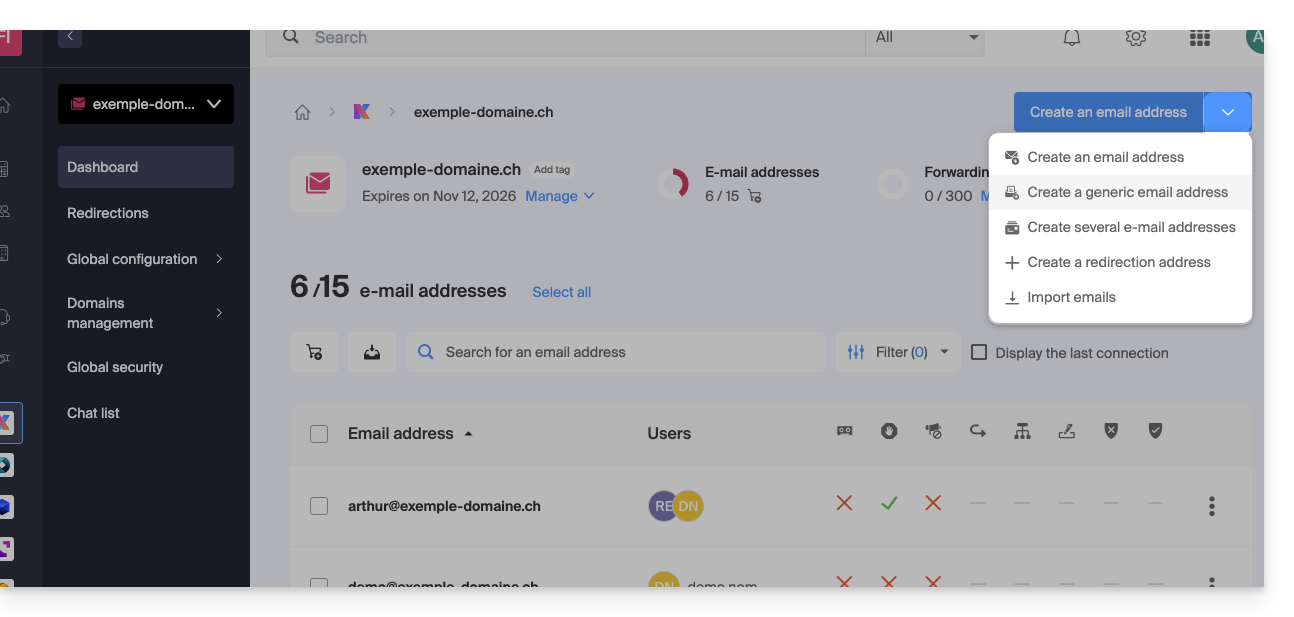
- Criar um endereço de e-mail genérico do tipo:
- no-reply (para o envio de confirmações, validações, faturas, etc.)
- catchall (permite receber todas as mensagens para as quais não existe um endereço de e-mail específico no seu domínio)
- Criar vários endereços de e-mail: permite criar de uma só vez vários endereços de e-mail usando um arquivo
CSV. - Criar endereços “virtuais” que servem como redirecionamento.
- Importar o conteúdo de outros endereços de e-mail.
Link para esta FAQ: https://faq.infomaniak.com/1993
Esta seção de perguntas frequentes foi útil?
A forma mais simples de gerir os seus e-mails é utilizar a aplicação web Mail da Infomaniak (serviço online ksuite.infomaniak.com/mail).
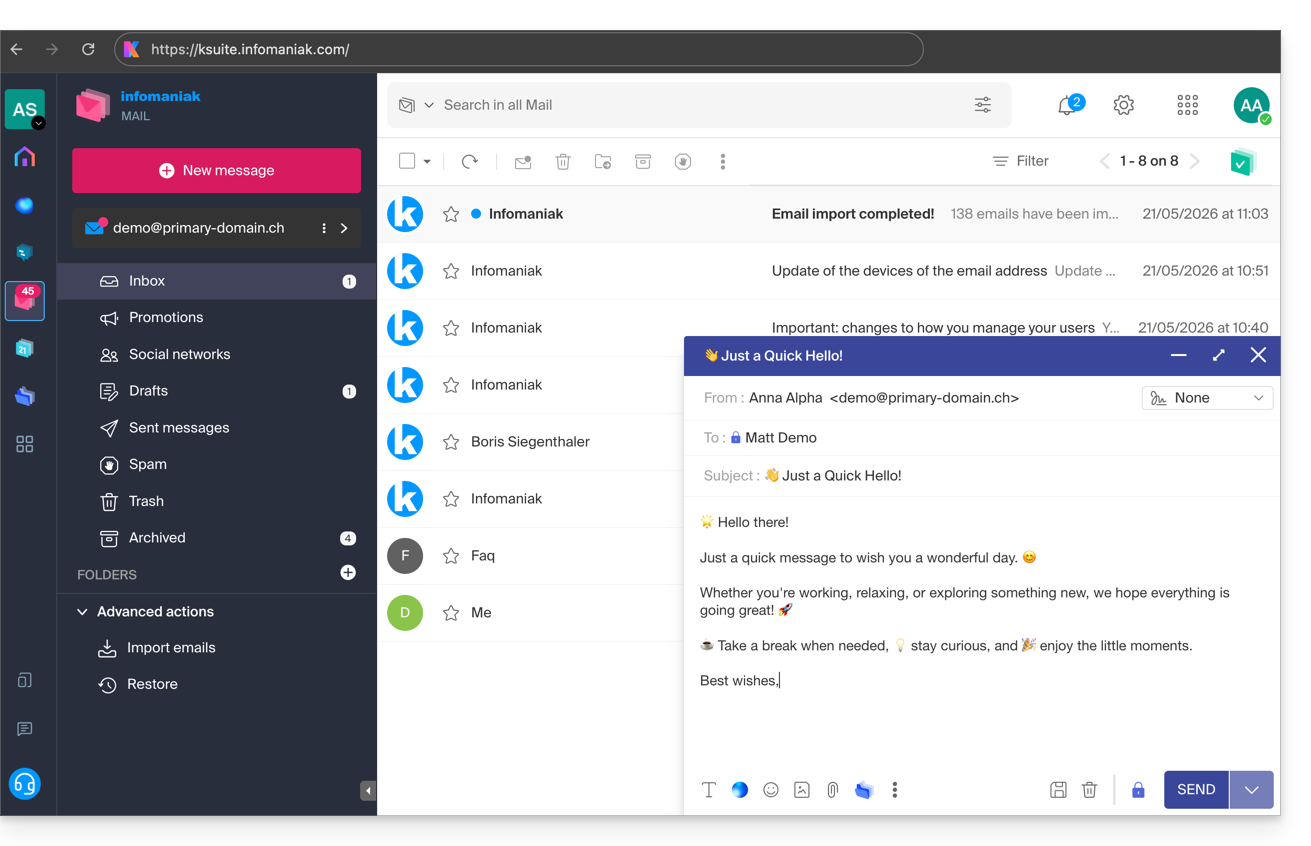
Esta interface oferece várias vantagens:
- Nenhum software para instalar ou configurar.
- Compartilhamento de e-mails com outros usuários.
- Gerenciamento unificado de todos os seus endereços de e-mail Infomaniak.
- Filtro anti-spam e antivírus profissional, tanto na entrada quanto na saída.
- Triagem automática das mensagens recebidas (filtros).
- Envio de anexos de grande dimensão.
- Armazenado permanentemente.
- Partilha do kDrive.
- Protege e respeita a sua privacidade, hospedado na Suíça por uma empresa neutra e independente.
Uma aplicação móvel (Infomaniak Mail, aplicação para smartphone ou tablet iOS / Android) está disponível aqui.
Como começar a usar o Mail Infomaniak?
Seja em ksuite.infomaniak.com/mail ou no aplicativo Infomaniak Mail, é fundamental efetuar login com o ID da sua conta Infomaniak e a respetiva palavra-passe. Isto NÃO funcionará se indicar diretamente um endereço de e-mail e a respetiva palavra-passe. Entenda a diferença
- Clique aqui para acessar o aplicativo web Mail da Infomaniak (serviço online ksuite.infomaniak.com/mail).
- Se necessário, associe os endereços de e-mail que deseja gerenciar ao Mail Infomaniak.
O que deseja fazer a seguir?
- Aceder às opções do aplicativo
- Alterar a senha de um endereço de e-mail no Mail
- Restaurar e-mails apagados
- Adicionar uma assinatura
- Criar um endereço de e-mail na Infomaniak
- Gerenciar os diferentes usuários de um endereço de e-mail
- Modificar as permissões de um usuário
- Sincronizar os seus dispositivos (e-mails e/ou contactos e calendários)
Link para esta FAQ: https://faq.infomaniak.com/2008
Esta seção de perguntas frequentes foi útil?
Este guia explica como alterar o número de telefone celular (utilizado em caso de esquecimento da senha de acesso ao seu Painel de Controle) da sua conta Infomaniak (= conta de usuário).
Introdução
- Para gerir as informações de contacto da sua conta Infomaniak, consulte este outro guia.
- Para alterar o seu nome de utilizador, consulte este outro guia.
- Para gerir os detalhes da Organização à qual pertence, consulte este outro guia.
Alterar o número de telefone móvel
Para alterar o número de telefone associado à sua conta Infomaniak:
- Clique aqui para acessar o gerenciamento das informações de segurança no Gerenciador Infomaniak.
- Clique em Editar na caixa Telefone de recuperação:
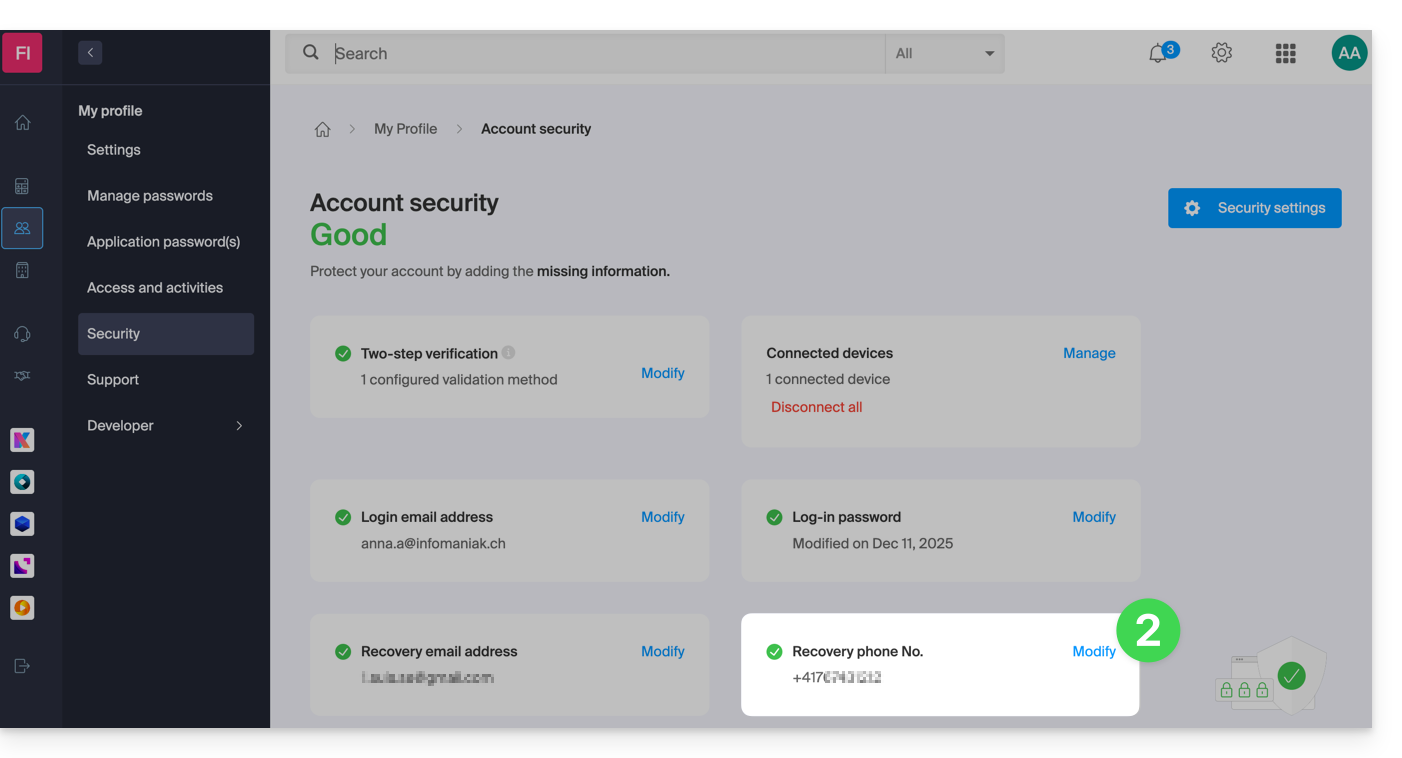
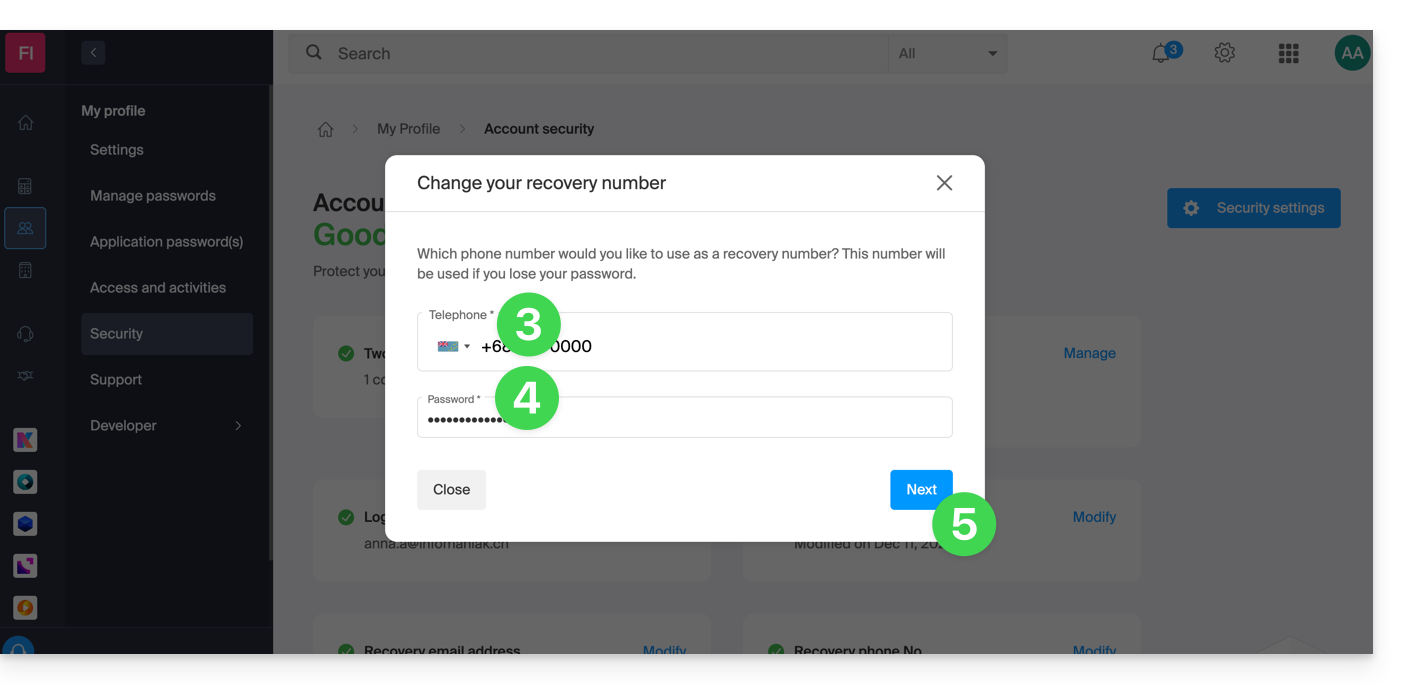
- Indique o código de país correspondente ao seu país e o novo número de telefone celular.
- Insira a sua senha para acessar o painel de controle.
- Clique no botão Seguinte para guardar:
Observação: um administrador dentro da Organização podeimpedir que os utilizadores solicitem uma redefinição de palavra-passe por SMS: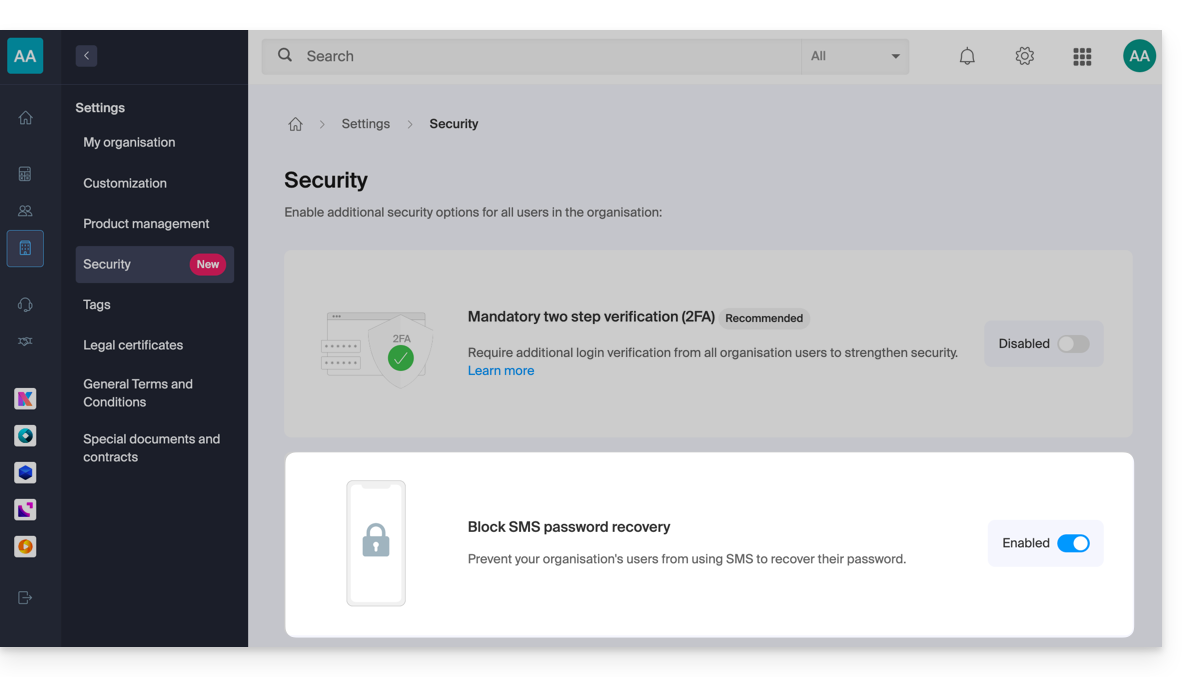
Neste caso, será o endereço de e-mail de recuperação que será utilizado, e não o número de telefone especificado acima.
Link para esta FAQ: https://faq.infomaniak.com/2017
Esta seção de perguntas frequentes foi útil?
Este guia explica como desativar a autenticação de dois fatores, também conhecida como autenticação dupla ou verificação em duas etapas (two-factor authentication em inglês, ou 2FA) para o acesso ao Manager Infomaniak (manager.infomaniak.com) ou ao Mail Infomaniak (ksuite.infomaniak.com/mail).
Introdução
- Por motivos de segurança, o suporte da Infomaniak nunca desativará um método de validação de login ativado em uma contamediante uma simples solicitação.
- É imperativo seguir os procedimentos abaixo.
- Atenção: se você utilizava o método de autenticação por SMS, após desativado, não poderá reativar esse método, a menos que resida em CH / FR / BE / DE.
- Fora desses países, será necessário utilizar o Infomaniak Authenticator ou qualquer outro aplicativo OTP.
Desativar a autenticação de dois fatores
Se a autenticação de dois fatores estiver ativada e você desejar desativá-la:
- Clique aqui para acessar o gerenciamento da autenticação de dois fatores no painel de controle Infomaniak.
- Clique no botão Remover para desativar a segurança:
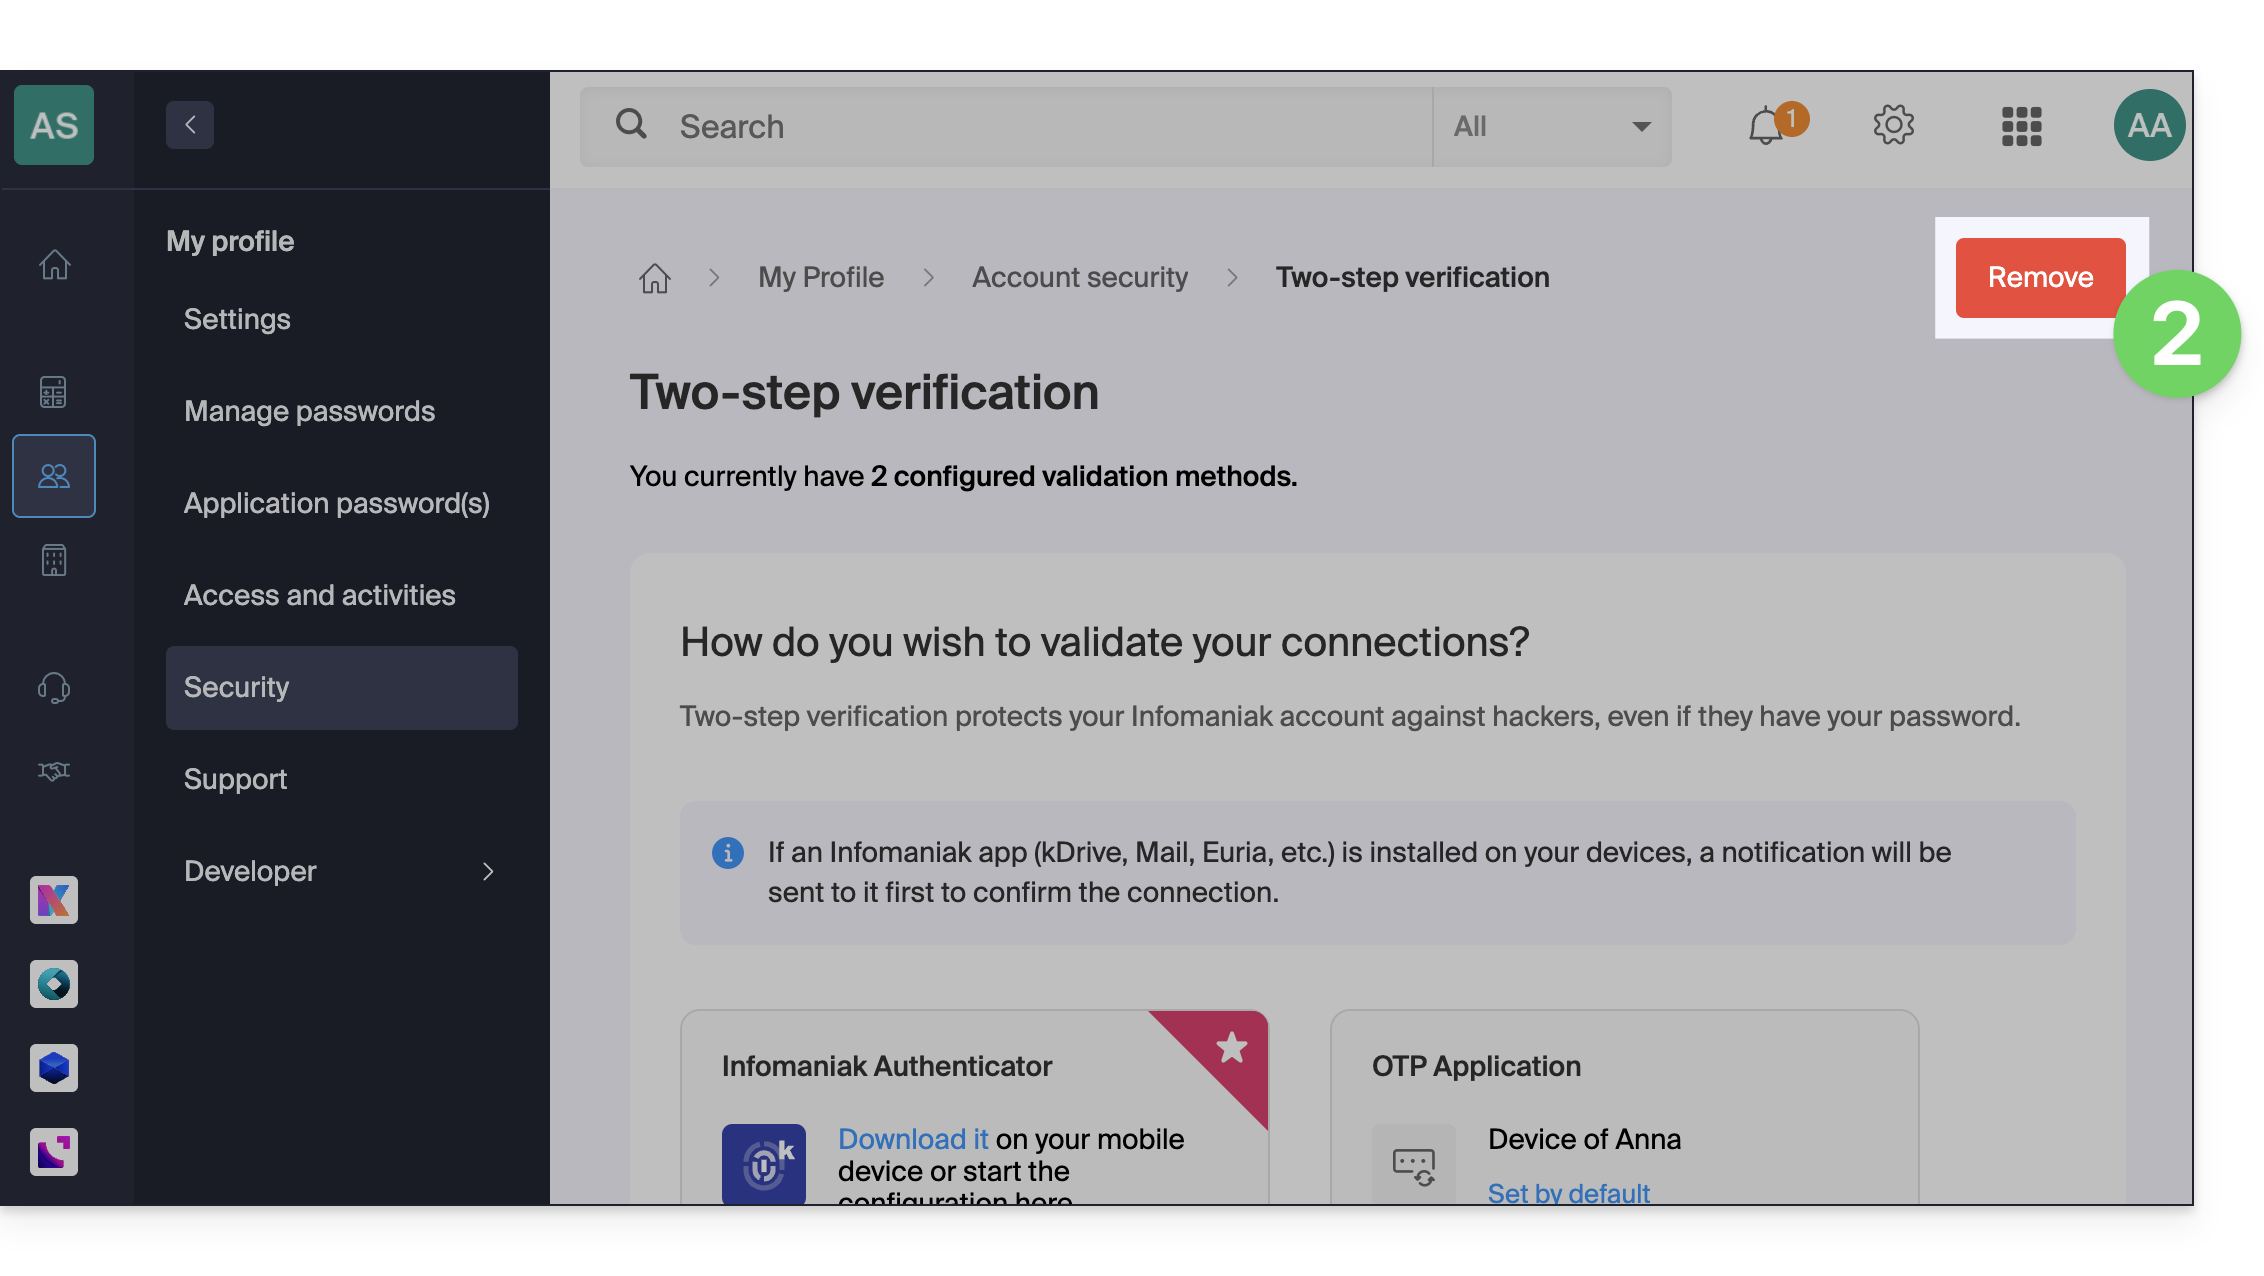
- Se o botão vermelho estiver inativo / desabilitado…
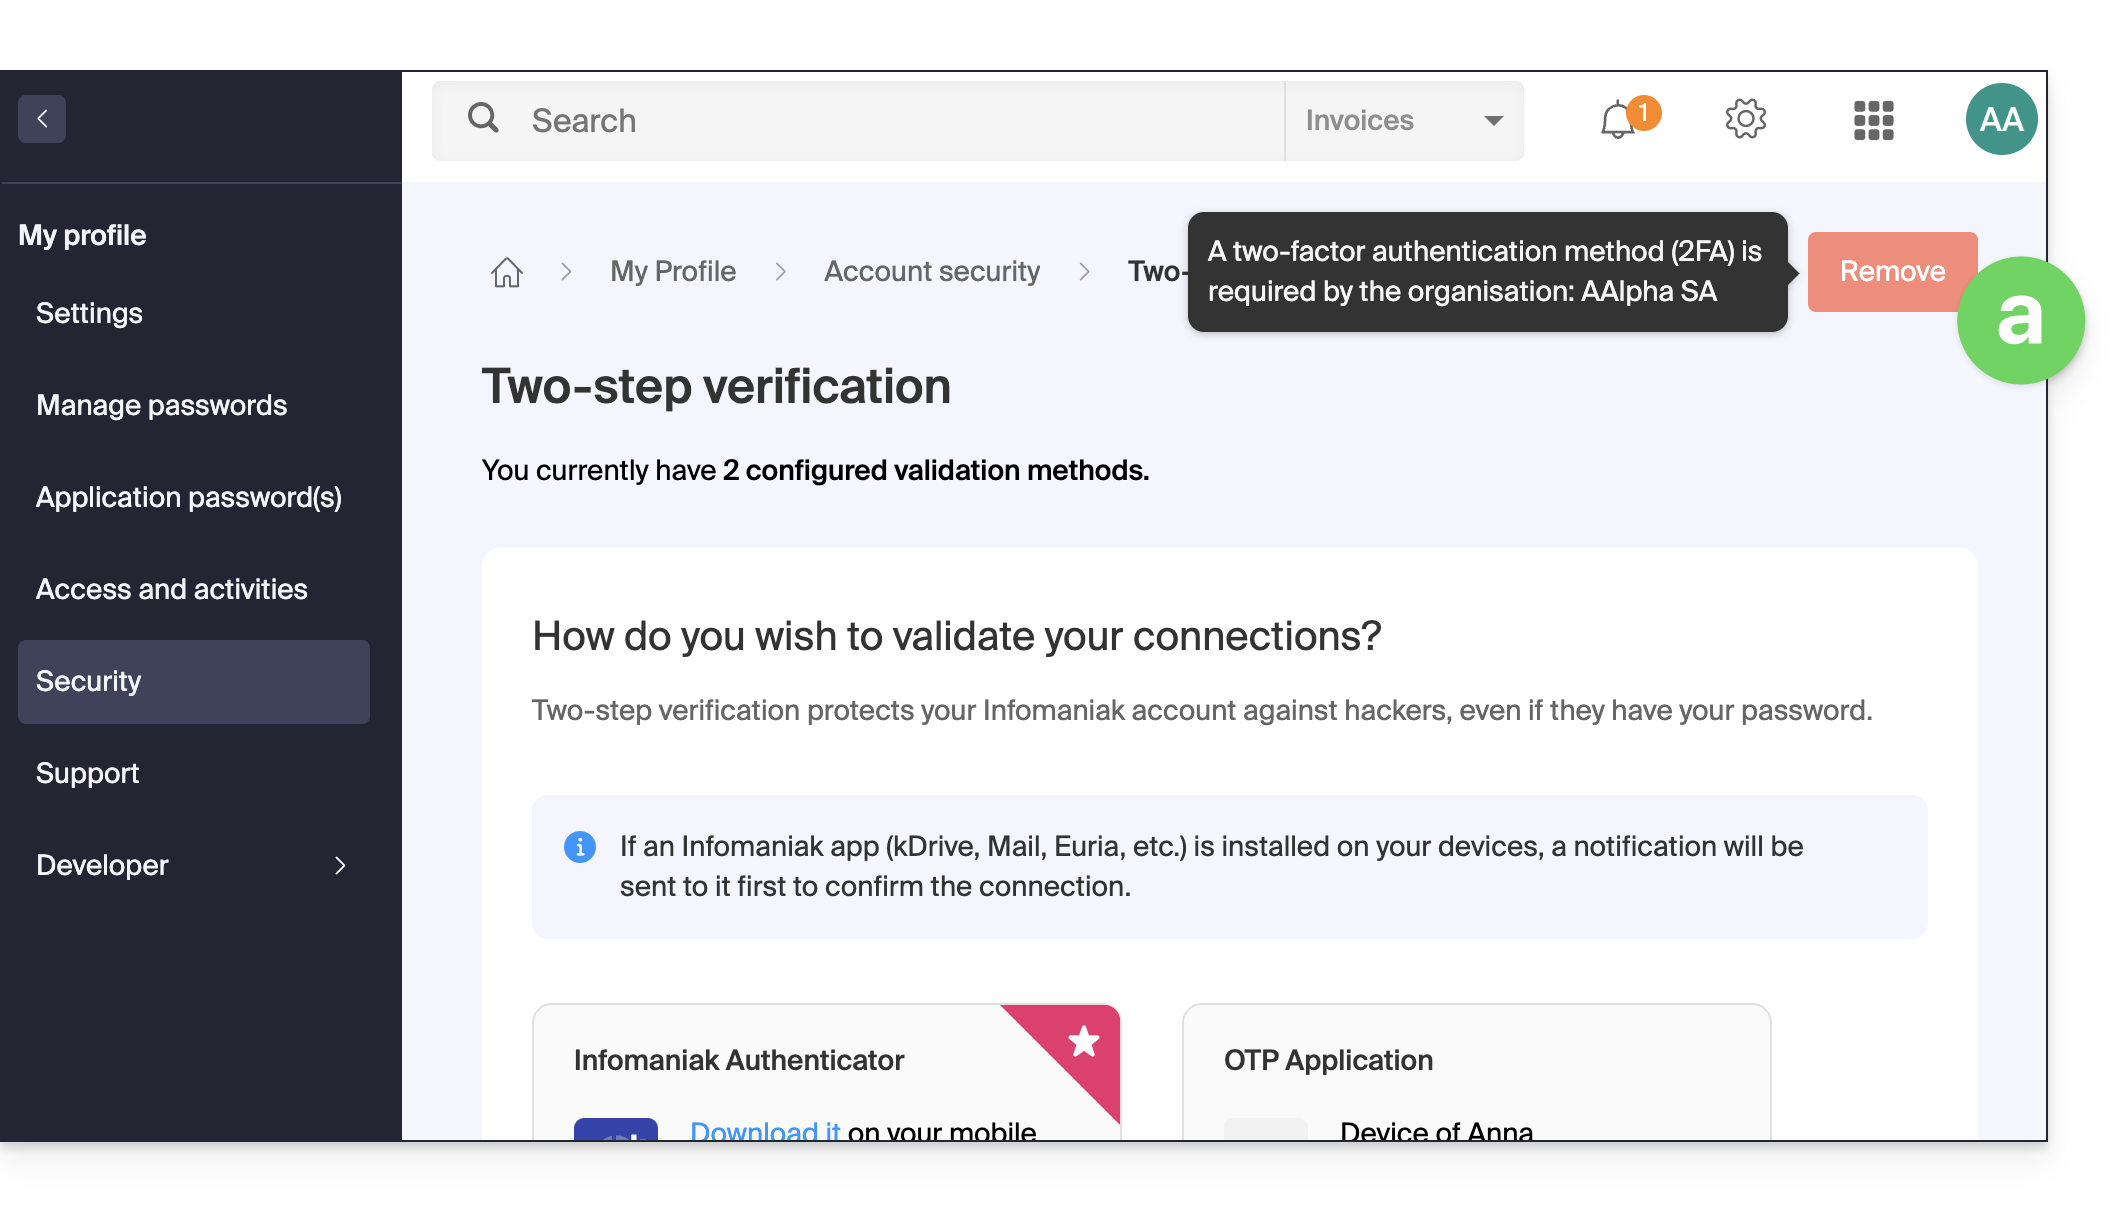
- … provavelmente existe uma opção de segurança anterior que impede que você desative a autenticação de dois fatores:
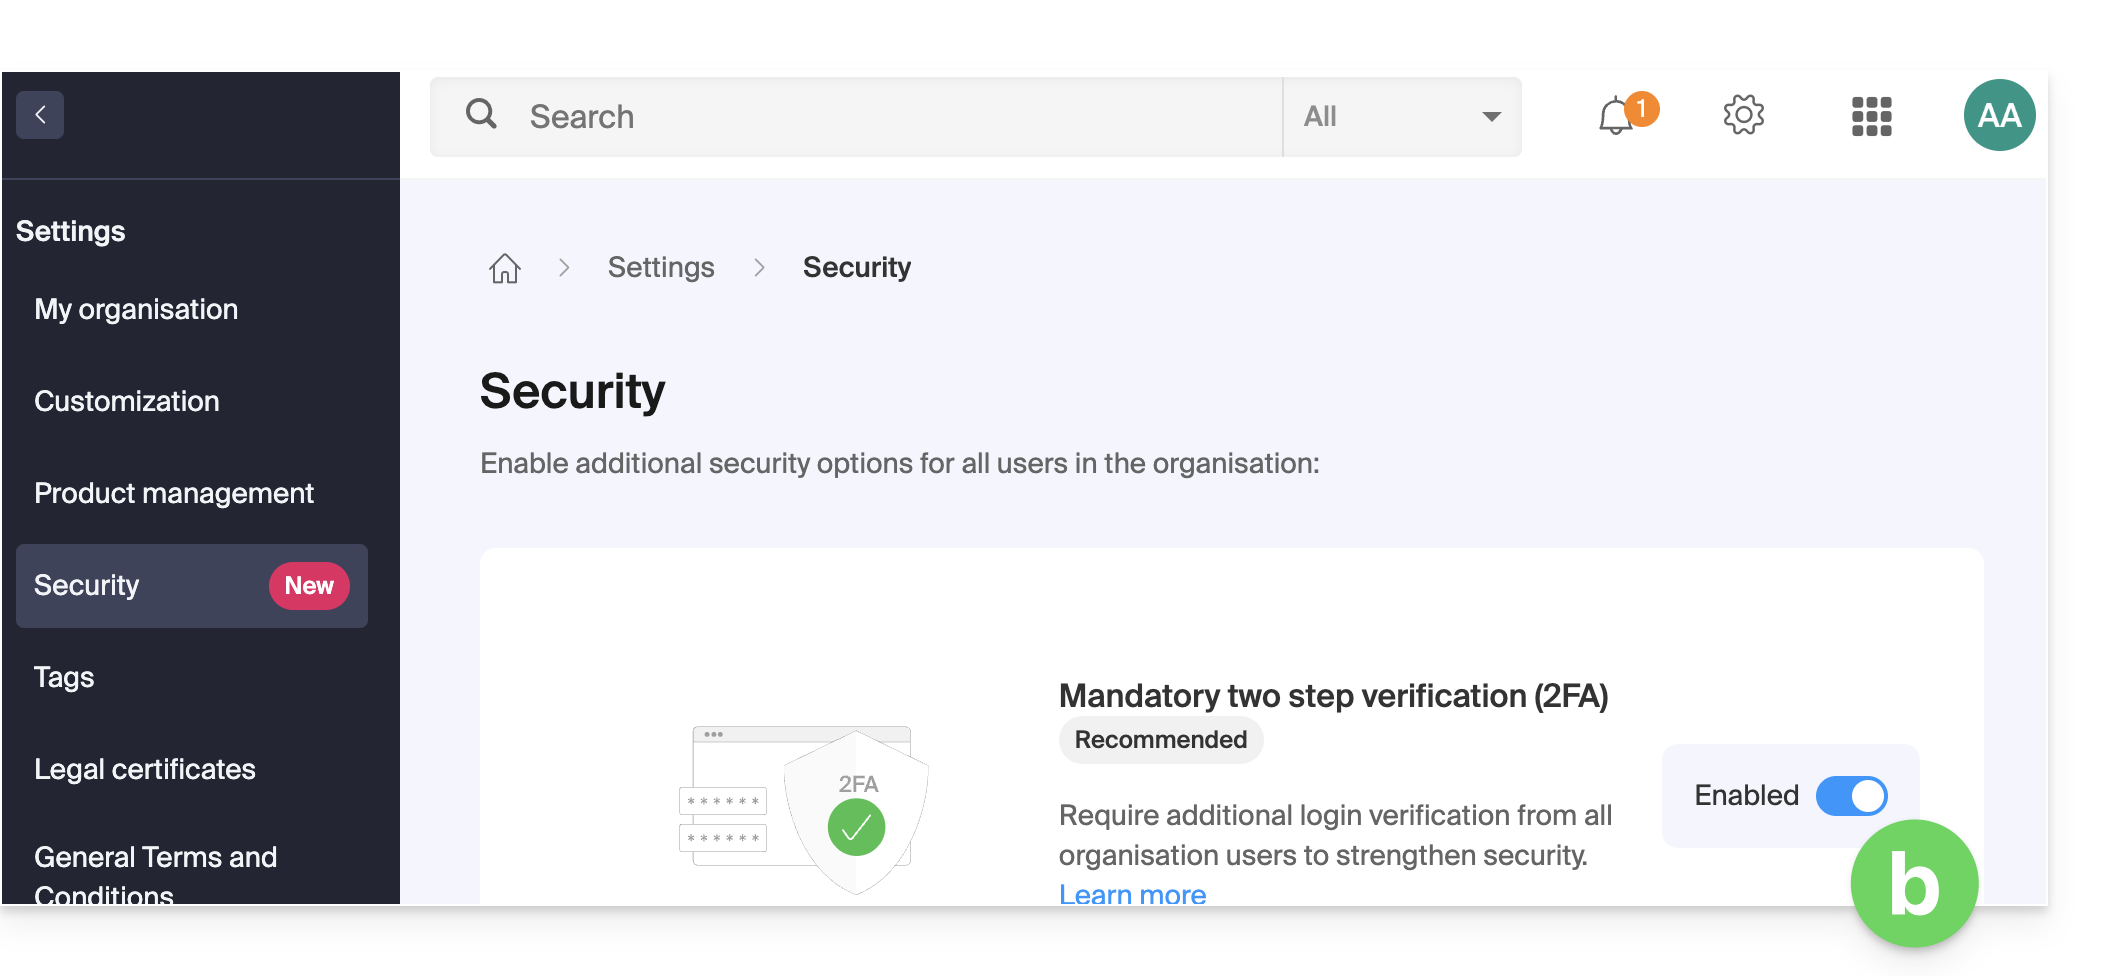
- Se o botão vermelho estiver inativo / desabilitado…
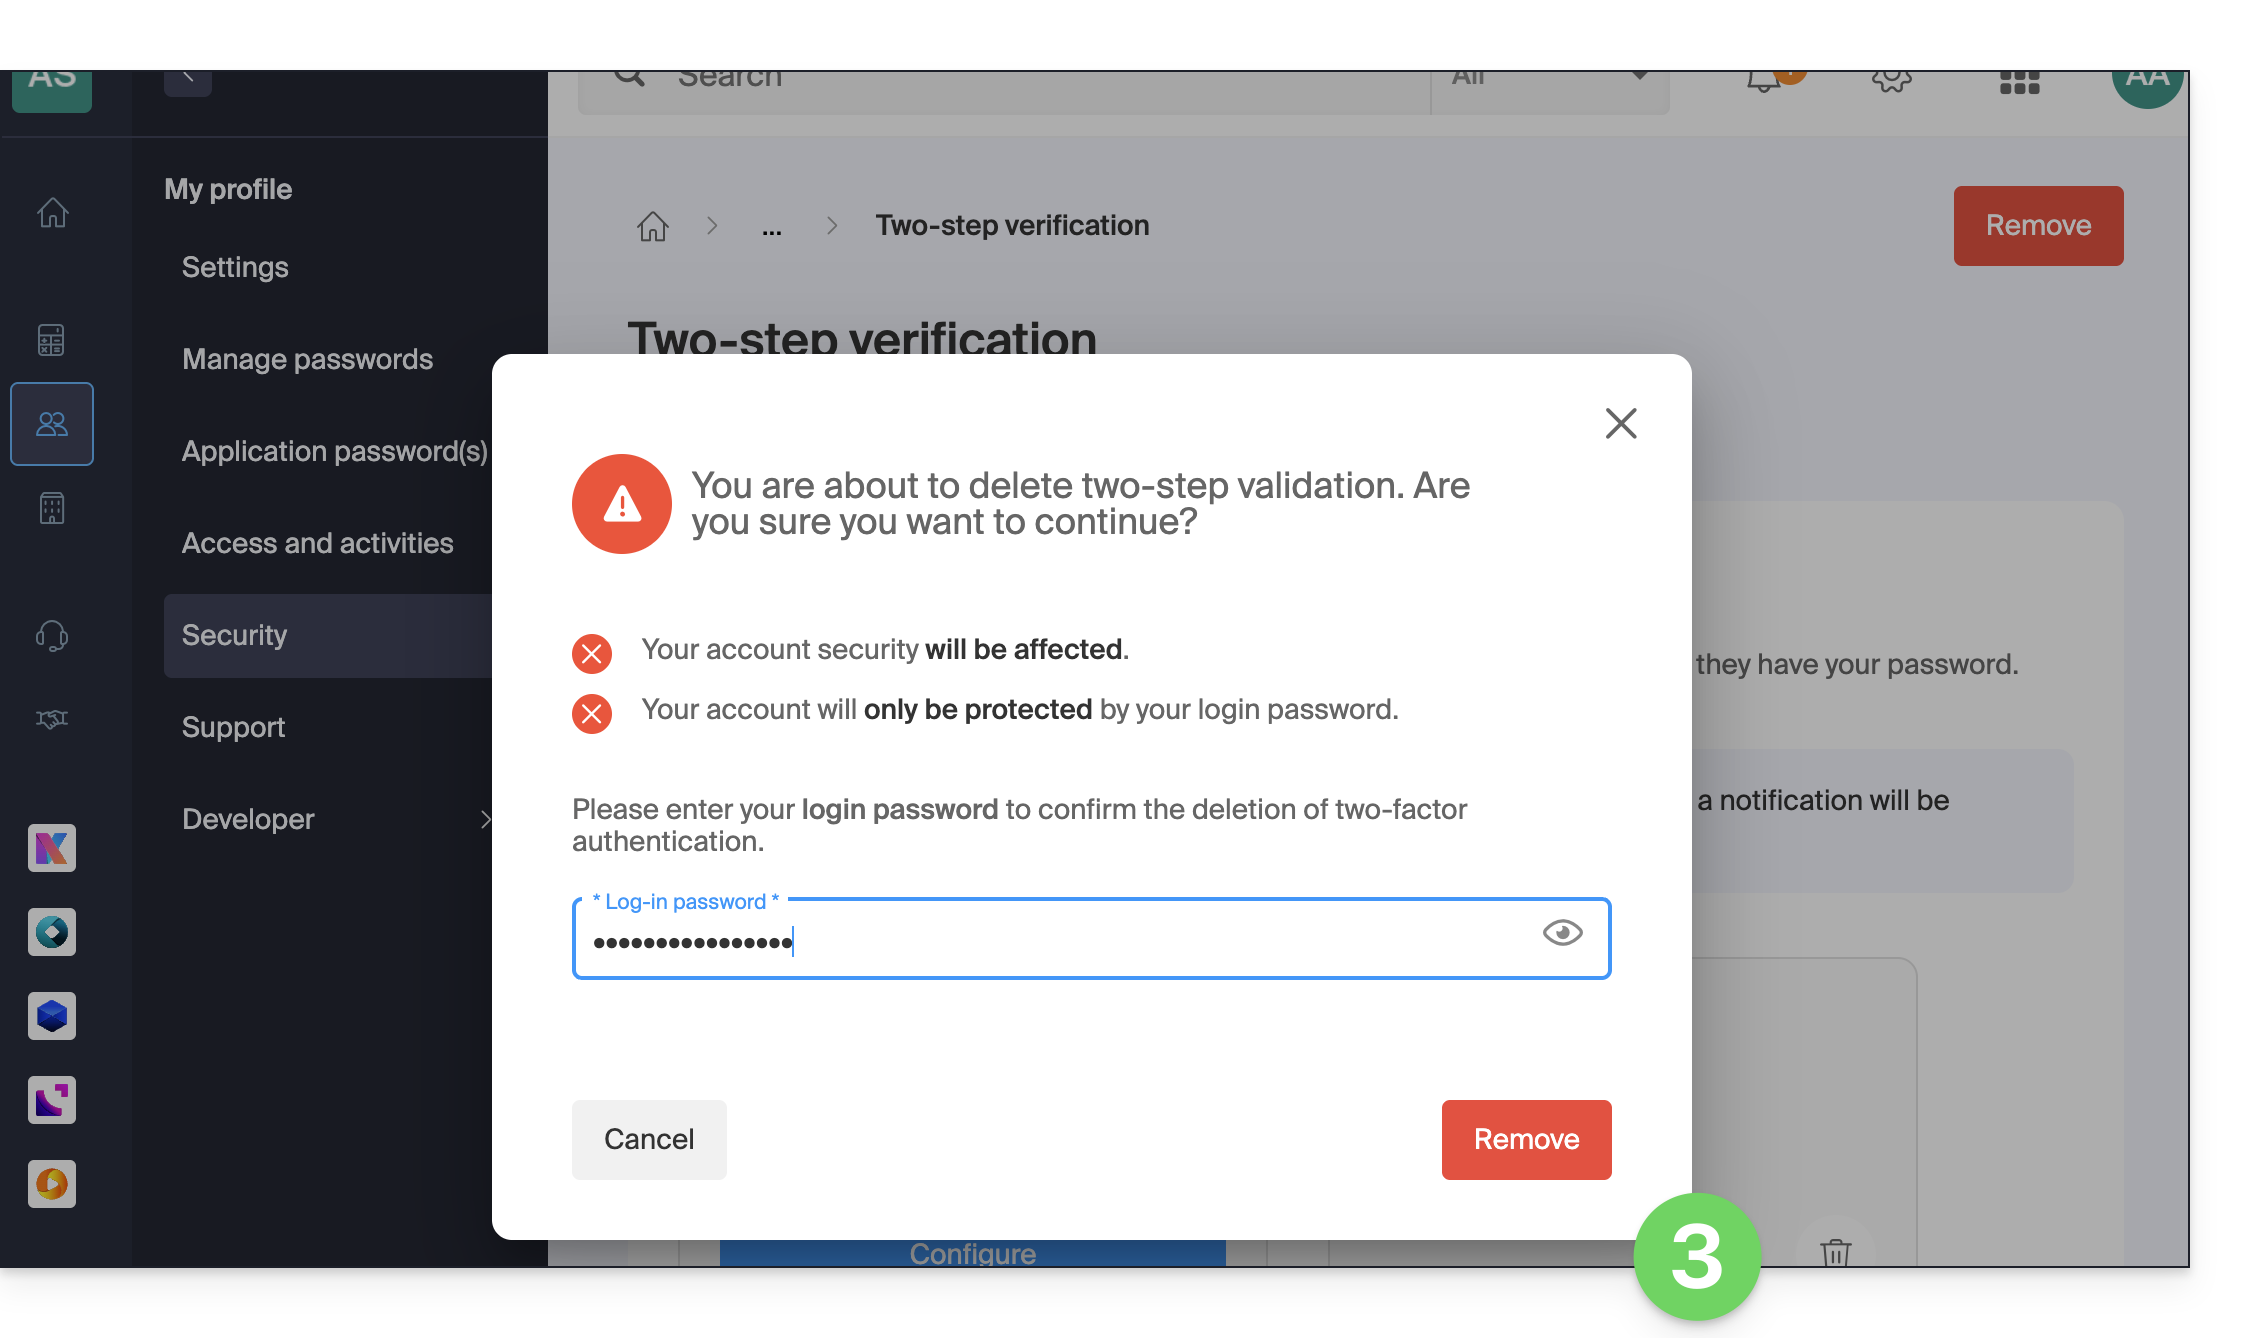
- Insira a senha de acesso à sua conta para confirmar:
Em caso de problemas
Obviamente, o procedimento acima exige que você faça login uma última vez com a autenticação de dois fatores, para depois poder desativá-la.
Se não tiver acesso à aplicação Infomaniak Authenticator nem ao dispositivo que recebe o SMS de validação ou a qualquer outra possibilidade de autenticação entre as configuradas, não vale a pena contactar a Infomaniak; nesse caso, não terá outra opção, terá de fornecer um certo número de elementos de segurança manualmente ou através da aplicação Infomaniak Check (kCheck) para obter novamente acesso à sua conta:
- Clique aqui para acessar a página de login do Manager Infomaniak.
- Insira o nome de usuário e a senha correta e usual:
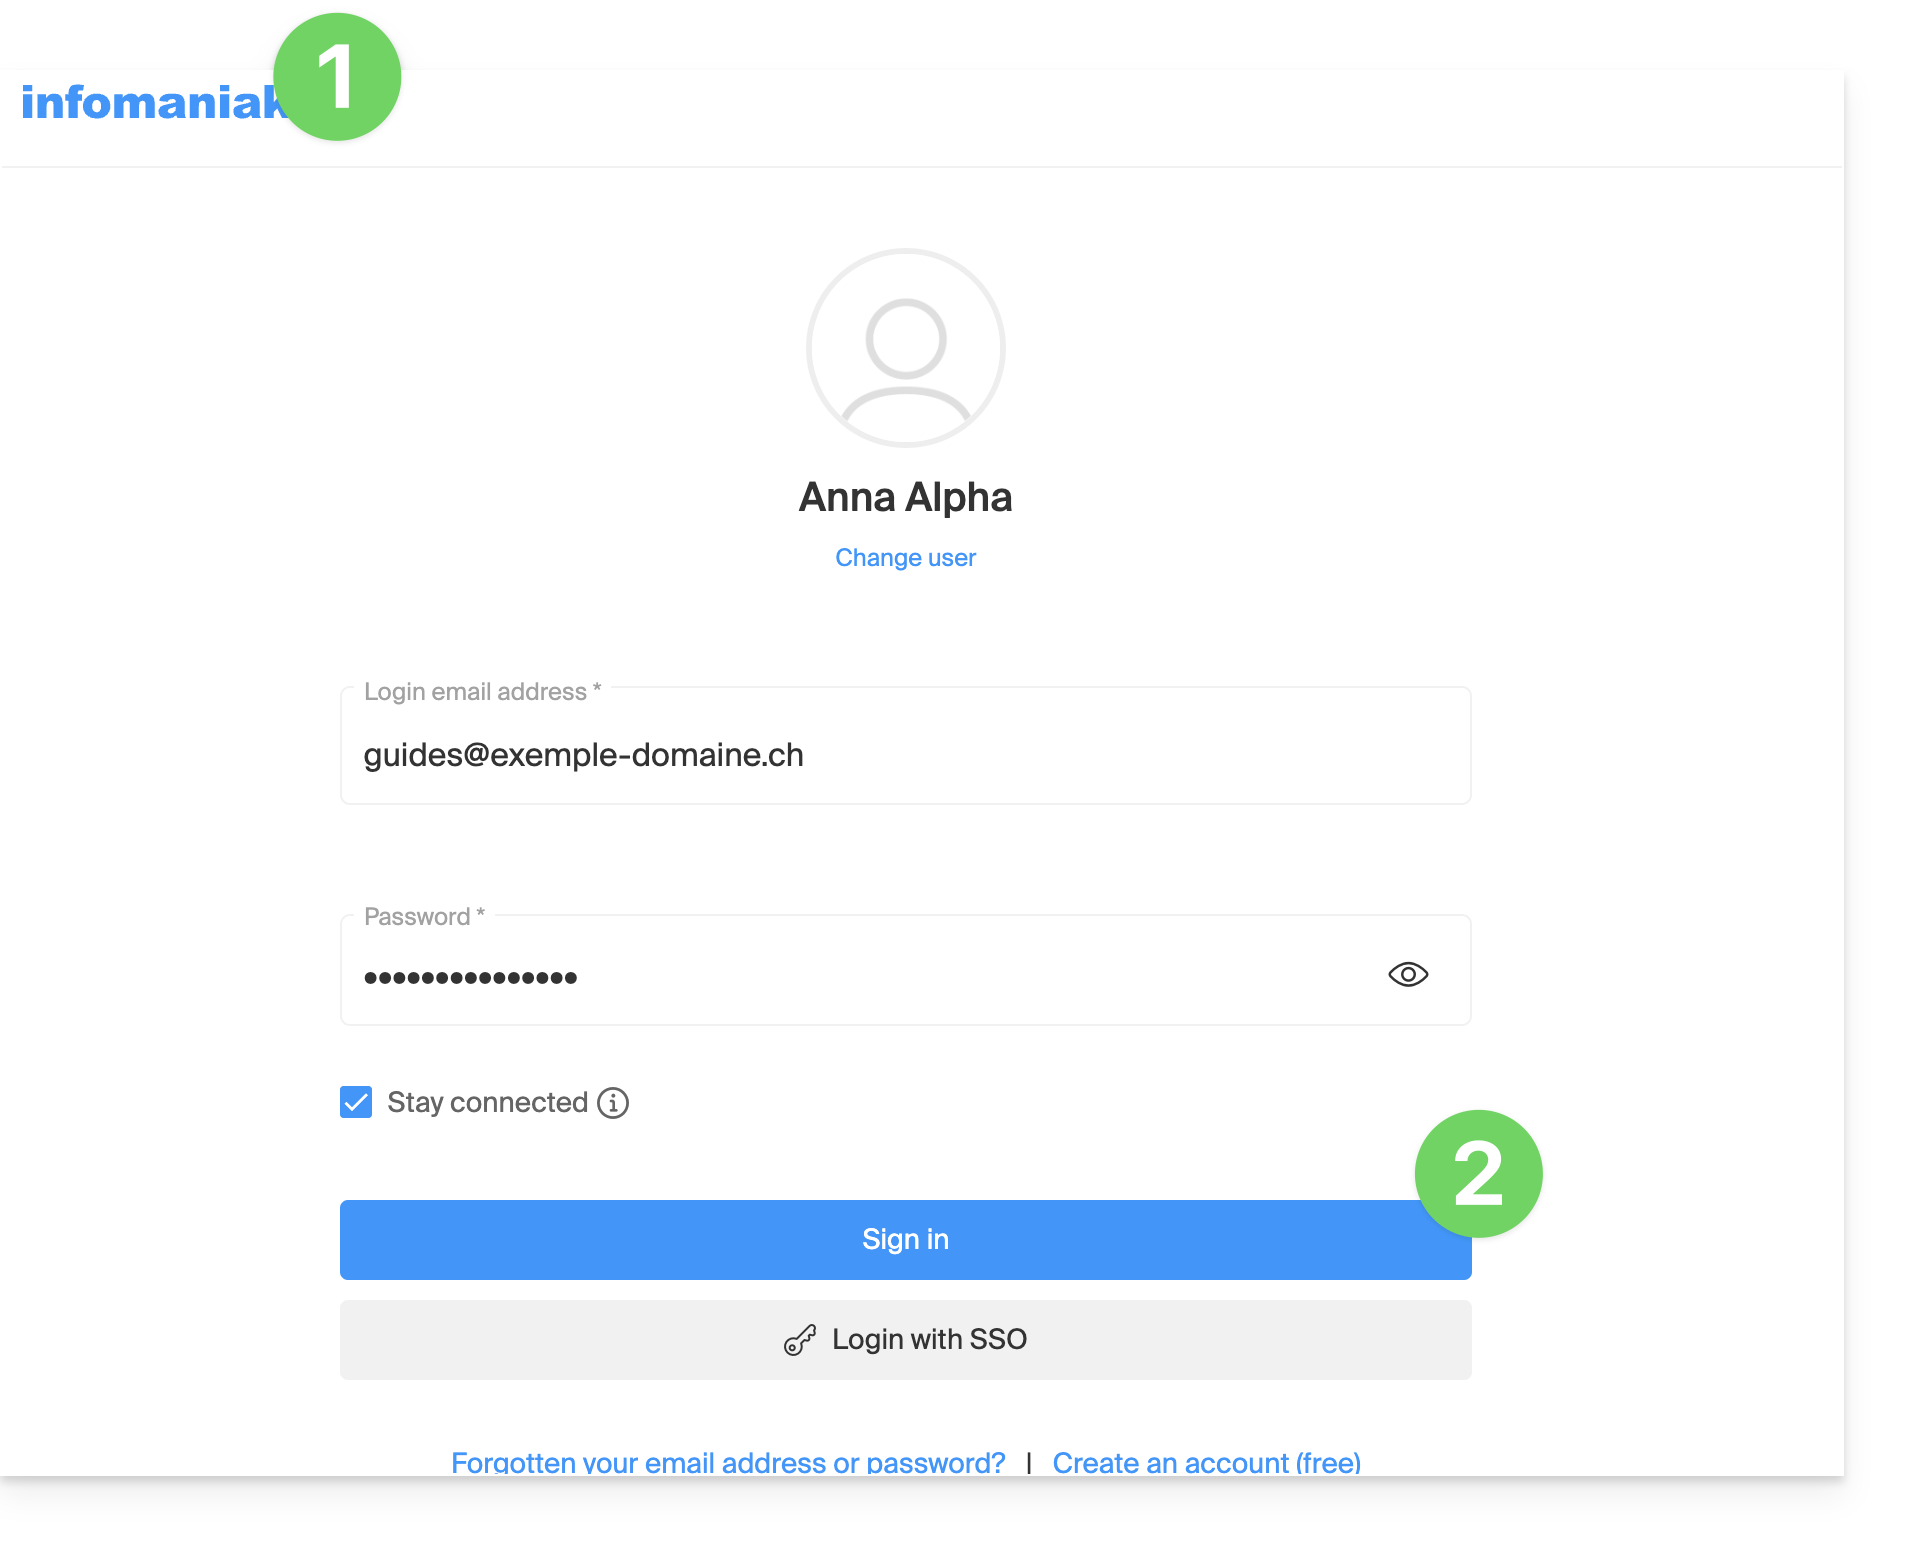
- Ao solicitar a autenticação adicional, clique em métodos alternativos:
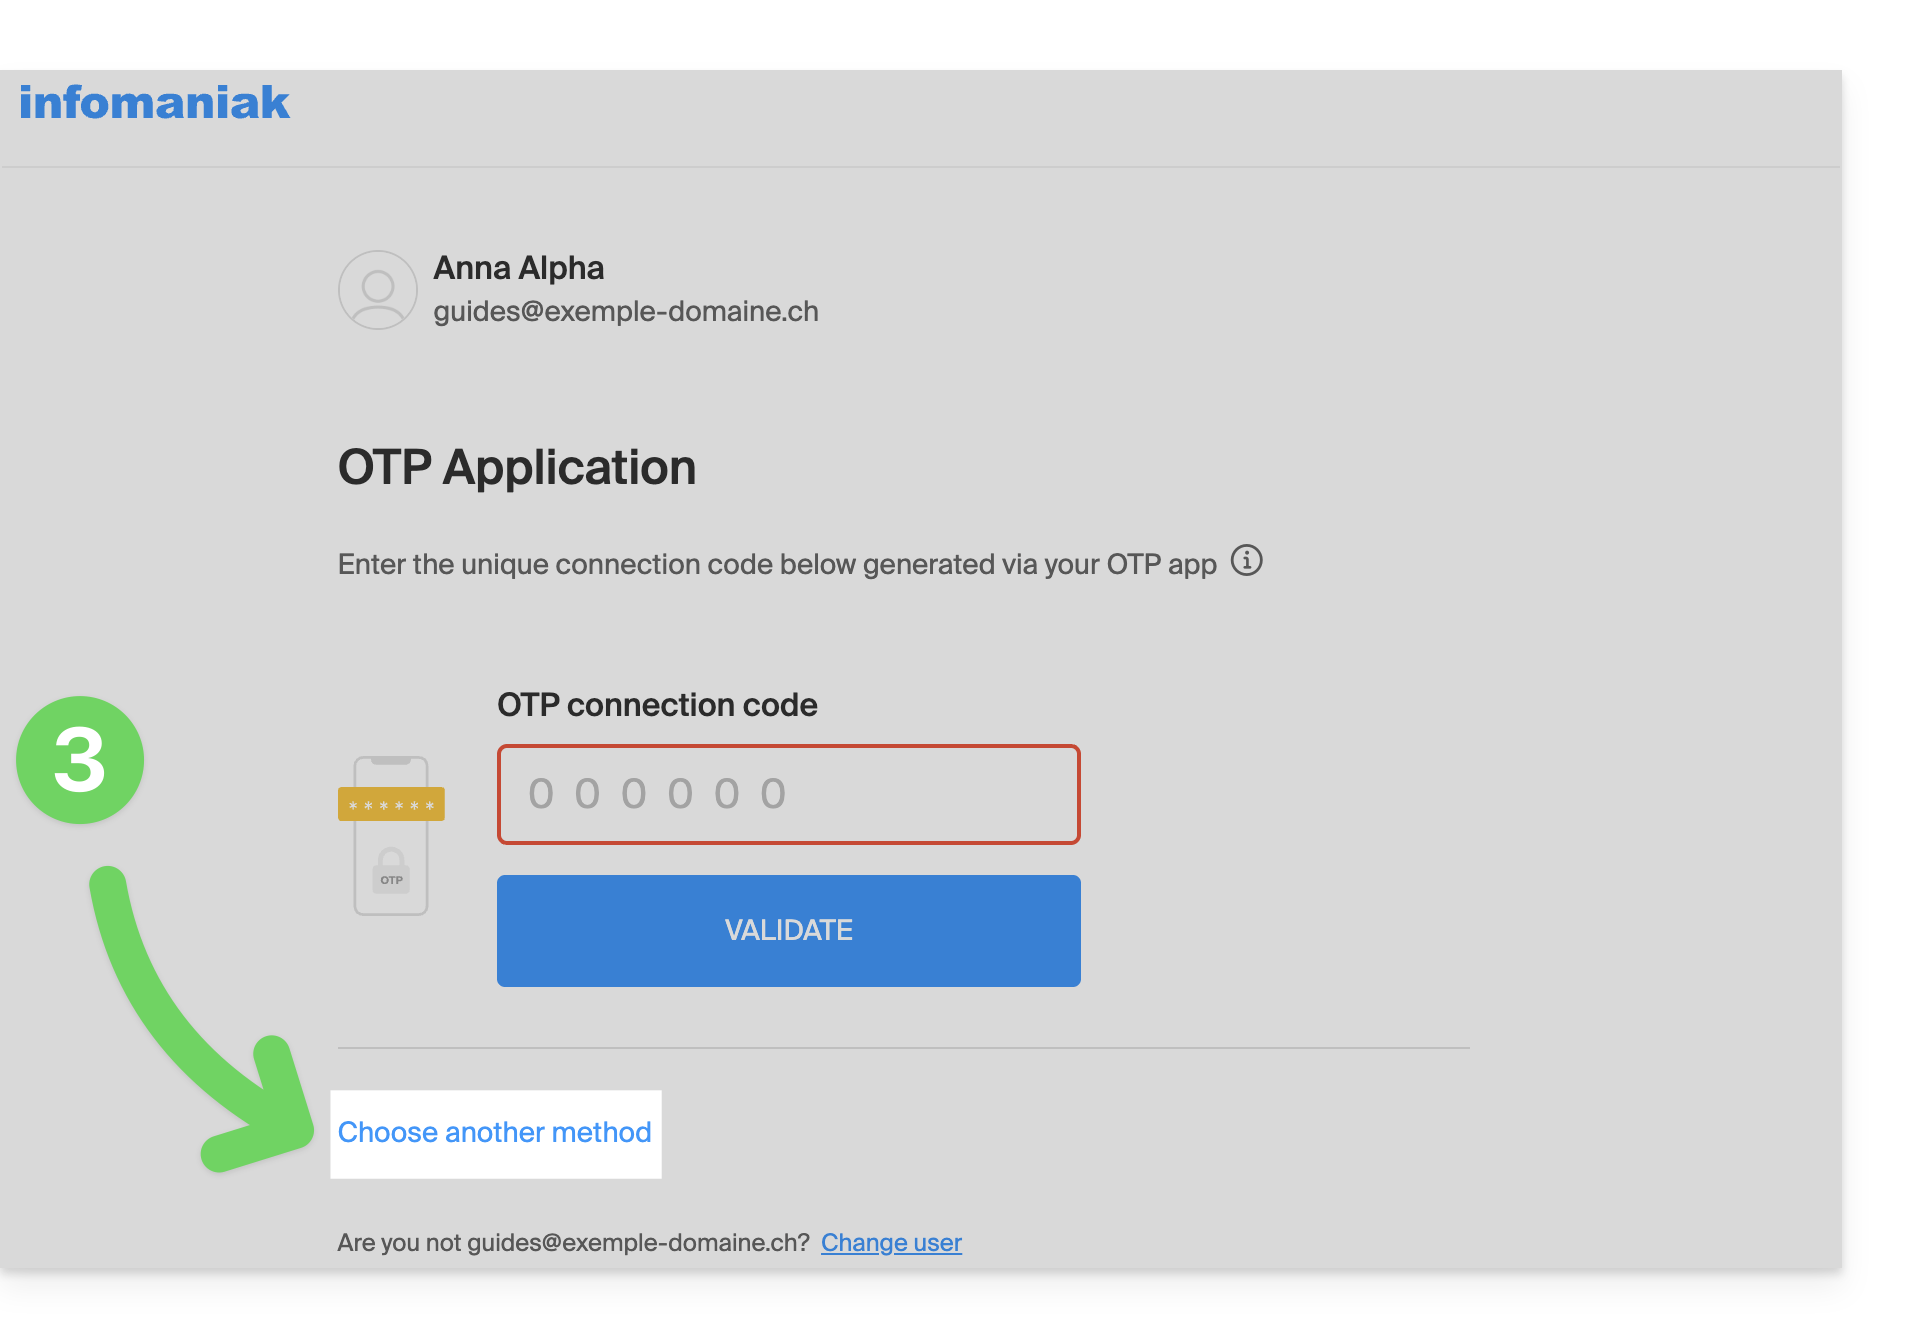
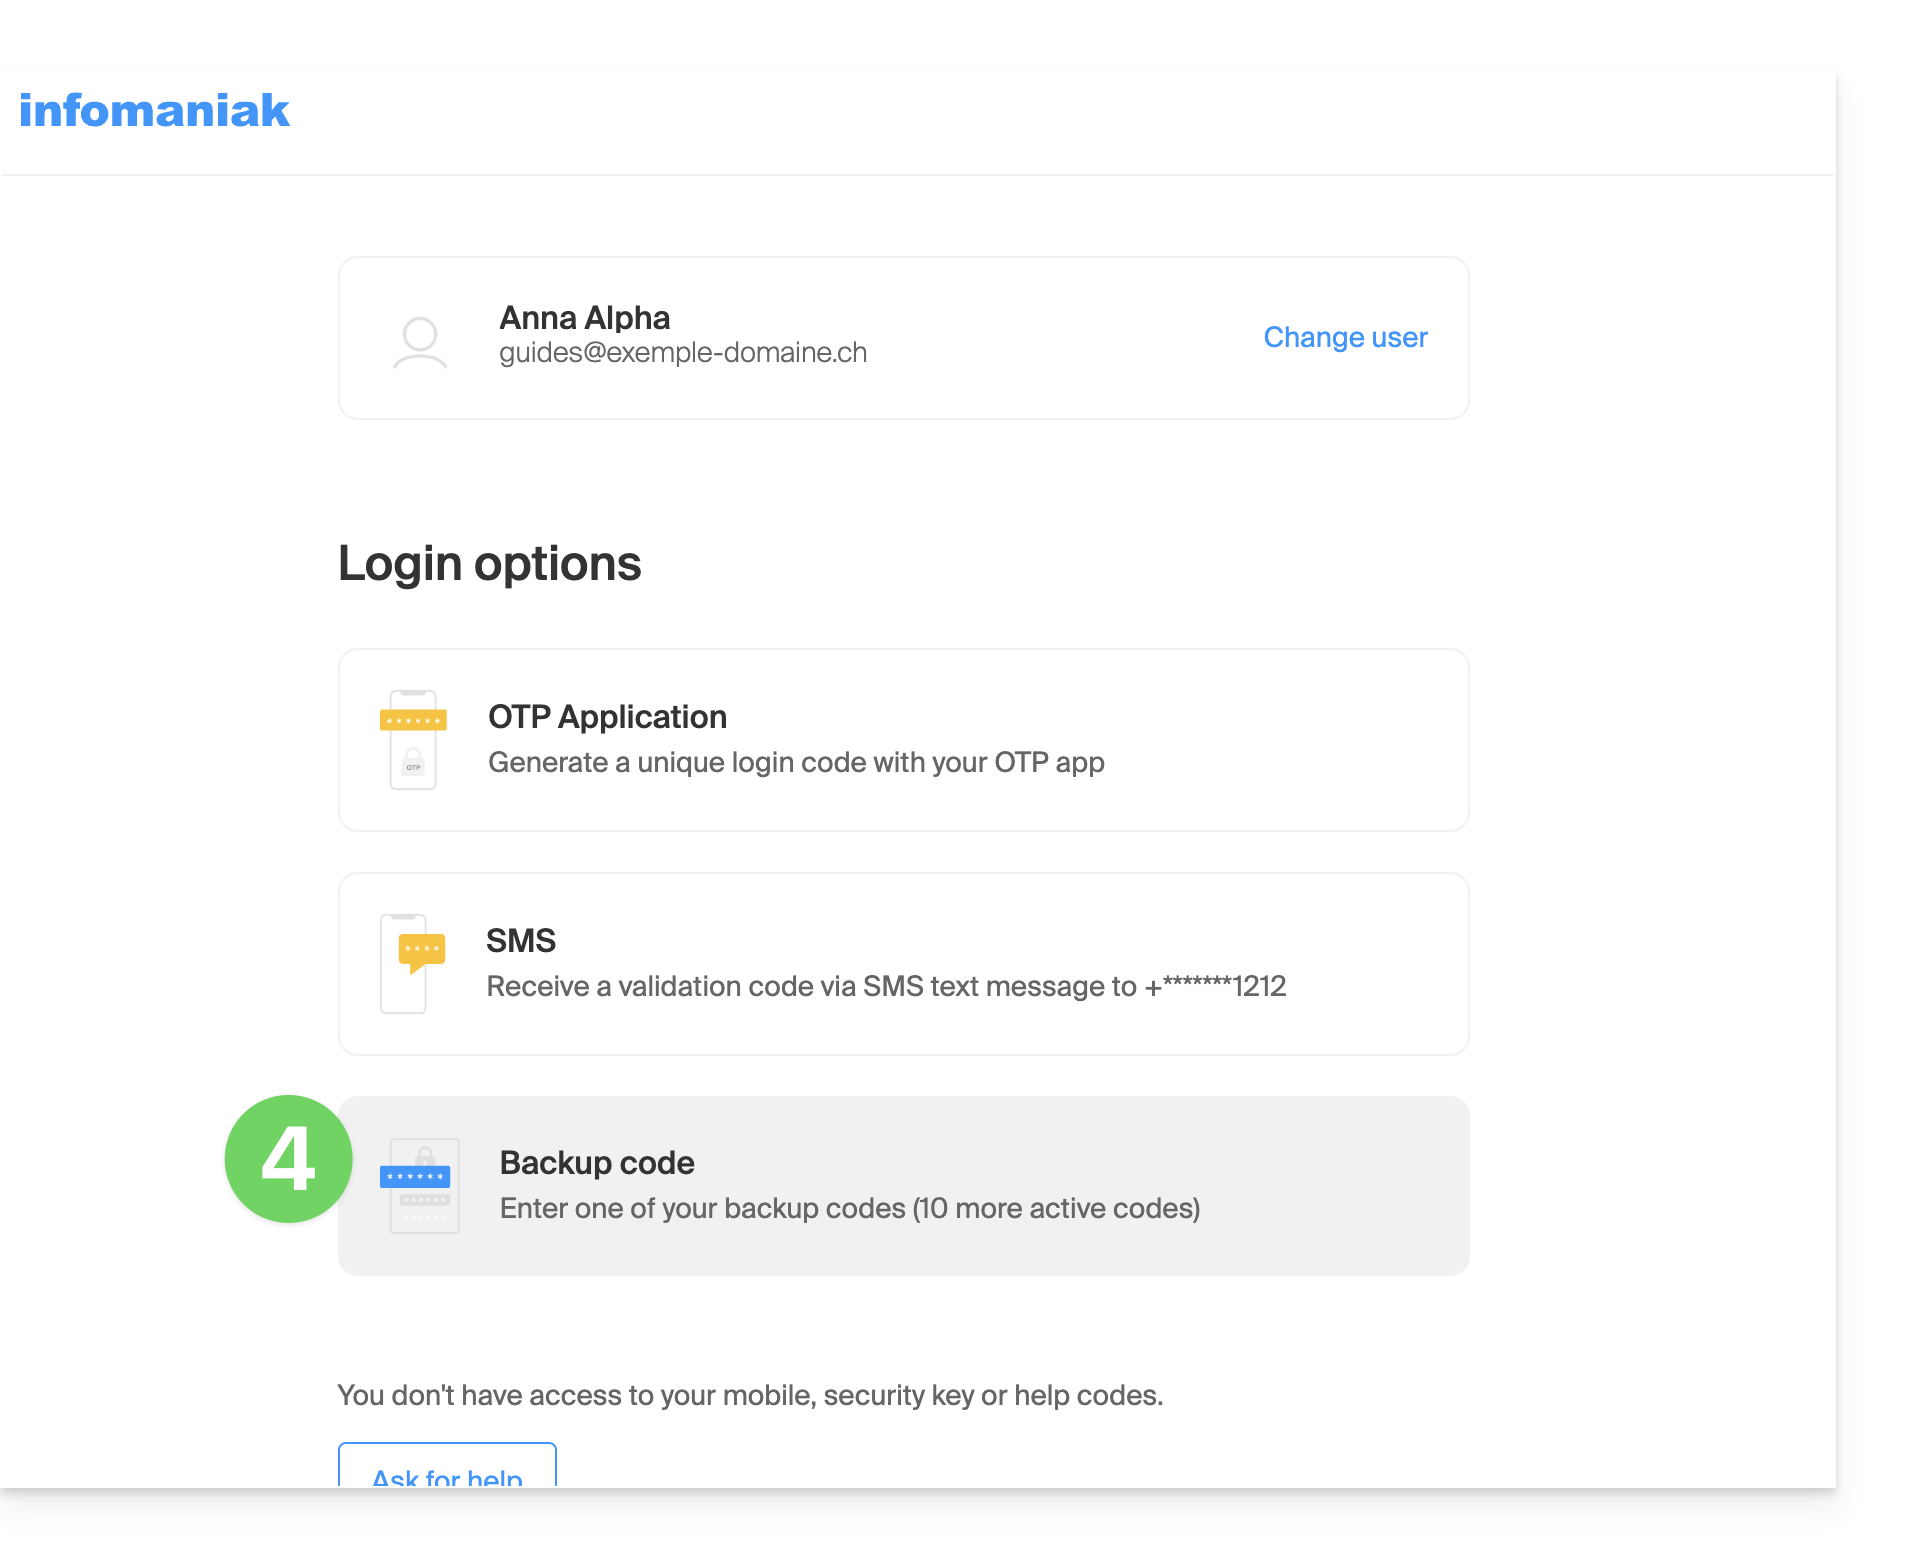
- Escolha inserir um dos seus códigos de recuperação se tiver feito o download da folha ao ativar a autenticação de dois fatores:
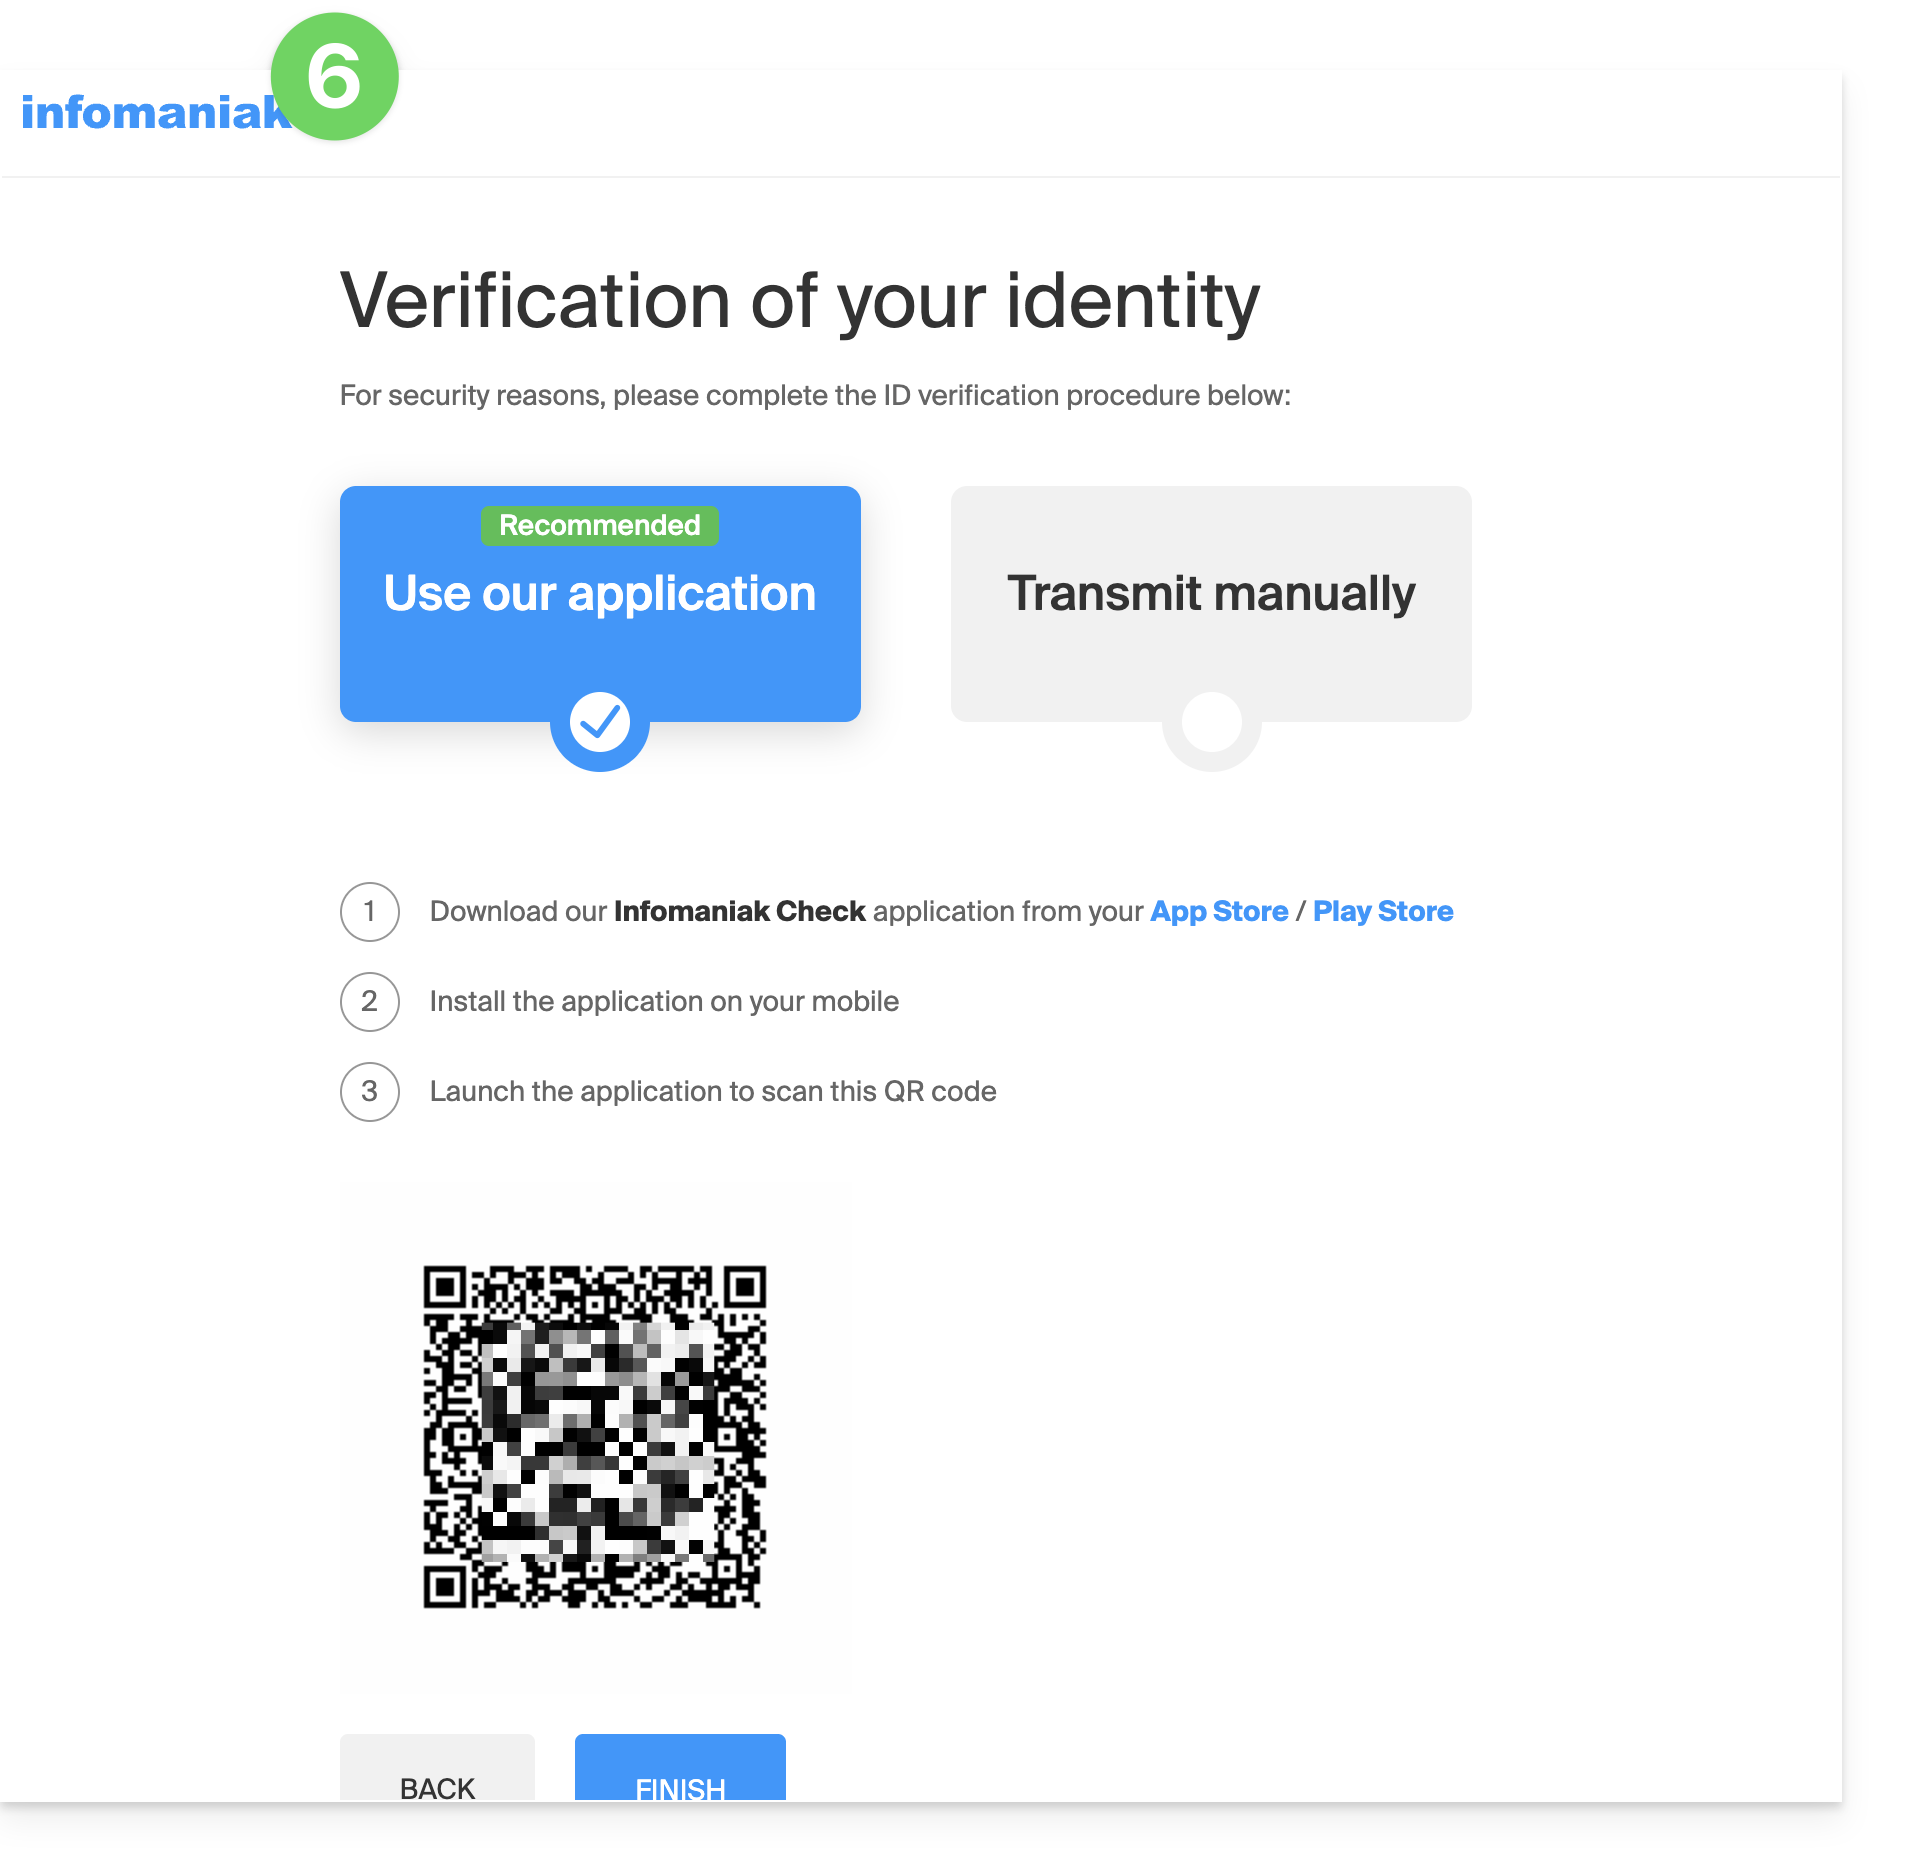
- Caso contrário, selecione a última opção do pedido de ajuda para acessar o formulário onde poderá enviar os seus documentos de identificação e uma selfie:
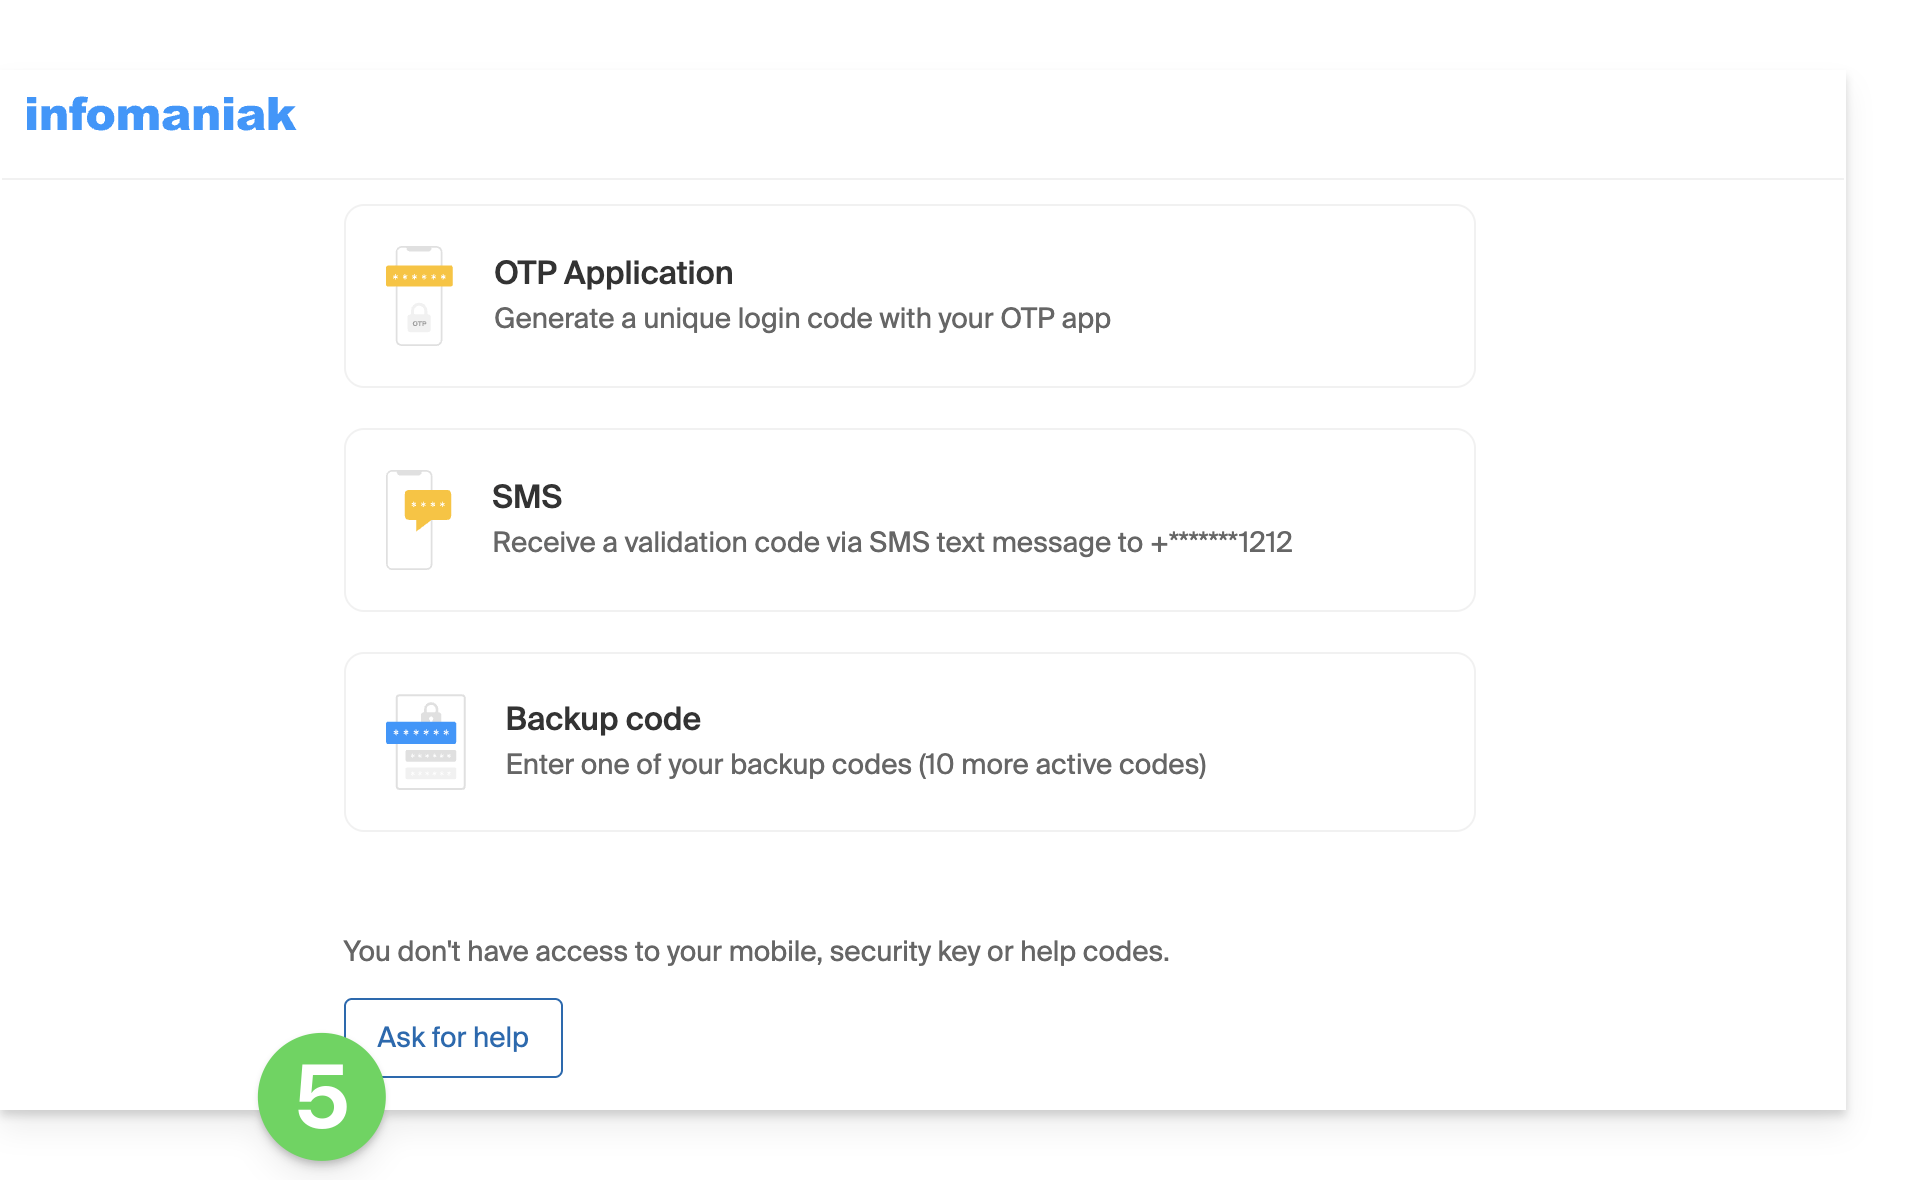
- Siga o procedimento até o fim e aguarde:
Link para esta FAQ: https://faq.infomaniak.com/2021
Esta seção de perguntas frequentes foi útil?
Este guia explica como remover, no aplicativo web Mail da Infomaniak (serviço online ksuite.infomaniak.com/mail), um endereço de e-mail que está sendo usado atualmente em sua conta Infomaniak.
Qualquer operação (adição ou remoção de endereço de e-mail) realizada no aplicativo web Mail da Infomaniak será imediatamente replicada no aplicativo móvel Infomaniak Mail (isso não afeta softwares/clientes de e-mail como o Outlook).
Desvincular um endereço de e-mail
Para remover um endereço de e-mail que está sendo visualizado:
- Clique aqui para acessar o aplicativo web Mail da Infomaniak (serviço online ksuite.infomaniak.com/mail).
- Se necessário, clique na seta para baixo à direita do endereço de e-mail atualmente visível no aplicativo web Mail da Infomaniak.
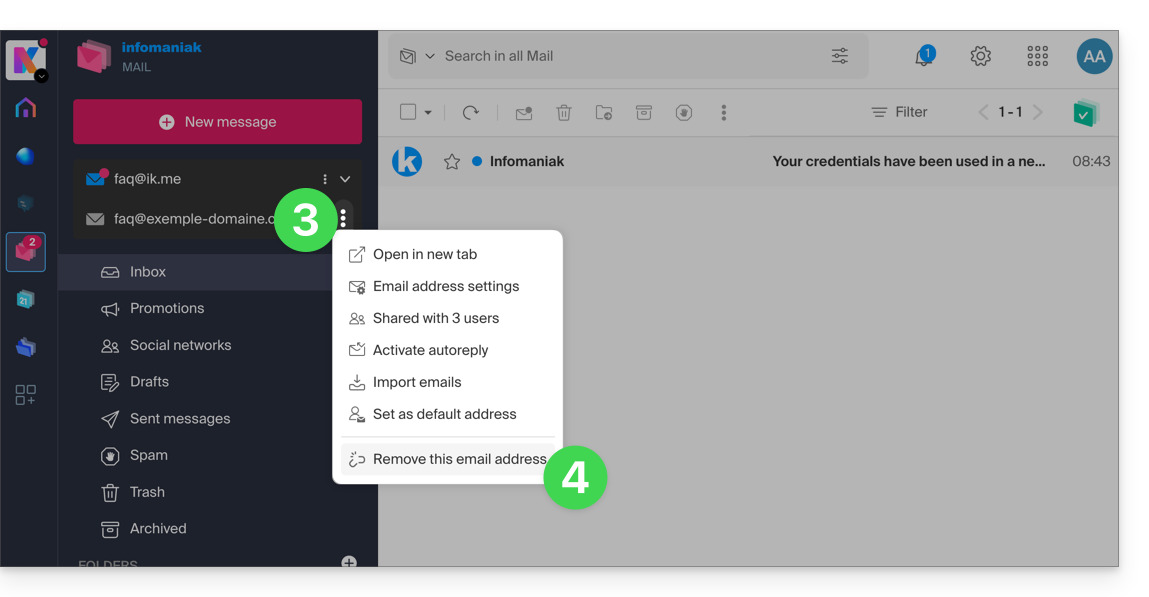
- Clique no menu de ações ⋮ à direita do endereço de e-mail que deseja desvincular.
- Clique em Desvincular este endereço de e-mail:
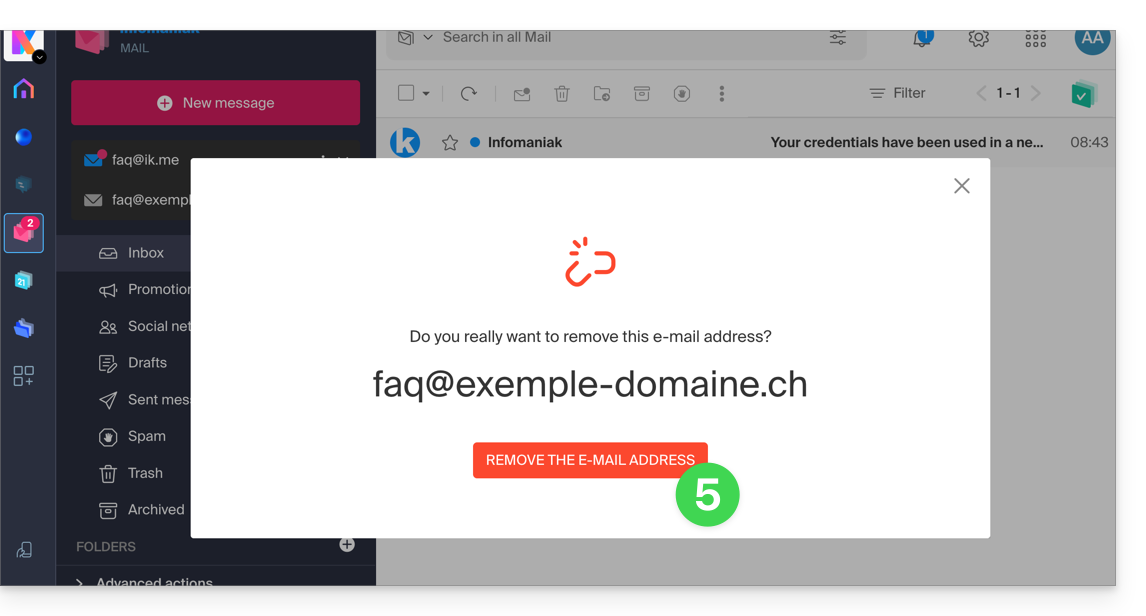
- Clique no botão vermelho para confirmar a remoção:
Remover um endereço incorreto
Para remover um endereço de e-mail atualmente associado e que exibe um sinal de alerta ⚠️:
É responsabilidade do administrador do Serviço de E-mail em questão tomar as medidas necessárias (seja removendo o acesso do usuário a partir da gestão de usuários do endereço de e-mail em questão, se necessário, desbloqueando o serviço previamente, caso este esteja bloqueado devido a um prazo de pagamento vencido ou outro problema de segurança):
Consulte este outro guia se precisar de informações sobre a exclusão definitiva de um endereço de e-mail e seu conteúdo, e este outro guia para vincular e consultar um endereço de e-mail adicional.
Link para esta FAQ: https://faq.infomaniak.com/2055
Esta seção de perguntas frequentes foi útil?
Este guia detalha as medidas de segurança implementadas nas ofertas de e-mail da Infomaniak, com o objetivo de detetar utilizações abusivas e anormais de um endereço de e-mail.
Introdução
- Número de e-mails que podem ser enviados por dia:
- kSuite Free = 200
- kSuite Standard = 500
- kSuite Business = 500
- kSuite Enterprise = 500
- my kSuite = 200
- my kSuite+ = 500
- Serviço de e-mail Starter = 200
- Serviço de e-mail Premium = 500
- Hospedagem Web = limite de acordo com a oferta de e-mail utilizada; caso contrário, 50 e-mails não autenticados no máximo via PHP Mail()
- Para enviar e-mails para um grande número de destinatários, a ferramenta Newsletter é a mais adequada.
- Consulte também estes outros guias:
Como são calculadas as cotas de envio?
As cotas são calculadas em uma janela móvel de 24 horas e não são redefinidas à meia-noite. Cada e-mail enviado é contabilizado durante 24 horas a partir do momento do envio e, em seguida, é automaticamente liberado da cota.
Por exemplo, se o limite for atingido às 11h, os e-mails enviados a partir desse horário só poderão ser enviados à medida que as mensagens enviadas anteriormente atingirem 24 horas de antiguidade. Os direitos de envio são, portanto, liberados gradualmente no dia seguinte, e não de uma só vez à meia-noite.
Por que existem limites de envio?
Os limites de envio são aplicados para proteger os serviços de e-mail contra usos abusivos ou anormais, incluindo o envio em massa de mensagens a partir de uma conta comprometida.
Elas também permitem limitar os riscos relacionados ao spam e preservar a reputação dos servidores Infomaniak, a fim de manter uma boa taxa de entrega de e-mails.
Esses limites se aplicam a todos os e-mails enviados a partir de um endereço, independentemente do software ou aplicativo utilizado. As mensagens enviadas para vários destinatários são contabilizadas individualmente: 1 mensagem enviada para 2, 42 ou 99 pessoas em CC/CCI conta como, respectivamente, 2, 42 e 99 mensagens.
Mediante pedido escrito, devidamente justificado e autenticado, é possível modificar estas regras de segurança para um endereço de e-mail pago específico.
Link para esta FAQ: https://faq.infomaniak.com/2065
Esta seção de perguntas frequentes foi útil?
Este guia explica como transferir para a Infomaniak os endereços de e-mail atualmente hospedados pela Orange (França), com a ajuda de uma ferramenta de importação por IMAP.
Introdução
- A operação não afeta os dados já existentes no endereço de destino, nem os dados do endereço de origem.
- A totalidade da caixa externa será importada.
- Uma vez iniciado o processo de importação, não é mais possível interrompê-lo.
- Os eventuais duplicados são gerenciados: um conteúdo idêntico será copiado apenas uma vez.
- Consulte este outro guia se procura alternativas a este processo via IMAP.
Importar todo o seu histórico de e-mails
1. Pré-requisitos da Orange
- Ativar as funcionalidades POP/IMAP/SMTP, que estão desativadas por padrão (precisa de ajuda?).
2. Pré-requisitos Infomaniak
- Ter um Serviço de Email na sua Central de Gestão Infomaniak.
- Ter à disposição um número de endereços disponíveis ou ajustá-lo caso seja necessário.
- Verificar se a conta de e-mail está devidamente protegida
- Criar um ou vários endereços neste serviço de e-mail.
- Se tiver muitos (10+) endereços de e-mail para criar, consulte este outro guia sobre a criação em massa.
- O endereço de e-mail de destino deve estar associado ao utilizador (= à conta Infomaniak) que está a utilizar.
3. Importar o conteúdo de e-mail da Orange para a Infomaniak
- Clique aqui para aceder à ferramenta de importação (serviço online https://import-email.infomaniak.com).
- Se necessário, inicie sessão na sua conta Infomaniak na organização em questão, pois a importação será feita para um dos endereços de e-mail associados à interface Web Mail da Infomaniak (serviço online ksuite.infomaniak.com/mail) da conta Infomaniak que está a utilizar.
- Clique em "Importar por IMAP".
- Clique em Importação única.
- Preencha o campo à esquerda com o seu endereço de e-mail de origem (do qual o conteúdo será copiado):
username@orange.fr, por exemplo
- Preencha o campo à direita com a senha do mesmo endereço de e-mail de origem (consulte os requisitos).
- Modifique, se necessário, as Configurações avançadas para especificar um endereço de servidor IMAP:
- Insira o nome do servidor IMAP
imap.orange.fr. - Deixe a porta padrão (993) e o SSL ativados.
- Insira o nome do servidor IMAP
- Clique em Confirmar.
- Se necessário, insira um segundo endereço de e-mail para ser importado ao mesmo tempo.
- Escolha o endereço de e-mail para o qual deseja importar os e-mails; o menu suspenso lista os endereços de e-mail atualmente associados à sua interface Web Mail Infomaniak (serviço online ksuite.infomaniak.com/mail) da conta Infomaniak com a qual está conectado.
- Após selecionar o endereço de destino desejado na lista, clique no botão azul Importar e-mails.
- A cópia está a iniciar, pode aguardar e verificar o resultado na página após a conclusão da importação, ou fechar a janela (a importação continua em segundo plano e o acompanhamento está disponível – consulte abaixo).
- Um e-mail de confirmação será enviado automaticamente para todos os endereços de e-mail envolvidos na operação após a conclusão da importação, indicando o número de mensagens copiadas.
- Um rastreamento está disponível nas configurações do endereço de e-mail de destino, apenas no aplicativo web Mail (serviço online ksuite.infomaniak.com/mail).
- O rastreamento permite visualizar o histórico das importações no endereço em questão.
4. Ajustar as configurações das aplicações
Assim que tiver configurado o nome de domínio associado à sua conta de e-mail para funcionar com a Infomaniak, modifique as configurações dos programas/clientes de e-mail que utiliza para que estes se conectem corretamente aos servidores da Infomaniak: siga o assistente de configuração.
Link para esta FAQ: https://faq.infomaniak.com/2090
Esta seção de perguntas frequentes foi útil?
Este guia explica o que é um serviço de hospedagem web como o da Infomaniak e detalha seu papel, seu escopo de atuação e os limites do suporte técnico oferecido.
Infomaniak, provedor de hospedagem desde 1996
De acordo com a Wikipédia, um provedor de hospedagem web é uma empresa que fornece serviços de hospedagem na Internet para sistemas de computação de pessoas ou entidades que não desejam fazê-lo por conta própria.
Infomaniak também oferece:
- … décadas de experiência em hospedagem e soluções online de alto desempenho.
- … mais de um milhão de utilizadores na Suíça e na Europa que confiam a gestão dos seus dados críticos.
- … uma empresa certificada pelas normas ISO 27001, 9001, 14001, 50001 e comprometida com uma abordagem digital sustentável.
- … 100% de conhecimento tecnológico "fabricado na Suíça", com dados hospedados na Suíça, em seus próprios centros de dados.
- … uma rica base de conhecimento e um suporte ao cliente disponível para o ajudar.
Responsabilidades e limites de intervenção
Como provedor de hospedagem, a Infomaniak instala, protege e mantém atualizada a infraestrutura do servidor, aprimora suas interfaces de gerenciamento (Manager) e auxilia seus clientes no uso ideal das ferramentas fornecidas. A Infomaniak se esforça para oferecer soluções acessíveis a todos; no entanto, o suporte humano para os produtos gratuitos é, por natureza, limitado, a fim de garantir a sustentabilidade desses serviços.
Por motivos de segurança e confidencialidade,nenhum suporte será fornecido sem uma identificação formaldo interlocutor.
O suporte destina-se exclusivamente aos administradores da Organização. Os clientes finais ou os utilizadores que beneficiam de um contrato através de um Parceiro revendedor devem, obrigatoriamente, contactar o seu administrador ou fornecedor de serviços dedicado em primeiro lugar.
Âmbito do suporte técnico
O suporte técnico não oferece assistência para:
- Desenvolvimento e programação: depuração de sites, correção de código-fonte, scripts personalizados (PHP, JS, etc.)
- O uso e a integração das APIs.
- A manutenção de aplicações e o gerenciamento de sites: resolução de problemas, atualização ou gerenciamento de conteúdo para aplicações de terceiros (por exemplo, CMS como WordPress, clientes de e-mail como Outlook, etc.).
- Intervenções locais e personalizadas: acesso remoto, configuração do seu próprio equipamento, instalações ou migrações manuais complexas.
Mas o suporte terá todo o prazer em ajudá-lo com:
- Infraestrutura e Gerenciador: resolução de incidentes relacionados à rede, ao hardware ou às interfaces de gerenciamento Infomaniak.
- Utilização dos serviços Infomaniak: esclarecimento dos processos de configuração e auxílio na utilização de nossas funcionalidades nativas.
- Orientação documental: para o ajudar a encontrar os recursos e guias técnicos adequados, para que possa trabalhar de forma independente.
Uma assistência Premium e um serviço de migração estão disponíveis para necessidades mais específicas.
Encontre ajuda externa
Para obter ajuda relacionada com o conteúdo do seu site, a sua programação ou a organização avançada das suas contas de e-mail, utilize a plataforma de pedidos de orçamento da Infomaniak, que reúne mais de 1000 profissionais verificados, ou consulte o diretório.
Link para esta FAQ: https://faq.infomaniak.com/2103
Esta seção de perguntas frequentes foi útil?
Este guia explica como alterar a localização de algumas pastas que já estão presentes na estrutura da sua conta de e-mail Infomaniak.
Introdução
- A estrutura de uma caixa de correio eletrónico clássica pode conter algumas pastas especiais, como, por exemplo, a pasta que armazena os e-mails…
- … depois de terem sido enviados (= "Mensagens enviadas").
- … durante alguns dias antes de serem eliminados definitivamente (= "Lixeira").
- Tudo já está configurado para que, por defeito, seja sincronizados entre as diferentes interfaces de e-mail em todo o mundo.
- Se desejar fazer ajustes por diferentes motivos, às vezes por motivos linguísticos, consulte o guia abaixo para modificar estas pastas especiais:
- rascunhos
- mensagens enviadas
- lixeira
- arquivos
- Isso permite, em particular, personalizar a sincronização dessas pastas com clientes IMAP como Outlook, Mail iOS, Thunderbird, Spark, etc.
- Atenção: isso não altera o prazo máximo de retençãoe-mails colocados em algumas destas pastas especiais.
Aceder a partir da aplicação Web Mail Infomaniak
Pré-requisitos
- Ter acesso válido ao aplicativo web Mail da Infomaniak (serviço online ksuite.infomaniak.com/mail), no qual o endereço de e-mail está registrado.
- Ter permissão para modificar as pastas especiais: é possível que o administrador do Serviço de Email tenha removido esse direito a partir da sua conta de administrador:
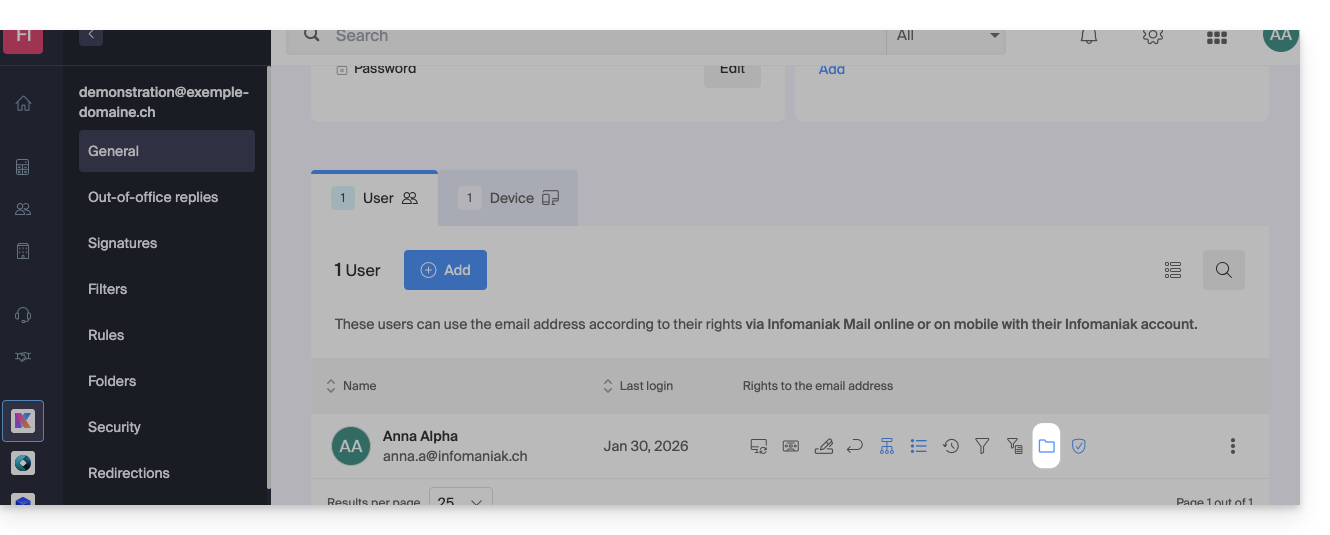
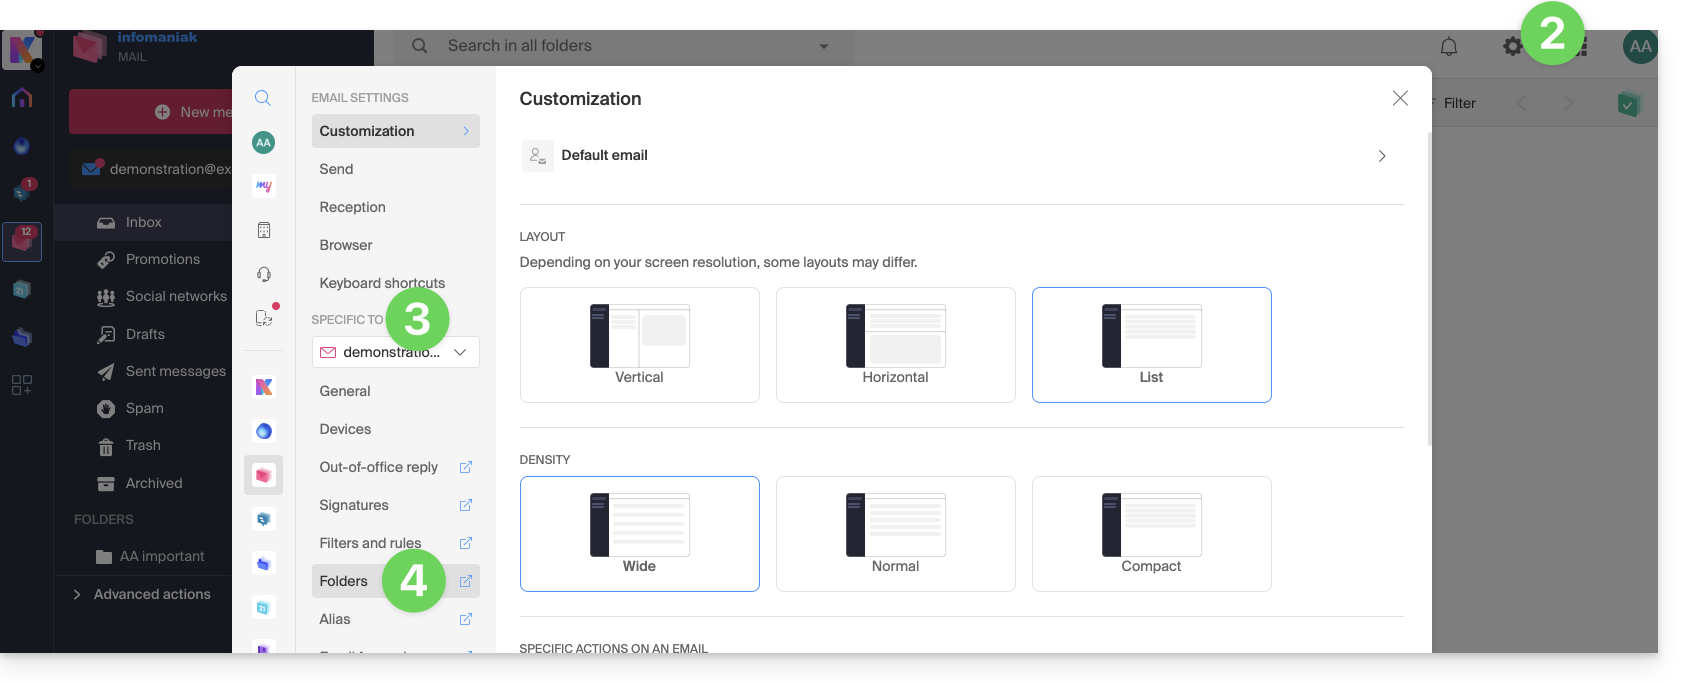
Para modificar estas pastas especiais:
- Clique aqui para aceder à aplicação web Mail da Infomaniak (serviço online ksuite.infomaniak.com/mail).
- Clique no ícone Configurações no canto superior direito.
- Verifique ou selecione o endereço de e-mail correspondente no menu suspenso do menu lateral esquerdo.
- Clique em Pastas:
Aceder a partir do Serviço de Email
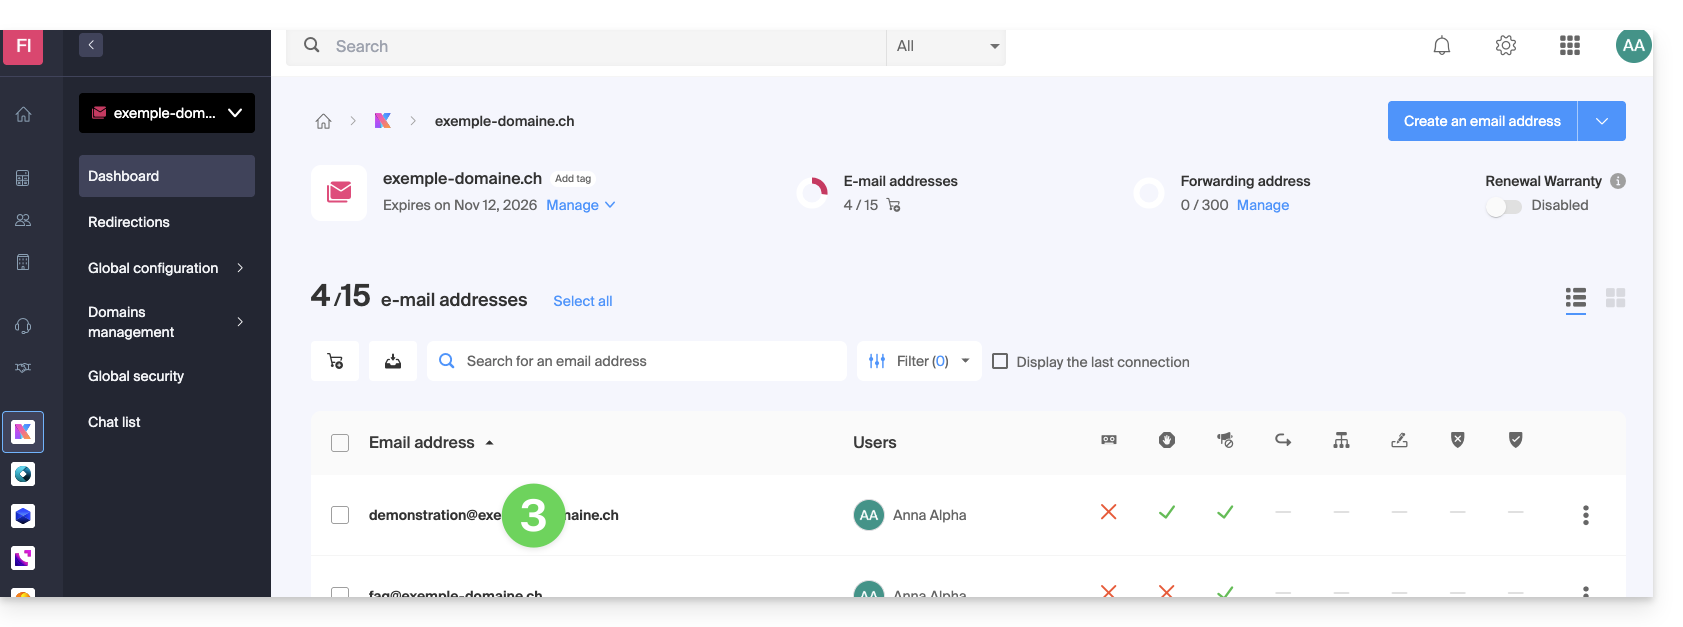
Para aceder a esta opção a partir de um Serviço de Email:
- Clique aqui para aceder à gestão do seu produto no painel de controlo Infomaniak (precisa de ajuda?).
- Clique diretamente no nome atribuído ao produto em questão.
- Clique no endereço de e-mail correspondente na tabela que aparece:
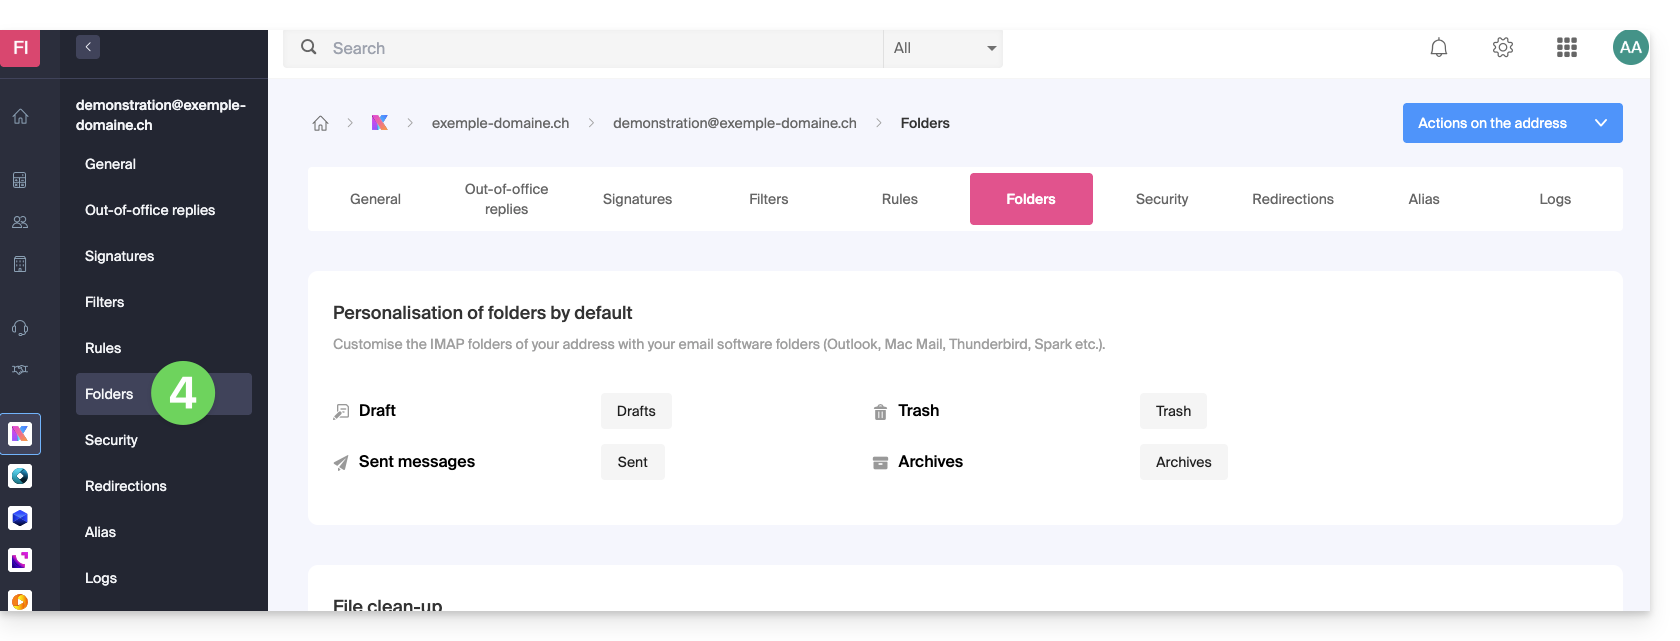
- Clique na aba/menu Pastas:
Configurar as pastas especiais
Por motivos de segurança, a gestão de pastas é confidencial e reservada aos utilizadores adicionados ao endereço de e-mail em questão.
Selecione as pastas desejadas para armazenar, por padrão, os seus rascunhos, arquivos, mensagens enviadas e a sua lixeira clicando na área à direita de cada elemento: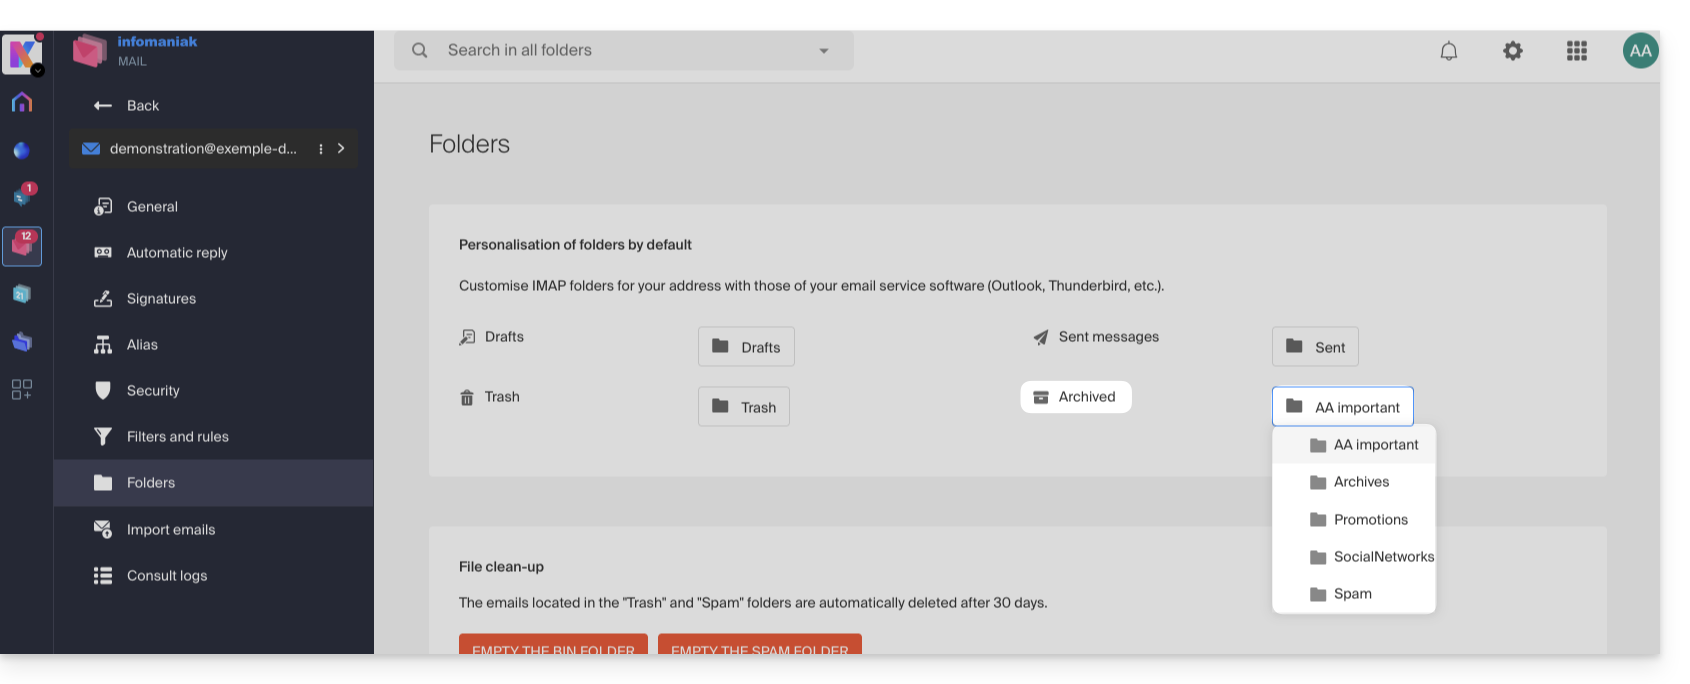
Isso exibirá a lista das pastas já presentes na estrutura da sua caixa de correio.
- Se necessário, crie a pasta desejada com antecedência a partir do Mail ou de um software IMAP:
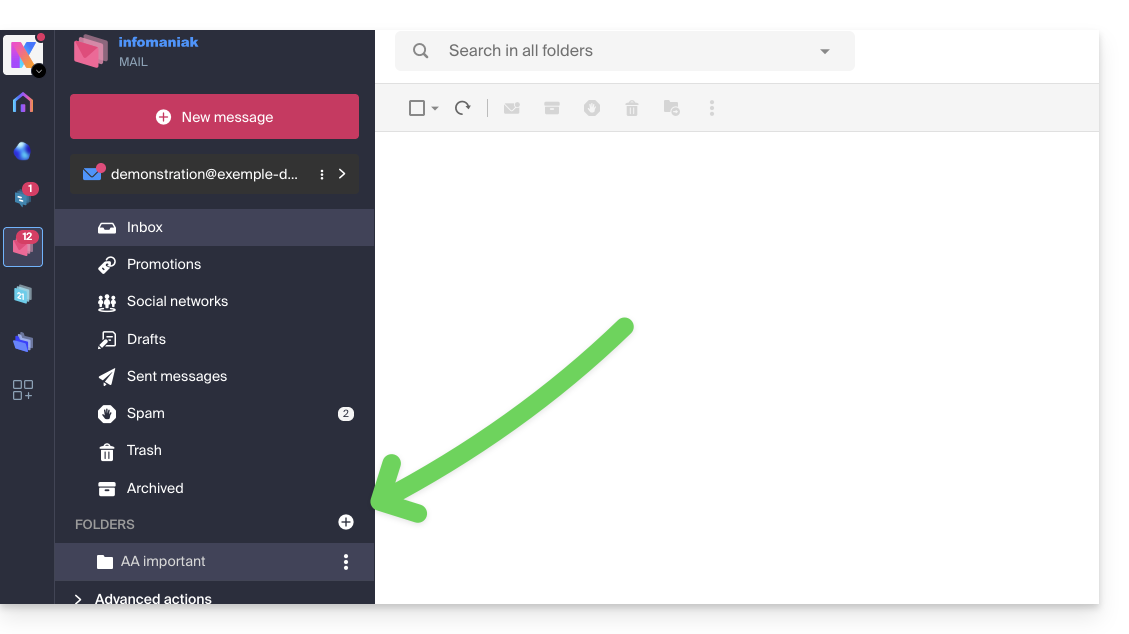
Para modificar as pastas padrão que recebem o spam e as mensagens publicitárias e notificações de redes sociais, é necessário fazê-lo diretamente na seção Filtro de Spam e Filtro de Publicidade: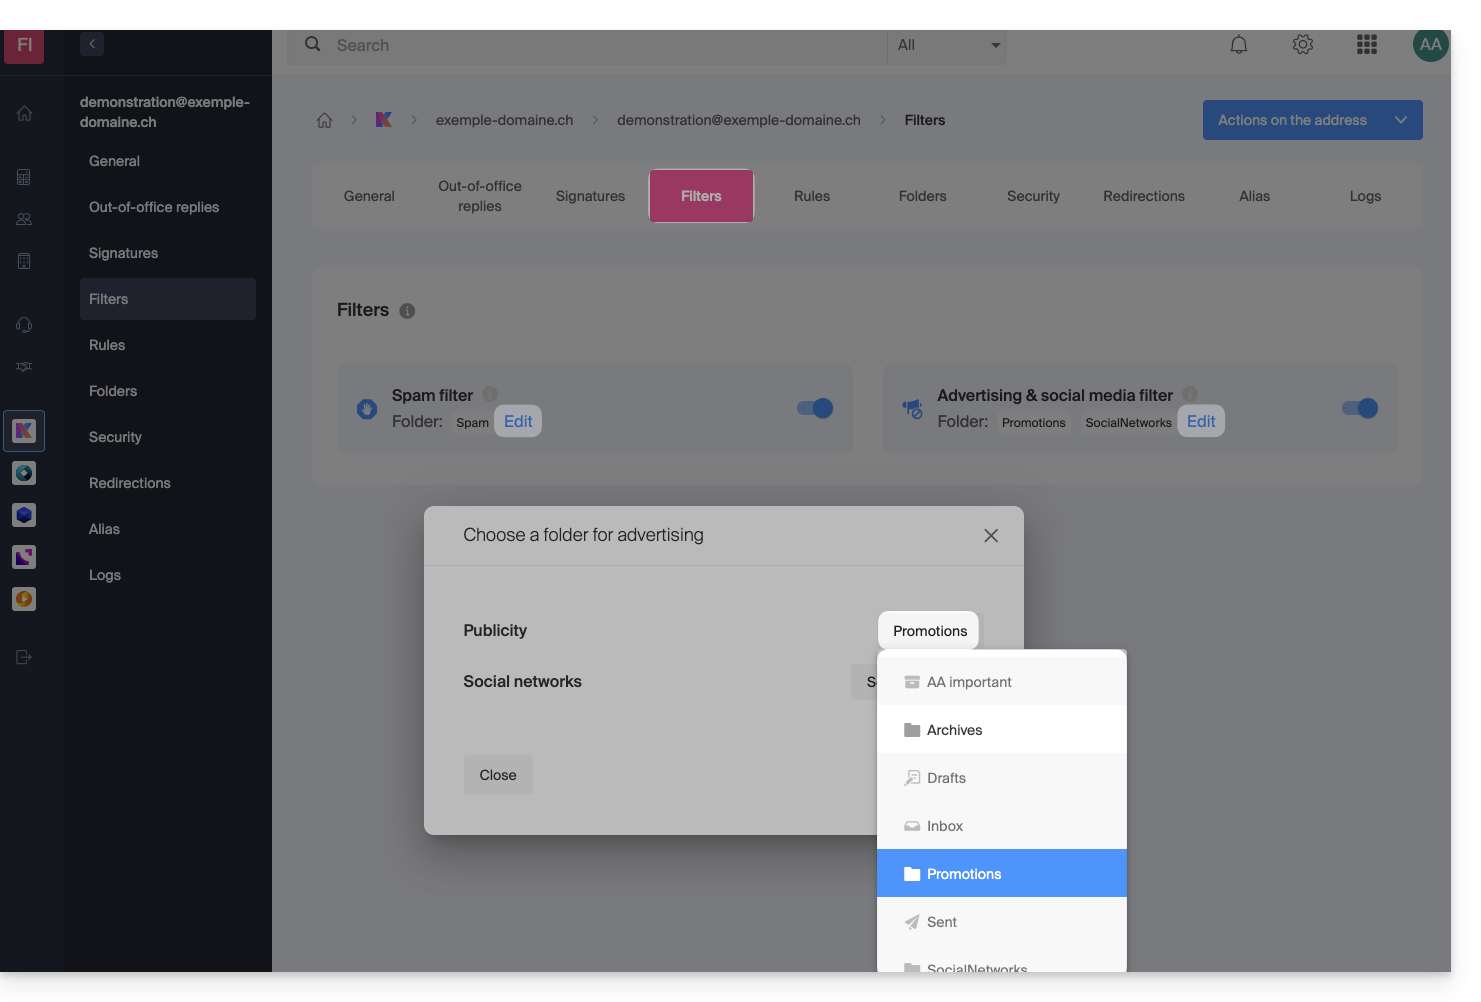
Soluções alternativas para…
Alguns softwares/clientes de e-mail também permitem alterar a localização das pastas especiais. Consulte a documentação oficial do seu aplicativo, se necessário. Os seguintes links são fornecidos apenas para fins informativos:
… Mozilla Thunderbird
Consulte este outro guia oficial se precisar de informações sobre como atribuir pastas específicas (como a Lixeira, Rascunhos, Mensagens enviadas) à conta IMAP e sincronizá-las com a Infomaniak.
… Microsoft Outlook 2013
Consulte este outro guia não oficial se procura informações sobre como o uso do protocolo IMAP no aplicativo pode levar a uma configuração em que as mensagens são armazenadas apenas localmente e não sincronizadas com o servidor, o que contradiz o objetivo principal do IMAP de manter a consistência entre os dispositivos.
… Microsoft Outlook 2021
Consulte este outro guia não oficial se precisar de informações sobre como salvar os e-mails enviados na pasta “Enviados” em vez da pasta “Itens Enviados” no aplicativo.
… Apple iOS
Consulte este outro guia não oficial se precisar de informações sobre como configurar as pastas de envio, rascunhos e mensagens apagadas em um iPhone para que sejam sincronizadas com o servidor de e-mail, acessando as configurações avançadas do aplicativo Mail e selecionando as pastas correspondentes no servidor IMAP.
Link para esta FAQ: https://faq.infomaniak.com/2107
Esta seção de perguntas frequentes foi útil?
Este guia explica como criar um alias, ou seja, uma variação do seu endereço de e-mail habitual, sem ter de adicionar um novo endereço ao seu serviço de e-mail existente.
✘ INDISPONÍVEL com
my kSuite (ik.me, etik.com, ikmail.com)
Preâmbulo
- Número de aliases possíveis por endereço de e-mail:
- kSuite Free = 1
- kSuite Standard = 50
- kSuite Business = 50
- kSuite Enterprise = 50
- my kSuite+ = 2 (atenção: um alias excluído não poderá ser recriado com o mesmo nome)
- Serviço de E-mail Starter = 1
- Serviço de E-mail Premium = 50
- Uma funcionalidade alternativa é apresentada aqui.
- Para modificar o que vem depois do símbolo "@", utilize domínios alias.
- Os utilizadores do endereço (na aplicação web Mail Infomaniak) recebem um e-mail sempre que um alias é adicionado ou removido.
Funcionamento de um alias
É possível criar versões alternativas dos seus endereços de e-mail, modificando o que vem antes do símbolo "@".
Por exemplo:
john-peter.smith@domain.xyz é um endereço de e-mail longo…
Ele pode ser encurtado e usado da seguinte forma:
jps@domain.xyz
Neste exemplo, é necessário criar um alias "jps" para o endereço "john-peter.smith".
Em seguida, se uma pessoa enviar uma mensagem para jps@domain.xyz:
- a mensagem chegará à caixa de entrada do endereço principal (
john-peter.smith@domain.xyz).
Se uma pessoa enviar uma mensagem para john-peter.smith@domain.xyz E colocar jps@domain.xyz em cópia (CC):
- a mensagem chegará duas vezes à caixa de entrada do endereço principal (
john-peter.smith@domain.xyz).
Adicionar um alias a partir da aplicação Web Mail Infomaniak
Pré-requisitos
- Ter permissão para gerenciar os aliases: é possível que o administrador do Serviço de Email tenha removido esse direito da sua conta de administrador.
Em seguida, para adicionar um alias:
- Clique aqui para acessar o aplicativo web Mail da Infomaniak (serviço online ksuite.infomaniak.com/mail).
- Clique no ícone Configurações no canto superior direito.
- Verifique ou selecione o endereço de e-mail correspondente no menu suspenso do menu lateral esquerdo.
- Clique em Alias:
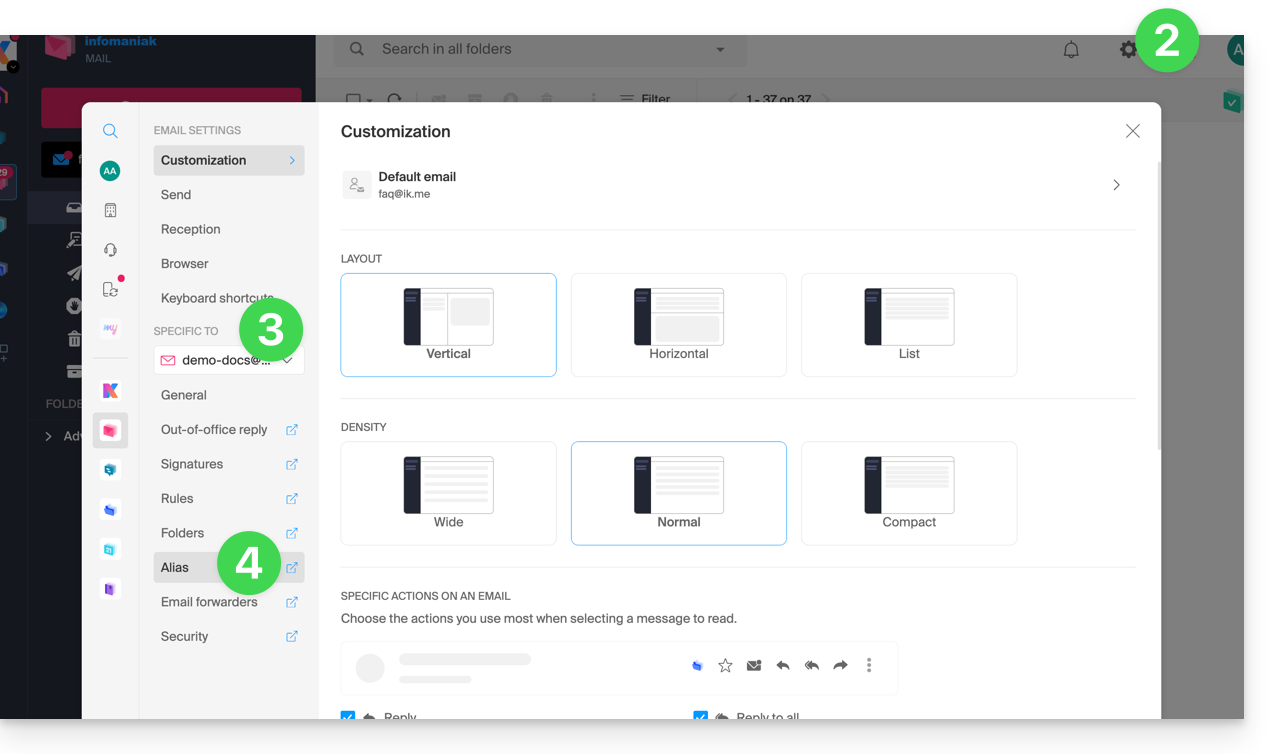
- Clique em Adicionar alias para criar uma variação do seu endereço de e-mail.
- Insira o alias desejado (o que vem antes do símbolo "@").
- Clique em Adicionar:
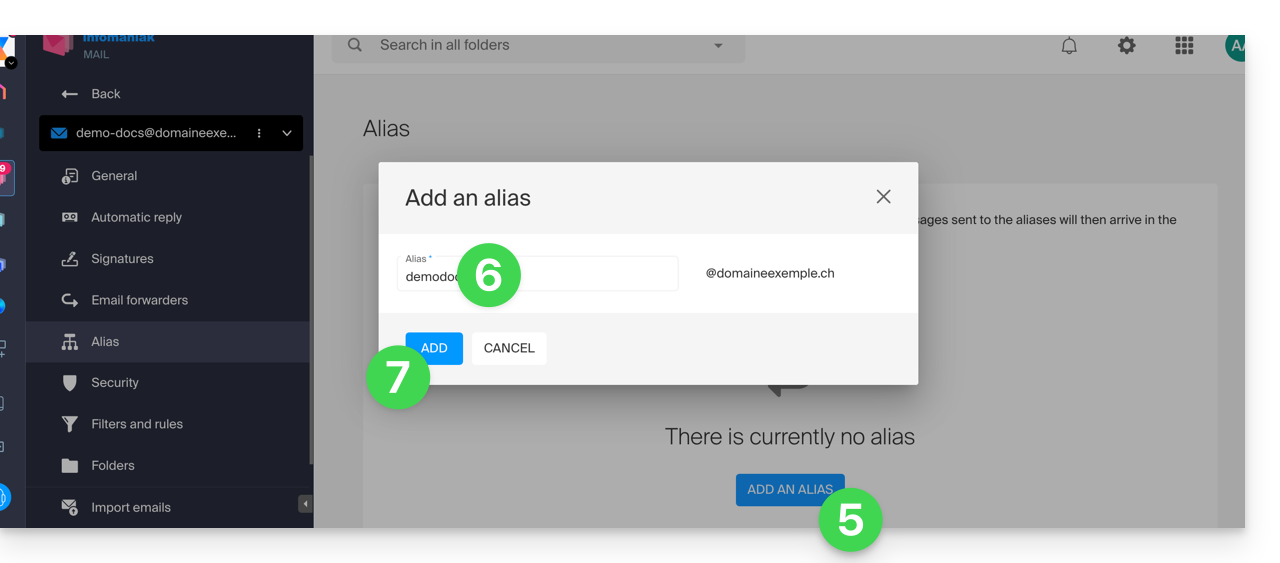
Adicionar um alias a partir do Serviço de Email
Para aceder ao Serviço de Email:
- Clique aqui para acessar o gerenciamento do seu produto no Manager Infomaniak (precisa de ajuda?).
- Clique diretamente no nome atribuído ao produto em questão.
- Clique em o endereço de e-mail em questão na tabela que aparece.
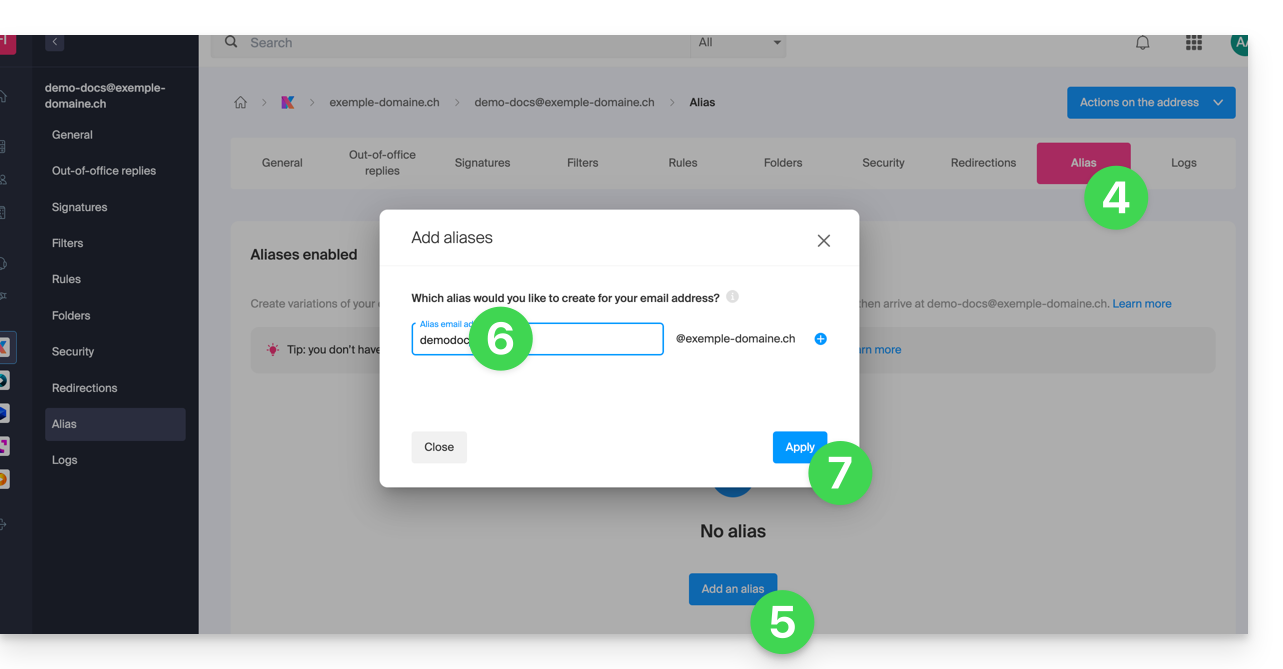
- Clique na aba Alias ou, no menu lateral esquerdo, em Alias.
- Clique no botão azul Adicionar um alias.
- Insira o alias desejado (o que vem antes do símbolo @):
- Clique em Aplicar para guardar as alterações:
Link para esta FAQ: https://faq.infomaniak.com/2129
Esta seção de perguntas frequentes foi útil?
Este guia explica como…
- … ativar um filtro para os e-mails recebidos
- … classificar automaticamente as mensagens publicitárias
- … sinalizar determinadas mensagens fraudulentas
… para reduzir o número de mensagens indesejadas ou excessivas em um endereço de e-mail gerenciado pela Infomaniak.
Soluções para excluir, classificar e filtrar e-mails recebidos
Métodos de filtragem automática
- Consulte este guia para utilizar a pasta <Spam> ativando o filtro de spam (é possível desativá-lo).
- Consulte este outro guia para utilizar as pastas <Promoções> e <Redes Sociais> (<SocialNetworks>) ativando o filtro de publicidade e redes sociais.
Métodos manuais
- Consulte este guia para denunciar uma mensagem recebida que não foi identificada como spam (publicidade / contacto não solicitado).
- Consulte este guia para denunciar uma mensagem recebida que não foi identificada como phishing (fraude / e-mail falso enganoso).
- Consulte este guia para bloquear ou autorizar endereços de e-mail específicos ou até mesmo domínios inteiros.
- Consulte este guia para definir seus próprios filtros de triagem e classificação ('linguagem Sieve') dos e-mails recebidos…
- … o que permitirá, por exemplo, filtrar mensagens enviadas para um alias temporário que você pode criar para se proteger durante novos registros na Internet.
Se estiver a enfrentar uma onda de spam ou de mensagens invulgares, consulte este outro guia para realizar algumas verificações.
Se os seus próprios envios forem frequentemente classificados incorretamente como spam, consulte este outro guia para realizar algumas verificações.
Para organizar e limpar uma caixa de e-mail que tenha sido inundada por mensagens, consulte este outro guia.
Link para esta FAQ: https://faq.infomaniak.com/2149
Esta seção de perguntas frequentes foi útil?
Este guia explica como conectar o aplicativo de desktop Outlook 2016 (aplicativo para computador no Windows) a um endereço de e-mail hospedado na Infomaniak.
Adicionar o endereço de e-mail ao aplicativo
Pré-requisitos
- Criar o endereço de e-mail (❓: my kSuite | Serviço de E-mail/kSuite).
- Criar uma senha para o dispositivo (❓: my kSuite | Serviço de e-mail/kSuite).
- Verificar se a configuração do domínio está correta (❓: Serviço de e-mail/kSuite).
Para configurar o aplicativo de e-mail:
- Abra o aplicativo.
- Clique no menu Arquivo:
- Clique em Configurações da conta.
- Clique em Adicionar ou remover contas:
- Clique em Novo:
- Insira o endereço de e-mail que deseja conectar.
- Clique em Opções avançadas.
- Clique em Configuração manual.
- Clique no botão azul Conectar:
- Clique em IMAP:
- Insira a senha do endereço de e-mail que deseja conectar.
- Clique no botão azul Conectar:
- Desmarque, se necessário, a caixa de seleção para configurações adicionais do dispositivo móvel.
- Clique no botão azul Concluir:
- Clique em Corrigir para ajustar algumas informações adicionadas automaticamente, mas incorretas:
- Clique em Opções avançadas.
- Clique em Reparação manual.
- Clique no botão azul Corrigir:
- Verifique e complete as informações ausentes ou incorretas.
- Clique em Servidor de saída:
- Verifique e complete as informações ausentes.
- Clique em Seguinte.
- Clique em Concluir:
- Clique em Fechar:
- Pronto, o seu endereço de e-mail está agora configurado corretamente na aplicação:
Parâmetros recomendados
- Servidor IMAP de entrada =
mail.infomaniak.com - Porta IMAP =
993(com SSL) - Servidor SMTP de saída =
mail.infomaniak.com - Porta SMTP e protocolo de criptografia e comando/método para ativar este protocolo:
587+ STARTTLS - Nome de utilizador/username = o endereço de e-mail completo (precisa de ajuda?)
- Senha/password = a senha gerada para o endereço de e-mail que você deseja consultar (❓: my kSuite | Serviço de e-mail/kSuite).
- Autenticação obrigatória para o envio de e-mails:
- Ative-a nas configurações SMTP do seu aplicativo.
- Marque "usar as mesmas configurações do servidor de entrada" ou, dependendo do software/cliente de e-mail, insira um nome de usuário (= endereço de e-mail completo) e a senha gerada.
Consulte este outro guia se precisar de informações sobre outras portas e protocolos de e-mail compatíveis (SSL/TLS, por exemplo).
Em caso de problemas
Verifique se o Serviço de Email está configurado de forma otimizada.
Não é necessário entrar em contato com o Suporte Infomaniak se o seu endereço de email funcionar corretamente fora da aplicação. O erro mais comum está relacionado ao uso de uma senha incorreta. Os guias de solução de problemas ajudarão você a resolver qualquer problema:
- Consulte as soluções apresentadas neste outro guia sobre o serviço de e-mail em geral.
- Este outro guia aborda especificamente o Outlook.
… e se o seu Outlook deixou de funcionar após uma alteração da palavra-passe do e-mail, consulte este outro guia.
Link para esta FAQ: https://faq.infomaniak.com/2172
Esta seção de perguntas frequentes foi útil?
Este guia explica como conectar o aplicativo para desktop Microsoft Outlook para Mac, versão 16.80 (aplicativo para desktop no macOS), a um endereço de e-mail hospedado na Infomaniak.
Introdução
- Em vez da configuração manual para o Outlook abaixo, recomenda-se usar o aplicativo macOS Infomaniak Mail ou até mesmo o Apple Mail com os perfis de configuração .mobileconfig oferecidos pela Apple.
Adicionar o endereço de e-mail ao aplicativo
Pré-requisitos
- Criar o endereço de e-mail (❓: ajuda my kSuite | Serviço de E-mail/kSuite).
- Criar uma senha para o dispositivo (❓: ajuda my kSuite | Serviço de e-mail/kSuite).
- Verificar se a configuração do domínio está correta (❓: ajuda).
Para configurar o aplicativo de e-mail:
- Abra o aplicativo.
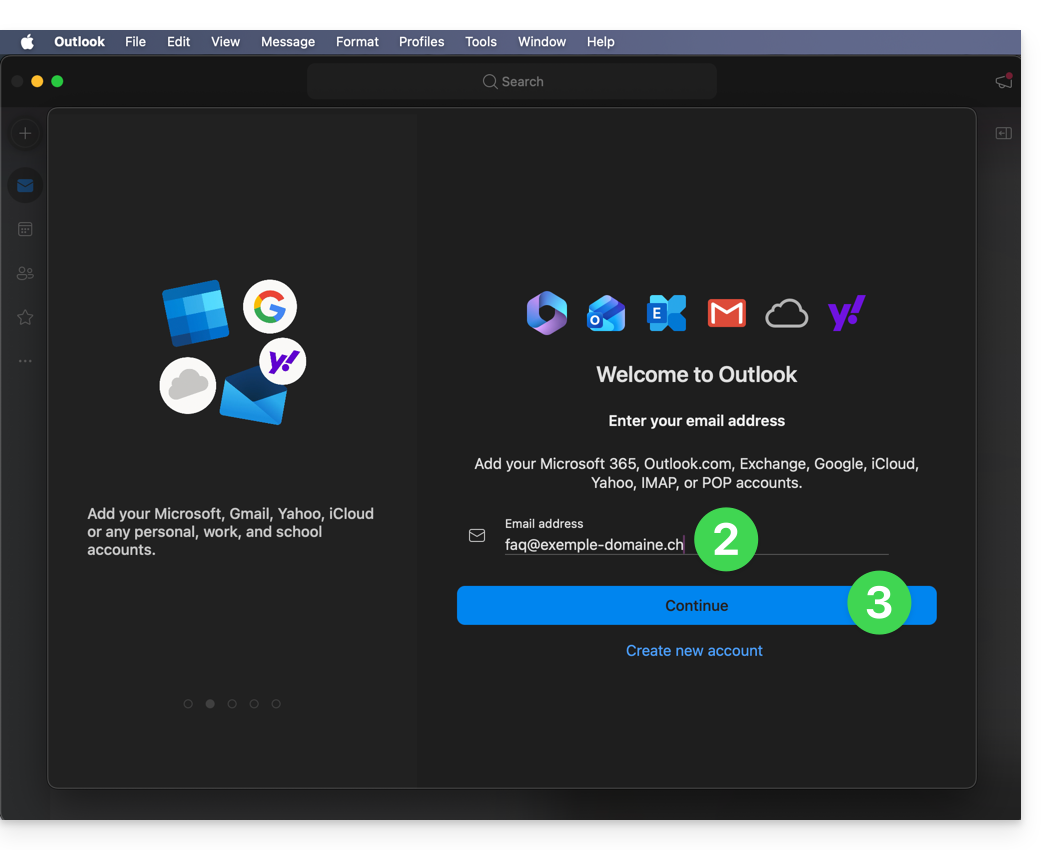
- Insira o endereço de e-mail que deseja associar.
- Clique em Continuar:
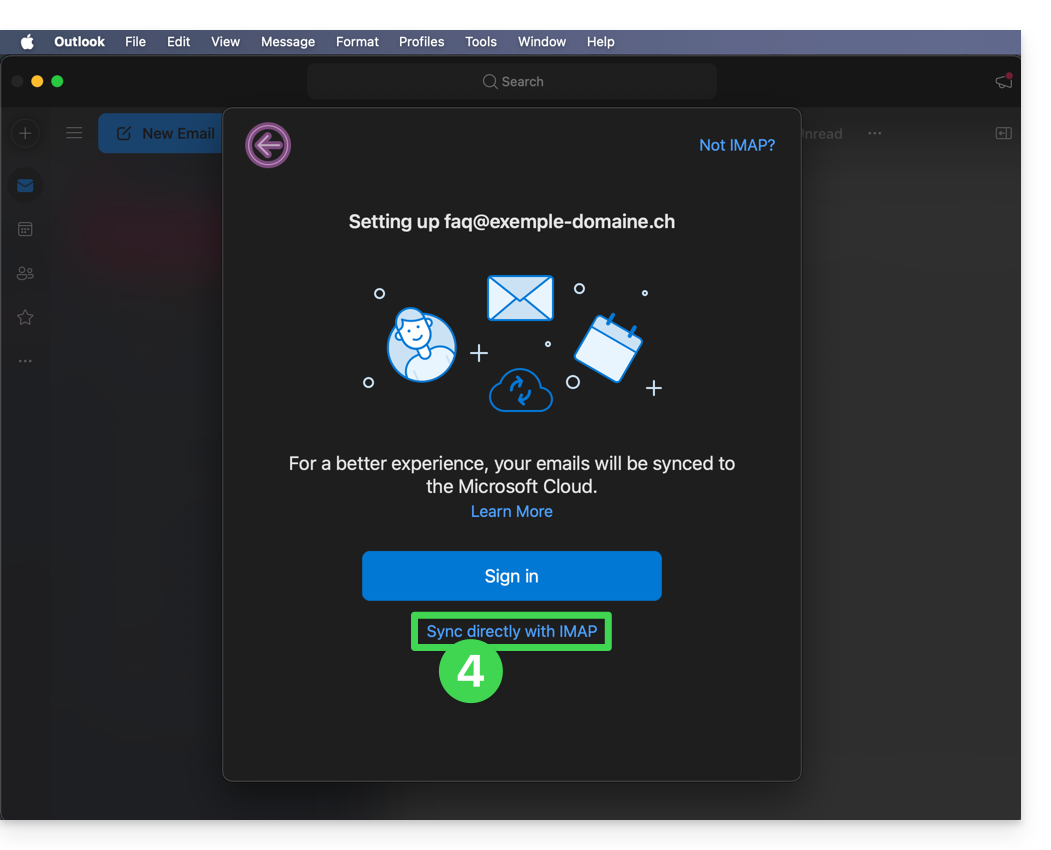
- Clique em Sincronizar via IMAP (sem o Cloud da Microsoft):
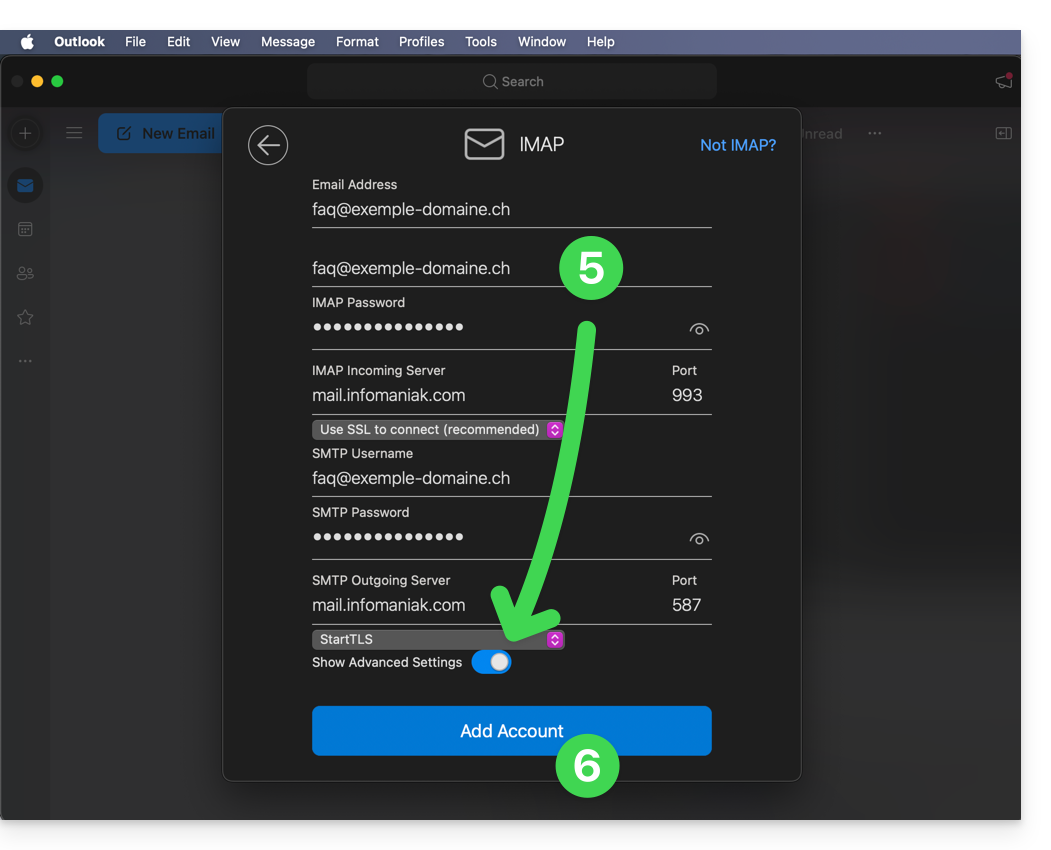
- Verifique e preencha as informações que faltam (❓: ajuda).
- Para isso, ative o botão de alternância (toggle switch) para a exibição das configurações avançadas.
- Clique em Adicionar conta:
- Leia e avance pelas diferentes janelas de informações da Microsoft:
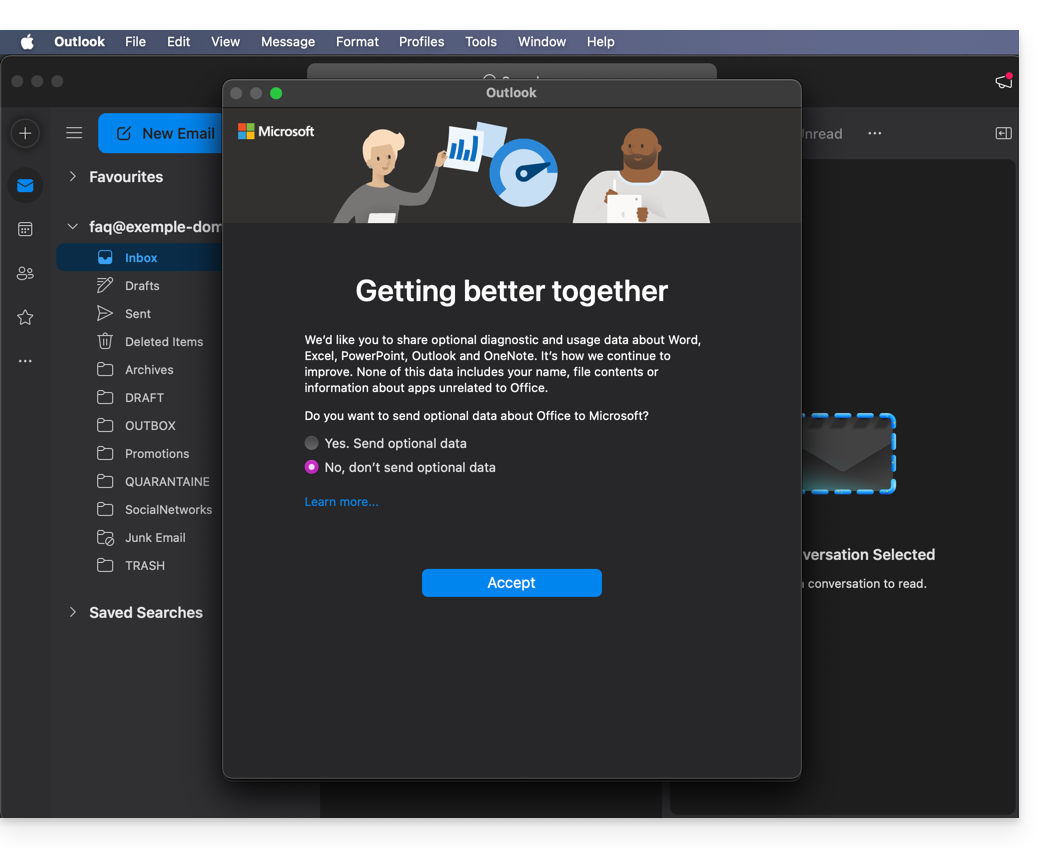
- Pronto, o seu endereço de e-mail já está configurado na aplicação:
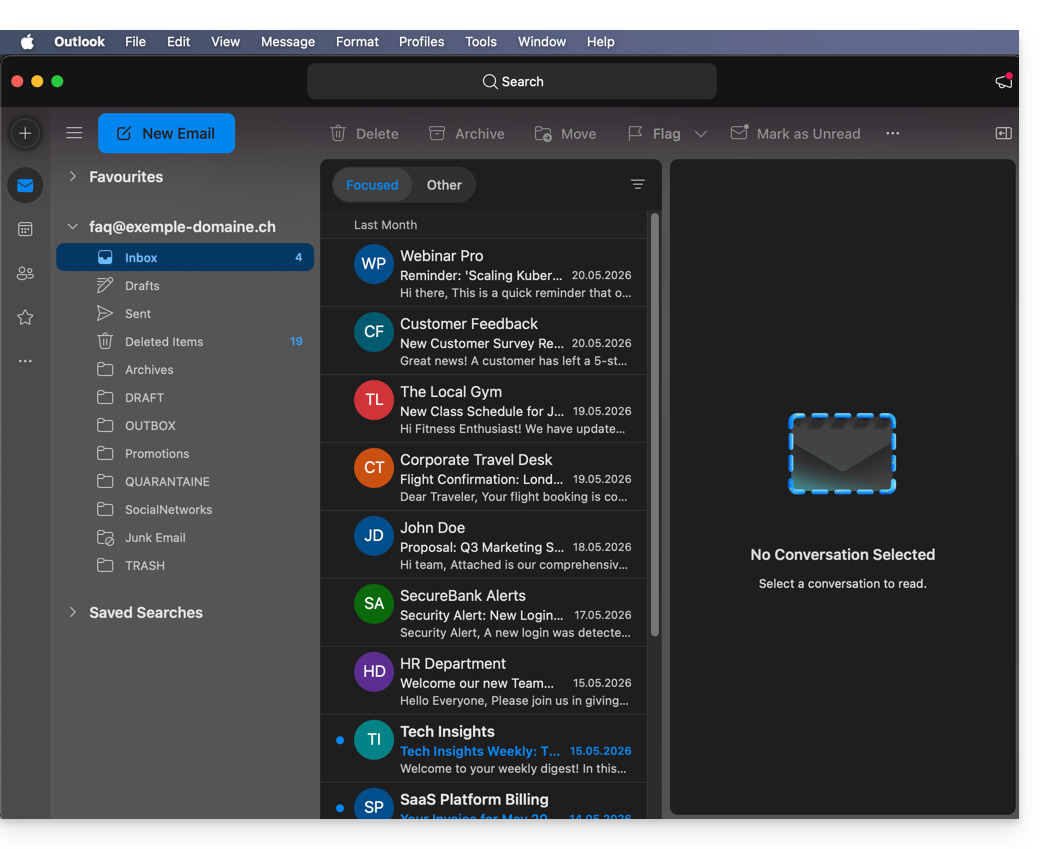
Parâmetros recomendados
- Servidor IMAP de entrada =
mail.infomaniak.com - Porta IMAP =
993(com SSL) - Servidor SMTP de saída =
mail.infomaniak.com - Porta SMTP e protocolo de criptografia e comando/método para ativar este protocolo:
587+ STARTTLS - Nome de utilizador/username = o endereço de e-mail completo (❓: ajuda)
- Palavra-passe/password = a palavra-passe gerada para o endereço de e-mail que pretende consultar (❓: ajuda my kSuite | Serviço de E-mail/kSuite).
- Autenticação obrigatória para o envio de e-mails:
- Ative-a nas configurações SMTP da sua aplicação.
- Marque a opção "usar as mesmas configurações do servidor de entrada" ou, dependendo do software/cliente de e-mail, insira um nome de usuário (= endereço de e-mail completo) e a senha gerada.
Consulte este outro guia se precisar de informações sobre outras portas e protocolos de e-mail compatíveis (SSL / TLS, por exemplo).
Em caso de problema
Verifique se o Serviço de E-mail está configurado de forma otimizada (❓: ajuda).
Não é necessário entrar em contato com o Suporte da Infomaniak se o seu endereço de e-mail funcionar corretamente fora do aplicativo. O erro mais comum está relacionado ao uso de uma senha incorreta. Os guias de solução de problemas ajudarão você a resolver qualquer problema:
- Consulte as soluções apresentadas neste outro guia sobre e-mail em geral.
- Este outro guia trata especificamente do Outlook.
… e se o seu Outlook deixou de funcionar após uma alteração da palavra-passe do e-mail, consulte este outro guia.
Link para esta FAQ: https://faq.infomaniak.com/2174
Esta seção de perguntas frequentes foi útil?
Este guia explica como cancelar o envio de um e-mail a partir da aplicação web Mail da Infomaniak (serviço online ksuite.infomaniak.com/mail).
Introdução
- Por padrão, você tem 15 segundos para cancelar o envio de um e-mail.
- Se necessário, é possível desativar esta funcionalidade ou aumentar o tempo de envio até 30 segundos.
- Esta funcionalidade aplica-se a todos os endereços de e-mail presentes na sua interface Mail.
Configurar o período de cancelamento
Para isso:
- Clique aqui para acessar o aplicativo web Mail da Infomaniak (serviço online ksuite.infomaniak.com/mail).
- Clique no ícone Configurações no canto superior direito da interface.
- Clique em Envio no menu lateral secundário.
- Defina o tempo de atraso para o cancelamento (0, 10, 15, 20, 25, 30 segundos) dos envios de acordo com as suas preferências:
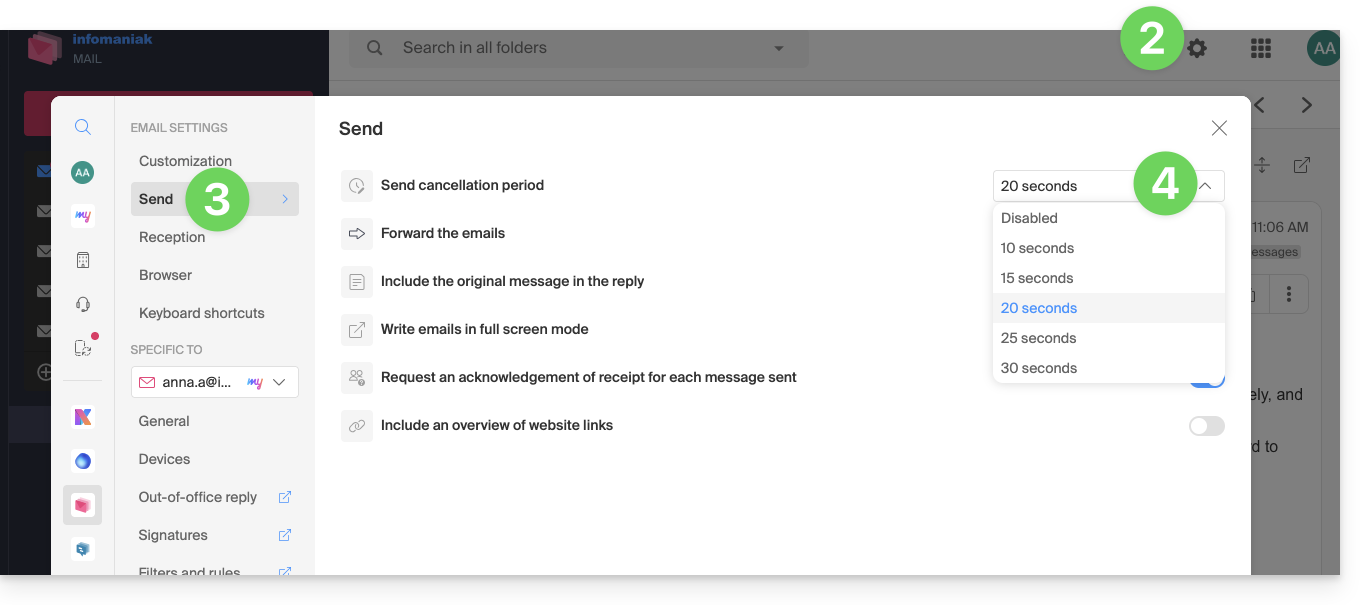
Cancelar o envio em curso
Ao clicar no botão de envio da sua mensagem no Mail, poderá cancelar o envio durante o tempo disponível através da notificação de envio que aparece no centro, na parte inferior do ecrã, clicando no botão CANCELAR: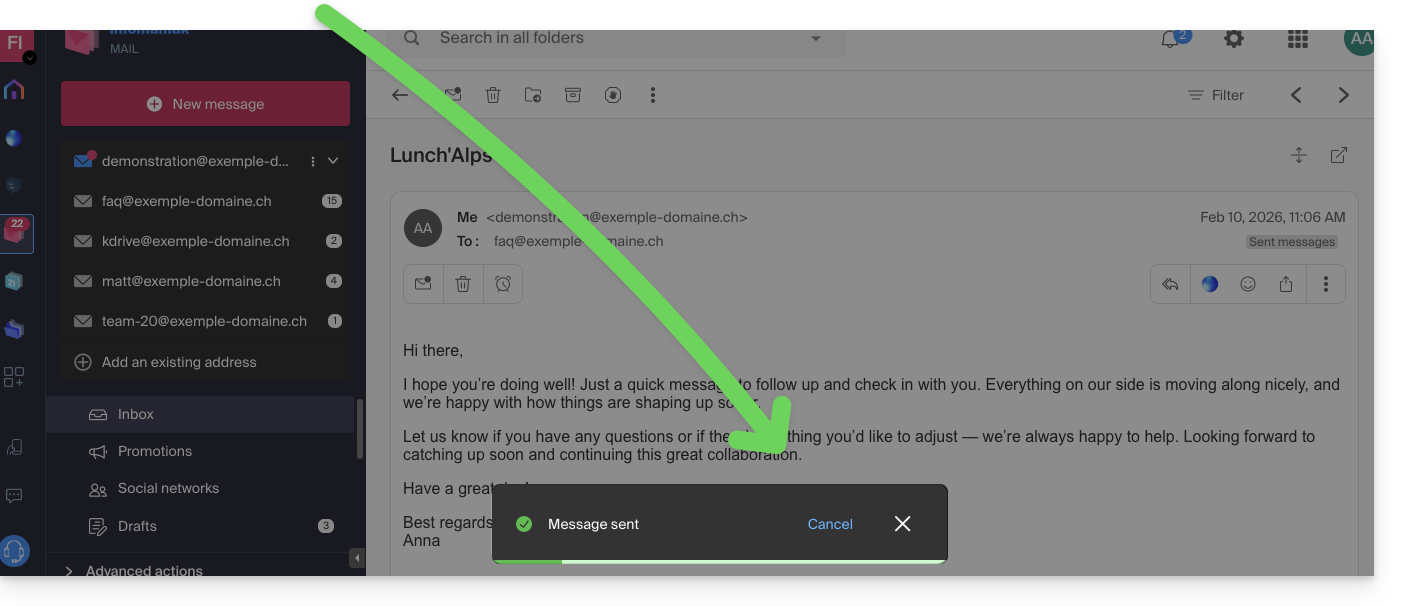
A mensagem em processo de envio regressará ao estado de mensagem em processo de redação e poderá reiniciar o envio, se necessário, ou eliminar o rascunho.
Link para esta FAQ: https://faq.infomaniak.com/2189
Esta seção de perguntas frequentes foi útil?
Este guia explica como visualizar e modificar o identificador de acesso à sua conta de utilizador no Manager, a interface de gestão e painel de controlo dos seus produtos Infomaniak. Este mesmo identificador permite-lhe também iniciar sessão no Mail Infomaniak e nas várias aplicações iOS/Android, como o kDrive, o Infomaniak Mail, etc.
Introdução
- Para gerir as informações de contacto da sua conta Infomaniak, consulte este outro guia.
- Para alterar o número de telefone, consulte este outro guia.
- Para gerir os detalhes da Organização à qual pertence, consulte este outro guia.
Ver o identificador atualmente conectado
O endereço de e-mail usado para a sessão atual é exibido no seu menu de usuário + na página de perfil:
- Clique no ícone com suas iniciais/avatar no canto superior direito do Manager Infomaniak para verificar o identificador de login em uso:
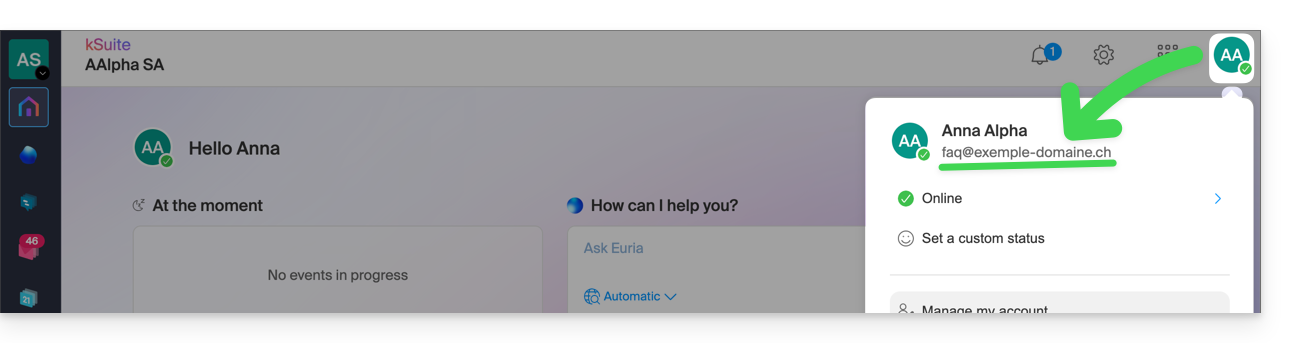
- Clique em Gerenciar minha conta logo abaixo para acessar o gerenciamento do seu perfil no Painel de Controle Infomaniak:
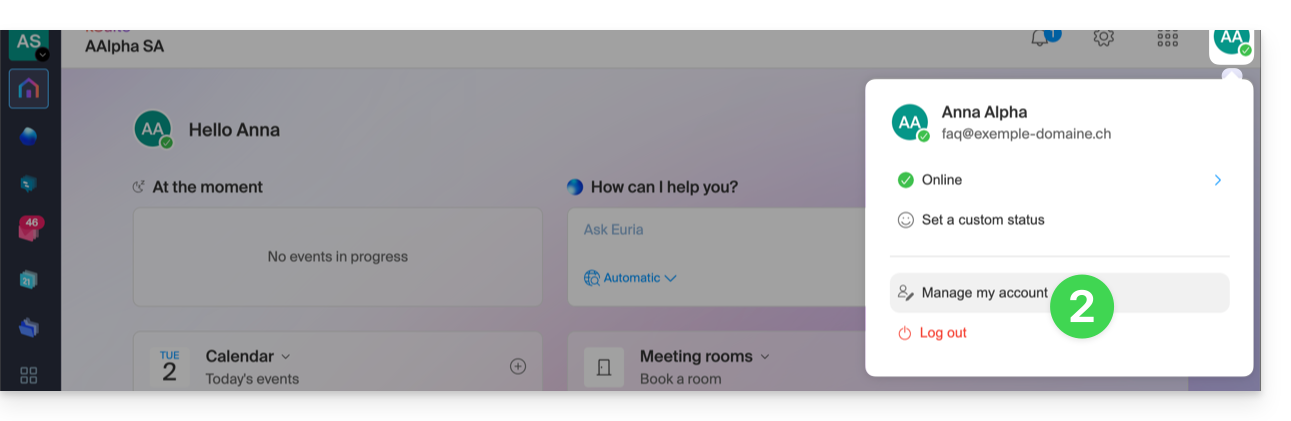
- Seu identificador de login atual também é exibido na página:
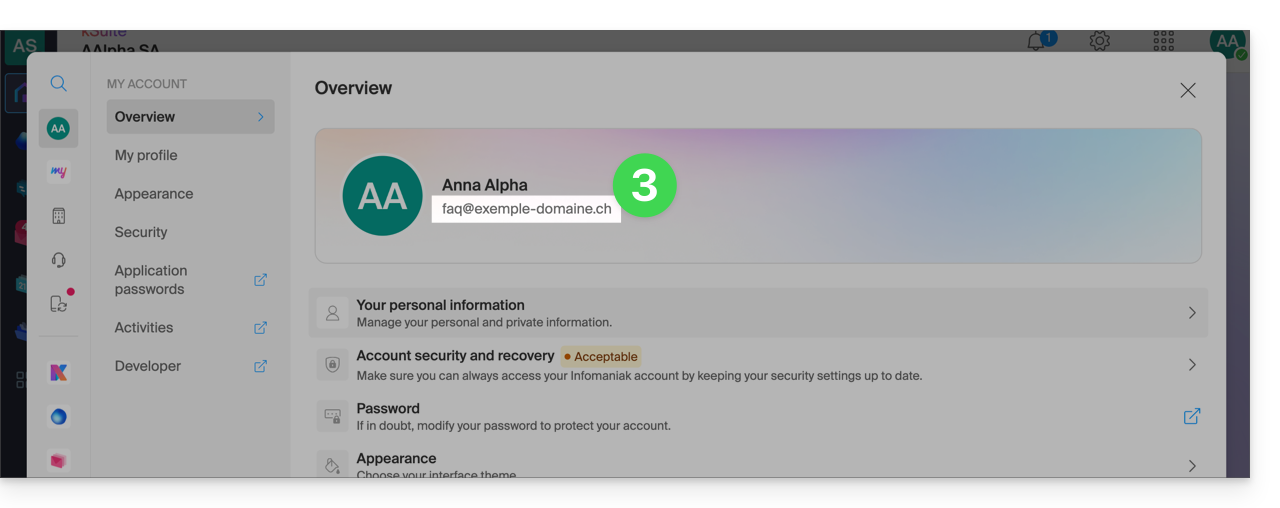
Alterar o identificador (endereço de e-mail para login)
Pré-requisitos
- O identificador de acesso é um endereço de e-mail que deve existir e que você deve poder consultar.
- O novo endereço de e-mail deve ser diferente do endereço de e-mail de recuperação.
- O novo endereço de e-mail não deve ser usado como identificador de login em outra conta de usuário (caso contrário, é necessário convidar o usuário para a Organização para conceder todos os direitos e, em seguida, remover a conta antiga com o identificador antigo).
Para alterar o identificador da sua conta Infomaniak:
- Clique aqui (ou no ícone com as suas iniciais/avatar no canto superior direito do painel de controlo Infomaniak) para “Gerir a minha conta”:
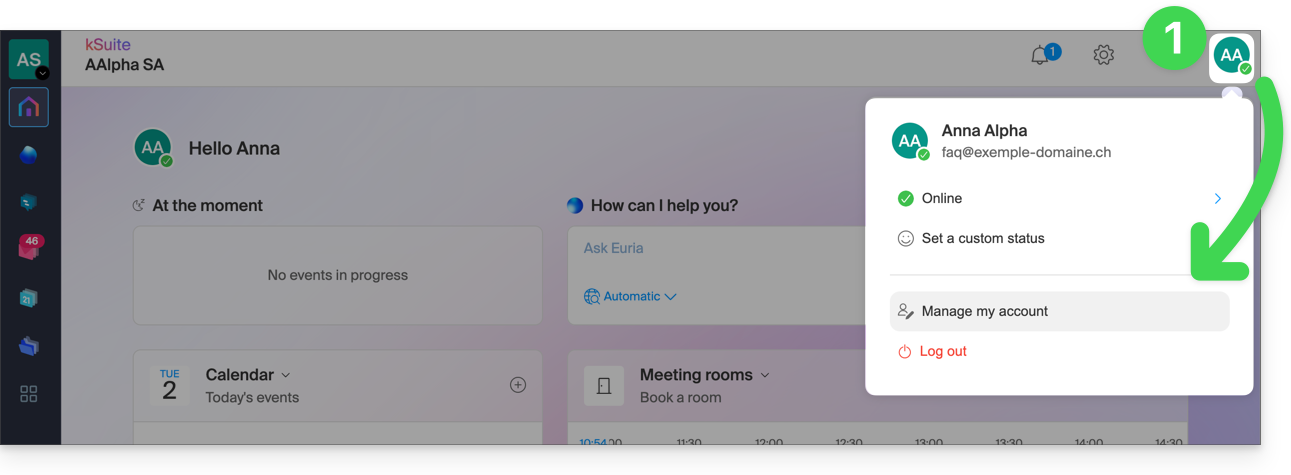
- No menu O meu perfil, clique no seu endereço de e-mail de login:
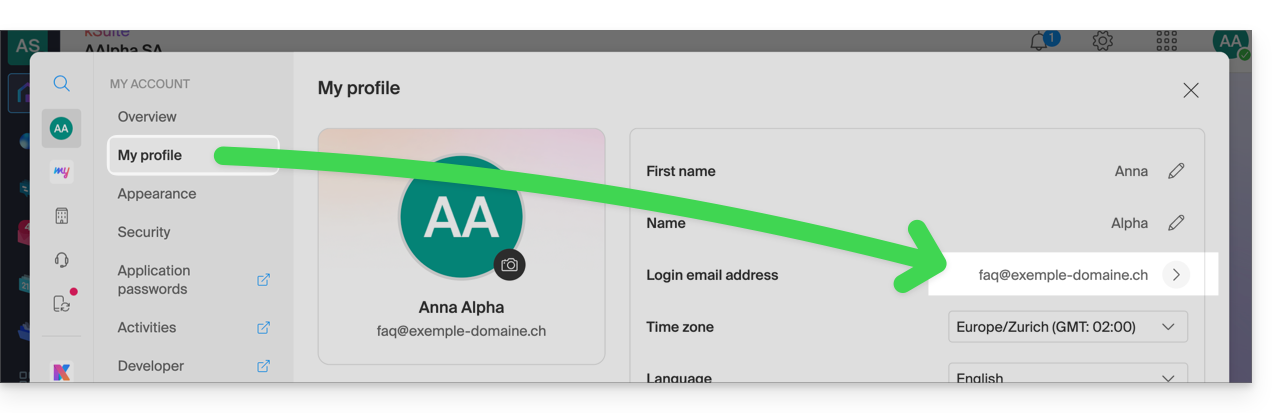
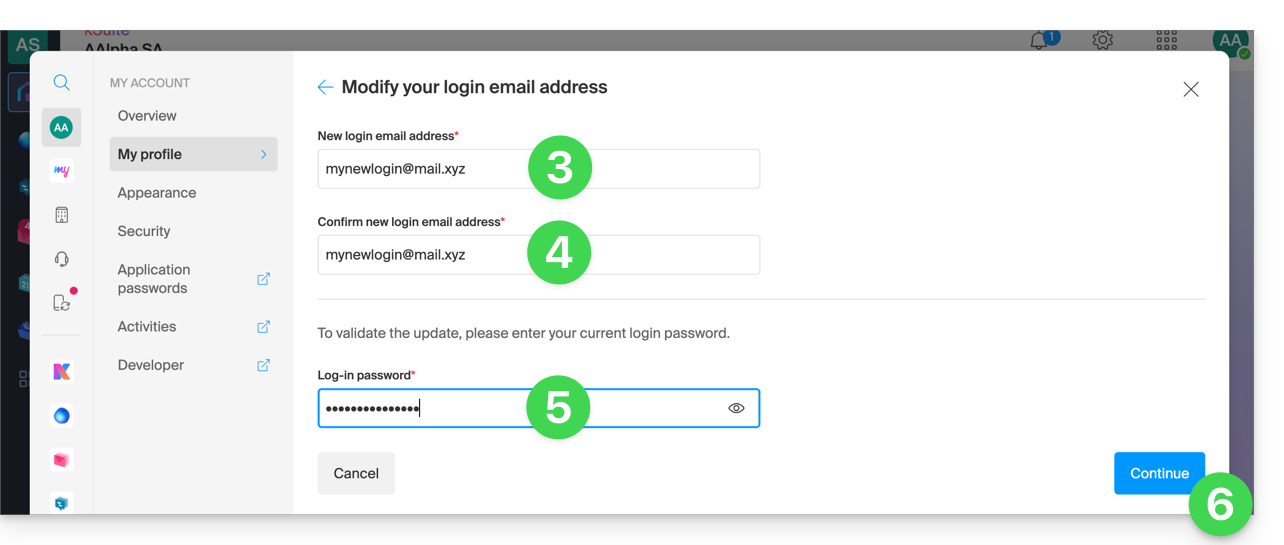
- Indique um novo endereço de e-mail para efetuar login.
- Confirme o seu novo endereço, indicando-o novamente.
- Insira a senha de acesso à sua conta Infomaniak.
- Clique em Continuar:
Link para esta FAQ: https://faq.infomaniak.com/2193
Esta seção de perguntas frequentes foi útil?
Este guia explica como adicionar ou modificar um ou mais registros do tipo SPF em uma zona DNS (de um nome de domínio) gerenciada no Manager Infomaniak.
Introdução
- Se o seu nome de domínio estiver registado na Infomaniak, se o seu e-mail for gerido pela Infomaniak, mas o site estiver alojado noutro serviço de alojamento (como o Wix, por exemplo), provavelmente gerirá a zona DNS (e, portanto, o SPF) nesse outro serviço de alojamento: consulte este outro guia sobre o assunto.
Compreender os registos do tipo SPF
O tipo de registo SPF (Sender Policy Framework) é um padrão de verificação do nome de domínio do remetente de um e-mail e tem como objetivo reduzir o SPAM. Serve para indicar qual servidor tem ou não o direito de enviar e-mails para um domínio. Se o SPF falhar para um e-mail, isso significa que este não foi enviado a partir de um servidor/endereço IP autorizado pelo administrador do domínio de envio. O e-mail é então considerado como spam.
SPF estrito -all: rejeição de e-mails não autorizados
A Infomaniak instala este tipo de registo automaticamenteao criar um Serviço de Email no seu domínio (SPF estrito):
v=spf1 include:spf.infomaniak.ch -allAssim, o servidor destinatário do e-mail que você envia avaliará que qualquer e-mail que não provenha dos servidores Infomaniak será rejeitado. Isso impede que pessoas mal-intencionadas falsifiquem endereços de e-mail do seu domínio.
SPF flexível ?all: tolerância para alguns e-mails
Você pode optar por modificar o SPF para um modelo mais flexível:
v=spf1 include:spf.infomaniak.ch ?allNesse caso, o servidor destinatário do e-mail que você está enviando avaliará, de acordo com suas próprias regras, se aceita e-mails que não são provenientes dos servidores Infomaniak.
Em resumo:
?: o servidor de recebimento aceita a mensagem, mesmo que o remetente não esteja listado no SPF.~: o servidor de receção aceita geralmente a mensagem se esta não estiver listada no SPF, mas identifica-a como suspeita-: o servidor de receção rejeita a mensagem se esta não estiver listada no SPF (recomendado)
Adicionar um SPF através de um registo TXT
Existem 2 formas de gerir os SPF.
Se você possui um Serviço de E-mail na Infomaniak, a ferramenta de Segurança Global no painel de controle Infomaniak (❓: ajuda) permite que você gerencie o SPF: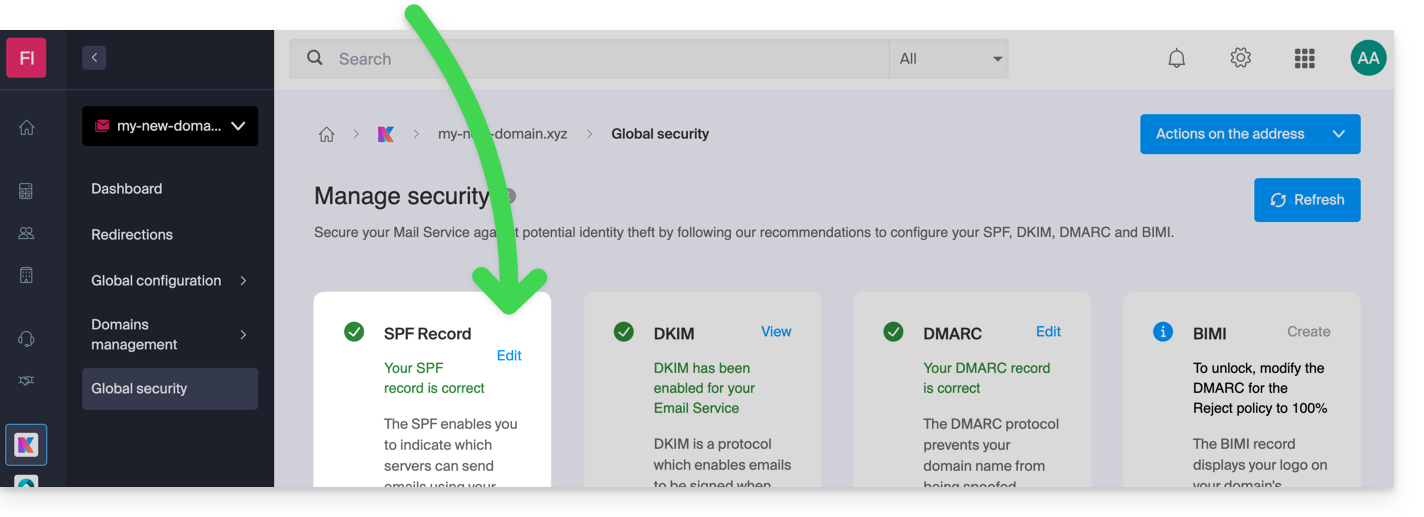
No entanto, como o registro SPF é um tipo de registro DNS do tipo TXT, você também pode gerenciá-lo a partir da zona DNS do nome de domínio:
- Clique aqui para acessar o gerenciamento do seu domínio no painel de controle Infomaniak (❓: ajuda).
- Clique diretamente no nome atribuído ao domínio em questão.
- Clique em Zona DNS no menu lateral esquerdo.
- Verifique na tabela se já não existe um registo TXT com um valor que mencione SPF, como aqui:
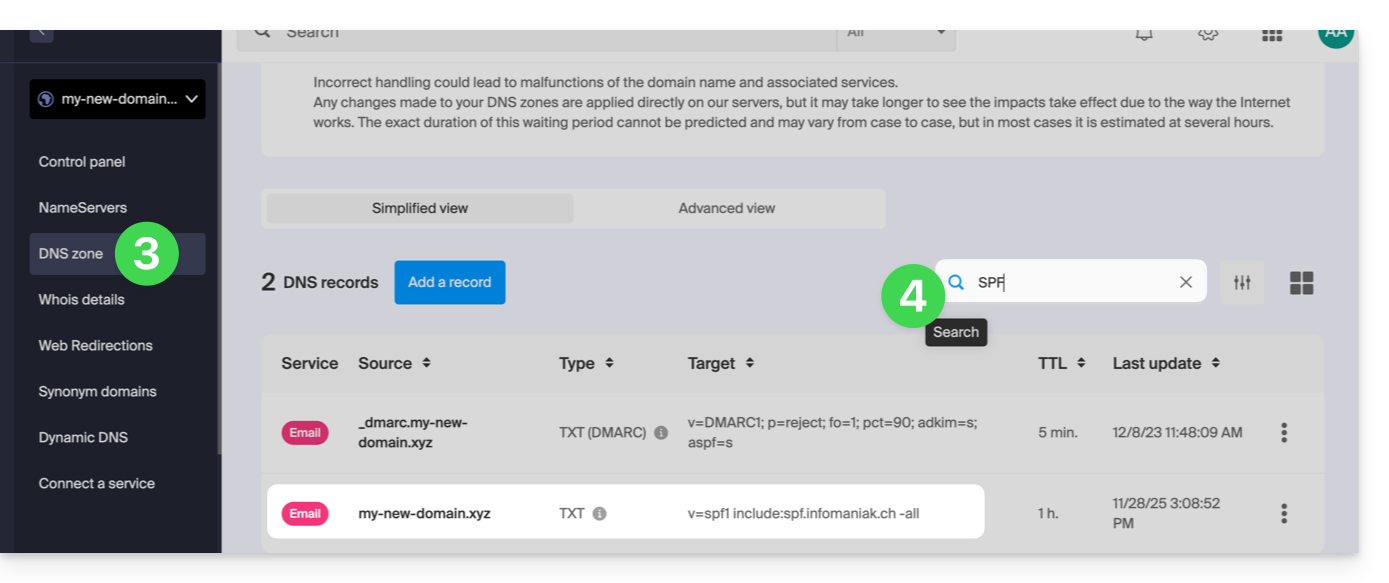
- Clique no botão para adicionar um registo (receberá uma mensagem de erro se tentar adicionar um registo TXT com um valor SPF quando já existir um na zona):
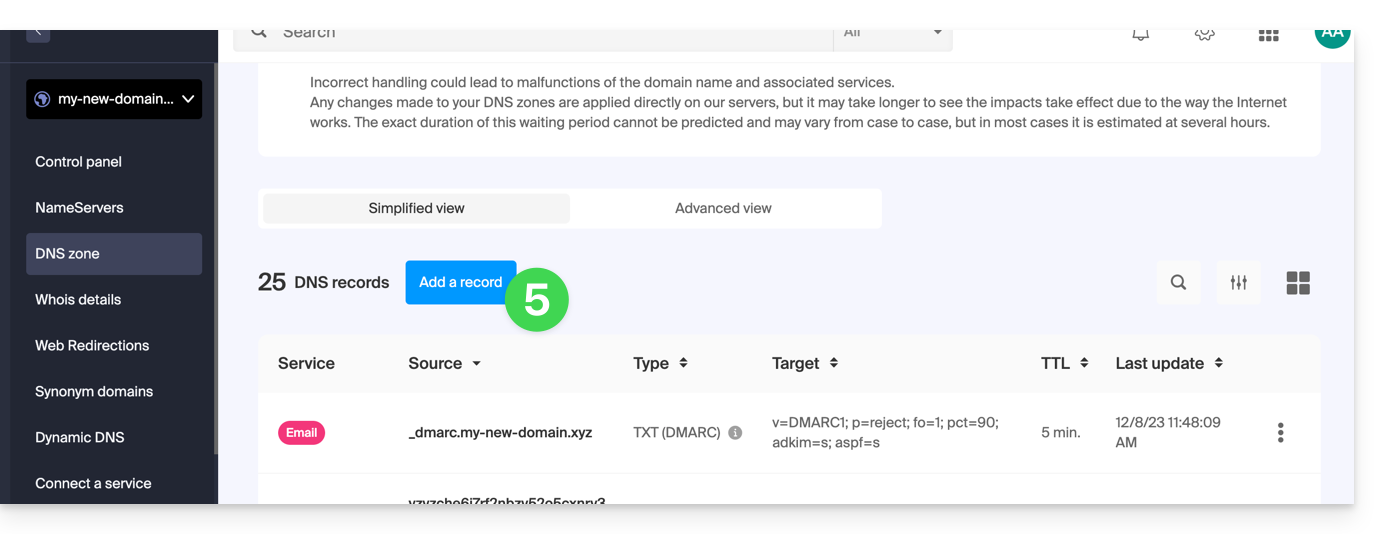
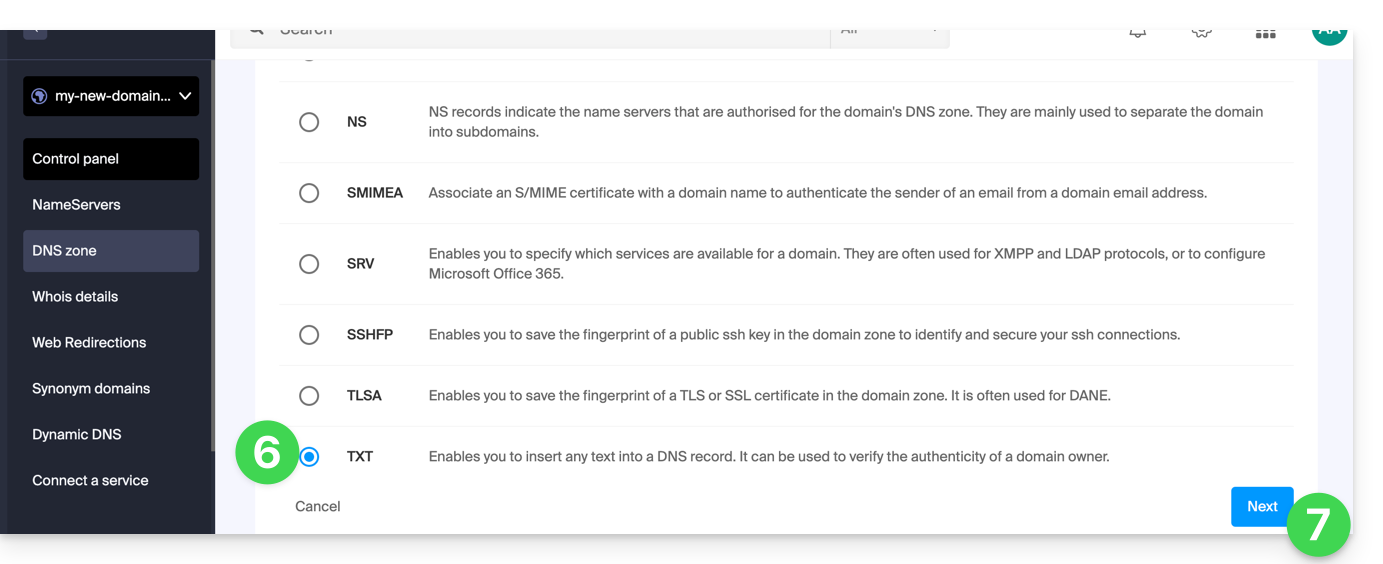
- Clique no botão de rádio TXT para adicionar um registo.
- Clique no botão Seguinte:
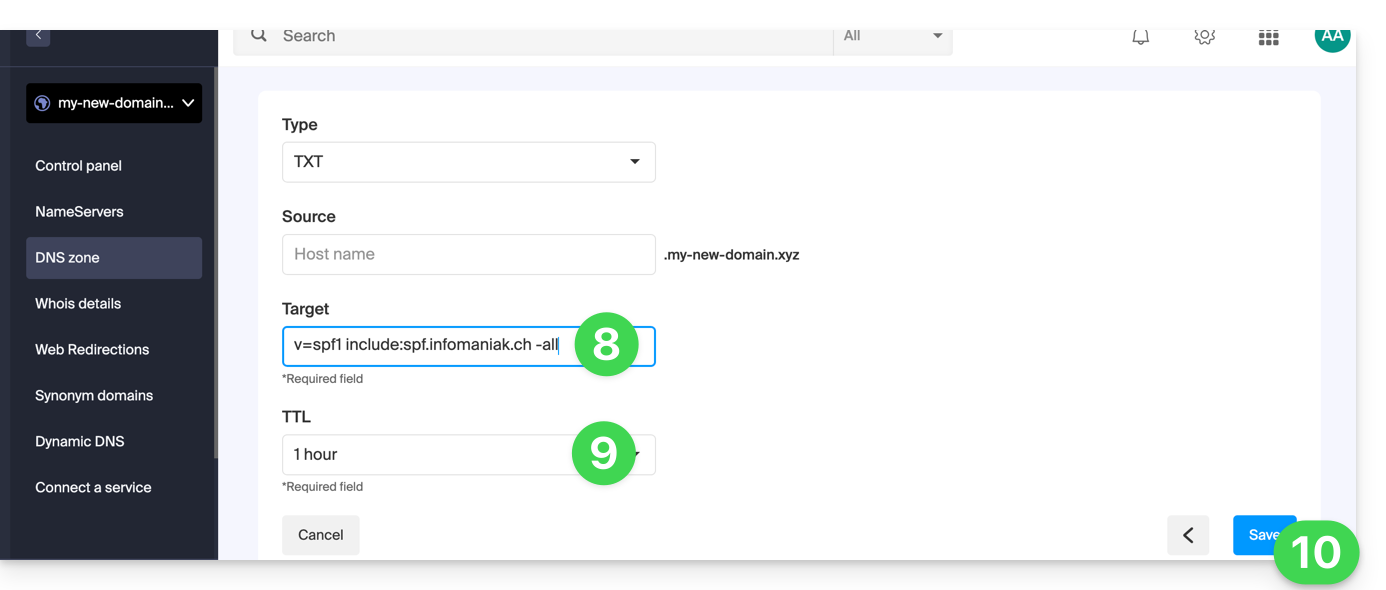
- Insira o valor do SPF necessário para a sua zona DNS.
- Deixe o valor padrão para o TTL.
- Clique no botão Salvar:
Adicionar vários registros SPF
Se utilizar outros fornecedores de e-mail em conjunto com a Infomaniak, é necessário obter os registros SPF deles e, em seguida, combiná-los com o registro SPF da Infomaniak, seguindo uma sintaxe específica.
Ter vários registros SPF distintos causará erros. É imprescindível combinar vários registros SPF no mesmo TXT!
Exemplo de 3 registros SPF a serem combinados:
- O da Infomaniak:
v=spf1 include:spf.infomaniak.ch -all - Os de 2 fornecedores secundários:
v=spf1 include:the-second-domain.xyz ?allv=spf1 include:the-other-domain.xyz ~all
... o registro SPF definitivo a ser inserido na sua zona DNS deverá ter o seguinte formato:
v=spf1 include:spf.infomaniak.ch include:the-second-domain.xyz include:the-other-domain.xyz -allRemova qualquer outro registro SPF da zona DNS do seu domínio!Qualquer adição/modificação de DNS pode levar até 48 horas para se propagar (❓: ajuda).
Limites do número de registros SPF
Os registros SPF múltiplos são limitados a um máximo de 10 inclusões.
O registro SPF da Infomaniak geralmente já contém 4 inclusões:
include:relay.mail.infomaniak.chinclude:app.mail.infomaniak.chinclude:newsletter.infomaniak.cominclude:amazonses.com
Verificar o(s) registro(s) SPF
Se você possui um Serviço de Email na Infomaniak, a ferramenta de Segurança Global no Painel de Controle Infomaniak (❓: ajuda) permite verificar e corrigir facilmente seus possíveis registros problemáticos.
Em caso de problemas, recomenda-se analisar o seu nome de domínio em MxToolbox para verificar se o seu registro SPF contém erros de sintaxe, inclusões excessivas ou outros problemas que possam estar a causar o erro: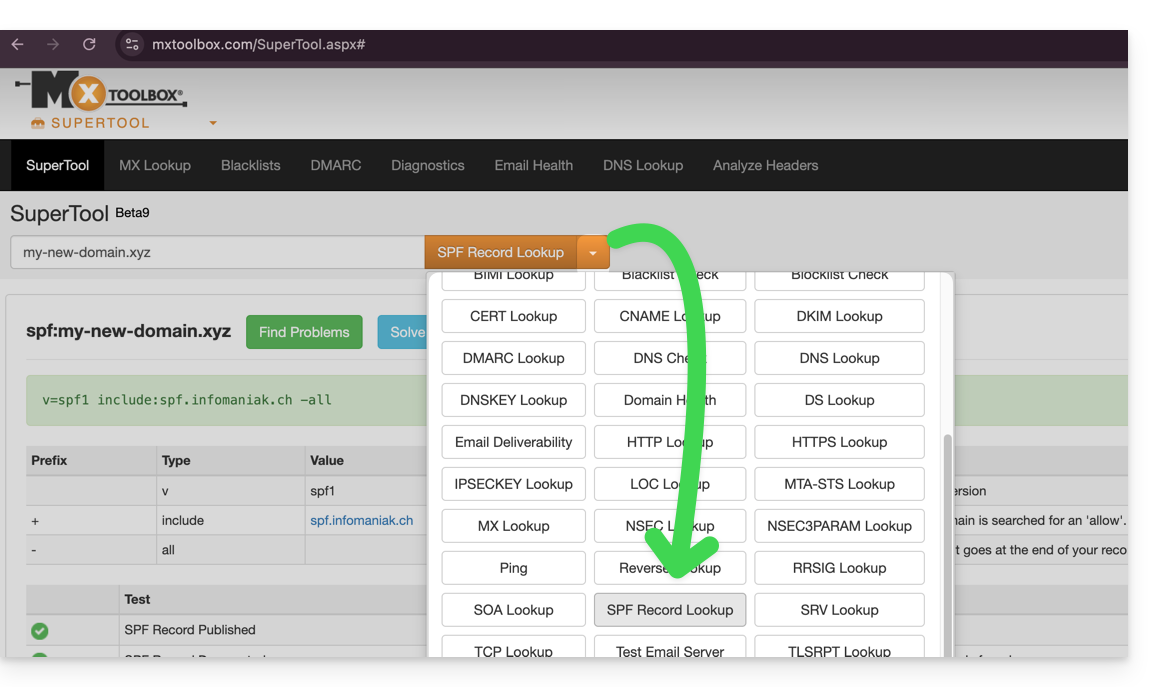
… ou diretamente no endereço https://mxtoolbox.com/spf.aspx.
Link para esta FAQ: https://faq.infomaniak.com/2199
Esta seção de perguntas frequentes foi útil?