Base de conhecimento
1000 perguntas frequentes, 500 tutoriais e vídeos explicativos. Aqui, você encontra apenas soluções!
Este guia explica como conectar o aplicativo móvel Apple Mail para iOS (iPhone, iPad…) a um endereço de e-mail hospedado na Infomaniak.
Introdução
- Seu dispositivo iOS será configurado automaticamente por meio de perfis de configuração .mobileconfig compatíveis com a Apple, ao contrário de uma configuração manual.
- É possível remover um perfil de configuração após a instalação (role até o final desta página para obter as instruções).
Instalar um perfil de configuração
Pré-requisitos
- Crie o endereço de e-mail em my kSuite ou em um Serviço de E-mail / kSuite.
- Verifique se o Serviço de E-mail está configurado de forma ideal.
Em seguida:
- Clique aqui para acessar a ferramenta de configuração da Infomaniak (serviço online https://config.infomaniak.com) — faça login, se necessário, na sua conta Infomaniak na Organização onde seu endereço de e-mail é gerenciado.
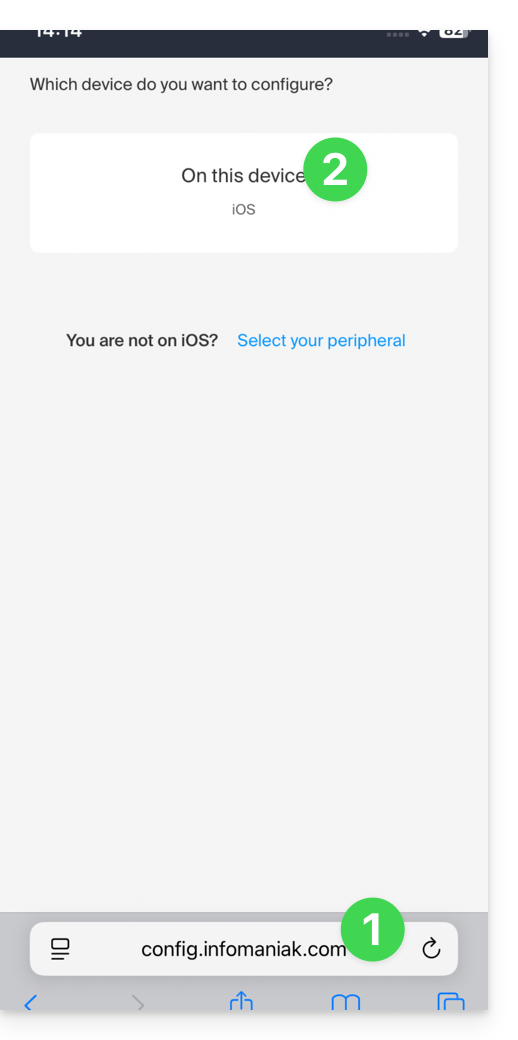
- Escolha instalar o perfil neste dispositivo iOS:
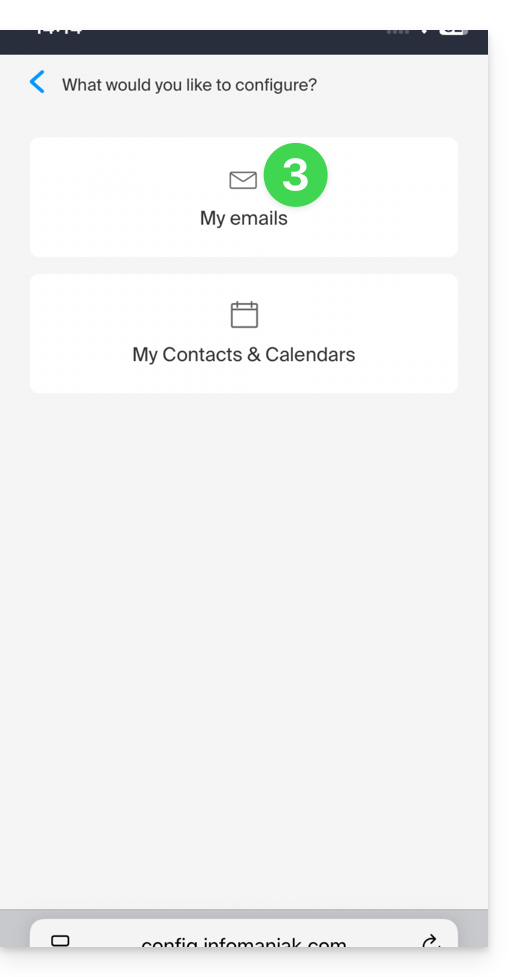
- Escolha sincronizar os e-mails:
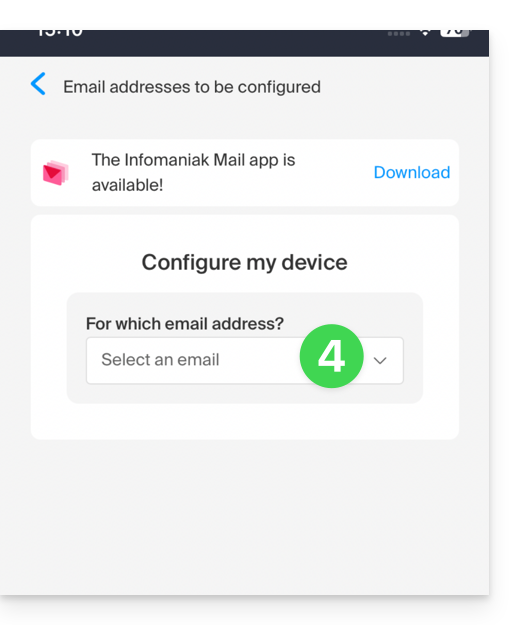
- Escolha o endereço de e-mail (entre os já associados ao seu utilizador atual) que deverá ser sincronizado no seu dispositivo:
- Escolha na lista de dispositivos para ativar a sincronização num novo dispositivo (aquele em que se encontra):
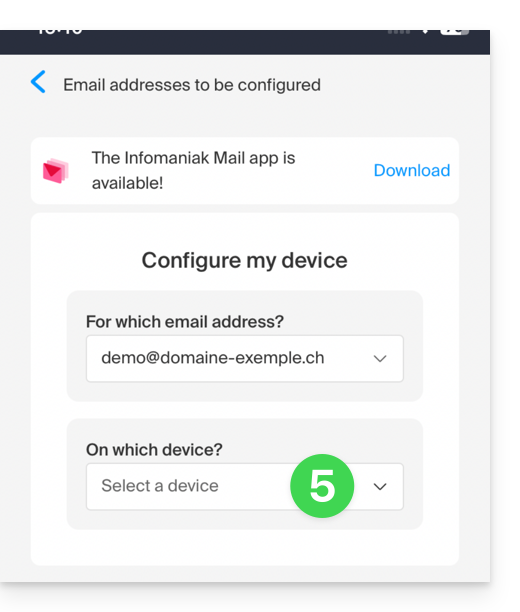
- O nome, apenas descritivo, do dispositivo é ajustado em conformidade, mas pode modificá-lo, se necessário:
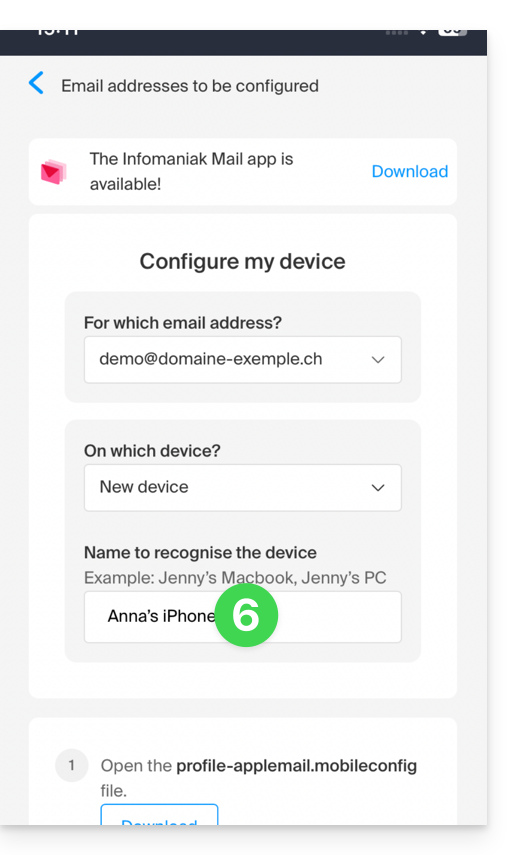
- Desça mais no assistente e gere uma palavra-passe dedicada à sincronização dos e-mails:
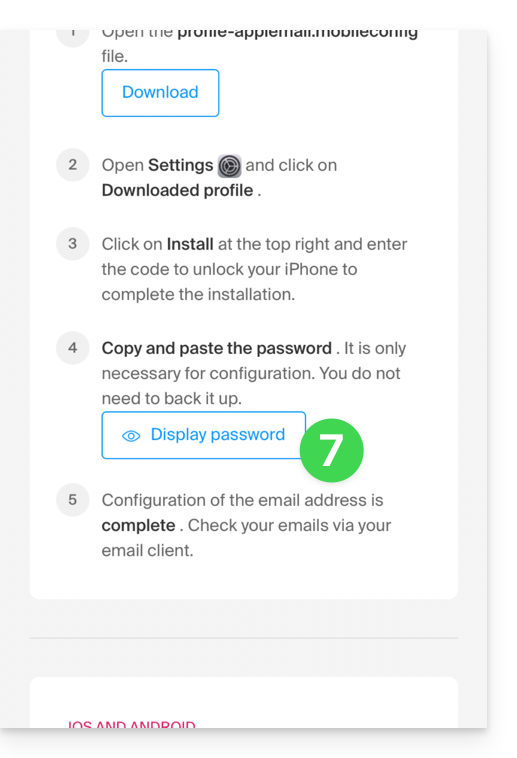
- Copie a palavra-passe gerada (será solicitada durante a instalação do perfil Apple).
- Descarregue o perfil Apple:
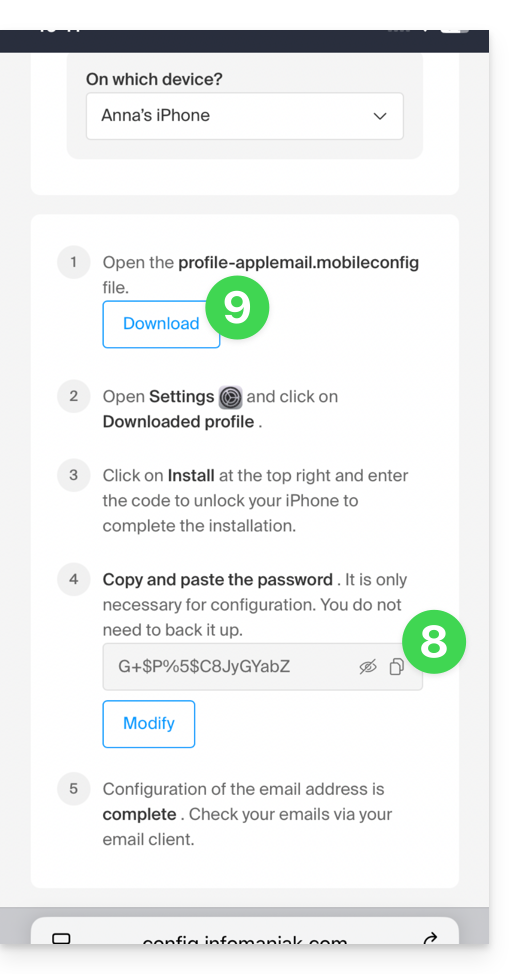
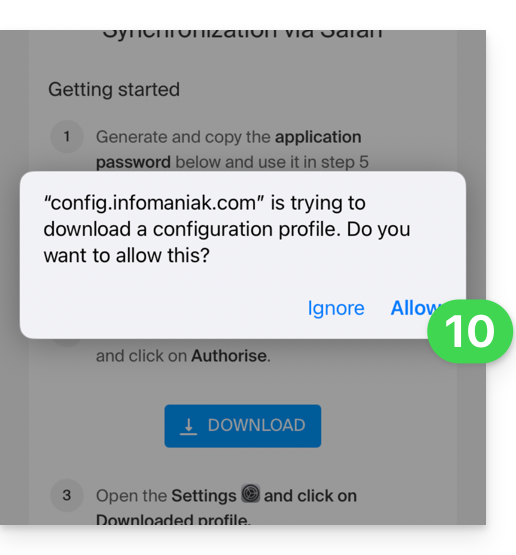
- Autorize o download no dispositivo:
- Toque para fechar a mensagem:
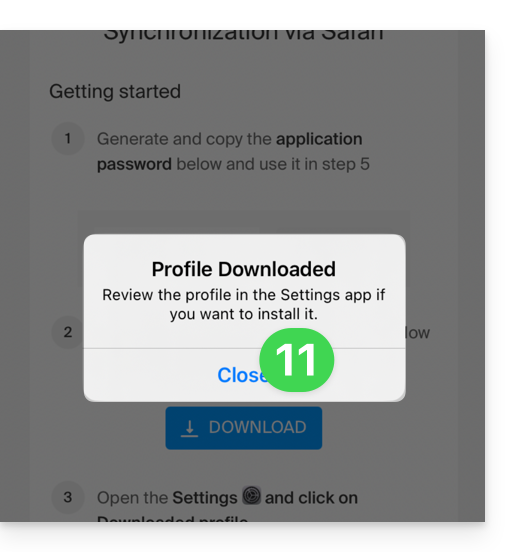
- Abra as configurações do dispositivo iOS e toque na faixa superior que o informa que um novo perfil foi descarregado:
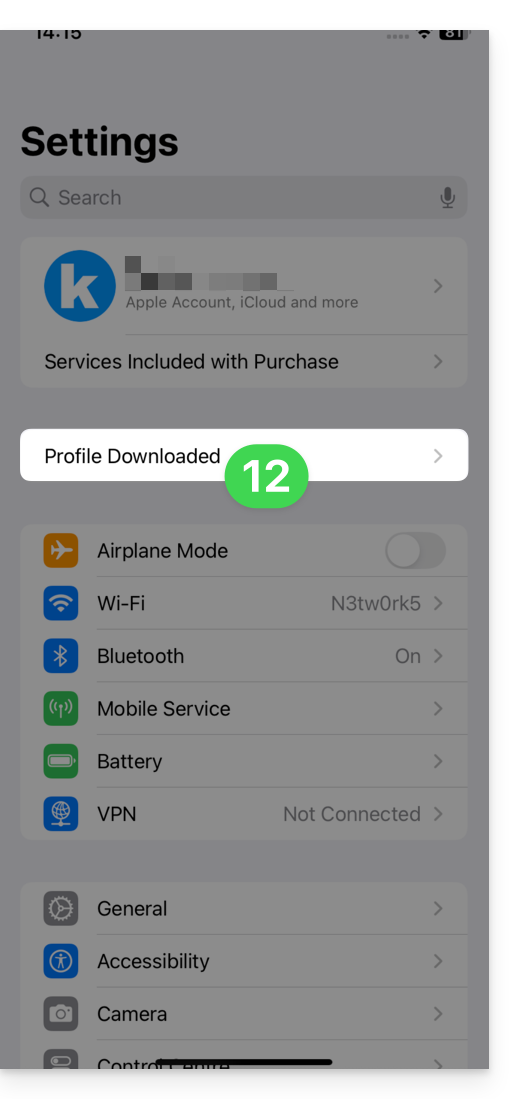
- Toque em Instalar:
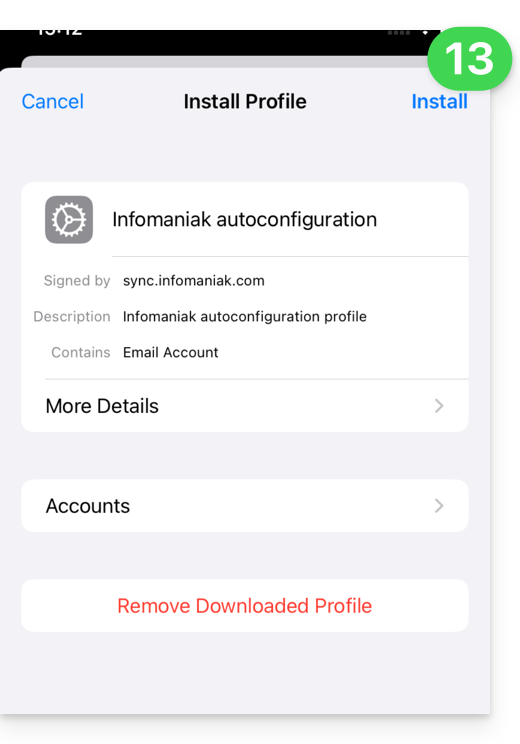
- Insira o código do seu dispositivo iOS, como faria para desbloqueá-lo:
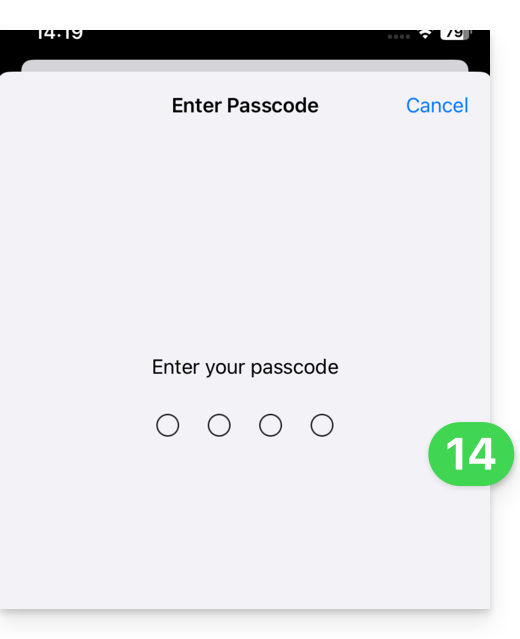
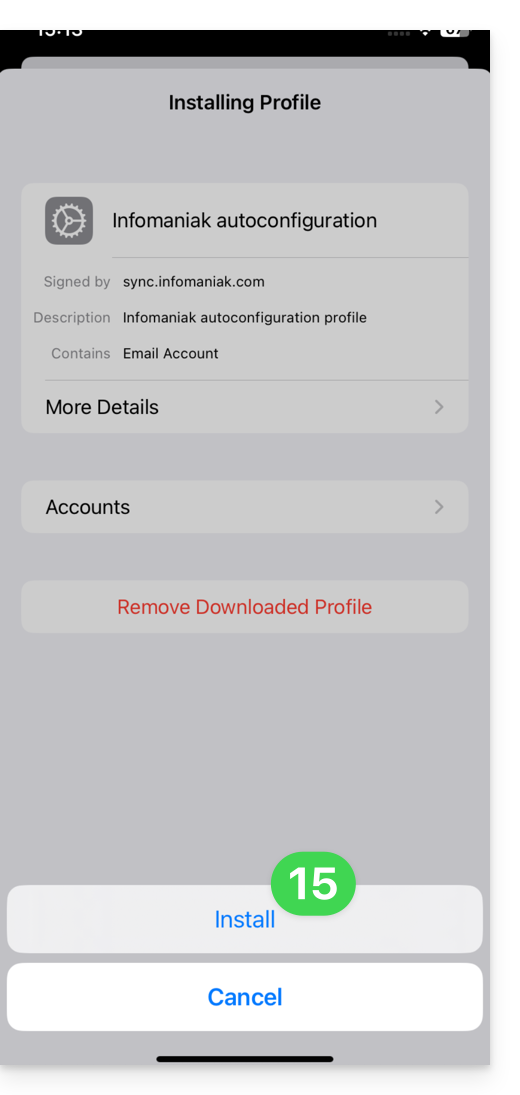
- Toque em Instalar:
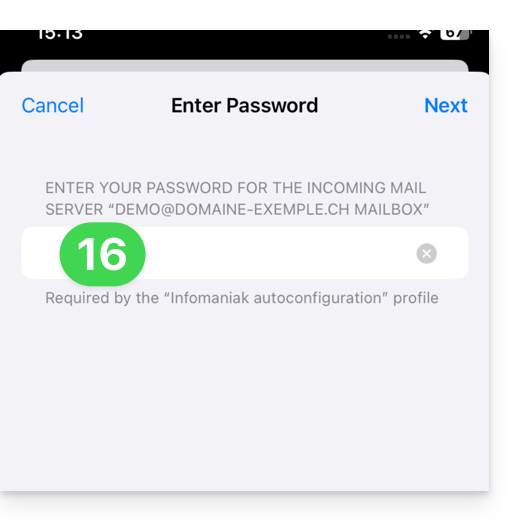
- Insira (ou cole) a senha do dispositivo copiada no passo 8 acima:
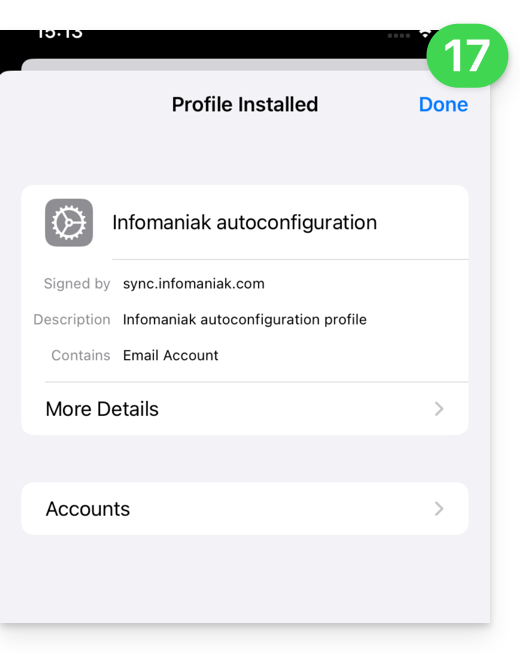
- Quando a indicação aparecer na parte superior, estará concluído:
Se o seu aplicativo iOS Apple Mail já estiver aberto, você precisará reiniciá-lo. Em seguida, verá as informações adicionadas pela sincronização: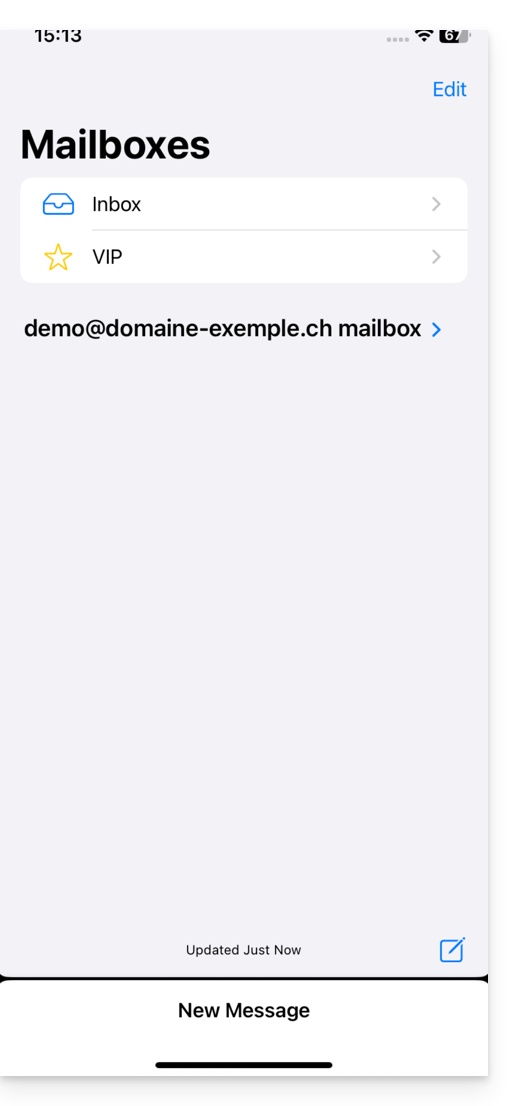
Remover um perfil Apple
Consulte a documentação oficial, alterando na parte superior da página* a versão do seu sistema, se necessário.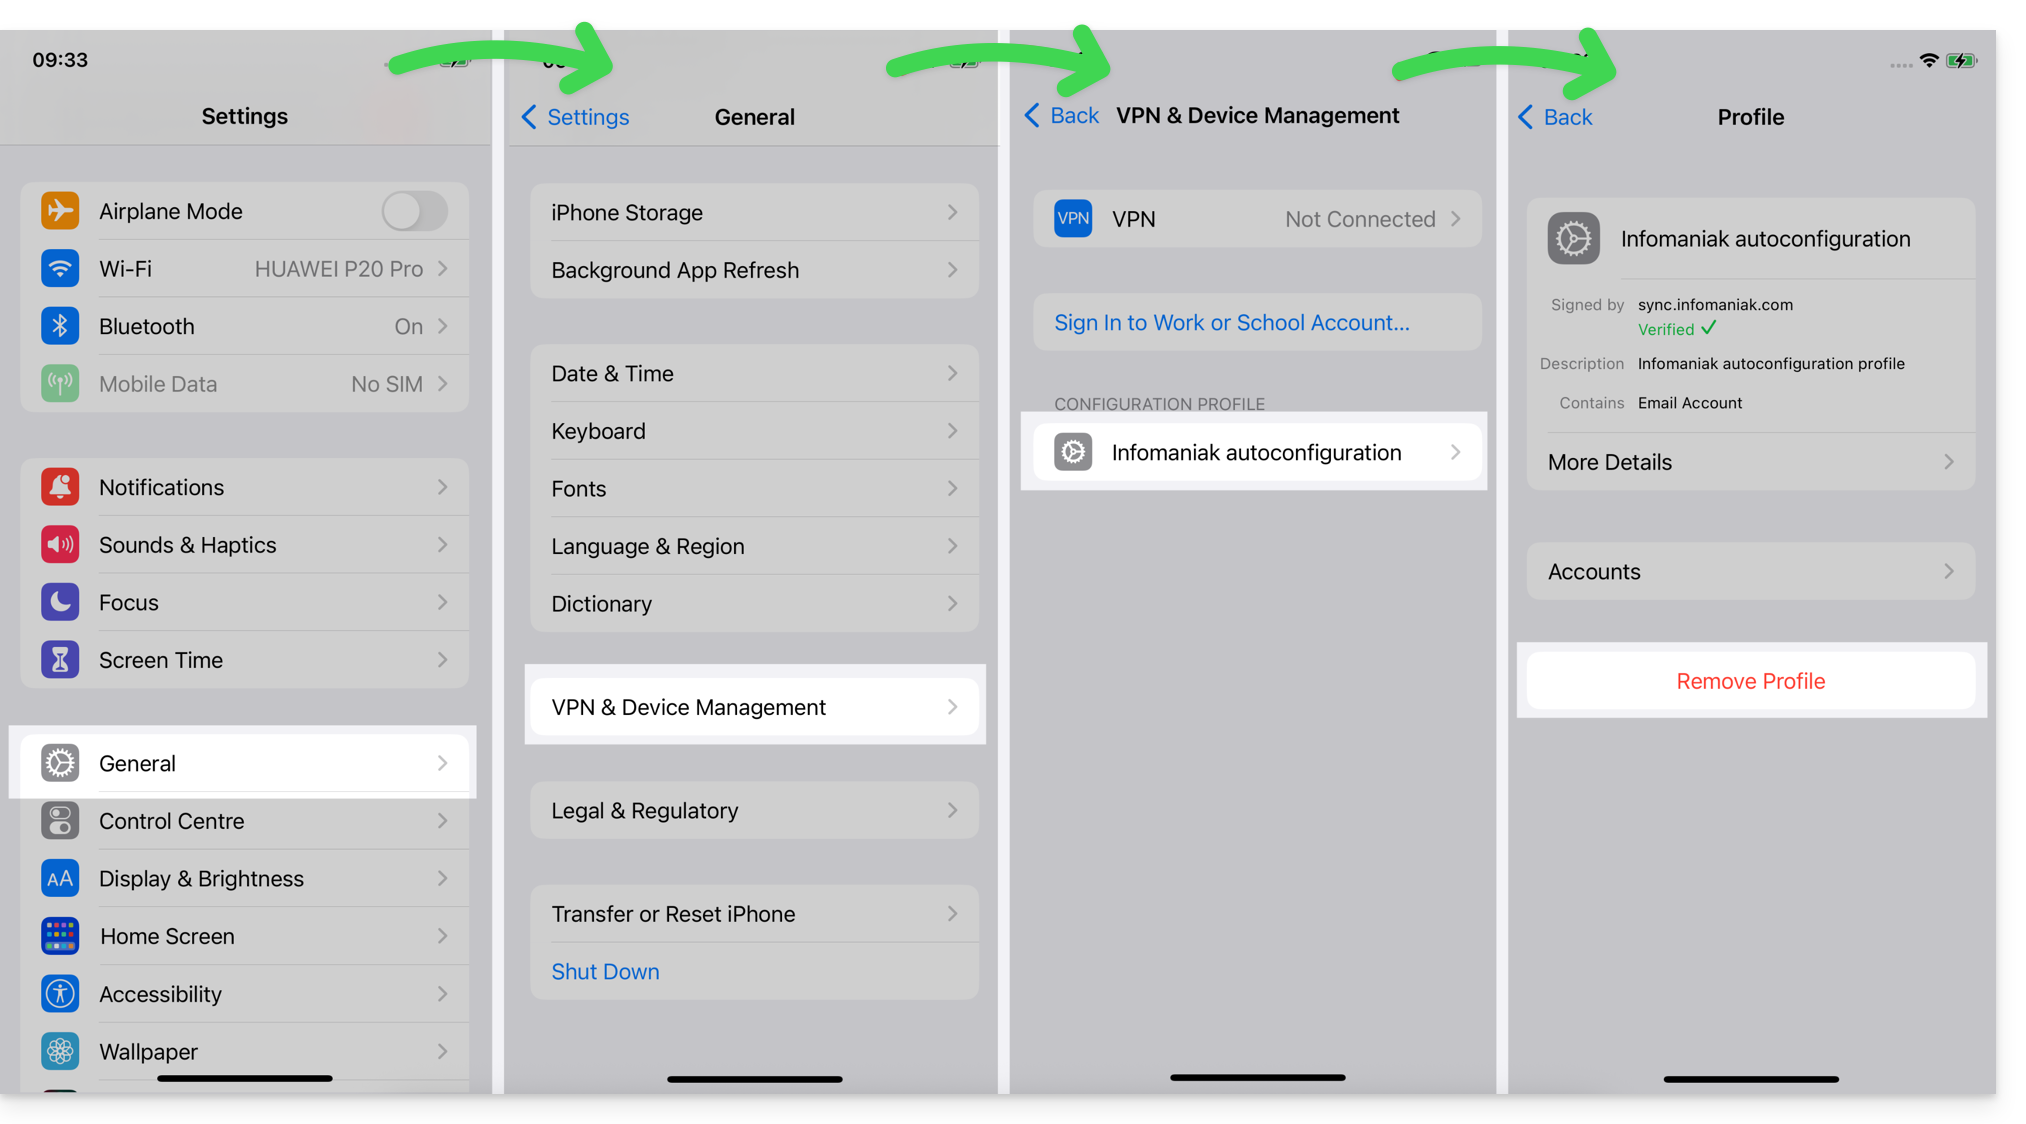
*Por que é necessário escolher a versão do guia que corresponda exatamente à sua versão do sistema macOS/iOS? A Apple introduz alterações, às vezes sutis, em cada nova versão do seu sistema. Por exemplo, um caminho em iOS 15…
… torna-se este em iOS 18…
Link para esta FAQ: https://faq.infomaniak.com/1319
Esta seção de perguntas frequentes foi útil?
Este guia explica como criar e gerenciar as senhas de um endereço de e-mail a partir do seu Serviço de E-mail, para que possa consultá-lo em um software de terceiros, como o Outlook ou o Thunderbird.
As outras opções de acesso e gerenciamento são apresentadas no guia principal. Se você for um usuário my kSuite, consulte este outro guia.
Pré-requisitos
- Contratar um Serviço de Email junto da Infomaniak.
- Criar um ou mais endereços neste Serviço de Email.
- Ter, no mínimo, o direito de gerir o Serviço de Email em questão (ou ser Administrador / Responsável legal dentro da Organização).
Gerar uma senha para o endereço de e-mail
Para adicionar uma senha ao endereço de exemplo demonstration@exemple-domaine.ch:
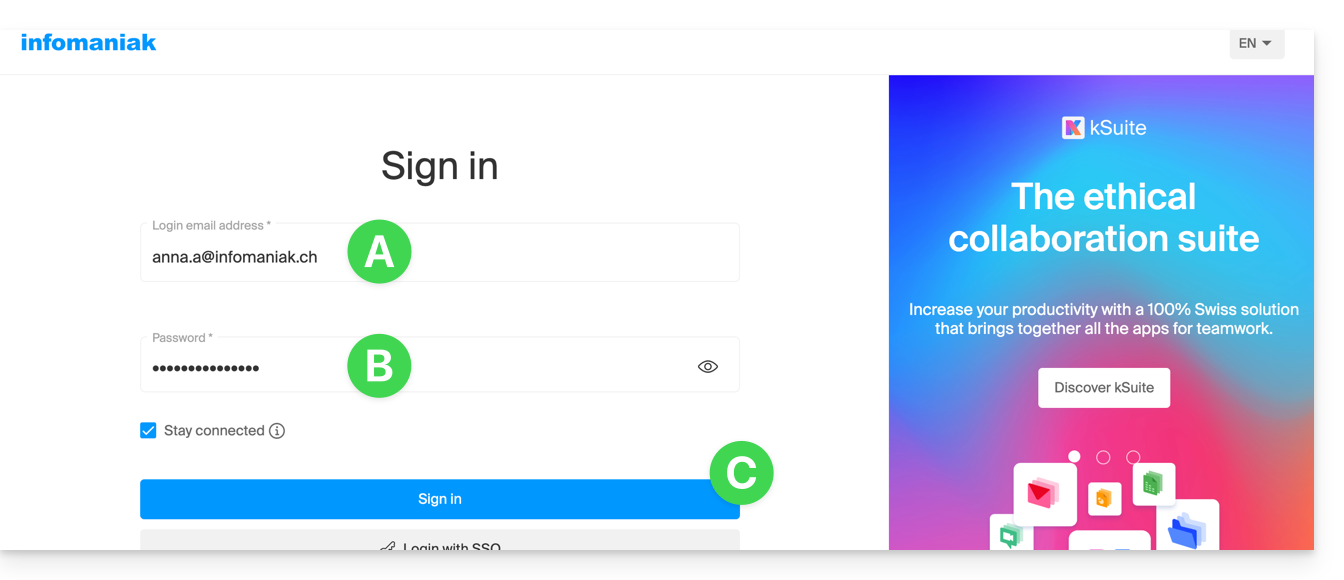
- Insira o ID de login da sua conta Infomaniak e a senha na página https://manager.infomaniak.com/:
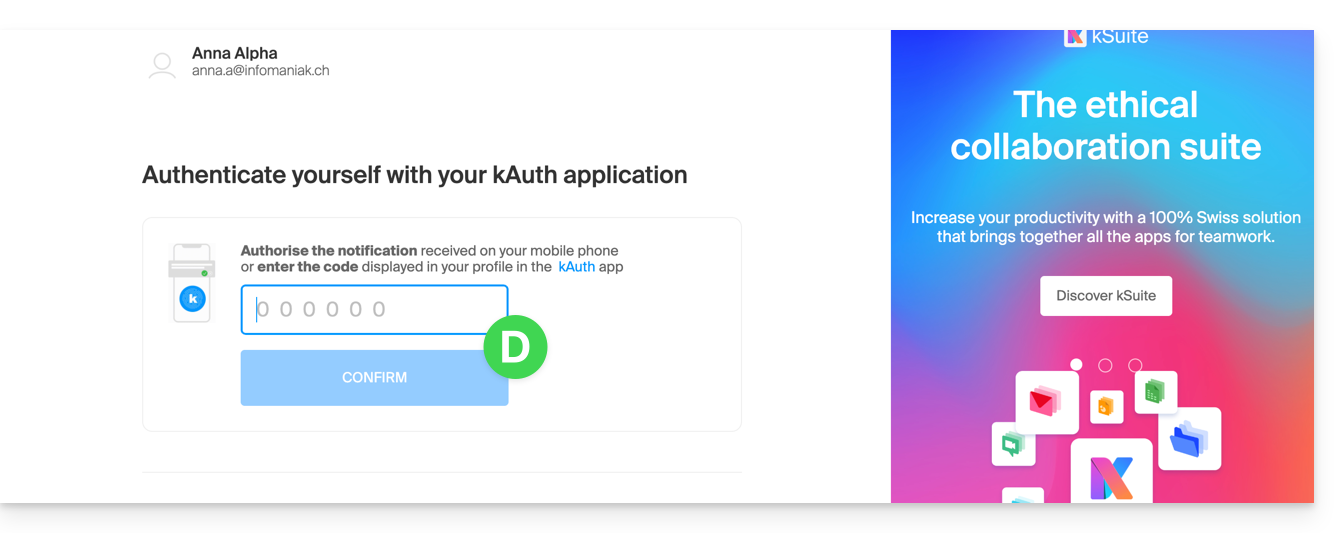
- Confirme o acesso no painel de controle usando o método de autenticação de dois fatores (2FA) definido inicialmente:
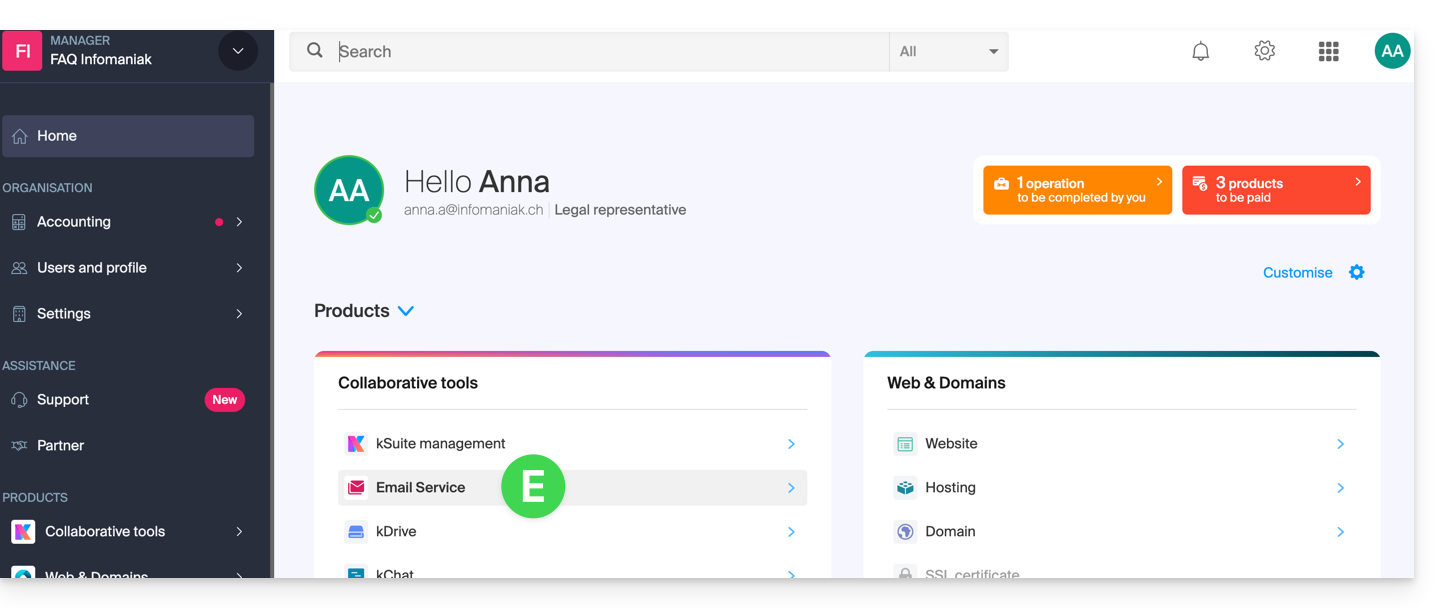
- Após acessar o painel de controle, clique em Serviço de E-mail:
- Após acessar seus Serviços de E-mail, clique no nome / nome de domínio ao qual pertence o endereço de e-mail em questão:
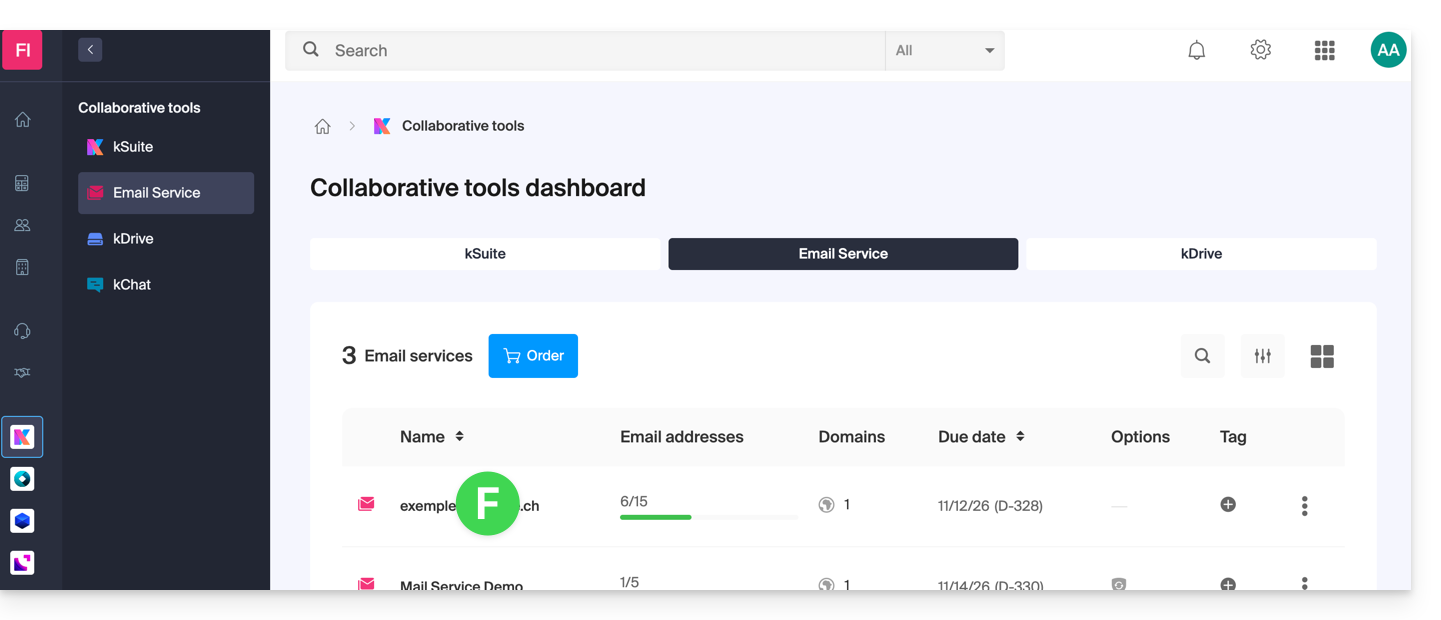
- Após acessar o Serviço de E-mail ao qual o endereço pertence, clique no endereço de e-mail em questão:
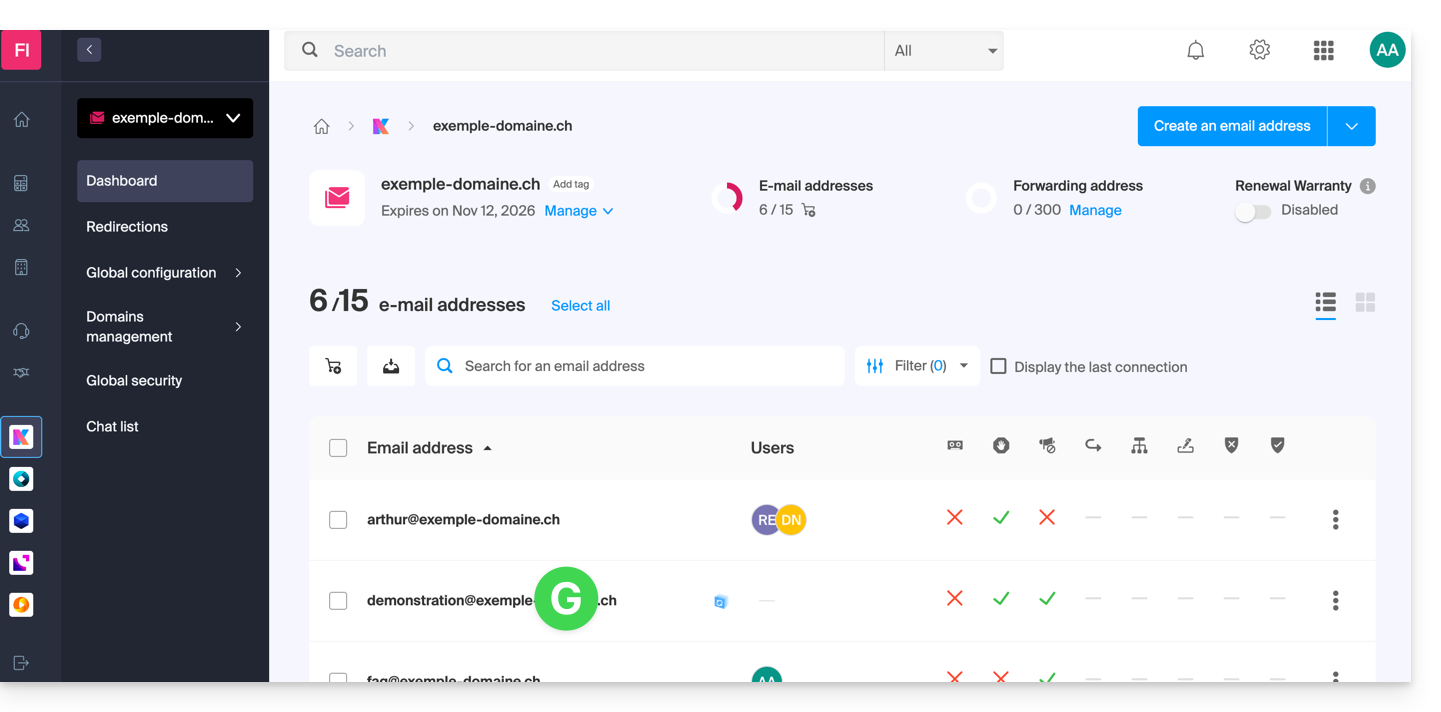
- Após acessar o endereço de e-mail em questão, clique na aba Dispositivos e, em seguida, em Adicionar um dispositivo:
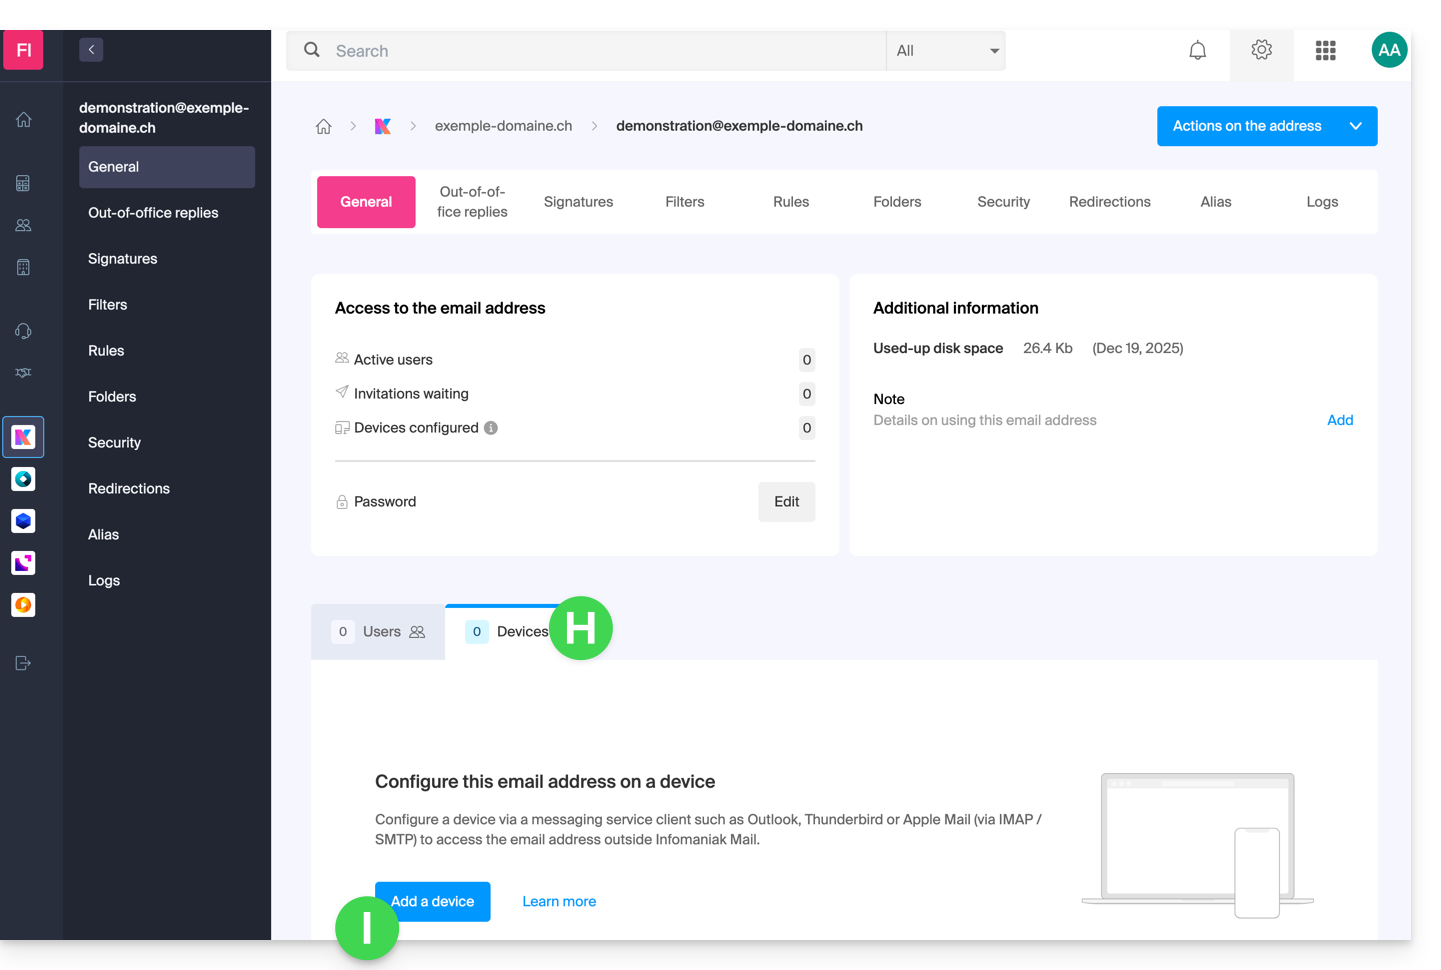
- Neste momento, pode ser necessário inserir novamente a senha de login (a mesma do item B acima):
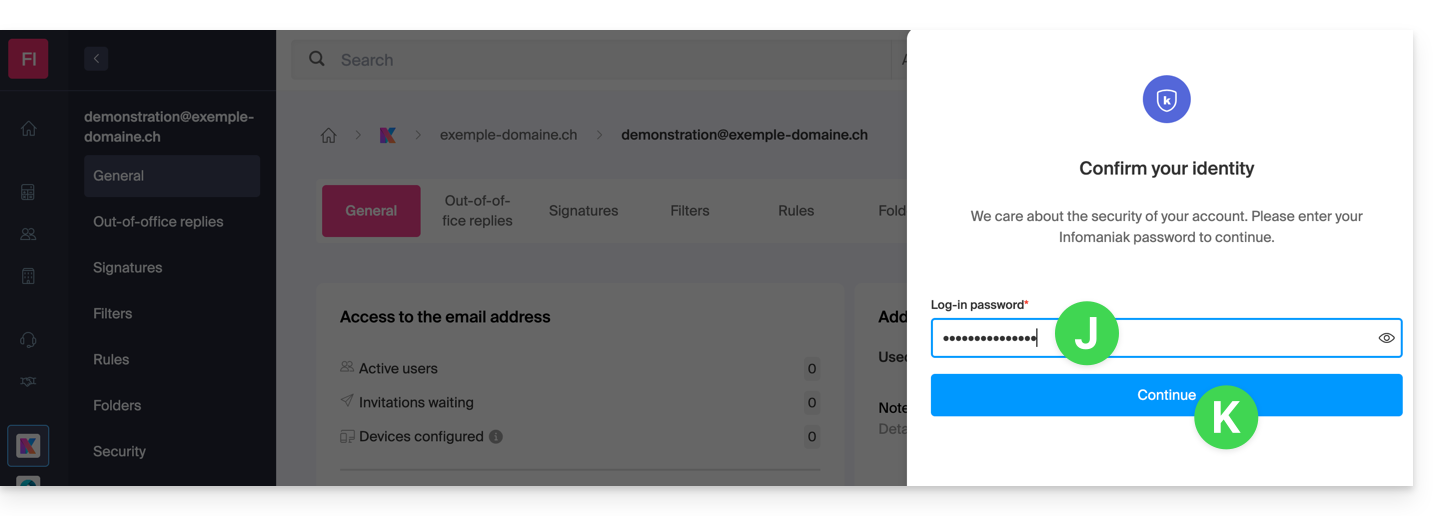
- Em seguida, escolha não especificar um usuário específico ("Sem usuário").
- Especificar um usuário permite, no entanto, vincular uma possível restrição SMTP do usuário aos seus dispositivos conectados, além de simplesmente remover o direito de envio a partir do ecossistema Infomaniak.
- Insira um nome descritivo que permita identificar o motivo pelo qual você criou este dispositivo(aqui, o utilizador precisa de uma senha para poder enviar e-mails a partir de um site, e adiciona como informação útil a data atual):
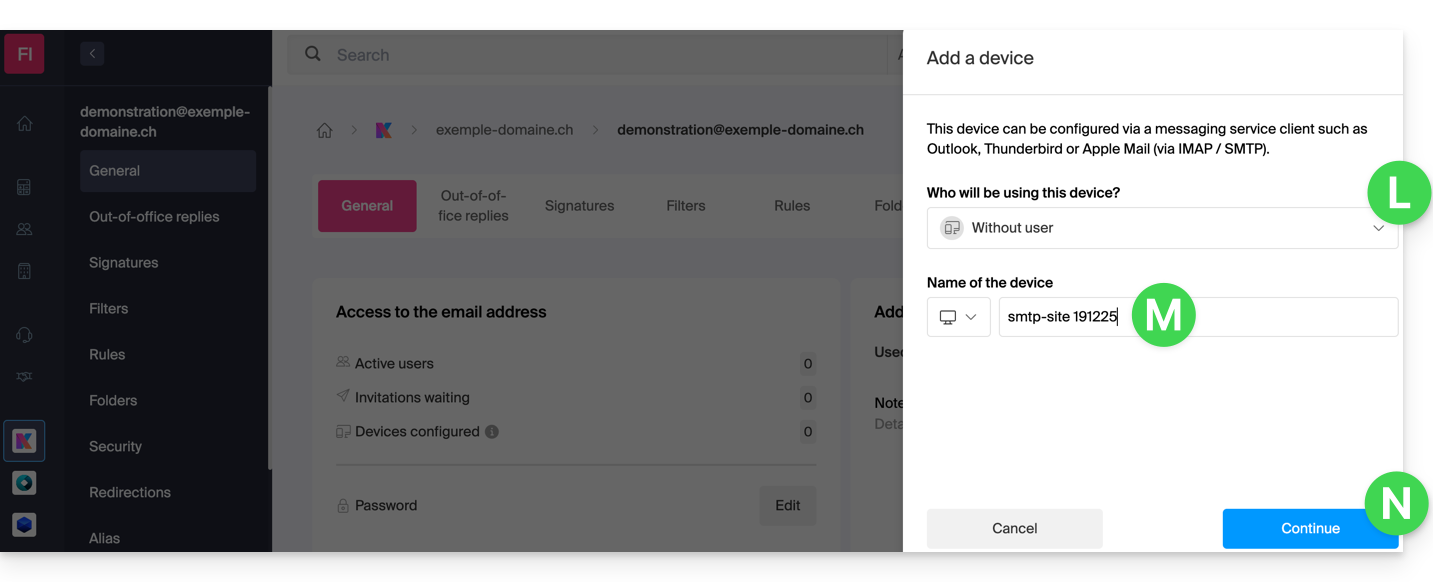
- Pronto: a nova senha é exibida, pode alterar os caracteres (mínimo de 16) se necessário.atenção, não será possível exibi-lo novamente depois).
- Salve-o na parte inferior da página para utilizá-lo da forma que desejar:
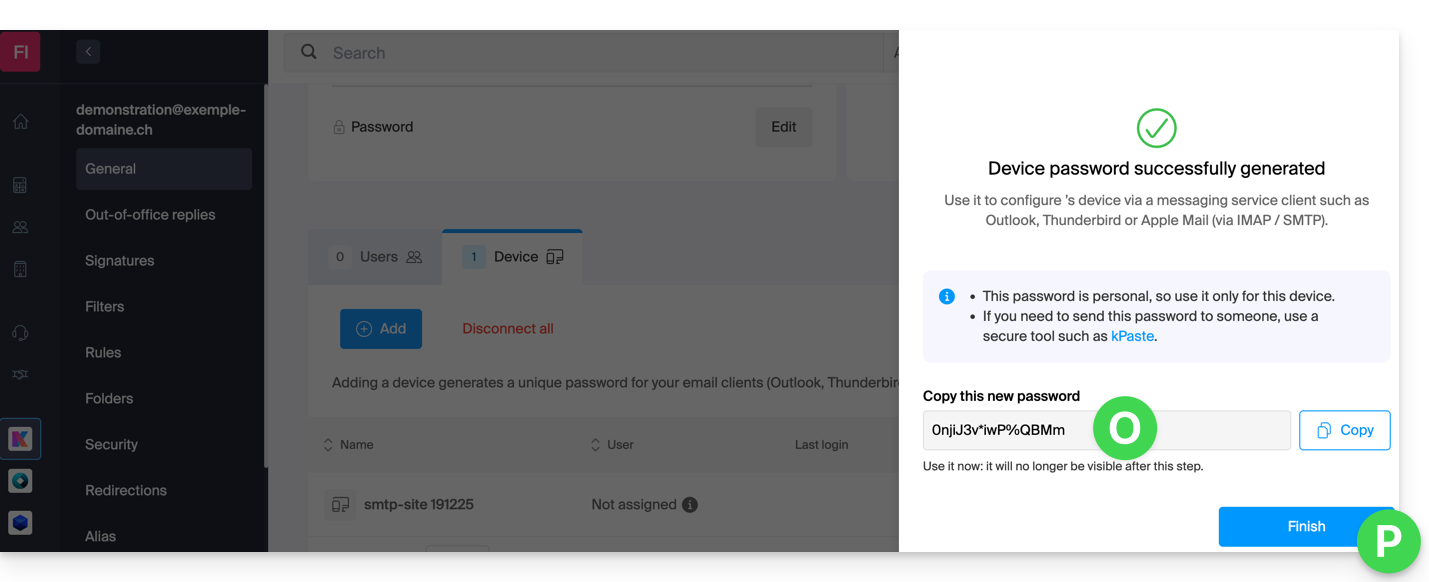
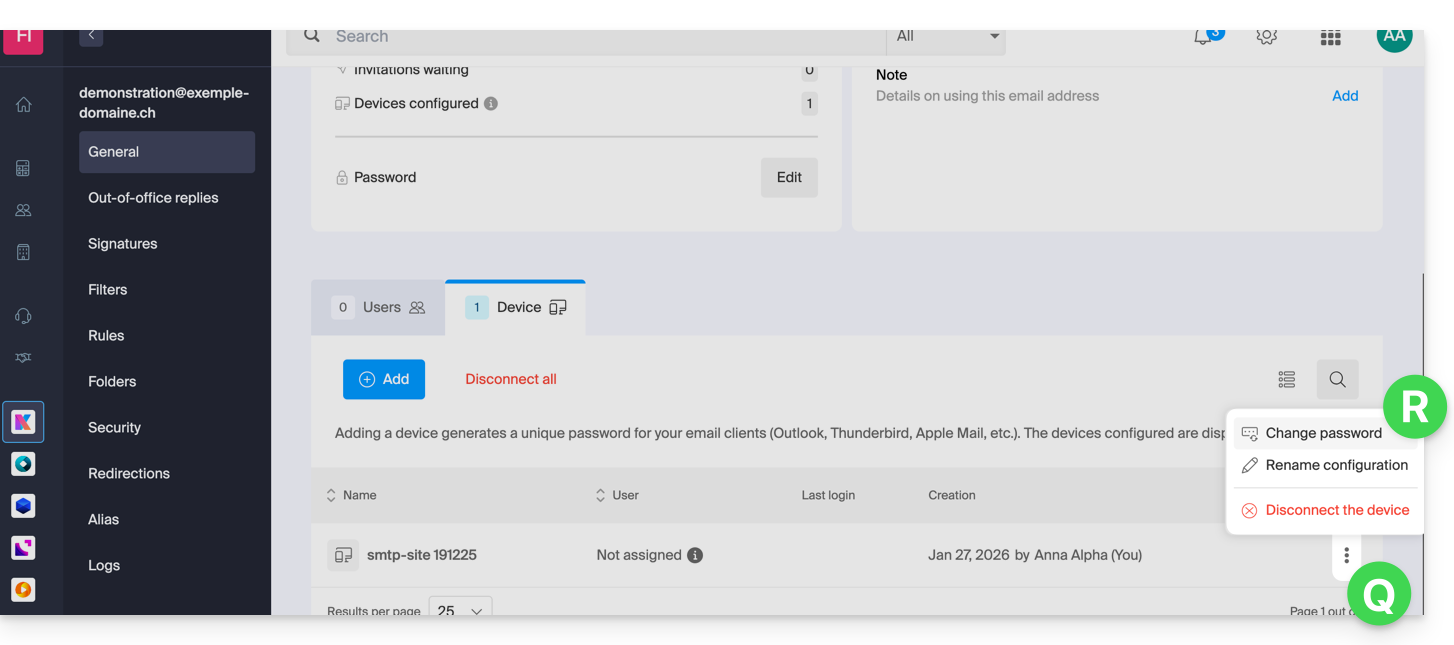
Clicou no botão “Concluir” (acima, “P”) sem anotar a senha? Sem problemas, modifique ou gere uma nova!
- Clique no menu de ações ⋮, localizado à direita do dispositivo recém-criado, e clique em Alterar senha:
- Clique no botão mais à direita do campo para gerar uma nova senha aleatória e/ou insira diretamente os caracteres seguros que deseja usar (mínimo de 16) para a nova senha e, em seguida, clique no botão para salvar a alteração:
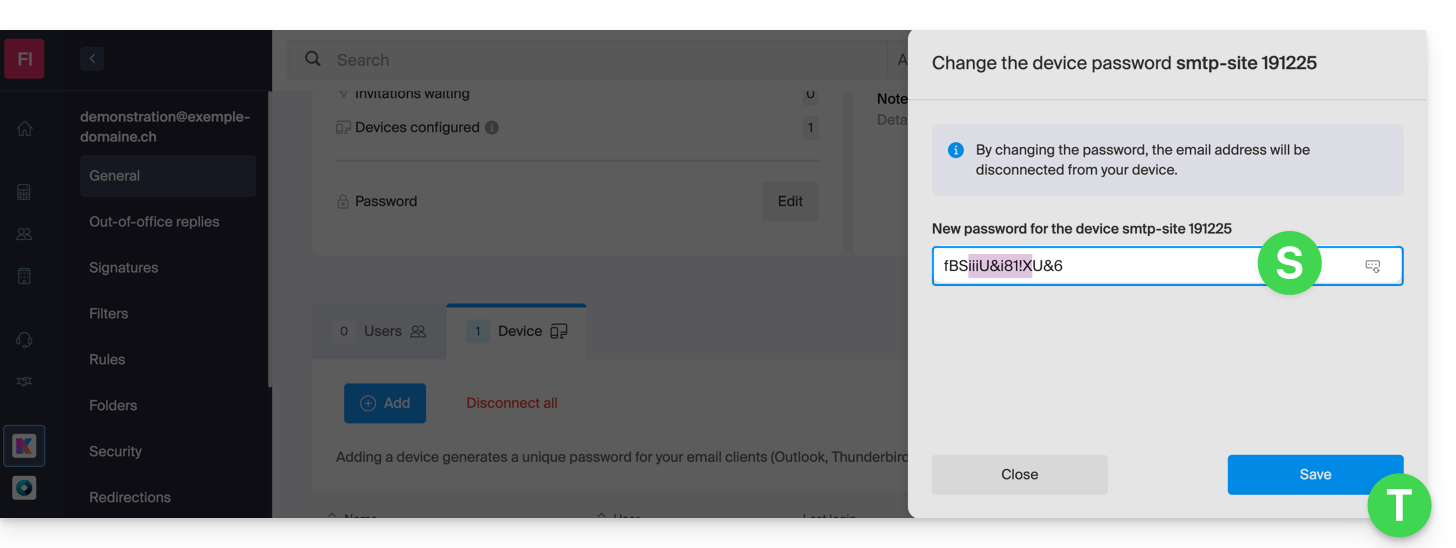
- Pronto, a senha que substituirá a antiga é exibida permanentemente. Você pode inseri-la em seus dispositivos, substituindo a senha anterior (atenção: não será possível exibi-la novamente).
Precisa de uma senha para um usuário secundário e temporário? Sem problemas, gere uma segunda senha!
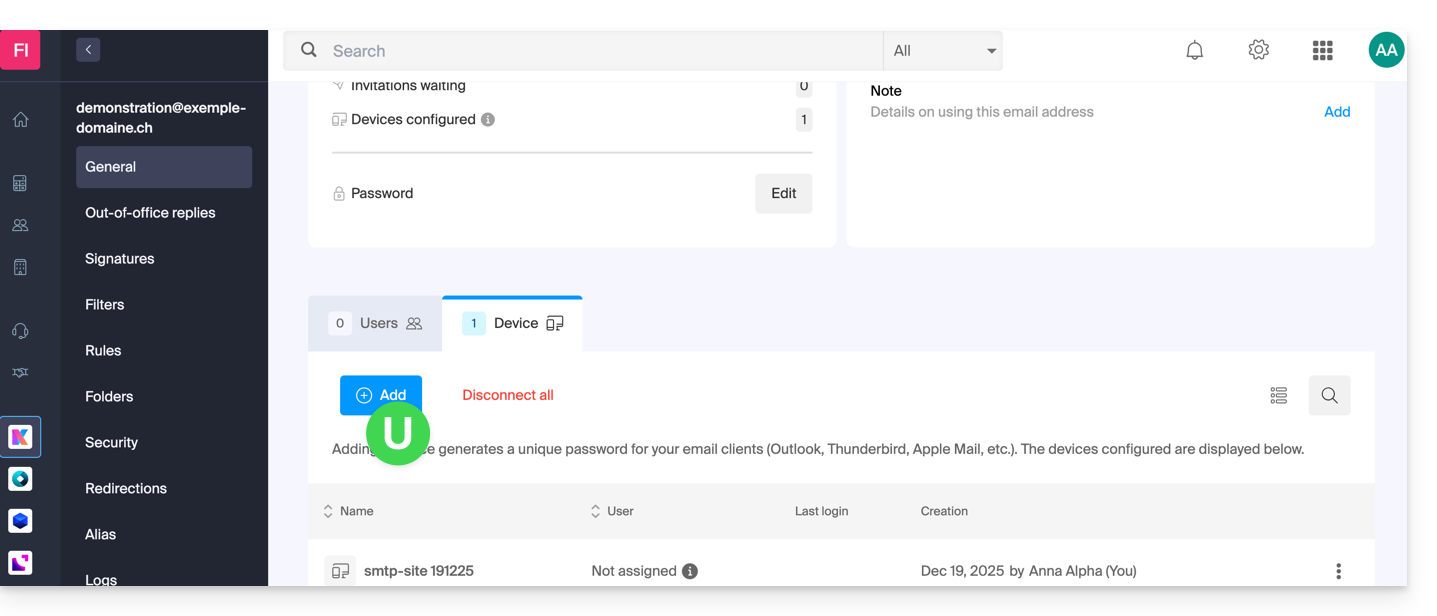
- Clique no botão para Adicionar um novo dispositivo:
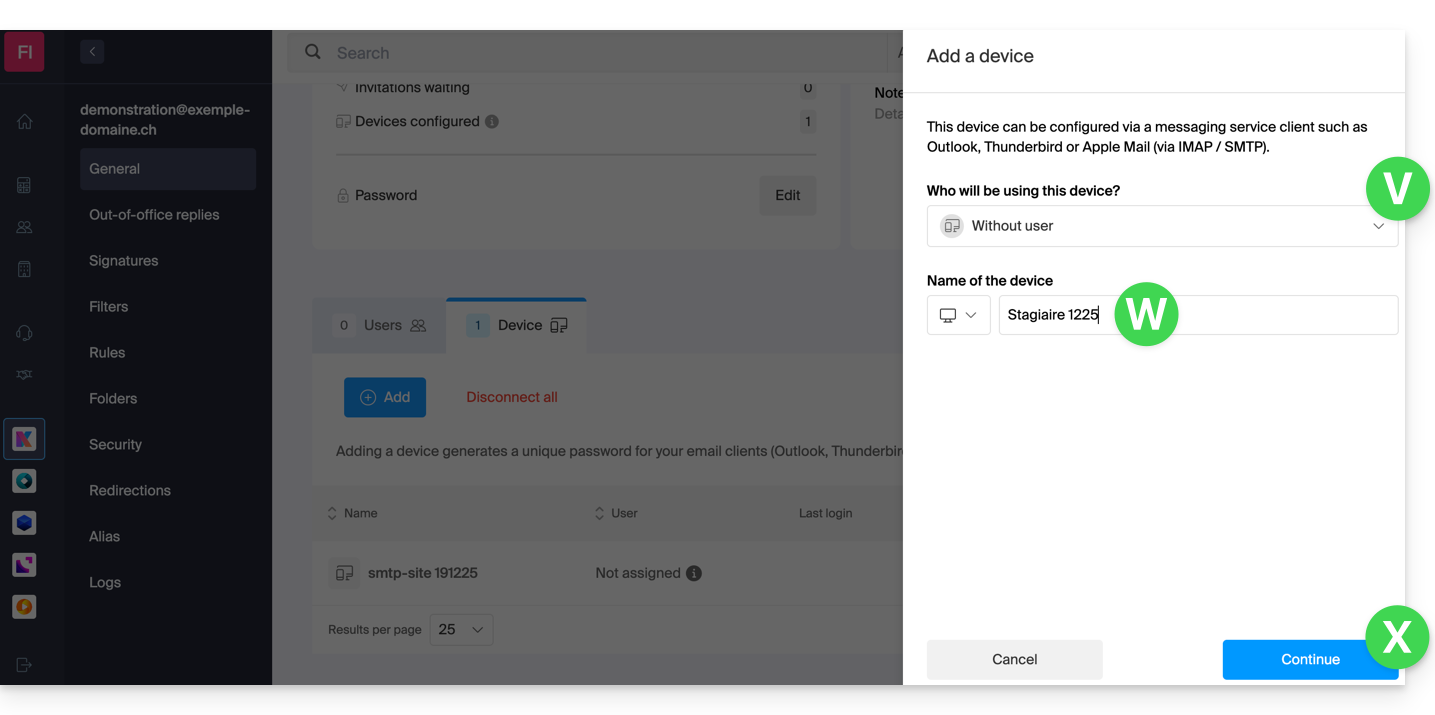
- Em seguida, escolha não especificar um usuário específico e insira um nome que permita identificar o motivo pelo qual você criou este dispositivo (aqui, o utilizador precisa de uma palavra-passe para um estagiário de uma semana):
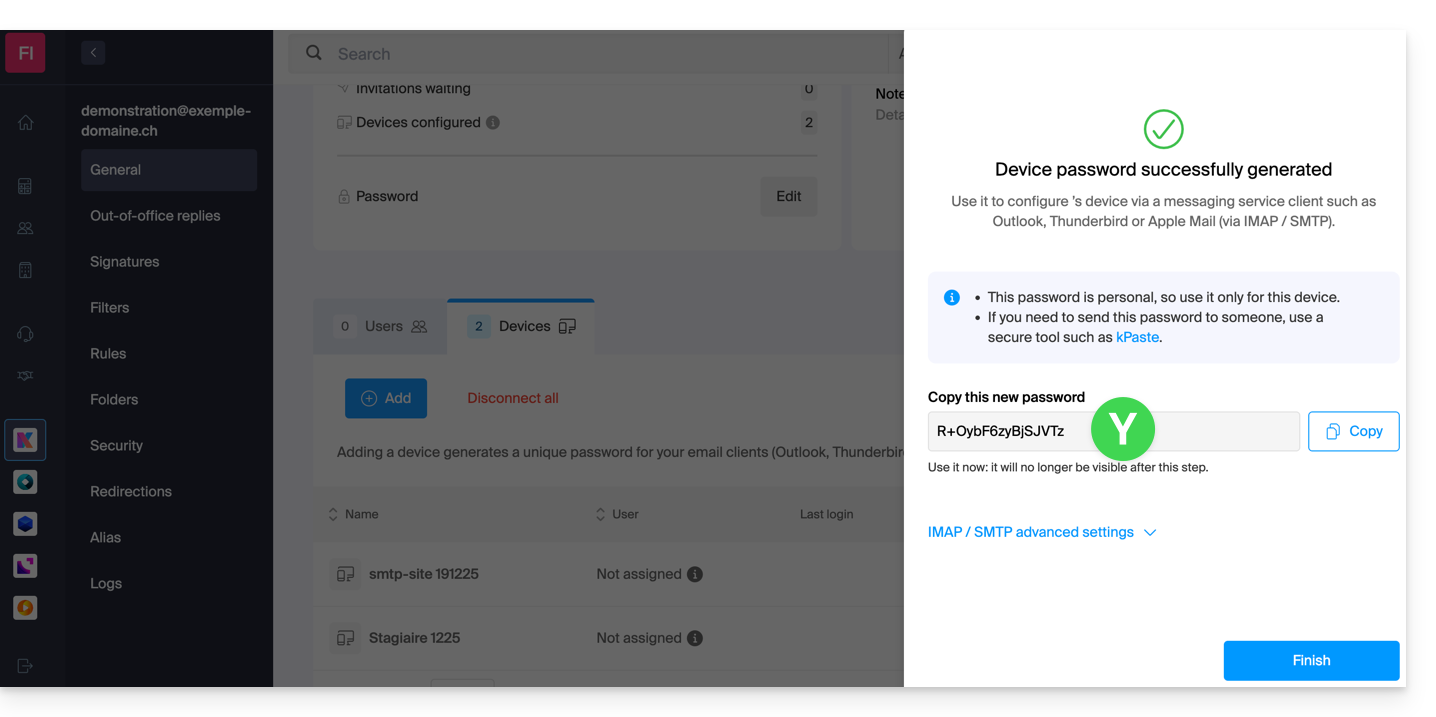
- Pronto, a palavra-passe é exibida e pode ser utilizada para o fim que desejar (atenção, não será possível exibi-la novamente, no entanto, como antes, será obviamente possível modificá-la ou gerar uma nova):
Alternativa: criar uma senha para um usuário
Em vez de criar uma senha você mesmo e ter que comunicá-la ao usuário posteriormente, você pode permitir diretamente que um usuário com menos permissões do que você obtenha a senha para o dispositivo de que precisa:
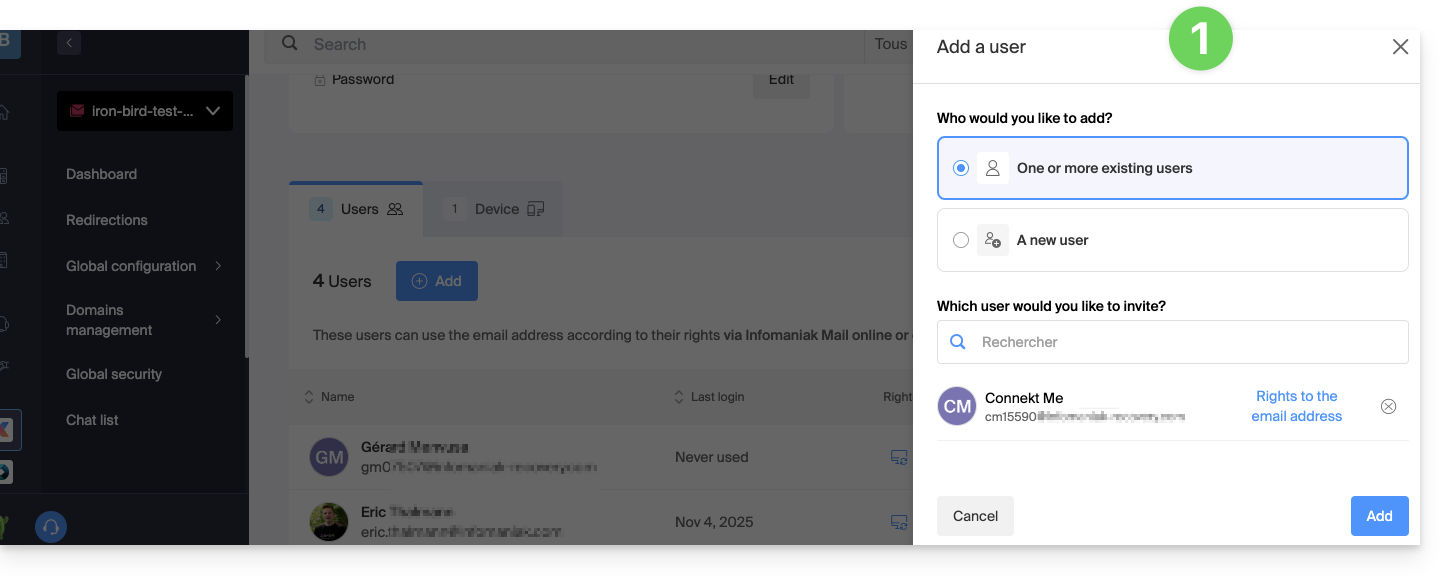
- Adicione o novo utilizador (existente na Organização ou não), conforme descrito neste outro guia:
- Depois de adicionar o utilizador, mude para o separador "Dispositivos" para adicionar um novo dispositivo:
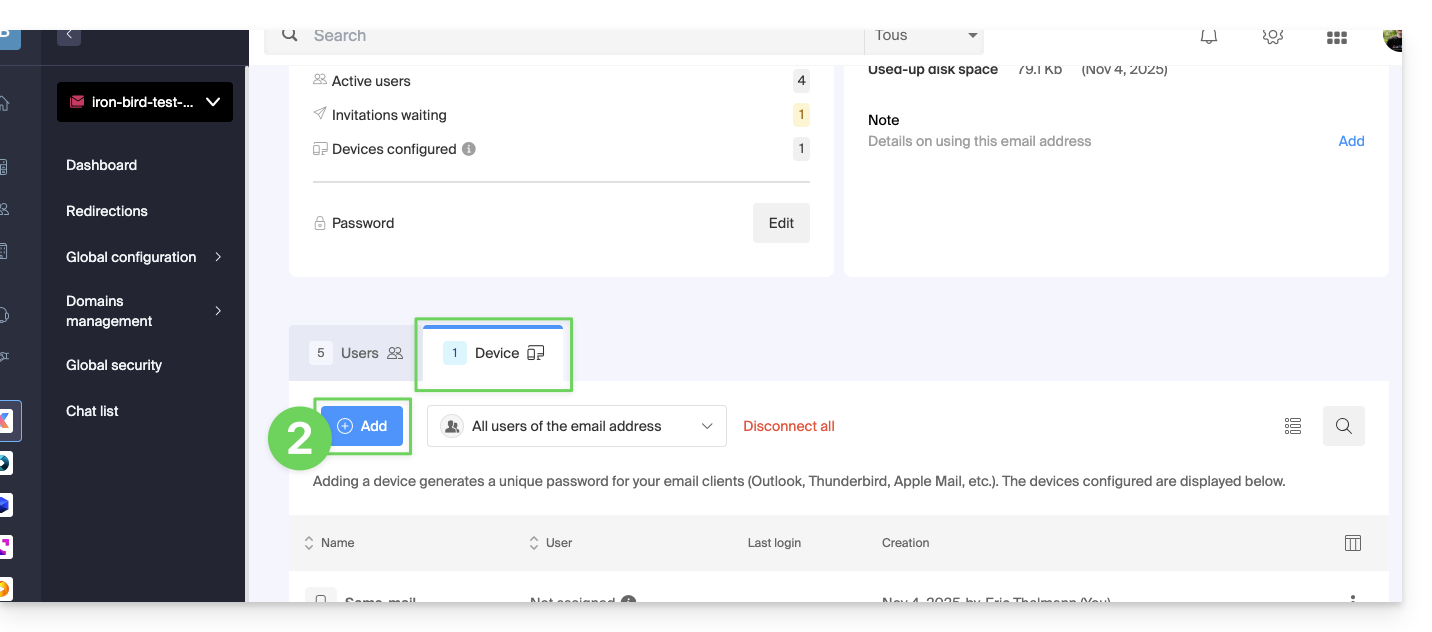
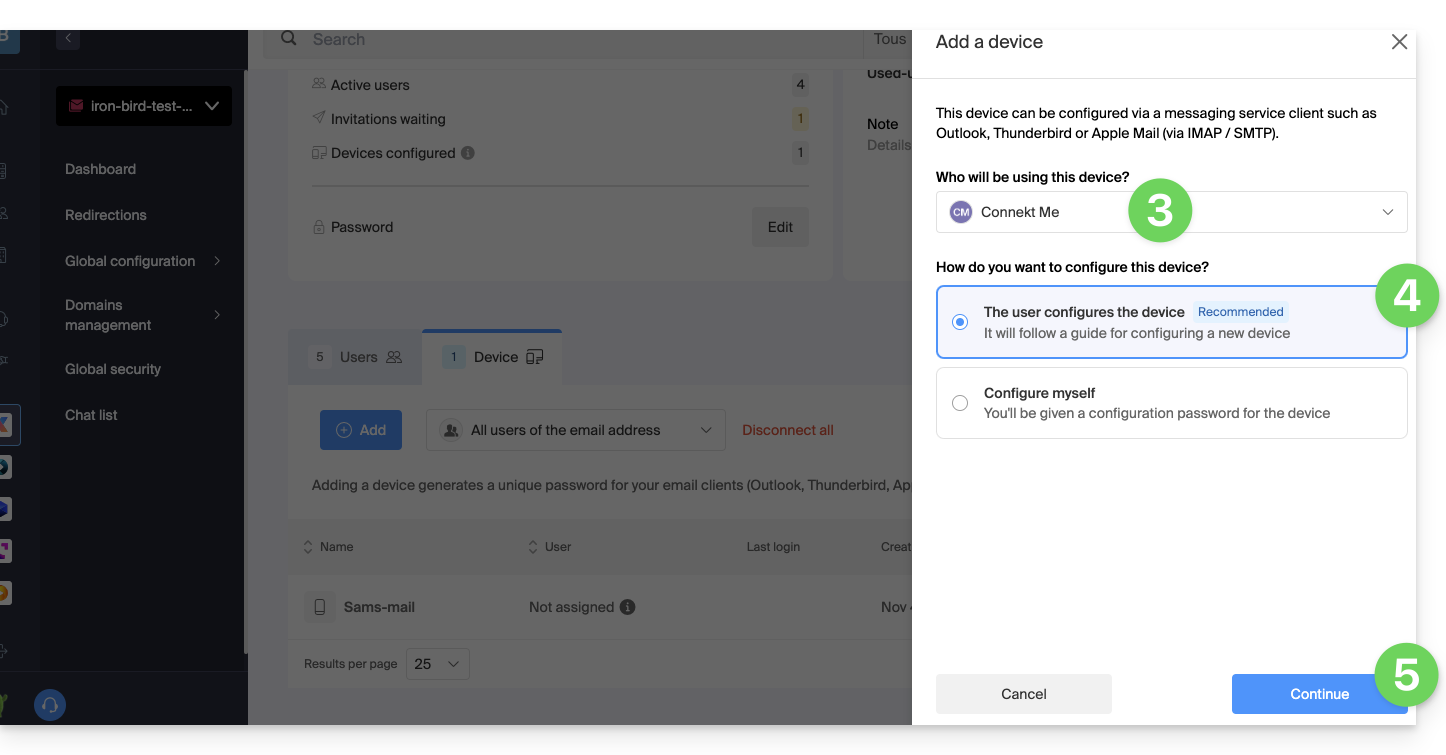
- Se necessário, insira a senha para acessar sua conta Infomaniak e, em seguida, selecione o usuário criado no passo 1.
- Clique na primeira opção para enviar um assistente de configuração para o dispositivo do usuário.
- Clique no botão Continuar:
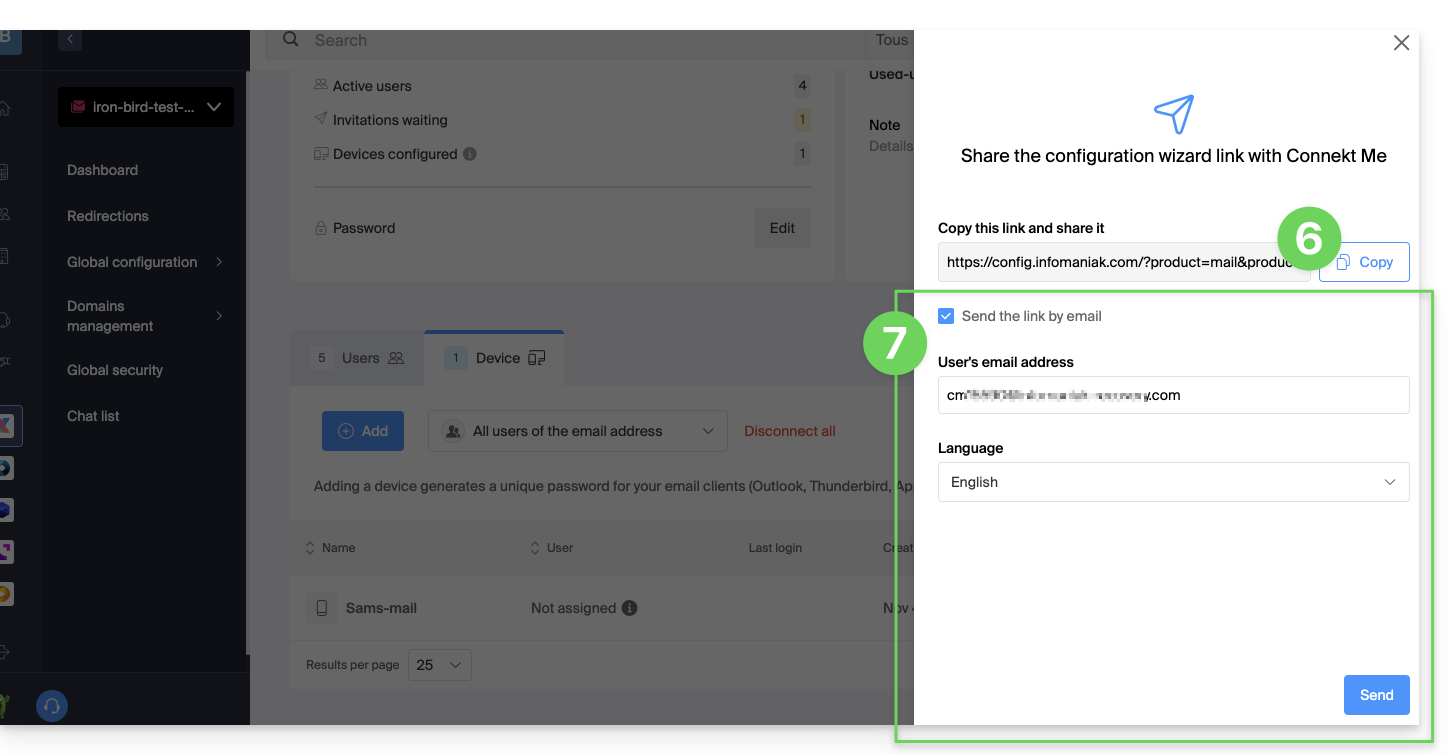
- Copie o link de convite, válido por 30 dias, para enviar ao utilizador.
- Se necessário, envie o convite para o endereço de e-mail do utilizador:
No ponto 4 acima, também pode optar por gerar uma palavra-passe:
- A senha criada será exibida; você pode modificá-la pela última vez, copiá-la e guardá-la em um local seguro (por exemplo, em um gerenciador de senhas); ela não poderá ser exibida novamente no futuro.
Modificar ou remover uma senha existente
Quando o acesso não for mais necessário, revogue apenas a senha correspondente: os outros acessos ao endereço de e-mail permanecerão ativos.
Link para esta FAQ: https://faq.infomaniak.com/1321
Esta seção de perguntas frequentes foi útil?
Este guia apresenta o funcionamento das RBL, a política questionável de algumas delas e os meios para resolver um eventual bloqueio de e-mails.
Introdução
- As RBL (Listas de Bloqueio em Tempo Real) ou DNSBL (Listas de Bloqueio DNS) são listas que contêm endereços, endereços IP ou nomes de fornecedores e servidores considerados grandes emissores de spam.
- Trata-se frequentemente de grandes listas negras generalizadas que permitem identificar as mensagens consideradas indesejadas, bem como os seus remetentes, e são geridas por alguns fornecedores, como smtpcheck ou uceprotect (lista não exaustiva).
1. Adição do endereço de e-mail à RBL
Quando um endereço de e-mail é identificado como pertencente a um remetente indesejado, ele é bloqueado para evitar o recebimento de mensagens não solicitadas. Um bloqueio na RBL não expira: os endereços permanecem listados indefinidamente.
Se receber uma mensagem indicando que o seu endereço de e-mail está bloqueado por uma RBL, isso significa que o sistema de segurança da Infomaniak detectou atividades suspeitas ou indesejadas associadas a esse endereço de e-mail. Isso pode incluir o envio em massa de mensagens não solicitadas, a participação em campanhas de phishing ou outros comportamentos maliciosos.
2. Resolver um bloqueio de e-mail (RBL)
Se o erro mencionar o seu endereço e uma RBL
Se receber erros do tipo:
anna.a@domain.xyz está na lista negra do RBL - http://chk.me/rbl
ao enviar um e-mail e se você acredita que se trata de um falso positivo, entre em contato com o suporte da Infomaniak.
Para evitar que o seu endereço de e-mail seja bloqueado pelo sistema de bloqueio RBL no futuro, siga as boas práticas de utilização de e-mail:
- Não envie mensagens não solicitadas nem mensagens em massa para destinatários desconhecidos.
- Organize regularmente a lista de destinatários utilizada.
- Não participe em atividades de phishing ou cibercrime.
- Garanta o melhor nível de segurança onde seus e-mails são utilizados:
- senha forte
- software atualizado
- sistema operacional (iOS, Android, Windows, macOS, etc.) atualizado
- configuração do domínio associado atualizada
Se o erro mencionar uma organização como Sorbs ou Barracuda
Se receber erros do tipo:
554 5.7.1 Host do cliente bloqueado usando o Sorbs
ou similar:
- Siga o procedimento da entidade mencionada (por exemplo, http://www.barracudacentral.org) para solicitar a remoção do seu endereço da lista.
- Altere temporariamente o seu provedor de acesso à Internet ou o método de conexão (Wi-Fi em vez de 4G/5G) para enviar as suas mensagens.
- Informe o seu destinatário e o seu provedor de e-mail para que tomem as medidas necessárias ou deixem de usar uma RBL pouco confiável.
- Aguarde algumas horas e tente novamente.
Cada vez menos profissionais (provedores de serviços de Internet, empresas de hospedagem, etc.) utilizam prestadores de serviços como Backscatterer / UCEPROTECT, cuja principal motivação é financeira. Existem muitas outras listas muito eficazes, como ABUSIX ou SPAMCOP, que são constantemente atualizadas e cujo objetivo real é combater o spam, uma das prioridades da Infomaniak.
Link para esta FAQ: https://faq.infomaniak.com/1333
Esta seção de perguntas frequentes foi útil?
Este guia apresenta o modelo de segurança que permite atribuir utilizadores a um endereço de e-mail ou definir uma senha diferente para cada dispositivo ou software que precise acessá-lo.
Introdução
- Ao criar um endereço de e-mail, nenhuma senha é definida.
- Se você permanecer no ecossistema Infomaniak, ou seja, se usar apenas o aplicativo web Mail Infomaniak (serviço online ksuite.infomaniak.com/mail) e/ou o aplicativo móvel Infomaniak Mail (aplicativo para smartphone ou tablet iOS / Android), você não precisa gerenciar uma senha, pois tudo é configurado com o conceito de usuário, ou seja, de conta Infomaniak (que, por sua vez, possui uma senha):
- Um endereço de e-mail pode ser consultado/utilizado nesses aplicativos Mail Infomaniak sem uma senha diferente daquela que já permite o acesso à sua conta Infomaniak, simplesmente após ser convidado.
- Basta autorizar sua própria conta ou convidar um conhecido para ser usuário do endereço de e-mail.
- Caso contrário, fora deste ecossistema, você simplesmente cria uma senha (ou várias) para seus dispositivos (Outlook, iPhone, CRM, etc.), de acordo com suas necessidades:
- Cada senha pode ser revogada individualmente, sem impacto nos outros usuários ou dispositivos vinculados a este endereço.
- Não é possível exibir uma senha criada anteriormente; basta criar uma nova!
Adicionar um usuário
= Permitir que uma pessoa consulte o endereço nas interfaces Mail Infomaniak
Para permitir que um utilizador (incluindo você) consulte o endereço de e-mail no Infomaniak sem precisar de outra senha além da sua (a senha da sua conta Infomaniak):
- No painel de controlo do Serviço de Email:
- adicione o endereço de email às suas aplicações Mail Infomaniak para que possa utilizar o endereço,
- ou defina qual outro utilizador externo deve ter acesso ao endereço nas suas aplicações Mail Infomaniak,
- ou remova o acesso de um utilizador: os outros acessos ao endereço de email permanecerão ativos.
- Pode gerir os utilizadores autorizados diretamente na aplicação Web Mail (qualquer utilizador de um endereço de email na Infomaniak pode visualizar a lista de outros utilizadores que têm acesso).
Adicionar um dispositivo
= Adicionar uma senha para permitir que uma pessoa acesse a conta em um dispositivo (Outlook, iPhone, CRM, etc.)
Para permitir que um utilizador (incluindo você) consulte o endereço de e-mail via IMAP e envie mensagens via SMTP (protocolos que exigem ambos uma palavra-passe):
- No painel de controlo do Serviço de E-mail:
- crie palavras-passe específicas para cada dispositivo (Outlook, iPhone, CRM, etc.), de acordo com as suas necessidades,
- ou revogue a palavra-passe em questão: os outros acessos ao endereço de e-mail permanecerão ativos.
- Você pode gerenciar os dispositivos conectados diretamente no aplicativo web Mail.
Link para esta FAQ: https://faq.infomaniak.com/1344
Esta seção de perguntas frequentes foi útil?
Este guia trata das notificações que pode receber através da aplicação móvel Infomaniak Mail (aplicação para smartphones ou tablets iOS/Android).
Receber notificações para um endereço de e-mail específico
O aplicativo móvel Infomaniak Mail permite gerenciar vários endereços de e-mail e você pode optar por receber notificações apenas para alguns de seus endereços de e-mail e não para outros.
Para acessar as configurações de notificação do aplicativo, consulte este outro guia.
Resolver um problema…
… no iOS
Verifique nas configurações do aplicativo móvel Infomaniak Mail se as notificações estão ativadas para o endereço de e-mail em questão: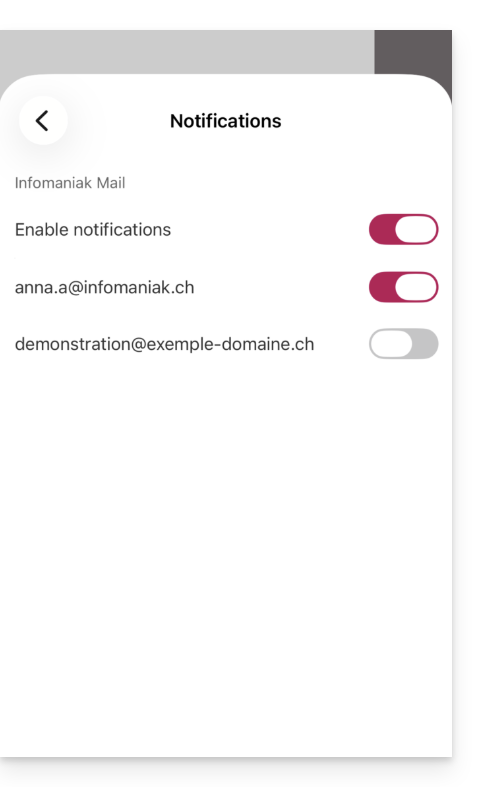
… no Android
Em dispositivos Android, especialmente em dispositivos Samsung com One UI 6.1 ou superior, a tela de configuração do sistema para notificações não permite mais especificar, por padrão, qual dos seus endereços de e-mail deve gerar uma notificação: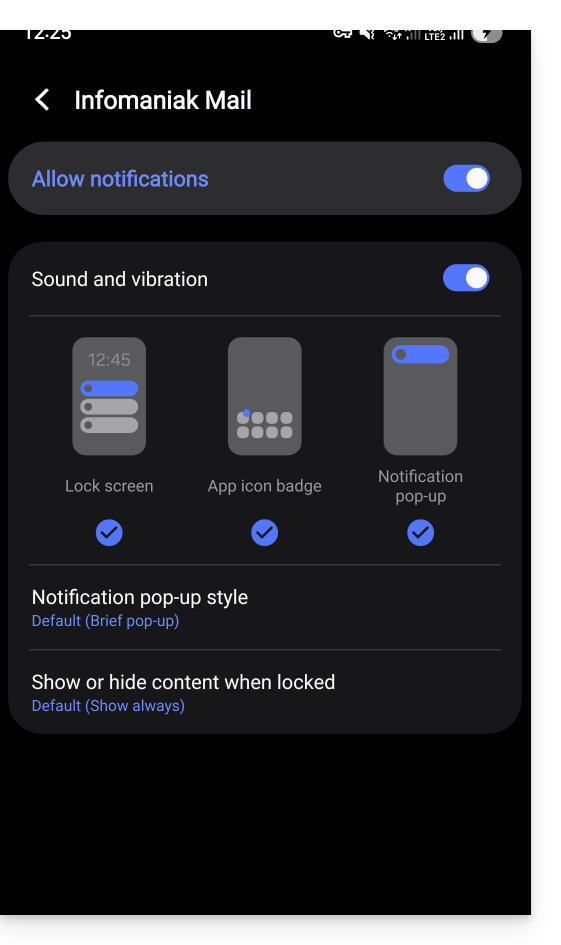
A solução é ativar, a partir da página principal de notificações do Android, clicando em “Configurações avançadas” na parte inferior da janela…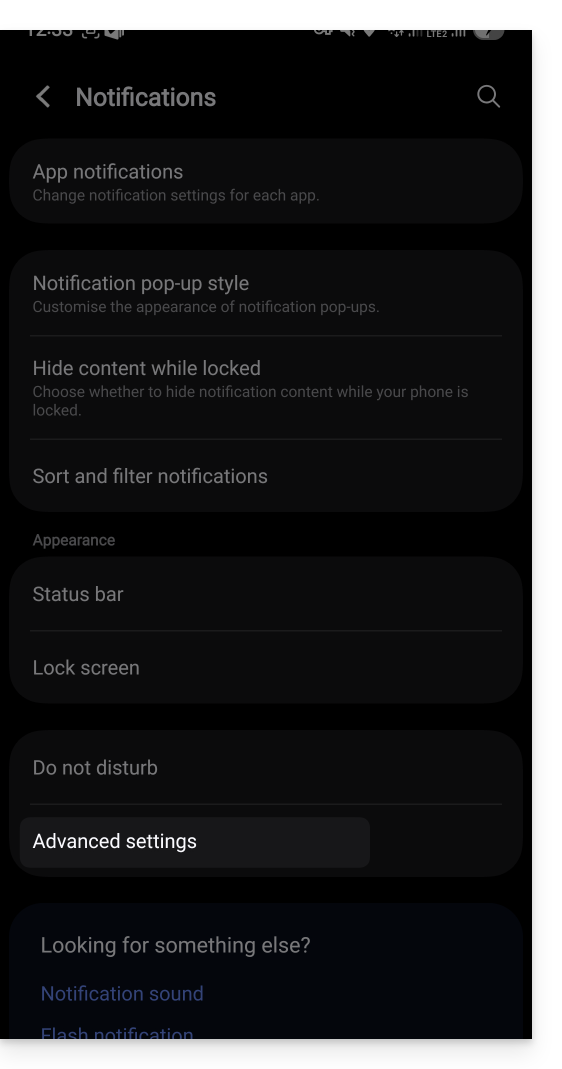
… a opção “Gerenciar as categorias de notificações para cada aplicativo”: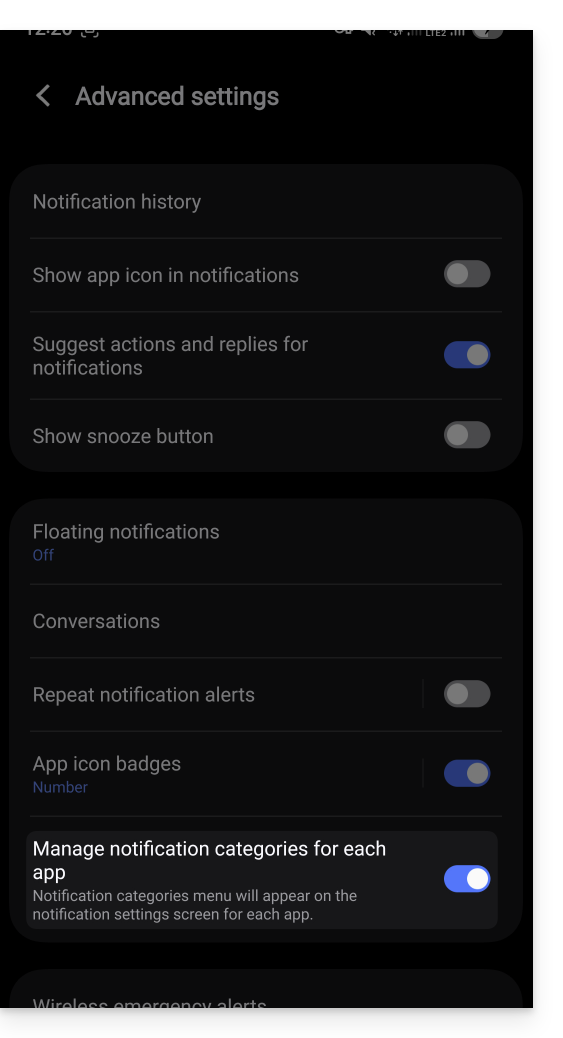
Em seguida, volte para a página de notificações do aplicativo Infomaniak e você poderá clicar em “Categorias de notificação”…
… para voltar a ter a opção de notificação específica por endereço de e-mail: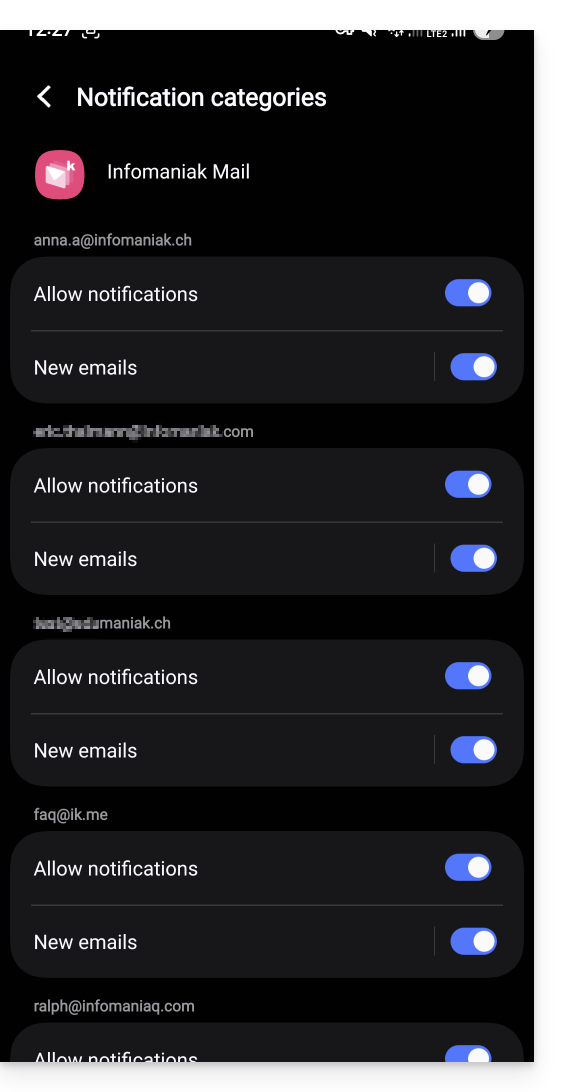
Receber todas as notificações
Se tiver ativado as notificações da aplicação no seu dispositivo móvel, receberá uma notificação para cada nova mensagem que chegar.
Resolver um problema…
Se você receber uma nova mensagem na sua caixa de entrada, mas não receber nenhuma notificação no seu dispositivo, pode haver várias razões.
- Comece por abrir a aplicação para garantir que ela está a funcionar e, se necessário, atualize-a.
- Abra outra aplicação ou desligue o ecrã do dispositivo (se a aplicação Infomaniak Mail estiver aberta, em primeiro plano e com o ecrã ligado, o dispositivo poderá não emitir notificações).
- Envie uma nova mensagem de teste para o seu endereço de e-mail para ativar uma notificação.
- A mensagem de teste chegou à caixa de entrada? De fato, uma mensagem que for para o spam ou outra pasta pode não emitir nenhuma notificação.
… no Android
- Já esperou vários minutos? De facto, as notificações rápidas (do tipo push) necessitam de passar por um serviço do Google para funcionar, mas alguns dispositivos não utilizam os serviços do Google (como o Fairphone), pelo que as notificações podem chegar com intervalos muito maiores.
Link para esta FAQ: https://faq.infomaniak.com/1364
Esta seção de perguntas frequentes foi útil?
Este guia explica como, a partir de um Serviço de Email, remover o acesso de um utilizador que consulta um endereço de email no ecossistema Infomaniak, ou seja, utilizando apenas a aplicação web Mail Infomaniak (serviço online ksuite.infomaniak.com/mail) e/ou a aplicação móvel Infomaniak Mail (aplicação para smartphone ou tablet iOS / Android).
As outras possibilidades de gestão de acessos (por senha, por exemplo) são apresentadas no guia principal; consulte também, se necessário, este outro guia para bloquear um serviço de e-mail completo para todos os utilizadores.
Pré-requisitos
- Ter, no mínimo, o direito de gerir o Serviço de Email em questão (ou ser Administrador / Responsável legal dentro da Organização).
Gestão e remoção de um utilizador a partir do Serviço de Email
O modelo atual de gestão de acessos ao e-mail permite que cada utilizador de uma Organização se conecte de forma independente e segura à mesma conta de e-mail, sem partilhar uma palavra-passe global.
Se um utilizador não precisar mais de acesso a uma conta de e-mail e ao seu conteúdo, basta removê-lo através da interface:
- Clique aqui para acessar o gerenciamento do seu Serviço de E-mail no Gerenciador Infomaniak (precisa de ajuda?).
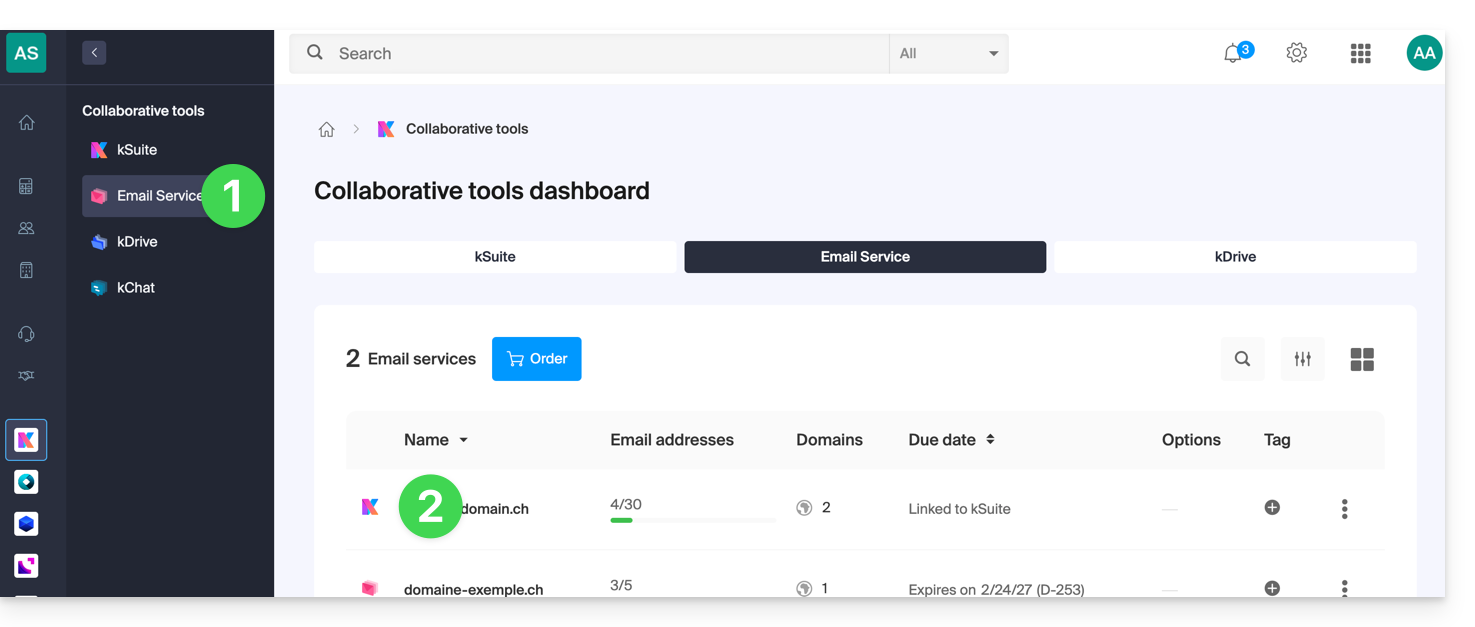
- Clique diretamente no nome atribuído ao produto em questão:
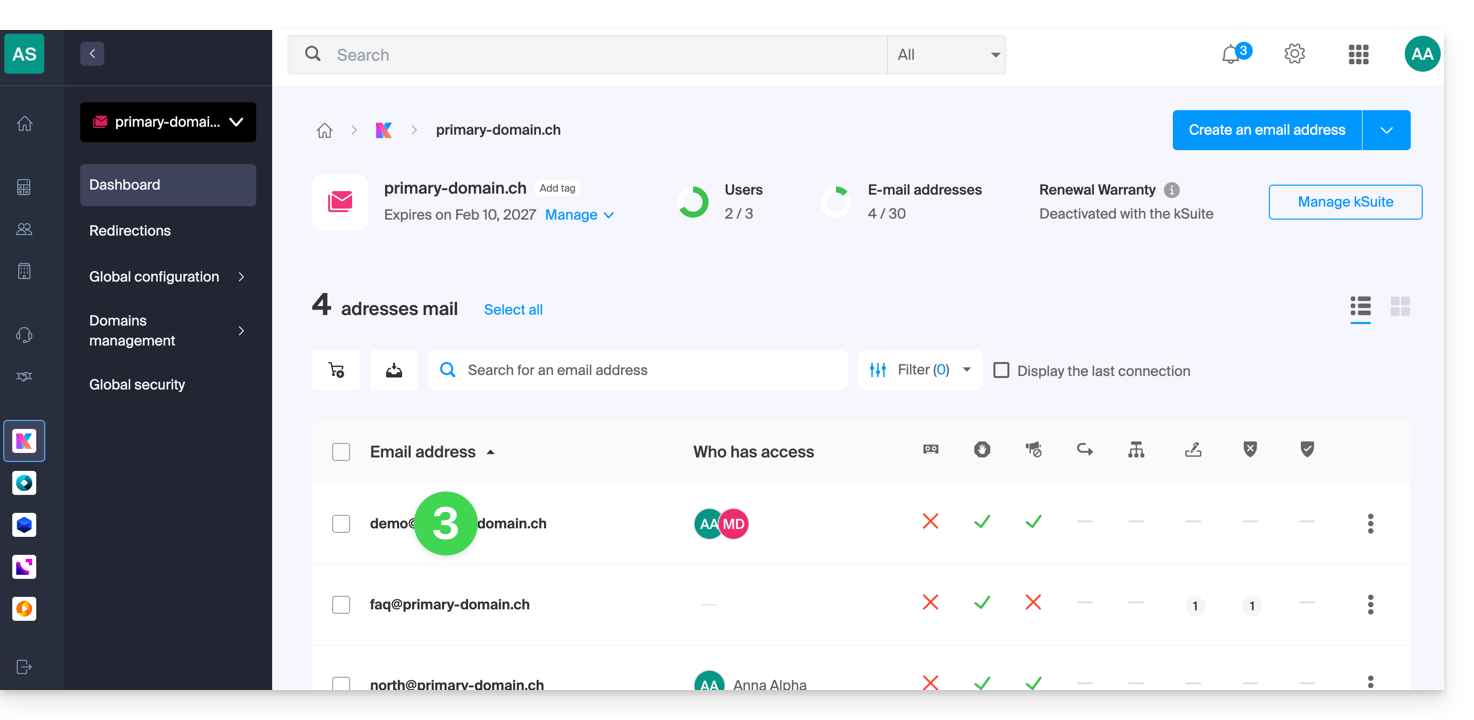
- Clique no endereço de e-mail correspondente na tabela que aparece:
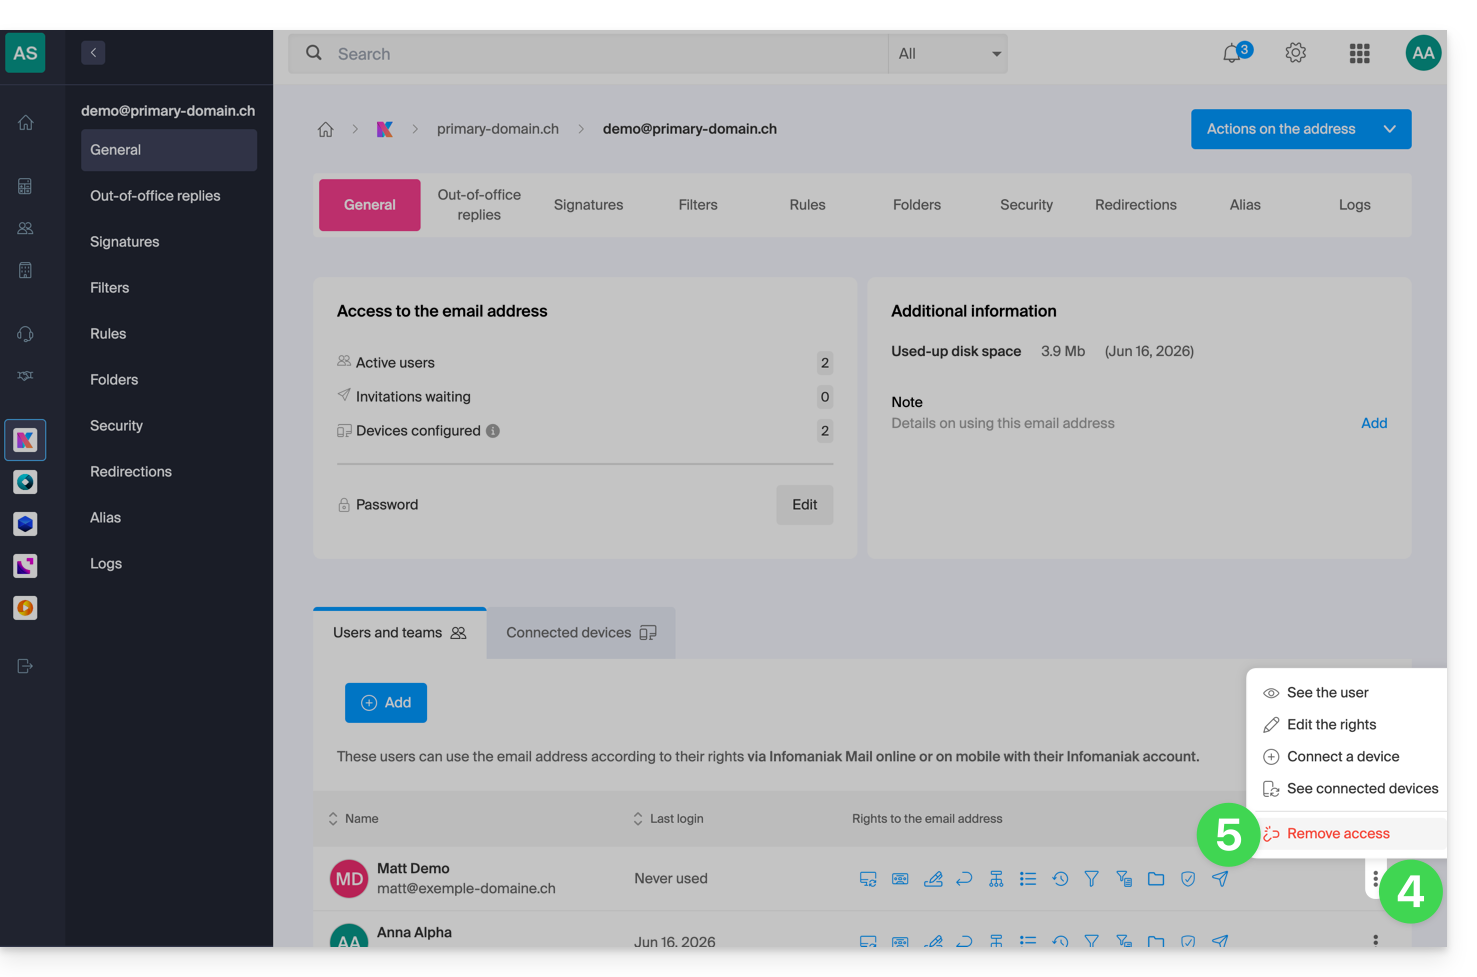
- Na tabela de utilizadores que têm atualmente acesso ao endereço em questão, clique no menu de ações ⋮ à direita do utilizador em questão.
- Escolha revogar o acesso deste utilizador ao endereço de e-mail:
- Confirme a ação: todos os acessos a este endereço de e-mail serão interrompidos e ele não poderá mais consultá-lo.
Link para esta FAQ: https://faq.infomaniak.com/1371
Esta seção de perguntas frequentes foi útil?
Este guia explica como, a partir da aplicação web Mail Infomaniak (serviço online ksuite.infomaniak.com/mail), gerir os outros utilizadores que consultam um endereço de email.
As outras opções de gestão de acessos (a partir do Serviço Mail, por exemplo) são apresentadas no guia principal.
Gerenciar os usuários com acesso ao endereço de e-mail
Ao criar um endereço de e-mail em um Serviço de E-mail, você pode, entre outras coisas:
- adicione você mesmo para consultá-la na Infomaniak,
- adicione outro utilizador a partir do Serviço de Email ou a partir da aplicação Web Mail para que ele possa consultá-la na Infomaniak.
Para gerir rapidamente estes diferentes acessos, aceda à sua conta de e-mail Infomaniak:
- Clique aqui para aceder à aplicação web Mail da Infomaniak (serviço online ksuite.infomaniak.com/mail).
- Clique no ícone Configurações no canto superior direito da interface.
- Verifique ou selecione o endereço de e-mail correspondente no menu suspenso do menu lateral esquerdo.
- Clique em Partilhado com:
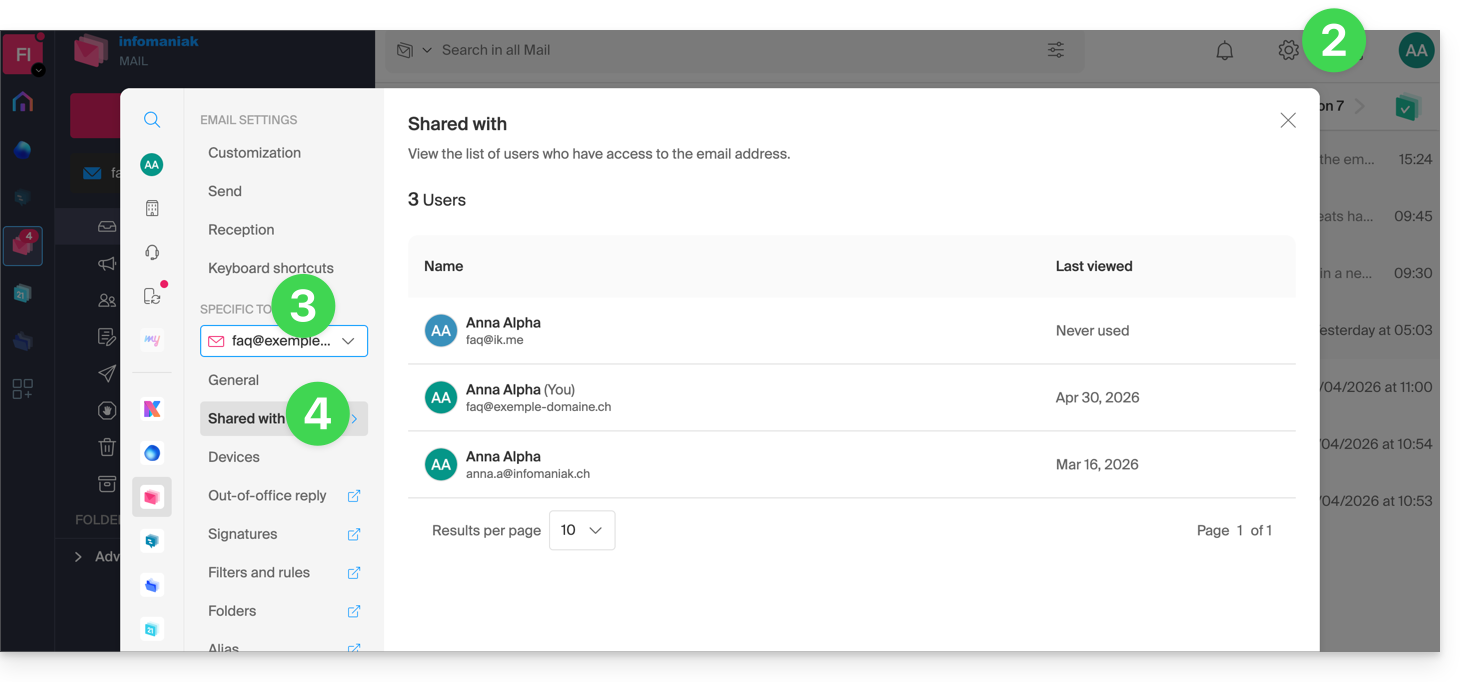
- Aqui, a lista é apenas informativa, pois o endereço de e-mail em questão é gerido numa outra Organização – nenhuma ação é possível.
Obter informações, adicionar um utilizador ou removê-lo…
No caso de um endereço de e-mail gerido por si (ou para o qual tenha obtido direitos suficientes), terá mais opções disponíveis:
- O botão Gerir permite aceder diretamente à gestão de utilizadores no serviço de e-mail em questão.
- Clique no menu de ação ⋮ à direita do utilizador para aceder a ações rápidas:
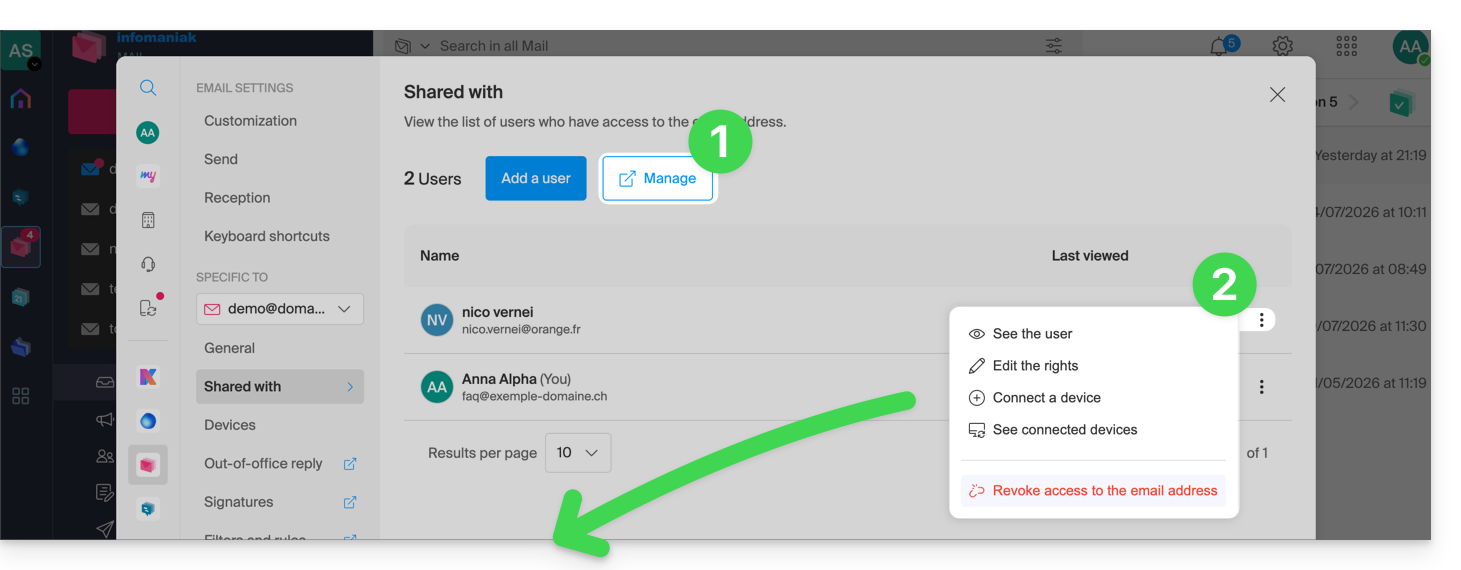
- Obter detalhes sobre o utilizador.
- Editar os direitos do utilizador.
- Conectar (ou permitir que o utilizador conecte) um dispositivo (através da criação de uma palavra-passe).
- Ver os dispositivos conectados (que, portanto, possuem uma palavra-passe previamente criada).
- Revogar o acesso do utilizador em questão.
A partir desta mesma página, através do botão Adicionar um utilizador, pode dar acesso a um utilizador para que este possa consultar e utilizar o endereço de e-mail. Consulte este outro guia.
Atalho
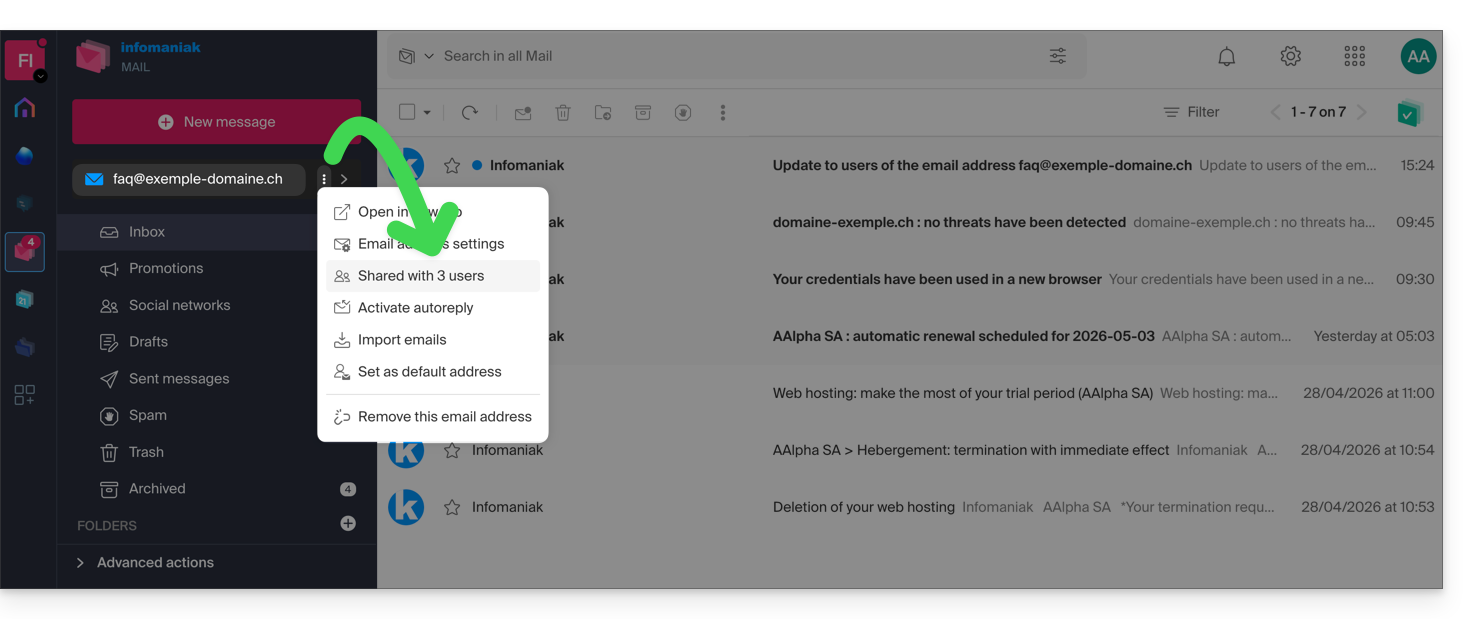
Também pode aceder às definições diretamente a partir da página inicial:
- Clique no menu de ação ⋮ à direita do seu endereço de e-mail.
- O número de compartilhamentos é exibido; se você clicar no item, será direcionado para a página de gerenciamento descrita acima:
Link para esta FAQ: https://faq.infomaniak.com/1390
Esta seção de perguntas frequentes foi útil?
Este guia explica como inserir texto formatado e imagens nas suas mensagens no aplicativo web Mail Infomaniak (serviço online ksuite.infomaniak.com/mail).
Introdução
- Para definir algumas das configurações abaixo por padrão para todas as suas novas mensagens, consulte este outro guia.
- Consulte este outro guia se você precisar de informações sobre como adicionar e inserir imagens.
Personalizar e formatar um e-mail
Para modificar o estilo de escrita dos seus e-mails no Mail Infomaniak:
- Clique aqui para acessar o aplicativo web Mail da Infomaniak (serviço online ksuite.infomaniak.com/mail).
- Redija uma nova mensagem e selecione uma parte dela.
- Clique no ícone
Ano canto inferior direito da janela de edição para exibir a barra de ferramentas. - Formate seu texto com as opções de estilo (itálico / negrito / sublinhado), tamanho, fonte, alinhamento, cores, etc., ou volte para o texto original:

- Também é possível editar o código fonte (HTML) da sua mensagem:

Link para esta FAQ: https://faq.infomaniak.com/1412
Esta seção de perguntas frequentes foi útil?
Este guia explica como programar o envio de um e-mail para que a sua mensagem seja enviada numa data/hora específica no futuro, através da aplicação web Mail da Infomaniak (serviço online ksuite.infomaniak.com/mail), mesmo que não esteja conectado nesse momento.
Introdução
- O agendamento também é possível no aplicativo móvel Infomaniak Mail (aplicativo para smartphone ou tablet iOS/Android).
- As versões kSuite Free / my kSuite / Serviço de E-mail Starter não permitem a personalização do horário ao agendar.
Envio agendado: programar uma mensagem
Para enviar um e-mail em uma data/hora posterior:
- Clique aqui para acessar o aplicativo web Mail da Infomaniak (serviço online ksuite.infomaniak.com/mail).
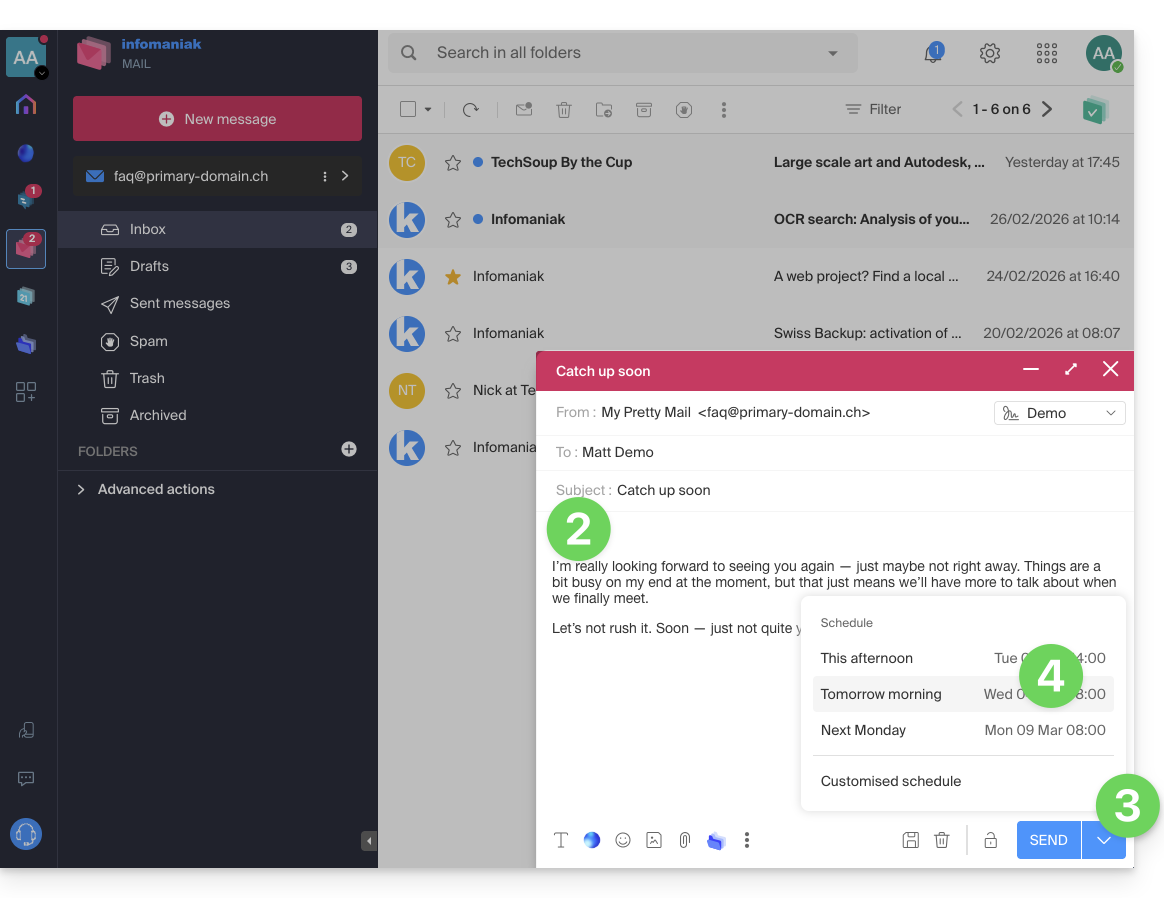
- Redija uma nova mensagem como de costume.
- Clique no ícone de seta para baixo à direita do botão Enviar para acessar as ações adicionais.
- Escolha o momento em que a mensagem deverá ser enviada, entre as opções propostas ou personalizando o horário (consulte a introdução acima):
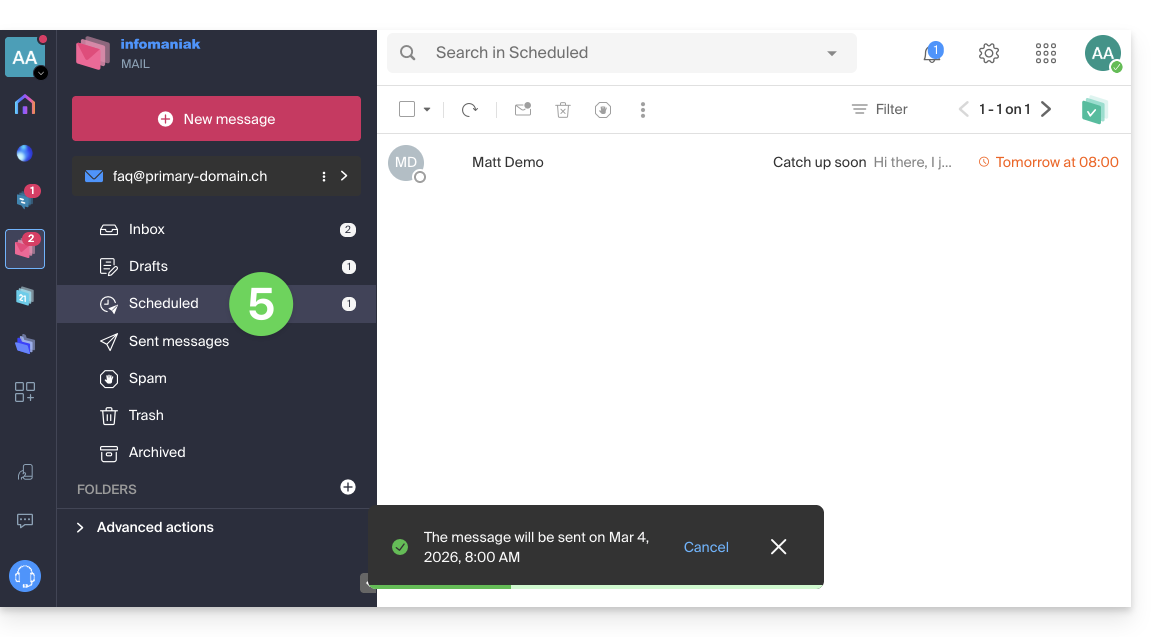
- Você pode encontrar suas mensagens programadas para envio em uma nova seção dedicada:
Reprogramar ou cancelar um envio programado
Para modificar a hora de envio de uma mensagem já programada para ser enviada mais tarde:
- Clique aqui para acessar o aplicativo web Mail da Infomaniak (serviço online ksuite.infomaniak.com/mail).
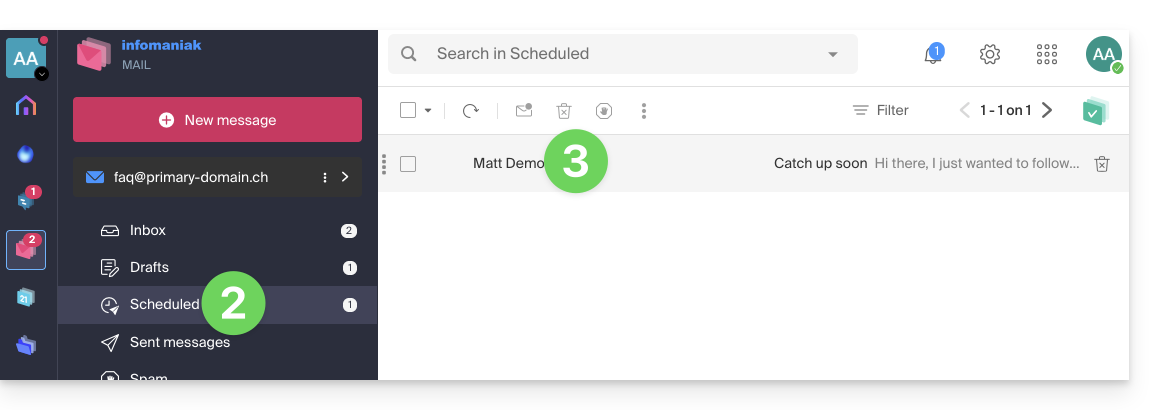
- Clique em Envios agendados no menu lateral esquerdo.
- Abra a mensagem cuja hora de envio futura você deseja modificar:
- Clique para Reprogramar o envio para o horário que deverá ser especificado através do menu suspenso…
- OU clique no botão ✎ Editar o rascunho:
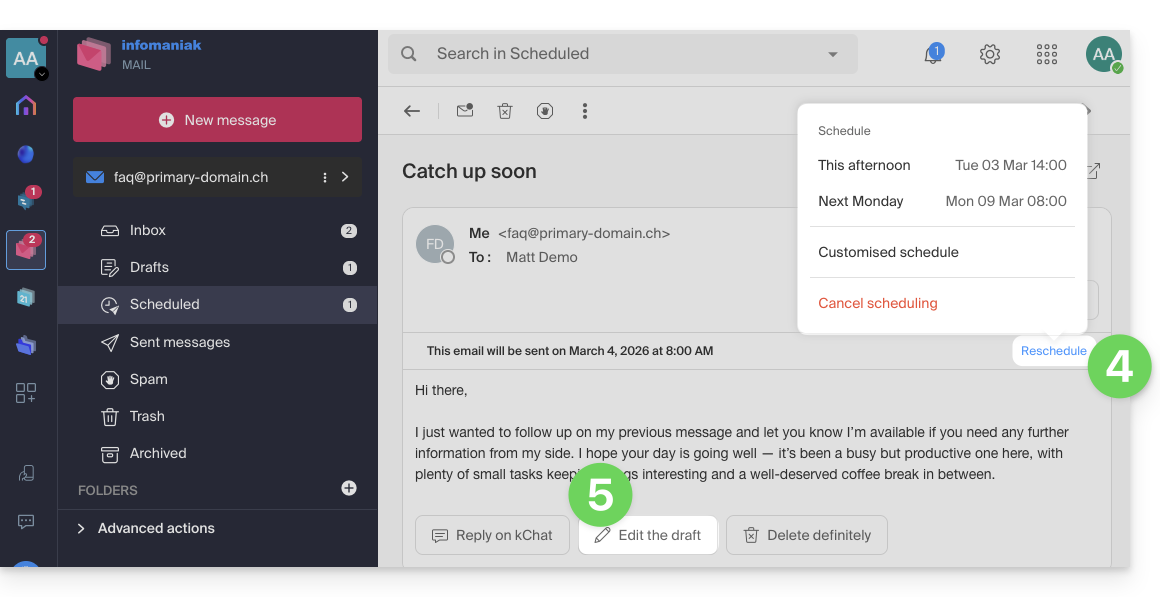
- Aceite que a mensagem seja movida para os rascunhos e que o envio programado seja, portanto, cancelado.
- Comece novamente no ponto 3 do primeiro capítulo acima para reprogramar um envio para o futuro.
Excluir completamente uma mensagem agendada
Para excluir definitivamente uma mensagem, sem possibilidade de recuperação:
- Clique aqui para acessar o aplicativo web Mail da Infomaniak (serviço online ksuite.infomaniak.com/mail).
- Clique em Envios agendados no menu lateral esquerdo.
- Passe o cursor sobre a mensagem que deseja excluir e clique no ícone da lixeira:
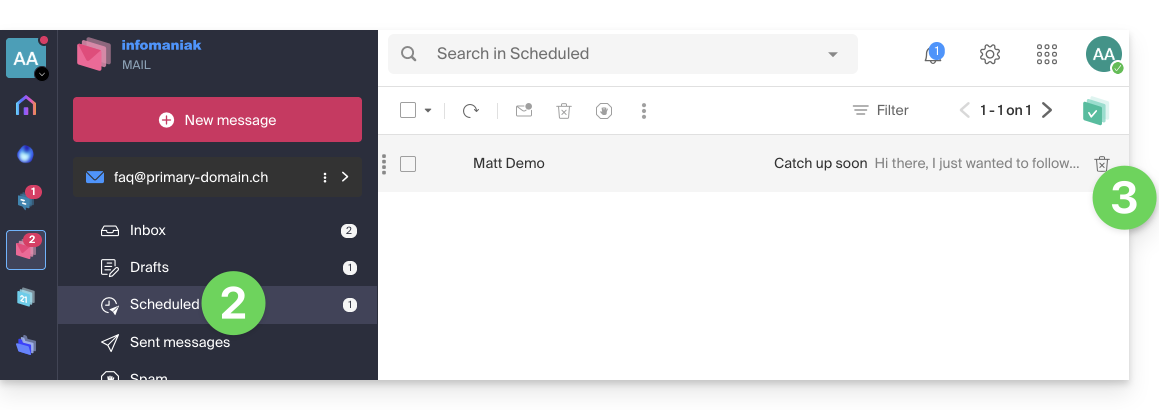
- Confirme a exclusão para remover o rascunho permanentemente.
Link para esta FAQ: https://faq.infomaniak.com/1449
Esta seção de perguntas frequentes foi útil?
Este guia explica como, a partir de um Serviço de E-mail, permitir que uma pessoa acesse um endereço de e-mail no ecossistema Infomaniak, ou seja, utilizando apenas o aplicativo web Mail da Infomaniak (serviço online ksuite.infomaniak.com/mail) e/ou o aplicativo móvel Infomaniak Mail (aplicativo para smartphone ou tablet iOS / Android), sem criar uma senha específica para o endereço.
As outras possibilidades de acesso e gerenciamento são apresentadas no guia principal.
Pré-requisitos
- Contratar um Serviço de Email junto da Infomaniak.
- Criar um ou mais endereços neste Serviço de Email.
- Ter, no mínimo, o direito de gerir o Serviço de Email em questão (ou ser Administrador / Responsável legal na Organização).
Convidar a usar o e-mail a partir do Serviço de E-mail
Para permitir que um utilizador já ativo aceda ao endereço de e-mail que pretende partilhar:
- Clique aqui para acessar o gerenciamento do seu Serviço de Email no painel de controle Infomaniak (precisa de ajuda?).
- Clique diretamente no nome atribuído ao produto em questão.
- Clique em o endereço de e-mail em questão na tabela que aparece:
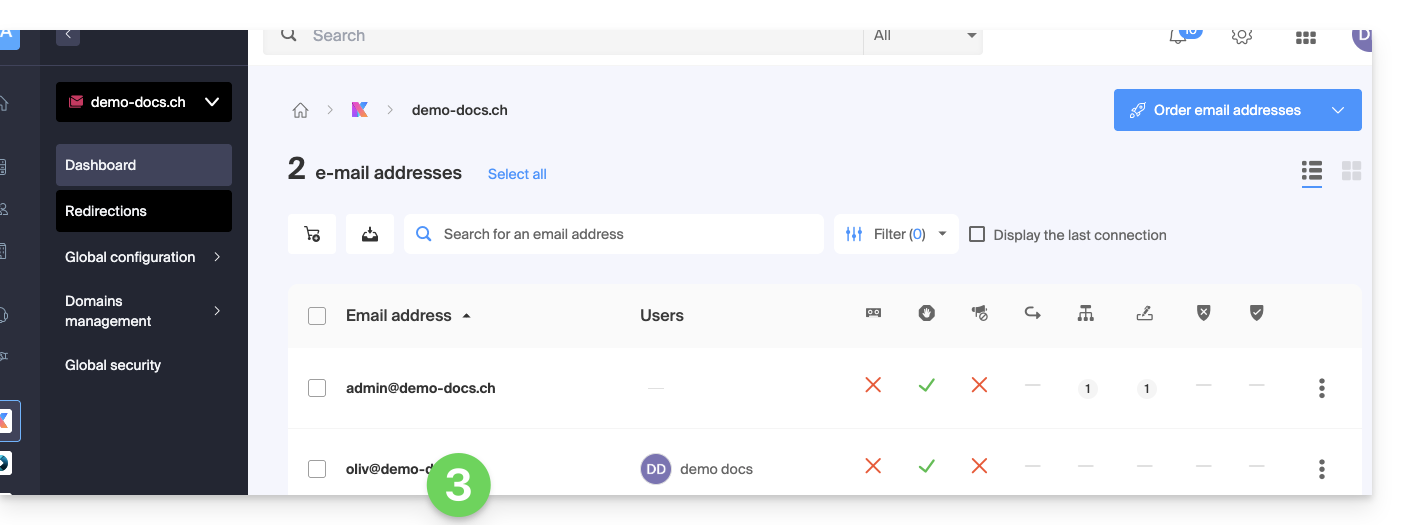
- Clique em Adicionar acima da tabela dos utilizadores que têm atualmente acesso ao endereço em questão no Mail:
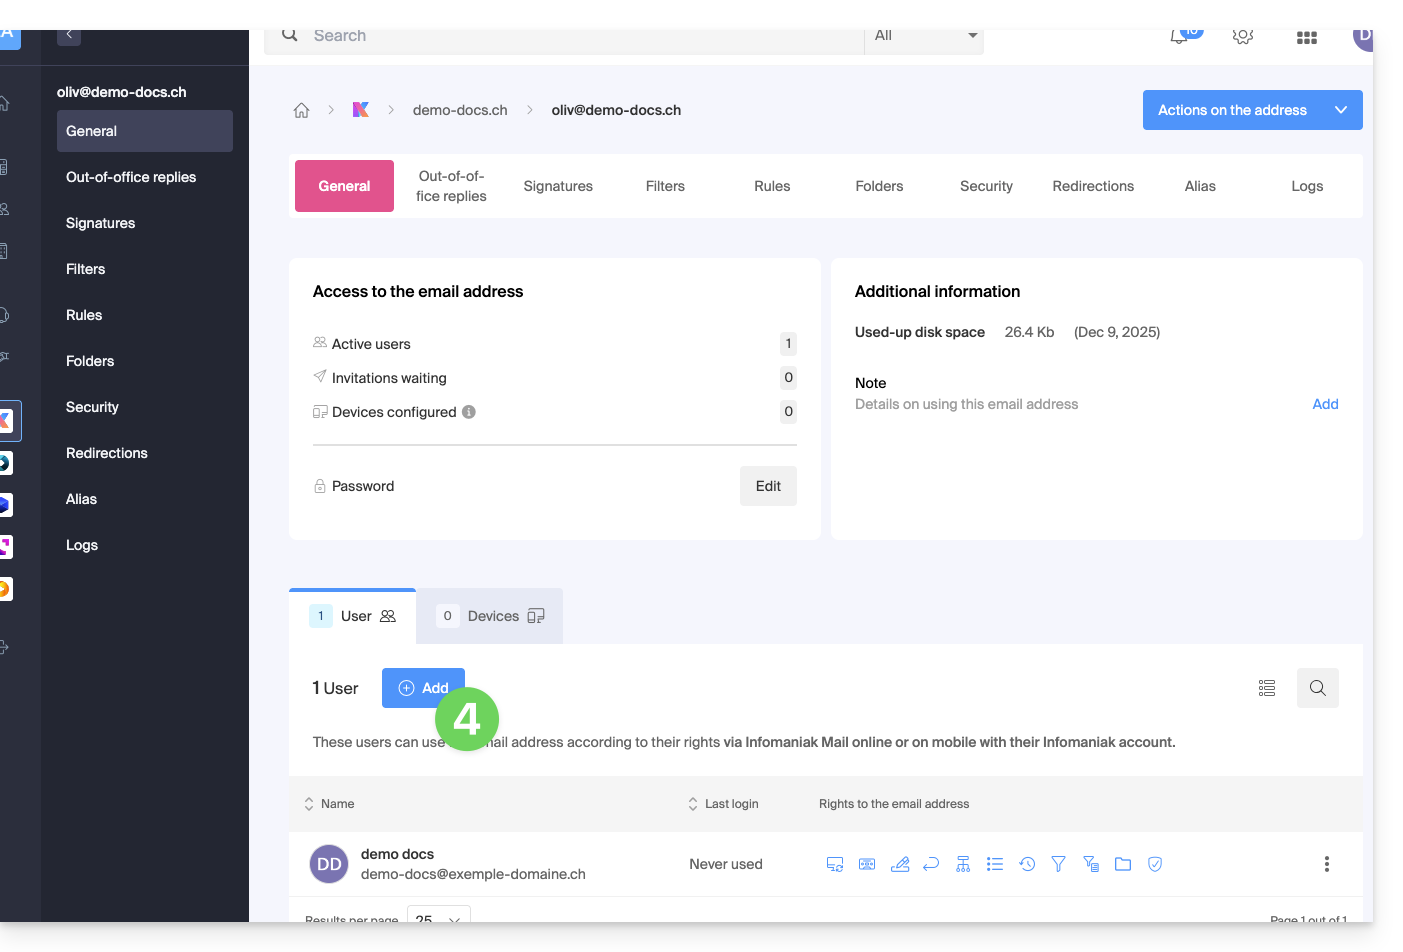
- Insira a senha para acessar sua conta Infomaniak, caso seja solicitada.
- Escolha (a) um dos usuários existentes em sua organização ou (b) um usuário externo à organização:
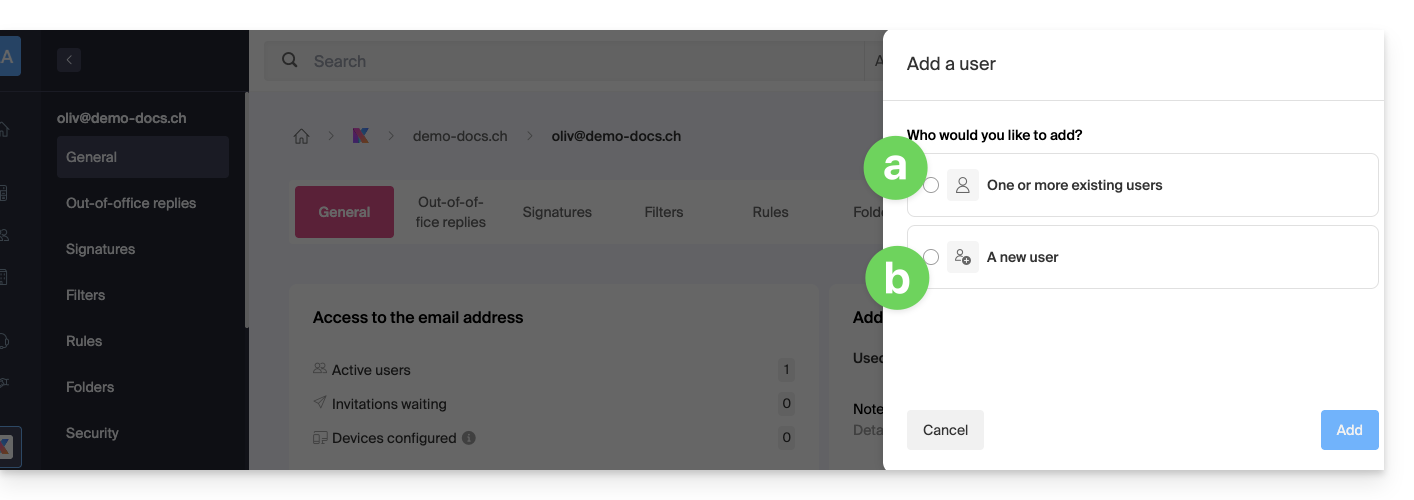
Opção [a]: utilizador existente na Organização
Quando a pessoa externa que precisa de acesso ao e-mail já faz parte da Organização, não há nada mais fácil:
- O endereço de e-mail em questão estará automaticamente visível e acessível para o usuário selecionado no aplicativo web Mail da Infomaniak (serviço online ksuite.infomaniak.com/mail) com as permissões especificadas.
- Clique no botão para Adicionar o usuário:
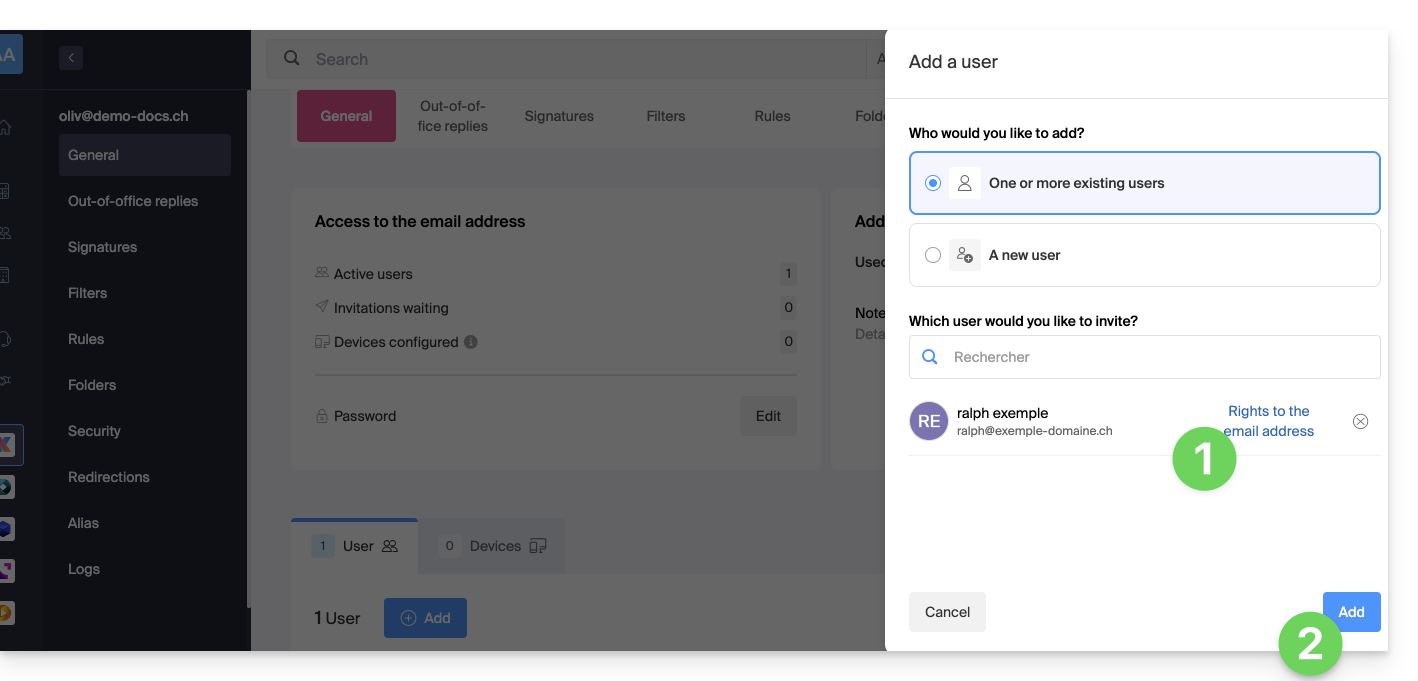
- Após a adição, é sempre possível restringir o usuário clicando nos ícones correspondentes às permissões…
- … e até mesmo revogar o acesso dele ao endereço de e-mail:
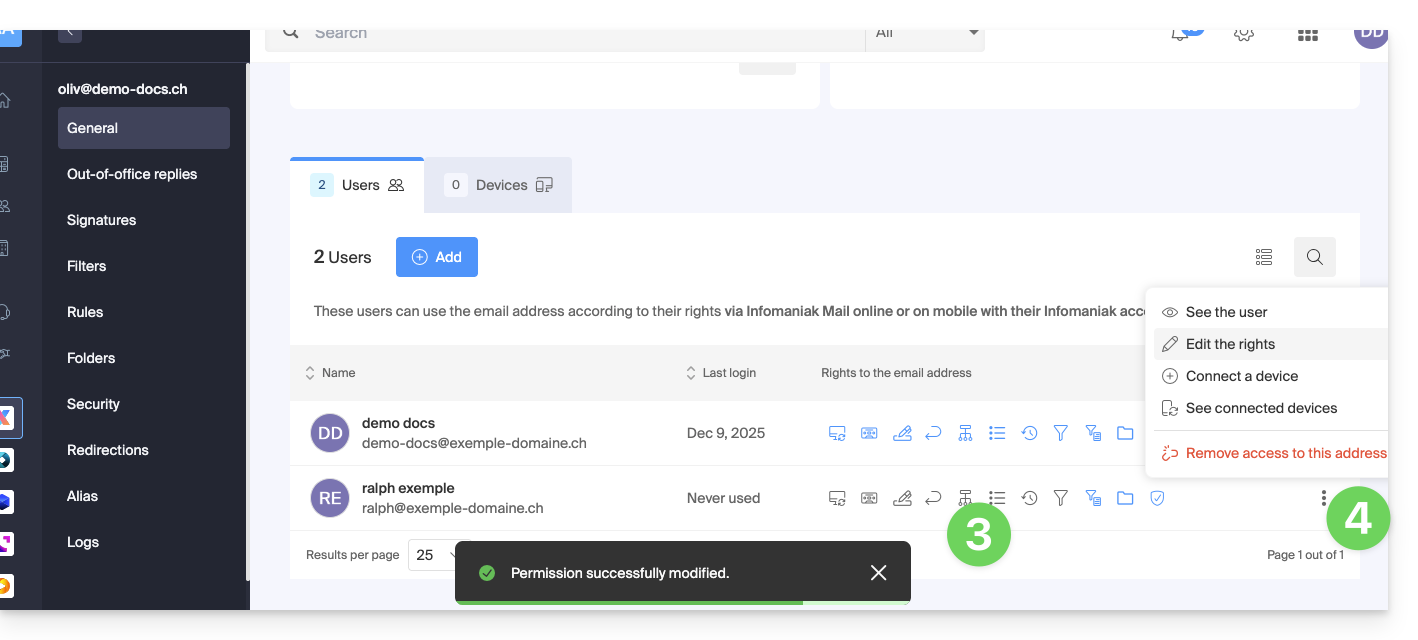
O utilizador em questão tem acesso à conta de e-mail em questão: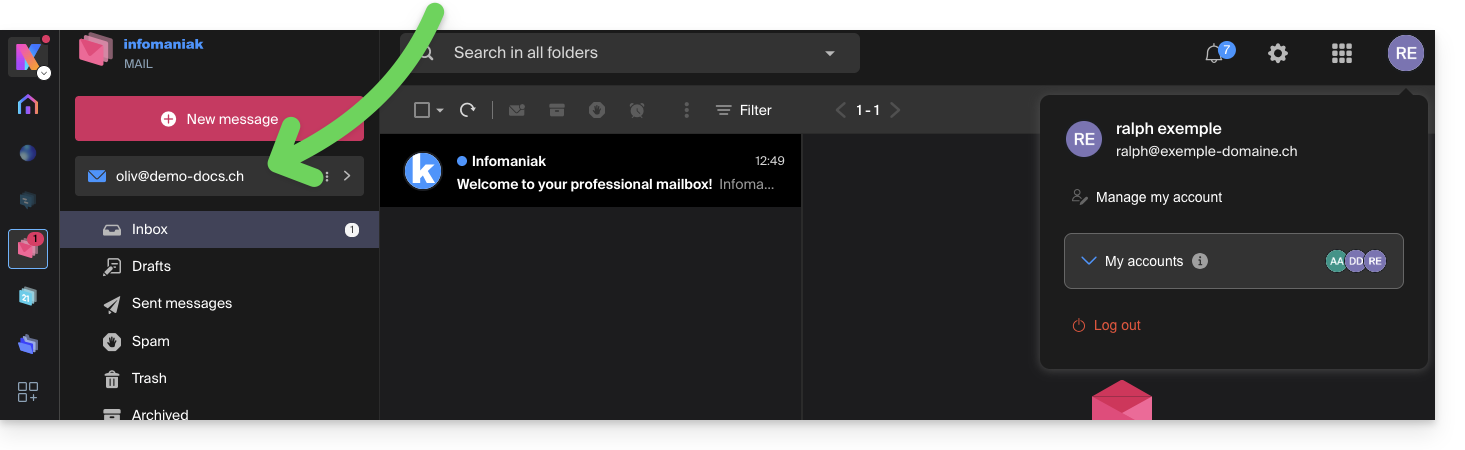
Opção [ b ] : utilizador externo à Organização
Se a terceira pessoa não estiver de forma alguma vinculada à Organização, seja porque ainda não conhece a Infomaniak, seja porque já possui sua própria Organização:
- Clique no botão de rádio para selecionar a opção de novo usuário.
- Clique para configurar os direitos do utilizador:
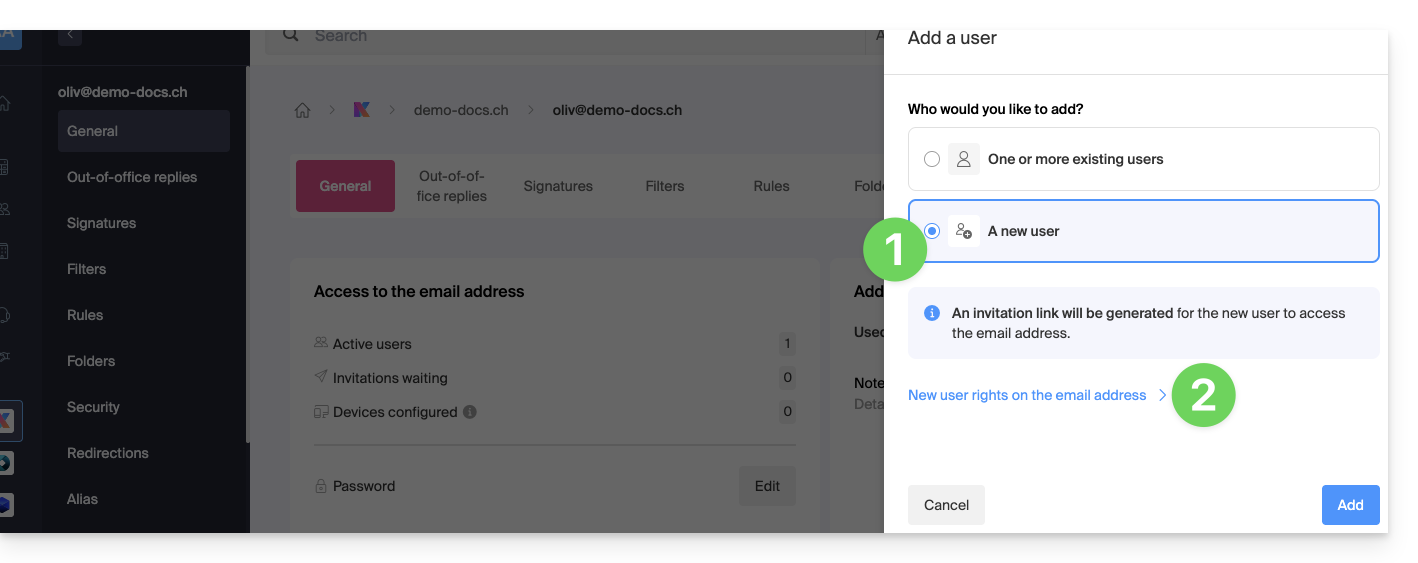
- Modifique, se necessário, as permissões concedidas ao utilizador para o endereço de e-mail em questão.
- Salve as alterações:
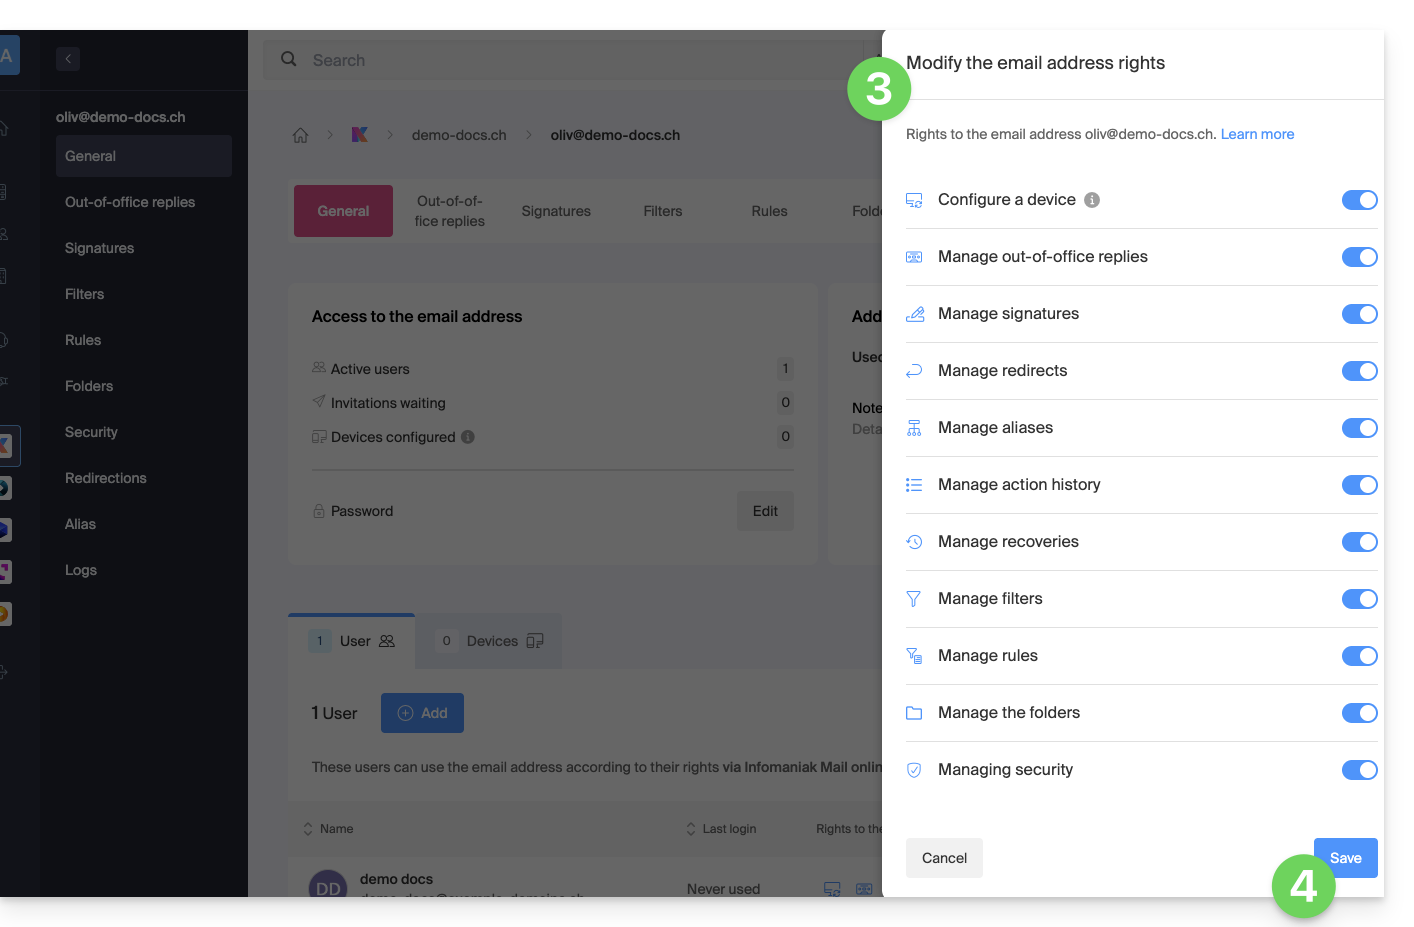
- Clique no botão para Adicionar o utilizador:
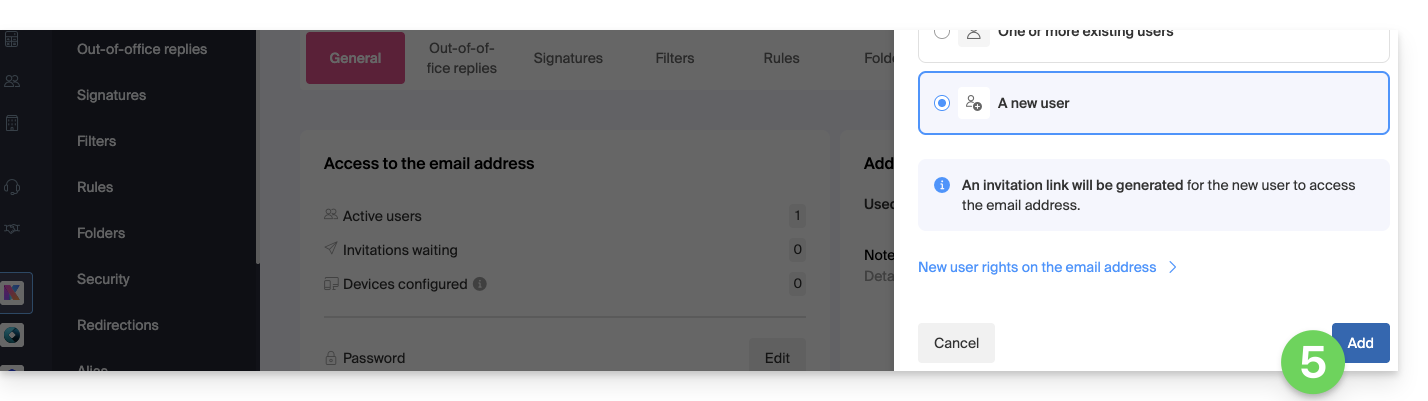
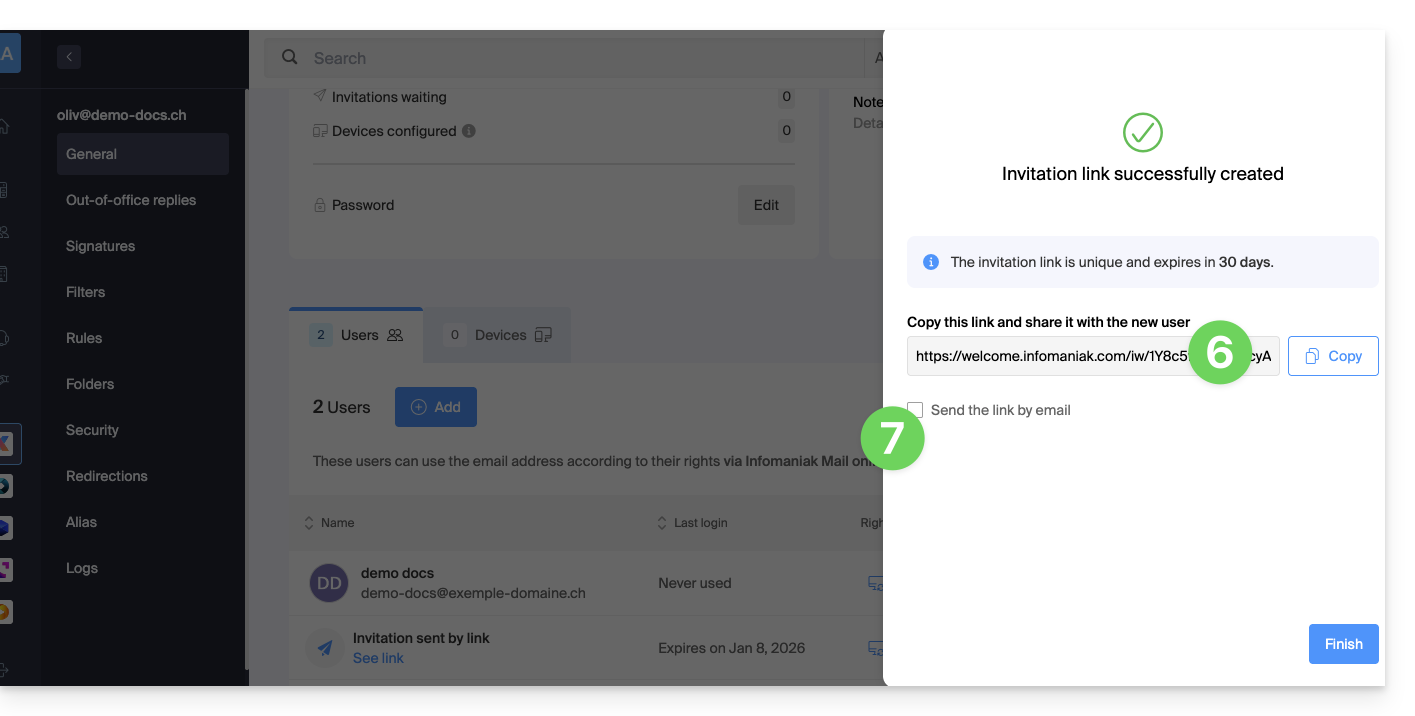
- O convite é criado (na forma de uma URL, como
https://welcome.infomaniak.com/iw/abcdef-12345..…) e o utilizador apenas precisa de clicar no link (veja abaixo) para que o endereço de e-mail correspondente seja adicionado ao seu Mail Infomaniak. - É possível enviar o convite por e-mail:
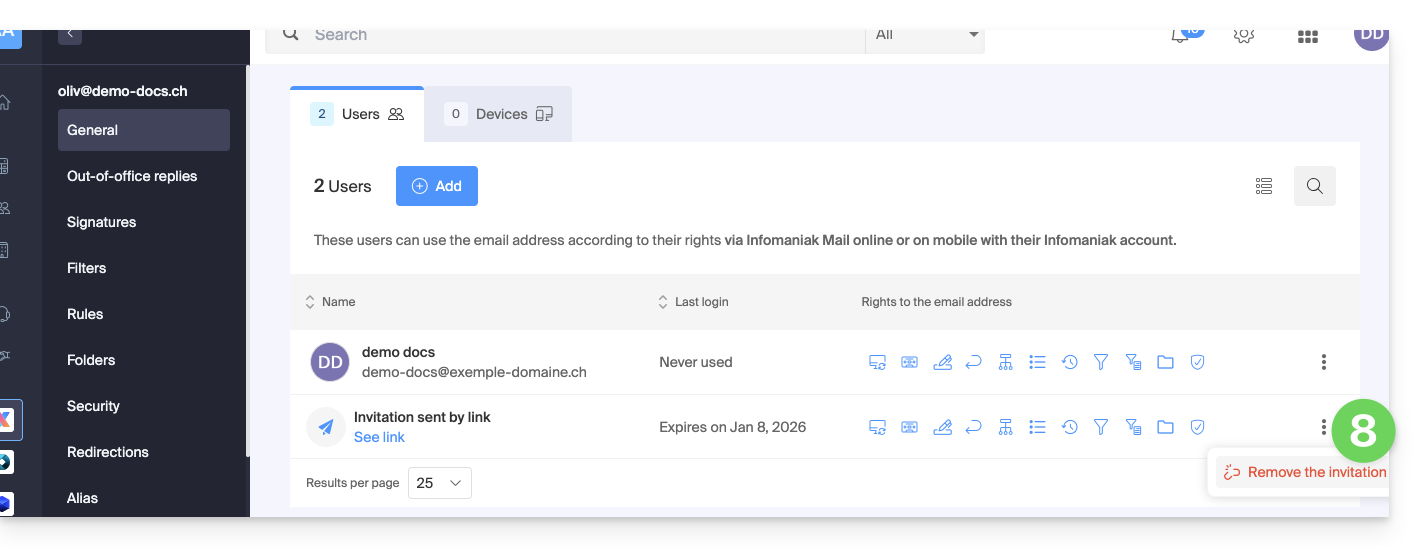
- O convite é visível na aba de utilizadores do endereço de e-mail e pode ser removido a qualquer momento:
Se a terceira pessoa já utiliza a aplicação Web Mail da Infomaniak…
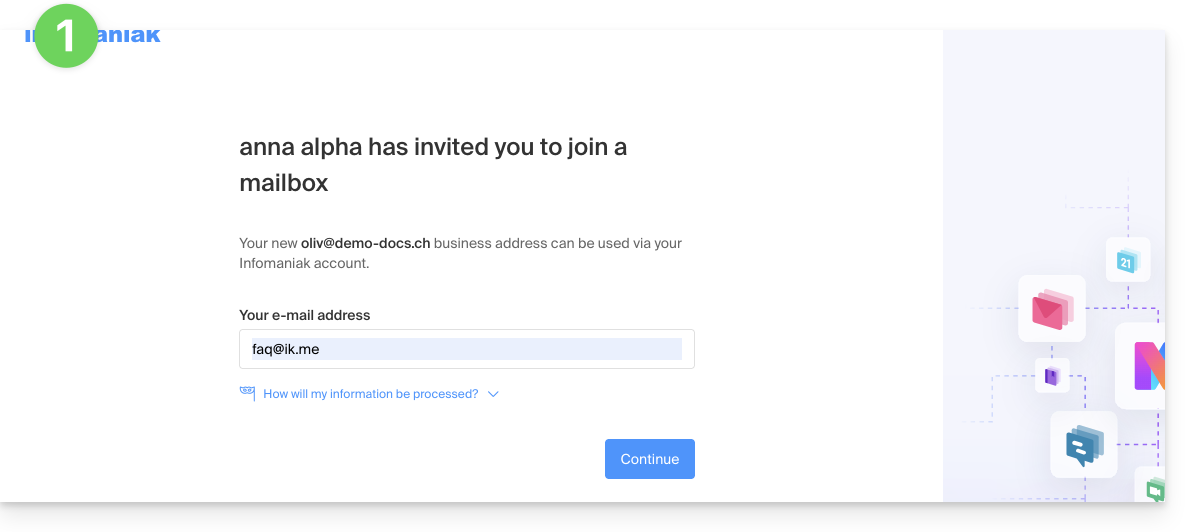
O utilizador (terceira pessoa) clica no link de convite enquanto está conectado à sua conta Infomaniak…
- … ou, se clicar no link de convite e, em seguida, se conectar à sua conta:
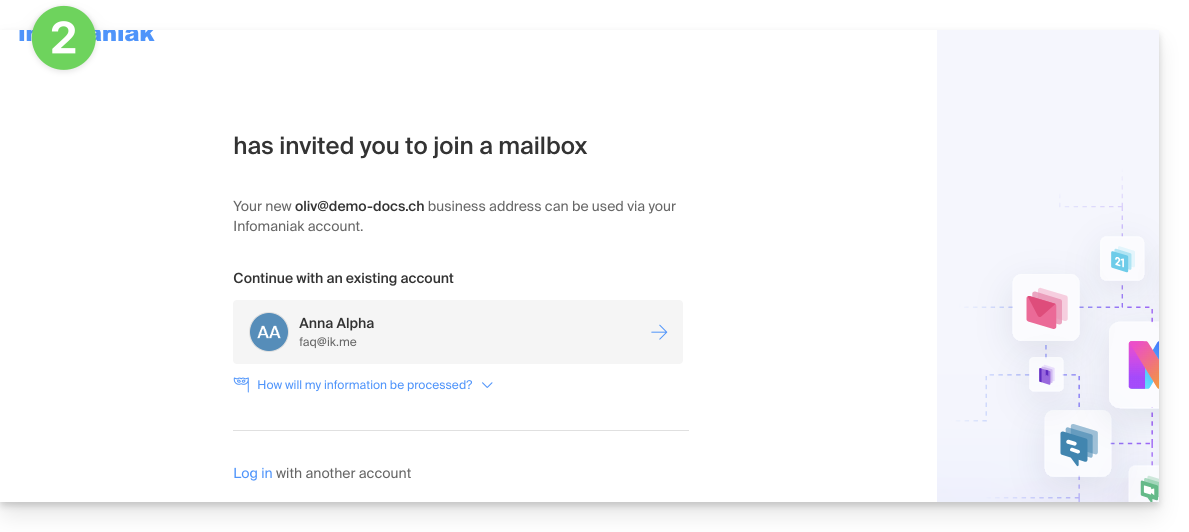
- Se necessário, o utilizador pode alterar a conta antes de associar o endereço, caso seja necessário:
- O utilizador em questão tem acesso ao endereço de e-mail em questão depois de escolher em qual Organização:
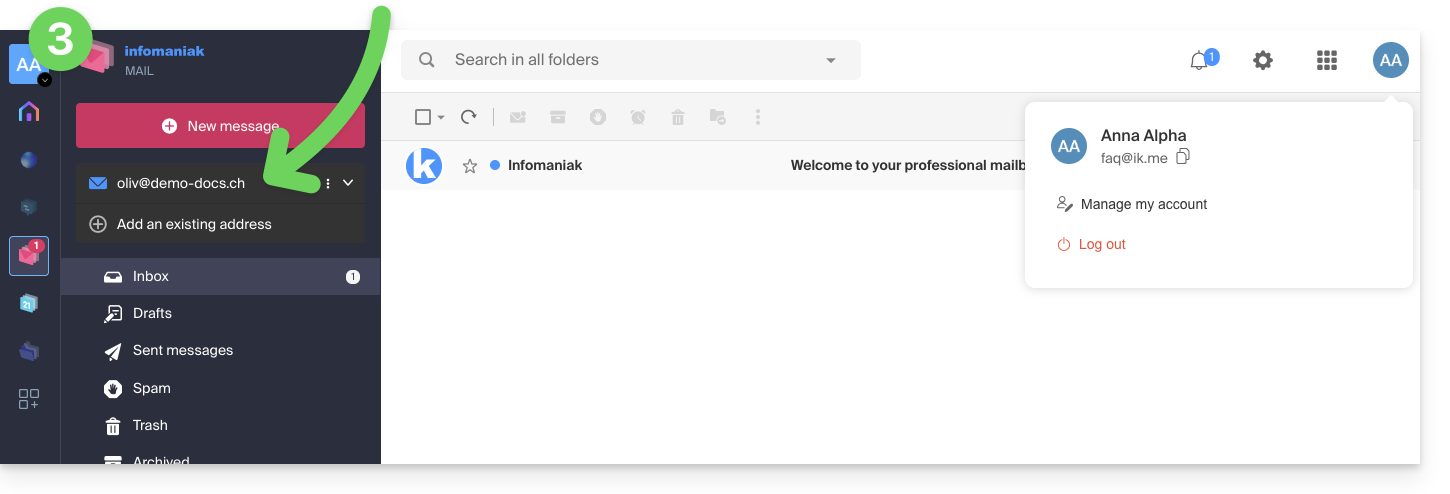
Se a terceira pessoa ainda não utiliza o Infomaniak…
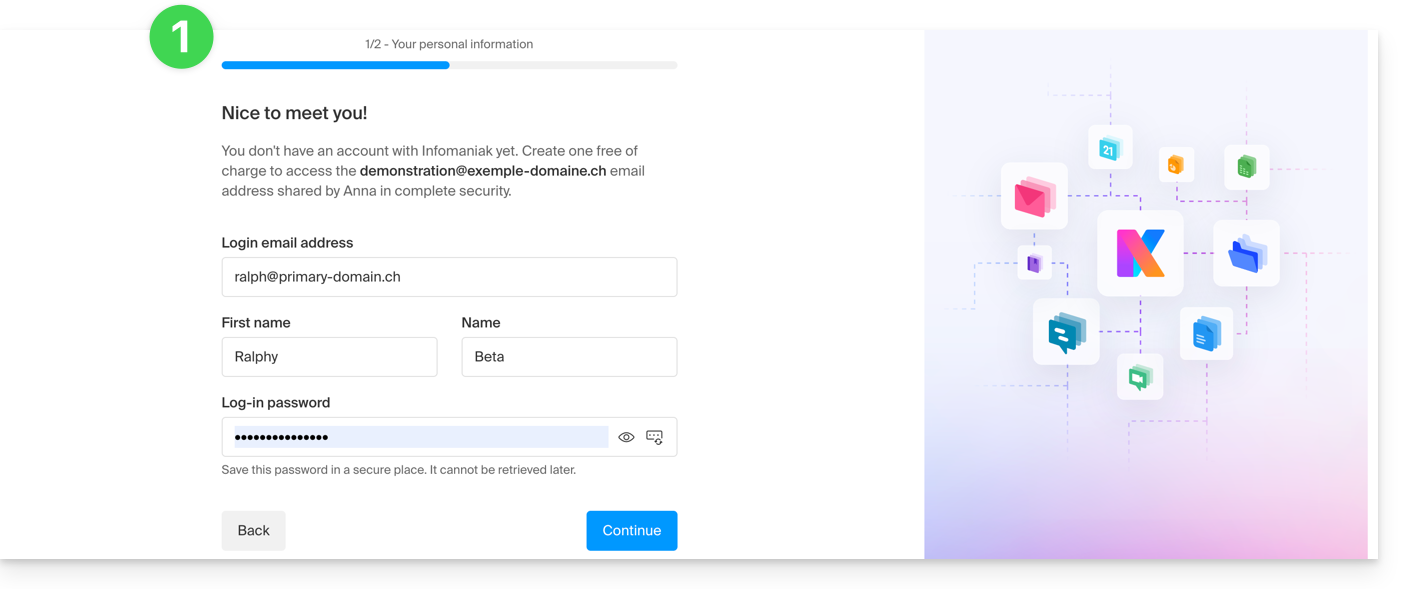
Após clicar no link de convite recebido e indicar o endereço de e-mail, a terceira pessoa será convidada a criar uma conta Infomaniak:
- Ela deverá inserir seus dados de contato e criar uma senha para acessar sua conta Infomaniak:
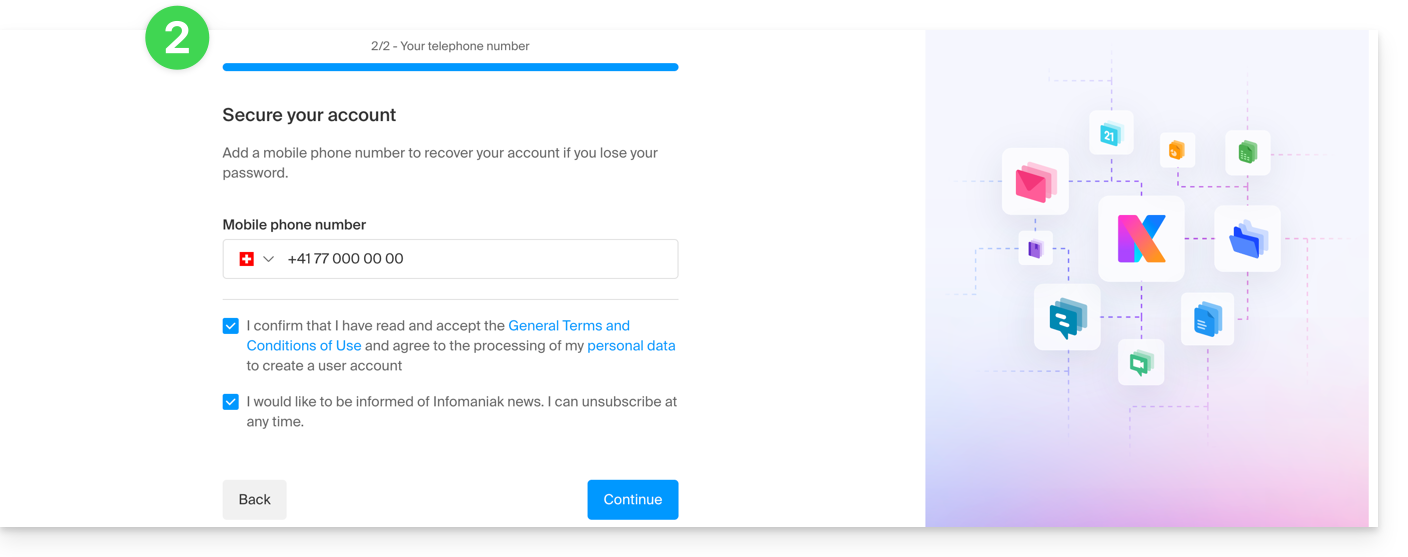
- Ela deverá indicar um número de telefone e aceitar os termos e condições:
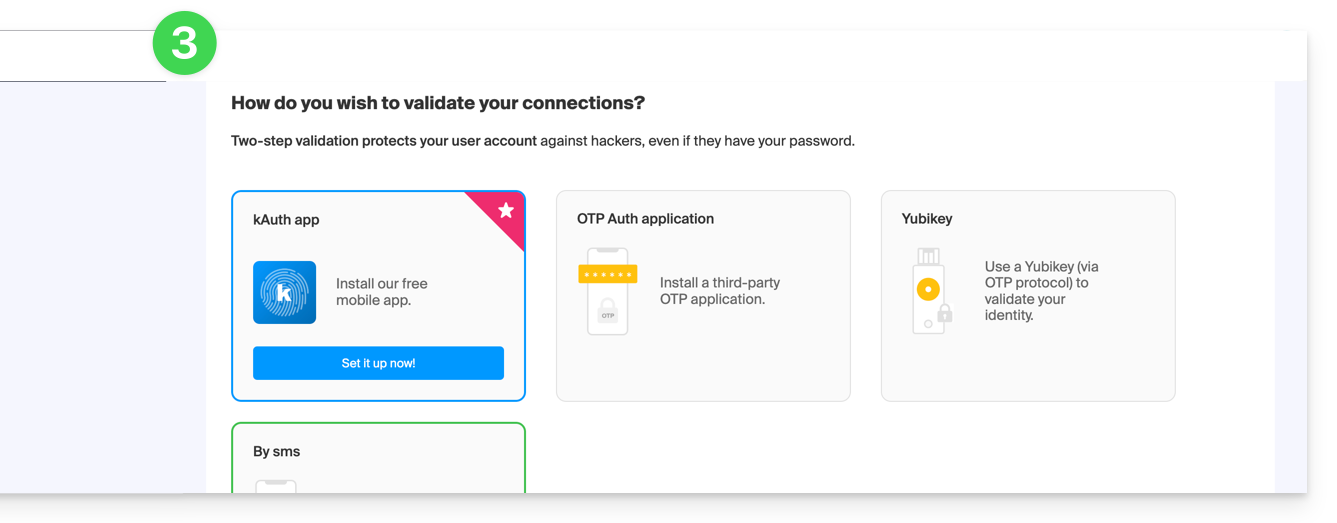
- Ela deverá adicionar um método de autenticação de dois fatores (2FA) para proteger o acesso à sua conta Infomaniak:
- Assim que o método de 2FA for adicionado, é tudo: o utilizador é redirecionado para a aplicação web Mail da Infomaniak, que exibirá o endereço de e-mail ao qual o link de convite se referia:
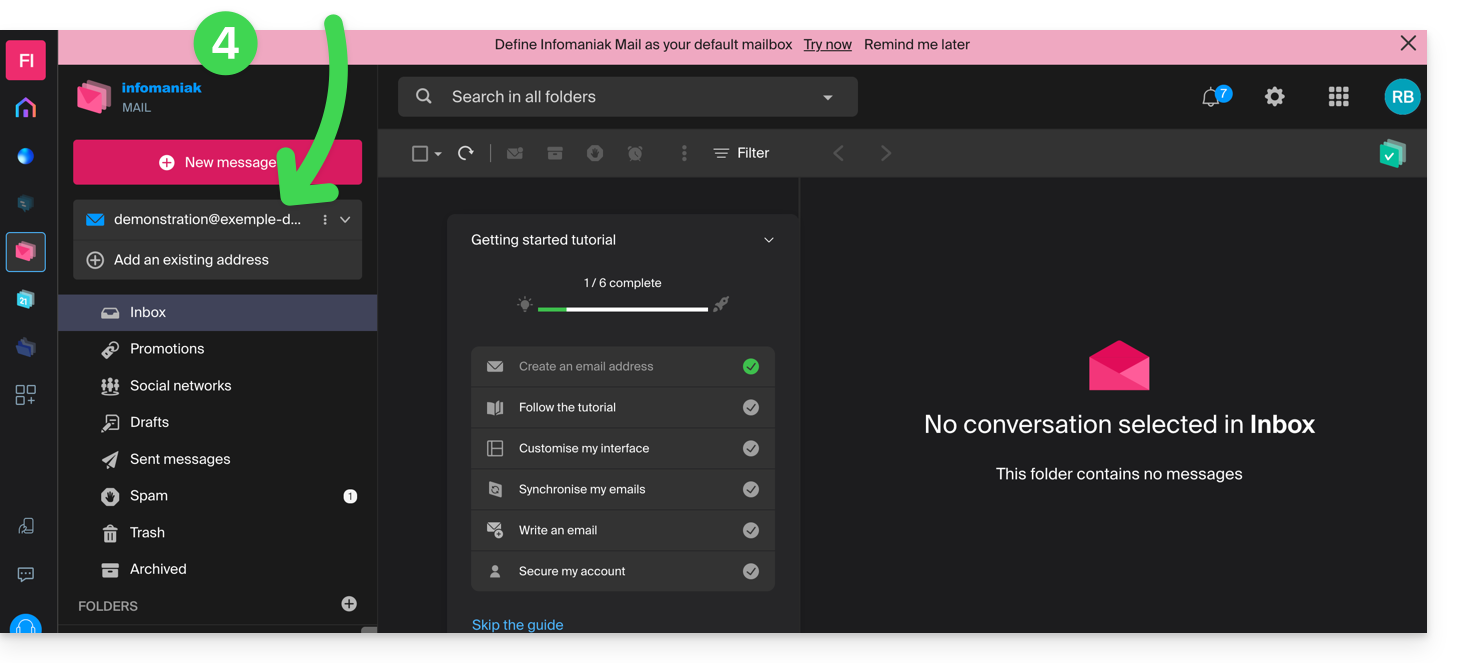
Em caso de problema
Se o botão Convidar não estiver visível ou permanecer desativado, verifique se:
- sua conta de usuário possui permissões suficientes para administrar o produto em questão
- o endereço de e-mail em questão ainda não existe como identificador de login em uma Organização Infomaniak
- a tabela abaixo do botão não menciona um utilizador com um endereço de e-mail idêntico ao endereço de e-mail em questão.
Exemplo: pretende convidar alguém para consultar o endereço anna.a@domain.xyz, mas o botão está desativado porque um utilizador anna.a@domain.xyz já consta na tabela.
Solução: para poder convidar um novo utilizador a consultar o endereço em questão (ou se uma mensagem indicar que não é possível prosseguir por motivos de segurança), consulte este outro guia.
Se o utilizador não conseguir aceder ao endereço
Quando um utilizador é adicionado, o endereço de e-mail é adicionado automaticamente nas aplicações Mail da Infomaniak: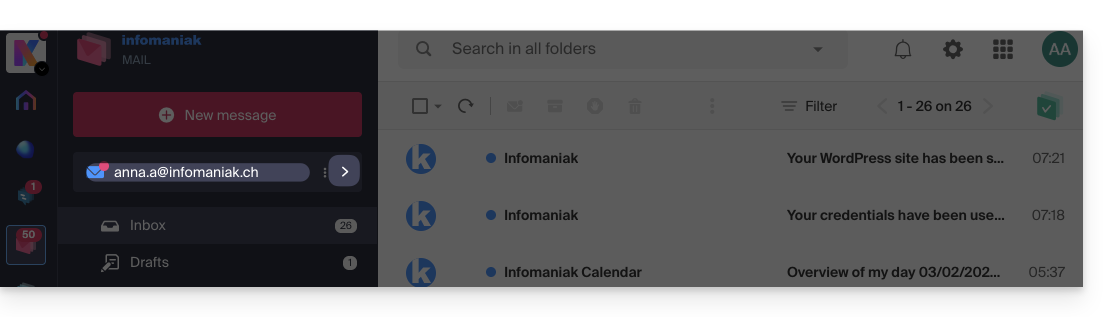
Ele pode alternar entre os seus endereços a qualquer momento através da seta localizada no canto superior esquerdo da tela: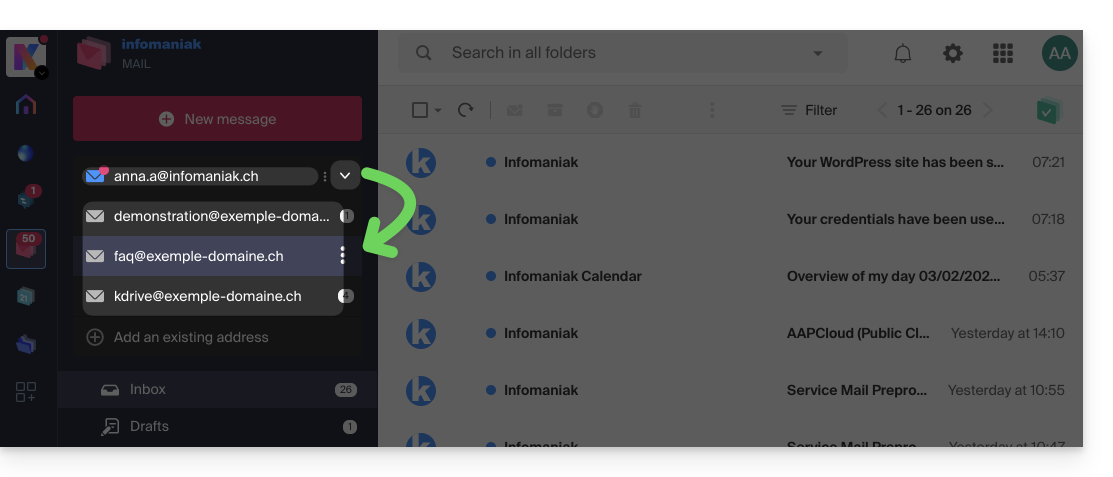
Também pode alternar entre as várias Organizações às quais a sua conta Infomaniak pertence, para aceder a outros endereços de outros Serviços de Email (consulte este outro guia).
Se o endereço associado ao convite não aparecer, tente atualizar a página do navegador (Command ⌘ + R no macOS e Ctrl + F5 no Windows).
Link para esta FAQ: https://faq.infomaniak.com/1478
Esta seção de perguntas frequentes foi útil?
Este guia explica como compartilhar uma mensagem recebida por e-mail nos aplicativos Mail da Infomaniak usando um link específico.
✘ INDISPONÍVEL com
my kSuite (ik.me, etik.com, ikmail.com)
Introdução
- É possível compartilhar qualquer e-mail, independentemente de sua localização (mensagens enviadas, arquivadas, etc.).
- O link de compartilhamento é válido por 30 dias.
- Os anexos serão visíveis.
- Não é necessário ter uma conta Infomaniak para visualizar a mensagem.
- Ao retornar à mesma mensagem para copiar o link de compartilhamento novamente, um novo link será gerado, válido por 30 dias.
- Atenção: não é possível revogar um link de compartilhamento.
Compartilhar o conteúdo de uma mensagem…
… a partir do aplicativo Web Mail Infomaniak
Para obter o link de compartilhamento de um e-mail a partir da interface Mail Infomaniak:
- Clique aqui para acessar o aplicativo Web Mail Infomaniak (serviço online ksuite.infomaniak.com/mail).
- Abra a mensagem a ser compartilhada e clique no menu de ação ⋮ à direita.
- No menu que aparece, selecione Copiar o link de compartilhamento:
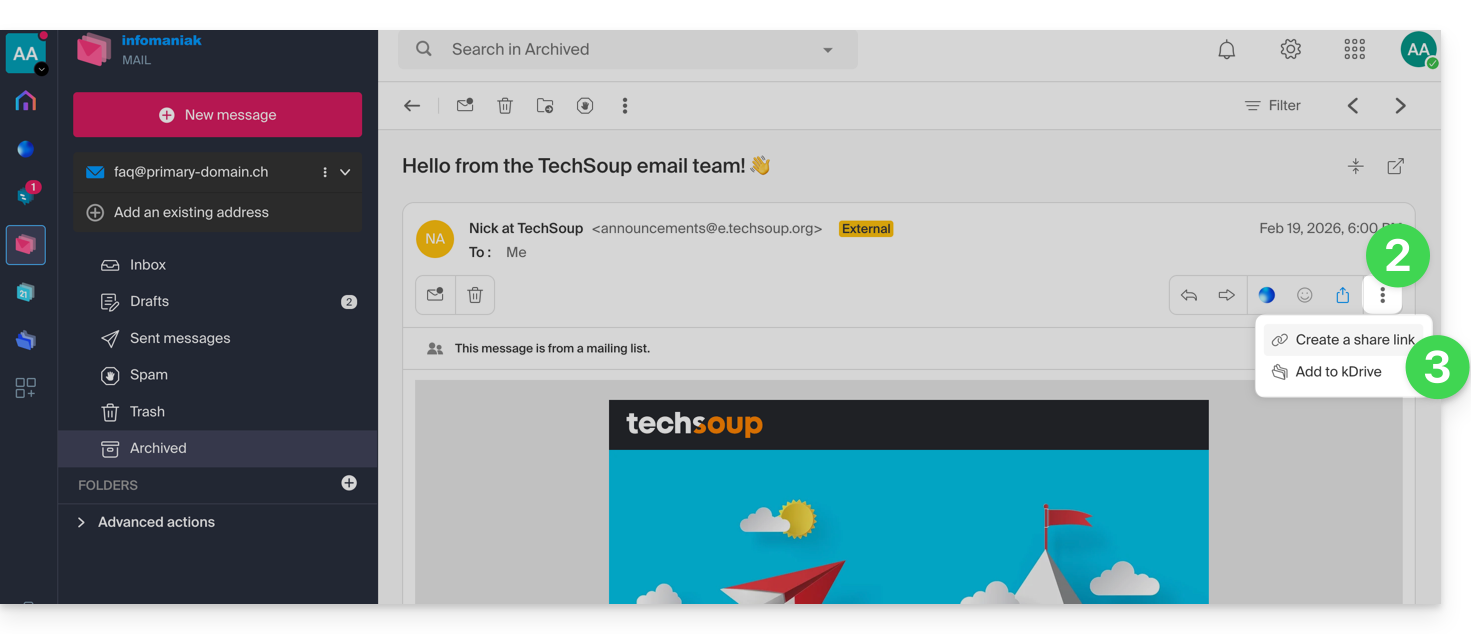
- Confirme o compartilhamento:
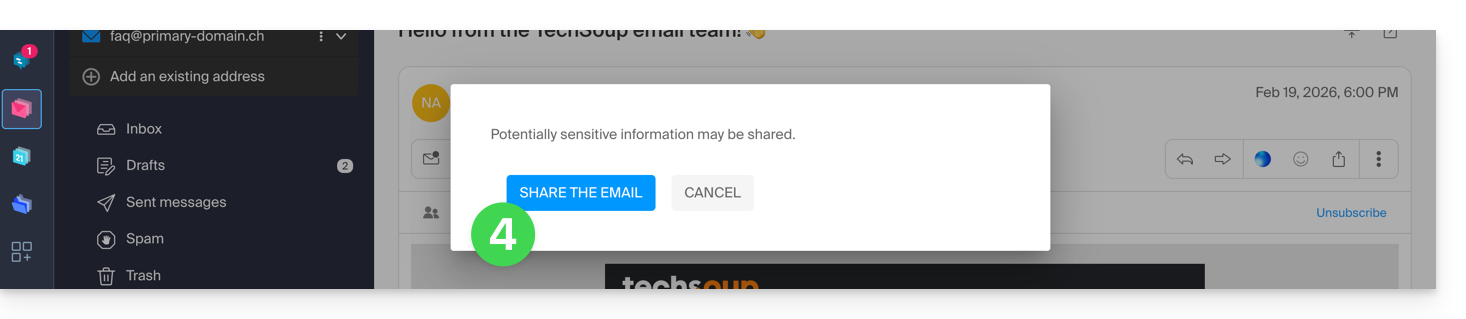
- O link foi copiado para a sua área de transferência; pode consultar a URL para pré-visualizar o compartilhamento e enviar a URL:

… a partir do aplicativo móvel Infomaniak Mail
Para isso:
- Abra o e-mail em questão no aplicativo móvel Infomaniak Mail (aplicativo para smartphone ou tablet iOS / Android).
- Clique no menu de ação ⋮ localizado no canto superior direito do e-mail exibido.
- Escolha Compartilhar e-mail para enviar o link específico deste e-mail pelos meios oferecidos pelo seu dispositivo (SMS, Compartilhamento Rápido, etc.).
Link para esta FAQ: https://faq.infomaniak.com/1535
Esta seção de perguntas frequentes foi útil?
Este guia explica como, a partir de um Serviço de Email, permitir que você (com suas credenciais de login da sua conta Infomaniak) acesse um endereço de email no ecossistema Infomaniak, ou seja, utilizando apenas o aplicativo web Mail da Infomaniak (serviço online ksuite.infomaniak.com/mail) e/ou o aplicativo móvel Infomaniak Mail (aplicativo para smartphone ou tablet iOS / Android), sem criar uma senha específica para o endereço.
As outras possibilidades de acesso e gerenciamento são apresentadas no guia principal.
Pré-requisitos
- Contratar um Serviço de Email junto da Infomaniak.
- Criar um ou mais endereços neste Serviço de Email.
- Ter, no mínimo, o direito de gerir o Serviço de Email em questão (ou ser Administrador / Responsável legal na Organização).
Aceder a um endereço de e-mail
Para utilizar o endereço de e-mail existente demonstration@exemple-domaine.ch:
- Insira o ID de login da sua conta Infomaniak e a senha na página https://manager.infomaniak.com/:
- Confirme o acesso no painel de controle usando o método de autenticação de dois fatores (2FA) definido inicialmente:
- Após acessar o painel de controle, clique em Serviço de E-mail:
- Após acessar seus Serviços de E-mail, clique no nome / nome de domínio ao qual pertence o endereço de e-mail em questão:
- Depois de acessar o Serviço de E-mail ao qual o endereço pertence, clique no endereço de e-mail em questão:
- Depois de acessar o endereço de e-mail em questão, clique no botão Adicionar um usuário:
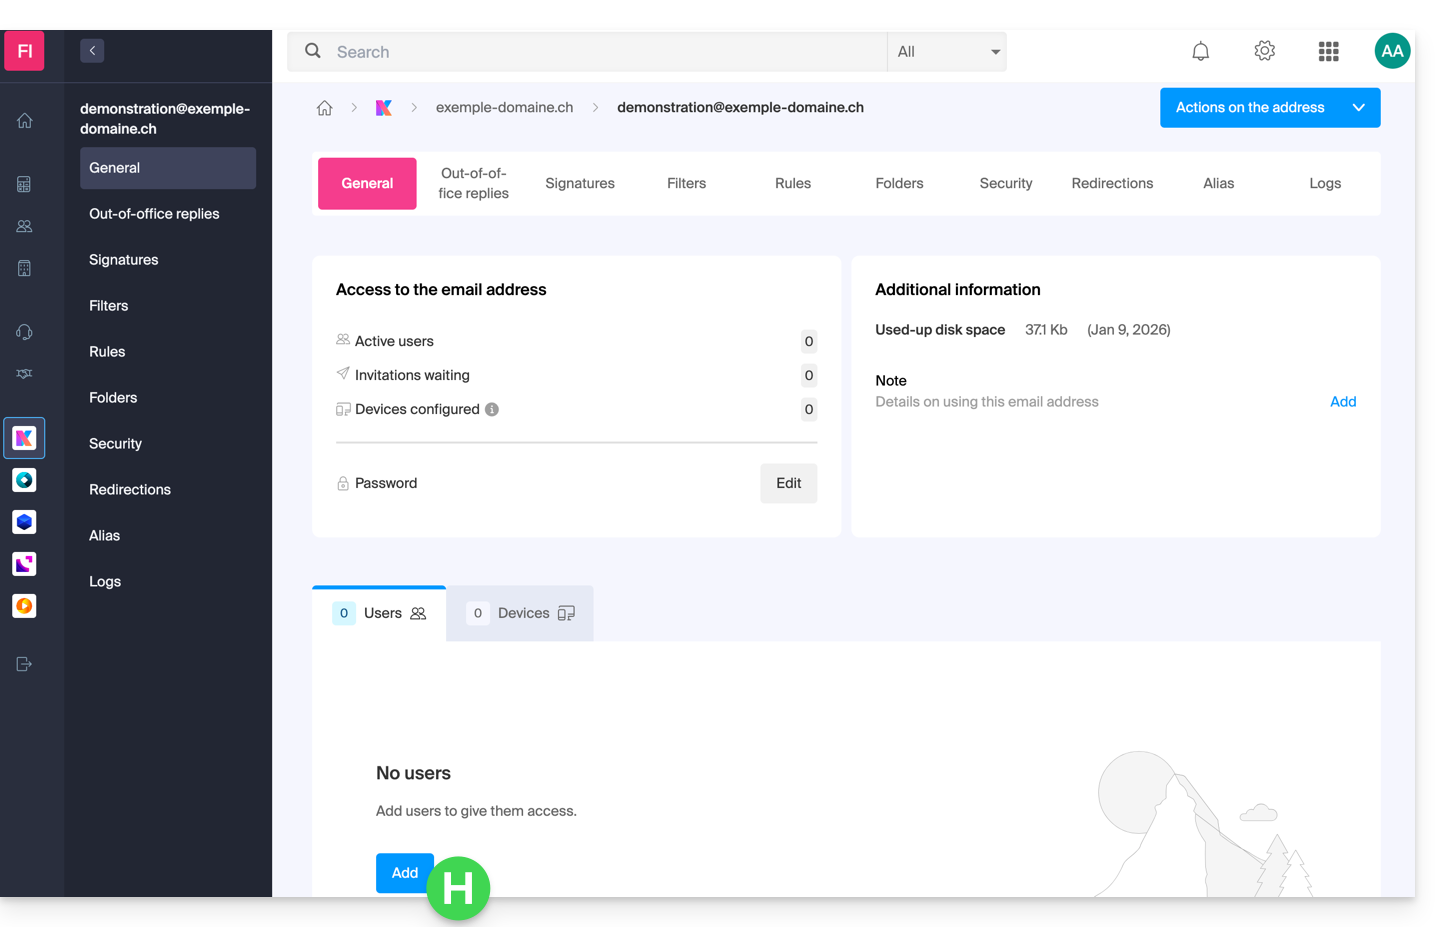
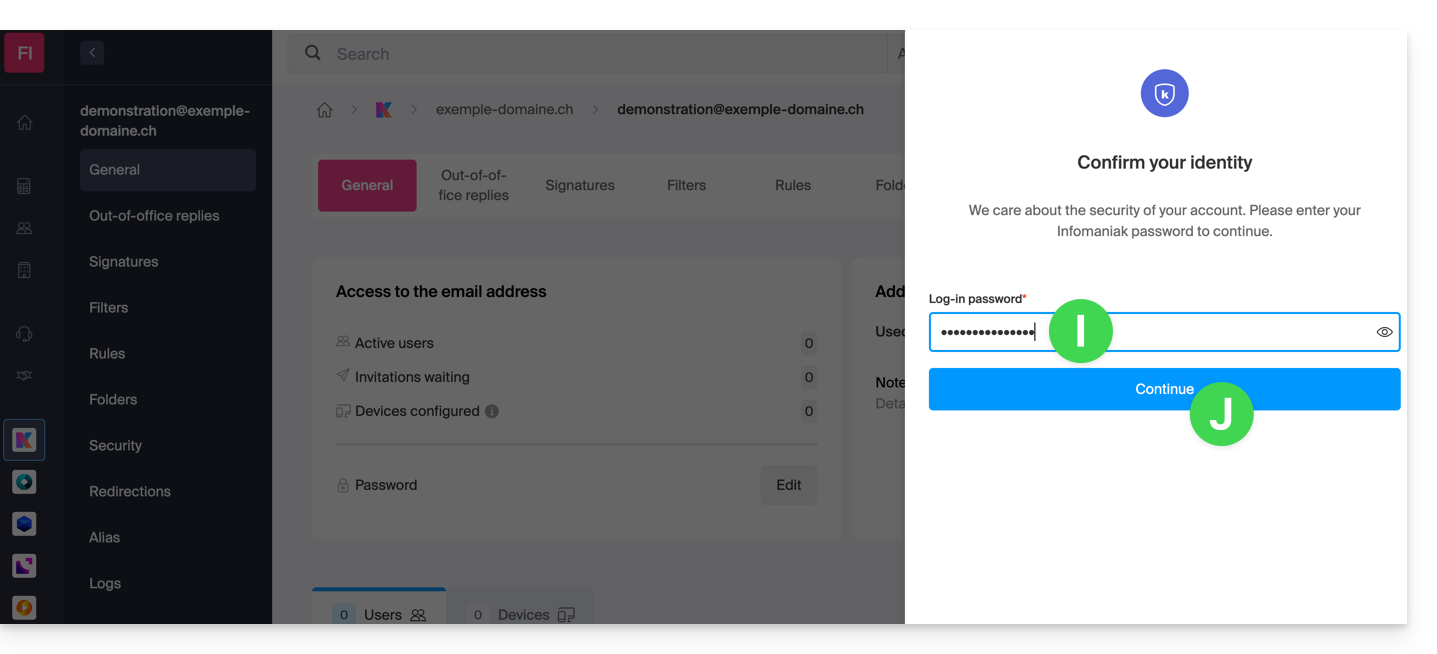
- Neste momento, pode ser necessário inserir novamente a senha de login (a mesma do ponto B acima):
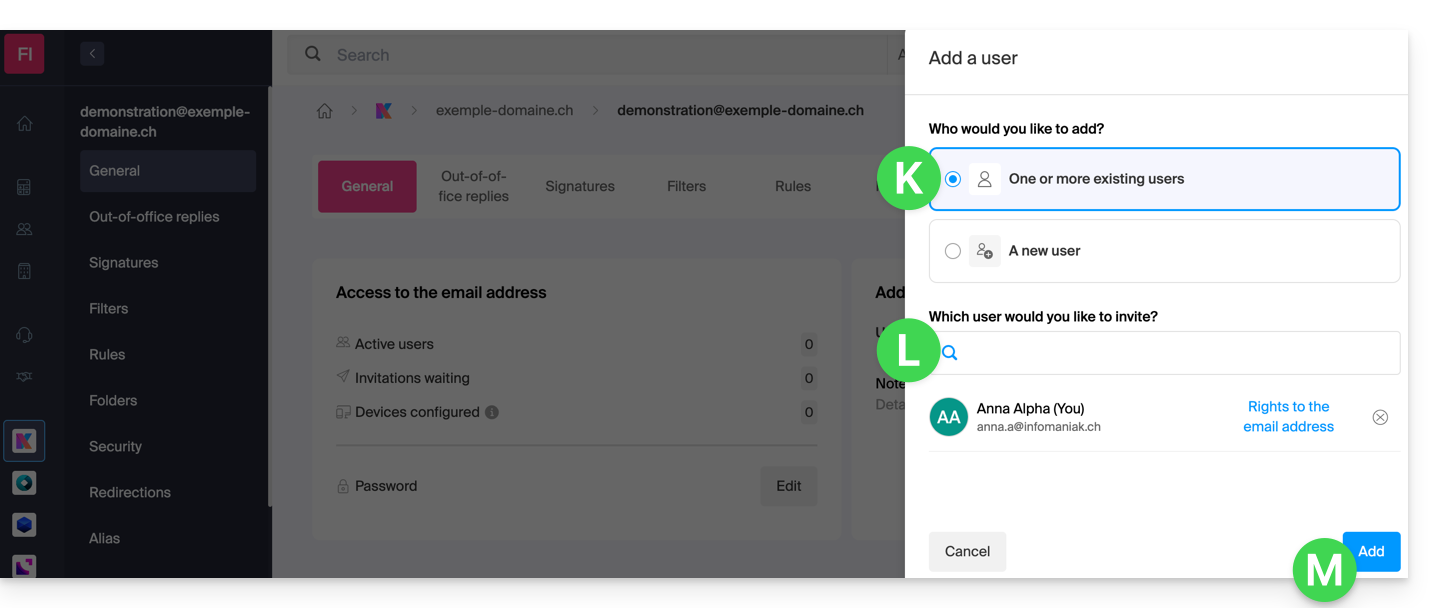
- Em seguida, escolha a opção para adicionar um usuário existente e, em seguida, clique no campo abaixo, o que fará com que a lista de usuários da organização em que você está conectado apareça. Clique em seu usuário (seu identificador de login na conta Infomaniak). Confirme a adição com o botão no canto inferior direito:
- Pronto, o seu novo utilizador foi adicionado:
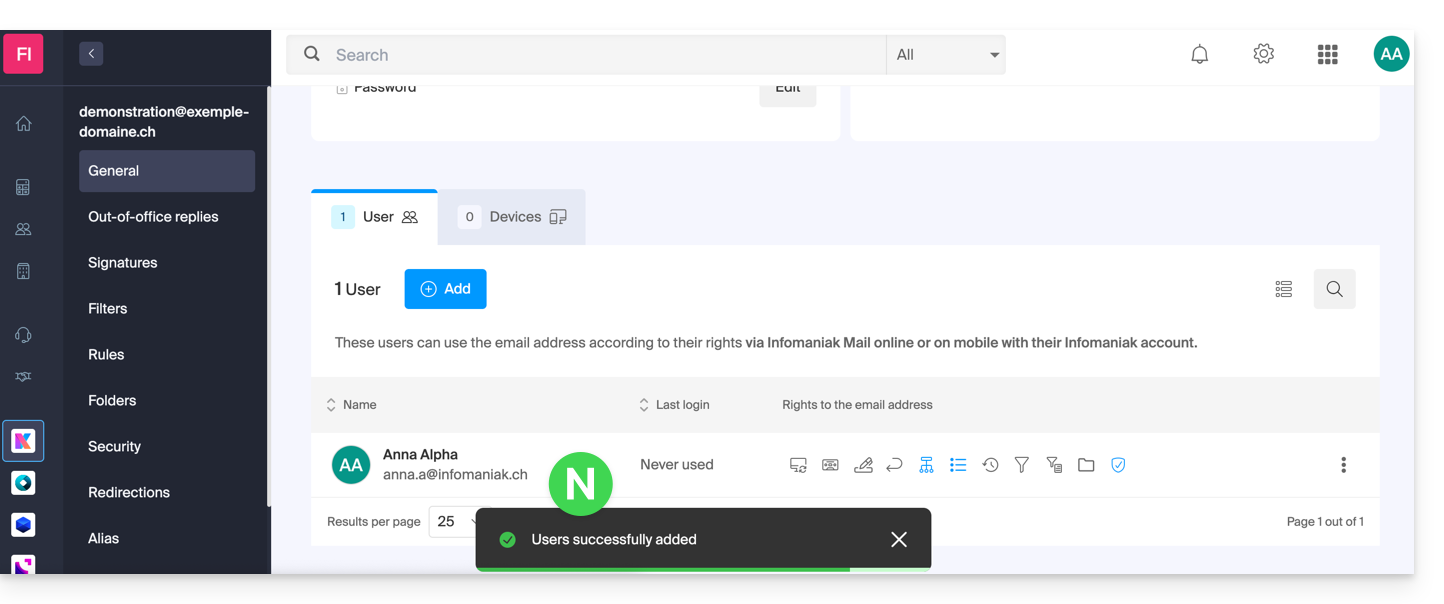
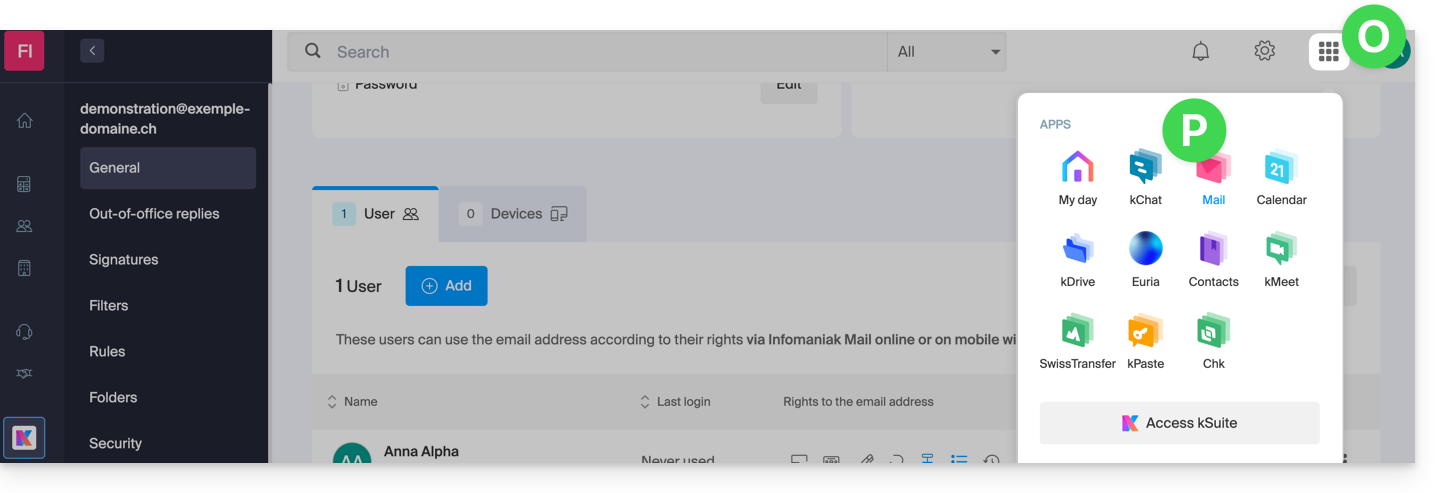
- Clique, em seguida, no ícone na parte superior do ecrã para abrir as ferramentas kSuite e clique na aplicação Web Mail da Infomaniak:
- O endereço de e-mail foi adicionado com sucesso ao aplicativo web Mail (clique, se necessário, na seta para baixo para expandir o menu de endereços e acessá-lo). Um e-mail de notificação foi enviado ao usuário (você, neste caso) para informá-lo sobre a operação:
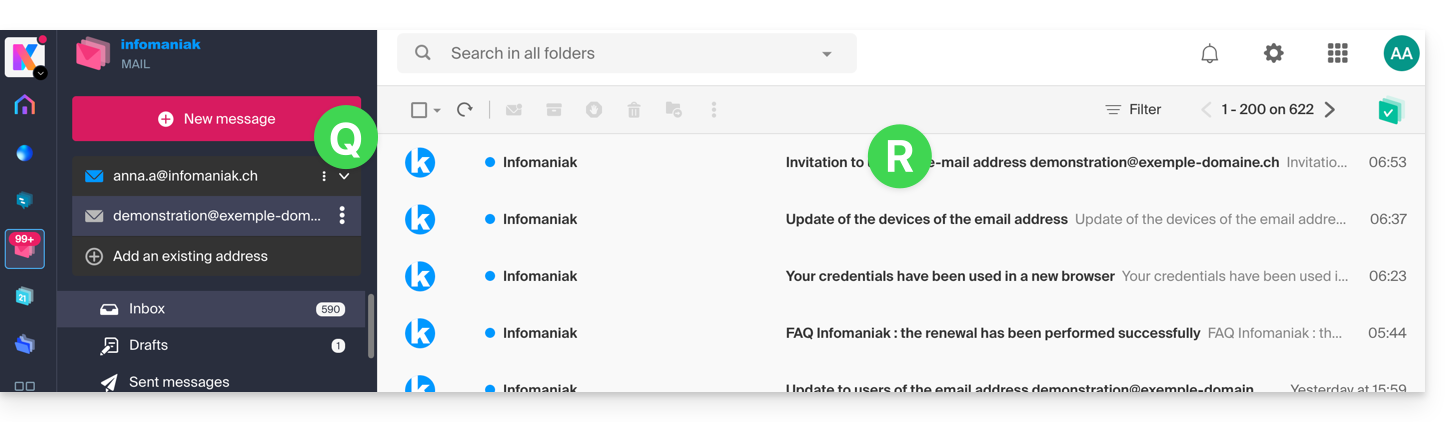
Quando seu identificador é adicionado como um usuário com acesso ao endereço de e-mail, a caixa de correio é adicionada automaticamente aos seus aplicativos Mail Infomaniak:
Pode alternar entre os seus endereços a qualquer momento através da seta localizada no canto superior esquerdo do ecrã:
Se o endereço não for exibido, tente atualizar a página do navegador (Command ⌘ + R no macOS e Ctrl + F5 no Windows).
Link para esta FAQ: https://faq.infomaniak.com/1547
Esta seção de perguntas frequentes foi útil?
Este guia explica como responder rapidamente a um e-mail na aplicação web Mail da Infomaniak (serviço online ksuite.infomaniak.com/mail).
Introdução
- As reações não são possíveis se:
- você foi destinatário da mensagem, mas em cópia oculta (CCI);
- você já adicionou 5 reações;
- a mensagem tem mais de 20 destinatários e/ou é do tipo newsletter ou lista de discussão;
- o remetente é
no-reply/catchall/postmaster; - a mensagem está criptografada ou está entre os spams, rascunhos, mensagens agendadas ou lixeira;
- a mensagem é aquela que anuncia uma reação anterior.
- É possível cancelar o envio de uma reação (mesmo que você não tenha ativado um prazo de cancelamento do envio de e-mails).
Enviar uma reação na forma de emoji
Pré-requisitos
- Ter permissão para gerir os envios: se você foi convidado para o aplicativo web Mail Infomaniak (serviço online ksuite.infomaniak.com/mail)para gerir o seu endereço, é possível que o administrador do Serviço de Email tenharemovido essa permissão a partir da sua conta de administrador.
Para enviar rapidamente um emoji de reação a um e-mail recebido:
- Clique aqui para acessar o aplicativo web Mail da Infomaniak (serviço online ksuite.infomaniak.com/mail).
- Abra o e-mail ao qual deseja responder.
- Clique no emoji “Smiley” na lista de ações rápidas no canto superior direito da mensagem:
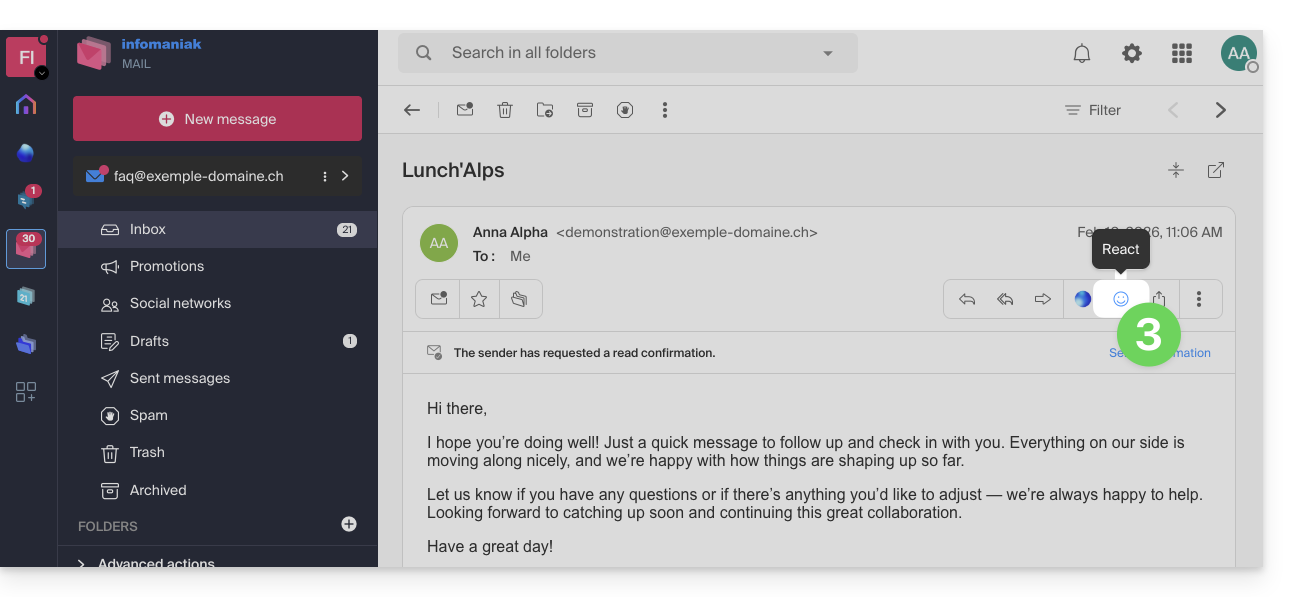
- Você também pode acessar esta funcionalidade por meio de um botão abaixo da mensagem:
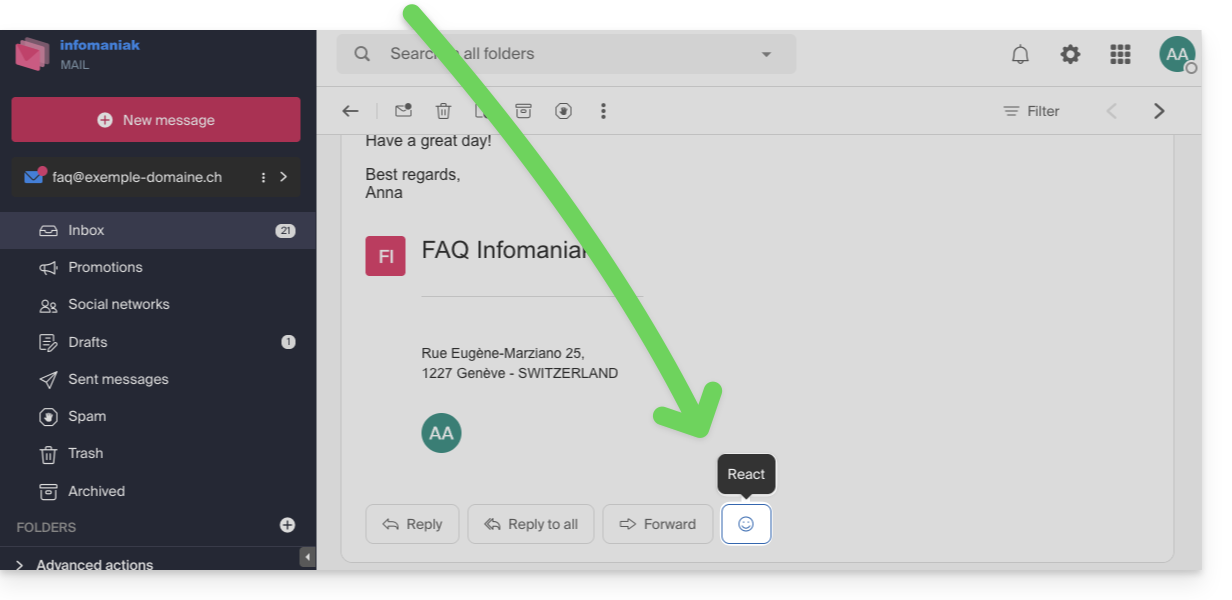
- Você também pode acessar esta funcionalidade por meio de um botão abaixo da mensagem:
- Clique no emoji que melhor representa sua reação. Ele será adicionado abaixo da mensagem e enviado imediatamente ao seu destinatário.
- É possível cancelar o envio enquanto a notificação estiver exibida na parte inferior da tela:

- É possível cancelar o envio enquanto a notificação estiver exibida na parte inferior da tela:
- O emoji é exibido na mensagem em questão.
- Um registro da sua reação também é armazenado na pasta de mensagens enviadas.
- Se várias pessoas tiverem interagido, você pode passar o mouse sobre o emoji para saber quem adicionou qual reação:
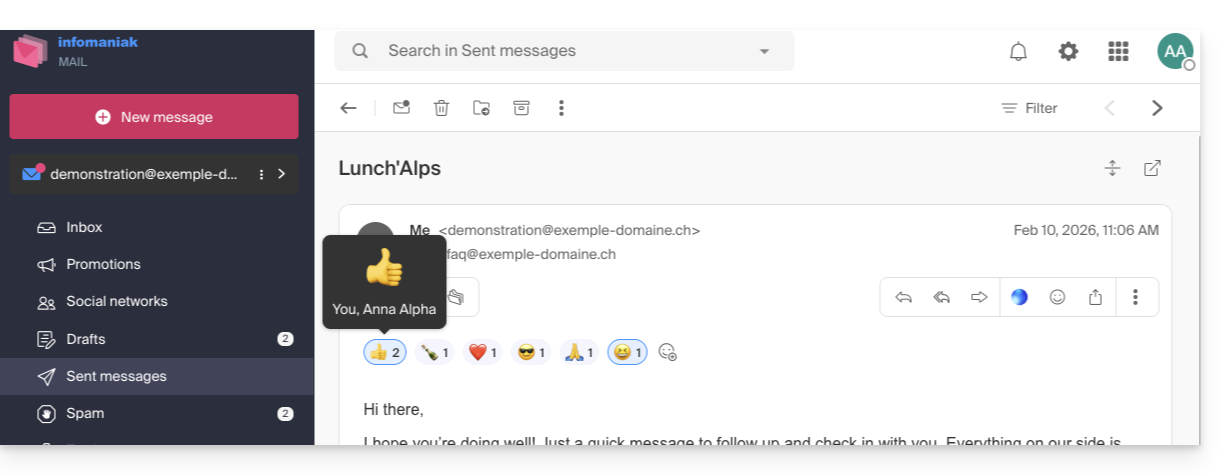
- O emoji é exibido para o seu destinatário, que recebe uma notificação como de costume quando recebe uma resposta ao seu e-mail:
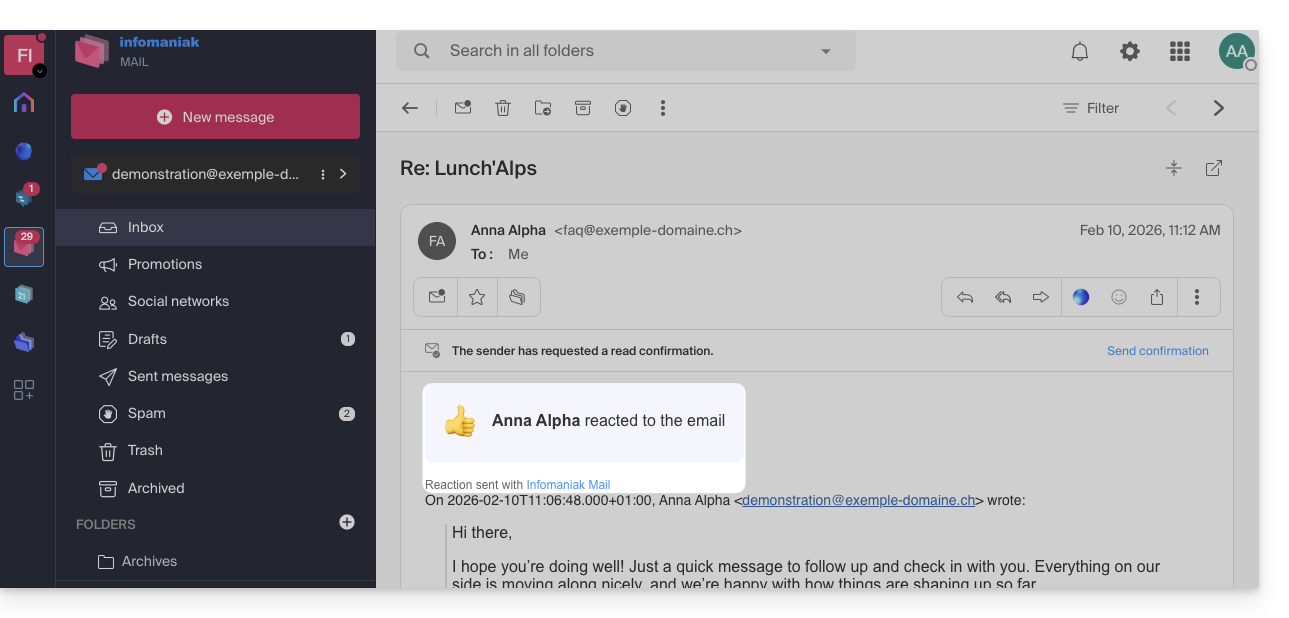
- Ele também pode responder à reação por e-mail (mas não por uma nova reação), como de costume ao receber uma nova mensagem.
- O usuário que reagiu ao e-mail encontra rapidamente o último emoji usado na sua lista de reações no aplicativo, evitando assim ter que procurá-lo a cada vez:
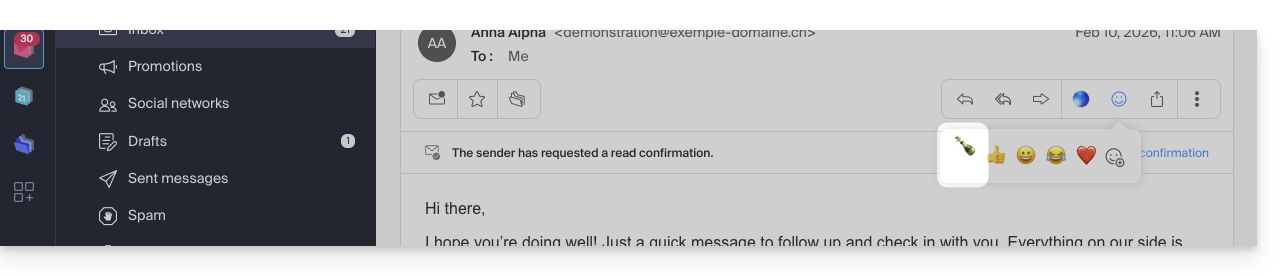
Link para esta FAQ: https://faq.infomaniak.com/1573
Esta seção de perguntas frequentes foi útil?
Este guia para o aplicativo web Mail da Infomaniak (serviço online ksuite.infomaniak.com/mail) ou para o aplicativo móvel Infomaniak Mail (aplicativo para smartphone ou tablet iOS/Android) explica como ativar a criptografia para os e-mails enviados a partir dos serviços web e móvel da Infomaniak.
Introdução
- Quando a criptografia está ativada, os e-mails e anexos são criptografados assim que são recebidos nos servidores Infomaniak, através das chaves públicas dos remetentes e destinatários.
- Cada endereço de e-mail gera uma chave na sua primeira utilização, armazenada de forma segura nos datacenters Infomaniak.
- As chaves baseiam-se na criptografia de curvas elípticas (ECC) e utilizam o padrão OpenPGP.
- Elas próprias são criptografadas em AES-256-GCM com uma descriptografia automática através da autenticação Infomaniak.
- Nos resultados da pesquisa, apenas o assunto das mensagens criptografadas será visível, enquanto o conteúdo permanecerá seguro durante o armazenamento.
Ativar a criptografia de e-mails…
… a partir do aplicativo Web Mail da Infomaniak
Para criptografar automaticamente uma mensagem enviada para um endereço de e-mail:
- Clique aqui para acessar o aplicativo web Mail da Infomaniak (serviço online ksuite.infomaniak.com/mail).
- Redija uma nova mensagem como de costume.
- Clique no ícone cadeado à esquerda do botão Enviar para ativar a criptografia:
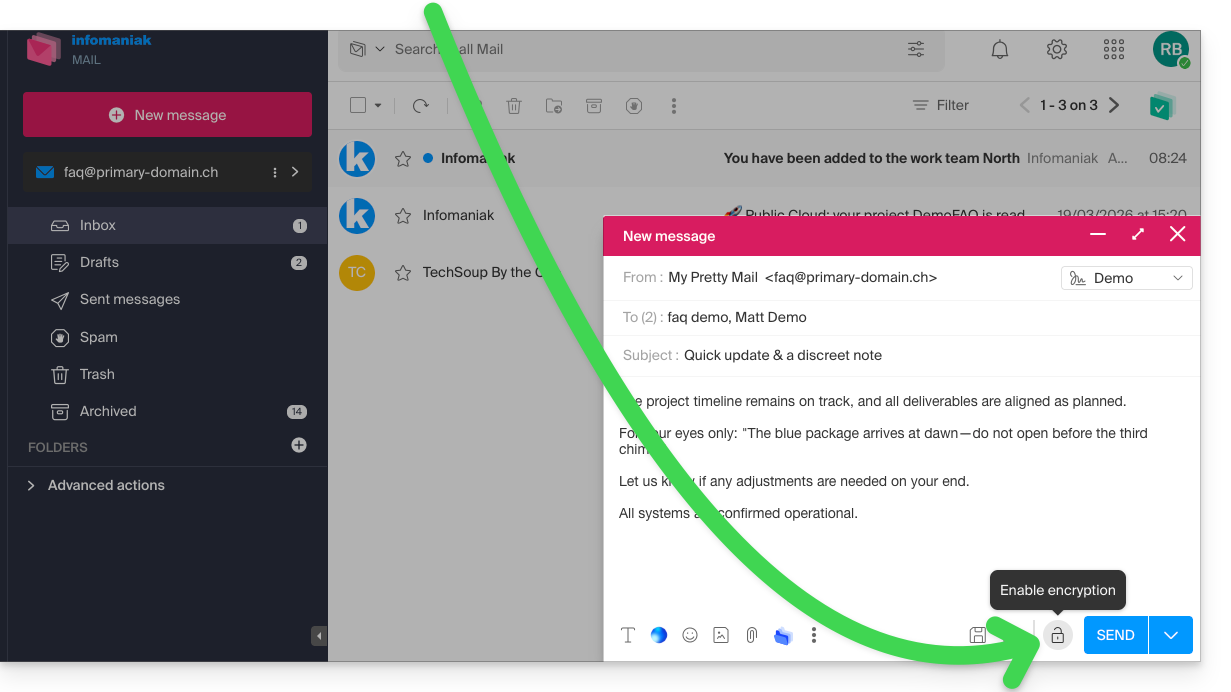
- Confirme a ação, caso apareça uma janela de confirmação.
- O ícone agora representa um cadeado fechado e a cor do conjunto foi alterada:
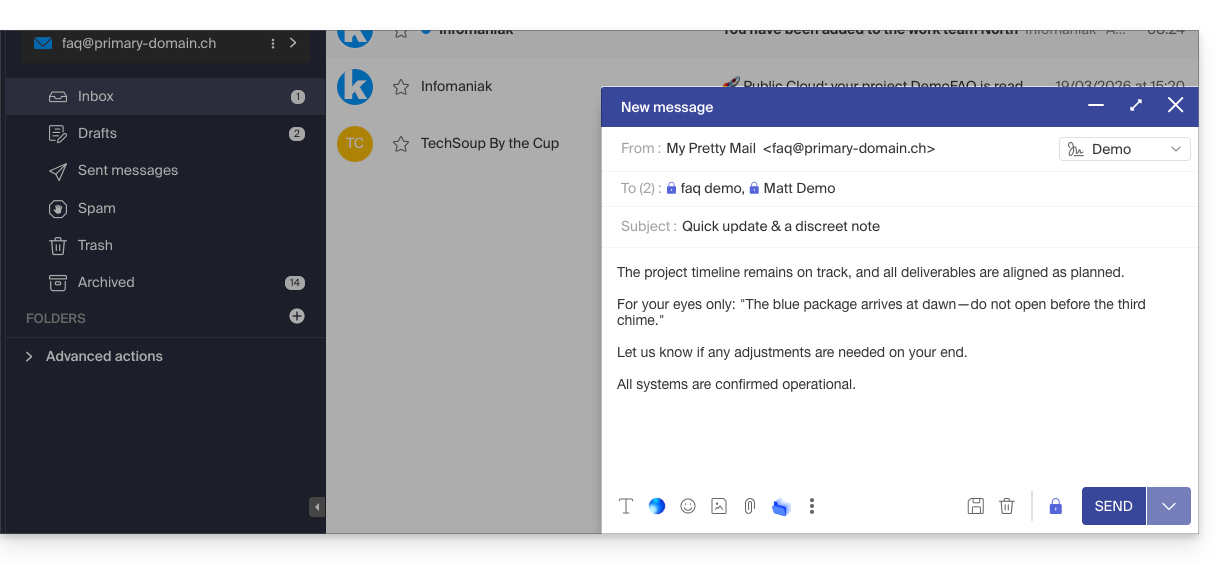
- Clique no botão Enviar.
Esta ação deve ser realizada a cada novo envio.
A. Destinatário cujo e-mail é gerenciado na Infomaniak
Se o destinatário do e-mail criptografado tiver um endereço de e-mail gerenciado na Infomaniak, a criptografia será feita de forma totalmente transparente para o remetente e para o destinatário. Uma mensagem indicará que a mensagem foi criptografada…
- … na caixa de entrada do destinatário:
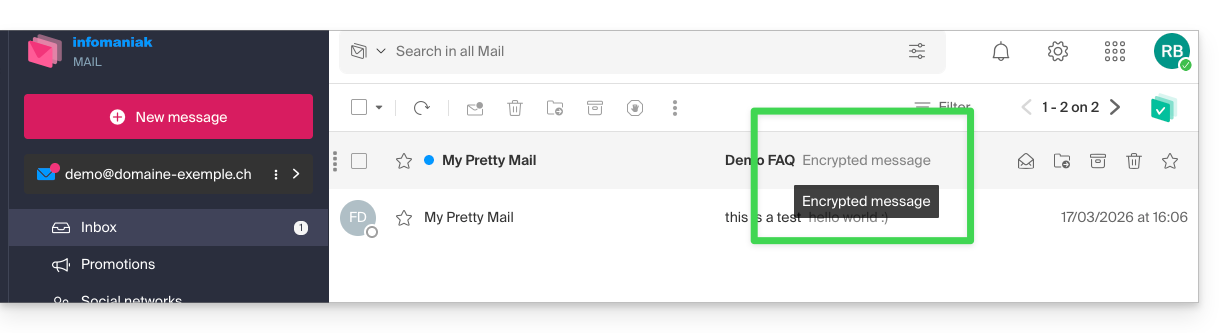
- … ao abrir a mensagem recebida:
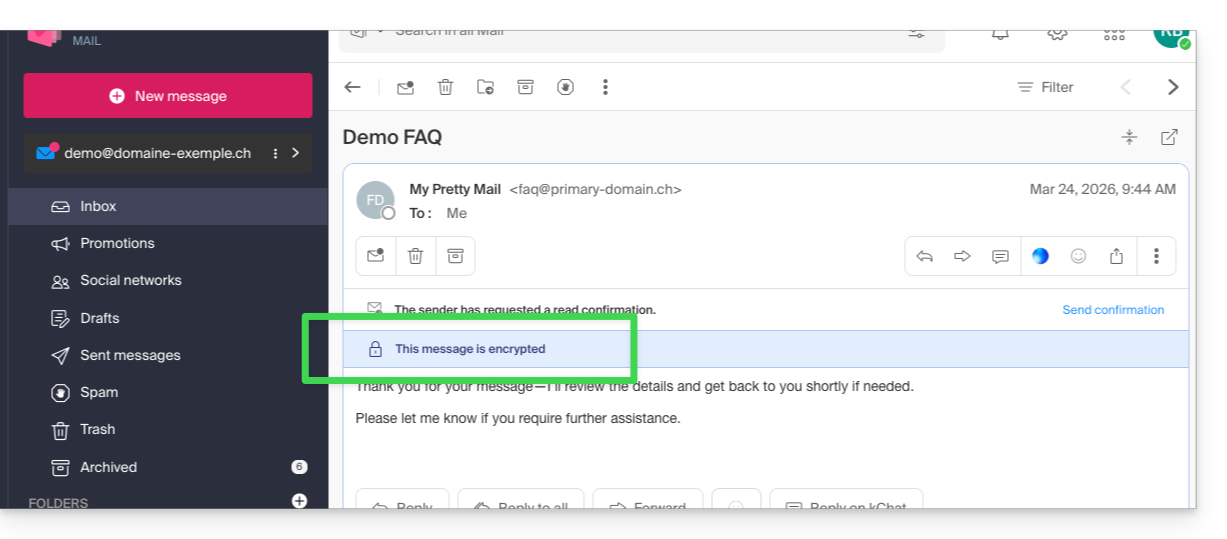
- … e na pasta das mensagens enviadas pelo remetente:
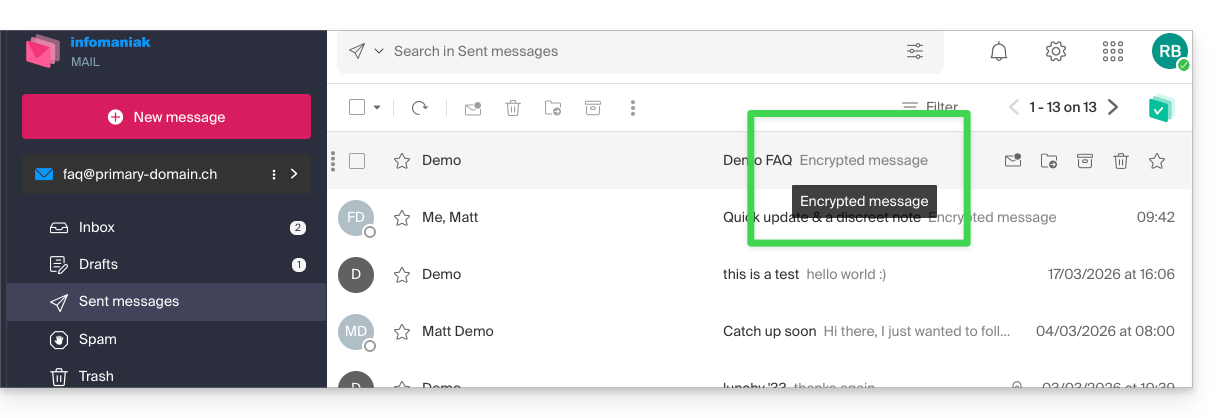
B. Destinatário externo
Se o destinatário do e-mail criptografado tiver um endereço de e-mail gerenciado fora dos serviços Infomaniak, a criptografia ainda é possível, mas exige a definição de uma senha:
- Clique aqui para acessar o aplicativo Mail da Infomaniak (serviço online ksuite.infomaniak.com/mail).
- Redija uma nova mensagem como de costume, mas envie-a para um endereço de e-mail fora da Infomaniak.
- Clique no ícone cadeado à esquerda do botão Enviar para ativar a criptografia.
- Uma janela será aberta para permitir que você crie uma senha:
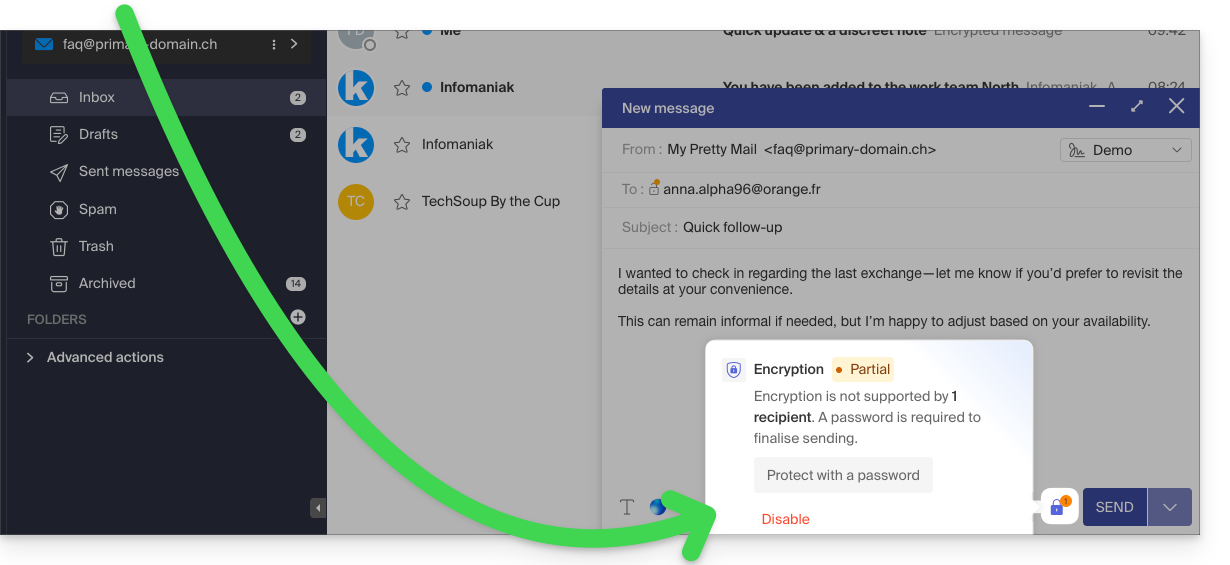
- Insira uma senha e copie-a para enviá-la por seus próprios meios (kPaste, por exemplo) ao destinatário (você pode combinar uma senha com antecedência para que o destinatário já esteja informado):
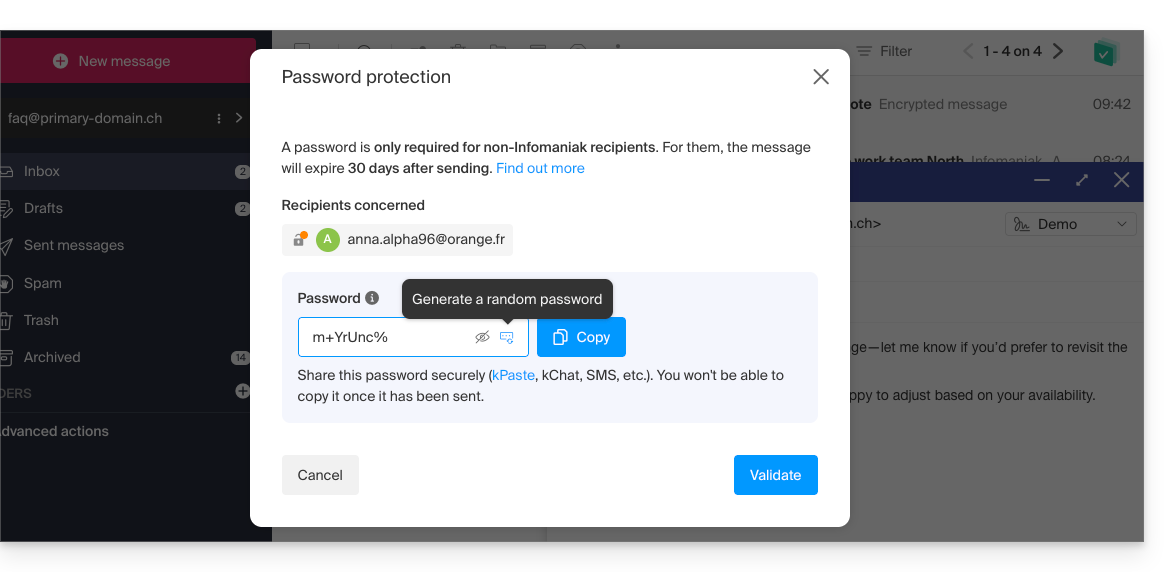
- Insira uma senha e copie-a para enviá-la por seus próprios meios (kPaste, por exemplo) ao destinatário (você pode combinar uma senha com antecedência para que o destinatário já esteja informado):
- O ícone agora representa um cadeado fechado, sem o ponto laranja, e você pode enviar o e-mail como de costume:
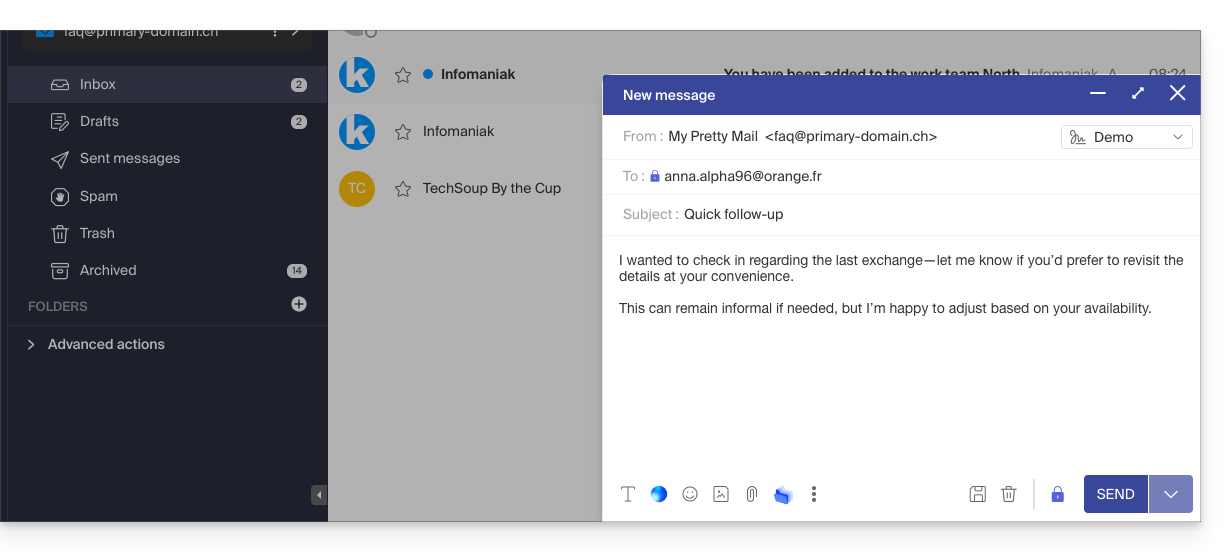
- Os destinatários receberão uma mensagem informando que um e-mail criptografado está aguardando:
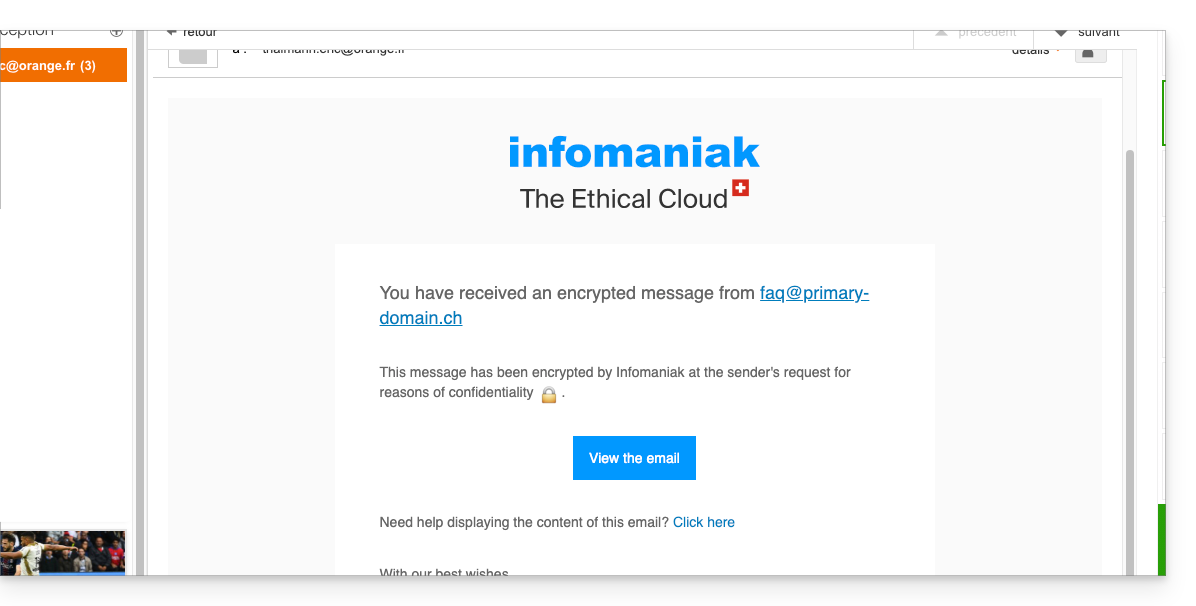
- Ao clicar no botão fornecido, eles serão redirecionados para uma página da web segura, onde a senha deverá ser inserida.
- Após a validação da senha, a mensagem criptografada poderá ser visualizada nesta mesma página, válida por 30 dias.
… a partir do aplicativo móvel Infomaniak Mail
Para criptografar automaticamente uma mensagem enviada para um endereço de e-mail:
- Abra o aplicativo móvel Infomaniak Mail (aplicativo para smartphone ou tablet iOS/Android).
- Redija uma nova mensagem como de costume.
- Clique no ícone cadeado na parte inferior da janela de redação para ativar a criptografia:
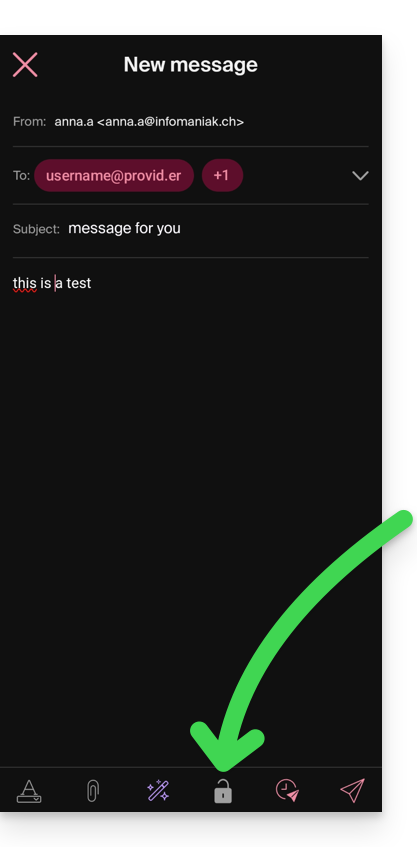
A. Destinatário cujo e-mail é gerenciado na Infomaniak
Se o destinatário do e-mail criptografado tiver um endereço de e-mail gerenciado na Infomaniak, a criptografia será feita de forma totalmente transparente para o remetente e para o destinatário:
- Cadeados fechados serão exibidos na tela.
- Toque no ícone de envio:
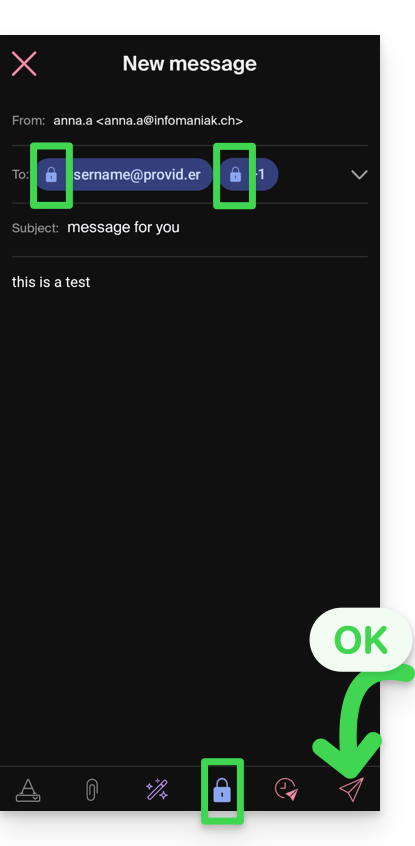
B. Destinatário externo
Se o destinatário do e-mail criptografado tiver um endereço de e-mail gerenciado fora dos serviços Infomaniak, a criptografia ainda é possível, mas exige a definição de uma senha:
- O envio não será possível, pois o ícone de envio permanecerá desativado e símbolos aparecerão nos cadeados:
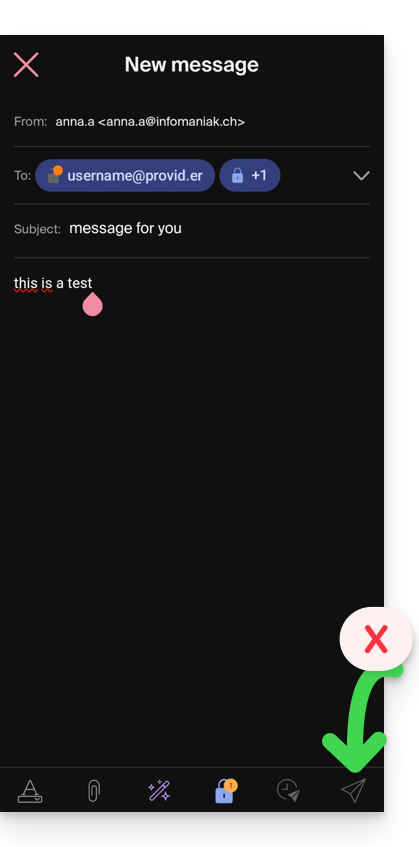
- Clique no ícone de cadeado.
- Uma janela será aberta para que possa criar uma senha.
- Utilize a senha sugerida ou insira uma nova senha e copie-a para enviá-la por outros meios (por exemplo, kPaste) ao destinatário (você pode combinar uma senha com antecedência para que o destinatário já esteja informado).
- Pressione o "X" no canto superior esquerdo se tiver terminado de gerenciar a senha.
- Pronto, o envio agora pode ser feito de forma criptografada:
Link para esta FAQ: https://faq.infomaniak.com/1582
Esta seção de perguntas frequentes foi útil?
Este guia explica como criar e partilhar um cartão de visita digital (código QR) que reúne os seus contactos e redes sociais a partir da aplicação Infomaniak Mail (iOS / Android).
Criar o código QR e partilhá-lo com os seus contactos
Para acessar a funcionalidade de código QR no aplicativo Infomaniak Mail em seu dispositivo:
- Clique no ícone com suas iniciais/avatar no canto superior direito do aplicativo.
- Clique à direita do nome da sua conta Infomaniak no menu inferior:
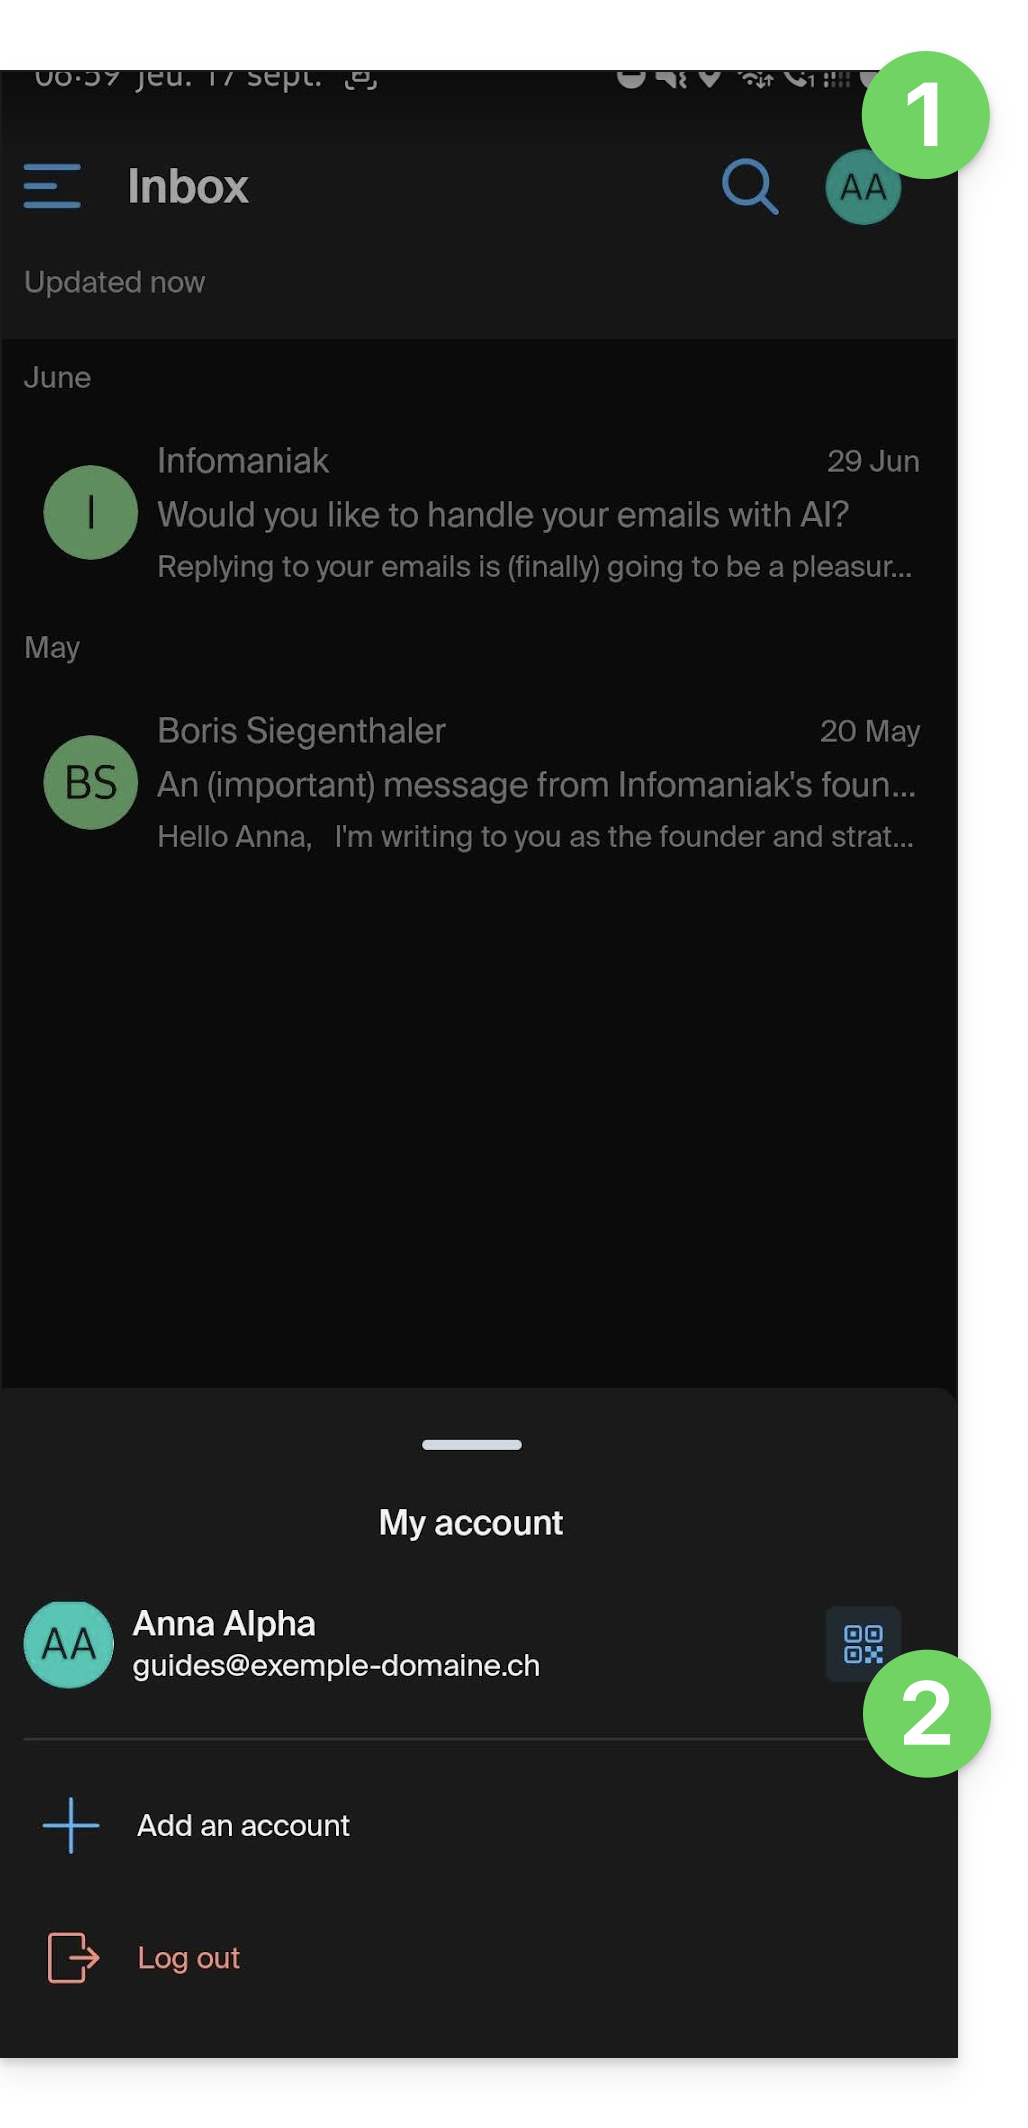
- Na primeira utilização, um ecrã apresenta a funcionalidade; clique no botão para iniciar a criação do seu cartão de visita:
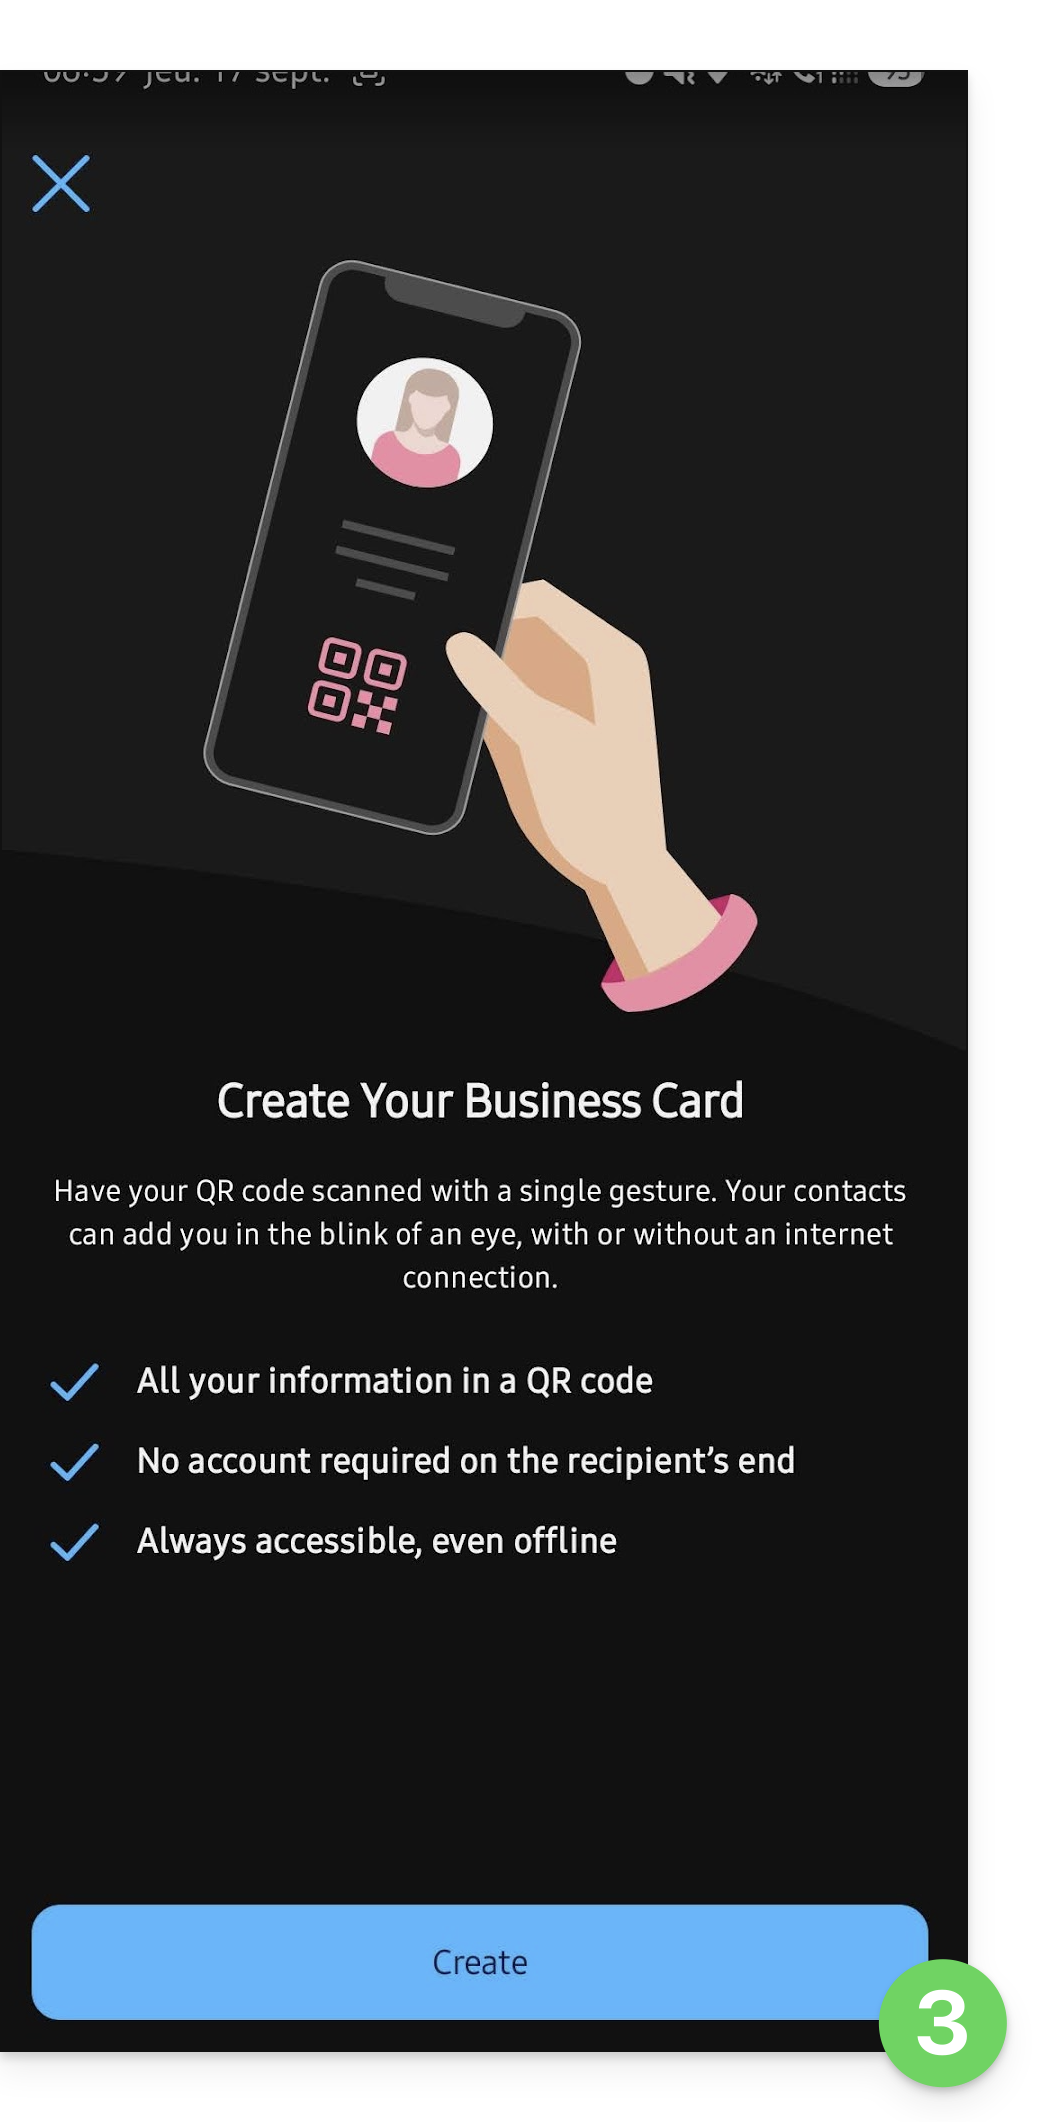
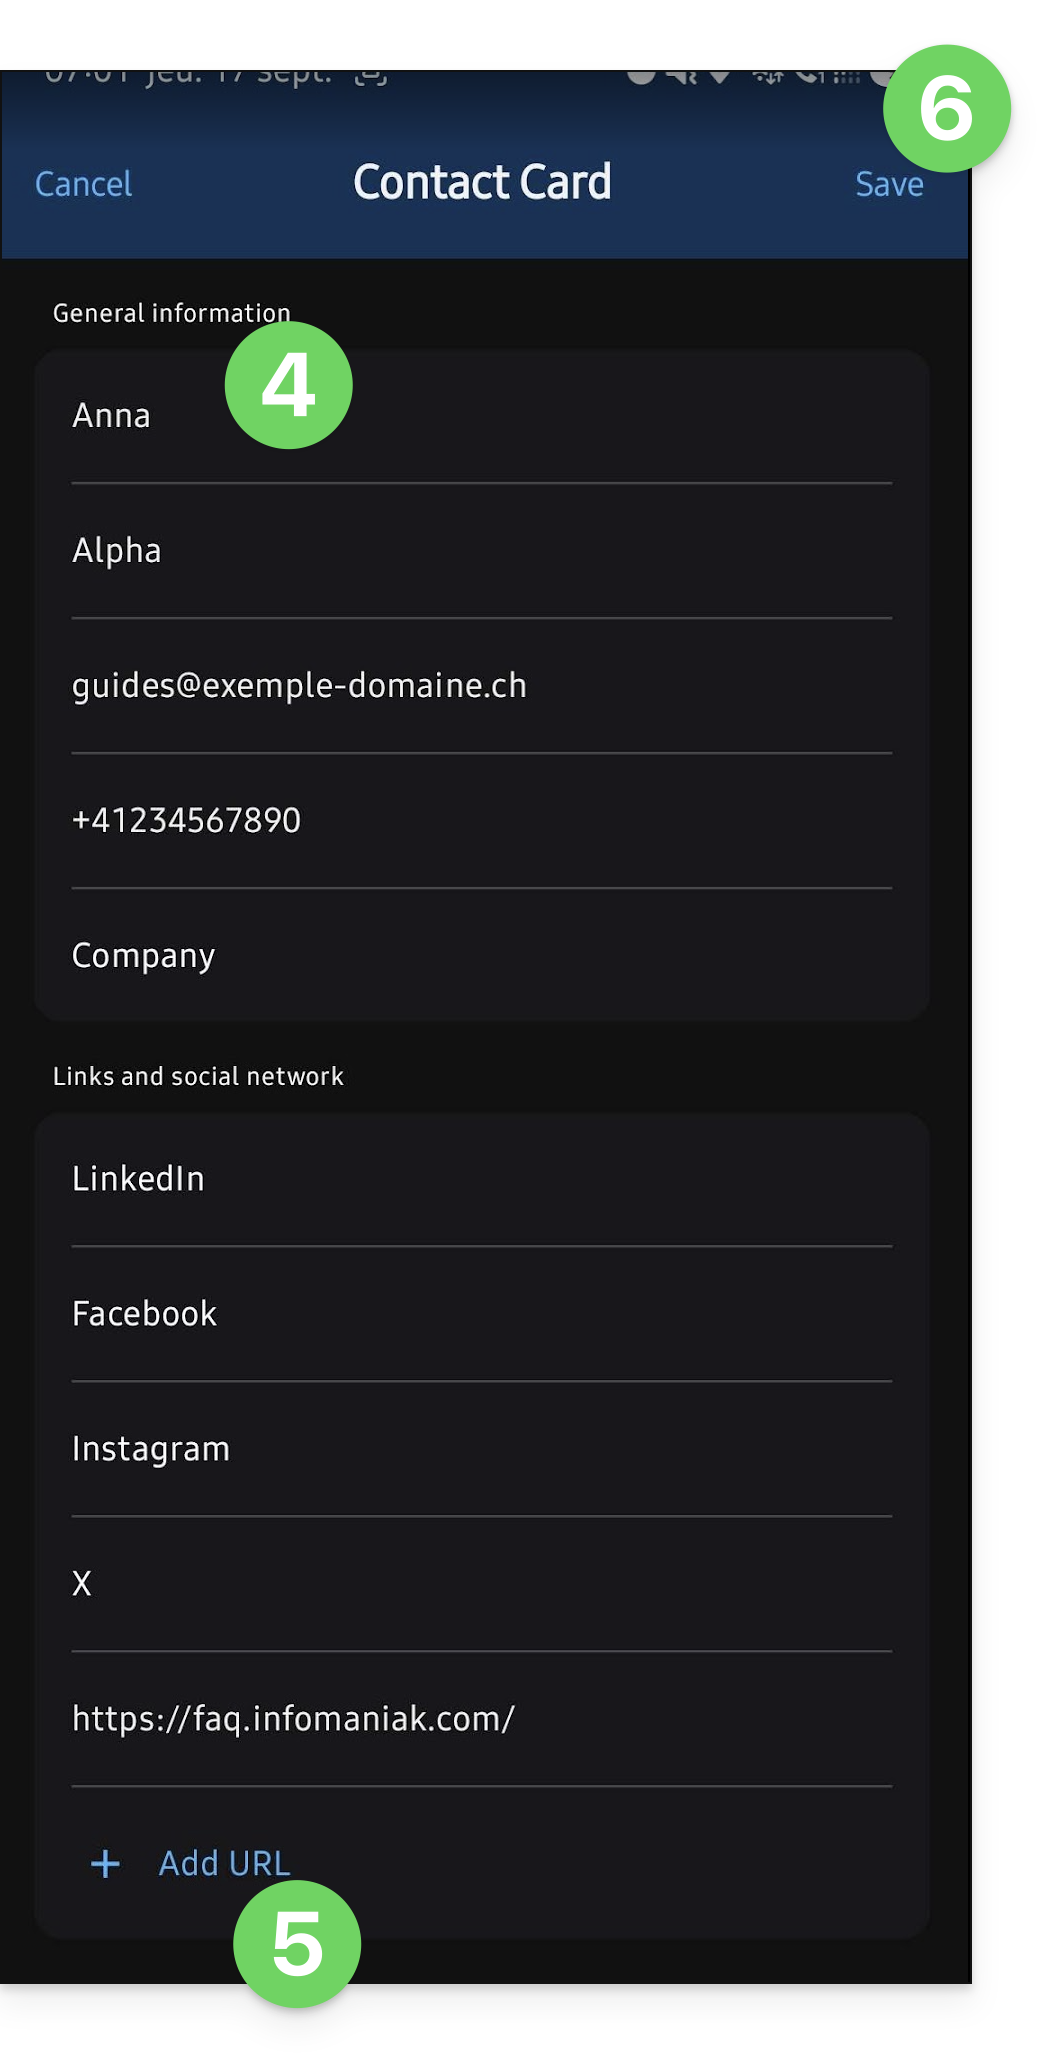
- Preencha as informações que deseja que apareçam na sua página de contato.
- Adicione, se necessário, outros links para divulgar (site, redes sociais).
- Salve o seu cartão clicando em Salvar:
- O código QR aparece e pode ser lido diretamente por outro dispositivo para salvar o cartão de contato associado.
- Este cartão de contato pode ser enviado por outros meios, clicando no botão Compartilhar.
- O formato
.vcf, seguindo o mesmo princípio de uma exportação de contatos, por exemplo, é automaticamente reconhecido pelas aplicações de gestão de contatos: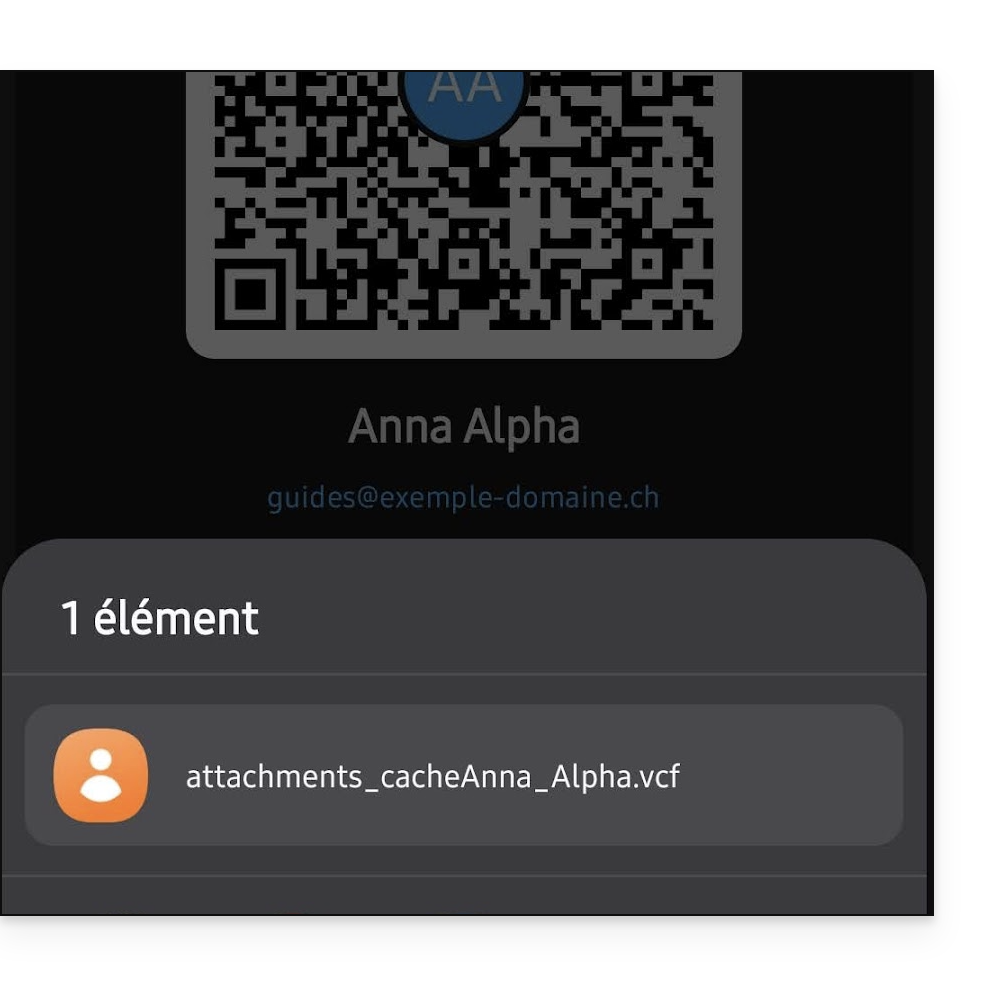
- O formato
- As suas informações podem ser editadas a qualquer momento através do menu de ação ⋮ no canto superior direito:
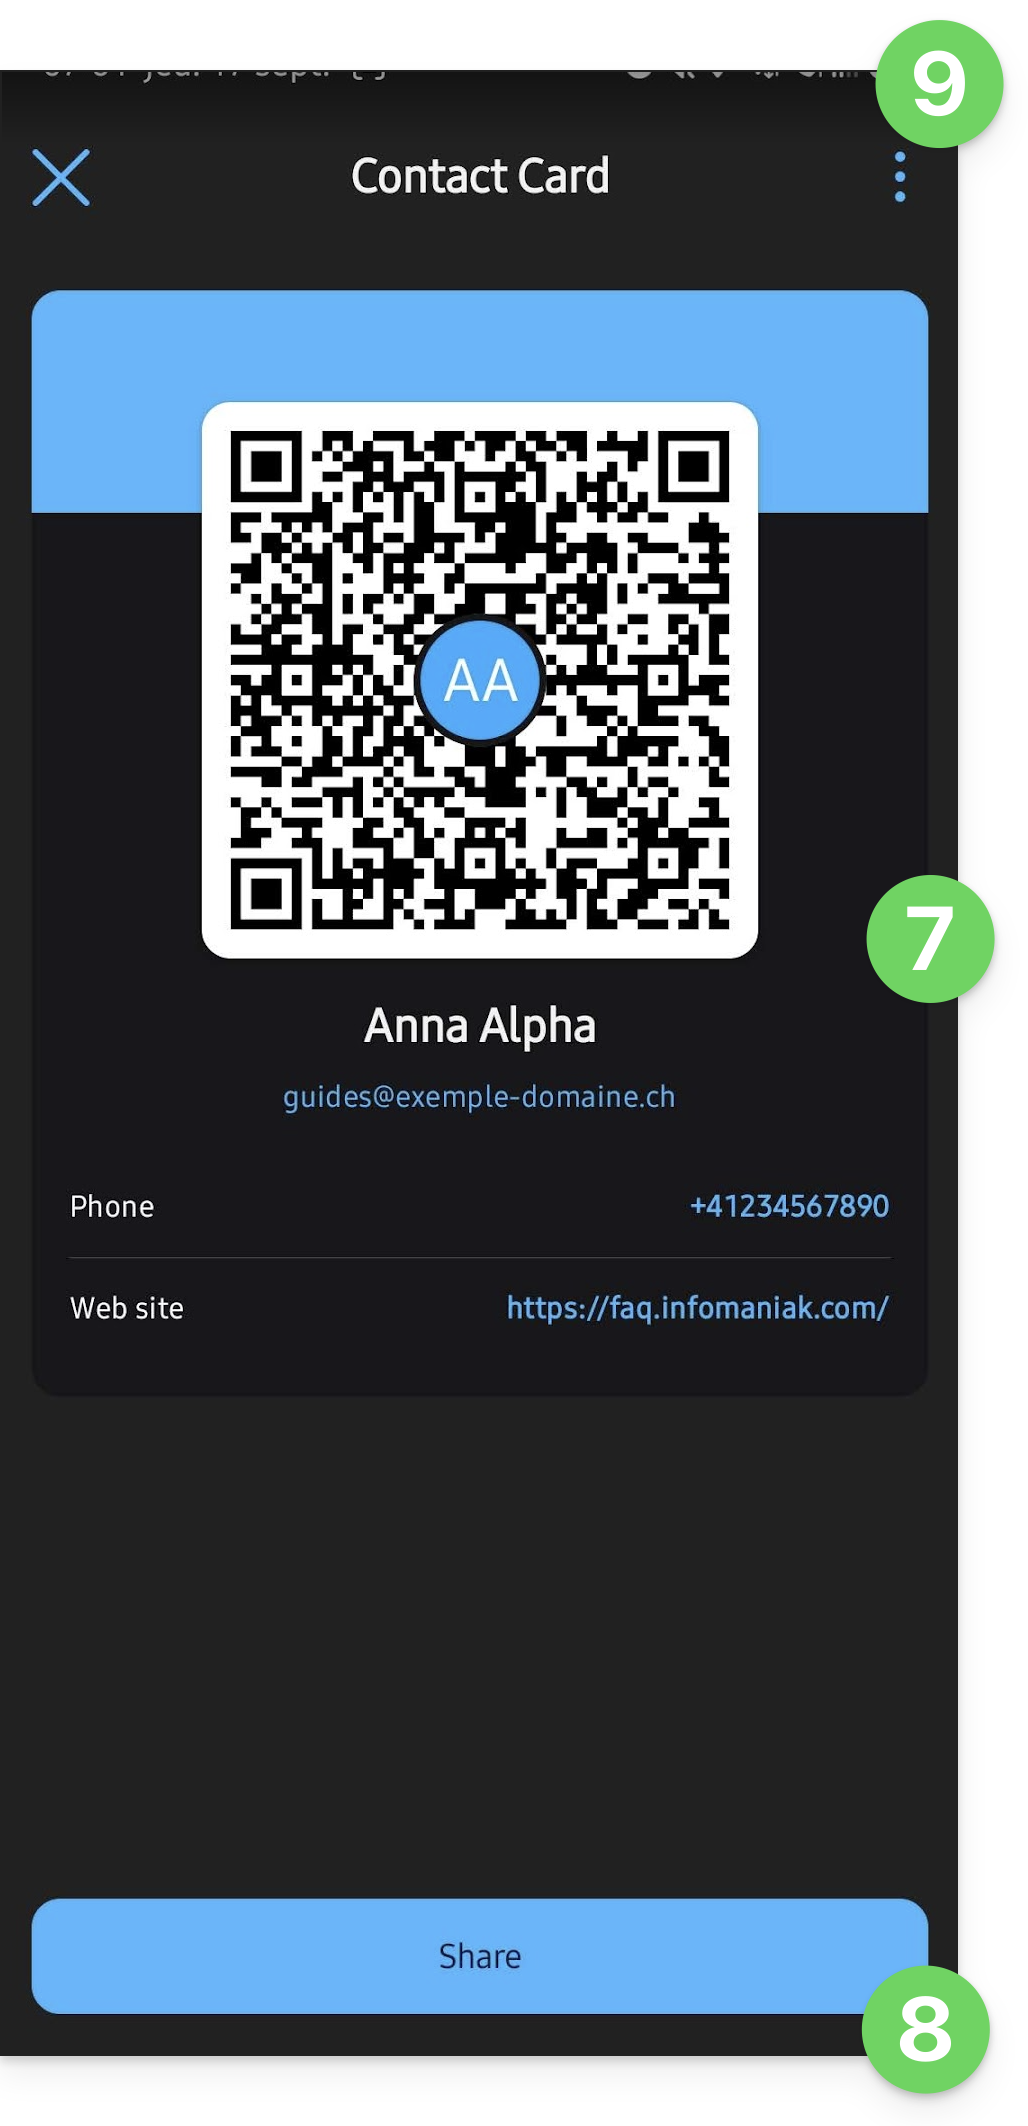
- A partir de agora, para exibir diretamente o código QR gerado, siga os passos 1 e 2 acima.
- A pessoa que digitalizar o código QR poderá salvar diretamente os seus dados de contato no dispositivo:
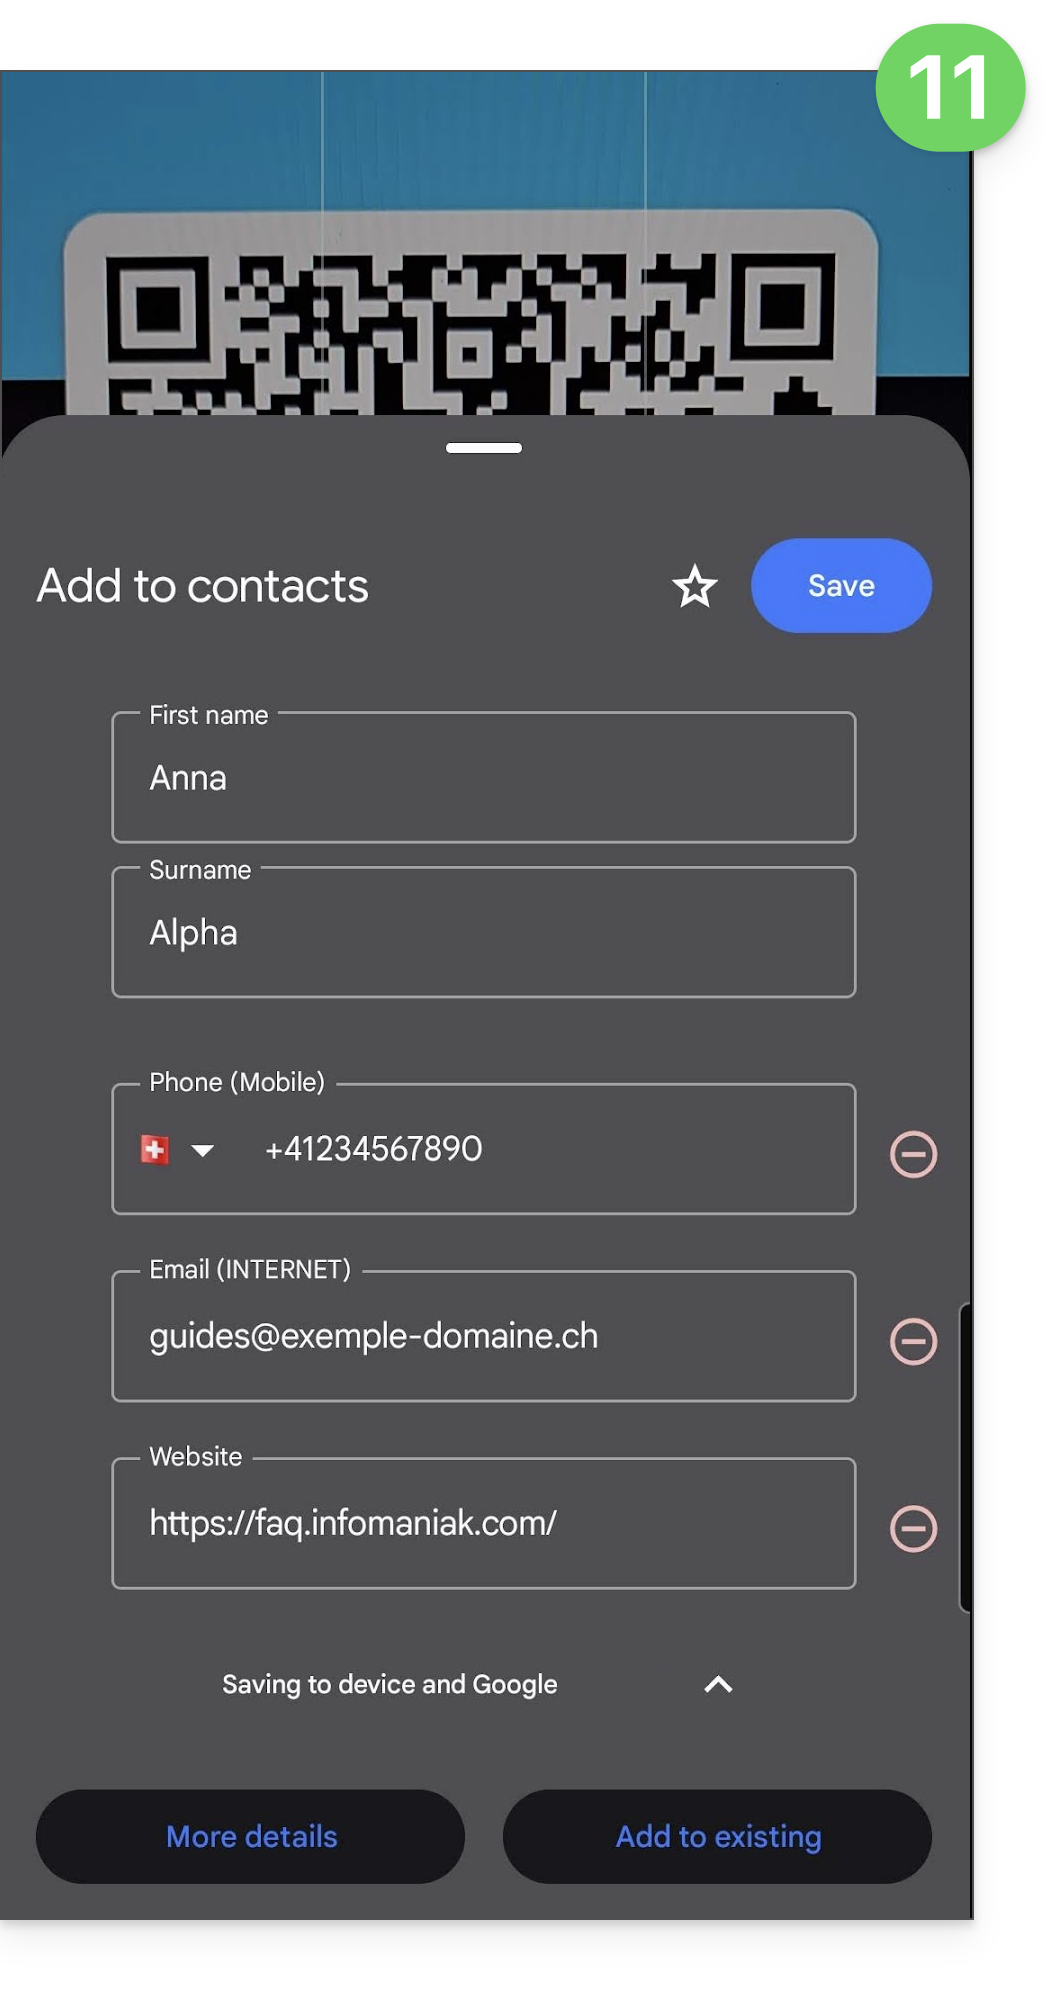
Link para esta FAQ: https://faq.infomaniak.com/1584
Esta seção de perguntas frequentes foi útil?
Este guia explica como denunciar um spam ou declarar um falso positivo caso mensagens do tipo spam passem despercebidas no Serviço de Email Infomaniak, ou, inversamente, se um email válido for classificado como spam involuntariamente; você pode intervir em poucos cliques.
Denunciar um spam
Pré-requisitos
- Verifique se o filtro de spam está ativo.
Em seguida, para mover automaticamente para a pasta de Spam um e-mail da sua caixa de entrada que tenha escapado ao filtro anti-spam:
- Clique aqui para acessar o aplicativo web Mail Infomaniak (serviço online ksuite.infomaniak.com/mail).
- Selecione a mensagem na caixa de entrada e clique no ícone Spam na barra de ferramentas:
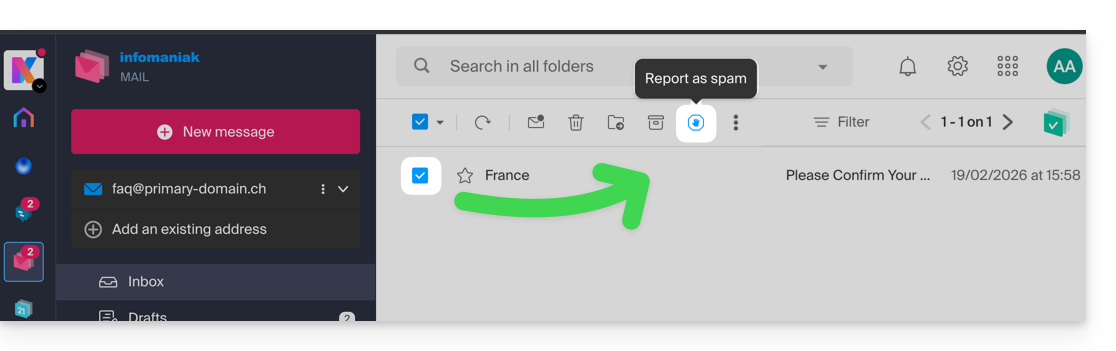
- Você também pode abri-la e marcá-la como Spam posteriormente:
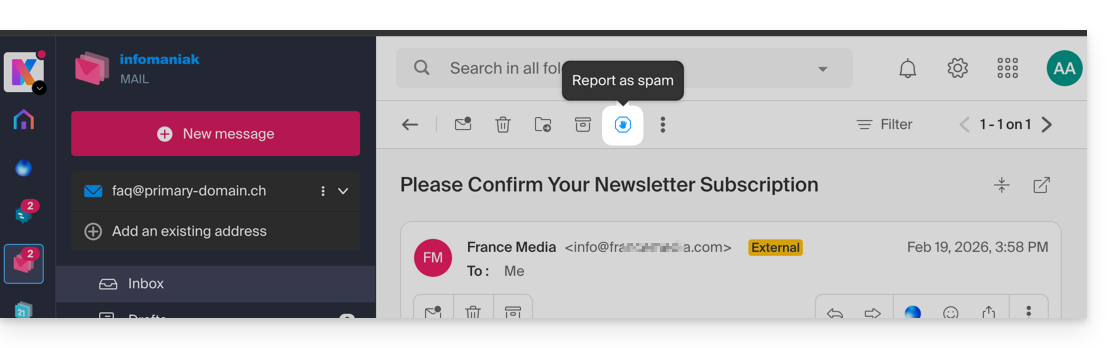
- Outra possibilidade: abri-lo e clicar no menu de ação ⋮ à direita:
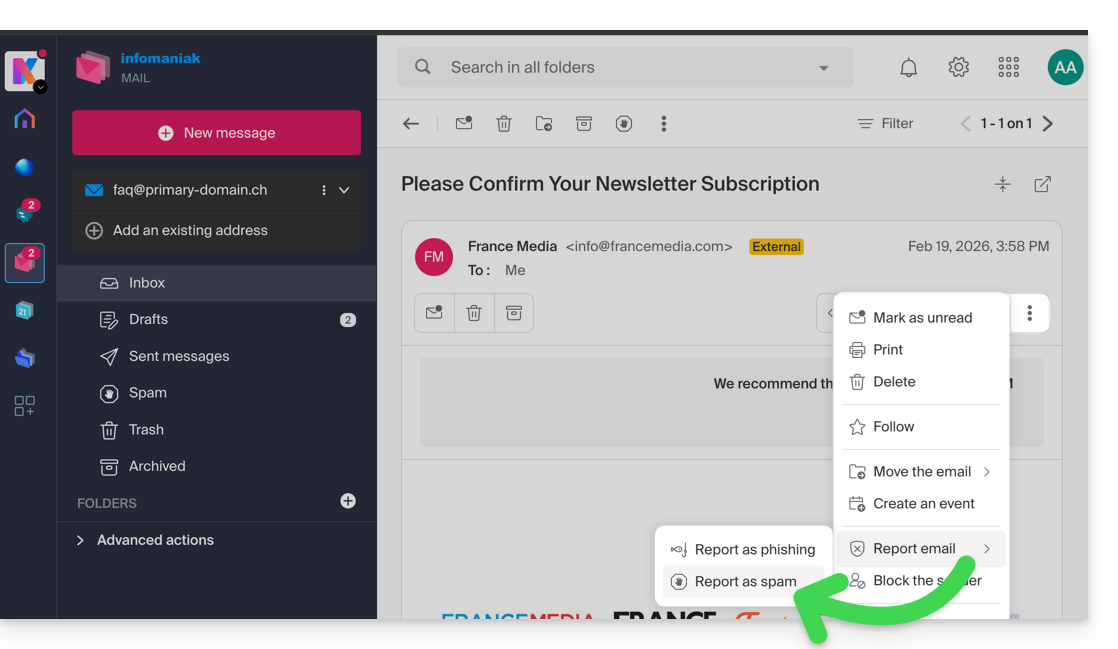
Assim que clicar em Denunciar como spam:
- o e-mail é movido para a pasta Spam (ou para a pasta definida manualmente)
- o endereço do remetente é adicionado à lista de utilizadores bloqueados
- o filtro é aprimorado para um melhor desempenho ao longo do tempo.
Denunciar um falso positivo
Por outro lado, se você interagir com um e-mail que foi erroneamente classificado como spam (falso positivo) clicando no ícone "Isto não é spam":
- O e-mail será movido para a caixa de entrada…
- O endereço do remetente é adicionado à lista de utilizadores autorizados…
- Isto também afeta o filtro e os seus critérios.
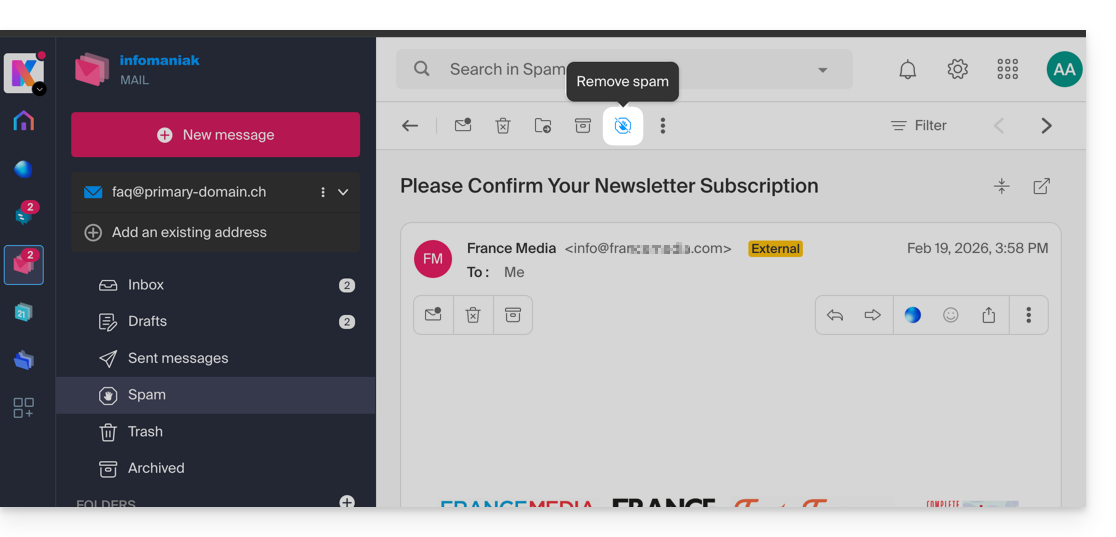
Link para esta FAQ: https://faq.infomaniak.com/1592
Esta seção de perguntas frequentes foi útil?
Este guia explica como adicionar ou modificar um nome de remetente que será usado ao enviar seus e-mails a partir do aplicativo web Mail Infomaniak (serviço online ksuite.infomaniak.com/mail).
Introdução
- Este nome completo (geralmente um nome e um sobrenome) está associado ao seu endereço de e-mail, à sua conta Infomaniak e a quaisquer assinaturas.
- Ele é exibido no lugar ou ao lado do seu endereço de e-mail para o destinatário do seu e-mail.
- Note que, se ele já o tiver adicionado à sua lista de contactos com um nome/sobrenome, são geralmente esses dados que prevalecem.
Adicionar/modificar o nome do remetente
Sem assinatura
Se não utilizar uma assinatura ao enviar a sua mensagem,as informações de contacto utilizadas são as da sua conta Infomaniak:
- Clique aqui para aceder à aplicação web Mail da Infomaniak (serviço online ksuite.infomaniak.com/mail) e redigir uma nova mensagem.
- Verifique o campo De:, ou seja, o remetente.
- Verifique se não está a usar uma assinatura:
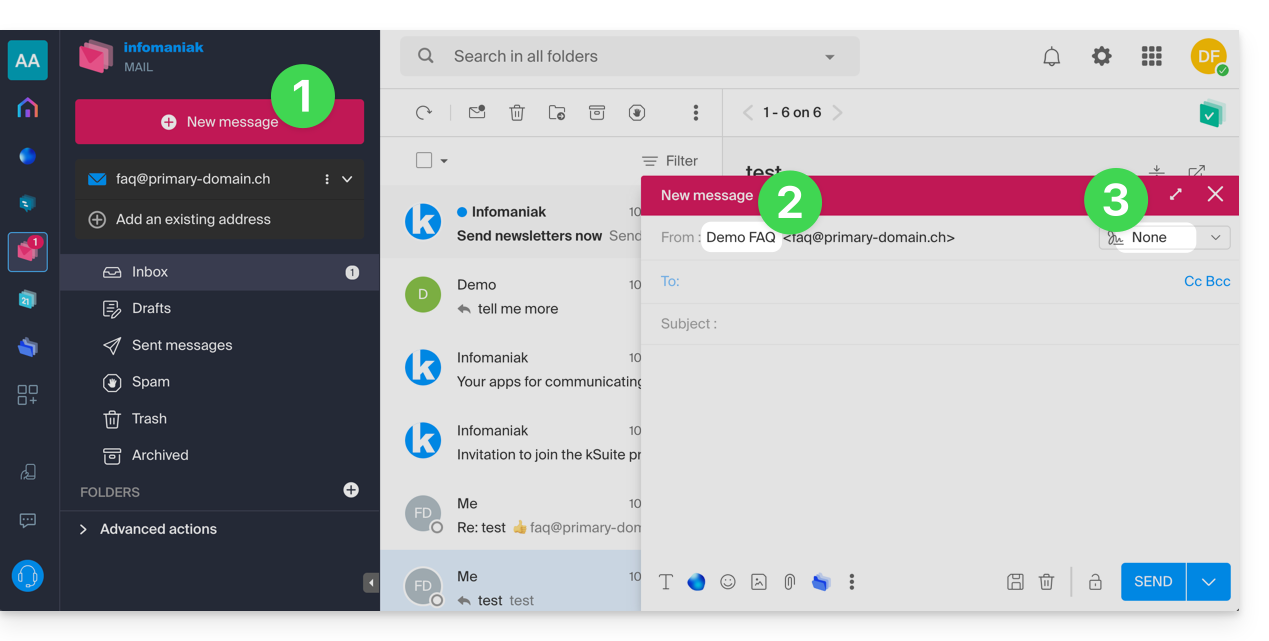
- Nesse caso, clique aqui (ou no ícone com suas iniciais/avatar no canto superior direito do Gerenciador Infomaniak) para “Gerenciar minha conta”:
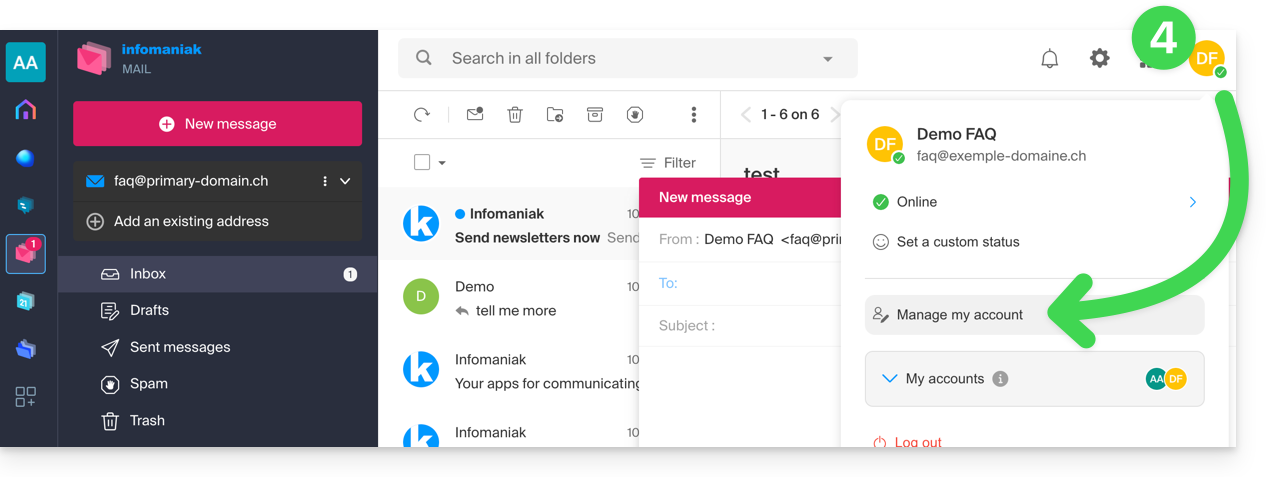
- Clique para editar suas informações pessoais:
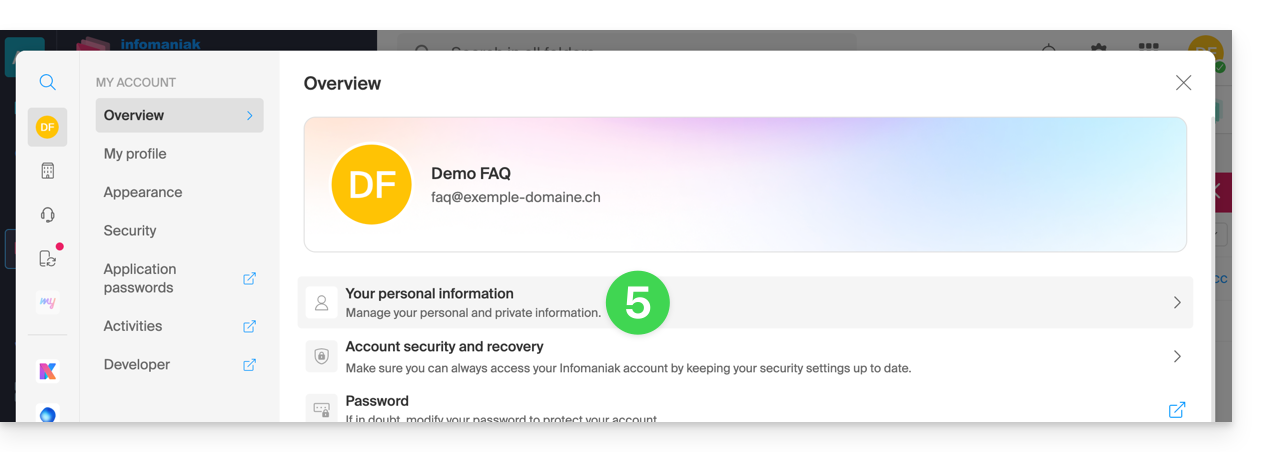
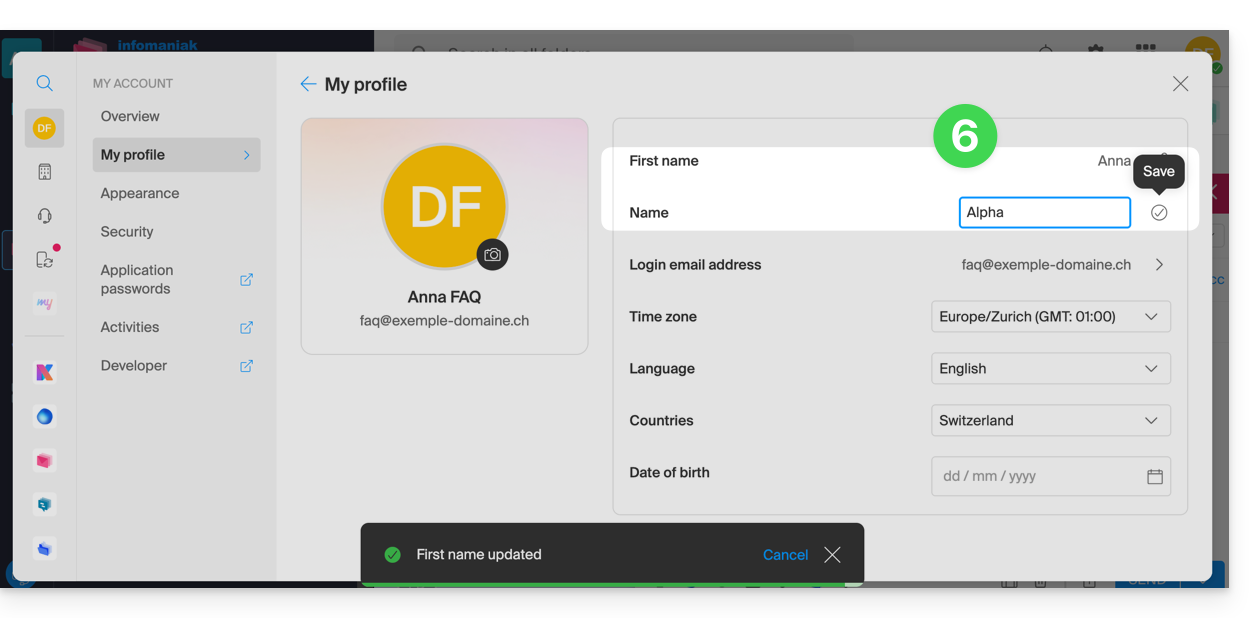
- Edite o nome e o sobrenome e valide clicando à direita da linha correspondente:
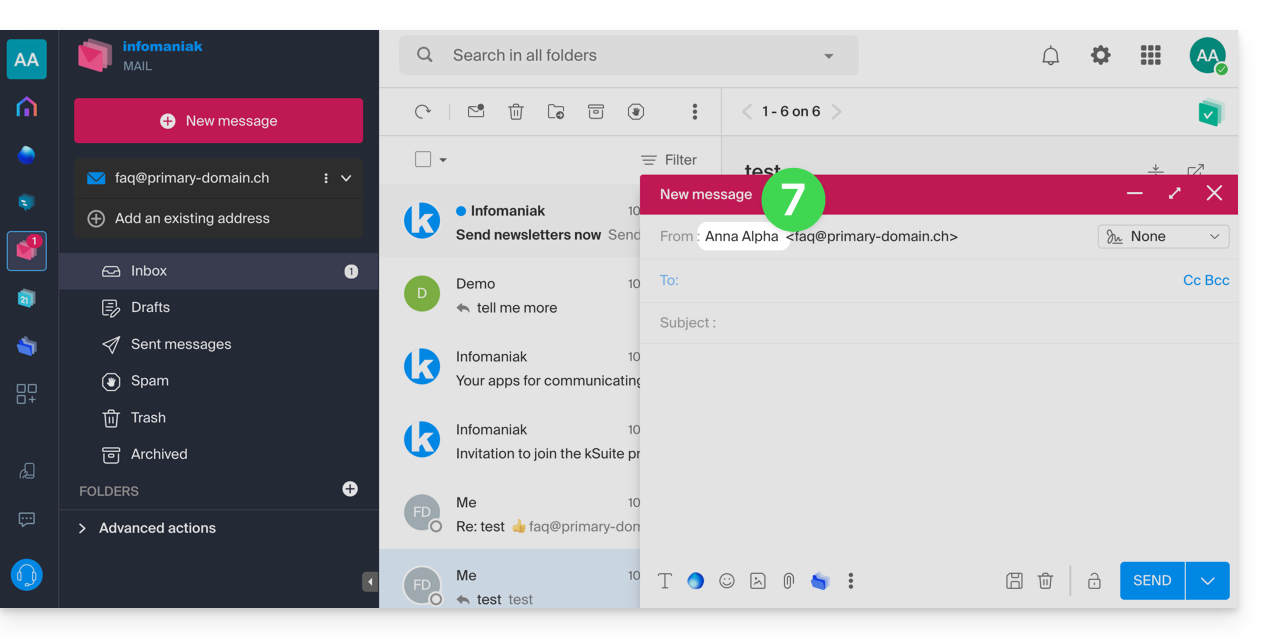
- Volte a redigir um novo e-mail, atualize a janela do navegador, se necessário, e verifique se o campo remetente foi alterado corretamente:
Com assinatura
- Clique aqui para acessar o aplicativo web Mail da Infomaniak (serviço online ksuite.infomaniak.com/mail) e redigir uma nova mensagem.
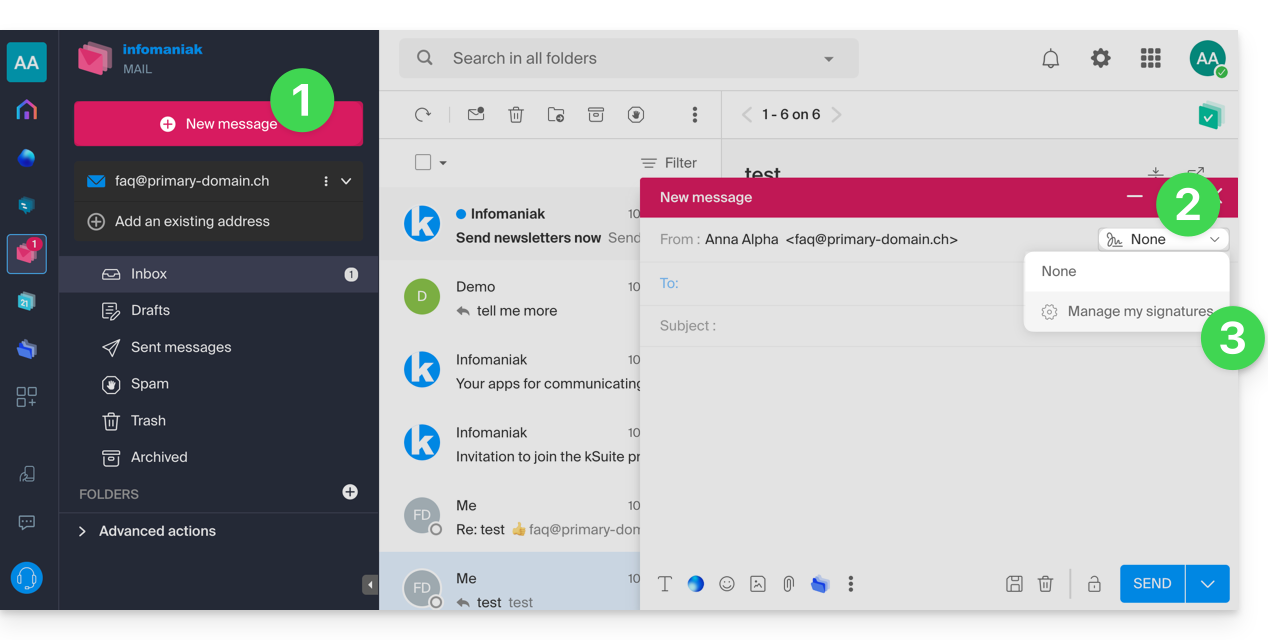
- Clique no menu de assinaturas.
- Clique em Gerenciar minhas assinaturas:
- Adicione uma nova assinatura:
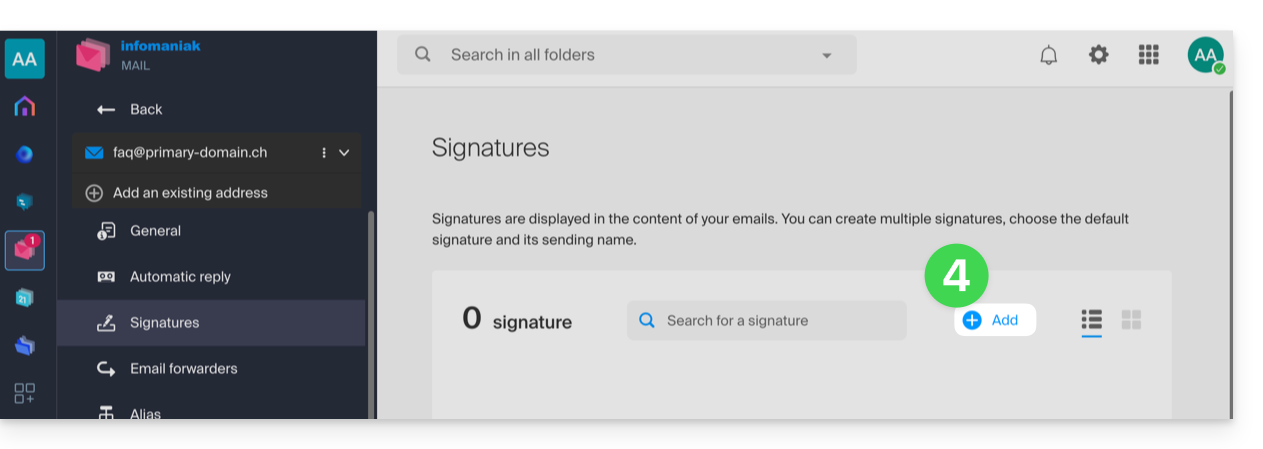
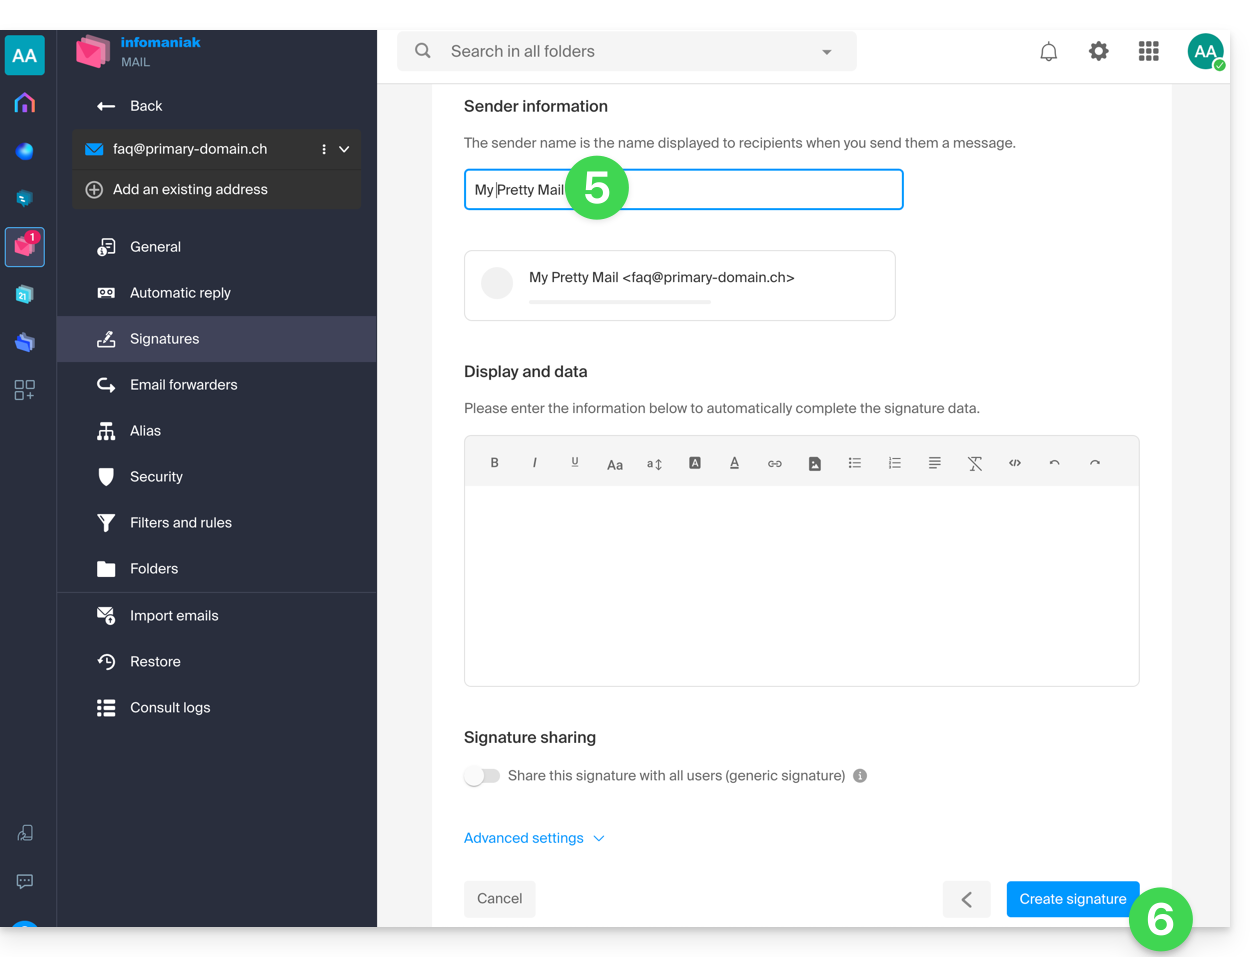
- Escolha o modelo a ser utilizado e, na página de edição, insira o nome que deverá ser exibido como remetente.
- Salve a sua assinatura:
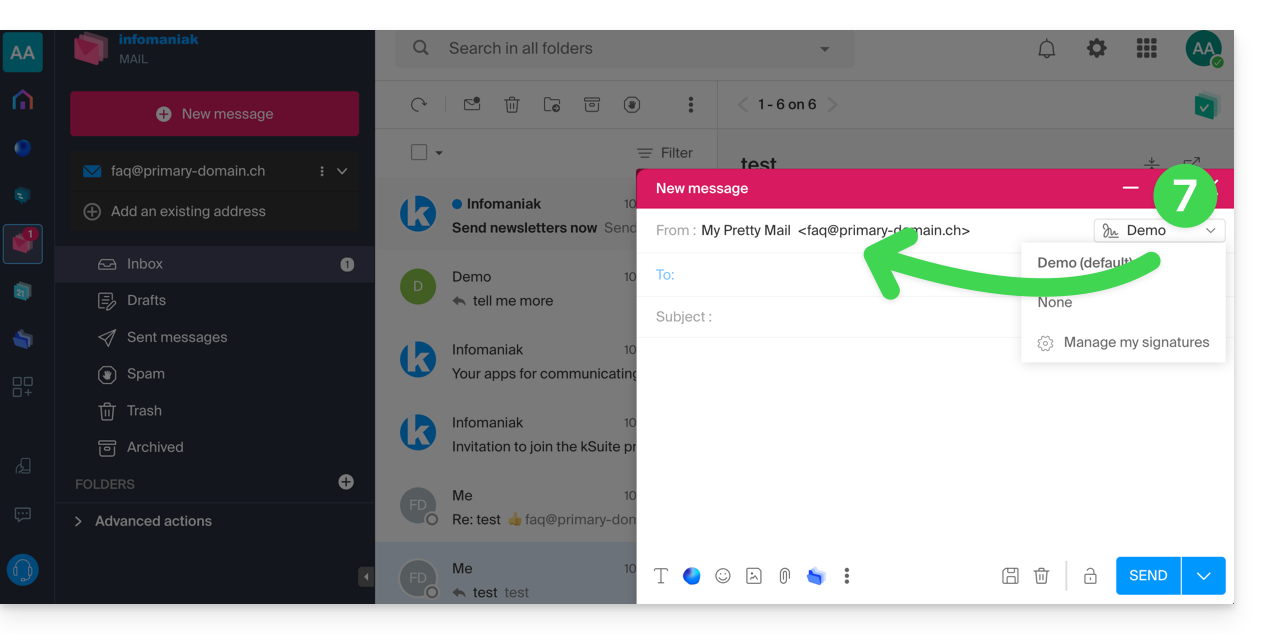
- Selecione a sua nova assinatura. Ela complementará o campo De da sua mensagem com o nome que você personalizou:
Consulte este outro guia se precisar de informações sobre a edição de assinaturas de e-mail e sobre o comportamento do nome completo para diferentes utilizadores de um modelo de assinatura.
Link para esta FAQ: https://faq.infomaniak.com/1662
Esta seção de perguntas frequentes foi útil?
Este guia detalha as regras para o envio de e-mails em massa na Infomaniak, a fim de evitar que sejam classificados como spam, em conformidade com as leis federais suíças e os Termos e Condições Gerais da Infomaniak.
Obter o consentimento (duplo opt-in)
O duplo opt-in é o único método para se proteger contra reclamações.
Para ser válido, o registo do utilizador deve:
- Ser proveniente de um formulário dedicado a um tópico específico.
- Ser confirmada pelo destinatário por meio de um link de validação enviado por e-mail.
- Ser rastreado pelo sistema (registro do endereço IP e da data).
Como manter-se em conformidade?
- Utilize um formulário de contato com dupla confirmação para criar suas listas.
- Guarde sistematicamente o endereço IP e a data de inscrição de cada assinante.
- Insira obrigatoriamente um link de cancelamento de inscrição visível na parte inferior de cada envio.
Gestão de reclamações de spam
Em caso de reclamação, a Infomaniak pode suspender temporariamente os envios.
- Se fornecer a prova de inscrição (endereço IP e data): a reclamação será arquivada.
- Sem comprovativo de inscrição: a reclamação é considerada justificada. A Infomaniak pode, então, suspender o endereço de e-mail, o domínio ou rescindir o contrato em caso de reincidência.
Link para esta FAQ: https://faq.infomaniak.com/1667
Esta seção de perguntas frequentes foi útil?
Este guia explica como transferir para a Infomaniak os endereços de e-mail atualmente alojados pela Swisscom, com a ajuda de uma ferramenta de importação por IMAP.
Introdução
- A operação não afeta os dados já existentes no endereço de destino, nem os dados do endereço de origem.
- A totalidade da caixa externa será importada.
- Uma vez iniciado o processo de importação, não é mais possível interrompê-lo.
- Os eventuais duplicados são gerenciados: um conteúdo idêntico será copiado apenas uma vez.
- Consulte este outro guia se procura alternativas a este processo via IMAP.
Importar o conteúdo de e-mail do Bluewin para o Infomaniak
Pré-requisitos Infomaniak
- Ter um Serviço de Email na sua Central de Gestão Infomaniak.
- Ter à disposição um número de endereços disponíveis ou ajustá-lo caso seja necessário.
- Verificar se a conta de e-mail está devidamente protegida
- Criar um ou vários endereços neste serviço de e-mail.
- Se tiver muitos (10+) endereços de e-mail para criar, consulte este outro guia sobre a criação em massa.
- O endereço de e-mail de destino deve estar associado ao utilizador (= à conta Infomaniak) que está a utilizar.
Em seguida, para importar o conteúdo do e-mail:
- Clique aqui para acessar a ferramenta de importação (serviço online https://import-email.infomaniak.com).
- Se necessário, inicie sessão na sua conta Infomaniak na organização em questão, pois a importação será efetuada para um dos endereços de e-mail associados à interface Web Mail da Infomaniak (serviço online ksuite.infomaniak.com/mail) da conta Infomaniak que está a utilizar.
- Clique em importar por IMAP.
- Clique em Importar.
- Preencha o campo à esquerda com o seu endereço de e-mail de origem (de onde o conteúdo será copiado).
- Preencha o campo à direita com a senha deste mesmo endereço de e-mail de origem (consulte os requisitos).
- Clique em Confirmar.
- Se necessário, adicione um segundo endereço de e-mail para importar simultaneamente.
- Selecione o endereço de e-mail de onde deseja importar os e-mails. O menu suspenso lista os endereços de e-mail atualmente associados à sua interface Web Mail Infomaniak (serviço online ksuite.infomaniak.com/mail) da conta Infomaniak com a qual você está conectado.
- Após selecionar o endereço de destino desejado na lista, clique no botão azul Importar e-mails.
- A cópia será iniciada. Você pode aguardar e verificar o resultado na página após a conclusão da importação ou fechar a janela (a importação continua em segundo plano e o acompanhamento está disponível – veja abaixo).
- Um e-mail de confirmação será enviado automaticamente para todos os endereços de e-mail envolvidos na operação, assim que a importação for concluída, indicando o número de mensagens copiadas.
- Um acompanhamento está disponível nas configurações do endereço de e-mail de destino, apenas no aplicativo web Mail (serviço online ksuite.infomaniak.com/mail).
- O rastreamento permite visualizar o histórico das importações no endereço em questão.
Importar todos os seus contatos
Para continuar a usar a sua lista de contactos, é necessário exportar os contactos do Bluewin:
- Inicie sessão na sua interface Bluewin.
- Clique em Contatos.
- Clique no ícone Configurações na barra de ferramentas.
- Clique em Exportar contactos.
- Guarde o ficheiro
contacts.csvno seu dispositivo.
Em seguida, é preciso importá-las:
- Conecte-se ao seu Catálogo de endereços Infomaniak.
- Clique em Ações avançadas no canto inferior esquerdo.
- Clique em Importar.
- Selecione o arquivo
.csvque você baixou no passo 5 acima. - Clique em Avançar e inicie a importação.
Redirecionar e-mails para o Infomaniak
Se o endereço Bluewin continuar a existir por mais algum tempo, pode configurar um redirecionamento das mensagens recebidas. Assim, elas serão automaticamente encaminhadas para o seu novo endereço Infomaniak:
- Aceda a “MySwisscom”, clique na caixa “Mais” e, em seguida, em “Definições”:
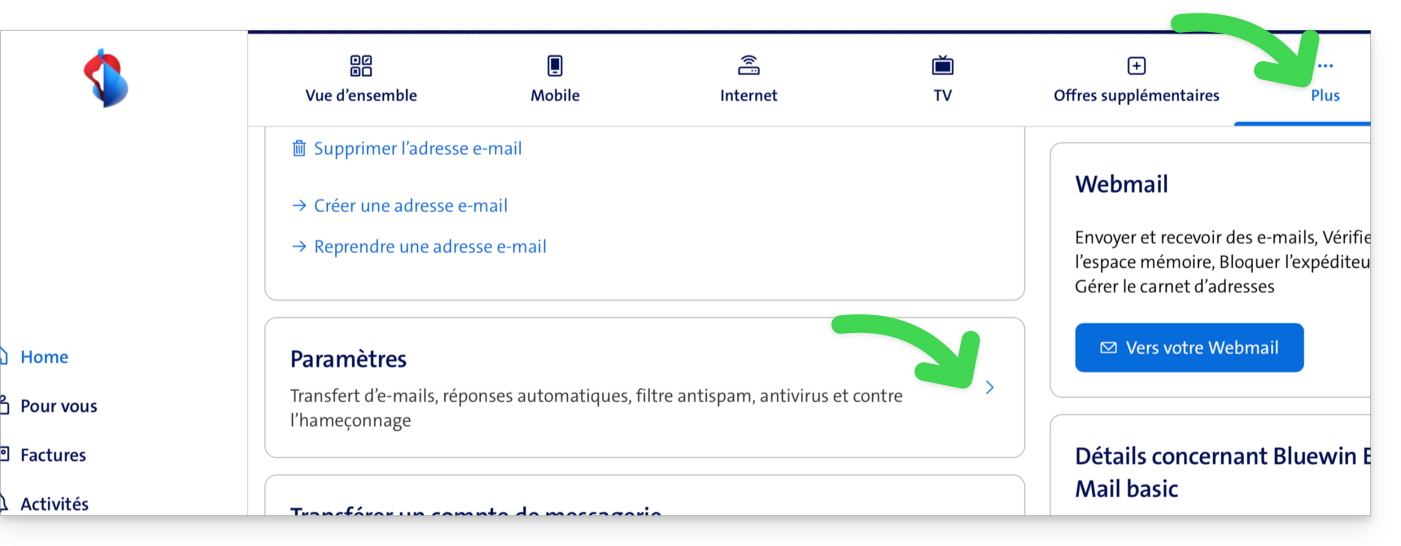
- Clique em seguida em “Gerir transferências”:
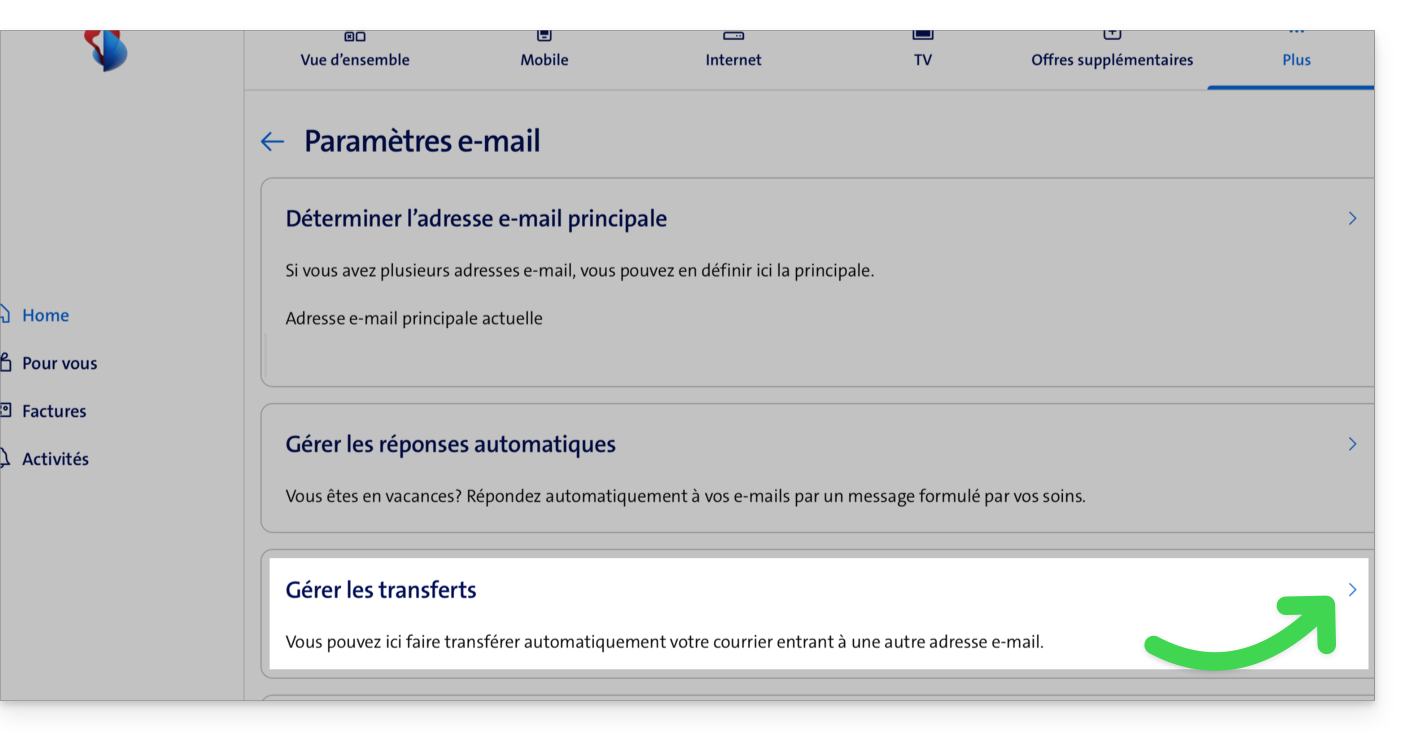
- Indique o endereço de e-mail criado na Infomaniak como destino de todos os seus futuros e-mails.
Link para esta FAQ: https://faq.infomaniak.com/1693
Esta seção de perguntas frequentes foi útil?
Este guia aborda a configuração do aplicativo móvel Infomaniak Mail (aplicativo para smartphone ou tablet iOS / Android).
O idioma do aplicativo é baseado no idioma do seu dispositivo no qual o aplicativo móvel Infomaniak Mail está instalado, e não no idioma configurado na sua conta de usuário.
Aceder às configurações da aplicação
Para abrir as configurações da aplicação móvel Infomaniak Mail (aplicação para smartphone ou tablet iOS / Android) no seu dispositivo:
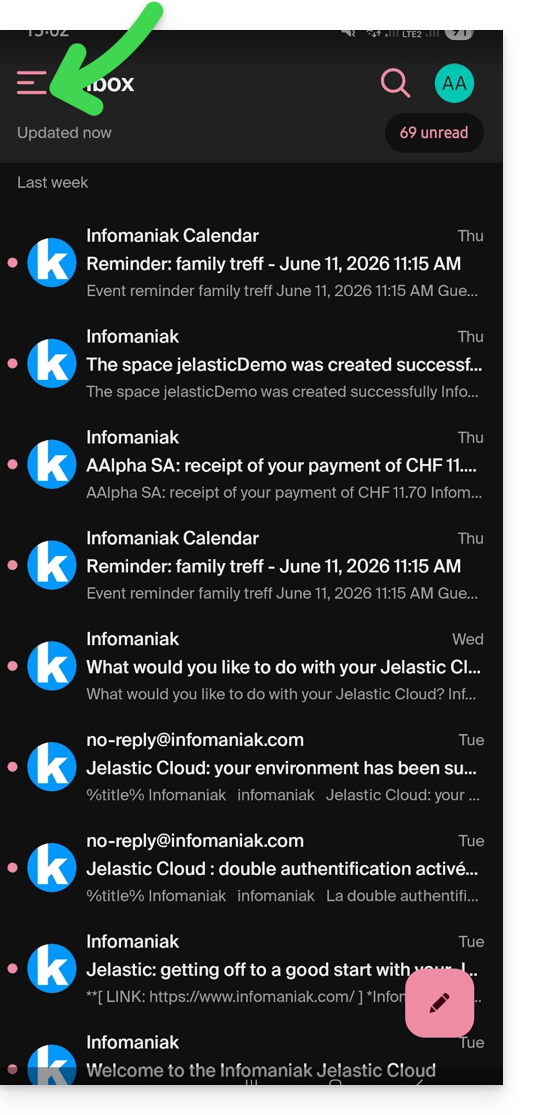
- Toque no canto superior esquerdo da sua caixa de entrada:
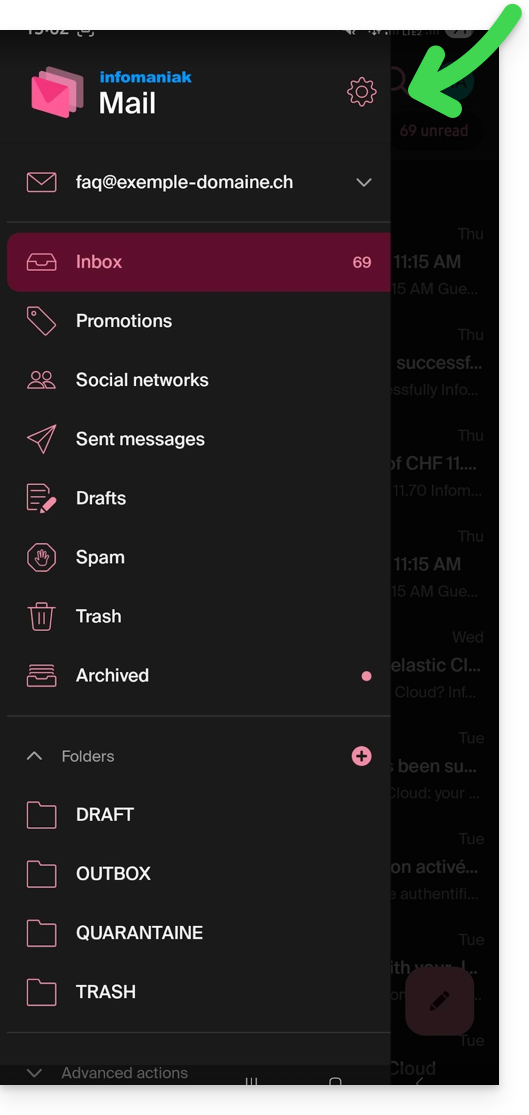
- Clique no ícone Configurações no canto superior direito do painel que foi aberto:
- Você pode gerenciar as configurações na tela exibida:
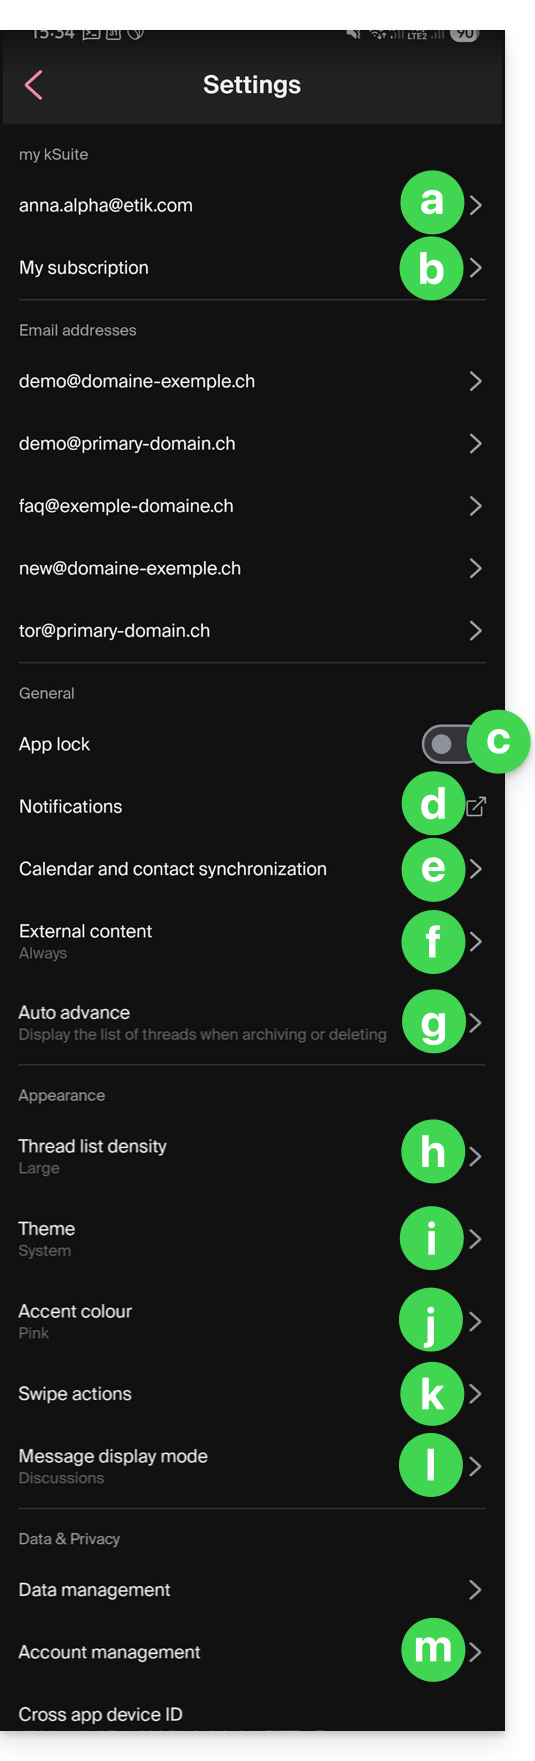
a. Escolha da assinatura
Se tiver vários endereços de e-mail associados à sua conta, toque no endereço de e-mail cuja assinatura deseja alterar. Em seguida, escolha outra assinatura entre as assinaturas configuradas.
No iOS, também pode gerir os seus pedidos de confirmação de leitura.
b. Apenas o meu kSuite
Permite obter informações sobre a subscrição atual. Exemplo: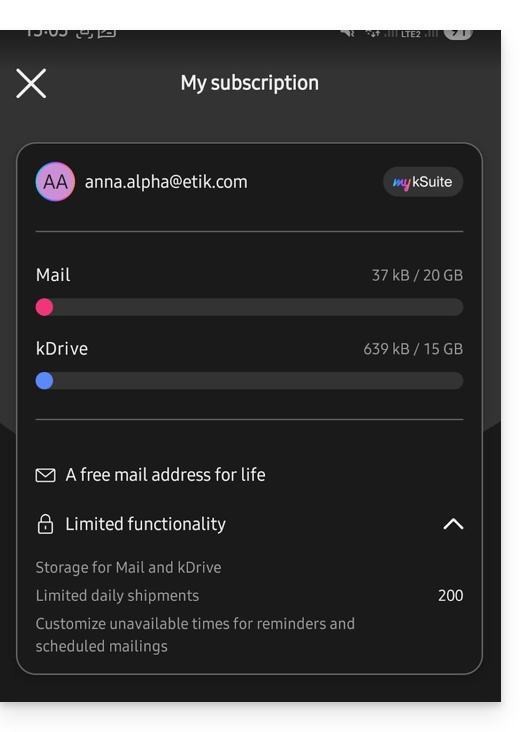
c. Bloqueio do aplicativo
Esta opção permite proteger o aplicativo por meio de um dos métodos de bloqueio do seu dispositivo, o que permite que você permaneça conectado ao serviço de e-mail Infomaniak com sua conta de usuário, mas impede que terceiros acessem o Infomaniak Mail quando o aplicativo não estiver entre os aplicativos abertos.
Se o seu dispositivo tiver um leitor de impressão digital, pode usar este método para ativar o bloqueio. O mesmo se aplica ao Face ID no iOS.
Ao reabrir a aplicação, será solicitada uma autenticação.
d. Notificações no dispositivo
Pode configurar as notificações para cada um dos endereços de e-mail associados na aplicação.
e. Sincronização de contactos e calendários
Por enquanto, esta sincronização é gerida externamente; consulte o guia https://config.infomaniak.com/.
f. Conteúdo externo
Esta secção permite escolher se deve exibir automaticamente todo o conteúdo externo presente num e-mail que está a ler, ou se prefere ocultá-lo e exibi-lo apenas quando solicitado.
g. Avanço automático
Esta secção permite escolher a ação a ser executada após o arquivamento ou a eliminação de um e-mail: abrir a mensagem seguinte, ou a mensagem anterior, ou retornar à lista de mensagens.
h. Densidade da lista de conversão
O modo de exibição pode ser compacto, normal ou amplo.
i. Tema
O tema permite escolher um tipo de visualização, como o modo escuro ou, inversamente, uma visualização clara, com texto preto sobre fundo branco. Essa visualização também pode ser definida com base no tema do dispositivo (permitindo, assim, que a visualização se adapte automaticamente de acordo com a hora, caso haja uma configuração de sistema que altere a visualização ao longo do dia).
j. Cor de destaque
A cor de destaque pode ser azul ou rosa.
k. Ações de deslizar
As ações de deslizar permitem definir qual operação o Infomaniak Mail deve executar se você deslizar o dedo em uma mensagem da lista da direita para a esquerda ou da esquerda para a direita (incluindo o “deslize longo” no iOS):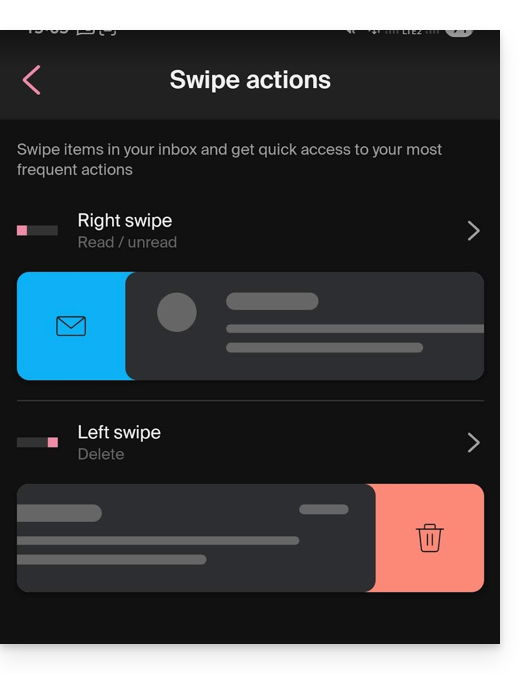
As ações possíveis são:
- excluir a mensagem (ela será movida para a lixeira)
- arquivar a mensagem (ela será movida para uma pasta de arquivo)
- marcar a mensagem como lida ou não lida
- mover a mensagem (e, neste caso, a lista de pastas é exibida após uma pesquisa)
- favoritos (para ativar um rastreamento da mensagem)
- denunciar como spam
- menu de ações rápidas (acessível também durante a leitura da mensagem e que oferece a opção de escrever uma resposta, efetuar um encaminhamento, uma exclusão, uma impressão, etc.)
e também é possível escolher "nenhuma" para evitar operações que não seriam desejadas se o seu dispositivo não for adequado para a digitalização: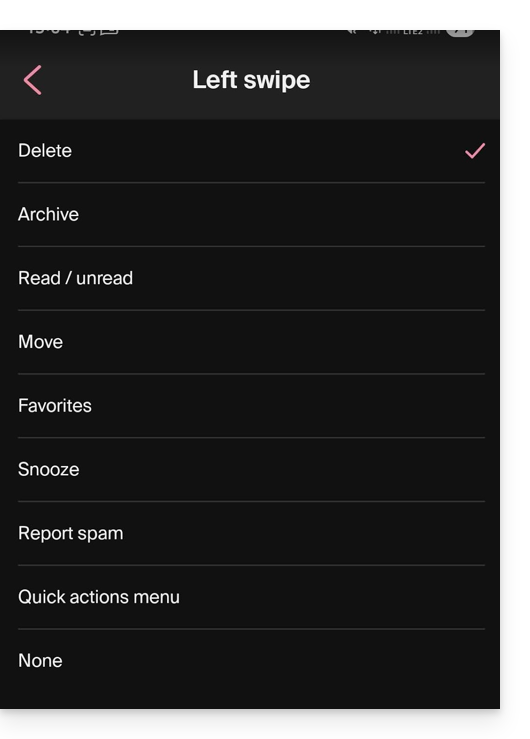
l. Modo de exibição das mensagens
Escolha entre uma exibição individual das mensagens ou um modo “conversa”, que permite agrupar seus e-mails por tópicos/remetentes, ou seja, agrupar os e-mails recebidos de acordo com o tópico da conversa. Assim, a exibição da caixa de entrada fica mais organizada e o acompanhamento das mensagens dos diferentes participantes da conversa fica mais fácil:
m. Gestão da conta
Permite eliminar a conta Infomaniak (após confirmar que leu o aviso importante). Consulte também este outro guia: aqui: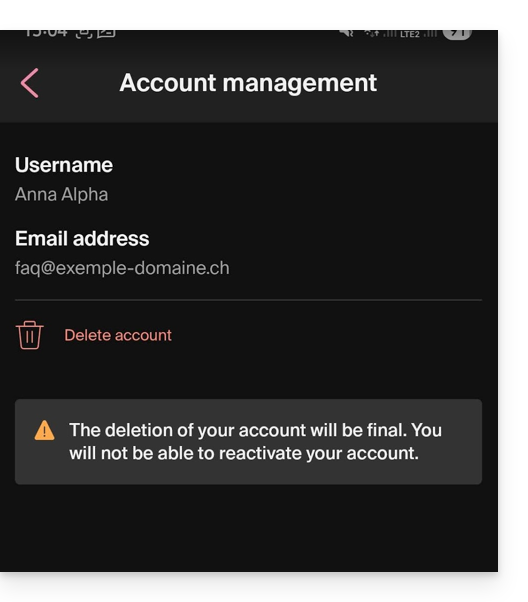
Link para esta FAQ: https://faq.infomaniak.com/1696
Esta seção de perguntas frequentes foi útil?