Base de conhecimento
1000 perguntas frequentes, 500 tutoriais e vídeos explicativos. Aqui, você encontra apenas soluções!
Este guia explica como anexar ficheiros e/ou imagens aos e-mails enviados a partir da aplicação web Mail Infomaniak (serviço online ksuite.infomaniak.com/mail), a solução online completa para ler e gerir os seus e-mails.
Introdução
- Consulte este outro guia sobre as limitações de envio de e-mail/anexos.
Anexar arquivos do computador à sua mensagem
Para adicionar um anexo presente no seu computador:
- Clique aqui para acessar o aplicativo web Mail da Infomaniak (serviço online ksuite.infomaniak.com/mail).
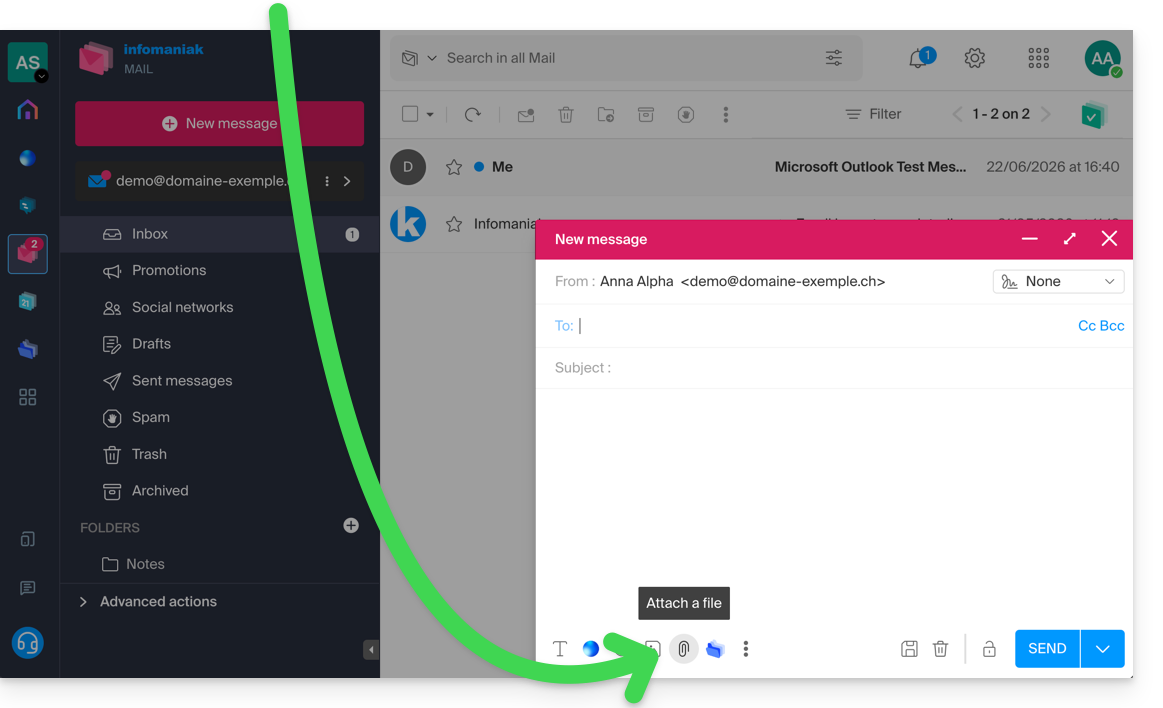
- Clique em Nova mensagem.
- Clique no ícone de clipe Anexar arquivo:
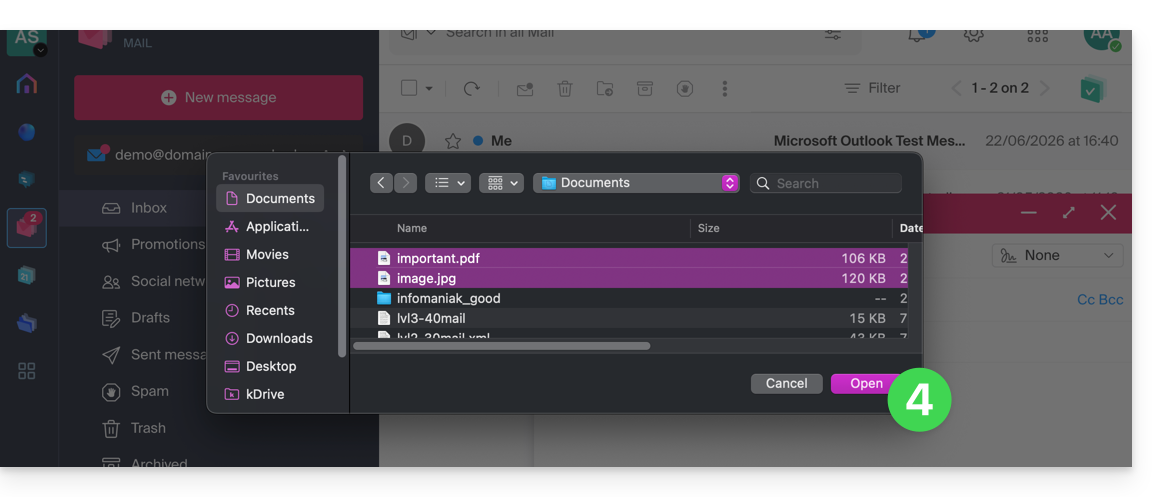
- Navegue pelas pastas para selecionar os arquivos a serem anexados à mensagem:
- Com o aplicativo web Mail da Infomaniak (serviço online ksuite.infomaniak.com/mail), o limite de tamanho dos anexos é de 25 MB.
- Acima desse limite e até um máximo de 3 GB, um link SwissTransfer é gerado e integrado à sua mensagem: os dados são armazenados na Suíça, na nuvem da Infomaniak, e seus destinatários poderão usar esse link para baixar facilmente os anexos durante um período predefinido.
- Acima de 3 GB (e até 50 GB), recomenda-se usar o SwissTransfer para todos os seus envios.
- Com o aplicativo web Mail da Infomaniak (serviço online ksuite.infomaniak.com/mail), o limite de tamanho dos anexos é de 25 MB.
Anexar arquivos do kDrive à sua mensagem
Para adicionar um anexo existente no kDrive:
- Clique aqui para acessar o aplicativo web Mail da Infomaniak (serviço online ksuite.infomaniak.com/mail).
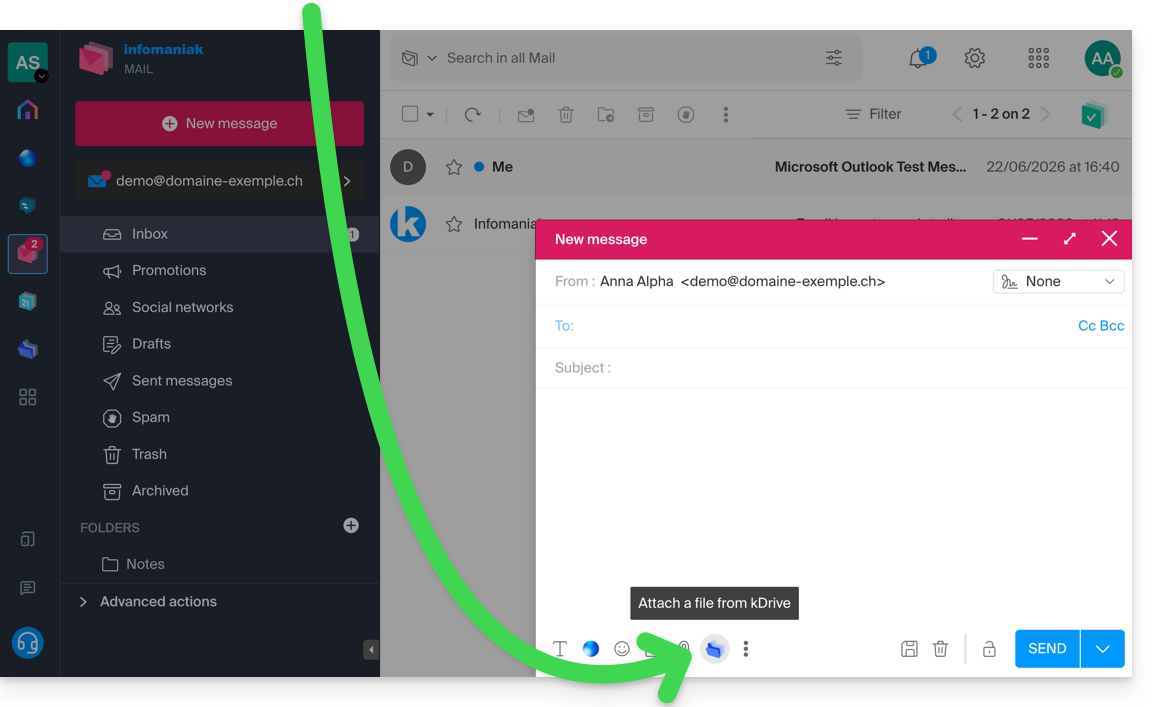
- Clique em Nova mensagem.
- Clique no ícone da pasta kDrive para navegar pelas pastas e selecionar os arquivos do kDrive que deseja anexar à mensagem:
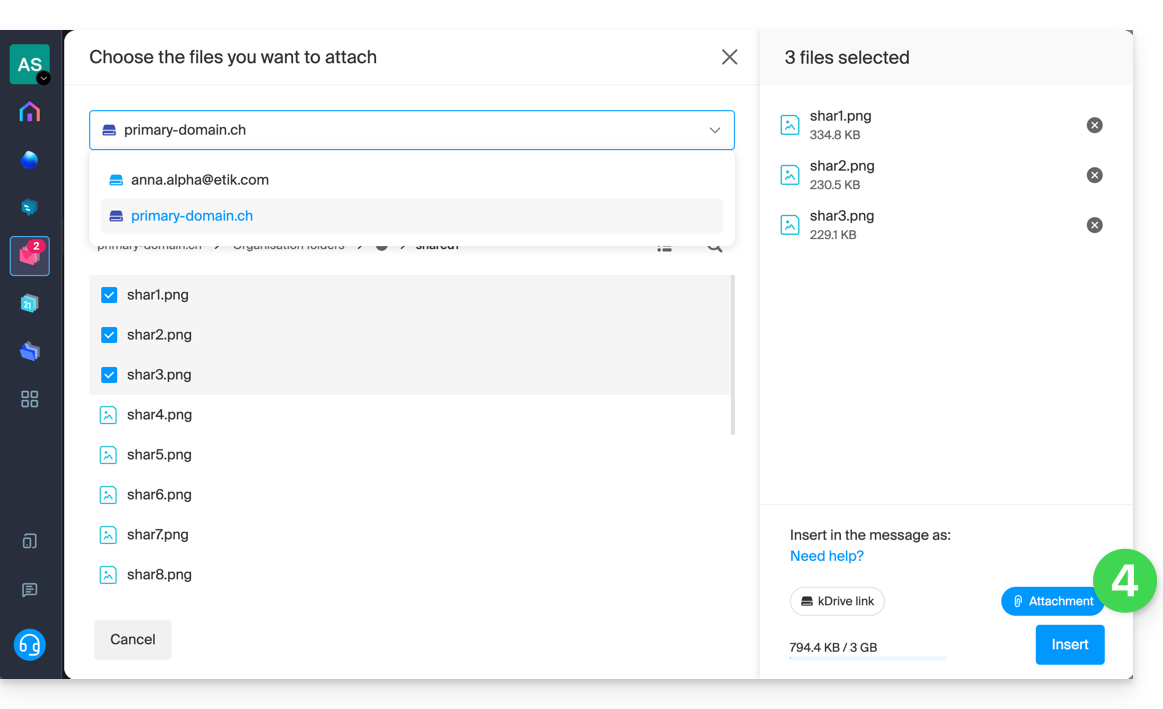
- Depois de encontrar e adicionar os dados (se necessário, altere o kDrive selecionado através do menu suspenso), selecione a opção Anexo à direita (para anexar os arquivos do kDrive à mensagem, em vez de enviar um link simples para os arquivos) e, em seguida, clique no botão Inserir:
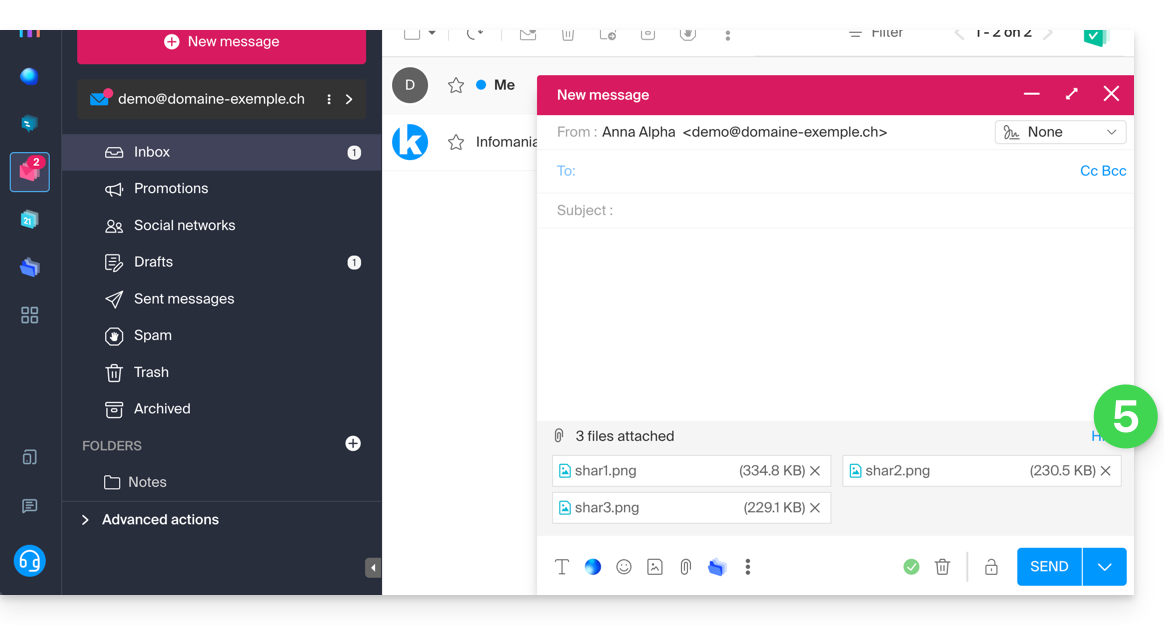
- Os arquivos selecionados são adicionados à mensagem:
Incluir uma imagem no corpo da sua mensagem
Para adicionar uma imagem à mensagem (no meio do texto da sua mensagem, por exemplo), existem 2 possibilidades:
- Arraste e solte a imagem na área de inserção(imagens com mais de 10 MB não serão exibidas, mas serão anexadas).
- … ou clique no ícone que representa uma paisagem:
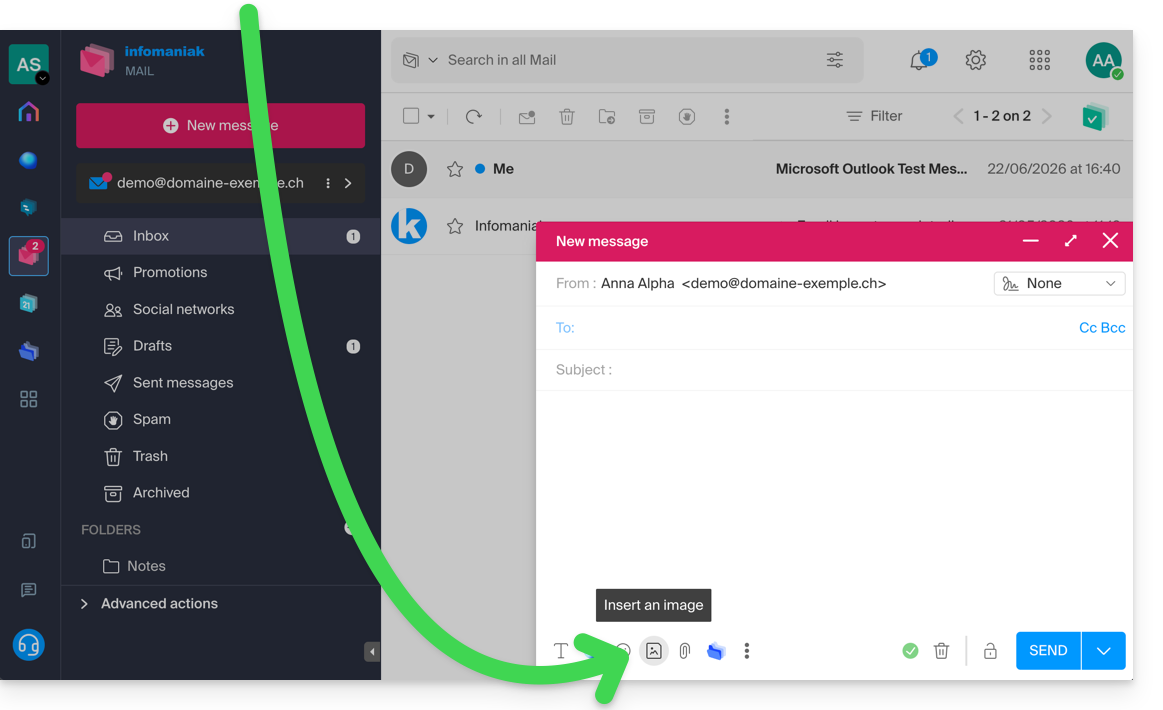
- em seguida:
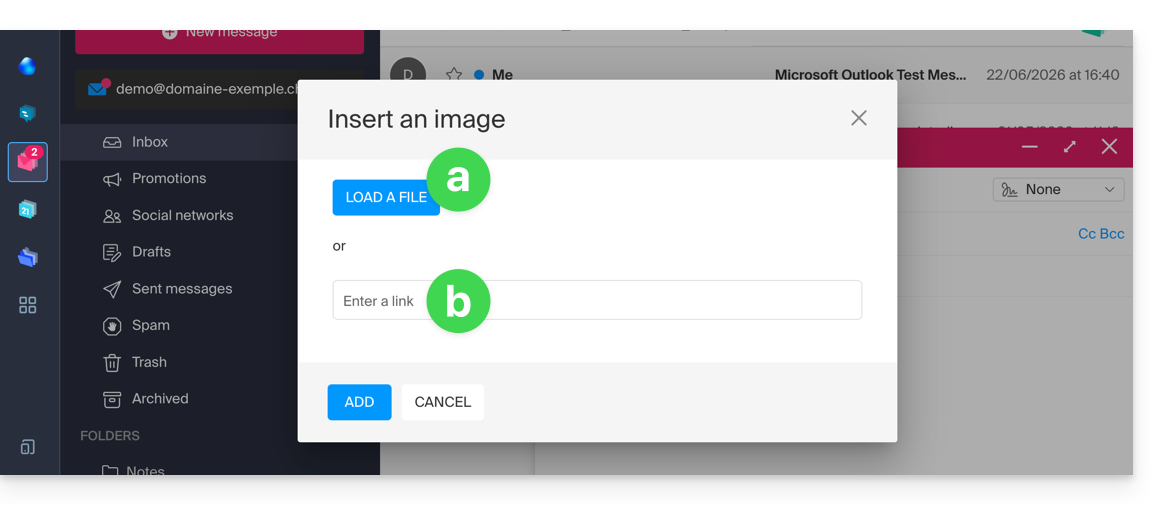
- Clique no botão para carregar uma imagem (o que permite selecioná-la no local desejado e inseri-la no corpo da mensagem)…
- … ou insira o endereço URL da imagem que deseja incluir dinamicamente; a imagem deve estar em algum lugar na Internet (você pode usar o Web FTP para enviar sua imagem para o seu espaço de hospedagem, caso possua um) e deve permanecer lá no momento em que o destinatário visualizar a mensagem.
- Clique no botão para adicionar a imagem.
Link para esta FAQ: https://faq.infomaniak.com/1697
Esta seção de perguntas frequentes foi útil?
Este guia explica como criar e adicionar automaticamente uma assinatura às mensagens enviadas a partir da aplicação web Mail Infomaniak (serviço online ksuite.infomaniak.com/mail).
Consulte este outro guia sobre as limitações da oferta my kSuite.
Introdução
- A assinatura também será visível nos seus envios a partir da aplicação Infomaniak Mail (iOS / Android).
- Ela não será exibida com outro método de envio (um software como o Outlook, por exemplo).
- Ela também não é adicionada às mensagens da secretária eletrônica; é necessário adicioná-la diretamente na mensagem de ausência.
- Uma ou mais assinaturas podem ser adicionadas a partir do Mail e do Manager, onde são gerenciados todos os endereços de um Serviço de Mail; escolha qual assinatura usar ao enviar uma mensagem.
Aceder às assinaturas a partir da aplicação Web Mail Infomaniak
Pré-requisitos
- Ter permissão para gerenciar as assinaturas: se você foi convidado para o aplicativo Web Mail da Infomaniak (serviço online ksuite.infomaniak.com/mail)para gerenciar seu endereço, é possível que o administrador do Serviço Mail tenharemova este direito da sua conta de administrador.
Para aceder à gestão das assinaturas:
- Clique aqui para acessar o aplicativo web Mail da Infomaniak (serviço online ksuite.infomaniak.com/mail).
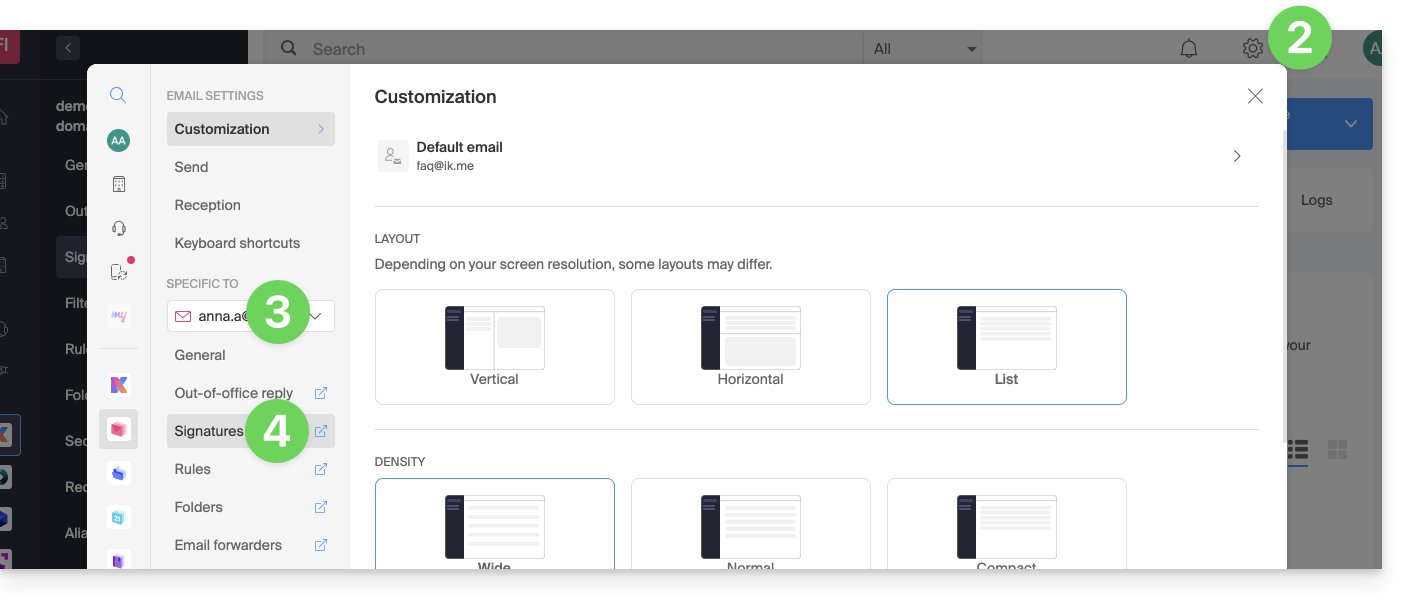
- Clique no ícone Configurações no canto superior direito da interface.
- Verifique ou selecione o endereço de e-mail em questão no menu suspenso do menu lateral esquerdo.
- Clique em Assinaturas:
Aceder às assinaturas a partir do Serviço de Email
Para aceder ao Serviço de Email e à gestão das assinaturas:
- Clique aqui para acessar o gerenciamento do seu produto no painel de controle Infomaniak (precisa de ajuda?).
- Clique diretamente no nome atribuído ao produto em questão.
- Clique em o endereço de e-mail em questão na tabela que aparece.
- Clique em Assinaturas no menu lateral esquerdo:
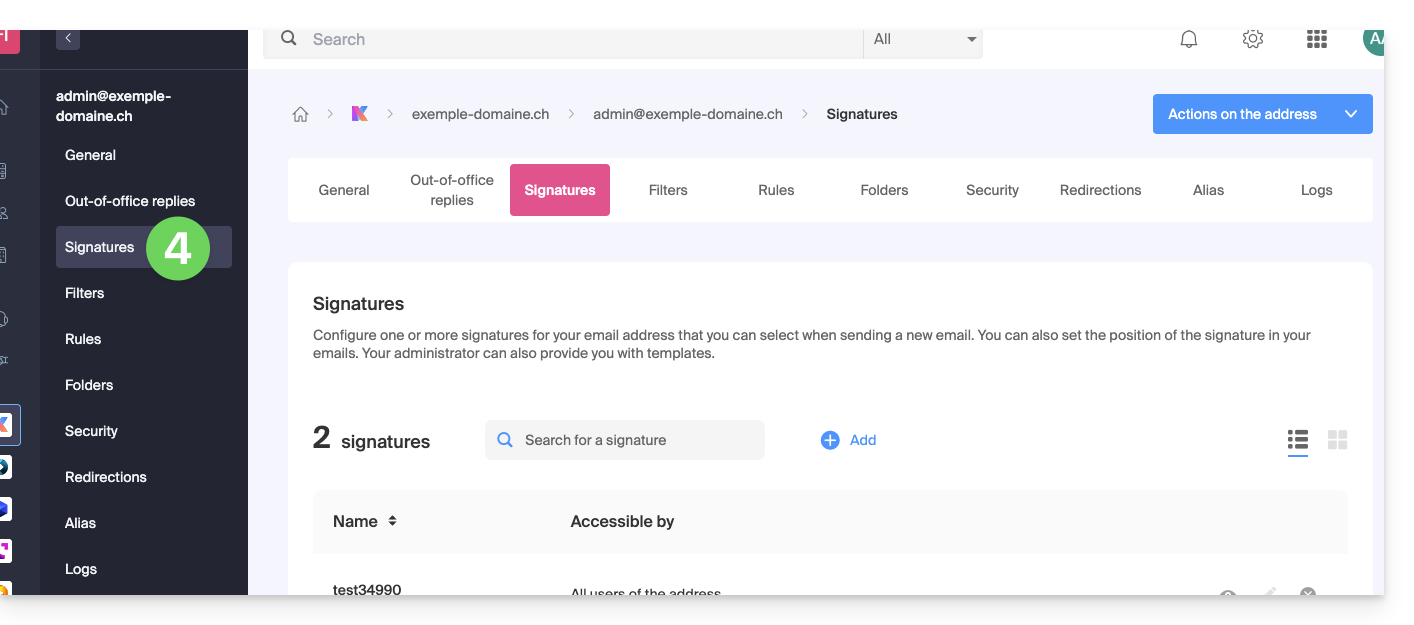
Criar e editar a assinatura
Existem duas opções:
- Clique em Adicionar para criar uma nova assinatura.
- Clique no ícone lápis ✎ ao lado de uma assinatura já existente para editá-la.
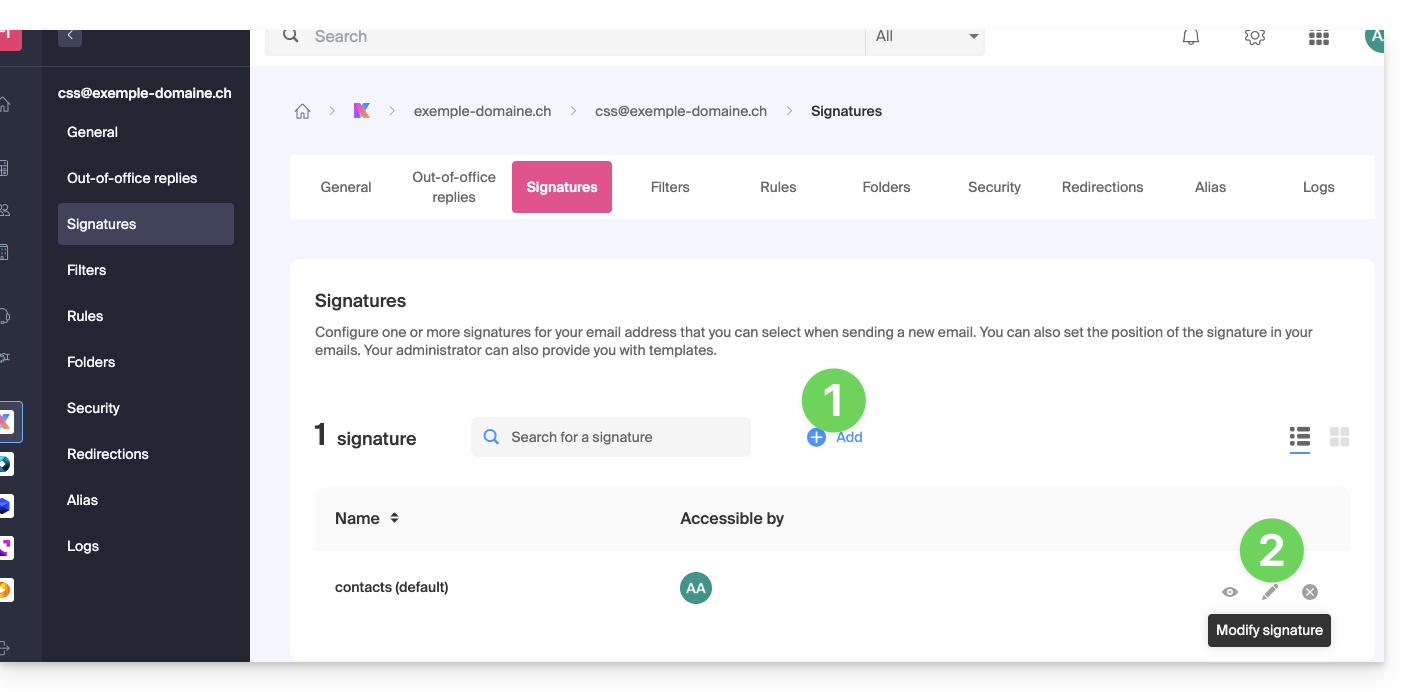
Em seguida:
- Escolha um modelo existente ou crie um novo:
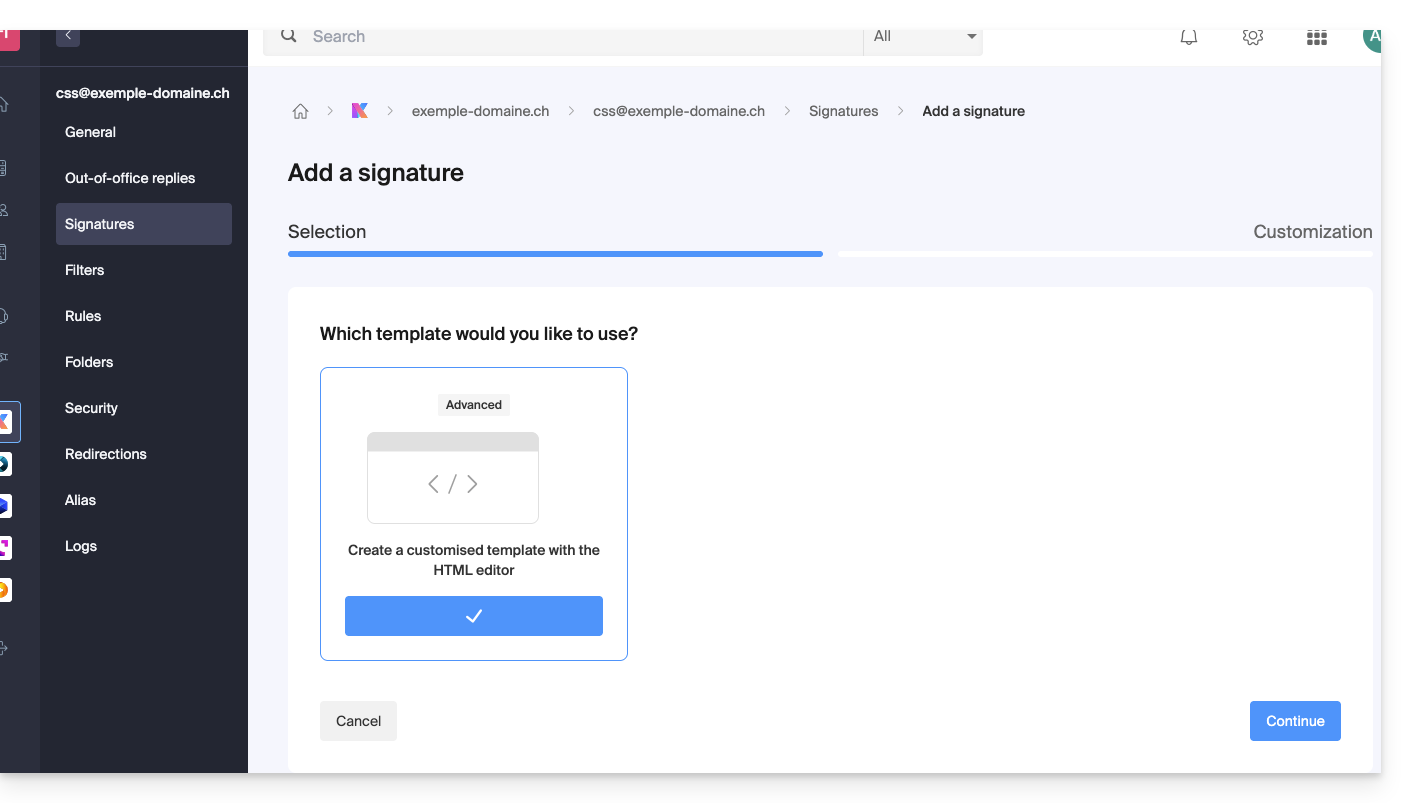
- Atribua um nome à assinatura.
- Especifique um nome para a sua identidade (este será exibido ao lado do seu endereço de e-mail nas mensagens recebidas pelos seus destinatários).
- Crie o conteúdo da assinatura na área designada para esse fim (consulte abaixo as opções de formatação).
- Escolha se deseja ou não compartilhar a assinatura com todos os utilizadores do endereço de e-mail.
- Clique em Configurações avançadas para escolher o local onde deseja inserir sua assinatura: antes da mensagem (= cabeçalho da página) ou depois da mensagem (= assinatura).
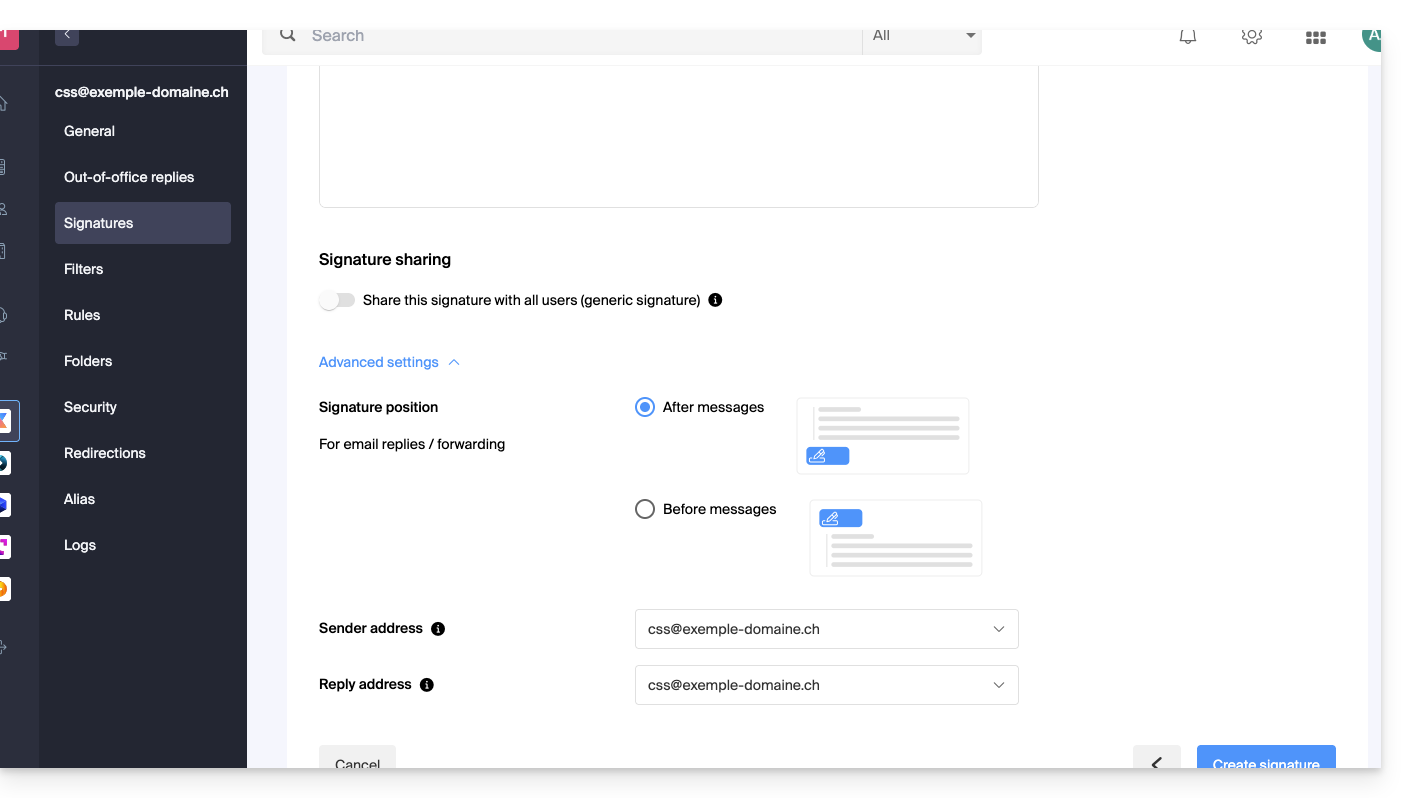
- Consulte este outro guia sobre a escolha dos endereços de envio/resposta.
- Clique no botão Criar assinatura.
Formatar a assinatura
Você pode usar uma imagem, editar o código-fonte HTML e formatar seu texto usando uma paleta de ferramentas.
Para evitar quebras de linha excessivas, use a tecla maiúscula em conjunto com a tecla ENTER do seu teclado, o que terá o mesmo efeito da tag HTML <br>, que causa uma quebra de linha em vez de um novo parágrafo.
Definir uma assinatura padrão
Para escolher a assinatura a ser utilizada por padrão em determinadas condições:
- Clique aqui para acessar suas assinaturas no aplicativo web Mail da Infomaniak.
- Verifique ou selecione o endereço de e-mail correspondente no menu suspenso do menu lateral esquerdo.
- Escolha a assinatura que será inserida por padrão ao redigir:
- uma nova mensagem
- uma resposta / encaminhamento
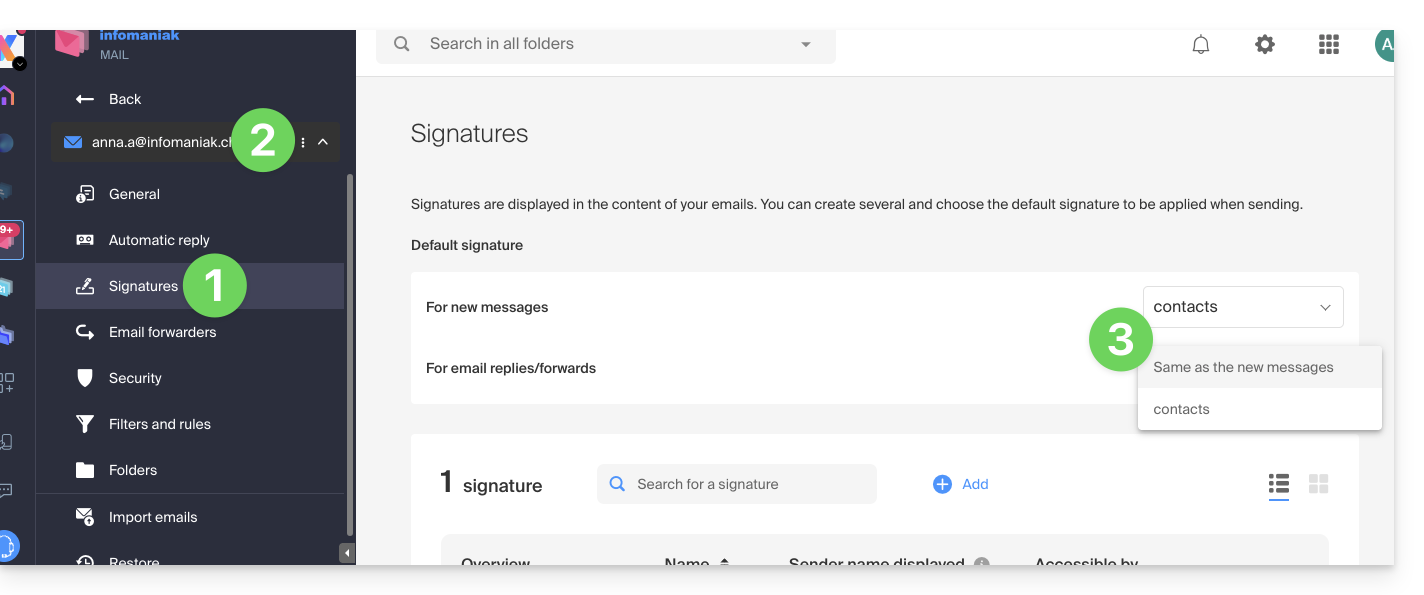
Ao definir uma assinatura padrão, esta será exibida automaticamente no corpo do e-mail ao redigir. Você ainda terá a possibilidade de alterar a assinatura.
Existe um caso em que a assinatura padrão não será a que é inserida automaticamente por padrão ao redigir uma mensagem: consulte o ponto 10 deste outro guia.
Selecionar ou remover a assinatura ao redigir
Ao iniciar a redação de uma nova mensagem:
- A assinatura é inserida automaticamente.
- Se existirem várias assinaturas, pode escolher outra identidade através do menu suspenso.
- Também pode aceder rapidamente às definições da assinatura através do botão na barra de ferramentas:
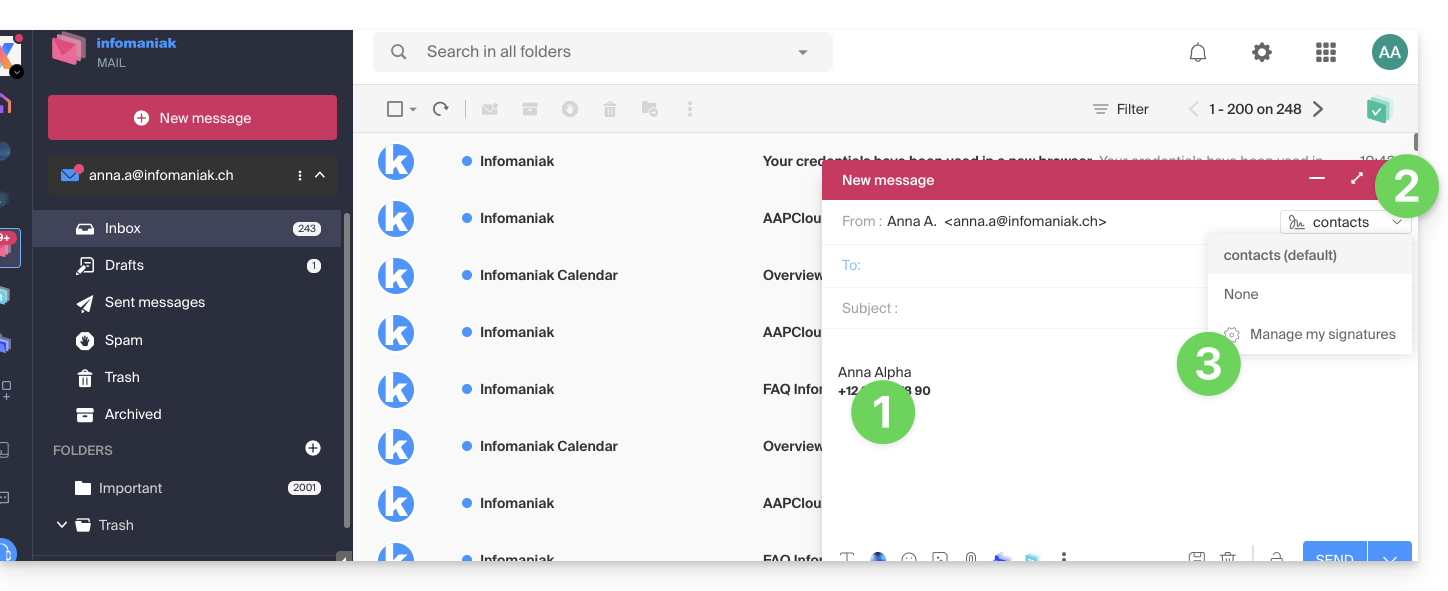
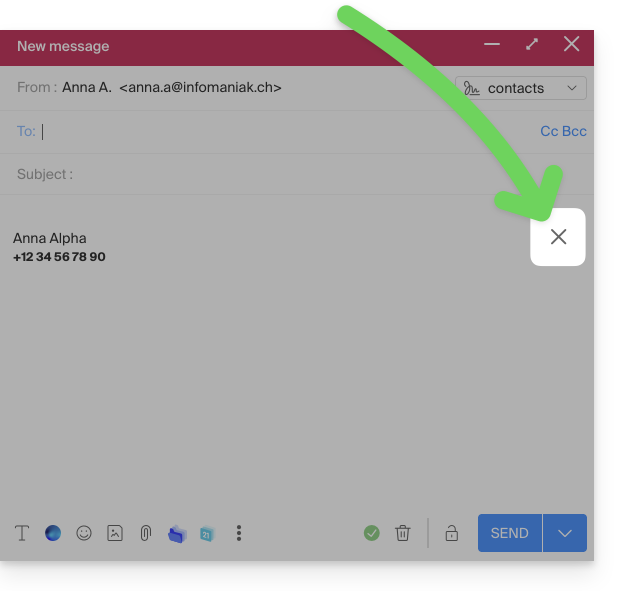
- Você pode remover a assinatura passando o mouse sobre ela e clicando no "X":
Endereços associados (vários possíveis)
Quando uma assinatura é criada a partir de um modelo (seja ele criado a partir de um modelo proposto pela Infomaniak ou gerado com o editor avançado):
- os utilizadores não têm acesso ao conteúdo da assinatura em modo de edição,
- eles podem inserir valores dinâmicos, como o nome do remetente ou dados pessoais que podem ser solicitados, como profissão ou número de telefone;
- eles também podem modificar as configurações avançadas da assinatura (como a posição desta em uma resposta/encaminhamento), mas, até o momento, esta configuração é comum a todos os utilizadores da assinatura (1);
Quando uma assinatura é criada diretamente, sem o uso de um modelo:
- se a assinatura for criada a partir de um modelo predefinido:
- o comportamento será o mesmo do ponto anterior, ou seja, uma assinatura criada a partir de um modelo
- se a assinatura foi criada através do editor avançado:
- os utilizadores têm acesso ao conteúdo da assinatura em modo de edição, mas atenção, este conteúdo é partilhado; se Morgane modificar o conteúdo, Vanessa terá o mesmo conteúdo assim que atualizar a sua interface Mail Infomaniak,
- apenas o nome do remetente é específico do utilizador e não existem valores dinâmicos neste tipo de caso,
- as definições avançadas seguem o mesmo princípio que nos outros casos: são comuns a todos os utilizadores
Em todos os casos, o facto de atribuir uma assinatura predefinida a uma caixa de correio é feito ao nível do utilizador. Por exemplo, dentro da mesma caixa de correio, a assinatura escolhida por predefinição por Morgane é independente daquela escolhida por Vanessa.
Aprofunde seus conhecimentos sobre modelos
Consulte este outro guia se você deseja saber como definir modelos personalizados que podem ser aplicados na criação de um novo endereço de e-mail no seu Serviço de E-mail, por exemplo, ou em massa em todos os endereços do seu domínio.
Excluir uma assinatura
Os utilizadores do endereço de e-mail na aplicação web Mail da Infomaniak recebem um e-mail sempre que uma assinatura é excluída.
Link para esta FAQ: https://faq.infomaniak.com/1700
Esta seção de perguntas frequentes foi útil?
Este guia ajuda você a resolver diversos problemas relacionados à implementação e ao uso de uma política DMARC com seu serviço de e-mail.
Consulte este outro guia se você estiver enfrentando um problema DMARC especificamente ao usar serviços do Google.
Erro ou rejeição DMARC...
...durante um redirecionamento, embora o endereço de destino inicial tenha recebido a mensagem (erro SPF)
Redirecionamento de e-mail sem SRS gerando um erro SPF
Imagine que você configurou um redirecionamento de e-mail do endereço "user@example2.com" para o endereço "user@yourdomain3.com", sem usar o mecanismo SRS. Quando uma mensagem é enviada para "user@example2.com", ela é recebida pelo primeiro servidor de e-mail e, em seguida, encaminhada automaticamente para "user@yourdomain3.com". Exemplo:
- remetente: john.doe@gmahoo1.com
- destinatário inicial: user@example2.com
- destino final: user@yourdomain3.com
Simplificando: quando John envia um e-mail para "user@example2.com", o servidor de e-mail de "example2.com" o redireciona para "user@yourdomain3.com". O servidor de destino recebe, portanto, a mensagem dos servidores de "example2.com", embora o endereço de envelope do remetente ainda indique "john.doe@gmahoo1.com".
Em detalhes: durante o redirecionamento, o endereço de envelope do destinatário é substituído por "user@yourdomain3.com", mas o endereço de envelope do remetente permanece "john.doe@gmahoo1.com". O endereço do remetente visível na mensagem também permanece inalterado.
A verificação SPF pode, então, falhar, pois os servidores de "example2.com" normalmente não são autorizados pelo registro SPF de "gmahoo1.com" a enviar mensagens para este domínio.
Um erro de SPF nem sempre causa uma falha no DMARC. O DMARC falha apenas se nenhum mecanismo SPF ou DKIM válido estiver alinhado com o domínio do endereço do remetente visível. Se a assinatura DKIM original estiver ausente, for inválida ou não estiver alinhada, a política DMARC do domínio do remetente pode levar à colocação em quarentena ou à rejeição da mensagem.
Para evitar que o SPF falhe apenas devido ao redirecionamento, o provedor que realiza o redirecionamento deve suportar o mecanismo SRS.
Como funcionam os redirecionamentos na Infomaniak
Quando um e-mail recebido em um endereço Infomaniak é redirecionado para outro endereço, a Infomaniak usa o SRS para reescrever o endereço de envelope do remetente. O endereço do remetente visível para o destinatário permanece inalterado.
Essa reescrita permite que o servidor de destino verifique se o servidor Infomaniak que realiza o redirecionamento está autorizado a usar o novo endereço de envelope. O SRS não modifica a assinatura DKIM original e, por si só, não garante a validação do DMARC. No contexto de um redirecionamento, o DMARC pode ser validado, por exemplo, se a assinatura DKIM original permanecer válida e alinhada.
...relacionado a uma entrada DNS incorreta
O registro DMARC deve ser publicado como um único registro TXT no subdomínio "_dmarc" do domínio em questão.
Registro DMARC mal formatado (Malformed DMARC Record): se o registro DMARC não estiver formatado corretamente, ele pode ser considerado inválido. Verifique a sintaxe, os pontos e vírgulas, as tags usadas e seus valores.
Política DMARC inválida (Invalid DMARC Policy): o valor da tag principal "p" deve ser "none", "quarantine" ou "reject". Qualquer outro valor torna a política DMARC inválida.
Múltiplos registos DMARC: um domínio deve conter apenas um único registo TXT DMARC. Se vários registos forem publicados no subdomínio "_dmarc", a configuração será considerada inválida e a política não poderá ser aplicada corretamente.
Agrupe todos os parâmetros DMARC necessários num único registo TXT.
Verifique a sua entrada DMARC atual utilizando uma ferramenta dedicada, como as que se seguem:
...relacionado com um envio que não valida nenhum mecanismo SPF ou DKIM alinhado
O DMARC não exige que o SPF e o DKIM sejam ambos válidos. A verificação DMARC é bem-sucedida assim que pelo menos um destes dois mecanismos for válido e estiver alinhado com o domínio do endereço do remetente visível.
Um erro ou rejeição DMARC pode, portanto, ocorrer quando nem o SPF nem o DKIM validam um domínio alinhado com o do remetente.
Isto pode acontecer, por exemplo, se enviar um e-mail com o seu endereço Infomaniak utilizando o servidor SMTP de outro fornecedor. O servidor utilizado pode não ser autorizado pelo registo SPF do seu domínio e não aplicar uma assinatura DKIM válida para o mesmo domínio.
Para resolver este problema:
- Verifique a segurança geral do Serviço de E-mail,
- utilize os servidores SMTP Infomaniak para enviar mensagens a partir de um endereço Infomaniak,
- se utilizar um serviço de envio externo, configure o seu domínio junto desse fornecedor para que este suporte corretamente o SPF, o DKIM e o seu alinhamento DMARC.
As mensagens de um domínio recém-criado chegam à pasta de spam
Este comportamento não indica necessariamente um erro DMARC. Um domínio recém-criado tem ainda poucos ou nenhum histórico de envio e, portanto, a sua reputação não está estabelecida junto dos vários fornecedores de e-mail.
Comece enviando um pequeno volume de mensagens legítimas para destinatários que deram o seu consentimento e, em seguida, aumente gradualmente o número de envios. Verifique também se o SPF, DKIM e DMARC estão configurados corretamente e evite envios repentinos ou em grande volume.
Enviar mensagens para si próprio pode ajudar a testar a configuração e a sinalizar uma mensagem como legítima na caixa de entrada correspondente. No entanto, isso não é suficiente para estabelecer uma reputação geral junto de outros fornecedores de e-mail.
O sucesso das verificações SPF, DKIM e DMARC não garante que as mensagens sejam entregues na caixa de entrada. Os fornecedores também levam em consideração a reputação do domínio e dos servidores de envio, o volume de mensagens, o conteúdo e as reações dos destinatários.
Estou a enviar um e-mail a partir do meu endereço Infomaniak e recebo uma mensagem de erro do tipo "Rejeitar DMARC"
Para resolver este problema:
- Verifique a segurança geral do Serviço de E-mail,
- faça um teste de envio a partir do Webmail mail.infomaniak.com,
- verifique as configurações do servidor do software ou do cliente de e-mail, incluindo o servidor SMTP utilizado e a autenticação do endereço de envio.
Se a mensagem for enviada corretamente a partir do Webmail, o problema provavelmente está relacionado com a configuração do software de e-mail ou do servidor SMTP externo utilizado para o envio.
Estou a enviar um e-mail a partir de um endereço externo (Microsoft, Google, Yahoo, Orange, etc.) e a Infomaniak o rejeita com um erro DMARC
A mensagem provavelmente não cumpre a política DMARC publicada pelo domínio do remetente. Isso pode significar, por exemplo, que o SPF e o DKIM falharam ou que não estão alinhados com o endereço do remetente visível.
Para resolver este problema:
- Verifique com o provedor do endereço de envio se as mensagens estão sendo enviadas de acordo com suas recomendações.
- Encaminhe ao provedor ou ao administrador do domínio de envio a mensagem de erro completa para que ele possa verificar as configurações SPF, DKIM e DMARC.
Gostaria de receber um e-mail no meu endereço Infomaniak, mas o remetente recebe um erro DMARC
A mensagem foi bloqueada porque não cumpria a política DMARC publicada pelo domínio do remetente. A configuração da conta de destino Infomaniak não permite corrigir um erro de autenticação proveniente do domínio do remetente.
Para resolver este problema:
- Peça ao remetente para encaminhar a mensagem de erro completa ao seu provedor de e-mail ou ao administrador do seu domínio, para que as configurações SPF, DKIM e DMARC sejam verificadas.
- se o endereço Infomaniak encaminhar as mensagens para outro endereço, verifique também em que etapa do encaminhamento a rejeição é gerada.
Link para esta FAQ: https://faq.infomaniak.com/1704
Esta seção de perguntas frequentes foi útil?
Este guia explica como adicionar um endereço de e-mail ao aplicativo web Mail da Infomaniak (serviço online ksuite.infomaniak.com/mail), que permite gerenciar um ou mais endereços de e-mail hospedados pela Infomaniak.
Introdução
- Qualquer adição ou remoção de endereço de e-mail visível no aplicativo Web Mail da Infomaniak também será refletida no aplicativo móvel Infomaniak Mail.
- Isso não afeta os softwares/clientes de e-mail como o Outlook.
- Consulte este outro guia se você precisar de informações sobre a exclusão definitiva de um endereço de e-mail e seu conteúdo.
- Consulte este outro guia para desvincular um endereço de e-mail.
Associar um endereço de e-mail
Neste exemplo, o administrador (a) irá criar um endereço de e-mail (b):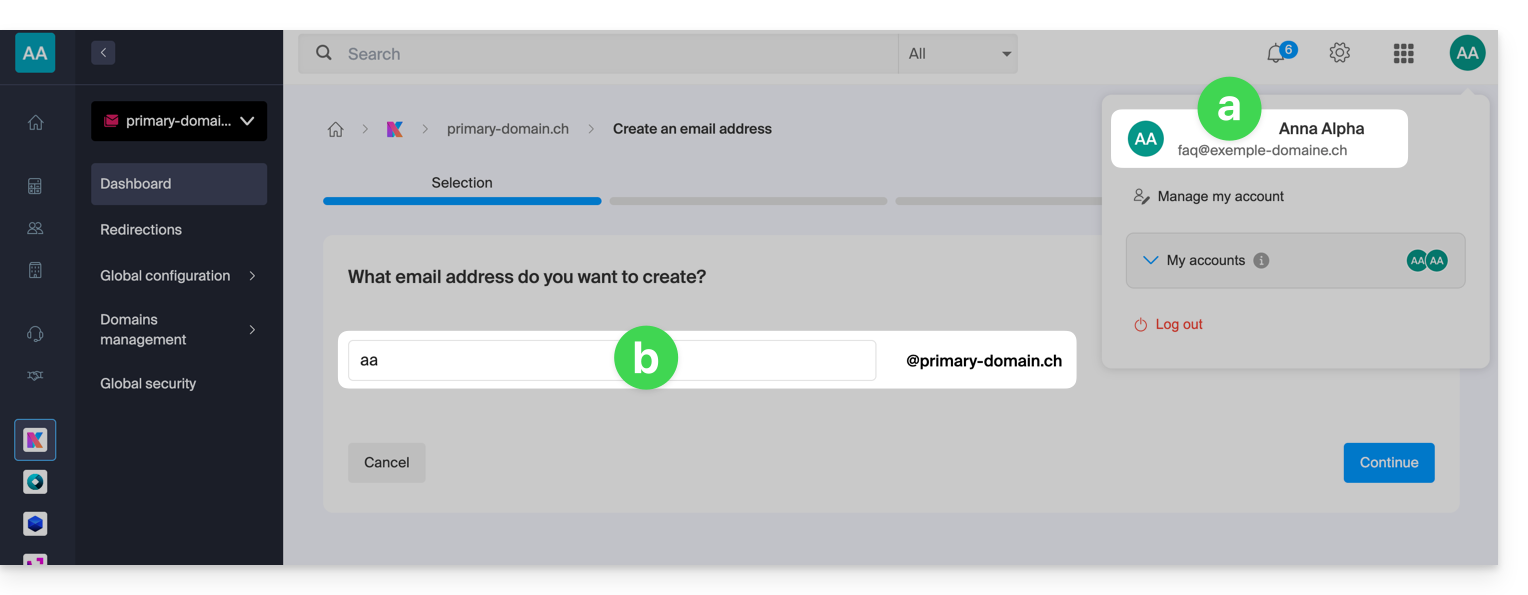
Ao final do processo de criação, ele opta por verificar o endereço (c):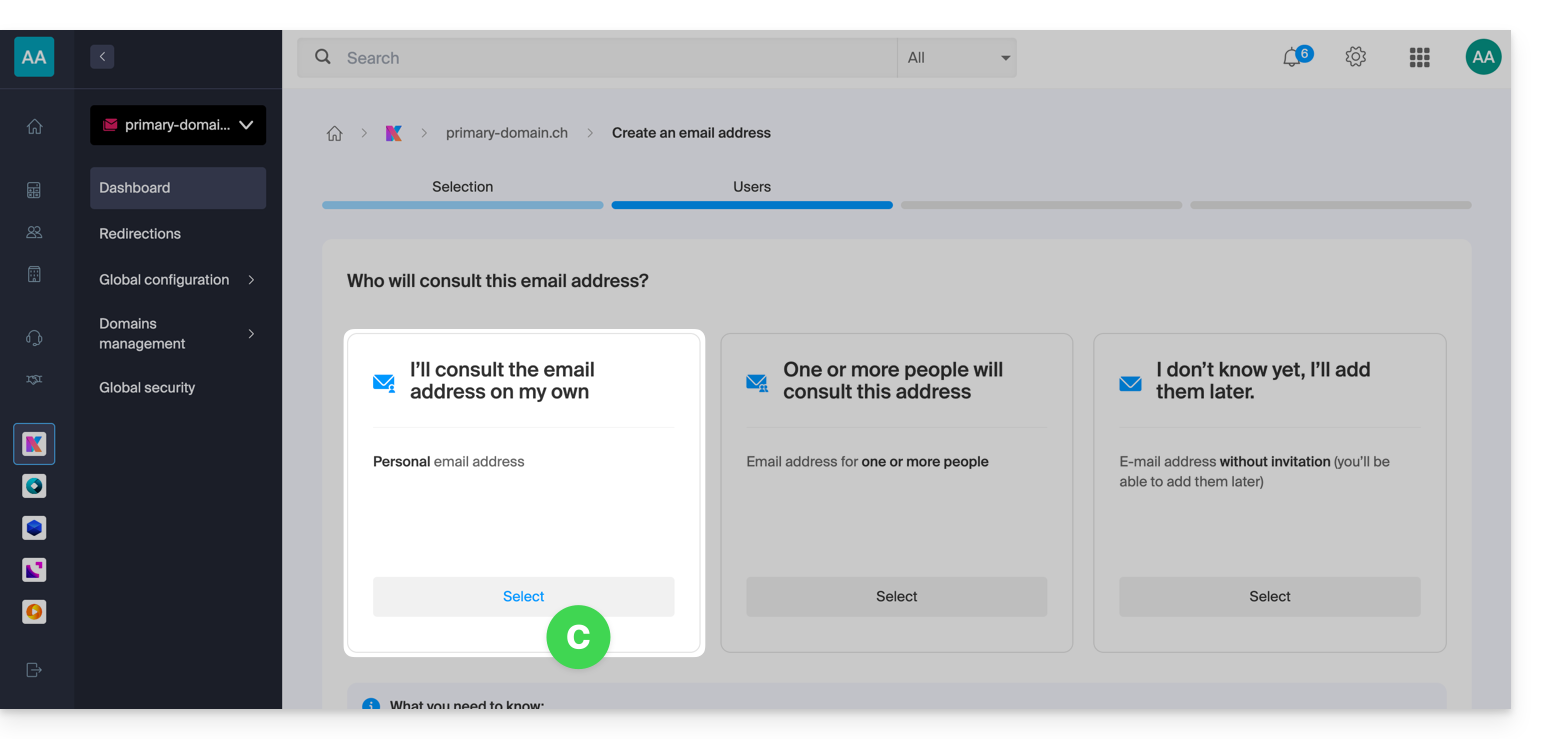
Resultado: o endereço fica imediatamente visível no aplicativo web Mail da Infomaniak (serviço online ksuite.infomaniak.com/mail) do administrador: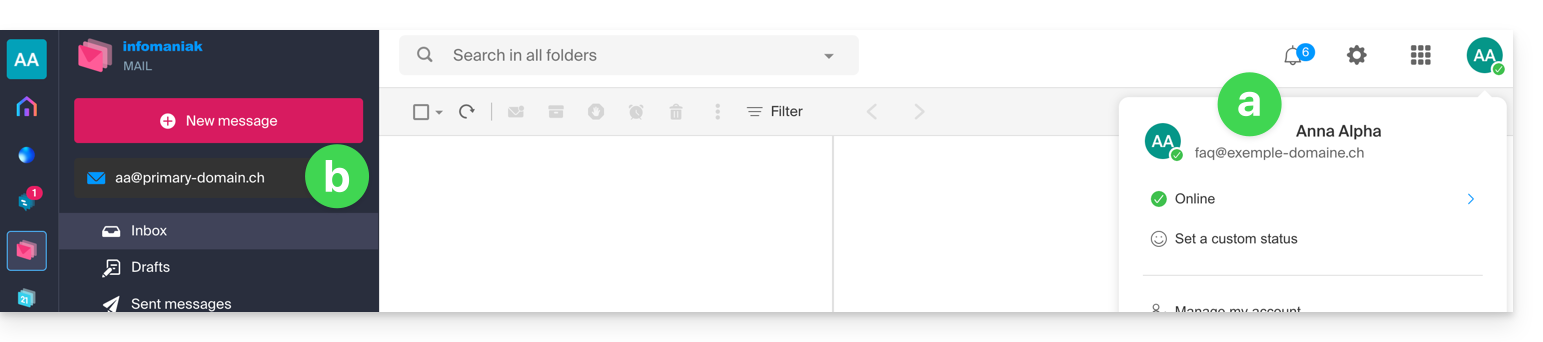
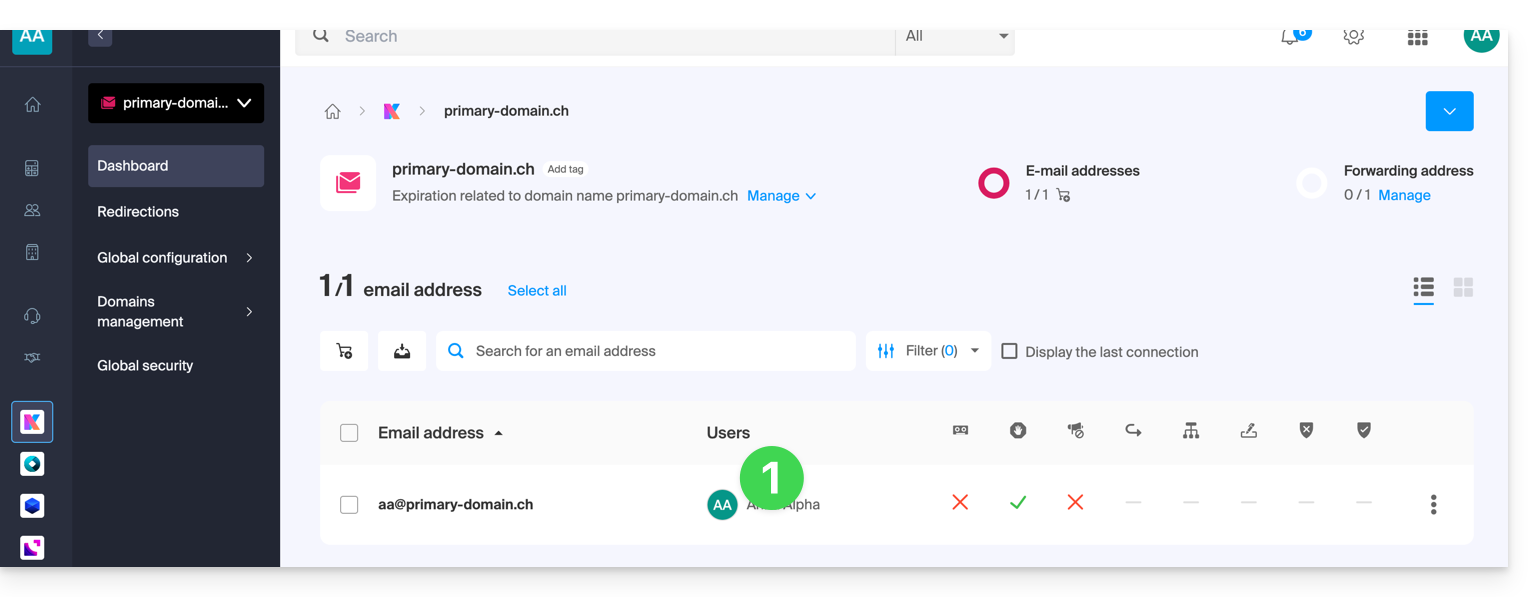
Ao retornar ao Serviço de E-mail no qual o endereço de e-mail foi criado, o administrador pode conceder acesso a este endereço para qualquer outro usuário Infomaniak (e, portanto, vincular automaticamente o endereço no aplicativo web Mail do usuário):
- Clique no usuário existente:
- Clique em Adicionar um utilizador:
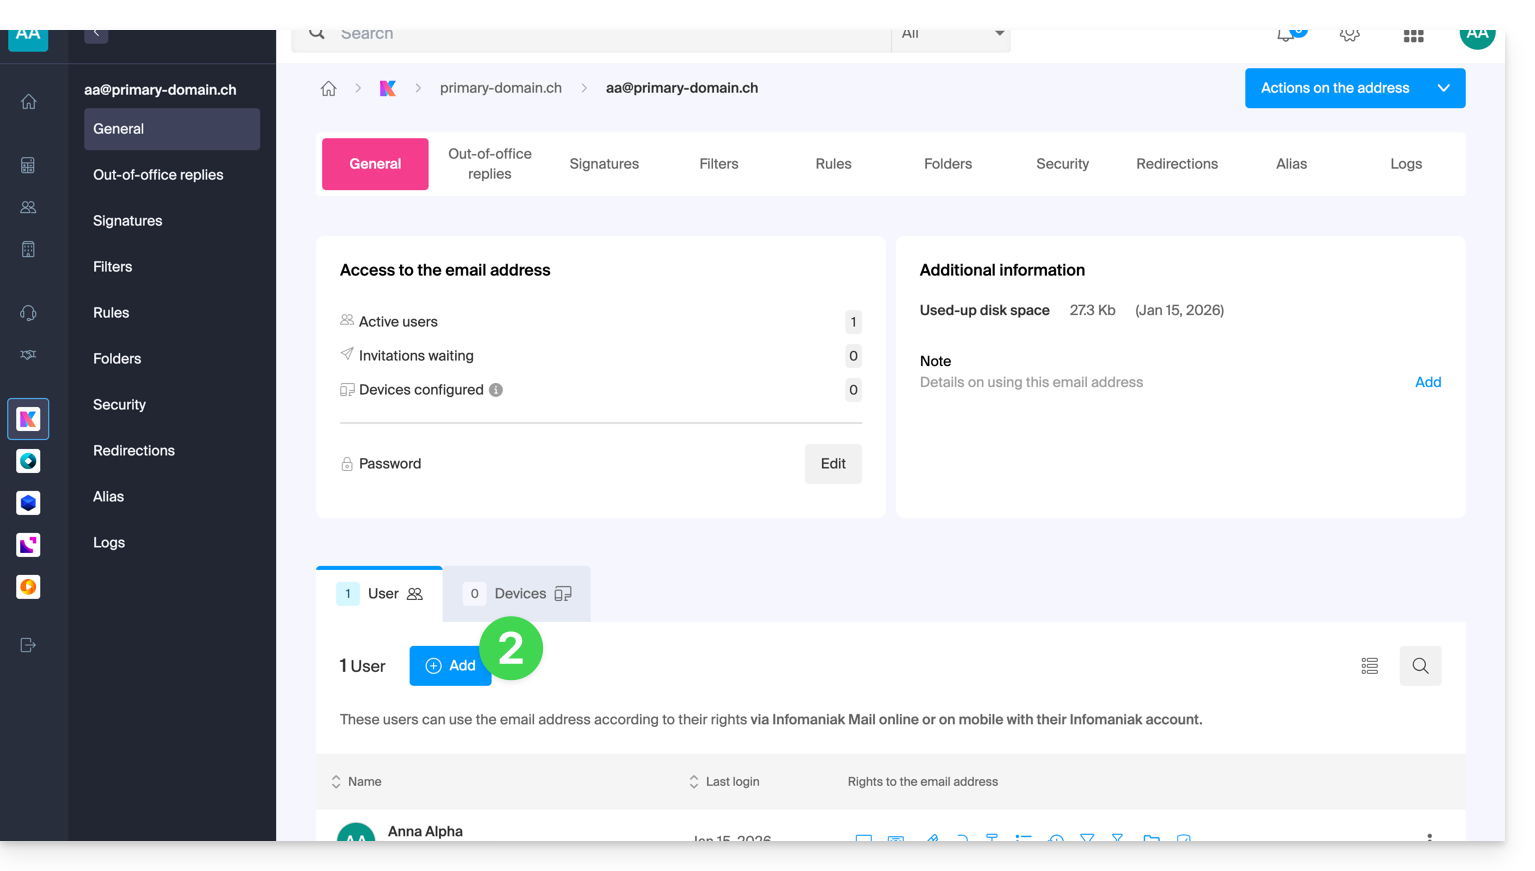
- Continue o processo (consulte este outro guia, se necessário).
Consultar os diferentes endereços associados
Para alternar entre os endereços:
- Clique aqui para acessar o aplicativo web Mail da Infomaniak (serviço online ksuite.infomaniak.com/mail).
- Em seguida, clique na seta para baixo à direita do endereço de e-mail indicado no canto superior esquerdo:
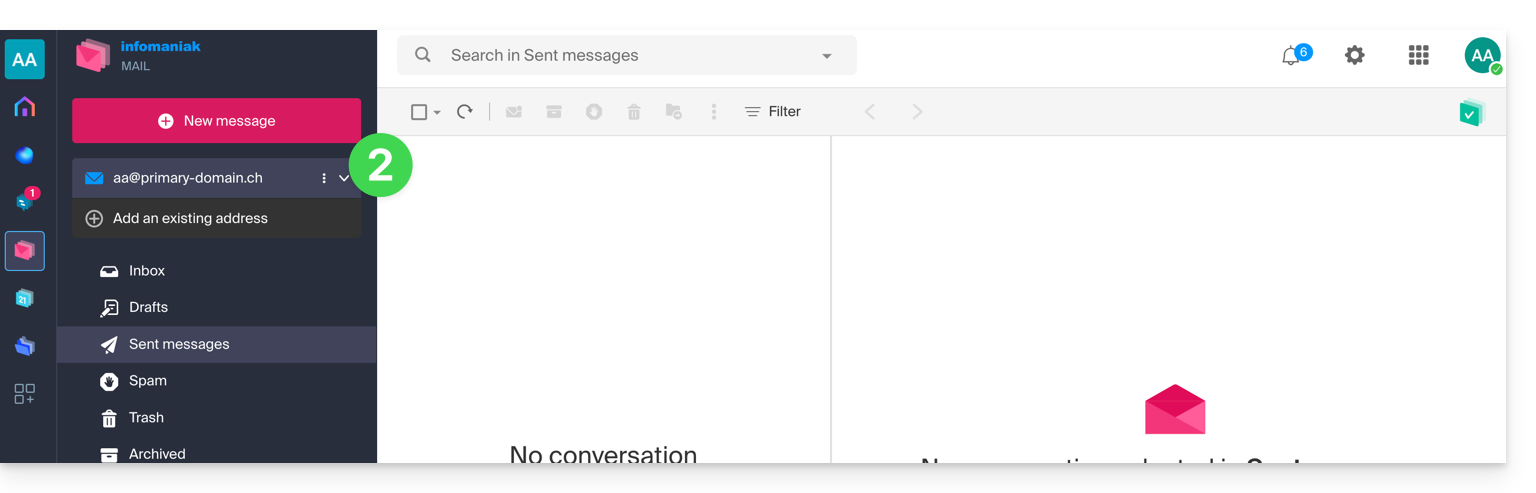
- Clique em um dos endereços já associados.
O utilizador também pode alternar entre as várias Organizações às quais a sua conta Infomaniak pertence, para aceder a outros endereços de outros Serviços de Email (consulte este outro guia).
Definir o tipo de abertura de um novo endereço por padrão
Para escolher se a exibição de um endereço diferente deve ser feita por padrão em uma nova aba do navegador ou diretamente substituindo a exibição atual, na mesma janela:
- Clique aqui para acessar o aplicativo web Mail da Infomaniak (serviço online ksuite.infomaniak.com/mail).
- Clique no ícone Configurações no canto superior direito.
- Clique em Navegador.
- Clique no botão de alternância para ativar a abertura padrão de uma caixa de e-mail em uma nova aba, em vez da janela atual:
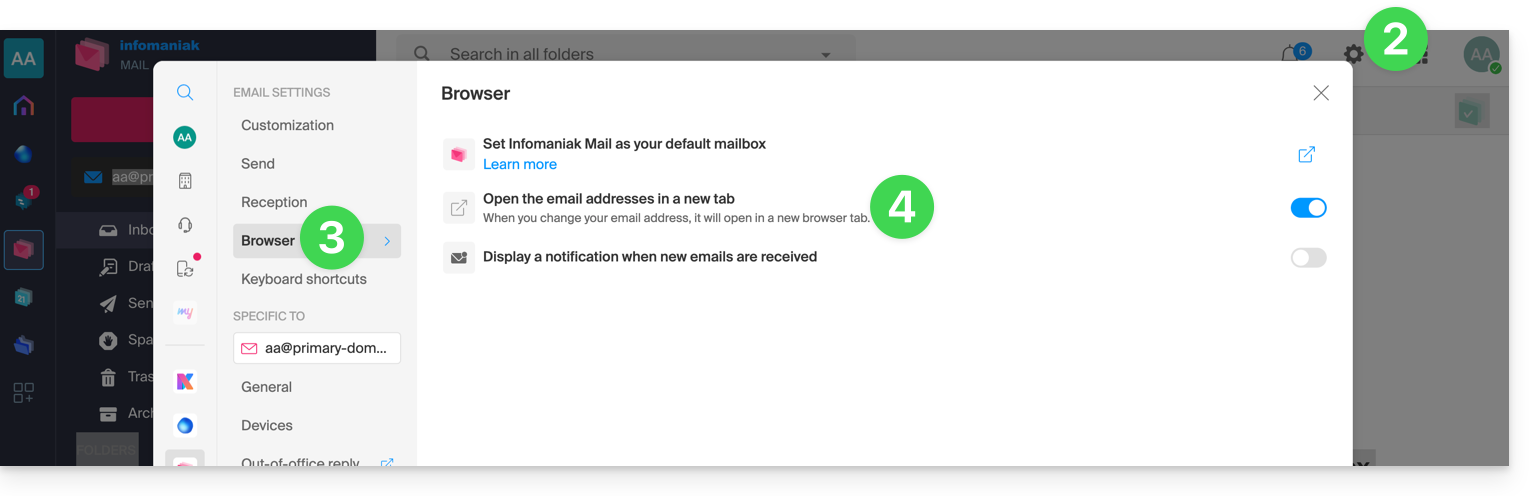
Para definir qual endereço deve ser exibido primeiro por padrãona interface, consulte este outro guia em “Personalização: endereço de e-mail padrão”.
Link para esta FAQ: https://faq.infomaniak.com/1714
Esta seção de perguntas frequentes foi útil?
Este guia explica como descarregar um e-mail a partir da aplicação web Mail da Infomaniak (serviço online ksuite.infomaniak.com/mail) para obter, no seu disco rígido, um ficheiro no formato .eml compatível com todos os softwares/clientes de e-mail.
Não é possível reproduzir esta operação na aplicação móvel Infomaniak Mail (aplicação para smartphone ou tablet iOS/Android), mas consulte as alternativas propostas no final deste guia.
Descarregar um e-mail
Para guardar um e-mail a partir da aplicação web Mail da Infomaniak (serviço online ksuite.infomaniak.com/mail):
- Clique aqui para acessar o aplicativo web Mail da Infomaniak (serviço online ksuite.infomaniak.com/mail).
- Abra a mensagem para download.
- Clique no menu de ações ⋮, à direita do e-mail aberto.
- Clique em Mais ações.
- Selecione Fazer download:
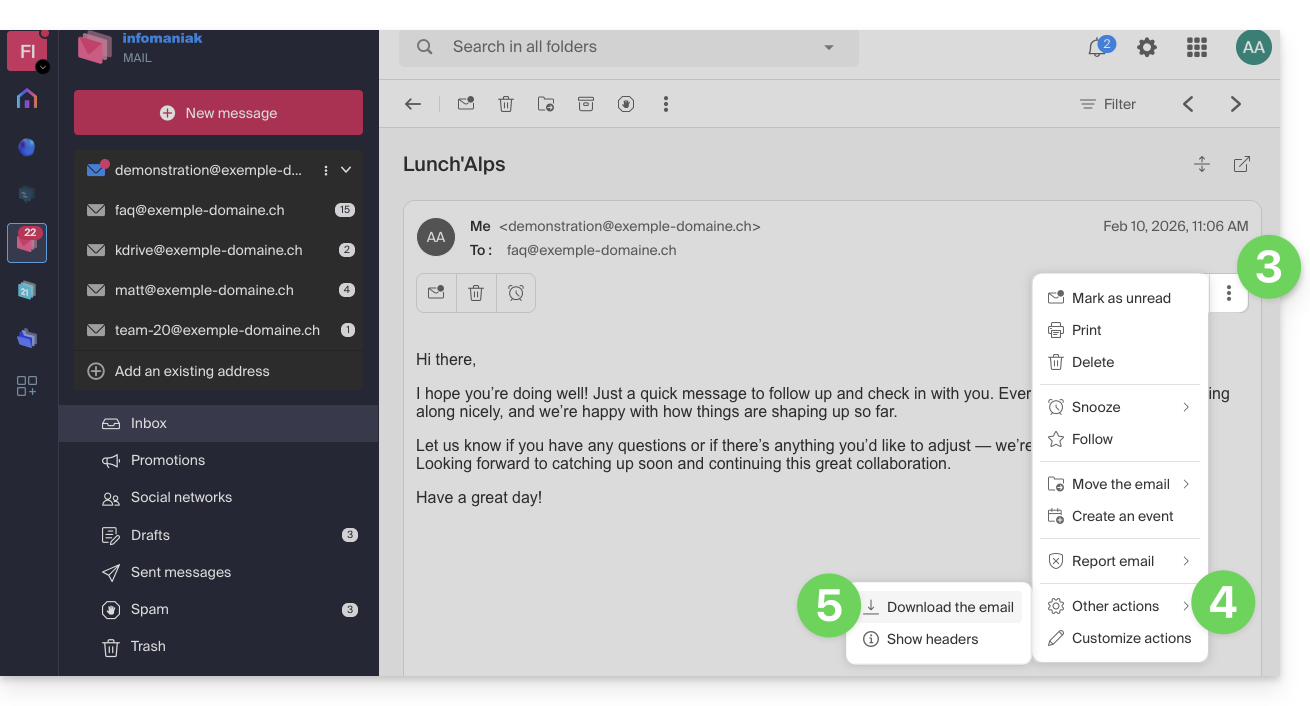
4 alternativas
- A função Salvar como... de um software/cliente de e-mail como o Thunderbird permite obter o mesmo resultado:
- Abra o software Thunderbird.
- Na caixa de entrada, clique com o botão direito do mouse na mensagem que deseja salvar.
- Escolha o local para salvar o arquivo
.eml.
- Para imprimir a mensagem e escolher PDF nas impressoras disponíveis, consulte este outro guia.
- Para descarregar a mensagem para o kDrive, consulte este outro guia.
- Para partilhá-la publicamente através de um simples link, consulte este outro guia.
Link para esta FAQ: https://faq.infomaniak.com/1718
Esta seção de perguntas frequentes foi útil?
Este guia explica como criar regras de filtragem (no modo Padrão) para classificar automaticamente os seus e-mails recebidos na Infomaniak, com base em determinadas condições.
Introdução
- Essas regras permitem, entre outras coisas, as seguintes ações automáticas:
- Excluir ou mover as mensagens provenientes de endereços de e-mail que você não deseja mais receber.
- Encaminhar para seu cônjuge os e-mails provenientes de um endereço de e-mail, para que ambos os recebam.
- Copiar as mensagens que contêm uma palavra-chave específica para uma pasta.
- etc.
- Ao contrário das regras de triagem propostas em softwares/clientes de e-mail (Microsoft Outlook, Mozilla Thunderbird, Apple Mail...), essas regras atuarão diretamente no servidor das suas caixas de e-mail, antes mesmo da conexão IMAP.
- Você pode usá-lo como um modelo para todos os endereços do seu Serviço de Email.
- Atenção: as regras são avaliadas uma após a outra: se um email corresponder às condições de várias regras, cada uma delas será executada.
- Por exemplo, uma mensagem da Amazon e cujo assunto contenha «Publicidade» pode ser processada por duas regras diferentes.
- Para evitar que o mesmo email seja processado várias vezes, adicione a ação «Interromper a execução dos filtros» ao final da regra que não deve ser seguida pelas regras subsequentes:
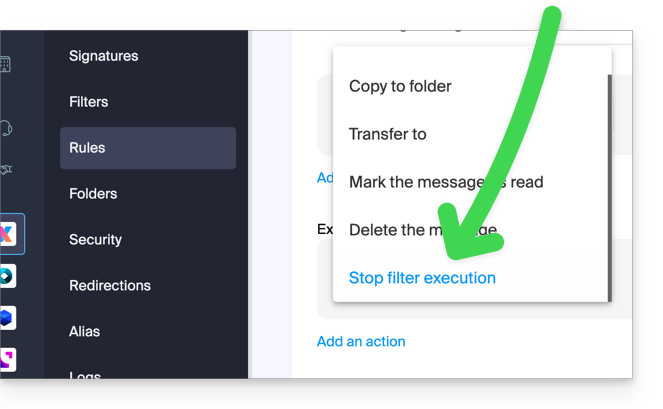
- Dependendo do plano que você possui, existe um modo avançado para criar regras de classificação em uma linguagem específica.
Aceder às regras a partir da aplicação Web Mail Infomaniak
Pré-requisitos
- Ter permissão para gerenciar as regras: se você foi convidado para o aplicativo Web Mail da Infomaniak (serviço online ksuite.infomaniak.com/mail)para gerenciar seu endereço, é possível que o administrador do Serviço Mail tenharemover este direito da sua conta de administrador.
- Para consultar as mensagens arquivadas, será necessário utilizar o protocolo IMAP ou apenas o Mail Infomaniak (uma vez que o protocolo POP apenas recupera as mensagens que se encontram na sua caixa de entrada principal).
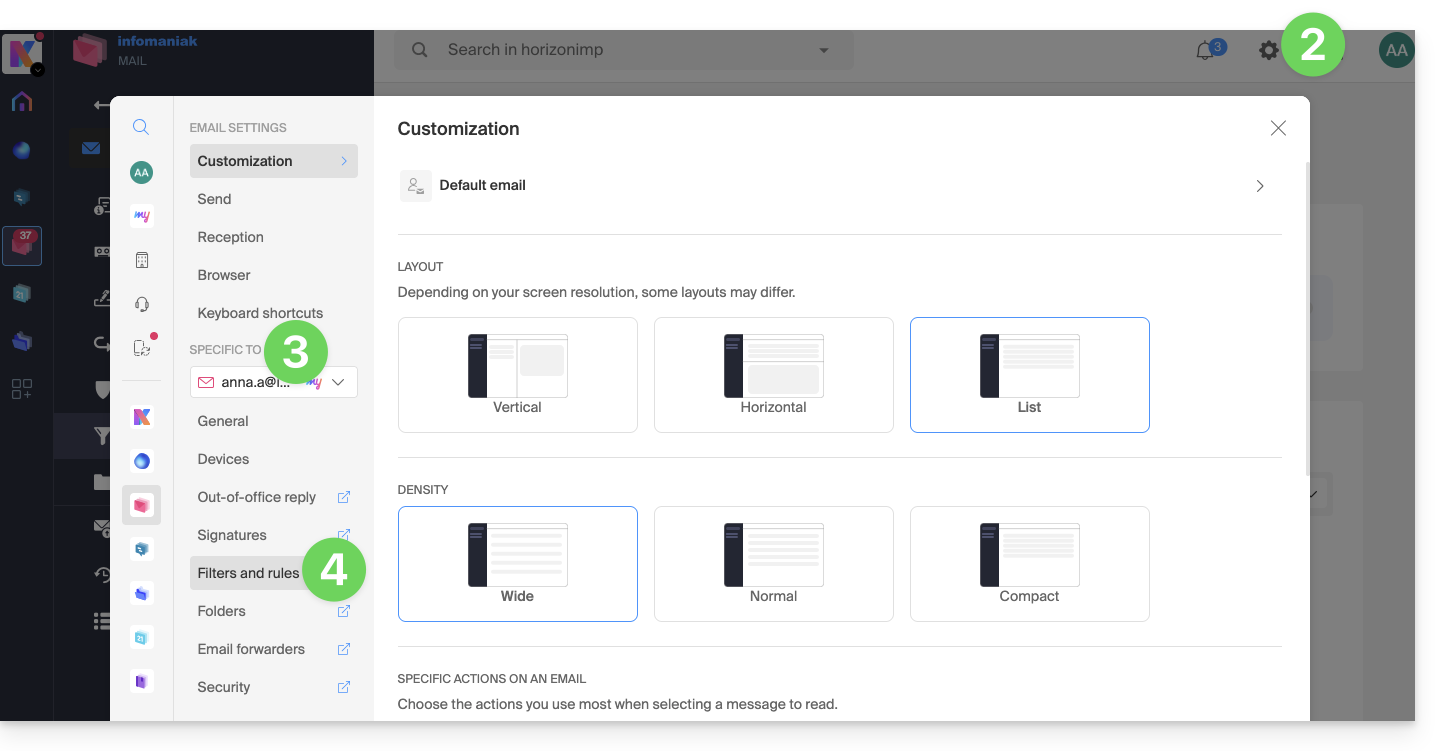
Para acessar os filtros de classificação para sua conta de e-mail Infomaniak:
- Clique aqui para acessar o aplicativo web Mail da Infomaniak (serviço online ksuite.infomaniak.com/mail).
- Clique no ícone Configurações no canto superior direito.
- Verifique ou selecione o endereço de e-mail correspondente no menu suspenso.
- Clique em Filtros e regras:
Definir uma regra com base em um e-mail recebido
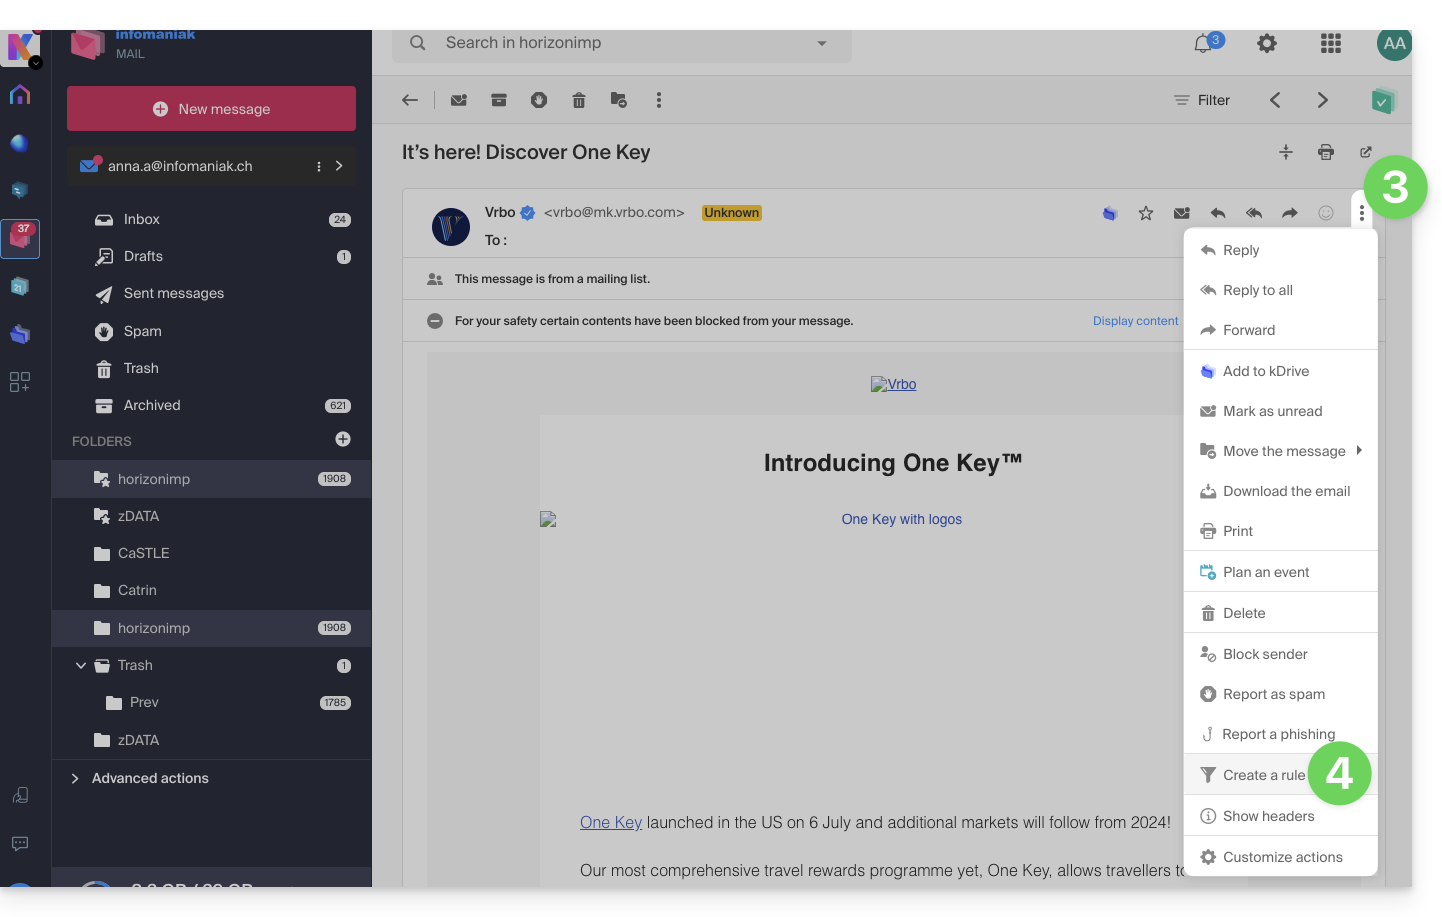
Você também pode criar uma regra diretamente do e-mail recebido:
- Clique aqui para acessar o aplicativo web Mail da Infomaniak (serviço online ksuite.infomaniak.com/mail).
- Abra a mensagem do remetente em questão.
- Clique no menu de ações ⋮ no canto superior direito da mensagem aberta.
- Escolha Criar uma regrapara abrir o assistente de criação, que será preenchido com os elementos da mensagem:
Aceder às regras a partir de um Serviço de Email
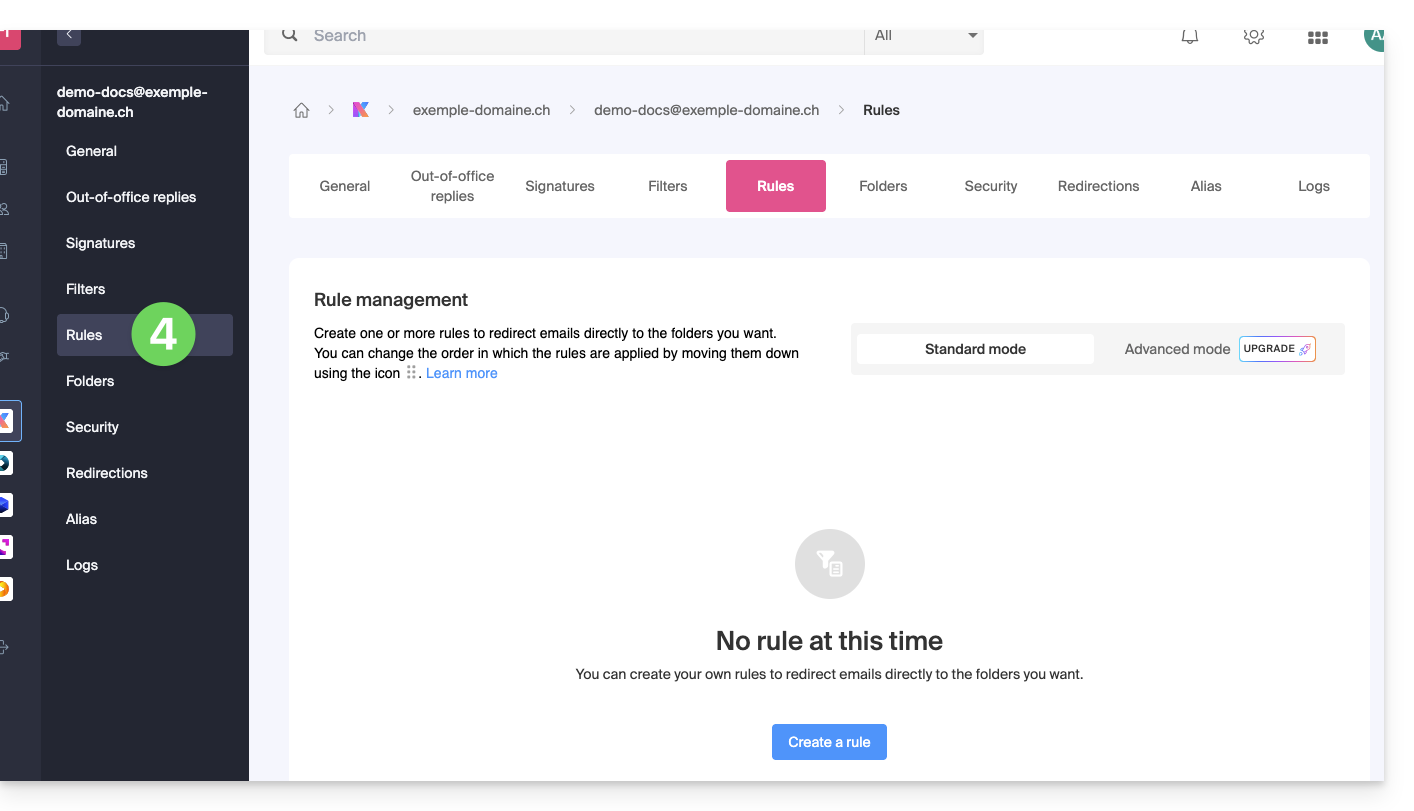
Para aceder aos filtros de triagem do seu email Infomaniak:
- Clique aqui para acessar a gestão do seu produto no Manager Infomaniak (precisa de ajuda?).
- Clique diretamente no nome atribuído ao produto em questão.
- Clique em o endereço de e-mail em questão na tabela que aparece.
- Clique na aba Regras no menu lateral esquerdo (ou na barra superior):
Criar uma nova regra no modo Padrão
- Clique no botão Adicionar regra no modo Padrão para criar uma nova regra usando um assistente/formulário de criação:

- As diferentes condições disponíveis para os filtros de ordenação são apresentadas neste outro guia.
- Depois de criar um filtro, clique em Continuar para o ativar.
Adicionar, duplicar ou modificar uma regra no modo Padrão
Se já existirem filtros de triagem, o botão para adicionar um novo filtro encontra-se no canto superior direito da tabela: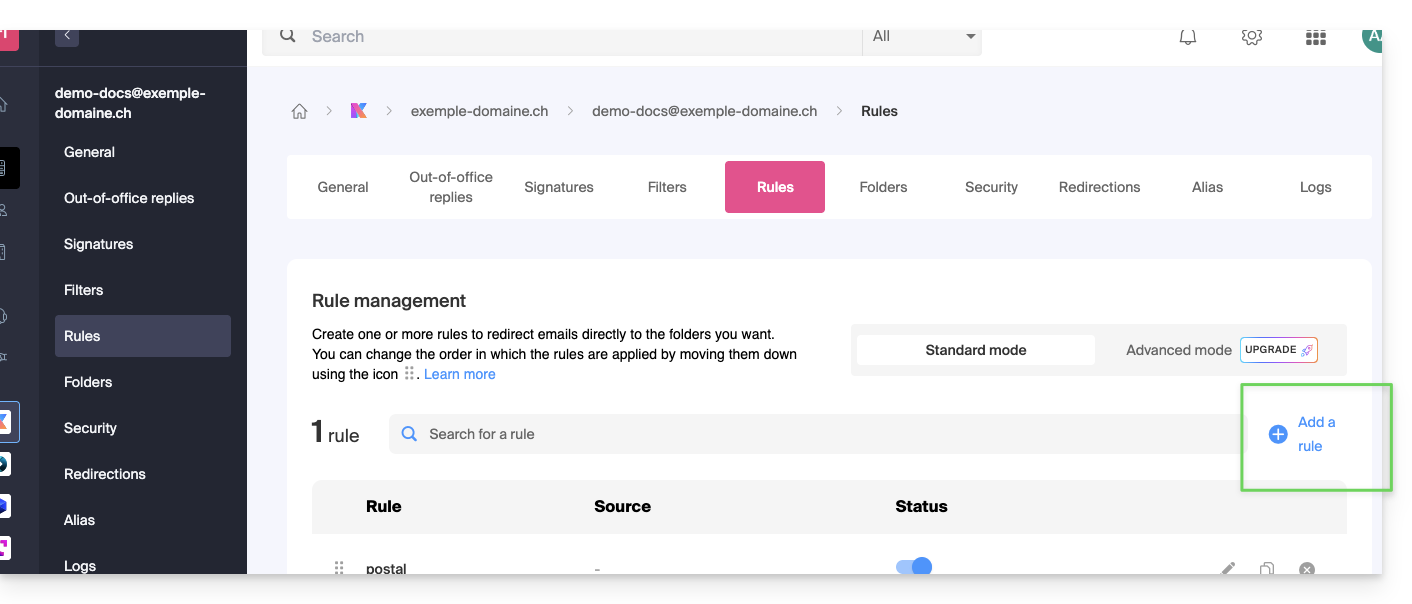
Essas configurações podem ser modificadas quando desejar, clicando no ícone lápis ✎, localizado à direita do elemento correspondente.
Também é possível duplicar uma regra já existente para trabalhar em uma cópia, sem afetar a regra original: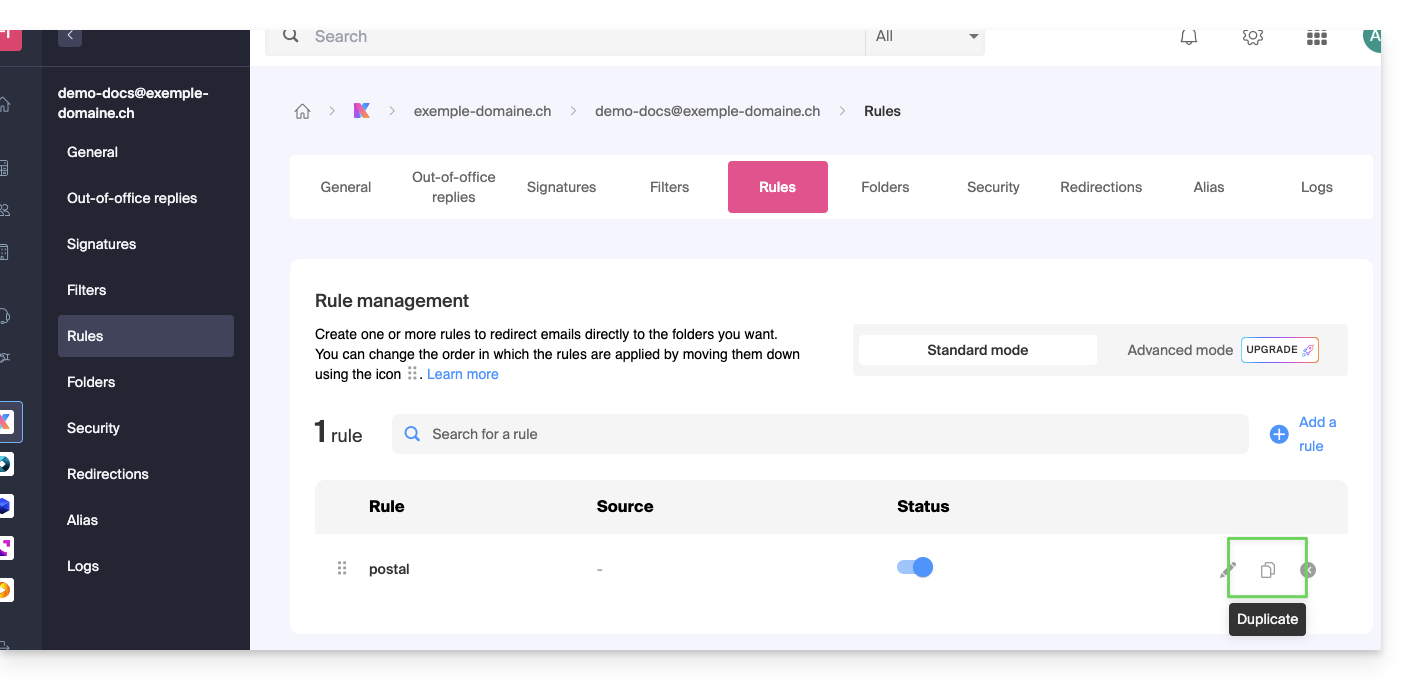
Link para esta FAQ: https://faq.infomaniak.com/1729
Esta seção de perguntas frequentes foi útil?
Este guia detalha o que é possível pesquisar no aplicativo web Mail da Infomaniak (serviço online ksuite.infomaniak.com/mail) ou em outros serviços da kSuite. Para pesquisar no kDrive, consulte este outro guia.
Pesquisar um e-mail
Em ksuite.infomaniak.com/mail, digite na barra de pesquisa, localizada na parte superior da página, o termo que deseja encontrar.
A pesquisa será efetuada no endereço de e-mail indicado na barra lateral esquerda(para pesquisar em vários endereços de e-mail ao mesmo tempo, utilize um software/cliente de e-mail IMAP no qual você conecta seus diferentes endereços):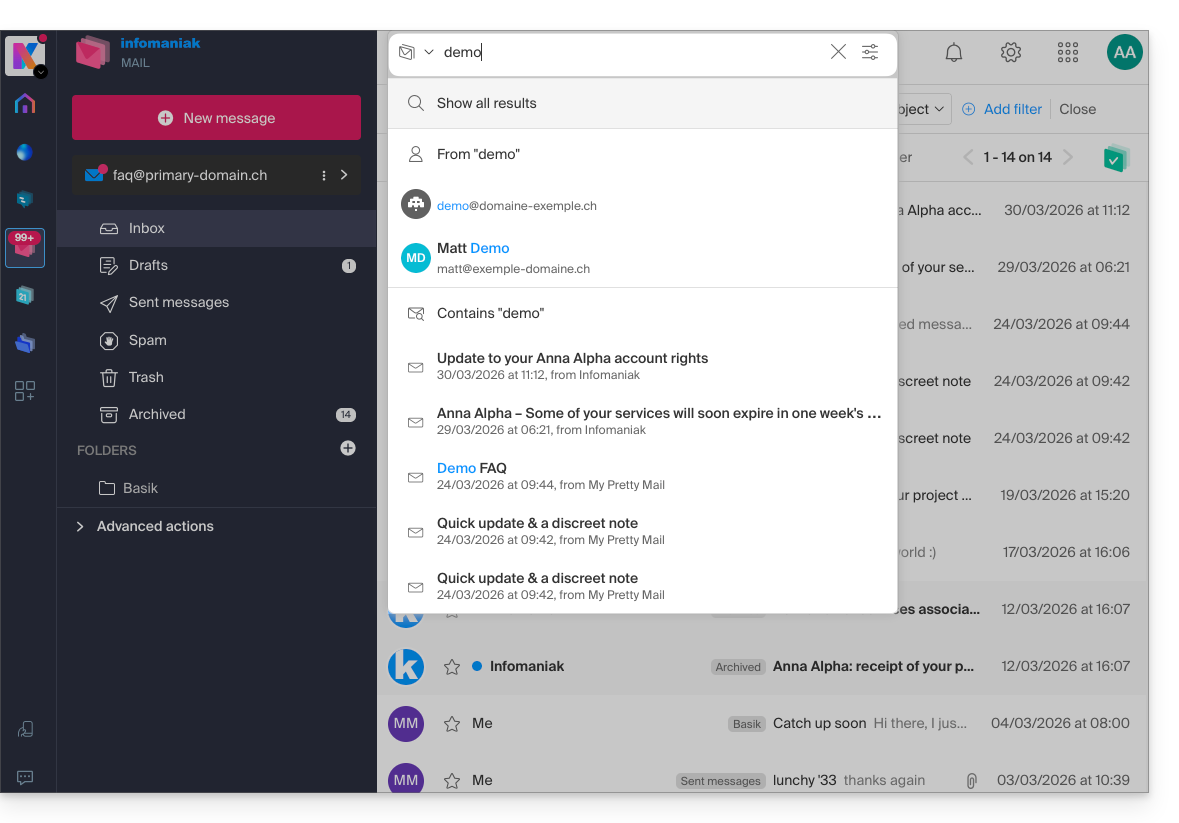
A pesquisa avançada está acessível à direita do campo de pesquisa na parte superior do seu Mail: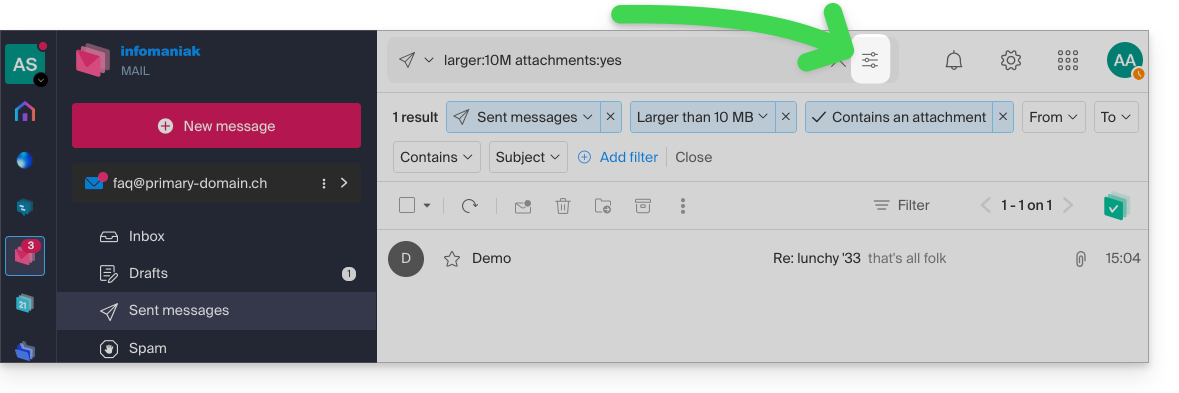
Pode pesquisar conteúdo…
- seja no corpo da mensagem,
- seja no seu assunto,
- seja entre os seus remetentes/destinatários…
Você também pode filtrar a pesquisa por tamanho da mensagem e pela presença ou ausência de anexos.
Em relação ao escopo das pesquisas:
- O conteúdo dos e-mails criptografados não é indexado (exceto o assunto do e-mail).
- O conteúdo dos anexos, assim como o seu nome, não é indexado: portanto, não é possível encontrar um e-mail pesquisando o nome do arquivo associado a ele.
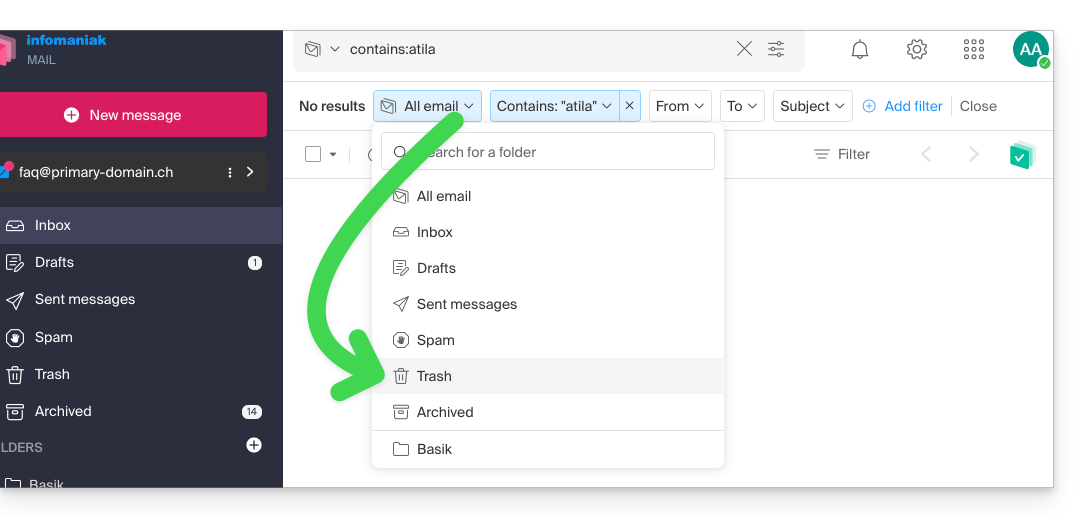
- A opção "Pesquisar todos os e-mails" não inclui a Lixeira nem a pasta de Spam:
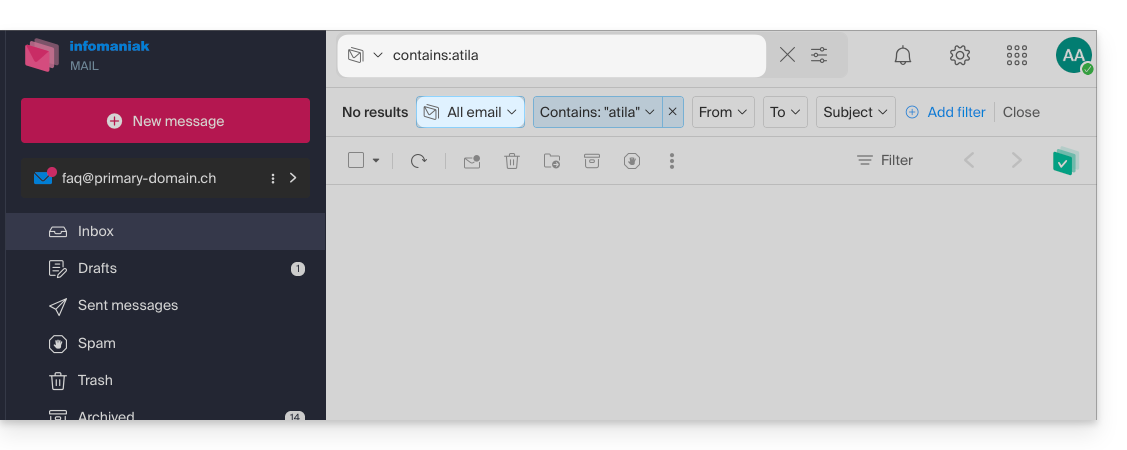
- Se uma pesquisa global não retornar resultados, é possível que o e-mail esteja em uma dessas duas pastas.
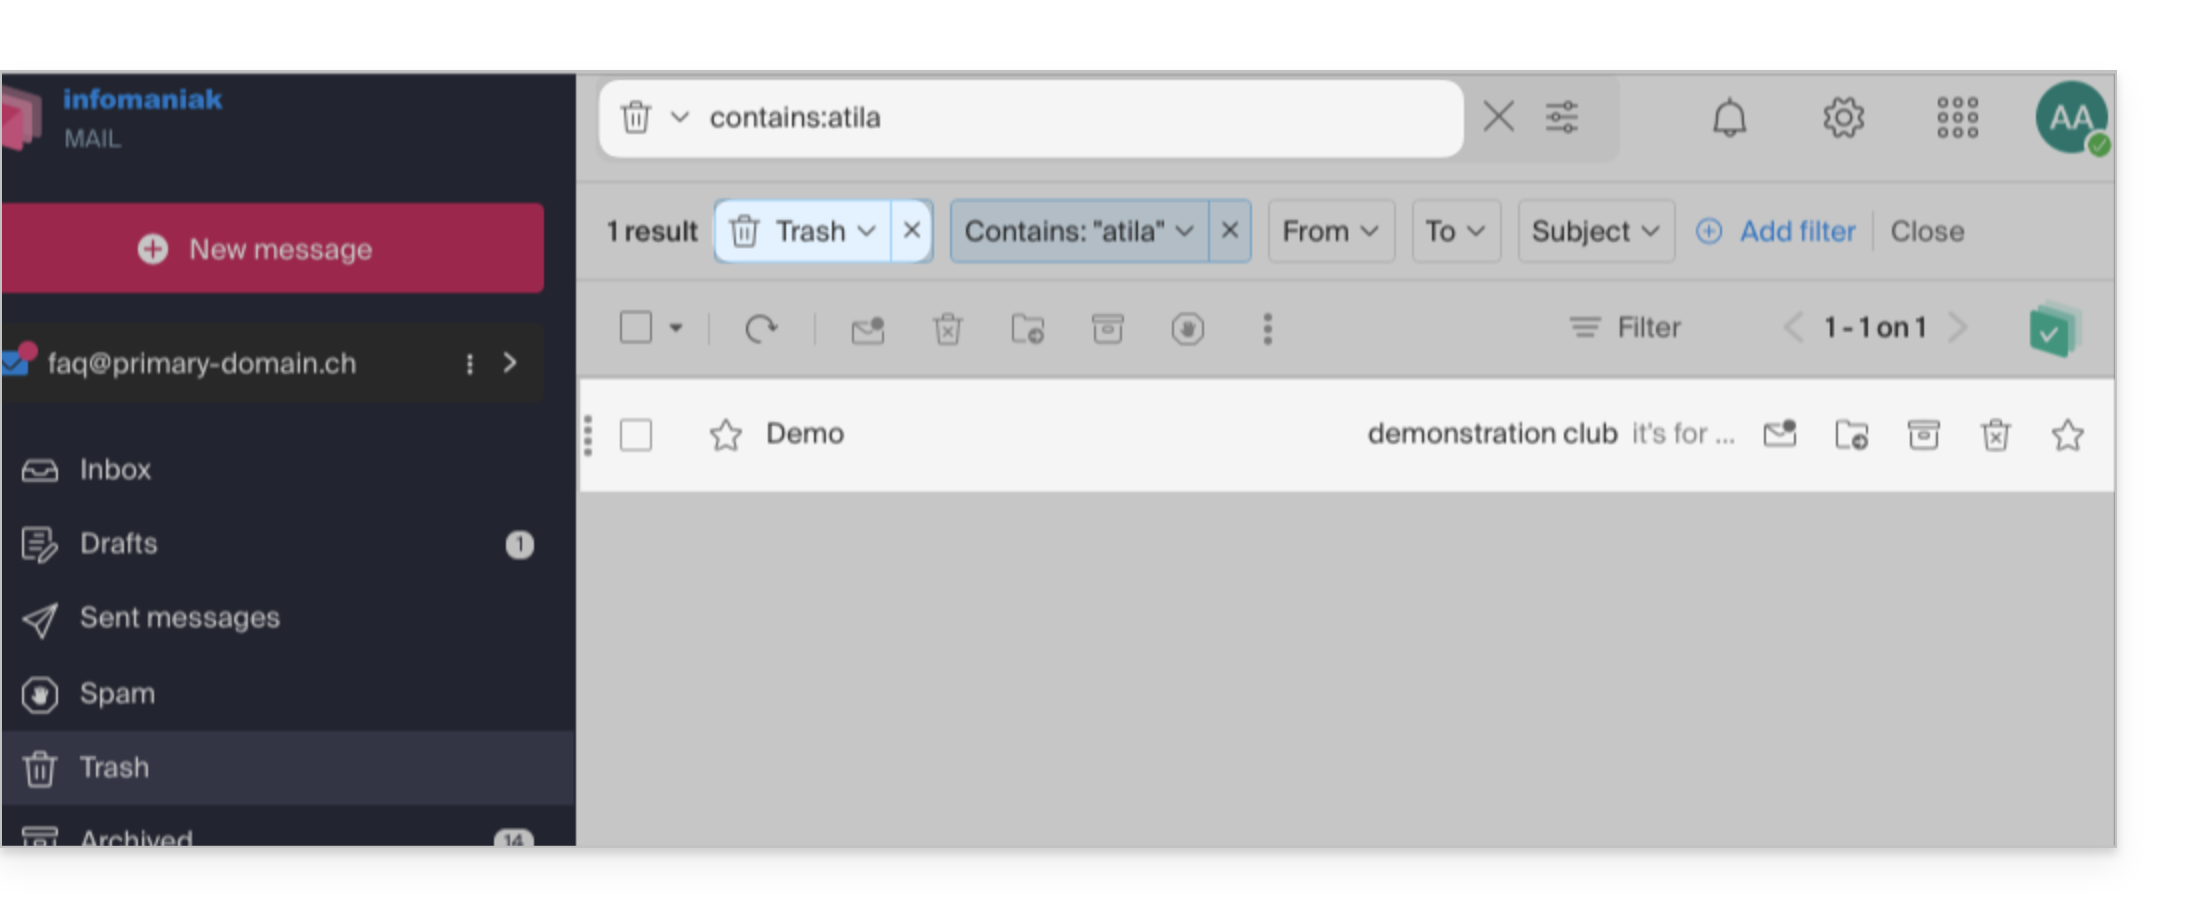
- Nesse caso, você precisará acessar especificamente a Lixeira ou a pasta de Spam para realizar a pesquisa, ou então iniciar a pesquisa selecionando um desses dois itens:
- Os resultados encontrados serão exibidos:
- Da mesma forma, quando você deseja encontrar uma mensagem em um diretório específico, é melhor acessá-lo primeiro pelo menu lateral esquerdo e, em seguida, iniciar a pesquisa.
Para pesquisar o histórico de um e-mail ou verificar sua atividade, você também pode pesquisar nos registros de um endereço de e-mail.
A pesquisa de e-mails com um software/cliente de e-mail
Para saber como o seu aplicativo de e-mail específico realiza as pesquisas, consulte a documentação. Por exemplo, os aplicativos de desktop Thunderbird e Outlook podem sincronizar as mensagens localmente e realizar as pesquisas localmente, enquanto outros aplicativos podem preferir a pesquisa no servidor IMAP e, nesse caso, o software/cliente de e-mail envia um comando de pesquisa ao servidor, que então pesquisa em todas as mensagens armazenadas no servidor e retorna os resultados ao software/cliente de e-mail.
Pesquisar um contato nos catálogos de endereços
A pesquisa de um item é realizada automaticamente em todos os seus catálogos de endereços, grupos, contatos, através do campo de pesquisa na parte superior da interface ksuite.infomaniak.com/contacts: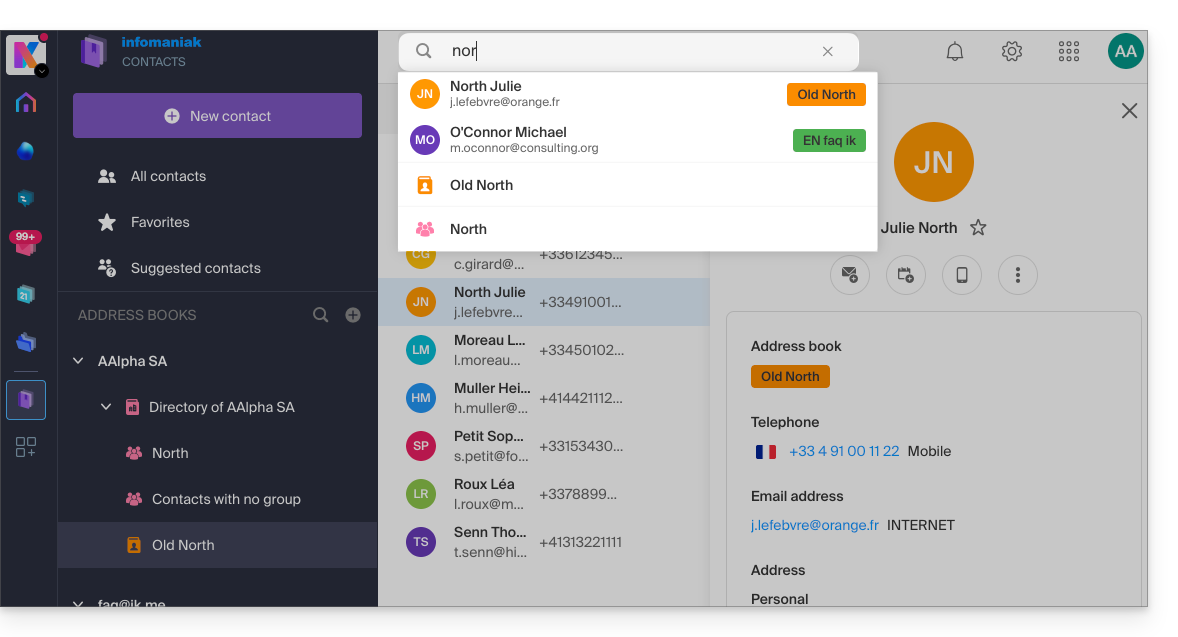
Pesquisar um evento nos calendários
A pesquisa de um item em ksuite.infomaniak.com/calendar é realizada automaticamente em todos os seus calendários, eventos, salas, incluindo a descrição destes e as pessoas que estavam associadas a eles (se clicar em um contato, obterá os eventos em comum com esse contato):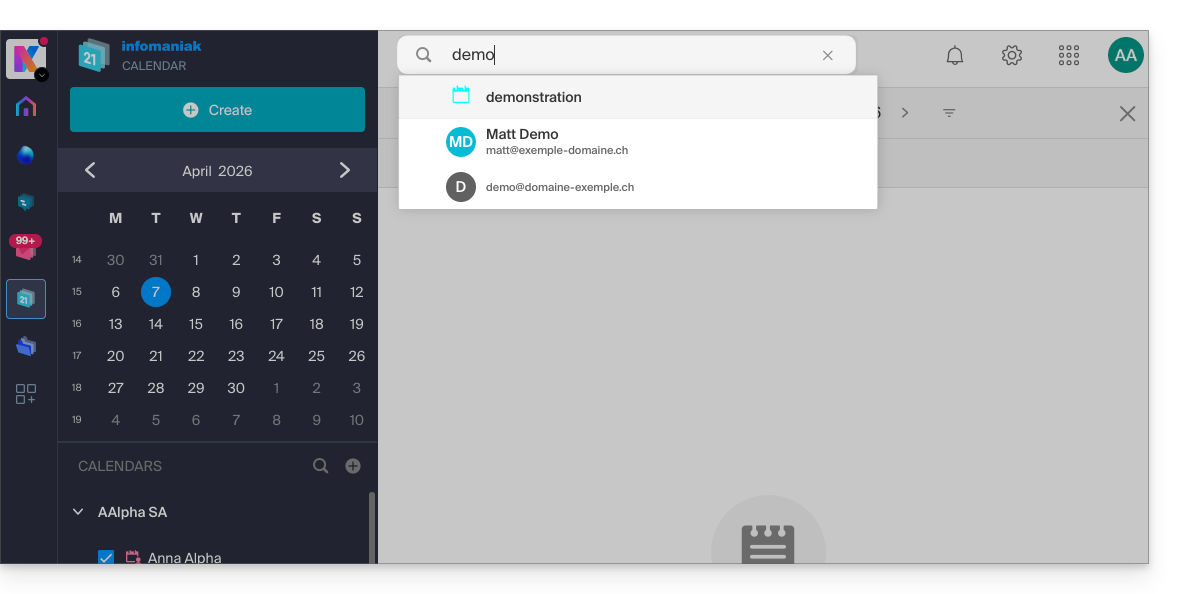
Pesquisar no kChat
A pesquisa de um elemento em ksuite.infomaniak.com/kchat é realizada através do campo de pesquisa principal para encontrar mensagens, respostas ou o conteúdo de arquivos: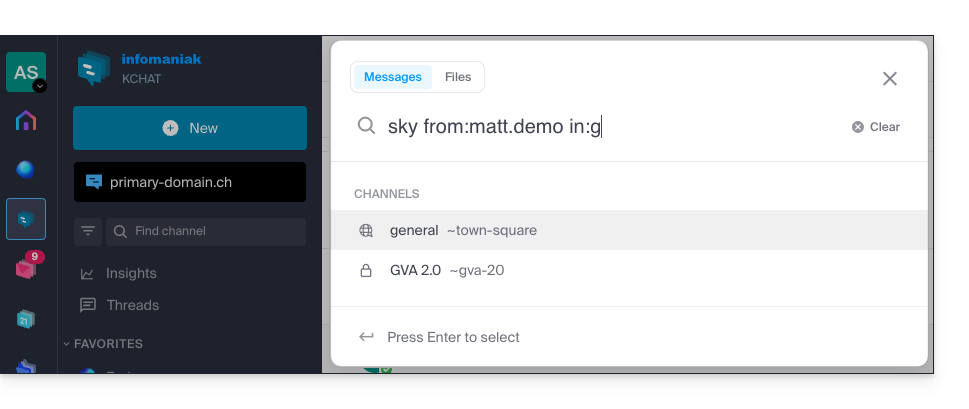
Para refinar os seus resultados, vários modificadores de pesquisa estão à sua disposição:
from:: para encontrar as mensagens enviadas por um utilizador específico (ex:from:jean.dupont).in:: para restringir a pesquisa a um canal público, um canal privado ou uma mensagem direta específica (ex:in:nome-do-canal).before:,after:,on:: para especificar uma data (no formato AAAA-MM-DD) ou um período preciso (ex:on:2026-09-01).
Excluir um canal ou termos de uma pesquisa (exclusões)
É possível excluir certos resultados da pesquisa usando o hífen - antes de um termo ou modificador. Esta é uma funcionalidade extremamente útil para filtrar resultados irrelevantes:
- Excluir um canal: adicione
-in:nome-do-canalà sua pesquisa para excluir completamente os resultados provenientes desse canal. - Excluir uma palavra: digite
teste -liberaçãopara que os resultados incluam o termo "teste", excluindo ao mesmo tempo as mensagens que contenham "liberação". - Excluir um utilizador: digite
-from:utilizadorpara ocultar as mensagens enviadas por essa pessoa específica.
Pode combinar perfeitamente estas exclusões. Por exemplo, a pesquisa test -release -in:release-discussion -from:anna encontrará a palavra "test", excluindo a palavra "release", ignorando completamente o canal "release-discussion" e excluindo as mensagens da utilizadora “anna”.
Link para esta FAQ: https://faq.infomaniak.com/1733
Esta seção de perguntas frequentes foi útil?
Este guia explica como, a partir de um Serviço de Email, redefinir ou remover as palavras-passe de um endereço de emailpara interromper a conexão de um software de terceiros, como o Outlook ou o Thunderbird.
As outras opções de acesso e gerenciamento são apresentadas no guia principal.
Preâmbulo
- Alterar a senha de um endereço de e-mail equivale a alterar a senha IMAP/SMTP:
- Assim que a senha for alterada, você deverá atualizar seus softwares (Outlook, etc.), dispositivos móveis (iPhone), etc. com a nova senha (isso é de sua responsabilidade).
- Se não conseguir iniciar sessão no Manager ou no Mail/kSuite, não poderá gerir as palavras-passe de um dos endereços de e-mail: consulte este outro guia neste caso.
Remover uma palavra-passe/dispositivo
Pré-requisitos
- Ter, no mínimo, o direito de gerir o Serviço de Email em questão (ou ser Administrador / Responsável legal dentro da Organização).
Para interromper qualquer conexão IMAP/POP/SMTP que esteja sendo feita atualmente por meio de uma senha gerada nesta interface (isso não remove o endereço dos aplicativos de e-mail Infomaniak — para isso, é necessário gerenciar os usuários do endereço de e-mail), é possível revogar um dispositivo ou até mesmo excluir todas as configurações existentes em um clique:
- Clique aqui para acessar o gerenciamento do seu produto no Painel de Controle Infomaniak (precisa de ajuda?).
- Clique no nome do produto em questão.
- Clique no endereço de e-mail correspondente na tabela:
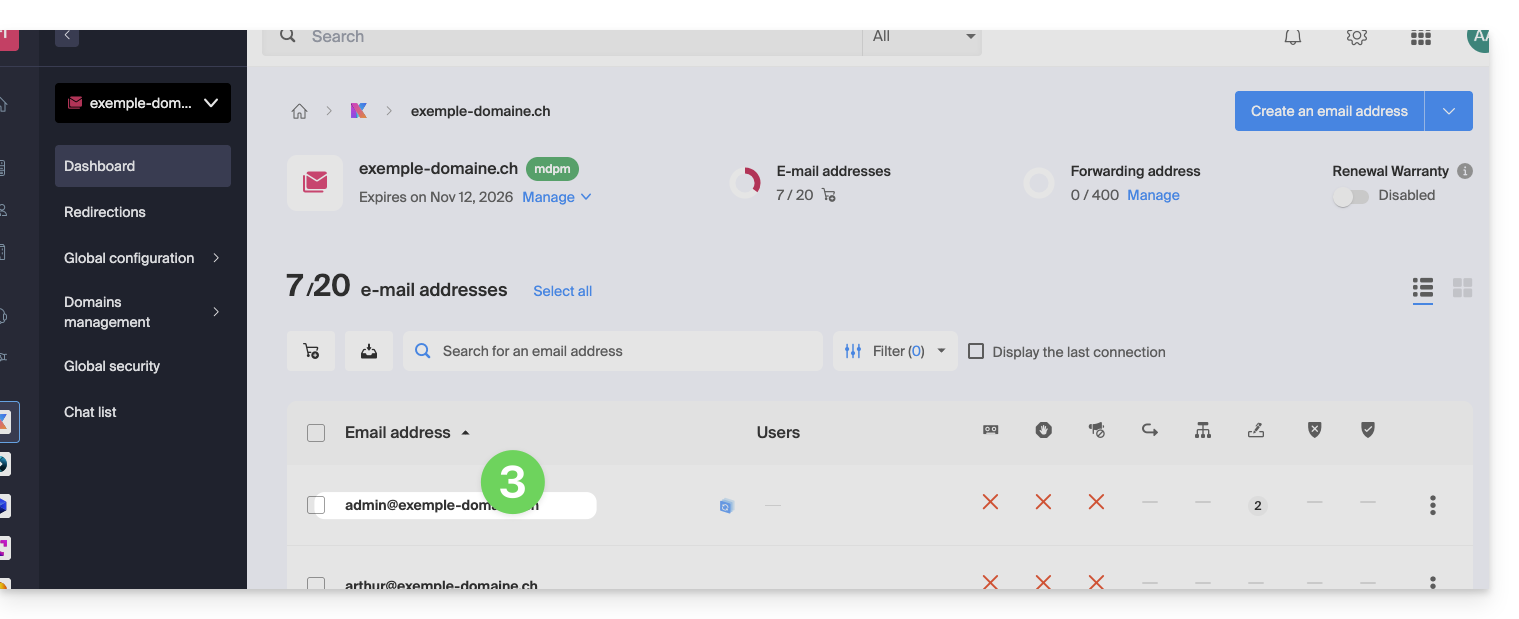
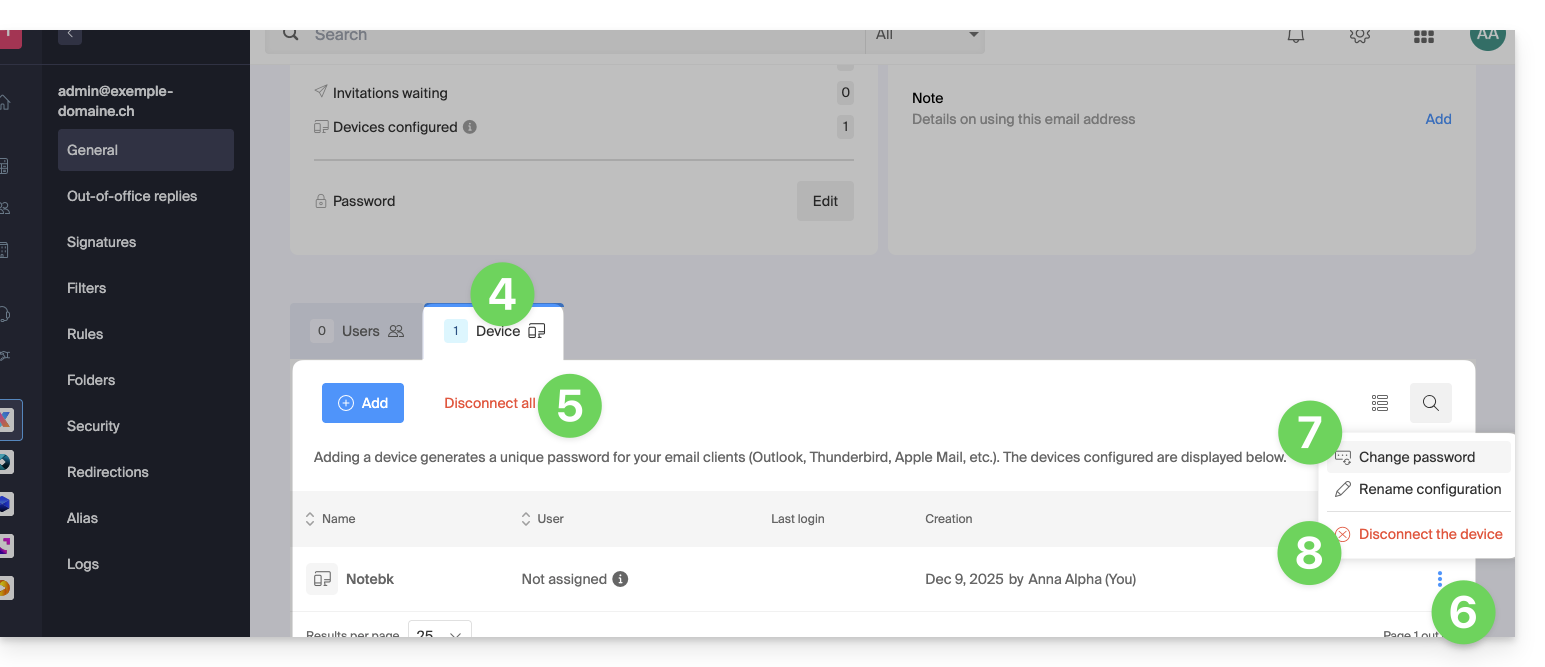
- Clique na aba Dispositivos.
- Clique no link vermelho para desconectar todos os dispositivos registrados (é necessária uma confirmação).
- Clique no menu de ação ⋮, localizado à direita do dispositivo em questão.
- Clique em “Alterar senha” para encerrar a conexão atual, mas permitir que o dispositivo se reconecte com uma nova senha.
- Clique em “Desconectar dispositivo” para removê-lo da lista e eliminar a conexão correspondente:
O que é uma senha “genérica”?
Alguns endereços de e-mail podem exibir uma indicação específica na seção Dispositivos: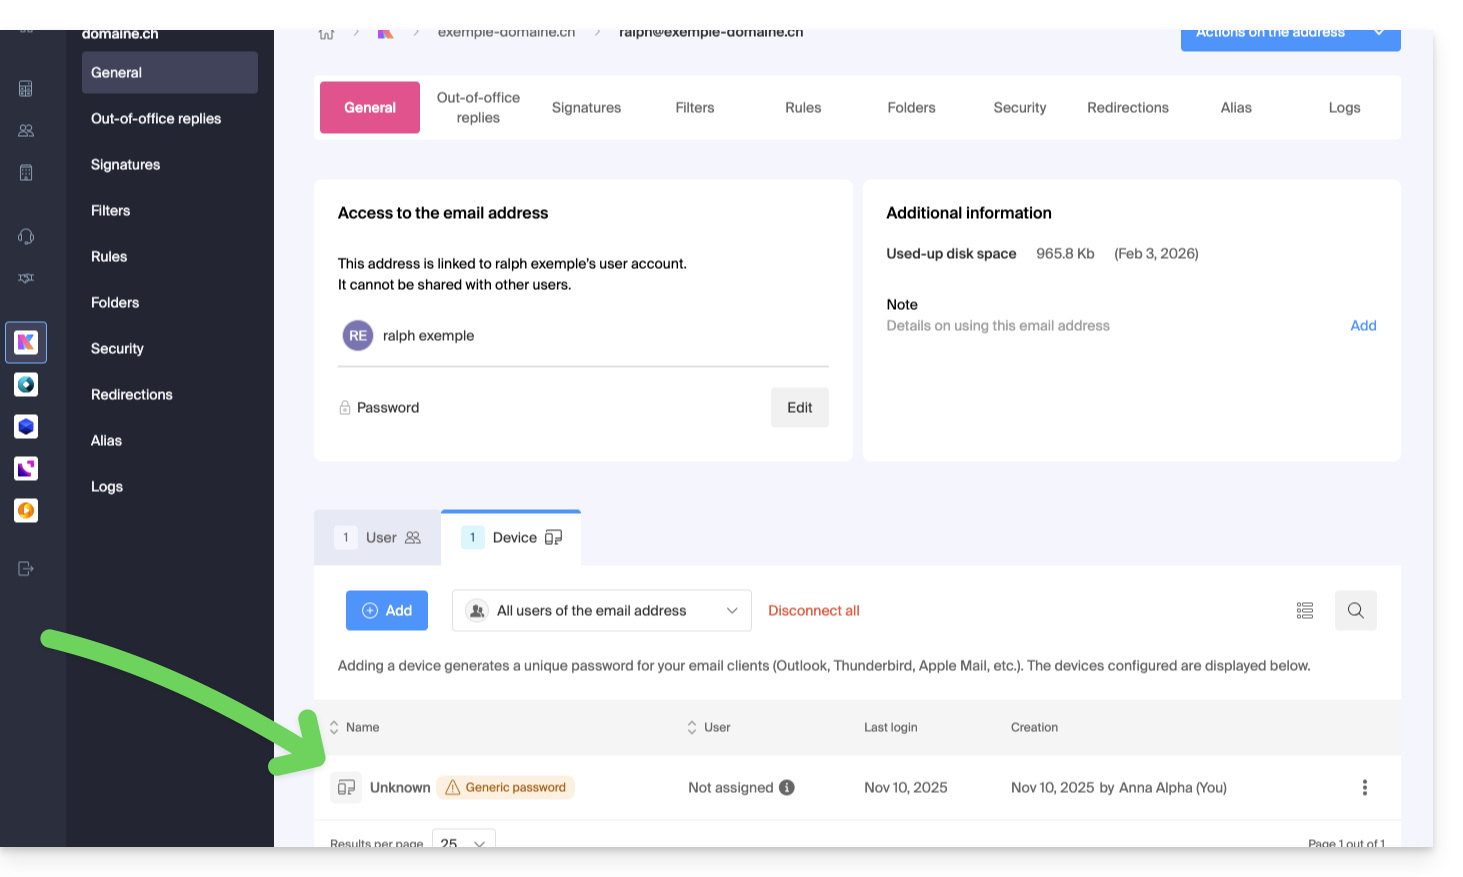
Se for esse o caso, não se preocupe, isso indica que o endereço possui uma senha atribuída durante sua criação (anterior a 2026). Essa senha permanece válida, mas, como acontece com outras senhas, não é possível exibi-la.E, ao contrário de outras senhas, esta não pode ser redefinida (a opção está desativada):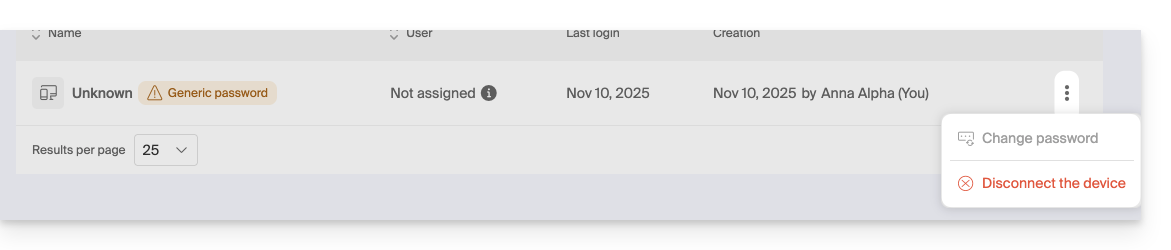
Nesse caso, você pode adicionar sem problemas uma senha adicional.
Link para esta FAQ: https://faq.infomaniak.com/1736
Esta seção de perguntas frequentes foi útil?
Este guia explica como adicionar uma pasta ou subpasta como favorito no aplicativo web Mail da Infomaniak (serviço online ksuite.infomaniak.com/mail).
Introdução
- Posicionado automaticamente no topo da sua lista de pastas, você terá acesso rápido e facilitado a esta pasta.
- Várias pastas podem ser adicionadas aos favoritos.
Definir uma pasta como favorita
Para adicionar uma pasta como favorita ou remover:
- Clique aqui para acessar o aplicativo web Mail da Infomaniak (serviço online ksuite.infomaniak.com/mail).
- Clique no menu de ação ⋮ à direita da pasta desejada no menu lateral esquerdo.
- Escolha a ação desejada:
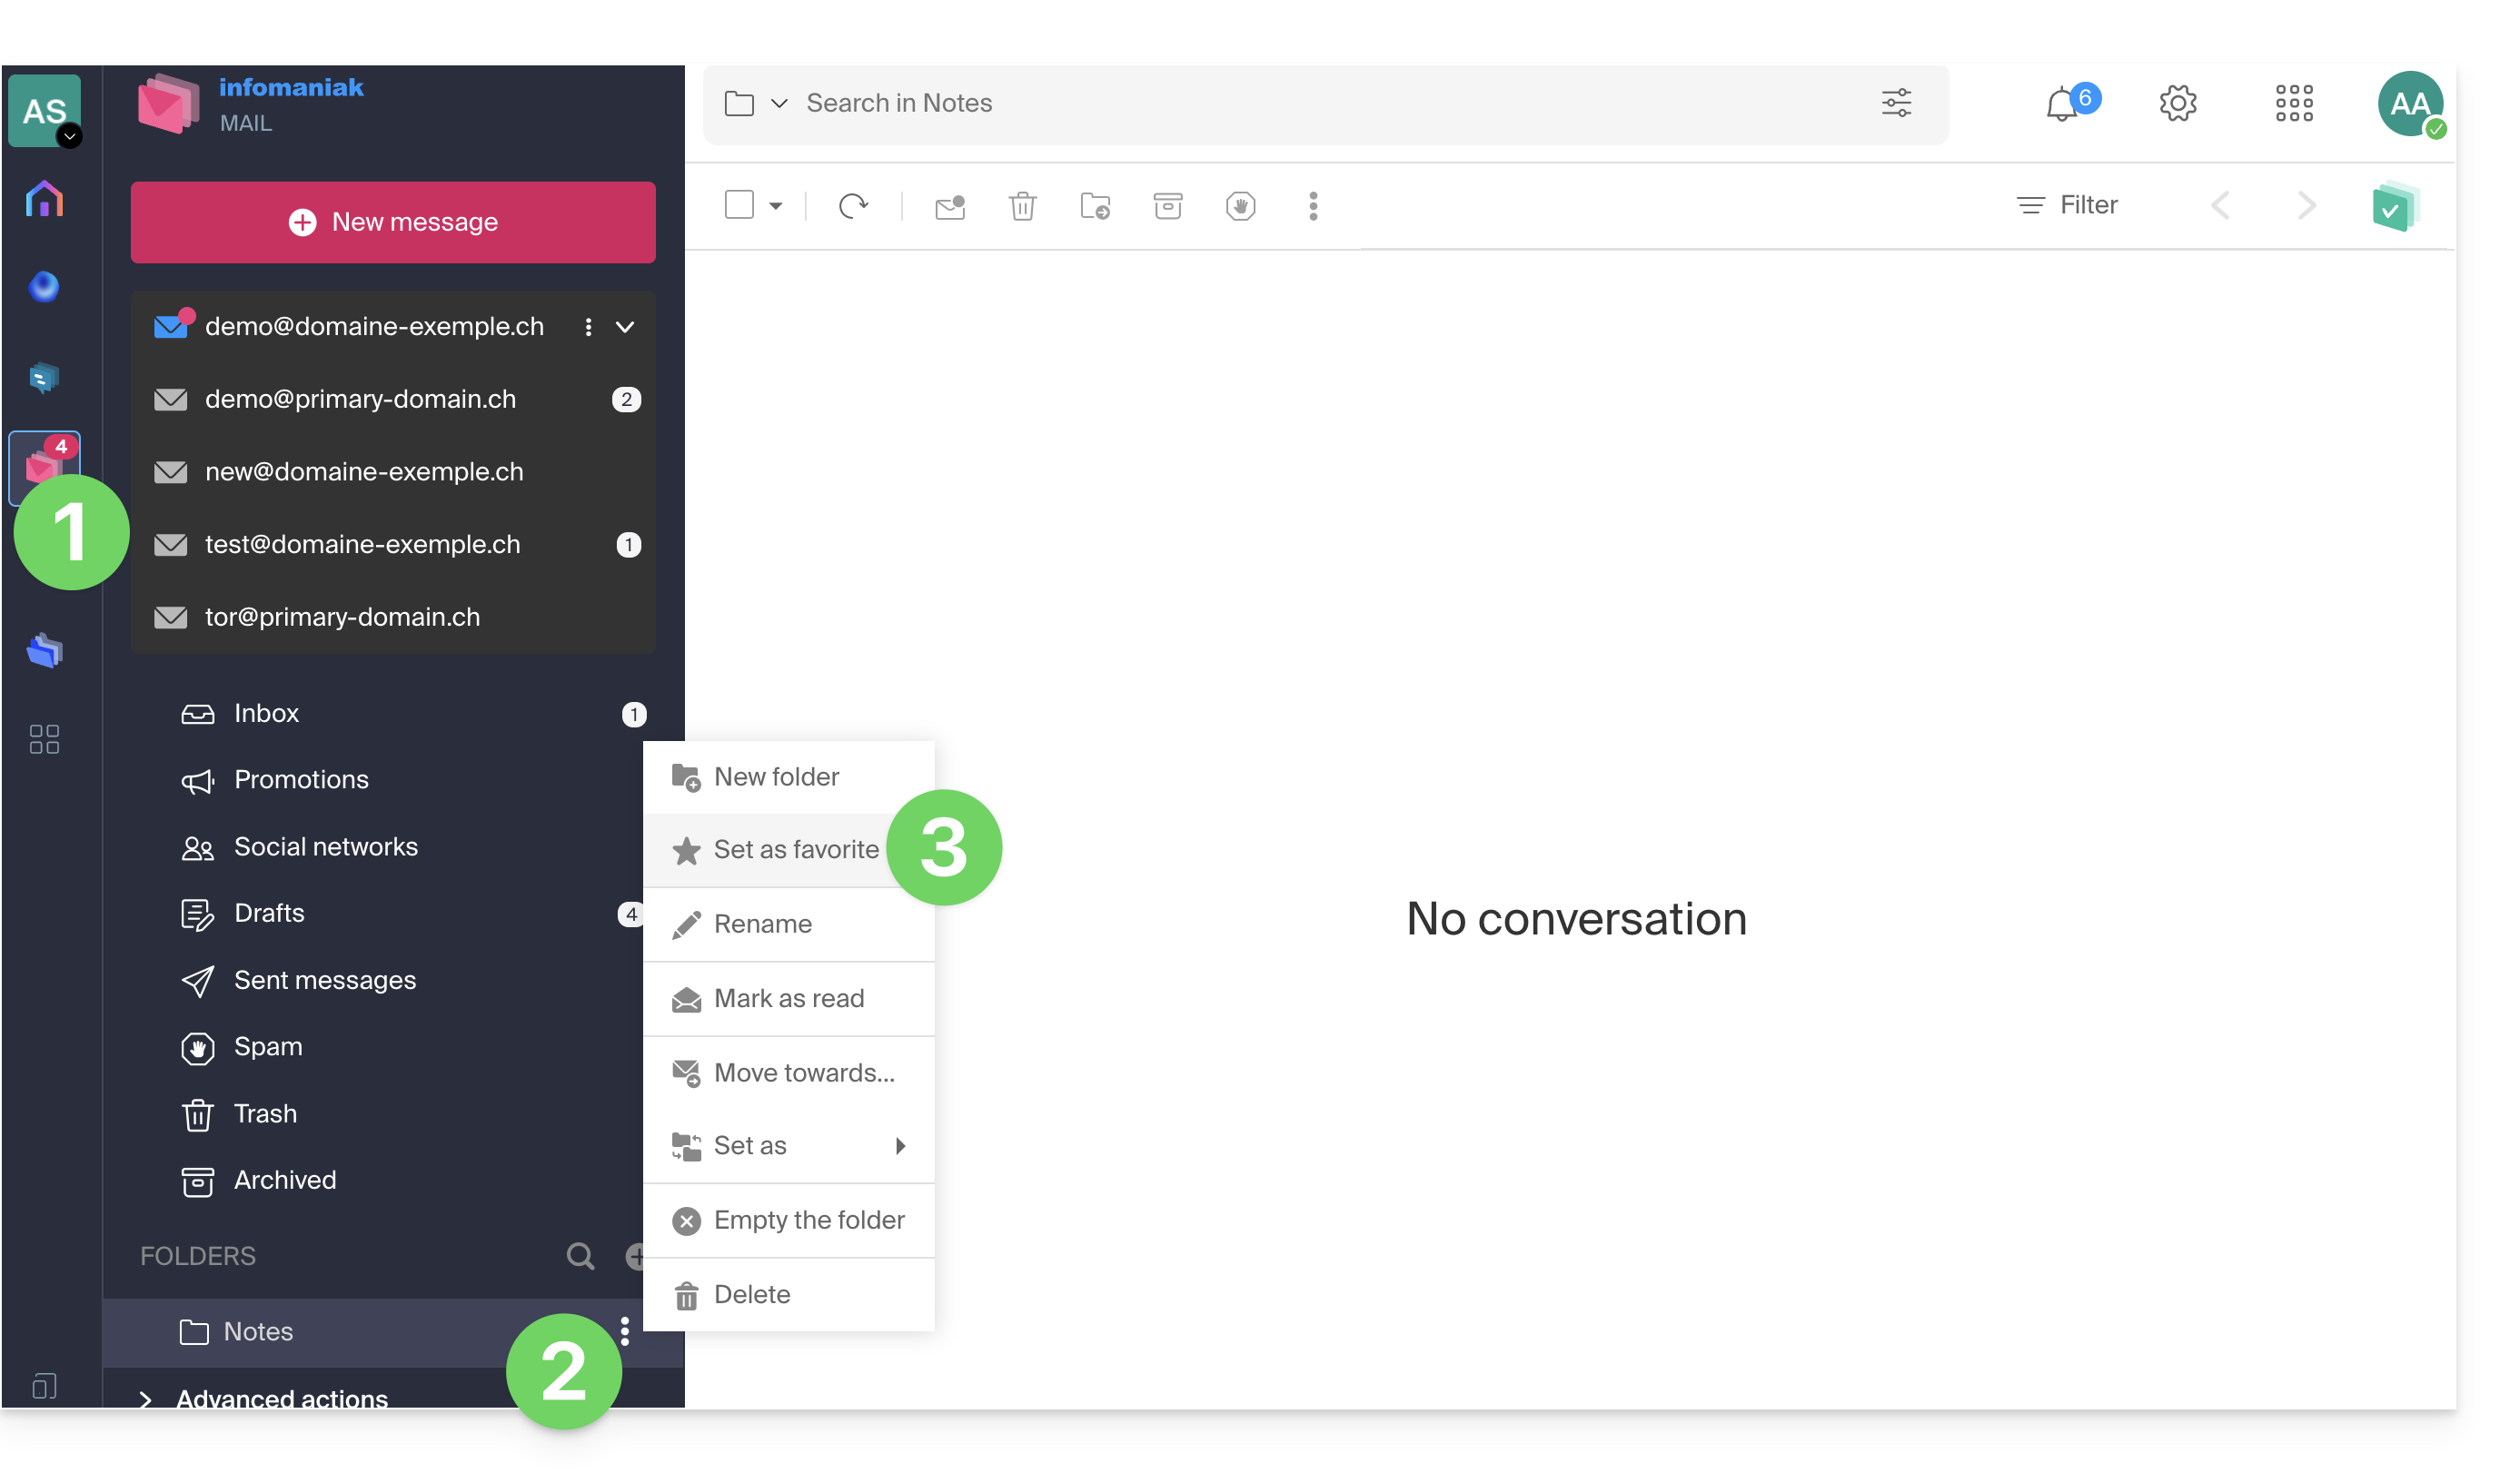
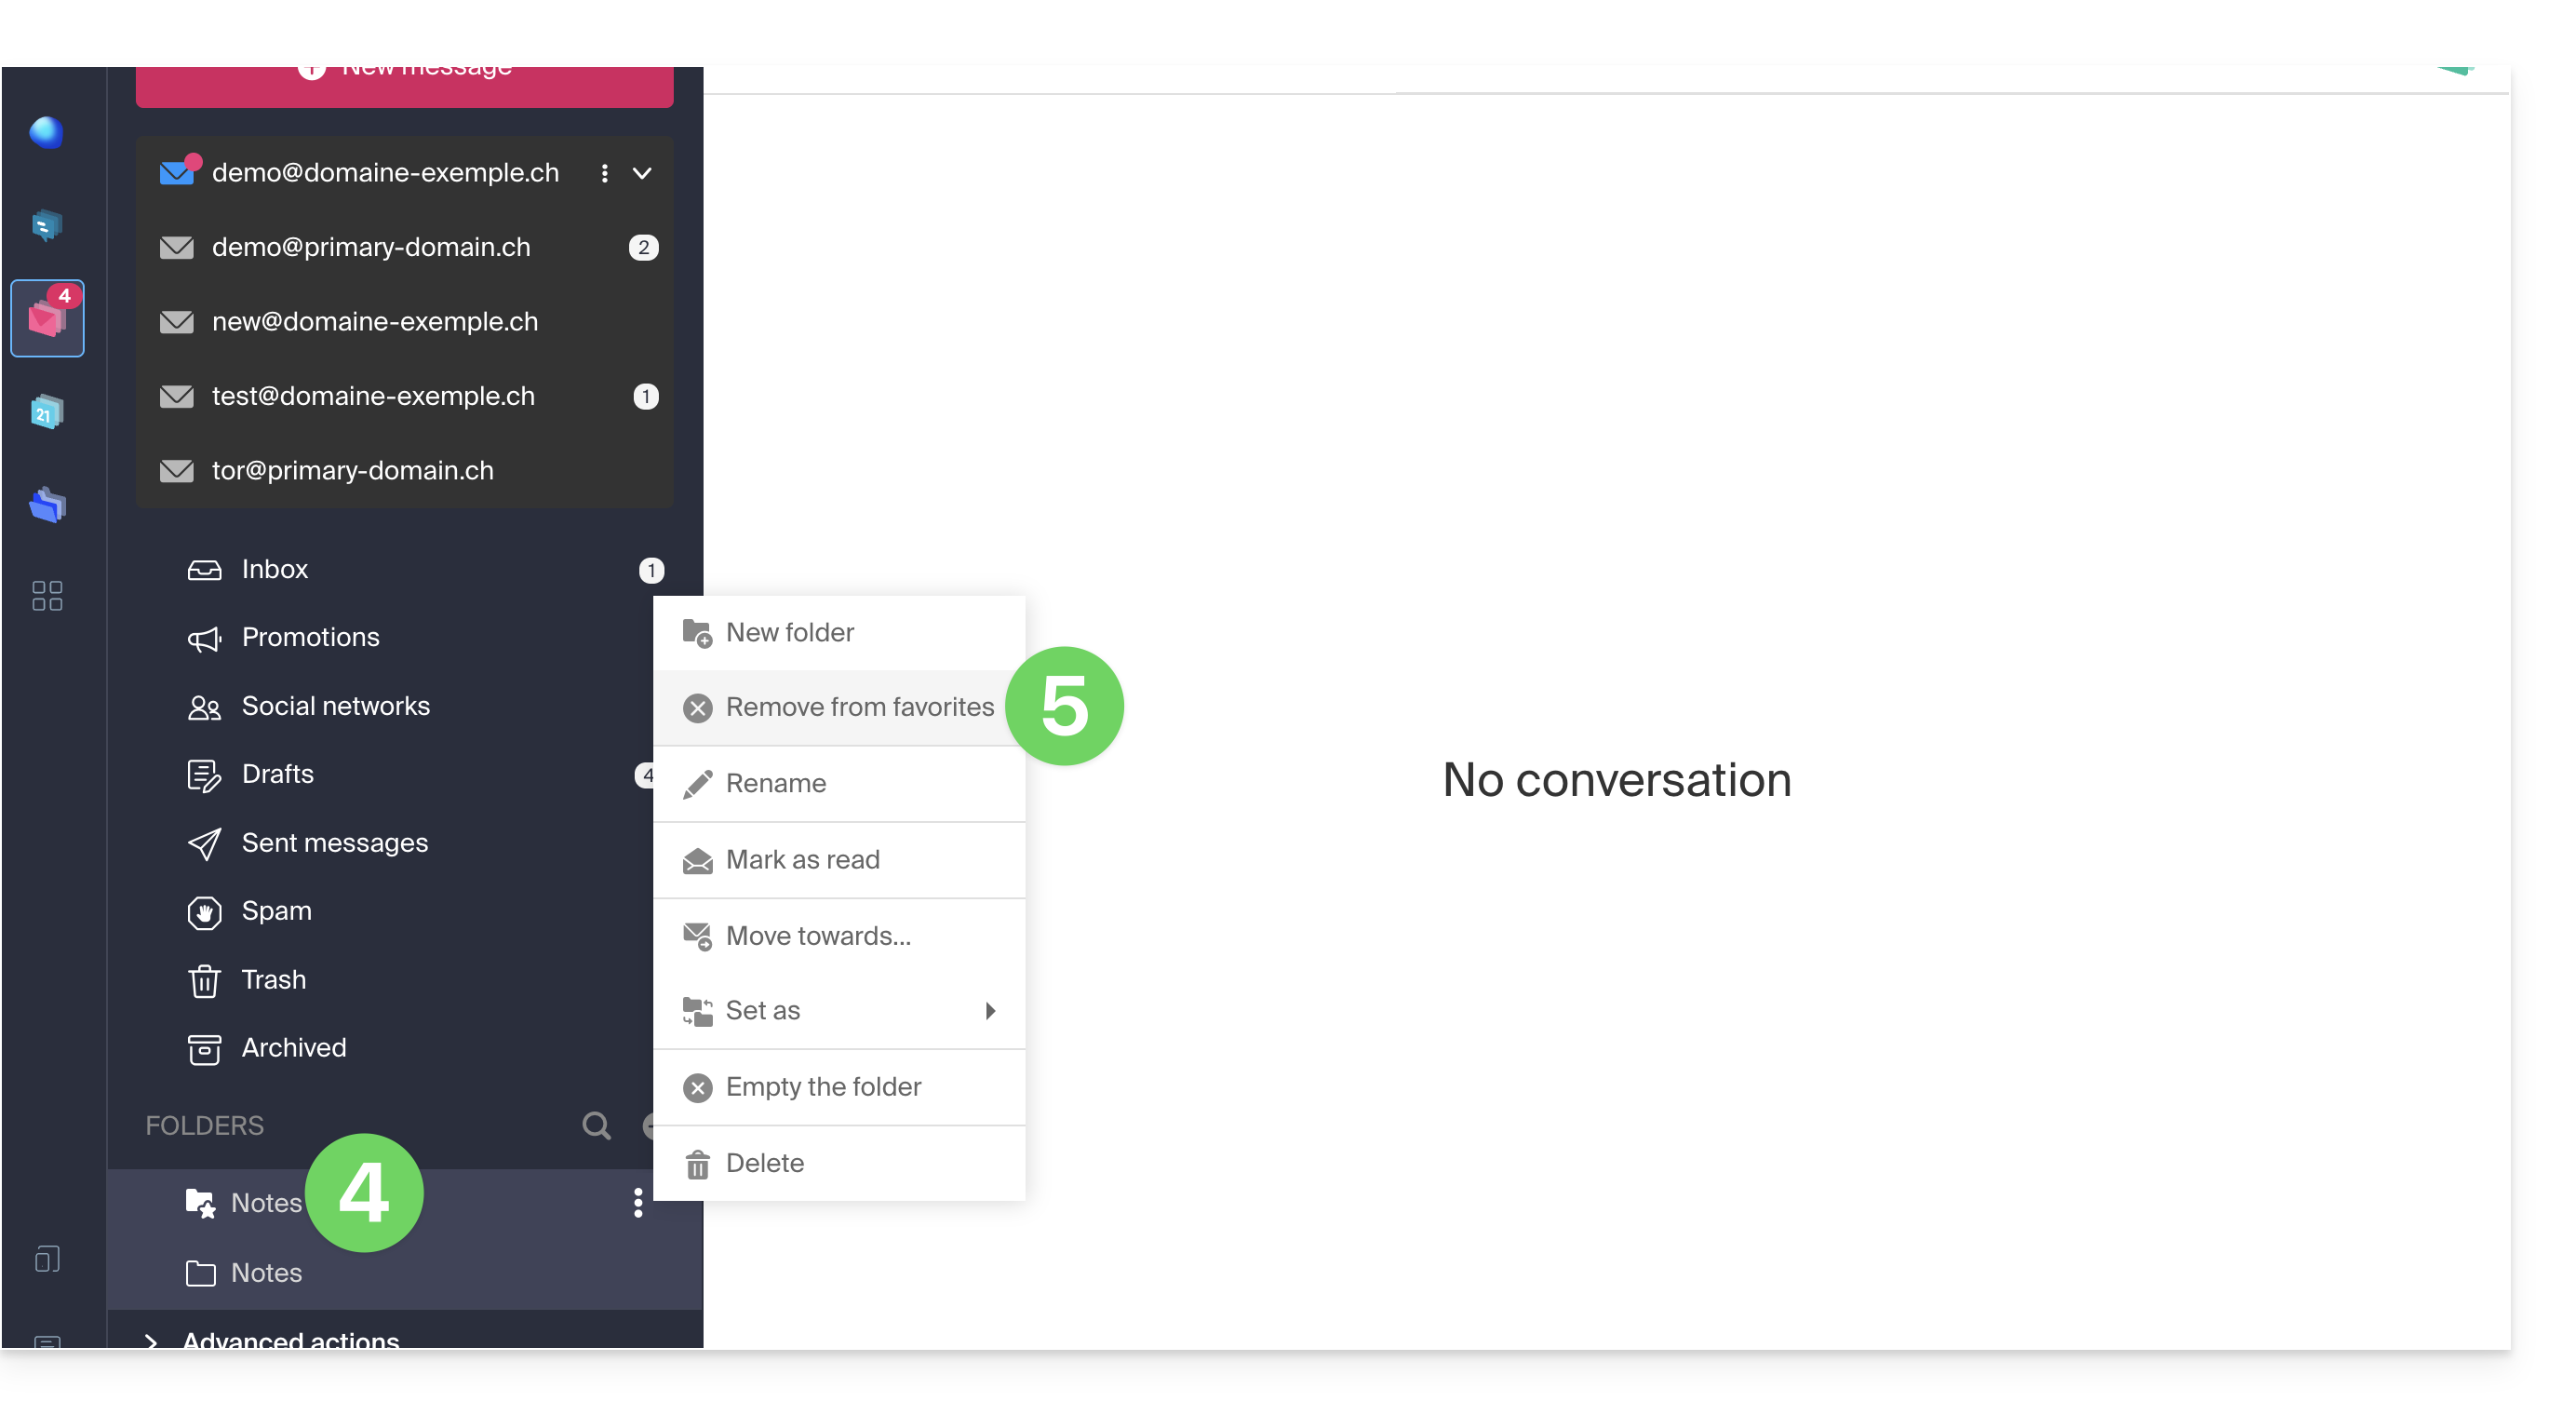
- A pasta definida como favorita é “duplicada” no início da lista de pastas, com uma estrela no seu ícone (mas é a mesma pasta da lista abaixo).
- Você pode remover um favorito a qualquer momento pelo menu de ações:
E no aplicativo móvel?
Não é possível adicionar uma pasta como favorita a partir do aplicativo móvel Infomaniak Mail (aplicativo para smartphone ou tablet iOS/Android).
É possível marcar mensagens como favoritas, para poder acompanhá-las.
Caso contrário, para acessar suas pastas no aplicativo móvel:
- Toque no ícone no canto superior esquerdo da caixa de entrada do Mail.
- Um painel é exibido no lado esquerdo, mostrando várias seções.
- A seção expansível “Pastas” exibe suas pastas em ordem alfabética; você pode criar novas pastas e, em seguida, renomeá-las ou excluí-las mantendo o nome da pasta pressionado na lista.
Link para esta FAQ: https://faq.infomaniak.com/1745
Esta seção de perguntas frequentes foi útil?
Este guia explica como encaminhar um ou mais e-mails já recebidos para um destinatário, inserindo-os diretamente…
- … no corpo de uma nova mensagem,
- … como anexo (isso permite transmitir a mensagem completa com seus cabeçalhos e não apenas seu conteúdo).
Introdução
- Para obter um link de compartilhamento que permita visualizar um e-mail específico, consulte este outro guia.
- Para redirecionar automaticamente todas as mensagens futuras, consulte este outro guia.
- Para filtrar e redirecionar automaticamente apenas algumas mensagens, consulte este outro guia.
- Para saber como encaminhar e-mails, mas a partir de um software/cliente de e-mail de terceiros:
Encaminhar uma mensagem a partir da aplicação Web Mail Infomaniak
Para isso:
- Clique aqui para acessar o aplicativo web Mail da Infomaniak (serviço online ksuite.infomaniak.com/mail).
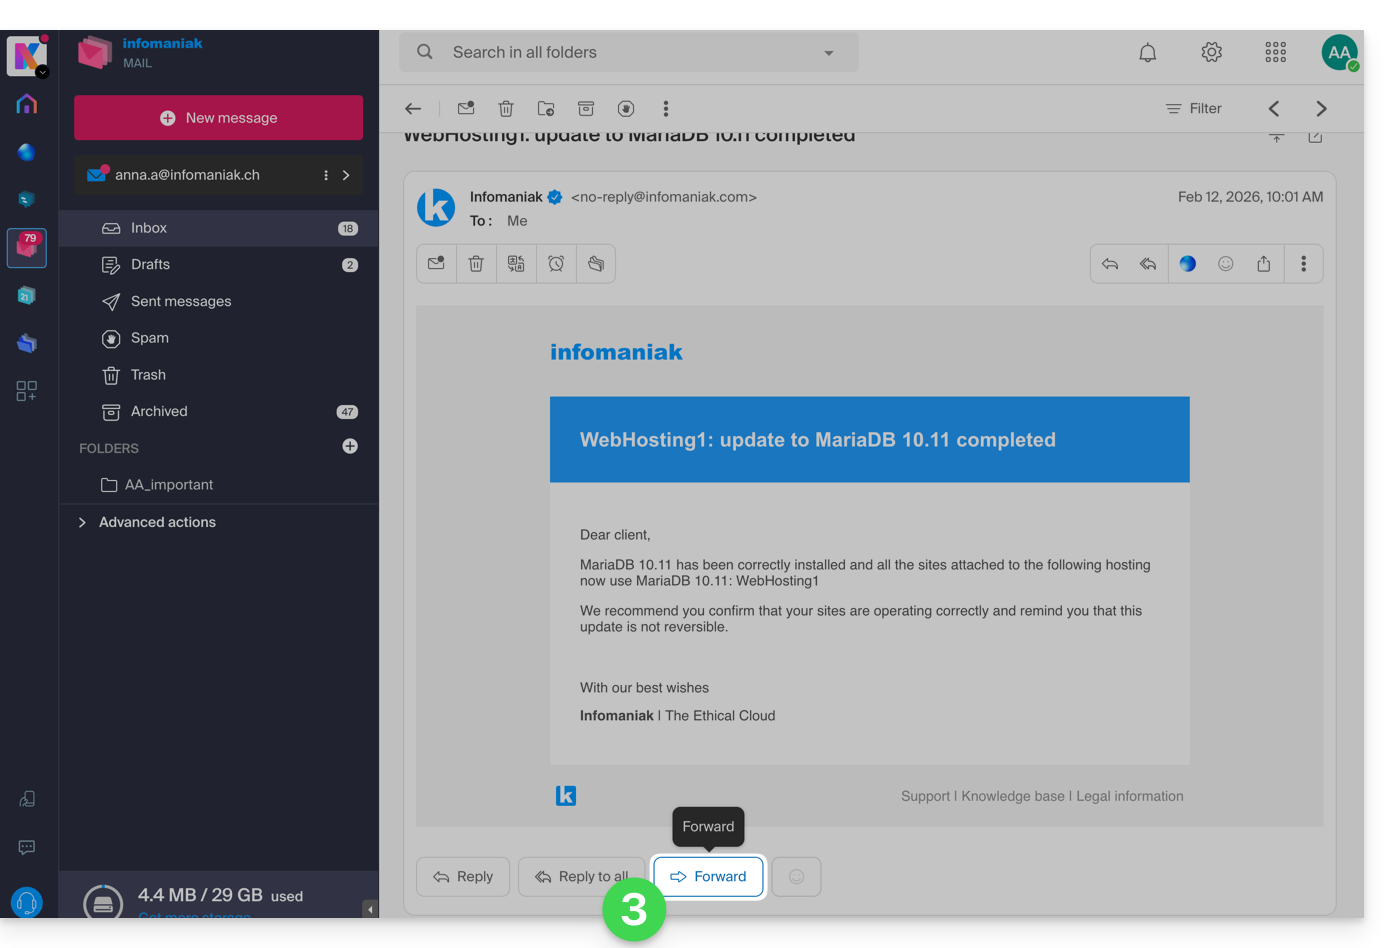
- Abra a mensagem que deseja encaminhar.
- O botão para TRANSFERIR está localizado abaixo da mensagem:
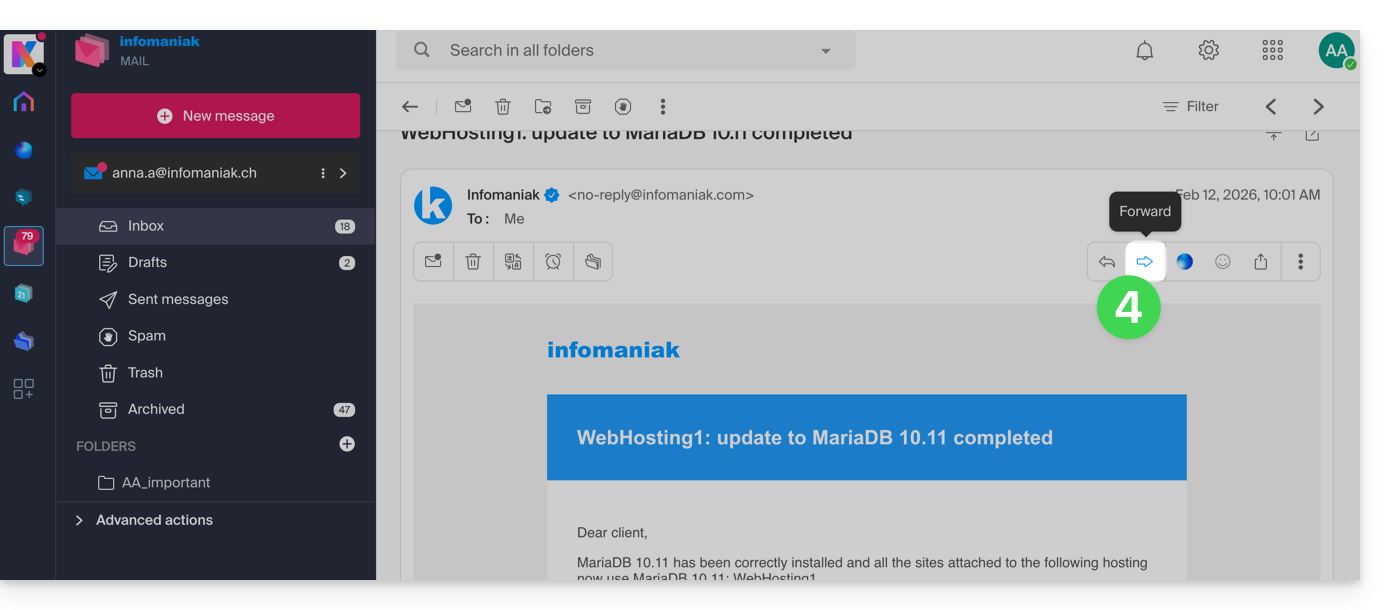
- Você também pode ativar atalhos para que um botão de transferência apareça acima da mensagem, na barra de ferramentas:
Configurar o método de encaminhamento padrão
Pode configurar o Mail Infomaniak para que um encaminhamento de e-mail seja sempre efetuado como um anexo e não como uma citação no corpo da mensagem.
De fato, por padrão, o e-mail original será citado em texto simples diretamente no corpo do e-mail: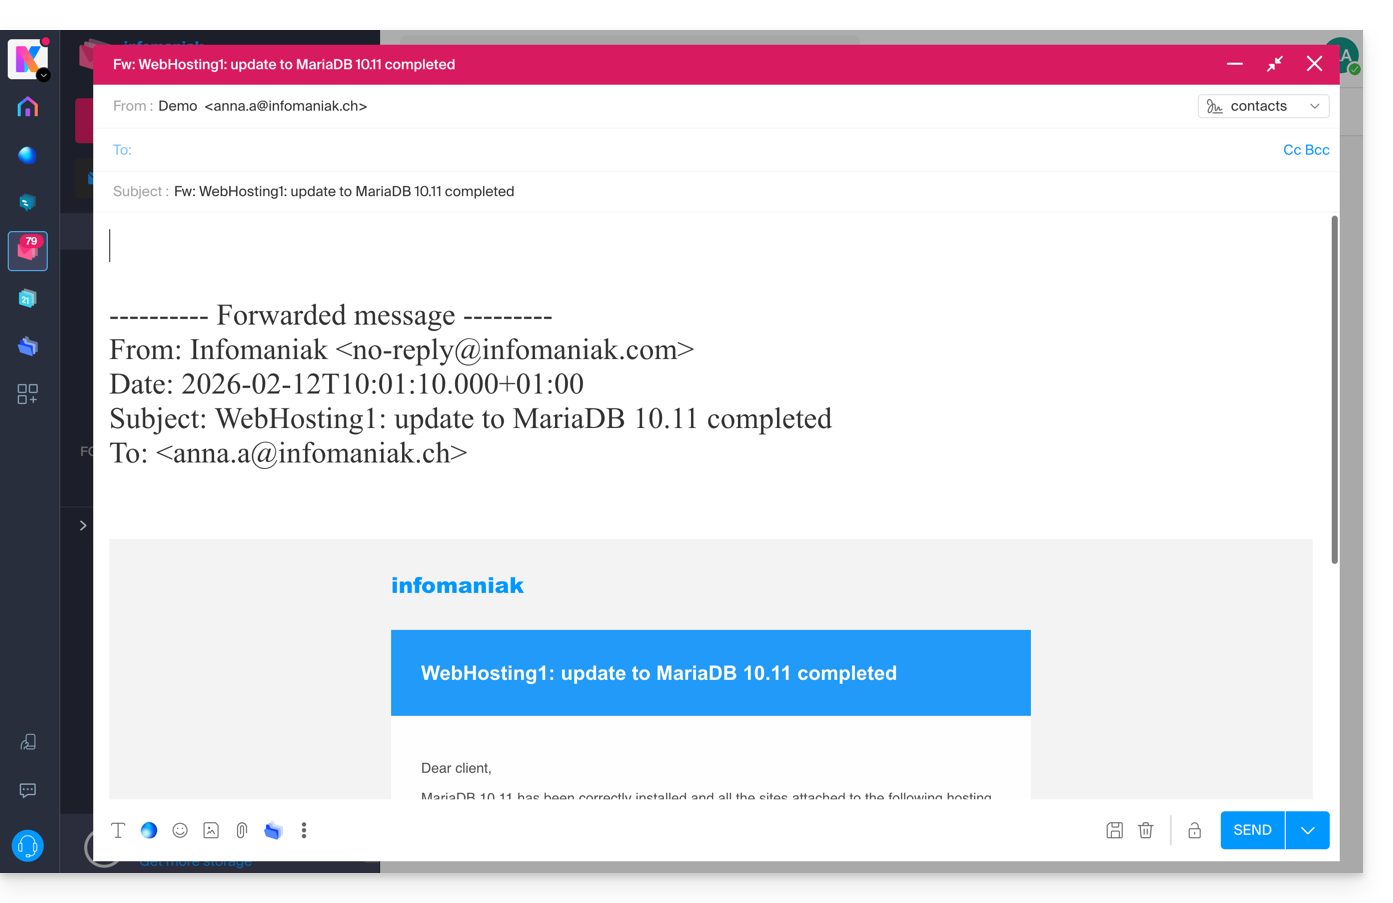
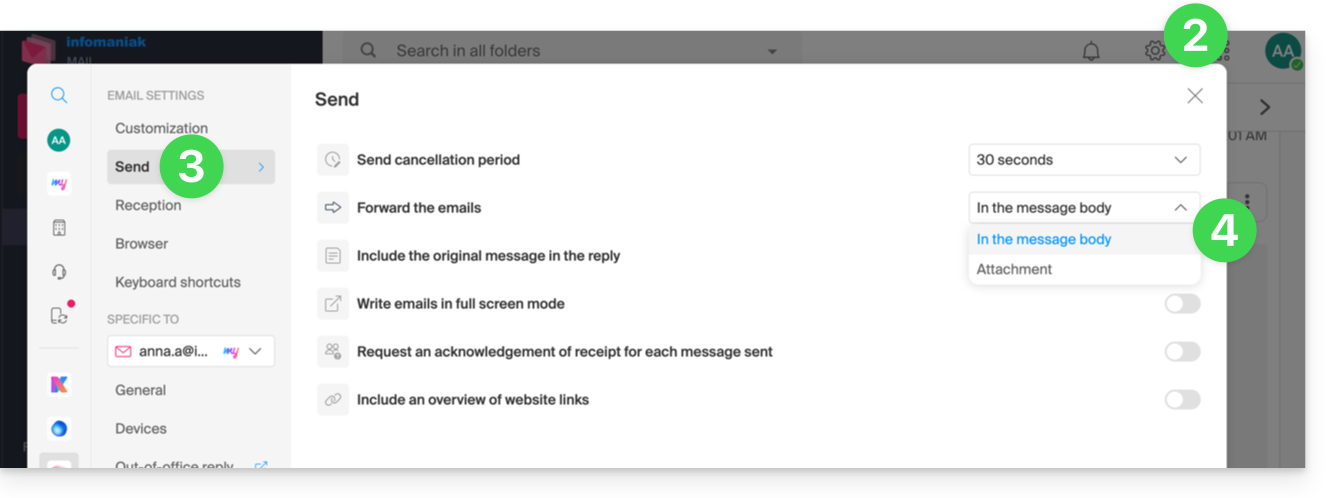
Para alterar isso e definir o método de transferência padrão:
- Clique aqui para acessar o aplicativo web Mail da Infomaniak (serviço online ksuite.infomaniak.com/mail).
- Clique no ícone Configurações no canto superior direito.
- Clique em Enviar no menu lateral secundário.
- Clique na opção desejada ("Como anexo") para "Encaminhar e-mails":
A partir de agora, o e-mail original será anexado como anexo ao e-mail: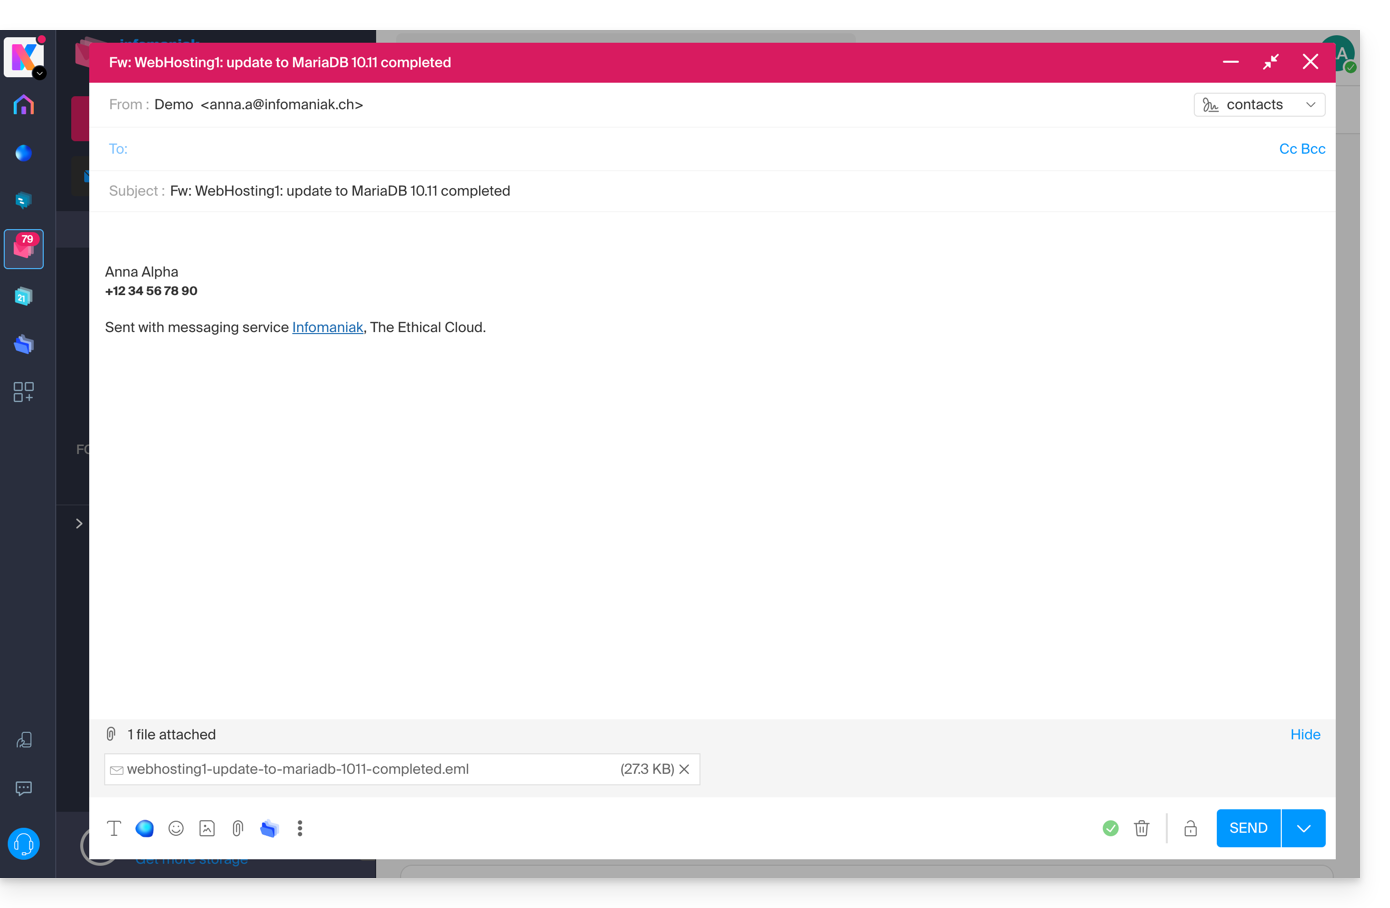
Link para esta FAQ: https://faq.infomaniak.com/1750
Esta seção de perguntas frequentes foi útil?
Para garantir a segurança dos seus dados e o desempenho dos seus serviços, a Infomaniak utiliza vários nomes de domínio.
Introdução
- Estes domínios são utilizados para alojar as interfaces de gestão, as ferramentas de comunicação e o conteúdo dos seus ficheiros de forma isolada e segura.
- Se utilizar um firewall ou um antivírus, recomenda-se que adicione estes domínios à sua lista de permissões (exemplos) para garantir o bom funcionamento das suas ferramentas (nomeadamente kDrive e SwissTransfer).
Principais domínios e serviços
- infomaniak.com: o site principal e o painel de controlo (gestão dos produtos).
- status.infomaniak.cloud / infomaniak.cloud
- infomaniakstatus.com
Armazenamento de arquivos
- infomaniakusercontent.com: domínio usado principalmente para o armazenamento/download de arquivos.
- ksharelink.com: utilizado para os links de partilha pública criados a partir do kDrive e do Mail Infomaniak.
- chk.me: domínio que permite criar links curtos e códigos QR personalizados.
Correio e identidade
- ik.me: domínio curto para o Infomaniak Mail.
- etik.com / ikmail.com: domínios alternativos para e-mail gratuito e ecológico.
- infomaniak.ch: utilizado para alguns serviços técnicos e institucionais.
Ferramentas de transferência e eventos
- swisstransfer.com: serviço de transferência de arquivos grandes.
- infomaniak.events / ticket-net.ch: plataforma de venda e gestão de bilhetes para eventos.
⚠️ Atenção às tentativas de phishing: A Infomaniak nunca solicitará sua senha por e-mail; verifique sempre se a URL na barra de endereço do seu navegador pertence a um dos domínios listados acima antes de inserir suas credenciais.
Link para esta FAQ: https://faq.infomaniak.com/1751
Esta seção de perguntas frequentes foi útil?
Este guia explica como ativar uma resposta automática (mensagem de e-mail automática "fora do escritório") em um endereço de e-mail gerenciado na Infomaniak. Assim, você poderá informar seus correspondentes de que não poderá responder imediatamente, pois está ausente, de férias, etc.
Introdução
- A resposta automática em caso de ausência pode ser ativada a partir do aplicativo web Mail da Infomaniak (serviço online ksuite.infomaniak.com/mail) e a partir do Manager, onde são gerenciados todos os endereços de um Serviço de E-mail.
- Você pode ativar ou desativar uma mensagem já salva, mas não pode haver várias respostas automáticas ativas em um mesmo endereço de e-mail: a ativação de uma mensagem desativa outra, se houver.
Ativar a resposta automática a partir do aplicativo web Mail da Infomaniak
Pré-requisitos
- Ter permissão para gerenciar a resposta automática: se você foi convidado para o aplicativo web Mail da Infomaniak (serviço online ksuite.infomaniak.com/mail) para gerenciar seu endereço, é possível que o administrador do Serviço de E-mail tenha removido esse direito de sua conta de administrador.
Para ativar a mensagem de ausência:
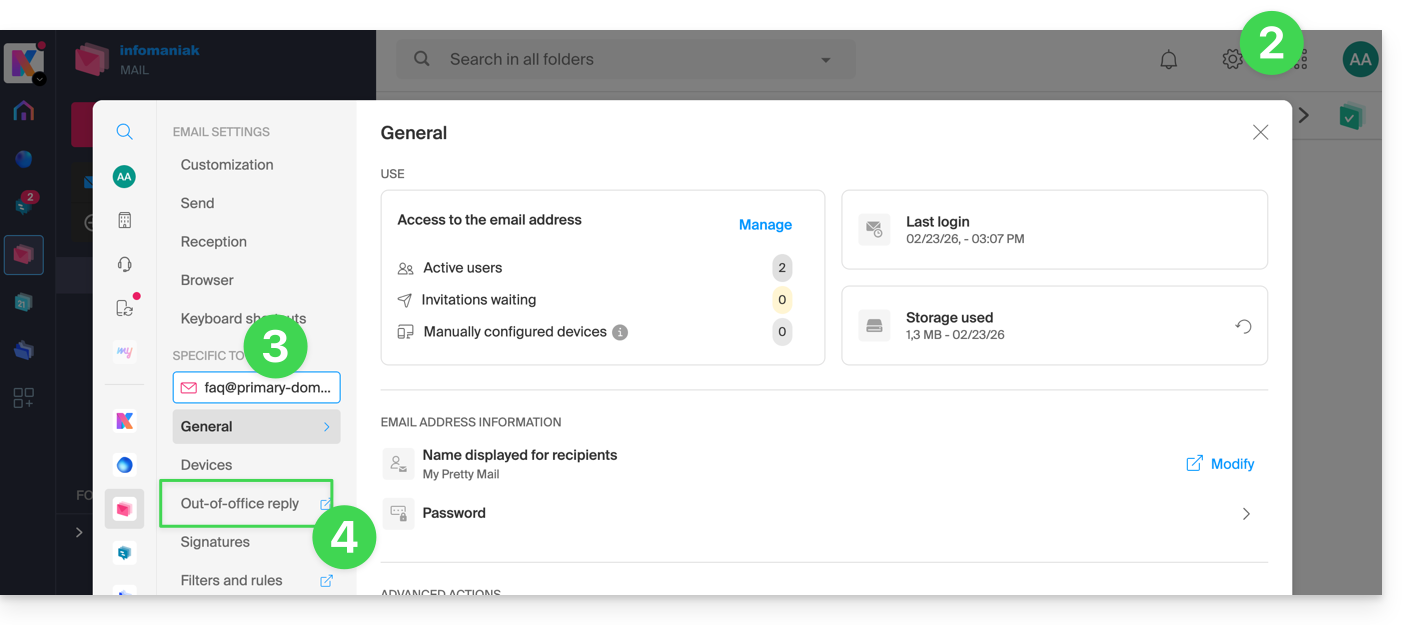
- Clique aqui para acessar o aplicativo web Mail da Infomaniak (serviço online ksuite.infomaniak.com/mail).
- Clique no ícone Configurações no canto superior direito.
- Verifique ou selecione o endereço de e-mail em questão no menu suspenso do menu lateral esquerdo.
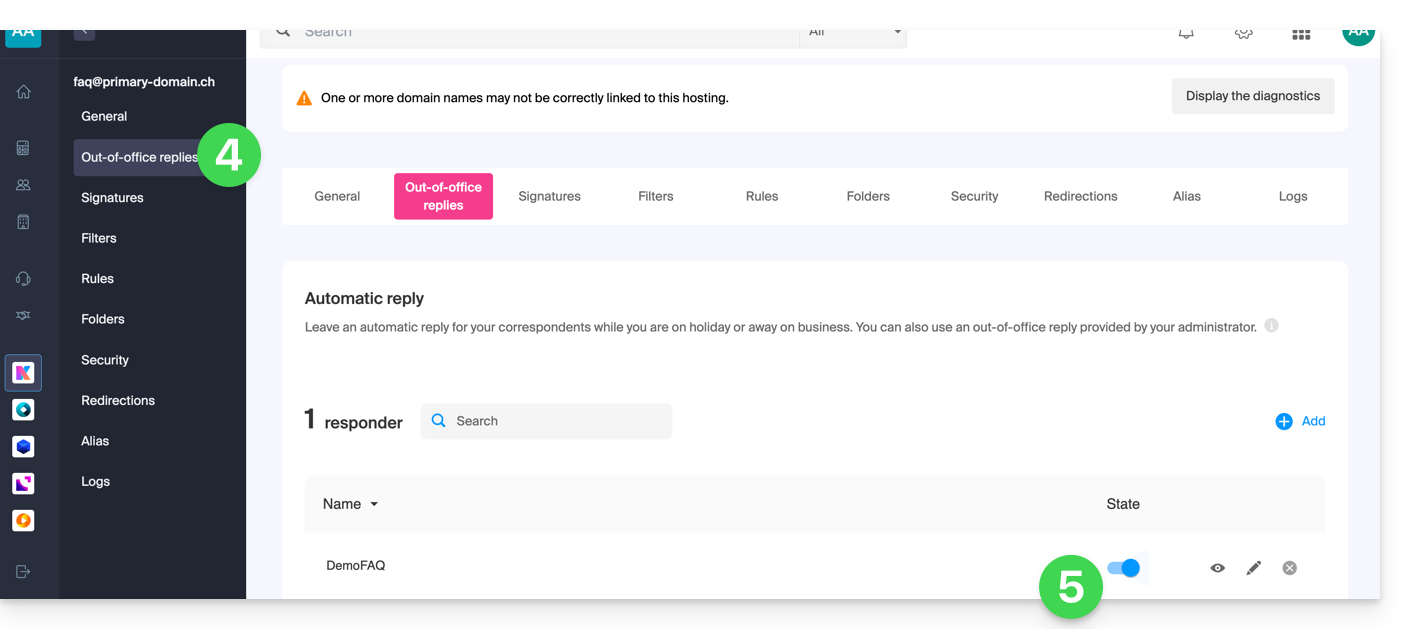
- Clique em Mensagem de ausência:
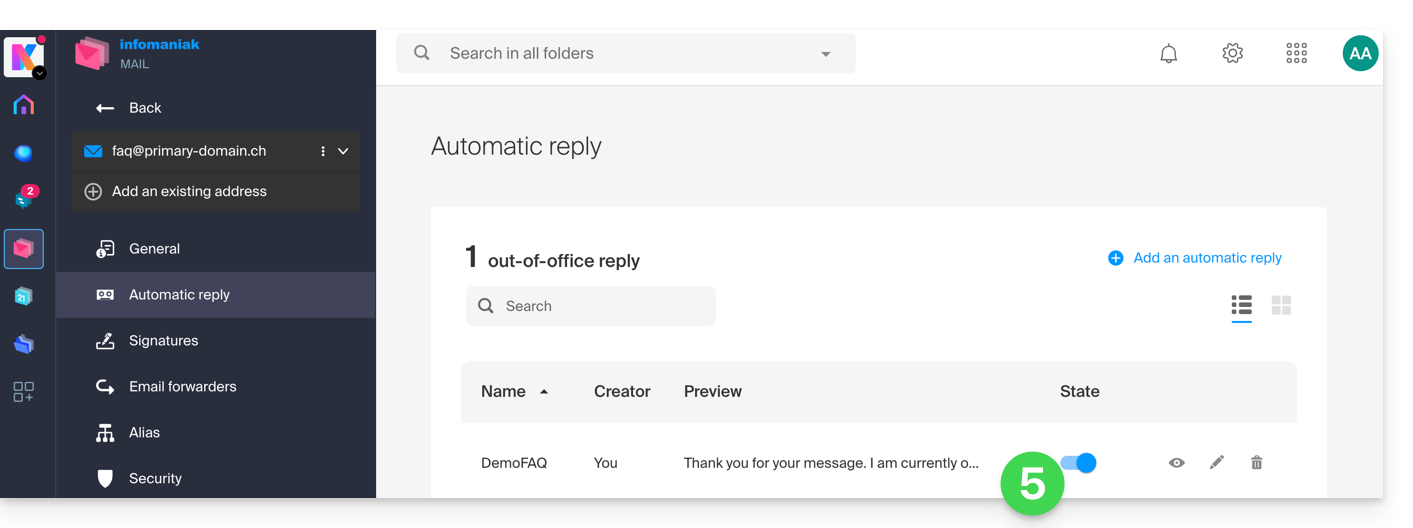
- Ative a mensagem automática, se necessário, ou leia mais abaixo:
Ativar a mensagem de ausência a partir do Manager Infomaniak
Para ativar a mensagem de ausência a partir do Manager:
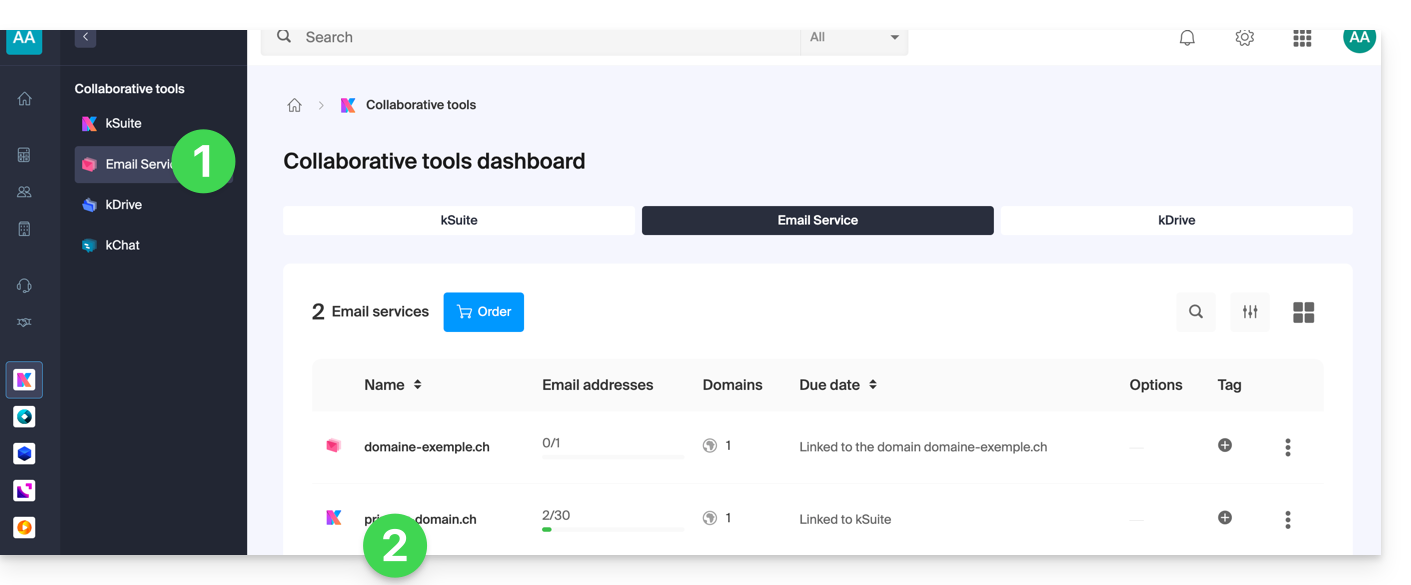
- Clique aqui para acessar o gerenciamento do seu produto no Manager Infomaniak (precisa de ajuda?).
- Clique diretamente no nome atribuído ao produto em questão:
- Clique no endereço de e-mail em questão na tabela que aparece:
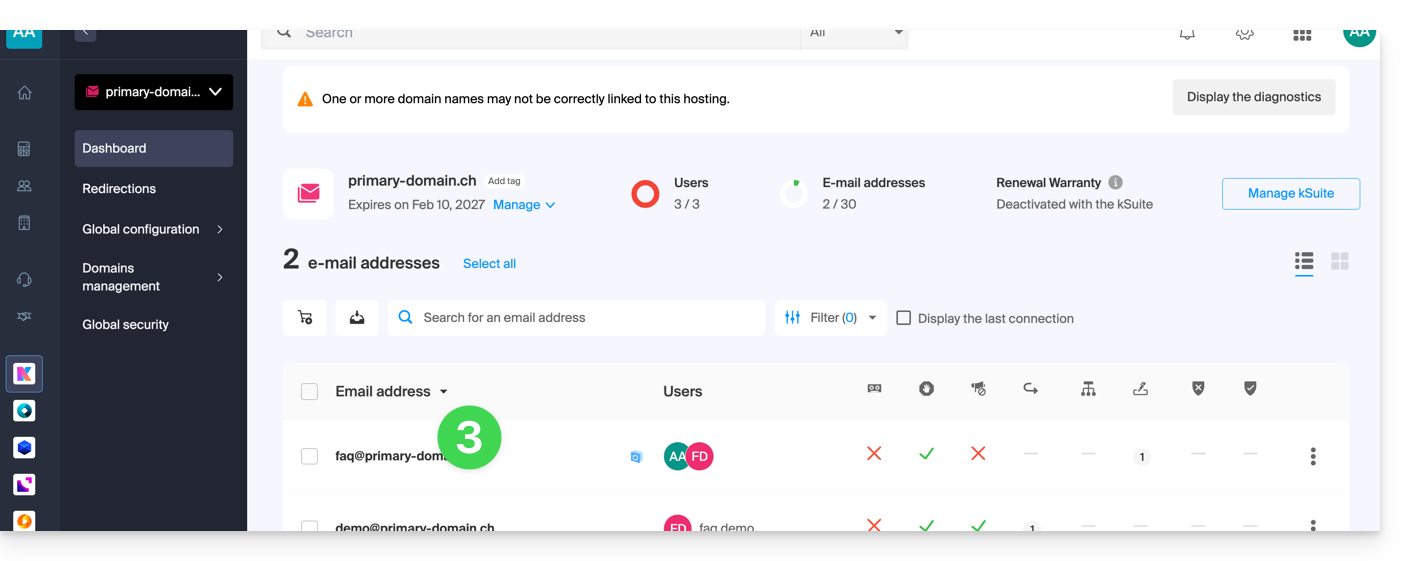
- Clique no menu Mensagem de ausência no menu lateral esquerdo.
- Ative a mensagem automática, se necessário, ou leia mais abaixo:
Redigir a mensagem de ausência
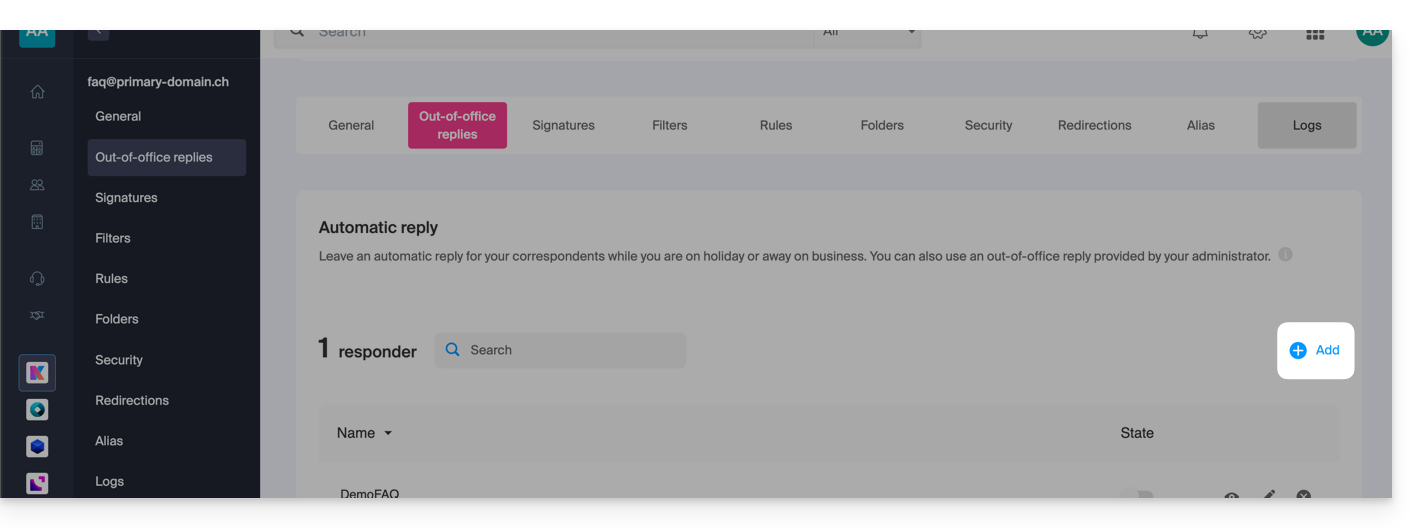
Para gerenciar a mensagem que será enviada automaticamente em resposta:
- Clique em Adicionar:
Em seguida: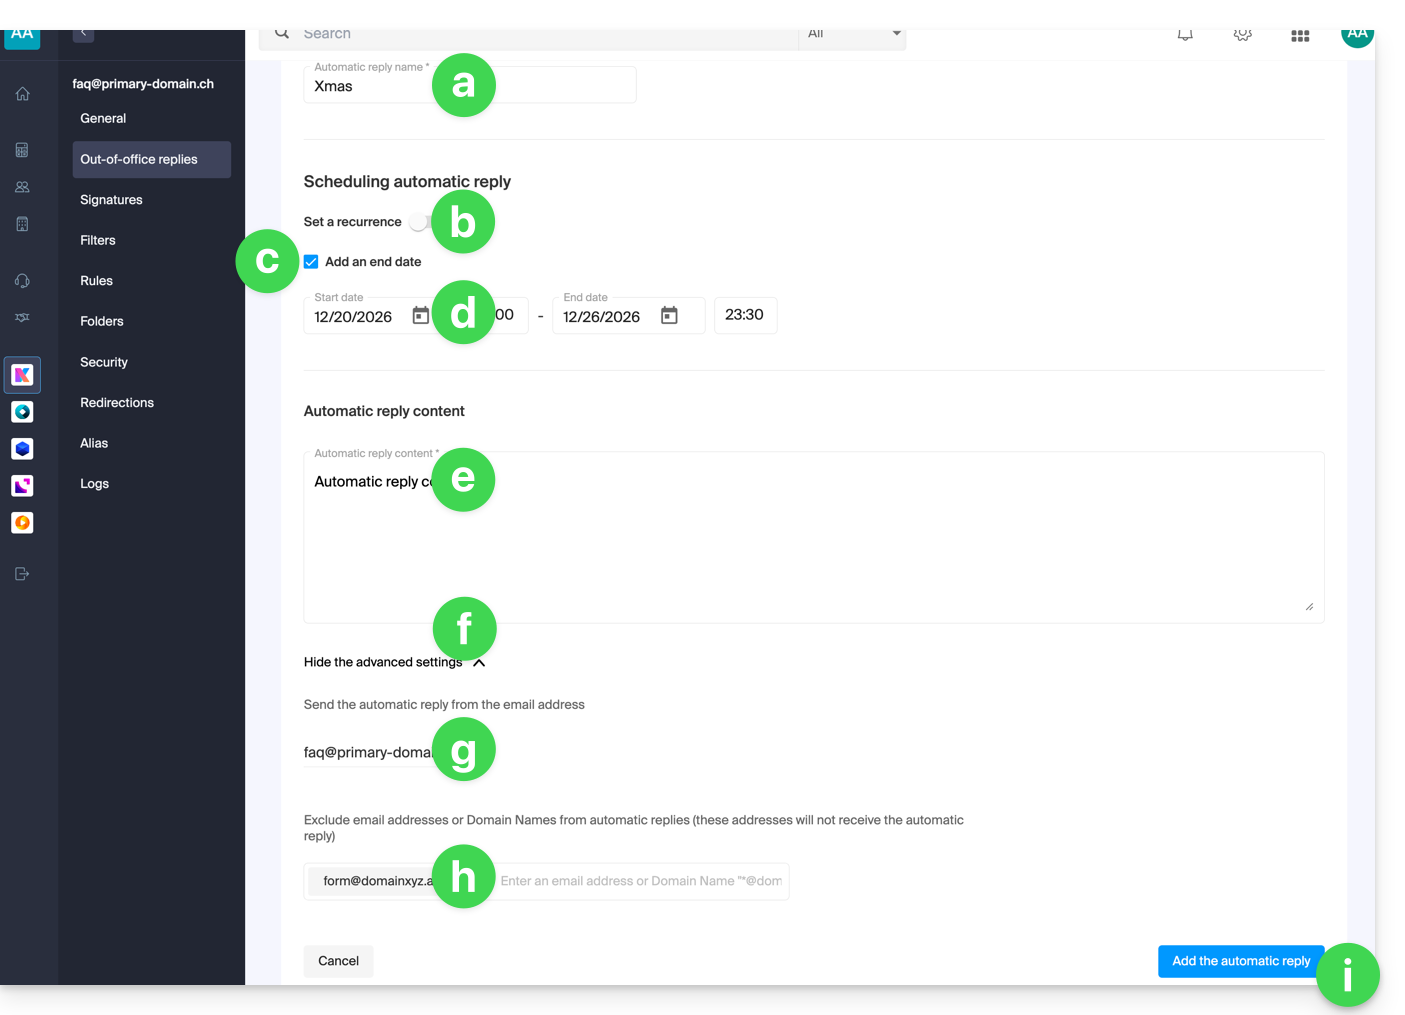
- Insira um nome para sua mensagem de ausência (para diferenciá-la de outras mensagens, caso crie várias).
- Defina se a resposta automática deve ser enviada de forma recorrente em determinados dias da semana.
- Defina uma data/hora de término, caso a mensagem não deva mais ser enviada após um determinado período.
- Defina uma data/hora de início, caso a mensagem seja programada para um período específico no futuro.
- Redija sua mensagem de ausência.
- Exiba as configurações avançadas.
- Defina um endereço de e-mail adicional, caso deseje que sua mensagem automática de ausência seja enviada para outro endereço; apenas os seguintes tipos de endereços serão exibidos:
- endereço de e-mail alternativo (alias, por exemplo:
jean-francois@… /jf@…) - domínio vinculado (alias, por exemplo jf@
domain1.abc/ jf@name.xyz)
- endereço de e-mail alternativo (alias, por exemplo:
- Insira endereços de e-mail específicos (ou
@domain.xyzpara um domínio inteiro) para evitar que esses endereços recebam esta mensagem de ausência. - Clique no botão azul no canto inferior direito para Adicionar a mensagem.
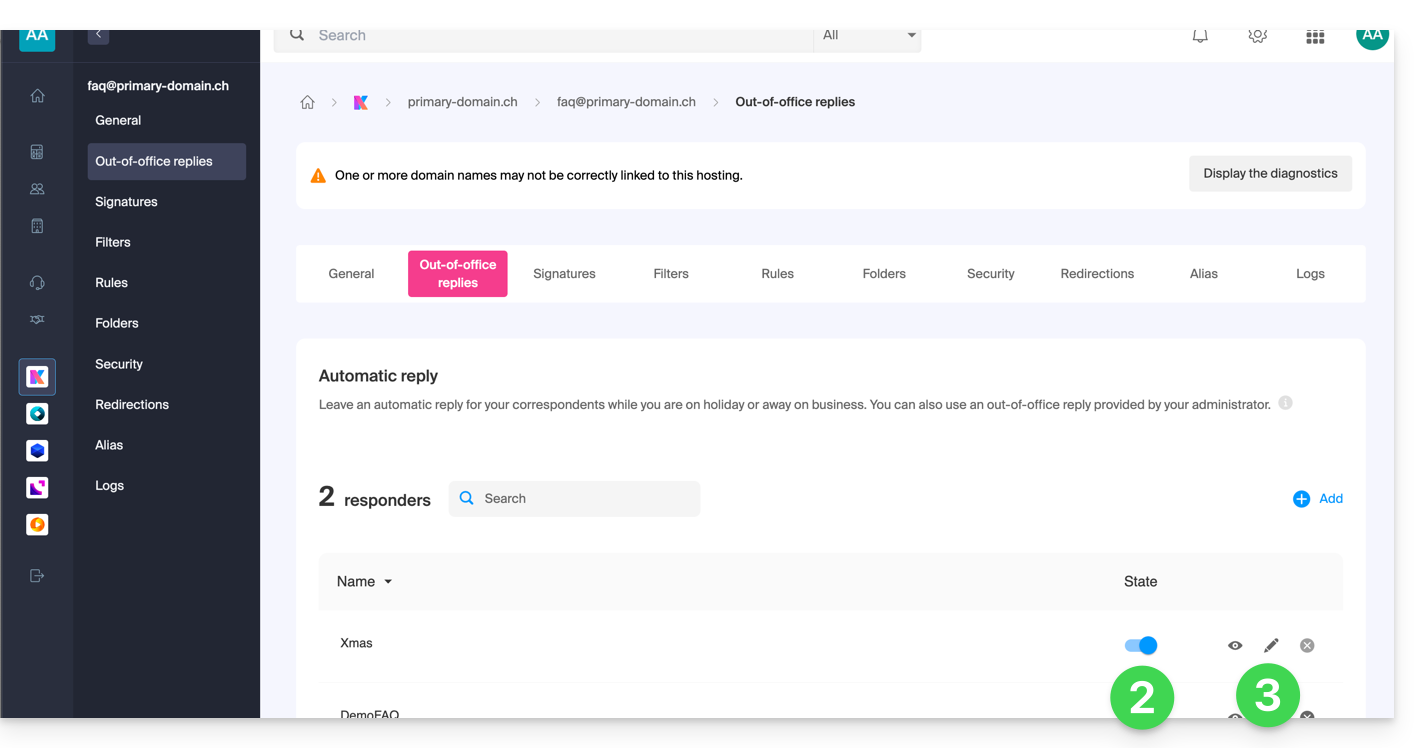
- Após adicionar, você pode ativá-la ou desativá-la.
- Você também pode editar uma mensagem já salva clicando no ícone lápis ✎ à direita:
Com que frequência a resposta automática é enviada?
A sua resposta é enviada apenas uma vez para as pessoas que lhe enviam mensagens.
No entanto, se o mesmo remetente lhe enviar um novo e-mail 7 dias após o anterior e se a sua resposta automática ainda estiver ativada, uma resposta automática será enviada novamente para o lembrar de que não tem acesso à sua caixa de correio.
Tenha cuidado, portanto, se fizer um teste no seu endereço, é normal que funcione apenas na primeira vez. Nos testes seguintes, a resposta automática não envia mais a mensagem quando deteta que a mensagem provém de um endereço que já enviou uma mensagem anteriormente. Terá de fazer um novo teste a partir de outro endereço de e-mail.
Pode redefinir o contador dos 7 dias clicando em Redefinir ao editar a sua mensagem: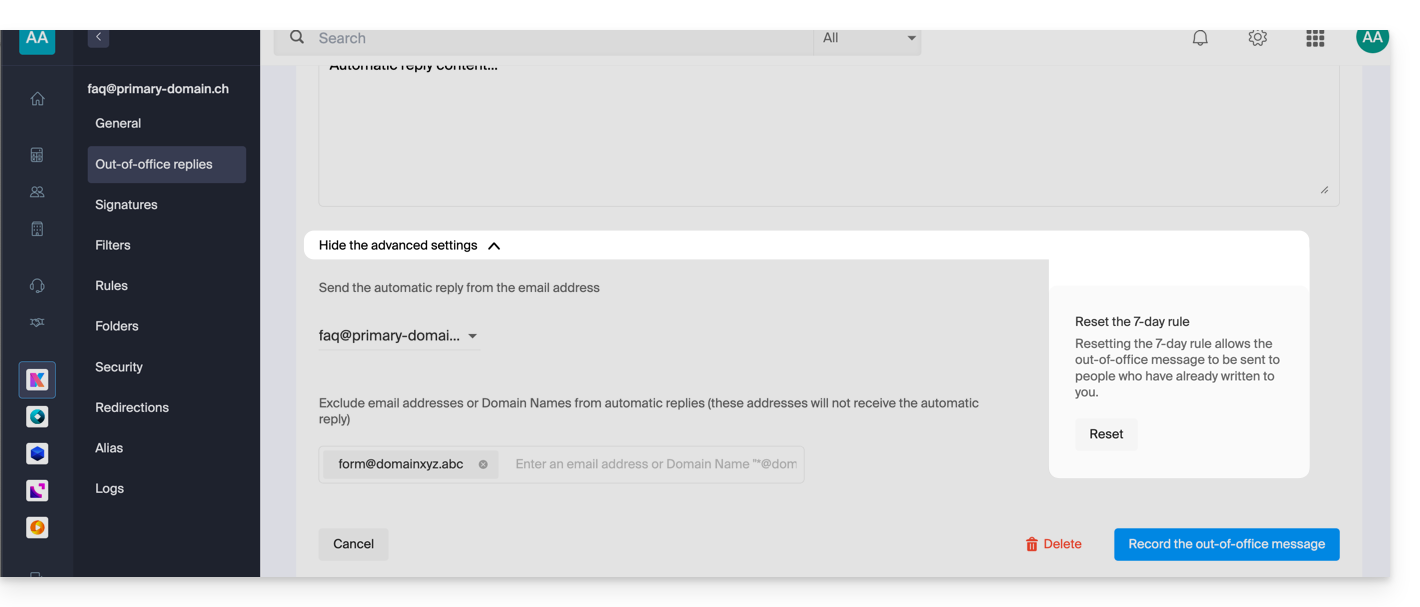
Aprofunde-se com os modelos
Modelos personalizados podem ser aplicados logo na criação de um novo endereço de e-mail no seu Serviço de E-mail, por exemplo, ou em massa em todos os endereços do seu domínio. Saiba mais
Link para esta FAQ: https://faq.infomaniak.com/1759
Esta seção de perguntas frequentes foi útil?
Este guia explica como marcar os e-mails que desejar como "favoritos" na sua caixa de correio Infomaniak, para que possa acompanhar esses e-mails de forma especial e, se desejar, exibi-los separadamente.
Acompanhar um ou mais e-mails…
… a partir do aplicativo Web Mail da Infomaniak
Para adicionar uma mensagem como favorito:
- Clique aqui para acessar o aplicativo web Mail da Infomaniak (serviço online ksuite.infomaniak.com/mail).
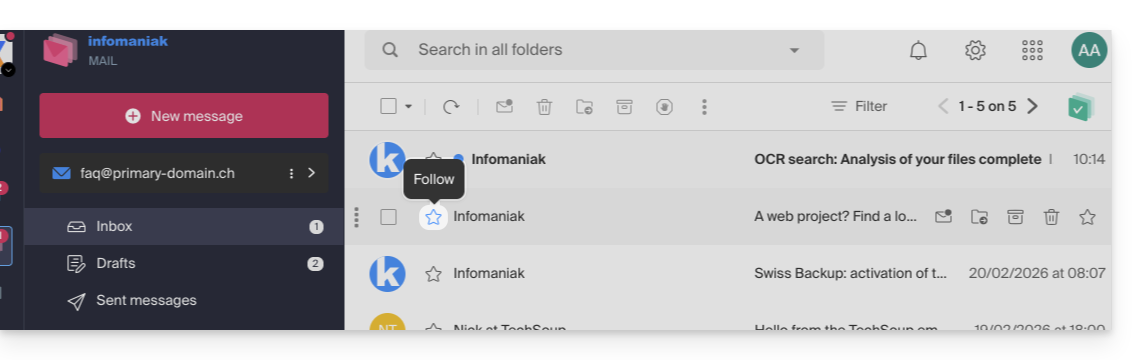
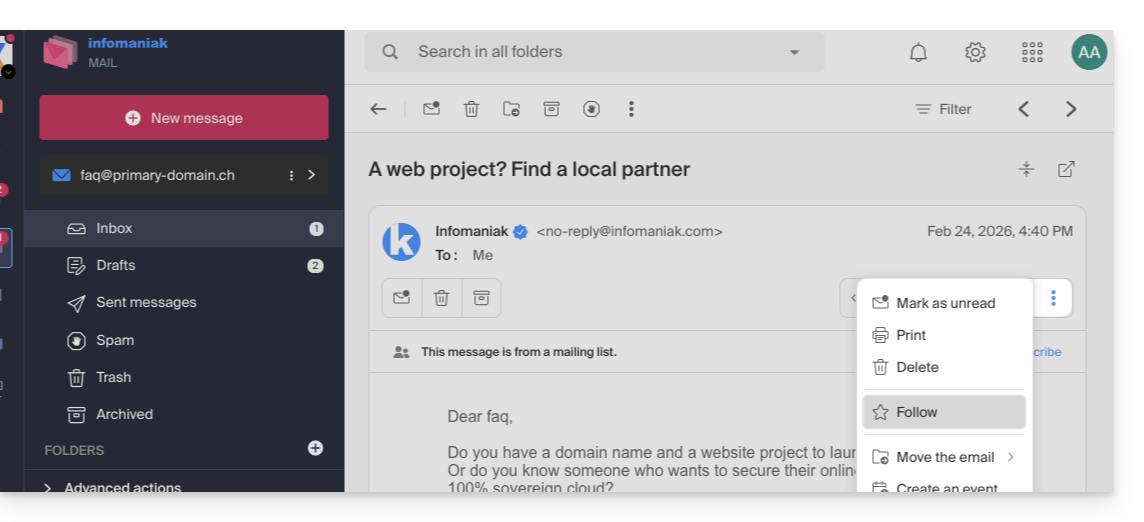
- Clique no ícone ☆…
- … à esquerda de uma mensagem na lista de mensagens
- … no canto superior direito da janela de leitura de uma mensagem
- … à esquerda de uma mensagem na lista de mensagens
- Após ativar o rastreamento, um menu suspenso no canto superior direito permite exibir apenas uma seleção de suas mensagens recebidas de acordo com vários critérios: Todos, Lidos, Não lidos, Rastreados, Não rastreados:
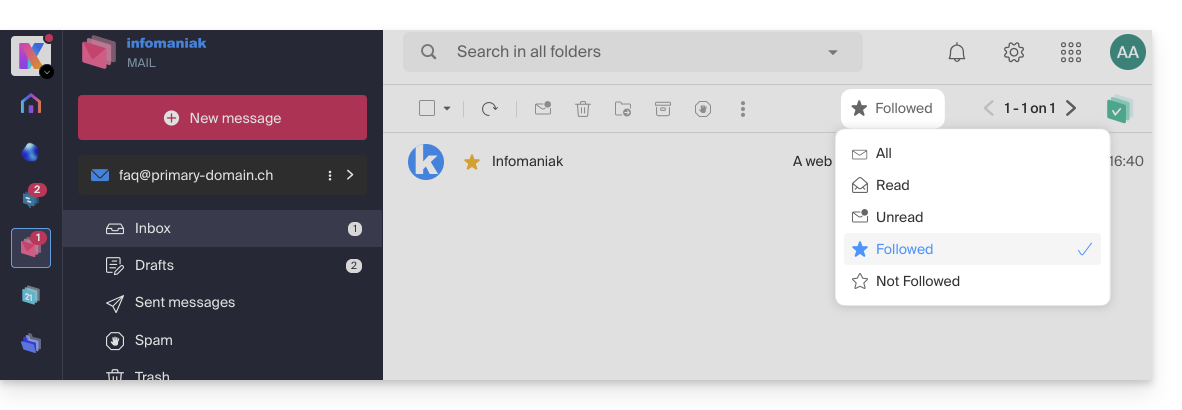
Também é possível definir uma ação ao passar o cursor ou adicionar um atalho na barra acima das listas de mensagens: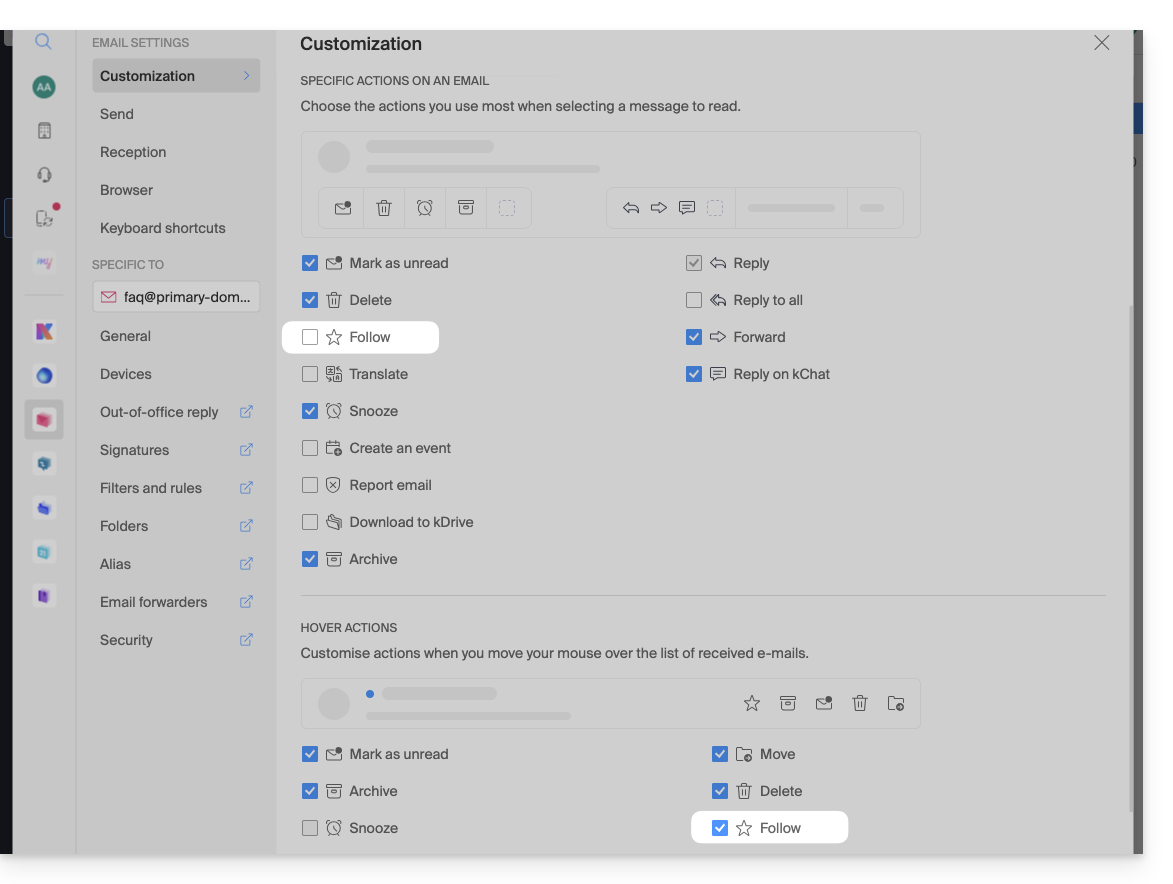
… a partir do aplicativo móvel Infomaniak Mail
Na lista de mensagens:
- Mantenha o dedo pressionado sobre uma mensagem.
- Toque no ícone ☆ na parte inferior da tela:
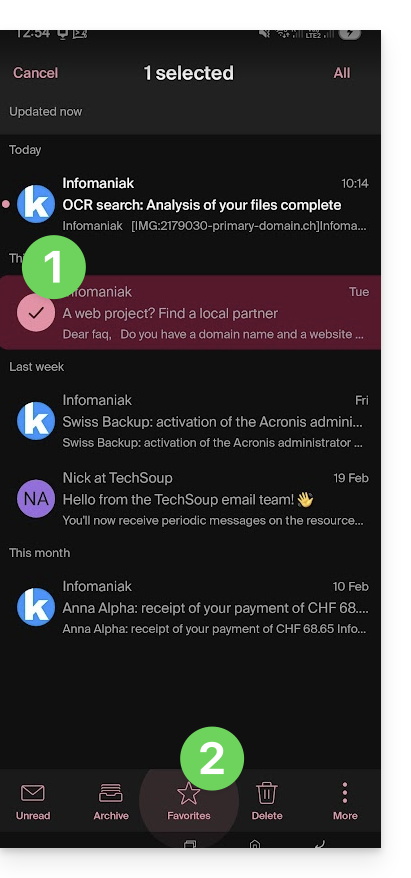
Em uma mensagem que está sendo lida:
- Toque no ícone ☆ no canto superior direito da janela de leitura de uma mensagem:
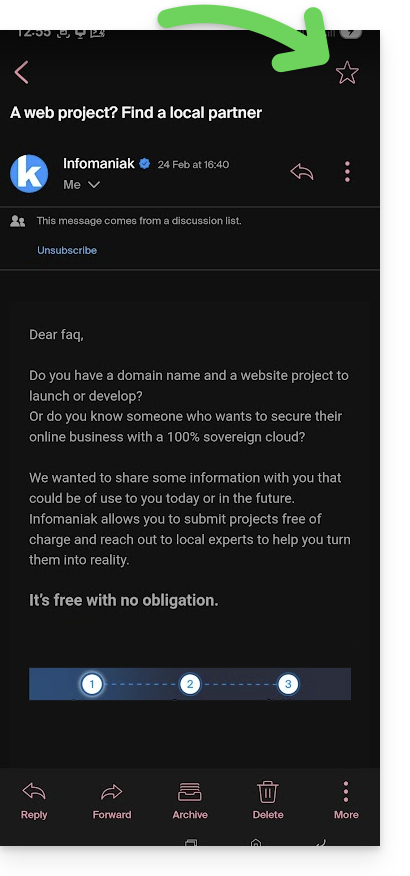
Também é possível definir um gesto de deslizar que levará à marcação da mensagem como favorita ao deslizar com o dedo.
Link para esta FAQ: https://faq.infomaniak.com/1761
Esta seção de perguntas frequentes foi útil?
Este guia explica como transferir para a Infomaniak os endereços de e-mail atualmente alojados pela Google (Workspace com um domínio personalizado ou endereço @gmail), com a ajuda de uma ferramenta de importação por IMAP.
Introdução
- Consulte este outro guia se procura uma alternativa a este processo via IMAP: de facto, é possível optar por realizar uma exportação Google Takeout e, em seguida, uma importação mBox na nossa infraestrutura.
- Esta operação não afeta os dados já existentes no endereço de destino, nem os dados do endereço de origem.
- Todo o conteúdo da caixa externa será importado.
- Uma vez iniciado o processo de importação, não é mais possível interrompê-lo.
- Os eventuais duplicados são geridos: um conteúdo idêntico será copiado apenas uma vez.
Importar todo o seu histórico de e-mails
Pré-requisitos Infomaniak
- Ter um Serviço de Email na sua Central de Gestão Infomaniak.
- Ter à disposição um número de endereços disponíveis ou ajustá-lo caso seja necessário.
- Verificar se a conta de e-mail está devidamente protegida
- Criar um ou vários endereços neste serviço de e-mail.
- Se tiver muitos (10+) endereços de e-mail para criar, consulte este outro guia sobre a criação em massa.
- O endereço de e-mail de destino deve estar associado ao utilizador (= à conta Infomaniak) que está a utilizar.
Importar o conteúdo de e-mail do Gmail para o Infomaniak
- Clique aqui para acessar a ferramenta de importação (serviço online https://import-email.infomaniak.com).
- Se necessário, inicie sessão na sua conta Infomaniak na organização em questão; a importação será efetuada para um dos endereços de e-mail associados à interface Web Mail da Infomaniak (serviço online ksuite.infomaniak.com/mail) da conta Infomaniak que está a utilizar.
- Clique em "Importar por IMAP".
- Clique em Importar.
- Preencha o campo da esquerda com o seu endereço de e-mail de origem (de onde o conteúdo será copiado).
- Clique no botão "Conectar com o Google" que apareceu:
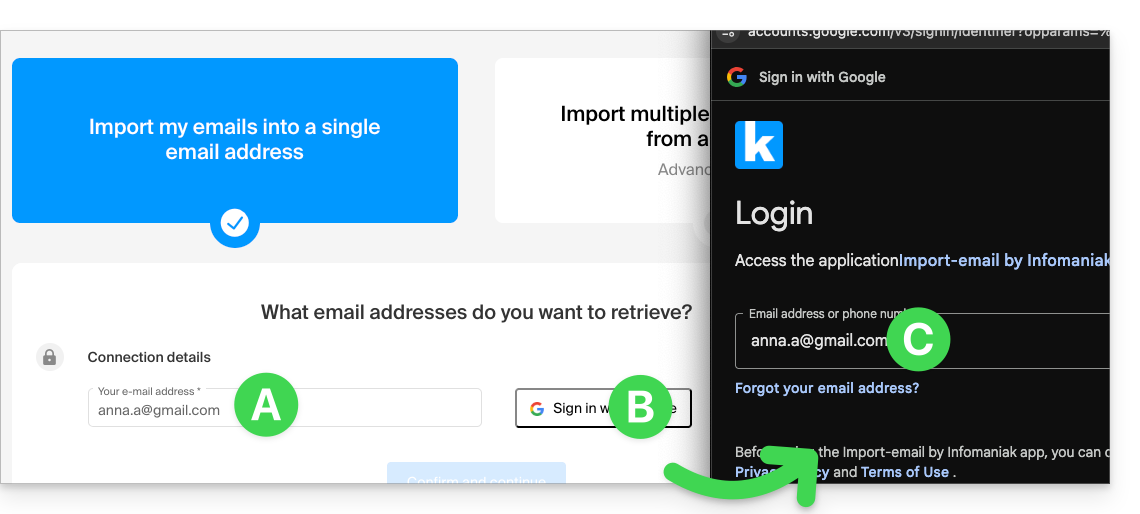
- Verifique se está a conectar-se à conta Google correta para a cópia dos e-mails.
- Confirme que autoriza a ferramenta Infomaniak a conectar-se à sua conta (processo automático).
- Após confirmar a janela pop-up, escolha para qual endereço de e-mail importar os e-mails; o menu suspenso lista os endereços de e-mail atualmente associados à sua interface Web Mail Infomaniak (serviço online ksuite.infomaniak.com/mail) da conta Infomaniak com a qual você está conectado.
- Após selecionar na lista o endereço de destino desejado, clique no botão azul Importar e-mails.
- A cópia está a iniciar. Pode aguardar e verificar o resultado na página após a conclusão da importação ou fechar a janela (a importação continua em segundo plano e o progresso pode ser acompanhado – consulte abaixo).
- Um e-mail de confirmação será enviado automaticamente para todos os endereços de e-mail envolvidos na operação, assim que a importação for concluída, indicando o número de mensagens copiadas.
- Um rastreamento está disponível nas configurações do endereço de e-mail de destino, apenas no aplicativo web Mail (serviço online ksuite.infomaniak.com/mail).
- O rastreamento permite visualizar o histórico das importações no endereço em questão.
Ajustar as configurações das aplicações
Assim que configurar o nome de domínio associado ao seu e-mail para funcionar com a Infomaniak, modifique as configurações dos programas/clientes de e-mail que utiliza para que estes se conectem corretamente aos servidores da Infomaniak: siga o assistente de configuração.
Etiquetas e volume de dados
O espaço de armazenamento exibido na Infomaniak pode não corresponder ao indicado no Gmail, principalmente devido à gestão diferente das etiquetas. De fato, estas, presentes no Gmail, serão convertidas em pastas nos servidores Infomaniak (mesmo princípio que durante uma recupera o correio com um software/cliente de e-mail IMAP como o Thunderbird):
Consequentemente, um e-mail etiquetado em várias pastas do Gmail pode ser contabilizado várias vezes durante a migração, o que explica por que uma conta que exibe, por exemplo, 6 GB no Gmail pode ocupar 18 GB após ser transferida para os servidores Infomaniak.
Tenha paciência ao importar um grande volume de e-mails; as importações do Gmail e da Microsoft são intencionalmente mais lentas (por exemplo, largura de banda de 1 GB/dia para o Google) para evitar que sejam rejeitadas por esses serviços.
Link para esta FAQ: https://faq.infomaniak.com/1785
Esta seção de perguntas frequentes foi útil?
Este guia para o aplicativo web Mail da Infomaniak (serviço online ksuite.infomaniak.com/mail) ou o aplicativo móvel Infomaniak Mail (aplicativo para smartphone ou tablet iOS / Android) explica como imprimir um e-mail para obter uma versão impressa (ou melhor: em PDF) da sua mensagem, e não da interface em si.
Imprimir um e-mail…
… a partir do aplicativo Web Mail da Infomaniak
Para isso:
- Clique aqui para acessar o aplicativo web Mail da Infomaniak (serviço online ksuite.infomaniak.com/mail).
- Consulte o e-mail que deseja imprimir.
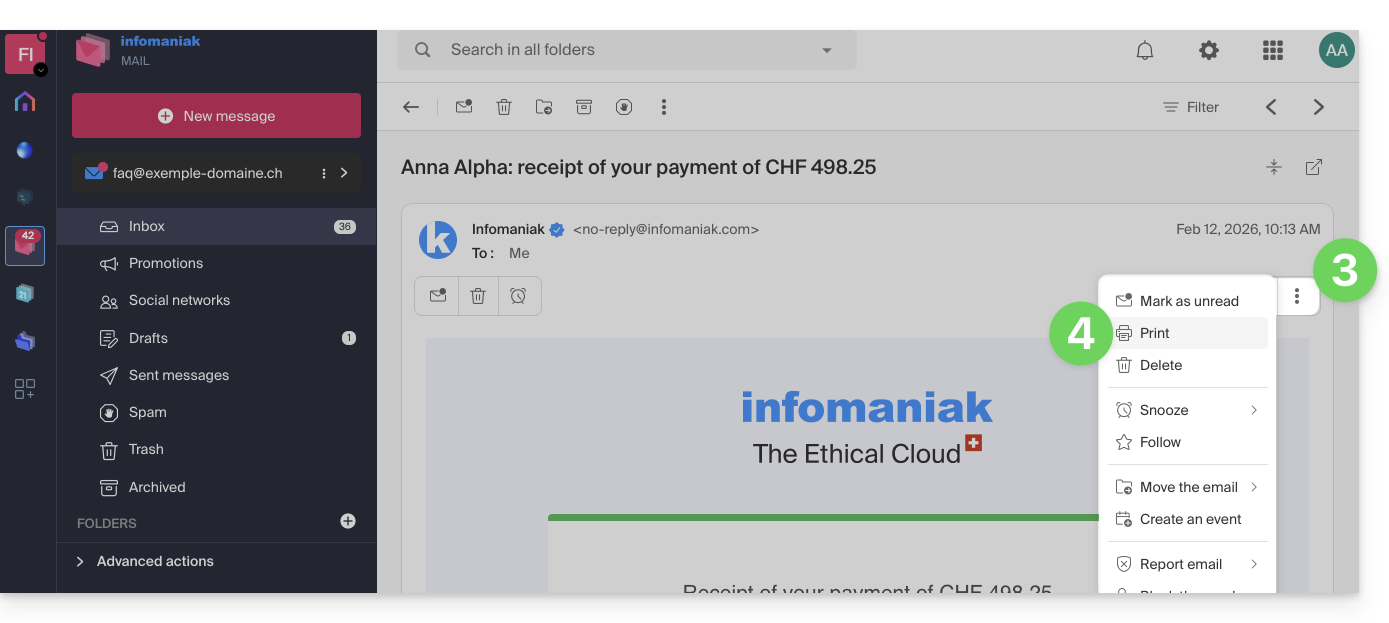
- Clique no menu de ação ⋮ no topo da sua mensagem.
- Clique em Imprimir:
… a partir do aplicativo móvel Infomaniak Mail
Para isso:
- Abra o aplicativo móvel Infomaniak Mail (aplicativo para smartphone ou tablet iOS/Android).
- Consulte o e-mail que deseja imprimir.
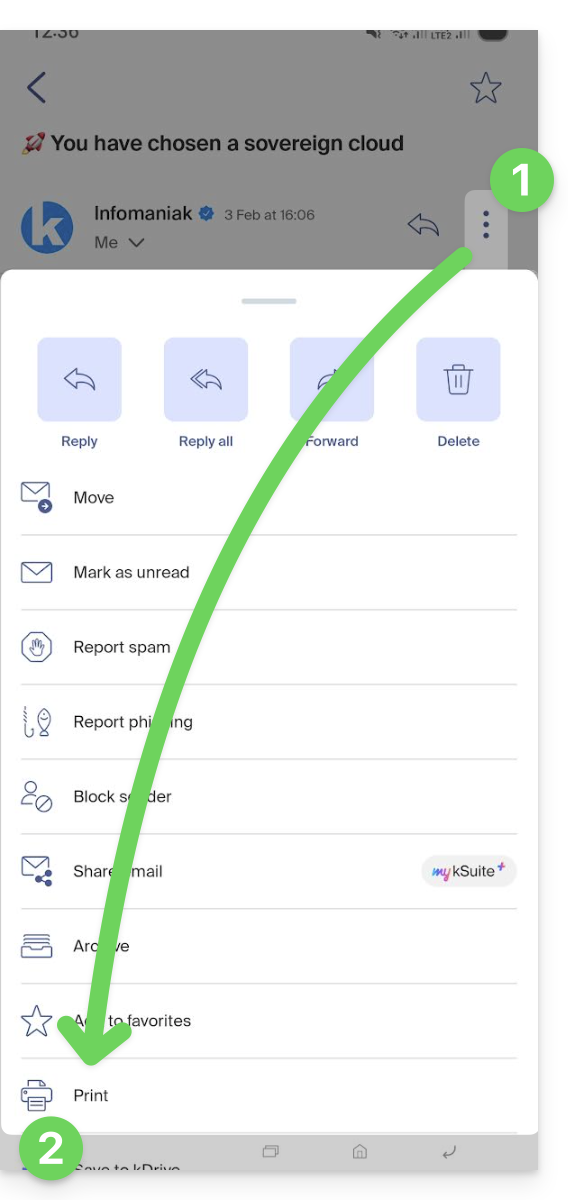
- Toque no menu de ação ⋮ no canto superior direito da mensagem.
- Toque em Imprimir:
Link para esta FAQ: https://faq.infomaniak.com/1786
Esta seção de perguntas frequentes foi útil?
Este guia explica como conectar o aplicativo de desktop Outlook 2013 (aplicativo para computador no Windows) a um endereço de e-mail hospedado na Infomaniak.
Adicionar o endereço de e-mail ao aplicativo
Pré-requisitos
- Criar o endereço de e-mail (❓: my kSuite | Serviço de E-mail/kSuite).
- Criar uma senha para o dispositivo (❓: my kSuite | Serviço de e-mail/kSuite).
- Verificar se a configuração do domínio está correta (❓: Serviço de e-mail/kSuite).
Para configurar o aplicativo de e-mail:
- Abra o aplicativo.
- Clique no menu Arquivo:
- Clique em Configurações da conta.
- Clique em Adicionar ou remover contas:
- Clique em Novo:
- Clique em Configuração manual:
- Clique em POP / IMAP.
- Clique em Seguinte:
- Verifique e complete as informações ausentes.
- Clique em Configurações avançadas:
- Clique na aba Servidor de saída.
- Clique emO meu servidor de saída requer autenticação.
- Clique na aba Avançado:
- Substitua o número das portas pelas informações corretas e ative o SSL.
- Clique em OK.
- Clique em Seguinte:
- Clique em Fechar:
- Clique em Concluir:
- Clique em Fechar:
- Pronto, o seu endereço de e-mail já está configurado na aplicação:
Parâmetros recomendados
- Servidor IMAP de entrada =
mail.infomaniak.com - Porta IMAP =
993(com SSL) - Servidor SMTP de saída =
mail.infomaniak.com - Porta SMTP e protocolo de criptografia e comando/método para ativar este protocolo:
587+ STARTTLS - Nome de utilizador/username = o endereço de e-mail completo (precisa de ajuda?)
- Senha/password = a senha gerada para o endereço de e-mail que você deseja consultar (❓: my kSuite | Serviço de e-mail/kSuite).
- Autenticação obrigatória para o envio de e-mails:
- Ative-a nas configurações SMTP do seu aplicativo.
- Marque "usar as mesmas configurações do servidor de entrada" ou, dependendo do software/cliente de e-mail, insira um nome de usuário (= endereço de e-mail completo) e a senha gerada.
Consulte este outro guia se precisar de informações sobre outras portas e protocolos de e-mail compatíveis (SSL/TLS, por exemplo).
Em caso de problemas
Verifique se o Serviço de Email está configurado de forma otimizada.
Não é necessário entrar em contato com o Suporte Infomaniak se o seu endereço de email funcionar corretamente fora da aplicação. O erro mais comum está relacionado ao uso de uma senha incorreta. Os guias de solução de problemas ajudarão você a resolver qualquer problema:
- Consulte as soluções apresentadas neste outro guia sobre o serviço de e-mail em geral.
- Este outro guia é mais específico sobre o Outlook.
… e se o seu Outlook deixou de funcionar após uma alteração da palavra-passe do e-mail, consulte este outro guia.
Link para esta FAQ: https://faq.infomaniak.com/1796
Esta seção de perguntas frequentes foi útil?
Este guia explica como gerenciar e modificar as permissões (atribuição de senha adicional, criação de um alias, etc. veja abaixo a lista completa) de um usuário Infomaniak, para que ele possa gerenciar mais ou menos elementos de configuração no aplicativo web Mail Infomaniak (serviço online ksuite.infomaniak.com/mail).
Introdução
- O endereço de e-mail é criado primeiro em um Serviço de E-mail e, em seguida, pode ser usado em uma ou mais interfaces de e-mail Infomaniak por um ou mais utilizadores.
- O criador (ou administrador) do endereço pode querer limitar as ações possíveis para um ou outro dos utilizadores que usarão o endereço de e-mail.
- Este gerenciamento detalhado de permissões pode ser feito durante a criação de um endereço ou posteriormente, e você também pode definir quais devem ser os direitos padrão a serem sempre aplicados.
Lista das permissões do utilizador de e-mail
Quando visualiza as utilizadores com acesso a um endereço de e-mail específicodentro de um Serviço de E-mail, uma coluna permite identificar rapidamente o tipo de permissões concedidas ao utilizador: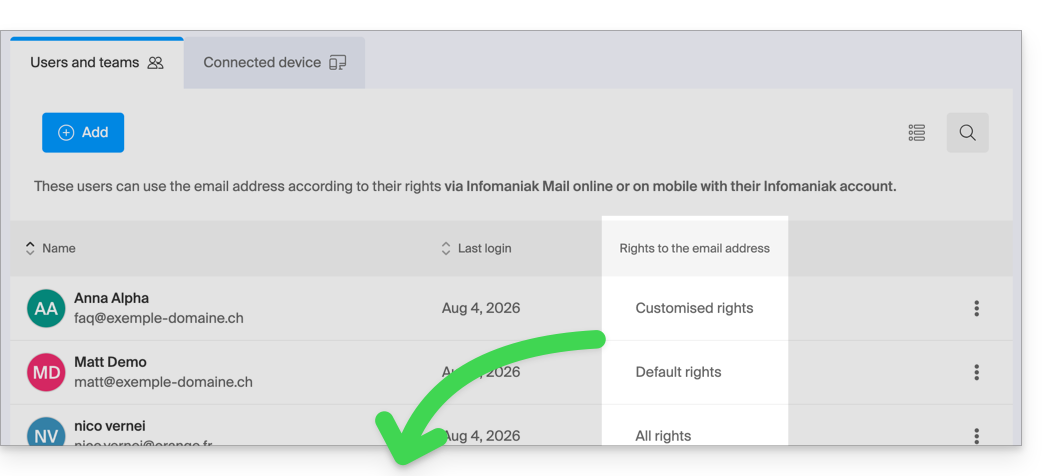
A indicação “Todos os direitos” é exibida quando o utilizador possui todas as permissões possíveis.
“Permissões padrão” é exibida quando as permissões são idênticas às especificadas na configuração global.
“Permissões personalizadas” é exibida assim que as permissões não forem todas concedidas e forem diferentes do modelo padrão (configuração global).
Clique na indicação para aceder à gestão das permissões do utilizador, detalhadas mais abaixo:
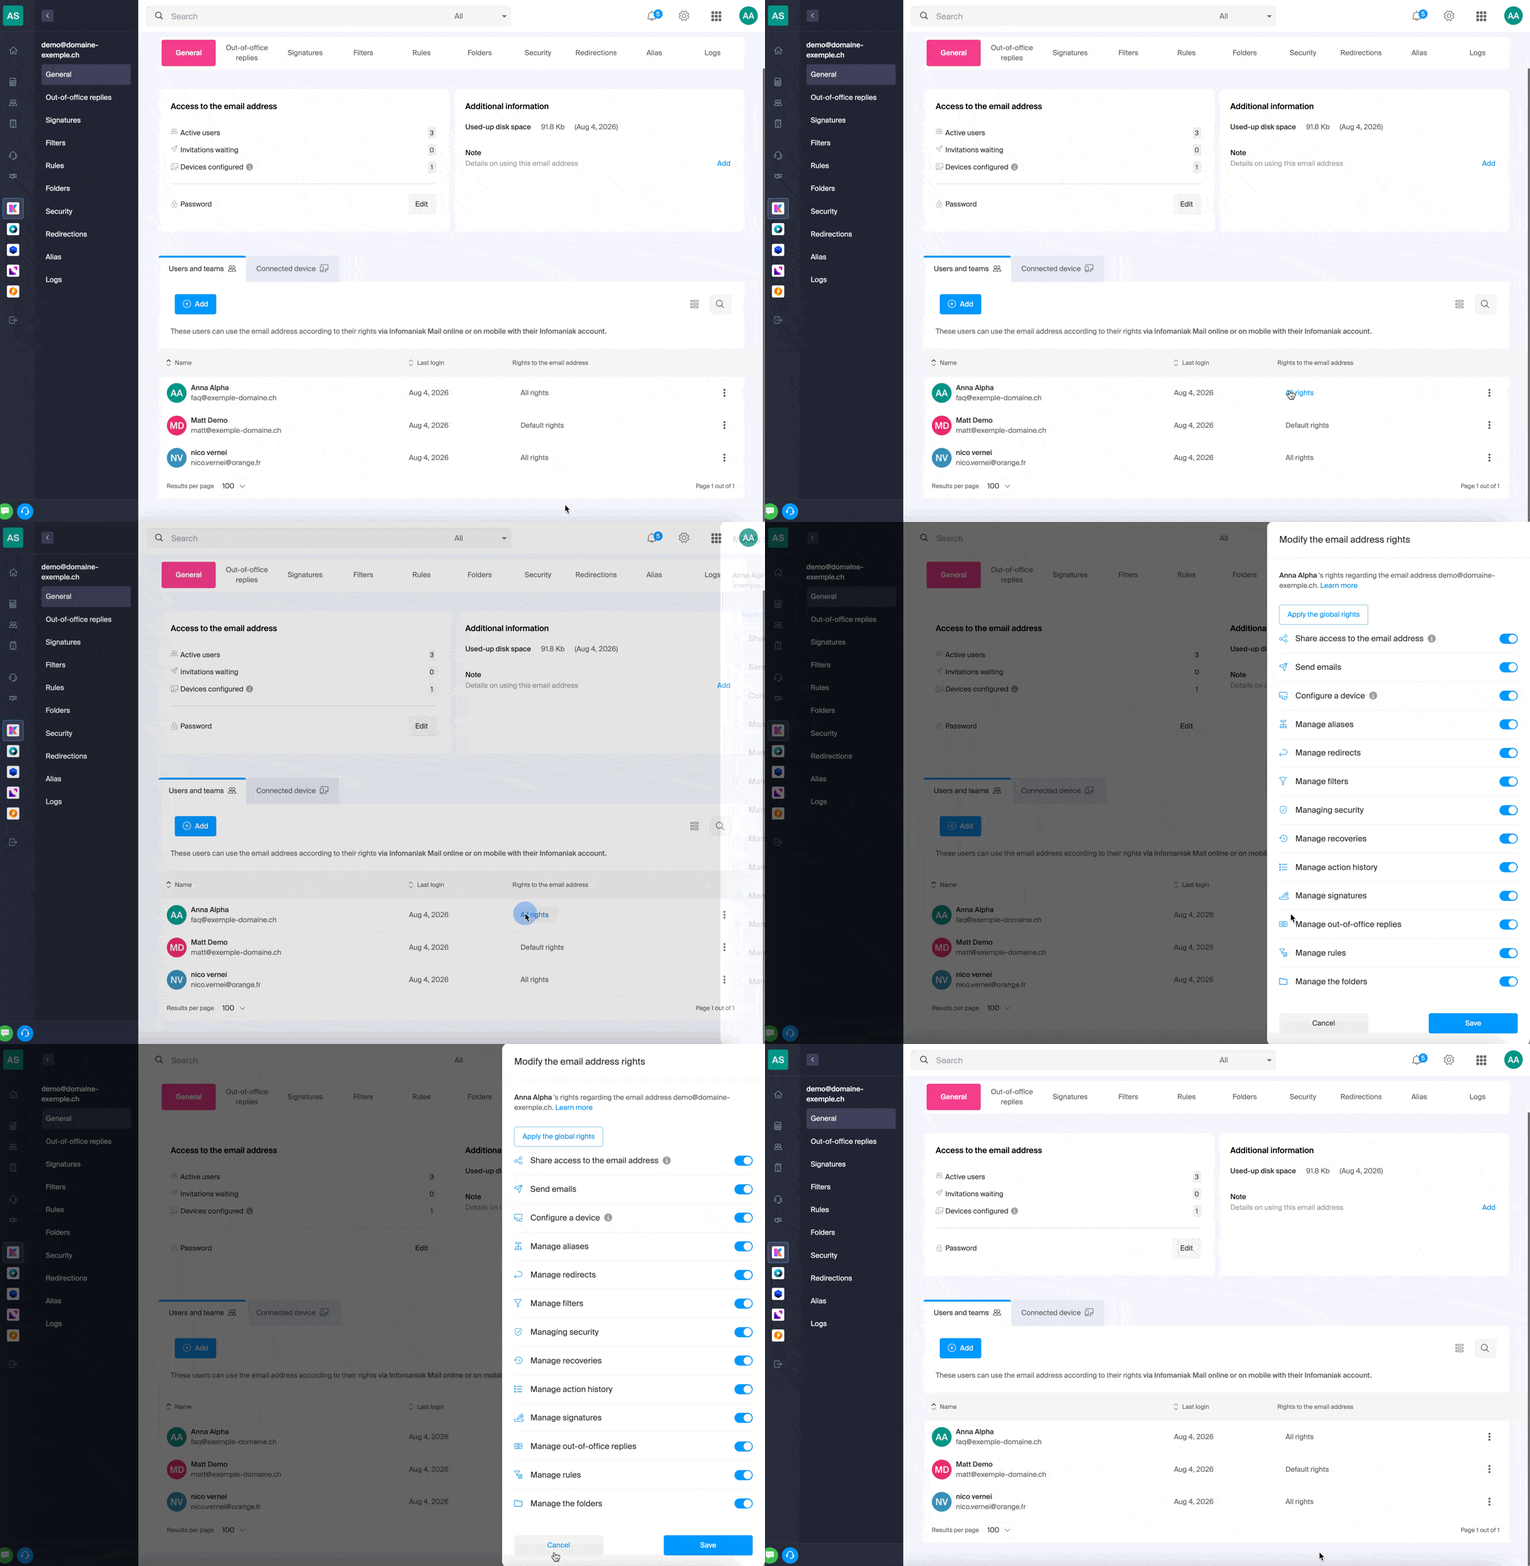
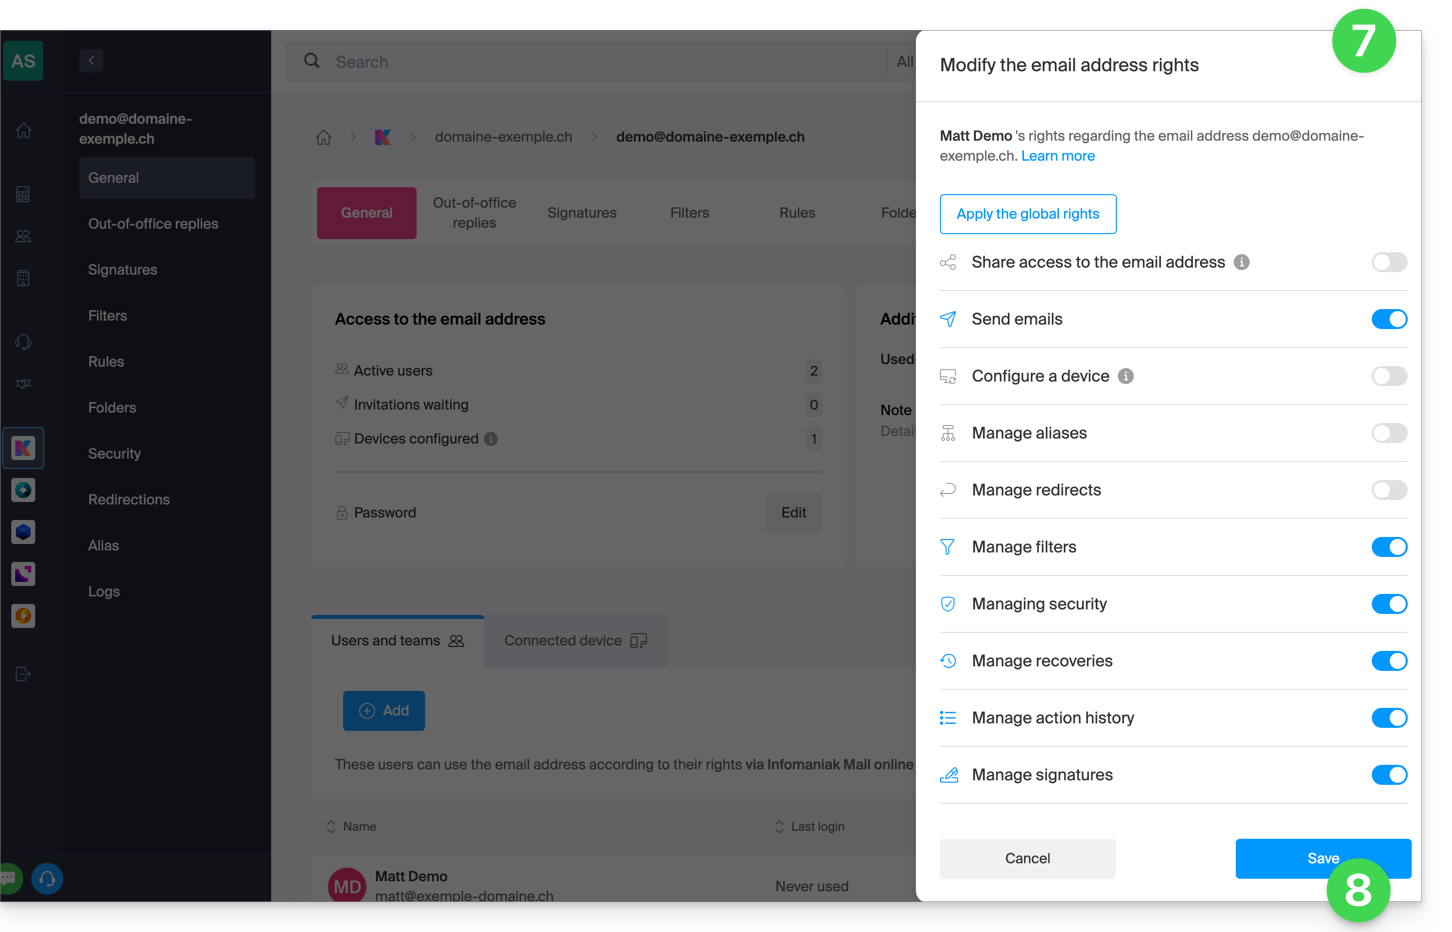
Basta clicar no botão correspondente para ativar ou desativar o direito específico. A seguir, a lista:
| Tipo / Ícone | Descrição da permissão concedida ao utilizador |
|---|---|
| Partilhar o acesso ao endereço de e-mail | Gerenciar usuários (possibilidade de delegar o acesso ao e-mail a outro usuário da Organização) |
| Configurar um dispositivo | Gerenciar dispositivos (possibilidade de criar uma senha dedicada) |
| Gerenciar os correios de voz | Criar uma resposta automática (por exemplo, configurar uma mensagem de ausência) |
| Gerenciar as assinaturas | Adicionar assinaturas e gerenciar os endereços de e-mail de resposta |
| Gerenciar os redirecionamentos | Redirecionar e-mails para um ou mais endereços |
| Gerenciar os alias | Criar variações do seu endereço de e-mail (modificando o que vem antes do @) |
| Gerenciar o histórico de ações | Acessar os registros do endereço de e-mail |
| Gerenciar as restaurações | Acessar as cópias de segurança e restaurações |
| Gerenciar os filtros | Acessar os filtros de SPAM e outros |
| Gerenciar as regras | Ordenar e classificar automaticamente os novos e-mails recebidos |
| Gerenciar as pastas | Personalizar as pastas IMAP |
| Gerenciar a segurança | Gerenciar os endereços bloqueados e aprovados |
| Gerenciar o envio de e-mail | Permitir o envio de e-mails (autorizar o SMTP global) |
Gerenciar as permissões concedidas a um usuário
A senha para acessar sua conta Infomaniak pode ser solicitada para efetuar uma modificação nas permissões.
… a partir do Serviço de E-mail
- Clique aqui para acessar o gerenciamento do seu Serviço de E-mail no painel de controle Infomaniak (precisa de ajuda?).
- Clique diretamente no nome atribuído ao Serviço de Email em questão.
- Clique no endereço de email correspondente na tabela que aparece.
- Existem várias maneiras de modificar as permissões de um endereço de e-mail:
- Ao adicionar um utilizador a um endereço de e-mail:
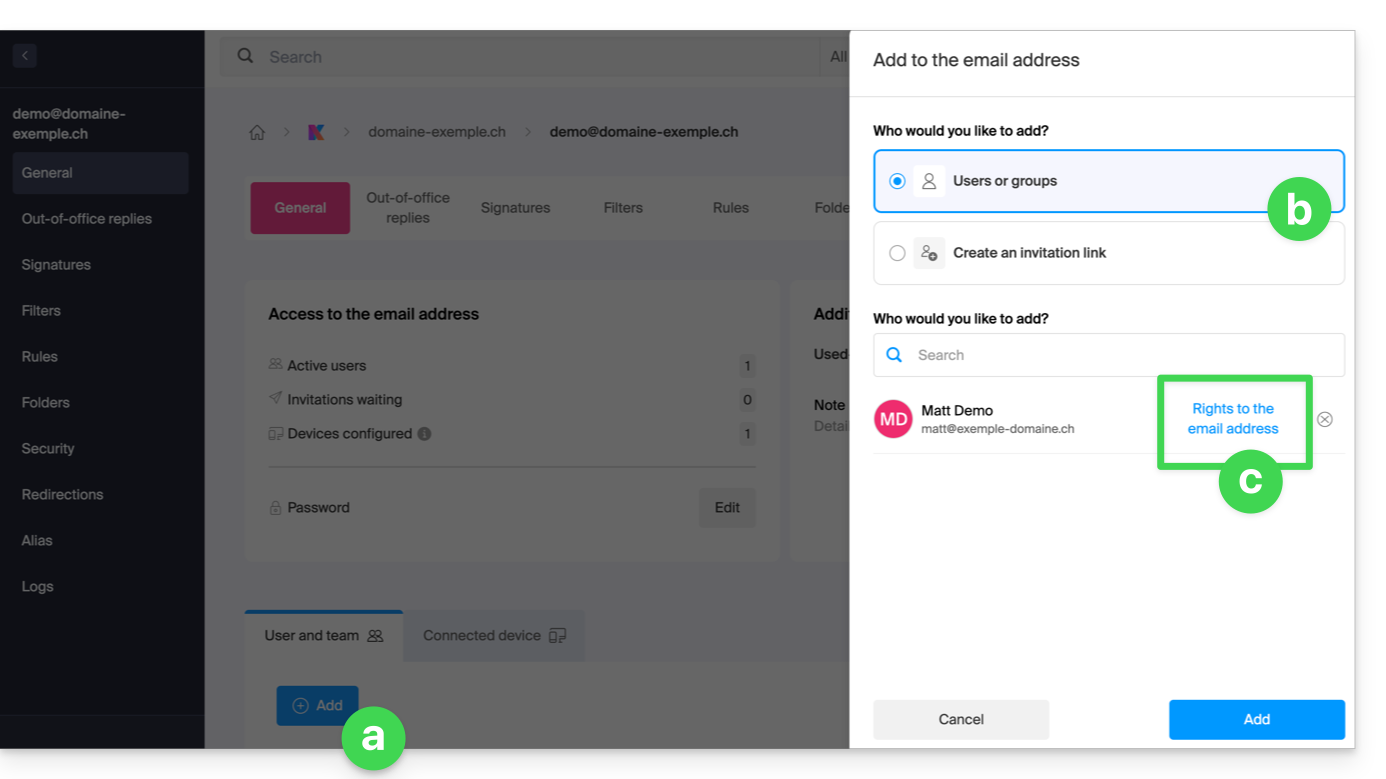
- Depois de o utilizador ter sido adicionado:
- Clique no menu de ações ⋮ localizado à direita do nome do utilizador do endereço de e-mail.
- Selecione ✎ Editar permissões.
- Ou clique diretamente na indicação relativa às suas permissões:
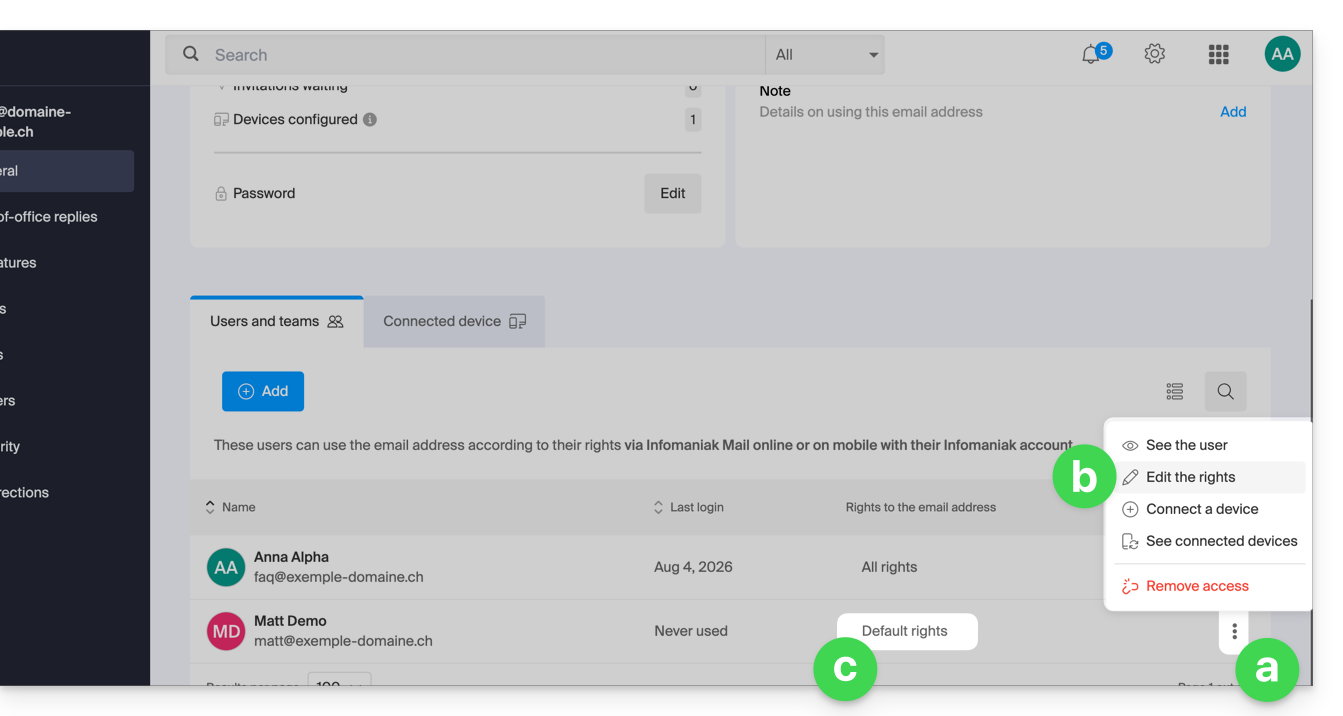
- Ao adicionar um utilizador a um endereço de e-mail:
… a partir do painel de controlo (gestão de utilizadores)
- Clique aqui para acessar o gerenciamento de usuários no painel de controle Infomaniak (precisa de ajuda?).
- Clique no usuário desejado na tabela que aparece.
- Expanda a seção de ferramentas de colaboração clicando na seta para baixo .
- Expanda a seção de endereços de e-mail acessíveis ao usuário clicando na seta para baixo .
- Clique no menu de ações ⋮ localizado à direita do endereço de e-mail em questão.
- Selecione Modificar permissões.
- Ou clique diretamente nos ícones visíveis na tabela:
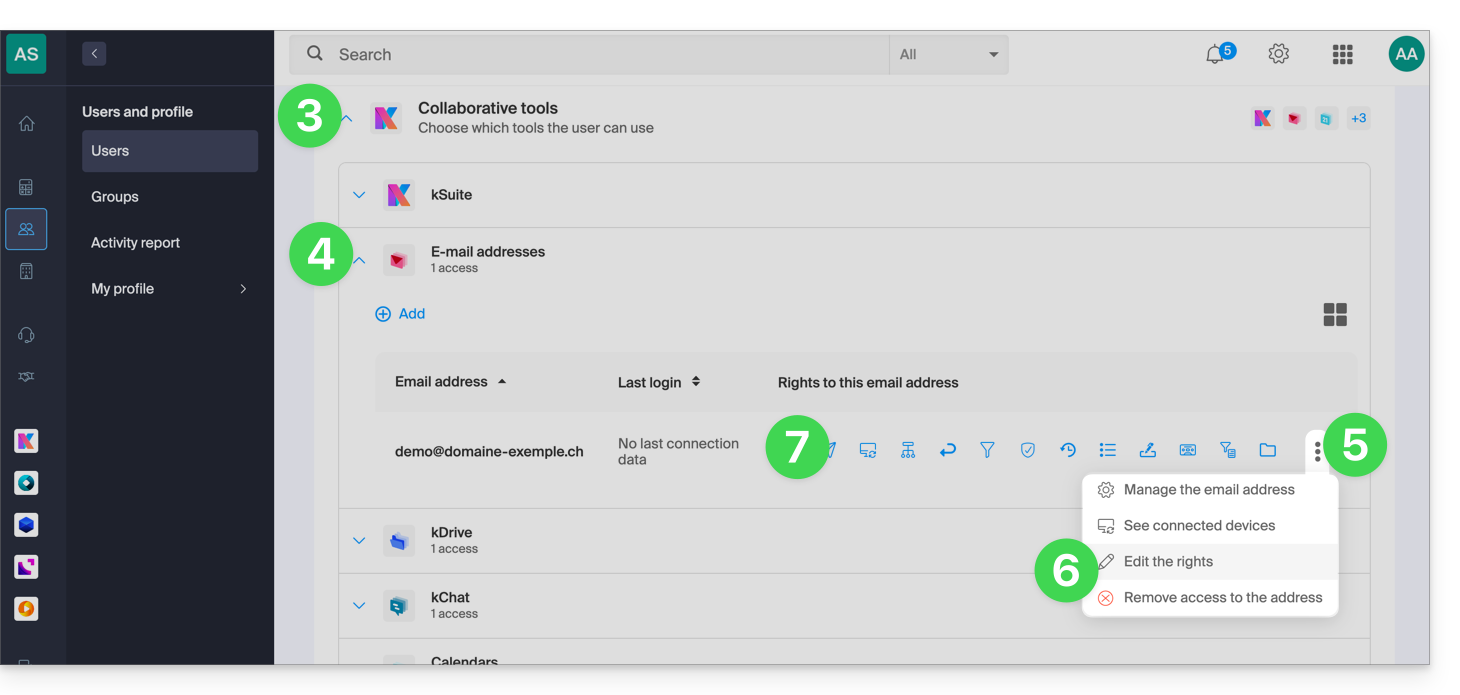
… a partir do aplicativo Web Mail
- Clique aqui para acessar o aplicativo web Mail da Infomaniak (serviço online ksuite.infomaniak.com/mail).
- Clique no ícone Configurações no canto superior direito da interface.
- Verifique ou selecione o endereço de e-mail em questão no menu suspenso do menu lateral esquerdo.
- Clique em Compartilhado com.
- Clique em o menu de ações ⋮ localizado à direita do nome de usuário do endereço de e-mail.
- Selecione ✎ Editar permissões:
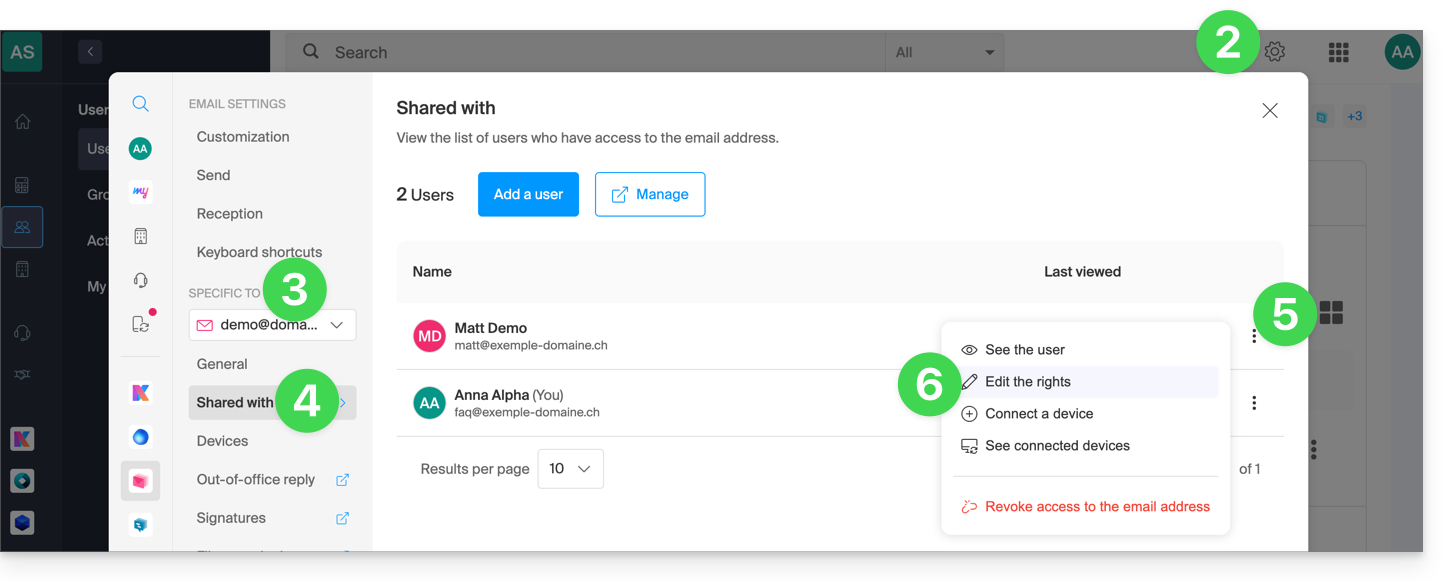
- Você será redirecionado para as configurações do seu endereço de e-mail no Serviço de E-mail e, mais especificamente, para a seção de permissões do usuário em questão.
- Ajuste as permissões e salve na parte inferior da página:
Resultado para o utilizador
O utilizador a quem são removidas permissões não verá mais determinados menus correspondentes nas configurações do seu endereço de e-mail.
Para algumas funcionalidades, mesmo que o menu continue acessível, alguns botões estarão inoperantes ou desativados: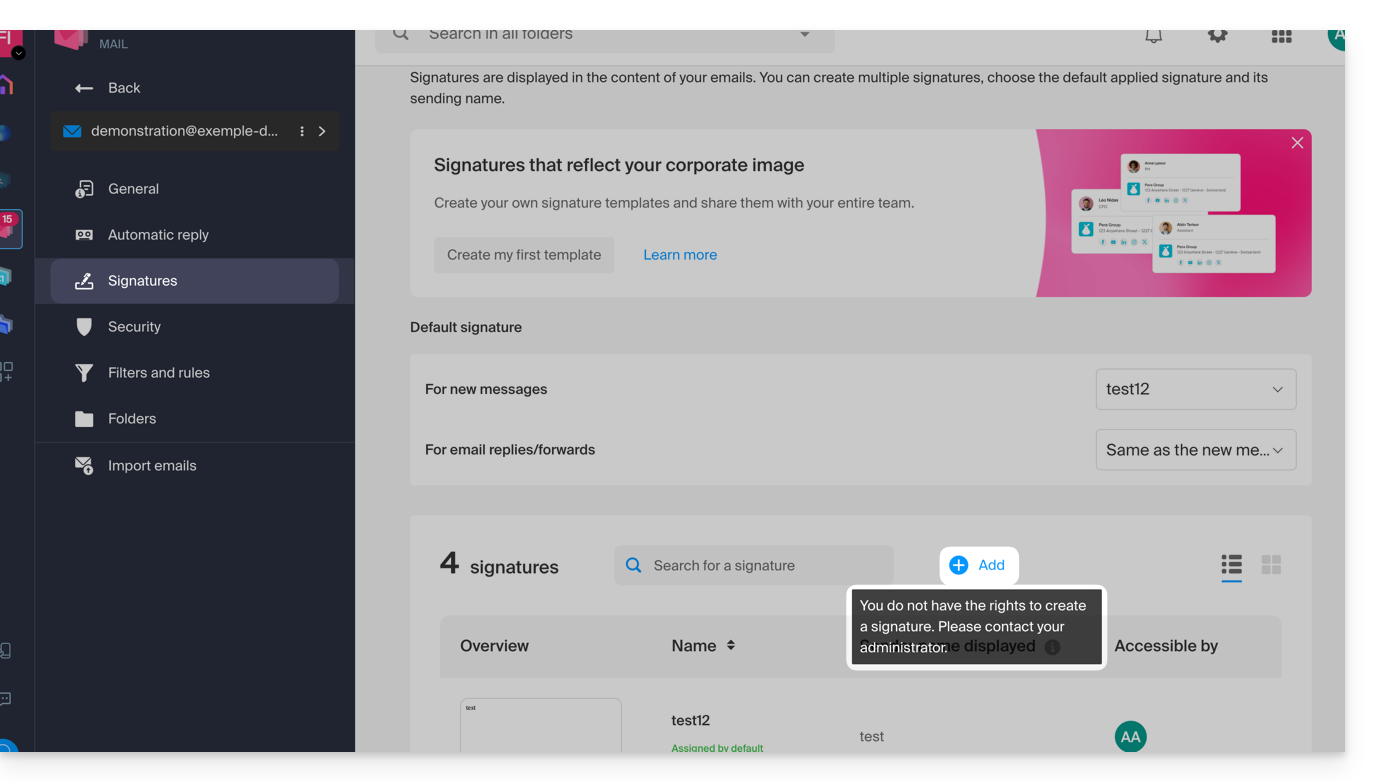
Link para esta FAQ: https://faq.infomaniak.com/1811
Esta seção de perguntas frequentes foi útil?
Para combater o spam e proteger os seus contactos contra o roubo de endereços de e-mail, pode acontecer que o envio de e-mails a partir de um determinado endereço seja bloqueado (bloqueio SMTP). Esta medida de proteção é automática e não afeta a receção de e-mails.
Suspensão do envio
Se o endereço de e-mail de um utilizador Infomaniak enviar um grande número de mensagens, pode tratar-se de uma ação realizada de forma
VOLONTAIRE
ou INVOLUNTÁRIA (por exemplo, em caso de pirataria do endereço)
Em ambos os casos, a Infomaniak corre o risco de ser bloqueada por fornecedores como a Microsoft ou o Gmail, o que afetaria todos os clientes.
A Infomaniak implementou, portanto, medidas de segurança para limitar ao máximo este risco, garantindo a entrega dos e-mails e protegendo os seus contactos contra e-mails indesejados.
Desbloqueio de envios ou proteção da conta
O responsável legal e o utilizador do endereço são imediatamente informados por e-mail em caso de bloqueio de envios; eles têm, então, a possibilidade de desbloquear rapidamente os envios suspensos através de uma ferramenta de desbloqueio, cujo link está na mensagem informativa:
- Se o envio for legítimo, o endereço será desbloqueado e você não será mais bloqueado no futuro com envios semelhantes.
- Caso contrário, você será orientado a alterar a senha do endereço de e-mail para prosseguir com o desbloqueio.
Link para esta FAQ: https://faq.infomaniak.com/1821
Esta seção de perguntas frequentes foi útil?
Este guia explica como criar regras de triagem no modo Avançado, scripts na linguagem Sieve, para classificar automaticamente os seus e-mails recebidos na Infomaniak, de acordo com determinadas condições.
✘ INDISPONÍVEL com
kSuite Free
my kSuite (ik.me, etik.com, ikmail.com)
Serviço de e-mail Starter
Introdução
- Se não tiver uma oferta compatível ou se preferir uma configuração simplificada, consulte este outro guia.
- ⚠️ Não é fornecido suporte para a linguagem Sieve (consulte esta documentação — descubra também o papel do provedor de hospedagem).
- Ao contrário das regras de organização propostas nos programas/clientes de e-mail(Microsoft Outlook, Mozilla Thunderbird, Apple Mail...), essas regras atuarão diretamente no servidor das suas caixas de e-mail, antes mesmo da conexão IMAP.
- É possível importar arquivos Sieve por meio de um botão.
- Ao ativar este modo, as regras padrão existentes serão mantidas, mas desativadas.
- O comando
redirect(que permite encaminhar um e-mail para outro endereço) não é permitido nos scripts.- Se importar um script Sieve de outro provedor, certifique-se de remover este comando.
- Para encaminhar e-mails, use o assistente no modo Padrão ou a seção Redirecionamentos do seu Serviço de E-mail.
Aceder às regras a partir da aplicação Web Mail Infomaniak
Pré-requisitos
- Ter permissão para gerenciar as regras: se você foi convidado para o aplicativo web Mail Infomaniak (serviço online ksuite.infomaniak.com/mail)para gerir o seu endereço, é possível que o administrador do Serviço de Email tenharemovido esse direito a partir da sua conta de administrador.
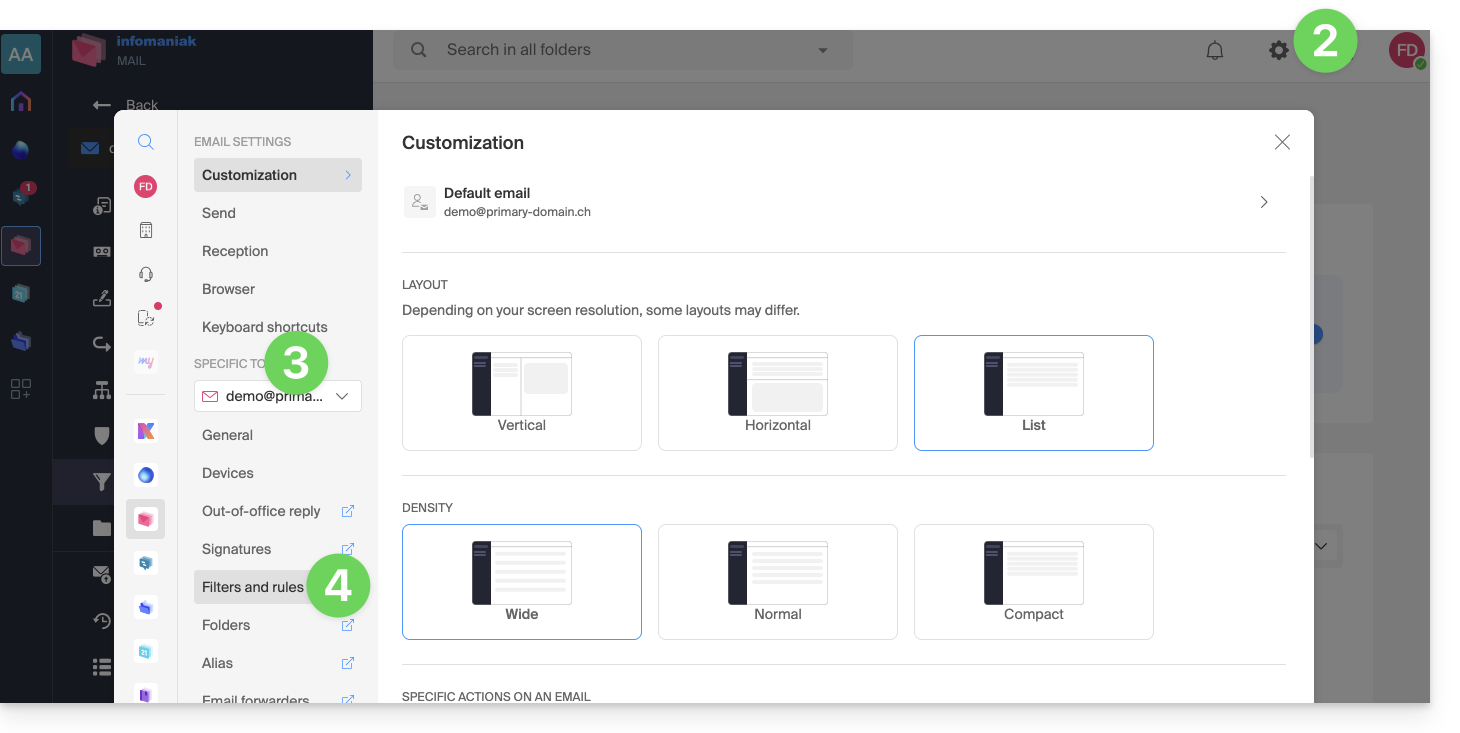
Para aceder aos filtros de ordenação para a sua conta de e-mail Infomaniak:
- Clique aqui para aceder à aplicação web Mail da Infomaniak (serviço online ksuite.infomaniak.com/mail).
- Clique no ícone Configurações no canto superior direito.
- Verifique ou selecione o endereço de e-mail correspondente no menu suspenso.
- Clique em Filtros e regras:
Aceder às regras a partir de um Serviço de Email
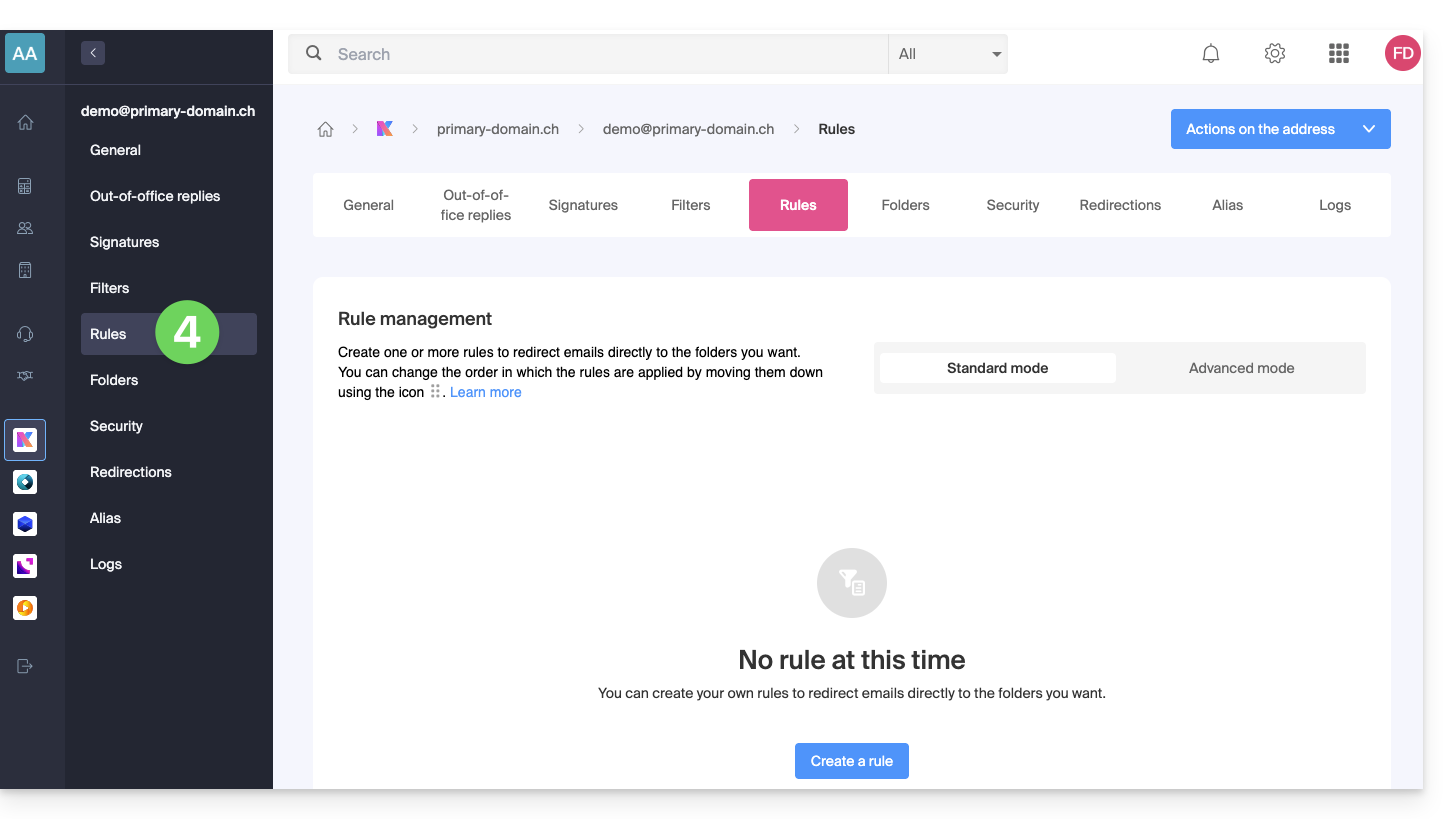
Para acessar os filtros de classificação para sua conta de e-mail Infomaniak:
- Clique aqui para acessar o gerenciamento do seu produto no Manager Infomaniak (precisa de ajuda?).
- Clique diretamente no nome atribuído ao produto em questão.
- Clique no endereço de e-mail correspondente na tabela que aparece.
- Clique na aba Regras no menu lateral esquerdo (ou na barra superior):
Criar uma nova regra no modo Avançado (especialista)
- Certifique-se de clicar no modo Avançado:
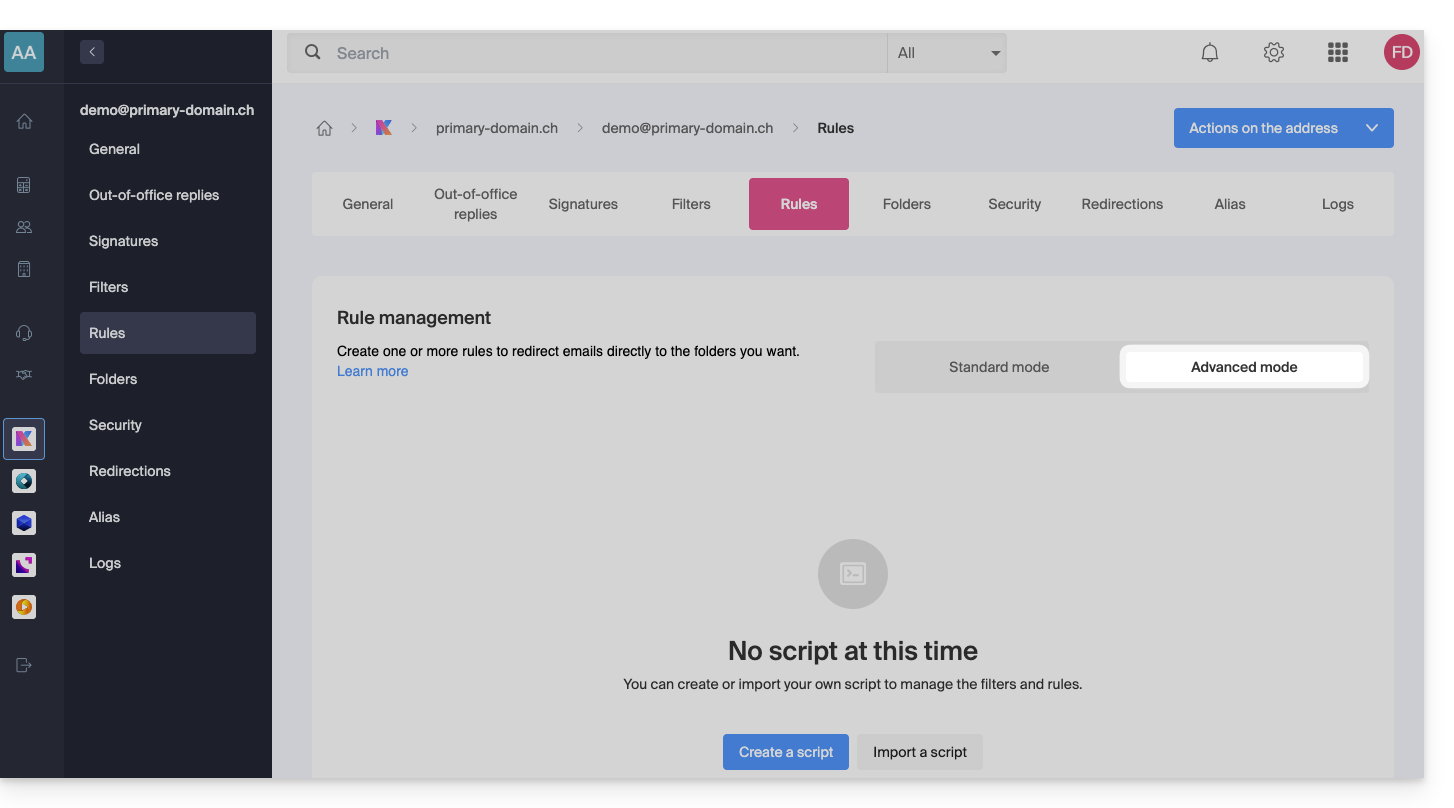
Primeiro exemplo de ordenação avançada
Aqui está um exemplo simples de um comando que utiliza esta linguagem:
require ["fileinto"];
if address :contains "from" "facebook.com" {
    fileinto "fb";
} elsif header :matches "List-Unsubscribe" "*" {
    fileinto "nl";
} else {
    keep;
}
Explicações:
- Carregamento das extensões necessárias: utilize
require ["fileinto"];para indicar que irá utilizar a funçãofileinto. - Filtragem das mensagens do Facebook: utilize
if address :contains "from" "facebook.com"para verificar se o endereço do remetente contém "facebook.com"; caso afirmativo, a mensagem é classificada na pasta "fb" comfileinto "fb";. - Filtragem de mensagens com um link de cancelamento de inscrição: utilize
elsif header :matches "List-Unsubscribe" "*"para verificar se o cabeçalho "List-Unsubscribe" está presente na mensagem; caso afirmativo, a mensagem é classificada na pasta "nl" comfileinto "nl";. - Conservação das outras mensagens: utilize
else { keep; }para conservar todas as outras mensagens que não correspondem aos critérios anteriores.
Atenção:
- Se precisar mencionar uma subpasta, use o separador
/(como no segundo exemplo), mas não é necessário especificarINBOXnos seus códigos. - Certifique-se de que as pastas "
fb" e "nl" já existem na sua caixa de entrada; caso contrário, as mensagens podem não ser classificadas corretamente. - O filtro
address :contains "from" "facebook.com"funciona corretamente para os endereços que contêm "facebook.com" no campo "from". - O filtro
header :matches "List-Unsubscribe" "*"verifica apenas a presença do cabeçalho "List-Unsubscribe", não o seu conteúdo.
Segundo exemplo de ordenação avançada
Este código modifica o assunto com base no remetente (adiciona um prefixo ao assunto quando um e-mail passa pelo filtro, por exemplo):
require ["fileinto", "editheader", "variables", "regex"];
if address "sender" "owner-scientific-linux-devel at LISTSERV.FNAL.GOV" {
    if header :regex "subject" "((Re|Fwd): *)\\[SCIENTIFIC-LINUX-DEVEL\\] *(.*)" {
        deleteheader "Subject";
        addheader "Subject" "${1}${3}";
    } else {
        # Ajouter un préfixe si l'objet ne correspond pas déjà au modèle
        deleteheader "Subject";
        addheader "Subject" "[SL-Devel] ${1}";
    }
    fileinto "Mail List/SL-Devel";
}
Explicações:
- Extensões necessárias:
fileinto: para classificar as mensagens em pastas.editheader: para modificar os cabeçalhos dos e-mails.variables: para usar variáveis nas expressões.regex: para expressões regulares.
- Condição sobre o remetente:
if address "sender" "owner-scientific-linux-devel at LISTSERV.FNAL.GOV": verifica se o remetente corresponde.
- Condição sobre o assunto:
if header :regex "subject" "((Re|Fwd): *)\\[SCIENTIFIC-LINUX-DEVEL\\] *(.*)": verifica se o assunto corresponde ao padrão especificado.deleteheader "Subject";eaddheader "Subject" "${1}${3}";: remove o assunto existente e adiciona um novo assunto com as partes capturadas.
- Adicionar um prefixo se o assunto ainda não corresponder ao modelo:
addheader "Subject" "[SL-Devel] ${1}";: adiciona um prefixo "[SL-Devel]" ao assunto, caso ele ainda não esteja presente.
- Classificação da mensagem:
fileinto "Mail List/SL-Devel";: classifica as mensagens na pasta "Mail List/SL-Devel".
Atenção:
- Certifique-se de que a pasta "
Mail List/SL-Devel" já existe na sua caixa de entrada. - Verifique se o script modifica corretamente o assunto dos e-mails para adicionar ou ajustar o prefixo, se necessário.
Link para esta FAQ: https://faq.infomaniak.com/1839
Esta seção de perguntas frequentes foi útil?
Este guia explica como partilhar rapidamente por e-mail conteúdo presente na aplicação web kDrive da Infomaniak (serviço online ksuite.infomaniak.com/kdrive).
Partilhar por e-mail a partir do kDrive
Pode enviar por e-mail um ficheiro (ou melhor, um link para um ficheiro, pois o e-mail não conterá um anexo) do seu kDrive:
- Clique aqui para aceder à aplicação web kDrive (serviço online ksuite.infomaniak.com/kdrive).
- Clique com o botão direito do mouse no arquivo/pasta desejado ou clique no menu de ação ⋮ à direita do item em questão.
- No menu suspenso que aparece, escolha compartilhar o item por e-mail:
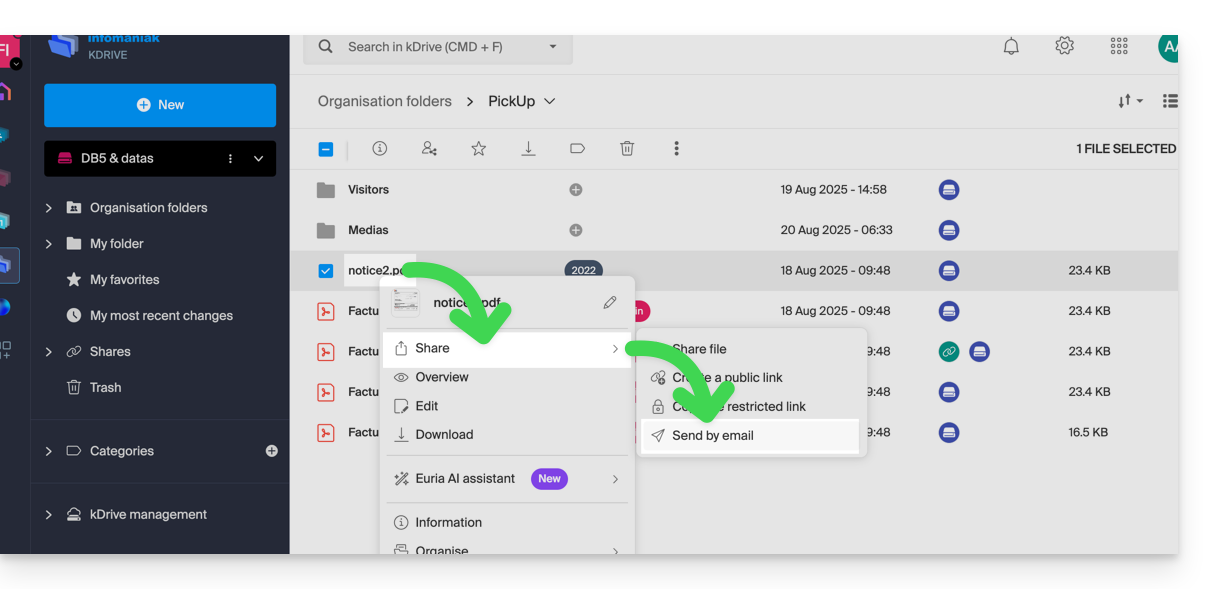
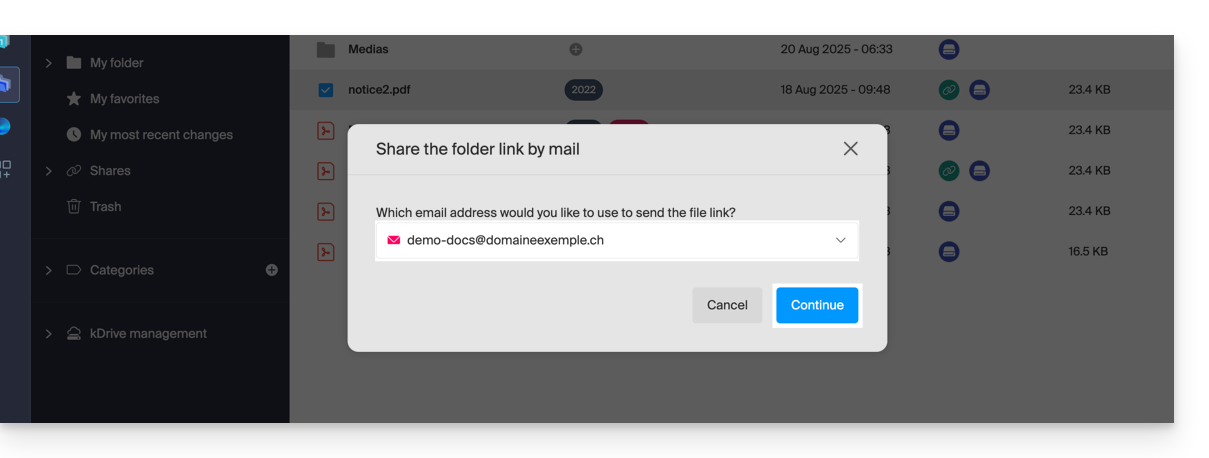
- Escolha qual endereço (entre os endereços atualmente associados à sua aplicação web Mail) usar para enviar o arquivo.
- Clique em Continuar:
- O aplicativo web Mail abre no navegador e o corpo da mensagem contém automaticamente os links para o conteúdo compartilhado:
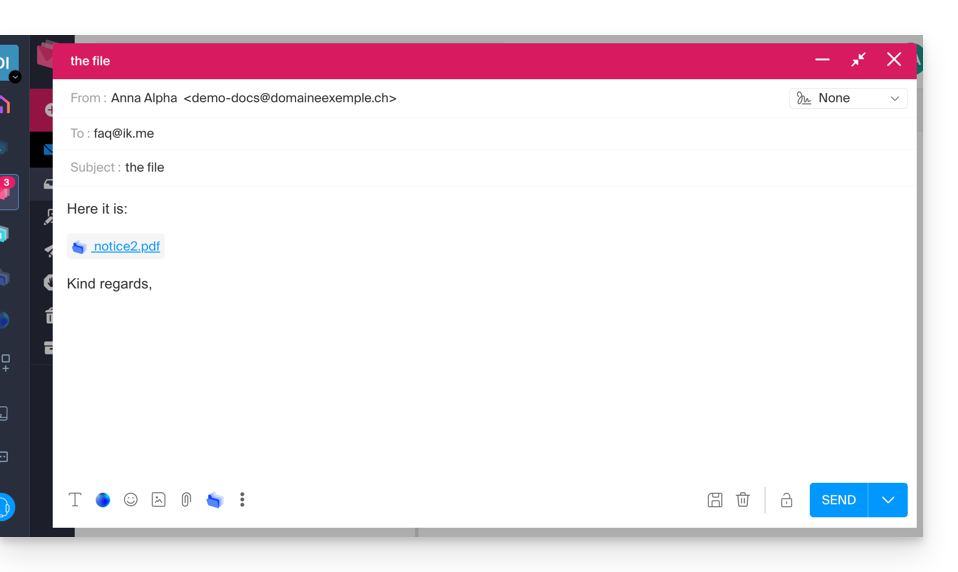
- Este é exatamente o mesmo método que você usaria se selecionasse o arquivo diretamente a partir do ícone kDrive na janela de redação do aplicativo web Mail:
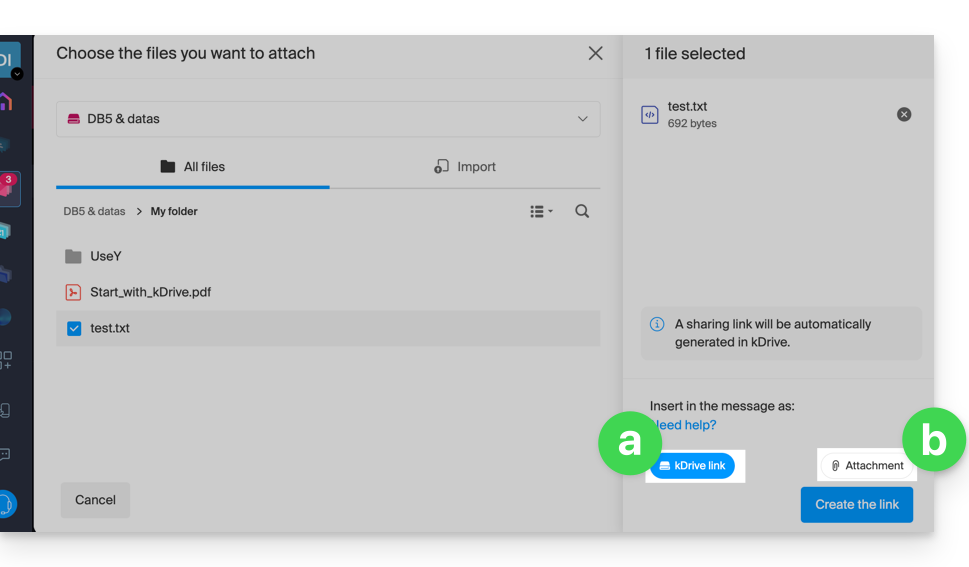
- No entanto, ao fazer isso (vincular um arquivo kDrive diretamente do Mail), uma opção adicional permite anexar o arquivo em si como um anexo (o arquivo será enviado no estado em que se encontra no momento em que você o seleciona; não há mais a noção de colaboração / compartilhamento, como é o caso com o método explicado neste guia e na opção do item “
a” acima).
- Este é exatamente o mesmo método que você usaria se selecionasse o arquivo diretamente a partir do ícone kDrive na janela de redação do aplicativo web Mail:
Convidar para colaborar no arquivo
Para documentos com extensões de arquivo do tipo Office, como .docx, .xls, etc., recomenda-se realizar um compartilhamento padrão do documento (veja a imagem abaixo), o que permite autorizar a edição do documento, caso deseje: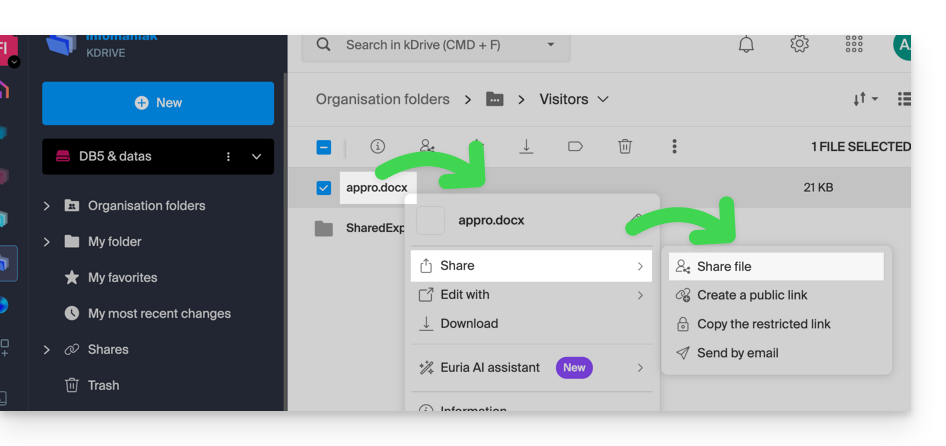
- Se você autorizar a edição do documento a partir do kDrive, o usuário poderá colaborar (com ou sem registro prévio), ou seja, editar no navegador e, em seguida, salvar o documento que você compartilhou:
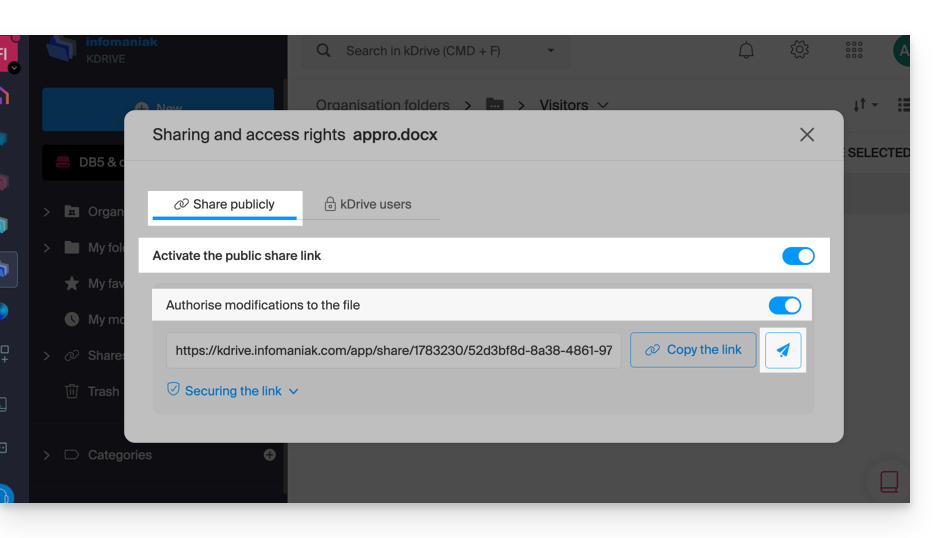
Link para esta FAQ: https://faq.infomaniak.com/1854
Esta seção de perguntas frequentes foi útil?