Base de conhecimento
1000 perguntas frequentes, 500 tutoriais e vídeos explicativos. Aqui, você encontra apenas soluções!
Este guia aborda o suporte de funções de hash seguras (nomeadamente SHA-256) pelos servidores Infomaniak, bem como a importância da segurança dos certificados SSL/TLS através da utilização de CSRs gerados com SHA-256.
Algoritmo de hash SHA-256
A função de hash criptográfico SHA-1 é compatível e os servidores Infomaniak também suportam a função SHA-256, útil, nomeadamente, para Paypal e SaferPay (SIX).
Os CSR (pedidos de assinatura de certificado) são em SHA-256 e não em SHA-1.
Link para esta FAQ: https://faq.infomaniak.com/1441
Esta seção de perguntas frequentes foi útil?
Este guia explica como exibir o endereço IP de um site em sua Hospedagem Web.
Introdução
- O endereço IPv4 é, em princípio, o mesmo para cada um dos sites hospedados (a menos que você tenha adquirido um IP dedicado).
Exibir o endereço IP do seu site
O endereço IP é especificado na página de gestão da hospedagem (Starter ou que contém vários sites):
- Clique aqui para acessar a gestão do seu site no Manager Infomaniak (precisa de ajuda?).
- Clique diretamente no nome atribuído ao produto em questão.
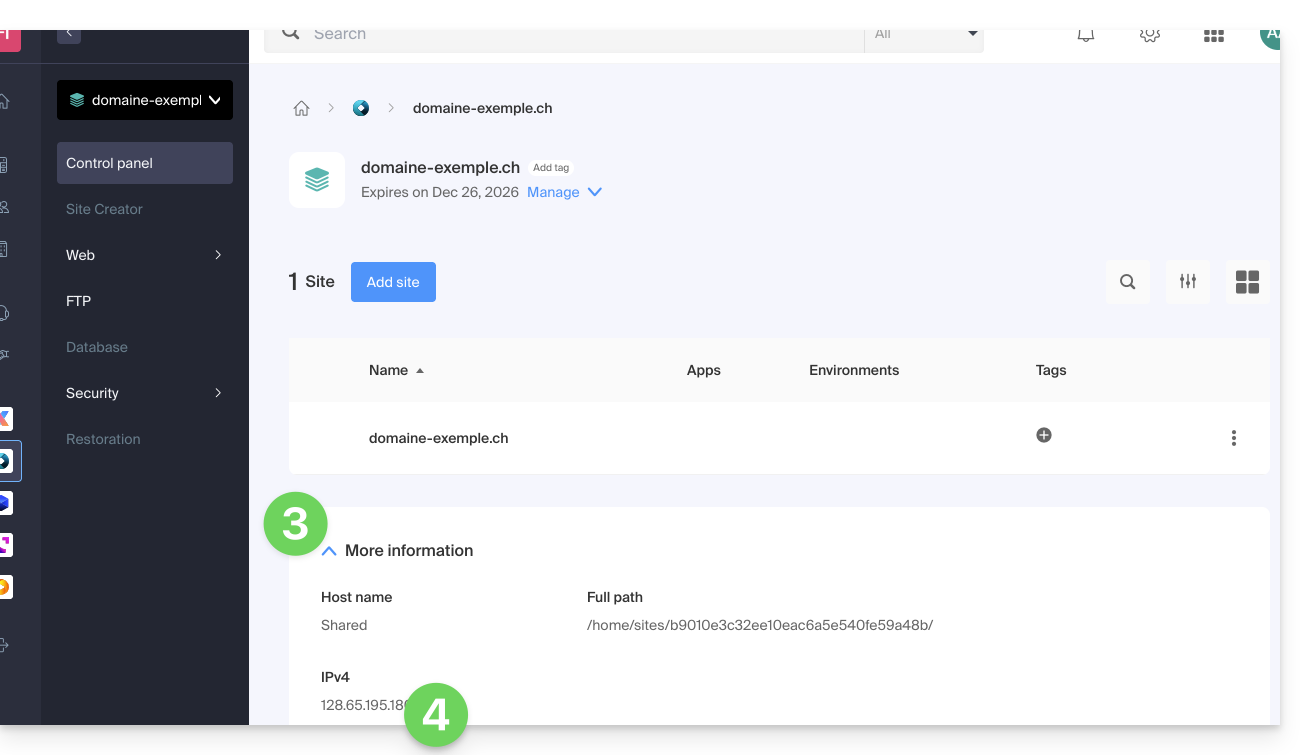
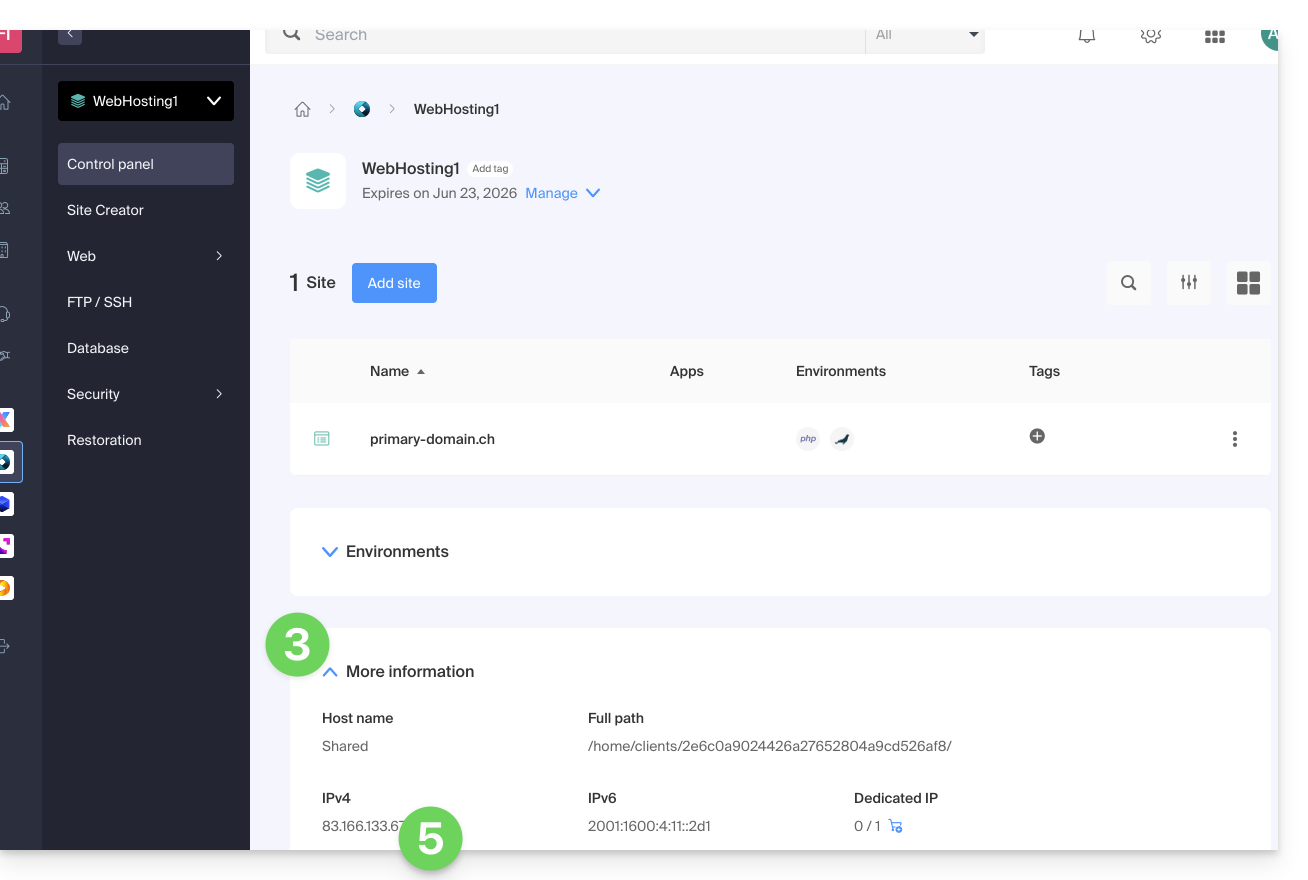
- Em seguida, clique na seta para baixo para expandir a seção Informações deste serviço de hospedagem.
- O endereço IPv4 é exibido na página:
- O endereço IPv6 também é exibido no caso das hospedagens pagas:
Link para esta FAQ: https://faq.infomaniak.com/1500
Esta seção de perguntas frequentes foi útil?
Este guia detalha os erros do tipo "502 Bad Gateway" que podem ocorrer ao visitar um site.
Introdução
- O erro 502 Bad Gateway ocorre quando o servidor que atua como intermediário entre o navegador e o servidor web original recebe uma resposta inválida.
- Este erro pode ser causado por um servidor web sobrecarregado, problemas de comunicação entre uma CDN e o servidor web de hospedagem ou um servidor proxy mal configurado.
- Às vezes, o erro pode ser causado por uma entrada incorreta no servidor DNS.
Possíveis soluções
Para resolver o erro 502 Bad Gateway, geralmente é necessário proceder por eliminação:
- Verifique se não se trata de uma sobrecarga momentânea do servidor: basta recarregar a página após alguns minutos para que o erro desapareça.
- Limpe o cache do navegador.
- Tente usar outro navegador.
Link para esta FAQ: https://faq.infomaniak.com/1509
Esta seção de perguntas frequentes foi útil?
Este guia explica como alterar o URL do seu site a partir da aplicação Joomla instalada no seu Hospedagem Web Infomaniak (apenas no caso de ter instalado o Joomla através das ferramentas dedicadas oferecidas pela Infomaniak).
Isto permite atribuir um nome de domínio diferente ao seu site Joomla.
Pré-requisitos
- O nome de domínio que pretende utilizar deve ser previamente adicionado como alias do domínio principal no site em questão.
Alterar o nome de domínio do Joomla
Para alterar o endereço do site criado com o Joomla para outro nome de domínio que já esteja presente na mesma Organização:
- Clique aqui para acessar o gerenciamento do seu site no painel de controle Infomaniak (precisa de ajuda?).
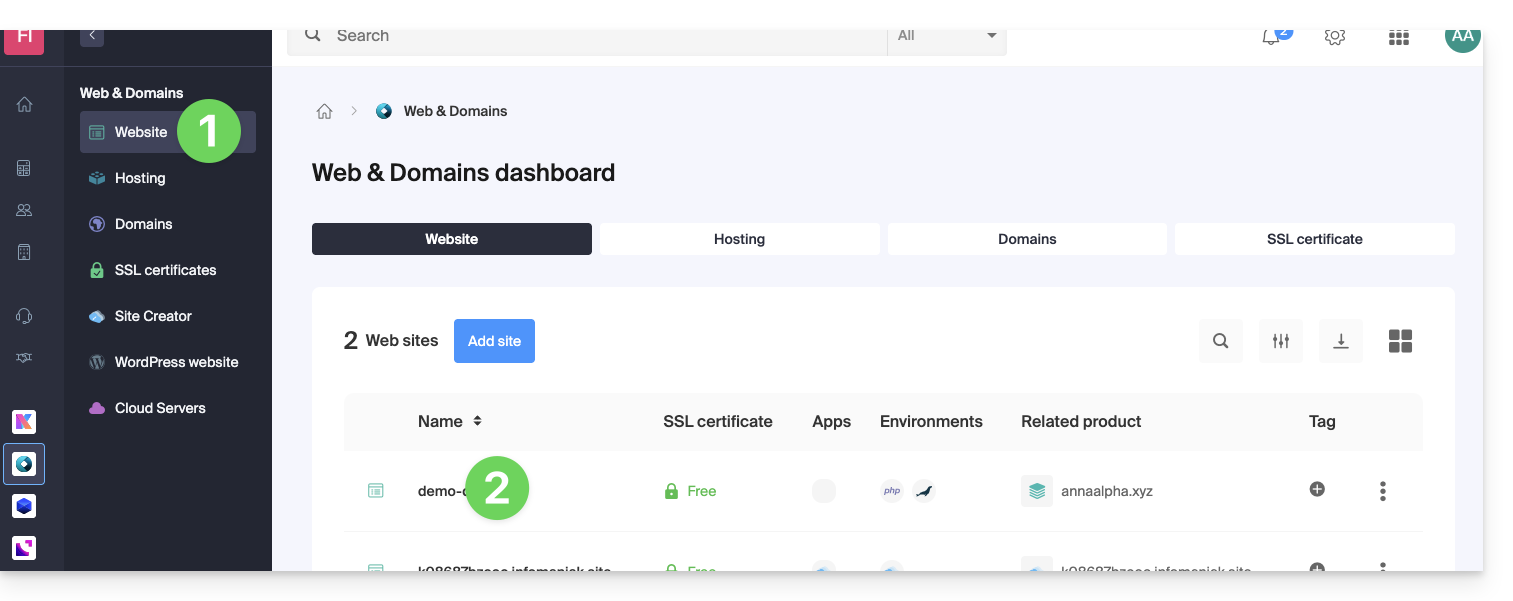
- Clique diretamente no nome atribuído ao produto em questão:
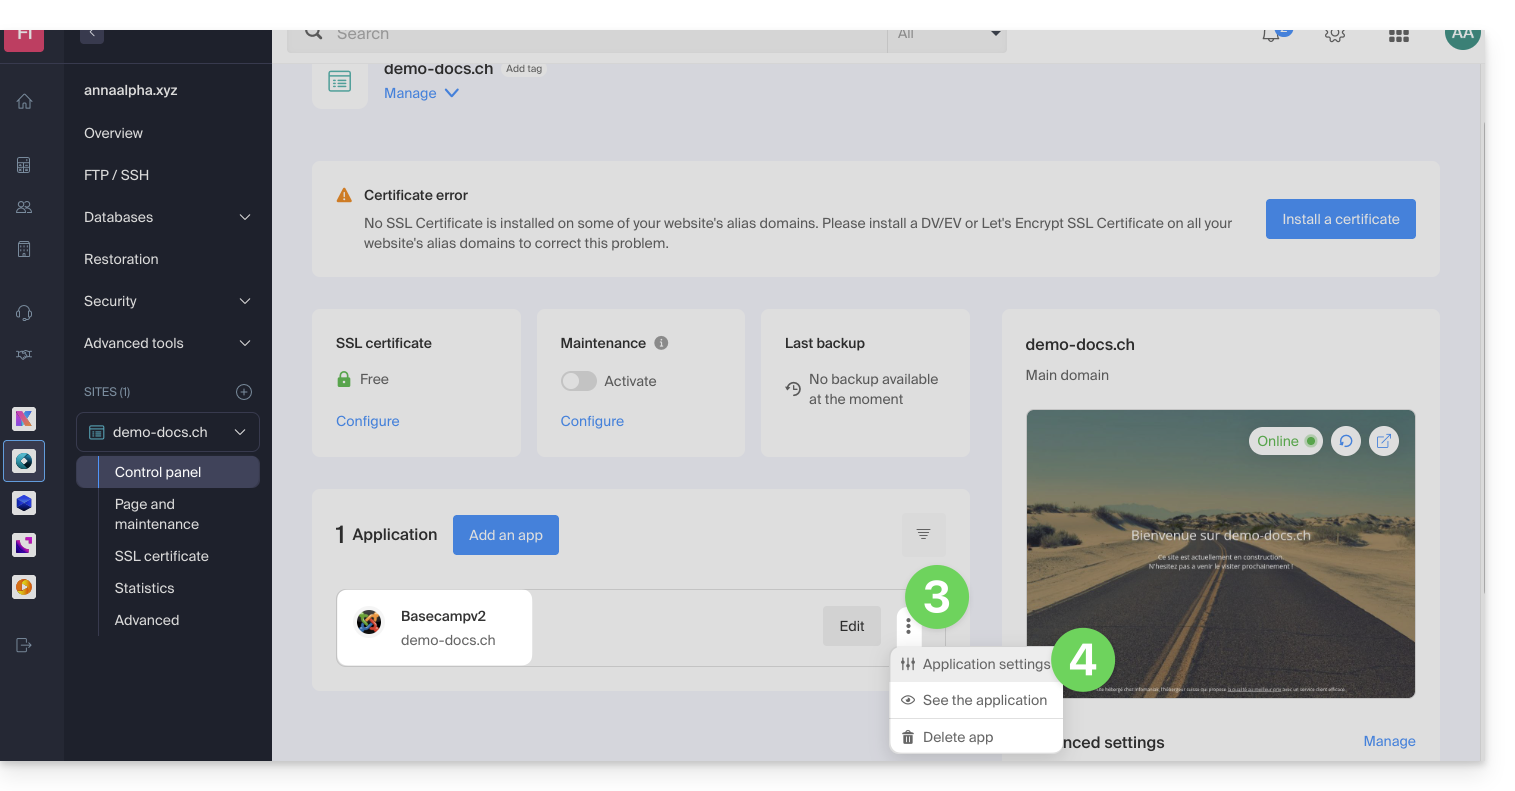
- Clique em o menu de ações ⋮, localizado à direita da aplicação web em questão.
- Clique em Configurações da aplicação:
- Clique em Editar à direita do Joomla:
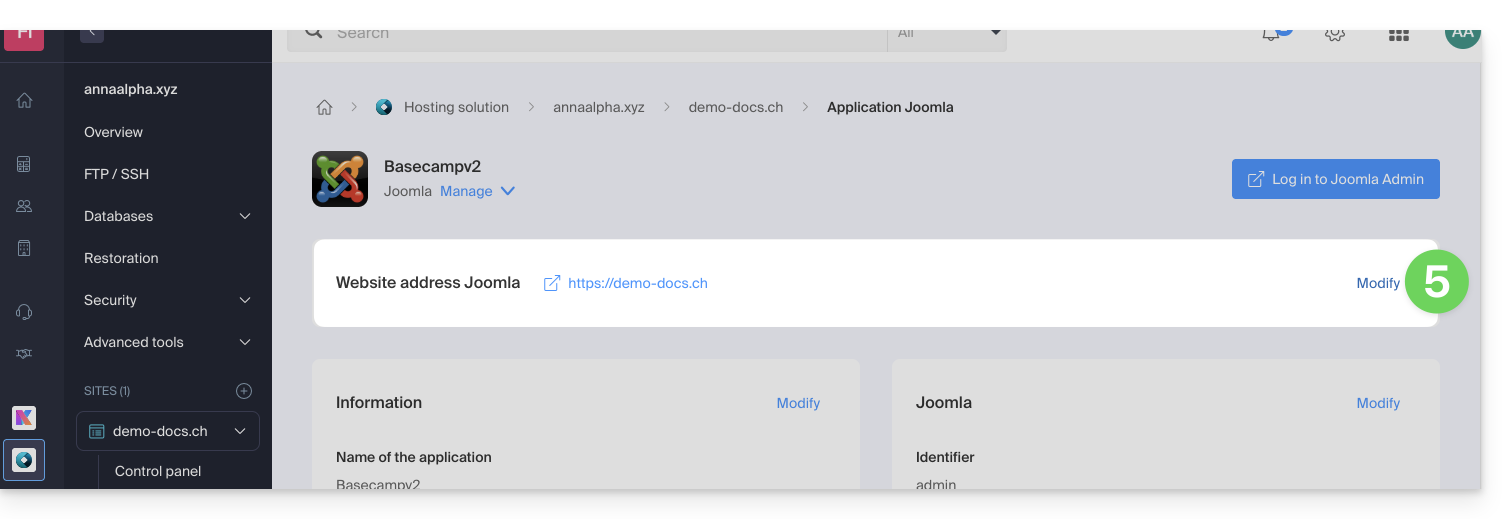
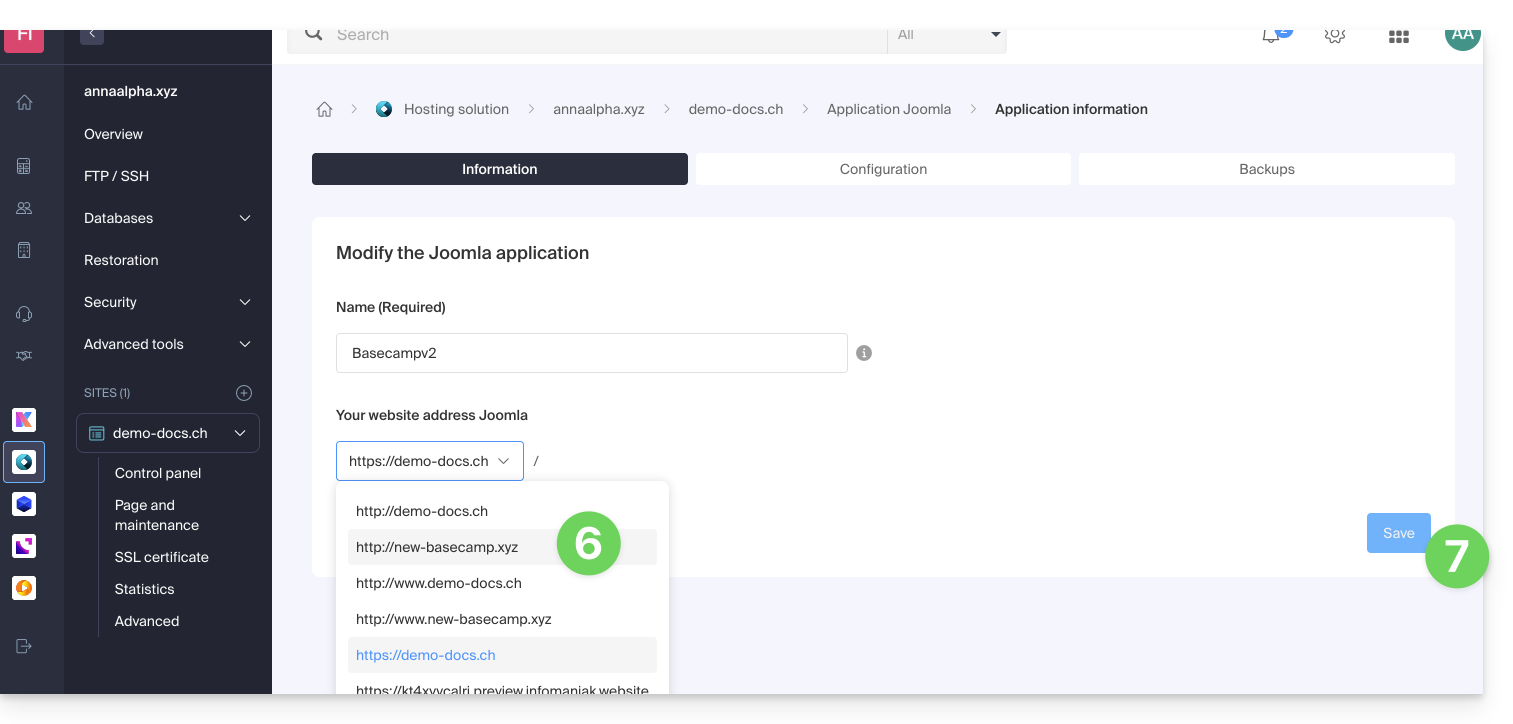
- Em URL do site, selecione o endereço web desejado no menu suspenso:
- Se você não tiver seguido os pré-requisitos acima, o domínio desejado não aparecerá, mesmo que esteja registrado na mesma organização.
- Se você adicionou o domínio como um alias do site, o domínio desejado aparecerá e você poderá selecioná-lo para que ele substitua o domínio anterior.
- Clique no botão Guardar:
Domínio “…preview.infomaniak.website”?
Entre as URLs presentes no menu suspenso, a URL de visualização permite acessar seu site Joomla caso o nome de domínio do site ainda não esteja configurado corretamente para apontar para seu aplicativo: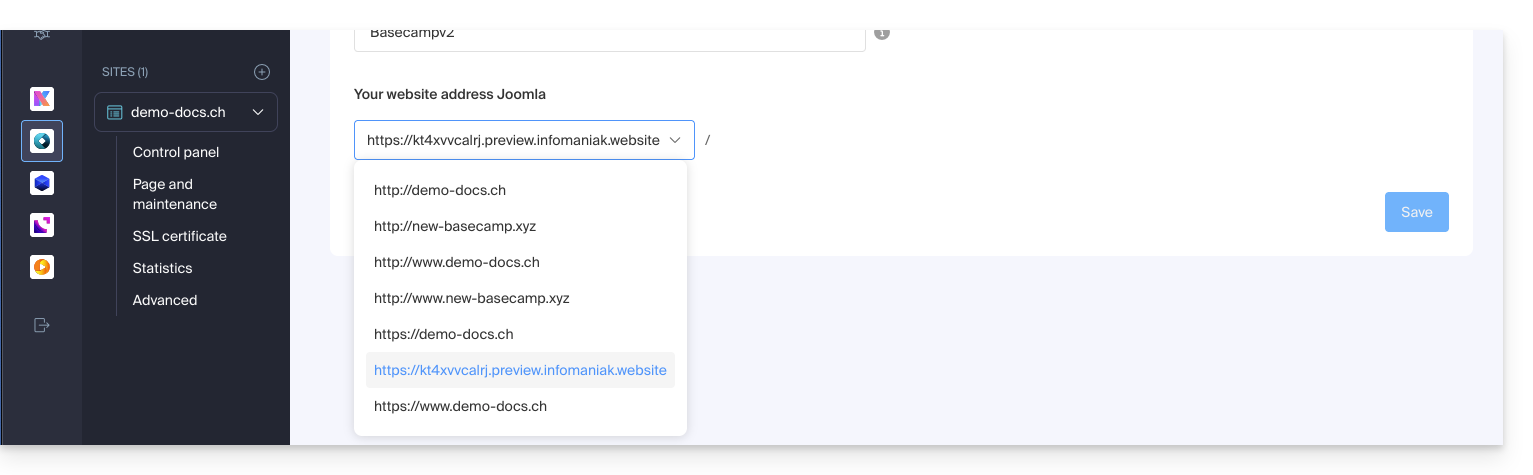
Modificar o endereço ou o local do Joomla
⚠️ Essas operações interrompem a ligação entre o seu Joomla e o sistema de Aplicações Web Infomaniak; não será mais possível usufruir das vantagens destes.
Pré-requisitos
- Criar uma conta FTP (precisa de ajuda?).
- Conectar-se via FTP (precisa de ajuda?).
Para modificar a instalação do Joomla, caso esta tenha sido feita em uma subpasta…
- Exclua a subpasta que ficou vazia:
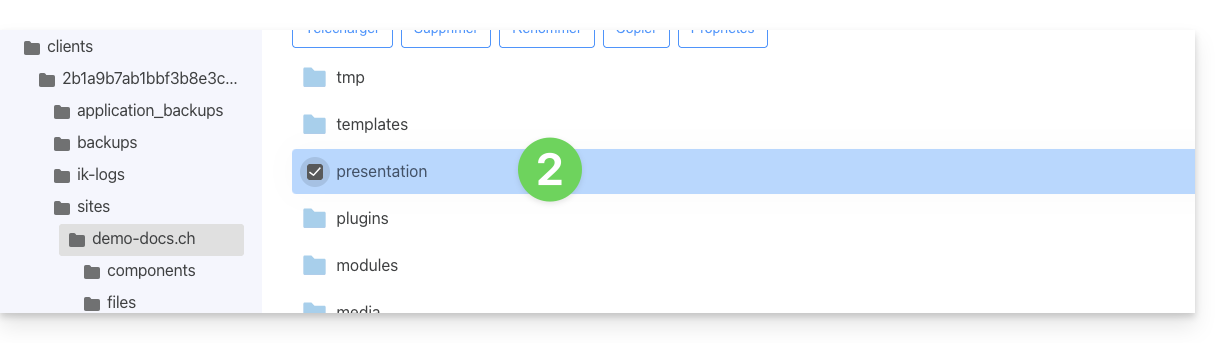
- Modifique o ficheiro
.htaccessque se encontra na raiz da estrutura do seu Joomla. - Substitua
RewriteBase /presentationporRewriteBase /: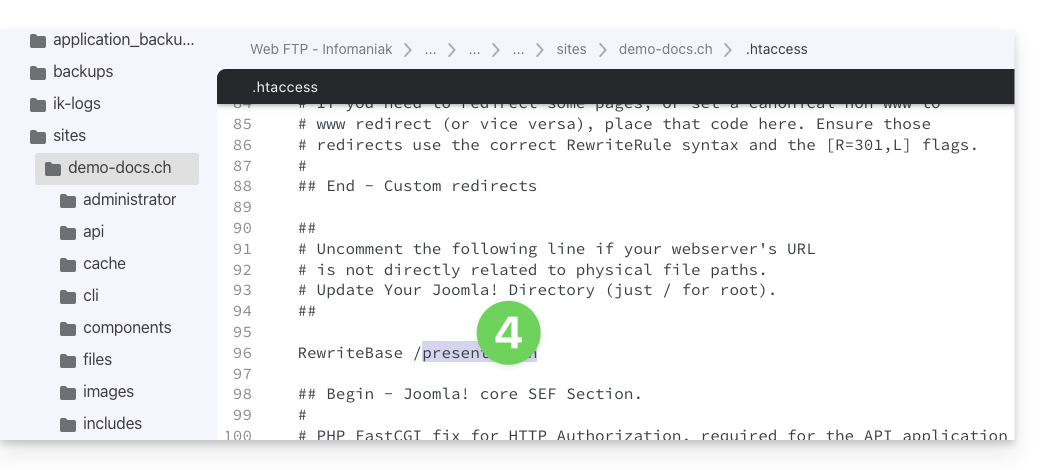
- Salve as alterações.
- Não desinstale a aplicação web Joomla, apenas pare de usá-la e conecte-se diretamente à interface de gestãodo seu Joomla através da URL
/administrator: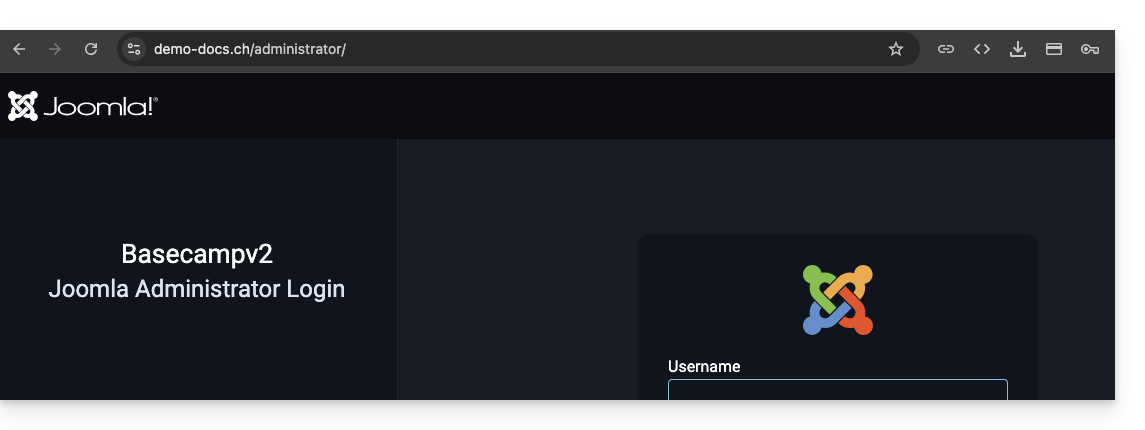
Link para esta FAQ: https://faq.infomaniak.com/1515
Esta seção de perguntas frequentes foi útil?
Este guia detalha a resolução de problemas relacionados à recuperação automática de mídia com a extensão VOD/AOD para WordPress, especialmente quando a sincronização falha, mesmo com uma conexão estabelecida entre a extensão e o espaço VOD.
Introdução
- Se o plugin VOD do seu CMS não conseguir mais recuperar automaticamente os vídeos do seu espaço VOD, é provável que o utilizador MySQL do banco de dados no qual o CMS está instalado não tenha os direitos de administrador.
- Esta situação pode causar um problema durante a instalação do plugin VOD no seu CMS.
Corrigir a recuperação automática de vídeos
A ser realizado no seu serviço de hospedagem web
- Clique aqui para acessar o gerenciamento do seu serviço de hospedagem no painel de controle Infomaniak (precisa de ajuda?).
- Clique diretamente no nome atribuído ao serviço de hospedagem em questão.
- Clique em Bases de dados no menu lateral esquerdo.
- Clique em Utilizadores no menu lateral esquerdo.
- Clique em o menu de ações ⋮ localizado à direita do usuário que gerencia o banco de dados do seu CMS.
- Clique em Editar:
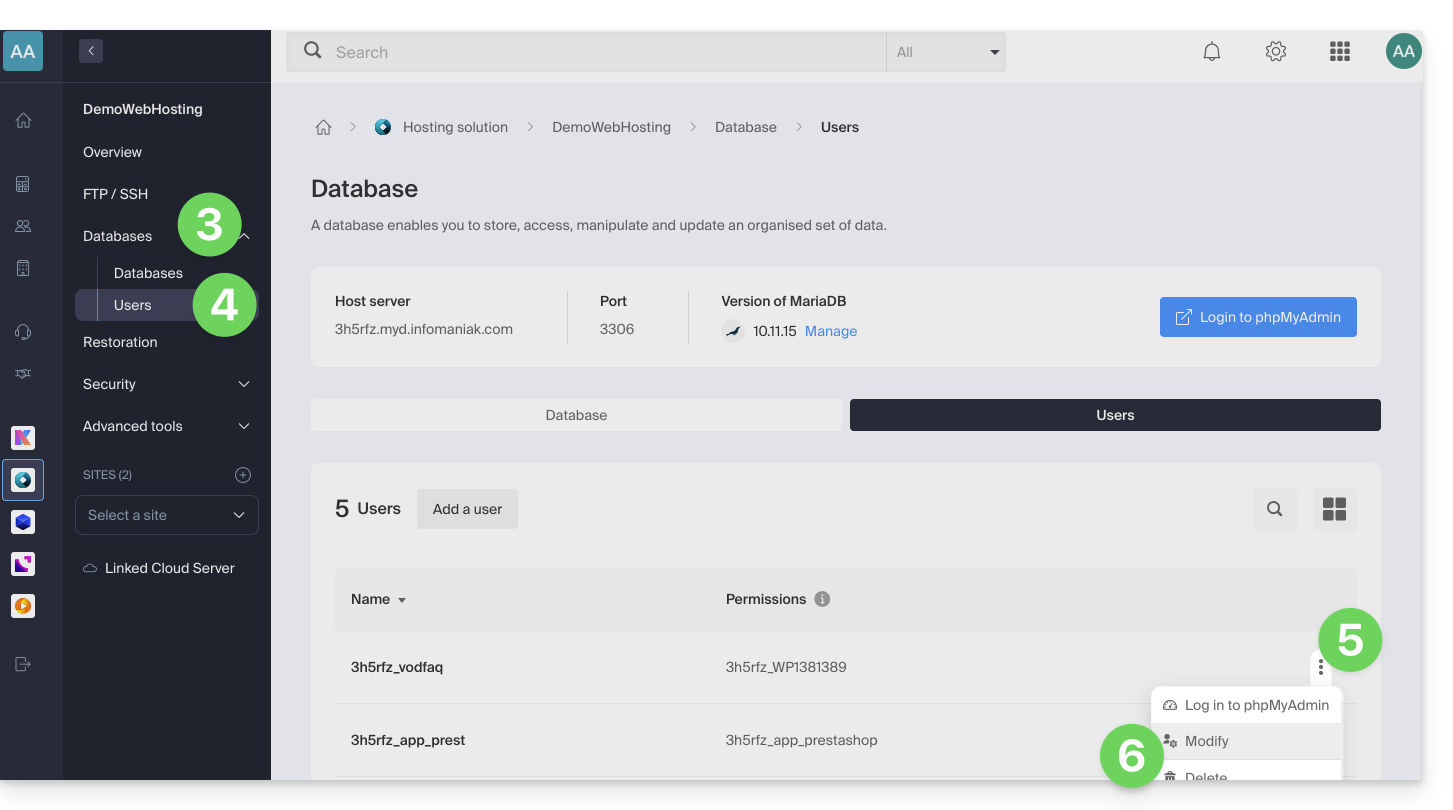
- Se necessário, adicione o direito ADMIN ao utilizador na linha da base de dados correspondente:
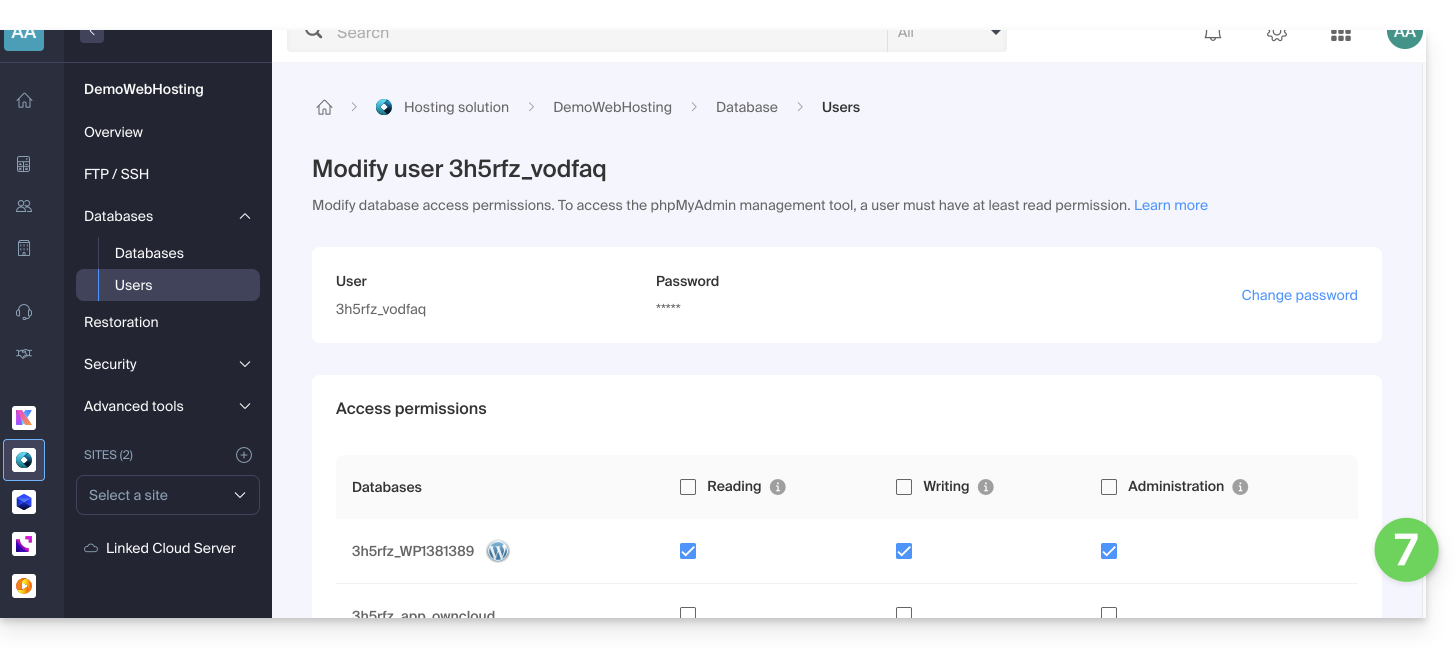
- Clique no botão para Confirmar na parte inferior da página.
A fazer no WordPress
- Desinstale o plugin VOD
- Reinstale e ative o plugin VOD (consulte este outro guia)
- Reconfigure a conexão do plugin com a conta VOD Infomaniak
- Faça uma nova solicitação para vincular os arquivos de vídeo.
Após a configuração ser restabelecida, os privilégios de administrador do usuário MySQL podem ser revogados, se necessário.
Se um vídeo importado apresentar o status "em conversão" de forma persistente, mesmo após a conclusão no painel de controle, é provável que haja um conflito com extensões de restrição de acesso (como Acesso Restrito a Membros).
Em caso de comportamento anormal, desative temporariamente suas extensões de terceiros para identificar uma possível incompatibilidade de software.
Para forçar a atualização de um vídeo que está bloqueado no estado de conversão, utilize a função Sincronizar disponível nas configurações da extensão VOD no WordPress.
A ser realizado no Gerenciador Infomaniak
Embora a extensão se sincronize periodicamente com a sua conta, o aparecimento de novos elementos (artistas, pastas ou listas de reprodução) pode ser adiado no seu CMS.
Para uma atualização imediata, aceda à secção Gestão VOD > Configuração do seu painel de controlo e ative a Sincronização rápida.
Se novos arquivos de mídia não aparecerem na lista do CMS, verifique a acessibilidade da URL de callback. Este endereço, usado pelo sistema de codificação para notificar seu site sobre a disponibilidade de um vídeo, deve ser, obrigatoriamente, público. Consulte a página Gerenciamento de VOD > Configuração para obter mais informações.
Link para esta FAQ: https://faq.infomaniak.com/1536
Esta seção de perguntas frequentes foi útil?
Este guia explica como gerir as interações entre o seu espaço VOD/AOD Infomaniak e qualquer um dos seus sites WordPress, utilizando uma extensão desenvolvida pela Infomaniak.
Introdução
- Esta extensão WordPress permite recuperar e gerenciar todos os seus vídeos presentes em um espaço VOD/AOD Infomaniak, com atualização automática quando novos vídeos são adicionados.
- Ela gerencia a recuperação automática dos Players existentes e o gerenciamento das playlists.
- Você poderá pesquisar seus vídeos ao redigir um artigo ou uma página ou importar arquivos de mídia diretamente do painel de administração do CMS.
- Incompatibilidades possíveis:
- O plugin não é compatível com Elementor.
- Teste se o problema persiste após a instalação de outro editor.
- O plugin não é compatível com WordPress Multisite.
- O plugin não é compatível com Really Simple Security (Really Simple SSL).
- Teste se o problema persiste ativando ou desativando esta configuração da extensão Really Simple Security:
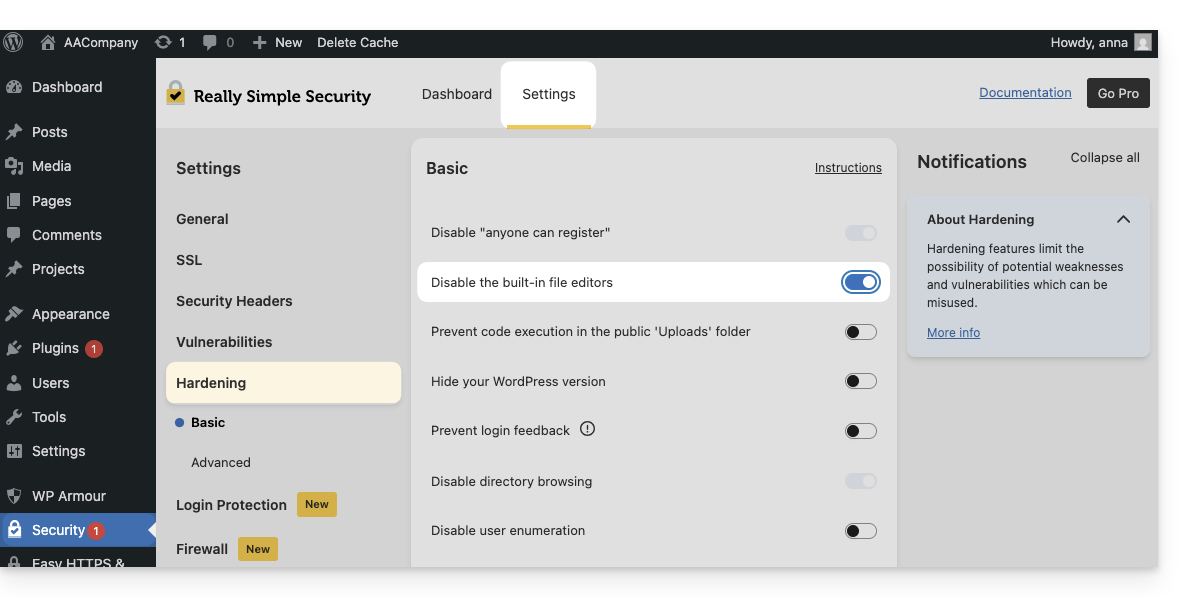
- Teste se o problema persiste após o uso de outro módulo semelhante.
- Se os problemas persistirem, consulte este outro guia.
- Teste se o problema persiste ativando ou desativando esta configuração da extensão Really Simple Security:
- O plugin não é compatível com Elementor.
Obter a extensão VOD Infomaniak
Acesse sua área VOD para obter as informações necessárias para o módulo externo do WordPress:
- Clique aqui para acessar o gerenciamento do seu produto no Manager Infomaniak (precisa de ajuda?).
- Clique diretamente no nome atribuído ao produto em questão:
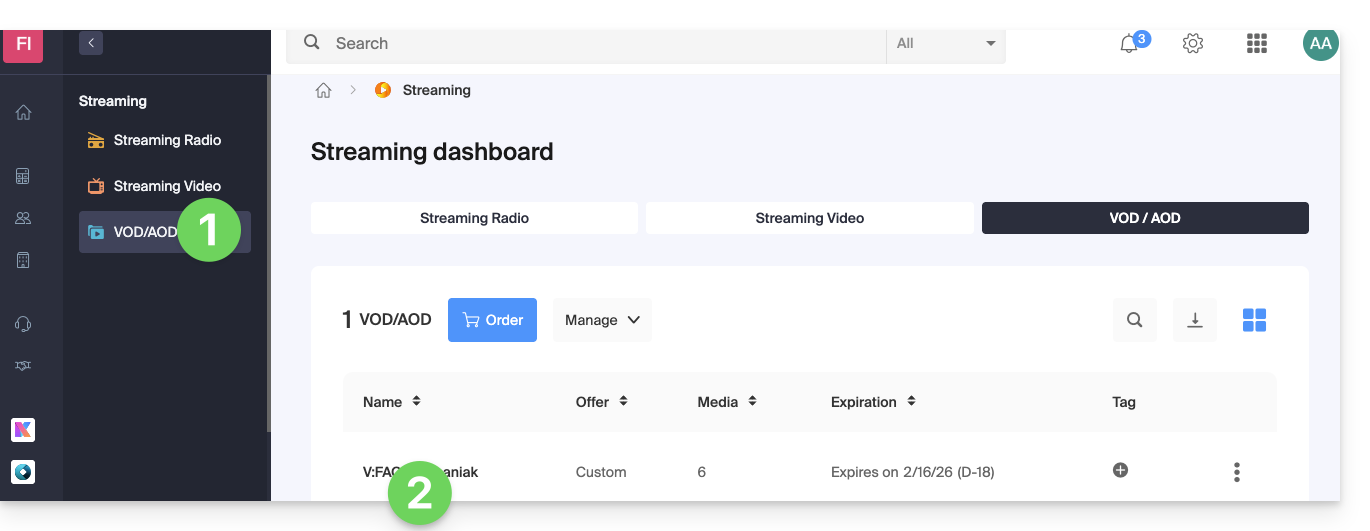
- Clique em Extensões CMS/API no menu lateral esquerdo.
- Clique em Extensões CMS no menu lateral esquerdo.
- Descarregue a extensão WordPress.
- Configure a extensão usando as instruções fornecidas:
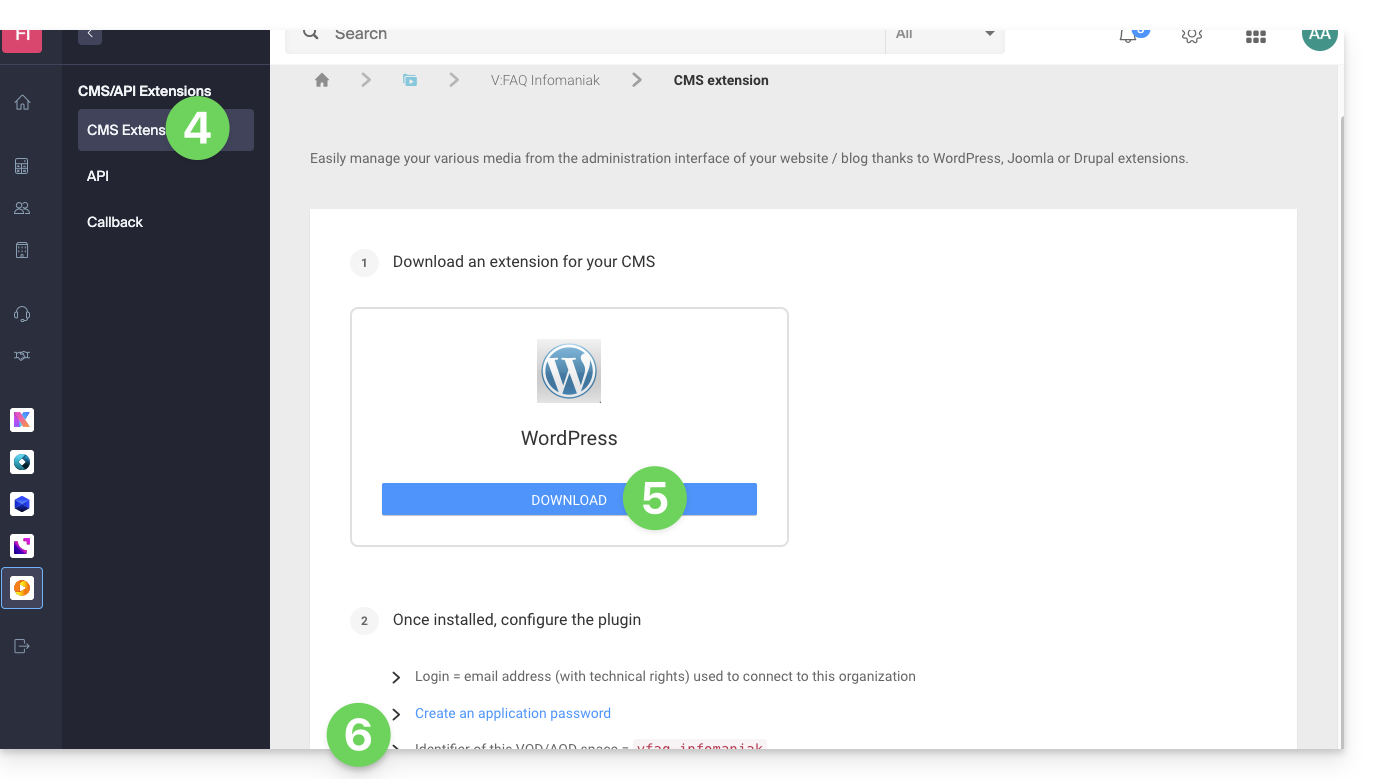
- Recomenda-se criar um novo utilizador na sua Organização com apenas direitos técnicos no produto VOD/AOD e, em seguida, criar a palavra-passe da aplicação a partir desta conta dedicada.
Também pode descarregar a extensão diretamente da biblioteca de extensões WordPress: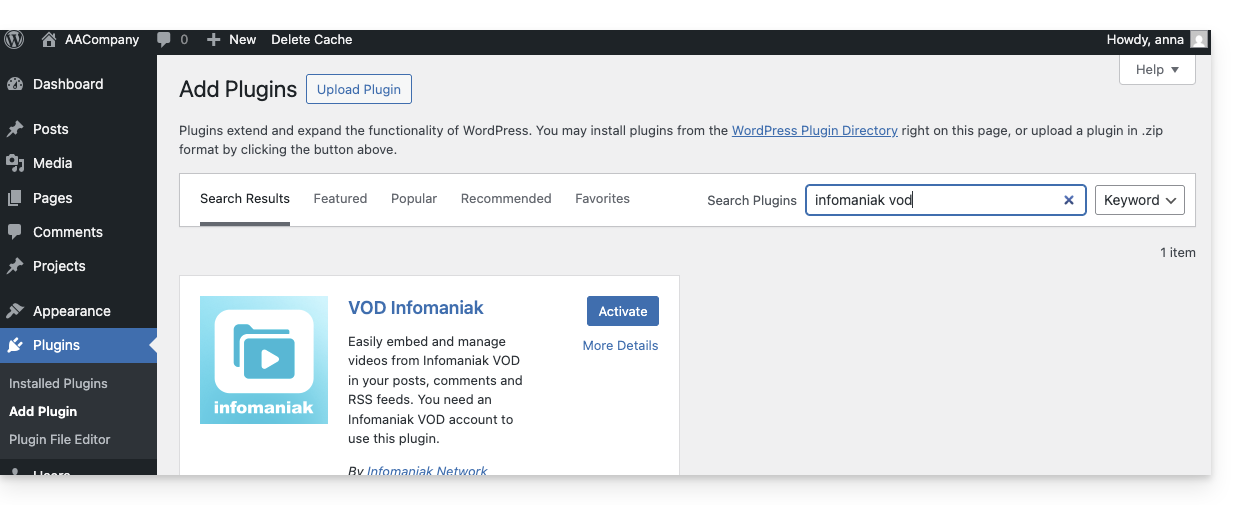
Uma funcionalidade semelhante existe para o Typo3, com a extensão dedicada, que pode ser encontrada e instalada a partir da sua biblioteca de extensões: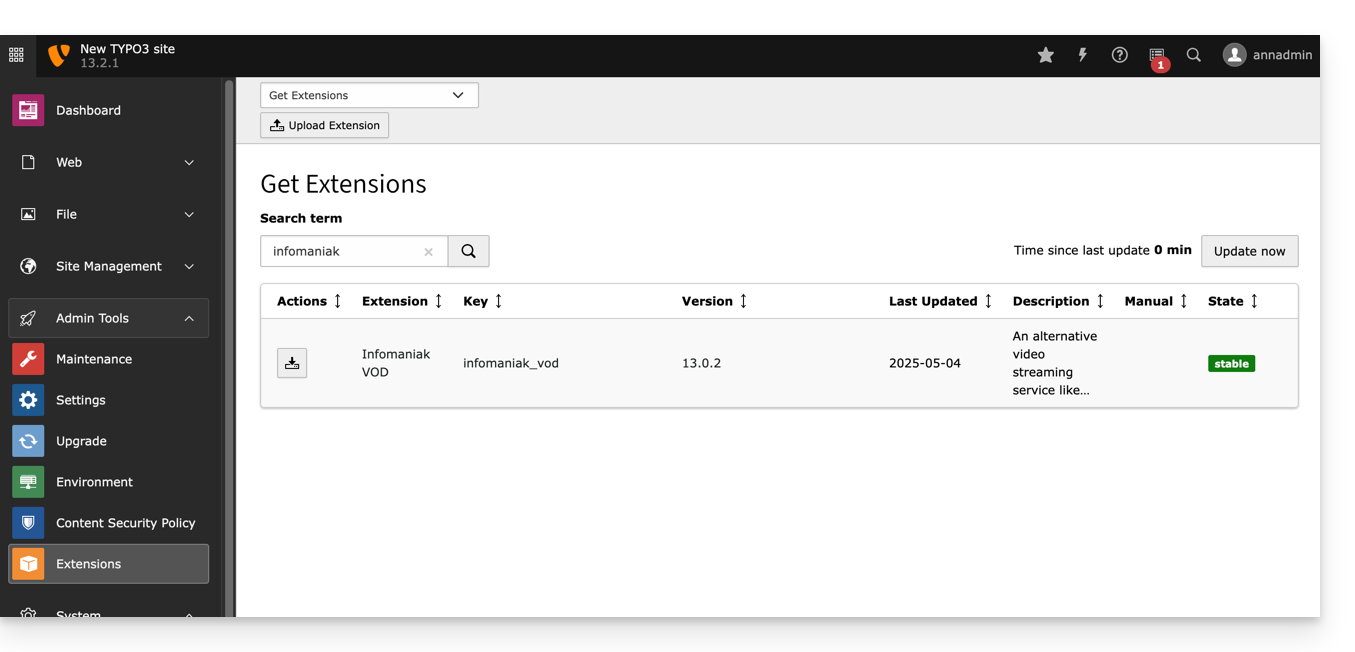
Link para esta FAQ: https://faq.infomaniak.com/1539
Esta seção de perguntas frequentes foi útil?
Este guia detalha as especificidades relacionadas com a gestão de MongoDB no seu Servidor Cloud gerido, nomeadamente no que diz respeito ao ciclo de vida das versões.
Introdução
- Toda nova instalação do aplicativo implementa, por padrão, o MongoDB versão 7.0 (ou superior).
Migrar da versão 6 para a versão 7
Não é possível realizar uma atualização automática da versão 6 para a versão 7 diretamente a partir da sua interface.
Existem duas soluções:
- Encomendar um novo Servidor Cloud: este virá nativamente com a versão 7, e poderá, posteriormente, migrar os seus dados para ele.
- Reinstalar a aplicação: desinstale e, em seguida, reinstale o MongoDB no servidor atual.
A desinstalação da aplicação elimina todos os seus dados MongoDB. Além disso, não será mais possível reinstalar a versão 6 após esta operação.
Backups e responsabilidade
Como administrador, a gestão e a integridade dos seus dados são da sua total responsabilidade.
Antes de qualquer manipulação (incluindo a reinstalação):
- Faça as suas próprias cópias de segurança e exportações (dump) das suas bases de dados.
- Prepare-se para a importação manual dos seus dados após a ativação da nova versão.
Link para esta FAQ: https://faq.infomaniak.com/1558
Esta seção de perguntas frequentes foi útil?
Este guia explica como publicar uma aplicação criada com Lovable, utilizando um site do tipo Node.js na Infomaniak.
Pré-requisitos
- Um projeto Lovable numa oferta Lovable paga, sincronizado com um repositório GitHub.
- Um site do tipo Node.js.
- Um nome de domínio ou subdomínio destinado à aplicação.
1. Sincronizar o projeto Lovable com o GitHub
Para isso:
- Abra o projeto no Lovable.
- Abra as configurações do projeto.
- Aceda à secção Git > GitHub:
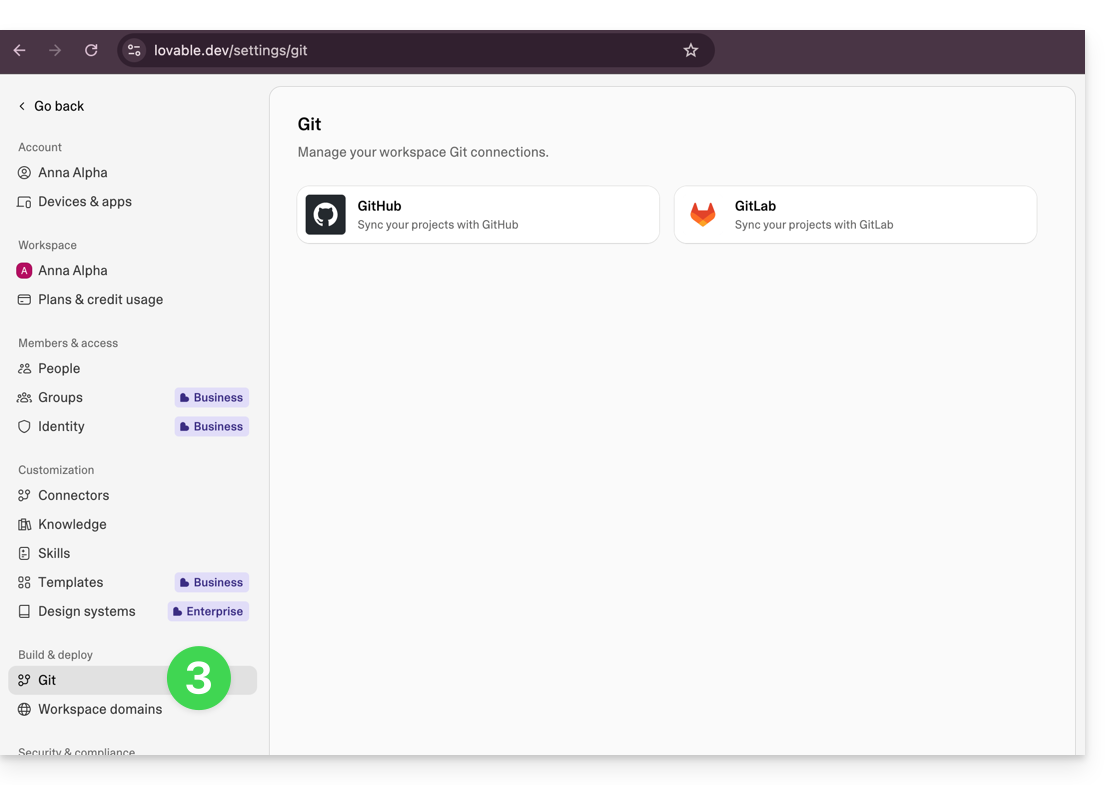
- Conecte o projeto a uma conta GitHub.
- Aguarde que o repositório GitHub seja criado e que a sincronização seja concluída.
2. Descarregar o arquivo ZIP do GitHub
Para isso:
- Abra o repositório GitHub associado ao projeto Lovable.
- No GitHub, clique em Code.
- Clique em Download ZIP:
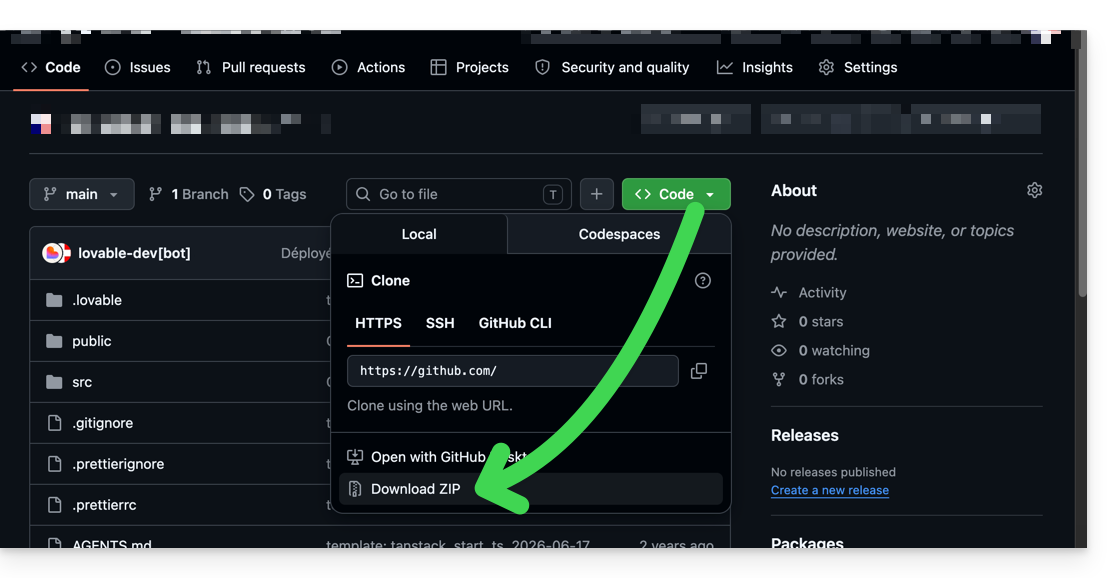
- Guarde o arquivo ZIP descarregado.
3. Criar o site Node.js na Infomaniak
Para isso:
- Aceda à hospedagem web em questão no Manager Infomaniak.
- Clique no botão para adicionar um site.
- Selecione um projeto com tecnologias avançadas.
- Escolha Node.js.
- Associe o nome de domínio ou o subdomínio destinado à aplicação.
- Selecione o método personalizado:
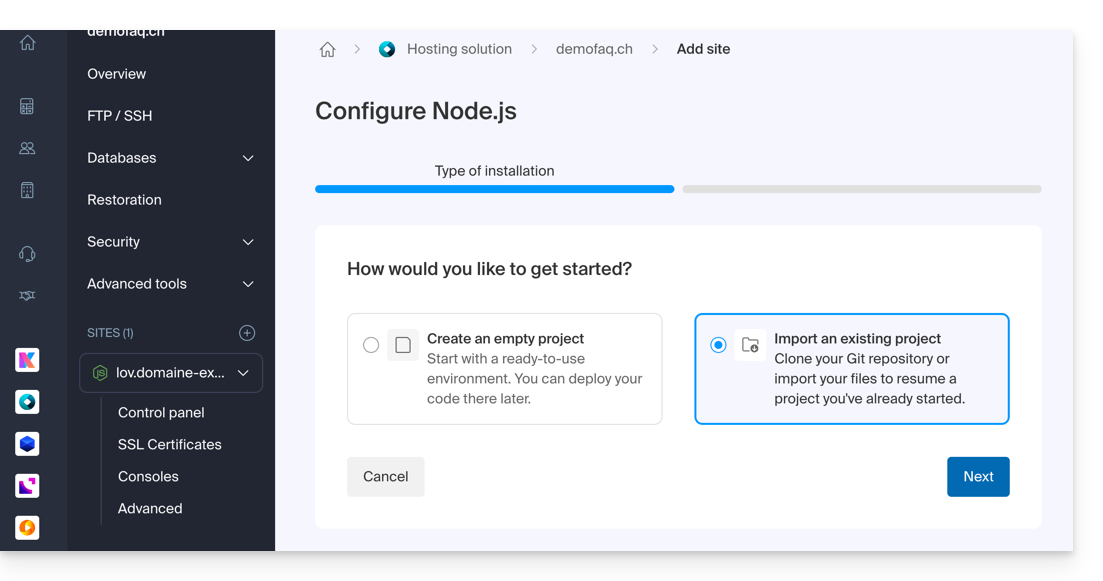
- Escolha a importação por arquivo ZIP.
- Importe o arquivo ZIP baixado do GitHub:
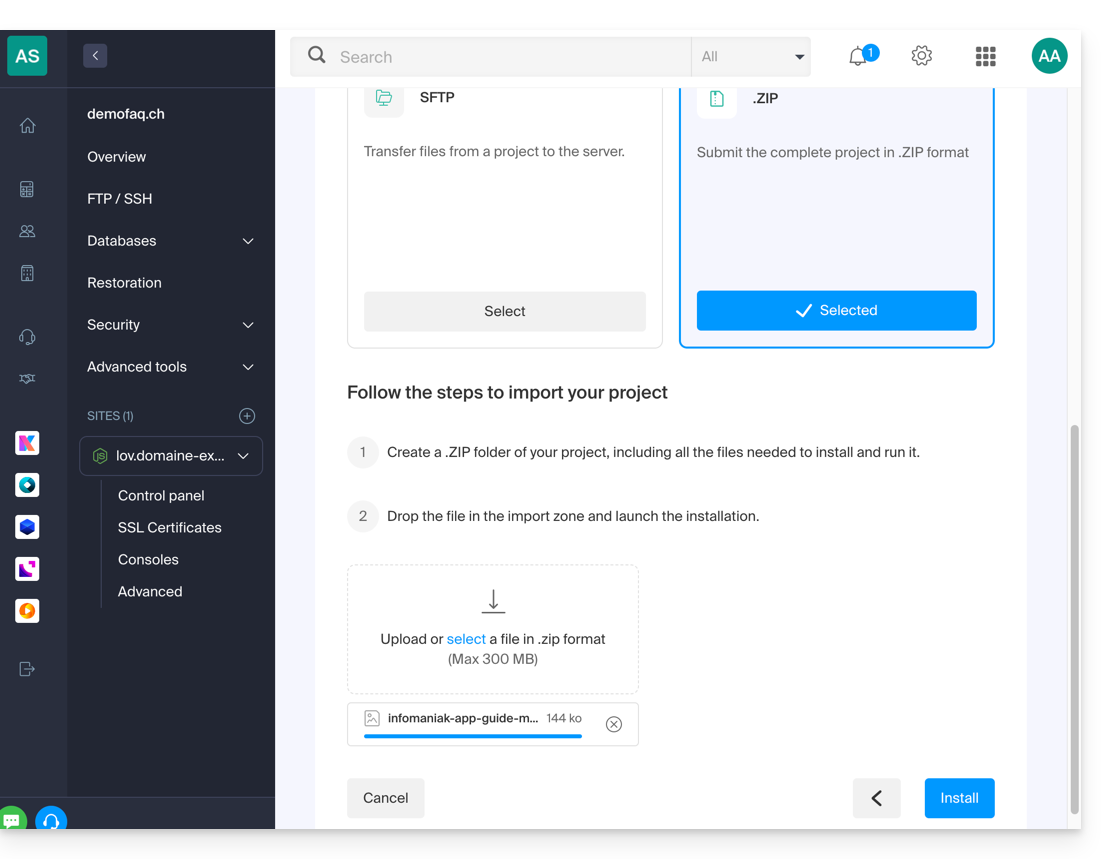
Em seguida, preencha os seguintes campos:
Comando de construção:
npm install && npm run buildComando de execução:
npm start
Salve a configuração.
Seu site foi publicado.
Link para esta FAQ: https://faq.infomaniak.com/1568
Esta seção de perguntas frequentes foi útil?
Este guia detalha as medidas essenciais para proteger o seu site WordPress contra spam e conteúdos maliciosos automatizados.
Introdução
- Um site não protegido é um alvo fácil para os
spambots(robôs) que usam os comentários para divulgar links fraudulentos. - Sem proteção, cada formulário (contacto, reserva, votação) pode ser utilizado para enviar e-mails em massa a partir do seu servidor.
- O spam prejudica a experiência do usuário, afeta a reputação do seu domínio (lista negra de e-mails) e pode sobrecarregar os recursos da sua hospedagem.
1. Gerenciar o sistema de comentários
Por padrão, o WordPress está configurado para permitir comentários. Para limitar abusos, consulte o codex do WordPress.
Desativar os comentários nas configurações gerais afeta apenas os próximos artigos. Para os artigos já publicados, é necessária uma modificação em massa ou o uso de uma extensão dedicada.
Se desejar manter as interações, pode restringir os comentários apenas aos utilizadores autenticados através da página de configurações da discussão.
2. Utilizar ferramentas de proteção automática
Para bloquear robôs sem prejudicar a experiência dos seus visitantes, existem duas tecnologias principais: o captcha (teste visual) e o honeypot (armadilha invisível para humanos, mas detectada por robôs).
Solução incluída com a Infomaniak
Se instalou o WordPress através da ferramenta de instalação automática da Infomaniak, a extensão WP Armour – Honeypot Anti Spam já está ativada. Ela protege nativamente os formulários mais comuns:
WP CommentseWP RegistrationContact Form 7,Elementor Forms,Divi Contact FormWooCommerce Reviews,BBPress,Gravity Forms
Alternativas recomendadas
- Akismet Anti-Spam: desenvolvido pela
Automattic, é uma referência muito eficaz, embora seja pago para sites comerciais. - O Sentinela antispam: uma extensão completa e muito bem avaliada pela comunidade francófona.
- Contact Form 7 Honeypot: um módulo específico se você usar apenas a extensão
Contact Form 7.
O papel do provedor de hospedagem
Além da segurança do seu site, a Infomaniak implementa proteções ao nível do servidor. Para saber mais, consulte o artigo sobre o combate a e-mails maliciosos, bem como as perguntas frequentes sobre as ferramentas de segurança disponibilizadas.
Link para esta FAQ: https://faq.infomaniak.com/1591
Esta seção de perguntas frequentes foi útil?
Este guia explica como denunciar um spam ou declarar um falso positivo caso mensagens do tipo spam passem despercebidas no Serviço de Email Infomaniak, ou, inversamente, se um email válido for classificado como spam involuntariamente; você pode intervir em poucos cliques.
Denunciar um spam
Pré-requisitos
- Verifique se o filtro de spam está ativo.
Em seguida, para mover automaticamente para a pasta de Spam um e-mail da sua caixa de entrada que tenha escapado ao filtro anti-spam:
- Clique aqui para acessar o aplicativo web Mail Infomaniak (serviço online ksuite.infomaniak.com/mail).
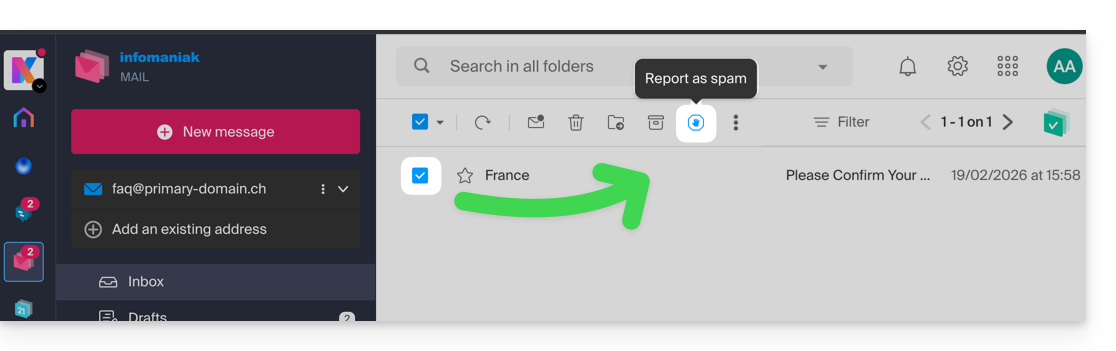
- Selecione a mensagem na caixa de entrada e clique no ícone Spam na barra de ferramentas:
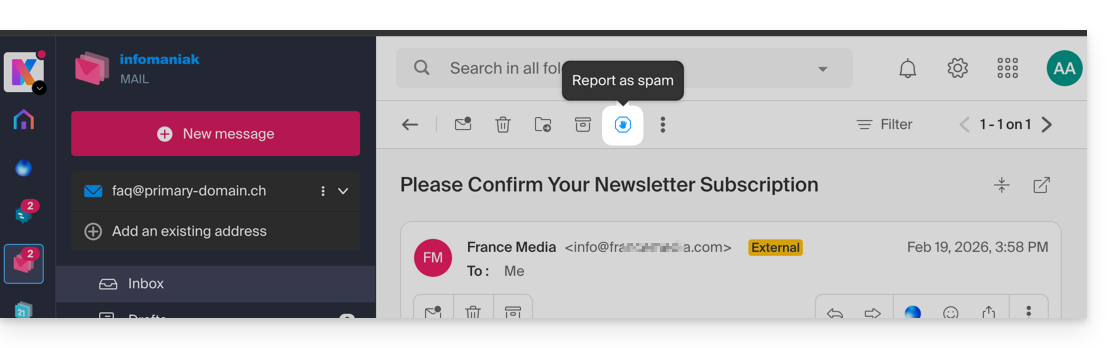
- Você também pode abri-la e marcá-la como Spam posteriormente:
- Outra possibilidade: abri-lo e clicar no menu de ação ⋮ à direita:
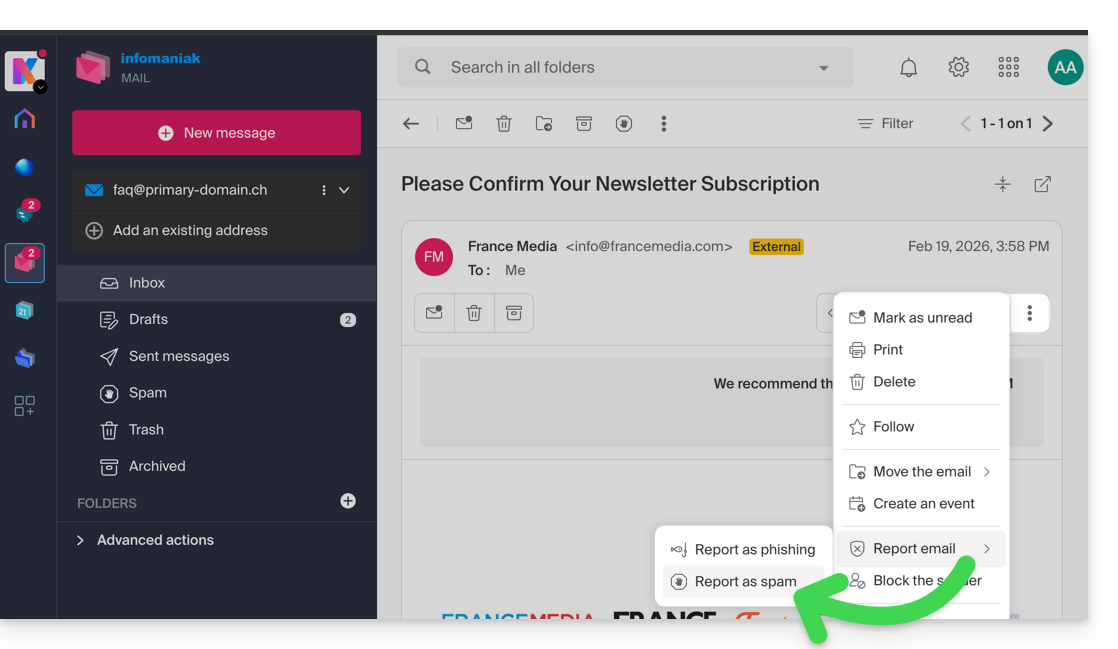
Assim que clicar em Denunciar como spam:
- o e-mail é movido para a pasta Spam (ou para a pasta definida manualmente)
- o endereço do remetente é adicionado à lista de utilizadores bloqueados
- o filtro é aprimorado para um melhor desempenho ao longo do tempo.
Denunciar um falso positivo
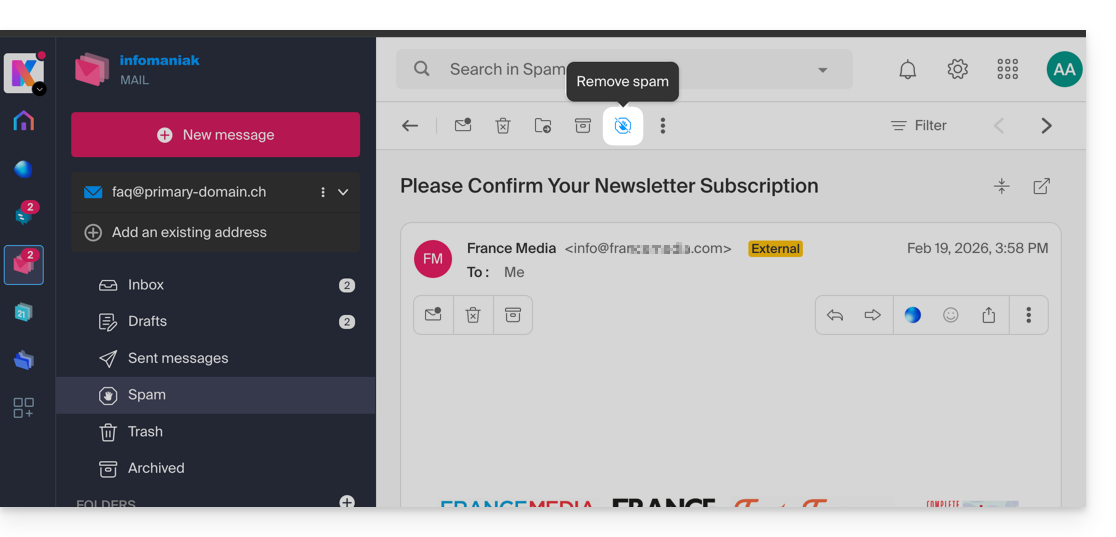
Por outro lado, se você interagir com um e-mail que foi erroneamente classificado como spam (falso positivo) clicando no ícone "Isto não é spam":
- O e-mail será movido para a caixa de entrada…
- O endereço do remetente é adicionado à lista de utilizadores autorizados…
- Isto também afeta o filtro e os seus critérios.
Link para esta FAQ: https://faq.infomaniak.com/1592
Esta seção de perguntas frequentes foi útil?
Este guia detalha as regras específicas a serem seguidas ao usar uma senha que contenha o caractere “cifrão” $ para enviar um e-mail via SMTP Infomaniak em um script (PowerShell, Python, etc.).
Introdução
- Se, ao enviar um e-mail via SMTP, receber uma mensagem de erro de autenticação (por exemplo,
autenticação falhou,nome de usuário ou senha inválidos), mesmo que a senha esteja correta e funcione em um programa como o Outlook, o problema pode estar relacionado ao tratamento do caractere$no seu script ou arquivo de configuração. - Para garantir a execução confiável dos seus scripts SMTP, é altamente recomendável evitar o uso de caracteres especiais com significado sintático, em particular
$, nas senhas utilizadas nos scripts e arquivos de configuração. - O problema também pode ocorrer ao conectar-se aos bancos de dados.
Regras a serem seguidas
O caractere $ é um símbolo especial em muitas linguagens e ambientes. Quando usado em uma senha em um script ou arquivo de configuração, ele pode ser interpretado incorretamente como uma variável ou um caractere de controle.
A seguir, alguns casos comuns em que não se deve usar o caractere $ em uma senha:
- PowerShell: o símbolo
$é usado para declarar variáveis. Uma senha que contenha$pode causar erros de sintaxe ou ser truncada. - Bash / Shell (Linux): o símbolo
$também é um prefixo de variável. Ele pode acionar substituições inesperadas. - Ficheiros YAML (por exemplo, Home Assistant, GitHub Actions, Docker Compose):
$pode ser interpretado como uma variável de ambiente. - Ficheiros
.env,.iniou outros ficheiros de configuração: as ferramentas que lêem estes ficheiros podem tentar interpretar as variáveis. - Comandos ou URL com autenticação: uma senha que contenha o caractere
$pode ser codificada incorretamente ou gerar falha durante a análise.
Para corrigir ou evitar este tipo de erro:
- Evite usar o caractere
$em senhas destinadas a serem usadas em scripts ou sistemas automatizados. - Se você precisar absolutamente usá-lo, sempre coloque a string da senha entre aspas corretamente, de acordo com a linguagem:
- No PowerShell: use aspas simples
'senha$Teste', se possível. - No Python: certifique-se de que a string esteja entre aspas simples ou duplas, sem interpretação.
- No Bash: escape o
$com uma barra invertida\$.
- No PowerShell: use aspas simples
Link para esta FAQ: https://faq.infomaniak.com/1608
Esta seção de perguntas frequentes foi útil?
Este guia explica o que você precisa verificar como visitante de um site se você receber um erro do tipo 403 para resolver esse problema.
O que é o erro 403?
O código de erro HTTP 403 geralmente significa que o acesso a um recurso é negado ao cliente pelo servidor.
Em que casos esse erro ocorre?
O usuário não está autenticado: o servidor exige que o usuário se identifique para acessar o recurso. Isso pode acontecer em páginas privadas que exigem autenticação, por exemplo.
O usuário está autenticado, mas não tem as permissões necessárias: o servidor reconhece o usuário, mas não permite que ele acesse o recurso solicitado devido a restrições de permissões ou funções. Essa causa do erro 403 pode ser um problema de permissão incorreta em uma pasta ou arquivo. Para uma pasta, a mensagem de erro é do tipo "403 Forbidden", para um arquivo, "failed to open stream: Permission denied". Nesse caso, você deve verificar se as permissões de suas pastas/arquivos estão corretas, ou seja, no mínimo 644 para um arquivo e 755 para uma pasta. Consulte este outro guia.
O endereço IP do usuário está bloqueado ou restrito: o servidor pode bloquear o acesso a um endereço IP específico por motivos de segurança, proteção contra ataques, etc. Consulte este outro guia.
O recurso solicitado não existe no servidor: neste caso, o servidor retorna um erro 403 em vez de um erro 404 para evitar a divulgação de informações confidenciais. Se você estiver tentando acessar sua página inicial ou uma parte do seu site, digitando um endereço como www.domínio.xyz ou www.domínio.xyz/pasta/, certifique-se de que exista uma página inicial chamada "index.html ou .htm ou .php" localizada no local correto (na raiz do seu espaço FTP, no diretório /web ou no diretório /pasta/). Consulte este outro guia.
Além disso, verifique se não há letras maiúsculas no nome do arquivo; todos os nomes de arquivos ou pastas devem estar em minúsculas, sem acentos ou espaços.
Erro relacionado ao script: se você estava executando um script, preenchendo um formulário ou fazendo um upload de arquivo e receber este tipo de mensagem:
Accès interdit!
Vous n'avez pas le droit d'accéder à l'objet demandé.
Soit celui-ci est protégé, soit il ne peut être lu par le serveur.
Si vous pensez qu'il s'agit d'une erreur du serveur, veuillez contacter le gestionnaire du site.
Error 403
a causa pode ser um filtro que impede o uso não autorizado de scripts por spammers. De fato, o antivírus Infomaniak bloqueia o upload de arquivos via scripts ou via FTP. Isso significa, na prática, que quando um hacker envia um arquivo identificado como vírus via um formulário, um script não seguro ou via FTP, sua instalação é bloqueada diretamente, o arquivo não é carregado no servidor e o upload gera um erro 403.
Em caso de falso positivo, entre em contato com o suporte da Infomaniak, fornecendo a URL da página onde você está encontrando esta mensagem de erro, para diagnosticar precisamente a origem do problema.
No entanto, existem muitos outros casos em que você pode receber uma mensagem "403 forbidden" e por razões muito diversas (scripts PHP, perl, mod_security, .htaccess, ...).
Link para esta FAQ: https://faq.infomaniak.com/1609
Esta seção de perguntas frequentes foi útil?
Este guia tem como objetivo solucionar problemas relacionados a caracteres especiais (acentos, emojis, etc.) que não são exibidos corretamente ou aparecem como símbolos, como ??, geralmente devido a uma codificação incorreta ao conectar-se ao MySQL.
Introdução
- Por padrão, o MySQL utiliza
UTF-8. - Os servidores MySQL mais recentes geralmente são configurados para usar
UTF-8ouUTF-8MB4por padrão.- Isso é adequado para a maioria dos casos, especialmente para idiomas internacionais e emojis.
- Consulte também este outro guia para aprender a evitar problemas de codificação com caracteres não europeus e emojis em seus projetos.
Definir o conjunto de caracteres padrão do MySQL / MariaDB (Servidor Cloud)
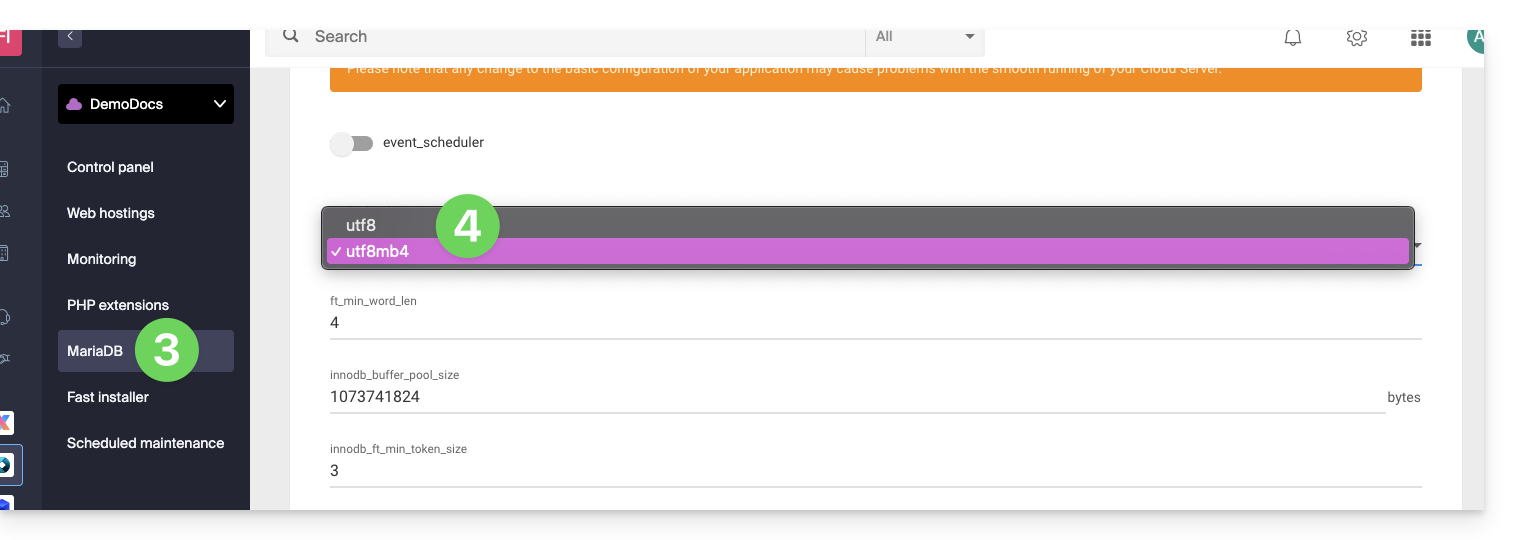
Com um Servidor Cloud Infomaniak, é possível definir o conjunto de caracteres padrão (utf8 ou utf8mb4):
- Clique aqui para acessar o gerenciamento do seu produto no Manager Infomaniak (precisa de ajuda?).
- Clique diretamente no nome atribuído ao produto em questão.
- Clique em MariaDB no menu lateral esquerdo.
- Escolha o conjunto de caracteres padrão:
- Se ainda não migrou para o MariaDB, o princípio é o mesmo.
- Salve as suas alterações na parte inferior da página.
Forçar uma codificação específica (latin1, por exemplo)
Se precisar trabalhar com um banco de dados em latin1 (ISO-8859-1), deverá alinhar explicitamente a codificação ao estabelecer a conexão, dependendo do seu ambiente.
Nas ofertas atuais, coloque o seguinte código num ficheiro user.ini localizado na raiz da sua hospedagem:
mysql.connect_charset = "latin1"
mysqli.connect_charset = "latin1"
pdo_mysql.connect_charset = "latin1"
ou em PHP (API MySQL):
mysql_query("SET CHARACTER SET latin1");
Nas antigas opções de hospedagem, force a conexão MySQL em latin1 através do arquivo .htaccess localizado na raiz da sua hospedagem:
php_value mysql.connect_charset latin1
php_value mysqli.connect_charset latin1
php_value pdo_mysql.connect_charset latin1
Link para esta FAQ: https://faq.infomaniak.com/1611
Esta seção de perguntas frequentes foi útil?
Este guia explica como efetuar uma transferência de site no qual está instalado o WordPress, utilizando uma de suas extensões, o All-in-One WP Migration.
Pré-requisitos
- Encomende uma hospedagem web / servidor em nuvem se ainda não tiver um.
- Crie um site na sua nova hospedagemao optar por instalar o WordPress na plataforma Infomaniak(opção apresentada ao adicionar um site – também pode instalar um site WordPress após a criação de um site em branco).
Backup completo do site WordPress
Para fazer o backup de todos os arquivos e do banco de dados de um site WordPress existente:
- Instale e, em seguida, ative o plugin All-in-One WP Migration a partir da interface de administração WordPress do site atual.
- Acesse o painel de controle do plugin recém-instalado.
- Clique em Exportar.
Descarregue o arquivo exportado:
Restauração do site
Conforme especificado nos requisitos acima, instale um novo WordPress no seu serviço de hospedagem web Infomaniak e, em seguida:
- Instale e ative o plugin All-in-One WP Migration a partir da interface de administração do novo WordPress (por vezes, é necessário usar a URL de visualização para se conectar ao novo site, por exemplo, se o domínio estiver em processo de transferência).
- Acesse o painel de controle do plugin recém-instalado.
- Clique para importar um arquivo, neste caso, o arquivo exportado do seu site WordPress anterior.
- Se o arquivo for grande, é necessário aumentar, nas configurações do site, o valor do tamanho máximo permitido para as importações no servidor.
- Após a reimportação do site, reconfigure o endereço principal do site no Infomaniak.
- Quando as condições o permitirem (por exemplo, após a conclusão da transferência do nome de domínio), instale um certificado SSL e verifique novamente o ponto 4 acima para selecionar o endereço
httpS://.
Link para esta FAQ: https://faq.infomaniak.com/1643
Esta seção de perguntas frequentes foi útil?
Este guia explica como aceder às cópias de segurança automáticas e restaurar um ficheiro específico de um site num serviço de alojamento Infomaniak.
Restaurar ficheiros ou pastas específicas
Para isso:
- Acesse o servidor FTP através do Web FTP (precisa de ajuda?).
- Acesse a pasta
/backups. - Selecione os arquivos e/ou pastas que deseja restaurar.
- Clique no botão Copiar:
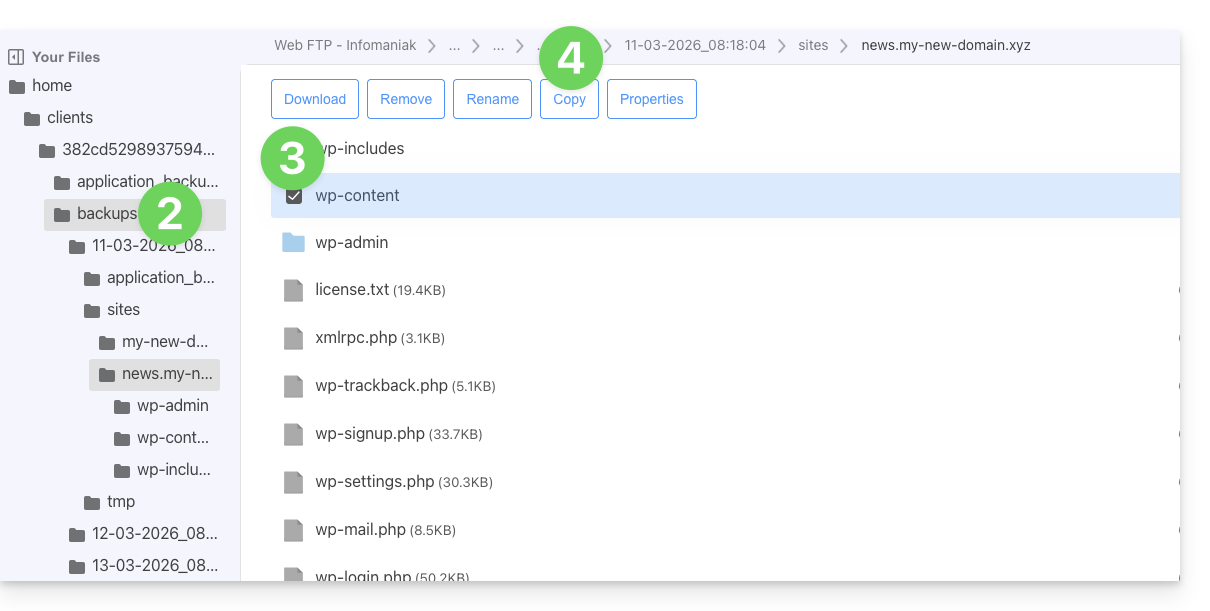
- Selecione o local para onde copiar/restaurar os dados (os dados existentes serão substituídos pelos dados selecionados).
Link para esta FAQ: https://faq.infomaniak.com/1655
Esta seção de perguntas frequentes foi útil?
Este guia aborda o MySQL/MariaDB e, mais especificamente, a análise de índices e consultas com o Hospedagem Web.
Slowlog para consultas lentas
O slowlog do MySQL está ativado em todos os servidores MySQL e reúne as consultas que demoram mais de 5 segundos* para serem executadas. Se as suas consultas estiverem bem estruturadas, nunca verá estes ficheiros. Caso contrário, consulte-os regularmente para corrigir eventuais problemas e garantir o bom funcionamento do seu site.
Contacte o suporte da Infomaniak por escrito para obtê-los (exceto para os antigos alojamentos v1 – fórmula antiga), que podem ser consultados diretamente através do Web FTP, um nível acima de /web, no diretório /logs).
E os logs?
Nenhum log MySQL é criado (exceto os slow logs), pois os servidores MySQL não suportariam a carga de milhões de logs simultâneos a serem registrados. Se necessário, a Infomaniak pode ativar este log MySQL por 5 minutos para que você possa analisá-lo com EXPLAIN e determinar, por exemplo, os índices úteis. Para isso, entre em contato com o suporte da Infomaniak por escrito.
* de tempo decorrido. E, no que diz respeito aos bloqueios, a documentação fornece a seguinte precisão: "O tempo necessário para adquirir os bloqueios iniciais não é considerado tempo de execução".
Link para esta FAQ: https://faq.infomaniak.com/1676
Esta seção de perguntas frequentes foi útil?
Este guia explica como suspender a gestão administrativa de um produto, de modo que nenhum utilizador da Organização possa mais utilizá-lo no Manager Infomaniak. Também é possível bloquear um utilizador da sua Organização, sem o eliminar.
Introdução
- Ao bloquear a gestão de um produto:
- Apenas os administradores e o responsável legal poderão desbloqueá-lo.
- Os utilizadores com direitos limitados (colaboradores e clientes) que tenham acesso a este produto não poderão mais gerir o mesmo.
- É enviado um e-mail aos utilizadores da Organização.
Bloquear um produto
Pré-requisitos
- Ser Administrador ou Responsável legal na Organização (❓: ajuda).
- Os utilizadores com permissões limitadas (colaboradores e clientes) que tenham acesso a este produto não poderão fazê-lo.
Para bloquear ou desbloquear determinados produtos para toda a Organização:
- Clique aqui para acessar a gestão de produtos no Manager Infomaniak (❓: ajuda).
- Acesse o serviço que deseja bloquear.
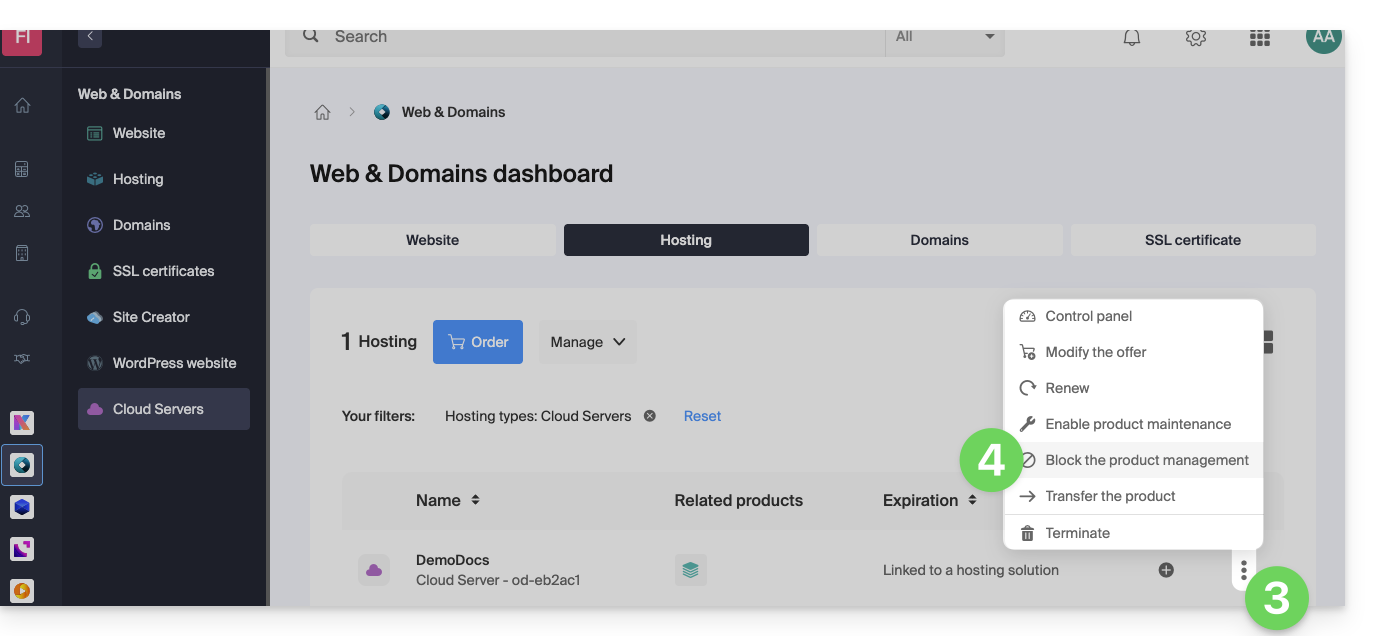
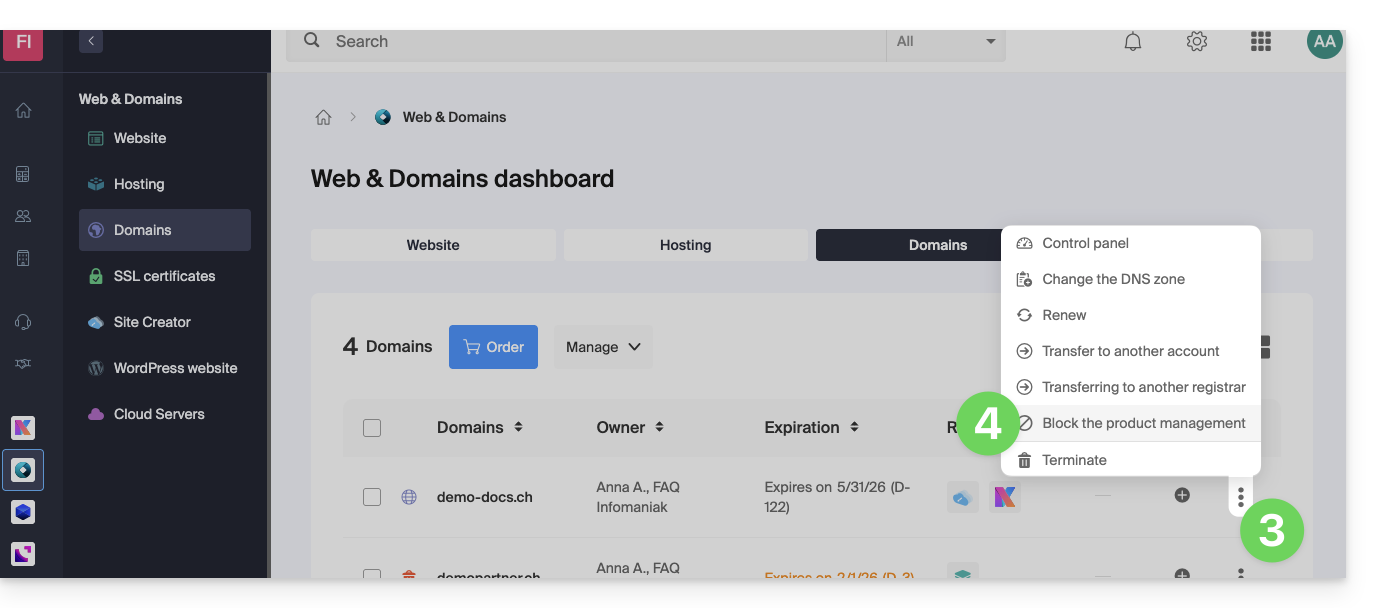
- Clique no menu de ação ⋮ localizado à direita do item correspondente.
- Clique em Bloquear a gestão do produto:
- Exemplo 1, Servidor Cloud:
- Exemplo 2, nome de domínio:
- Exemplo 1, Servidor Cloud:
- Confirme a suspensão.
Suspender e-mails
Um Serviço de E-mail não pode ser bloqueado da forma indicada acima, mas pode ser colocado em manutenção.
Pré-requisitos
- Ser administrador ou responsável legal; os utilizadores com direitos limitados (colaboradores e clientes) que tenham acesso a este produto não poderão fazê-lo.
Para suspender os endereços de e-mail:
- Clique aqui para acessar o gerenciamento do seu produto no Manager Infomaniak (❓: ajuda).
- Clique diretamente no nome atribuído ao produto em questão.
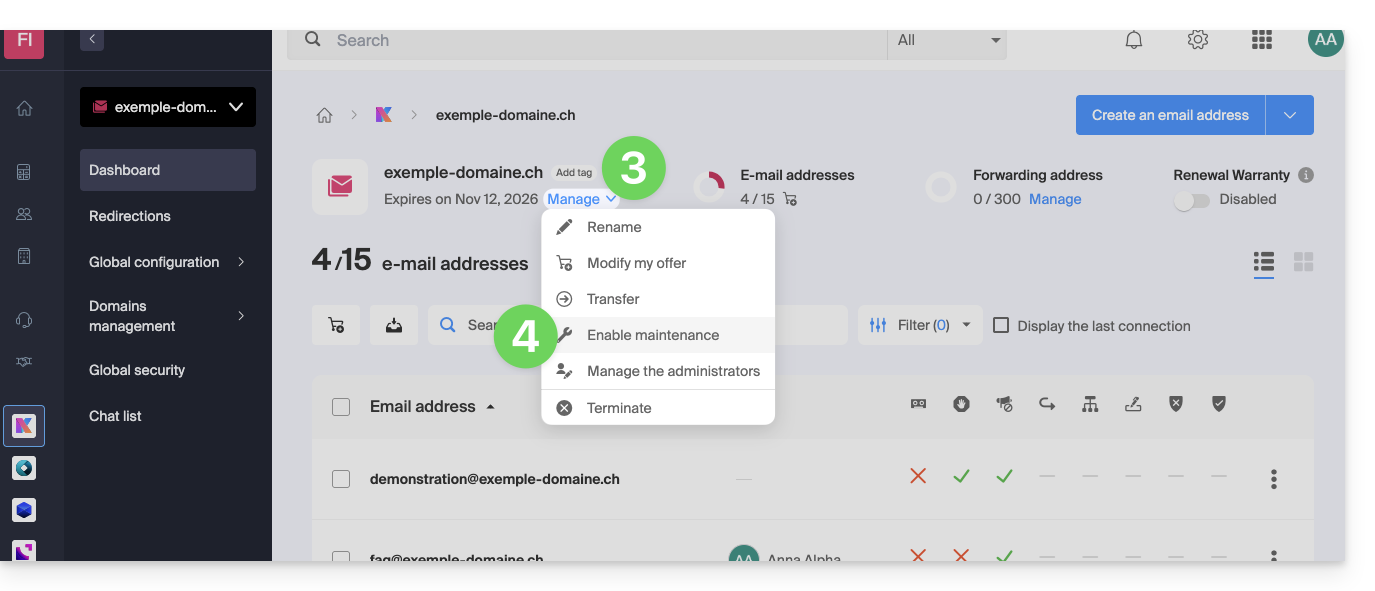
- Clique em Gerenciar.
- Clique em Ativar a manutenção:
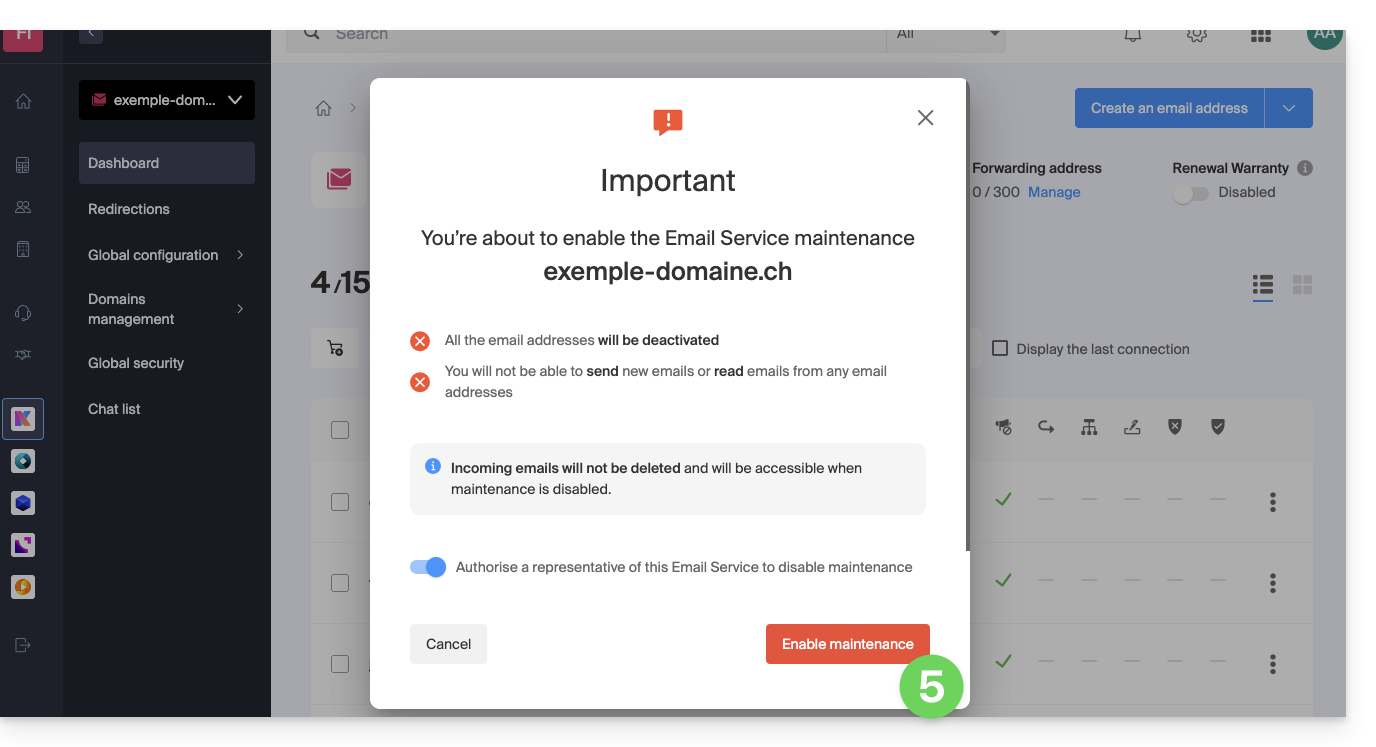
- Confirme a suspensão do uso dos endereços de e-mail clicando no botão vermelho (o recebimento não é interrompido, mas a consulta é impossível):
Bloquear um utilizador da Organização
Para bloquear rapidamente um utilizador da Organização, em caso de incidente de segurança, aceda à gestão dos seus utilizadores como Administrador ou Responsável legal da Organização:
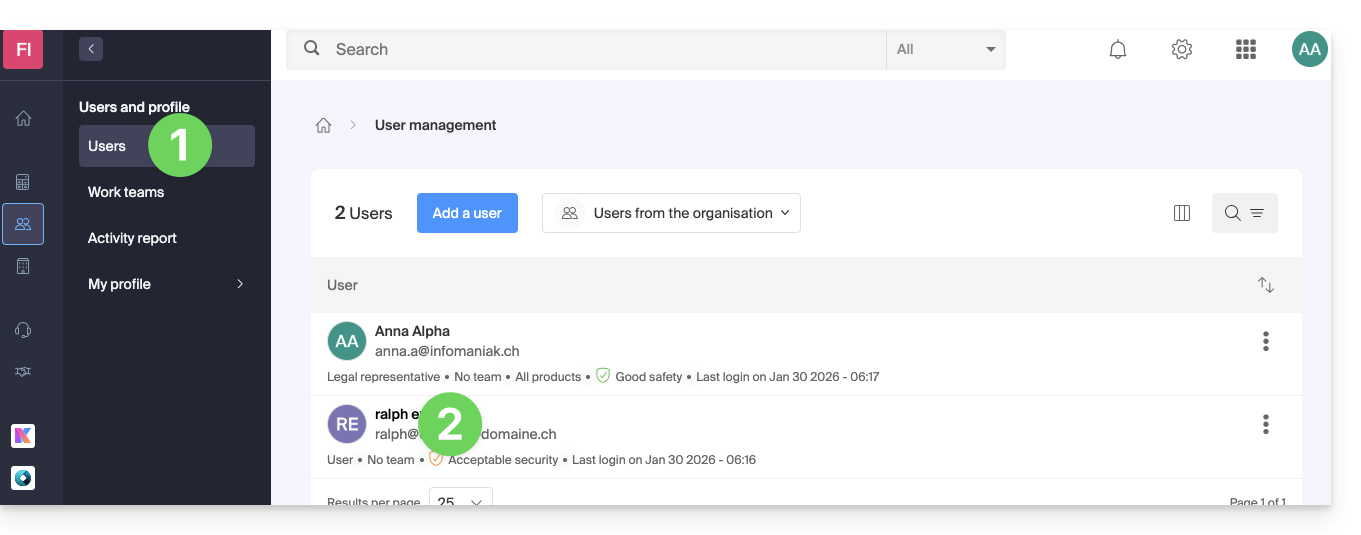
- Clique aqui para acessar o gerenciamento de usuários no painel de controle Infomaniak (❓: ajuda).
- Clique no usuário desejado:
- No botão Gerenciar, na parte superior da página, você pode remover o usuário da Organização (o que também remove os diferentes acessos de gerenciamento aos produtos aos quais ele tinha acesso).
- Mais abaixo, você pode gerenciar com mais precisão os produtos aos quais o usuário deve ter acesso:
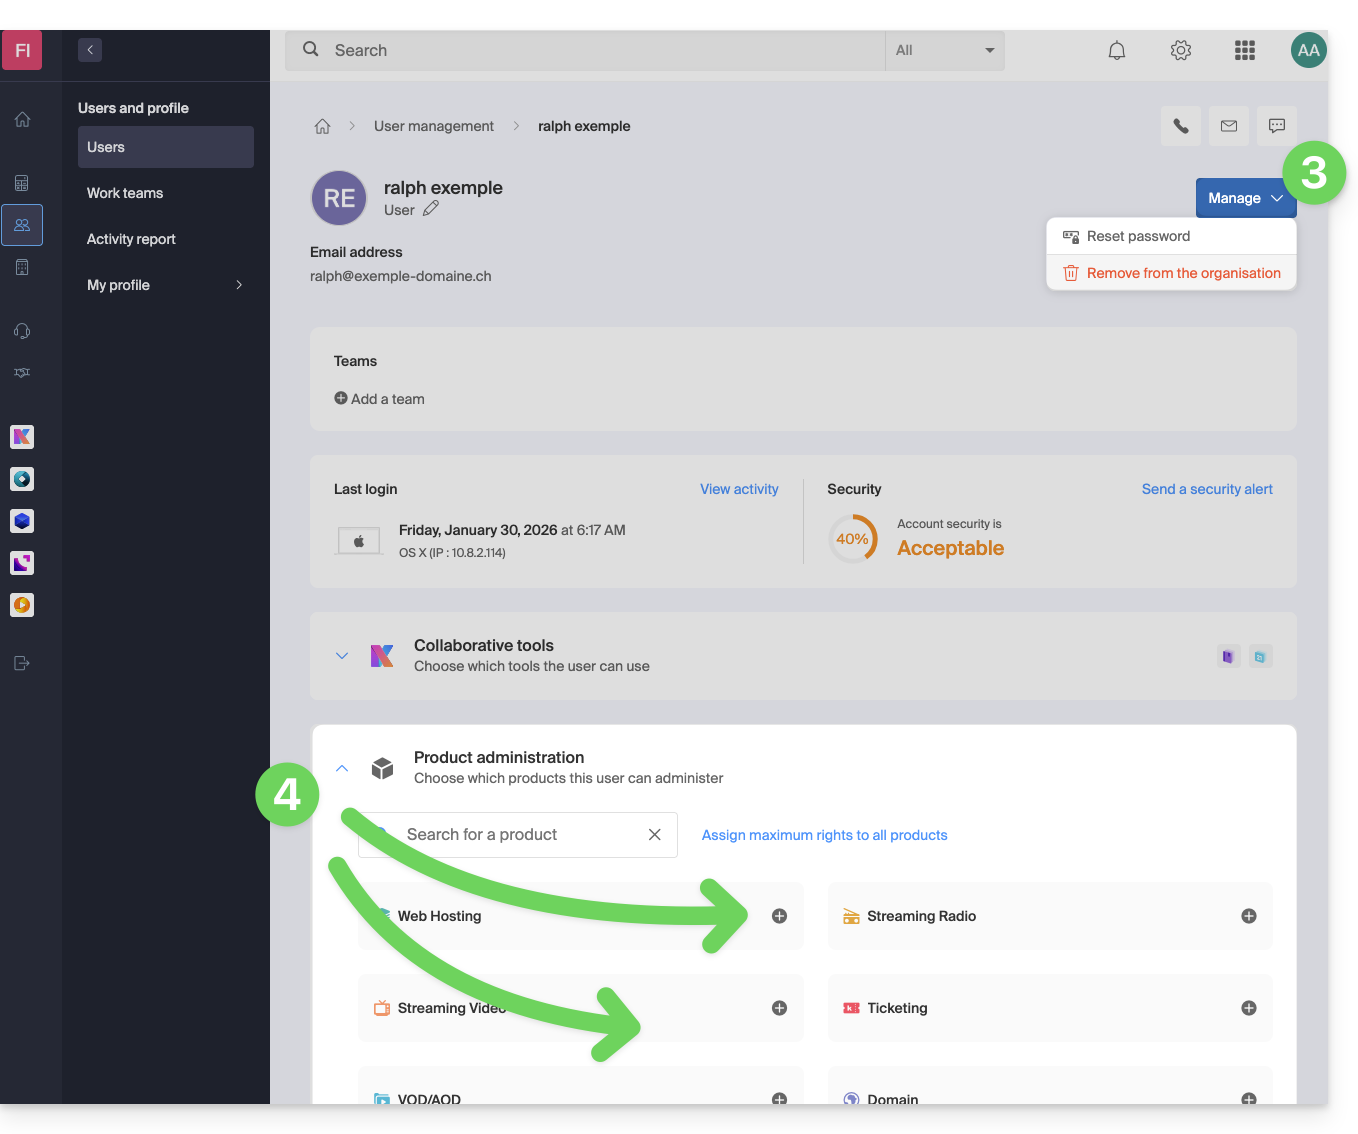
Assim, serviços essenciais, como a interface Manager da sua Organização, o aplicativo web kDrive e o aplicativo web Mail, podem se tornar inacessíveis para este usuário.
Dependendo da situação, você pode bloquear outros serviços, como serviços web (❓: ajuda) ou a mensagem e, mais especificamente, o IMAP (❓: ajuda) e/ou o SMTP (❓: ajuda).
Para não bloquear o utilizador, pode indicar-lhe um procedimento a seguir para proteger a sua conta (❓: ajuda).
Link para esta FAQ: https://faq.infomaniak.com/1689
Esta seção de perguntas frequentes foi útil?
Este guia detalha a oferta de Servidor Cloud da Infomaniak e a oferta VPS da Infomaniak, destinadas a diferentes usos.
Introdução
- A Infomaniak oferece duas soluções de hospedagem avançada:
- o Servidor Cloud gerenciado, que permite criar várias hospedagens (espaços FTP/SSH) nas quais você adiciona seus sites (vhosts Apache),
- e o VPS (Servidor Virtual Privado), que oferece total liberdade de administração e atende a diferentes necessidades.
Servidor Cloud gerenciado
O Servidor Cloud permite ultrapassar as limitações de uma hospedagem compartilhada. Pode criar e distribuir os seus sites como desejar, definir o diretório raiz de cada site e ajustar parâmetros como memory_limit e max_execution_time.
São fornecidas ferramentas integradas: cron jobs, Site Creator, instalação simplificada do WordPress, registos de acesso e de erros (logs). Também é possível adicionar módulos Apache específicos ou instalar um sistema de cache.
O ambiente de software é gerenciado pela Infomaniak (FastCGI, PHP-FPM). Você não tem total liberdade para configurar o servidor (não é possível instalar software arbitrário), mas alguns programas específicos podem ser instalados.
VPS (não gerenciado)
O VPS oferece controle total sobre o servidor, mas a responsabilidade é sua. A Infomaniak gerencia o hardware e instala a versão do Linux ou do Windows escolhida no momento da encomenda. A Infomaniak não realiza nenhuma intervenção de software: você administra o sistema, instala e configura os softwares.
Você pode reiniciar o servidor através do Manager Infomaniak. Um sistema de snapshots está disponível (exceto na oferta VPS Lite).
Conteúdo de vídeo e alternativas
Se o seu projeto envolver principalmente um grande volume de vídeos, geralmente é preferível separar a distribuição de vídeo do alojamento principal. Combinado com um alojamento partilhado, o espaço VOD/AOD Infomaniak permite armazenar e distribuir vídeos de forma eficiente, suportar picos de tráfego e obter estatísticas detalhadas de visualização.
Migração entre Servidor Cloud e VPS
Não existe uma solução de migração automática entre um Servidor Cloud gerenciado e um VPS.Para mudar de um plano para outro, é necessário cancelar o produto que você não usa mais e solicitar o novo plano. A Infomaniak reembolsa, mediante solicitação, qualquer novo servidor se o cancelamento ocorrer dentro de 30 dias após o pedido.
Link para esta FAQ: https://faq.infomaniak.com/1730
Esta seção de perguntas frequentes foi útil?
O padrão BIMI (Brand Indicators for Message Identification, indicadores de marca para a identificação de mensagens) oferece a possibilidade de as empresas incorporarem o seu logótipo nos e-mails enviados.
Introdução
- As aplicações Infomaniak (e de outras empresas em todo o mundo – consulte o capítulo em caso de problemas abaixo) são compatíveis com BIMI e exibirão os logotipos ao lado das mensagens de e-mail recebidas.
- Os Serviços de E-mail Infomaniak permitem configurar o e-mail com o seu logotipo; as vantagens são muitas:
- aumento da confiança: os destinatários podem identificar visualmente os seus e-mails, reduzindo assim os riscos de phishing.
- reforço da marca: um logotipo bem visível nas caixas de entrada reforça o reconhecimento da marca.
- melhor entregabilidade: os e-mails que cumprem os requisitos do DMARC têm mais probabilidade de chegar à caixa de entrada principal.
1. Criar um logotipo
Crie um logotipo no formato SVG (Scalable Vector Graphics). Este formato é obrigatório, pois garante uma qualidade ótima, independentemente do dispositivo ou do tamanho da tela.
Para ser importado na interface Infomaniak (veja abaixo), o arquivo não deve exceder 10 MB, mas também pode ser hospedado em um servidor seguro acessível publicamente, bastando indicar seu URL para o registro DNS BIMI.
2. Obter o certificado VMC
É necessária uma certificação de logotipo verificado (VMC); ela comprova que você é o proprietário legítimo do logotipo. Você pode obter essa certificação junto a autoridades de certificação reconhecidas, como DigiCert e Entrust.
Quando seu certificado VMC for emitido, você receberá um arquivo PEM contendo o certificado da entidade. Este arquivo PEM integra seu logotipo no formato SVG, bem como o VMC.
3. Adicionar o logotipo ao Serviço de Email
Pré-requisitos
- Todos os indicadores de segurança globaldo seu serviço de e-mail devem estar verdes (SPF + DKIM + DMARC)!
Para aceder ao Serviço de Email e definir o logótipo da sua empresa:
- Clique aqui para aceder à gestão do seu Serviço de Email no Manager Infomaniak (precisa de ajuda?).
- Clique diretamente no nome atribuído ao Serviço de Email em questão.
- Clique em Segurança global no menu lateral esquerdo.
- Clique no botão Criar (na secção BIMI):
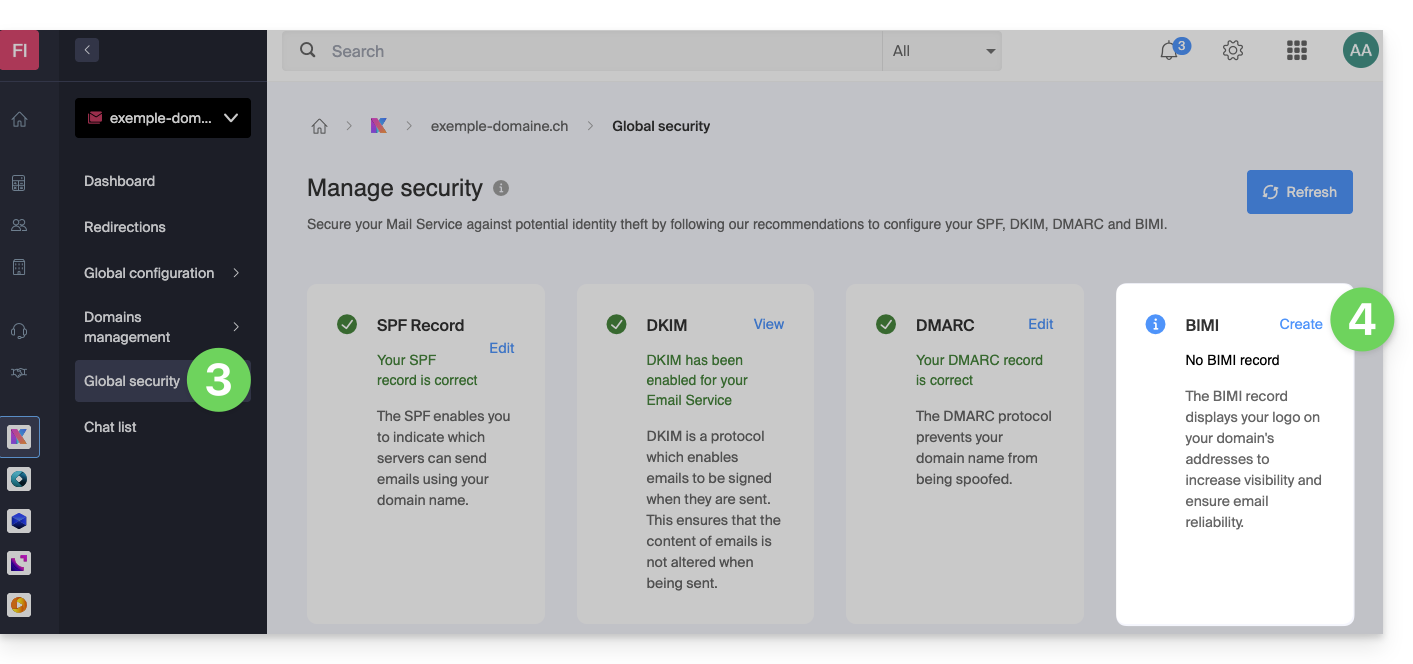
- Preencha as informações solicitadas com base nos documentos recebidos (ver capítulo 2 acima) e não se esqueça de guardar.
Em caso de problema
- Se o botão Criar na caixa BIMI permanecer acinzentado, verifique cuidadosamente as mensagens informativas: o DMARC pode existir, mas não atingir a porcentagem de rejeição exigida, portanto, ajuste as configurações de acordo com as instruções.
- Quando existem vários domínios associados ao Serviço de Email, é importante garantir que possui um certificado em cada domínio associado, caso deseje utilizar o BIMI nesses domínios.
- Note que o Apple Mail suporta o BIMI, ao contrário do Microsoft Outlook, do Thunderbird e do aplicativo Mail da Samsung, que ainda não o implementaram totalmente.
Desativar o BIMI
Para desativar o BIMI, basta acessar a página de gerenciamento do nome de domínio vinculado ao Serviço de E-mail e remover o registro TXT correspondente.
Link para esta FAQ: https://faq.infomaniak.com/1816
Esta seção de perguntas frequentes foi útil?
Este guia explica como alterar a senha de administração do WordPress ou de qualquer outra aplicação web (Joomla, Drupal, Typo3, PrestaShop, ownCloud, etc.) instalada através das ferramentas Infomaniak incluídas nas ofertas de Hospedagem Web pagas.
Introdução
- Algumas aplicações também permitem alterar a senha do usuário diretamente em sua interface dedicada:
- Exemplo: WordPress (gerenciar usuários, nomes, senhas, funções, etc.).
Alterar a senha de um aplicativo web
Para alterar a senha de acesso ao painel de administração da sua aplicação web, siga os seguintes passos:
- Clique aqui para acessar o gerenciamento do seu site no Manager Infomaniak (precisa de ajuda?).
- Clique diretamente no nome atribuído ao site em questão:
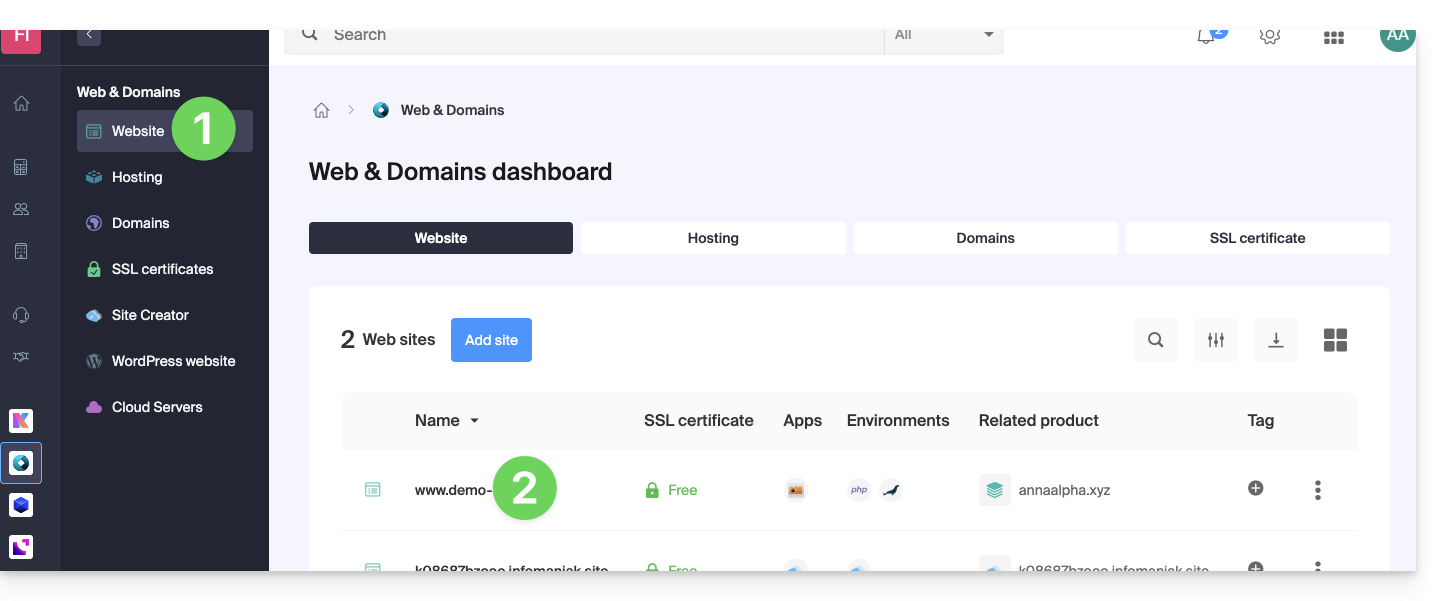
- Clique no menu de ações ⋮ localizado à direita da aplicação web em questão.
- Clique em Configurações no aplicativo:
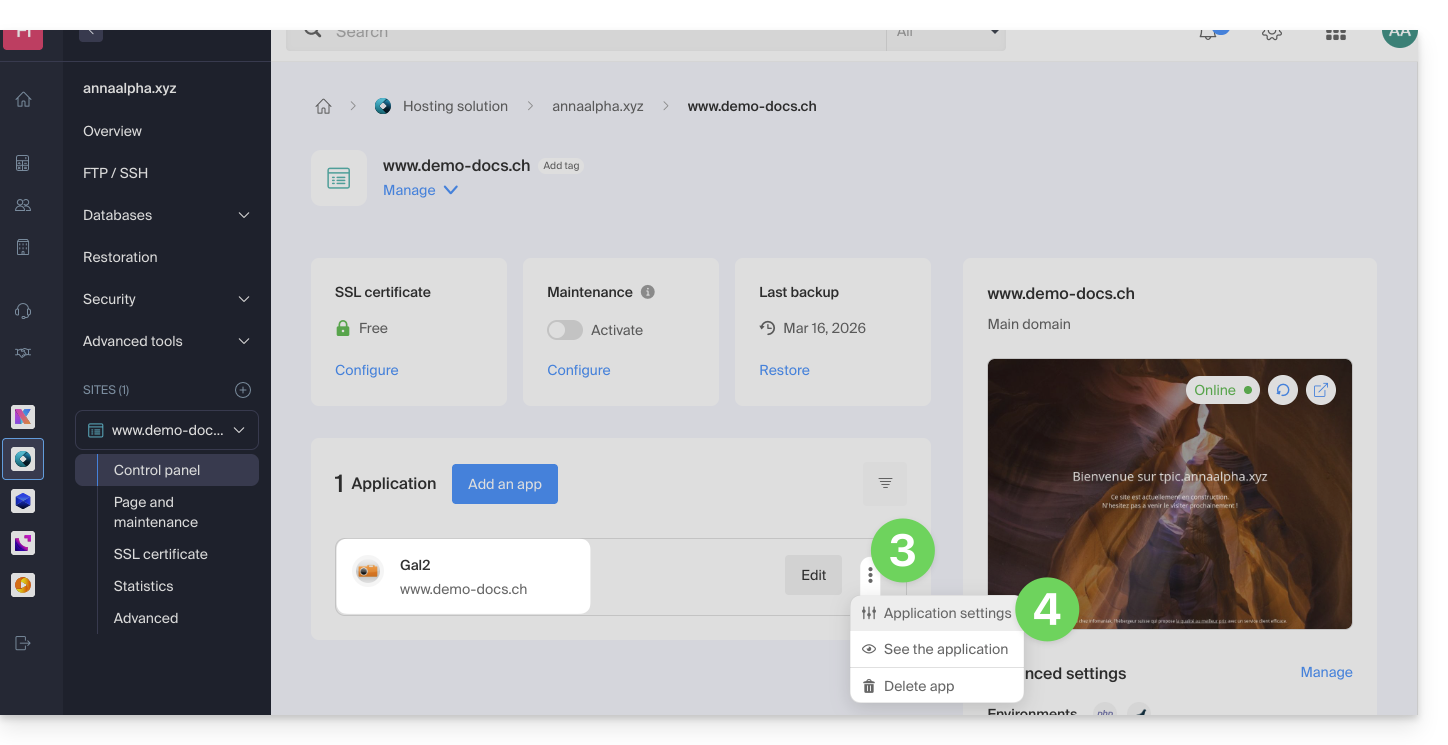
- Clique em Editar à direita do aplicativo:
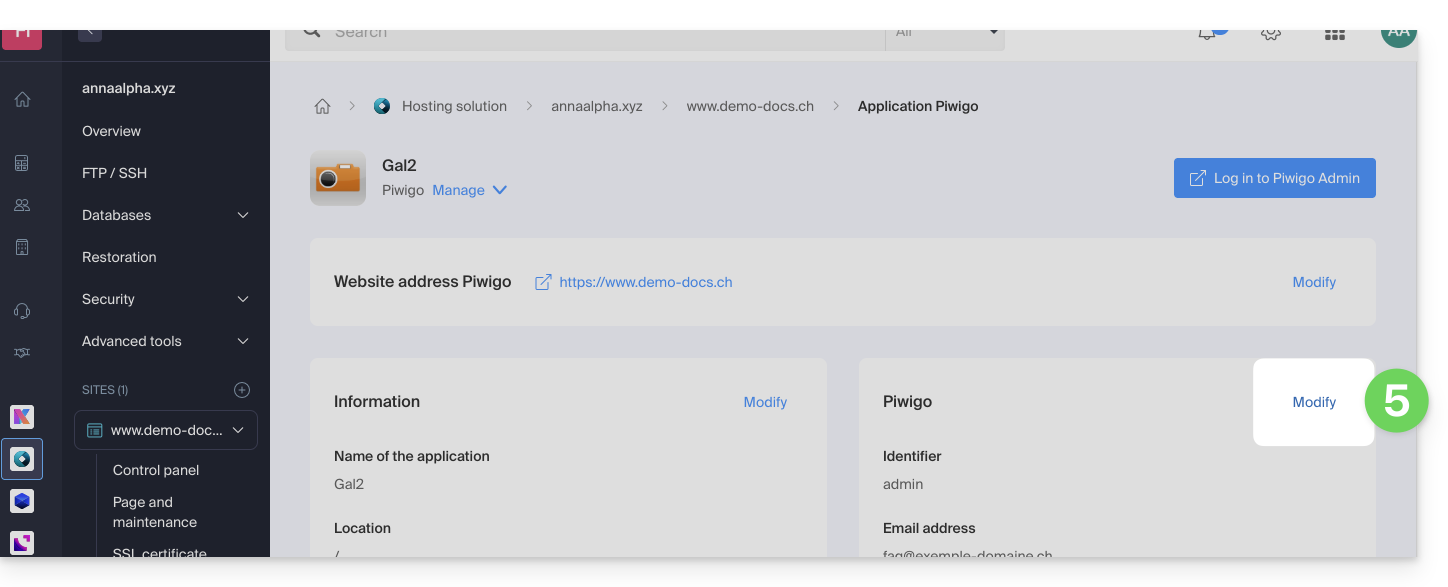
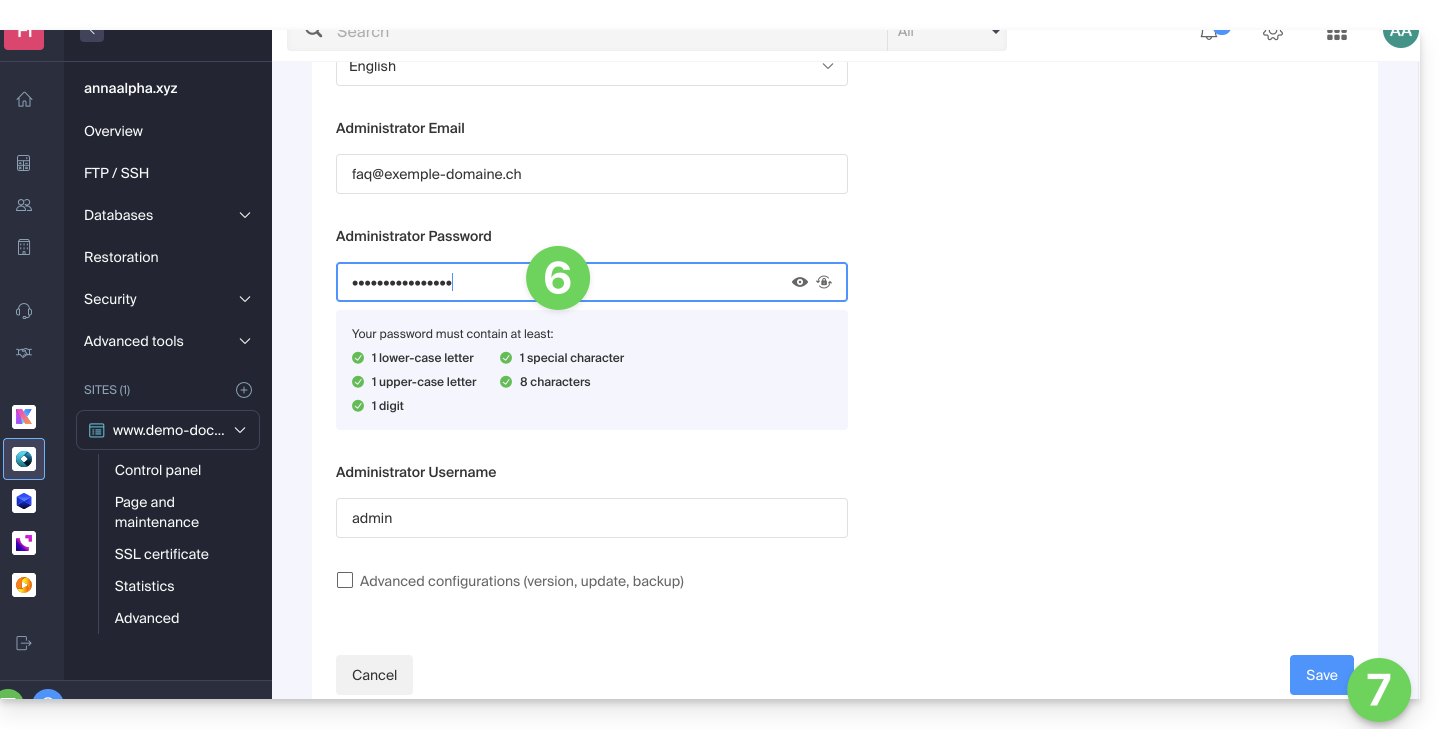
- Em Senha, insira a nova senha (para o login com o identificador indicado acima).
- Clique no botão Salvar na parte inferior da página:
Link para esta FAQ: https://faq.infomaniak.com/1848
Esta seção de perguntas frequentes foi útil?