Base de conhecimento
1000 perguntas frequentes, 500 tutoriais e vídeos explicativos. Aqui, você encontra apenas soluções!
Este guia explica como editar as notificações e alertas de e-mail do Agente Acronis, usado para fazer o backup dos seus dispositivos com o Swiss Backup.
Ativar / desativar os alertas e notificações
Para acessar a interface de gerenciamento:
- Clique aqui para acessar o Console Acronis com as credenciais obtidas após a adição do dispositivo (precisa de ajuda?).
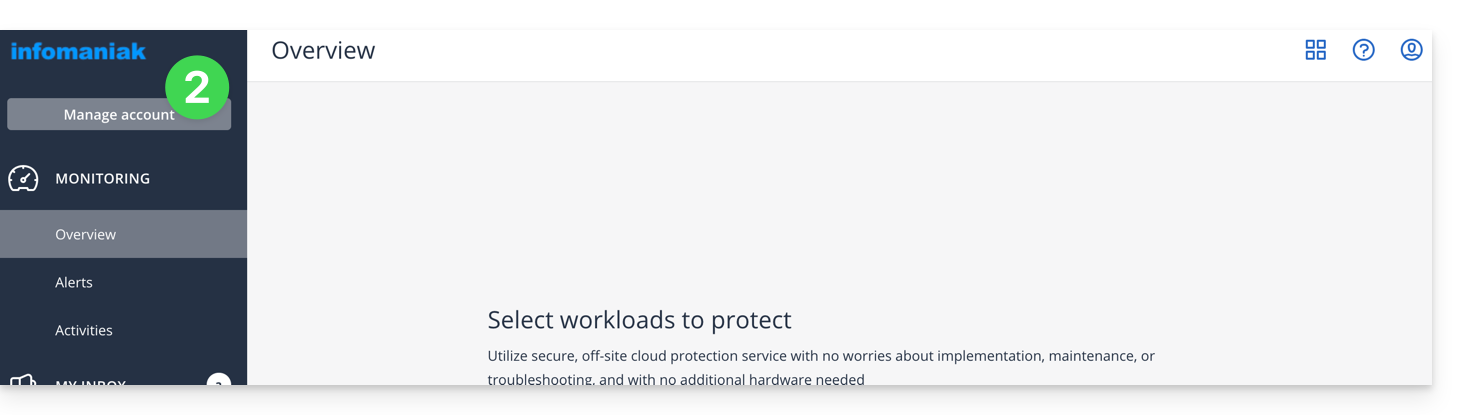
- Clique em Gerenciar conta no menu lateral esquerdo:
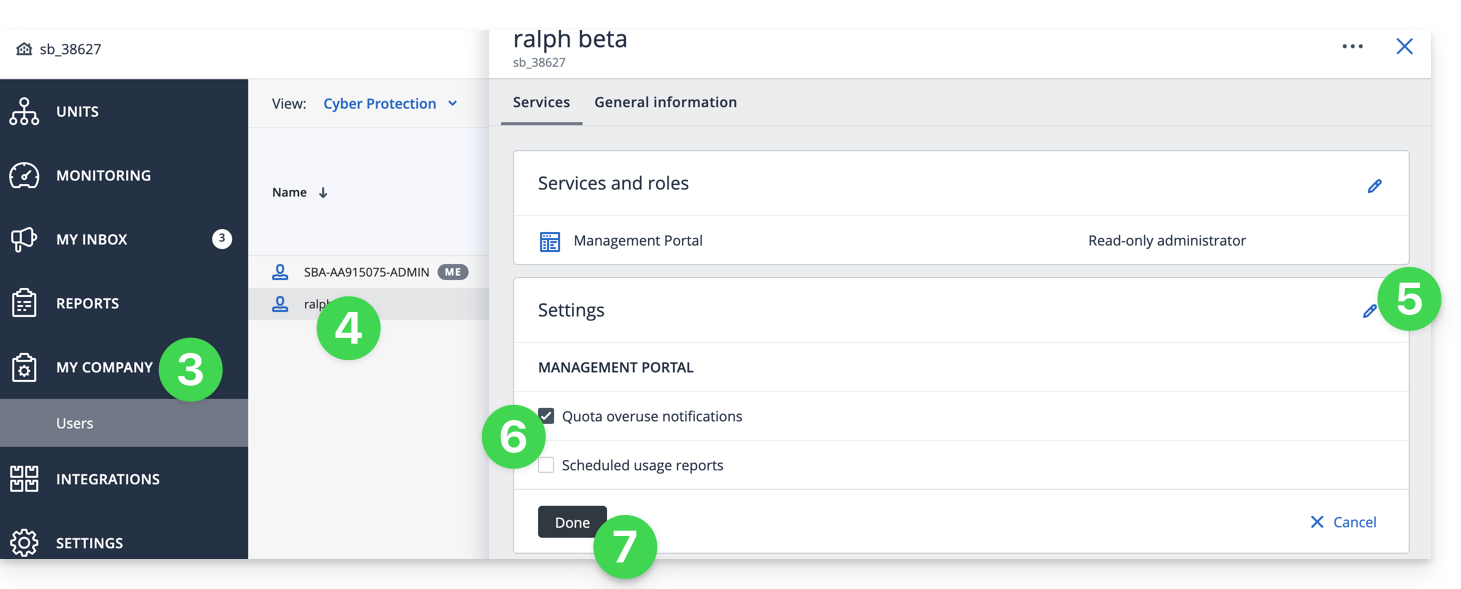
- Clique em Minha empresa.
- Clique no utilizador em questão na tabela que aparece.
- Clique no ícone lápis ✎ no bloco de configurações.
- Ative ou desative as notificações desejadas.
- Clique em Confirmar para guardar as alterações:
Alterar o endereço de e-mail de receção
Para alterar o endereço de e-mail que recebe as notificações:
- Clique aqui para acessar o Console Acronis com as credenciais obtidas após adicionar o dispositivo (precisa de ajuda?).
- Clique em Gerenciar conta no menu lateral esquerdo:
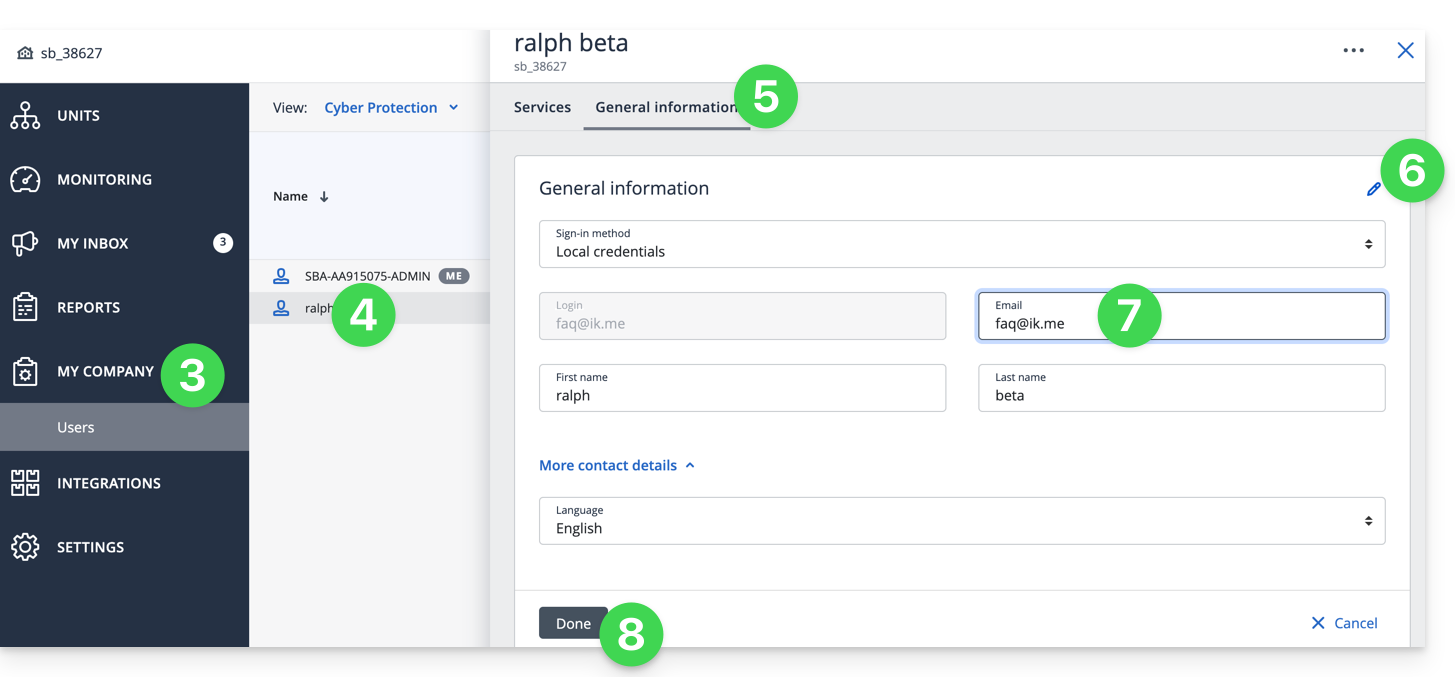
- Clique em Minha empresa.
- Clique no utilizador em questão na tabela que aparece.
- Clique na aba Informações gerais, no canto superior direito.
- Clique no ícone lápis ✎.
- Edite o endereço de e-mail.
- Clique em Confirmar para guardar a alteração:
Gerar relatórios pontuais
Consulte este outro guia se precisar de informações sobre o gerenciamento de relatórios pontuais (personalizá-los ou permitir que várias pessoas os recebam).
Link para esta FAQ: https://faq.infomaniak.com/2292
Esta seção de perguntas frequentes foi útil?
Este guia explica como alterar o idioma do painel de controlo do Acronis, bem como o idioma das comunicações por e-mail do Agente Acronis utilizado para fazer o backup dos seus dispositivos com o Swiss Backup.
Gerir as definições de idioma do Acronis
Para alterar o idioma exibido pelo Acronis:
- Clique aqui para acessar o Console Acronis com as credenciais obtidas após adicionar o dispositivo (precisa de ajuda?).
- Clique no ícone do usuário, no canto superior direito.
- Clique em Alterar idioma:
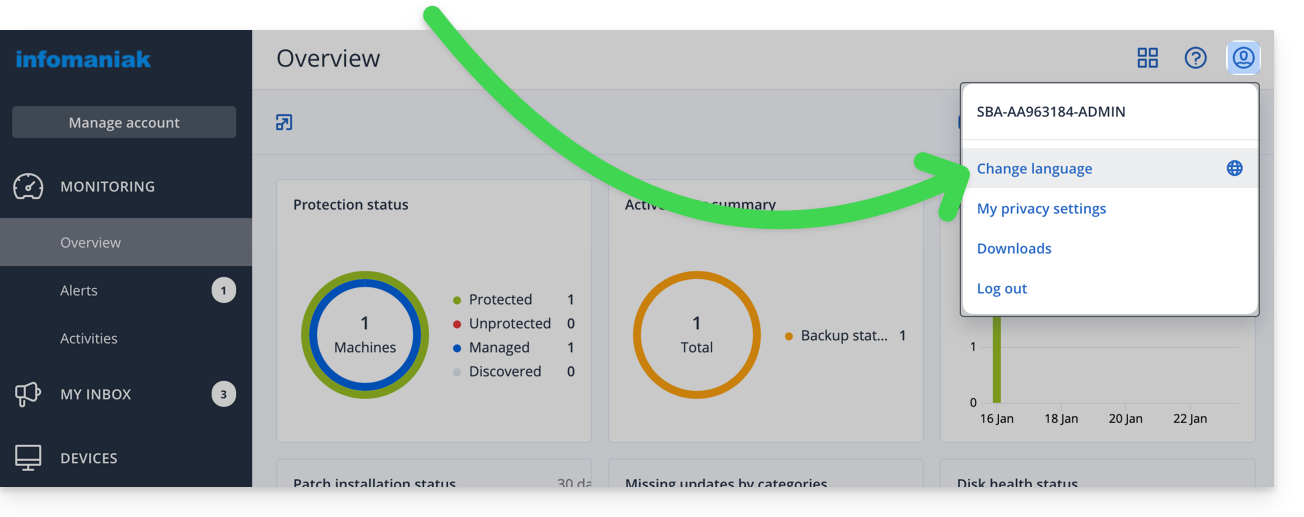
- Também é possível acessar este menu através da gestão da conta Acronis:
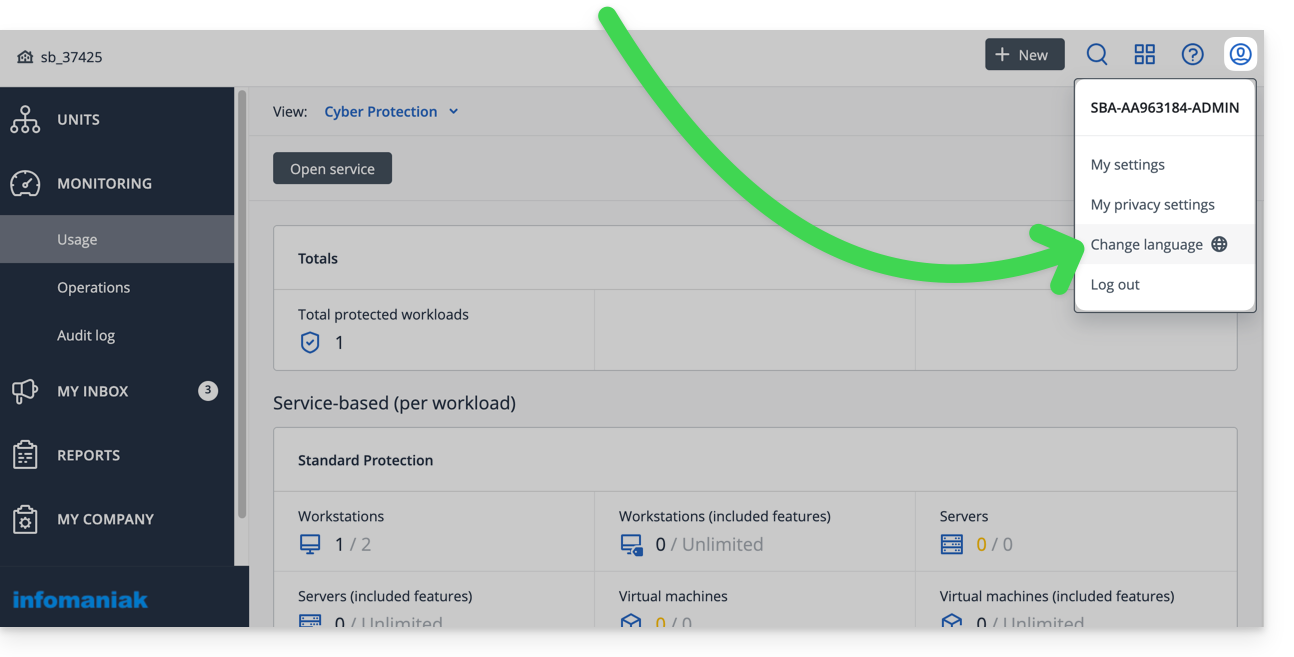
- Clique no idioma desejado.
Gerenciar as configurações por usuário
É possível alterar o idioma dos e-mails/alertas/ notificações para seus diferentes clientes/usuários (por exemplo, um que fale inglês e outro que fale francês) – isso não altera o idioma da interface em si – acessando a gestão da conta Acronis e seguindo a ordem A, B, C…: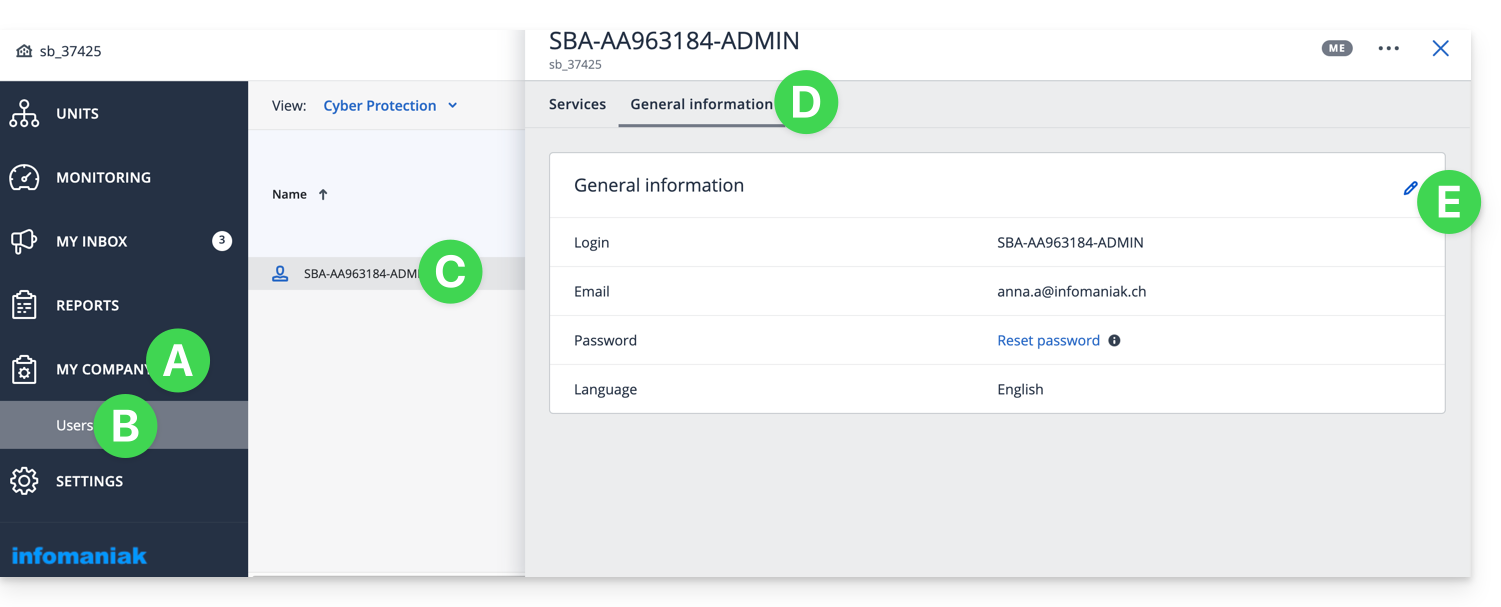
Link para esta FAQ: https://faq.infomaniak.com/2293
Esta seção de perguntas frequentes foi útil?
Este guia detalha como fazer o backup de um dispositivo Android (Samsung, Huawei, OnePlus, etc.) usando o Acronis no Swiss Backup da Infomaniak, a solução de backup em uma nuvem suíça independente.
Introdução
- O que poderá guardar:
- Contactos e Calendários
- Fotos (o tamanho e o formato original das suas fotos são preservados)
- Vídeos
- Também é possível guardar outros tipos de dados.
Configurar a cópia de segurança
Pré-requisitos
- Ter um espaço Swiss Backup Infomaniak com uma quota de dispositivo disponível (mínimo 1) para Mobile:
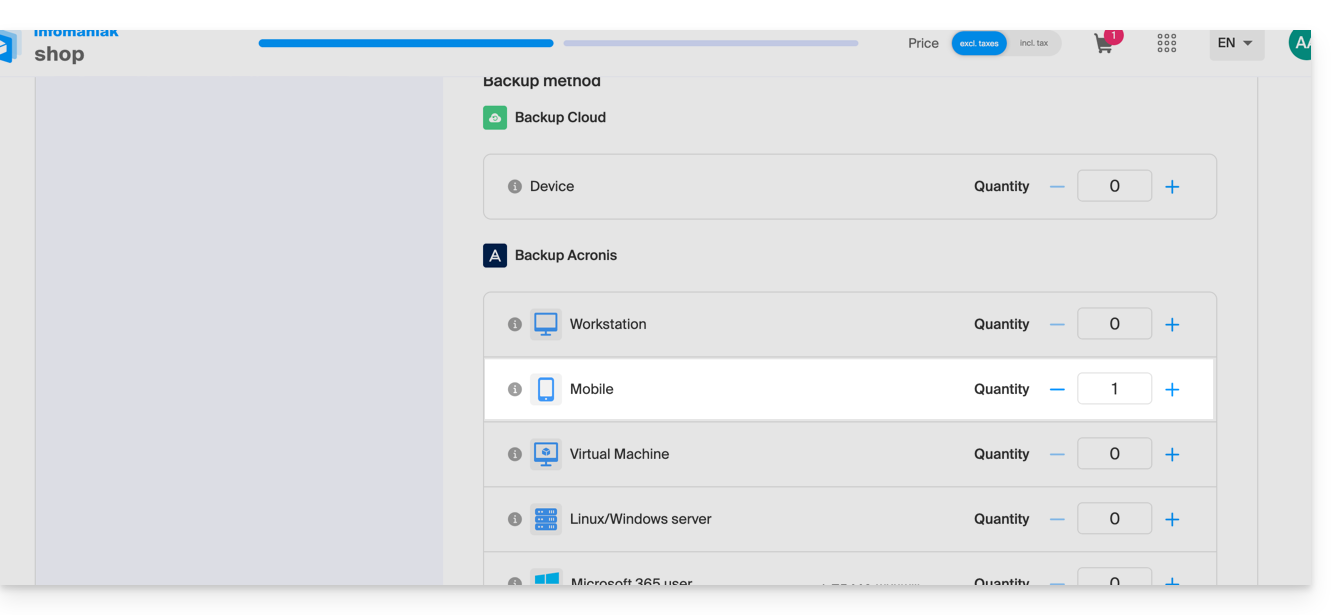
- Se necessário, aumentar a quota de dispositivo de acordo com as suas necessidades.
- Adicione o dispositivo no Gerenciador Infomaniak para receber as credenciais de acesso.
- Consulte a documentação da Acronis sobre este assunto.
Para configurar o backup do dispositivo móvel Android com o Acronis:
- Descarregue e instale a aplicação Acronis Cyber Protect a partir da Google Play Store.
- Abra o aplicativo móvel Cyber Protect, conectando-se ao Agente Acronis com as credenciais obtidas após adicionar o dispositivo (precisa de ajuda?).
- Clique em Fazer backup e escolha os dados que deseja fazer backup.
- Clique em Confirmar para iniciar a cópia de segurança dos dados.
Link para esta FAQ: https://faq.infomaniak.com/2294
Esta seção de perguntas frequentes foi útil?
Este guia detalha como fazer o backup de um dispositivo Apple iOS (iPhone, iPad, etc.) usando o Acronis no Swiss Backup, a solução de backup em uma nuvem suíça independente.
Introdução
- O que poderá guardar:
- Contactos e Calendários
- Fotos (o tamanho e o formato original das suas fotos são preservados)
- Vídeos
- Também é possível guardar outros tipos de dados.
Configurar o backup
Pré-requisitos
- Ter um espaço Swiss Backup Infomaniak com uma quota de dispositivo disponível (mínimo 1) para Dispositivos móveis:
- Se necessário, aumente a quota de dispositivo de acordo com as suas necessidades.
- Adicione o dispositivo no Gerenciador Infomaniak para receber as credenciais de acesso.
- Consulte a documentação da Acronis sobre este assunto.
Para configurar o backup do dispositivo móvel no Android com o Acronis:
- Descarregue e instale a aplicação Acronis Cyber Protect (não Acronis Mobile) na App Store.
- Abra a aplicação, fazendo login no Agente Acronis com as credenciais obtidas após adicionar o dispositivo (precisa de ajuda?).
- Clique em Fazer backup e escolha os dados que deseja fazer backup.
- Clique em Confirmar para iniciar a cópia de segurança dos dados.
Link para esta FAQ: https://faq.infomaniak.com/2295
Esta seção de perguntas frequentes foi útil?
This guide explains how to retrieve specific files or folders/directories from a backup created with Acronis and Swiss Backup, Infomaniak's Swiss backup solution.
Preamble
- The online view from the Acronis console allows you to view a file or folder with a maximum size of 100MB; beyond that, it is imperative to download the file or folder in order to view it.
- Also refer to the Acronis documentation on this subject.
Restore specific data
To do this:
- Click here to access the Acronis Console with the credentials obtained after adding the device (need help?).
- Click on the device concerned from the All devices menu on the left.
- Click on Restore from the menu that appears on the right.
- Click on Restore files / folders.
- Select the files to restore.
- Click on Restore.
Link para esta FAQ: https://faq.infomaniak.com/2296
Esta seção de perguntas frequentes foi útil?
Este guia explica como desinstalar permanentemente o Agente de backup da Acronispara o Swiss Backup em dispositivos Apple.
Consulte também a documentação da Acronis sobre este assunto.
Remover o Agente de Backup do macOS
Para desinstalar o Cyber Protect:
- Clique aqui para acessar o Console Acronis com as credenciais obtidas após adicionar o dispositivo (precisa de ajuda?).
- Clique no ícone de usuário, no canto superior direito.
- Clique em Downloads:
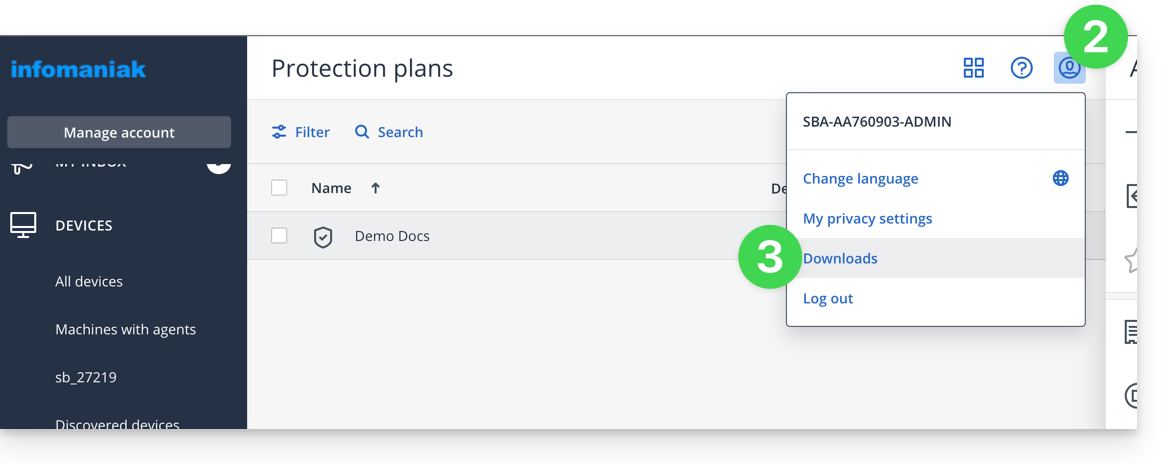
- Escolha o cliente adequado para o seu dispositivo.
- Abra o arquivo
.dmgapós o download. - Clique duas vezes em Desinstalar:
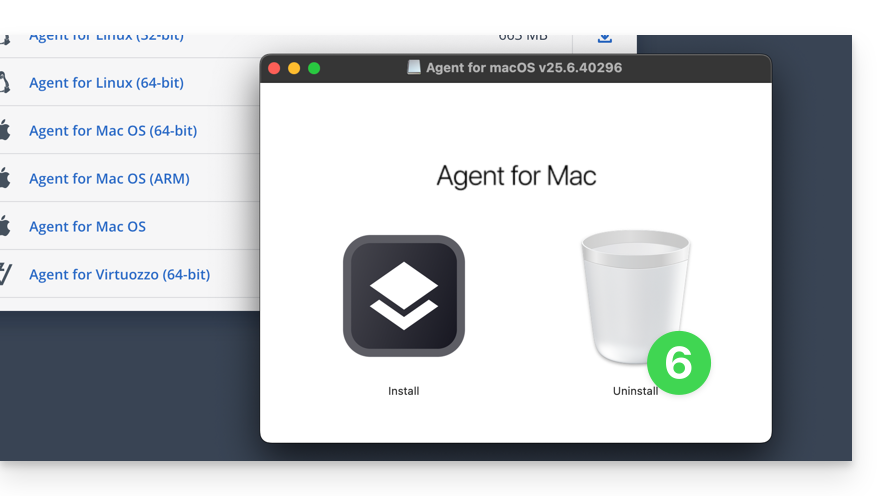
- Confirme, se necessário, a abertura da aplicação.
- Confirme, se necessário, a desinstalação da aplicação.
- Aguarde até o final da desinstalação.
Link para esta FAQ: https://faq.infomaniak.com/2311
Esta seção de perguntas frequentes foi útil?
Este guia detalha como fazer o backup de um NAS do tipo QNAP usando o rClone ou o HBS através do protocolo OpenStack Swift no Swiss Backup, a solução de backup em uma nuvem suíça independente.
Conexão via rClone
Pré-requisitos
- Ter um espaço Swiss Backup Infomaniak com uma quota de dispositivo disponível (mínimo 1) para uma cópia de segurança na nuvem.
- Adicionar 1 dispositivo do tipo Cloud para obter as configurações OpenStack Swift.
- Instalar a aplicação rClone (https://www.qnapclub.eu/en/qpkg/330) ou HBS (https://www.qnap.com/en/software/hybrid-backup-sync) no QNAP.
Para configurar uma nova cópia de segurança:
- Copie o conteúdo abaixo para o ficheiro
rclone.confno diretório.config/rclonedo utilizador (por exemplo,/share/homes/backupuser/.config/rclone/rclone.conf). - Verifique a configuração com o comando "
rclone config". - Inicie a cópia com o comando "
rclone sync /share/to/sync Infomaniak:default".
Substitua SBI-XXXXXXXX e "passwd" pelas informações específicas do seu dispositivo (consulte este outro guia):
[sb_project_SBI-XXXXXXXX]
type = swift
user = SBI-XXXXXXXX
key = passwd
auth (1) = {{URL_8}}
domain = default
tenant = sb_project_SBI-XXXXXXXX
tenant_domain = default
region = RegionOne
storage_url =
auth_version =
Conexão via HBS (Hybrid Backup Sync)
Para configurar uma nova cópia de segurança:
- Abra o HBS e vá para Cópia de Segurança e Restauração e, em seguida, clique em Criar nova tarefa de cópia de segurança.
- Selecione a pasta do NAS que deseja fazer backup e clique em Avançar.
- Escolha OpenStack Swift e insira as informações conforme as instruções abaixo:
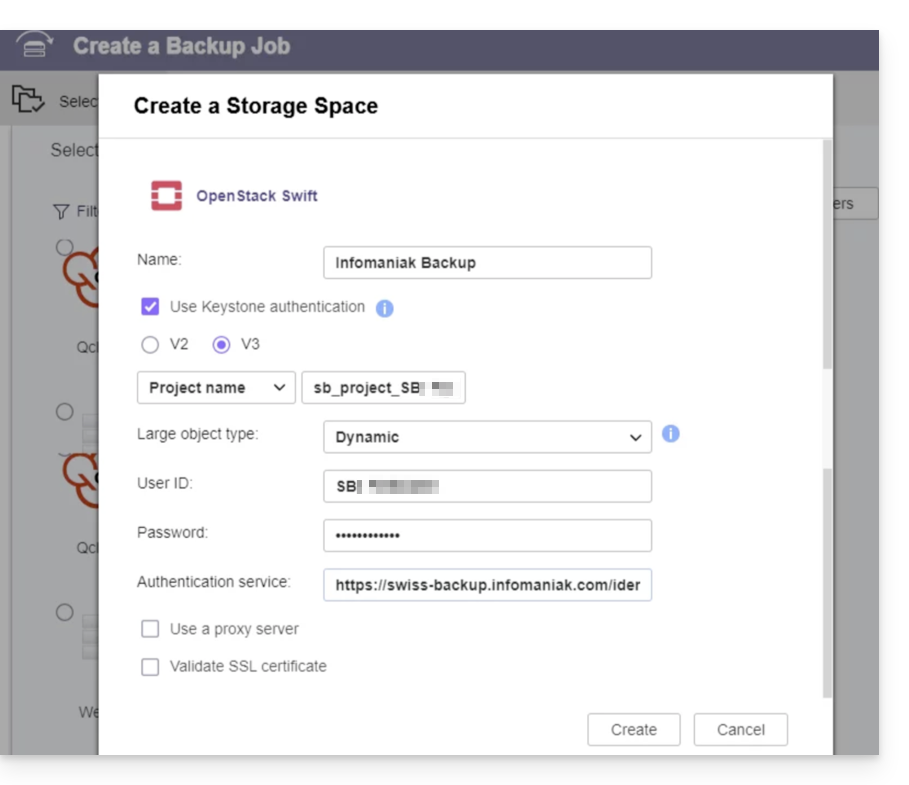
- Nome: atribua um nome ao backup
- Selecione “
Usar infraestrutura Keystone” - Selecione “
V3” - Nome do projeto:
sb_project_SBI-XXXXXXXX(substituaSBI-XXXXXXXXpelo seu próprio identificador, idem abaixo) - ID do usuário:
SBI-XXXXXXXX - Senha: a senha gerada no Swiss Backup
- Serviço de autenticação (1):
https://swiss-backup.infomaniak.com/identity/v3
- Clique em Criar.
- Nome da região:
RegionOne - Nome do bucket:
default - Tamanho das partes: deixe em
128MB - Clique em Selecionar.
- Clique em Padrão no campo de destino e, em seguida, em OK.
- Atribua um nome à tarefa.
- Configure, em seguida, as configurações desejadas, como a frequência das cópias de segurança e a limitação da largura de banda.
- Clique em Criar.
(1) A indicação "//swiss-backup02", "//swiss-backup03", etc., muda de acordo com o número do cluster indicado no Manager, nas informações de armazenamento em nuvem, em "Localização"; e, se o seu dispositivo Swiss Backup foi criado antes de outubro de 2020, deverá usar https://swiss-backup.infomaniak.com/identity/v3.
Link para esta FAQ: https://faq.infomaniak.com/2319
Esta seção de perguntas frequentes foi útil?
Este guia explica como encontrar uma solução caso esteja a executar uma cópia de segurança Swiss Backup, mas esta falhe devido a um erro de conexão. É necessário verificar o que pode estar a bloquear a conexão…
Antivírus
Em alguns casos, programas de segurança, como antivírus ou outros pacotes de segurança, bloqueiam a funcionalidade do Agente Acronis.
Adicione os diretórios do programa e os arquivos executáveis à lista de permissões para resolver o problema:
- Windows: https://kb.acronis.com/content/36429#Windows3
- macOS: https://kb.acronis.com/content/36429#macOS4
- Linux: https://kb.acronis.com/content/36429#Linux5
Portas fechadas
Consulte a documentação sobre as portas que devem ser abertas ou não utilizadas por outro processo e verifique as portas automaticamente com a ferramenta CVT da Acronis:
- Windows / Linux: https://kb.acronis.com/content/47678
- macOS: a partir de uma aplicação do tipo
Terminal(interface de linha de comando,CLI /Command Line Interface), execute o seguinte comando:
echo 0 | nc eu5-cloud.acronis.com 443 >/dev/null && echo "eu5-cloud.acronis.com 443: OK";echo 0 | nc eu5-cloud.acronis.com 7790 >/dev/null && echo "eu5-cloud.acronis.com 7790: OK";echo 0 | nc swift01-acronis.cloud.infomaniak.ch 44445 >/dev/null && echo "swift01-acronis.cloud.infomaniak.ch 44445: OK"; echo 0 | nc eu5-baas.acronis.com 8443 > /dev/null && echo "eu5-baas.acronis.com 8443: OK"Link para esta FAQ: https://faq.infomaniak.com/2328
Esta seção de perguntas frequentes foi útil?
Este guia detalha como fazer o backup manual de dados usando o aplicativo Mountain Duck (macOS / Windows) através do protocolo OpenStack Swift no Swiss Backup, a solução de backup em uma nuvem suíça independente.
Introdução
- O Mountain Duck permite a sincronização de arquivos como alternativa ao Dropbox (para este uso, também é recomendado usar o kDrive).
Configurar o Mountain Duck com o Swiss Backup
Pré-requisitos
- Possuir um espaço Swiss Backup Infomaniak com uma quota de dispositivo disponível (mínimo 1) para um backup na nuvem.
- Adicionar 1 dispositivo do tipo Nuvem para obter os parâmetros OpenStack Swift.
- Baixar e instalar o Mountain Duck (macOS / Windows).
Para configurar um novo backup:
- Abra o Mountain Duck.
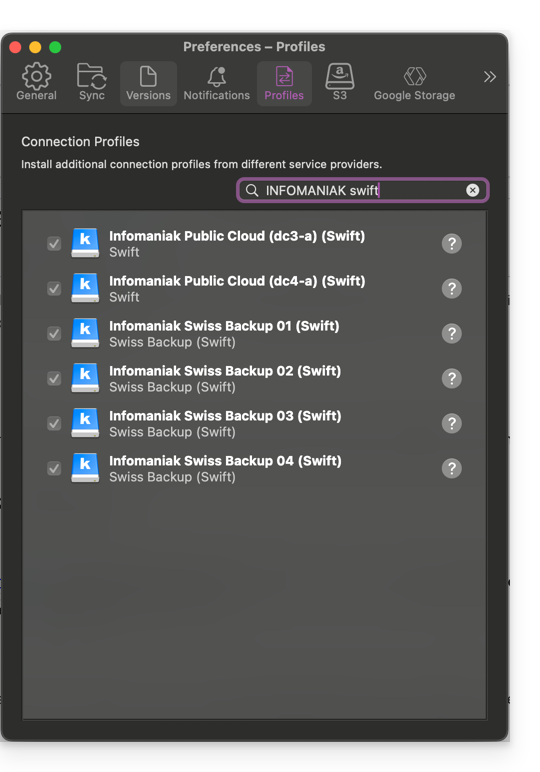
- Nas preferências do aplicativo, procure e adicione os perfis necessários:
- Crie uma Nova conexão.
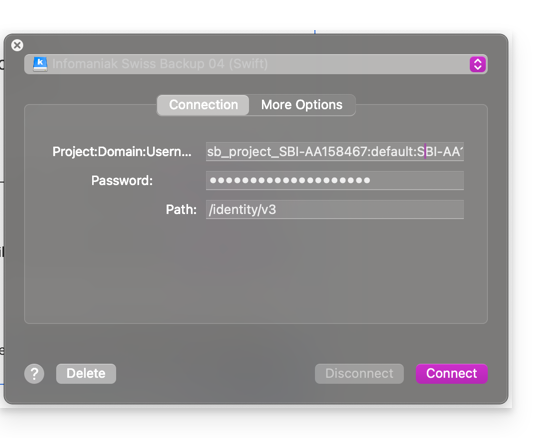
- Selecione o perfil correspondente na lista de perfis propostos (de acordo com as informações específicas do seu dispositivo — consulte este outro guia).
- Preencha os campos com as informações específicas do seu dispositivo (com base nas informações específicas do seu dispositivo — consulte este outro guia) combinando Projeto:Domínio:Nome de usuário:
- Clique em Conectar.
Link para esta FAQ: https://faq.infomaniak.com/2337
Esta seção de perguntas frequentes foi útil?
This guide details how to back up a Synology NAS using the Hyper Backup application via the OpenStack Swift protocol on Swiss Backup, the backup solution in an independent Swiss cloud.
Preamble
- In the event of a disaster, it is possible to order a Synology directly from Infomaniak. You can then restore your data easily using the Hyper Backup tool, thus ensuring the continuity and security of your information.
- It is also possible to use Cloud Sync: refer to this other guide.
- The various services offered by Infomaniak are all compatible with the corresponding standard protocols (S3/Swift for storage, for example). Therefore, if you encounter a problem with third-party software, contact its publisher or a Partner and refer to the support policy as well as Article 11.9 of the Infomaniak T&Cs.
Configure Hyper Backup for Synology NAS
Prerequisites
- Have a Swiss Backup space from Infomaniak with an available device quota (minimum 1) for a Cloud backup.
- Add 1 device of type Cloud to obtain the OpenStack Swift parameters.
To configure a new backup:
- Log in to the administration interface of your Synology NAS (DSM).
- If necessary, install the Hyper Backup application from the Package Center:

- Open the Hyper Backup application.
- Click on the to add a new Cloud provider.
- Choose OpenStack Swift from the list of providers:

- Fill in the fields according to the information specific to your device (refer to this other guide) and modify the drop-down menus if necessary as shown below:

Warning: make sure to specify “name” in the drop-down menus shown above, as these usually indicate “id” by default…
- Choose the volumes and applications to back up:

- Define the frequency of the backup and check the box to enable encryption (keep the encryption key safe so you can use your backup if necessary):

- Backup rotation allows you to avoid overloading your backup location by limiting the maximum number of backups to keep:

If you have insufficient backup quota on Hyper Backup or if you want to delete the historical versions of backup data, refer to this other guide.
Restore / view backups
To restore / view your backups:
- You can use any Swift compatible Keystone V3 client, for example Cyberduck.
- If your backups are in a
.hbkformat (Synology proprietary format)…- … and you no longer have a NAS, download the
.hbkfile and use their software Hyper Backup Explorer. - Refer to their official guide to restore on another Synology NAS.
- … and you no longer have a NAS, download the
Link para esta FAQ: https://faq.infomaniak.com/2341
Esta seção de perguntas frequentes foi útil?
Este guia detalha como fazer o backup de um computador equipado com a distribuição Linux de sua preferênciautilizando o Acronis no Swiss Backup, a solução de backup em uma nuvem suíça independente.
Também é possível fazer backup (Backup na Nuvem) de um servidor Linux usando o rClone.
Pré-requisitos
- Verificar as versões Linux suportadas pelo Agente Acronis; usar
uname -rpara saber a sua versão do kernel.- Consulte este outro guia sobre o AlmaLinux 9.
- Ter um espaço Swiss Backup Infomaniak com uma quota de dispositivo disponível (mínimo 1) para VM ou servidor Linux/Windows:
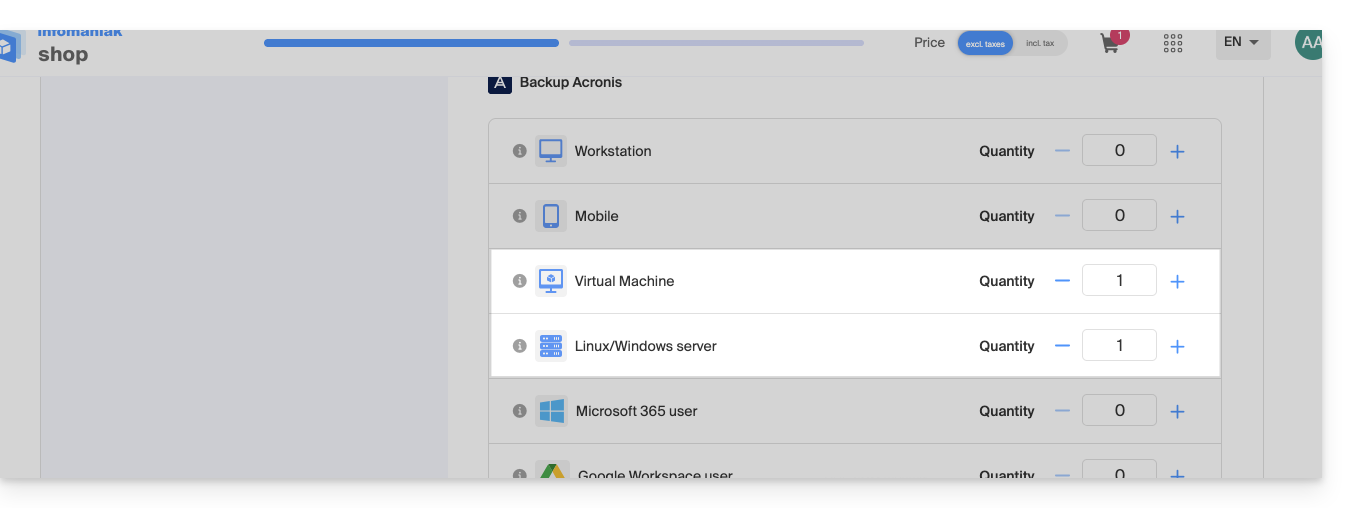
- Se necessário, aumentar a quota de dispositivo de acordo com as suas necessidades.
- Adicionar o dispositivo no Gerenciador Infomaniak para receber as credenciais de acesso.
Diferenças entre os dispositivos
Escolha a Máquina Virtual:
- Máquina virtual hospedada em um ambiente de hipervisor (por exemplo, VMware, Hyper-V, Scale Computing HC3 ou Virtuozzo).
- Servidor VPS ou máquina virtual em um ambiente de Nuvem Pública Infomaniak:
- Esses ambientes são baseados em tecnologias de virtualização, e a licença é projetada para cobrir este tipo de configuração.
- O host físico que hospeda as máquinas virtuais deve ser coberto por uma única licença, e essa licença inclui todas as VMs presentes nesse host.
- Cluster de hipervisores com vários hosts (cada host requer uma licença de VM).
Escolha Servidor Linux:
- Máquina física ou máquina virtual individual que funciona com Linux (sistema operacional de servidor).
- Máquina do tipo servidor autônomo (seja ela hospedada localmente ou em uma nuvem, sem um ambiente de virtualização complexo e sem um hipervisor como VMware ou Hyper-V para gerenciar máquinas virtuais neste dispositivo).
- Cada licença cobre uma máquina física ou virtual individual.
- Servidor físico em sua casa ou em um data center.
Configurar a cópia de segurança
Para instalar o agente Acronis Cyber Protect 15 num sistema Debian apenas através da linha de comandos, sem interface gráfica:
1. Atualização do sistema
Antes de instalar qualquer coisa, recomenda-se atualizar a lista de pacotes disponíveis.
sudo apt updatePode visualizar a lista de atualizações disponíveis sem as instalar:
apt list --upgradableAtualização parcial (opcional)
Se desejar atualizar apenas alguns pacotes específicos:
sudo apt install package_name_1 package_name_2Atualização completa do sistema (opcional)
Para aplicar todas as atualizações disponíveis:
sudo apt upgrade -y
2. Instalação das dependências necessárias
Os seguintes pacotes são necessários para o bom funcionamento do agente Acronis:
sudo apt install -y rpm gcc linux-image-$(uname -r) linux-headers-$(uname -r)
3. Download do agente Acronis
Descarregue o instalador oficial do agente Acronis Cyber Protect 15 para Linux (versão completa):
wget "{{URL_8}}" -O acronis_agent.bin
4. Instalação do agente
Torne o arquivo executável e inicie a instalação:
chmod +x acronis_agent.bin

sudo ./acronis_agent.bin
A instalação é iniciada no modo interativo.
5. Registo do agente
No final da instalação, será exibida uma mensagem solicitando que registre o agente.
Será apresentado um código de registo do seguinte tipo:
Go to {{URL_9}}

Enter the code: AB12-CD34
Abra o URL indicado a partir de outro dispositivo com um navegador (computador, tablet ou telemóvel) e introduza o código apresentado para concluir o registo.
Em seguida, crie um plano de backup.
Link para esta FAQ: https://faq.infomaniak.com/2342
Esta seção de perguntas frequentes foi útil?
Link para esta FAQ: https://faq.infomaniak.com/2355
Esta seção de perguntas frequentes foi útil?
Este guia explica como instalar no macOS o Agente Acronis para Swiss Backup, mesmo que a aplicação Gatekeeper tente impedir a instalação e cause um erro: “Não foi possível abrir install.pkg porque a Apple não consegue verificar se ele contém software malicioso”.
Autorizar o Acronis no Gatekeeper
Para isso:
- Abra o arquivo
install.pkgda Acronis para que o erro seja exibido. - Acesse Preferências do Sistema (no menu Apple).
- Escolha Segurança e privacidade e, se necessário, a aba Geral.
- Um texto será exibido sobre
install.pkg; clique em Abrir mesmo assim. - Confirme a sua decisão de abrir o ficheiro clicando no botão correspondente.
Link para esta FAQ: https://faq.infomaniak.com/2402
Esta seção de perguntas frequentes foi útil?
Este guia detalha como fazer o backup dos dados dos seus diretórios e nós Jelastic Cloud através do protocolo OpenStack Swift no Swiss Backup, a solução de backup em uma nuvem suíça independente.
Introdução
- Para fazer o backup dos dados, uma extensão para Virtuozzo (Jelastic Cloud) está disponível nos complementos do nó.
- Saiba mais sobre a extensão (complemento) no Github.
Configurar a extensão Swiss Backup no Jelastic Cloud
Pré-requisitos
- Utilizar Jelastic Cloud (pelo menos um ambiente Jelastic deve estar ativo com a extensão instalada para que as suas cópias de segurança sejam visíveis).
- Ter um espaço Swiss Backup da Infomaniak com uma quota de dispositivo disponível (mínimo 1) para uma cópia de segurança na nuvem.
- Adicionar 1 dispositivo do tipo Nuvem para obter as configurações OpenStack Swift.
Para adicionar a extensão útil ao Swiss Backup no Jelastic Cloud:
- Conecte-se ao Painel de Controle do Jelastic Cloud do seu servidor.
- Acesse a seção de complementos do nó:
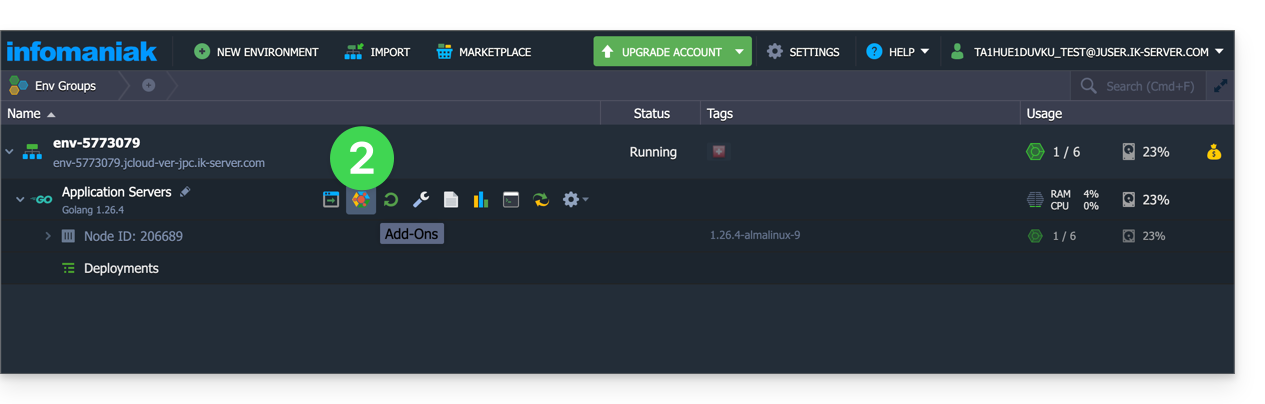
- Procure e instale a extensão Backup / Restauração:
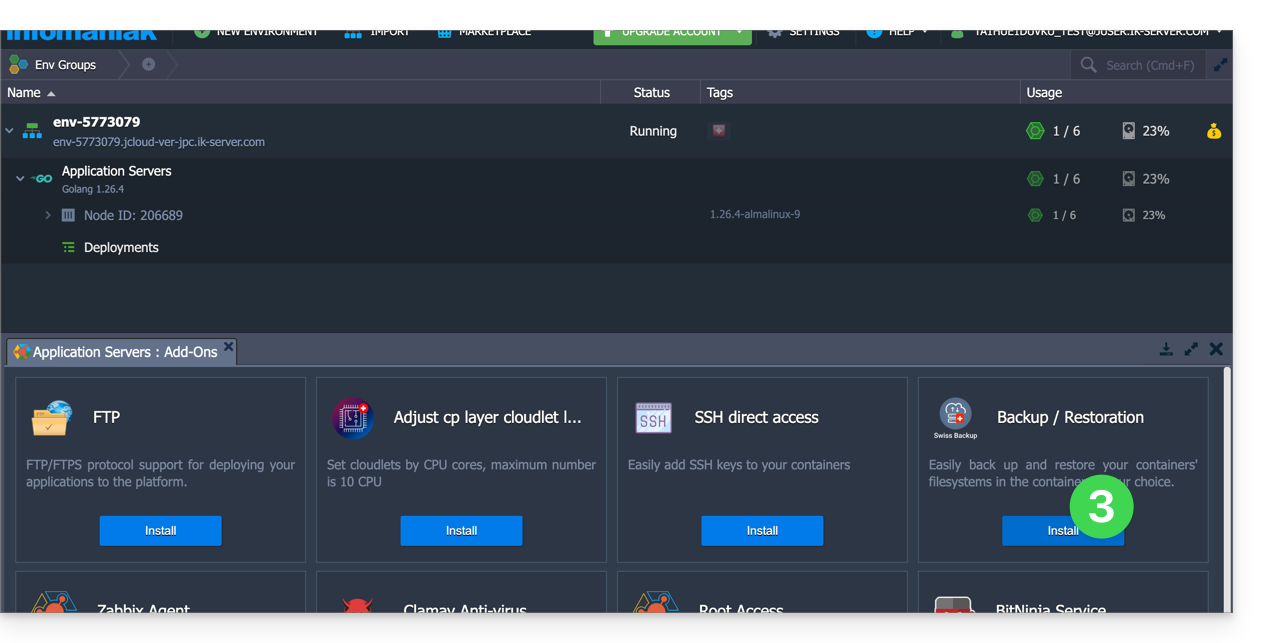
Existem dois tipos de cópias de segurança possíveis, detalhados abaixo:
- Faça cópias de segurança de pastas específicas.
- Crie um instantâneo de um nó inteiro.
Fazer backup de pastas específicas
Para fazer o backup de diretórios específicos:
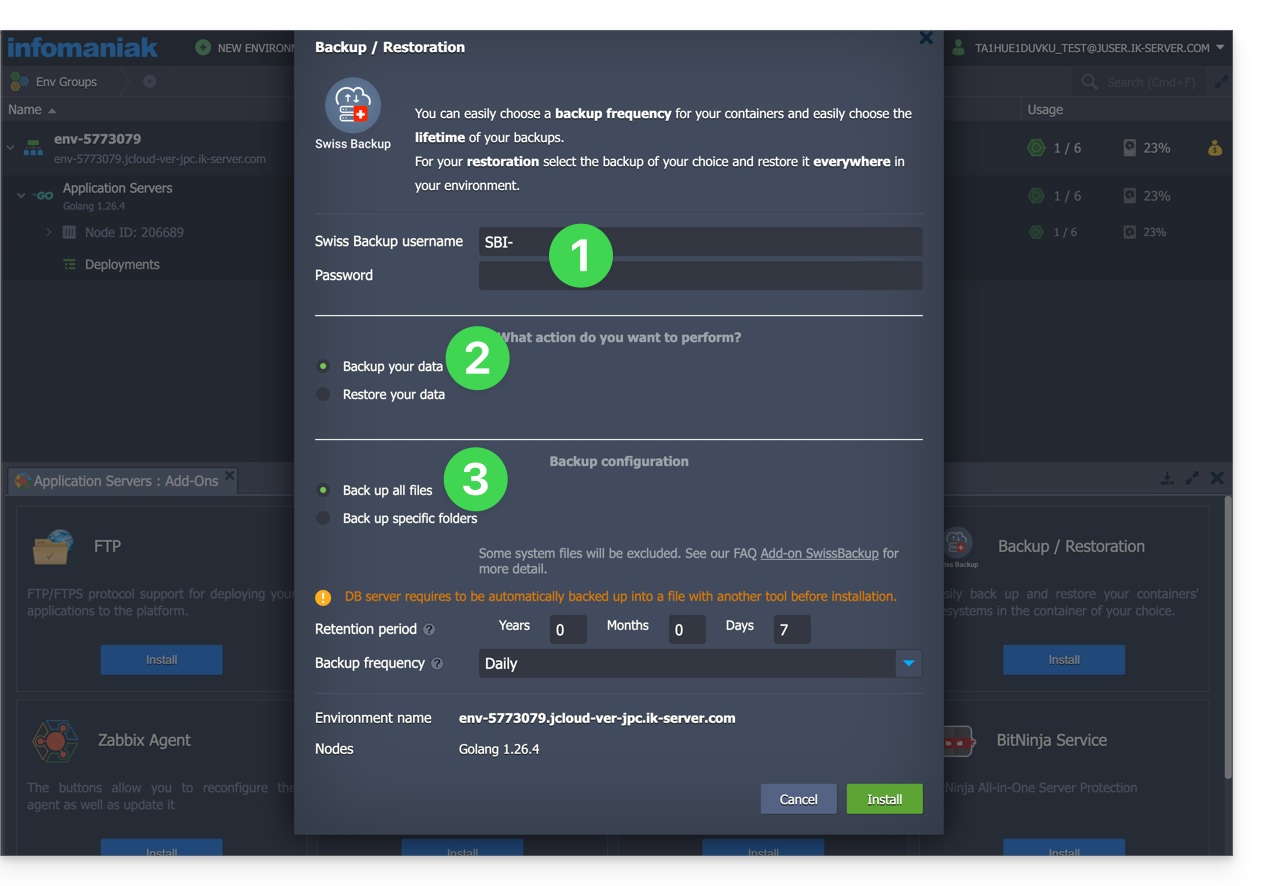
- Insira o nome de usuário e a senha de acordo com as informações específicas do seu dispositivo.
- Marque a opção Fazer backup dos seus dados.
- Marque a opção Fazer backup de pastas específicas
- Indique o caminho absoluto das pastas a serem copiadas no campo Pastas a serem copiadas; é possível especificar várias pastas separando cada caminho por uma vírgula, por exemplo:
/root/admin/, /home/user1/, /jelastic/containers/(neste exemplo, 3 pastas foram especificadas)…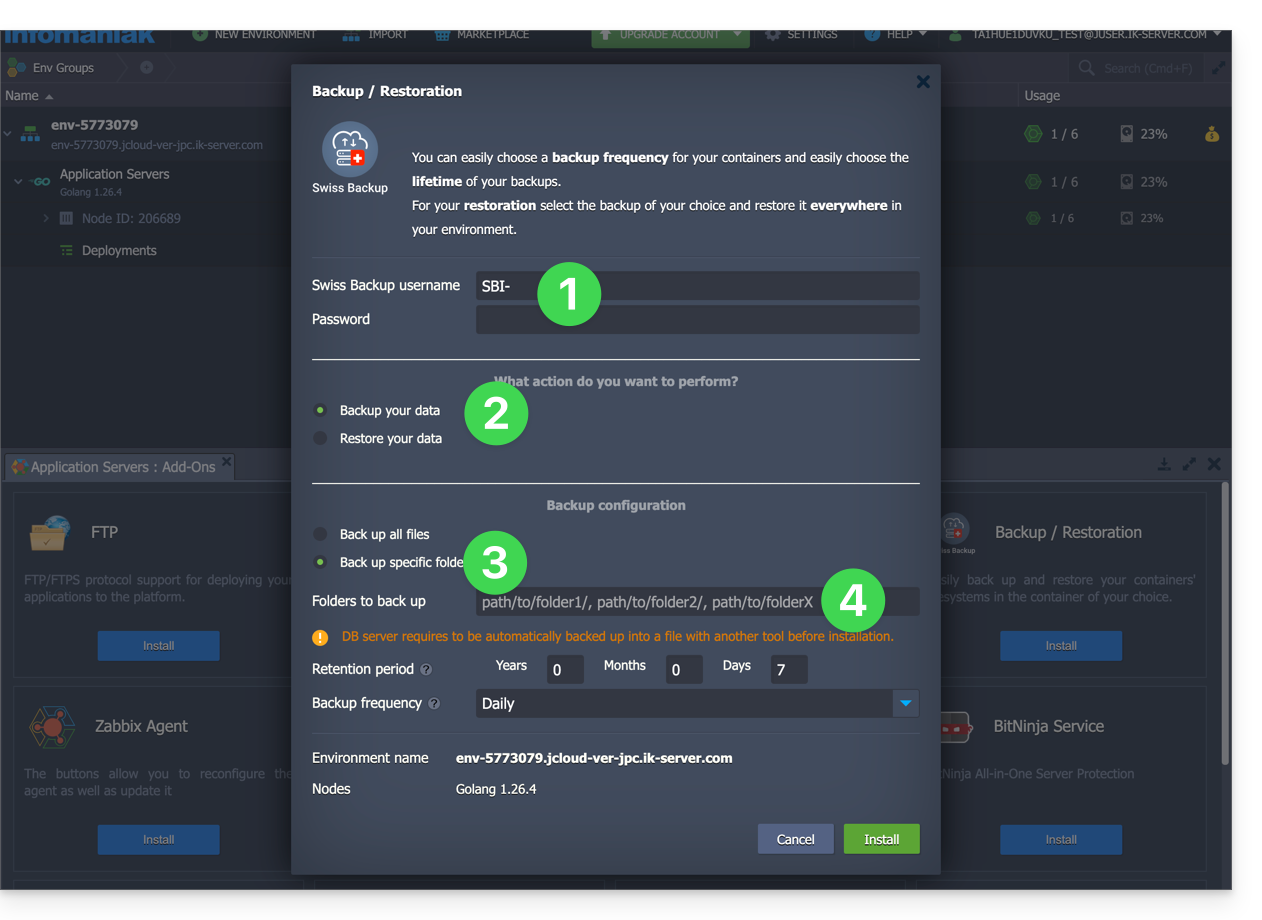
Em seguida, defina a frequência das cópias de segurança (veja abaixo).
Fazer backup de um nó inteiro
Para fazer o backup de um nó inteiro:
- Insira o nome de usuário e a senha do seu dispositivo Swift no Swiss Backup.
- Marque a opção Fazer backup dos seus dados.
- Marque a opção Fazer backup de todos os arquivos para salvar todo o sistema de arquivos de um nó; alguns arquivos são automaticamente excluídos:
- as pastas
/dev,/proc,/sys,/run - os sistemas de arquivos que não estão montados como parte da partição raiz, incluindo os sistemas de arquivos virtuais
- as pastas
Em seguida, defina a frequência dos backups.
Definir a frequência e a política de retenção das cópias de segurança
Existem duas opções disponíveis para efetuar a cópia de segurança:
- diariamente (às 20h UTC)
- a cada hora (no início da hora, por exemplo, às 13h, às 14h, etc.)
Pode definir a duração da retenção das suas cópias de segurança em anos, meses, dias e horas. Para manter as suas cópias de segurança indefinidamente, basta definir os parâmetros para 0.
Por exemplo, se efetuar cópias de segurança a cada hora e definir uma política de retenção de 1 ano, 2 meses, 4 dias, 2 horas, isso significa que cada cópia de segurança estará disponível durante um período de 1 ano, 2 meses, 4 dias, 2 horas (= 10322 cópias de segurança). Note que a eliminação das cópias de segurança é efetuada todos os domingos às 22h30 (UTC).
Atenção: não defina todos os parâmetros como 0, pois backups permanentes podem causar falhas no processo de backup.
Limites recomendados:
- Ano: 1
- Mês: 12
- Dias: 99
Para uma cópia de segurança horária (a cada hora), recomenda-se um período máximo de retenção de um mês. Ultrapassando este valor, algumas cópias de segurança poderão falhar.
Restaurar cópias de segurança
Restaurar dados de um nó
- Aceda ao Painel de Controlo Jelastic do seu servidor.
- Provavelmente, terá de reinstalar (reiniciar) o complemento a partir da Marketplace:
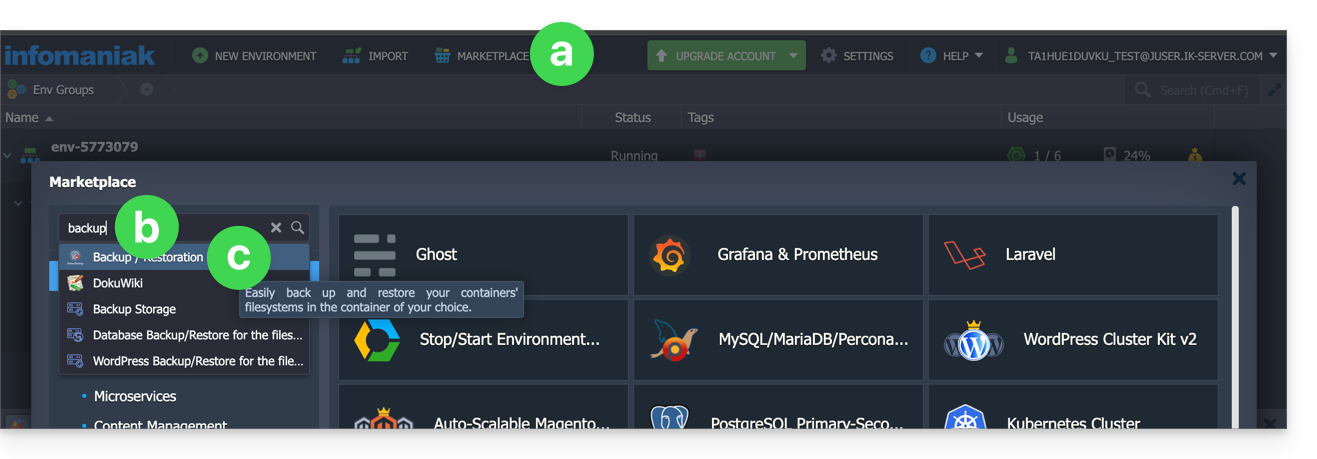
- Clique em Marketplace.
- Pesquise por “backup”…
- Clique no complemento "Backup / Restauração":
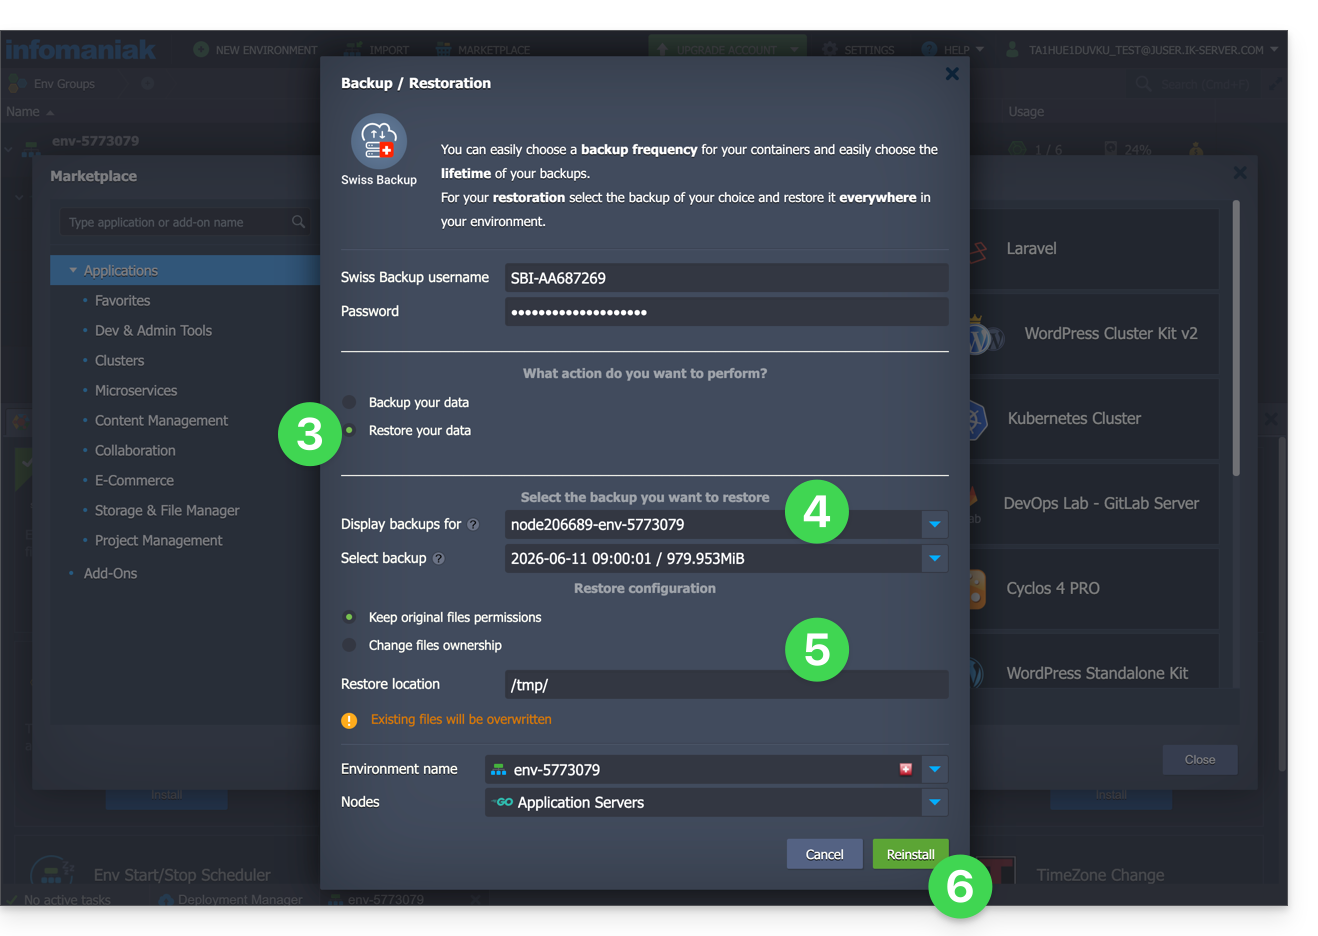
- Depois de adicionar a extensão e inserir o nome de usuário e a senha do seu dispositivo Swift no Swiss Backup, marque a opção Restaurar seus dados.
- Selecione o nó que contém o backup a ser restaurado.
- Selecione o backup a ser restaurado e a pasta de destino.
- Clique no botão Restaurar:
Restaurar pastas específicas de um snapshot (CLI)
Cada cópia de segurança corresponde a um ID único. Pode incluir e excluir pastas dos seus snapshots durante uma restauração. Para ver os seus snapshots:
. /home/.config/swissbackup/openrc.shrestic snapshots
- Use
--excludee--includepara restringir a restauração a um subconjunto de arquivos no snapshot; por exemplo, para restaurar um único arquivo:restore 79766175 --target /tmp/restore-work --include /work/foo
Existem variantes que não diferenciam maiúsculas de minúsculas de --exclude e --include, chamadas --iexclude e --iinclude. Essas opções se comportam da mesma maneira, mas ignoram a diferença entre maiúsculas e minúsculas nos caminhos.
Modificar a configuração da cópia de segurança
Para tal:
- Faça login no Painel de Controle Jelastic do seu servidor.
- Depois de adicionar a extensão e inserir o nome de usuário e a senha do seu dispositivo Swift no Swiss Backup, modifique a configuração conforme desejado.
O agendamento das cópias de segurança é definido por um cron job e as cópias de segurança são realizadas com a ferramenta restic.
Para modificar manualmente o agendamento das cópias de segurança (linha de comando), como utilizador root, execute o comando crontab -l para visualizar os horários atuais:
- a linha que contém
retention-all.shcorresponde à tarefa de cópia de segurança - a linha que contém
purge.shcorresponde à tarefa de retenção das cópias de segurança
Exemplo:

Modifique a programação usando o comando crontab -e.
Pode modificar a linha que contém o script retention-all.sh ou retention.sh, estes scripts correspondem ao lançamento das suas cópias de segurança. Atenção: os cron jobs foram concebidos para não causar problemas entre as cópias de segurança e as eliminações múltiplas. Tenha atenção ao tempo necessário para as cópias de segurança e as eliminações…
- Saiba mais sobre os cron jobs: crontab.guru
- Saiba mais sobre o restic: restic.net
Excluir manualmente cópias de segurança (CLI)
Para isso:
- Carregue o arquivo de configuração:
. /home/.config/swissbackup/openrc.sh - Exiba as cópias de segurança disponíveis:
restic snapshots - Elimine a cópia de segurança desejada:
restic forget IdBackup --prune - Remova todas as cópias de segurança de um arquivo, exceto a mais recente:
restic forget --tag folders --keep-last 1 --prune

Remover a programação da cópia de segurança
Este botão permite remover a programação da sua cópia de segurança: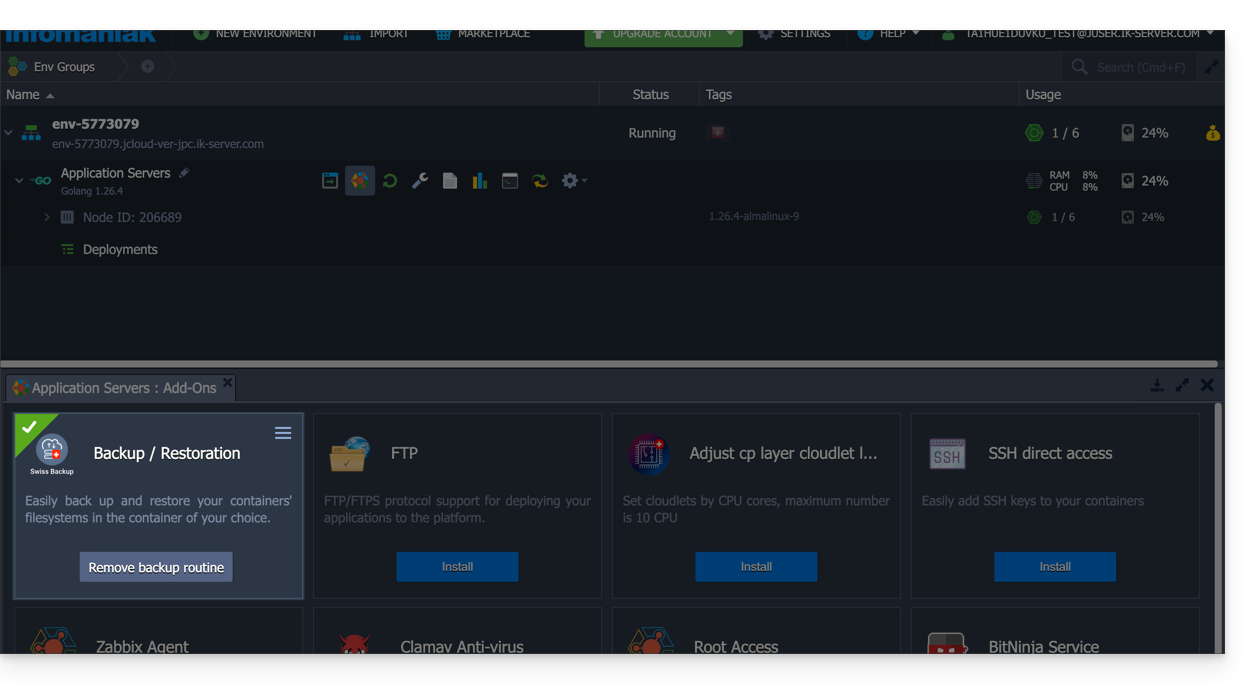
Desinstalar a extensão Swiss Backup
É necessário remover a programação da cópia de segurança (consulte acima) antes de poder remover a extensão Swiss Backup:
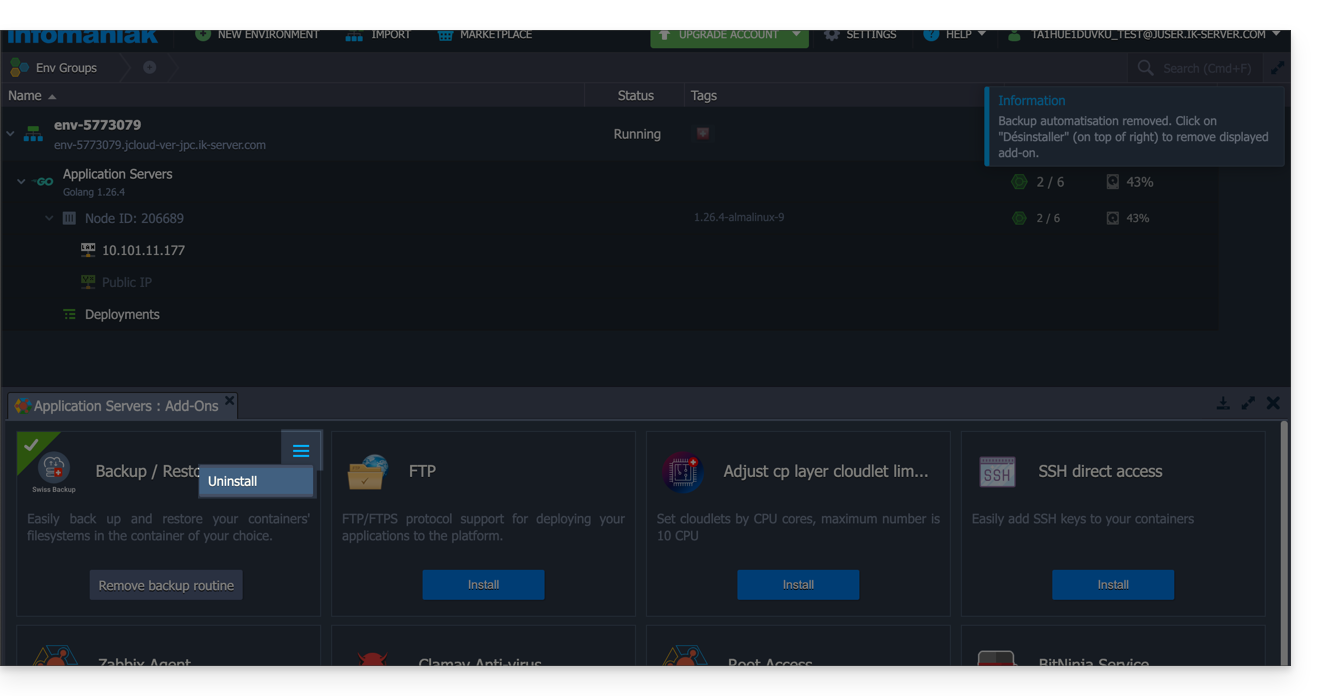
Link para esta FAQ: https://faq.infomaniak.com/2420
Esta seção de perguntas frequentes foi útil?
Este guia explica como personalizar os recursos (CPU e largura de banda) utilizados pelo software Acronis para fazer o backup do seu computador com o Swiss Backup.
Introdução
- Este procedimento é particularmente útil se a sua conexão de Internet ou o seu computador ficarem lentos durante as cópias de segurança.
- Consulte também a documentação da Acronis sobre este assunto.
- Atenção: ao limitar os recursos alocados às suas cópias de segurança, estas poderão demorar mais tempo para serem concluídas.
Personalizar os recursos dedicados às cópias de segurança
Para acessar a interface de gerenciamento Acronis:
- Clique aqui para acessar o Console Acronis com as credenciais obtidas após a adição do dispositivo (precisa de ajuda?).
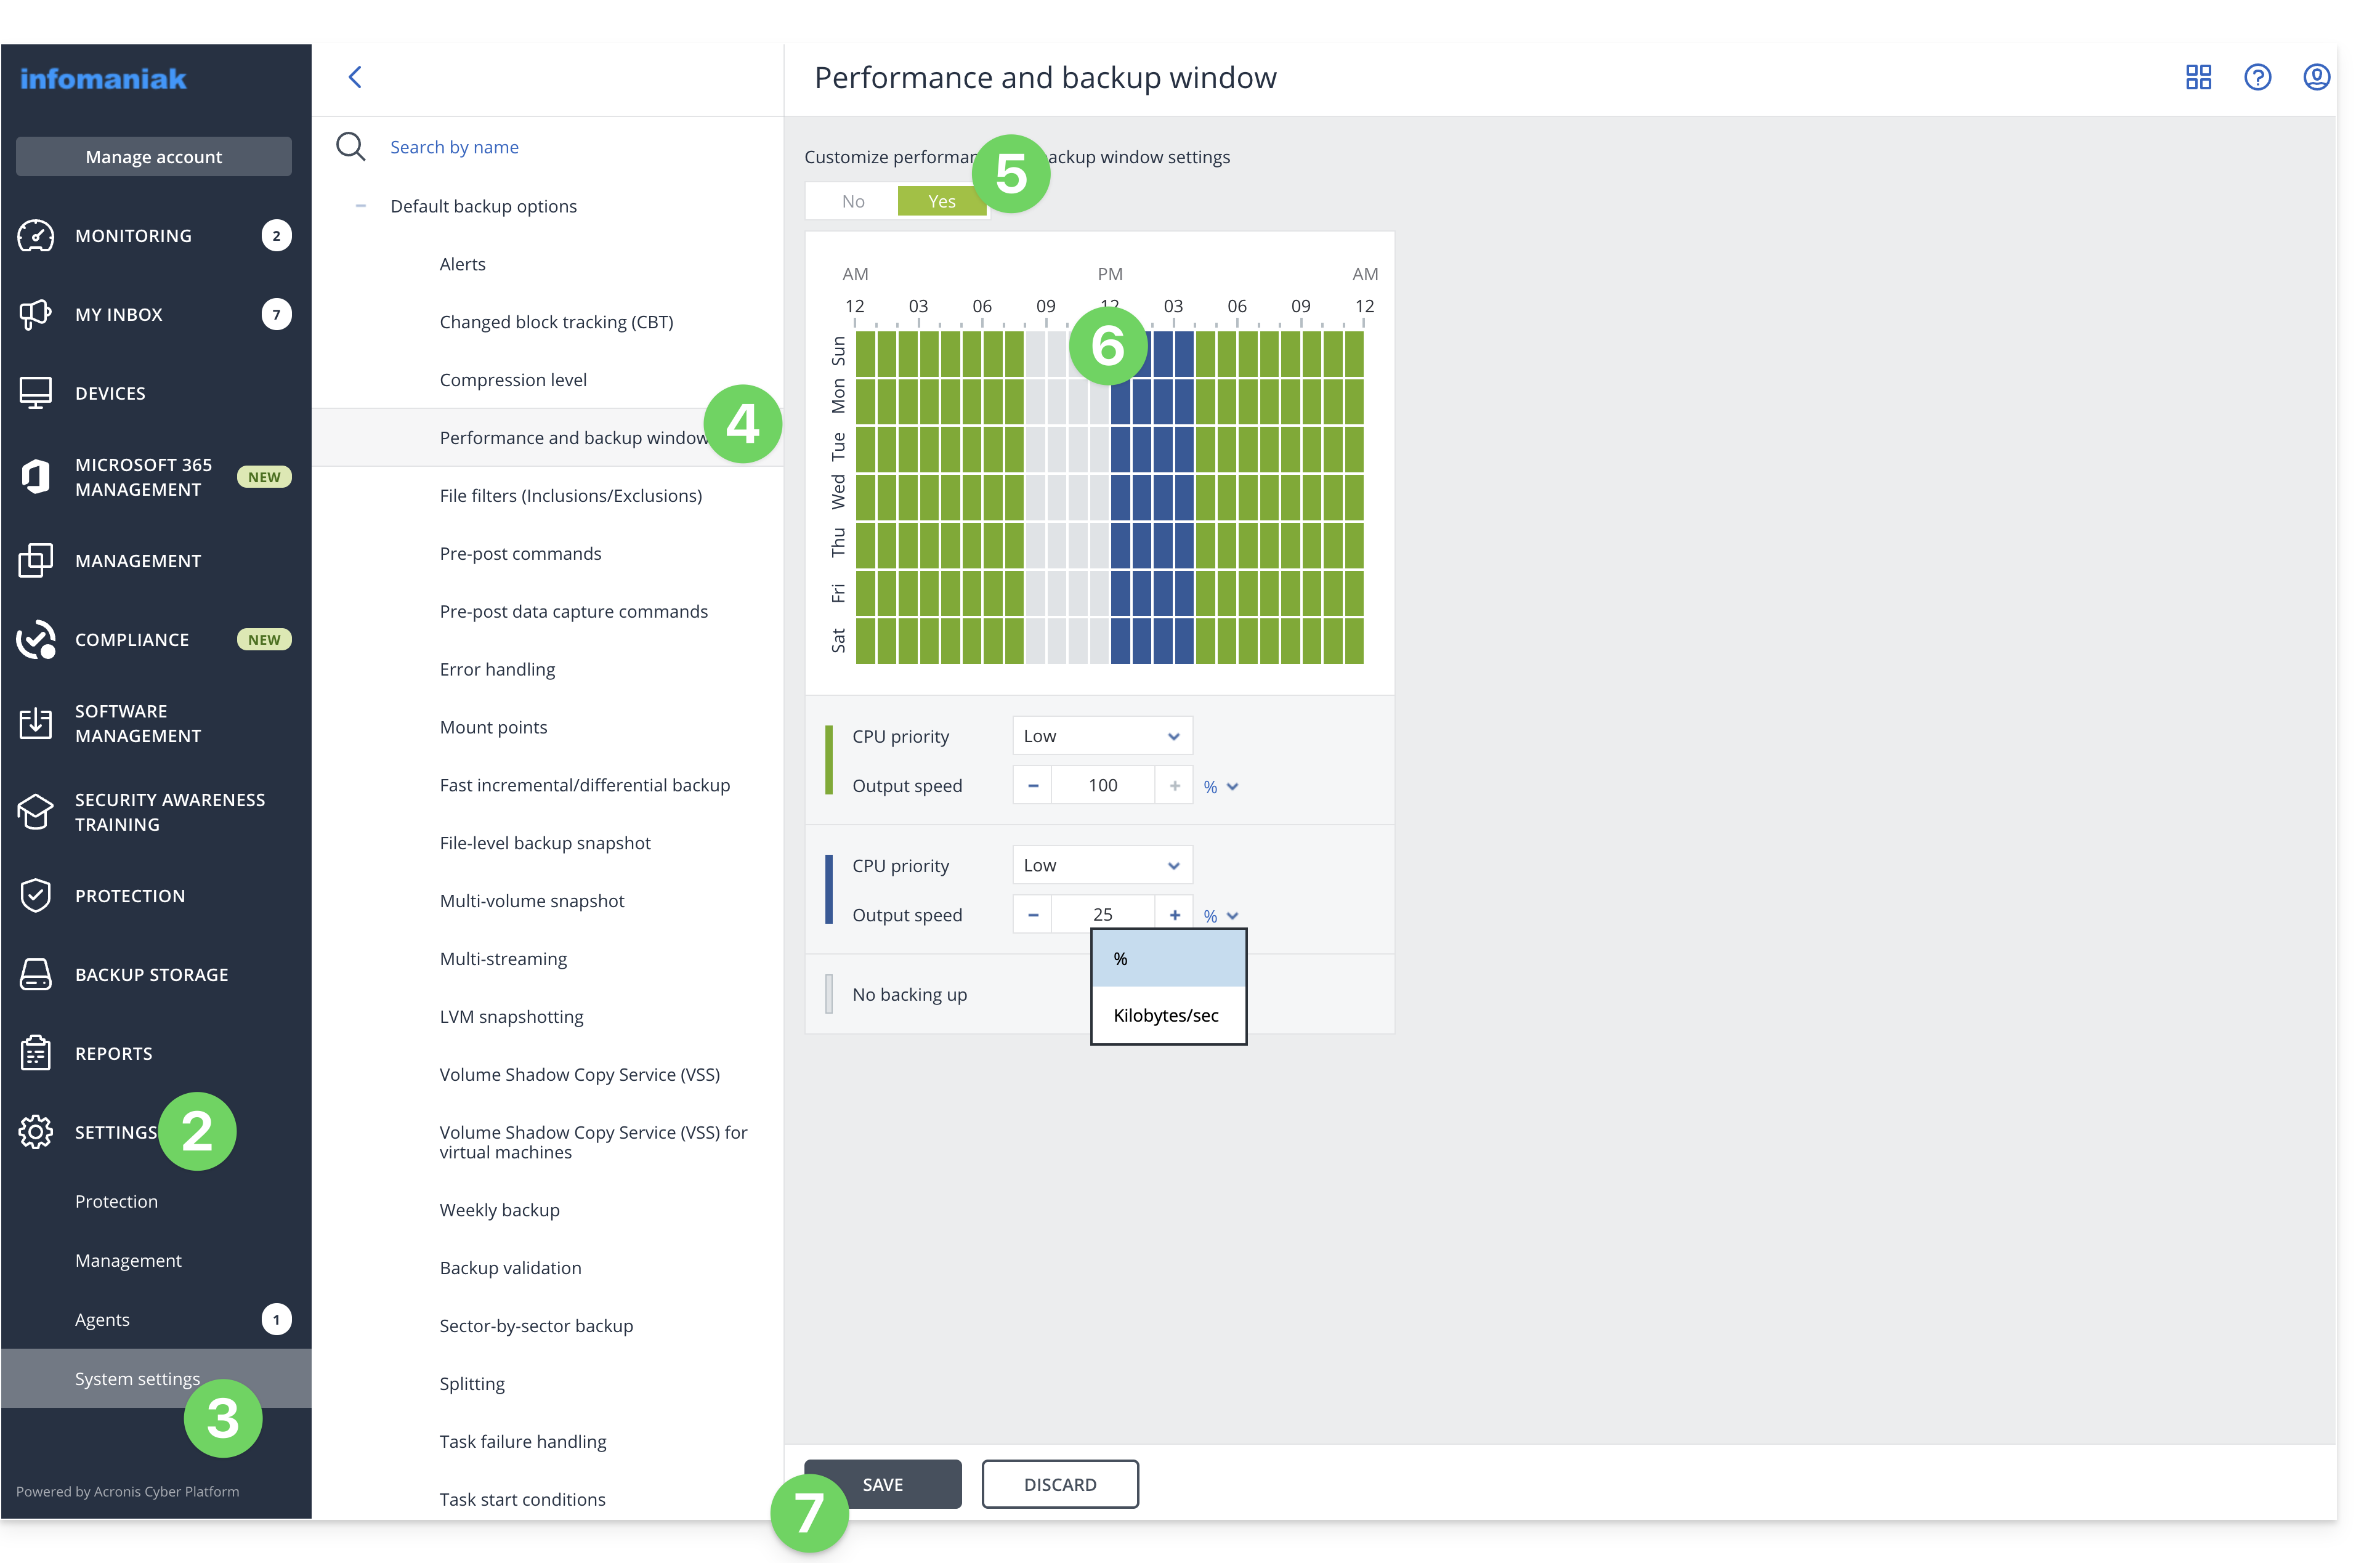
- Clique em Configurações no menu lateral esquerdo.
- Clique em Configurações do sistema no menu lateral esquerdo.
- Clique em Desempenho e intervalo de backup.
- Clique em SIM para ativar a personalização do desempenho.
- Defina os recursos dedicados ao Acronis:
- Prioridade da CPU: permite limitar a potência alocada aos seus backups.
- Velocidade de saída: permite limitar a largura de banda alocada aos seus backups; no macOS, insira este parâmetro em KB/segundo, pois o valor em % só é considerado no Windows.
- Defina um período durante o qual os recursos serão menores: isso permite alocar todos os recursos aos seus backups quando você não estiver usando o computador, por exemplo, recursos reduzidos das 6h às 18h, enquanto o Acronis pode usar todos os recursos durante a noite.
- Clique em Salvar:
Link para esta FAQ: https://faq.infomaniak.com/2425
Esta seção de perguntas frequentes foi útil?
Este guia detalha como começar a usar o Swiss Backup (solução de backup de código aberto, compatível com Openstack Swift, S3, SFTP...), a solução de backup em uma nuvem suíça independente.
Introdução
- O backup na nuvem gratuito permite que você faça o backup do seu dispositivo usando um dos seguintes métodos:
- Os 3 guias acima mostram como adicionar um dispositivo para cada um desses 3 tipos de backup.
- Não é possível usar os 3 protocolos ao mesmo tempo; a escolha deve ser feita durante a criação do slot.
- Para remover um dispositivo, consulte este outro guia.
- Para obter informações sobre os principais parâmetros de conexão, consulte este outro guia.
Guias específicos
A seguir, encontre guias detalhados:
| Dados salvos | Ferramenta / SO | Protocolo |
|---|---|---|
| arquivos, pastas | CyberDuck | Swift |
| arquivos, pastas | CyberDuck | SFTP |
| arquivos, pastas | CyberDuck | S3 |
| arquivos, pastas | Filezilla | SFTP |
| arquivos, pastas | MSP360 (antigo CloudBerry) | S3 |
| arquivos, pastas | MSP360 (antigo CloudBerry) | S3 |
| WordPress | UpdraftPlus | S3 |
| Nextcloud | Swift | |
| NAS Qnap | rClone / HBS | Swift |
| NAS Synology | Hyper Backup | Swift |
| NAS Synology | Sincronização na Nuvem | Swift |
| Jelastic Cloud | Swift | |
| hospedagem web | Restic | Swift |
| macOS / Windows / Linux | Duplicati | Swift |
| servidor Linux | rClone | Swift |
| Mountain Duck | Swift |
Link para esta FAQ: https://faq.infomaniak.com/2543
Esta seção de perguntas frequentes foi útil?
Este guia explica como criar um novo dispositivo (armazenamento em nuvem via OpenStack Swift) no Swiss Backup, a solução de backup em uma nuvem suíça independente.
Pré-requisitos
- Encomendar um espaço Swiss Backup Infomaniak.
- Durante a encomenda, defina a quota de dispositivo(s) disponível(eis) (mínimo 1) para o tipo de backup Cloud:
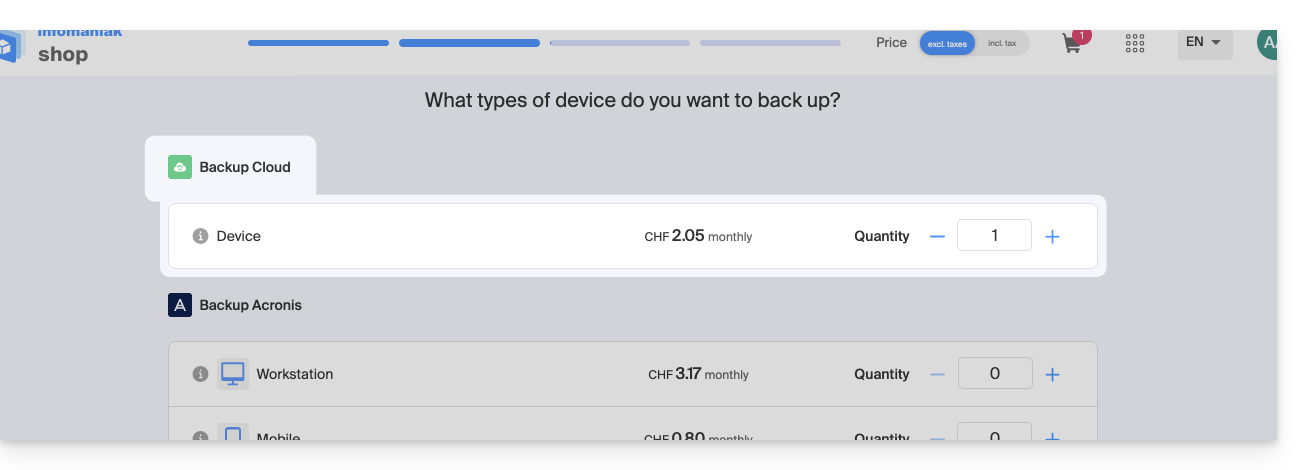
- Se necessário, aumente a quota do dispositivo de acordo com as suas necessidades.
Adicionar um dispositivo (para conexão OpenStack Swift)
Para aceder ao Swiss Backup e configurar uma nova cópia de segurança:
- Clique aqui para aceder à gestão do seu produto no painel de controlo Infomaniak (precisa de ajuda?).
- Clique diretamente no nome atribuído ao produto em questão:
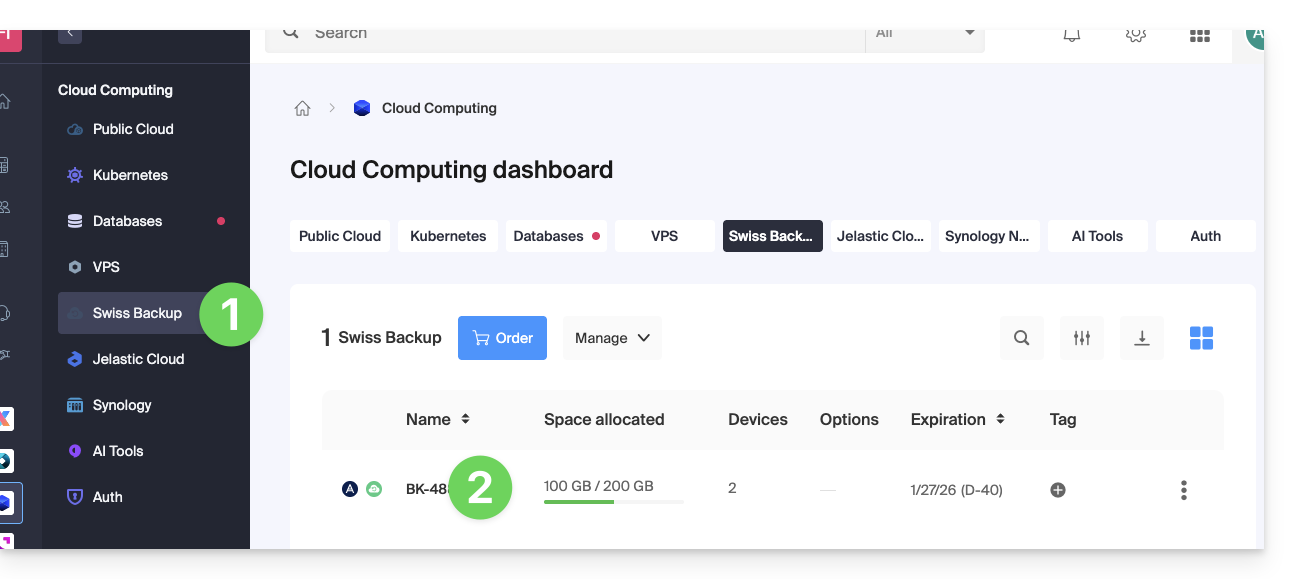
- Clique no botão azul Gerenciar meus dispositivos (na seção Espaço de armazenamento na nuvem):
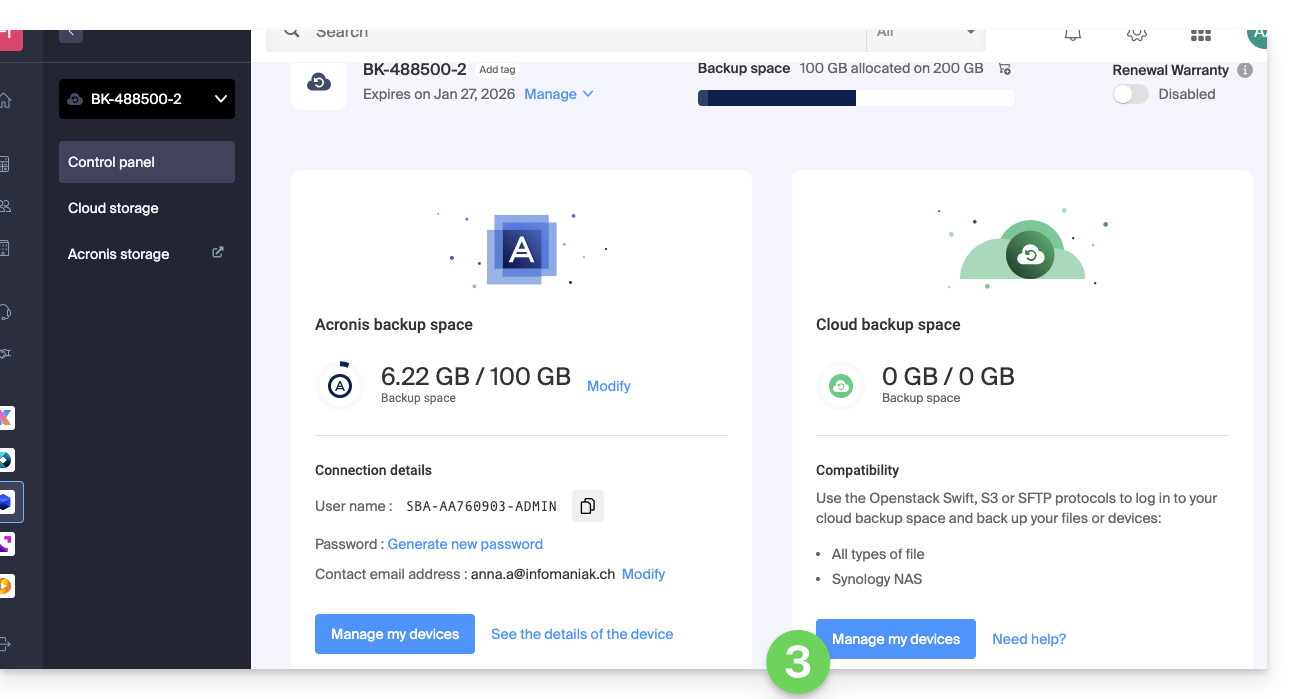
- Clique no botão azul Adicionar dispositivo:
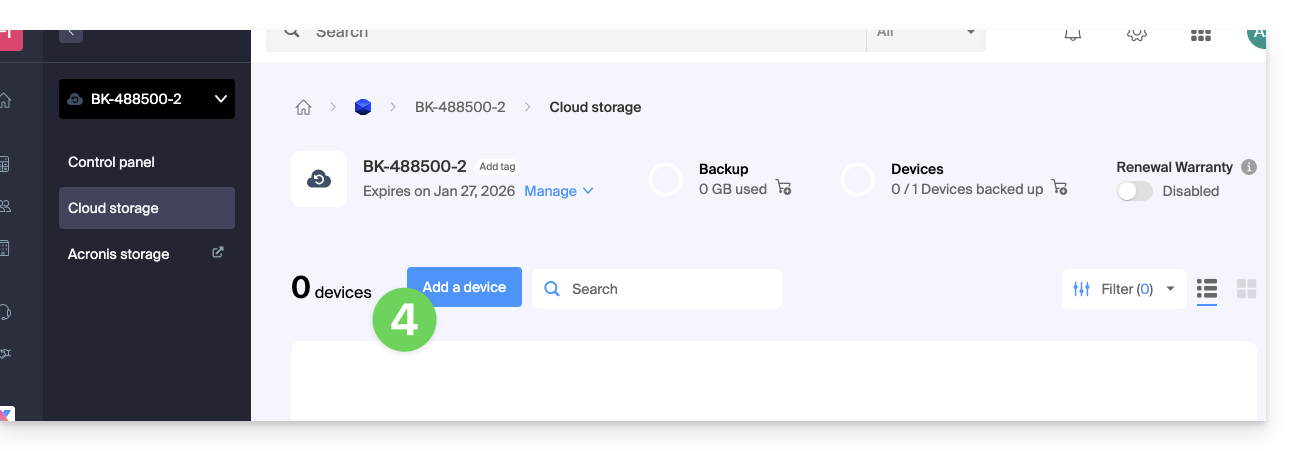
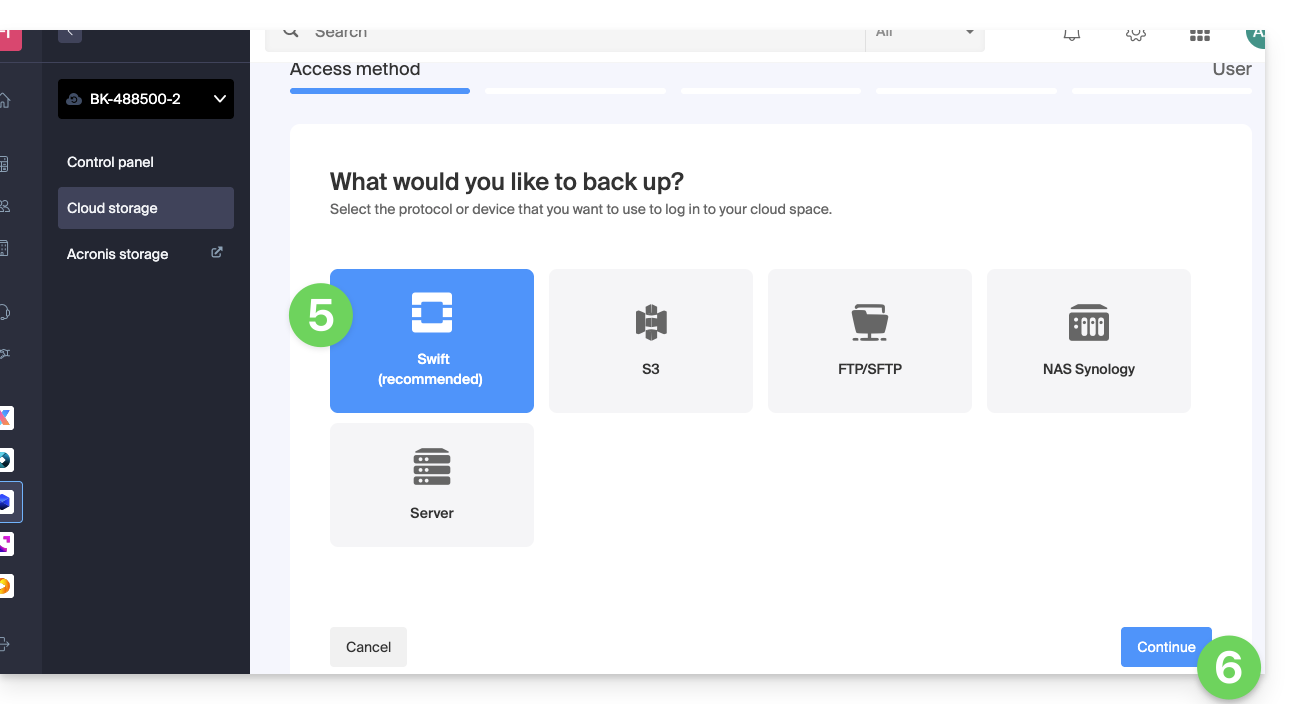
- Escolha o tipo/protocolo de backup Swift.
- Clique no botão azul Continuar:
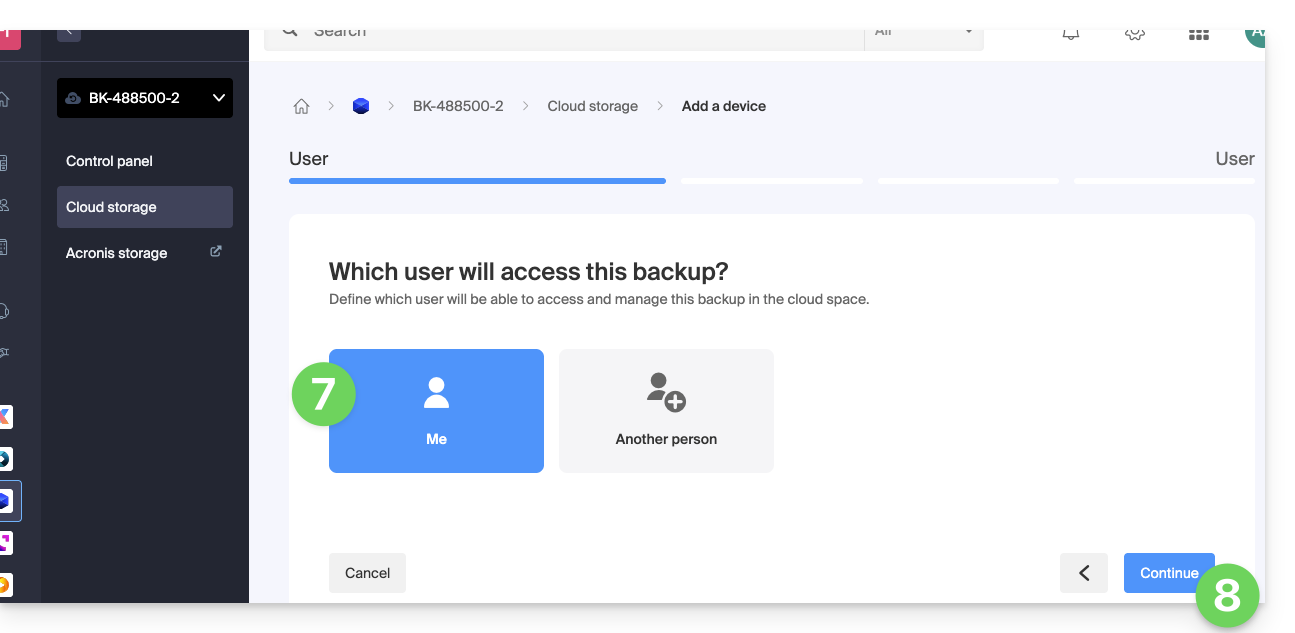
- Escolha o utilizador que receberá as informações de login (se necessário, escolha um utilizador diferente do seu e especifique os dados de contacto da pessoa na etapa adicional seguinte).
- Clique no botão azul Continuar:
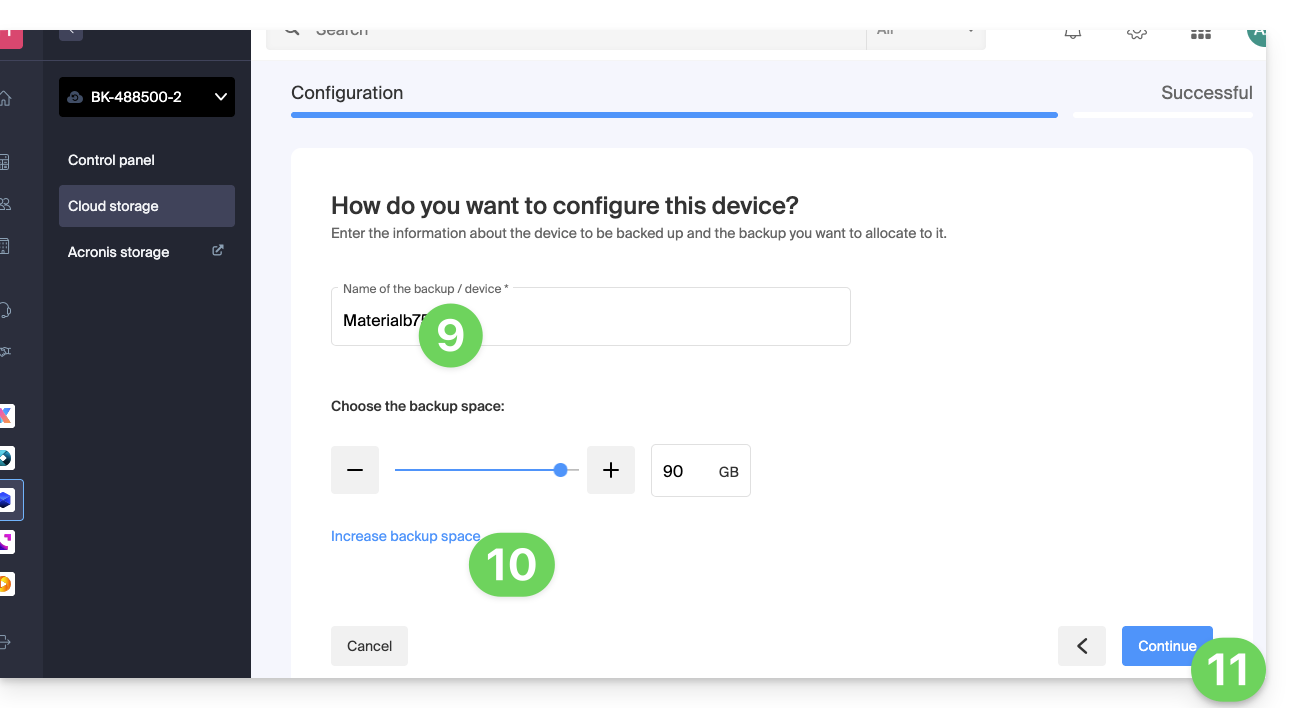
- Atribua um nome à cópia de segurança.
- Defina o espaço em disco máximo que este espaço de armazenamento deverá representar em relação ao volume total do Swiss Backup contratado, aumentando, se necessário, o tamanho total através do link azul.
- Clique no botão azul Continuar:
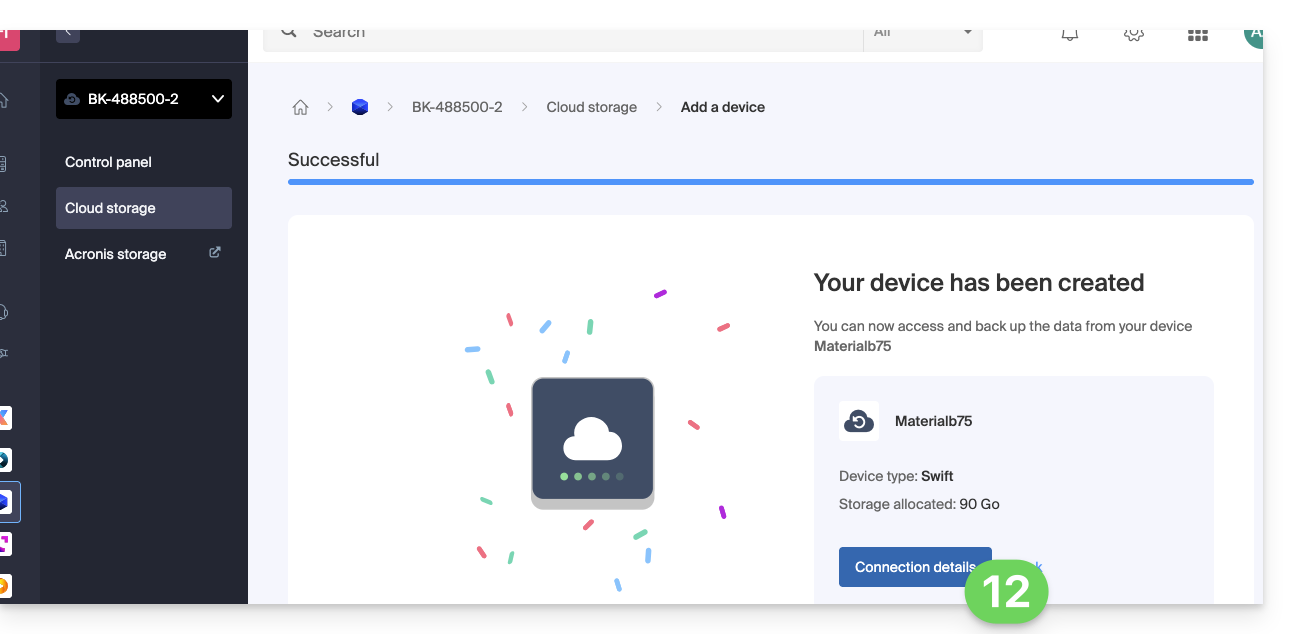
- Clique no botão azul para exibir as informações de conexão:
- Esta seção menciona, entre outras coisas, o número que representa a localização, útil para preencher algumas informações que você precisará fornecer ao configurar seu aplicativo de backup.
- Esta seção apresenta um exemplo de método de backup, facilitado pelo download de um perfil de configuração.
- Esta seção fornece todas as informações de login.
- O local ou nome do servidor de alojamento.
- A palavra-passe (a gerar através do link azul que abrirá o assistente numa janela pop-up do navegador ou através do link recebido por e-mail), bem como outras informações adicionais, como o
Tenant, para algumas aplicações de cópia de segurança: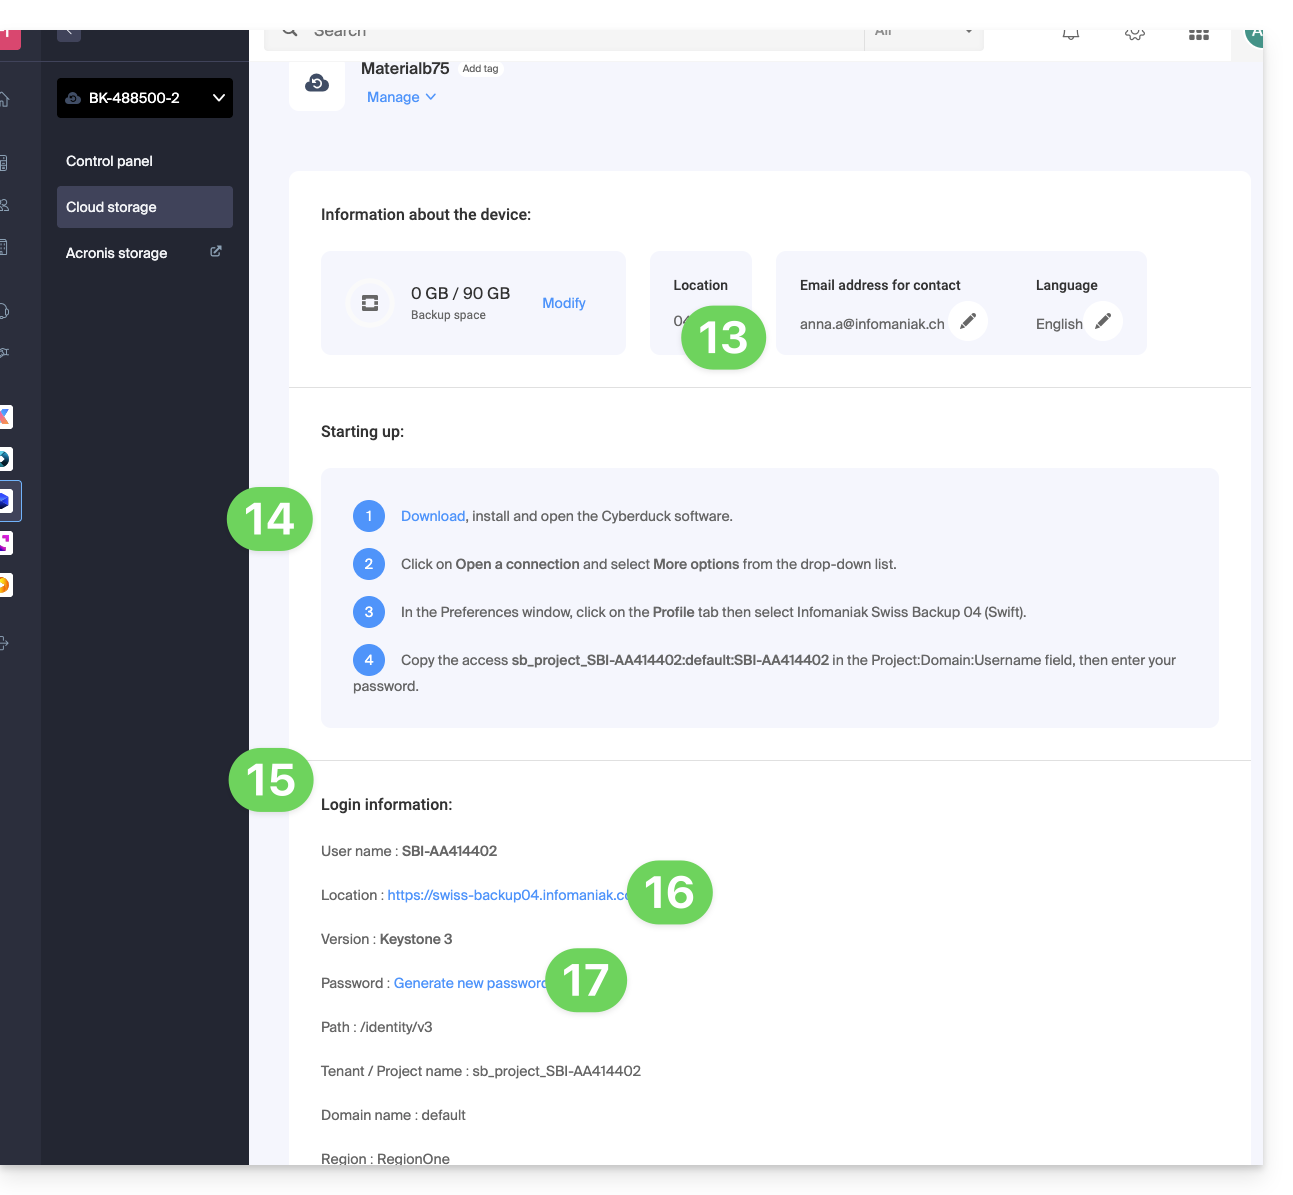
E depois?
Depois de adicionar o dispositivo na interface Swiss Backup, dentro do Manager Infomaniak, você pode configurar o aplicativo de sua escolha para iniciar seus backups na nuvem, utilizando o protocolo mencionado neste guia.
Link para esta FAQ: https://faq.infomaniak.com/2544
Esta seção de perguntas frequentes foi útil?
Este guia explica como criar um novo dispositivo (backup na nuvem via FTP / SFTP) no Swiss Backup, a solução de backup em uma nuvem suíça independente.
Pré-requisitos
- Encomendar um espaço Swiss Backup Infomaniak.
- Durante a encomenda, defina a quota de dispositivo(s) disponível(eis) (mínimo 1) para a cópia de segurança do tipo Cloud:
- Se necessário, aumente a quota do dispositivo de acordo com as suas necessidades.
- Atenção: para que a transferência de um ficheiro a partir de uma ligação FTP/SFTP seja bem-sucedida, o tamanho do ficheiro não deve exceder 10 TB.
- Recomenda-se verificar e ajustar, se necessário, as definições do tempo limite (timeout) do seu software/cliente FTP.
Adicionar um dispositivo (para conexão FTP/SFTP)
Para aceder ao Swiss Backup e configurar uma nova cópia de segurança:
- Clique aqui para acessar o gerenciamento do seu produto no painel de controle Infomaniak (precisa de ajuda?).
- Clique diretamente no nome atribuído ao produto em questão:
- Clique no botão azul Gerenciar meus dispositivos (na seção Espaço de armazenamento na nuvem):
- Clique no botão azul Adicionar um dispositivo:
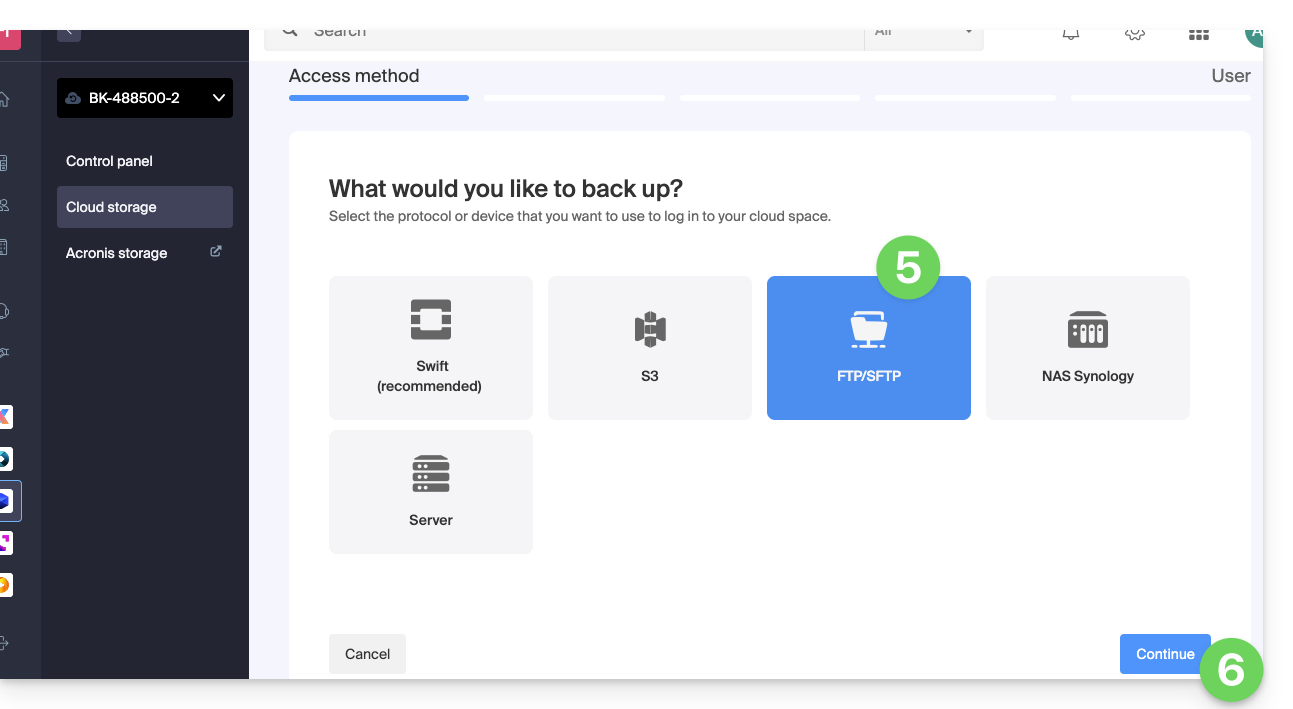
- Escolha o tipo/protocolo de backup FTP/SFTP.
- Clique no botão azul Continuar:
- Escolha o utilizador que receberá as informações de login (se necessário, escolha um utilizador diferente do seu e especifique os dados de contacto da pessoa na etapa seguinte).
- Clique no botão azul Continuar:
- Atribua um nome à cópia de segurança.
- Defina o espaço máximo em disco que esta cópia de segurança deverá ocupar, em relação ao volume total do Swiss Backup contratado, aumentando, se necessário, o tamanho total através do link azul.
- Clique no botão azul Continuar:
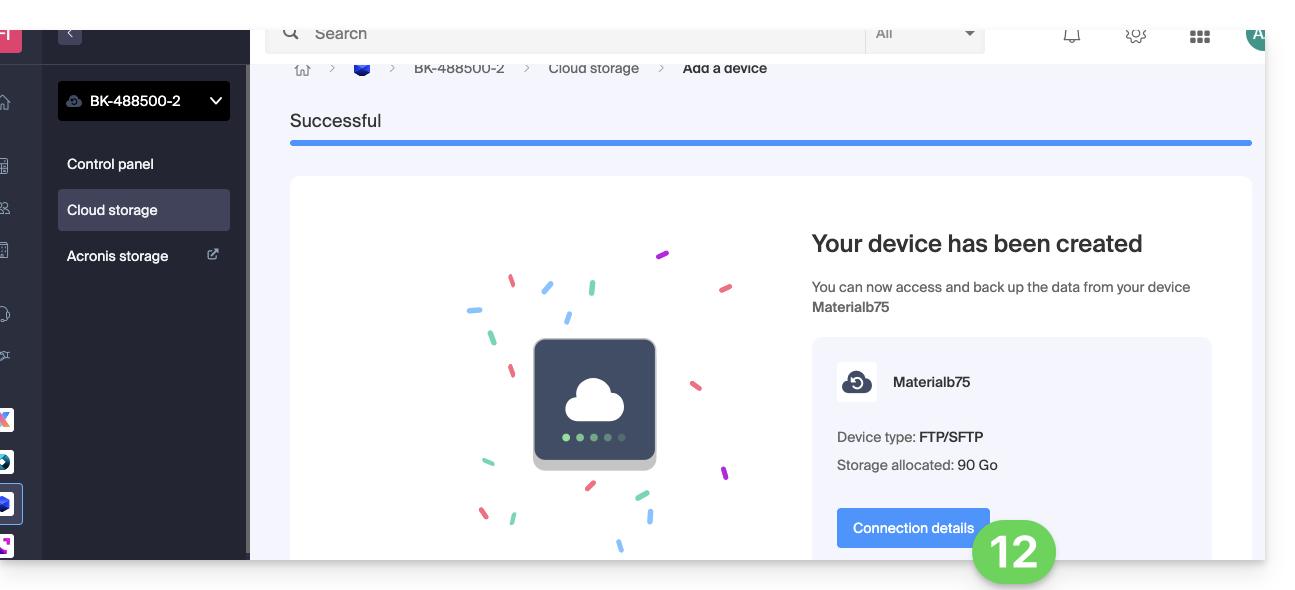
- Clique no botão azul para exibir as informações de login:
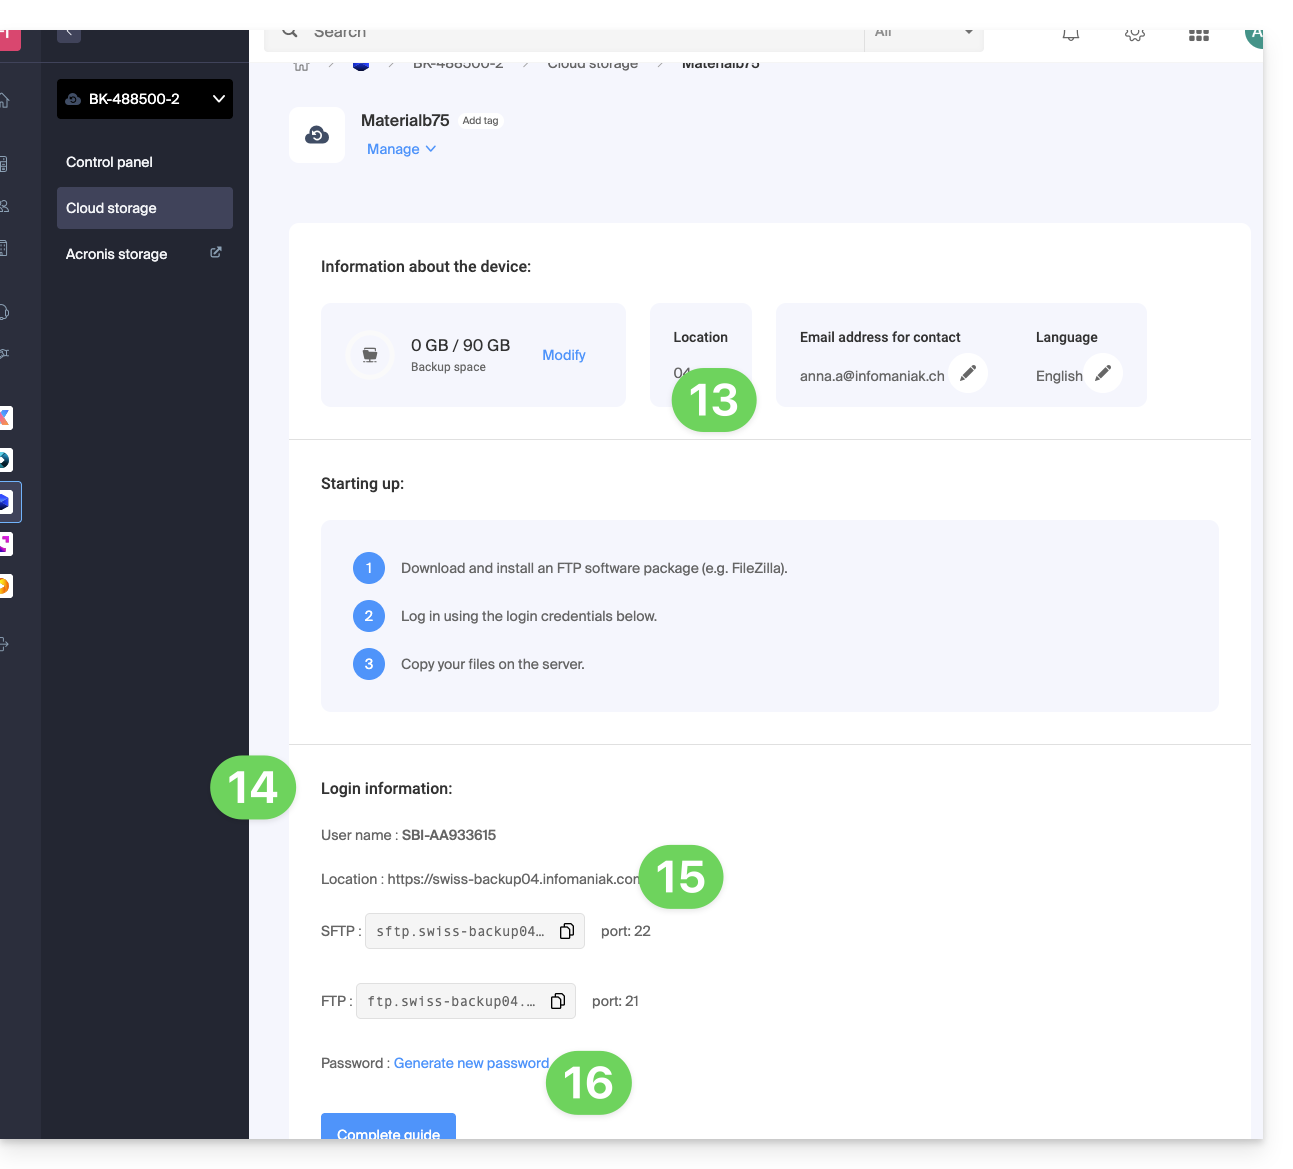
- Esta secção menciona, entre outras coisas, o número que representa a localização, útil para completar algumas informações que terá de fornecer durante a configuração da sua aplicação de cópia de segurança.
- Esta secção fornece todas as informações de acesso.
- O endereço ou nome do servidor de alojamento para a conexão SFTP e FTP abaixo, juntamente com o número da porta (portas padrão para estes protocolos).
- A senha (a ser gerada através do link azul, que abrirá o assistente em uma janela pop-up do navegador ou através do link recebido por e-mail):
E depois?
Depois de adicionar o dispositivo na interface Swiss Backup, dentro do Manager Infomaniak, você pode configurar o aplicativo de sua escolha para iniciar seus backups na nuvem, utilizando o protocolo mencionado neste guia.
Link para esta FAQ: https://faq.infomaniak.com/2545
Esta seção de perguntas frequentes foi útil?
Este guia explica como criar um novo dispositivo (armazenamento em nuvem via S3 Compatible) no Swiss Backup, a solução de armazenamento em nuvem suíça independente.
Pré-requisitos
- Encomendar um espaço Swiss Backup Infomaniak.
- Durante a encomenda, defina a quota de dispositivo(s) disponível(eis) (mínimo 1) para a cópia de segurança do tipo Cloud:
- Se necessário, aumente a quota do dispositivo de acordo com as suas necessidades.
Adicionar um dispositivo (para conexão S3)
Para aceder ao Swiss Backup e configurar uma nova cópia de segurança:
- Clique aqui para aceder à gestão do seu produto no painel de controlo Infomaniak (precisa de ajuda?).
- Clique diretamente no nome atribuído ao produto em questão:
- Clique no botão azul Gerenciar meus dispositivos (na seção Espaço de armazenamento na nuvem):
- Clique no botão azul Adicionar dispositivo:
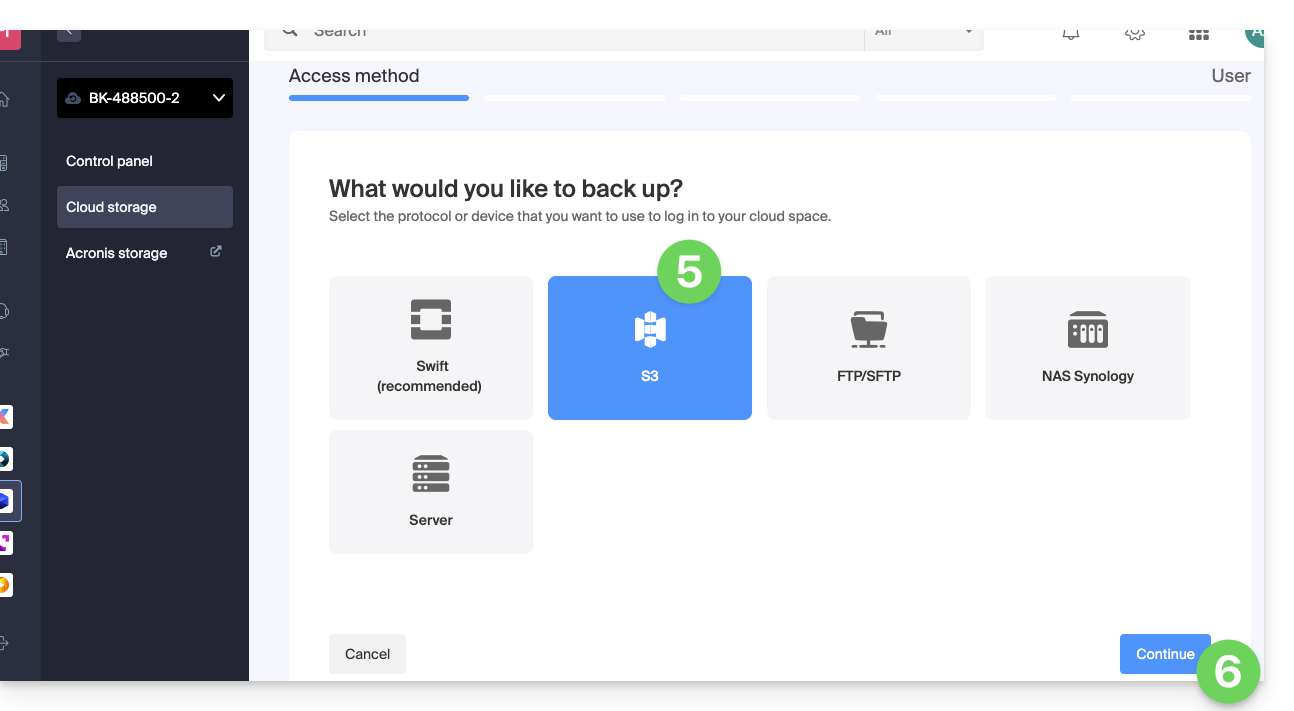
- Escolha o tipo/protocolo de backup S3.
- Clique no botão azul Continuar:
- Escolha o utilizador que receberá as informações de login (se necessário, escolha um utilizador diferente do seu e especifique os dados de contacto da pessoa na etapa adicional seguinte).
- Clique no botão azul Continuar:
- Atribua um nome à cópia de segurança.
- Defina o espaço em disco máximo que este espaço de armazenamento deverá representar em relação ao volume total do Swiss Backup contratado, aumentando, se necessário, o tamanho total através do link azul.
- Clique no botão azul Continuar:
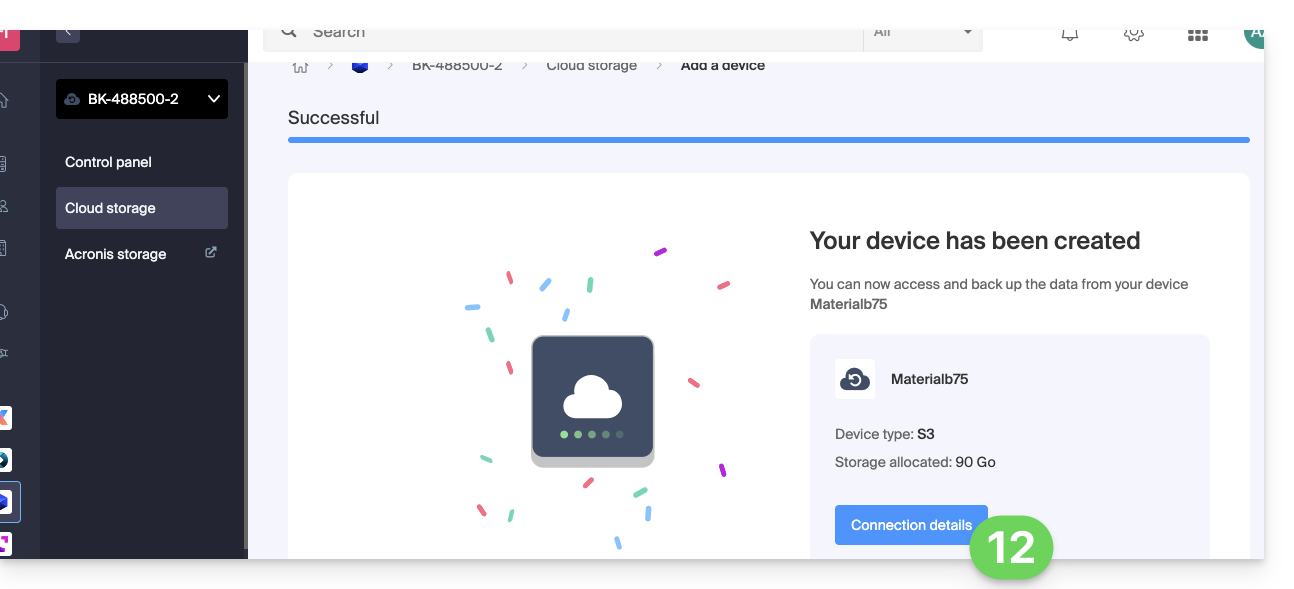
- Clique no botão azul para exibir as informações de conexão:
- Esta seção menciona, entre outras coisas, o número que representa a localização, útil para preencher algumas informações que você precisará fornecer ao configurar seu aplicativo de backup.
- Esta seção fornece todas as informações de login.
- A senha (a ser gerada por meio do link azul, que abrirá o assistente em uma janela pop-up do navegador ou por meio do link recebido por e-mail) contém um "
Endpoint", uma "Chave de Acesso" e uma "Chave Secreta":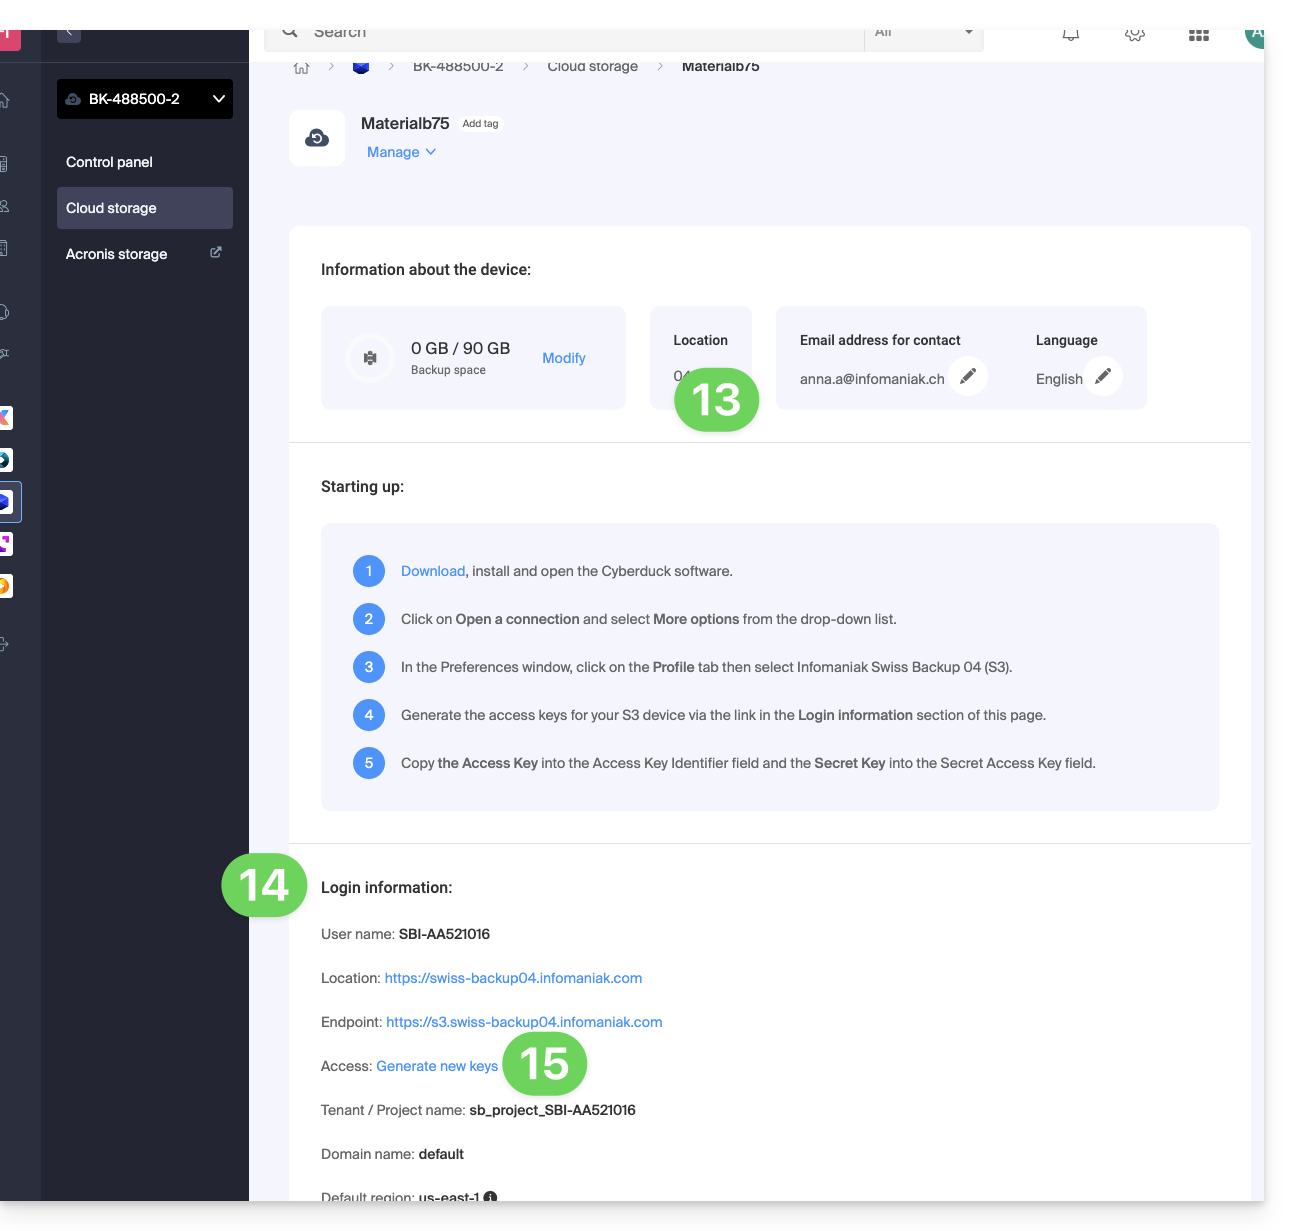
E depois?
Depois de adicionar o dispositivo na interface Swiss Backup, dentro do Manager Infomaniak, você pode configurar o aplicativo de sua escolha para iniciar seus backups na nuvem por meio do protocolo mencionado neste guia.
Link para esta FAQ: https://faq.infomaniak.com/2546
Esta seção de perguntas frequentes foi útil?
Este guia detalha como fazer o backup manual de dados usando a aplicação FileZilla (macOS / Windows / Linux) através do protocolo SFTP no Swiss Backup, a solução de backup em uma nuvem suíça independente.
Introdução
Configurar o FileZilla
Pré-requisitos
- Ter um espaço Swiss Backup Infomaniak com uma quota de dispositivo disponível (mínimo 1) para um backup na nuvem.
- Adicionar 1 dispositivo do tipo Nuvem para obter os parâmetros SFTP.
- Descarregar e instalar o FileZilla (macOS / Windows / Linux).
Para configurar um novo backup:
- Preencha os campos de acordo com as informações específicas do seu dispositivo (consulte este outro guia):
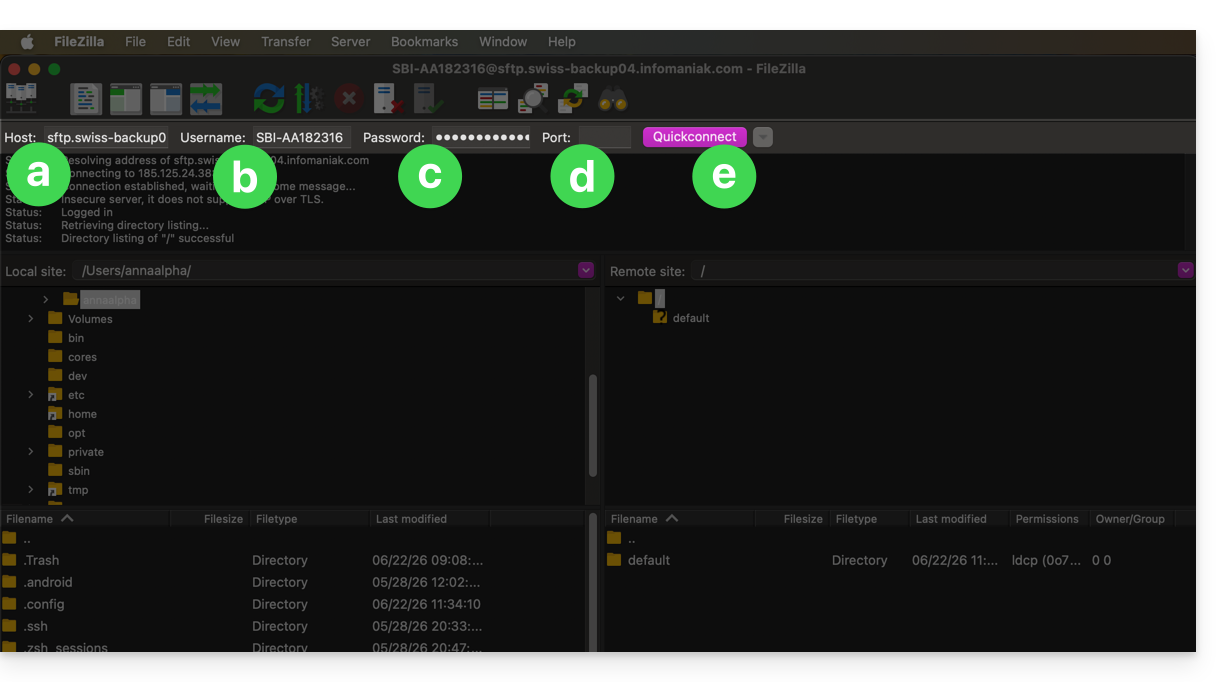
- Host:
sftp.swiss-backup02.infomaniak.com - Nome de usuário: Nome do dispositivo Swiss Backup (por exemplo,
SBI-MS0020) - Senha: Senha gerada através do e-mail recebido após a criação do dispositivo Swiss Backup
- Porta:
22 - Clique em Conectar
- Host:
O FileZilla também permite configurar conexões para que você não precise digitar novamente as credenciais de login:
- Clique no ícone Gerenciador de sites.
- Clique em Novo site:
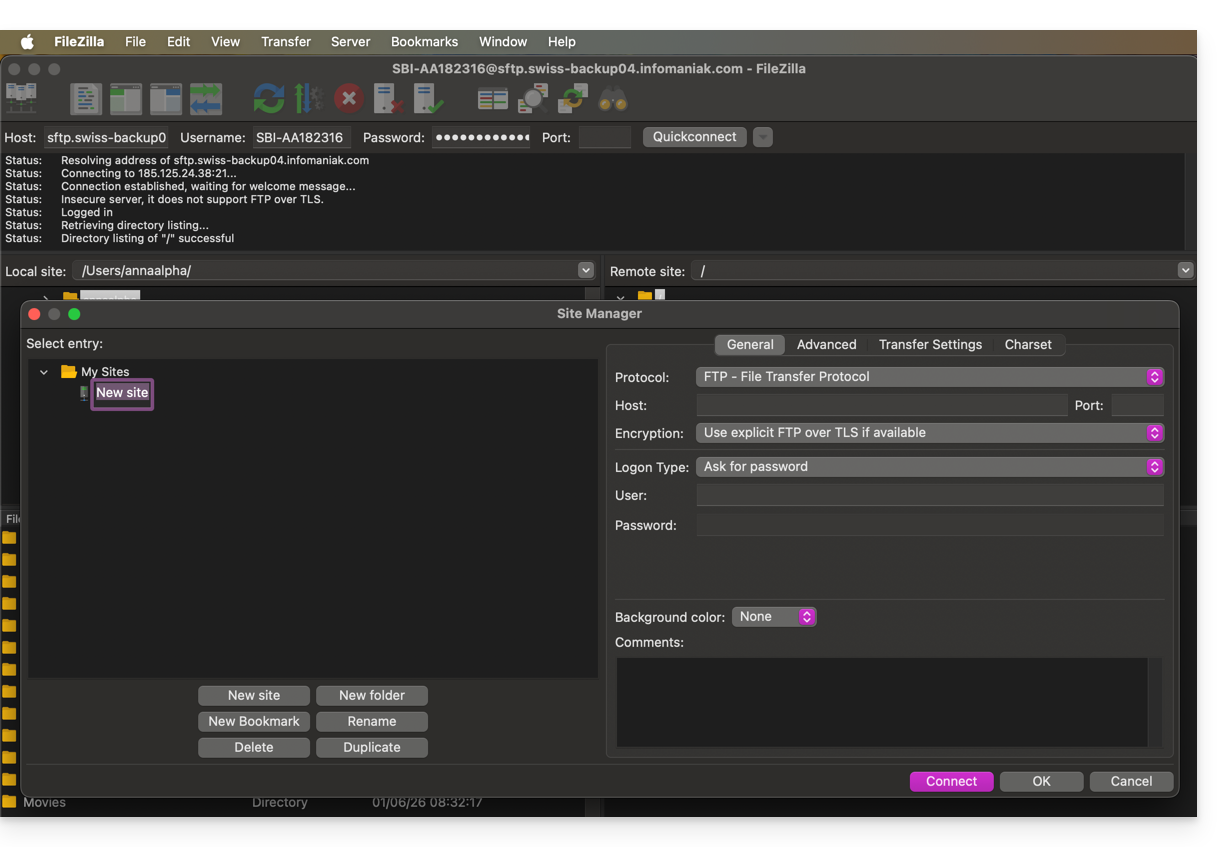
- Preencha os campos de acordo com as informações específicas do seu dispositivo.
A conexão SFTP é recomendada para que os dados sejam transmitidos de forma segura.
Link para esta FAQ: https://faq.infomaniak.com/2547
Esta seção de perguntas frequentes foi útil?