Base de conhecimento
1000 perguntas frequentes, 500 tutoriais e vídeos explicativos. Aqui, você encontra apenas soluções!
Este guia detalha como fazer o backup manual de dados usando a aplicação Cyberduck (macOS / Windows) através do protocolo SFTP no Swiss Backup, a solução de backup em uma nuvem suíça independente.
Introdução
Configurar o Cyberduck
Pré-requisitos
- Ter um espaço Swiss Backup Infomaniak com uma quota de dispositivo disponível (mínimo 1) para uma cópia de segurança na nuvem.
- Adicionar 1 dispositivo do tipo Cloud para obter as configurações SFTP.
- Descarregar e instalar o Cyberduck (macOS / Windows).
Para configurar uma nova cópia de segurança:
- Abra a aplicação Cyberduck.
- Clique em Abrir conexão:
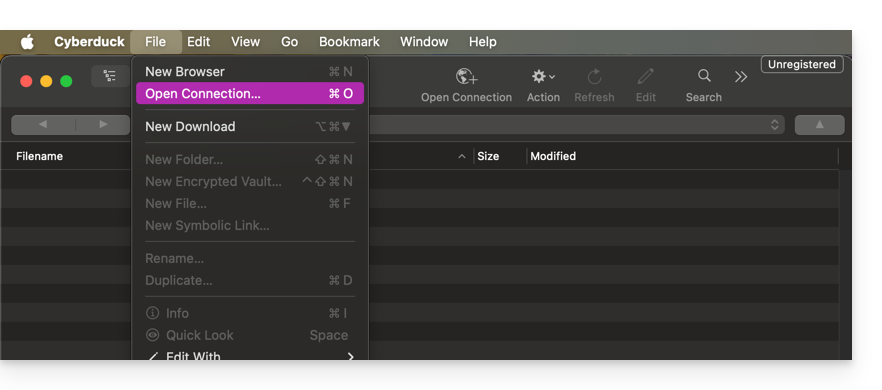
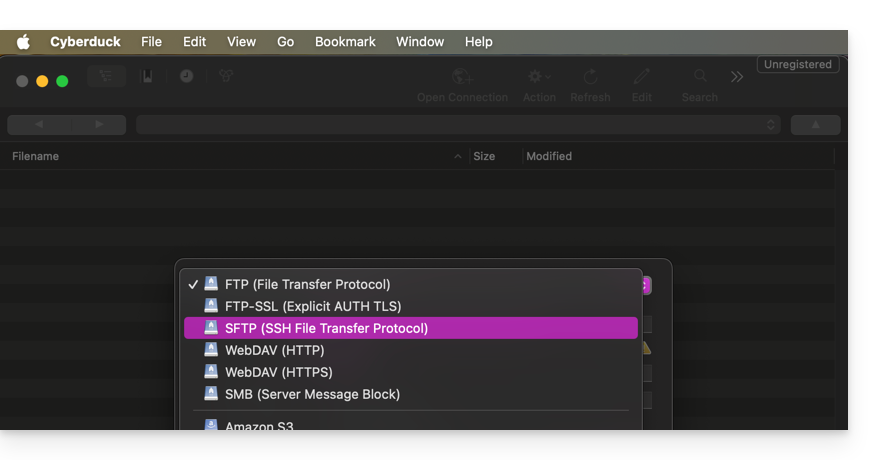
- Escolha o protocolo correspondente:
- Preencha os campos com as informações específicas do seu dispositivo (consulte este outro guia):
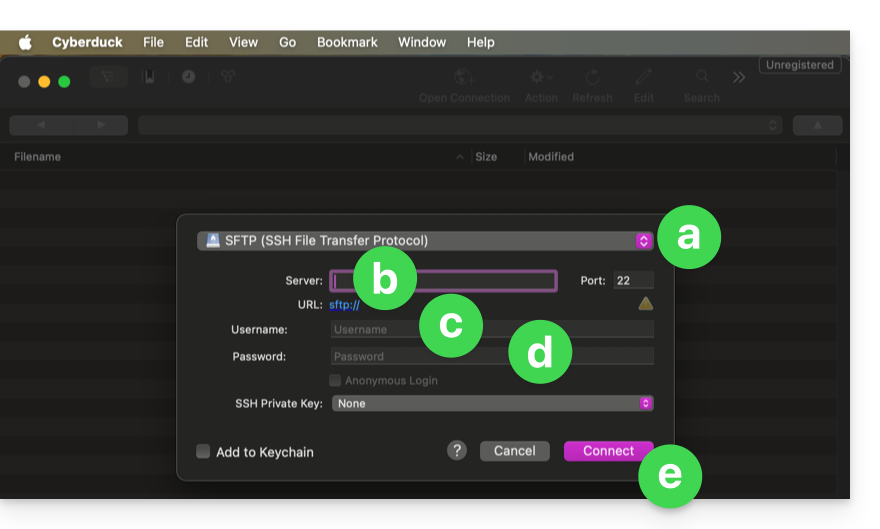
- Selecione no menu suspenso:
SFTP(SSH File Transfer Protocol). - Servidor:
sftp.swiss-backup02.infomaniak.com - Nome de usuário: nome do dispositivo Swiss Backup (por exemplo,
SBI-MS0020). - Senha: senha gerada por meio do e-mail recebido após a criação do dispositivo Swiss Backup.
- Clique em Conectar.
- Selecione no menu suspenso:
O Cyberduck permite criar marcadores, acessos pré-configurados para facilitar a conexão ao armazenamento FTP posteriormente. Depois de criar o marcador, você poderá clicar duas vezes nele para se conectar ao armazenamento FTP.
Link para esta FAQ: https://faq.infomaniak.com/2548
Esta seção de perguntas frequentes foi útil?
Este guia detalha como fazer o backup manual de dados usando o aplicativo MSP360 (anteriormente CloudBerry Windows) através do protocolo S3 Compatible no Swiss Backup, a solução de backup em nuvem suíça independente.
Introdução
- Também é possível usar o FileZilla (SFTP): consulte este outro guia.
Configurar o MSP360/CloudBerry
Pré-requisitos
- Ter um espaço Swiss Backup Infomaniak com uma quota de dispositivo disponível (mínimo 1) para uma cópia de segurança na nuvem.
- Adicionar 1 dispositivo do tipo Cloud para obter as configurações compatíveis com S3.
- Descarregar e instalar o MSP360 (Windows).
Para configurar uma nova cópia de segurança:
- Clique no ícone CloudBerry, no canto superior esquerdo.
- Escolha Adicionar conta de armazenamento:

- Selecione Compatível com S3:

- Preencha os campos com as informações específicas do seu dispositivo (consulte este outro guia):

Nome de exibição= escolha um nome para o armazenamento.Chave de acessoeChave secreta= as chaves de acesso geradas no e-mail recebido da Infomaniak após a criação do espaço de armazenamento.Ponto de serviço= https://s3.swiss-backup02.infomaniak.comNome do bucket= default
- Clique em OK.
Link para esta FAQ: https://faq.infomaniak.com/2549
Esta seção de perguntas frequentes foi útil?
Este guia detalha como fazer o backup manual de dados usando a aplicação MSP360 (anteriormente CloudBerry macOS) através do protocolo S3 Compatible no Swiss Backup, a solução de backup na nuvem de uma empresa suíça independente.
Introdução
- Também é possível usar o FileZilla (SFTP): consulte este outro guia.
Configurar o MSP360/CloudBerry
Pré-requisitos
- Ter um espaço Swiss Backup Infomaniak com uma quota de dispositivo disponível (mínimo 1) para uma cópia de segurança na nuvem.
- Adicionar 1 dispositivo do tipo Cloud para obter as configurações compatíveis com S3.
- Descarregar e instalar o MSP360 (macOS).
Para configurar uma nova cópia de segurança:
- Aceda a Configurações:

- Escolha um armazenamento compatível com S3 na lista abaixo:

- Preencha os campos com as informações específicas do seu dispositivo (consulte este outro guia):

Display Name: o nome deste espaço de armazenamento no aplicativo.AccessKeyeSecretKey: as chaves de acesso geradas a partir do e-mail recebido da Infomaniak após a criação do espaço de armazenamento.Endpoint(ou URL do servidor):https://s3.swiss-backup02.infomaniak.com- O valor de "bucket" permanece como padrão.
- Valide clicando em OK.
Link para esta FAQ: https://faq.infomaniak.com/2550
Esta seção de perguntas frequentes foi útil?
Este guia explica como preparar o seu servidor e instalar o Agente de backup Acronis para Swiss Backup no AlmaLinux 9.
Instalar o agente Acronis CyberProtect
1. Requisitos do sistema
- Utilize uma conta com privilégios de root.
- É necessário acesso à internet para o envio e download.
- Espaço em disco disponível: aproximadamente 2 GB.
2. Preparação do sistema
Aceda como utilizador root:
# Switch to root user
sudo -i
Atualize o cache de metadados do DNF:
# Refresh DNF metadata cache
dnf -y makecache
Verifique as versões atuais do kernel e do GCC:
# Check current kernel and GCC version
cat /proc/version
Se a versão do kernel não corresponder ao pacote kernel-devel disponível, será necessária uma atualização na etapa seguinte.
Instale a ferramenta de construção (make):
# Install make utility
dnf install -y make
# Verify installation
make -v | head -n 1
Instale o compilador GCC:
# Install GCC compiler
dnf install -y gcc
# Verify version (should match the one in /proc/version)
gcc -dumpfullversion
Instale o kernel mais recente e seus cabeçalhos (kernel-devel):
# List available versions
dnf list kernel kernel-devel --showduplicates | sort -r
# Install latest kernel and headers
dnf install -y kernel kernel-devel
Reinicie o servidor para carregar o novo kernel:
# Reboot the system
systemctl reboot
Após a reinicialização, reconecte-se e volte a ser o usuário root (
sudo -i).Confirme se todas as ferramentas necessárias estão presentes:
# Final environment check
uname -r
rpm -qa | grep ^kernel-devel
make -v | head -n 1
gcc -dumpfullversion
perl -v | head -n 2
3. Download do instalador
Instale o wget, se necessário:
# Install wget dnf install -y wget- Obtenha a URL de download:
- Faça login em https://acronis.infomaniak.com.
- Vá para Terminais → Todos os terminais.
- Clique em Adicionar e selecione Linux.
- Copie a URL completa contendo o seu token.
Faça o download do arquivo binário para o seu servidor:
# Download the installer using your URL
wget -O CyberProtect_AgentForLinux_x86_64.bin "metre_ici_URL_obtenue_avant"
Torne o arquivo executável:
# Set execution permissions
chmod +x CyberProtect_AgentForLinux_x86_64.bin
4. Instalação do agente
Inicie a instalação:
# Run the installation script ./CyberProtect_AgentForLinux_x86_64.bin- Use a tecla Tab para navegar e Enter para confirmar na interface de texto.
- Selecione Instalar.
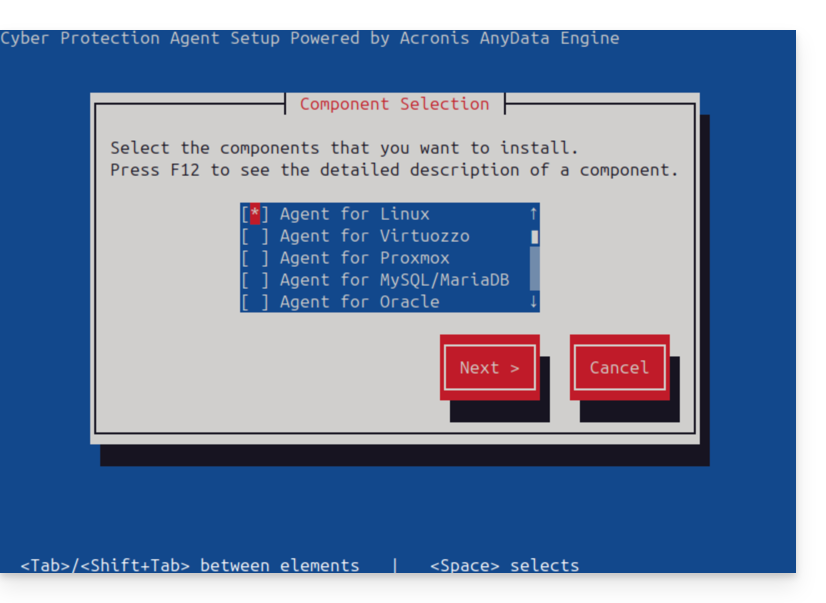
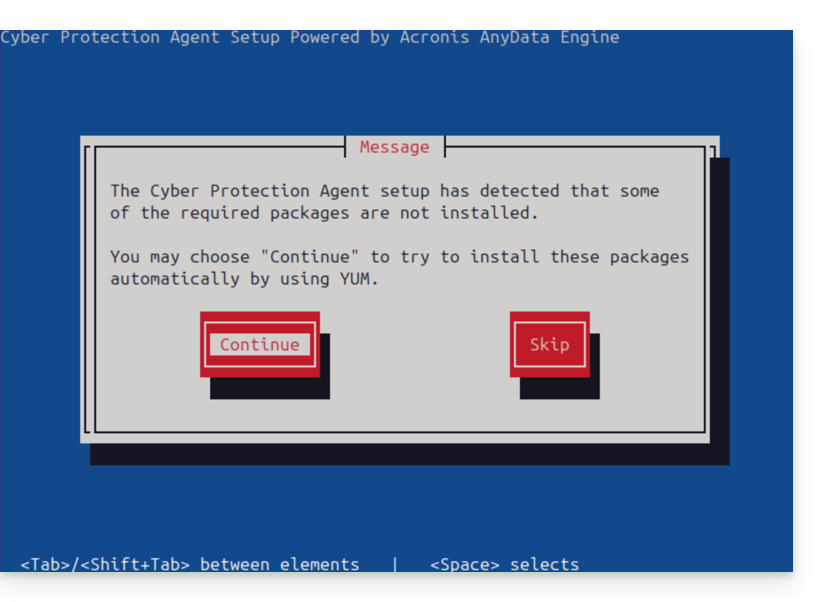
- Aceite a instalação automática das dependências ausentes via YUM.
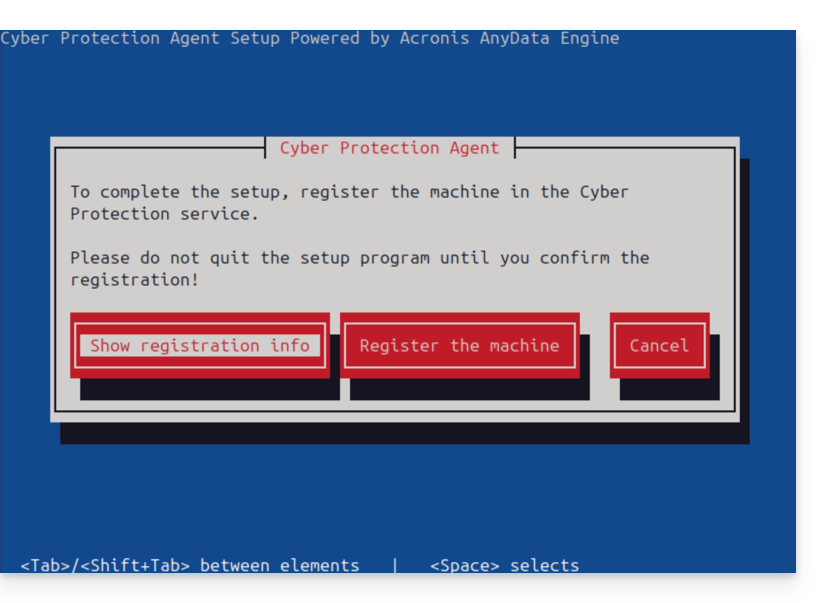
- No final do processo, escolha Exibir informações de registro.
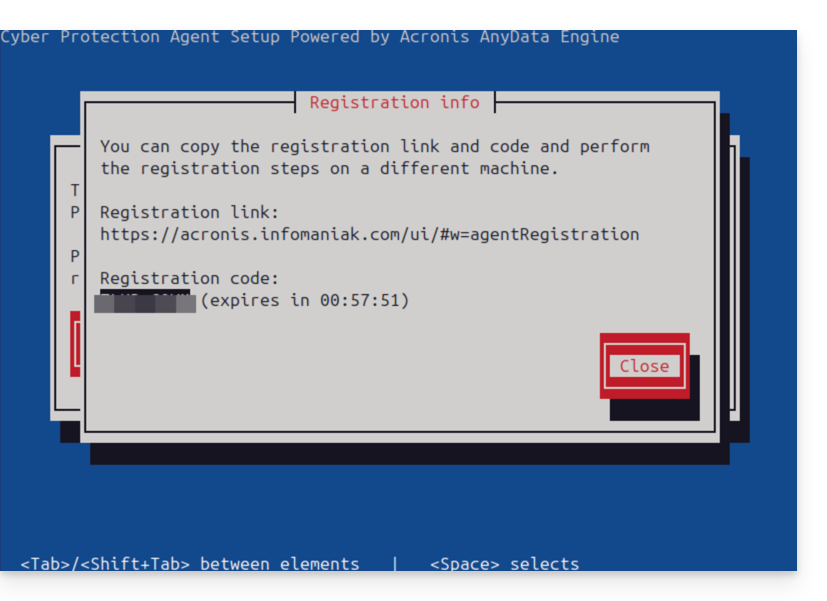
- Anote cuidadosamente o código de registro exibido (ex: ABCD-1234).
5. Registro no console Acronis
- Volte para o console Acronis (navegador).
- Clique em Adicionar e, na parte inferior da lista, escolha Registro por código.
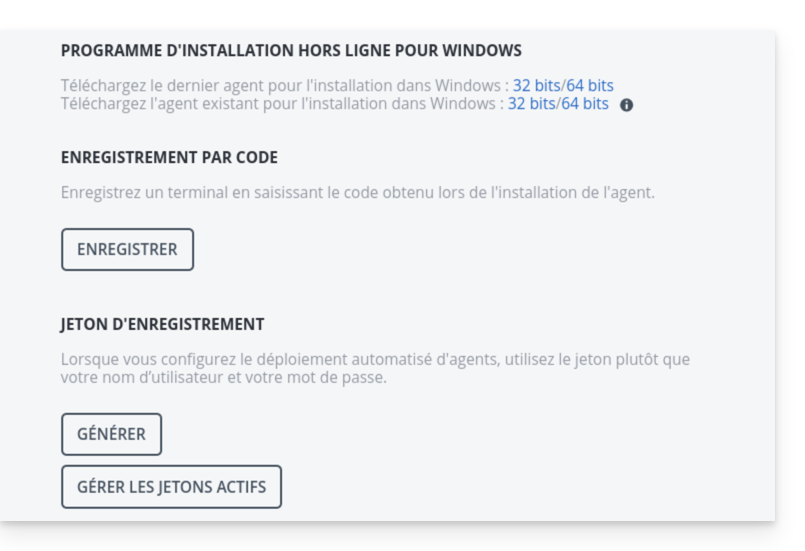
- Insira o código obtido no servidor e clique em Validar.
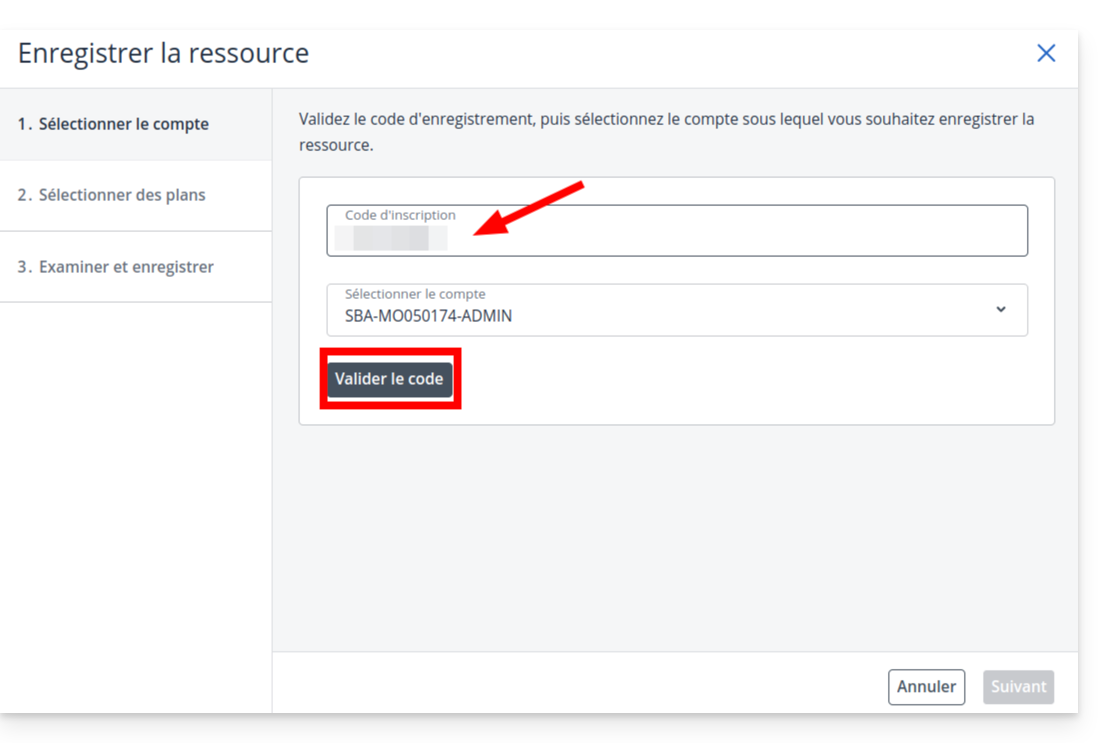
- Importante: Na tela de seleção do plano, clique no menu suspenso
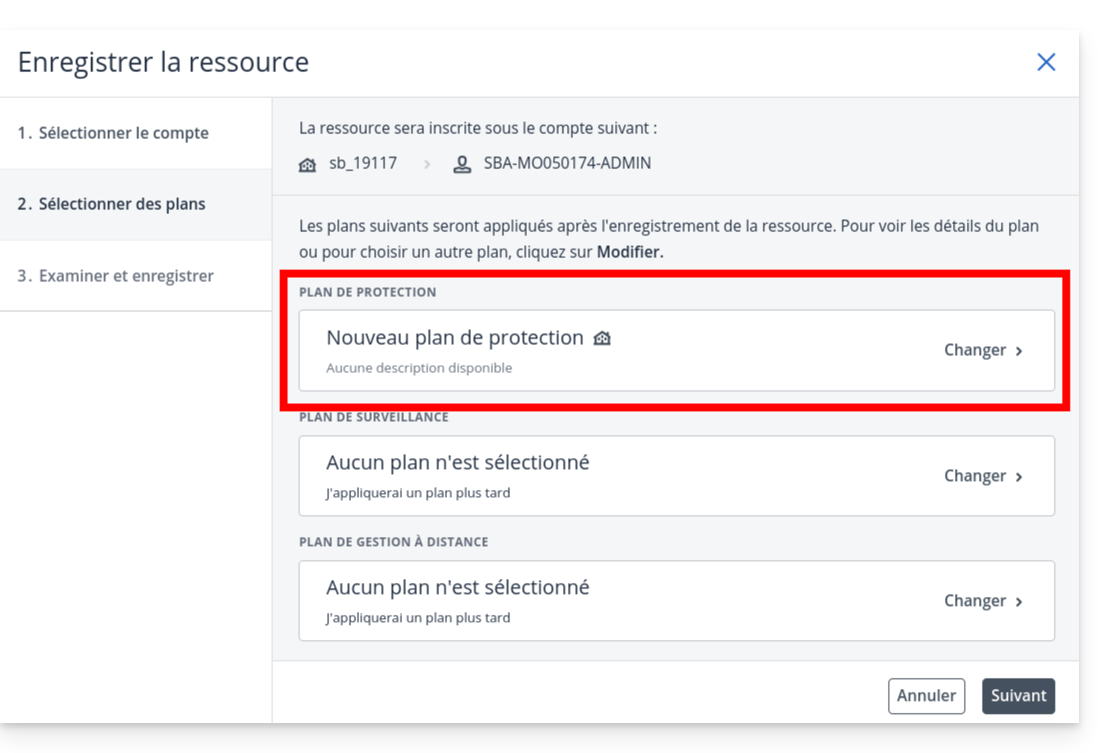
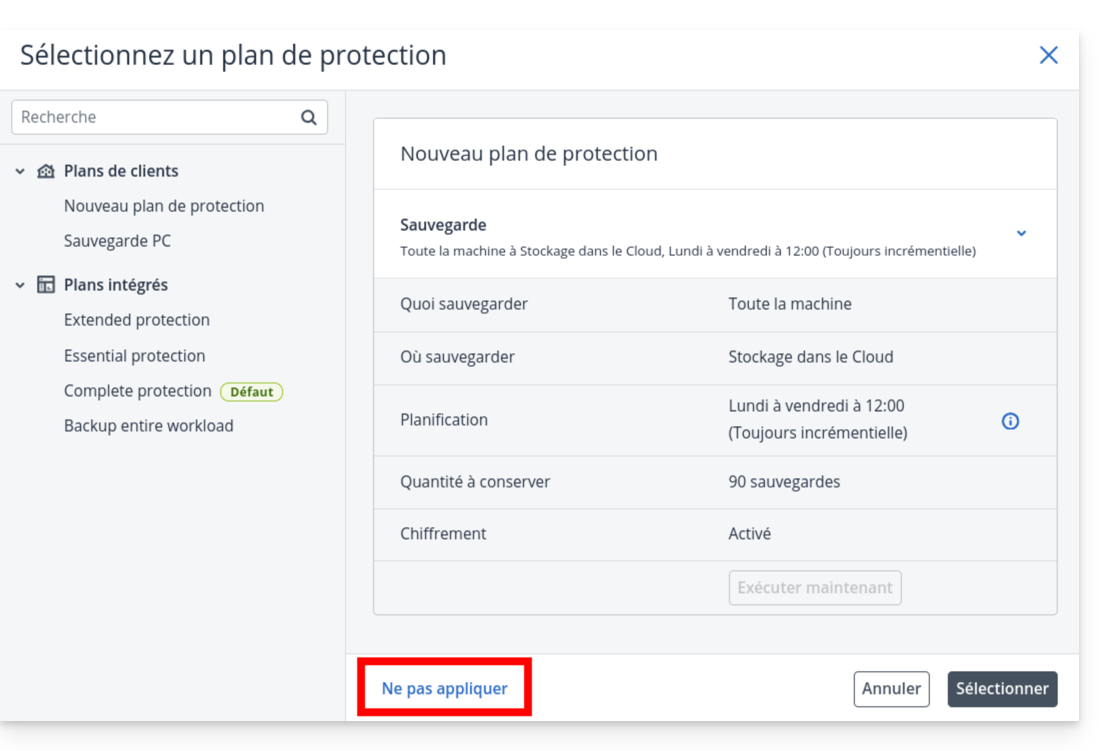
- e escolha Não aplicar.
- Clique em Seguinte
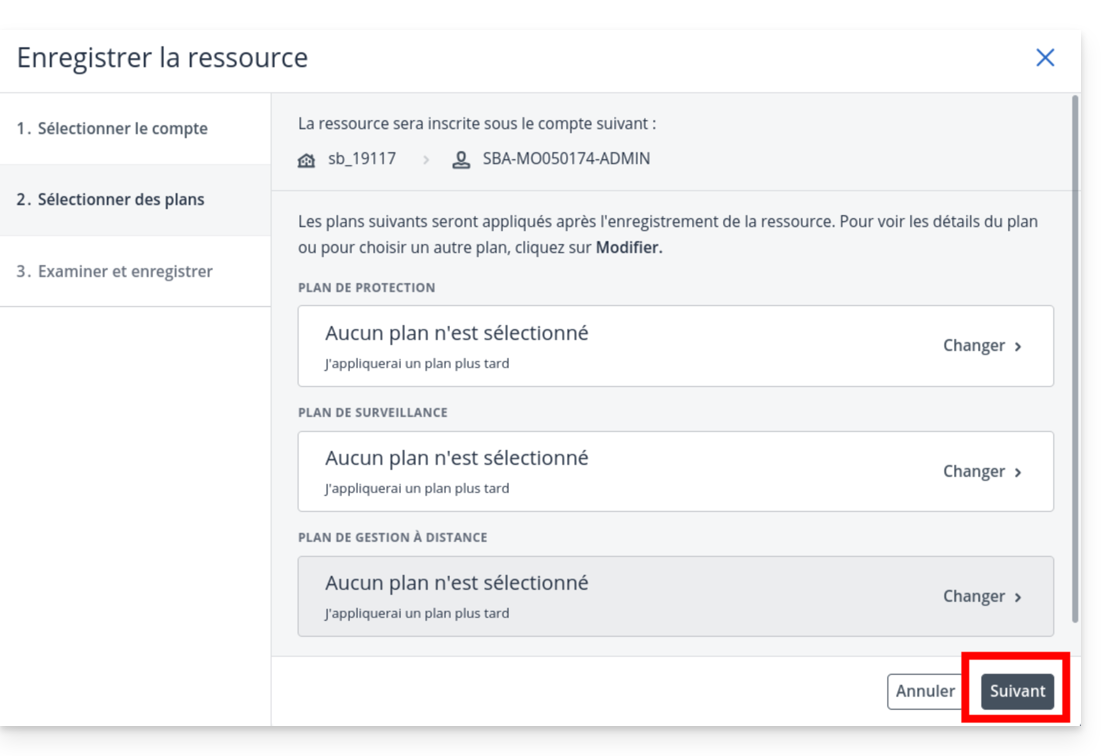
- em seguida, clique em Guardar.
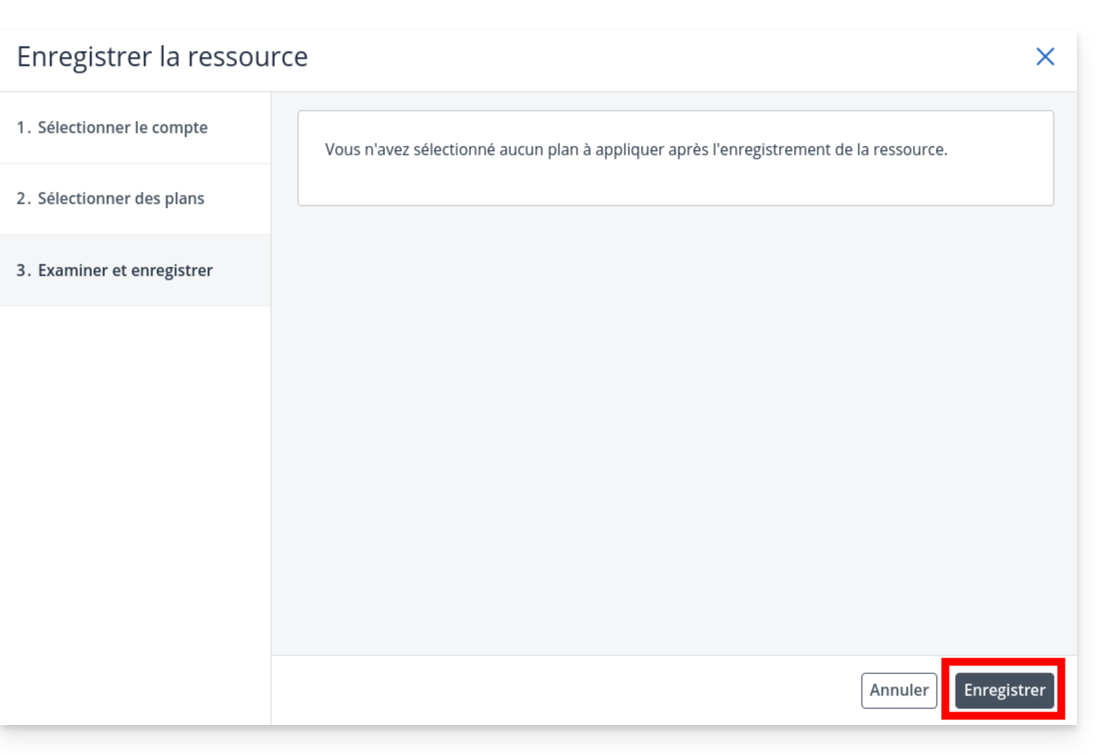
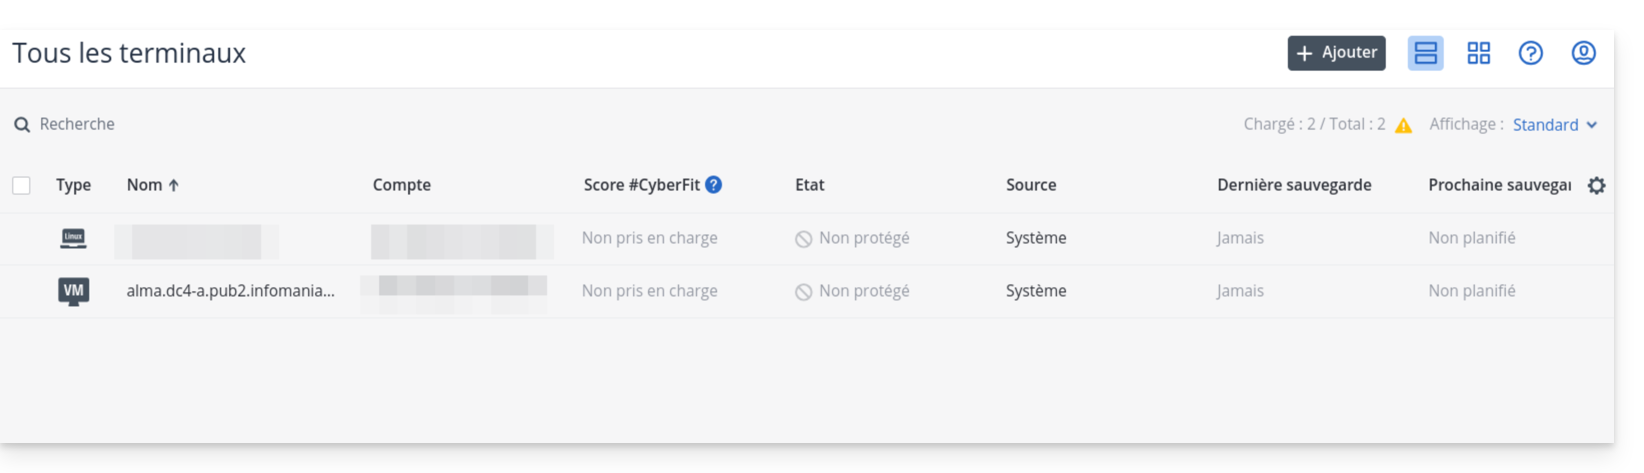
- Verifique se o seu servidor aparece na lista de dispositivos após alguns segundos.
6. Criação do plano de proteção
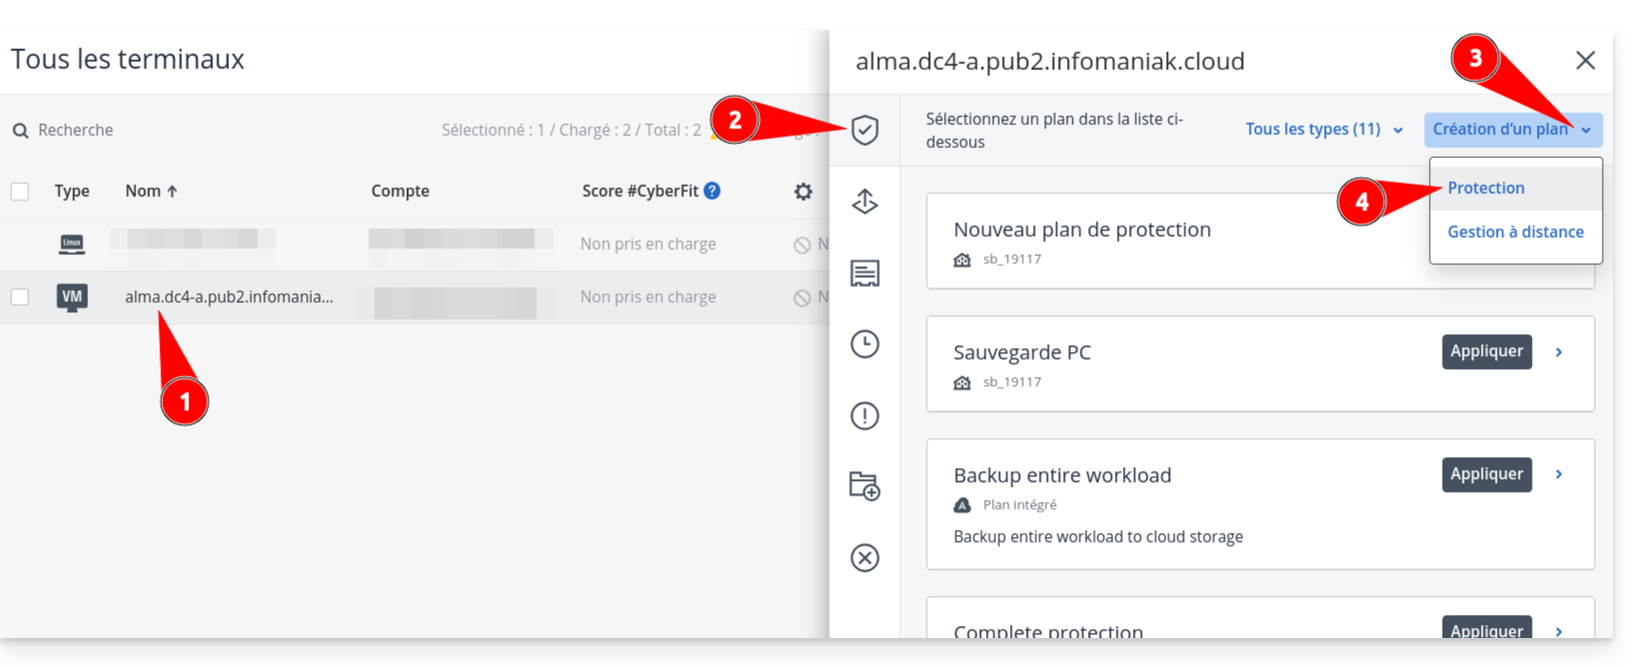
- Clique no nome do seu servidor na lista e, em seguida, no botão Proteger.
- Selecione Criar um plano → Proteção.
- Defina as configurações de backup (frequência, período de retenção, destino).
- Atenção: Se ativar a encriptação, guarde a palavra-passe num local seguro. Sem ela, as suas cópias de segurança serão inutilizáveis.
- Verifique a configuração e clique em Criar.
Link para esta FAQ: https://faq.infomaniak.com/2555
Esta seção de perguntas frequentes foi útil?
Este guia trata da gestão de utilizadores do Swiss Backup para cópias de segurança do Acronis.
Administrador do Swiss Backup
A sua conta SBA-XXXX-ADMIN, obtida após a configuração do Swiss Backup no Manager Infomaniak, tem, por padrão, acesso a todas as licenças, dispositivos, locais e a todo o espaço de armazenamento disponível:
- Clique aqui para aceder à Consola Acronis com as credenciais obtidas após a adição do dispositivo (precisa de ajuda?).
- Na página inicial, uma conta de administrador sempre verá o botão de gerenciamento, o que não acontecerá com uma conta limitada:
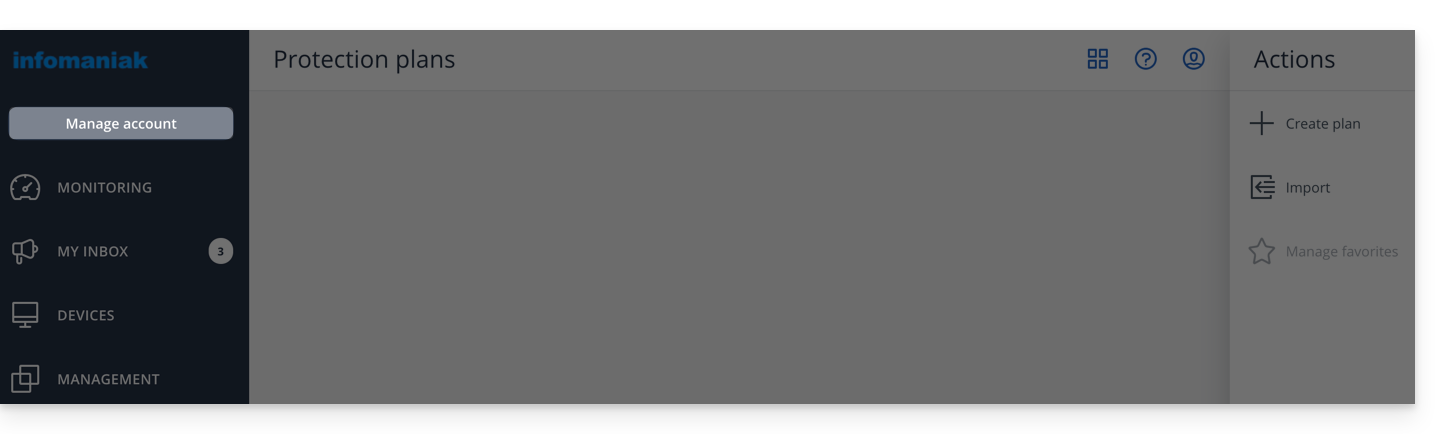
- Isso dá acesso à seção reservada para contas de administrador (ou “empresa” / “gerente de empresa”, dependendo dos termos visíveis na plataforma acronis.infomaniak.com):
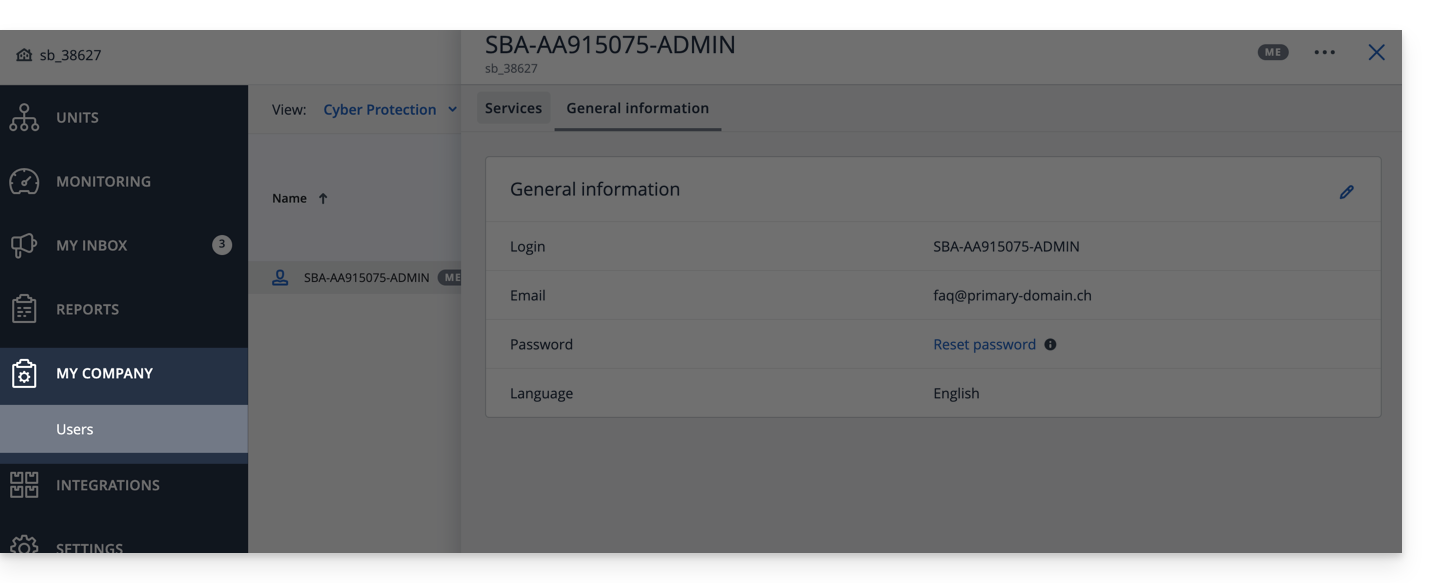
Se você adquiriu 2 licenças/dispositivos e sua cota total de armazenamento é de 1 TB para o Acronis (por exemplo):
- 1 dispositivo móvel
- 1 Servidor
a sua conta SBA-XXXX-ADMIN poderá fazer o backup de 1 dispositivo móvel e 1 servidor; a quota de armazenamento dos 2 dispositivos será partilhada, mas limitada a 1 TB.
Na interface do Acronis, você verá uma cota "ilimitada", mas que permanece limitada às opções que você escolheu no Gerenciador Swiss Backup.
Para ter uma melhor gestão das cotas de armazenamento e das cotas de serviço (licenças), crie usuários no Acronis, isso permite:
Adicionar um utilizador
Existem dois tipos de contas de utilizador: contas de administrador e contas de utilizador (consulte a ajuda da Acronis para mais informações). Apenas uma conta de administrador pode adicionar/remover utilizadores:
- Clique aqui para aceder à Consola Acronis com as credenciais obtidas após a adição do dispositivo (precisa de ajuda?).
- Clique em Gerenciar conta na barra lateral esquerda.
- Clique em Administradores da empresa.
- Clique no botão Utilizadores.
- Clique no botão +Novo na parte superior da página.
- Preencha as informações (consulte a ajuda da Acronis para obter mais informações).
Excluir um utilizador
Atenção:
- A remoção do dispositivo é irreversível e todos os dados armazenados serão eliminados dos servidores Infomaniak.
- As máquinas associadas a este utilizador serão desregistadas.
- Todos os planos de proteção serão revogados de todas as máquinas associadas a este utilizador.
Para eliminar a conta:
- Clique aqui para aceder à Consola Acronis com uma conta de administrador.
- Clique em Gerenciar conta na barra lateral esquerda.
- Clique em Administradores da empresa (como neste exemplo).
- Clique no menu de ação ⋮ à direita do utilizador em questão na tabela que aparece.
- Desative a conta.
- Após desativar a conta, exclua-a (conforme o passo 5 acima).
Associar dispositivo e utilizador
Exemplo
Armazenamento de 1 TB
Licenças: 2 dispositivos móveis, 1 servidor, 1 VM
- SBA-XXXX-ADMIN (limitado às quotas do Gerenciador Infomaniak padrão)
- User1 (quota de armazenamento: 800 GB, quota de serviço: 1 Mobile, 1 Servidor)
- Utilizador 2 (quota de armazenamento: 200 GB, quota de serviço: 1 Dispositivo móvel, 1 VM)
Para associar um dispositivo a um utilizador,faça o download e instale o agente Acronis no dispositivo em questãoe, em seguida, confirme o registo com a conta correta (SBA-XXXX-ADMIN, user1 ou user2):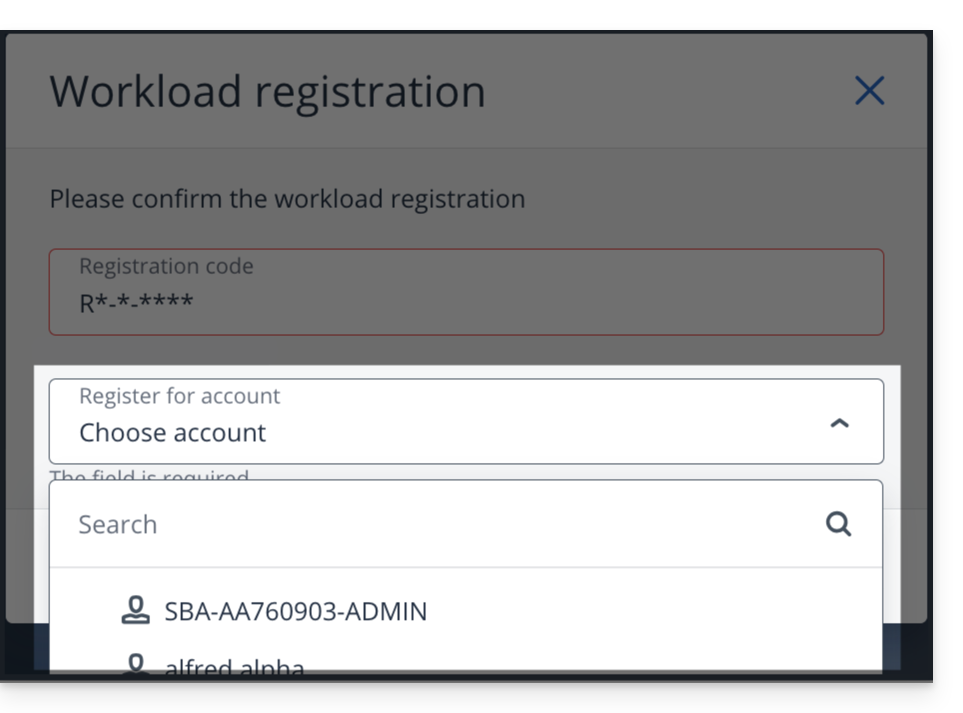
Para resolver problemas de registro, consulte este outro guia.
Link para esta FAQ: https://faq.infomaniak.com/2573
Esta seção de perguntas frequentes foi útil?
Este guia explica como instalar o Agente de Backup Acronis para Swiss Backup nos computadores Mac da Apple equipados com processadores M1, M2... que utilizam uma arquitetura ARM em vez da arquitetura x86 utilizada habitualmente.
Consulte este outro guia se precisar de informações sobre a desinstalação.
Instalar o Agente Acronis específico para ARM
Para acessar a interface de gerenciamento Acronis:
- Clique aqui para acessar o Console Acronis com as credenciais obtidas após adicionar o dispositivo (precisa de ajuda?).
- Clique no ícone do usuário, no canto superior direito.
- Clique em Downloads:
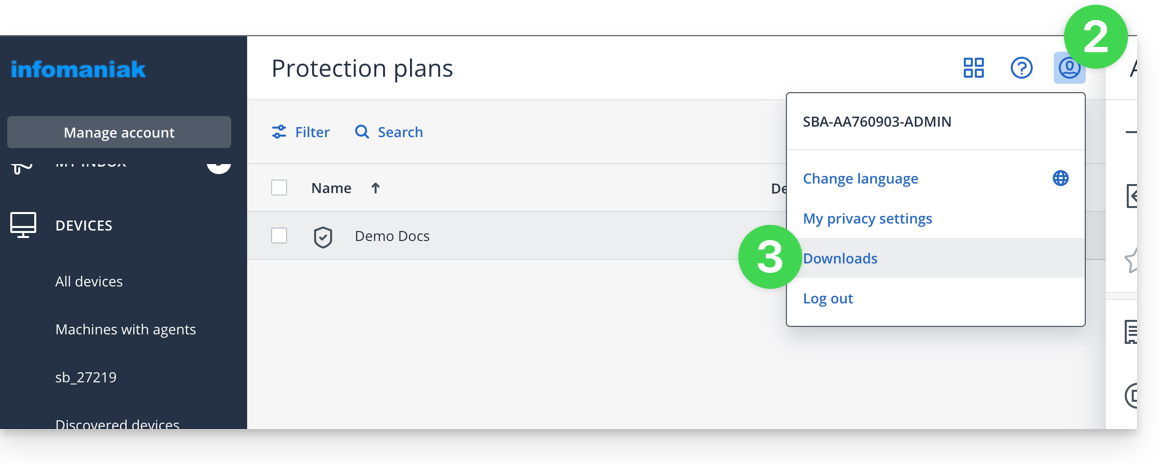
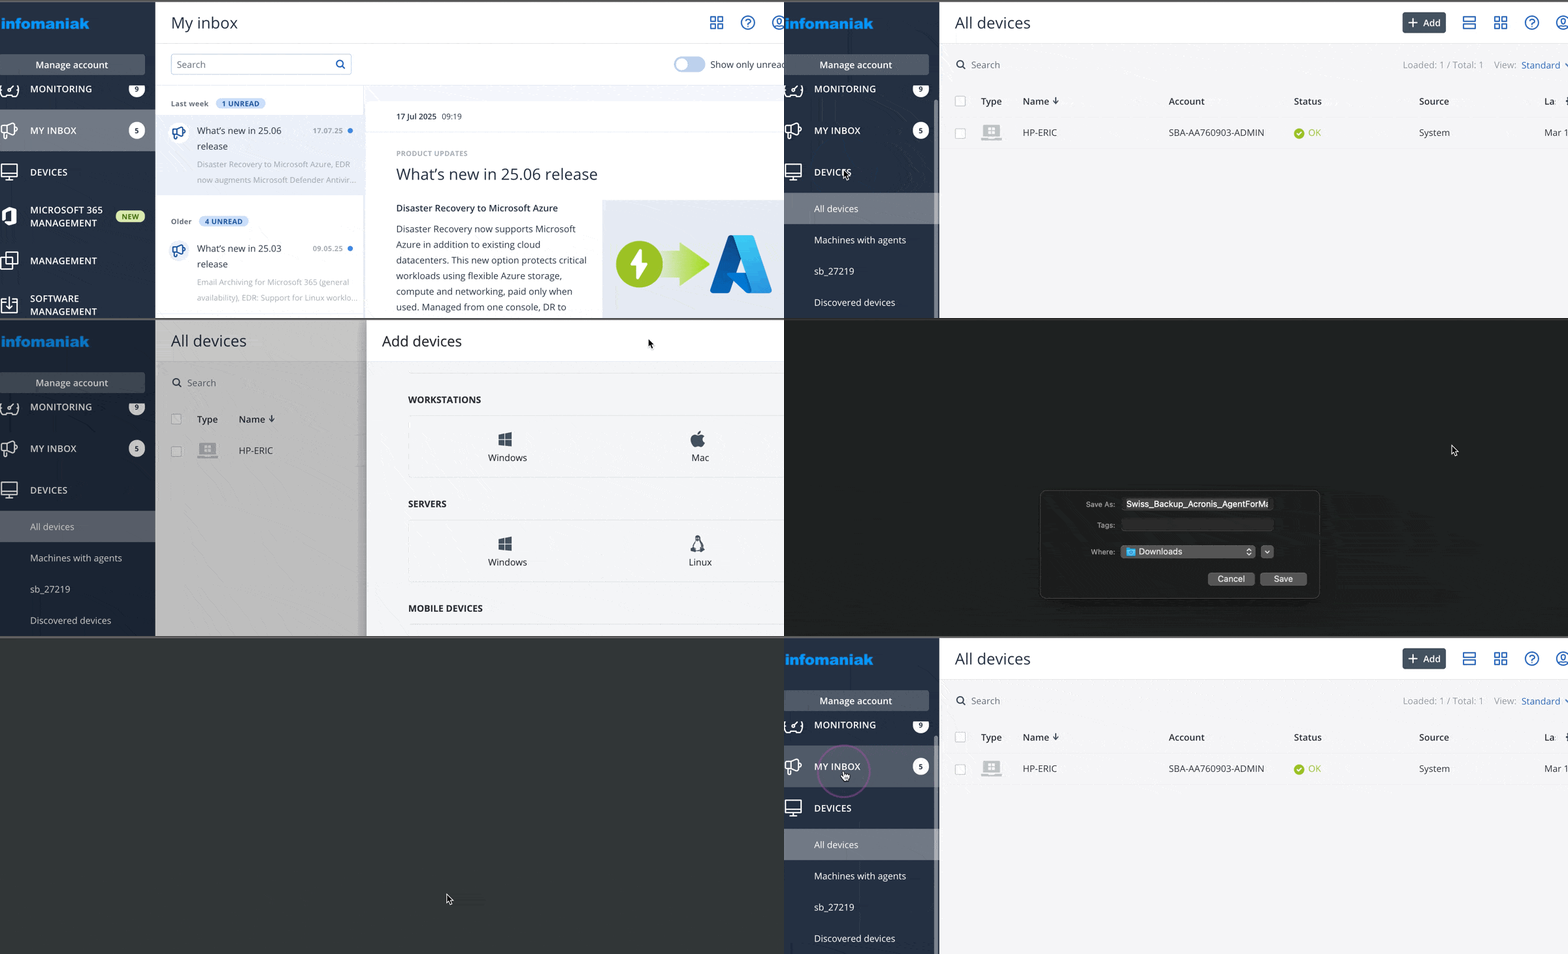
- Escolha o cliente adequado para o seu dispositivo:
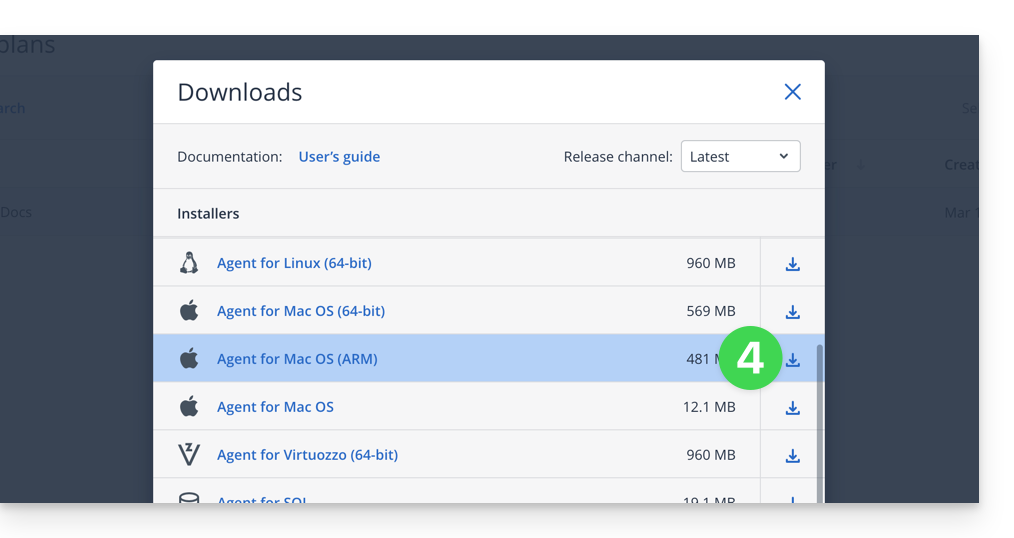
Atenção
Se utilizar a versão disponível no menu lateral esquerdo, ela não será compatível:
- Não siga o método abaixo, pois a versão obtida não será a correta (versão Intel):
Link para esta FAQ: https://faq.infomaniak.com/2583
Esta seção de perguntas frequentes foi útil?
Este guia explica o procedimento para alterar um plano Swiss Backup, a solução de backup seguro em uma nuvem suíça independente.
Alterar seu plano Swiss Backup
Para aceder à modificação da sua oferta Swiss Backup, siga os seguintes passos:
- Clique aqui para abrir a gestão do seu produto no Manager Infomaniak (precisa de ajuda?).
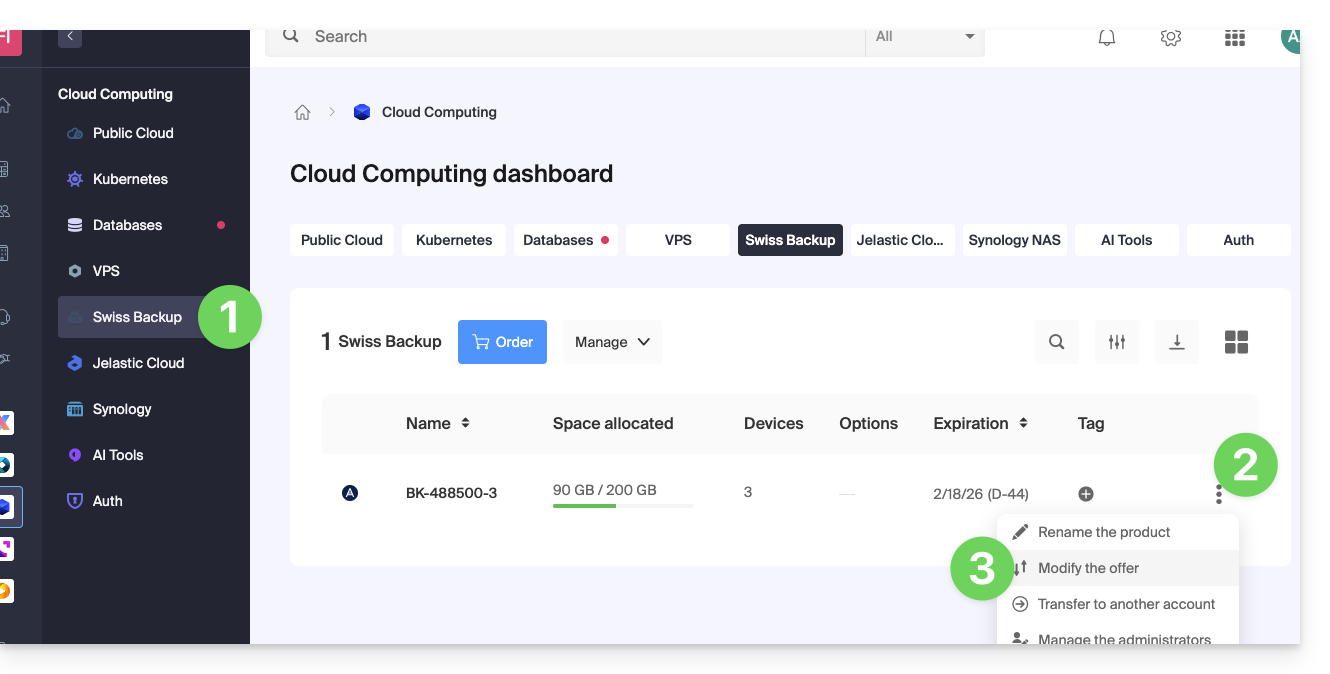
- Na lista dos seus produtos, clique no menu de ações ⋮, localizado à direita do nome do seu espaço Swiss Backup.
- Selecione Modificar o plano:
- Ajuste as configurações da sua oferta de acordo com as suas necessidades, modificando:
- o espaço de armazenamento
- o número de dispositivos
- o número de máquinas virtuais através do Acronis
- o número de servidores Linux/Windows através do Acronis
- etc.
- Clique em Seguinte e efetue o pagamento para confirmar a alteração.
Você também pode gerenciar sua oferta diretamente do painel do produto: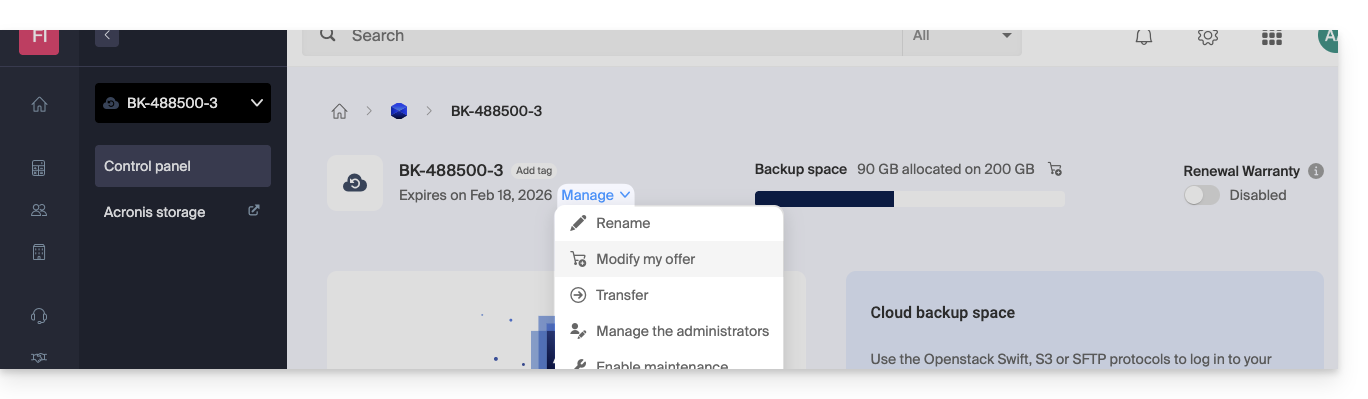
Exemplos de modificação de oferta
Inicialmente, o utilizador pretendia:
- fazer uma cópia de segurança de um dispositivo móvel iOS/Android com o Acronis
- e ter uma cópia de segurança gratuita, baseada na nuvem, acessível por SFTP ou método semelhante.
Agora, ele deseja:
- fazer o backup de dois dispositivos via Acronis (sempre o dispositivo móvel e um computador Windows), sem manter o backup gratuito.
Ele modifica as cotas: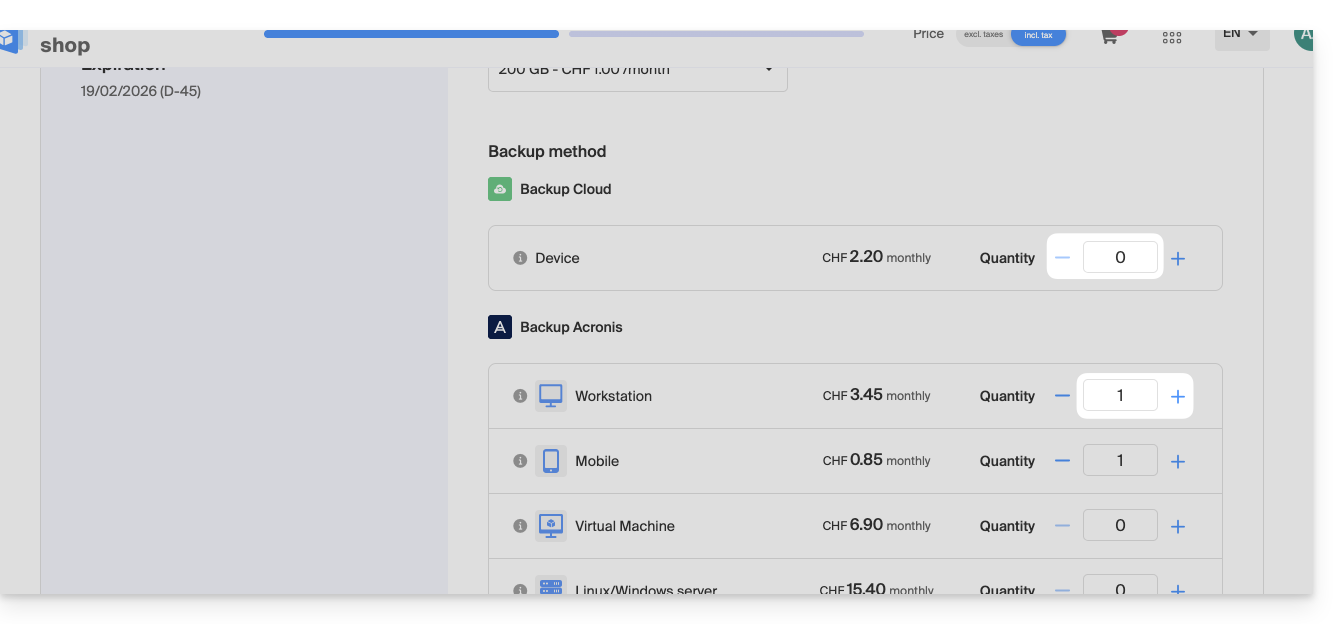
Resta apenas validar o pagamento para aplicar a modificação.
Atenção:
Para remover um tipo de dispositivo que você não deseja mais utilizar, este dispositivo deve ter sido previamente removido do seu painel Acronis, o que significa que a quota exibida na página de modificação da oferta deve ser zero.
Por exemplo, se desejar remover um backup de um site, primeiro deverá excluí-lo a partir do seu painel de controlo Acronis.
De facto, para modificar completamente a oferta (por exemplo, para manter apenas um único backup de um computador Windows), o pedido não poderá ser concluído enquanto a seguinte mensagem for exibida:
«O número de licenças selecionadas é inferior ao uso atual do seu produto»
Esta mensagem aparece quando tenta reduzir para zero a quantidade de um tipo de cópia de segurança que ainda está ativo.
Nesse caso, siga estas instruções:
- Clique aqui para acessar o console Acronis com as credenciais obtidas ao adicionar o dispositivo (precisa de ajuda?).
- Remova o dispositivo em questão no menu «Dispositivos».
- Aguarde cerca de dez minutos para que as cotas sejam atualizadas.
O limite de espaço dos seus dispositivos exibido no painel de controle Infomaniak deverá então ser alterado para zero. Em seguida, você poderá modificar o plano sem encontrar erros que impeçam a conclusão do processo.
Link para esta FAQ: https://faq.infomaniak.com/2624
Esta seção de perguntas frequentes foi útil?
Este guia explica como remover um dispositivo (do tipo backup na nuvem) no Swiss Backup, a solução de backup em uma nuvem suíça independente.
Remover um dispositivo (Swift, S3, etc.)
Para aceder ao Swiss Backup e remover um dos locais de armazenamento:
- Clique aqui para aceder à gestão do seu produto no Manager Infomaniak (precisa de ajuda?).
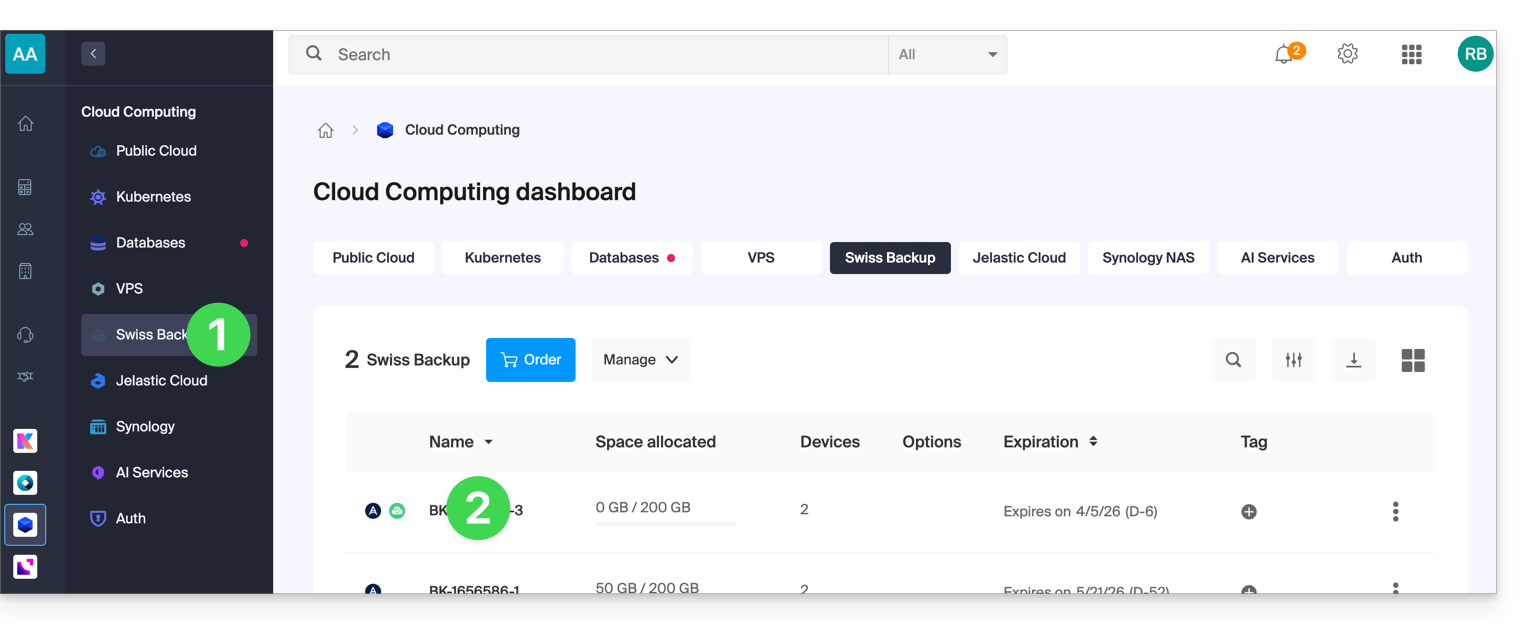
- Clique diretamente no nome atribuído ao produto em questão:
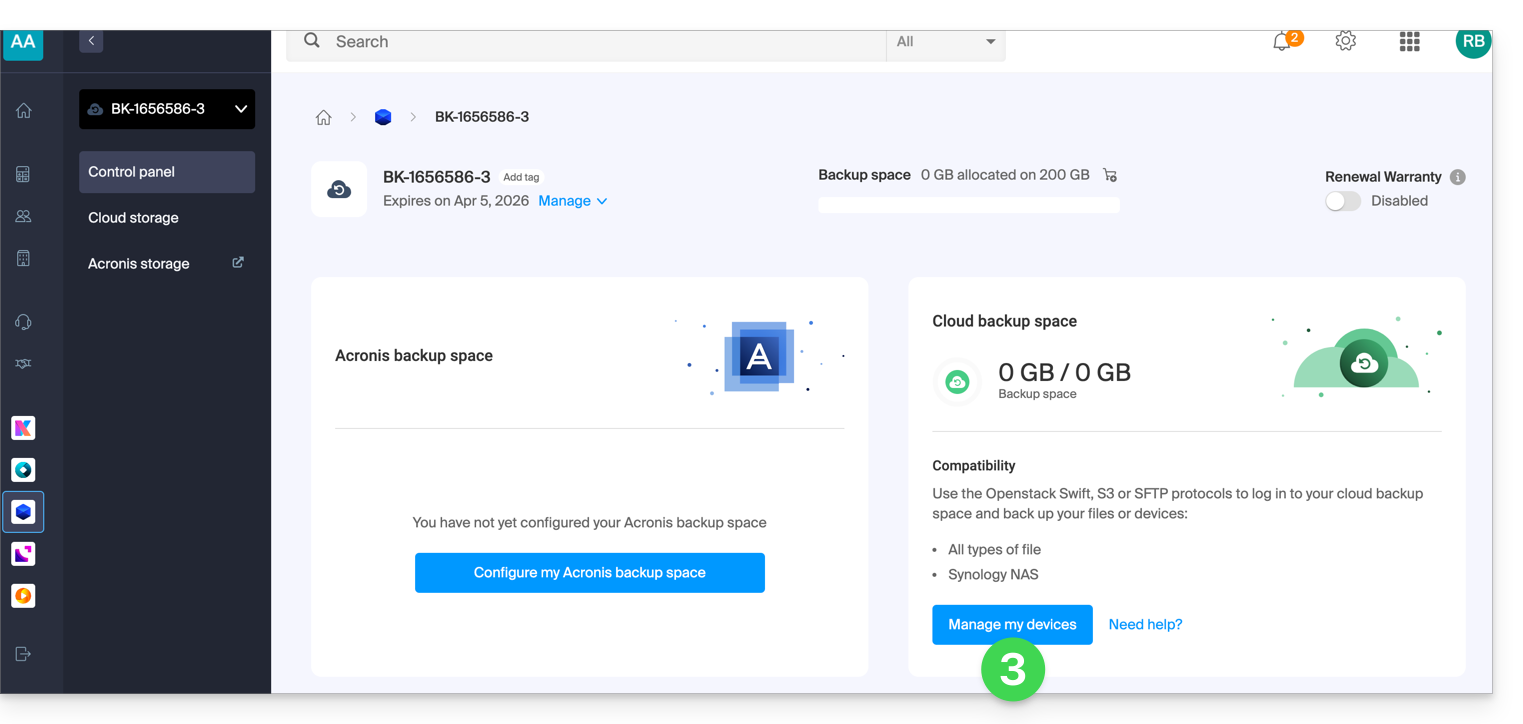
- Clique no botão azul Gerenciar meus dispositivos (na seção Espaço de armazenamento na nuvem):
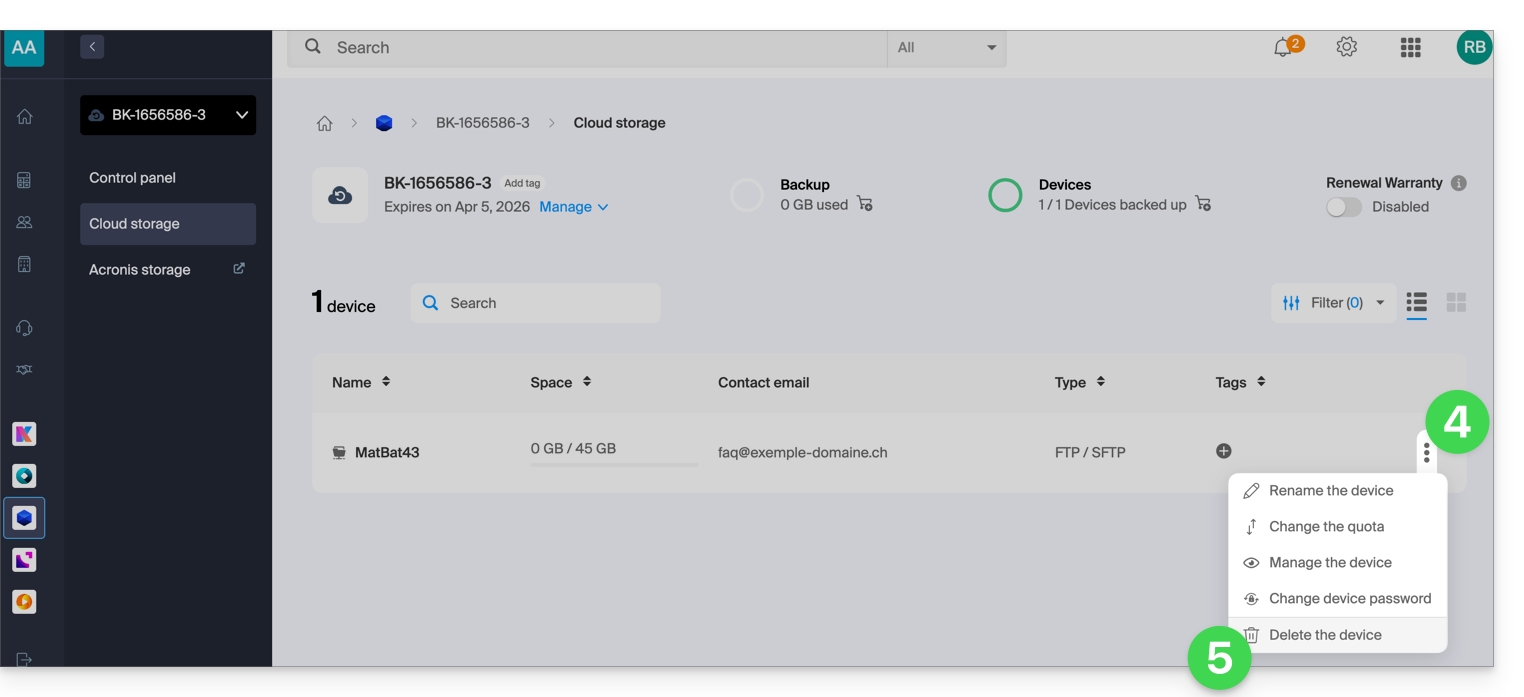
- Clique no menu de ação ⋮ à direita do item correspondente na tabela exibida.
- Clique em Remover dispositivo:
- Confirme a exclusão inserindo a senha de acesso ao Manager e ativando a caixa de confirmação.
A exclusão do dispositivo é irreversível e todos os dados armazenados serão removidos dos servidores Infomaniak, sem possibilidade de recuperação.
Para escolher um novo dispositivo no Swiss Backup, consulte este outro guia.
Link para esta FAQ: https://faq.infomaniak.com/2625
Esta seção de perguntas frequentes foi útil?
Este guia aborda o armazenamento imutável, um recurso de segurança essencial que permite proteger seus backups contra exclusão acidental ou maliciosa, incluindo ataques de ransomware.
Introdução
- O Armazenamento Imutável (Immutability) é uma configuração que torna os dados de seus backups Acronis não modificáveis e não excluíveis por um período de tempo que você define.
- Uma vez que o período de retenção esteja ativo, nenhuma ação (exclusão ou modificação) pode ser realizada nesses dados até que o período expire.
Configuração e Uso
Esta funcionalidade é gerenciada diretamente por meio dos Planos de Backup no console de gerenciamento Acronis Cyber Protect.
Consulte a documentação da Acronis para obter as etapas detalhadas de ativação da opção de imutabilidade em seu plano de backup.
Limitação em outros protocolos (Swift e S3)
A imutabilidade não está disponível em outros protocolos de armazenamento do Swiss Backup, como Swift e S3. Essa limitação se deve a restrições técnicas inerentes ao protocolo Swift OpenStack que esses armazenamentos utilizam.
Link para esta FAQ: https://faq.infomaniak.com/2763
Esta seção de perguntas frequentes foi útil?
Este guia aborda a cópia de segurança do Microsoft OneDrive no Swiss Backup, a solução de cópia de segurança na nuvem de uma empresa suíça independente.
Introdução
- O Acronis (e outros softwares de backup) não consegue fazer backup dos arquivos do OneDrive que estão apenas na nuvem.
- O recurso Arquivos sob demanda (Files On-Demand) da Microsoft cria pontos de análise NTFS no lugar dos arquivos reais no disco, o que causa um erro durante o backup.
Desativar os arquivos sob demanda
É possível contornar este problema forçando o OneDrive a descarregar todos os ficheiros localmente e, em seguida, reiniciando a cópia de segurança:
- Clique no ícone do OneDrive na área de notificação (barra de tarefas).
- Abra Configurações > guia Sincronização e backup (ou Configurações, dependendo da versão).
- Desative a opção Arquivos sob demanda (Arquivos sob Demanda).
- Aguarde até que os arquivos sejam totalmente baixados para o seu dispositivo.
- Reinicie o processo de backup a partir do Swiss Backup.
Atenção: esta operação requer espaço de disco local suficiente para armazenar todos os seus arquivos do OneDrive.
Soluções alternativas
Link para esta FAQ: https://faq.infomaniak.com/2764
Esta seção de perguntas frequentes foi útil?
Para restaurar um backup do Swiss Backup em uma máquina virtual, consulte a documentação da Acronis sobre o assunto:
Link para esta FAQ: https://faq.infomaniak.com/2765
Esta seção de perguntas frequentes foi útil?
Este guia detalha como obter as informações de configuração doSwiss Backup(solução de backup de código aberto, compatível com Openstack Swift, S3, SFTP...)e explica as diferenças entre as palavras-passe disponíveis.
Informações de login (backup na nuvem)
Aceder às informações
Para aceder às informações relativas à sua cópia de segurança, do tipo Openstack Swift, S3, SFTP...:
- Clique aqui para acessar o gerenciamento do seu produto no painel de controle Infomaniak (precisa de ajuda?).
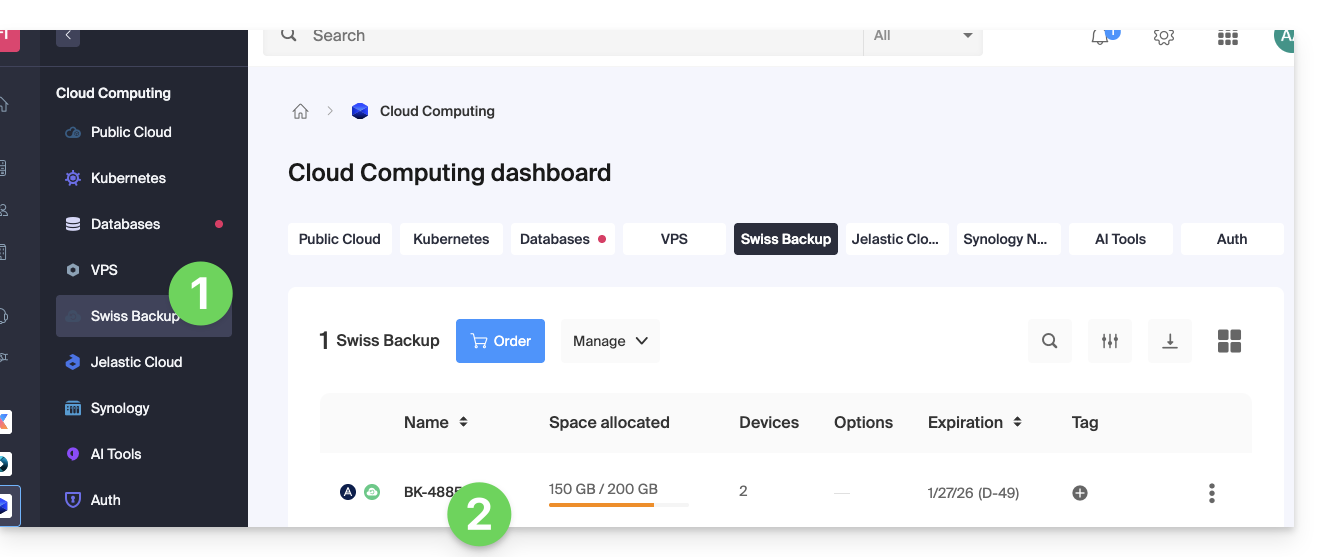
- Clique diretamente no nome atribuído ao produto em questão:
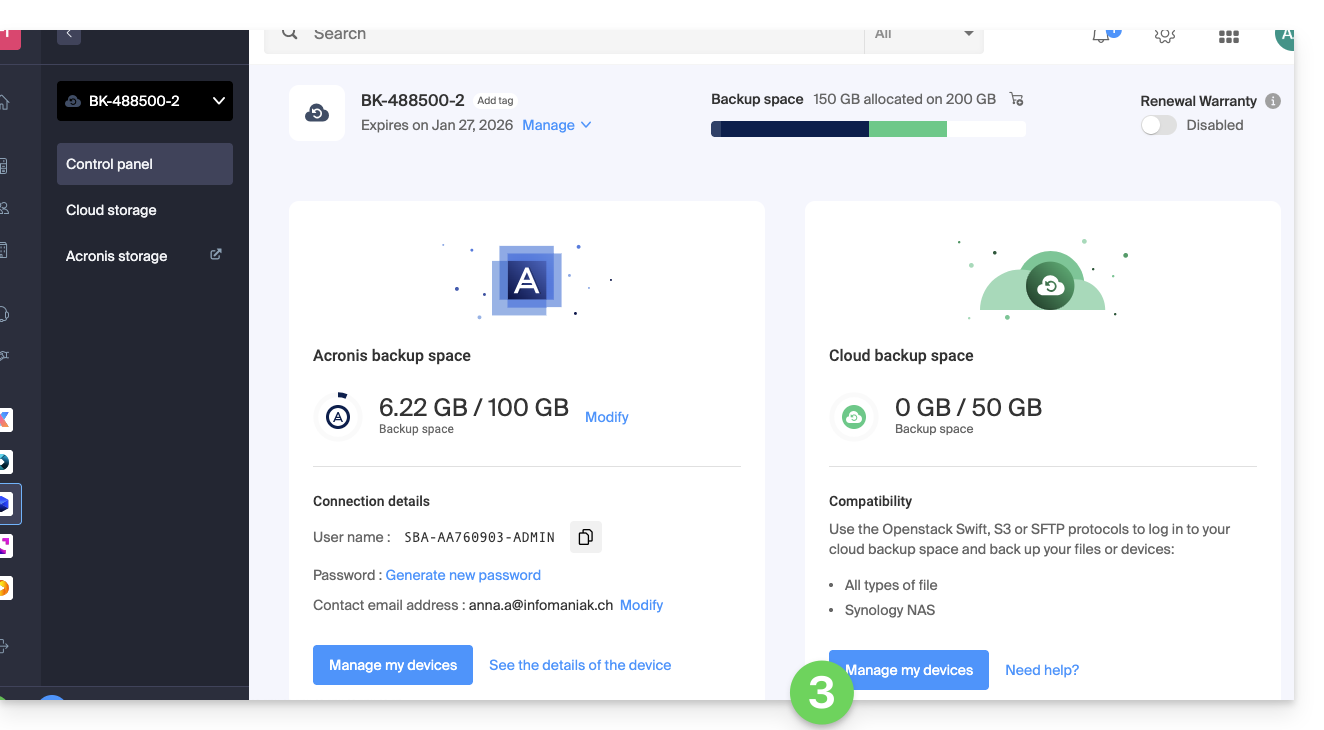
- Clique no botão azul Gerenciar meus dispositivos (na seção Espaço de armazenamento na nuvem):
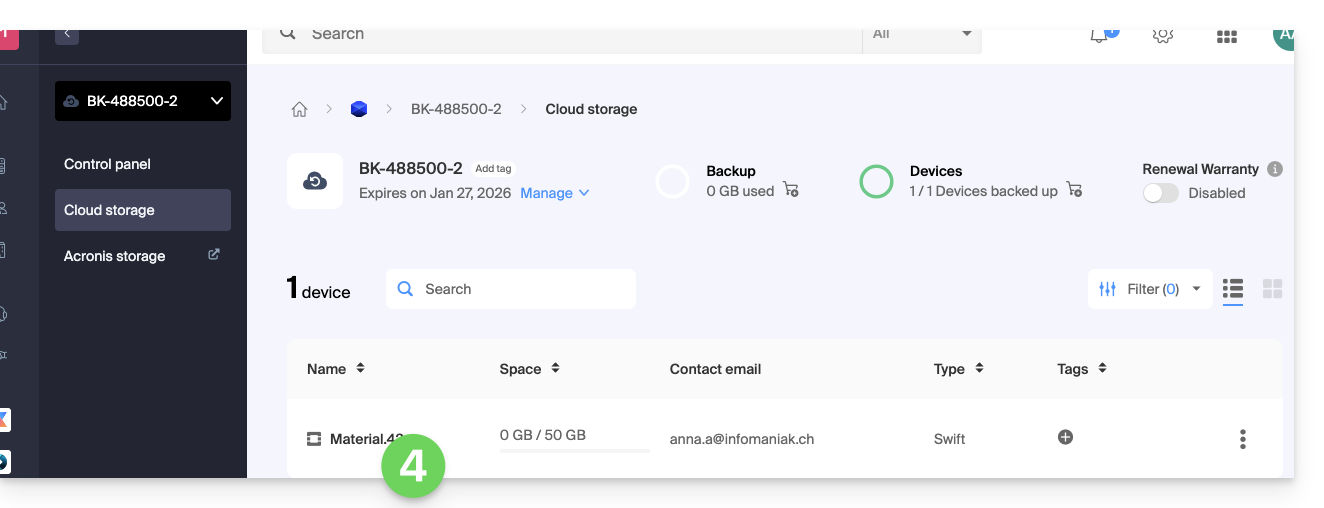
- Clique no nome do item correspondente na tabela que aparece:
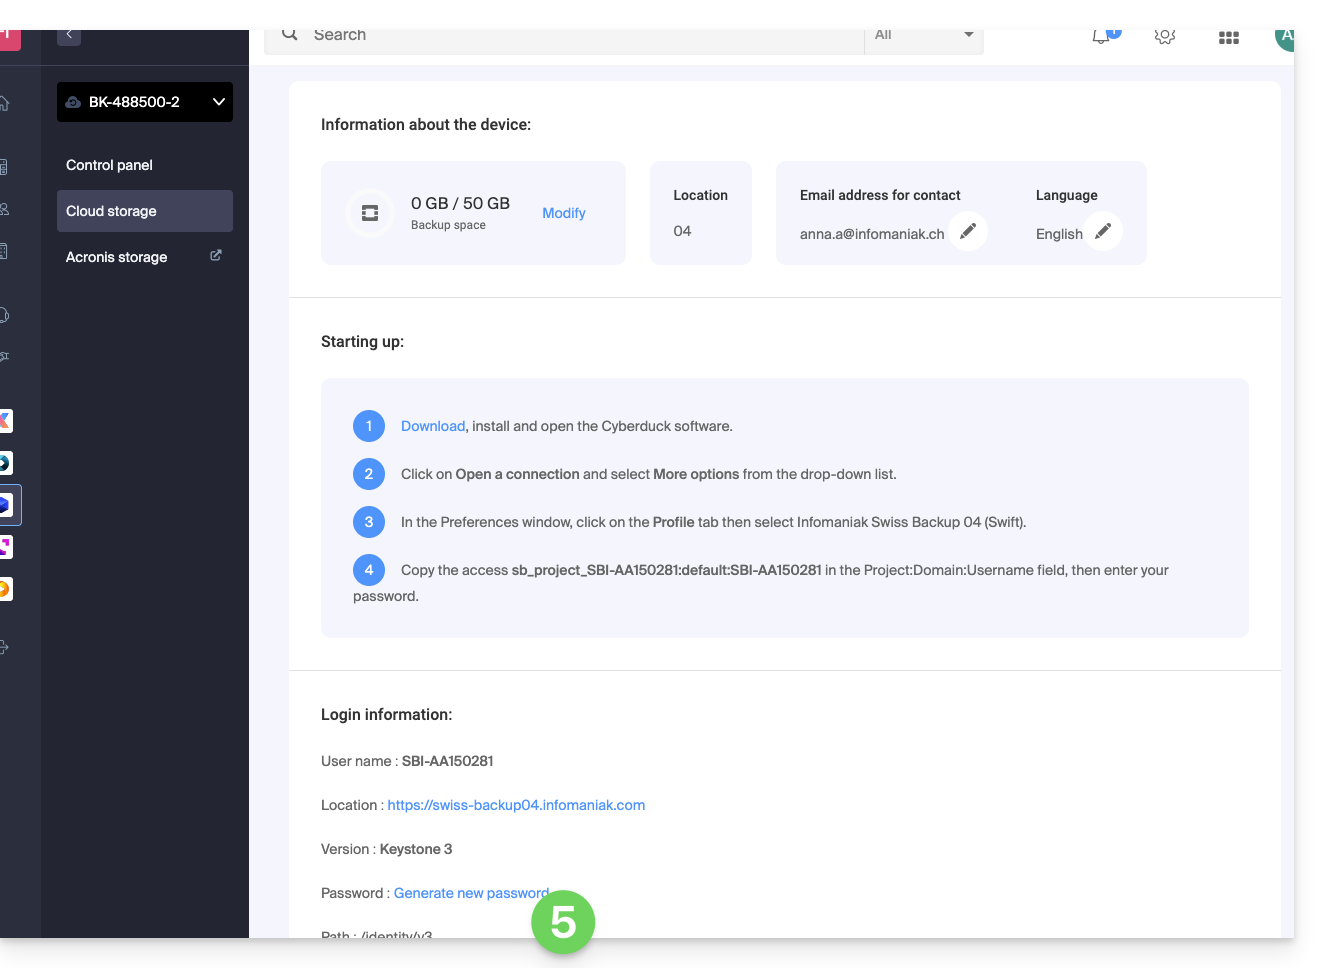
- As várias informações sobre o seu dispositivo são exibidas na parte inferior da página...
As várias informações de conexão (Swift, S3, etc.)
Essas informações variam dependendo do tipo de dispositivo escolhido (Swift, SFTP, etc.), mas incluem principalmente:
| informação solicitada | conteúdo a ser especificado |
|---|---|
| nome de usuário / identificador de login | na maioria das vezes, no formato SBI-AB123456 |
| localização | https://swiss-backup01.infomaniak.com ou swiss-backup02... 03... etc. |
| número da versão | Keystone 3 |
| uma palavra-passe / chaves de acesso | ***** (veja abaixo para gerenciar) |
| caminho | /identity/v3 |
| Locatário / nome do projeto / projeto | na maioria das vezes, no formato sb_project_ seguido do nome de usuário, por exemplo, sb_project_SBI-AB123456 |
| nome do domínio | na maioria dos casos, insira default |
| região | RegionOne |
| bucket | na maioria dos casos, insira default ou /default |
| ponto de extremidade de identidade | na maioria das vezes, o local seguido do caminho (veja acima), por exemplo, swiss-backup01.infomaniak.com/identity/v3 |
Diferentes palavras-passe
Conta Infomaniak
Para aceder à gestão do produto Swiss Backup (Acronis ou armazenamento na nuvem), é necessário iniciar sessão no Manager Infomaniak: consulte este outro guia sobre o assunto.
Backup na Nuvem – regeneração da senha de conexão
Para estabelecer uma conexão do tipo Swift / S3 / FTP/SFTP / etc., uma senha deve ser gerada pela primeira vez durante a criação de um dispositivo na interface Swiss Backup e a ativação do identificador.
Não é possível exibir uma senha já gerada. Em caso de esquecimento, é necessário gerar uma nova:
- Clique aqui para acessar o gerenciamento do seu produto no Manager Infomaniak (precisa de ajuda?).
- Clique diretamente no nome atribuído ao produto em questão.
- Clique no botão azul Gerenciar meus dispositivos (na seção Espaço de armazenamento na nuvem):
- Clique no nome do objeto correspondente na tabela que aparece:
- Clique em Gerar uma nova senha ou chaves de acesso e siga o assistente:
Backup Acronis
Para estabelecer uma conexão com o Acronis, uma senha para este tipo de backup é gerada durante a criação de um dispositivo na interface Swiss Backup e a ativação do identificador. Existe também uma senha de criptografia.
Link para esta FAQ: https://faq.infomaniak.com/2766
Esta seção de perguntas frequentes foi útil?
Este guia explica como fazer o backup de dados do WordPress num espaço de backup Swiss Backup, a solução de backup numa nuvem suíça independente.
Introdução
- Se os backups oferecidos pela Infomaniak não corresponderem ou já não atenderem às suas necessidades em termos de disponibilidade ou segurança, ou se o seu site estiver hospedado em outro lugar, os seus dados poderão ser salvaguardados através de uma conexão S3 compatível nos servidores da Infomaniak; assim, terá a garantia de não perder nada.
Instalar e configurar a extensão UpdraftPlus
Pré-requisitos
- Ter um espaço Swiss Backup Infomaniak com uma quota de dispositivo disponível (mínimo 1) para uma cópia de segurança do iCloud.
- Adicionar 1 dispositivo do tipo Cloud para obter as configurações compatíveis com S3.
Em seguida:
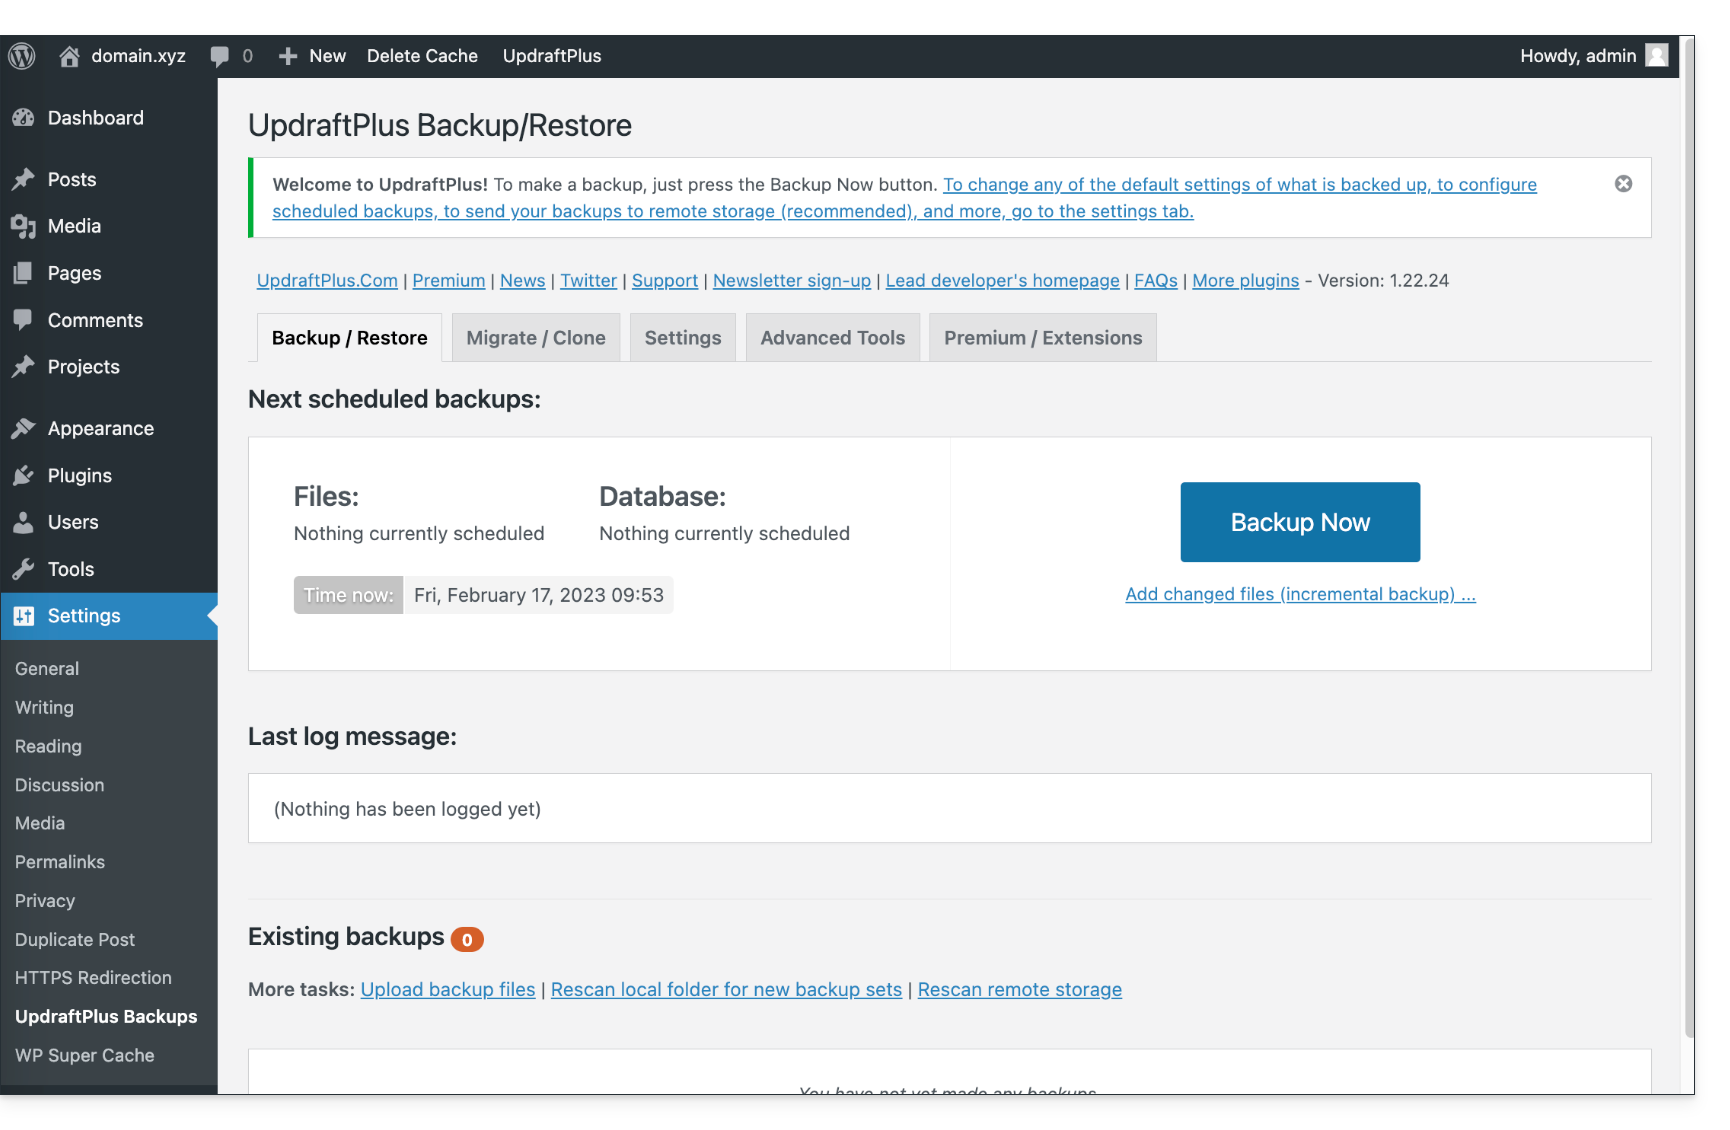
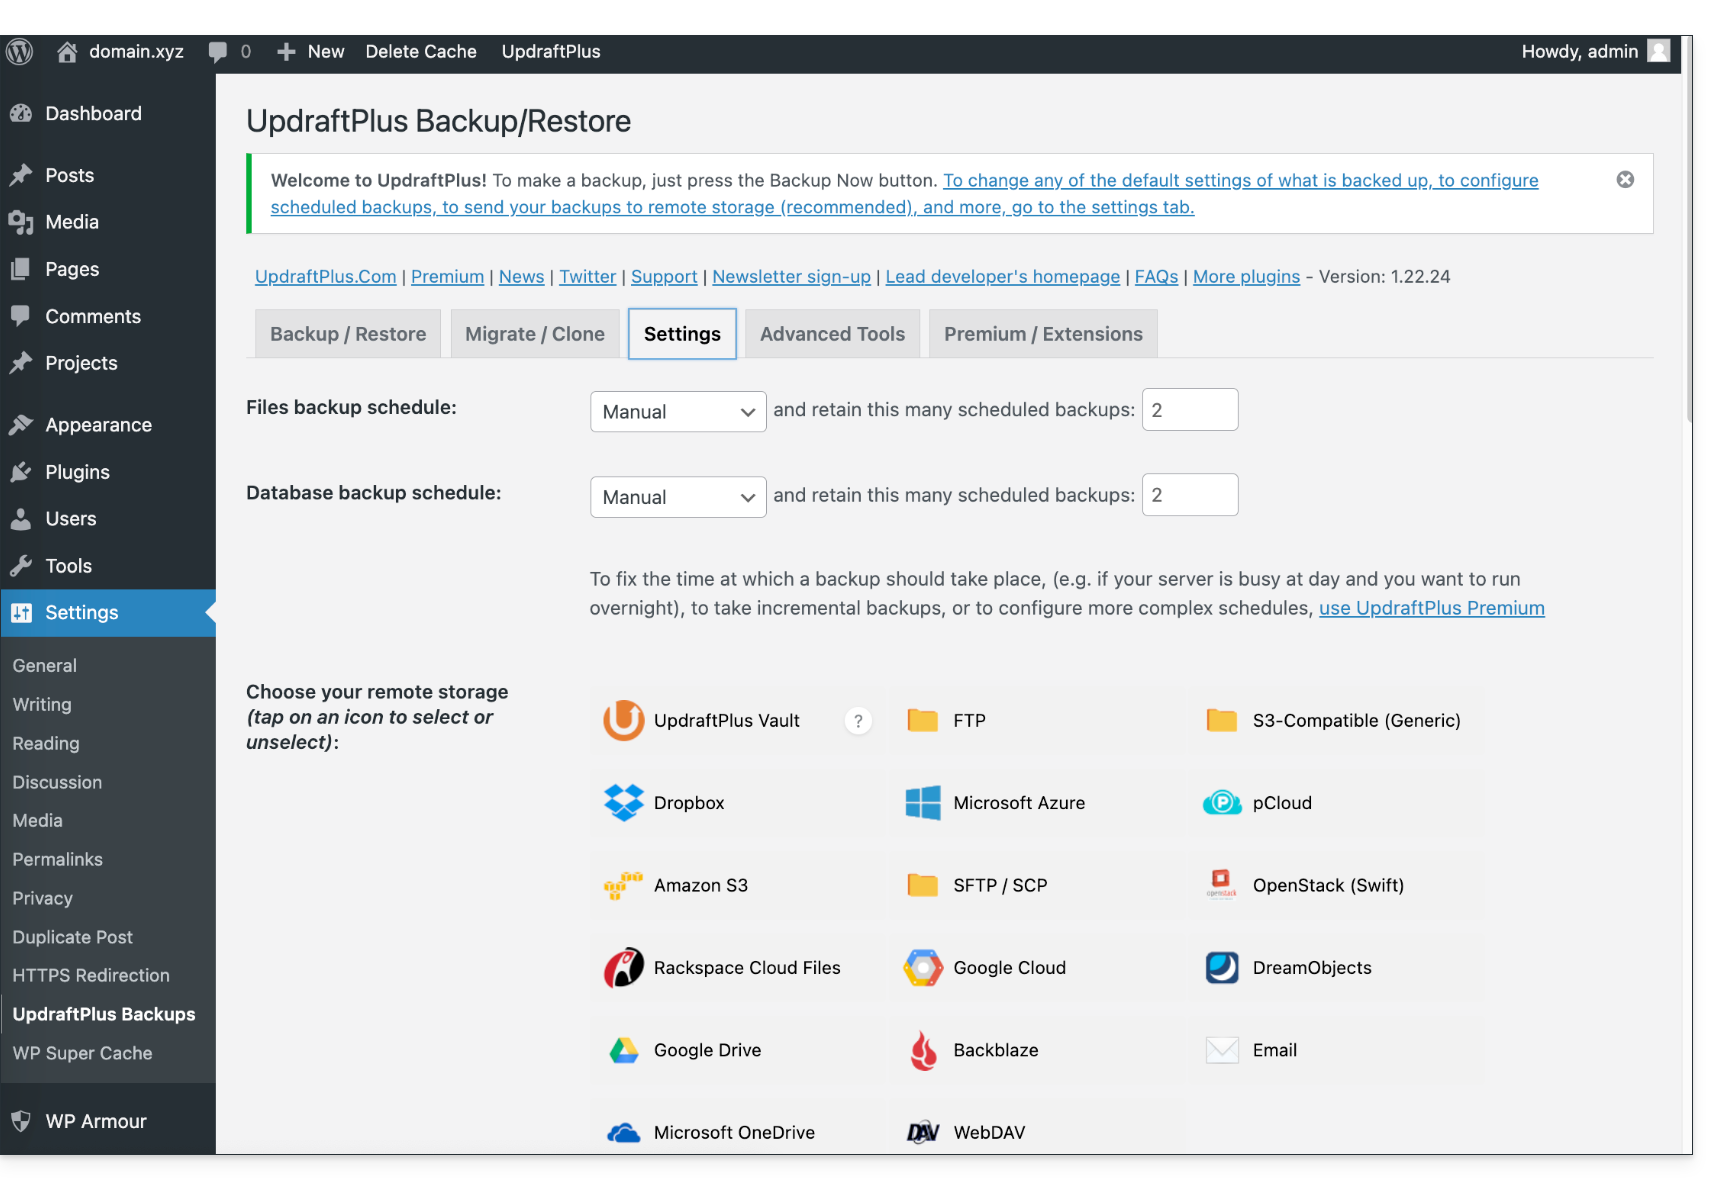
- Adicione a extensão WordPress UpdraftPlus, que oferece a opção de fazer backup dos dados do WordPress em um local compatível com S3.
- Clique em Configurações e, em seguida, em Backups UpdraftPlus:
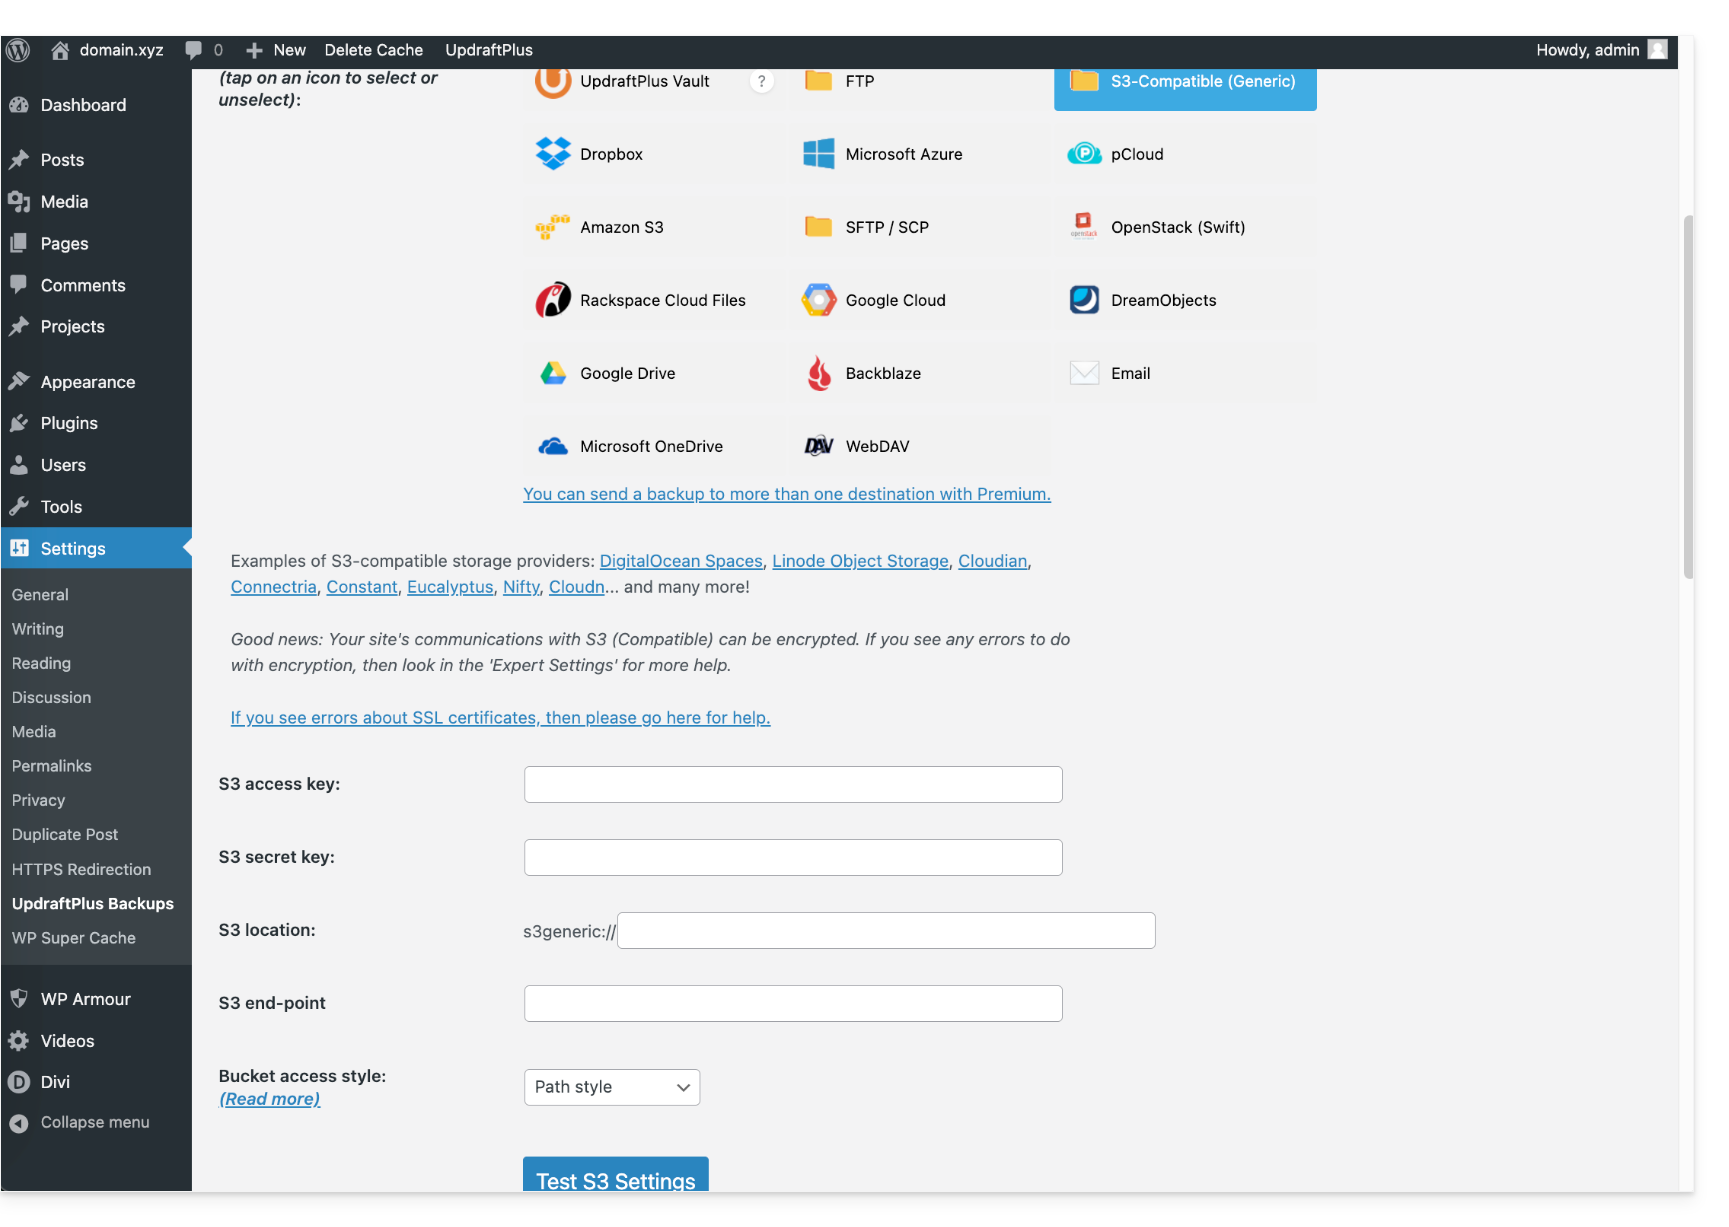
- Clique em Configurações e, em seguida, em Compatível com S3 (Genérico):
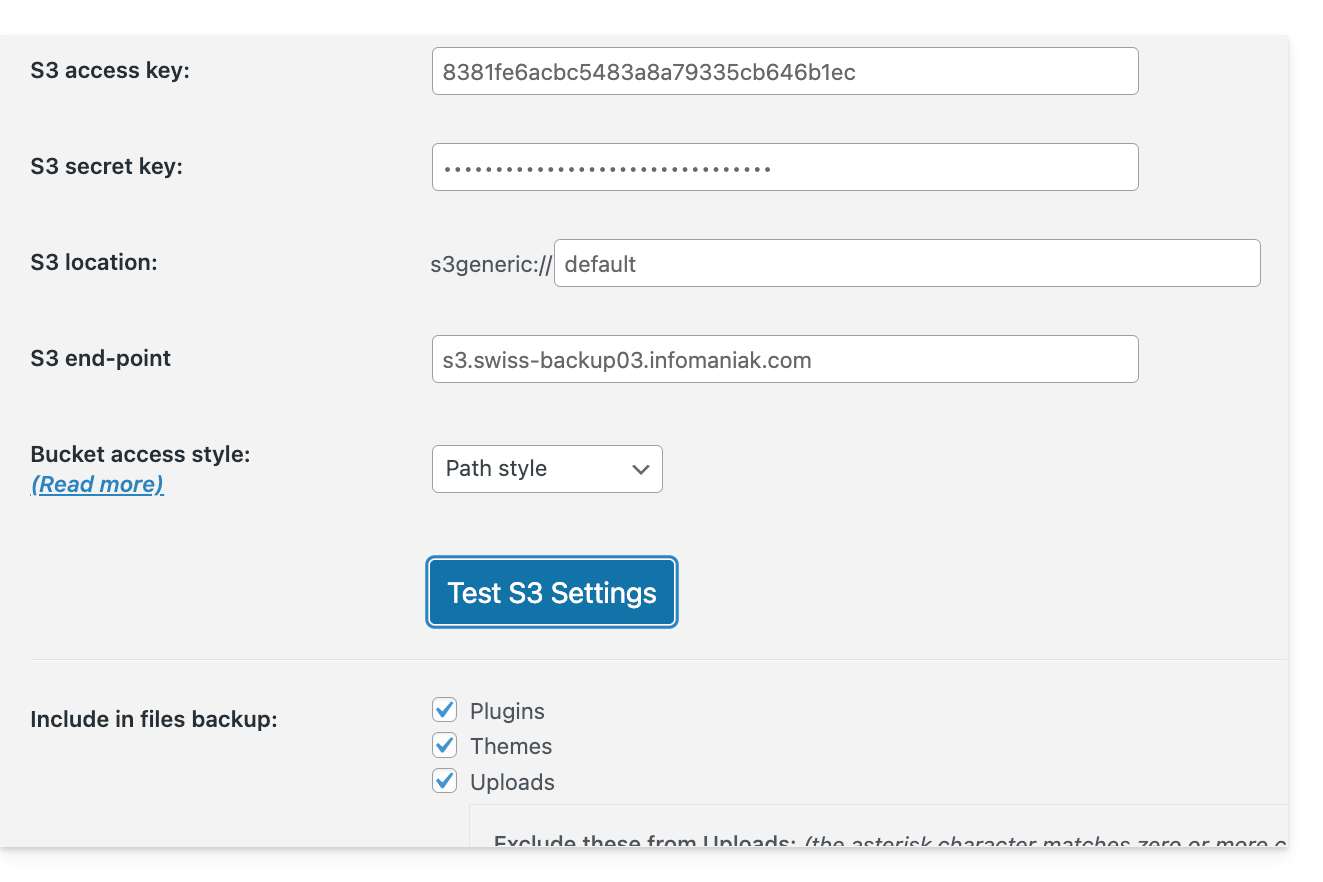
- Mais abaixo, preencha os campos de acordo com as informações específicas do seu dispositivo.
- Aqui estão os tipos de informações que você deve ter em mãos e que precisa especificar nos diferentes campos para criar a conexão:
Em seguida, você poderá programar seus backups em intervalos regulares.
Descarregar a cópia de segurança manualmente
As suas cópias de segurança feitas através do UpdraftPlus - S3 podem ser recuperadas através de um cliente S3 compatível, como o Cyberduck, por exemplo.
Restaurar um backup do UpdraftPlus
Consulte este guia oficial em inglês.
Link para esta FAQ: https://faq.infomaniak.com/2767
Esta seção de perguntas frequentes foi útil?
Como Parceiro Infomaniak, recomenda-se gerir os seus clientes Swiss Backup numa única conta/acesso Acronis e definir grupos/unidades na consola Acronis.
Não é possível migrar clientes finais ou cópias de segurança de clientes finais entre 2 contas Swiss Backup.
Link para esta FAQ: https://faq.infomaniak.com/2768
Esta seção de perguntas frequentes foi útil?
Este guia detalha como fazer o backup manual de dados usando o aplicativo Cyberduck (macOS / Windows) através do protocolo S3 Compatible no Swiss Backup, a solução de backup em uma nuvem suíça independente.
Introdução
Configurar o Cyberduck
Pré-requisitos
- Possuir um espaço Swiss Backup Infomaniak com uma quota de dispositivo disponível (mínimo 1) para um backup na nuvem.
- Adicionar 1 dispositivo do tipo Nuvem para obter os parâmetros S3 Compatible.
- Baixar e instalar o Cyberduck (macOS / Windows).
- Consultar a documentação oficial https://docs.cyberduck.io/protocols/openstack/infomaniak/.
Para configurar um novo backup:
- Abra o aplicativo Cyberduck.
- Clique em Open Connection:
- Clique no menu suspenso e escolha Mais opções:
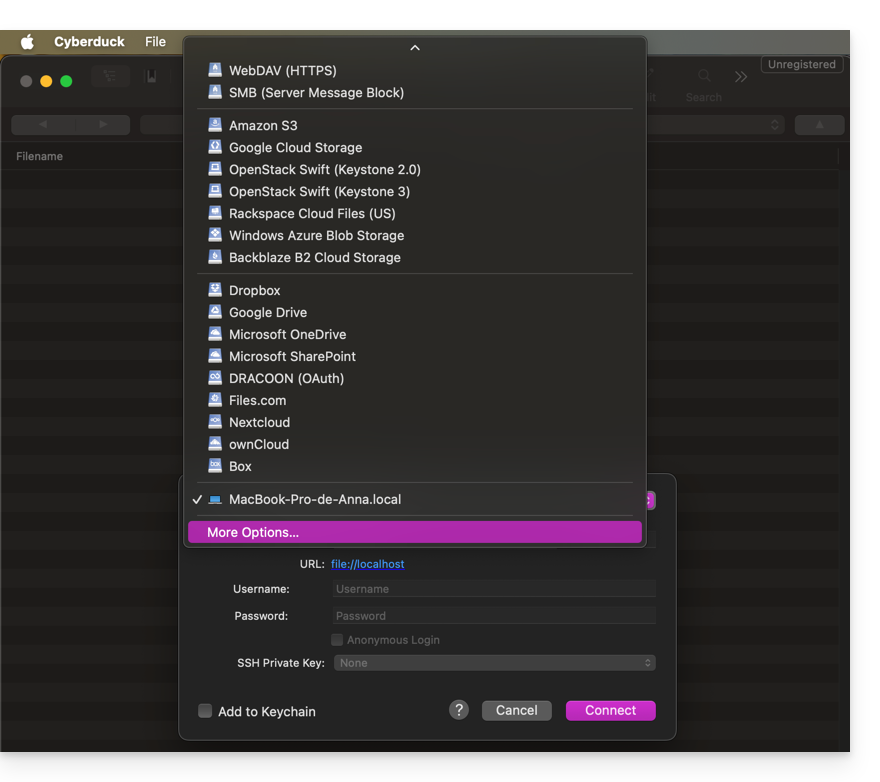
- Aguarde o carregamento dos perfis adicionais:
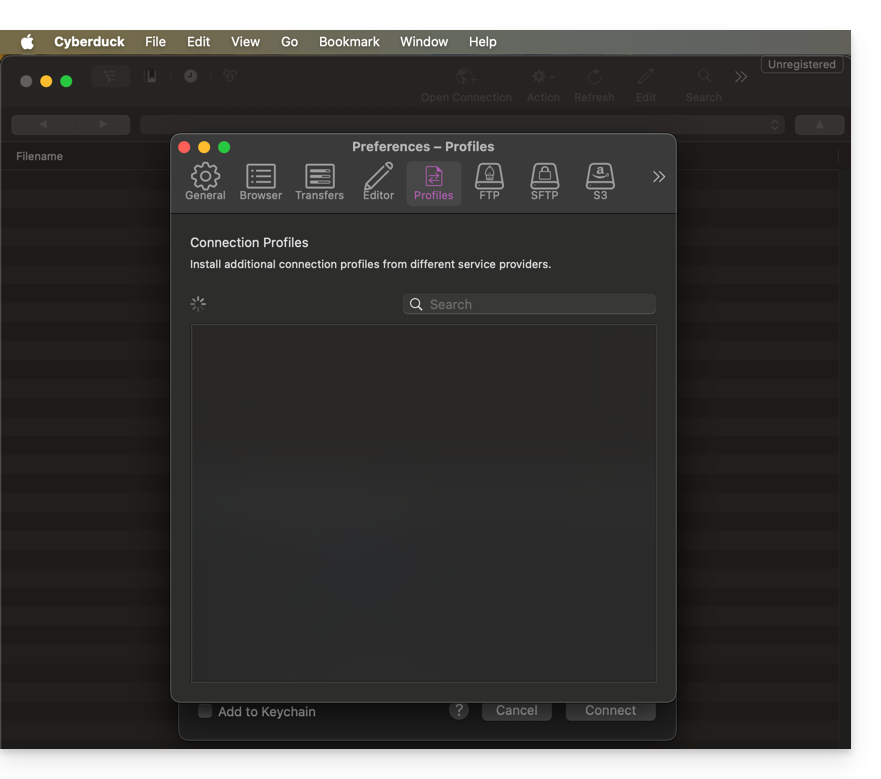
- Procure e selecione os perfis correspondentes ao Infomaniak S3:
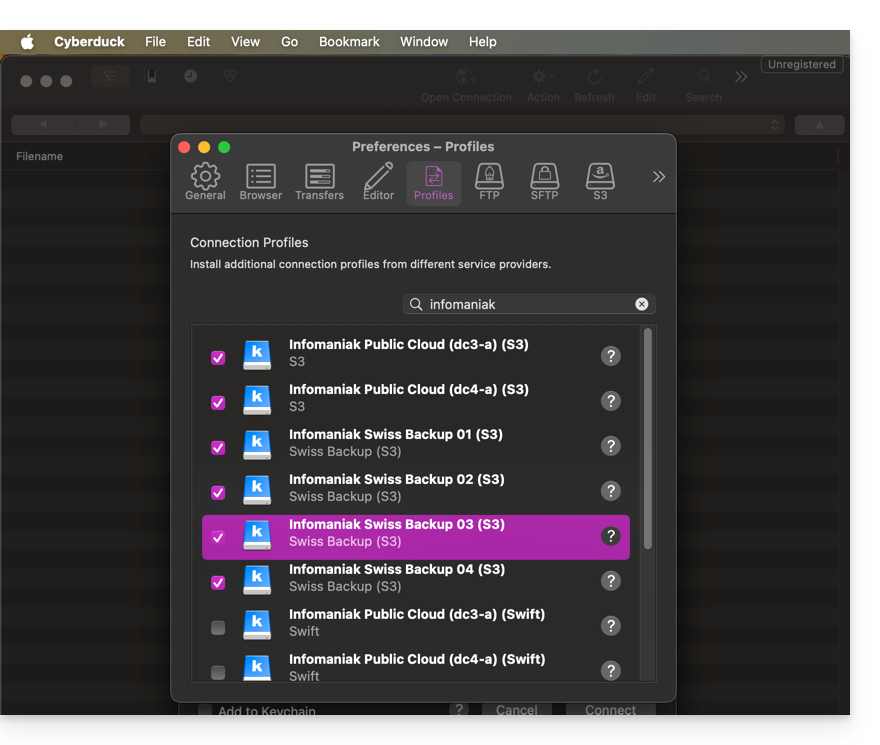
- Verifique, se necessário, o seu número de cluster indicado no Manager, nas informações de armazenamento Cloud, em "Localização".
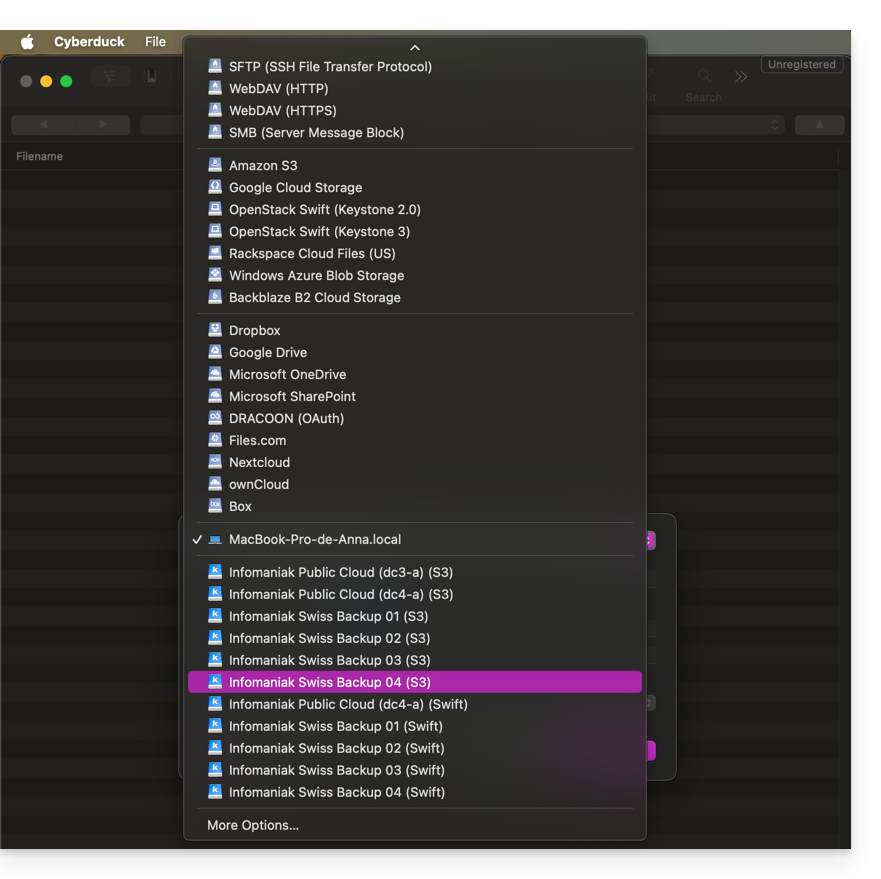
- Feche a janela e reinicie o Cyberduck se os perfis não aparecerem no menu suspenso do ponto 3 acima.
- Escolha o perfil correspondente:
- Preencha os campos de acordo com as informações específicas do seu dispositivo:
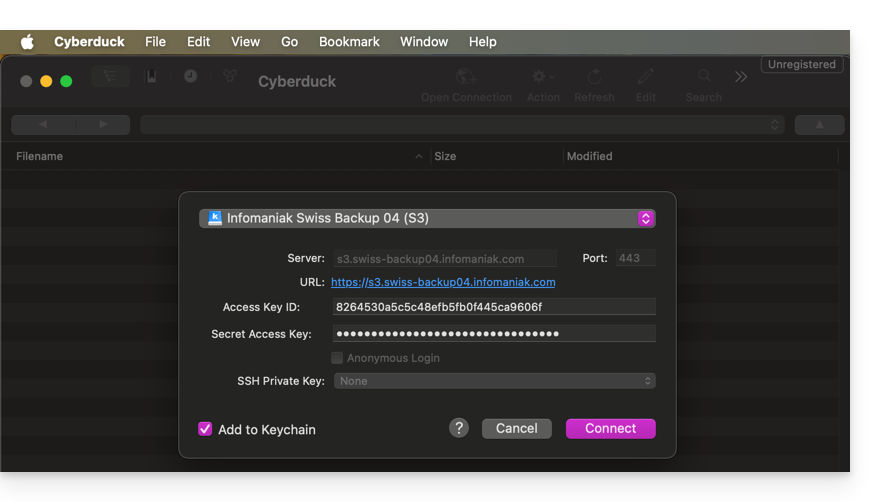
- Clique no botão Conectar para estabelecer a conexão S3.
Link para esta FAQ: https://faq.infomaniak.com/2795
Esta seção de perguntas frequentes foi útil?
Este guia detalha como fazer o backup de um espaço Google Workspace (Gmail, Google Drive, Google Calendar, …)utilizando o Acronis no Swiss Backup, a solução de backup em uma nuvem suíça independente.
Também é possível fazer backup de outros tipos de dados.
Pré-requisitos
- Ter um espaço Swiss Backup Infomaniak com uma quota de dispositivo disponível (mínimo 1) para backup do Google Workspace (1 licença por utilizador do Workspace a fazer backup):
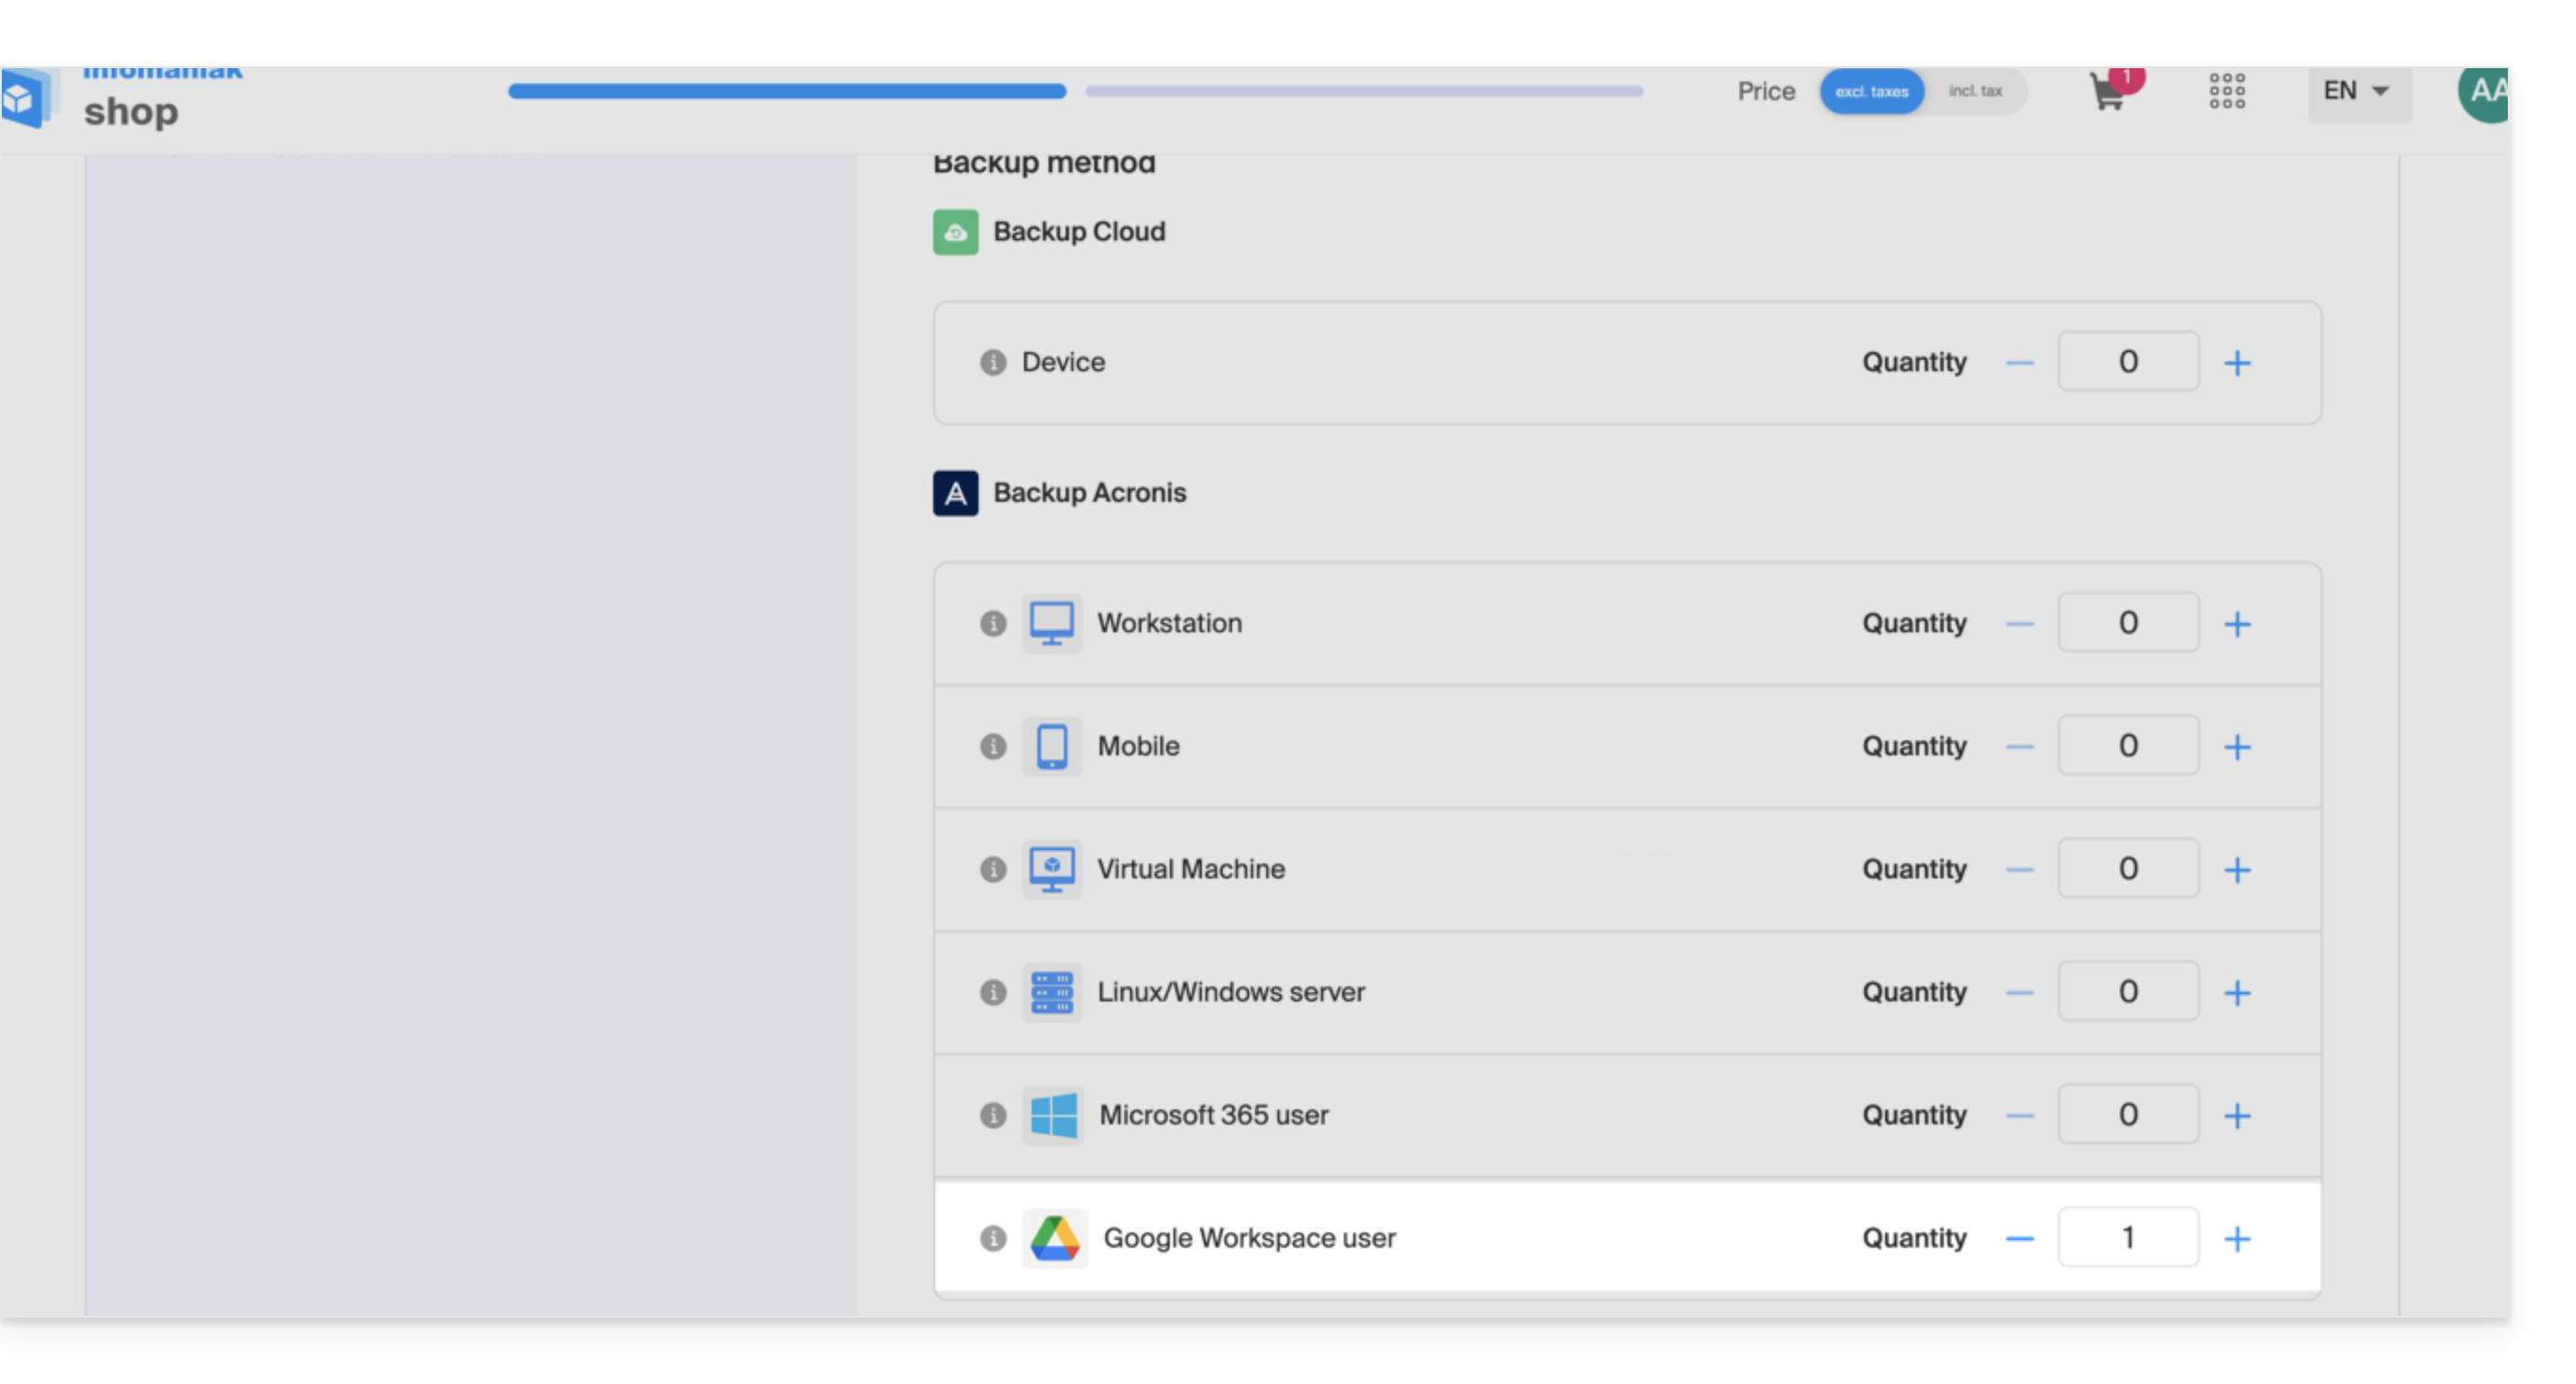
- Se necessário, aumente a quota do dispositivo de acordo com as suas necessidades.
- Adicionar o dispositivo no Gerenciador Infomaniak para receber as credenciais de acesso.
- Criar um novo projeto na Google Cloud Platform (console.cloud.google.com) como superadministrador:
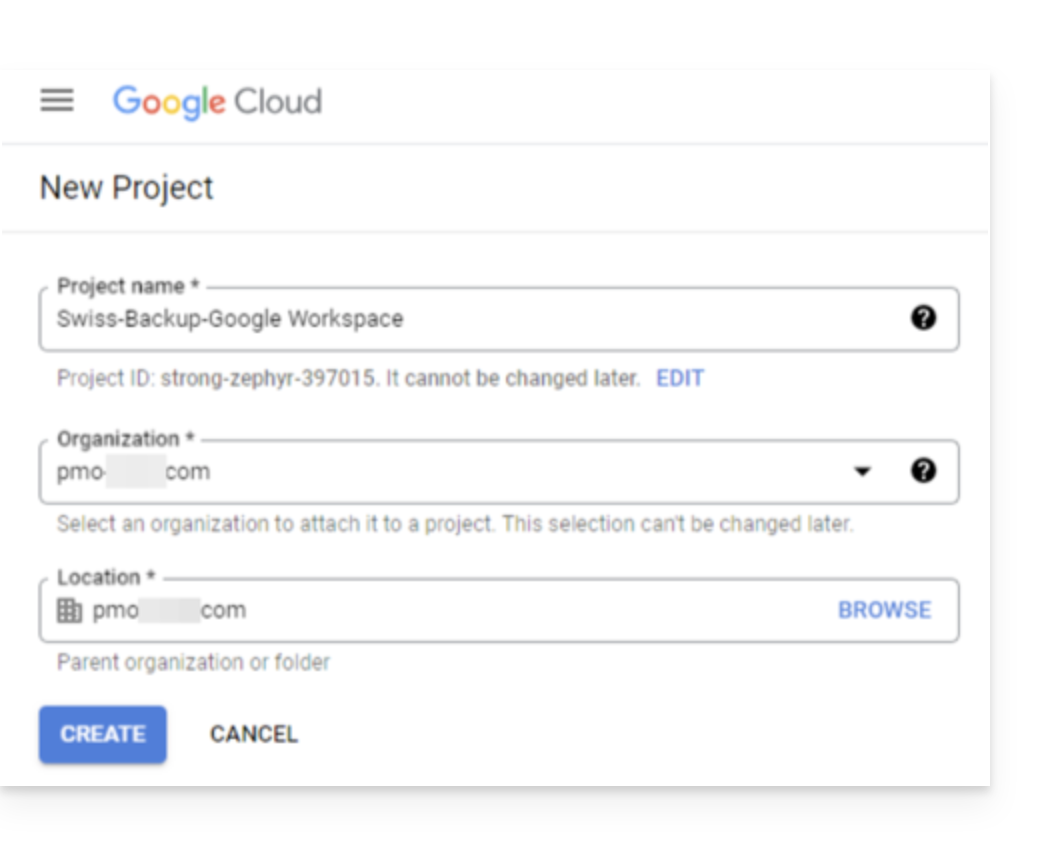
- Consulte a documentação da Acronis sobre o assunto:
- Reserve de 20 a 30 minutos para configurar tudo.
Permitir que o Acronis acesse o Google Cloud Platform
No console do Google Cloud Platform:
- Selecione o seu novo projeto.
- No menu de navegação, selecione APIs e serviços > APIs e serviços ativados:
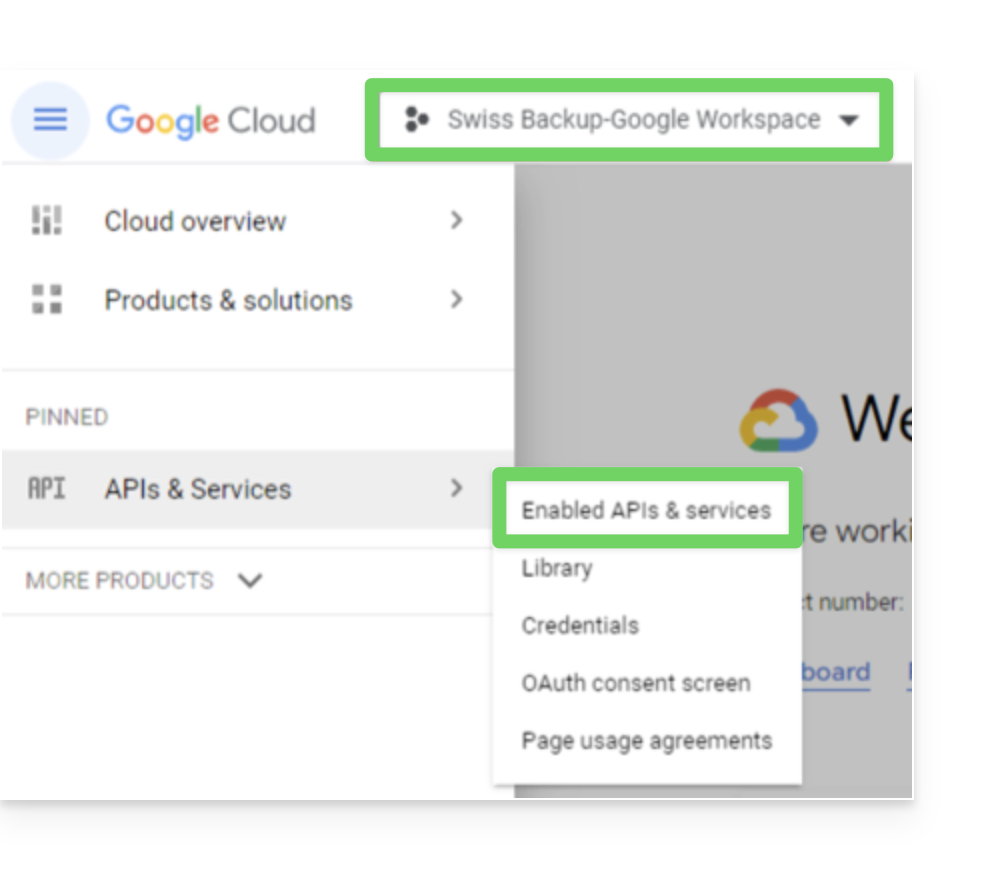
- Desative uma a uma todas as APIs ativadas por padrão neste projeto:
- Role para baixo na página APIs e serviços ativados.
- Clique no nome de uma API ativada.
- Na página Detalhes da API/Serviço que se abre, clique em Desativar e confirme:
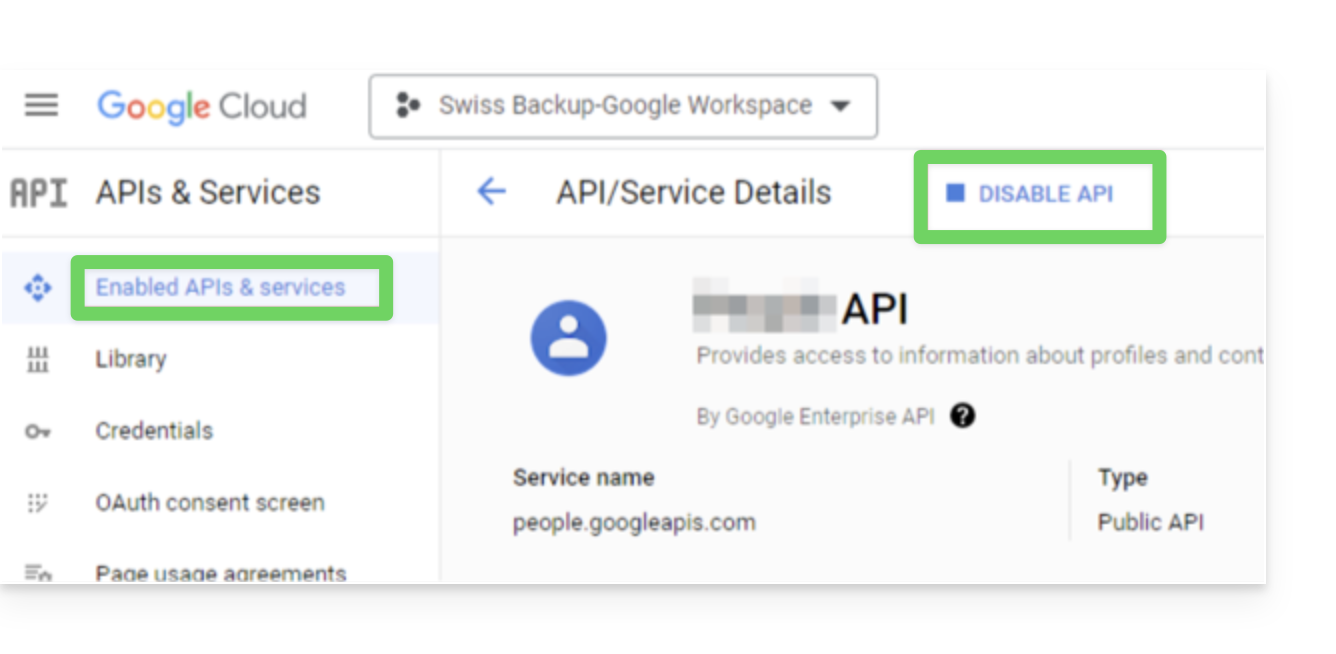
- Volte para a página anterior e faça o mesmo com a próxima API.
- No menu de navegação, selecione APIs e serviços > Biblioteca.
- Na biblioteca de APIs, ative as seguintes APIs, uma a uma, usando a barra de pesquisa para encontrar as APIs necessárias:
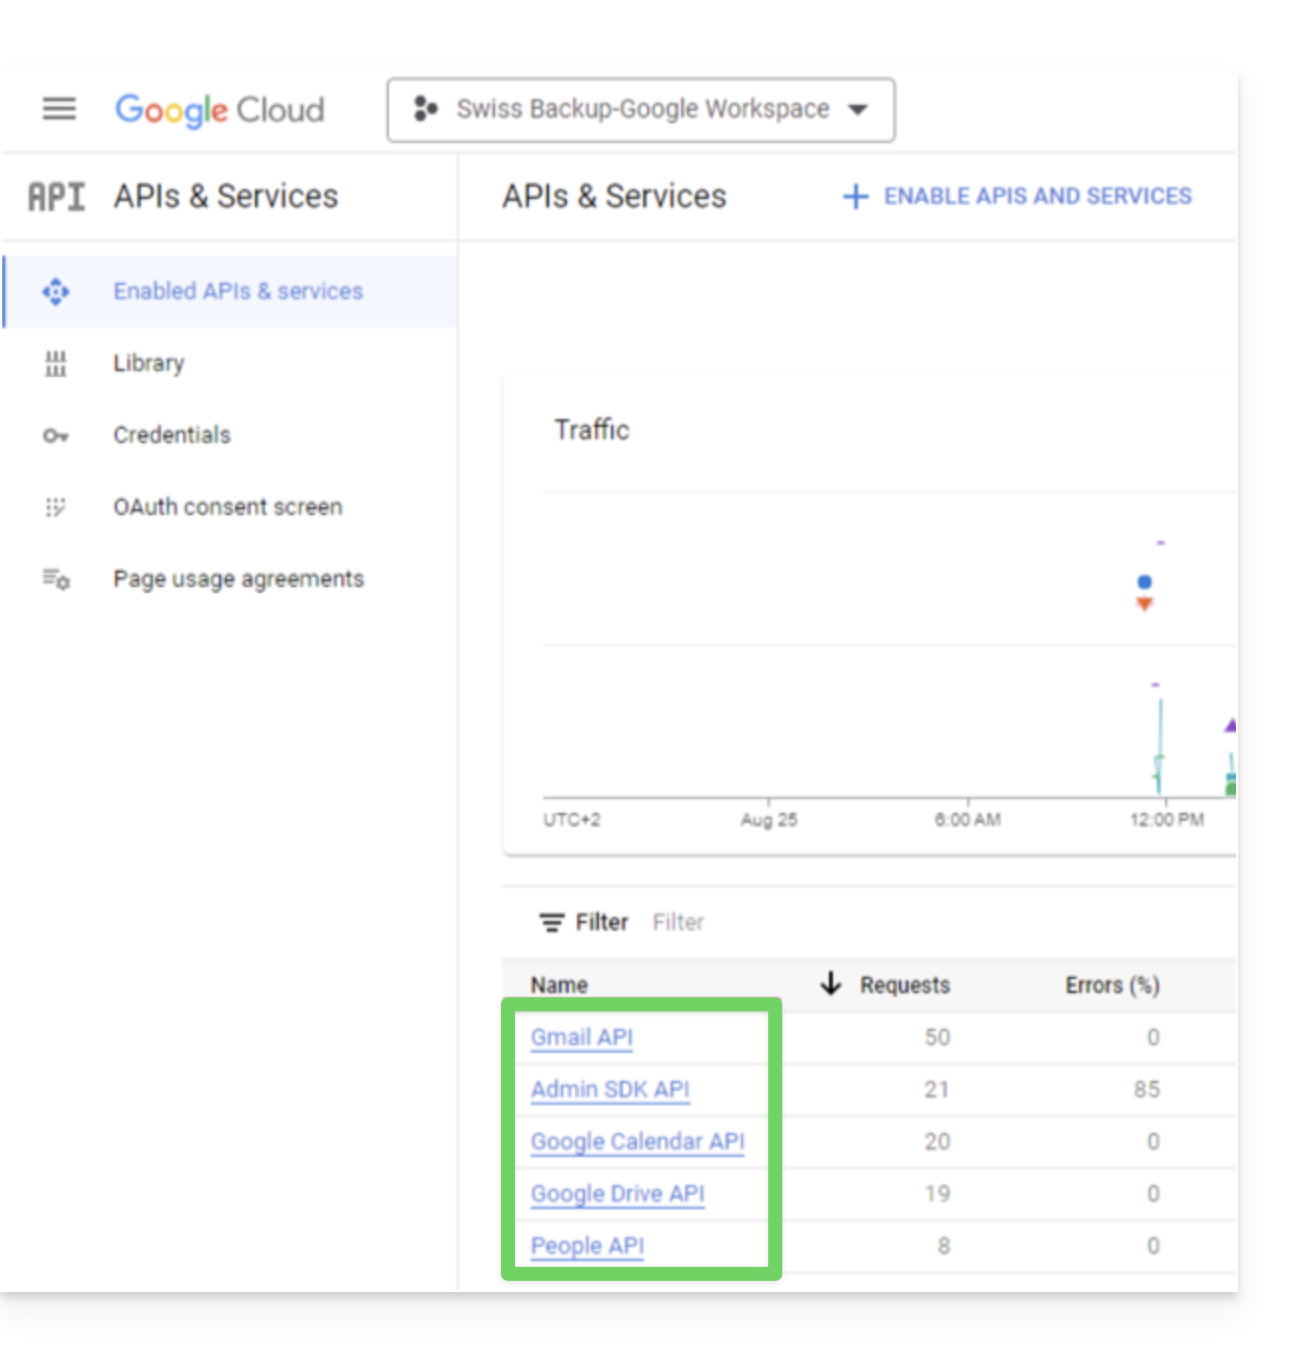
- API Gmail
- API Google Drive
- SDK Admin
- API Google Calendar
- Google People API
- Clique no nome da API e, em seguida, em Ativar.
- Para pesquisar a próxima API, volte ao passo 5.
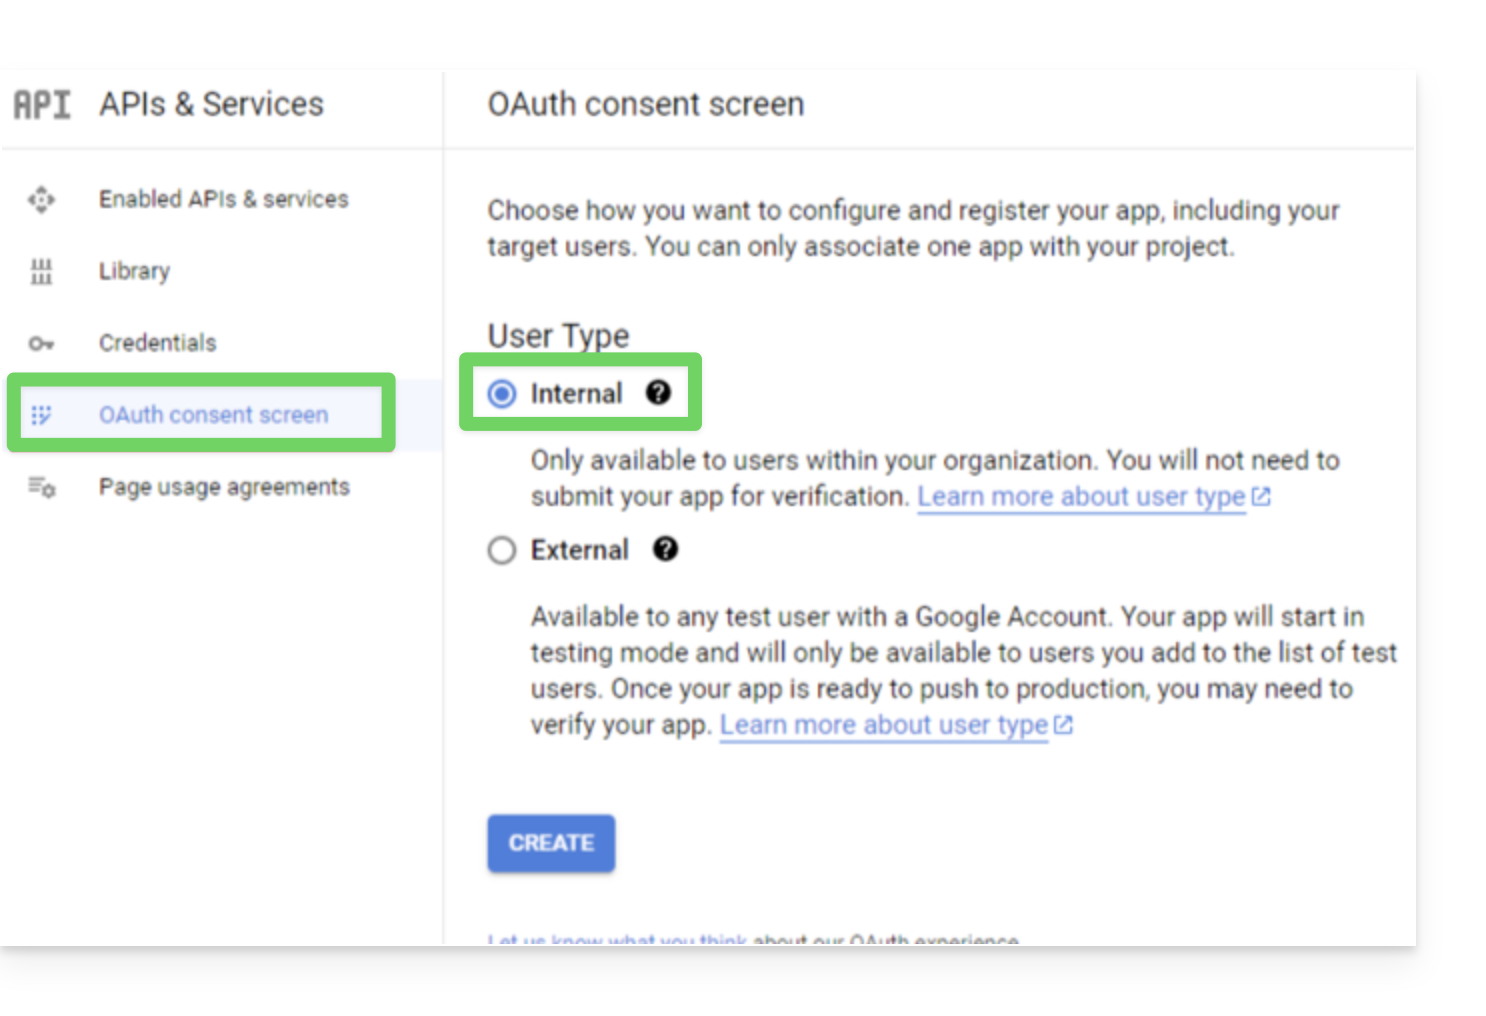
- No menu de navegação do Google Cloud Platform, selecione APIs e serviços > Tela de consentimento OAuth.
- Na janela que se abre, selecione Interno para o tipo de utilizador e, em seguida, clique em Criar:
- No campo Nome da aplicação, indique um nome para a sua aplicação.
- No campo E-mail de suporte ao usuário, insira o endereço do superadministrador.
- No campo Informações de contato do desenvolvedor, insira o endereço do superadministrador.
- Deixe todos os outros campos em branco e clique em Salvar e continuar.
- Na página Escopos, clique em Salvar e continuar sem fazer alterações.
- Na página Resumo, verifique suas configurações e clique em Voltar ao painel.
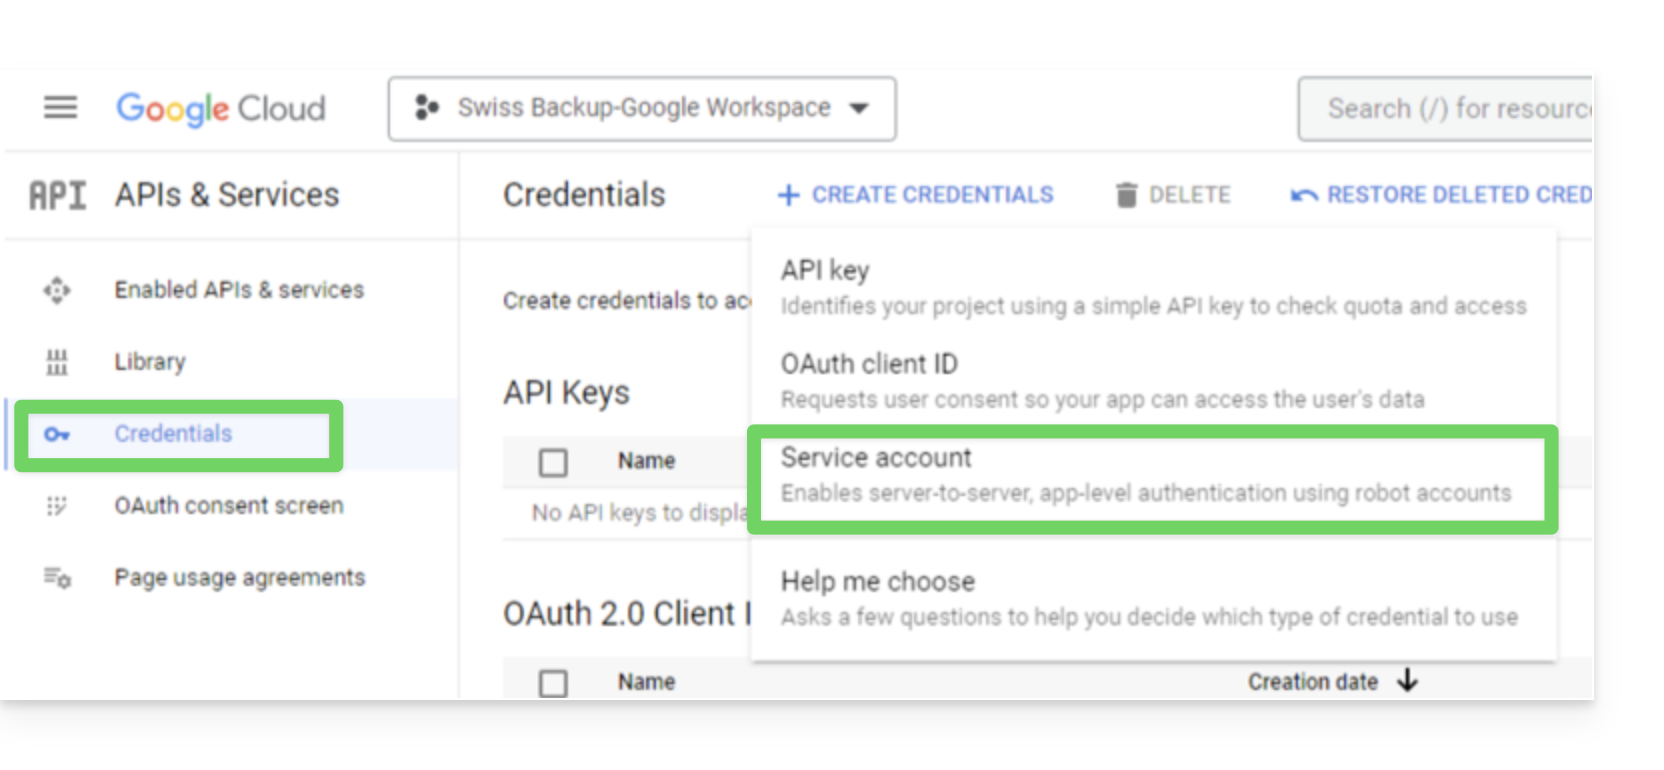
- No menu de navegação do Google Cloud Platform, selecione Credenciais > Conta de serviço.
- Clique em Criar uma conta de serviço:
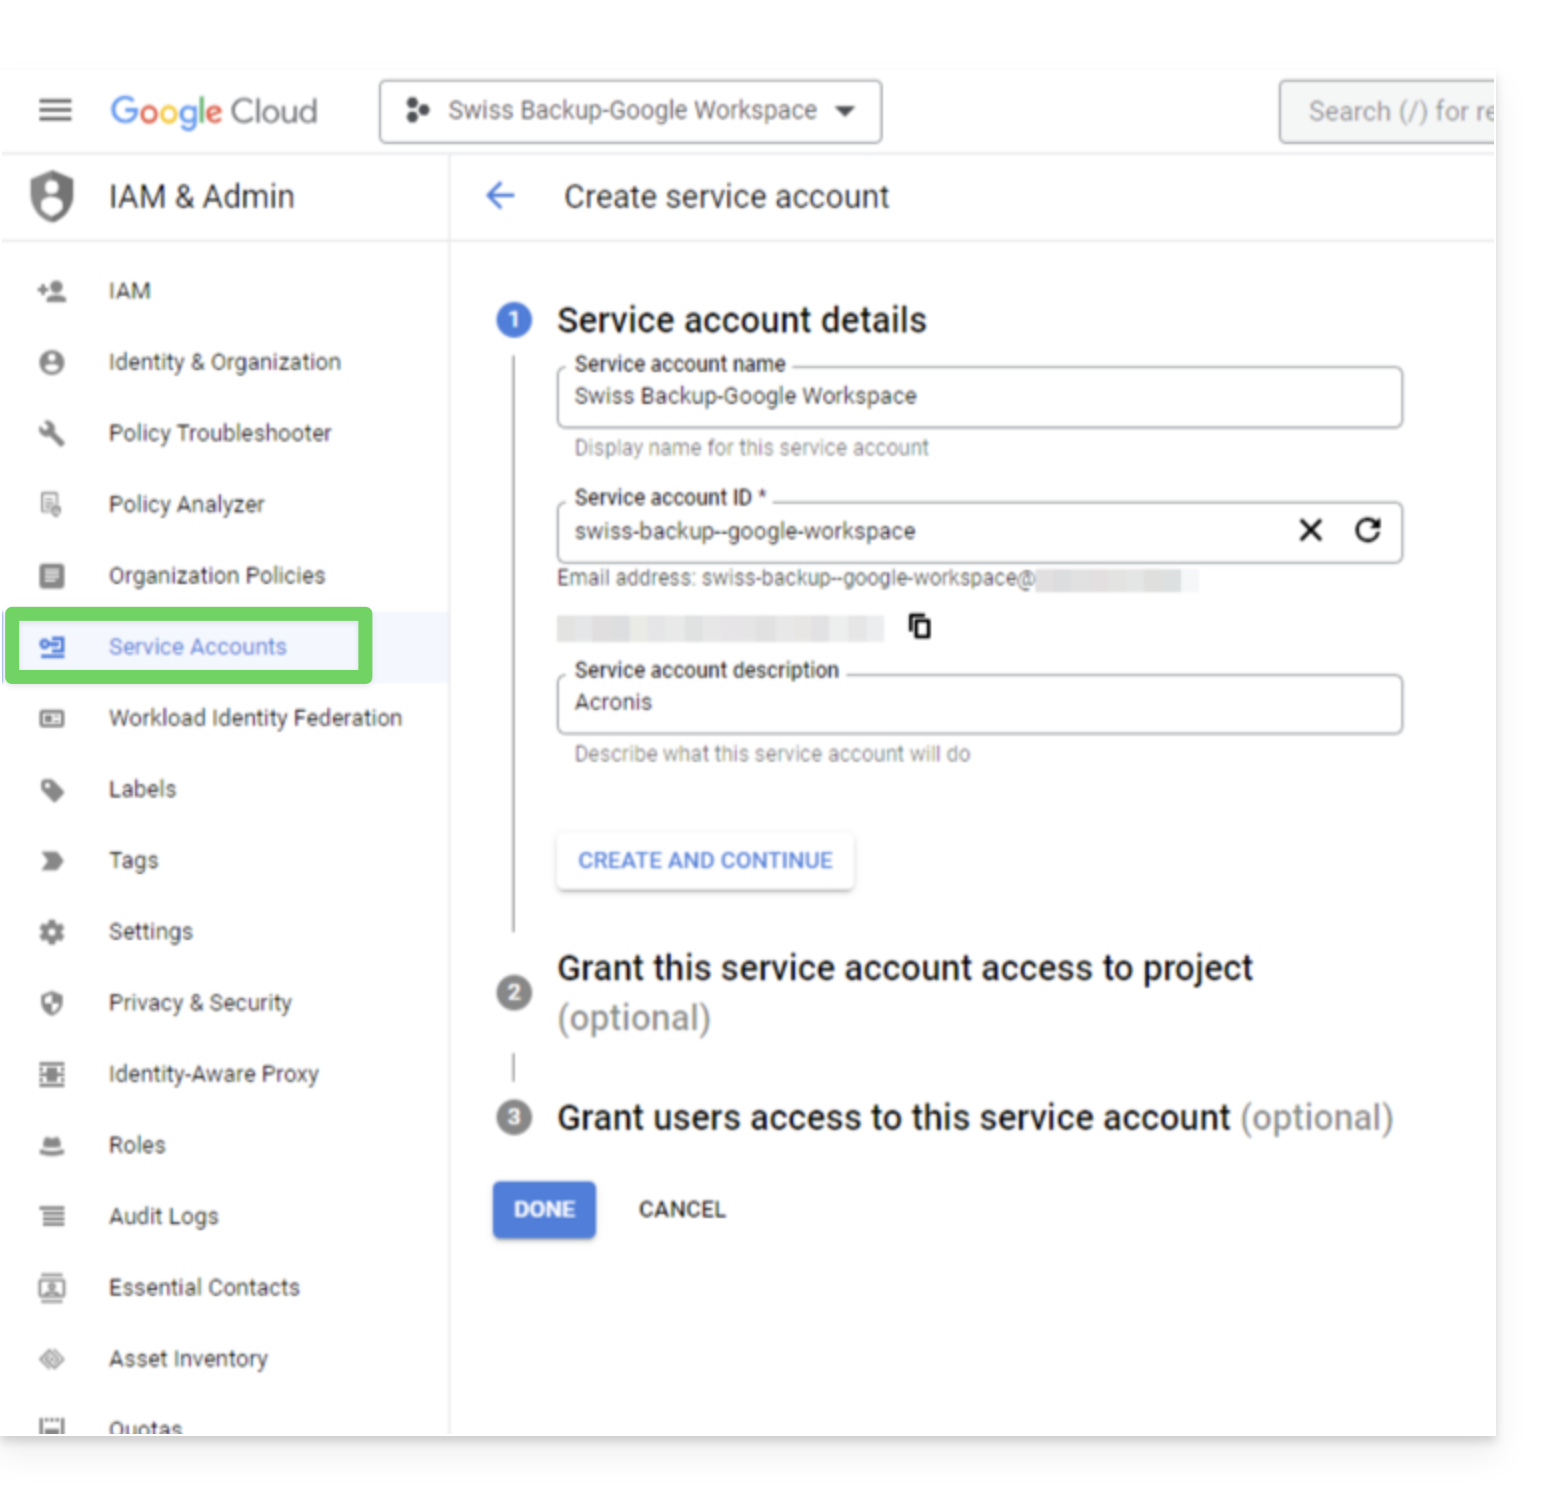
- Especifique um nome, uma descrição e clique em Criar e continuar:
- Não altere as etapas Conceder acesso ao projeto a esta conta de serviço e Conceder acesso a esta conta de serviço aos utilizadores.
- Clique em Concluído; a página Contas de serviço será aberta.
- Selecione a nova conta de serviço e, em seguida, em Ações, clique em Gerenciar chaves.
- Em Chaves, clique em Adicionar uma chave > Criar uma nova chave e, em seguida, selecione o tipo de chave JSON:
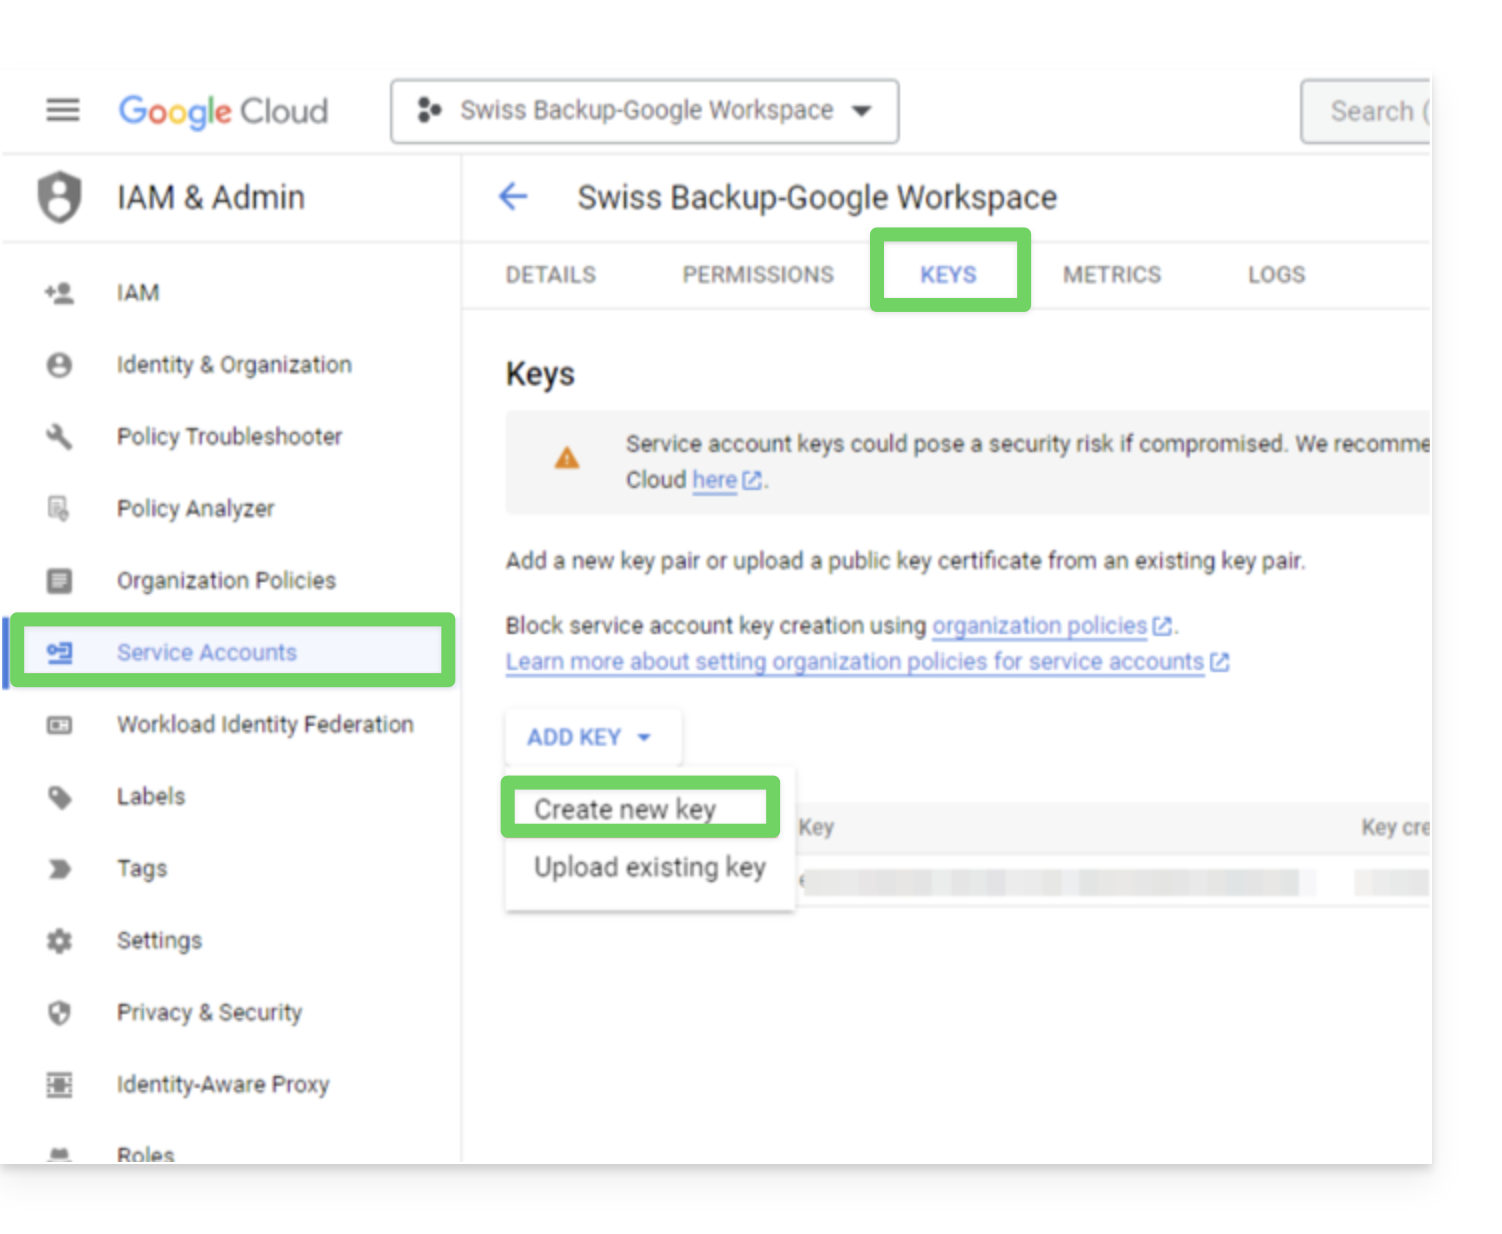
- Clique em Criar; um arquivo JSON contendo a chave privada da conta de serviço será automaticamente baixado para o seu computador: guarde este arquivo em um local seguro, pois você precisará dele para adicionar sua organização Google Workspace ao serviço Cyber Protection, conforme descrito mais adiante neste guia.
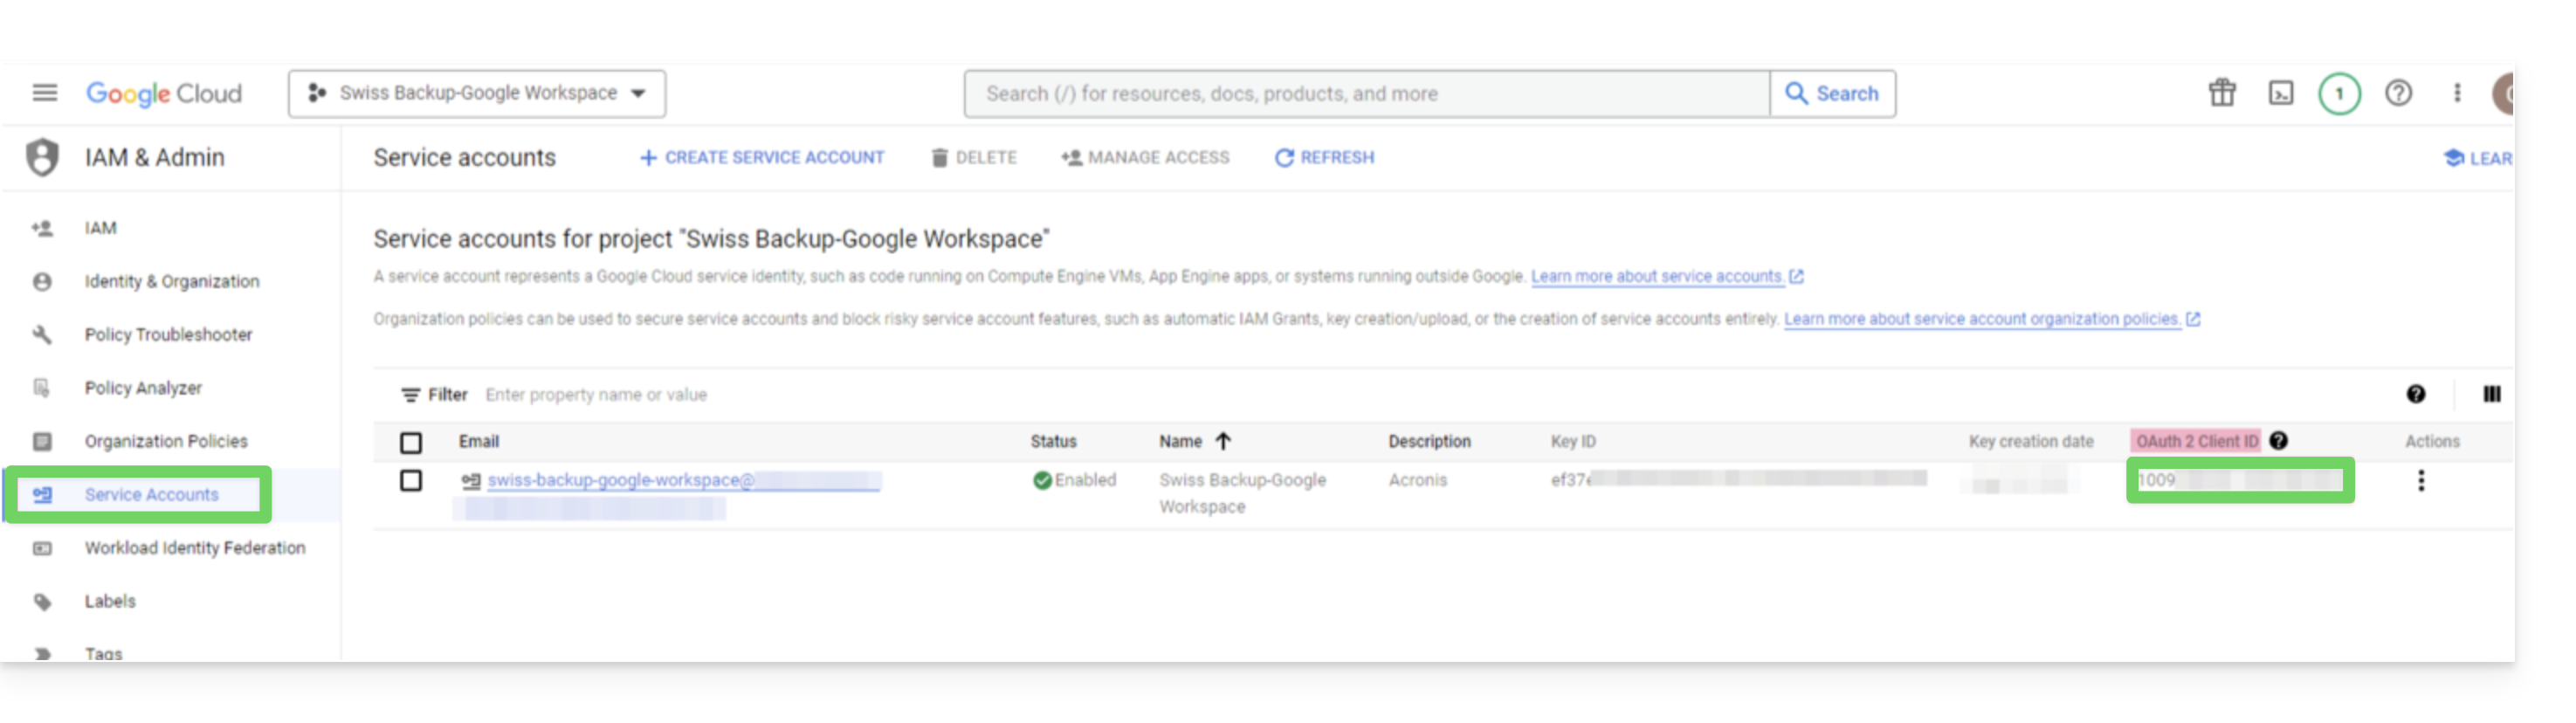
- No menu de navegação do Google Cloud Platform, selecione Credenciais > Conta de serviço.
- Na lista, procure a conta de serviço que você criou e, em seguida, copie o ID do cliente que é exibido na coluna ID do cliente OAuth 2.0 (ID do cliente OAuth 2.0):
- Clique aqui para acessar a interface de administração do Google como superadministrador.
- No menu de navegação, selecione Segurança > Controlo de acesso e de dados > Controlos de API:
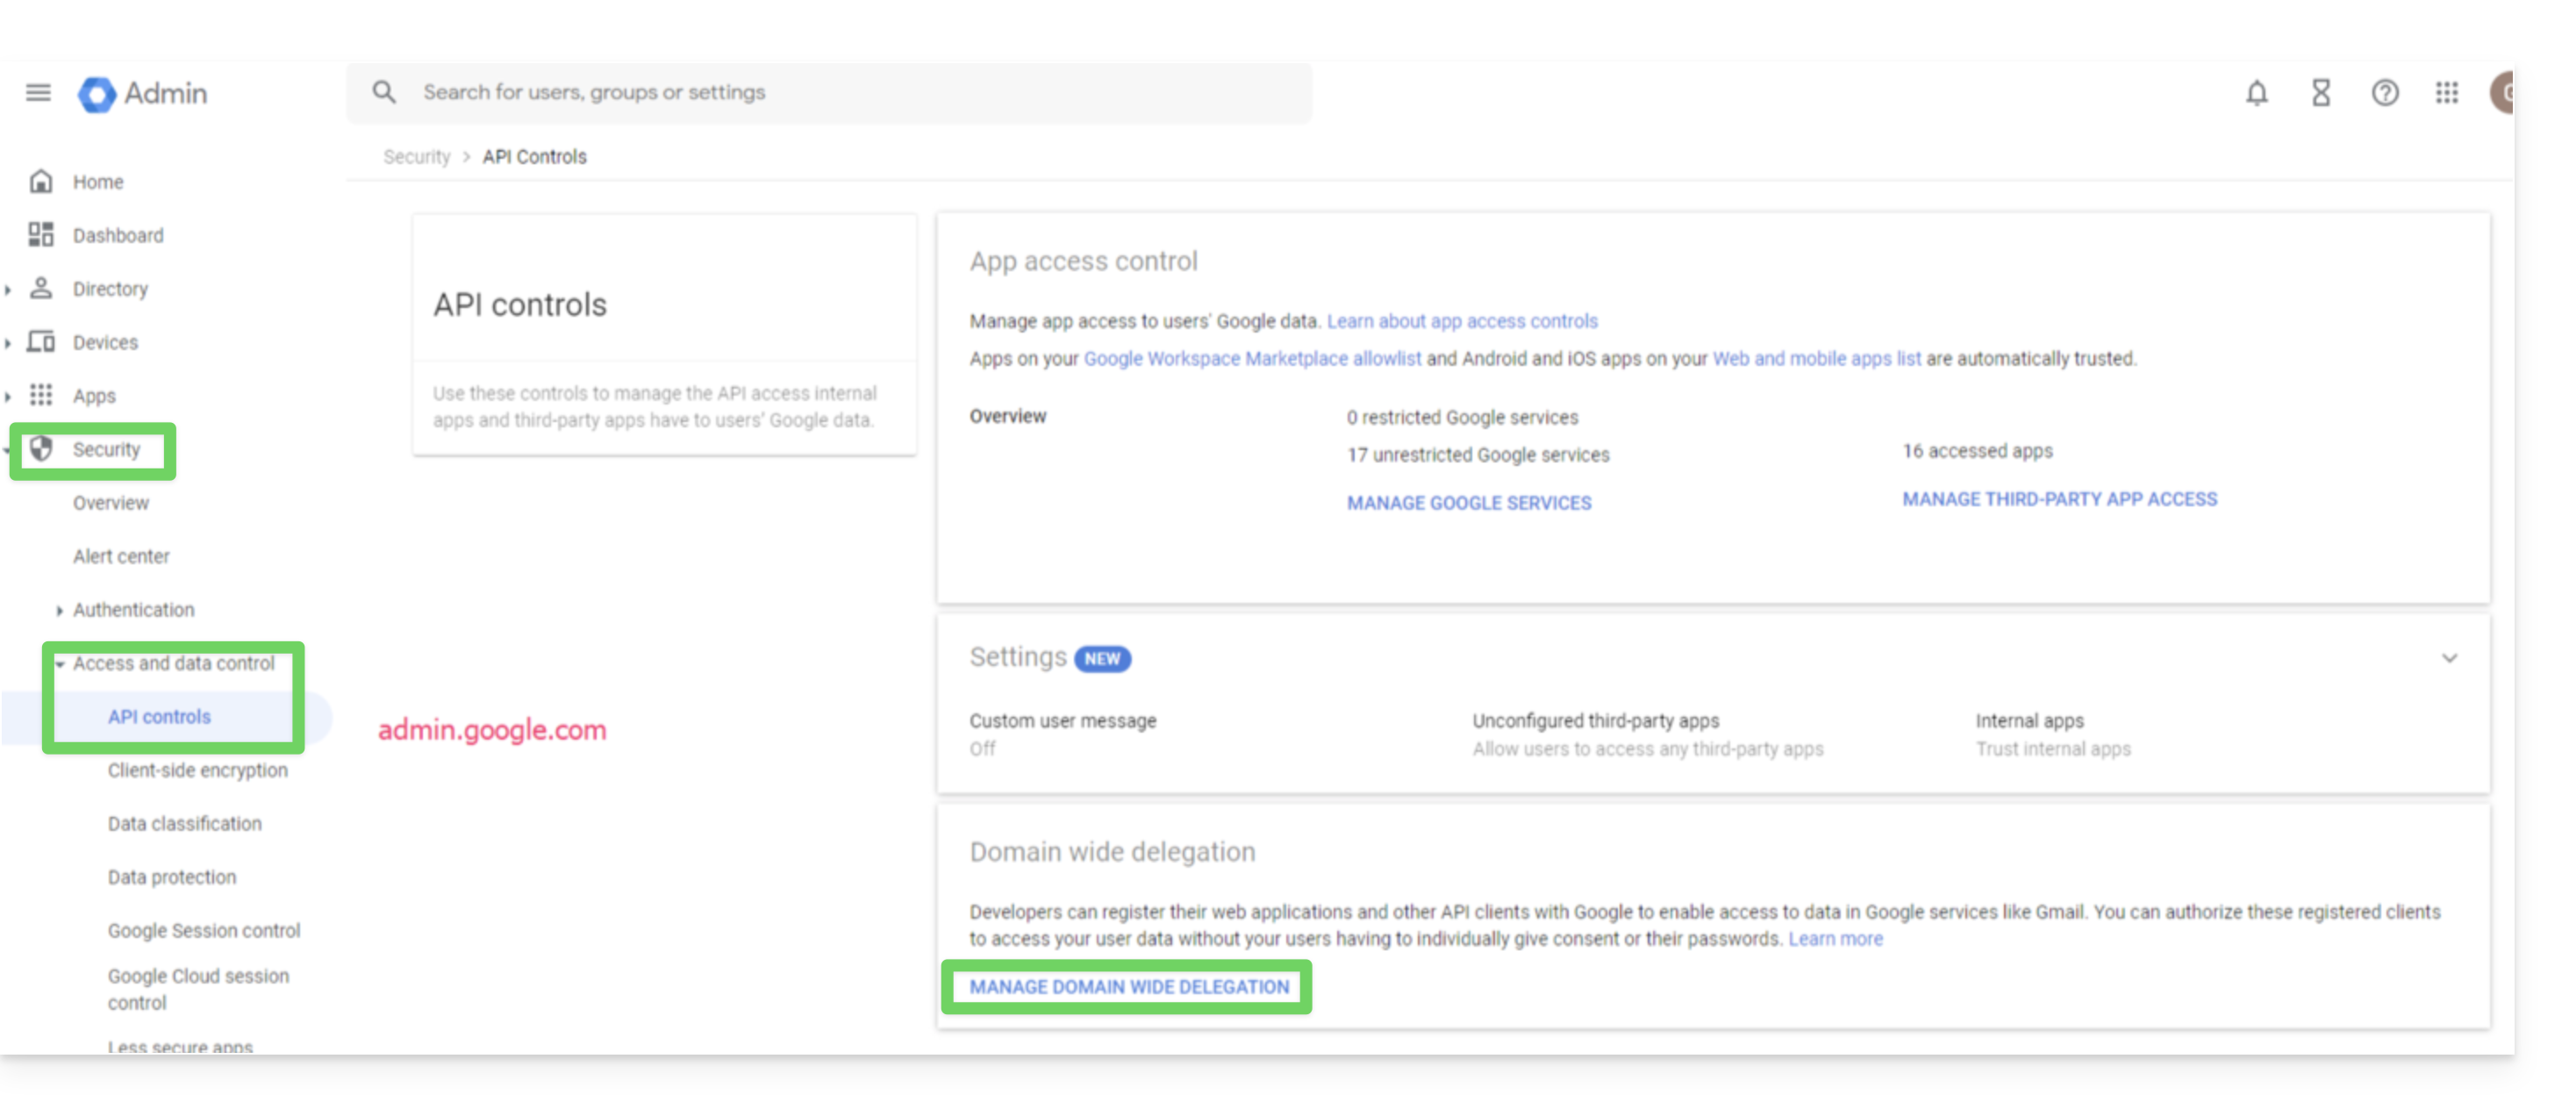
- Percorra a página Controlos de API e, em seguida, em Delegação em todo o domínio, clique em Gerir delegação em todo o domínio; a página Delegação em todo o domínio será aberta.
- Nesta página, clique em Adicionar:
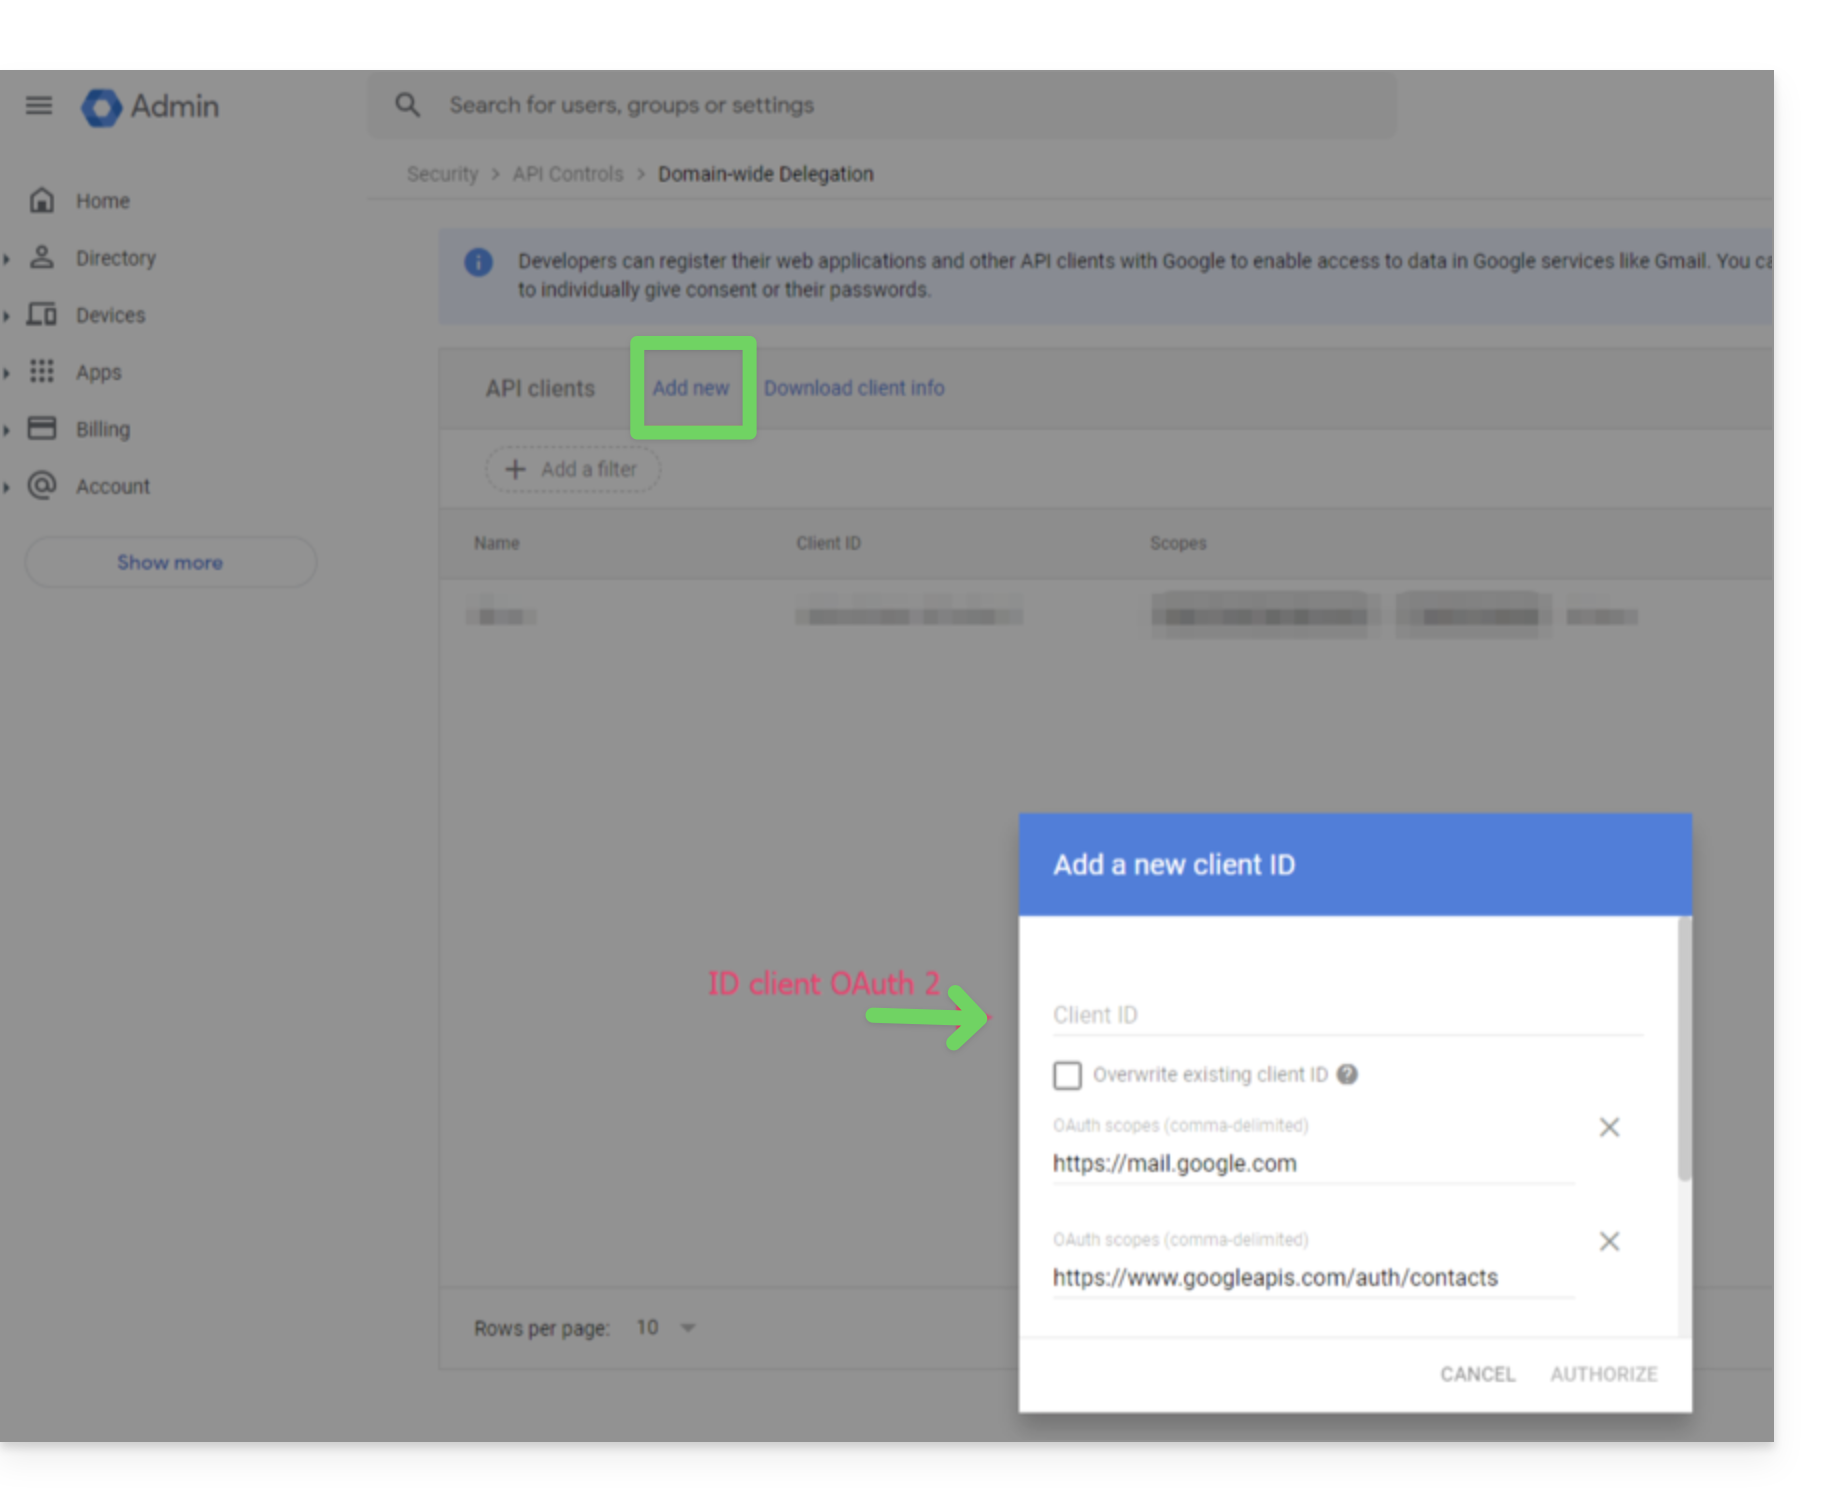
- A janela Adicionar um novo ID de cliente é aberta.
- No campo ID do cliente, insira o ID do cliente da sua conta de serviço.
- No campo Escopos OAuth, adicione os seguintes escopos:
- https://mail.google.com
- https://www.googleapis.com/auth/contacts
- https://www.googleapis.com/auth/calendar
- https://www.googleapis.com/auth/admin.directory.user.readonly
- https://www.googleapis.com/auth/admin.directory.domain.readonly
- https://www.googleapis.com/auth/drive
- https://www.googleapis.com/auth/gmail.modify
- Clique em Autorizar.
O seu novo projeto Google Cloud poderá, assim, aceder aos dados da sua conta Google Workspace.
Criação do espaço de armazenamento
Para configurar o backup do Workspace Google com o Acronis:
- Clique aqui para acessar o Console Acronis com as credenciais obtidas após adicionar o dispositivo (precisa de ajuda?).
- Clique no botão para adicionar um dispositivo e adicione um dispositivo do tipo Google Workspace:
- Insira o endereço de um superadministrador da sua conta Google Workspace (não importa se a autenticação de dois fatores estiver ativada para a conta de e-mail do superadministrador).
- Procure o arquivo JSON que contém a chave privada da conta de serviço que você criou no seu projeto Google Cloud (ou cole o conteúdo do arquivo como texto).
- Clique em Confirmar:
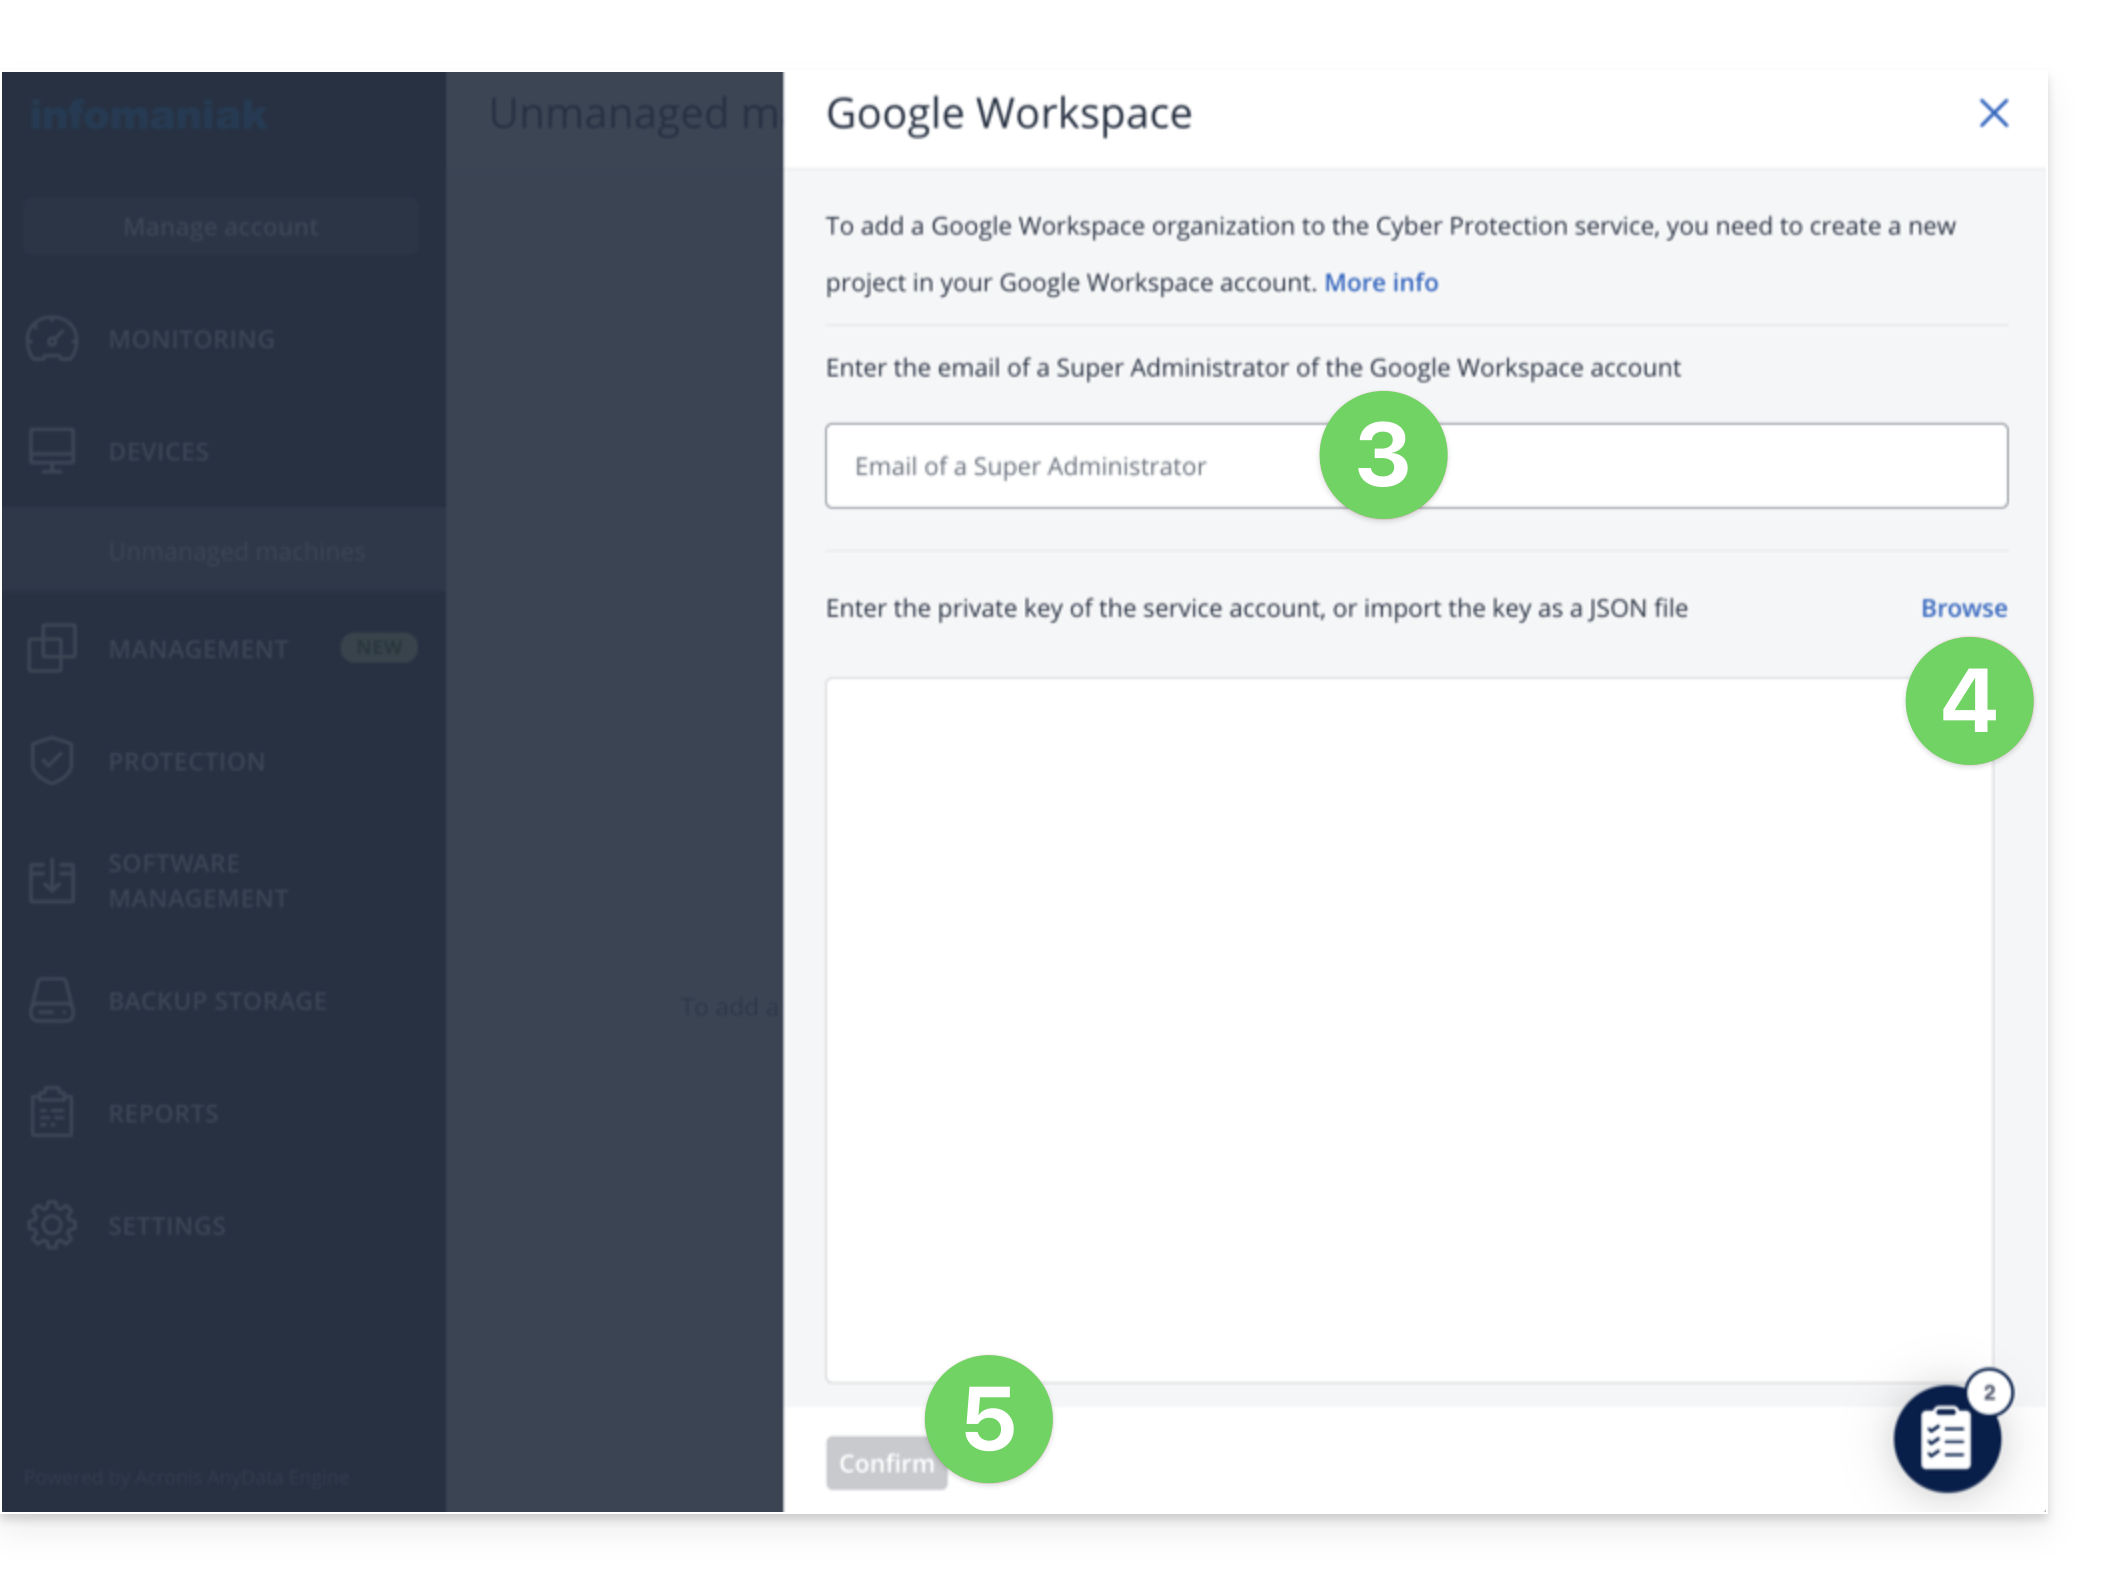
A sua organização Google Workspace aparecerá no separador Dispositivos da consola de serviço: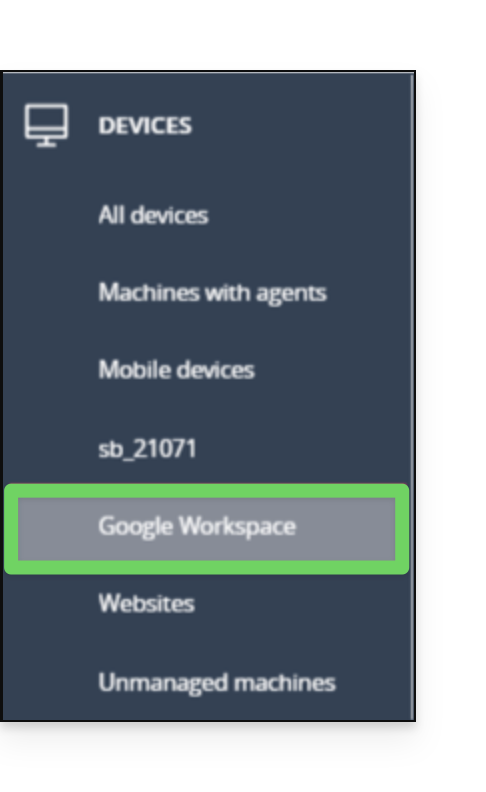
Link para esta FAQ: https://faq.infomaniak.com/2805
Esta seção de perguntas frequentes foi útil?
Este guia detalha como fazer o backup de um espaço Microsoft 365 usando o Acronis no Swiss Backup, a solução de backup em uma nuvem suíça independente.
Introdução
- O que poderá fazer backup:
- Office
- OneDrive
- Exchange
- Teams
- SharePoint
- e-mails
- Por padrão, os blocos de notas OneNote estão incluídos nos backups de arquivos do OneDrive, do Microsoft Teams e dos sites SharePoint.
- Também é possível fazer backup de outros tipos de dados.
Adicionar uma organização Microsoft 365
Pré-requisitos
- Ter um espaço Swiss Backup Infomaniak com uma quota de dispositivo disponível (mínimo 1) para uma cópia de segurança Acronis Microsoft 365 (1 licença por utilizador Office 365 a proteger):
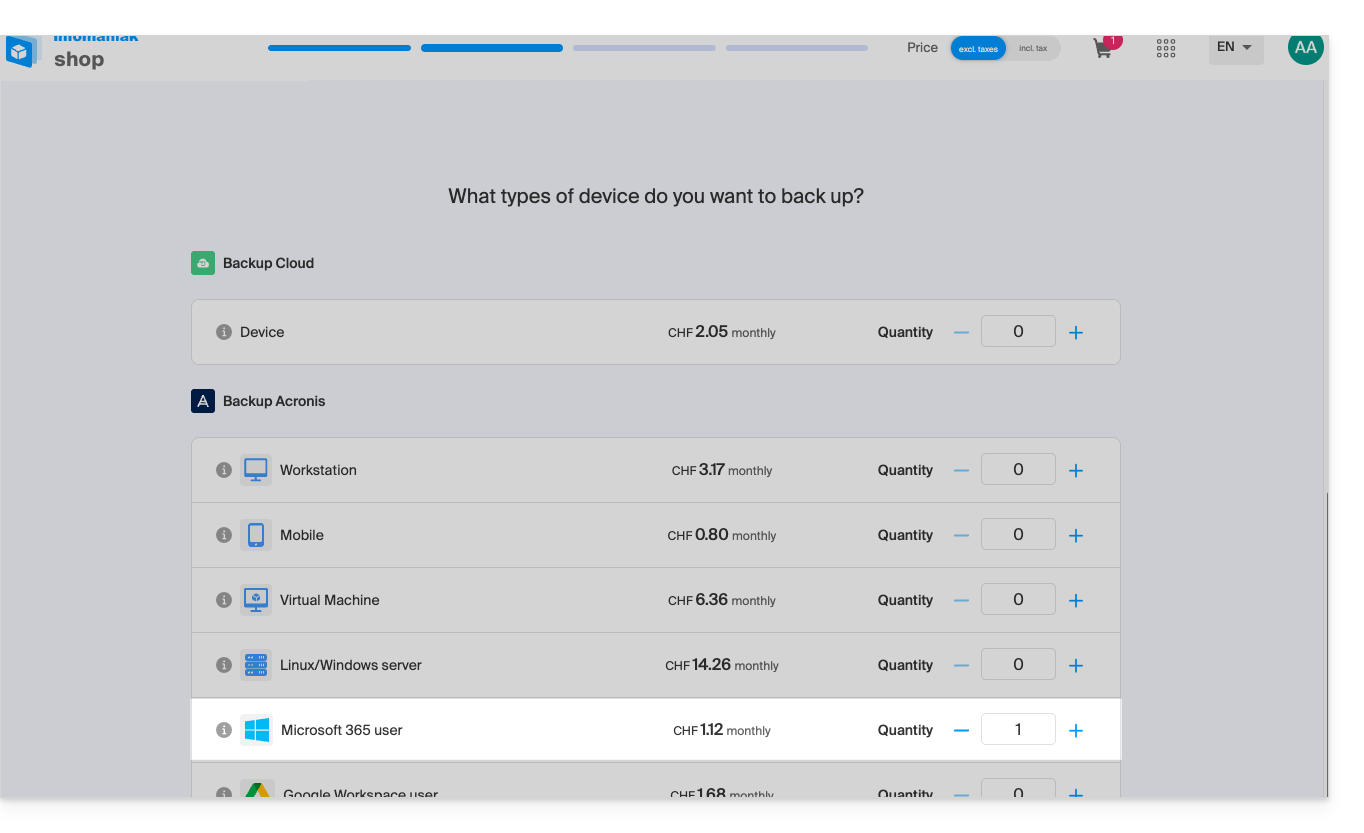
- Se necessário, aumente a quota do dispositivo de acordo com as suas necessidades.
- Adicione o dispositivo no Manager Infomaniak para receber as credenciais de acesso.
- A sua conta deve ter o papel de administrador global no Microsoft 365.
- Consulte a documentação da Acronis sobre este assunto.
Um administrador pode adicionar uma ou mais organizações Microsoft 365 a uma conta Swiss Backup.
Para adicionar uma organização Microsoft 365:
- Clique aqui para acessar o Console Acronis com as credenciais obtidas após adicionar o dispositivo (precisa de ajuda?).
- Clique no botão para adicionar um dispositivo e adicione um dispositivo do tipo Microsoft 365 Business:
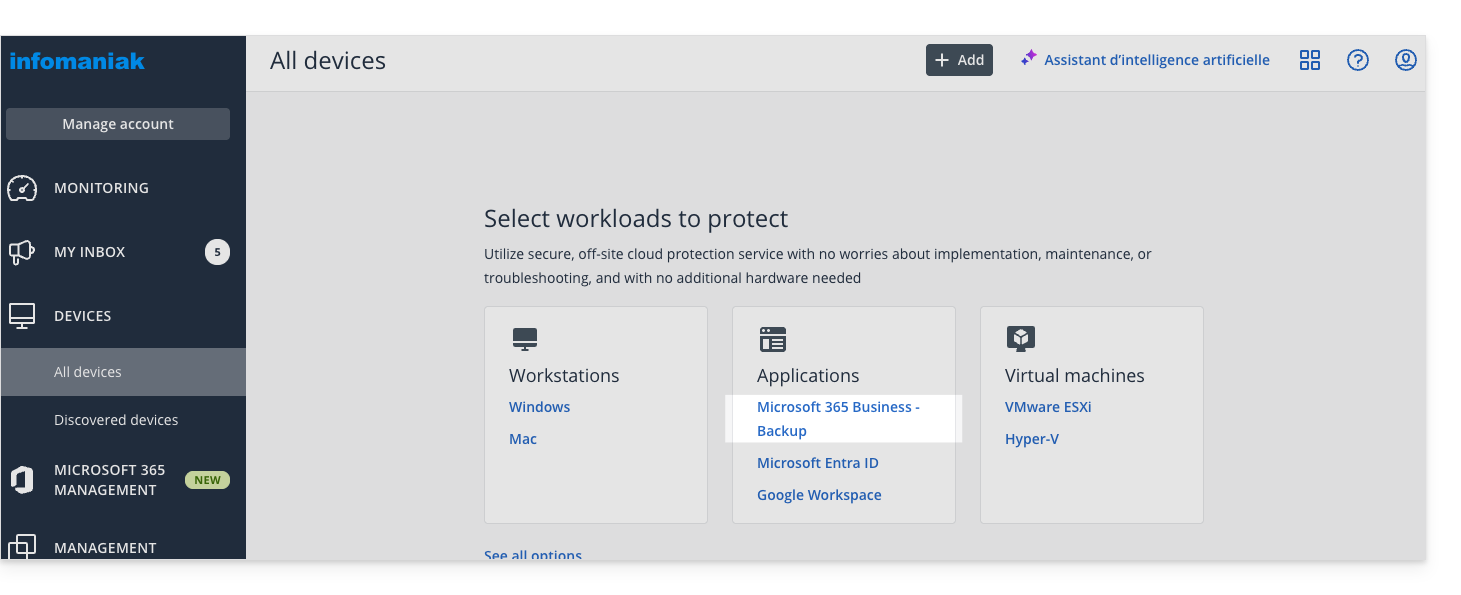
- O software o redireciona para a página de login do Microsoft 365:
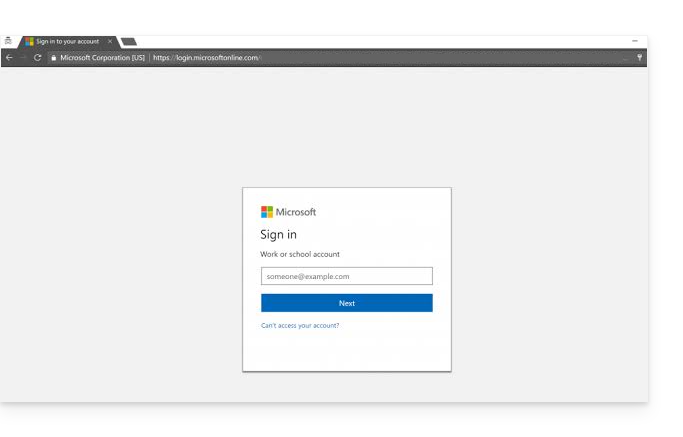
- Faça login usando as credenciais do administrador global do Microsoft 365.
- O Microsoft 365 exibe uma lista das permissões necessárias para fazer backup e restaurar os dados da sua organização:
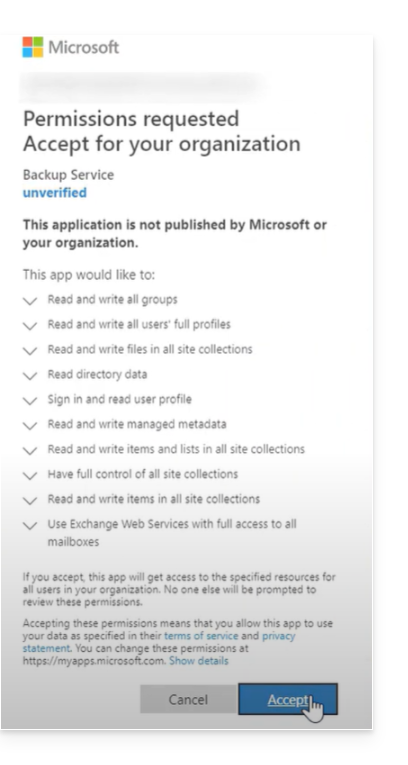
- Confirme que está a conceder estas permissões ao serviço Cyber Protect.
O agente Cloud não se conecta ao Microsoft 365. O agente obtém as permissões necessárias diretamente do Microsoft 365. Você só precisa confirmar a concessão dessas permissões, estando conectado como administrador global. O agente não armazena suas credenciais de conta e não as utiliza para realizar os backups e as restaurações. A alteração da senha desta conta ou a desativação ou exclusão desta conta no Microsoft 365 não afeta o funcionamento do agente.
Sua organização Microsoft 365 aparece então na guia Dispositivos no console Cyber Protect: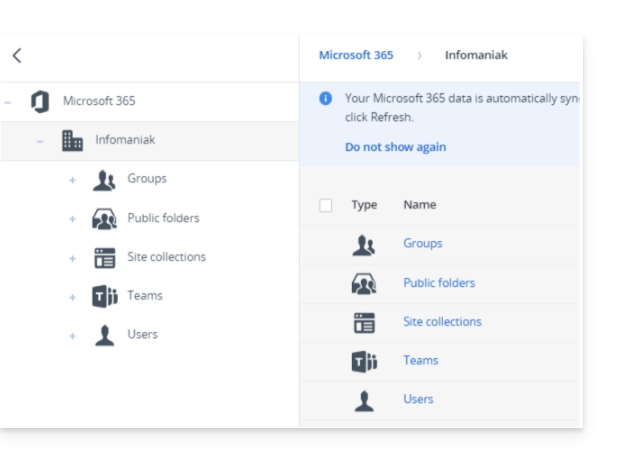
Frequência de backup/sincronização
O agente Cloud sincroniza-se com o Microsoft 365 a cada 24 horas, a partir do momento em que a organização é adicionada ao serviço Cyber Protection. Se adicionar ou remover um utilizador, um grupo ou um site, essa alteração não será imediatamente visível na consola Cyber Protect.
Sincronização imediata
Para sincronizar a alteração imediatamente, selecione a organização na página Microsoft 365 e clique em Atualizar.
Se você aplicou um plano de proteção ao grupo Todos os usuários, Todos os grupos ou Todos os sites, os itens adicionados recentemente só serão incluídos no backup após a sincronização ser concluída.
Em caso de lentidão
Se as tarefas de cópia de segurança ou de restauração Microsoft 365 Cloud-to-Cloud (C2C) demorarem mais do que o esperado e levarem muito tempo para serem concluídas, consulte este outro guia para desativar temporariamente a limitação da API Exchange Web Services, a fim de melhorar o desempenho durante a restauração de itens do Microsoft 365.
Itens excluídos
De acordo com a política da Microsoft, quando um utilizador, grupo ou site é removido da interface gráfica do Microsoft 365, ele permanece disponível por alguns dias através da API. Durante este período, o item removido fica inativo (esmaecido) no console Cyber Protect e não é guardado.
Quando o item removido deixar de estar disponível através da API, ele desaparecerá do console Cyber Protect. As suas cópias de segurança (se existirem) encontram-se em Armazenamento de cópias de segurança > Cópias de segurança de aplicações na nuvem.
Saiba mais
Link para esta FAQ: https://faq.infomaniak.com/2825
Esta seção de perguntas frequentes foi útil?
Este guia explica como eliminar uma cópia de segurança do Swiss Backup com o Acronis e os diferentes cenários que podem surgir durante a eliminação. Consulte também este outro guia do Acronis sobre o assunto.
Pré-requisitos
- Pelo menos um dispositivo deve estar registado (e online) com as mesmas credenciais utilizadas para efetuar a cópia de segurança:
- Por exemplo, se o objetivo for eliminar uma cópia de segurança efetuada por
SBA-XXXX-ADMIN, mas nenhum dispositivo estiver online, basta descarregar o Acronis para outro dispositivo e registá-lo com o mesmo utilizador: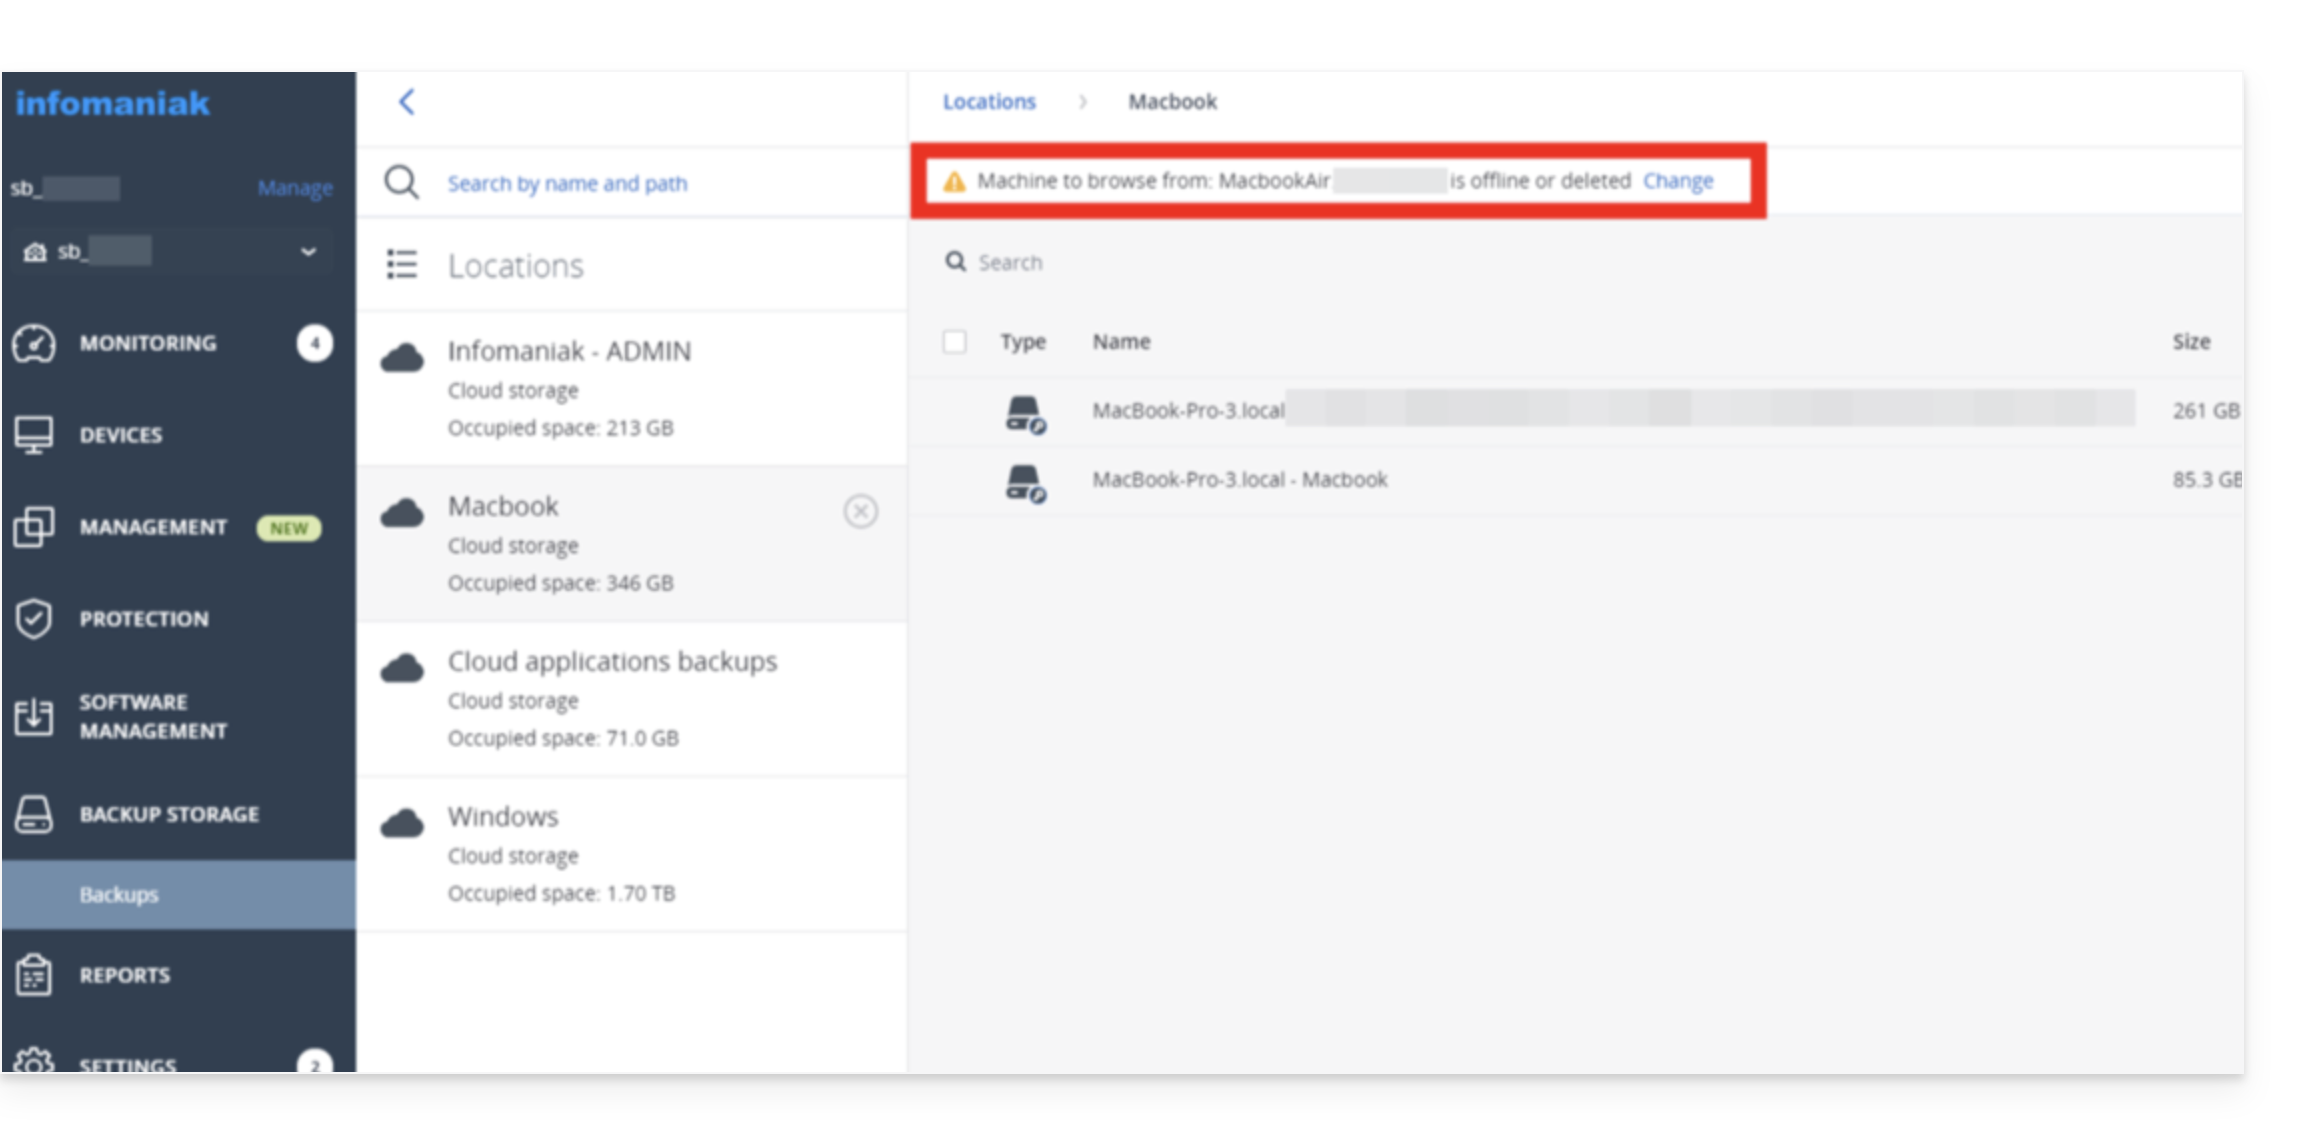
- Por exemplo, se o objetivo for eliminar uma cópia de segurança efetuada por
- A eliminação requer espaço livre:
- Considere aumentar a quota do seu utilizador (ajuda). Após a conclusão da eliminação, pode reduzir a quota para o nível acordado:
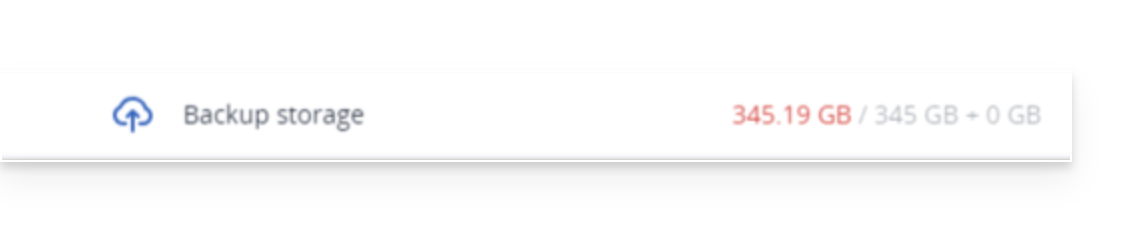
- Considere aumentar a quota do seu utilizador (ajuda). Após a conclusão da eliminação, pode reduzir a quota para o nível acordado:
- Atualizar o armazenamento:
- Se uma exclusão foi feita recentemente, é preciso ter paciência, pois a exclusão pode demorar um pouco, dependendo do tamanho do arquivo a ser excluído; se o espaço de armazenamento utilizado não mudou, atualize o local de backup:
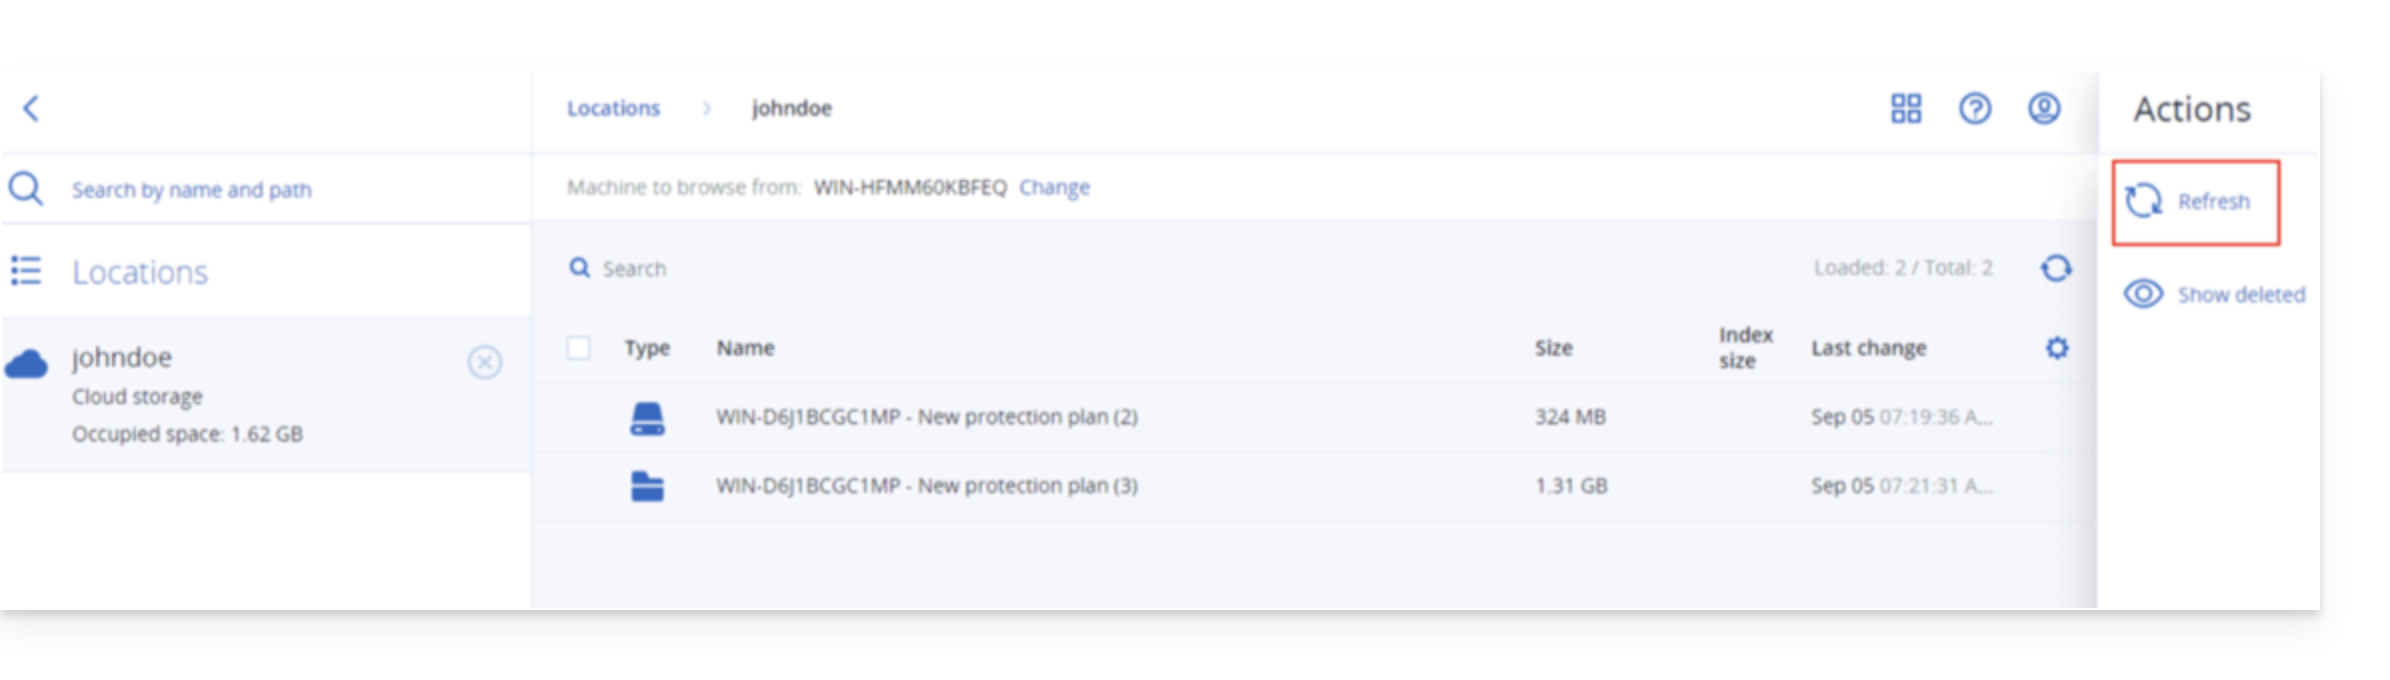
- Se uma exclusão foi feita recentemente, é preciso ter paciência, pois a exclusão pode demorar um pouco, dependendo do tamanho do arquivo a ser excluído; se o espaço de armazenamento utilizado não mudou, atualize o local de backup:
Excluir um backup do Acronis
Para isso:
- Acesse o Armazenamento de backup no console Cyber Protect.
- Selecione o local a partir do qual deseja remover os backups.
- Selecione o arquivo de backup a partir do qual deseja remover os backups.
Excluir todo o arquivo de cópias de segurança
- Clique em Excluir.
- A exclusão de um arquivo de backup remove todos os backups desse arquivo.
Excluir um backup específico no arquivo de backup
- Clique em Ver as cópias de segurança.
- Selecione a cópia de segurança (ponto de restauração) que pretende eliminar.
- Clique em Ações > Excluir:
- Ao excluir um arquivo de backup, marque a caixa e clique em Excluir para confirmar sua decisão.
- Ao excluir um backup específico, clique em Excluir para confirmar sua decisão.
Excluir todos os backups associados a um usuário
- Mesmo que nenhum dispositivo esteja online, você pode Desativar > Excluir (consulte este guia da Acronis para obter mais informações).
Excluir backups incompletos (se houver)
- Consulte este outro guia para obter instruções detalhadas.
Certificado
Se o problema de limite de armazenamento/exclusão persistir mesmo após aumentar o limite de armazenamento do utilizador em questão, recomenda-se reinstalar o Acronis.
Quando o Acronis é completamente desinstalado, o certificado que pode estar a causar este problema é removido.
Para remover o certificado manualmente, sem desinstalar o Acronis:
- Verifique a sua localização e remova/mova o certificado – consulte este outro guia.
- Reinicie o serviço Acronis Managed Machine – consulte este outro guia.
- Execute um backup ou atualize o armazenamento.
- Isso gerará um novo certificado e resolverá o problema de limite de armazenamento.
Link para esta FAQ: https://faq.infomaniak.com/2877
Esta seção de perguntas frequentes foi útil?
Este guia irá ajudá-lo caso o seu software/cliente SFTP apresente, de repente, um pedido para aceitar uma nova impressão digital ao utilizar o serviço Swiss Backup da Infomaniak.
Alerta do software/cliente SFTP
Se o seu software SFTP apresentar repentinamente uma mensagem solicitando que aceite uma nova impressão digital (fingerprint), não se trata necessariamente de um problema de segurança. Este pedido pode ocorrer após modificações técnicas planeadas na infraestrutura da Infomaniak (caso tenha recebido um e-mail sobre o assunto).
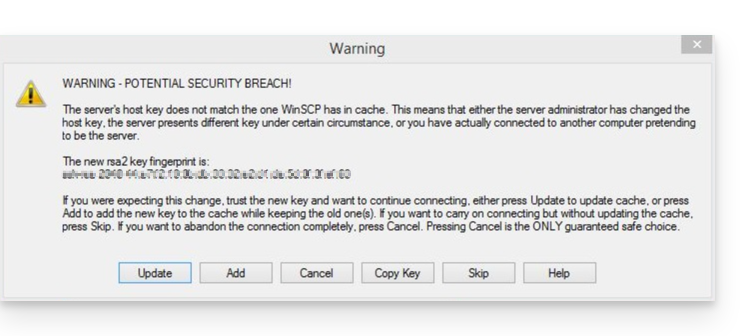
De facto, no âmbito da evolução dos seus serviços, a Infomaniak alterou recentemente o gateway SFTP utilizado para aceder aos ficheiros alojados. Estas alterações implicam a implementação de novas chaves SSH no lado do servidor. Por razões de segurança,os softwares/clientes SFTP comparam sistematicamente a chave do servidor com a que têm em memória.
Se for detetada uma diferença, mesmo que legítima, eles avisam para solicitar a sua confirmação. Portanto, é normal que apareça um aviso e que lhe seja pedido para aprovar uma nova impressão digital.
Verifique, se necessário
Você pode verificar as novas impressões digitais oficiais das chaves SSH da Infomaniak abaixo. Se elas corresponderem ao que é exibido no seu software, você pode aceitá-las com segurança:
4096 SHA256:p4QkBc70lkIpDZpjJAZ4VbPEIaOv54lWxd/DRCMfwgg sftp.swiss-backup.infomaniak.com (RSA)
4096 MD5:a3:6b:fa:7c:0e:22:da:42:ca:82:c7:cc:7e:1f:0a:4a sftp.swiss-backup.infomaniak.com (RSA)
4096 SHA256:gMiEH8oVwWhq8ByQWQP8xMEVy3URi2omZNSMCc0n8z0 sftp.swiss-backup02.infomaniak.com (RSA)
4096 MD5:d2:1a:11:9a:06:4c:55:98:df:38:cd:70:be:08:dd:ca sftp.swiss-backup02.infomaniak.com (RSA)4096 SHA256:EcQDR+VNUCbK1Zz/eDoa295c0+7JGQD7EP6n+ro5G0U sftp.swiss-backup03.infomaniak.com (RSA)
4096 MD5:bf:5e:92:f7:ed:81:de:84:9e:43:48:f3:1a:9c:3e:8d sftp.swiss-backup03.infomaniak.com (RSA)4096 SHA256:xRU5RakUZ/yJYg3CDi9JiSRymodbPgM4S3FXvVHqK2s sftp.swiss-backup04.infomaniak.com (RSA)
4096 MD5:16:ce:56:02:c3:ab:80:7b:31:99:a6:cd:a8:00:0e:79 sftp.swiss-backup04.infomaniak.com (RSA)Esta alteração não afeta a segurança dos seus dados. Se utilizar scripts ou softwares automatizados para as suas transferências ou cópias de segurança, verifique se eles têm em conta esta nova configuração.
Link para esta FAQ: https://faq.infomaniak.com/2889
Esta seção de perguntas frequentes foi útil?