Base de conhecimento
1000 perguntas frequentes, 500 tutoriais e vídeos explicativos. Aqui, você encontra apenas soluções!
Este guia explica como integrar emojis / emoticons / smileys no título e no conteúdo de uma Newsletter Infomaniak.
Inserir um emoticon no título
Para escolher um emoji para o título da sua newsletter (e/ou o texto de visualização):
- Clique aqui para acessar o gerenciamento do seu produto no Manager Infomaniak (precisa de ajuda?).
- Clique no nome do domínio correspondente na tabela que aparece:
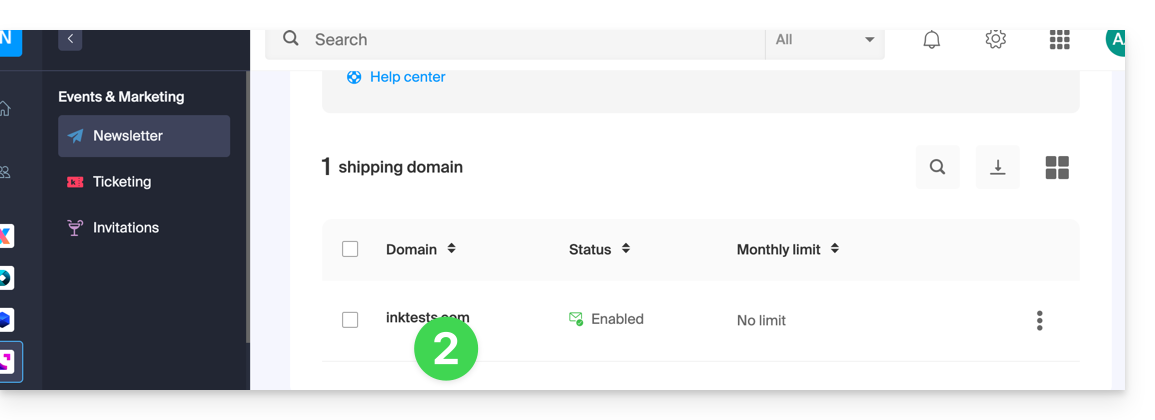
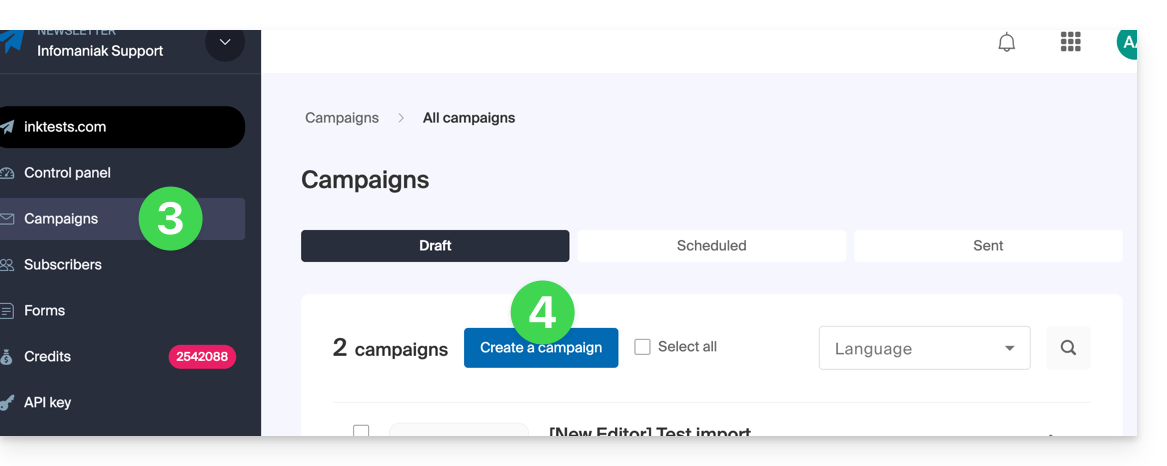
- Clique em Campanhas no menu lateral esquerdo.
- Clique em Criar campanha:
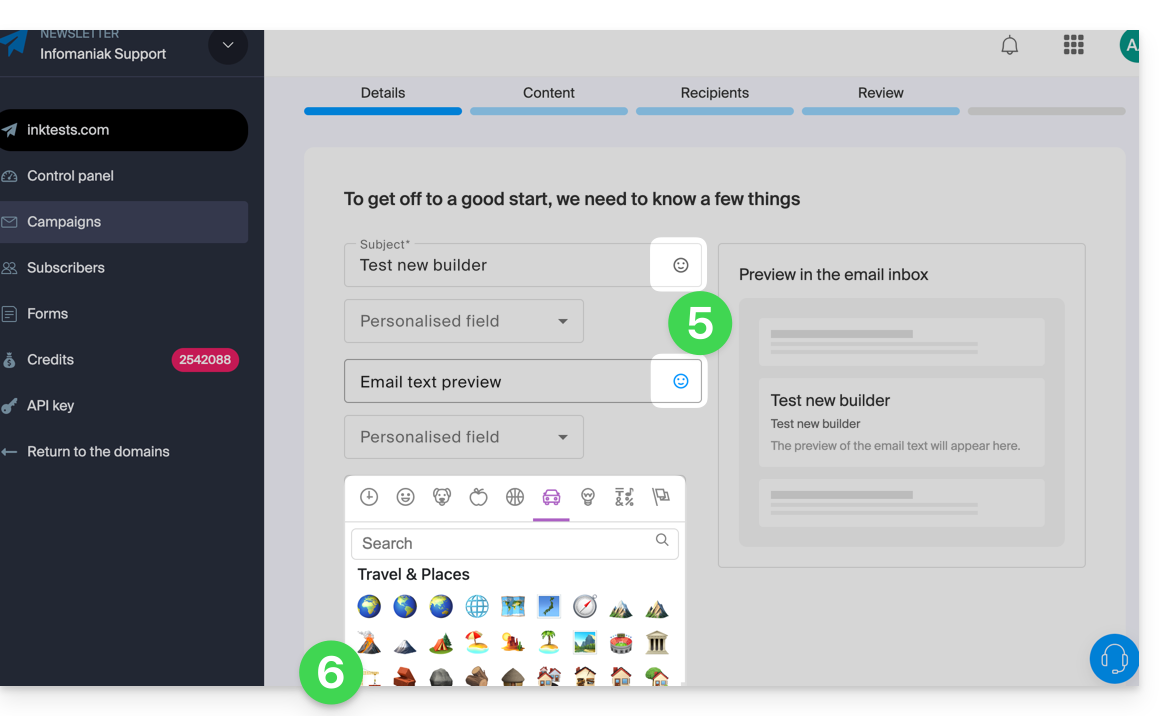
- Clique no ícone Smiley no campo correspondente para abrir o painel de emojis.
- Clique no emoji que deseja inserir:
Inserir um emoji no corpo do e-mail
Pode colar no seu texto qualquer caractere Unicode ou emoji que tenha copiado de outro lugar: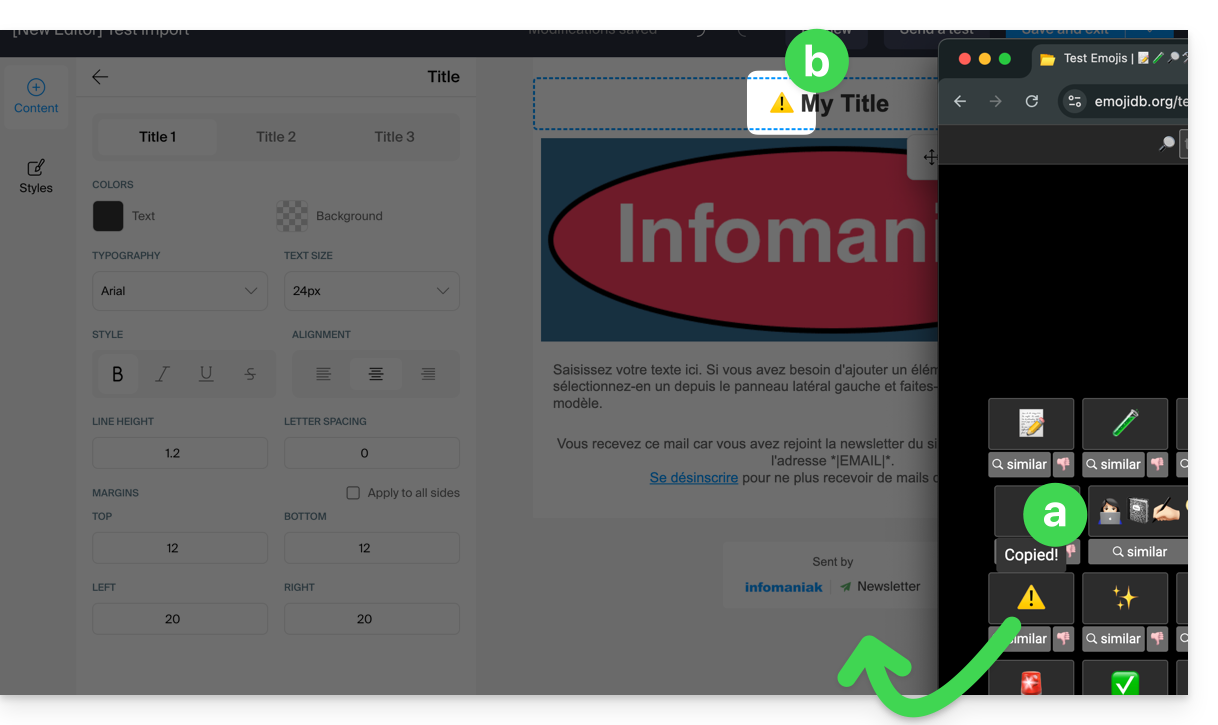
… ou faça com que emojis apareçam
… no macOS
Pressione as teclas CTRL + CMD ⌘ + ESPAÇO
… no Windows
Pressione as teclas LOGOTIPO DO WINDOWS + PONTO (.)
Método alternativo:
- Clique com o botão direito do mouse em uma área vazia da barra de tarefas.
- No menu, clique em Exibir o teclado virtual.
- Um ícone de teclado aparecerá na barra de tarefas, no canto inferior direito da tela.
- Clique neste ícone para exibir o teclado virtual.
- Clique na tecla com um sorriso no canto inferior esquerdo do teclado.
- Utilize os diversos emojis do Windows.
Link para esta FAQ: https://faq.infomaniak.com/869
Esta seção de perguntas frequentes foi útil?
Este guia trata dos parâmetros UTM, ou Módulo de Rastreamento Urchin, que são etiquetas adicionadas às URLs para rastrear e analisar o desempenho das campanhas de marketing online a partir da ferramenta Newsletter da Infomaniak.
Introdução
- Essas tags UTM, opcionais, são compostas por parâmetros específicos, como fonte, meio, campanha, termo e conteúdo, que ajudam a identificar a origem do tráfego de um link.
- Ao usar as tags UTM, os profissionais de marketing podem entender quais campanhas geram tráfego, quais canais são mais eficazes e quais anúncios ou estratégias funcionam melhor, com base nos dados coletados pelas ferramentas de análise da web.
- As tags UTM permitem, portanto, criar uma correspondência entre os links presentes nas suas newsletters e o acompanhamento de uma ferramenta como o Google Analytics no seu site.
Ativar a funcionalidade UTM
Ative esta opção no primeiro passo da criação da sua newsletter:
- Clique aqui para acessar o gerenciamento do seu produto no Manager Infomaniak (precisa de ajuda?).
- Clique no nome do domínio correspondente na tabela que aparece:
- Clique em Campanhas no menu lateral esquerdo.
- Clique em Criar campanha:
- Ative o parâmetro UTM usando o botão de alternância (toggle switch):
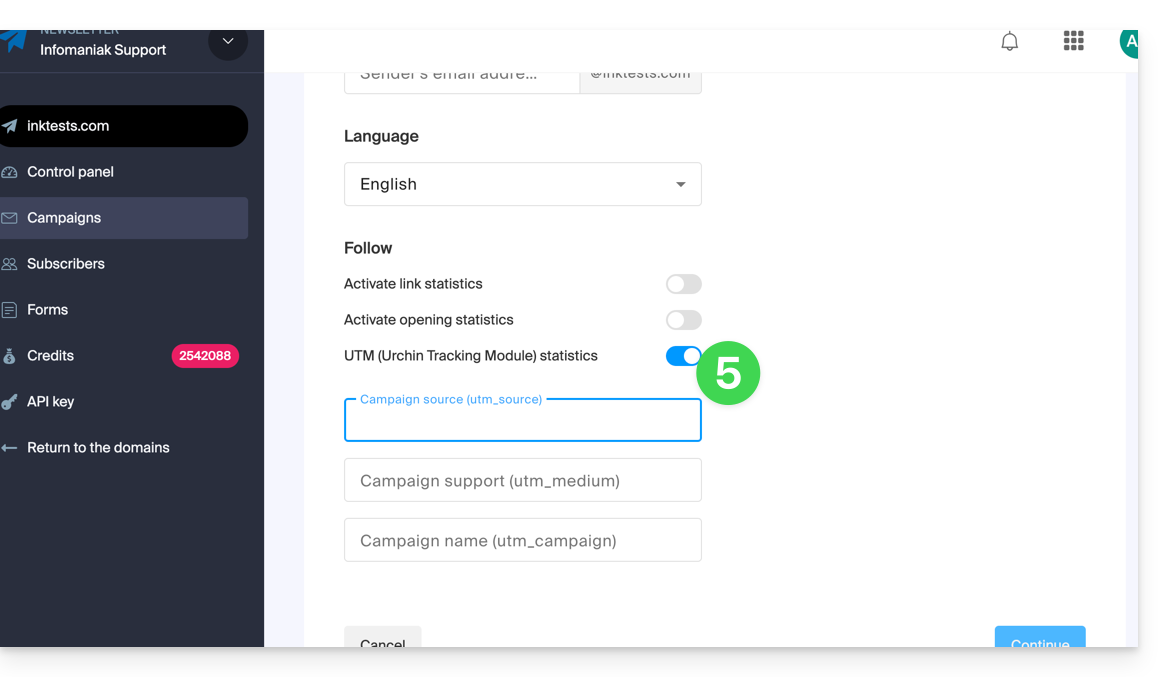
Você encontrará, portanto, 3 campos para indicar palavras-chave do tipo utm_parameters:
- fonte da campanha (
utm_source) - suporte da campanha (
utm_medium, portanto, e-mail, por exemplo) - nome da campanha (
utm_campaign= o nome da sua campanha, por exemplo)
Portanto:
- Preencha os 3 campos UTM na etapa 1 da criação da newsletter.
- Insira um link para o URL do seu site (que deve estar corretamente configurado e analisado pelo Google Analytics, por exemplo) no corpo da newsletter, na etapa 3.
- Quando o leitor clicar nele, será direcionado para o URL seguido dos termos "
?utm_source=...&utm_medium=...&utm_campaign=...", com suas palavras-chave no lugar de "...", obviamente.
Se indicar várias palavras-chave nestes campos, os espaços existentes serão substituídos por um sinal de sublinhado _.
Mais tarde, será possível inserir nestes campos fórmulas dinâmicas, como a data atual, por exemplo. Consulte também o artigo https://news.infomaniak.com/comment-creer-un-objectif-google-analytics.
Link para esta FAQ: https://faq.infomaniak.com/958
Esta seção de perguntas frequentes foi útil?
Este guia explica como ativar ou desativar o rastreamento na sua próxima Newsletter Infomaniak.
Introdução
- Um rastreador, ou «tracker», é um pequeno elemento (uma imagem de 1 pixel ou um link especial) inserido na newsletter.
- Quando o destinatário abre o e-mail, a imagem é descarregada a partir do servidor do remetente, o que regista a abertura.
- Nem todos os programas/clientes de e-mail carregam as imagens automaticamente, e alguns utilizadores optam por desativá-las; isso significa que uma pessoa que leu o e-mail pode ser contabilizada como se nunca o tivesse aberto.
- Os links na newsletter são transformados em links de redirecionamento através do servidor de rastreamento, registrando assim os cliques.
- Algumas ferramentas de e-mail, como o Outlook, exploram automaticamente os links contidos no e-mail, registrando assim uma abertura, mesmo que o utilizador nunca o tenha consultado.
- Os rastreadores são usados para coletar diversos dados úteis para os profissionais de marketing, como:
- Taxa de abertura para saber quantas pessoas abriram a newsletter
- Horário de abertura para determinar o momento em que a newsletter foi aberta
- Localização geográfica com base no endereço IP do destinatário
- Tipo de dispositivo e software para identificar o dispositivo (computador, smartphone, tablet) e o software (navegador, aplicativo/cliente de e-mail) usado para ler a newsletter
- Taxa de cliques para medir quantas pessoas clicaram nos links da newsletter
- Conversões para acompanhar se os destinatários realizam ações específicas após abrir a newsletter (compras, inscrições, etc.)
Ativar a coleta de estatísticas
Ative esta opção no primeiro passo da criação da sua newsletter:
- Clique aqui para acessar o gerenciamento do seu produto no Manager Infomaniak (precisa de ajuda?).
- Clique no nome do domínio correspondente na tabela que aparece:
- Clique em Campanhas no menu lateral esquerdo.
- Clique em Criar campanha:
- Ative as configurações de estatísticas usando os botões de alternância:
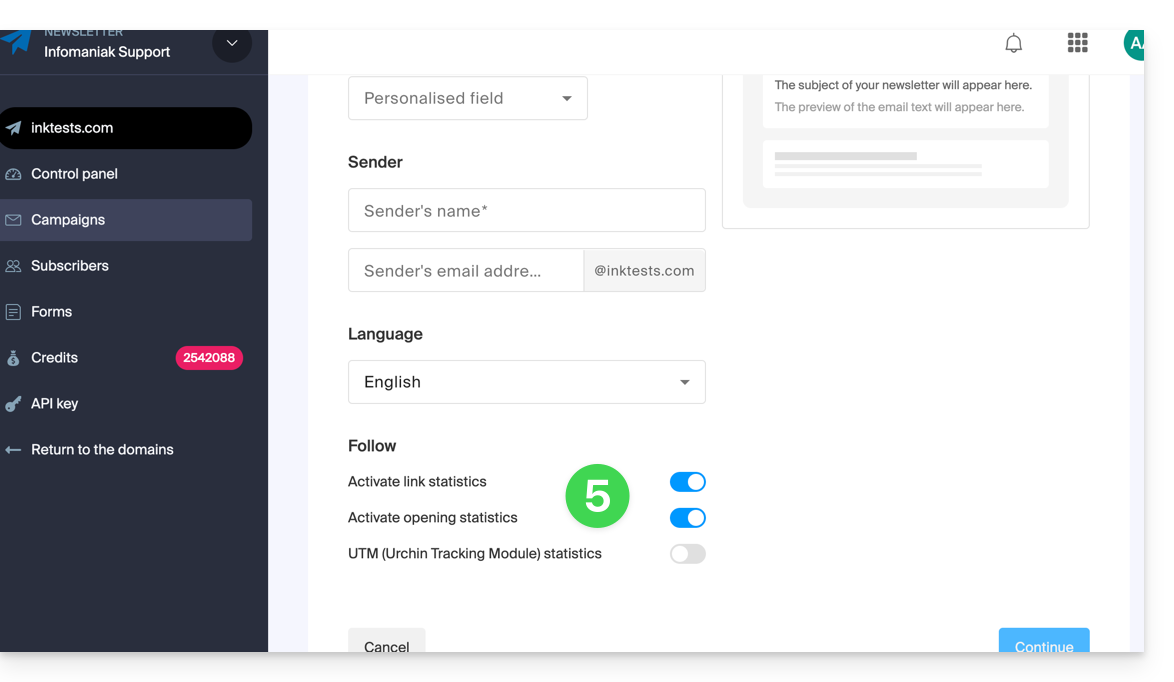
Ao desativar as estatísticas, os URLs dos links que você inserir no corpo da sua newsletter não serão mais transformados e você não terá informações estatísticas sobre o uso que seus destinatários fazem da sua newsletter.
Consulte este outro guia sobre a última opção da página.
Link para esta FAQ: https://faq.infomaniak.com/1079
Esta seção de perguntas frequentes foi útil?
Este guia explica como criar grupos para distribuir seus assinantes da Newsletter.
Introdução
- É necessário criar pelo menos 1 grupo para adicionar os seus futuros contactos/subscritores.
- Isto será útil, nomeadamente, para criar um formulário de inscrição para a sua newsletter.
- Sem um grupo, é impossível criar o formulário, e o botão permanecerá desativado:
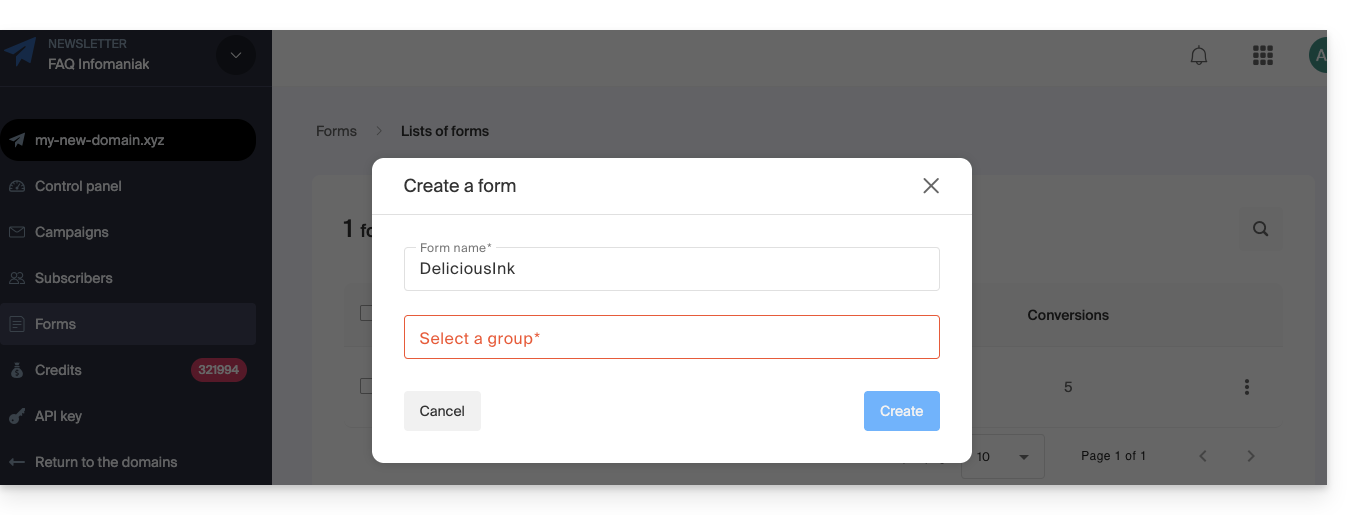
- Sem um grupo, é impossível criar o formulário, e o botão permanecerá desativado:
Criar um grupo de assinantes
Para aceder à gestão dos grupos da newsletter:
- Clique aqui para acessar o gerenciamento do seu produto no painel de controle Infomaniak (precisa de ajuda?).
- Clique diretamente no nome de domínio atribuído ao produto em questão.
- Clique em Assinantes no menu lateral esquerdo.
- Clique na aba Grupos.
- Clique no botão para Criar um grupo.
- Insira um nome para o seu grupo.
- Clique no botão Criar:
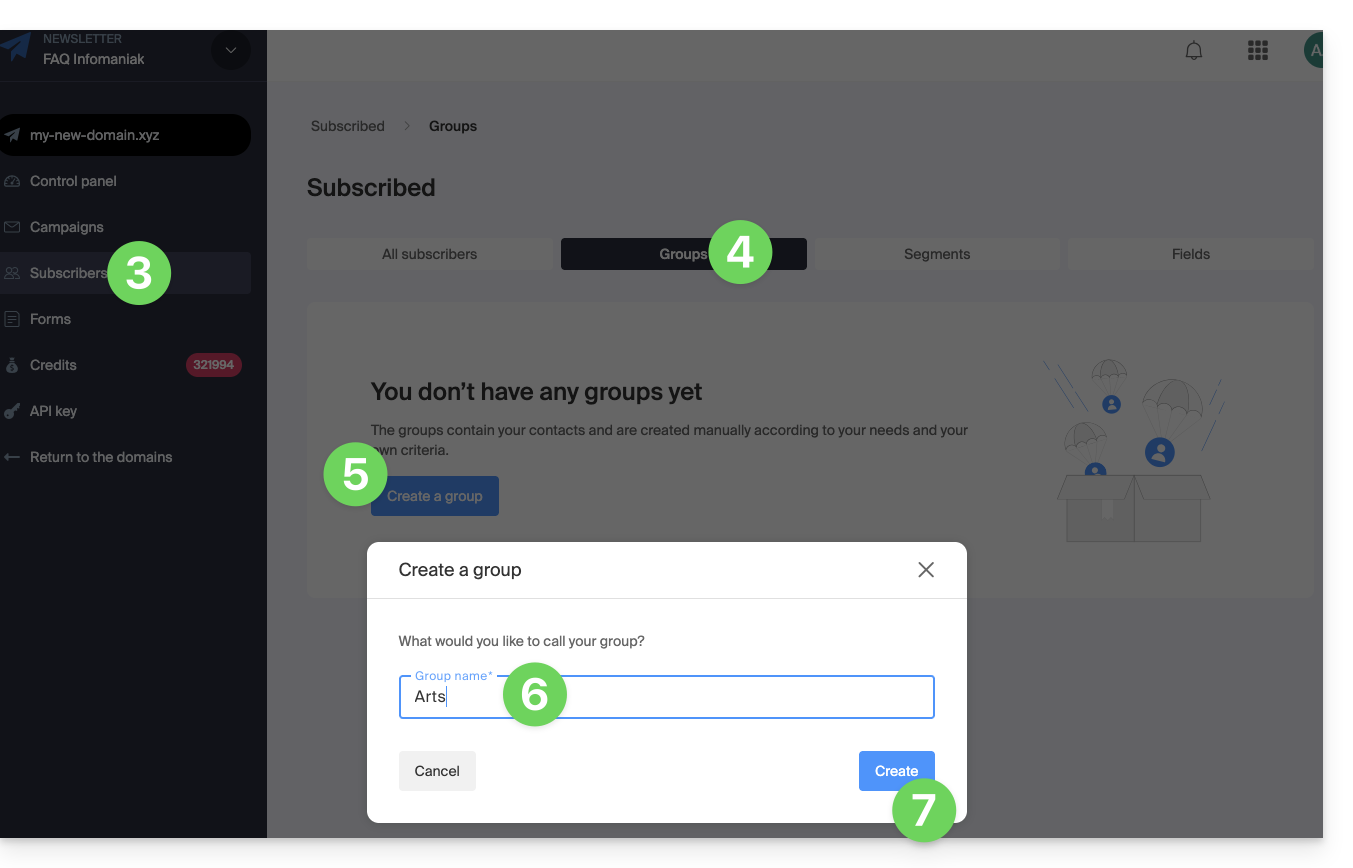
Depois de criar o grupo, pode agora adicionar facilmente um novo formulário de inscrição e definir qual grupo deverá ser usado para armazenar os futuros assinantes: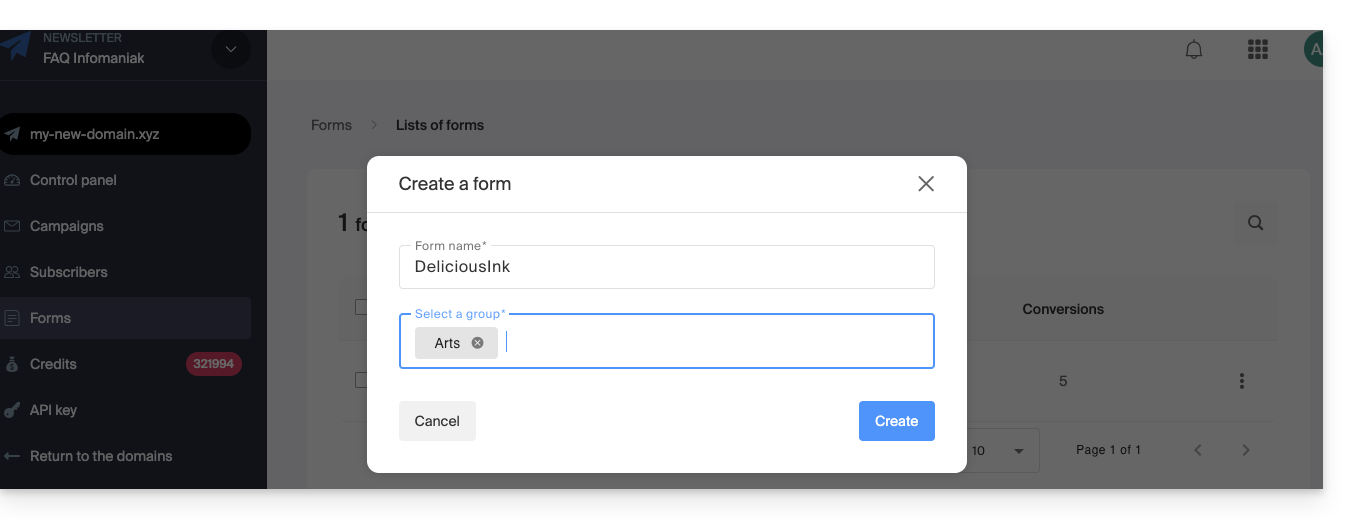
Criar vários grupos permite, por exemplo, enviar newsletters apenas para um deles e não para os outros. Isso também permite ter um formulário de inscrição em um local correspondente ao preenchimento de uma lista de contatos específica e, em seguida, outro formulário em outro local correspondente a outra lista, com o objetivo de enviar posteriormente uma newsletter ainda mais personalizada.
Adicionar assinantes ao grupo
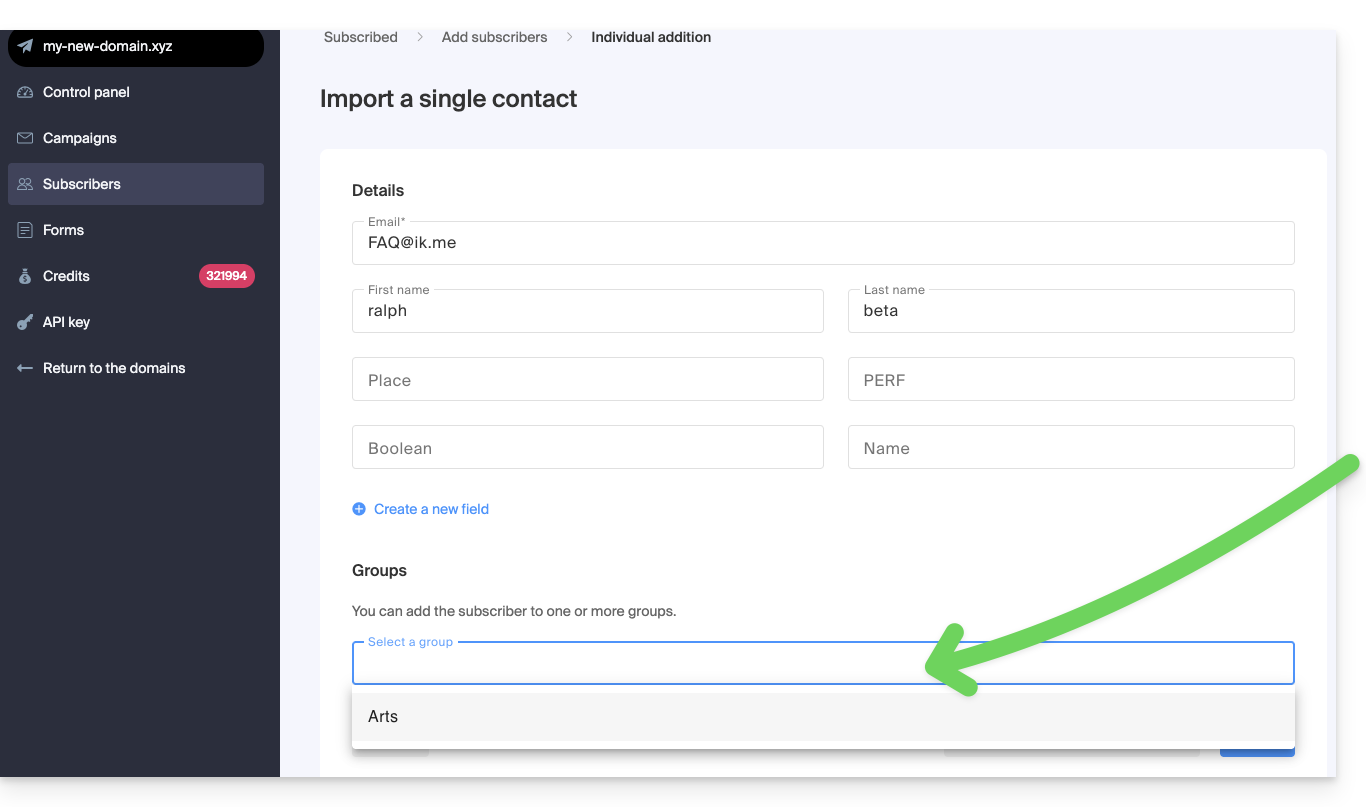
É possível selecionar o grupo criado durante a criação/importação de um novo contato:
- Clique aqui para acessar a gestão do seu produto no Manager Infomaniak (precisa de ajuda?).
- Clique diretamente no nome de domínio atribuído ao produto em questão.
- Clique em Assinantes no menu lateral esquerdo.
- Clique em Adicionar um assinante.
- Clique, por exemplo, na caixa para adicionar um assinante individualmente.
- Selecione o grupo adequado na parte inferior do formulário:
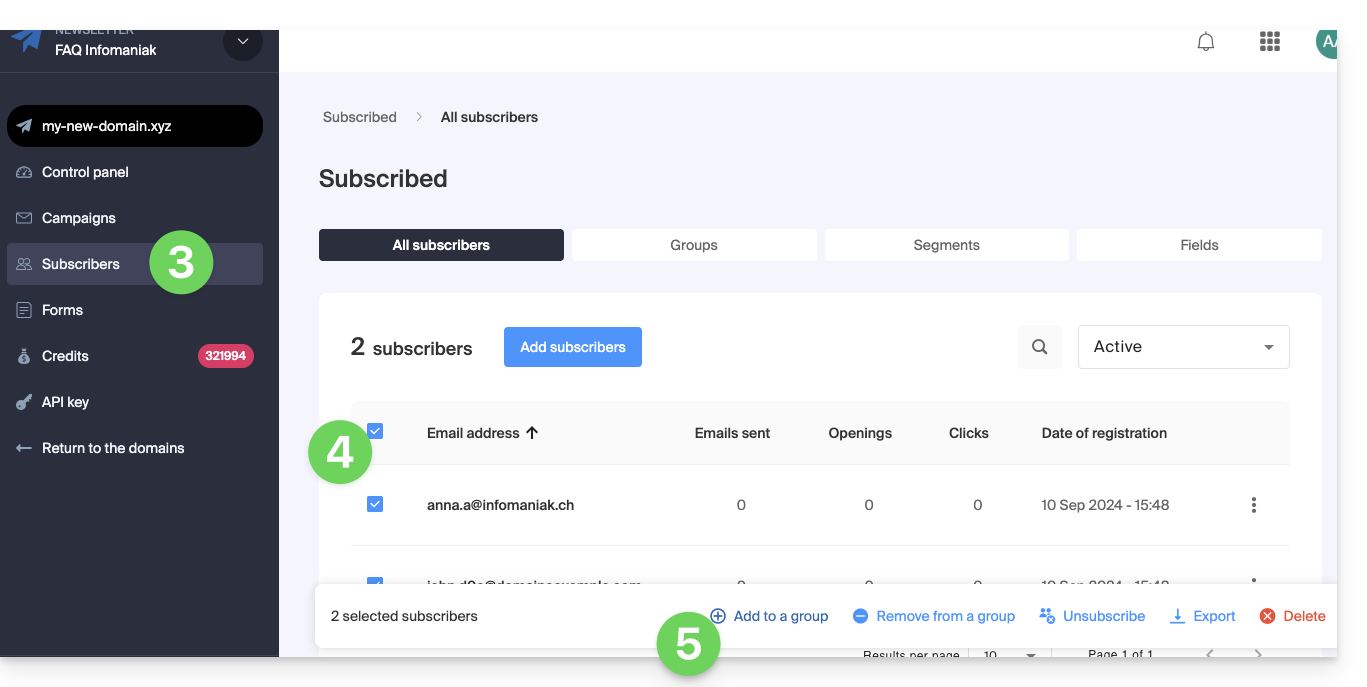
Para adicionar assinantes existentes ao grupo criado:
- Clique aqui para acessar o gerenciamento do seu produto no painel de controle Infomaniak (precisa de ajuda?).
- Clique diretamente no nome de domínio atribuído ao produto em questão.
- Clique em Assinantes no menu lateral esquerdo.
- Selecione os assinantes que deseja agrupar.
- Clique em Adicionar a um grupo no menu de ações que aparece na parte inferior da tela:
- Insira o(s) nome(s) dos grupos existentes.
- Clique no botão Adicionar:
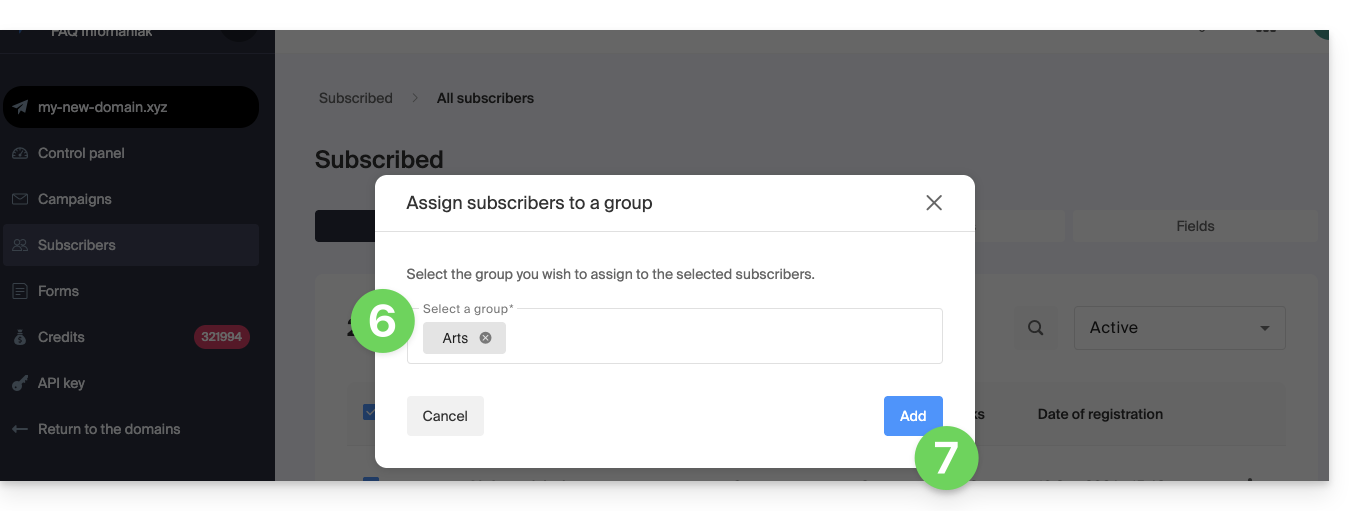
Para remover assinantes de determinados grupos, escolha Remover de um grupo no ponto 5 acima.
Link para esta FAQ: https://faq.infomaniak.com/1525
Esta seção de perguntas frequentes foi útil?
Este guia diz respeito à ferramenta de Newsletter da Infomaniak, que oferece relatórios detalhados para medir com precisão o impacto dos seus envios.
Introdução
- Conheça as pessoas que o seguem:
- Descubra num mapa mundial onde estão localizados os seus assinantes (geolocalização) e quais os dispositivos que utilizam para ler as suas mensagens (dispositivos móveis, computadores, etc.).
- Esta informação permite-lhe conhecer melhor os seus contactos e adaptar o conteúdo das suas newsletters em conformidade.
- Acompanhe a atividade das suas newsletters:
- De forma rápida, visualize todos os dados importantes para medir a qualidade e o alcance das suas campanhas de e-mail: a taxa de abertura única, a taxa de cancelamento de subscrição e o número de endereços de e-mail inválidos (rejeitados).
- Descubra o que realmente interessa aos seus assinantes:
- Meça facilmente o interesse dos seus destinatários consultando as estatísticas dos links.
- Assim, poderá ver precisamente quantas pessoas clicaram nos links das suas newsletters e descobrir o que mais interessa aos seus assinantes.
Aceder aos relatórios dos envios anteriores
O painel oferece uma visão geral rápida da evolução das suas campanhas desde o início, com estatísticas mensais:
- Clique aqui para acessar o gerenciamento do seu produto no Manager Infomaniak (precisa de ajuda?).
- Clique no nome do domínio correspondente na tabela que aparece:
- Clique em Campanhas no menu lateral esquerdo.
- Clique na aba ENVIADAS.
- Clique no botão VER RELATÓRIO:
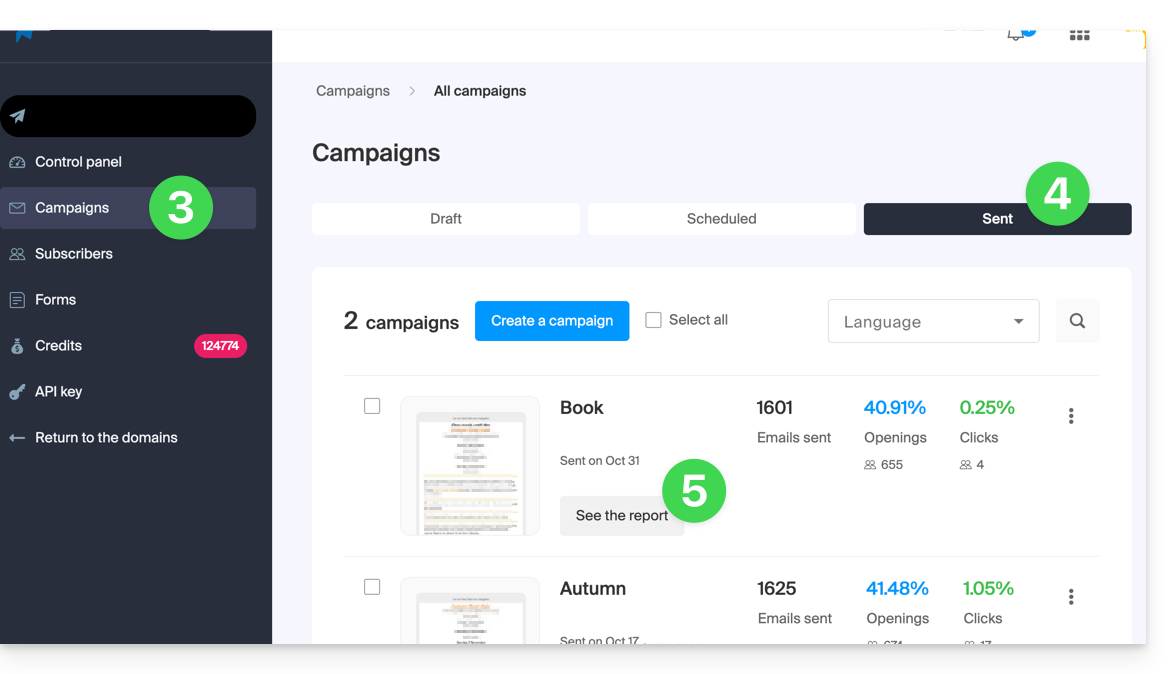
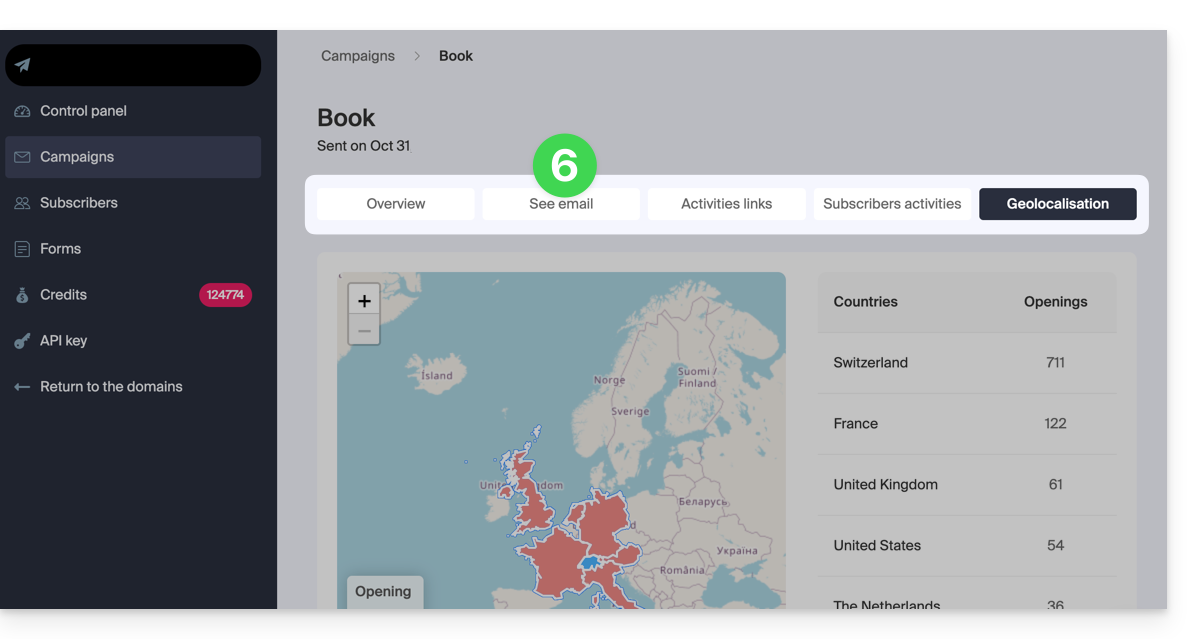
- Em seguida, você tem diferentes guias à sua disposição para analisar os resultados da sua campanha de e-mail, incluindo a possibilidade de rever o e-mail e baixá-lo:
Link para esta FAQ: https://faq.infomaniak.com/1576
Esta seção de perguntas frequentes foi útil?
Este guia explica como gerenciar erros do tipo Soft Bounce e Hard Bounce que podem ocorrer durante o envio de e-mails, especialmente ao usar a Newsletter Infomaniak.
Hard Bounce
Um erro permanente é um e-mail que não pode ser entregue devido a motivos permanentes.
- e-mail enviado para um endereço falso
- domínio de e-mail do destinatário que não é um domínio real
- servidor do destinatário que não aceita e-mails
- etc.
Resposta Temporária Negativa
Um «soft bounce» é uma mensagem de erro que indica que o e-mail não foi entregue ao destinatário e corresponde a um problema de encaminhamento, aparentemente temporário: o endereço de e-mail é válido e o remetente pode repetir o envio.
Várias razões podem explicar um «soft bounce» e, portanto, o motivo pelo qual o servidor do destinatário recusa temporariamente o e-mail:
- a caixa de entrada do destinatário está cheia: devido à falta de capacidade de armazenamento suficiente, o destinatário não recebe mais mensagens
- ocorre um problema no servidor de mensagens do destinatário: o servidor está temporariamente indisponível ou com problemas, ou o utilizador configurou, inadvertidamente, filtros que impedem a receção de determinadas mensagens
- quando o conteúdo do e-mail, especialmente os arquivos anexados, é muito grande, o problema de entrega ocorre no momento do envio.
A menos que o destinatário tenha abandonado definitivamente sua caixa de entrada sem excluir sua conta, o "soft bounce" é um problema temporário.
Exemplo da ferramenta de newsletter da Infomaniak após um envio com uma boa pontuação de 0% de “Rejeições permanentes” e 0,31% de “Rejeições temporárias”: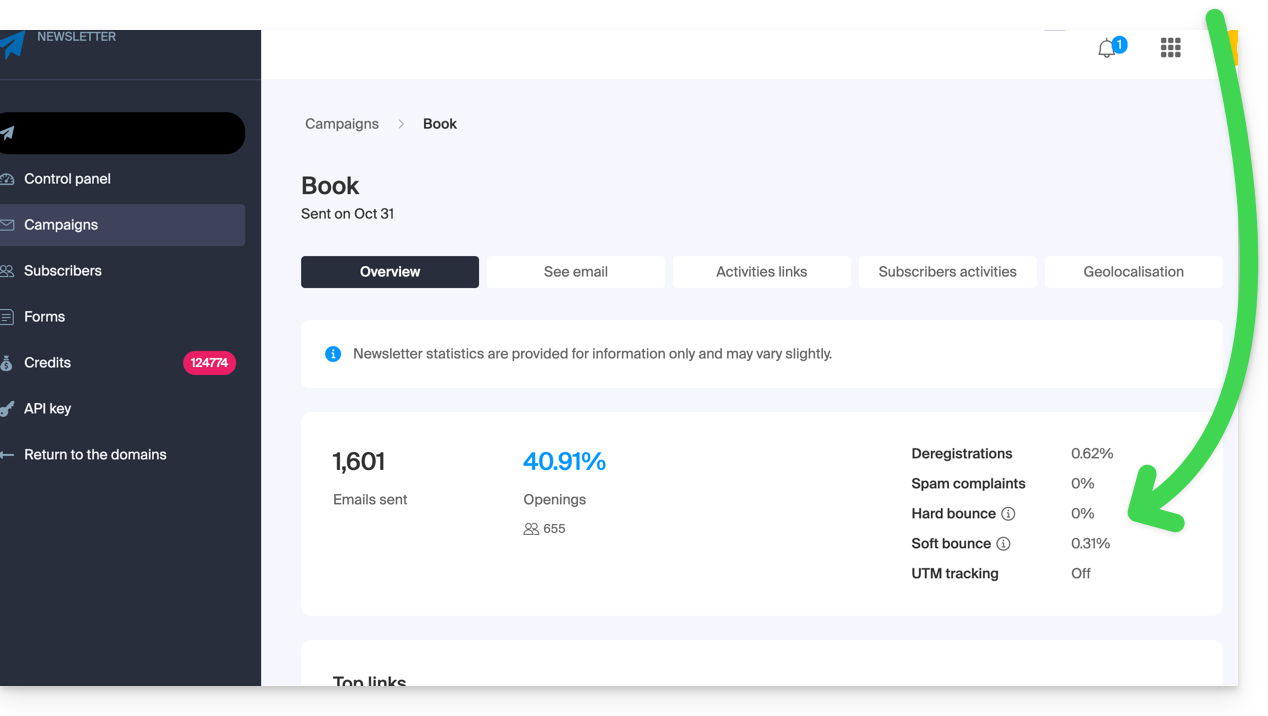
Consulte também este outro guia.
Link para esta FAQ: https://faq.infomaniak.com/1605
Esta seção de perguntas frequentes foi útil?
Este guia detalha as regras para o envio de e-mails em massa na Infomaniak, a fim de evitar que sejam classificados como spam, em conformidade com as leis federais suíças e os Termos e Condições Gerais da Infomaniak.
Obter o consentimento (duplo opt-in)
O duplo opt-in é o único método para se proteger contra reclamações.
Para ser válido, o registo do utilizador deve:
- Ser proveniente de um formulário dedicado a um tópico específico.
- Ser confirmada pelo destinatário por meio de um link de validação enviado por e-mail.
- Ser rastreado pelo sistema (registro do endereço IP e da data).
Como manter-se em conformidade?
- Utilize um formulário de contato com dupla confirmação para criar suas listas.
- Guarde sistematicamente o endereço IP e a data de inscrição de cada assinante.
- Insira obrigatoriamente um link de cancelamento de inscrição visível na parte inferior de cada envio.
Gestão de reclamações de spam
Em caso de reclamação, a Infomaniak pode suspender temporariamente os envios.
- Se fornecer a prova de inscrição (endereço IP e data): a reclamação será arquivada.
- Sem comprovativo de inscrição: a reclamação é considerada justificada. A Infomaniak pode, então, suspender o endereço de e-mail, o domínio ou rescindir o contrato em caso de reincidência.
Link para esta FAQ: https://faq.infomaniak.com/1667
Esta seção de perguntas frequentes foi útil?
Este guia explica como funciona o sistema de gestão de envios da Newsletter Infomaniak.
Volumes de envio disponíveis para as suas newsletters
De modo geral, a regra é simples: 1 envio = 1 newsletter enviada para 1 assinante.
Existem dois tipos de volumes de envio:
- Os envios ofertados com os seus produtos Infomaniak (não são acumulados caso não sejam utilizados).
- Os envios adquiridos através de pacotes (duração ilimitada).
1. Obter e utilizar os envios gratuitos
Cada produto Infomaniak que você possui dá direito a uma quota de envios mensais gratuitos. Exemplo: possuir pelo menos um Infomaniak Ticketing (mesmo que nenhum evento seja criado ou esteja ativo) permite que você se beneficie de 2500 envios gratuitos por mês. Este volume é fixo, independentemente de você possuir um ou vários sistemas de bilheteira na mesma conta. O mesmo princípio se aplica a kSuite (na versão Enterprise, você recebe um crédito de 5000 envios).
Em relação ao uso, seus envios gratuitos são consumidos primeiro. Seus envios pagos só começam a ser descontados quando não houver mais um saldo suficiente de envios gratuitos.
Exemplo de funcionamento:
Um cliente tem direito a 2000 envios mensais gratuitos.
- Se, no final do mês, ainda tiver 1500 envios gratuitos disponíveis, o sistema complementará automaticamente o seu saldo para que volte a ter 2000 envios gratuitos no início do mês seguinte.
- Se tiver adquirido um pacote de 10.000 envios, estes não serão utilizados enquanto ainda tiver envios gratuitos disponíveis. Só começarão a ser contabilizados depois de o limite mensal gratuito ter sido totalmente esgotado. Assim, a renovação mensal dos 2000 envios gratuitos continua a ser aplicada independentemente do saldo de envios pagos.
2. Visualizar e encomendar envios adicionais
Para aceder à gestão dos seus volumes de envio gratuitos e pagos:
- Clique aqui para acessar o gerenciamento do seu produto no Manager Infomaniak (precisa de ajuda?).
- Clique no nome de domínio atribuído à sua newsletter.
- Clique em Envios (ou no menu de gestão do saldo) no menu lateral esquerdo.
- Você pode visualizar o detalhe do seu consumo e obter mais envios clicando no botão Obter envios:
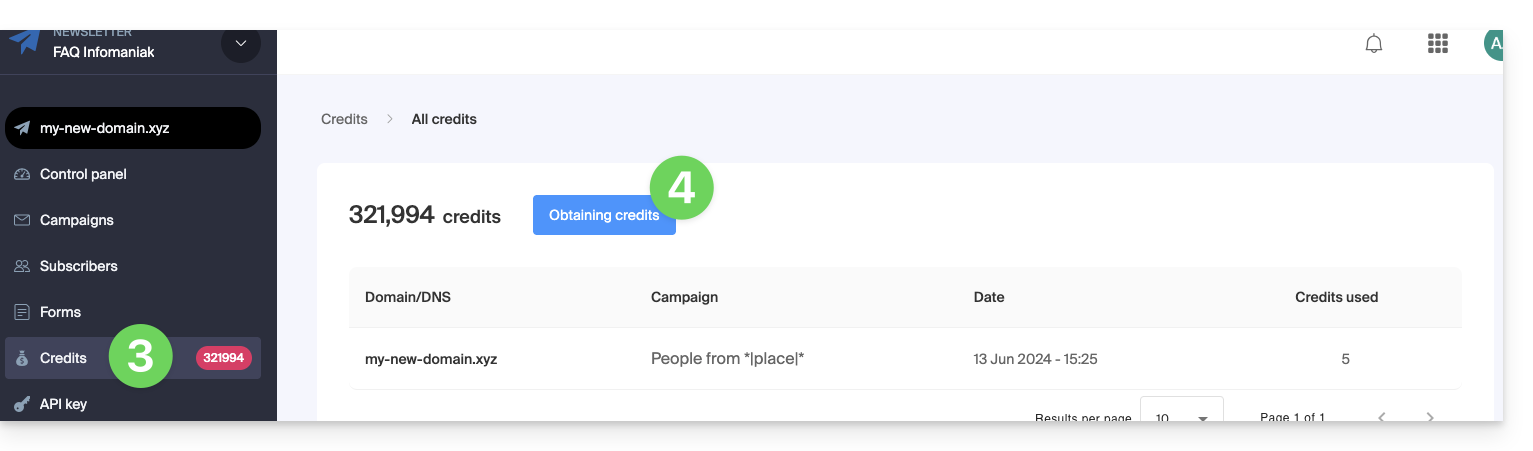
- Para aumentar sua reserva, clique em Encomendar envios.
- Clique em Detalhes para consultar os créditos obtidos com o restante de seus produtos,
- Clique no botão azul para saber quais os créditos que o restante de seus produtos lhe proporciona:

Definir um limite de utilização mensal
Se desejar controlar o seu consumo, pode definir um limite para o número de e-mails enviados por mês:
- Clique aqui para aceder à sua interface Newsletter.
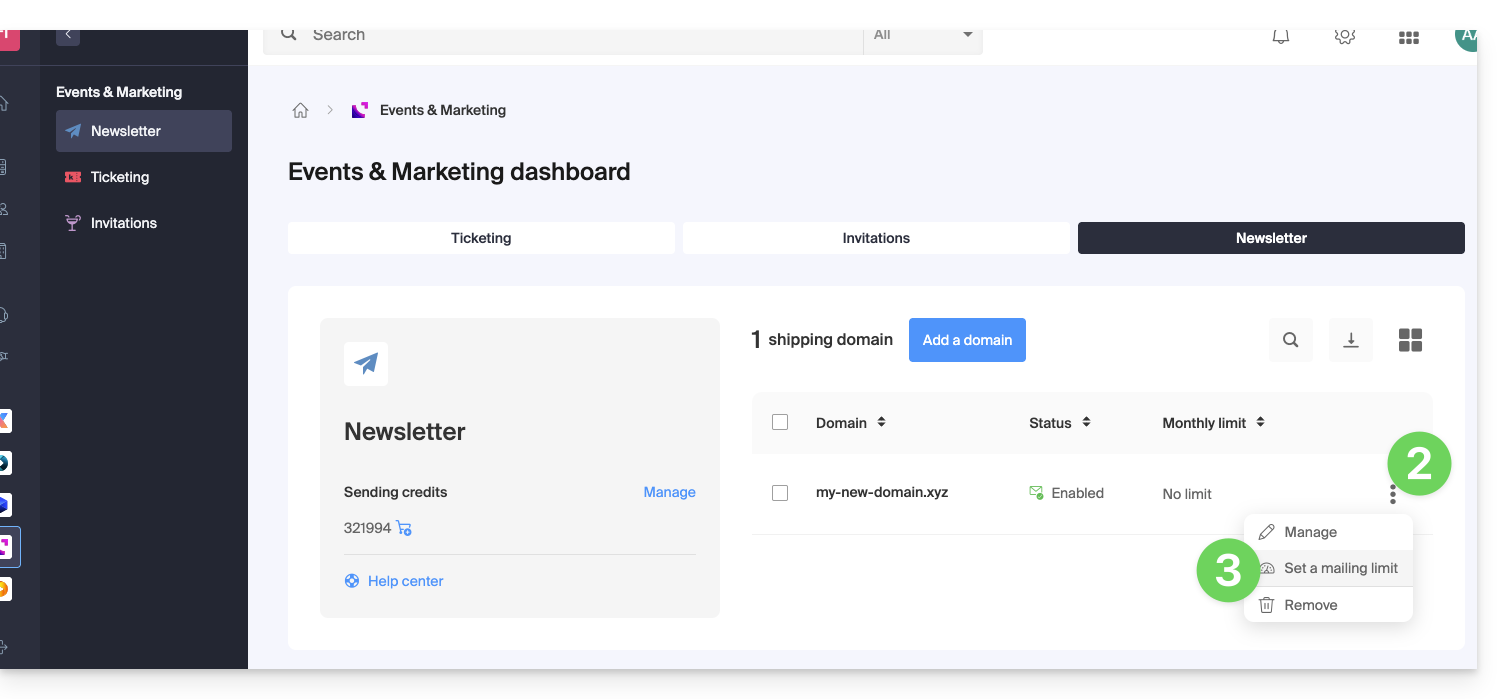
- Clique no menu de ação ⋮ à direita do domínio em questão.
- Selecione Definir um limite de envio:
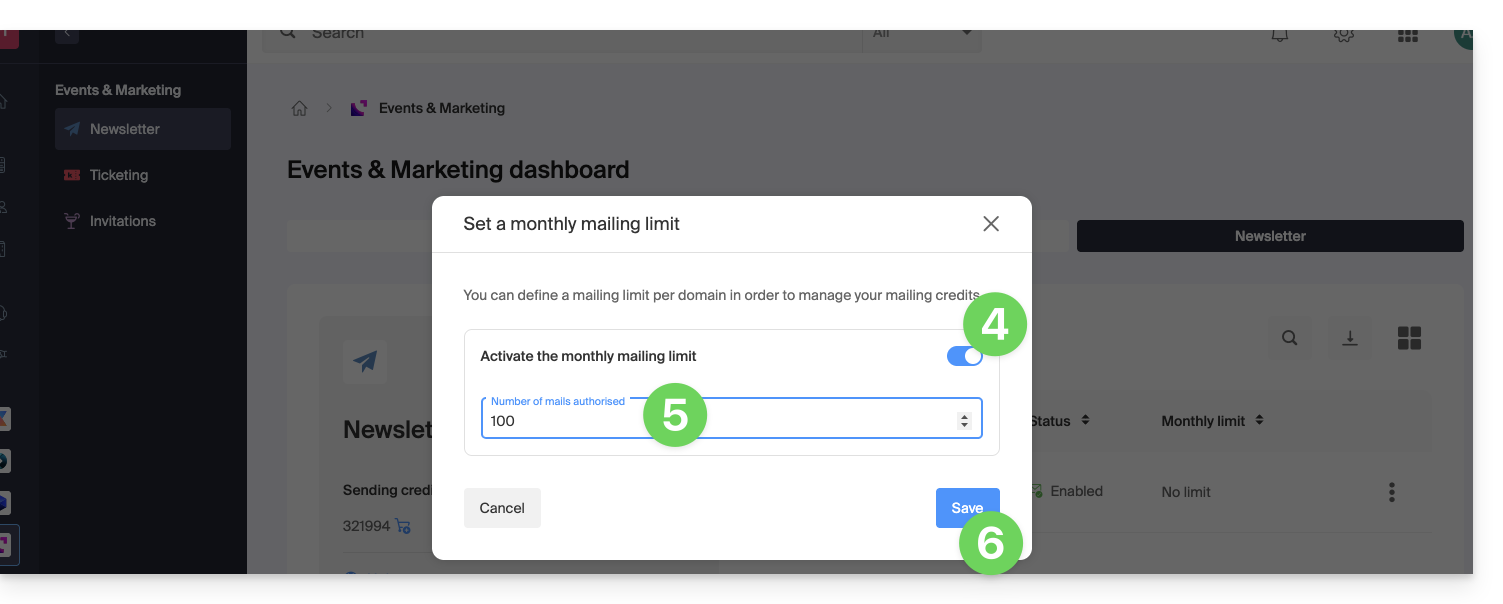
- Ative o botão para configurar o seu limite.
- Insira o número máximo de envios permitidos por mês.
- Clique em Salvar:
Link para esta FAQ: https://faq.infomaniak.com/2031
Esta seção de perguntas frequentes foi útil?
Este guia explica os diferentes estatutos dos seus assinantes da Newsletter Infomaniak e detalha o funcionamento da gestão dos endereços inválidos para otimizar a taxa de entrega dos seus envios.
Aceder à lista de assinantes e filtrar a vista
Para organizar e filtrar os seus contactos de acordo com o seu estado:
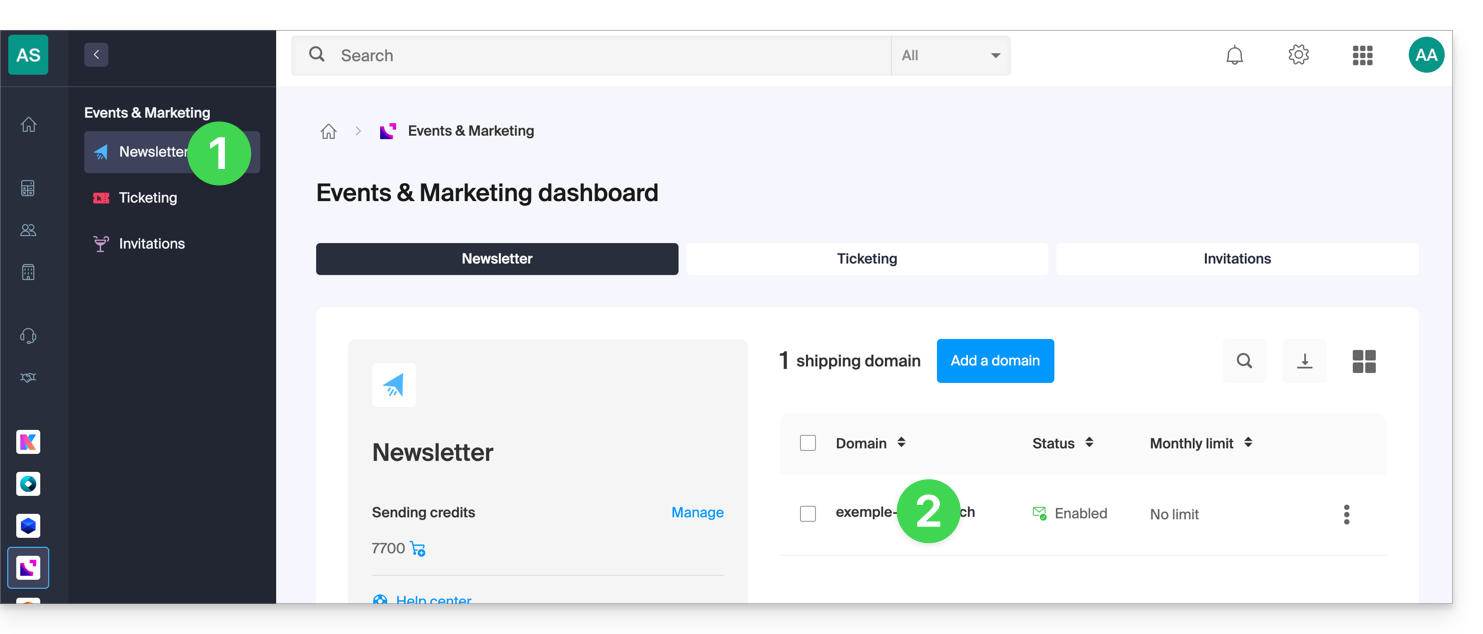
- Clique aqui para aceder à gestão da sua newsletter no painel de controlo Infomaniak (precisa de ajuda?).
- Clique no nome do domínio correspondente na tabela que aparece:
- Clique em Subscritores no menu lateral esquerdo.
- Utilize o menu suspenso localizado à direita, acima da tabela (filtro padrão: ATIVO), para alterar a exibição de acordo com o status desejado:
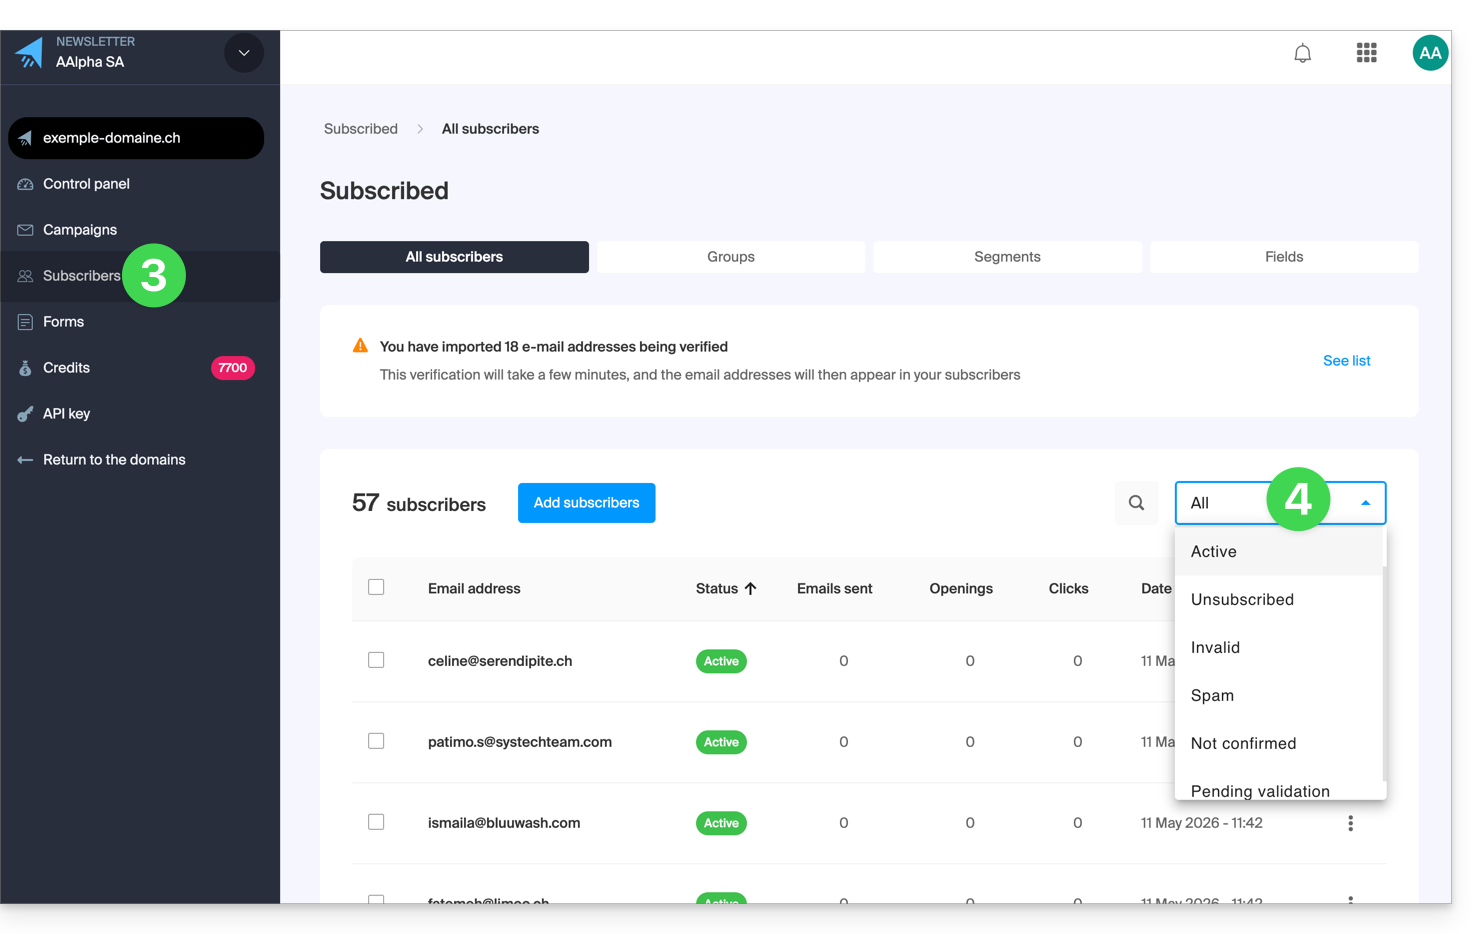
- O filtro TODOS permite exibir todos os seus contatos.
Entenda os diferentes status de um assinante
Cada contato em sua lista possui um status específico que determina se ele receberá ou não suas comunicações:
1. Os assinantes ATIVOS
- Este é o estado padrão após um registo ou importação bem-sucedidos.
- Um assinante ativo recebe todas as suas newsletters enquanto o seu estado não for alterado.
2. Assinantes CANCELADOS
- Este status indica que o assinante optou por não receber mais suas mensagens (geralmente por meio do link de cancelamento de inscrição na parte inferior de seus envios).
- Você também pode cancelar a inscrição de um contato manualmente, acessando o perfil dele e utilizando o botão dedicado (consulte este outro guia).
3. Os assinantes INVÁLIDOS
- Um endereço é marcado como Inválido se for detetado como incorreto, inatingível, desativado ou de risco.
- Esta alteração de estado pode ocorrer em dois momentos:
- Na importação: após a análise automática do sistema de verificação.
- No envio: se o servidor de e-mail do destinatário informar de forma permanente que o endereço é inatingível (hard bounce).
4. Assinantes marcados como SPAM
- Este status indica que o assinante optou por não receber mais suas mensagens, selecionando "isto é spam" ou "nunca me inscrevi" no link de cancelamento de inscrição na parte inferior de seus envios.
5. Assinantes NÃO CONFIRMADOS
- Este status se refere aos usuários que se inscreveram por meio de um formulário que utiliza o modelo duplo opt-in, mas que ainda não clicaram no link de confirmação.
- Observação: não é possível forçar a inscrição de um contato até que ele valide seu registro.
6. Assinantes EM ESPERA DE VALIDAÇÃO
- Estado temporário que ocorre logo após uma importação.
- O sistema analisa os endereços para verificar a sua validade técnica; o estado definitivo é atribuído após a conclusão da análise.
Por que alguns endereços são filtrados?
O gerenciamento rigoroso dos endereços inválidos é essencial para garantir que suas newsletters cheguem à caixa de entrada (taxa de entrega) e evitar o bloqueio dos serviços de envio da Infomaniak.
As principais causas de invalidez
- Endereço inexistente: Isso pode ser devido a um erro de digitação (por exemplo,
john.doe@infomania.comem vez deinfomaniak.com) ou a um endereço excluído. - Obsolecência das listas: Uma lista não atualizada pode ter sua taxa de endereços inválidos duplicada a cada ano.
- Restrições técnicas: Se a opção Catchall estiver ativada no domínio de destino ou se o servidor remoto recusar a verificação, o sistema pode marcar o endereço como inválido por medida de segurança para proteger sua reputação como remetente.
Ao excluir esses endereços, você maximiza sua taxa de abertura e minimiza os riscos de reclamações por spam junto aos provedores de hospedagem de seus destinatários.
Link para esta FAQ: https://faq.infomaniak.com/2104
Esta seção de perguntas frequentes foi útil?
Este guia aborda o uso da ferramenta Newsletter oferecida pela Infomaniak e detalha as diferentes possibilidades de criação e redação de campanhas de e-mail direcionadas aos assinantes presentes nas listas de contatos dentro da ferramenta.
Criar e enviar uma newsletter
As suas newsletters são geridas a partir do menu lateral esquerdo, intitulado "Campanhas", que permite visualizar os seus envios anteriores e criar novos:
- Clique aqui para aceder à gestão do seu produto no Manager Infomaniak (precisa de ajuda?).
- Clique no nome do domínio correspondente na tabela que aparece:
- Clique em Campanhas no menu lateral esquerdo.
- Clique em Criar campanha:
1. Detalhes: configurar o envio
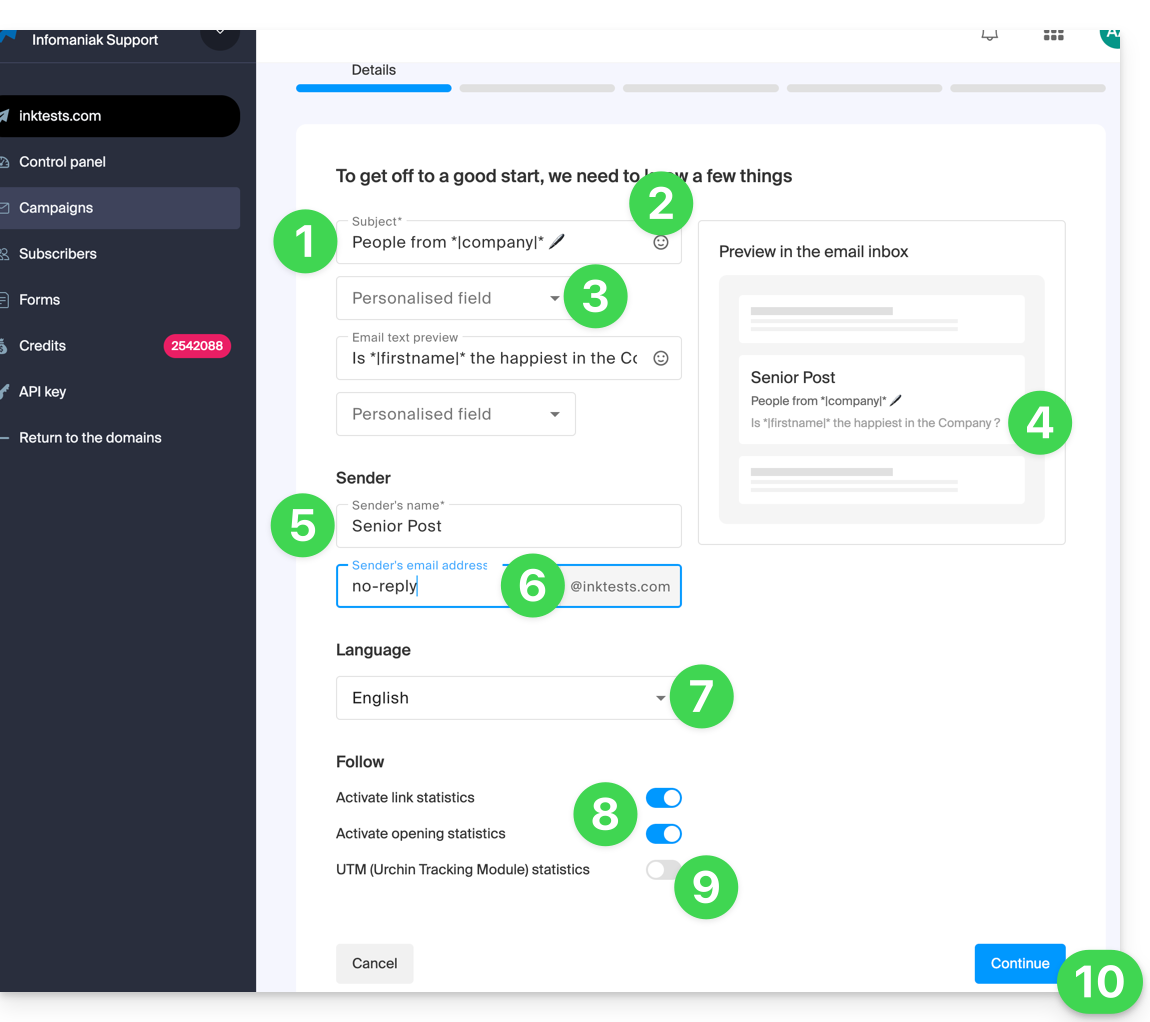
Para começar a redigir a sua newsletter, preencha as informações solicitadas:
- Insira um assunto para o e-mail (visível para o destinatário e na lista dos seus envios).
- Insira, se necessário, um emoji.
- Insira, se necessário, variáveis (campos personalizados).
- É exatamente o mesmo princípio para a mensagem de pré-visualização/visualização (que pode pré-visualizar juntamente com o restante do assunto na parte direita da janela).
- Em seguida, para que este excerto seja visível depois que a sua newsletter chegar a um utilizador da aplicação web Mail da Infomaniak, este deve ter ativado esta configuração:
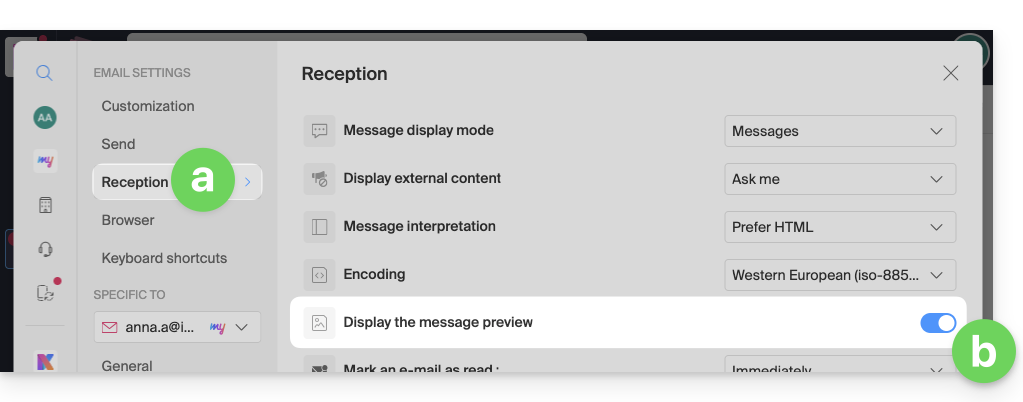
- No Gmail, é esta configuração que deve ser ativada:
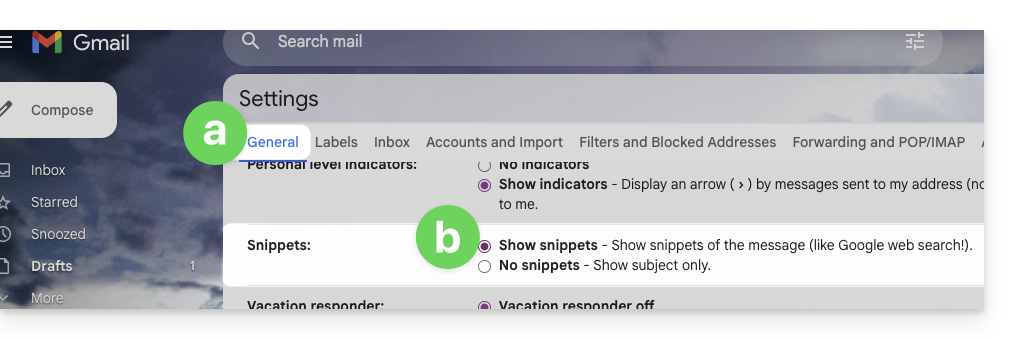
- O resultado depois de a opção ser ativada:

- Por defeito, são as primeiras linhas da mensagem que aparecerão se nada for especificado, sendo estes dois campos opcionais.
- Em seguida, para que este excerto seja visível depois que a sua newsletter chegar a um utilizador da aplicação web Mail da Infomaniak, este deve ter ativado esta configuração:
- Insira um nome correspondente ao remetente (visível para o destinatário).
- Insira o endereço de e-mail do remetente (entre os endereços existentes no domínio correspondente à newsletter; o endereço de e-mail deve existir e ser válido).
- Escolha o idioma (para o idioma usado nos e-mails anexos, como o e-mail de cancelamento de inscrição).
- Ative ou desative o rastreamento.
- Ative ou desative a parte UTM.
- Clique em Continuar para passar para a próxima etapa (a sua newsletter está agora guardada como rascunho):
2. Escolher o tema da newsletter
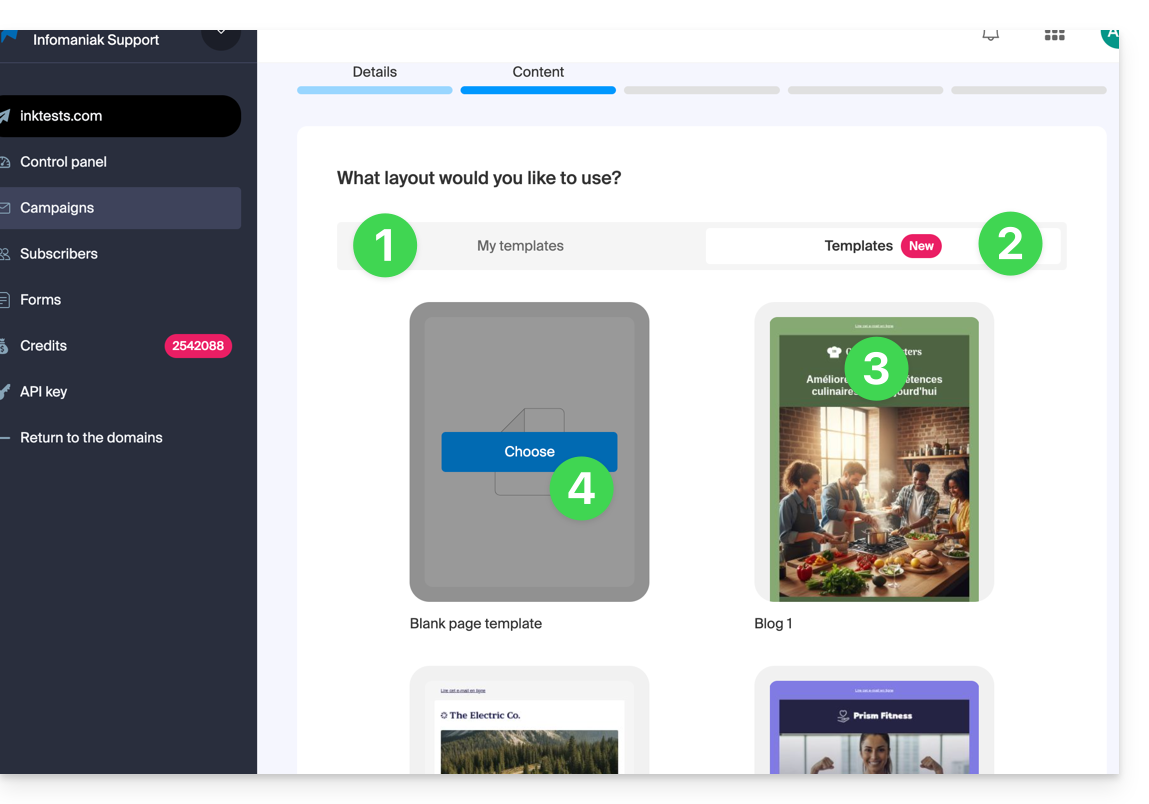
- Se tiver guardado previamente modelos de redação (blocos e layouts configurados ao seu gosto), pode encontrá-los na aba “Os meus modelos” para os reutilizar.
- Caso contrário, clique na aba Modelos.
- Passe o cursor sobre um design pré-configurado para iniciar a edição a partir desse modelo ou para visualizá-lo.
- Clique no modelo em branco para iniciar uma nova criação a partir do editor de blocos:
3. Redigir e editar o conteúdo
- Em todos os momentos, as suas modificações são guardadas e podem ser desfeitas; também pode visualizar a aparência (desktop/móvel) da sua newsletter (e enviar um teste).
- O separador Seções agrupa diferentes elementos pré-definidos, como blocos destinados à parte superior (cabeçalho) ou inferior (rodapé, etc.).
- Clique na seta para baixo para expandir o conteúdo e selecionar um elemento:
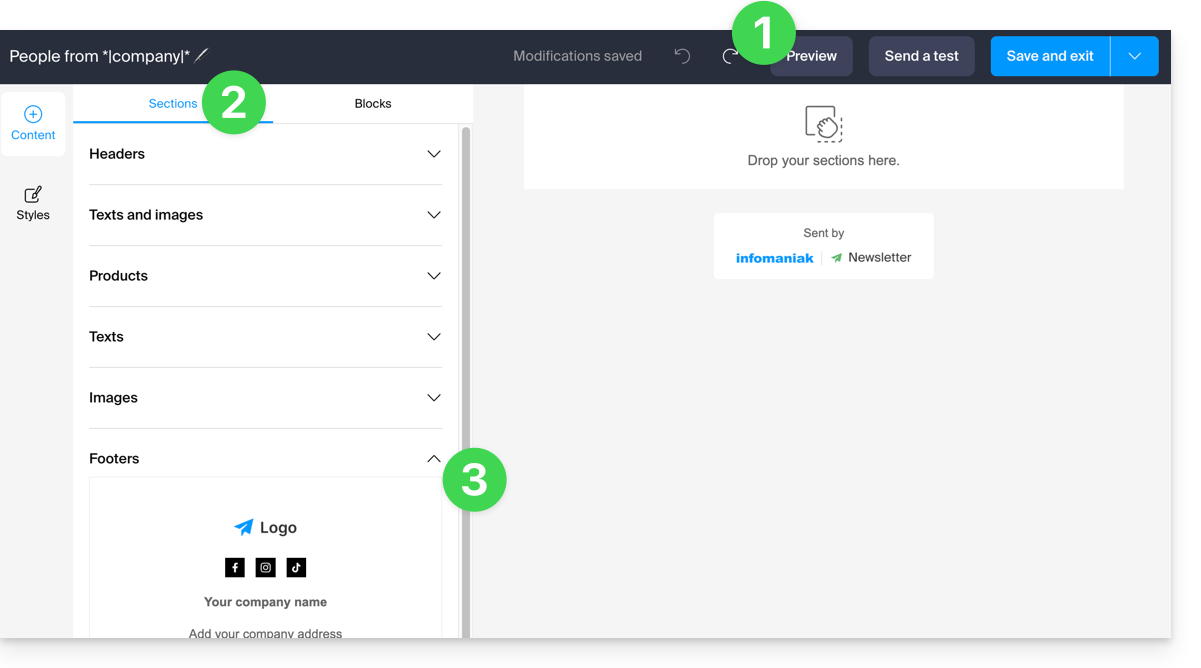
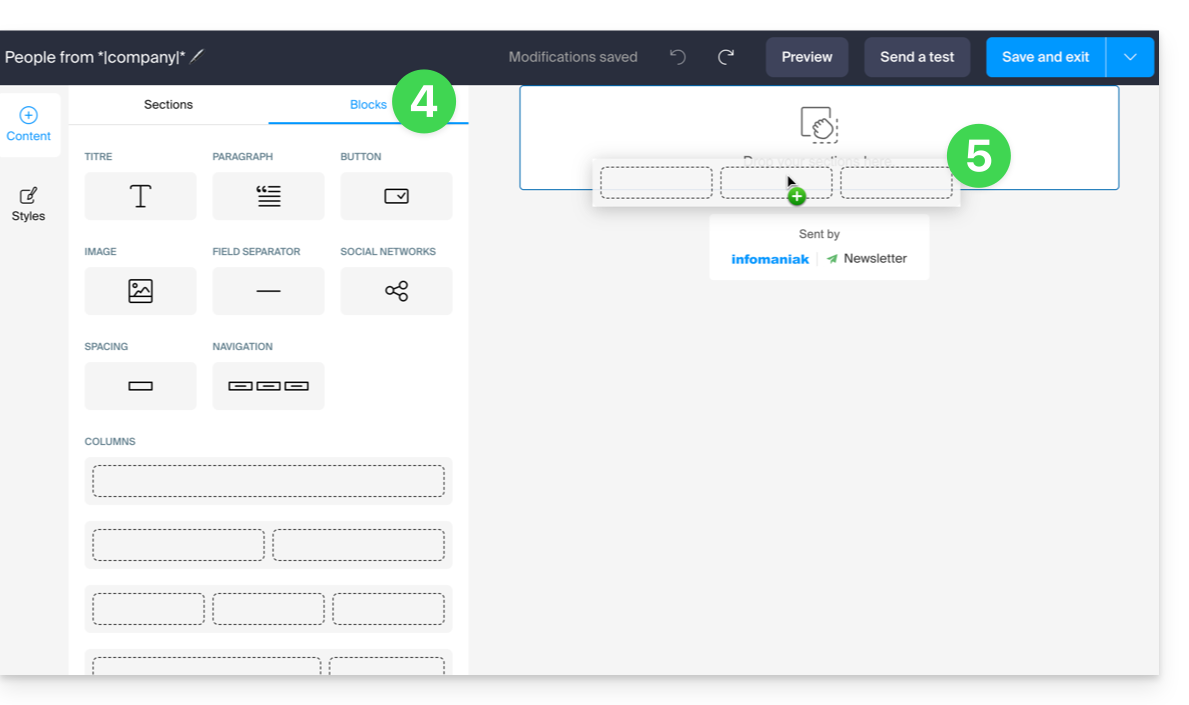
- Clique na aba Blocos para obter elementos mais simples que você poderá usar para criar o layout.
- Arraste os elementos escolhidos para a parte lateral direita, no local desejado:
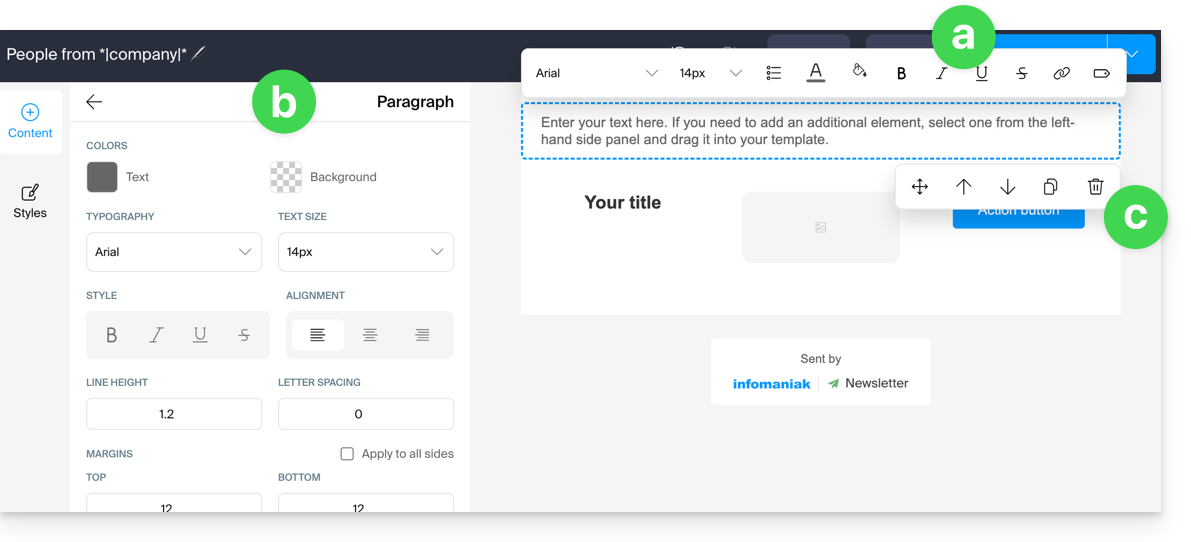
- Cada elemento pode ser ajustado ainda mais ao clicar nele:
- O texto pode ser formatado através da barra de ferramentas que aparece acima (também é possível inserir variáveis).
- A edição mais abrangente do elemento estará sempre disponível no painel lateral esquerdo (cor de fundo, seleção do arquivo (5 MB máx.) para os blocos de imagem, etc.).
- O próprio bloco pode ser movido na página, duplicado ou excluído:
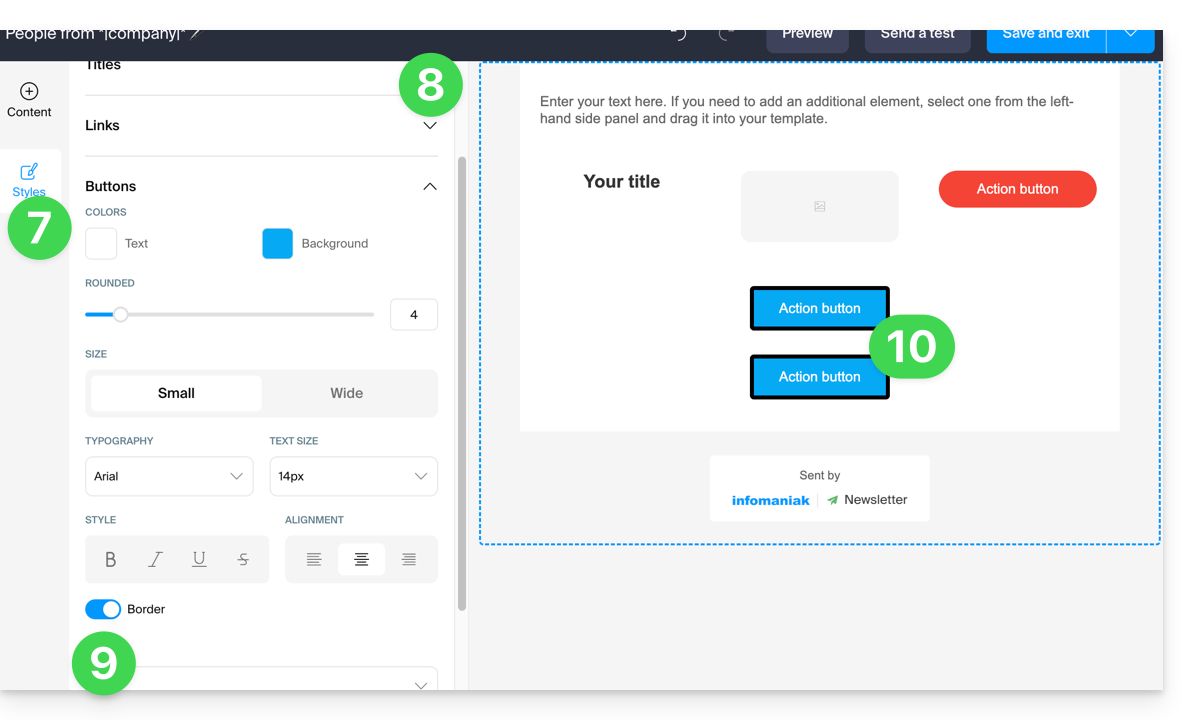
- Clique em Estilos para gerenciar as características que compõem seus diferentes elementos.
- Escolha os elementos que deseja personalizar.
- Adicione, por exemplo, uma borda ao estilo dos botões.
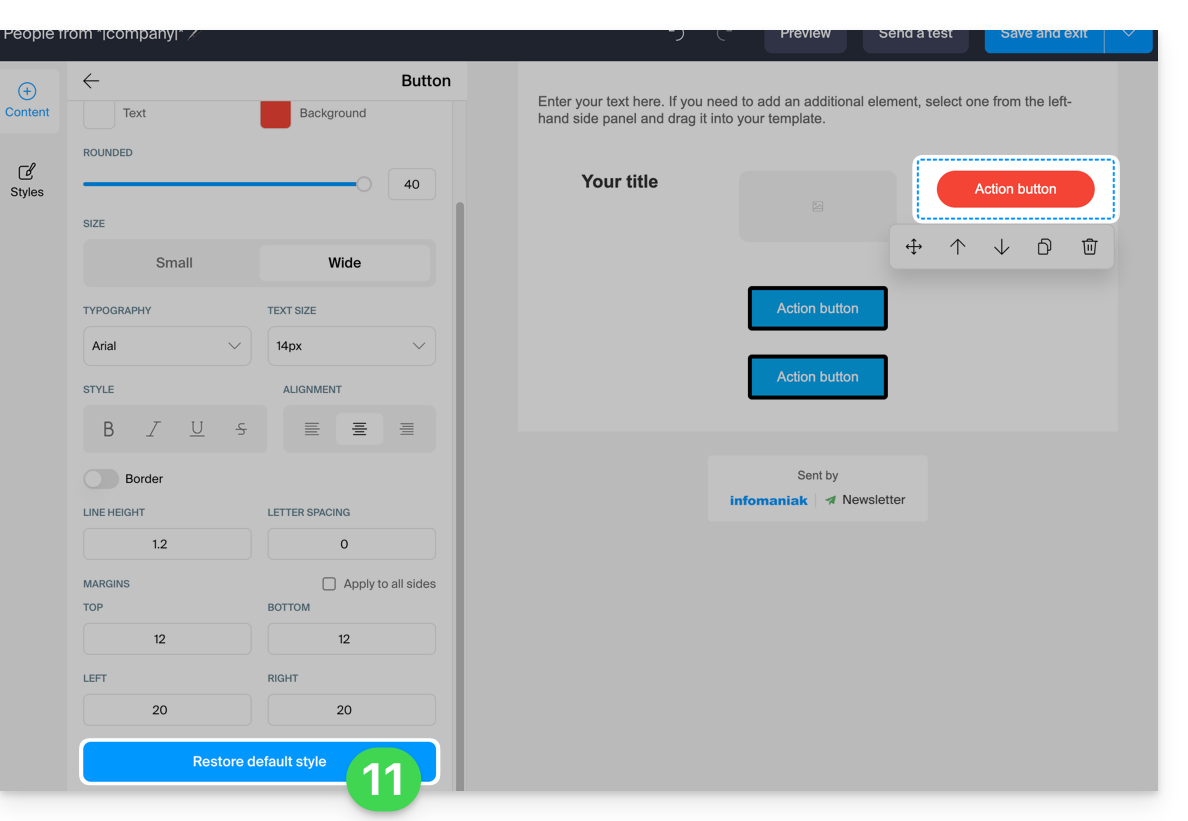
- Todas as novas inserções de botões e todos os botões existentes sem personalização serão afetados pela modificação:
- A qualquer momento, é possível atribuir o estilo que foi definido para os diferentes elementos (ponto 8 acima) aplicando o estilo padrão aos elementos que foram personalizados anteriormente:
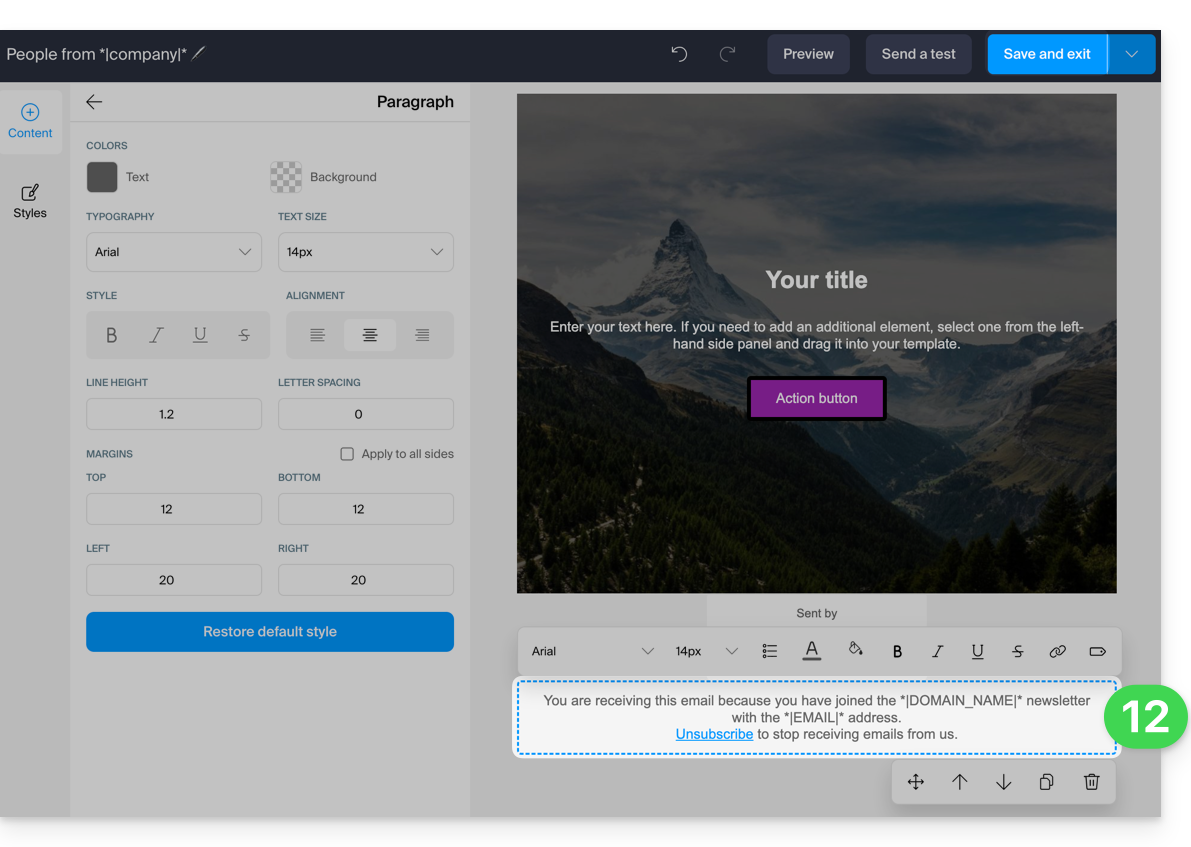
- No momento de salvar, caso faltem informações obrigatórias sobre o cancelamento de inscrição do usuário, estas serão adicionadas ao seu conteúdo:
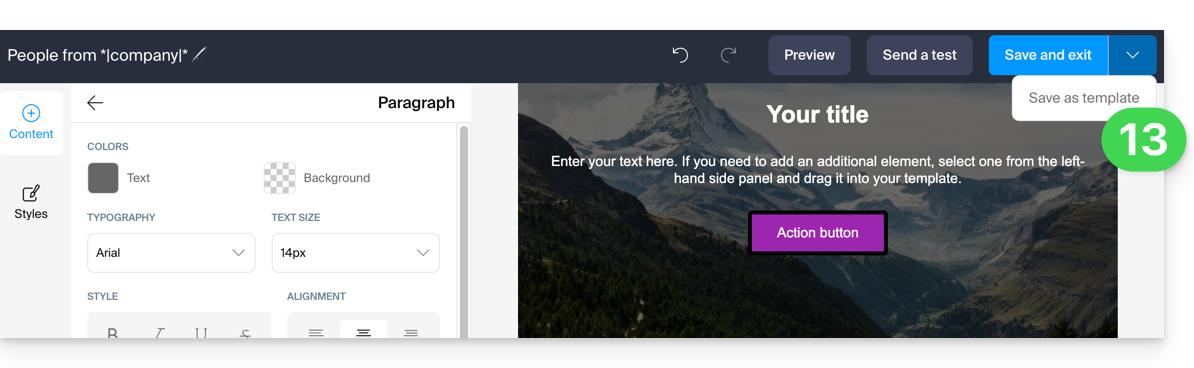
- É possível salvar seu modelo para reutilizá-lo em outras edições de newsletters (o modelo ficará visível na aba dedicada, veja o item 2.1 acima) clicando na seta para baixo à direita do botão de salvar:
- Clique no botão de guardar no canto superior direito quando terminar de redigir a sua newsletter.
4. Escolha dos destinatários
Para selecionar seus assinantes (modo simples):
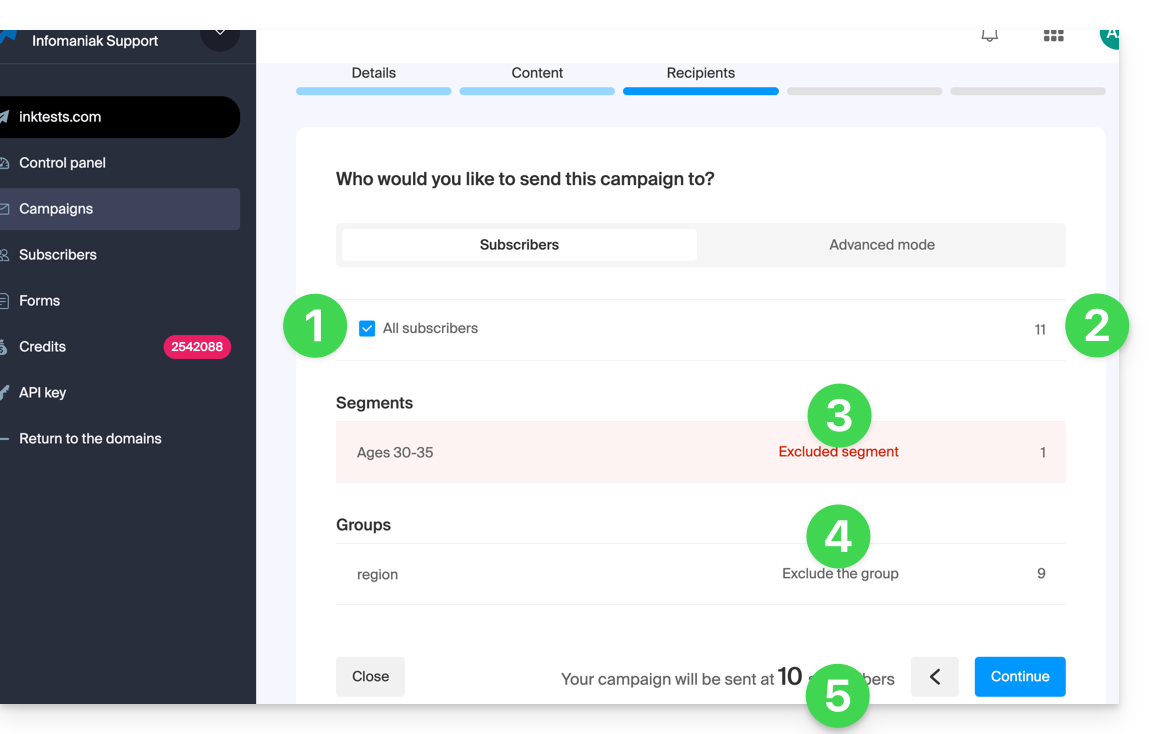
- Selecione todos os assinantes marcando a caixa.
- O número total de assinantes representado por este elemento é exibido à direita, o mesmo para os elementos detalhados abaixo.
- Você pode subtrair do número total de destinatários os assinantes selecionados automaticamente com base em critérios que você definiu previamente no nível da segmentação; você também pode selecionar apenas essa segmentação.
- Pode subtrair do número total de destinatários os assinantes agrupados; também pode selecionar apenas este grupo.
- O número total de assinantes aos quais a newsletter será enviada é atualizado automaticamente com base nas suas escolhas:
Para efetuar uma seleção dos destinatários com base em determinados critérios (consulte este outro guia):
- Clique na aba Avançado:
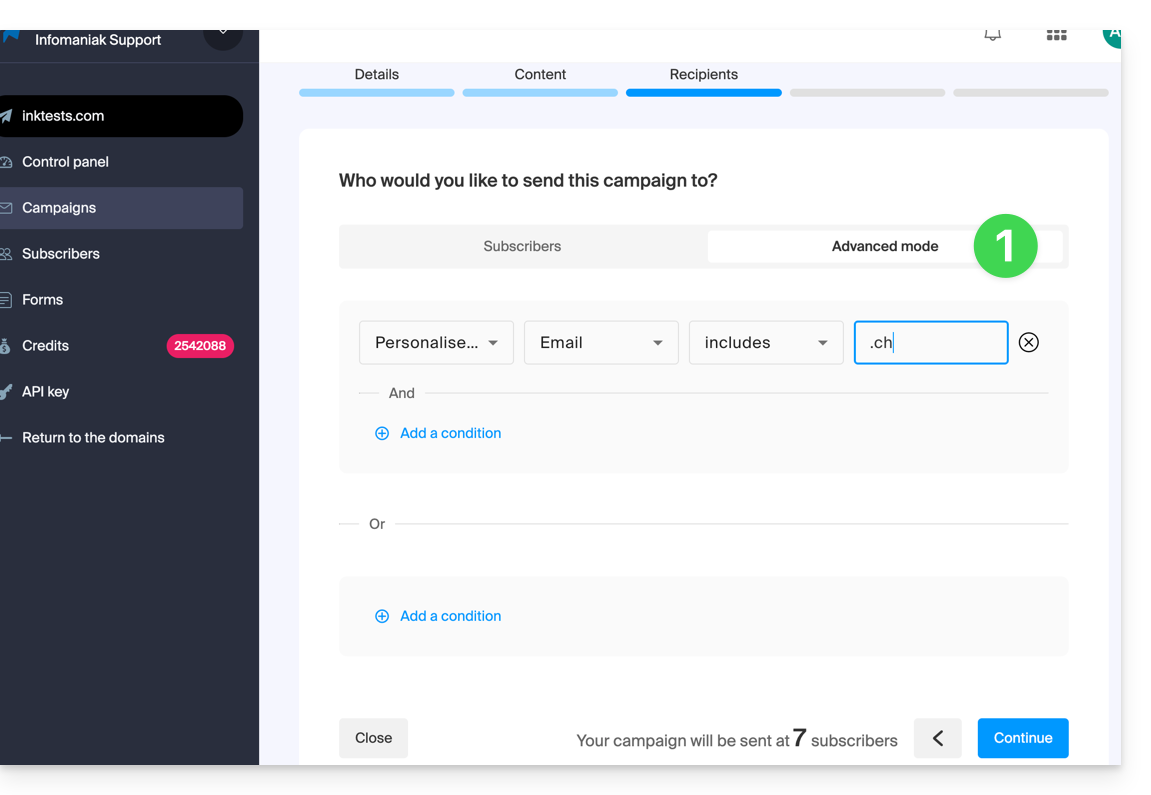
Isto permite adicionar critérios (atenção: se adicionar vários, a condição adicional pode ser combinada com “E” ou com “OU”, o que pode incluir ou excluir um grande número de assinantes, dependendo dos seus critérios).
Tal como no separador anterior, o número total de destinatários é atualizado dinamicamente na parte inferior da página, de acordo com as suas escolhas.
5. Pré-visualizar e testar o envio
Esta penúltima etapa é resumida: permite verificar as principais características do seu envio e modificar eventuais informações de última hora.
Quando estiver pronto, clique no botão azul no canto inferior direito para prosseguir para a última etapa.
6. Agendar um envio imediato ou posterior
A última etapa permite que você escolha o momento em que deseja enviar sua newsletter:
- O envio pode ser agendado para o horário desejado ou ser iniciado imediatamente:
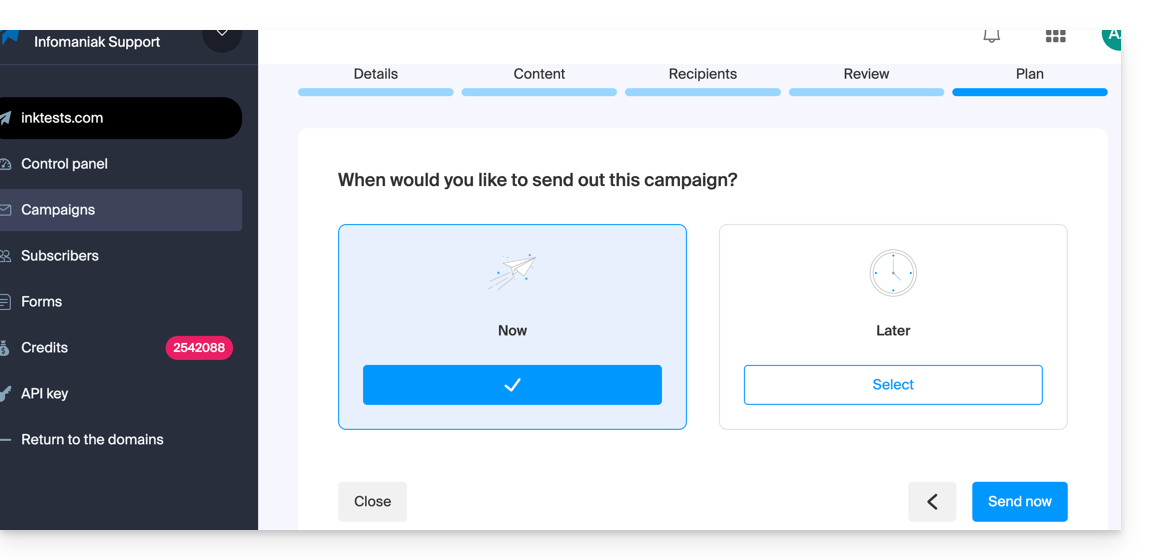
- O envio será então realizado em algumas horas, dependendo do volume total de newsletters em processo de envio, do número de destinatários e da quota horária permitida para a sua conta. Você será informado sobre o andamento do seu envio.
7. Cancelar um envio em andamento
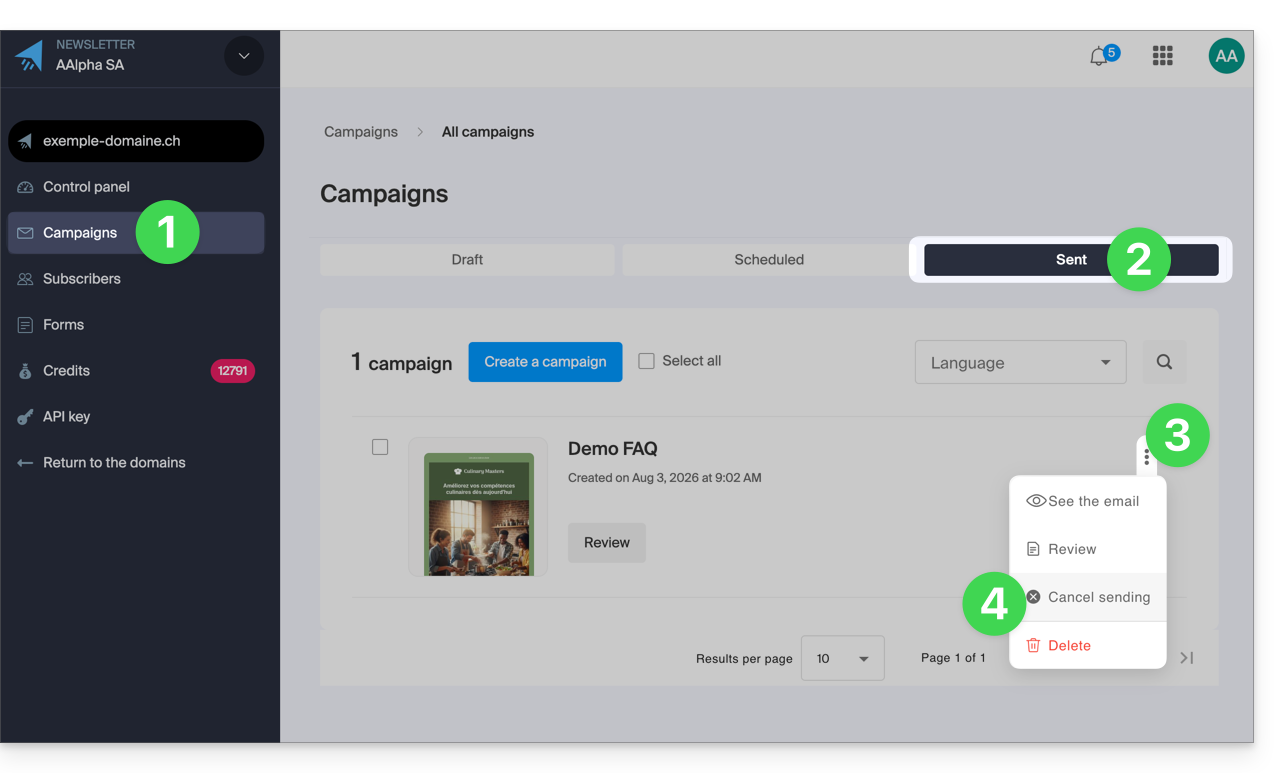
É possível cancelar um envio, seja ele agendado para alguns minutos ou já em andamento:
- Clique em Campanhas no menu lateral esquerdo.
- Clique na aba Enviado (se o envio já tiver começado, caso contrário, clique em Programado).
- Clique no menu de ações ⋮ localizado à direita do item em questão.
- Escolha cancelar o envio e confirme a ação:
Link para esta FAQ: https://faq.infomaniak.com/2114
Esta seção de perguntas frequentes foi útil?
Este guia explica como adicionar tags (códigos e variáveis) no corpo do seu texto para personalizar seus envios com o Newsletter Infomaniak.
Introdução
- Um assinante é representado por um endereço de e-mail, mas não apenas isso:
- Você pode ter detalhes adicionais sobre ele, e estes devem ser incluídos no arquivo que você importa para que você possa definir um campo personalizado associado a cada uma dessas informações adicionais.
- Muitas outras informações podem ser coletadas durante o cadastro de um assinante por meio de um formulário.
- Você pode adicionar muitas outras informações manualmente a qualquer momento.
- As informações associadas a cada assinante podem ser usadas para segmentar seu público, enviar mensagens direcionadas e melhorar o engajamento.
- Ao utilizar esses detalhes adicionais, você aumenta as chances de conversão e fidelização, criando assim uma relação mais forte e personalizada com cada assinante.
Gerenciar os campos personalizados
Para visualizar o conteúdo de cada campo de cada assinante, consulte este outro guia (na seção Editar a ficha de um assinante).
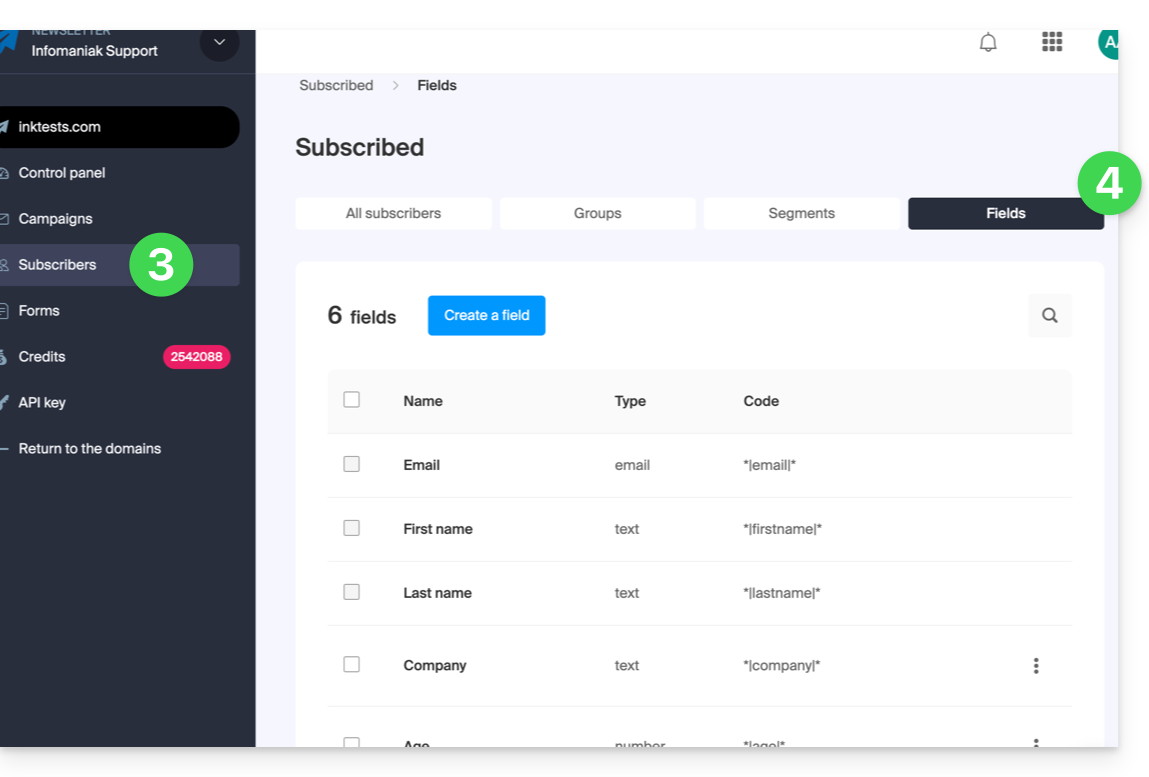
Para gerenciar o nome desses campos, ou simplesmente excluí-los ou adicioná-los, acesse a seção Assinantes:
- Clique aqui para acessar o gerenciamento do seu produto no painel de controle Infomaniak (precisa de ajuda?).
- Clique no nome do domínio correspondente na tabela que aparece:
- Clique em Assinantes no menu lateral esquerdo.
- Clique na aba Campos:
Inserir uma variável…
… no título da Newsletter
Ao criar uma nova newsletter, insira os campos personalizados no assunto e no texto de pré-visualização:
- Na primeira etapa da criação, clique nos menus suspensos dedicados a esse fim:
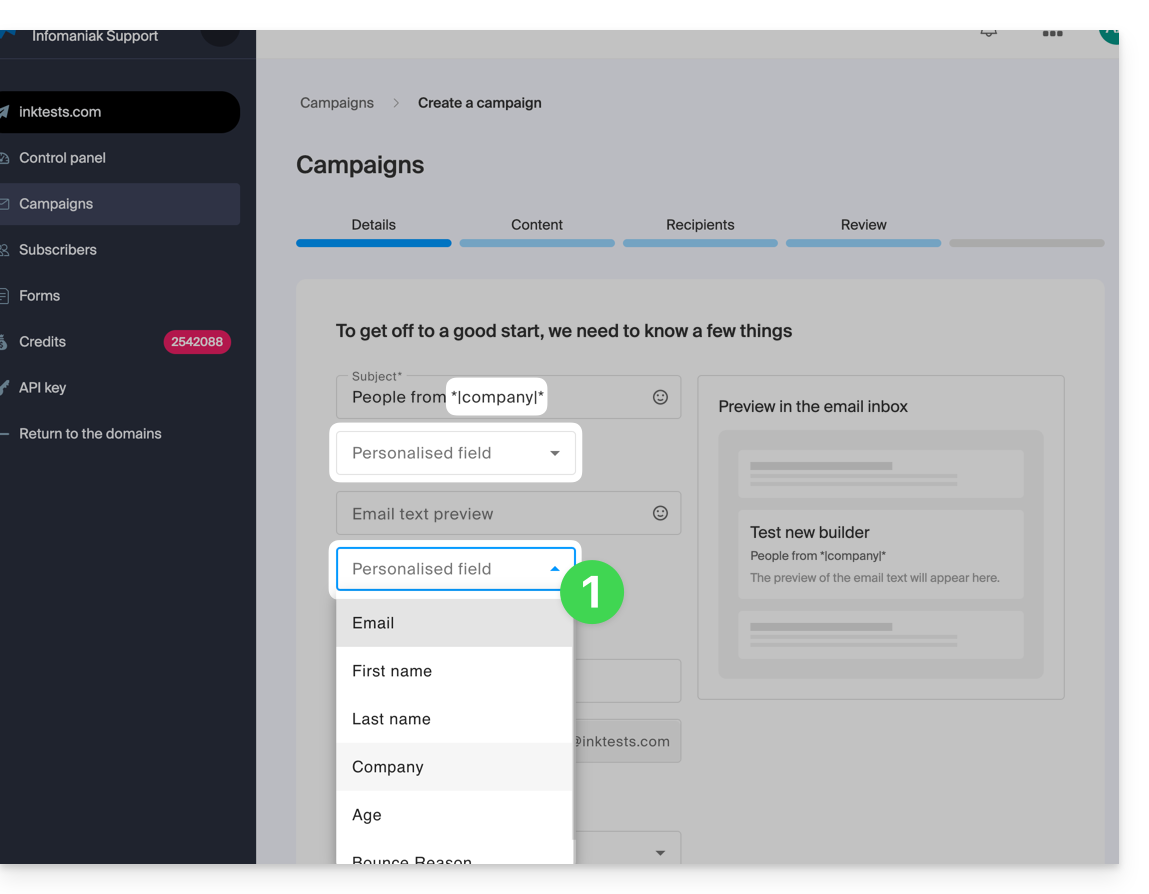
… no corpo do e-mail
Ao criar sua newsletter com o editor de blocos:
- Clique no local do texto onde deseja inserir a sua variável.
- Clique no ícone "Tag" / "Etiqueta" na barra de ferramentas.
- Escolha a variável a ser inserida:
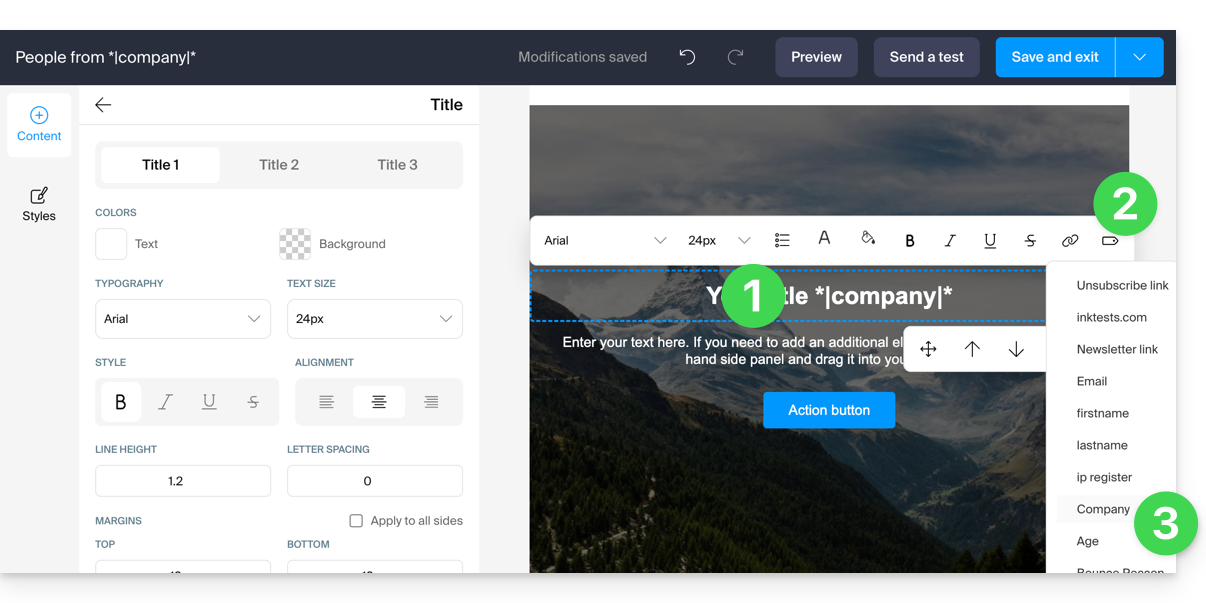
Você também pode simplesmente inserir o nome da variável entre asteriscos e separadores: *|VARIÁVEL|*
Lista das variáveis básicas
*|FIRSTNAME|* | nome |
*|LASTNAME|* | nome: esta variável também pode ser integrada num link href, por exemplo https://domain.xyz?name=*|LASTNAME|* |
*|EMAIL|* | endereço de e-mail |
*|DOMAIN_NAME|* | nome de domínio da newsletter |
*|IP-REGISTER|* | endereço IP do utilizador no momento do registo |
Link de cancelamento de inscrição | Para inserir um link de cancelamento de inscrição ("cancelar inscrição") no local desejado, sem que você precise fazer nada, este link será inserido automaticamente na parte inferior da sua newsletter. |
Link para a newsletter | Para adicionar manualmente um link para uma versão online da sua newsletter, mas sem qualquer ação da sua parte, este link será inserido automaticamente no topo da sua newsletter. |
Link para esta FAQ: https://faq.infomaniak.com/2137
Esta seção de perguntas frequentes foi útil?
Este guia aborda a configuração do produto Newsletter da Infomaniak no caso em que o nome de domínio utilizado para o envio dos seus e-mails não é gerido pela Infomaniak.
Introdução
- Para utilizar a ferramenta Newsletter de forma automática, é necessário gerir o nome de domínio a partir do qual envia as suas newsletters (assim como a sua zona DNS) na Infomaniak.
- Por exemplo, se enviar as suas newsletters a partir do endereço
news@domain.xyz, o domíniodomain.xyzdeve ser gerido na Infomaniak.
Configuração DNS específica
Para utilizar a ferramenta Newsletter com um domínio que não é gerido na Infomaniak, deverá adicionar na sua zona DNS as entradas específicas fornecidas no seu painel de controlo: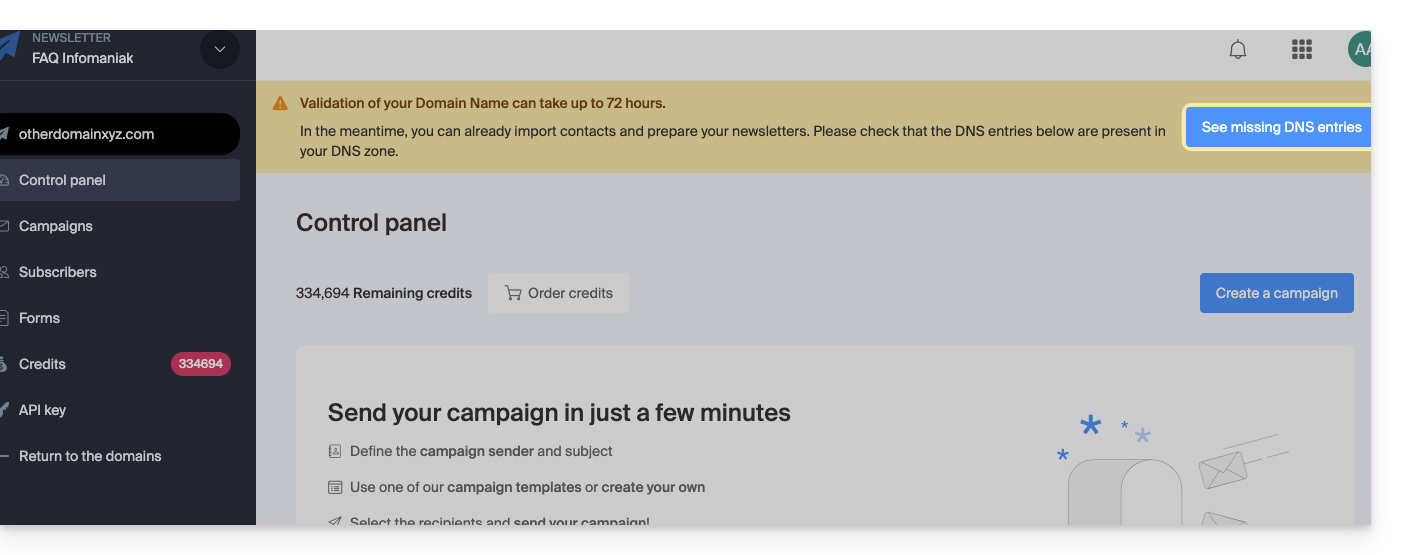
Consulte este outro guia para adicionar as entradas DNS que mencionam ._domainkey, tendo o cuidado de selecionar o tipo DKIM inicialmente e, em seguida, o subtipo CNAME ao adicionar o DKIM.
Em caso de transferência do domínio
Se o nome de domínio, atualmente gerenciado pela Infomaniak (e associado à Newsletter), for transferido para outro registrador, a ferramenta Newsletter será desativada nos 30 dias seguintes, caso nenhuma modificação DNS seja efetuada.
Link para esta FAQ: https://faq.infomaniak.com/2157
Esta seção de perguntas frequentes foi útil?
Este guia detalha as razões pelas quais o envio de uma Newsletter através da Infomaniak pode ser bloqueado, bem como as melhores práticas para evitar esses bloqueios no futuro.
Causas frequentes de bloqueio de uma Newsletter
O envio de uma newsletter pode ser interrompido nos seguintes casos:
- um número excessivo de endereços de e-mail de destinatários é inválido ou inexistente, gerando uma alta taxa de rejeição («bounces»).
- uma elevada taxa de denúncias de spam por parte dos destinatários.
Como fornecedor de serviços de alojamento de e-mail e envio de newsletters, a Infomaniak tem o dever de implementar mecanismos rigorosos de combate ao spam.
De fato, se os endereços IP ou os domínios da Infomaniak estiverem listados em listas negras (« blacklists »), isso comprometeria a capacidade de entrega de todos os e-mails enviados por seus clientes, incluindo aqueles que estão em conformidade, e prejudicaria a reputação geral do serviço.
Como evitar bloqueios ao enviar uma newsletter
Para isso:
- Utilize exclusivamente listas de contactos obtidas com o consentimento explícito dos seus titulares.
- Priorize a criação de suas listas por meio de formulários com dupla confirmação, garantindo uma validação ativa dos assinantes.
- Limpe regularmente suas listas de contatos — no mínimo uma vez por ano — com serviços especializados, como NeverBounce, Bounceless, Verifalia ou QuickEmailVerification, para remover endereços inválidos ou inativos.
- Certifique-se de que seus e-mails exibam claramente sua marca ou o nome de sua empresa, reforçando a confiança dos destinatários e a transparência de suas comunicações.
- Evite importar listas de outros provedores sem antes realizar uma limpeza completa desses contatos.
- Verifique cuidadosamente o público-alvo da sua campanha para garantir que apenas os assinantes relevantes e que deram o seu consentimento recebam a newsletter.
O que fazer em caso de bloqueio de envio?
Em caso de bloqueio, entre em contato com o suporte da Infomaniak o mais rápido possível para diagnosticar a causa e obter assistência para concluir o envio bloqueado.
Link para esta FAQ: https://faq.infomaniak.com/2159
Esta seção de perguntas frequentes foi útil?
Este guia mostra como usar a ferramenta Newsletter oferecida pela Infomaniak para criar e enviar newsletters, ou seja, mensagens recorrentes para vários destinatários.
Por que usar a Newsletter em vez de um Serviço de E-mail
Uma newsletter é uma ferramenta de comunicação periódica enviada por e-mail a um grupo específico de assinantes. Geralmente, tem como objetivo informar, compartilhar notícias, atualizações ou conteúdo relevante sobre um tópico específico e manter um relacionamento com um público-alvo.
Elas podem conter artigos, anúncios, promoções, links para conteúdos recentes, eventos futuros e, por vezes, ofertas exclusivas para os assinantes. O objetivo principal é fornecer conteúdo interessante e relevante para estimular o envolvimento e manter o interesse dos assinantes.
O Newsletter Infomaniak permite que você agende e envie boletins informativos para uma lista de destinatários de e-mail que aguardam seus envios; assim, você divulga campanhas de e-mail marketing de forma eficaz e personalizada, mantendo uma comunicação regular e relevante com seus clientes e assinantes.
As funcionalidades incluem a criação de modelos, o gerenciamento da lista de assinantes, a análise do desempenho e tudo isso não é diretamente possível com um serviço de e-mail tradicional. Além disso,a ferramenta possui sua própria interface, independente dentro do seu navegador, completamente distinta deMailInfomaniak e não requer um aplicativo de mensagens. Cela signifie que si vous possédez déjà des contacts à qui vous souhaitez écrire avec leur accord, il faudra au préalable les importer sur l'outil.
Pré-requisitos
- Ter um nome de domínio no qual você ativará a newsletter:
- Acesso à zona DNS, caso o nome de domínio não esteja hospedado na Infomaniak.
- Criar um novo nome de domínio, se necessário.
- Possuir créditos para newsletters, que permitem o envio (1 crédito = 1 newsletter enviada para 1 assinante).
É necessário obter o consentimento explícito dos seus destinatários através do modelo double opt-in. O envio de spam e a utilização de listas de endereços compradas/alugadas são proibidos. Os proprietários do nome de domínio utilizado para o envio das newsletters são legalmente responsáveis, e a violação dos termos e condições pode resultar na suspensão da conta.
Ativar a ferramenta Newsletter
Para ativar a ferramenta Newsletter pela primeira vez:
- Clique aqui para acessar o gerenciamento do seu produto no Manager Infomaniak (precisa de ajuda?).
- Clique em COMEÇAR GRATUITAMENTE para assinar a oferta de newsletter.
- Insira o nome de domínio que deverá ser utilizado (e que deve pertencer a você – consulte os pré-requisitos).
- Clique no botão azul para Confirmar.
- Comece a usar a ferramenta ou consulte este outro guia em caso de problemas ou se for solicitada uma configuração adicional na tela.
Acessar a ferramenta Newsletter
Para aceder à Newsletter após a ativação:
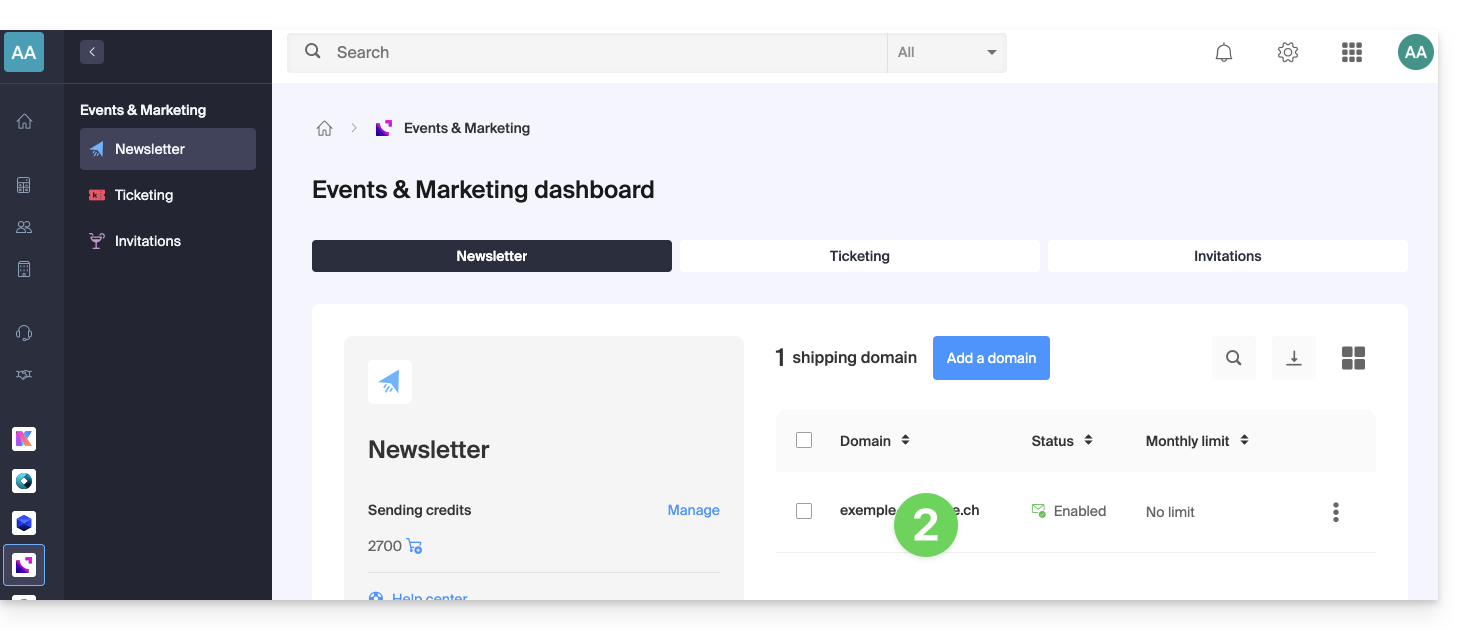
- Clique aqui para aceder à gestão do seu produto no painel de controlo Infomaniak (precisa de ajuda?).
- Clique no nome do domínio correspondente na tabela que aparece:
Aprofunde-se com a ferramenta
- Importar contactos
- Criar e enviar uma newsletter
- Créditos da Newsletter
- Formulário de inscrição na Newsletter
- O sistema de dupla confirmação para evitar ser classificado como spam
- Enviar uma newsletter para tipos específicos de assinantes
- As variáveis para personalizar o seu conteúdo
- Utilizar a API de Newsletter
Consulte todas as Perguntas Frequentes sobre a Newsletter; clique aqui para partilhar uma opinião ou sugestão sobre um produto Infomaniak.
Link para esta FAQ: https://faq.infomaniak.com/2163
Esta seção de perguntas frequentes foi útil?
Este guia mostra como criar/importar/gerenciar os contatos dentro das listas de assinantes da Newsletter Infomaniak.
Introdução
- Você deve obter o consentimento explícito dos seus destinatários através do modelo duplo opt-in:
- O envio de spam e a utilização de listas de endereços compradas/alugadas são proibidos.
- A importação não envia nenhuma mensagem aos contatos adicionados (portanto, leia e aceite os pontos acima).
- Os duplicados serão automaticamente eliminados.
- Se você reimportar um endereço que já está inscrito, os campos personalizados diferentes serão atualizados.
Criar uma lista de assinantes
Para aceder à gestão dos assinantes da newsletter:
- Clique aqui para acessar o gerenciamento do seu produto no Manager Infomaniak (precisa de ajuda?).
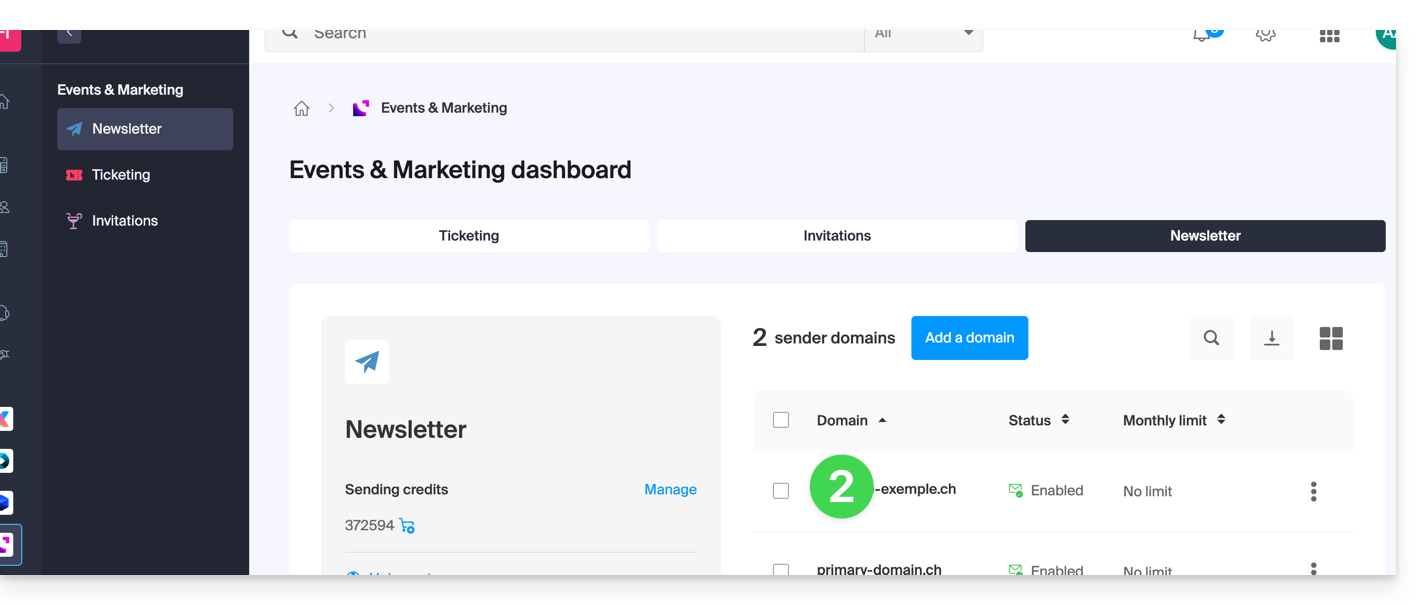
- Clique no nome do domínio correspondente na tabela que aparece:
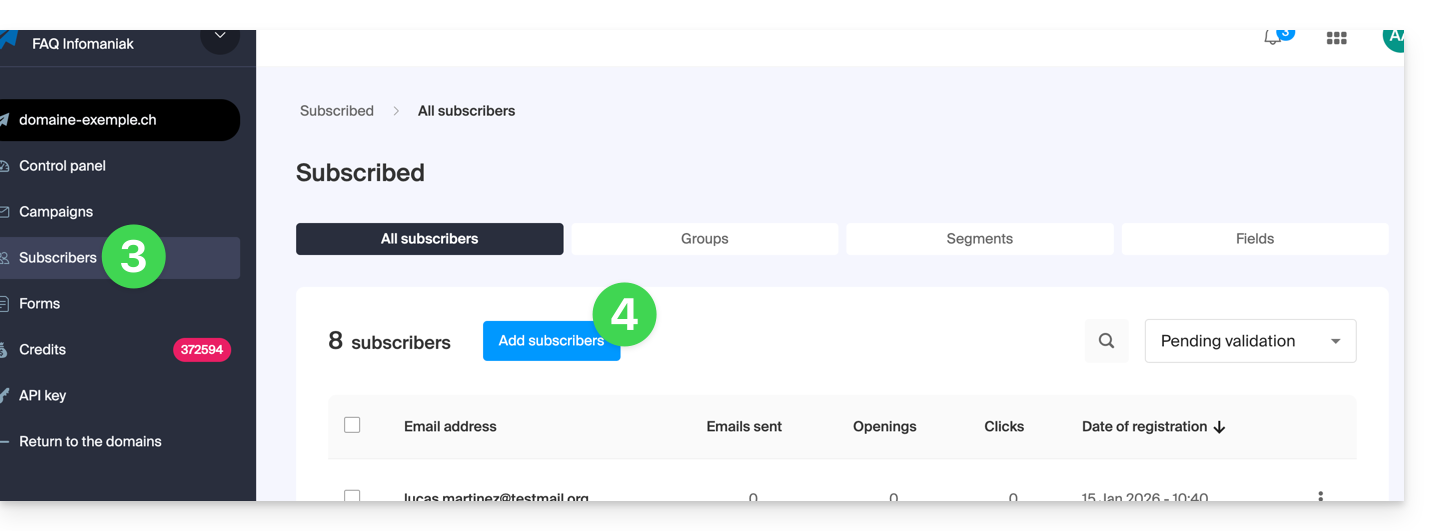
- Clique em Subscritores no menu lateral esquerdo.
- Clique no botão azul Adicionar contactos:
- Leia e aceite os Termos e Condições de Utilização.
- Escolha um dos métodos disponíveis para criar uma lista de assinantes:

A. Importar um arquivo CSV (formato .csv) ou arquivo .txt (formato predefinido)
- O formato deve ser respeitado (um modelo para download está disponível como exemplo na página). Tamanho máximo: 300 MB
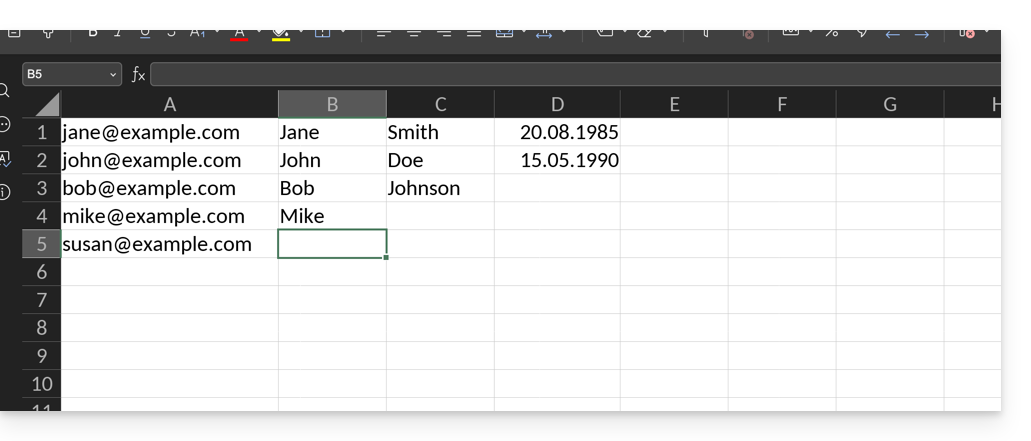
- Depois de criar o documento modelo (planilha), exporte-o para o formato
.csv. Isso criará um tipo de documento de texto com um separador entre cada informação presente nas diferentes células: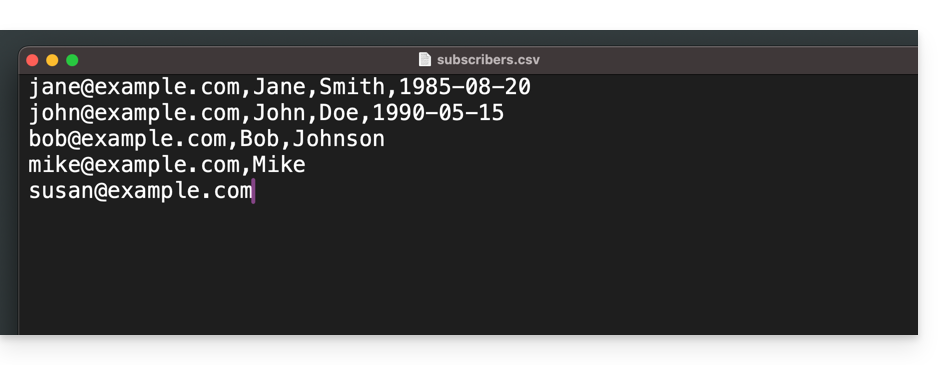
- Selecione o arquivo
.csvna interface de importação e clique no botão azul Importar: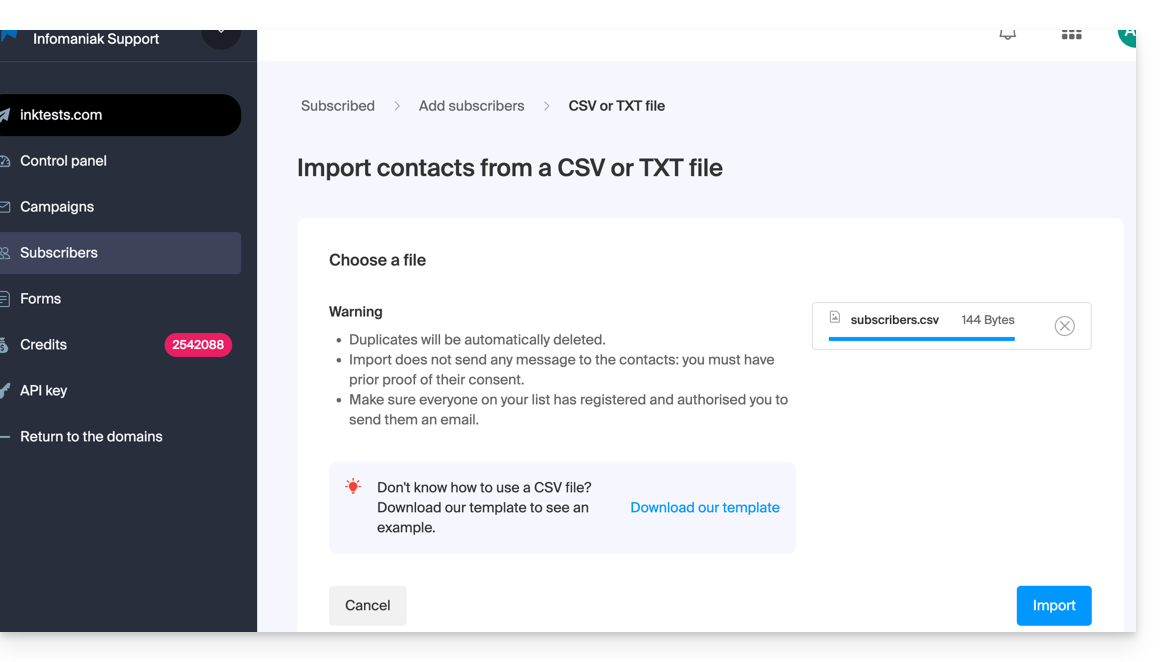
- É necessário atribuir o campo desejado à informação correspondente (as informações são agrupadas de acordo com as colunas originais).
- Na parte inferior do menu suspenso, é possível criar os campos que ainda não existem (o tipo de campo pode ser definido como numérico ou data, booleano, etc.).
- Escolha um grupo, se desejar, entre os seus grupos criados, no qual colocar os contactos importados:
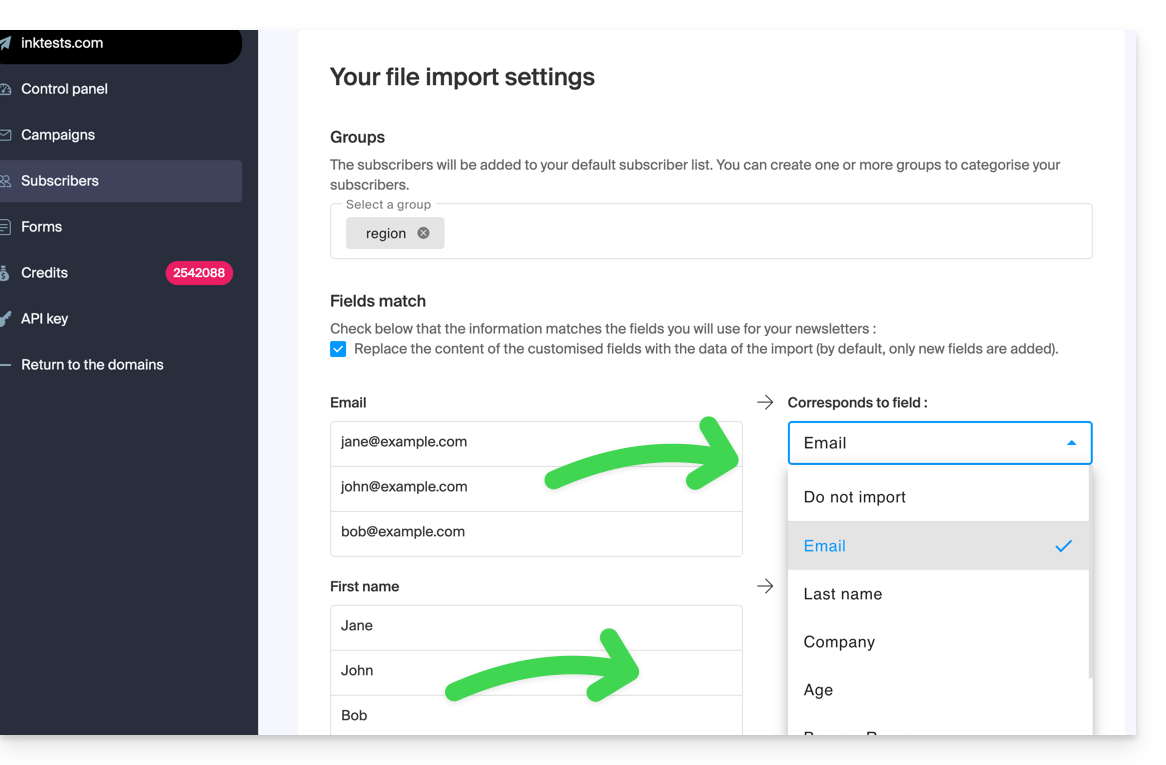
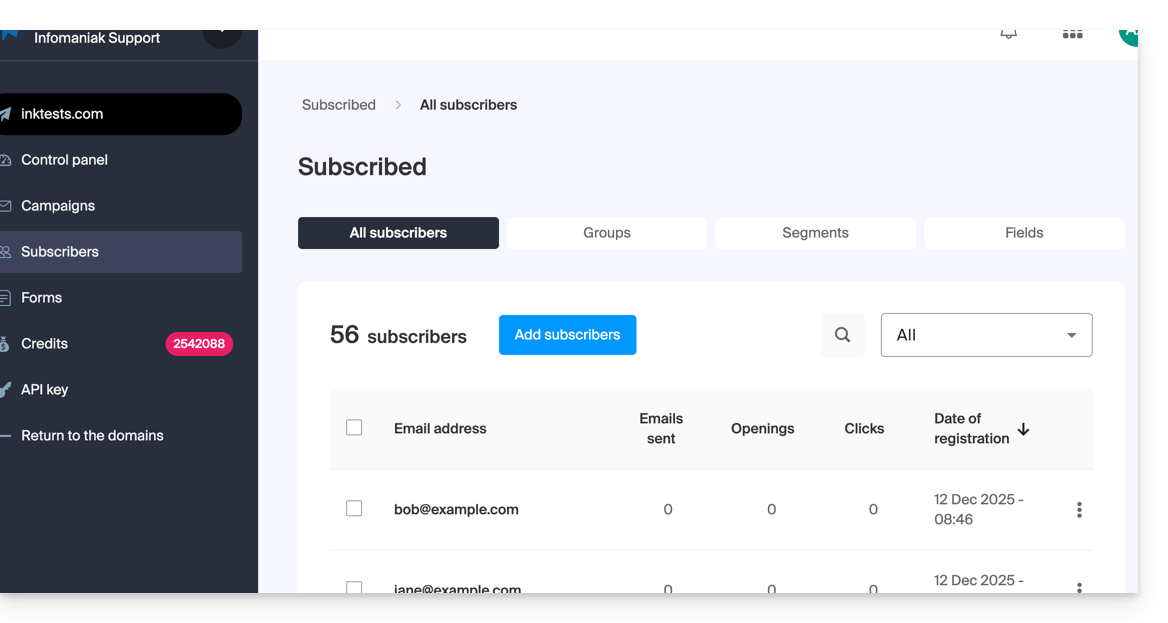
- Pronto, quer seja em Grupos ou em Subscritores, a sua importação é visível.
- Se não for o caso, verifique se são visíveis com o filtro de visualização “Todos”:
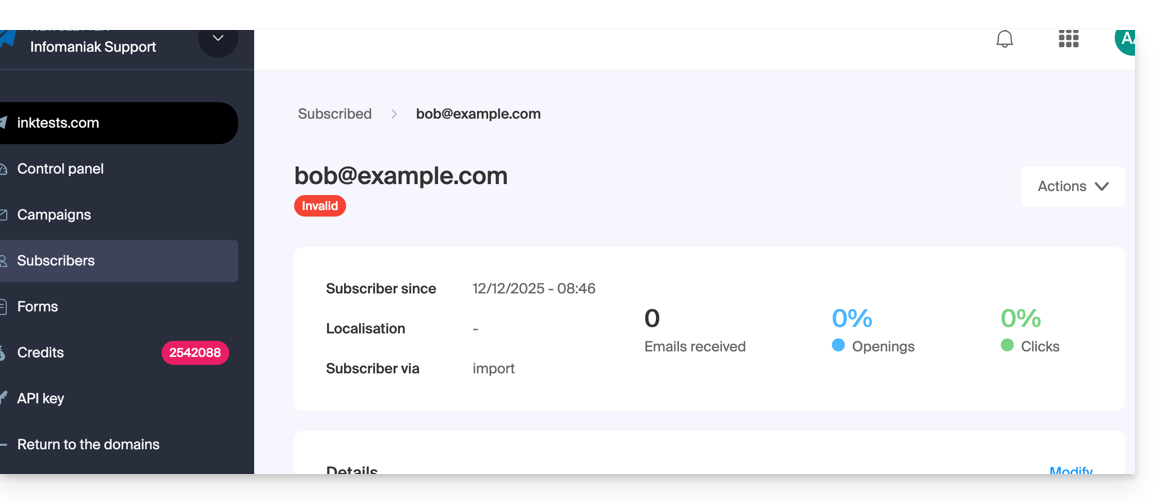
- Pode ser que, após uma verificação do e-mail, o estado do subscritor importado seja inválido, pelo que não poderá enviar mensagens para ele:
- Se não for o caso, verifique se são visíveis com o filtro de visualização “Todos”:
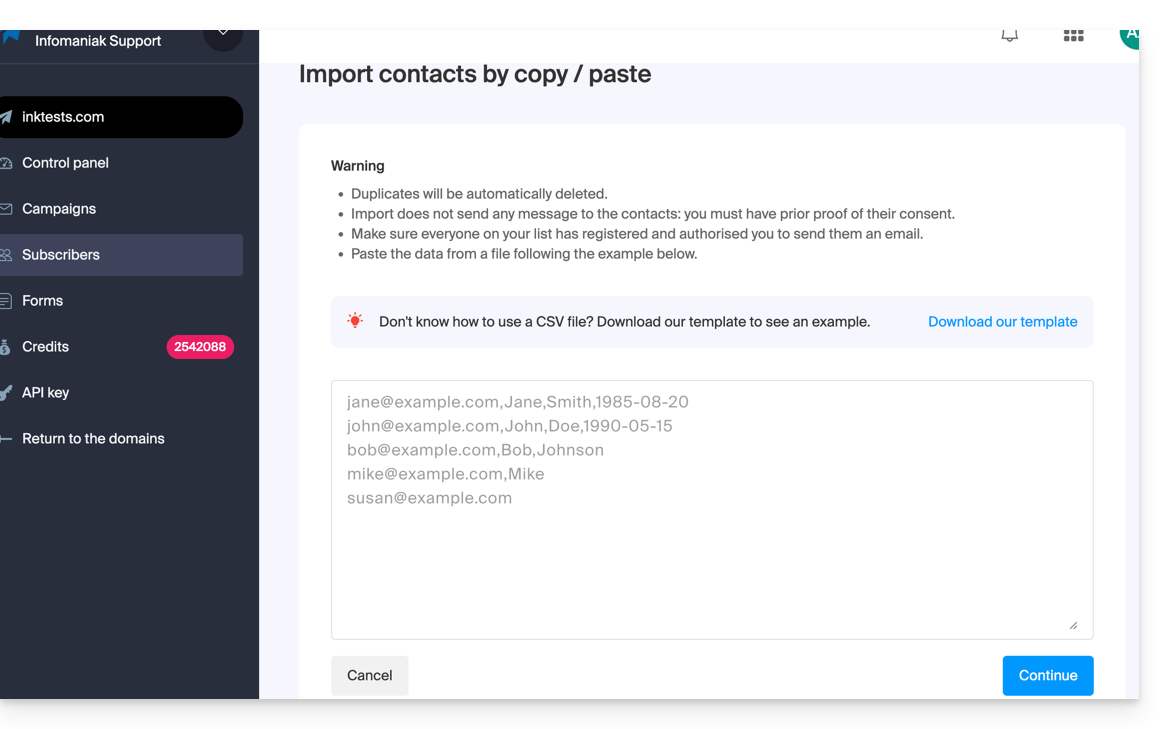
B. Copiar e colar o conteúdo equivalente de um arquivo .csv ou .txt (formato predefinido)
- O formato deve ser respeitado, como no arquivo a ser carregado (veja acima), por exemplo:
anna.a@domain.xyz,Anna,Alpha,1985-08-20
alfred.a@domain.xyz,Alfred,Alpha
contact@domain.xyz,Suporte
mail@domain.xyz- Depois de colar estas informações no campo designado para esse efeito, clique no botão azul Continuar:
- O restante do processo de importação é idêntico ao ponto A acima.
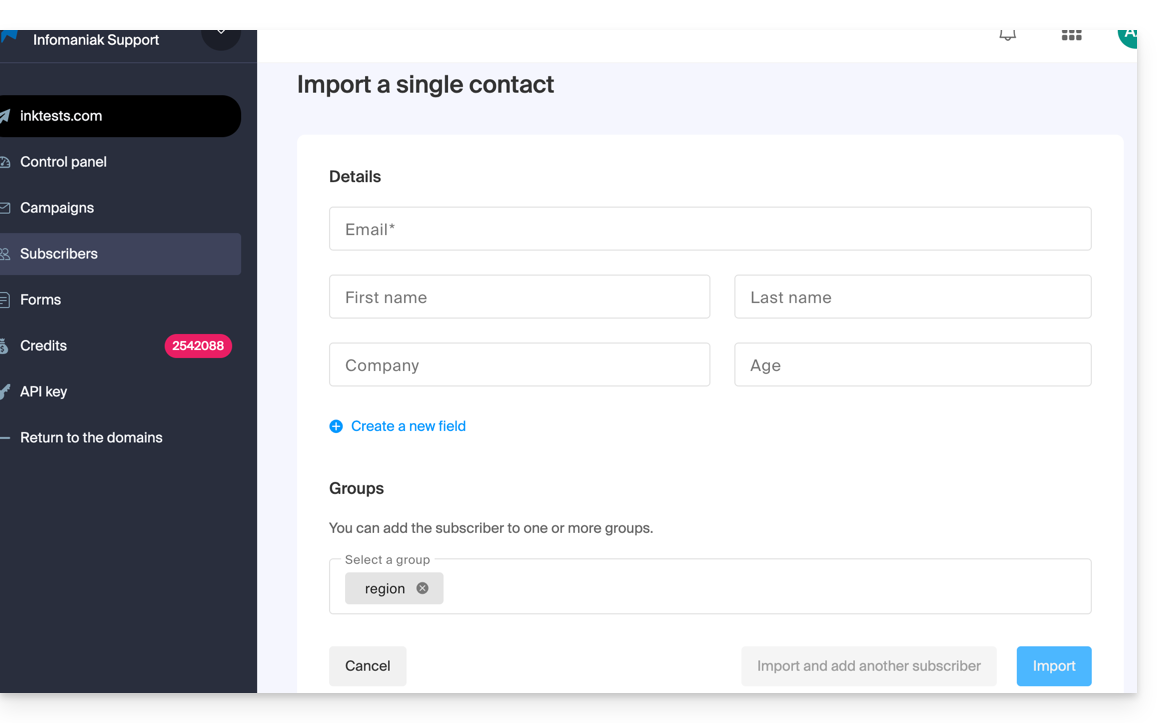
C. Preenchimento de um formulário de contato individual
- Importe os contactos um a um através do formulário disponibilizado.
- Adicione, se necessário, campos personalizados (o tipo de campo pode ser definido como numérico ou data, booleano, etc.).
- Especifique o grupo existente, se houver:
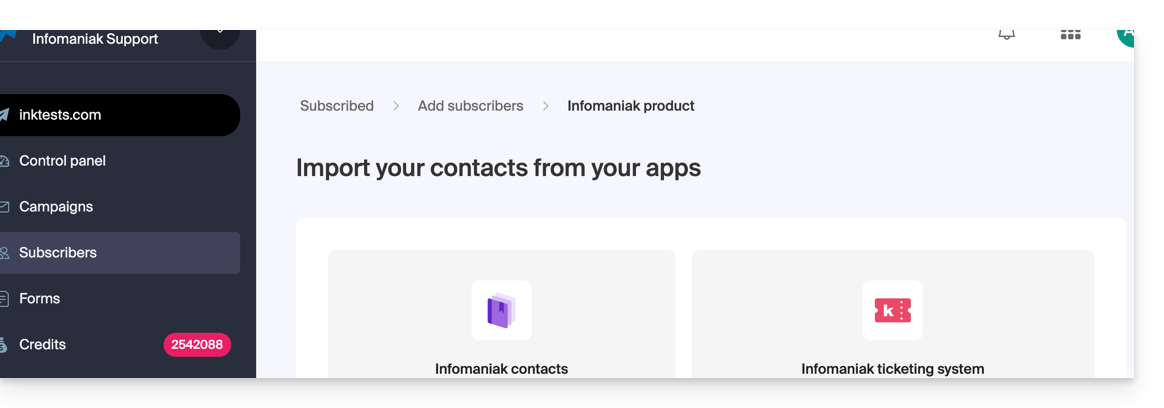
D. Importação automática de outras ferramentas Infomaniak
- Importe os contactos dos seus catálogos de endereços Infomaniak e da ferramenta de gestão de bilhetes Infomaniak, se disponível (com a possibilidade de importar apenas os utilizadores que indicaram querer receber uma newsletter):
Editar a ficha de um assinante
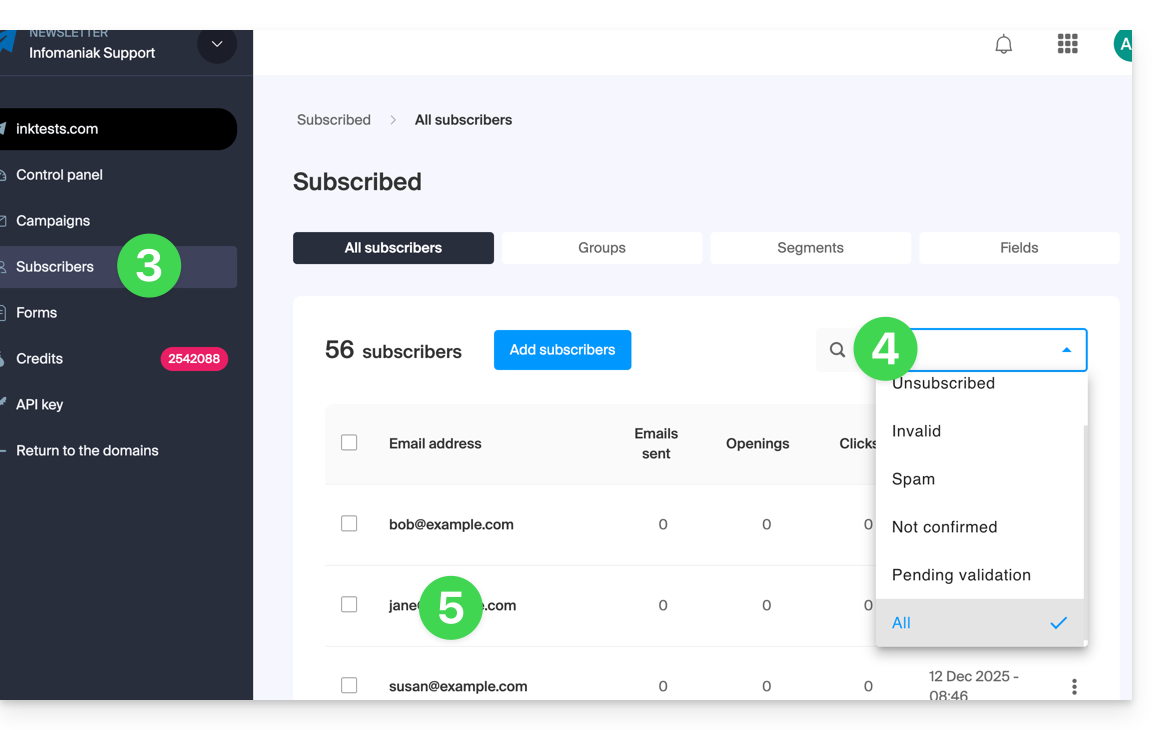
Para editar as informações dos seus assinantes:
- Clique aqui para acessar a gestão do seu produto no Manager Infomaniak (precisa de ajuda?).
- Clique no nome do domínio correspondente na tabela que aparece.
- Clique em Assinantes no menu lateral esquerdo.
- Pesquise ou filtre o tipo de exibição, se necessário.
- Clique no assinante cujos detalhes deseja editar:
- Clique em Editar:
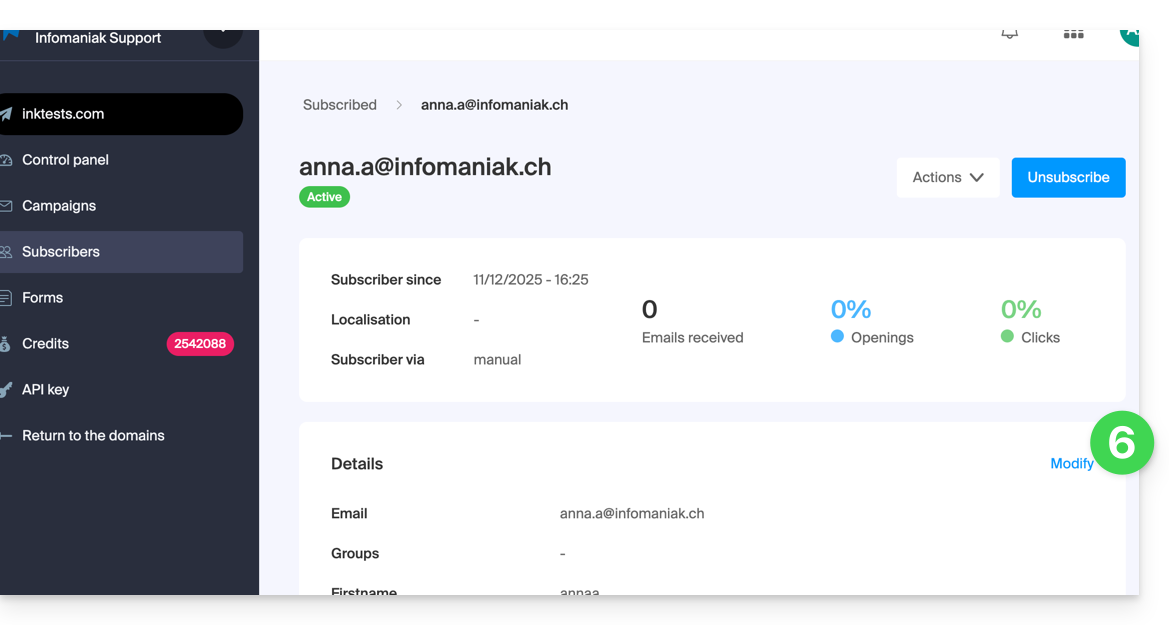
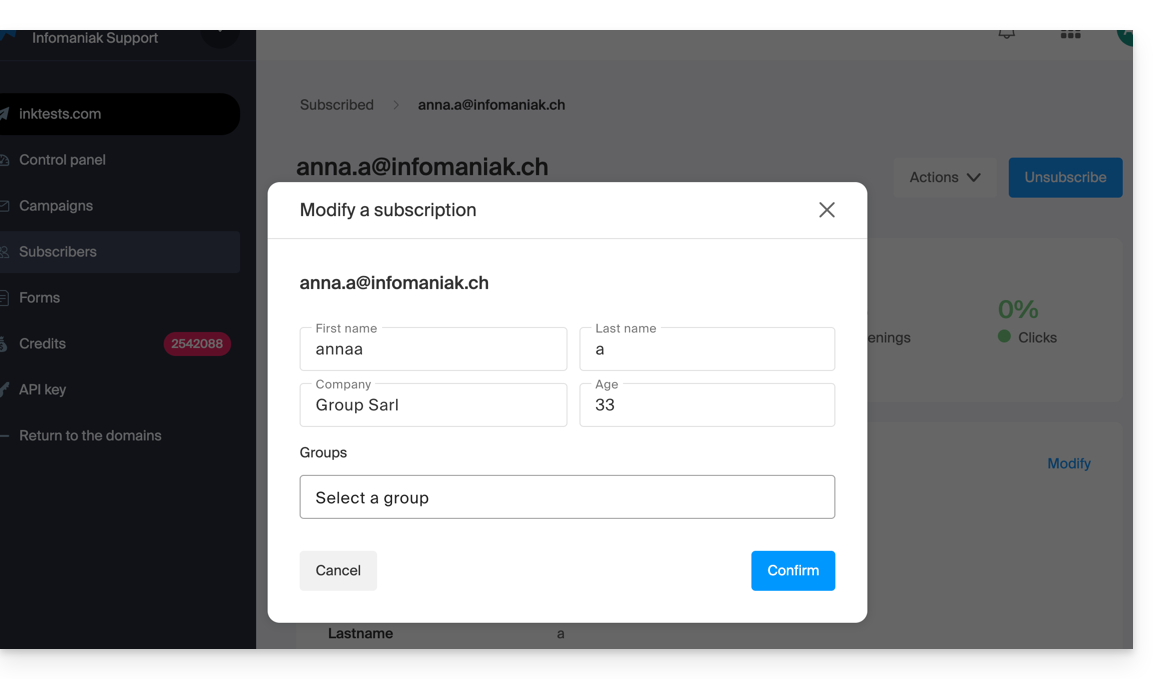
- Edite as informações (apenas o endereço de e-mail não pode ser alterado):
- Se desejar adicionar um novo campo, adicione-o globalmente, retornando ao menu Assinantes.
- Clique na aba Campos.
- Clique em Criar um campo.
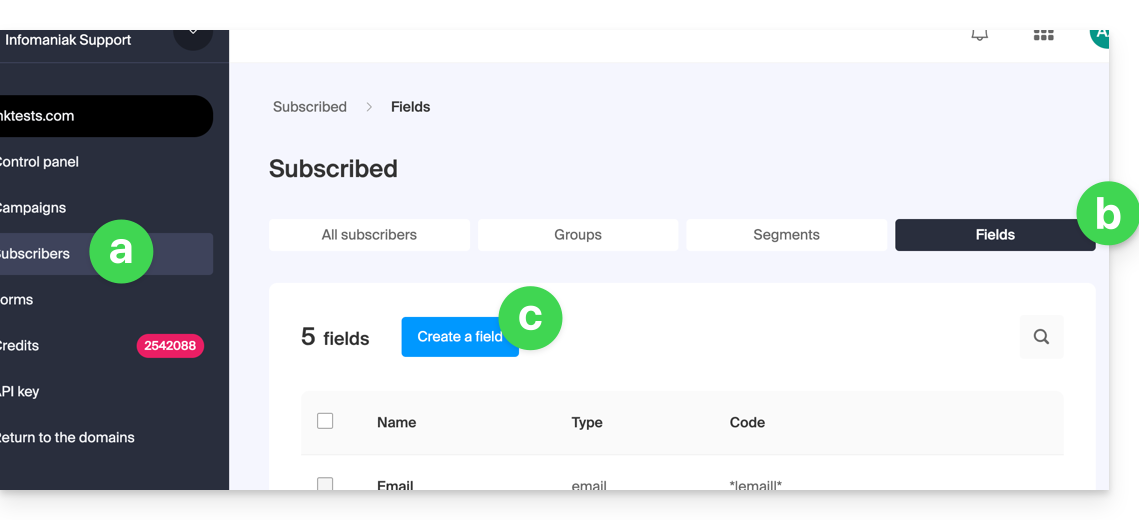
- A ficha do assinante pode agora ser editada ao nível deste novo campo:
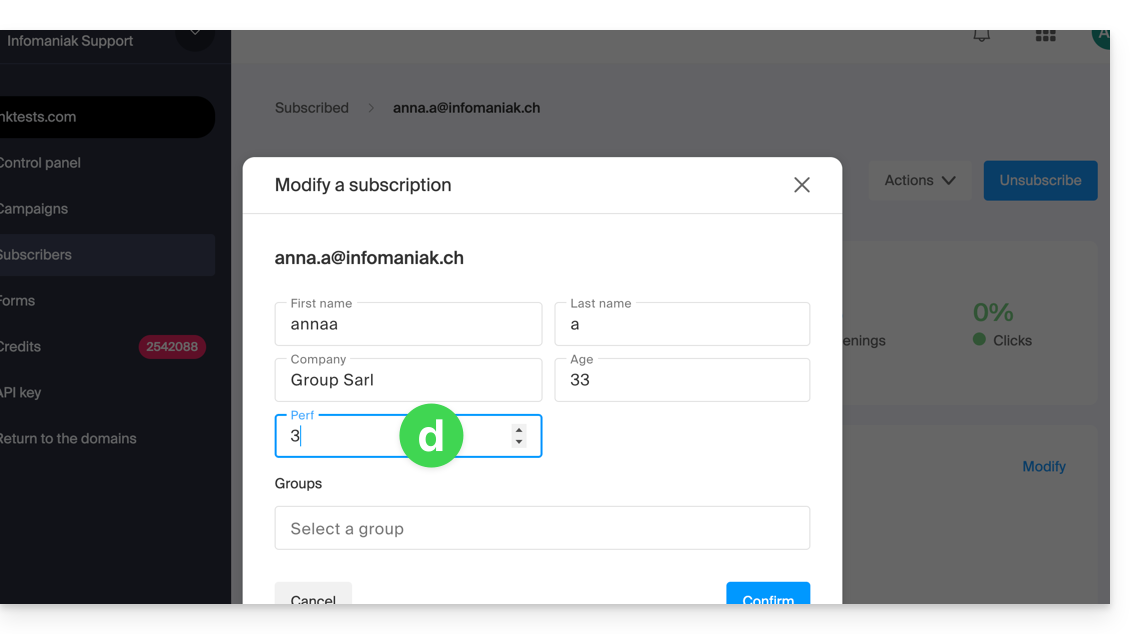
Remover assinantes
Para remover assinantes da newsletter:
- Clique aqui para acessar o gerenciamento do seu produto no Manager Infomaniak (precisa de ajuda?).
- Clique no nome do domínio correspondente na tabela que aparece.
- Clique em Assinantes no menu lateral esquerdo.
- Pesquise ou filtre o tipo de exibição, se necessário.
- Clique na caixa para selecionar um ou mais assinantes.
- Clique em Excluir:
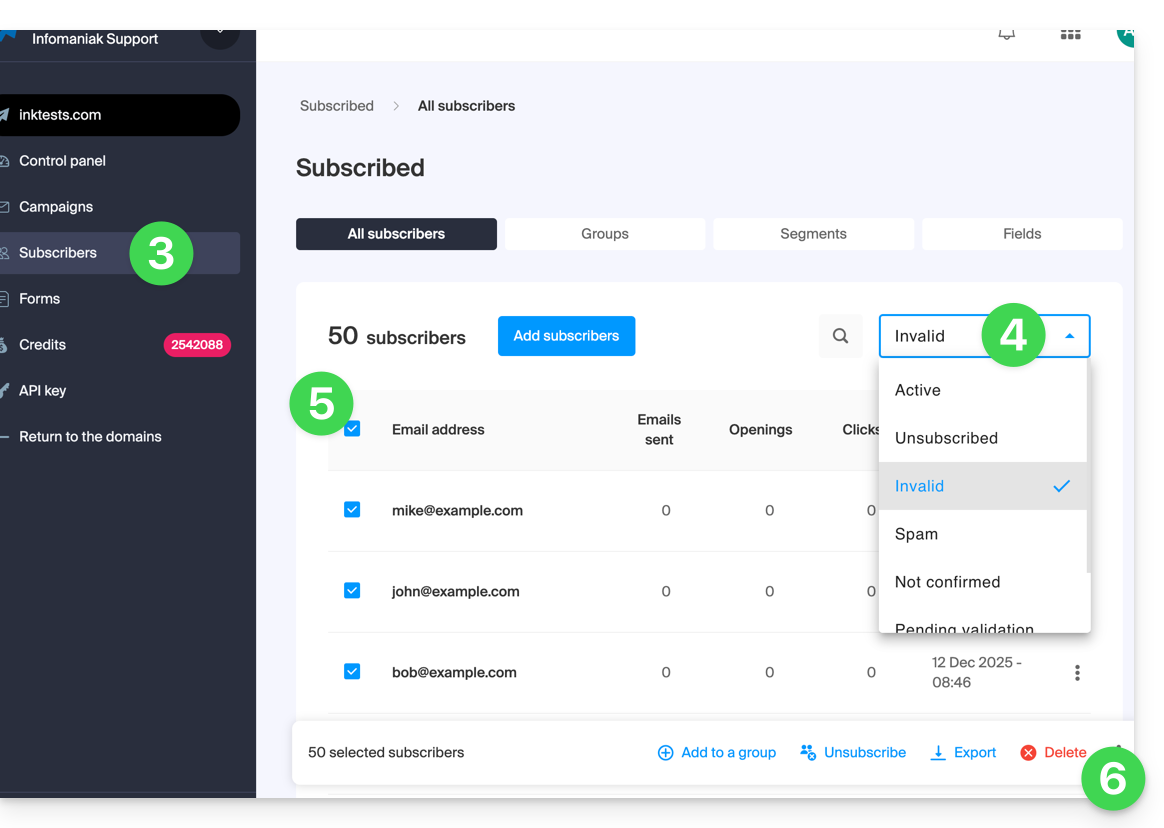
- Confirmar a exclusão
Também pode clicar em Cancelar inscrição em vez de Excluir para que os contactos continuem presentes na lista: consulte este outro guia.
Exportar assinantes
Para exportar a lista de assinantes da newsletter, no formato .csv e de acordo com critérios selecionados:
- Clique aqui para acessar o gerenciamento do seu produto no Manager Infomaniak (precisa de ajuda?).
- Clique no nome do domínio correspondente na tabela que aparece.
- Clique em Assinantes no menu lateral esquerdo.
- Pesquise ou filtre o tipo de exibição, se necessário.
- Clique na caixa para selecionar um ou mais assinantes.
- Clique em Exportar:
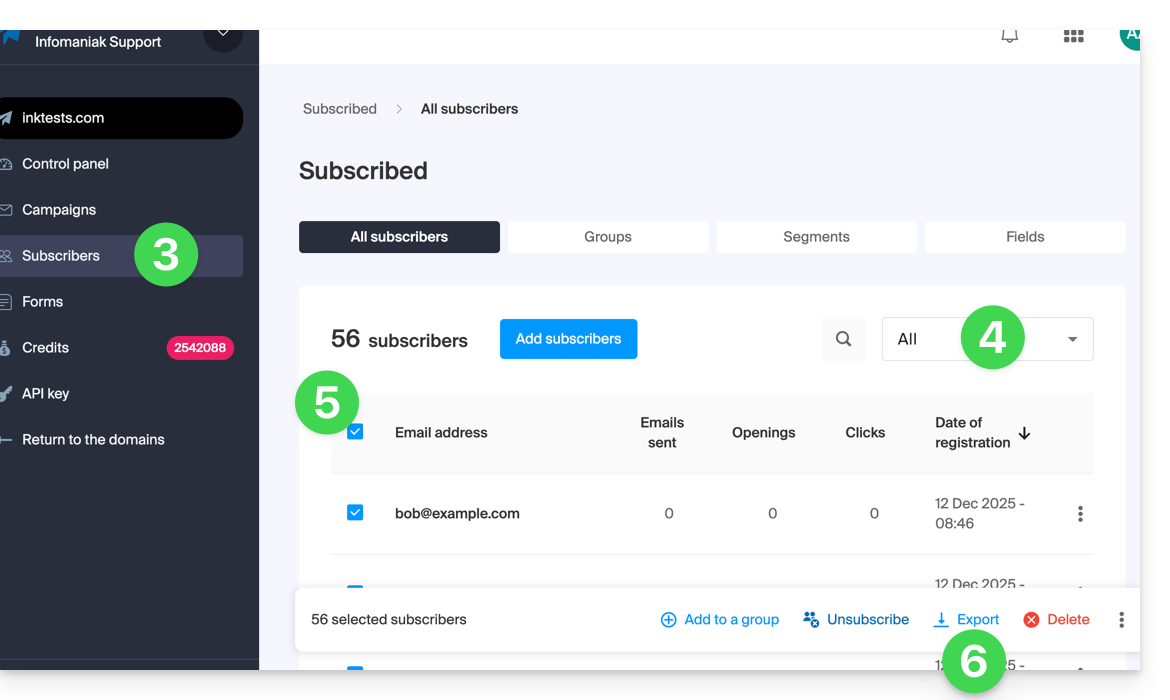
- Clique no botão azul quando a exportação estiver pronta para baixar os dados num ficheiro CSV (formato
.csv).
O ficheiro resultante contém as seguintes colunas: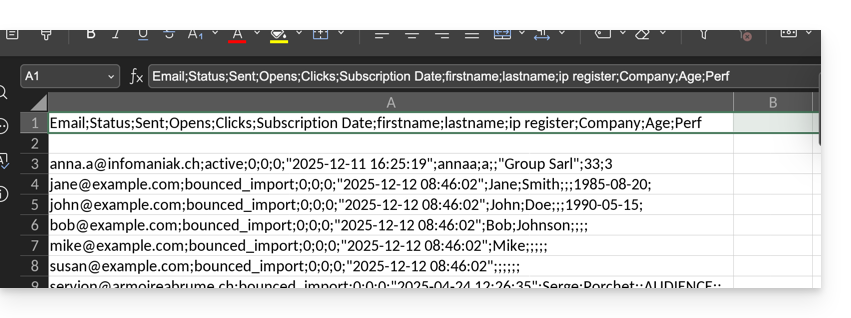
- Estado
- Enviados
- Aberturas
- Cliques
- Data de subscrição
- nome
- sobrenome
- registro de IP
- em seguida, os campos personalizados (texto, número, data, etc.) criados manualmente…
Link para esta FAQ: https://faq.infomaniak.com/2165
Esta seção de perguntas frequentes foi útil?
Este guia explica como criar um formulário de inscrição para a ferramenta Newsletter da Infomaniak, como integrá-lo em uma página da Web e como gerenciar o envio de newsletters para os assinantes e o cancelamento da assinatura.
Introdução
- A página de gerenciamento lista os formulários já criados e indica o número de visualizações e conversões dos mesmos.
- Uma conversão é um formulário preenchido, sem que necessariamente a pessoa tenha confirmado, por exemplo, o endereço de e-mail.
Criar um formulário de inscrição
Pré-requisitos
- Ter criado pelo menos um grupo.
Um formulário de inscrição permite que os visitantes de um site se inscrevam em uma newsletter e enriqueçam uma ou mais listas de contatos/grupos (ver pré-requisitos). Para acessar o gerenciamento de formulários:
- Clique aqui para acessar o gerenciamento do seu produto no Manager Infomaniak (precisa de ajuda?).
- Clique diretamente no nome de domínio da Newsletter.
- Clique em Formulários no menu lateral esquerdo.
- Clique no botão azul Criar um formulário:
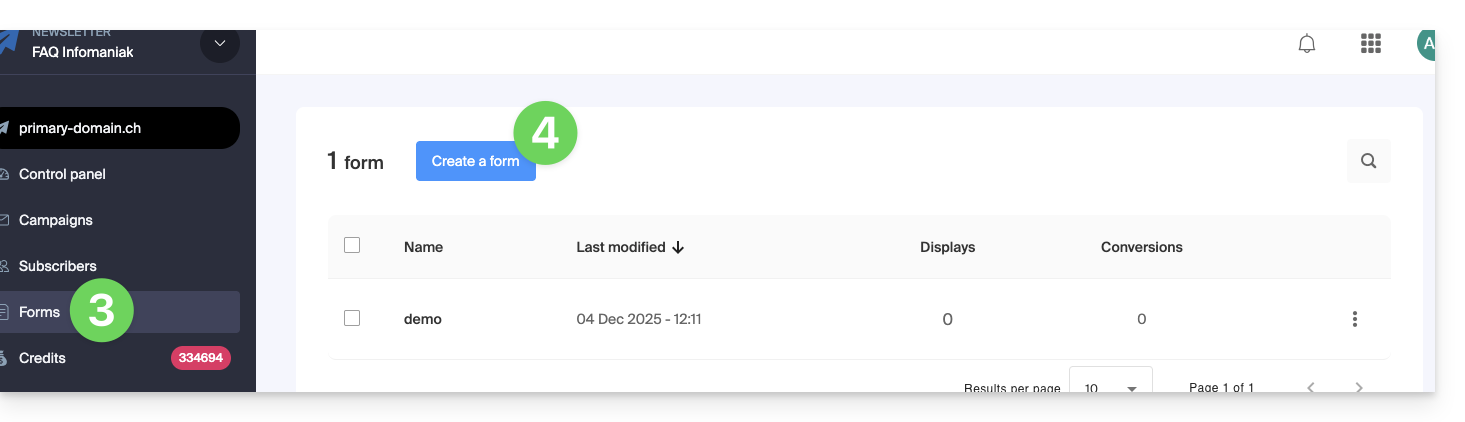
- Dê um nome ao seu formulário.
- Indique o grupo de contatos que deverá ser incrementado pelas inscrições feitas neste formulário.
- Clique no botão para continuar:
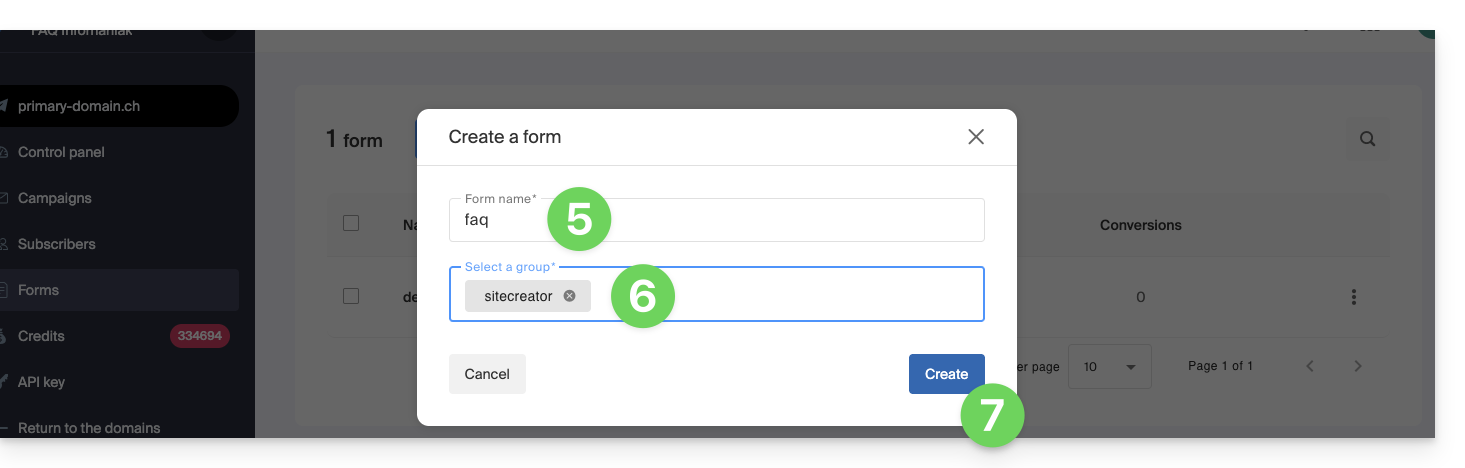
Em seguida, você será direcionado para a área de personalização do seu formulário.
A. Personalizar o conteúdo e gerar um código HTML/JavaScript
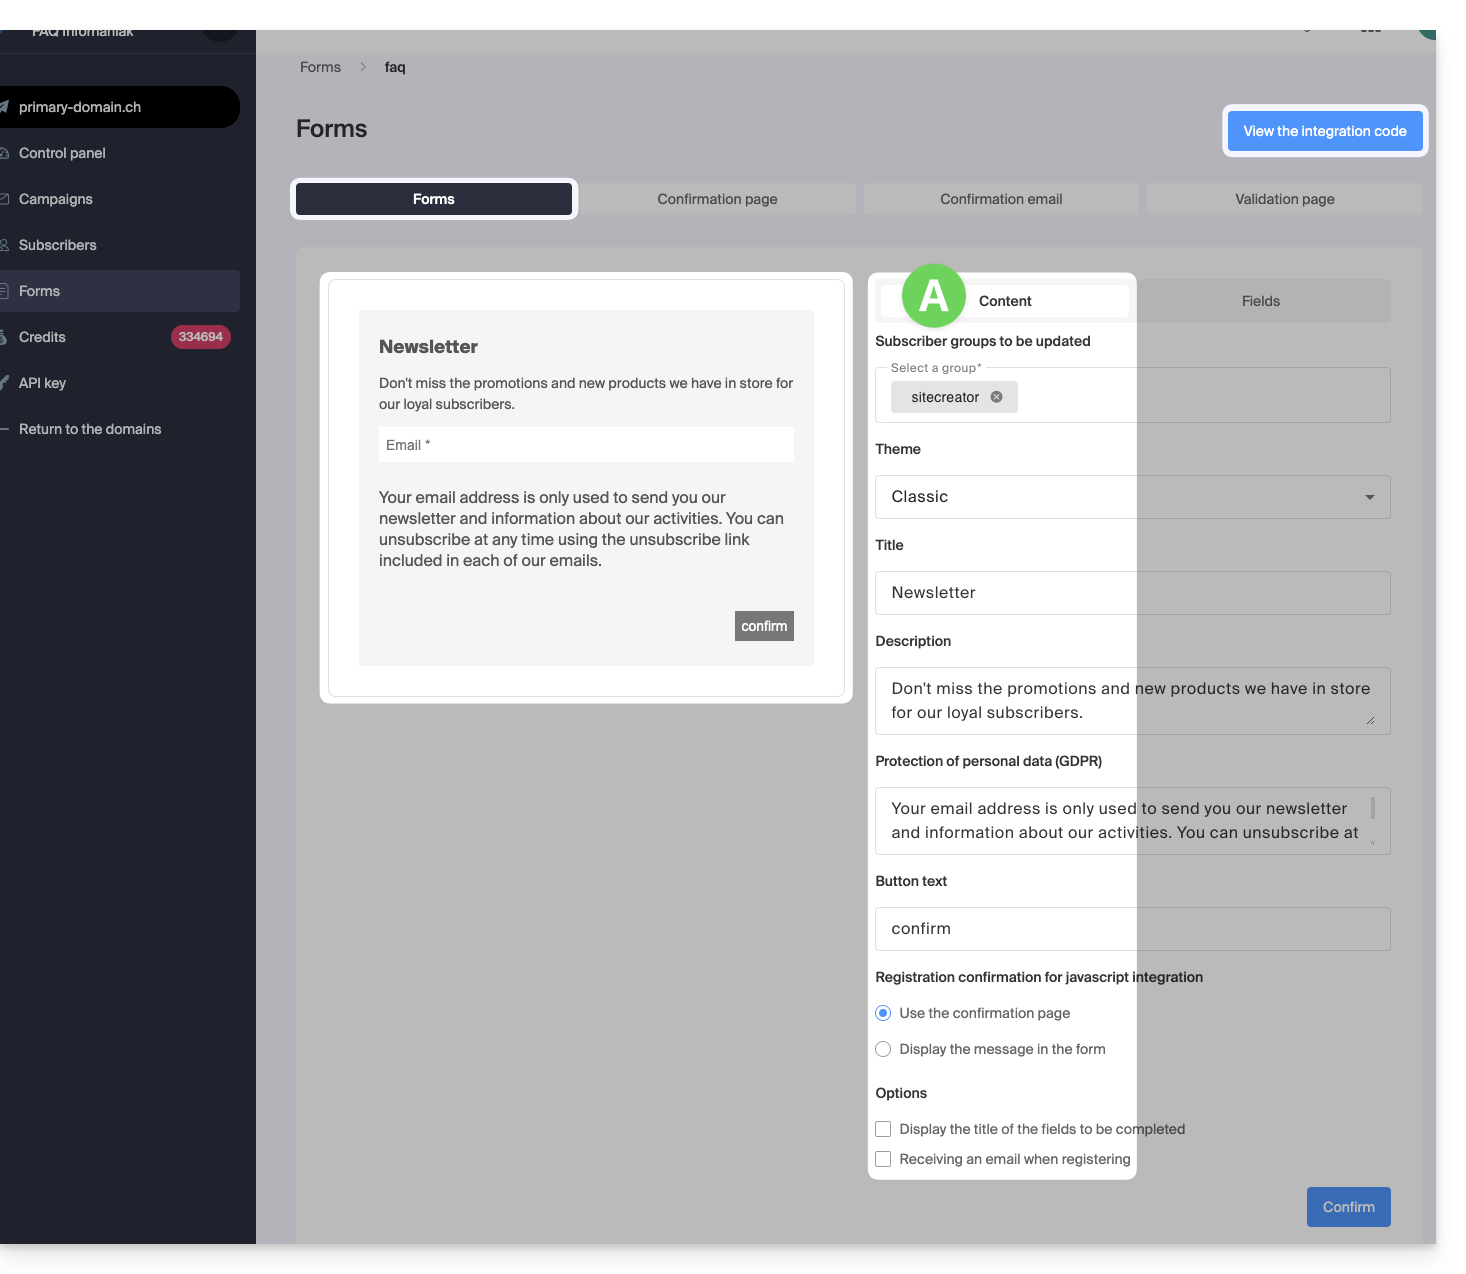
- A parte esquerda visualiza o seu formulário.
- Especifique quais dos seus grupos devem conter os futuros assinantes deste formulário.
- Isso permite, por exemplo, ter um formulário em um local correspondente ao preenchimento de uma lista de contatos específica e, em seguida, outro formulário em outro local correspondente a outra lista, para que, posteriormente, você possa enviar um boletim informativo ainda mais personalizado.
- O menu Tema permite definir a paleta de cores mais adequada para o seu formulário, para que ele se integre da melhor forma possível ao restante do conteúdo ao lado do qual será inserido o seu formulário.
- Todos os elementos do formulário podem ser personalizados, incluindo o texto do botão no qual os visitantes devem clicar para se inscrever e o texto de confirmação que será exibido após esse clique (integração apenas com o código JavaScript).
- As caixas na parte inferior, em Opções, permitem:
- exibir o título acima dos campos, em vez de exibi-lo dentro deles
- receber um e-mail (como administrador do boletim informativo) quando uma pessoa usar o formulário para se inscrever
- Clique no botão azul na parte inferior da página para salvar suas alterações à medida que as faz.
- Clique no botão azul na parte superior da página para exibir o código JavaScript e o código HTML a serem integrados em suas páginas (consulte este outro guia sobre o assunto) se você terminou ou deseja continuar personalizando seu formulário antes de copiar o código.
B. Gerenciar as informações coletadas do inscrito (configurar os campos)
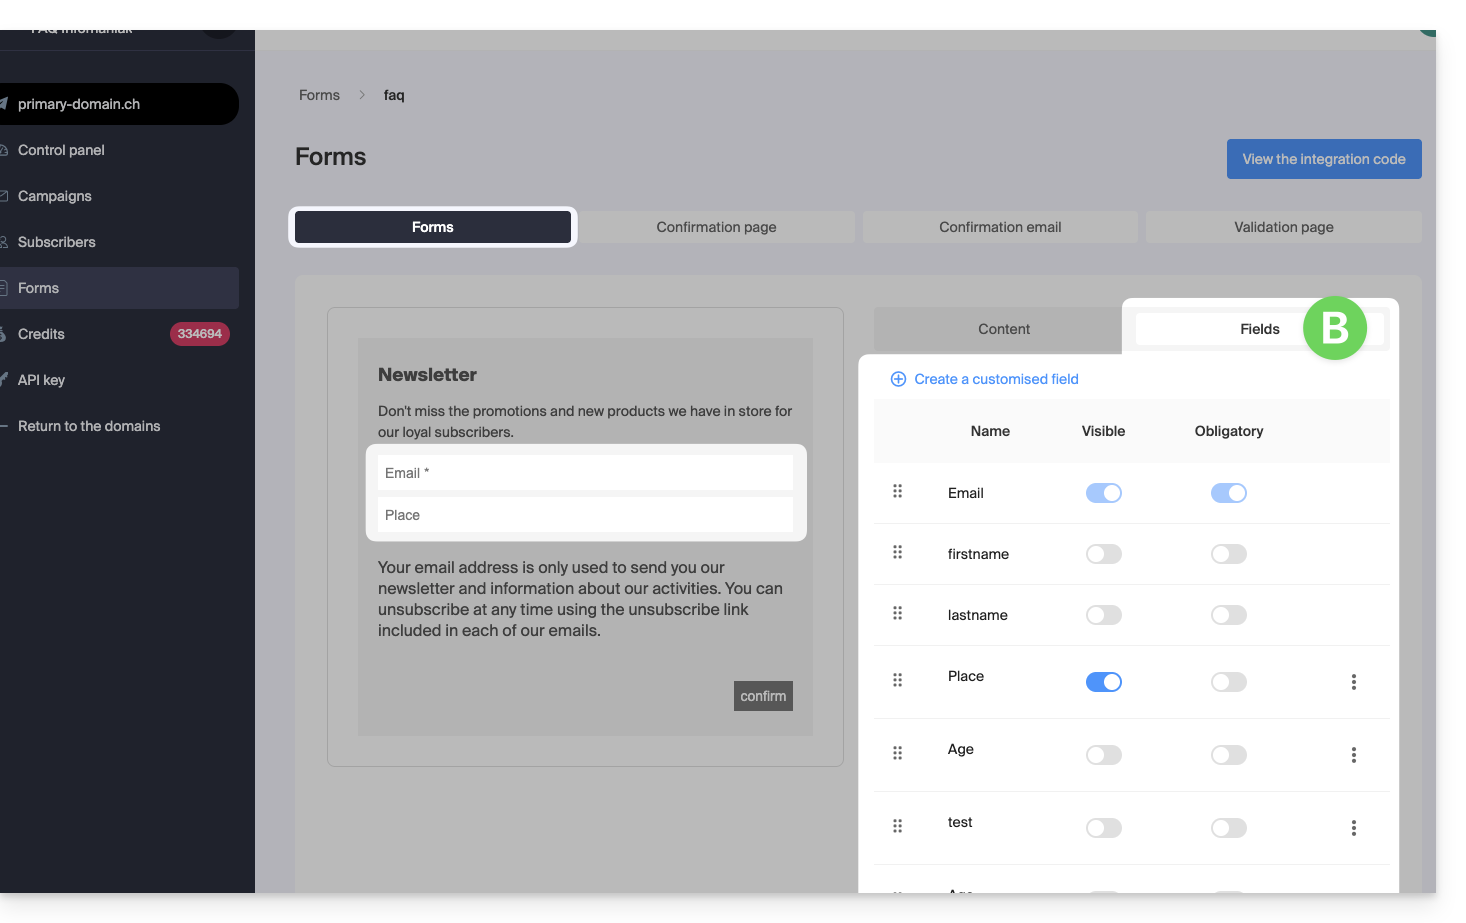
A guia Campos lista os campos já configurados e permite configurar novos campos (botão Criar na parte superior da guia):
- Esses campos podem ser textuais, do tipo “data” ou que forçam a inserção apenas de números.
- A coluna “Obrigatório” permite ativar o status obrigatório do campo, o que força o inscrito a preencher a informação solicitada; caso contrário, a inscrição não será permitida.
- As informações coletadas por esses diferentes campos serão armazenadas no cadastro do assinante e podem ser usadas como variável em sua newsletter e inseridas no corpo da newsletter ao redigir a mesma.
- Clique no botão azul na parte inferior da página para salvar suas alterações conforme avança.
- Você pode excluir os campos na seção Assinantes.
C. Continuação da configuração das inscrições
As guias a seguir permitem gerenciar a continuação do processo do assinante: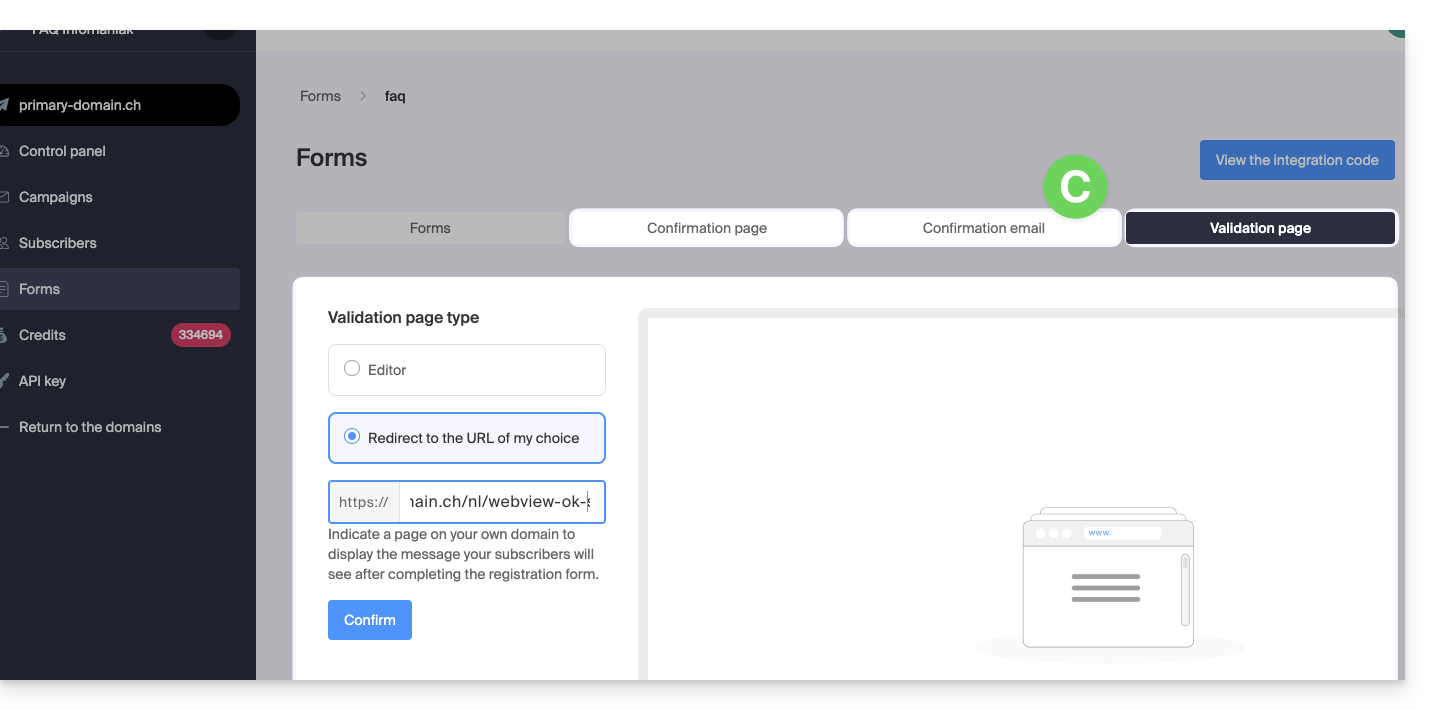
De fato, o registro de um visitante por meio do formulário funciona com base no princípio do duplo opt-in: uma primeira mensagem é enviada para o endereço da pessoa que se registrou, e ela deve validar manualmente e voluntariamente seu registro clicando em um link exclusivo contido no e-mail recebido.
Somente então a pessoa será definitivamente registrada em seu banco de dados como assinante, até que ela se cancele.
Você pode, portanto, personalizar nas 3 abas restantes:
- a página ou o texto que deve ser exibido durante a primeira fase de registro (que informa ao usuário que um e-mail será enviado);
- o e-mail que é enviado ao usuário que desejou se registrar (conteúdo, remetente, título, etc.);
- a página ou o texto que deve ser exibido quando o usuário confirmar seu registro clicando no link contido no corpo do e-mail.
Link para esta FAQ: https://faq.infomaniak.com/2167
Esta seção de perguntas frequentes foi útil?
Este guia diz respeito aos links presentes na Newsletter Infomaniak que você criou.
Links inválidos?
Se estiver a fazer um teste de envio da sua newsletter…
- Clique aqui para aceder à gestão do seu produto no painel de controlo Infomaniak (precisa de ajuda?).
- Clique no nome do domínio correspondente na tabela que aparece:
- Clique em Campanhas no menu lateral esquerdo.
- Clique em Criar campanha:
- Na etapa de redação do conteúdo, se você enviar um teste (botão dedicado para esse fim na barra superior) para o endereço de sua escolha…
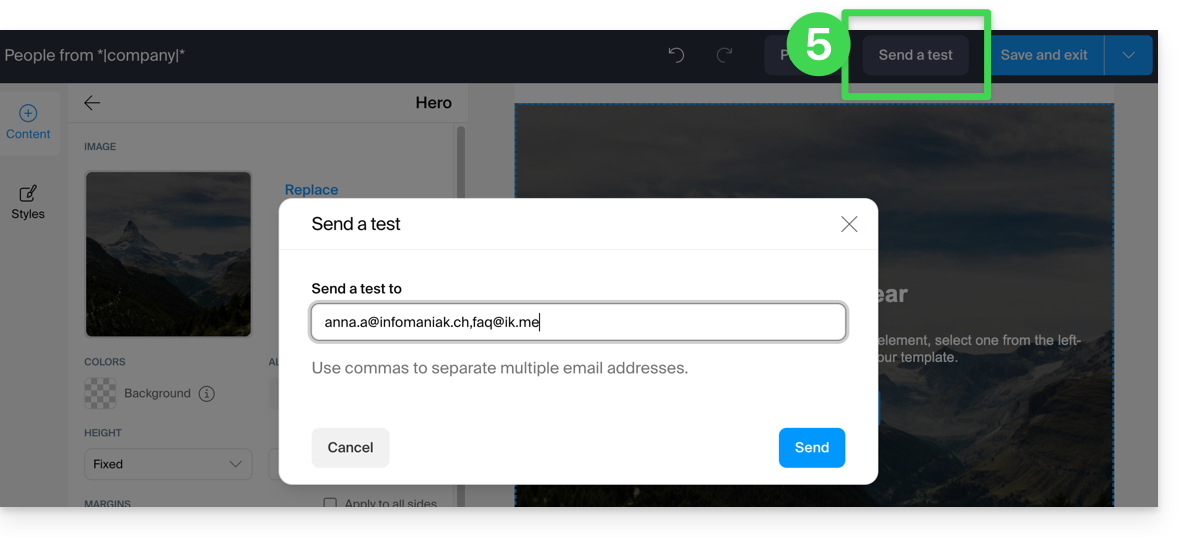
… portanto, é normal que os links presentes na sua mensagem enviada durante o teste (parte superior: "LER ESTE E-MAIL NO MEU NAVEGADOR" = link para visualizar a mensagem em um navegador e parte inferior: "CANCELAR INSCRIÇÃO" = link para permitir que o usuário cancele a inscrição) não funcionem.
Eles funcionarão, obviamente, durante o seu envio definitivo.
Link para esta FAQ: https://faq.infomaniak.com/2170
Esta seção de perguntas frequentes foi útil?
Este guia apresenta as opções disponíveis para segmentar e filtrar suas listas de contatos ao enviar uma Newsletter Infomaniak.
Introdução
- O filtro de assinantes com base em determinados critérios permite enviar newsletters apenas para algumas pessoas da sua lista de assinantes.
- Os critérios podem ser a data de inscrição ou campos personalizados, ou ainda ações realizadas ou não em envios anteriores.
- Você pode combinar várias condições e adicionar condições "
OU" para refinar seus filtros.
Segmentar os envios de acordo com…
Aceda à sua newsletter:
- Clique aqui para aceder à gestão do seu produto no painel de controlo Infomaniak (precisa de ajuda?).
- Clique no nome do domínio correspondente na tabela que aparece:
… as particularidades dos assinantes
Aqui está um exemplo de formulário de inscrição na newsletter com campos adicionais que permitem solicitar informações personalizadas ao usuário que se inscreve: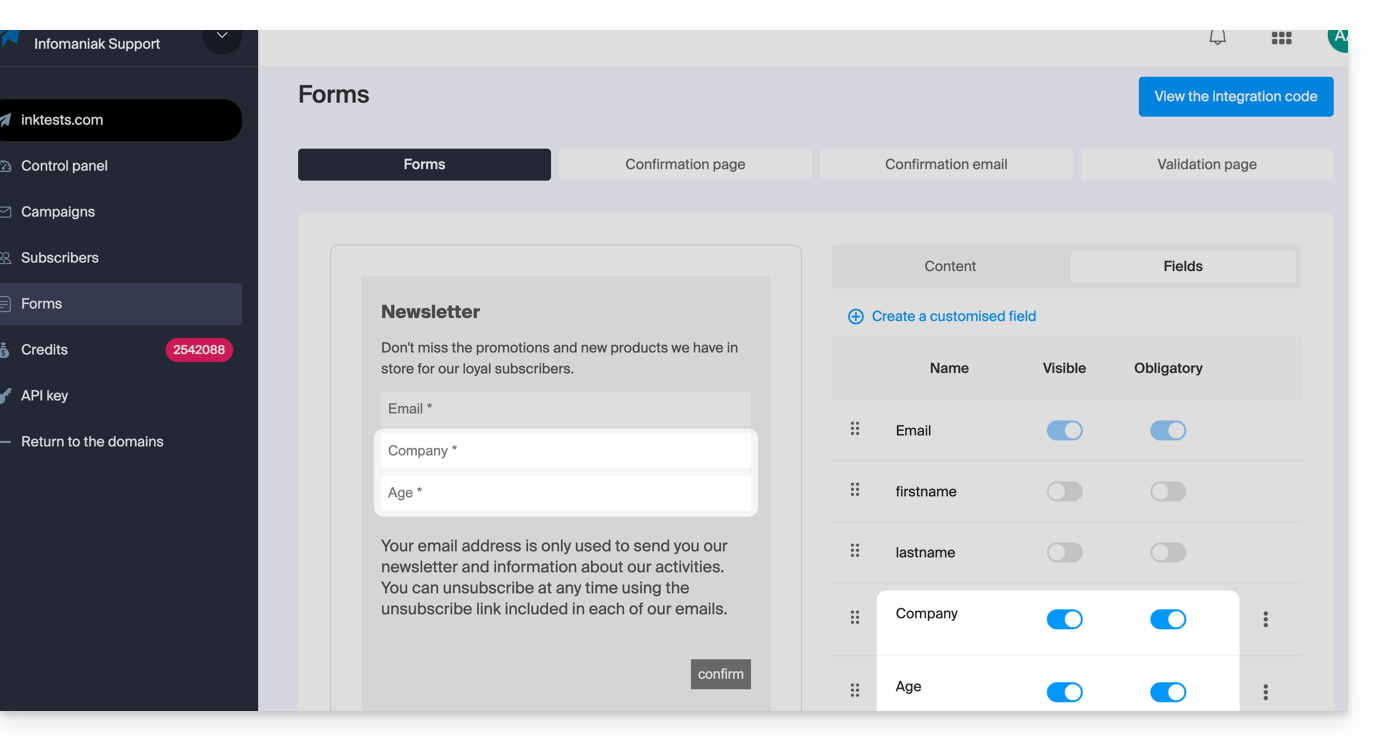
Assim que alguns usuários preencherem essas informações, você poderá encontrá-las nos detalhes do perfil de contato deles: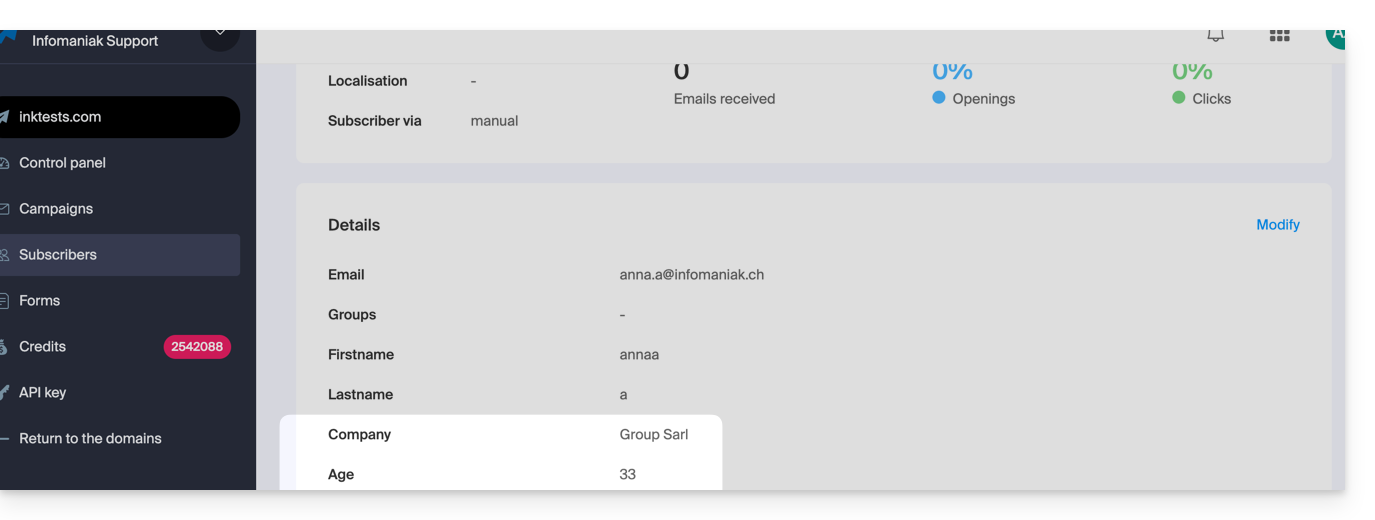
Este tipo de informação pode ser utilizado para segmentar a sua lista de subscritores e enviar mensagens apenas para uma parte dela. Consulte o capítulo 4 deste outro guia.
… as ações anteriores do subscritor
As informações sobre um envio anterior podem ser utilizadas para segmentar seu próximo envio. Exemplo: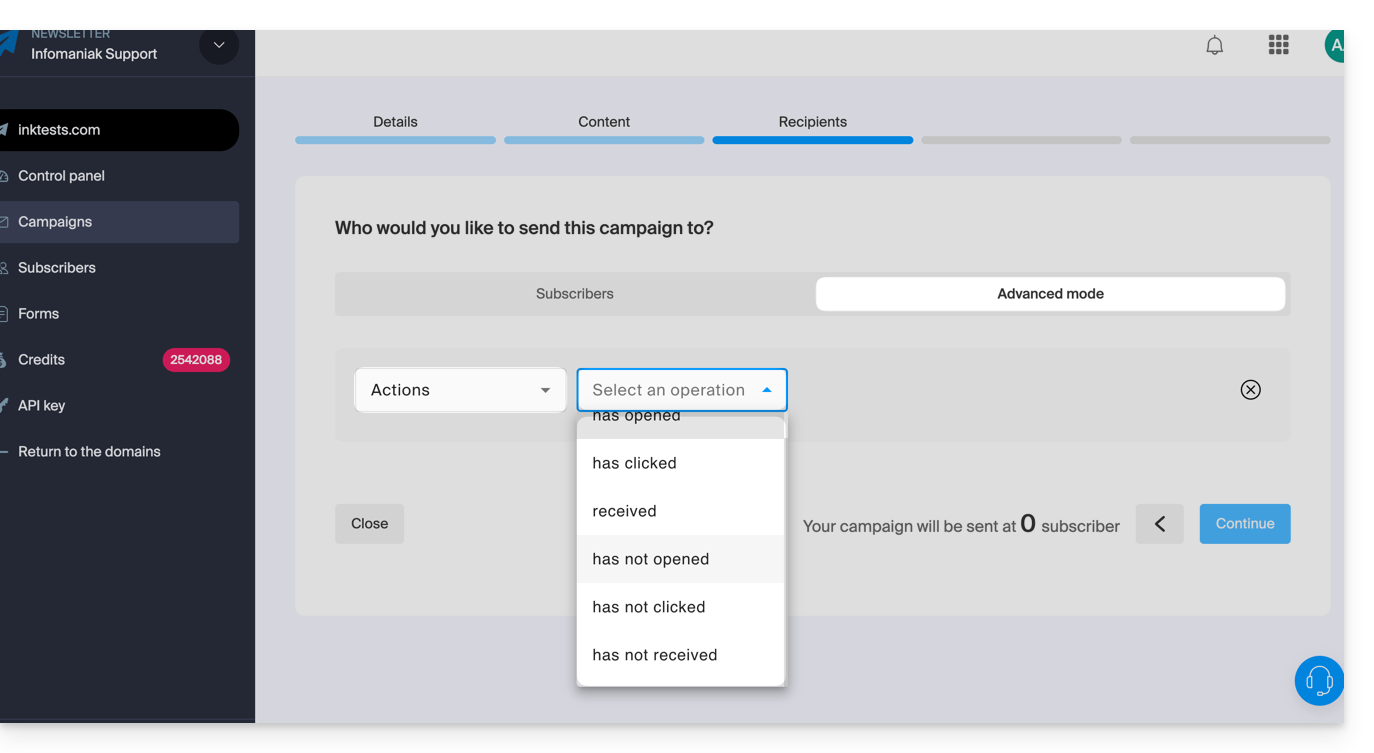
- Enviar apenas para os assinantes que abriram as últimas 5 campanhas.
- Envie apenas para os assinantes que nunca clicaram na newsletter específica enviada há 1 mês.
- etc.
Para isso:
- Consulte o capítulo 4 deste outro guia.
- Escolha Ações em vez de campo personalizado para selecionar os critérios que definem as pessoas que receberão o próximo envio da newsletter.
- Este mesmo menu suspenso também permite segmentar um envio com base nas datas de inscrição dos assinantes (enviar apenas para os inscritos de um determinado mês, por exemplo).
Link para esta FAQ: https://faq.infomaniak.com/2184
Esta seção de perguntas frequentes foi útil?
Este guia diz respeito à Newsletter Infomaniak e apresenta alguns casos de uso relacionados com o registo de utilizadores.
Registo e novo registo, dados diferentes…
Para aceder à sua newsletter:
- Clique aqui para aceder à gestão do seu produto no painel de controlo Infomaniak (precisa de ajuda?).
- Clique, se necessário, no nome do domínio correspondente na tabela que aparece.
- A interface da newsletter é exibida.
É possível inscrever-se várias vezes consecutivas na mesma newsletter (incluindo a reinscrição do utilizador após o cancelamento da subscrição):
- A data de inscrição exibida na página de gestão de subscritores corresponderá sempre à primeira inscrição (mesmo que as inscrições sejam múltiplas e mesmo que não tenha havido cancelamento da subscrição do utilizador entretanto):
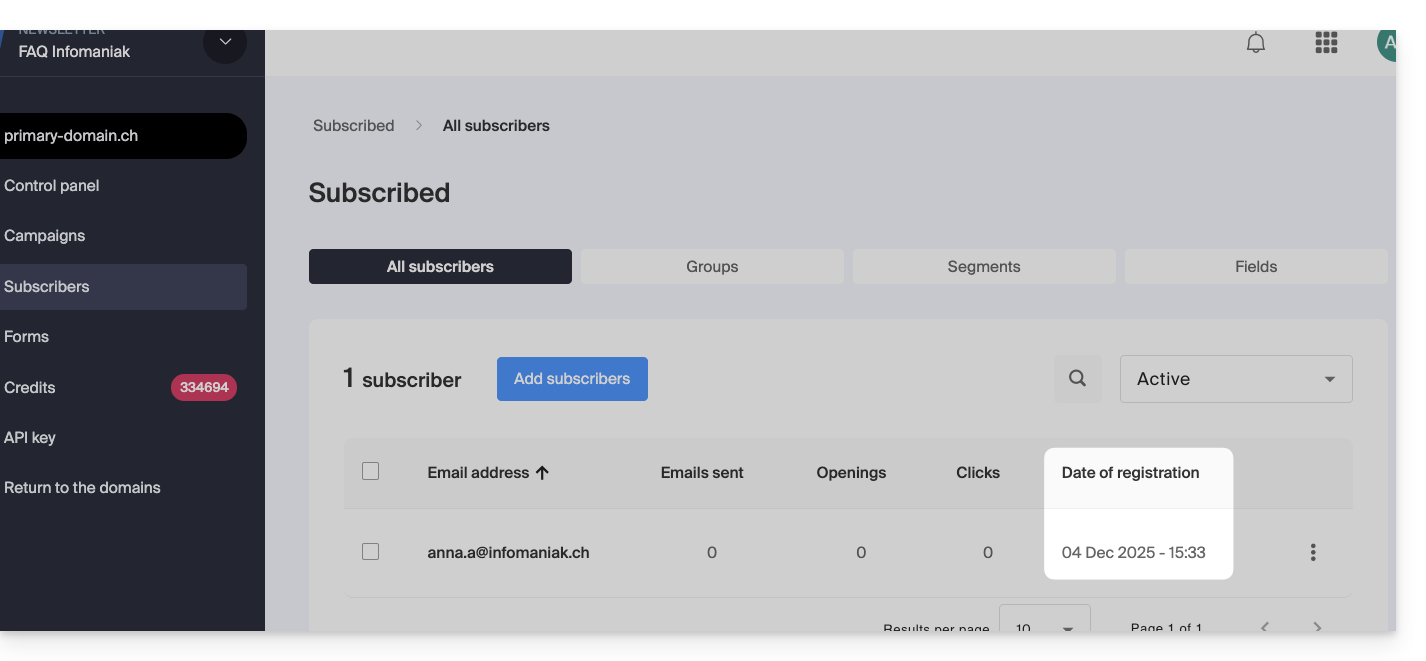
- Se o utilizador se registar novamente sem ter cancelado o registo anterior, mas fornecer informações diferentes no novo registo (por exemplo, um nome diferente), serão aplicadas estas novas informações.
Cancelamento de registo, eliminação e esquecimento
O gestor da newsletter pode realizar 3 ações na ficha de um assinante: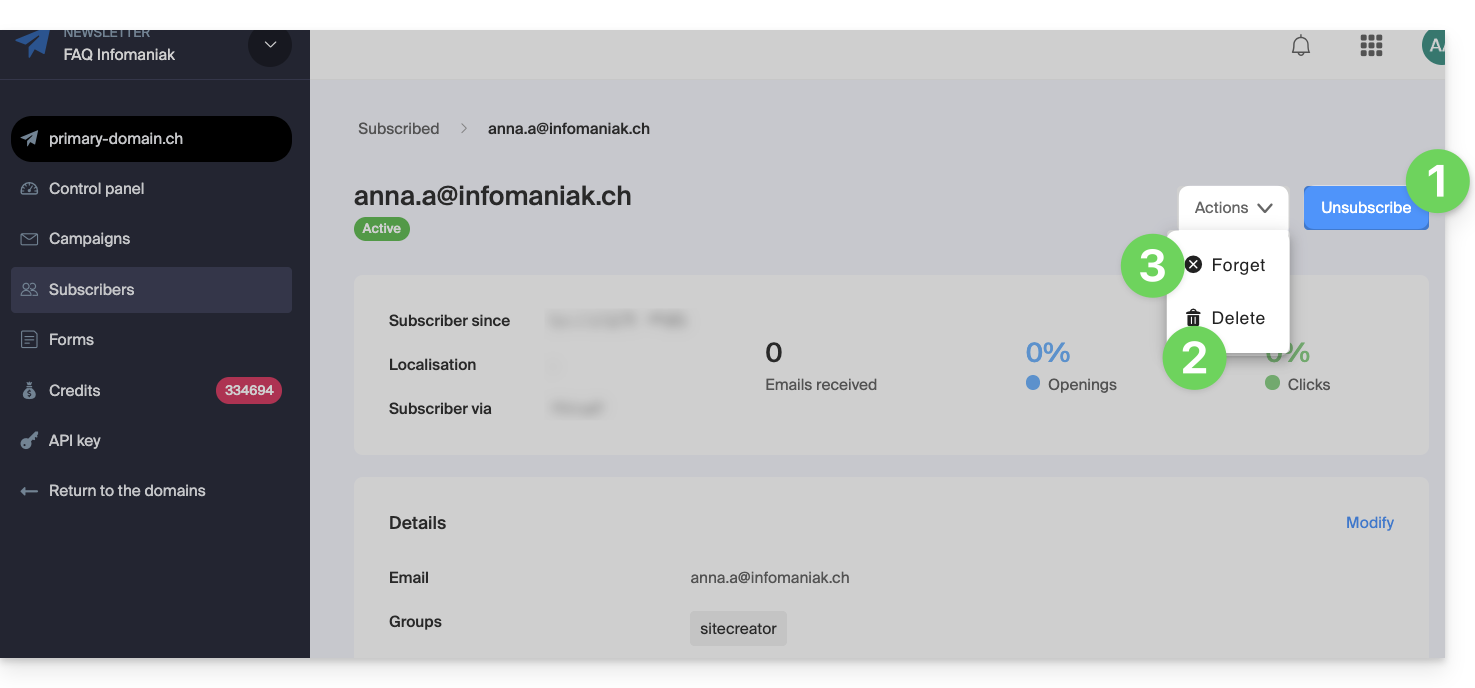
1. Cancelar a inscrição do assinante manualmente
Neste caso, o assinante
- passa para o estado de cancelado
- não receberá mais newsletters
- permanecerá visível nas listas (ativando o filtro Cancelado)
- pode ser modificado através de uma nova importação, seja ela única ou de outra forma, mas o seu estado (inscrito ou não inscrito) permanecerá o mesmo
- e é possível reativá-lo manualmente a partir da sua ficha de assinante:
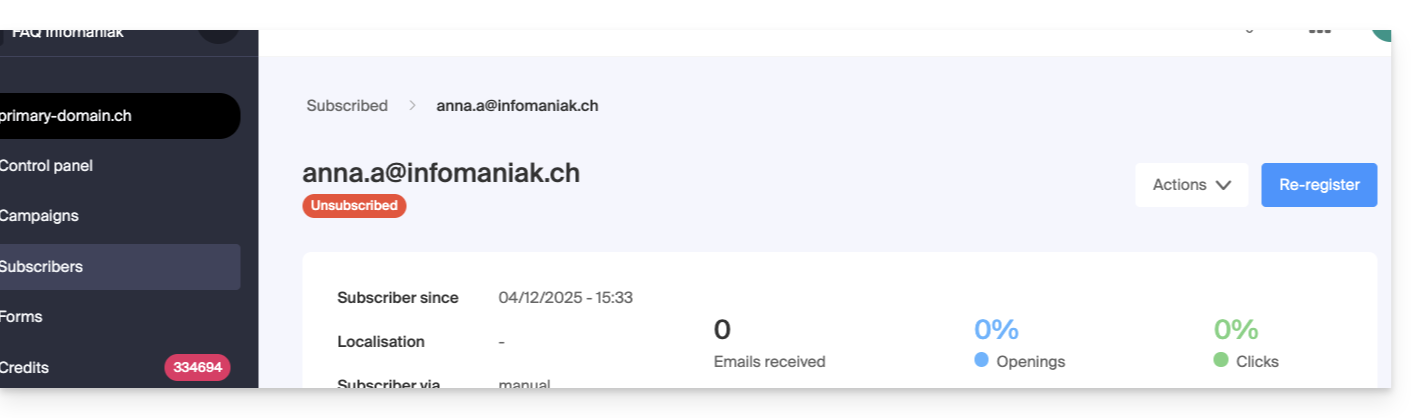
Nenhum e-mail é enviado ao utilizador durante estas operações.
2. Remover o assinante
Neste caso, o assinante (inscrito ou não) é removido das listas e nenhum filtro de pesquisa (ou sistema de lixeira) permite encontrar um utilizador removido.
- est supprimé des listes et aucun filtre de recherche (ou un système de corbeille) ne permet de retrouver un utilisateur supprimé
- pode ser modificado através de uma nova importação, seja ela única ou de outra forma, mas o seu estado de inscrição ou não inscrição permanecerá o mesmo:
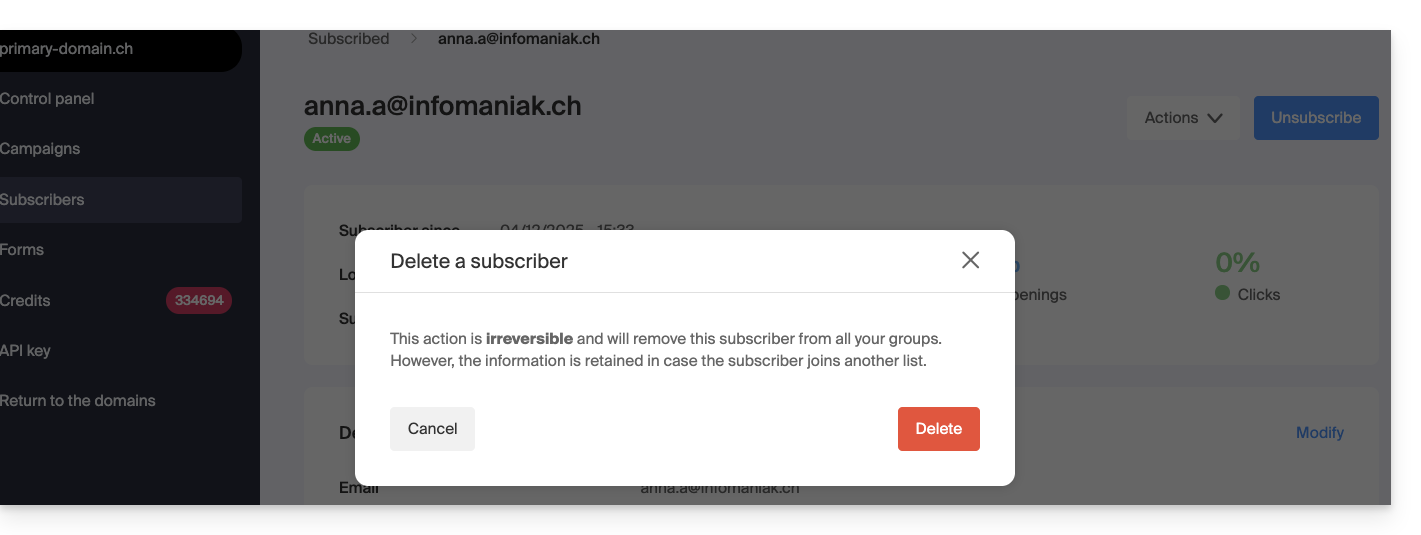
- todas as informações relativas à sua atividade desde a primeira inscrição são recuperadas e exibidas
Nenhum e-mail é enviado ao utilizador durante estas operações.
3. Remover o assinante
Neste caso, o resultado e as possibilidades são exatamente os mesmos que na exclusão (ponto 2 acima), exceto por:
- após 30 dias, todas as informações relativas à sua atividade são irrecuperáveis:
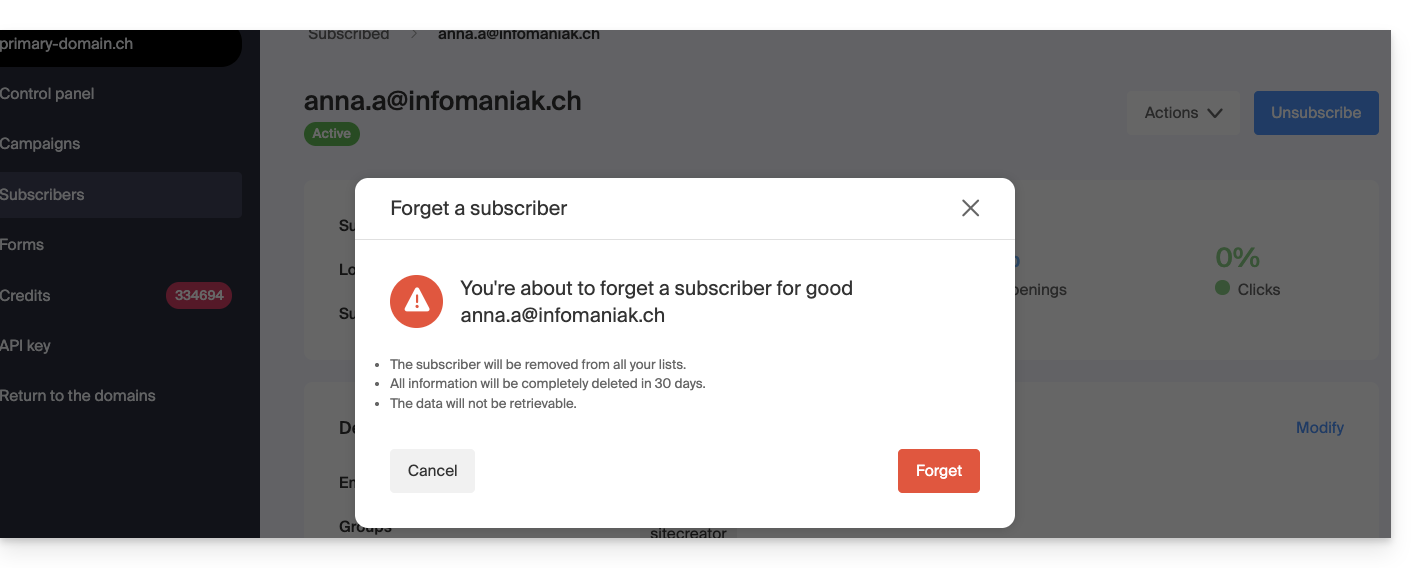
Nenhum e-mail é enviado ao utilizador durante estas operações.
Link para esta FAQ: https://faq.infomaniak.com/2190
Esta seção de perguntas frequentes foi útil?
Este guia explica como criar um token, ou chave API (ou ainda um token) para a ferramenta Newsletter Infomaniak.
Obter um token
Para obter uma chave de API Newsletter:
- Clique aqui para acessar o gerenciamento do seu produto no Manager Infomaniak (precisa de ajuda?).
- Clique diretamente no nome de domínio atribuído ao produto em questão.
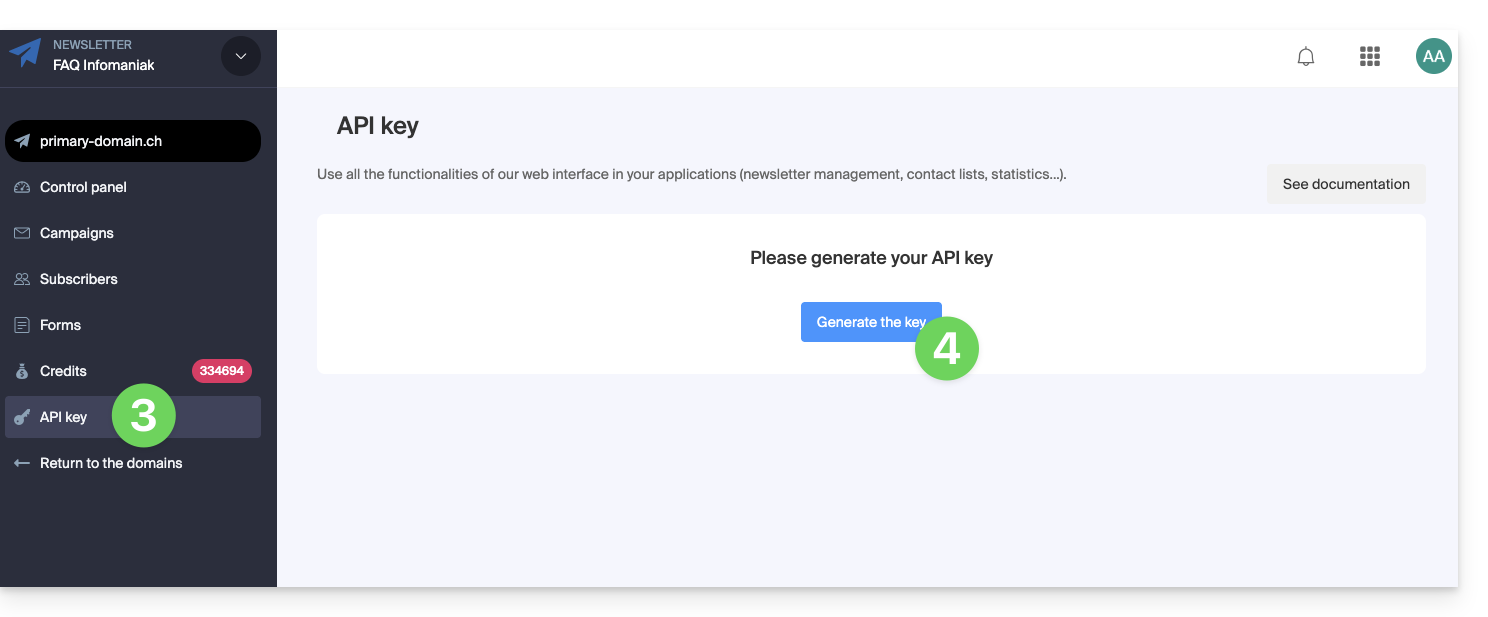
- Clique em Chave API no menu lateral esquerdo.
- Clique no botão azul Gerar uma chave:
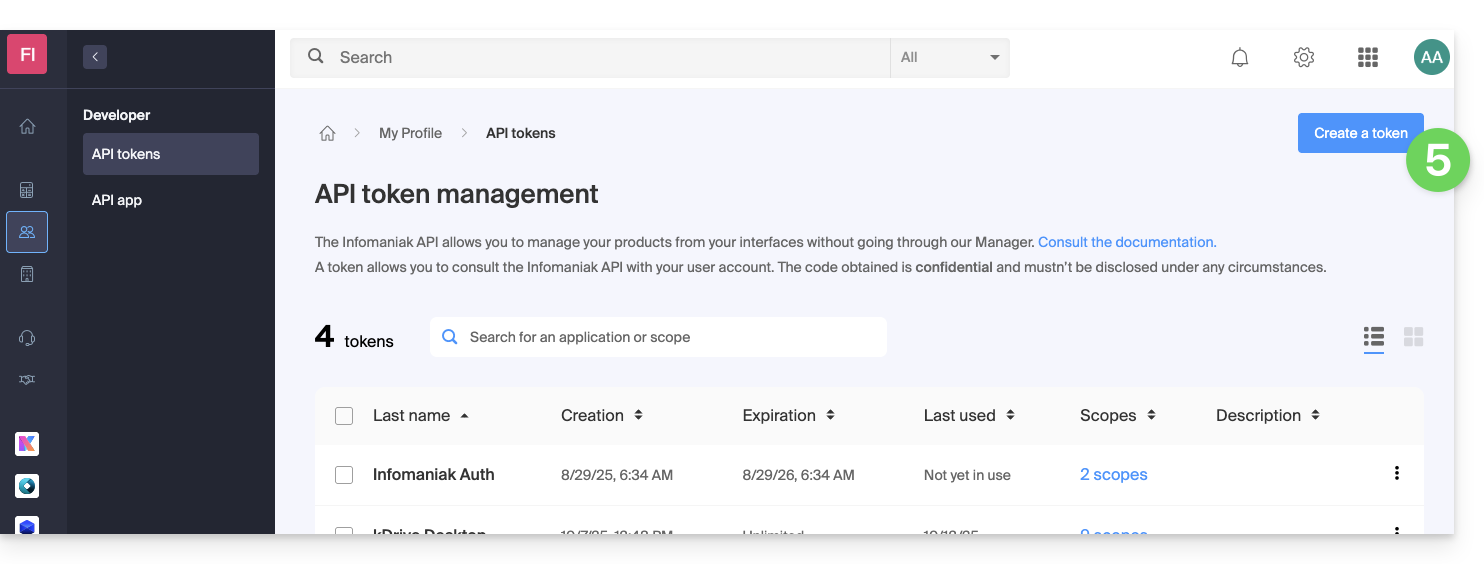
- Clique no botão azul Criar um token:
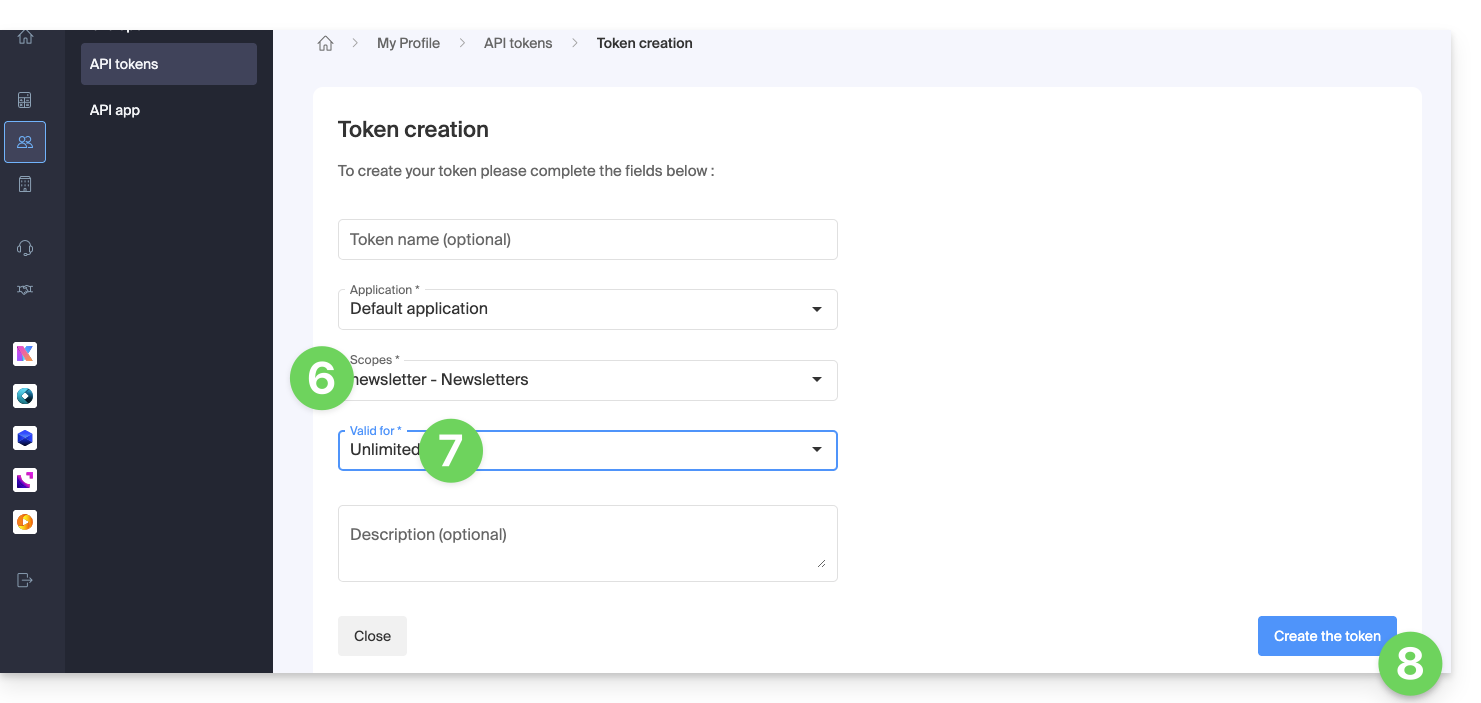
- Selecione o produto adequado no menu suspenso.
- Escolha um período de validade.
- Clique no botão azul Criar um token:
- Insira a senha de acesso ao Manager, conforme solicitado.
- Copie o token e guarde-o num local seguro, pois não será mais acessível depois disso.
Consulte a documentação da API Newsletter.
Link para esta FAQ: https://faq.infomaniak.com/2211
Esta seção de perguntas frequentes foi útil?