Base de conhecimento
1000 perguntas frequentes, 500 tutoriais e vídeos explicativos. Aqui, você encontra apenas soluções!
Este guia explica como guardar e exportar um calendário da aplicação web Calendar Infomaniak (serviço online ksuite.infomaniak.com/calendar) no formato .ics.
Exportar um calendário
Para exportar a agenda no formato .ics:
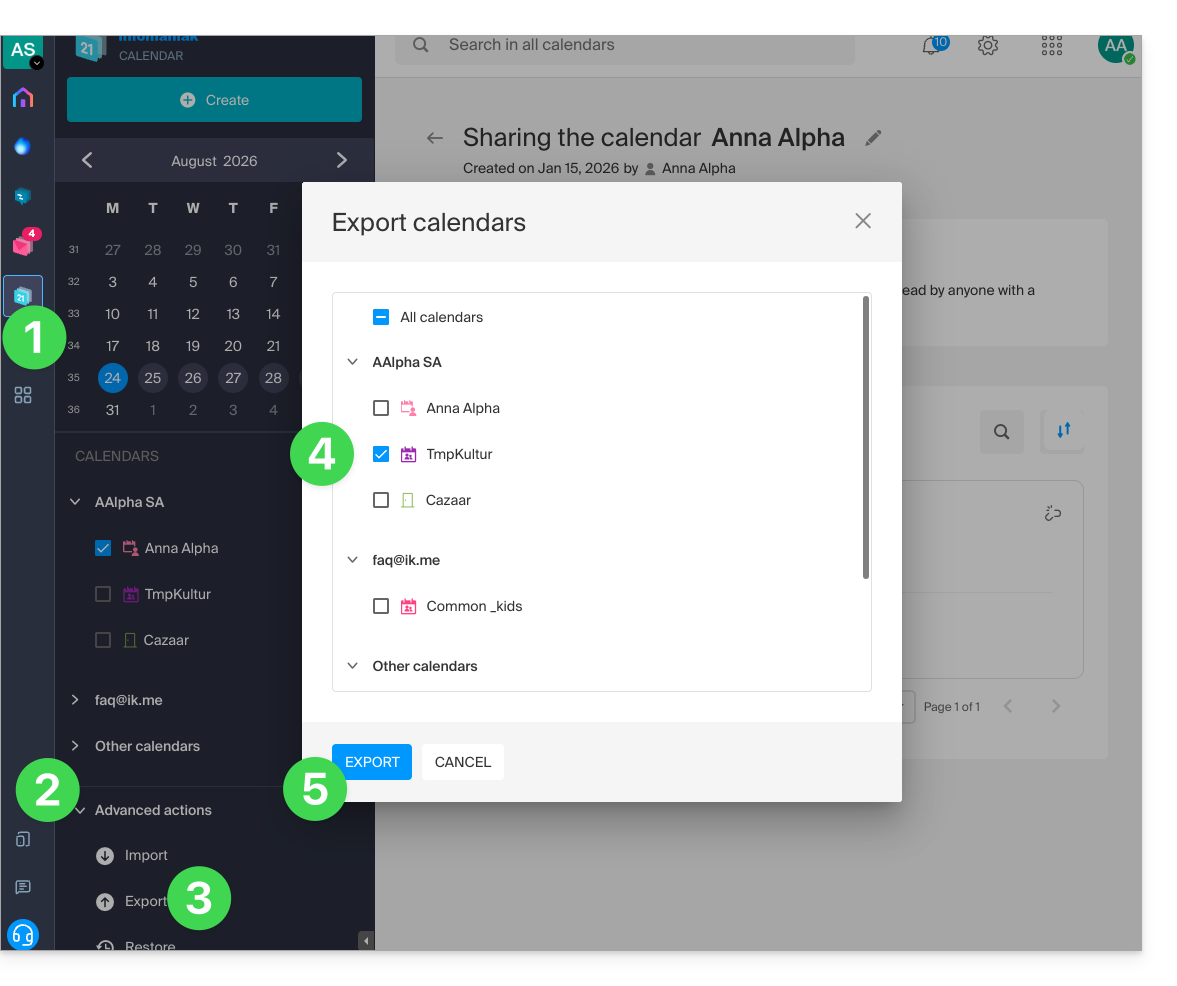
- Clique aqui para acessar o aplicativo web Calendar da Infomaniak (serviço online ksuite.infomaniak.com/calendar).
- Clique em Ações avançadas no menu lateral esquerdo.
- Clique em Exportar no menu lateral esquerdo.
- Selecione o(s) calendário(s) que deseja exportar.
- Clique em Exportar:
- Salve o arquivo
.icsno seu computador.
Consulte este outro guia se precisar de informações sobre a importação de eventos.
Link para esta FAQ: https://faq.infomaniak.com/1173
Esta seção de perguntas frequentes foi útil?
Este guia explica como usar o aplicativo móvel Gmail (aplicativo para smartphone ou tablet iOS/Android) para consultar um endereço de e-mail hospedado pela Infomaniak.
Introdução
- Em vez da configuração manual abaixo, recomenda-se usar o aplicativo Infomaniak Mail (iOS / Android) para usufruir dos benefícios de segurança da Infomaniak.
Usar o aplicativo móvel Gmail para Infomaniak
Pré-requisitos
- Criar o endereço de e-mail (❓: ajuda my kSuite | Serviço de E-mail/kSuite).
- Criar uma senha para o dispositivo (❓: ajuda my kSuite | Serviço de e-mail/kSuite).
- Verificar se a configuração do domínio está correta (❓: ajuda).
Para adicionar, via IMAP, o endereço de e-mail gerenciado na Infomaniak no seu aplicativo móvel Gmail (❓: ajuda oficial):
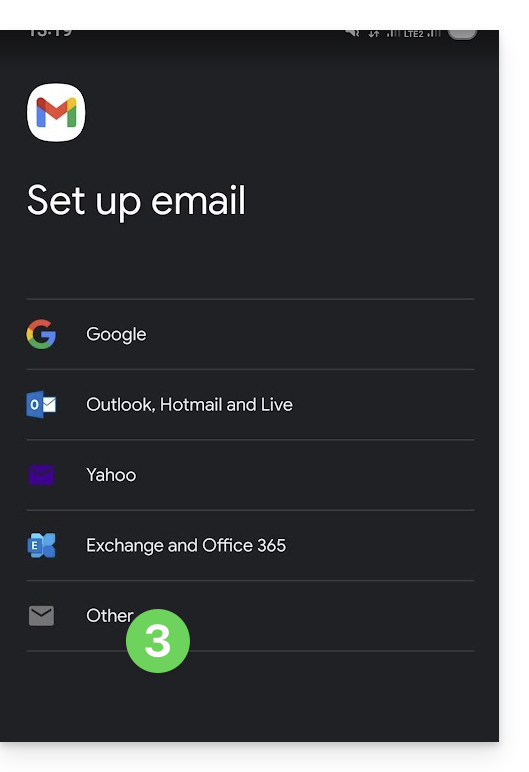
- Acesse as Configurações do Gmail.
- Toque em Adicionar conta.
- Escolha Outro:
- Insira o endereço de e-mail que deseja usar.
- Escolha o tipo de conta IMAP.
- Insira a senha (consulte os pré-requisitos) do endereço de e-mail:
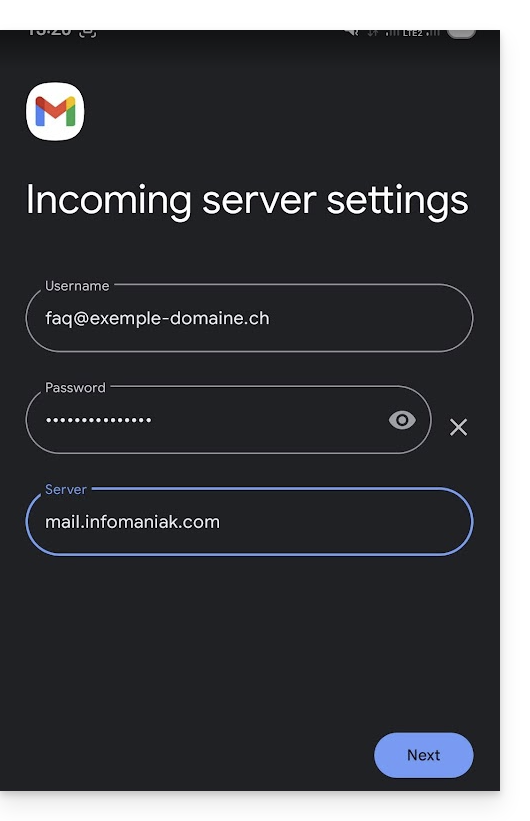
- Utilize o nome de servidor
mail.infomaniak.compara:- Servidor de entrada IMAP (recepção)
- Servidor de saída SMTP (envio)
- Conclua a adição do endereço.
Link para esta FAQ: https://faq.infomaniak.com/1208
Esta seção de perguntas frequentes foi útil?
Este guia explica como conectar o aplicativo para desktop Apple Mail macOS (MacBook Pro, Neo…) a um endereço de e-mail hospedado na Infomaniak.
Introdução
- O seu computador macOS será configurado automaticamente através de perfis de configuração .mobileconfig compatíveis com a Apple, ao contrário de uma configuração manual.
- É possível remover um perfil de configuração após a instalação (consulte a parte inferior desta página para obter mais informações).
Instalar um perfil de configuração
Pré-requisitos
- Crie o endereço de e-mail em my kSuite ou em um Serviço de E-mail / kSuite.
- Verifique se o Serviço de E-mail está configurado de forma otimizada.
Pode descarregar o perfil a partir do dispositivo em questão ou enviá-lo a partir de outro dispositivo (se já tiver um endereço de e-mail que funcione corretamente, por exemplo):
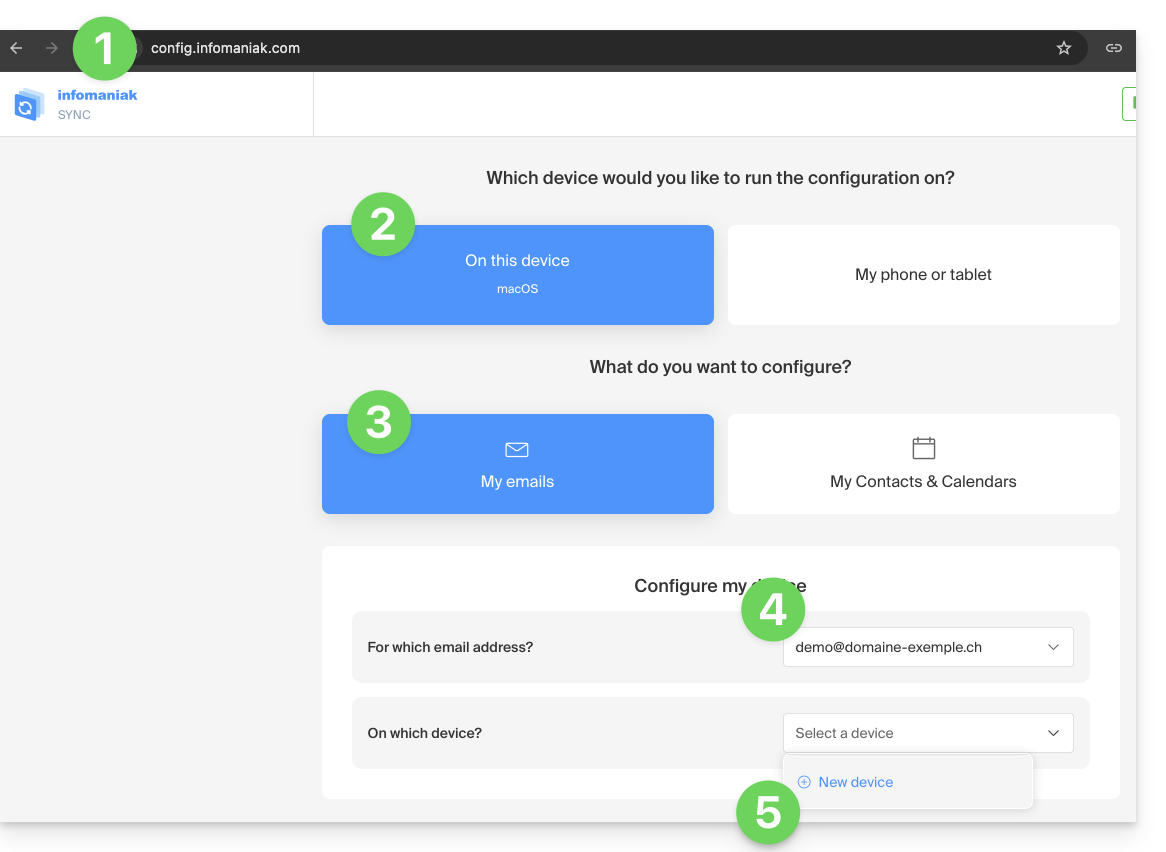
- Clique aqui para aceder à ferramenta de configuração Infomaniak (serviço online https://config.infomaniak.com) — inicie sessão, se necessário, na sua conta Infomaniak na Organização onde é gerido o seu endereço de e-mail.
- Escolha instalar o perfil neste dispositivo.
- Escolha sincronizar os e-mails.
- Escolha o endereço de e-mail que deseja configurar no Apple Mail (entre os endereços aos quais tem acesso).
- Crie um novo dispositivo:
- Insira um nome descritivo para o novo dispositivo.
- Clique no botão para descarregar o perfil (também pode enviá-lo por e-mail através do link à direita):
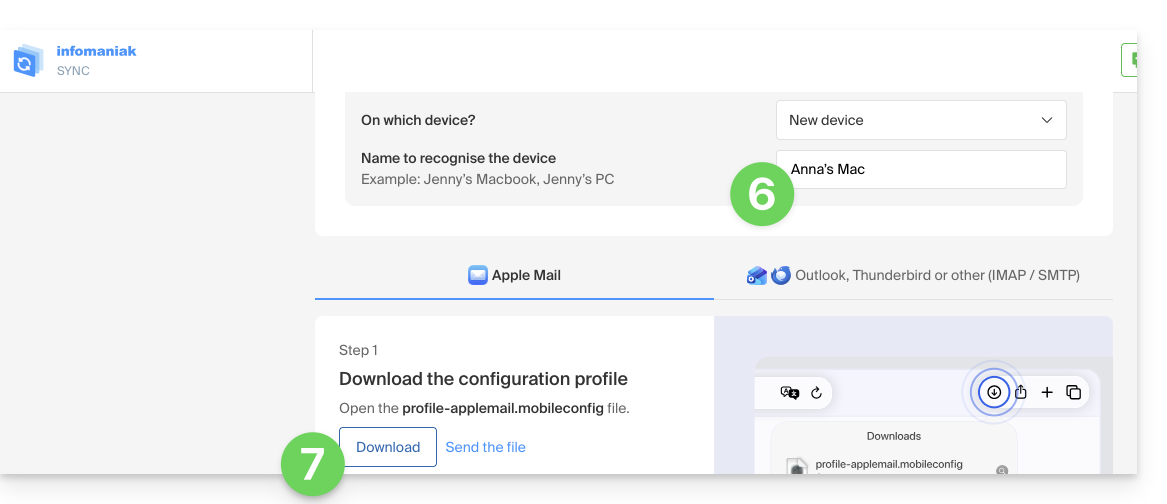
- Depois de ter o ficheiro
profile-applemail.mobileconfigno seu computador, clique duas vezes para o abrir e executá-lo. - Clique em OK:
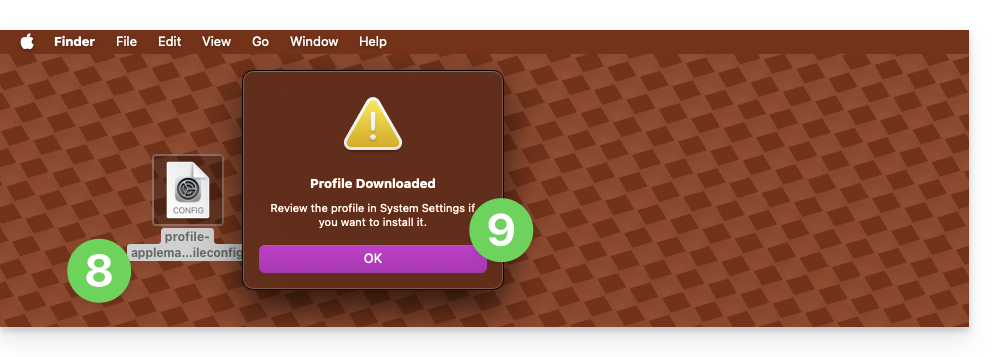
- Abra as Configurações do sistema do computador.
- Clique em Perfil baixado na barra lateral e, em seguida, clique duas vezes no novo perfil para aplicá-lo:
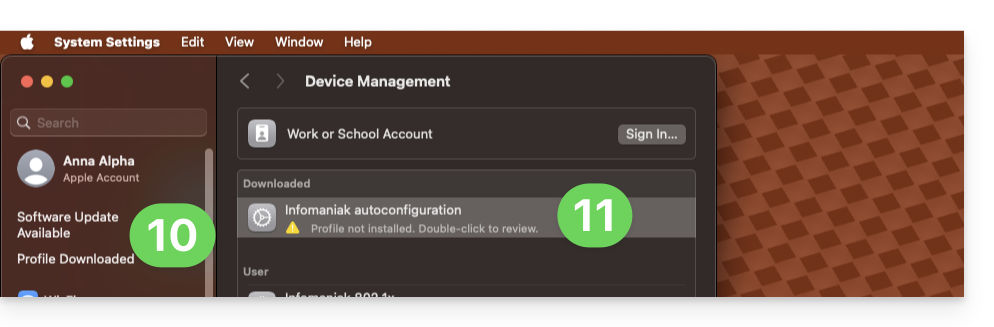
- Se você tiver uma versão antiga do macOS ou não encontrar o perfil, procure por “perfil” nas configurações ou consulte a documentação oficial, alterando, se necessário, a versão do seu sistema na parte superior da página.
- Clique em Instalar…:
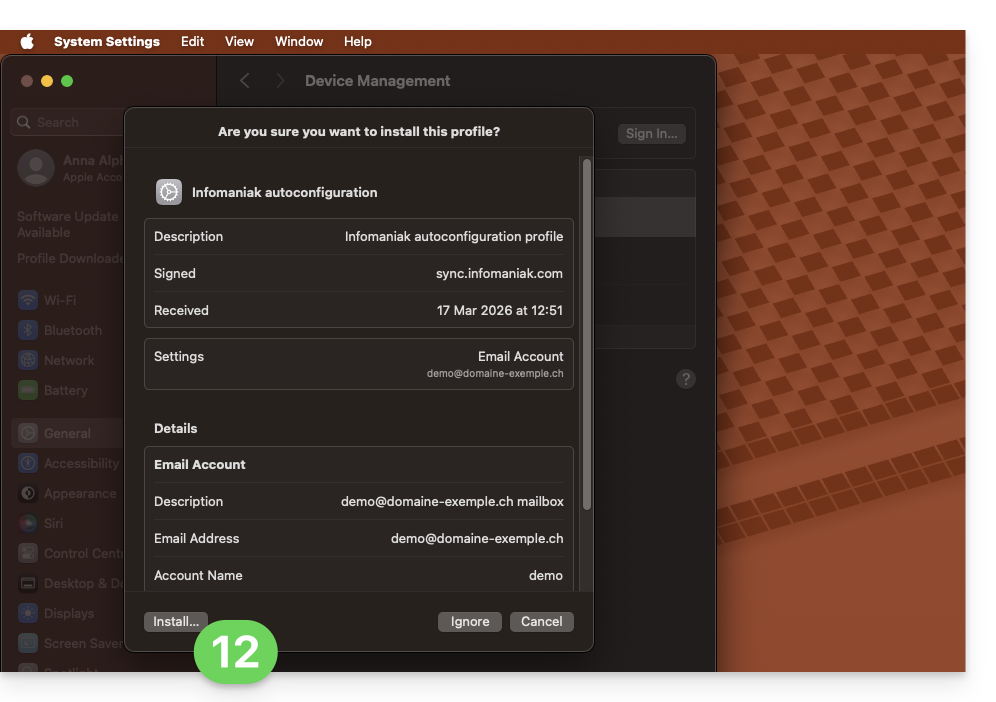
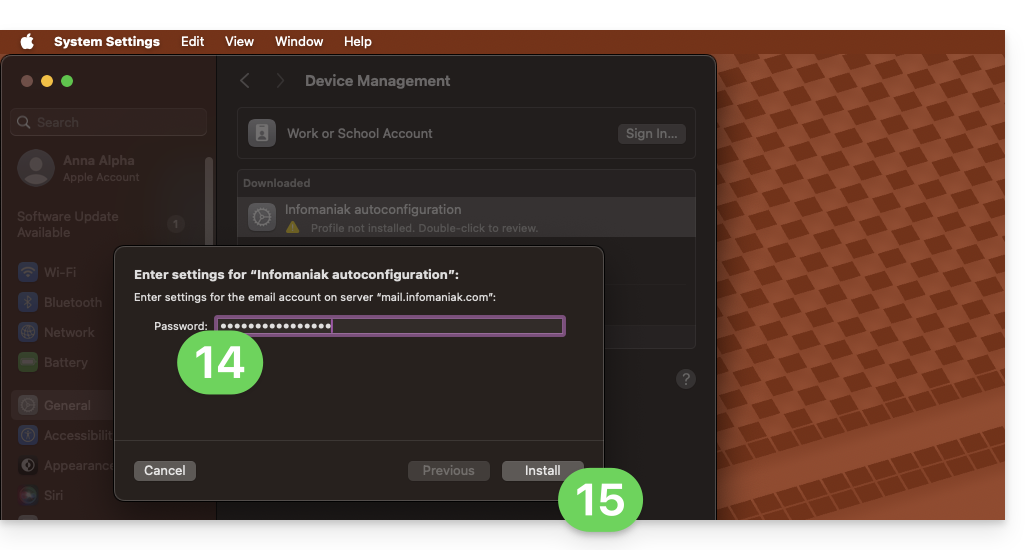
- Será solicitada uma senha…
- se você a conhece, pois já a criou na seção Dispositivos do Serviço de E-mail:
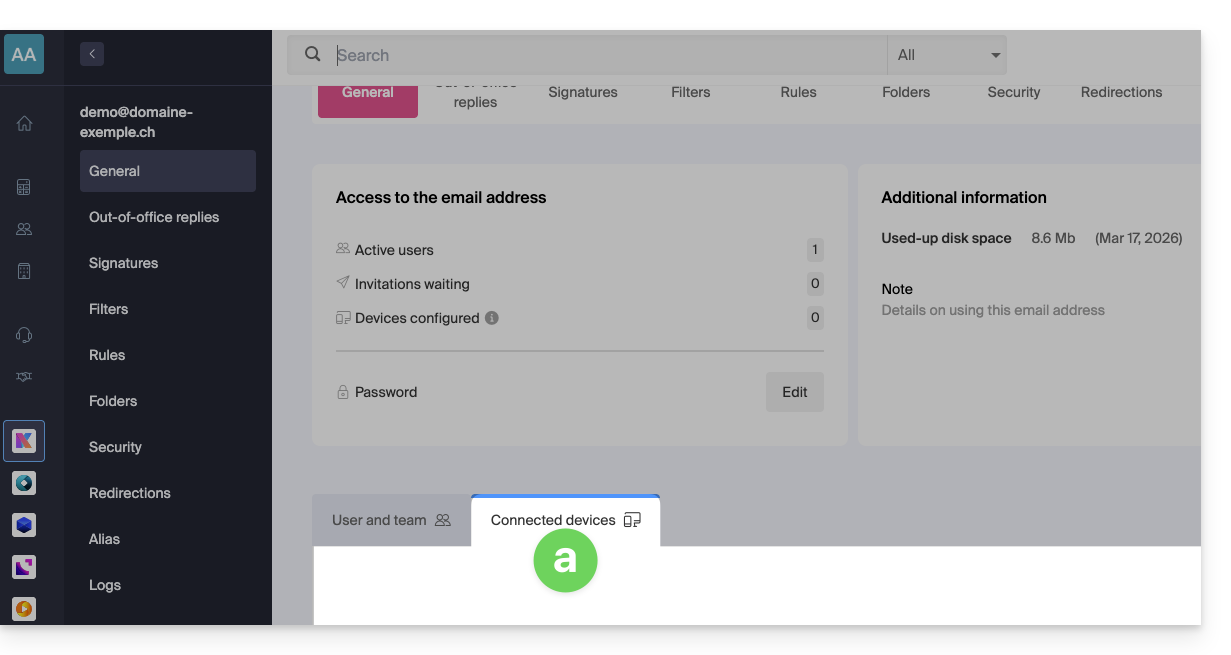
- ou você pode copiar a nova senha que está mais abaixo na página do assistente
config.infomaniak.comaberta anteriormente: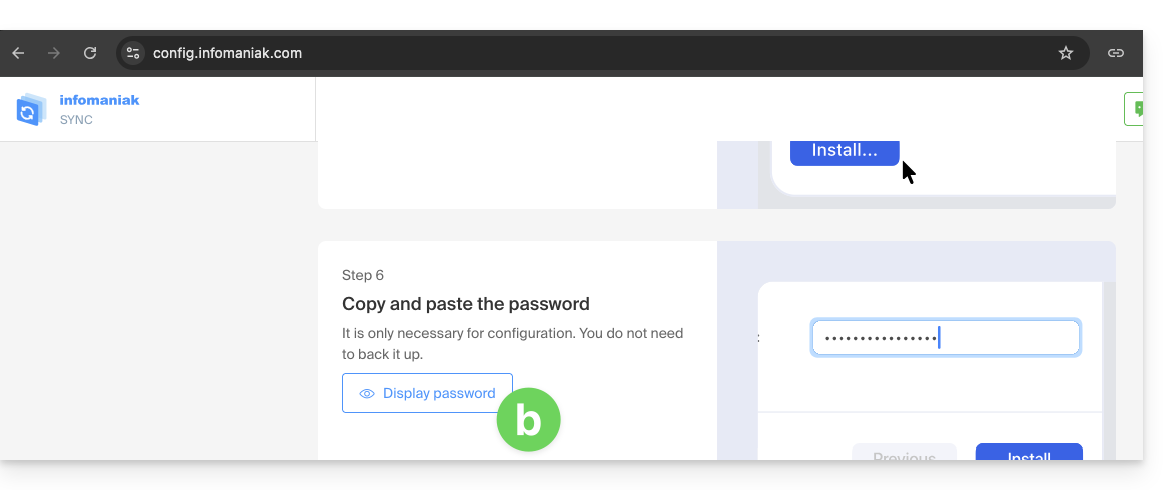
- Antes que a senha do endereço de e-mail seja exibida, é possível que a senha da sua conta Infomaniak seja solicitada por motivos de segurança:
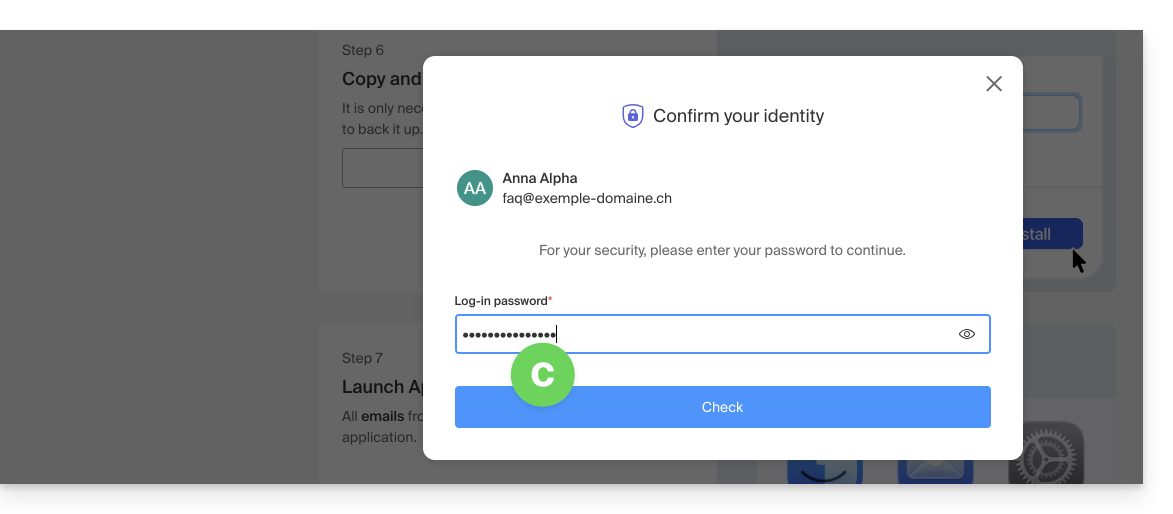
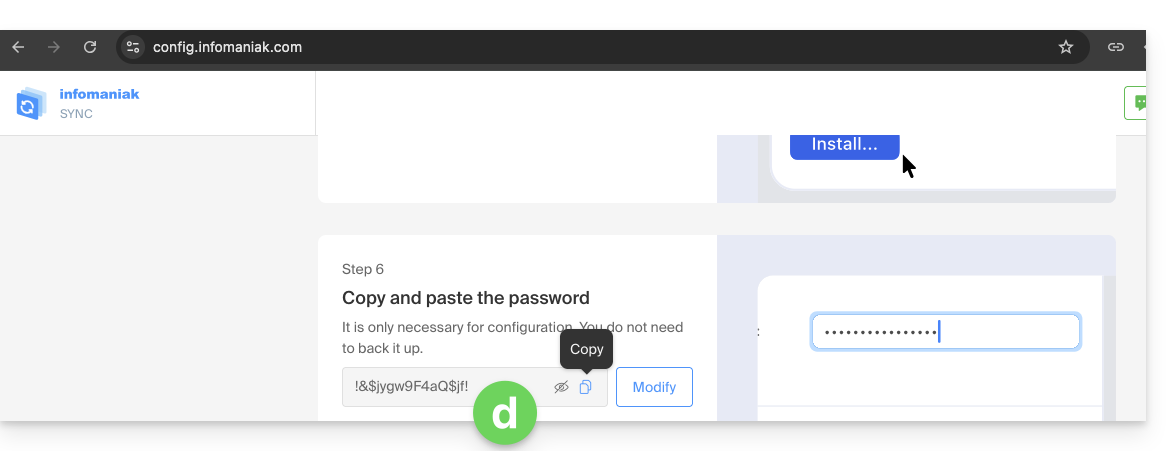
- Pronto, a senha gerada aleatoriamente é exibida, basta copiá-la:
- se você a conhece, pois já a criou na seção Dispositivos do Serviço de E-mail:
- Cole a senha na janela do macOS.
- Clique em Instalar para iniciar a instalação do perfil:
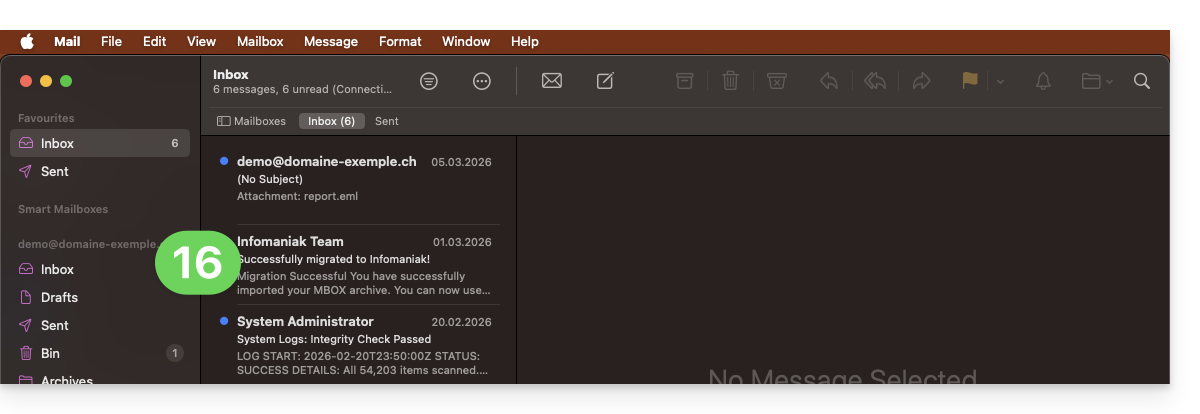
- Pronto, o seu endereço de e-mail já está configurado na aplicação Apple Mail, que pode abrir e controlar:
Remover uma conta IMAP
Consulte o capítulo "Deixar de usar uma conta" e, se necessário, altere a versão do seu sistema na parte superior da página*. (Atenção: não exclua uma conta configurada em POP sem fazer uma cópia de segurança das suas mensagens).
Excluir um perfil Apple
Consulte a documentação oficial, alterando, no topo da página, a versão do seu sistema, se necessário.
*Por que é necessário selecionar a versão do guia que corresponda exatamente à sua versão do sistema macOS/iOS?A Apple introduz alterações, por vezes subtis, em cada nova versão do seu sistema, por exemplo, um caminho no iOS 15…
… torna-se isto no iOS 18…
Link para esta FAQ: https://faq.infomaniak.com/1316
Esta seção de perguntas frequentes foi útil?
Este guia explica como conectar o aplicativo móvel Apple Mail para iOS (iPhone, iPad…) a um endereço de e-mail hospedado na Infomaniak.
Introdução
- Seu dispositivo iOS será configurado automaticamente por meio de perfis de configuração .mobileconfig compatíveis com a Apple, ao contrário de uma configuração manual.
- É possível remover um perfil de configuração após a instalação (role até o final desta página para obter as instruções).
Instalar um perfil de configuração
Pré-requisitos
- Crie o endereço de e-mail em my kSuite ou em um Serviço de E-mail / kSuite.
- Verifique se o Serviço de E-mail está configurado de forma ideal.
Em seguida:
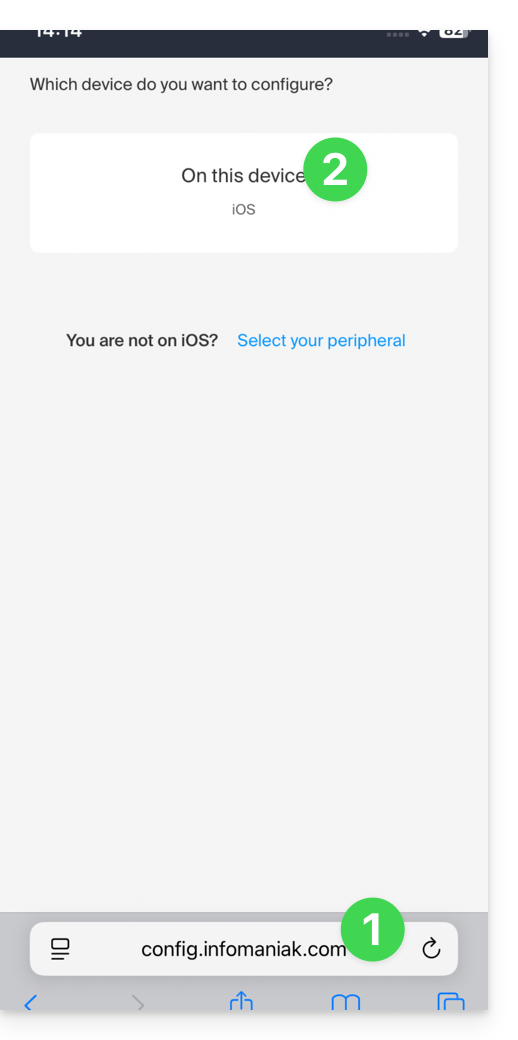
- Clique aqui para acessar a ferramenta de configuração da Infomaniak (serviço online https://config.infomaniak.com) — faça login, se necessário, na sua conta Infomaniak na Organização onde seu endereço de e-mail é gerenciado.
- Escolha instalar o perfil neste dispositivo iOS:
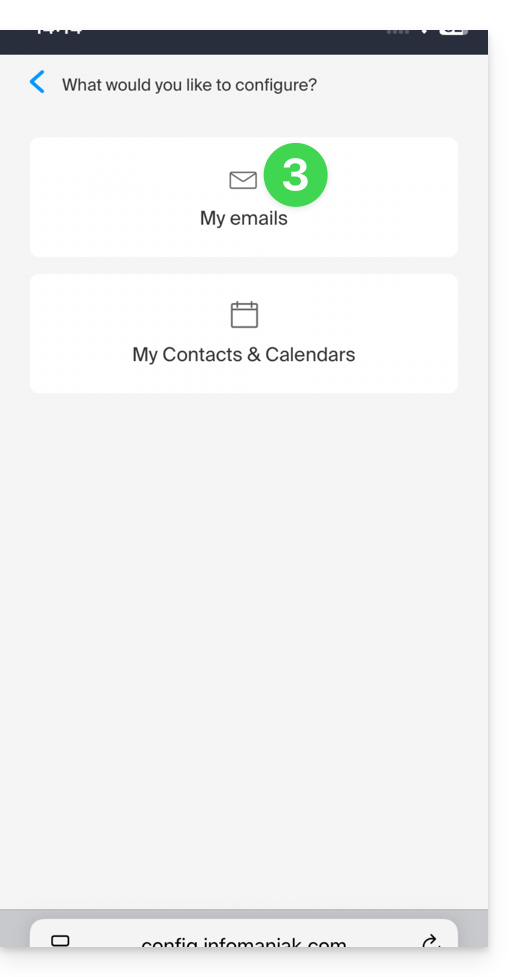
- Escolha sincronizar os e-mails:
- Escolha o endereço de e-mail (entre os já associados ao seu utilizador atual) que deverá ser sincronizado no seu dispositivo:
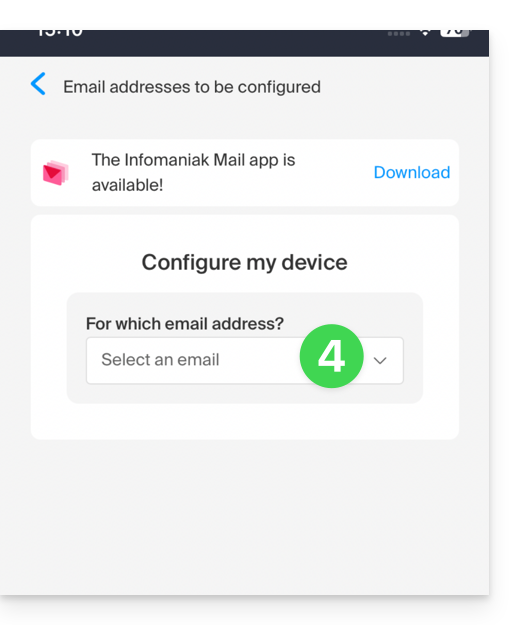
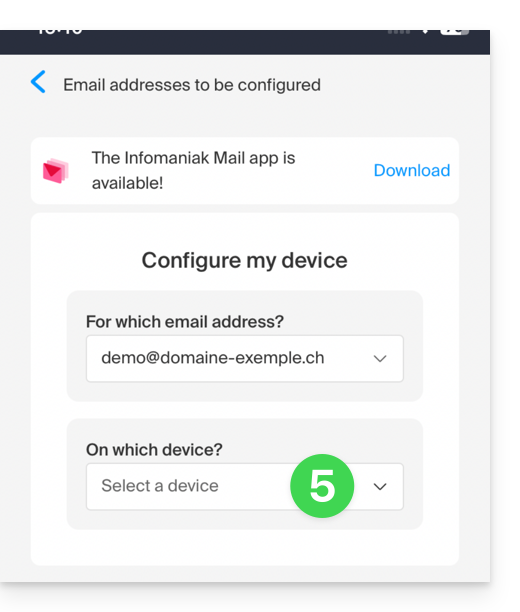
- Escolha na lista de dispositivos para ativar a sincronização num novo dispositivo (aquele em que se encontra):
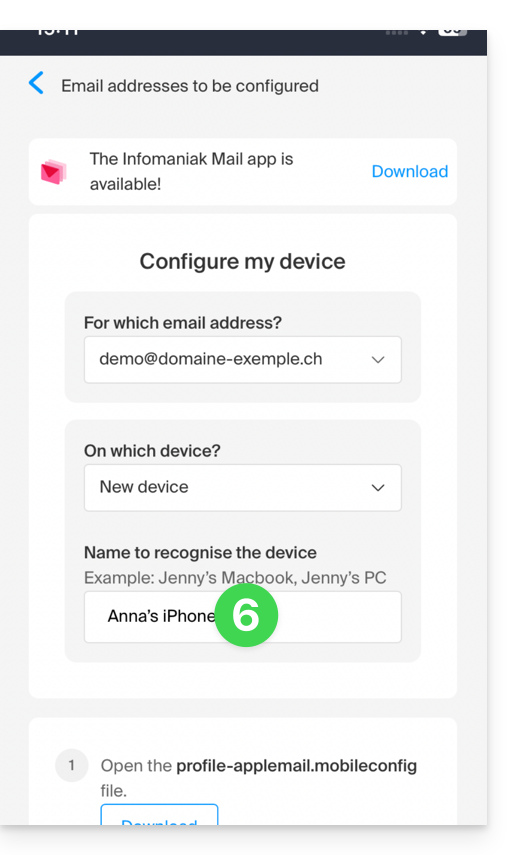
- O nome, apenas descritivo, do dispositivo é ajustado em conformidade, mas pode modificá-lo, se necessário:
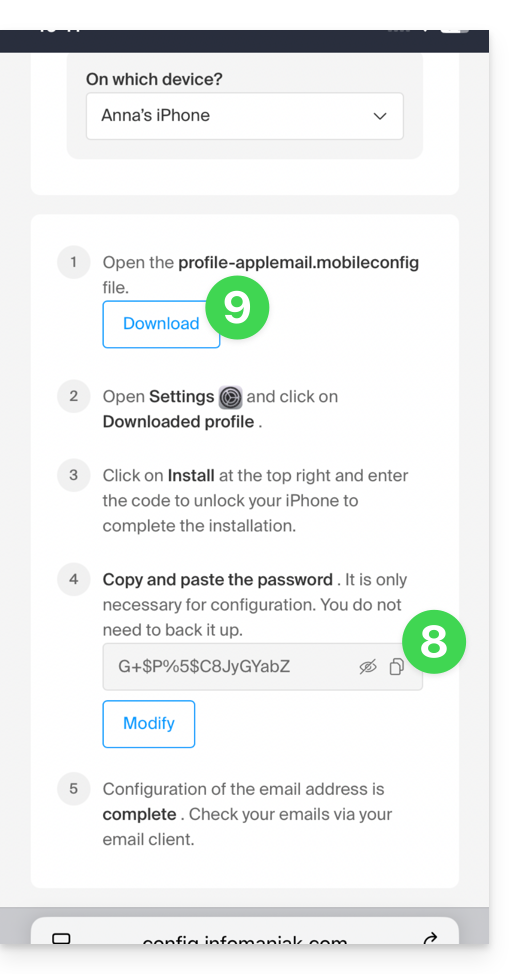
- Desça mais no assistente e gere uma palavra-passe dedicada à sincronização dos e-mails:
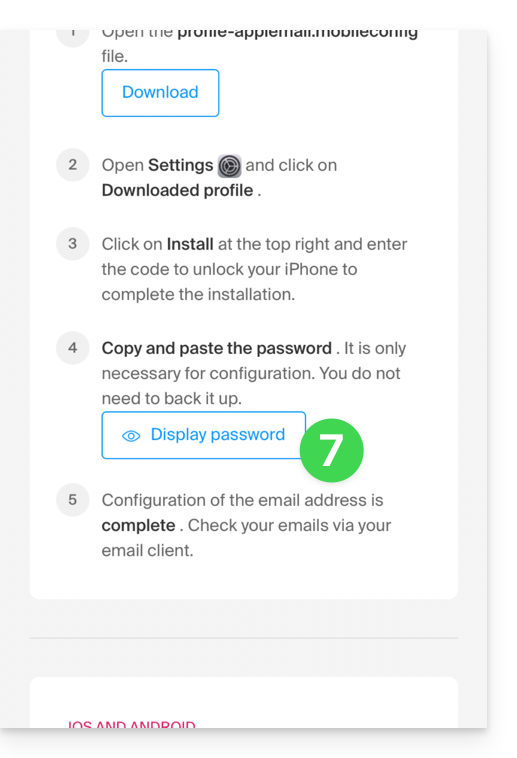
- Copie a palavra-passe gerada (será solicitada durante a instalação do perfil Apple).
- Descarregue o perfil Apple:
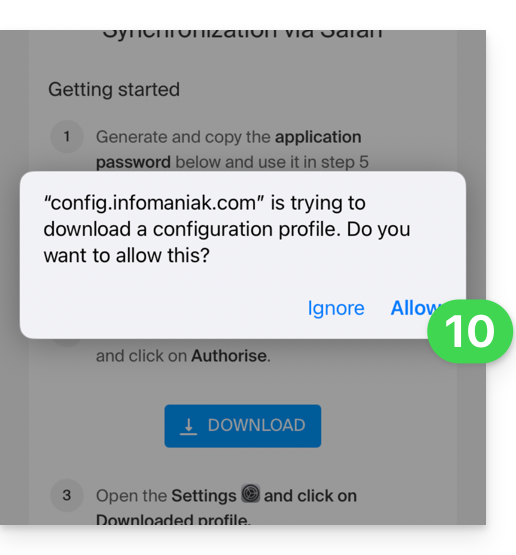
- Autorize o download no dispositivo:
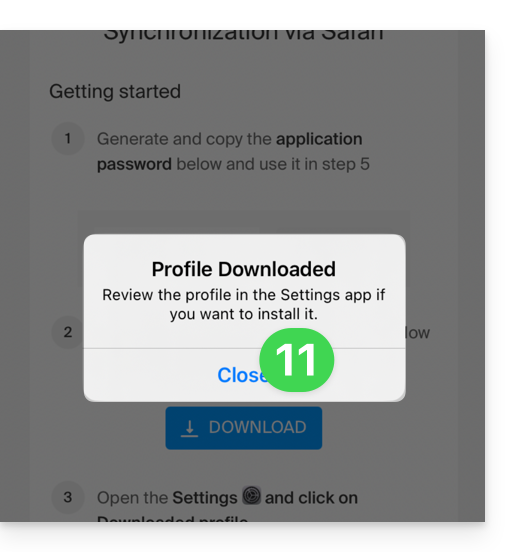
- Toque para fechar a mensagem:
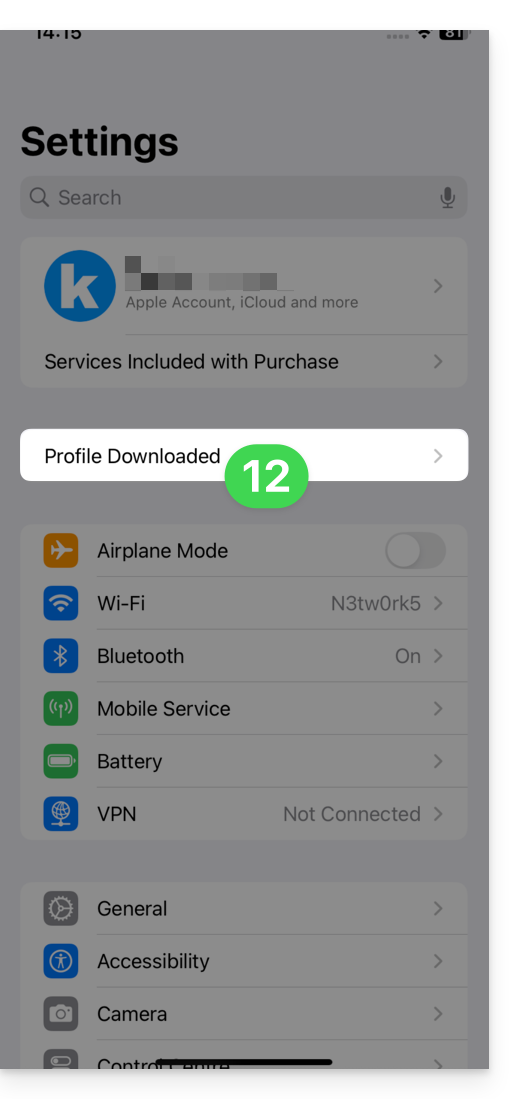
- Abra as configurações do dispositivo iOS e toque na faixa superior que o informa que um novo perfil foi descarregado:
- Toque em Instalar:
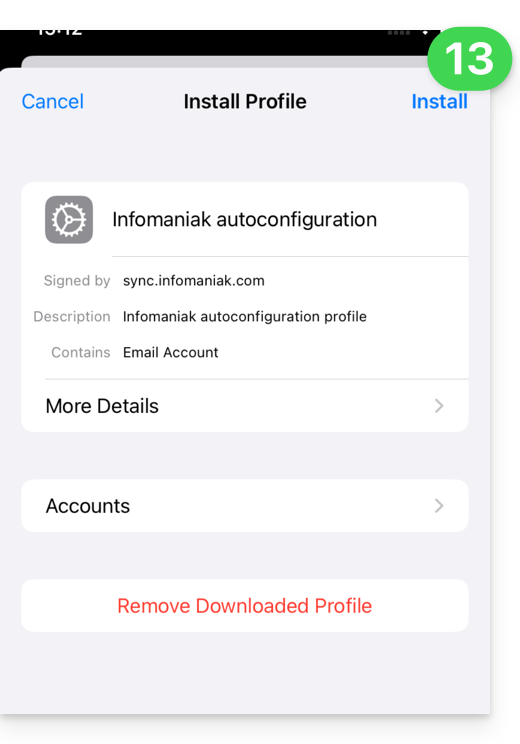
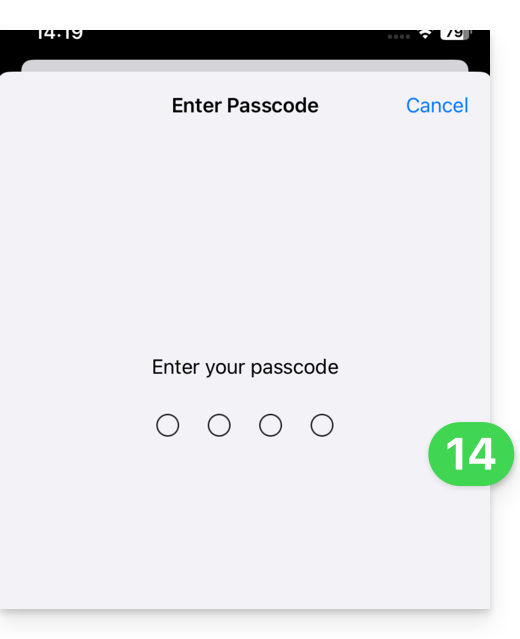
- Insira o código do seu dispositivo iOS, como faria para desbloqueá-lo:
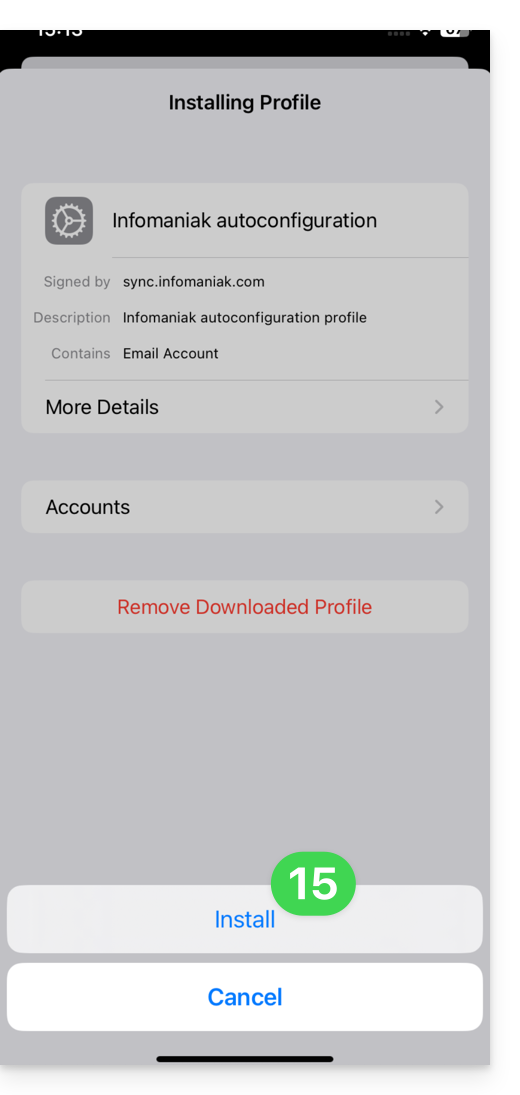
- Toque em Instalar:
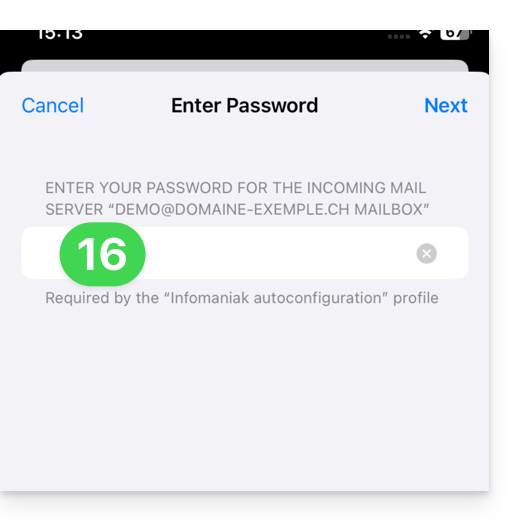
- Insira (ou cole) a senha do dispositivo copiada no passo 8 acima:
- Quando a indicação aparecer na parte superior, estará concluído:
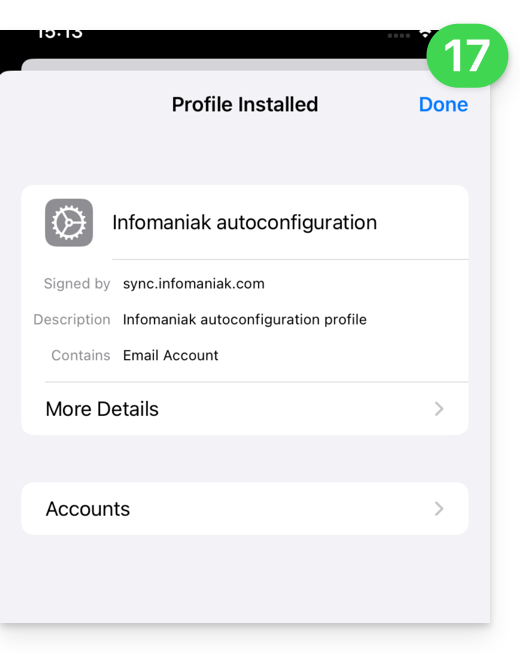
Se o seu aplicativo iOS Apple Mail já estiver aberto, você precisará reiniciá-lo. Em seguida, verá as informações adicionadas pela sincronização: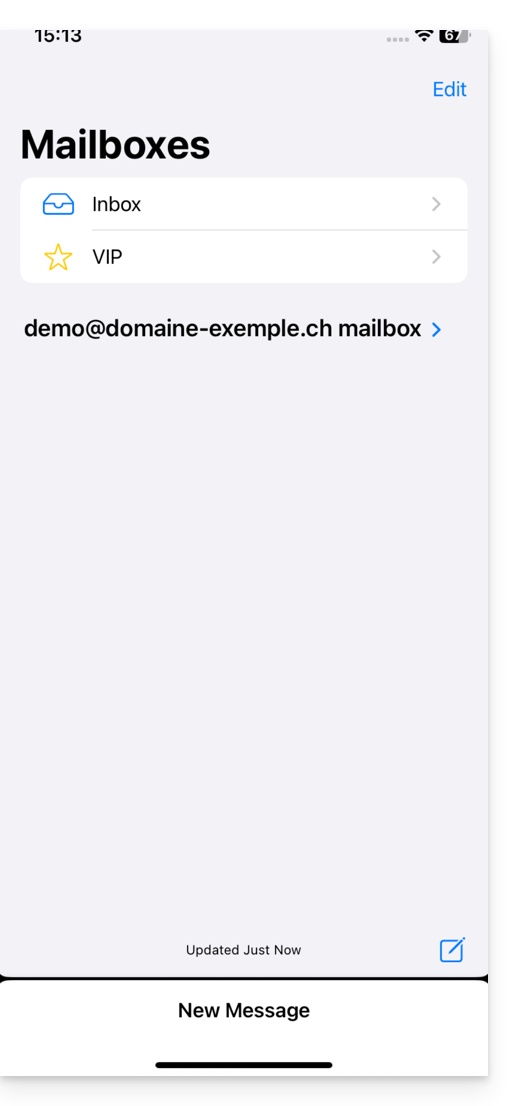
Remover um perfil Apple
Consulte a documentação oficial, alterando na parte superior da página* a versão do seu sistema, se necessário.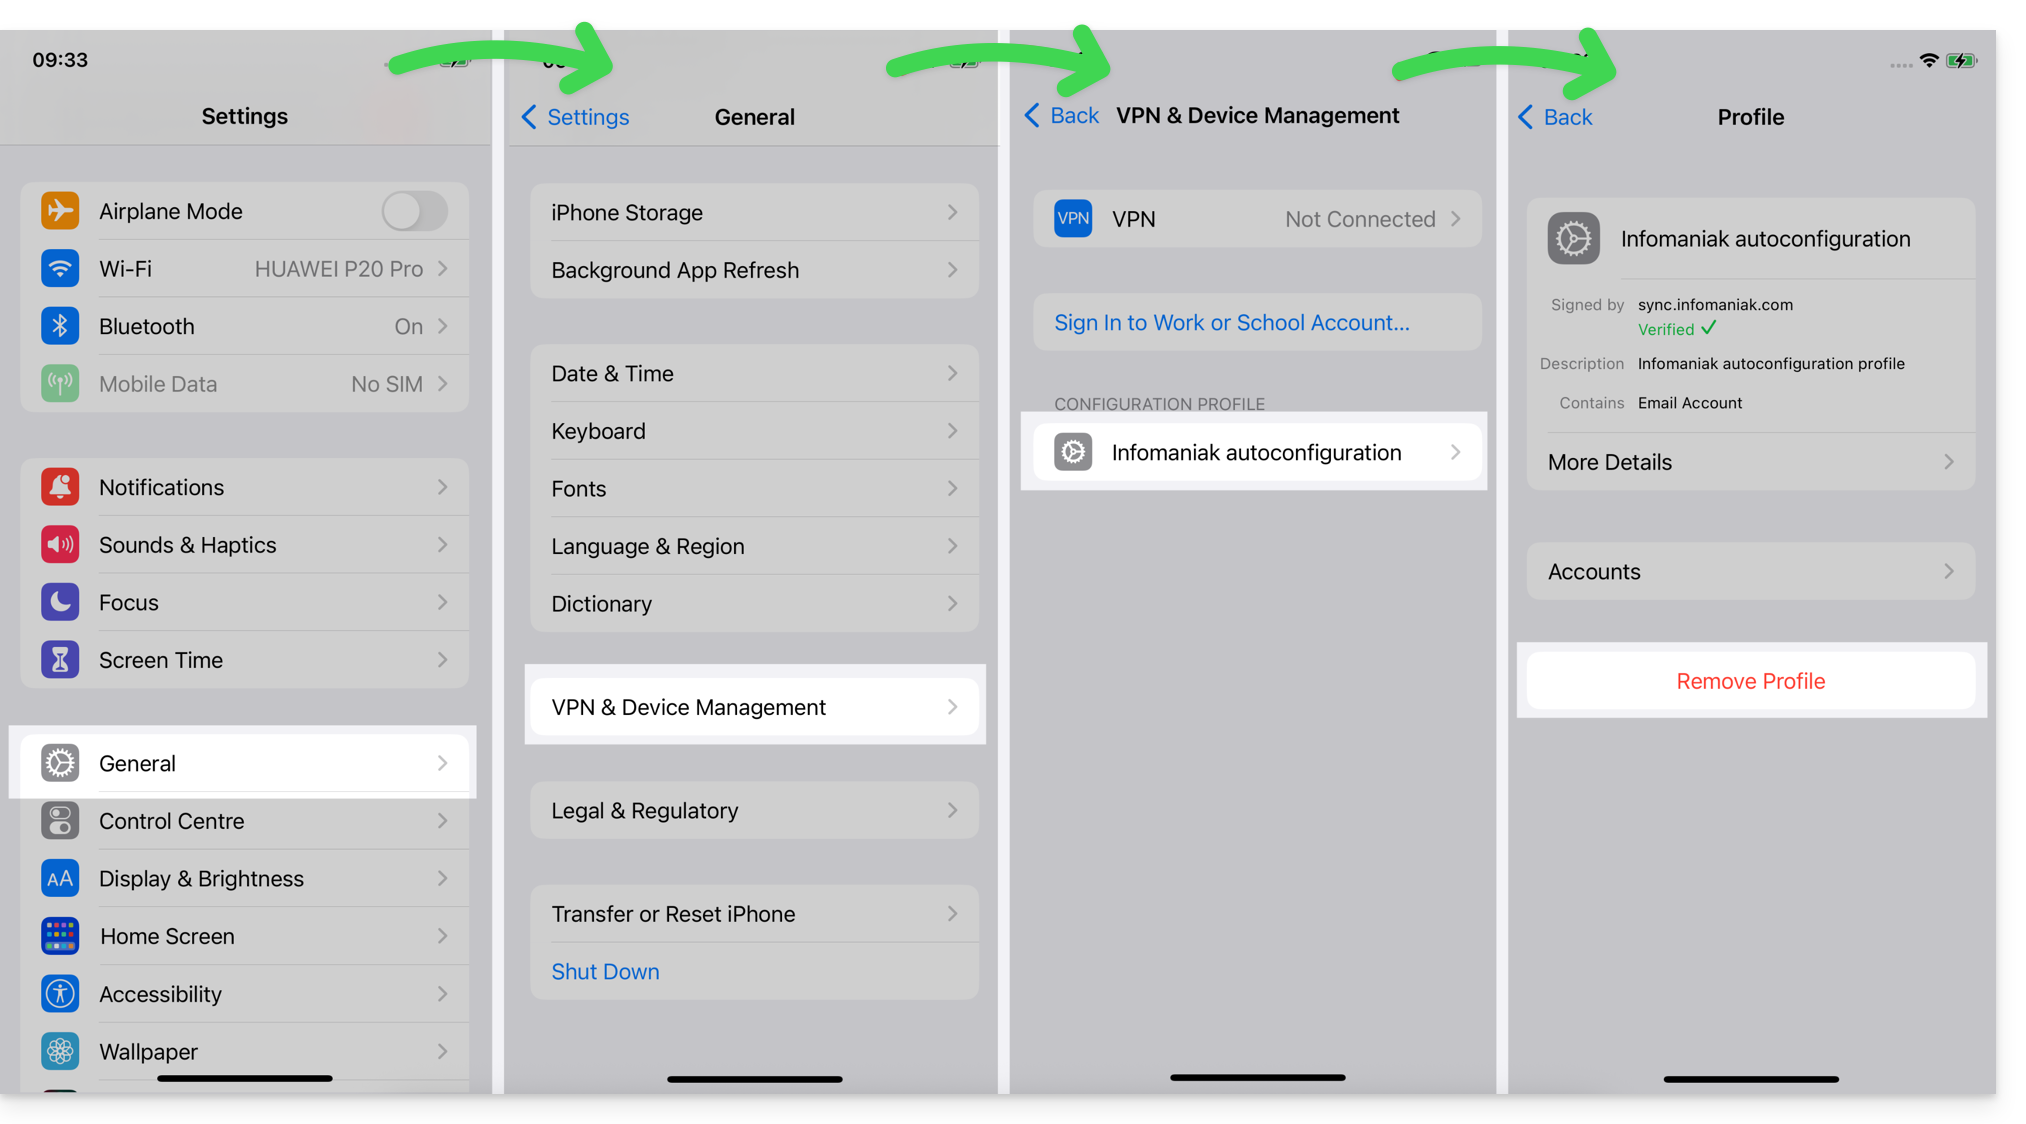
*Por que é necessário escolher a versão do guia que corresponda exatamente à sua versão do sistema macOS/iOS? A Apple introduz alterações, às vezes sutis, em cada nova versão do seu sistema. Por exemplo, um caminho em iOS 15…
… torna-se este em iOS 18…
Link para esta FAQ: https://faq.infomaniak.com/1319
Esta seção de perguntas frequentes foi útil?
Este guia explica como criar e gerenciar as senhas de um endereço de e-mail a partir do seu Serviço de E-mail, para que possa consultá-lo em um software de terceiros, como o Outlook ou o Thunderbird.
As outras opções de acesso e gerenciamento são apresentadas no guia principal. Se você for um usuário my kSuite, consulte este outro guia.
Pré-requisitos
- Contratar um Serviço de Email junto da Infomaniak.
- Criar um ou mais endereços neste Serviço de Email.
- Ter, no mínimo, o direito de gerir o Serviço de Email em questão (ou ser Administrador / Responsável legal dentro da Organização).
Gerar uma senha para o endereço de e-mail
Para adicionar uma senha ao endereço de exemplo demonstration@exemple-domaine.ch:
- Insira o ID de login da sua conta Infomaniak e a senha na página https://manager.infomaniak.com/:
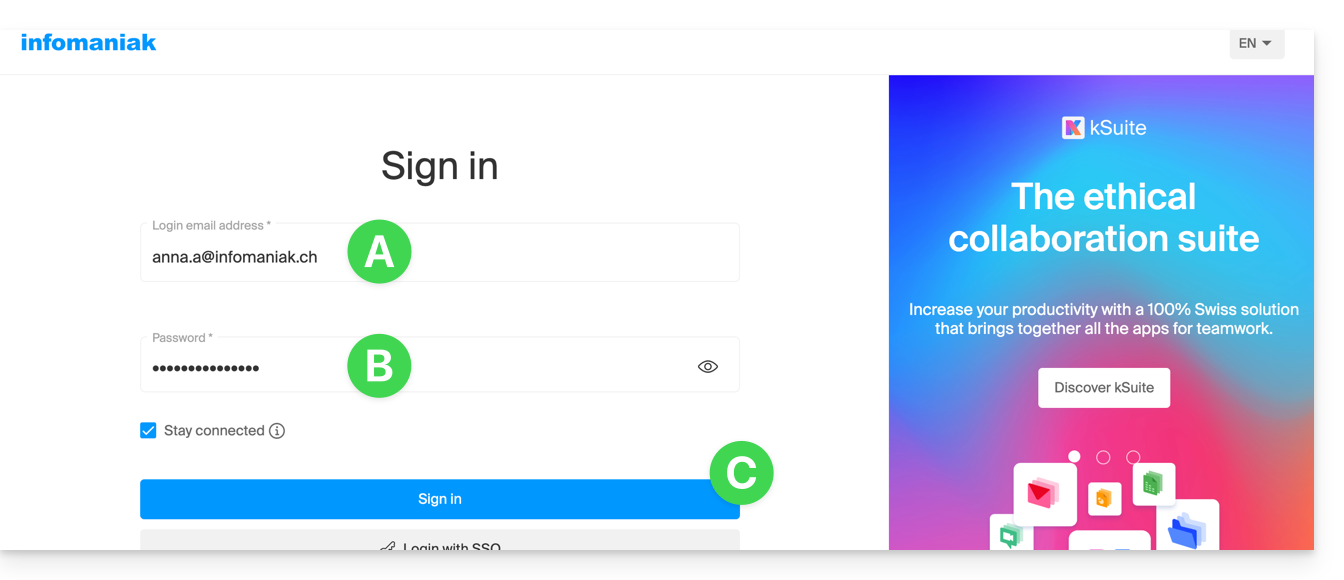
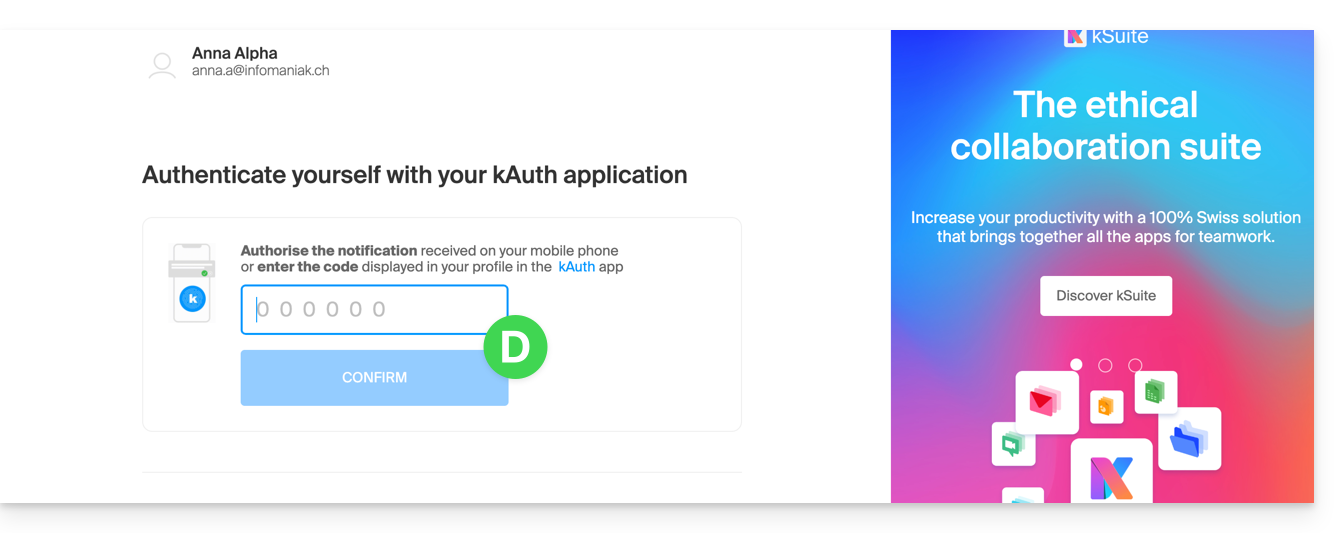
- Confirme o acesso no painel de controle usando o método de autenticação de dois fatores (2FA) definido inicialmente:
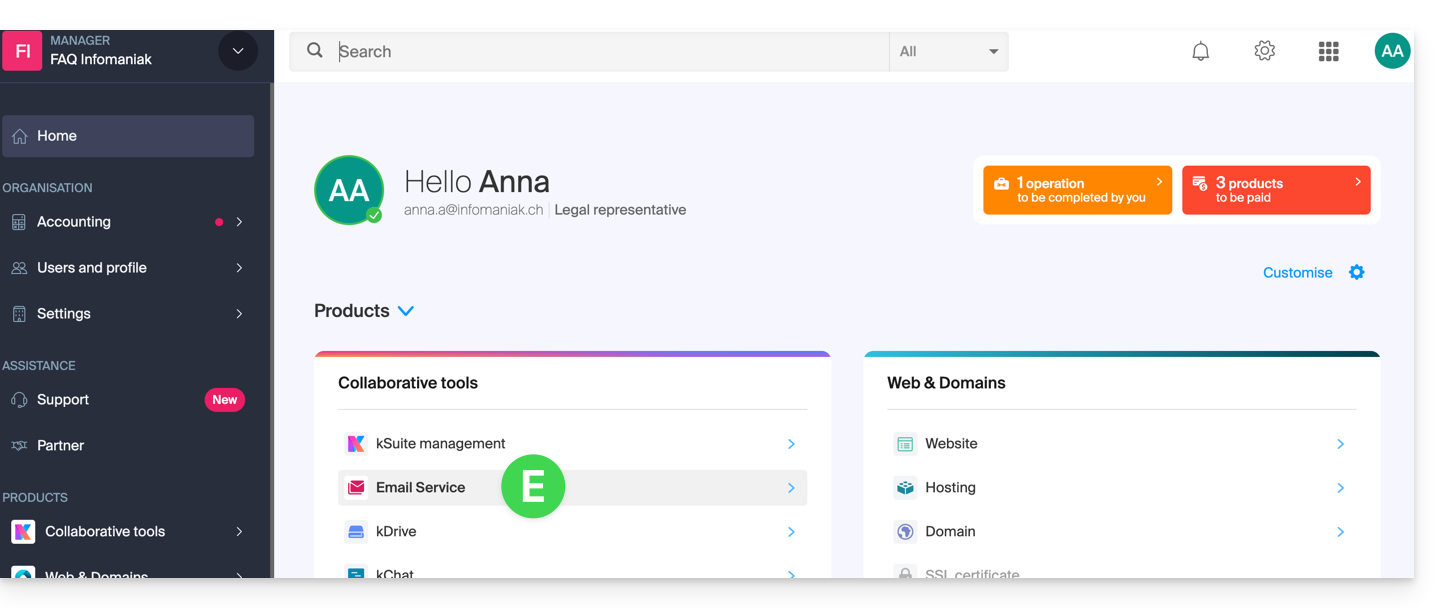
- Após acessar o painel de controle, clique em Serviço de E-mail:
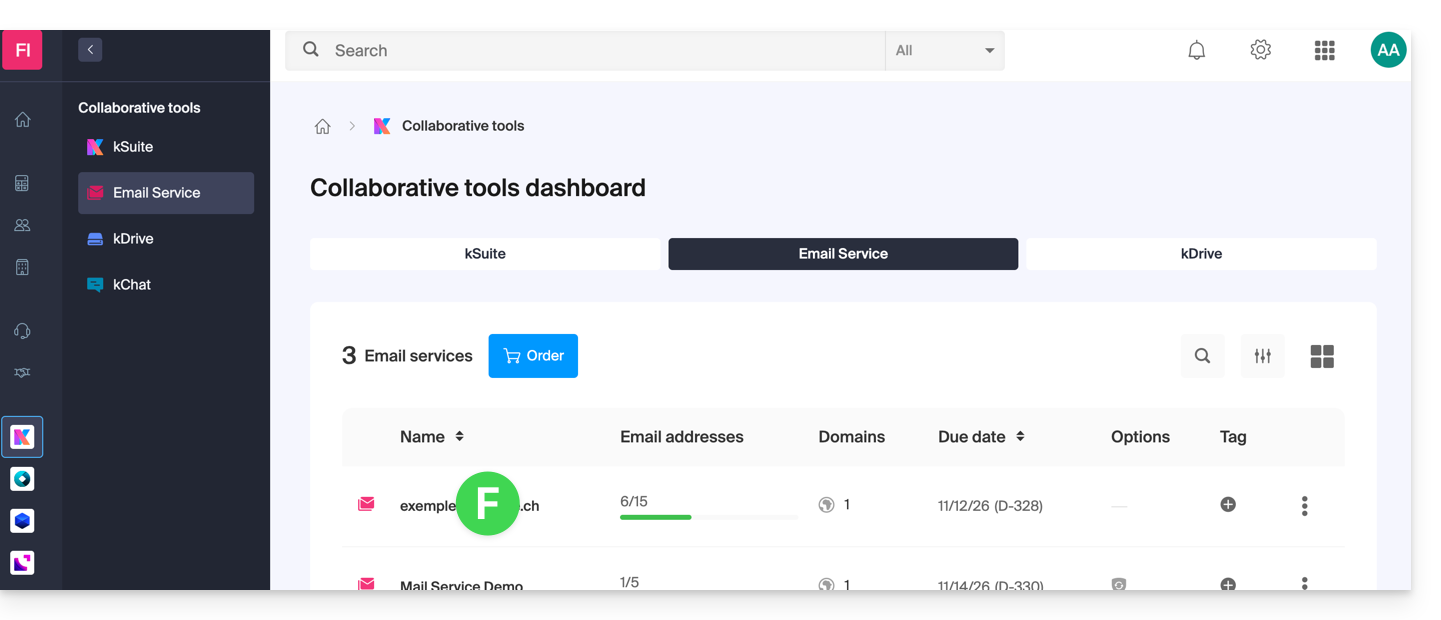
- Após acessar seus Serviços de E-mail, clique no nome / nome de domínio ao qual pertence o endereço de e-mail em questão:
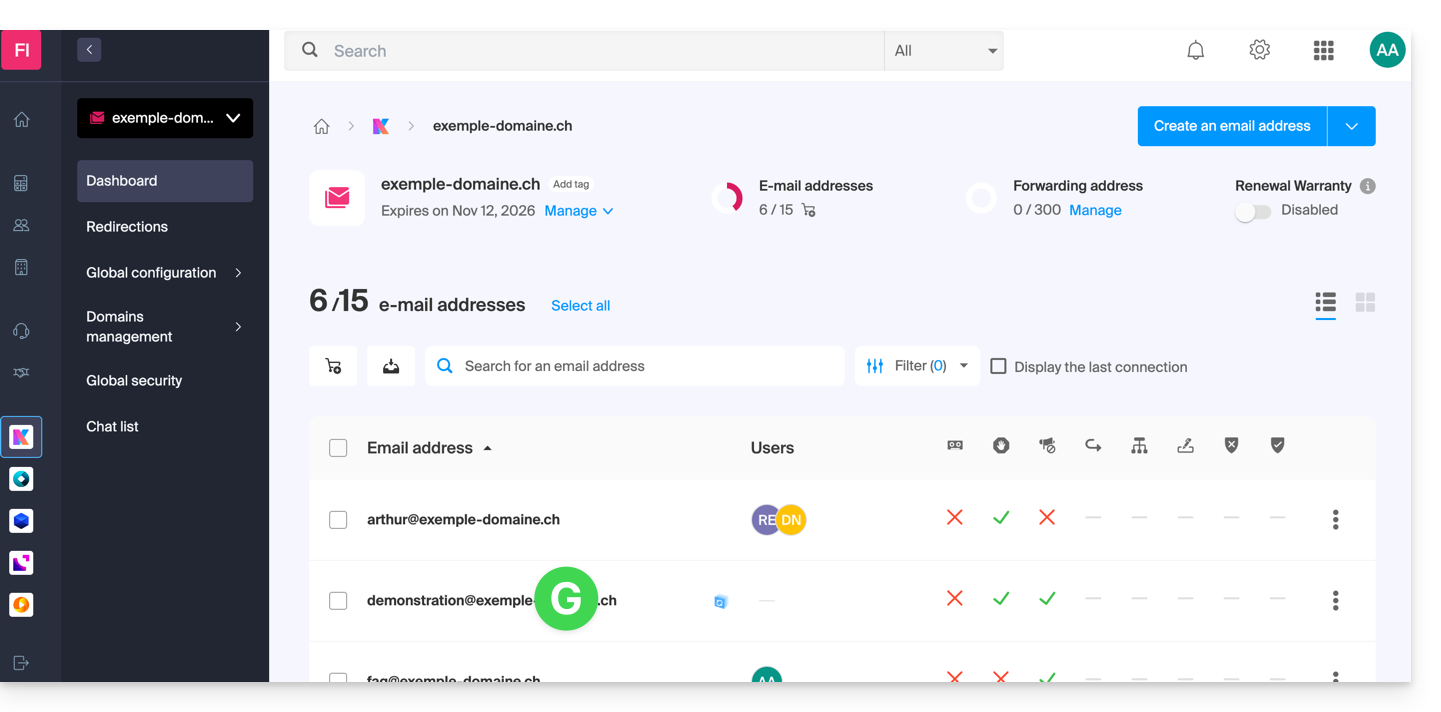
- Após acessar o Serviço de E-mail ao qual o endereço pertence, clique no endereço de e-mail em questão:
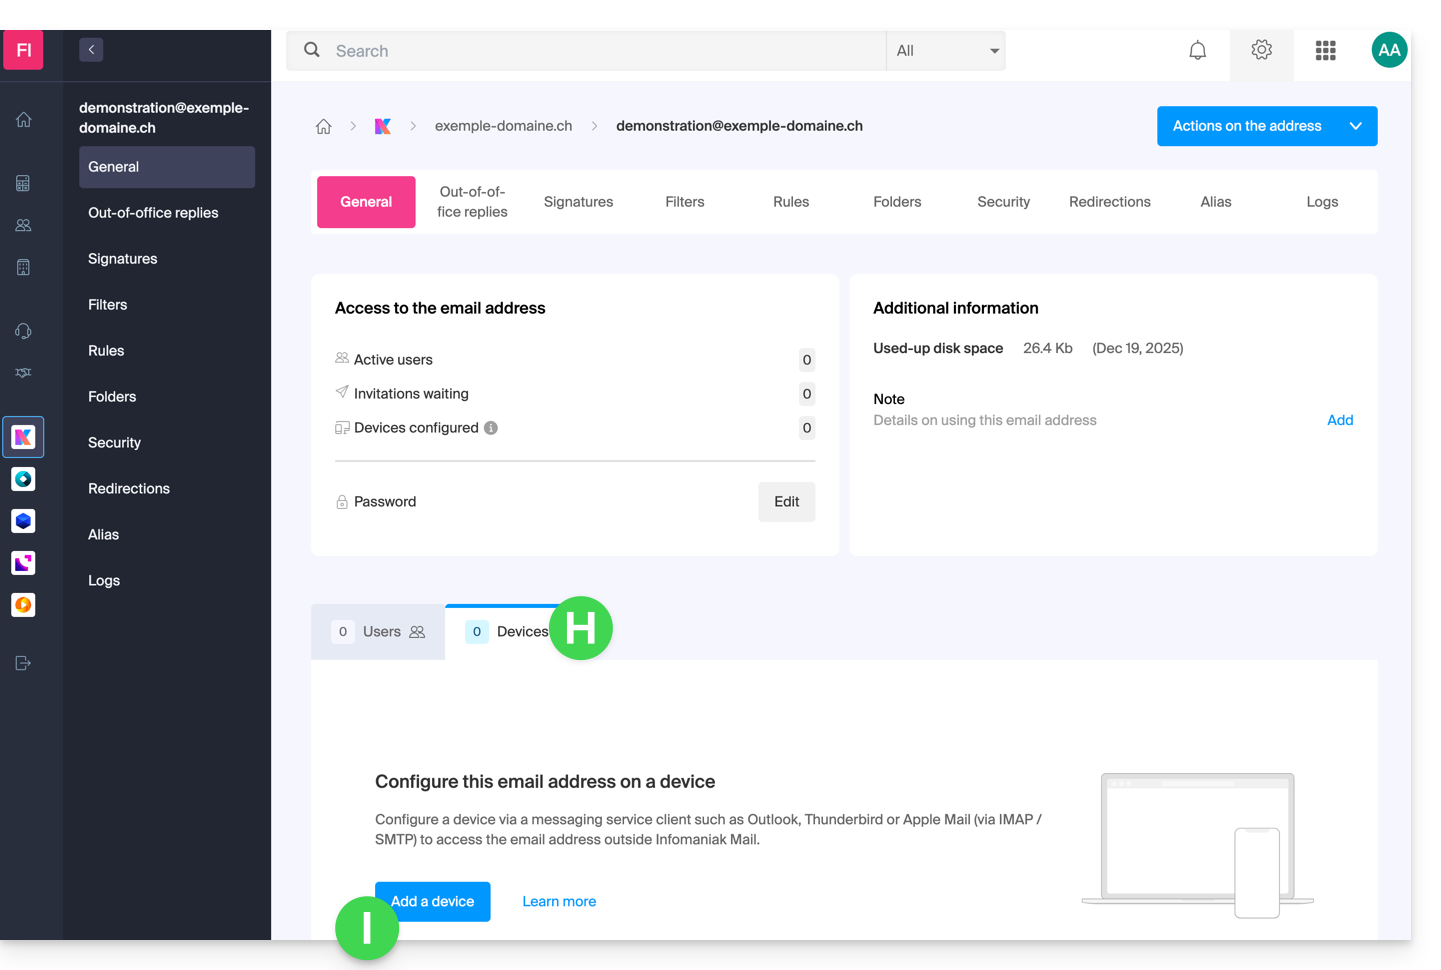
- Após acessar o endereço de e-mail em questão, clique na aba Dispositivos e, em seguida, em Adicionar um dispositivo:
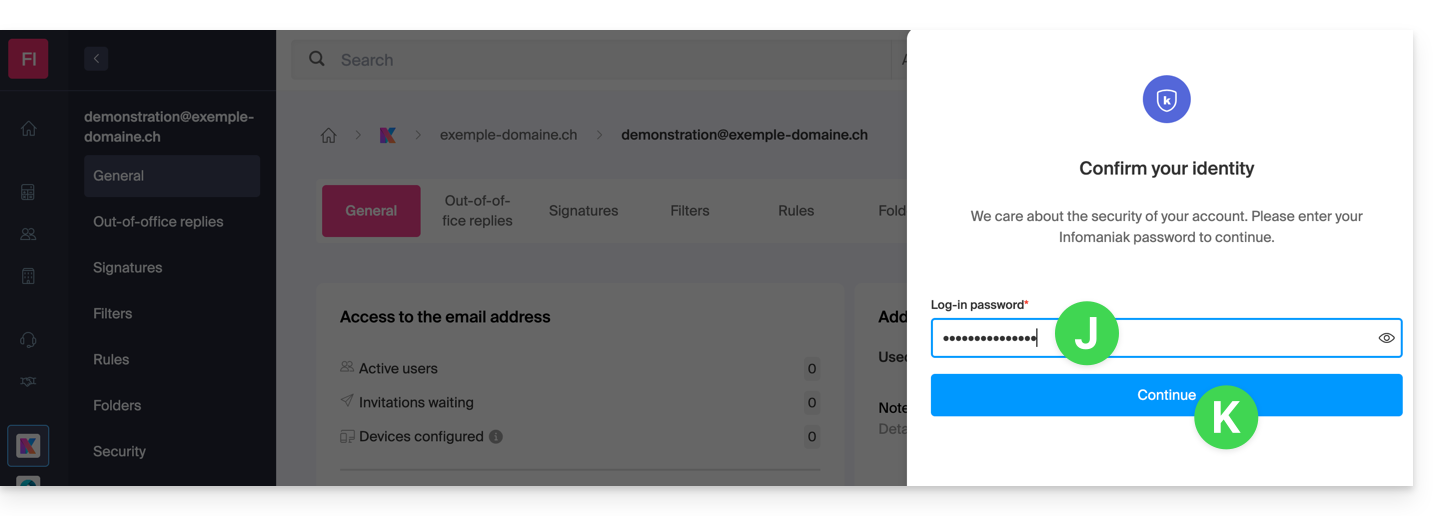
- Neste momento, pode ser necessário inserir novamente a senha de login (a mesma do item B acima):
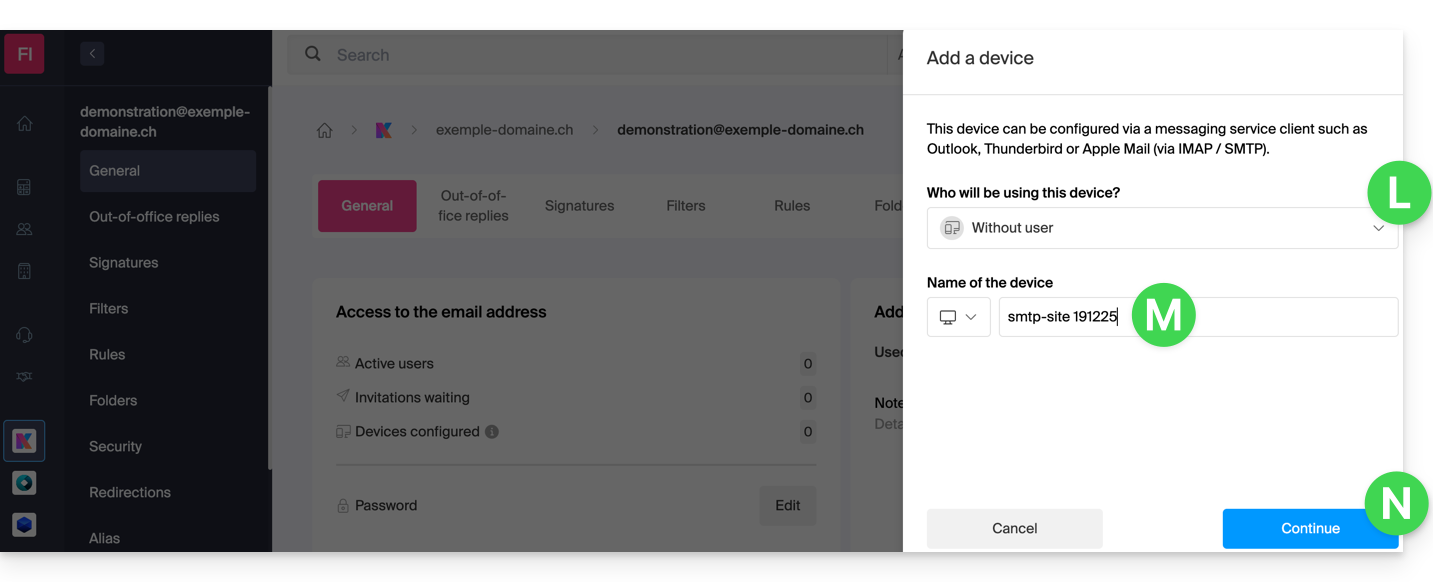
- Em seguida, escolha não especificar um usuário específico ("Sem usuário").
- Especificar um usuário permite, no entanto, vincular uma possível restrição SMTP do usuário aos seus dispositivos conectados, além de simplesmente remover o direito de envio a partir do ecossistema Infomaniak.
- Insira um nome descritivo que permita identificar o motivo pelo qual você criou este dispositivo(aqui, o utilizador precisa de uma senha para poder enviar e-mails a partir de um site, e adiciona como informação útil a data atual):
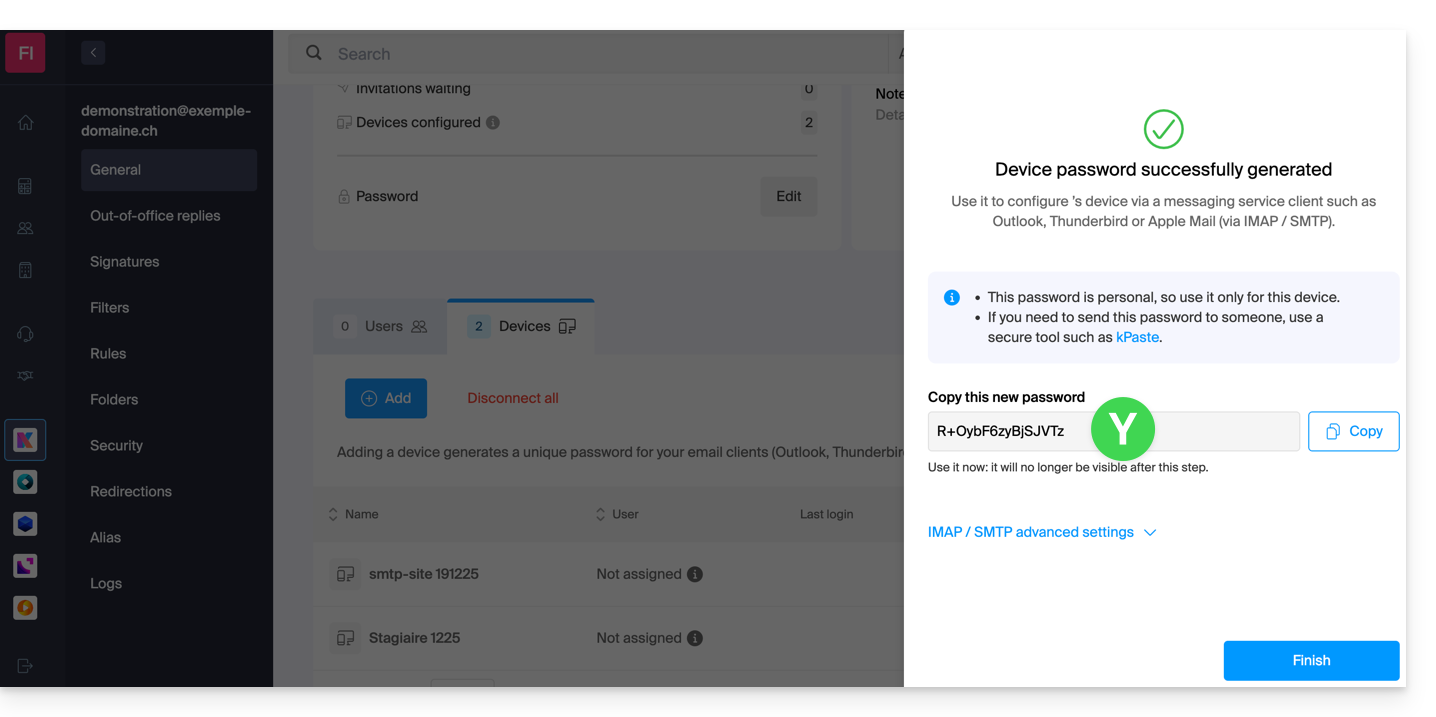
- Pronto: a nova senha é exibida, pode alterar os caracteres (mínimo de 16) se necessário.atenção, não será possível exibi-lo novamente depois).
- Salve-o na parte inferior da página para utilizá-lo da forma que desejar:
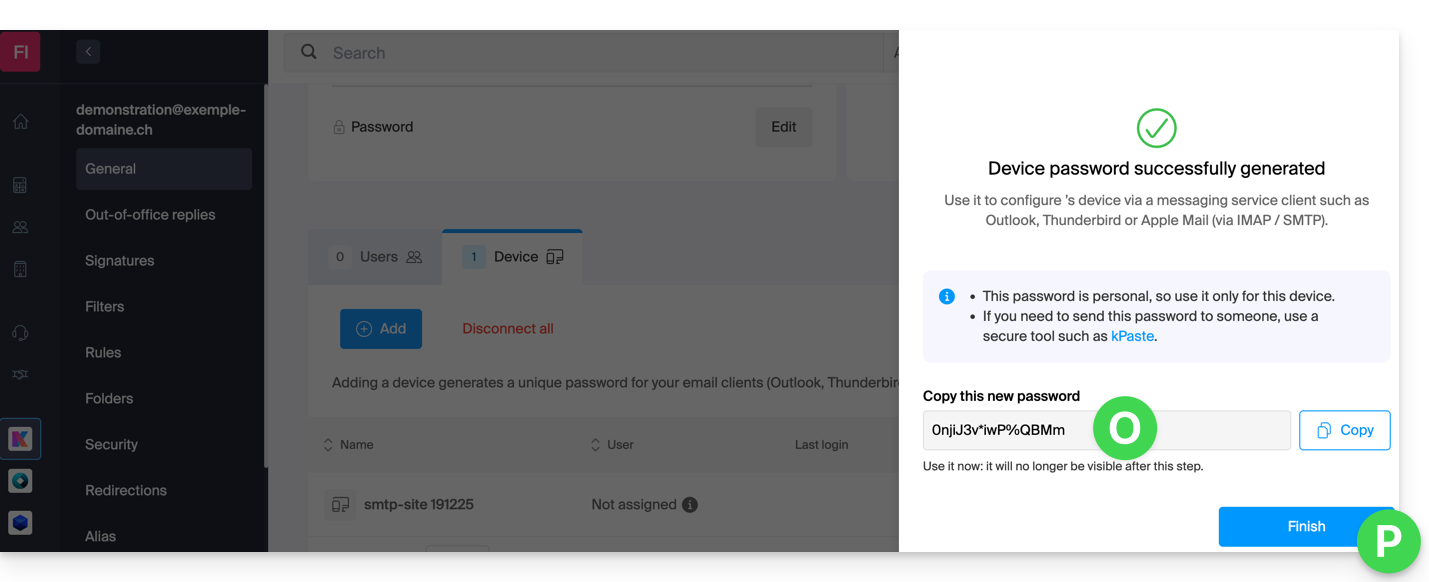
Clicou no botão “Concluir” (acima, “P”) sem anotar a senha? Sem problemas, modifique ou gere uma nova!
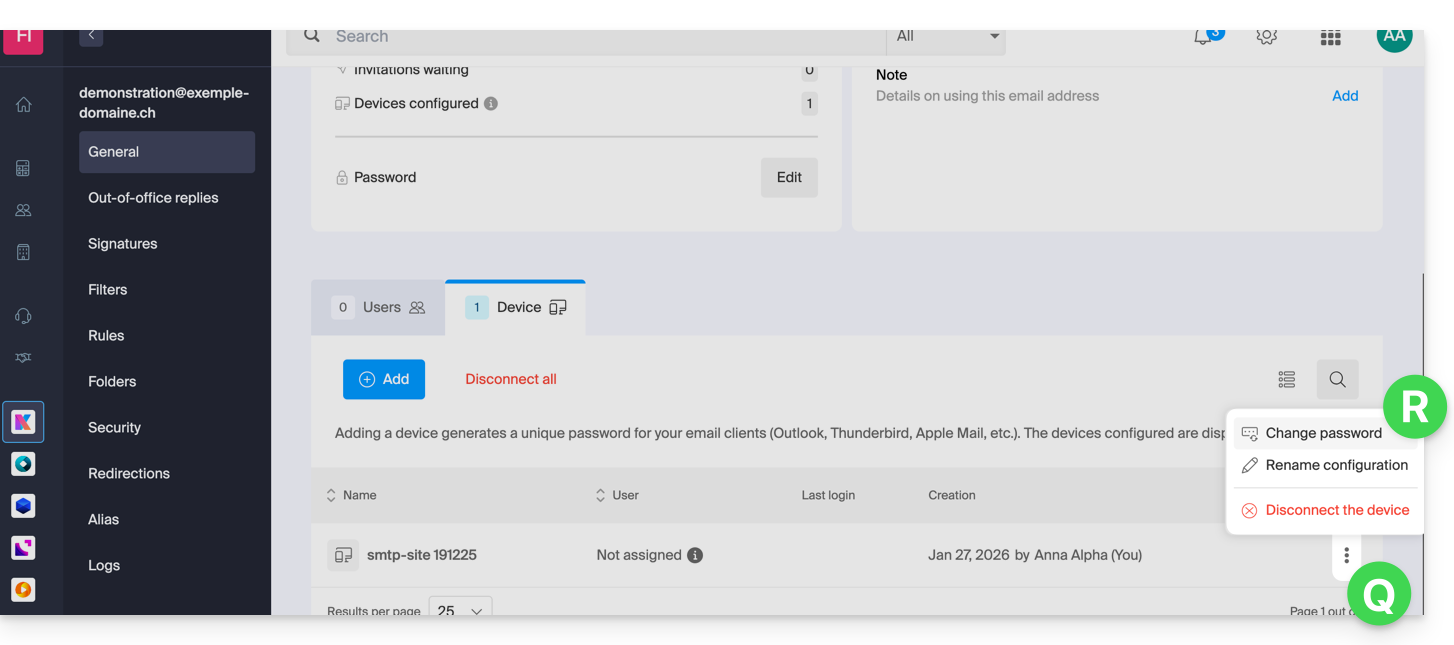
- Clique no menu de ações ⋮, localizado à direita do dispositivo recém-criado, e clique em Alterar senha:
- Clique no botão mais à direita do campo para gerar uma nova senha aleatória e/ou insira diretamente os caracteres seguros que deseja usar (mínimo de 16) para a nova senha e, em seguida, clique no botão para salvar a alteração:
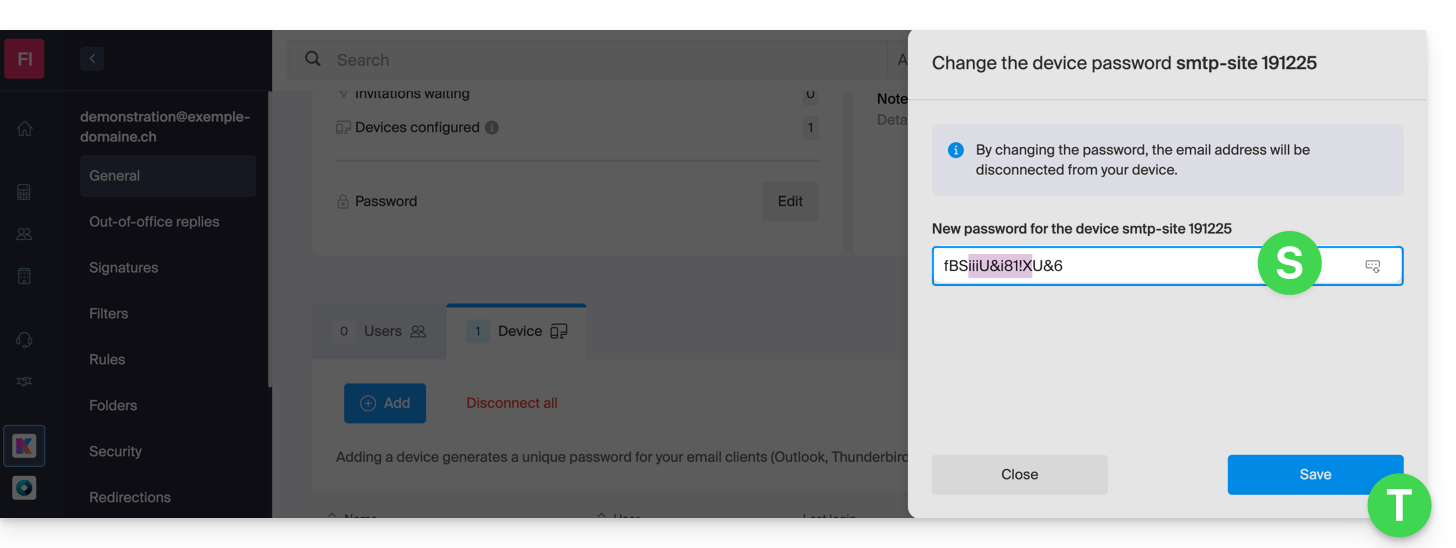
- Pronto, a senha que substituirá a antiga é exibida permanentemente. Você pode inseri-la em seus dispositivos, substituindo a senha anterior (atenção: não será possível exibi-la novamente).
Precisa de uma senha para um usuário secundário e temporário? Sem problemas, gere uma segunda senha!
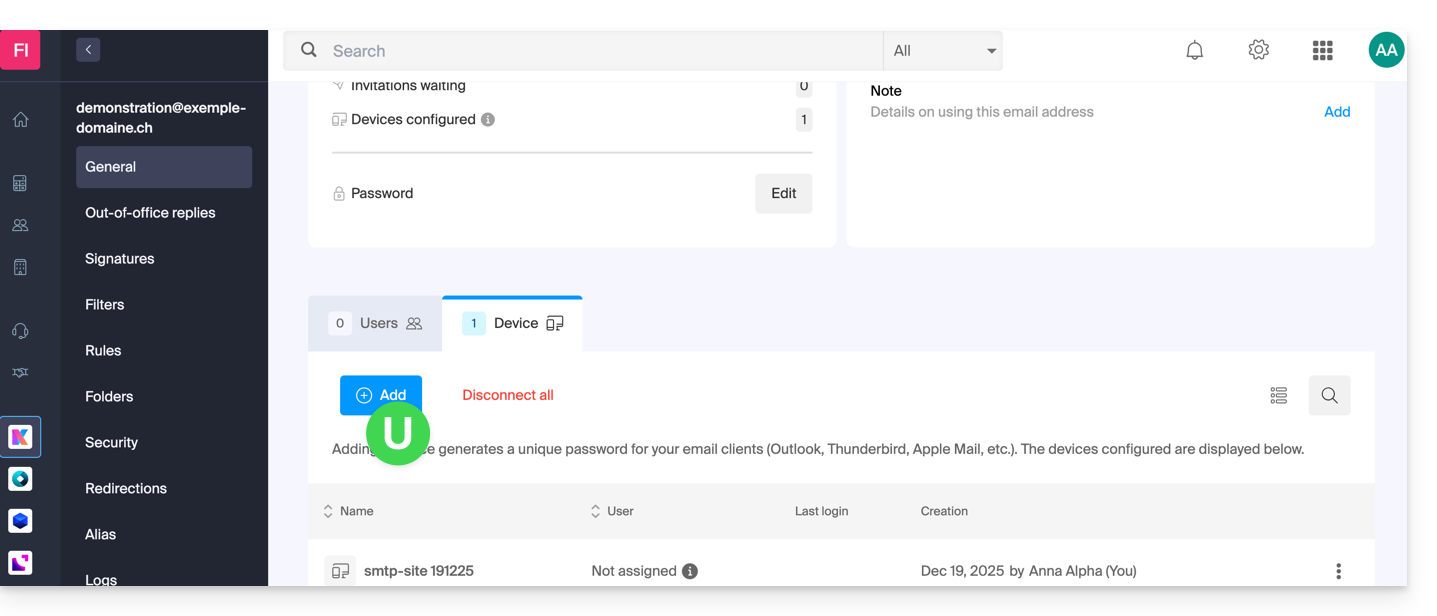
- Clique no botão para Adicionar um novo dispositivo:
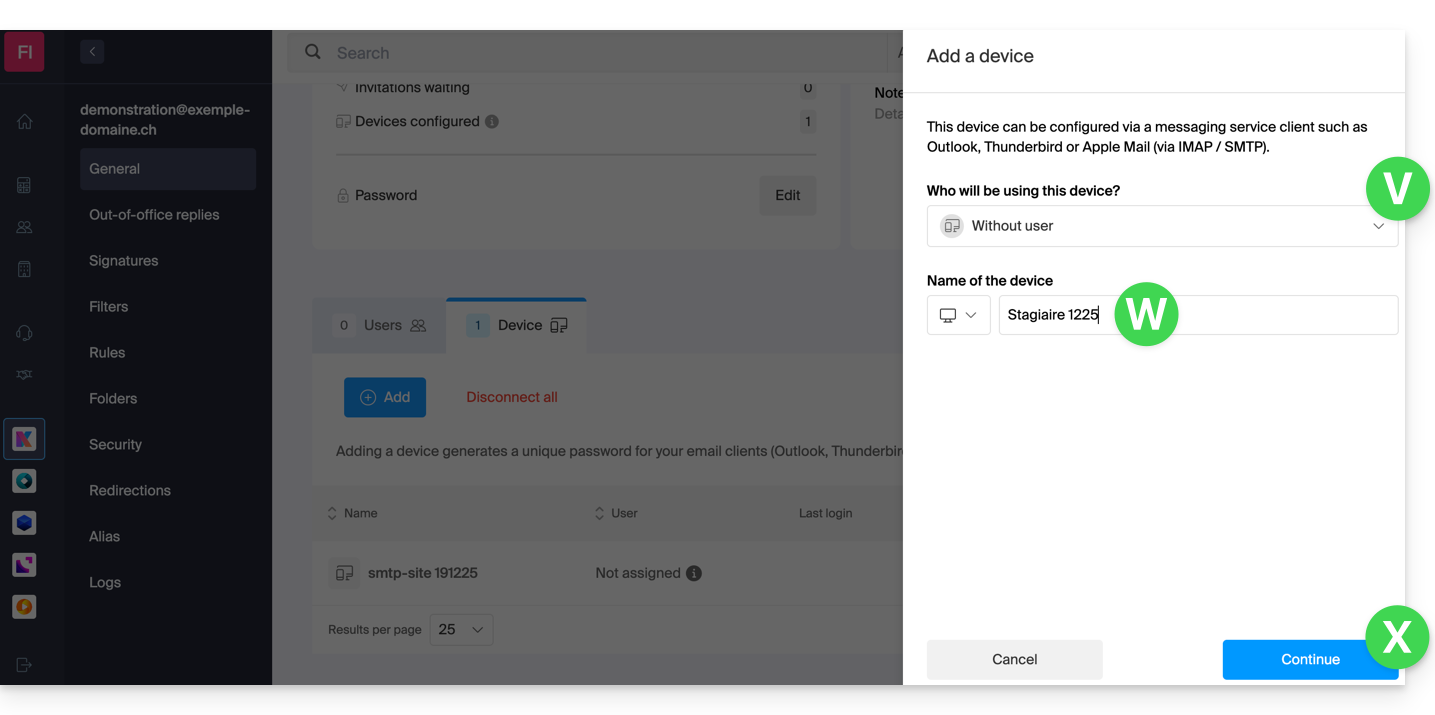
- Em seguida, escolha não especificar um usuário específico e insira um nome que permita identificar o motivo pelo qual você criou este dispositivo (aqui, o utilizador precisa de uma palavra-passe para um estagiário de uma semana):
- Pronto, a palavra-passe é exibida e pode ser utilizada para o fim que desejar (atenção, não será possível exibi-la novamente, no entanto, como antes, será obviamente possível modificá-la ou gerar uma nova):
Alternativa: criar uma senha para um usuário
Em vez de criar uma senha você mesmo e ter que comunicá-la ao usuário posteriormente, você pode permitir diretamente que um usuário com menos permissões do que você obtenha a senha para o dispositivo de que precisa:
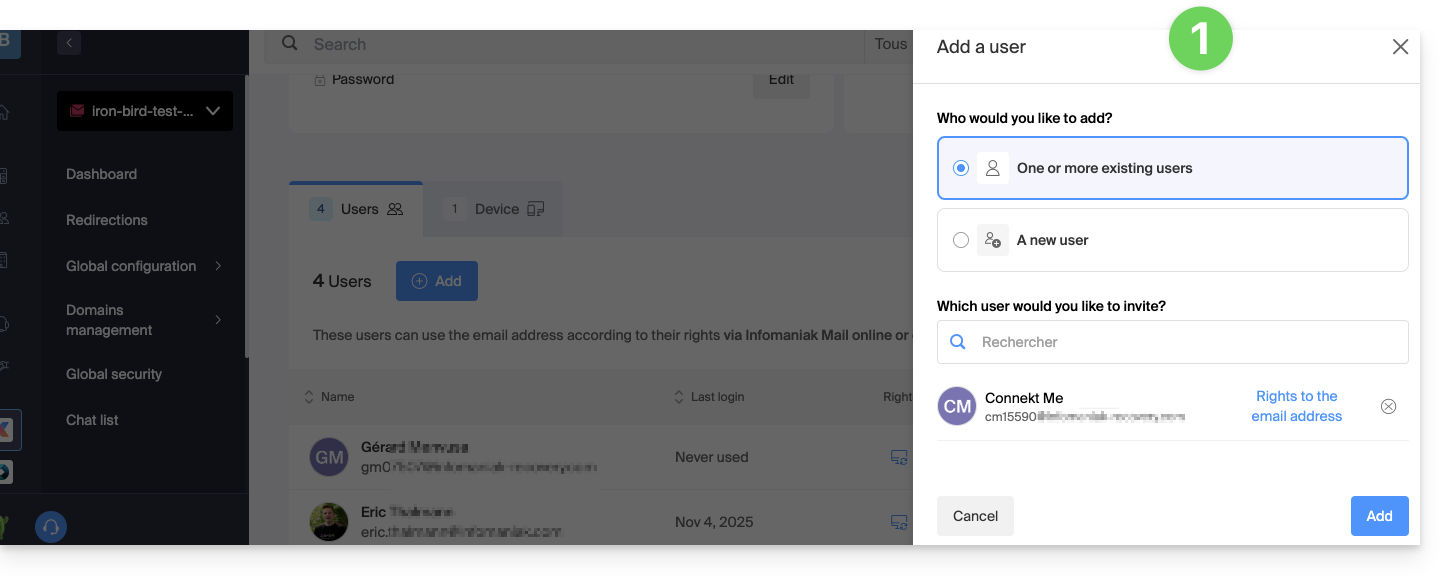
- Adicione o novo utilizador (existente na Organização ou não), conforme descrito neste outro guia:
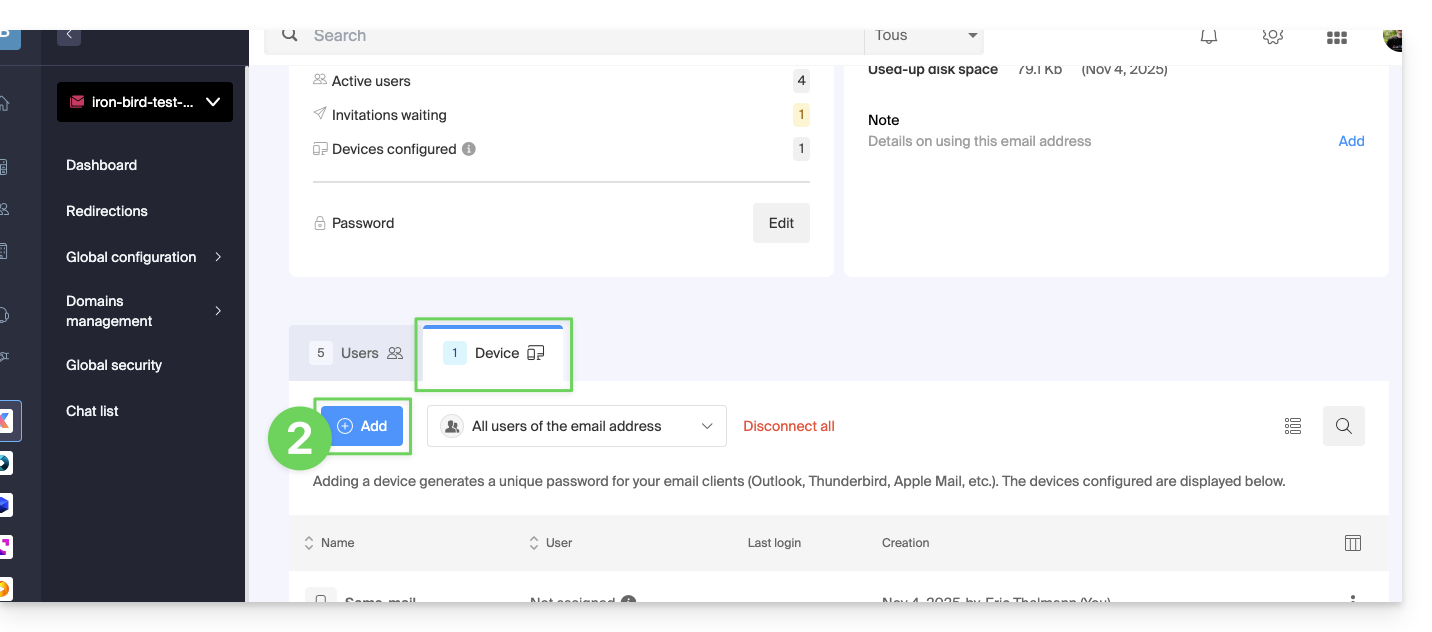
- Depois de adicionar o utilizador, mude para o separador "Dispositivos" para adicionar um novo dispositivo:
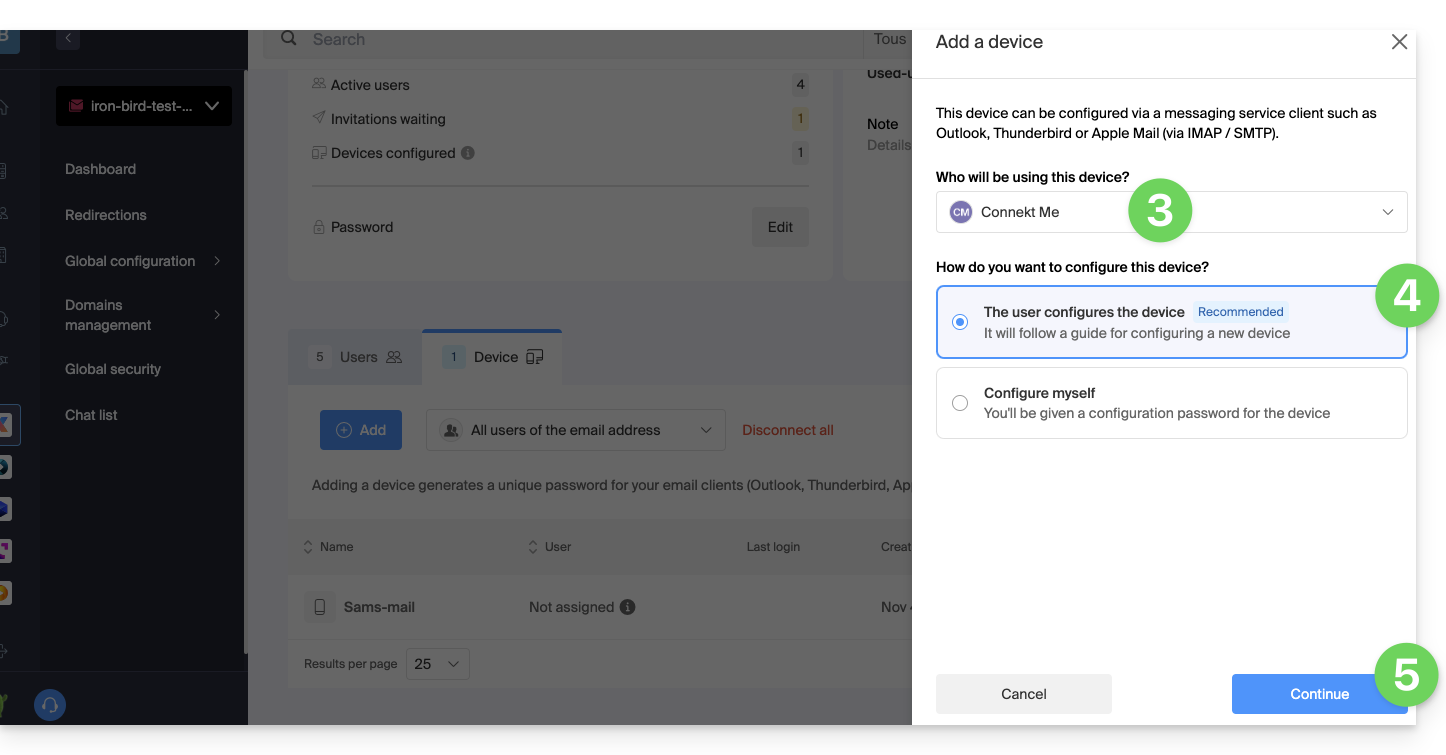
- Se necessário, insira a senha para acessar sua conta Infomaniak e, em seguida, selecione o usuário criado no passo 1.
- Clique na primeira opção para enviar um assistente de configuração para o dispositivo do usuário.
- Clique no botão Continuar:
- Copie o link de convite, válido por 30 dias, para enviar ao utilizador.
- Se necessário, envie o convite para o endereço de e-mail do utilizador:
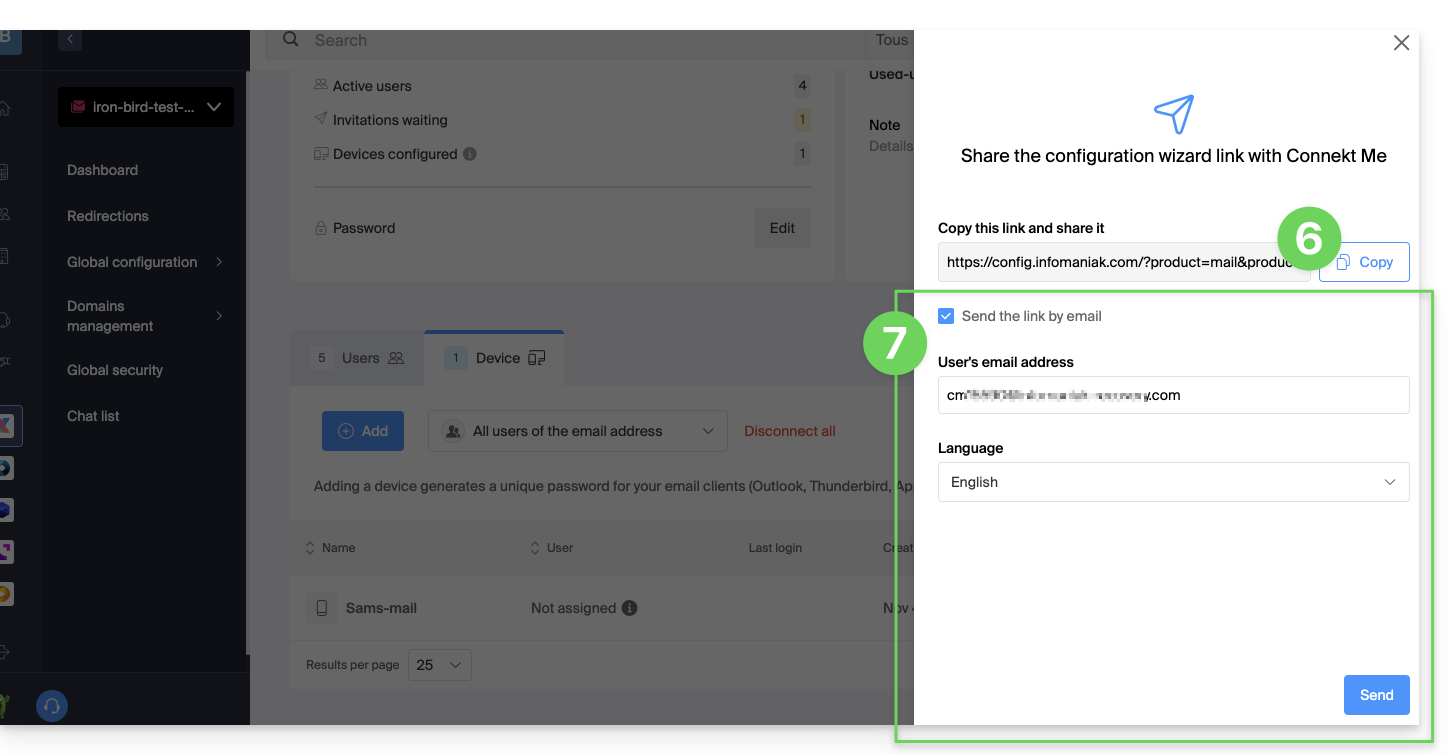
No ponto 4 acima, também pode optar por gerar uma palavra-passe:
- A senha criada será exibida; você pode modificá-la pela última vez, copiá-la e guardá-la em um local seguro (por exemplo, em um gerenciador de senhas); ela não poderá ser exibida novamente no futuro.
Modificar ou remover uma senha existente
Quando o acesso não for mais necessário, revogue apenas a senha correspondente: os outros acessos ao endereço de e-mail permanecerão ativos.
Link para esta FAQ: https://faq.infomaniak.com/1321
Esta seção de perguntas frequentes foi útil?
Este guia detalha a funcionalidade de reserva de salas (de reunião, desportivas, de aulas, etc.) disponível na aplicação web Calendar Infomaniak (serviço online ksuite.infomaniak.com/calendar).
✘ INDISPONÍVEL com
my kSuite / my kSuite+ (ik.me, etik.com, ikmail.com)
Serviço de Email Starter / Premium
Introdução
- É possível criar e associar salas de reunião físicas a eventos no Calendar, por exemplo, para organizar um evento em um local específico que disponha de equipamentos e de um número limitado de lugares.
- Cada sala criada exibe um calendário dedicado no aplicativo, que pode ser compartilhado (❓: ajuda).
- É possível fazer uma reserva dupla (ou mais) para a mesma sala.
- Número de salas possíveis por recurso:
- kSuite Free = 1
- kSuite Standard = 2
- kSuite Business = 6
- kSuite Enterprise = 50
Configurar as salas de reunião
Pré-requisitos
- Ser Administrador ou Responsável legal na Organização (❓: ajuda).
- Os utilizadores com permissões limitadas (colaboradores e clientes) que tenham acesso a este produto não poderão fazê-lo.
Para criar salas que possam ser reservadas pelos colaboradores:
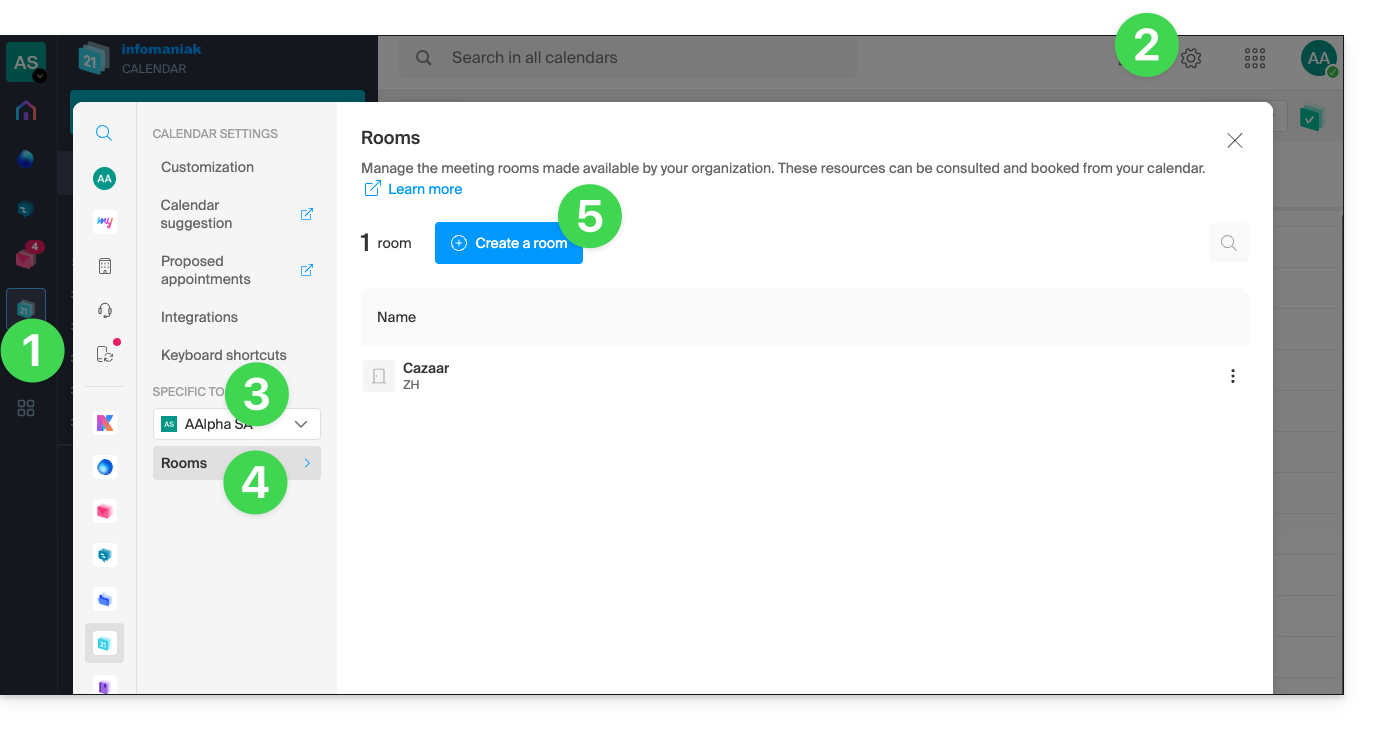
- Clique aqui para acessar o aplicativo web Calendar da Infomaniak (serviço online ksuite.infomaniak.com/calendar).
- Clique no ícone Configurações no canto superior direito.
- Verifique ou selecione a Organização correspondente no menu suspenso do menu lateral esquerdo.
- Clique em Salas no menu lateral esquerdo.
- Clique no botão Criar sala:
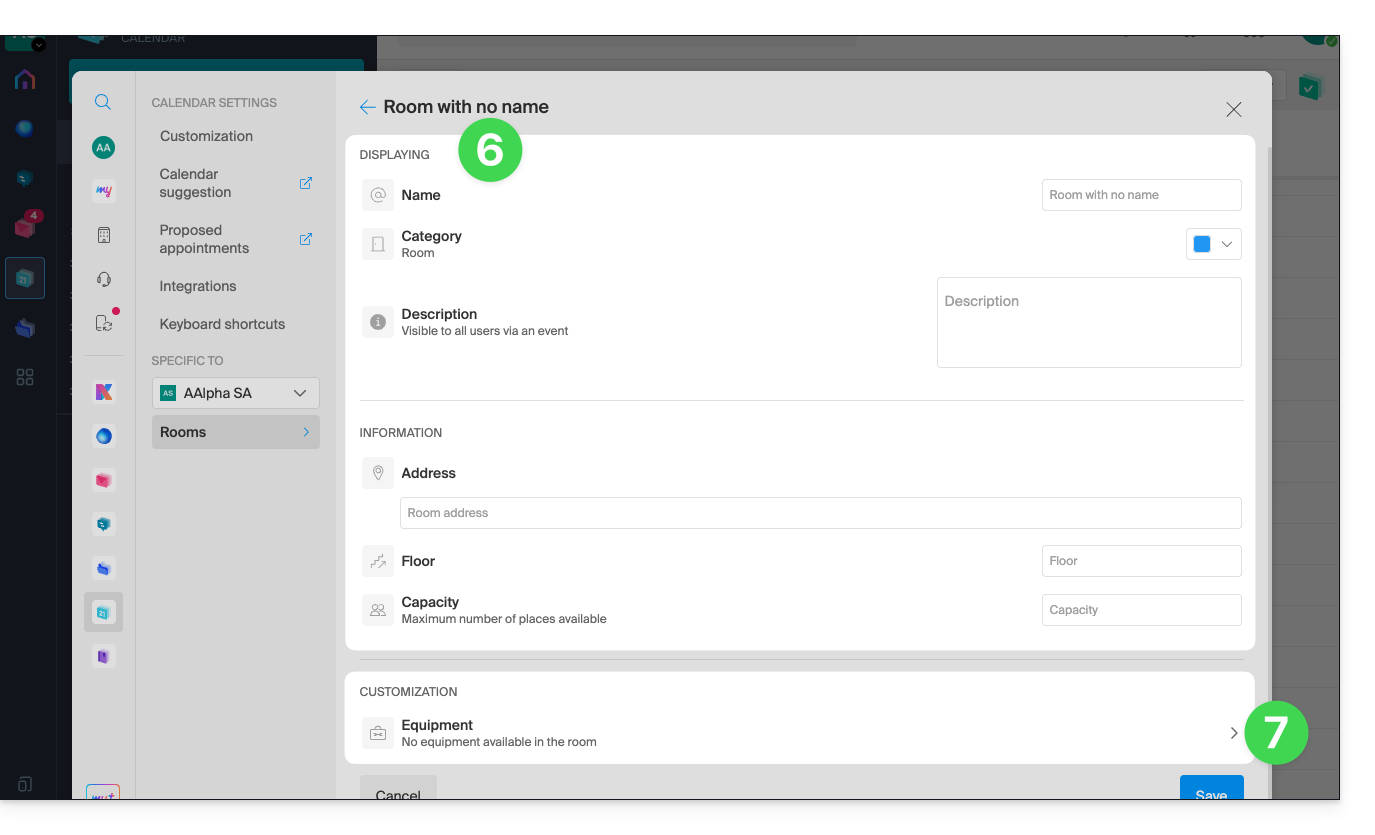
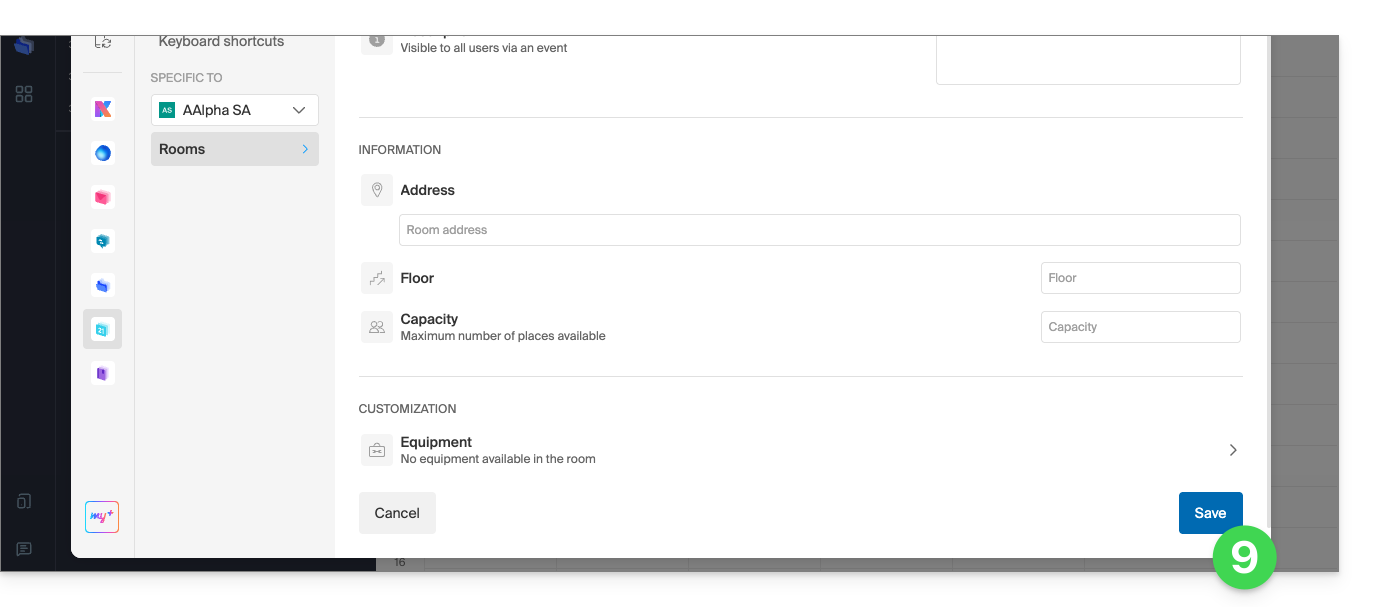
- Preencha as informações essenciais, como o nome, a localização exata (endereço completo, andar), uma cor e o número máximo de pessoas que podem ser acomodadas:
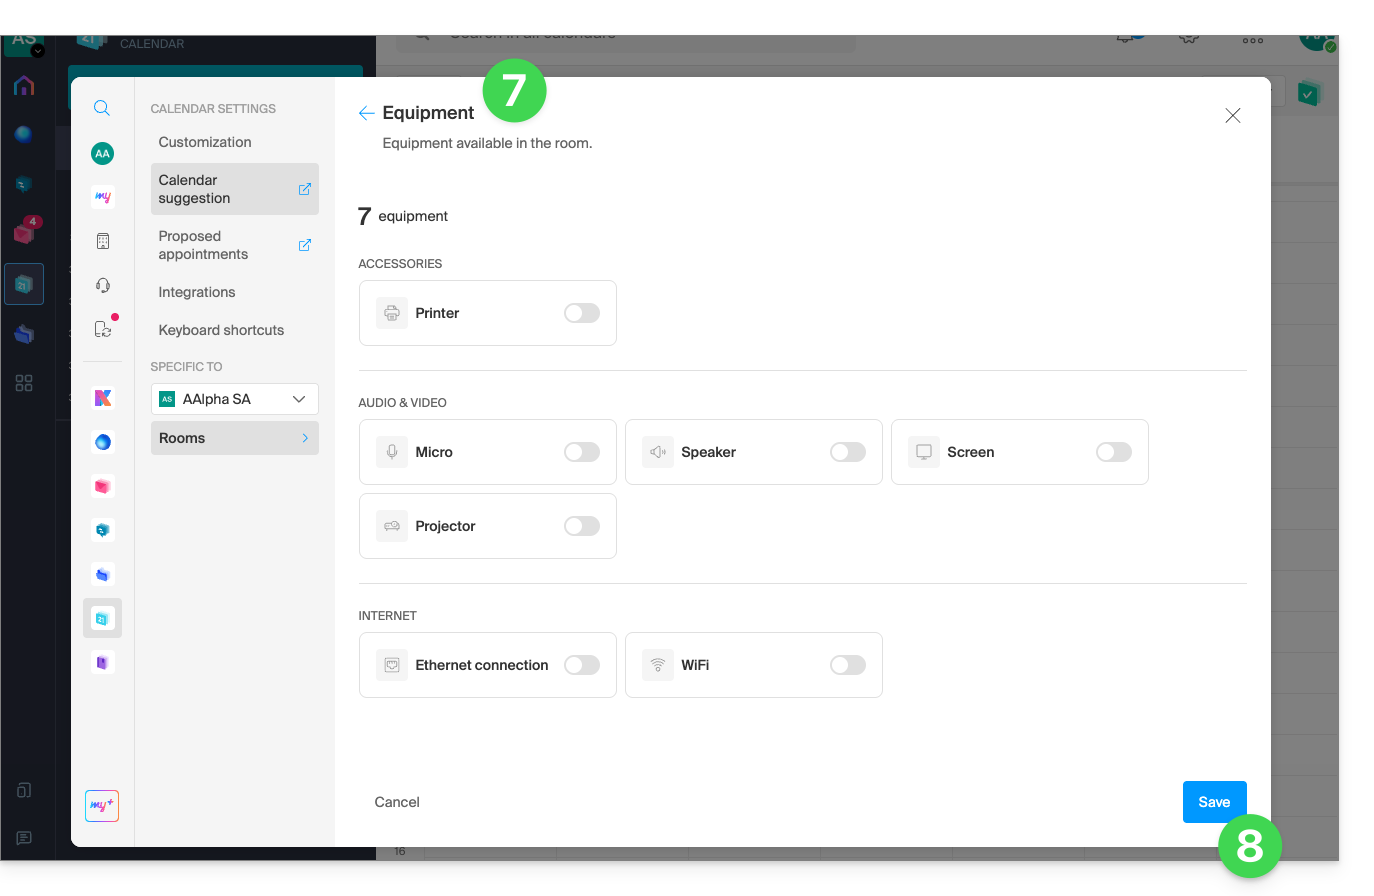
- Adicione o equipamento disponível na sala e no andar em questão.
- Clique em Guardar para guardar o equipamento associado à sala:
- Clique em Guardar para criar a sala de reunião:
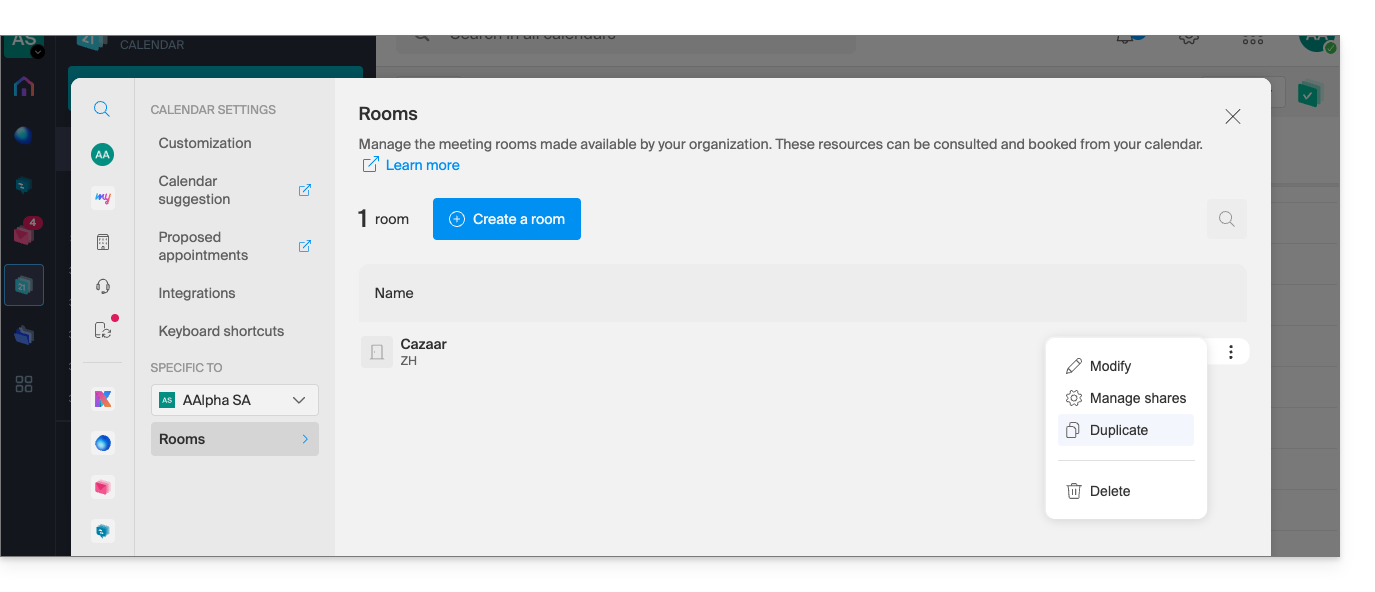
Ações na sala criada
Se tiver várias salas semelhantes, pode acelerar a criação delas duplicando a primeira:
- Clique no menu de ação ⋮ à direita da sala em questão na tabela que é exibida:
Criar um evento e associar-lhe uma sala
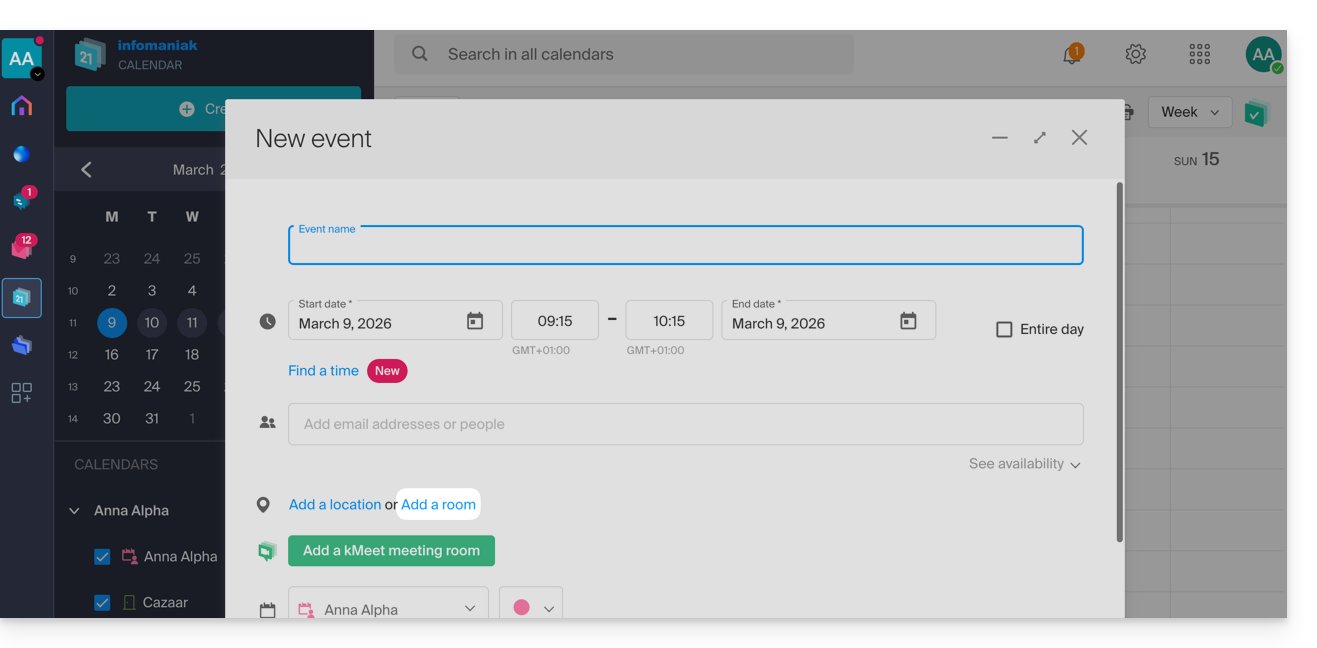
Depois de criar e configurar a sala, basta criar um evento para associar-lhe a sala desejada:
- Clique aqui para acessar o aplicativo web Calendar da Infomaniak (serviço online ksuite.infomaniak.com/calendar).
- Clique no botão Criar no canto superior esquerdo.
- Clique em Evento.
- Clique em Adicionar sala:
- Clique no campo Pesquisar sala ou local para exibir as salas disponíveis no período selecionado (as 3 últimas reservas, da mais recente para a mais antiga).
- Clique em Guardar para publicar o evento e a sala correspondente no calendário:
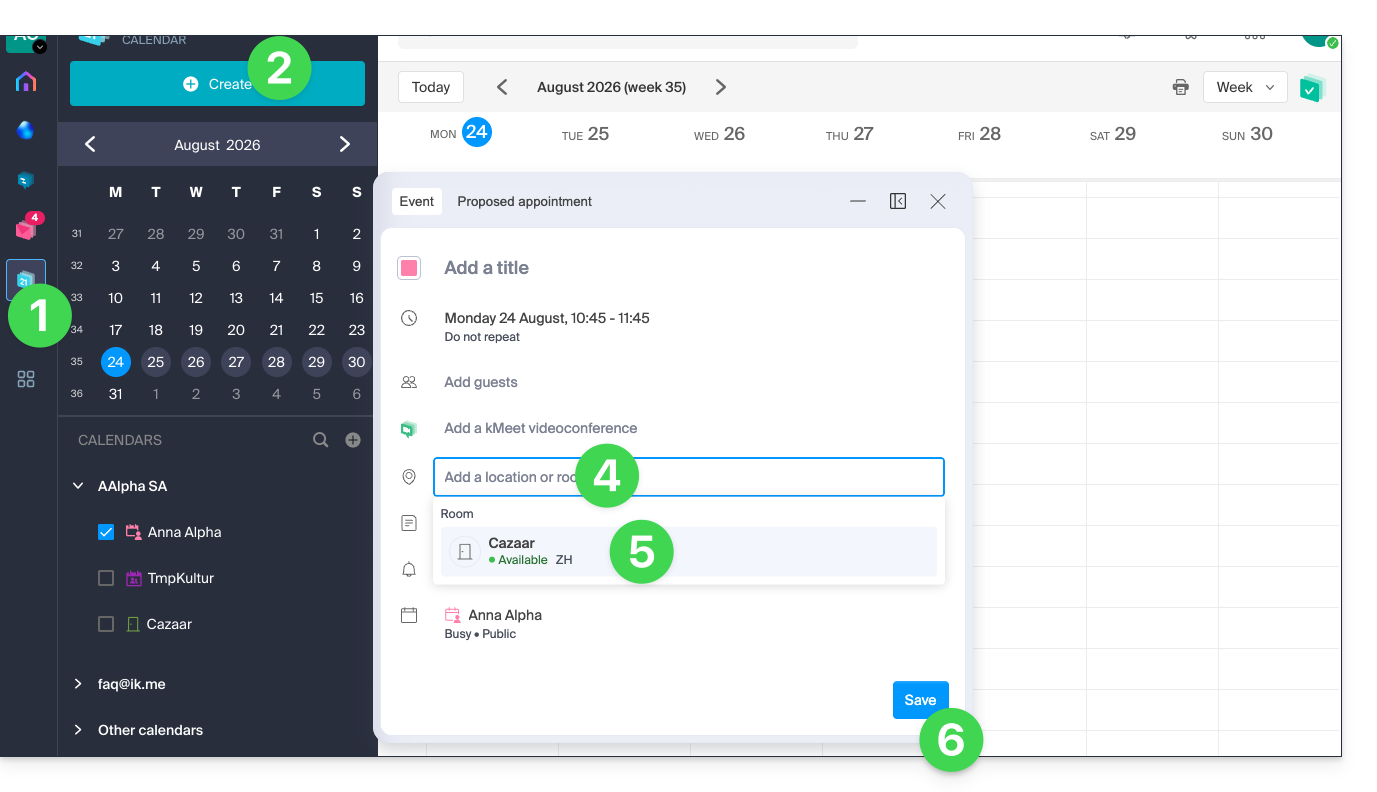
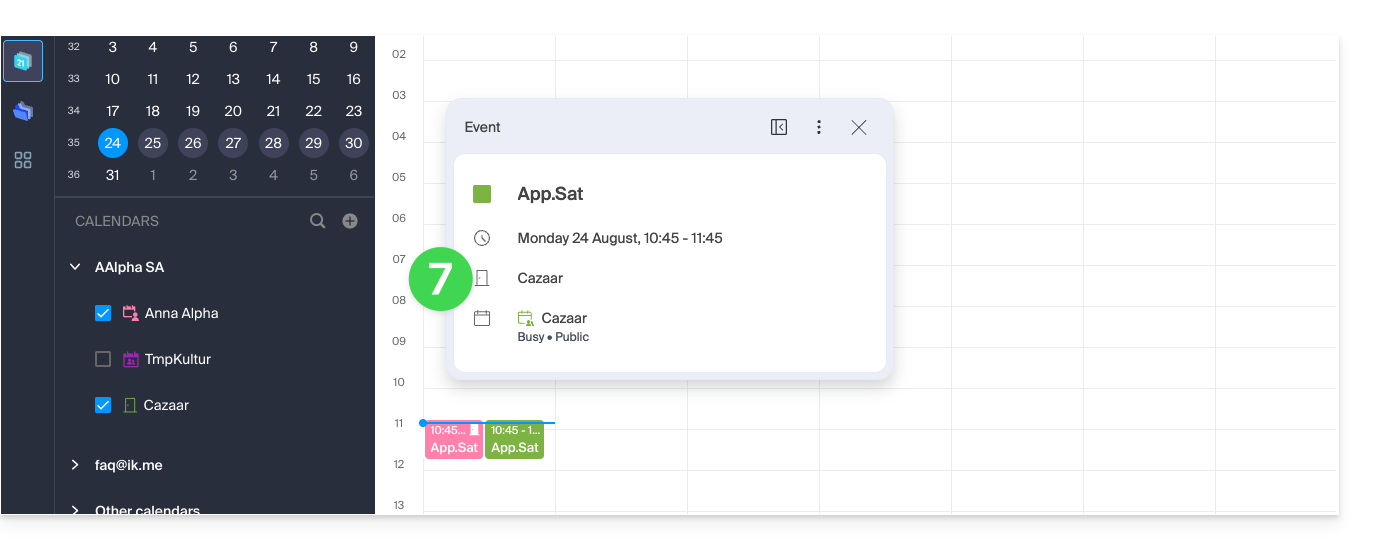
- Você encontrará todas as informações sobre o local escolhido na página do evento no calendário (e no calendário da sala – veja abaixo):
Visão geral das salas e sua ocupação
É possível ter uma visão geral do calendário de cada sala para verificar sua ocupação. De fato, quando uma sala é criada, um calendário associado a ela é criado nos calendários da Organização: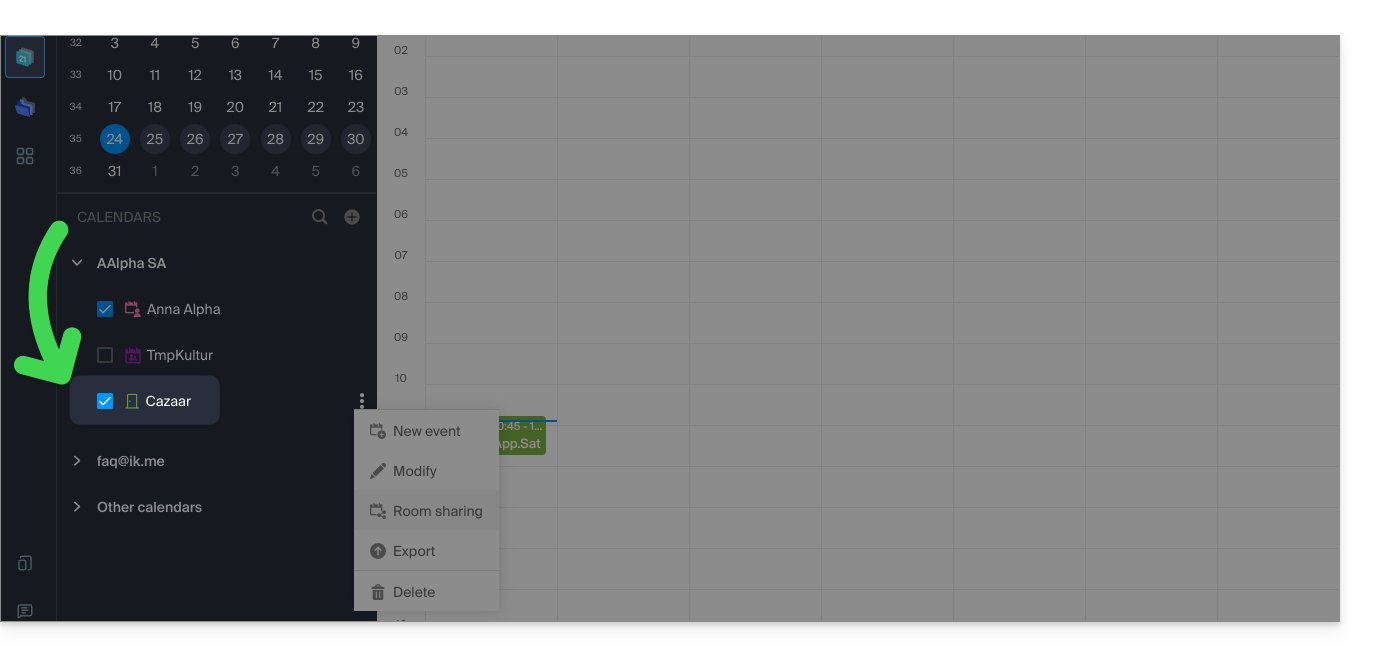
Seu espaço kSuite dedicado (❓: ajuda) também exibe uma visão das disponibilidades de suas salas em tempo real, com a possibilidade de reservar uma delas em poucos cliques, o que economizará tempo na organização de suas reuniões: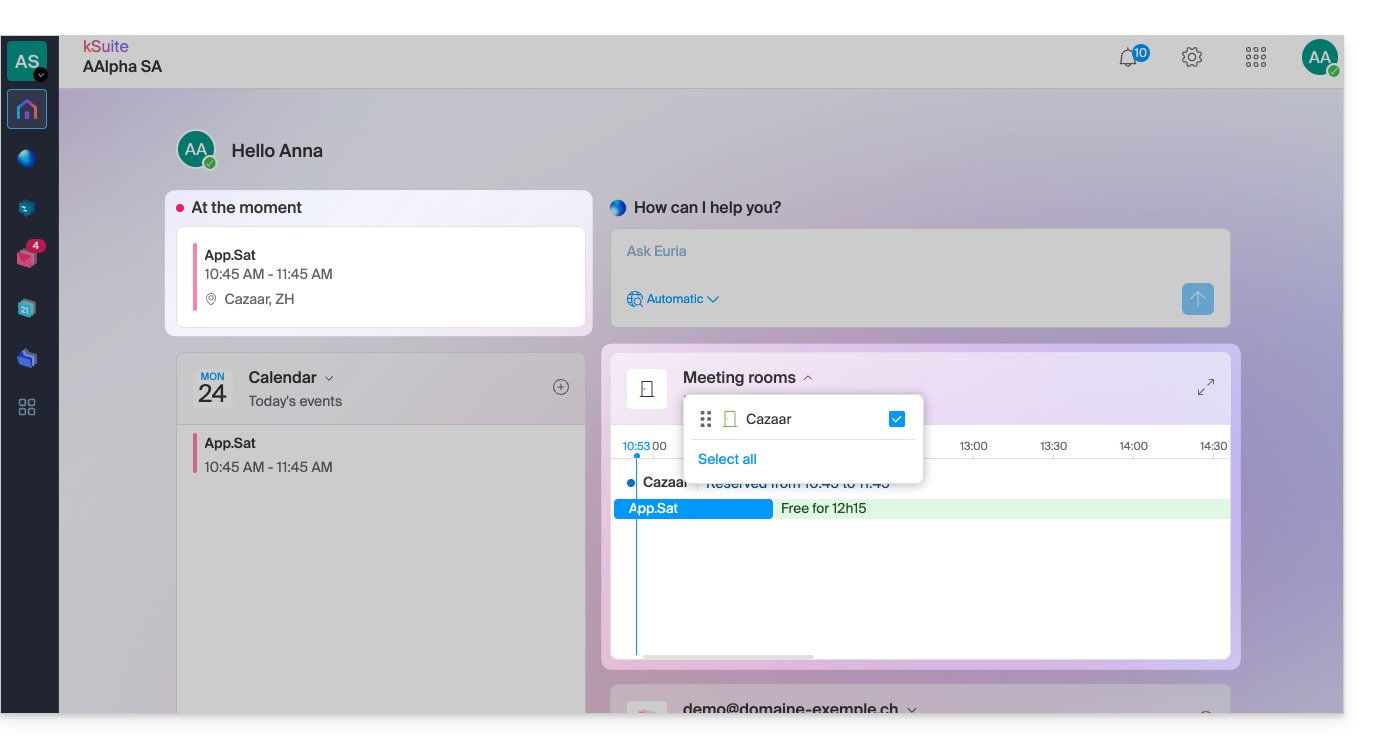
Link para esta FAQ: https://faq.infomaniak.com/1329
Esta seção de perguntas frequentes foi útil?
Este guia explica como criar, ocultar ou eliminar listas de contactos na aplicação web Contactos Infomaniak (serviço online ksuite.infomaniak.com/contacts).
Introdução
- Para gerir os contactos, consulte este outro guia.
- Para gerir o partilhamento de cadernos, consulte este outro guia.
- Para saber mais sobre os catálogos de organização, consulte este outro guia.
Adicionar um novo catálogo de endereços
Para criar um novo catálogo de endereços:
- Clique aqui para acessar o aplicativo web Contatos Infomaniak (serviço online ksuite.infomaniak.com/contacts).
- Clique em no menu lateral esquerdo:
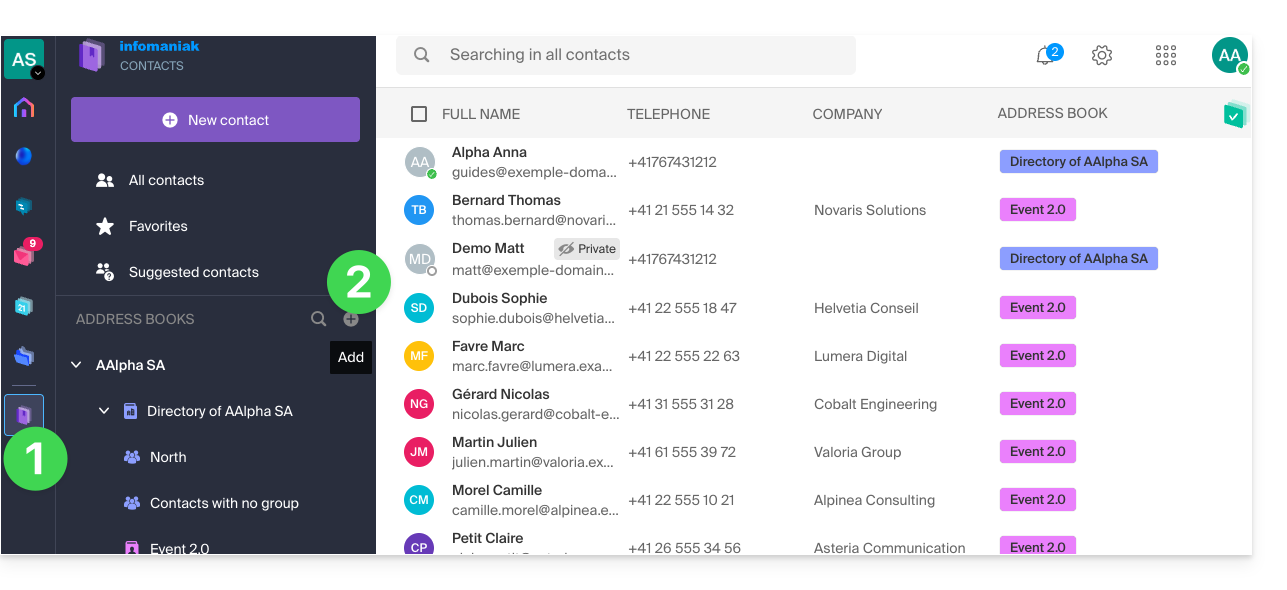
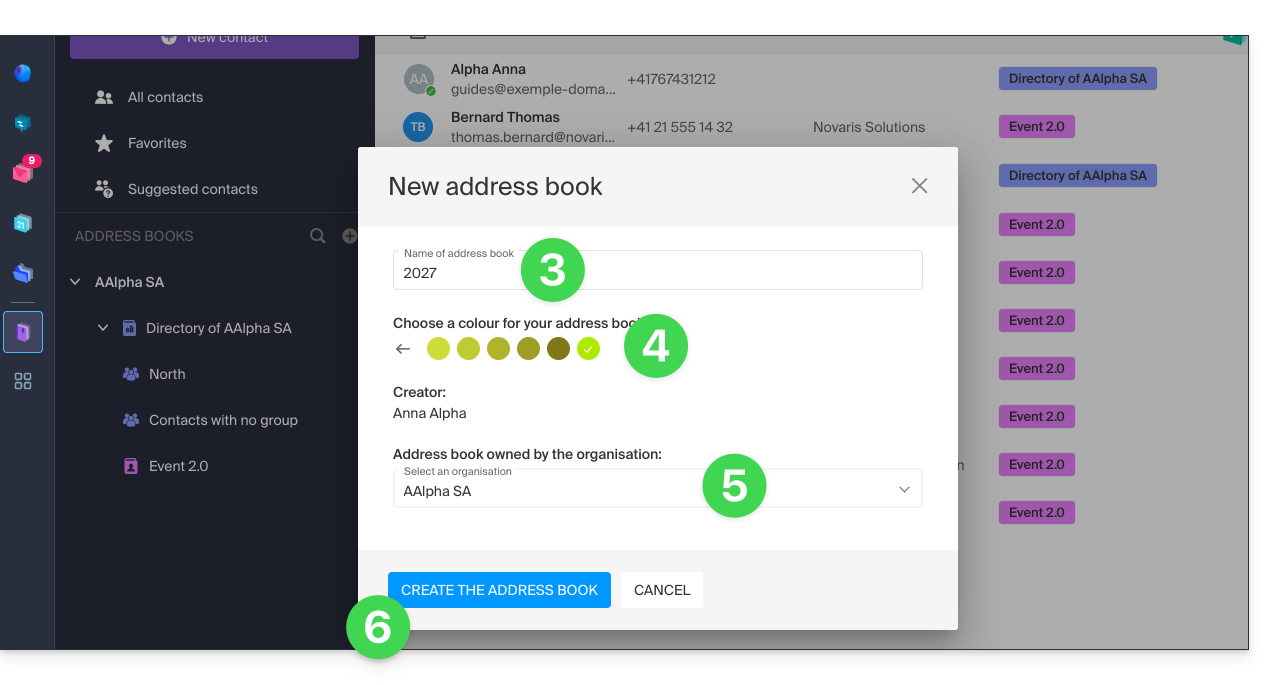
- Atribua um nome à lista de endereços.
- Escolha uma cor.
- Escolha a Organização na qual o bloco de notas deve ser criado.
- Clique no botão para concluir:
- O novo bloco de notas, ainda vazio, é adicionado à lista do menu lateral esquerdo:
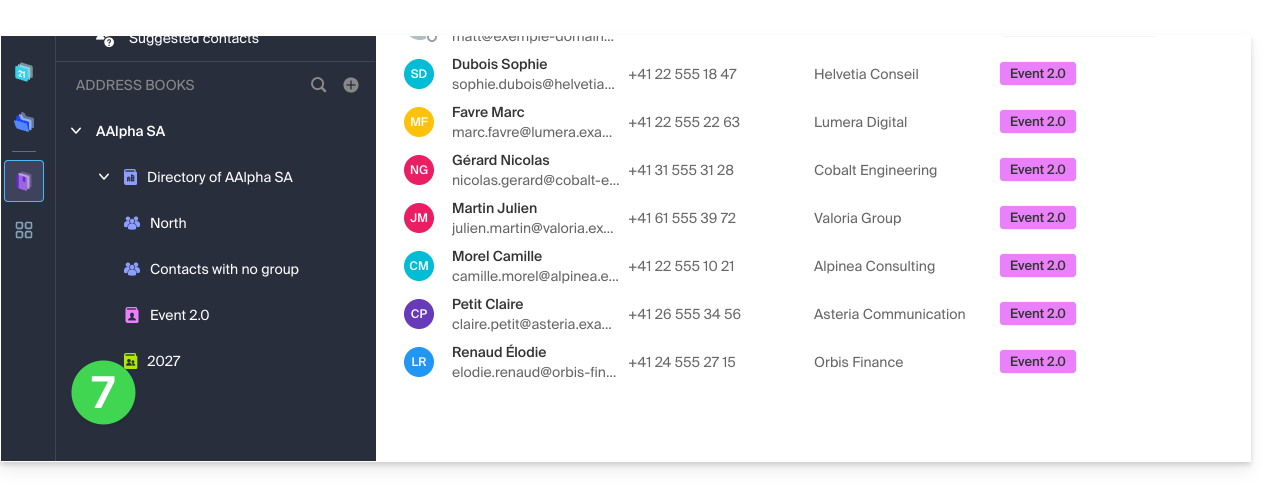
- Você pode copiar ou mover os contatos para lá.
Novo catálogo durante uma importação
Também é possível criar um novo catálogo de endereços diretamente durante a importação de novos contactos: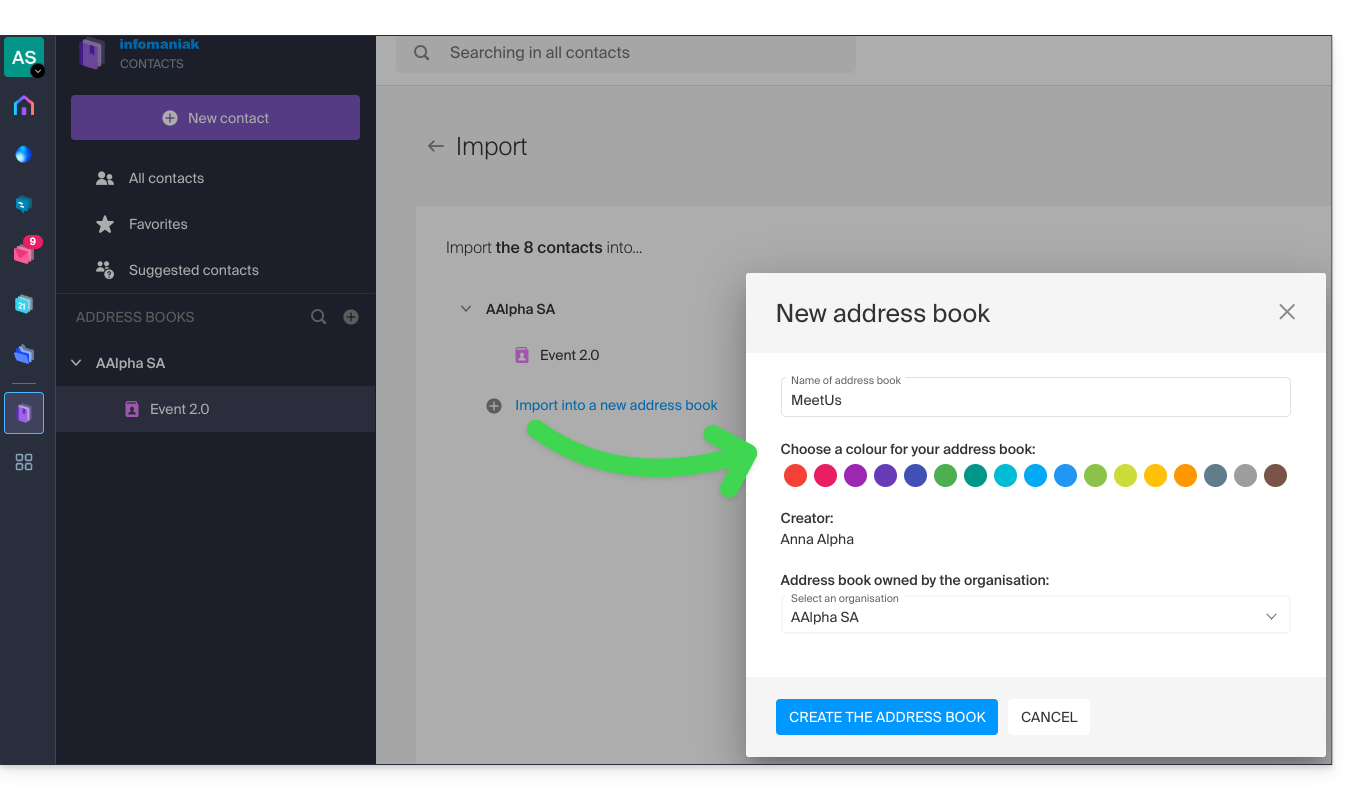
Nesse caso, também pode escolher em qual Organização (entre as já associadas ao seu utilizador) deseja criar este novo catálogo para armazenar os seus contactos importados.
Gerenciar os catálogos de endereços dos usuários da Organização
Como administrador em uma Organização, você pode gerenciar os diferentes catálogos de endereços dos seus usuários:
- Clique no menu de ações ⋮ à direita da Organização em questão.
- Clique em Gerenciar listas de endereços:
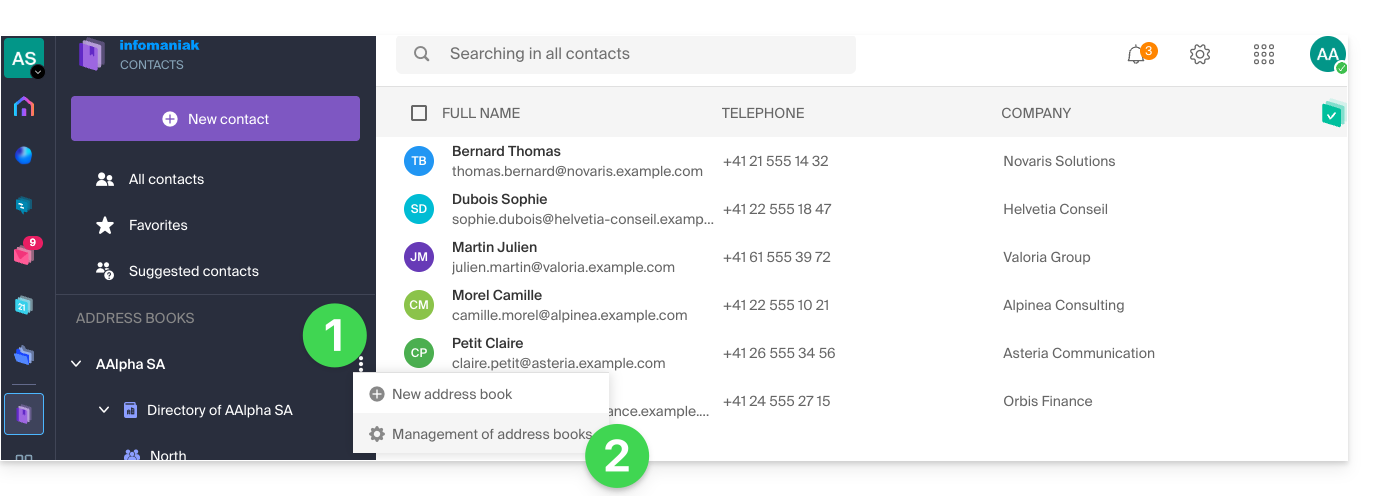
- É exibida a lista dos diferentes catálogos de endereços de todos os utilizadores da Organização, com o seu nome e o número de contactos contidos (por defeito, estes contactos não são visíveis):
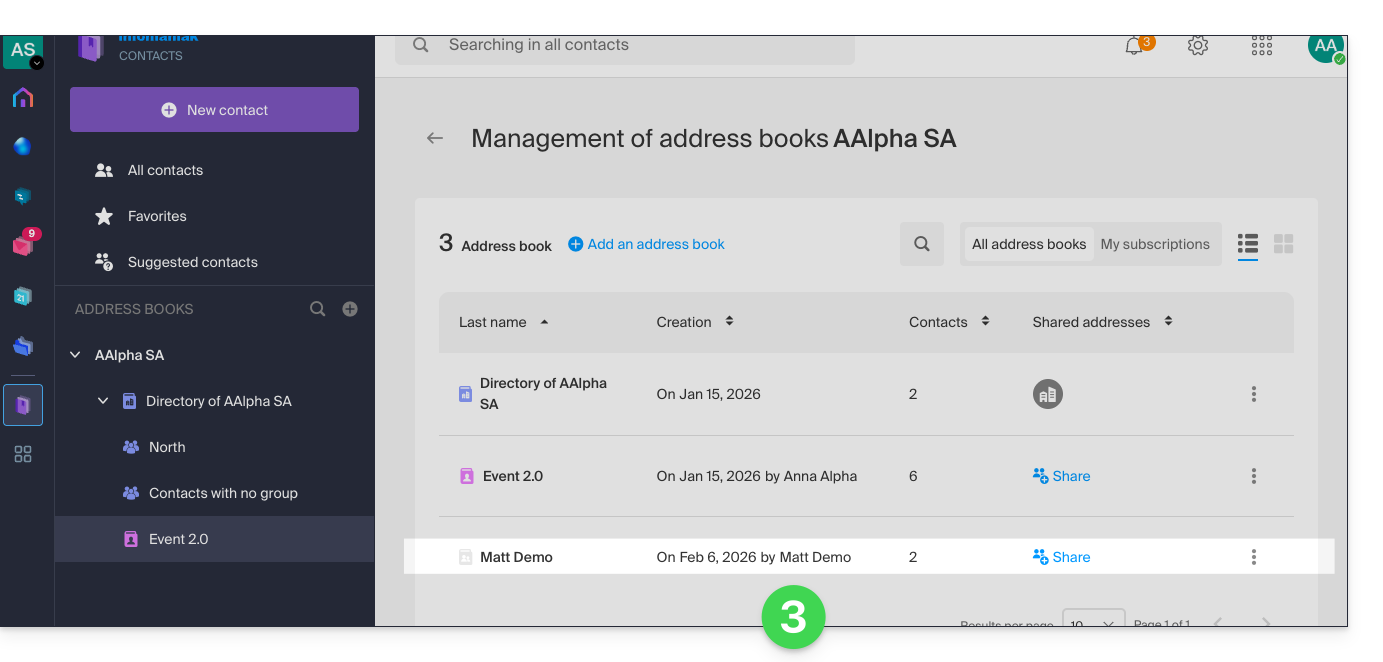
- Ao clicar em Partilhar, poderá obter acesso aos contactos.
- Você pode até decidir conceder acesso não apenas ao seu usuário, mas a toda a organização.
- Clique no botão para obter acesso (um e-mail informativo será enviado ao usuário):
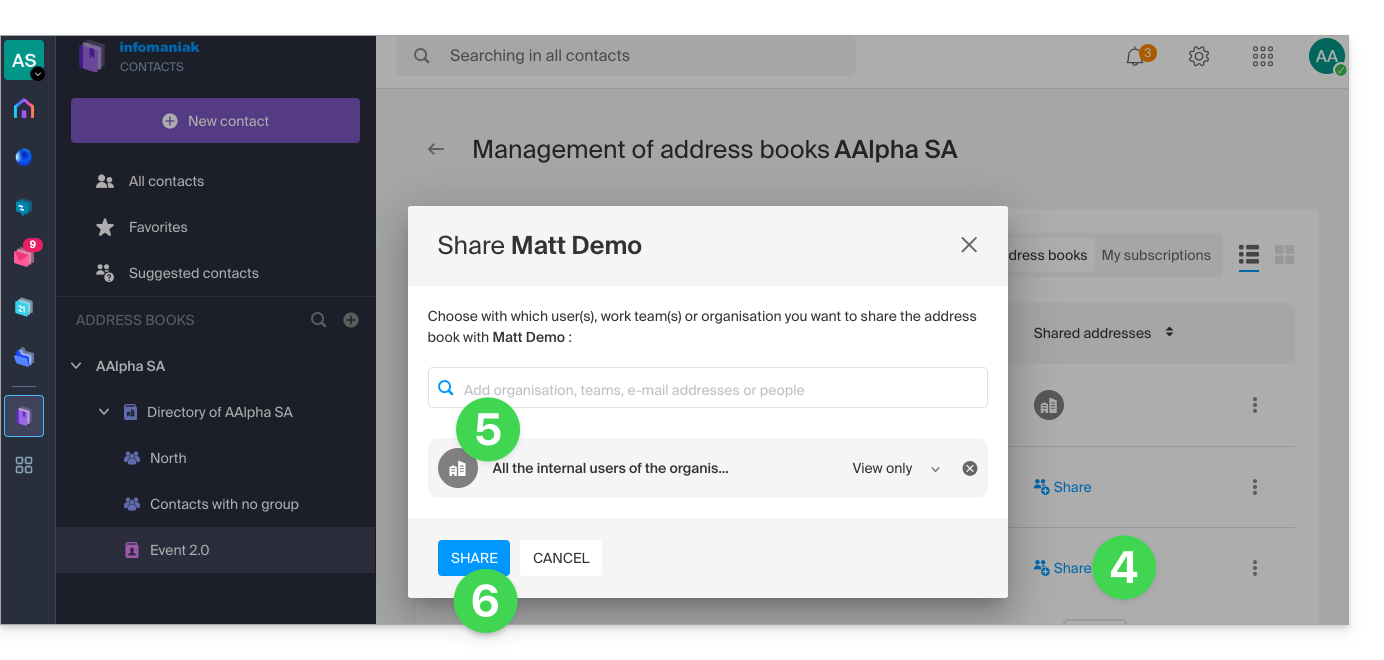
- Atualize a interface, se necessário, para que o catálogo apareça.
Ocultar/exibir um catálogo de endereços
Para ocultar a exibição de um caderno adicional (não é possível ocultar o caderno padrão nem um caderno da Organização) apenas no seu perfil:
- Clique no menu de ação ⋮ à direita do caderno em questão.
- Clique em Ocultar este catálogo de endereços:
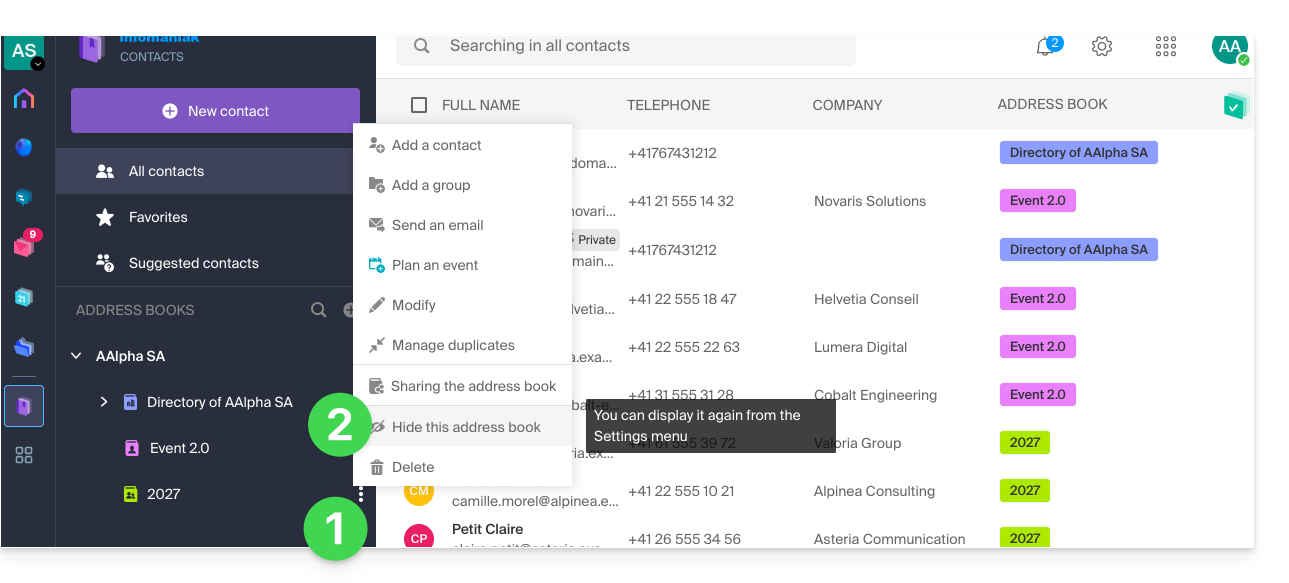
- O catálogo desaparece da lista.
- Clique no menu de ação ⋮ à direita da Organização em questão.
- Clique em Mostrar todos os catálogos de endereços:
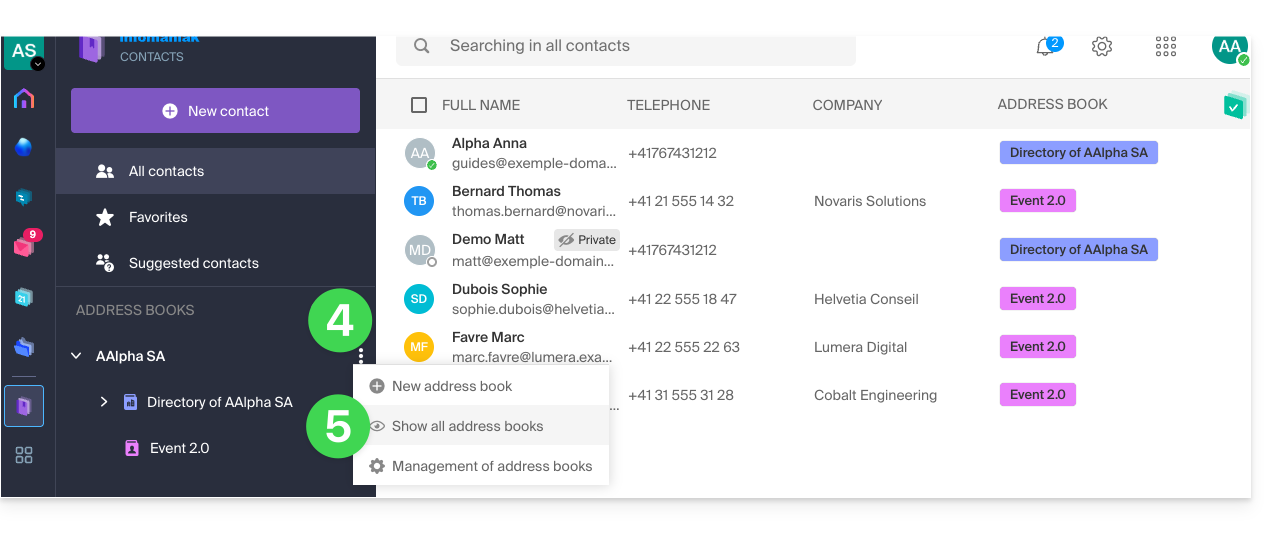
Remover um compartilhamento em vez de ocultá-lo
Se o catálogo de endereços que você não deseja mais ver na lista for resultado de um compartilhamento feito por outro usuário, você também pode remover esse compartilhamento e, assim, não ter mais acesso ao catálogo compartilhado:
- Clique no menu de ação ⋮ à direita do bloco de notas em questão.
- Clique no elemento de compartilhamento.
- Clique no ícone para remover este compartilhamento:
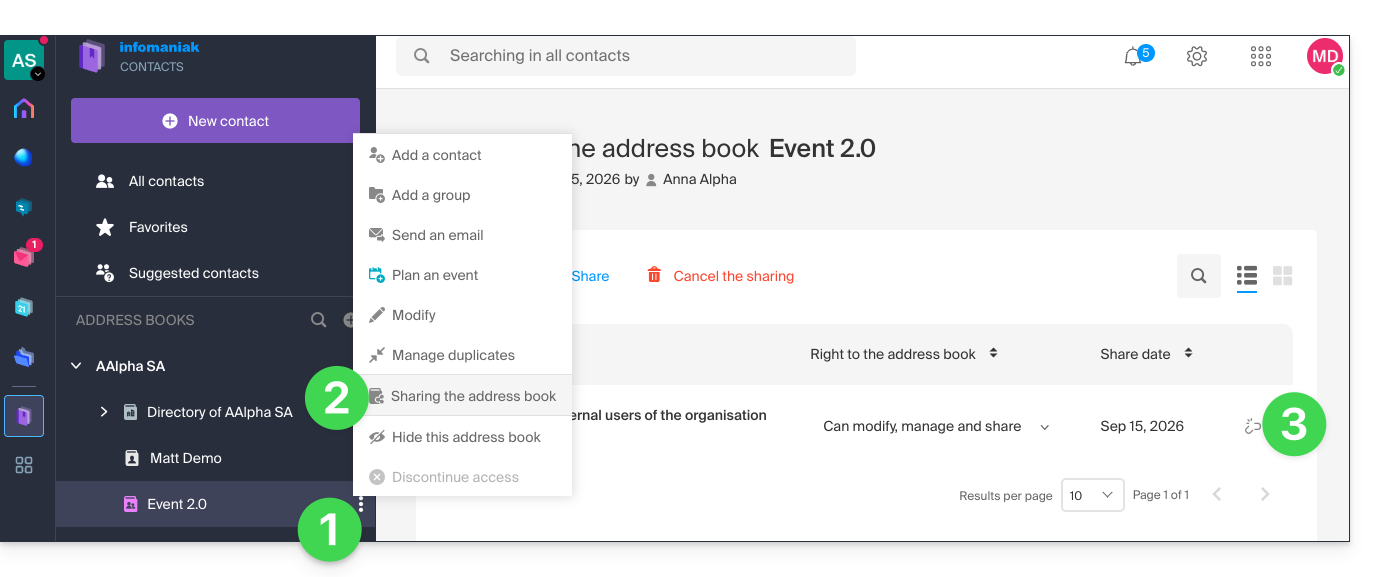
- Confirme a operação e, se necessário, atualize a interface para que o bloco desapareça.
Link para esta FAQ: https://faq.infomaniak.com/1340
Esta seção de perguntas frequentes foi útil?
Este guia apresenta o modelo de segurança que permite atribuir utilizadores a um endereço de e-mail ou definir uma senha diferente para cada dispositivo ou software que precise acessá-lo.
Introdução
- Ao criar um endereço de e-mail, nenhuma senha é definida.
- Se você permanecer no ecossistema Infomaniak, ou seja, se usar apenas o aplicativo web Mail Infomaniak (serviço online ksuite.infomaniak.com/mail) e/ou o aplicativo móvel Infomaniak Mail (aplicativo para smartphone ou tablet iOS / Android), você não precisa gerenciar uma senha, pois tudo é configurado com o conceito de usuário, ou seja, de conta Infomaniak (que, por sua vez, possui uma senha):
- Um endereço de e-mail pode ser consultado/utilizado nesses aplicativos Mail Infomaniak sem uma senha diferente daquela que já permite o acesso à sua conta Infomaniak, simplesmente após ser convidado.
- Basta autorizar sua própria conta ou convidar um conhecido para ser usuário do endereço de e-mail.
- Caso contrário, fora deste ecossistema, você simplesmente cria uma senha (ou várias) para seus dispositivos (Outlook, iPhone, CRM, etc.), de acordo com suas necessidades:
- Cada senha pode ser revogada individualmente, sem impacto nos outros usuários ou dispositivos vinculados a este endereço.
- Não é possível exibir uma senha criada anteriormente; basta criar uma nova!
Adicionar um usuário
= Permitir que uma pessoa consulte o endereço nas interfaces Mail Infomaniak
Para permitir que um utilizador (incluindo você) consulte o endereço de e-mail no Infomaniak sem precisar de outra senha além da sua (a senha da sua conta Infomaniak):
- No painel de controlo do Serviço de Email:
- adicione o endereço de email às suas aplicações Mail Infomaniak para que possa utilizar o endereço,
- ou defina qual outro utilizador externo deve ter acesso ao endereço nas suas aplicações Mail Infomaniak,
- ou remova o acesso de um utilizador: os outros acessos ao endereço de email permanecerão ativos.
- Pode gerir os utilizadores autorizados diretamente na aplicação Web Mail (qualquer utilizador de um endereço de email na Infomaniak pode visualizar a lista de outros utilizadores que têm acesso).
Adicionar um dispositivo
= Adicionar uma senha para permitir que uma pessoa acesse a conta em um dispositivo (Outlook, iPhone, CRM, etc.)
Para permitir que um utilizador (incluindo você) consulte o endereço de e-mail via IMAP e envie mensagens via SMTP (protocolos que exigem ambos uma palavra-passe):
- No painel de controlo do Serviço de E-mail:
- crie palavras-passe específicas para cada dispositivo (Outlook, iPhone, CRM, etc.), de acordo com as suas necessidades,
- ou revogue a palavra-passe em questão: os outros acessos ao endereço de e-mail permanecerão ativos.
- Você pode gerenciar os dispositivos conectados diretamente no aplicativo web Mail.
Link para esta FAQ: https://faq.infomaniak.com/1344
Esta seção de perguntas frequentes foi útil?
Este guia explica como transmitir uma reunião online kMeet em um fluxo separado, acessível por meio de uma URL exclusiva, graças ao Streaming de Vídeo Infomaniak.
✘ INDISPONÍVEL com
kSuite Free / kSuite Standard
my kSuite / my kSuite+ (ik.me, etik.com, ikmail.com)
Preâmbulo
- Transmitir uma reunião, como uma conferência, através de um fluxo de Streaming de Vídeo, em vez de dentro da aplicação kMeet, apresenta várias vantagens:
- Transmissão pública em larga escala sem ter de restringir o acesso a um público limitado a pessoas convidadas.
- Atrair um público mais amplo, como em conferências, webinars ou eventos ao vivo, onde centenas ou milhares de espectadores podem acompanhar o evento sem participar numa chamada privada.
- Permite alcançar um número ilimitado de espectadores.
- Não é necessário gerir o acesso para cada participante; o fluxo é simplesmente acessível através de um link.
- Um simples navegador web é suficiente para aceder ao fluxo de streaming.
- Acesso passivo: os espectadores não são obrigados a participar ativamente ou a interagir; podem simplesmente assistir ao evento sem se registarem ou se conectarem, o que é mais adequado para grandes eventos.
- Não há interrupções de áudio ou perturbações relacionadas com a gestão dos microfones; isso permite manter um fluxo mais suave e focado no orador.
- Resolução de transmissão mais elevada, enquanto o kMeet pode ser limitado por restrições de largura de banda e ter uma qualidade de vídeo inferior para evitar a sobrecarga da rede.
Criar o link de compartilhamento para streaming de vídeo
Pré-requisitos
- É preciso ser moderador do kMeet para poder criar um link de transmissão ao vivo.
- Não é necessário ter uma oferta de streaming de vídeo Infomaniak.
Em seguida:
- Inicie o kMeet através de ksuite.infomaniak.com/kmeet ou a partir de uma das aplicações para computador ou dispositivos móveis.
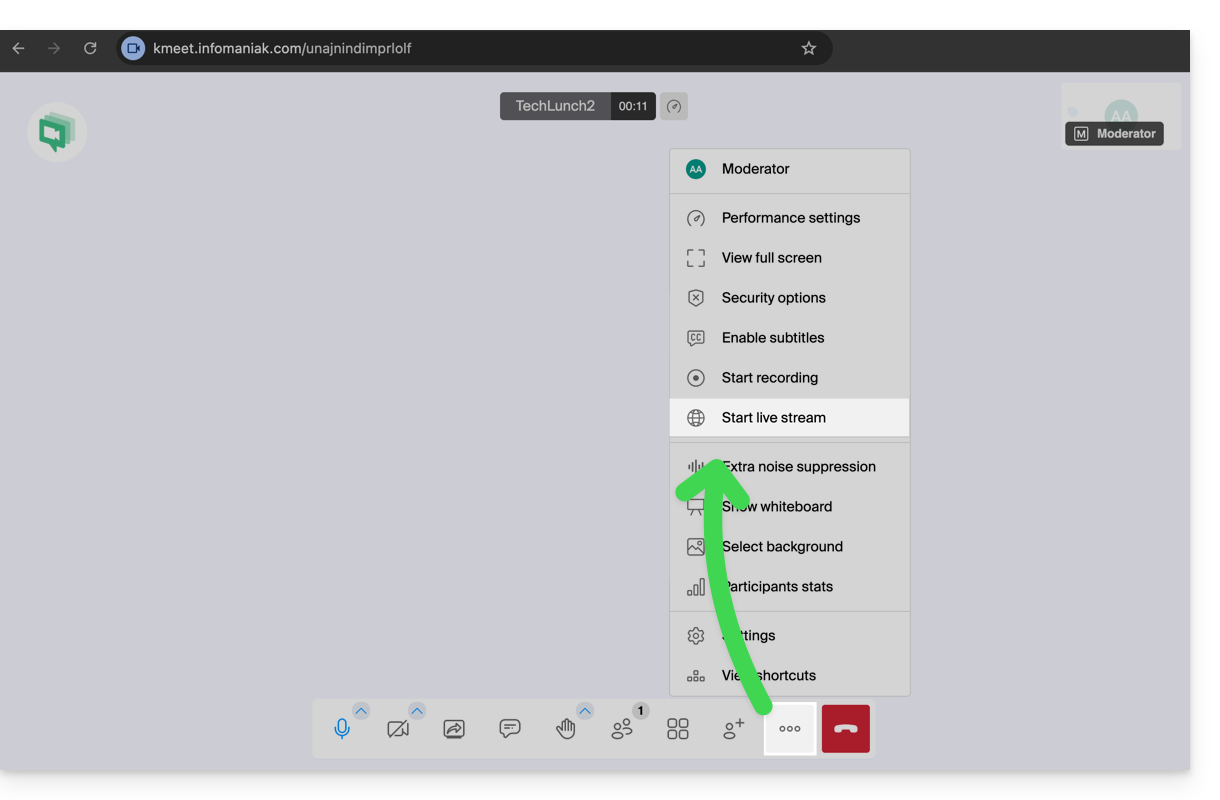
- Dentro da reunião, clique no menu de ações ○○○ na barra de ferramentas do kMeet.
- Escolha Iniciar a transmissão ao vivo:
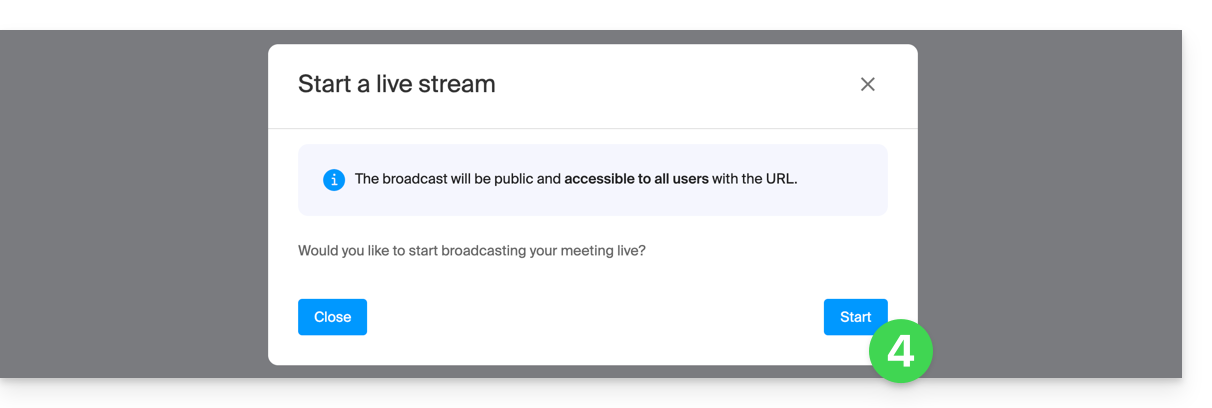
- Clique no botão para Iniciar:
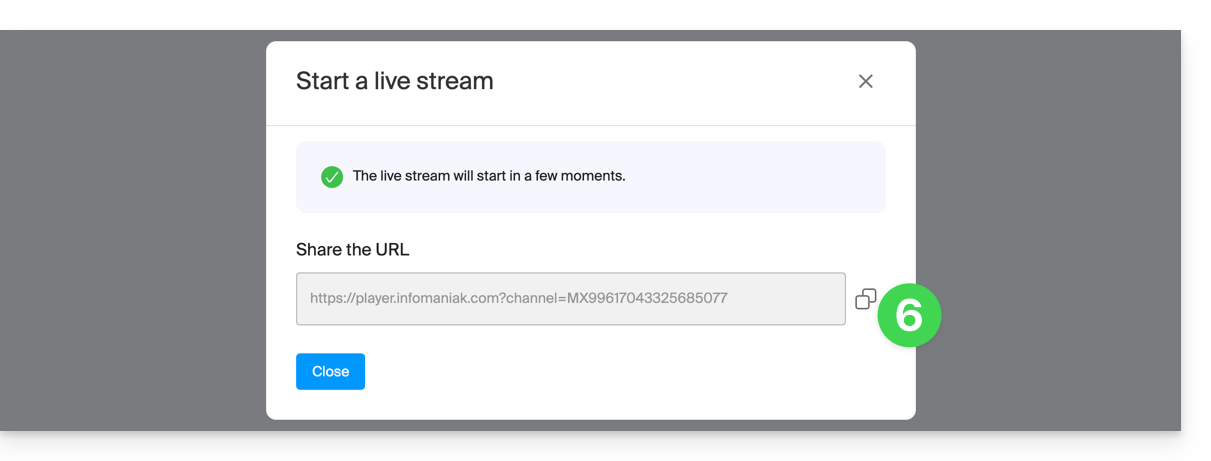
- Aguarde enquanto o fluxo de Streaming de Vídeo é criado;um símbolo exibido no kMeet, juntamente com um sinal sonoro, indica o início da transmissão por streaming de vídeo.
- No mesmo local, após a exibição do link do streaming, clique no ícone à direita para copiar a URL correspondente ao fluxo ao vivo; cole a URL em uma mensagem destinada aos participantes ou a qualquer pessoa que deva assistir à transmissão ao vivo:
O fluxo é transmitido continuamente por um máximo de 24 horas e não estará mais acessível assim que a reunião kMeet for interrompida.
Link para esta FAQ: https://faq.infomaniak.com/1355
Esta seção de perguntas frequentes foi útil?
Este guia é sobre o Euria, o assistente de inteligência artificial autônomo, um serviço completo da kSuite, também disponível em um aplicativo independente.
Introdução
- A força da Euria reside na sua infraestrutura local:
- Ao contrário das soluções baseadas em nuvens públicas estrangeiras, a IA da Infomaniak é alojada exclusivamente nos seus próprios servidores na Suíça.
- Esta abordagem permite respeitar rigorosamente as normas de proteção de dados e garantir que nenhuma informação processada é utilizada para treinar modelos de terceiros ou partilhada fora da infraestrutura segura do provedor de hospedagem.
- O uso da IA na Infomaniak baseia-se numa abordagem transparente e ética; a Euria utiliza modelos de linguagem de ponta (LLM) selecionados pela sua eficiência e desempenho, sendo ao mesmo tempo otimizados para minimizar a sua pegada energética.
- A Infomaniak aposta numa transparência total relativamente aos algoritmos utilizados, integrando-se numa abordagem de independência tecnológica e sustentabilidade ambiental própria da empresa.
Descubra o Euria
Para começar a usar o Euria, consulte este outro guia.
Para criar um projeto de IA com instruções personalizadas e base de conhecimento, consulte este outro guia.
Os serviços Infomaniak também integram o Euria
Concebido para oferecer uma alternativa europeia aos gigantes tecnológicos americanos, o assistente de inteligência artificial soberano Euria distingue-se pela sua integração profunda no ecossistema de produtividade da Infomaniak, garantindo, ao mesmo tempo, a confidencialidade absoluta dos dados do utilizador:
- kChat
- A IA Euria integrada no kChat permite poupar tempo nas conversas: pode reformular frases, gerar respostas rápidas, corrigir a ortografia ou ajustar o tom de uma mensagem. O utilizador mantém o controlo total sobre as sugestões, que são apenas locais para cada sessão.
- Mail Infomaniak
- No aplicativo Mail, a Euria auxilia na redação de e-mails. Ela pode gerar conteúdo a partir de algumas palavras-chave, reformular ou estruturar uma mensagem, adaptando-se a diferentes estilos. Nada é enviado automaticamente, e o usuário pode modificar os textos a qualquer momento.
- Site Creator
- Um assistente de redação baseado em IA permite que o Site Creator gere rapidamente conteúdos adaptados a diferentes tipos de páginas web. Este serviço é útil para pessoas que estão criando um site e desejam produzir textos claros, otimizados e relevantes.
- kDrive
- No kDrive, a inteligência artificial é utilizada em dois níveis complementares para simplificar a gestão de documentos. O Euria permite interagir com os ficheiros de texto armazenados no drive. Este módulo pode responder a perguntas sobre o conteúdo de um documento, resumir, traduzir ou extrair informações úteis. É particularmente eficaz para ler relatórios, compreender textos complexos ou gerar rapidamente uma visão geral de um ficheiro.
Limites de utilização
Cada serviço que integra IA segue princípios rigorosos para garantir um uso confiável e responsável:
- a proteção das informações é garantida por meio do tratamento integral dos dados em infraestruturas localizadas exclusivamente na Suíça, assegurando, assim, o controle total da soberania digital,
- os resultados gerados nunca são utilizados para treinar os modelos nem para fins publicitários,
- e a IA não tem como objetivo substituir o ser humano, mas sim auxiliá-lo.
Para garantir uma experiência fluida e segura, o uso do Euria está sujeito a certas condições de volume e tamanho de arquivos:
- Cálculo das cotas (janela deslizante): os limites (abaixo) não são redefinidos à meia-noite, mas calculados em tempo real em uma janela de 24 horas; cada mensagem enviada "ocupa" um espaço na sua cota e é liberado automaticamente 24 horas após o envio.
- Se você enviar mensagens ao longo da manhã até atingir seu limite às 11h, seus direitos de envio serão liberados gradualmente na manhã seguinte, à medida que cada mensagem atingir suas 24 horas de antiguidade.
- Quota global de mensagens: o seu limite diário é partilhado; cada pedido enviado para o Euria é descontado do seu quota global, independentemente do projeto ou da conversa em que interage.
- Uma conversa não pode exceder 254 000 tokens no momento.
- Transcrições: os serviços de transcrição são ilimitados.
- Número de projetos possíveis / Número máximo de conversas por projeto:
- kSuite Free = 2 / 5
- kSuite Standard = 10 / 50
- kSuite Business = ilimitado / ilimitado
- kSuite Enterprise = ilimitado / ilimitado
- my kSuite = 2 / 5
- my kSuite+ = ilimitado / ilimitado
- Limite de tamanho (em MB) por arquivo para o envio de documentos / envio de imagens (máximo de 20 arquivos por conversa):
- kSuite Free = 100 / 10
- kSuite Standard = 100 / 10
- kSuite Business = 100 / 10
- kSuite Enterprise = 100 / 10
- my kSuite = 20 / 10
- my kSuite+ = 20 / 10
- Formatos de ficheiros Documentos suportados:
- PDF:
PDF - Folhas de cálculo:
CSV,XLS,XLSX - Processadores de texto:
DOC,DOCX - Texto e código:
JSON,MD,TXT,XML,YAML,YML - Apresentações:
PPT,PPTX
- PDF:
- Formatos de ficheiros Áudio suportados:
AAC,M4A,MP3,OGA,OGG,OPUS,WAV
- Formatos de ficheiros Vídeo suportados:
MP4
- Formatos de ficheiros Imagens suportados:
- Locais (navegador):
BMP,JPG,JPEG,PNG,WEBP - Extensos:
TIF,TIFF
- Locais (navegador):
- Limitação para o uso do Euria; o serviço não está disponível nestes países:
- Afeganistão
- Arábia Saudita
- Argentina
- Arménia
- Azerbaijão
- Bahrein
- Bangladesh
- Belize
- Butão
- Birmânia (Myanmar)
- Bolívia
- Brunei
- Camboja
- China
- Colômbia
- Coreia do Norte
- Costa Rica
- Emirados Árabes Unidos
- Equador
- El Salvador
- Geórgia
- Guatemala
- Guiana
- Honduras
- Índia
- Indonésia
- Iraque
- Irão
- Israel
- Jordânia
- Cazaquistão
- Quirguistão
- Kuwait
- Laos
- Líbano
- Malásia
- Maldivas
- México
- Mongólia
- Nepal
- Nicarágua
- Omã
- Uzbequistão
- Paquistão
- Palestina
- Panamá
- Paraguai
- Peru
- Filipinas
- Qatar
- Sri Lanka
- Suriname
- Síria
- Tajiquistão
- Taiwan
- Timor-Leste
- Turcomenistão
- Uruguai
- Venezuela
- Iémen
Responsabilidades das partes
Dados fornecidos à IA
- A IA da Infomaniak é atualmente baseada, por padrão, em estes modelos.
- Entre eles, Mistral, Whisper, DeepSeek, Llama, granite…
- Ao utilizar um assistente de redação, as mensagens e os pedidos enviados à IA são processados exclusivamente na Suíça, através da infraestrutura da Infomaniak.
- Nenhum dado é processado ou partilhado com terceiros.
Dados fornecidos pela IA
- O modelo de linguagem gera texto com base nos dados que assimilou durante o seu treinamento, sem consciência, intenções ou responsabilidades morais.
- É fundamental que o utilizador esteja ciente de que as informações geradas pelo modelo nem sempre são precisas e não devem ser consideradas uma fonte de informação incontestável.
- Deve exercer o seu discernimento crítico e verificar as informações fornecidas pelo assistente junto de fontes fiáveis, quando necessário.
- Por exemplo, se uma pessoa utilizar o modelo para tarefas cruciais, como aconselhamento médico, jurídico ou financeiro, deve tomar precauções adicionais para confirmar as informações provenientes do modelo.
- Em caso de uso inadequado ou perigoso deste assistente, a responsabilidade recai sobre o utilizador que realizar essas ações.
Descubra também os Serviços de IA: a Infomaniak disponibiliza uma plataforma que permite integrar facilmente modelos de código aberto em projetos personalizados. É possível utilizar funções de análise de texto, geração de conteúdo, tradução ou outros usos de IA através de chamadas sob demanda. Estes serviços permitem que os desenvolvedores aproveitem uma IA de alto desempenho, sem depender de soluções fechadas ou proprietárias.
Link para esta FAQ: https://faq.infomaniak.com/1369
Esta seção de perguntas frequentes foi útil?
Este guia explica como, a partir de um Serviço de Email, remover o acesso de um utilizador que consulta um endereço de email no ecossistema Infomaniak, ou seja, utilizando apenas a aplicação web Mail Infomaniak (serviço online ksuite.infomaniak.com/mail) e/ou a aplicação móvel Infomaniak Mail (aplicação para smartphone ou tablet iOS / Android).
As outras possibilidades de gestão de acessos (por senha, por exemplo) são apresentadas no guia principal; consulte também, se necessário, este outro guia para bloquear um serviço de e-mail completo para todos os utilizadores.
Pré-requisitos
- Ter, no mínimo, o direito de gerir o Serviço de Email em questão (ou ser Administrador / Responsável legal dentro da Organização).
Gestão e remoção de um utilizador a partir do Serviço de Email
O modelo atual de gestão de acessos ao e-mail permite que cada utilizador de uma Organização se conecte de forma independente e segura à mesma conta de e-mail, sem partilhar uma palavra-passe global.
Se um utilizador não precisar mais de acesso a uma conta de e-mail e ao seu conteúdo, basta removê-lo através da interface:
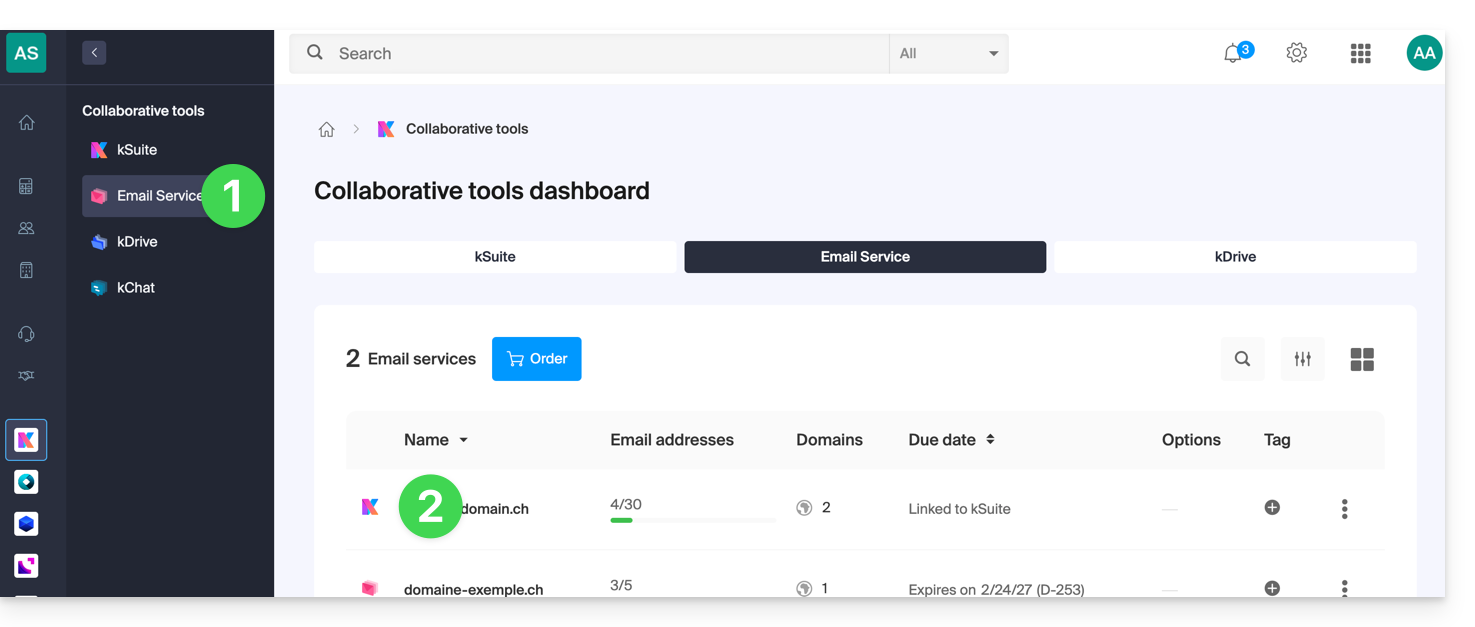
- Clique aqui para acessar o gerenciamento do seu Serviço de E-mail no Gerenciador Infomaniak (precisa de ajuda?).
- Clique diretamente no nome atribuído ao produto em questão:
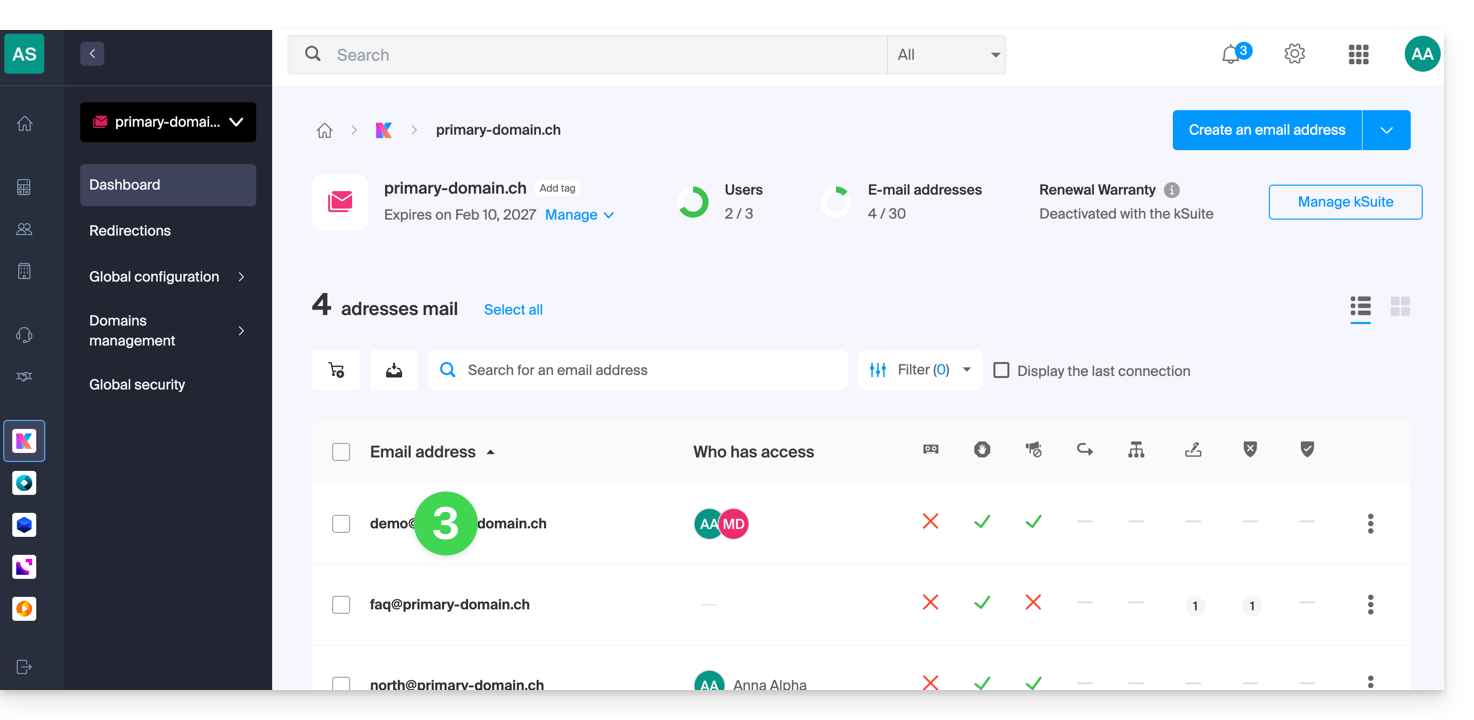
- Clique no endereço de e-mail correspondente na tabela que aparece:
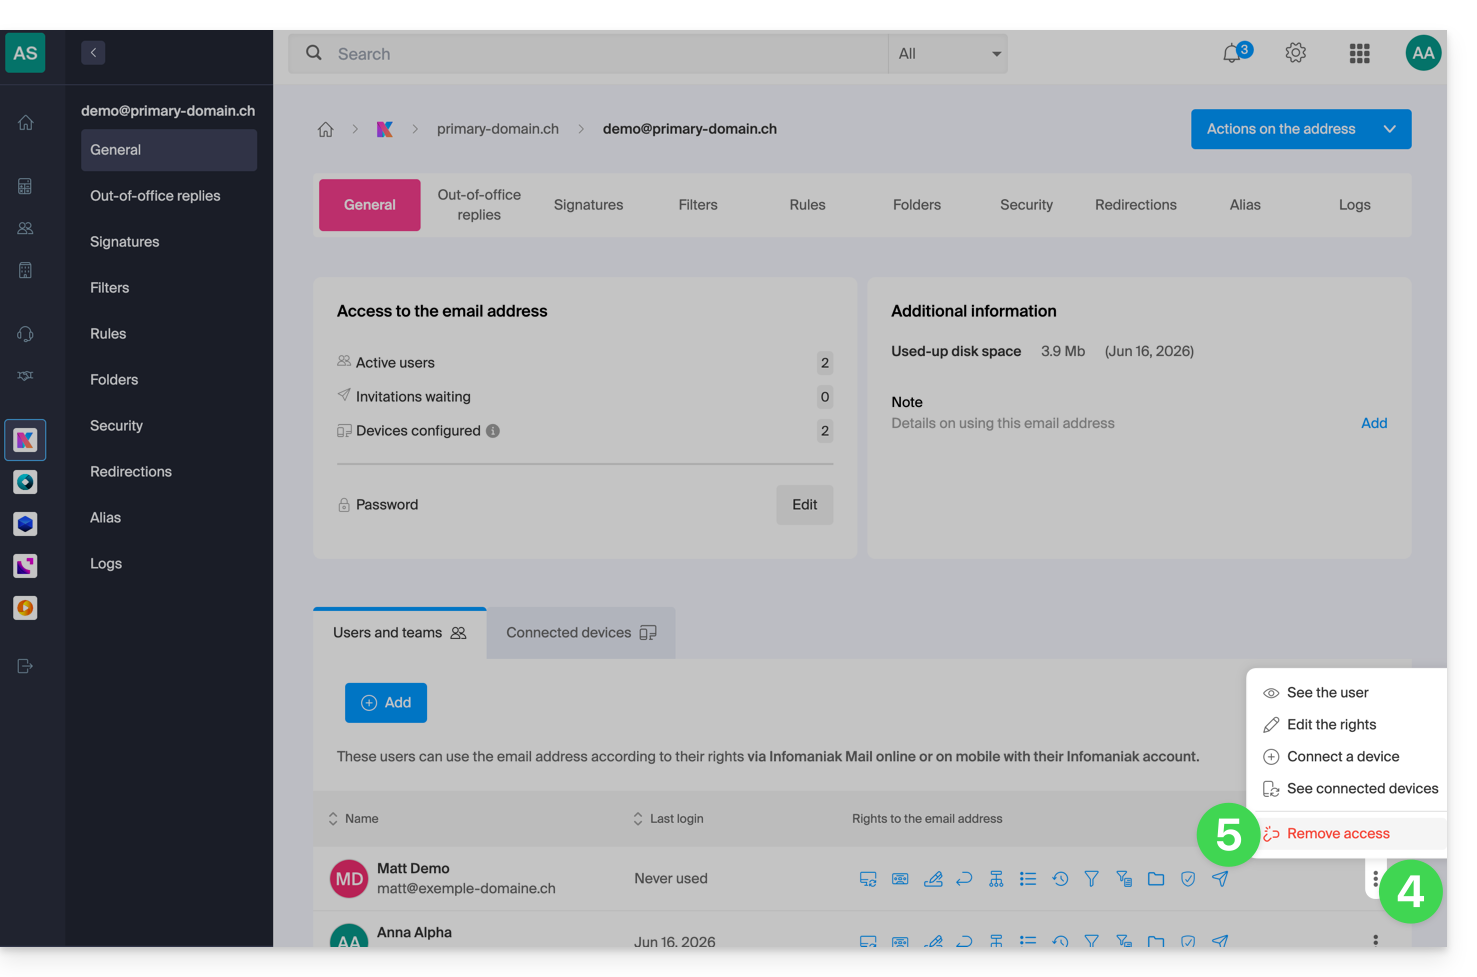
- Na tabela de utilizadores que têm atualmente acesso ao endereço em questão, clique no menu de ações ⋮ à direita do utilizador em questão.
- Escolha revogar o acesso deste utilizador ao endereço de e-mail:
- Confirme a ação: todos os acessos a este endereço de e-mail serão interrompidos e ele não poderá mais consultá-lo.
Link para esta FAQ: https://faq.infomaniak.com/1371
Esta seção de perguntas frequentes foi útil?
A forma mais simples de gerir os seus calendários é utilizar a aplicação web Calendar da Infomaniak (serviço online ksuite.infomaniak.com/calendar).
Esta interface oferece várias vantagens:
- Nenhum software para instalar ou configurar.
- Compartilhamento de calendários com outros usuários.
- Armazenado permanentemente.
- Sincronização de calendários (+ tarefas) entre dispositivos.
- Anexo / kDrive.
- Seguro e respeita a sua privacidade, alojado na Suíça por uma empresa neutra e independente.
Como começar a usar o Calendar Infomaniak?
Tanto no kSuite quanto no aplicativo Mail, é indispensável conectar-se com o nome de usuário da sua conta Infomaniak e sua senha. Não funcionará se você inserir diretamente um endereço de e-mail hospedado que não seja uma conta Infomaniak. Entenda a diferença
- Clique aqui para acessar o aplicativo web Calendar da Infomaniak (serviço online ksuite.infomaniak.com/calendar).
O que você deseja fazer?
- Sincronizar calendários em todos os seus dispositivos
- Personalizar a aparência do aplicativo
- Mostrar os feriados
- Criar uma tarefa
- Criar um evento único
- Criar um evento recorrente
- Criar um lembrete de evento
- Agendar uma reunião
- Agendar uma reunião a partir do aplicativo web Mail
- Gerenciar reservas de salas
- Imprimir um calendário
- Importar um calendário
- Importar tarefas
- Exportar um calendário
- Partilhar um calendário
- Partilhar um calendário publicamente
- Restaurar eventos apagados
- Adicionar um arquivo anexo a um evento
- Definir um calendário como padrão no aplicativo
- Criar um aplicativo para desktop (a partir do aplicativo web Calendar, por exemplo) no Chrome
Tem alguma pergunta ou sugestão?
- Entre em contato com o suporte da Infomaniak
- Clique aqui para partilhar uma opinião ou sugestão sobre um produto Infomaniak
Link para esta FAQ: https://faq.infomaniak.com/1451
Esta seção de perguntas frequentes foi útil?
A forma mais simples de gerir os seus contactos/listas de contactos é utilizar a aplicação web Contactos Infomaniak (serviço online ksuite.infomaniak.com/contacts).
Como começar a usar o Contactos Infomaniak?
Tanto no kSuite quanto no aplicativo Mail, é indispensável fazer login com o nome de usuário da sua conta Infomaniak e sua senha. Não funcionará se você inserir diretamente um endereço de e-mail hospedado que não seja uma conta Infomaniak. Entenda a diferença
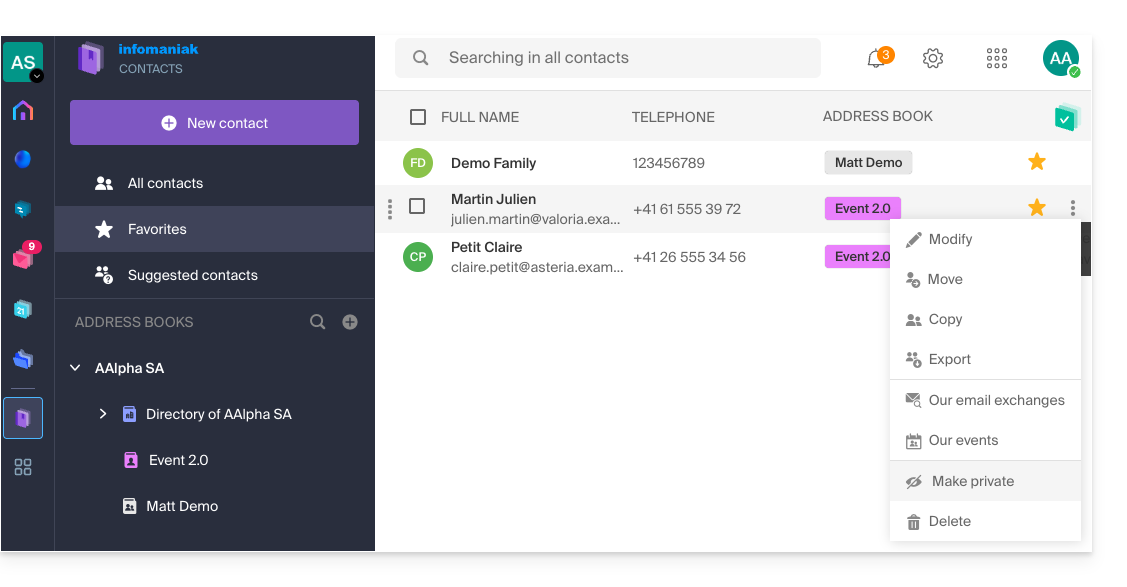
- Clique aqui para acessar o aplicativo web Contatos Infomaniak (serviço online ksuite.infomaniak.com/contacts):
- Esta interface oferece inúmeras vantagens:
- Não é necessário instalar ou configurar nenhum software.
- Compartilhamento de listas de contatos com outros usuários.
- Armazenamento permanente.
- Sincronização dos seus contactos entre dispositivos.
- Protege a sua privacidade e garante a segurança dos seus dados, com alojamento na Suíça por uma empresa neutra e independente.
O que deseja fazer?
- Sincronizar os contactos e calendários em todos os seus dispositivos
- Gerenciar as listas de endereços
- Gerenciar os contatos
- Gerenciar duplicatas
- Importar contatos
- Exportar contactos
- Agrupar contactos
- Copiar ou mover contactos
- Restaurar contactos
- Pesquisar contactos
- Partilhar uma lista de contactos
Tem alguma dúvida ou sugestão?
- Entre em contato com o suporte da Infomaniak
- Clique aqui para partilhar uma opinião ou sugestão sobre um produto Infomaniak
Link para esta FAQ: https://faq.infomaniak.com/1452
Esta seção de perguntas frequentes foi útil?
Este guia explica como convidar para o kChat um utilizador que ainda não faz parte da sua Organização, mas que será registado como um utilizador kSuite.
Introdução
- Consulte este outro guia para conceder acesso a um ou mais canais kChat a um utilizador externo, que poderá assim interagir com a sua equipa sem ser contabilizado como um utilizador kSuitee sem ter direitos especiais na Organização (da qual não fará parte).
- Você também pode convidar um Grupo completo diretamente do kChat.
- Consulte este outro guia se desejar gerenciar os canais aos quais os novos membros devem ser automaticamente adicionados.
Convidar para usar o kSuite
Pré-requisitos
- Ser administrador do kChat:
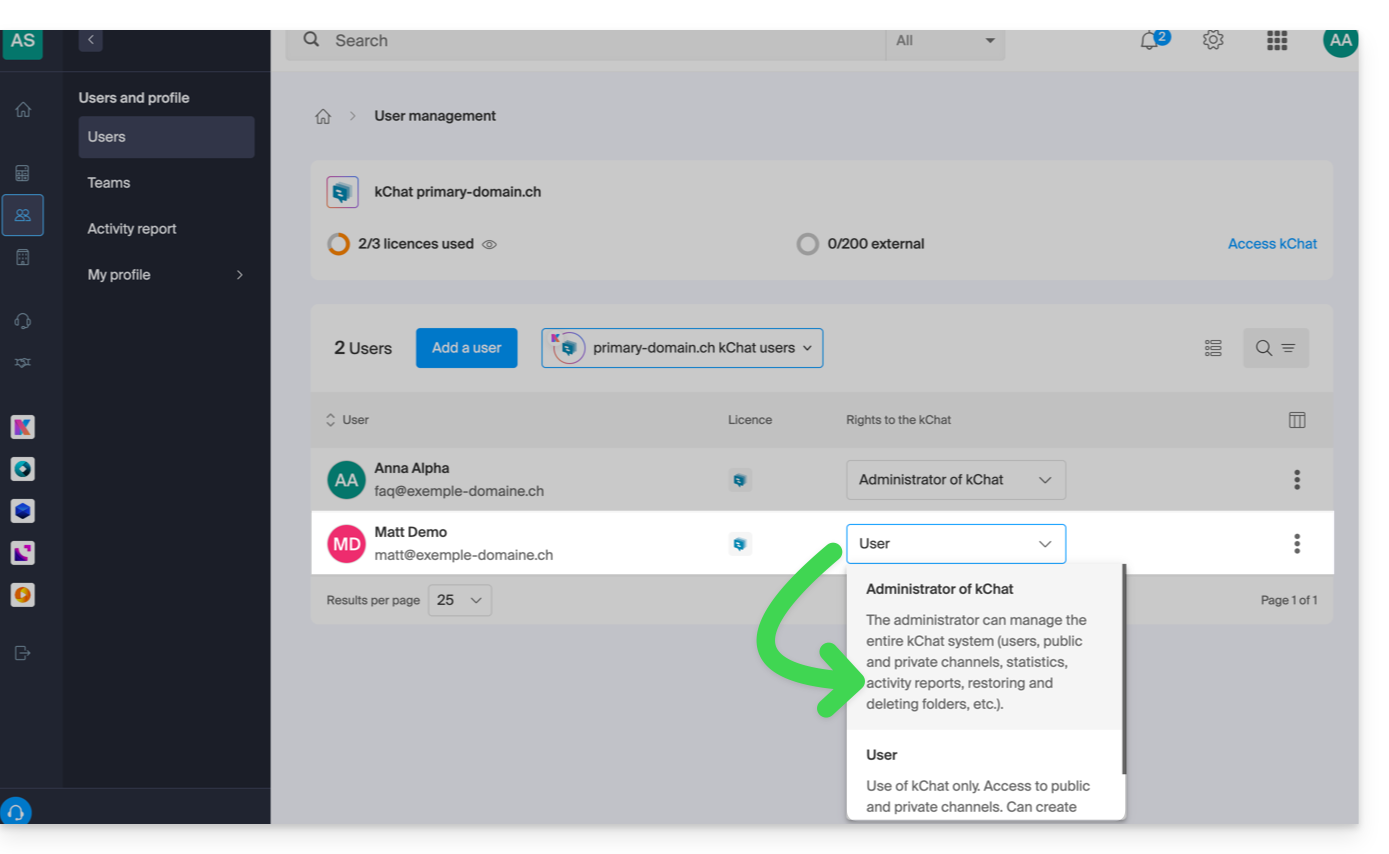
- Não importa o cargo na Organização; ser administrador da Organização na qual existe a kSuite (e, portanto, o kChat) não é obrigatório e, de qualquer forma, não é suficiente:
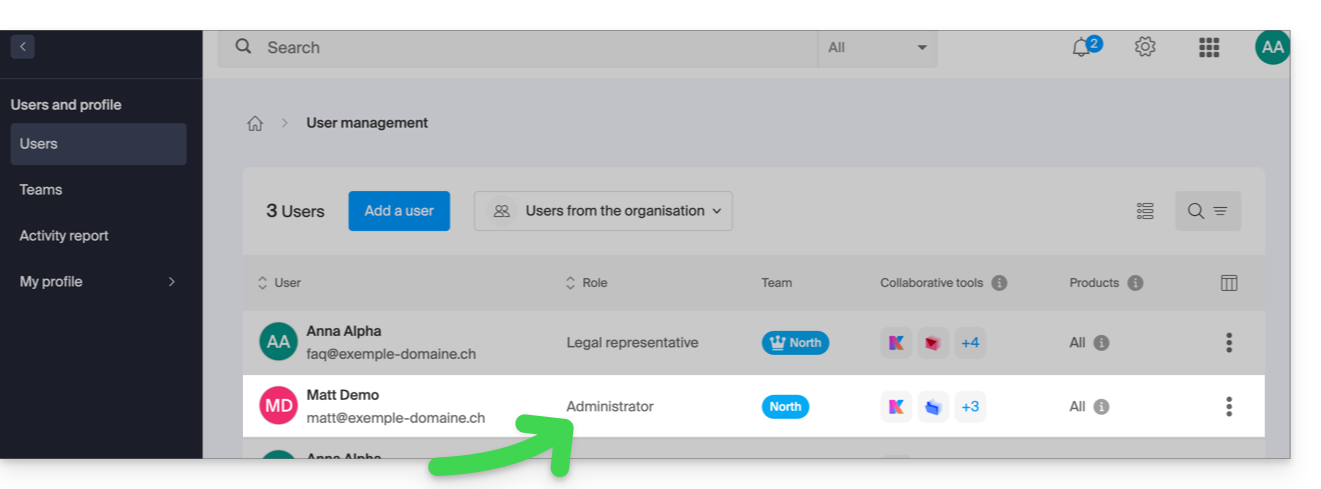
- Não importa o cargo na Organização; ser administrador da Organização na qual existe a kSuite (e, portanto, o kChat) não é obrigatório e, de qualquer forma, não é suficiente:
Em seguida, convide o utilizador seguindo o procedimento abaixo. Após o convite, o utilizador poderá confirmar a sua adesão e acederá ao kChat com as permissões limitadas que lhe tiver concedido:
- Clique aqui para aceder à gestão do kChat no painel de controlo Infomaniak (precisa de ajuda?).
- Clique em Adicionar um utilizador:
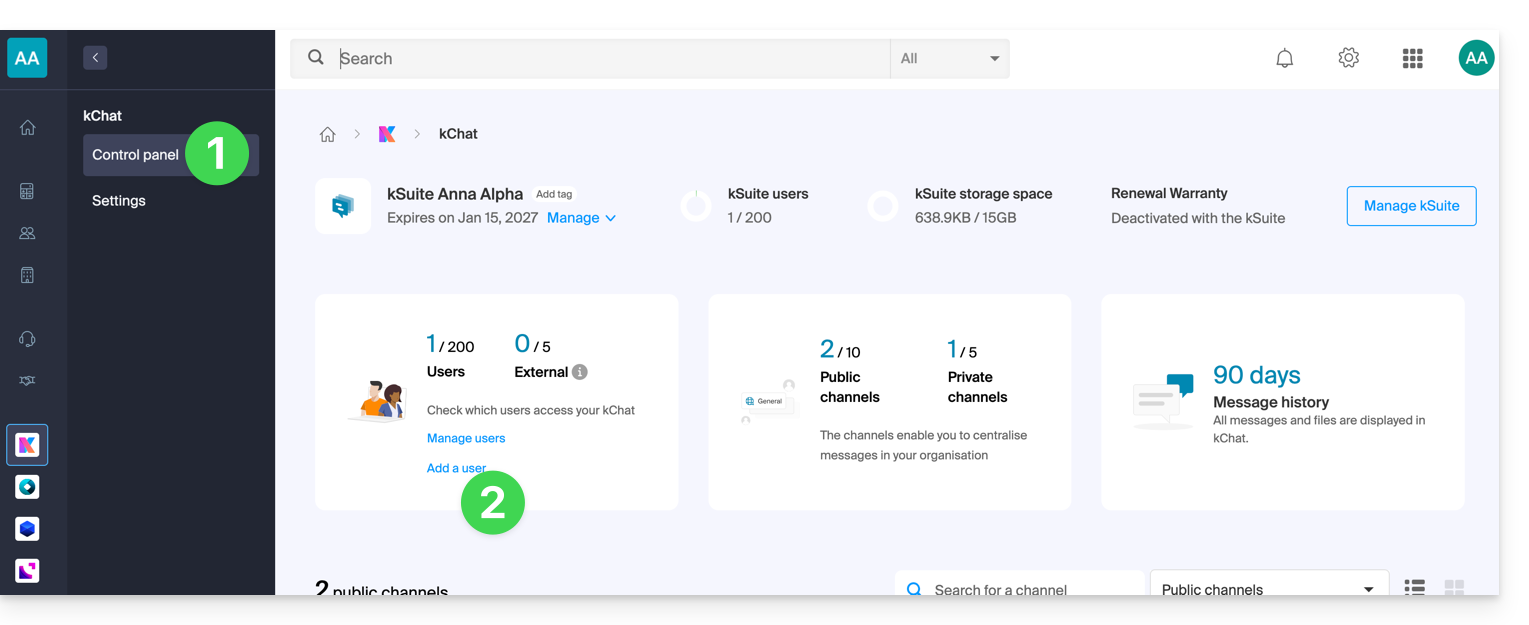
- Clique em Criar um utilizador kSuite.
- Clique em Seguinte:
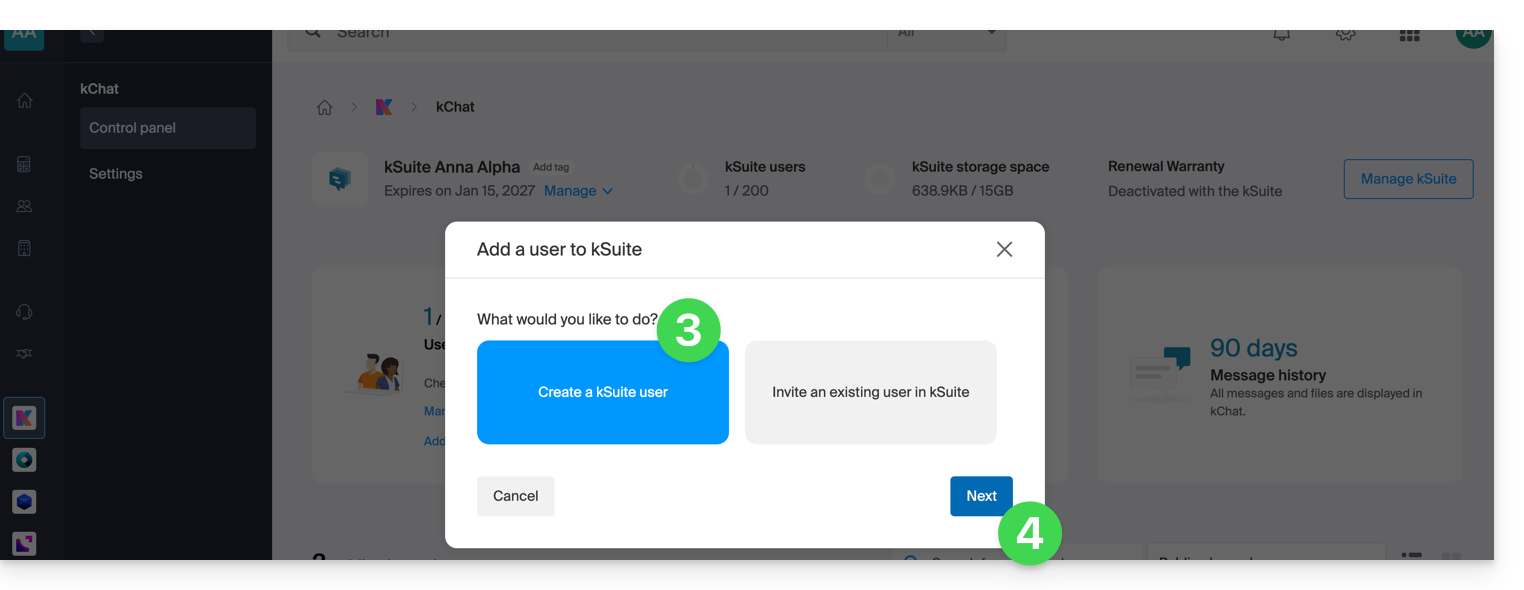
- Insira o nome e o sobrenome do usuário e defina seu papel como usuário comum:
- Representante legal
- Responsabilidade legal da organização
- Pode gerenciar todos os produtos e usuários
- Pode gerenciar a contabilidade e os pedidos de novos produtos
- Administrador
- Pode gerenciar todos os produtos e usuários
- Pode gerenciar a contabilidade e os pedidos de novos produtos
- Usuário
- Pode gerenciar os produtos que você autorizar
- Pode gerenciar a contabilidade se você autorizar
- Representante legal
- Não crie um endereço de e-mail para o utilizador e indique o endereço de e-mail existente para o qual enviar o convite:
- Pode forçar este futuro utilizador a ter de se conectar com este endereço de e-mail ou permitir que especifique outro endereço de e-mail (útil, nomeadamente, se já tiver uma conta de utilizador na Infomaniak com outro identificador de conexão).
- Adicione o utilizador à sua kSuite com o botão de alternância.
- Clique no botão Convidar:
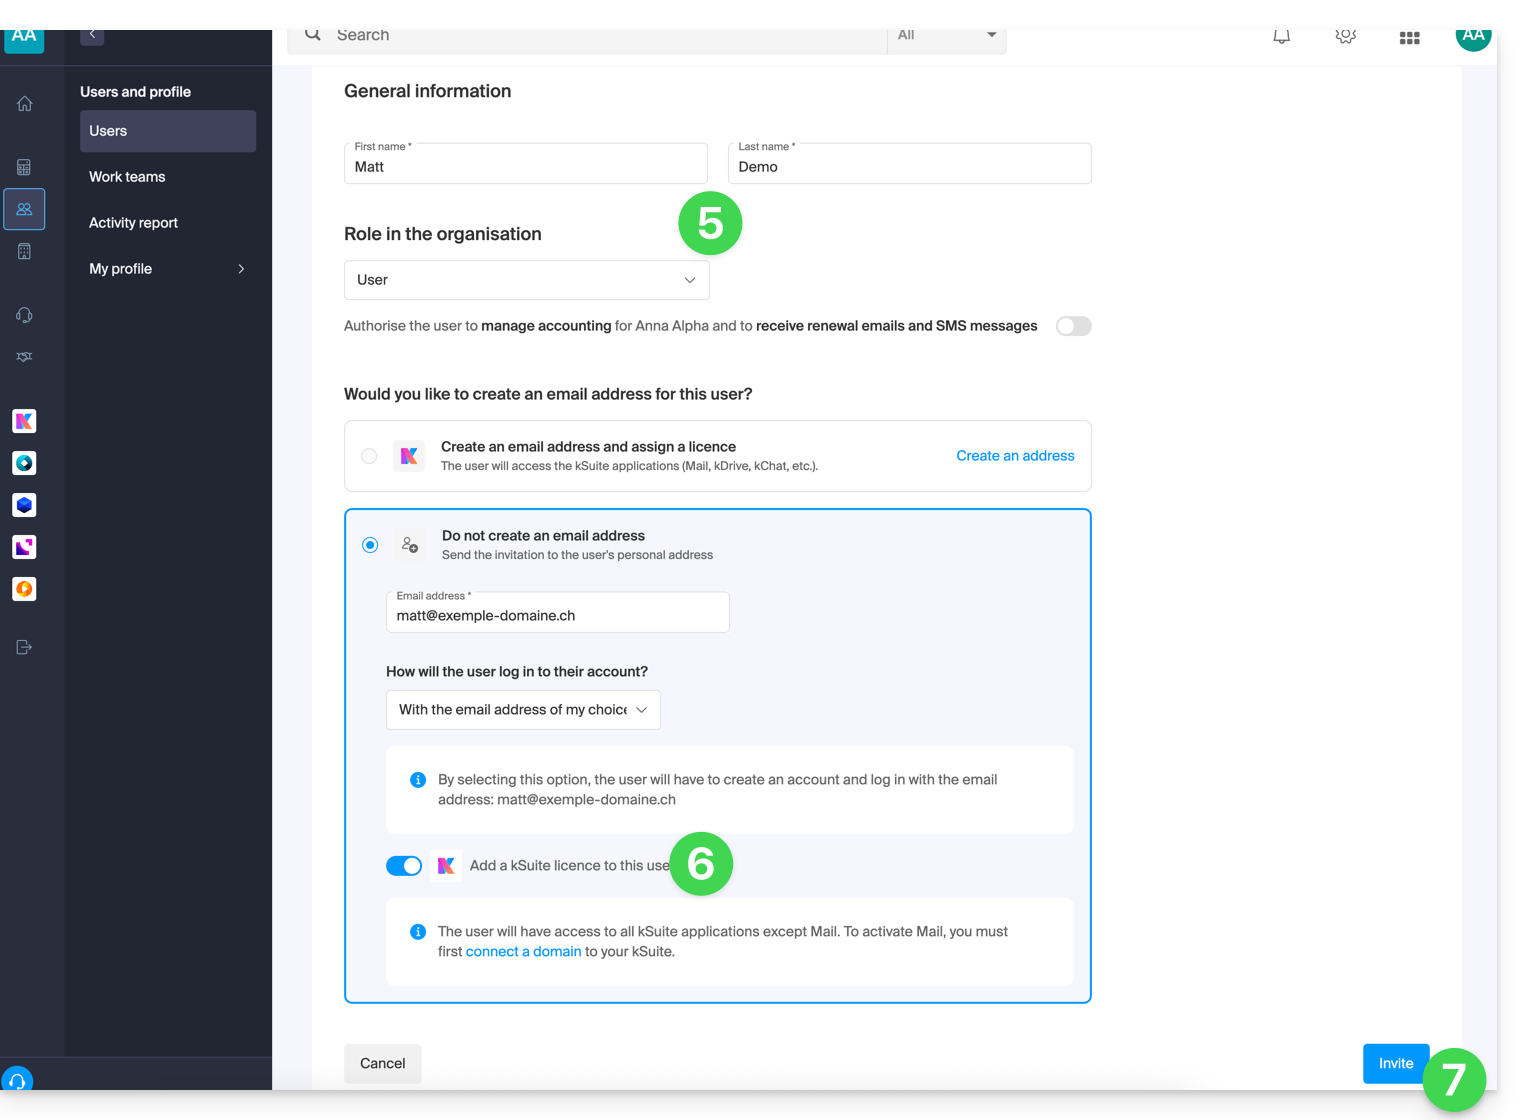
- O convite está pendente até ao registo definitivo do utilizador convidado (consulte abaixo). O painel de controlo dos utilizadores da Organização indica este estado:
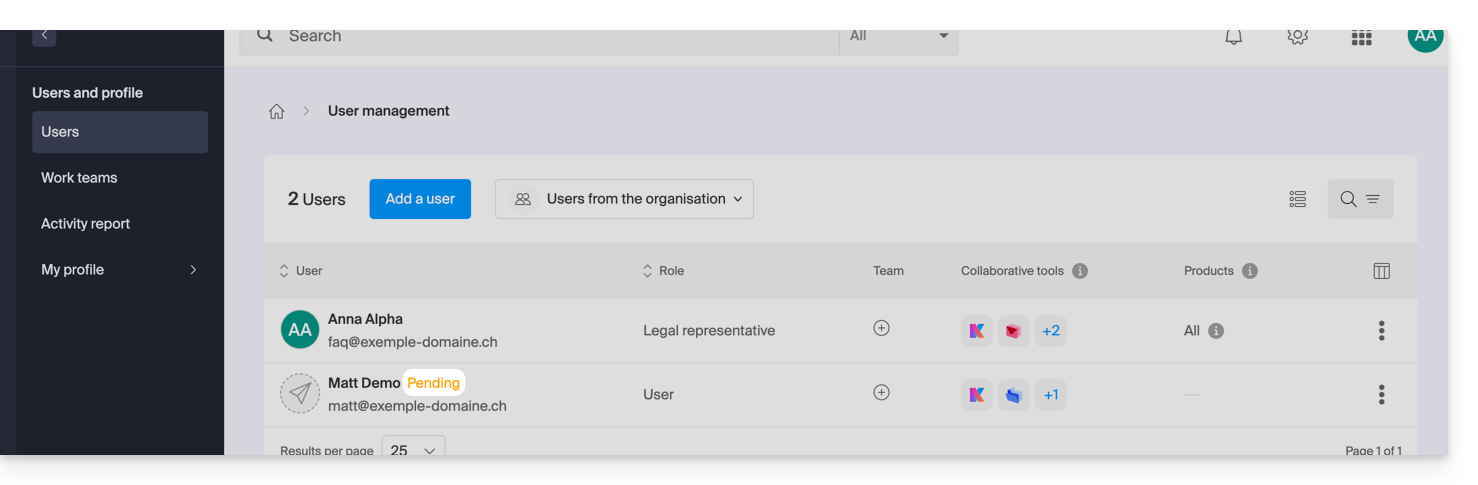
- O convite está pendente até ao registo definitivo do utilizador convidado (consulte abaixo). O painel de controlo dos utilizadores da Organização indica este estado:
Aceitar o convite
Para aceder à Organização que detém o kChat:
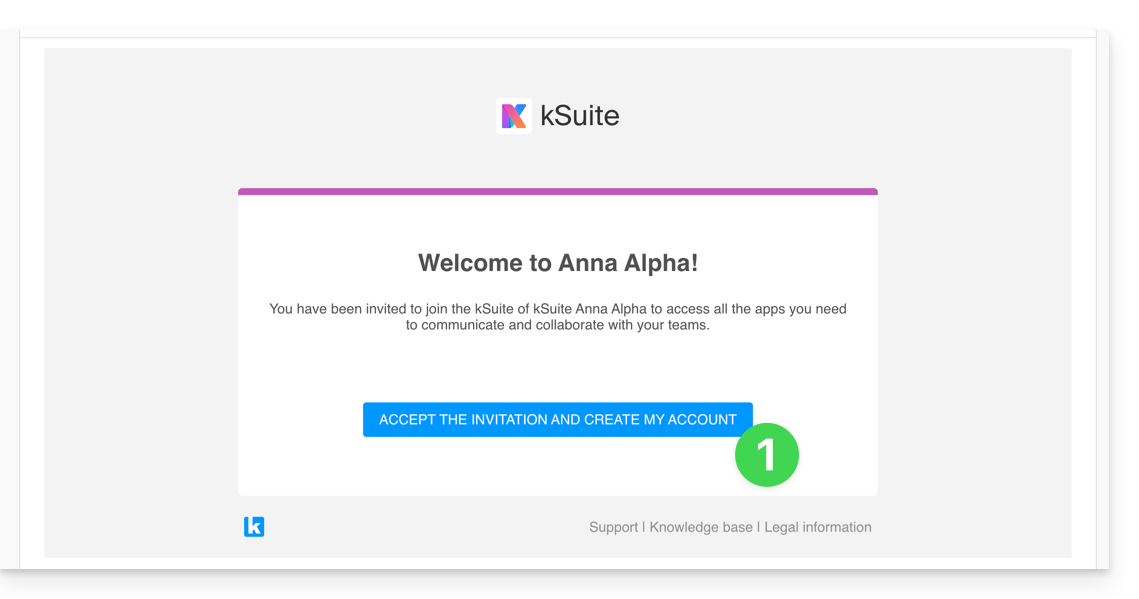
- O utilizador convidado recebe o convite no seu endereço de e-mail e clica no botão Aceitar o convite:
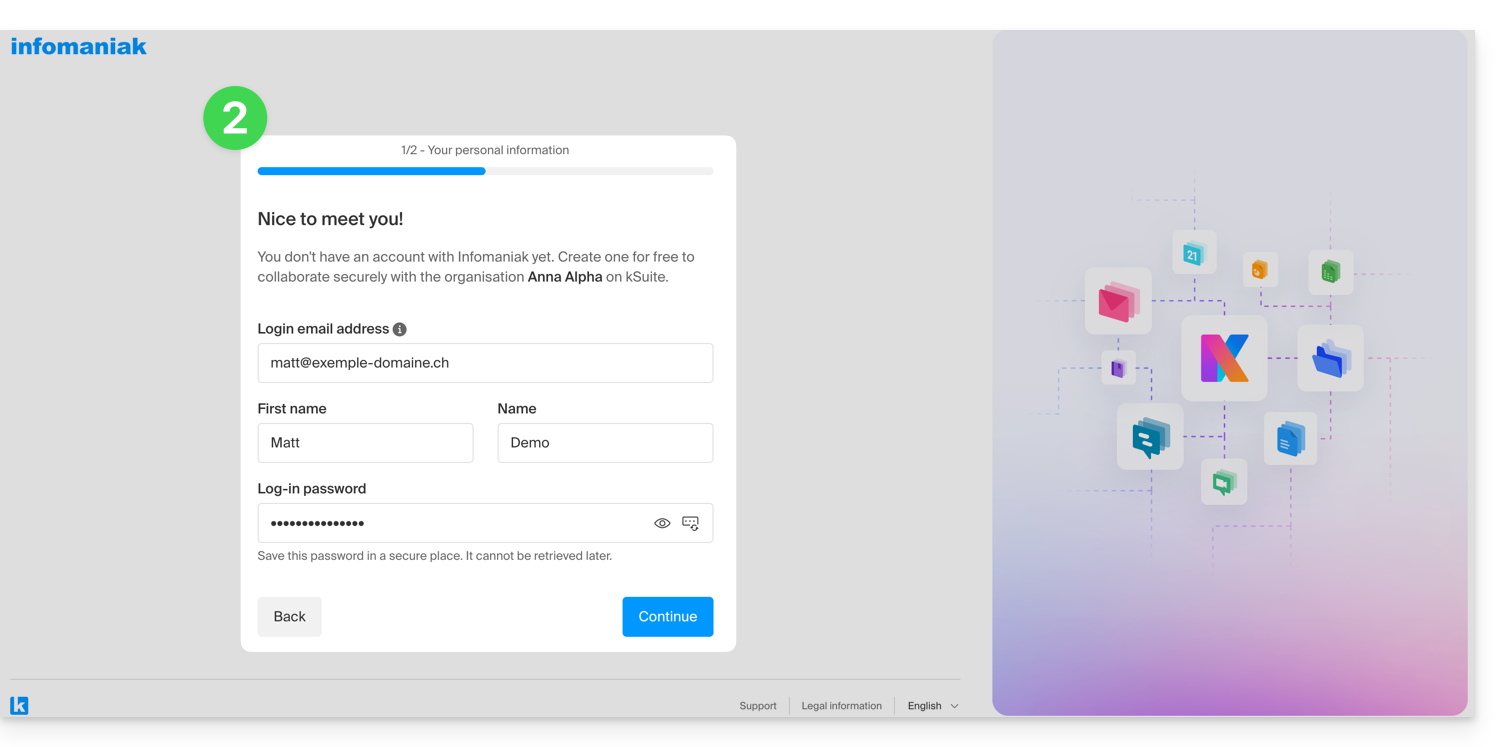
- Ele especifica os seus dados de contacto, bem como o endereço de e-mail e a palavra-passe que pretende utilizar, e conclui o registo:
- Após a conclusão do registo, o utilizador recém-registado pode iniciar sessão no seu Painel de controlo e aceder ao kChat para o qual foi convidado.
- Os utilizadores existentes são automaticamente notificados da chegada do novo participante e podem agora conversar com ele; assim que é adicionado, o novo utilizador recebe uma mensagem da Euria (Bot de IA da Infomaniak) que lhe dá as boas-vindas:
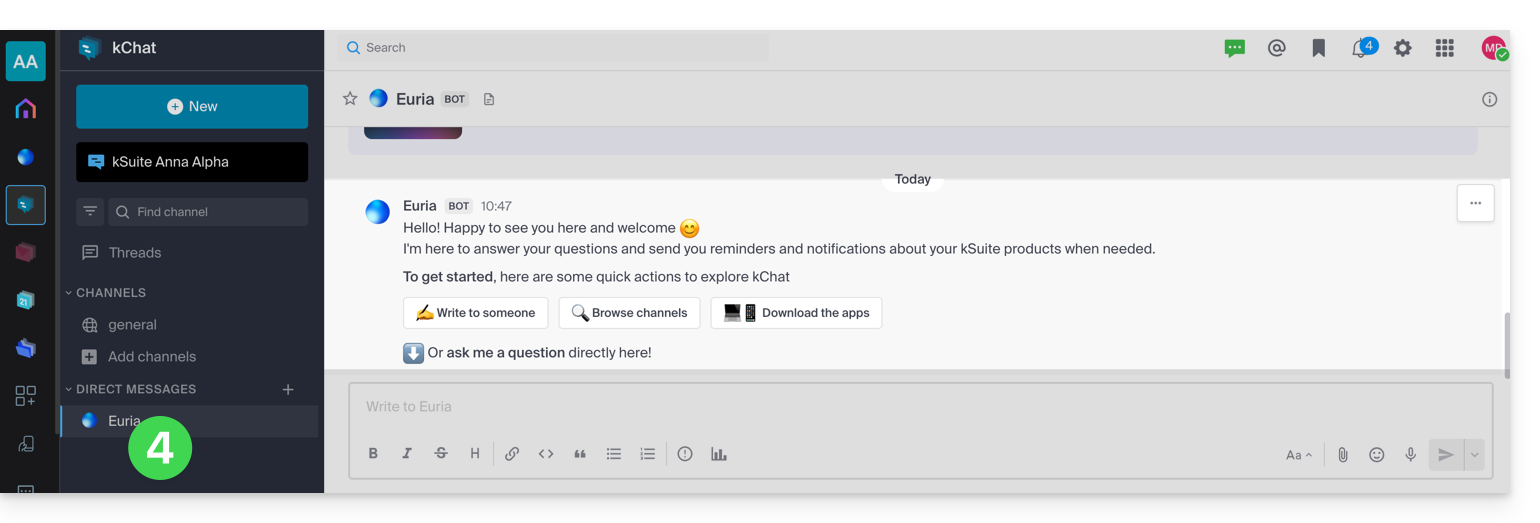
Acesso ao kSuite, e não ao gerenciamento do kSuite!
É importante distinguir entre o uso do aplicativo kChat (dentro do kSuite) e o gerenciamento do kSuite em si.
No exemplo de convite acima, o novo usuário foi convidado a participar do kChat, portanto, agora ele é contado como um usuário da kSuite quando um administrador acessa o gerenciamento de usuários do kChat: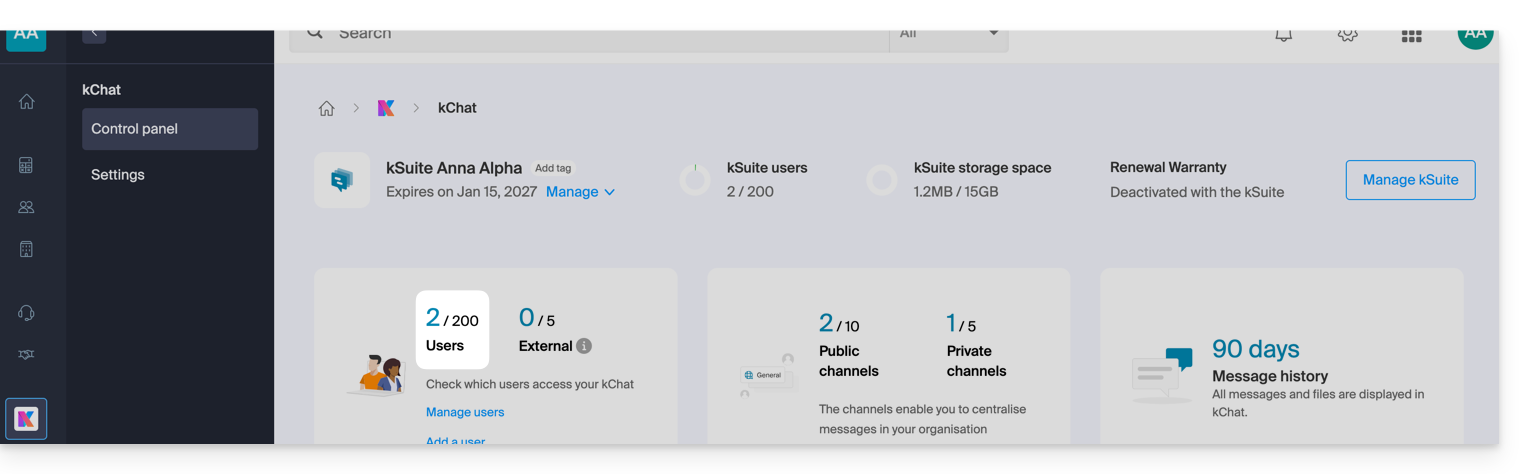
O mesmo se aplica, obviamente, ao gerenciamento de usuários da kSuite: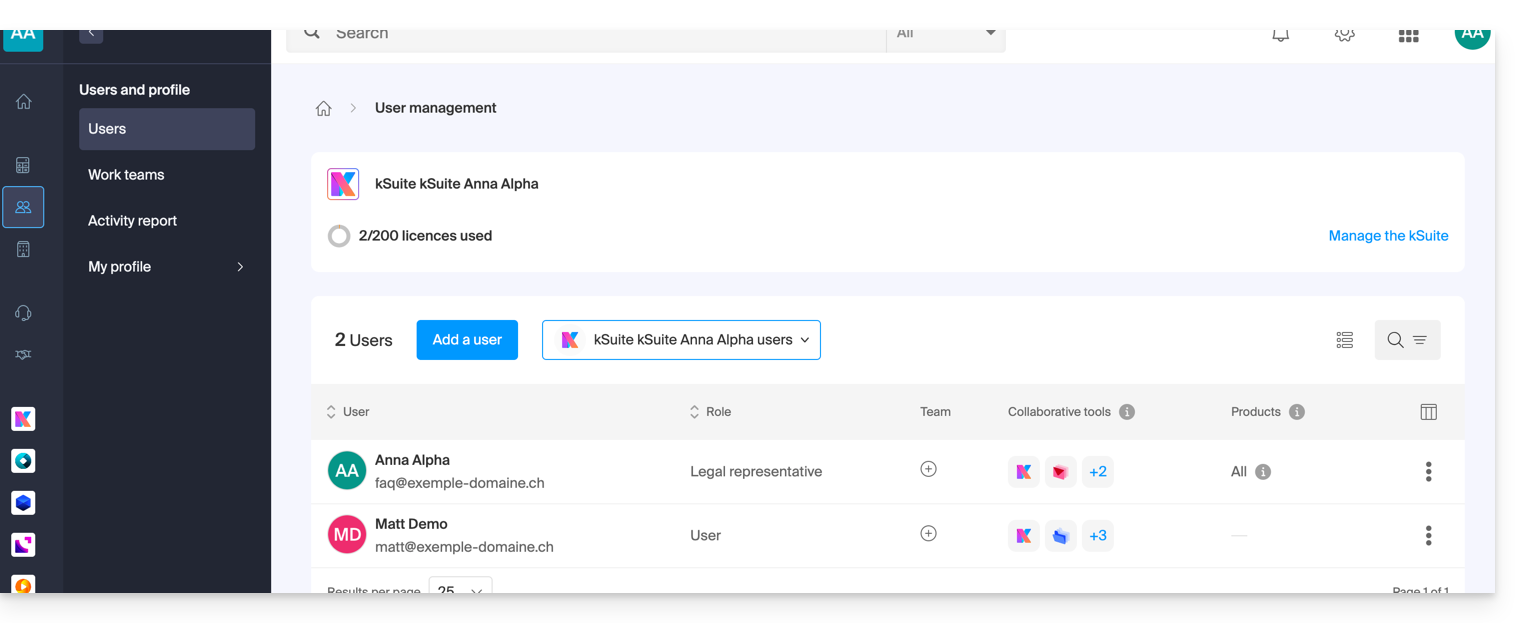
Por outro lado, este novo utilizador não poderá gerir diretamente a kSuite para a qual foi convidado, uma vez que o seu papel (definido no primeiro ponto 5 acima) não o autoriza a fazê-lo: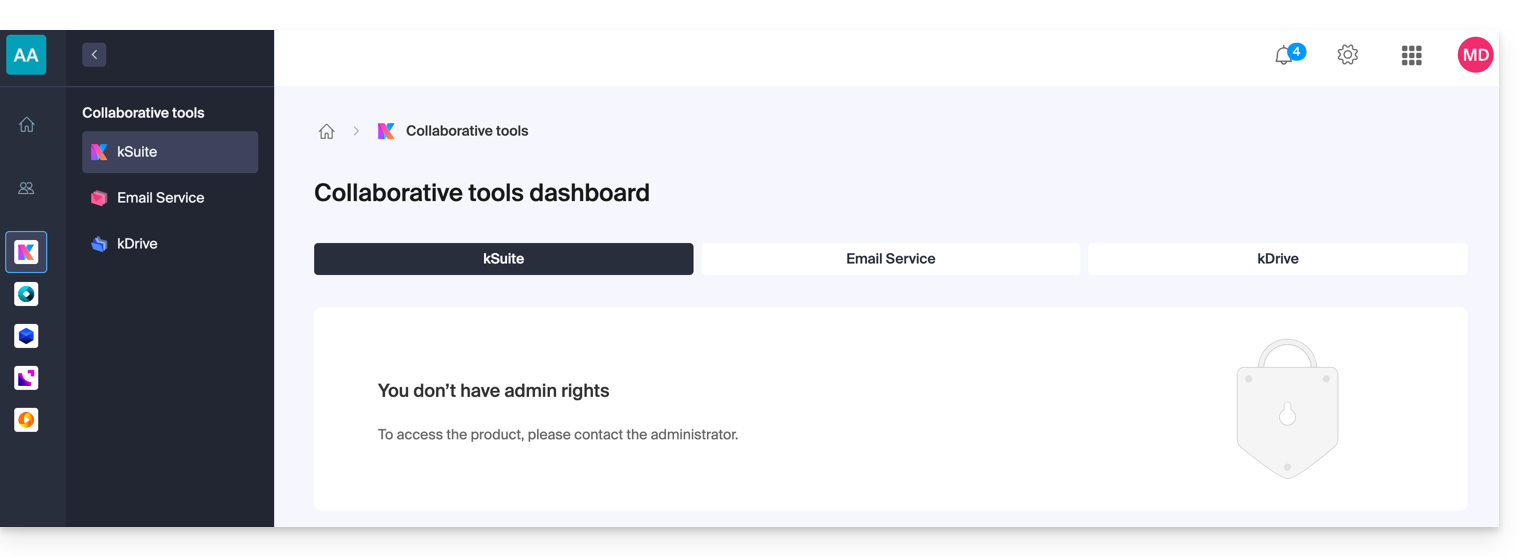
- É por esta razão que este utilizador não verá nenhum link ativo na secção Ferramentas de Colaboração → kSuite do seu Manager Infomaniak.
- Ele deverá migrar para os aplicativos Infomaniak através do menu no canto superior direito:
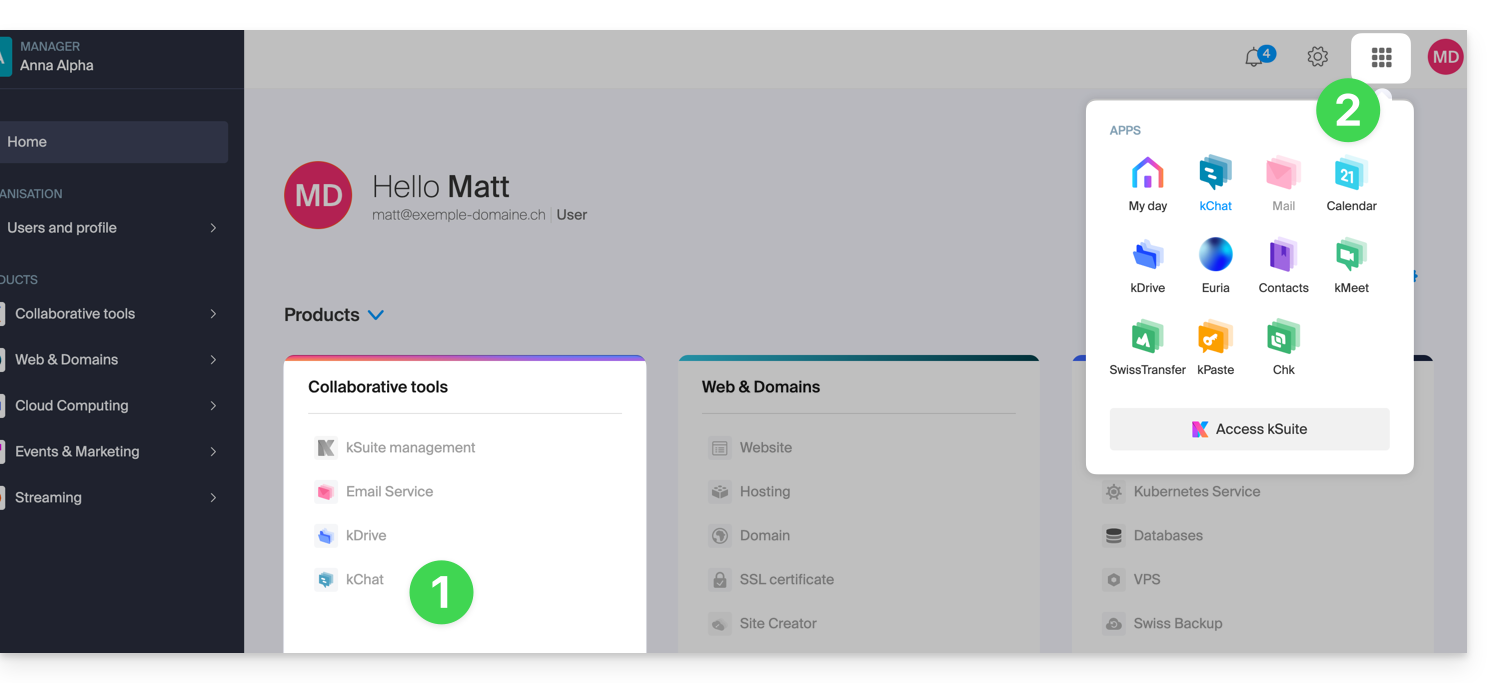
É importante notar que, se desejar, este usuário poderá solicitar sua própria kSuite, sem relação com a kSuite para a qual foi convidado.
Link para esta FAQ: https://faq.infomaniak.com/1455
Esta seção de perguntas frequentes foi útil?
Este guia apresenta os espaços kSuite, a suíte de ferramentas de produtividade e colaboração online desenvolvida na Suíça pela Infomaniak.
Introdução
- Um espaço kSuite reúne os acessos às suas aplicações e oferece um painel de controlo inteligente para aceder rapidamente às informações essenciais:
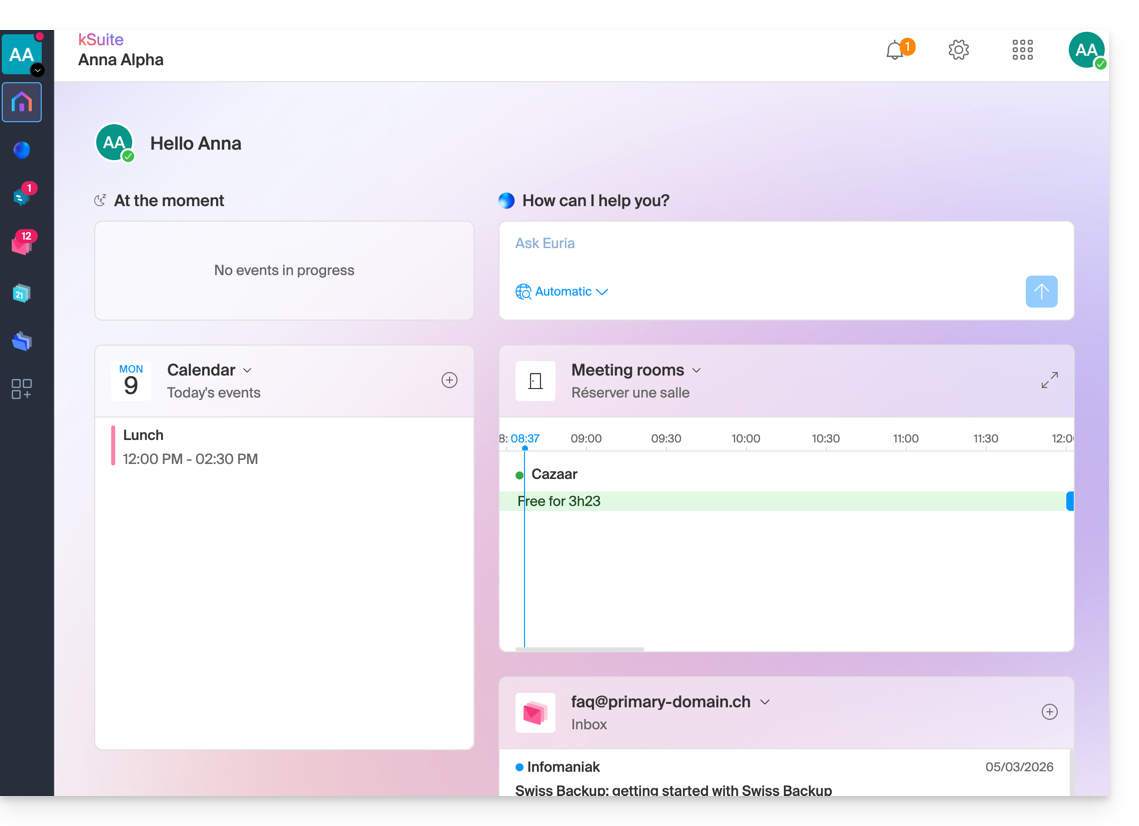
- widgets como "Atualmente" exibem os seus compromissos (local, participantes, link kMeet).
- o widget "Euria" permite solicitar a IA com um clique.
- os seus últimos e-mails recebidos…
- a navegação foi concebida para permitir a transição de uma aplicação para outra de forma fluida, dentro de uma única janela do navegador.
- A interface permite gerir o seu estado e a sua presença, para colaborar de forma mais eficaz com outros utilizadores.
- Você pode alternar entre os espaços kSuite de suas diferentes Organizações da mesma forma que no painel de controle Infomaniak.
- Se você possui o my kSuite, este espaço será sempre proposto em primeiro lugar.
Acessar a página kSuite a partir do painel de controle
Clique no ícone no canto superior direito da interface e, em seguida, em Minha área para alternar entre o Manager Infomaniak e o espaço kSuite, bem como os aplicativos kSuite: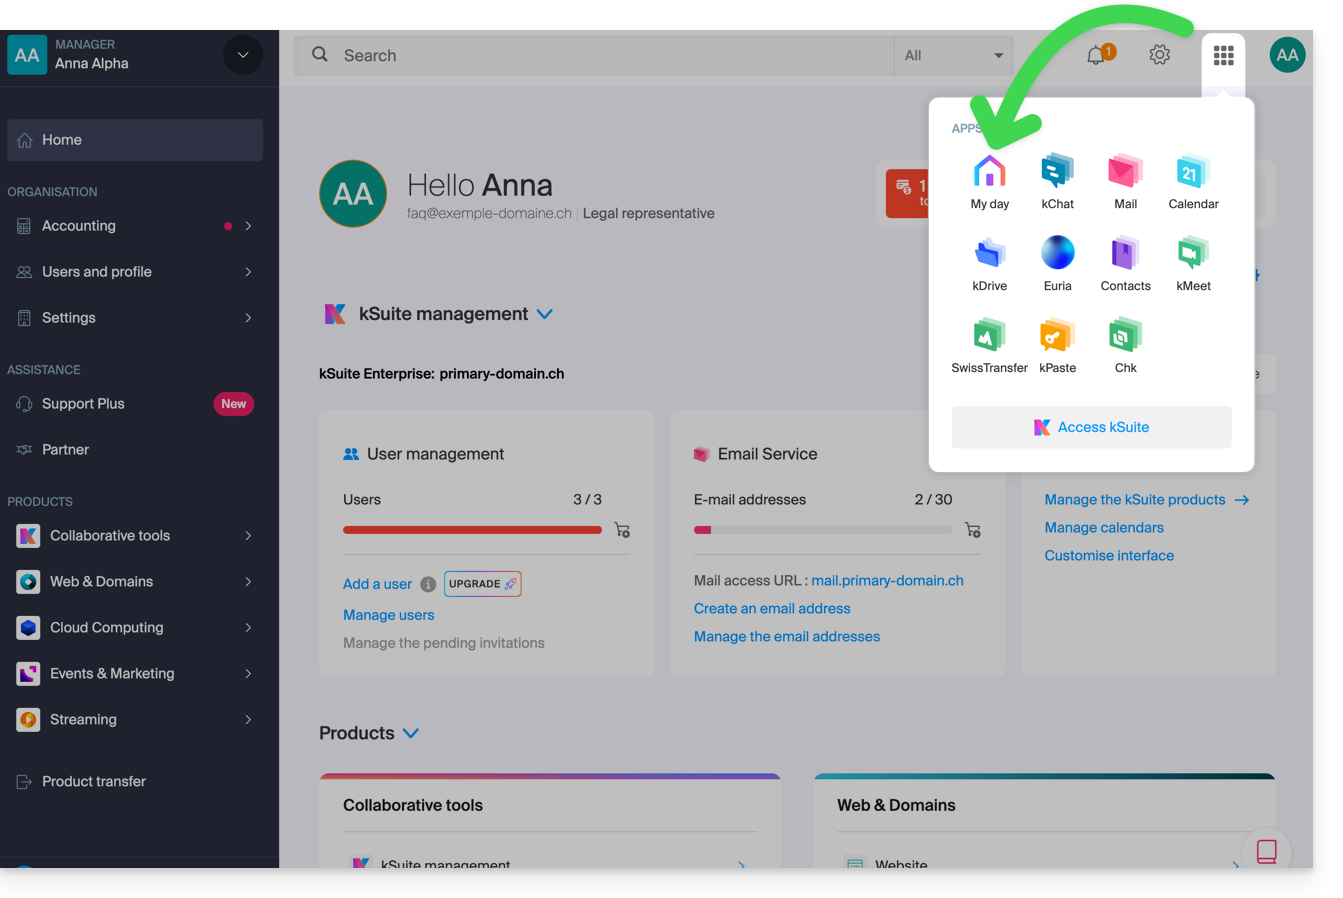
Acessar o espaço kSuite a partir de um aplicativo
Se já estiver em um aplicativo kSuite, clique na casa colorida no menu lateral esquerdo ou clique no ícone no canto superior direito da interface e, em seguida, em Minha agenda: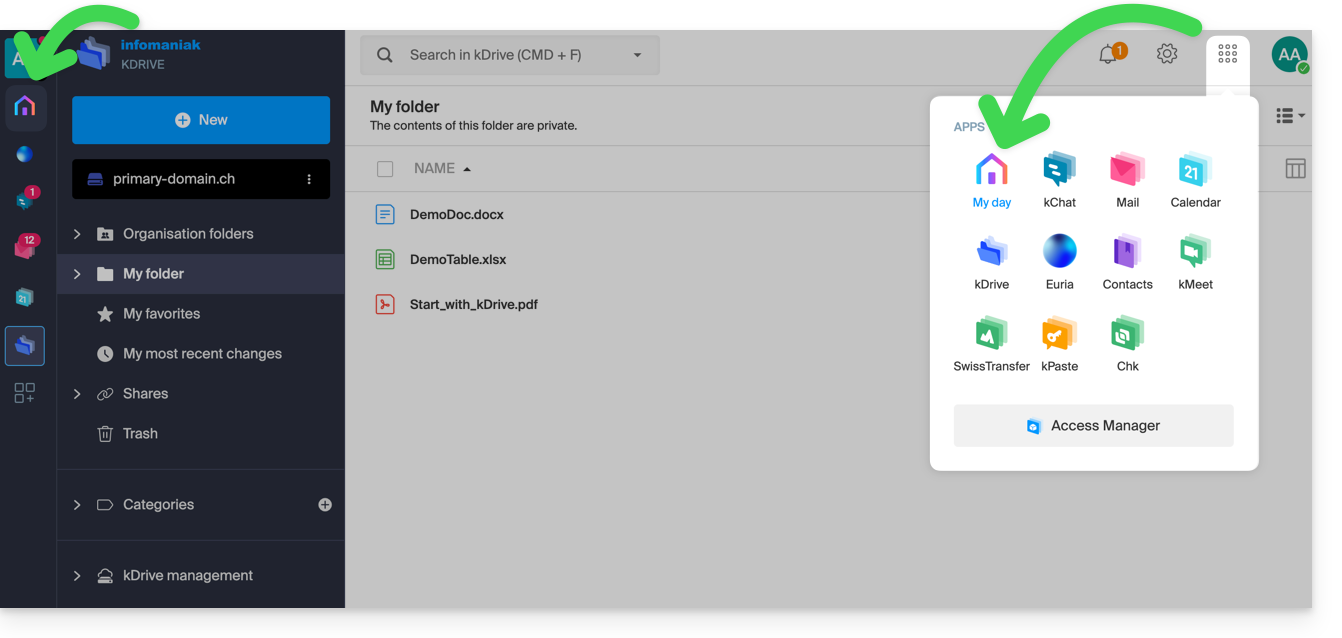
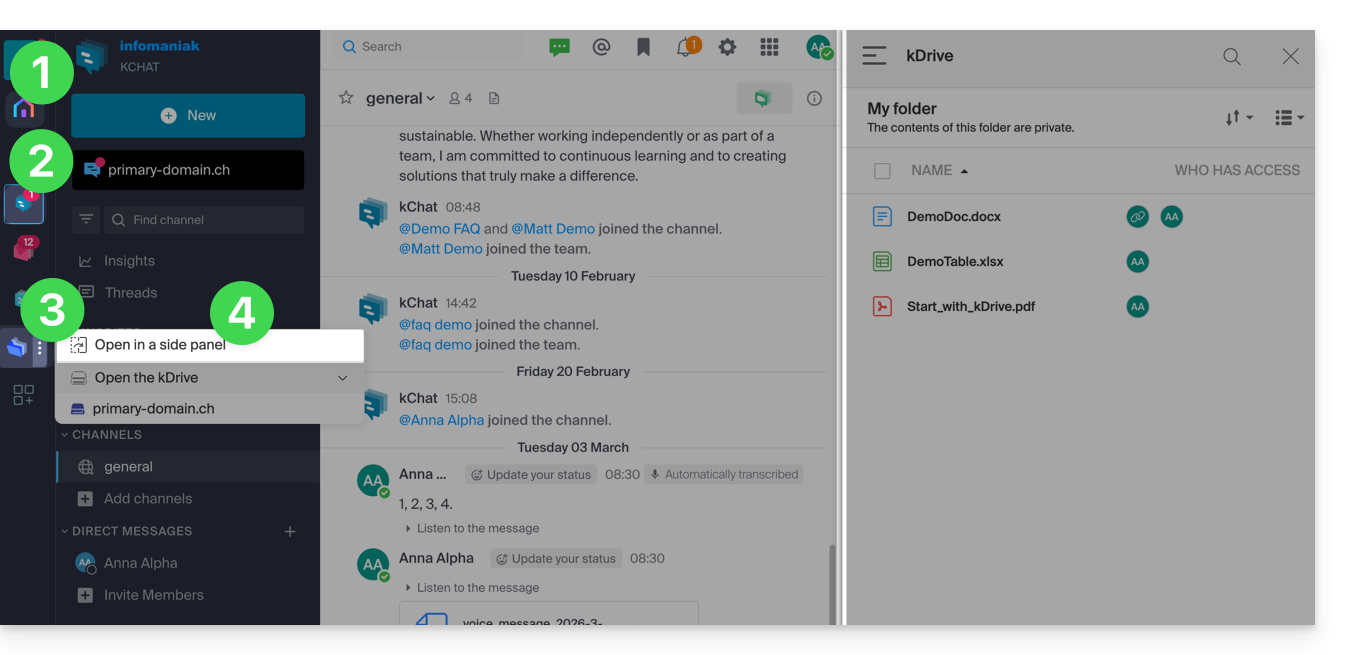
Dividir a tela para 2 aplicativos kSuite
Para trabalhar com 2 aplicações kSuite lado a lado:
- Clique aqui para acessar o espaço kSuite da sua Organização.
- Clique nos ícones no menu lateral esquerdo para acessar um primeiro aplicativo kSuite, como o kChat, por exemplo.
- Clique no menu de ação ⋮ localizado à direita de um segundo aplicativo kSuite, como o kDrive, por exemplo.
- Escolha abrir o aplicativo em um painel lateral para ter os dois aplicativos lado a lado:
Saiba mais
Link para esta FAQ: https://faq.infomaniak.com/1496
Esta seção de perguntas frequentes foi útil?
Este guia explica como conectar os aplicativos móveis Contatos e Calendário iOS (iPhone, iPad…) com os contatos e calendários hospedados na Infomaniak.
Introdução
- Em vez da configuração manual abaixo, recomenda-se usar os perfis de configuração .mobileconfig propostos pela Apple.
- Os contatos e calendários da Infomaniak estão vinculados à sua conta Infomaniak; ao fazer login em ksuite.infomaniak.com/contacts ou /calendar, você provavelmente precisará realizar a autenticação de dois fatores (2FA) ao fazer login.
- Nesse caso, uma senha de aplicativo é necessária para estabelecer a sincronização entre seu dispositivo e as ferramentas da Infomaniak.
- Mas não se preocupe, a criação de uma senha como essa é oferecida ao seguir o assistente de configuração.
Configuração manual (contatos e calendários)
Obtenha suas informações de login
Para obter o nome de usuário e a senha de sincronização CardDAV/CalDAV:
- Clique aqui para acessar a ferramenta de configuração da Infomaniak (serviço online https://config.infomaniak.com) — faça login, se necessário, na sua conta Infomaniak na Organização onde seu endereço de e-mail é gerenciado.
- Selecione outro dispositivo que não seja iOS (para obter seu nome de usuário):
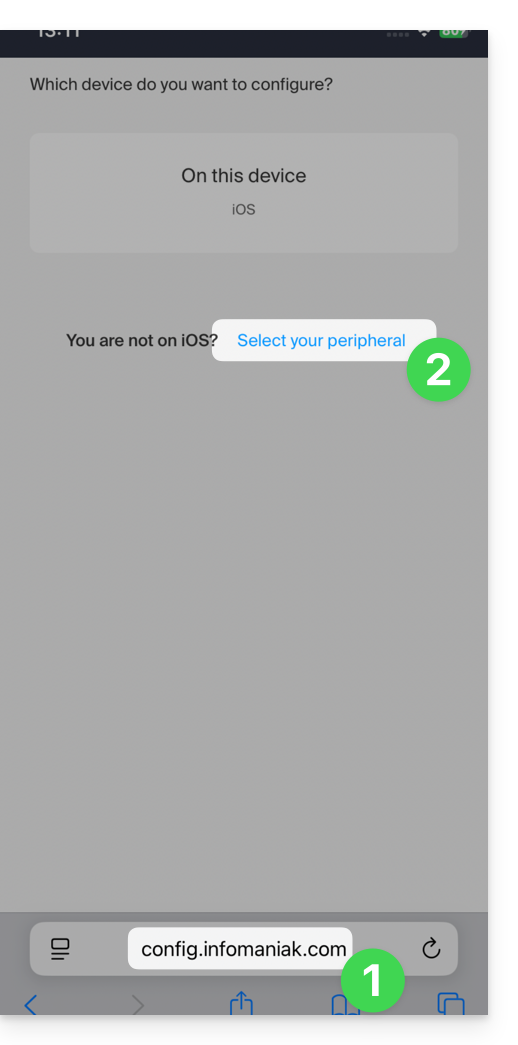
- Escolha Linux:
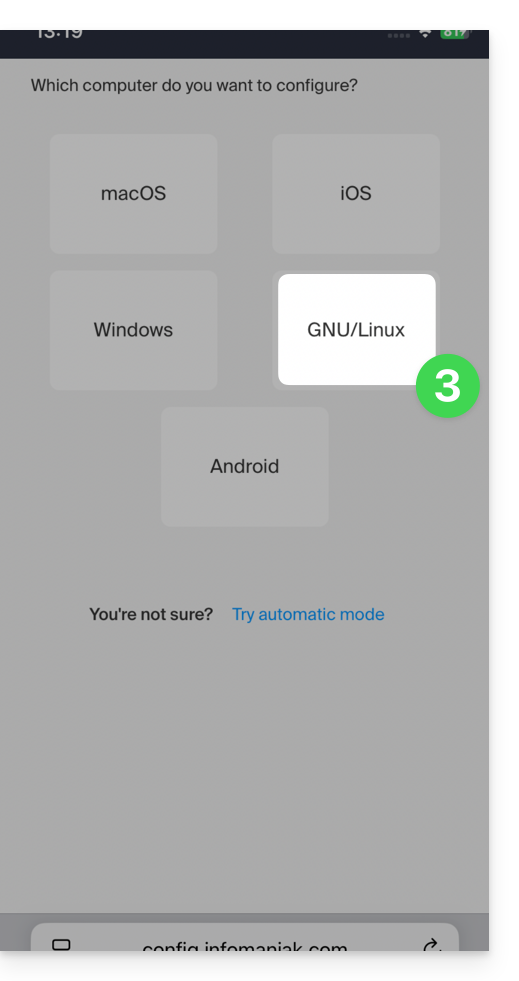
- Escolha Contatos ou Calendários:
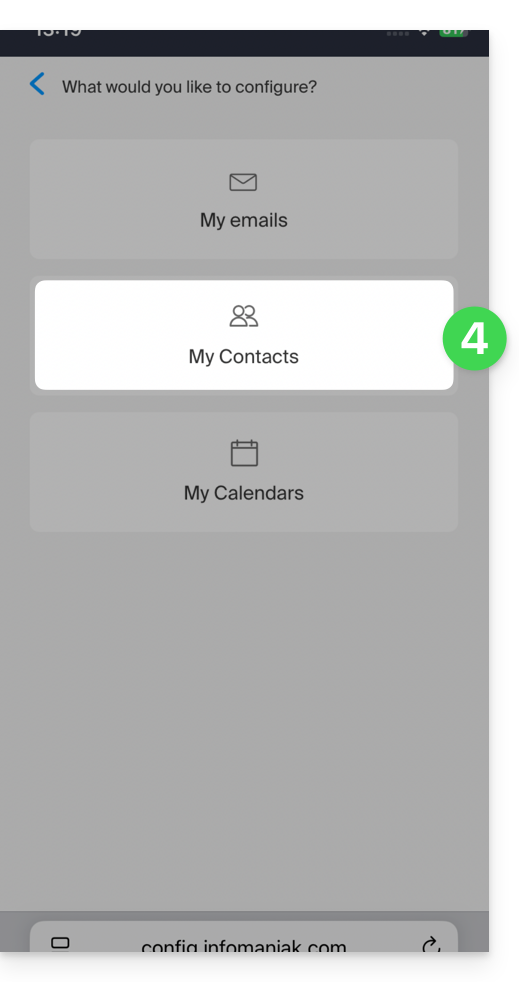
- Escolha o serviço específico que deve ser sincronizado.
- Toque na seta para a direita várias vezes e, em seguida, toque no título da aba de sincronização manual:
- As informações exibidas abaixo permitem que você obtenha:
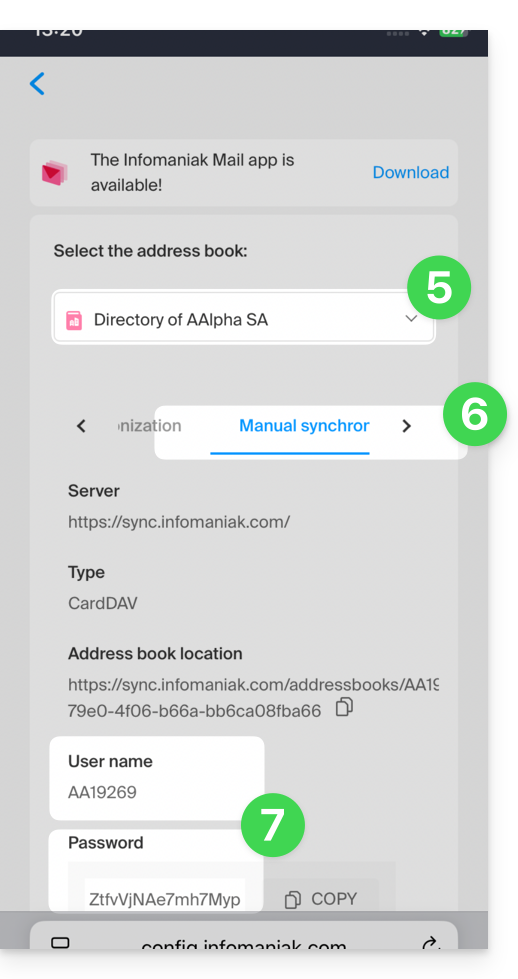
- seu nome de usuário (por exemplo,
AB12345)… - senha do aplicativo, caso a autenticação de dois fatores esteja ativada ou a senha da sua conta de usuário Infomaniak, caso você não tenha ativado a autenticação de dois fatores.
- Para o endereço do servidor, use apenas
sync.infomaniak.com.
- seu nome de usuário (por exemplo,
Usar as informações de login
Com essas informações, basta adicionar suas contas de acordo com as instruções da Apple:
- Acesse Ajustes > Contatos > Contas > Adicionar conta.
- Toque em Outro e, em seguida, em Adicionar conta CardDAV e insira as informações da conta e do servidor.
Faça o mesmo para o aplicativo Calendário:
- Acesse Configurações > Calendário > Contas > Adicionar conta.
- Toque em Outro, depois em Adicionar conta CalDAV e insira as informações da conta e do servidor.
Particularidades da sincronização
Consulte este outro guia.
Link para esta FAQ: https://faq.infomaniak.com/1544
Esta seção de perguntas frequentes foi útil?
Este guia explica como, a partir de um Serviço de Email, permitir que você (com suas credenciais de login da sua conta Infomaniak) acesse um endereço de email no ecossistema Infomaniak, ou seja, utilizando apenas o aplicativo web Mail da Infomaniak (serviço online ksuite.infomaniak.com/mail) e/ou o aplicativo móvel Infomaniak Mail (aplicativo para smartphone ou tablet iOS / Android), sem criar uma senha específica para o endereço.
As outras possibilidades de acesso e gerenciamento são apresentadas no guia principal.
Pré-requisitos
- Contratar um Serviço de Email junto da Infomaniak.
- Criar um ou mais endereços neste Serviço de Email.
- Ter, no mínimo, o direito de gerir o Serviço de Email em questão (ou ser Administrador / Responsável legal na Organização).
Aceder a um endereço de e-mail
Para utilizar o endereço de e-mail existente demonstration@exemple-domaine.ch:
- Insira o ID de login da sua conta Infomaniak e a senha na página https://manager.infomaniak.com/:
- Confirme o acesso no painel de controle usando o método de autenticação de dois fatores (2FA) definido inicialmente:
- Após acessar o painel de controle, clique em Serviço de E-mail:
- Após acessar seus Serviços de E-mail, clique no nome / nome de domínio ao qual pertence o endereço de e-mail em questão:
- Depois de acessar o Serviço de E-mail ao qual o endereço pertence, clique no endereço de e-mail em questão:
- Depois de acessar o endereço de e-mail em questão, clique no botão Adicionar um usuário:
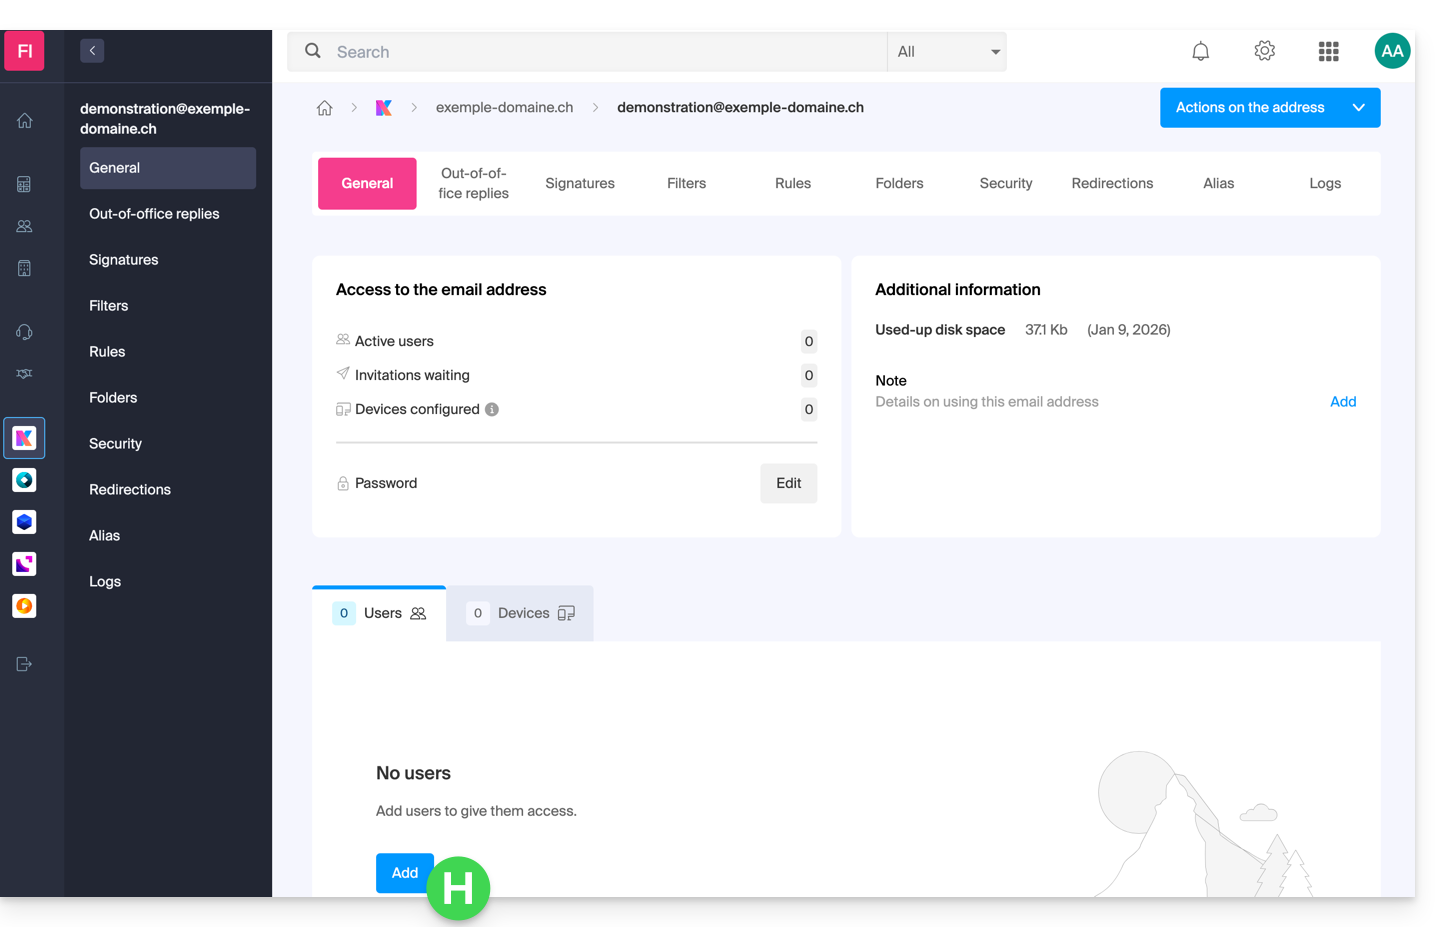
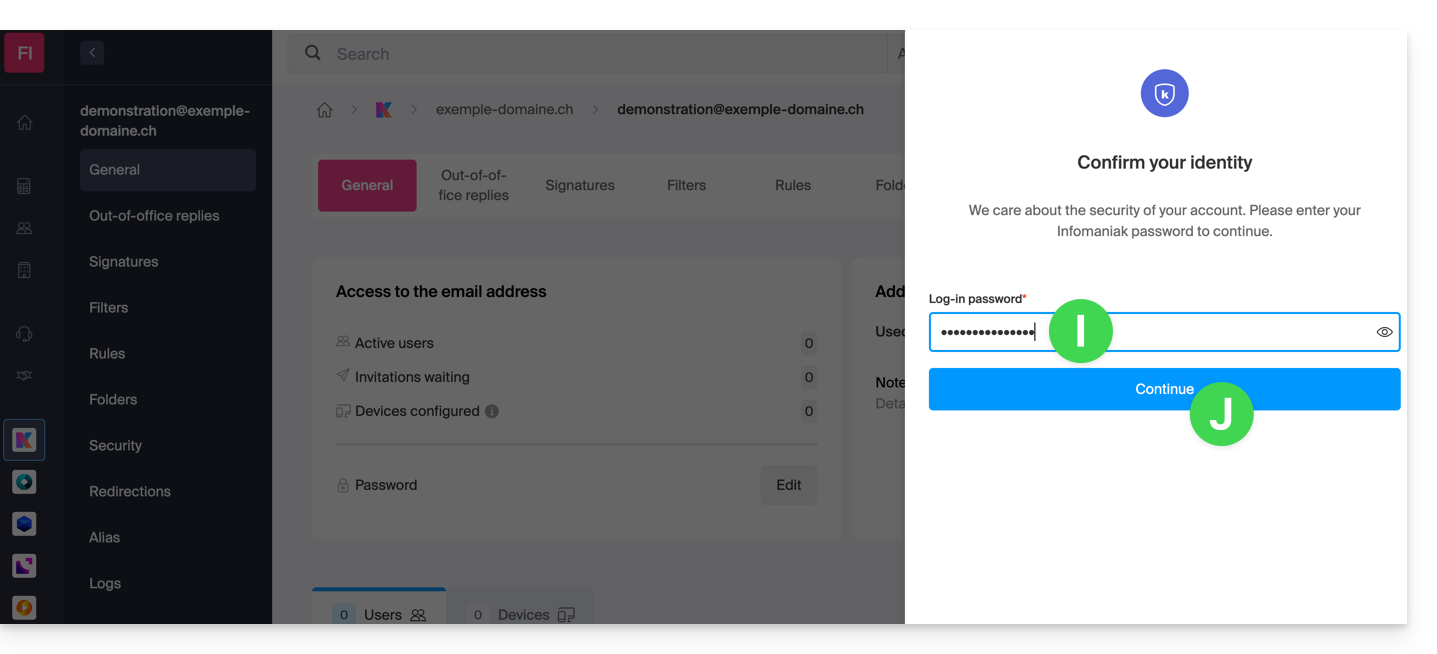
- Neste momento, pode ser necessário inserir novamente a senha de login (a mesma do ponto B acima):
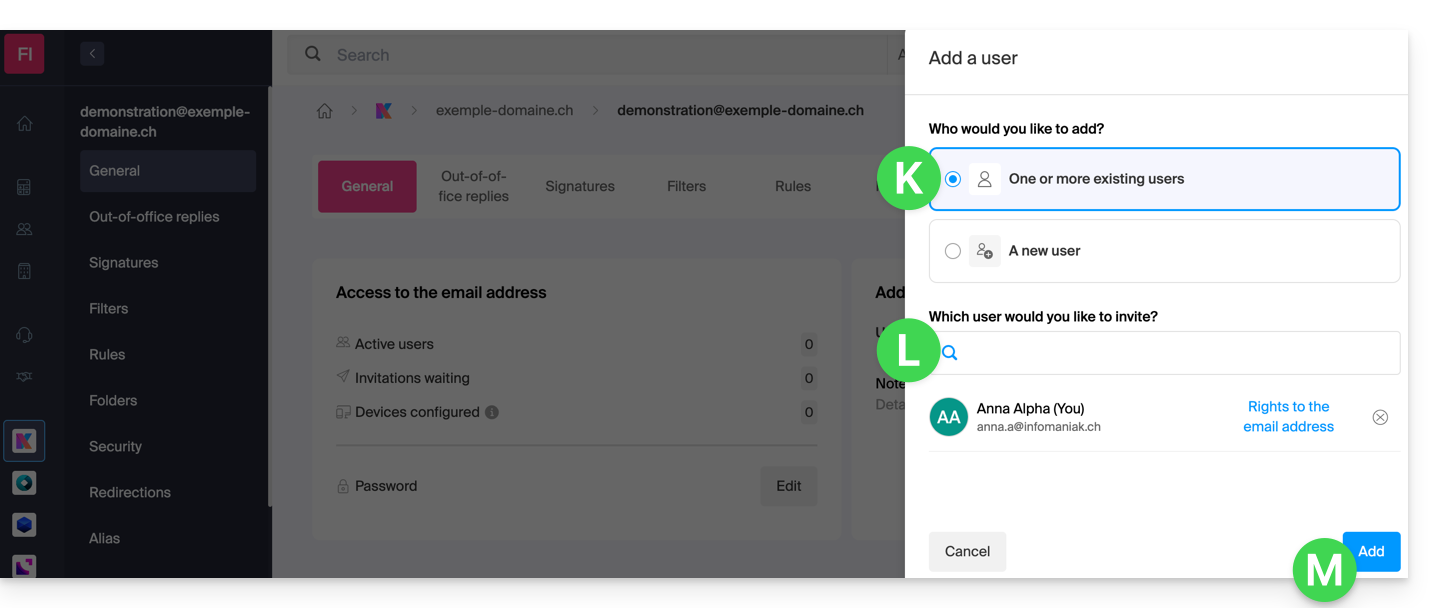
- Em seguida, escolha a opção para adicionar um usuário existente e, em seguida, clique no campo abaixo, o que fará com que a lista de usuários da organização em que você está conectado apareça. Clique em seu usuário (seu identificador de login na conta Infomaniak). Confirme a adição com o botão no canto inferior direito:
- Pronto, o seu novo utilizador foi adicionado:
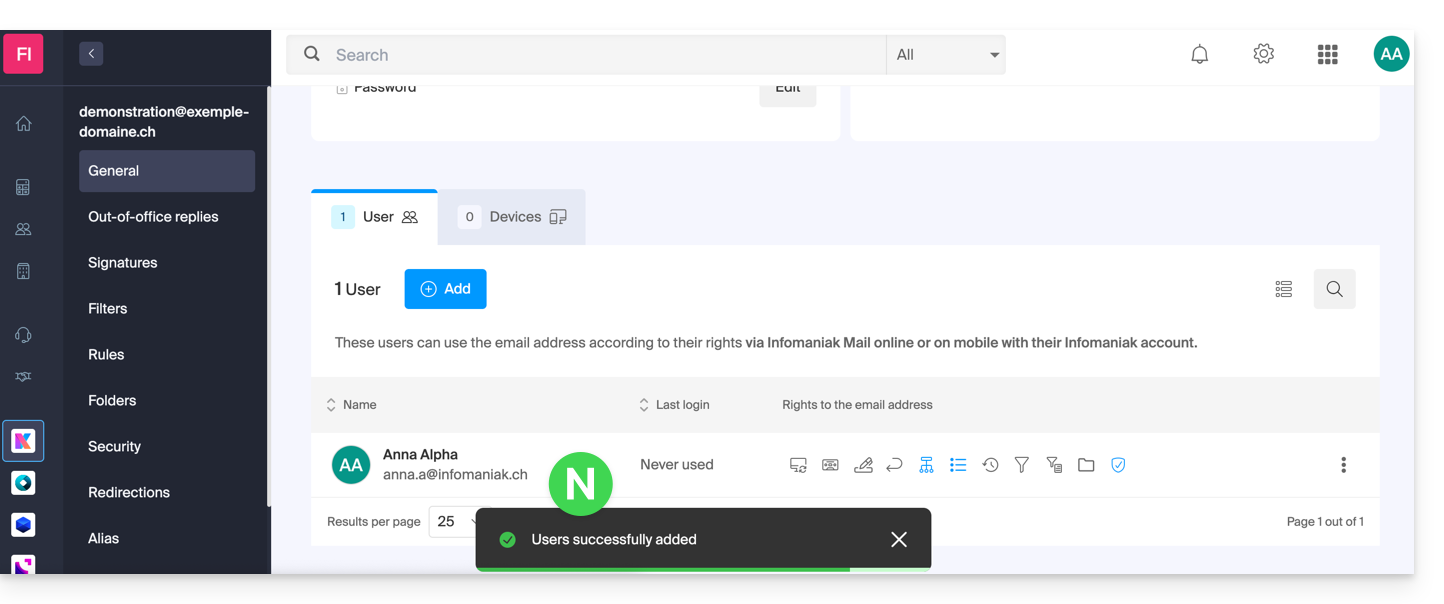
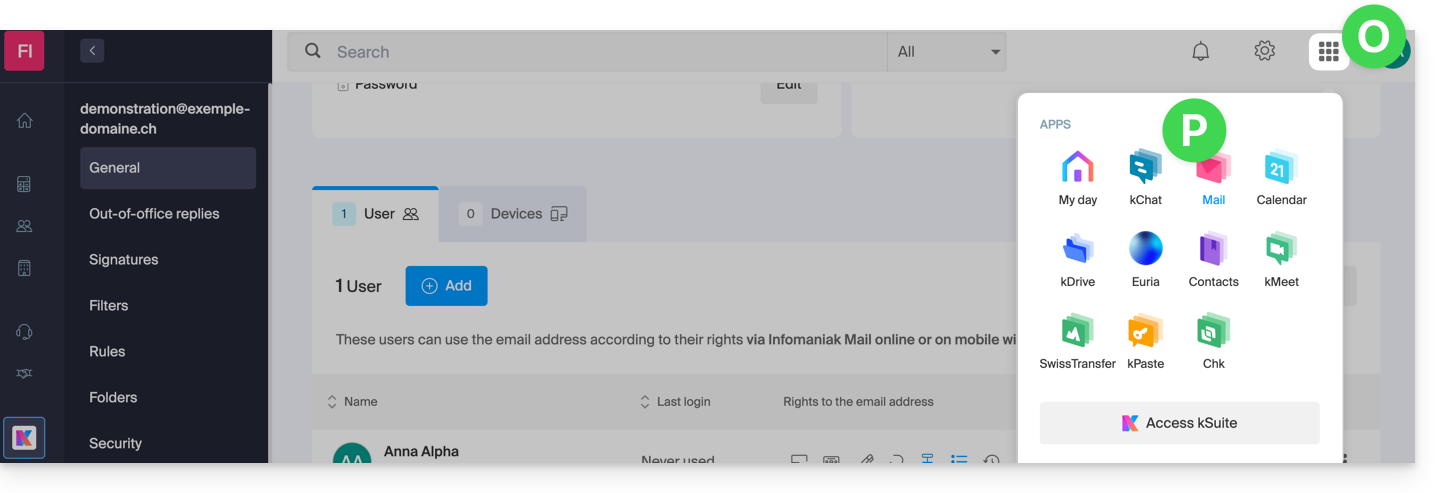
- Clique, em seguida, no ícone na parte superior do ecrã para abrir as ferramentas kSuite e clique na aplicação Web Mail da Infomaniak:
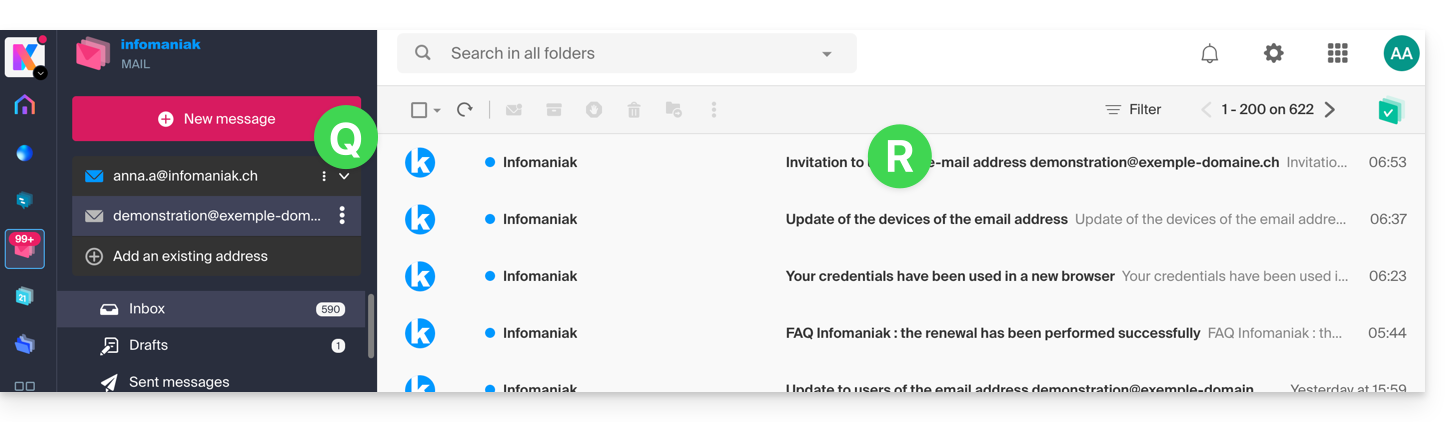
- O endereço de e-mail foi adicionado com sucesso ao aplicativo web Mail (clique, se necessário, na seta para baixo para expandir o menu de endereços e acessá-lo). Um e-mail de notificação foi enviado ao usuário (você, neste caso) para informá-lo sobre a operação:
Quando seu identificador é adicionado como um usuário com acesso ao endereço de e-mail, a caixa de correio é adicionada automaticamente aos seus aplicativos Mail Infomaniak: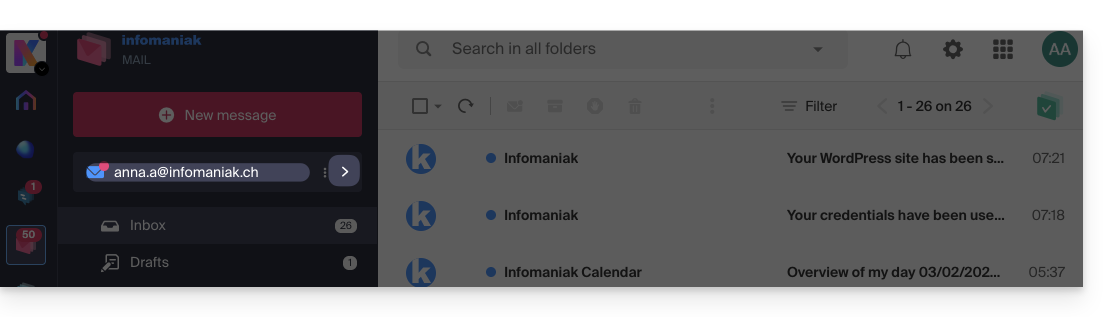
Pode alternar entre os seus endereços a qualquer momento através da seta localizada no canto superior esquerdo do ecrã: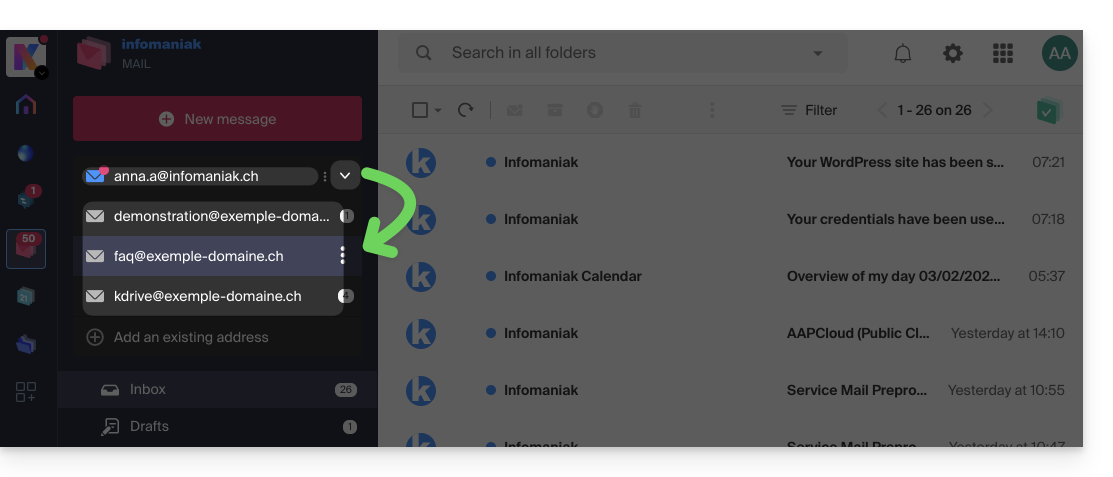
Se o endereço não for exibido, tente atualizar a página do navegador (Command ⌘ + R no macOS e Ctrl + F5 no Windows).
Link para esta FAQ: https://faq.infomaniak.com/1547
Esta seção de perguntas frequentes foi útil?
Este guia explica como adicionar um novo evento recorrente a um calendário na aplicação web Calendar da Infomaniak (serviço online ksuite.infomaniak.com/calendar).
Introdução
- Para criar e configurar facilmente um novo evento, consulte este outro guia.
- É possível modificar (mover/excluir) uma única ocorrência de um evento recorrente na agenda Infomaniak sem afetar toda a série, permitindo assim adaptar pontualmente o horário, os participantes, o local ou a duração de uma reunião específica, preservando a configuração original para todas as outras ocorrências.
Adicionar um evento recorrente
Para adicionar um evento que será repetido no futuro:
- Clique aqui para acessar o aplicativo web Calendar da Infomaniak (serviço online ksuite.infomaniak.com/calendar).
- Clique no botão Criar no canto superior esquerdo.
- Clique em Evento:
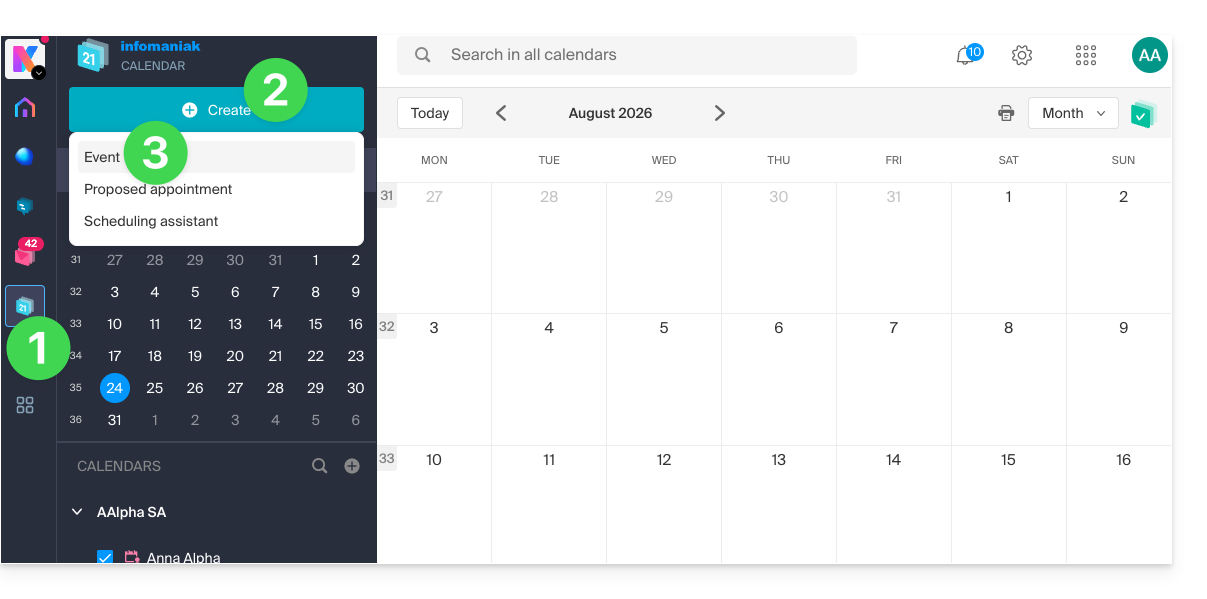
- Insira os detalhes do evento.
- Clique na parte referente aos horários/datas:
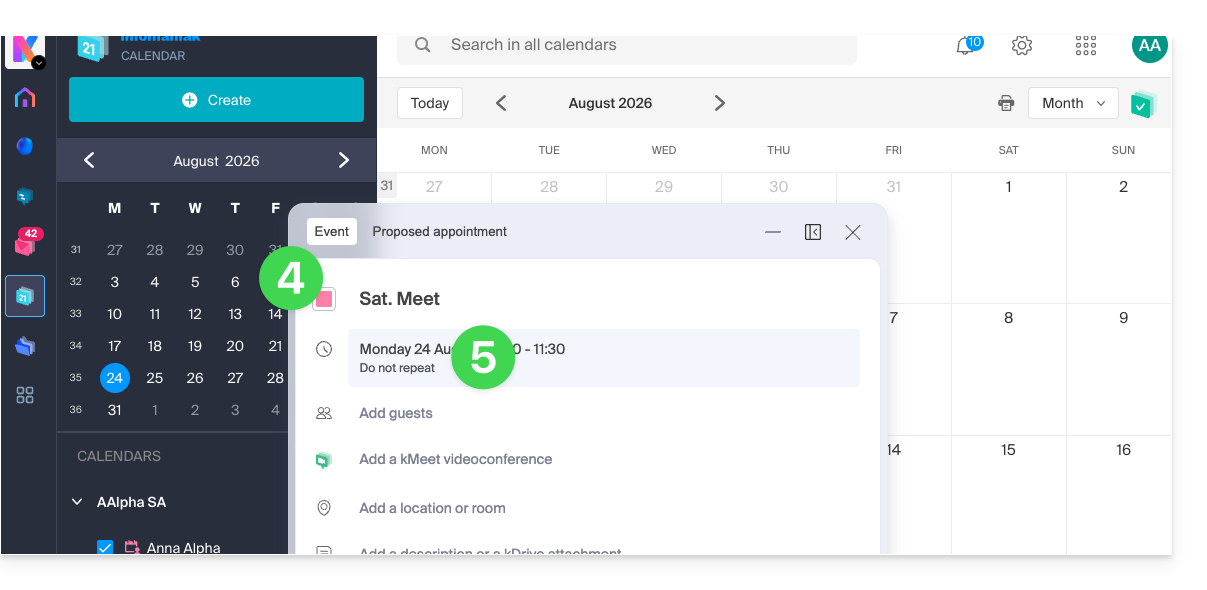
- Ative a recorrência e personalize-a conforme necessário.
- Salve o evento recorrente na parte inferior da página:
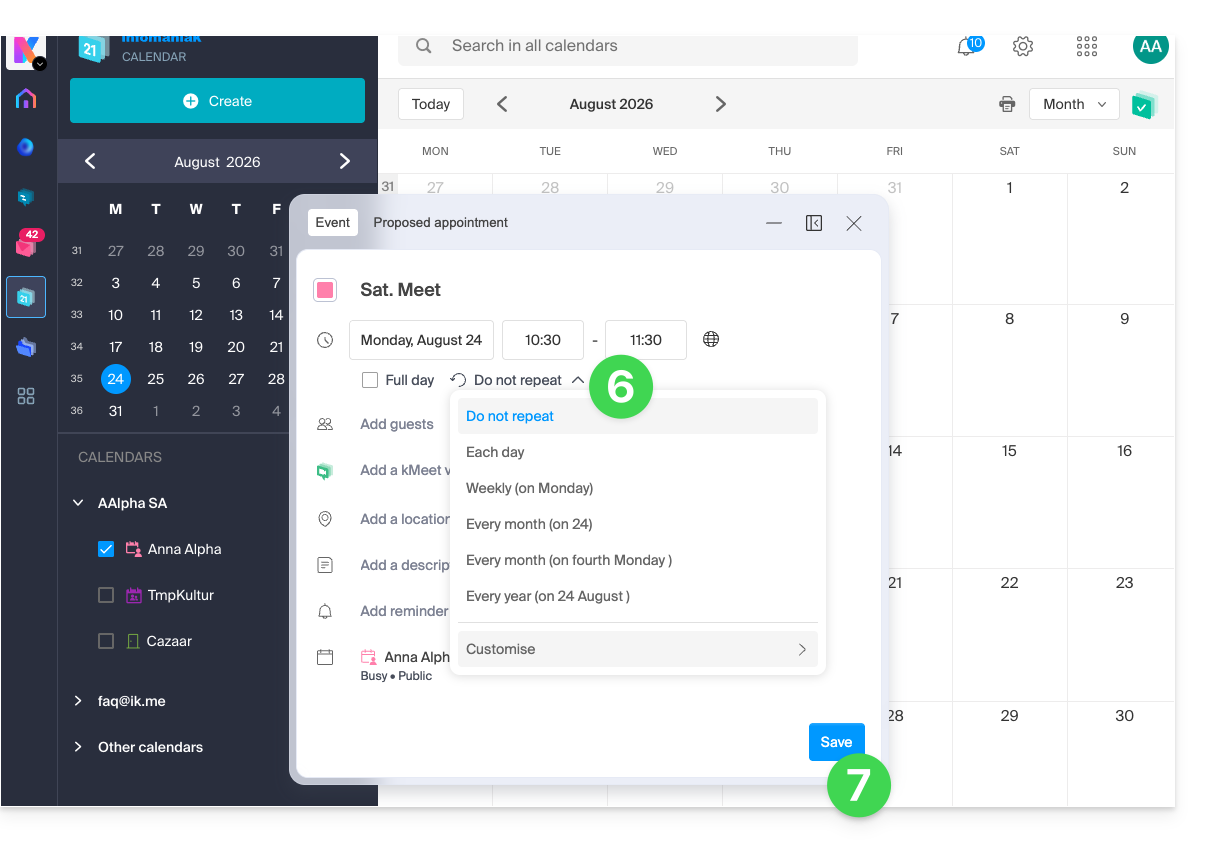
Link para esta FAQ: https://faq.infomaniak.com/1565
Esta seção de perguntas frequentes foi útil?
Este guia explica como alterar o seu plano kDrive, a solução de armazenamento colaborativo na nuvem, 100% de fabricação suíça.
Introdução
- kDrive é o nome dado ao serviço de armazenamento/partilha de ficheiros, oferecido pela Infomaniak na Suíça.
- O kDrive pode ser acedido gratuitamente ou através de uma assinatura, dependendo se é o único utilizador ou se pretende que colaboradores também tenham acesso.
- o kDrive existe como um produto independente ou como um produto entre outros na suíte kSuite e my kSuite / my kSuite+.
- Para o ajudar a identificar a oferta mais adequada às suas necessidades, consulte este outro guia.
Se foi convidado a visualizar/colaborar num ficheiro de um kDrive, é possível que não possua realmente o produto kDrive; tem apenas acesso ao kDrive gerido por outra pessoa. Portanto, não pode interagir na oferta em curso.
Descubra o plano kDrive atual
Através da aplicação web kDrive
Para saber qual é o plano que você possui atualmente:
- Clique aqui para acessar a aplicação web kDrive da Infomaniak (serviço online ksuite.infomaniak.com/kdrive).
- Clique em Gerenciar para acessar a página de alteração de plano e ver o plano atual:
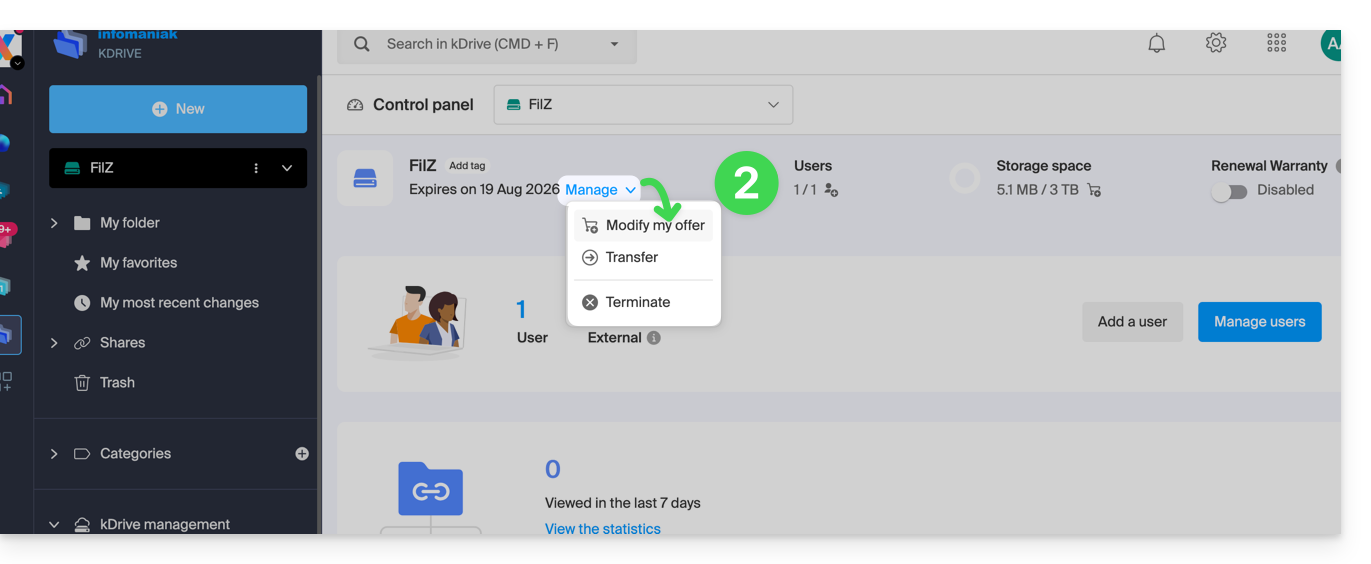
Se nenhum painel estiver acessível no canto inferior esquerdo, você tem funcionalidades limitadas (plano my kSuite, por exemplo), que podem ser desbloqueadas ao fazer upgrade para um plano superior: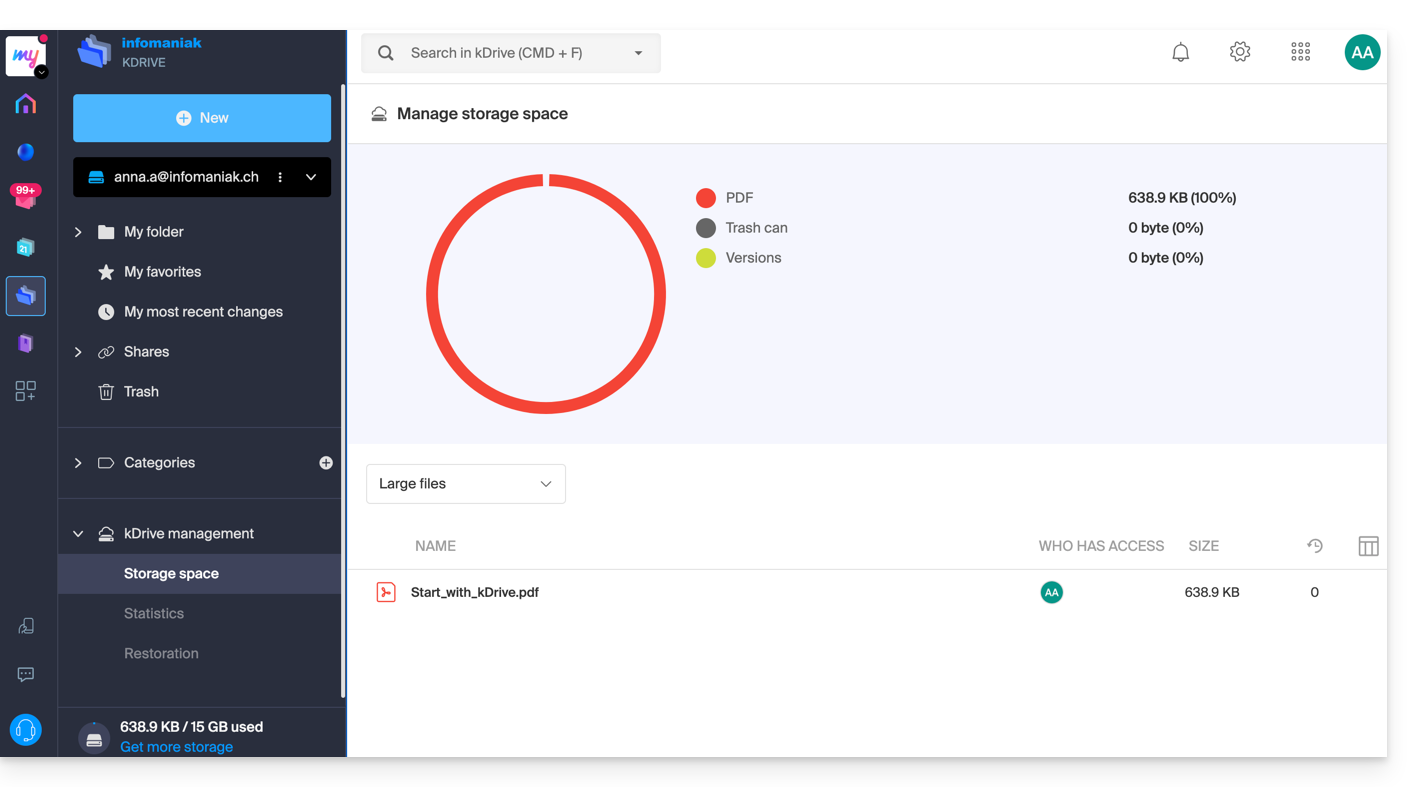
Através do Manager Infomaniak
Também pode obter informações sobre a oferta atual através do Manager, o painel de controlo dos seus produtos.
Se nenhum produto kDrive estiver presente no painel de controle, o aplicativo kDrive estará acessível apenas entre os aplicativos no canto superior direito, pois você possui…
- uma oferta my kSuite / my kSuite+:
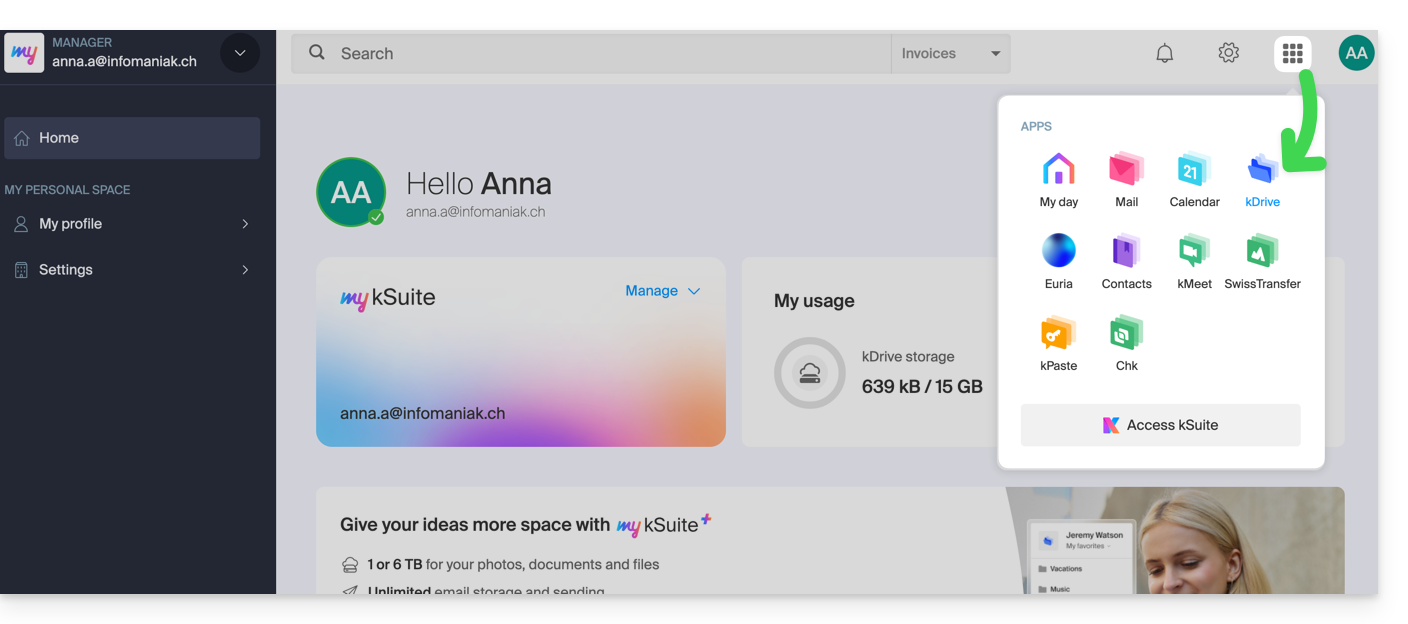
- se você foi convidado para compartilhar um documento (nesse caso, você é um usuário externo do kDrive):
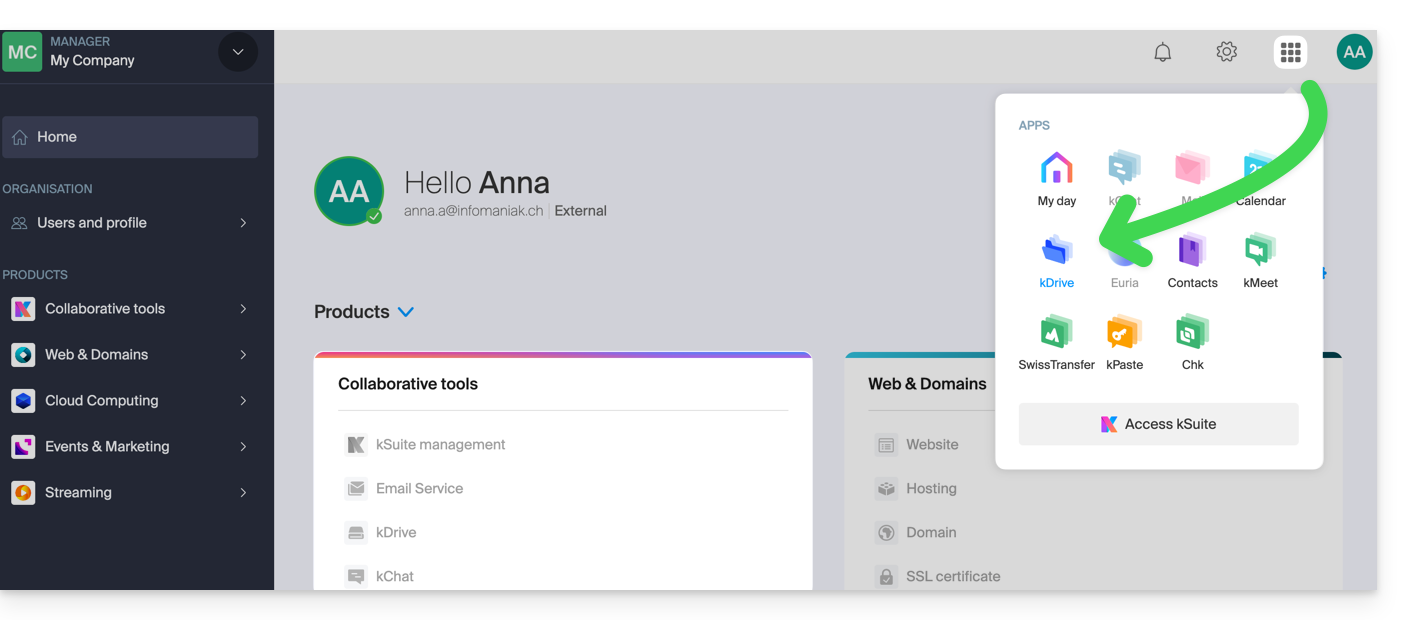
Caso contrário, encontre seu kDrive entre suas ferramentas de colaboração: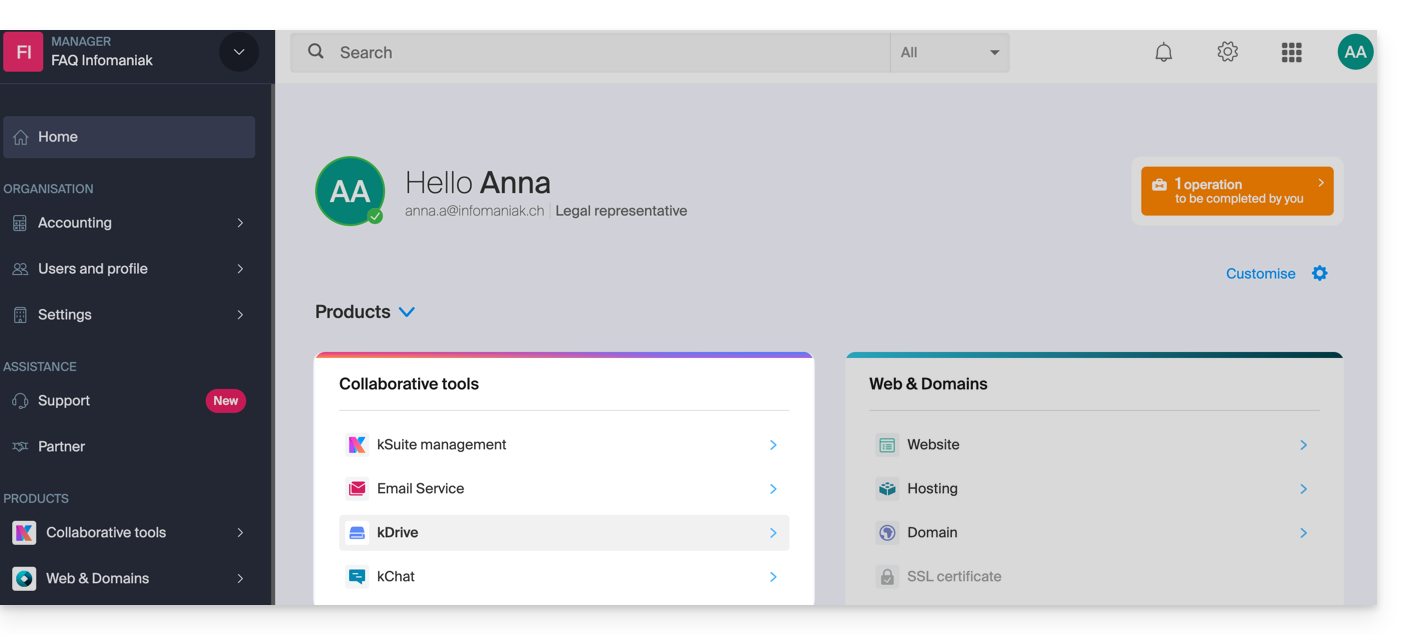
Alterar o plano kDrive atual
O seu kDrive pode evoluir com as suas necessidades. À medida que estas aumentam — seja para adicionar novos colaboradores, integrar um membro da sua família ou armazenar um volume crescente de dados — aumente facilmente a sua capacidade para liberar todo o seu potencial.
Pré-requisitos
- Ter permissões suficientes dentro da Organização.
Para alterar o seu plano kDrive atual:
- Clique aqui para acessar a aplicação web kDrive da Infomaniak (serviço online ksuite.infomaniak.com/kdrive).
- Clique em Gerenciar para acessar a página de alteração de plano e ver o plano atual:
Assim, poderá mudar para um plano superior na loja Infomaniak: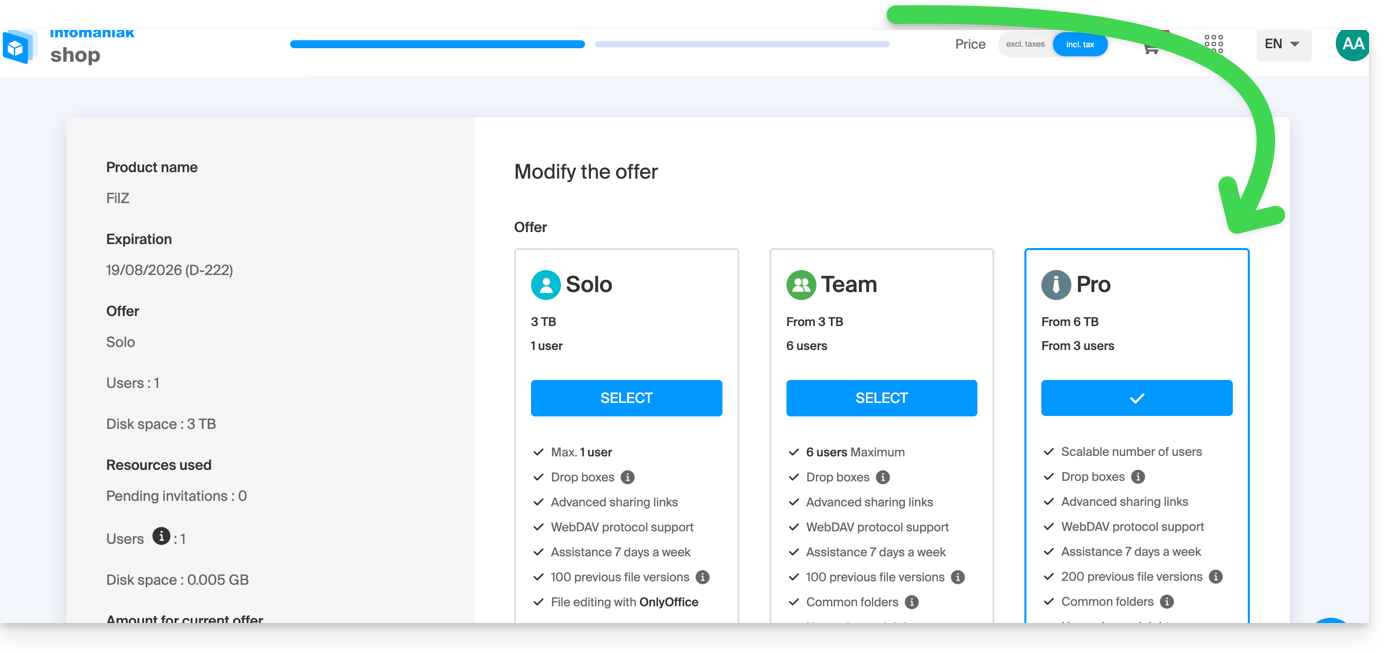
Por exemplo, se, ao escolher um novo plano, aumentar o número de utilizadores que podem ser adicionados ao seu kDrive, consulte este outro guia para os convidar a juntarem-se.
Link para esta FAQ: https://faq.infomaniak.com/1577
Esta seção de perguntas frequentes foi útil?
Este guia para o aplicativo web Mail da Infomaniak (serviço online ksuite.infomaniak.com/mail) ou para o aplicativo móvel Infomaniak Mail (aplicativo para smartphone ou tablet iOS/Android) explica como ativar a criptografia para os e-mails enviados a partir dos serviços web e móvel da Infomaniak.
Introdução
- Quando a criptografia está ativada, os e-mails e anexos são criptografados assim que são recebidos nos servidores Infomaniak, através das chaves públicas dos remetentes e destinatários.
- Cada endereço de e-mail gera uma chave na sua primeira utilização, armazenada de forma segura nos datacenters Infomaniak.
- As chaves baseiam-se na criptografia de curvas elípticas (ECC) e utilizam o padrão OpenPGP.
- Elas próprias são criptografadas em AES-256-GCM com uma descriptografia automática através da autenticação Infomaniak.
- Nos resultados da pesquisa, apenas o assunto das mensagens criptografadas será visível, enquanto o conteúdo permanecerá seguro durante o armazenamento.
Ativar a criptografia de e-mails…
… a partir do aplicativo Web Mail da Infomaniak
Para criptografar automaticamente uma mensagem enviada para um endereço de e-mail:
- Clique aqui para acessar o aplicativo web Mail da Infomaniak (serviço online ksuite.infomaniak.com/mail).
- Redija uma nova mensagem como de costume.
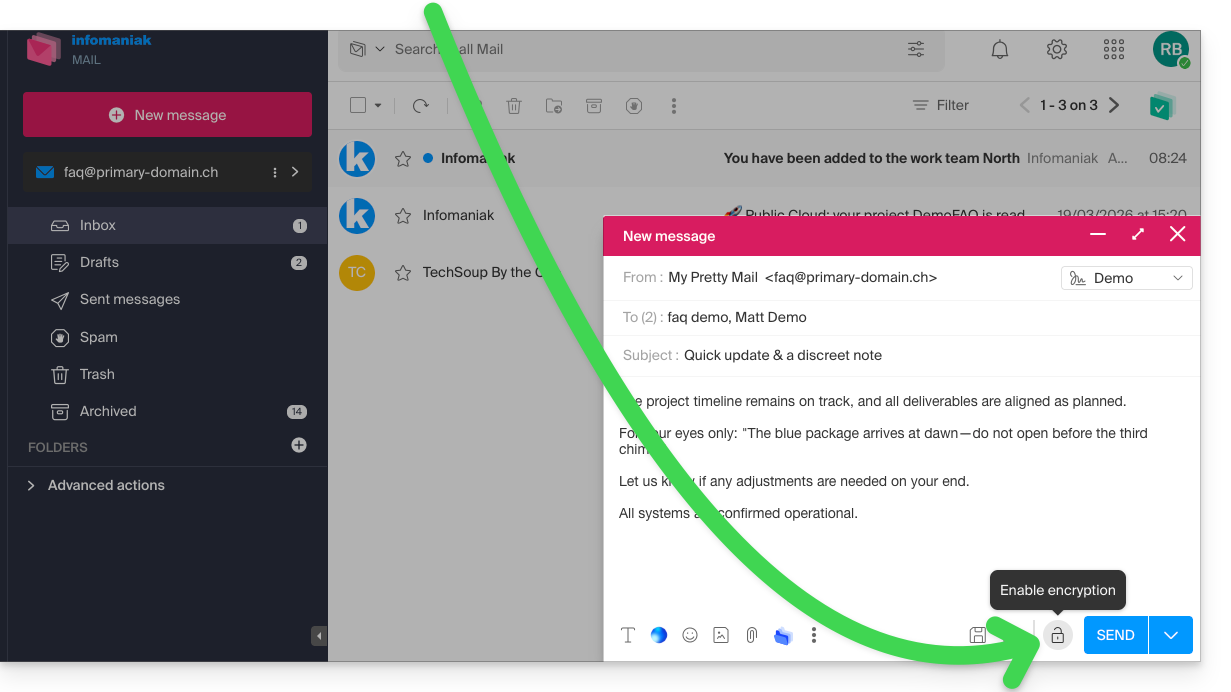
- Clique no ícone cadeado à esquerda do botão Enviar para ativar a criptografia:
- Confirme a ação, caso apareça uma janela de confirmação.
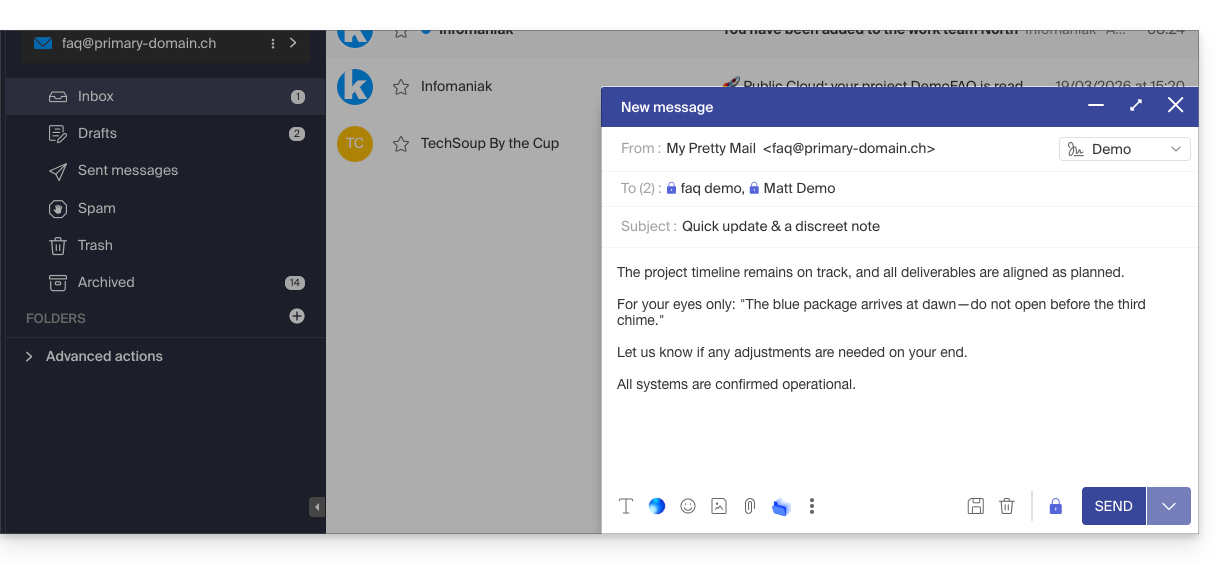
- O ícone agora representa um cadeado fechado e a cor do conjunto foi alterada:
- Clique no botão Enviar.
Esta ação deve ser realizada a cada novo envio.
A. Destinatário cujo e-mail é gerenciado na Infomaniak
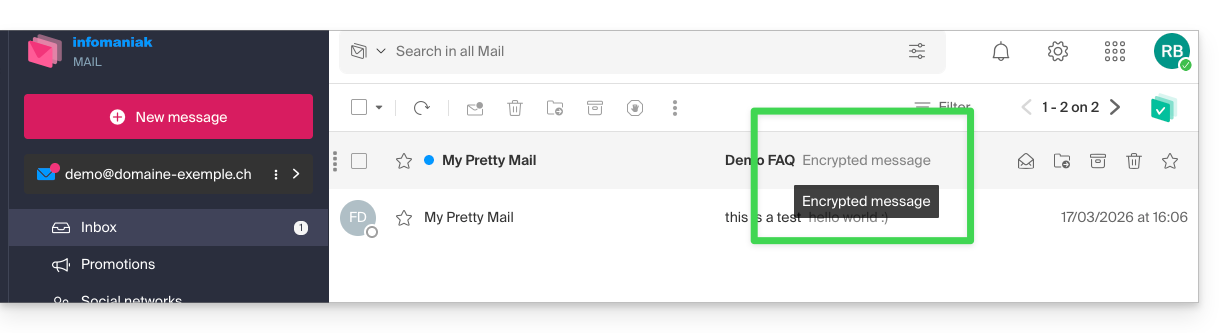
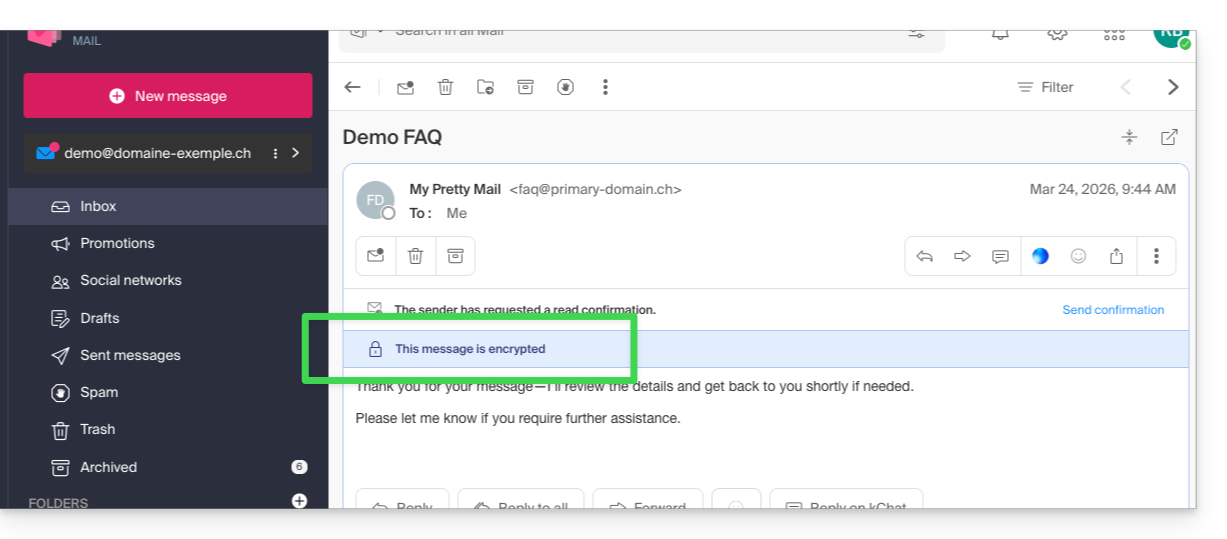
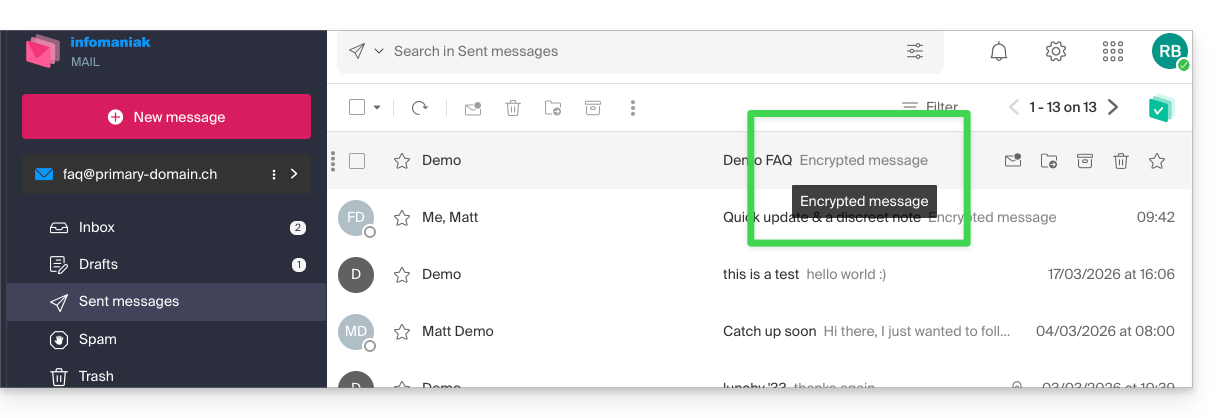
Se o destinatário do e-mail criptografado tiver um endereço de e-mail gerenciado na Infomaniak, a criptografia será feita de forma totalmente transparente para o remetente e para o destinatário. Uma mensagem indicará que a mensagem foi criptografada…
- … na caixa de entrada do destinatário:
- … ao abrir a mensagem recebida:
- … e na pasta das mensagens enviadas pelo remetente:
B. Destinatário externo
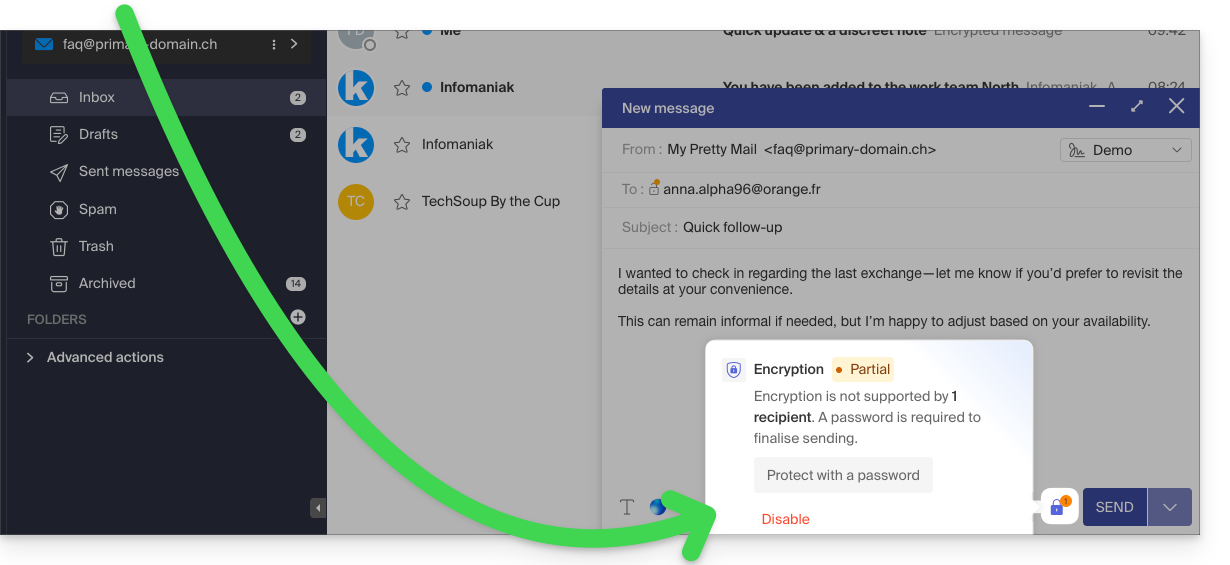
Se o destinatário do e-mail criptografado tiver um endereço de e-mail gerenciado fora dos serviços Infomaniak, a criptografia ainda é possível, mas exige a definição de uma senha:
- Clique aqui para acessar o aplicativo Mail da Infomaniak (serviço online ksuite.infomaniak.com/mail).
- Redija uma nova mensagem como de costume, mas envie-a para um endereço de e-mail fora da Infomaniak.
- Clique no ícone cadeado à esquerda do botão Enviar para ativar a criptografia.
- Uma janela será aberta para permitir que você crie uma senha:
- Insira uma senha e copie-a para enviá-la por seus próprios meios (kPaste, por exemplo) ao destinatário (você pode combinar uma senha com antecedência para que o destinatário já esteja informado):
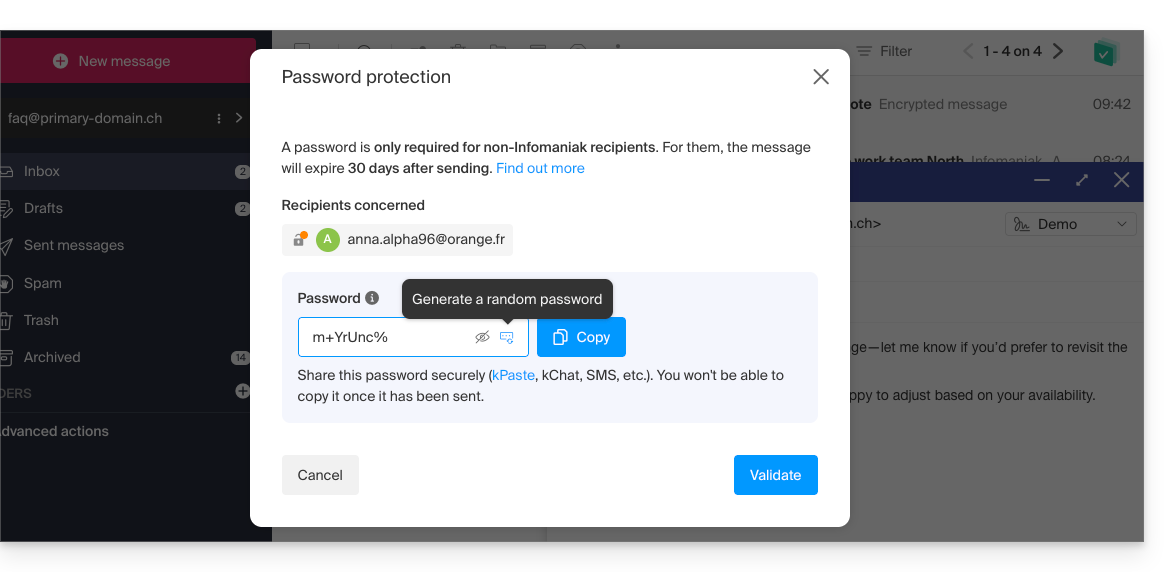
- Insira uma senha e copie-a para enviá-la por seus próprios meios (kPaste, por exemplo) ao destinatário (você pode combinar uma senha com antecedência para que o destinatário já esteja informado):
- O ícone agora representa um cadeado fechado, sem o ponto laranja, e você pode enviar o e-mail como de costume:
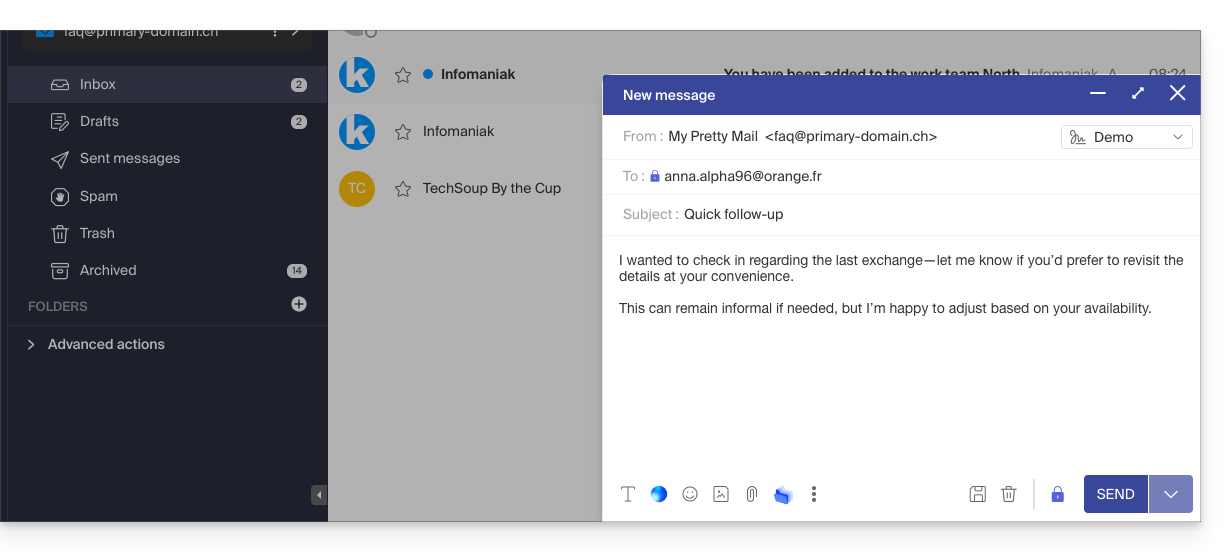
- Os destinatários receberão uma mensagem informando que um e-mail criptografado está aguardando:
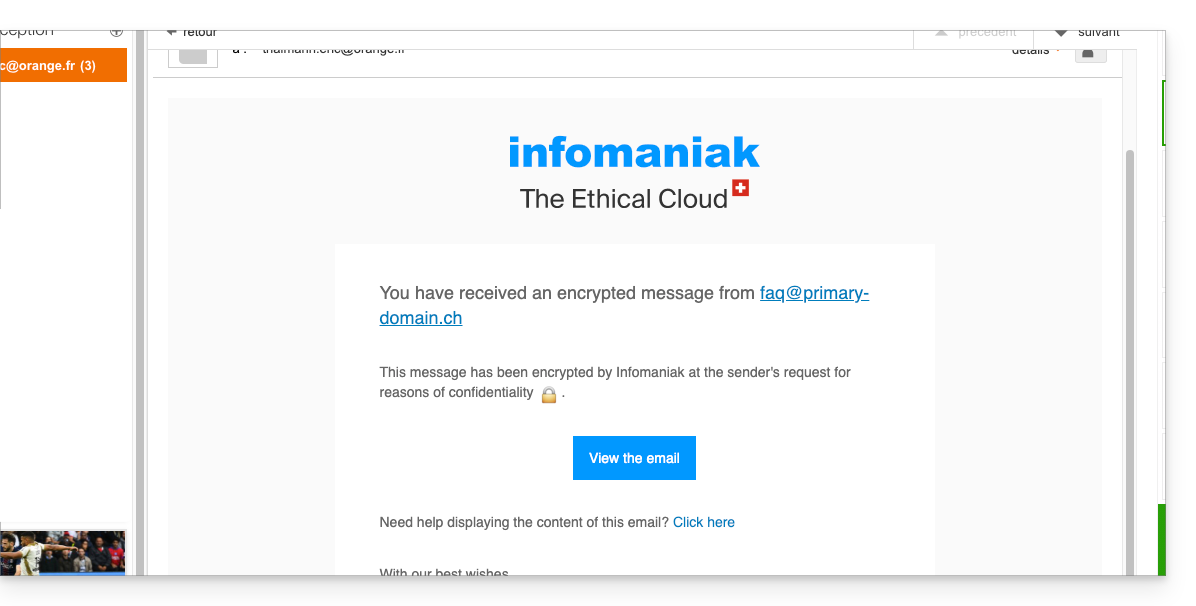
- Ao clicar no botão fornecido, eles serão redirecionados para uma página da web segura, onde a senha deverá ser inserida.
- Após a validação da senha, a mensagem criptografada poderá ser visualizada nesta mesma página, válida por 30 dias.
… a partir do aplicativo móvel Infomaniak Mail
Para criptografar automaticamente uma mensagem enviada para um endereço de e-mail:
- Abra o aplicativo móvel Infomaniak Mail (aplicativo para smartphone ou tablet iOS/Android).
- Redija uma nova mensagem como de costume.
- Clique no ícone cadeado na parte inferior da janela de redação para ativar a criptografia:
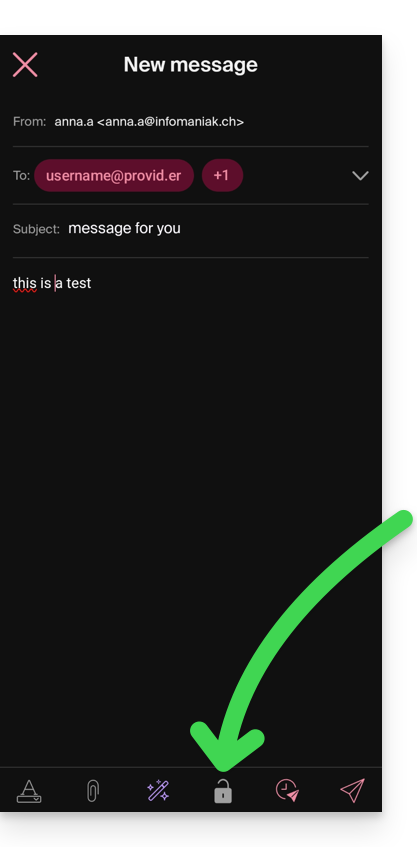
A. Destinatário cujo e-mail é gerenciado na Infomaniak
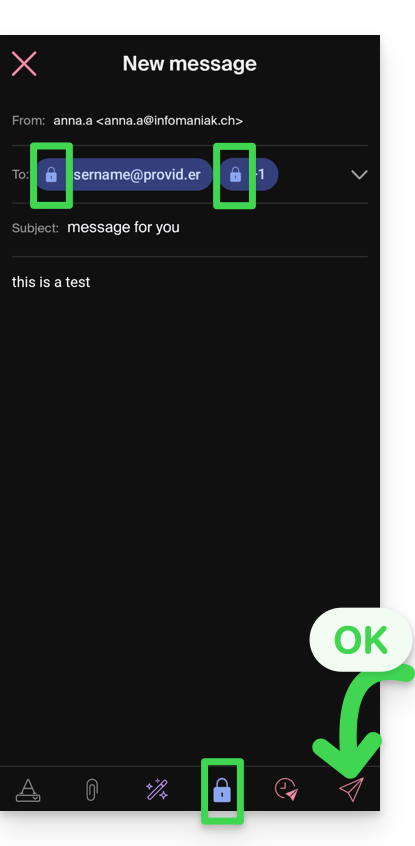
Se o destinatário do e-mail criptografado tiver um endereço de e-mail gerenciado na Infomaniak, a criptografia será feita de forma totalmente transparente para o remetente e para o destinatário:
- Cadeados fechados serão exibidos na tela.
- Toque no ícone de envio:
B. Destinatário externo
Se o destinatário do e-mail criptografado tiver um endereço de e-mail gerenciado fora dos serviços Infomaniak, a criptografia ainda é possível, mas exige a definição de uma senha:
- O envio não será possível, pois o ícone de envio permanecerá desativado e símbolos aparecerão nos cadeados:
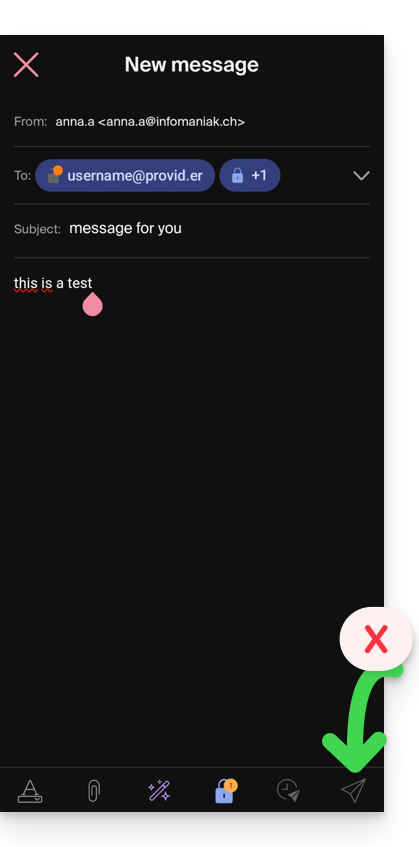
- Clique no ícone de cadeado.
- Uma janela será aberta para que possa criar uma senha.
- Utilize a senha sugerida ou insira uma nova senha e copie-a para enviá-la por outros meios (por exemplo, kPaste) ao destinatário (você pode combinar uma senha com antecedência para que o destinatário já esteja informado).
- Pressione o "X" no canto superior esquerdo se tiver terminado de gerenciar a senha.
- Pronto, o envio agora pode ser feito de forma criptografada:
Link para esta FAQ: https://faq.infomaniak.com/1582
Esta seção de perguntas frequentes foi útil?