Base de conhecimento
1000 perguntas frequentes, 500 tutoriais e vídeos explicativos. Aqui, você encontra apenas soluções!
This guide presents the advantages of kSuite (Standard, Business, Enterprise), the suite of productivity and online collaboration tools developed in Switzerland by Infomaniak.
Preamble
- kSuite simplifies user management in a company and groups your products into a single invoice with a single due date.
- It also includes advanced management of users of all the applications you need to collaborate online.
- You choose the domain name and kSuite is then set up according to your needs in terms of number of users and storage space.
- kSuite is a bundled offer that can be upgraded to a higher offer at any time but it is not possible to change to a lower rate later, nor to transfer kSuite to another Organization.
- The products included in kSuite cannot be moved or canceled independently of each other.
- To help you identify the kSuite offer that best suits your needs, refer to this other guide.
Choosing kSuite over individual apps
The question of choosing kDrive and/or Mail separately, standalone, rather than the suite kSuite may indeed arise.
kSuite is more economical, simplifies user management in a company and groups all your products into a single invoice with a single due date. The offer is recommended from the moment you own or wish to have a domain name that will be associated with it.
It also includes advanced and unified management of users and teams, as well as kChat which cannot be ordered separately.
Here are some other points:
- unlocked features
- 1 single invoice
- address book & dynamic calendar for the Organization
- more important disk storage (per user)
- Custom Brand offered with kSuite Enterprise
In summary, choosing this collection of web tools over individual applications offers advantages in terms of integration, simplified management, real-time collaboration, multi-platform accessibility, and flexibility. These advantages can improve your efficiency, productivity, and overall user experience.
Products included in my kSuite
On your interface ksuite.infomaniak.com you access to: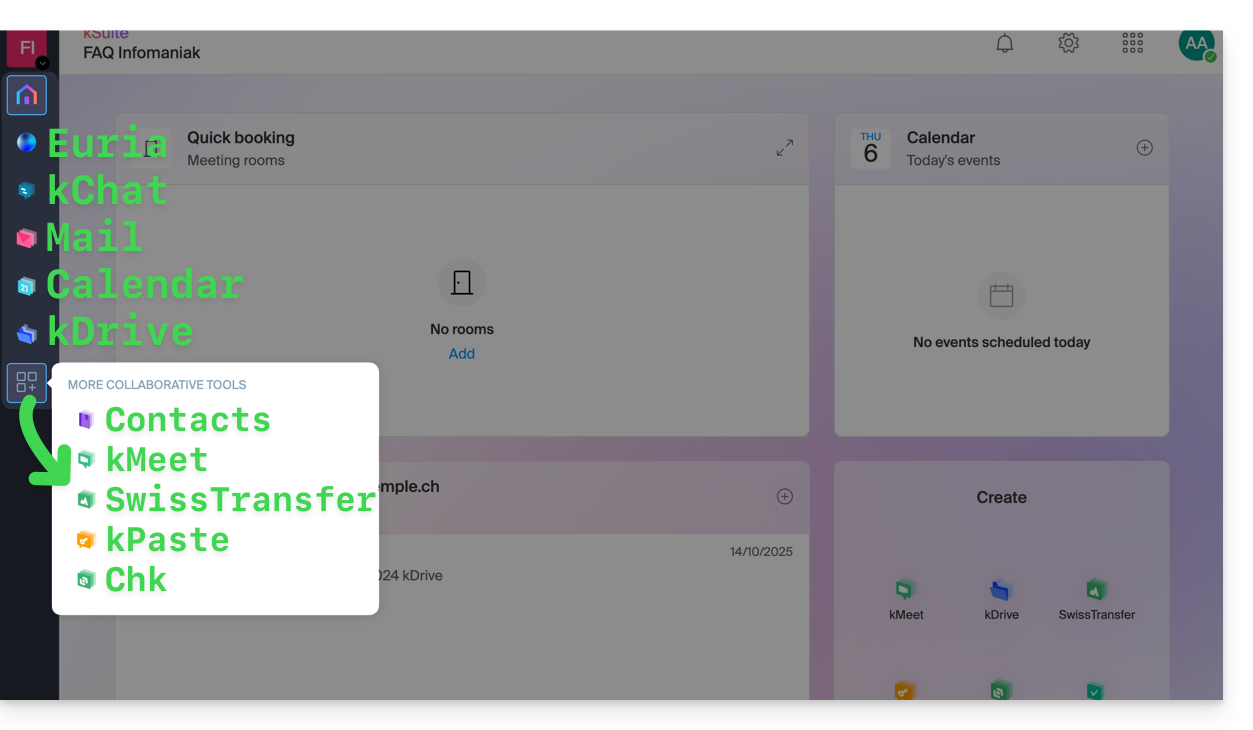
Create, communicate, plan, collaborate, share…
- Euria
- kChat
- A Mail Service (even if you already own a Mail Service)
- Calendar
- kDrive (even if you already own a kDrive)
Also:
Management
- The Manager interface with Custom Brand included or as an option depending on the offer
Are you a Partner or would you like to become one in order to resell my kSuite?
Link para esta FAQ: https://faq.infomaniak.com/80
Esta seção de perguntas frequentes foi útil?
This guide explains how to centralize the display of your different Infomaniak email addresses when you have multiple accounts and messaging offers.
Display email addresses from all Organizations
A first approach is to display the global Mail web app for all Organizations to which your Infomaniak account is linked:
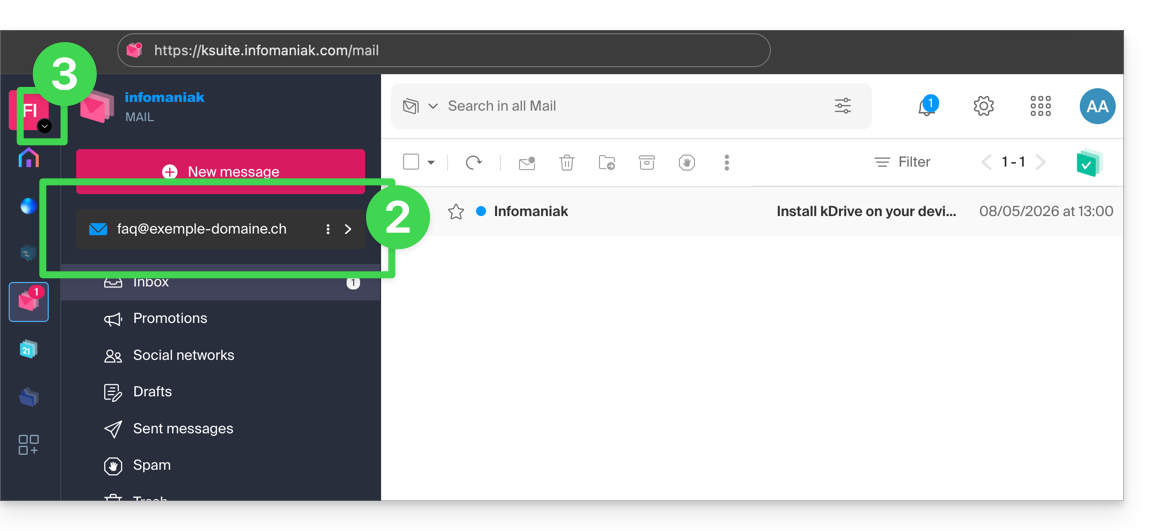
- Click here to access the Infomaniak Mail web app (online service ksuite.infomaniak.com/mail).
- Then click on the chevron to the right of the displayed email address.
- The other addresses of the Organization for which you have permission will be displayed.
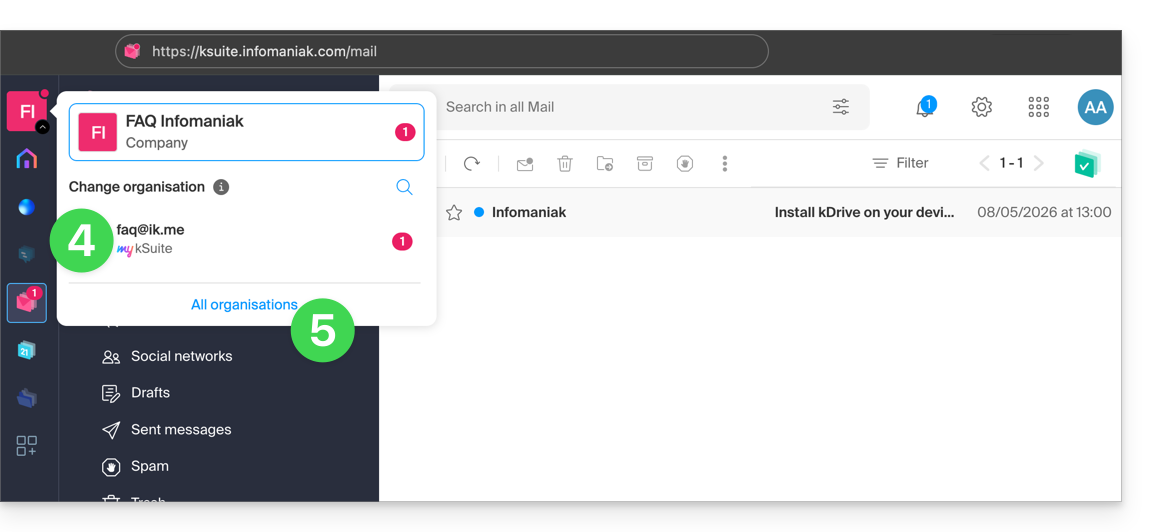
- If you have access to other addresses on other Organizations that your user accesses, click on the chevron to the right of the active Organization:
- Either you click on another Organization (my kSuite for example) to display only the other specific email address…
- Or you click on All Organizations to display all email addresses in the interface:
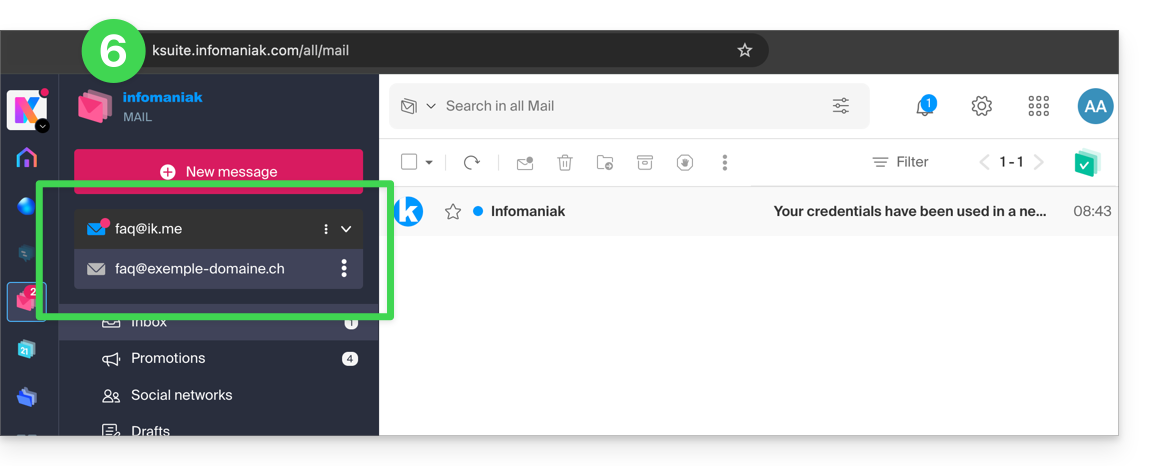
- The shortcut for this common display is https://ksuite.infomaniak.com/all/mail:
If an email address you know is not visible:
- Check at the top right that you are logged in with the correct Infomaniak account.
- Check with the address administrator that you have access to the address in question with your current Infomaniak account login.
If, on the other hand, you want to remove an address from the list, refer to this other guide.
Link para esta FAQ: https://faq.infomaniak.com/108
Esta seção de perguntas frequentes foi útil?
This guide explains how to change the first name and last name that Infomaniak displays when you are logged into your Infomaniak account (user account) within an Organization in the Manager, as well as your account avatar.
Introduction
- To change your login ID, please refer to this other guide.
- To change your phone number, please refer to this other guide.
- To manage the details of the Organization you belong to, please refer to this other guide.
Change Infomaniak Account Details
To edit your personal details:
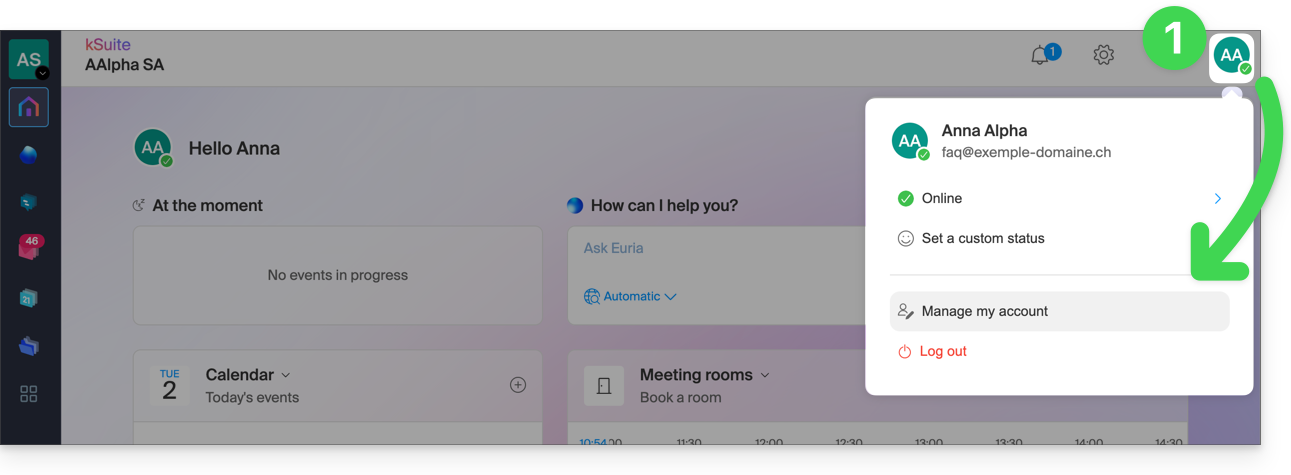
- Click here (or on the badge with your initials / avatar in the top right corner of the Infomaniak Manager) to "Manage my account":
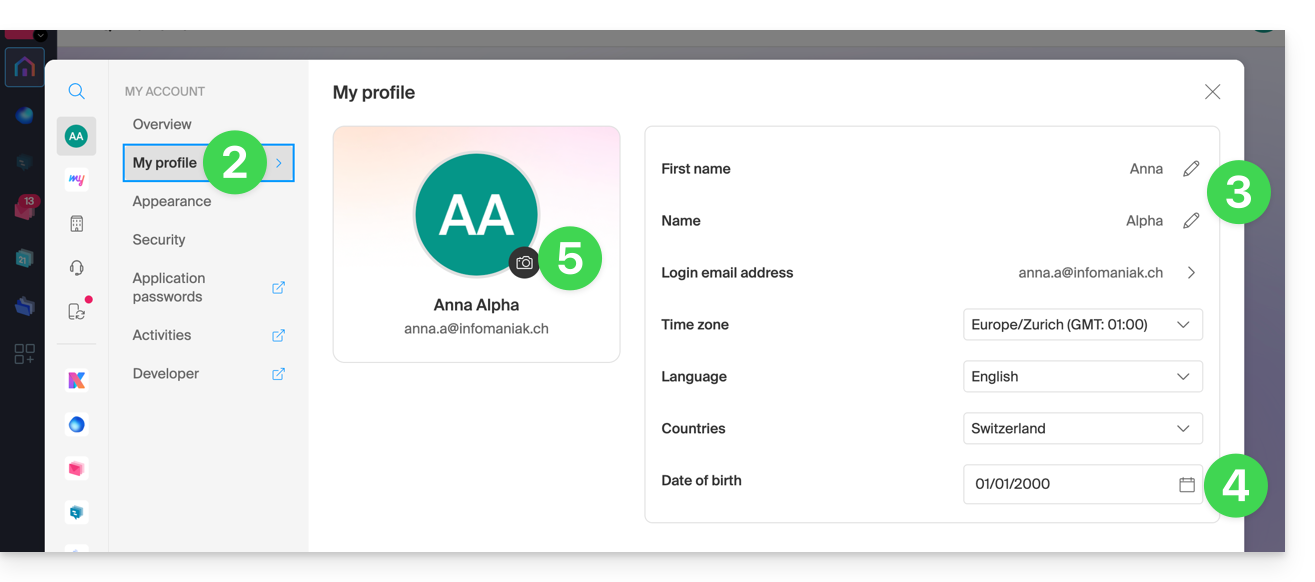
- Click on My profile in the left-hand menu.
- Change your first name and last name on the right-hand side.
- You can also specify your date of birth.
- You can add a profile picture to your Infomaniak account, which will be displayed in place of your initials; it is recommended to import an image of at least 210 pixels on each side:
Link para esta FAQ: https://faq.infomaniak.com/220
Esta seção de perguntas frequentes foi útil?
Este guia permite que você descubra rapidamente as funções essenciais da Euria, a inteligência artificial à sua disposição dentro da kSuite, especialmente eficaz para resumir e-mails no aplicativo web Mail da Infomaniak (serviço online ksuite.infomaniak.com/mail).
✘ INDISPONÍVEL com
kSuite gratuita
my kSuite (ik.me, etik.com, ikmail.com)
Resumir um e-mail
Pré-requisitos
- Leia e compreenda este outro guia sobre o modelo utilizado e as responsabilidades de cada um.
Para acessar a funcionalidade de resumo:
- Clique aqui para acessar o aplicativo web Mail da Infomaniak (serviço online ksuite.infomaniak.com/mail).
- Faça login com as credenciais da sua conta Infomaniak (e não com a senha do seu endereço de e-mail).
- Acesse a mensagem de e-mail que deseja resumir (ela pode estar em qualquer pasta).
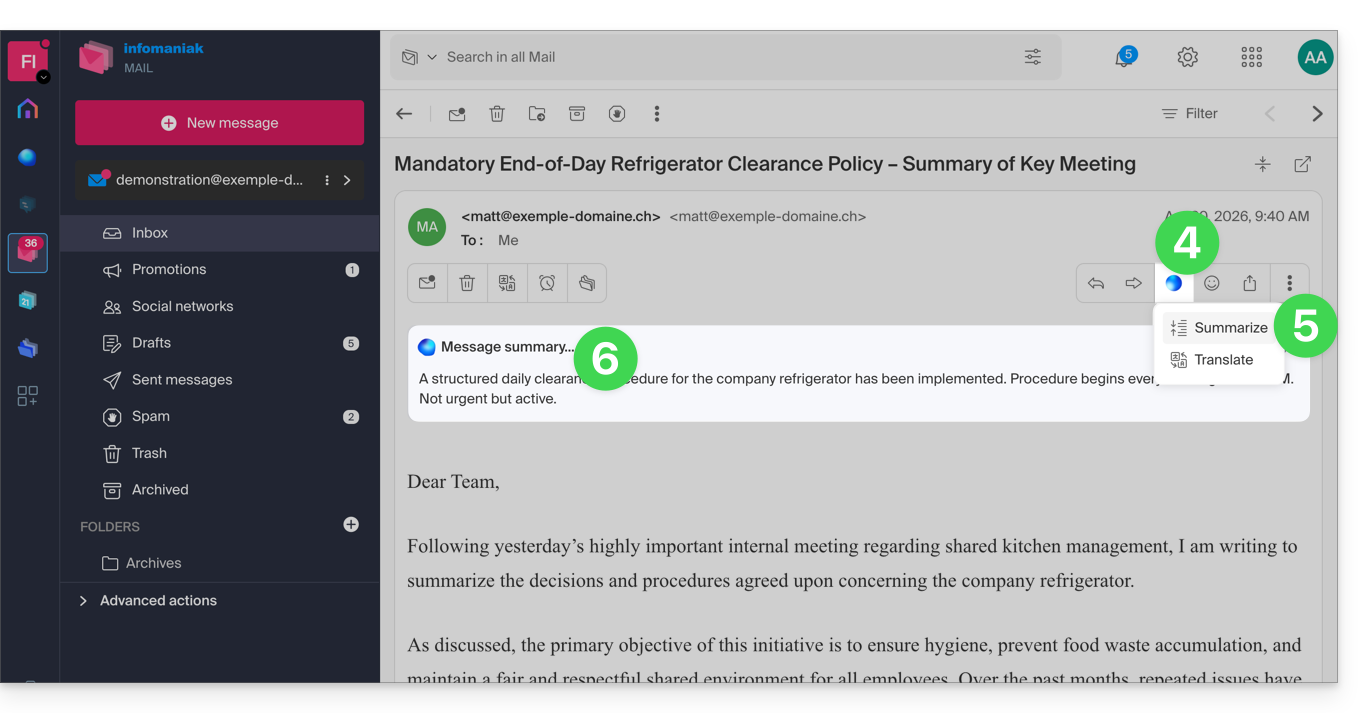
- Clique no botão Euria localizado na barra de ferramentas superior.
- Clique em Resumir.
- O resumo da mensagem será exibido em um bloco acima da mensagem original (visível apenas para você):
Link para esta FAQ: https://faq.infomaniak.com/308
Esta seção de perguntas frequentes foi útil?
This guide explains how to display a calendar with the dates of public holidays for the canton or country of your choice in the Infomaniak Calendar web app (online service ksuite.infomaniak.com/calendar).
Introduction
- These suggested calendars can be synchronized with your mobile and desktop devices.
- The birthday calendar (the calendar that displays the birthdays of your contacts when the date is entered in their address book entry) is only visible in the Infomaniak Calendar web app (online service ksuite.infomaniak.com/calendar) and cannot be synchronized with CalDAV tools.
Display additional official calendars
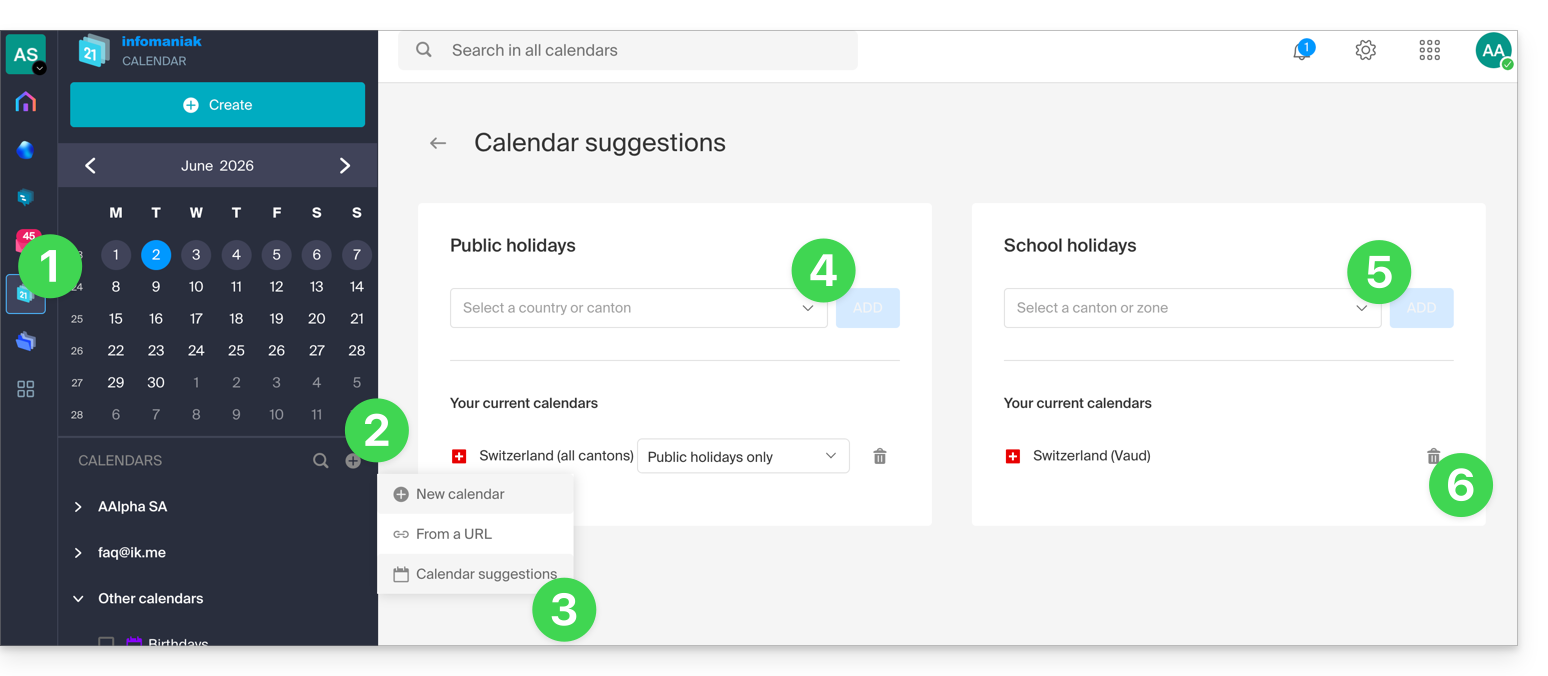
To add the public holiday or school holiday calendar:
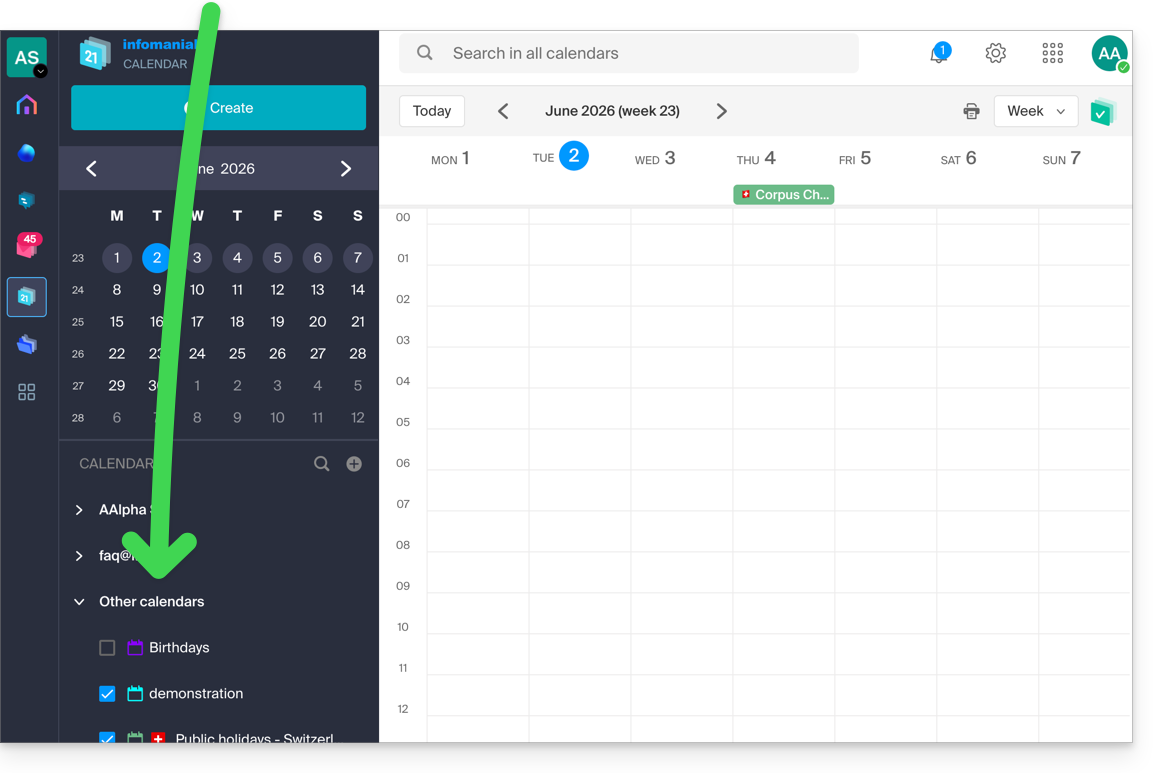
- Click here to access the Infomaniak Calendar web app (online service ksuite.infomaniak.com/calendar).
- Click on the button in the left-hand menu.
- Click on Suggested Calendars.
- Choose from the calendars of national public holidays (by canton or country).
- You can also add the official calendar of national school holidays (France, Switzerland, etc.).
- Once added, you can also remove them from here:
Link para esta FAQ: https://faq.infomaniak.com/566
Esta seção de perguntas frequentes foi útil?
This guide explains how to connect the Microsoft Outlook mobile app (application for smartphone or tablet iOS / Android) to an email address hosted by Infomaniak.
Introduction
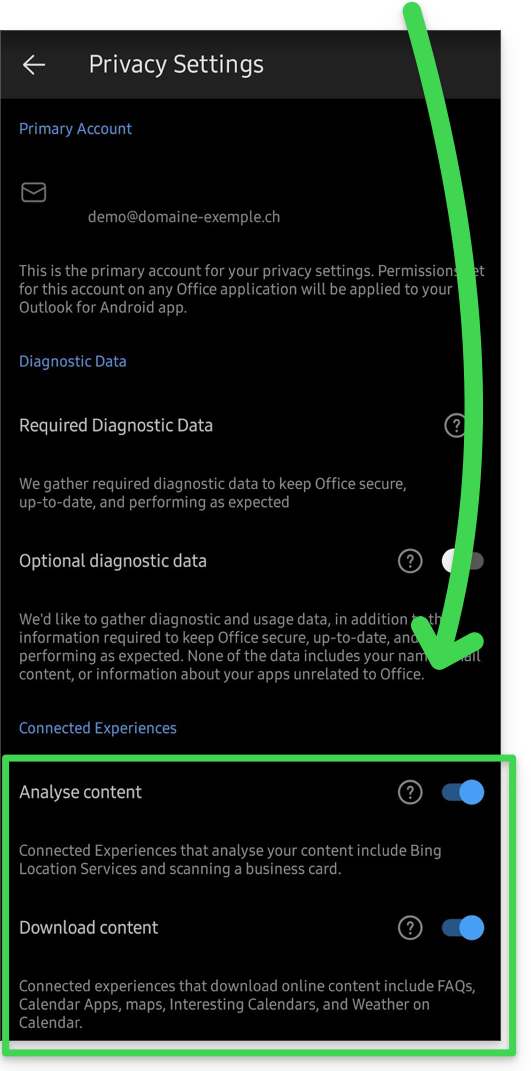
- Rather than using the manual configuration below, it is recommended to use the Infomaniak Mail app (iOS / Android) to benefit from Infomaniak's security features.
- The Microsoft application is configured by default to analyze your data:
Add the email address to the application
Prerequisites
- Create the email address within my kSuite or a Mail Service / kSuite.
- Create a password for the email address for the device you are going to configure.
- Verify that the Mail Service is configured optimally.
To configure the email application:
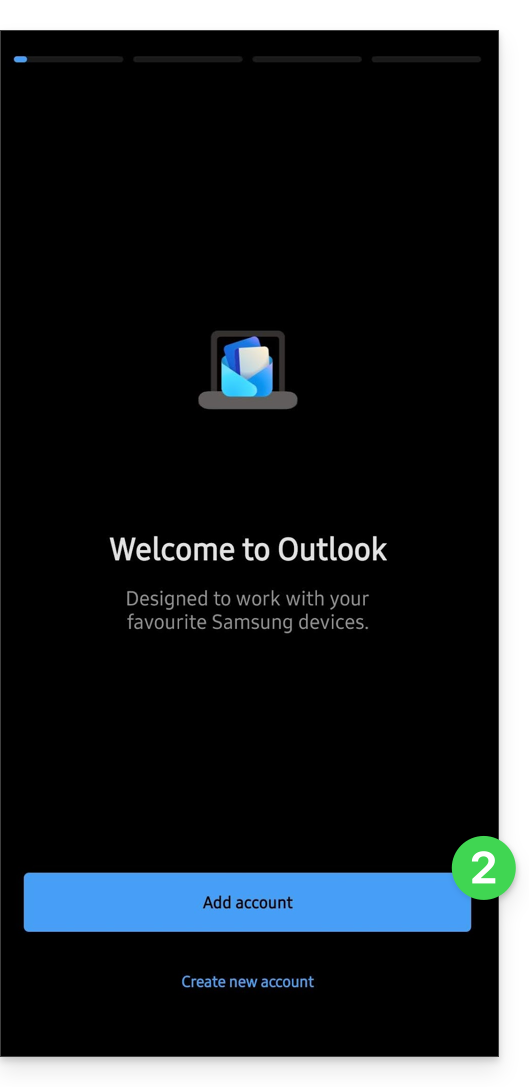
- Open the application.
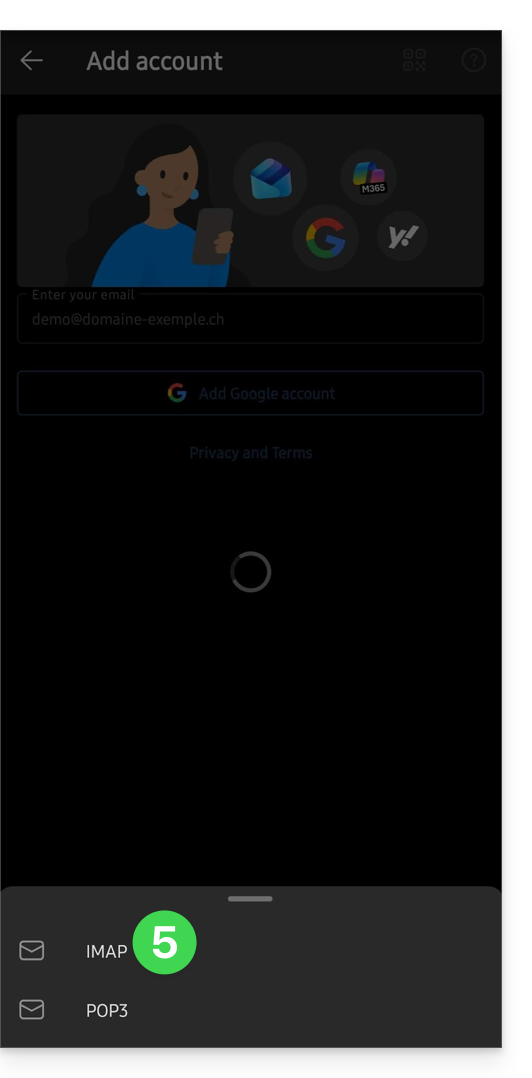
- Click on Add account:
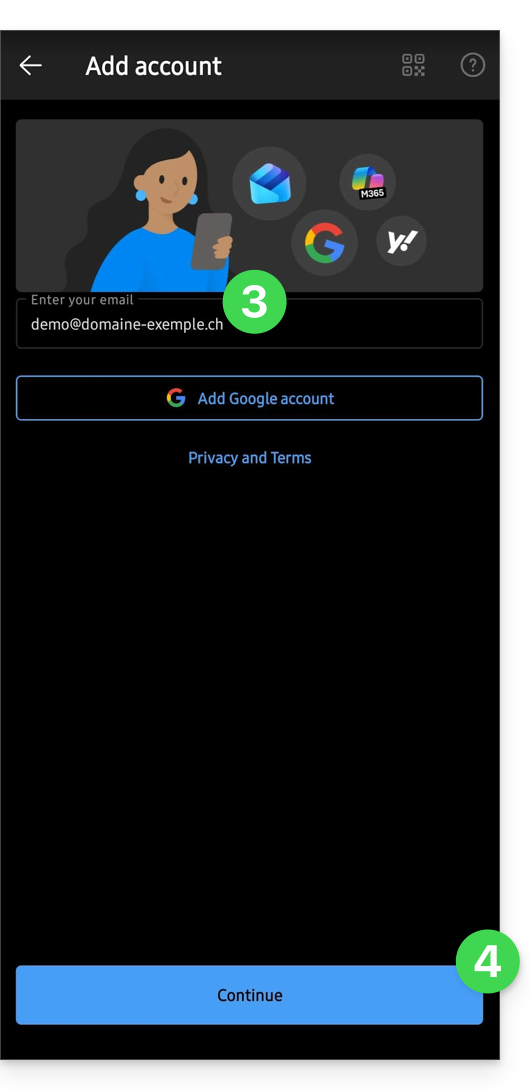
- Enter the email address to be added.
- Click on Continue:
- Click on IMAP:
- Activate the toggle switch to enable advanced settings.
- Complete the missing information.
- Click on the ✓ icon in the top right corner.
- If necessary, choose to add an additional account, otherwise Later.
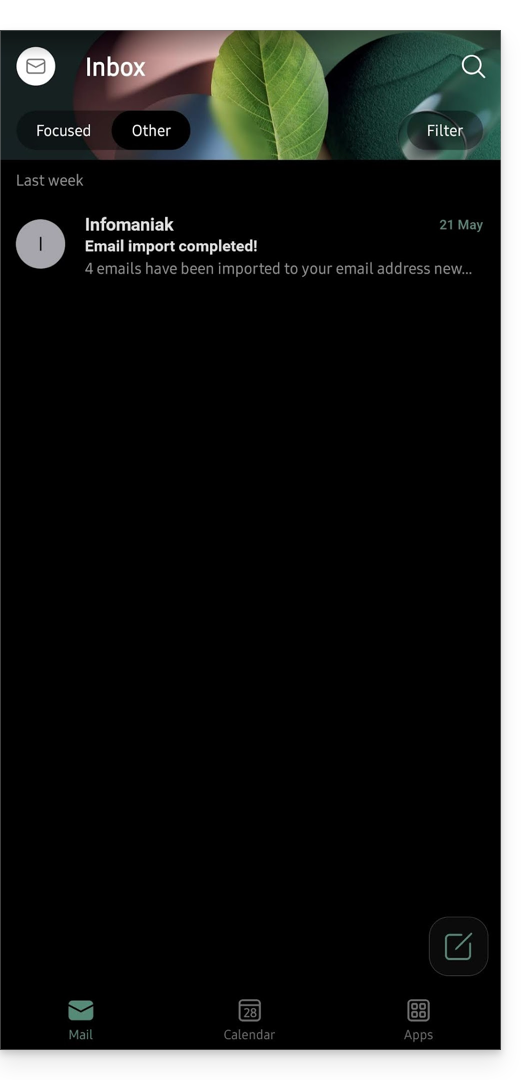
- That's it, your email address is now configured in the application:
Recommended settings
- Incoming IMAP server =
mail.infomaniak.com - IMAP port =
993(with SSL) - Outgoing SMTP server =
mail.infomaniak.com - SMTP port & encryption protocol and command/method to enable this protocol:
587+ STARTTLS - Username = the complete email address
- Password = the one generated for the email address you want to access
- Authentication is required for sending emails:
- It is activated in the SMTP settings of your application.
- Check "use the same settings as the incoming server" or, depending on the software/email client, enter a username (= complete email address) and the generated password.
Refer to this other guide if you are looking for information about other compatible email ports and protocols (SSL / TLS, for example).
In case of a problem
Check that the Mail Service is configured optimally.
It is not necessary to contact Infomaniak Support if your email address works correctly outside the application. The most common error concerns the use of an incorrect password. The troubleshooting guides will help you resolve any potential issues:
- Refer to the solutions provided in this other guide regarding email in general.
- This other guide is specifically about Outlook.
… and if your Outlook is no longer working after a change of email password, refer to this other guide.
Link para esta FAQ: https://faq.infomaniak.com/575
Esta seção de perguntas frequentes foi útil?
This guide details how to disable the SMTP protocol, thereby preventing a specific user from sending emails from a specific email address.
Preamble
- Removing the sending right from a user will prevent them from sending a message (new, reply, reaction, etc.) from the Infomaniak Web Mail app (online service ksuite.infomaniak.com/mail) and the mobile app.
- If the user in question is also specified in the connected devices, sending will also be impossible from a software/email client like Outlook, Apple Mail, Thunderbird, etc.
- There is a specific permission regarding out-of-office messages if you also want to prevent this type of message from being sent.
Prevent a user from sending messages from a specific email address
New user
Do you want to allow a new collaborator to access an email address (be able to read incoming emails) but without allowing them to send new messages?
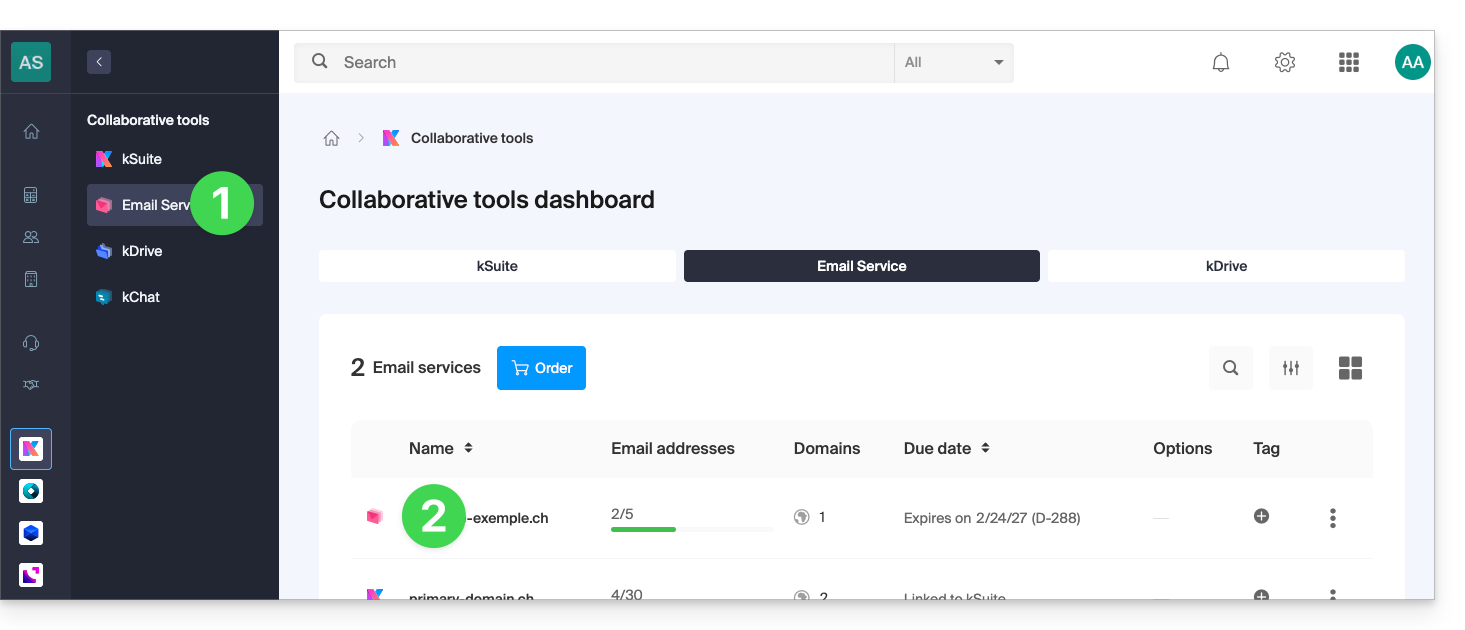
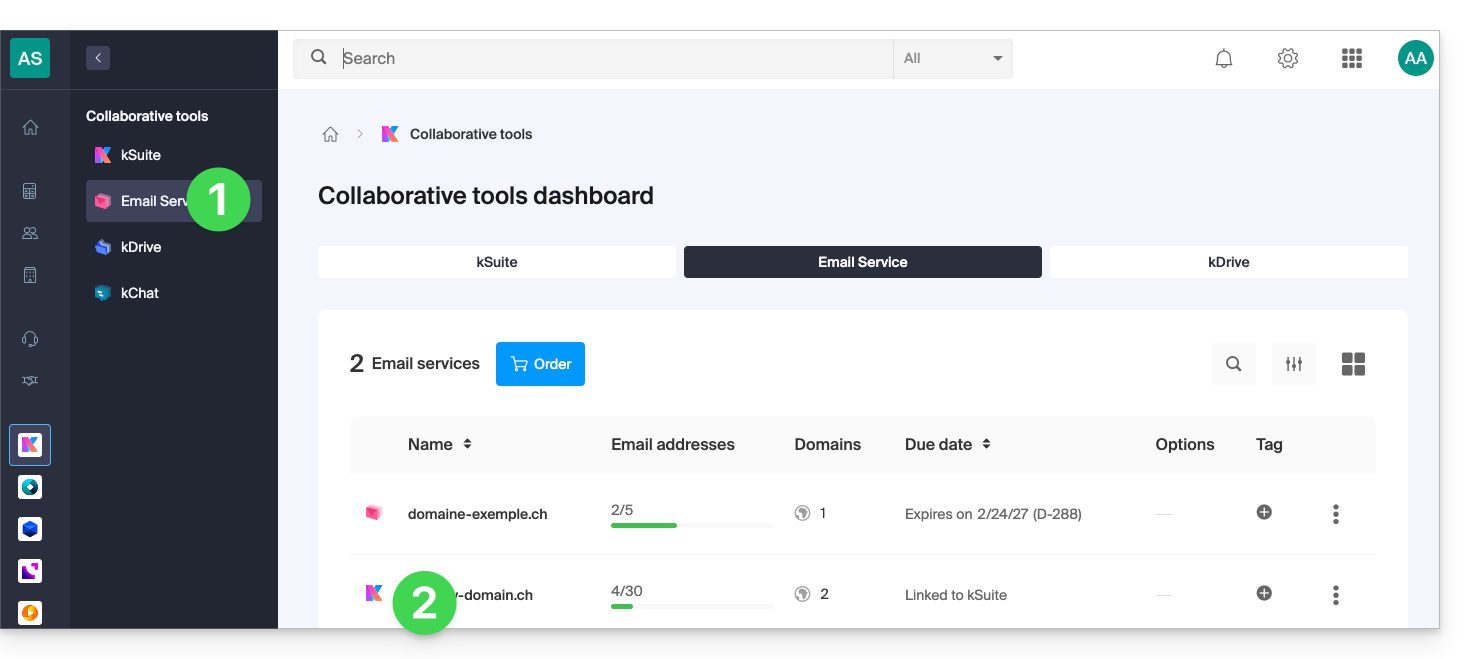
- Click here to access the management of your Mail Service on the Infomaniak Manager (need help?).
- Click directly on the name assigned to the Mail Service concerned:
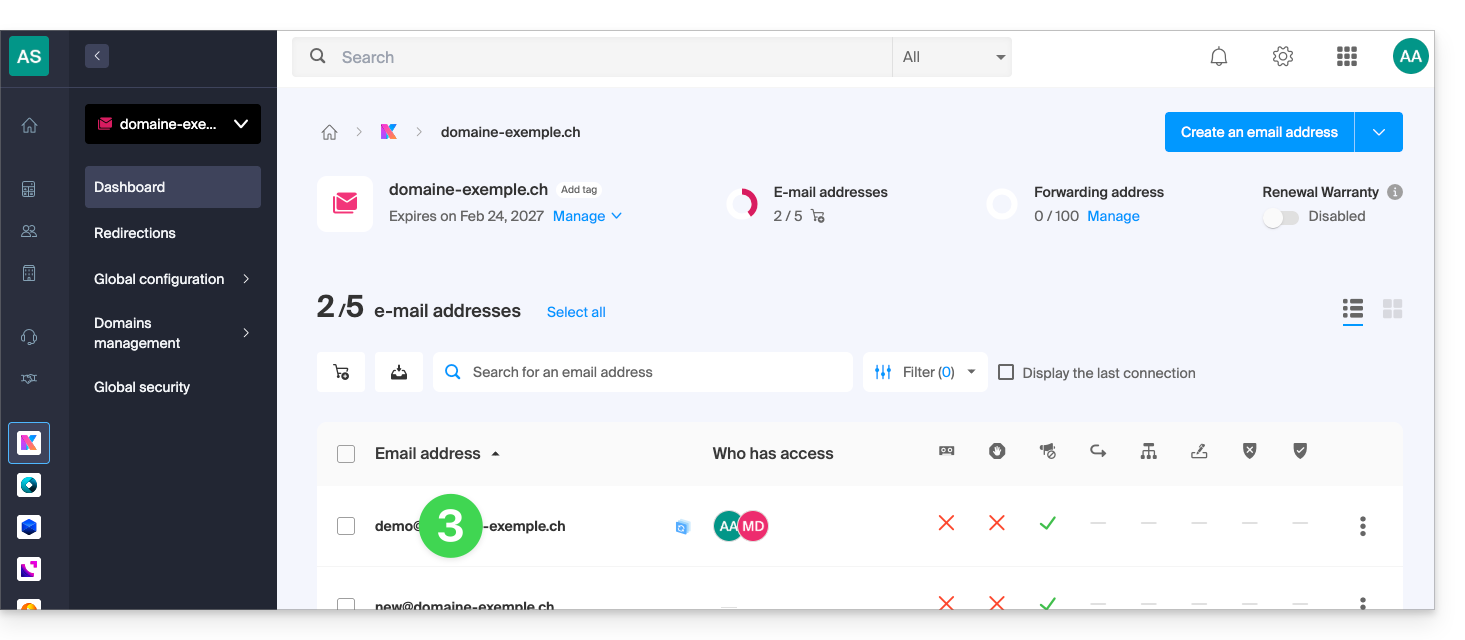
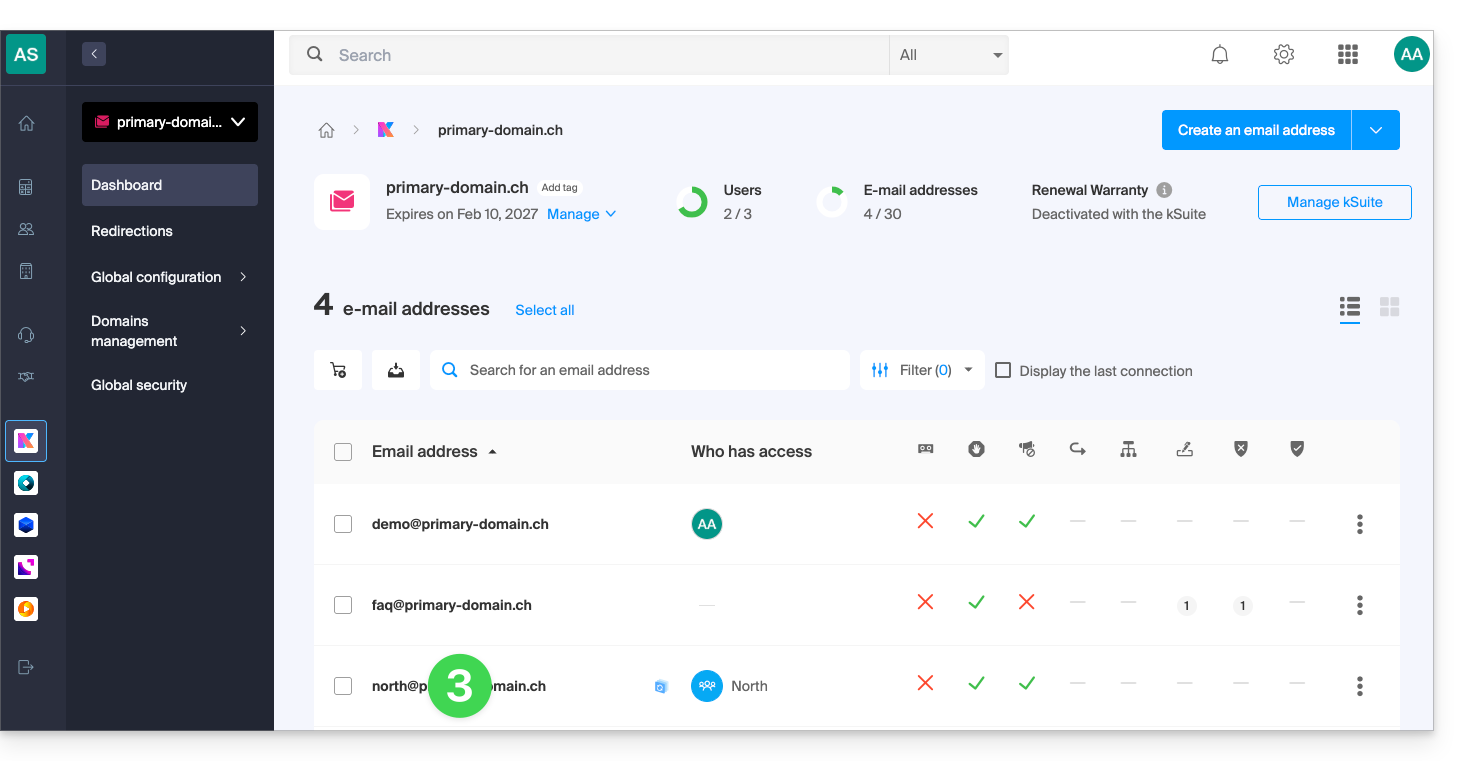
- Click on the email address concerned in the table that appears:
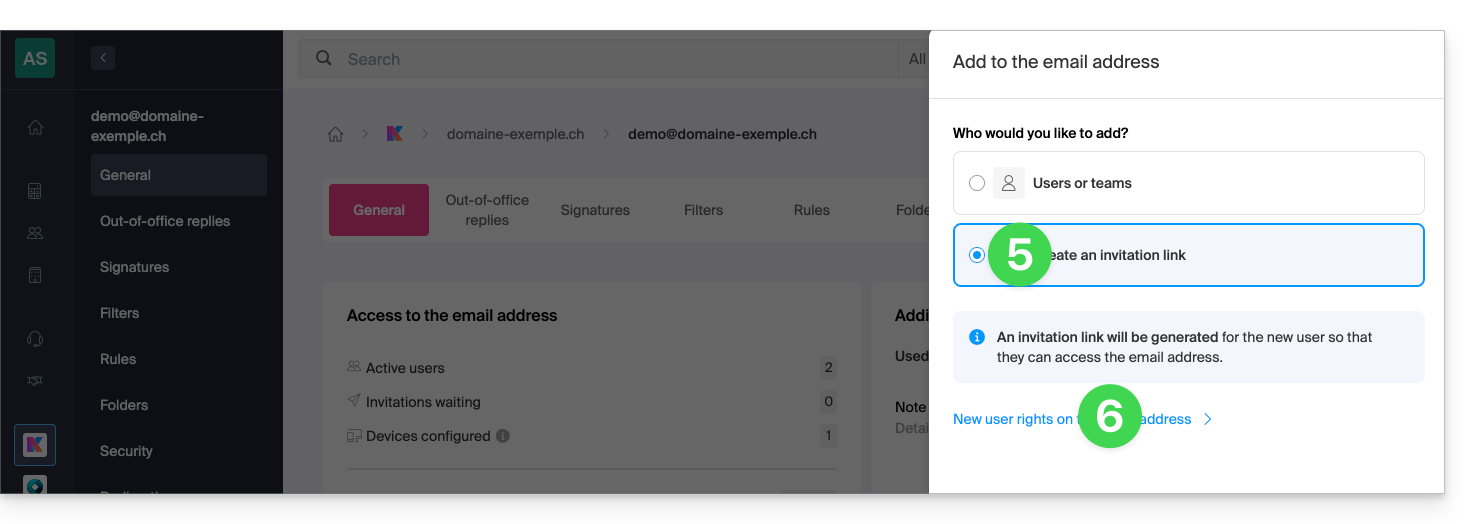
- Click to Add a new user:

- In this example, the collaborator is external, so click to Create an invitation link.
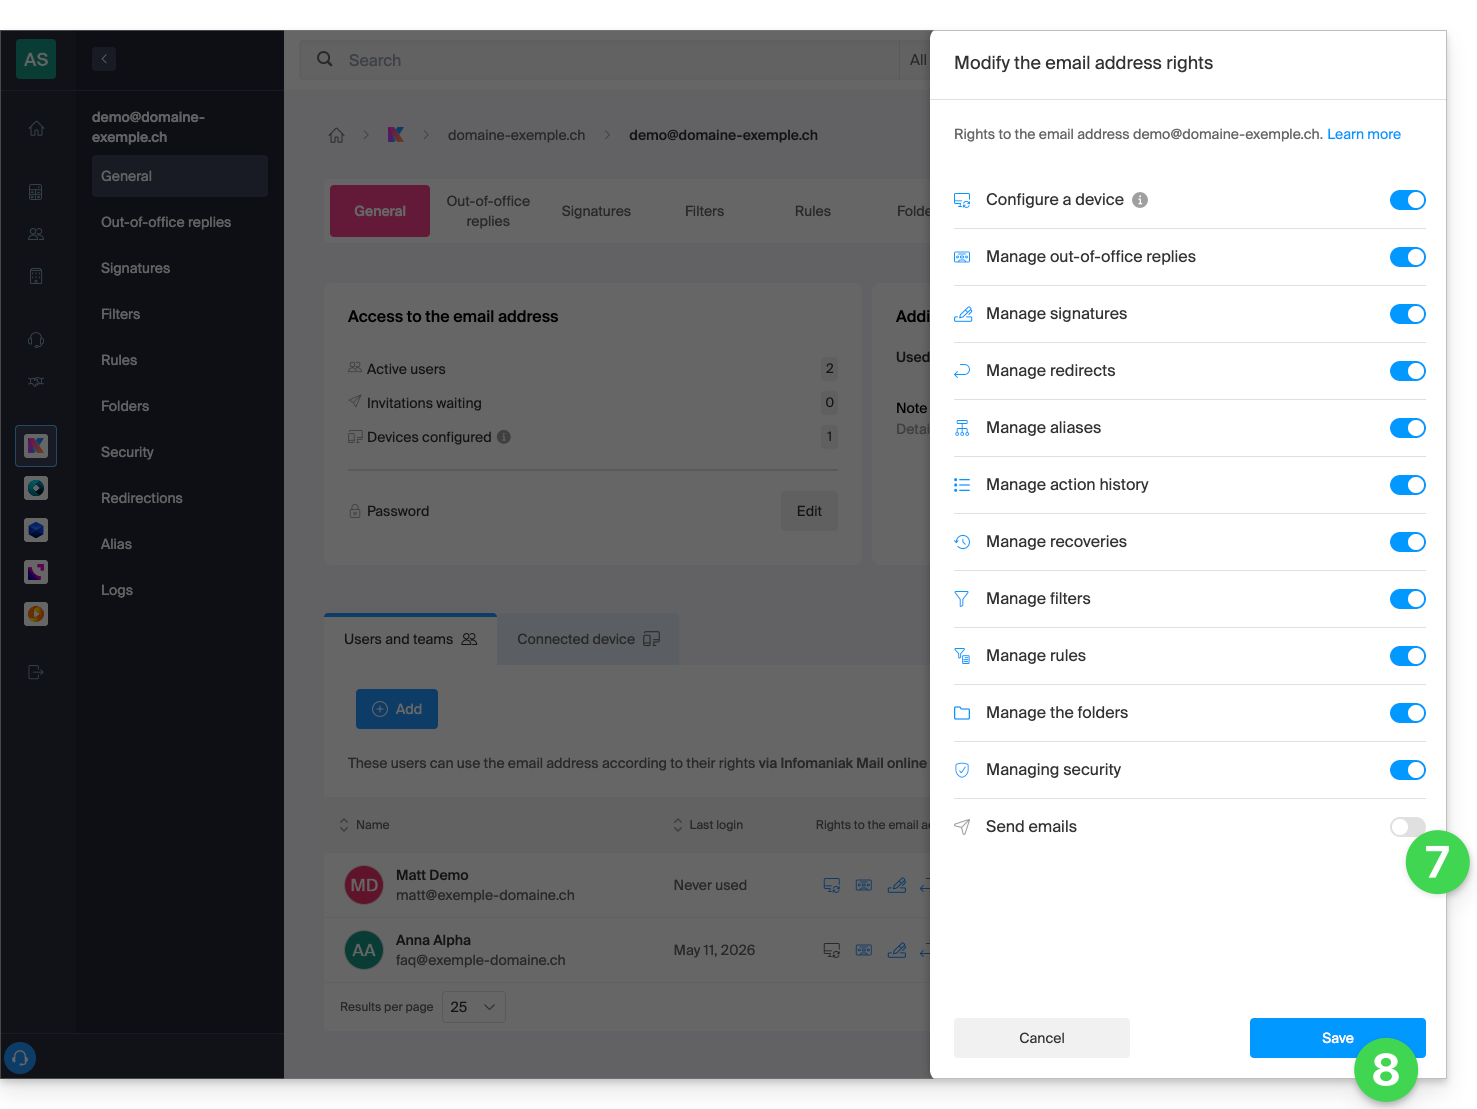
- Click to manage the permissions of this user on the email address concerned:
- Click on Send emails to remove their sending rights.
- Save the change:
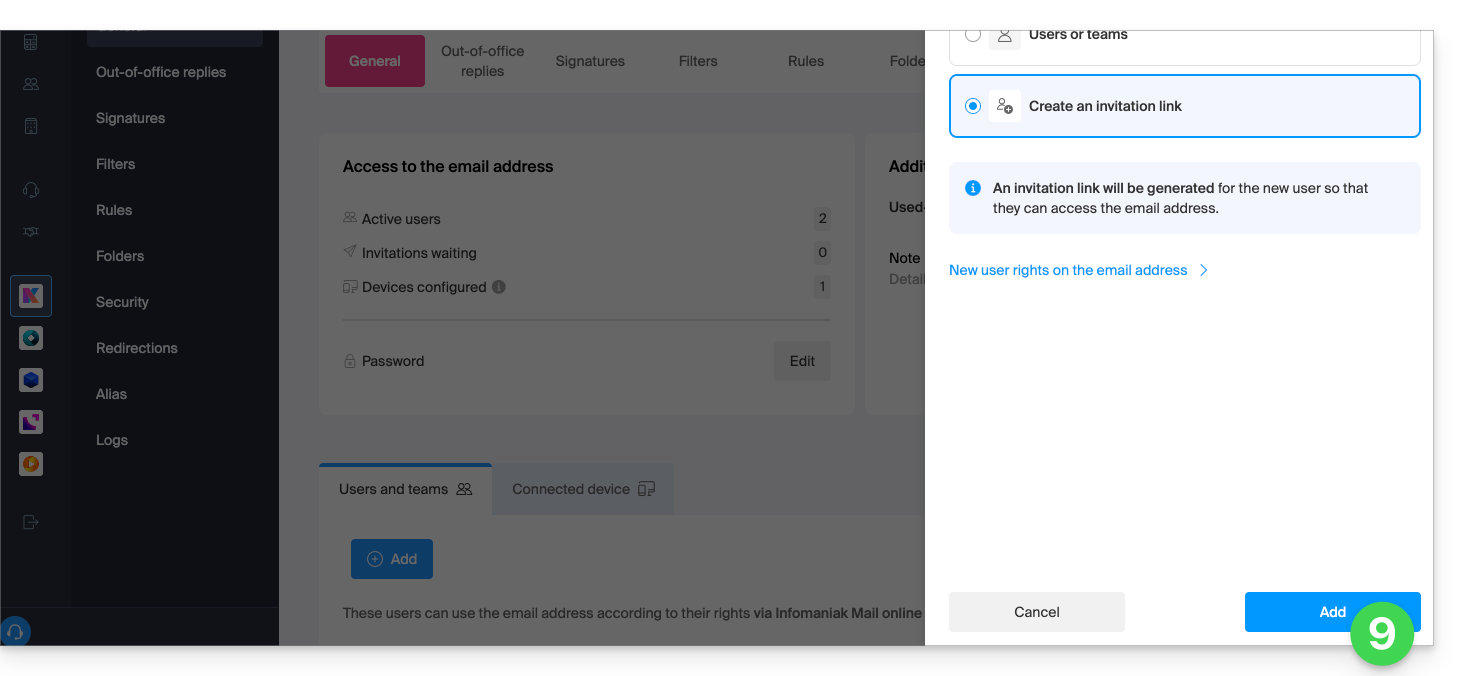
- Click on Add to complete the invitation:
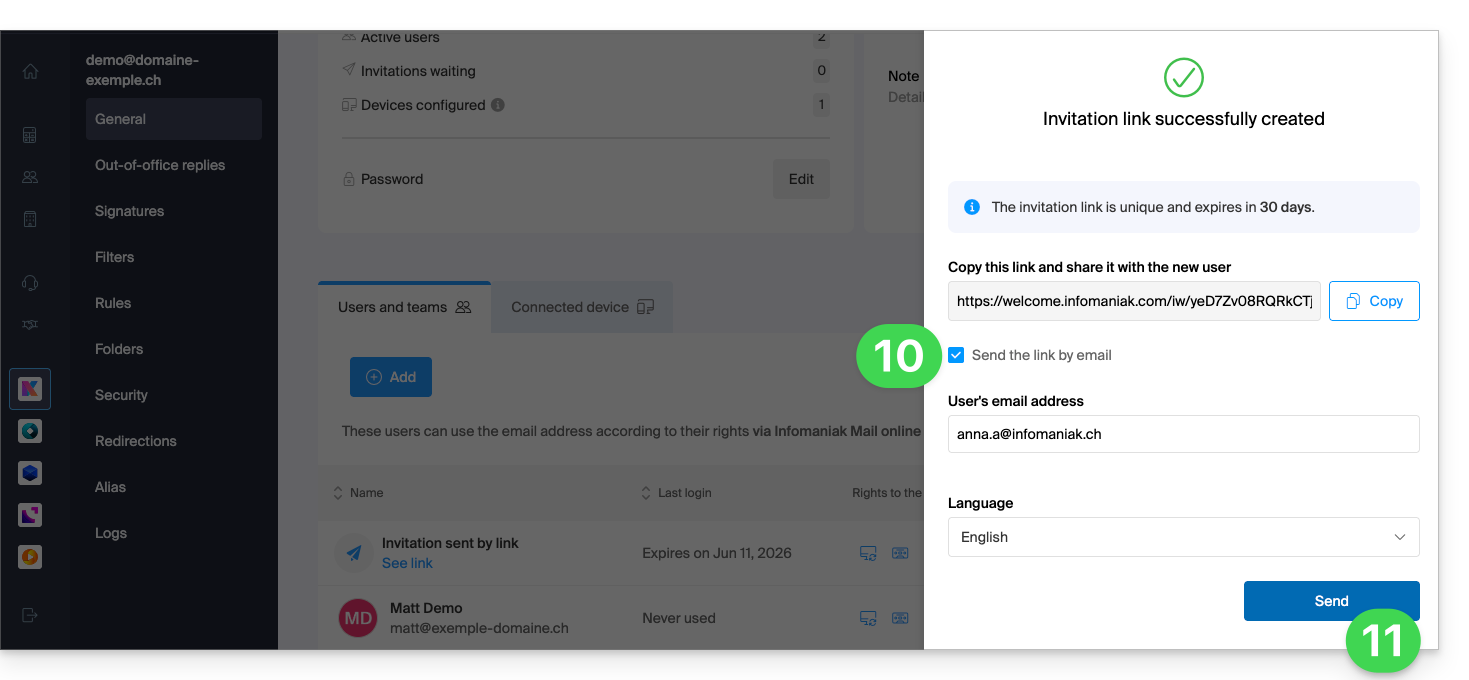
- Enter an email address to which to send the invitation.
- Click on Send:
The invited user accepts the invitation: they thus access the email address and its messages, but the button to compose a new message will remain grayed out with no possibility for them to draft a message (or even reply, react, etc. as these buttons will also be grayed out/deactivated):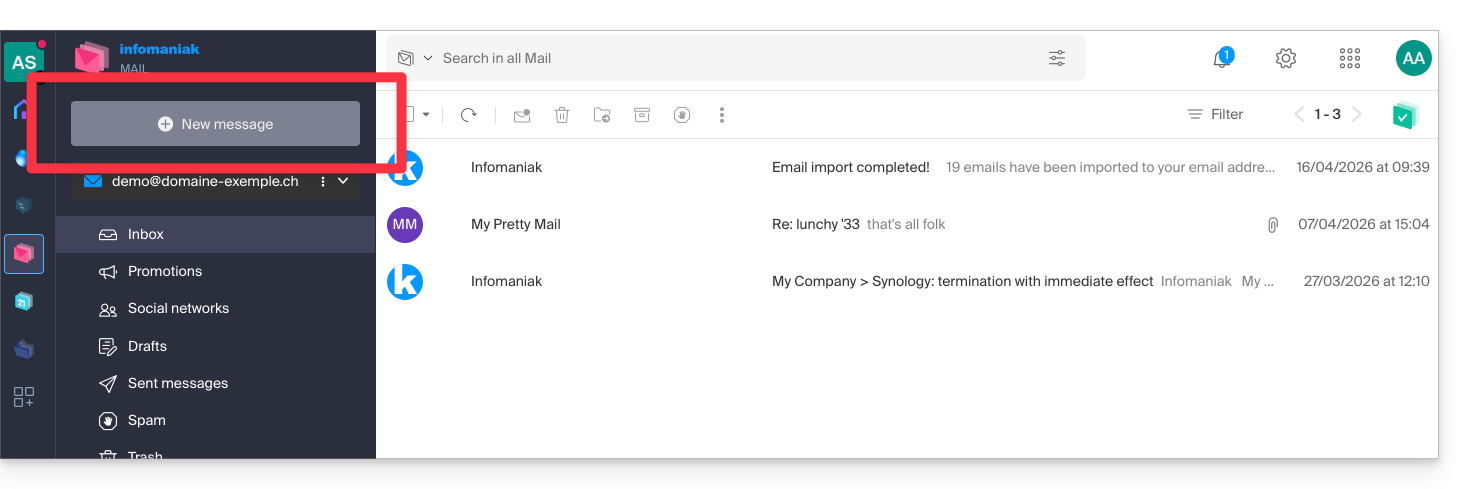
Prevent sending to an existing user
Do you want to allow collaborators to continue to access an email address (be able to read incoming emails) but without allowing them to send new messages?
- Click here to access the management of your Mail Service on the Infomaniak Manager (need help?).
- Click directly on the name assigned to the Mail Service concerned:
- Click on the email address concerned in the table that appears:
- Click on Send emails to remove the send permission:
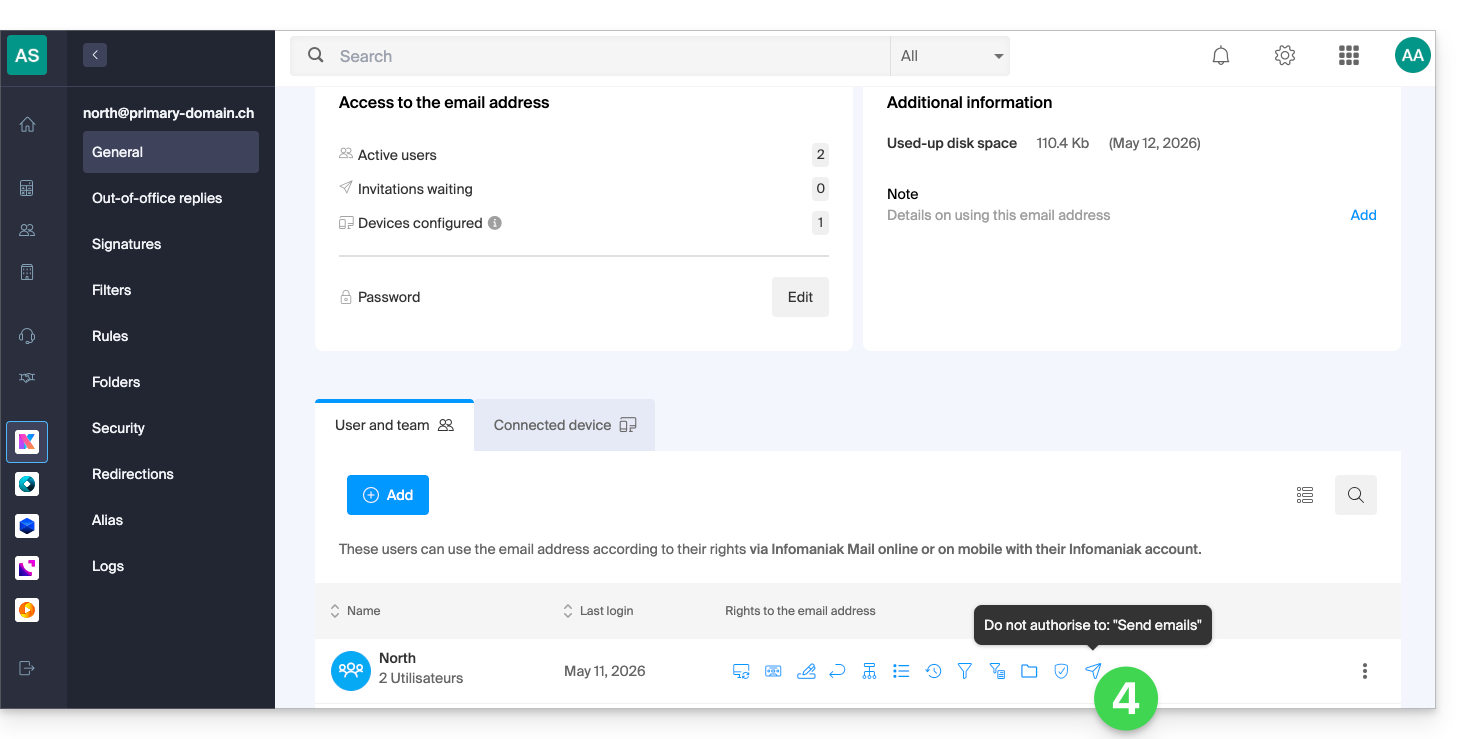
The user will access the email address and its messages, but the button to compose a new message will remain grayed out with no possibility for them to draft a message (or even reply, react, etc. as these buttons will also be grayed out/deactivated):
Prevent sending from an SMTP email client/software
If you want to prevent the user from sending emails from an email client/software or any fixed and mobile device containing an SMTP email app, start by following the steps above.
You will then need to create a password (= "connected device") linked to this user (so at point 8 of this other guide instead of “Without user” you will need to specify the identifier of the collaborator concerned, already added in the users tab):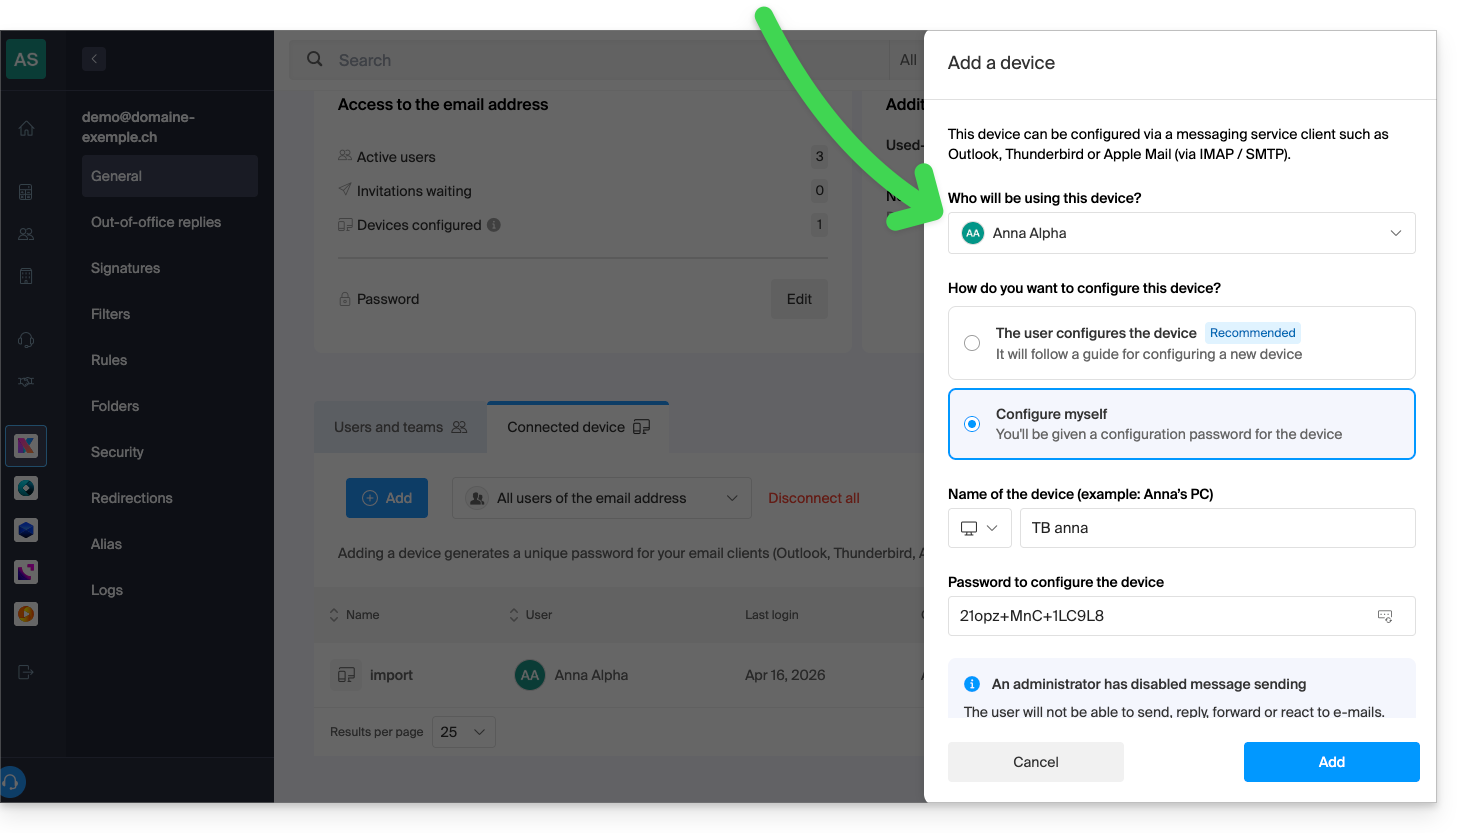
Thus, their email client/software can be configured to receive emails but will not allow any sending, causing a continuous error (password request) if the user insists on sending an email: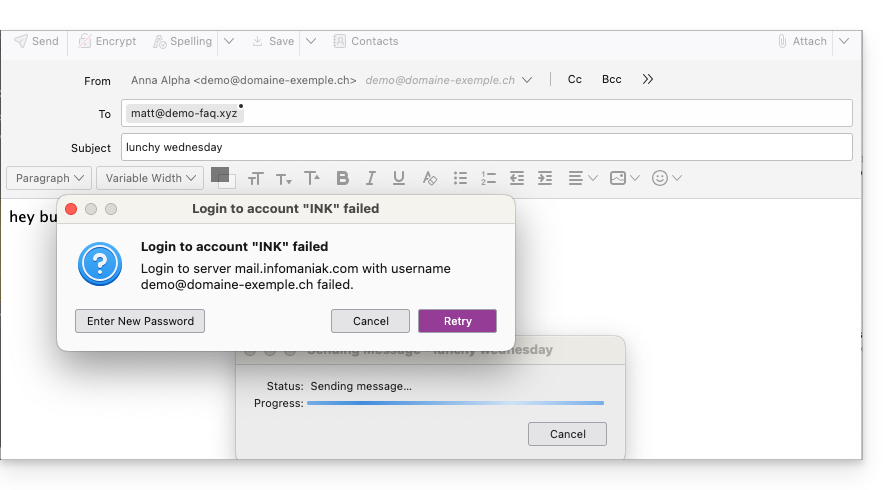
Link para esta FAQ: https://faq.infomaniak.com/593
Esta seção de perguntas frequentes foi útil?
This guide explains how to manage the passwords for an email address from the Infomaniak Mail web app (online service ksuite.infomaniak.com/mail).
Other access and management options are presented in the main guide.
Prerequisites
- You must have permission to manage devices: it is possible that the Mail Service administrator has removed this right from their admin account.
Add or remove a connected device
Create and display a new password to add the email address to your computer, mobile app, etc.
To manage the password for an email address that is already linked to your Infomaniak Mail web app:
- Click here to access the Infomaniak Mail web app (online service ksuite.infomaniak.com/mail).
- Click on the action menu ⋮ to the right of the email address in question.
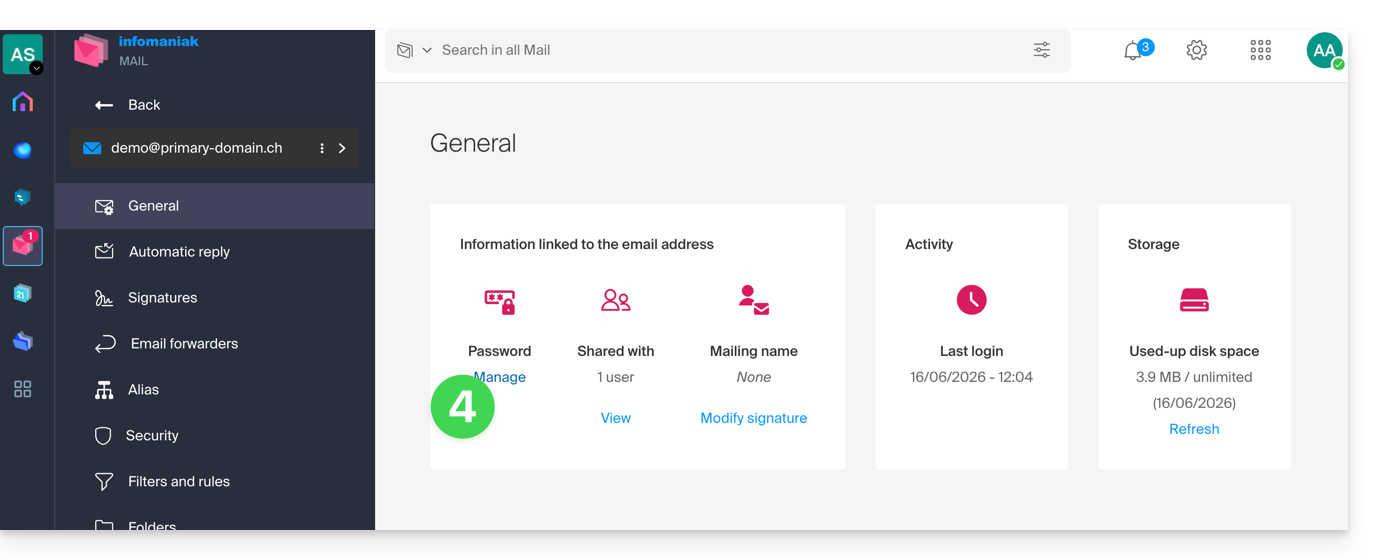
- Click on Address settings:

- Click on Manage password:
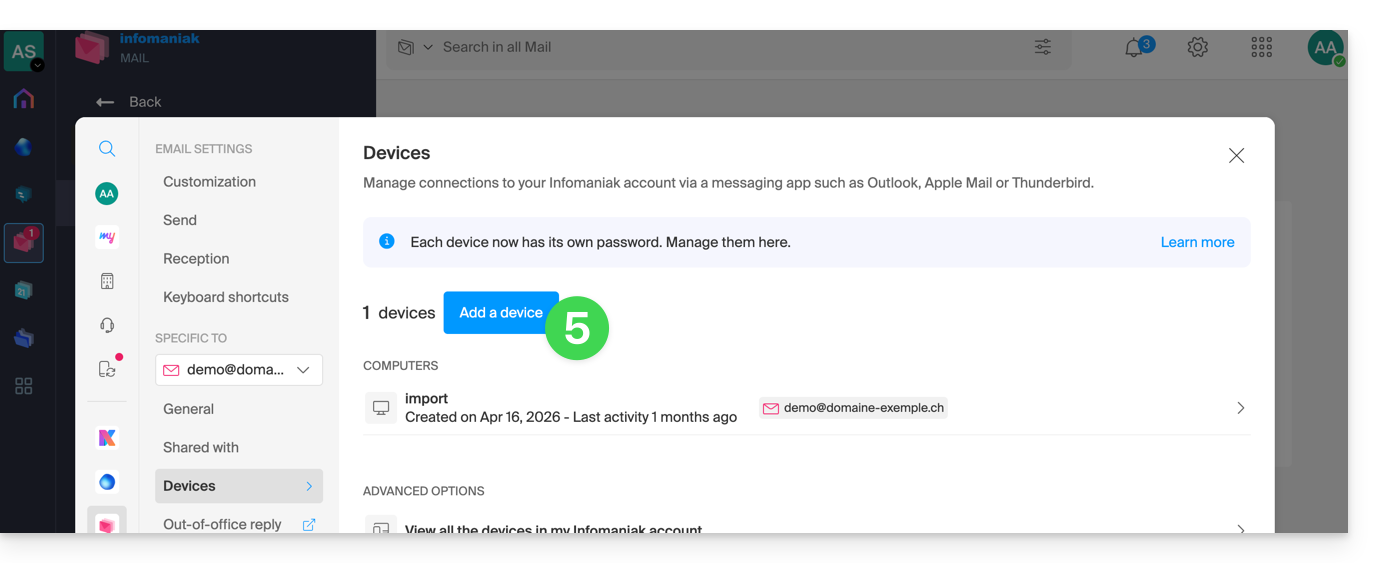
- Click on Add a device:
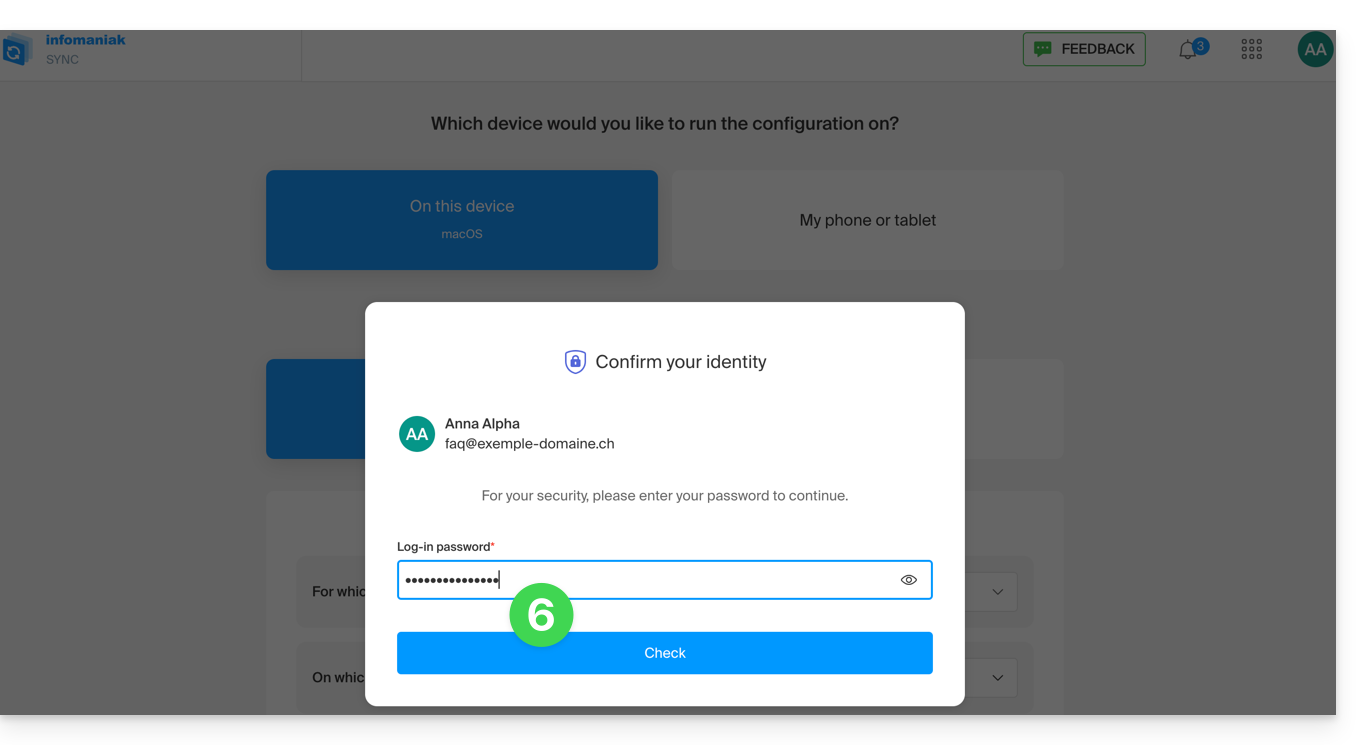
- Enter the password to log in to your Infomaniak account if prompted:
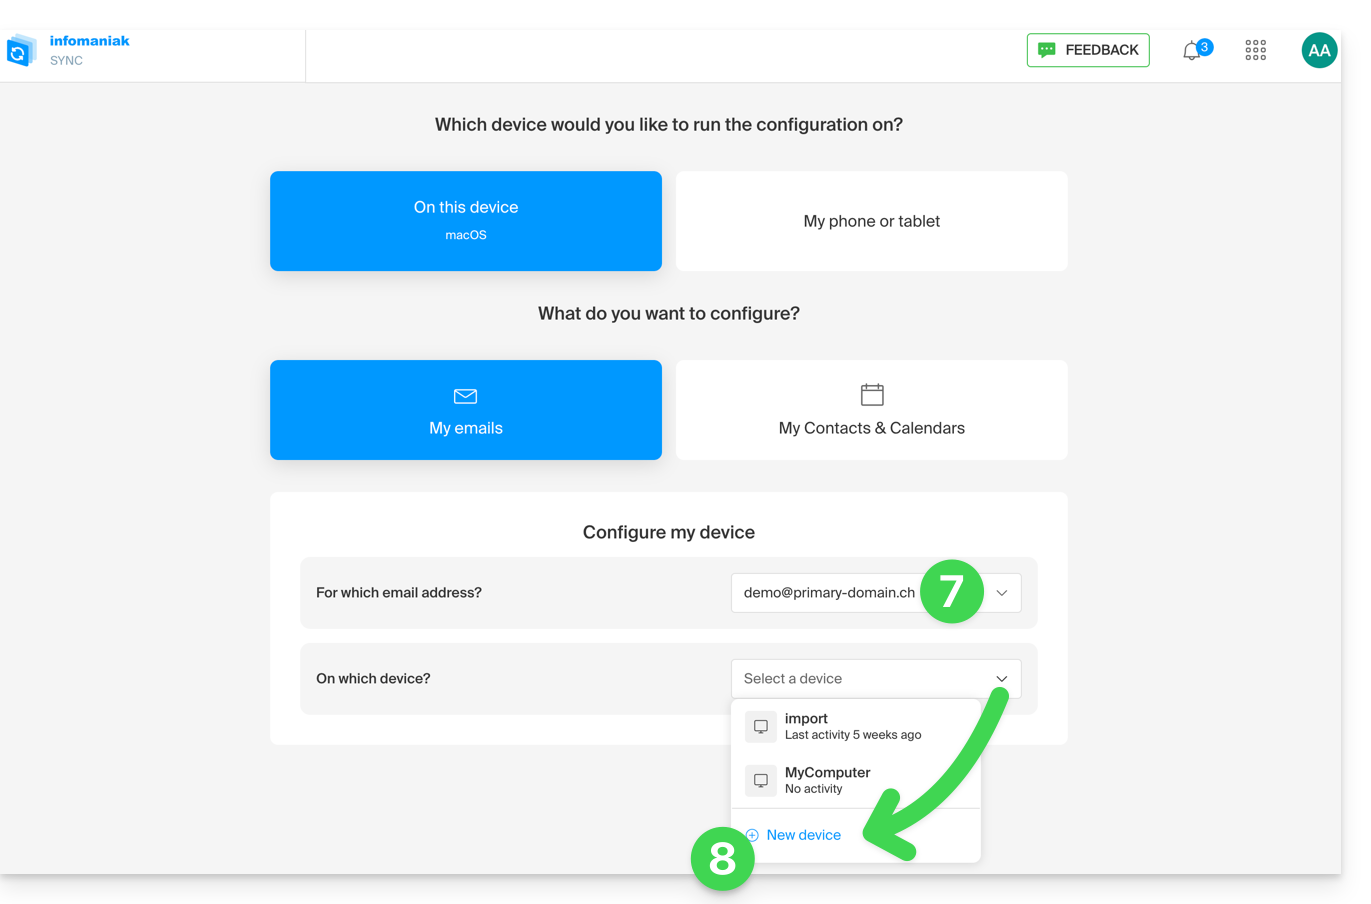
- The configuration wizard will then open on the MAIL section; check or select the relevant email address from the drop-down menu.
- Select “new device” from the drop-down menu:
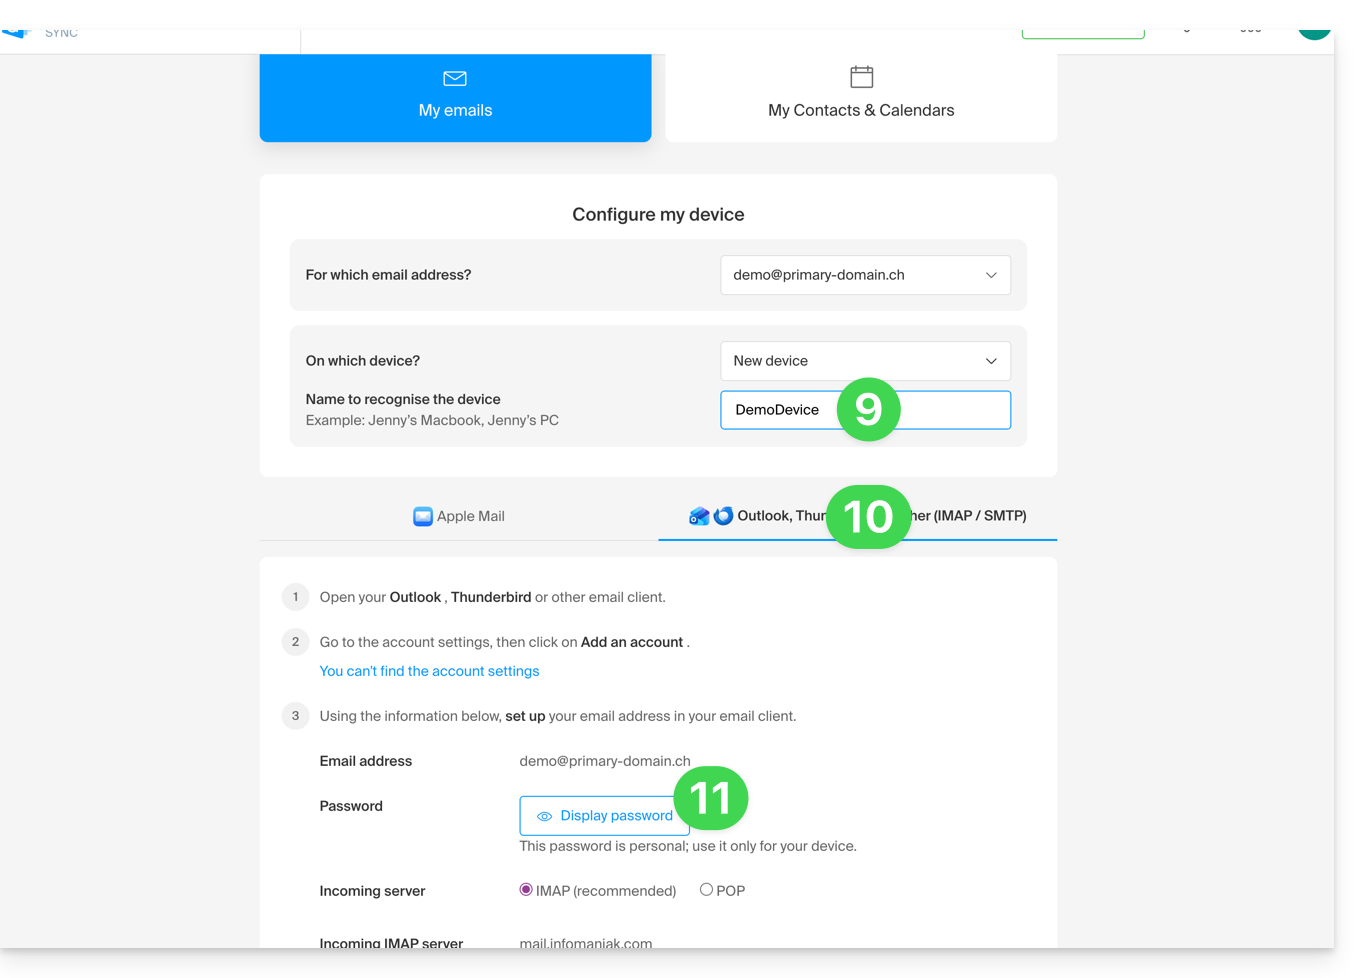
- Give the device a description.
- Click on the tab corresponding to your needs (either the procedure for Apple Mail, or any other IMAP/SMTP configuration).
- Scroll down and click the button to generate a password:
- A new password will be created and displayed:
- you can modify it by clicking on the button, but don't forget to save it:

- you can modify it by clicking on the button, but don't forget to save it:
- Then, copy it and keep it safe (e.g., in a password manager); it will no longer be possible to display it later.
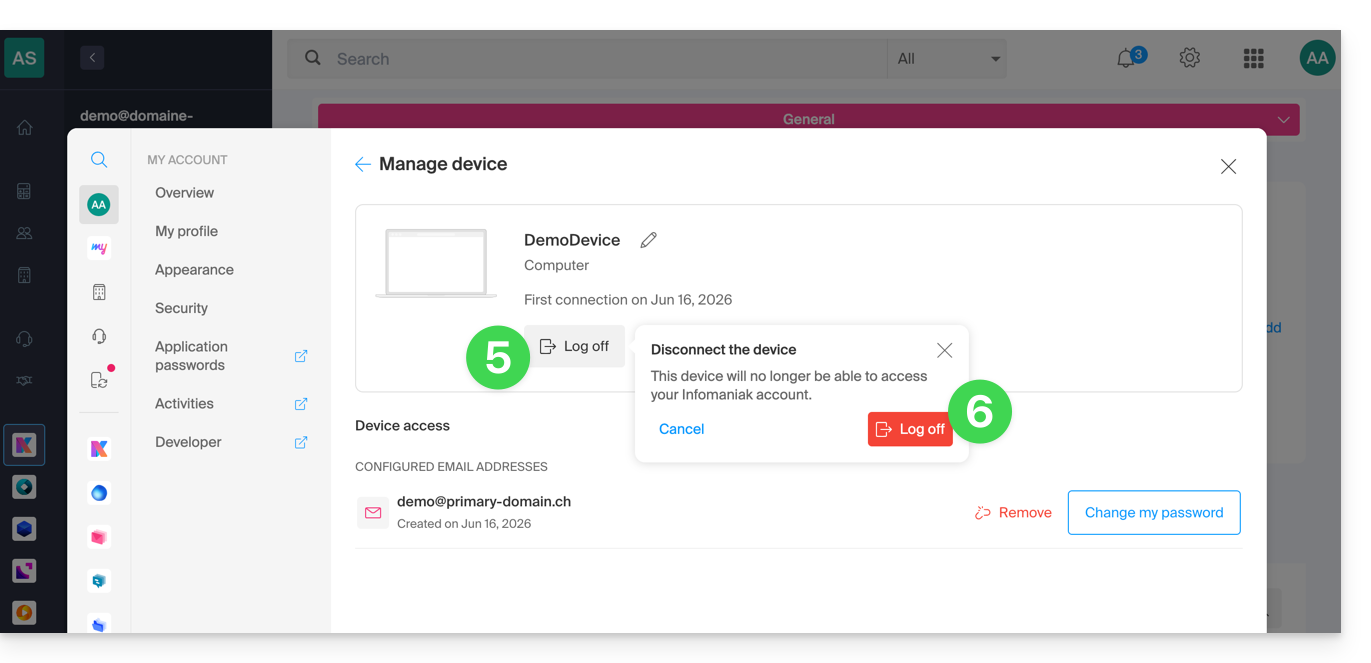
Delete a password to cut off access from a computer, mobile app, etc.
At any time, you can manage the created/used access:
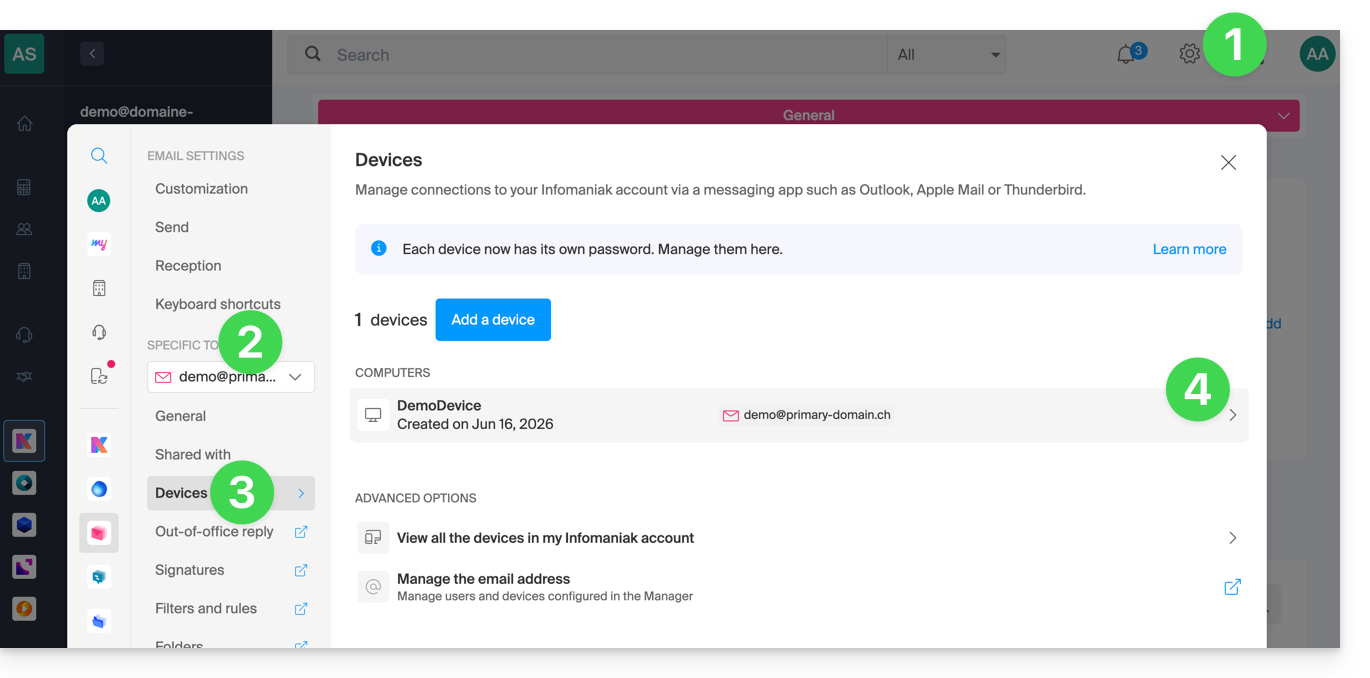
- Click on the Settings icon in the top right corner of the interface.
- Check or select the relevant email address from the drop-down menu in the left-hand menu.
- Click on Devices in the left-hand menu.
- Click on the device in question:
- Click on the button to disconnect the device.
- Confirm the disconnection of the device in question:
Link para esta FAQ: https://faq.infomaniak.com/711
Esta seção de perguntas frequentes foi útil?
This guide explains how to copy the content of one or more external email addresses (all email messages, folders, subfolders, in short, the entire structure of your existing mailbox with other providers) to one or more of your existing addresses at Infomaniak, using the Infomaniak import tool!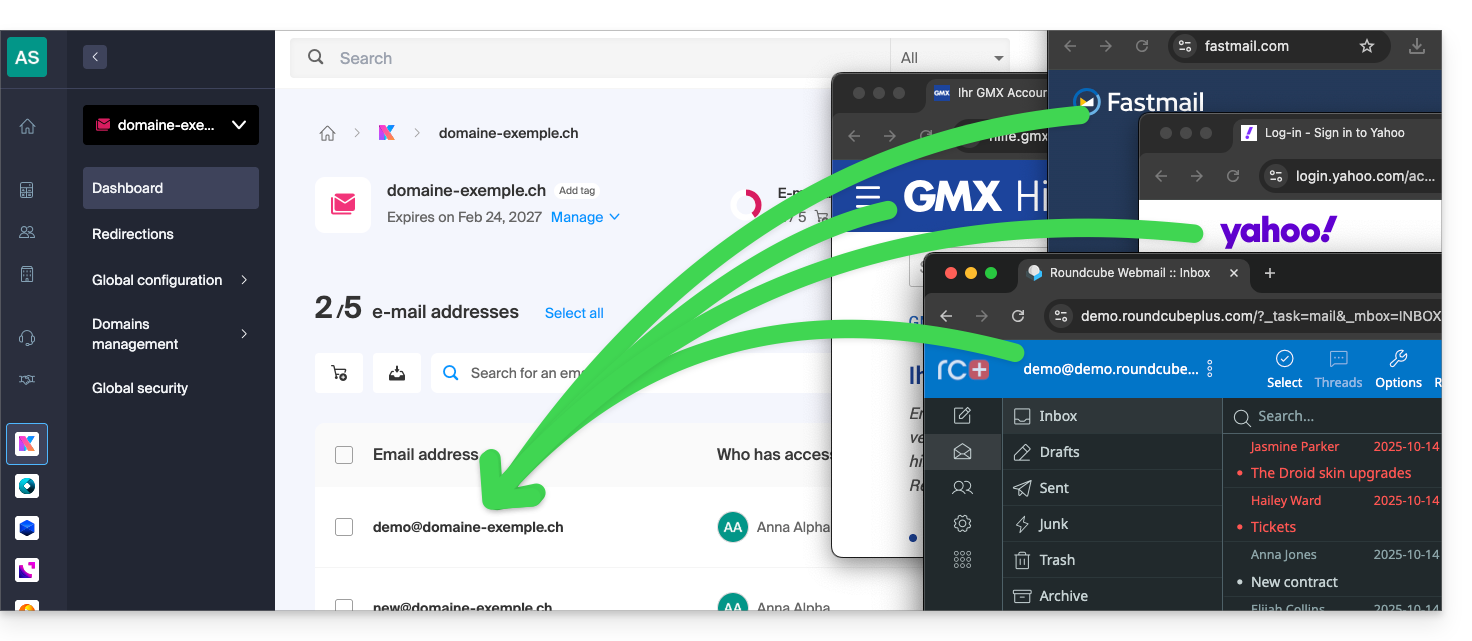
Introduction
- It is easy to transfer the entire structure of your emails to Infomaniak - discover the offers.
- This operation does not affect the data already present in the destination address or the source address.
- The entirety of the external mailbox will be imported as a copy.
- Once the import process has started, it is no longer possible to interrupt it.
- Any duplicates are managed: identical content will only be copied once.
Start copying to an Infomaniak email address
Several options are available for importing emails:
- Do you want to copy emails already present at Infomaniak (e.g., @ik.me) to another mailbox also at Infomaniak?
- Refer to this other guide to copy email content internally.
- You have a file/archive in MBOX format and want to import it directly into an existing address on Infomaniak?
- Refer to this other guide to import the content of the
.mboxfile and thus import your emails, regardless of their origin, to Infomaniak. - This is ideal for easily transferring content from Google, as an MBOX file can be easily obtained via Google Takeout.
- Refer to this other guide to import the content of the
- If you were unable to obtain an MBOX file of your emails, you can copy emails from an external provider using the IMAP import tool; click on the link corresponding to the email provider to be imported:
- addresses @ Bluewin
- addresses @ Gmail or custom domain Google
- addresses @ GMX
- addresses @ custom domain Microsoft 365
- addresses @ Orange
- addresses @ custom domain Swisscom
- addresses @ Yahoo
- Any other mail provider such as Gandi, Hotmail, Hostinger, Sunrise, etc.
Link para esta FAQ: https://faq.infomaniak.com/837
Esta seção de perguntas frequentes foi útil?
Este guia explica como configurar determinados parâmetros para que sejam automaticamente aplicados por padrão aos novos endereços de e-mail (e utilizadores) adicionados ao Serviço de E-mail no futuro.
Introdução
Para aplicar parâmetros a todos os endereços de e-mail existentes, consulte este outro guia.
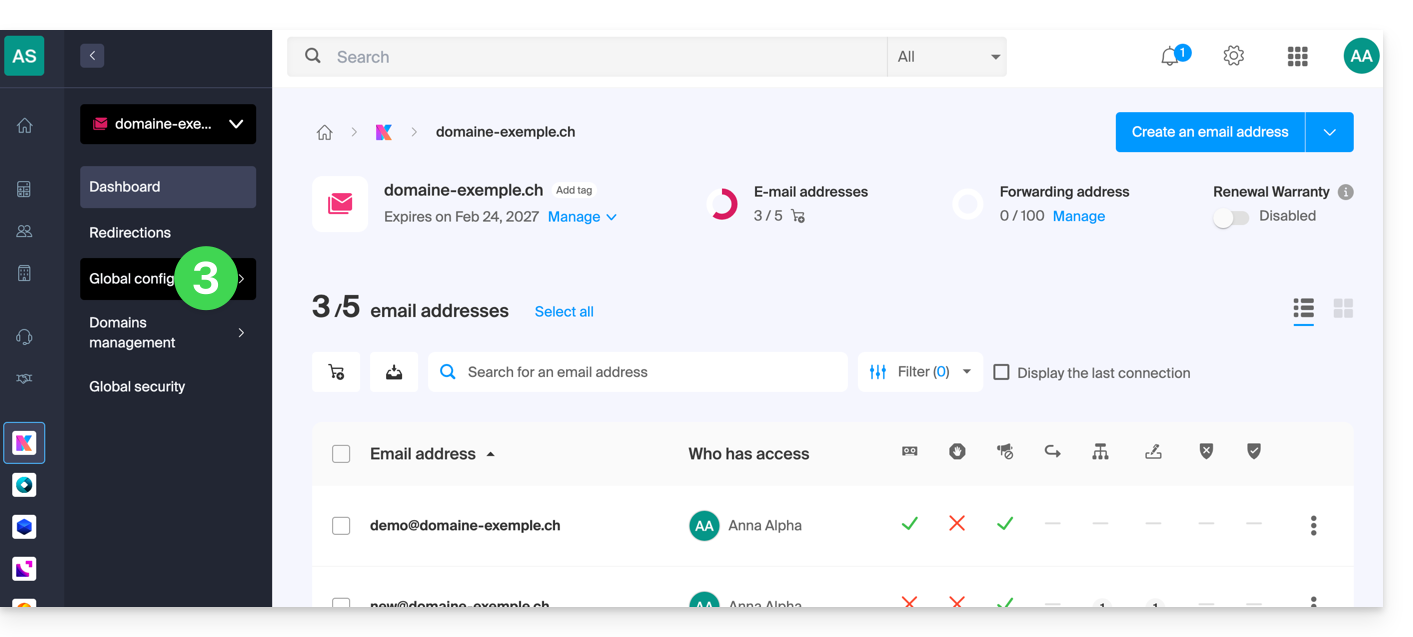
Aceder à Configuração Global do Serviço de E-mail
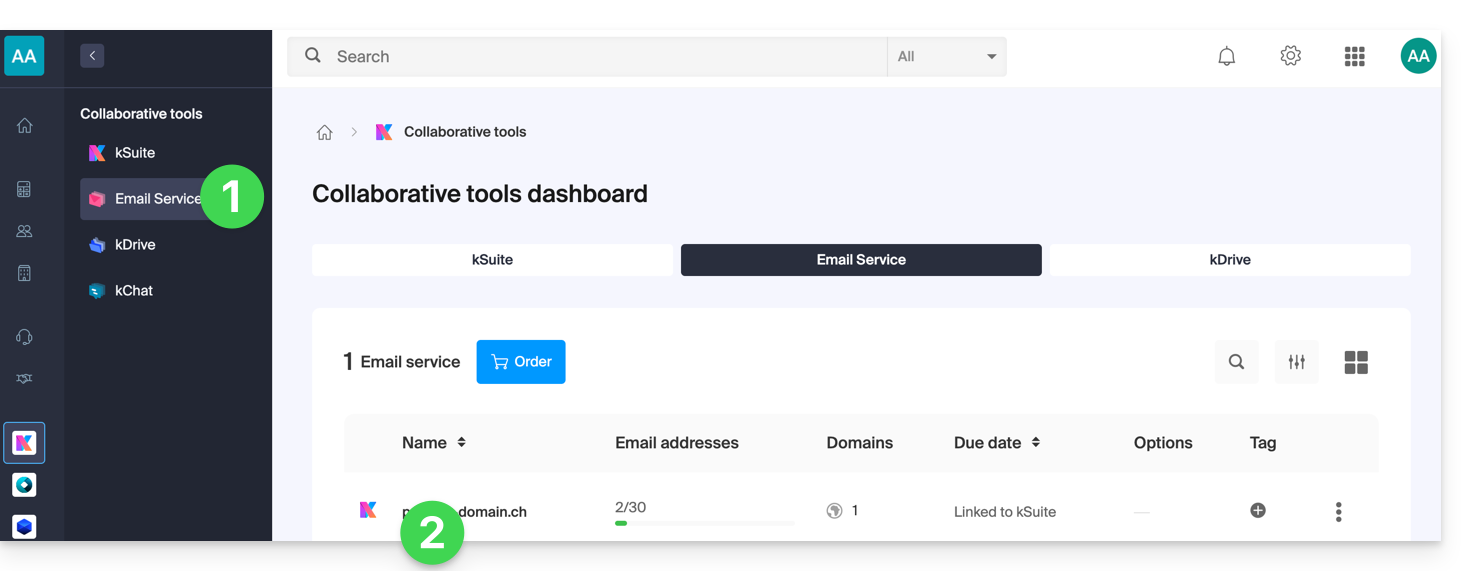
Para tal:
- Clique aqui para aceder à gestão do seu Serviço de E-mail no Manager Infomaniak (precisa de ajuda?).
- Clique diretamente no nome atribuído ao Serviço de E-mail em questão:

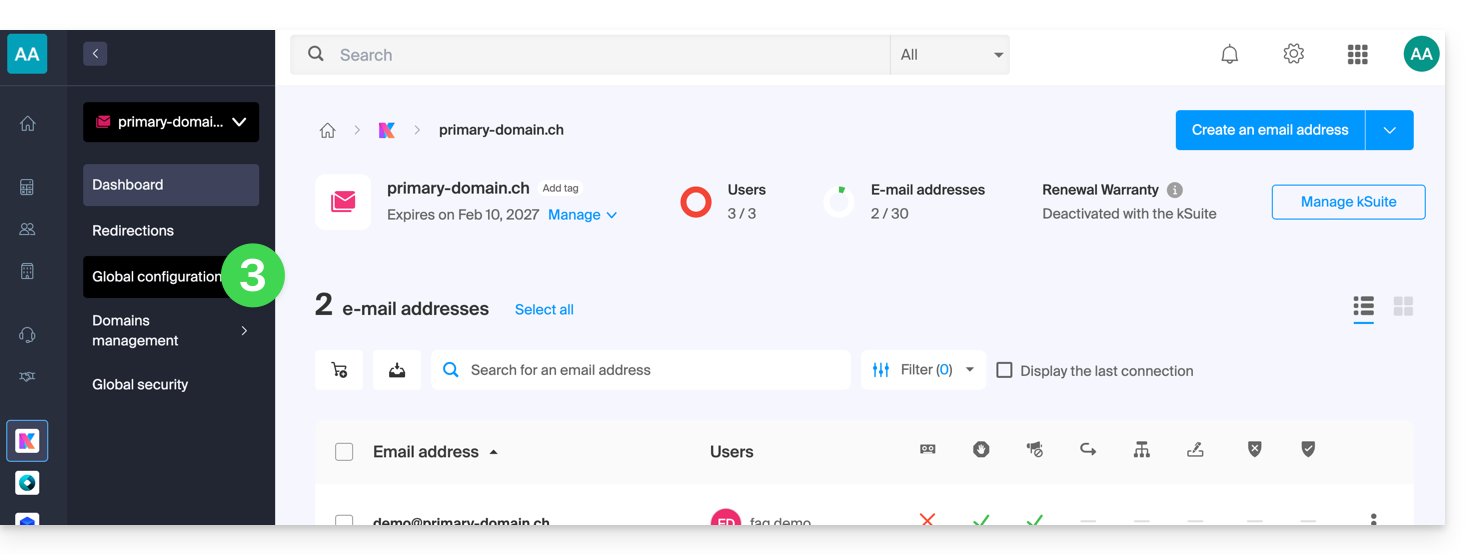
Clique em Configuração global no menu lateral esquerdo:
Pode então escolher, entre 5 secções, os parâmetros que pretende ativar ou desativar por padrão:
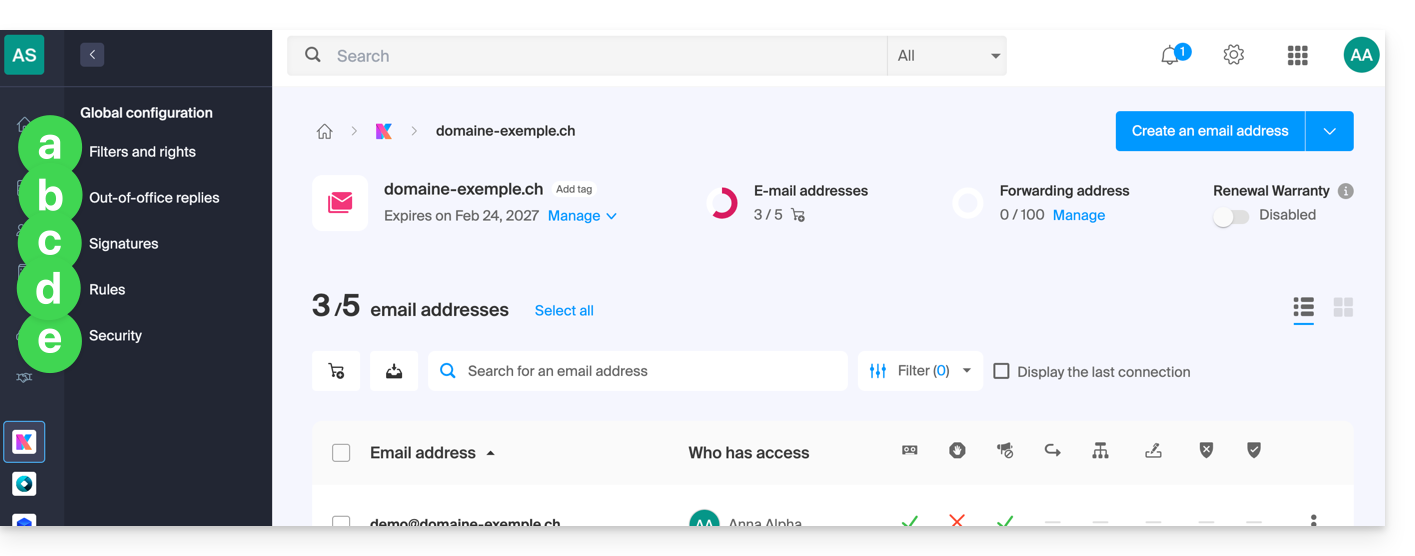
a. Filtros e permissões
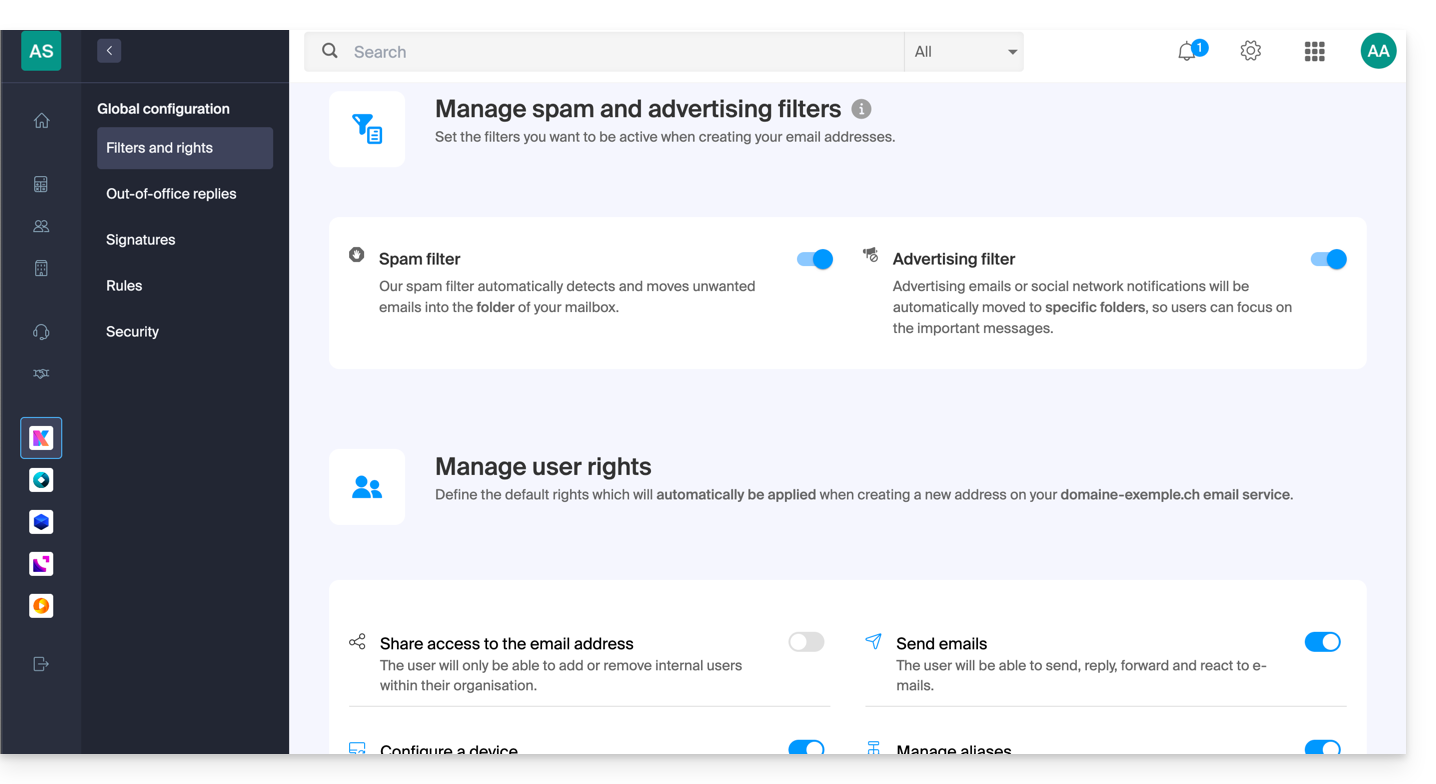
Pode optar por ativar ou desativar o filtro anti-spam quando for criada uma nova conta de e-mail no Serviço de E-mail.
O mesmo se aplica ao filtro de publicidade.
É aqui também que pode gerir os direitos padrão que um utilizador terá na conta de e-mail.
b. Respostas automáticas
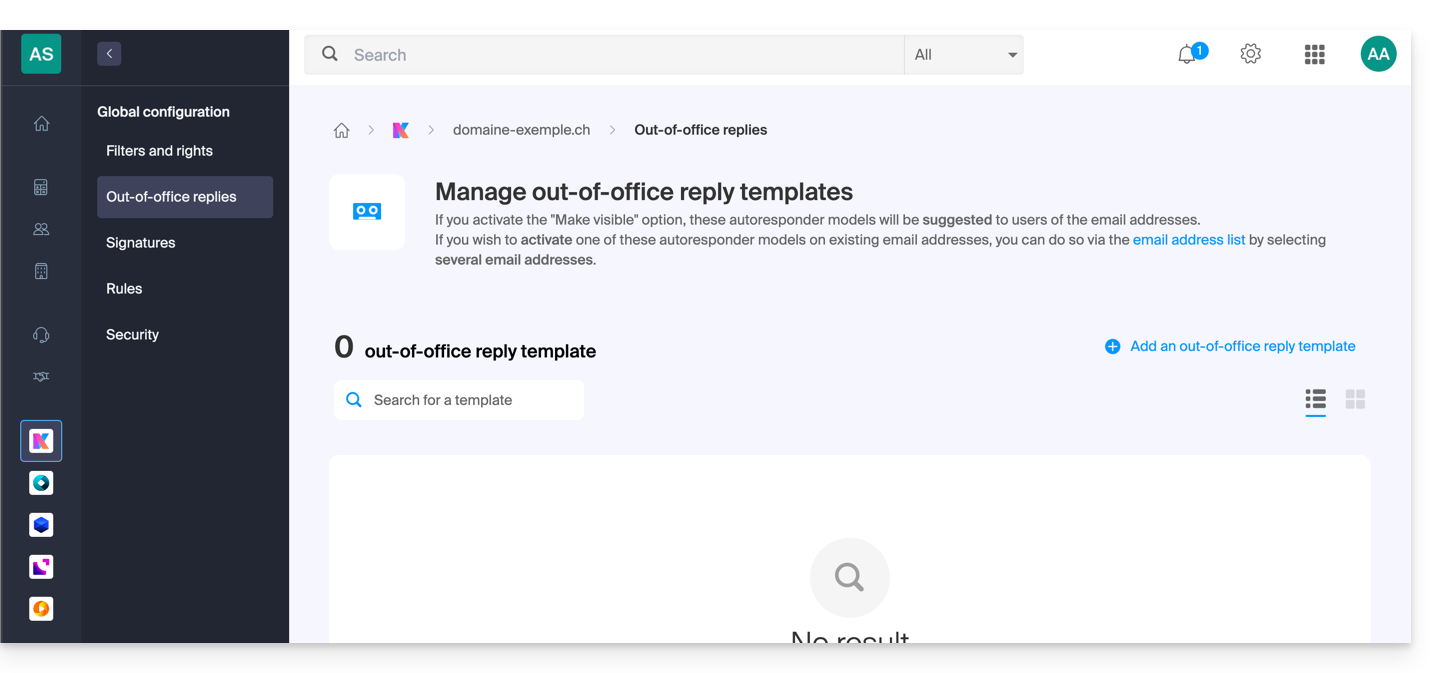
- Pode gerir os modelos de respostas automáticas que poderão ser posteriormente adaptados pelos utilizadores das contas de e-mail.
c. Assinaturas
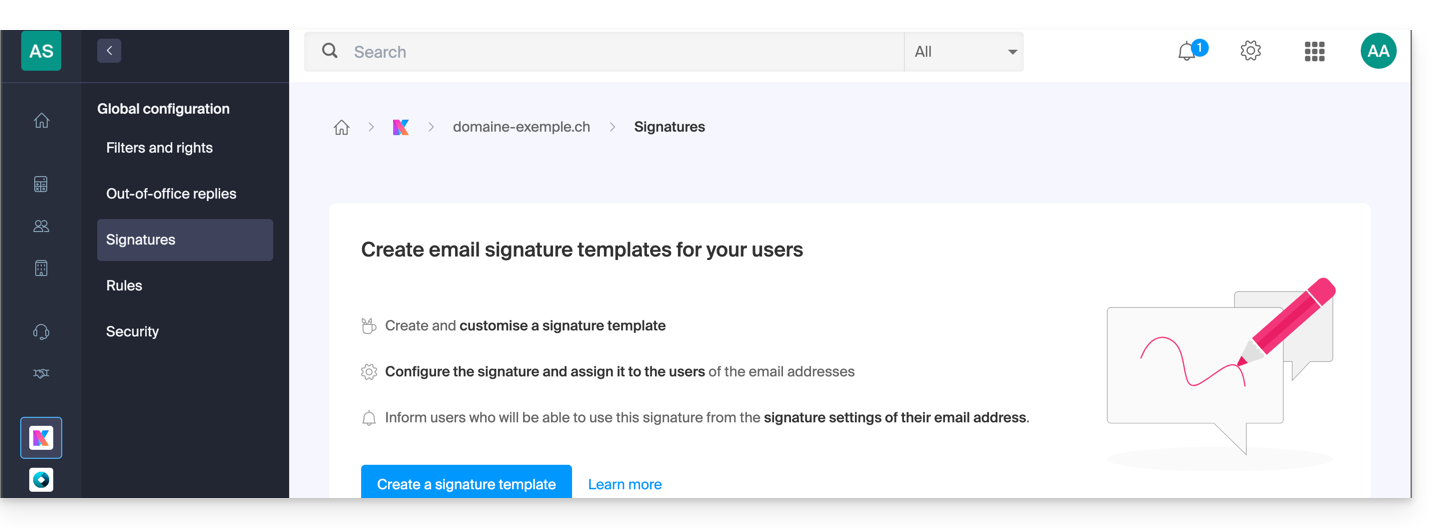
- Pode gerir os modelos de assinaturas que poderão ser posteriormente adaptados pelos utilizadores das contas de e-mail.
d. Regras
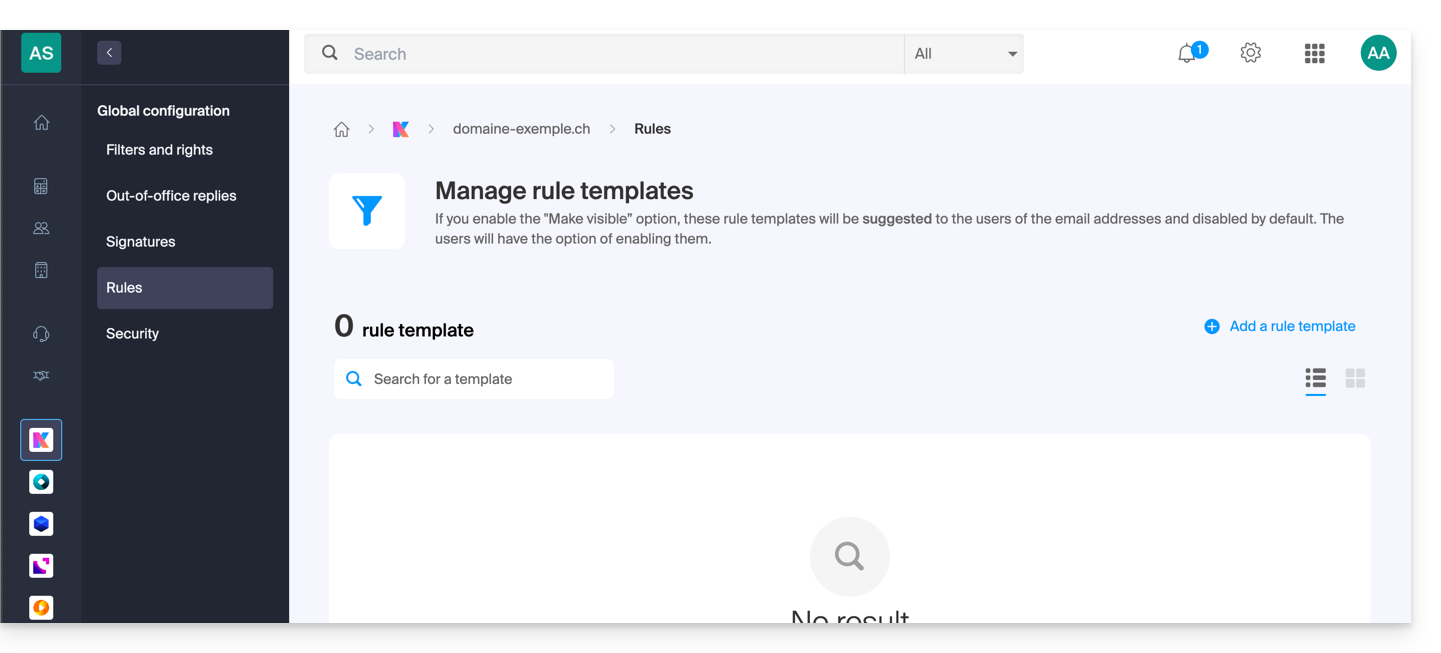
- Pode gerir os modelos de regras, que estão desativadas por padrão, e que poderão ser posteriormente adaptados e ativados pelos utilizadores das contas de e-mail.
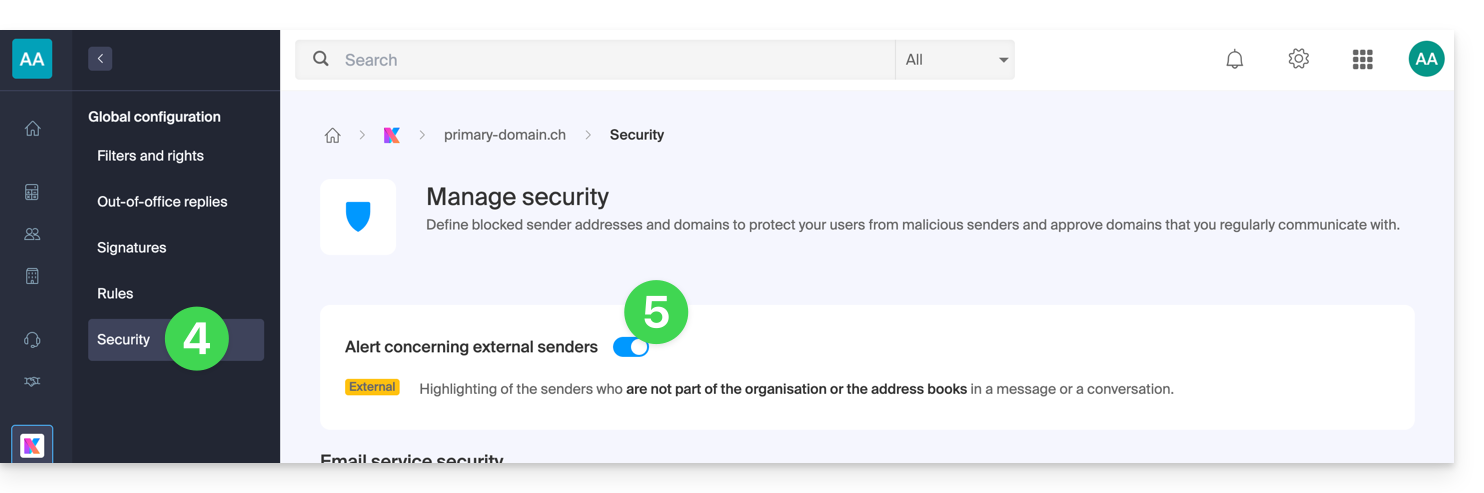
e. Segurança
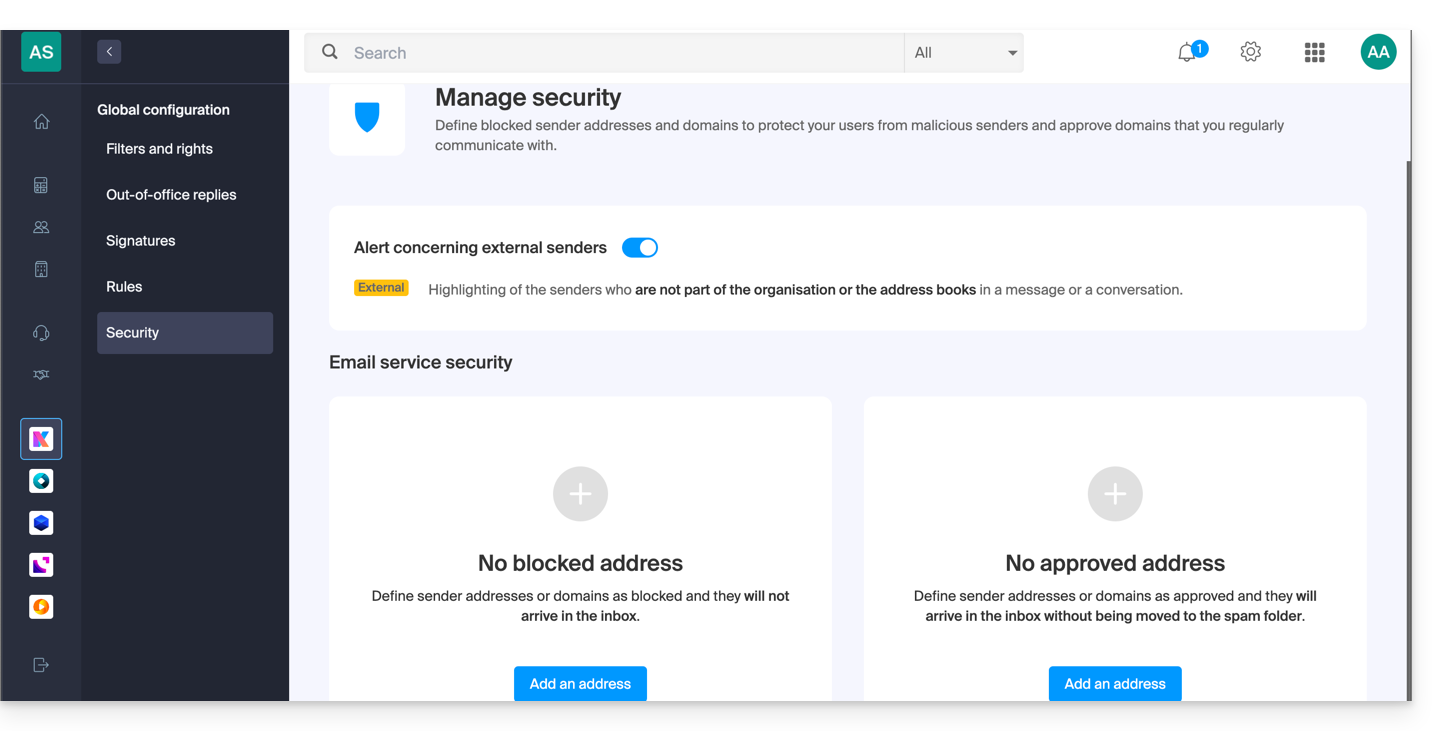
- Você pode gerenciar o aviso de e-mail externo e, abaixo, adicionar remetentes cujos e-mails sempre serão enviados para a pasta Spam, ou, inversamente, que nunca serão filtrados.
Link para esta FAQ: https://faq.infomaniak.com/843
Esta seção de perguntas frequentes foi útil?
This guide concerns kSuite and the management of users, as well as their different types of access.
Introduction
- Each kSuite includes 1 initial user offered during the subscription; compare the offers by clicking here.
- Each user is entitled to their own email address on the domain name around which your kSuite is based.
- The email address quota depends on the offer and the number of users:
- Standard: 1 user = 2 email addresses (2 = 4, etc.)
- Business: 1 user = 5 email addresses (2 = 10, etc.)
- Enterprise: 1 user = 10 email addresses (2 = 20, etc.)
- You can assign a kSuite email address to a user who is not part of the kSuite.
- To obtain more email addresses, you must upgrade the offer to increase the number of users. Example:
- You order a Business kSuite with 5 users, you benefit from a quota of 5x5=25 email addresses in total in your kSuite, which you can use (for any purpose - creating an email address within the kSuite Mail Service is the same as creating one in a Mail Service outside of kSuite).
Add a user to kSuite
Prerequisites
- The quota of users that can be added to kSuite must be sufficient (in this example, you will need to upgrade the offer first to adjust the number of users):
Then:
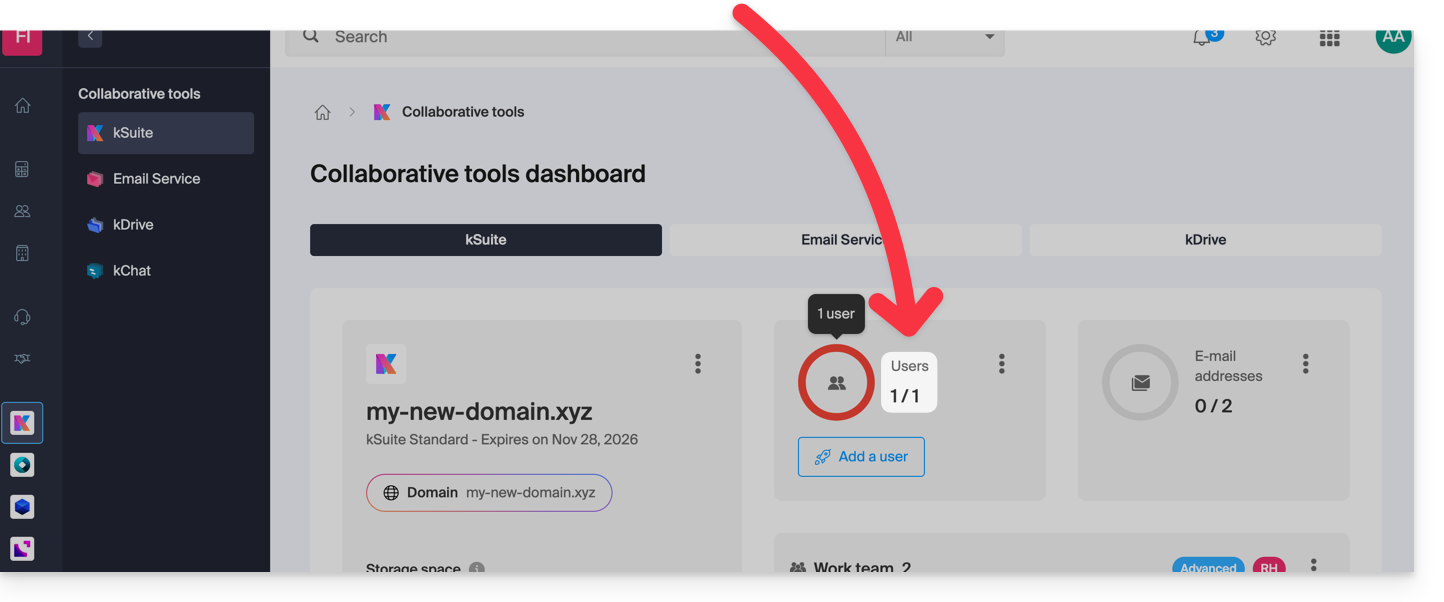
- Click here to access your product management in the Infomaniak Manager (need help?).
- Click on the action menu ⋮ in the Users section.
- Click on Add a user:

- Two options are available:
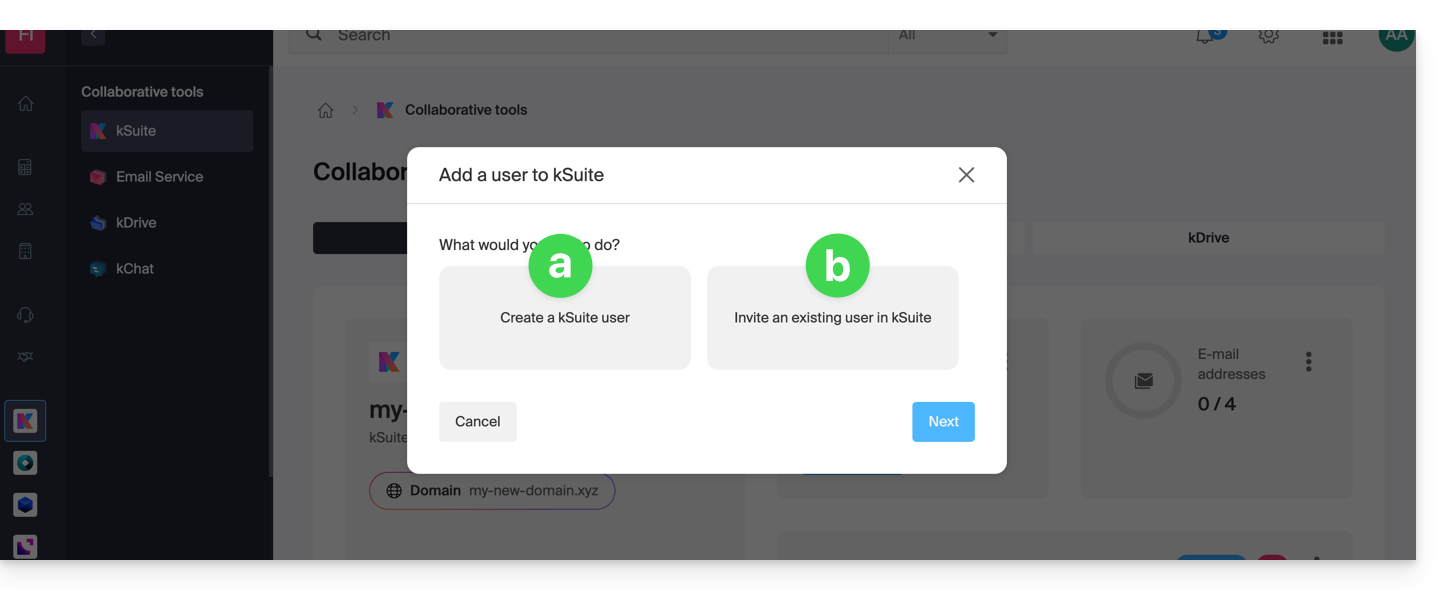
- Add a user who is not yet associated with the Organization where kSuite is located: you will need to configure and generate an invitation, specifying whether the user will receive an email address and, if so, whether they will need to log in with it, etc.
- Add a user who is already part of the Organization where kSuite is located: this is the same process as going to the profile of the user in question within your Organization and adding them:
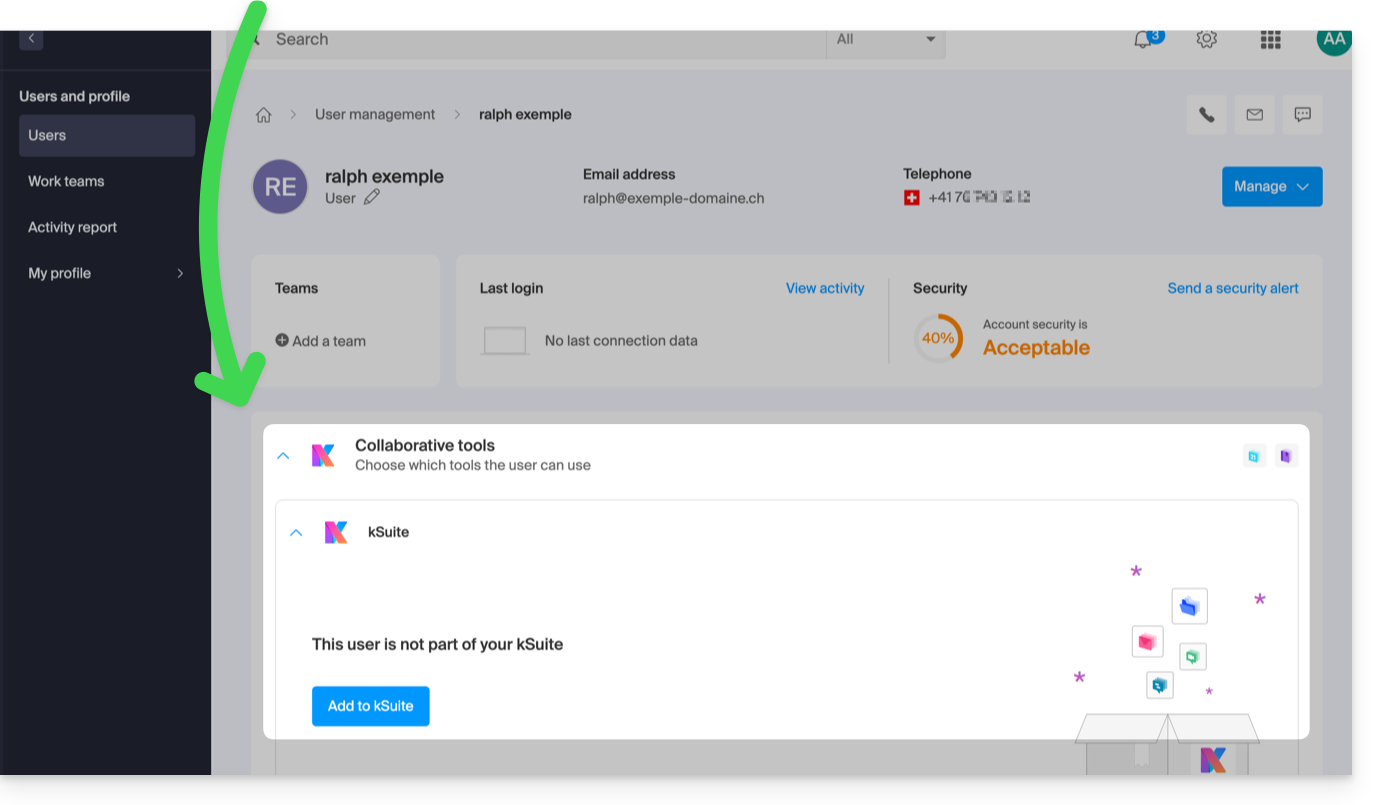
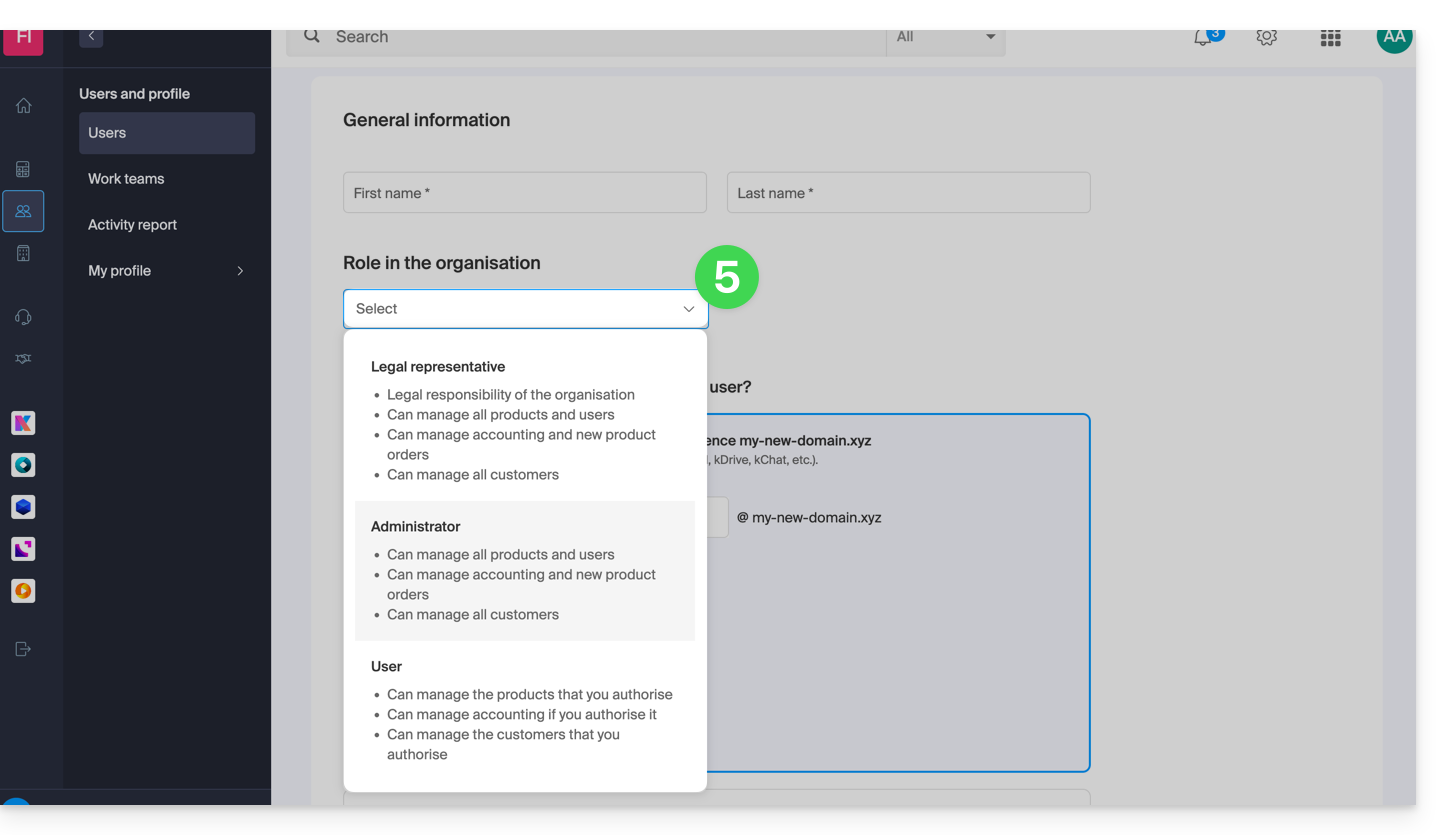
- In both cases, follow the wizard, carefully reading the instructions, especially the detailed characteristics of each role that can be assigned to the user:
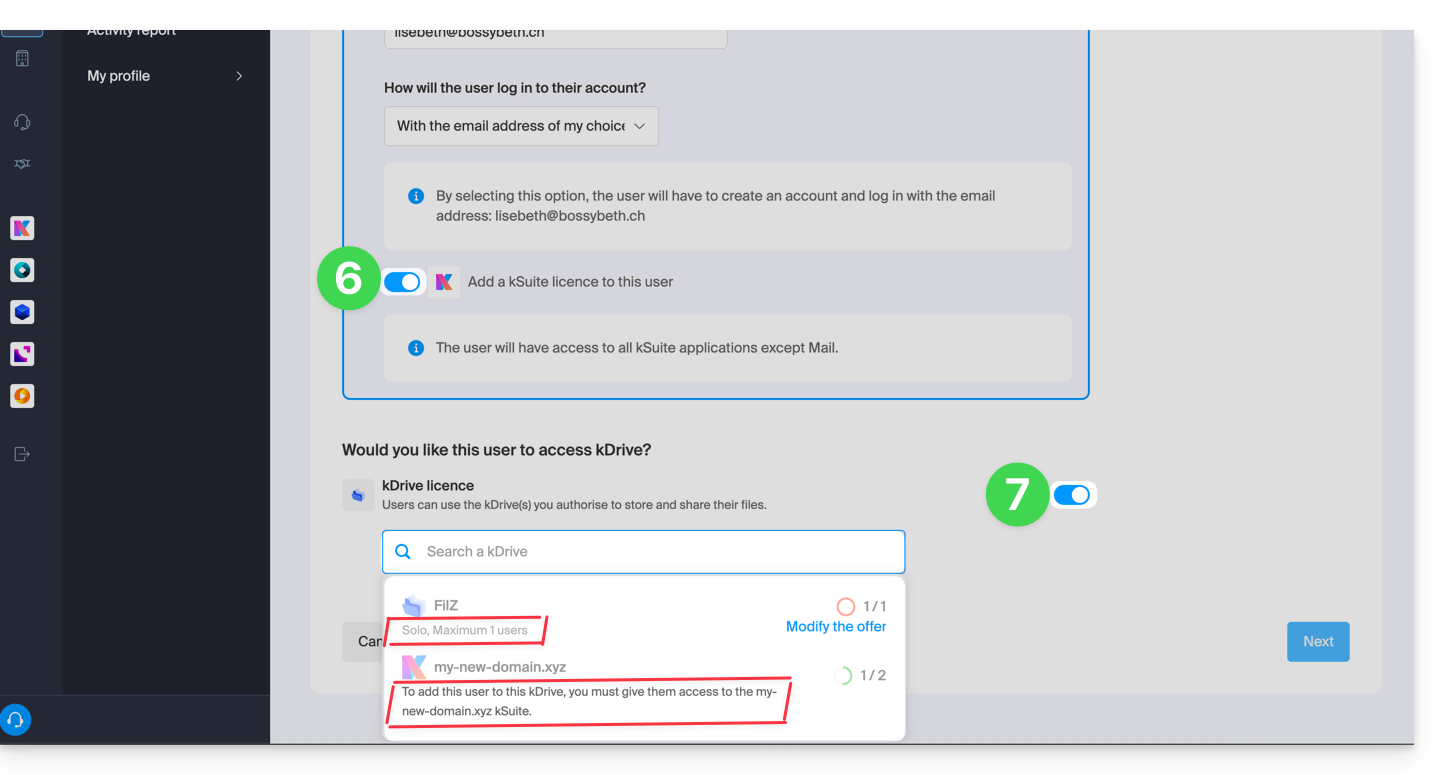
- Activate a kSuite license so that the new user can access kSuite.
- Enable access to kDrive if necessary (provided that the kDrive is multi-user and belongs to the kSuite to which you are adding the user):
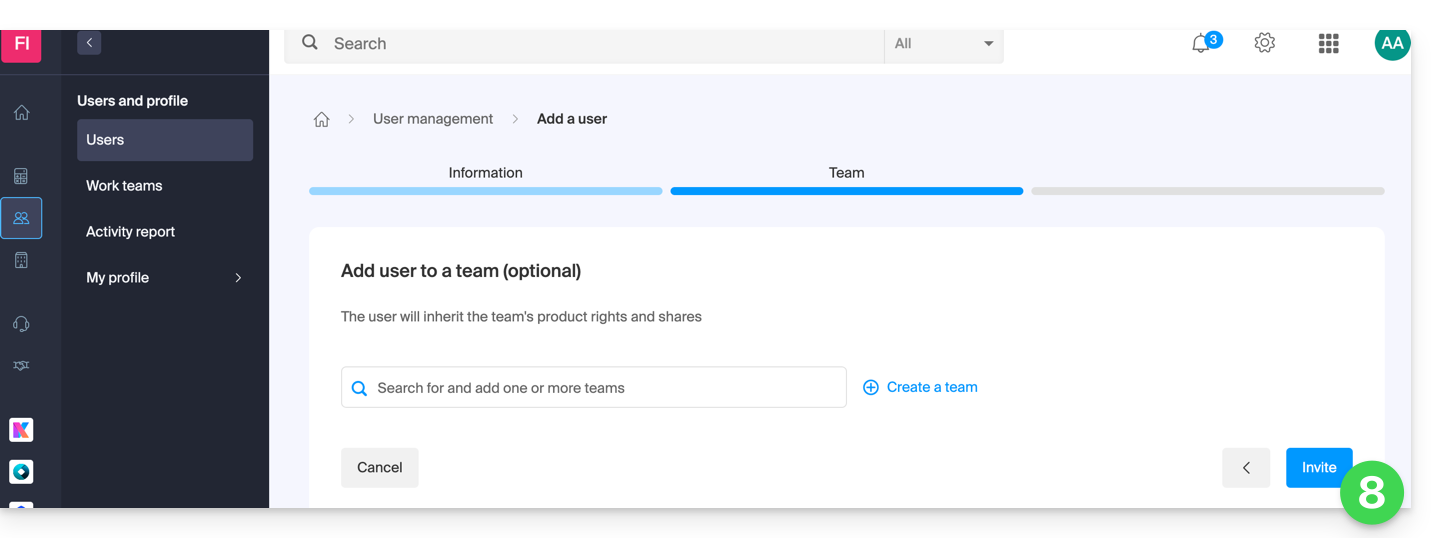
- The last step allows you to manage the Groups section if you wish; finish by clicking the button to generate the invitation:
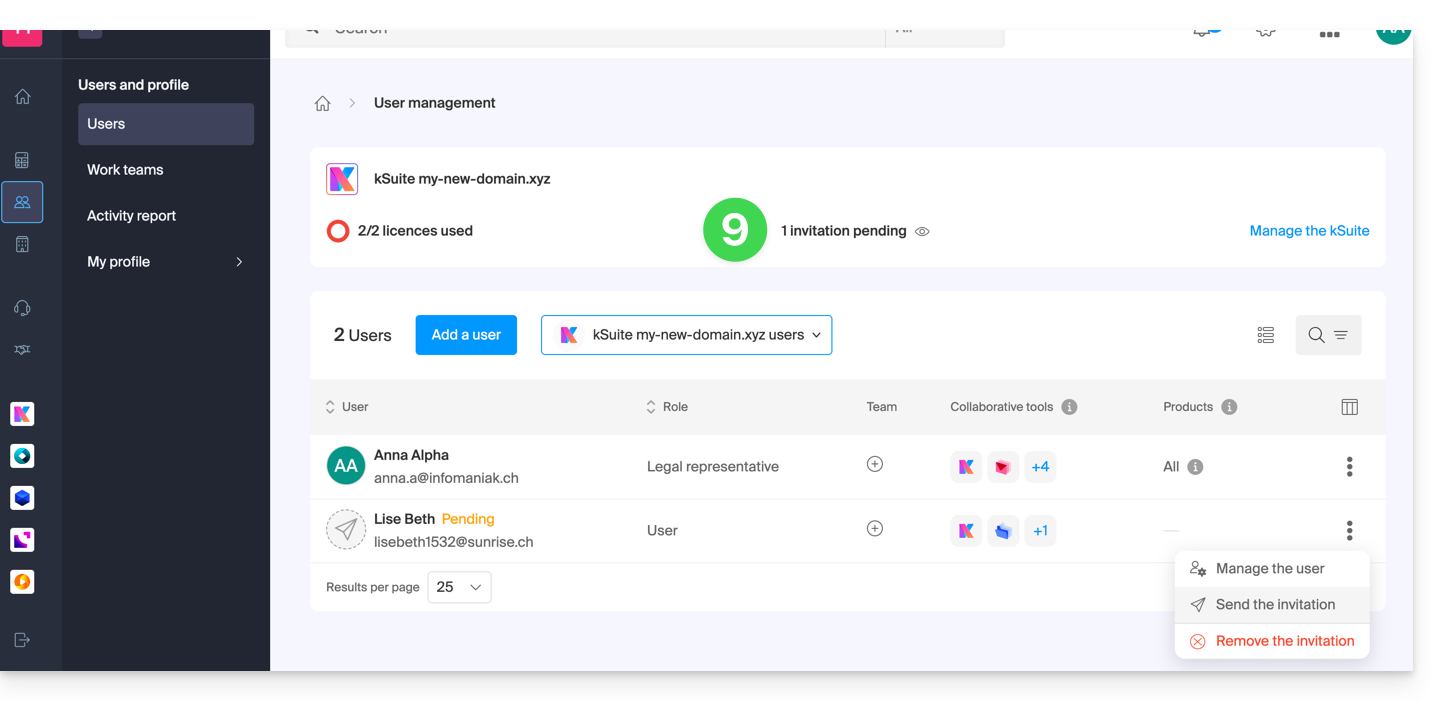
- The user, whether they are already part of the Organization or not, will receive an invitation to their email address inviting them to join the kSuite; in the meantime, they are listed as a pending user, and you can resend the invitation to them at any time:
kChat and kDrive Examples
- Refer to this other guide to add an external user to the Organization so that they can use kChat and kDrive without the products themselves being visible in the Manager directly.
- Refer to this other guide for examples of adding users to kDrive / kSuite.
It is not possible to add a user so that they only have access to kDrive or kChat separately. In this case, it would be better to use, for example, the sharing features so that third parties can join kDrive temporarily.
Link para esta FAQ: https://faq.infomaniak.com/879
Esta seção de perguntas frequentes foi útil?
This guide explains how to contact Infomaniak Support and grant them access to your online products, particularly their content, and provide useful details when submitting a support request.
Contacting Infomaniak Support
Some email addresses, such as support@infomaniak.com, are not intended for receiving direct support requests.
Messages sent to these addresses are not processed by the teams and do not allow for tracking the request.
To ensure proper support, each request must be submitted only through the support center:
- This process generates a ticket, automatically routes the request to the relevant department, and ensures complete follow-up until resolution.
- Once the request is registered, the communication can then continue directly via email with the support team.
Before contacting support, it is also recommended to consult the knowledge base, which contains many guides and answers to frequently asked questions.
Granting Support Access to a Type of Content
Infomaniak Support may ask you to grant temporary access to a portion of your content; this saves time in the diagnosis by avoiding unnecessary back-and-forth communication:
- This access is strictly limited to the context of the analysis and is used only to identify the source of the problem:
- Only Infomaniak employees directly handling your support request.
- Access is only granted from Infomaniak's controlled facilities.
- In accordance with Infomaniak's privacy policy, your data will never be used for other purposes:
- You can revoke this access at any time.
- Otherwise, it will expire automatically after 7 days.
To allow Infomaniak to access a specific part of your services (granting access to one type of content never opens access to others; each authorization is specific and independent):
- Click here to access the access management section in the Infomaniak Manager.
- Click on the toggle switch to allow access to the content of…
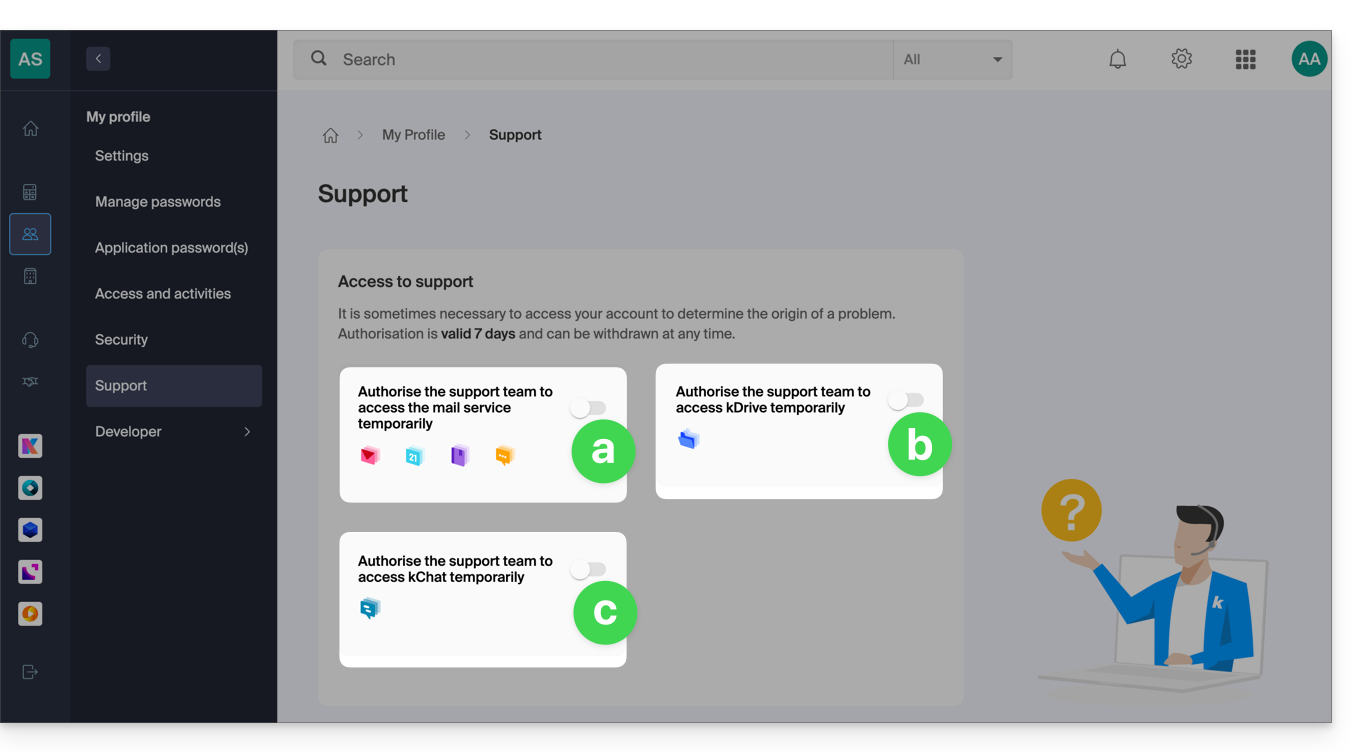
- … email addresses associated with the Mail web app (online service ksuite.infomaniak.com/mail) + contacts & calendars,
- … folders within the existing kDrive accounts in the Organizations to which the current user belongs,
- … conversations within the existing kChat products in the Organizations to which the current user belongs.
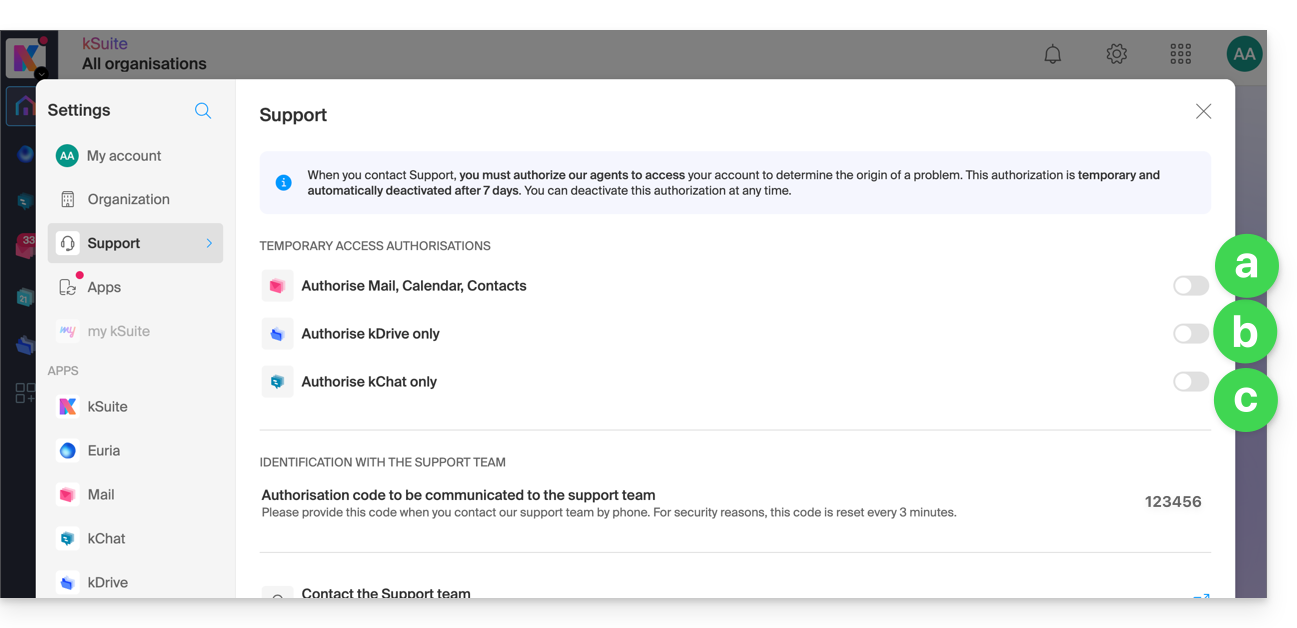
With kSuite, you can also do this by clicking here or proceed as follows:
- Click on the Settings icon in the top right corner of your kSuite window.
- Click on Support in the left-hand menu:
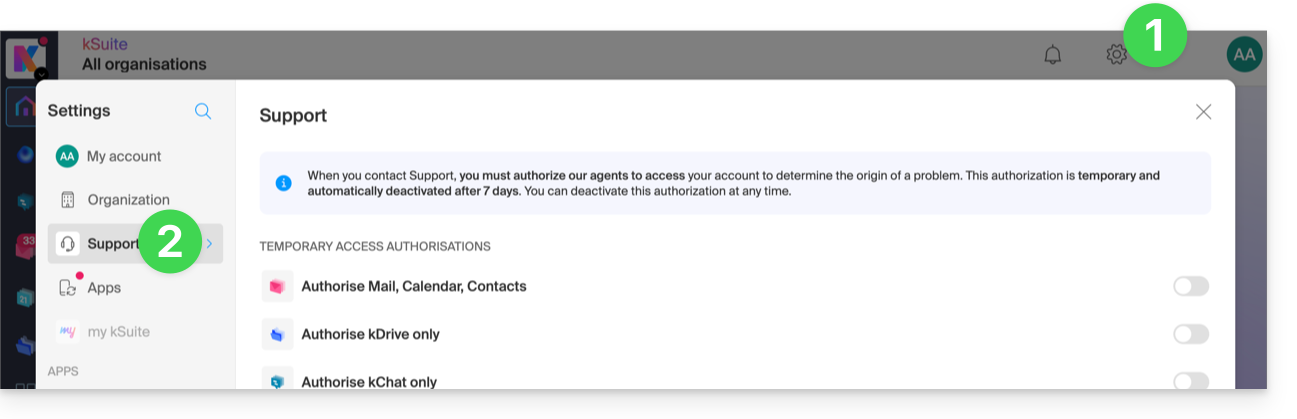
- Click on the toggle switch to allow access to the content of…
You can also share a single specific email very easily.
Taking screenshots
… on Windows
Microsoft offers a software pre-installed that is dedicated to taking screenshots. But to do it manually:
- Display what you want/need to show on the screen.
- Press the PRINTSCREEN key on your keyboard (or
PRTSCR,IMPR. ECRAN, etc.) once. - In Microsoft Word (or similar), go to "Edit" -> "Paste" to place your image on the page.
- "Save" your file.
- Repeat the operation from step 1 to step 5 as many times as the number of screenshots desired.
… on macOS
- Press the "
CMD" + "shift" (the upward-pointing arrow — shift) + "3" keys simultaneously. - Each time you press these keys, an image file is created on your computer's desktop.
… on iOS (iPhone, iPad...)
- Press the "
Power" + "Home" buttons simultaneously (the two physical buttons). - Then, retrieve the screenshots in the "Photos" app on your device.
… on Android (e.g. Samsung, LG or Huawei)
- Simultaneously press the “Volume Down” button (on the side) and the lock button.
- The captured image is automatically saved in a Screenshots folder in your gallery.
Copying the content of an alert window
… on Windows
To copy and paste a Windows “popup” error message as text, simply press the CTRL + C keys on your keyboard to copy the message to the clipboard. You can then paste it (CTRL + V) into the body of the message you are sending.
Accessing the browser's JavaScript console
… on Windows
Chrome, Firefox, and Safari: enter the key combination CTRL + SHIFT + i
Internet Explorer and Edge: press the F12 key
… on macOS
Chrome: enter the key combination ⌘ + ⌥ + J
Safari: enter the key combination ⌘ + ⌥ + C
- Then, click on the icon with a crossed-out circle or similar to reset the log.
- Display the page of your site that is experiencing the issue.
- The console tab displays JavaScript errors and online resources that could not be found.
Link para esta FAQ: https://faq.infomaniak.com/913
Esta seção de perguntas frequentes foi útil?
This guide explains how to completely cancel a kSuite offer from Infomaniak.
Cancel the free kSuite offer
If there is a kSuite in your Organization that you did not order (free kSuite offer), it is linked to the Organization and the latter must be deleted to cancel kSuite. Refer to this other guide.
You can also simply detach the domain name if necessary.
Cancel the paid kSuite offer
Preamble
- When you decide to cancel kSuite, if a domain name is linked to it, it will be kept in your user account until its expiration.
- All other products in the kSuite will be permanently deleted.
- Existing users will always be part of your Organization.
- Open and out-of-package fees remain due.
To access the cancellation of the paid kSuite offer:
- Click here to access the management of your kSuite on the Infomaniak Manager (need help?).
- Click on the action menu ⋮ to the right of the kSuite name.
- Choose Cancel:
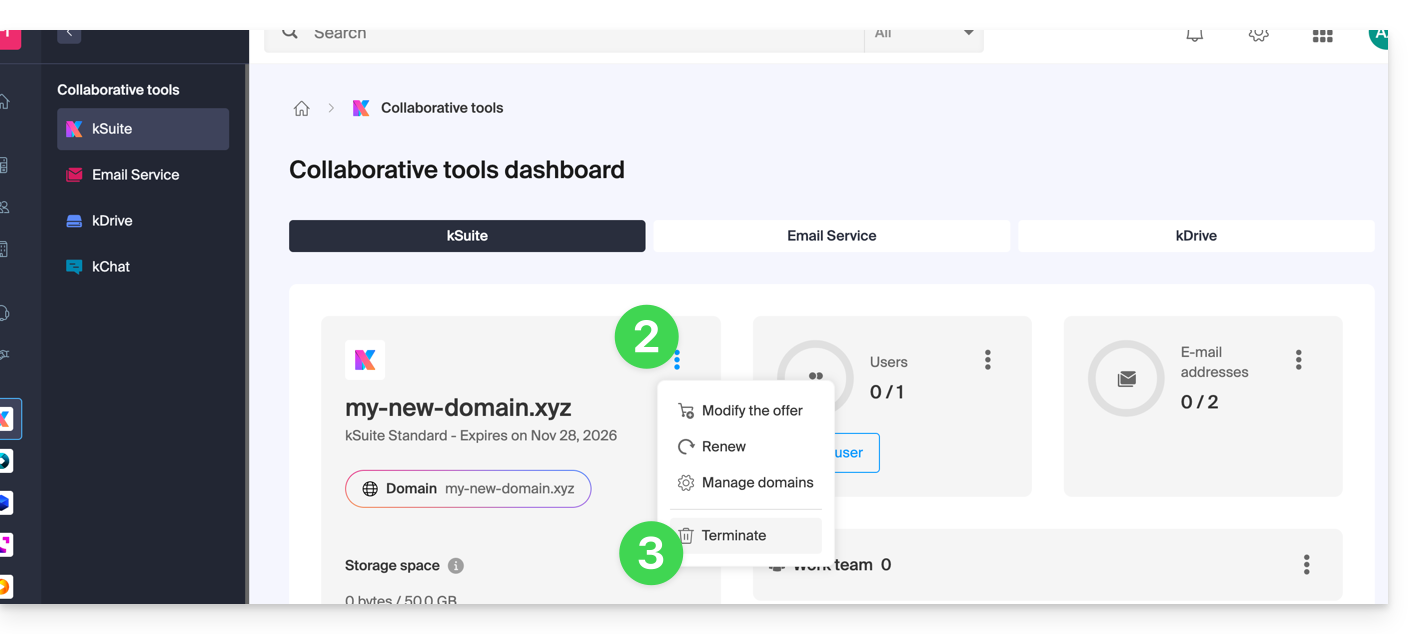
- Follow the procedure to the end by confirming the operation by email:
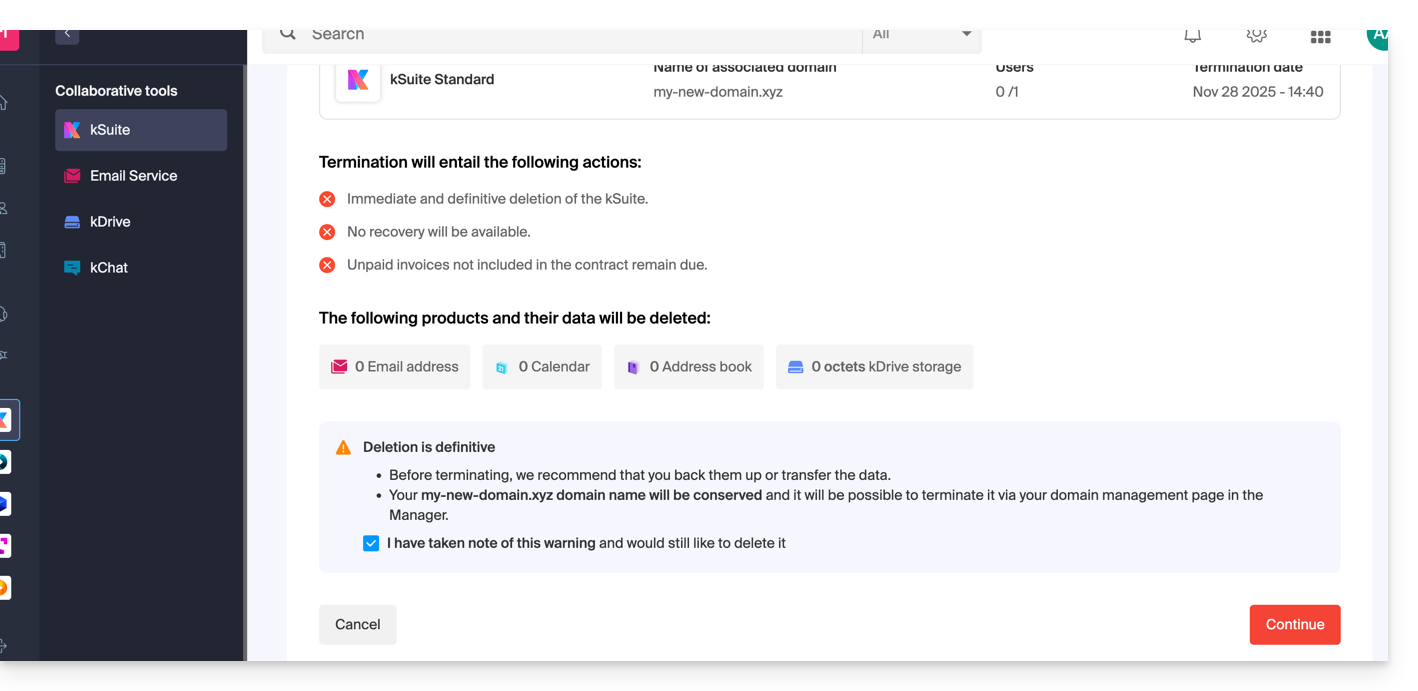
After these operations, the possible domain name is detached and remains accessible from the Manager, while kSuite is no longer available in its paid version.
Link para esta FAQ: https://faq.infomaniak.com/955
Esta seção de perguntas frequentes foi útil?
This guide explains how to add a simple new, one-time event to a calendar in the Infomaniak Web app Calendar (online service ksuite.infomaniak.com/calendar).
Introduction
- To create a recurring event, please refer to this other guide.
- To schedule a meeting with multiple users and find the best time slot, please refer to this other guide about the meeting scheduler.
Add a new event
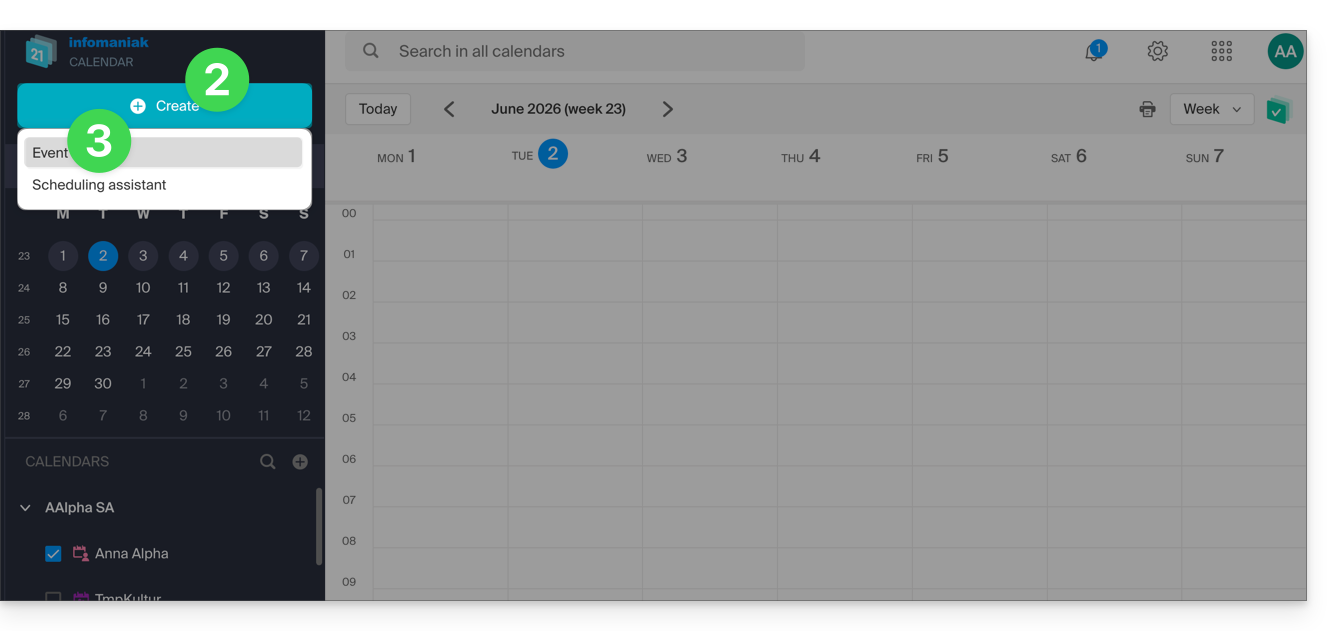
To schedule a one-time event in a calendar managed by Infomaniak:
- Click here to access the Infomaniak Web app Calendar (online service ksuite.infomaniak.com/calendar).
- Click on the Create button in the top left corner.
- Click on Event:
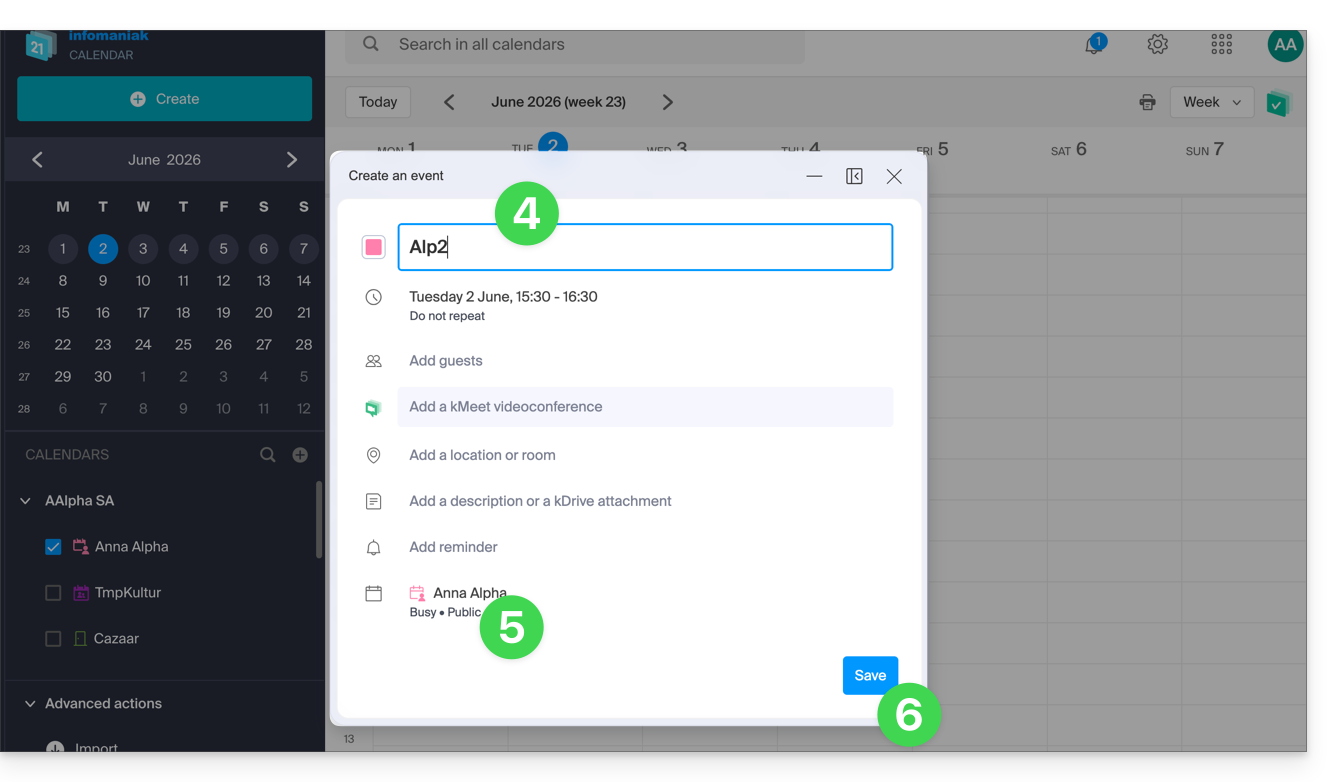
- Fill in the various fields:
- Color and title (subject) of the event
- Date/time or duration, possible recurrence
- Possible participants (see below)
- kMeet link if the event corresponds to a meeting between several people
- Geographical location or meeting room
- Description or attachment from kDrive
- Reminder (notification) deadline
- Calendar concerned
- Choose:
- the calendar concerned
- whether the event should have a busy or free status (in order not to block any possible appointment scheduling)
- whether it should be public or private (and in this case, no one will see the event in your calendar unless they have editing rights)
- Click SAVE to add the event to the selected calendar:
You can also click directly on the calendar to add a new event by dragging the mouse pointer over the desired time period. The editing window can be moved on the screen or even inserted into the left sidebar for better calendar visibility: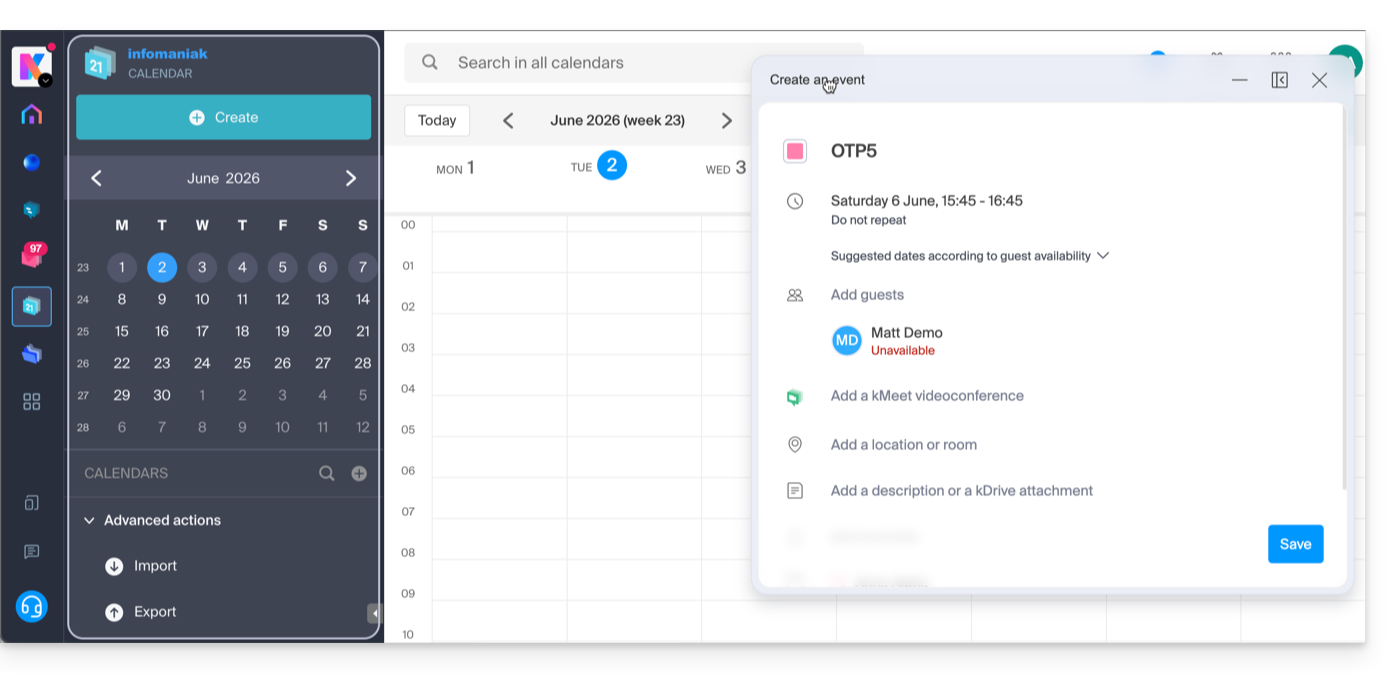
Add participants to the event
To invite users, add their name or email address when creating the event or later: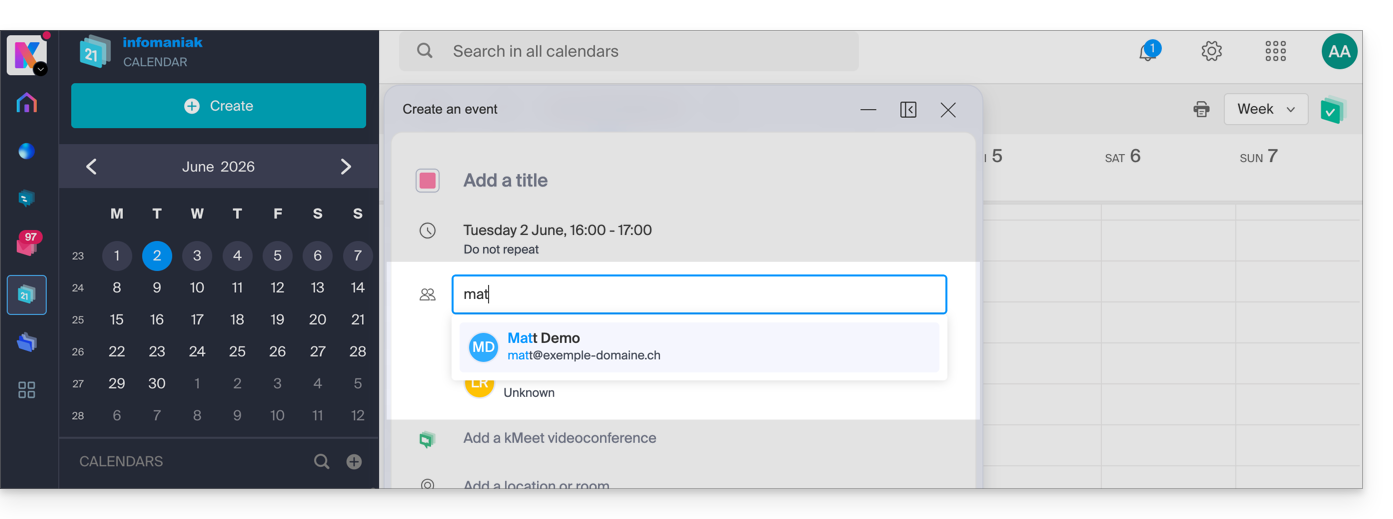
You will be notified of their attendance or their refusal if they follow the procedure sent to them by email when the event is created.
Any update to a scheduled event is also sent by email to all participants.
Link para esta FAQ: https://faq.infomaniak.com/956
Esta seção de perguntas frequentes foi útil?
Este guia explica o que significa a indicação de e-mail externo, "Externo", que aparece na aplicação web Mail (serviço online ksuite.infomaniak.com/mail) e na aplicação móvel Infomaniak Mail (aplicação para smartphone ou tablet iOS / Android) ao ler certas mensagens: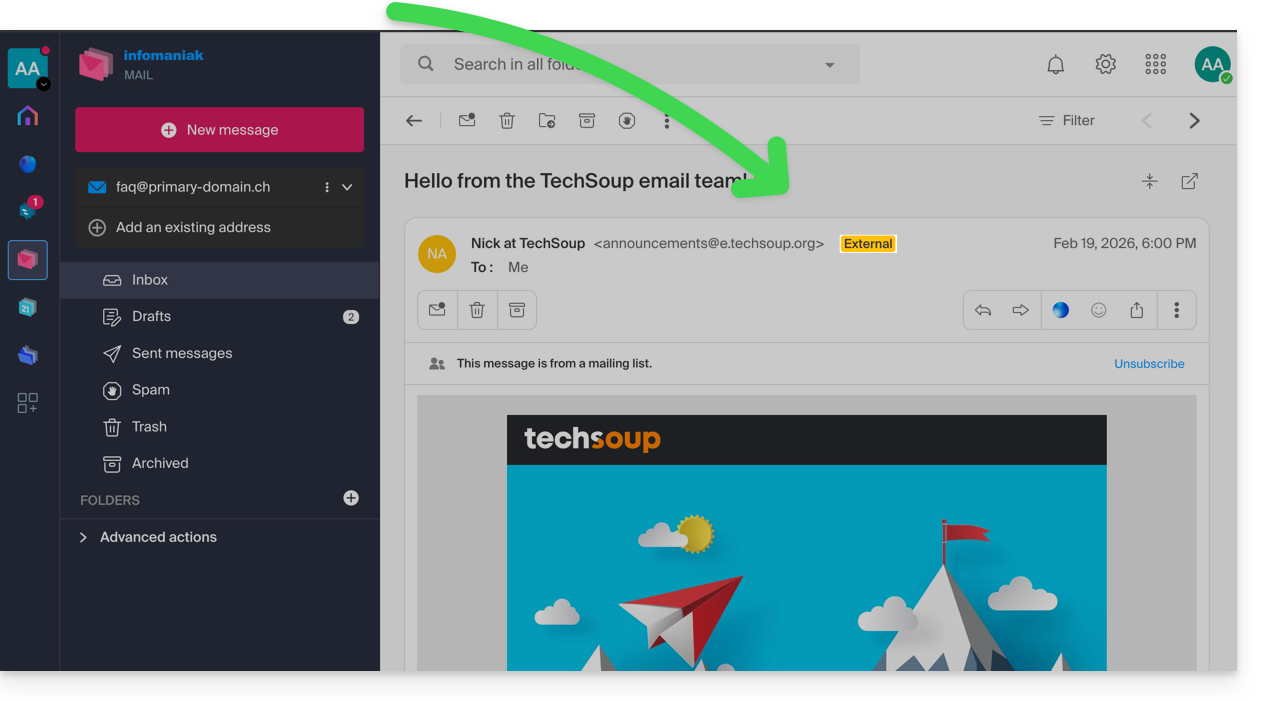
Introdução
- A indicação de e-mail externo é exibida nos seguintes casos:
- O nome de domínio (ou alias) do remetente não corresponde ao da conta de e-mail configurada no Mail.
- O remetente não faz parte dos contatos (incluindo os contatos sugeridos).
- O e-mail provém de um endereço hospedado fora da Organização.
- A indicação será exibida como "desconhecido" em vez de “externo” em algumas ofertas gratuitas, como my kSuite.
Ativar ou desativar a indicação
Pode ativar ou desativar a indicação; o efeito é imediato para os e-mails recebidos e, no caso de uma resposta a um e-mail externo. Para tal:
- Clique aqui para aceder à gestão do seu Serviço de E-mail no Manager Infomaniak (precisa de ajuda?).
- Clique diretamente no nome atribuído ao Serviço de E-mail em questão:
- Clique em Configurações globais no menu lateral esquerdo:
- Clique na aba Segurança.
- Ative ou desative o botão de alternância:
Link para esta FAQ: https://faq.infomaniak.com/964
Esta seção de perguntas frequentes foi útil?
This guide explains how to use the task manager in the Infomaniak Calendar web app (online service ksuite.infomaniak.com/calendar/tasks).
Managing Your Tasks
To add a task to the task manager:
- Click here to access the Tasks web app (online service ksuite.infomaniak.com/calendar/tasks)…
- … also accessible from your calendar by clicking on the Tasks icon in the right-hand side menu:
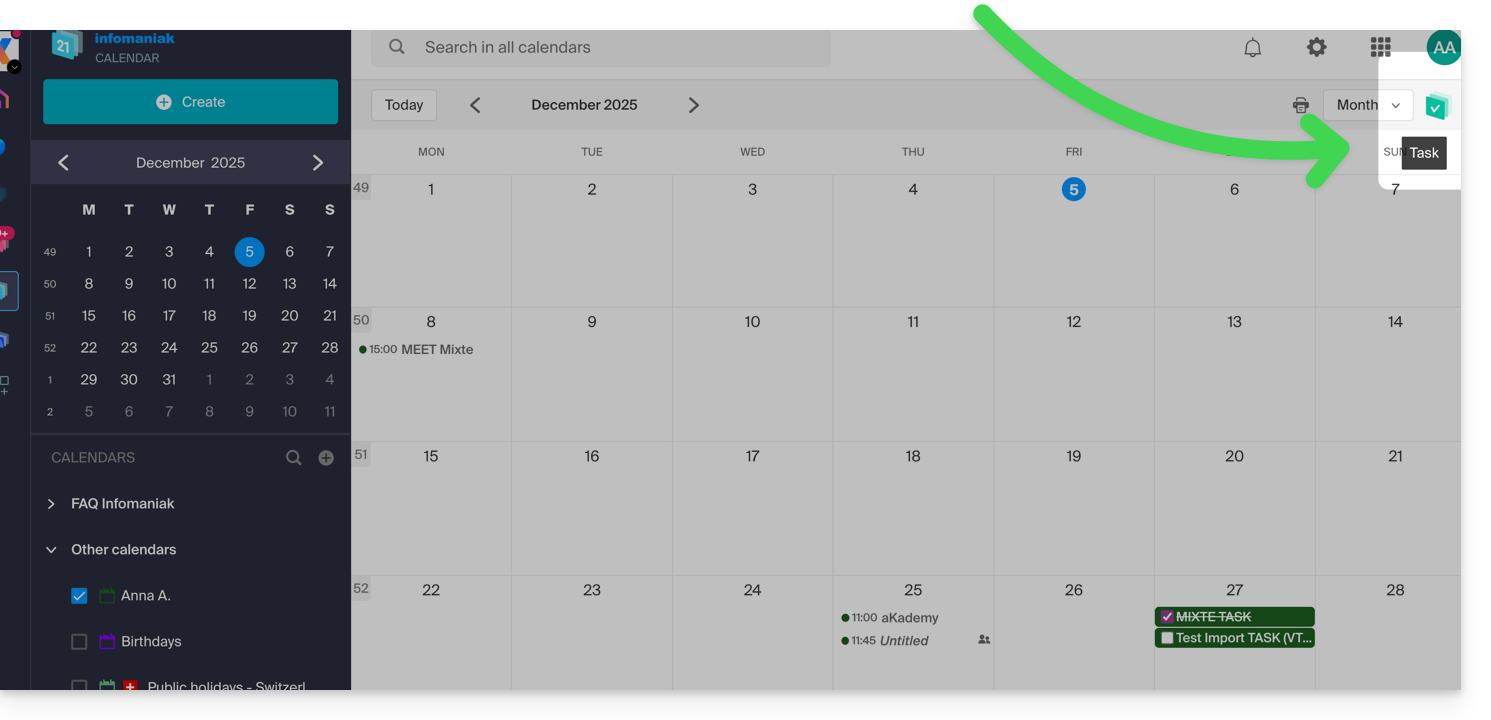
- … also accessible from your calendar by clicking on the Tasks icon in the right-hand side menu:
Once the manager is open, you can Create a task in the upper left corner, linked to the calendar specified to the right of the button: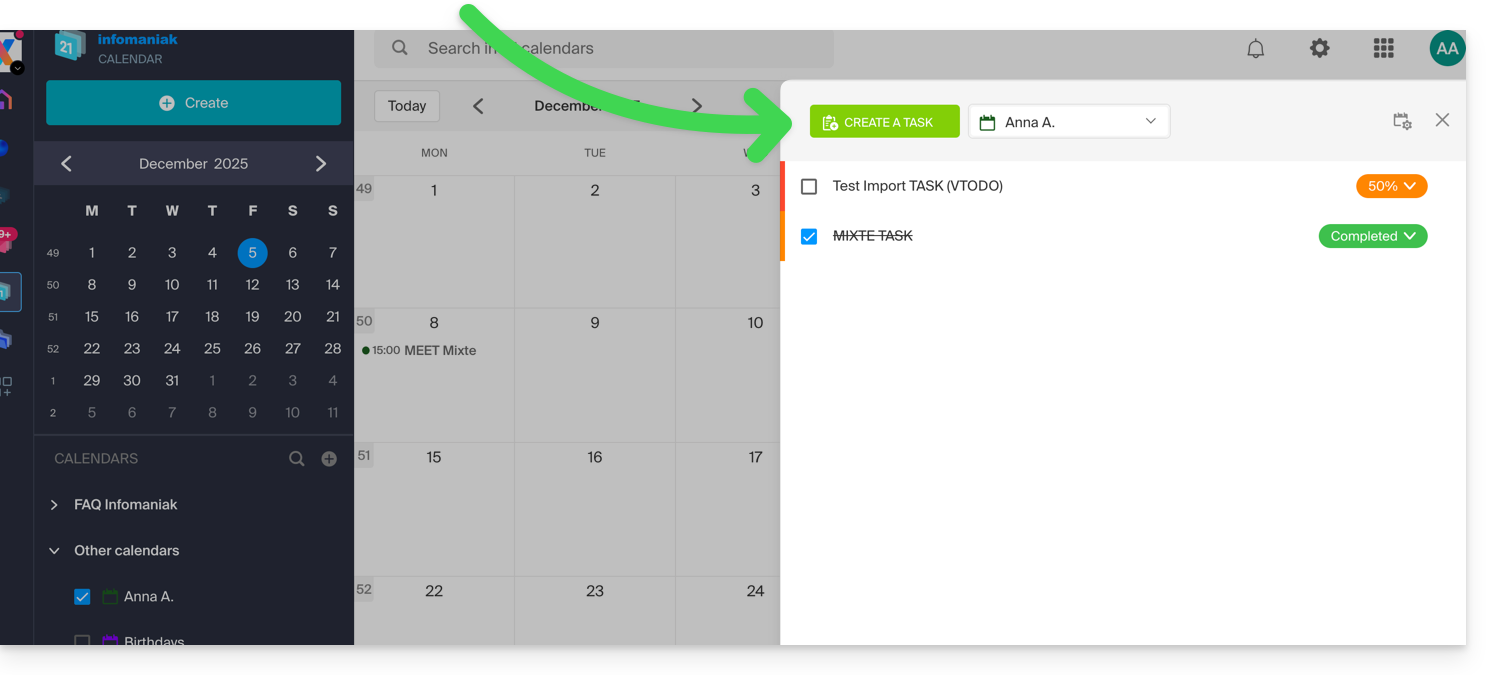
If you add a due date to your task, it will be displayed on the corresponding calendar: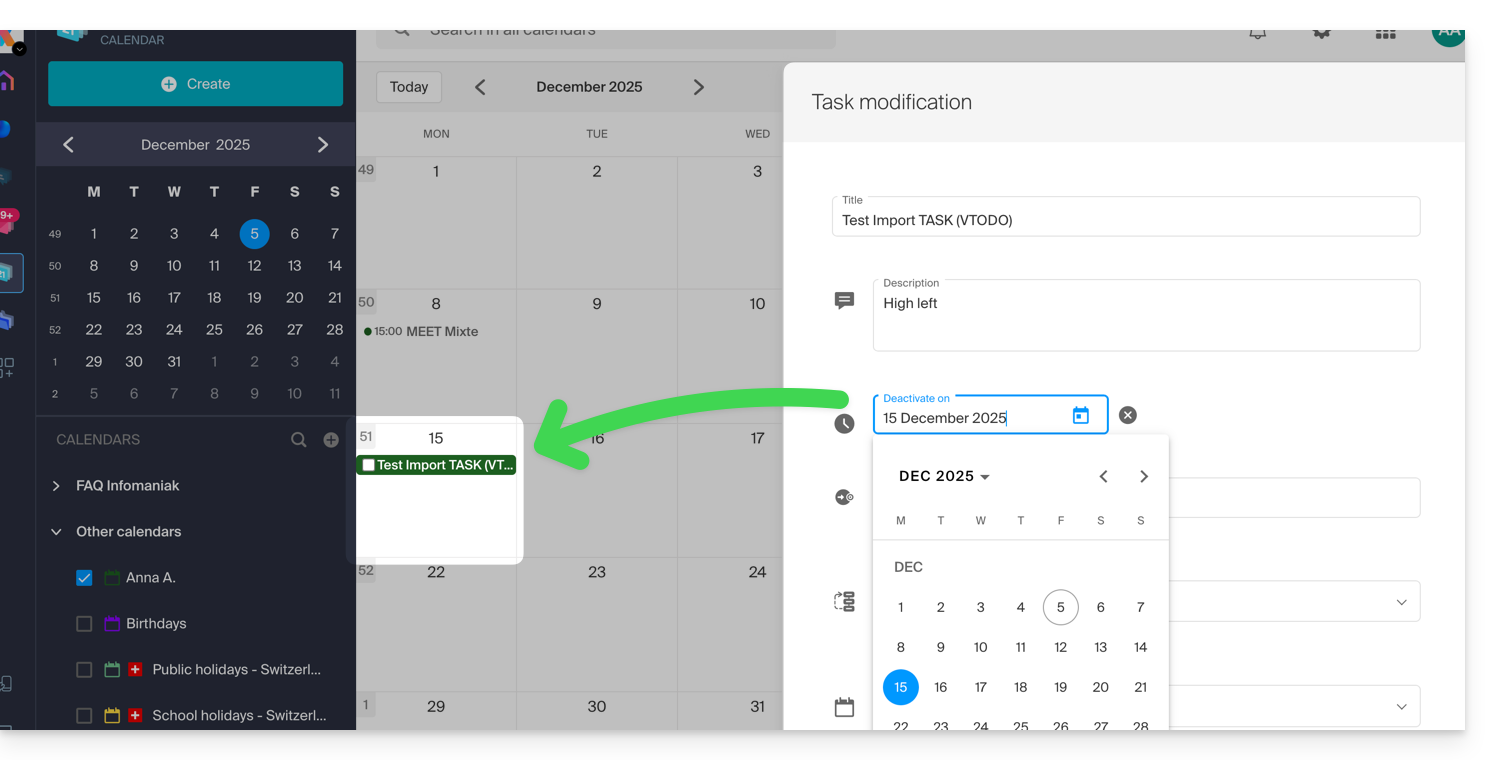
You can also filter and sort your displayed tasks using the button located in the upper right corner of the manager, next to the cross that allows you to close it: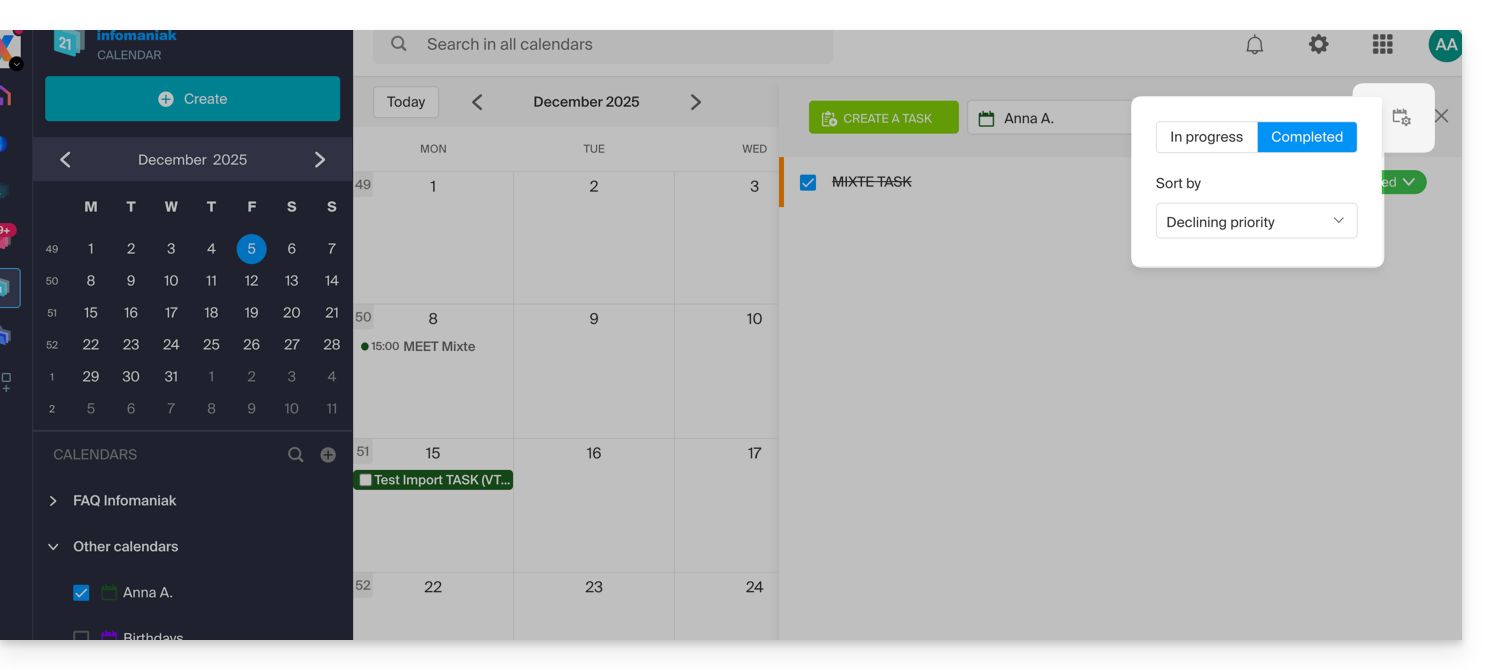
You can import tasks into your calendar.
To synchronize tasks with an Android device, please refer to this other guide.
Link para esta FAQ: https://faq.infomaniak.com/984
Esta seção de perguntas frequentes foi útil?
Este guia explica como adicionar ou remover contactos em agendas da aplicação web Contactos Infomaniak (serviço online ksuite.infomaniak.com/contacts).
Introdução
- Para importar contactos existentes, consulte este outro guia.
Adicionar um novo contacto
Para adicionar uma nova ficha de contacto numa agenda:
- Clique aqui para aceder à aplicação web Contactos Infomaniak (serviço online ksuite.infomaniak.com/contacts).
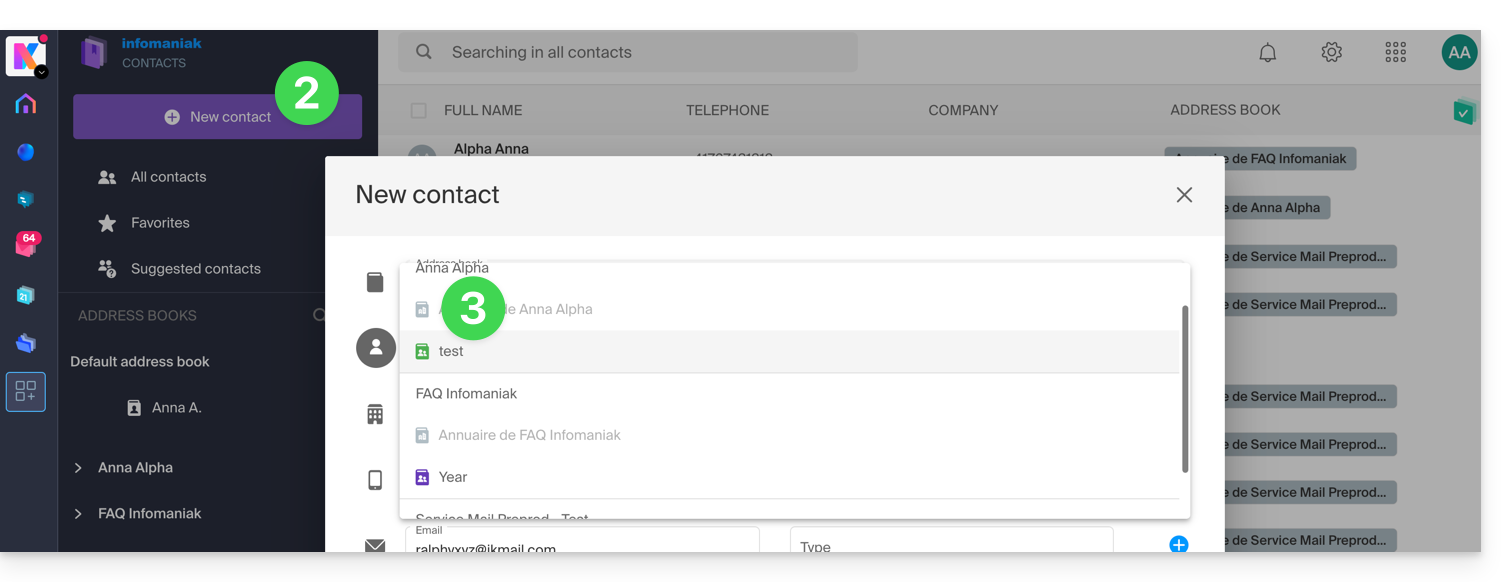
- Clique em Novo contacto no canto superior esquerdo.
- Escolha a agenda existente na qual deseja adicionar o contacto:
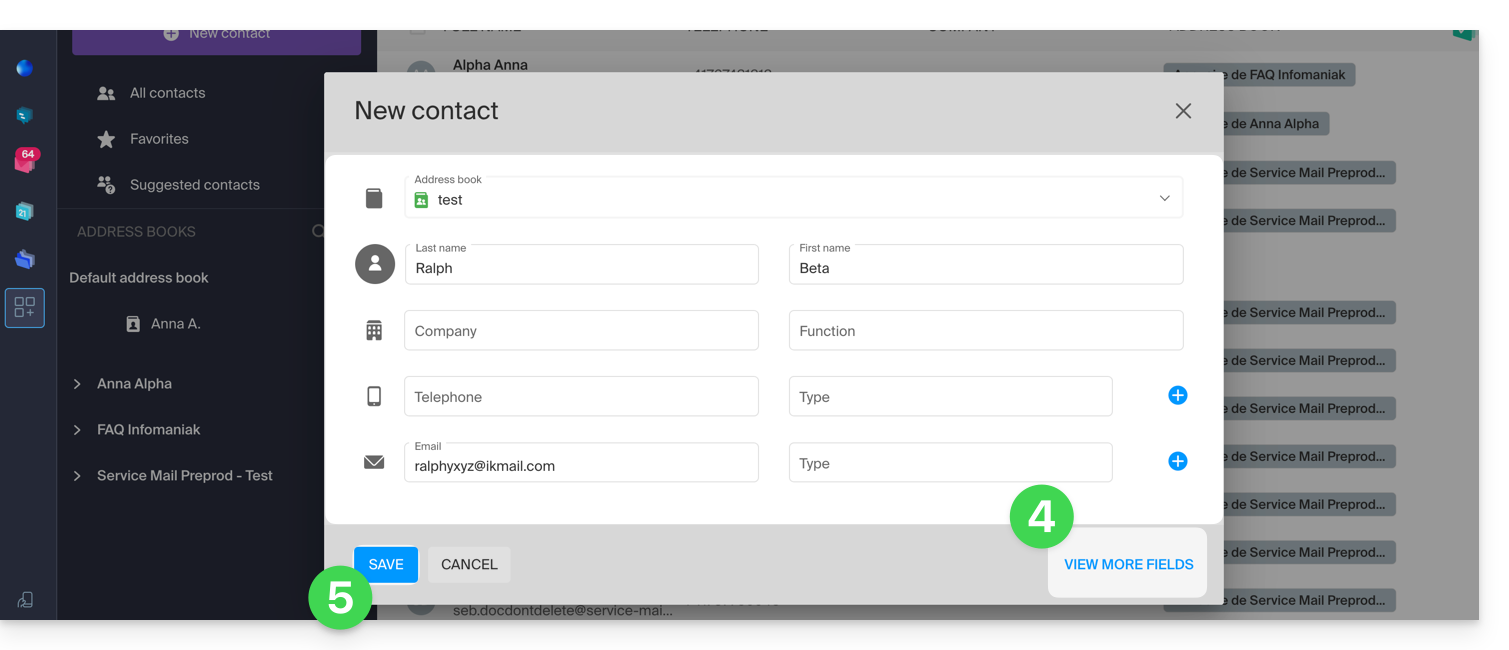
- Preencha as informações principais (ou adicionais através do link no canto inferior direito).
- Valide com o botão Guardar:
Adicionar a partir de contactos frequentemente utilizados
Pode completar uma agenda a partir dos contactos frequentes sugeridos pela aplicação (com base no seu uso da aplicação web Mail). O nome/sobrenome/e-mail serão pré-preenchidos, se disponíveis:
- Clique aqui para acessar o aplicativo web Contatos Infomaniak (serviço online ksuite.infomaniak.com/contacts).
- Clique em Contatos sugeridos no menu lateral esquerdo.
- Clique no menu de ação ⋮ à direita do contato em questão.
- Clique em Adicionar para adicionar o contato a uma lista de endereços existente.
- Você também pode clicar no menu de ação ⋮ no painel lateral direito:
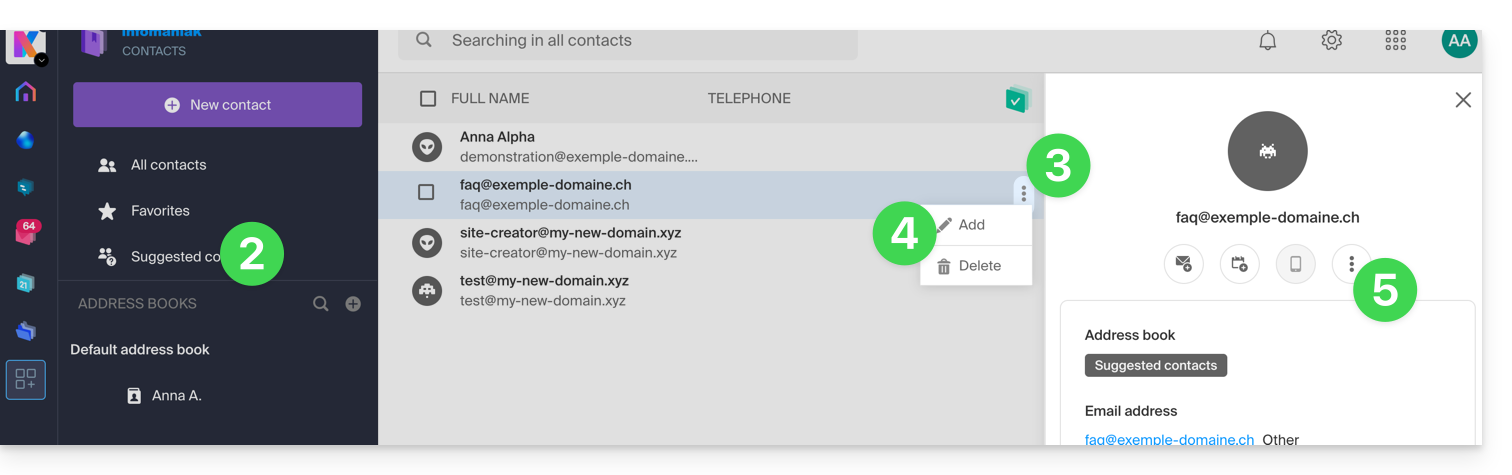
- Complete as informações do contato, se necessário, e clique em Salvar.
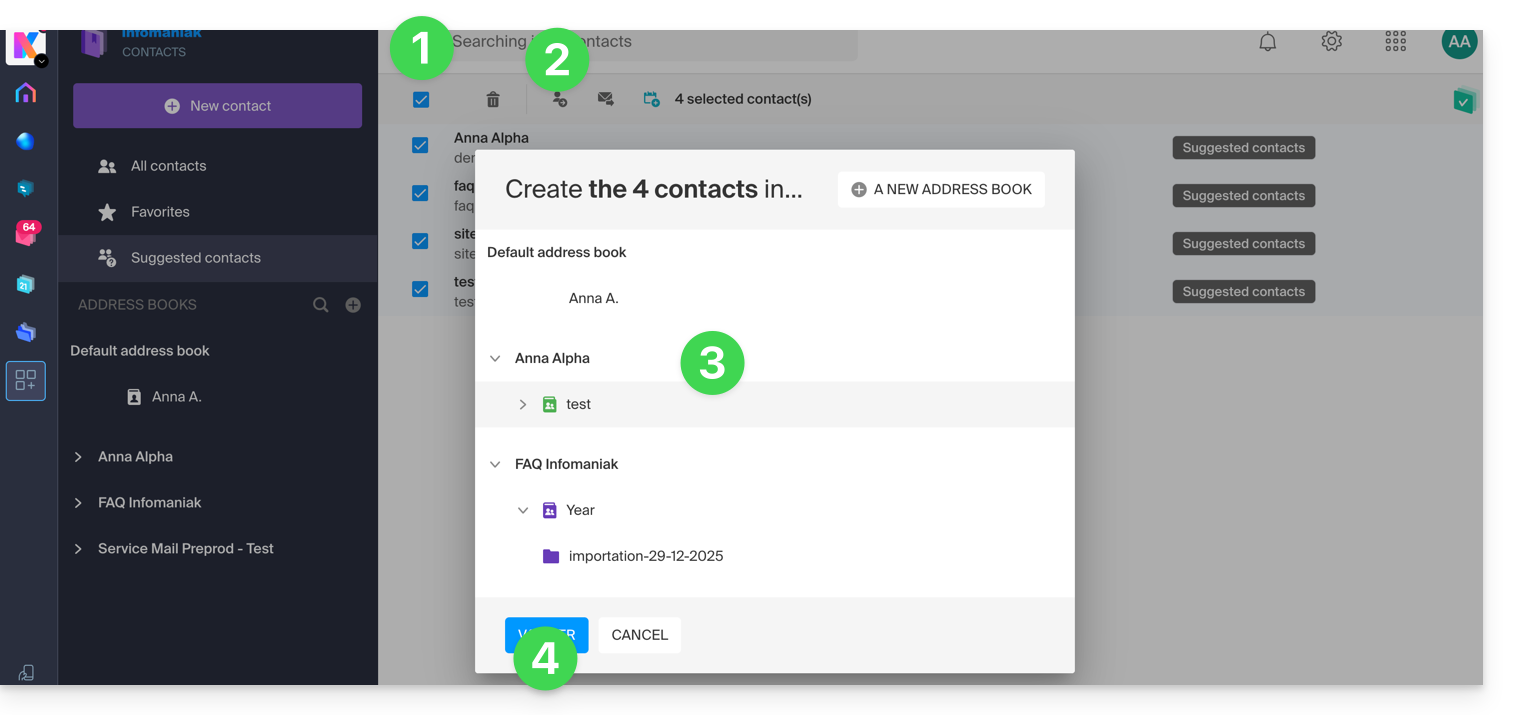
Para adicionar todos os contatos sugeridos de uma só vez:
- Clique no topo da coluna para selecionar todos os contatos.
- Em seguida, clique no ícone que aparece no topo da tabela.
- Escolha a lista de endereços existente na qual deseja adicionar os contatos.
- Clique no botão para salvar todos os contatos selecionados:
Adicionar a partir do aplicativo web Mail Infomaniak
Você pode criar uma ficha para um contato diretamente a partir das mensagens que troca com ele:
- Clique aqui para acessar o aplicativo web Mail Infomaniak (serviço online ksuite.infomaniak.com/mail).
- Abra a mensagem do remetente (ou a conversa entre vários participantes).
- Passe o cursor sobre a parte que menciona o remetente ou o destinatário que deseja adicionar ao seu catálogo de endereços.
- Clique em Criar contato:
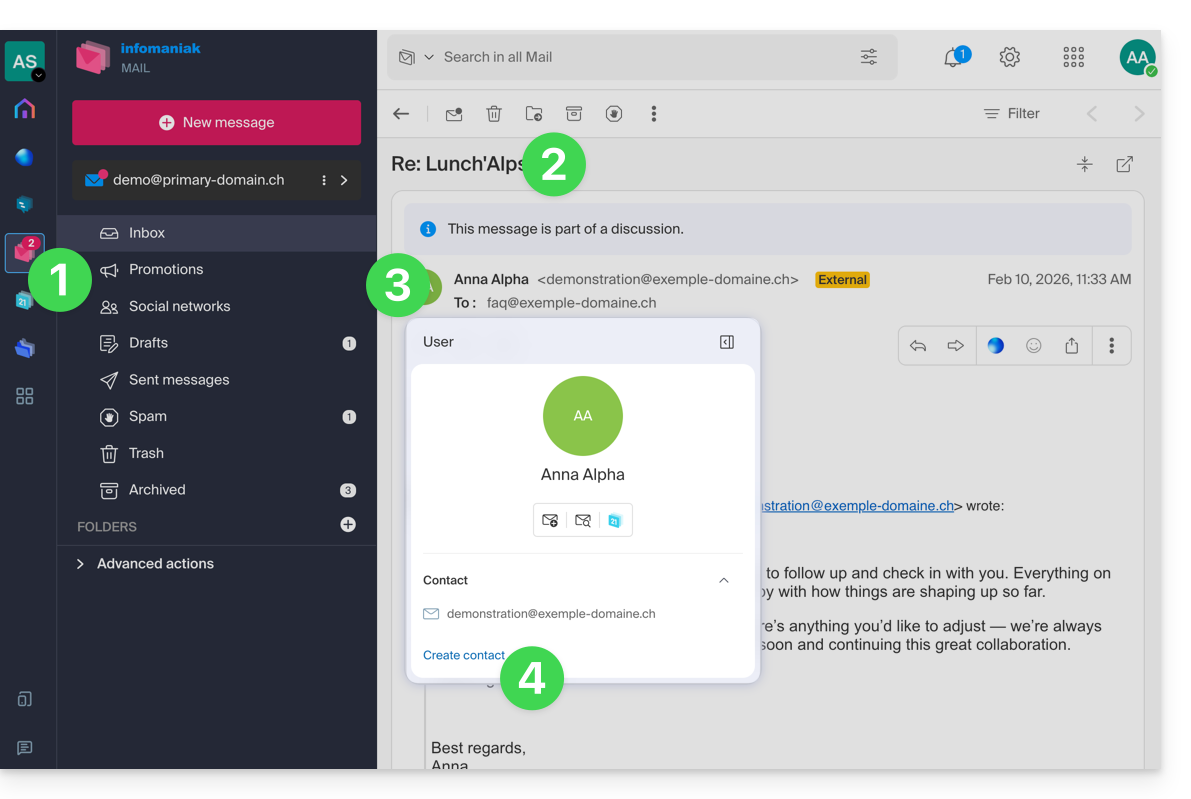
- Preencha as informações do contato, se necessário, e clique em Salvar.
Excluir um ou mais contatos
Para remover um contato de suas listas:
- Clique aqui para acessar o aplicativo web Contatos da Infomaniak (serviço online ksuite.infomaniak.com/contacts).
- Selecione o catálogo de endereços do qual deseja excluir seus contatos:
- Selecione o(s) contato(s) que deseja excluir.
- O ícone Lixeira aparece no cabeçalho da coluna, permitindo que você exclua os contatos selecionados:
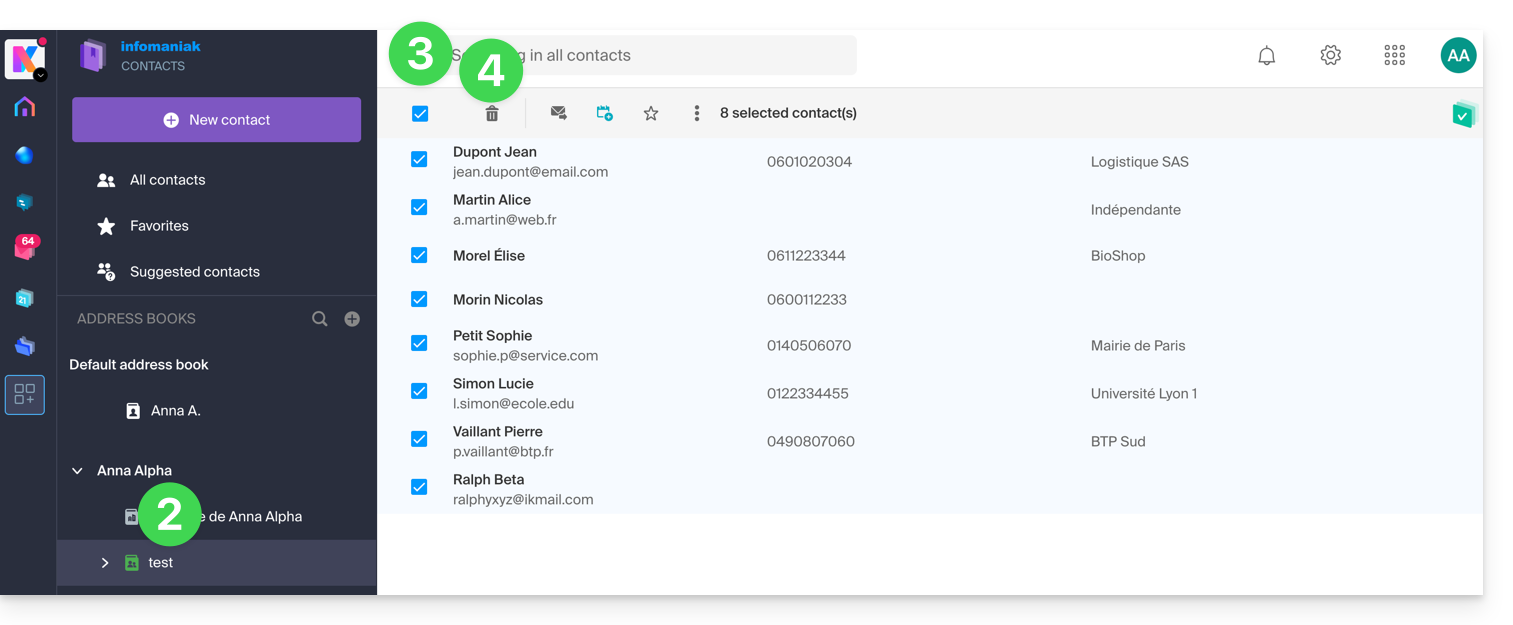
Atenção: a exibição de todos os contatos nem sempre permite a exclusão, caso entre eles estejam contatos de Organizações das quais você não é administrador.
Link para esta FAQ: https://faq.infomaniak.com/996
Esta seção de perguntas frequentes foi útil?
Este guia aborda problemas que podem ocorrer ao usar aplicativos Infomaniak (como kChat, kDrive, Infomaniak Authenticator, etc.) ou ferramentas (como config.infomaniak.com, o Manager Infomaniak, etc.) com hardware (sistema operacional, navegador, dispositivos, etc.) antigo / desatualizado / obsoleto.
Introdução
- Por exemplo, não será possível acessar confortavelmente os serviços Infomaniak com um iPhone 5s ou 6 no iOS 12.
- Portanto, recomenda-se atualizar regularmente os navegadores e os sistemas operacionais para obter a melhor experiência possível com a infraestrutura Infomaniak.
- Consulte também este outro guia, que se concentra principalmente em navegadores e seus componentes.
- E você está usando a última versão do aplicativo Infomaniak em questão?
Atualizar o sistema operacional, o navegador, etc.
Sistemas ou navegadores antigos podem causar lentidão, erros ou exibição incorreta. Portanto, é melhor usar componentes atualizados regularmente, pois os aplicativos Infomaniak funcionam de forma ideal em sistemas atualizados e hardware recente.
Exemplo para kChat:
| kChat | Requisito mínimo |
|---|---|
| Aplicativo web (navegador) | Chrome 134+, Firefox 128+, Safari 17.4+, Edge 134+ |
| Aplicativo móvel (iOS) | iOS 15.1+ (iPhone 6s ou mais recente) |
| Aplicativo móvel (Android) | Android 7.0+ com Chrome atualizado |
| Aplicativo desktop (macOS) | macOS 12 (Monterey) ou versão posterior |
| Aplicativo desktop (Windows) | Windows 10 ou versão posterior |
| Aplicativo para desktop (Linux) | Ubuntu 22.04 LTS ou distribuição equivalente com suporte |
Em caso de problemas com um navegador da Internet, tente atualizá-lo ou instalar uma alternativa:
- Google Chrome
https://www.google.com/chrome/
(O site detecta automaticamente o sistema operacional e oferece a versão mais recente) - Mozilla Firefox
https://www.mozilla.org/firefox/new/
(Página de download e atualização para Windows, macOS e Linux) - Microsoft Edge
https://www.microsoft.com/edge
(O link oferece atualização automática ou download, dependendo do sistema) - Safari (apenas macOS)
https://support.apple.com/fr-fr/HT204416
(A atualização do Safari é feita através das atualizações do sistema macOS) - Opera
https://www.opera.com/fr/download
(Permite baixar a versão mais recente para o seu sistema) - Brave
https://brave.com/download/
(Página de download com detecção automática do sistema operacional)
Tecnologias utilizadas pela Infomaniak
Muitas ferramentas web desenvolvidas pela Infomaniak utilizam Angular. A necessidade de hardware atualizado ou recente para executar os aplicativos não é específica do Angular em si, mas sim um requisito geral para a execução de qualquer aplicativo web moderno. Aqui estão algumas razões pelas quais um hardware atualizado é frequentemente necessário:
- O Angular utiliza recursos avançados dos navegadores modernos, que muitas vezes estão ausentes ou são mal implementados em versões mais antigas.
- Os navegadores mais recentes otimizam a execução do JavaScript e a renderização gráfica, o que melhora o desempenho das aplicações Angular.
- As versões atualizadas corrigem vulnerabilidades conhecidas, reduzindo os riscos de comprometimento.
- Os navegadores modernos estão mais em conformidade com as últimas especificações HTML, CSS e JavaScript, garantindo uma melhor compatibilidade.
- As APIs modernas (câmera, geolocalização, notificações, etc.) só estão acessíveis através de navegadores recentes, o que é essencial para experiências interativas.
Link para esta FAQ: https://faq.infomaniak.com/1025
Esta seção de perguntas frequentes foi útil?
This guide explains how to create an additional calendar in the Infomaniak Calendar web app (online service ksuite.infomaniak.com/calendar) and then set it as the default.
Introduction
- Setting a default calendar, for example, allows you to speed up the creation of new events because you will no longer need to change the calendar each time you create a new event.
- You can only set calendars that you directly own as the default.
Add a new calendar
To create an additional calendar:
- Click here to access the Infomaniak Calendar web app (online service ksuite.infomaniak.com/calendar).
- Click on in the left-hand menu.
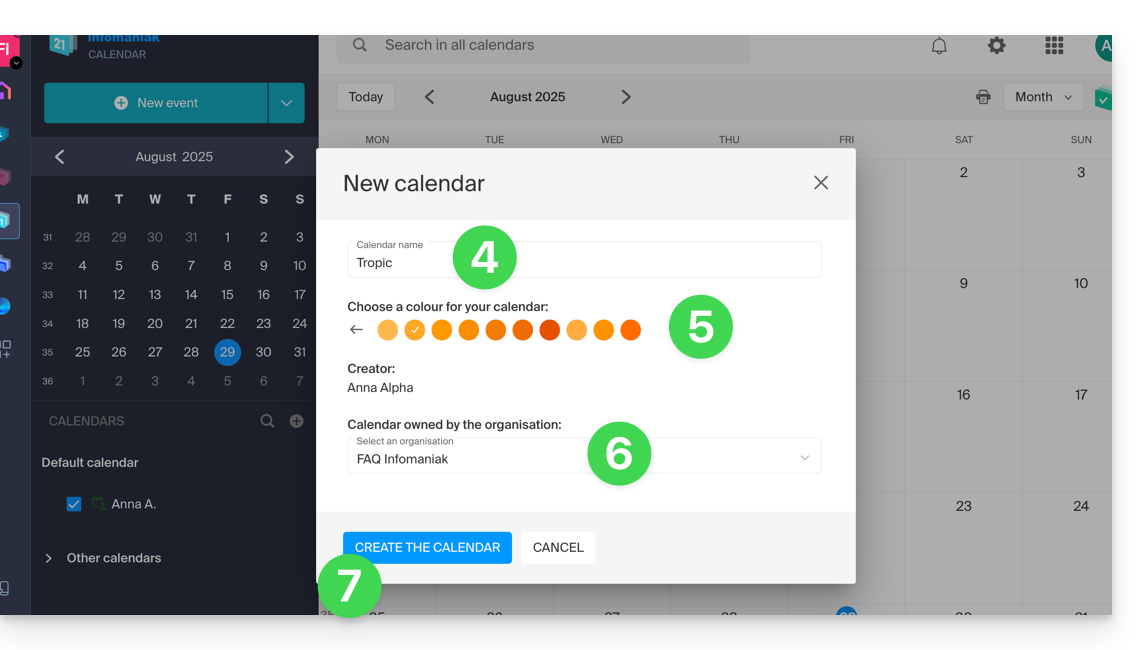
- Click on New calendar:
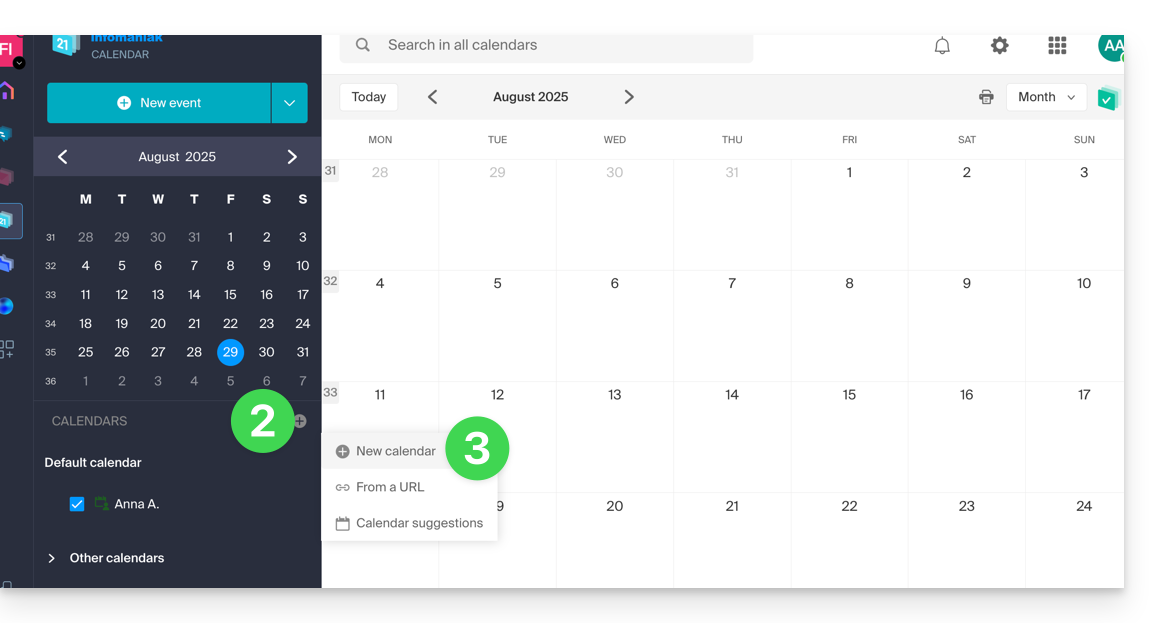
- Enter a name for the calendar.
- Choose a color.
- Choose one of your Organizations in which to create the calendar.
- Click the button to create the calendar:
Change the default calendar
To set one of your calendars as the default:
- Click here to access the Infomaniak Calendar web app (online service ksuite.infomaniak.com/calendar).
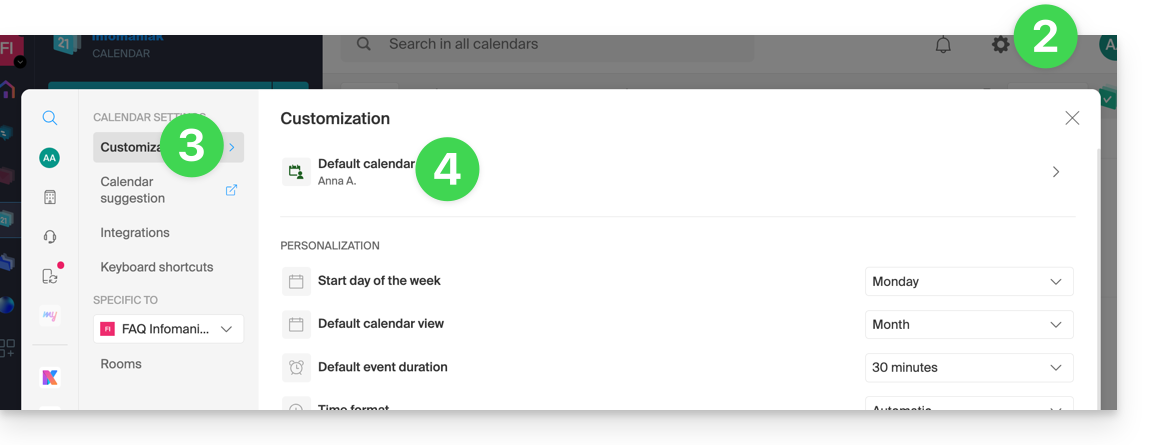
- Click on the Settings icon in the top right corner.
- Click on Customization in the left-hand menu.
- Click on the default calendar to open the options menu:
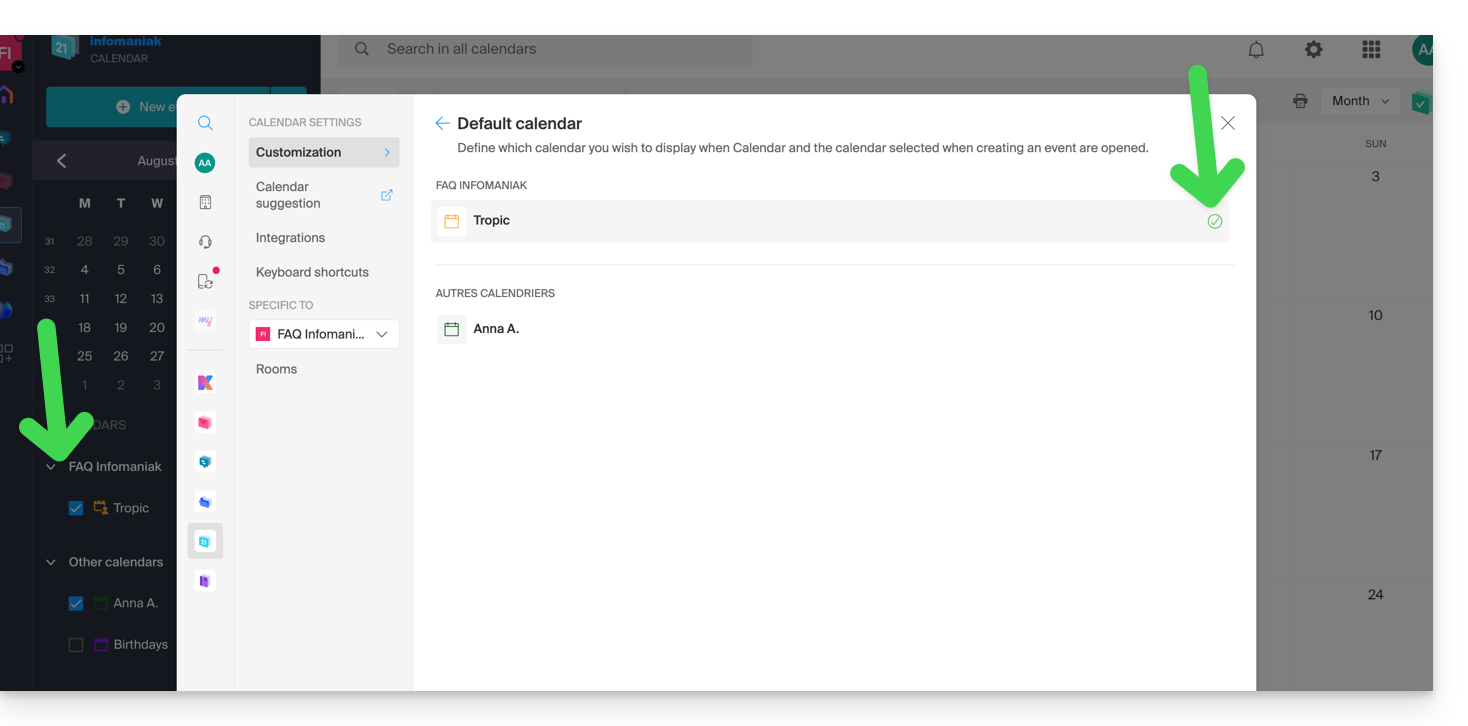
- Choose the desired calendar in the Default Calendar field; it will be placed in the first position in your calendar lists:
Link para esta FAQ: https://faq.infomaniak.com/1078
Esta seção de perguntas frequentes foi útil?
Este guia explica como copiar, via IMAP, o conteúdo de um ou mais endereços de e-mail externos (todas as mensagens de e-mail, pastas, subpastas, ou seja, toda a estrutura da sua caixa de e-mail existente em outros provedores) para um ou mais dos seus endereços existentes na Infomaniak, usando a ferramenta de importação da Infomaniak!
Introdução
- A operação não afeta os dados já presentes no endereço de destino, nem os dados do endereço de origem.
- A totalidade da caixa de e-mail externa será importada.
- Uma vez iniciado o processo de importação, não é mais possível interrompê-lo.
- Os eventuais duplicados são gerenciados: um conteúdo idêntico será copiado apenas uma vez.
- Consulte este outro guia se estiver procurando alternativas a este processo via IMAP.
Copiar e-mails de outro provedor para a Infomaniak
Pré-requisitos
- Possuir um Serviço de E-mail no seu Painel de Controle Infomaniak.
- Dispor de uma quota de endereços livres disponíveis ou ajustá-la previamente, se necessário.
- Certificar-se de que a caixa de e-mail está devidamente protegida.
- Criar um ou mais endereços neste Serviço de E-mail.
- O endereço de e-mail de destino deve estar associado ao utilizador (= à conta Infomaniak) que está a utilizar (não é um requisito para a importação em massa explicada abaixo).
- O endereço de e-mail de origem, cujo conteúdo deve ser copiado, deve ter sido utilizado (ou ser compatível) com o protocolo IMAP:
Em seguida, para importar o conteúdo do e-mail:
- Clique aqui para aceder à ferramenta de importação (serviço online https://import-email.infomaniak.com).
- Se necessário, inicie sessão na sua conta Infomaniak na Organização em questão; de facto, a importação será efetuada para um dos endereços de e-mail associados à interface Web Mail Infomaniak (serviço online ksuite.infomaniak.com/mail) da conta Infomaniak que está a utilizar.
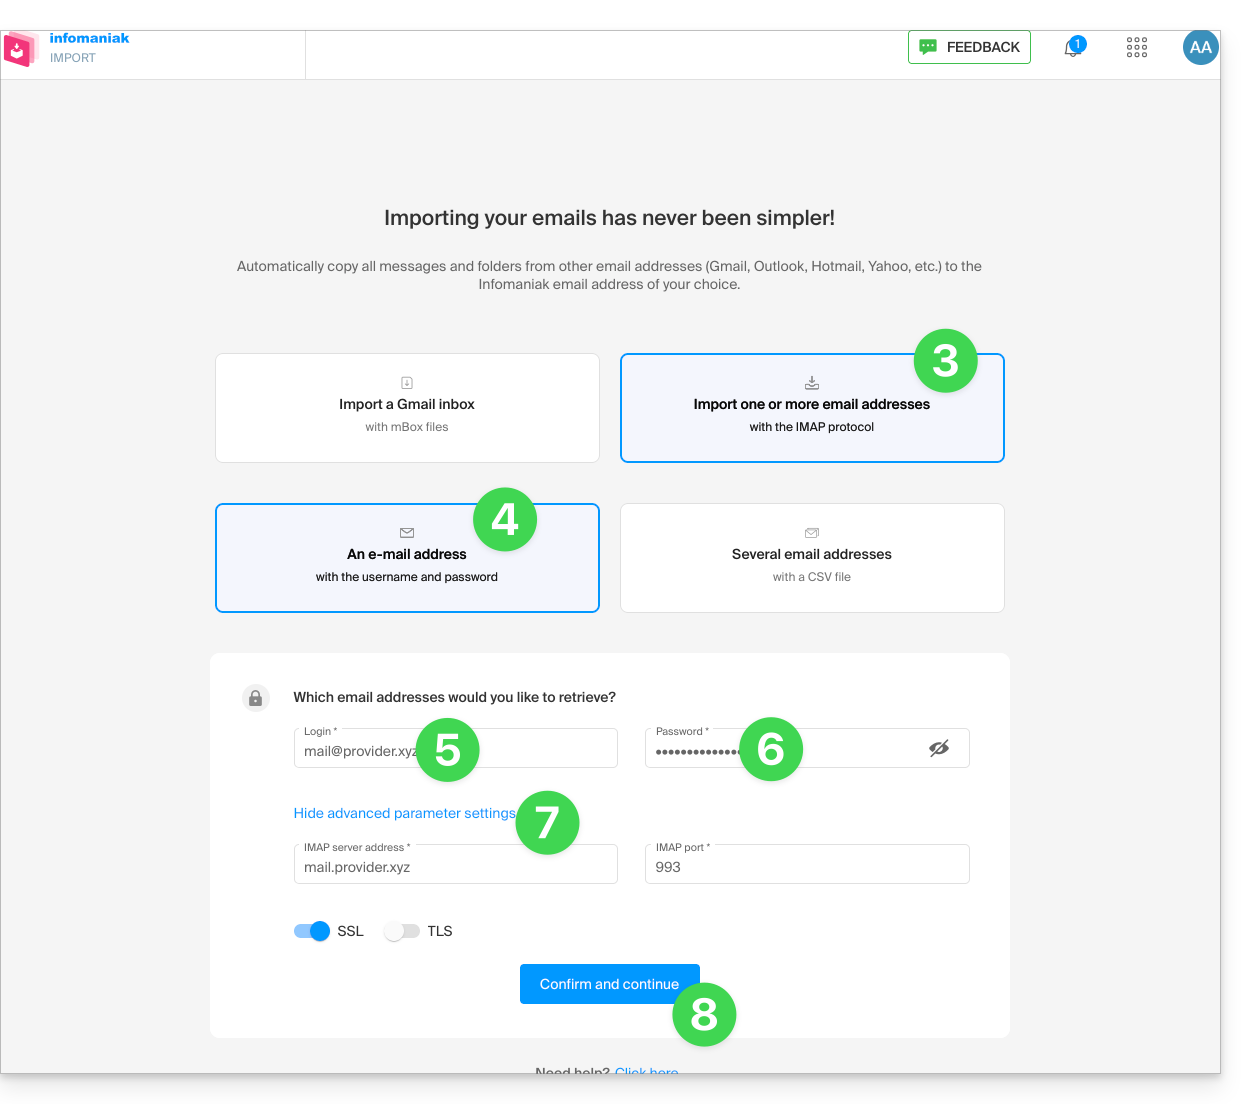
- Clique em importar por IMAP.
- Clique em importar única.
- Preencha o campo da esquerda com o seu endereço de e-mail de origem (cujo conteúdo deve ser copiado).
- Preencha o campo da direita com a palavra-passe desse mesmo endereço de e-mail de origem (ver requisitos).
- Se necessário, modifique as Configurações avançadas para especificar um endereço de servidor IMAP:
- Insira o nome do servidor IMAP (nome do host fornecido pelo seu provedor de e-mail), por exemplo,
imap.domain.ch(ou .net, .com, etc., dependendo do seu endereço de e-mail no item 5 acima). - Insira o número da porta (o padrão é 993) e o SSL.
- Insira o nome do servidor IMAP (nome do host fornecido pelo seu provedor de e-mail), por exemplo,
- Clique em Confirmar:
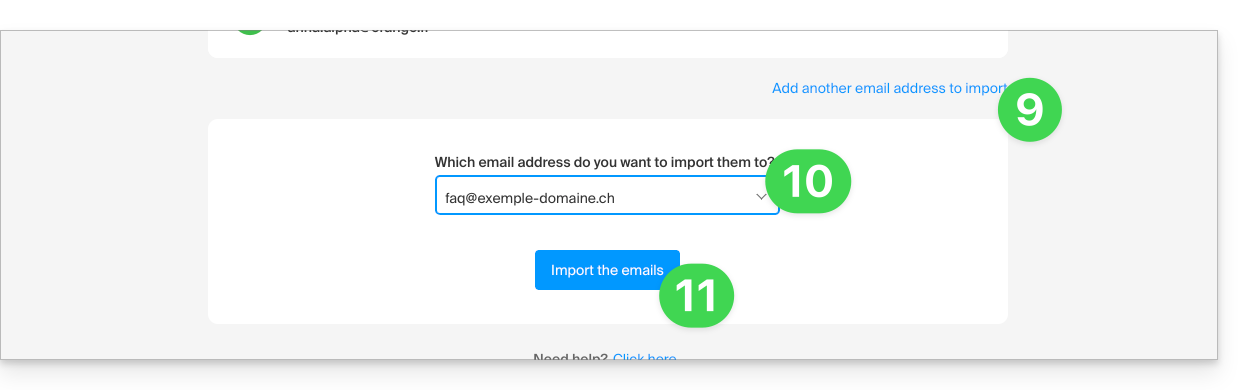
- Se necessário, insira um segundo endereço de e-mail para ser importado ao mesmo tempo.
- Escolha para qual endereço de e-mail importar os e-mails; o menu suspenso lista os endereços de e-mail atualmente associados à sua interface Web Mail Infomaniak (serviço online ksuite.infomaniak.com/mail) da conta Infomaniak com a qual você está conectado.
- Depois de selecionar o endereço de destino desejado na lista, clique no botão azul Importar e-mails:
- A cópia será iniciada; você pode aguardar e verificar o resultado na página após a conclusão da importação ou fechar a janela (a importação continua em segundo plano e um acompanhamento está disponível – veja abaixo):
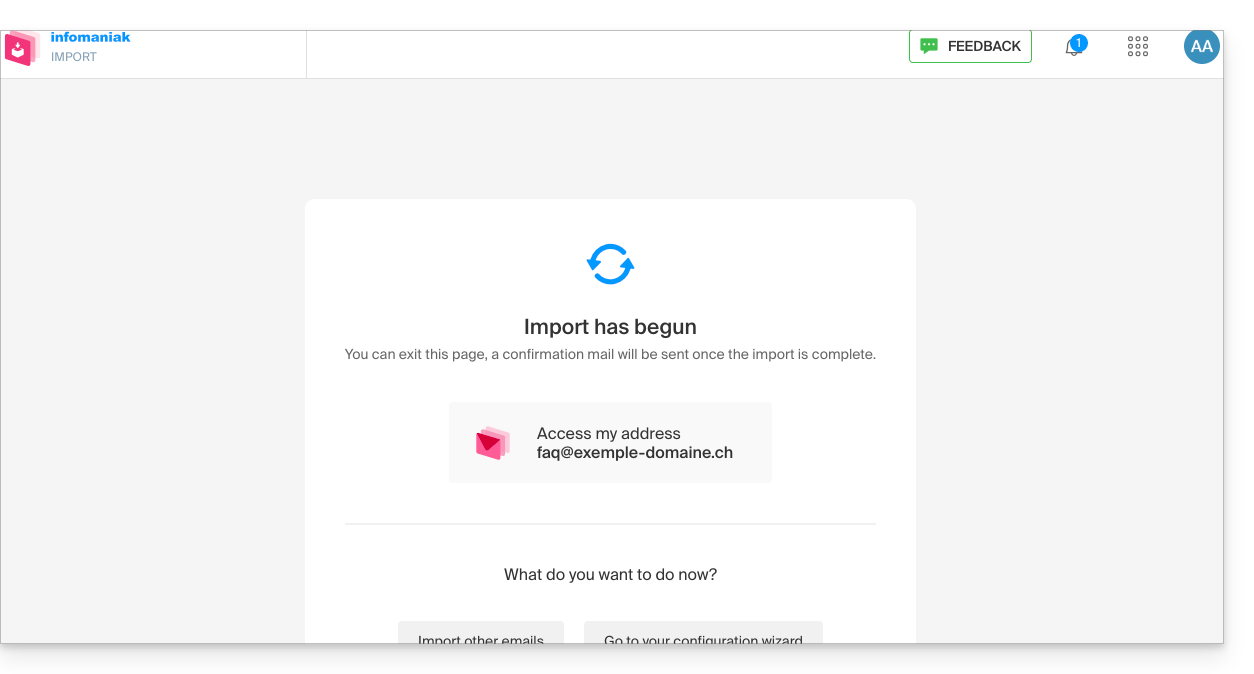
- Um e-mail de confirmação será enviado automaticamente para todos os endereços de e-mail envolvidos na operação, após a conclusão da importação, mencionando o número de mensagens copiadas:

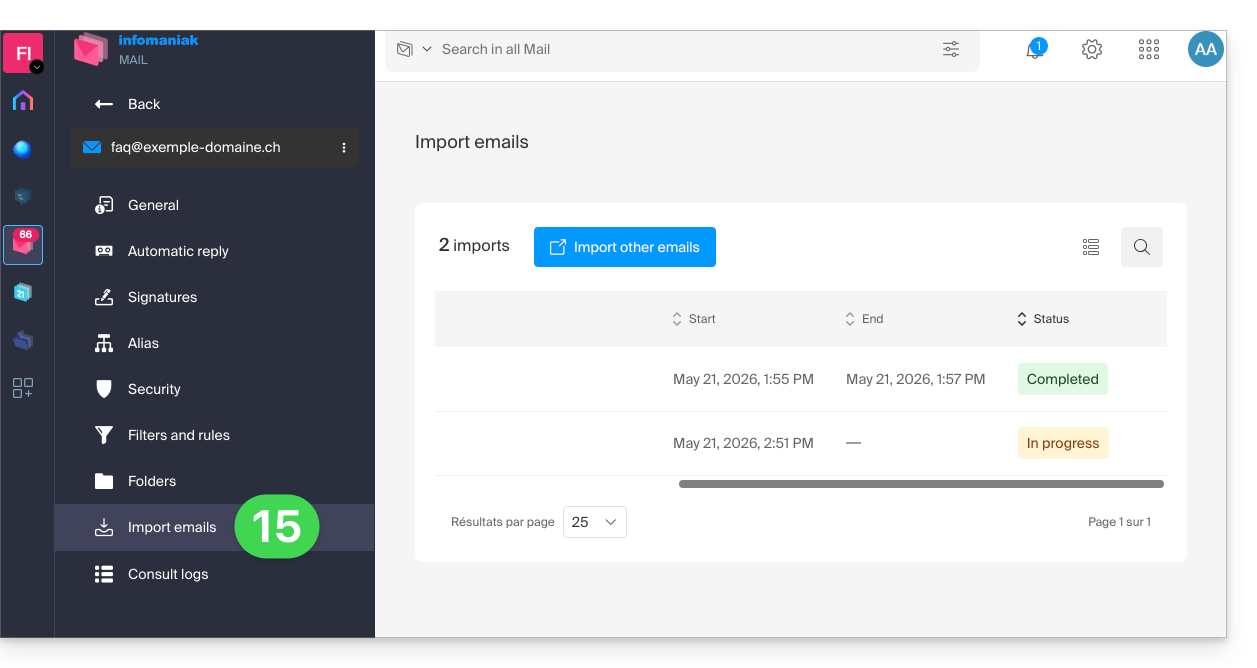
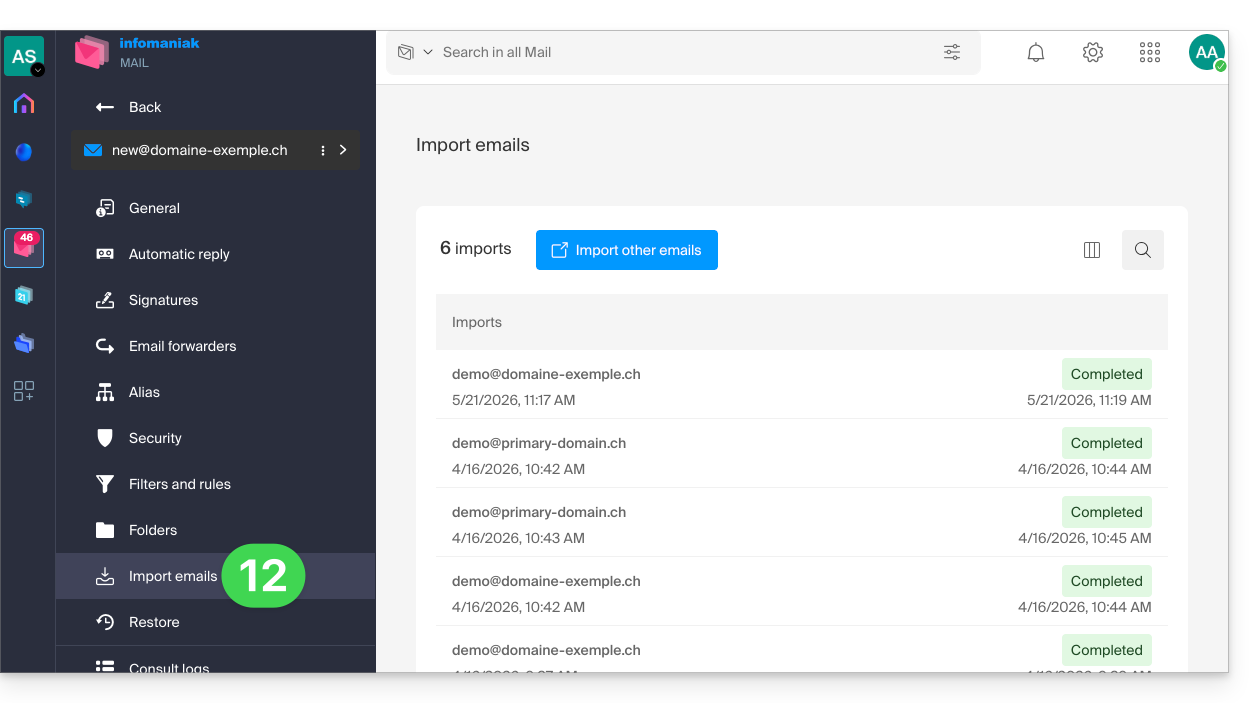
- Um rastreamento está disponível nas configurações do endereço de e-mail de destino, apenas no aplicativo web Mail (serviço online ksuite.infomaniak.com/mail):

- O rastreamento permite visualizar o histórico das importações no endereço em questão:
Importar o conteúdo de vários endereços de e-mail em lote
Este método, via arquivo CSV, não funcionará para endereços Google ou Microsoft devido ao sistema de autenticação — consulte também os pré-requisitos mencionados acima neste guia.
Para importar o conteúdo de vários endereços de e-mail externos (máximo de 25 por 25) para um ou mais endereços de e-mail Infomaniak:
- Clique aqui para acessar a ferramenta de importação (serviço online https://import-email.infomaniak.com).
- Se necessário, faça login na sua conta Infomaniak na Organização correspondente; a importação será feita para um dos endereços de e-mail associados à interface web Mail Infomaniak (serviço online ksuite.infomaniak.com/mail) da conta Infomaniak que você está usando.
- Clique em importar via IMAP.
- Clique em "Modo avançado": Importar vários endereços de e-mail a partir de um arquivo CSV (formato
.csv). - Descarregue o modelo
CSVfornecido como exemplo: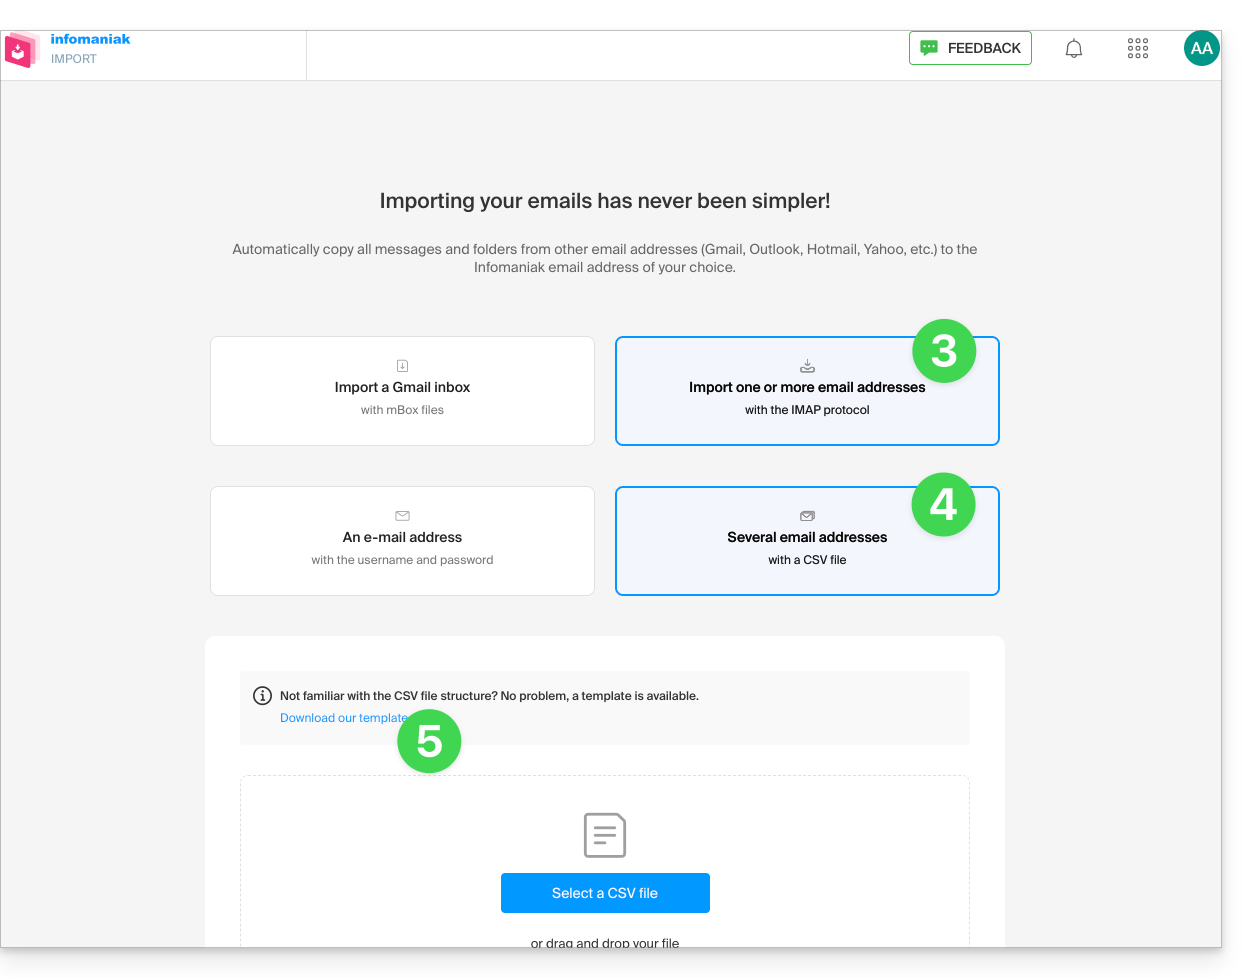
- O modelo tem o seguinte formato:
source-email@domain.com;sourcePassword;imap.source-host.com;sourcePort(993);sourceSsl(1or0);dest-email@domain.com
- O modelo tem o seguinte formato:
- Edite o arquivo
csvpara criar um arquivo com as informações corretas necessárias para a cópia (consulte os pré-requisitos):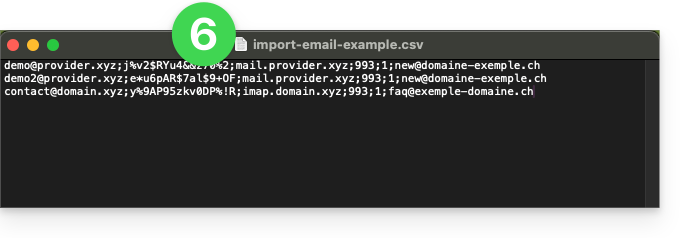
- Carregue o arquivo usando o botão Selecionar arquivo CSV.
- Depois que o arquivo for carregado na página da ferramenta, corrija ou ignore quaisquer erros; clique em Importar.
- A cópia será iniciada. Você pode aguardar e verificar o resultado na página após a conclusão da importação ou fechar a janela (a importação continua em segundo plano e um acompanhamento está disponível – veja abaixo).
- Um e-mail de confirmação será enviado automaticamente para todos os endereços de e-mail afetados pela operação após a conclusão da importação, indicando o número de mensagens copiadas.
- Um acompanhamento está disponível nas configurações dos endereços de e-mail de destino, no aplicativo web Mail (serviço online ksuite.infomaniak.com/mail).
- O acompanhamento permite visualizar o histórico das importações:
Link para esta FAQ: https://faq.infomaniak.com/1144
Esta seção de perguntas frequentes foi útil?