1000 FAQ, 500 tutoriales y vídeos explicativos. ¡Aquí sólo hay soluciones!
Importar las fotos de Google a kDrive
Esta guía detalla cómo importar sus fotos desde Google Photos (https://photos.google.com/) a kDrive de Infomaniak.
1. Exportar sus fotos de Google
Para recuperar en el disco duro de su computadora todas sus fotos almacenadas en Google Photos, debe usar el servicio Google Takeout. Este le permite, en particular, elegir qué álbumes recuperar si desea proceder por etapas:
- Inicie sesión en Google Takeout.
- Deseleccione todos los productos para conservar solo Google Photos:
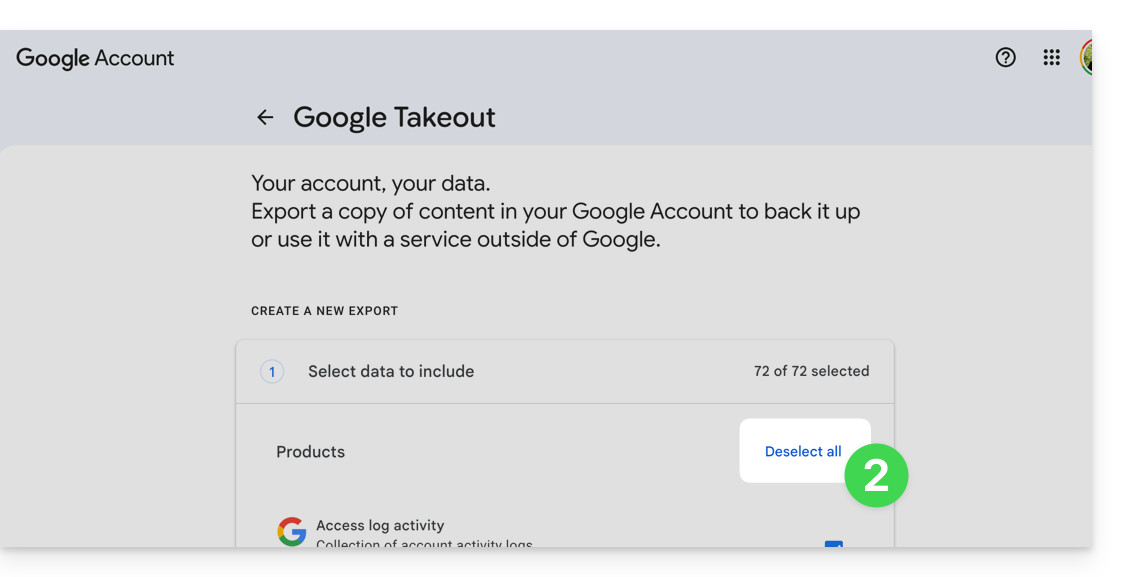
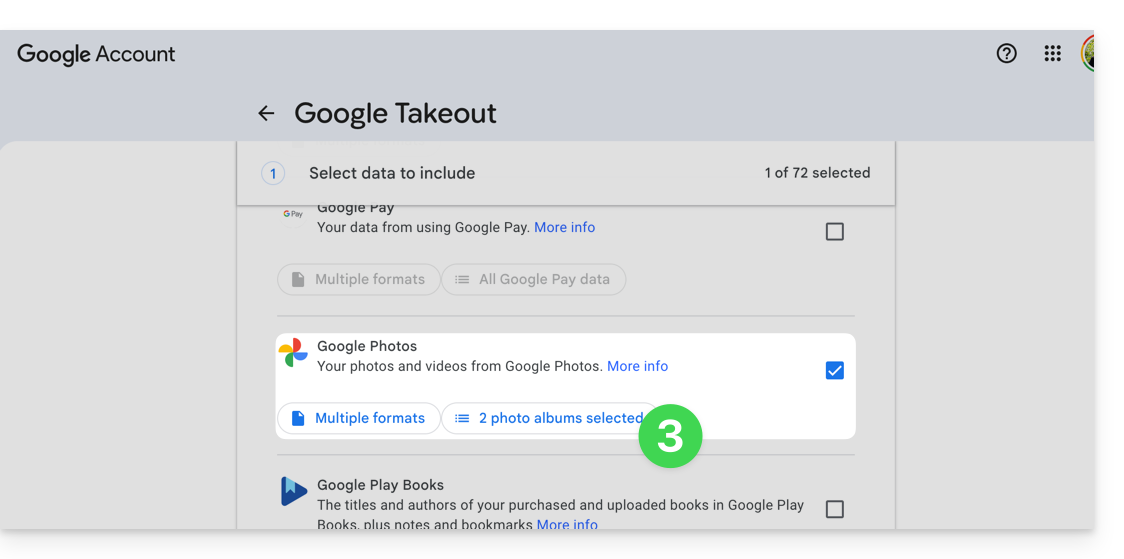
- Si es necesario, deseleccione los álbumes que no desea exportar:
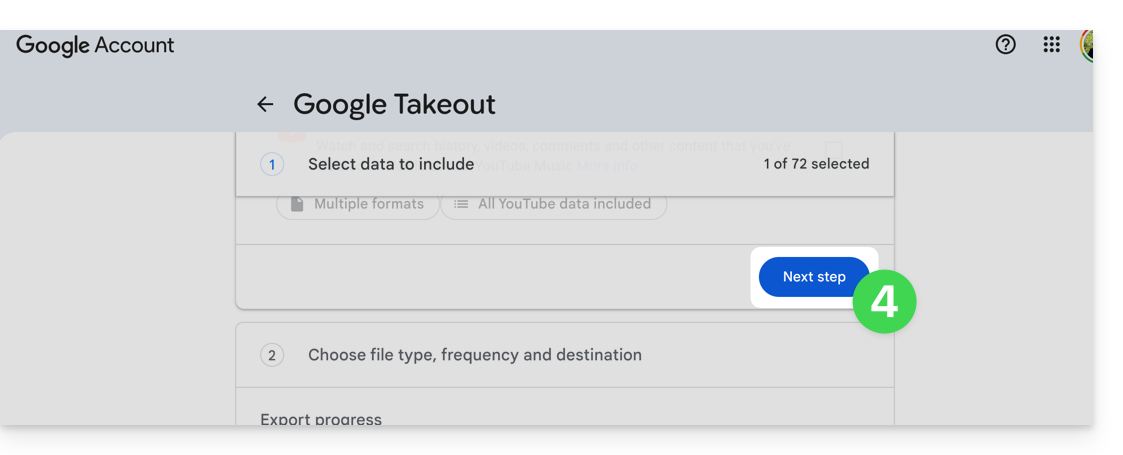
- Pase a la siguiente etapa al final de la página:
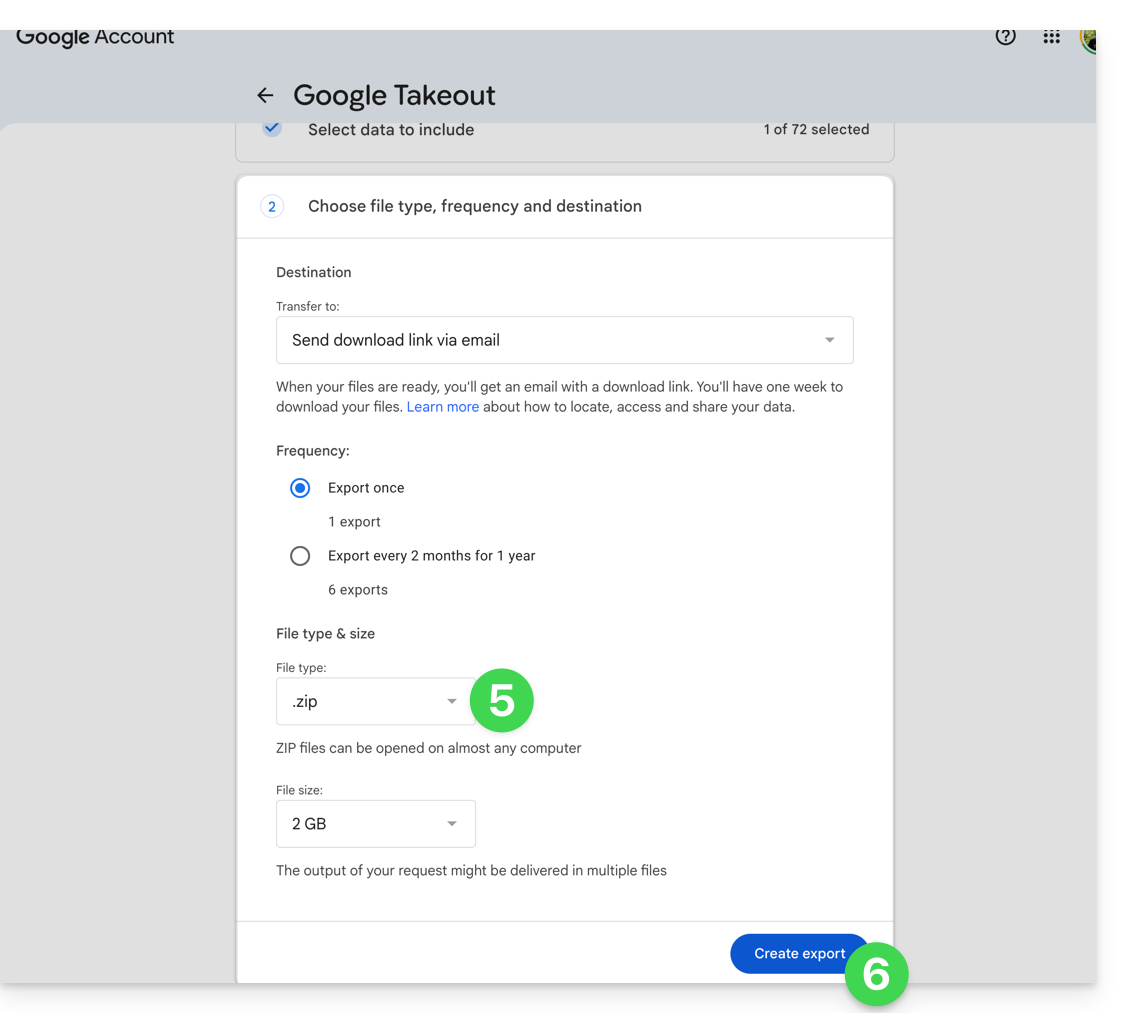
- Configure la exportación por archivos ZIP.
- Haga clic en el botón "Crear una exportación" en la parte inferior para iniciar la exportación:
- Espere (varias horas o incluso varios días) hasta recibir un correo electrónico con los enlaces de exportación en ZIP.
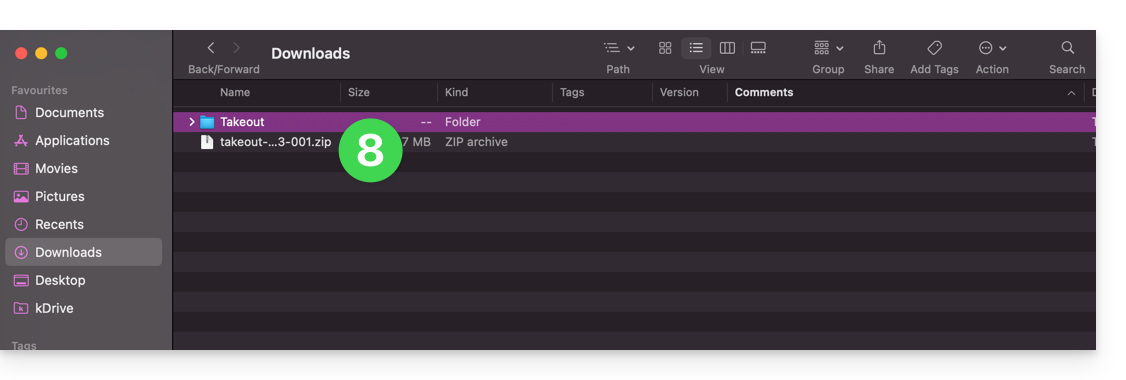
- Descargue y descomprima el contenido en su computadora:
- Limpie y fusione, si es necesario, sus diferentes carpetas de fotos.
2. Corregir las fechas de las fotos exportadas…
Durante la exportación, las fechas de creación de los archivos se modifican y se reemplazan por la fecha de exportación en lugar de la fecha original de la toma. Por lo tanto, debe proceder a una corrección de las fechas a través de un script adecuado.
Este es un script para usuarios avanzados que permite restaurar los datos correctos a sus archivos a partir de las informaciones EXIF (se recomienda procesar lotes de 7000-8000 fotos como máximo para evitar un fallo):
… en macOS
- Descargue ExifTool https://exiftool.org/index.html (Paquete macOS).
- Instale la aplicación autorizando su apertura de antemano si es necesario:

- Abra Script Editor (ubicado en su carpeta Aplicaciones > Utilidades):

- Haga clic en Nuevo documento.
- Copie y pegue el largo script propuesto a continuación en la ventana del Editor de Scripts.
- Haga clic en Ejecutar para iniciar el script, se abrirá una ventana:

- Seleccione la carpeta a analizar.
- Deje que el script se ejecute, modificará las fechas o escribirá los errores en un archivo
errors.txten el escritorio.
El script a copiar y pegar por completo:
-- replace file date with EXIF creation date or date from name after the first dash -
tell application "Finder"
    set FolderPath to choose folder with prompt "Select the folder containing the files to update"
    my processFolder(FolderPath)
end tell
on processFolder(aFolder)
    tell application "Finder"
        -- process files:
        set fileList to files of aFolder
        repeat with eachFile in fileList
            -- process a single file

            set theFile to eachFile
            set AppleScript's text item delimiters to {""}
            set fileName to name of eachFile --get the file name

            set eachFile to eachFile as string --file path
            set hasDate to true --initialize date found flag

            try
                --get date if available
                set photoDate to do shell script "/usr/local/bin/exiftool -DateTimeOriginal " & quoted form of POSIX path of eachFile
                if photoDate is "" then set photoDate to do shell script "/usr/local/bin/exiftool -CreationDate " & quoted form of POSIX path of eachFile
                if photoDate is "" then set photoDate to do shell script "/usr/local/bin/exiftool -CreateDate " & quoted form of POSIX path of eachFile

                if photoDate is "" then
                    set hasDate to false --check if date was found
                end if

            on error
                set hasDate to false -- error retrieving date
                set photoDate to ""
            end try

            if length of photoDate > 20 then
                --format extracted date
                set x to (length of photoDate) - 33
                set OriginalDate to text -x thru -1 of photoDate
                set formattedDate to text 1 thru 5 of OriginalDate
                set theYear to formattedDate
                set formattedDate to formattedDate & text 7 thru 8 of OriginalDate
                set theMonth to text 7 thru 8 of OriginalDate
                set formattedDate to formattedDate & text 10 thru 11 of OriginalDate
                set theDay to text 10 thru 11 of OriginalDate
                set formattedDate to formattedDate & text 13 thru 14 of OriginalDate
                set theHour to text 13 thru 14 of OriginalDate
                set formattedDate to formattedDate & text 16 thru 17 of OriginalDate
                set theMinute to text 16 thru 17 of OriginalDate
                set formattedDate to formattedDate & "." & text 19 thru 20 of OriginalDate
                set theSecond to text 19 thru 20 of OriginalDate
                set newName to theYear & "-" & theMonth & "-" & theDay & " " & theHour & "." & theMinute & "." & theSecond

                set testValue to formattedDate as string --check if found date is 000
                if testValue is " 000000000000.00" then
                    set hasDate to false
                else
                    -- set file date to original EXIF date and write to log
                    do shell script "touch -t " & formattedDate & " " & quoted form of POSIX path of eachFile
                    set logFile to open for access ((path to desktop folder as text) & "Date Found.txt") as text with write permission
                    write "Original date found for file: " & OriginalDate & " " & eachFile & return to logFile starting at eof
                    close access logFile
                end if
            end if

            if hasDate is false then
                -- get date from file name after first dash
                set nb to ""
                set nameDate to ""
                set fileName to fileName as string
                set savedDelimiters to AppleScript's text item delimiters --save delimiters
                set AppleScript's text item delimiters to {"-"} --split on "-"
                set nb to offset of "-" in fileName
                if nb is not 0 then
                    set AppleScript's text item delimiters to savedDelimiters --restore delimiters
                    set nameDate to characters (nb + 1) thru (nb + 8) of fileName as string
                    set nameDate to nameDate & "1200.00"
                    set cmd1 to "/usr/local/bin/exiftool -datetimeoriginal=" & nameDate & " " & quoted form of POSIX path of eachFile
                    set cmd2 to "/usr/local/bin/exiftool -createdate=" & nameDate & " " & quoted form of POSIX path of eachFile
                end if
                try
                    -- write date from name to EXIF
                    do shell script cmd1
                    do shell script cmd2
                    do shell script "touch -t " & nameDate & " " & quoted form of POSIX path of eachFile
                    do shell script "rm " & quoted form of POSIX path of (eachFile & "_original")
                on error
                    -- if date from name is invalid, log the error
                    set logFile to open for access ((path to desktop folder as text) & "Date Error.txt") as text with write permission
                    write "No valid date found in file name: " & eachFile & return to logFile starting at eof
                    close access logFile
                end try
            end if
        end repeat

        -- process folders:
        set folderList to folders of aFolder
        repeat with eachSubfolder in folderList
            -- process a subfolder
            my processFolder(eachSubfolder)
        end repeat
    end tell
end processFolder
tell application "Finder"
    display dialog "Done! All files processed." buttons {"Close"}
end tell
… en Windows
- Descargue ExifTool https://exiftool.org/index.html (ejecutable de Windows)
- Colóquelo en una carpeta accesible (por ejemplo
C:\ExifTool). - Renombre
exiftool(-k).exeaexiftool.exe. - Tome nota de su ruta (por ejemplo
C:\ExifTool\exiftool.exe).- El script busca el ejecutable en
C:\ExifTool\exiftool.exe. Si lo coloca en otro lugar, debe modificar la segunda línea del script.
- El script busca el ejecutable en
- Copie y pegue el largo script propuesto a continuación en un archivo de texto tipo bloc de notas en su ordenador.
- Modifique, si es necesario, la ruta especificada en el archivo con la anotada en el punto 4.
- Guárdelo con la extensión
.ps1, por ejemploUpdateExifDates.ps1. - Haga clic derecho en el archivo
.ps1para ejecutarlo con PowerShell (un entorno de intérprete de comandos y escritura de scripts, preinstalado en las versiones modernas de Windows). - Seleccione la carpeta a analizar.
- Deje que el script se ejecute, modificará las fechas o escribirá los errores en un archivo
DateError.txten el escritorio.
PowerShell puede bloquear los scripts. Para permitir su ejecución (si es necesario), abra PowerShell como administrador y escriba Set-ExecutionPolicy RemoteSigned -Scope CurrentUser.
El script a copiar y pegar por completo:
# === Configuration ===
$exifToolPath = "C:\ExifTool\exiftool.exe"
$desktop = [Environment]::GetFolderPath("Desktop")
$logFound = Join-Path $desktop "DateFound.txt"
$logError = Join-Path $desktop "DateError.txt"

# === Folder Selection Dialog ===
Add-Type -AssemblyName System.Windows.Forms
$folderBrowser = New-Object System.Windows.Forms.FolderBrowserDialog
$folderBrowser.Description = "Select the folder to process"
if ($folderBrowser.ShowDialog() -ne "OK") { exit }
$folder = $folderBrowser.SelectedPath

function Process-Folder {
    param ([string]$path)
    Get-ChildItem -Path $path -Recurse -File | ForEach-Object {
        $file = $_
        $filePath = $file.FullName
        $fileName = $file.Name
        $hasDate = $true

        # Try reading EXIF date
        $photoRaw = & $exifToolPath -DateTimeOriginal -S -n "$filePath"
        if (-not $photoRaw) { $photoRaw = & $exifToolPath -CreateDate -S -n "$filePath" }

        if ($photoRaw -match "\d{4}:\d{2}:\d{2} \d{2}:\d{2}:\d{2}") {
            $photoDate = $matches[0]
            # Nettoyage de la date pour formatage (YYYYMMDDHHMM.SS)
            $dateString = $photoDate -replace '[: ]', ''

            if ($dateString.Length -ge 14) {
                $formattedDate = $dateString.Substring(0, 12) + "." + $dateString.Substring(12, 2)
                try {
                    $newDate = [datetime]::ParseExact($photoDate, "yyyy:MM:dd HH:mm:ss", $null)
                    [System.IO.File]::SetCreationTime($filePath, $newDate)
                    [System.IO.File]::SetLastWriteTime($filePath, $newDate)
                    Add-Content -Path $logFound -Value "EXIF date set for: $fileName → $photoDate"
                } catch {
                    $hasDate = $false
                }
            } else { $hasDate = $false }
        } else { $hasDate = $false }

        if (-not $hasDate) {
            if ($fileName -match "-(\d{8})") {
                $nameDateRaw = $matches[1] + "120000"
                try {
                    & $exifToolPath "-datetimeoriginal=$($matches[1]) 12:00:00" "$filePath"
                    & $exifToolPath "-createdate=$($matches[1]) 12:00:00" "$filePath"
                    $newDate = [datetime]::ParseExact($nameDateRaw, "yyyyMMddHHmmss", $null)
                    [System.IO.File]::SetCreationTime($filePath, $newDate)
                    [System.IO.File]::SetLastWriteTime($filePath, $newDate)
                    Add-Content -Path $logFound -Value "Date from filename set for: $fileName"
                } catch {
                    Add-Content -Path $logError -Value "Invalid date in filename: $fileName"
                }
            } else {
                Add-Content -Path $logError -Value "No valid date found for: $fileName"
            }
        }
    }
}

# Execute processing
Process-Folder -path $folder
[System.Windows.Forms.MessageBox]::Show("Done! All files processed.")
3. Importar las fotos a kDrive
No modifique sus contraseñas hasta que la importación no haya finalizado.
Una vez que sus fotos estén listas, si su número no es demasiado elevado (unos pocos miles de elementos) y su conexión a Internet es adecuada, puede simplemente abrir la aplicación web kDrive (servicio en línea ksuite.infomaniak.com/kdrive) y elegir importar en el lugar deseado la carpeta que contiene sus fotos:
- Haga clic aquí para acceder a la aplicación web kDrive de Infomaniak (servicio en línea ksuite.infomaniak.com/kdrive).
- Navegue hasta el lugar donde se almacenarán sus fotos.
- Haga clic en el botón Nuevo en la parte superior izquierda.
- Haga clic en Importar una carpeta.
- Seleccione la carpeta que contiene sus fotos en su ordenador.
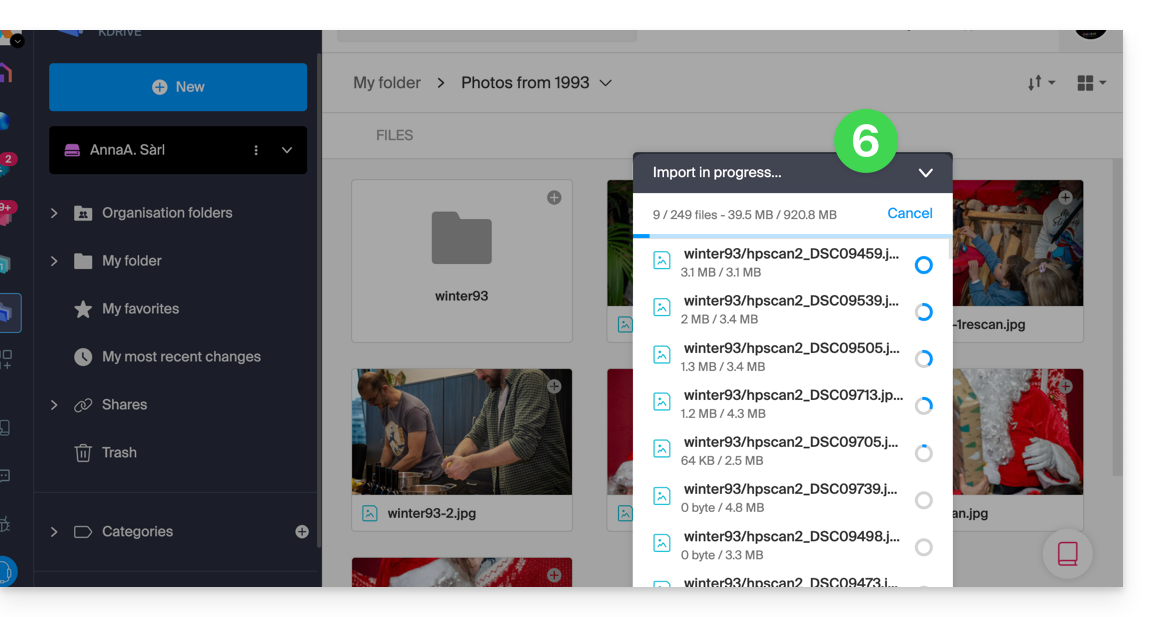
- Espere hasta que se complete la importación de sus datos (el registro de actividades se desplaza en la parte inferior derecha):
O, en el caso de que sincronice sus datos utilizando la aplicación de escritorio, simplemente coloque sus fotos en la estructura de carpetas de su carpeta kDrive en el ordenador. La sincronización comenzará y sus fotos se enviarán de forma segura a los servidores de Infomaniak.
4. Acceder a las fotos desde sus dispositivos
Ahora puede acceder a sus fotos en sus diferentes dispositivos conectados a kDrive (el tiempo que tarden en sincronizarse si se trata de la aplicación de escritorio kDrive).
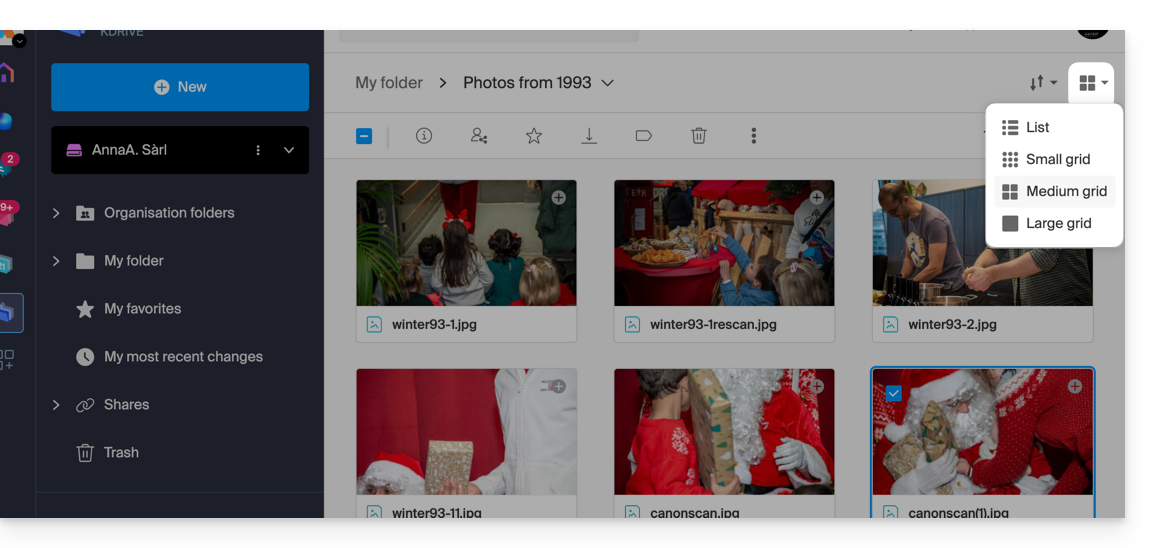
- En la aplicación Web kDrive Infomaniak (servicio en línea ksuite.infomaniak.com/kdrive) puede modificar la presentación para visualizar mejor sus fotos con una vista ampliada de las miniaturas:
