Knowledge base
1000 FAQs, 500 tutorials and instructional videos. Here, there are only solutions!
Manage the folders to synchronize on kDrive
This guide explains how to select the folders that will be synchronised between the desktop app kDrive (desktop application on macOS / Windows / Linux) and the web app (online service ksuite.infomaniak.com/kdrive).
Prerequisites
- You must have a kDrive / kSuite plan.
- You must have the kDrive application installed on the device to be synchronised.
Choosing the kDrive folders to synchronise
1. Avoid having everything on your computer
When you install the kDrive application on your computer, everything that is already on the web app kDrive (online service ksuite.infomaniak.com/kdrive) will be visible on your computer, either virtually if you choose to enable Lite Sync (10 GB on the web will be reduced to a few MB on the computer), or physically with the same storage size (10 GB on the web will require 10 GB on your computer).
To choose which folder(s) you want to be able to view on your computer, go to the settings of the kDrive application on your computer:
- Left-click on the desktop app icon in the notification area of your computer (top right on macOS, bottom right on Windows, and double left-click in the taskbar on Linux).
- Click on the action menu ⋮ on the right of the window that appears.
- Click on kDrive Settings:
- Click on the chevron to the left of your synchronisation name to display the list of folders.
- Expand the contents of the listed folders and check/uncheck the folders to be synchronized with your computer.
- Click on the blue Confirm button:
Important
- When deselecting a folder from the list, a message next to the button (point 6 above) will warn you that the folder will be moved to the trash/recycle bin on your computer.
- This is the folder that was in your kDrive directory on your computer.
- The kDrive folders in the online version accessible via a web browser will not be affected, but you must ensure, before the operation, that the folder in question was properly synchronized and fully present in this online version (especially if you had just placed it within your synchronized directory).
- If in doubt, also make sure that your computer does not instantly delete large items when they are placed in the trash/recycle bin, due to the size of the Windows trash/recycle bin, for example:

Add a local folder for advanced synchronization
To do this:
- In the same location accessible as described above, click on Synchronize a local folder:
- … which will allow you to synchronize one or more new folders from your hard drive with the location of your choice on kDrive:
Stop and remove a synchronization
To do this:
- In the same location accessible as described above, click on the ⋮ icon on the far right:
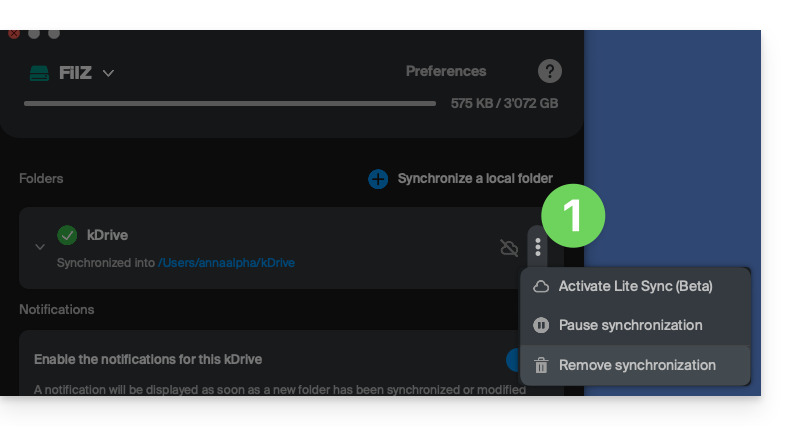
- … which will allow you to:
- Activate Lite Sync
- Pause synchronization
- Delete synchronization (only from your device, without affecting your kDrive) - please refer to this other guide.
Link to this FAQ: https://faq.infomaniak.com/2454
Has this FAQ been helpful?