Base de conhecimento
1000 perguntas frequentes, 500 tutoriais e vídeos explicativos. Aqui, você encontra apenas soluções!
Este guia ajuda a identificar e corrigir a maioria dos erros de e-mail encontrados após o envio de um e-mail para um destinatário.
Se procura informações sobre erros que aparecemao configurar um endereço de e-mail em um software/cliente de e-mail, consulte este outro guia.
Introdução
- Em geral, uma mensagem de erro no serviço de e-mail ocorre devido a:
- uma configuração incorreta do nome de domínio utilizado com o seu serviço de e-mail,
- um problema no provedor de e-mail do seu destinatário.
- Em todos os casos, um relatório de falha na entrega (
Mailer DaemonouMail Delivery Subsystem) contendo a explicação é enviado ao remetente.
1. Princípios básicos e identificação do erro
Funcionamento dos relatórios de falha
Quando a sua mensagem não chega ao destinatário, um primeiro relatório de falha (Relatório de Falha Temporária na Entrega) é enviado, indicando que o servidor tentará reenviar a sua mensagem várias vezes.
Um relatório de falha de entrega final (Final Delivery Failure Report ou Undeliverable Mail) emitido pelo servidor do destinatário é enviado ao remetente (através do servidor de e-mail Infomaniak, o que explica a menção da Infomaniak no início da maioria das mensagens de erro que você pode receber) para informá-lo de que o e-mail não pôde ser entregue, mesmo após várias tentativas.
A notificação contém sempre o motivo da falha. Exemplo abaixo:
This is the mail system at host smtp-1-1234.mail.infomaniak.ch.
I'm sorry to have to inform you that your message could not be delivered to one or more recipients. It's attached below.
For further assistance, please send mail to postmaster.
If you do so, please include this problem report. You can delete your own text from the attached returned message.
The mail system anna.a@abc.xyz: host mxbw-abc-xyz.abc-ab12.abc.ch[123.456.789.00] said: 550 5.1.1
anna.a@abc.xyz recipient rejected, account administratively disabled (in reply to RCPT TO command)
Aqui, o endereço do seu destinatário está visivelmente suspenso pelo seu provedor de e-mail (conta desativada administrativamente).
Às vezes, é preciso procurar a razão da mensagem de erro recebida entre os anexos (geralmente um arquivo de texto simples). Exemplo:
Reporting-MTA: dns; mxbw.abc.ch [123.456.789.00]
Received-From-MTA: dns; smtp-1-1234.mail.infomaniak.ch [12.345.678.99]
Arrival-Date: Tue, 01 Aug 2023 15:49:22 +0200
Final-recipient: rfc822; anna.a@abc.xyz
Diagnostic-Code: smtp; 552 RCPT TO:anna.a@abc.xyz Mailbox disk quota exceeded
Last-attempt-Date: Tue, 01 Aug 2023 15:49:22 +0200Aqui, a caixa de e-mail do seu correspondente externo na Infomaniak parece estar cheia (Limite de quota de disco da caixa de e-mail excedido).
2. Casos mais comuns
Falha no SPF
O registro SPF (Sender Policy Framework) não está configurado corretamente:
Subject: Delivery Status Notification (Failure)
From: Mail Delivery System mailer-daemon@domain.xyz
To: Anna.A anna.a@abc.xyz
This is an automatically generated Delivery Status Notification.
Delivery to the following recipient failed due to SPF failure:
anna.a@abc.xyz
Technical details of SPF failure:
The sender's domain domain.xyz does not have a valid SPF record. Please contact your email administrator to correct the SPF configuration.
Solução: verifique a configuração do seu nome de domínio e, em particular, o registro do tipo SPF se o seu site estiver hospedado no Wix ou em outro provedor.
Utilizador desconhecido
O endereço de e-mail especificado na mensagem é inválido ou não existe:
Subject: Delivery Status Notification (Failure)
From: Mail Delivery System mailer-daemon@domain.xyz
To: Anna.A anna.a@abc.xyz
This is an automatically generated Delivery Status Notification.
Delivery to the following recipient failed permanently:
anna.a@abc.xyz
Technical details of permanent failure:
The email address does not exist. Please check the recipient's email address and try again.
Solução: verifique cuidadosamente o endereço de e-mail do destinatário e corrija-o, se necessário; certifique-se de usar um endereço de e-mail válido para o destinatário.
Falha Temporária
O servidor de mensagens do destinatário está com problemas temporários ou indisponível.
Solução: aguarde um pouco e tente enviar a mensagem novamente mais tarde. Se o problema persistir, entre em contato com o suporte técnico do destinatário para obter ajuda.
Bloqueado pelo filtro de SPAM (ou conteúdo rejeitado)
O servidor de e-mail do destinatário bloqueou a mensagem devido a regras de filtragem anti-spam:
Subject: Delivery Status Notification (Failure)
From: Mail Delivery System mailer-daemon@domain.xyz
To: Anna.A anna.a@domain.xyz
This is an automatically generated Delivery Status Notification.
Delivery to the following recipient failed due to the message being rejected as spam:
anna.a@domain.xyz
Technical details of delivery failure:
The content of the message triggered the spam filters of the recipient's email server. Please review the message content and try again.
Solução: verifique se a sua mensagem contém elementos que possam ser considerados spam (palavras-chave, links suspeitos, etc.). Contacte o destinatário para verificar se a mensagem foi filtrada na pasta de lixo eletrónico.
Consulte este outro guia sobre spam de saída e este outro guia sobre spam de entrada.
Má Reputação
O servidor de e-mail do destinatário bloqueou a mensagem devido a regras de filtragem anti-spam:
gmail-smtp-in.l.google.com said: 550-5.7.1
Our system has detected that this message is likely suspicious due to the very low reputation of the sending domain.
To best protect our users from spam, the message has been blocked.
Please visit {{URL_5}} for more information.
Solução: verifique a reputação do domínio e determine se alguma de suas contas de e-mail foi recentemente utilizada indevidamente para fins maliciosos.
Domínio não encontrado (ou erro de DNS)
O nome de domínio do destinatário não pôde ser resolvido ou não existe.
Solução: verifique a ortografia do domínio do destinatário e corrija-o, se necessário; certifique-se de que o nome de domínio e os DNS são válidos e estão ativos.
Caixa de correio cheia
A caixa de entrada do destinatário está cheia, impedindo o recebimento de novas mensagens.
Solução: informe o destinatário sobre a situação e peça para que ele libere espaço excluindo e-mails ou arquivando itens.
Isso não pode acontecer com os endereços de e-mail gerenciados pela Infomaniak, pois eles não têm limite de tamanho de armazenamento.
Parte da rede deles está na nossa lista de bloqueio
Se a mensagem de erro (geralmente obtida após o envio de um e-mail a partir de uma ferramenta online, instalada no servidor onde se encontra o seu site, por exemplo, uma confirmação de pedido do PrestaShop ou de outra loja online que gere) contiver o seguinte:
host hotmail-com.olc.protection.outlook.com[104.47.30.97] said: 550 5.7.1
Unfortunately, messages from [89.123.456.789] weren't sent. Please contact your Internet service provider since part of their network is on our block list.
Solução: altere o método de envio dos e-mails. O envio é não autenticado e é enviado a partir do servidor com um endereço IP específico que, aparentemente, está bloqueado pelo destinatário por alguma razão (a Infomaniak não intervém para solicitar o desbloqueio). Portanto, configure a ferramenta online para efetuar envios autenticados.
3. Erros menos frequentes
Atrasado
A mensagem de erro Adiado - Atrasado - Aviso: a mensagem ainda não foi entregue após 4 horas, continuaremos tentando até que a mensagem tenha 3 dias significa que o servidor de e-mail da Infomaniak tentou conectar-se ao servidor de e-mail do seu destinatário para enviar a mensagem, mas não conseguiu por algum motivo. Esta mensagem de erro indica que o servidor Infomaniak continuará tentando enviar sua mensagem durante o período especificado na mensagem de erro. Se, após esse período, a mensagem ainda não tiver sido entregue, você receberá uma mensagem de erro final informando que sua mensagem não pôde ser entregue e que seu destinatário não a recebeu.
Atraso devido ao Greylisting
Este erro Atraso do Greylisting ocorre quando o servidor de e-mail do seu destinatário utiliza, tal como a Infomaniak, uma técnica chamada "greylisting", que impõe um atraso temporário na primeira tentativa de entrega de uma mensagem proveniente de um remetente desconhecido. O Mailer Daemon pode enviar um relatório de erro indicando que a entrega foi atrasada devido ao greylisting. O erro também pode mencionar remetente bloqueado. Tente reenviar a sua mensagem alguns minutos/horas depois.
Mensagem com malware rejeitada
Este erro Malware message rejected ocorre quando a mensagem contém um anexo, um link para um site de armazenamento como o Dropbox ou conteúdo dinâmico, incluindo na parte "transmitida" da mensagem (no caso de um "encaminhamento" de mensagem, por exemplo). Tente reenviar a mensagem a partir do aplicativo web Mail Infomaniak (serviço online ksuite.infomaniak.com/mail) em vez de um aplicativo de e-mail e remova qualquer conteúdo que possa causar este erro.
Tamanho da mensagem excedido / Arquivo muito grande
Esses erros Tamanho da mensagem excedido / Arquivo muito grande ocorrem quando o tamanho da mensagem (ou dos anexos) excede o limite permitido pelo servidor de e-mail do destinatário. O Mailer Daemon enviará um relatório de erro indicando que a entrega falhou devido ao tamanho excessivo da mensagem.
Limite de taxa excedido
Este erro Limite de taxa excedido ocorre quando o remetente excedeu o limite de frequência ou de volume permitido pelo servidor de mensagens do destinatário. Os servidores de mensagens podem impor limites para evitar spam ou sobrecarga do sistema.
Remetente rejeitado: as proteções de autenticação falharam
Consulte este outro guia se encontrar o erro Sender denied: auth guards failed.
A mensagem contém um caractere Unicode em um cabeçalho não permitido.
Este erro A mensagem contém um caractere Unicode em um cabeçalho não permitido pode aparecer se você inseriu um caractere especial, como um coração ♥, por exemplo, no corpo do e-mail, no assunto ou, principalmente, no nome completo. O risco de ser rejeitado pelos provedores é muito alto: é preciso ser o mais simples possível no uso de sinais, caracteres e fontes.
Link para esta FAQ: https://faq.infomaniak.com/858
Esta seção de perguntas frequentes foi útil?
Este guia explica como remover pastas que aparecem esmaecidas na aplicação web Mail da Infomaniak (serviço online ksuite.infomaniak.com/mail) ou em alguns softwares/clientes de e-mail como Apple Mail, Mozilla Thunderbird ou Microsoft Outlook.
Pastas fantasmas
Alguns programas/clientes de e-mail, como o Microsoft Outlook, permitem criar subpastas de pastas inexistentes. Por exemplo, é possível criar a pasta /abc/klm/xyz, mesmo que a pasta "klm" não exista.
No Mail Infomaniak ou em outros programas, as pastas "fantasmas", como a pasta "klm", aparecem em cinza e não podem ser eliminadas diretamente, pois são apenas "caminhos" para uma subpasta real.
Para remover estas pastas fantasmas, é necessário remover primeiro as suas subpastas (neste exemplo: xyz).
Pastas problemáticas
Se, ao consultar o seu endereço de e-mail Infomaniak no Outlook, pastas fantasmas persistirem ou reaparecerem instantaneamente após a exclusão, aqui estão os procedimentos técnicos recomendados pela Microsoft para forçar a sincronização:
1. Forçar a reinicialização das pastas do Outlook
Às vezes, a tabela de pastas local do Outlook está corrompida. Um comando simples pode, muitas vezes, corrigir isso sem apagar nada:
- Feche o Outlook completamente.
- Pressione as teclas
Windows + Rno seu teclado. - Digite
outlook.exe /resetfolderse valide (isso restaura as pastas ausentes ou corrompidas a partir do servidor).
2. Reinicializar o cache IMAP (.ost)
Se o problema persistir, forçar o Outlook a reconstruir a sua base de dados local é, muitas vezes, a solução mais eficaz:
- Feche o Outlook.
- Acesse a pasta:
C:\Users\[Seu Nome de Usuário]\AppData\Local\Microsoft\Outlook. - Identifique o ficheiro
.ostcom o nome do seu endereço Infomaniak e elimine-o (ou renomeie-o para.oldpor segurança). - Reinicie o Outlook; o programa irá descarregar novamente todos os seus e-mails e pastas dos servidores Infomaniak.
3. Utilizar a ferramenta MFCMAPI (Nível Avançado)
O MFCMAPI permite aceder diretamente à estrutura MAPI da sua caixa de correio para eliminar elementos que a interface padrão do Outlook se recusa a remover:
- Faça o download da versão mais recente do MFCMAPI em GitHub (Fonte oficial).
- Execute
MFCMAPI.exee vá paraSessão > Iniciar sessão; selecione o seu perfil do Outlook. - Clique duas vezes na sua conta de e-mail Infomaniak na lista.
- Na nova janela, expanda
Root Container(ouRacine - Boîte aux lettres) e, em seguida,IPM_SUBTREE. - Localize a pasta problemática, clique com o botão direito e escolha
Excluir pasta. - Atenção: na caixa de diálogo, tente primeiro a exclusão simples; se isso falhar, tente novamente marcando a opção
DELETE_HARD_DELETE(exclusão definitiva no nível do servidor).
4. Verificação final através do Webmail
Se uma pasta for excluída no Outlook, mas continuar a reaparecer, verifique obrigatoriamente na aplicação Web Mail da Infomaniak se a pasta está presente e exclua-a primeiro através da interface Web, para depois aplicar o passo nº 1 (resetfolders) no Outlook.
Excluir uma conta e reconfigurá-la imediatamente continua sendo a alternativa mais simples, caso o MFCMAPI lhe pareça muito complexo.
Link para esta FAQ: https://faq.infomaniak.com/865
Esta seção de perguntas frequentes foi útil?
Este guia explica o que significa a indicação de e-mail externo, "Externo", que aparece na aplicação web Mail (serviço online ksuite.infomaniak.com/mail) e na aplicação móvel Infomaniak Mail (aplicação para smartphone ou tablet iOS / Android) ao ler certas mensagens: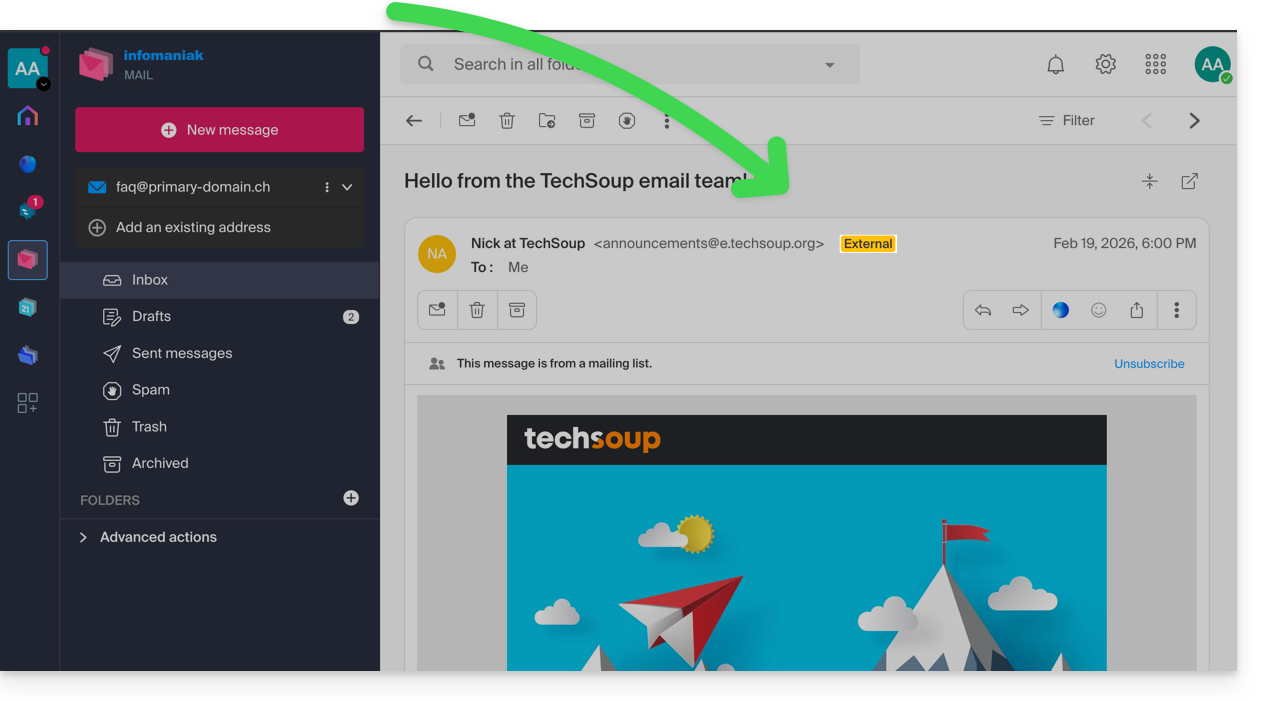
Introdução
- A indicação de e-mail externo é exibida nos seguintes casos:
- O nome de domínio (ou alias) do remetente não corresponde ao da conta de e-mail configurada no Mail.
- O remetente não faz parte dos contatos (incluindo os contatos sugeridos).
- O e-mail provém de um endereço hospedado fora da Organização.
- A indicação será exibida como "desconhecido" em vez de “externo” em algumas ofertas gratuitas, como my kSuite.
Ativar ou desativar a indicação
Pode ativar ou desativar a indicação; o efeito é imediato para os e-mails recebidos e, no caso de uma resposta a um e-mail externo. Para tal:
- Clique aqui para aceder à gestão do seu Serviço de E-mail no Manager Infomaniak (precisa de ajuda?).
- Clique diretamente no nome atribuído ao Serviço de E-mail em questão:
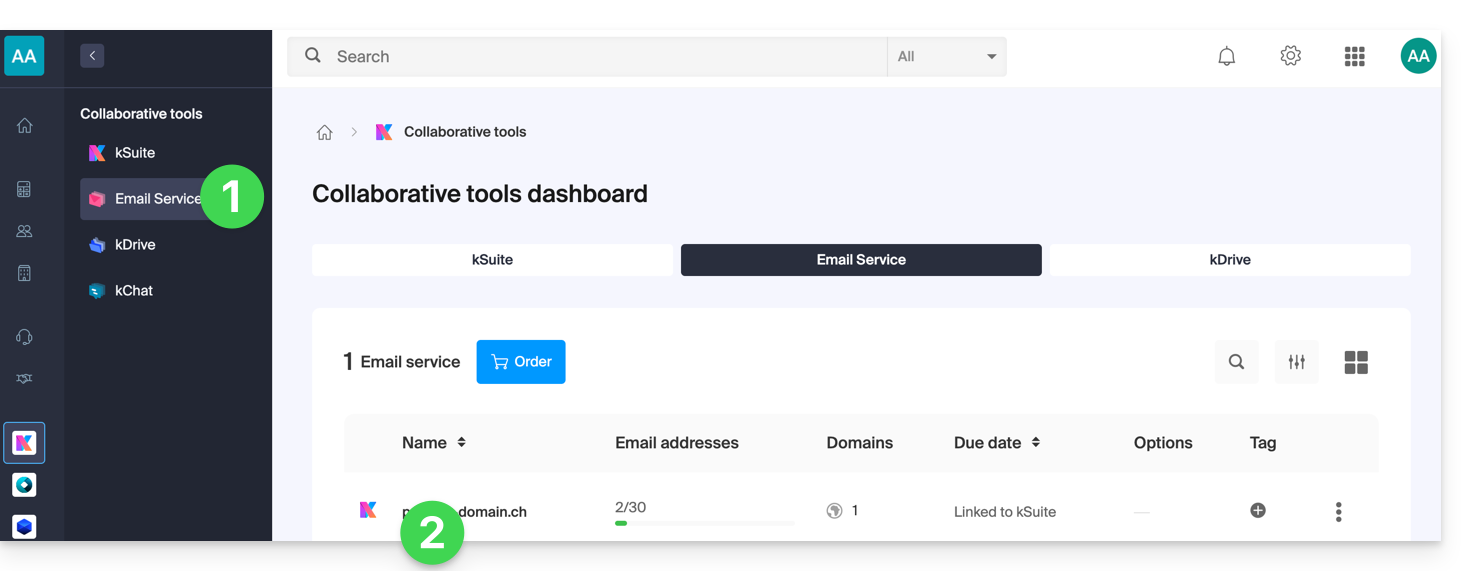
- Clique em Configurações globais no menu lateral esquerdo:
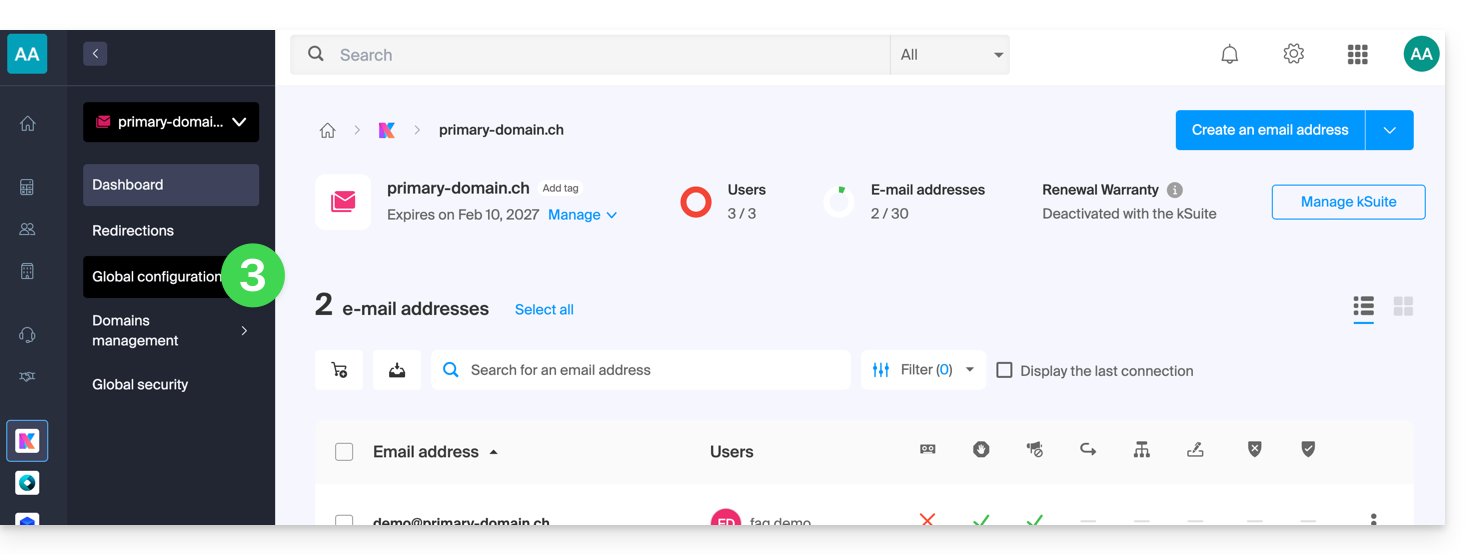
- Clique na aba Segurança.
- Ative ou desative o botão de alternância:
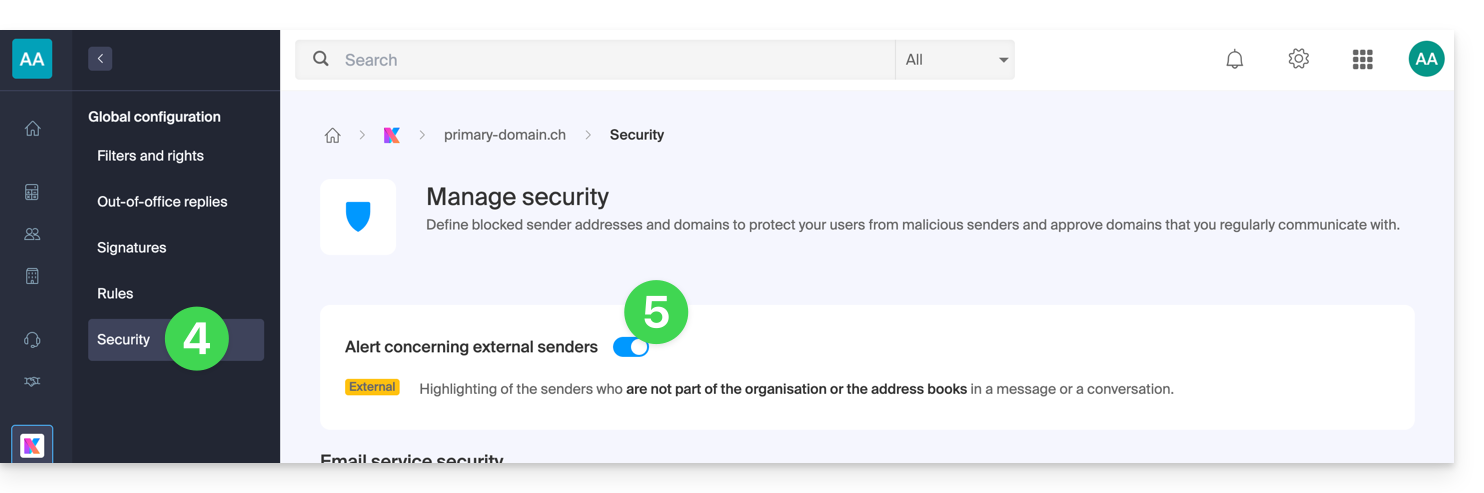
Link para esta FAQ: https://faq.infomaniak.com/964
Esta seção de perguntas frequentes foi útil?
Este guia explica como guardar um e-mail (como se o descarregasse) diretamente no seu kDrive.
Introdução
- Salve, com apenas alguns cliques, uma mensagem recebida em um endereço do seu Serviço de E-mail Infomaniak, no formato
.eml, que pode ser lida diretamente na sua interface kDrive. - Para exportar todos os e-mails de um endereço de e-mail, consulte este outro guia.
- Para exportar os anexos de um e-mail, consulte este outro guia.
Adicionar um e-mail ao kDrive…
… a partir do aplicativo Web Mail da Infomaniak
Para exportar a mensagem de e-mail desejada para o seu kDrive:
- Clique aqui para acessar o aplicativo web Mail da Infomaniak (serviço online ksuite.infomaniak.com/mail).
- Abra o e-mail que deseja salvar.
- Clique, em seguida, no ícone de compartilhamento na parte superior da mensagem para adicionar ao kDrive:
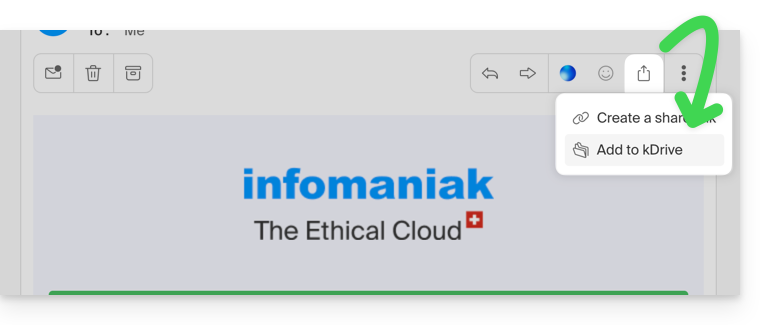
- Clique, em seguida, no ícone de compartilhamento na parte superior da mensagem para adicionar ao kDrive:
- Caso contrário, você também pode clicar no ícone Adicionar ao kDrive na parte superior da mensagem em questão:
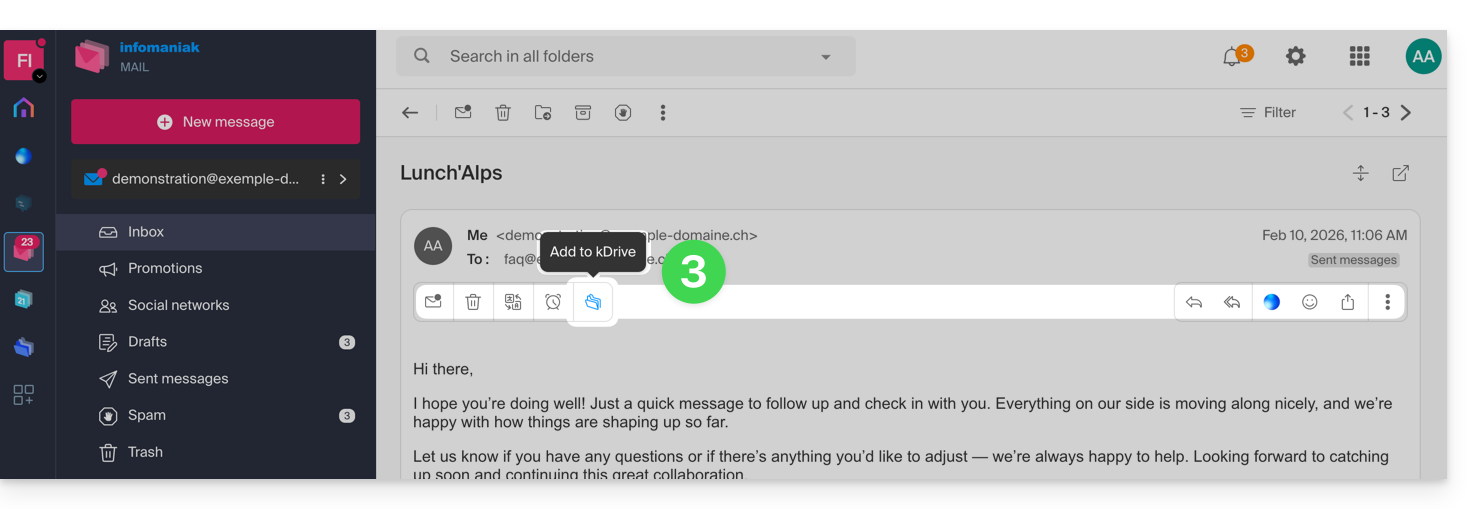
- Se o ícone não estiver visível, clique no menu de ação ⋮ à direita.
- Em seguida, escolha personalizar as ações:
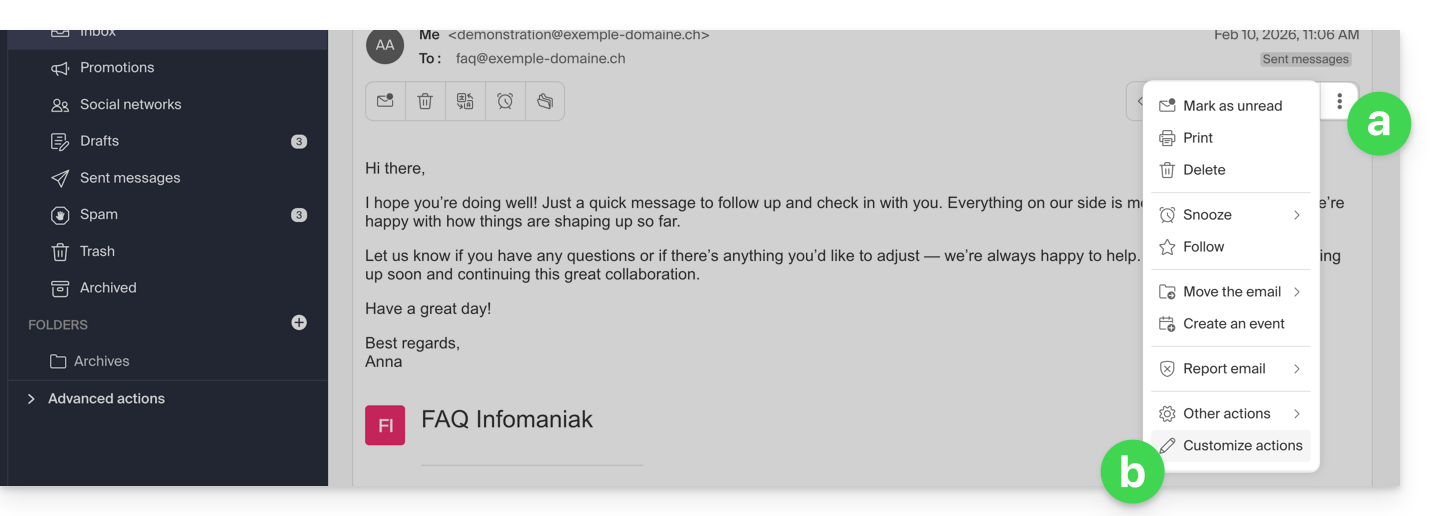
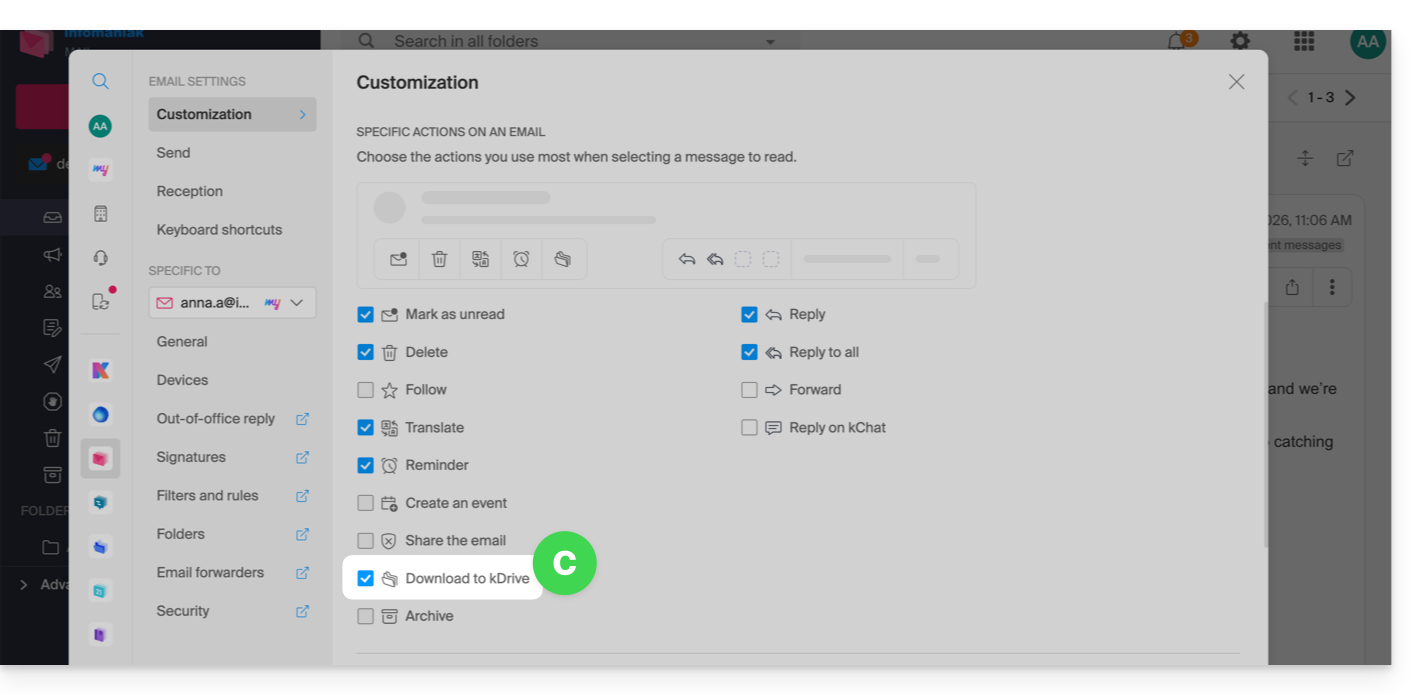
- para adicionar a ação desejada:
- Escolha o kDrive (entre aqueles aos quais você está vinculado pela sua Organização) e o local desejado para salvar seu arquivo. Se você renomeá-lo, mantenha a extensão
.emlpara poder lê-lo diretamente na interface do kDrive. - Clique no botão Adicionar.
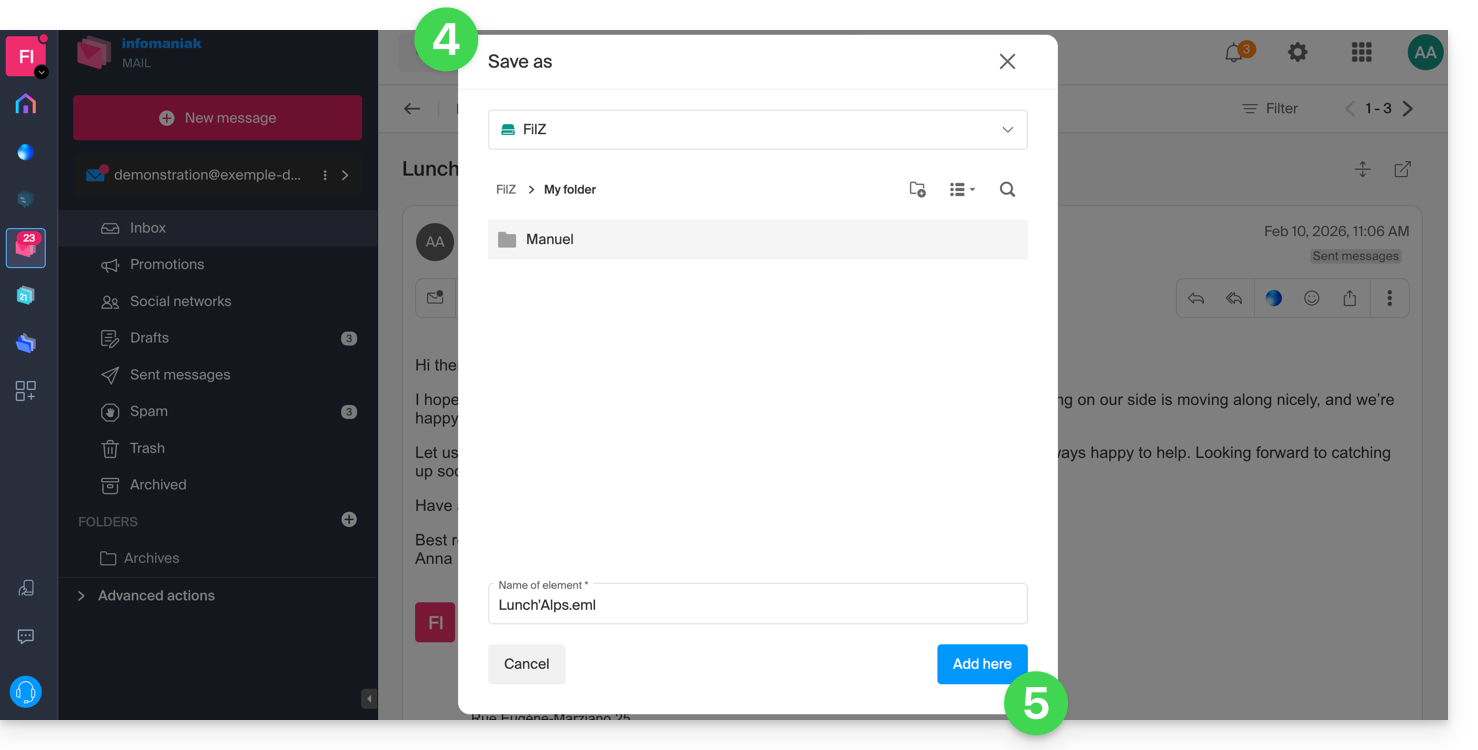
- Uma mensagem na parte inferior da tela informa sobre o andamento do processo de salvamento e permite que você acesse diretamente o local onde o e-mail está sendo salvo:
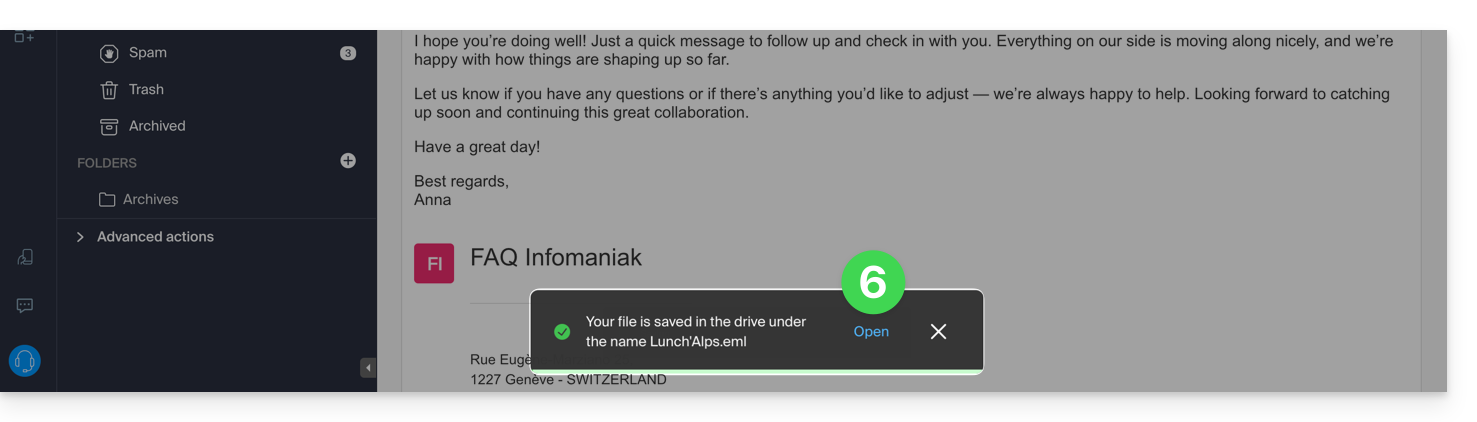
- O e-mail guardado pode ser visualizado no kDrive como se o estivesse a ler diretamente no Mail.
… a partir da aplicação móvel Infomaniak Mail
Para isso:
- Abra o e-mail em questão no aplicativo móvel Infomaniak Mail (aplicativo para smartphone ou tablet iOS / Android).
- Clique no menu de ações ⋮, localizado no canto superior direito do e-mail exibido.
- Escolha Salvar no kDrive e siga o mesmo procedimento descrito no passo 4 acima.
Link para esta FAQ: https://faq.infomaniak.com/973
Esta seção de perguntas frequentes foi útil?
Este guia explica como adicionar ou remover contatos nas listas de endereços do aplicativo web Contatos Infomaniak (serviço online ksuite.infomaniak.com/contacts).
Introdução
- Para importar contactos existentes, consulte este outro guia.
- Para gerir os livros de endereços, consulte este outro guia.
Adicionar um novo contato
Para adicionar uma nova ficha de contato em um catálogo de endereços:
- Clique aqui para acessar o aplicativo web Contatos da Infomaniak (serviço online ksuite.infomaniak.com/contacts).
- Clique em Novo contato no canto superior esquerdo.
- Escolha o catálogo de endereços existente no qual deseja adicionar o contato:
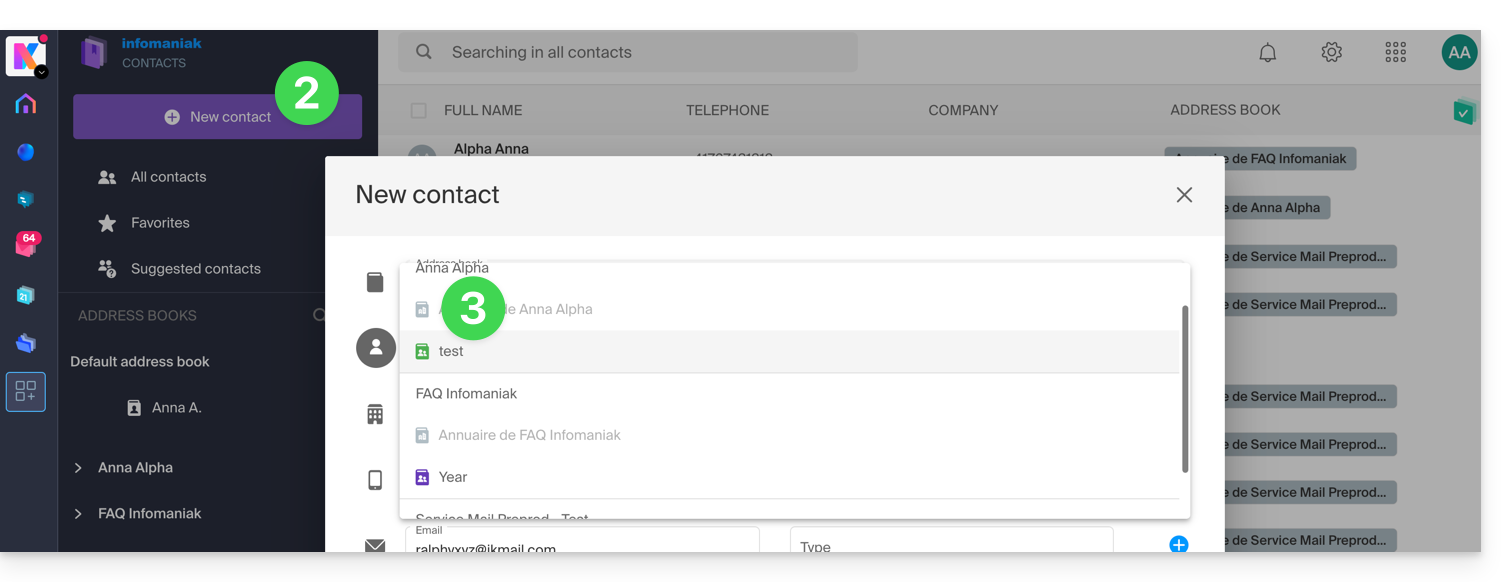
- Preencha as informações principais (ou adicionais através do link no canto inferior direito).
- Valide com o botão Salvar:
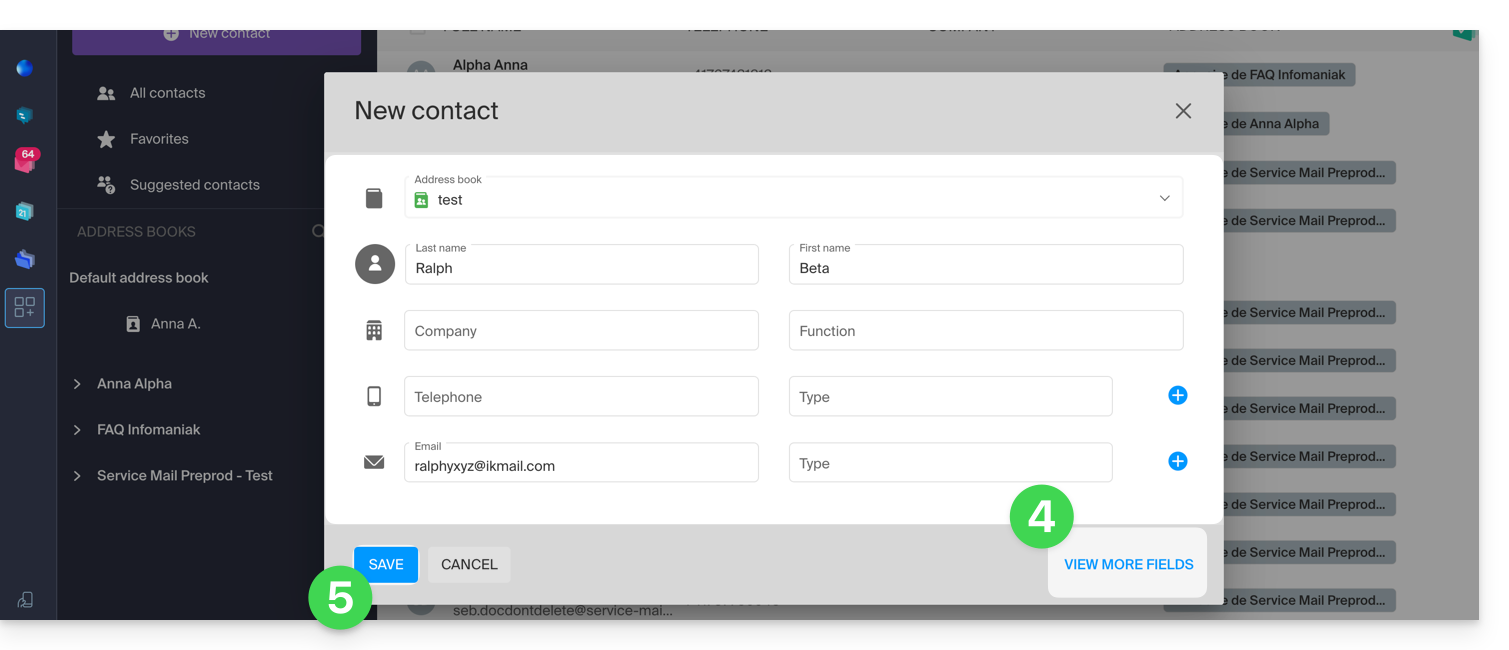
Adicionar a partir de contatos frequentemente utilizados
Pode completar uma lista de contactos a partir dos contactos frequentes sugeridos pela aplicação (com base no seu uso da aplicação Web Mail). O nome/sobrenome/e-mail serão preenchidos automaticamente, caso estejam disponíveis:
- Clique aqui para aceder à aplicação Web Contactos Infomaniak (serviço online ksuite.infomaniak.com/contacts).
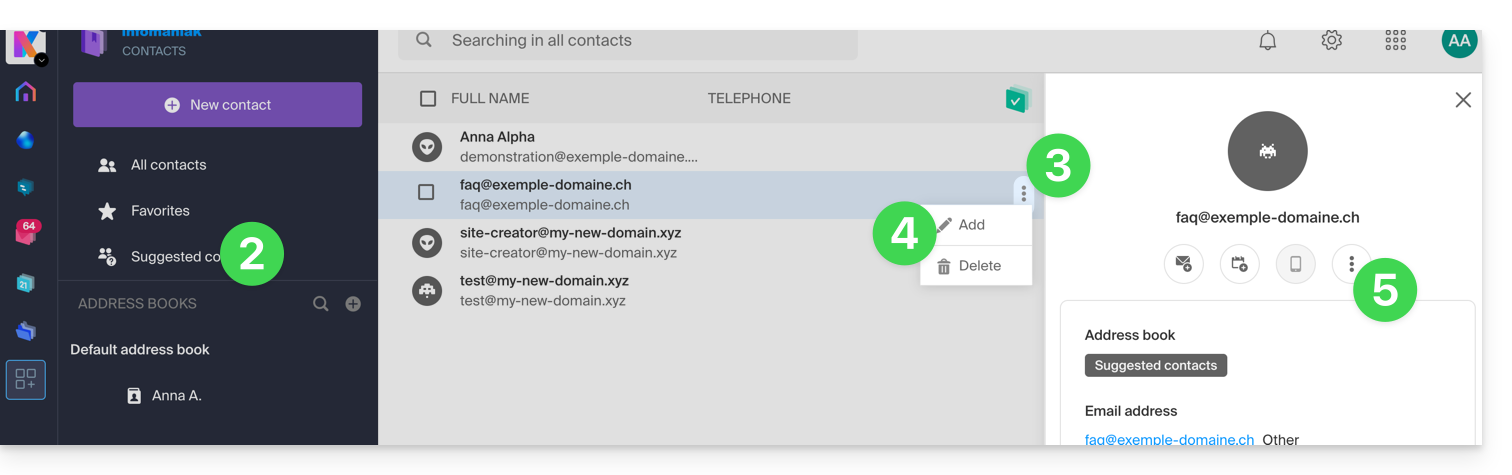
- Clique em Contatos sugeridos no menu lateral esquerdo.
- Clique no menu de ação ⋮ à direita do contato em questão.
- Clique em Adicionar para adicionar o contato a uma lista de endereços existente.
- Você também pode clicar no menu de ação ⋮ no painel lateral direito:
- Complete as informações de contato, se necessário, e clique em Salvar.
Para adicionar todos os contactos sugeridos de uma só vez:
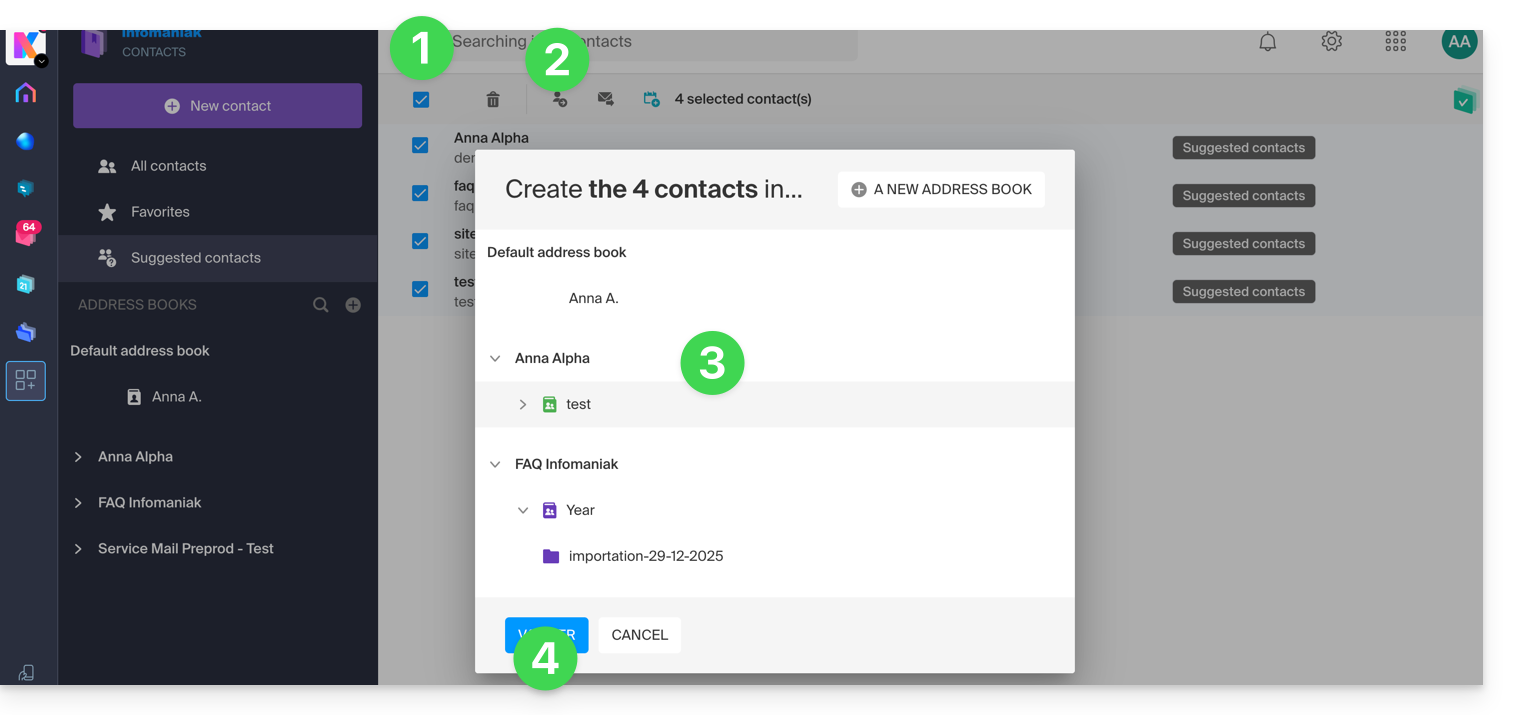
- Clique no cabeçalho da coluna para selecionar todos os contactos.
- Clique, em seguida, no ícone que aparece na parte superior da tabela.
- Escolha o catálogo de endereços existente no qual deseja adicionar os contactos.
- Clique no botão para guardar todos os contactos selecionados:
Adicionar a partir da aplicação Web Mail Infomaniak
Pode criar uma ficha para um contacto diretamente a partir das mensagens que troca com esse contacto:
- Clique aqui para aceder à aplicação web Mail da Infomaniak (serviço online ksuite.infomaniak.com/mail).
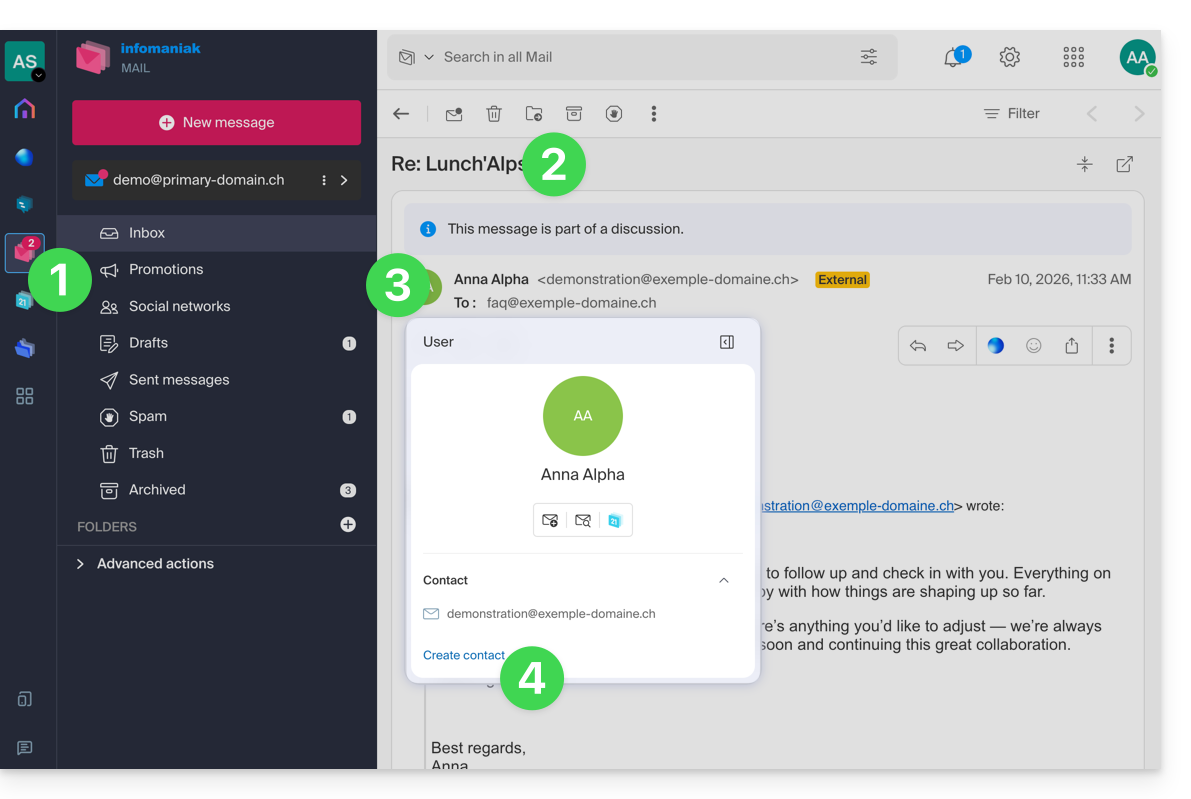
- Abra a mensagem do remetente (ou a conversa entre vários participantes).
- Passe o cursor sobre a parte que menciona o remetente ou o destinatário que deseja adicionar à sua lista de contactos.
- Clique em Criar contato:
- Preencha as informações do contato, se necessário, e clique em Salvar.
Excluir um ou mais contactos
Para remover um contacto das suas listas:
- Clique aqui para acessar o aplicativo web Contatos da Infomaniak (serviço online ksuite.infomaniak.com/contacts).
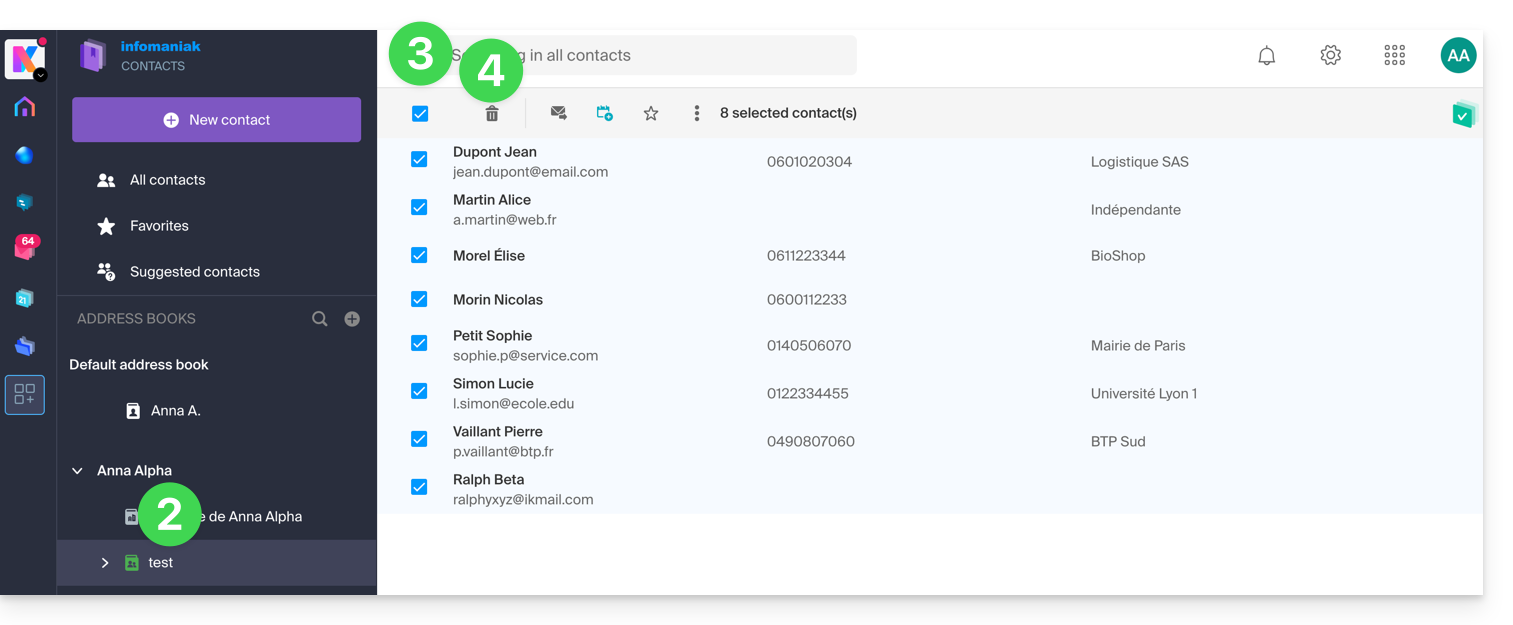
- Selecione o catálogo de endereços do qual deseja remover seus contatos:
- Selecione o(s) contato(s) que deseja excluir.
- O ícone Lixeira aparece no cabeçalho da coluna, permitindo que você exclua os contatos selecionados:
Atenção: a exibição de todos os contactos nem sempre permite a eliminação, caso entre eles se encontrem contactos de Organizações das quais não é administrador.
Link para esta FAQ: https://faq.infomaniak.com/996
Esta seção de perguntas frequentes foi útil?
Este guia detalha as diferentes formas de enviar um e-mail para vários destinatários, incluindo a possibilidade de ocultar os endereços de e-mail dos outros participantes.
Introdução
- Ao enviar e-mails, por vezes é necessário incluir vários destinatários utilizando os campos:
- Para
- CC:
- Português: Cópia
- Inglês: Carbon Copy
- CCI:
- Português: Cópia Oculta
- Inglês: Blind Carbon Copy
- Não sobrecarregue os campos "Para" e "CC" com destinatários que não estão diretamente relacionados com o e-mail.
- Utilize o campo Cco para proteger os endereços de e-mail dos destinatários quando houver várias pessoas na lista.
- Ao enviar e-mails em massa, de forma recorrente e/ou em grande quantidade, excedendo os limites estabelecidos, recomenda-se utilizar ferramentas adequadas:
Compreender e utilizar estes 3 campos de e-mail
O campo "Para"
Este campo é usado para indicar o(s) destinatário(s) principal(is) do e-mail, ou seja, aqueles que recebem o e-mail diretamente.
- Use este campo para os destinatários principais que são diretamente relevantes para o conteúdo do e-mail.
- Exemplos: reunião de trabalho, relatório de projeto, comunicação direta com um cliente.
O campo CC
Usado para enviar uma cópia do e-mail para outras pessoas, além dos destinatários principais. Todos os destinatários podem ver quem recebeu uma cópia do e-mail.
- Use este campo para incluir destinatários secundários que precisam ser informados, mas que não são os principais participantes da discussão.
- Exemplo: informar um superior hierárquico sobre uma conversa, incluir colegas interessados no assunto sem que eles precisem intervir.
O campo CCI
Usado para enviar uma cópia do e-mail para pessoas sem que os outros destinatários saibam que também receberam o e-mail.
- Use este campo para incluir destinatários que devem receber o e-mail sem que os outros destinatários saibam.
- Exemplo: envio de um e-mail para um grupo com um supervisor em cópia para acompanhamento, evitando a divulgação de endereços de e-mail para todos os destinatários (frequentemente utilizado em e-mails em massa).
Utilizar os campos disponíveis no Mail Infomaniak
Para acessar os campos relevantes na sua conta de e-mail Infomaniak:
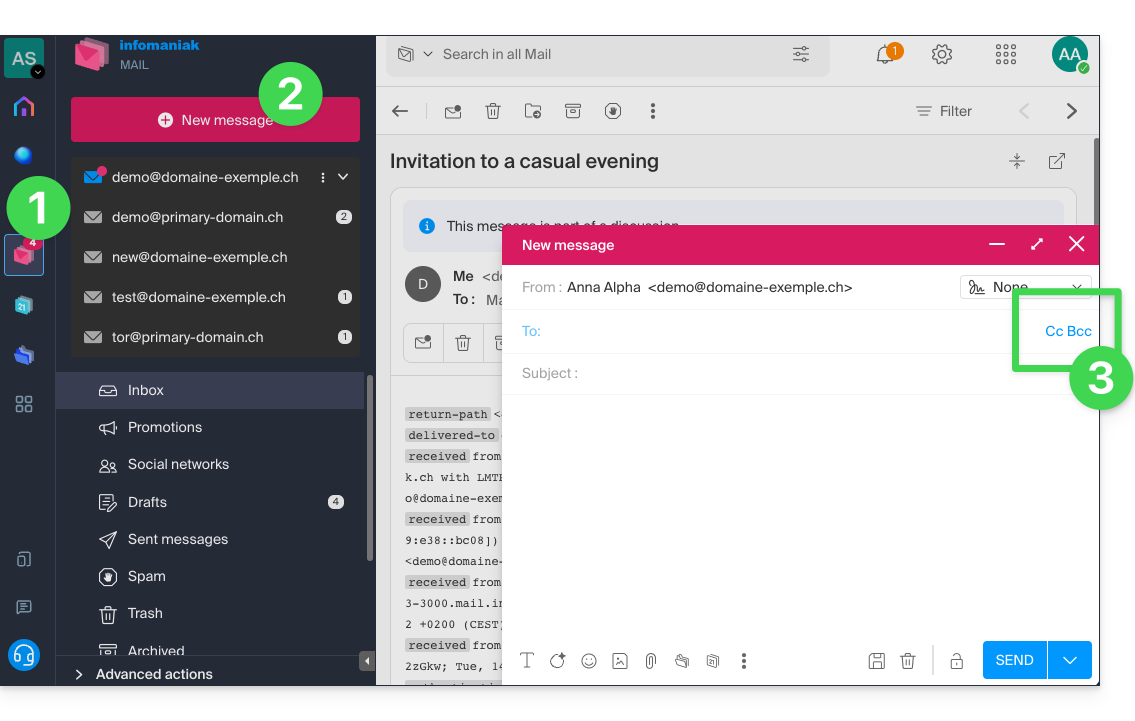
- Clique aqui para acessar o aplicativo web Mail da Infomaniak (serviço online ksuite.infomaniak.com/mail).
- Clique em Nova mensagem.
- Clique em CC e CCO:
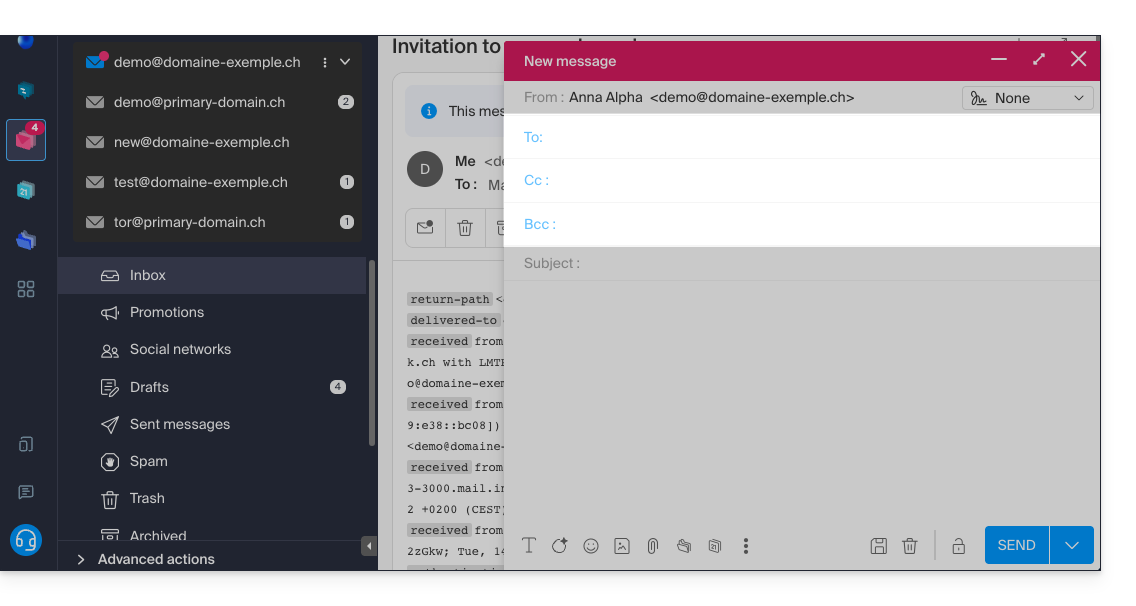
- Os campos adicionais são exibidos e permitem inserir os endereços de e-mail dos seus destinatários:
Exemplos de utilização
Cada um destes campos tem uma função específica e pode ser utilizado estrategicamente de acordo com o contexto da sua comunicação. Seja transparente e ético no uso do campo CCI para evitar mal-entendidos ou conflitos:
- Comunicação de equipe
- Para: membros principais do projeto
- CC: Gerente do projeto, outros departamentos envolvidos
- CCI: Diretor para informação, sem necessidade de intervenção direta
- E-mail marketing
- Para: não utilizar (ou indique apenas o endereço de e-mail do remetente)
- Cc: não utilizar
- Cco: lista de assinantes para proteger os endereços de e-mail individuais
- Anúncio importante
- Para: destinatários principais (por exemplo: diretores)
- Cc: membros do conselho, principais colaboradores
- Cco: outras partes interessadas para informação confidencial
- Anúncio de uma reunião
- Para: John Doe, Jane Smith
- CC: projeto.manager@empresa.com
- CCI: diretor@empresa.com
- Convite para um evento
- Para: convidados principais
- CC: coordenação@evento.com
- CCI: lista de convidados secundários (para proteger os endereços de e-mail)
Link para esta FAQ: https://faq.infomaniak.com/1049
Esta seção de perguntas frequentes foi útil?
Este guia explica como visualizar e encaminhar os cabeçalhos de um e-mail.
Introdução
- Um e-mail é composto por um cabeçalho (
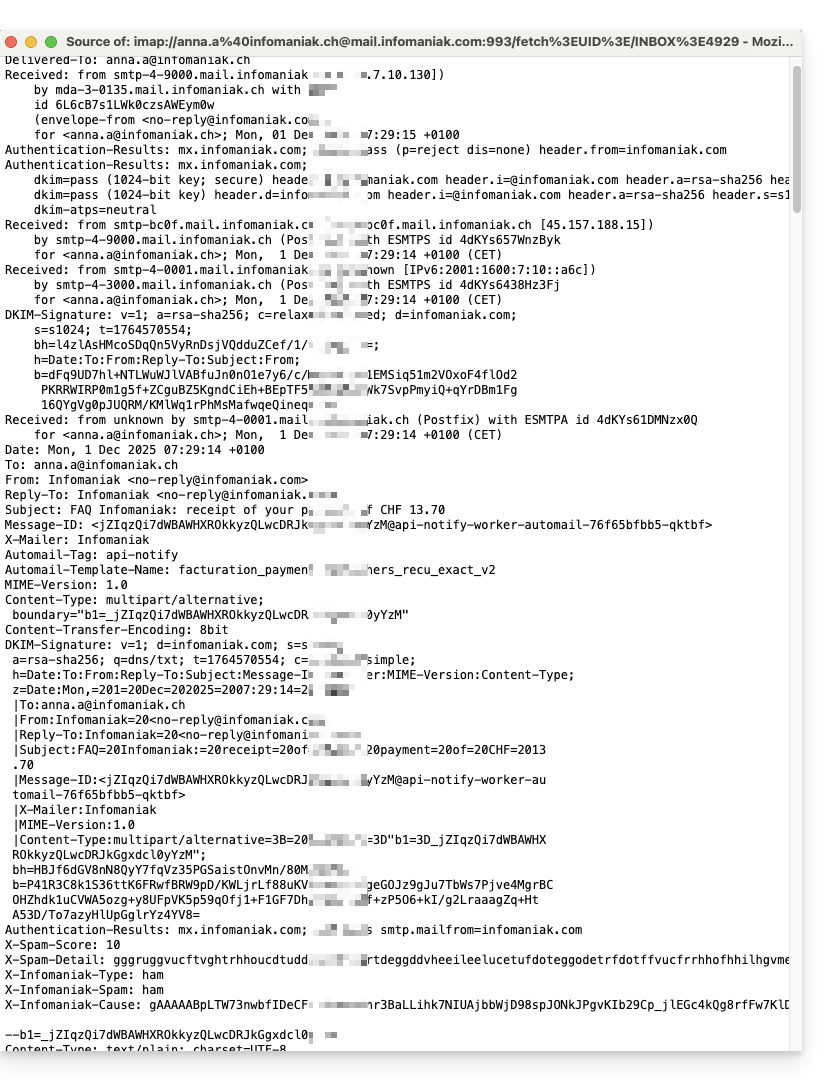
header) e o conteúdo propriamente dito da mensagem (body, corpo do texto). - A maioria dos programas/clientes de e-mail não exibe diretamente os cabeçalhos, mas exibi-los ou transmiti-los permite que o suporte da Infomaniak identifique os problemas encontrados.
- Os cabeçalhos (ou seja, a origem) de um e-mail fornecem diferentes informações, como:
- o remetente
- o destinatário
- a data
- o assunto
- os servidores envolvidos durante a transmissão entre o remetente e o destinatário:
Exibir os cabeçalhos no Mail Infomaniak
Para visualizar os cabeçalhos de um e-mail a partir da interface Mail Infomaniak:
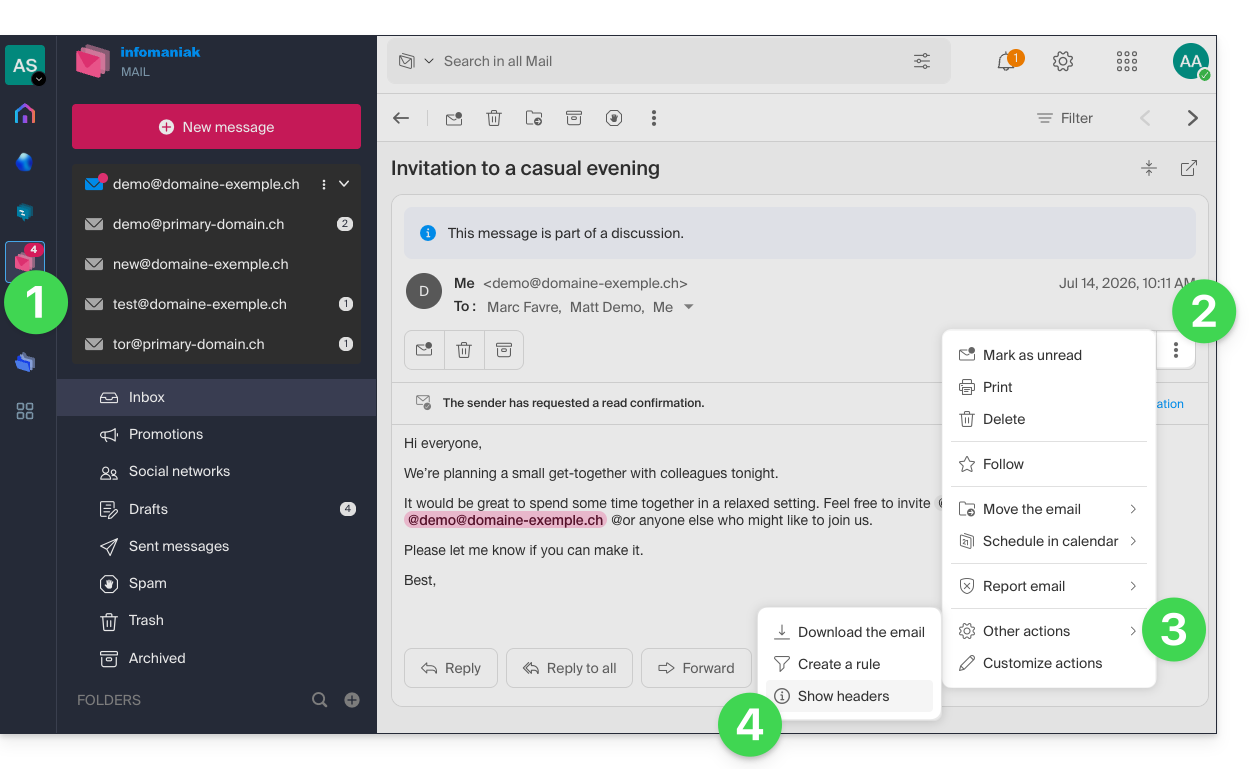
- Clique aqui para acessar o aplicativo web Mail Infomaniak (serviço online ksuite.infomaniak.com/mail).
- Abra a mensagem em questão e clique no menu de ações ⋮, à direita.
- Clique no menu de outras ações.
- No menu que aparece, selecione Ver cabeçalhos:
- Repita a operação para ocultá-los:

Para exibir os cabeçalhos com um software/cliente de e-mail externo, consulte este outro guia.
Transmitir os cabeçalhos de um e-mail
Para encaminhar os cabeçalhos de um e-mail, em resposta a uma solicitação do suporte ou para o destinatário de sua escolha, basta…
- … copiar e colar os cabeçalhos exibidos conforme o método descrito acima.
- … encaminhe a mensagem de e-mail.
No entanto, para que os cabeçalhos estejam presentes, é imprescindível encaminhar a mensagem não no corpo da mensagem, mas sim como anexo. O e-mail em anexo estará, em princípio, no formato .eml e este arquivo contém todos os cabeçalhos necessários.
Um terceiro método de transmissão completa de e-mails é explicado neste outro guia.
Link para esta FAQ: https://faq.infomaniak.com/1055
Esta seção de perguntas frequentes foi útil?
Este guia detalha os mecanismos da falsificação de identidade eletrônica (spoofing) e as medidas de proteção contra mensagens indesejadas que parecem vir do seu próprio domínio.
A minha conta foi utilizada sem o meu conhecimento?
Receber um e-mail que parece ter sido enviado por si é uma técnica comum de manipulação psicológica. Isso não significa que a sua caixa de e-mail foi invadida. Na maioria dos casos, trata-se de uma simples falsificação do cabeçalho «From», comparável a uma pessoa que escreveria o seu endereço no verso de um envelope de papel antes de o enviar.
Certifique-se de que o seu próprio endereço não está incluído na lista de permissões (Allowlist) do seu filtro antispamSe estiver presente, o sistema de proteção ignora a análise de segurança, considerando que a mensagem é legítima.
Diagnóstico: Phishing vs. Hackeamento
É crucial distinguir a falsificação (spoofing de e-mail) da intrusão. O protocolo global de envio de e-mails (SMTP) foi concebido sem uma verificação nativa da identidade do remetente.
Embora a infraestrutura da Infomaniak aplique normas de segurança rigorosas, é tecnicamente impossível impedir que um servidor de terceiros (externo) não seguro, localizado em qualquer parte do mundo, envie uma mensagem fingindo ser você. No entanto, existem ferramentas para tornar essas mensagens indetetáveis ou bloqueá-las nos seus destinatários.
Reforce a integridade do seu domínio
Para proteger a sua reputação digital e limitar o impacto destas tentativas de falsificação, a implementação de protocolos de autenticação é a prática padrão:
- SPF e DKIM: Estas assinaturas digitais certificam que as suas mensagens provêm dos nossos servidores autorizados.
- DMARC: Este protocolo essencial permite-lhe dar instruções aos servidores de todo o mundo (ex: "Se o e-mail não for assinado pela Infomaniak, rejeite-o ou coloque-o no spam"). É a ferramenta mais poderosa paraanalisar e limitar o uso fraudulento do seu domínio.
- Gestão do "catch-all": Evite usar um endereço do tipo "catch-all", que coleta todas as mensagens enviadas para endereços inexistentes do seu domínio, pois ele atrai naturalmente fluxos de spam em massa.
Notificações de falha (Backscatter)
Se receber notificações de não entrega (Non-Delivery Reports) para mensagens que nunca enviou, está a enfrentar o fenómeno do Backscatter. Servidores de terceiros mal configurados ou botnets estão a usar a sua identidade para difundir conteúdo em massa. Quando encontram um endereço inexistente, o servidor remoto envia o erro para o remetente indicado: você.
Link para esta FAQ: https://faq.infomaniak.com/1127
Esta seção de perguntas frequentes foi útil?
Este guia explica como copiar, via IMAP, o conteúdo de um ou mais endereços de e-mail externos (todas as mensagens de e-mail, pastas, subpastas, ou seja, toda a estrutura da sua caixa de e-mail existente em outros provedores) para um ou mais dos seus endereços existentes na Infomaniak, usando a ferramenta de importação da Infomaniak!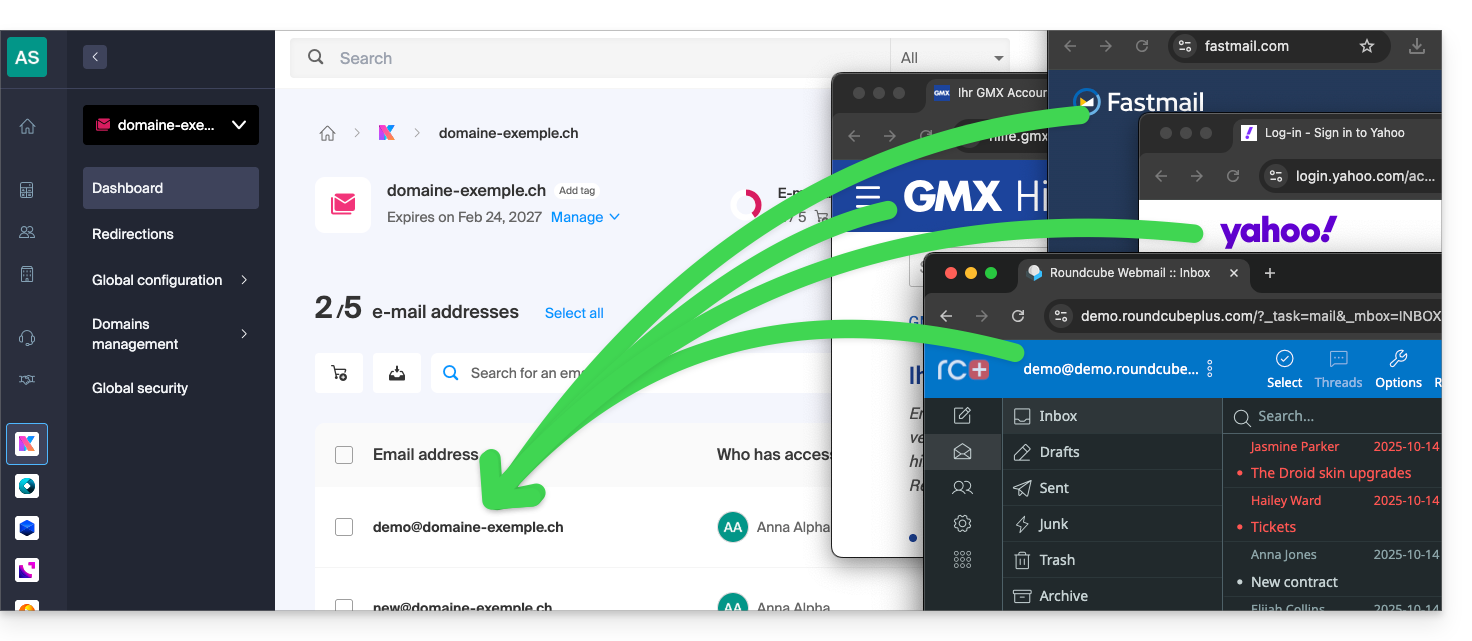
Introdução
- A operação não afeta os dados já presentes no endereço de destino, nem os dados do endereço de origem.
- A totalidade da caixa de e-mail externa será importada.
- Uma vez iniciado o processo de importação, não é mais possível interrompê-lo.
- Os eventuais duplicados são gerenciados: um conteúdo idêntico será copiado apenas uma vez.
- Consulte este outro guia se estiver procurando alternativas a este processo via IMAP.
Copiar e-mails de outro provedor para a Infomaniak
Pré-requisitos
- Possuir um Serviço de E-mail no seu Painel de Controle Infomaniak.
- Dispor de uma quota de endereços livres disponíveis ou ajustá-la previamente, se necessário.
- Certificar-se de que a caixa de e-mail está devidamente protegida.
- Criar um ou mais endereços neste Serviço de E-mail.
- O endereço de e-mail de destino deve estar associado ao utilizador (= à conta Infomaniak) que está a utilizar (não é um requisito para a importação em massa explicada abaixo).
- O endereço de e-mail de origem, cujo conteúdo deve ser copiado, deve ter sido utilizado (ou ser compatível) com o protocolo IMAP:
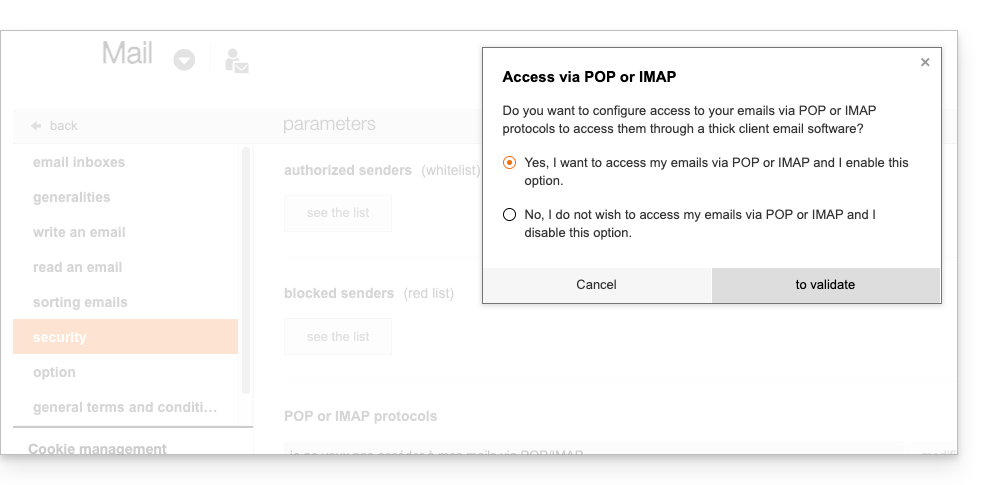
Em seguida, para importar o conteúdo do e-mail:
- Clique aqui para aceder à ferramenta de importação (serviço online https://import-email.infomaniak.com).
- Se necessário, inicie sessão na sua conta Infomaniak na Organização em questão; de facto, a importação será efetuada para um dos endereços de e-mail associados à interface Web Mail Infomaniak (serviço online ksuite.infomaniak.com/mail) da conta Infomaniak que está a utilizar.
- Clique em importar por IMAP.
- Clique em importar única.
- Preencha o campo da esquerda com o seu endereço de e-mail de origem (cujo conteúdo deve ser copiado).
- Preencha o campo da direita com a palavra-passe desse mesmo endereço de e-mail de origem (ver requisitos).
- Se necessário, modifique as Configurações avançadas para especificar um endereço de servidor IMAP:
- Insira o nome do servidor IMAP (nome do host fornecido pelo seu provedor de e-mail), por exemplo,
imap.domain.ch(ou .net, .com, etc., dependendo do seu endereço de e-mail no item 5 acima). - Insira o número da porta (o padrão é 993) e o SSL.
- Insira o nome do servidor IMAP (nome do host fornecido pelo seu provedor de e-mail), por exemplo,
- Clique em Confirmar:
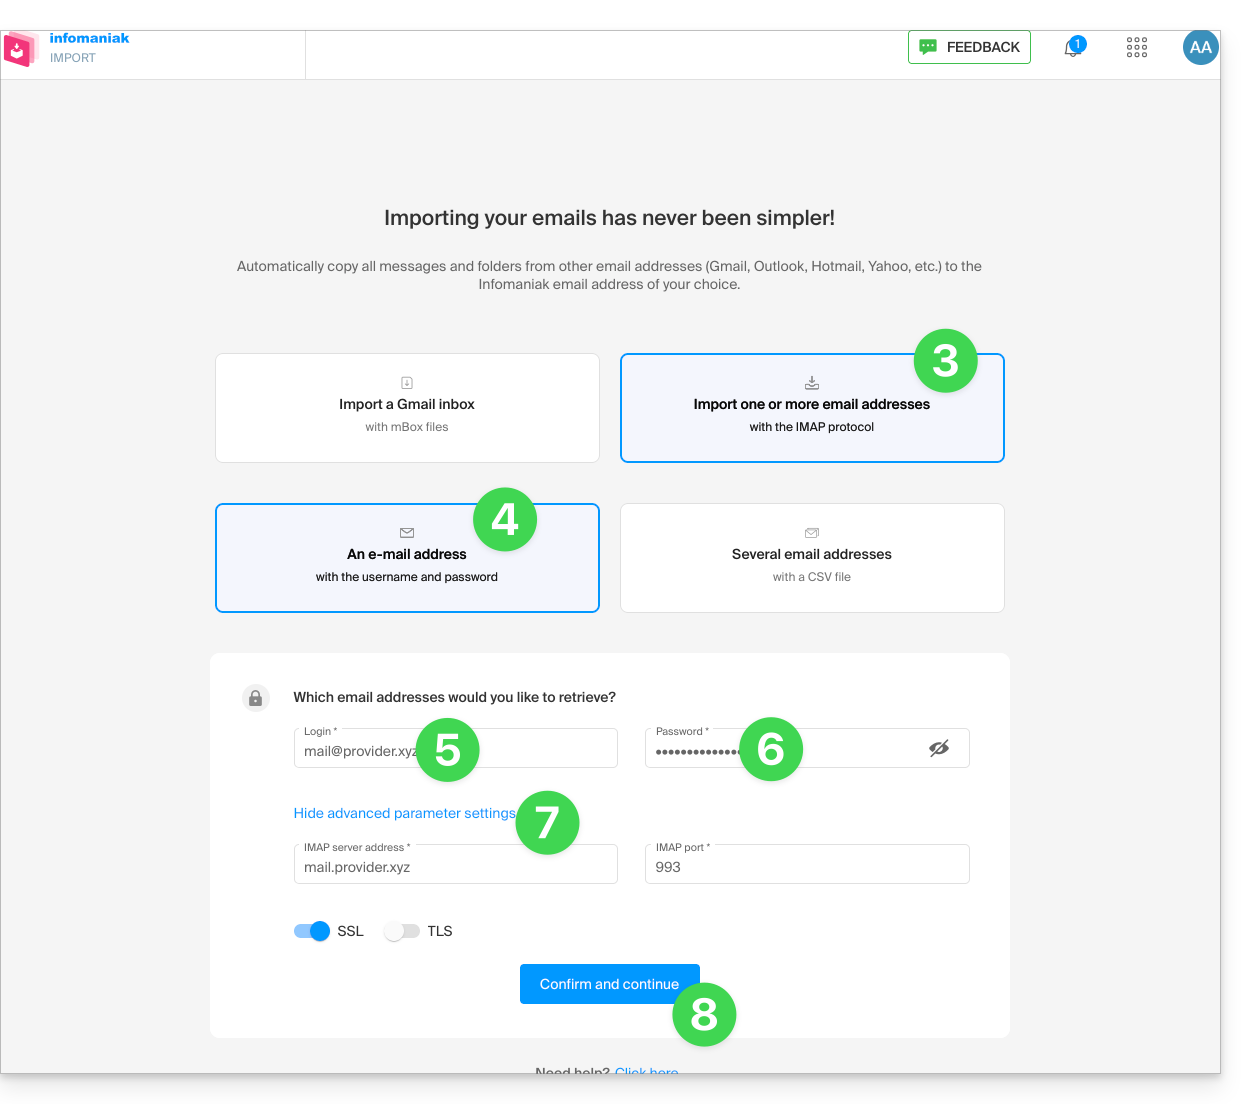
- Se necessário, insira um segundo endereço de e-mail para ser importado ao mesmo tempo.
- Escolha para qual endereço de e-mail importar os e-mails; o menu suspenso lista os endereços de e-mail atualmente associados à sua interface Web Mail Infomaniak (serviço online ksuite.infomaniak.com/mail) da conta Infomaniak com a qual você está conectado.
- Depois de selecionar o endereço de destino desejado na lista, clique no botão azul Importar e-mails:
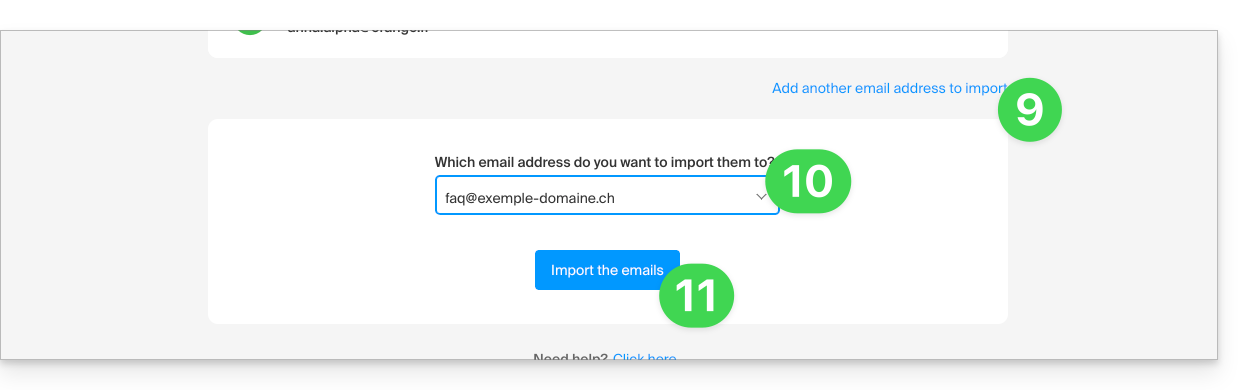
- A cópia será iniciada; você pode aguardar e verificar o resultado na página após a conclusão da importação ou fechar a janela (a importação continua em segundo plano e um acompanhamento está disponível – veja abaixo):
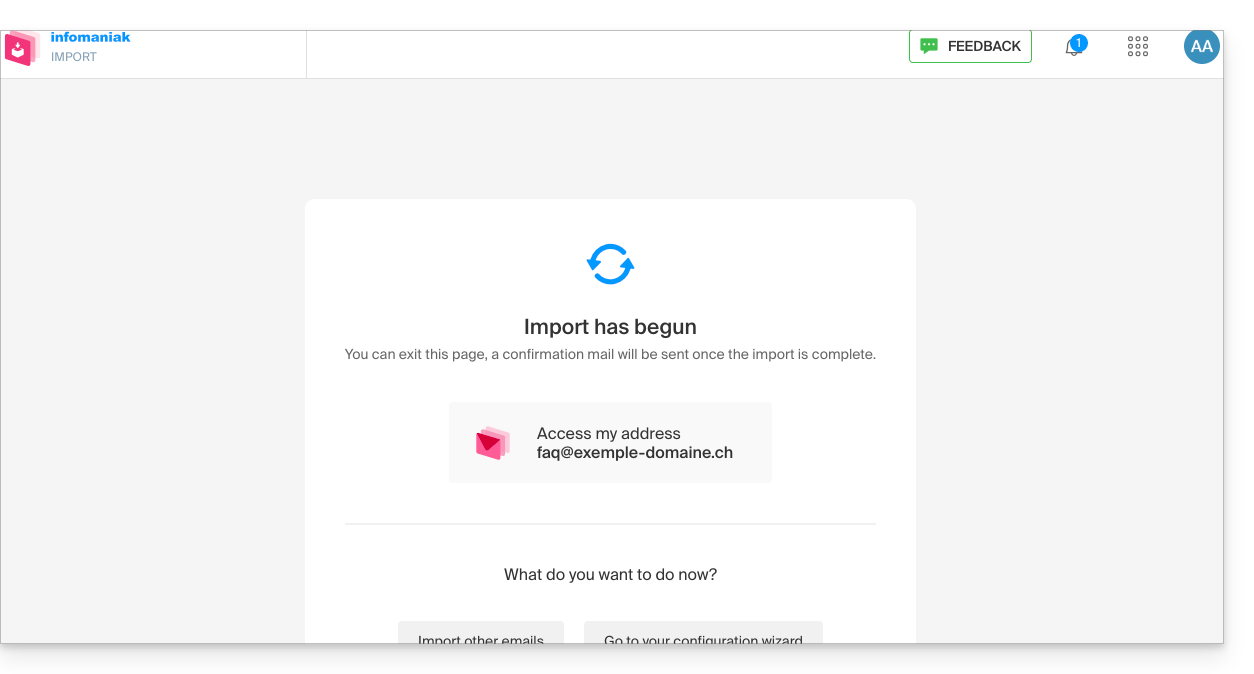
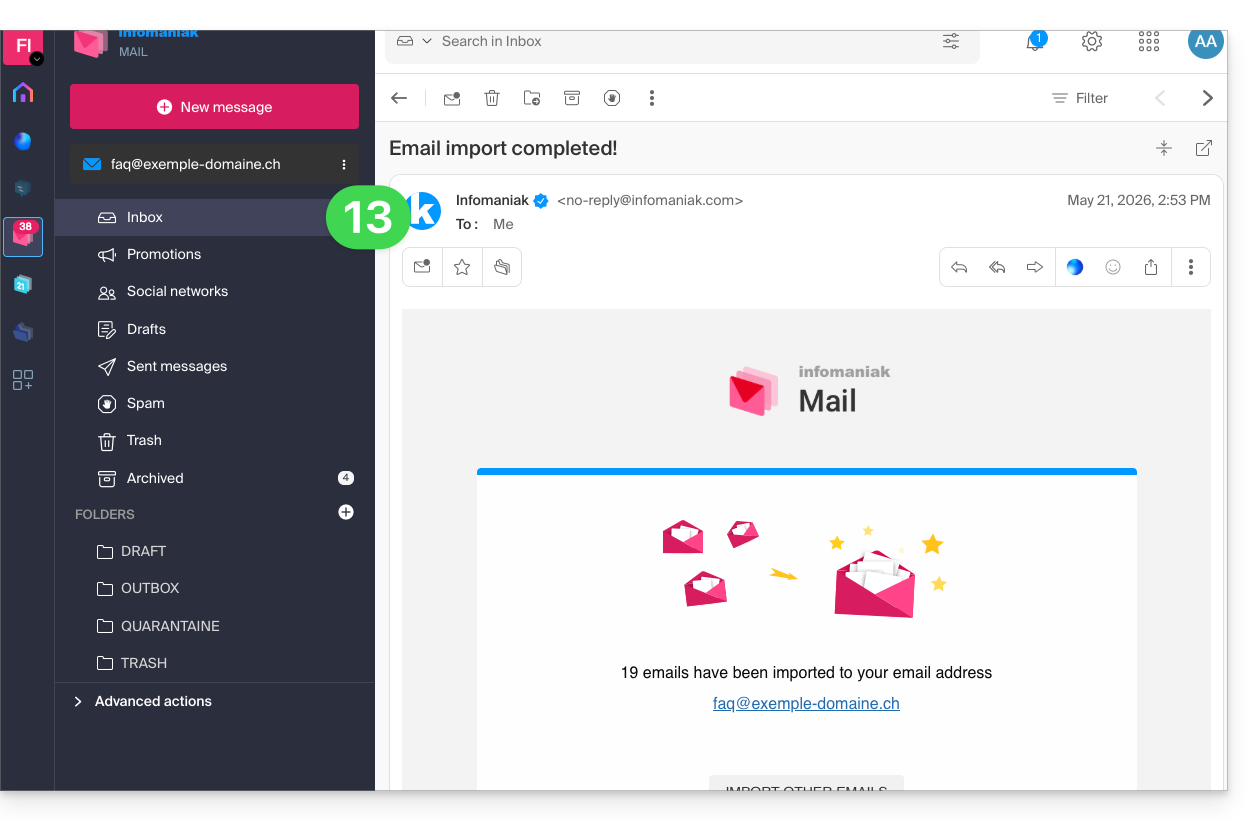
- Um e-mail de confirmação será enviado automaticamente para todos os endereços de e-mail envolvidos na operação, após a conclusão da importação, mencionando o número de mensagens copiadas:
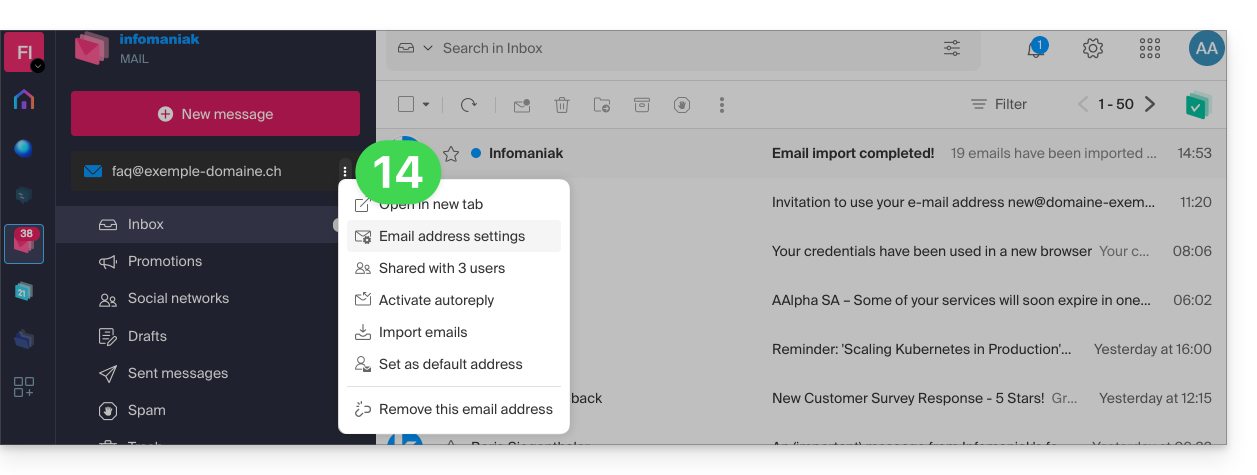
- Um rastreamento está disponível nas configurações do endereço de e-mail de destino, apenas no aplicativo web Mail (serviço online ksuite.infomaniak.com/mail):
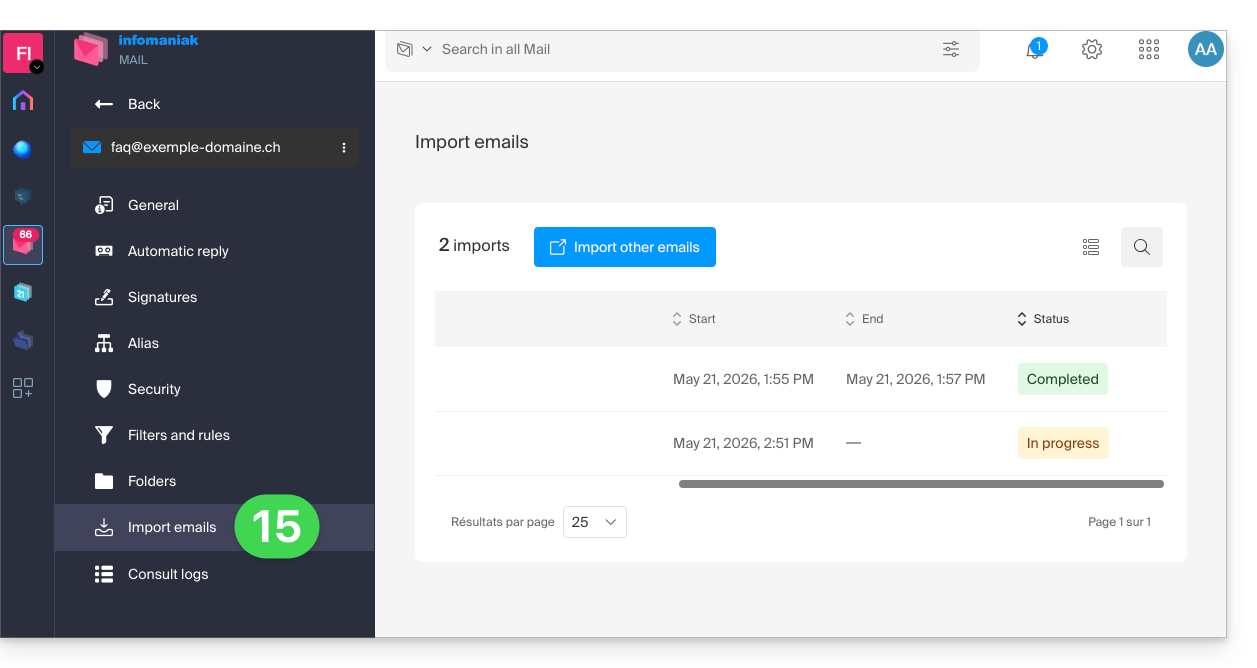
- O rastreamento permite visualizar o histórico das importações no endereço em questão:
Importar o conteúdo de vários endereços de e-mail em lote
Este método, via arquivo CSV, não funcionará para endereços Google ou Microsoft devido ao sistema de autenticação — consulte também os pré-requisitos mencionados acima neste guia.
Para importar o conteúdo de vários endereços de e-mail externos (máximo de 25 por 25) para um ou mais endereços de e-mail Infomaniak:
- Clique aqui para acessar a ferramenta de importação (serviço online https://import-email.infomaniak.com).
- Se necessário, faça login na sua conta Infomaniak na Organização correspondente; a importação será feita para um dos endereços de e-mail associados à interface web Mail Infomaniak (serviço online ksuite.infomaniak.com/mail) da conta Infomaniak que você está usando.
- Clique em importar via IMAP.
- Clique em "Modo avançado": Importar vários endereços de e-mail a partir de um arquivo CSV (formato
.csv). - Descarregue o modelo
CSVfornecido como exemplo: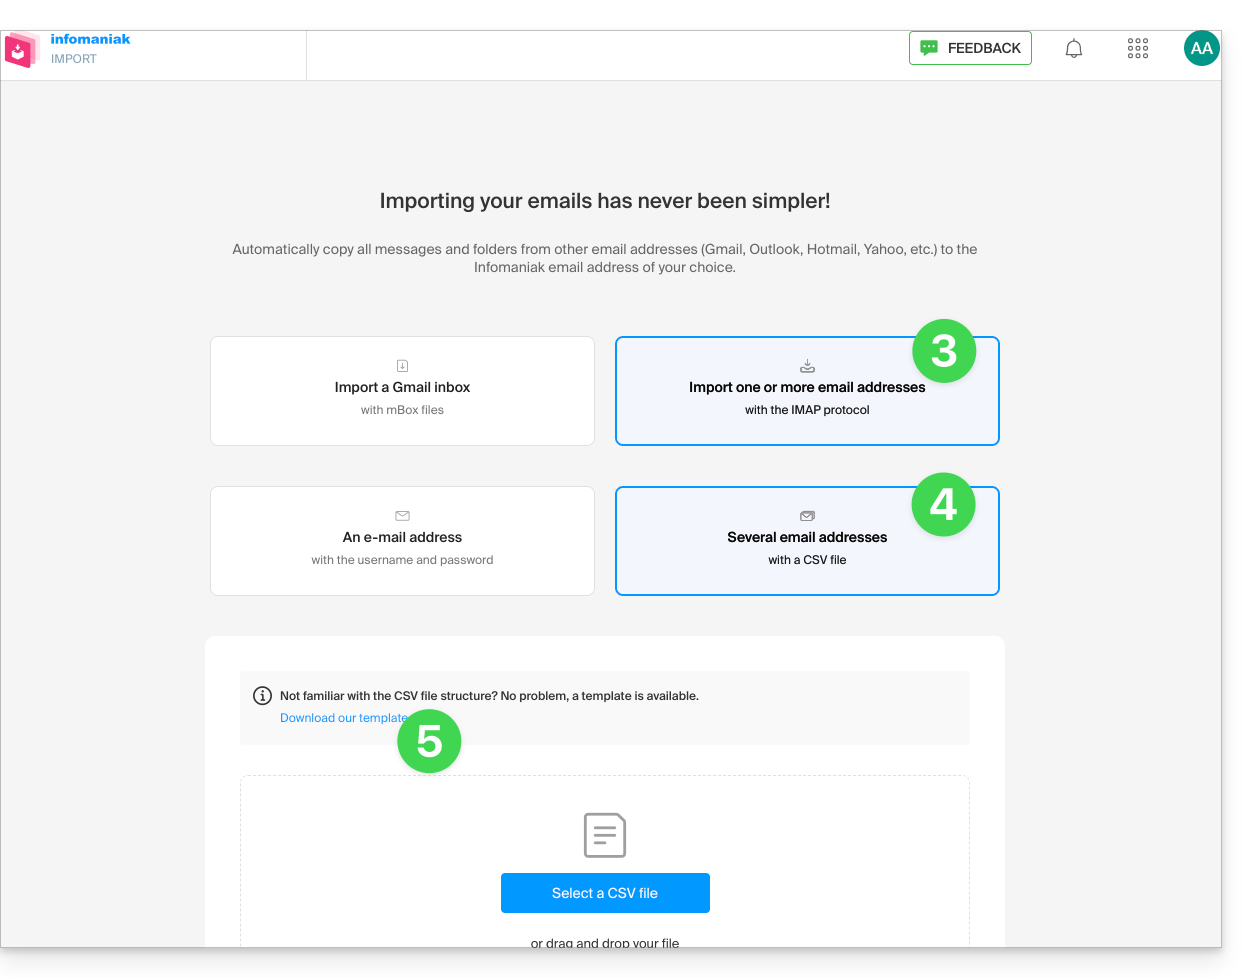
- O modelo tem o seguinte formato:
source-email@domain.com;sourcePassword;imap.source-host.com;sourcePort(993);sourceSsl(1or0);dest-email@domain.com
- O modelo tem o seguinte formato:
- Edite o arquivo
csvpara criar um arquivo com as informações corretas necessárias para a cópia (consulte os pré-requisitos):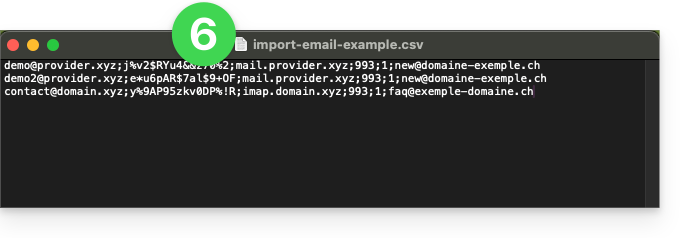
- Carregue o arquivo usando o botão Selecionar arquivo CSV.
- Depois que o arquivo for carregado na página da ferramenta, corrija ou ignore quaisquer erros; clique em Importar.
- A cópia será iniciada. Você pode aguardar e verificar o resultado na página após a conclusão da importação ou fechar a janela (a importação continua em segundo plano e um acompanhamento está disponível – veja abaixo).
- Um e-mail de confirmação será enviado automaticamente para todos os endereços de e-mail afetados pela operação após a conclusão da importação, indicando o número de mensagens copiadas.
- Um acompanhamento está disponível nas configurações dos endereços de e-mail de destino, no aplicativo web Mail (serviço online ksuite.infomaniak.com/mail).
- O acompanhamento permite visualizar o histórico das importações:
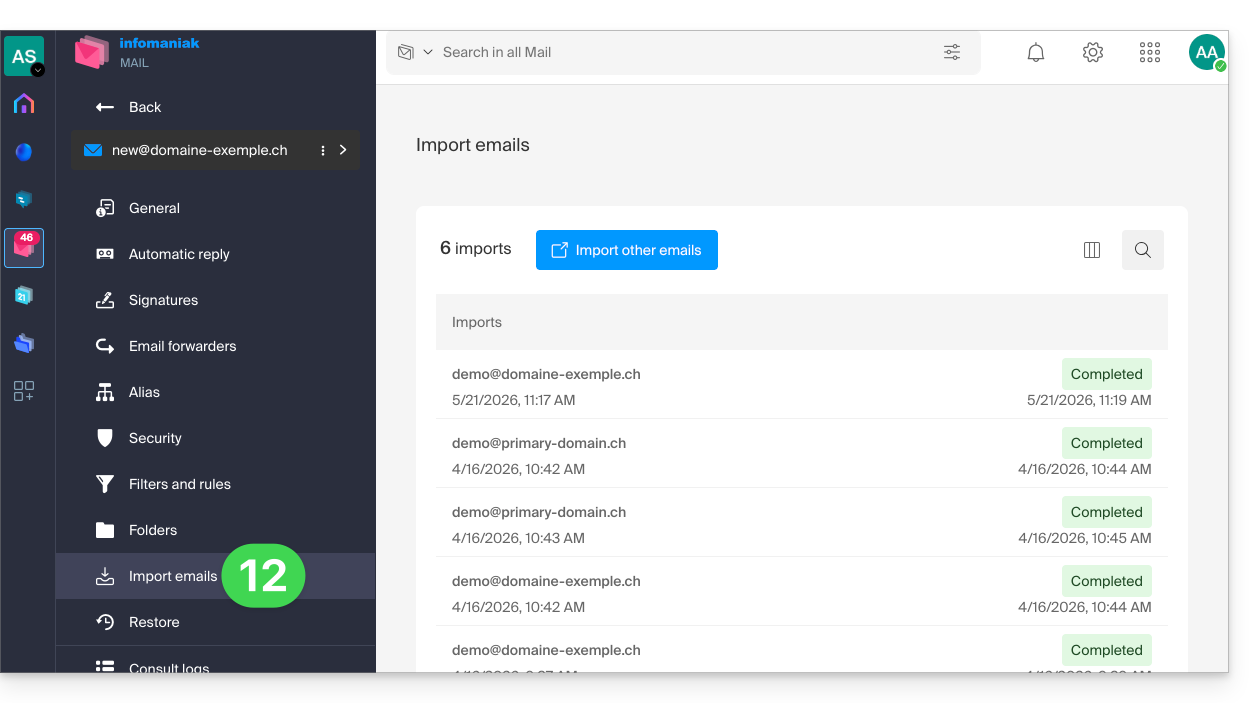
Link para esta FAQ: https://faq.infomaniak.com/1144
Esta seção de perguntas frequentes foi útil?
Este guia explica como exportar o conteúdo de um endereço de e-mail hospedado pela Infomaniak.
Preâmbulo
- A Infomaniak não oferece a opção de exportação (de
PST, por exemplo). - A Infomaniak guarda os seus e-mails durante toda a duração do seu contrato e, de acordo com o seu plano, com cópias de segurança integradas, sem limite de tamanho no âmbito de uma utilização normal de um serviço partilhado, em conformidade com o art. 1.º das condições gerais do Serviço de E-mail.
- A exportação manual proposta abaixo funciona em Windows: desta forma, poderá guardar os seus e-mails numa única cópia de segurança, que poderá ser facilmente restaurada.
Exportação manual
Para exportar todas as mensagens contidas no seu endereço de e-mail hospedado pela Infomaniak:
- Instale o aplicativo gratuito Thunderbird.
- Configure o endereço de e-mail em questão usando o protocolo IMAP (para incluir as subpastas).
- Certifique-se de que todo o conteúdo desejado está presente (sincronize a caixa de correio sempre – não apenas os últimos 30 dias, por exemplo).
Em seguida…
- … ou você instala o aplicativo gratuito BackupThunderbird, que permite criar um arquivo (cifrado, se necessário) e restaurá-lo posteriormente…
- … ou você pode simplesmente exibir os arquivos ocultos do Windows e, em seguida, encontrar e salvar esta pasta perfil
C:\Users{USER}\AppData\Roaming\Thunderbird\Profiles{PROFIL_USER}\
, pois ela contém todas as suas mensagens.
Descarregar os e-mails localmente
Outra solução (não recomendada) pode ser configurar um software/cliente de e-mail, escolhendo a receção através do protocolo POP3, o que terá como efeito descarregar as mensagens localmente e apenas a caixa de receção será afetada.
Link para esta FAQ: https://faq.infomaniak.com/1167
Esta seção de perguntas frequentes foi útil?
Este guia explica como ser notificado sobre a chegada de novos e-mails na aplicação web Mail da Infomaniak (serviço online ksuite.infomaniak.com/mail).
Introdução
- O aplicativo web Mail da Infomaniak é compatível com os navegadores web (Chrome, Firefox, etc.) que oferecem alertas visuais quando uma nova mensagem é recebida em segundo plano.
- O aplicativo móvel Infomaniak Mail (iOS / Android) também oferece a possibilidade de aproveitar os recursos de notificação do seu dispositivo móvel.
Exibir uma notificação no navegador
Para ativar as notificações do navegador quando uma nova mensagem chegar:
- Clique aqui para acessar o aplicativo web Mail da Infomaniak (serviço online ksuite.infomaniak.com/mail).
- Clique no ícone Configurações no canto superior direito.
- Clique em Navegador no menu lateral esquerdo.
- Ative o botão de alternância (toggle switch) para Exibir uma notificação ao receber novos e-mails:
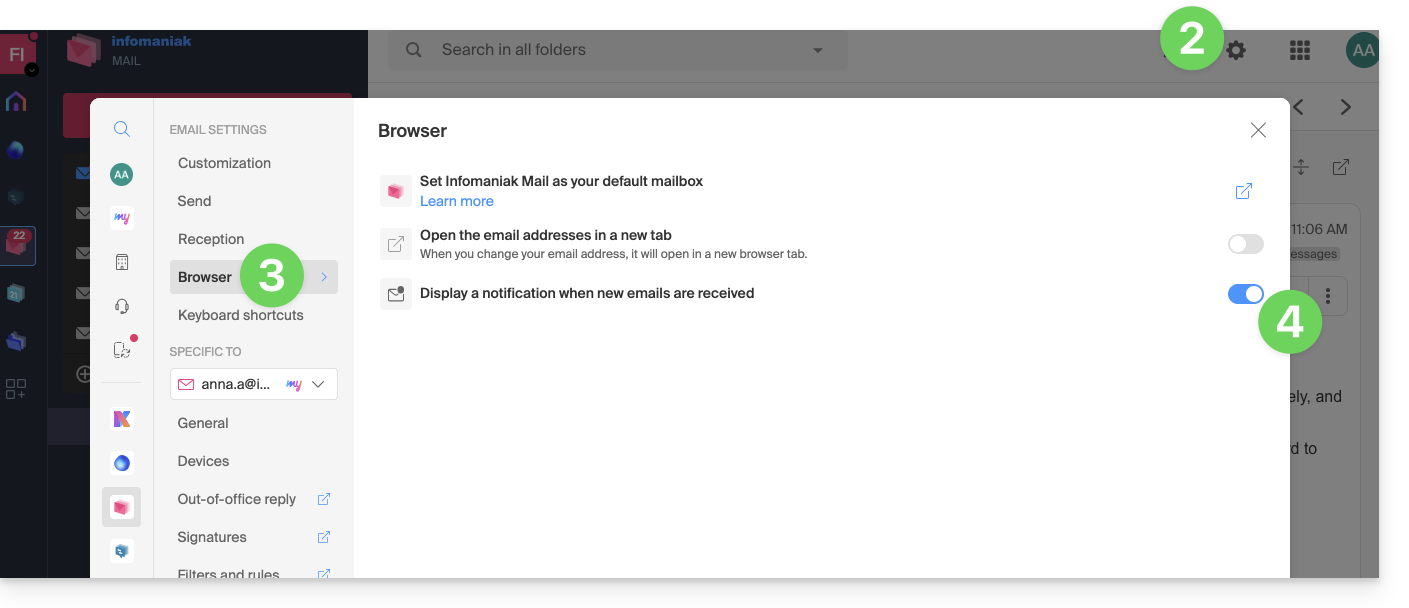
Para desativar esta funcionalidade, desative o botão.Também será necessário remover a permissão de notificação diretamente no navegador (consulte a documentação do editor).
Permitir as notificações do navegador…
… no Safari
- Abra o Safari.
- Clique em Preferências e selecione Sites, depois Notificações.
- Procure o site ksuite.infomaniak.com/mail e selecione Permitir.
Para mais informações, consulte a documentação da Apple.
… no Firefox
- Abra o Firefox.
- Acesse o menu principal em Preferências ou Configurações.
- Acesse Privacidade e segurança no painel esquerdo.
- Role para baixo até a seção Permissões.
- Clique no botão Configurações, à direita de Notificações.
- Procure o site ksuite.infomaniak.com/mail e selecione Permitir.
Para mais informações, consulte a documentação do Firefox.
… sobre o Google Chrome
- Abra o Google Chrome.
- Clique no menu Mais ⋮ no canto superior direito e, em seguida, em Configurações.
- Acesse Privacidade e segurança e clique em Configurações do site.
- Clique em Notificações e escolha permitir notificações:
- Permitir um site: ao lado da opção Permitir, clique em Adicionar. Insira o URL: https://ksuite.infomaniak.com/mail e clique em Adicionar.
Para mais informações, consulte a documentação do Google Chrome.
… sobre o Microsoft Edge
- Abra o Microsoft Edge.
- Clique no menu no canto superior direito e, em seguida, clique em Configurações.
- Acesse o menu Cookies e permissões do site.
- Clique em Notificações:
- Permitir um site: ao lado da opção Permitir, clique em Adicionar. Insira o URL: https://ksuite.infomaniak.com/mail e, em seguida, clique em Adicionar.
Link para esta FAQ: https://faq.infomaniak.com/1168
Esta seção de perguntas frequentes foi útil?
Este guia explica como denunciar uma tentativa de phishing (phishing, spear phishing, etc.) de que você seria vítima.
Preâmbulo
- O phishing é uma tentativa de fraude e engano, com o objetivo de obter informações confidenciais de forma fraudulenta.
- Geralmente, a vítima recebe em sua caixa de mensagens um e-mail que parece ser da Infomaniak, do seu banco ou de uma entidade confiável, informando que ocorreu um problema em sua conta ou em sua vida cotidiana:
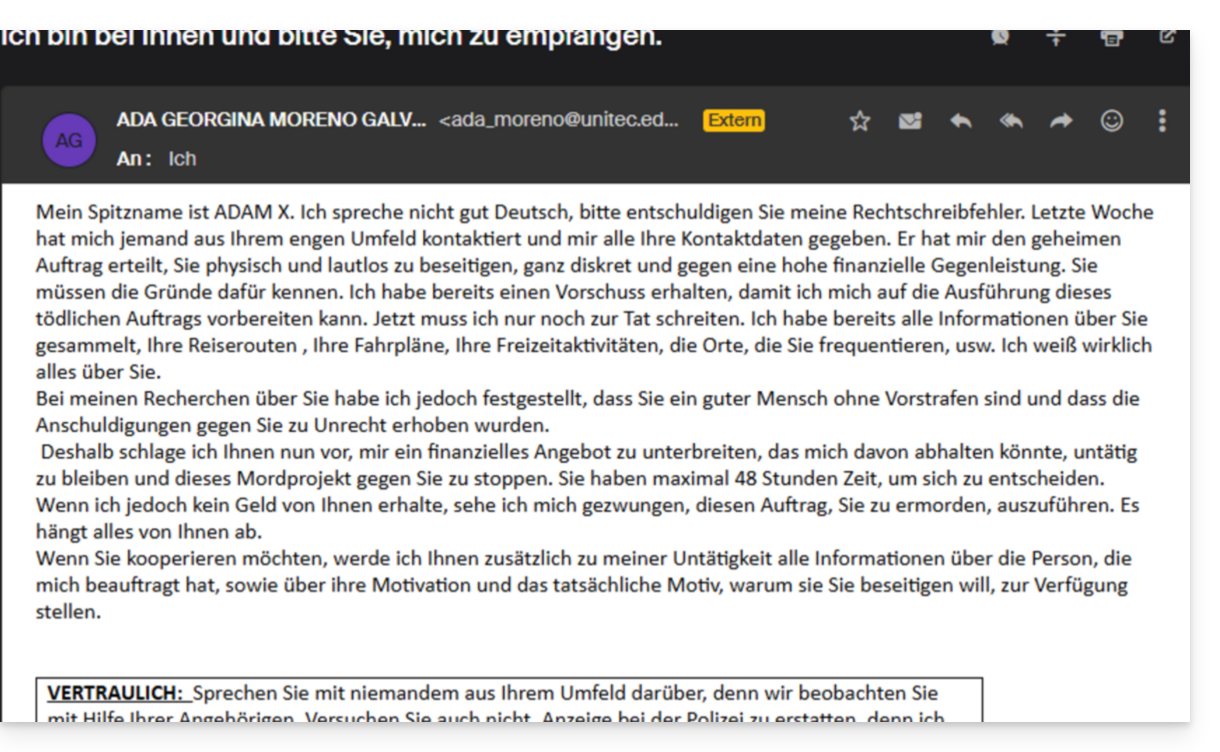
- O objetivo desta usurpação de identidade é, geralmente, que o utilizador aceda voluntariamente a uma página e forneça informações confidenciais que serão posteriormente utilizadas para diversos fins, principalmente financeiros.
- Caso não se trate de uma mensagem “fazendo-se passar por algo que não é”, mas se for apenas uma mensagem publicitária não solicitada, é melhor denunciá-la como spam.
Denunciar um e-mail de phishing
Pré-requisitos
- Verifique se o filtro de spam está ativo.
- Para maior segurança, ative a indicação de e-mail externo.
Em seguida, se você encontrar um e-mail desse tipo diretamente na sua caixa de entrada, terá a possibilidade de tomar medidas para que essas mensagens diminuam e, eventualmente, desapareçam dos sistemas de mensagens:
- Clique aqui para acessar o aplicativo web Mail da Infomaniak (serviço online ksuite.infomaniak.com/mail).
- Abra a mensagem de phishing.
- Clique no menu de ações ⋮, no lado direito.
- Clique em Denunciar mensagem.
- No menu que aparece, selecione Denunciar como phishing:
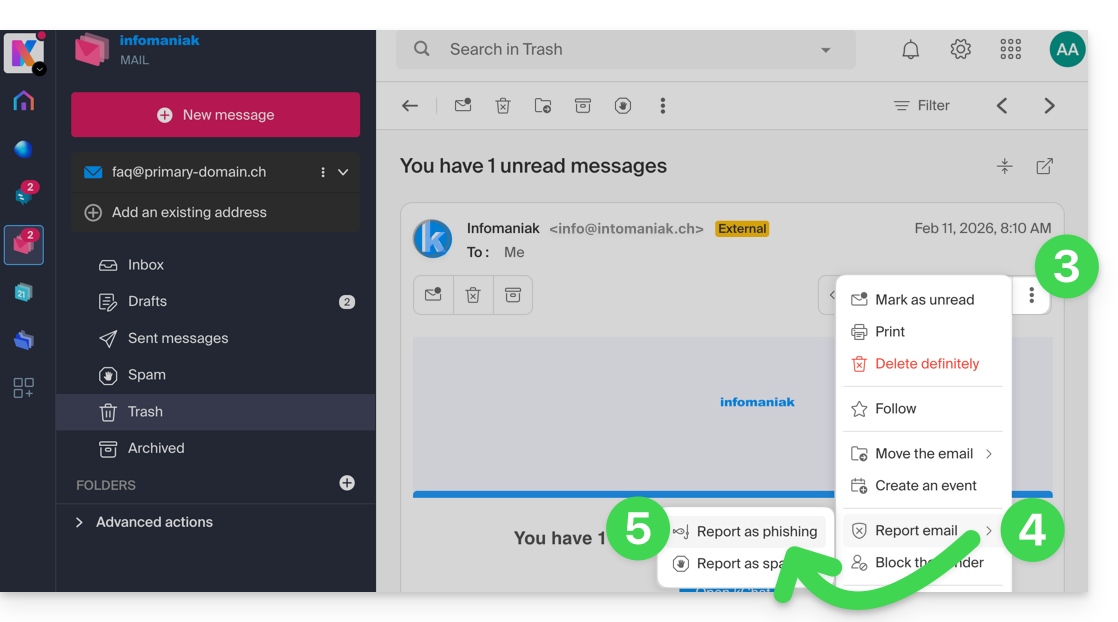
- Confirme o envio para processamento.
- Exclua o e-mail.
Assim que clicar em Denunciar como phishing, um e-mail será enviado automaticamente para a Infomaniak com todas as informações necessárias para o tratamento da denúncia.
Em caso de um problema mais grave (quando a mensagem é enviada diretamente para você por um conhecido ou contato, e não se trata de um envio em massa), recomenda-se entrar em contato com uma organização como, por exemplo, report.ncsc.admin.ch.
Link para esta FAQ: https://faq.infomaniak.com/1172
Esta seção de perguntas frequentes foi útil?
Este guia explica como ativar ou desativar a inclusão da mensagem original ao responder a um e-mail a partir da aplicação web Mail da Infomaniak (serviço online ksuite.infomaniak.com/mail) para navegador web.
Deixar de citar a mensagem inicial
Por padrão, o texto da mensagem à qual você está respondendo será colocado abaixo do seu próprio texto de resposta (A):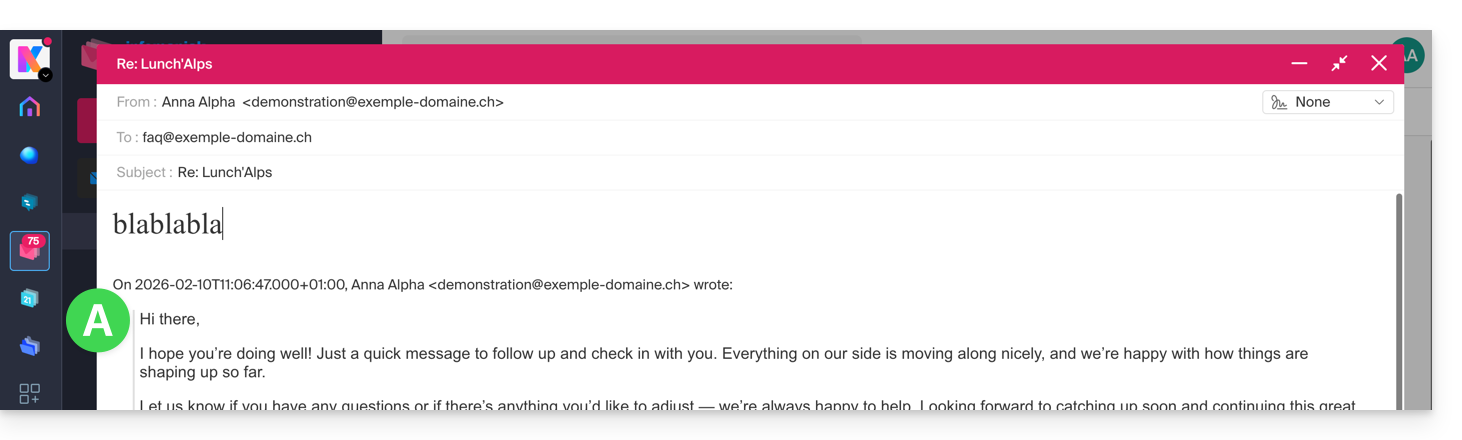
Seguindo o guia abaixo, nada do texto original será citado e você responderá a partir de uma base em branco, com ou sem assinatura (B):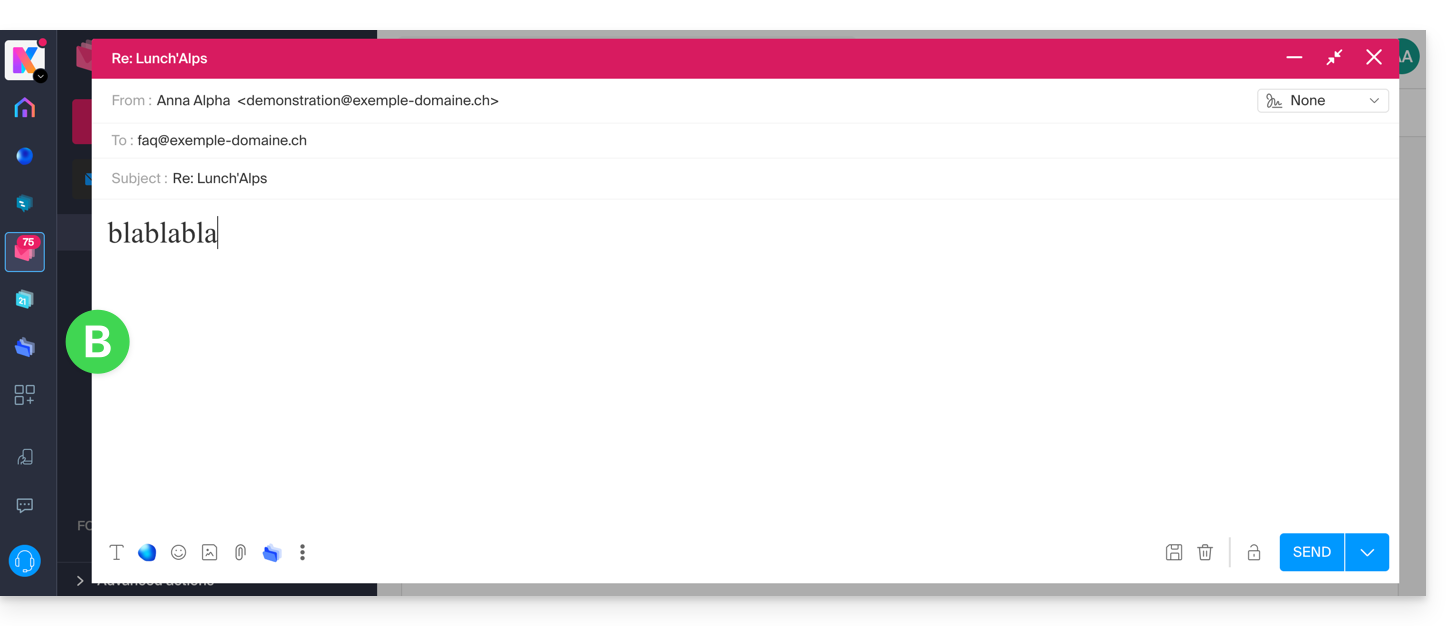
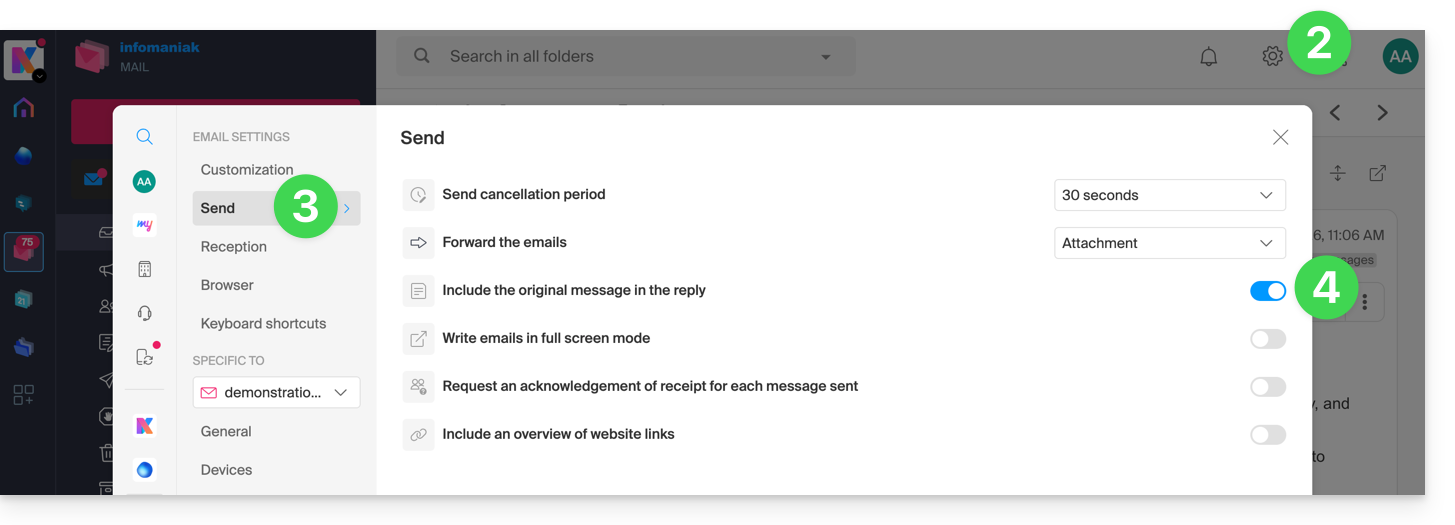
Para não incluir mais o conteúdo da mensagem original ao responder a um contato:
- Clique aqui para acessar o aplicativo web Mail da Infomaniak (serviço online ksuite.infomaniak.com/mail).
- Clique no ícone Configurações no canto superior direito.
- Clique em Envio no menu lateral esquerdo.
- Desativeo botão de alternância à direita do item "Incluir a mensagem original na resposta":
Link para esta FAQ: https://faq.infomaniak.com/1199
Esta seção de perguntas frequentes foi útil?
Este guia explica como encontrar e-mails perdidos, especialmente após uma exclusão acidental.
✘ INDISPONÍVEL com
kSuite Free
my kSuite (ik.me, etik.com, ikmail.com)
Serviço de e-mail Starter
Ao fazer o upgrade de uma destas ofertas gratuitas, será possível recuperar a cópia de segurança até 30 dias.
Introdução
- A Infomaniak faz uma cópia de segurança de cada endereço de e-mail uma vez por dia (geralmente no início da manhã).
- Dessa forma, pode restaurar a sua caixa de e-mail para o estado exato em que se encontrava no momento da cópia de segurança.
- ELEMENTOS RESTAURADOS:
- Os e-mails (presentes no momento da cópia de segurança) que deixaram de existir (no momento do pedido de restauração) serão devolvidos ao seu local original.
- Algumas configurações (mensagem de ausência e redirecionamento, por exemplo) serão restauradas caso tenham sido alteradas entretanto.
- ELEMENTOS NÃO RECUPERADOS:
- Os e-mails movidos (subpastas, lixeira): eles ainda existem na sua conta e devem ser procurados.
- A restauração não inclui o calendário nem a lista de contactos.
- As mensagens ausentes no momento da cópia de segurança diária (ver capítulo POP3); exemplo:
- Restauração solicitada às 10h (cópia de segurança das 5h) para um e-mail recebido às 8h e apagado às 9h30: ele não será recuperado porque ainda não estava presente na cópia de segurança das 5h.
- ELEMENTOS NÃO ALTERADOS:
- Os e-mails recebidos, criados ou armazenados entre a data do backup e a execução da restauração permanecem na sua caixa de entrada.
- Consulte este outro guia sobre os limites de conservação das suas mensagens.
Restaurar a partir da aplicação Web Mail da Infomaniak
Pré-requisitos
- Certificar-se de que a exclusão ocorreu há menos de 30 dias (ou dentro do prazo previsto no seu plano – consulte acima).
- Ter permissão para gerir as cópias de segurança: se tiver sido convidado para o aplicativo Web Mail da Infomaniak (serviço online ksuite.infomaniak.com/mail)para gerenciar seu endereço, é possível que o administrador do Serviço Mail tenharemova este direito da sua conta de administrador.
Para restaurar e-mails:
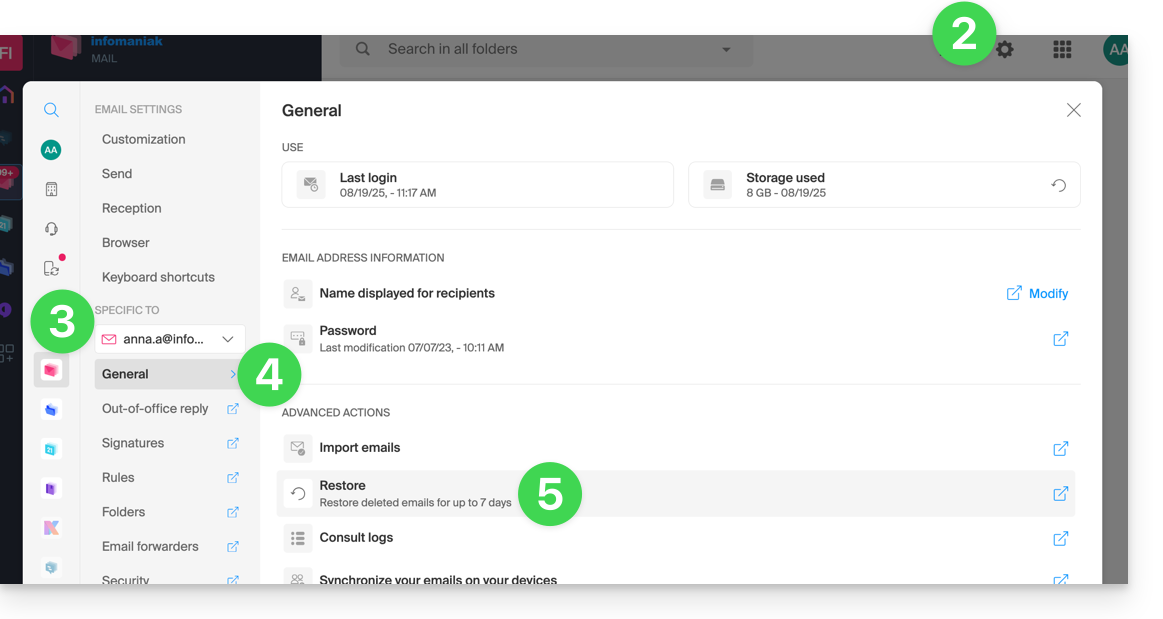
- Clique aqui para acessar o aplicativo web Mail da Infomaniak (serviço online ksuite.infomaniak.com/mail).
- Clique no ícone Configurações no canto superior direito.
- Verifique ou selecione o endereço de e-mail correspondente no menu suspenso do menu lateral esquerdo.
- Clique em Geral.
- Clique em Restaurar:
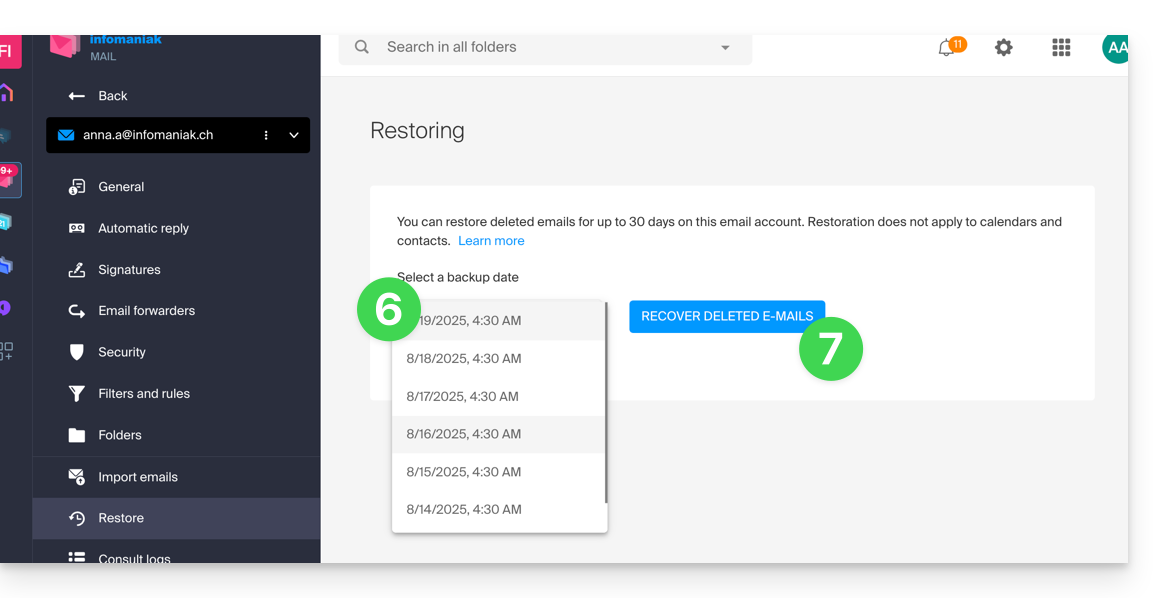
- Escolha uma data para a Restauração.
- Clique em Restaurar e-mails:
- Após a conclusão da restauração, um e-mail de notificação será enviado.
Restaurar a partir do Serviço de E-mail
Pré-requisitos
- Ser Administrador ou Representante legalna organização que gere o serviço de e-mail.
- Certificar-se de que a exclusão ocorreu há menos de 30 dias (ou dentro do prazo previsto no seu plano – consulte acima).
Para restaurar e-mails a partir de um Serviço de E-mail:
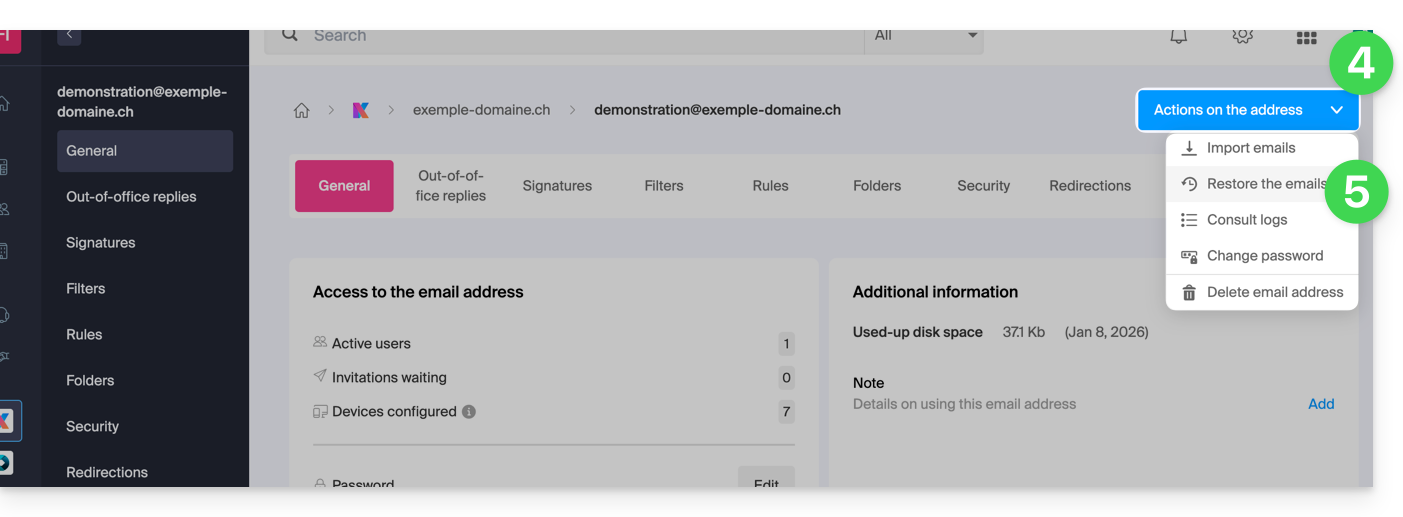
- Clique aqui para acessar o gerenciamento do seu produto no Manager Infomaniak (precisa de ajuda?).
- Clique diretamente no nome atribuído ao produto em questão.
- Clique em o endereço de e-mail em questão na tabela que aparece.
- Clique no botão Ações no endereço, no canto superior direito.
- Clique em Restaurar e-mails:
- Escolha uma data para a Restauração.
- Clique em Restaurar e-mails.
- Após a conclusão da restauração, um e-mail de notificação será enviado.
E-mails colocados na lixeira
Salvo configuração específica, um e-mail excluído pelo utilizador é movido para uma lixeira, e só após um período de vários dias ou semanas é que a lixeira é esvaziada automaticamente (também pode ser esvaziada com um clique do utilizador). Portanto, durante uma operação de restauração:
- Os e-mails que estiverem atualmente na lixeira permanecerão inalterados, independentemente da data da restauração.
- Os e-mails que foram removidos da lixeira serão restaurados para o seu local original, ou seja, o local onde estavam quando foram eliminados (seja nas pastas de entrada ou na própria lixeira).
E-mails armazenados em pastas não convencionais
Se você armazena intencionalmente suas mensagens em pastas com nomes incomuns (por exemplo, pastas chamadas Lixo ou Spam), consulte as informações importantes deste outro guia.
Software/cliente de e-mail configurado em POP3
Se você costuma acessar sua caixa de e-mail com um software/cliente de e-mail como o Outlook e este estiver configurado com o protocolo POP/POP3, não será possível restaurar tudo, pois o backup é feito uma vez por dia e armazena apenas as mensagens que estavam no momento do backup na caixa de entrada do Infomaniak; o mesmo vale para suas outras pastas (Mensagens enviadas, por exemplo) presentes no aplicativo POP3: estas não são sincronizadas com o Infomaniak e, portanto, não são armazenadas em backup; portanto, no futuro, é recomendável utilizar o protocolo IMAP no seu software/cliente de e-mail.
Link para esta FAQ: https://faq.infomaniak.com/1203
Esta seção de perguntas frequentes foi útil?
Este guia explica como usar o aplicativo móvel Gmail (aplicativo para smartphone ou tablet iOS/Android) para consultar um endereço de e-mail hospedado pela Infomaniak.
Introdução
- Em vez da configuração manual abaixo, recomenda-se usar o aplicativo Infomaniak Mail (iOS / Android) para usufruir dos benefícios de segurança da Infomaniak.
Usar o aplicativo móvel Gmail para Infomaniak
Pré-requisitos
- Criar o endereço de e-mail (❓: my kSuite | Serviço de E-mail/kSuite).
- Criar uma senha para o dispositivo (❓: my kSuite | Serviço de e-mail/kSuite).
- Verificar se a configuração do domínio está correta (❓: Serviço de e-mail/kSuite).
Para adicionar, via IMAP, o endereço de e-mail gerenciado na Infomaniak no seu aplicativo móvel Gmail (guia oficial):
- Acesse as Configurações do Gmail.
- Toque em Adicionar conta.
- Escolha Outro:
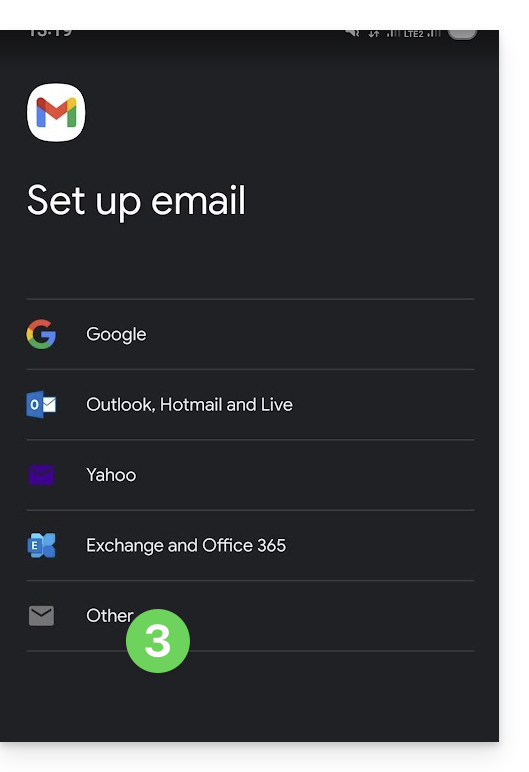
- Insira o endereço de e-mail que deseja usar.
- Escolha o tipo de conta IMAP.
- Insira a senha (consulte os pré-requisitos) do endereço de e-mail:
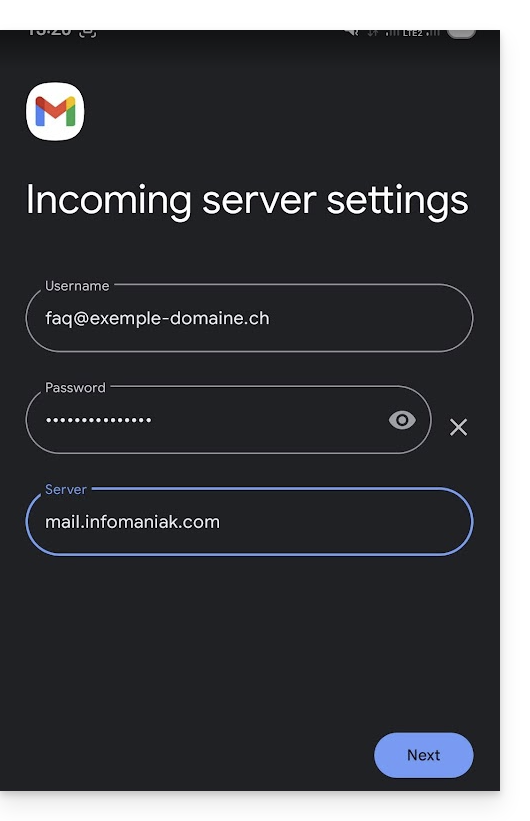
- Utilize o nome do servidor
mail.infomaniak.compara:- Servidor de entrada IMAP (recepção)
- Servidor de saída SMTP (envio)
- Conclua a adição do endereço.
Link para esta FAQ: https://faq.infomaniak.com/1208
Esta seção de perguntas frequentes foi útil?
Este guia detalha o serviço de tradução automática integrado no aplicativo web Mail da Infomaniak (serviço online ksuite.infomaniak.com/mail).
Introdução
- O aplicativo web Mail da Infomaniak (serviço online ksuite.infomaniak.com/mail) integra um tradutor automático, tanto para leitura quanto para redação, para francês, alemão, inglês, italiano e espanhol.
- Esta solução de IA não se baseia em um serviço de terceiros (DeepL, Google Translate, etc.) contatado via API, mas é hospedada, operada e parcialmente treinada pela Infomaniak.
Traduzir o texto…
… durante a redação
Para traduzir automaticamente para um idioma estrangeiro uma mensagem que você está escrevendo em seu idioma:
- Clique aqui para acessar o aplicativo web Mail da Infomaniak (serviço online ksuite.infomaniak.com/mail).
- Redija um novo e-mail sem enviá-lo.
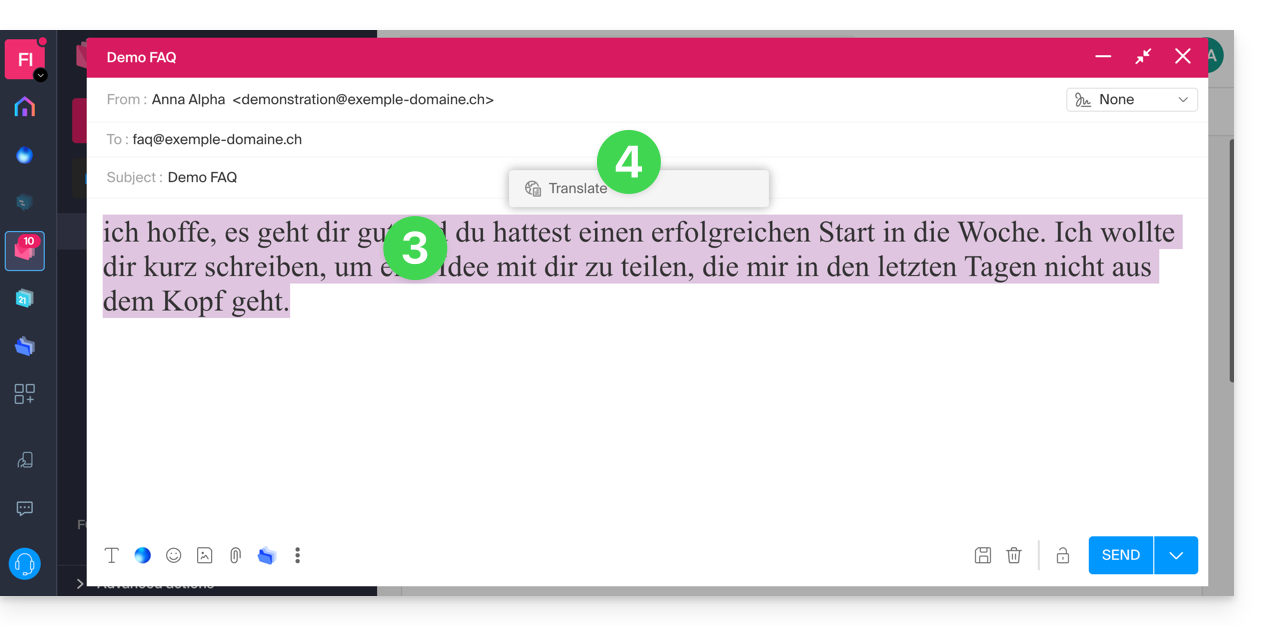
- Selecione o texto a ser traduzido.
- Clique em Traduzir:
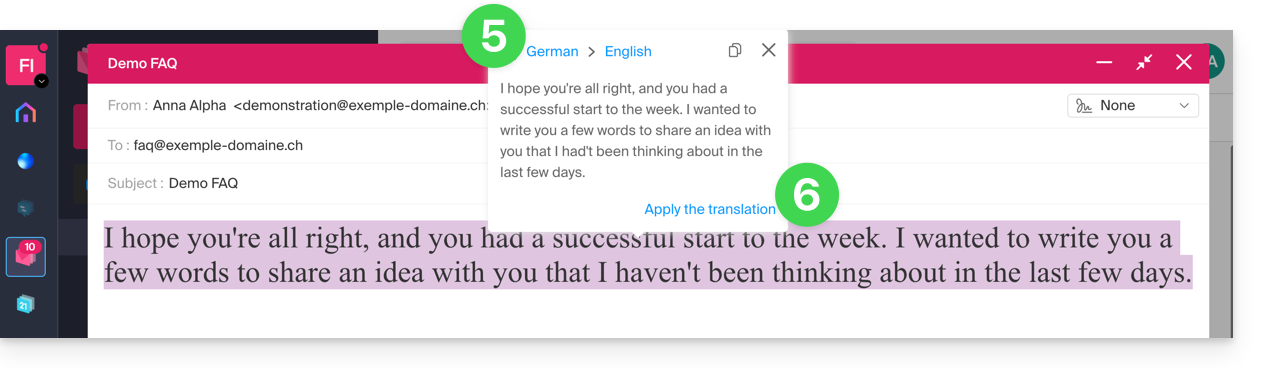
- Altere os idiomas, se necessário.
- Clique em Aplicar a tradução:
… durante a leitura
Para traduzir automaticamente para o seu idioma uma mensagem recebida redigida em um idioma estrangeiro:
- Clique aqui para acessar o aplicativo web Mail da Infomaniak (serviço online ksuite.infomaniak.com/mail).
- Consulte o e-mail a ser traduzido.
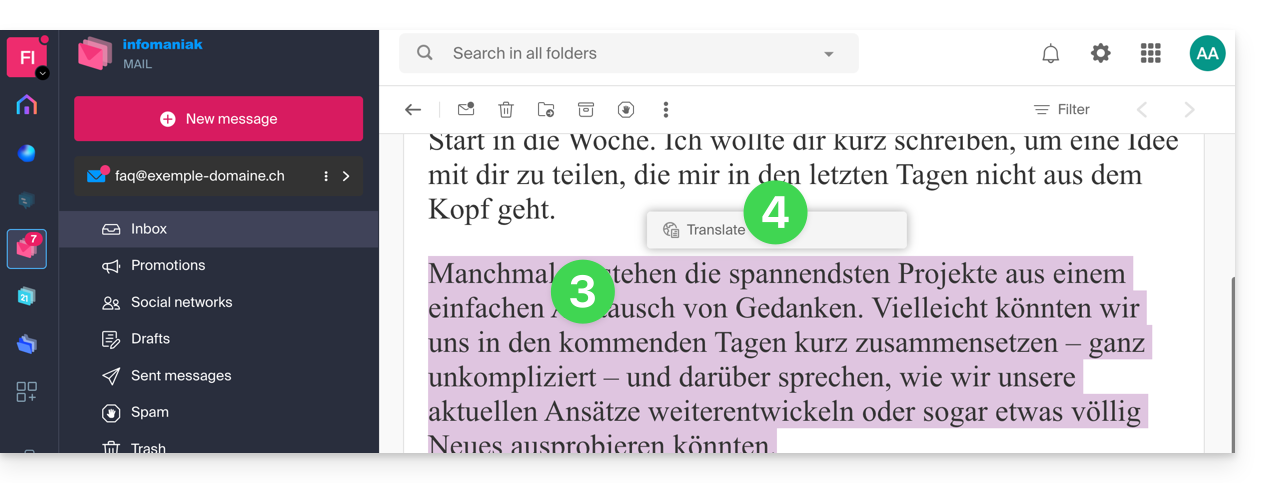
- Selecione o texto a ser traduzido.
- Clique em Traduzir:
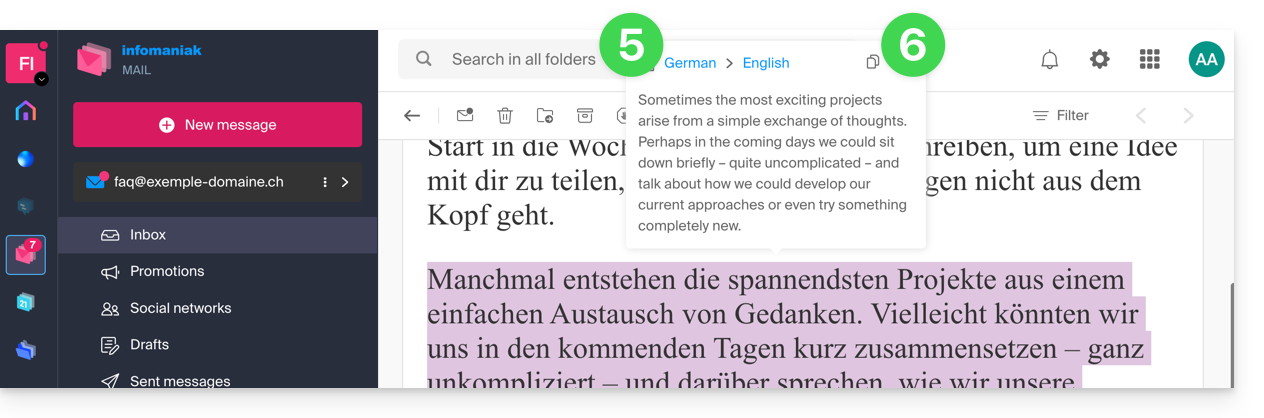
- Clique no nome dos idiomas para alterar os idiomas utilizados.
- No mesmo local, você também pode copiar o texto traduzido para a área de transferência, para usá-lo posteriormente:
Desativar o tradutor
Pode configurar os elementos (traduções / Euria) que são exibidos ao clicar na sua mensagem:
- Clique aqui para aceder à aplicação web Mail da Infomaniak (serviço online ksuite.infomaniak.com/mail).
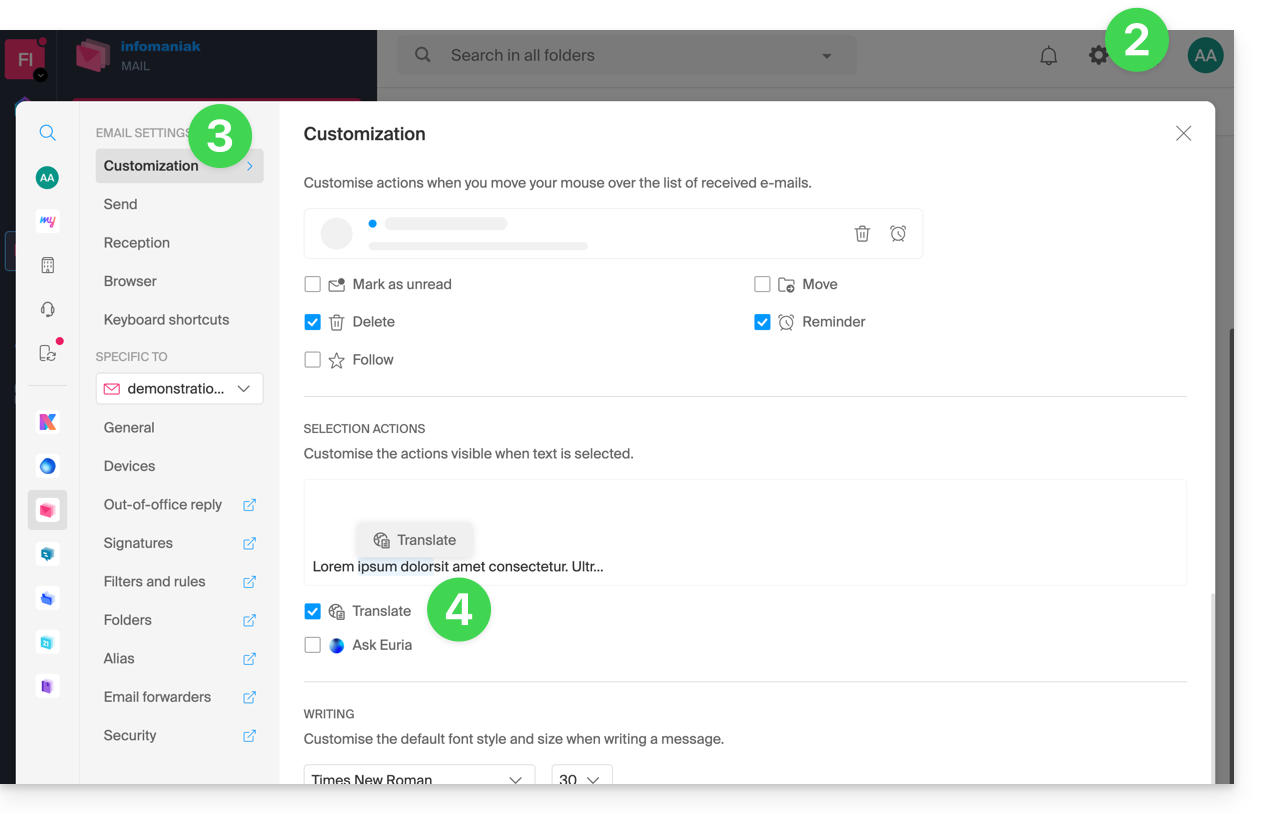
- Clique no ícone Configurações no canto superior direito da interface.
- Clique em Personalização no menu lateral esquerdo.
- Marque ou desmarque as ações que deseja executar com um clique:
Link para esta FAQ: https://faq.infomaniak.com/1215
Esta seção de perguntas frequentes foi útil?
Este guia aborda o spam de saída das infraestruturas Infomaniak e ajuda a identificar e resolver as possíveis causas quando um e-mail enviado a partir de um endereço alojado pela Infomaniak chega à pasta de Spam (correio não desejado) do destinatário.
Importante: A Infomaniak não pode intervir diretamente na classificação de uma mensagem como spam por outros fornecedores; as soluções devem ser procuradas junto dos administradores do servidor de receção em questão.
Utilizar o e-mail de forma adequada
A Infomaniak implementa medidas reforçadas para garantir a segurança e a entrega dos e-mails. Ao respeitar também as boas práticas abaixo, reduz significativamente o risco de que as suas mensagens sejam consideradas indesejadas.
1. Utilizar um endereço de e-mail válido
- Verifique se o seu endereço de e-mail e o domínio associado estão corretos e válidos.
- Verifique as configurações de segurança do seu nome de domínio (SPF, DKIM, DMARC).
- Se alterar uma configuração, aguarde cerca de 24 horas antes de efetuar um novo teste de envio.
2. Evitar conteúdo suspeito
- Evite palavras, frases ou apresentações frequentemente associadas ao spam (promoções abusivas, frases genéricas, layout demasiado complexo, etc.).
- Não inclua links não seguros, truncados ou mal formatados.
- Personalize as suas mensagens (por exemplo, mencionando o nome do destinatário) para aumentar a sua credibilidade.
- Não anexe ficheiros suspeitos ou demasiado grandes; utilize, em vez disso, um serviço como o SwissTransfer.
3. Testar o envio a partir da aplicação Web Mail Infomaniak
- Se estiver a usar um software/cliente de e-mail de terceiros, tente enviar a mensagem a partir da aplicação web Mail da Infomaniak (ksuite.infomaniak.com/mail).
- Compare os resultados para identificar se o problema é causado pelo seu software/cliente de e-mail ou por uma configuração.
4. Monitorizar a reputação do seu domínio
- Se o seu endereço de e-mail usar um domínio personalizado (por exemplo,
@o-seu-domínio.xyz), uma má reputação do domínio pode afetar a entrega das suas mensagens. - Analise e corrija as possíveis causas (envios em massa antigos, configuração incorreta, denúncias, etc.).
- O tempo decorrido desde a data de criação do domínio pode ser um fator.
5. Obter o consentimento do destinatário
- Escreva apenas para destinatários que o conhecem ou que esperam a sua mensagem.
- Para envios em grupo ou regulares, utilize um sistema de subscrição voluntária (opt-in).
- Para campanhas de informação ou marketing, prefira a solução Newsletter da Infomaniak.
6. Otimizar a frequência e o volume de envio
- Evite enviar um grande número de mensagens idênticas para muitos destinatários simultaneamente.
- Respeite uma frequência de envio razoável para não ser identificado como um remetente suspeito.
7. Ser adicionado à lista de permissões (whitelist) da Infomaniak
- Se os seus e-mails forem classificados como spam por um destinatário também alojado na Infomaniak, este pode adicionar o seu endereço à sua lista de permissões.
- Esta ação garante o recebimento de suas mensagens, mas não substitui a verificação das causas que levaram inicialmente à classificação como spam.
Link para esta FAQ: https://faq.infomaniak.com/1243
Esta seção de perguntas frequentes foi útil?
Este guia apresenta várias soluções para eliminar rapidamente um grande número de e-mails contidos numa conta de e-mail alojada pela Infomaniak. Note que o tamanho da sua caixa de correio não é limitado.
Eliminar e-mails em massa…
… a partir do aplicativo Web Mail da Infomaniak
- Clique aqui para acessar o aplicativo Web Mail da Infomaniak (serviço online ksuite.infomaniak.com/mail).
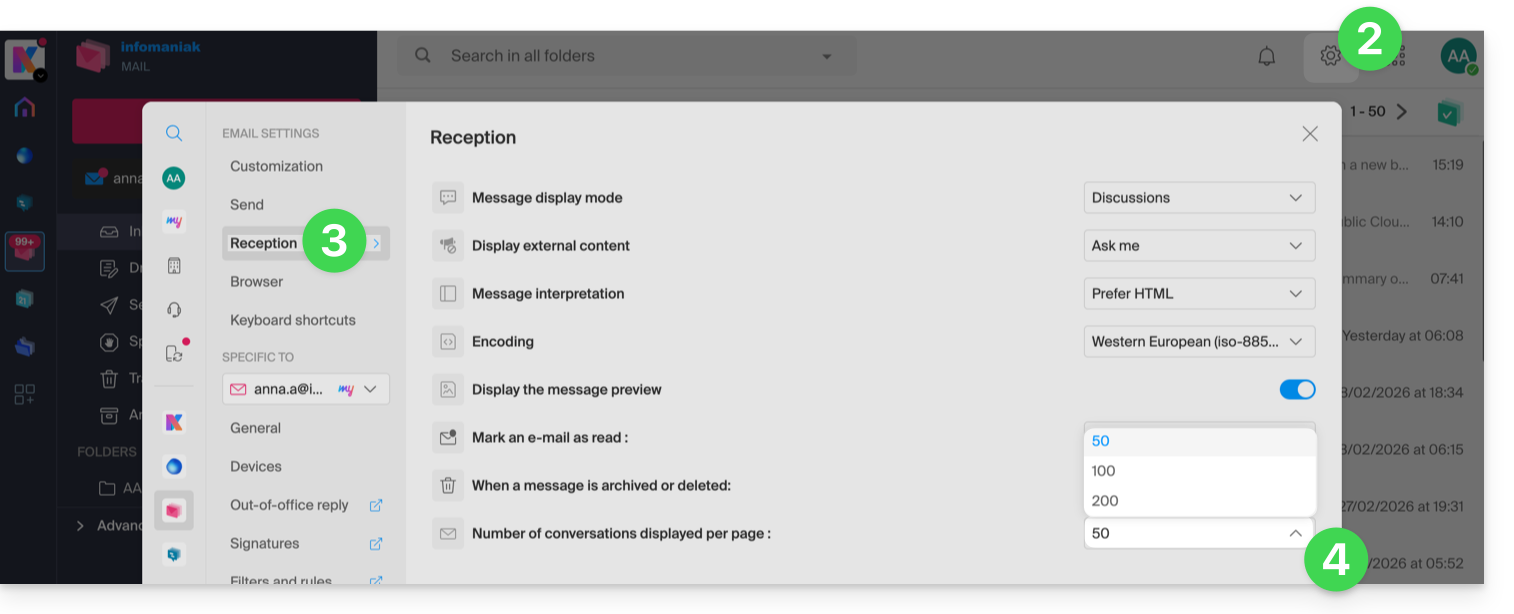
- Clique no ícone Configurações no canto superior direito da interface.
- Clique em Receber.
- Exiba o número máximo de itens carregados simultaneamente:
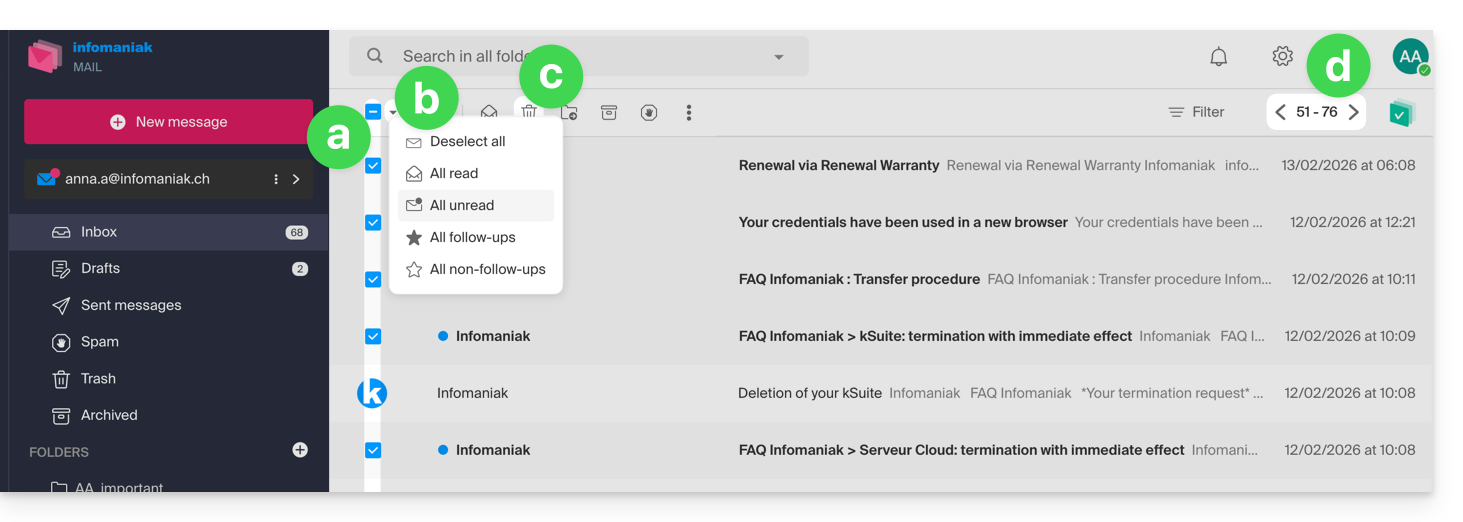
- Para esvaziar a caixa de entrada:
- Selecione todos os itens visíveis na tela.
- É possível fazer uma seleção mais precisa.
- Clique no ícone Lixeira para enviá-los para a lixeira.
- Repita este processo em todas as páginas:
- Além da caixa de entrada, as pastas podem ser esvaziadas em poucos cliques:
- Clique no menu de ação ⋮ à direita da pasta em questão.
- Clique em Esvaziar a pasta:
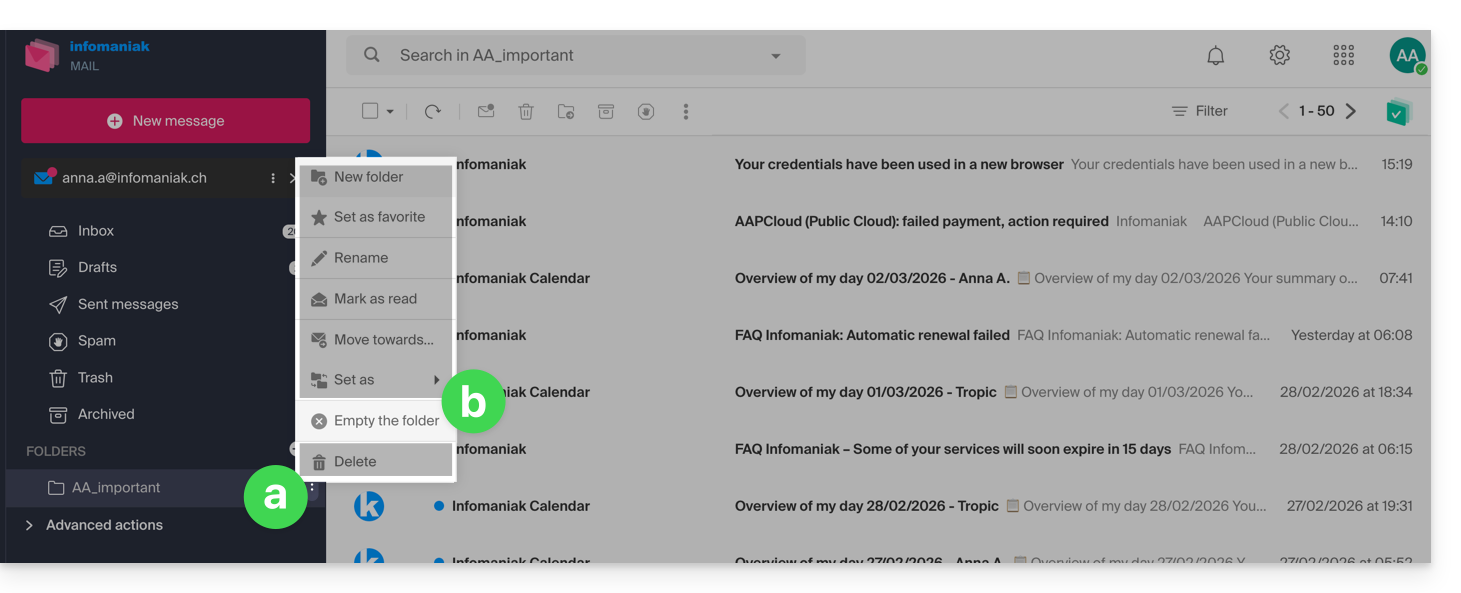
- Atenção: os e-mails são excluídos sem passar pela lixeira, como se você estivesse excluindo a própria pasta — apenas uma restauração pode permitir uma possível recuperação.
Você também pode excluir o endereço de e-mail que está em um Serviço de E-mail e, em seguida, recriá-lo. Ele ficará completamente vazio.
… a partir de um software/cliente de e-mail IMAP
Uma solução eficaz consiste em configurar o endereço de e-mail em um software/cliente de e-mail IMAP, o que permitirá selecionar todas as mensagens (sem a noção de paginação…), tornando o processo de exclusão fácil e rápido:
- Instale o Thunderbird (ou qualquer outro aplicativo de e-mail no seu dispositivo).
- Adicione o seu endereço de e-mail, indicando a respetiva senha.
- Aguarde até que a caixa de entrada seja carregada.
- Selecione todas as mensagens.
- Clique em Apagar.
- Pronto, pode remover a aplicação, se desejar.
Caso especial: as mensagens riscadas
Para remover definitivamente os e-mails riscados que possam aparecer no seu software/cliente de e-mail ou no Mail Infomaniak: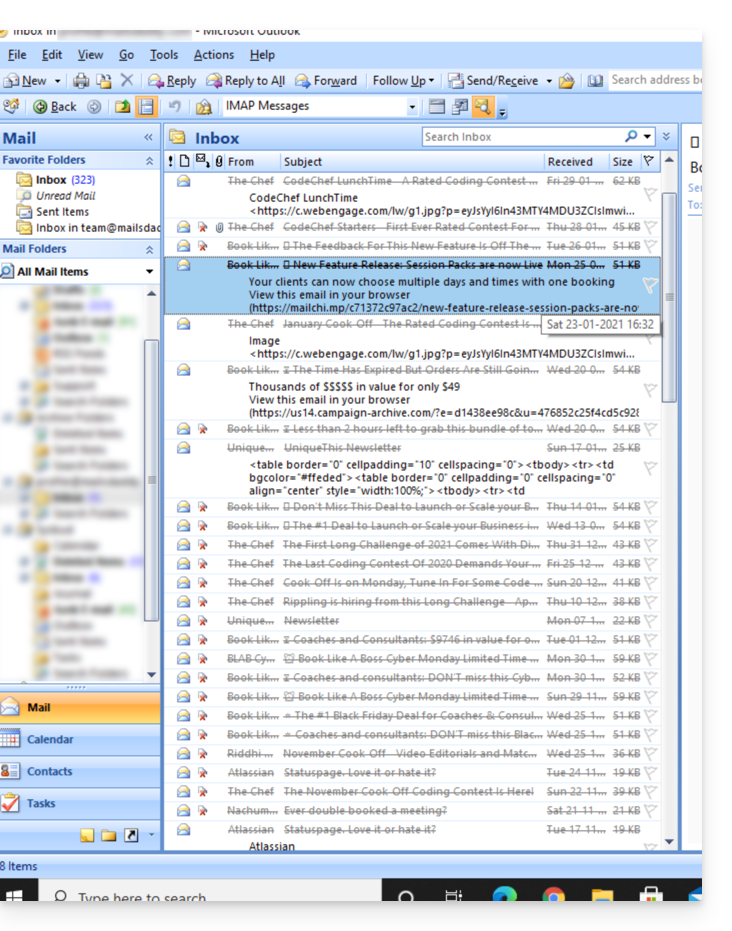
- Microsoft Outlook
- vá para o menu Editar -> Limpar mensagens apagadas (em inglês, deverá ter um menu Purge)
- Apple Mail
- vá para o menu MAIL -> Limpar itens apagados
Eles também desaparecerão da interface do Mail Infomaniak.
Link para esta FAQ: https://faq.infomaniak.com/1247
Esta seção de perguntas frequentes foi útil?
Este guia tem como objetivo ajudá-lo a compreender melhor as particularidades que podem surgir na exibição de e-mails ao utilizar diferentes aplicações de e-mail e os aplicativos Mail da Infomaniak.
Introdução
- Pode acontecer que surjam inconsistências na exibição de uma lista de e-mails contidos numa pasta (por exemplo, a pasta de Mensagens enviadas) e que as mensagens classificadas e consideradas as mais recentes por um dispositivo não sejam as mesmas que são exibidas ao usar outra ferramenta.
Compreender os identificadores únicos (UID)
Os UID (Identificadores Únicos) são identificadores exclusivos atribuídos a cada mensagem em uma caixa de correio IMAP. São usados para identificar cada mensagem de forma exclusiva, independentemente das modificações feitas nas pastas ou nas próprias mensagens. Os UID são particularmente úteis para gerenciar e sincronizar e-mails em vários softwares/clientes de e-mail IMAP:
- Cada e-mail recebe um UID exclusivo no momento da sua criação em uma caixa de correio; esse UID, em princípio, nunca muda enquanto o e-mail existir, mesmo que o seu conteúdo ou metadados sejam modificados.
- Os UID são geralmente sequenciais, o que significa que as mensagens mais recentes têm, em princípio, UID mais elevados.
- Ao sincronizar e-mails, os softwares/clientes de e-mail IMAP podem usar os UID para determinar quais mensagens são novas, modificadas ou excluídas desde a última sincronização; isso permite uma gestão eficiente dos e-mails sem ter que baixar e comparar todas as mensagens.
- Dependendo da ferramenta utilizada, para exibi-los na ordem em que foram recebidos, as mensagens podem ser ordenadas pela data de recebimento ou pelo UID.
Não confundir com:
Número de sequência da mensagem(utilizado para operações temporárias baseadas na posição atual das mensagens)…Message-ID (RFC 5322)(utilizado para identificar de forma única as mensagens em diferentes servidores e softwares/clientes de e-mail)…X-Message-Id(específico do servidor e usado para fins internos de rastreamento)…Thread-IndexeThread-Topic(usados pelas aplicações Microsoft para rastrear os tópicos de conversa)…
Aplicações IMAP e o aplicativo Infomaniak Mail
O problema pode surgir desta forma ao nível dos comandos do servidor:
758 - date.sent: 2017-10-11 23:15:26 (+0100)
757 - date.sent: 2017-10-11 15:00:55 (+0100)
756 - date.sent: 2017-10-11 14:39:28 (+0100)
(...)
742 - date.sent: 2018-01-17 00:40:21 (+0000)
741 - date.sent: 2018-01-17 00:30:33 (+0000)
740 - date.sent: 2018-01-17 00:26:07 (+0000)
(...)
51 - date.sent: 2022-10-07 16:39:16 (+0100)
50 - date.sent: 2023-06-13 10:15:00 (+0100)
49 - date.sent: 2023-06-07 12:11:35 (+0100)
Verificamos que os e-mails de 2017 têm um UID (758, 757, ...) superior aos e-mails com data mais recente, em 2023. Os UID devem ter sido reatribuídos por algum motivo ao longo da vida útil desta conta de e-mail (transferências, cópias, importações, etc.).
Dependendo da forma como a ferramenta de e-mail irá ordenar os e-mails, uma mensagem de 2017 pode aparecer entre as mensagens recentes, enquanto a mensagem de 2018 não será carregada imediatamente. Isto é particularmente verdadeiro para o aplicativo Mail Infomaniak, que carrega apenas uma série de e-mails de cada vez, com base no UID (o que está em processo de evolução).
Consequentemente, para resolver eventuais inconsistências, recomenda-se utilizar um software/cliente de e-mail IMAP como o Thunderbird num computador, o que permitirá ordenar de forma rápida e eficiente todas as mensagens de uma pasta específica, com base na data do e-mail, pois a aplicação exibirá todas as mensagens presentes no servidor Infomaniak.
Link para esta FAQ: https://faq.infomaniak.com/1276
Esta seção de perguntas frequentes foi útil?
Este guia explica como conectar o aplicativo para desktop Apple Mail macOS (MacBook Pro, Neo…) a um endereço de e-mail hospedado na Infomaniak.
Introdução
- O seu computador macOS será configurado automaticamente através de perfis de configuração .mobileconfig compatíveis com a Apple, ao contrário de uma configuração manual.
- É possível remover um perfil de configuração após a instalação (consulte a parte inferior desta página para obter mais informações).
Instalar um perfil de configuração
Pré-requisitos
- Crie o endereço de e-mail em my kSuite ou em um Serviço de E-mail / kSuite.
- Verifique se o Serviço de E-mail está configurado de forma otimizada.
Pode descarregar o perfil a partir do dispositivo em questão ou enviá-lo a partir de outro dispositivo (se já tiver um endereço de e-mail que funcione corretamente, por exemplo):
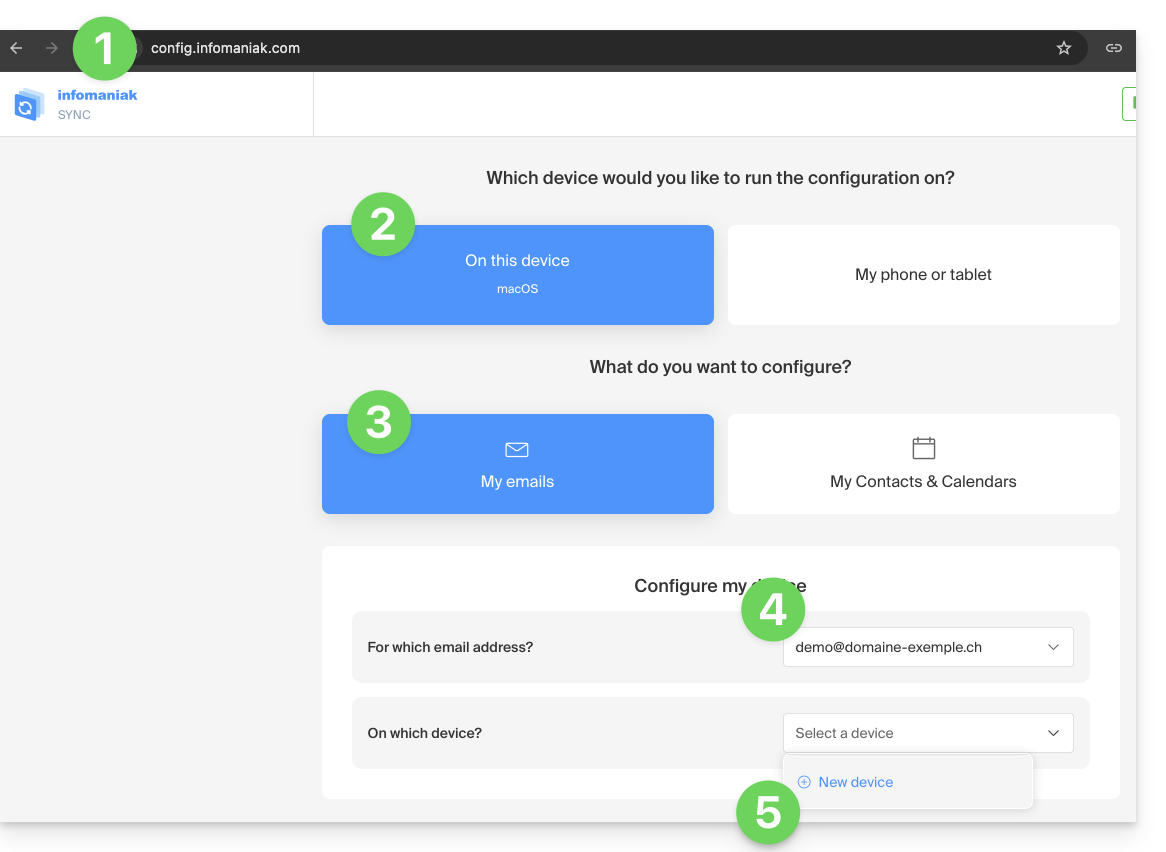
- Clique aqui para aceder à ferramenta de configuração Infomaniak (serviço online https://config.infomaniak.com) — inicie sessão, se necessário, na sua conta Infomaniak na Organização onde é gerido o seu endereço de e-mail.
- Escolha instalar o perfil neste dispositivo.
- Escolha sincronizar os e-mails.
- Escolha o endereço de e-mail que deseja configurar no Apple Mail (entre os endereços aos quais tem acesso).
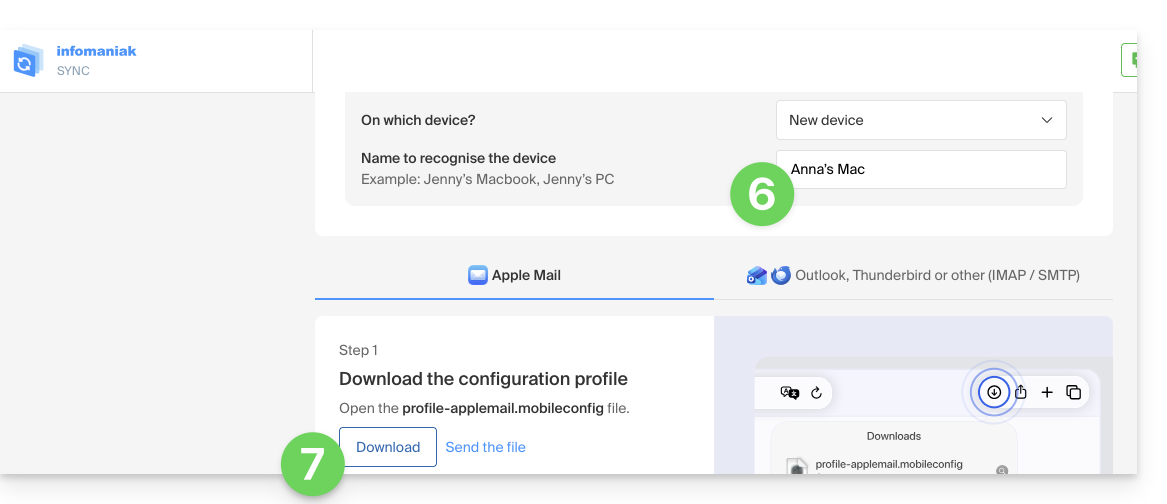
- Crie um novo dispositivo:
- Insira um nome descritivo para o novo dispositivo.
- Clique no botão para descarregar o perfil (também pode enviá-lo por e-mail através do link à direita):
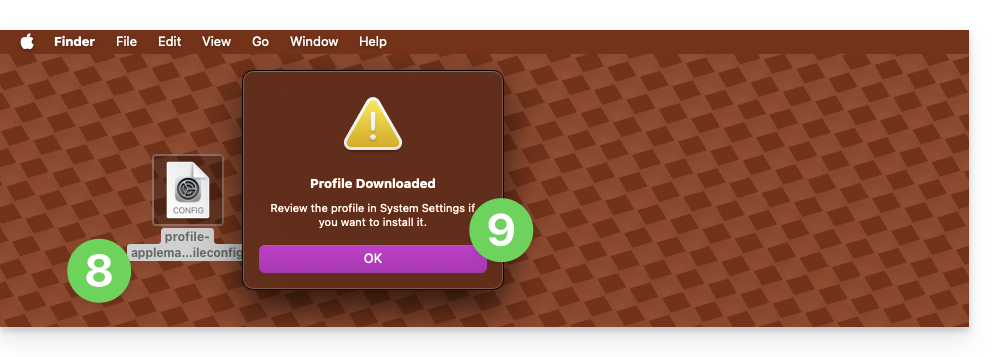
- Depois de ter o ficheiro
profile-applemail.mobileconfigno seu computador, clique duas vezes para o abrir e executá-lo. - Clique em OK:
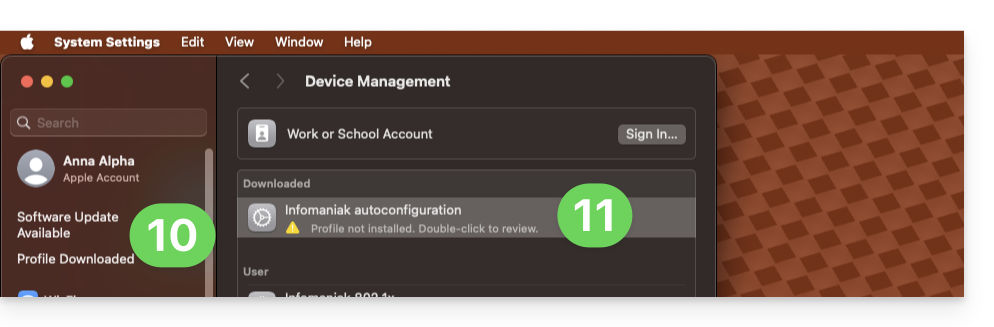
- Abra as Configurações do sistema do computador.
- Clique em Perfil baixado na barra lateral e, em seguida, clique duas vezes no novo perfil para aplicá-lo:
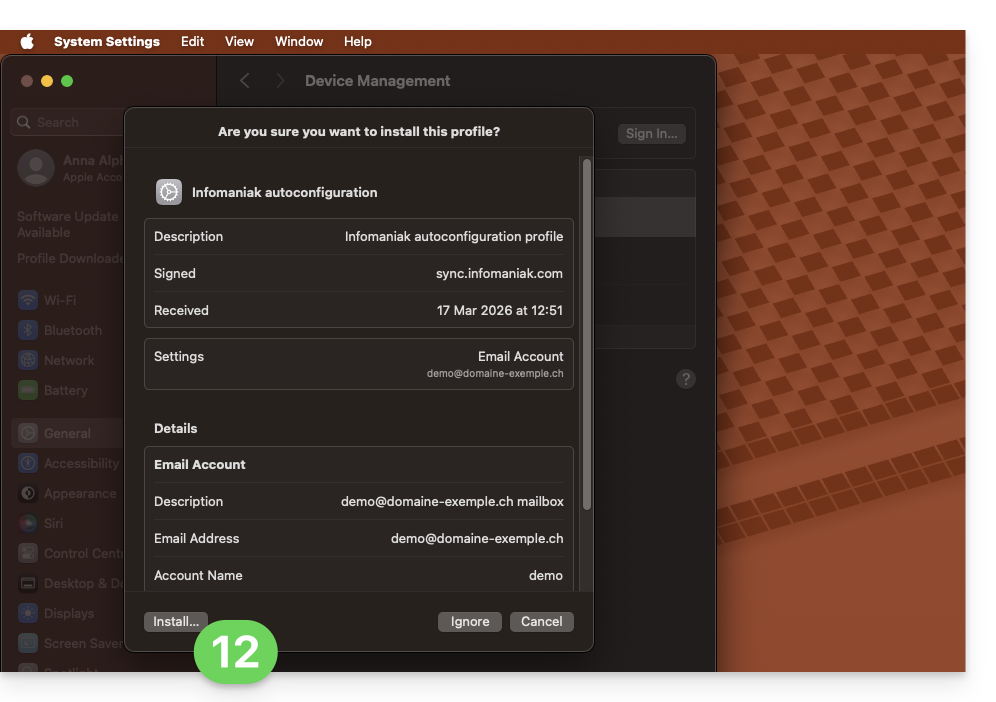
- Se você tiver uma versão antiga do macOS ou não encontrar o perfil, procure por “perfil” nas configurações ou consulte a documentação oficial, alterando, se necessário, a versão do seu sistema na parte superior da página.
- Clique em Instalar…:
- Será solicitada uma senha…
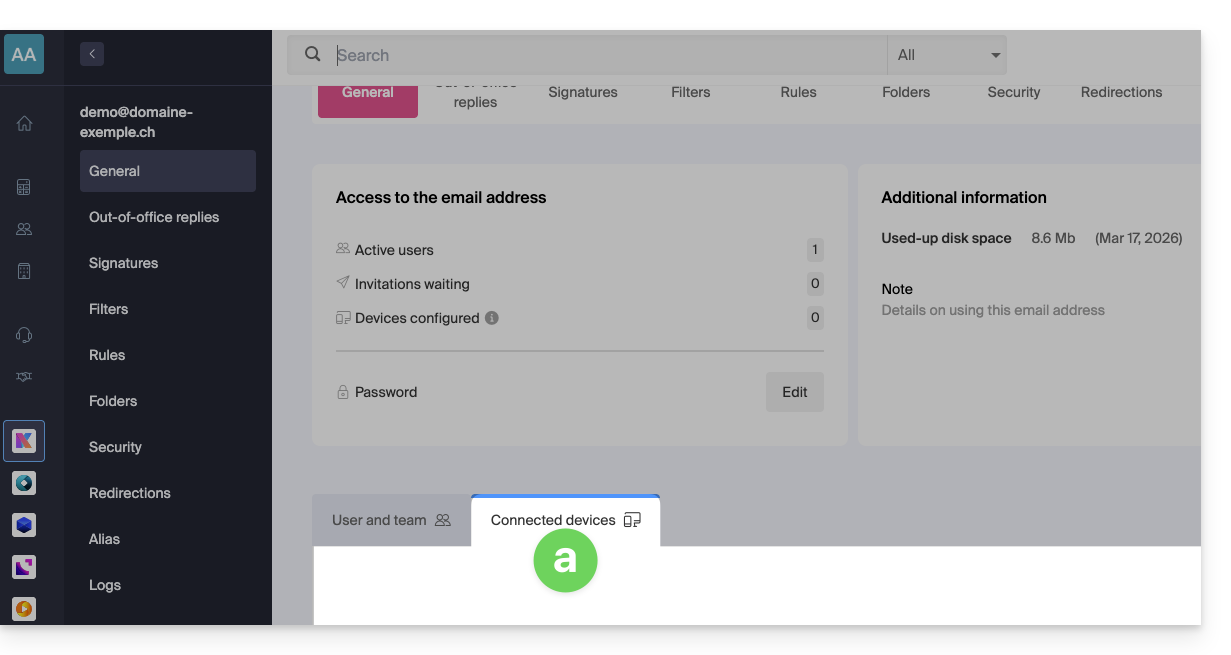
- se você a conhece, pois já a criou na seção Dispositivos do Serviço de E-mail:
- ou você pode copiar a nova senha que está mais abaixo na página do assistente
config.infomaniak.comaberta anteriormente: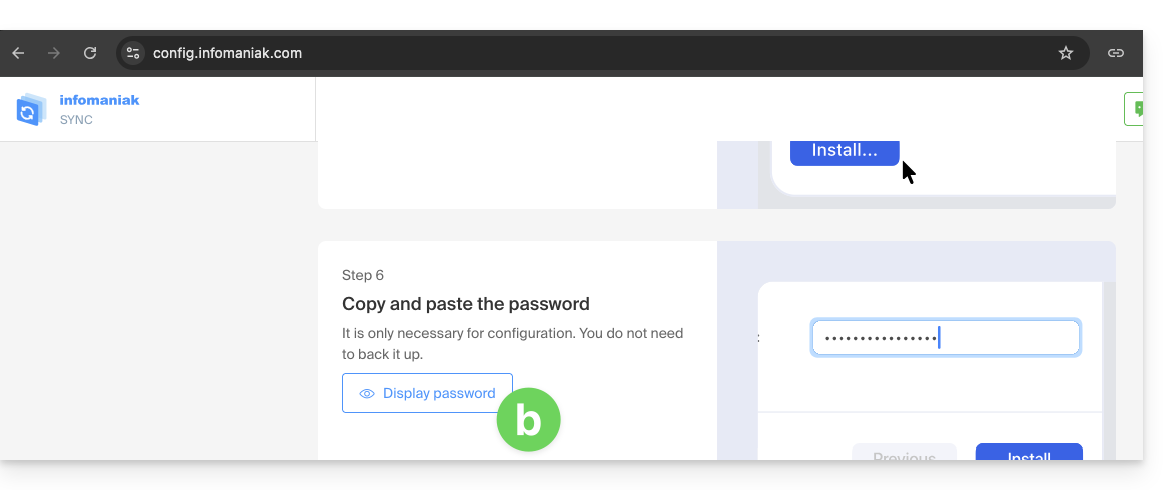
- Antes que a senha do endereço de e-mail seja exibida, é possível que a senha da sua conta Infomaniak seja solicitada por motivos de segurança:
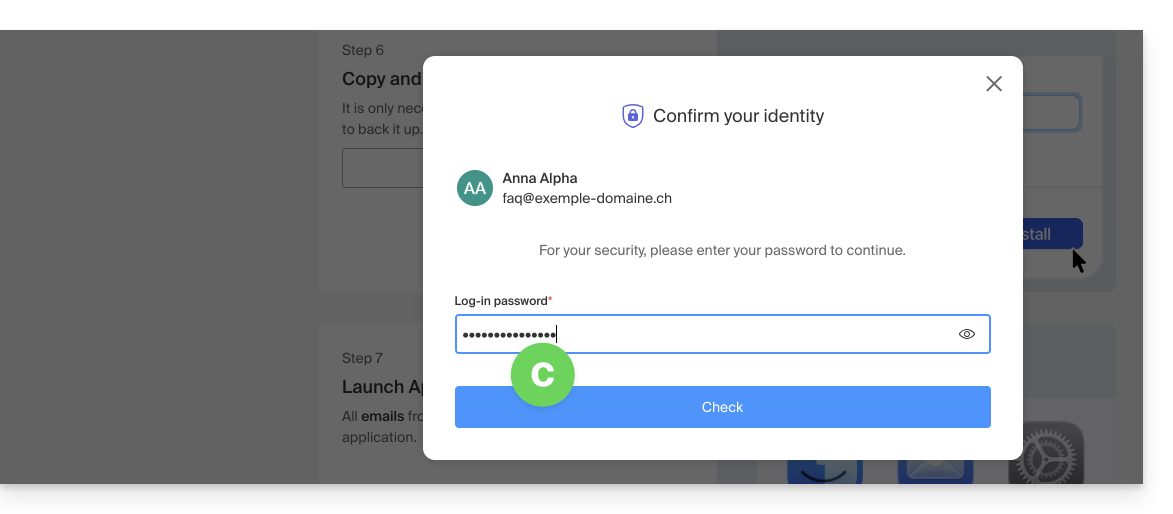
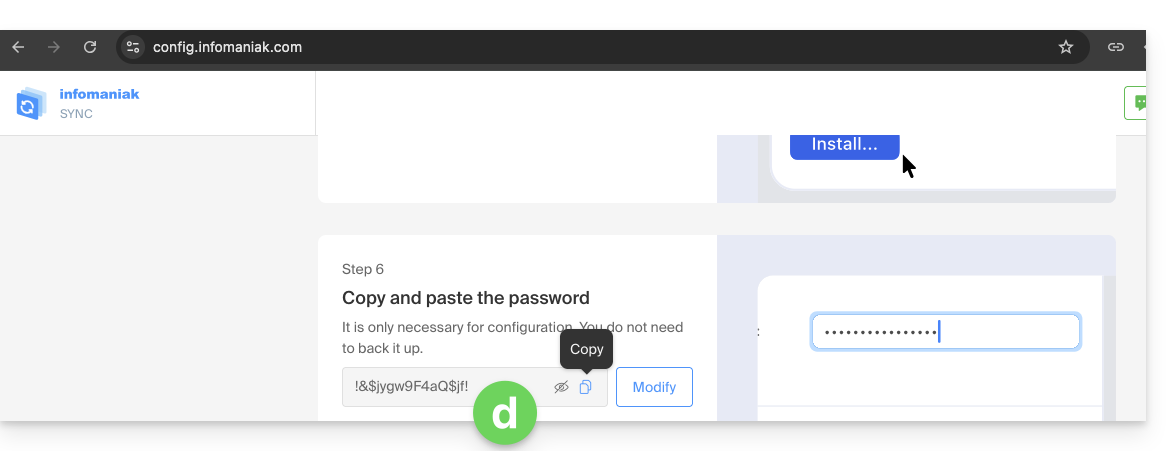
- Pronto, a senha gerada aleatoriamente é exibida, basta copiá-la:
- se você a conhece, pois já a criou na seção Dispositivos do Serviço de E-mail:
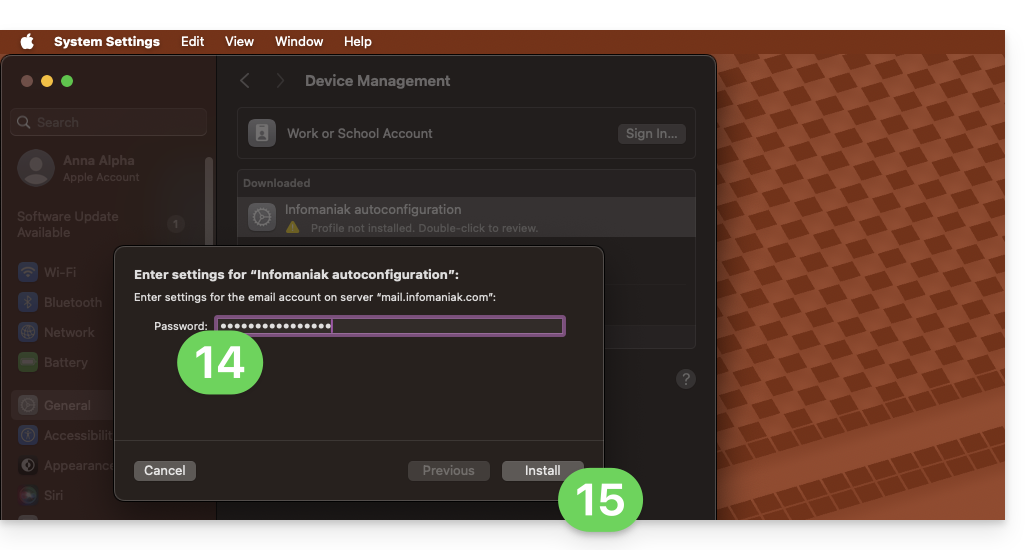
- Cole a senha na janela do macOS.
- Clique em Instalar para iniciar a instalação do perfil:
- Pronto, o seu endereço de e-mail já está configurado na aplicação Apple Mail, que pode abrir e controlar:
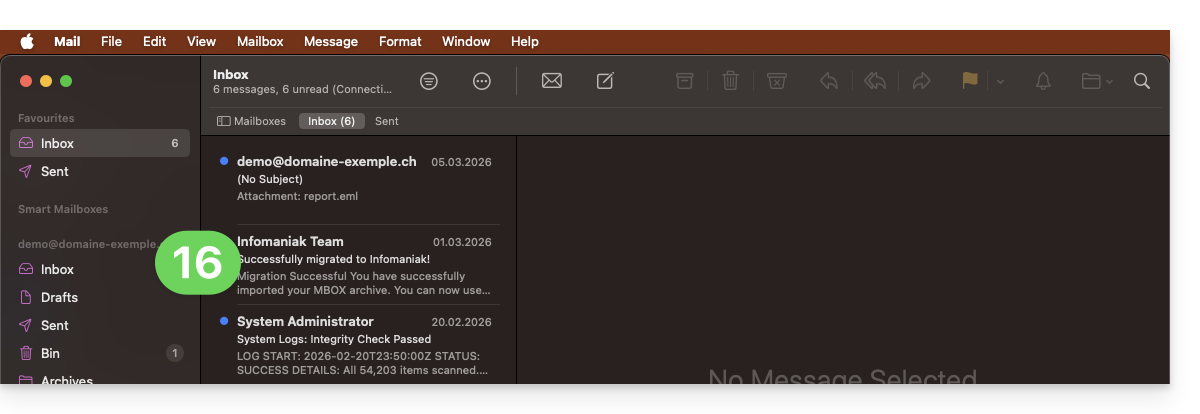
Remover uma conta IMAP
Consulte o capítulo "Deixar de usar uma conta" e, se necessário, altere a versão do seu sistema na parte superior da página*. (Atenção: não exclua uma conta configurada em POP sem fazer uma cópia de segurança das suas mensagens).
Excluir um perfil Apple
Consulte a documentação oficial, alterando, no topo da página, a versão do seu sistema, se necessário.
*Por que é necessário selecionar a versão do guia que corresponda exatamente à sua versão do sistema macOS/iOS?A Apple introduz alterações, por vezes subtis, em cada nova versão do seu sistema, por exemplo, um caminho no iOS 15…
… torna-se isto no iOS 18…
Link para esta FAQ: https://faq.infomaniak.com/1316
Esta seção de perguntas frequentes foi útil?