Base de conhecimento
1000 perguntas frequentes, 500 tutoriais e vídeos explicativos. Aqui, você encontra apenas soluções!
Este guia explica como modificar a exibição dos seus eventos (no âmbito do sistema de bilheteira Infomaniak).
Aceder às opções para configurar a exibição
Para isso:
- Clique aqui para acessar o gerenciamento do seu produto no Manager Infomaniak (precisa de ajuda?).
- Clique diretamente no nome atribuído ao sistema de bilheteira relacionado ao evento.
- Clique em Programação no menu lateral esquerdo.
- Clique em Eventos no menu lateral esquerdo.
- Clique no nome do evento em questão:
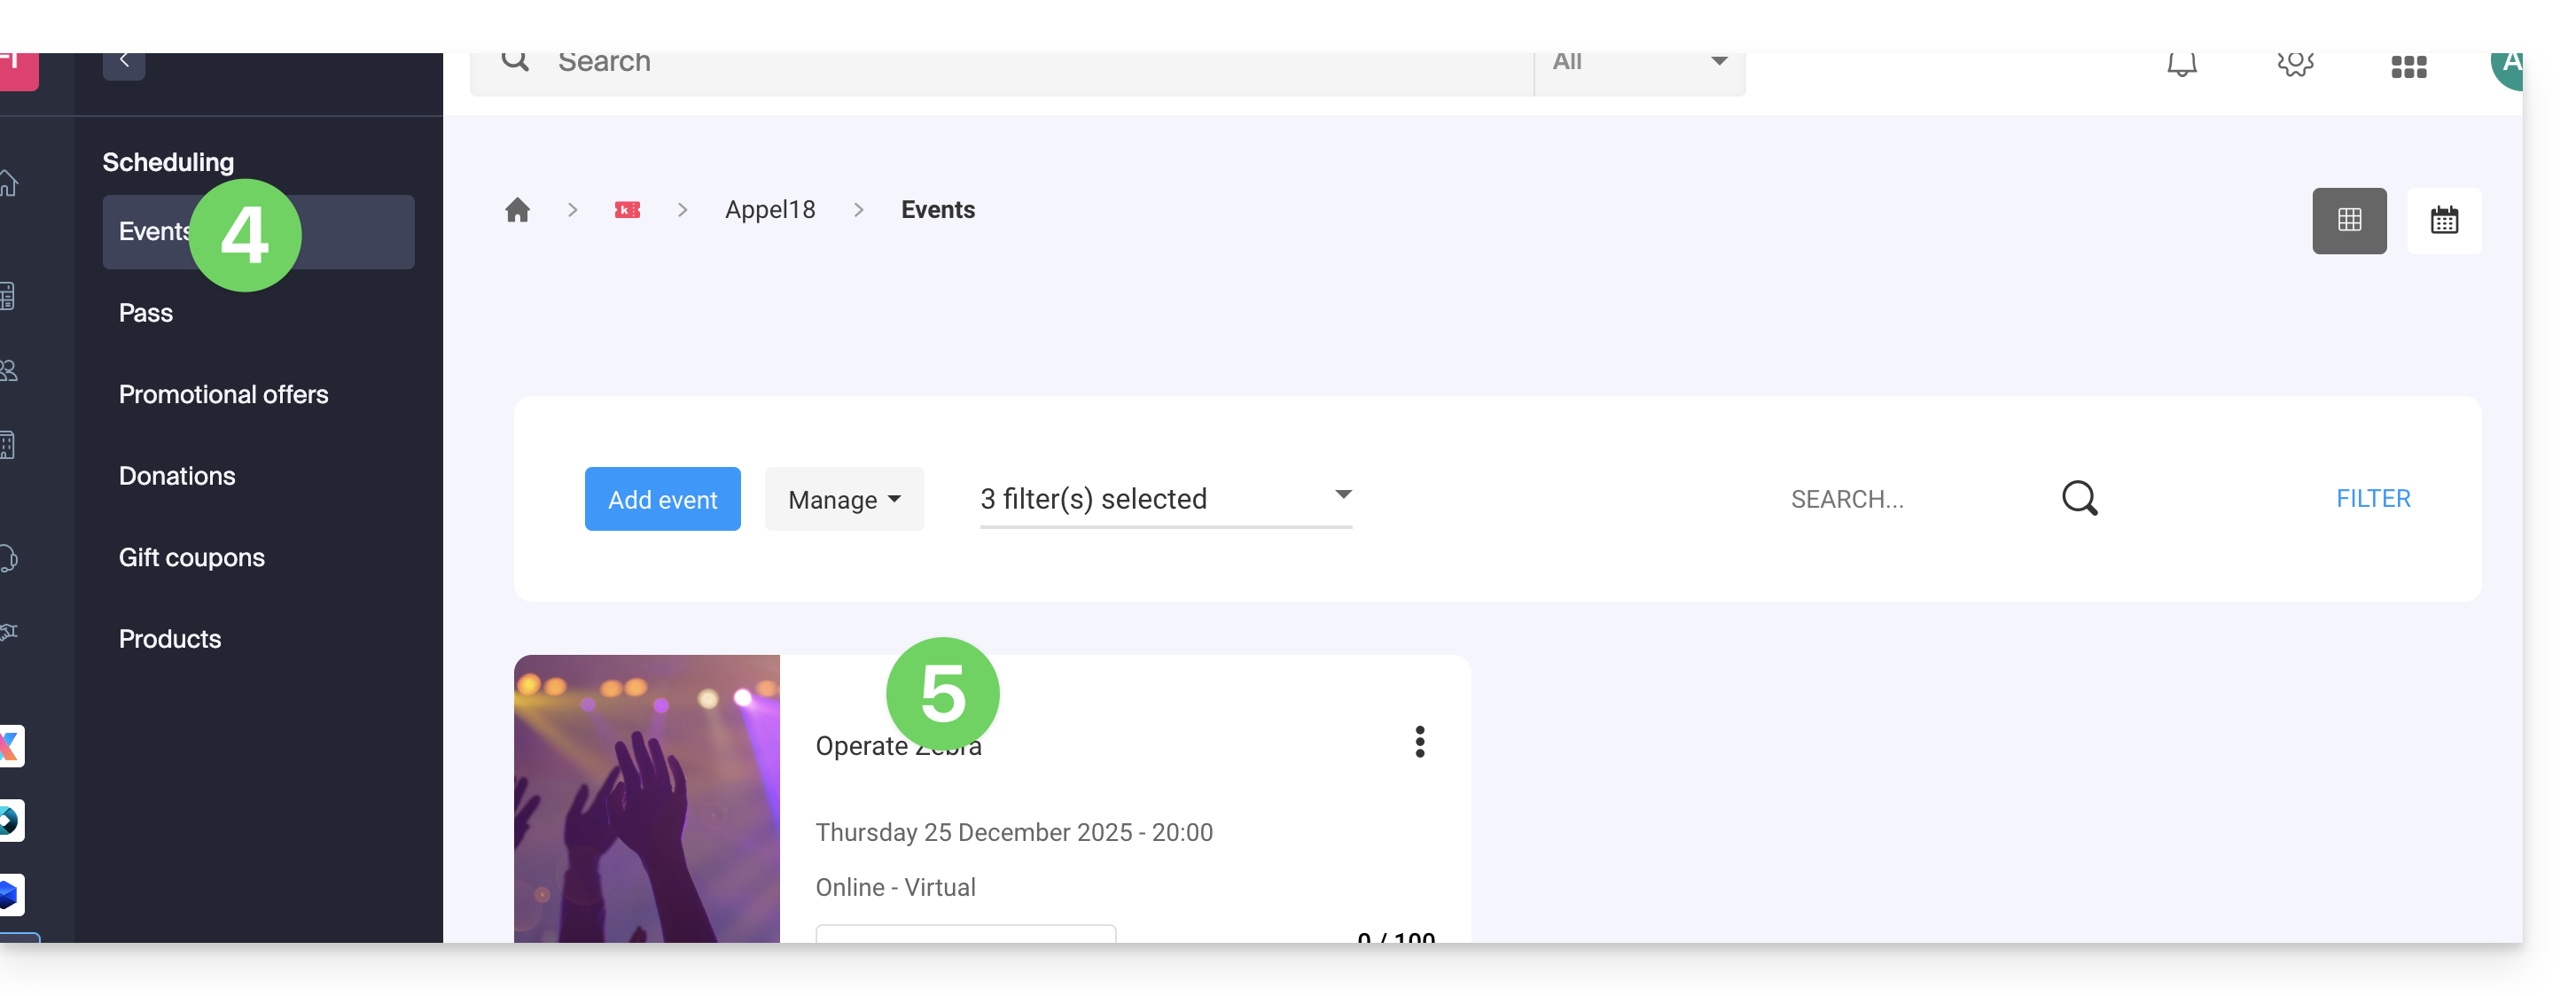
- Clique no botão Editar:
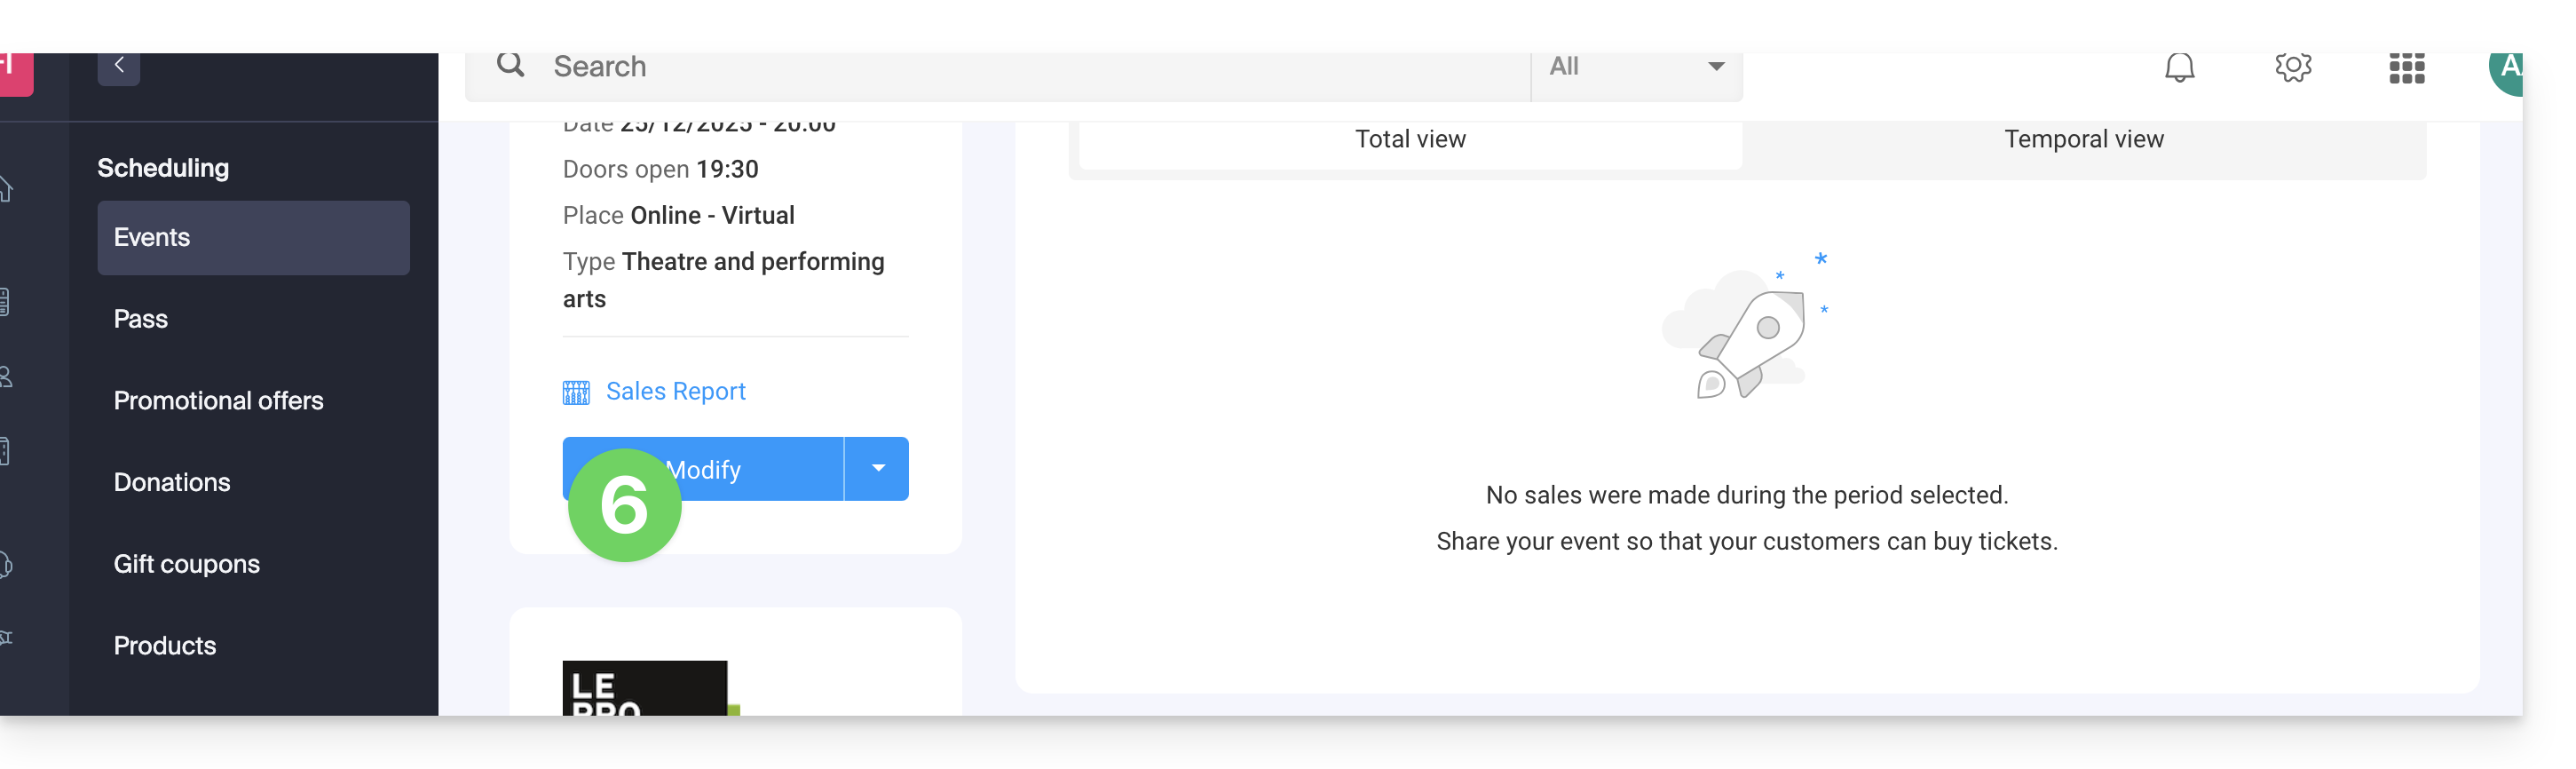
Escolher um modo de exibição dos eventos com várias datas
Para isso:
- Adicione novas datas possíveis…
- Escolha os métodos de exibição destas datas no calendário; estes modos estarão disponíveis no sistema de bilheteira online e permitirão que os seus clientes alternem entre os diferentes modos de exibição que preferirem (veja abaixo)…
- Escolha qual modo de exibição será usado por padrão…
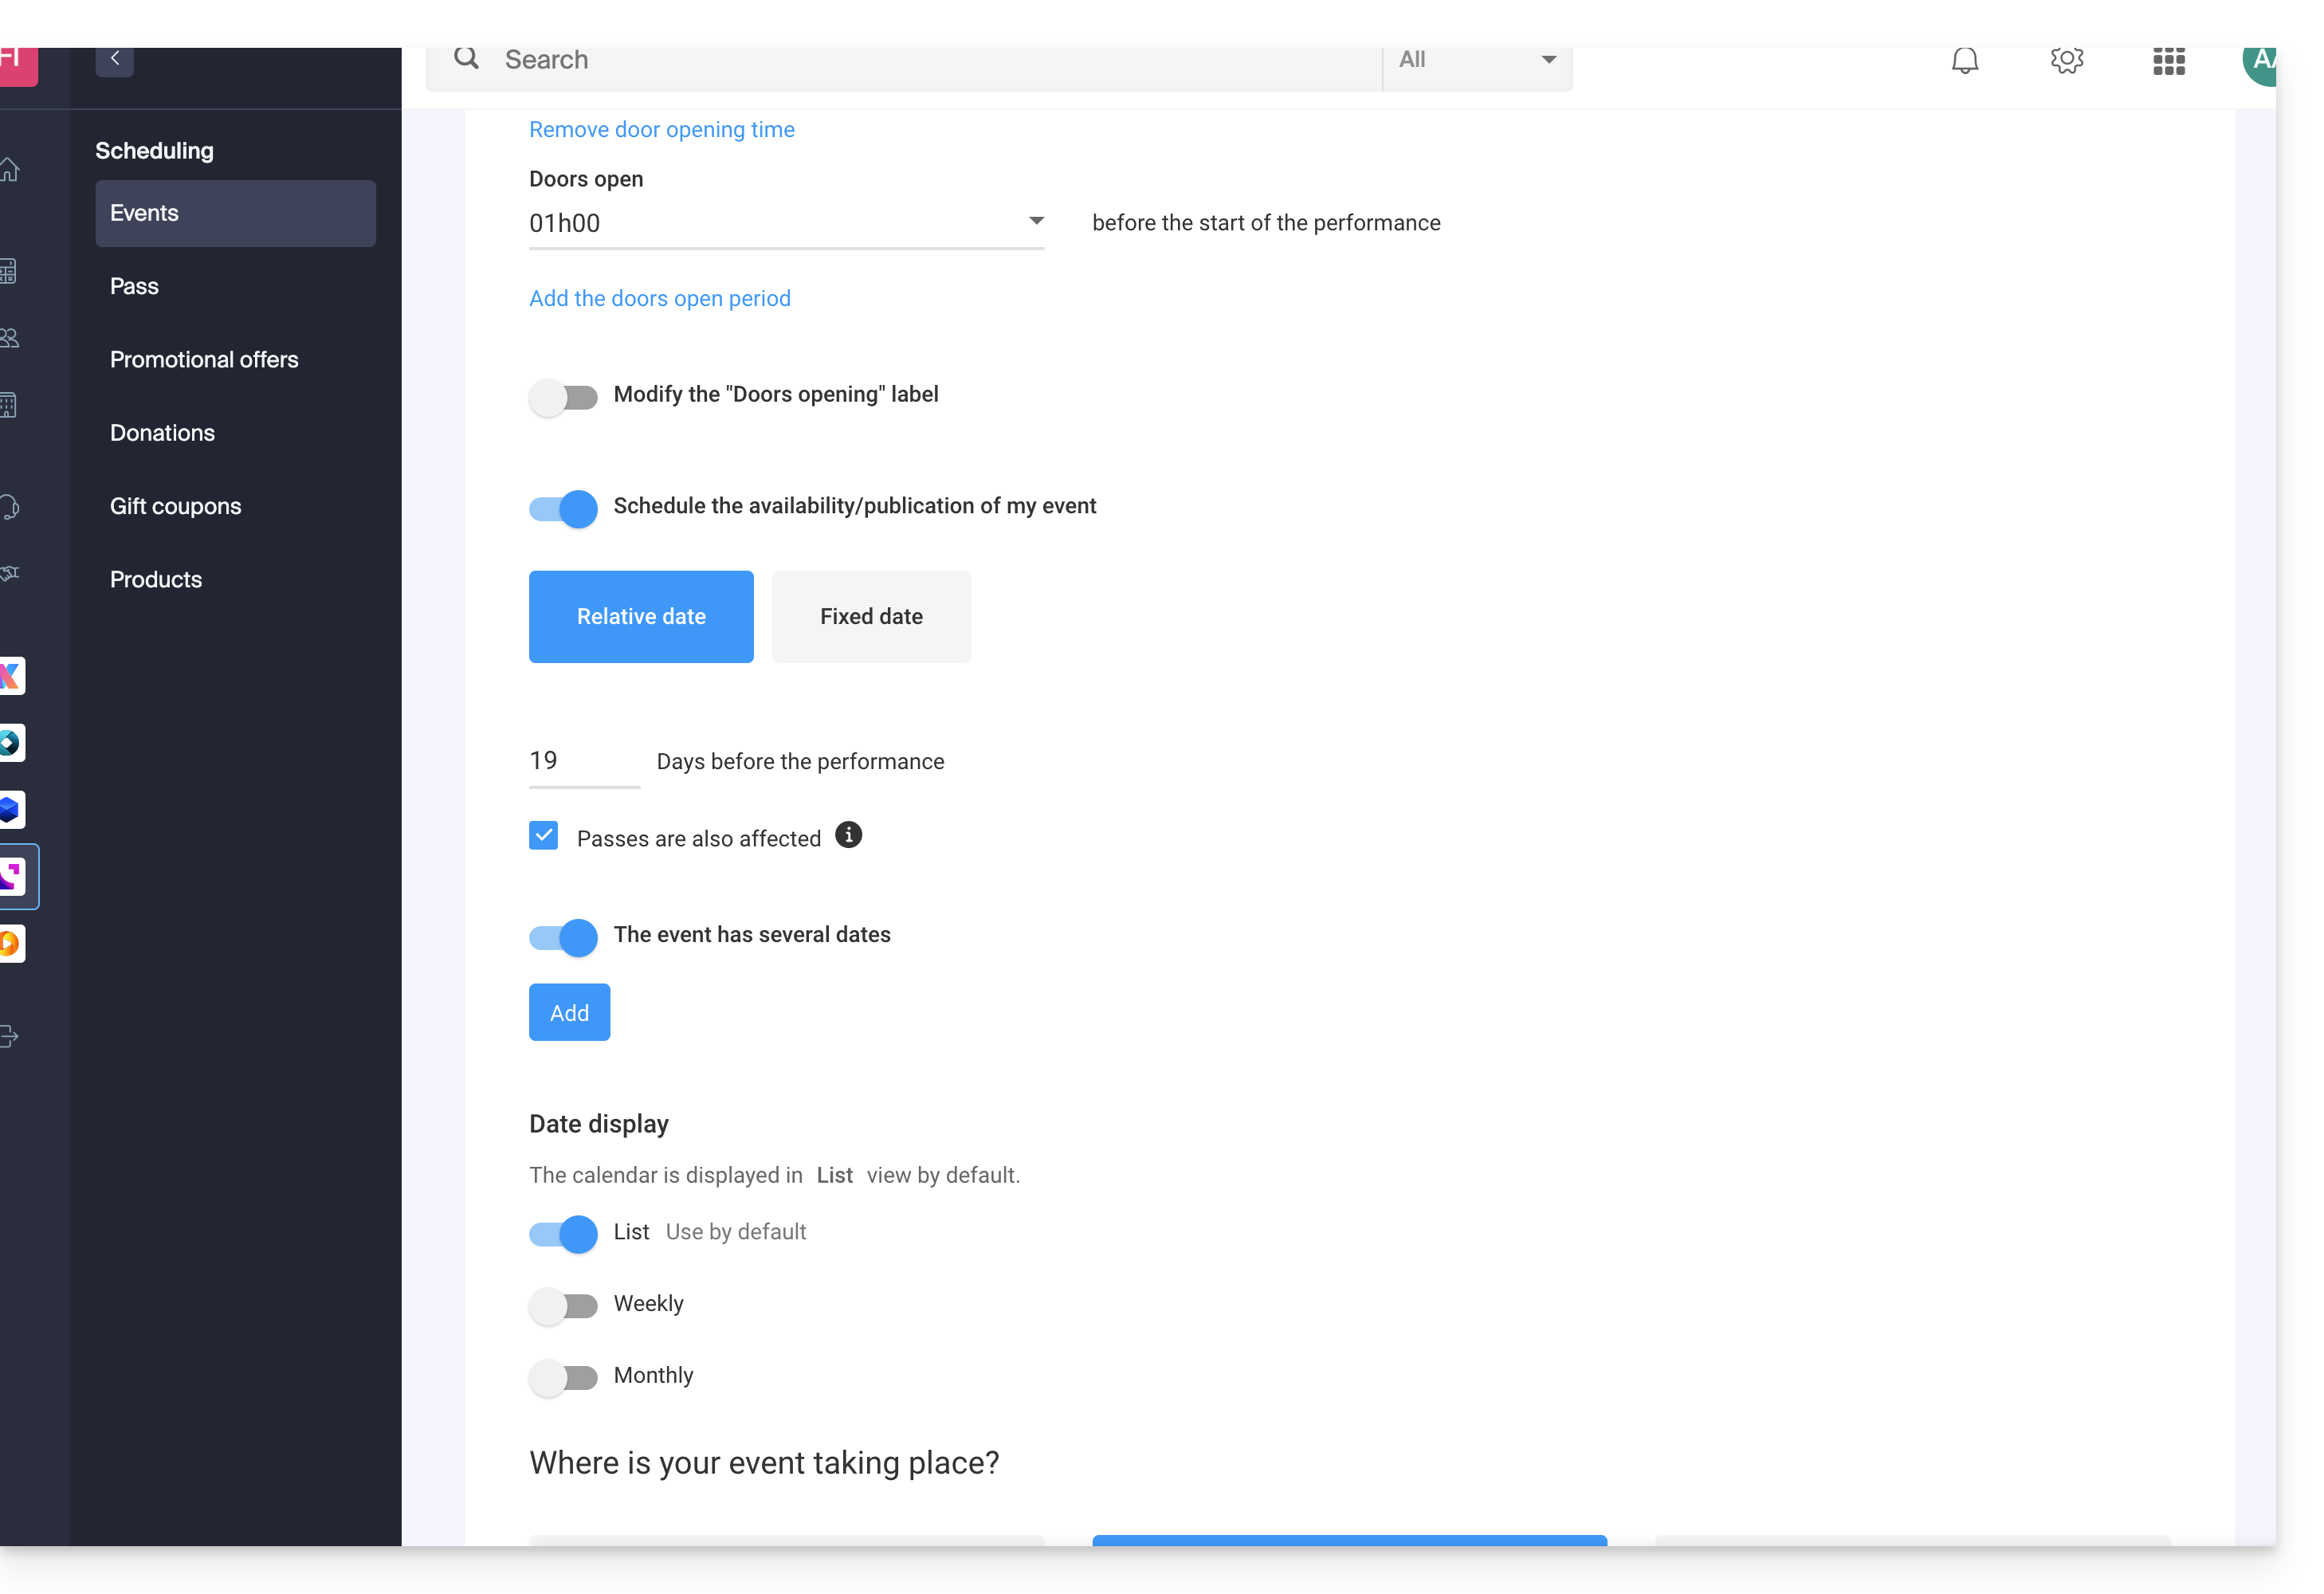
Os diferentes modos de visualização disponíveis
O modo de visualização em lista
A visualização em lista é prática se as datas estiverem espaçadas no tempo, com períodos vazios (semanalmente ou mensalmente, por exemplo), e/ou se o sistema de bilheteira precisar oferecer várias datas ou sessões, sem que estas sejam indicadas num calendário.
O calendário mensal
O calendário mensal permite visualizar os eventos em um calendário mensal. É uma forma de visualização eficiente, mas pode ficar muito carregado caso haja muitas sessões por dia.
O calendário semanal
Muito útil se você deseja exibir as datas por semana, especialmente se houver vários eventos por dia, ou no caso em que o evento dura apenas um curto período e você deseja exibir os dias da semana.
Link para esta FAQ: https://faq.infomaniak.com/2696
Esta seção de perguntas frequentes foi útil?
Este guia explica como coletar e recuperar informações dos clientes quando eles compram bilhetes no âmbito do sistema de bilheteira Infomaniak.
Configurar um formulário de contato
Para obter informações dos clientes:
- Clique aqui para acessar o gerenciamento do seu produto no Manager Infomaniak (precisa de ajuda?).
- Clique diretamente no nome atribuído ao sistema de bilheteira relacionado ao evento.
- Clique em Configurações no menu lateral esquerdo.
- Clique em Registo de clientes no menu lateral esquerdo.
- Ative as informações a serem solicitadas aos clientes e escolha a visibilidade:
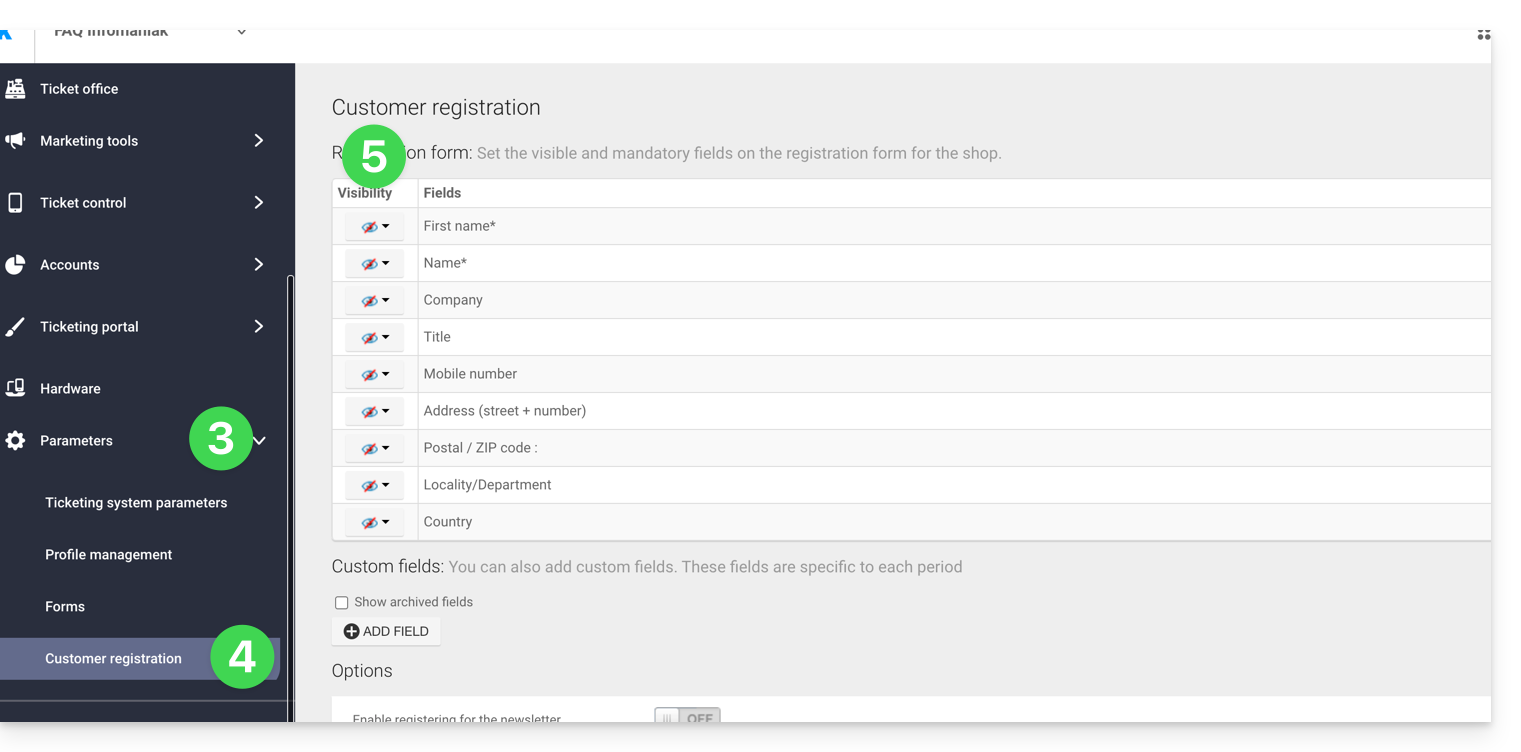
Visível e obrigatório
Visível, mas opcional
Invisível (não solicitar)
Adicionar campos adicionais
É possível adicionar informações adicionais a este formulário:
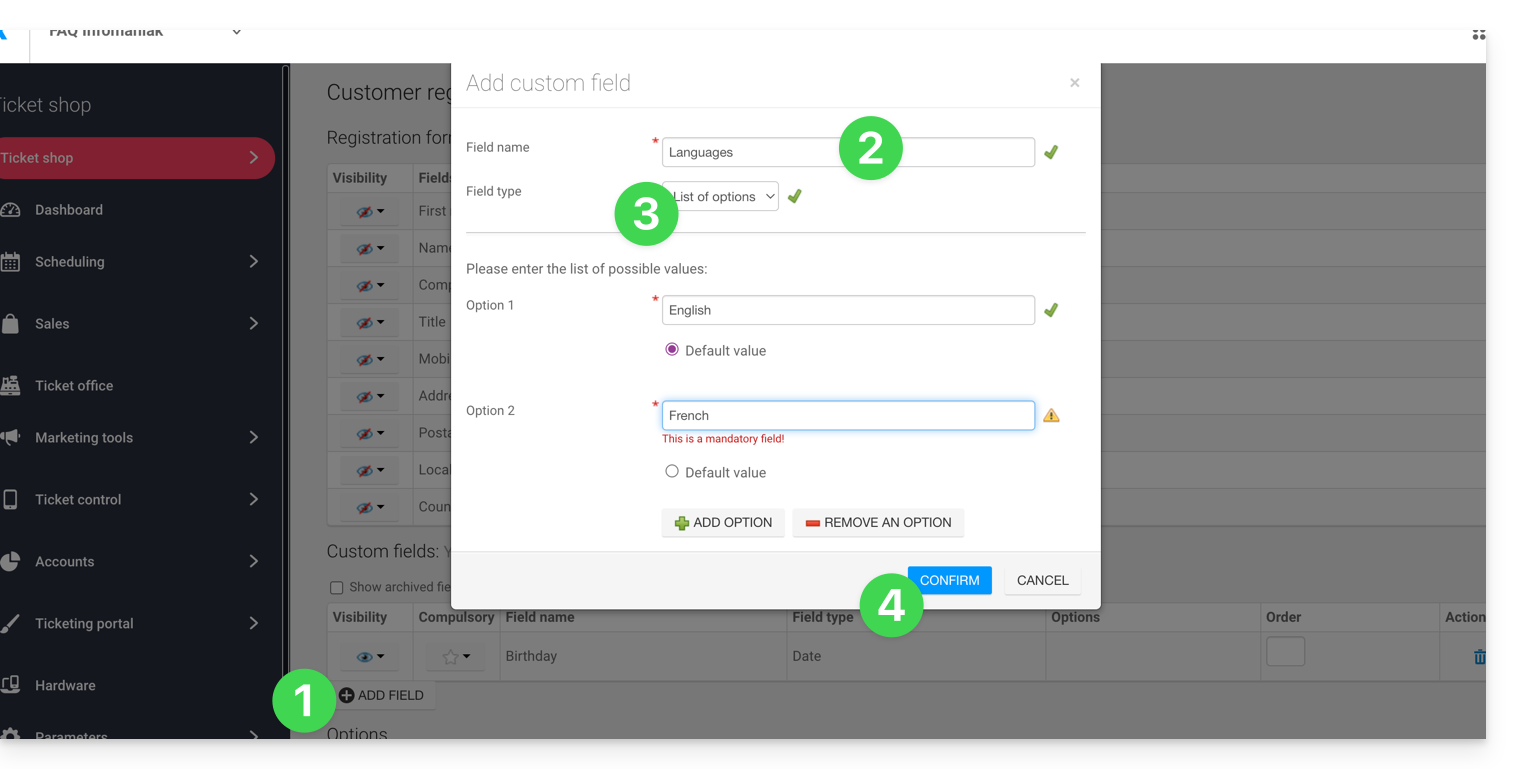
- Clique no botão Adicionar campo.
- Dê um nome ao campo e escolha o tipo de campo.
- Dependendo do tipo de campo, preencha com as opções dos menus suspensos ou caixas de seleção.
- Clique no botão para Confirmar:
Link para esta FAQ: https://faq.infomaniak.com/2697
Esta seção de perguntas frequentes foi útil?
Este guia explica como exportar as informações dos clientes e participantes dos eventos (no âmbito do sistema de bilheteira Infomaniak).
Introdução
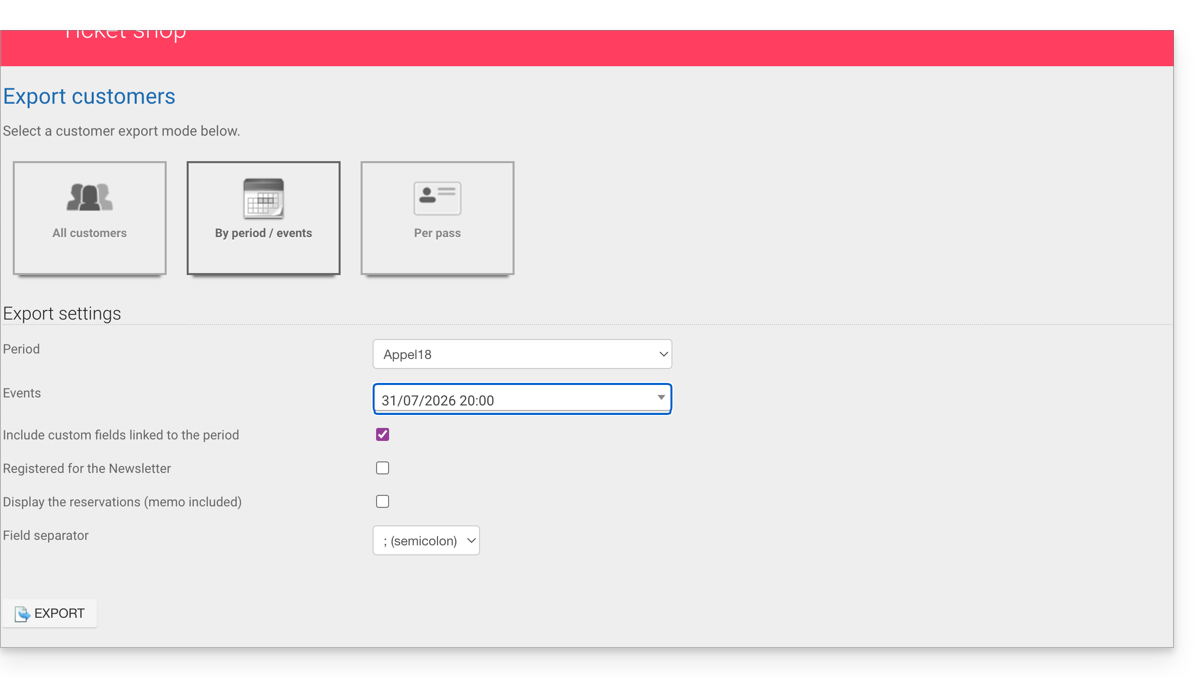
- As exportações consistem em disponibilizar para download um arquivo no formato
CSVque reúne as informações coletadas; em alguns casos, como no exemplo ilustrado abaixo, o tipo de separador de campo poderá ser modificado (ponto e vírgula, por exemplo). - Para obter informações sobre a proteção de dados pessoais, consulte este outro guia.
Recuperar as informações dos clientes
Os clientes são as pessoas que forneceram informações ao efetuar o pedido através do seu sistema de bilheteira online:
- Clique aqui para acessar o gerenciamento do seu produto no Manager Infomaniak (precisa de ajuda?).
- Clique diretamente no nome atribuído à bilheteria relacionada ao evento.
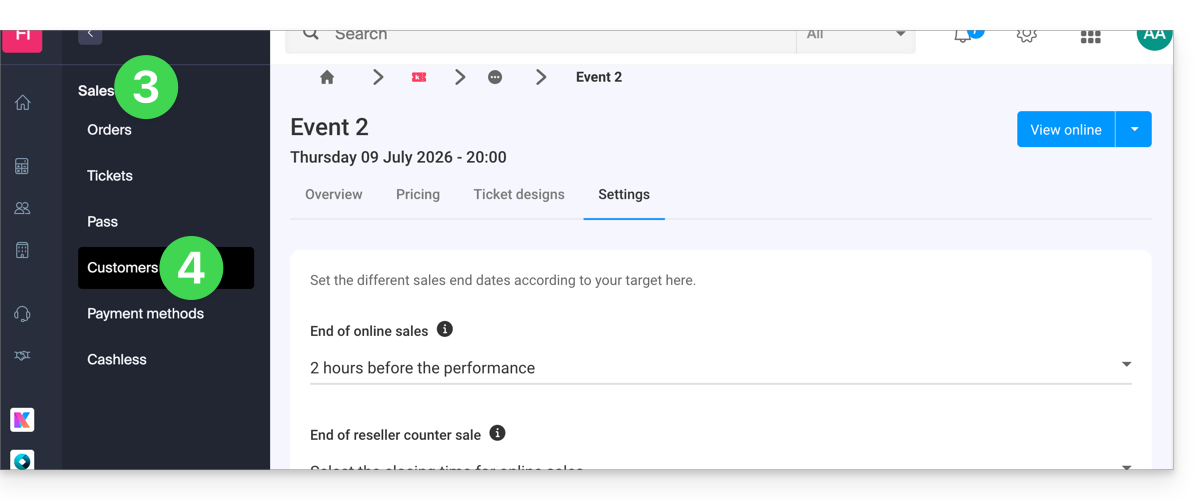
- Clique em Vendas no menu lateral esquerdo.
- Clique em Clientes no menu lateral esquerdo:
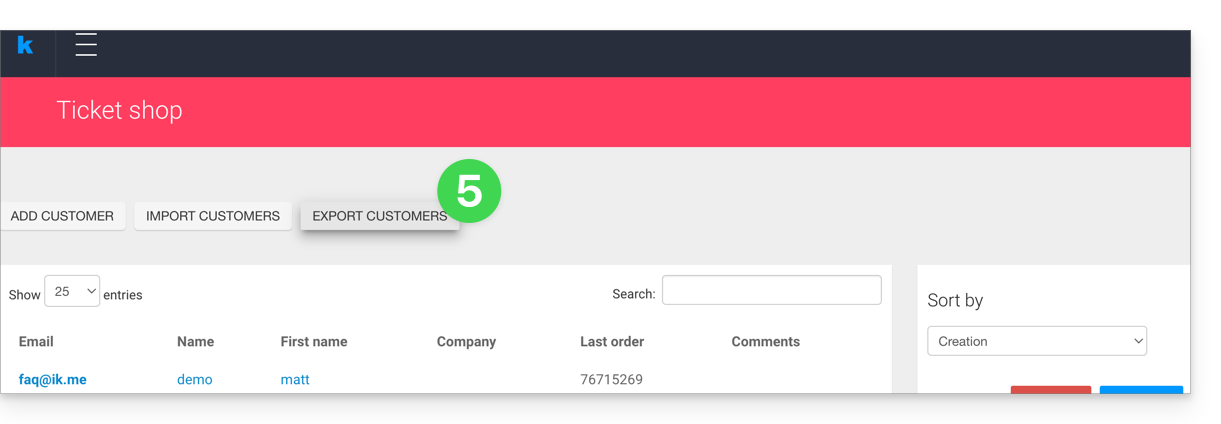
- Clique em Exportar clientes
- Escolha os critérios para a exportação:
Recuperar as informações dos participantes
As informações dos participantes podem ser recuperadas em dois locais:
- no nível do formulário por tarifa: permite obter um arquivo Excel com todas as respostas dos participantes, independentemente da data.
- no nível de um evento, data ou sessão específica: permite obter todos os formulários utilizados para o evento ou a data escolhida.
Para um formulário
Para isso:
- Clique aqui para acessar o gerenciamento do seu produto no Manager Infomaniak (precisa de ajuda?).
- Clique diretamente no nome atribuído ao sistema de bilheteria relacionado ao evento.
- Clique em Configurações no menu lateral esquerdo.
- Clique em Formulários no menu lateral esquerdo:
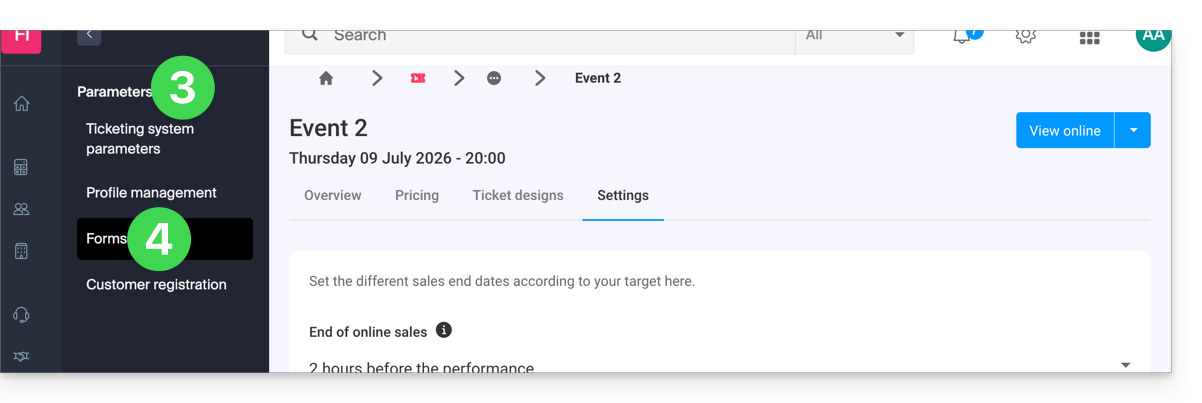
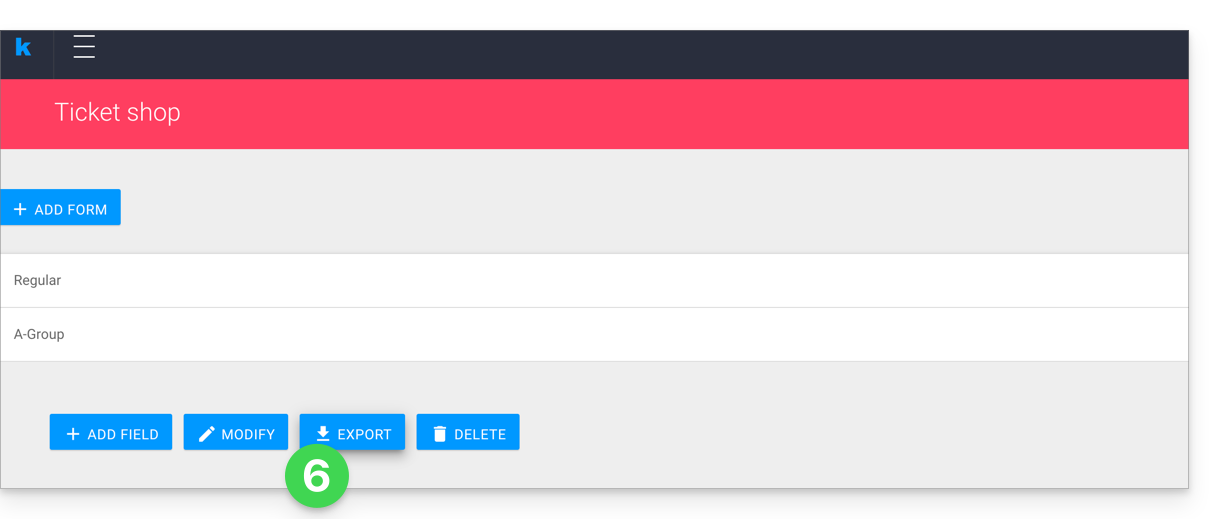
- Selecione o formulário a ser exportado.
- Clique em Exportar:
Para uma data específica
Para isso:
- Clique aqui para acessar o gerenciamento do seu produto no Manager Infomaniak (precisa de ajuda?).
- Clique diretamente no nome atribuído ao sistema de bilheteira relacionado ao evento.
- Clique em Programação no menu lateral esquerdo.
- Clique em Eventos no menu lateral esquerdo.
- Escolha o evento para o qual deseja exportar as informações; no caso de um evento com várias datas, selecione a data desejada.
- Na parte inferior da página, clique no link Exportar os dados dos formulários de preços para obter um arquivo no formato
csv: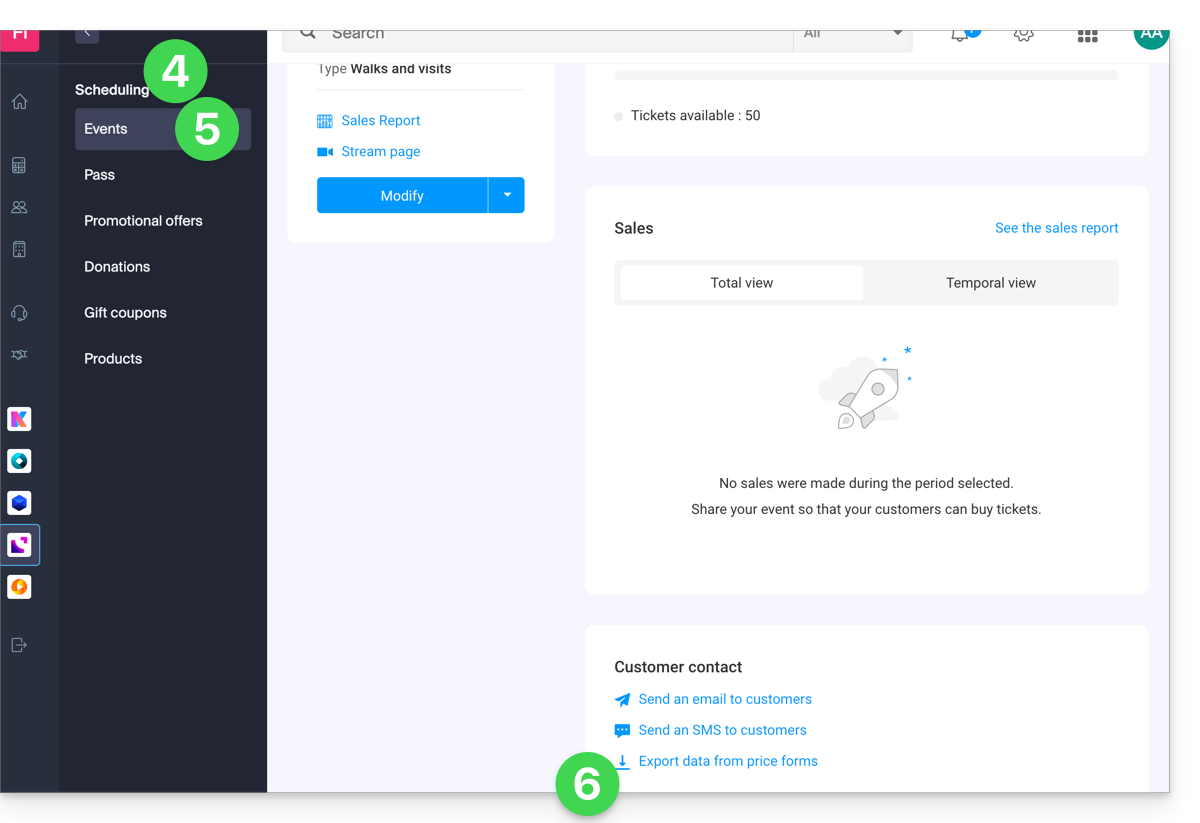
Link para esta FAQ: https://faq.infomaniak.com/2699
Esta seção de perguntas frequentes foi útil?
Este guia explica como entrar em contato com as pessoas que compraram ingressos para seus eventos diretamente através do sistema de venda de ingressos Infomaniak.
Enviar um e-mail ou SMS aos clientes
Esta ferramenta permite comunicar rapidamente com os seus clientes, seja para informar sobre uma alteração de horário, um cancelamento ou reagendamento, ou para fornecer informações importantes. O envio de e-mails ou SMS é feito para a lista de clientes que fizeram o pedido, e não para os participantes:
- Clique aqui para aceder à gestão do seu produto no Manager Infomaniak (precisa de ajuda?).
- Clique diretamente no nome atribuído ao sistema de bilheteira relacionado ao evento.
- Clique em Programação no menu lateral esquerdo.
- Clique em Eventos no menu lateral esquerdo.
- Clique no nome do evento em questão:
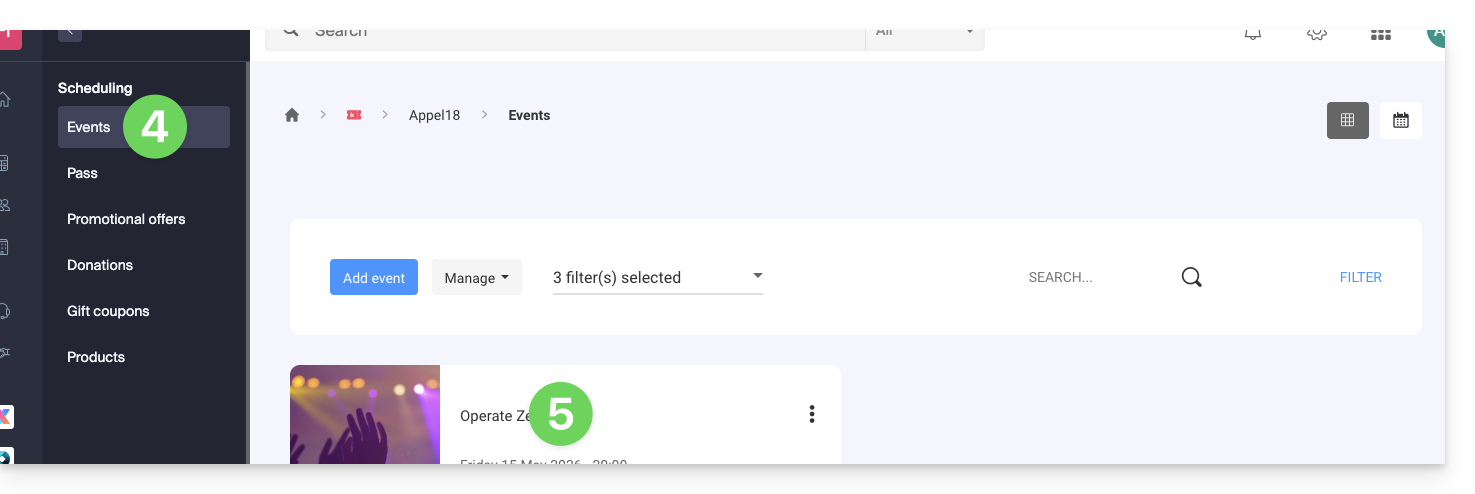
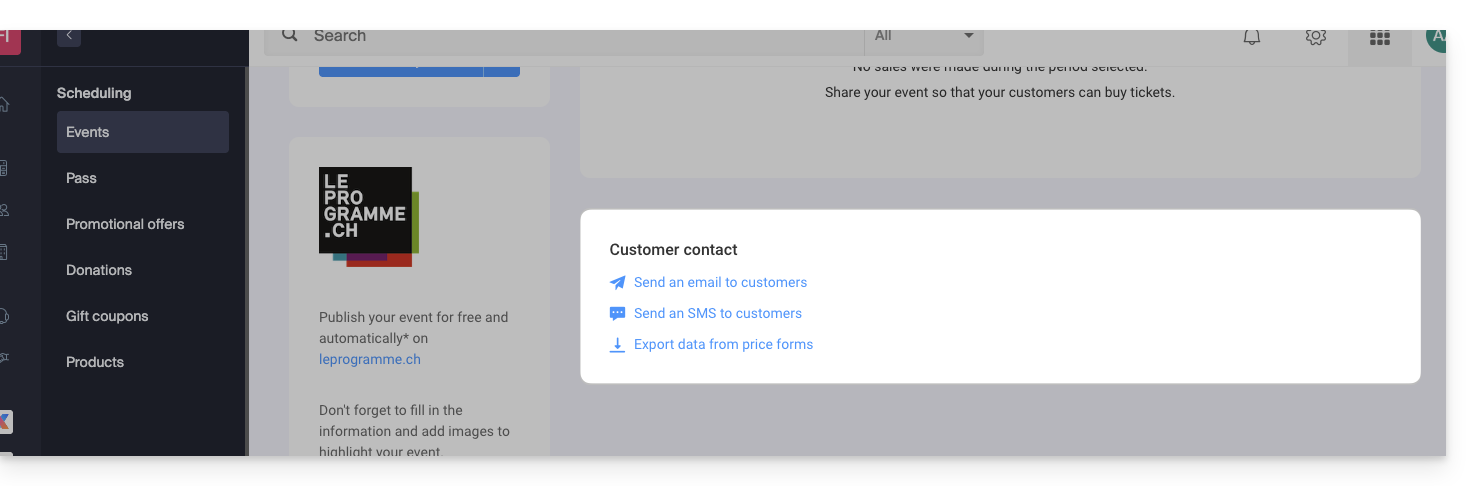
- Clique no link desejado na parte inferior da página:
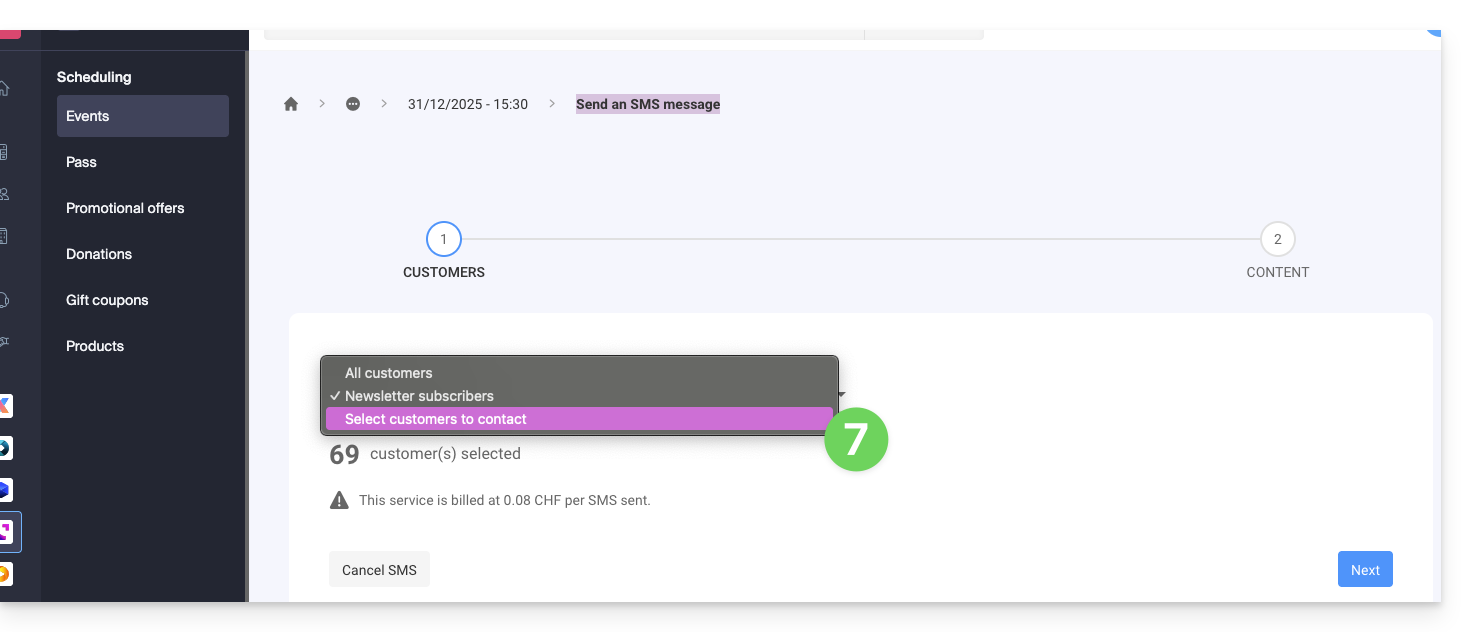
- Selecione os clientes a serem contatados (exemplo de envio de SMS):
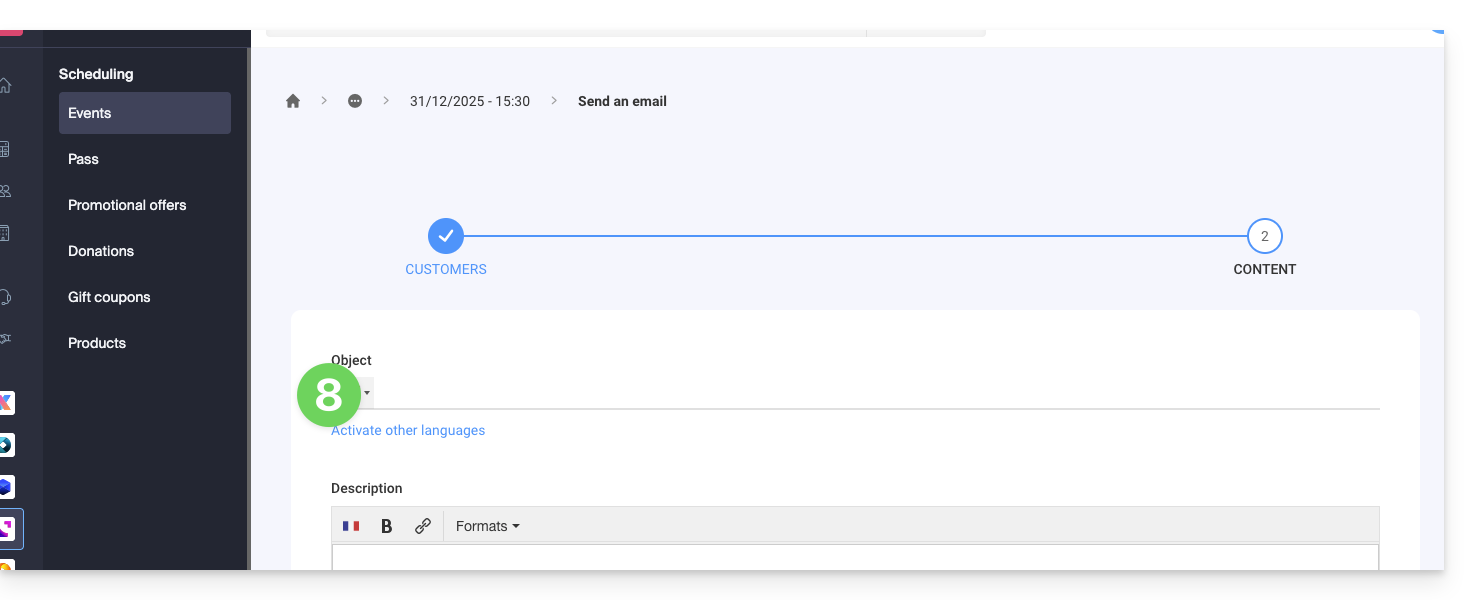
- Redija a mensagem a ser enviada (exemplo de envio de e-mail):
Link para esta FAQ: https://faq.infomaniak.com/2700
Esta seção de perguntas frequentes foi útil?
Este guia explica como adicionar e configurar as imagens dos seus eventos no âmbito do sistema de bilheteira Infomaniak.
Introdução
- As imagens de apresentação do seu evento podem ser definidas no formato vertical e horizontal.
- Uma imagem vertical é obrigatória, pois será utilizada em…
- … na ferramenta de administração da sua bilheteira,
- … no balcão de atendimento,
- … e também na sua loja online, caso não exista uma imagem horizontal.
- A imagem horizontal, por sua vez, será utilizada em…
- … na sua loja online quando existirem vários eventos,
- … no portal infomaniak.events.
- É possível adicionar imagens personalizadas ou utilizar uma imagem padrão, bem como uma galeria de imagens associada ao seu evento; esta pode conter até 4 imagens e estará localizada na página do evento da sua bilheteira online, abaixo da descrição:

Adicionar as imagens durante a criação do evento
Ao criar um novo evento, é possível escolher uma imagem vertical, uma imagem horizontal e uma galeria de imagens, selecionando o separador adequado.
- Clique aqui para aceder à gestão do seu produto no Manager Infomaniak (precisa de ajuda?).
- Clique diretamente no nome da bilheteira em questão.
- Clique em Programação no menu lateral esquerdo.
- Clique em Eventos no menu lateral esquerdo.
- Clique no botão Adicionar evento.
Pode escolher uma foto da sua biblioteca de mídia ou uma imagem livre de direitos de autor da lista proposta:
- Retrato:
1000 x 1414px, imagem vertical - Paisagem:
1200 x 630px, imagem horizontal
Modificar as imagens de um evento existente
Para modificar as imagens de um evento existente
- Clique aqui para aceder à gestão do seu produto no Manager Infomaniak (precisa de ajuda?).
- Clique diretamente no nome do evento em questão.
- Clique em Programação no menu lateral esquerdo.
- Clique em Eventos no menu lateral esquerdo.
- Clique no evento em questão.
- Clique no botão Editar:

- Clique no parâmetro que pretende modificar em Visuais:

Link para esta FAQ: https://faq.infomaniak.com/2703
Esta seção de perguntas frequentes foi útil?
Este guia explica como configurar as configurações gerais do sistema de bilheteira Infomaniak.
Configurações gerais
As configurações gerais estão organizadas em 3 separadores:
- Bilheteira: as configurações gerais utilizadas na sua bilheteira
- Dados de contacto do organizador: informações exibidas na bilheteira online e no portal Infomaniak para que os visitantes possam entrar em contacto com o organizador
- Termos e condições: permite definir os termos e condições da sua bilheteira online
1. Separador Bilheteira
- O botão "Visibilidade da bilheteira" permite colocar a sua bilheteira em modo visível, quando tudo estiver configurado e depois de ter ativado a loja online; permite tornar rapidamente a sua bilheteira acessível ou não online.
- O modo Teste permite reativar o modo de teste. Esta opção deixará de estar acessível assim que uma encomenda for efetuada em modo real.
- O nome da bilheteira que introduzir neste campo será visível na loja online, bem como nos bilhetes e nos e-mails que serão enviados aos seus clientes.
- A URL do seu site será exibida nos Termos e Condições Gerais de Venda (TCGV) dos vales-presente, em vez da denominação social (nome legal) da sua organização, caso não pretenda que a sua denominação social seja visível para os seus clientes.
- Para escolher o seu logótipo, clique no ícone do lápis; o logótipo escolhido aparecerá na fatura dos seus clientes. As dimensões do seu logótipo devem ser de 600 x 160 píxeis:

- Por padrão, a moeda da sua bilheteria é o franco suíço (CHF). Para permitir que seus clientes paguem suas compras em euros (EUR), marque a caixa "Desejo ativar outra moeda" e, em seguida, marque a caixa "EUR". A bilheteria oferece apenas transações em CHF e EUR.
- Sujeição ao IVA: sua organização deve pagar o IVA? Para ter certeza, entre em contato com seu responsável jurídico ou financeiro ou consulte a prefeitura de seu município. Marque a caixa "Estou sujeito ao IVA" depois de confirmar essa informação:

- Você pode escolher entre diferentes idiomas para sua bilheteria: francês, inglês, alemão, espanhol, italiano... Ao marcar mais de uma caixa de idioma, não se esqueça de traduzir o conteúdo da sua bilheteria (por exemplo, a descrição dos seus eventos) para todos os idiomas selecionados.
- Neste espaço, insira a assinatura da sua organização, que será exibida em todas as comunicações enviadas aos seus clientes:

2. Guia Dados do organizador
Os dados que você inserir neste guia serão usados para faturamento e na sua bilheteria online.
- Nome da organização: Insira o nome da sua organização, empresa, associação ou ONG.
- Endereço - Código postal - Cidade - País: Certifique-se de inserir o endereço exato da sua razão social, que será usado para contabilidade/faturamento.
- Endereço de e-mail: O endereço de e-mail que você inserir neste campo será usado para confirmações de pedidos, bilhetes e informações sobre eventos.
- Telefone: O número que você inserir neste campo permitirá que seus clientes entrem em contato com você em caso de dúvidas ou problemas. Certifique-se de selecionar o código de área correspondente ao número que você deseja exibir.
- Nome do remetente de SMS: Insira aqui o nome que você deseja que apareça como assinatura no final das mensagens SMS:

Você pode deixar o campo do número de telefone em branco se não quiser fornecê-lo aos seus clientes.
3. Termos e condições
Nesta guia, você pode editar os termos e condições. Estes devem ser obrigatoriamente aceitos pelos seus clientes no carrinho de compras antes que possam efetuar o pagamento online. Nesta guia, são propostos termos e condições padrão que podem ser consultados e modificados conforme necessário.
Caso tenha modificado os termos e condições, você pode, a qualquer momento, retornar à versão padrão clicando no texto azul "Restaurar os termos e condições padrão" localizado abaixo da área dos termos e condições.
Link para esta FAQ: https://faq.infomaniak.com/2769
Esta seção de perguntas frequentes foi útil?
Este guia explica como criar um passe (no âmbito do sistema de bilheteira Infomaniak). O passe poderá então ser configurado em várias etapas:
- Definir o tipo durante a criação (assinatura, pacote de bilhetes, etc.), bem como as informações e parâmetros básicos (abaixo)
- Associar os eventos aos passes
- Configurar o visual e as informações relacionadas ao passe
- Definir e coletar as informações dos assinantes que serão associadas aos passes
1. Começar a criar passes
Para isso:
- Clique aqui para acessar o gerenciamento do seu produto no Manager Infomaniak (precisa de ajuda?).
- Clique diretamente no nome atribuído ao sistema de bilheteira relacionado ao evento.
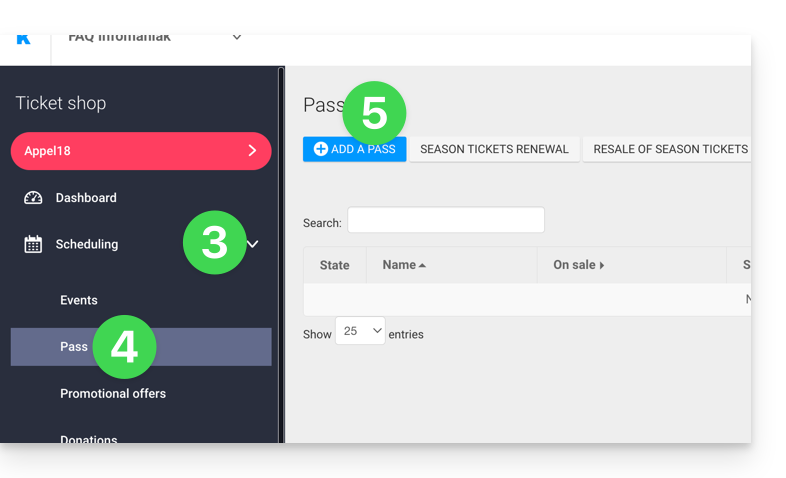
- Clique em Programação no menu lateral esquerdo.
- Clique em Pass no menu lateral esquerdo.
- Clique em Adicionar um passe:
Nome e descrição do passe
Esta seção permite definir o nome do passe, bem como uma descrição do mesmo: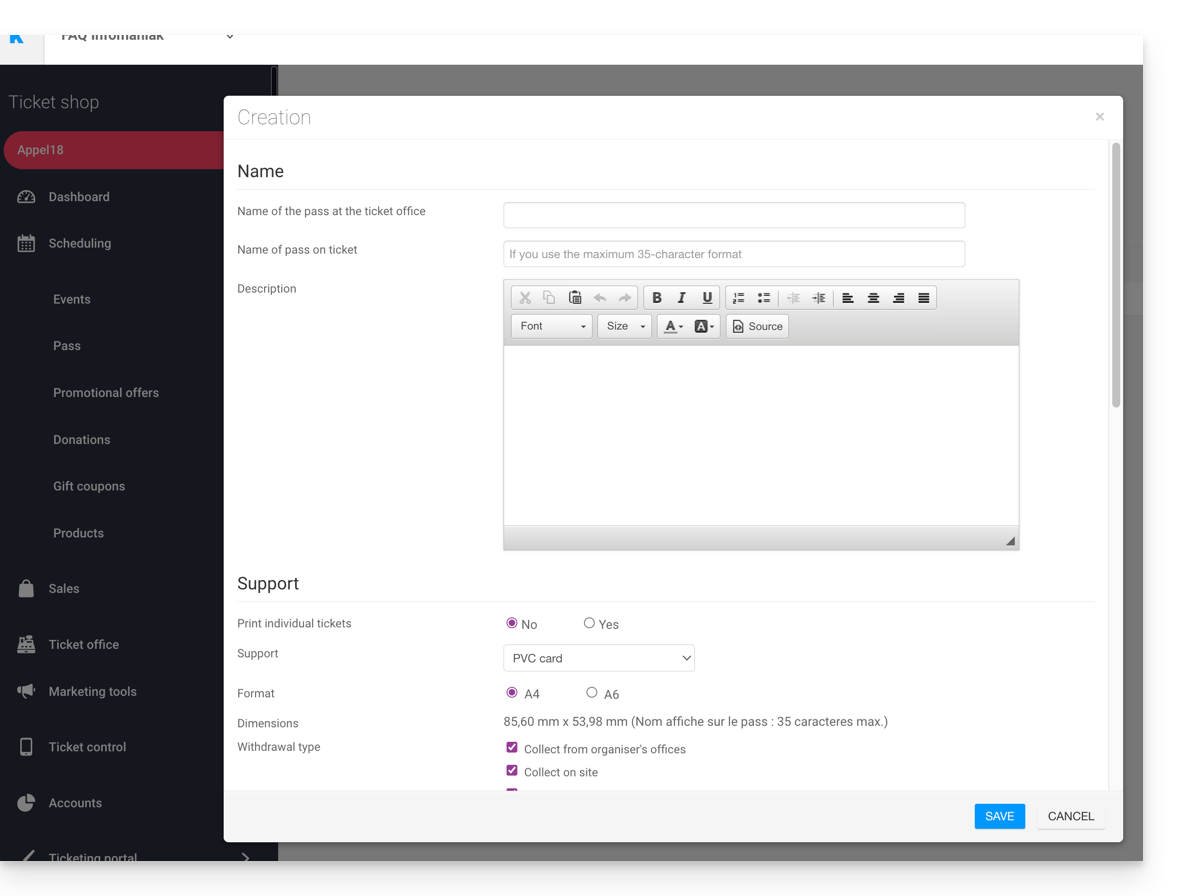
Recomenda-se inserir um nome curto na seção Nome do passe no bilhete, pois este será impresso diretamente no passe.
Suporte do passe
É possível escolher dois tipos de suporte: 
- O cartão de PVC, do tipo cartão de crédito, é frequentemente utilizado para assinaturas sazonais ou anuais.
- Preste atenção ao tamanho do texto utilizado para o Nome exibido no bilhete, que será reproduzido aqui e será limitado a 35 caracteres.
- Escolha cuidadosamente o método de recolha que será disponibilizado ao cliente.
- O formato Telefone/Papel, que prioriza o uso do telefone, mas também permite imprimir o bilhete numa folha A4 ou A6.
- O visitante receberá o seu passe em formato digital num e-mail.
- Poderá descarregar o seu passe em formato PDF a partir do link incluído no e-mail.
A Infomaniak não envia passes ou bilhetes físicos aos visitantes. O envio do passe é da responsabilidade do organizador.
A aparência do passe poderá ser configurada após a criação do passe (ver etapa 3).
Gerenciar a exibição durante as verificações por digitalização
As duas opções presentes aqui permitem definir os parâmetros utilizados para a verificação das senhas:
- Os passes terão códigos de barras aleatórios durante a criação, mas o organizador poderá modificá-los livremente a partir da gestão de cada passe.
- O ícone que será exibido durante a verificação do passe:

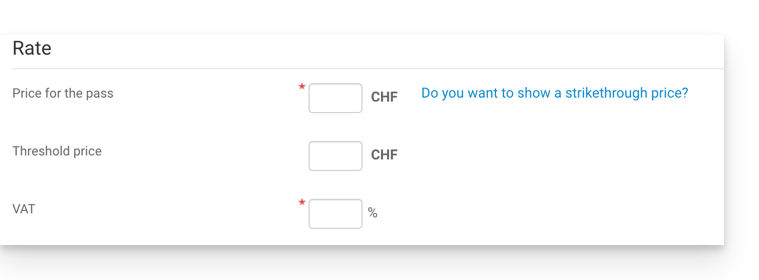
Preço do plano
- Insira o valor desejado:
Período de validade
- O período de validade será utilizado caso se pretenda garantir que este passe só estará disponível durante um período limitado.
- É possível, por exemplo, configurar um pacote de bilhetes que só poderá ser utilizado durante a época de inverno, para uma promoção sazonal.
- É importante notar que, se um passe estiver fora do período de validade, será possível comprá-lo, mas não será possível utilizá-lo ou aceder a ele para adicionar bilhetes.
Tipos de passes
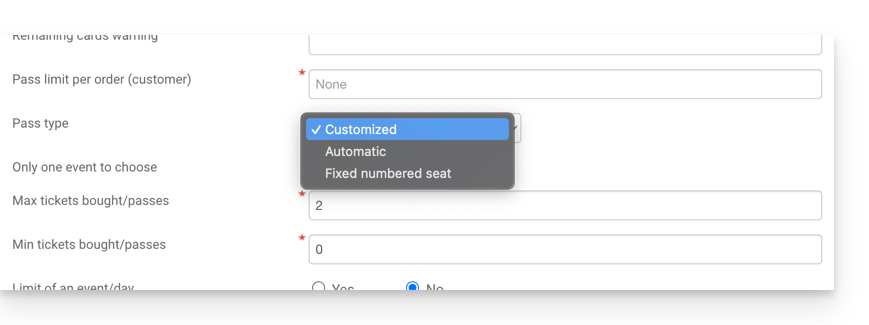
1. Personalizado
Este passe permite que o cliente escolha os eventos e as datas entre as opções propostas. Portanto, é preciso definir as limitações do passe:
- Um único evento para escolher:
- O cliente poderá escolher apenas um evento, mas, de acordo com o limite de bilhetes, poderá escolher um ou mais bilhetes para o evento escolhido.
- Atenção: quando um cliente compra um passe, o sistema irá descontar o número de lugares inserido neste campo em todos os eventos relacionados ao passe.
- Esses lugares serão "reservados" para este passe.
- Quando o cliente passar pelos leitores, o sistema irá liberar os lugares em todos os outros eventos.
- Número máximo de bilhetes
- O número de bilhetes que podem ser associados ao passe.
- Número mínimo de bilhetes
- Se for definido um mínimo de 0, o cliente poderá comprar um passe vazio e escolher os seus lugares posteriormente.
- Qualquer número diferente de 0 obrigará o cliente a escolher os bilhetes no momento da compra do passe.
- Limitação de um evento por dia
- o passe tem um limite de um único evento por dia.
- O cliente não poderá encomendar mais de um bilhete por dia para este passe.
- Todos os lugares no mesmo dia
- permite escolher uma data e, em seguida, escolher os eventos dessa data.
- Limitação de representações por evento
- Permite definir se o cliente poderá participar várias vezes em um evento (no caso de eventos com várias datas).
- Se ativado, o cliente poderá adquirir apenas um ingresso por evento com o "mesmo nome" (ou "mesma representação") para este passe.
- Atenção: a ortografia do nome do evento deve ser idêntica.
- Número mínimo de eventos diferentes por passe
- O cliente deverá adquirir ingressos para um número mínimo de eventos diferentes disponíveis no passe.
- Isso será usado para evitar que o visitante adquira todos os seus ingressos para um único evento.
2. Automático
O passe não poderá ser personalizado pelo cliente: ele utilizará automaticamente os bilhetes que forem definidos pelo organizador.
3. Lugar numerado fixo
No caso de o evento ocorrer em um local com uma planta, este tipo de ingresso permite que o cliente escolha o ingresso com um lugar numerado na planta. Este lugar permanecerá inalterado para todos os eventos associados ao ingresso que ocorrerem no mesmo local.
Um organizador pode querer criar passes com validação de inscrição.
Após criar o passe, o próximo passo é associar os eventos correspondentes e configurar as diferentes opções disponíveis.
Link para esta FAQ: https://faq.infomaniak.com/2770
Esta seção de perguntas frequentes foi útil?
Este guia explica como associar eventos aos passes (no âmbito do sistema de bilheteira Infomaniak). Estes parâmetros estarão disponíveis após a conclusão da etapa 1:
- Definir o tipo durante a criação (assinatura, pacote de bilhetes, etc.), bem como as informações e parâmetros básicos
- Associar os eventos aos passes (abaixo)
- Configurar o visual e as informações relacionadas ao passe
- Definir e coletar as informações dos assinantes que serão associadas aos passes
2. Associar eventos ao passe
Após criar o passe, será necessário associar os eventos que estarão relacionados a ele:
- Clique aqui para acessar o gerenciamento do seu produto no Manager Infomaniak (precisa de ajuda?).
- Clique diretamente no nome atribuído ao sistema de bilheteira relacionado ao evento.
- Clique em Programação no menu lateral esquerdo.
- Clique em Pass no menu lateral esquerdo.
- Clique no nome do pass correspondente.
- Clique em Associar eventos:

- Selecione os eventos que serão associados ao passe.
- Escolha o número de bilhetes que poderão ser associados a este passe.
- Escolha se este evento terá um custo adicional ao ser adicionado ao passe:
- Um preço de 0 neste campo permite definir bilhetes incluídos no preço do passe.
- Escolha se deseja definir um limite para o número total de bilhetes em um passe:
- Por exemplo, se o evento tiver 100 lugares, dos quais apenas 10 podem ser associados, independentemente do visitante, o limite deverá ser definido como 10 na configuração da quota.

- Por exemplo, se o evento tiver 100 lugares, dos quais apenas 10 podem ser associados, independentemente do visitante, o limite deverá ser definido como 10 na configuração da quota.
Após associar os eventos, é possível consultar a lista de eventos e efetuar correções clicando no ícone lápis ✎ à direita do evento ou excluí-lo clicando no ícone Lixeira.
Um organizador pode decidir adicionar eventos a um passe após a sua criação.
O próximo passo éconfigurar o design e as informações relacionadas ao passe.
Link para esta FAQ: https://faq.infomaniak.com/2771
Esta seção de perguntas frequentes foi útil?
Link para esta FAQ: https://faq.infomaniak.com/2772
Esta seção de perguntas frequentes foi útil?
This guide shows you an example of a pass configured as a subscription where all events are included upon purchase (as part of the Infomaniak ticketing system).
The subscription with all events included
The example below allows you to have a pass that acts as a subscription for a single entry to all events included. Typical uses of this type of pass would include:
- Subscriptions for a season or a year of a sports club or a theater
- A 2, 3, 4, 5, 6, or 7-day subscription for a week-long festival
- A ticket sales package, if the event is broken down, for example, a conference during the day, a meal, and a concert. A package could be created for conference entry + meal, another for meal + concert, etc.
Pass creation
After filling in the information, such as the pass name, price, or quantity of passes available...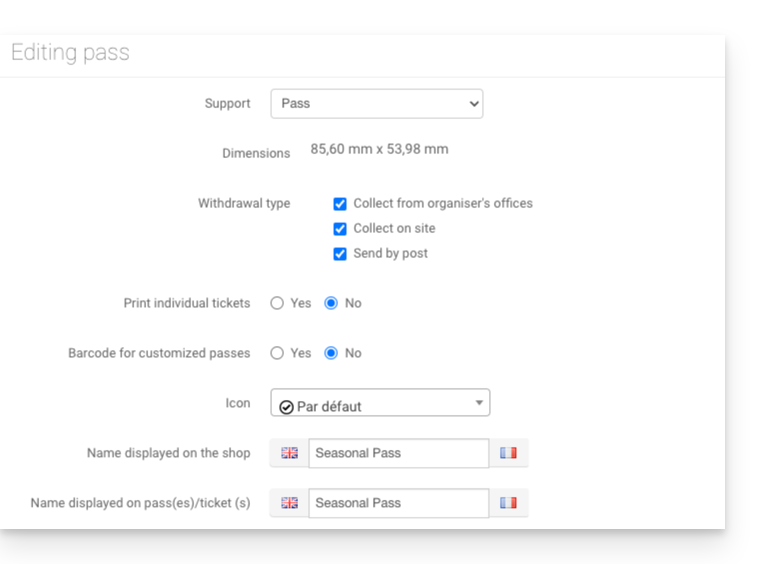
... you need to set the pass to Automatic: 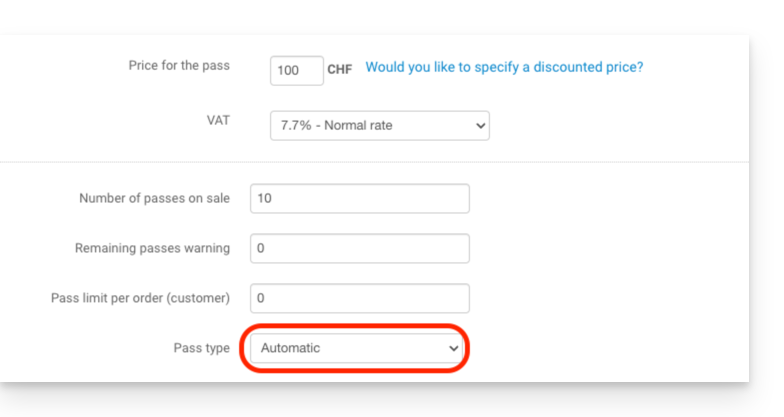
Event association
Events are associated with the pass, with a limit of one ticket per event and no additional cost: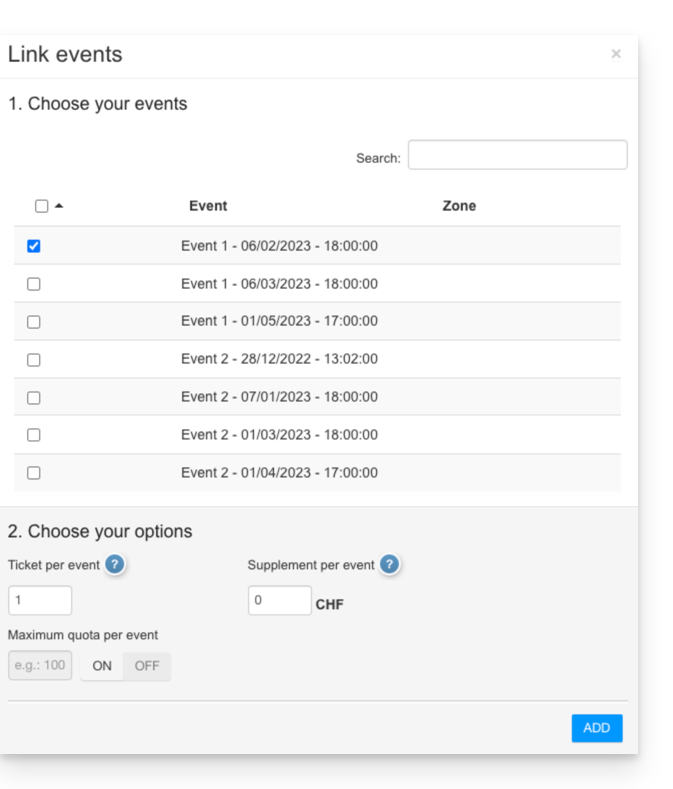
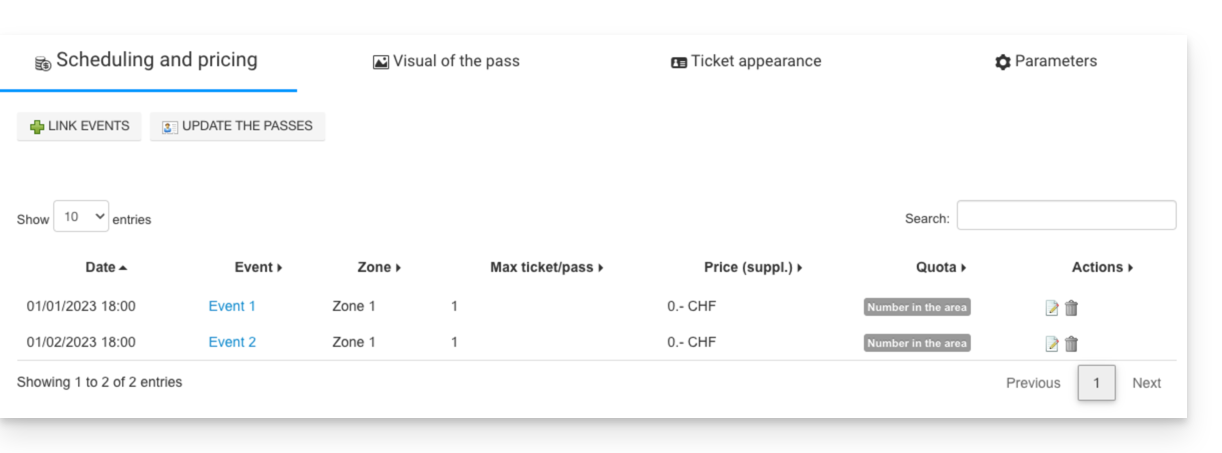
Pass visual
This pass will be used as a vertical badge and will therefore be printed on a PVC badge whose visual will be configured as follows: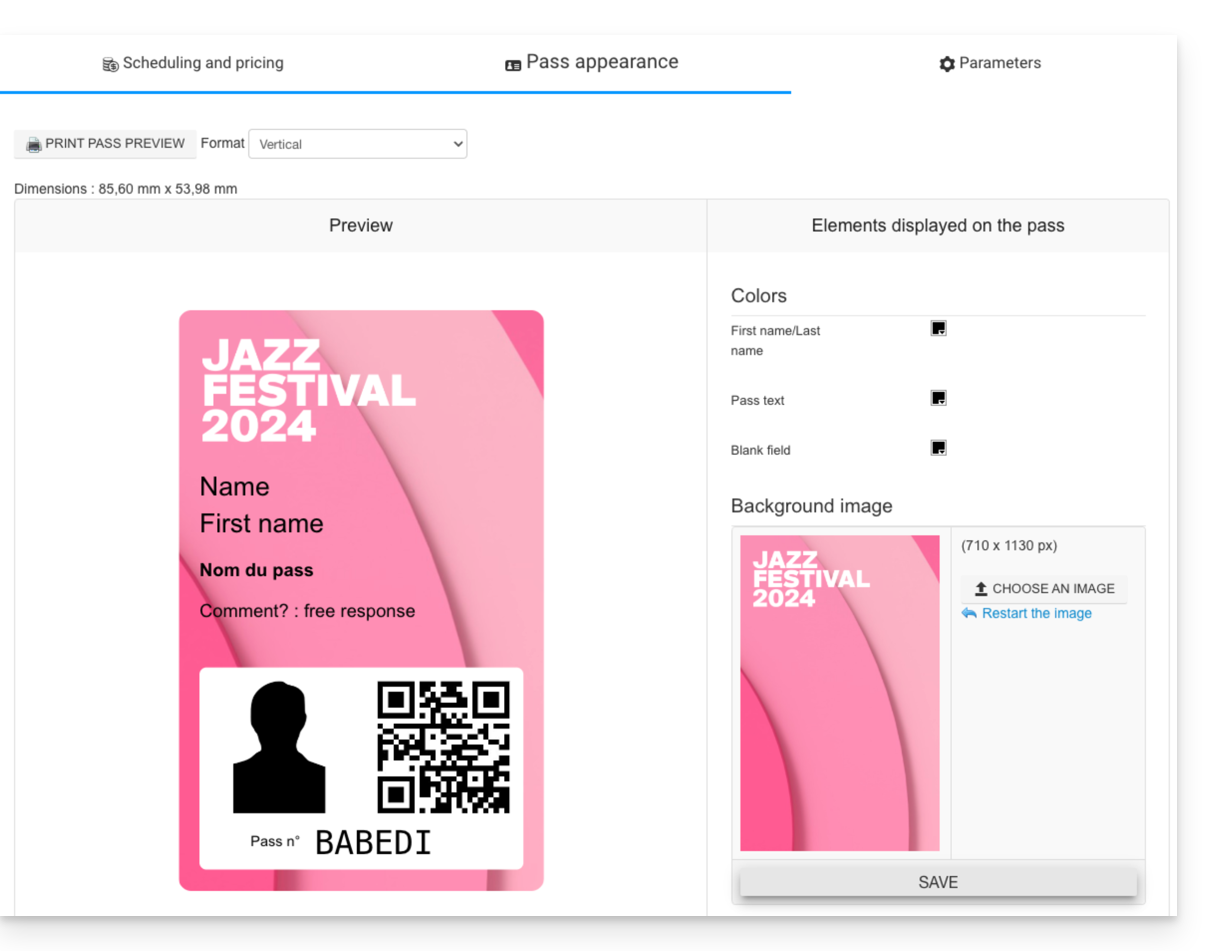
Information requested
Since this pass is personalized, the name and first name fields are mandatory, as well as a photo of the person: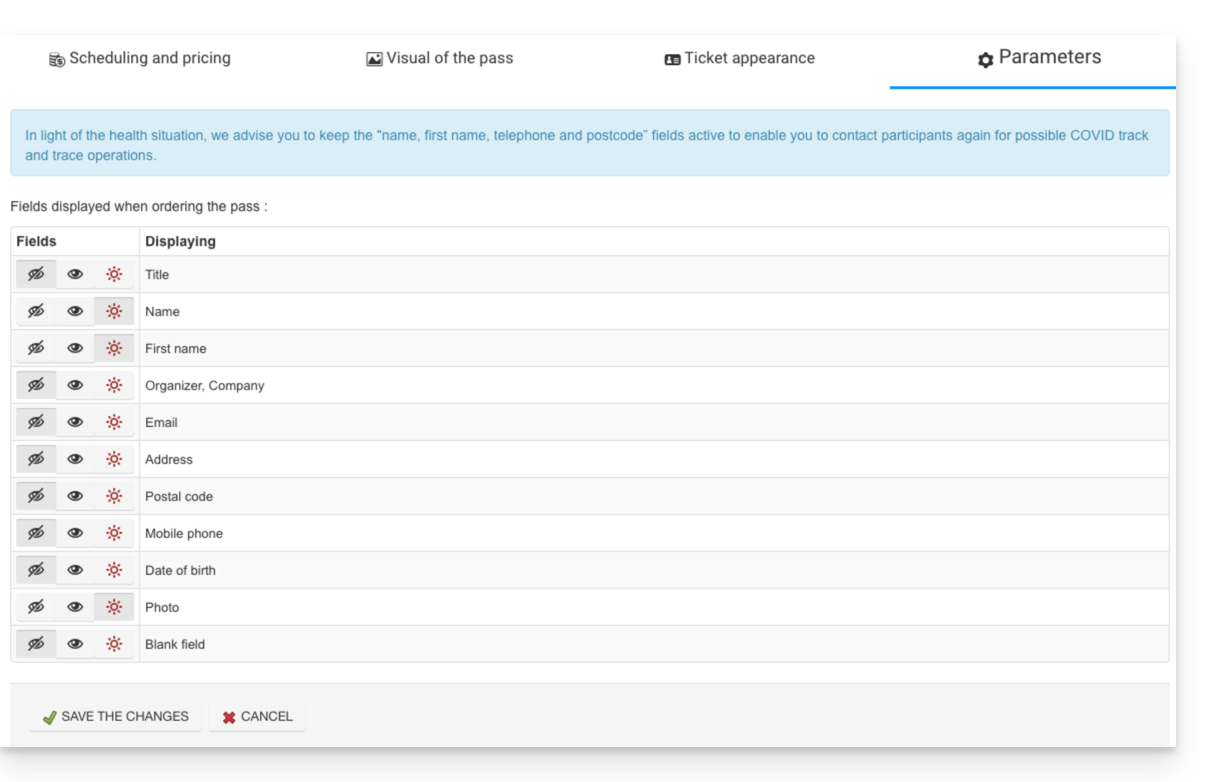
Link para esta FAQ: https://faq.infomaniak.com/2773
Esta seção de perguntas frequentes foi útil?
Este guia mostra um exemplo de passe configurado como uma assinatura, onde todos os eventos estão incluídos na compra (no âmbito do sistema de bilheteira Infomaniak).
O pacote de bilhetes
O exemplo abaixo mostra um passe que funciona como um pacote de vários bilhetes. Alguns usos típicos desse tipo de passe incluem:
- Um passe com entradas para 2, 3 ou 4 noites de um festival que dura vários dias.
- Um passe com diferentes atividades, como um pacote "entrada no museu com refeição", ou a entrada e a refeição são dois eventos individuais e distintos.
- Um pacote de bilhetes que inclui a entrada em vários estabelecimentos no mesmo dia.
Criação do bilhete
O bilhete é configurado individualmente para que os participantes possam imprimir cada bilhete separadamente: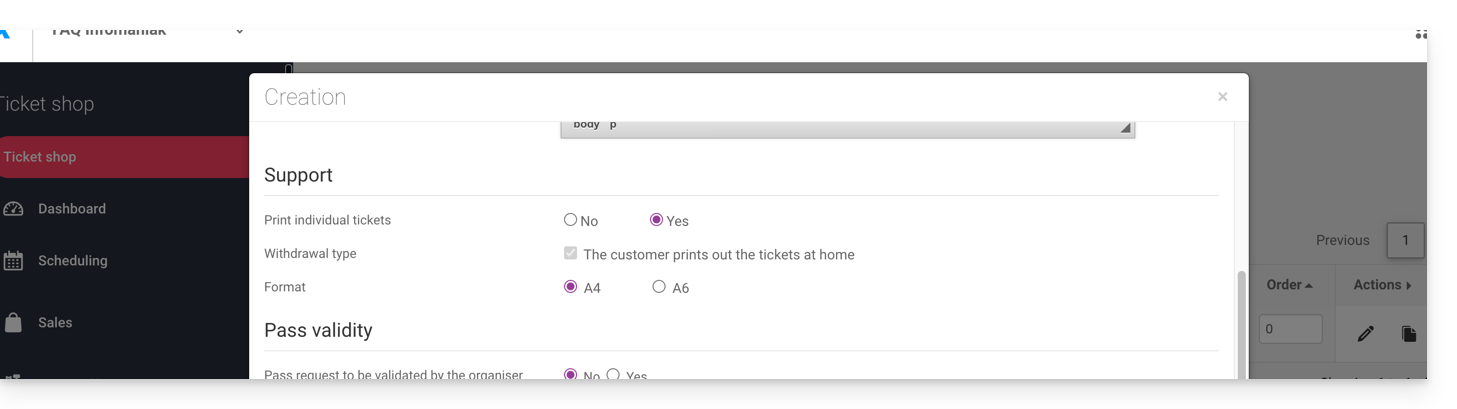
Após preencher as informações, como o nome do passe, o preço ou a quantidade de passes disponíveis, é preciso definir o passe como Automático: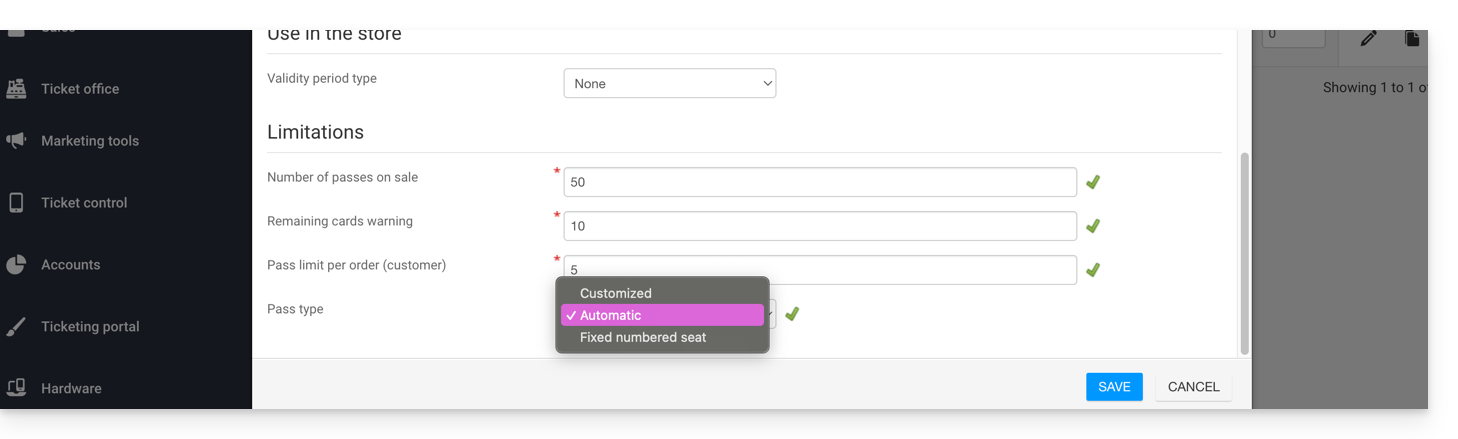
Associação de eventos
Os eventos estão associados ao passe, com um limite de um bilhete por evento e sem custo adicional:
Este passe contém um bilhete para o evento 1 e um bilhete para o evento 2:
Visual do passe
Este passe nunca será impresso, pois apenas os bilhetes individuais relacionados aos eventos serão impressos. Portanto, não é necessário configurar o visual do passe. O cliente que adquirir este passe receberá um bilhete do evento 1 e um bilhete do evento 2, portanto, será necessário definir o visual desses bilhetes.
Informações solicitadas
Este passe não é pessoal, mas, para facilitar a identificação, é possível indicar o nome e o sobrenome:
Link para esta FAQ: https://faq.infomaniak.com/2774
Esta seção de perguntas frequentes foi útil?
Este guia mostra um exemplo de passe configurado como uma assinatura, onde os clientes podem escolher os eventos (no âmbito do sistema de bilheteira Infomaniak).
O passe com a escolha de eventos
O exemplo abaixo permite criar um passe que funciona como um pacote de vários bilhetes, mas no qual o cliente pode escolher eventos de uma lista de eventos disponíveis. É um tipo de passe versátil, que pode ser configurado de várias maneiras para obter o comportamento desejado:
- Um passe com entradas para vários locais, mas apenas para um dia escolhido.
- Um passe com 10 entradas para espetáculos durante uma temporada.
- Um passe gratuito que permite escolher vários bilhetes a preços reduzidos.
- Um passe que permite escolher as sessões de filme para cada dia do festival, mas que limita a uma sessão por dia.
Neste exemplo, imagine um passe que permite o acesso a dois eventos no mesmo dia, escolhendo entre uma lista de 3 sessões possíveis por evento. O passe em si será gratuito, mas cada sessão terá um custo diferente. O cliente poderá, assim, escolher participar nos dois eventos ou apenas num deles, dependendo do seu orçamento.
Criação do passe
Após preencher as informações, como o nome do passe, o preço ou a quantidade de passes disponíveis, é necessário definir o passe como Personalizado.
O passe é configurado como um bilhete único e o passe será impresso, e não os bilhetes individuais (por uma escolha estratégica). Assim, o cliente não terá vários bilhetes, mas sim um único, com um código QR que conterá todos os seus eventos.
Uma vez que o passe é configurado como Personalizado, os parâmetros serão indicados conforme a captura de tela, para que o cliente possa escolher apenas uma sessão por evento.
Associação de eventos
Os eventos estão associados ao passe, com um limite de um bilhete por evento e o custo do bilhete de 20.- para o primeiro evento…
… e de 30.- para o segundo:
A lista de eventos será a seguinte, com o número máximo de bilhetes e o preço por evento para o evento escolhido:
O cliente terá, ao comprar o passe, a interface para escolher os seus eventos, e é possível verificar no carrinho que o preço dos bilhetes é calculado corretamente por unidade ao adicionar o bilhete.
Visual do passe
Este passe será impresso no formato A4 e, portanto, terá o visual de um bilhete. Será necessário definir o visual desses bilhetes.
Informações solicitadas
Como este passe não é pessoal, nenhuma informação será associada ao passe, mas as informações do cliente serão solicitadas no momento do pedido.
Link para esta FAQ: https://faq.infomaniak.com/2775
Esta seção de perguntas frequentes foi útil?
Este guia mostra como adicionar eventos a passes já criados e vendidos, mas para os quais é necessário adicionar datas (no âmbito do sistema de bilheteira Infomaniak).
Para uma visão geral do passe e de tudo o que ele pode oferecer, consulte este outro guia.
Pré-requisitos
- As senhas em questão devem ser do tipo automático e ter eventos gratuitos associados.
Utilizar a atualização de passes
Ao comprar ou criar um passe, este recupera a lista de eventos associados ao nível da programação (Programação, Passe). Se um evento for associado após a realização de vendas, apenas os novos passes terão este novo evento.
Esta função permite adicionar este novo evento aos passes existentes, para que os assinantes também possam acessá-lo.
Como atualizar os passes existentes
Ao adicionar novos eventos a um passe, o botão Atualizar o passe estará disponível: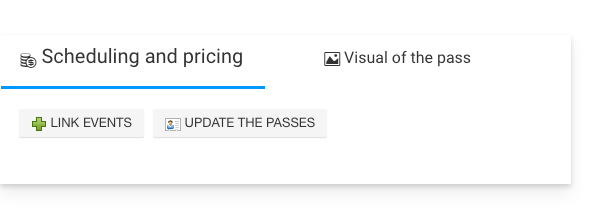
Ao clicar neste botão, uma mensagem indicará o número de passes que será atualizado: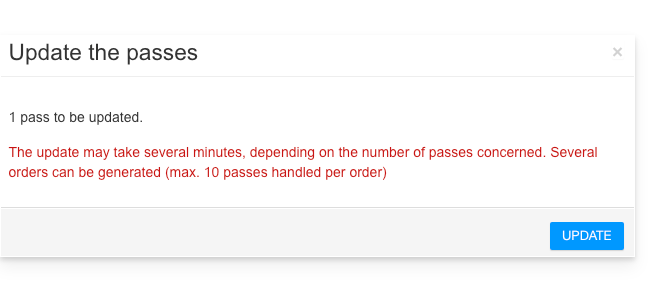
Link para esta FAQ: https://faq.infomaniak.com/2776
Esta seção de perguntas frequentes foi útil?
Este guia explica como usar as zonas no menu de tarifas (no âmbito do sistema de bilheteira Infomaniak).
Introdução
- Cada evento pode conter uma ou mais zonas, cada uma com sua própria tarifa.
- Isso permite agrupar as tarifas em cada zona e gerenciar cada zona de forma independente:
- Cada zona pode conter tarifas, cada uma com sua própria quantidade de bilhetes.
- Cada zona pode ser atribuída ou não ao plano da sala.
- Cada zona e cada tarifa podem ter sua própria visibilidade online.

Aceder ao menu de preços
Para tal:
- Clique aqui para acessar o gerenciamento do seu produto no Manager Infomaniak (precisa de ajuda?).
- Clique diretamente no nome atribuído ao sistema de bilheteria relacionado ao evento.
- Clique em Programação no menu lateral esquerdo.
- Clique em Eventos no menu lateral esquerdo.
- Clique no evento em questão.
- Clique na aba Preços.
- Se o evento tiver várias datas, esta seção será substituída por “Datas”, que abrirá um calendário.
- Clique na data do calendário para acessar a seção de preços…
- Ative o gerenciamento por zona.Esta opção será ativada automaticamente se um plano de sala for atribuído ao evento.:

Este menu também é apresentado durante a criação de um evento.
Adicionar uma zona e uma tarifa, gerir os parâmetros de cada zona
Aqui estão os botões importantes para gerenciar seus domínios e tarifas:
Link para esta FAQ: https://faq.infomaniak.com/2777
Esta seção de perguntas frequentes foi útil?
Este guia explica como encomendar equipamentos para aluguer para a venda no local e controlo de acesso (no âmbito do sistema de bilheteira Infomaniak).
Encomenda de equipamentos
Para isso:
- Clique aqui para acessar o gerenciamento do seu produto no Manager Infomaniak (precisa de ajuda?).
- Clique diretamente no nome atribuído ao sistema de bilheteira relacionado ao evento.
- Clique em Equipamento no menu lateral esquerdo:

Visão geral dos pedidos em curso e do histórico de pedidos
Se já efetuou pedidos, pode consultar o estado do pedido na página principal. Aí, verá o estado do pedido em curso, com os detalhes do seu conteúdo e, no caso de envios postais, o número da encomenda, que permite acompanhar o seu percurso:
Efetuar uma nova encomenda de equipamento
Para encomendar equipamento para aluguer, basta clicar no botão Nova Solicitação e seguir o assistente.
Escolha a quantidade de recursos necessários. Informações adicionais estão disponíveis em formato de dicas informativas:
Após inserir o período de locação, os custos estimados da locação serão exibidos logo abaixo.
Indique o período total de locação desejado, levando em consideração o tempo necessário para instalação e testes.

Se o assistente não apresentar as datas desejadas, entre em contato com o suporte da Infomaniak.
Escolha cuidadosamente se deseja que o equipamento seja enviado para você ou se prefere retirá-lo pessoalmente:

Se o equipamento estiver disponível nas datas que você indicou, você receberá um e-mail de confirmação e com informações sobre o acompanhamento do seu pedido.
Saiba mais
Link para esta FAQ: https://faq.infomaniak.com/2778
Esta seção de perguntas frequentes foi útil?
Este guia explica como renomear um sistema de tickets (no âmbito do sistema de tickets da Infomaniak).
Introdução
- O nome do sistema de bilheteira aparece, nomeadamente, quando as lojas são publicadas no portal infomaniak.events.
- No caso de uma exibição de várias lojas na mesma página, será o nome indicado nos dados de contacto do organizador.na última bilheteria criada que tem eventos à venda.
Modificar os detalhes de uma bilheteria
Para isso:
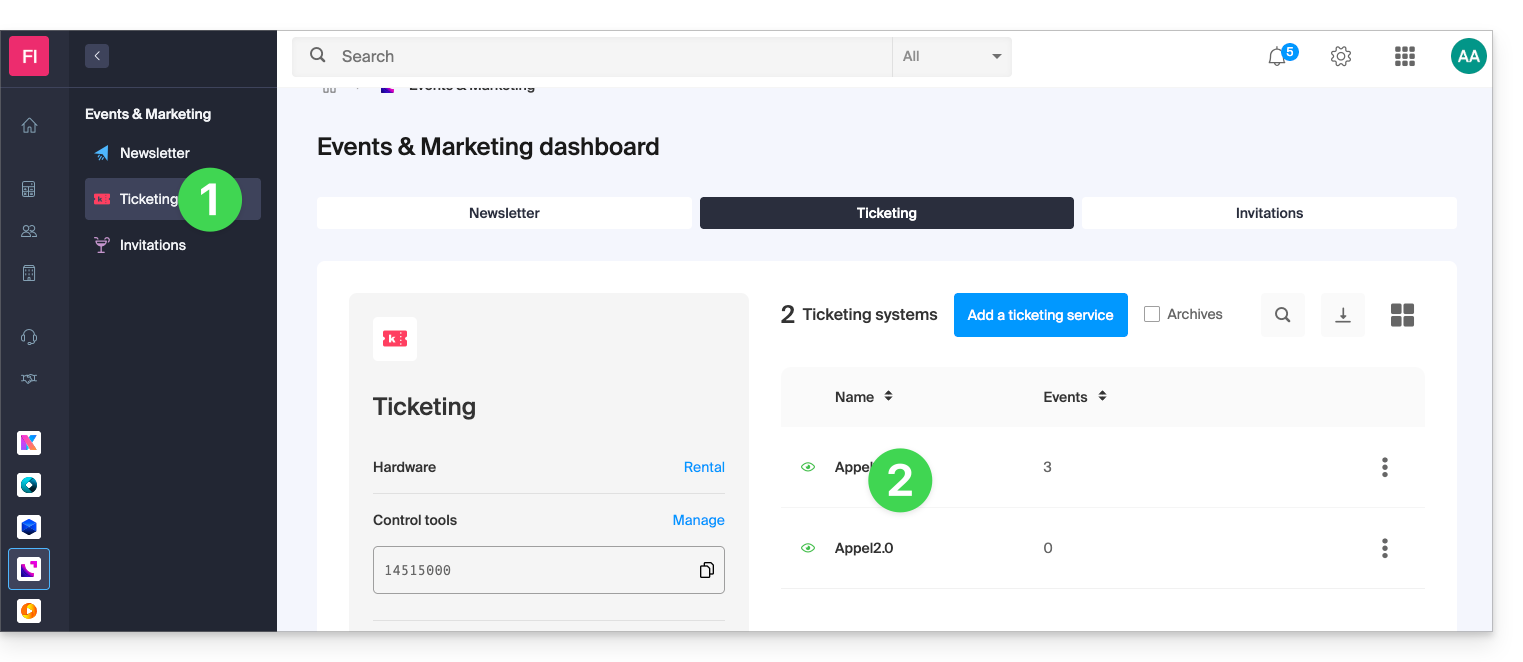
- Clique aqui para acessar o gerenciamento do seu produto no Manager Infomaniak (precisa de ajuda?).
- Clique diretamente no nome do serviço de suporte técnico em questão:
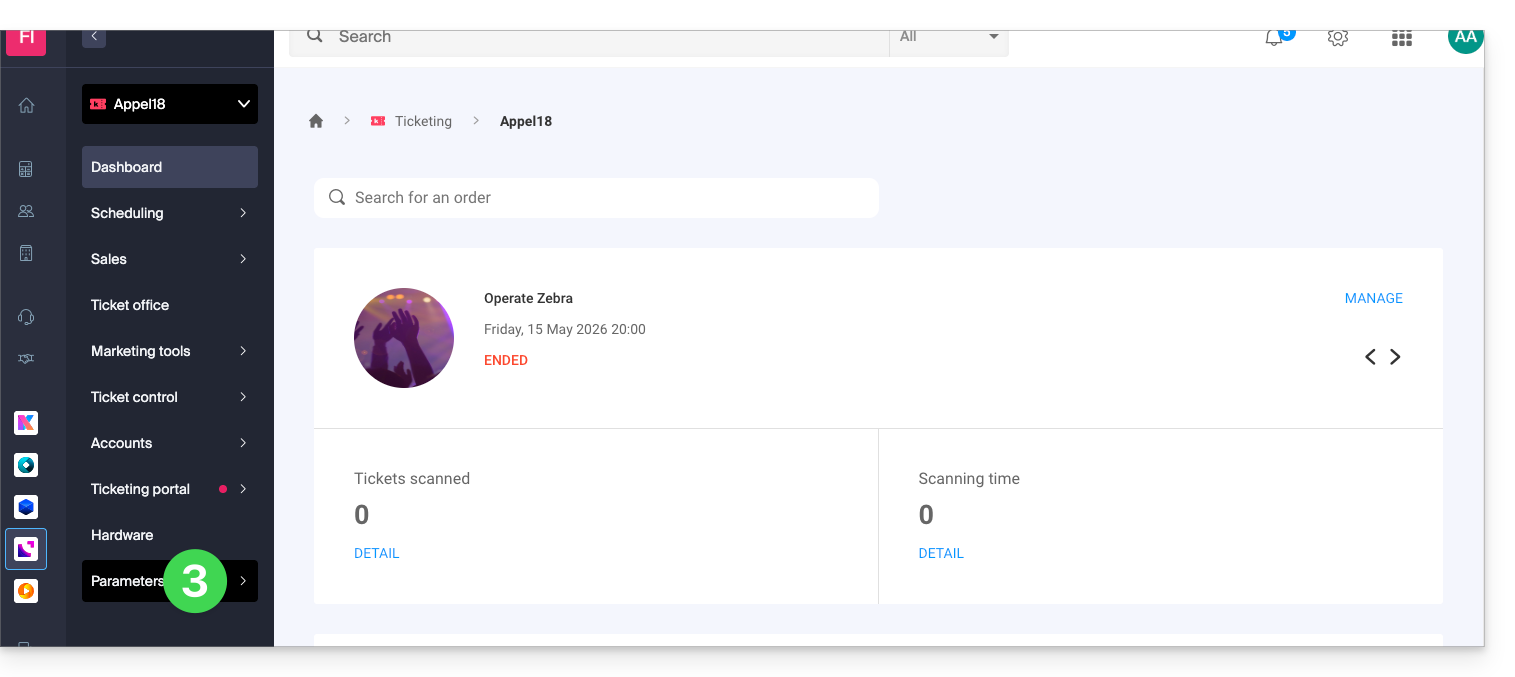
- Clique em Configurações no menu lateral esquerdo:
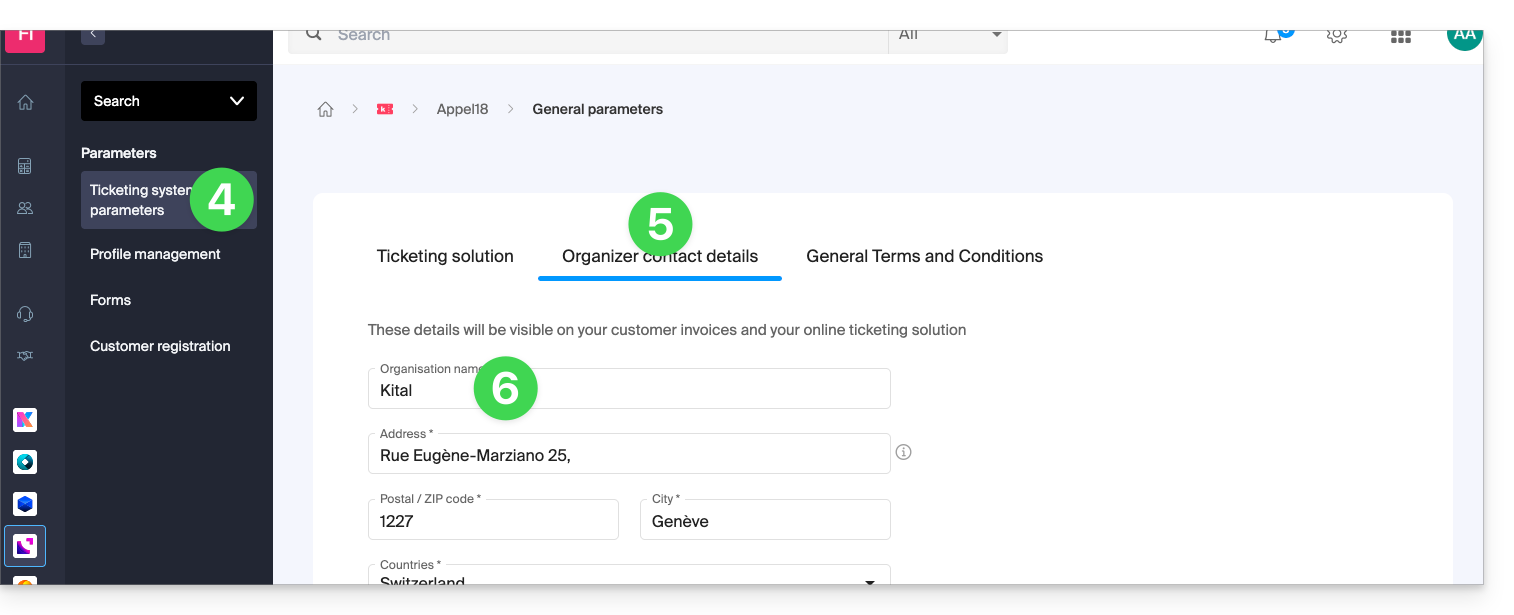
- Clique em Configurações do sistema de bilhetes no menu lateral esquerdo.
- Clique na aba Dados de contato do organizador.
- Modifique o nome no primeiro campo do formulário:
- Clique no botão Salvar na parte inferior da página.
Exemplo de alteração de nome
A exibição antes da modificação:
Modificação do nome do organizador de acordo com o procedimento acima:
A exibição é modificada e passa a ser:
Link para esta FAQ: https://faq.infomaniak.com/2779
Esta seção de perguntas frequentes foi útil?
This guide explains how to sell products (within the framework of the Infomaniak ticketing system), such as refreshments during intermission, souvenirs, or merchandise related to your events.
Access the product menu to create one
To do this:
- Click here to access the management of your product on the Infomaniak Manager (need help?).
- Click directly on the name assigned to the ticketing concerned by the event.
- Click on Programming in the left sidebar menu.
- Click on Products in the left sidebar menu.
- Click on Create a new product:

- Fill in the Name and Description fields in all the languages of your ticketing:

- This information will be visible on the ticketing page during the purchasing process.
- Associate an image that will be displayed on the site for this product:

- Activate if necessary the association of the product to an event:

- The purchase of a product necessarily implies the purchase of a ticket (5 tickets in the example below); refer to this other guide on this subject:

- The purchase of a product necessarily implies the purchase of a ticket (5 tickets in the example below); refer to this other guide on this subject:
- Associate the attributes of your product.
- Attributes are the parameters that allow you to create different variations of a product.
- The dropdown list allows you to choose existing attributes, and the link below allows you to create new ones:

- For example, the attribute T-shirt size could include the variations XS, S, M, L, XL, and a second attribute will allow you to choose the colors of the T-shirt:

- It is also possible to manage attributes outside the creation form, under the tab dedicated to attribute management:

- Warning: attributes cannot be modified if sales have already taken place; variations can be added or modified at any time, but can only be deleted if there have been no sales.
- In the next step, define the price of each product variant, the VAT to be applied, the quantity put on sale, and the visibility of the product in your store.
- It is possible to remove a variant from the store in case there are no sales of this variation after the finalization of your online store:

- It is possible to remove a variant from the store in case there are no sales of this variation after the finalization of your online store:
- In the next step, define whether you want to add an automatic association rule when purchasing a ticket.
- This option means that the purchase of a specified ticket in this rule necessarily implies the purchase of the linked product (also refer to point 8 above):

- This option means that the purchase of a specified ticket in this rule necessarily implies the purchase of the linked product (also refer to point 8 above):
- Click on the Finish button to save your item.
Track sales and modify product parameters
Once the products are created, it is possible to track their sales and modify the parameters by clicking on the action menu ⋮ located to the right of the concerned element:
Link para esta FAQ: https://faq.infomaniak.com/2780
Esta seção de perguntas frequentes foi útil?
Este guia explica como dividir reservas com vários bilhetes (no âmbito do sistema de bilheteira Infomaniak). Isso permite validar uma parte de uma reserva, caso a reserva inclua vários bilhetes, mas apenas uma parte deva ser validada no balcão.
Pré-requisitos
- Esta operação exige que uma encomenda esteja atualmente definida com o método de pagamento "pagamento no local".
- Para mais informações sobre este método de pagamento e como ativá-lo, consulte este outro guia.
Dividir a partir do painel de controlo
Para isso:
- Clique aqui para acessar o gerenciamento do seu produto no Manager Infomaniak (precisa de ajuda?).
- Clique diretamente no nome atribuído ao balcão de bilhetes relacionado ao evento.
- Clique em Balcão no menu lateral esquerdo:
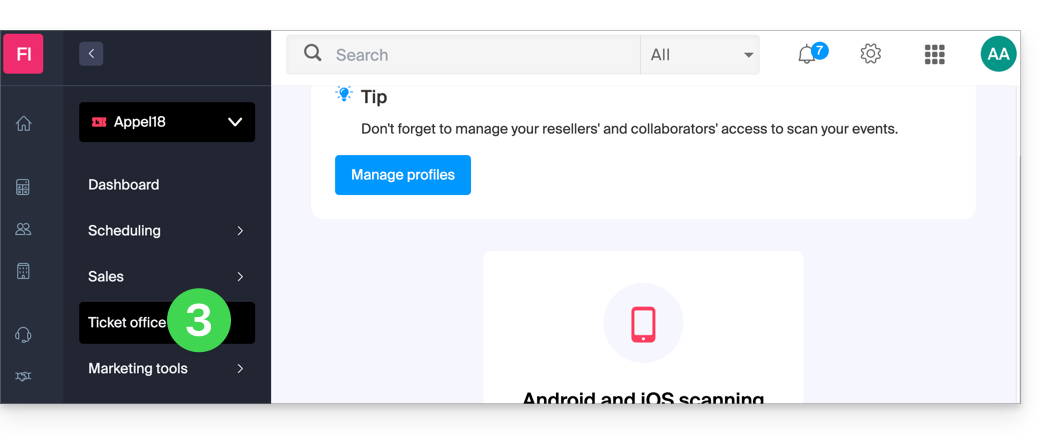
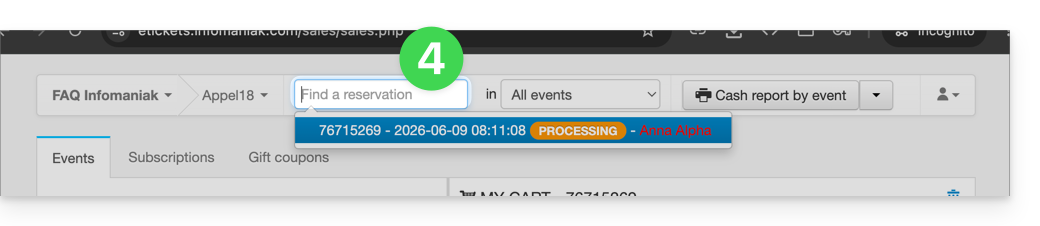
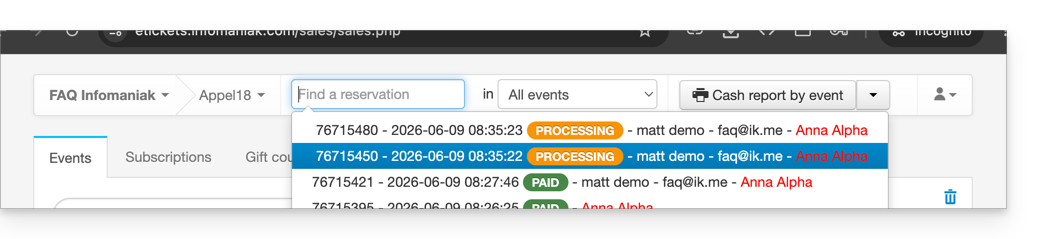
- Encontre a reserva no campo de pesquisa na parte superior da página; você pode encontrar o pedido usando o número do pedido ou qualquer outro elemento relacionado ao pedido:
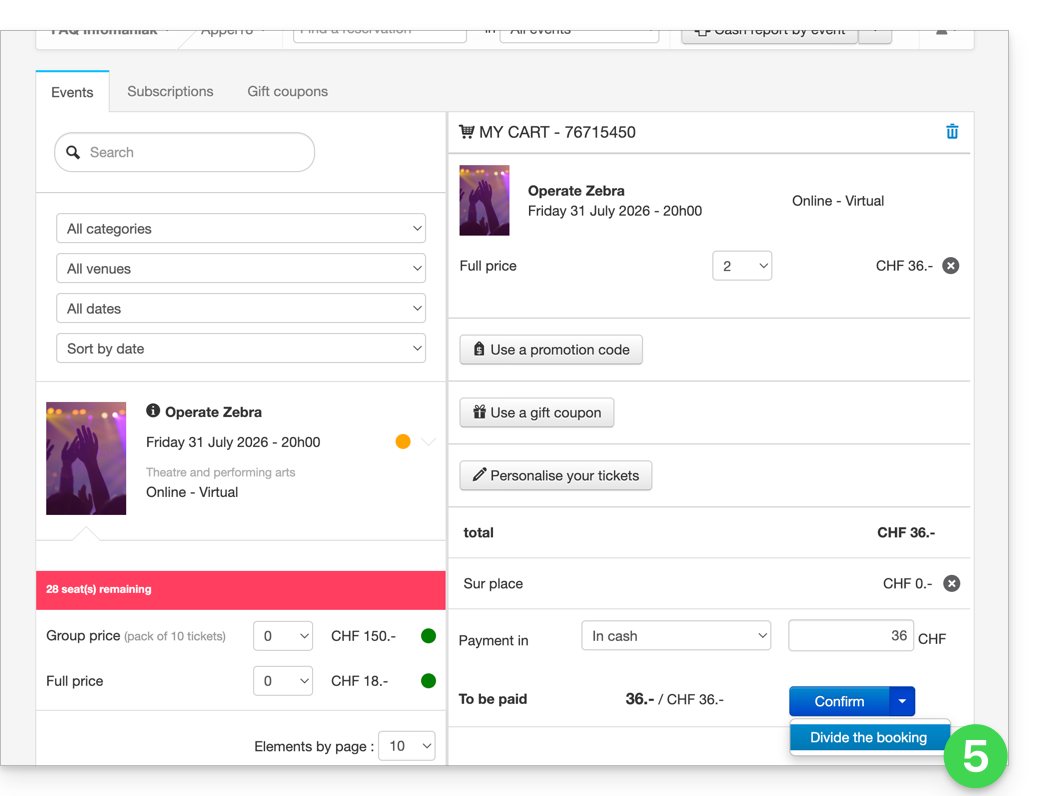
- A reserva é exibida na coluna da direita; se for uma reserva, é possível clicar na seta à direita do botão Validar e Dividir a reserva:
- A próxima tela permite selecionar os bilhetes a serem validados:
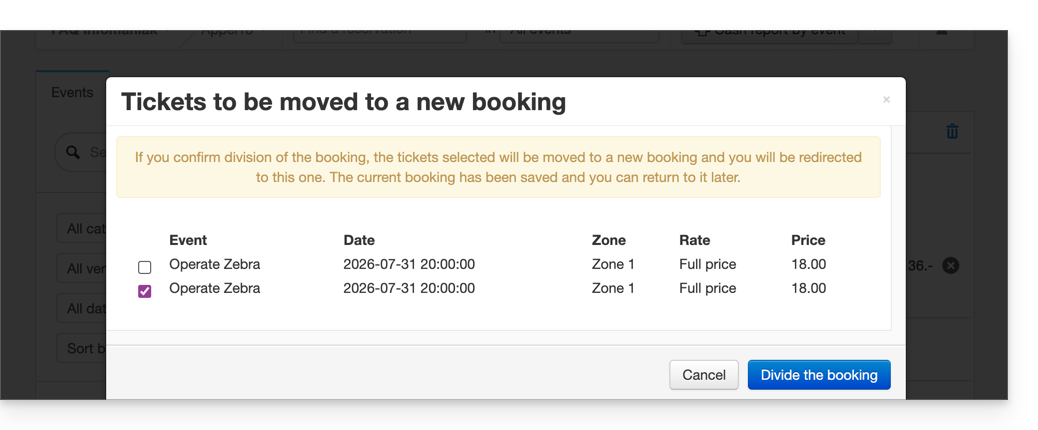
- Agora, basta efetuar o pedido dos bilhetes a serem validados; verá que isso criou um novo pedido e que o pedido anterior contém apenas os bilhetes que não foram selecionados durante a divisão:
Dividir a partir do terminal de vendas
O procedimento para dividir um pedido no terminal de vendas é semelhante ao procedimento no portal web:
- Faça login na sua conta Infomaniak.
- Clique na aba Pedidos e encontre o pedido que deseja dividir.
- Clique na aba Tickets do pedido:

- Selecione os tickets que deseja validar e clique em Separar:

- Continue a encomenda para a validar:

- A nova encomenda aparece como validada e a encomenda inicial mostra os bilhetes restantes:

Link para esta FAQ: https://faq.infomaniak.com/2781
Esta seção de perguntas frequentes foi útil?
Este guia explica como adicionar bilhetes aos seus passes, pacotes de bilhetes e assinaturas (no âmbito do sistema de bilheteira Infomaniak).
Pré-requisitos
- Tenha em mãos o código do passe ou da assinatura.
- Este código encontra-se no e-mail de confirmação recebido no momento da compra ou na sua conta de cliente.
- Acesse a página de vendas do organizador.
Adicionar os bilhetes ao passe
Para isso:
- Clique no botão Acesso para Assinantes no canto superior direito:

- Insira o código do seu passe ou assinatura no campo indicado e clique em Seguinte:

- Selecione os bilhetes que deseja adicionar ao passe clicando no botão e confirme a sua escolha clicando em Adicionar ao carrinho:

- Continue com o processo de encomenda.
Você receberá um e-mail de confirmação para este novo pedido no endereço indicado.
Link para esta FAQ: https://faq.infomaniak.com/2787
Esta seção de perguntas frequentes foi útil?
Este guia explica como configurar um sistema de renovação de passes ou assinaturas (no âmbito do sistema de bilheteira Infomaniak). Esta funcionalidade permitirá aos visitantes com assinaturas renová-las para a nova temporada.
Introdução
- Não é obrigatório ter assinaturas sazonais ou anuais para utilizar a renovação de passes, mas é imprescindível ter um novo período com passes configurados.
- Se as assinaturas estiverem configuradas com lugares numerados fixos em uma planta de sala inalterada, as assinaturas renovadas manterão os mesmos lugares para a nova temporada.
- As assinaturas renovadas manterão os mesmos códigos QR de uma temporada para a outra.
Criar uma renovação
Pré-requisitos
- Para que as renovações possam ser ativadas no seu sistema de bilheteira, será necessário criar os passes para o novo período.
Em seguida:
- Clique aqui para acessar a gestão do seu produto no Manager Infomaniak (precisa de ajuda?).
- Clique diretamente no nome atribuído ao sistema de bilheteira relacionado ao evento (vá para o período em que as renovações serão oferecidas).
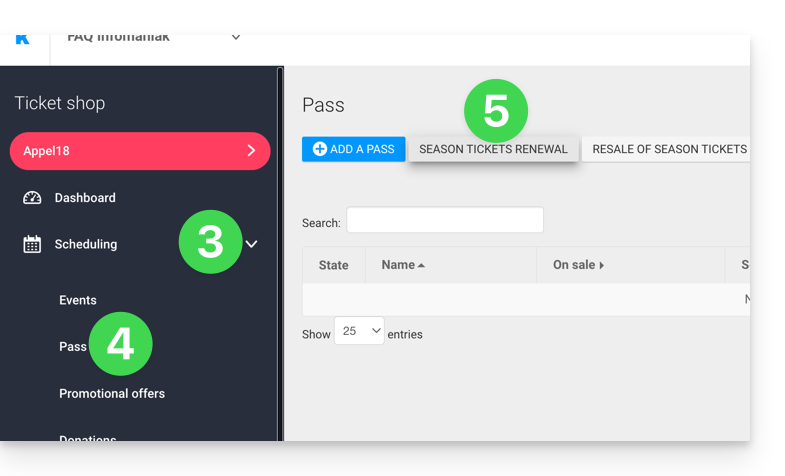
- Clique em Programação no menu lateral esquerdo.
- Clique em Pass no menu lateral esquerdo.
- Clique em Renovação da assinatura:
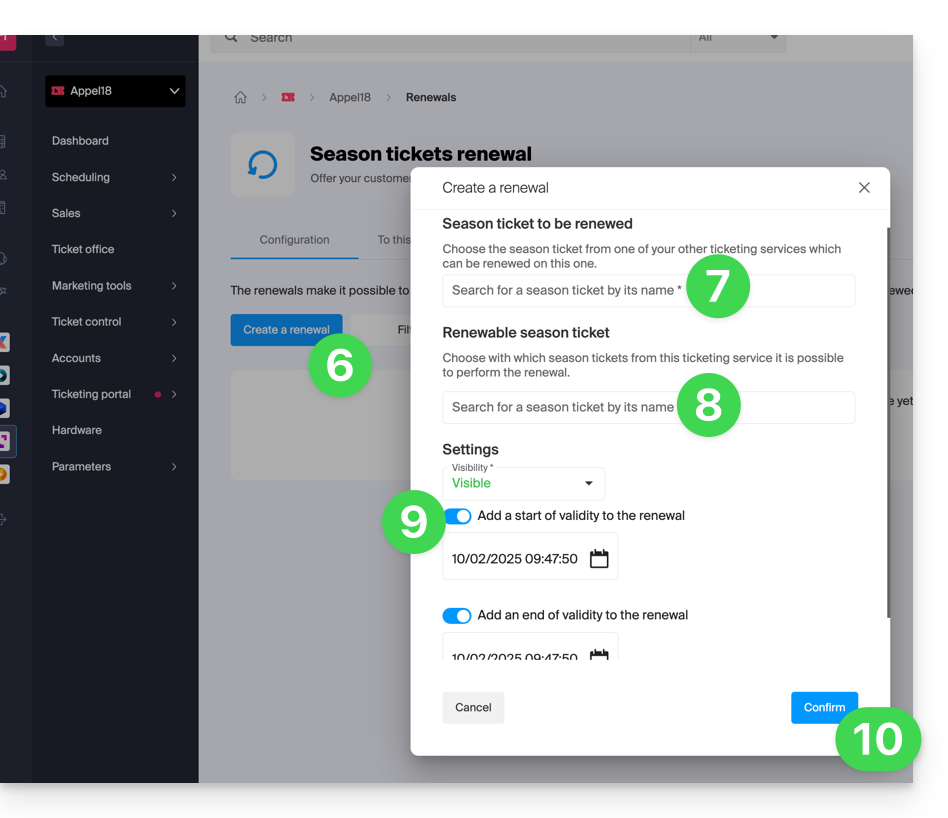
- Clique em Criar uma renovação.
- Na janela pop-up, insira, na ordem, a assinatura do período anterior…
- … e, em seguida, os planos de assinatura que os visitantes poderão escolher no momento da renovação; vários planos de assinatura podem ser oferecidos nesta fase.
- Indique, se desejar, um período de validade para a renovação.
- Clique no botão para Confirmar:
Procedimento de renovação para o utilizador
O utilizador poderá renovar a sua subscrição seguindo este procedimento a partir do link de renovação do passe, que estará por defeito na parte inferior da página da sua bilheteira.
Para uma integração direta, é possível utilizar a URL da bilheteira desejada e adicionar /pass-renew no final. Por exemplo: https://infomaniak.events/shop/abcABC4242I/pass-renew
Acompanhamento das renovações
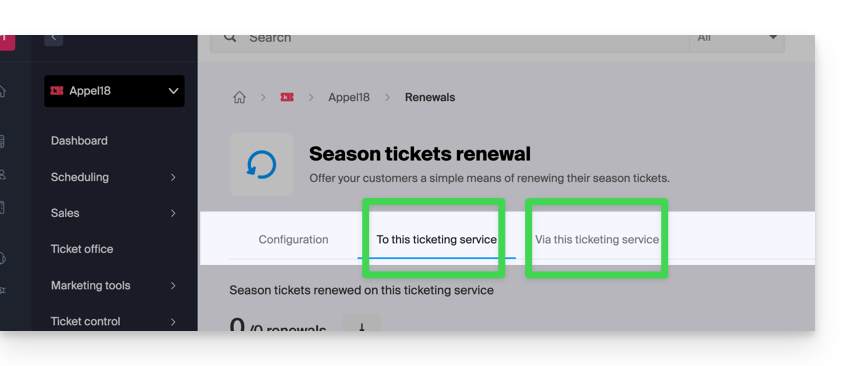
É possível acompanhar cada renovação através das abas de renovações:
- Para este sistema de bilheteira: indica as renovações efetuadas de uma temporada anterior para a temporada em que se encontra.
- A partir deste sistema de bilheteira: indica as assinaturas renovadas a partir do sistema de bilheteira selecionado para um novo período.
Link para esta FAQ: https://faq.infomaniak.com/2788
Esta seção de perguntas frequentes foi útil?