Base de conhecimento
1000 perguntas frequentes, 500 tutoriais e vídeos explicativos. Aqui, você encontra apenas soluções!
Este guia detalha como fazer o backup dos dados dos seus serviços de hospedagem web (Starter, compartilhados ou Servidor Cloud) usando a aplicação restic através do protocolo OpenStack Swift no Swiss Backup, a solução de backup em uma nuvem suíça independente.
Introdução
- Existem outras soluções para fazer backup dos seus dados web: consulte este outro guia.
Instalar o Restic
Pré-requisitos
- Utilizar uma hospedagem web.
- Ter um espaço Swiss Backup Infomaniak com uma quota de dispositivo disponível (mínimo 1) para uma cópia de segurança na nuvem.
- Adicionar 1 dispositivo do tipo Nuvem para obter as configurações OpenStack Swift.
Para isso:
Faça o download do binário linux_amd64 do repositório GitHub do restic:
wget -O restic.bz2 {{URL_8}}⚠️ O link de download pode variar no lançamento de novas versões; a versão
0.14utiliza a compressão padrão.Descompacte o arquivo e torne o binário executável:
bunzip2 restic.bz2
chmod +x restic
Configurar o Restic
Criação de uma chave de criptografia para criptografar os dados
- A chave não pode ser alterada e, em caso de perda, os dados não poderão mais ser lidos.
- Coloque esta chave num ficheiro legível pelo Restic.
Exemplo de geração de uma chave:
openssl rand -base64 16 > restickey
Configuração do restic
Para configurar a cópia de segurança:
Crie um arquivo resticconfig com o seguinte conteúdo, adaptando-o de acordo com as informações específicas do seu dispositivo:
echo "export OS_AUTH_URL={{URL_10}} export OS_REGION_NAME=RegionOne export OS_PROJECT_NAME=sb_project_SBI-XXXX export OS_PASSWORD='' export OS_USER_DOMAIN_NAME=default export OS_USERNAME=SBI-XXXX export OS_PROJECT_DOMAIN_NAME=default export RESTIC_REPOSITORY=swift:sb_project_SBI-XXXX:/bucket name export RESTIC_PASSWORD_FILE=restickey" > resticconfOS_AUTH_URLURL de acesso ao cluster Swiss Backup (1)OS_PROJECT_NAMEeOS_USERNAME: substitua SBI-XXXX pelo seu identificadorOS_PASSWORD: substitua pela senha gerada durante a ativaçãoRESTIC_REPOSITORY- substitua SBI-XXXX pelo seu identificador
- substitua o
bucket namepelo nome que deseja dar ao seu contêiner que armazenará os backups
RESTIC_PASSWORD_FILE: substitua pelo caminho completo para o arquivo que contém a chave de criptografia
Carregue a configuração do Restic executando o seguinte comando:
source resticconfInicialize o bucket com o seguinte comando:
./restic -r $RESTIC_REPOSITORY init
(1) A indicação "//swiss-backup02", "//swiss-backup03", etc., muda de acordo com o número do cluster indicado no Manager, em Informações de armazenamento na nuvem, em "Localização"; e se o seu dispositivo Swiss Backup foi criado antes de outubro de 2020, você deverá usar https://swiss-backup.infomaniak.com/identity/v3.
Fazer backup dos seus arquivos
Para fazer backup dos seus arquivos, basta executar o seguinte comando:
./restic backup
#Example: Backing up the entire hosting account
./restic backup ./
#Example: Backing up the “sites” folder
./restic backup sites/
O primeiro snapshot demora mais (várias horas, dependendo da quantidade de dados), pois todos os arquivos são copiados, enquanto os seguintes usarão o princípio diferencial.
Fazer backup das bases de dados
O Restic permite ler dados provenientes do stdin, para gravar a saída de um programa.
Utilize o seguinte comando para efetuar uma cópia de segurança de uma base de dados MySQL individual:
mysqldump --databases db_name -u db_username -p | restic backup --stdin --stdin-filename database_dump.sql Para fazer o backup de todos os bancos de dados, execute o comando mysqldump para extrair todos os bancos de dados do servidor e, em seguida, redirecione a saída para o Restic:
mysqldump -u -p --all-databases | restic backup --stdin --stdin-filename all_databases.sql
Listar os backups
Para listar as suas cópias de segurança, pode usar o seguinte comando:
./restic snapshots
Restaurar uma cópia de segurança
Você pode restaurar um backup com o seguinte comando:
./restic restore --target
Automatizar
No Servidor Cloud, é possível adicionar uma tarefa cron para automatizar o lançamento da cópia de segurança.
Em uma hospedagem compartilhada, esta opção não está disponível.
Link para esta FAQ: https://faq.infomaniak.com/1019
Esta seção de perguntas frequentes foi útil?
Link para esta FAQ: https://faq.infomaniak.com/1356
Esta seção de perguntas frequentes foi útil?
Este guia detalha como fazer o backup manual de dados através da linha de comando (CLI) usando o protocolo Compatível com S3 no Swiss Backup, a solução de backup em nuvem suíça independente.
Usar um local S3 na CLI
Pré-requisitos
- Ter um espaço Swiss Backup Infomaniak com uma quota de dispositivo disponível (mínimo 1) para uma cópia de segurança na nuvem.
- Adicionar 1 dispositivo do tipo Cloud para obter as configurações compatíveis com S3.
- Utilizar uma aplicação do tipo
Terminal(interface de linha de comando,CLI / Command Line Interface) no seu dispositivo.
Com uma aplicação do tipo Terminal (interface de linha de comando, CLI) no seu dispositivo:
Instale
s3cmd, por exemplo, no Debian/Ubuntu:sudo apt install s3cmdou no macOS (com Homebrew):
brew install s3cmde, para Windows, recomenda-se usar S3Express, uma ferramenta de linha de comando de código aberto (precisa de ajuda?).
Insira o seguinte comando para configurar a conexão:
s3cmd --configure- Preencha os campos com as informações específicas do seu dispositivo (consulte este outro guia):
Display name= escolha um nome para o armazenamento.AccessKeyeSecretKey= as chaves de acesso geradas no e-mail recebido da Infomaniak após a criação do espaço de armazenamento.Service point= por exemplo, https://s3.swiss-backup02.infomaniak.com (1)Bucket name= defaultDefault regionS3 Endpoint: use a URL fornecida pela InfomaniakUse HTTPS: simHTTP Proxy server: deixe em branco, a menos que haja uma configuração específicaSignature version: force o uso da versão v4Path style: escolha Sim, se solicitado- Test access: você pode fazer o teste para validar a configuração
(1) A indicação "//s3.swiss-backup02", "//s3.swiss-backup03", etc., muda de acordo com o número do cluster indicado no Manager, nas informações de armazenamento em nuvem, em "Localização"; e, se o seu dispositivo Swiss Backup foi criado antes de outubro de 2020, deverá usar https://swiss-backup.infomaniak.com/identity/v3.
Após a conclusão, um arquivo de configuração será salvo (por padrão, em ~/.s3cfg).
Iniciar uma cópia para o Swiss Backup
Aqui estão alguns comandos básicos para interagir com o Swiss Backup:
- Listar os buckets:
s3cmd ls - Listar o conteúdo de um bucket:
s3cmd ls s3://nome-do-bucket - Enviar um arquivo:
s3cmd put example.txt s3://bucket-name/ - Baixar um arquivo:
s3cmd get s3://bucket-name/example.txt - Sincronizar um diretório local com um bucket:
s3cmd sync /path/local/ s3://bucket-name/
Em caso de problema
Após uma atualização da ferramenta AWS CLI (Interface de Linha de Comando dos Serviços Web da Amazon), poderá encontrar um erro ao tentar conectar-se ou transferir dados para um local S3 do Swiss Backup:
A transferência de dados em vários blocos usando o aws-chunked não é suportada
Este erro está relacionado com um método de transferência utilizado pela AWS CLI (aws-chunked), que não é compatível com o serviço Swiss Backup.
Infelizmente, a Infomaniak não tem a possibilidade de intervir nesta incompatibilidade, pois esta está relacionada com o funcionamento interno do cliente AWS CLI, desenvolvido pela Amazon.
Para continuar a usar o Swiss Backup de forma eficiente através da linha de comando, a Infomaniak recomenda o uso da ferramenta de código aberto s3cmd, descrita anteriormente neste guia, que é totalmente compatível com os locais S3.
Link para esta FAQ: https://faq.infomaniak.com/1579
Esta seção de perguntas frequentes foi útil?
Este guia explica como fazer o backup de um VPS (Servidor Privado Virtual) com o Acronis no Swiss Backupa solução de backup em uma nuvem suíça independente; descreve os pré-requisitos, as diferenças entre os tipos de licença e redireciona para os recursos úteis.
Resumo das opções de licença
- Linux:
- Máquina Virtual: Para VPS ou ambientes virtualizados.
- Servidor Linux: Para máquinas autônomas, físicas ou virtuais sem hipervisor.
- Windows:
- Estação de Trabalho: Para estações de trabalho físicas.
- Servidor: Para máquinas físicas ou virtuais com funções avançadas.
- Máquina Virtual: Para VMs Windows em um ambiente de hipervisor.
Fazer backup de um VPS no Linux
Diferenças entre os tipos de licença
- Máquina Virtual:
- Para um VPS ou uma máquina virtual hospedada em um ambiente de virtualização (por exemplo, VMware, Hyper-V, Virtuozzo).
- Uma licença cobre o host físico e todas as máquinas virtuais que ele contém.
- Adequado para ambientes Public Cloud Infomaniak ou clusters de hipervisores (cada host requer uma licença).
- Servidor Linux:
- Para uma máquina física ou virtual individual que executa Linux (sistema operacional de servidor).
- Adequado para servidores autônomos, locais ou em colocation.
- Cada licença cobre uma máquina física ou virtual individual.
Para configurar o backup do Linux:
- Consulte este guia para obter todos os detalhes.
Fazer backup de um VPS no Windows
Diferenças entre os tipos de licença
- Estação de trabalho:
- Uma licença por máquina física a ser protegida.
- Limitação: Esta licença não oferece suporte às aplicações Microsoft Exchange Server, SQL Server ou Active Directory.
- Servidor:
- Uma licença por máquina física ou virtual executando Windows.
- Oferece suporte ao Microsoft SQL Server, SharePoint e Active Directory.
- Compatível com funções de host de virtualização (Hyper-V, VMware ESXi, etc.).
- Máquina Virtual:
- Uma licença por máquina virtual em execução no Windows em um ambiente de hipervisor.
- Cada host de cluster requer uma licença.
Para configurar o backup do Windows:
- Consulte este guia para obter todos os detalhes.
Link para esta FAQ: https://faq.infomaniak.com/1660
Esta seção de perguntas frequentes foi útil?
Este guia detalha como fazer o backup de dados do Nextcloud através do protocolo OpenStack Swift no Swiss Backup, a solução de backup em uma nuvem suíça independente.
Introdução
- Também é possível usar o Hyper Backup (recomendado): consulte este outro guia.
Configurar o Nextcloud para o Swiss Backup
Pré-requisitos
- Ter um espaço Swiss Backup Infomaniak com uma quota de dispositivo disponível (mínimo 1) para uma cópia de segurança na nuvem.
- Adicionar 1 dispositivo do tipo Cloud para obter as configurações OpenStack Swift.
Para configurar uma nova cópia de segurança:
- Ative o aplicativo Suporte ao armazenamento externo na seção Aplicativos da sua instalação Nextcloud:

- Clique em Armazenamento externo na seção Administração da sua instalação Nextcloud:

- Clique no menu suspenso e escolha OpenStack Object Storage:

- Preencha os campos com as informações específicas do seu dispositivo (consulte este outro guia) e, se necessário, modifique os menus suspensos conforme abaixo:

Região:RegionOne
Bucket:default
Nome de usuário: seu identificador de usuário Swiss Backup, no formatoSBI-AA12345
Domínio:default
Senha: a senha obtida após a criação do usuário Swiss Backup
Nome do tenant:sb_project_SBI-AA12345(de acordo com o nome de usuário acima)
Endpoint de identidade: utilize o endereço (1) seguido do caminho (2) nas suas informações de login…
… portanto, aqui:swiss-backup03.infomaniak.com/identity/v3
Link para esta FAQ: https://faq.infomaniak.com/1661
Esta seção de perguntas frequentes foi útil?
Este guia explica como encontrar uma solução caso o Agente Acronis para Swiss Backup solicite o registro da sua máquina e, em seguida, apresente um erro quando você clicar em "Registrar a Máquina".
Registro manual…
Em algumas situações, especialmente se você (re)instalou o Acronis em seu dispositivo, o aplicativo pode solicitar que você registre seu computador e, em seguida, exibir um erro. Nesse caso, é necessário realizar um registro manual do Acronis de acordo com o seu sistema operacional.
… no macOS
Consulte este outro guia para desinstalar o aplicativo.
Caso contrário, execute os seguintes comandos a partir de um aplicativo do tipo Terminal (interface de linha de comando, CLI / Command Line Interface) no seu dispositivo macOS:
Para cancelar o registro, insira o seguinte comando:
sudo "/Library/Application Support/BackupClient/Acronis/RegisterAgentTool/RegisterAgent" -o unregister -t cloud -a acronis.infomaniak.comPara registrar novamente, insira:
sudo "/Library/Application Support/BackupClient/Acronis/RegisterAgentTool/RegisterAgent" -o register -t cloud -a acronis.infomaniak.com -u SBA-XXXX-XX -p "PASSWORD_HERE"- Substitua e complete as informações específicas da sua conta nos comandos acima e, em seguida, indique a senha do seu computador quando solicitado.
… no Windows
Utilize o utilitário de limpeza da Acronis para desinstalar o aplicativo.
Caso contrário, execute os seguintes comandos a partir de um aplicativo do tipo Terminal (interface de linha de comando, CLI / Command Line Interface) no seu dispositivo Windows:
Abra o menu Iniciar digitando o seguinte comando:
cmd
- Nos resultados da pesquisa, clique com o botão direito do mouse em
cmde selecione Executar como administrador. Para cancelar o registo, introduza:
cd "C:\Program Files\BackupClient\RegisterAgentTool\"Em seguida:
.\register_agent.exe -o unregister -t cloud -a acronis.infomaniak.comPara reativar, insira:
cd "C:\Program Files\BackupClient\RegisterAgentTool\"Em seguida:
.\register_agent.exe -o register -t cloud -a acronis.infomaniak.com -u SBA-XXXX-XX -p "PASSWORD_HERE"- Substitua e complete as informações específicas da sua conta nos comandos acima.
Se tiver a autenticação de dois fatores (2FA) da Acronis ativada…
Se a autenticação de dois fatores da Acronis estiver ativada, os comandos serão ligeiramente diferentes:
- Gere um token de registo em https://acronis.infomaniak.com (precisa de ajuda?).
- Execute o comando
unregister(veja acima, de acordo com o seu sistema operativo). - Execute o comando
registercomo indicado acima, mas adaptando-o para…… macOS
sudo "/Library/Application Support/BackupClient/Acronis/RegisterAgentTool/RegisterAgent" -o register -t cloud -a acronis.infomaniak.com --token TOKEN_HERE… Windows
.\register_agent.exe -o register -t cloud -a acronis.infomaniak.com --token TOKEN_HERE
O registo foi bem-sucedido?
Se receber uma mensagem 200 ou "sucesso", o comando executado funcionou corretamente.
Se o resultado for diferente, tire uma captura de tela da mensagem de erro e, em seguida, entre em contato com o suporte da Infomaniak.
Link para esta FAQ: https://faq.infomaniak.com/2121
Esta seção de perguntas frequentes foi útil?
Link para esta FAQ: https://faq.infomaniak.com/2277
Esta seção de perguntas frequentes foi útil?
Este guia explica como ativar a conta Acronis no Swiss Backup, a solução de backup em uma nuvem suíça independente.
Pré-requisitos
- Encomendar um espaço Swiss Backup Infomaniak (backup Acronis).
- Ao fazer a encomenda, definir a quota de dispositivos disponíveis (mínimo 1) de acordo com as suas necessidades:
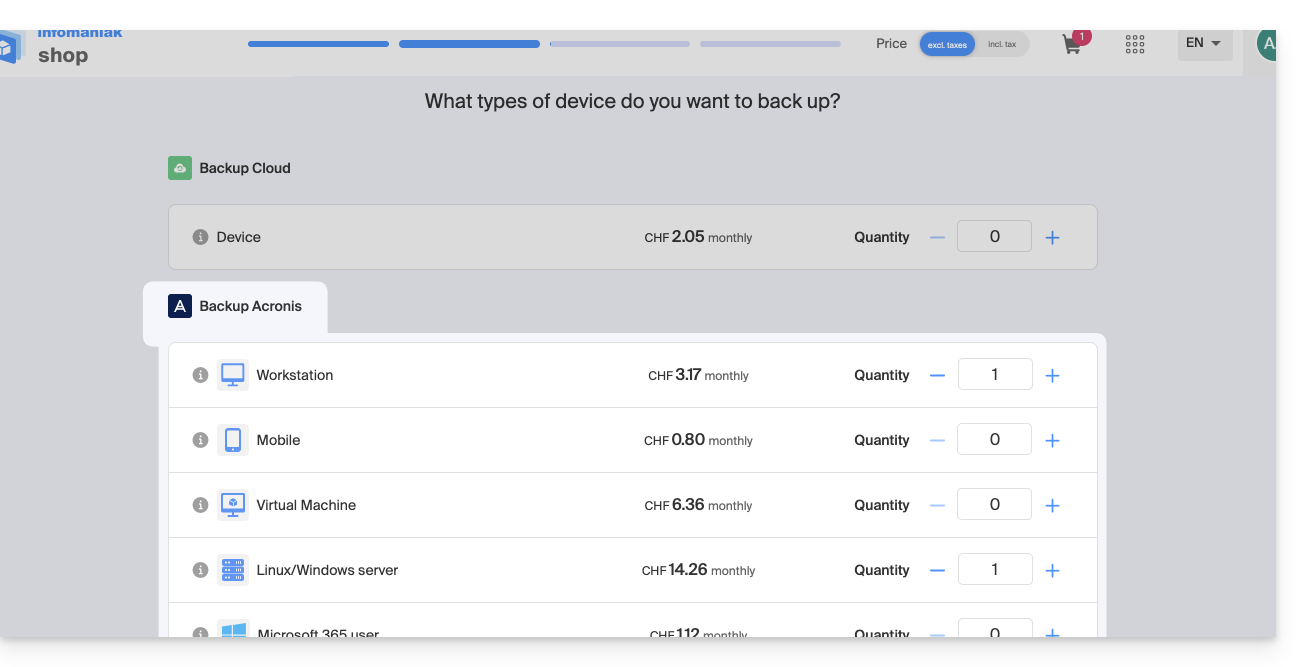
- Se necessário, aumentar a quota de dispositivos de acordo com as suas necessidades.
Ativar a conta Acronis para o backup
Para aceder ao Swiss Backup e preparar um novo backup Acronis:
- Clique aqui para aceder à gestão do seu produto no Manager Infomaniak (precisa de ajuda?).
- Clique diretamente no nome atribuído ao produto em questão:
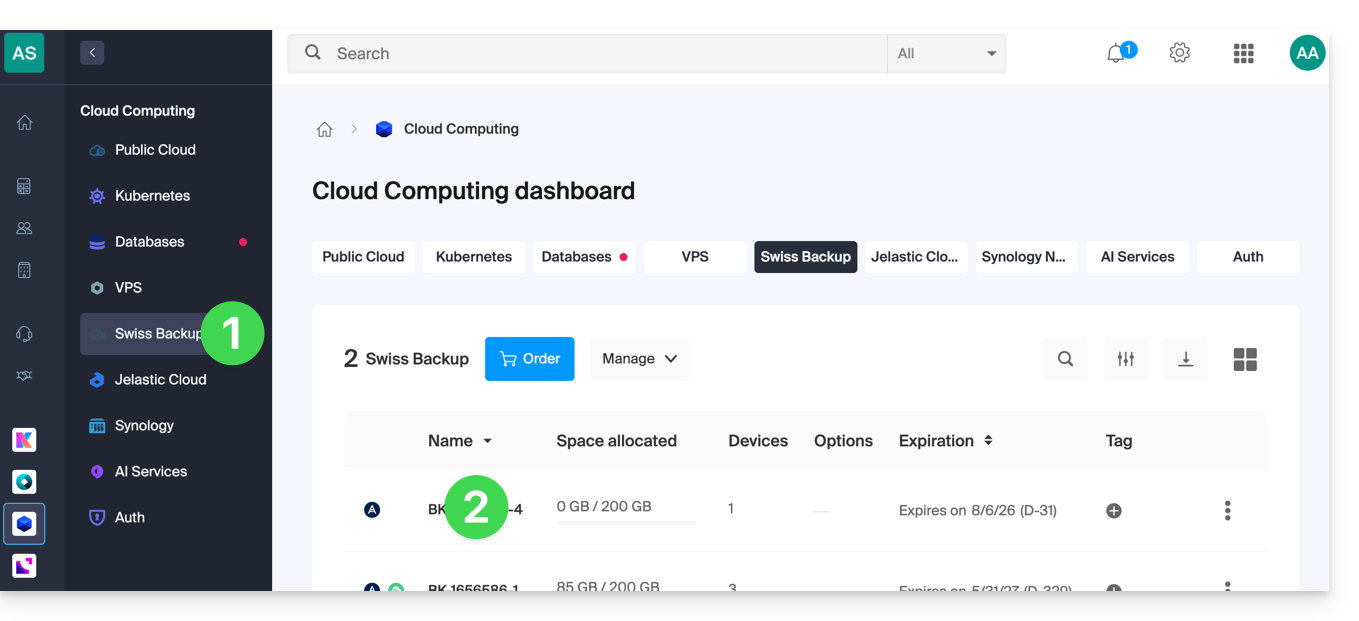
- Clique no botão Configurar o meu espaço de backup Acronis (na parte Espaço de backup Acronis):
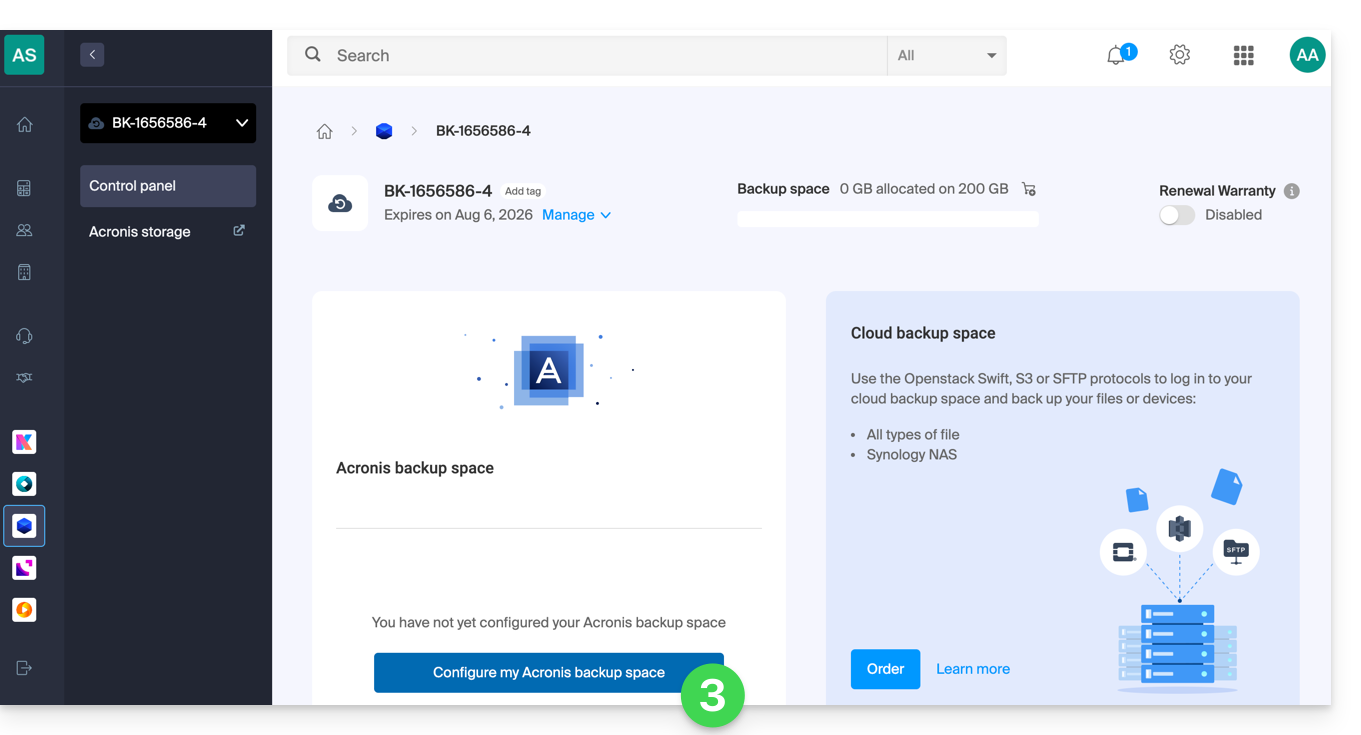
- Insira um endereço de e-mail de contacto válido.
- Clique no botão Continuar:
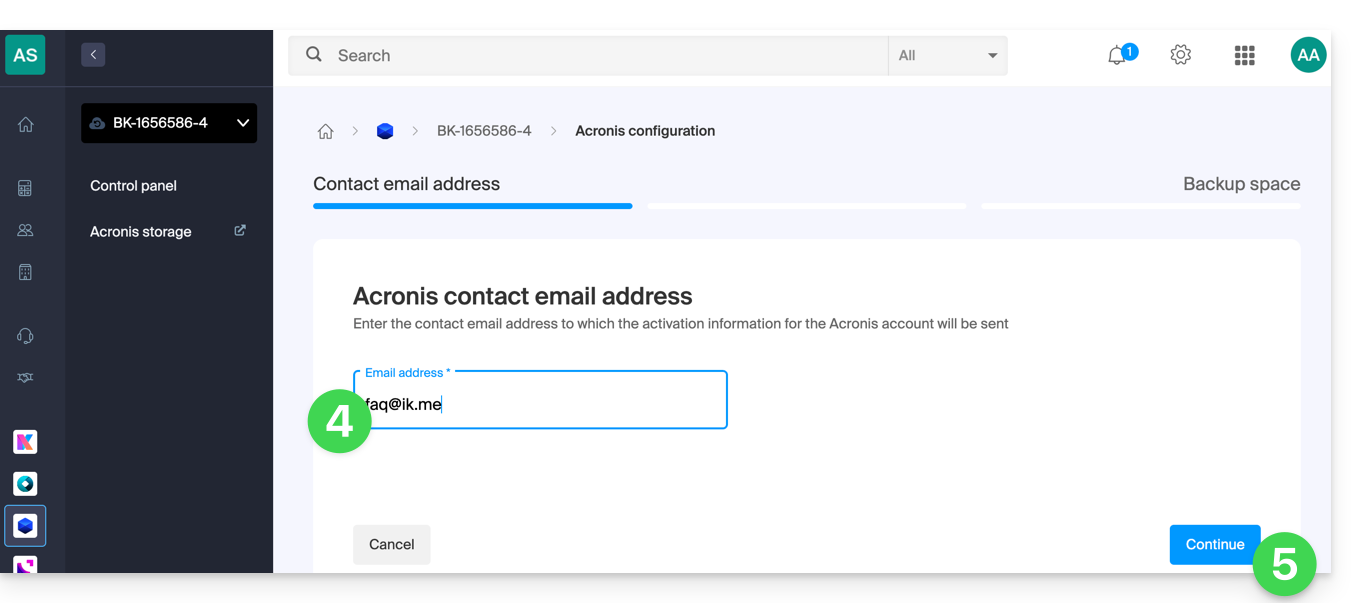
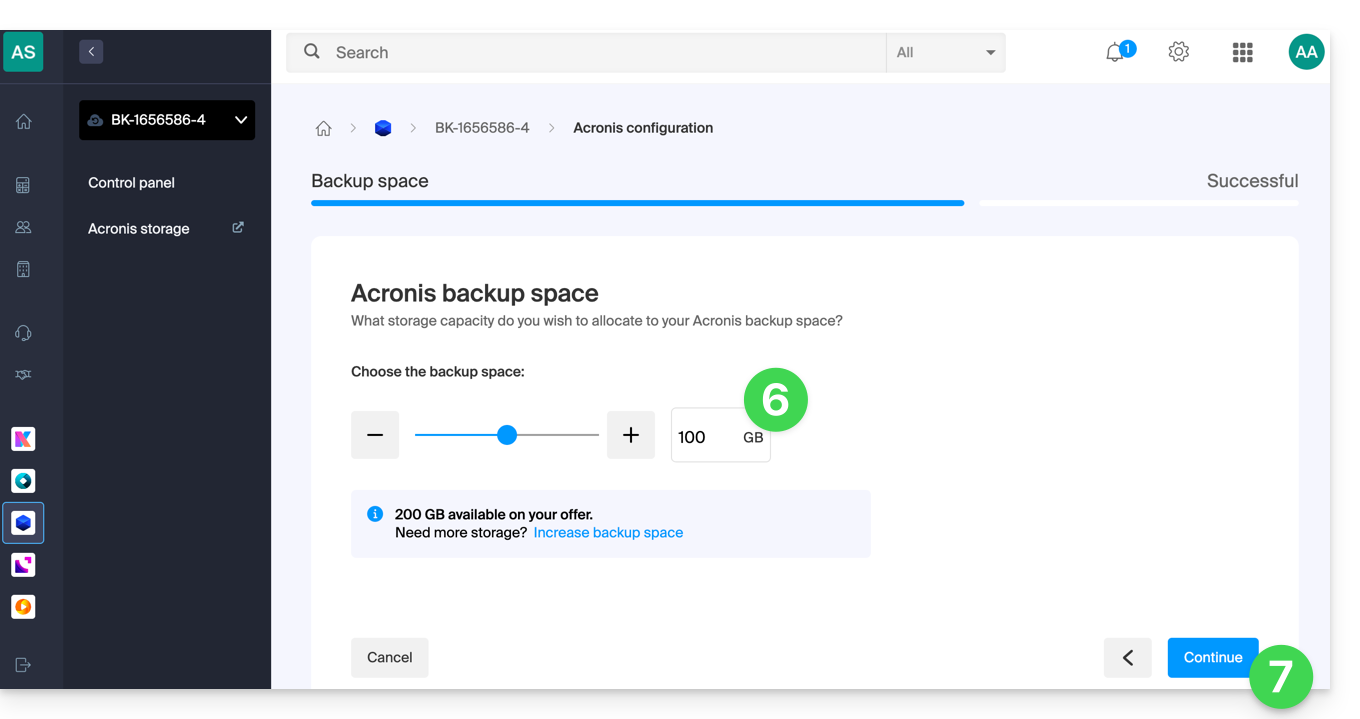
- Defina o espaço em disco máximo que este espaço de backup deverá representar, em relação ao volume total do Swiss Backup contratado, aumentando, se necessário, o tamanho total através do link azul.
- Clique no botão Continuar:
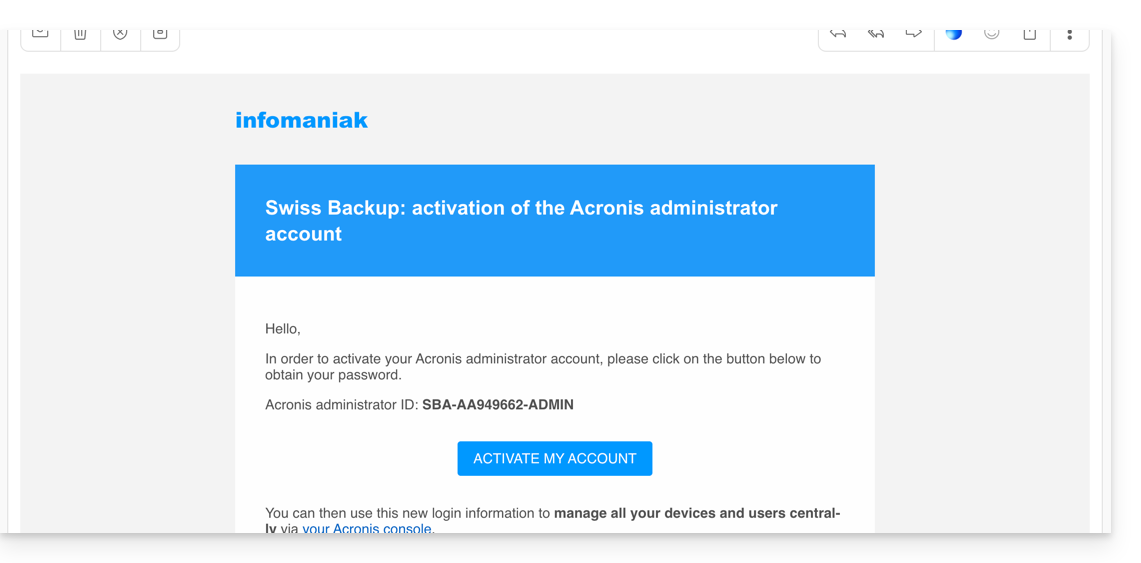
- Consulte o e-mail recebido para ativar a conta e gerar uma senha de login:
- Clique no botão no e-mail recebido:
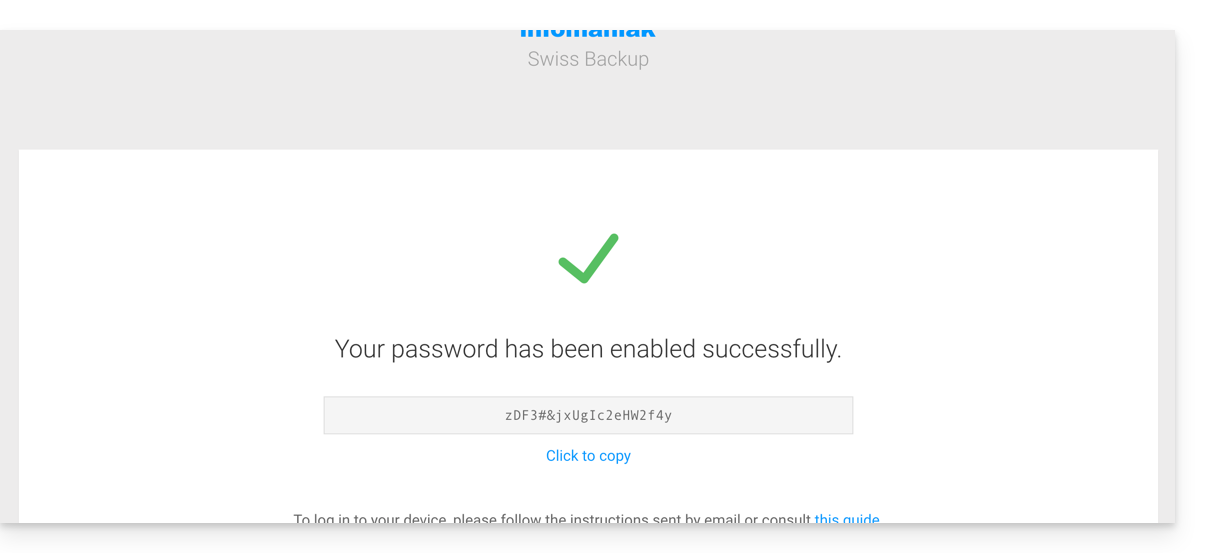
- Anote cuidadosamente a senha que será exibida na sua tela (exemplo abaixo):
- Se necessário, você pode regenerar uma nova senha da conta Acronis.
- Clique no botão no e-mail recebido:
- As informações de login agora são exibidas na página de gerenciamento do Swiss Backup no Manager Infomaniak:
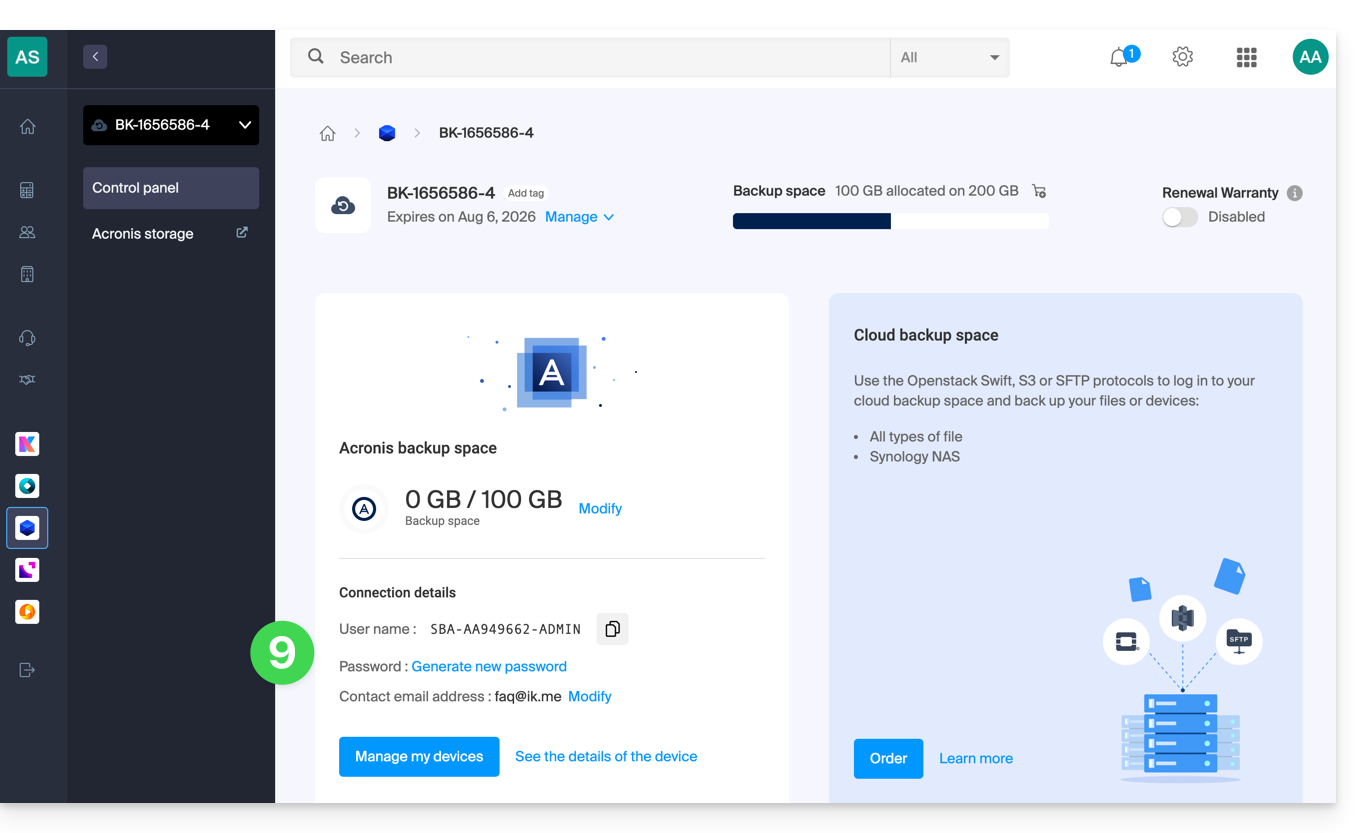
- O botão abaixo dessas informações permite fazer login no Acronis.
E depois?
Depois que o dispositivo for adicionado na interface do Swiss Backup dentro do Manager Infomaniak, você pode configurar o aplicativo Acronis para iniciar seus planos de backup.
Link para esta FAQ: https://faq.infomaniak.com/2279
Esta seção de perguntas frequentes foi útil?
Este guia detalha como fazer o backup de um computador com Microsoft Windows usando o Acronis no Swiss Backup da Infomaniak, a solução de backup em uma nuvem suíça independente.
Também é possível fazer o backup do Windows, instalado em uma máquina virtual do tipo VMware, Virtuozzo ou Microsoft Hyper-V.
Pré-requisitos
- Verifique as versões do Windows suportadas pelo Agente Acronis.
- Ter um espaço Swiss Backup com uma quota de dispositivo disponível (mín. 1) para Windows (consulte abaixo).
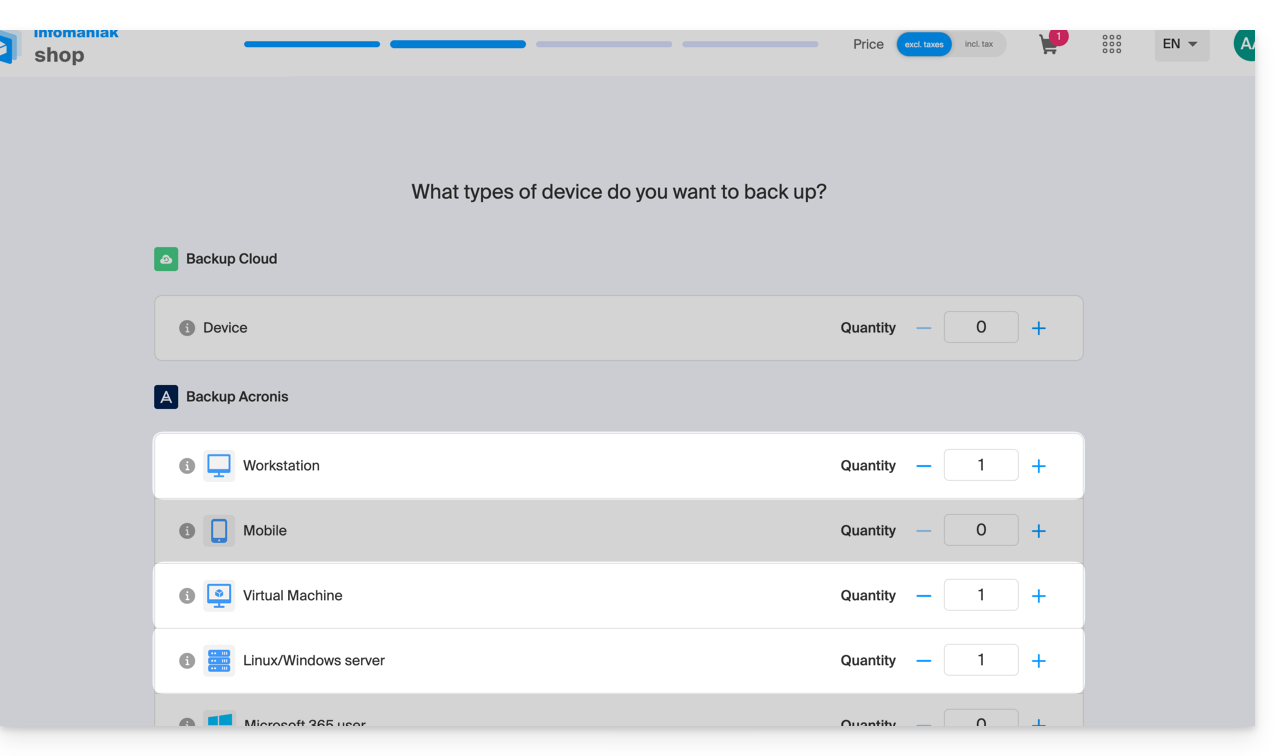
- Se necessário, aumente a quota de dispositivo de acordo com as suas necessidades.
- Adicionar o dispositivo no Gerenciador Infomaniak para receber as credenciais de acesso.
Diferenças entre os dispositivos
Estação de trabalho
- 1 licença por máquina física a ser protegida.
- Observação: esta licença NÃO oferece suporte ao backup do Microsoft Exchange Server, Microsoft SQL Server ou Active Directory.
- Se desejar fazer o backup de aplicativos Microsoft instalados em um sistema operacional de estação de trabalho, será necessária uma licença de servidor.
Máquina Virtual
- 1 licença por máquina virtual a ser protegida.
- Suporta Microsoft SQL Server, Microsoft SharePoint e Active Directory.
- Quando o Acronis é instalado em um cluster (por exemplo, Hyper-V), cada host do cluster requer uma licença de VM.
- Se instalou o Windows numa máquina virtual, é necessário adicionar um dispositivo desse tipo.
Servidor
- 1 licença por máquina física ou virtual executando Windows.
- Suporta Microsoft SQL Server, Microsoft SharePoint e Active Directory.
- Suporta o backup de um servidor que atua como host de virtualização (Hyper-V, VMware ESXi, etc.).
Configurar o backup
Para configurar a cópia de segurança com o Acronis:
- Clique aqui para aceder à Consola Acronis com as credenciais obtidas após a adição do dispositivo (precisa de ajuda?).
- Clique em Dispositivos no menu lateral esquerdo.
- Escolha o agente para Windows:
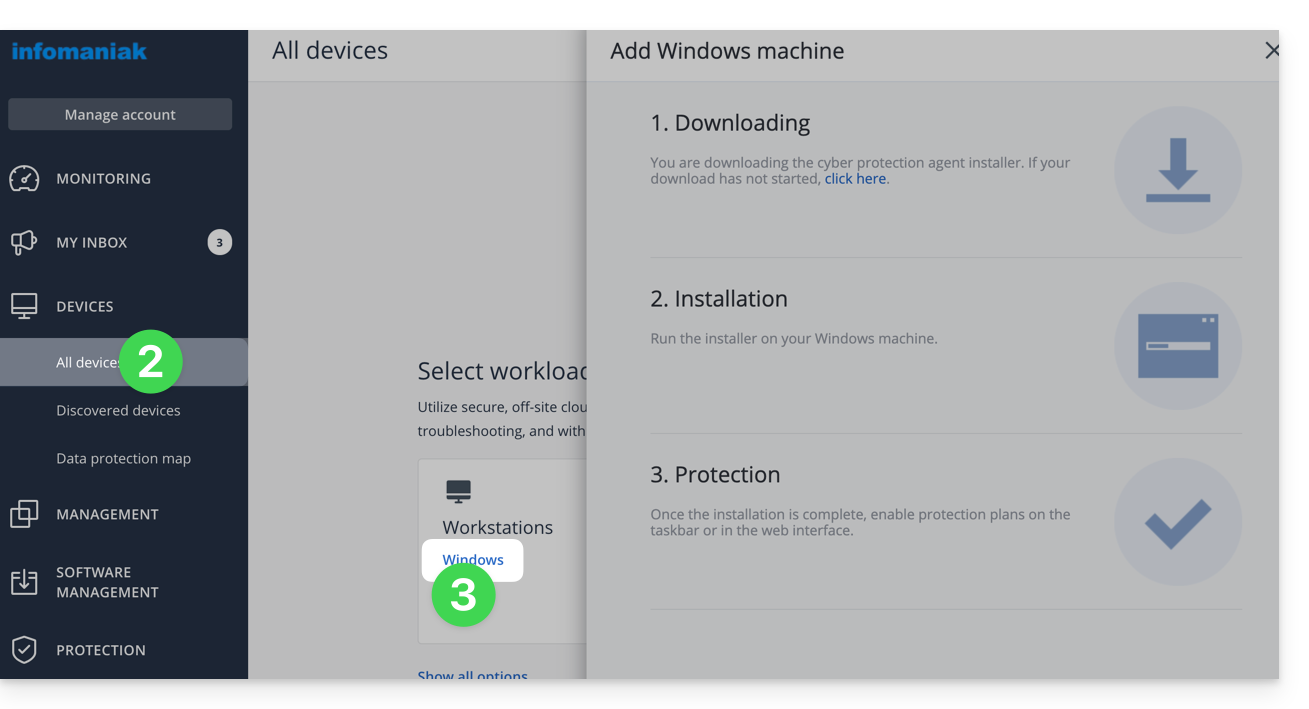
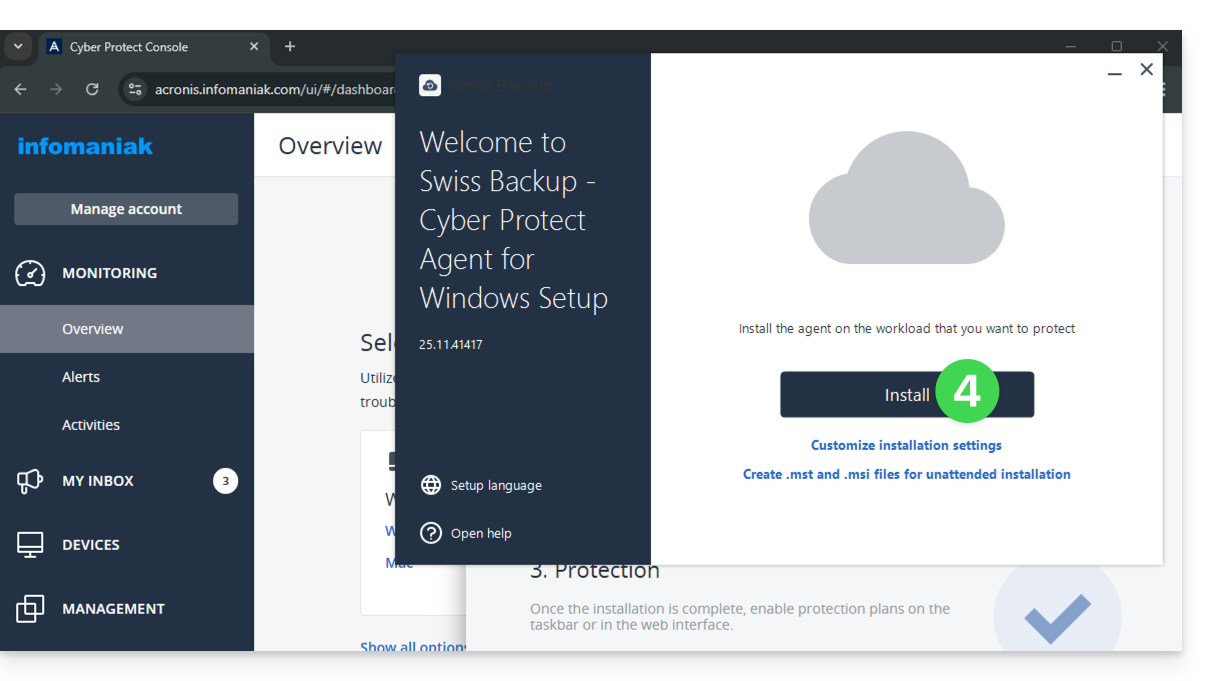
- Em seguida, instale o aplicativo Acronis para Windows:
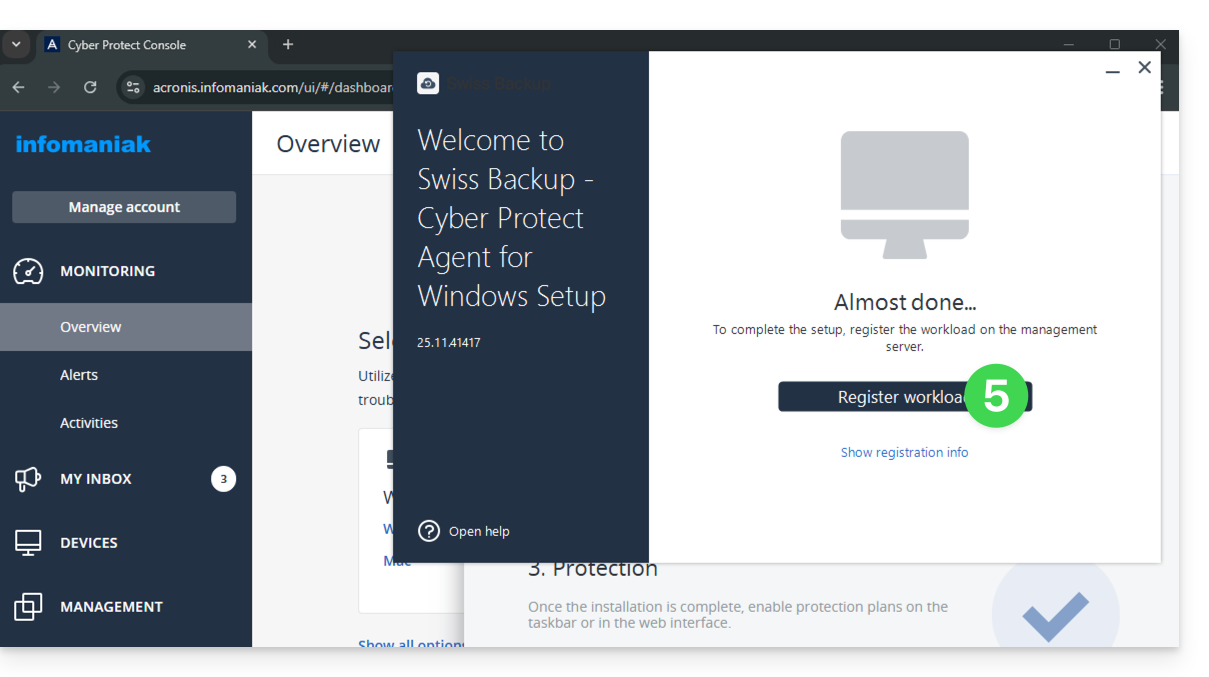
- Clique no botão Salvar a carga de trabalho:
- Se necessário, selecione o utilizador a quem se refere esta cópia de segurança:
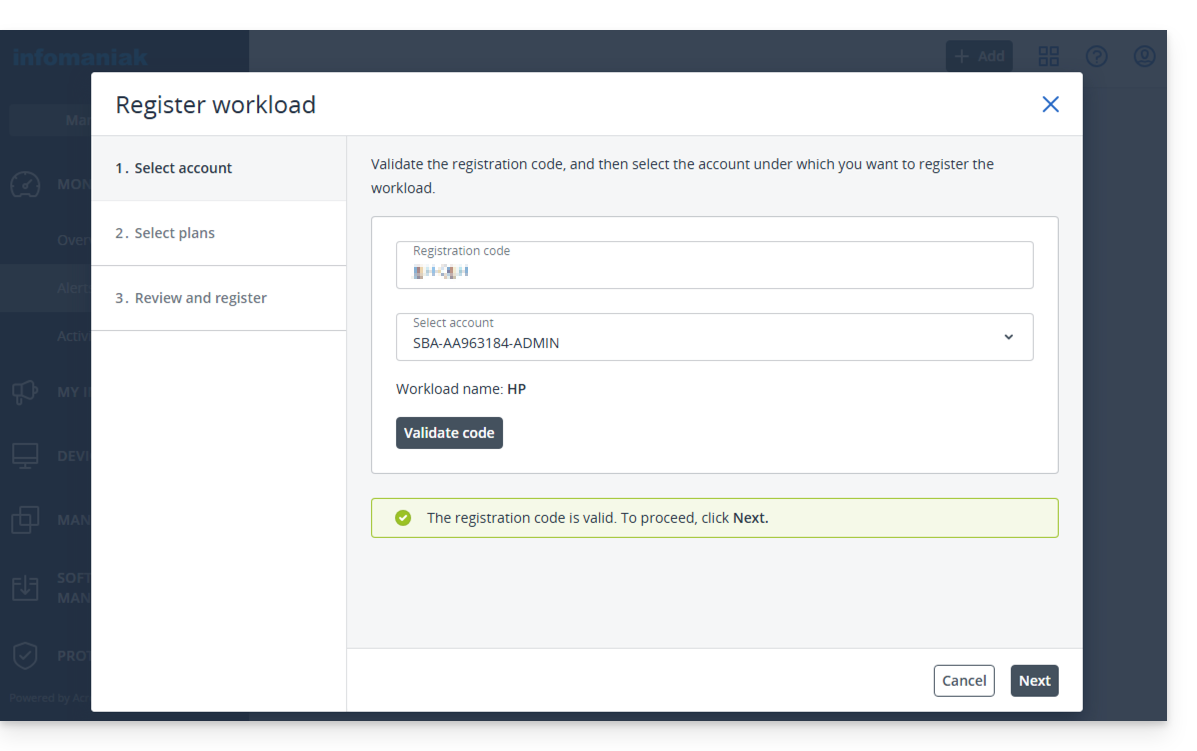
- Continue para finalizar e ativar o plano de proteção selecionado:
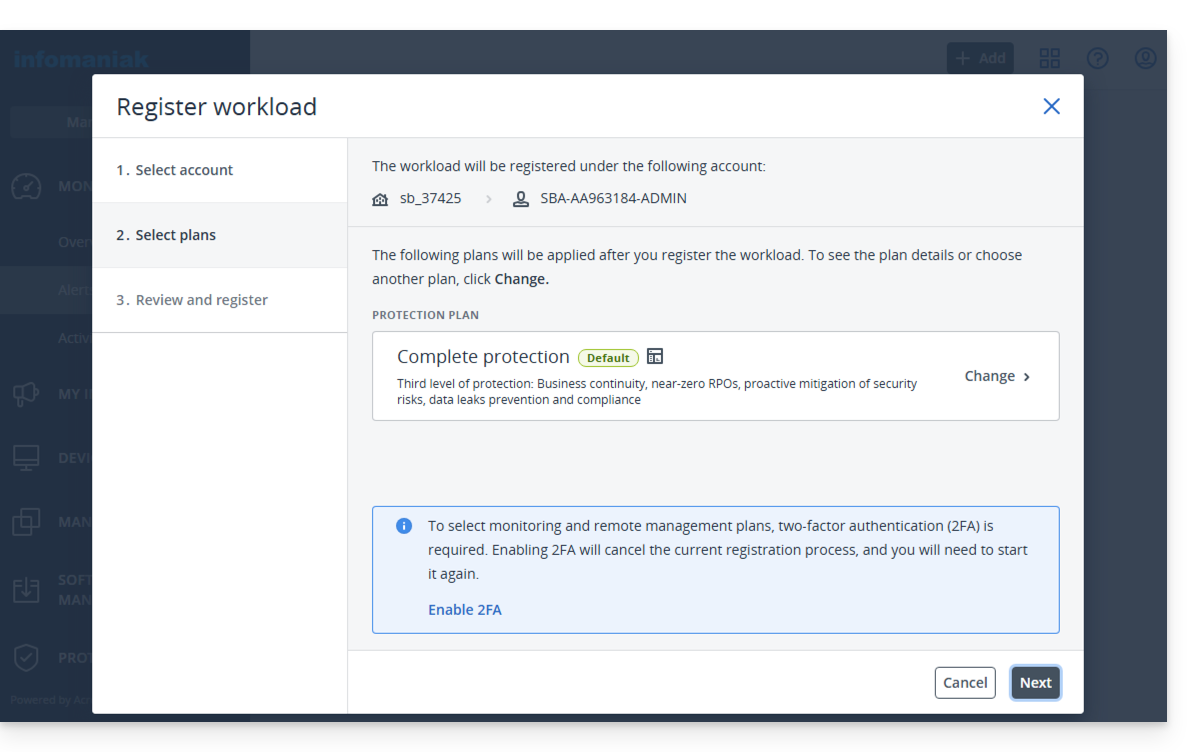
- Aguarde até que a interface do Acronis exiba sua nova máquina:
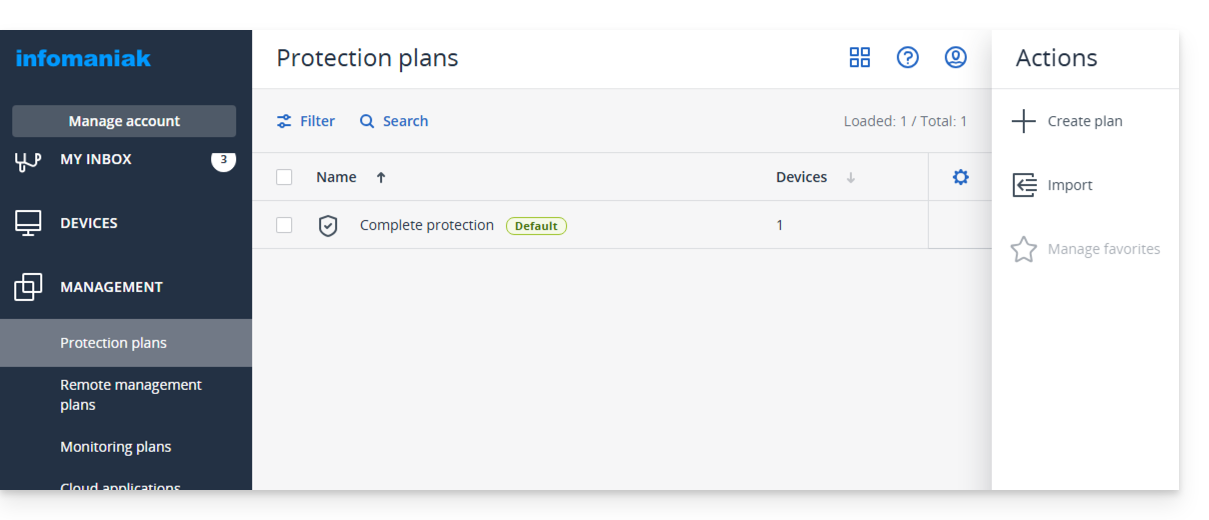
- Verifique o plano de backup ativo ou substitua-o por um novo para ativar, se necessário, a criptografia do backup, definindo uma senha que você nunca deve perder, caso contrário, não poderá restaurar sua máquina.
- O download de um arquivo de inicialização no formato
.isonão é útil (você sempre poderá fazê-lo a partir de outro computador, caso seu dispositivo se torne inutilizável no futuro). - A proteção será realizada em segundo plano, nos horários configurados no seu plano de backup.
Restaurar o backup
Para uma restauração (parcial ou completa), consulte este outro guia.
Link para esta FAQ: https://faq.infomaniak.com/2280
Esta seção de perguntas frequentes foi útil?
Este guia detalha como fazer o backup de um computador Apple macOS usando o Acronis no Swiss Backup, a solução de backup em nuvem de um provedor suíço independente.
Pré-requisitos
- Verificar as versões do macOS suportadas pelo Agente Acronis.
- Ter um espaço Swiss Backup Infomaniak com uma quota de dispositivo disponível (mínimo 1) para macOS:
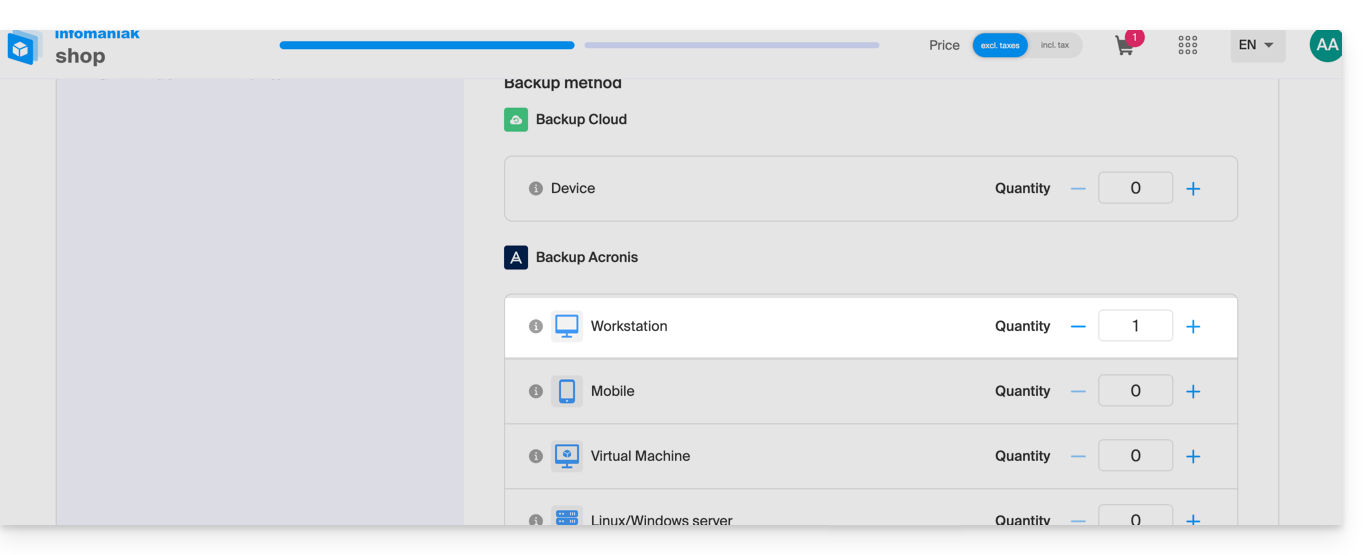
- Se necessário, aumente a quota do dispositivo de acordo com as suas necessidades.
- Adicione o dispositivo no Gerenciador Infomaniak para receber as credenciais de acesso.
Configurar a cópia de segurança
Para configurar a cópia de segurança com o Acronis:
- Clique aqui para acessar o Console Acronis com as credenciais obtidas após adicionar o dispositivo (precisa de ajuda?).
- Faça o download e instale o Agente Acronis para macOS (precisa de ajuda?):
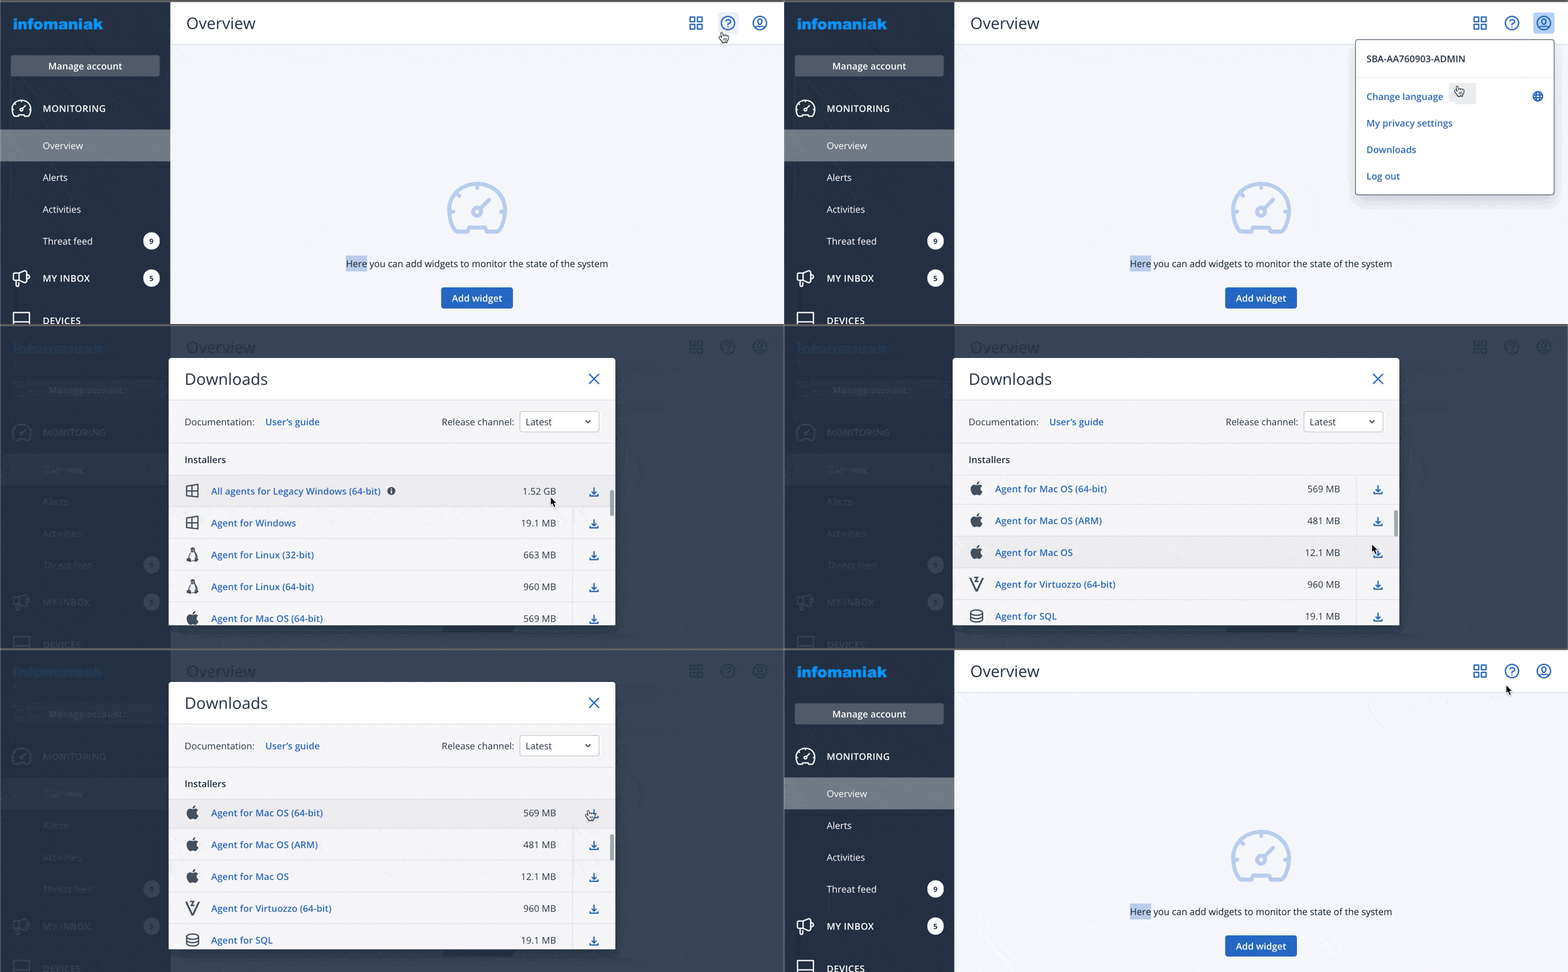
- Consulte também o capítulo abaixo sobre as permissões de acesso ao disco solicitadas pelo instalador.
- Clique em Registar o dispositivo no final da instalação do Cyber Protect:
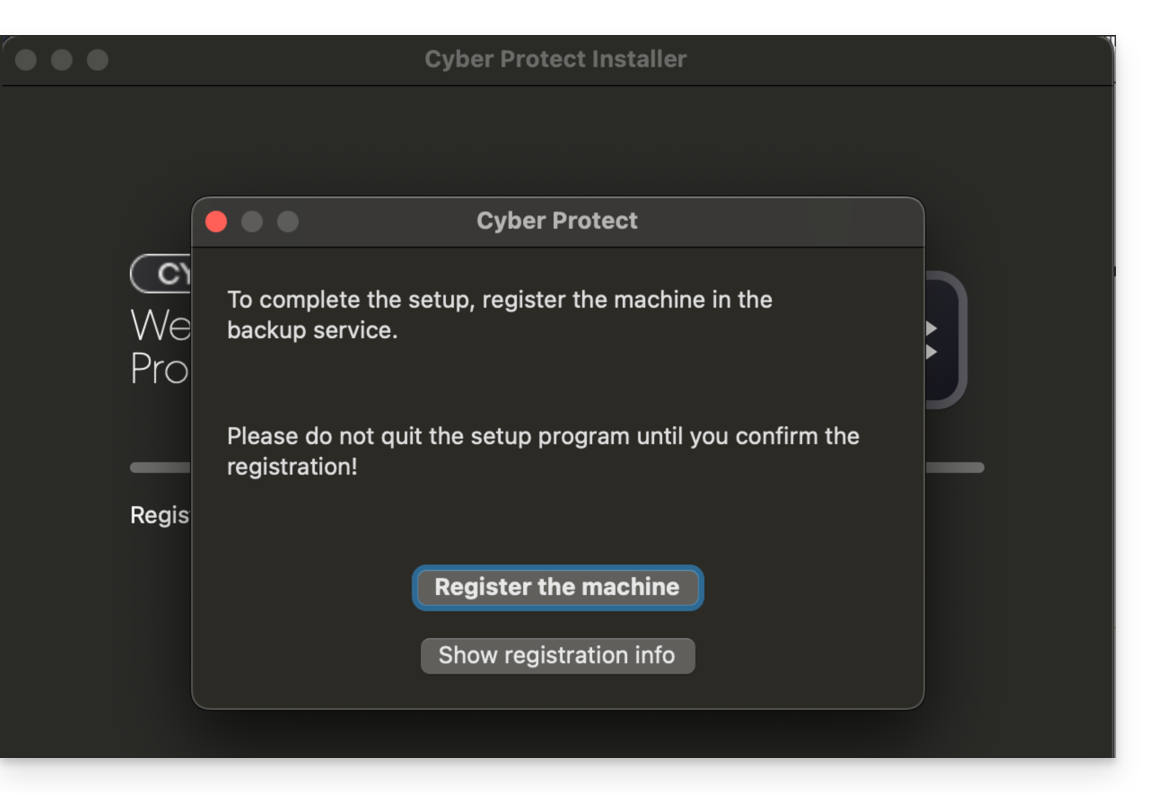
- Não altere o código proposto, selecione o utilizador em questão, se necessário, e clique em Verificar código:
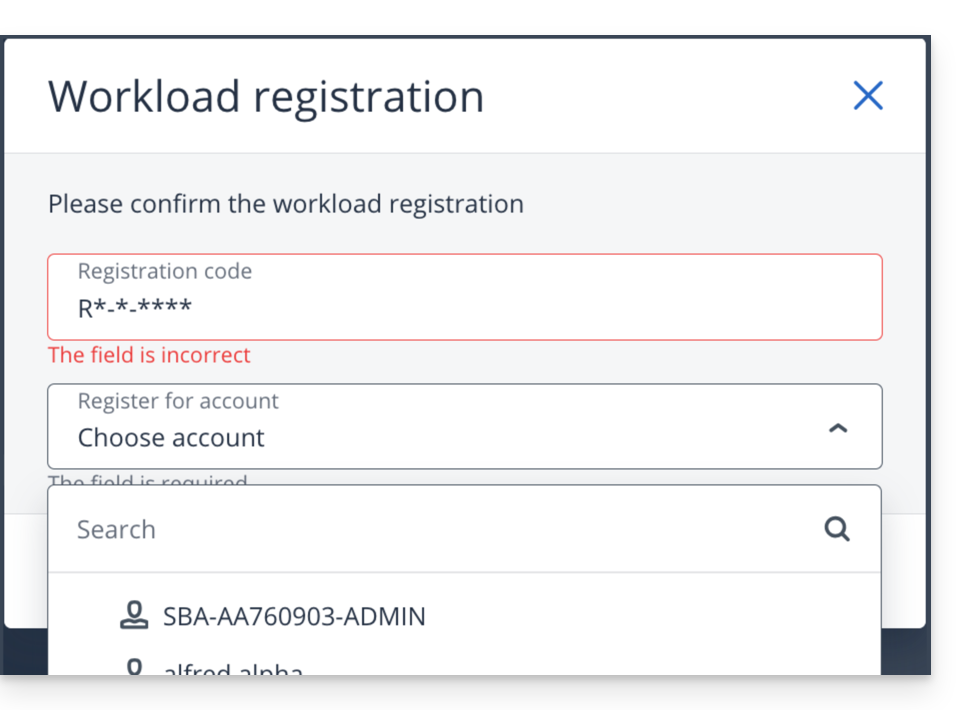
- Consulte este outro guia se o registo do dispositivo falhar.
- Crie um plano de backup.
Senha e permissões de acesso
Durante a instalação da aplicação para desktop (item 2 acima), a senha solicitada é a do seu Mac (conta de usuário).
Além disso, você deverá conceder (nas configurações do macOS) acesso total ao disco ao Agente Cyber-Protect-Service da Acronis: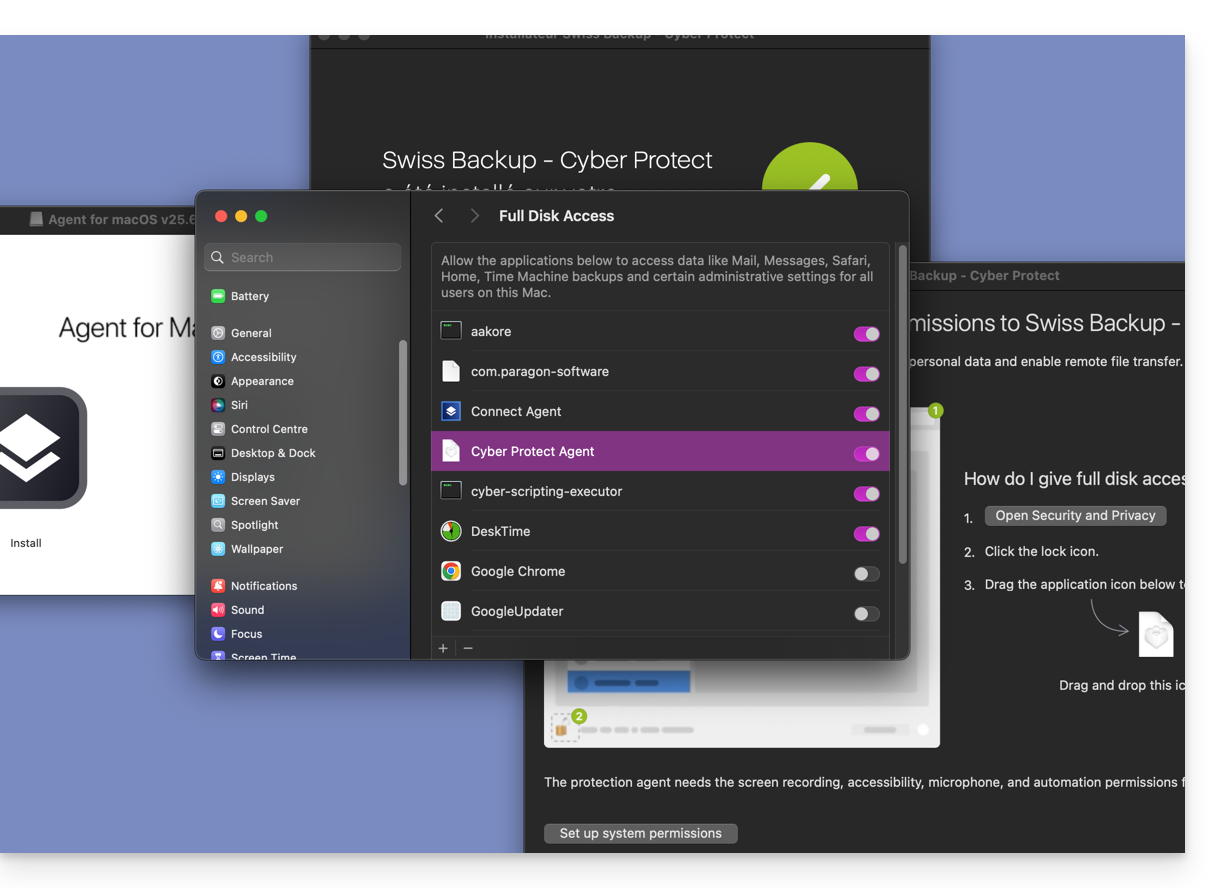
Aceder aos ficheiros guardados e restaurá-los
Consulte este outro guia para restaurar os seus dados.
Link para esta FAQ: https://faq.infomaniak.com/2281
Esta seção de perguntas frequentes foi útil?
Este guia detalha como fazer o backup manual de dados usando o aplicativo Cyberduck (macOS / Windows) através do protocolo OpenStack Swift no Swiss Backup, a solução de backup em uma nuvem suíça independente.
Introdução
Configurar o Cyberduck
Pré-requisitos
- Possuir um espaço Swiss Backup Infomaniak com uma quota de dispositivo disponível (mínimo 1) para um backup na nuvem.
- Adicionar 1 dispositivo do tipo Nuvem para obter os parâmetros OpenStack Swift.
- Baixar e instalar o Cyberduck (macOS / Windows).
- Consultar a documentação oficial https://docs.cyberduck.io/protocols/openstack/infomaniak/.
Para configurar um novo backup:
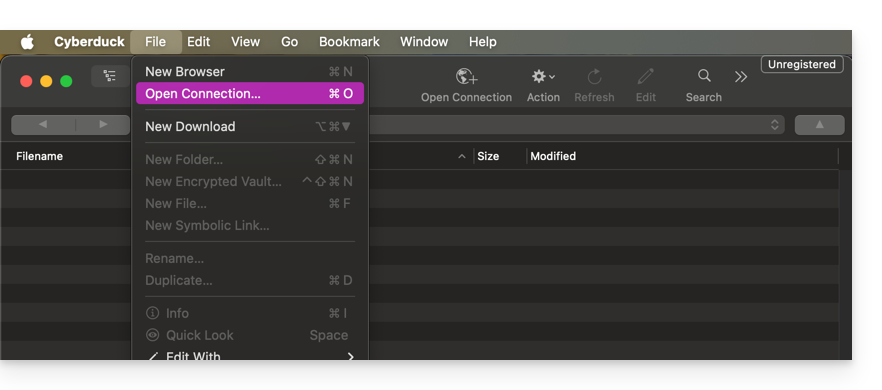
- Abra o aplicativo Cyberduck.
- Clique em Abrir conexão:
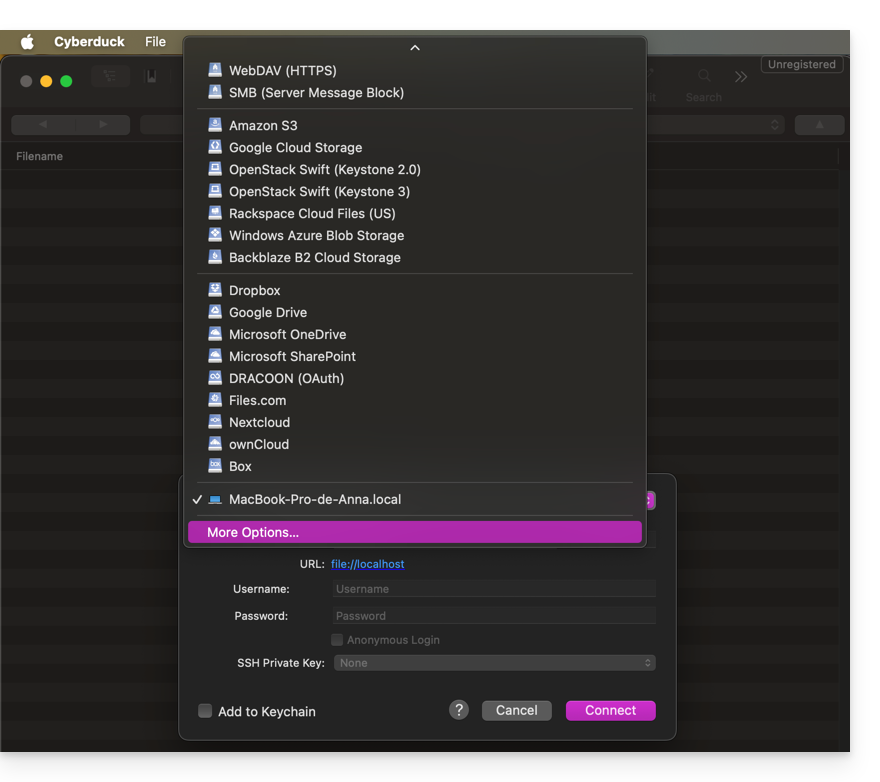
- Clique no menu suspenso e escolha Mais opções:
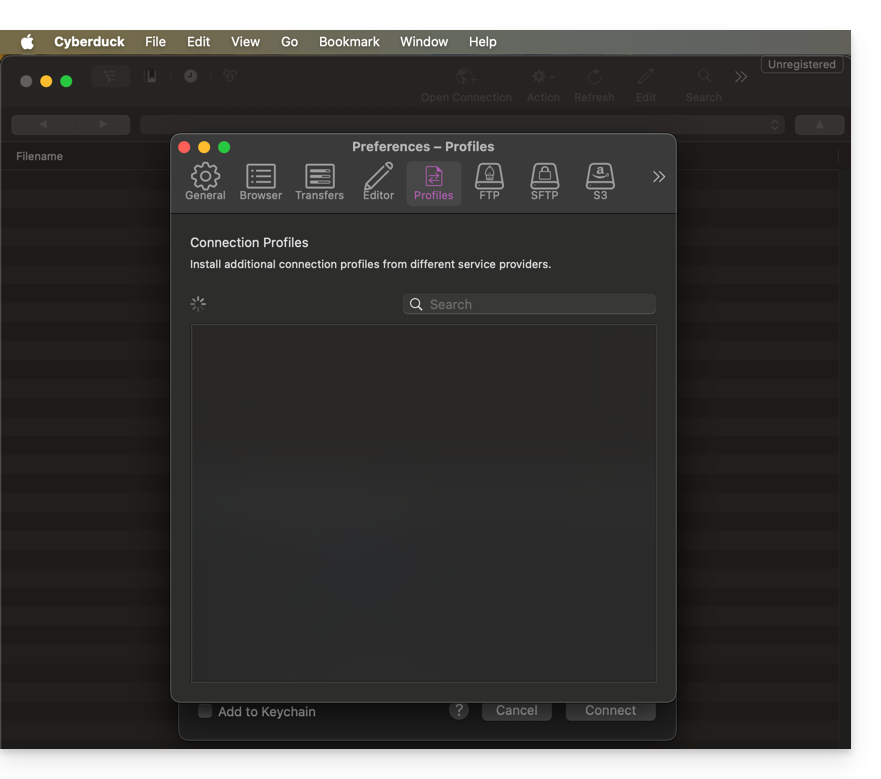
- Aguarde o carregamento dos perfis adicionais:
- Procure e selecione os perfis correspondentes ao Infomaniak Swift:
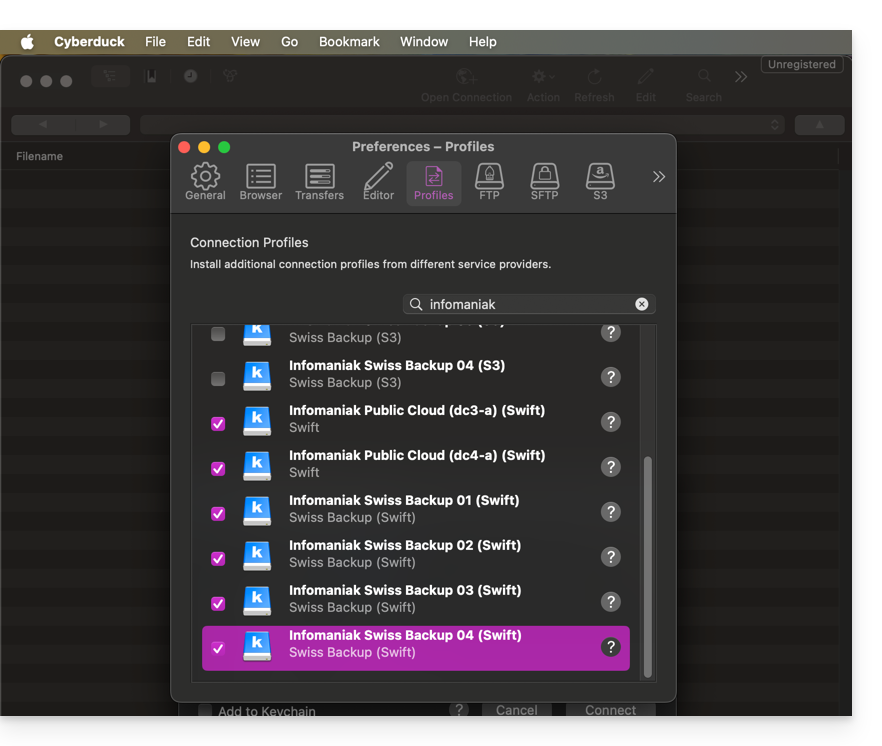
- Verifique, se necessário, o seu número de cluster indicado no Manager, nas informações de armazenamento Cloud, em "Localização".
- Feche a janela e reinicie o Cyberduck se os perfis não aparecerem no menu suspenso do ponto 3 acima.
- Escolha o perfil correspondente:
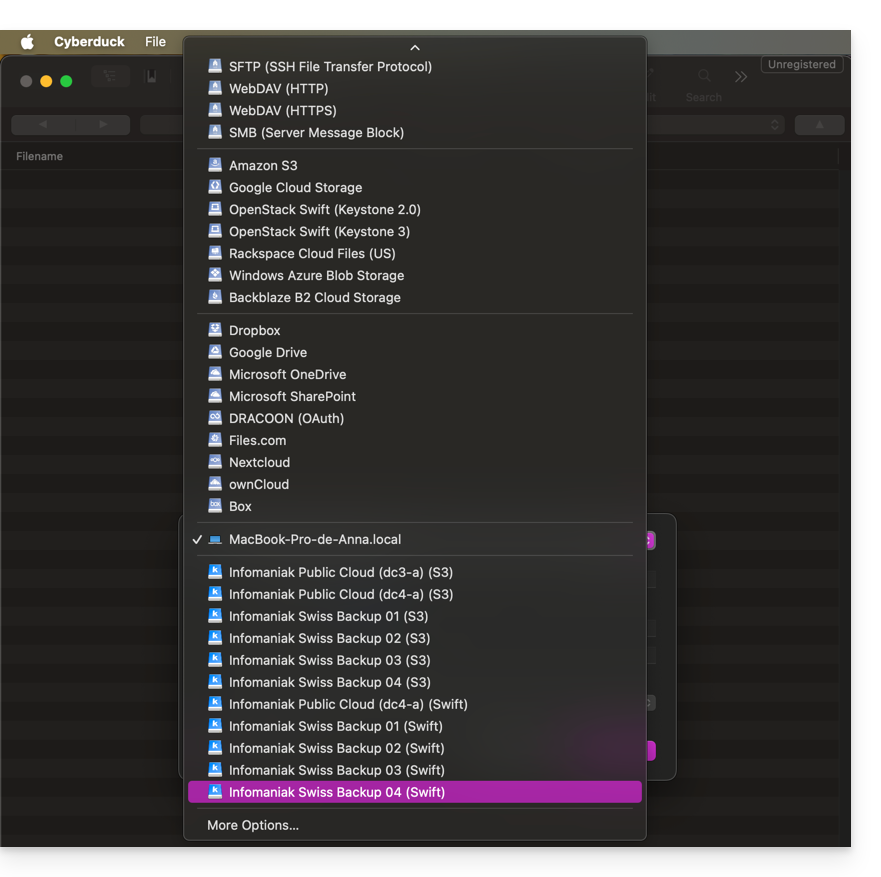
- Preencha os campos de acordo com as informações específicas do seu dispositivo:
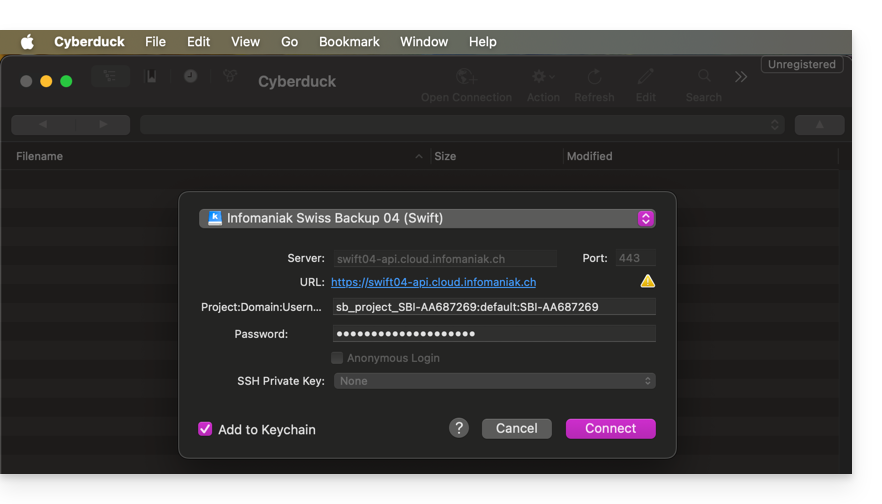
- Clique no botão Conectar para estabelecer a conexão Swift.
Link para esta FAQ: https://faq.infomaniak.com/2282
Esta seção de perguntas frequentes foi útil?
Este guia detalha como obter as informações de login e configuração do Swiss Backup (backup com Acronis), a solução de backup em uma nuvem suíça independente. Ele também explica as diferenças entre as senhas disponíveis.
Acessar as informações de login
Para aceder às informações relativas à sua ligação ao Acronis:
- Clique aqui para aceder à gestão do seu produto no Manager Infomaniak (precisa de ajuda?).
- Clique diretamente no nome atribuído ao produto em questão:
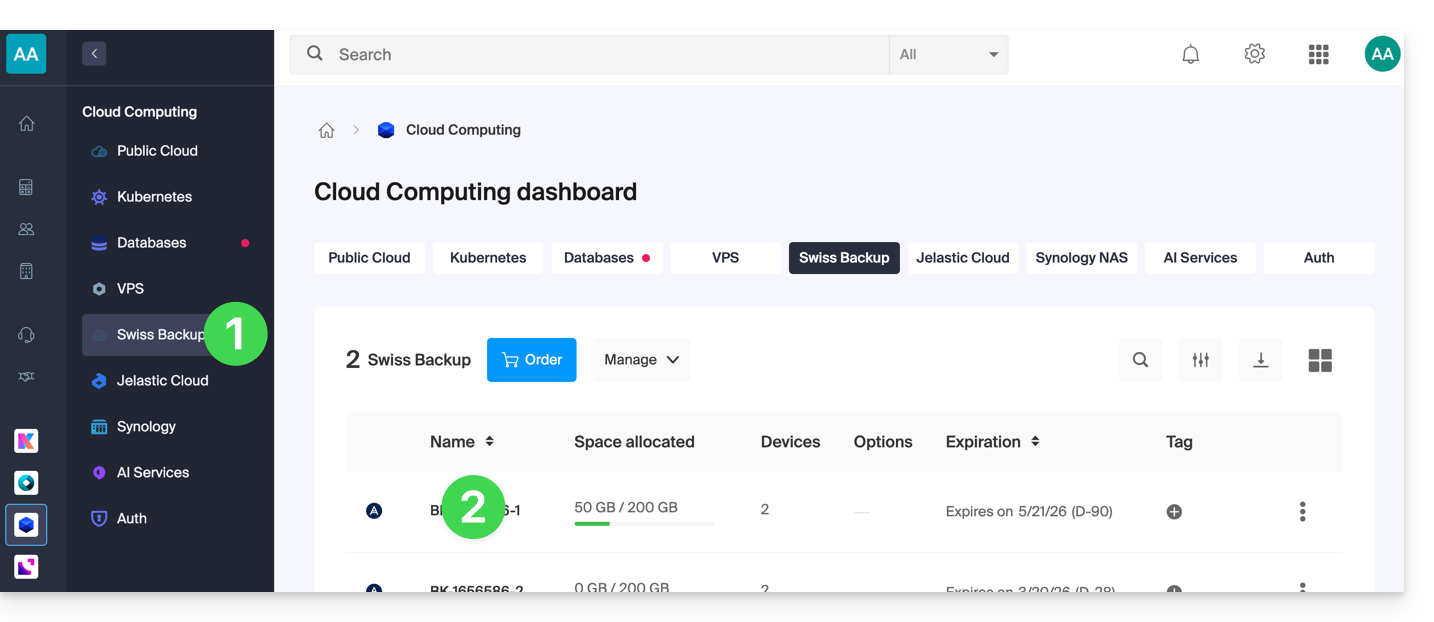
- As diferentes informações relativas ao seu dispositivo são exibidas na página:
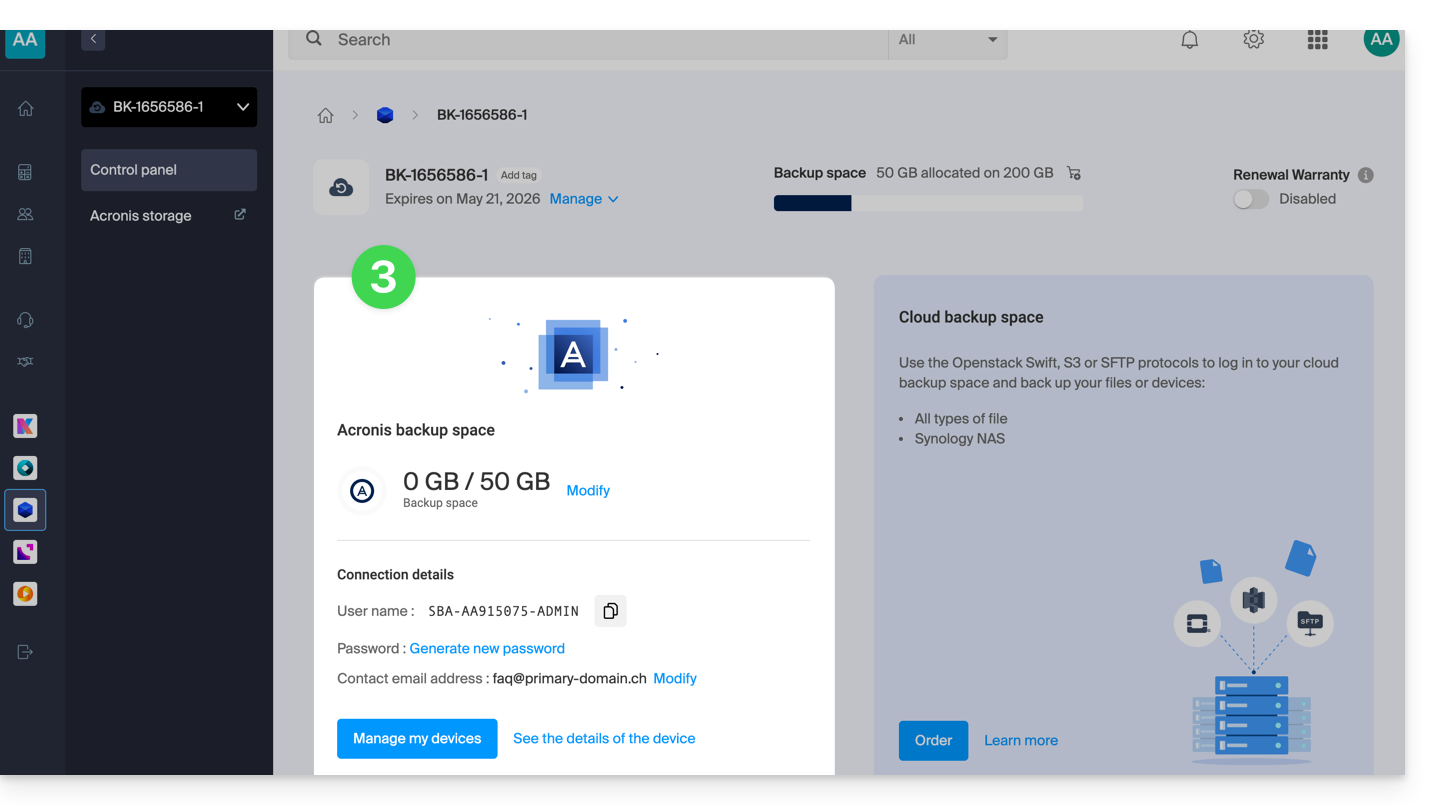
- Nome de utilizador:
SBA-AB123456-ABCDE - Senha: *** (veja abaixo para gerenciar)
- Nome de utilizador:
Diferentes senhas
Conta de usuário Infomaniak
Para acessar o gerenciamento do produto Swiss Backup (Acronis ou armazenamento em nuvem), é necessário fazer login no Manager Infomaniak: consulte este outro guia sobre o assunto.
Conta de Backup Acronis
Para estabelecer uma conexão com a interface Acronis, uma senha deve ser gerada pela primeira vez ao criar um dispositivo na interface Swiss Backup e ao ativar o ID (ponto 8, na parte inferior deste outro guia).Não é possível exibir uma senha já gerada.
Em caso de esquecimento, é necessário gerar uma nova senha:
- Clique aqui para acessar o gerenciamento do seu produto no Manager Infomaniak (precisa de ajuda?).
- Clique diretamente no nome atribuído ao produto em questão.
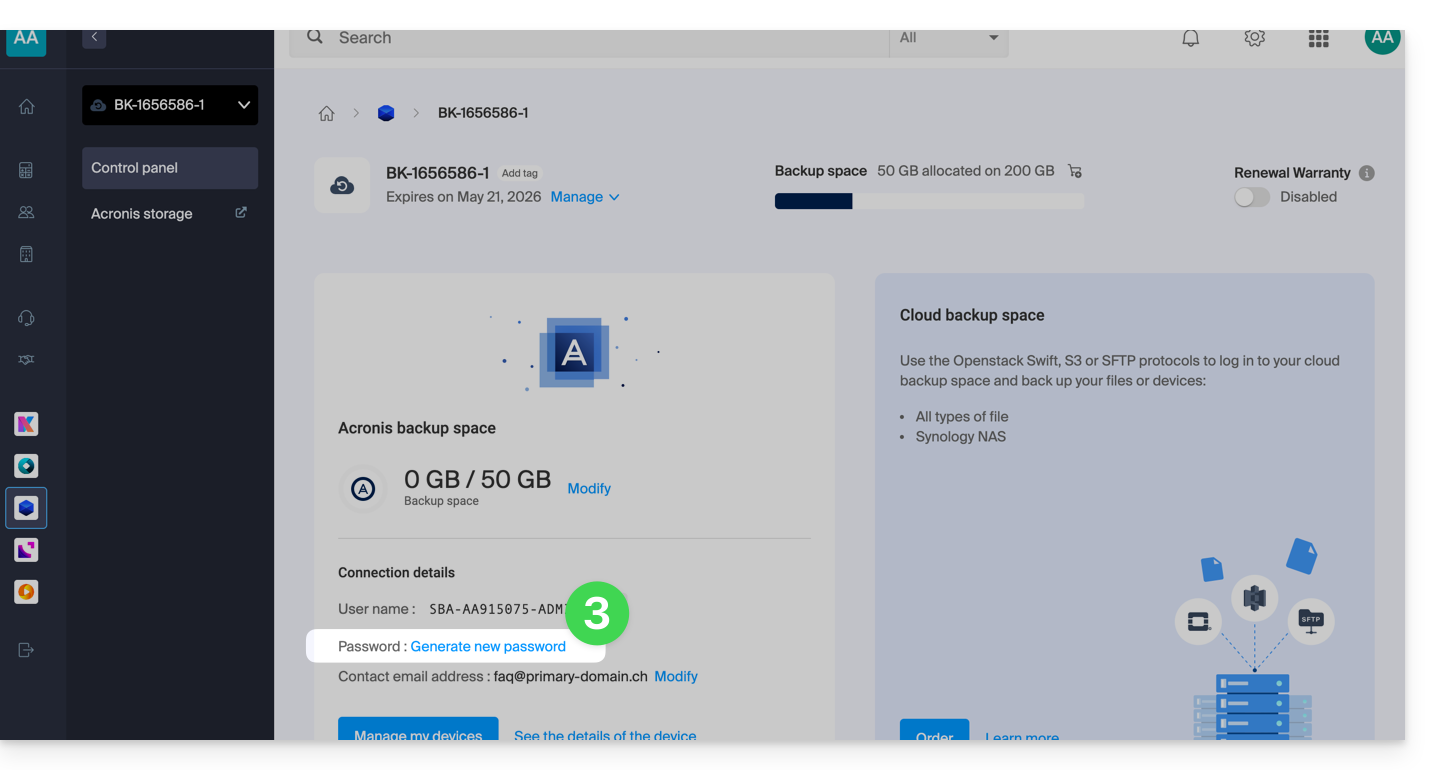
- Clique em Gerar uma nova senha (na seção Espaço de backup Acronis) e siga o assistente:
Conta de utilizador sem privilégios de administrador
Uma conta de administrador pode criar contas de utilizador sem privilégios de administrador. A redefinição da palavra-passe de uma conta de utilizador sem privilégios de administrador é solicitada na página de início de sessão na interface Acronis e, em seguida, é enviada por e-mail para o endereço do utilizador: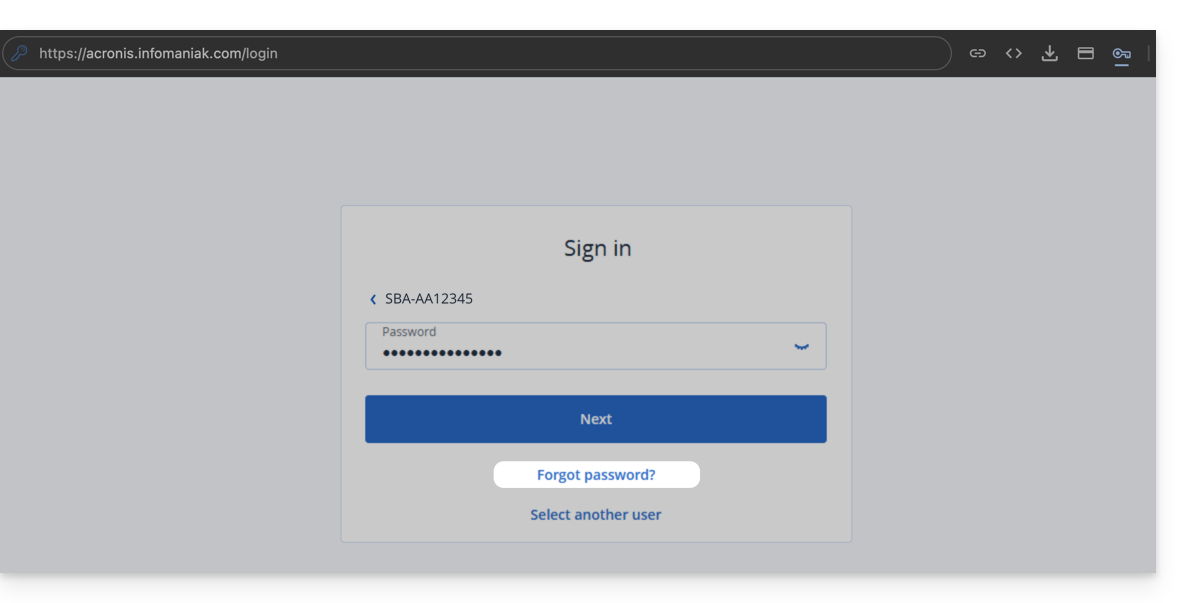
Se nenhuma mensagem for entregue no e-mail do usuário, verifique se o nome de usuário está correto (SBA-12345 pode ter sido criado com um nome de usuário específico e é esse nome que deve ser especificado para redefinir a senha).
Criptografia Acronis
Recomenda-se criptografar todas as cópias de segurança armazenadas no armazenamento em nuvem, especialmente se a sua empresa estiver sujeita a requisitos de conformidade regulamentar. A senha de criptografia não está sujeita a requisitos de comprimento ou complexidade.
É impossível restaurar as cópias de segurança criptografadas se perder ou esquecer a senha.
Para ativar a criptografia, indique as configurações de criptografia ao criar um plano de proteção. Depois que um plano de proteção for aplicado, as configurações de criptografia não poderão ser alteradas.
Para usar configurações de criptografia diferentes, crie um novo plano de proteção.
Backup na Nuvem
Para estabelecer uma conexão do tipo Swift / S3 / FTP/SFTP / etc., uma senha para este tipo de backup é gerada durante a criação de um dispositivo na interface Swiss Backup e a ativação do identificador.
Link para esta FAQ: https://faq.infomaniak.com/2283
Esta seção de perguntas frequentes foi útil?
Este guia detalha como começar a usar o Swiss Backup, a solução de backup em uma nuvem suíça independente.
Introdução
- A Infomaniak oferece duas variantes no que diz respeito aos métodos de cópia de segurança, dependendo do que pretende guardar:
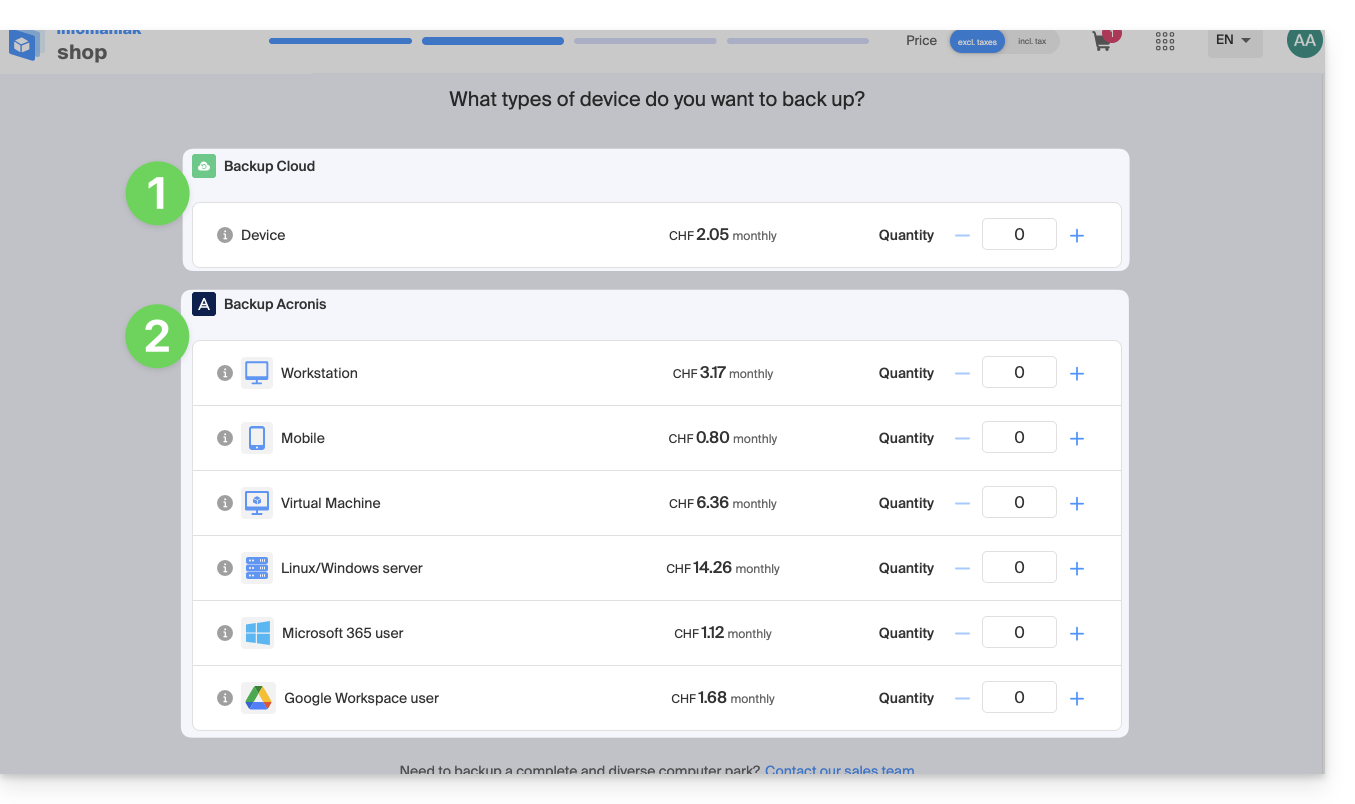
- Já deve ter feito a sua escolha ao encomendar um espaço de cópia de segurança Swiss Backup, mas é possível alterar a oferta a qualquer momento.
1. Modo de Backup CLOUD
Permite fazer backup e sincronizar arquivos por meio dos seguintes protocolos:
- Swift (recomendado)
- FTP / SFTP
- S3
- sistema NAS Synology
com a aplicação de sua preferência…
2. Métodos de cópias de segurança ACRONIS
Solução ideal para fazer backup:
- estações de trabalho Windows / macOS
- dispositivos móveis iOS / Android (iPhone / Samsung, etc.)
- servidores Windows / Linux
- máquinas virtuais VMware, Hyper-x, Virtuozzo...
- espaços Microsoft 365 / Google Workspace...
com o software Acronis Cyber Protect Cloud, que realizará backups automáticos e personalizados…
Link para esta FAQ: https://faq.infomaniak.com/2284
Esta seção de perguntas frequentes foi útil?
Este guia detalha como fazer o backup de um servidor equipado com a distribuição Linux de sua escolha em Swiss Backup, a solução de backup em uma nuvem suíça independente.
Configurar o rClone para o Swiss Backup
Pré-requisitos
- Ter um espaço Swiss Backup Infomaniak com uma quota de dispositivo disponível (mínimo 1) para uma cópia de segurança na nuvem.
- Instale o aplicativo rClone através do gerenciador de pacotes da sua distribuição Linux.
- Adicionar 1 dispositivo, mas do tipo Servidor, para obter as configurações rClone
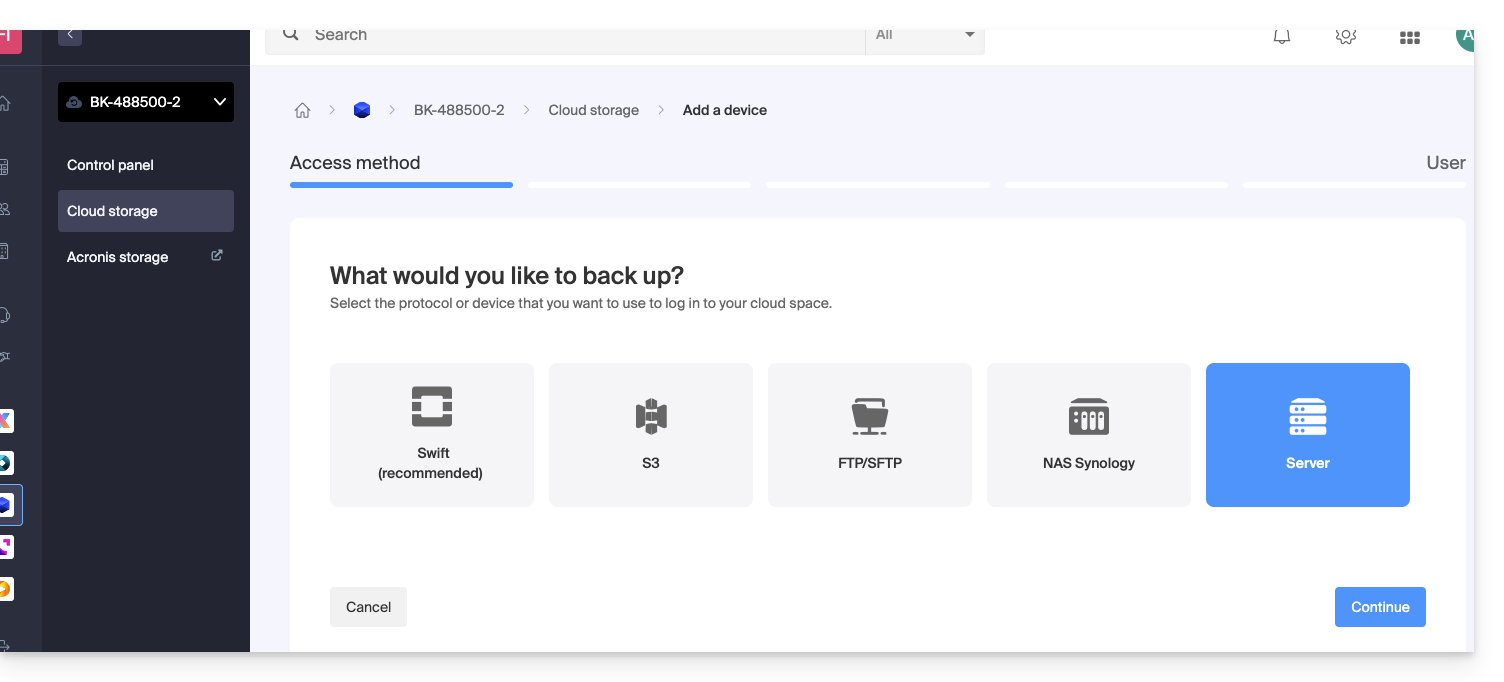
Para configurar uma nova cópia de segurança:
- Descarregue o ficheiro rclone que recebeu por e-mail após adicionar o dispositivo:
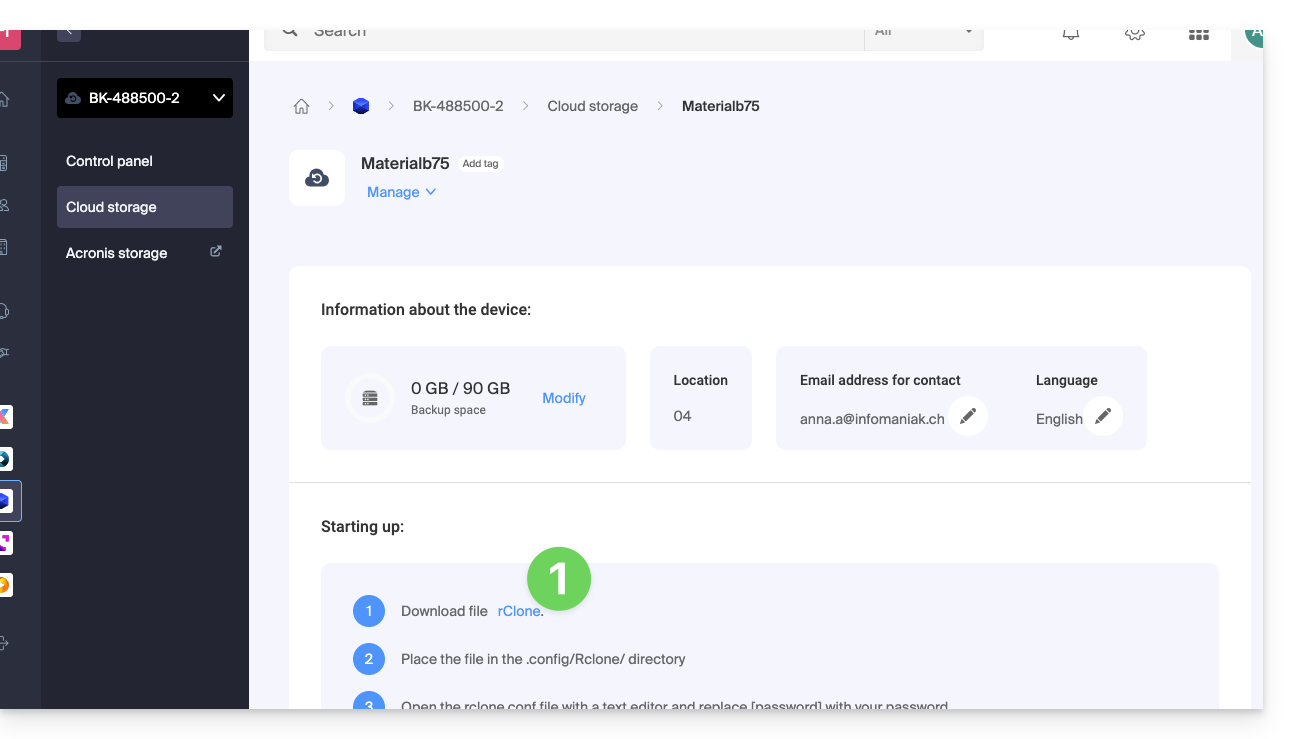
- Coloque o arquivo no diretório
~/.rclone.conf.config/rclone/ou adicione o conteúdo do arquivo ao final do arquivo~/.rclone.conf.config/rclone/rclone.confexistente (no Debian Stretch, este arquivo está localizado em:~/.rclone.conf) — consulte também a documentação do rClone. - Abra o arquivo
rclone.confcom um editor de texto e substitua[password]pela senha gerada: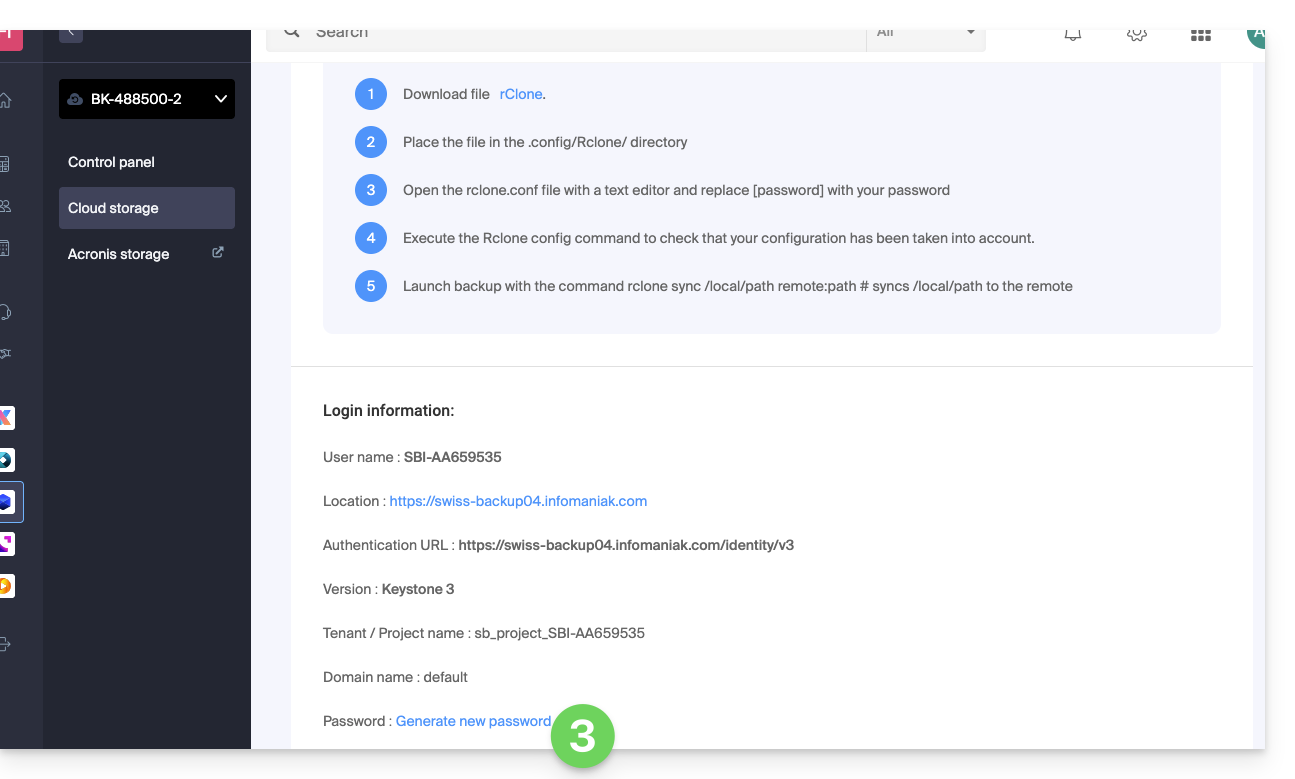
- Execute o comando
rclone configpara verificar se a configuração foi aplicada corretamente. - Inicie a cópia de segurança com o comando
rclone sync /local/path project_name:default.
Se necessário, pode consultar as informações de acesso no painel de controlo.
Exemplo de configuração do rClone
[sb_project_SBI-AB123456]
type = swift
user = SBI-AB123456
key = [password]
auth (1) = {{URL_8}}
domain = default
tenant = sb_project_SBI-AB123456
tenant_domain = default
region = RegionOne
storage_url =
auth_version =
(1) A indicação "//swiss-backup02", "//swiss-backup03", etc., muda de acordo com o número do cluster indicado no Manager, nas informações de armazenamento em nuvem, em "Localização"; e se o seu dispositivo Swiss Backup foi criado antes de outubro de 2020, deverá usar https://swiss-backup.infomaniak.com/identity/v3.
Pode alterar [sb_project_SBI-AB123456] pela indicação de sua preferência para facilitar.
Por exemplo, a indicação [swissbackup] resultará em:
rclone sync /local/folder swissbackup:remote/folderem vez de:
rclone sync /local/folder sb_project_SBI-AB123456:remote/folder
Iniciar uma cópia de segurança ou uma restauração
Inicie uma cópia de segurança com o seguinte comando:
rclone sync /local/folder sb_project_SBI-AB123456:remote/folderInicie a restauração com o seguinte comando:
rclone sync sb_project_SBI-AB123456:remote/folder /local/folderLink para esta FAQ: https://faq.infomaniak.com/2285
Esta seção de perguntas frequentes foi útil?
Este guia detalha como começar a usar o Swiss Backup (backup Acronis), a solução de backup em uma nuvem suíça independente.
Configuração
- Ativar a conta Acronis para adicionar um novo dispositivo
- Informações de login do Swiss Backup
- Gerenciar os usuários do Acronis
- Modificar as cotas dos usuários
- Modificar a frequência dos backups do Acronis
- Limitar os recursos usados pelo Acronis
- Ativar a autenticação de dois fatores
- Gerenciar as notificações e alertas do Acronis
- Modificar o idioma do Acronis
- Resolver um erro do Gatekeeper no macOS
- Resolver um erro de registro do Acronis
- Resolver um erro de conexão
- Armazenamento imutável no Swiss Backup
Exemplos de uso
- Fazer backup do Windows
- Fazer backup do macOS (Agente Acronis (Apple M1/M2...) / desinstalar o Agente Acronis (macOS))
- Fazer backup do Linux (Agente Acronis (AlmaLinux 9))
- Fazer backup de um dispositivo móvel Android (Samsung, Huawei, OnePlus, etc.)
- Fazer backup de um dispositivo móvel iOS (iPhone, iPad, etc.)
- Fazer backup do Microsoft 365
- Fazer backup do Google Workspace
- Restaurar ficheiros e pastas específicas
- Restaurar completamente um Mac
- Restaurar completamente um PC (Windows)
- Restaurar um backup do Swiss Backup numa máquina virtual
- Resolver um problema de eliminação de backups do Acronis
Link para esta FAQ: https://faq.infomaniak.com/2286
Esta seção de perguntas frequentes foi útil?
This guide explains how to schedule a daily, weekly, or monthly Swiss Backup with Acronis.
Also refer to the Acronis documentation on this subject.
Modify the frequency of Acronis backups
To do this:
- Click here to access the Acronis Console with the credentials obtained after adding the device (need help?).
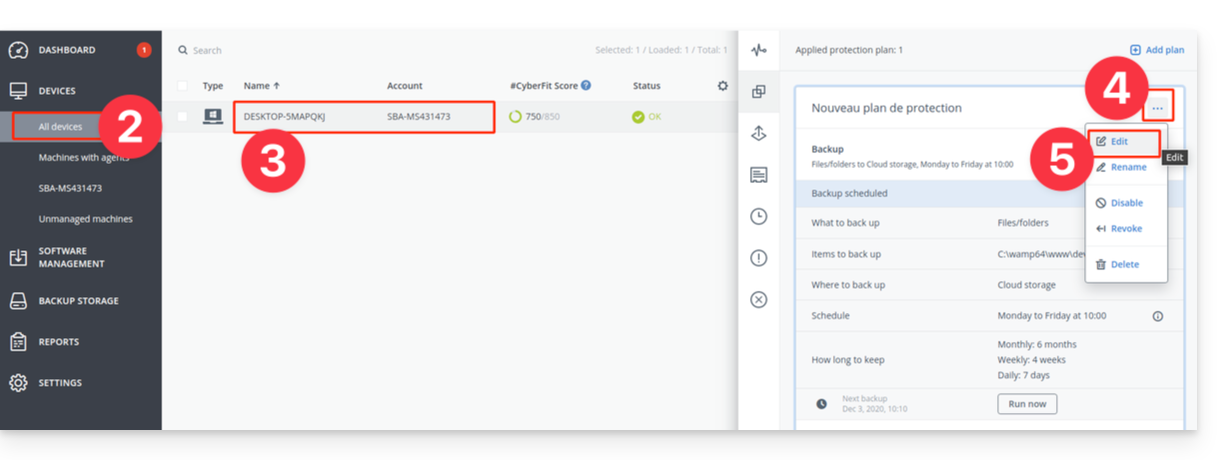
- Click on the All devices menu in the left sidebar.
- Click on the device in question.
- Click on the 3-dot action menu on the Protection plan that appears on the right.
- Click on Edit:
- Customize the Protection plan according to your needs.
- Once all changes have been made, click on the Save button in the upper right corner of your Protection plan.
Link para esta FAQ: https://faq.infomaniak.com/2287
Esta seção de perguntas frequentes foi útil?
Este guia detalha como restaurar um computador com Windows usando o Acronis no Swiss Backup, a solução de backup em uma nuvem suíça independente.
Pré-requisitos
- Ter um backup do computador no Swiss Backup (consulte este outro guia).
- Consulte a documentação da Acronis sobre a restauração de máquinas físicas.
- O computador a ser restaurado deve estar conectado à Internet por cabo Ethernet (ou Wi-Fi, dependendo da capacidade do computador).
Restaurar o backup
Para começar, a partir do computador em questão ou de qualquer outro dispositivo:
- Clique aqui para acessar o Console Acronis com as credenciais obtidas após adicionar o dispositivo (precisa de ajuda?).
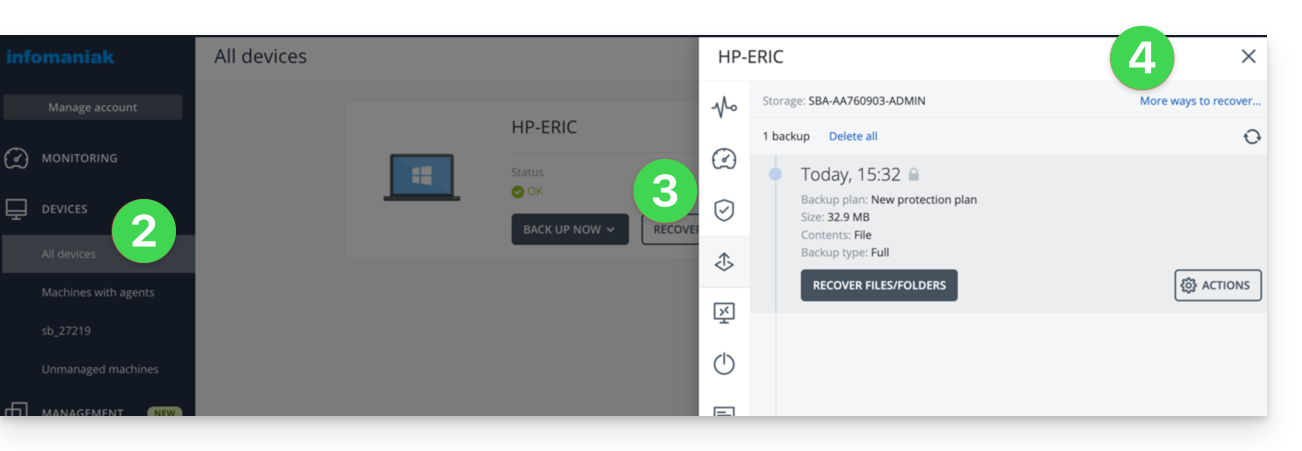
- Clique em Dispositivos no menu lateral esquerdo.
- Clique no botão Restaurar no plano de backup correspondente.
- Clique em Outras formas de restaurar na parte superior da interface:
Navegar pelos ficheiros guardados
Se necessário, localmente ou remotamente, pode, em primeiro lugar, simplesmente restaurar os ficheiros de que necessitar:
- Clique no botão Carregar ficheiros (na secção Navegue no armazenamento na nuvem).
- Abra a cópia de segurança correspondente.
- Insira a senha de criptografia, se necessário.
- Navegue pela estrutura de diretórios e selecione seus arquivos:
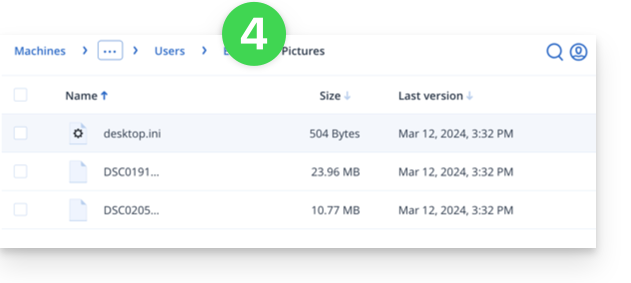
- Clique em Descarregar para obter um arquivo
.zipcontendo os seus arquivos selecionados.
Consulte também este outro guia.
Criar um disco de inicialização (por exemplo, em uma unidade USB)
Para criar um disco de inicialização do Windows e permitir a recuperação de um computador:
- Clique no botão Carregar uma imagem ISO (na secção Restaurar uma máquina inteira):
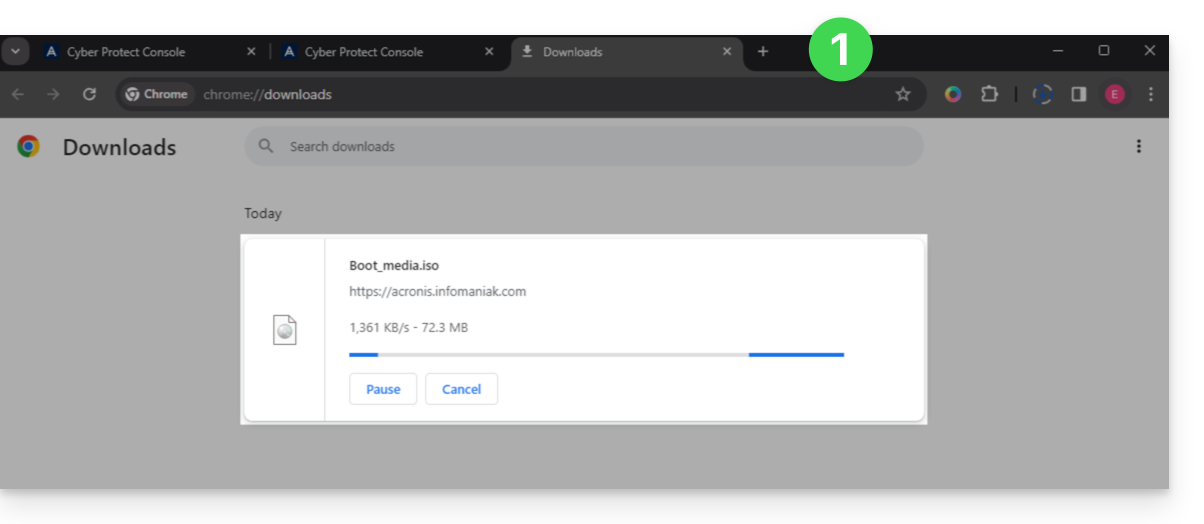
- Anote em um local seguro o código no formato
AA11-BB22-CC33que aparece no ecrã (mais informações). - Utilize um software como Etcher para criar um disco de inicialização a partir do arquivo
.isobaixado.
Iniciar o computador a partir da mídia removível
Inicie o computador a partir deste disco de inicialização (pressionando a tecla correspondente no seu dispositivo: F1, F2, F10, F12, DEL, etc.) e siga os passos a seguir:
- Clique em Mídia de Recuperação:
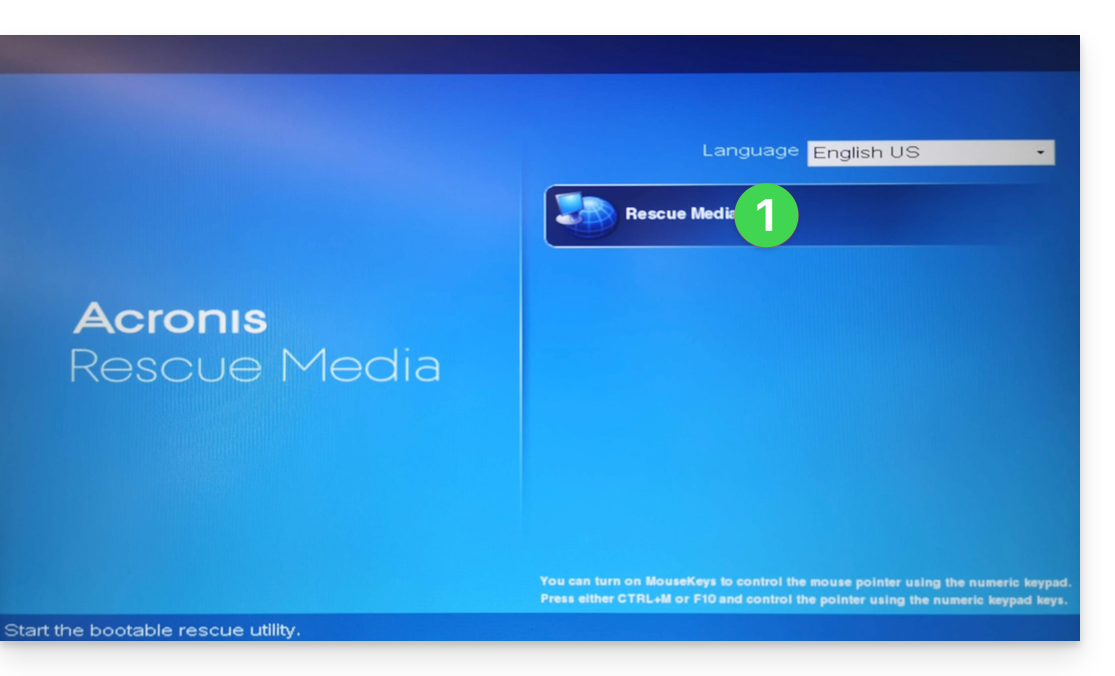
- Conecte o computador por Ethernet (ou, se necessário, configure o Wi-Fi a partir do link localizado à direita da interface, caso o computador o permita) e, em seguida, clique em Gerenciar o dispositivo localmente:
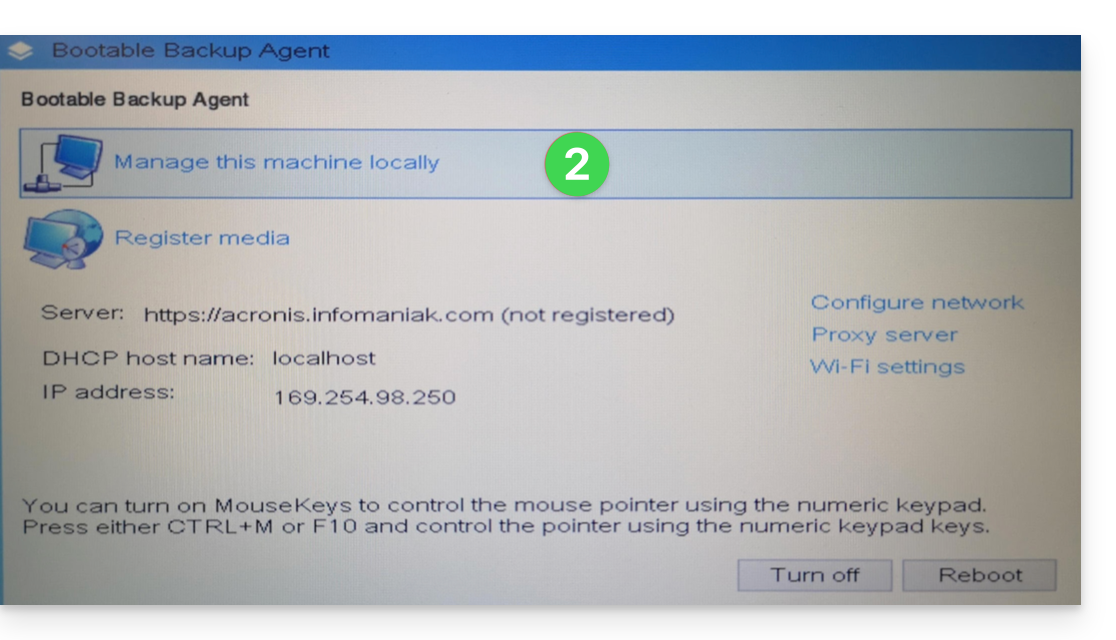
- Clique em Restaurar:
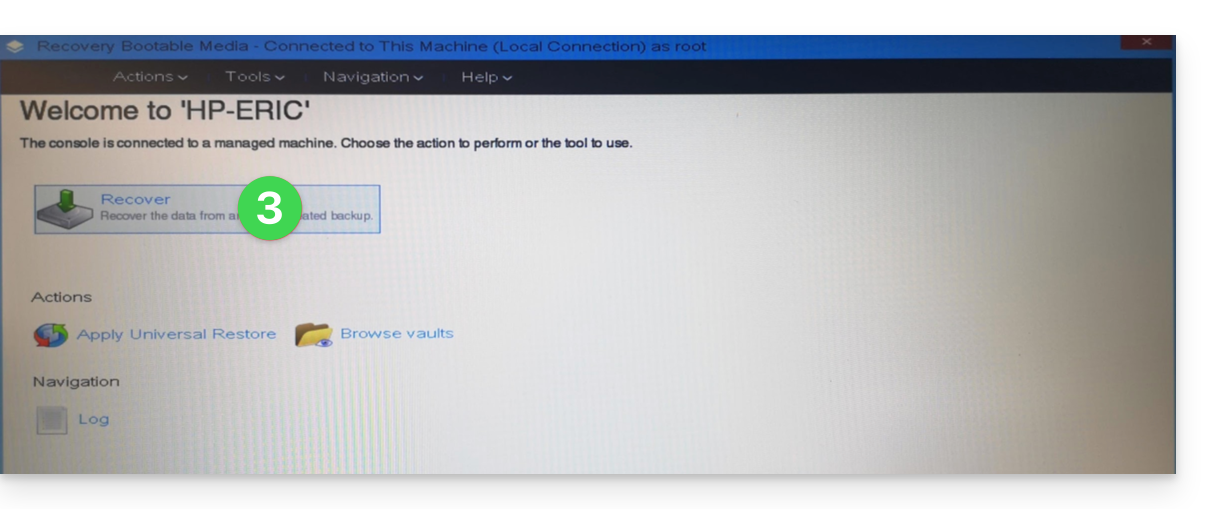
- Clique em Selecionar os dados...
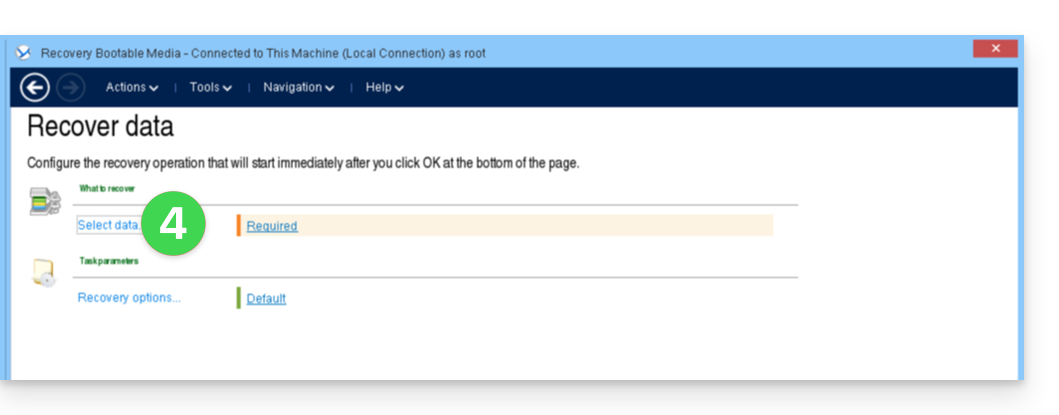
- Clique no botão Procurar:
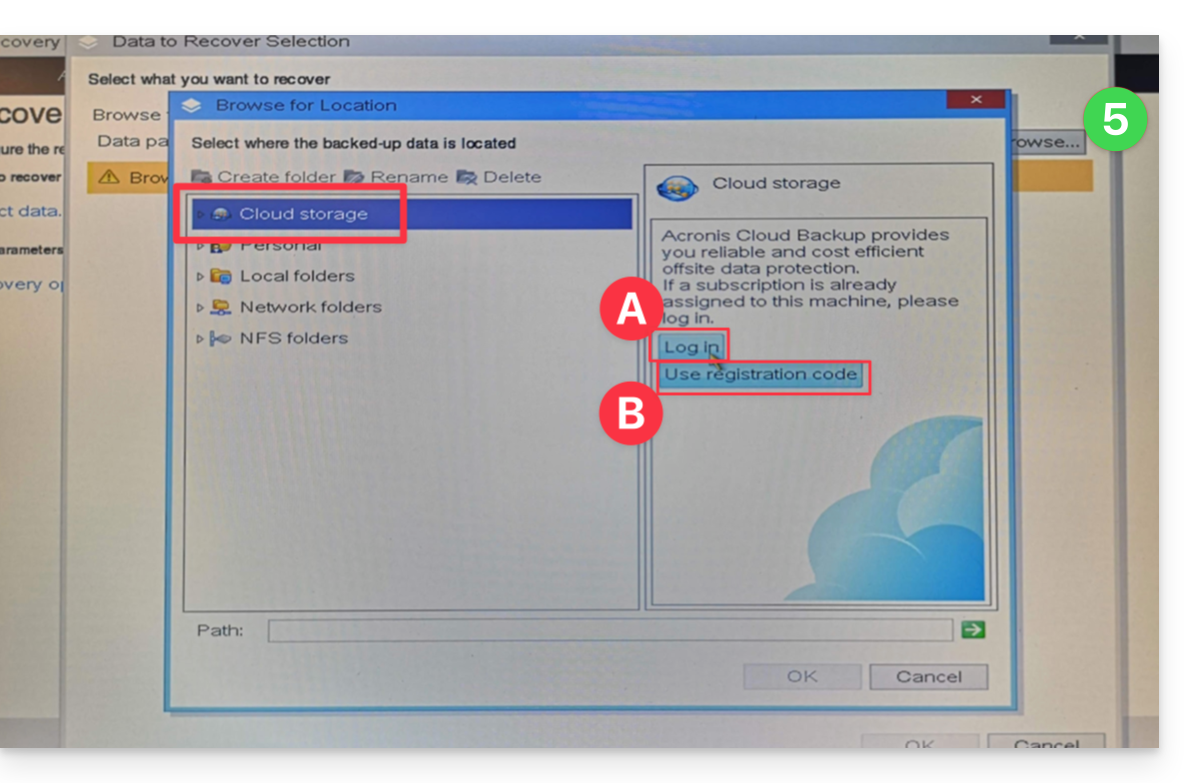
- Em Armazenamento na Nuvem, clique em uma das seguintes opções:
- Iniciar sessão e utilize as credenciais Acronis (no formato
SBA-XXXX-ADMIN) para autenticação (o teclado está definido por padrão para EN-US, certifique-se de digitar a senha corretamente para verificá-la, se necessário):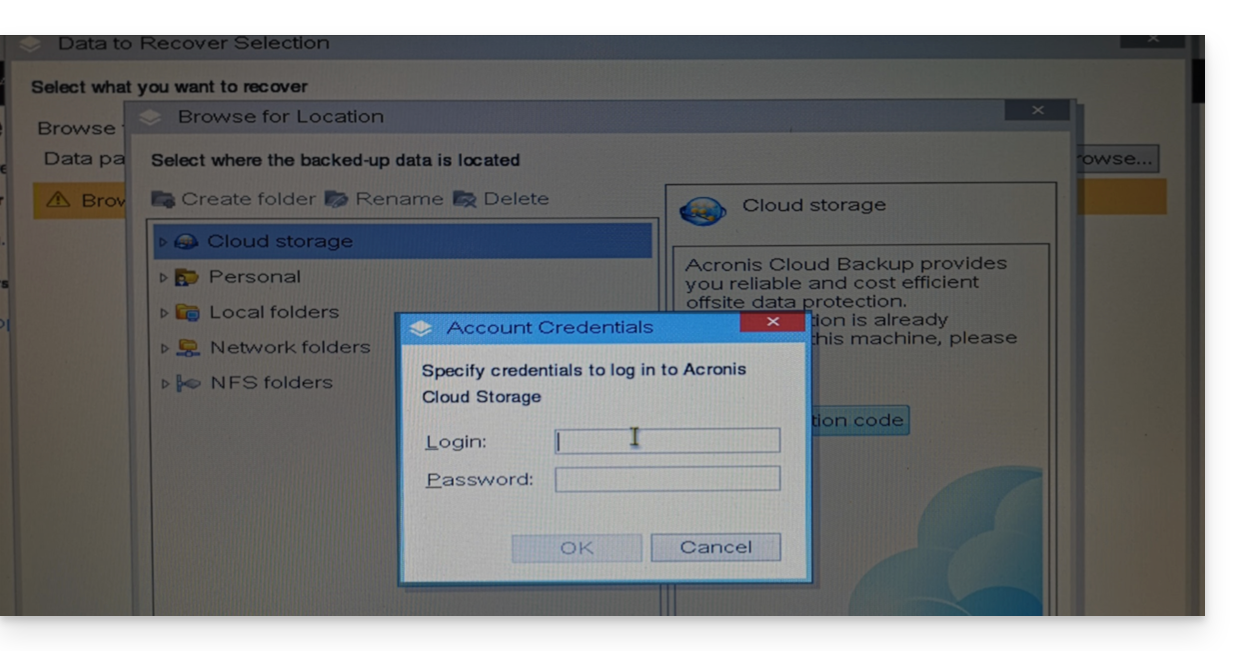
- OU Usar o código de registro se tiver a autenticação de dois fatores ativada, seguindo o procedimento indicado (que consiste em solicitar um código temporário (no formato ABCD-ABCD) e, em seguida, acessar a página
https://acronis.infomaniak.com/ui/#w=agentRegistrationpara inserir esse código após iniciar sessão na sua conta Acronis):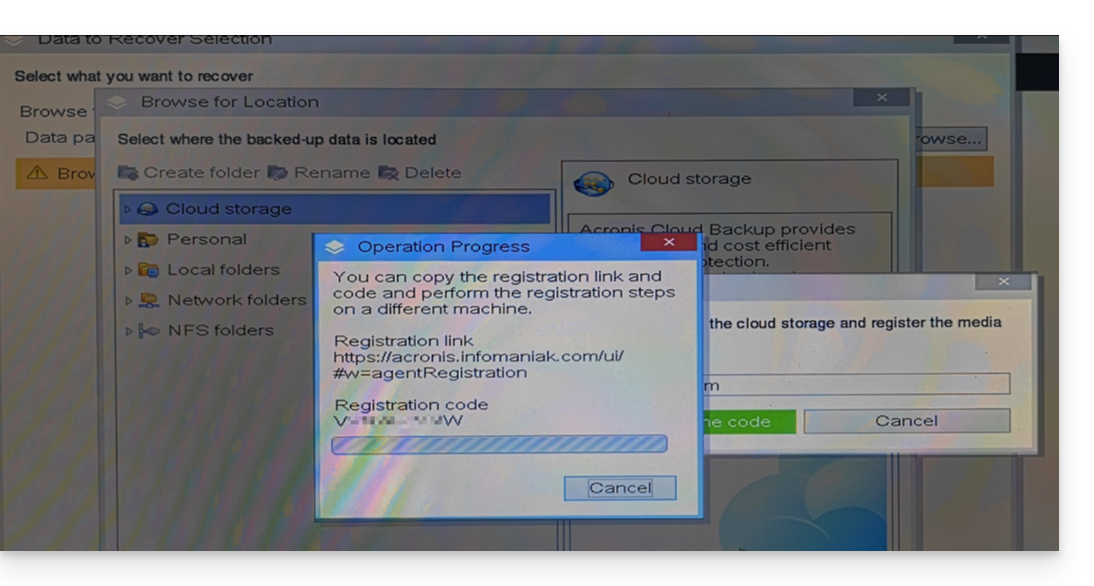
- Iniciar sessão e utilize as credenciais Acronis (no formato
- Clique, em seguida, no seu identificador de conta Acronis e continue para acessar os backups (a senha de criptografia será solicitada se tiver sido ativada – consulte o ponto 12 deste guia).
- Escolha o computador, o ponto de restauração e os volumes (discos) a serem restaurados:
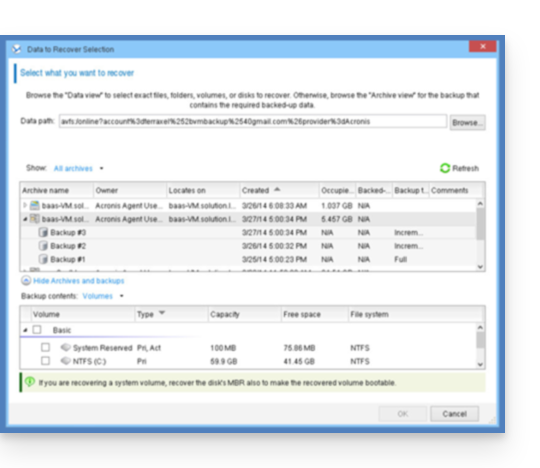
Informações úteis:- Use a seta à esquerda do nome dos computadores para exibir os backups…
- A primeira tabela na parte superior permite escolher o computador e o backup a serem restaurados…
- A segunda tabela permite escolher o conteúdo (os discos) do backup a ser restaurado…
- Clique em OK para continuar.
- Estabeleça a correspondência entre os volumes de origem e de destino:
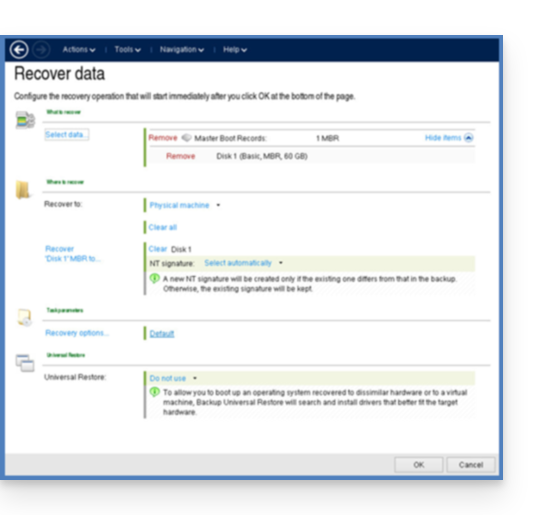
Informações úteis:- Para cada volume ou disco do backup de origem, clique em Necessário para escolher onde restaurar os dados.
- Em Opções de restauração, recomenda-se marcar a caixa Reinicialização automática.
- Clique em OK para iniciar a restauração.
Link para esta FAQ: https://faq.infomaniak.com/2288
Esta seção de perguntas frequentes foi útil?
Este guia detalha como restaurar um computador Apple macOS usando o Acronis no Swiss Backup, a solução de backup em nuvem de uma empresa suíça independente.
Pré-requisitos
- O aplicativo Acronis deve ser instalado no computador no qual você deseja realizar a restauração; use as mesmas credenciais usadas para fazer o backup da máquina ao registrar o agente:
- Clique aqui para acessar o Console Acronis com as credenciais obtidas após adicionar o dispositivo (precisa de ajuda?).
- Clique no ícone do usuário, no canto superior direito.
- Clique em Downloads:
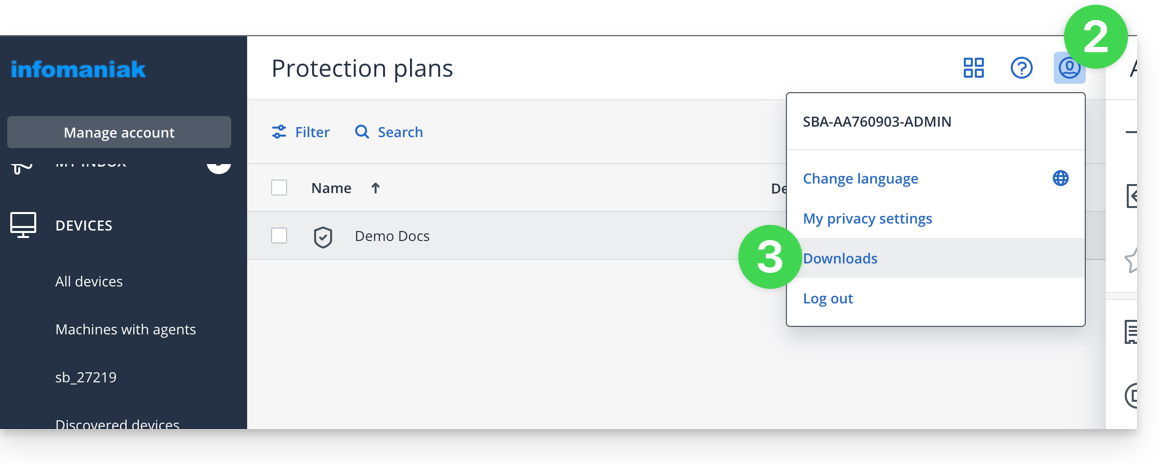
- Escolha o cliente adequado para o seu computador macOS:
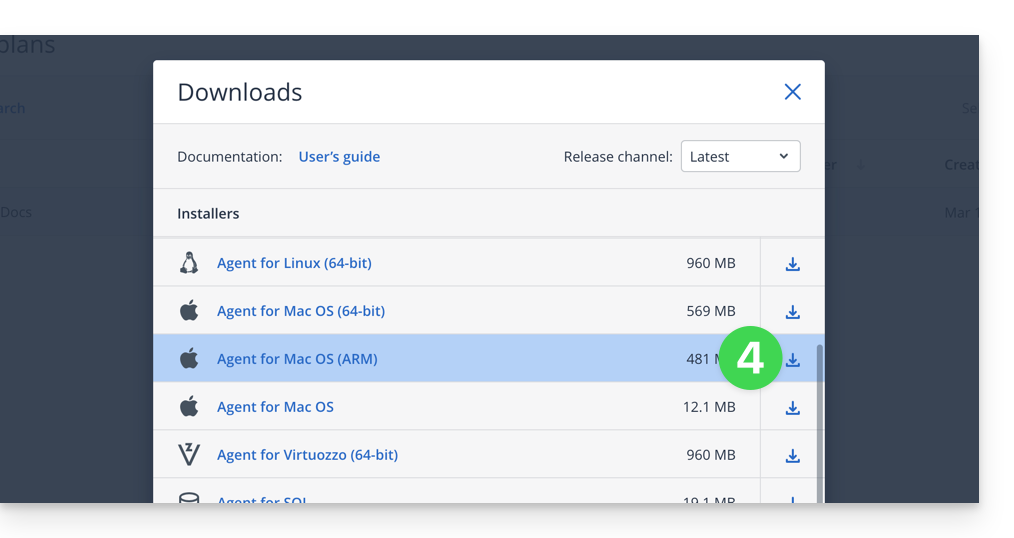
Criar uma chave USB de inicialização
Para isso:
- Insira uma pen drive vazia com pelo menos 4 GB no seu computador (atenção: os dados contidos na pen drive serão apagados).
- Abra a aplicação Rescue Media Builder a partir da pasta Aplicações do Finder do seu macOS. Esta aplicação foi instalada automaticamente com a aplicação Acronis.
- Selecione a unidade USB detetada e clique em Criar Mídia.
Iniciar o processo de restauração
Para isso:
- Reinicie o computador macOS com a unidade USB de inicialização.
- Dependendo da versão do macOS, pressione e mantenha pressionada uma tecla do teclado (consulte este guia da Apple para saber qual) durante a reinicialização.
- Se necessário, clique na unidade USB de inicialização para iniciar o sistema a partir dela.
Configurar e iniciar a restauração
Para isso:
- Selecione a sua chave em Rescue Media Builder:

- Clique em Mídia de inicialização de recuperação:

- Clique em Recuperar:

- Clique em Selecionar os dados:
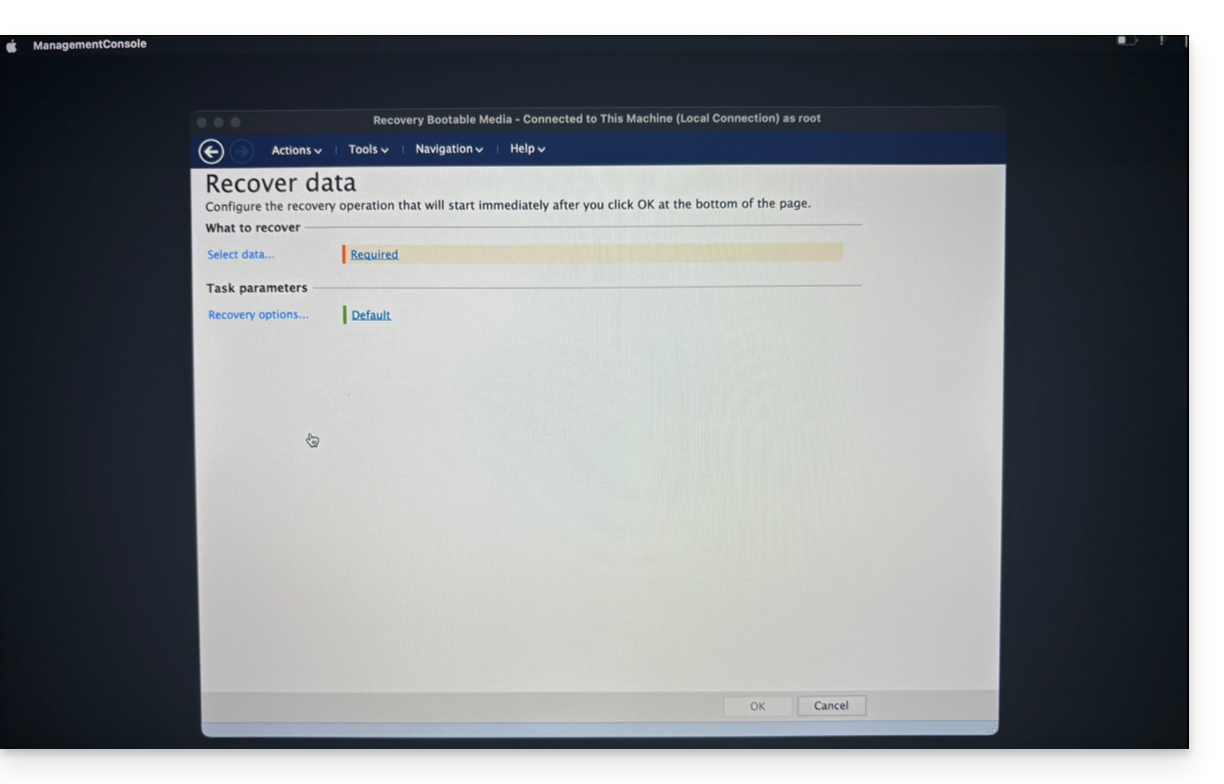
- … e, em seguida, em Procurar:

- e selecione Armazenamento na Nuvem; em seguida, clique no botão Iniciar sessão:

- Use as credenciais do dispositivo para autenticar:

- Escolha o computador macOS que deseja restaurar e clique em OK para iniciar a restauração:

- Se optou por encriptar os seus backups, será solicitado que introduza a palavra-passe do backup:

- Na parte superior do ecrã, selecione a cópia de segurança disponível que pretende restaurar:

- Após selecionar a cópia de segurança, poderá selecionar, na parte inferior do ecrã, o tipo de elemento a restaurar, bem como os elementos que pretende restaurar. Recomenda-se selecionar o tipo Volumes e restaurar todos os volumes disponíveis, para restaurar todos os seus discos rígidos... Em seguida, inicie a restauração clicando no botão OK:

- A restauração será iniciada e você poderá acompanhar o progresso na guia Progresso:

Quando atingir 100%, o computador macOS será reiniciado várias vezes seguidas (isso é normal) até que todo o processo seja concluído.
Link para esta FAQ: https://faq.infomaniak.com/2289
Esta seção de perguntas frequentes foi útil?
Este guia explica como aumentar ou reduzir o espaço alocado a um dispositivo que está sendo feito backup com o Swiss Backup, o que é particularmente útil quando você recebe um e-mail informando que não tem espaço livre suficiente para realizar seus backups.
Modificar cotas para os dispositivos dos usuários
Para isso:
- Clique aqui para acessar o Console Acronis com as credenciais obtidas após adicionar o dispositivo (precisa de ajuda?).
- Clique em Gerenciar conta na barra lateral esquerda:
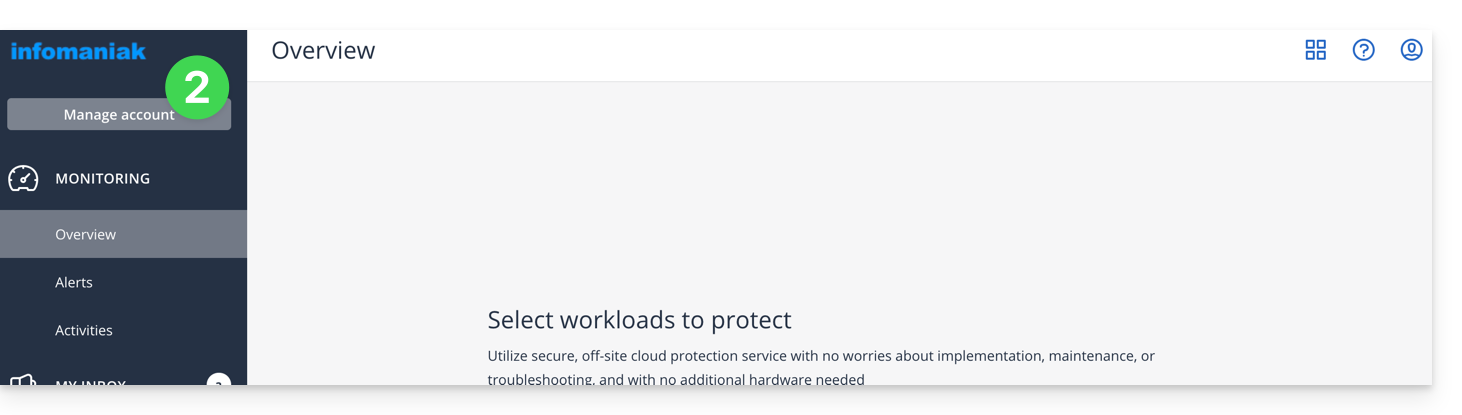
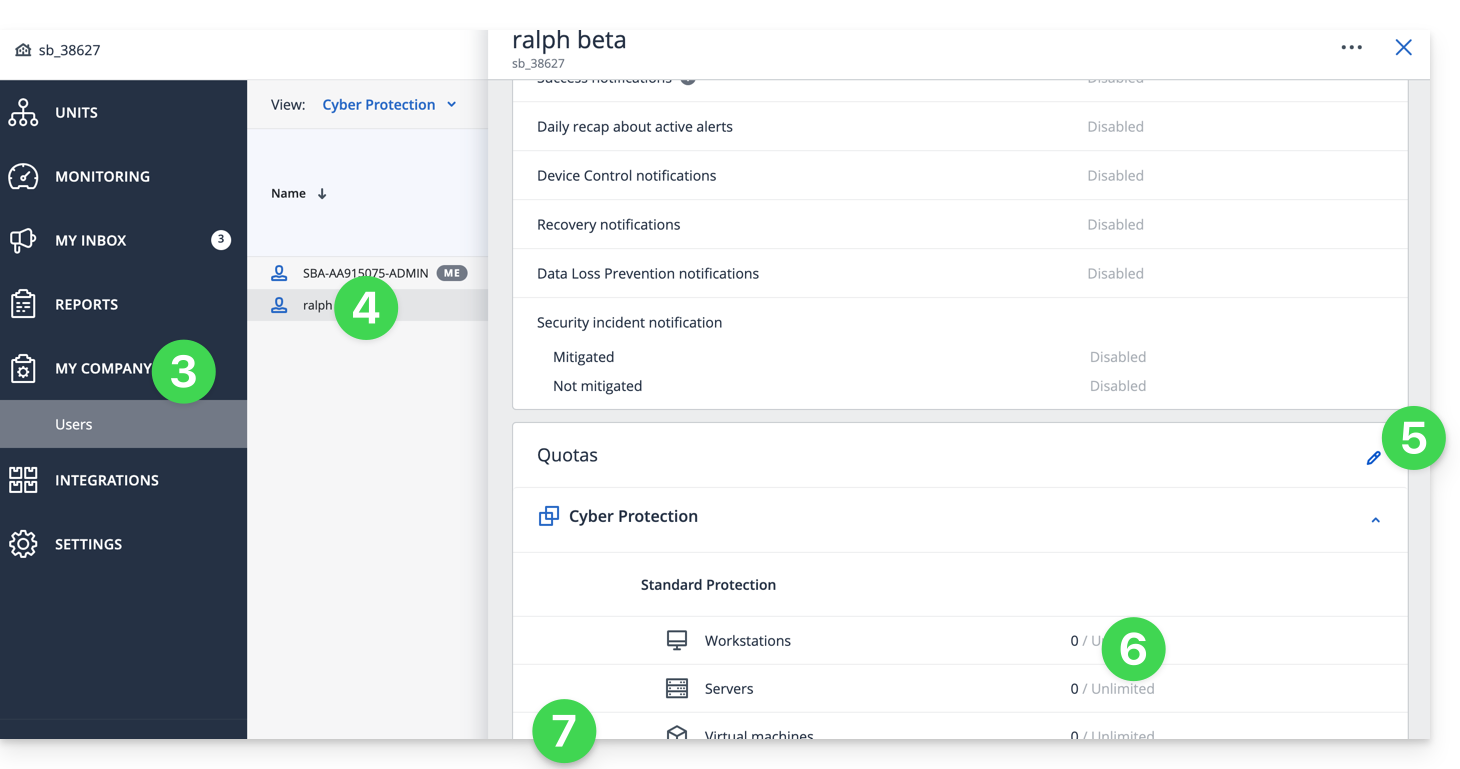
- Clique em Minha empresa.
- Clique no utilizador em questão em Utilizadores.
- Clique no ícone de lápis no retângulo COTAS, à direita.
- Clique diretamente no espaço de disco para poder editar os valores desejados.
- Confirme clicando no botão na parte inferior da seção:
Link para esta FAQ: https://faq.infomaniak.com/2290
Esta seção de perguntas frequentes foi útil?
Este guia explica como obter um espaço de armazenamento para cópias de segurança Swiss Backup, a solução de cópias de segurança na nuvem suíça.
Pré-requisitos
- Determinar qual tipo de dispositivo será feito backup no Swiss Backup:
Backups CLOUD – permite fazer backup e sincronizar arquivos por meio dos seguintes protocolos:
- Swift (recomendado)
- FTP / SFTP
- Compatível com S3
- Sistema NAS Synology
com o aplicativo de sua escolha…
Backups ACRONIS – solução ideal para fazer backup de:
- estações de trabalho Windows / macOS
- dispositivos móveis Android / iOS (iPhone)
- servidores Windows / Linux
- máquinas virtuais VMware, Hyper-x, Virtuozzo...
- espaços Microsoft 365 / Google Workspace…
usando o software Acronis Cyber Protect Cloud, que permite armazenar dados de backup usando o Swift como back-end e criar "planos de proteção", onde você pode escolher entre:
- backup da máquina inteira (todos os discos rígidos conectados à máquina via SATA)
- backup de arquivos / pastas (de sua escolha especificamente)
- backup de volumes / discos (se você tiver discos externos)
- agendamento de backups
- duração da retenção dos backups
- restauração dos backups
- criptografia dos backups
Obter o Swiss Backup
Para encomendar um espaço de armazenamento do Swiss Backup:
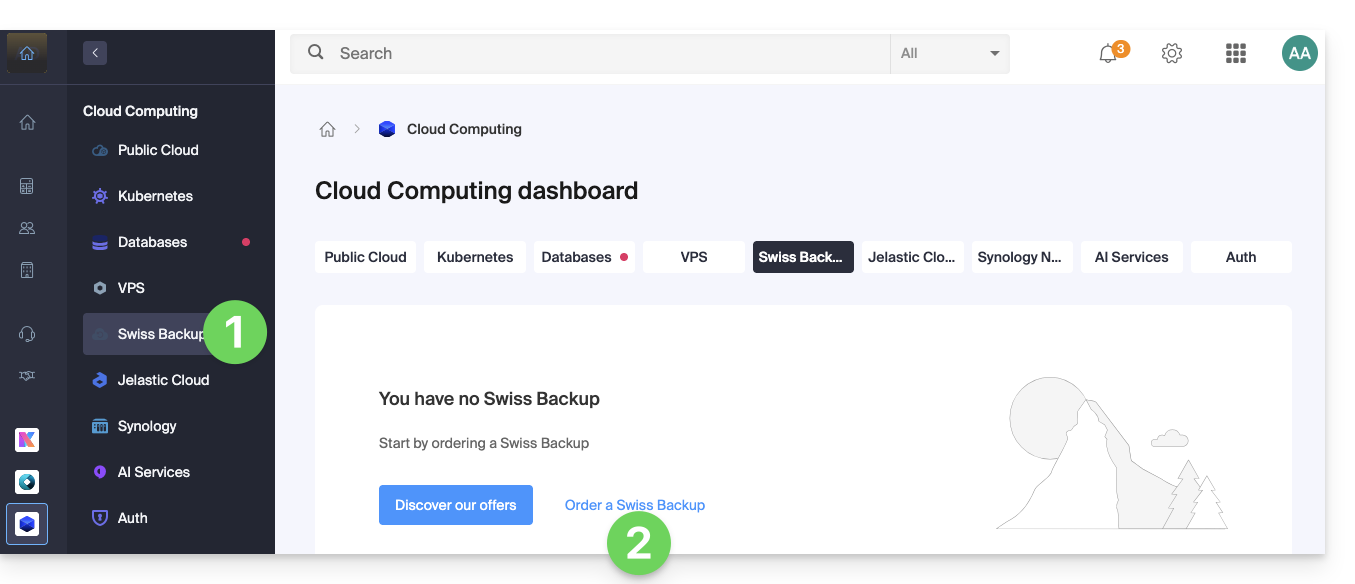
- Clique aqui para acessar o gerenciamento do seu produto no Manager Infomaniak (precisa de ajuda?).
- Clique em Encomendar:
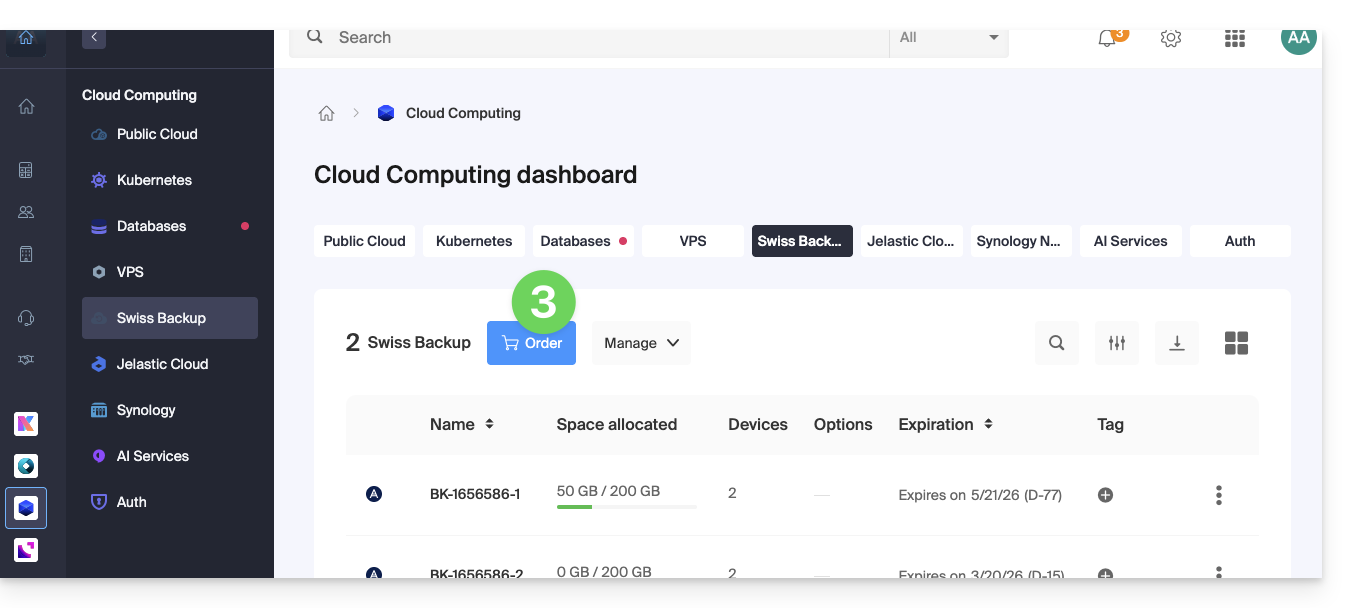
- ou no ícone do carrinho, caso já tenha um produto Swiss Backup ativo na sua organização e deseje encomendar um produto adicional:
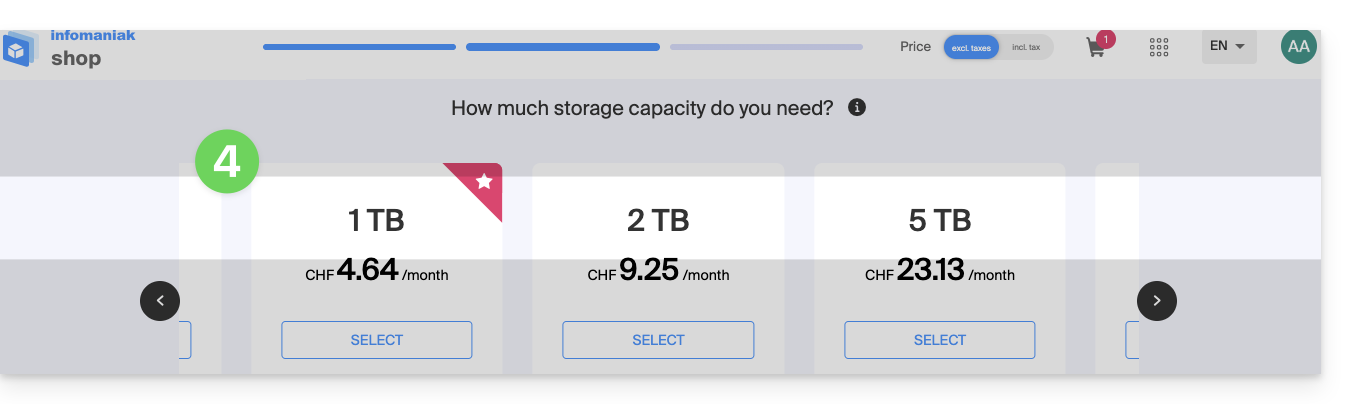
- Escolha o tamanho máximo de todo o espaço de armazenamento necessário para o seu(s) projeto(s), independentemente do número e do tipo de cópias de segurança que efetuar:
- Neste exemplo, o projeto consiste em fazer o backup de 2 coisas:
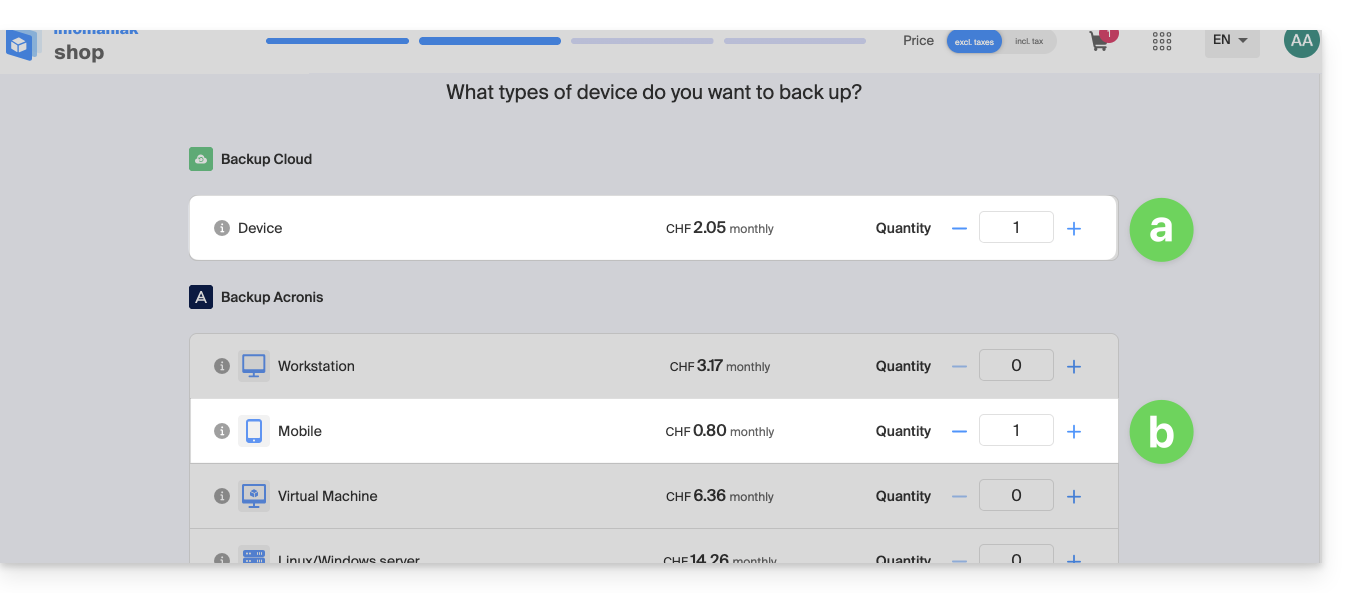
- documentos importantes e de grande volume armazenados em 1 NAS
- fotos/vídeos de um dispositivo móvel Android
- Conclua o pedido e efetue o pagamento.
- O produto Swiss Backup é exibido no seu painel de controle, juntamente com o espaço em disco e as cotas selecionadas durante o pedido:
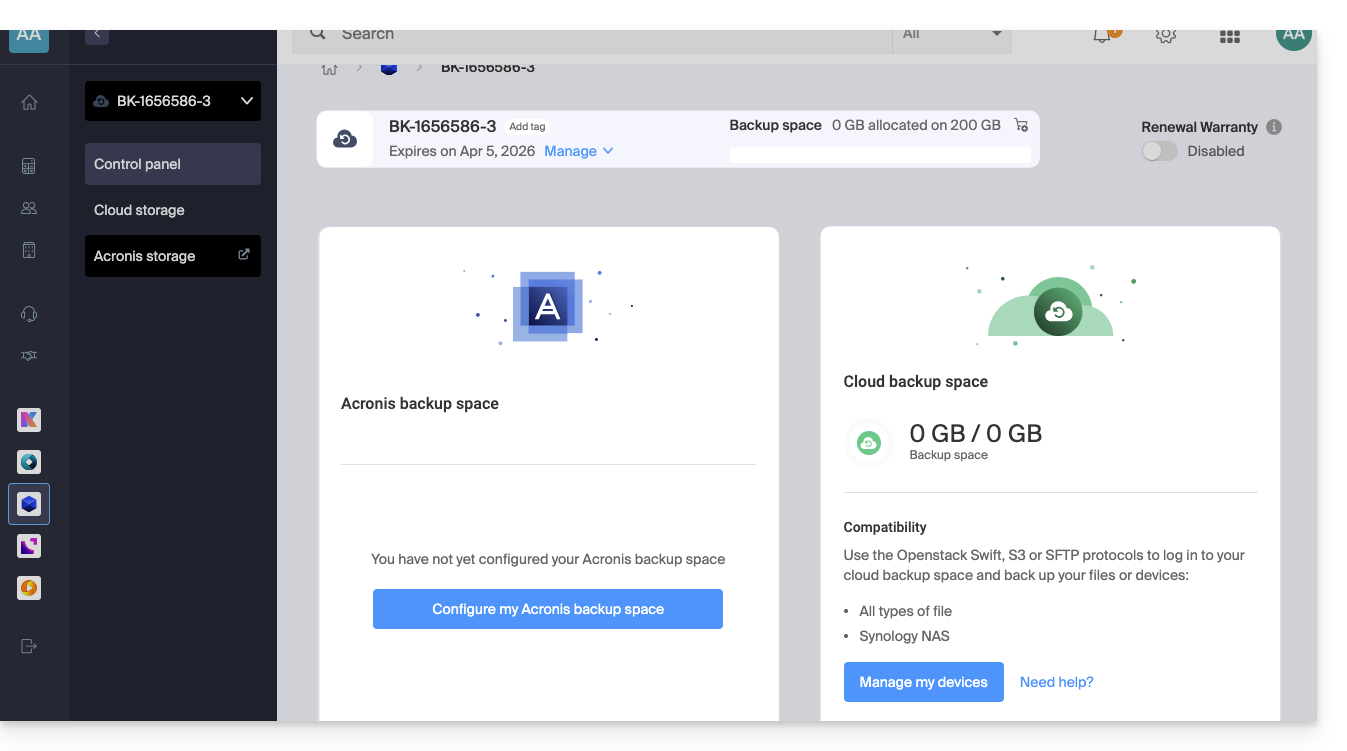
- Você pode então adicionar os dispositivos desejados na sua interface Swiss Backup: consulte este outro guia.
Link para esta FAQ: https://faq.infomaniak.com/2291
Esta seção de perguntas frequentes foi útil?