Base de conhecimento
1000 perguntas frequentes, 500 tutoriais e vídeos explicativos. Aqui, você encontra apenas soluções!
Este guia explica como editar um ficheiro do tipo imagem na aplicação web kDrive (serviço online ksuite.infomaniak.com/kdrive).
Introdução
- O aplicativo web kDrive integra nativamente um editor que permite modificar uma imagem online.
- Seus arquivos não são nunca foram analisados e são armazenados exclusivamente na Suíça.
- Consulte este outro guia se precisar de informações sobre a edição de outros formatos de arquivo.
Editar uma imagem, uma foto
Para aceder ao kDrive e editar os ficheiros:
- Clique aqui para acessar o aplicativo web kDrive (serviço online ksuite.infomaniak.com/kdrive).
- Abra o arquivo de imagem correspondente.
- Clique no botão Editar na parte superior do documento para acessar o editor de arquivos:
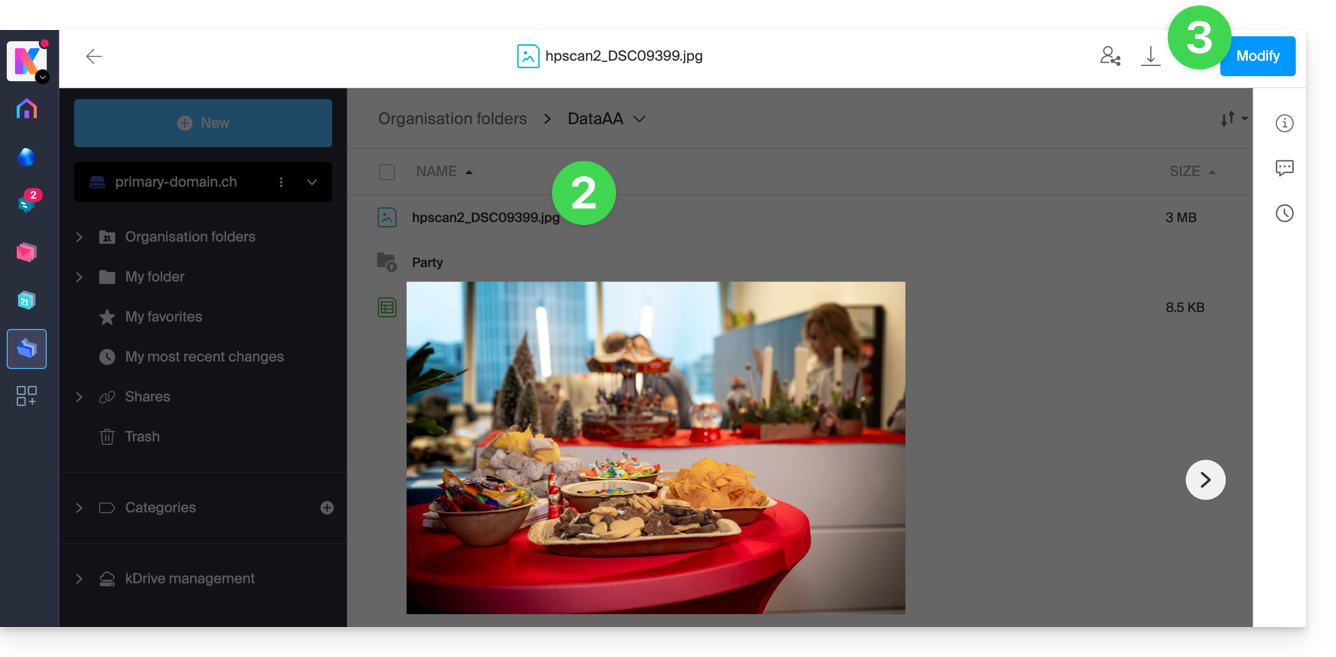
- O editor permite, entre outras coisas…
- … girar a imagem 90° para a direita ou para a esquerda;
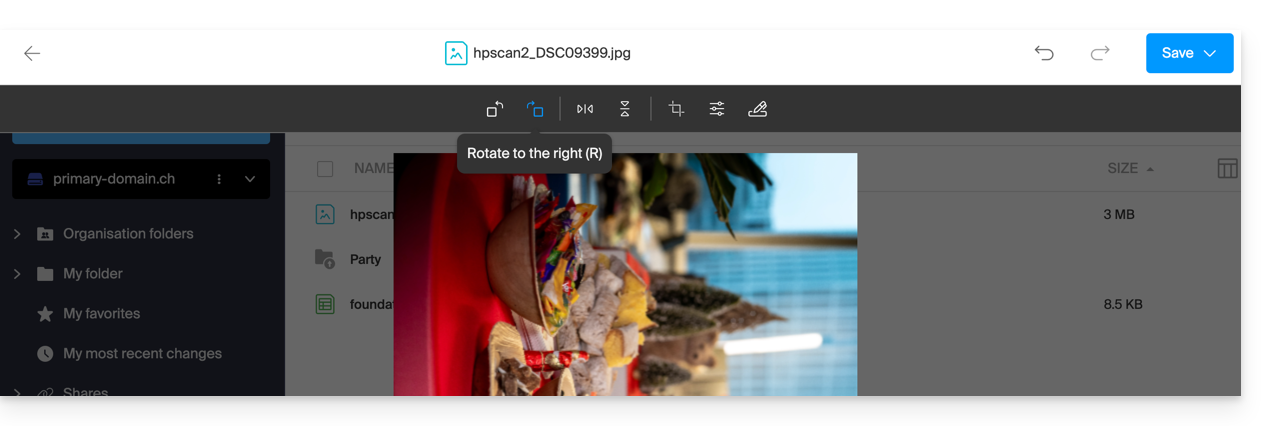
- … espelhar/inverter a imagem horizontalmente ou verticalmente:
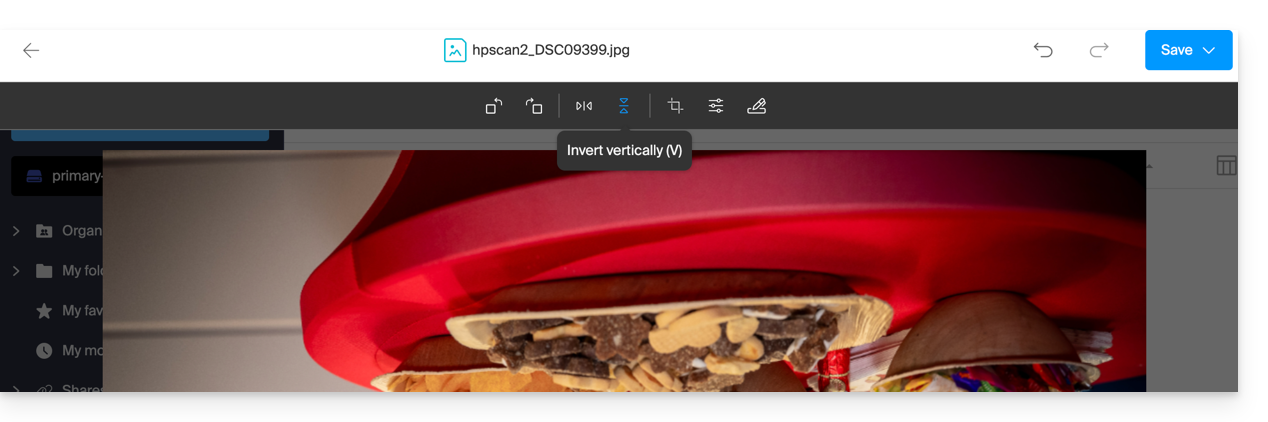
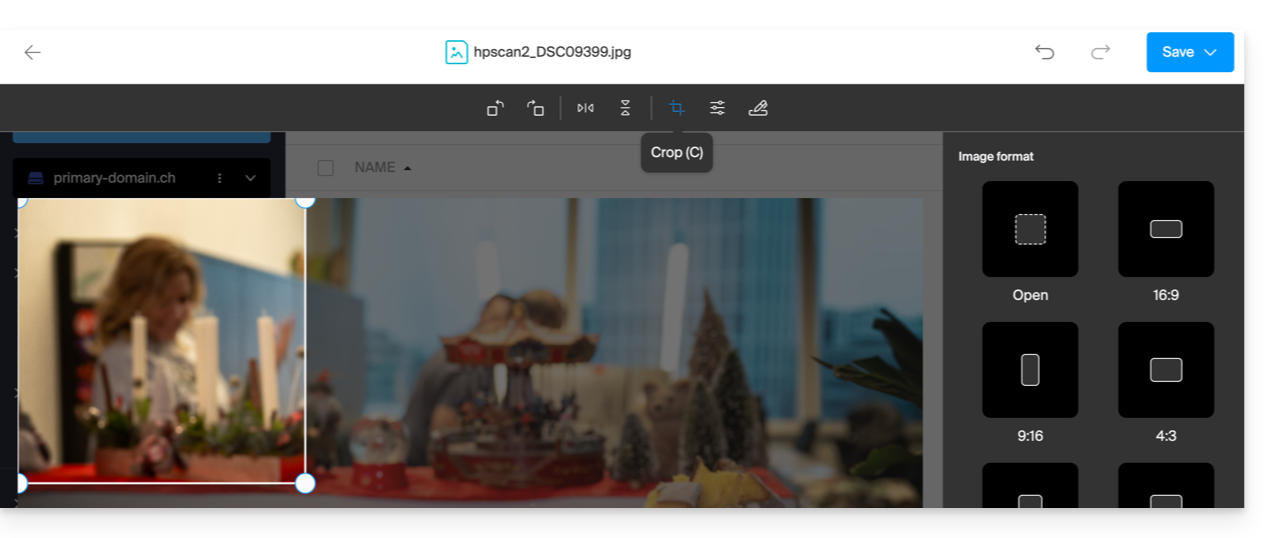
- … recortar sua imagem:
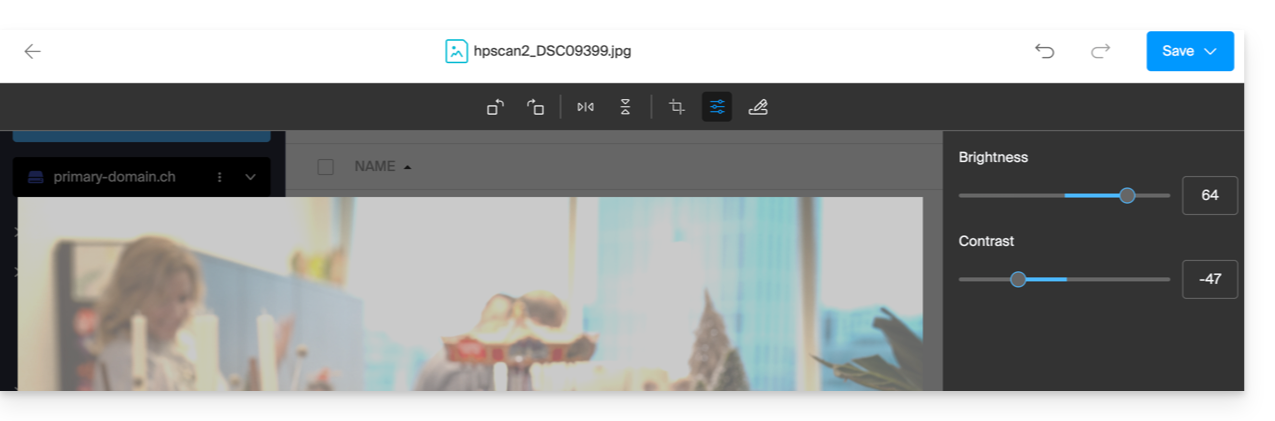
- … modificar o brilho e o contraste da imagem:
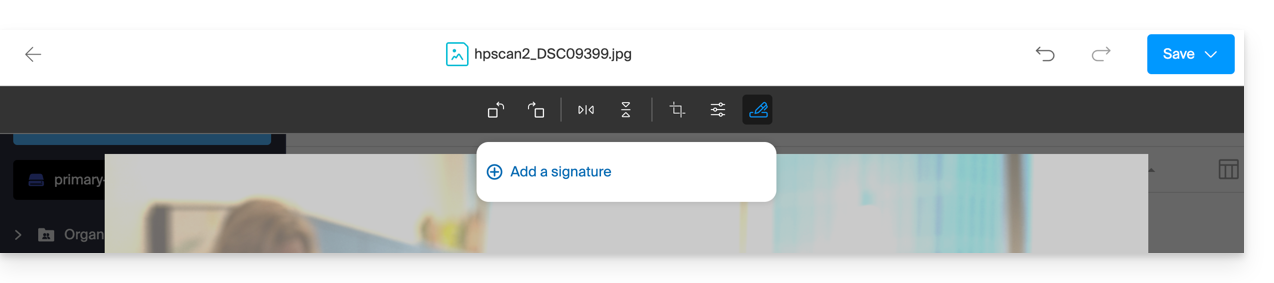
- … criar uma assinatura (apenas nas ofertas pagas do kDrive) e, em seguida, aplicá-la à imagem (consulte este outro guia sobre o assunto):
- … girar a imagem 90° para a direita ou para a esquerda;
- Após a conclusão, salve as alterações e escolha se deseja criar uma cópia do documento modificado ou substituir o arquivo existente.
Link para esta FAQ: https://faq.infomaniak.com/219
Esta seção de perguntas frequentes foi útil?
Este guia detalha a instalação da aplicação de ambiente de trabalho kDrive da Infomaniak num computador equipado com o sistema operativo Linux. Esta aplicação permite sincronizar automaticamente os ficheiros do seu computador com o seu espaço kDrive online.
Introdução
- Neste sistema operativo, algumas funcionalidades avançadas do kDrive não estão disponíveis, como a opção Lite Sync (que permite consultar os seus ficheiros sem os armazenar fisicamente no disco) ou o menu de contexto através do clique com o botão direito (para partilhar um link rapidamente, por exemplo).
- A aplicação kDrive é oficialmente suportada pela Infomaniak apenas nas seguintes configurações:
- Ubuntu 22.04 LTS (e versões superiores)
- Ambientes de desktop: GNOME ou KDE
- O aplicativo pode funcionar em outras distribuições Linux (Debian, Fedora, etc.) ou com outros ambientes de desktop, mas a Infomaniak não oferece suporte técnico para a instalação ou utilização fora das configurações mencionadas acima.
Instalação do kDrive no Linux
Pré-requisitos
- Descarregar a aplicação kDrive para Linux (é um ficheiro no formato .AppImage).
- D-Bus (sistema de comunicação interna presente na maioria das versões).
- Gnome-keyring ou KWallet (gestores de palavras-passe geralmente integrados, exceto nas versões muito simplificadas do Linux).
Em seguida:
- Coloque o arquivo baixado em uma pasta de sua escolha, por exemplo, uma pasta chamada "Aplicativos" em seu diretório pessoal.
- Clique com o botão direito no arquivo, escolha Propriedades e, em seguida, a guia Permissões.
- Marque a caixa "Permitir a execução do arquivo como um programa".
Para que o kDrive seja iniciado automaticamente ao ligar o seu computador, adicione este ficheiro nas suas "Preferências de aplicações ao iniciar" (ou menu equivalente, dependendo do seu sistema).
Problemas conhecidos e soluções
Sincronização bloqueada ou erro "Inotify watches"
Se a sincronização parecer estar interrompida (por exemplo, na etapa 1/10) ou se os registos indicarem o erro Out of memory or limit number of inotify watches reached!, isso significa que o seu sistema está a limitar o número de ficheiros que pode monitorizar simultaneamente.
- Verificar o limite atual: digite o comando
cat /proc/sys/fs/inotify/max_user_watchesem um terminal. - Aumentar o limite: para dobrar o valor (por exemplo, para 131072), execute:
echo fs.inotify.max_user_watches=131072 | sudo tee -a /etc/sysctl.conf
Em seguida, aplique a alteração com:sudo sysctl -p
O aplicativo fecha ao abrir (AppArmor / Wayland)
Em algumas versões recentes do Ubuntu (24.04+) ou Debian, a segurança AppArmor pode impedir a abertura da janela de login.
- Solução AppArmor: instale as ferramentas necessárias:
sudo apt install apparmor-utils. Em seguida, crie uma regra para o kDrive:sudo aa-autodep /path/to/kDrive.AppImagee reinicie o serviço:sudo service apparmor restart. - Conflito com o Wayland: se o aplicativo apresentar falhas no Wayland, tente forçar a exibição clássica (X11) executando o aplicativo pelo terminal com o seguinte comando:
export QT_QPA_PLATFORM=xcb && ./kDrive.AppImage
Problemas de exibição do ícone ou da janela
- Ícone invisível (Gnome): instale a extensão Suporte ao AppIndicator. Observe que a extensão Dash to Panel pode tornar os menus do aplicativo invisíveis e não é recomendada.
- Janela impossível de abrir: verifique se as bibliotecas de software
libfuse2elibdbus-1-devestão instaladas no seu sistema. - KDE Wayland: se a interface for exibida incorretamente, adicione estas linhas ao seu arquivo de configuração
~/.config/kdeglobals:[QtQuickRendererSettings]RenderLoop=basicSceneGraphBackend=opengl
Erro ao armazenar as credenciais (Armazenamento de chaves)
Se o kDrive solicitar suas credenciais a cada inicialização ou exibir o erro Falha ao salvar as informações de autenticação no chaveiro:
- Certifique-se de que um gerenciador de senhas (Gnome Keyring ou KWallet) esteja instalado e desbloqueado ao abrir a sua sessão.
- Verifique se o serviço D-Bus
org.freedesktop.secretsestá configurado. Se estiver a usar o KWallet, o ficheiro/usr/share/dbus-1/services/org.freedesktop.secrets.servicedeve conter:[D-BUS Service]Name=org.freedesktop.secretsExec=/usr/bin/kwalletd5
Utilização do AppImageLauncher
Se estiver a utilizar a ferramenta AppImageLauncher e a integração falhar, verifique se está a utilizar, no mínimo, a versão 3.0.0 (beta 2) para suportar o formato de compressão do kDrive.
Ajuda para diagnóstico em caso de falha
Se a aplicação fechar sem exibir uma mensagem de erro, pode gerar um relatório para análise técnica, extraindo as últimas atividades do seu sistema com este comando: journalctl -r -n 1000 > kdrive_syslog.txt
Link para esta FAQ: https://faq.infomaniak.com/617
Esta seção de perguntas frequentes foi útil?
Este guia detalha as ações a serem realizadas com prioridade caso não observe nenhuma diferença no seu site após uma alteração que tenha efetuado, em comparação com a versão anterior à alteração. Estas dicas também são válidas caso encontre problemas ao utilizar a interface dos produtos Infomaniak.
Introdução
- Durante a sua navegação, um navegador da web guarda, num espaço reservado, os dados consultados, com o objetivo de evitar solicitar novamente ao servidor os dados já consultados, para poupar tempo e recursos.
- O seu cache pode conter uma enorme quantidade de dados e, por vezes, o navegador pode ter problemas. Os sites podem então ser exibidos incorretamente ou exibir uma versão desatualizada.
- Limpar o cache garante que você está visualizando a versão mais recente da página ou pasta acessada.
Limpar o cache do navegador da web…
… no Safari
Escolha a sua versão do macOS para consultar a documentação de suporte da Apple correspondente.
… sobre as ferramentas do Google (Chrome, Android, etc.)
Consulte a Central de Ajuda do Google.
… no Firefox
Consulte a página de ajuda da Mozilla.
… no Edge / Internet Explorer
Consulte a ajuda da Microsoft.
Link para esta FAQ: https://faq.infomaniak.com/793
Esta seção de perguntas frequentes foi útil?
Este guia explica como guardar um e-mail (como se o descarregasse) diretamente no seu kDrive.
Introdução
- Salve, com apenas alguns cliques, uma mensagem recebida em um endereço do seu Serviço de E-mail Infomaniak, no formato
.eml, que pode ser lida diretamente na sua interface kDrive. - Para exportar todos os e-mails de um endereço de e-mail, consulte este outro guia.
- Para exportar os anexos de um e-mail, consulte este outro guia.
Adicionar um e-mail ao kDrive…
… a partir do aplicativo Web Mail da Infomaniak
Para exportar a mensagem de e-mail desejada para o seu kDrive:
- Clique aqui para acessar o aplicativo web Mail da Infomaniak (serviço online ksuite.infomaniak.com/mail).
- Abra o e-mail que deseja salvar.
- Clique, em seguida, no ícone de compartilhamento na parte superior da mensagem para adicionar ao kDrive:
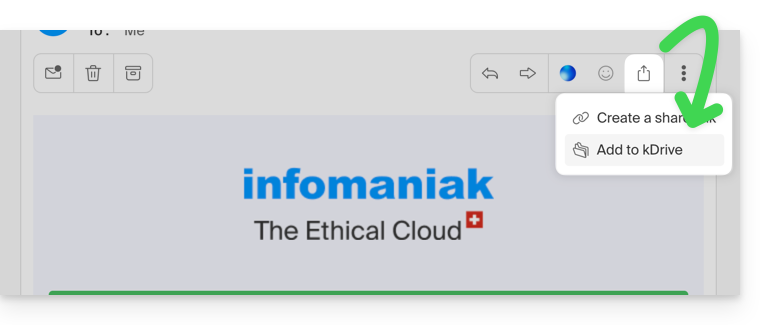
- Clique, em seguida, no ícone de compartilhamento na parte superior da mensagem para adicionar ao kDrive:
- Caso contrário, você também pode clicar no ícone Adicionar ao kDrive na parte superior da mensagem em questão:
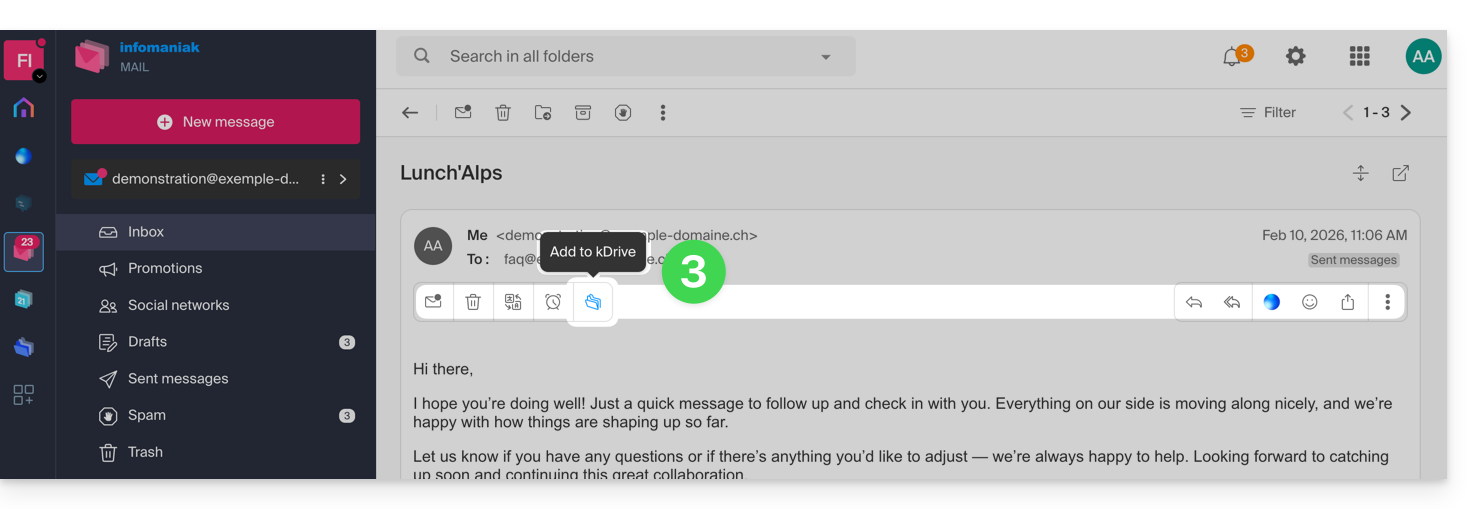
- Se o ícone não estiver visível, clique no menu de ação ⋮ à direita.
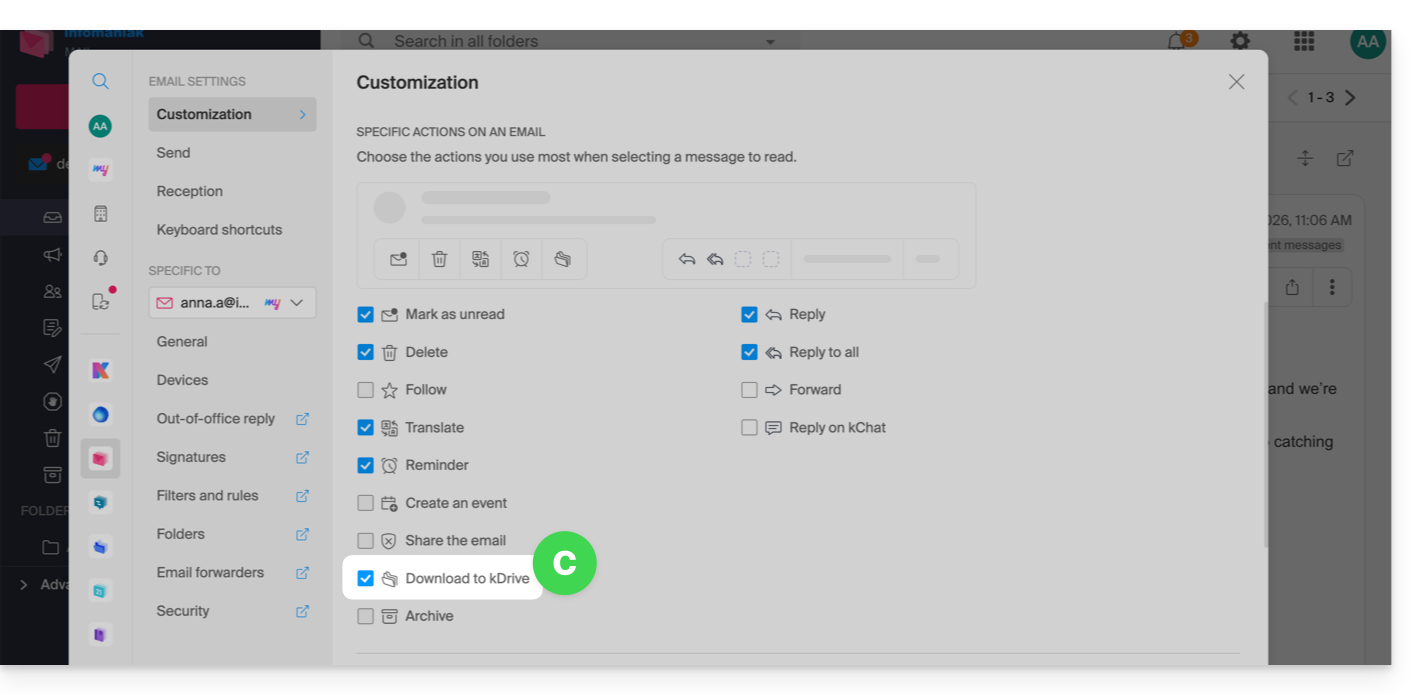
- Em seguida, escolha personalizar as ações:
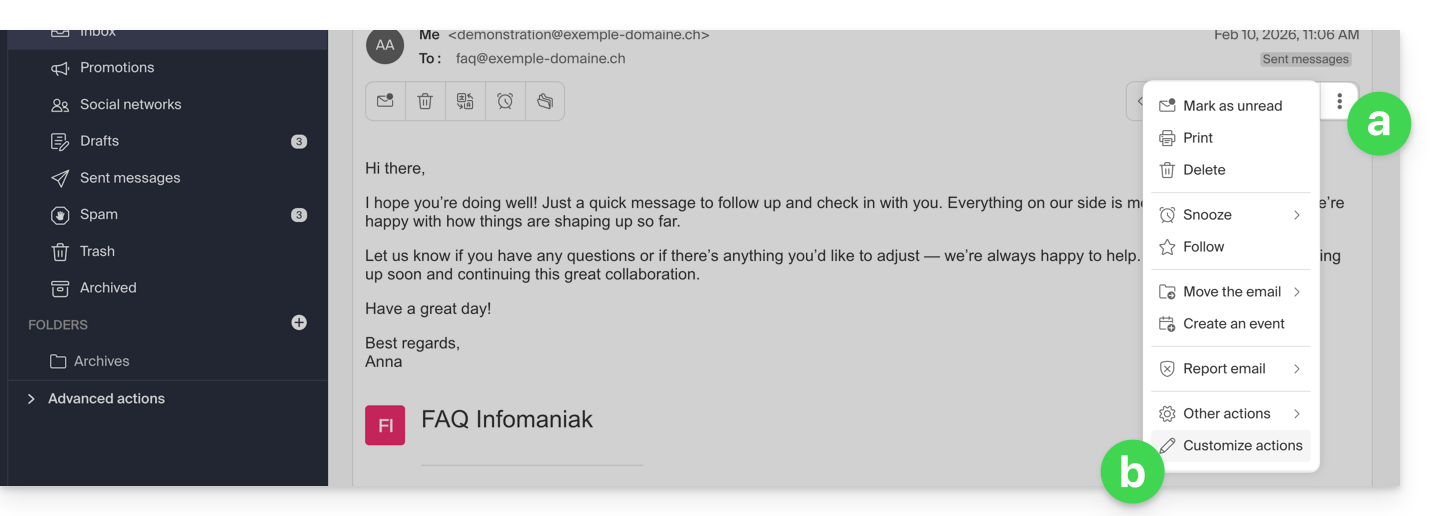
- para adicionar a ação desejada:
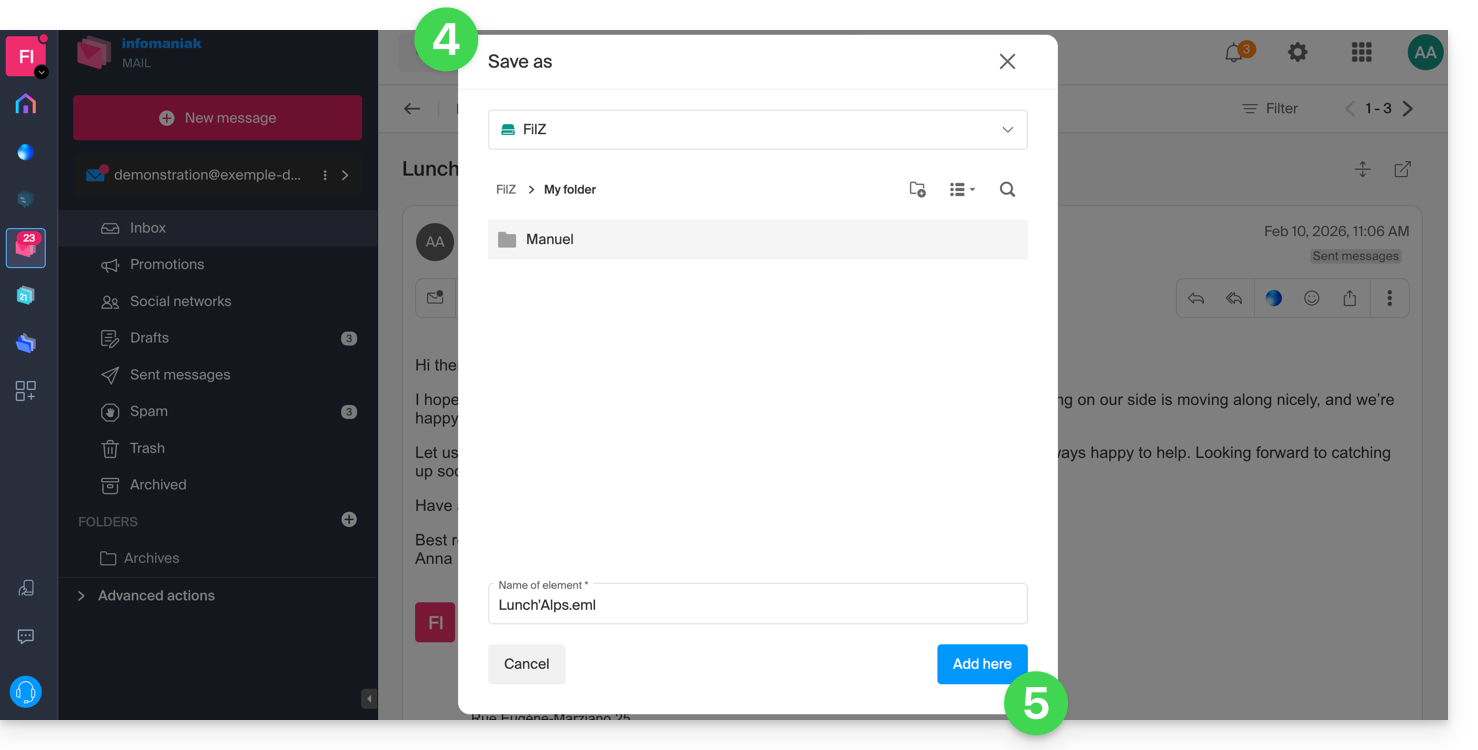
- Escolha o kDrive (entre aqueles aos quais você está vinculado pela sua Organização) e o local desejado para salvar seu arquivo. Se você renomeá-lo, mantenha a extensão
.emlpara poder lê-lo diretamente na interface do kDrive. - Clique no botão Adicionar.
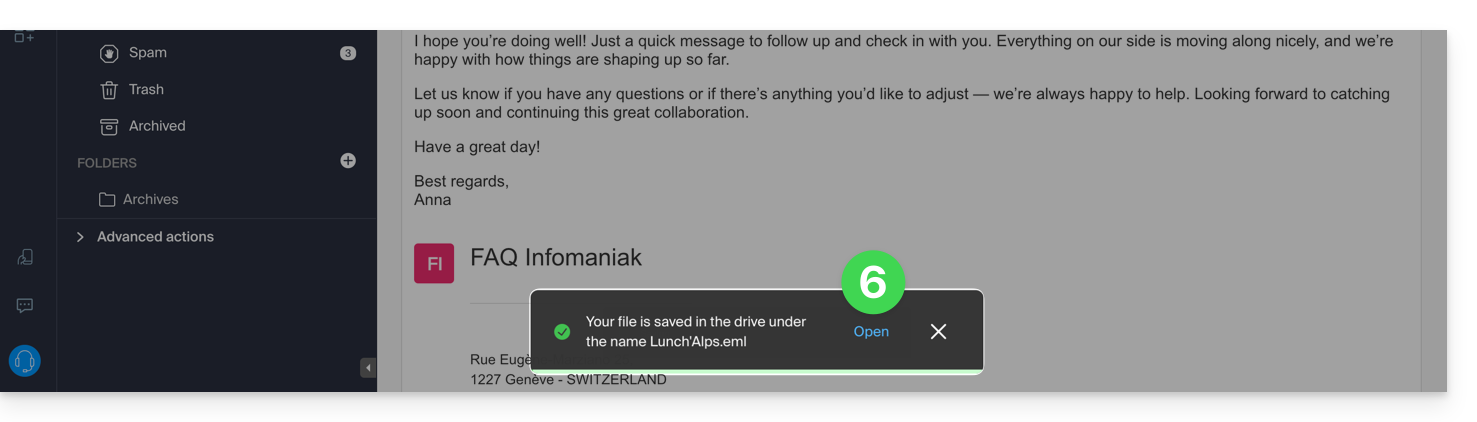
- Uma mensagem na parte inferior da tela informa sobre o andamento do processo de salvamento e permite que você acesse diretamente o local onde o e-mail está sendo salvo:
- O e-mail guardado pode ser visualizado no kDrive como se o estivesse a ler diretamente no Mail.
… a partir da aplicação móvel Infomaniak Mail
Para isso:
- Abra o e-mail em questão no aplicativo móvel Infomaniak Mail (aplicativo para smartphone ou tablet iOS / Android).
- Clique no menu de ações ⋮, localizado no canto superior direito do e-mail exibido.
- Escolha Salvar no kDrive e siga o mesmo procedimento descrito no passo 4 acima.
Link para esta FAQ: https://faq.infomaniak.com/973
Esta seção de perguntas frequentes foi útil?
Este guia permite resolver problemas relacionados ao estado (OK, em sincronização, etc.) que podem ocorrer nos arquivos e pastas da estrutura do kDrive no Explorador do Windows, caso essas indicações não correspondam mais à realidade.
Como resolver o problema de estados incorretos
O problema pode ser visto no log do kDrive da seguinte forma:
20240616_2008_kDrive.log:2024-06-16 20:19:01:349 [I] (6732) socketlistener.cpp:46 - Sending SocketAPI message --> STATUS:OK:D:\kDrive\Photos\Personnal\2024\06_June\0616_Bern\HP7A6181.JPG to 0000025197E46A60A aplicação envia o status correto do arquivo para o explorador, por exemplo, o status enviado é OK, o ícone de status exibido deveria ser o círculo verde, mas o status exibido não corresponde:
Reiniciar o Explorador do Windows
Para isso:
- Acesse o gerenciador de tarefas pressionando
ctrl shift + esc. - No gerenciador de tarefas, procure o Explorador do Windows.
- Clique com o botão direito do mouse sobre ele e clique em Concluir tarefa.
- No canto superior esquerdo do gerenciador de tarefas, clique em Arquivo.
- Clique em executar uma nova tarefa.
- Digite:
explorer.exe. - Pressione Enter.
Verificar a integridade do sistema e repará-lo
Para isso:
- Abra o prompt de comando com acesso de administrador.
- Digite cada comando abaixo e aguarde até que a análise seja concluída:
SFC /scannow
DISM /Online /Cleanup-Image /CheckHealth
DISM /Online /Cleanup-Image /ScanHealth
DISM /Online /Cleanup-Image /RestoreHealth
Link para esta FAQ: https://faq.infomaniak.com/1342
Esta seção de perguntas frequentes foi útil?
Este guia explica como assinar um arquivo no formato PDF no aplicativo web kDrive (serviço online ksuite.infomaniak.com/kdrive). Consulte este outro guia se precisar de informações sobre as outras opções disponíveis ao editar este tipo de documento.
✘ INDISPONÍVEL com
kSuite Free
my kSuite (ik.me, etik.com, ikmail.com)
Introdução
- O aplicativo web kDrive integra nativamente um editor que permite assinar digitalmente um documento PDF.
- As assinaturas de um utilizador são pessoais e só podem ser utilizadas por esse utilizador em todos os kDrives aos quais ele tem acesso.
- Os seus ficheiros não são nunca foram analisados e são armazenados exclusivamente na Suíça.
Criar e adicionar sua assinatura a um PDF
Para acessar o kDrive e gerenciar as assinaturas de documentos PDF:
- Clique aqui para acessar o aplicativo web kDrive (serviço online ksuite.infomaniak.com/kdrive).
- Abra o documento PDF em questão:
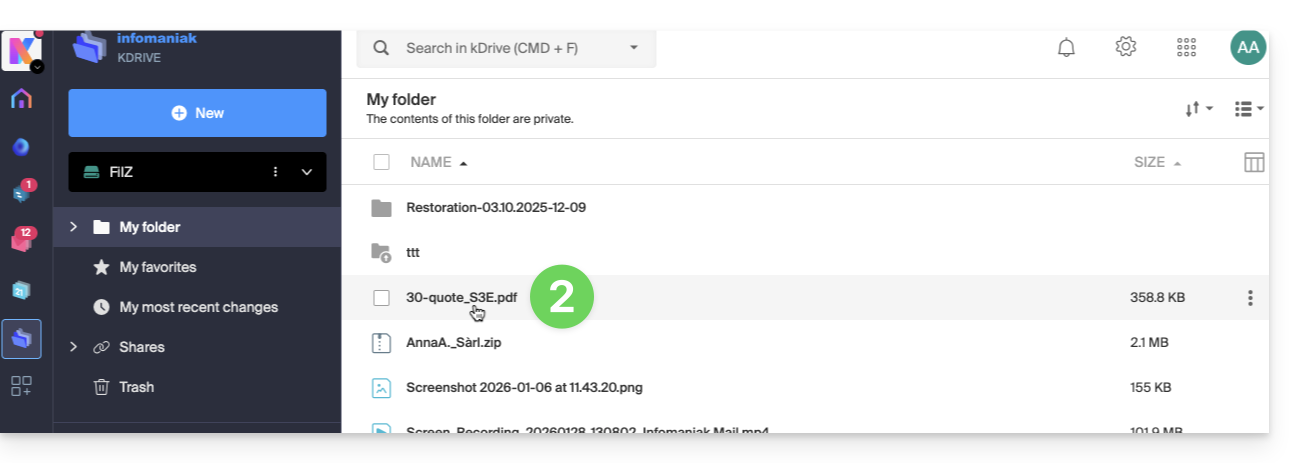
- Clique no botão Editar na parte superior do documento para acessar o editor de arquivos:
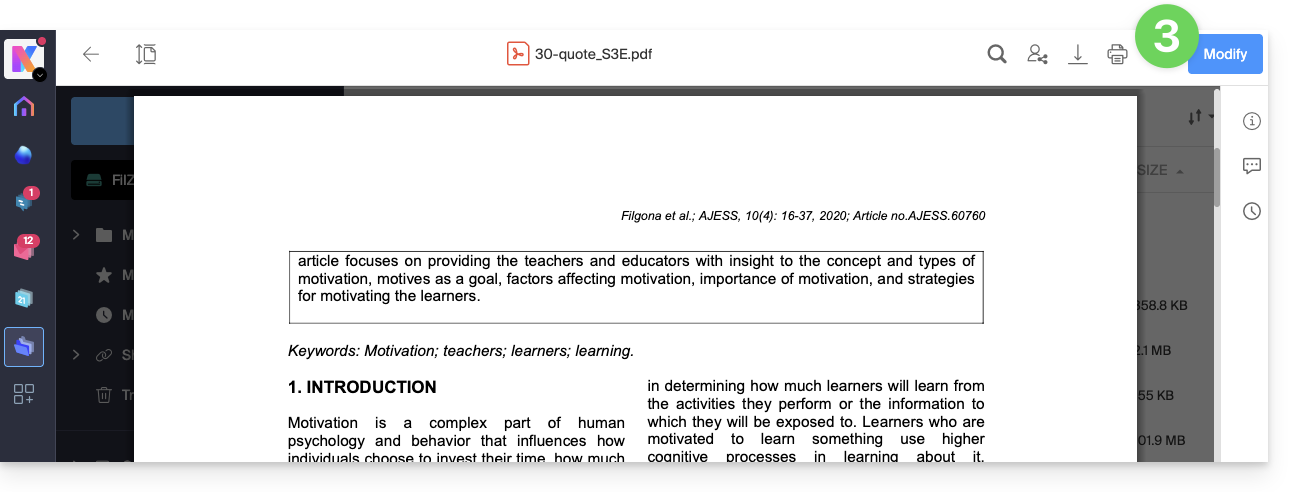
- Clique no ícone Assinatura na barra de ferramentas:
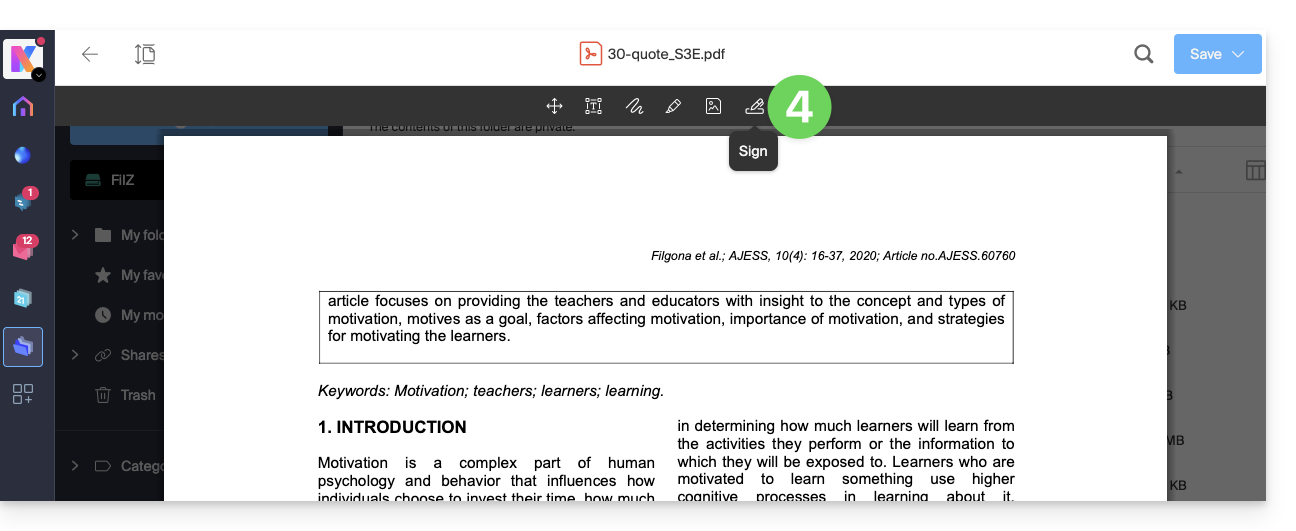
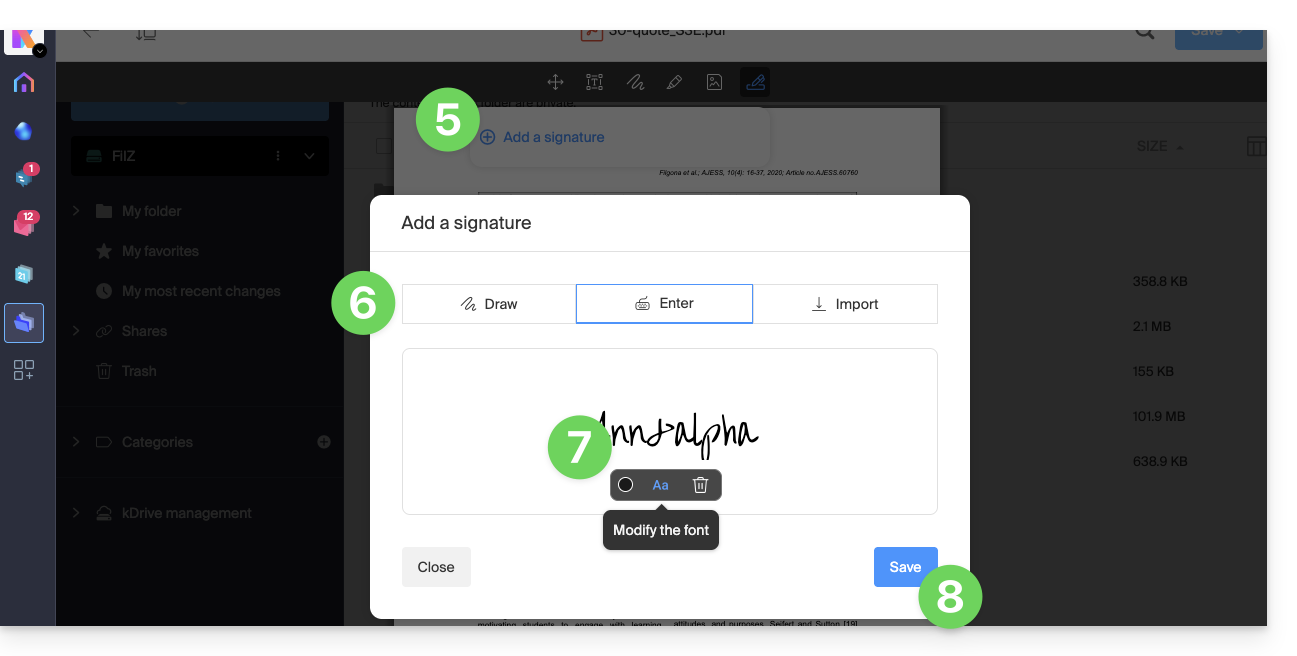
- Clique em Adicionar uma assinatura.
- Escolha o método para criar a assinatura:
- Desenhar à mão livre com o mouse.
- Digitar o texto e escolher a fonte manuscrita (exemplo abaixo).
- Importar uma imagem (uma digitalização da sua assinatura manuscrita, por exemplo) a partir do seu dispositivo.
- Digite o texto desejado para a assinatura e clique no botão Aa para escolher o estilo de escrita manuscrita.
- Clique em Guardar:
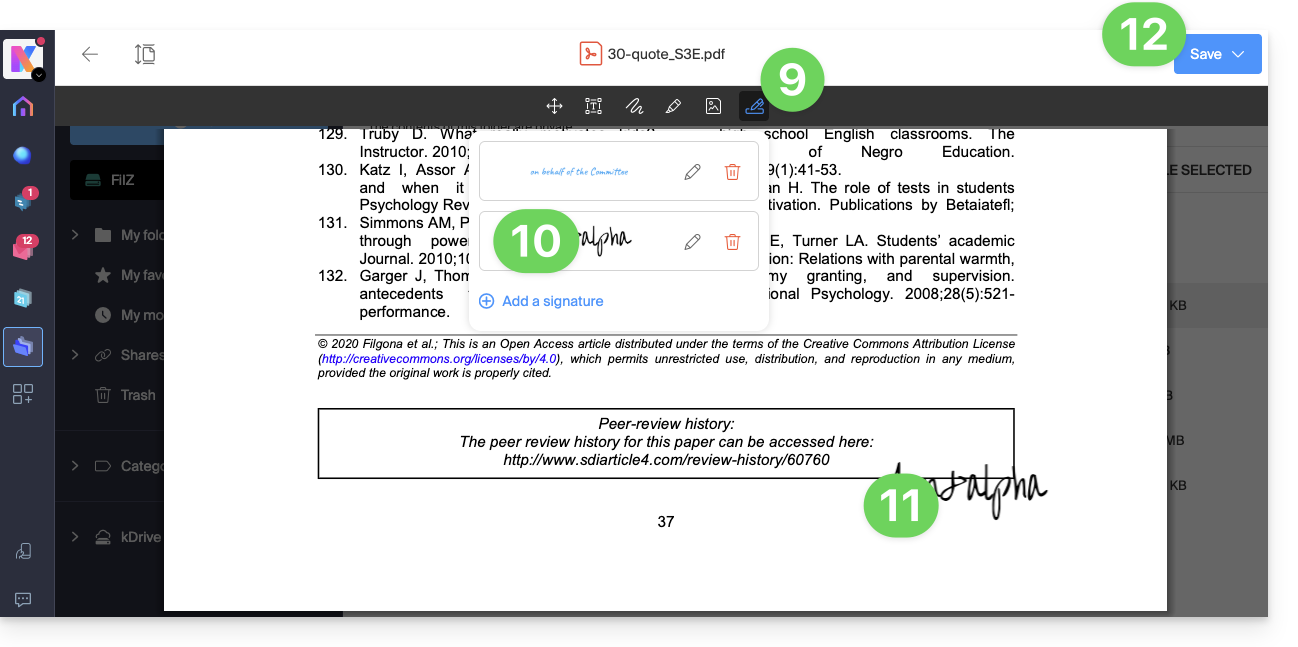
- Depois de criar uma assinatura, basta clicar novamente no ícone Assinatura em qualquer PDF para exibir suas assinaturas criadas.
- Clique na assinatura para inseri-la no documento.
- Após a inserção, pode inserir um texto alternativo para facilitar a acessibilidade do documento:
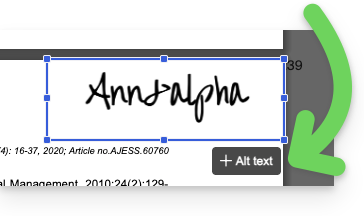
- Após a inserção, pode inserir um texto alternativo para facilitar a acessibilidade do documento:
- A assinatura pode ser movida e redimensionada conforme desejado.
- Após a conclusão, para salvar, clique uma vez no botão no canto superior direito e escolha se deseja criar uma cópia do documento modificado ou substituir o arquivo existente:
Link para esta FAQ: https://faq.infomaniak.com/1463
Esta seção de perguntas frequentes foi útil?
Este guia explica como remover o cache (dados armazenados em cache após várias operações, ocupando espaço de armazenamento desnecessário no seu dispositivo) a partir do aplicativo móvel kDrive (aplicativo para smartphone ou tablet iOS/Android).
Remover o cache do kDrive…
… no iOS (iPhone, iPad)
- Abra o aplicativo móvel kDrive (iOS).
- Toque na foto/iniciais no canto inferior direito.
- Toque em Configurações.
- Toque em Gerenciamento do armazenamento local.
- Remova os dados que deseja, por exemplo, o cache (ou importação, o que também permite desbloquear importações que possam estar bloqueadas)…
… no Android
- Abra as configurações do telefone Android.
- Vá para a seção Aplicativos ou Aplicativos e notificações, por exemplo.
- Toque em Mostrar XX aplicativos, se o dispositivo não os exibir por padrão.
- Toque em kDrive.
- Vá para a seção Armazenamento ou Espaço de armazenamento e cache, por exemplo.
- Toque em Limpar cache.
- Atenção: se clicar no botão Limpar armazenamento, você apagará todos os dados do usuário (credenciais de login, por exemplo), além do cache.
Link para esta FAQ: https://faq.infomaniak.com/1561
Esta seção de perguntas frequentes foi útil?
Este guia explica como alterar o seu plano kDrive, a solução de armazenamento colaborativo na nuvem, 100% de fabricação suíça.
Introdução
- kDrive é o nome dado ao serviço de armazenamento/partilha de ficheiros, oferecido pela Infomaniak na Suíça.
- O kDrive pode ser acedido gratuitamente ou através de uma assinatura, dependendo se é o único utilizador ou se pretende que colaboradores também tenham acesso.
- o kDrive existe como um produto independente ou como um produto entre outros na suíte kSuite e my kSuite / my kSuite+.
- Para o ajudar a identificar a oferta mais adequada às suas necessidades, consulte este outro guia.
Se foi convidado a visualizar/colaborar num ficheiro de um kDrive, é possível que não possua realmente o produto kDrive; tem apenas acesso ao kDrive gerido por outra pessoa. Portanto, não pode interagir na oferta em curso.
Descubra o plano kDrive atual
Através da aplicação web kDrive
Para saber qual é o plano que você possui atualmente:
- Clique aqui para acessar a aplicação web kDrive da Infomaniak (serviço online ksuite.infomaniak.com/kdrive).
- Clique em Gerenciar para acessar a página de alteração de plano e ver o plano atual:
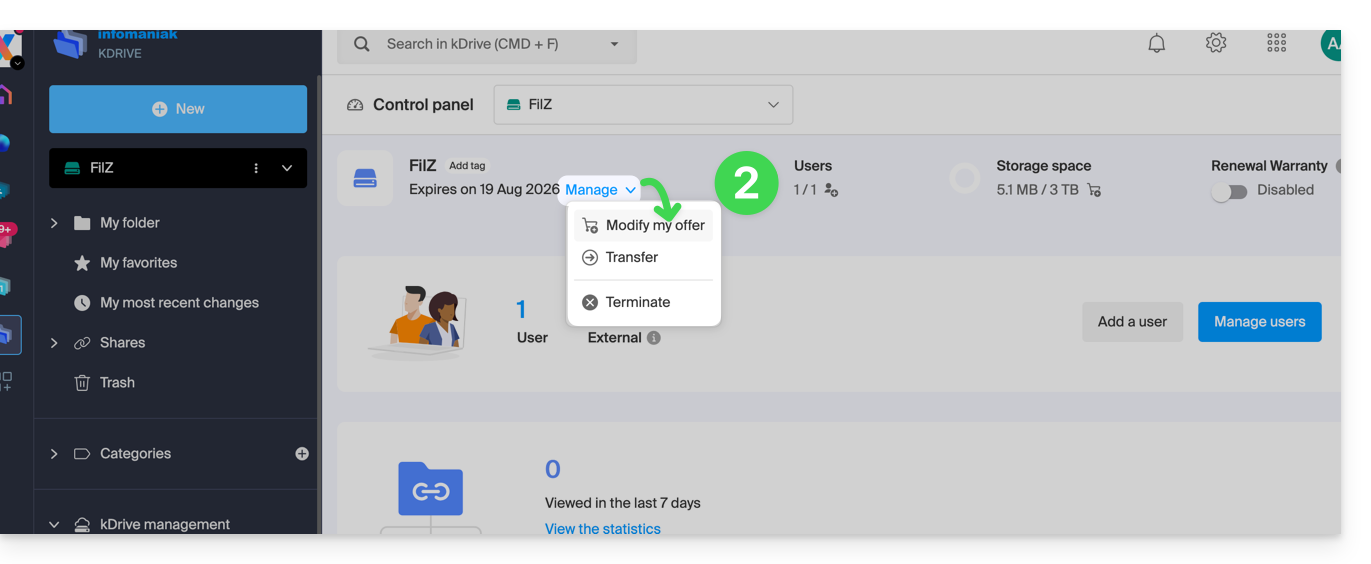
Se nenhum painel estiver acessível no canto inferior esquerdo, você tem funcionalidades limitadas (plano my kSuite, por exemplo), que podem ser desbloqueadas ao fazer upgrade para um plano superior: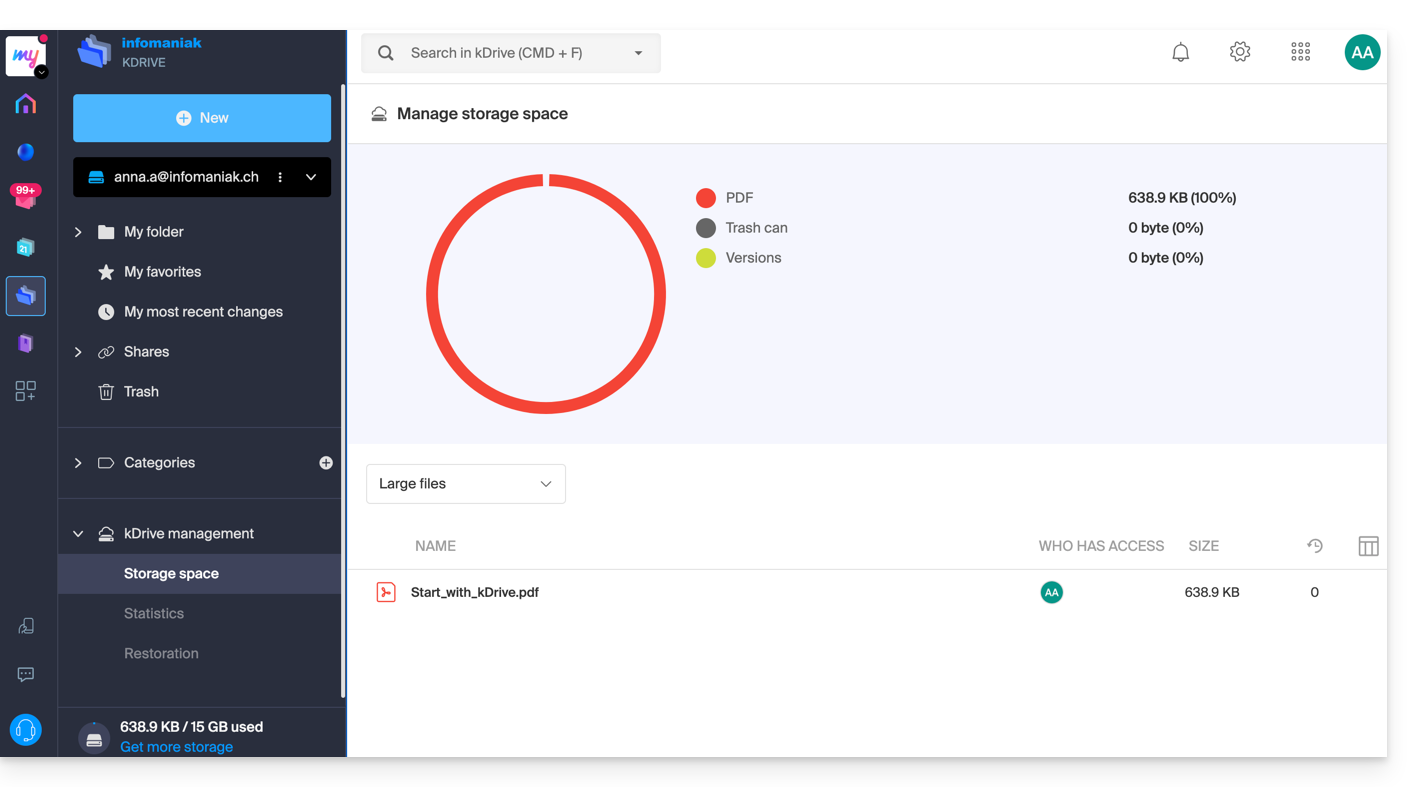
Através do Manager Infomaniak
Também pode obter informações sobre a oferta atual através do Manager, o painel de controlo dos seus produtos.
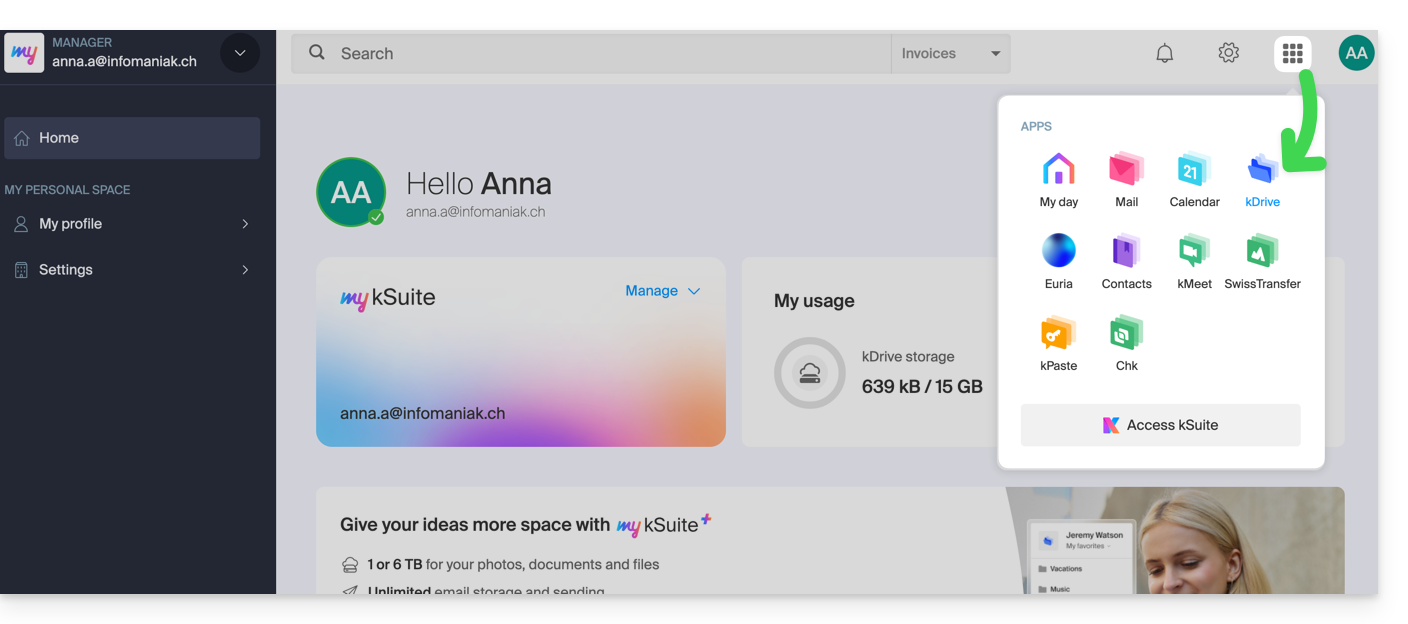
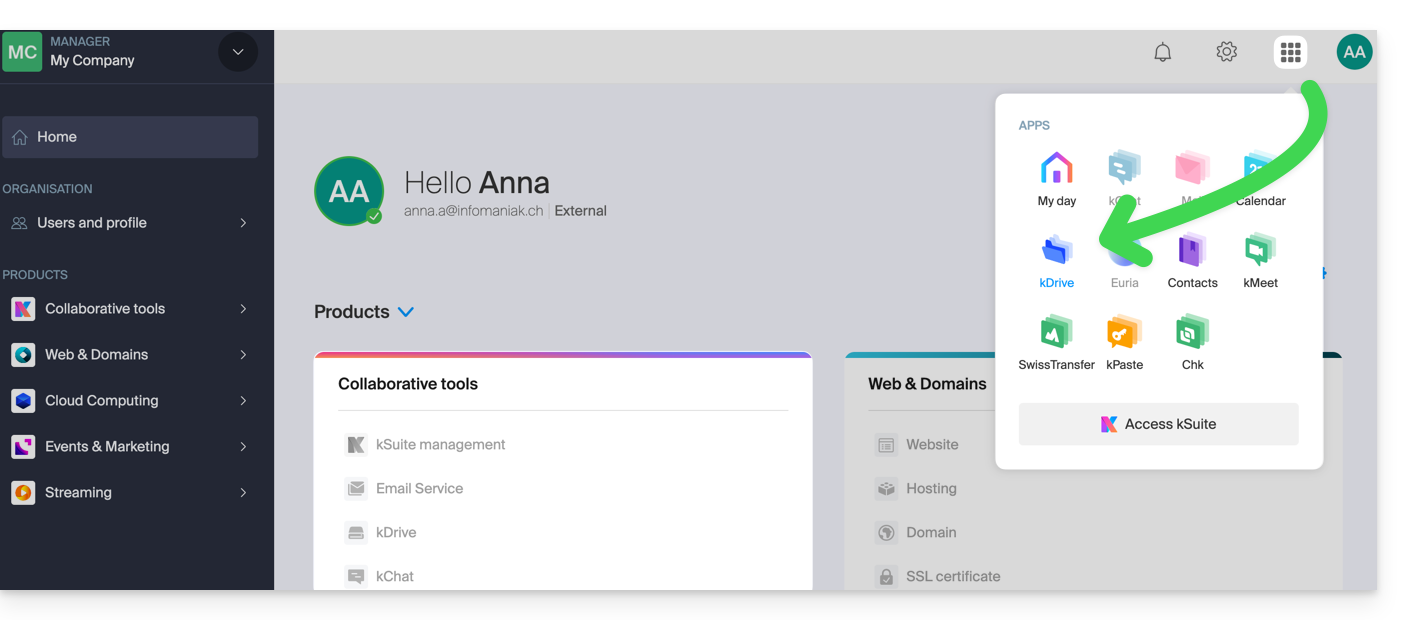
Se nenhum produto kDrive estiver presente no painel de controle, o aplicativo kDrive estará acessível apenas entre os aplicativos no canto superior direito, pois você possui…
- uma oferta my kSuite / my kSuite+:
- se você foi convidado para compartilhar um documento (nesse caso, você é um usuário externo do kDrive):
Caso contrário, encontre seu kDrive entre suas ferramentas de colaboração: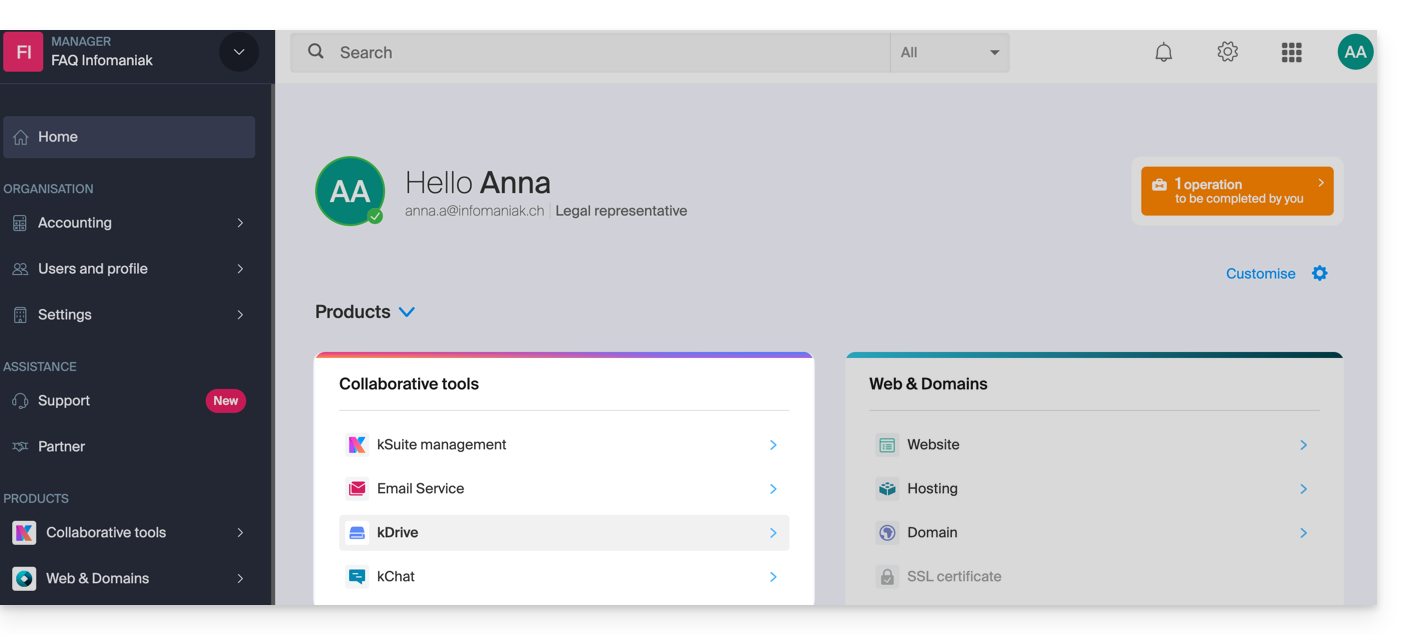
Alterar o plano kDrive atual
O seu kDrive pode evoluir com as suas necessidades. À medida que estas aumentam — seja para adicionar novos colaboradores, integrar um membro da sua família ou armazenar um volume crescente de dados — aumente facilmente a sua capacidade para liberar todo o seu potencial.
Pré-requisitos
- Ter permissões suficientes dentro da Organização.
Para alterar o seu plano kDrive atual:
- Clique aqui para acessar a aplicação web kDrive da Infomaniak (serviço online ksuite.infomaniak.com/kdrive).
- Clique em Gerenciar para acessar a página de alteração de plano e ver o plano atual:
Assim, poderá mudar para um plano superior na loja Infomaniak: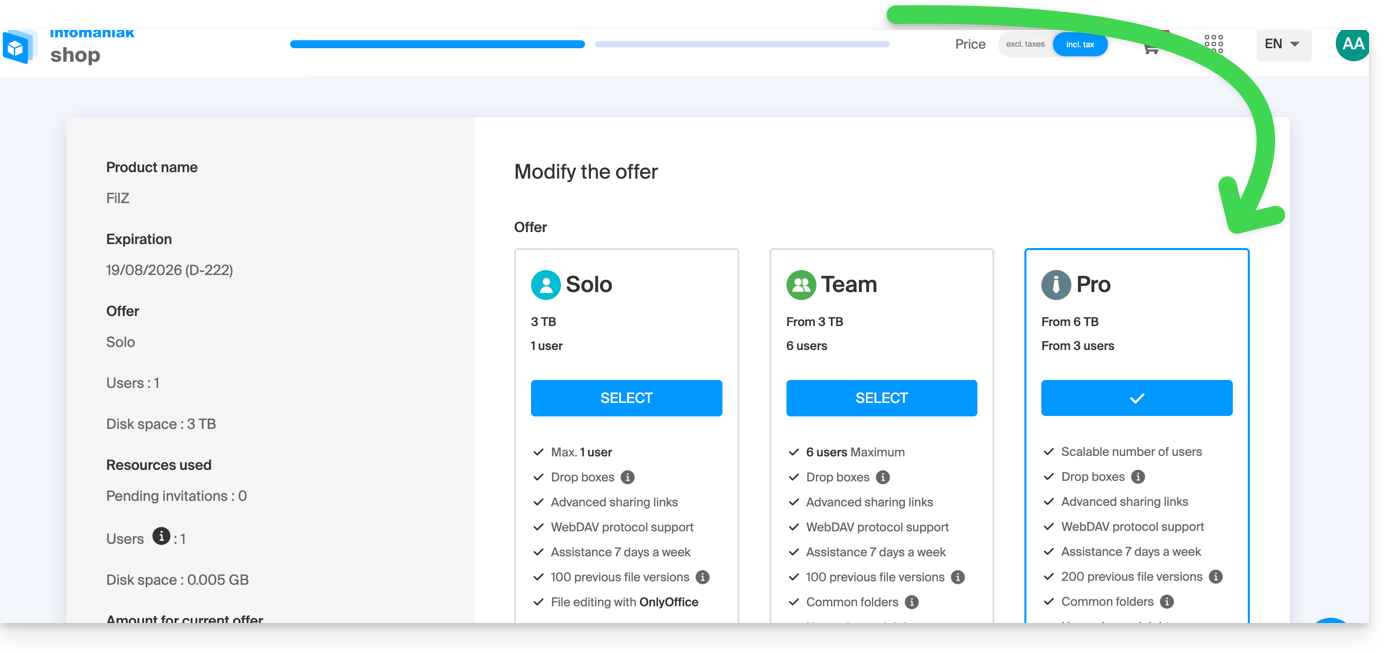
Por exemplo, se, ao escolher um novo plano, aumentar o número de utilizadores que podem ser adicionados ao seu kDrive, consulte este outro guia para os convidar a juntarem-se.
Link para esta FAQ: https://faq.infomaniak.com/1577
Esta seção de perguntas frequentes foi útil?
Este guia explica como modificar os direitos de acesso aos produtos para um utilizador da sua Organização no Manager Infomaniak.
Introdução
- Desde que abriu a sua conta na Infomaniak, faz parte de pelo menos uma Organização (❓: ajuda).
- Se estava sozinho e não se tratava de um convite, uma Organização foi criada em seu nome e você se torna automaticamente o responsável legal.
- Caso contrário, você pertence à Organização que o convidou (para participar da sua kSuite, para gerenciar um produto, etc.).
- É possível alterar o papel de um utilizador dentro da sua Organização (❓: ajuda).
- Você pode então definir se um usuário…
- … faz parte da sua Organização e se ele deve se tornar:
- Responsável legal
- Administrador
- Colaborador (esta parte é detalhada abaixo…)
- … é externo à sua Organização (direitos limitados):
- Os usuários externos não são considerados nos compartilhamentos de calendários e agendas de endereços com toda a Organização.
- … faz parte da sua Organização e se ele deve se tornar:
Quem pode acessar o quê…
Pré-requisitos
- Alterne previamente para a Organização desejada, caso não encontre a lista de utilizadores esperada (❓: ajuda).
- Ser Administrador ou Representante legal na Organização (❓: ajuda).
- Ter adicionado um utilizador como colaborador (❓: ajuda).
O guia abaixo permite gerenciar o acesso aos produtos para colaboradores e usuários externos. De fato, um responsável legal ou um administrador tem, de qualquer forma, acesso a todos os produtos existentes na organização e visíveis no Gerenciador Infomaniak.
Para modificar os acessos aos produtos de um utilizador da Organização:
- Clique aqui para aceder à gestão de utilizadores no Manager Infomaniak (❓: ajuda).
- Clique no menu de ações ⋮ localizado à direita do utilizador em questão.
- Clique em Editar acessos aos produtos:
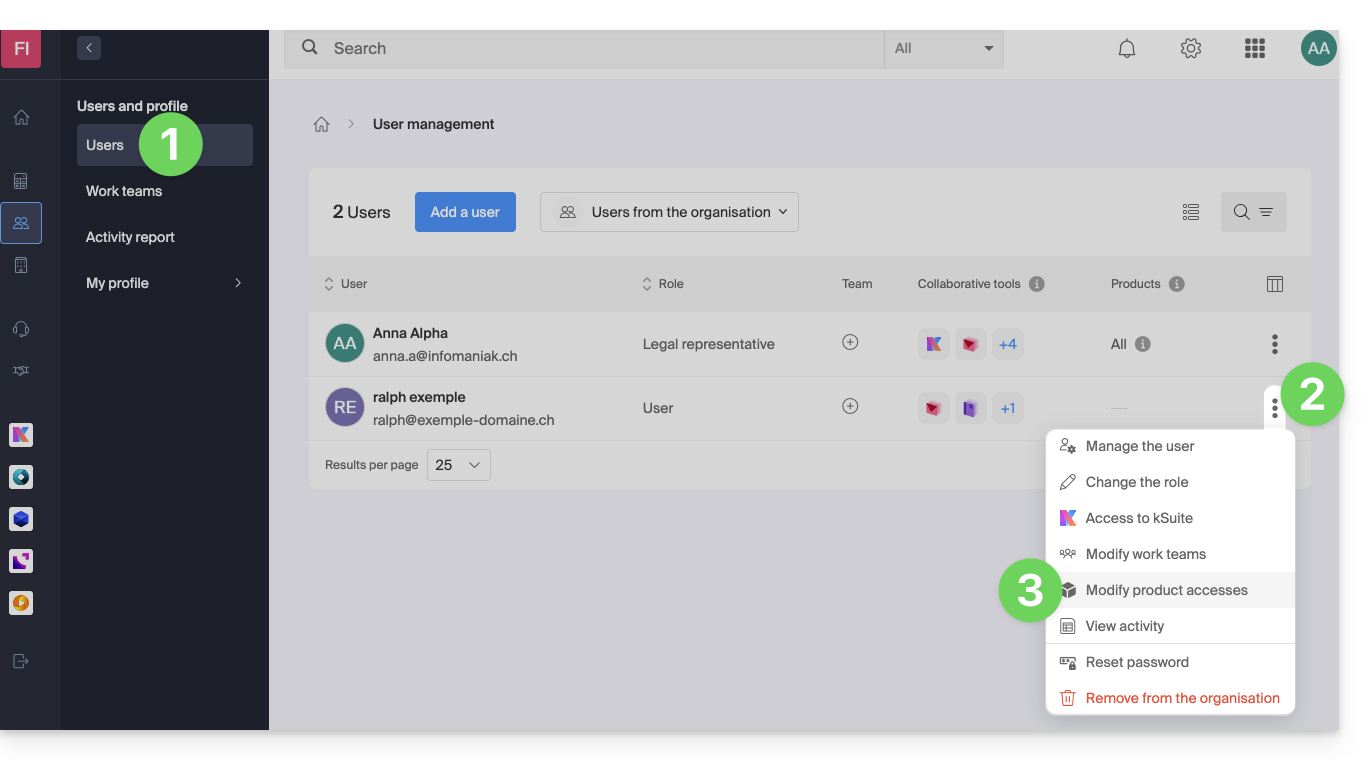
- Você pode conceder acesso total a tudo com as permissões máximas em um único clique.
- Caso contrário, clique na categoria de produto à qual deseja conceder acesso.
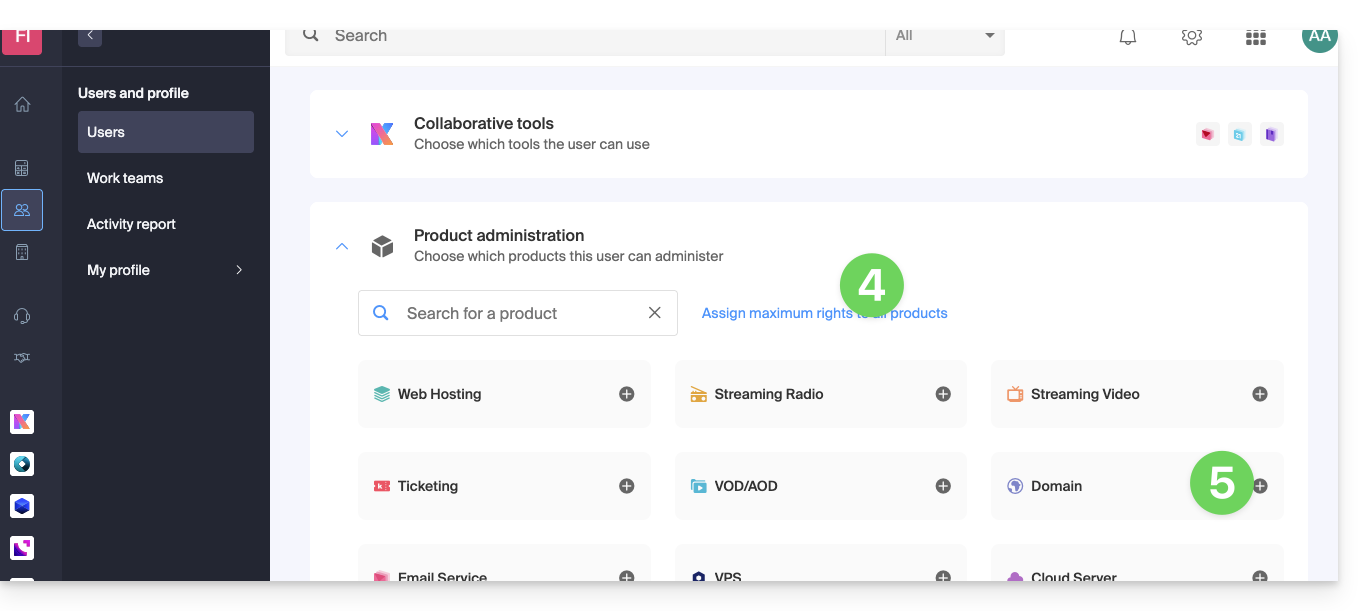
- Selecione o(s) produto(s) necessário(s).
- Se selecionou vários produtos, decida se um produto adicional futuro deverá ser automaticamente visível para o utilizador (e com que tipo de permissões❓: ajuda).
- Clique no botão Guardar:
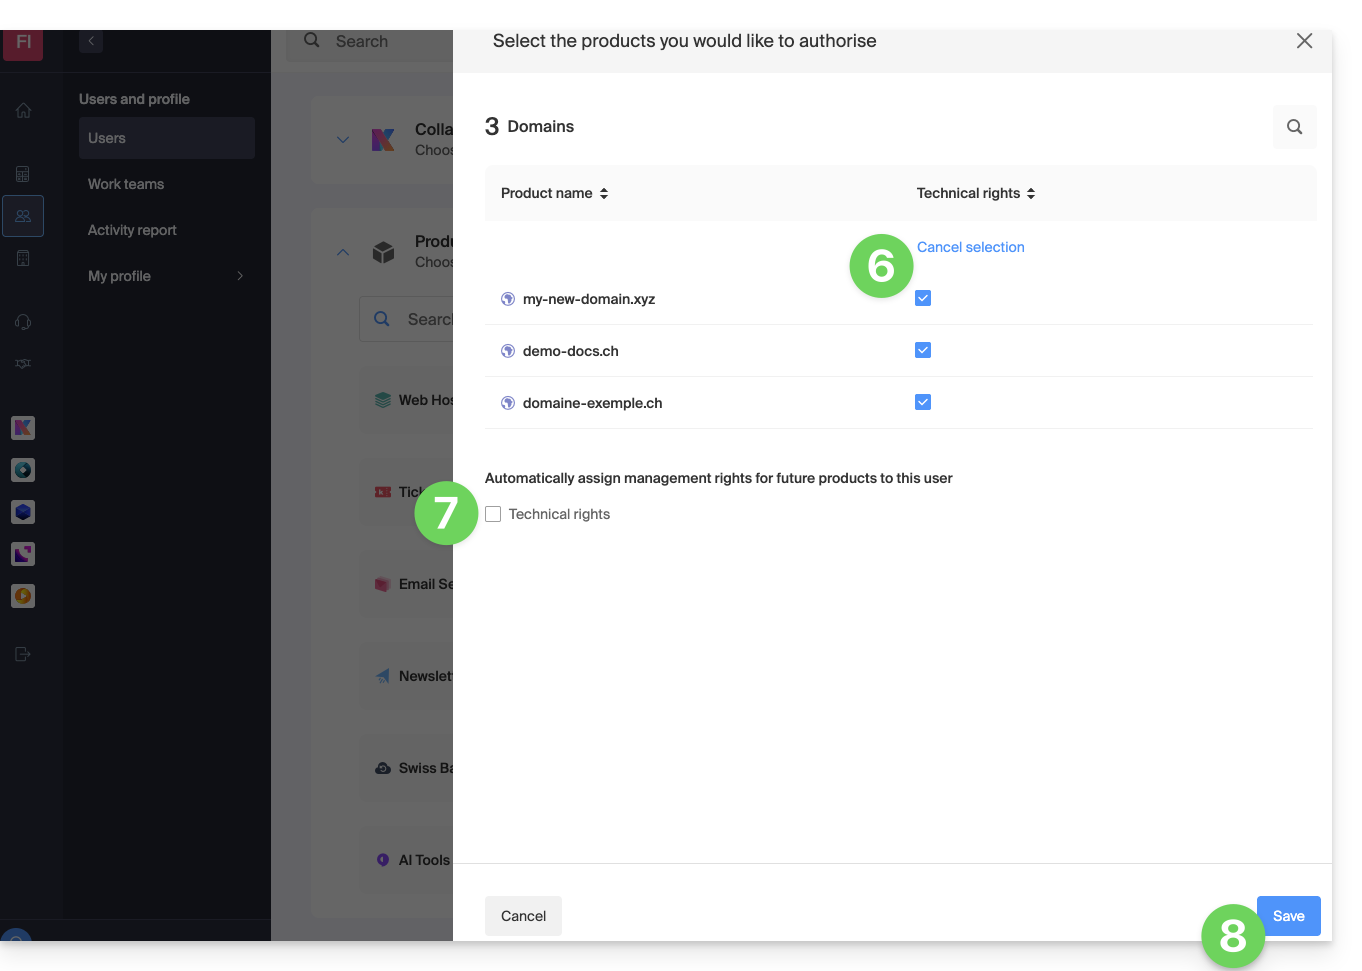
- Os direitos são concedidos imediatamente.
- Clique no ícone lápis ✎ para modificar as permissões:
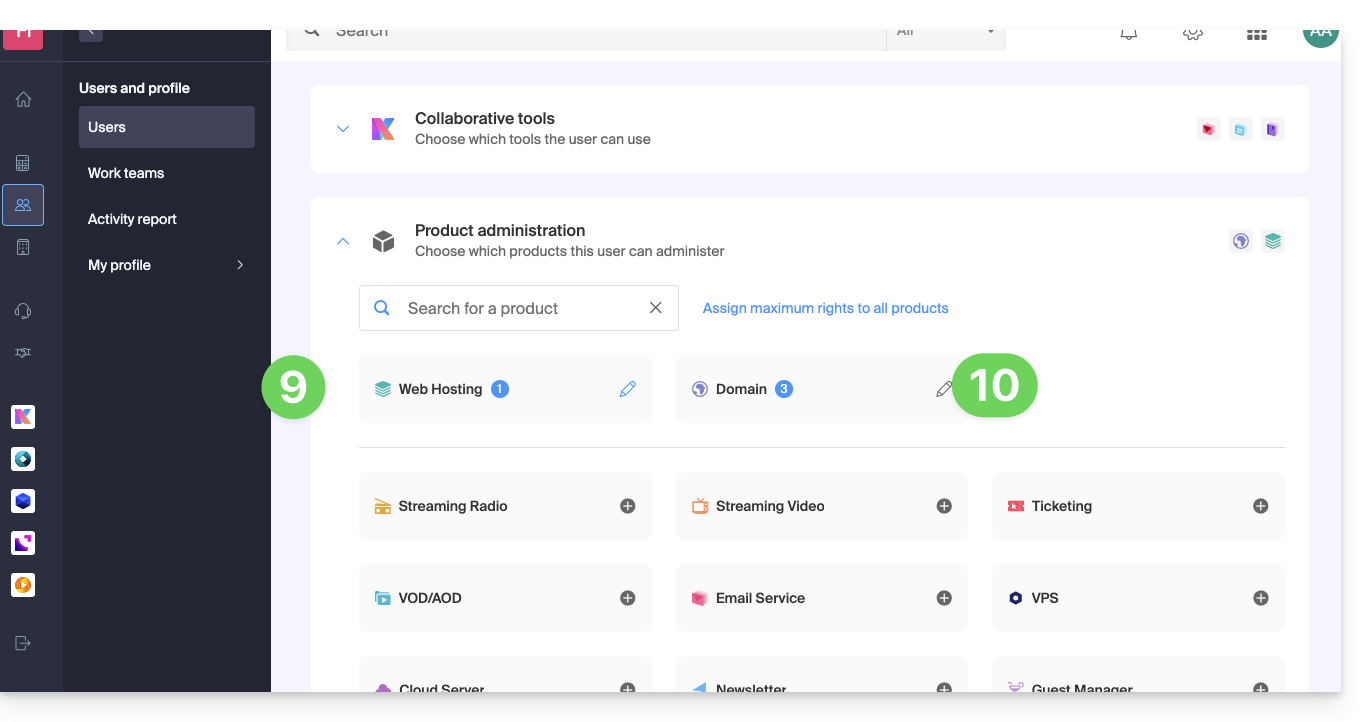
- Repita o processo a partir do passo 5 se precisar conceder acesso a vários produtos.
Utilização do serviço / Gestão do serviço
Atenção, na tabela dos seus produtos, é importante distinguir os acessos aos produtos (como o kDrive, por exemplo, dentro da kSuite) e os acessos à gestão dos produtos: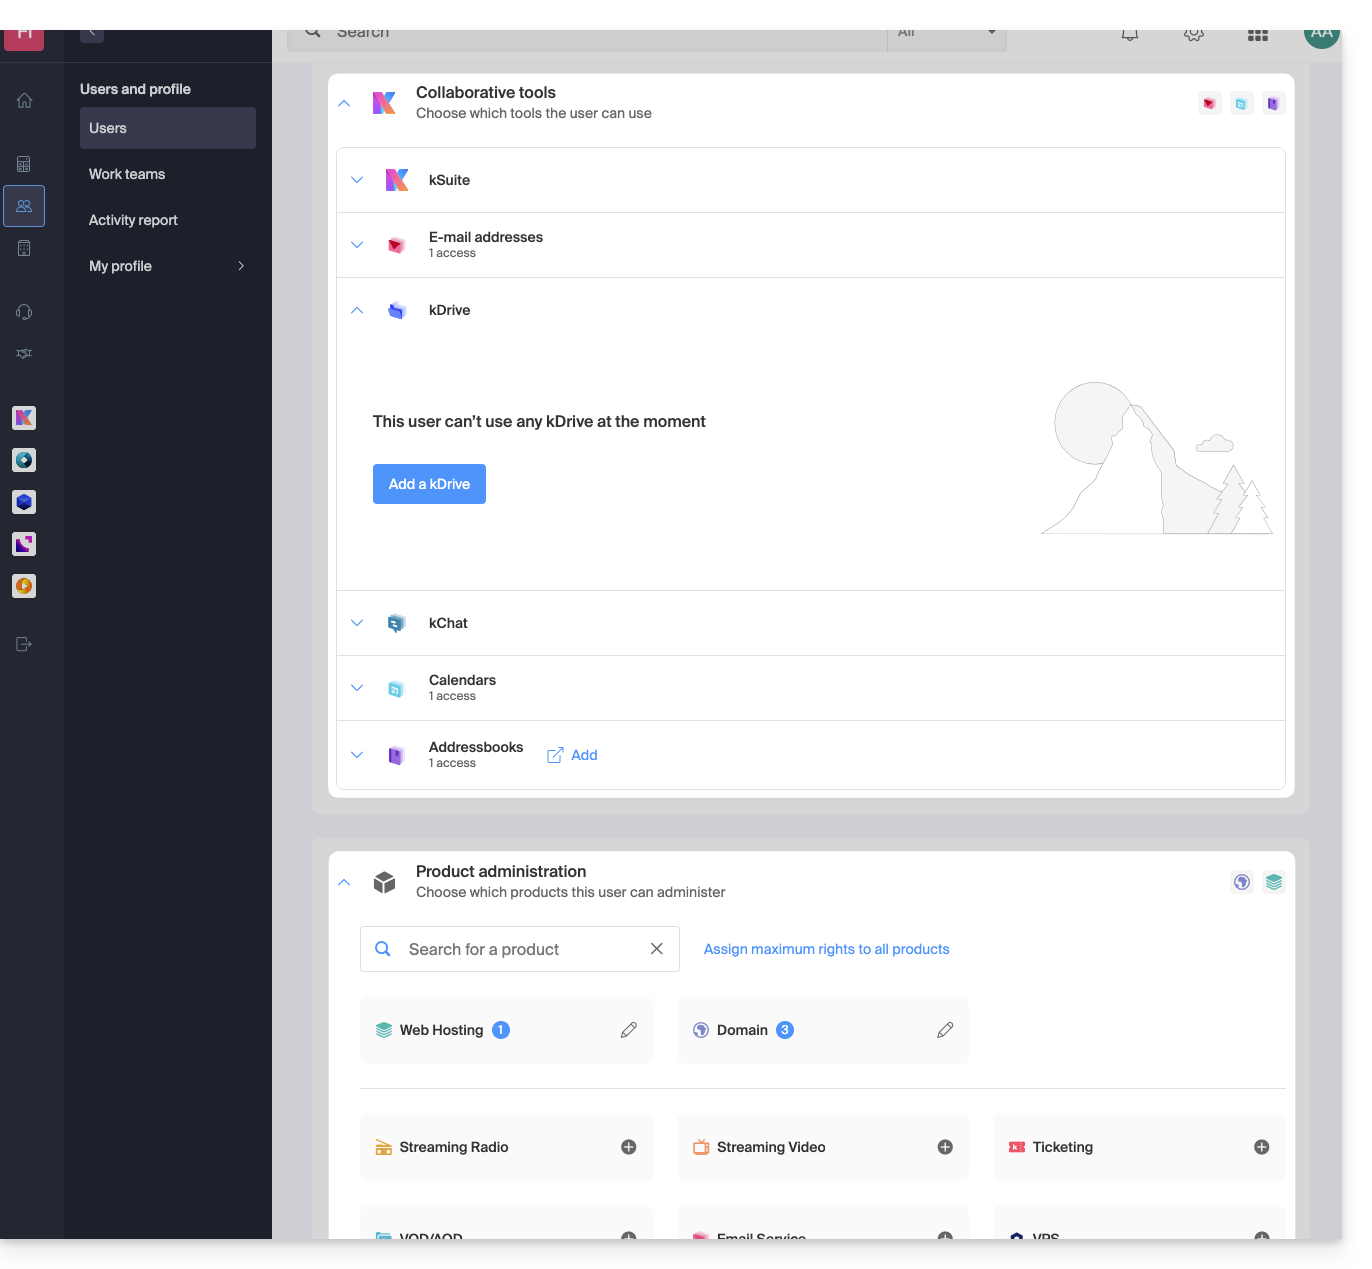
É possível autorizar um utilizador a utilizar o kDrive (poderá criar um PDF, por exemplo) sem, no entanto, lhe conceder um direito de gestão do serviço kDrive (não poderá alterar o plano, convidar um novo utilizador, cancelar, etc.).
Direitos técnicos / Direitos estatísticos
Com alguns serviços, como o kDrive, é possível conceder a um colaborador direitos TÉCNICOS e/ou ESTATÍSTICOS (adiciona acesso ao painel de controle, links de compartilhamento, estatísticas de armazenamento, usuários ativos, dispositivos conectados, atividade no kDrive):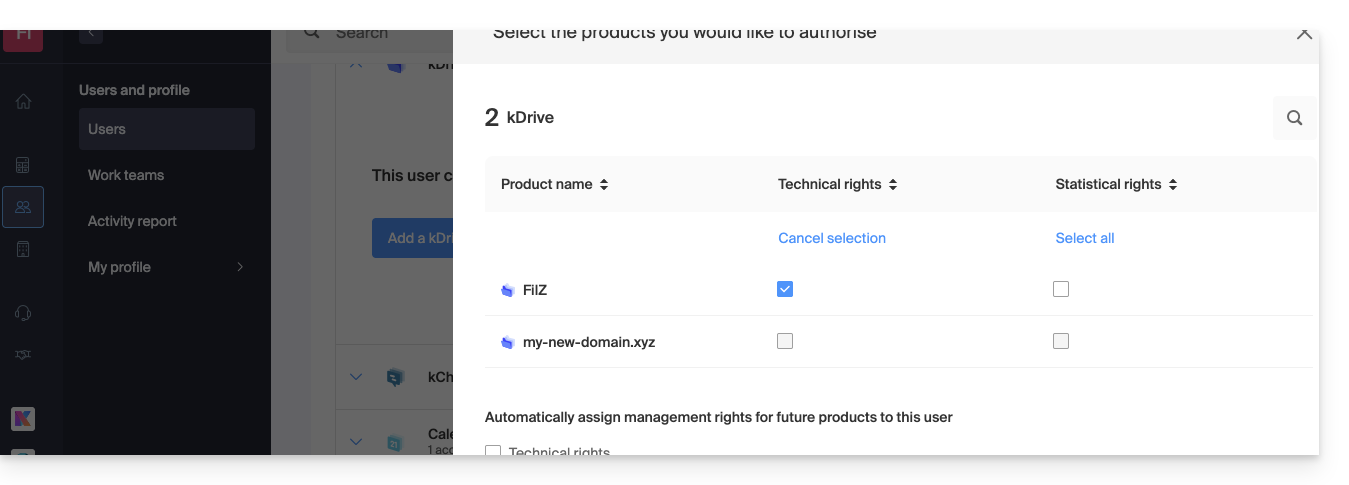
Outros serviços, como os domínios, não possuem uma seção ESTATÍSTICA: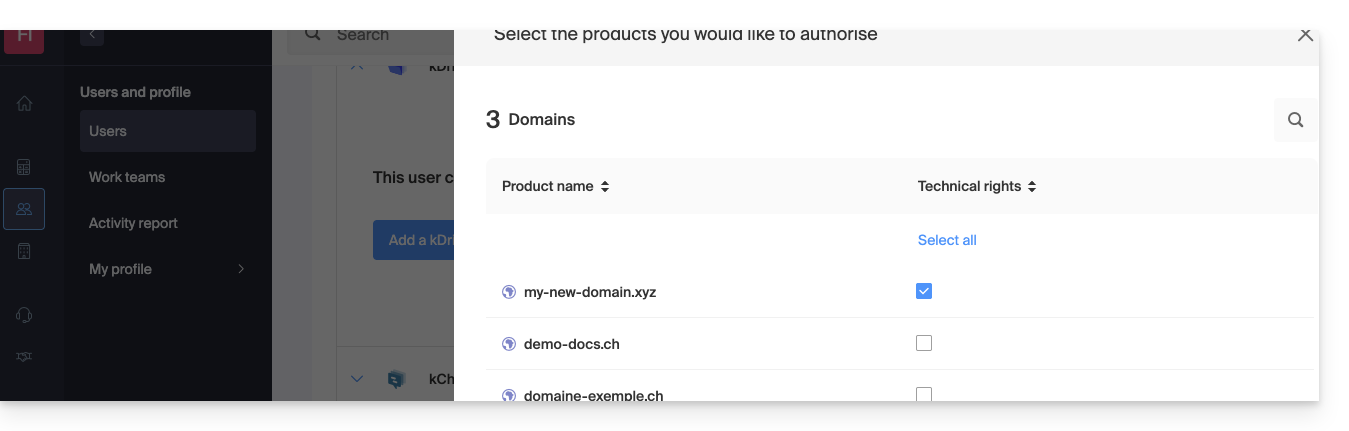
Certos serviços específicos, como a venda de bilhetes, permitem conceder direitos ainda mais detalhados: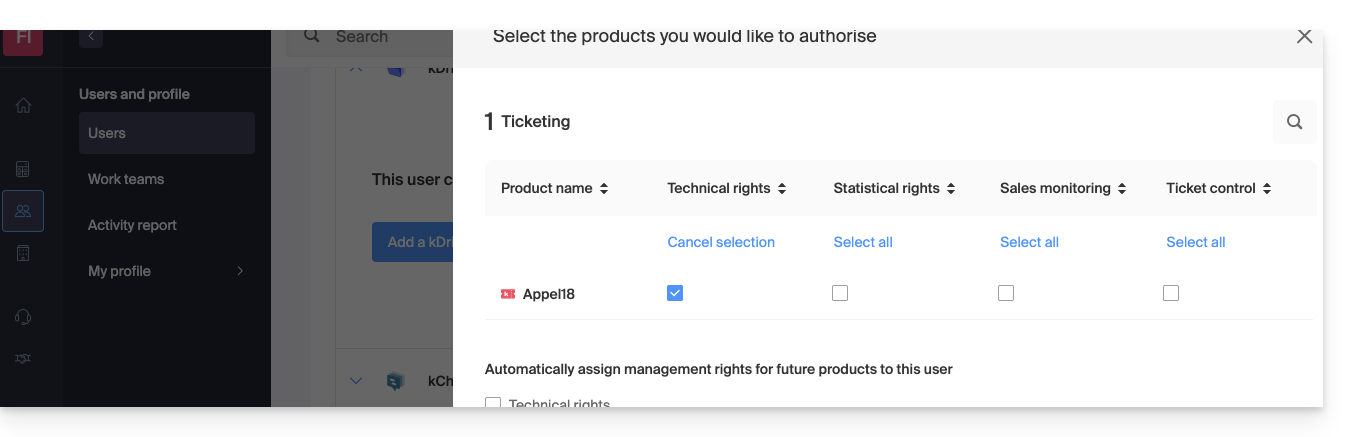
Acesso facilitado: os Grupos
Para facilitar a atribuição de permissões de acesso a um produto que se encontra na sua Organização, existem os Grupos (❓: ajuda). Estes permitem criar equipas que estão associadas a produtos Infomaniak com as permissões desejadas, o que é muito útil para conceder a um novo colaborador da sua Organização o acesso aos produtos de que ele precisará nas suas atividades diárias.
Link para esta FAQ: https://faq.infomaniak.com/1610
Esta seção de perguntas frequentes foi útil?
Este guia explica como modificar o papel e as permissões de um utilizador, de forma que este tenha apenas um papel legal restrito ou acesso apenas a certas funcionalidades da sua Organização no Manager Infomaniak.
Introdução
- Desde que abriu a sua conta na Infomaniak, faz parte de pelo menos uma Organização (❓: ajuda).
- Se estava sozinho e não se tratava de um convite, uma Organização foi criada em seu nome e você se torna automaticamente o responsável legal.
- Caso contrário, você pertence à Organização que o convidou (para participar da sua kSuite, para gerenciar um produto, etc.).
- Você pode definir se um utilizador…
- … faz parte da sua Organização e se deve ter o papel de:
- Responsável legal
- Administrador
- Colaborador
- … é externo à sua Organização (direitos limitados):
- Os utilizadores externos não são considerados nos partilhamentos de calendários e agendas de contactos para toda a Organização.
- … faz parte da sua Organização e se deve ter o papel de:
Modificar os direitos/permissões de um utilizador
Pré-requisitos
- Se não encontrar a lista de utilizadores esperada, altere primeiro para a Organização desejada (❓: ajuda).
- Ser Administrador ou Responsável legal na Organização (❓: ajuda).
- Consulte as diferentespermissões (direito de acesso aos produtos, por exemplo) e preferências de contato administrativode um usuário dentro de uma Organização (❓: ajuda).
- Atenção: não é possível remover um responsável legal se não houver outro responsável legal (❓: ajuda).
Para alterar o papel de um utilizador:
- Clique aqui para acessar o gerenciamento de usuários no Manager Infomaniak (❓: ajuda).
- Clique no menu de ação ⋮ localizado à direita do usuário em questão.
- Clique em Modificar função:
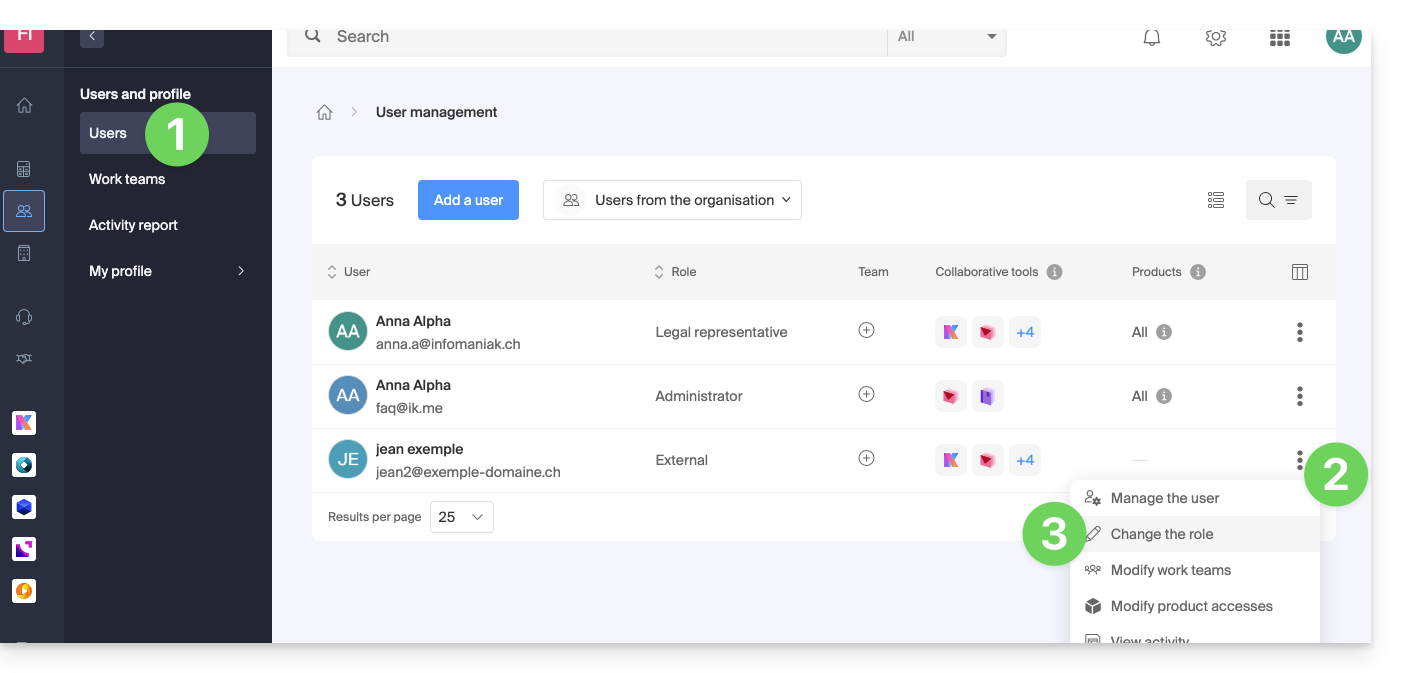
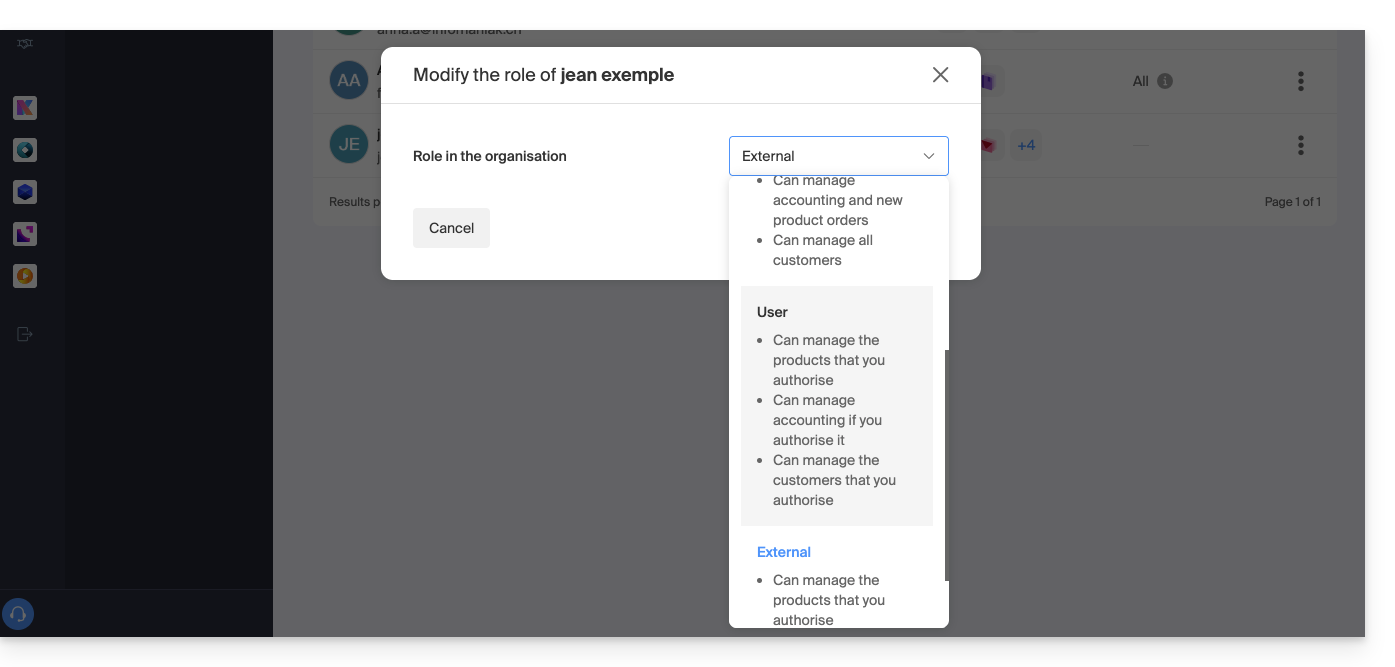
- Modifique a função desejada:
- Clique no botão Guardar.
Um e-mail de resumo é enviado ao utilizador cujo papel foi alterado.
Se atribuir ao utilizador o papel de simples colaborador…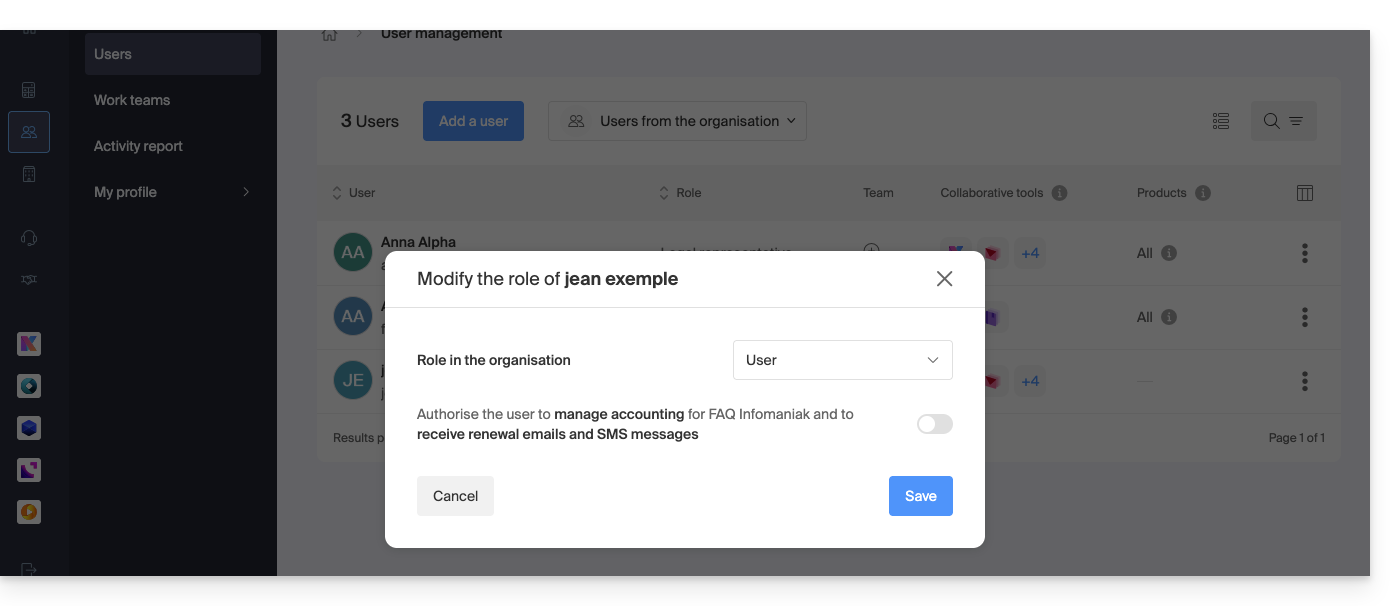
… poderá modificar os serviços aos quais ele terá acesso (❓: ajuda):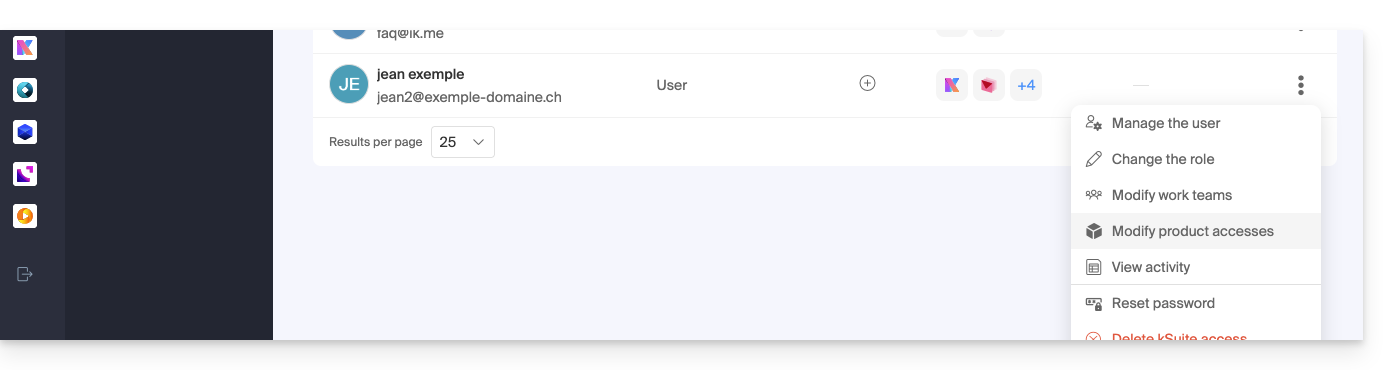
Link para esta FAQ: https://faq.infomaniak.com/1633
Esta seção de perguntas frequentes foi útil?
Este guia explica como adicionar um anexo proveniente do kDrive a um evento de um calendário na aplicação web Calendar Infomaniak (serviço online ksuite.infomaniak.com/calendar).
Introdução
- Alguns softwares ou aplicativos também permitem adicionar um anexo e, nesse caso, se você sincronizar a agenda com a da sua solução, o arquivo anexado poderá ter um tamanho máximo de 64 KB.
Adicionar um anexo ao kDrive
Ao criar um novo evento no aplicativo web Calendar da Infomaniak (serviço online ksuite.infomaniak.com/calendar), você pode adicionar um ou mais anexos (links para arquivos do kDrive):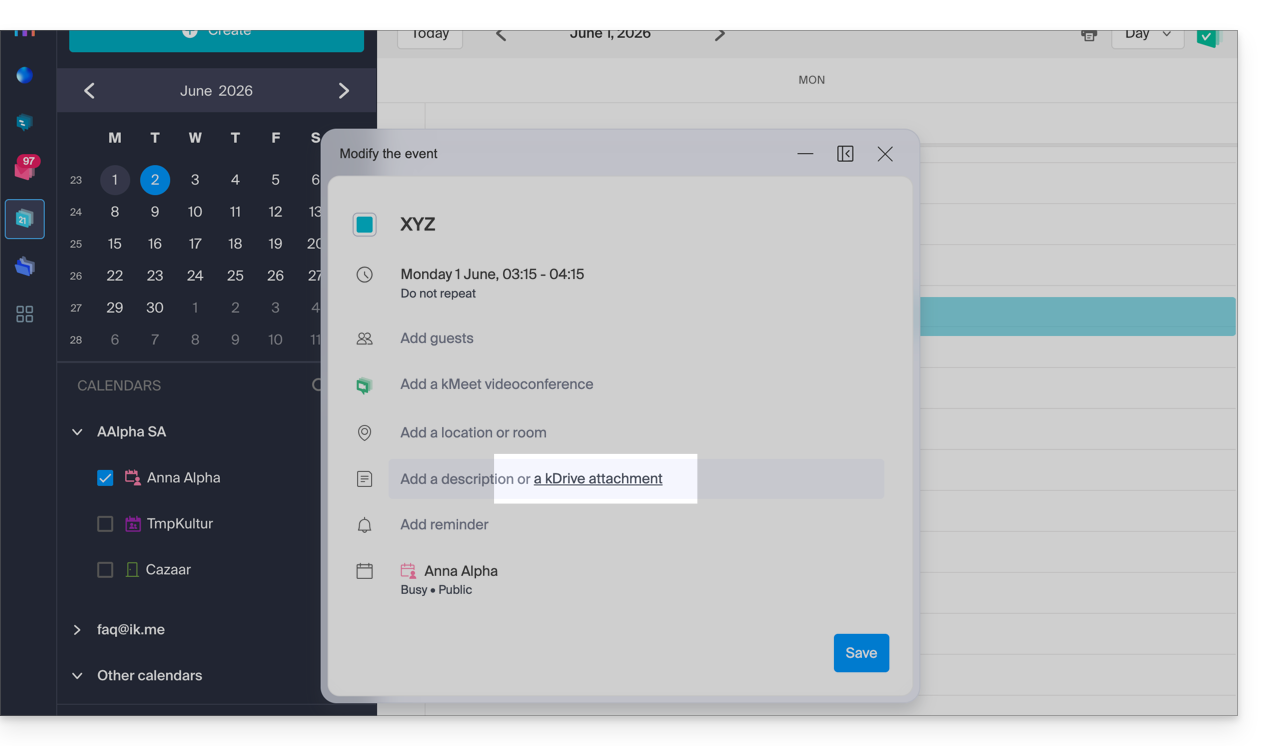
Em seguida, clique no link “Inserir um link kDrive” e você terá acesso ao kDrive diretamente da janela de criação de eventos do Calendar: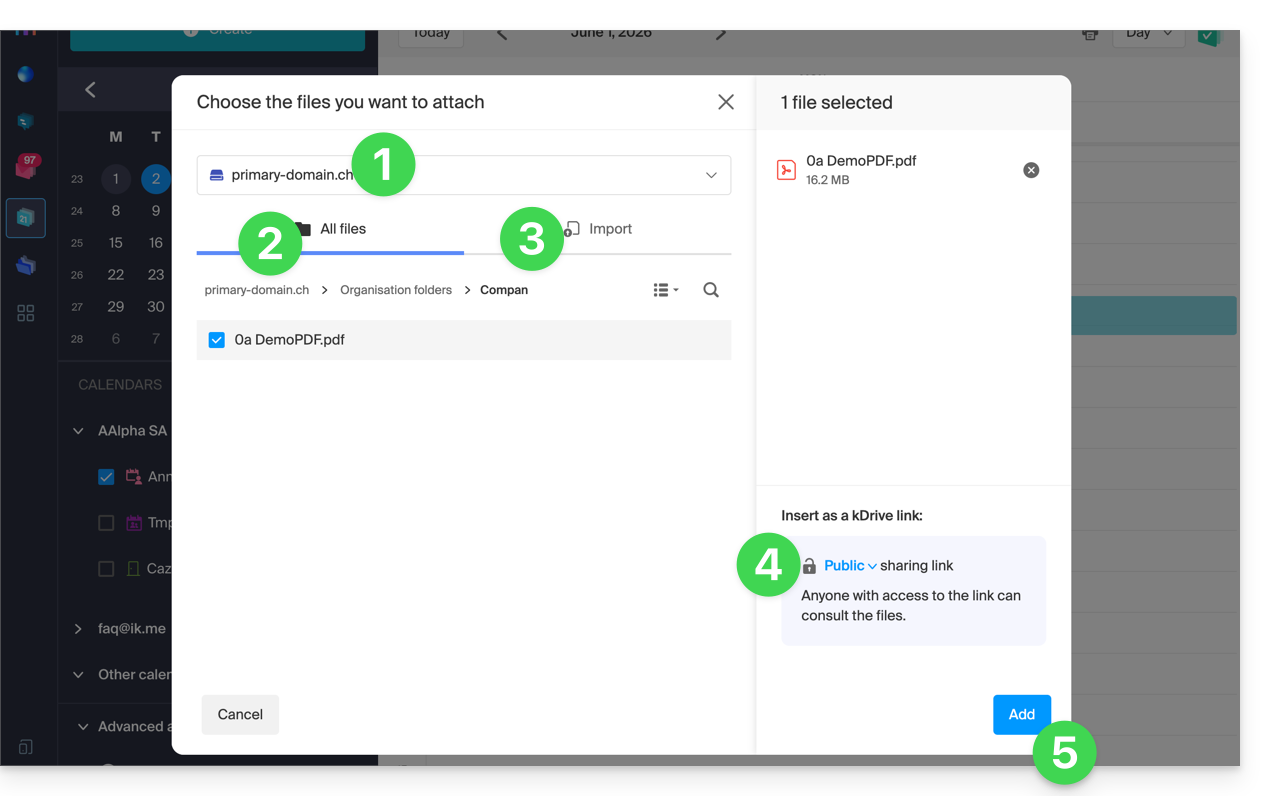
- Se necessário, selecione o kDrive.
- Navegue e escolha os arquivos a serem adicionados ao evento.
- Caso contrário, importe novos documentos que serão armazenados no kDrive.
- Após a seleção, escolha se o link deve ser:
- um link público (qualquer pessoa pode acessá-lo)
- um link restrito (apenas as pessoas com acesso podem acessá-lo)
- Clique em Adicionar.
Seja o evento recorrente ou não, você pode adicionar arquivos que serão compartilhados com aqueles que consultarem o evento no calendário: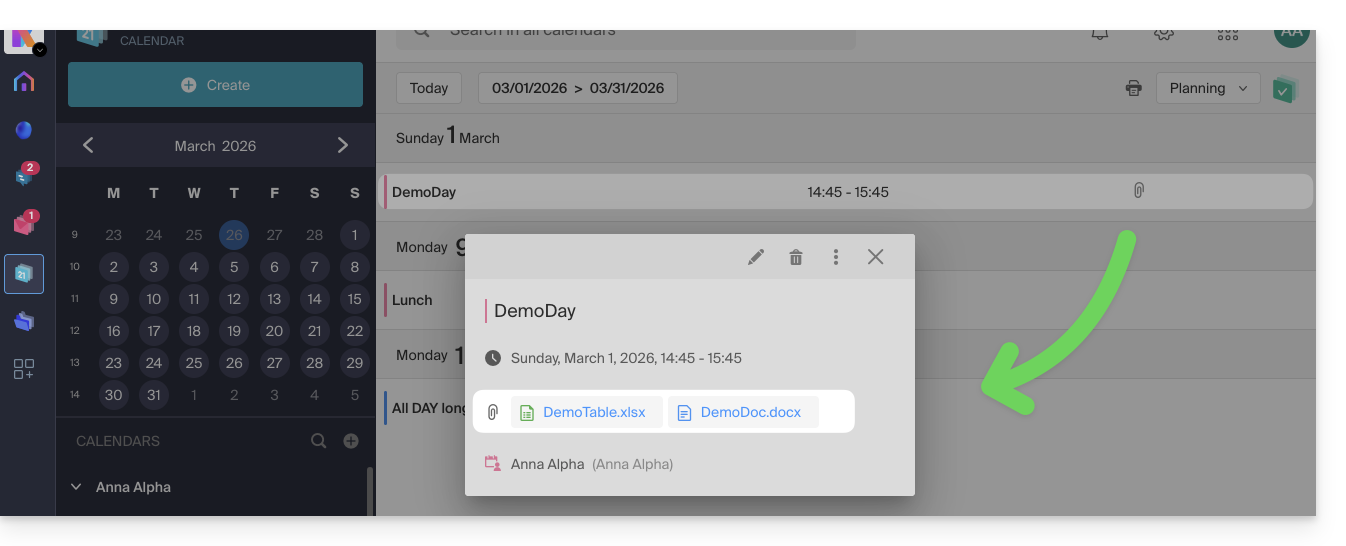
Os participantes do evento que consultarem a ficha através de uma aplicação sincronizada, Outlook, Gmail e outras, verão os links na descrição (como é o caso do possível link kMeet, por exemplo, se uma videoconferência estiver prevista para o evento).
Link para esta FAQ: https://faq.infomaniak.com/1673
Esta seção de perguntas frequentes foi útil?
Este guia permite recuperar o controlo de uma pasta presente no sistema operativo Windows em determinados casos problemáticos do kDrive. Este cenário é comum para as pastas do sistema que pertencem ao grupo TrustedInstaller.
Se, em vez disso, estiver a ter problemas de visualização ou erros de acesso ao kDrive ou a uma das pastas, consulte este outro guia.
Obter a propriedade de uma pasta
Eis como recuperar a posse de uma pasta:
- Clique com o botão direito do rato na pasta em questão.
- Selecione Propriedades.
- Aceda ao separador Segurança.
- Clique no botão Avançado na parte inferior da janela.
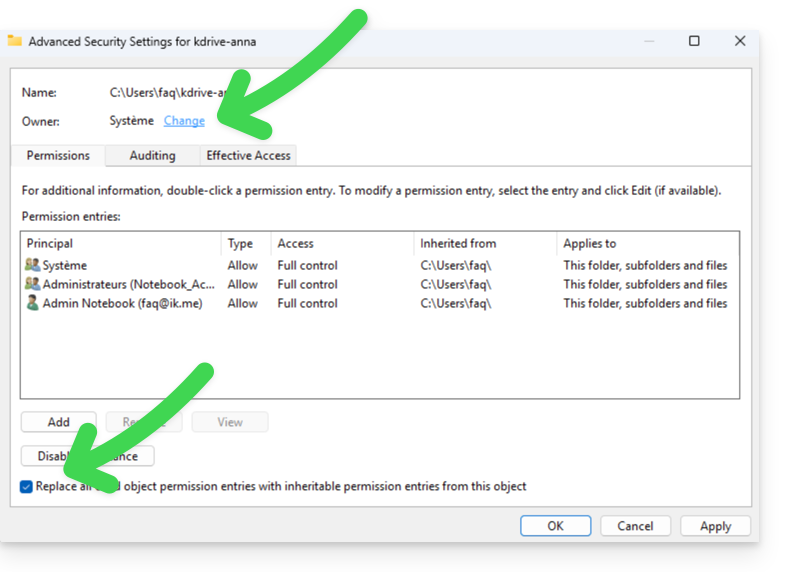
- Clique em Editar junto ao campo Proprietário.
- Clique em Avançado.
- Clique em Procurar.
- Selecione a sua conta de utilizador na lista e clique em OK.
- Clique novamente em OK, o proprietário da pasta foi alterado.
- Ative Substituir o proprietário de subcontentores e objetos para obter a propriedade dos ficheiros e subpastas desta pasta:
- Clique em OK para validar.
Link para esta FAQ: https://faq.infomaniak.com/1686
Esta seção de perguntas frequentes foi útil?
Este guia explica como remover um dos utilizadores da sua Organização no Manager Infomaniak.
Pré-requisitos
- Alterne para a Organização desejada, caso não encontre a lista de utilizadores esperada (❓: ajuda).
- Seja Administrador ou Representante legal na Organização (❓: ajuda).
- Atenção: não é possível remover um representante legal se não houver outro representante legal (❓: ajuda).
Remover um utilizador da sua Organização
Se o utilizador tiver acesso ao kDrive ou tiver sido convidado a consultar um endereço de e-mail de terceiros, várias etapas intermediárias solicitarão as ações a serem executadas com os seus dados e o informarão, se for o caso, sobre o que acontecerá com os calendários e as listas de contactos. Para remover um dos utilizadores da Organização:
- Clique aqui para acessar o gerenciamento de usuários da Organização no Gerenciador Infomaniak (❓: ajuda).
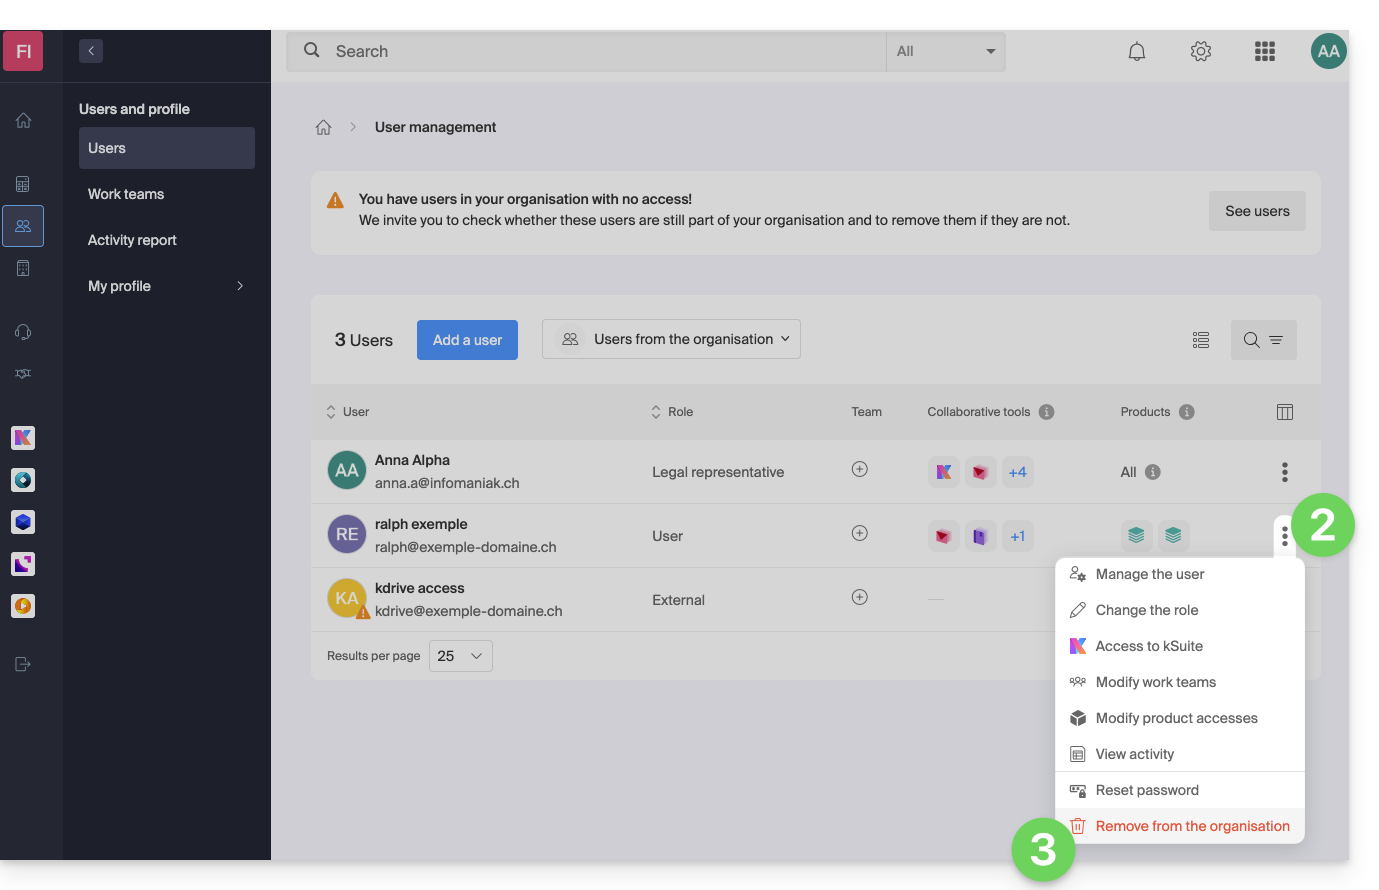
- Clique no menu de ação ⋮ à direita do usuário em questão.
- Clique em Remover da Organização:
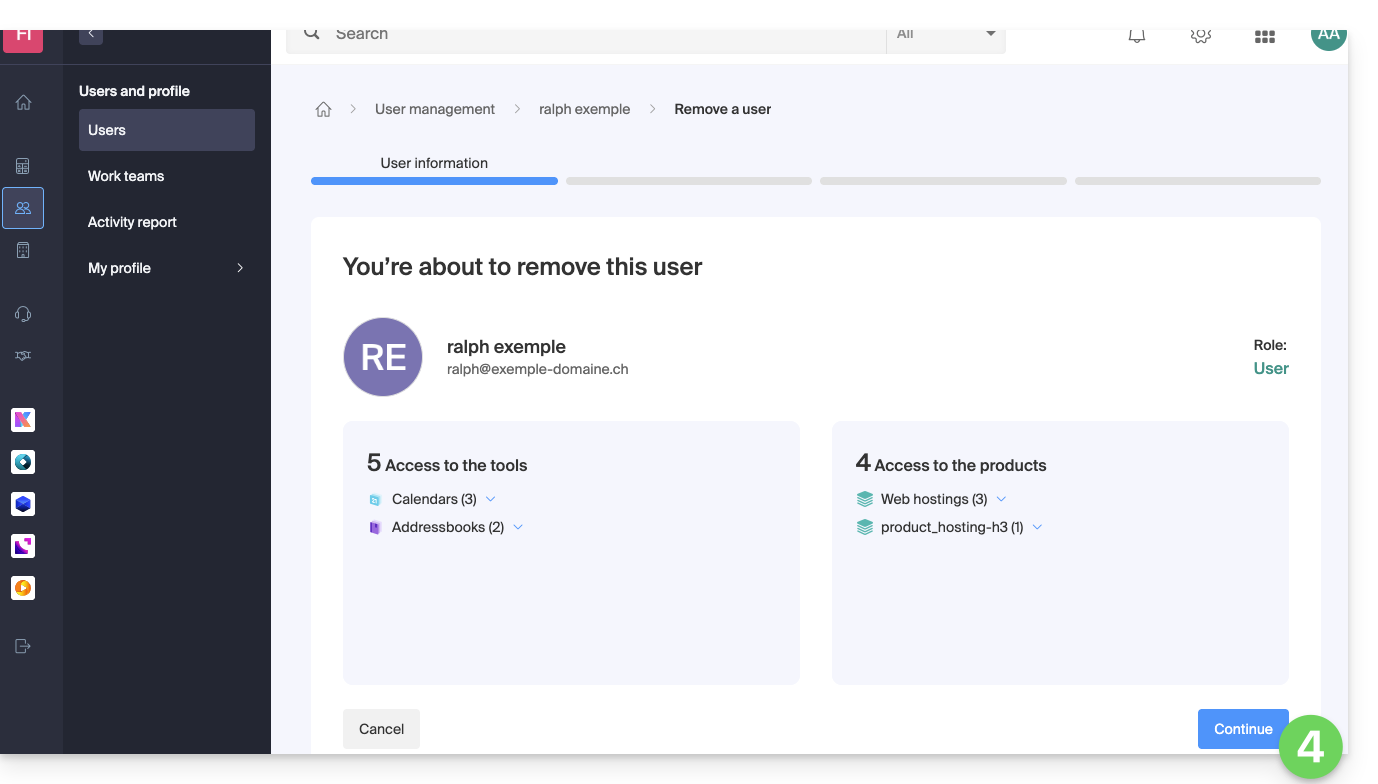
- Leia as informações (clique, se necessário, nas setas para baixo para obter detalhes sobre as exclusões) e, em seguida, clique no botão azul Continuar:
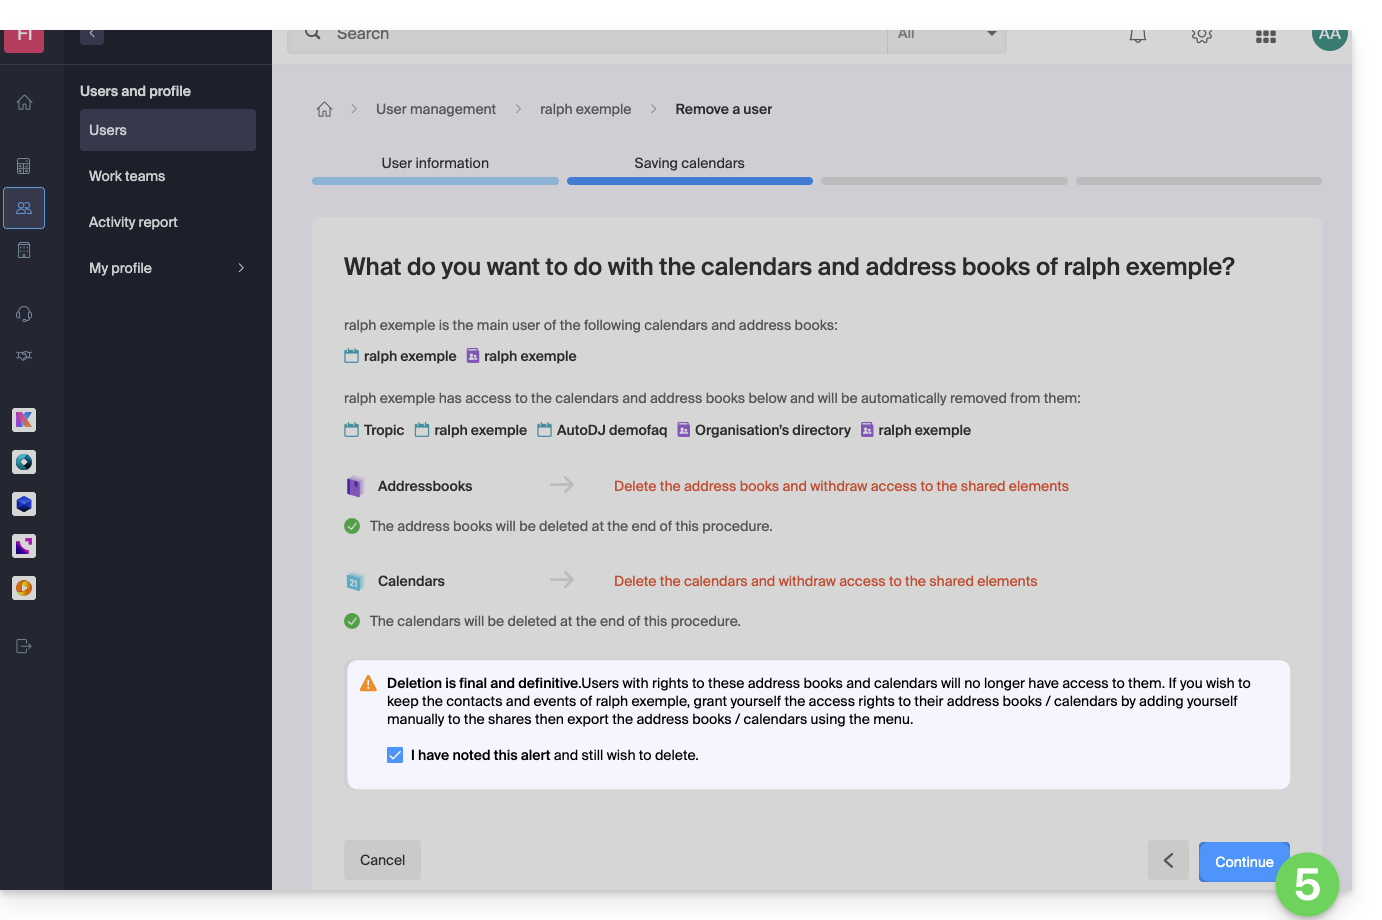
- Leia as informações, confirme a exclusão ativando a caixa de seleção e, em seguida, clique no botão azul Continuar:
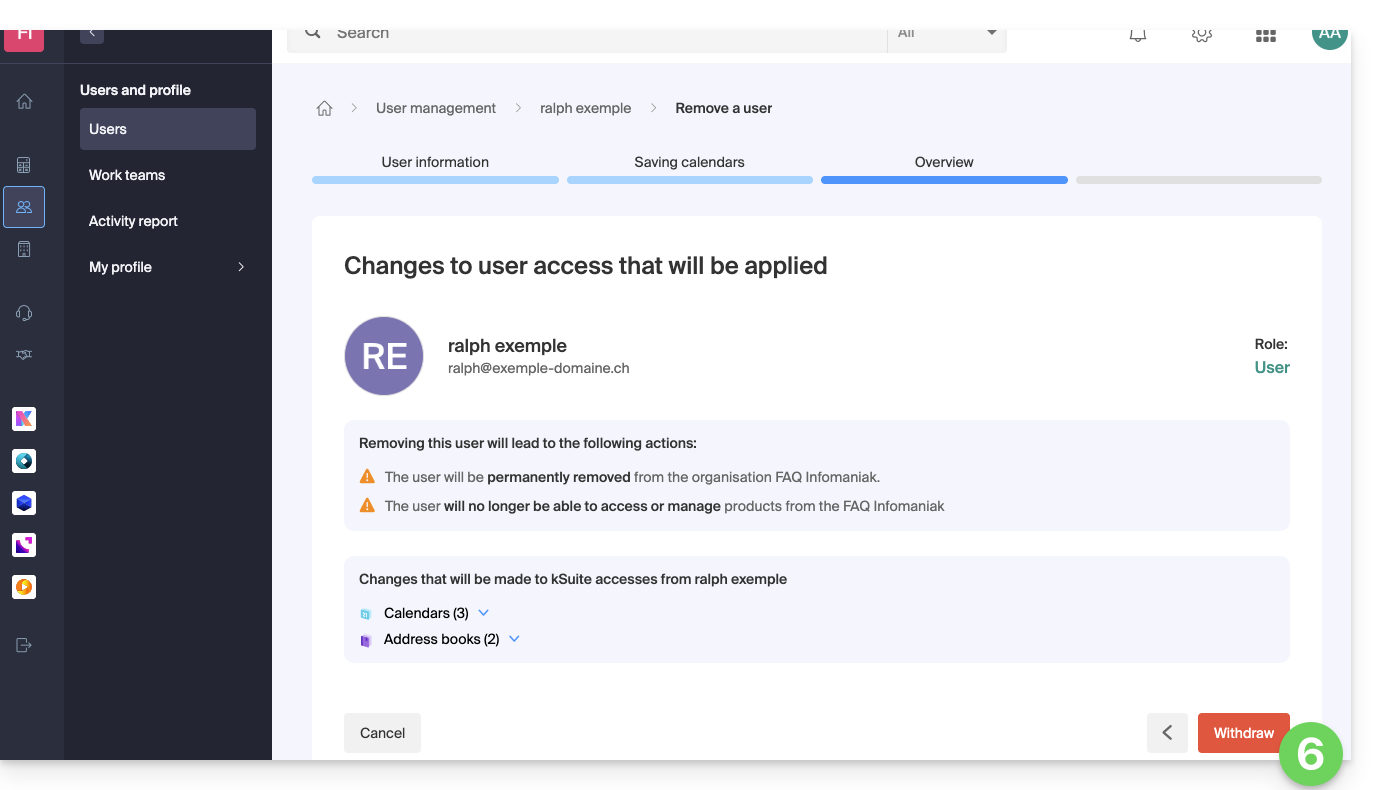
- Leia as informações (clique, se necessário, nos ícones de seta para baixo para obter detalhes sobre as exclusões) e, em seguida, clique no botão vermelho Remover:
- Indique o seu endereço de e-mail (identificador de acesso ao painel de controlo), marque a caixa de confirmação e clique no botão vermelho Remover este utilizador para remover definitivamente o utilizador, sem possibilidade de reverter.
Link para esta FAQ: https://faq.infomaniak.com/1738
Esta seção de perguntas frequentes foi útil?
Este guia ilustra os diferentes tipos de compartilhamentos que podem ser realizados na pasta compartilhada chamada “Pastas da organização” no kDrive e explica como limitar o acesso à pasta caso alguns usuários não devam ter acesso a todo o conteúdo existente. É muito fácil modificar um compartilhamento a qualquer momento.
Consulte também este outro guia sobre compartilhamentos de pastas.
Transição de um compartilhamento simples para um convite kSuite
Imagine…
- … um kDrive dentro de uma kSuite…
- … com 1 único usuário em 2…
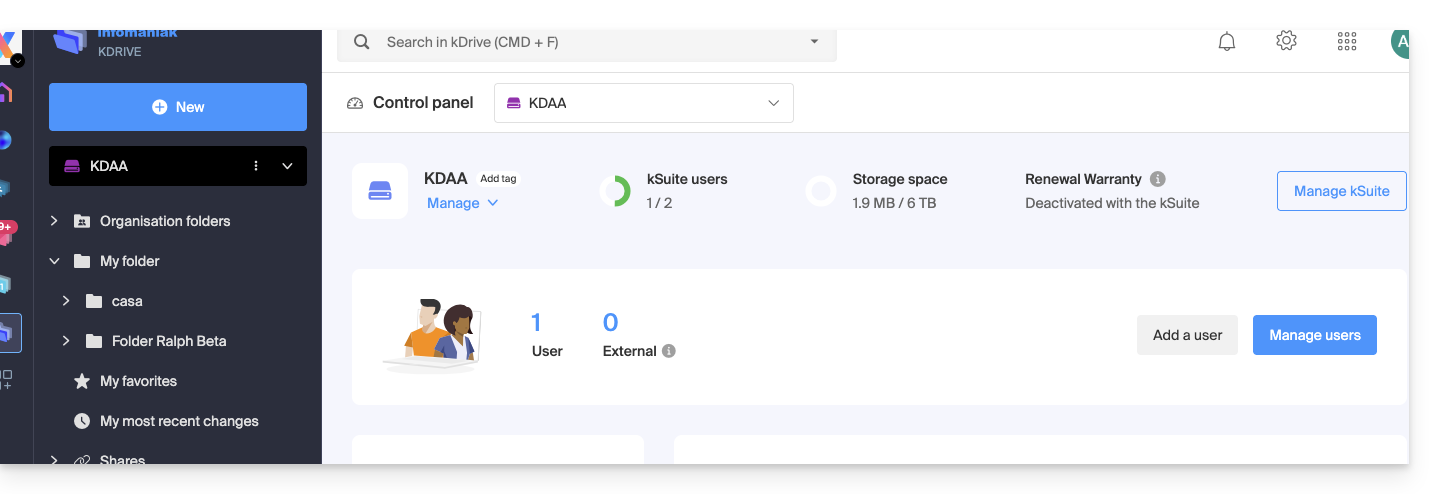
- … dados em “Pastas da organização” e em “Minha pasta”:
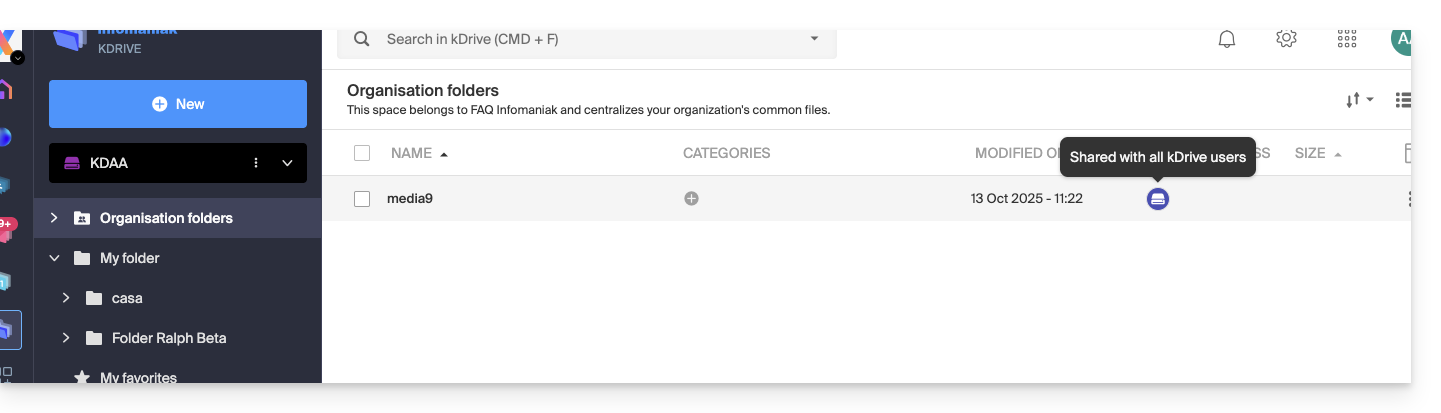
A. Resultado de um compartilhamento sem necessidade de registro do usuário convidado
Uma pasta presente em “Pastas da organização” é, primeiramente, compartilhada com um novo usuário totalmente externo a este kDrive e à Infomaniak, por meio de um link de compartilhamento público:
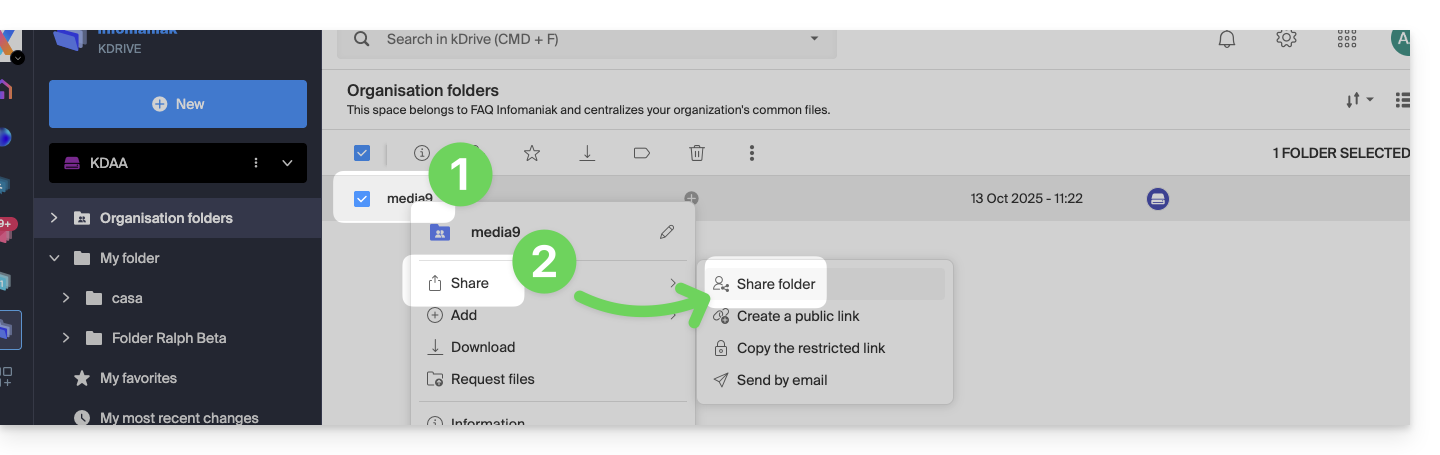
- Faça um clique com o botão direito na pasta ou subpasta em questão.
- Escolha a opção Compartilhar:
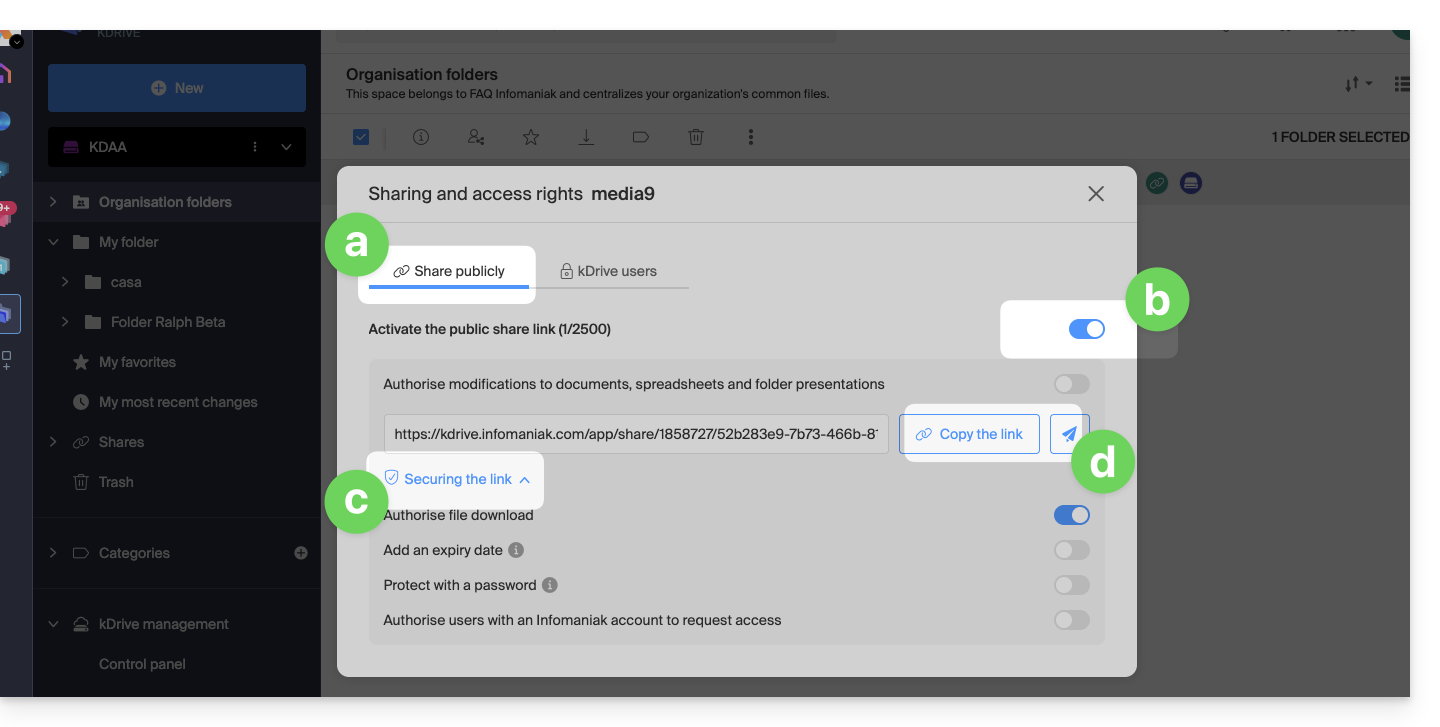
- Em seguida:
- Mantenha-se na primeira aba.
- Ative o link de compartilhamento público.
- Ajuste as configurações de segurança de acordo com suas necessidades.
- Copie o link para compartilhá-lo ou envie-o diretamente da janela:
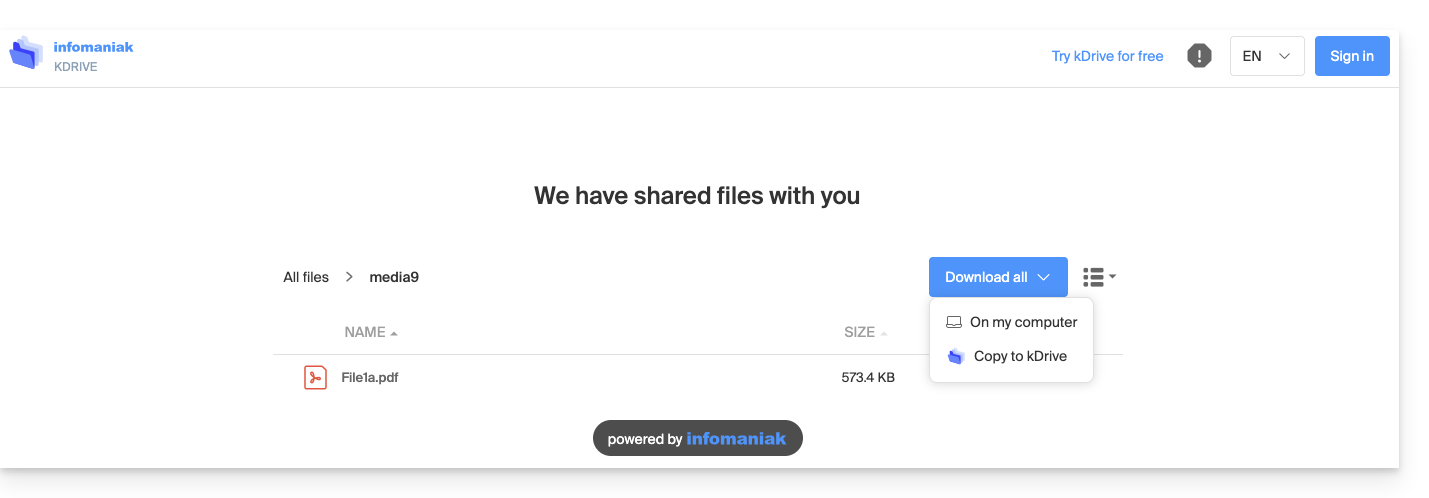
Consequentemente, o usuário que acessar este link público terá esta visualização:
- Ele pode navegar, visualizar e baixar os arquivos, inclusive para o seu próprio kDrive, tudo em modo somente leitura:
B. Resultado de um compartilhamento com registro (mas não contabilizado no kSuite)
Uma pasta presente em Pastas da organização (ou qualquer pasta do kDrive, já que esta funcionalidade também é válida com um kDrive Solo) agora é compartilhada com um usuário do tipo “externo” que deverá se registrar ou, no mínimo, fazer login em sua conta, caso já possua uma, e aceitar o convite.
O usuário deve ser totalmente externo à Infomaniak ou, no mínimo, não ter um endereço de e-mail no Serviço de E-mail vinculado ao possível kSuite do qual depende o kDrive em questão.
Para isso, desta vez, é preciso escolher a segunda aba de compartilhamento:
- Faça um clique com o botão direito na pasta ou subpasta em questão.
- Escolha a opção Compartilhar.
- Clique na segunda aba.
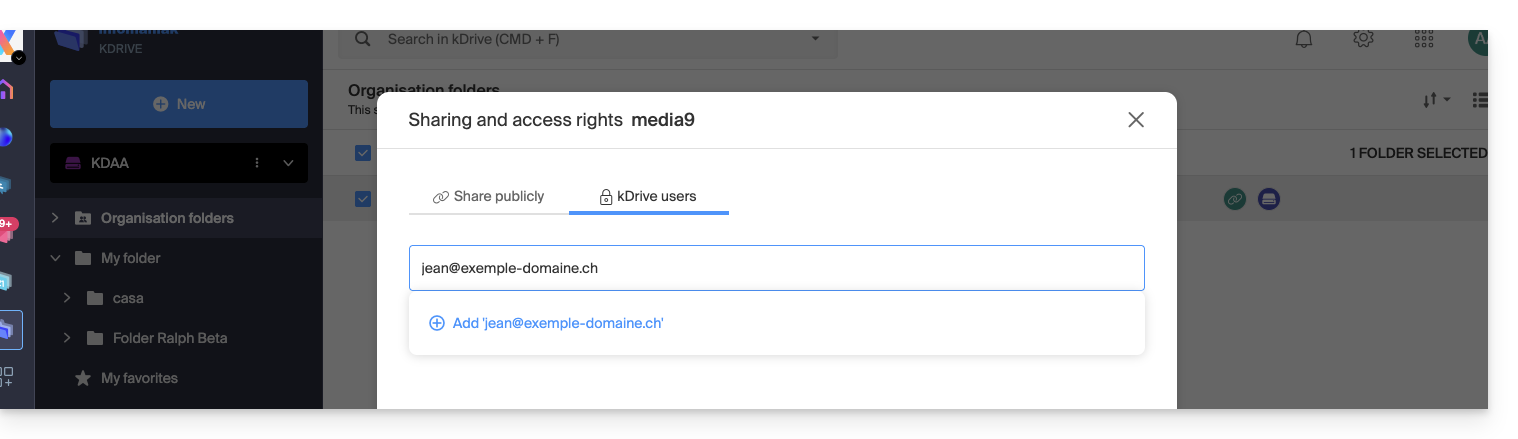
- Indique o endereço de e-mail do usuário em questão.
- Clique para adicionar (a operação pode ser realizada para vários utilizadores ao mesmo tempo):
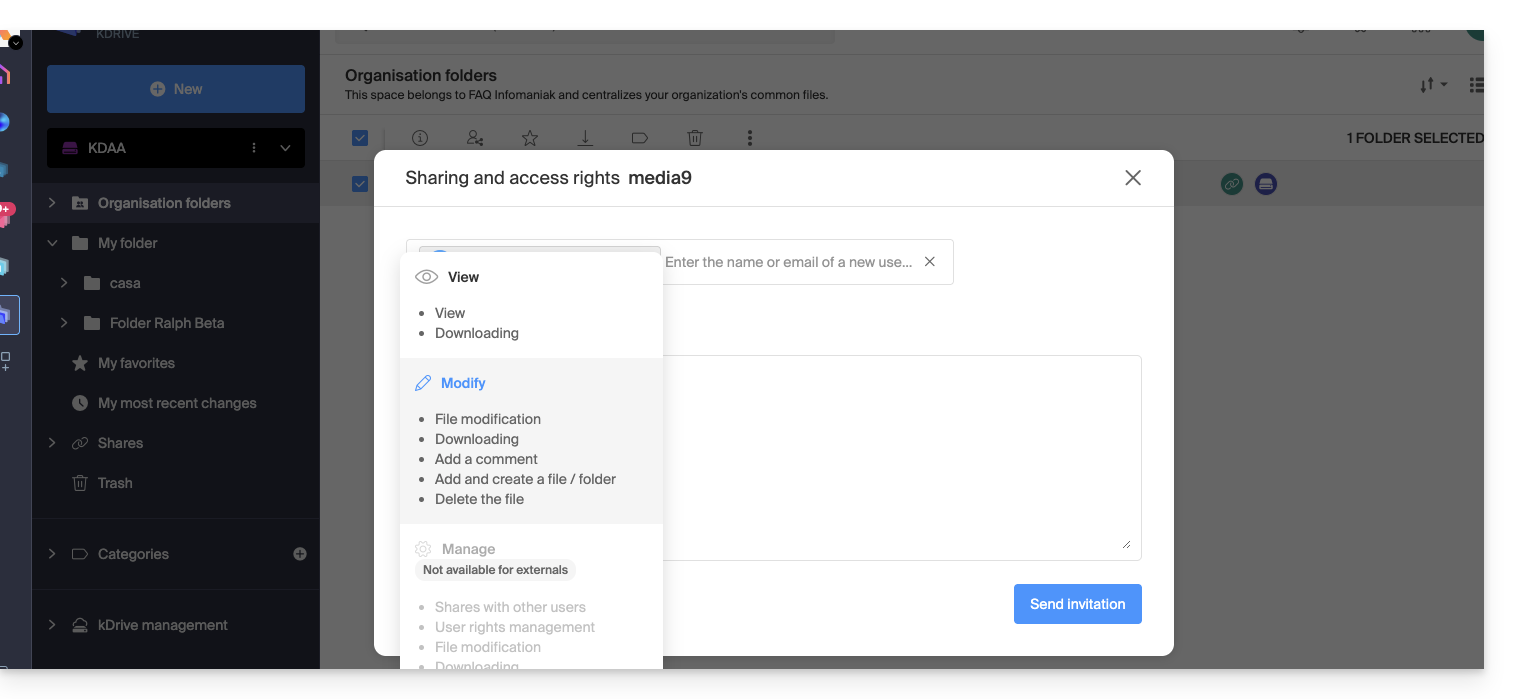
- No que diz respeito à liberdade concedida ao utilizador para modificar ou não a parte do kDrive à qual terá acesso, a opção escolhida aqui é a de Modificar.
- Clique em Enviar o convite:
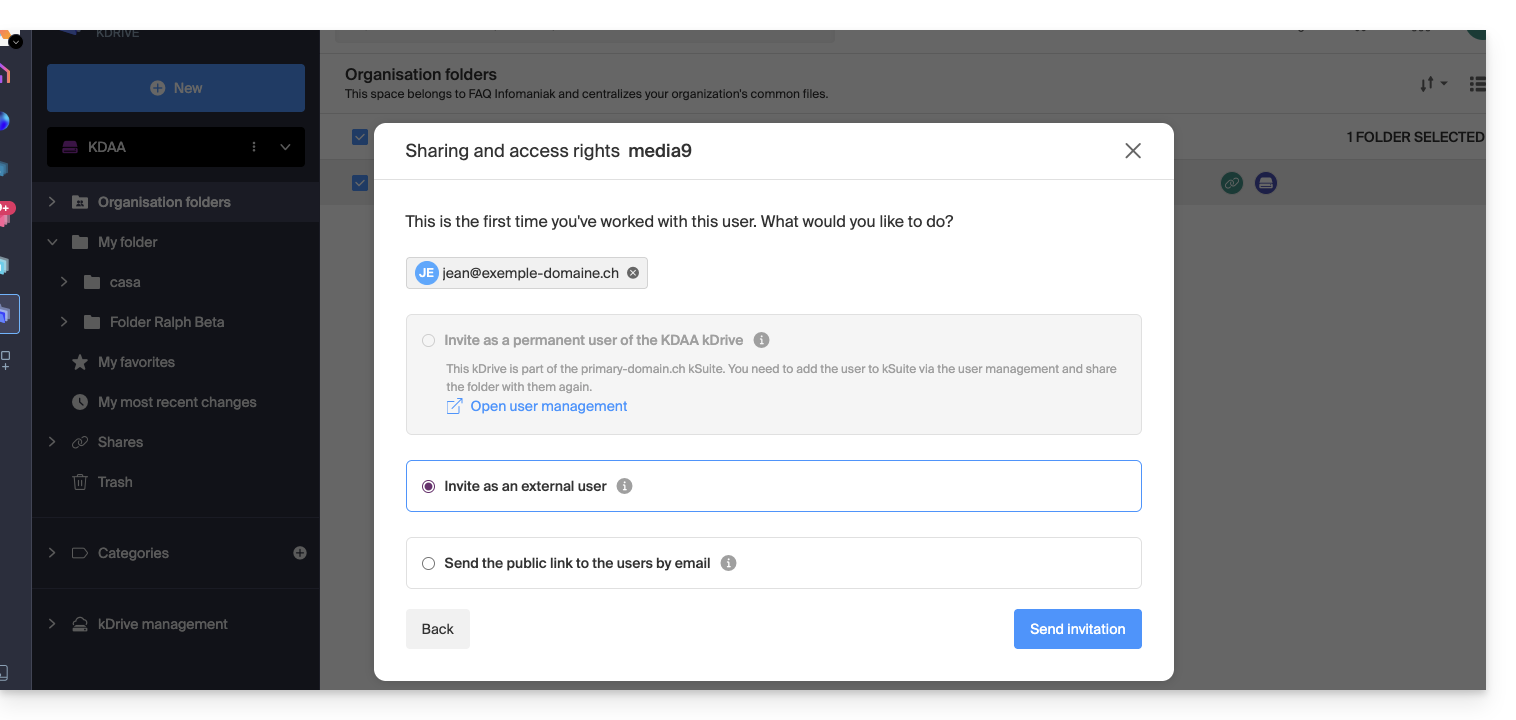
- Esta opção (ver ponto 6 acima) permite convidar esta pessoa como um utilizador externo inicialmente (leia mais abaixo para o convite completo do kSuite):
- O administrador pode visualizar o pedido pendente e reenviar o convite, se necessário:
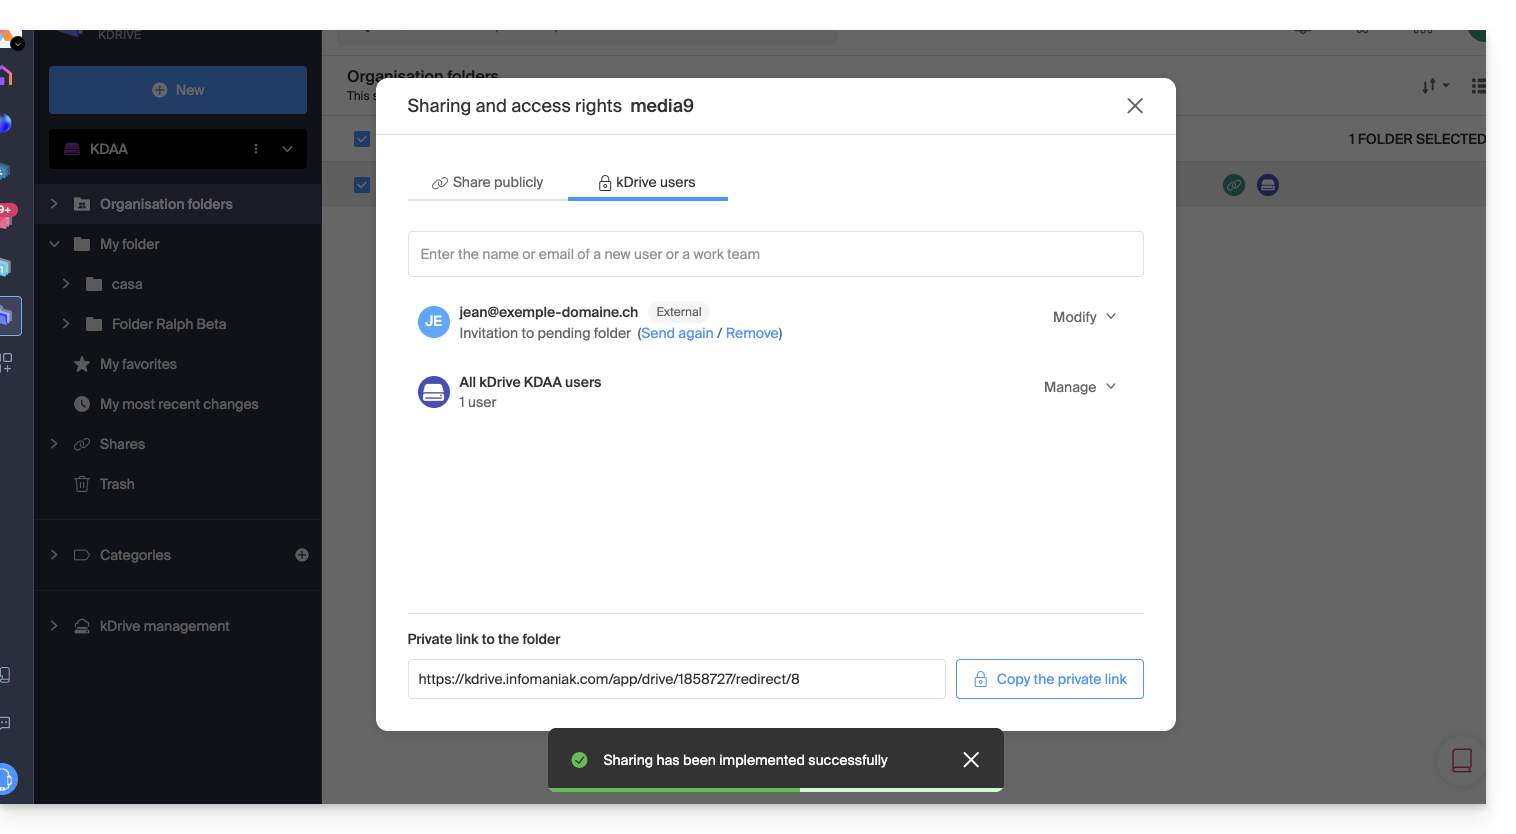
- A pessoa convidada recebe um e-mail para se registar como utilizador Infomaniak:
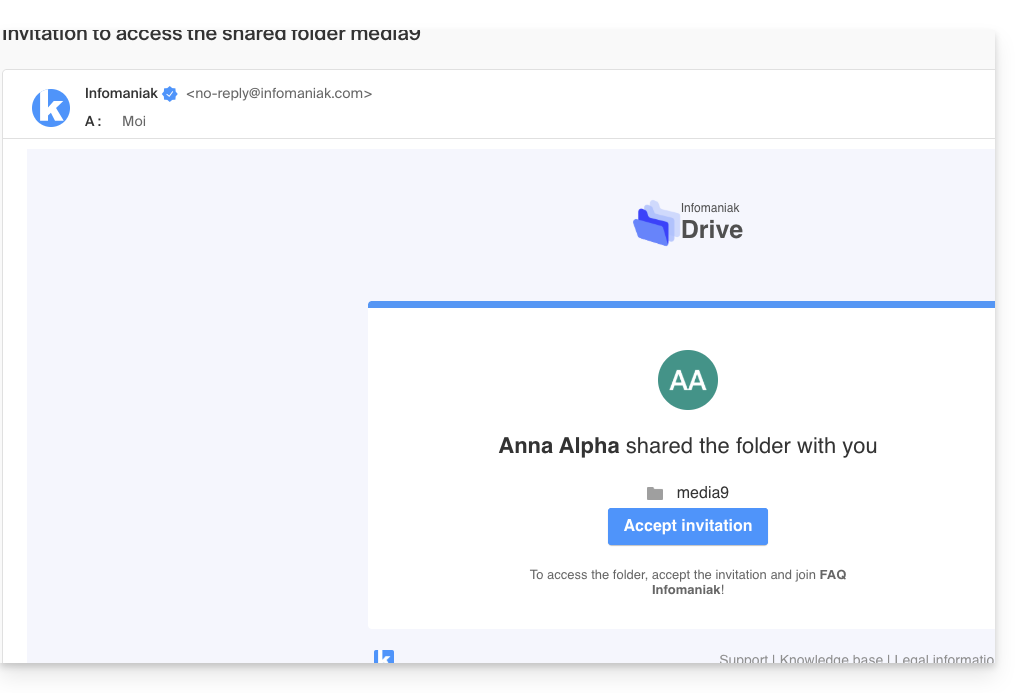
- A pessoa preenche o formulário com os seus dados e escolhe uma palavra-passe; o seu endereço de e-mail é preenchido automaticamente; este será o seu identificador da conta Infomaniak:
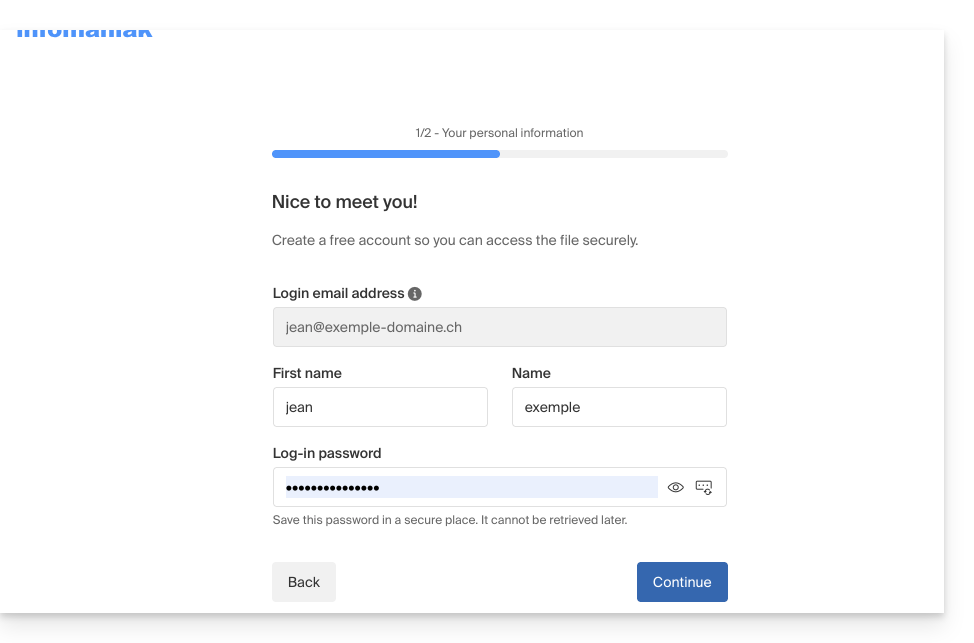
- Após a conclusão do registro, uma interface kDrive simplificada com a opção “Compartilhado comigo” no lado esquerdo permite:
- acessar o conteúdo compartilhado (apenas o conteúdo compartilhado inicialmente, e não a pasta compartilhada inteira);
- modificar o conteúdo compartilhado (sem, no entanto, ter a possibilidade de excluir o conteúdo existente no momento do compartilhamento);
- adicionar/excluir seu próprio conteúdo:
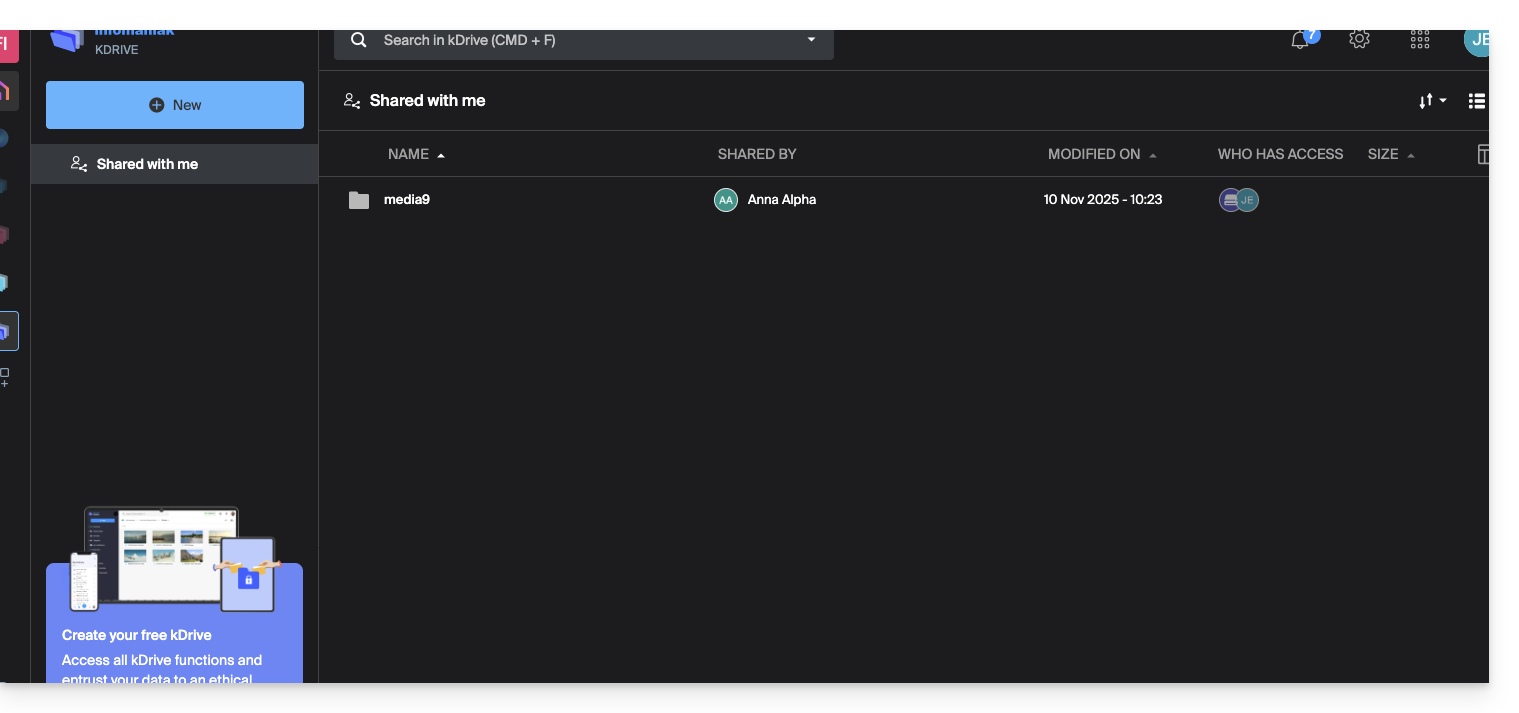
- As eventuais modificações efetuadas são comuns a todos os usuários que têm acesso a esta parte do kDrive.
- O usuário não tem um espaço privado/pessoal.
- Ele pode instalar o aplicativo móvel/desktop kDrive e se conectar, mas nenhum dado será visível:
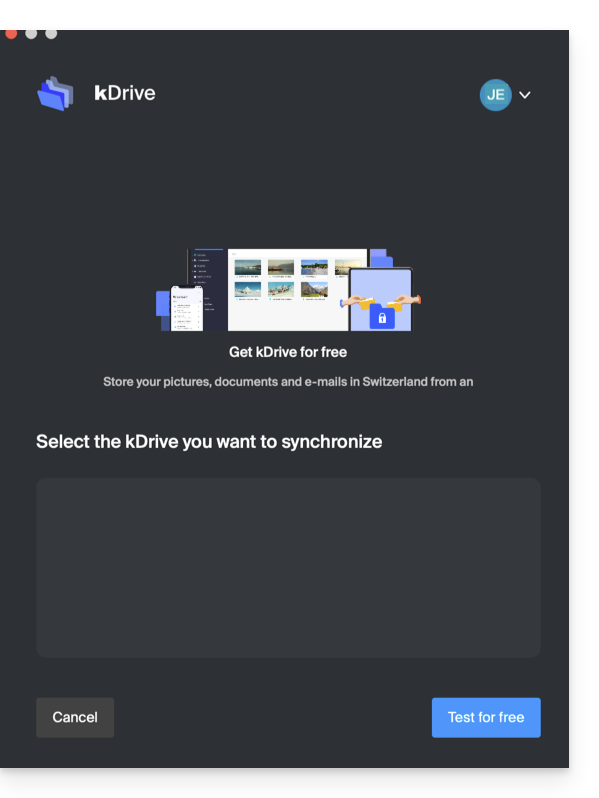
O usuário deverá obrigatoriamente acessar a interface online para acessar os arquivos compartilhados com ele, enquanto for um usuário externo, mesmo que possua um kDrive pessoal!
- No painel do administrador kDrive, os usuários são apresentados da seguinte forma:
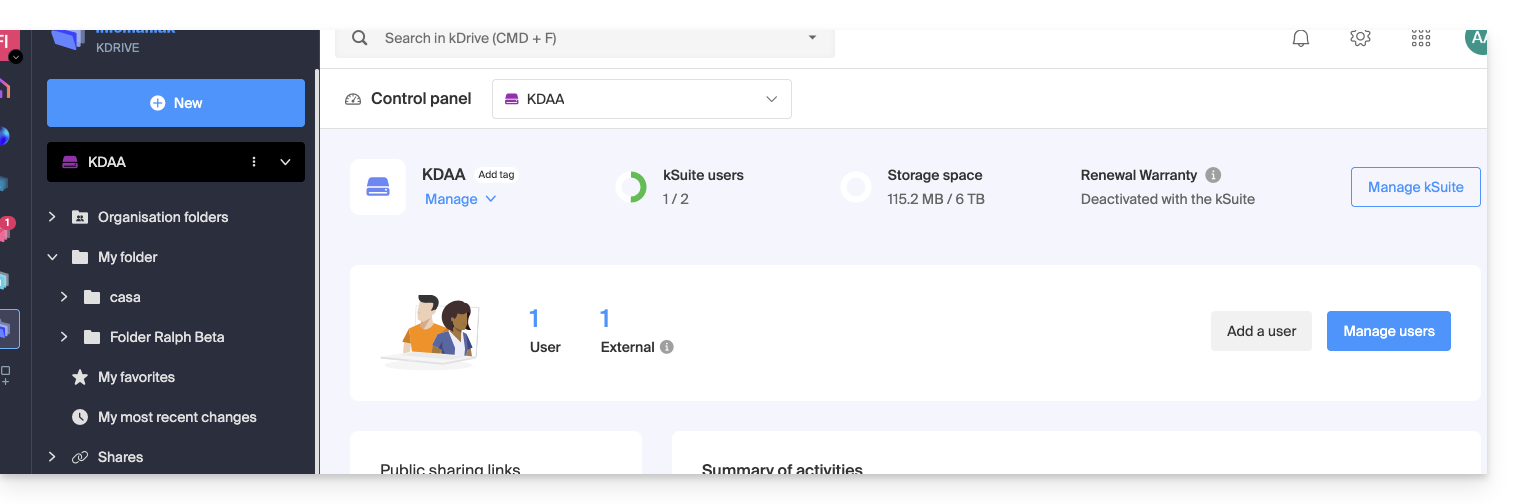
C. Resultado de um compartilhamento com registro como usuário kSuite
Imagine agora que nenhum compartilhamento ou convite foi feito. Repita os passos de 1 a 7 acima…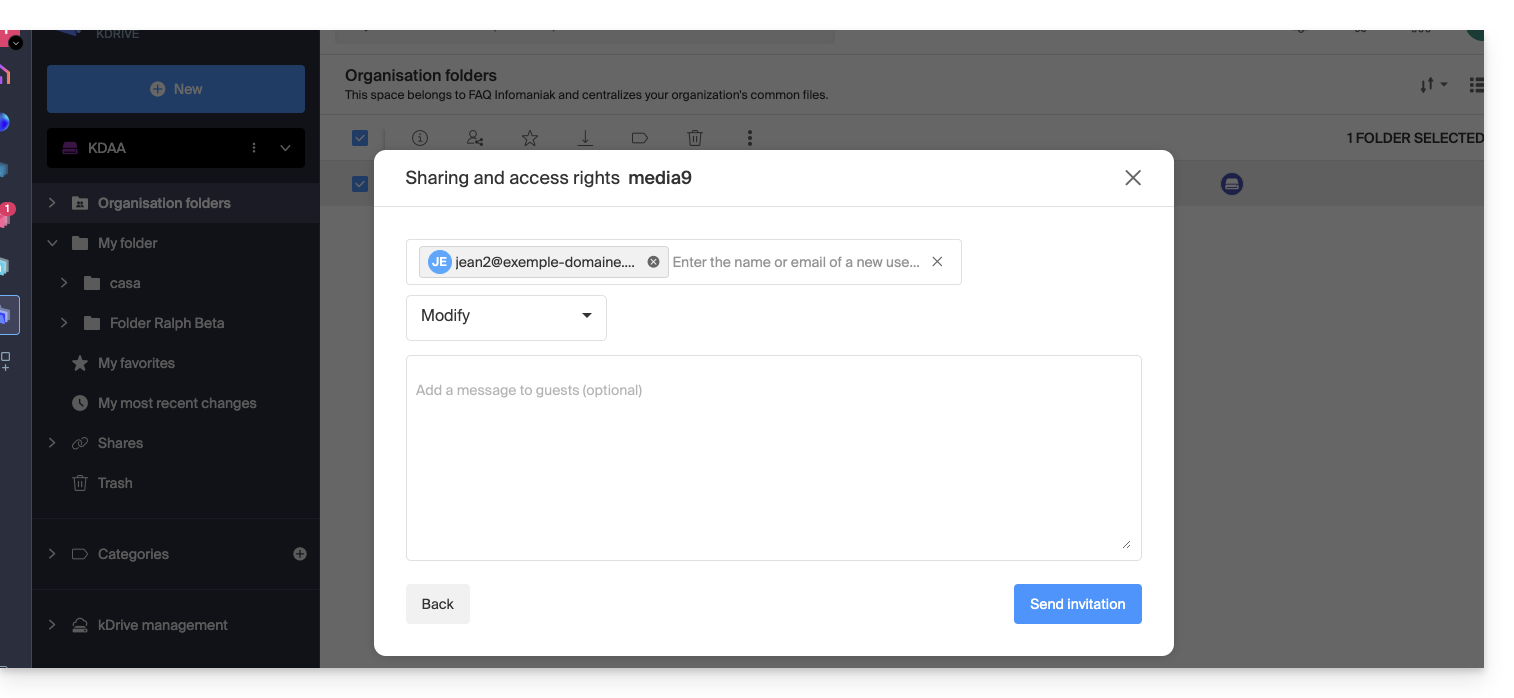 … e, em seguida, no passo 8:
- Convide essa pessoa como usuário kSuite, clicando no link que abre a página de gerenciamento de usuários em uma nova aba:
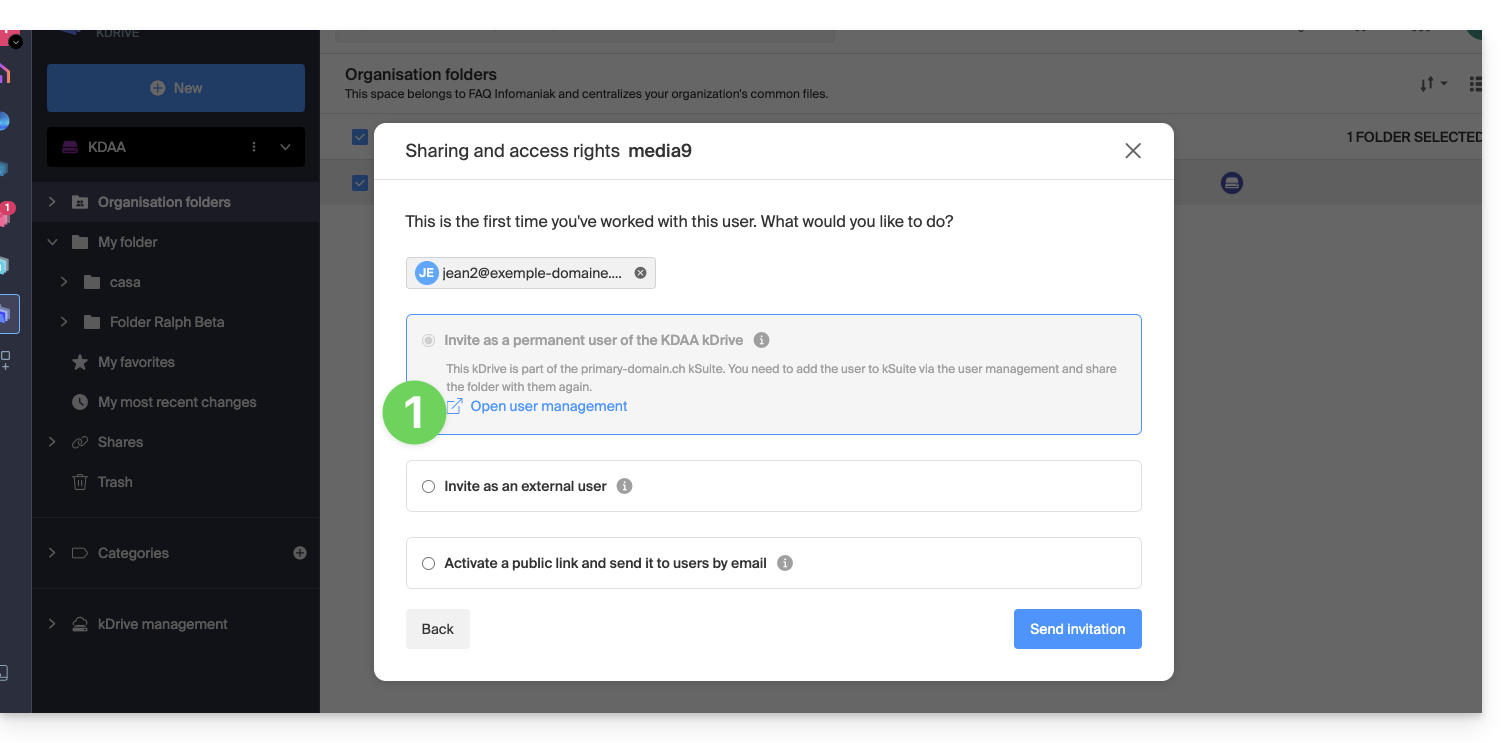
- Crie o usuário kSuite (seguindo a ordem A (se necessário), depois B e C abaixo):
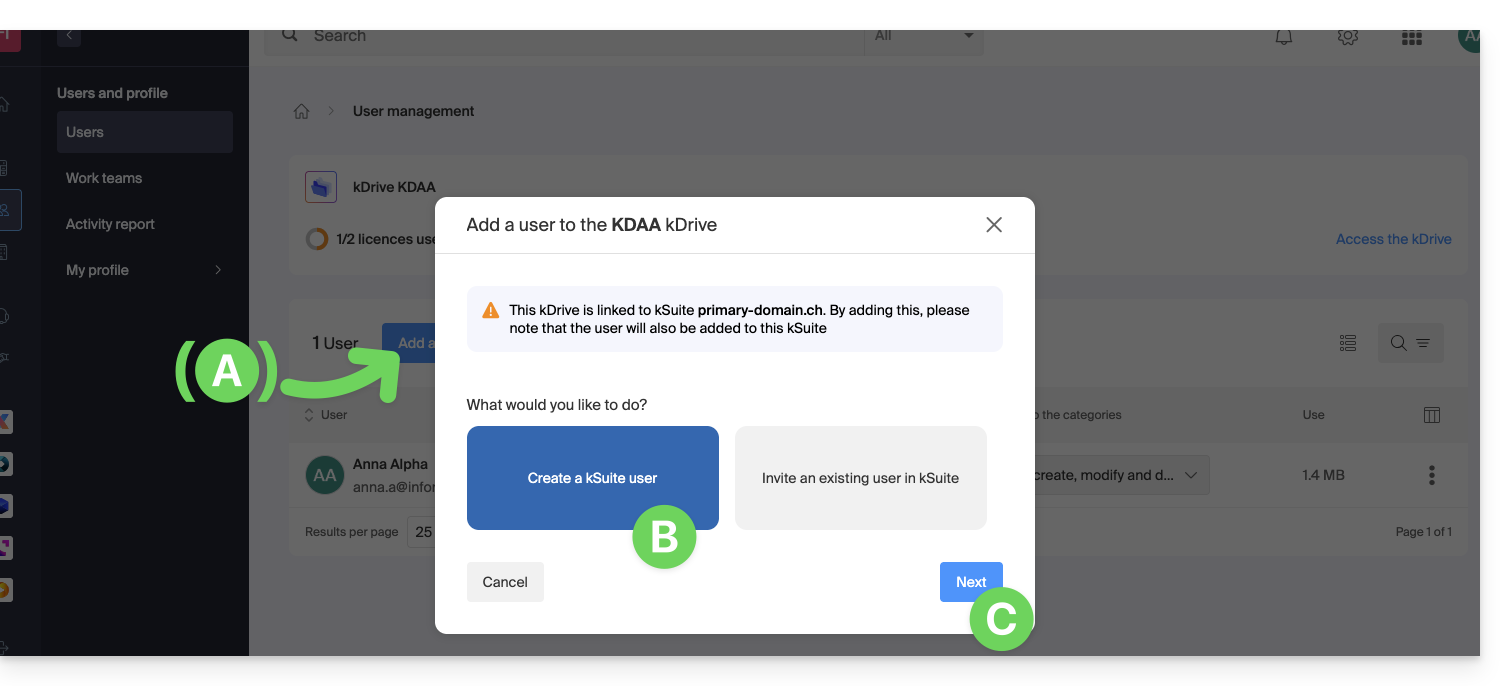
- Comece a criar o utilizador (seguindo a ordem D-E-F-G-H abaixo):
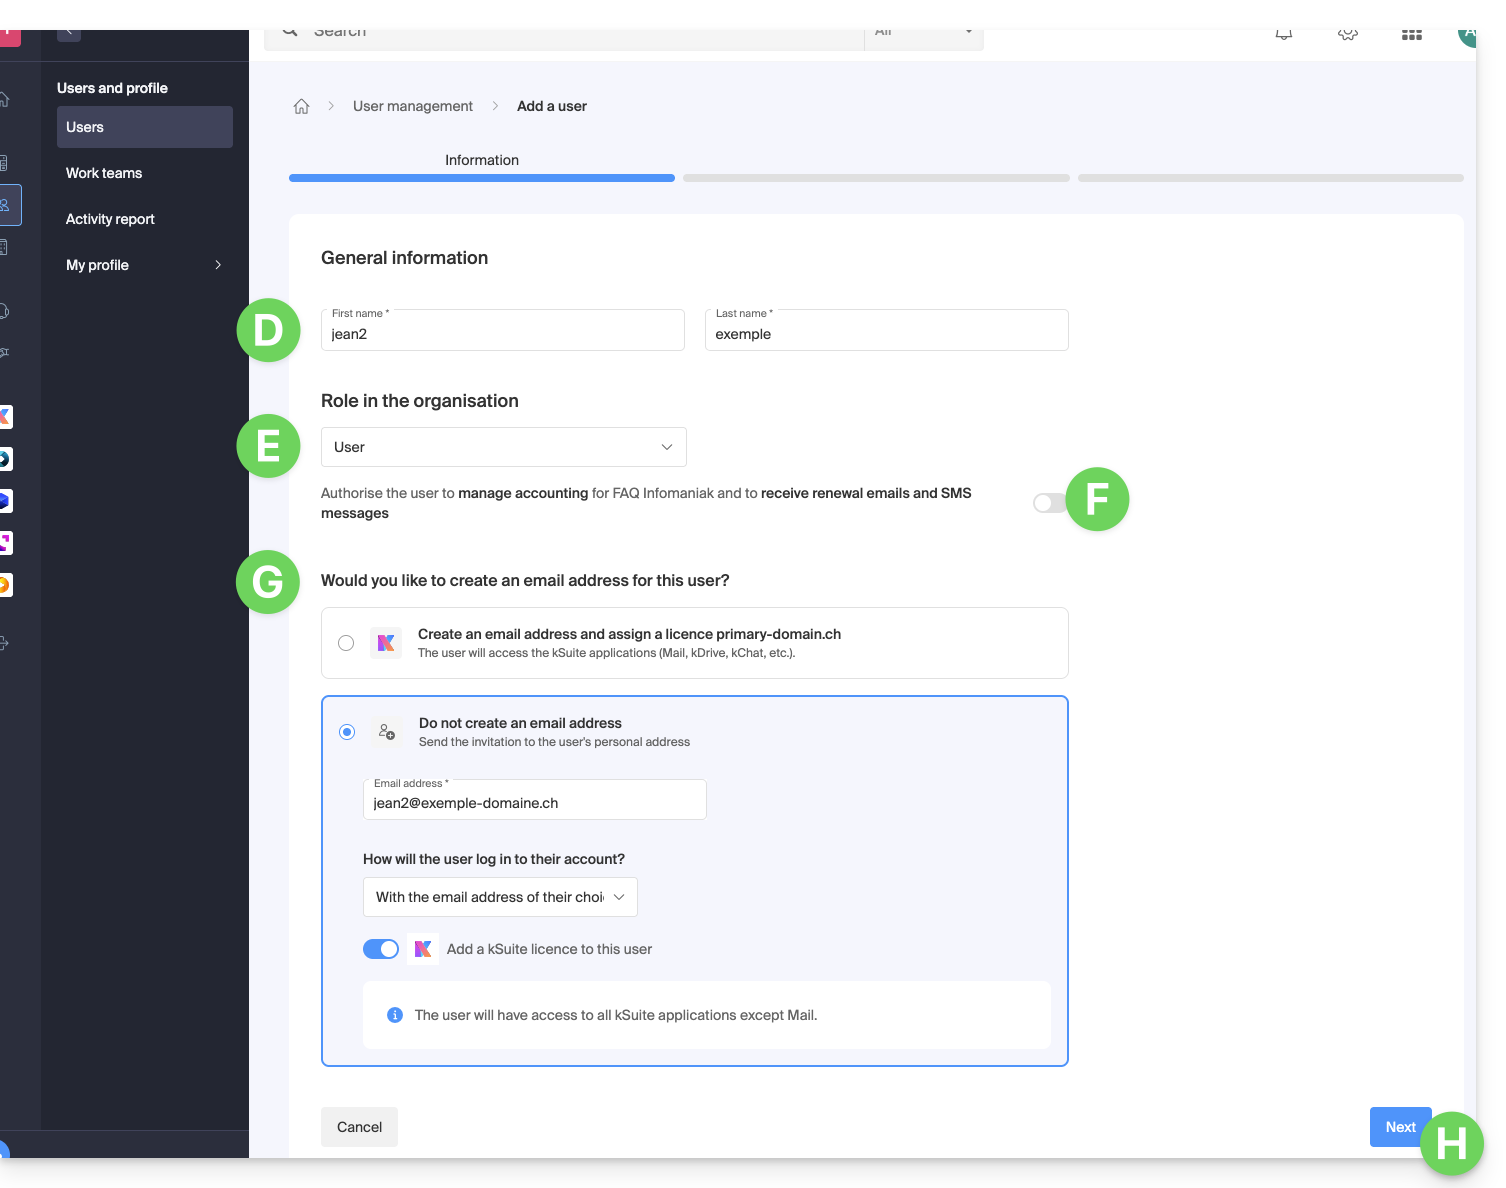
- D — Insira um nome e um apelido.
- E & F — Dependendo das suas necessidades, atribua-lhe permissões mais amplas ou mais restritas dentro da Organização; aqui, apenas um estatuto de utilizador (consulte as diferentes permissões (direito de acesso aos produtos, por exemplo) e preferências de contacto administrativo de um utilizador dentro de uma Organização).
- G — Escolha se deseja criar (ou não) um endereço de e-mail para o utilizador; isso influencia a forma como permite que o utilizador se conecte (aqui, com o endereço de e-mail de sua escolha – enviando o convite para outro endereço de e-mail).
- H — A etapa seguinte permite integrar o utilizador a um possível Grupo:
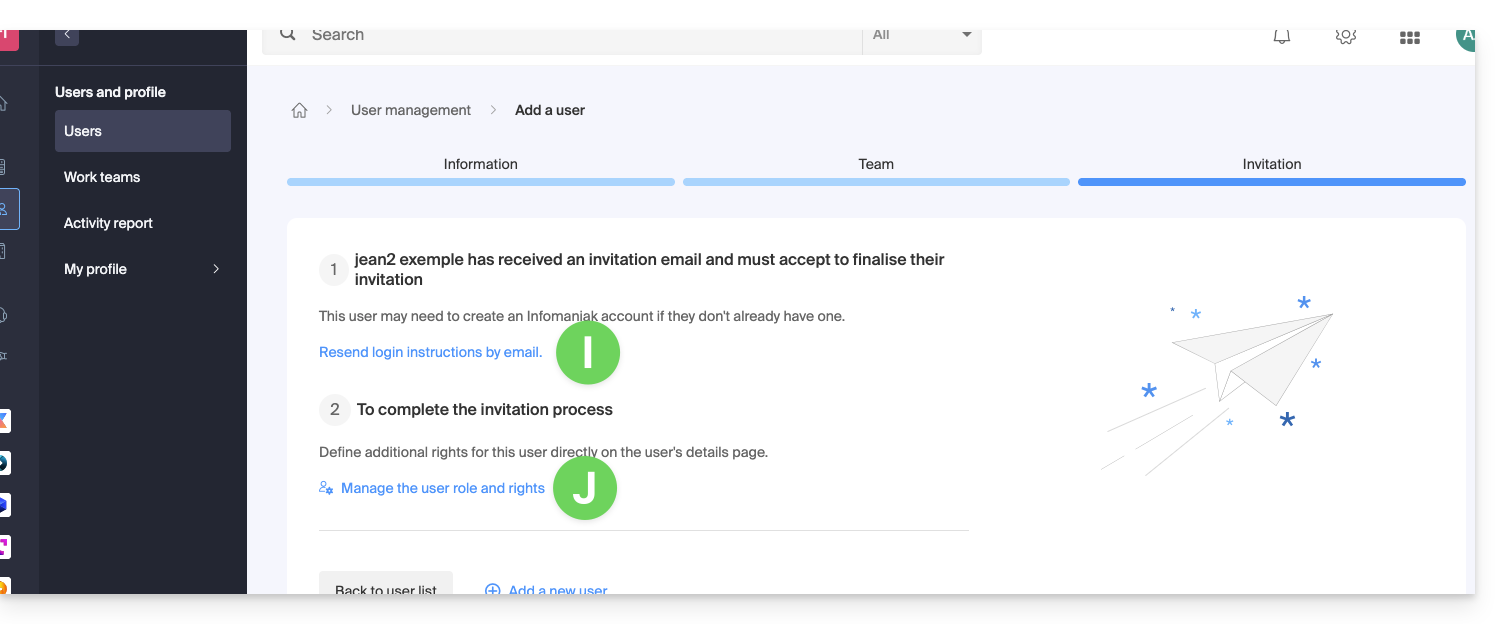
- Após a conclusão do procedimento:
- I — A pessoa convidada recebe um e-mail para se registar como utilizador Infomaniak e pode reenviá-lo aqui, se necessário.
- J — Dependendo do papel atribuído à pessoa convidada (consulte o ponto E acima), pode definir a qualquer momento quais produtos ela poderá gerir no Manager Infomaniak:
D. Restringir o acesso do utilizador
Após a conclusão do registo, a interface kDrive do novo utilizador permite, na maioria das vezes, o acesso a todo o conteúdo que foi partilhado com todos os utilizadores do kDrive.
As pastas da organização são pastas compartilhadas, mas não implica necessariamente que todos os utilizadores do kDrive tenham acesso a elas.
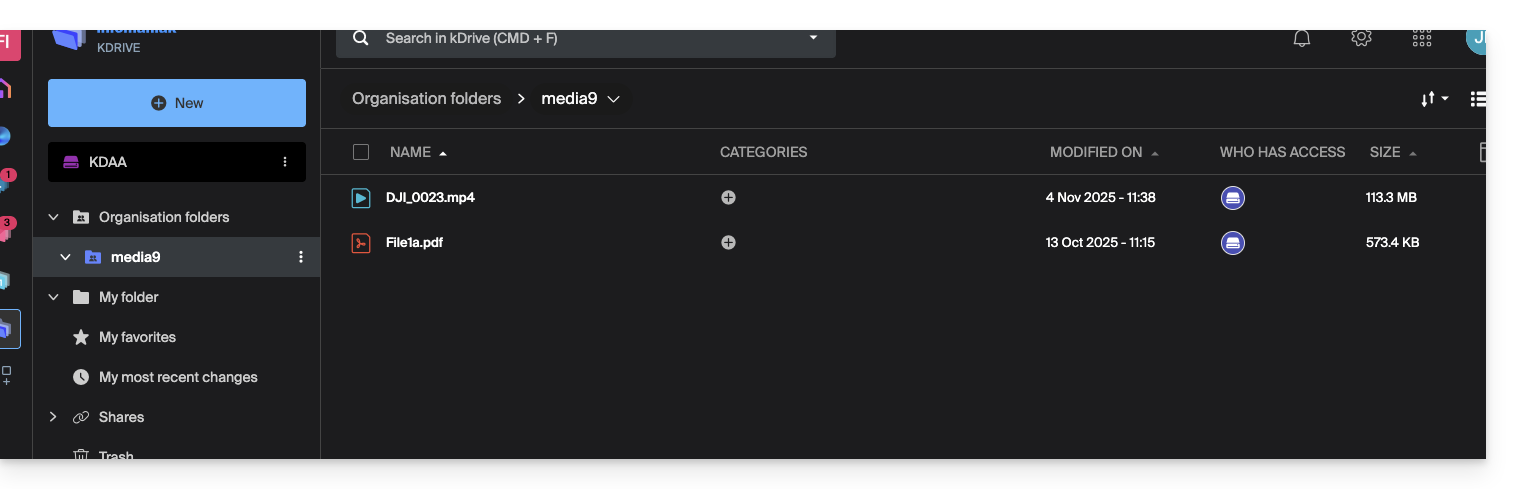
Se o utilizador convidado não vir nada nesta pasta compartilhada, verifique a partir da conta de administrador se os direitos de compartilhamento foram realmente ampliados para todos os utilizadores do kDrive: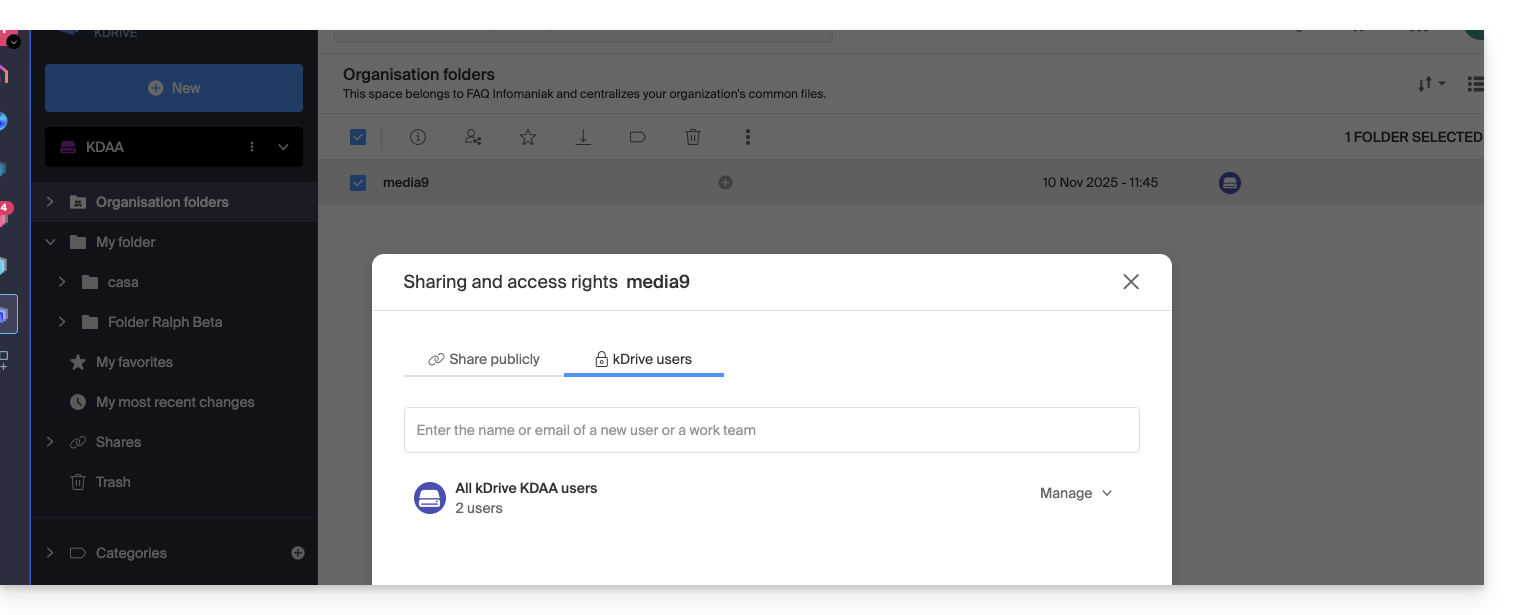
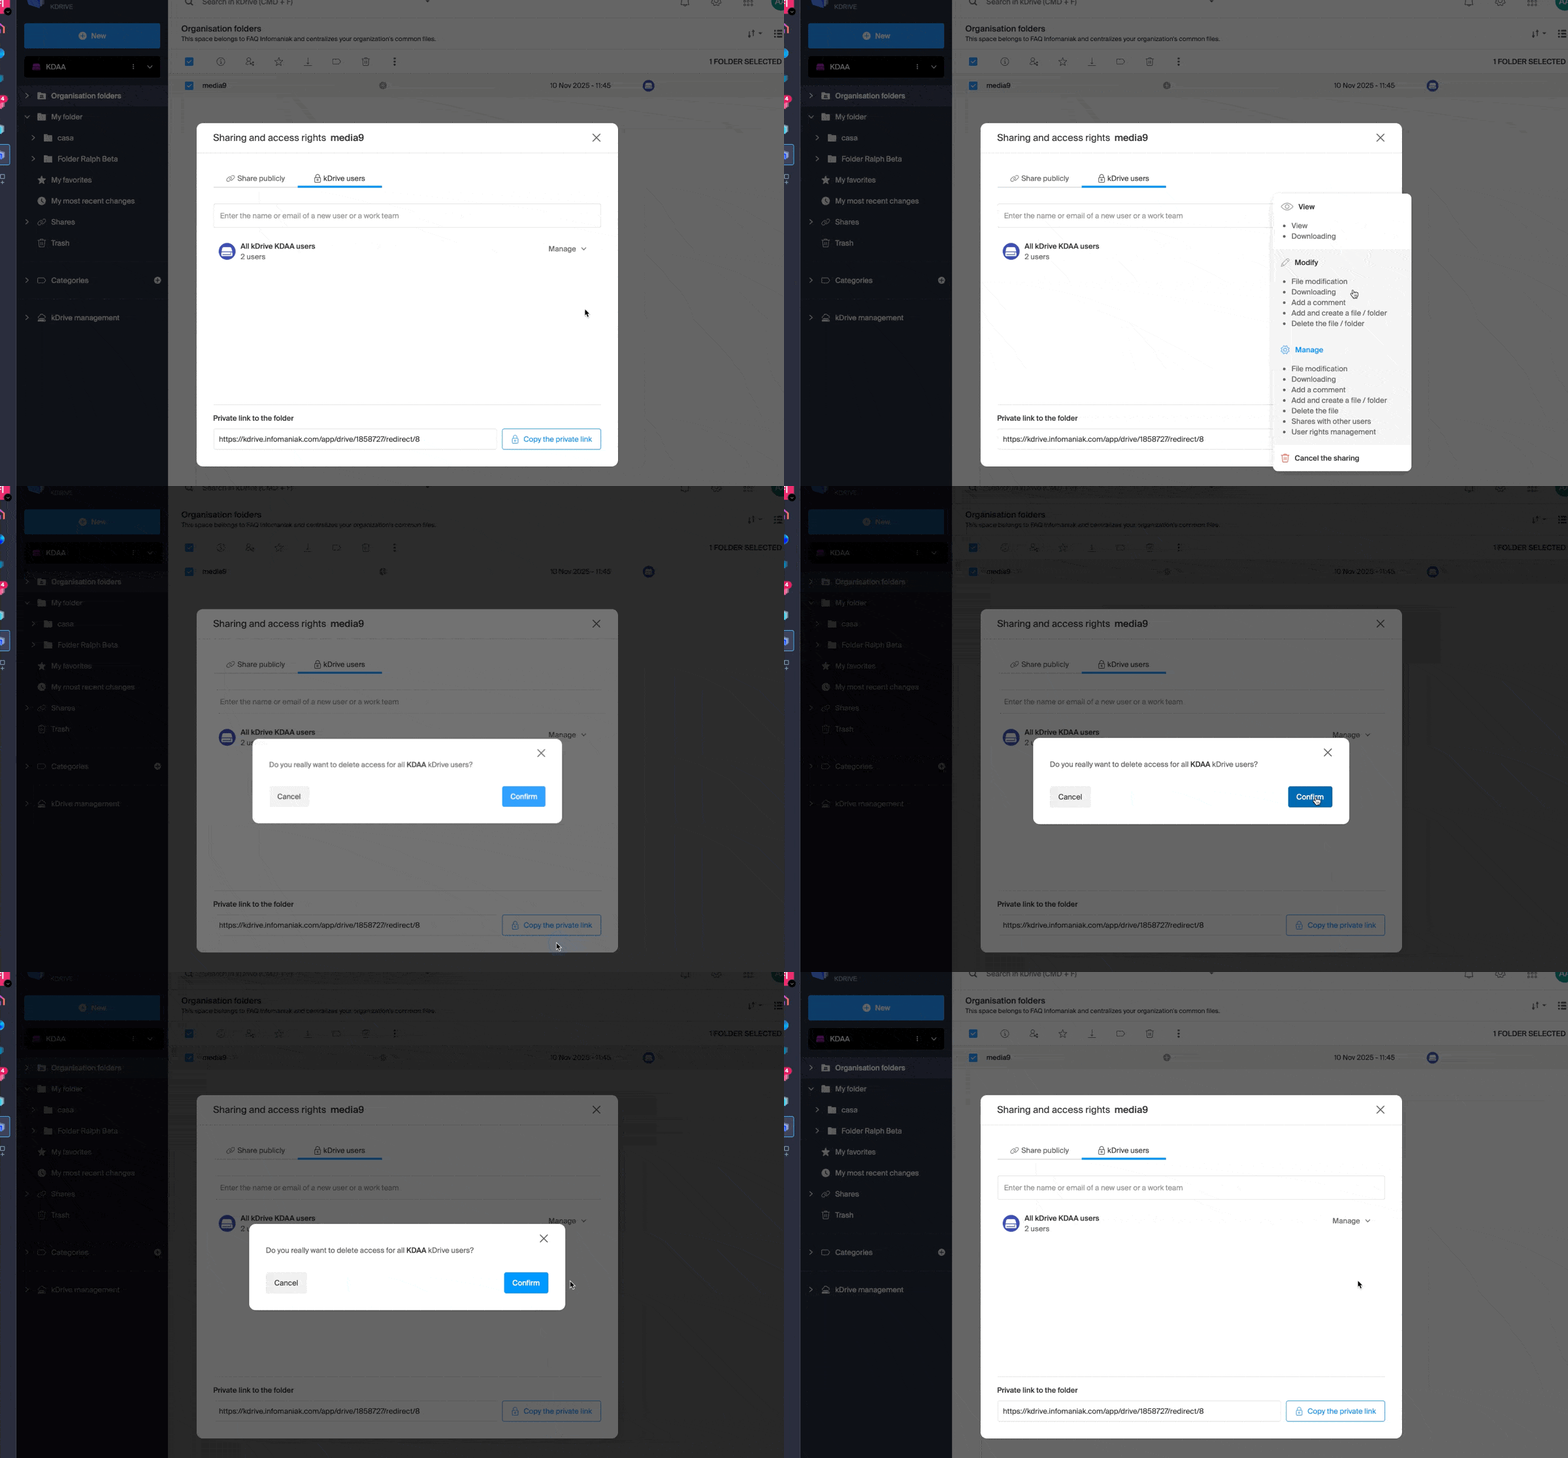
O inverso também é possível: se o novo utilizador kSuite tiver acesso a todas as pastas da organização e isso não for desejado, o administrador deve modificar o compartilhamento da pasta principal (a pasta na raiz da pasta compartilhada, por exemplo):
- Clique com o botão direito do rato na pasta principal, escolha a opção Compartilhar e, em seguida, escolha a segunda aba de compartilhamento e clique em Gerir à direita para selecionar a remoção do compartilhamento (o efeito é recursivo e, portanto, aplica-se a todos os elementos contidos dentro da pasta principal):
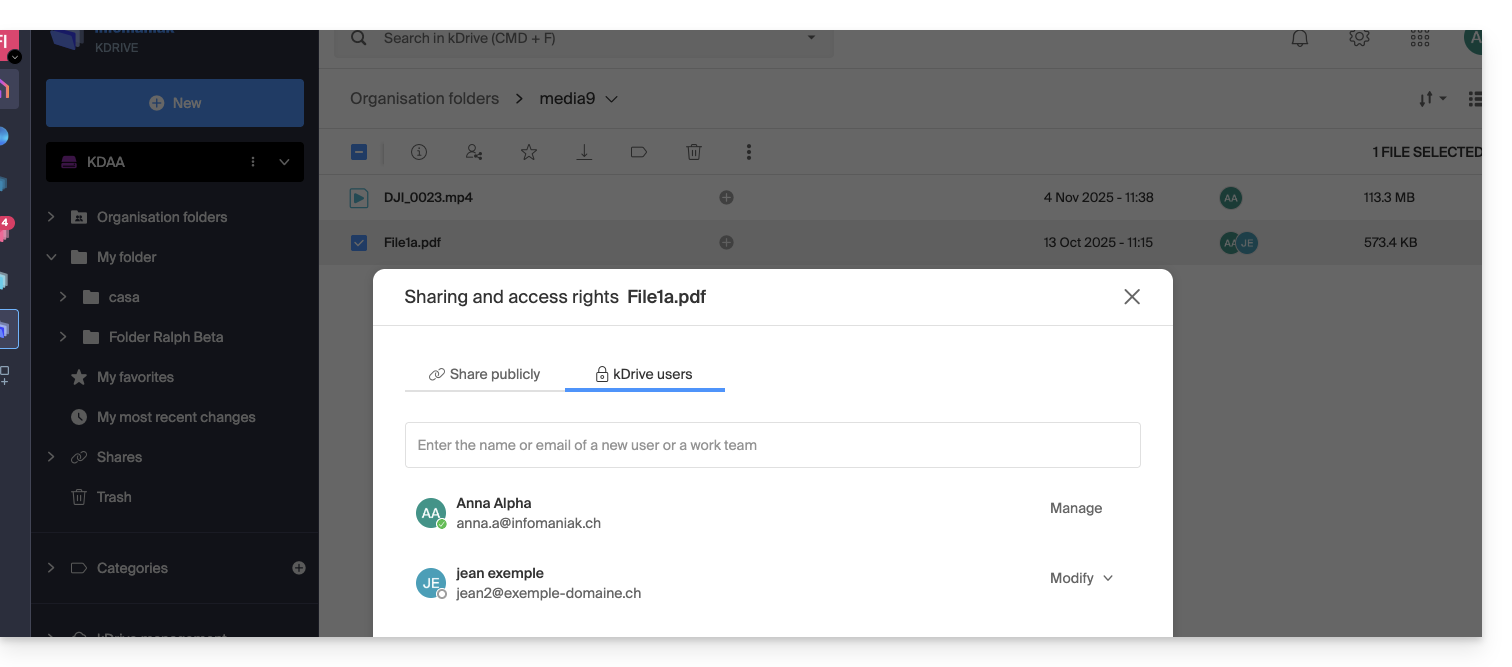
- Em seguida, volte a compartilhar, mas de forma mais restrita, a partir da pasta em questão:
- Verifique a coluna de acessos na árvore do kDrive:
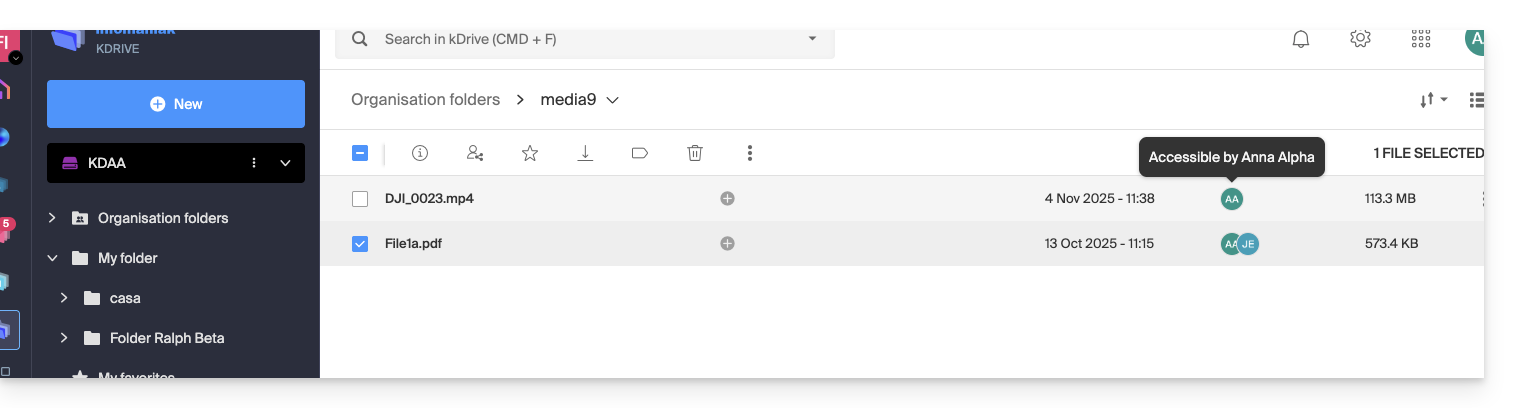
- E, assim, o utilizador só vê uma parte da pasta, embora seja uma pasta compartilhada:
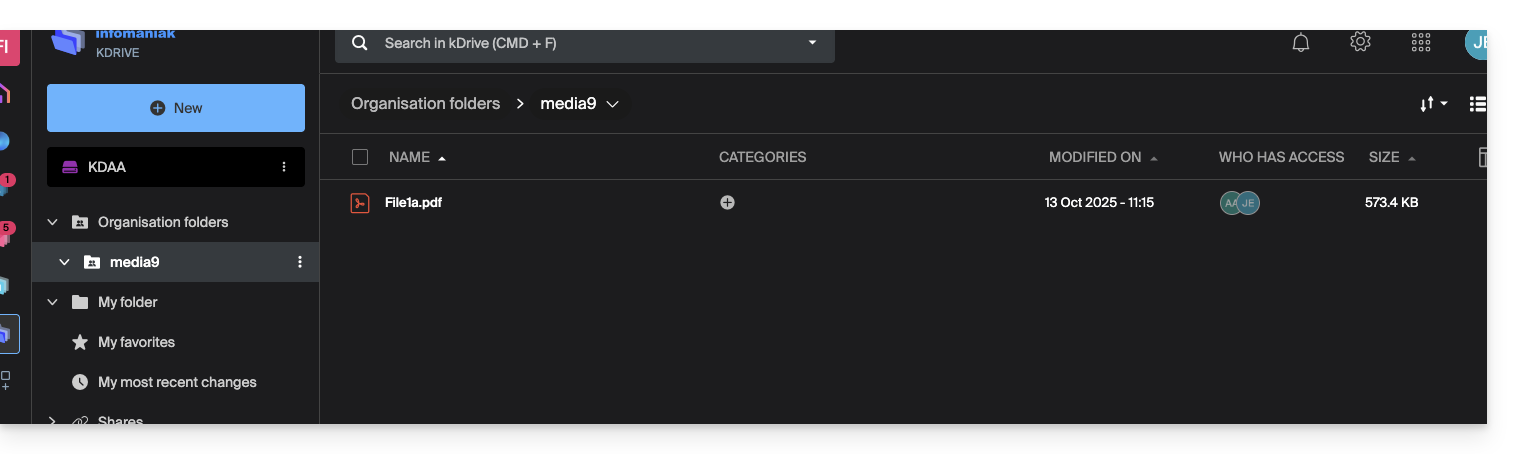
- E, desta vez, se o utilizador instalar a aplicação kDrive, poderá escolher o kDrive em questão:
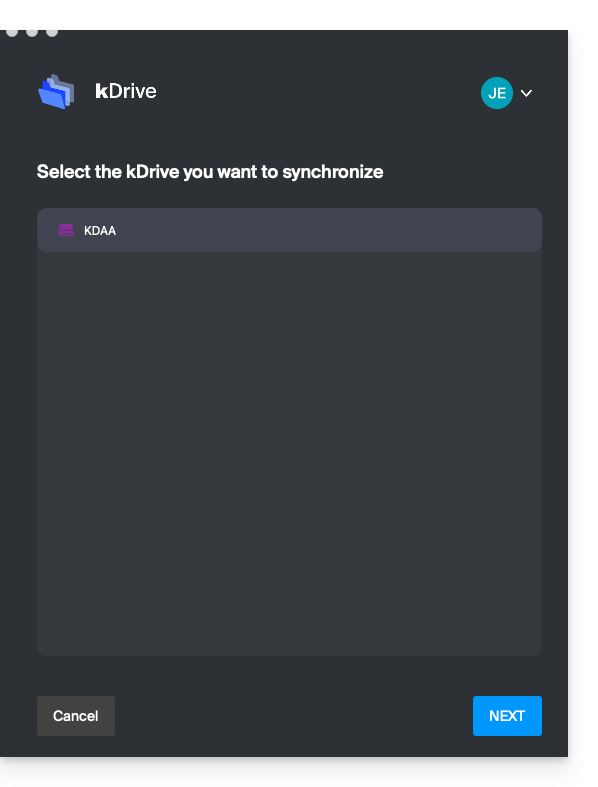
e aceder aos ficheiros no computador: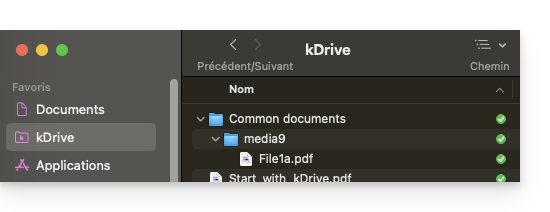
Link para esta FAQ: https://faq.infomaniak.com/1793
Esta seção de perguntas frequentes foi útil?
Este guia explica como armazenar o banco de dados do Joplin no seu kDrive Infomaniak e conectá-lo aos seus diversos dispositivos através do protocolo WebDAV. Assim, você mantém suas notas em um local seguro, em um suporte de armazenamento localizado na Suíça.
✘ INDISPONÍVEL com
kSuite Free / kSuite Standard
my kSuite / my kSuite+ (ik.me, etik.com, ikmail.com)
Preâmbulo
- Joplin é uma ferramenta gratuita e de código aberto para anotações, que permite organizar todas as suas notas em pastas e acessá-las a partir de qualquer dispositivo (computador, dispositivo móvel, etc.).
- O Joplin irá armazenar vários dos seus ficheiros de configuração, portanto, para não sobrecarregar os seus diretórios kDrive, recomenda-se criar uma pasta dedicada na sua estrutura pessoal no kDrive, com um nome de pasta simples como "
joplin", por exemplo, e, em seguida, especificá-la no final do link WebDAV no ponto 6 abaixo: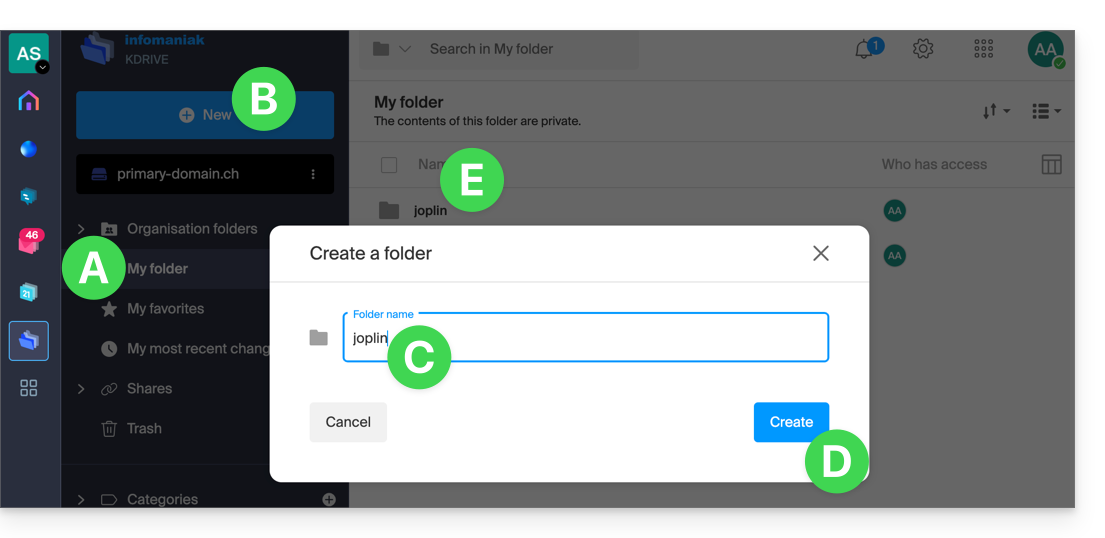
Configurar o Joplin para usar o kDrive via WebDAV
Pré-requisitos
- Descarregue o Joplin
- Conheça o seu identificador kDrive (ID kDrive)
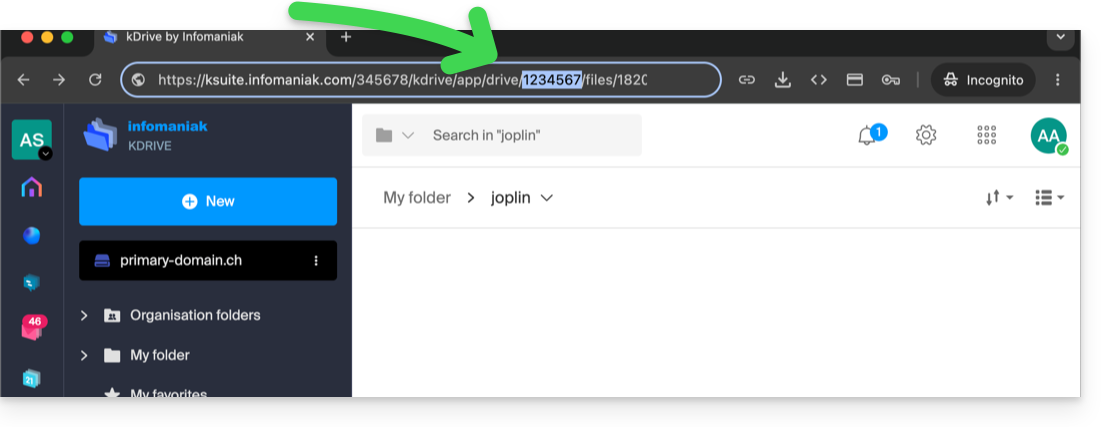
O exemplo abaixo é praticamente idêntico em todas as versões do Joplin:
- Abra a aplicação Joplin.
- Aceda às preferências da aplicação:
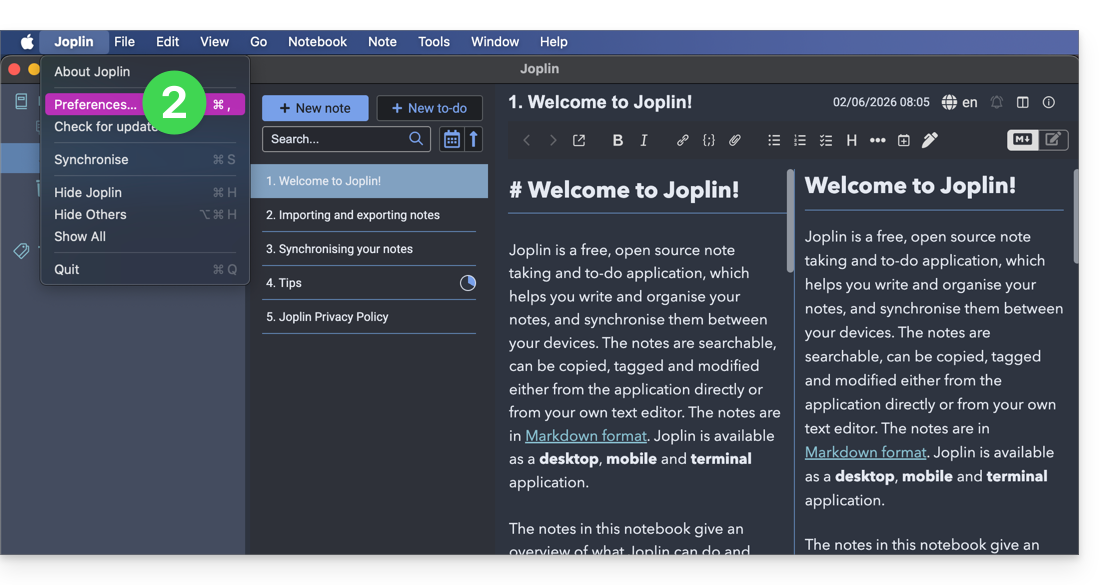
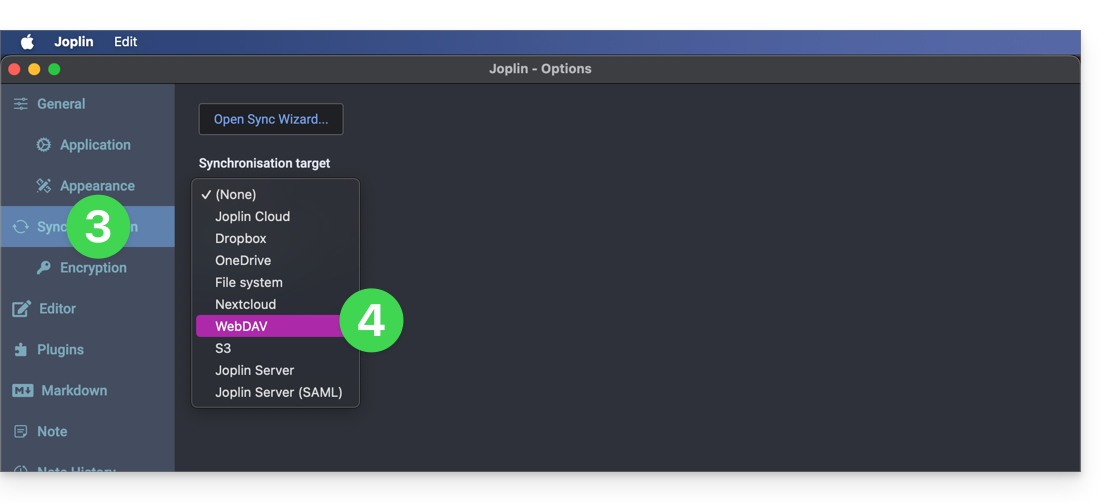
- Toque em Sincronizar.
- Toque no menu para selecionar um destino.
- Escolha o modo WebDAV:
- Para as configurações da conta, utilize as seguintes informações:
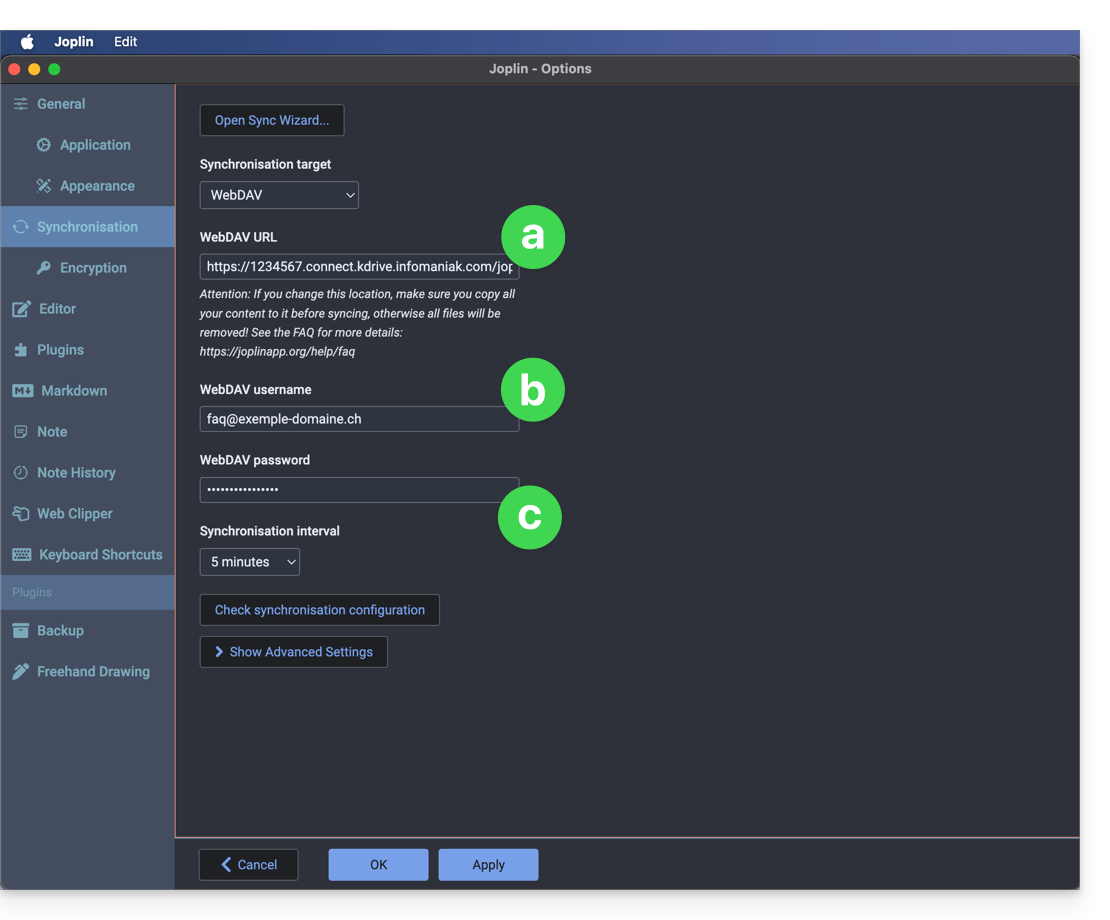
- Endereço do servidor:
https://IDkDrive.connect.kdrive.infomaniak.com(consulte os pré-requisitos) seguido de/joplinou /nome da pasta (leia a introdução acima) - Nome de usuário: endereço de e-mail para fazer login na conta Infomaniak
- Senha: senha do aplicativo caso a autenticação de dois fatores esteja ativada ou a senha da sua conta de usuário Infomaniak, caso não tenha ativado a autenticação de dois fatores
- Endereço do servidor:
- Clique em teste de sincronização abaixo e aguarde a confirmação da conexão.
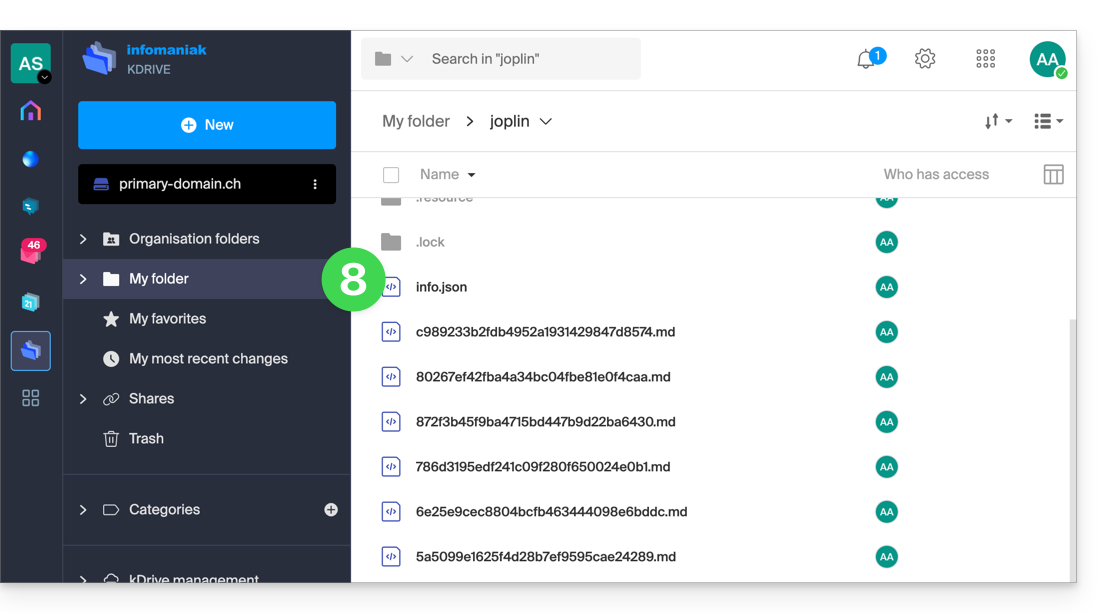
- Verifique na sua pasta kDrive se os arquivos Joplin foram gravados corretamente:
- Volte às notas para começar a trabalhar.
Link para esta FAQ: https://faq.infomaniak.com/1800
Esta seção de perguntas frequentes foi útil?
Este guia explica como resolver problemas de acesso ou utilização do kDrive no Windows e macOS quando um software de terceiros pode interferir na sua sincronização.
Introdução
- O aplicativo kDrive pode, por vezes, apresentar problemas de interação com os firewalls do Windows ou macOS, bem como com algumas soluções antivírus, VPN ou de limpeza, o que pode causar dificuldades na sincronização de arquivos, impedir a abertura de PDFs na web ou tornar impossível o uso do modo Lite Sync (arquivos sob demanda).
- É necessárioautorize o kDrive nestas aplicações e adicione à lista de permissões (whitelist) três componentes essenciais:
kdrive.exe(oukdrive.appno macOS)kdrive_client.exe- O domínio
*.infomaniakusercontent.com
- Se, em vez disso, notar um problema de sincronização e pastas ausentes, consulte este outro guia.
Avast
Para isso:
- Abra a interface do Avast.
- Vá para Menu > Configurações.
- Na aba Geral, clique em Exceções.
- Clique em Adicionar uma exceção e insira o domínio:
https://*.infomaniakusercontent.com/* - Vá para a aba Caminhos dos arquivos para adicionar os executáveis do kDrive (
kdrive.exe,kdrive_client.exeoukdrive.app).
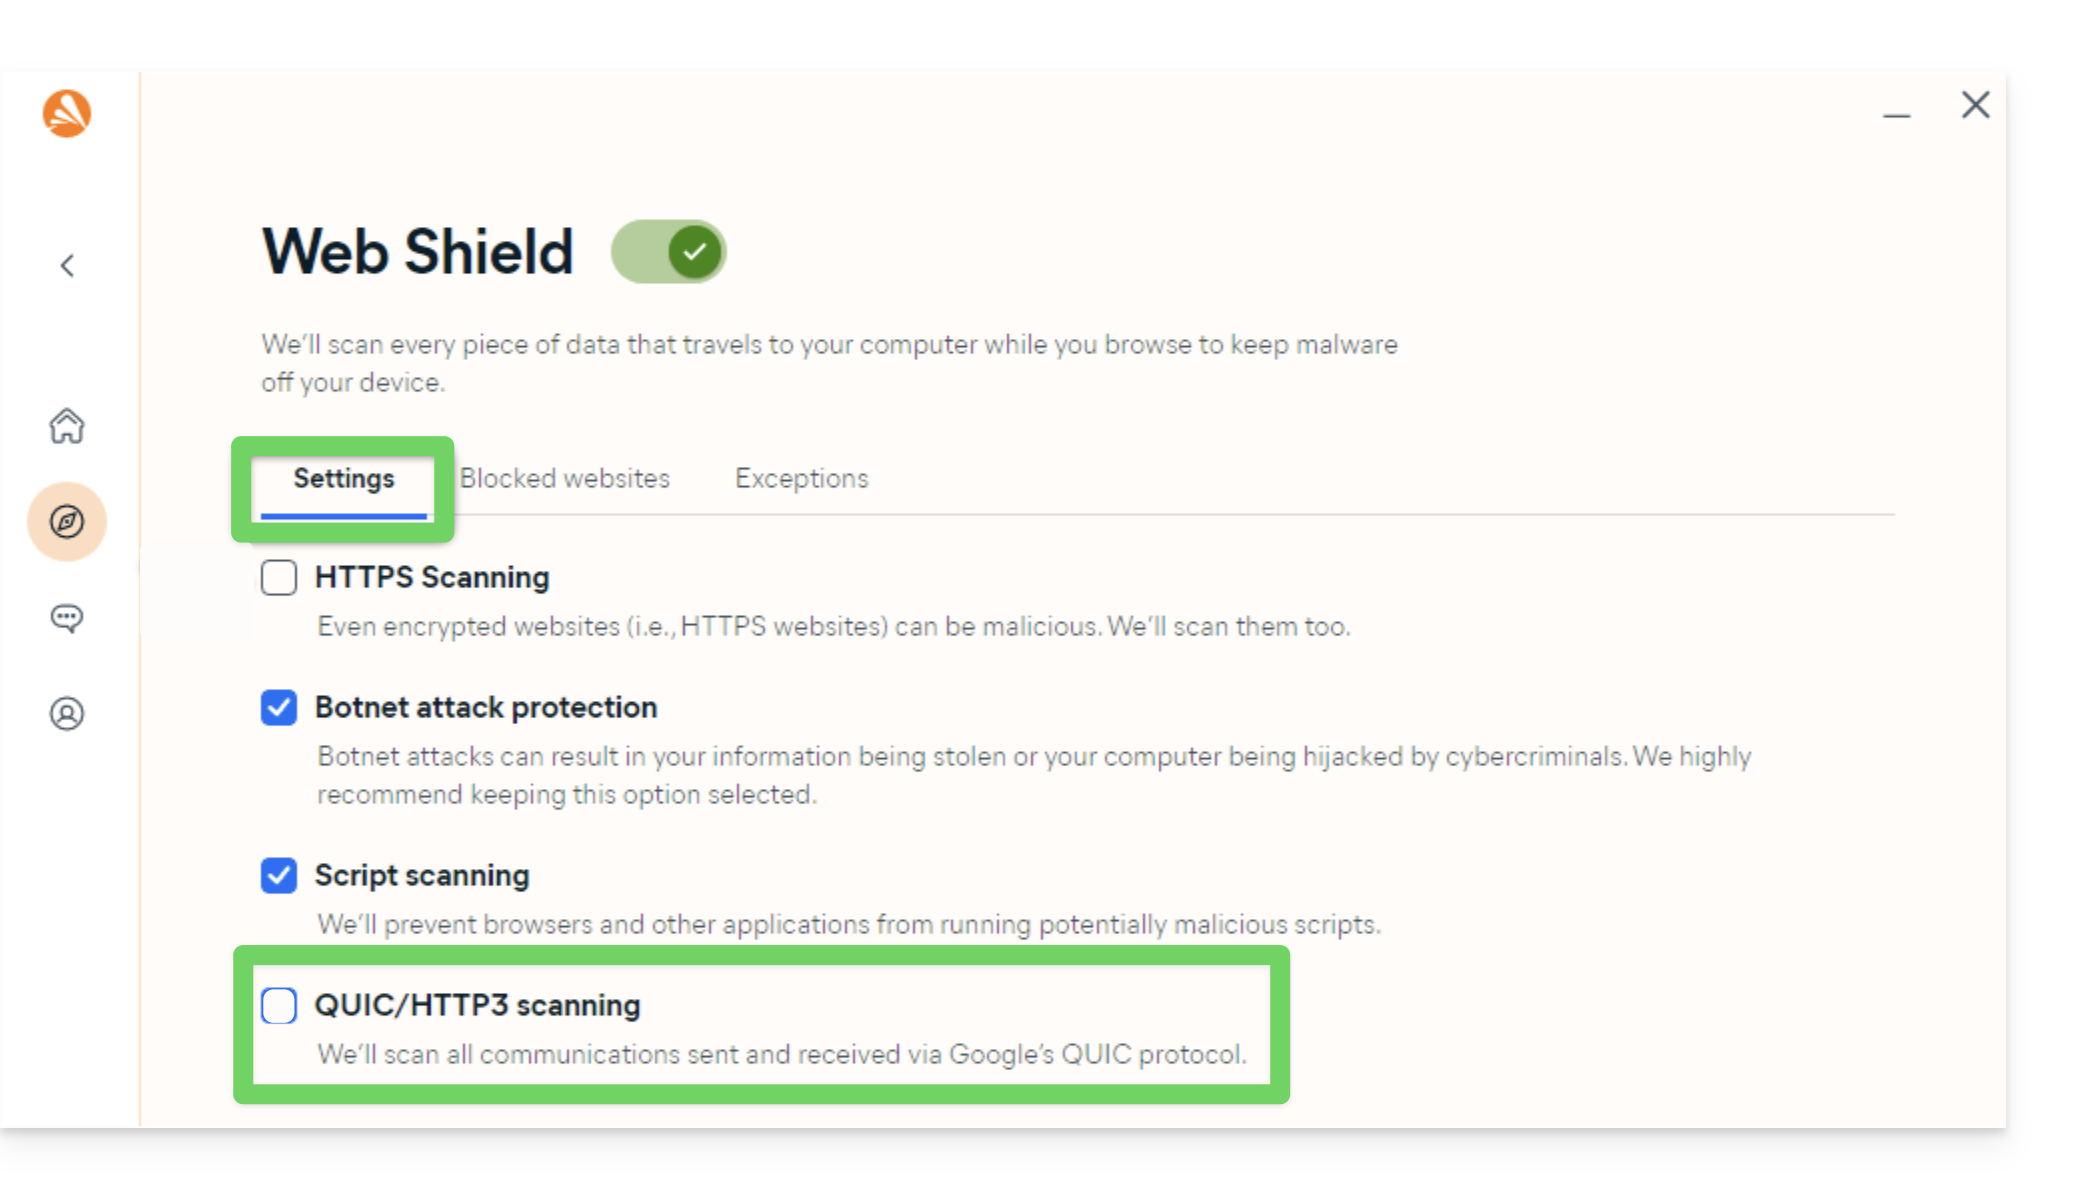
Recomenda-se realizar uma ação adicional no Avast para evitar bloqueios (especialmente ao abrir arquivos PDF):
- Desative a análise QUIC/HTTP3 (consulte a documentação oficial na seção Windows PC):
AVG
Consulte a documentação oficial da AVG.
- Abra o AVG Antivirus.
- Vá para Menu > Configurações > Geral > Exceções.
- Clique em Adicionar uma exceção e insira o domínio
https://*.infomaniakusercontent.com/*. - Adicione também os caminhos de acesso aos executáveis do kDrive (
kdrive.exeekdrive_client.exeoukdrive.app).
Avira
Consulte a documentação oficial da Avira.
- Clique com o botão direito do mouse no ícone Avira e desative temporariamente a proteção.
- Vá para Configuração > Proteção do PC > Análise > Exceções.
- Adicione os arquivos executáveis do kDrive (
kdrive.exe,kdrive_client.exeoukdrive.app). - Repita o processo em Proteção em tempo real > Exceções.
- Na seção Proteção Web, adicione o domínio
*.infomaniakusercontent.comàs URLs permitidas.
Bitdefender
Consulte a documentação oficial da Bitdefender.
- Abra o Bitdefender e vá para Proteção > Prevenção de ameaças online > Configurações.
- Clique em Gerenciar exceções e adicione o domínio
*.infomaniakusercontent.com(marque a opção de prevenção online). - Se estiver a usar a extensão do navegador TrafficLight, adicione também este domínio à sua lista de permissões.
- Para excluir os ficheiros executáveis do kDrive (
kdrive.exe,kdrive_client.exeoukdrive.app), vá para Proteção > Antivírus > Definições > Gerir exceções.
CCleaner
Consulte a documentação oficial do CCleaner.
- Abra o CCleaner e vá para Opções > Excluir.
- Clique em Adicionar e selecione os arquivos executáveis do kDrive (
kdrive.exe,kdrive_client.exe) ou a pasta de instalação global para evitar qualquer exclusão de cache ou interrupção de processos.
CleanMyMac
Consulte a documentação oficial do CleanMyMac (MacPaw).
- Abra o CleanMyMac.
- Na tela de resultados da análise, mantenha a tecla Ctrl pressionada e clique nos itens relacionados ao kDrive (
kdrive.app). - Selecione Adicionar à lista de exclusão.
ESET
Consulte a documentação oficial da ESET.
- Abra o ESET e pressione F5 (Configuração avançada).
- Vá para Antivírus > Exclusões e clique em Adicionar para inserir os caminhos para os executáveis do kDrive (
kdrive.exe,kdrive_client.exeoukdrive.app). - Acesse Web e e-mail > Proteção de acesso à Web > Gerenciamento de endereços URL e adicione
*.infomaniakusercontent.comaos endereços permitidos.
Kaspersky
Consulte a documentação oficial da Kaspersky.
- Abra a Kaspersky e vá para Configurações > Exclusões e gestão de ameaças.
- Adicione os arquivos executáveis do kDrive (
kdrive.exe,kdrive_client.exeoukdrive.app) à lista de aplicativos confiáveis. - Para resolver problemas de acesso à web, exclua os domínios
kdrive.infomaniak.come*.infomaniakusercontent.comda análise:
- Em caso de problemas persistentes com as conexões seguras SSL/TLS, desmarque a seguinte caixa:

macOS (firewall)
Consulte a documentação oficial da Apple (Firewall do macOS).
- Abra as Configurações do Sistema (ou Preferências do Sistema).
- Clique em Privacidade e segurança.
- Selecione Firewall.
- Clique no botão Opções do firewall (insira a sua senha de administrador, se solicitado).
- Clique no botão Adicionar um aplicativo (+).
- Selecione o aplicativo kDrive (
kdrive.app) para permitir as conexões de entrada. - Clique em Adicionar e, em seguida, em OK.
Malwarebytes
Consulte a documentação oficial do Malwarebytes.
- Abra o Malwarebytes e vá para Configurações > Lista de permissões (Exclusões).
- Clique em Adicionar uma permissão.
- Selecione Excluir um arquivo ou pasta e especifique
kdrive.exe,kdrive_client.exe(oukdrive.app). - Selecione Excluir um site e insira o domínio
*.infomaniakusercontent.com.
McAfee
Consulte a documentação oficial da McAfee.
- Abra o McAfee e acesse as Configurações (ícone de engrenagem) > Análise em tempo real.
- Em Arquivos excluídos, adicione os arquivos executáveis do kDrive (
kdrive.exeekdrive_client.exeoukdrive.app). - Na secção Firewall / Proteção Web, adicione o domínio
*.infomaniakusercontent.comà lista de endereços web autorizados.
NordVPN
Consulte a documentação oficial da NordVPN (Proteção contra Ameaças).
- Abra o NordVPN.
- Acesse a função Proteção Avançada contra Ameaças (
Threat Protection). - Consulte a lista de arquivos ou atividades bloqueadas para autorizar a aplicação kDrive (
kdrive.exe,kdrive_client.exeoukdrive.app). - Adicione o domínio
*.infomaniakusercontent.comà lista de domínios autorizados da Proteção contra ameaças. - Se a VPN ativa estiver a interferir na sincronização local, configure o Split Tunneling para excluir a aplicação kDrive do túnel VPN.
Norton
Consulte a documentação oficial da Norton.
- Abra a Norton e vá para Configurações > Antivírus > Verificações e riscos.
- Em Exclusões / Riscos baixos, configure as "URLs a excluir da análise" e adicione
*.infomaniakusercontent.com. - Para excluir os arquivos executáveis (
kdrive.exe,kdrive_client.exeoukdrive.app), configure as seções Exclusões da análise de segurança e Exclusões do Auto-Protect.
Windows (firewall)
Saiba mais sobre o documentação oficial da Microsoft (Firewall do Windows).
- Abra o menu Iniciar e clique em Configurações.
- No campo de pesquisa, digite Firewall.
- Clique em Permitir que um aplicativo passe pelo Firewall do Windows.
- Clique no botão Editar configurações.
- Marque as caixas ao lado dos aplicativos kDrive (
kdrive.exeekdrive_client.exe). Se eles não estiverem na lista, clique em Permitir outro aplicativo... para procurá-los e adicioná-los. - Marque as caixas abaixo dos tipos de rede (Privada e Pública) e clique em OK.
Windows Defender
Consulte a documentação oficial da Microsoft (Segurança do Windows).
- Abra o Segurança do Windows a partir da área de notificação ou do menu Iniciar.
- Selecione Proteção contra vírus e ameaças.
- Em Configurações de proteção contra vírus e ameaças, clique em Gerenciar configurações.
- Role para baixo até Exclusões e clique em Adicionar ou remover exclusões.
- Clique em Adicionar uma exclusão e selecione os arquivos ou pastas do kDrive (
kdrive.exeekdrive_client.exe).
Link para esta FAQ: https://faq.infomaniak.com/1822
Esta seção de perguntas frequentes foi útil?
Este guia explica como reverter as alterações na organização dos arquivos do seu kDrive, especialmente se você fez várias alterações e perdeu o controle.
✘ INDISPONÍVEL com
kSuite Free
my kSuite (ik.me, etik.com, ikmail.com)
Introdução
- A funcionalidade de restauração ou Rewind permite retornar a um estado anterior, como uma máquina do tempo, e restaurar a ordem dos arquivos de sua escolha ou todo o seu kDrive até 3 meses atrás (relacionado ao período de retenção das versões dos arquivos —❓: ajuda).
- Os ficheiros eliminados permanentemente da sua lixeira kDrive e as versões de ficheiros eliminadas não podem ser restaurados.
- A restauração pode demorar vários minutos, durante os quais o kDrive não estará acessível para todos os utilizadores, dependendo do volume de dados a recuperar.
- Nenhuma ação é realizada sobre os direitos e compartilhamentos.
Acessar a ferramenta de restauração kDrive
Pré-requisitos
- Ser Administrador ou Representante legal na Organização (❓: ajuda).
Para abrir a interface de restauração:
- Clique aqui para acessar o aplicativo web kDrive da Infomaniak (serviço online ksuite.infomaniak.com/kdrive).
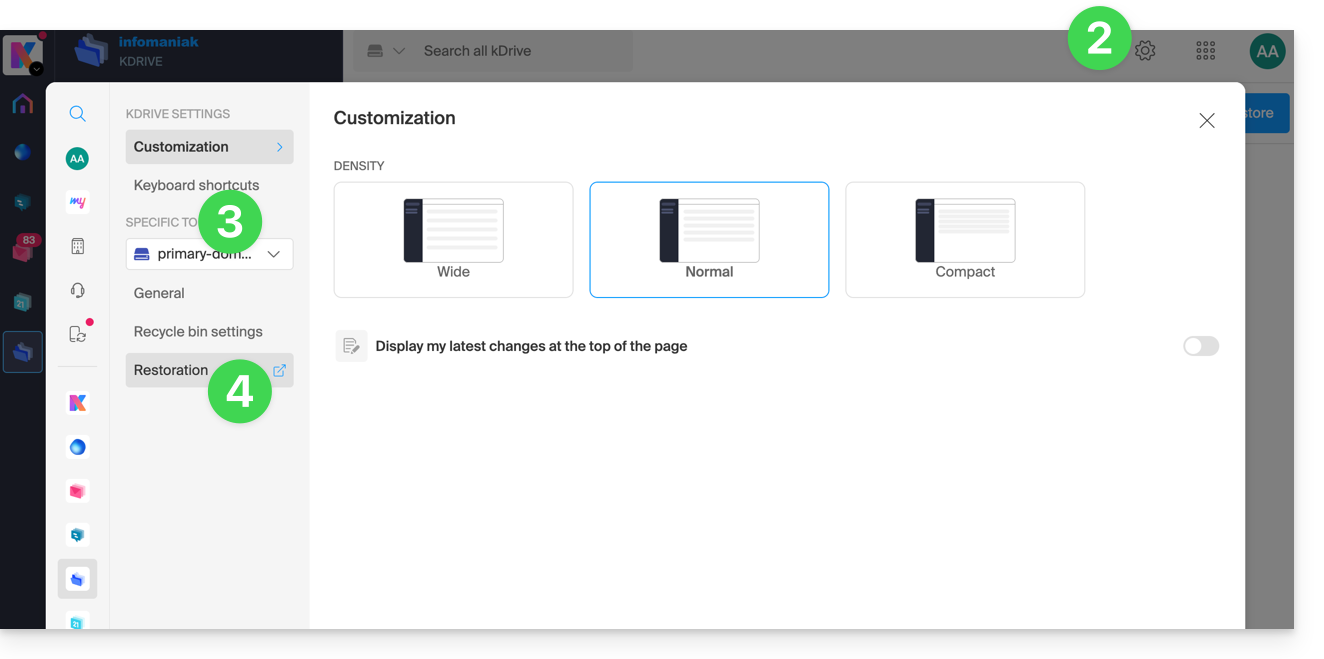
- Clique no ícone Configurações no canto superior direito.
- Verifique ou selecione o kDrive correspondente no menu suspenso do menu lateral esquerdo.
- Clique em Restaurar:
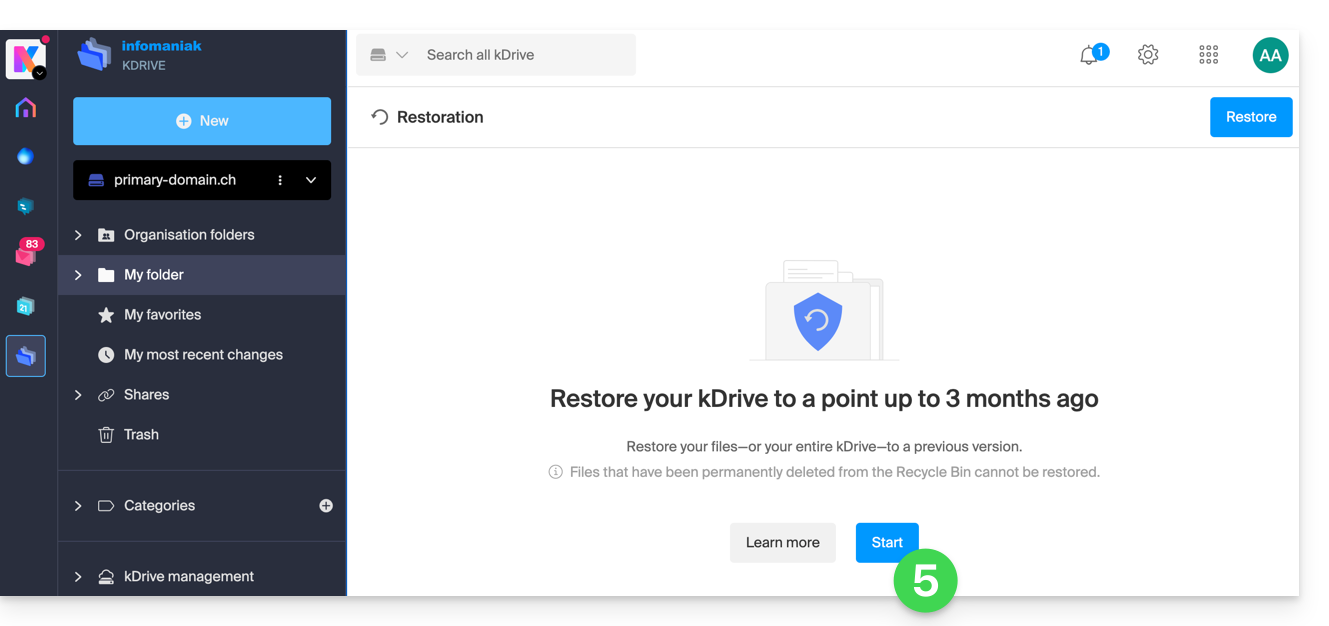
- Leia as informações na tela e clique no botão para iniciar:
- Leia as informações na janela que aparece e clique no botão para confirmar.
- Escolha o que será afetado pela reversão (todo o kDrive ou apenas uma parte e, se aplicável, para qual utilizador).
- Clique em Continuar:
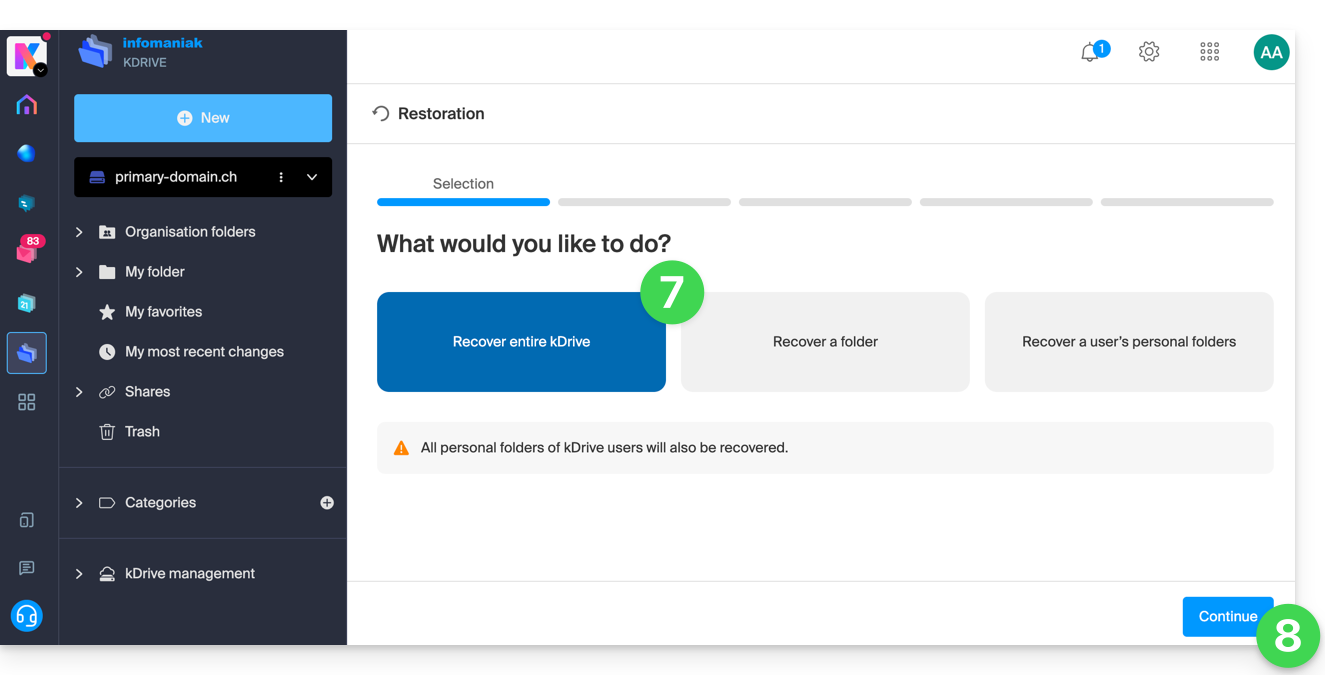
- Escolha a data para a qual deseja retornar (máximo de 3 meses / 90 dias).
- Clique em Continuar:
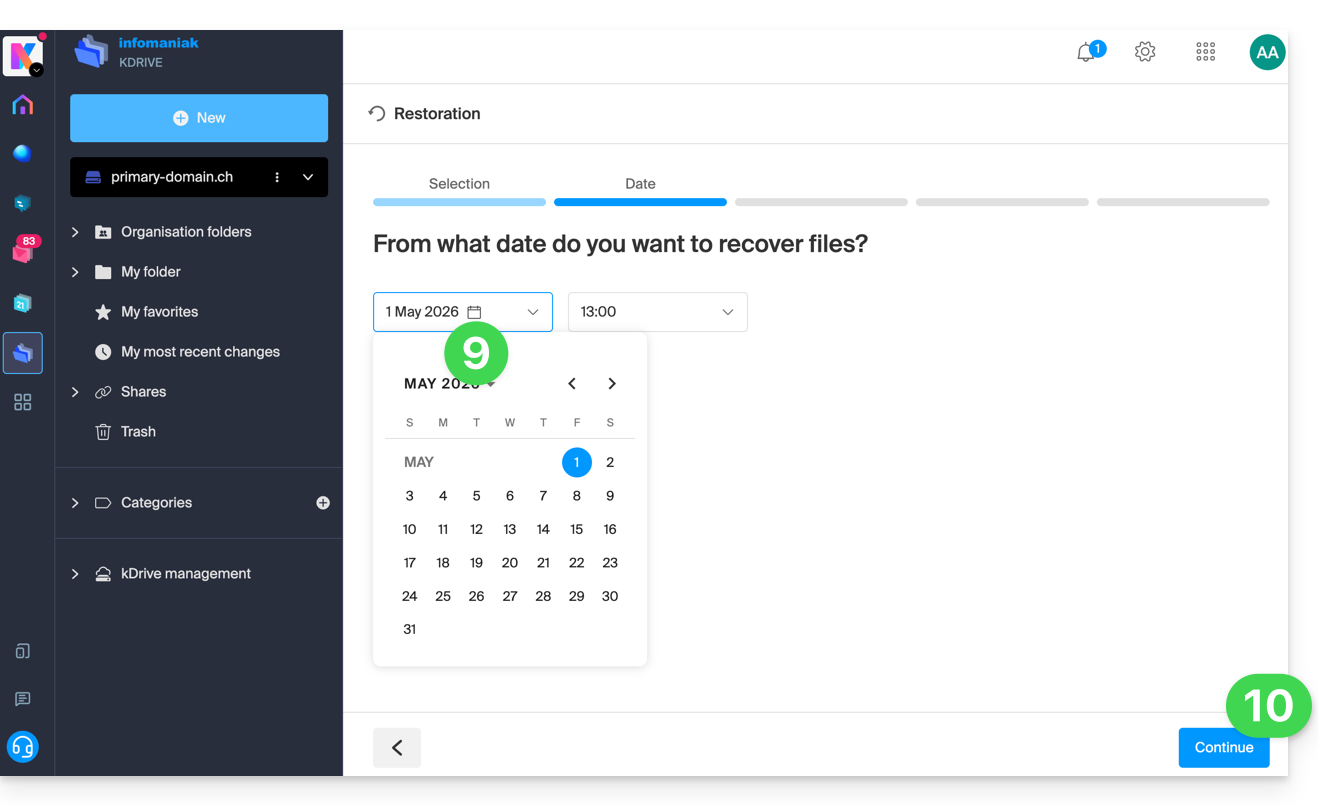
- Inicie a análise na etapa seguinte:
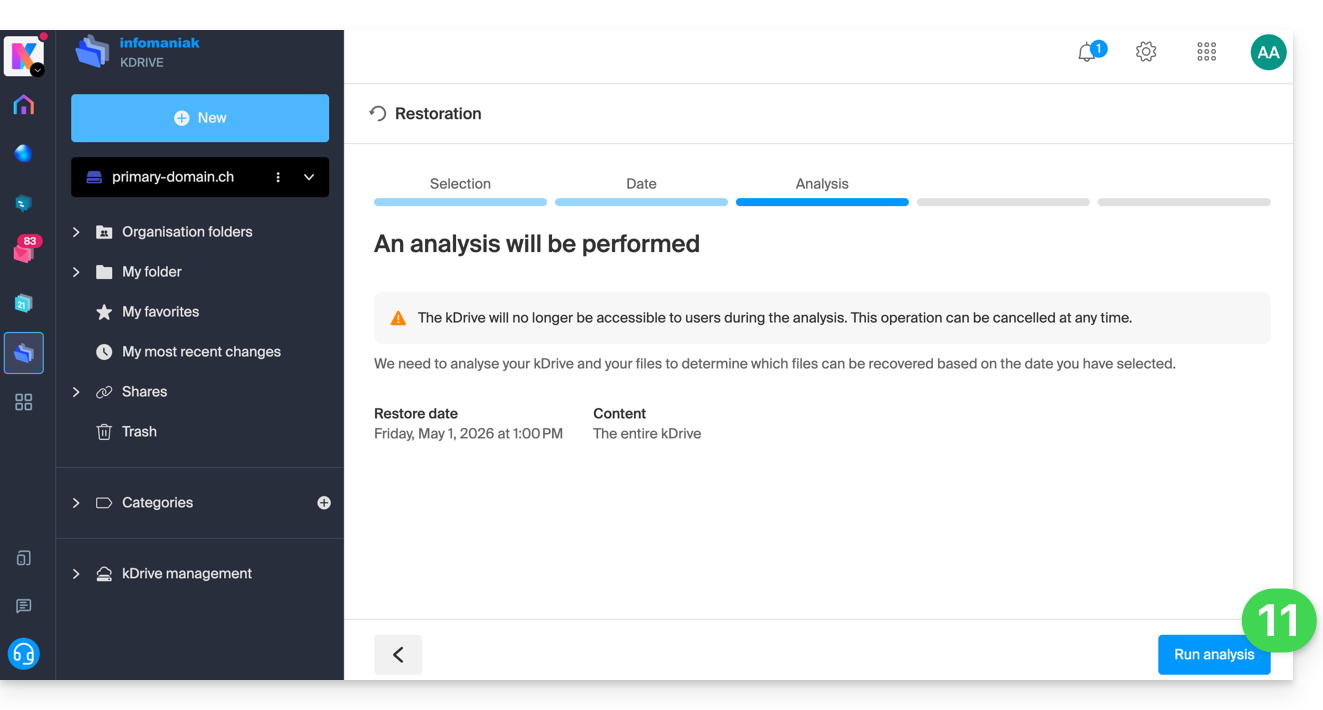
- Se uma análise anterior não produzir resultados, o sistema irá informá-lo, e poderá especificar uma data diferente:
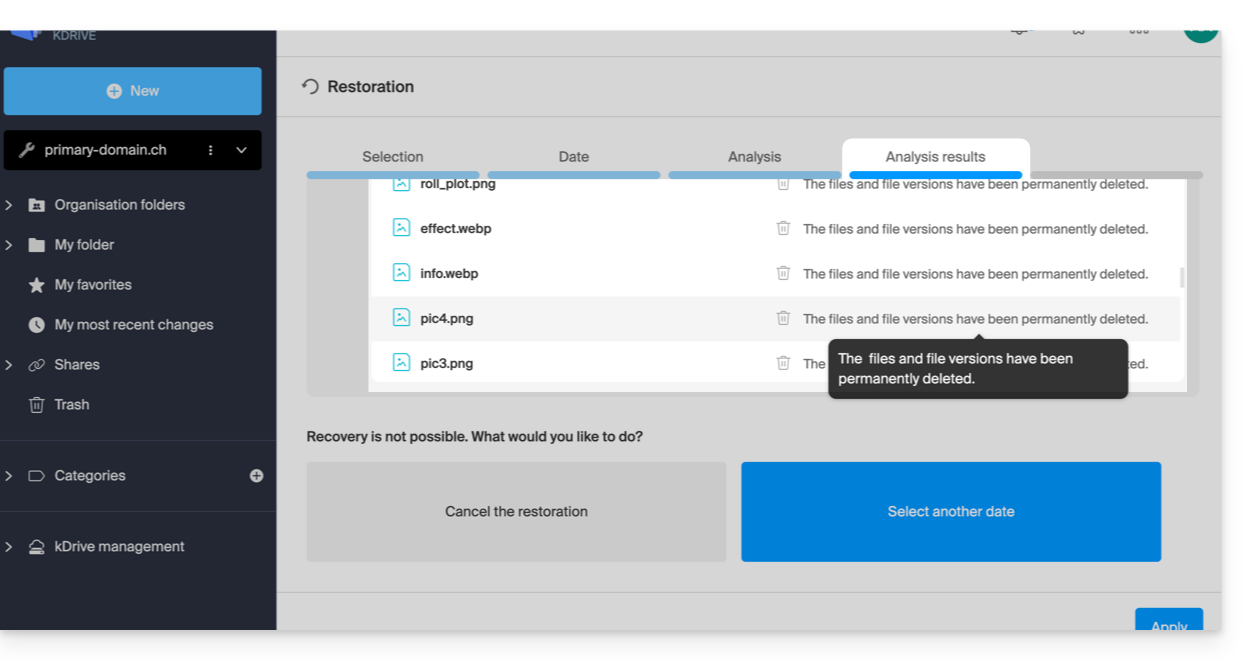
- Se uma análise anterior não produzir resultados, o sistema irá informá-lo, e poderá especificar uma data diferente:
- Determine, então, os próximos passos com base no resultado proposto:
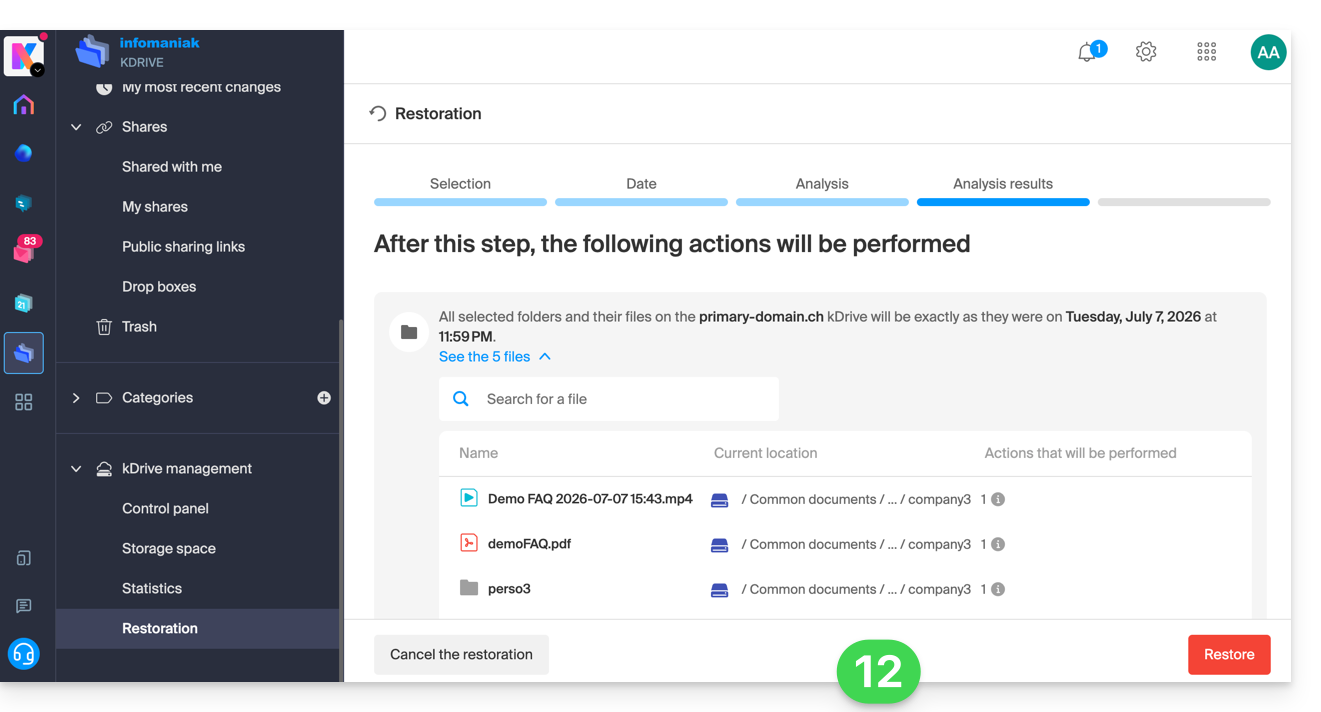
- Uma última solicitação de segurança será exibida antes do início da restauração:
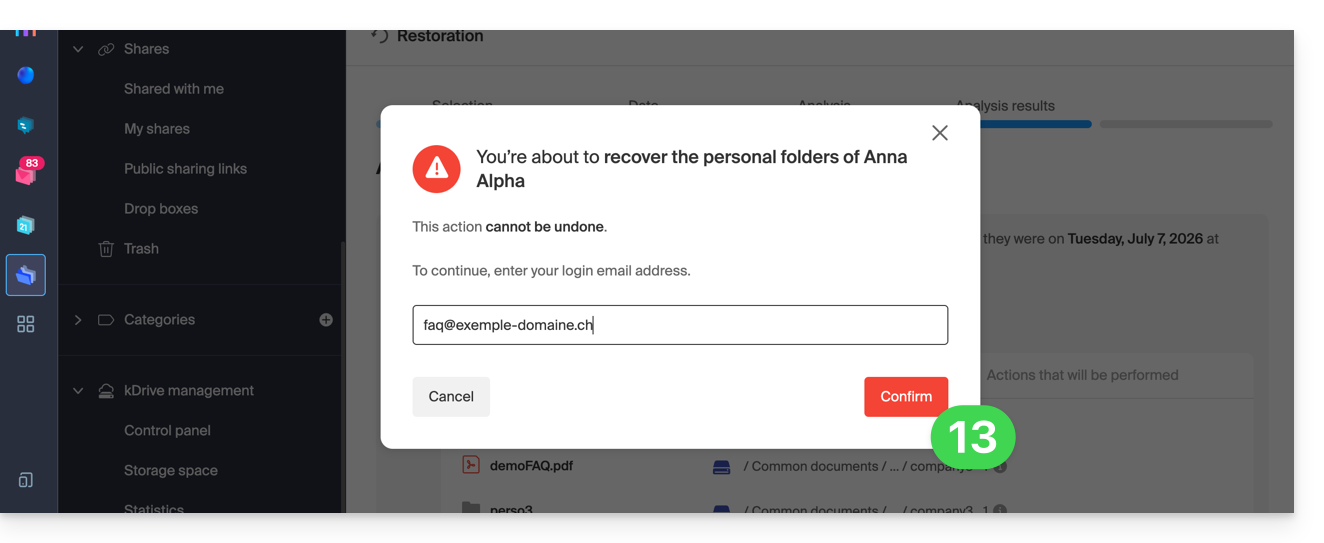
Após a operação, um e-mail será enviado: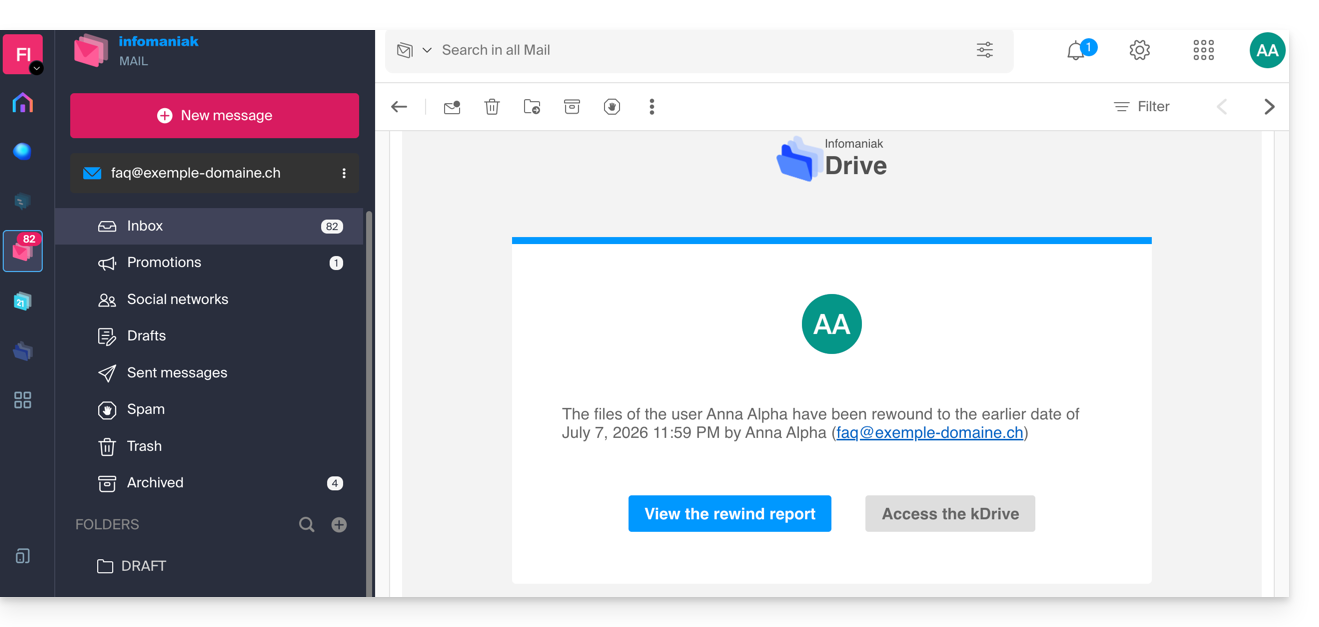
e uma notificação é exibida no kDrive online: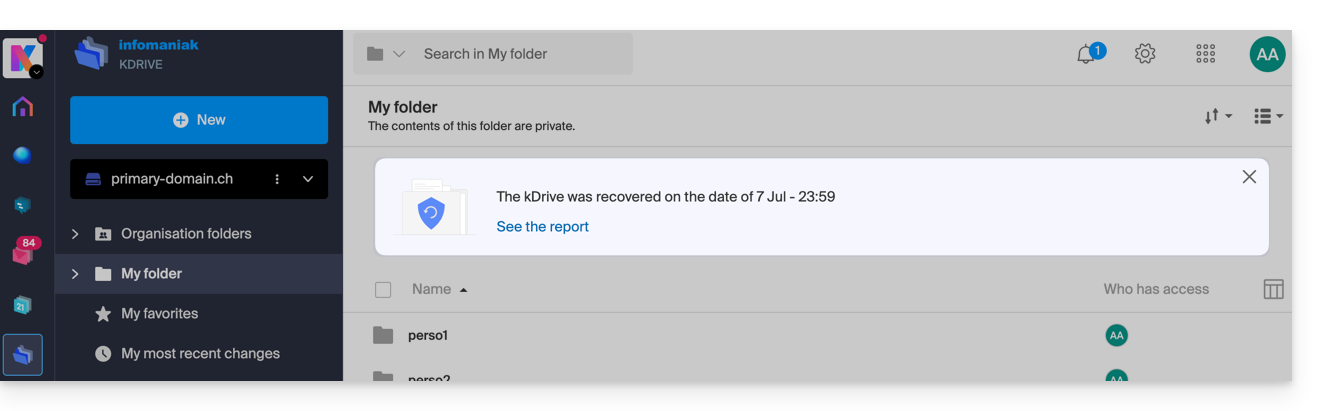
Relatório de análise
Um administrador que consulta um relatório de uma restauração iniciada por outro administrador não verá todos os detalhes relacionados ao perfil pessoal do administrador que iniciou a restauração: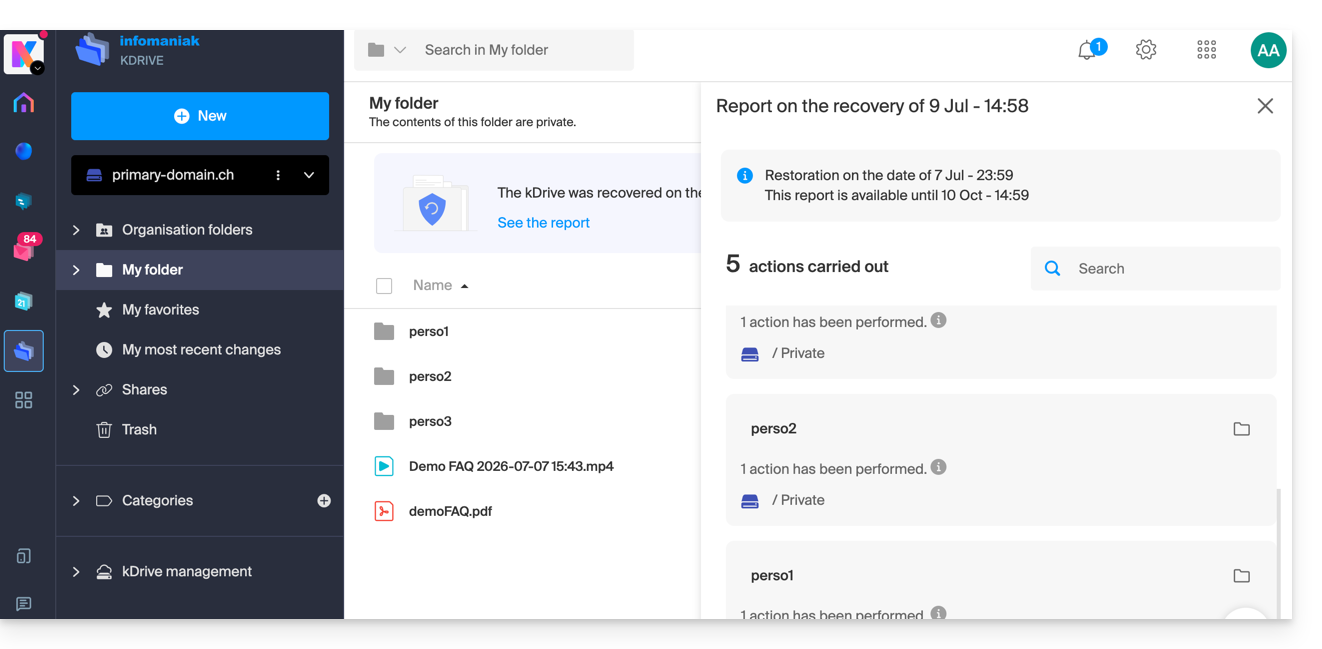
Na visualização do relatório de análise, os dados são listados e agrupados de acordo com a localização atual antes da reversão.
Em caso de conflito
Na raiz do kDrive do administrador que realizou a operação (ou no utilizador em questão) será criada uma pasta chamada "Restauração (data e hora)", contendo uma subpasta com os ficheiros em conflito, chamada "Conflito", e outra pasta para os ficheiros existentes atualmente no destino, chamada “Elementos posteriores”.
Link para esta FAQ: https://faq.infomaniak.com/1838
Esta seção de perguntas frequentes foi útil?
Este guia explica como partilhar rapidamente por e-mail conteúdo presente na aplicação web kDrive da Infomaniak (serviço online ksuite.infomaniak.com/kdrive).
Partilhar por e-mail a partir do kDrive
Pode enviar por e-mail um ficheiro (ou melhor, um link para um ficheiro, pois o e-mail não conterá um anexo) do seu kDrive:
- Clique aqui para aceder à aplicação web kDrive (serviço online ksuite.infomaniak.com/kdrive).
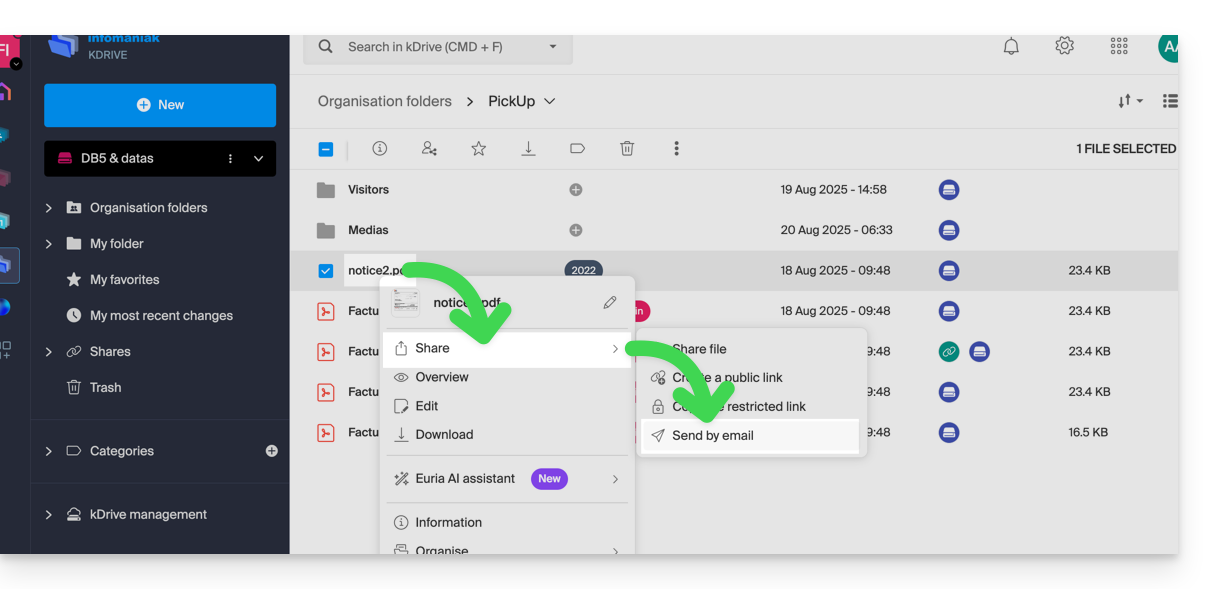
- Clique com o botão direito do mouse no arquivo/pasta desejado ou clique no menu de ação ⋮ à direita do item em questão.
- No menu suspenso que aparece, escolha compartilhar o item por e-mail:
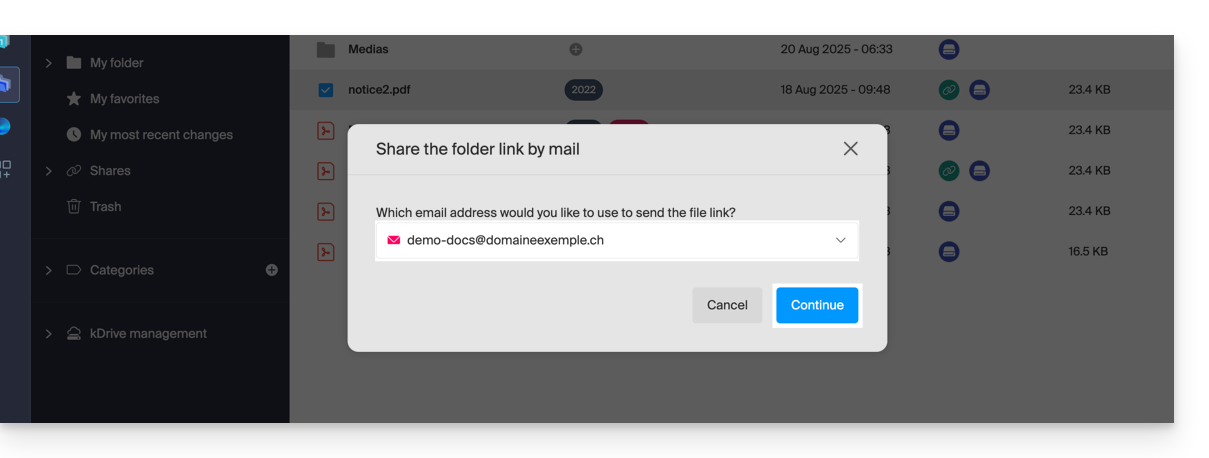
- Escolha qual endereço (entre os endereços atualmente associados à sua aplicação web Mail) usar para enviar o arquivo.
- Clique em Continuar:
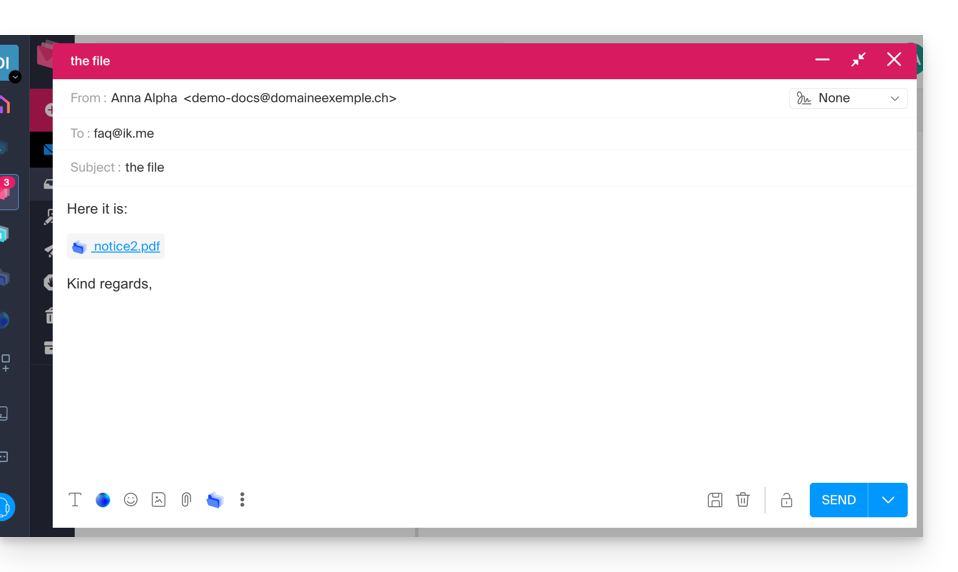
- O aplicativo web Mail abre no navegador e o corpo da mensagem contém automaticamente os links para o conteúdo compartilhado:
- Este é exatamente o mesmo método que você usaria se selecionasse o arquivo diretamente a partir do ícone kDrive na janela de redação do aplicativo web Mail:
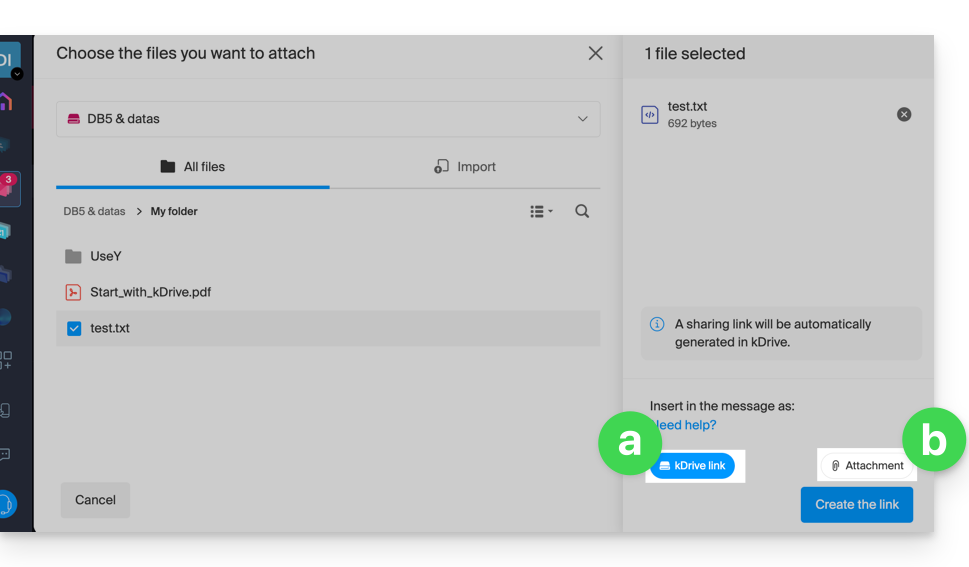
- No entanto, ao fazer isso (vincular um arquivo kDrive diretamente do Mail), uma opção adicional permite anexar o arquivo em si como um anexo (o arquivo será enviado no estado em que se encontra no momento em que você o seleciona; não há mais a noção de colaboração / compartilhamento, como é o caso com o método explicado neste guia e na opção do item “
a” acima).
- Este é exatamente o mesmo método que você usaria se selecionasse o arquivo diretamente a partir do ícone kDrive na janela de redação do aplicativo web Mail:
Convidar para colaborar no arquivo
Para documentos com extensões de arquivo do tipo Office, como .docx, .xls, etc., recomenda-se realizar um compartilhamento padrão do documento (veja a imagem abaixo), o que permite autorizar a edição do documento, caso deseje: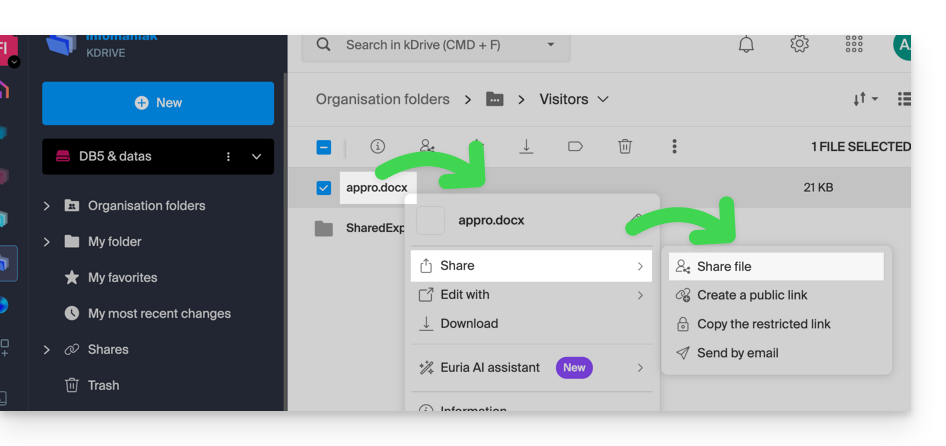
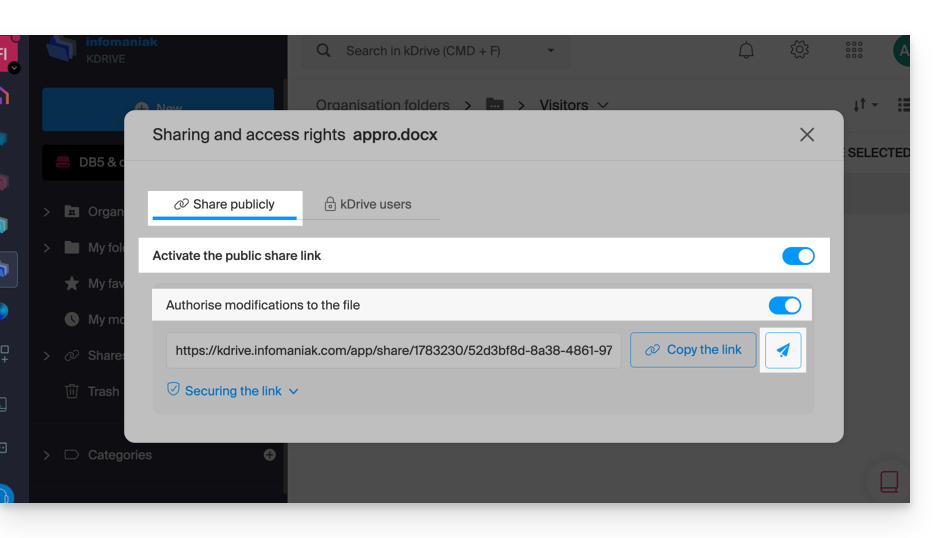
- Se você autorizar a edição do documento a partir do kDrive, o usuário poderá colaborar (com ou sem registro prévio), ou seja, editar no navegador e, em seguida, salvar o documento que você compartilhou:
Link para esta FAQ: https://faq.infomaniak.com/1854
Esta seção de perguntas frequentes foi útil?
Este guia explica como copiar, dentro da aplicação desktop kDrive (aplicação para computador em macOS / Windows / Linux), dados de um kDrive ao qual o seu utilizador Infomaniak tem acesso para outro kDrive ao qual o mesmo utilizador Infomaniak tem acesso.
Introdução
- Para poder ser utilizador de várias Organizações, é necessário ter sido adicionado a essas organizações e ter obtido um direito de acesso aos respetivos kDrives.
- Por exemplo, se o utilizador
abc@domain.xyzpossui, na sua Organização "ABC", um kDrive "ABC" e é convidado para a Organização "VWX", que lhe concede um direito de acesso ao kDrive "VWX", ele verá 2 kDrives em ksuite.infomaniak.com/kdrive e poderá enviar dados de um para o outro com 1 clique.
- Por exemplo, se o utilizador
- Sem ser utilizador de várias Organizações, também é possível copiar dados, mas apenas importando todo um kDrive, sem poder escolher dados específicos: para importar de uma só vez todos os dados contidos noutro dos seus kDrives, consulte este outro guia e escolha kDrive no ponto 7.
Copiar dados entre vários kDrive
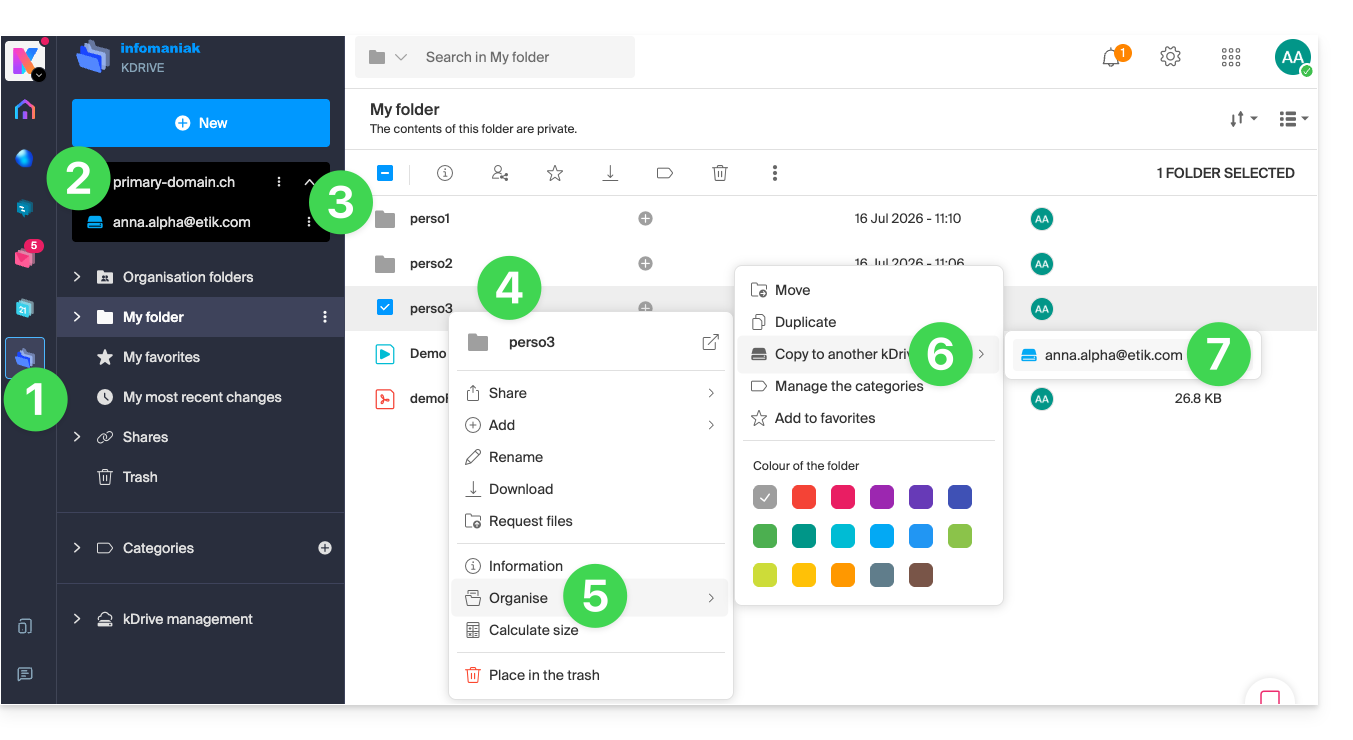
Para copiar uma pasta ou um arquivo para outro kDrive ao qual você tem acesso a partir da mesma conta de usuário:
- Clique aqui para acessar o aplicativo web kDrive da Infomaniak (serviço online ksuite.infomaniak.com/kdrive).
- Verifique ou selecione o kDrive desejado no menu suspenso do menu lateral esquerdo.
- Se necessário, selecione o outro kDrive de onde deseja copiar os arquivos.
- Clique com o botão direito ou clique no menu de ação ⋮ à direita da pasta ou do arquivo que deseja copiar para o outro kDrive.
- Clique em Organizar.
- Clique em Copiar para outro kDrive.
- Escolha o kDrive desejado na lista visível neste mesmo menu suspenso:
- Escolha o local de destino (tendo em conta que a pasta partilhada ("Pastas da organização") não pode receber ficheiros ou pastas na sua raiz, mas pode criar uma subpasta através do ícone adequado, caso o utilizador tenha as permissões necessárias).
- Clique no botão azul para iniciar a cópia:
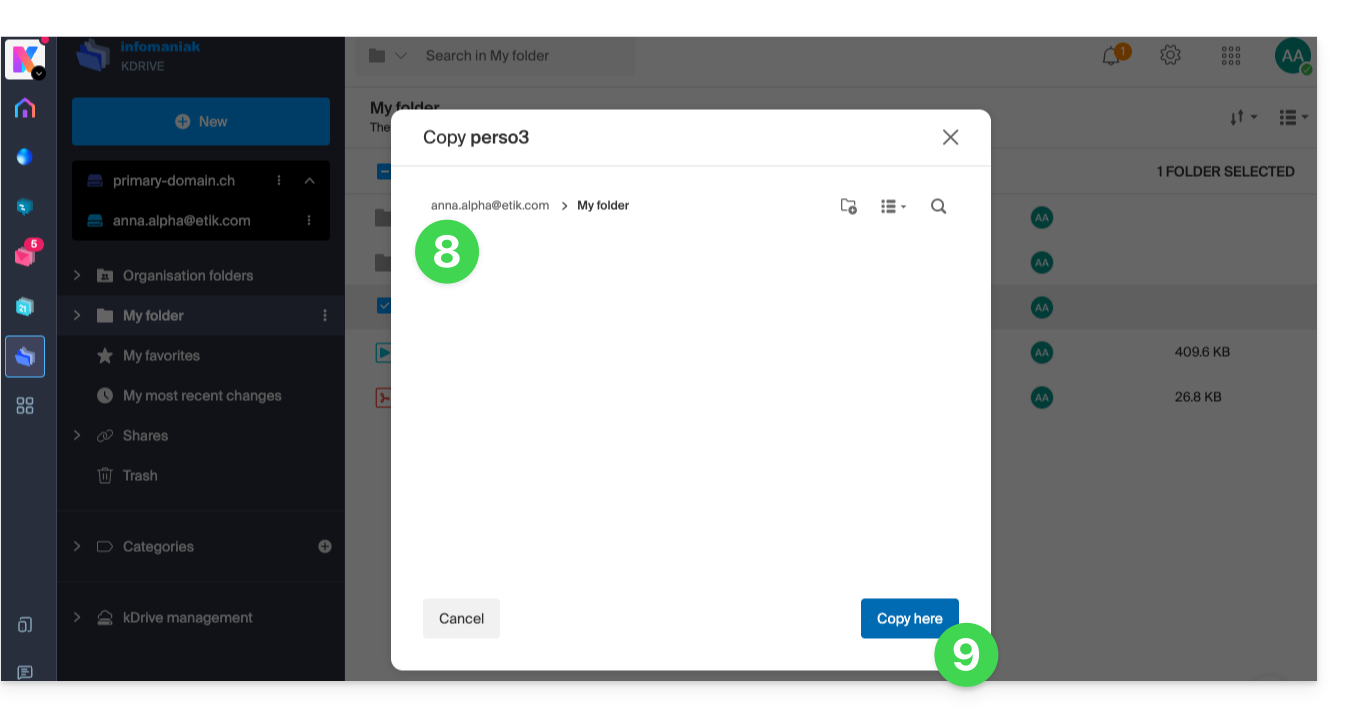
A cópia não é instantânea, por favor, aguarde alguns minutos!
Link para esta FAQ: https://faq.infomaniak.com/1908
Esta seção de perguntas frequentes foi útil?
Este guia ajuda a resolver alguns casos em que você percebe que os dados do kDrive não estão sendo sincronizados entre seus dispositivos.
Ausência de algumas pastas no computador
Se tudo parece estar funcionando corretamente:
- o aplicativo kDrive está aberto em segundo plano e funcionando,
- nenhuma sincronização foi interrompida,
- nenhuma mensagem de erro,
- você tem as permissões de acesso corretas ao visualizá-las na versão online (ksuite.infomaniak.com/kdrive),
mas você percebe que:
- pastas como as Pastas da organização ou outros diretórios não estão visíveis no seu computador,
então, verifique no aplicativo desktop kDrive instalado no seu computador quais pastas você deseja sincronizar:
- Clique com o botão esquerdo do mouse no ícone do aplicativo desktop na área de notificação do seu computador (no canto superior direito no macOS, no canto inferior direito no Windows e um clique duplo na barra de tarefas no Linux).
- Clique no menu de ação ⋮ à direita na janela que aparece.
- Clique em Configurações do kDrive:
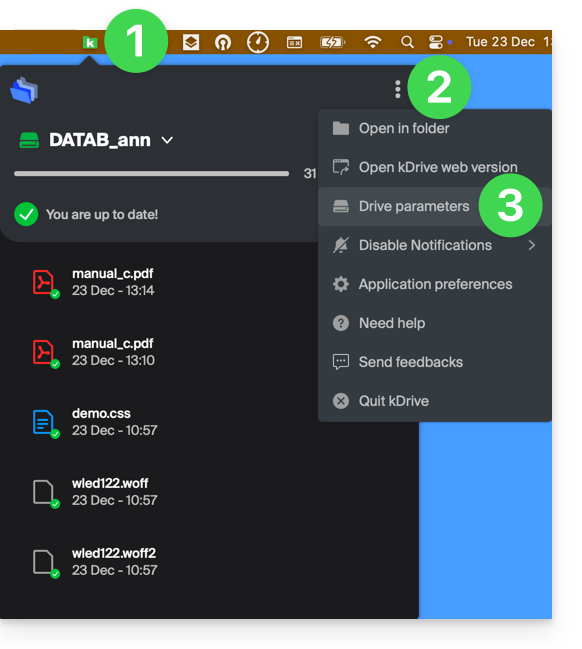
- Clique na seta para baixo à esquerda do nome da sua sincronização para exibir a lista de pastas.
- Exiba, se necessário, o conteúdo das pastas listadas e marque/desmarque as pastas que deseja sincronizar com o seu computador.
- Clique no botão azul Validar:
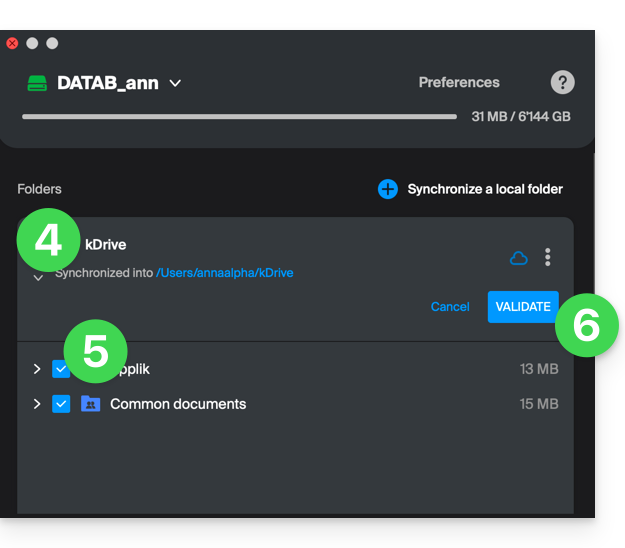
O resultado será que a sua pasta local, que representa o kDrive (com o nome kDrive, ou kDrive2, ou outro), no seu computador, exibirá finalmente todas as pastas desejadas (após o tempo necessário para a sincronização).
Sincronização em curso (0/10) e, em seguida, pausa
Verifique se o serviço Windows Search não está desativado. Faça isso através da janela Executar (Win + R):
- Digite
services.msc. - Clique em OK:
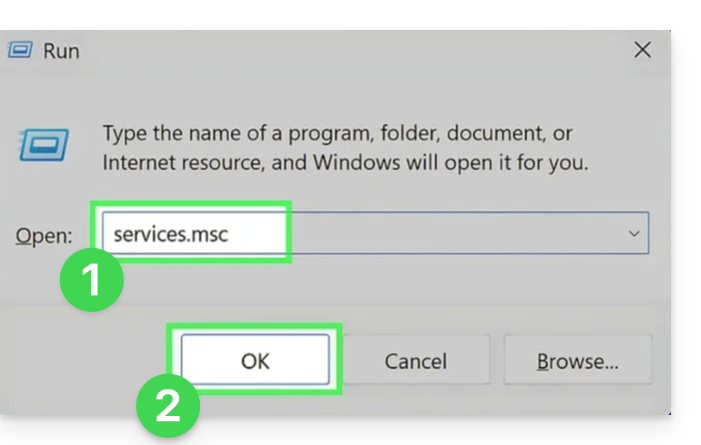
- Localize o Windows Search na lista da janela Serviços e ative-o, caso ainda não esteja:
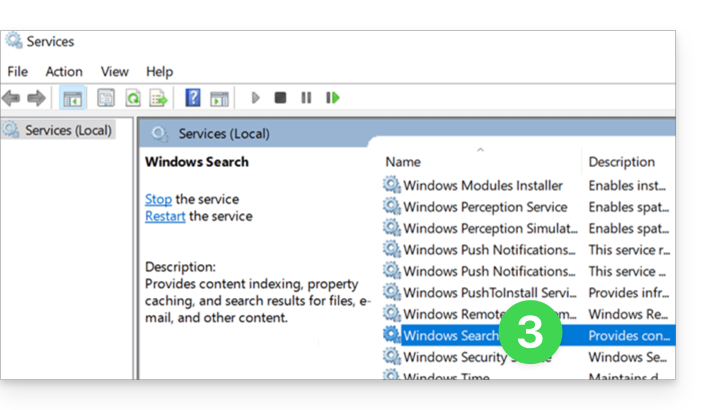
Sincronização contínua (arquivos .eml)
Um problema relacionado à indexação do Windows pode ocorrer durante a sincronização do kDrive de arquivos com a extensão .eml (um tipo de arquivo correspondente à exportação/armazenamento de e-mails). Portanto, é necessário remover o tipo eml das opções de indexação para resolver este problema:
- Abra o menu Iniciar e procure as opções de indexação.
- Clique em Opções de indexação (Painel de Controle):
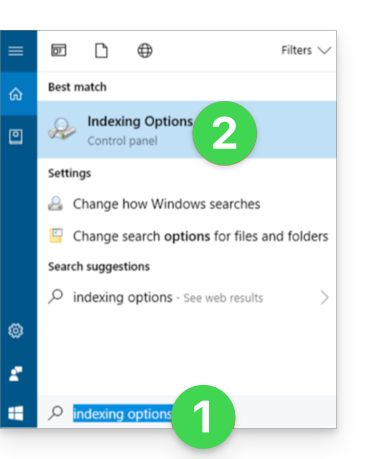
- Clique no botão Avançado.
- Desmarque a caixa do tipo
eml: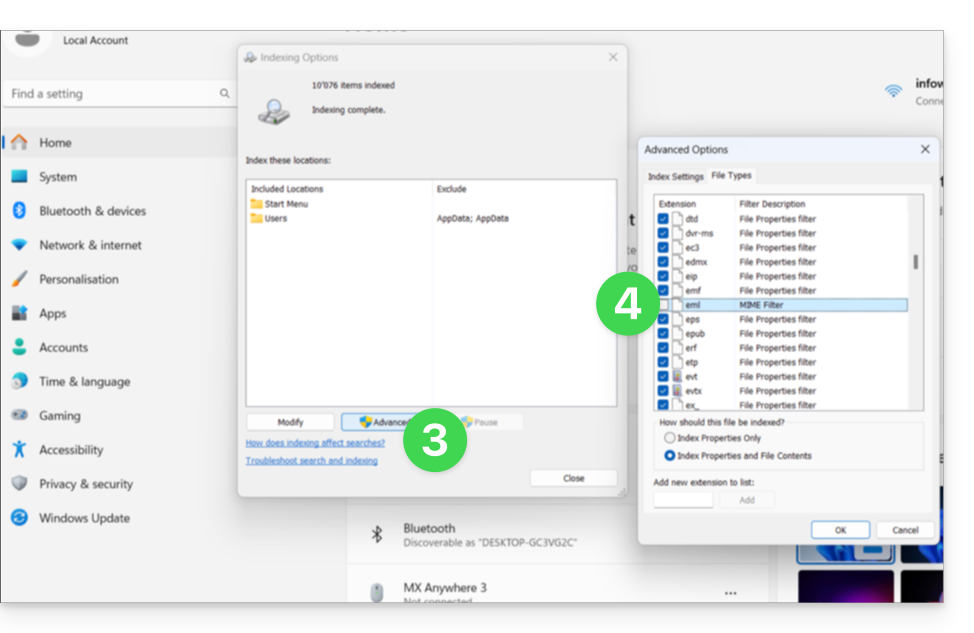
- Confirme e feche as janelas.
Sincronização de arquivos Adobe
As aplicações Adobe, como Illustrator, Photoshop, Lightroom, etc., ou algumas aplicações de arquitetura/3D, podem apresentar problemas ao salvar arquivos (mensagens de erro no software, duplicação de arquivos...) no kDrive. Portanto, é recomendável evitar incluir esses arquivos em uma sincronização.
A Adobe indica explicitamente que não oferece suporte à sincronização na nuvem (Cloud), em discos externos e em discos de rede.
Problemas relacionados aos nomes dos arquivos
Recomendações de estrutura
- Use apenas caracteres alfanuméricos padrão.
- Substitua os espaços no final por sublinhados (_) ou hífens (-).
- Limite o comprimento total do caminho de acesso (nome da pasta + nome do arquivo) a menos de 255 caracteres.
Estes caracteres devem ser evitados, pois são reservados pelo sistema de arquivos Windows ou pelos servidores de armazenamento em nuvem:
- < (menor que)
- > (maior que)
- : (dois pontos)
- " (aspas)
- / (barra)
- \ (barra invertida)
- | (barra vertical)
- ? (ponto de interrogação)
- * (asterisco)
A posição do espaço é frequentemente mais crítica do que o próprio caractere para a sincronização:
- Espaço no final do nome: um arquivo chamado "
projeto .pdf" causa erros de sincronização significativos no Windows. - Espaço no início do nome: pode tornar o arquivo invisível ou difícil de indexar.
- Ponto no final do nome: as pastas que terminam com um ponto (ex: "
Arquivos.") são rejeitadas pelo Windows. - Espaços Unicode (não separáveis): caracteres invisíveis gerados frequentemente no macOS que aparecem como espaços, mas são tecnicamente caracteres especiais não suportados pelo Windows.
Nomes de arquivos reservados pelo sistema
Os seguintes termos não devem ser usados como nomes de arquivos, pois são reservados para as comunicações internas do Windows:
- CON, PRN, AUX, NUL
- COM1, COM2, COM3, COM4, COM5, COM6, COM7, COM8, COM9
- LPT1, LPT2, LPT3, LPT4, LPT5, LPT6, LPT7, LPT8, LPT9
Consulte também este outro guia.
Link para esta FAQ: https://faq.infomaniak.com/2153
Esta seção de perguntas frequentes foi útil?