Base de conhecimento
1000 perguntas frequentes, 500 tutoriais e vídeos explicativos. Aqui, você encontra apenas soluções!
Este guia explica como remover os nomes de domínio adicionais de um Serviço de Email existente (tudo o que vem após o símbolo "@" do seu endereço de email), desvinculando os seus nomes de domínio associados.
Introdução
- Uma vez removido, o nome de domínio fica novamente disponível para encomendar um novo Serviço de Email ou para ser associado a outro Serviço de Email existente.
- É importante notar também que pode renomear o seu produto no painel de controlo Infomaniak, mas alterar o nome de um Serviço de Email não tem qualquer impacto nos seus endereços; é necessário atuar no nome de domínio.
Remover o domínio associado
Pré-requisitos
- Ter dissociado o nome de domínio sinônimo do nome de domínio principal, caso houvesse uma associação anterior.
- Ter definido o nome de domínio a ser desvinculado como um domínio secundário (em vez de domínio principal) — essa inversão pode ser feita seguindo este outro guia no capítulo intitulado "a" a partir do ponto 3.
Para desvincular um nome de domínio do seu Serviço de Email:
- Clique aqui para acessar o gerenciamento do seu produto no Manager Infomaniak (precisa de ajuda?).
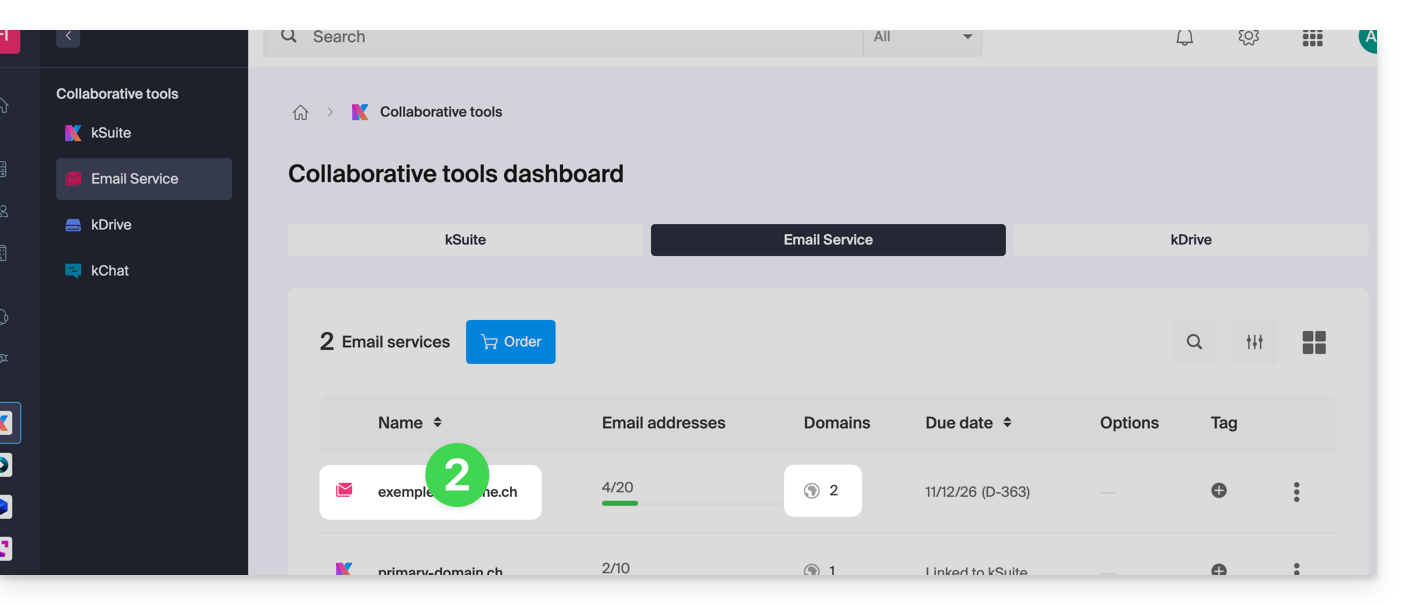
- Clique diretamente no nome atribuído ao produto em questão:
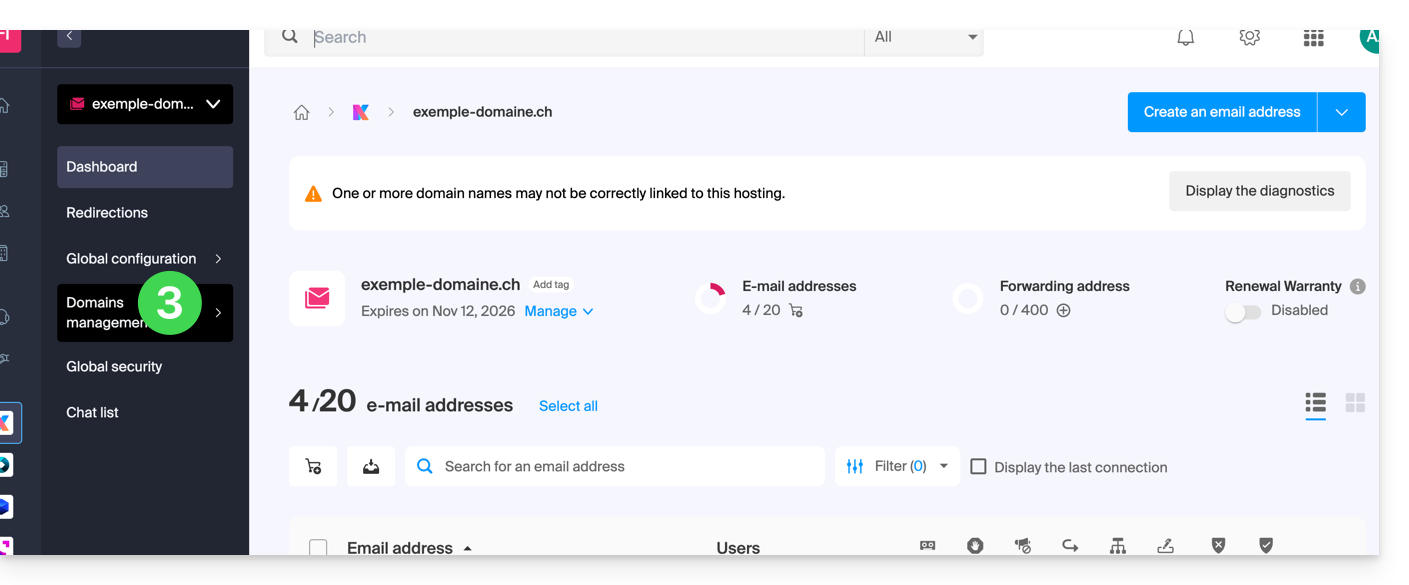
- Clique em Gerenciamento de domínios no menu lateral esquerdo:
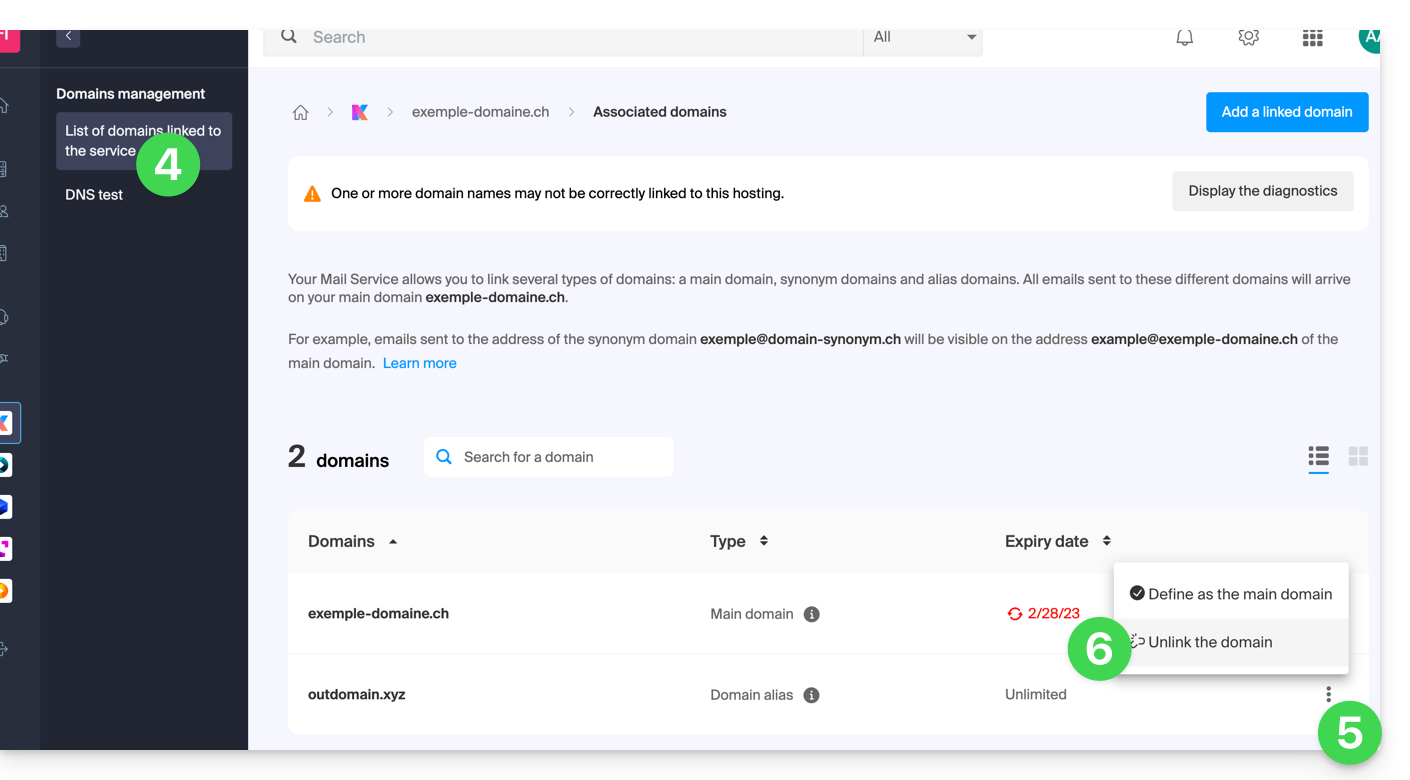
- Clique em Lista de Domínios associados ao serviço no menu lateral esquerdo.
- Clique no ícone ⋮ à direita do nome de domínio que deseja desvincular.
- Clique em Desvincular o domínio (consulte os pré-requisitos se esta opção não estiver disponível):
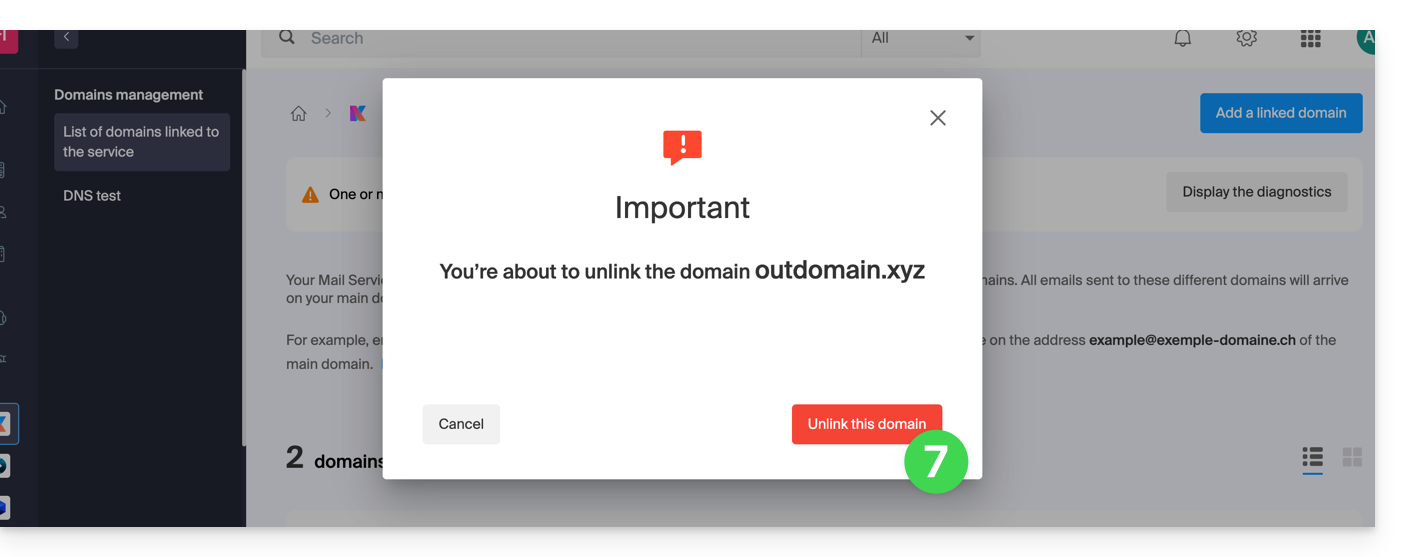
- Confirme a desvinculação:
Link para esta FAQ: https://faq.infomaniak.com/1996
Esta seção de perguntas frequentes foi útil?
Este guia explica como adicionar um domínio sinônimo a um nome de domínio.
Introdução
- Um domínio sinônimo é um nome de domínio que pode servir como nome secundário para outro domínio.
- Quando um domínio sinônimo é adicionado, ele herda automaticamente o conteúdo da zona DNS do domínio principal (incluindo os registros
MX,A, etc.), bem como seu alojamento Web e Mail. - Em vez disso, você também pode adicionar um (domínio) alias a um site ou adicionar um (domínio) alias a um Serviço Mail.
Adicionar um domínio sinônimo a um domínio
Pré-requisitos
- O nome de domínio do futuro sinônimo ou a gestão da sua zona DNS…
- … deve estar registado na Infomaniak,
- … deve estar configurado com os DNS Infomaniak,
- … não deve estar ainda associado a nenhum produto.
- O nome de domínio no qual será colocado o sinônimo…
- … não deve estar associado ao produto Newsletter Infomaniak.
Para acessar seus nomes de domínio:
- Clique aqui para acessar a gestão do seu domínio no Manager Infomaniak (precisa de ajuda?).
- Clique diretamente no nome atribuído ao domínio principal em questão:
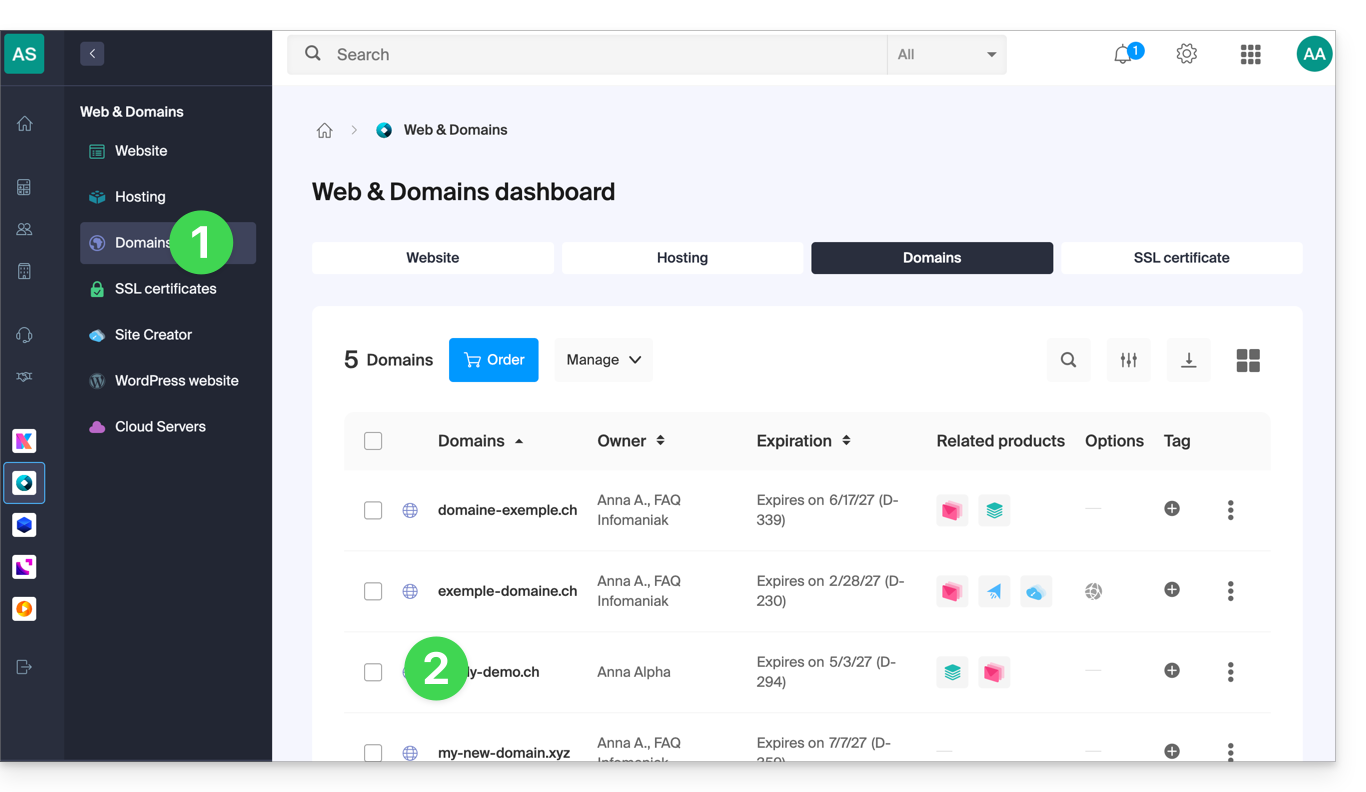
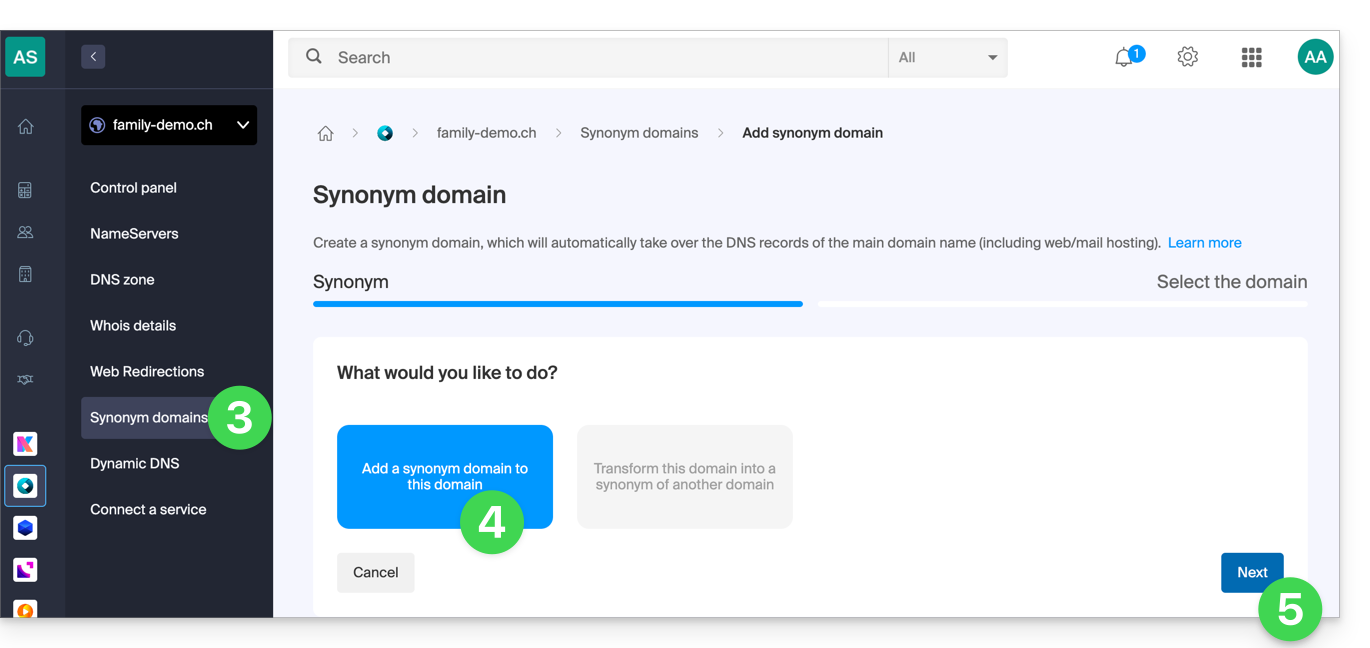
- Clique em Domínios sinónimos no menu lateral esquerdo.
- Escolha adicionar um sinónimo.
- Clique em Seguinte:
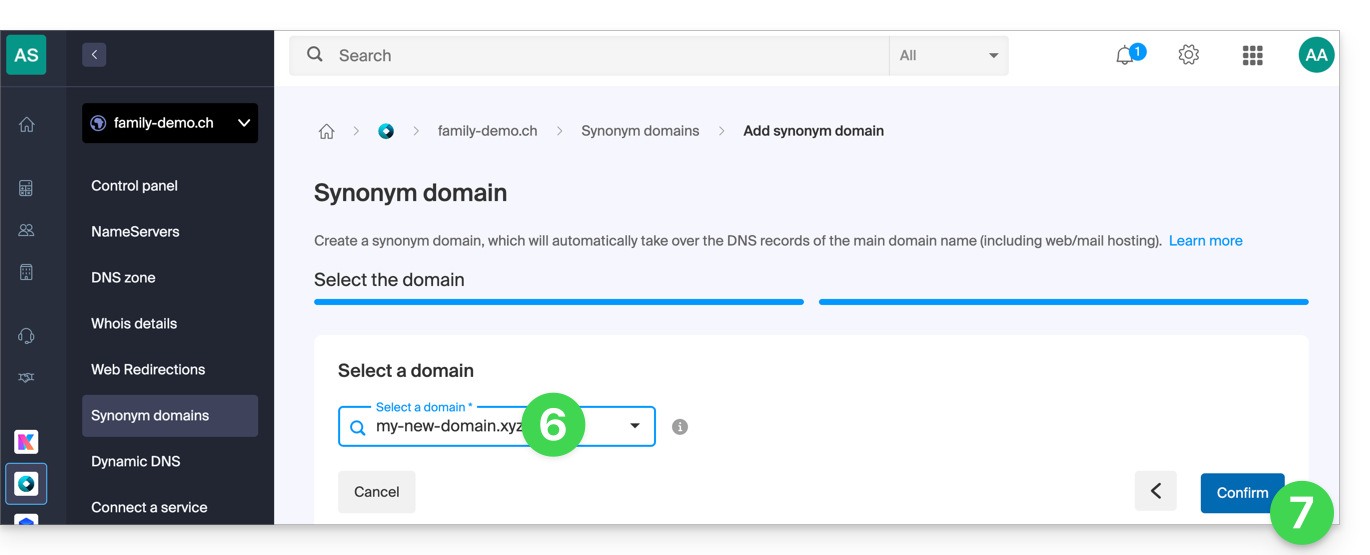
- Escolha um domínio existente nesta Organização ou registe um novo domínio antecipadamente.
- Clique no botão para Confirmar:
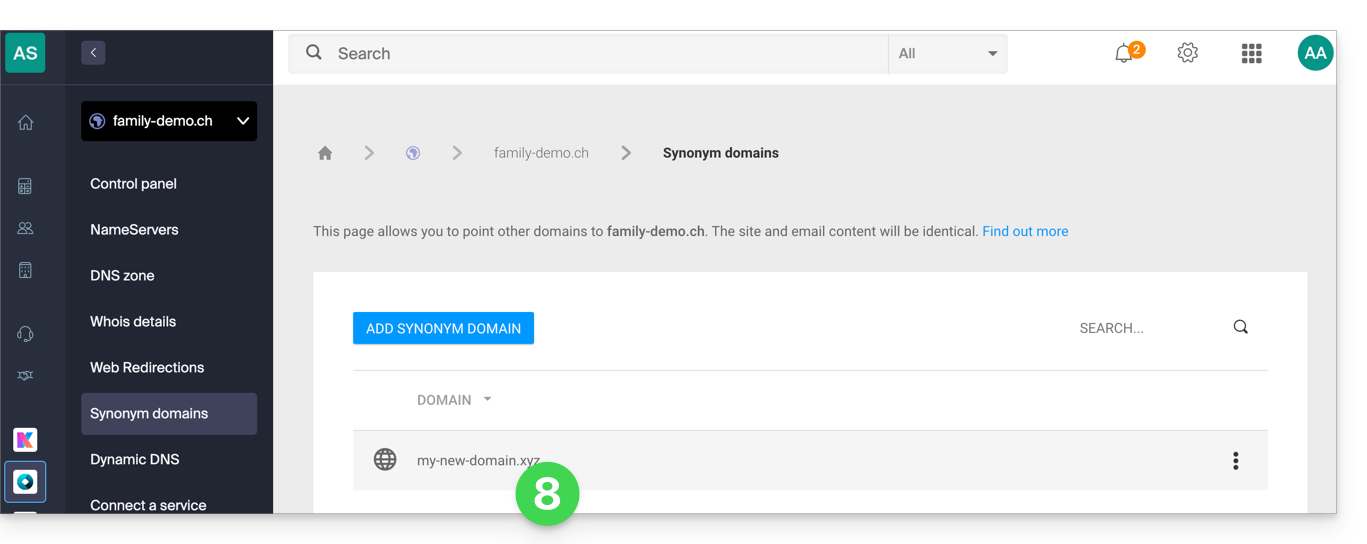
- Pronto:
Consulte este outro guia se precisar de informações sobre como desassociar um nome de domínio sinónimo.
Link para esta FAQ: https://faq.infomaniak.com/1999
Esta seção de perguntas frequentes foi útil?
Este guia explica como, após adquirir um nome de domínio na Infomaniak, obter gratuitamente um Serviço de Email + uma hospedagem Web.
Introdução
- Para cada nome de domínio registado ou transferido para a Infomaniak, pode beneficiar gratuitamente de:
- um endereço de email que lhe dá acesso, nomeadamente, à aplicação Mail Infomaniak
- e um espaço web de 10 MB para uma página básica.
- Também é possível ter um Serviço de Email gratuito ao mesmo tempo que possui uma oferta Web paga, ou vice-versa.
- Em vez de um serviço de e-mail do tipo Starter, também existe a kSuite.
Ativar a oferta Starter Mail + Web
Pré-requisitos
- Ter um nome de domínio na Infomaniak (uma zona DNS não é suficiente).
- Dependendo do tipo desejado (Mail ou Web), certifique-se de que não haja um produto correspondente já associado ao nome de domínioe isso em qualquer Organização Infomaniak existente.
Para encomendar um Serviço de Email Starter e Hospedagem Web Starter incluídos com cada domínio:
- Clique aqui para acessar o gerenciamento do seu produto no Manager Infomaniak (precisa de ajuda?).
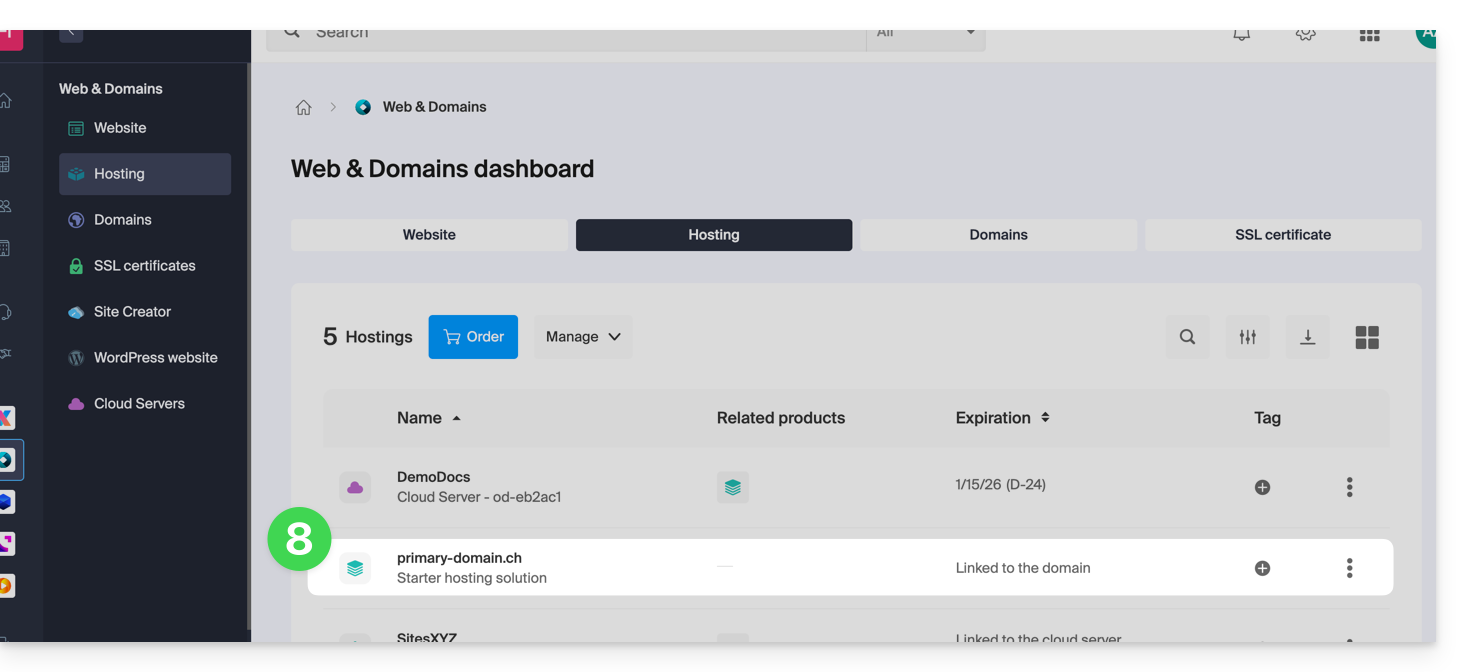
- Clique diretamente no nome atribuído ao produto em questão:
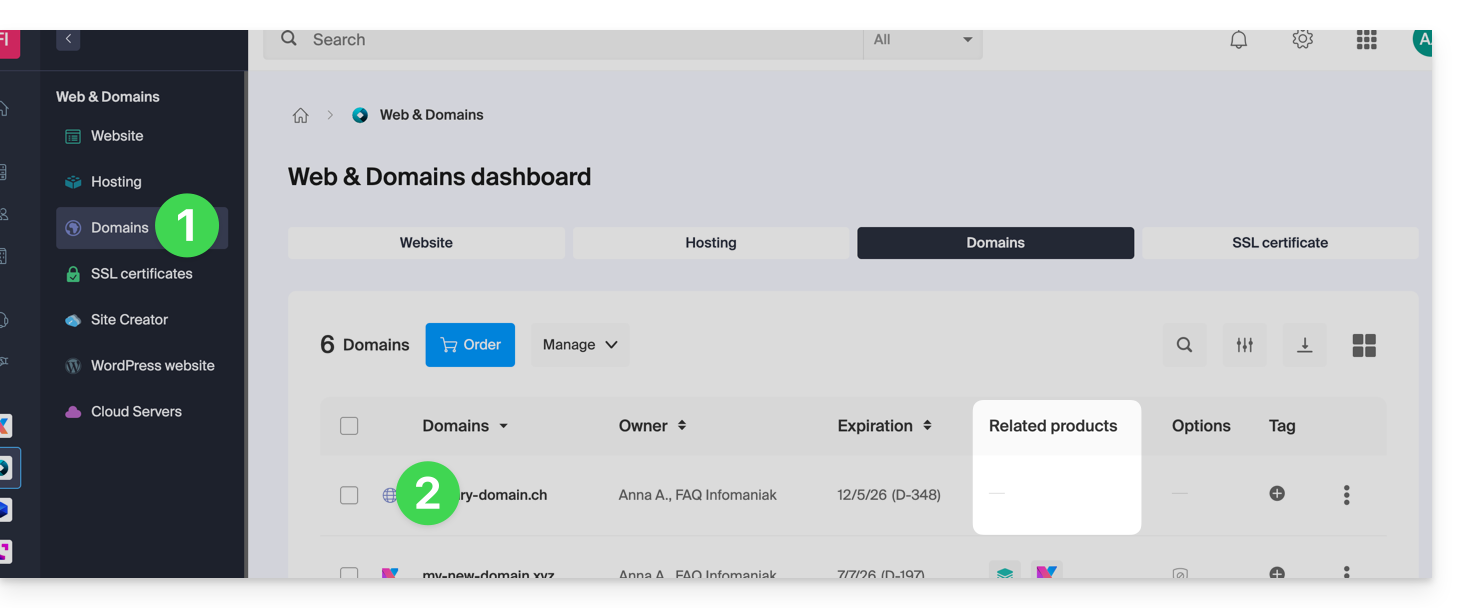
- É necessário que nenhum produto esteja vinculado ao domínio no momento (visível na coluna de produtos vinculados).
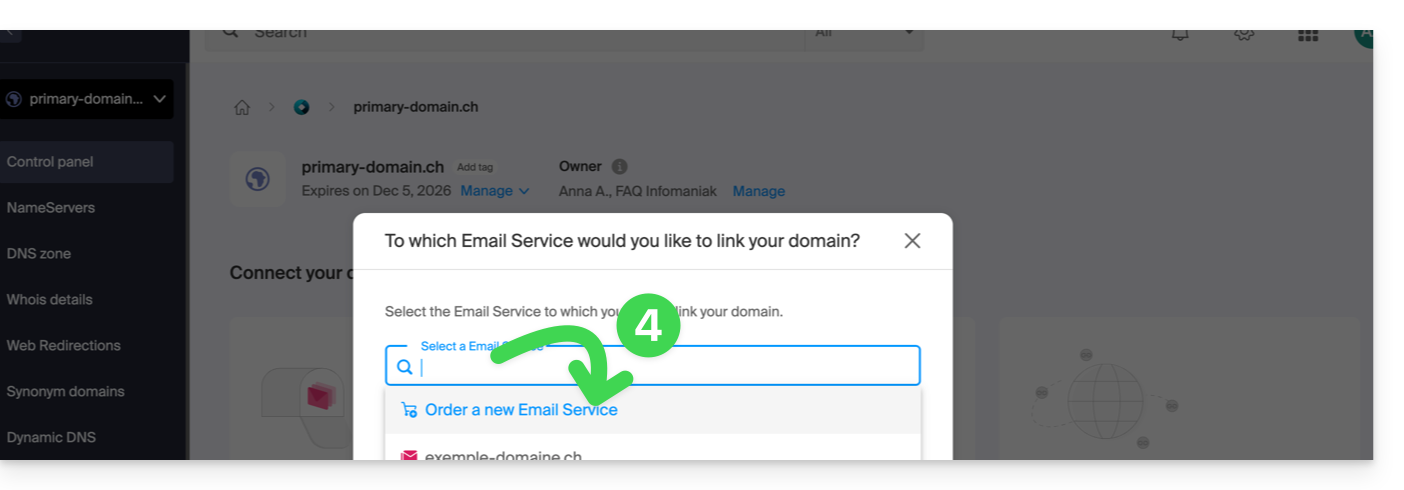
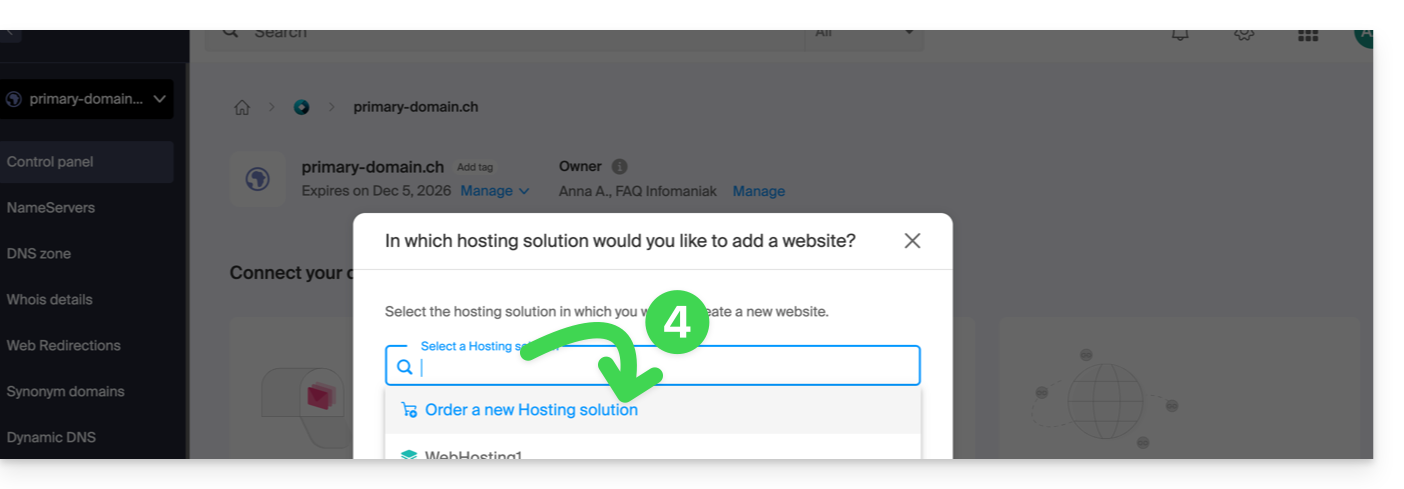
- Clique em um dos atalhos para Conectar um serviço (e-mail ou web):
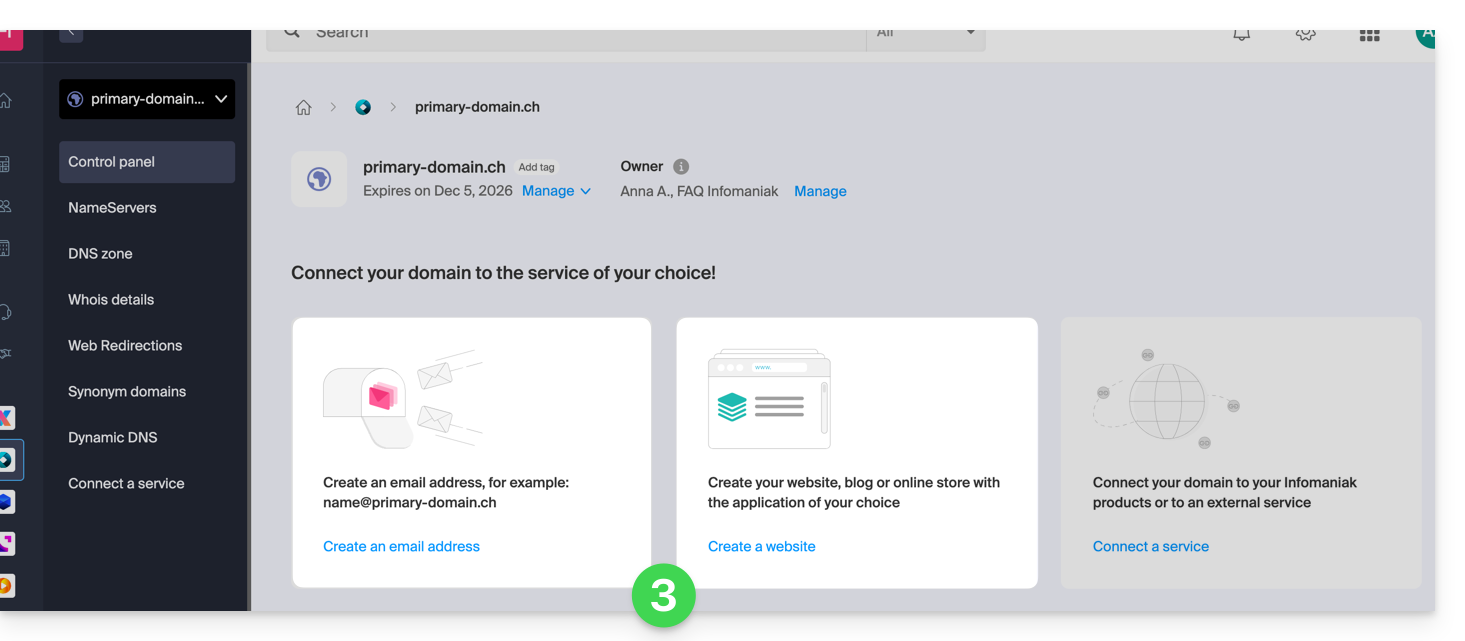
- Em ambos os casos, clique em Encomendar…:
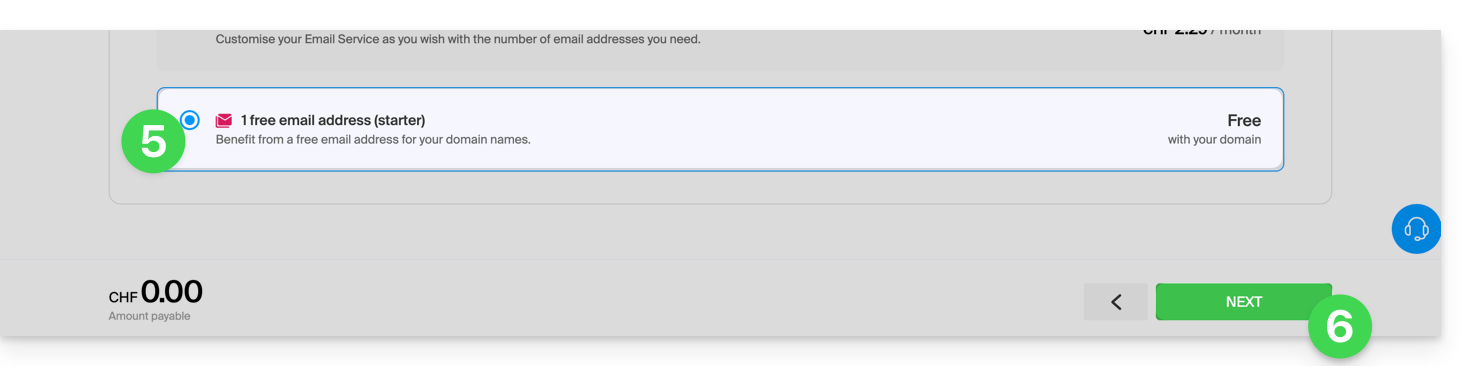
- Você poderá escolher o serviço gratuito correspondente (e-mail ou web) e, na etapa seguinte, será solicitado que escolha o outro (e-mail ou web), se desejar.
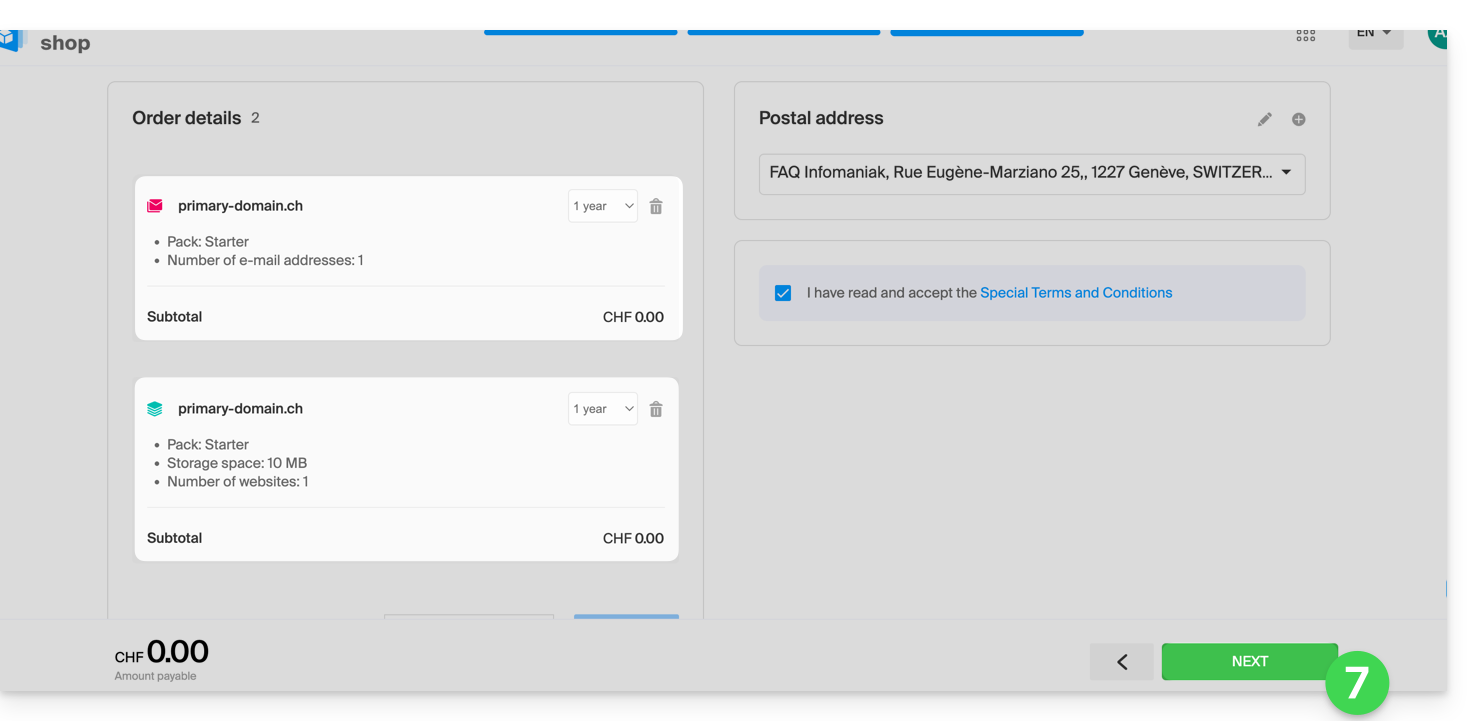
- Clique na parte inferior da página para continuar:
- Conclua o pedido:
- Volte para o seu Painel de Controle Infomaniak para descobrir e usar seus novos produtos:
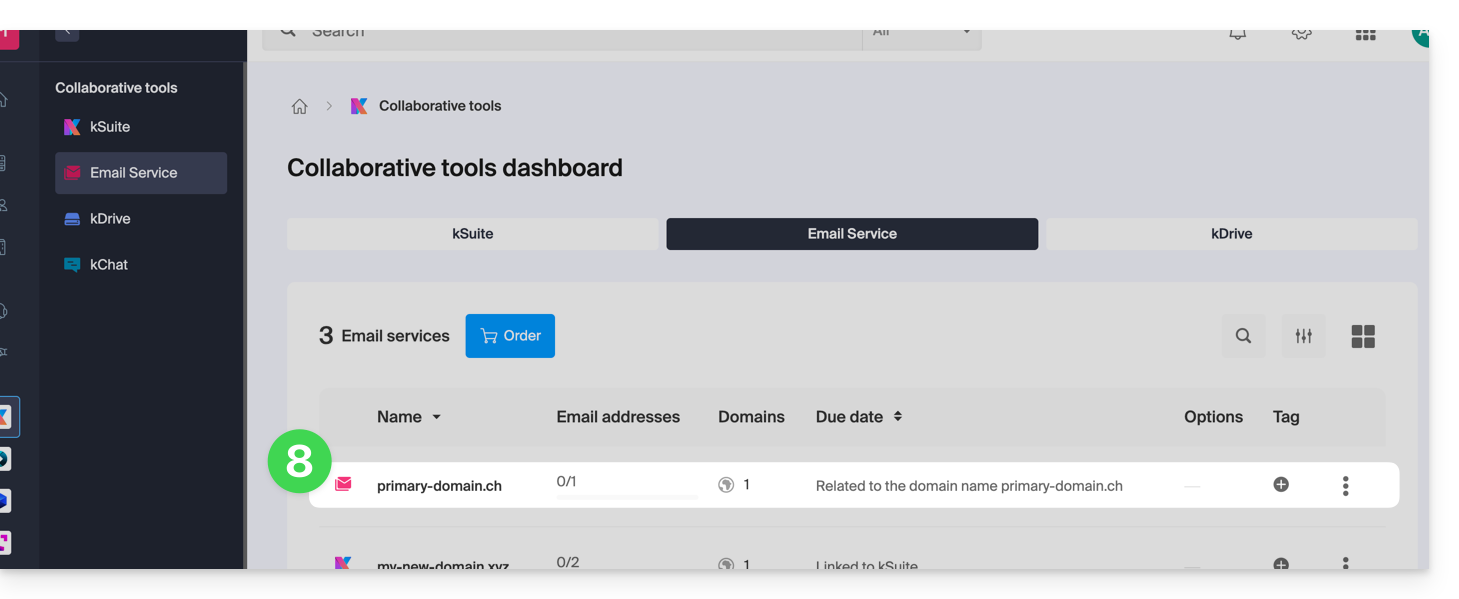
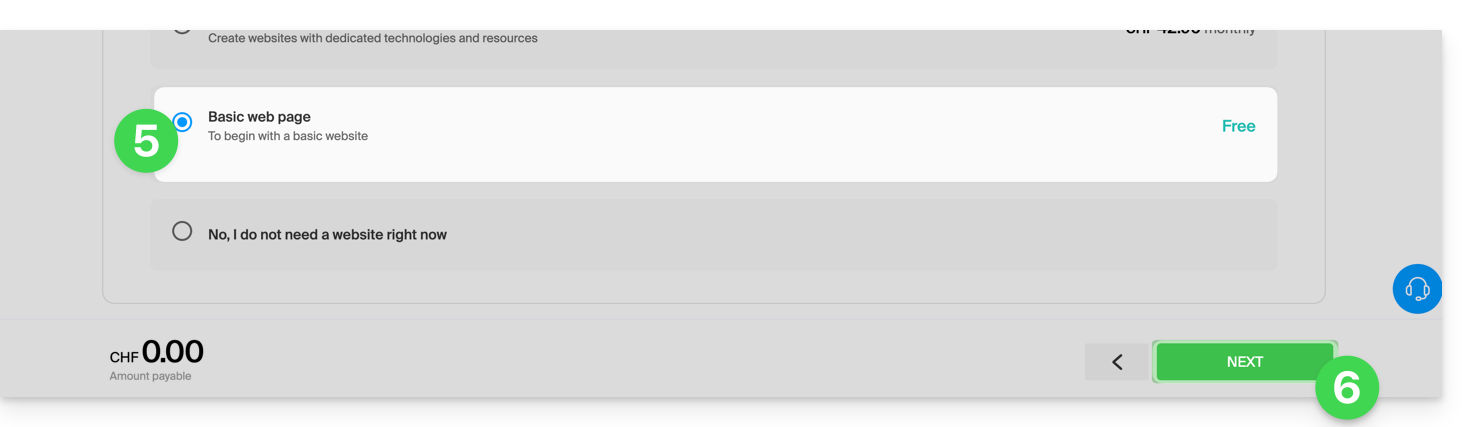
Usar seus produtos Starter
- Crie o endereço de e-mail desejado no seu Serviço de E-mail Starter.
- Para usar o espaço web de 10 MB e criar uma página web básica no seu Serviço de Hospedagem Web Starter, utilize:
- o editor de página
- ou o Web FTP no painel de controle para gerenciar suas páginas HTML
- ou qualquer software/cliente FTP com o protocolo FTP clássico
Como atualizar um plano Starter
- Modificar um plano Mail (clique aqui)
- Modificar uma oferta de Web (clique aqui).
Em caso de problema com uma hospedagem Starter
Um serviço de hospedagem web do tipo Starter não oferece suporte a IPv6. Portanto, preste atenção aos registros AAAA na zona DNS do domínio em questão, pois eles podem impedir a ativação do SSL; consulte também este outro guia.
Link para esta FAQ: https://faq.infomaniak.com/2002
Esta seção de perguntas frequentes foi útil?
Obrigado por confiar a Infomaniak na hospedagem dos seus e-mails.
Este guia permite que você utilize rapidamente as funções essenciais do seu novo Serviço de E-mail. Em caso de problemas, acesse a base de conhecimento antes de entrar em contato com o suporte da Infomaniak.
Se o seu nome de domínio não for gerenciado pela Infomaniak ou se o seu Serviço de Email não for gerenciado na mesma conta de usuário do seu nome de domínio, consulte este outro guiapara vincular o nome de domínio ao seu Serviço de Email.
Criar endereços de e-mail
- Familiarize-se com a interface
- Criar endereços de e-mail
- Criar endereços de e-mail em massa
- Criar endereços de e-mail que servem apenas como redirecionamento
- Copiar o conteúdo de e-mails do Gmail, OVH, etc., para o Infomaniak
Utilizar os seus endereços de e-mail criados
- Gerir palavras-passe e utilizadores
- Sincronize seus e-mails em todos os seus dispositivos
- Oculte os endereços dos destinatários de um e-mail
- Descubra o aplicativo móvel Infomaniak Mail
- Utilize o serviço de e-mail mesmo que o nome de domínio esteja direcionado para o Wix ou similar
- Usar o serviço de e-mail com o seu site
- Usar o Euria (IA Infomaniak) no seu serviço de e-mail
- Verificar o registo de e-mails enviados e recebidos
Consultar informações importantes
- Limites de envio
- Limites de tamanho
- Limite de destinatários
- Os diferentes identificadores
- Solucionar problemas com um software/cliente de e-mail
Personalizar o seu e-mail
- Adicionar uma assinatura
- Adicionar um alias
- Adicionar uma mensagem de ausência automática
- Adicionar um nome de domínio
- Ordenar automaticamente os e-mails recebidos
Proteger o seu endereço de e-mail
Link para esta FAQ: https://faq.infomaniak.com/2009
Esta seção de perguntas frequentes foi útil?
Este guia detalha o envio de e-mails autenticados a partir de um site / CMShospedado pela Infomaniak.
Introdução
- Configurar o envio de e-mails do seu site através de um servidor SMTP autenticado permite melhorar a fiabilidade e a segurança dos envios, em comparação com a função PHP
mail()utilizada sem autenticação:- maior fiabilidade na entrega dos e-mails,
- segurança reforçada,
- detecção mais precisa dos erros de envio,
- melhor compatibilidade com os serviços de mensagens,
- e melhor rastreabilidade dos envios.
Exemplos de configuração SMTP
Pré-requisitos
- Ter um serviço de e-mail.
- Você pode usar o Serviço de E-mail oferecido pela Infomaniak ou qualquer outro serviço de e-mail de sua preferência.
- Criar uma senha para o dispositivo (❓: my kSuite | Serviço de e-mail/kSuite).
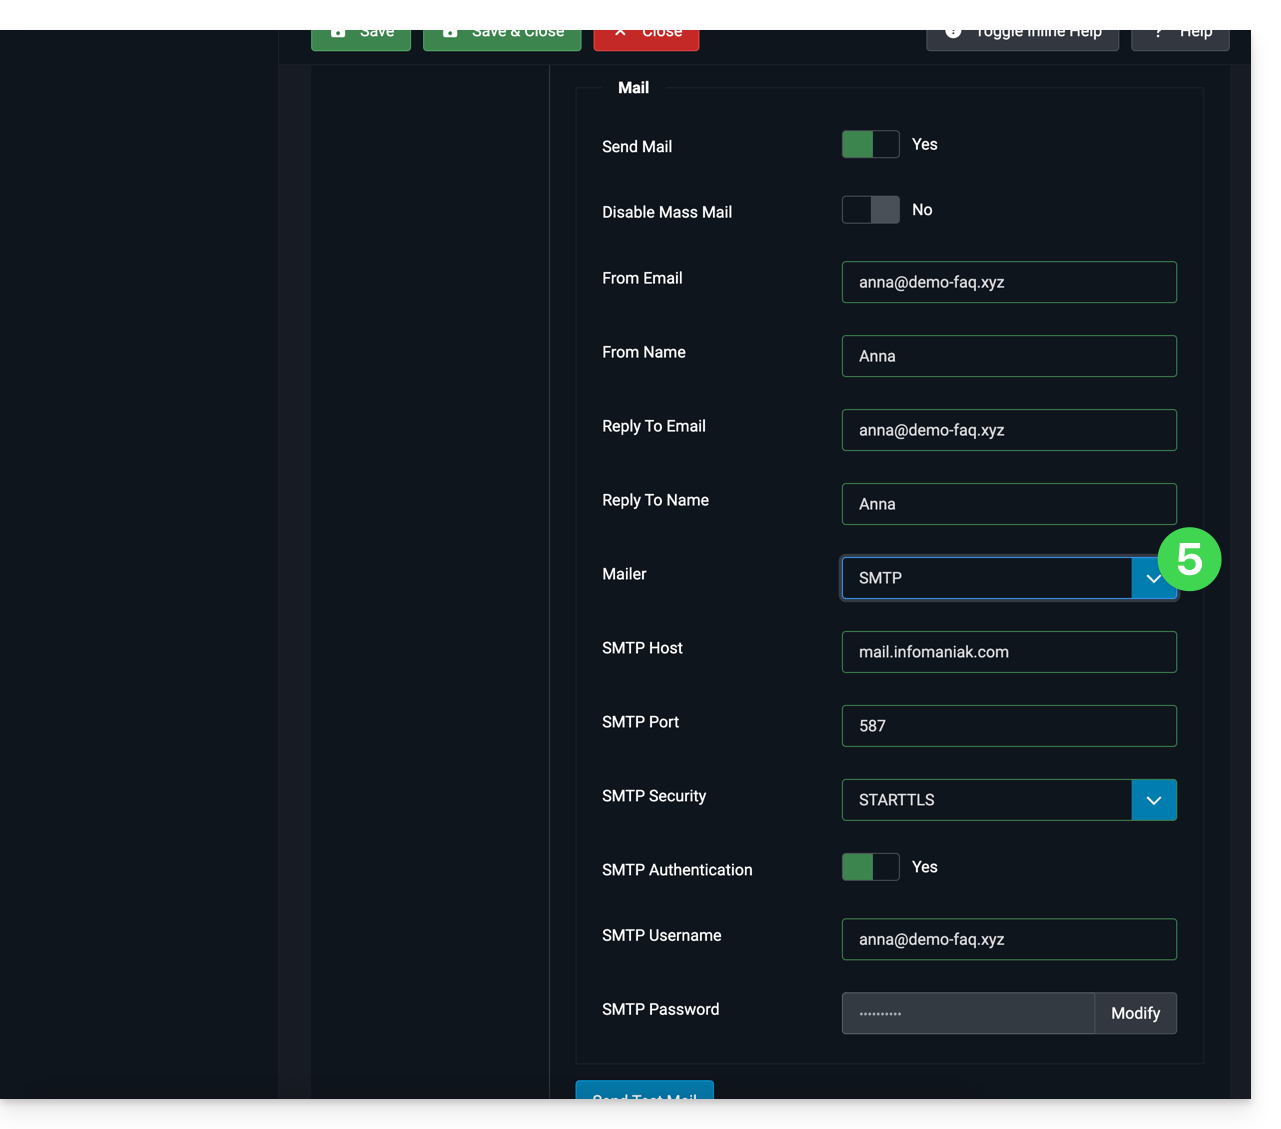
- Utilizar as configurações recomendadas:
- Servidor SMTP de saída =
mail.infomaniak.com - Porta SMTP e protocolo de criptografia e comando/método para ativar este protocolo:
587+ STARTTLS - Nome de usuário/username = o endereço de e-mail completo (precisa de ajuda?)
- Senha/password = a senha gerada para o endereço de e-mail que você deseja usar
- Autenticação obrigatória para o envio de e-mails:
- Ela é ativada nas configurações SMTP do seu CMS.
- Marque "usar as mesmas configurações do servidor de entrada" ou, dependendo do CMS, insira um nome de usuário (= endereço de e-mail completo) e a senha gerada.
- Servidor SMTP de saída =
WordPress
Para permitir que o seu site envie e-mails, utilize um endereço de e-mail do seu domínio (por exemplo, e-mail@dominio-site.xyz) e configure as definições SMTP (consulte os pré-requisitos):
- Aceda ao painel de administração do WordPress.
- Instale uma extensão SMTP (WP Mail SMTP funciona).
- Configure a extensão, por exemplo:
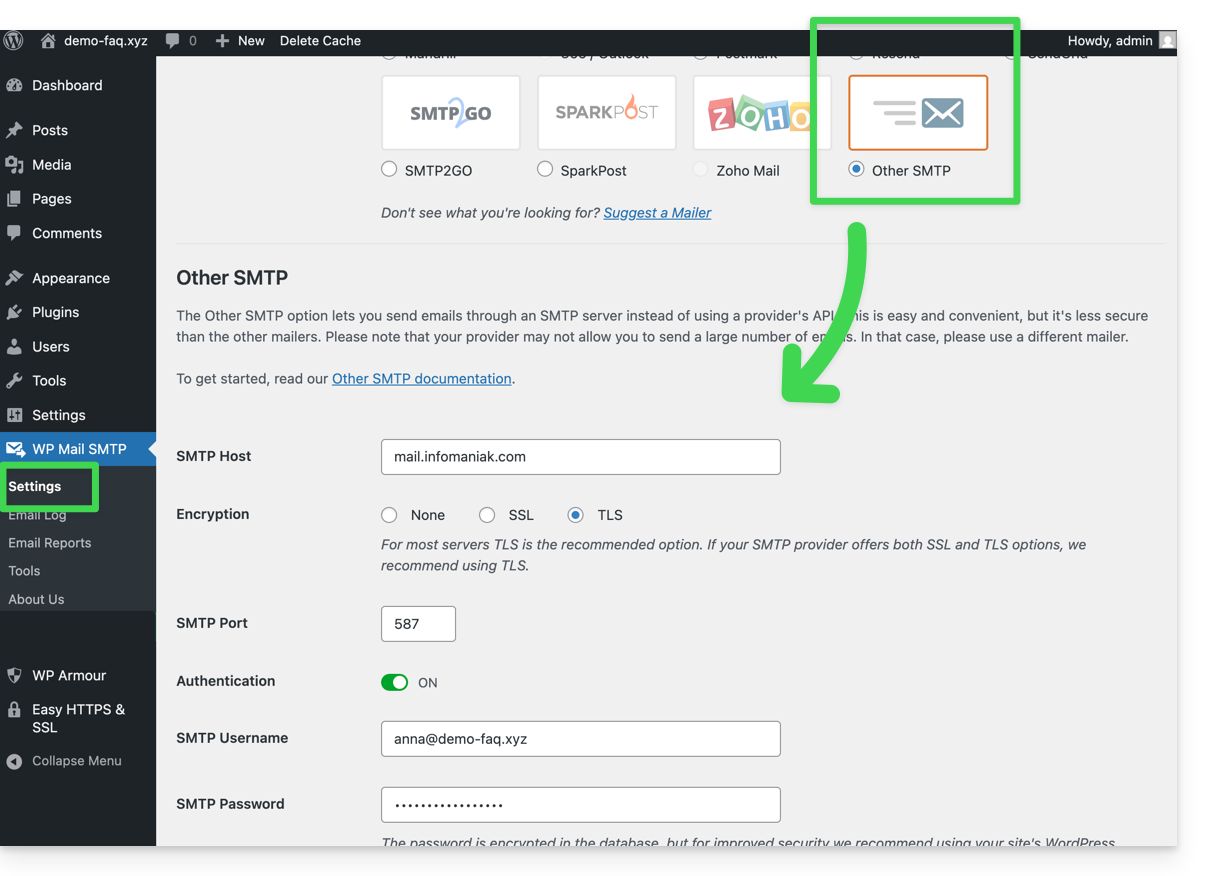
A partir desse momento, um e-mail enviado a partir de um formulário de contato presente no site (formulário padrão Divi, por exemplo) será enviado por meio de um método SMTP.
Para confirmar isso, basta verificar os cabeçalhos de uma mensagem recebida por este meio, nomeadamente a linha x-mailer, que pode indicar, por exemplo, WPMailSMTP/Mailer/smtp em vez de PHPMailer.
Observação: o x-mailer pode ser qualquer indicação, não necessariamente representativa do método de envio real!
Prestashop
Para permitir que o seu site envie e-mails, utilize um endereço de e-mail do seu domínio (por exemplo, e-mail@dominio-site.xyz) e preencha as configurações SMTP (consulte os pré-requisitos):
- Faça login no painel de administração do Prestashop.
- Acesse Configurações avançadas e, em seguida, E-mail.
- Configure o envio via SMTP:
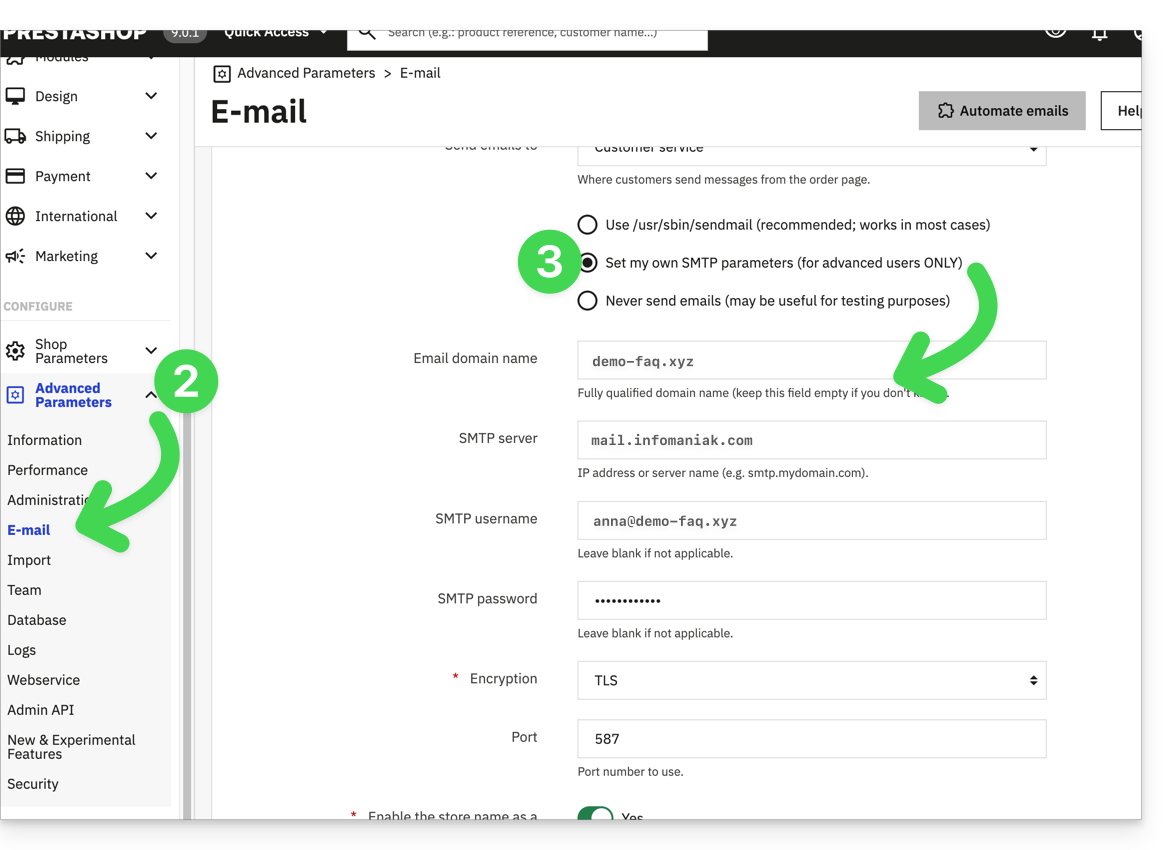
Em seguida, verifique (para evitar um erro como Could not instantiate mail function ou sender mismatch) se o endereço que você configurou nestas configurações avançadas corresponde ao endereço que o Prestashop utiliza para os envios. Para isso:
- Faça login no painel de administração do Prestashop.
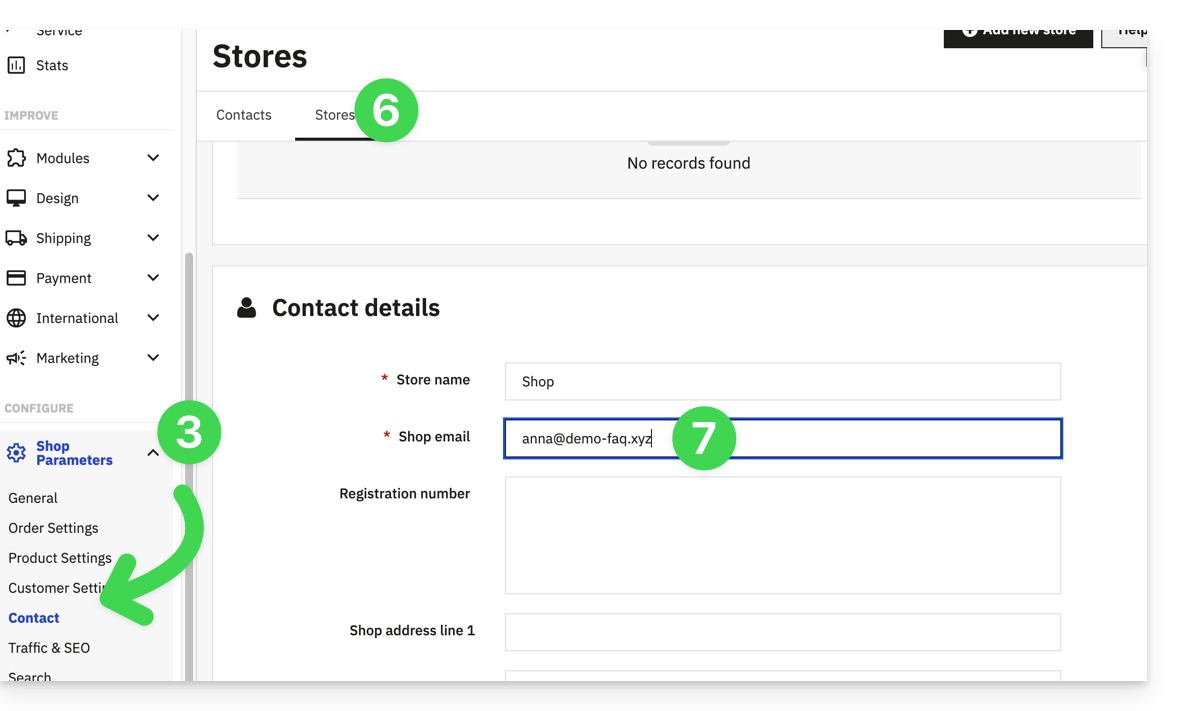
- Acesse Configurações da loja.
- Clique em Contato no menu lateral esquerdo.
- Na aba Contatos, verifique se o endereço de e-mail mencionado é o mesmo que o configurado anteriormente.
- Edite os endereços de e-mail, se necessário:
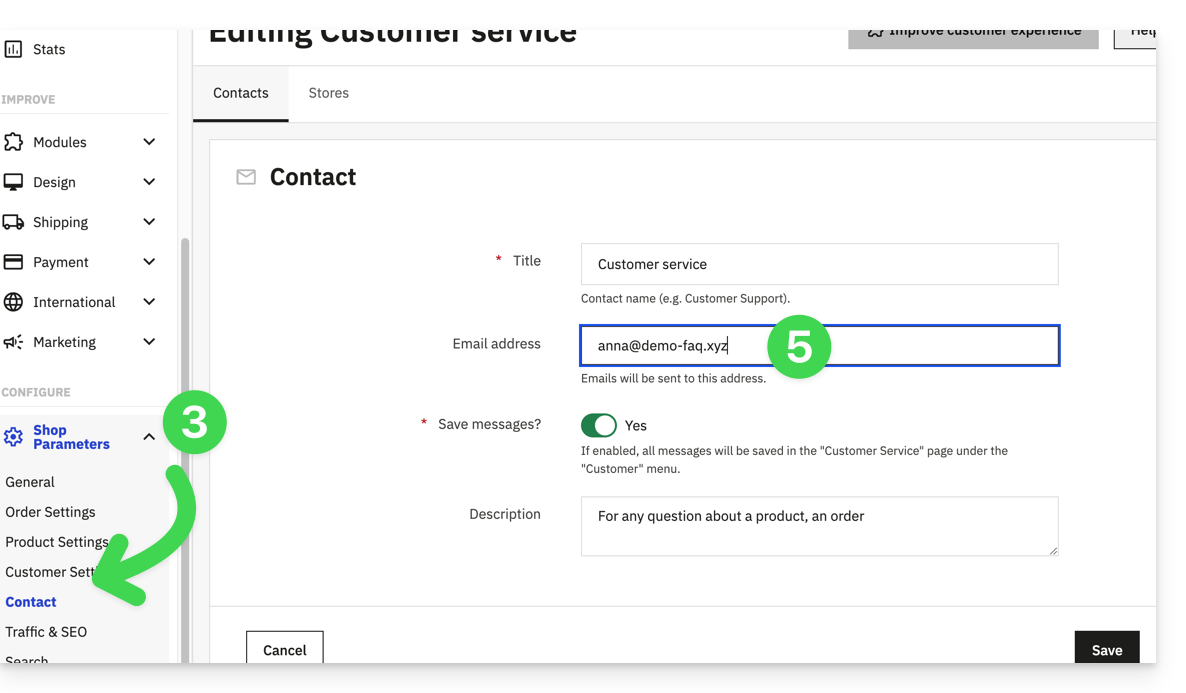
- Clique na aba Lojas.
- Verifique (e corrija, se necessário) se o endereço de e-mail indicado é o mesmo que o configurado anteriormente:
Joomla
Para permitir que o seu site envie e-mails, utilize um endereço de e-mail do seu domínio (por exemplo, e-mail@dominio-site.xyz) e configure os parâmetros SMTP (consulte os pré-requisitos):
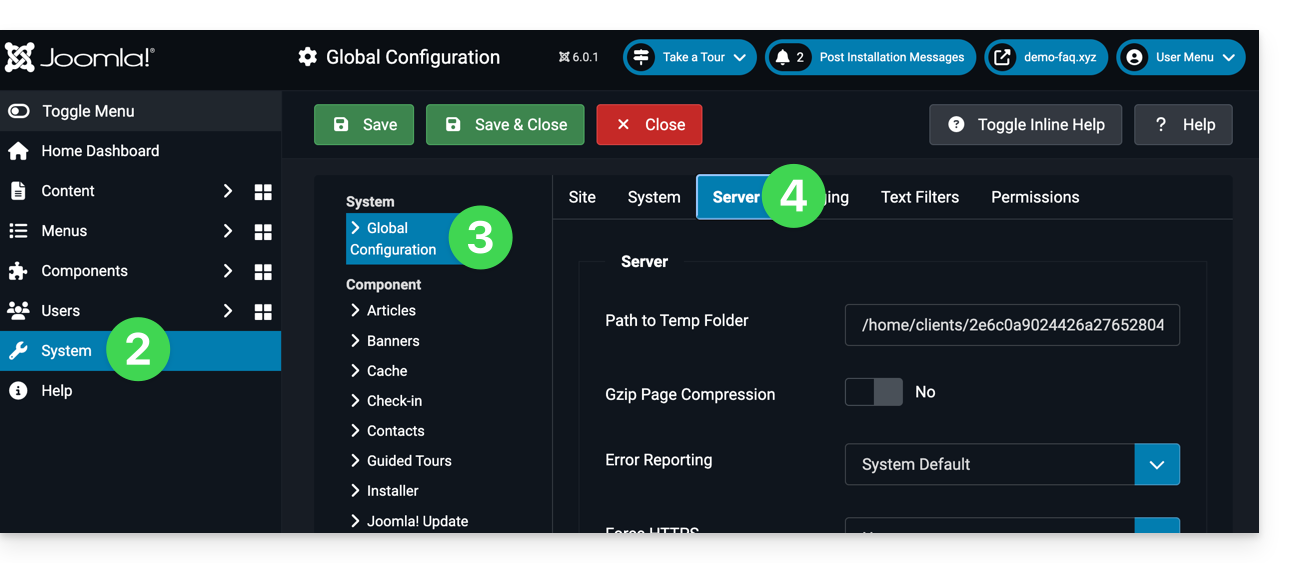
- Inicie sessão no painel de administração do Joomla.
- Clique em Sistema no menu lateral esquerdo.
- Clique em Configuração geral.
- Clique na aba Servidor:
- Configure o envio através do método SMTP:
Link para esta FAQ: https://faq.infomaniak.com/2023
Esta seção de perguntas frequentes foi útil?
Este guia explica como transferir para a Infomaniak dados (Web, Mail, Domínio e até Cloud) atualmente hospedados em outro localVocê continua sendo o proprietário dos seus dados, sem perda ou interrupção!
Introdução
- Ao centralizar seus nomes de domínio, sites e endereços de e-mail na Infomaniak, você simplifica o gerenciamento de suas faturas e serviços.
- Além disso, a vinculação de seus domínios será feita automaticamente com seu site e endereço de e-mail.
- Dessa forma, você não precisará configurar manualmente os DNS de seus domínios em outro registrador.
Guias específicos
Clique no link correspondente ao seu provedor de hospedagem atual:
- Swisscom: guia completo para migrar os dados Web, Mail e nome de domínio
Guias para qualquer outro provedor de hospedagem
Para não interromper o seu site e os seus e-mails e não perder conteúdo ao importar os seus dados existentes, migre os seus serviços na ordem indicada:
Importar os dados Web (qualquer site PHP, HTML, etc.)
- Para WordPress, consulte especificamente este outro guia…
- Para WordPress, consulte especificamente este outro guia…
Copiar os dados do Mail (endereços e conteúdo das caixas de correio, etc.) para o kSuite ou um simples Serviço de Mail
Transferir o nome de domínio (gestão do domínio, zona DNS, etc.)
Você também pode transferir outros tipos de dados para os servidores Infomaniak:
- Conteúdo do Dropbox, Google Drive, etc.: consulte este outro guia
- Dados em NAS Synology ou QNAP: consulte este outro guia
Link para esta FAQ: https://faq.infomaniak.com/2057
Esta seção de perguntas frequentes foi útil?
Este guia detalha as medidas de segurança implementadas nas ofertas de e-mail da Infomaniak, com o objetivo de detetar utilizações abusivas e anormais de um endereço de e-mail.
Introdução
- Número de e-mails que podem ser enviados por dia:
- kSuite Free = 200
- kSuite Standard = 500
- kSuite Business = 500
- kSuite Enterprise = 500
- my kSuite = 200
- my kSuite+ = 500
- Serviço de e-mail Starter = 200
- Serviço de e-mail Premium = 500
- Hospedagem Web = limite de acordo com a oferta de e-mail utilizada; caso contrário, 50 e-mails não autenticados no máximo via PHP Mail()
- Para enviar e-mails para um grande número de destinatários, a ferramenta Newsletter é a mais adequada.
- Consulte também estes outros guias:
Como são calculadas as cotas de envio?
As cotas são calculadas em uma janela móvel de 24 horas e não são redefinidas à meia-noite. Cada e-mail enviado é contabilizado durante 24 horas a partir do momento do envio e, em seguida, é automaticamente liberado da cota.
Por exemplo, se o limite for atingido às 11h, os e-mails enviados a partir desse horário só poderão ser enviados à medida que as mensagens enviadas anteriormente atingirem 24 horas de antiguidade. Os direitos de envio são, portanto, liberados gradualmente no dia seguinte, e não de uma só vez à meia-noite.
Por que existem limites de envio?
Os limites de envio são aplicados para proteger os serviços de e-mail contra usos abusivos ou anormais, incluindo o envio em massa de mensagens a partir de uma conta comprometida.
Elas também permitem limitar os riscos relacionados ao spam e preservar a reputação dos servidores Infomaniak, a fim de manter uma boa taxa de entrega de e-mails.
Esses limites se aplicam a todos os e-mails enviados a partir de um endereço, independentemente do software ou aplicativo utilizado. As mensagens enviadas para vários destinatários são contabilizadas individualmente: 1 mensagem enviada para 2, 42 ou 99 pessoas em CC/CCI conta como, respectivamente, 2, 42 e 99 mensagens.
Mediante pedido escrito, devidamente justificado e autenticado, é possível modificar estas regras de segurança para um endereço de e-mail pago específico.
Link para esta FAQ: https://faq.infomaniak.com/2065
Esta seção de perguntas frequentes foi útil?
Este guia explica como remover um endereço de e-mail no Serviço de E-mail Infomaniak.
Remover um ou mais endereços de e-mail
Pré-requisitos
- Ter um Serviço de Email na sua Central de Gestão Infomaniak.
- Ser Administrador ou Responsável legal na Organização.
A remoção de um endereço de e-mail ou o cancelamento de uma conta de utilizador é efetuada através do painel de controlo do Serviço de E-mail. Esta ação resulta na desvinculação dos serviços relacionados e requer atenção especial quanto à conservação dos dados existentes. Para remover um endereço de e-mail (o seu conteúdo será destruído permanentemente):
- Clique aqui para acessar o gerenciamento do seu Serviço de E-mail no Painel de Controle Infomaniak (precisa de ajuda?).
- Clique diretamente no nome atribuído ao Serviço de E-mail em questão.
Depois de acessar a lista de endereços de e-mail: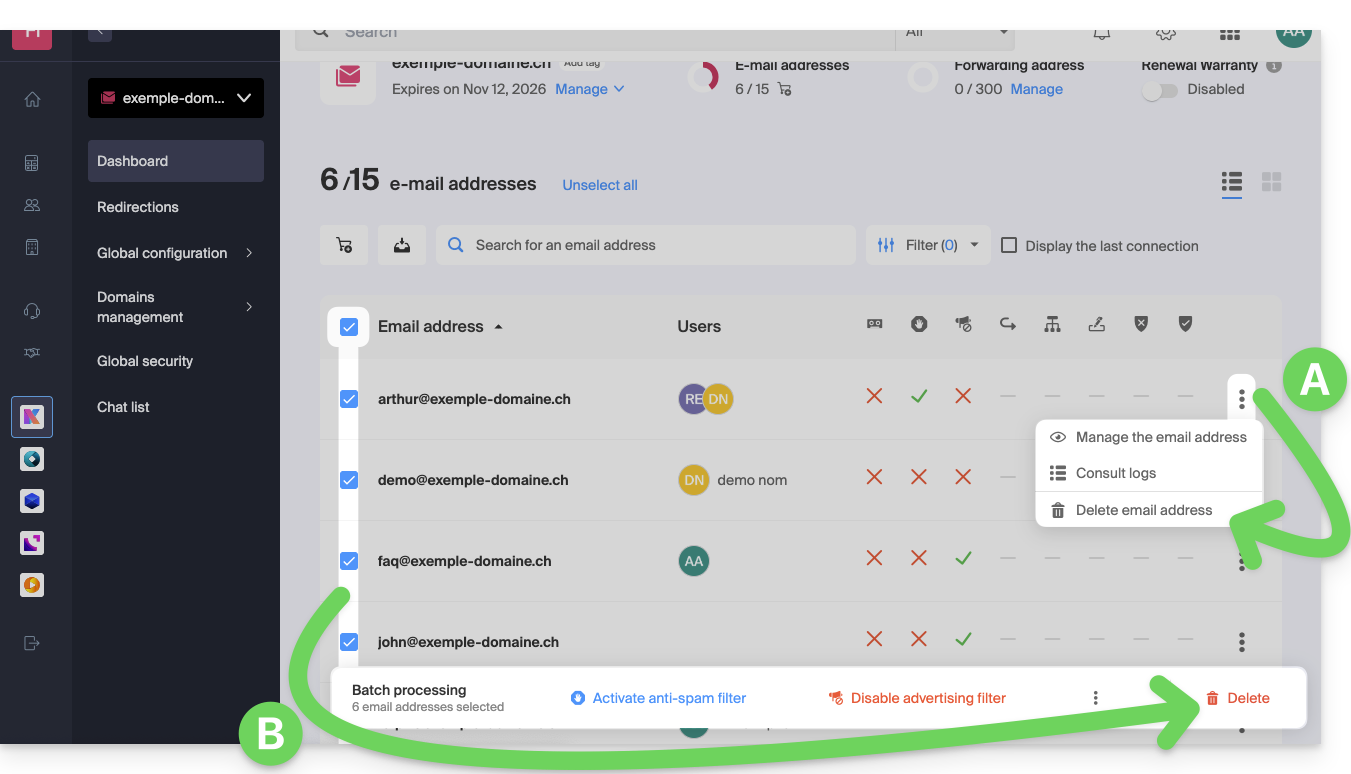
A. Excluir um endereço de cada vez
- Clique no menu de ações ⋮ localizado à direita do item em questão.
- Selecione a exclusão do endereço de e-mail.
B. Excluir vários endereços de uma só vez
- Selecione os endereços a serem excluídos, marcando as caixas correspondentes à esquerda de cada linha.
- Clique em Excluir na parte inferior da tela.
Link para esta FAQ: https://faq.infomaniak.com/2066
Esta seção de perguntas frequentes foi útil?
Este guia explica como transferir para a Infomaniak os endereços de e-mail atualmente hospedados pela Orange (França), com a ajuda de uma ferramenta de importação por IMAP.
Introdução
- A operação não afeta os dados já existentes no endereço de destino, nem os dados do endereço de origem.
- A totalidade da caixa externa será importada.
- Uma vez iniciado o processo de importação, não é mais possível interrompê-lo.
- Os eventuais duplicados são gerenciados: um conteúdo idêntico será copiado apenas uma vez.
- Consulte este outro guia se procura alternativas a este processo via IMAP.
Importar todo o seu histórico de e-mails
1. Pré-requisitos da Orange
- Ativar as funcionalidades POP/IMAP/SMTP, que estão desativadas por padrão (precisa de ajuda?).
2. Pré-requisitos Infomaniak
- Ter um Serviço de Email na sua Central de Gestão Infomaniak.
- Ter à disposição um número de endereços disponíveis ou ajustá-lo caso seja necessário.
- Verificar se a conta de e-mail está devidamente protegida
- Criar um ou vários endereços neste serviço de e-mail.
- Se tiver muitos (10+) endereços de e-mail para criar, consulte este outro guia sobre a criação em massa.
- O endereço de e-mail de destino deve estar associado ao utilizador (= à conta Infomaniak) que está a utilizar.
3. Importar o conteúdo de e-mail da Orange para a Infomaniak
- Clique aqui para aceder à ferramenta de importação (serviço online https://import-email.infomaniak.com).
- Se necessário, inicie sessão na sua conta Infomaniak na organização em questão, pois a importação será feita para um dos endereços de e-mail associados à interface Web Mail da Infomaniak (serviço online ksuite.infomaniak.com/mail) da conta Infomaniak que está a utilizar.
- Clique em "Importar por IMAP".
- Clique em Importação única.
- Preencha o campo à esquerda com o seu endereço de e-mail de origem (do qual o conteúdo será copiado):
username@orange.fr, por exemplo
- Preencha o campo à direita com a senha do mesmo endereço de e-mail de origem (consulte os requisitos).
- Modifique, se necessário, as Configurações avançadas para especificar um endereço de servidor IMAP:
- Insira o nome do servidor IMAP
imap.orange.fr. - Deixe a porta padrão (993) e o SSL ativados.
- Insira o nome do servidor IMAP
- Clique em Confirmar.
- Se necessário, insira um segundo endereço de e-mail para ser importado ao mesmo tempo.
- Escolha o endereço de e-mail para o qual deseja importar os e-mails; o menu suspenso lista os endereços de e-mail atualmente associados à sua interface Web Mail Infomaniak (serviço online ksuite.infomaniak.com/mail) da conta Infomaniak com a qual está conectado.
- Após selecionar o endereço de destino desejado na lista, clique no botão azul Importar e-mails.
- A cópia está a iniciar, pode aguardar e verificar o resultado na página após a conclusão da importação, ou fechar a janela (a importação continua em segundo plano e o acompanhamento está disponível – consulte abaixo).
- Um e-mail de confirmação será enviado automaticamente para todos os endereços de e-mail envolvidos na operação após a conclusão da importação, indicando o número de mensagens copiadas.
- Um rastreamento está disponível nas configurações do endereço de e-mail de destino, apenas no aplicativo web Mail (serviço online ksuite.infomaniak.com/mail).
- O rastreamento permite visualizar o histórico das importações no endereço em questão.
4. Ajustar as configurações das aplicações
Assim que tiver configurado o nome de domínio associado à sua conta de e-mail para funcionar com a Infomaniak, modifique as configurações dos programas/clientes de e-mail que utiliza para que estes se conectem corretamente aos servidores da Infomaniak: siga o assistente de configuração.
Link para esta FAQ: https://faq.infomaniak.com/2090
Esta seção de perguntas frequentes foi útil?
Este guia explica como ter vários nomes de domínio (tudo o que vem após o símbolo "@" do seu endereço de e-mail) para um Serviço de E-mail existente, adicionando domínios relacionados.
Introdução
- Os endereços de e-mail (existentes e futuros) são automaticamente válidos com todos os domínios associados.
- Para alterar e inverter completamente os nomes de domínio de um Serviço de E-mail, consulte este outro guia.
- Para modificar a parte do seu endereço de e-mail que aparece antes do símbolo "arroba"
@, consulte este outro guia. - Note também que pode renomear o seu produto no painel de controlo Infomaniak, mas alterar o nome de um serviço de e-mail não tem qualquer impacto nos seus endereços; é necessário atuar no nome de domínio.
Adicionar um nome de domínio ao Serviço de Email
Pré-requisitos
- Ter o novo nome de domínio (se necessário, crie-o previamente).
- Consultar as instruções deste outro guia e aplicar as indicações correspondentes à sua situação (para garantir que o nome de domínio funcione quando for associado ao seu Serviço de Email).
Depois que o novo nome de domínio estiver pronto para ser usado em conjunto com o antigo, é preciso adicioná-lo ao Serviço de E-mail:
- Clique aqui para acessar o gerenciamento do seu produto no Manager Infomaniak (precisa de ajuda?).
- Clique diretamente no nome atribuído ao produto em questão.
- Clique em Gerenciamento de domínios no menu lateral esquerdo:
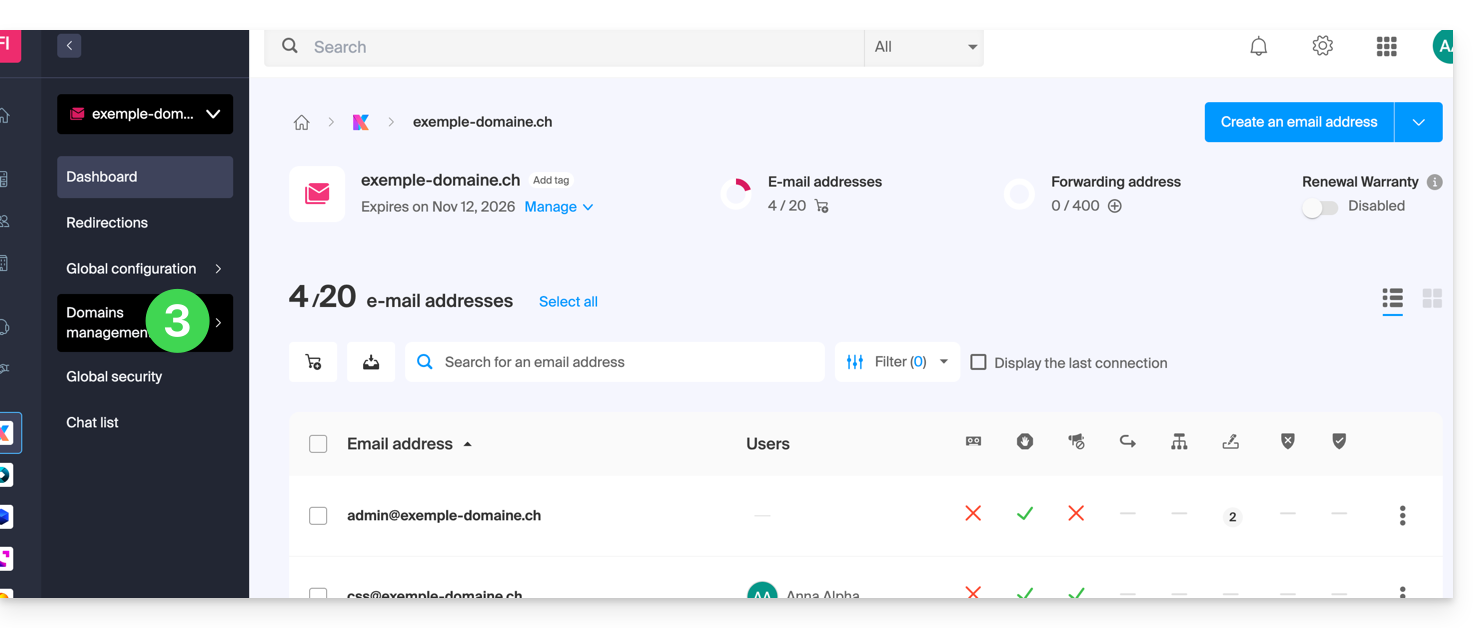
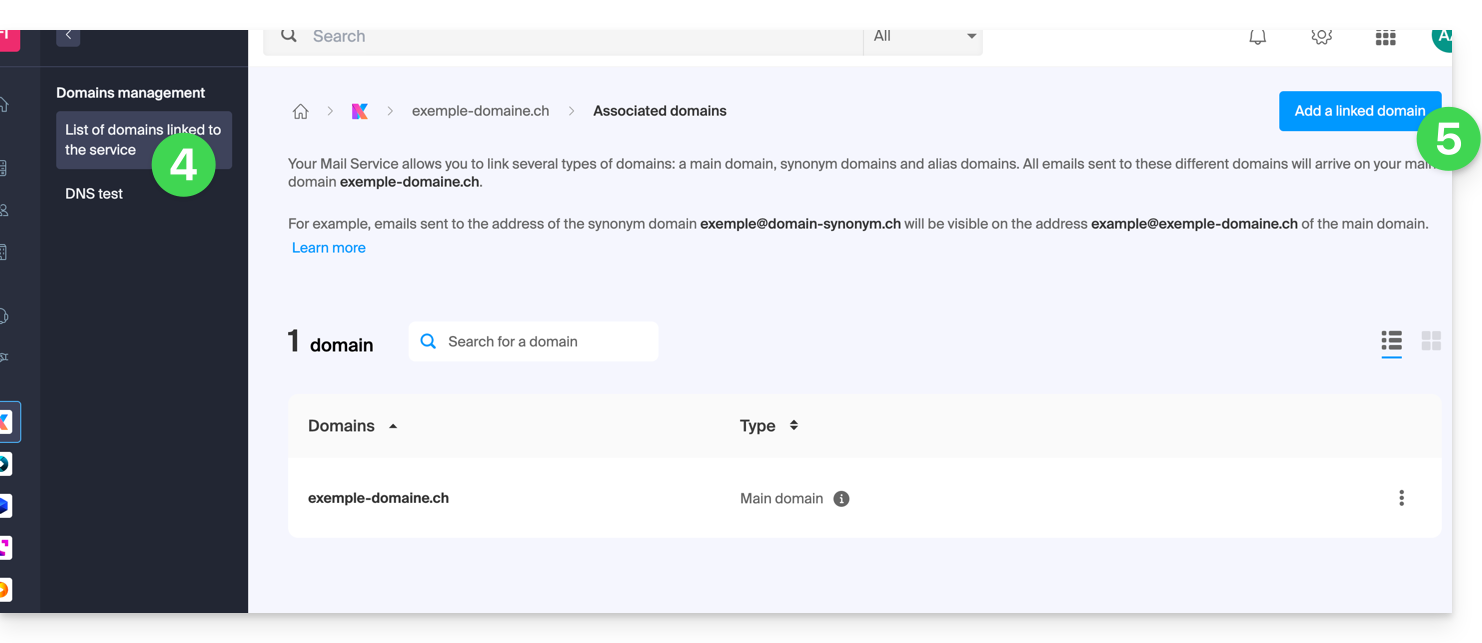
- Clique em Lista de domínios associados ao serviço no menu lateral esquerdo.
- Clique no botão azul Adicionar um domínio associado:
- É possível…
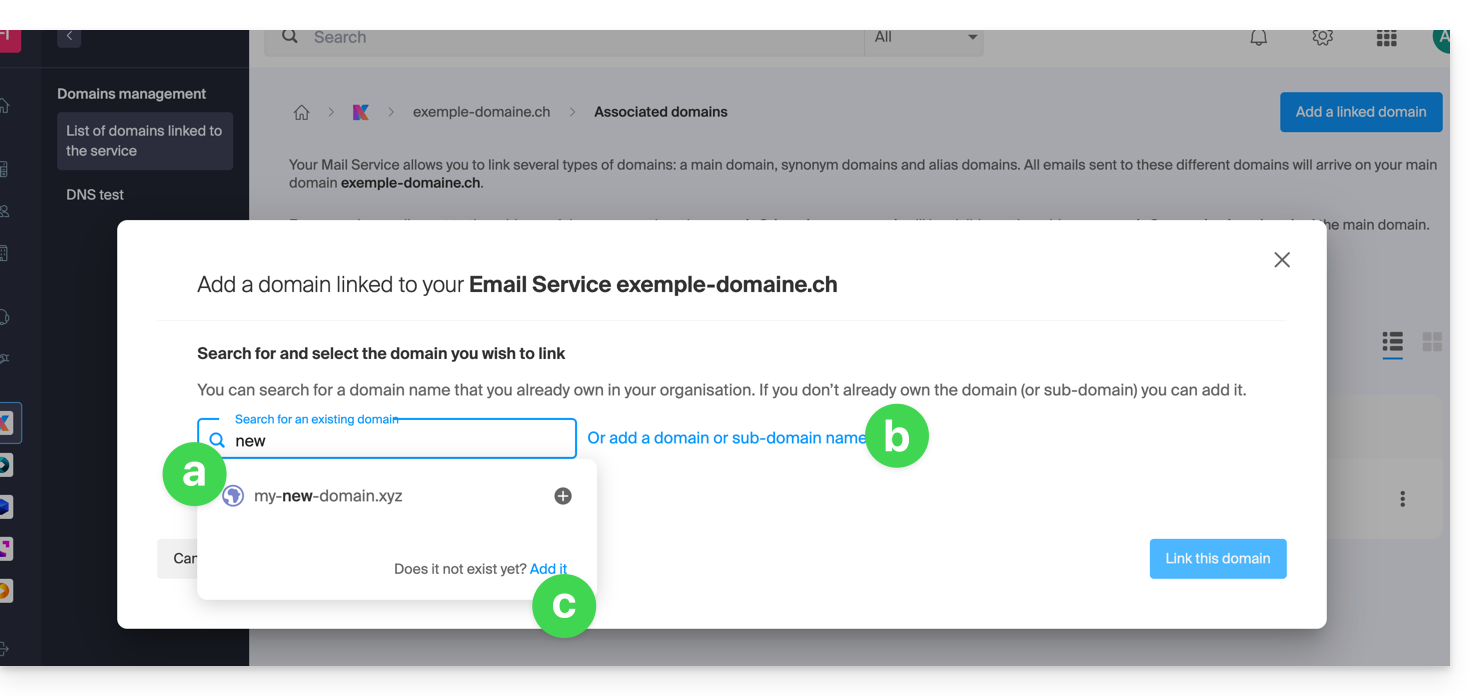
- … Pesquisar um domínio existente na organização à qual você está conectado; isso vinculará e atualizará automaticamente a zona DNS do domínio adicionado.
- … Adicionar um nome de domínio ou subdomínio para indicar manualmente o nome de domínio ou subdomínio a ser usado (ideal se o nome de domínio estiver em outro lugar).
- … Comprar um novo nome de domínio.
a: O domínio existe no nível da Organização
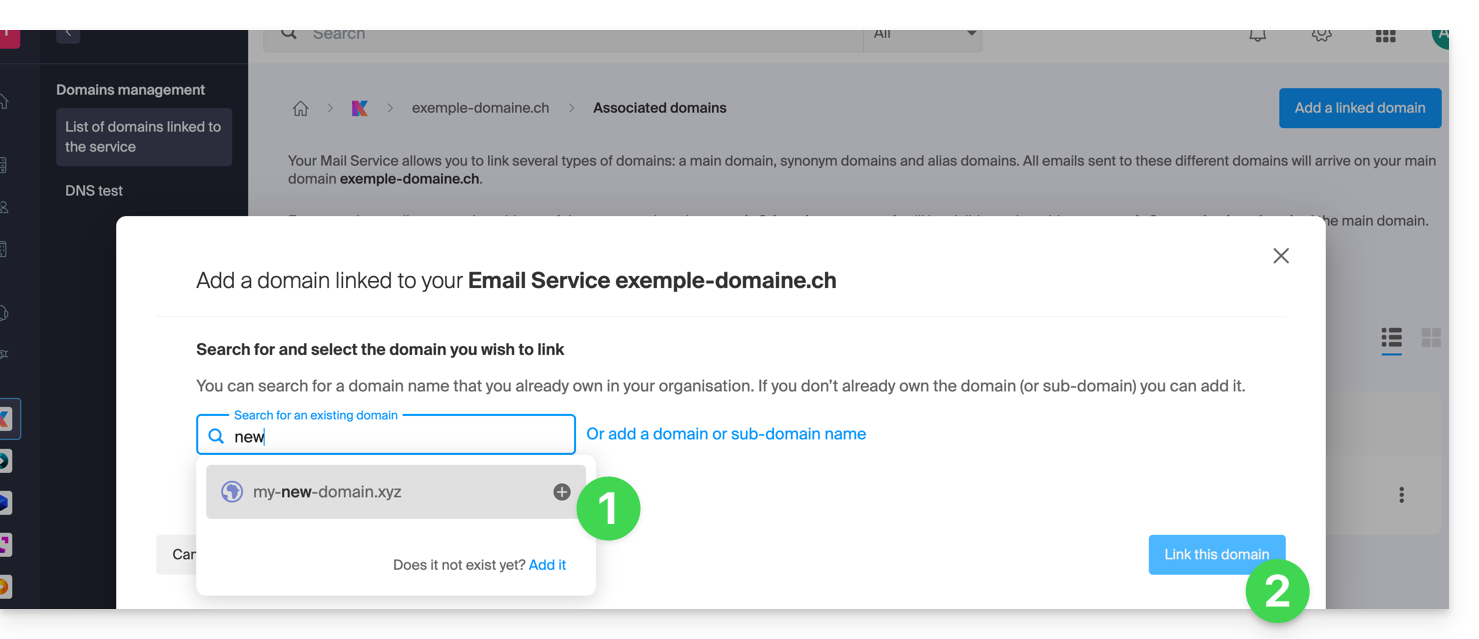
- Clique no nome de domínio sugerido.
- Clique no botão azul Associar este domínio:
Chegou ao fim: o Serviço de Email agora responde a um segundo nome de domínio: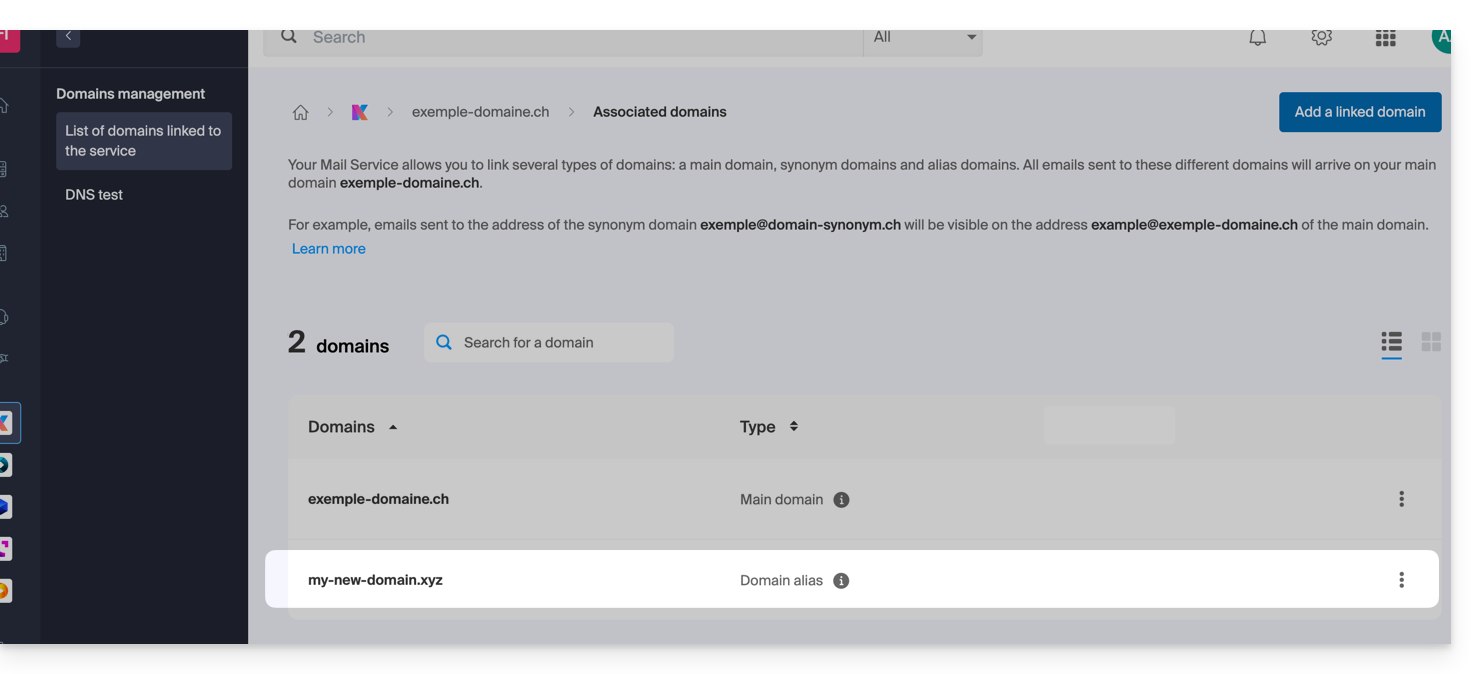
b: O domínio existe, mas está registado noutro local (outra organização, outro registrador…)
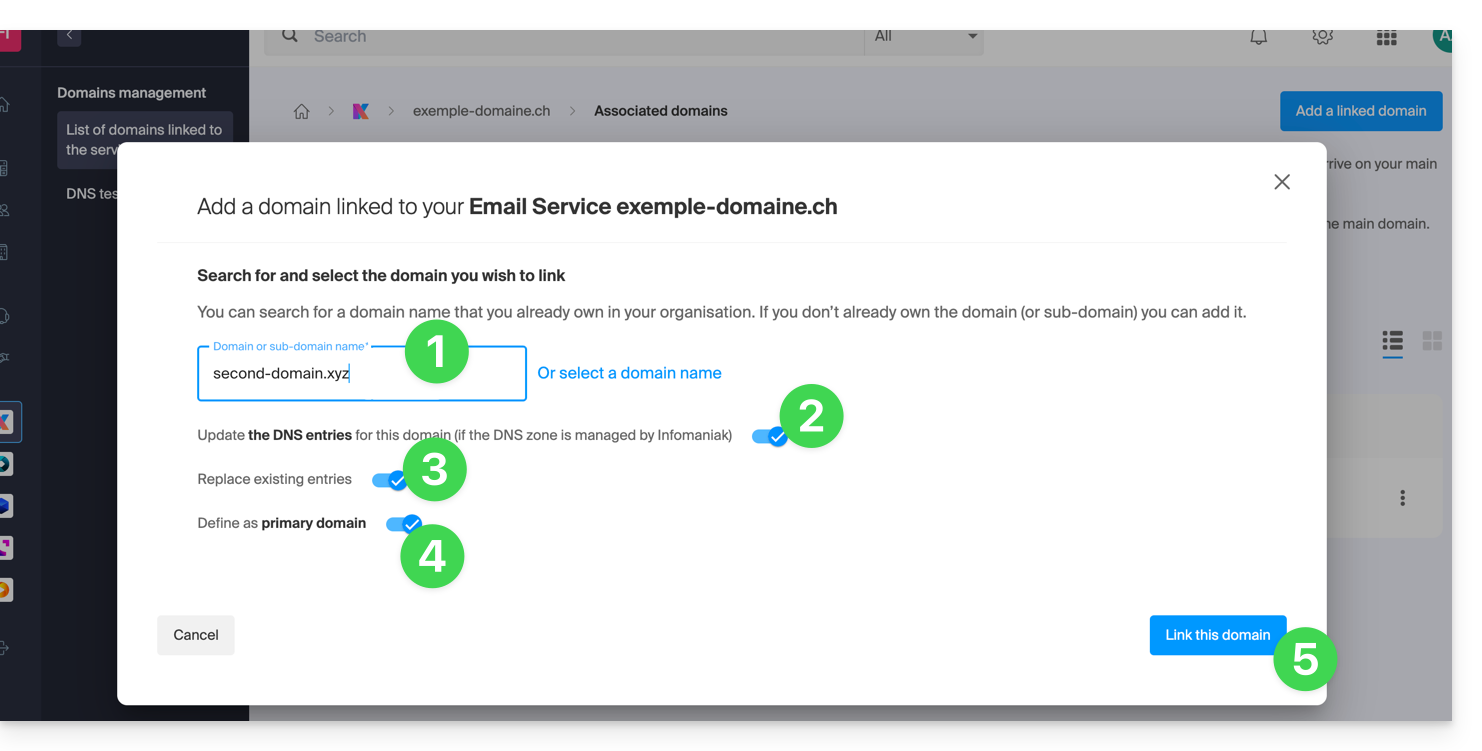
- Insira o nome de domínio a ser adicionado.
- Ative a atualização dos registros DNS (se a situação do nome de domínio permitir, a zona DNS do nome de domínio será atualizada automaticamente).
- Se o ponto 2 acima estiver ativo, ative a substituição das entradas existentes.
- Ative a inversão do nome de domínio apenas se desejar definir este novo nome de domínio como o principal (isto é principalmente uma questão administrativa e não técnica).
- Clique no botão azul Associar este domínio:
Exemplo de utilização
O endereço de e-mail contact@une-super-entreprise-familiale.com é um endereço longo. O domínio sinônimo contact@usef.com é mais curto e fácil de lembrar.
Ao adicionar o domínio "usef.com" ao Serviço de E-mail "une-super-entreprise-familiale.com", você autoriza que todas as mensagens enviadas para contact@usef.com (o domínio associado) para que as mensagens sejam enviadas para o endereço contact@une-super-entreprise-familiale.com.
Link para esta FAQ: https://faq.infomaniak.com/2097
Esta seção de perguntas frequentes foi útil?
Este guia explica o que é um serviço de hospedagem web como o da Infomaniak e detalha seu papel, seu escopo de atuação e os limites do suporte técnico oferecido.
Infomaniak, provedor de hospedagem desde 1996
De acordo com a Wikipédia, um provedor de hospedagem web é uma empresa que fornece serviços de hospedagem na Internet para sistemas de computação de pessoas ou entidades que não desejam fazê-lo por conta própria.
Infomaniak também oferece:
- … décadas de experiência em hospedagem e soluções online de alto desempenho.
- … mais de um milhão de utilizadores na Suíça e na Europa que confiam a gestão dos seus dados críticos.
- … uma empresa certificada pelas normas ISO 27001, 9001, 14001, 50001 e comprometida com uma abordagem digital sustentável.
- … 100% de conhecimento tecnológico "fabricado na Suíça", com dados hospedados na Suíça, em seus próprios centros de dados.
- … uma rica base de conhecimento e um suporte ao cliente disponível para o ajudar.
Responsabilidades e limites de intervenção
Como provedor de hospedagem, a Infomaniak instala, protege e mantém atualizada a infraestrutura do servidor, aprimora suas interfaces de gerenciamento (Manager) e auxilia seus clientes no uso ideal das ferramentas fornecidas. A Infomaniak se esforça para oferecer soluções acessíveis a todos; no entanto, o suporte humano para os produtos gratuitos é, por natureza, limitado, a fim de garantir a sustentabilidade desses serviços.
Por motivos de segurança e confidencialidade,nenhum suporte será fornecido sem uma identificação formaldo interlocutor.
O suporte destina-se exclusivamente aos administradores da Organização. Os clientes finais ou os utilizadores que beneficiam de um contrato através de um Parceiro revendedor devem, obrigatoriamente, contactar o seu administrador ou fornecedor de serviços dedicado em primeiro lugar.
Âmbito do suporte técnico
O suporte técnico não oferece assistência para:
- Desenvolvimento e programação: depuração de sites, correção de código-fonte, scripts personalizados (PHP, JS, etc.)
- O uso e a integração das APIs.
- A manutenção de aplicações e o gerenciamento de sites: resolução de problemas, atualização ou gerenciamento de conteúdo para aplicações de terceiros (por exemplo, CMS como WordPress, clientes de e-mail como Outlook, etc.).
- Intervenções locais e personalizadas: acesso remoto, configuração do seu próprio equipamento, instalações ou migrações manuais complexas.
Mas o suporte terá todo o prazer em ajudá-lo com:
- Infraestrutura e Gerenciador: resolução de incidentes relacionados à rede, ao hardware ou às interfaces de gerenciamento Infomaniak.
- Utilização dos serviços Infomaniak: esclarecimento dos processos de configuração e auxílio na utilização de nossas funcionalidades nativas.
- Orientação documental: para o ajudar a encontrar os recursos e guias técnicos adequados, para que possa trabalhar de forma independente.
Uma assistência Premium e um serviço de migração estão disponíveis para necessidades mais específicas.
Encontre ajuda externa
Para obter ajuda relacionada com o conteúdo do seu site, a sua programação ou a organização avançada das suas contas de e-mail, utilize a plataforma de pedidos de orçamento da Infomaniak, que reúne mais de 1000 profissionais verificados, ou consulte o diretório.
Link para esta FAQ: https://faq.infomaniak.com/2103
Esta seção de perguntas frequentes foi útil?
Este guia explica como alterar a localização de algumas pastas que já estão presentes na estrutura da sua conta de e-mail Infomaniak.
Introdução
- A estrutura de uma caixa de correio eletrónico clássica pode conter algumas pastas especiais, como, por exemplo, a pasta que armazena os e-mails…
- … depois de terem sido enviados (= "Mensagens enviadas").
- … durante alguns dias antes de serem eliminados definitivamente (= "Lixeira").
- Tudo já está configurado para que, por defeito, seja sincronizados entre as diferentes interfaces de e-mail em todo o mundo.
- Se desejar fazer ajustes por diferentes motivos, às vezes por motivos linguísticos, consulte o guia abaixo para modificar estas pastas especiais:
- rascunhos
- mensagens enviadas
- lixeira
- arquivos
- Isso permite, em particular, personalizar a sincronização dessas pastas com clientes IMAP como Outlook, Mail iOS, Thunderbird, Spark, etc.
- Atenção: isso não altera o prazo máximo de retençãoe-mails colocados em algumas destas pastas especiais.
Aceder a partir da aplicação Web Mail Infomaniak
Pré-requisitos
- Ter acesso válido ao aplicativo web Mail da Infomaniak (serviço online ksuite.infomaniak.com/mail), no qual o endereço de e-mail está registrado.
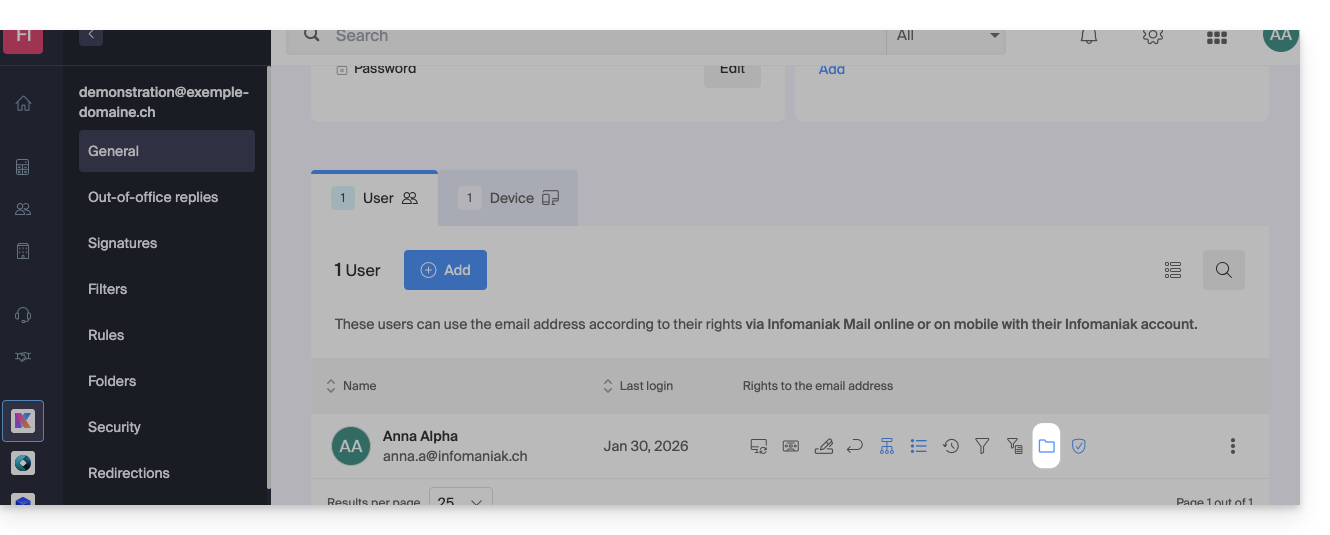
- Ter permissão para modificar as pastas especiais: é possível que o administrador do Serviço de Email tenha removido esse direito a partir da sua conta de administrador:
Para modificar estas pastas especiais:
- Clique aqui para aceder à aplicação web Mail da Infomaniak (serviço online ksuite.infomaniak.com/mail).
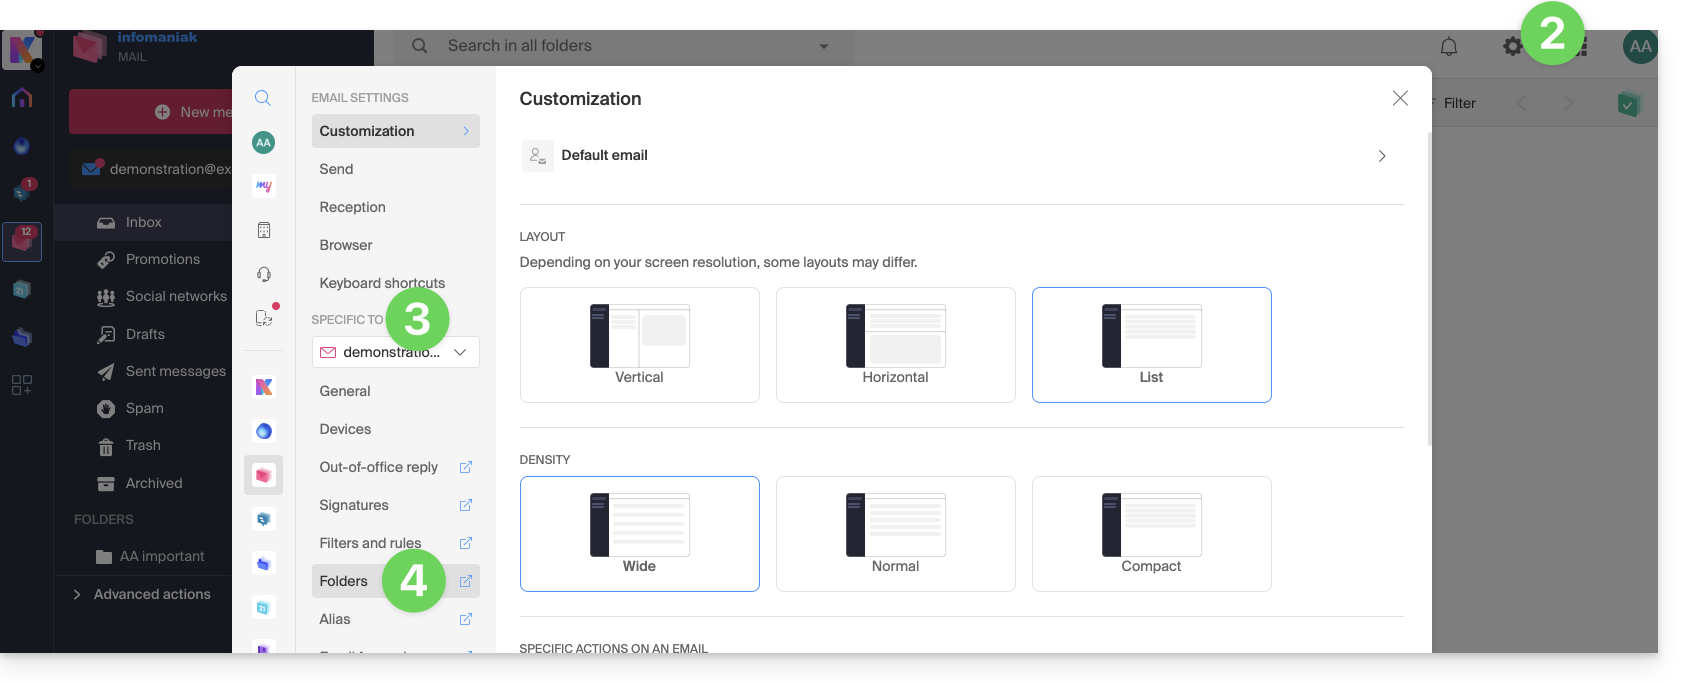
- Clique no ícone Configurações no canto superior direito.
- Verifique ou selecione o endereço de e-mail correspondente no menu suspenso do menu lateral esquerdo.
- Clique em Pastas:
Aceder a partir do Serviço de Email
Para aceder a esta opção a partir de um Serviço de Email:
- Clique aqui para aceder à gestão do seu produto no painel de controlo Infomaniak (precisa de ajuda?).
- Clique diretamente no nome atribuído ao produto em questão.
- Clique no endereço de e-mail correspondente na tabela que aparece:
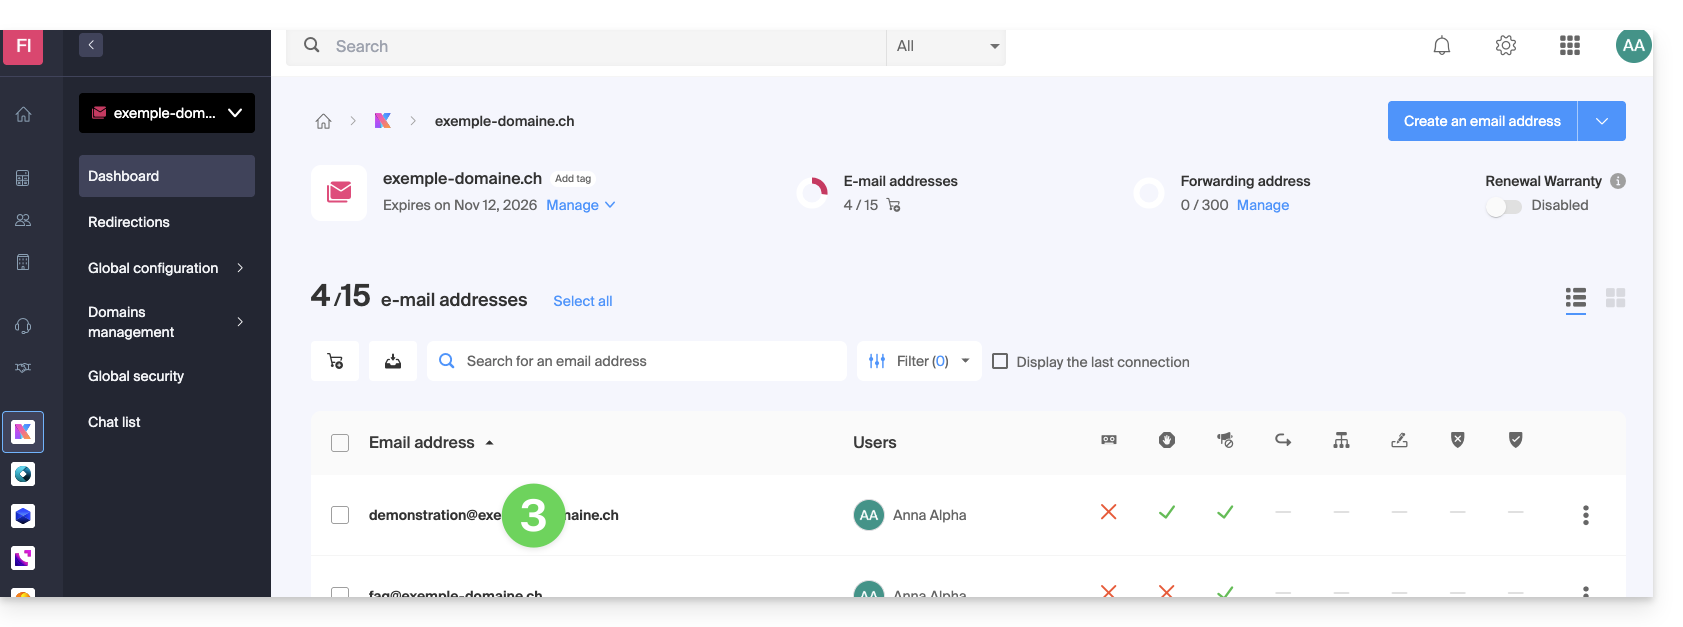
- Clique na aba/menu Pastas:
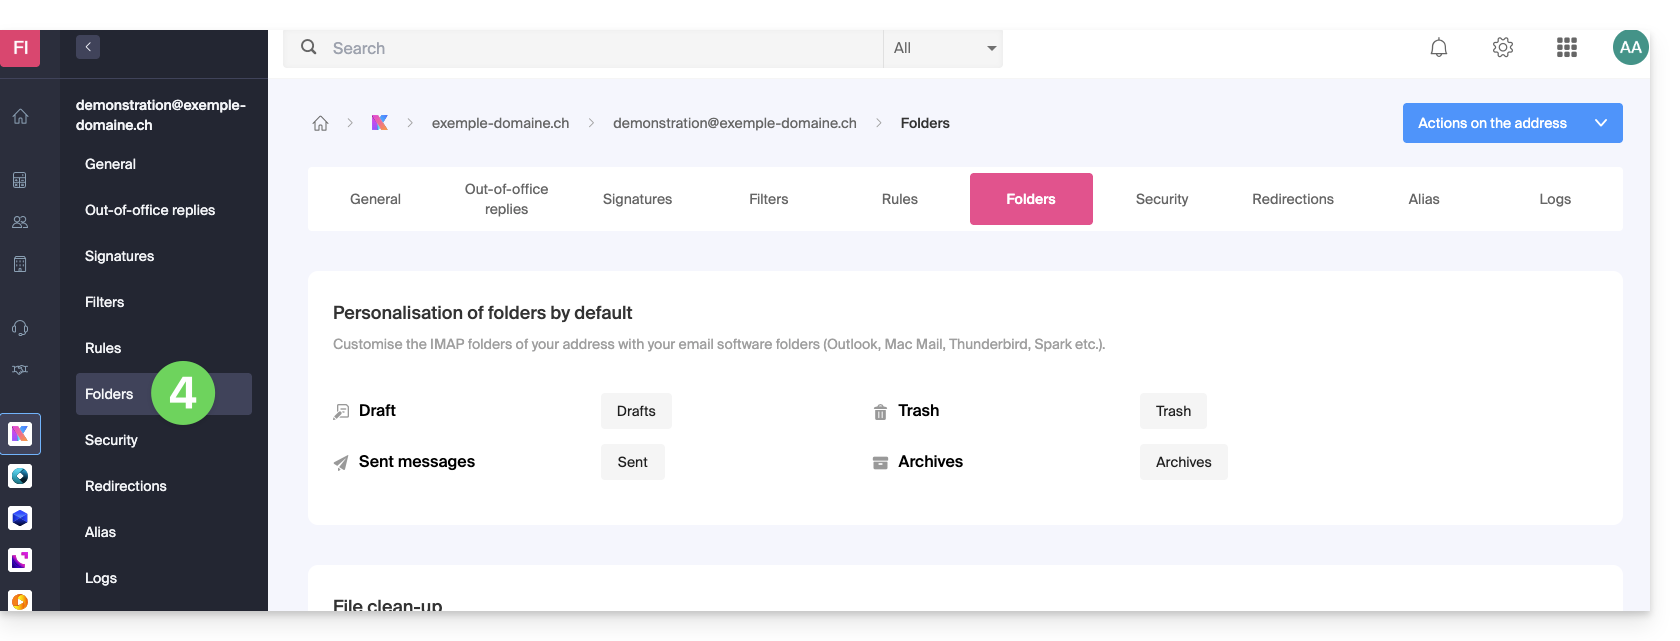
Configurar as pastas especiais
Por motivos de segurança, a gestão de pastas é confidencial e reservada aos utilizadores adicionados ao endereço de e-mail em questão.
Selecione as pastas desejadas para armazenar, por padrão, os seus rascunhos, arquivos, mensagens enviadas e a sua lixeira clicando na área à direita de cada elemento: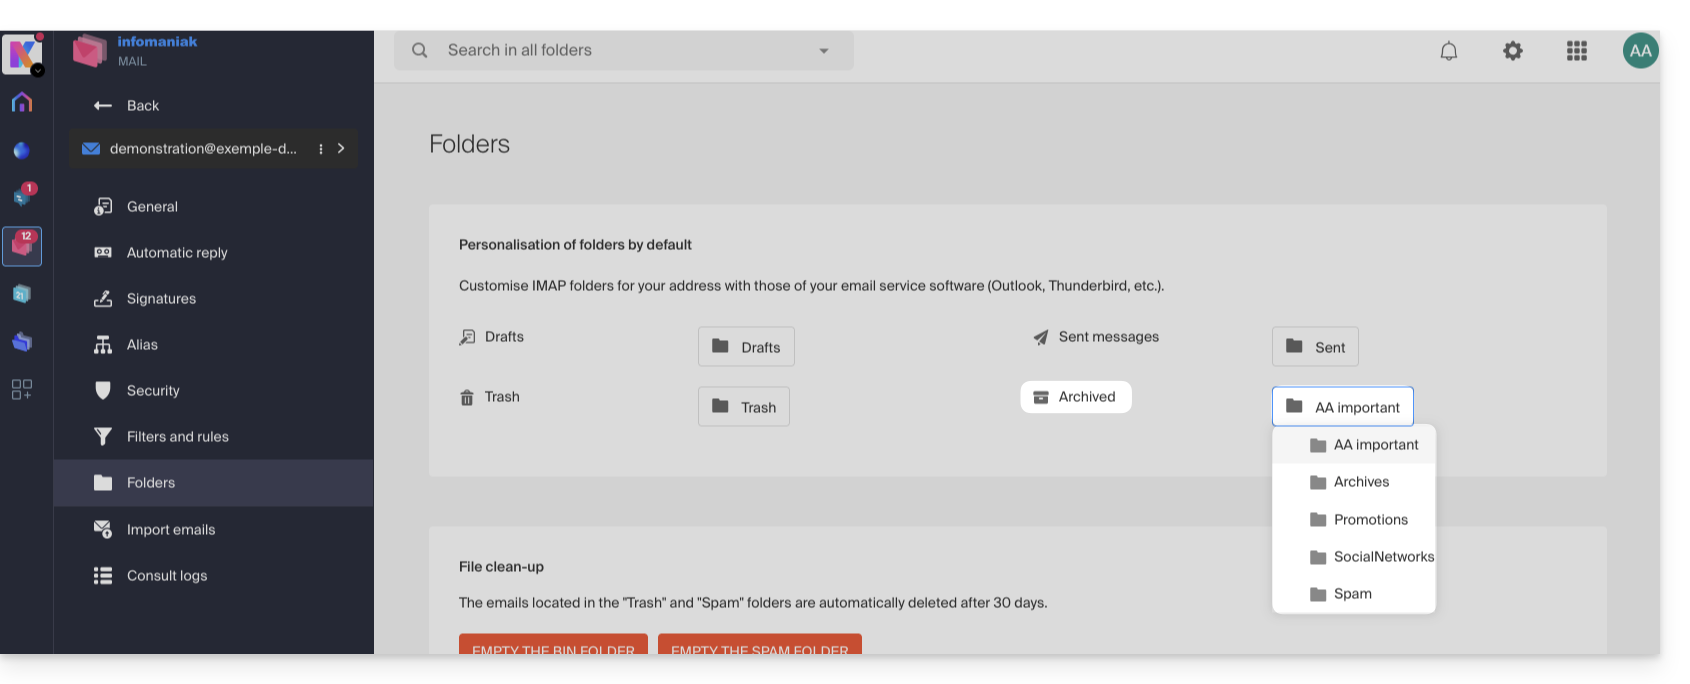
Isso exibirá a lista das pastas já presentes na estrutura da sua caixa de correio.
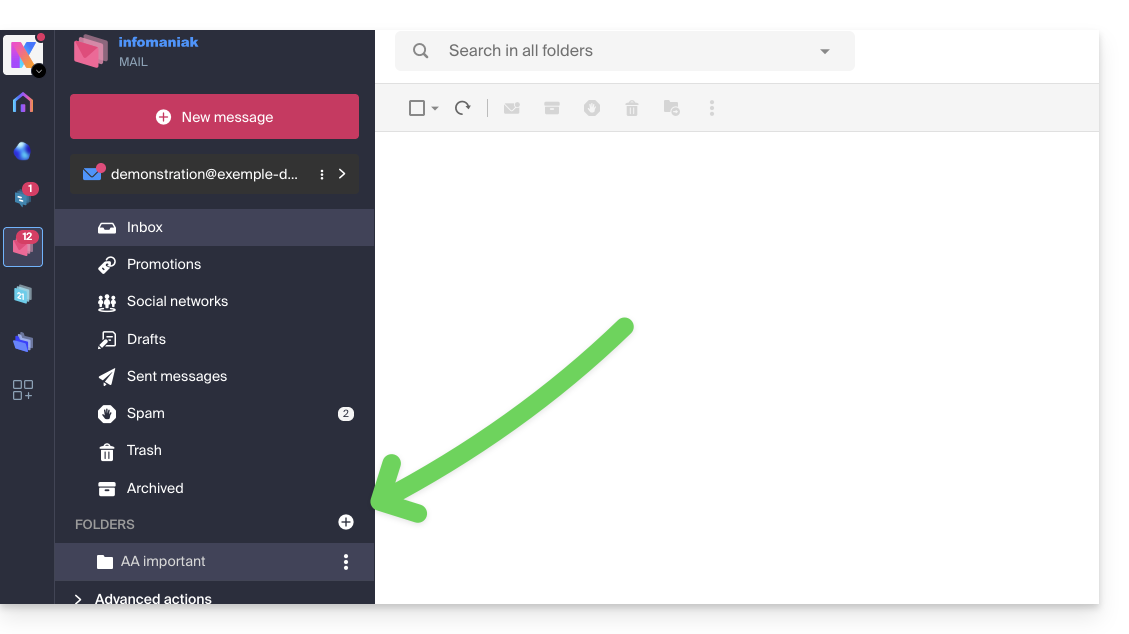
- Se necessário, crie a pasta desejada com antecedência a partir do Mail ou de um software IMAP:
Para modificar as pastas padrão que recebem o spam e as mensagens publicitárias e notificações de redes sociais, é necessário fazê-lo diretamente na seção Filtro de Spam e Filtro de Publicidade: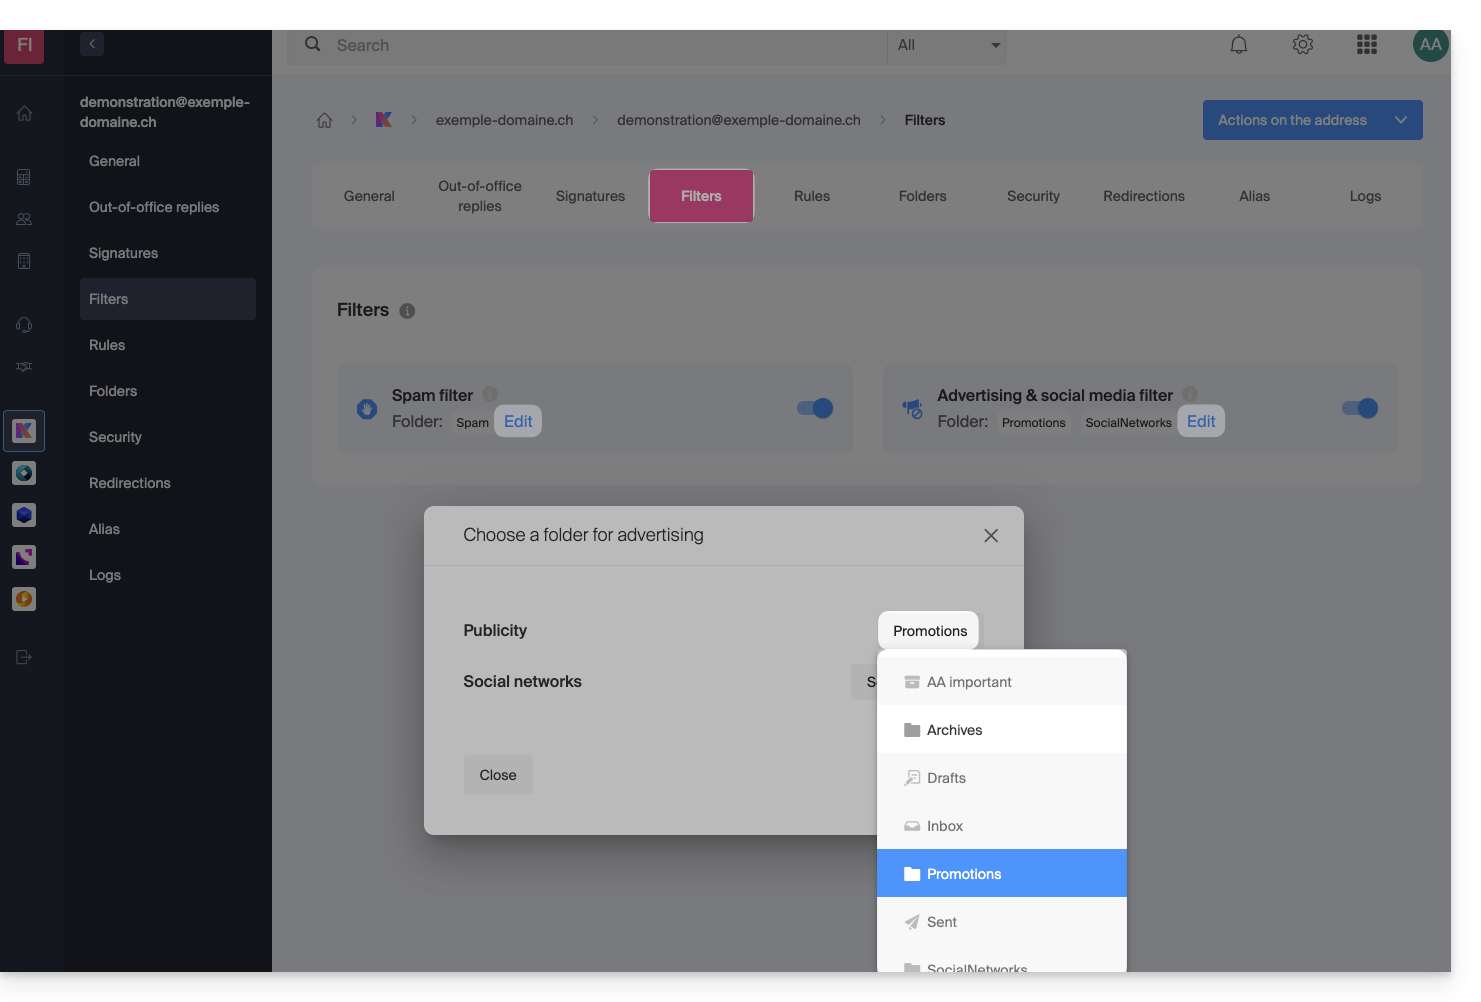
Soluções alternativas para…
Alguns softwares/clientes de e-mail também permitem alterar a localização das pastas especiais. Consulte a documentação oficial do seu aplicativo, se necessário. Os seguintes links são fornecidos apenas para fins informativos:
… Mozilla Thunderbird
Consulte este outro guia oficial se precisar de informações sobre como atribuir pastas específicas (como a Lixeira, Rascunhos, Mensagens enviadas) à conta IMAP e sincronizá-las com a Infomaniak.
… Microsoft Outlook 2013
Consulte este outro guia não oficial se procura informações sobre como o uso do protocolo IMAP no aplicativo pode levar a uma configuração em que as mensagens são armazenadas apenas localmente e não sincronizadas com o servidor, o que contradiz o objetivo principal do IMAP de manter a consistência entre os dispositivos.
… Microsoft Outlook 2021
Consulte este outro guia não oficial se precisar de informações sobre como salvar os e-mails enviados na pasta “Enviados” em vez da pasta “Itens Enviados” no aplicativo.
… Apple iOS
Consulte este outro guia não oficial se precisar de informações sobre como configurar as pastas de envio, rascunhos e mensagens apagadas em um iPhone para que sejam sincronizadas com o servidor de e-mail, acessando as configurações avançadas do aplicativo Mail e selecionando as pastas correspondentes no servidor IMAP.
Link para esta FAQ: https://faq.infomaniak.com/2107
Esta seção de perguntas frequentes foi útil?
Este guia explica como adicionar ou modificar um registo MX na zona DNS de um nome de domínio gerido a partir do Manager Infomaniak.
Introdução
- Um registro MX indica aos servidores de e-mail para qual servidor/provedor encaminhar as mensagens destinadas ao seu nome de domínio.
- As alterações efetuadas no painel de controlo Infomaniak só são tidas em conta se o nome de domínio utilizar a zona DNS correspondente.
- Qualquer adição/modificação de DNS pode levar até 48 horas para se propagar; durante este período, algumas mensagens podem ainda ser direcionadas de acordo com a configuração anterior.
Registros MX para o serviço de e-mail Infomaniak
A Infomaniak configura automaticamente o registo MX necessário quando o nome de domínio e o Serviço de Email são criados na mesma Organização no Gestor Infomaniak.
Se a sua configuração exigir a adição manual do registo MX para direcionar as mensagens recebidas para a Infomaniak, insira os seguintes valores:
- Anfitrião / Origem: deixe este campo em branco para aplicar o registo ao domínio principal
- Destino:
mta-gw.infomaniak.ch - Prioridade:
5
O destino deve ser inserido na forma de um nome de host, sem https://, sem endereço de e-mail e sem caminho adicional.
Variação específica para algumas interfaces DNS
Algumas interfaces, nomeadamente a da Gandi, exigem um ponto no final do destino para indicar que se trata de um nome de host completo. Neste caso, introduza:
mta-gw.infomaniak.ch.
Se for utilizado outro registo MX ou se vários registos MX estiverem configurados, a Infomaniak não pode garantir a receção correta das mensagens.
Modificar a zona DNS
Para adicionar um registo MX na zona DNS:
- Clique aqui para acessar o gerenciamento dos seus domínios no Manager Infomaniak (precisa de ajuda?).
- Clique diretamente no nome atribuído ao domínio em questão.
- Clique em Zona DNS no menu lateral esquerdo.
- Clique no botão para adicionar um registo:
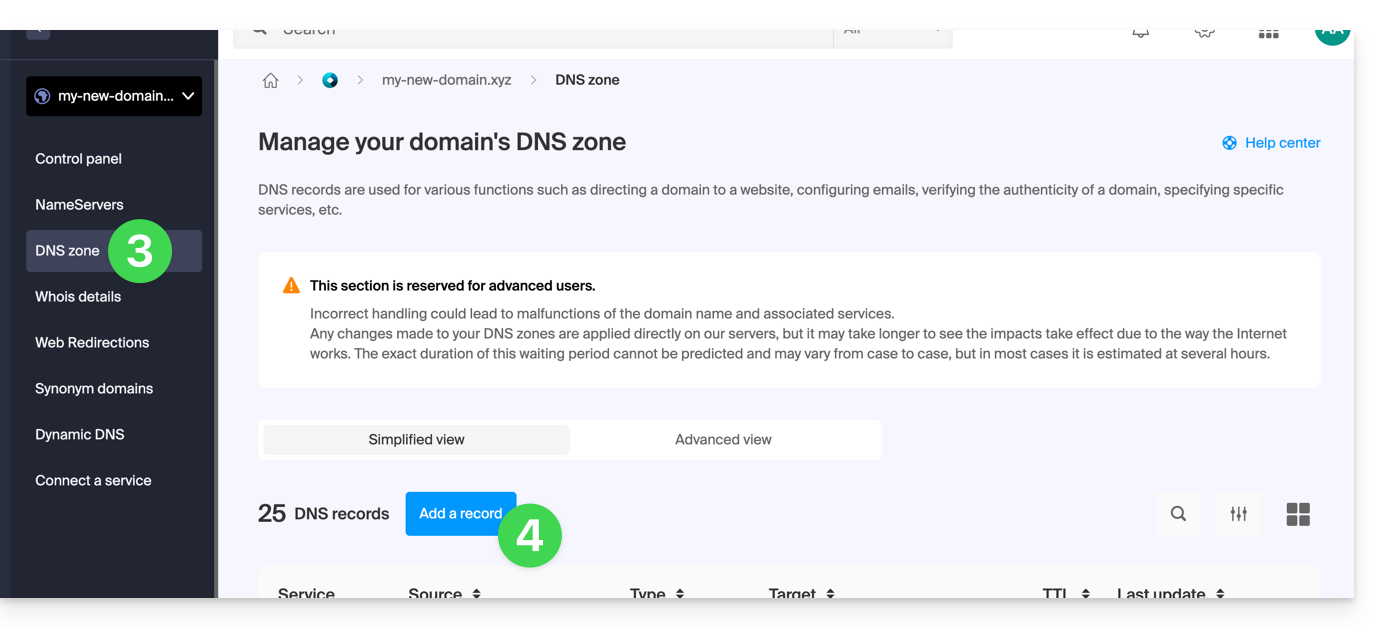
- Selecione o tipo de registo MX.
- Clique no botão Seguinte:
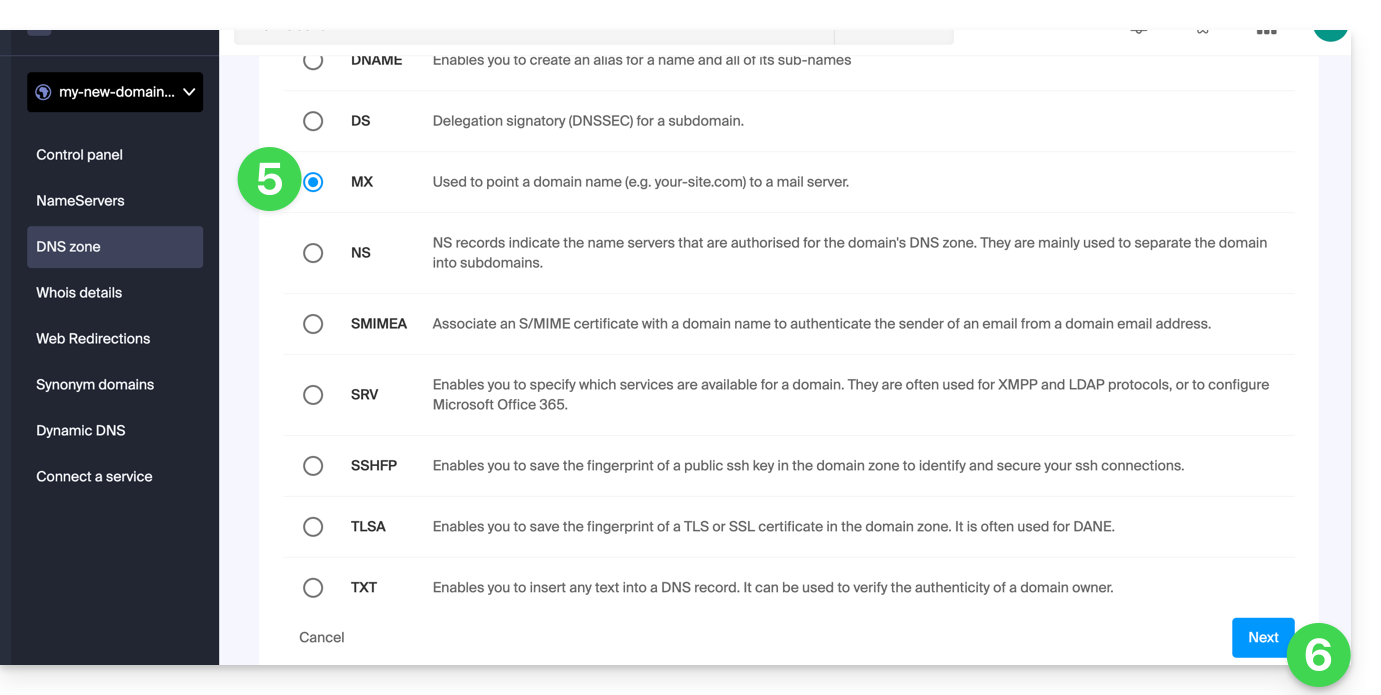
- Preencha os valores solicitados:
- para o serviço de e-mail do domínio principal, deixe o campo Servidor ou Origem em branco
- insira no campo Destino o nome do servidor de e-mail fornecido pelo provedor
- preencha a prioridade indicada por este provedor
- Mantenha o valor padrão proposto para o TTL, a menos que o seu provedor de e-mail indique o contrário.
- Clique no botão Guardar:
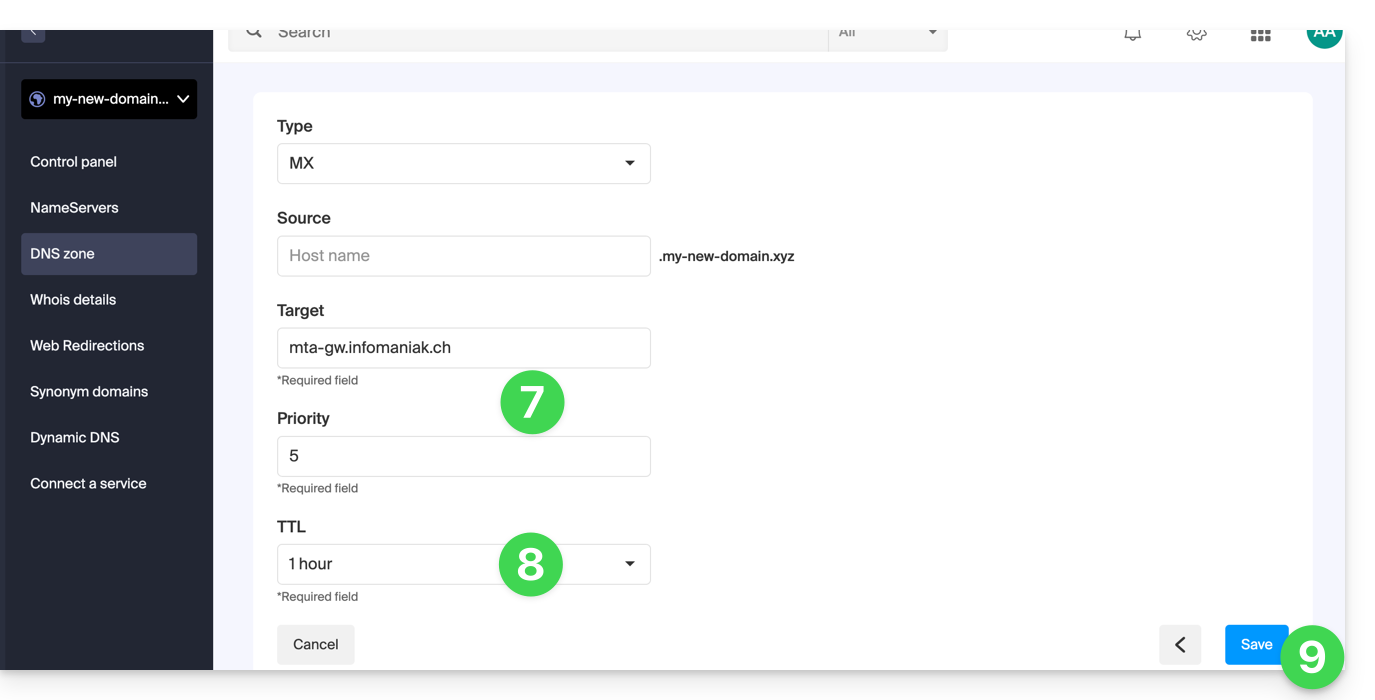
Após guardar, o registo MX aparecerá na tabela da zona DNS: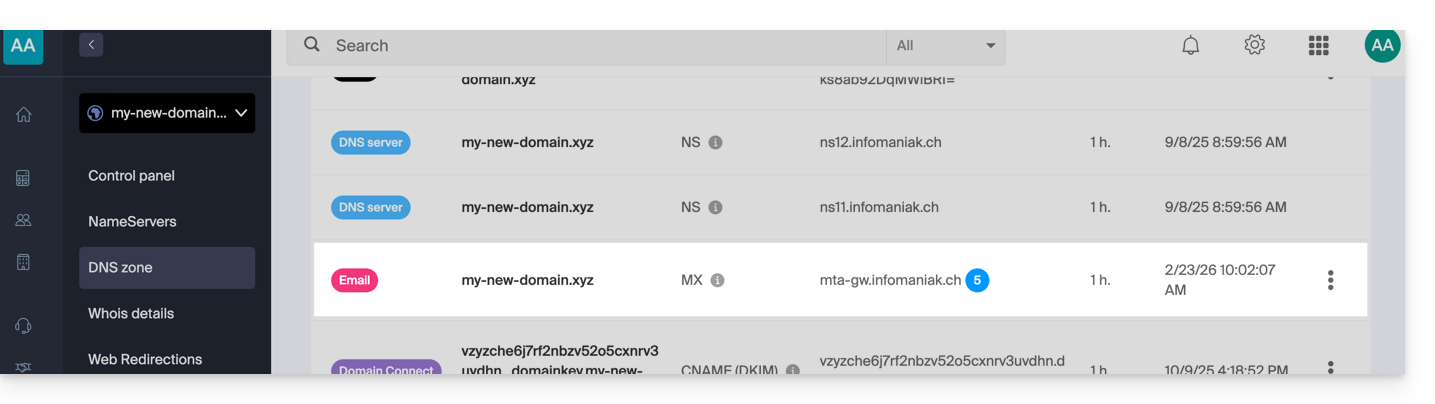
Para enviar mensagens com o serviço de e-mail da Infomaniak, o nome de domínio também deve ter um registro SPF configurado corretamente.
Saiba mais
Link para esta FAQ: https://faq.infomaniak.com/2110
Esta seção de perguntas frequentes foi útil?
Este guia explica como converter uma oferta Mail Starter gratuita para uma oferta mais completa e aprimorada, por exemplo, kSuite Free ou outros planos do kSuite Pro.
Introdução
- Ao adquirir um nome de domínio na Infomaniak, você obtém1 endereço de e-mail gratuito e um espaço web básico de 10 MB: esta é a oferta Starter.
- Com apenas alguns cliques, é possível atualizar essas ofertas para remover as limitações e usufruir de uma experiência aprimorada.
- Para ajudá-lo a identificar a oferta de e-mail mais adequada às suas necessidades, consulte este outro guia.
Alterar o plano Starter – Serviço de e-mail gratuito
Para atualizar o plano Starter:
- Clique aqui para acessar o gerenciamento do seu produto no painel de controle Infomaniak (precisa de ajuda?).
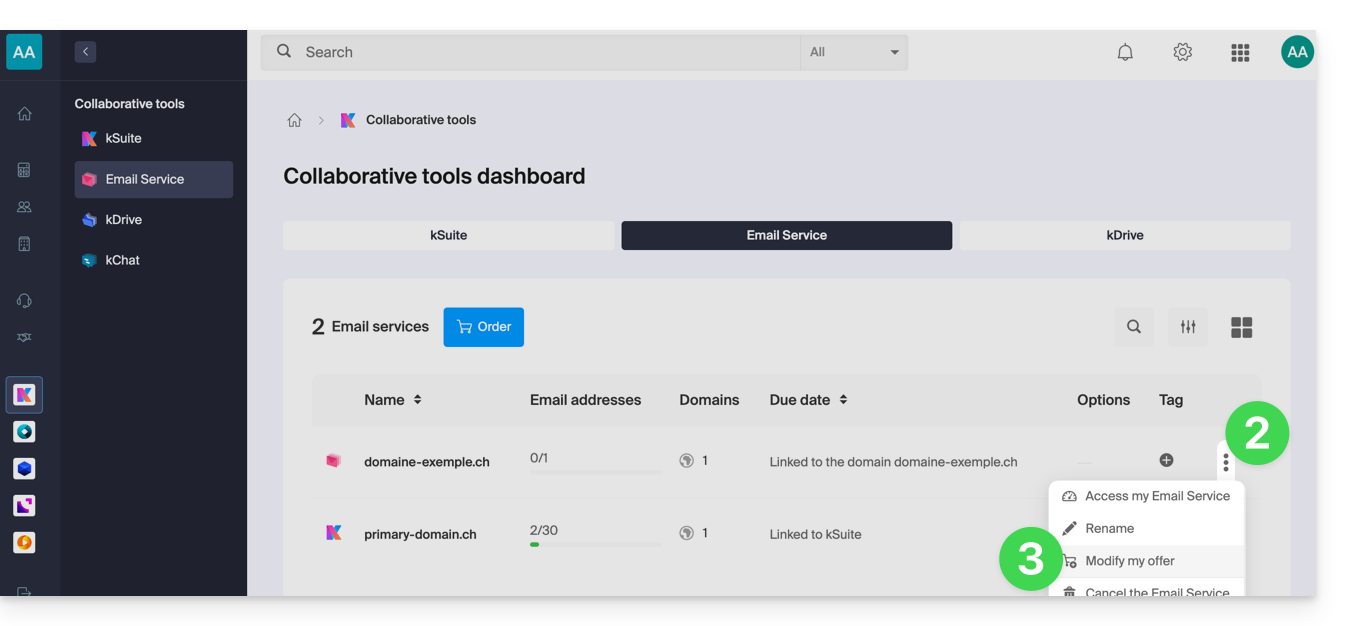
- Clique no menu de ações ⋮ localizado à direita do item em questão.
- Clique em Modificar oferta:
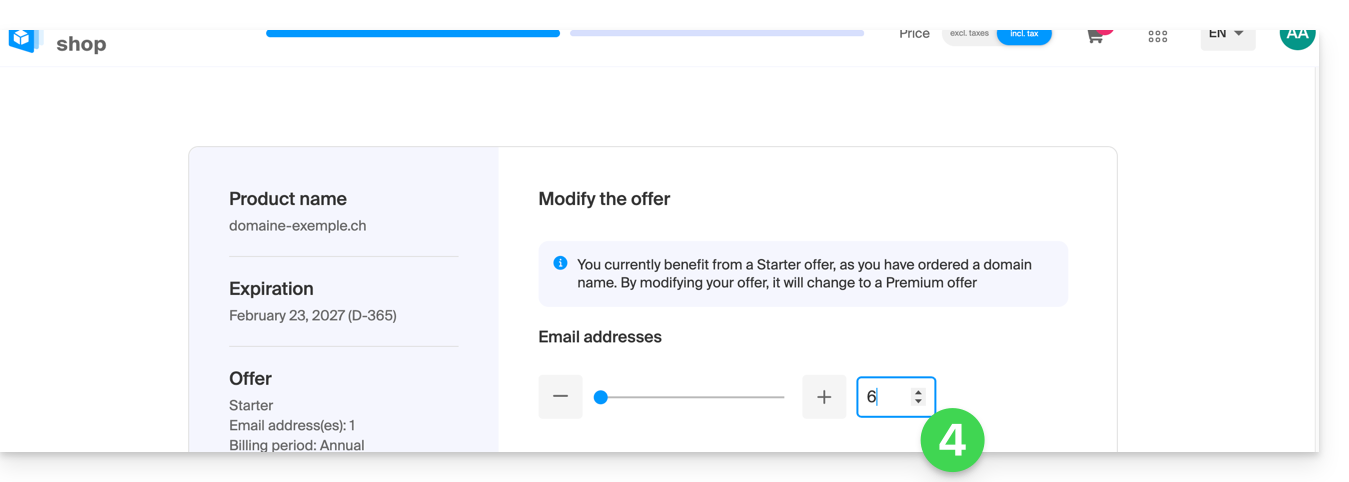
- Ajuste, se necessário.o número de endereços de e-mail a adicionar ao Serviço de E-mailatravés do assistente de pedido, que o ajudará a concluir a alteração do plano até ao fim:
Link para esta FAQ: https://faq.infomaniak.com/2112
Esta seção de perguntas frequentes foi útil?
Este guia sugere soluções para resolver erros da Microsoft do tipo 0x800...
Introdução
- Para saber a que corresponde um número de erro (
0x800CCCXX, por exemplo), consulte a base de conhecimento da Microsoft ou um assistente virtual.
0x800CCCDE
Para tentar resolver o seguinte erro:
Outlook cannot synchronize subscribed folders for email@domain.xyz. Error: An unexpected internal error occurred. It is suggested that you restart your client. If you continue to receive this message, contact your server administrator or Internet service provider (ISP)- Abra o Microsoft Outlook.
- Clique em Arquivo e, em seguida, em Opções.
- No menu à esquerda, clique em Opções avançadas.
- Clique no botão Enviar/Receber...
- Clique em Alterar.
- Marque a caixa Usar o comportamento personalizado abaixo.
- Marque as pastas a serem sincronizadas.
- Marque a caixa Baixar todos os itens (incluindo anexos) para as pastas com assinatura.
- Confirme as alterações e feche a janela de opções.
0x800CCC0E
- Compare as configurações recomendadas para o software utilizado.
- Consulte este outro guia.
- Entre em contato com o suporte da Infomaniak, informando seu endereço IP público.
Link para esta FAQ: https://faq.infomaniak.com/2120
Esta seção de perguntas frequentes foi útil?
Este guia apresenta a ferramenta de Diagnóstico DNS, que permite verificar as relações entre…
- NOME DE DOMÍNIO na Infomaniak
e - SERVIÇO DE EMAIL na Infomaniak
… estão corretos, para garantir que o tráfego de email seja direcionado para o local correto.
Introdução
- Para verificar, a ferramenta analisa os registos MX, SPF, etc.
- Dessa forma, você poderá detectar e corrigir alguns problemas do Mail, especialmente se estiverem relacionados aos DNS (informações técnicas que, em termos gerais, determinam para onde deve ser direcionado determinado tráfego de e-mail), atuando no nível do seu domínio.
- A correção automática só é possível quando o nome de domínio está presente na mesma Organização do produto ao qual deve ser associado.
- Caso contrário, a correção deverá ser feita manualmente.
Diagnosticar um problema de DNS
Para aceder ao diagnóstico DNS do seu nome de domínio:
- Clique aqui para acessar o gerenciamento do seu Serviço de E-mail no painel de controle Infomaniak (precisa de ajuda?).
- Clique diretamente no nome atribuído ao produto em questão:
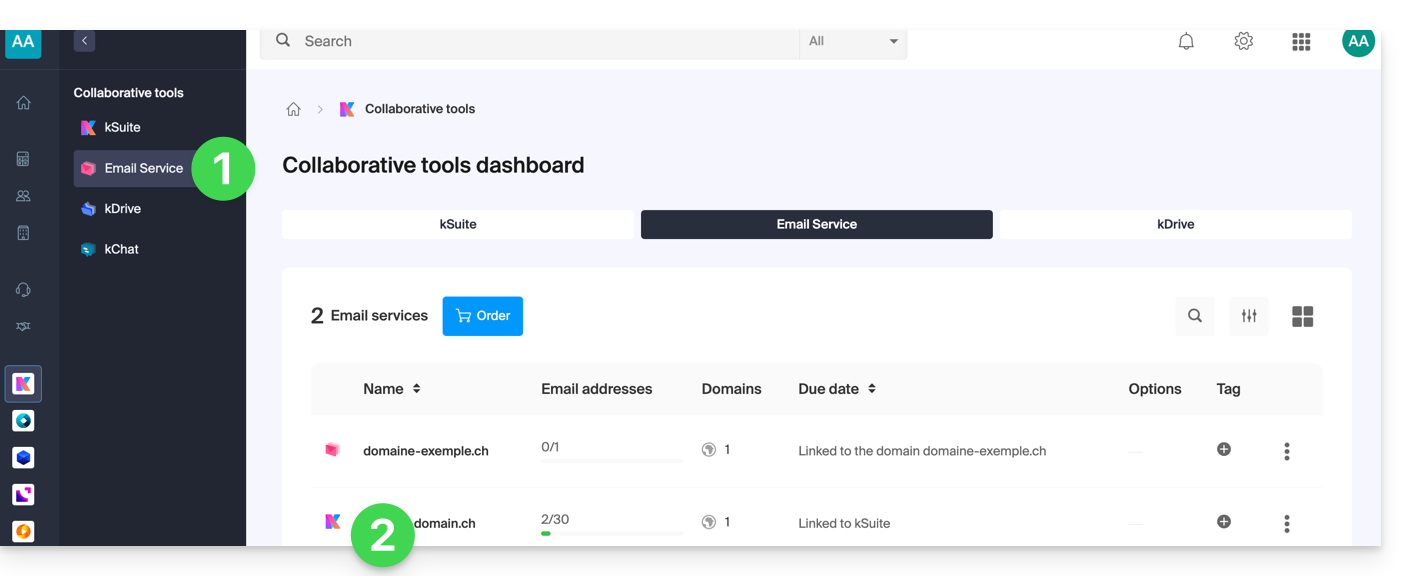
- Clique em Gerenciamento de domínios no menu lateral esquerdo:
- Clique em Diagnóstico DNS no menu lateral esquerdo.
- Clique no botão, se necessário, para atualizar as informações, que devem estar em verde.
- Se forem detetados problemas de DNS, um indicador vermelho na tabela irá sinalizá-los:
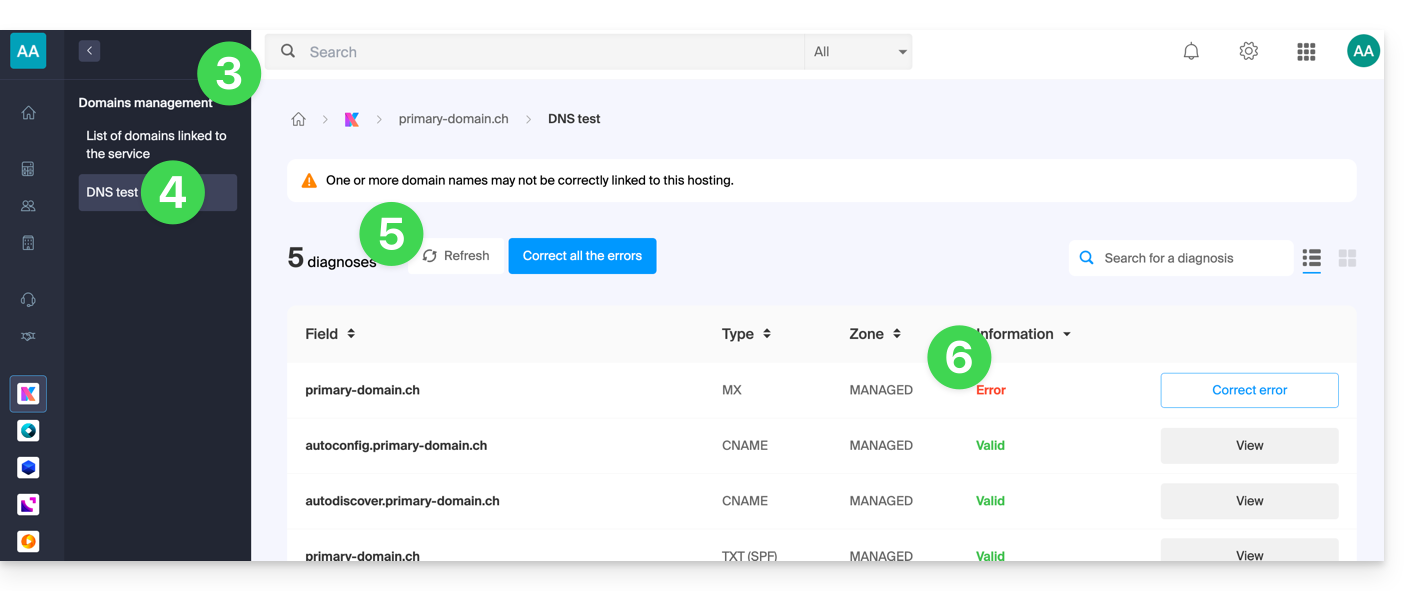
- Corrija cada erro individualmente, clicando no botão à direita do elemento em questão…
- … ou corrija todos os erros de uma só vez com o botão localizado acima da tabela.
Consulte este outro guia sobre o mesmo processo de verificação automática, mas para hospedagem web.
E, se necessário, consulte o diagnóstico de segurança relacionado ao e-mail.
Link para esta FAQ: https://faq.infomaniak.com/2124
Esta seção de perguntas frequentes foi útil?
Este guia explica como criar um alias, ou seja, uma variação do seu endereço de e-mail habitual, sem ter de adicionar um novo endereço ao seu serviço de e-mail existente.
✘ INDISPONÍVEL com
my kSuite (ik.me, etik.com, ikmail.com)
Preâmbulo
- Número de aliases possíveis por endereço de e-mail:
- kSuite Free = 1
- kSuite Standard = 50
- kSuite Business = 50
- kSuite Enterprise = 50
- my kSuite+ = 2 (atenção: um alias excluído não poderá ser recriado com o mesmo nome)
- Serviço de E-mail Starter = 1
- Serviço de E-mail Premium = 50
- Uma funcionalidade alternativa é apresentada aqui.
- Para modificar o que vem depois do símbolo "@", utilize domínios alias.
- Os utilizadores do endereço (na aplicação web Mail Infomaniak) recebem um e-mail sempre que um alias é adicionado ou removido.
Funcionamento de um alias
É possível criar versões alternativas dos seus endereços de e-mail, modificando o que vem antes do símbolo "@".
Por exemplo:
john-peter.smith@domain.xyz é um endereço de e-mail longo…
Ele pode ser encurtado e usado da seguinte forma:
jps@domain.xyz
Neste exemplo, é necessário criar um alias "jps" para o endereço "john-peter.smith".
Em seguida, se uma pessoa enviar uma mensagem para jps@domain.xyz:
- a mensagem chegará à caixa de entrada do endereço principal (
john-peter.smith@domain.xyz).
Se uma pessoa enviar uma mensagem para john-peter.smith@domain.xyz E colocar jps@domain.xyz em cópia (CC):
- a mensagem chegará duas vezes à caixa de entrada do endereço principal (
john-peter.smith@domain.xyz).
Adicionar um alias a partir da aplicação Web Mail Infomaniak
Pré-requisitos
- Ter permissão para gerenciar os aliases: é possível que o administrador do Serviço de Email tenha removido esse direito da sua conta de administrador.
Em seguida, para adicionar um alias:
- Clique aqui para acessar o aplicativo web Mail da Infomaniak (serviço online ksuite.infomaniak.com/mail).
- Clique no ícone Configurações no canto superior direito.
- Verifique ou selecione o endereço de e-mail correspondente no menu suspenso do menu lateral esquerdo.
- Clique em Alias:
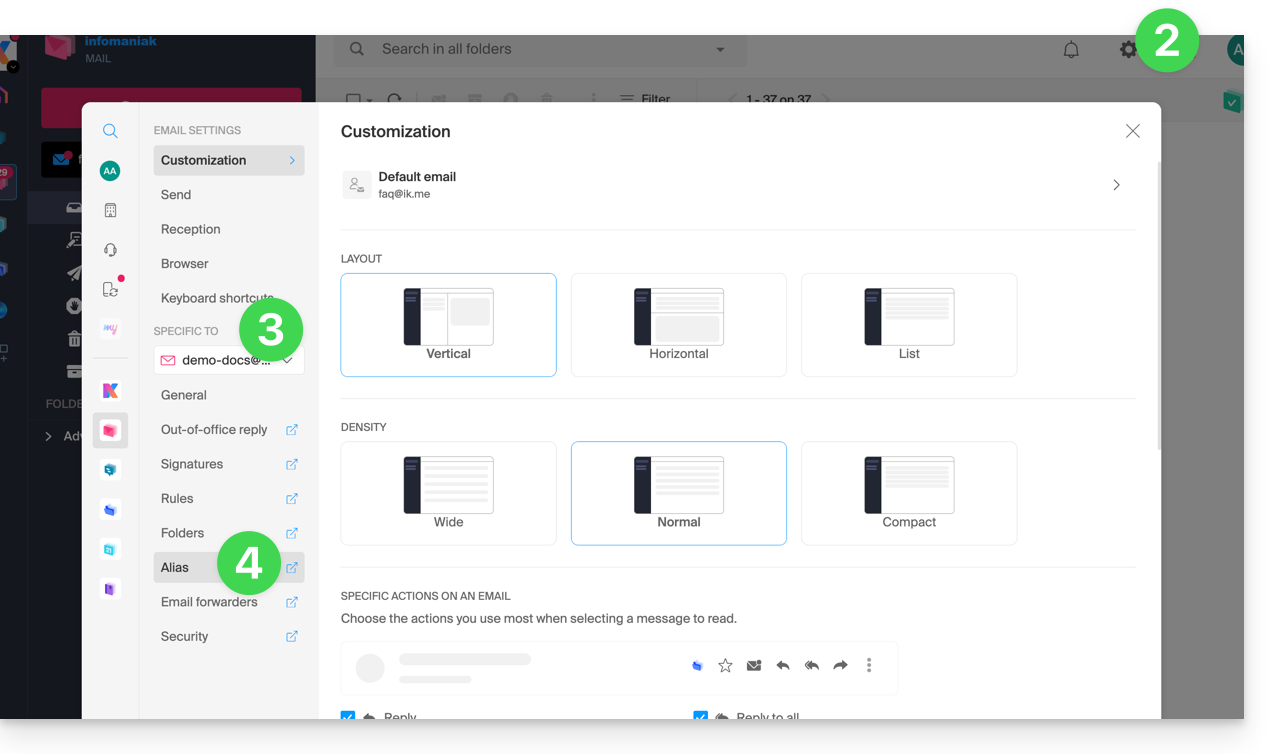
- Clique em Adicionar alias para criar uma variação do seu endereço de e-mail.
- Insira o alias desejado (o que vem antes do símbolo "@").
- Clique em Adicionar:
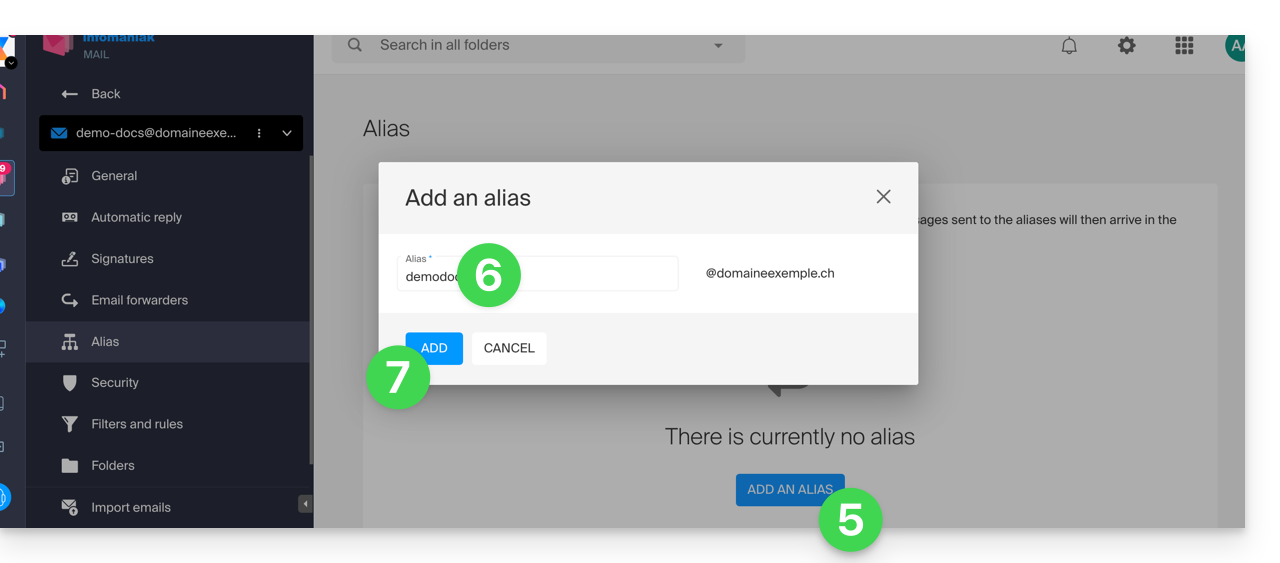
Adicionar um alias a partir do Serviço de Email
Para aceder ao Serviço de Email:
- Clique aqui para acessar o gerenciamento do seu produto no Manager Infomaniak (precisa de ajuda?).
- Clique diretamente no nome atribuído ao produto em questão.
- Clique em o endereço de e-mail em questão na tabela que aparece.
- Clique na aba Alias ou, no menu lateral esquerdo, em Alias.
- Clique no botão azul Adicionar um alias.
- Insira o alias desejado (o que vem antes do símbolo @):
- Clique em Aplicar para guardar as alterações:
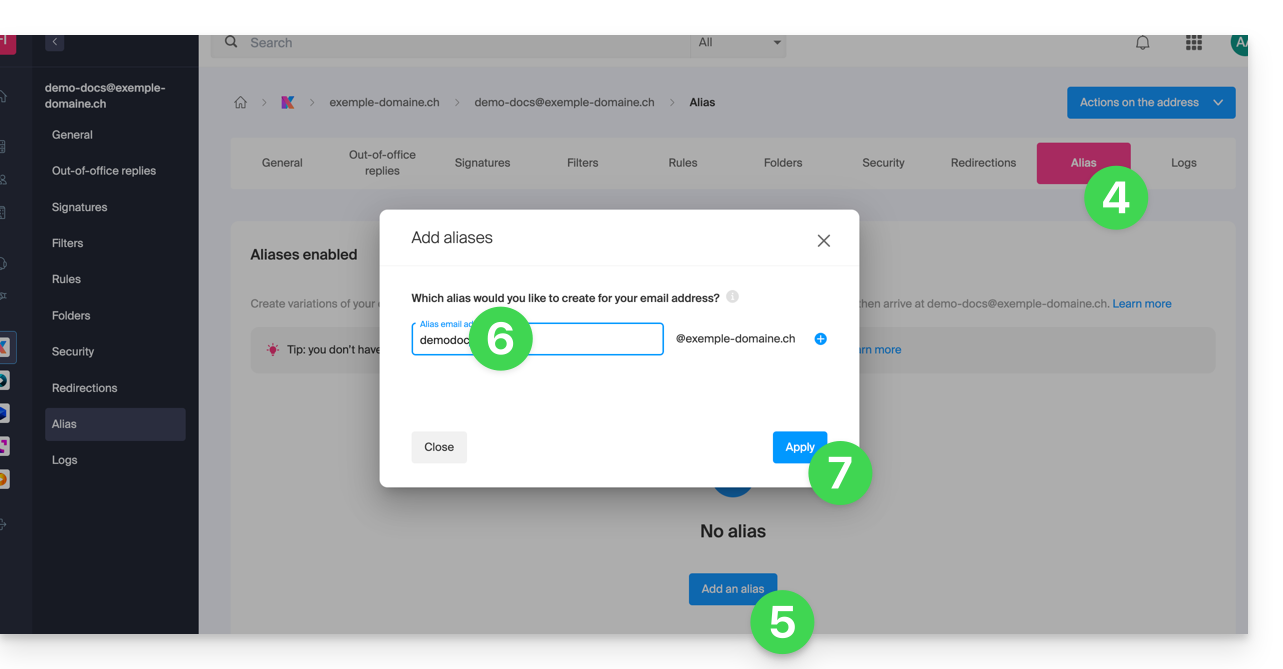
Link para esta FAQ: https://faq.infomaniak.com/2129
Esta seção de perguntas frequentes foi útil?
Este guia trata sobre os endereços IP, aqueles…
- … atribuídos a sites/hospedagens/servidores, IPs dinâmicos ou estáticos, compartilhados ou dedicados,
- … atribuídas pelo seu Provedor de Serviços de Internet (ISP) ao estabelecer uma conexão de Internet com o seu produto Infomaniak.
Introdução
- Um endereço IP dedicado ou estático para um site é um endereço IP permanente que lhe é especificamente atribuído.
- Ao contrário de um endereço IP compartilhado, que é usado por vários sites, um endereço IP dedicado garante que apenas essa plataforma esteja associada a esse endereço.
- Os endereços IP dedicados para sites são frequentemente utilizados em casos onde a estabilidade, a personalização e a segurança são importantes, como no alojamento de servidores, na configuração de firewalls ou na ativação de certificados SSL (embora seja possível prosseguir sem um endereço IP dedicado para instalar um certificado SSL).
- Aqui estão as principais vantagens:
- Configurar uma entrada PTR ou DNS reverso nos IPs dedicados é útil, especialmente para a instalação de um servidor de e-mail, pois alguns fornecedores de e-mail verificam o registo PTR antes de aceitar os e-mails enviados de um servidor.
- Melhor estabilidade da conexão.
- Redução do risco de má reputação associada a sites que partilham o mesmo endereço IP.
- Facilidade na configuração de alguns aspetos técnicos.
- Um IP dedicado pode melhorar o posicionamento de um site nos motores de busca (embora existam opiniões divergentes entre os especialistas em SEO).
- Atenção: a Infomaniak não permite o acesso a sites por HTTP(S) através de IPs (dedicadas) em servidores gerenciados; você deve usar um nome de domínio que aponte para o IP (ou usar a URL de visualização).
Adicionar um IP dedicado ao site
Para adicionar um IP dedicado ao seu site, consulte este guia.
Se tiver algum problema ao direcionar o tráfego da web para uma porta específica, consulte este outro guia.
Bloqueio do endereço IP (conexão de Internet)
Se não conseguir acessar…
- … todos os seus endereços de e-mail que você possui na Infomaniak (que normalmente funcionam bem) e isso com um software/cliente de e-mail a partir de uma única rede de Internet (ou seja, a partir do mesmo endereço IP fornecido pelo seu provedor de serviços de Internet)…
… ou se, infelizmente, você realizou este tipo de operação:
- tentativas repetidas de conexões malsucedidas via FTP, SSH ou em pontos de acesso como o login do WordPress…
- requisições que retornam muitos erros, como erros 403 em massa…
… o seu acesso aos servidores Infomaniak pode ser bloqueado devido ao bloqueio do endereço IP (banip / ipban) da sua conexão de internet.
Para resolver a situação, contacte o suporte Infomaniak por e-mail, indicando o domínio em questão e, principalmente, o seu endereço IP público.
Desbloqueio definitivo (IP na lista de permissões)
Com um Servidor Cloud, pode solicitar que o endereço IP em questão seja autorizado definitivamente, para que o bloqueio não volte a ocorrer, independentemente da situação. Para tal, deve:
- Ter um IP dedicado associado ao seu Servidor Cloud.
- Estar ciente de que a Infomaniak não bloqueará eventuais ataques provenientes deste IP; os ataques ou tentativas de acesso maliciosos provenientes deste endereço não serão mais bloqueados automaticamente pelos sistemas de segurança.
- Confirmar por e-mail e a partir de um endereço de contatoassociada à conta (proprietário ou administrador), e que compreende e aceita a total responsabilidade em caso de ataque originado neste endereço IP.
Link para esta FAQ: https://faq.infomaniak.com/2138
Esta seção de perguntas frequentes foi útil?
Este guia explica como…
- … ativar um filtro para os e-mails recebidos
- … classificar automaticamente as mensagens publicitárias
- … sinalizar determinadas mensagens fraudulentas
… para reduzir o número de mensagens indesejadas ou excessivas em um endereço de e-mail gerenciado pela Infomaniak.
Soluções para excluir, classificar e filtrar e-mails recebidos
Métodos de filtragem automática
- Consulte este guia para utilizar a pasta <Spam> ativando o filtro de spam (é possível desativá-lo).
- Consulte este outro guia para utilizar as pastas <Promoções> e <Redes Sociais> (<SocialNetworks>) ativando o filtro de publicidade e redes sociais.
Métodos manuais
- Consulte este guia para denunciar uma mensagem recebida que não foi identificada como spam (publicidade / contacto não solicitado).
- Consulte este guia para denunciar uma mensagem recebida que não foi identificada como phishing (fraude / e-mail falso enganoso).
- Consulte este guia para bloquear ou autorizar endereços de e-mail específicos ou até mesmo domínios inteiros.
- Consulte este guia para definir seus próprios filtros de triagem e classificação ('linguagem Sieve') dos e-mails recebidos…
- … o que permitirá, por exemplo, filtrar mensagens enviadas para um alias temporário que você pode criar para se proteger durante novos registros na Internet.
Se estiver a enfrentar uma onda de spam ou de mensagens invulgares, consulte este outro guia para realizar algumas verificações.
Se os seus próprios envios forem frequentemente classificados incorretamente como spam, consulte este outro guia para realizar algumas verificações.
Para organizar e limpar uma caixa de e-mail que tenha sido inundada por mensagens, consulte este outro guia.
Link para esta FAQ: https://faq.infomaniak.com/2149
Esta seção de perguntas frequentes foi útil?
Este guia mostra como exportar e salvar os contatos da ferramenta "Lista de discussão" em um arquivo CSV (formato .csv).
A ferramenta Lista de discussão está atualmente disponível disponível apenas para os utilizadores que o ativaram anteriormente. Descubra uma solução de e-mail marketing (newsletter) mais simples e poderosa. Poderá facilmente importar os seus contactos existentes.
Exportar os contactos para um ficheiro
A ferramenta de lista de discussão está disponível no seu Serviço de Email:
- Clique aqui para acessar o gerenciamento do seu Serviço de E-mail no painel de controle Infomaniak (precisa de ajuda?).
- Clique diretamente no nome de domínio atribuído ao produto em questão.
- Clique em Lista de discussão no menu lateral esquerdo.
- Clique no nome da sua lista.
- Clique na aba Assinantes.
- Clique em Descarregar a lista em formato CSV:
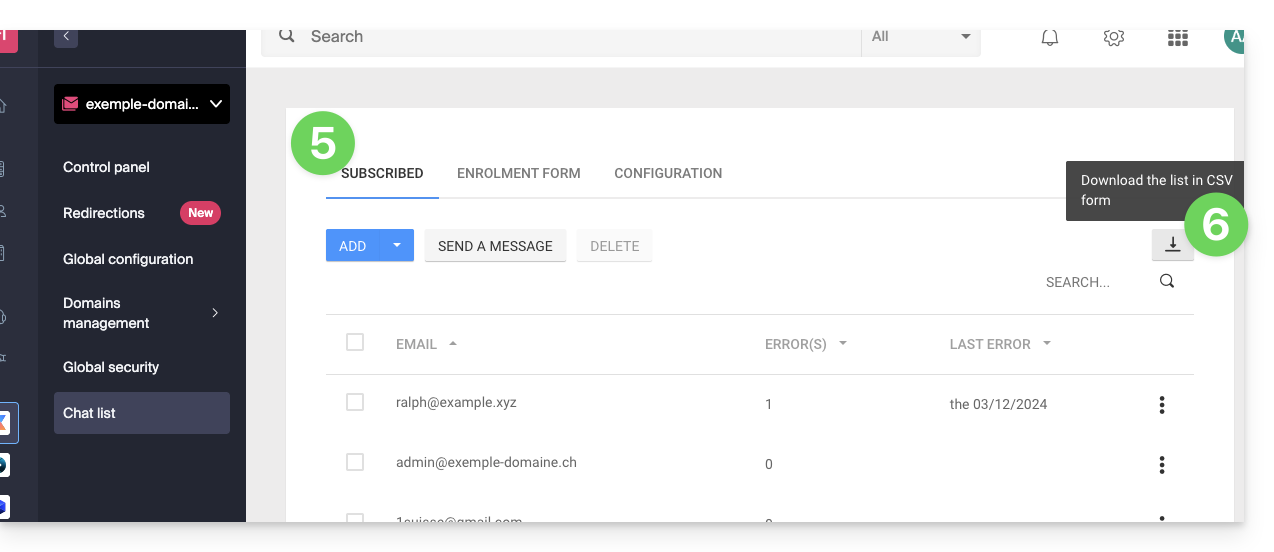
O ficheiro CSV será descarregado para o disco rígido do seu computador.
Para importar estes contactos na ferramenta Newsletter:
- Altere a extensão do arquivo, se necessário, de
.txtpara.csv. - Consulte este outro guia.
Link para esta FAQ: https://faq.infomaniak.com/2166
Esta seção de perguntas frequentes foi útil?