Base de conhecimento
1000 perguntas frequentes, 500 tutoriais e vídeos explicativos. Aqui, você encontra apenas soluções!
Este guia detalha as possíveis soluções para recuperar um nome de domínio expirado ou roubado, um processo complexo que depende das circunstâncias específicas de cada caso.
Certifique-se, antes de tudo, de que não se trata apenas de um período de resgate.
Contactar o titular atual
Se o nome de domínio estiver (re)registrado em nome de outra pessoa ou entidade, pode tentar contactá-la diretamente para discutir uma possível devolução do nome de domínio. Isso pode envolver a negociação com o titular atual e a chegada a um acordo amigável. No entanto, isso pode ser difícil se o titular atual não estiver disposto a cooperar ou se não conseguir contactá-lo.
Utilizar os serviços de mediação ou arbitragem da ICANN
A ICANN (Internet Corporation for Assigned Names and Numbers) oferece serviços de mediação e arbitragem para resolver litígios relacionados a nomes de domínio. Pode apresentar uma reclamação à ICANN se considerar que tem direitos legítimos sobre o nome de domínio em questão. A ICANN analisará as provas apresentadas pelas partes e tomará uma decisão com base nas políticas da ICANN. Note, no entanto, que este pode ser um processo longo e dispendioso.
As regras e os procedimentos para recuperar um nome de domínio expirado ou roubado podem variar dependendo da jurisdição e das políticas da ICANN. Recomenda-se consultar as políticas específicas da ICANN, bem como as leis e regulamentos locais, para compreender as opções disponíveis na sua situação específica. Também pode ser útil consultar um advogado especializado em direito de nomes de domínio para obter aconselhamento jurídico adequado.
Recorrer a procedimentos judiciais
Se você acredita que o nome de domínio foi roubado ou que seus direitos foram violados, pode considerar a possibilidade de processar o detentor atual perante os tribunais competentes. Isso pode envolver a apresentação de uma queixa e a apresentação de provas perante um tribunal para obter uma decisão judicial. Os processos judiciais também podem ser dispendiosos e demorados.
Monitorizar leilões de nomes de domínio expirados
Se o nome de domínio tiver expirado completamente e for colocado em leilão, você pode tentar comprá-lo durante esse leilão. Alguns nomes de domínio expirados são colocados à venda em leilões em plataformas especializadas, e você pode participar desses leilões para tentar recuperar o nome de domínio.
E para evitar que isso aconteça, consulte este artigo da Infomaniak sobre o assunto.
Link para esta FAQ: https://faq.infomaniak.com/1053
Esta seção de perguntas frequentes foi útil?
Este guia é para você se receber o erro O servidor web não existe ao acessar o endereço de um site em um Serviço de Hospedagem Web Infomaniak.
Introdução
- Este tipo de erro geralmente ocorre porque o seu nome de domínio não está corretamente ligado ao seu site (o seu nome de domínio provavelmente aponta para o endereço IP errado ou está mal configurado).
- Exemplo: um domínio
abc.xyzmal configurado, que aponta em IPv4 para uma hospedagem Starter e em IPv6 para uma hospedagem compartilhada…
- Exemplo: um domínio
Resolver um problema de ligação Domínio - Site Web
Para que possamos colocar o seu site novamente online:
- Verifique a zona DNS do seu nome de domínio, especialmente os seus registos A.
- Corrija-os, se necessário, indicando o endereço IP da sua hospedagem.
- Qualquer adição/modificação de DNS pode levar até 48 horas para se propagar.
Para isso, a forma mais simples é usar a ferramenta de Diagnóstico DNS Infomaniak para corrigir o apontamento automaticamente, agrupando previamente os produtos na mesma Organização, se necessário.
Link para esta FAQ: https://faq.infomaniak.com/1213
Esta seção de perguntas frequentes foi útil?
Este guia ajuda você a proteger a reputação do seu nome de domínio, para manter a confiança dos utilizadores da Internet e dos fornecedores de serviços no seu site ou na sua empresa, com o objetivo de facilitar o bom funcionamento do seu serviço de e-mail.
A reputação na web
Existem diferentes tipos de reputação na Internet, incluindo a reputação pessoal, a reputação empresarial e a reputação de domínio.
A reputação de domínio é, em termos gerais, uma pontuação que determina como os sistemas de e-mail decidem o que permitirão que chegue às caixas de entrada dos utilizadores. Fundamentalmente, a reputação do seu domínio é uma medida da saúde e da legitimidade do seu domínio. Essa reputação pode ser influenciada pela segurança do e-mail e do site.
Por exemplo, a reputação de um domínio pode diminuir se…
- … o site visível no endereço do domínio for alvo de um ataque que resulte no envio em massa de e-mails fraudulentos,
- … o serviço de e-mail do domínio está sendo utilizado para o envio de spam não solicitado.
Se a reputação do seu domínio permanecer negativa, seus e-mails poderão ser marcados como spam e não chegarão ao público-alvo. Isso pode prejudicar a capacidade de entrega dos e-mails (consulte este outro guia em inglês sobre o assunto).
Melhorar a reputação do domínio
Seguindo estas dicas, pode melhorar a reputação do seu domínio e, por exemplo, impulsionar todos os seus esforços de marketing por e-mail:
- Configure e verifique os registos SPF, DKIM e DMARC, que ajudam a proteger o seu domínio contra ataques de falsificação de identidade.
- Verifique a reputação do seu domínio com ferramentas como Google Postmaster Tools, Sender Score, Microsoft SNDS, McAfee ou Talos Intelligence e identifique potenciais problemas.
- Envie e-mails apenas para os utilizadores que escolheram subscrever!
- Obtenha links de confiança ou backlinks…
Consulte este outro guia sobre as RBL.
Link para esta FAQ: https://faq.infomaniak.com/1314
Esta seção de perguntas frequentes foi útil?
Este guia explica como obter o código EPP do seu nome de domínio na Hostpoint para poder transferi-lo para a Infomaniak.
Introdução
- Os termos "
EPP", "AuthCode", "AuthInfo", "código de transferência" e "código de autorização" referem-se a sequências alfanuméricas específicas do domínio, cujo objetivo principal é verificar a autorização do proprietário antes de uma transferência entre registradores. - Consulte o guia principal sobre o restante do processo de transferência.
- ⚠️ Trata-se de transferir um nome de domínio que você possui junto a um fornecedor diferente da Infomaniak, para que a gestão futura desse domínio seja feita pela Infomaniak; portanto, não se trata de uma transferência interna de um titular para outro, e o código a ser obtido não é, portanto, um código para uma transferência interna para o seu fornecedor atual.
Transferir o nome de domínio para a Infomaniak
Para obter o código de autorização do seu provedor atual:
- Consulte o procedimento completo fornecido pela Hostpoint para obter o código e guardá-lo em segurança.
- Depois de obter o código de autorização, consulte o guia principal da Infomaniak sobre o restante do processo de transferência do nome de domínio.
Link para esta FAQ: https://faq.infomaniak.com/1341
Esta seção de perguntas frequentes foi útil?
Este guia explica como adicionar ou modificar um ou mais registos do tipo CAAna zona DNS (de um nome de domínio) gerenciada no Painel de Controle Infomaniak.
Introdução
- Um registo CAA permite especificar uma autoridade de certificação autorizada a emitir certificados para um domínio.
Adicionar um CAA
Para gerenciar este tipo de registro em uma zona DNS:
- Clique aqui para acessar o gerenciamento do seu domínio no Manager Infomaniak (precisa de ajuda?).
- Clique diretamente no nome atribuído ao domínio em questão.
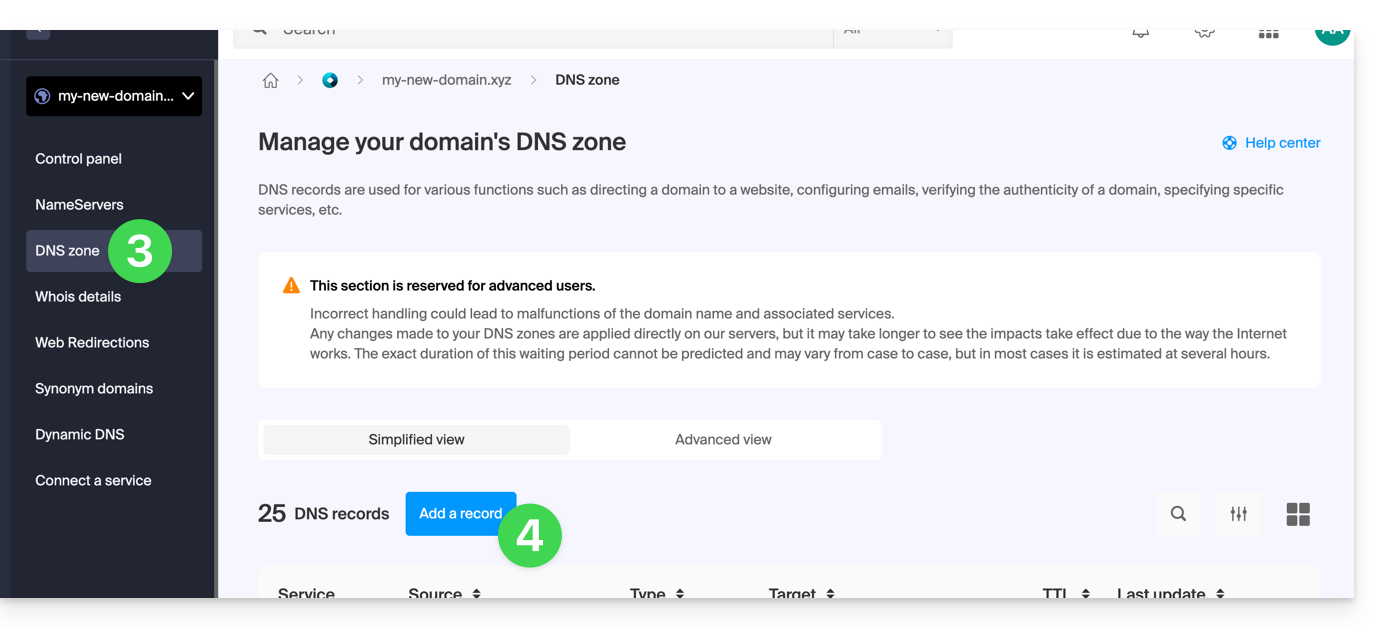
- Clique em Zona DNS no menu lateral esquerdo.
- Clique no botão para adicionar um registo:
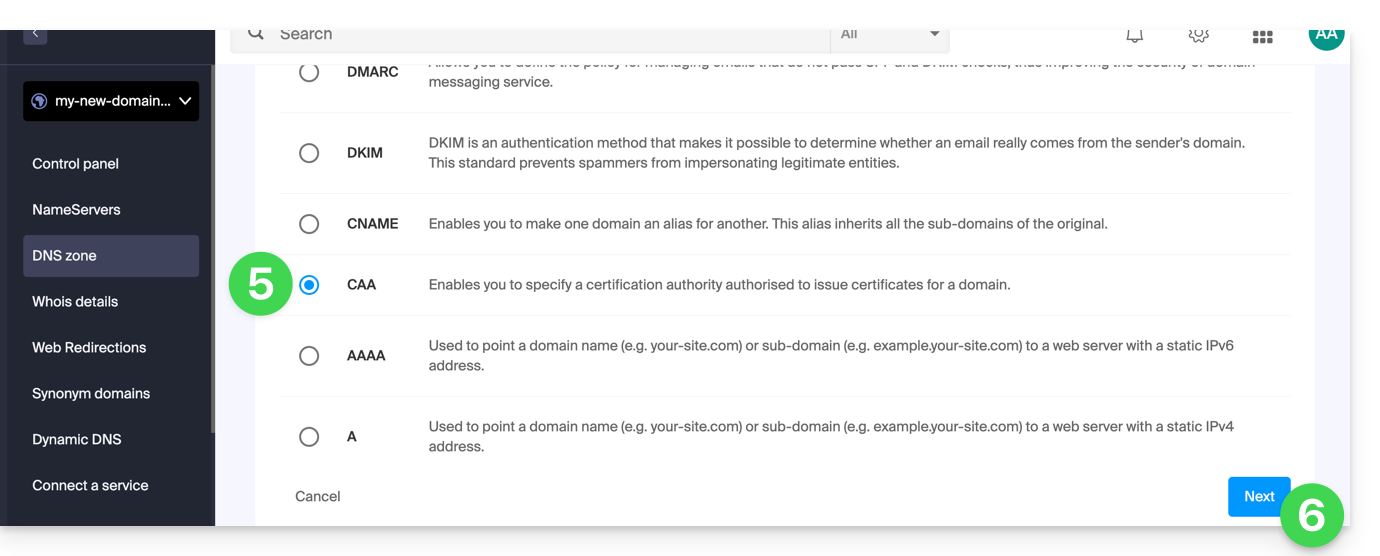
- Clique no botão de rádio CAA para adicionar um registo.
- Clique no botão Seguinte:
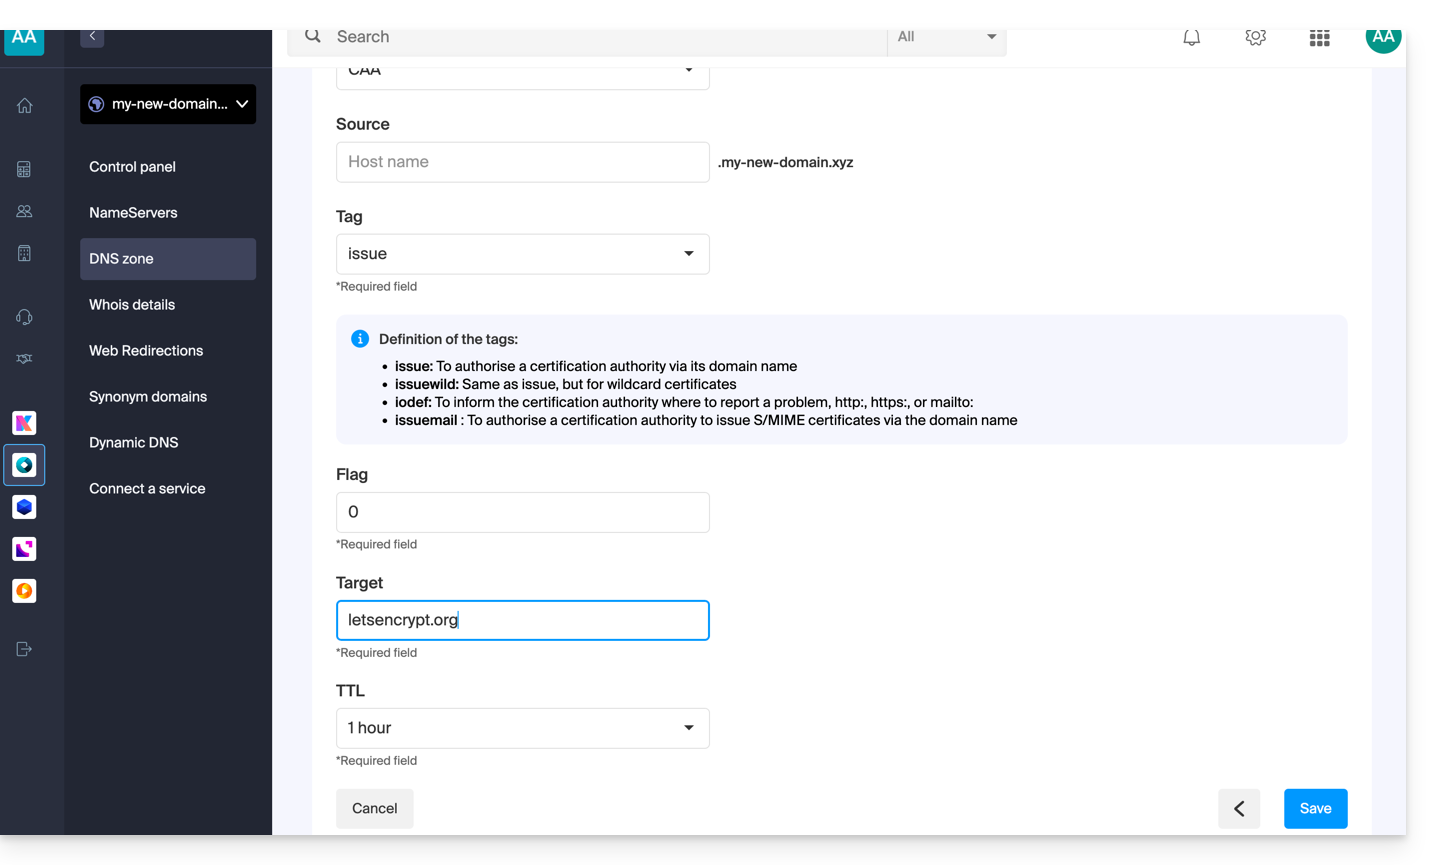
- Insira os valores do CAA necessários para a sua zona DNS: se pretende validar um certificado SSL, consulte as informações abaixo.
- Salve suas informações clicando no botão na parte inferior da página.
Adicionar um CAA para validar um certificado SSL…
… Sectigo
No caso de uma validação de certificado SSL Sectigo, siga o guia genérico, mas insira especificamente os seguintes dados:
- Selecione “Emitido para autoridade de certificação”.
- Insira o sinalizador/flag:
0. - Especifique
sectigo.com.
… Let's Encrypt
No caso da validação de um certificado SSL Let's Encrypt, siga o guia genérico, mas insira especificamente os seguintes dados:
- Escolha “Emitido para uma autoridade de certificação”.
- Insira o sinalizador/flag:
0. - Especifique
letsencrypt.org.
Link para esta FAQ: https://faq.infomaniak.com/1394
Esta seção de perguntas frequentes foi útil?
Este guia explica como obter o código EPP do seu nome de domínio na Hostinger para poder transferi-lo para a Infomaniak.
Introdução
- Os termos "
EPP", "AuthCode", "AuthInfo", "código de transferência" e "código de autorização" referem-se a sequências alfanuméricas específicas de um domínio, cujo objetivo principal é verificar a autorização do proprietário antes de uma transferência entre registradores. - Consulte o guia principal sobre o restante do processo de transferência.
- ⚠️ Trata-se de transferir um nome de domínio que você possui junto a um fornecedor diferente da Infomaniak, para que a gestão futura desse domínio seja feita pela Infomaniak; portanto, não se trata de uma transferência interna de um titular para outro, e o código a ser obtido não é, portanto, um código para uma transferência interna para o seu fornecedor atual.
Transferir o nome de domínio para a Infomaniak
Para obter o código de autorização do seu provedor atual:
- Consulte o procedimento completo fornecido pela Hostinger para obter o código e guardá-lo em segurança.
- Depois de obter o código de autorização, consulte o guia principal da Infomaniak sobre o restante do processo de transferência do nome de domínio.
Link para esta FAQ: https://faq.infomaniak.com/1414
Esta seção de perguntas frequentes foi útil?
Este guia explica como obter o código EPP do seu nome de domínio na o2switch para poder transferi-lo para a Infomaniak.
Introdução
- Os termos "
EPP", "AuthCode", "AuthInfo", "código de transferência" e "código de autorização" referem-se a sequências alfanuméricas específicas de um domínio, cujo objetivo principal é verificar a autorização do proprietário antes de uma transferência entre registradores. - Consulte o guia principal sobre o restante do processo de transferência.
- ⚠️ Trata-se de transferir um nome de domínio que você possui junto a um fornecedor diferente da Infomaniak, para que a gestão futura desse domínio seja feita pela Infomaniak; portanto, não se trata de uma transferência interna de um titular para outro, e o código a ser obtido não é, portanto, um código para uma transferência interna para o seu fornecedor atual.
Transferir o nome de domínio para a Infomaniak
Para obter o código de autorização do seu provedor atual:
- Consulte o procedimento completo fornecido pela o2switch para obter o código e guardá-lo em segurança.
- Depois de obter o código de autorização, consulte o guia principal da Infomaniak para obter informações sobre o restante do processo de transferência do nome de domínio.
Link para esta FAQ: https://faq.infomaniak.com/1428
Esta seção de perguntas frequentes foi útil?
Este guia explica como exibir o endereço IP de um site em sua Hospedagem Web.
Introdução
- O endereço IPv4 é, em princípio, o mesmo para cada um dos sites hospedados (a menos que você tenha adquirido um IP dedicado).
Exibir o endereço IP do seu site
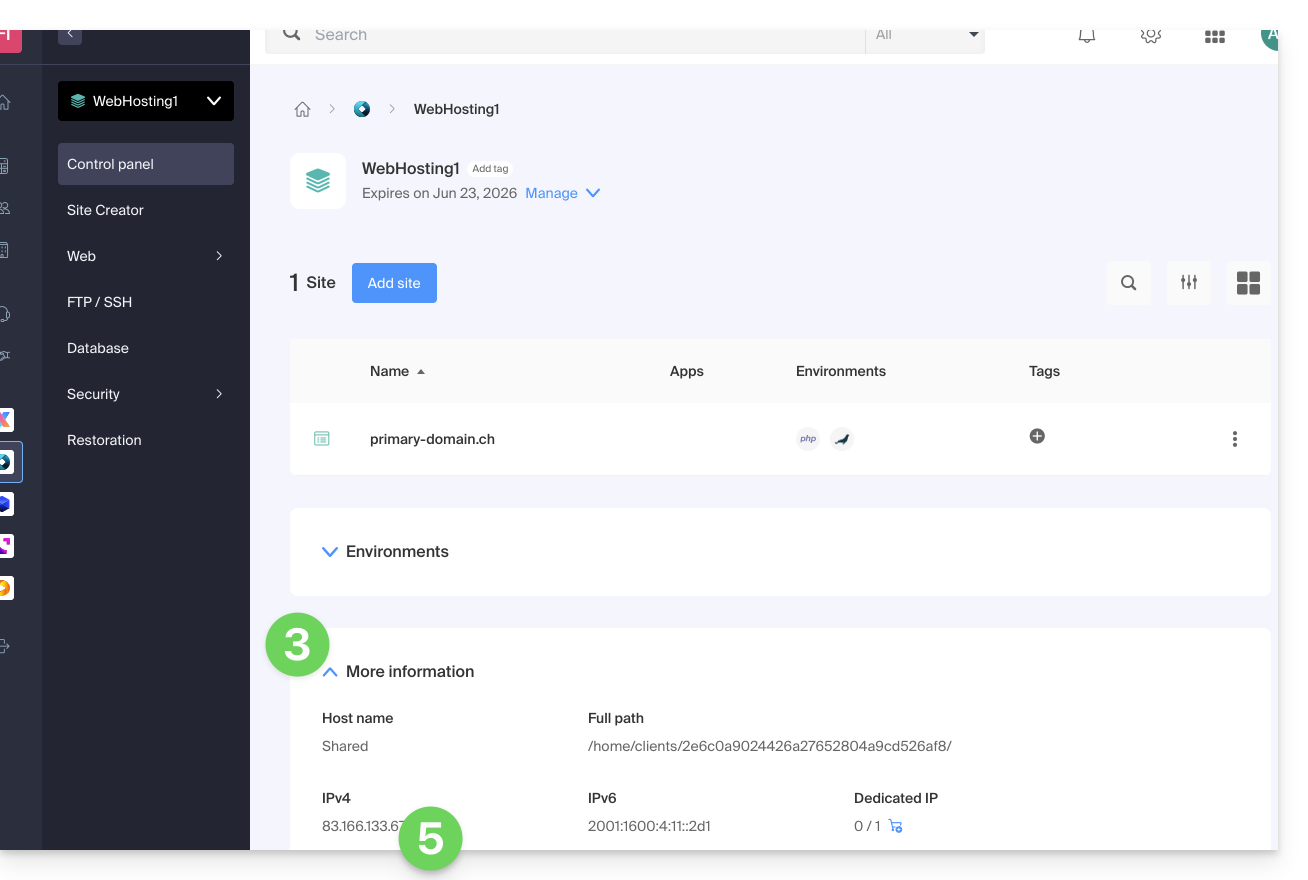
O endereço IP é especificado na página de gestão da hospedagem (Starter ou que contém vários sites):
- Clique aqui para acessar a gestão do seu site no Manager Infomaniak (precisa de ajuda?).
- Clique diretamente no nome atribuído ao produto em questão.
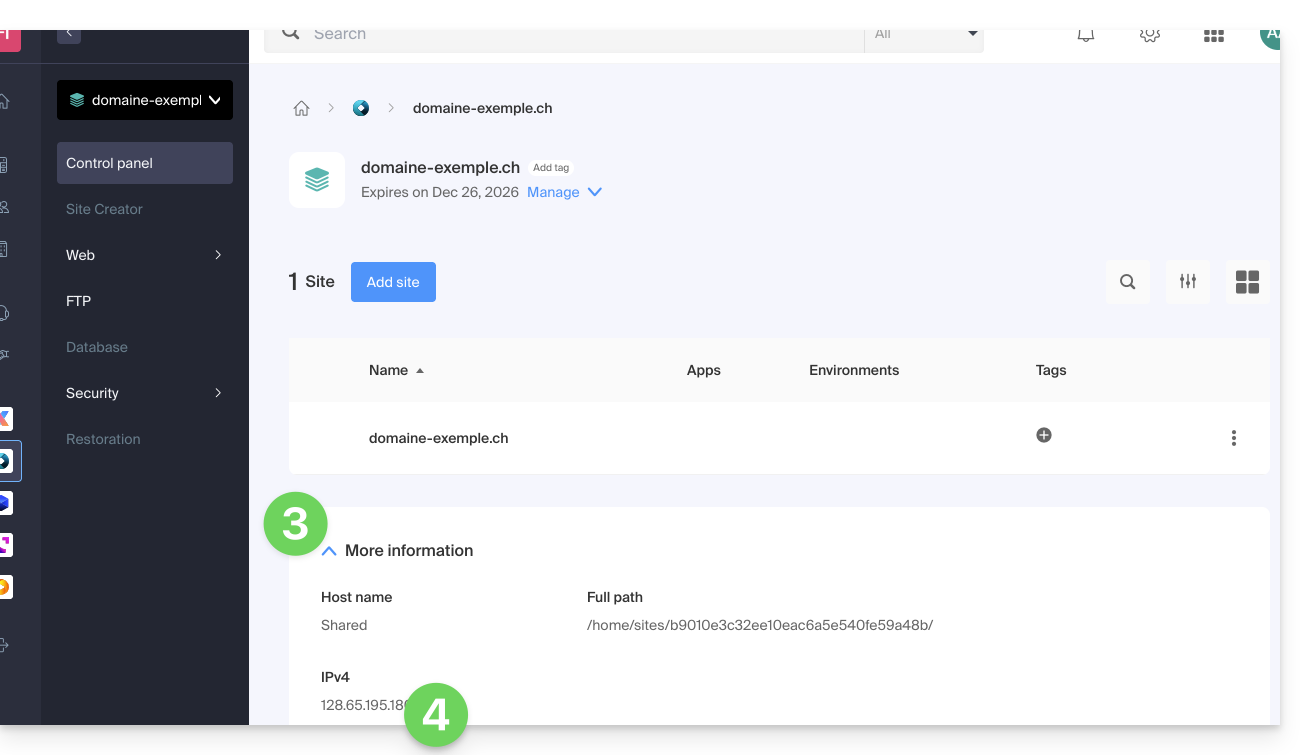
- Em seguida, clique na seta para baixo para expandir a seção Informações deste serviço de hospedagem.
- O endereço IPv4 é exibido na página:
- O endereço IPv6 também é exibido no caso das hospedagens pagas:
Link para esta FAQ: https://faq.infomaniak.com/1500
Esta seção de perguntas frequentes foi útil?
Este guia explica como configurar uma política DMARC para o seu serviço de e-mail hospedado pela Infomaniak, um elemento que se tornou indispensável para prevenir possíveis problemas de entrega.
Introdução
- O protocolo DMARC (Domain-based Message Authentication, Reporting, and Conformance) reforça a segurança do seu domínio, baseando-se nas verificações SPF e DKIM.
- Ele indica aos servidores destinatários como tratar os e-mails que não passam nesses testes de autenticidade, com três políticas de proteção (Nenhuma, Quarentena, Rejeitar) detalhadas abaixo.
- Em caso de falha na autenticação, o destinatário pode enviar um relatório DMARC; esses dados são essenciais para identificar erros de configuração ou impedir tentativas de phishing que utilizem seu nome de domínio.
Política DMARC e percentual de aceitação
Para as ações que podem ser aplicadas aos servidores destinatários quando uma mensagem suspeita é detetada, existem 3 políticas (p = política) que podem ser ajustadas com uma percentagem (pct):
Nenhuma: o e-mail é entregue normalmente (modo de observação)
Com “p=none”, nenhum e-mail é rejeitado ou colocado em quarentena com base na verificação DMARC. No entanto, a porcentagem de entrega pode ser usada para coletar dados sobre e-mails não autenticados, indicando quantos desses e-mails devem ser submetidos à política DMARC. Por exemplo, “p=none; pct=10” significa que 10% dos e-mails não autenticados serão submetidos à política DMARC, enquanto os 90% restantes serão aceitos.
Quarentena: o e-mail é enviado para a pasta de spam
Com "p=quarantine", os e-mails não autenticados podem ser colocados em quarentena, mas a porcentagem de recebimento determina a proporção que será efetivamente submetida a essa política. Por exemplo, "p=quarantine; pct=50" significa que 50% dos e-mails não autenticados serão colocados em quarentena, enquanto os 50% restantes serão aceitos.
Rejeição (reject): O e-mail é simplesmente bloqueado/apagado
Com "p=reject", os e-mails não autenticados são rejeitados. A porcentagem de recebimento determina a proporção dos e-mails não autenticados que serão efetivamente rejeitados. Por exemplo, "p=reject; pct=20" significa que 20% dos e-mails não autenticados serão rejeitados, enquanto os 80% restantes serão aceitos.
Criar um registro DMARC
Existem 2 formas de gerir o DMARC.
Se possui um serviço de e-mail na Infomaniak, a forma mais simples é aceder à ferramenta de Segurança global para gerir a sua política de segurança DMARC e os relatórios: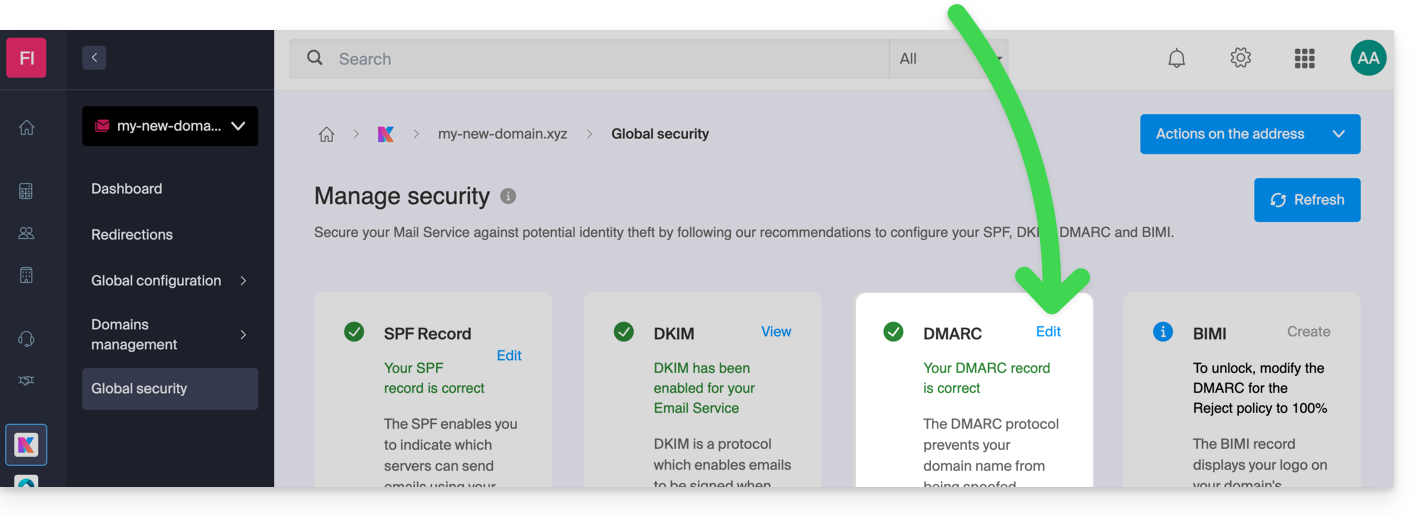
Como o registro DMARC é um tipo de registro DNS, geralmente do tipo TXT, você também pode gerenciá-lo a partir da zona DNS do nome de domínio:
- Clique aqui para acessar o gerenciamento do seu domínio no Manager Infomaniak (precisa de ajuda?).
- Clique diretamente no nome atribuído ao domínio em questão.
- Clique em Zona DNS no menu lateral esquerdo.
- Clique no botão para adicionar um registo:
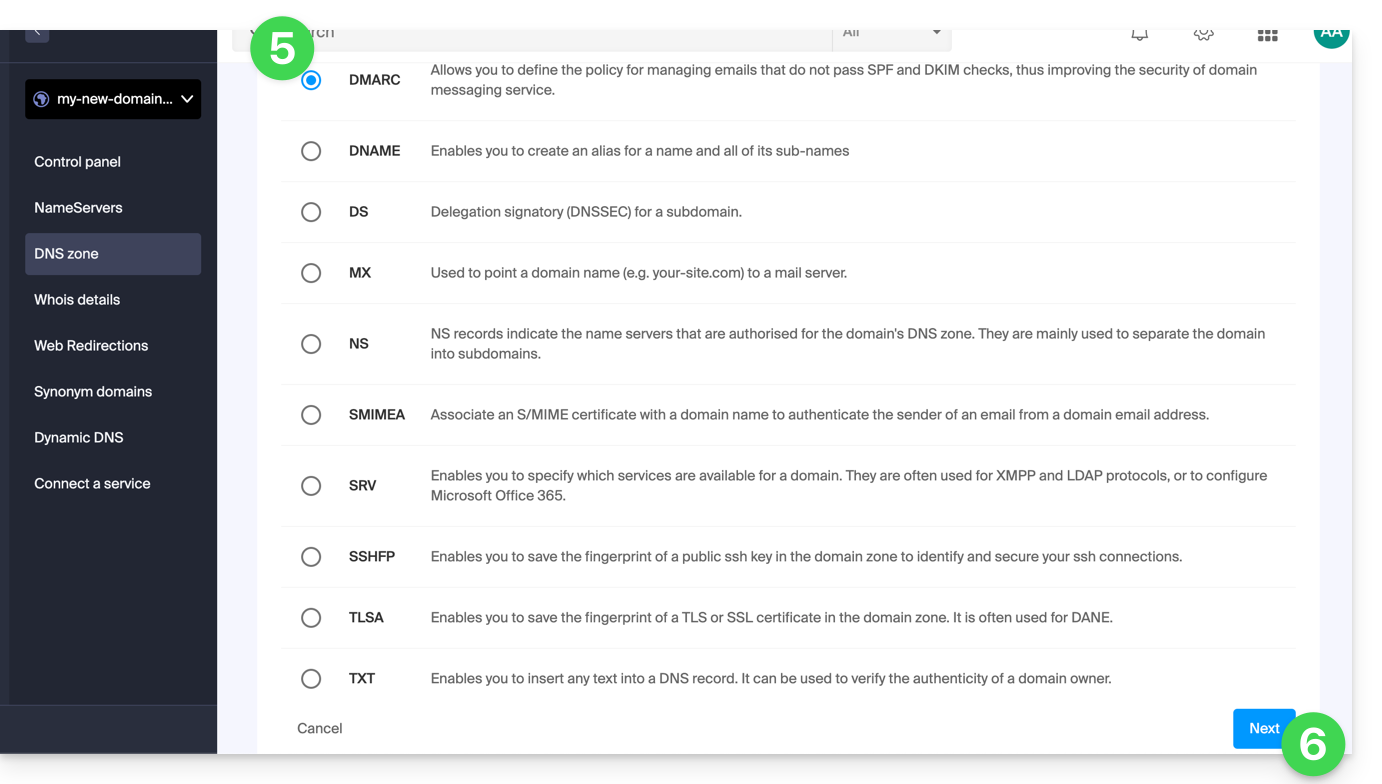
- Clique no botão de rádio DMARC para adicionar um registo.
- Clique no botão Seguinte:
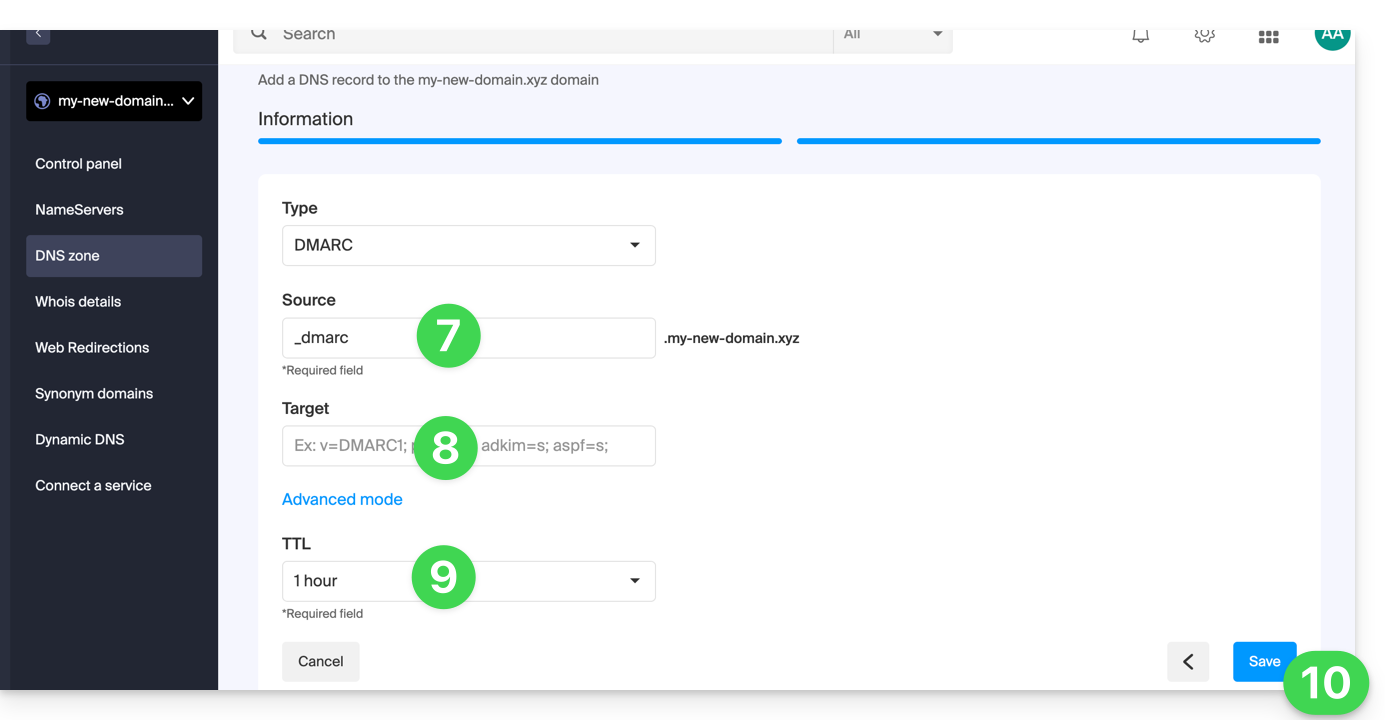
- Deixe (ou adicione, se necessário) o valor
_dmarcno campo Origem. O campo Destino deve conter os parâmetros que deseja utilizar, separados por
;:Nome da Tag Objetivo Exemplo v Versão do protocolo v=DMARC1pct Percentagem de mensagens sujeitas ao filtro pct=20ruf URI de relatório para relatórios forenses ruf=mailto:authfail@domain.xyzrua URI de relatório para relatórios agregados rua=mailto:aggrep@domain.xyzp Política para o domínio organizacional p=quarantinesp Política para os subdomínios do domínio organizacional sp=rejectadkim Modo de alinhamento para DKIM adkim=saspf Modo de alinhamento para SPF aspf=ro que pode resultar, por exemplo, em
v=DMARC1;p=reject;pct=100;rua=mailto:postmaster@dmarcdomain.com(fonte)- Deixe o valor padrão para o TTL.
- Clique no botão Salvar:
Qualquer adição/modificação de DNS pode levar até 48 horas para ser propagada.
Link para esta FAQ: https://faq.infomaniak.com/1552
Esta seção de perguntas frequentes foi útil?
Este guia explica qual DKIM adicionar para proteger o serviço de e-mail da Infomaniak, caso este esteja associado a um nome de domínio cujos DNS são geridos pela Cloudflare.
Introdução
- Se você gerencia seus e-mails na Infomaniak, assim como o nome de domínio associado, mas o gerenciamento DNS é feito na Cloudflare, então você deve adicionar o DKIM na interface da Cloudflare.
Adicionar um DKIM na Cloudflare
Pré-requisitos
- Consulte este outro guia para poder visualizar o DKIM correspondente à sua conta de e-mail Infomaniak.
- Exibir o DKIM para poder copiá-lo e colá-lo. Exemplo:
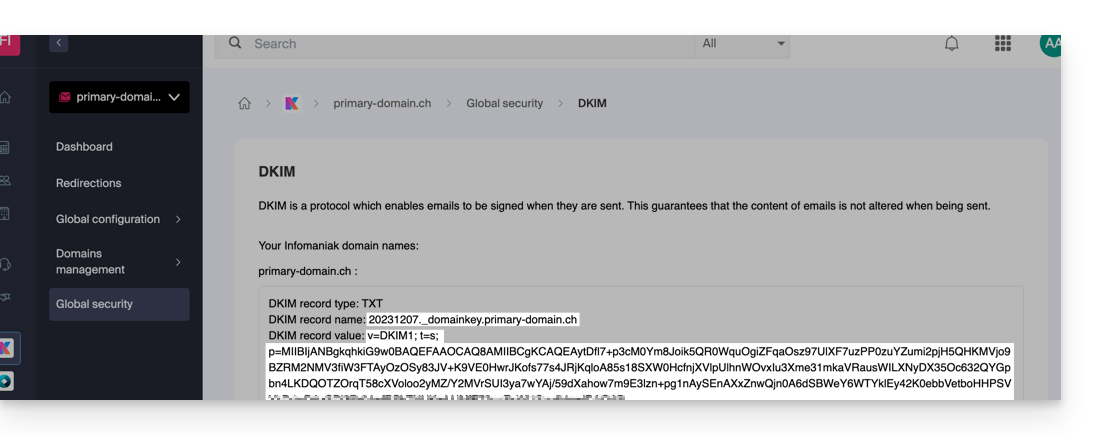
Em seguida, siga o procedimento abaixo, que permite ativar o DKIM corretamente, melhorando assim a segurança e a capacidade de entrega de e-mails para o domínio em questão:
- Clique aqui para acessar sua conta Cloudflare.
- Selecione o domínio desejado.
- Na secção DNS, procure e elimine todos os registos NS para "
_domainkey" que apontem para a Infomaniak. - Clique no botão Adicionar registo para abrir o formulário de introdução de dados.
- Preencha os campos utilizando os dados obtidos no painel de controlo Infomaniak, respeitando a configuração padrão para um registo DKIM do tipo TXT:
| Campo Cloudflare | Valor a inserir | Notas importantes |
|---|---|---|
| Tipo | TXT (texto) | Escolha o tipo padrão para as chaves DKIM. |
| Nome (Host) | O seletor DKIM (ex: 20240112) | Insira apenas o seletor, pois, em princípio, o Cloudflare adiciona automaticamente o nome de domínio e o sufixo ._domainkey. Consulte a documentação do Cloudflare, se necessário. |
| Conteúdo (Valor) | A chave pública (a sequência longa) | Cole a chave pública DKIM completa fornecida (o que vem depois de p=) |
| TTL | Automático | Deixe o valor padrão para uma gestão ideal pela Cloudflare. |
Certifique-se de que o Status do Proxy (nuvem) esteja definido como Apenas DNS (cinza) para os registros de autenticação de e-mail.
Backup e Propagação
Após verificar cuidadosamente a exatidão do Seletor e da Chave Pública, clique no botão Salvar. Isso confirma a adição do seu registro DKIM na zona DNS do Cloudflare.
Qualquer adição ou modificação de DNS pode levar até 48 horas para se propagar.
Após esse período, você pode usar as ferramentas de verificação online para confirmar se o registro DKIM foi publicado e está válido. Essa validação garante que seus e-mails Infomaniak serão devidamente assinados e que sua taxa de entrega será otimizada.
Link para esta FAQ: https://faq.infomaniak.com/1619
Esta seção de perguntas frequentes foi útil?
Este guia destina-se aos proprietários de um nome de domínio na infraestrutura Infomaniak que estejam a ter problemas com o DMARC ao utilizar algumas das ferramentas do Google, como o Meet ou o Calendar.
Resolver um erro DMARC
Para tornar a configuração do seu nome de domínio (que possui uma política DMARC do tipo reject) compatível com o uso de alguns serviços do Google, é necessário adicionar um registro SPF correspondente:
- Antes:
v=spf1 include:spf.infomaniak.ch -all - Depois:
v=spf1 include:spf.infomaniak.ch include:_spf.google.com -all
Para editar o registro SPF atualmente configurado na zona DNS do seu nome de domínio:
- Clique aqui para acessar o gerenciamento do seu domínio no painel de controle Infomaniak (precisa de ajuda?).
- Clique diretamente no nome atribuído ao domínio em questão.
- Clique em Zona DNS no menu lateral esquerdo.
- Clique no menu de ação ⋮ localizado à direita do registro do tipo TXT que contém o valor do SPF em questão.
- Clique em Editar:
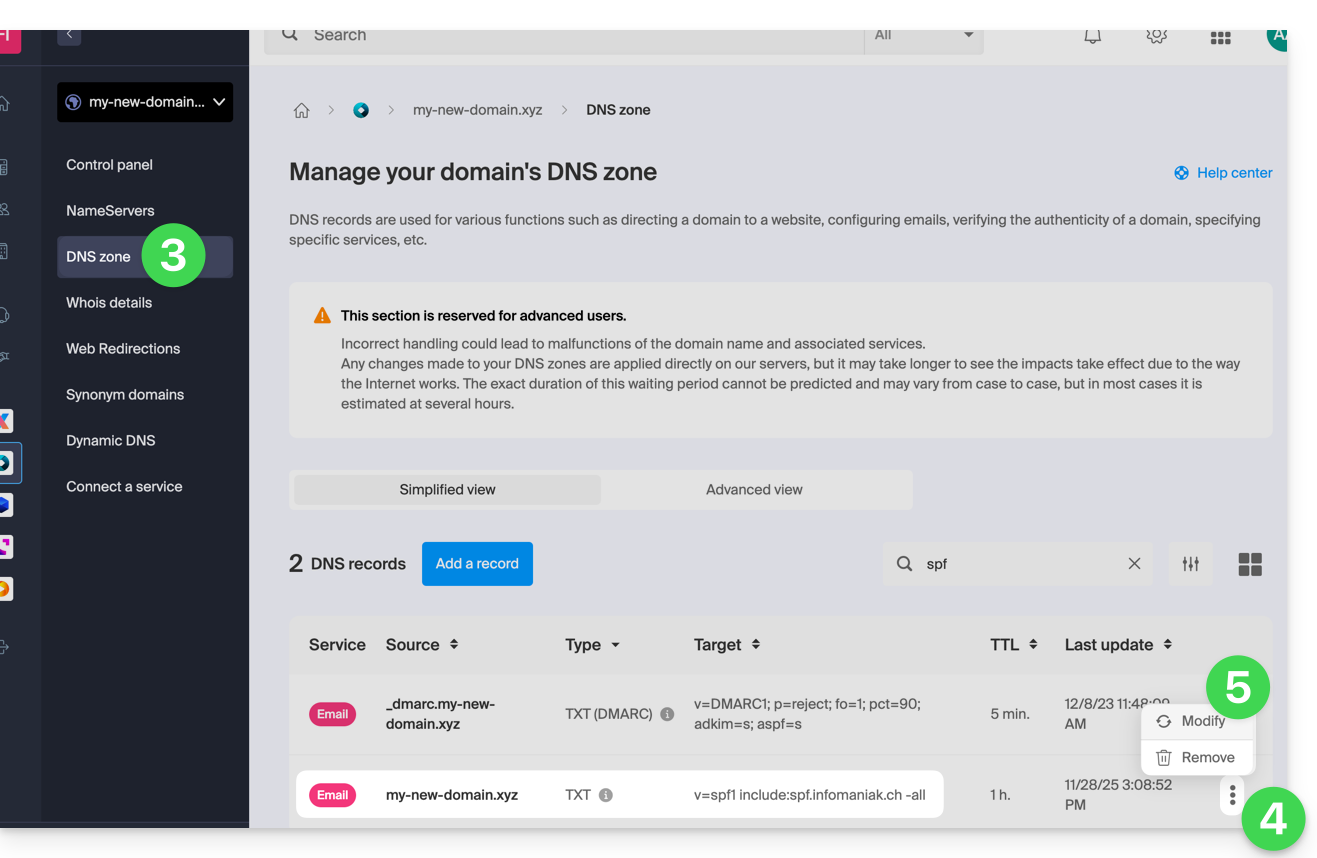
- Edite o campo, adicionando na mesma linha
include:_spf.google.comapós o include Infomaniak existente e antes do-allfinal. - Clique no botão Guardar:
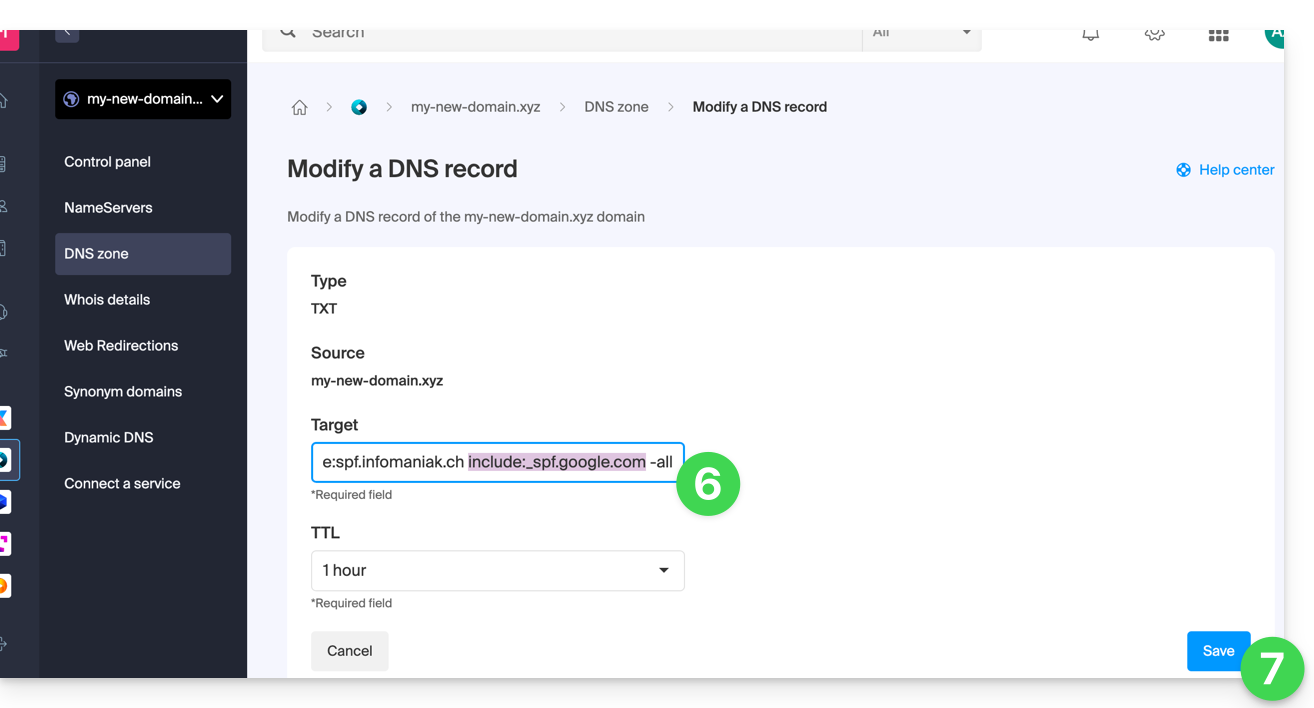
Qualquer adição/modificação de DNS pode demorar até 48 horas para ser propagada.
Consulte esta documentação do Google se precisar de informações sobre a configuração do SPF do Google.
Link para esta FAQ: https://faq.infomaniak.com/1641
Esta seção de perguntas frequentes foi útil?
Este guia explica como acessar sua central doméstica Home Assistant (que está localizada atrás de um endereço IP dinâmico, fornecido pelo seu provedor de serviços de Internet) com um nome de domínio na Infomaniak, através da opção gratuita DynDNS e um script gratuito disponibilizado aqui.
Introdução
- A integração que você instala funciona como um mensageiro: ela monitora continuamente o endereço IP da sua rede local.
- Assim que detecta que o seu provedor de serviços alterou o seu IP, ela envia instantaneamente um sinal para a Infomaniak.
- A Infomaniak atualiza então o seu nome de domínio (ex:
ha.domain.xyz) para que ele aponte para o novo endereço IP.
Instalar a Integração Infomaniak DynDNS — Home Assistant
Pré-requisitos
- Possuir uma instalação Home Assistant (em um Raspberry Pi 5, por exemplo) conectada à Internet com um endereço IP dinâmico.
- Um DNS dinâmico deve ter sido criado no domínio em questão.
Em seguida:
- Conecte-se ao painel de controle do seu Home Assistant.
- Instale o HACS, caso ainda não o tenha; vá para as configurações do Home Assistant:
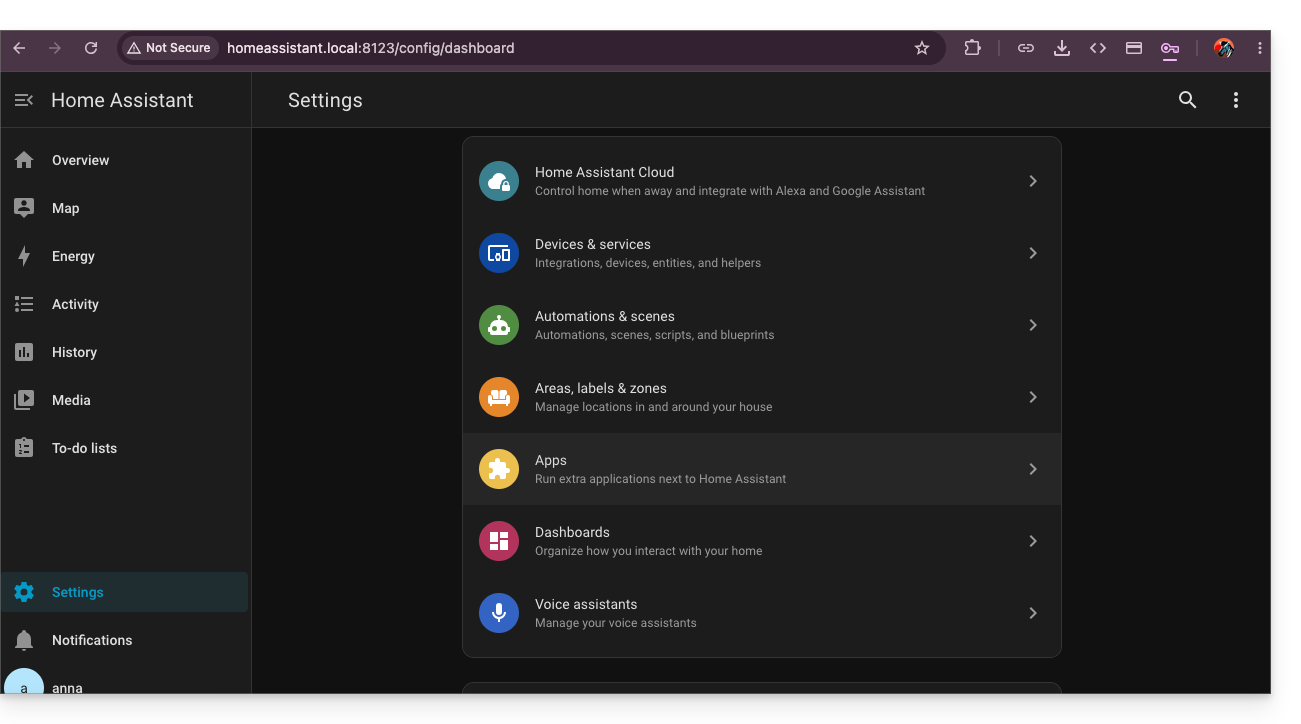
- Instale o aplicativo Terminal & SSH:
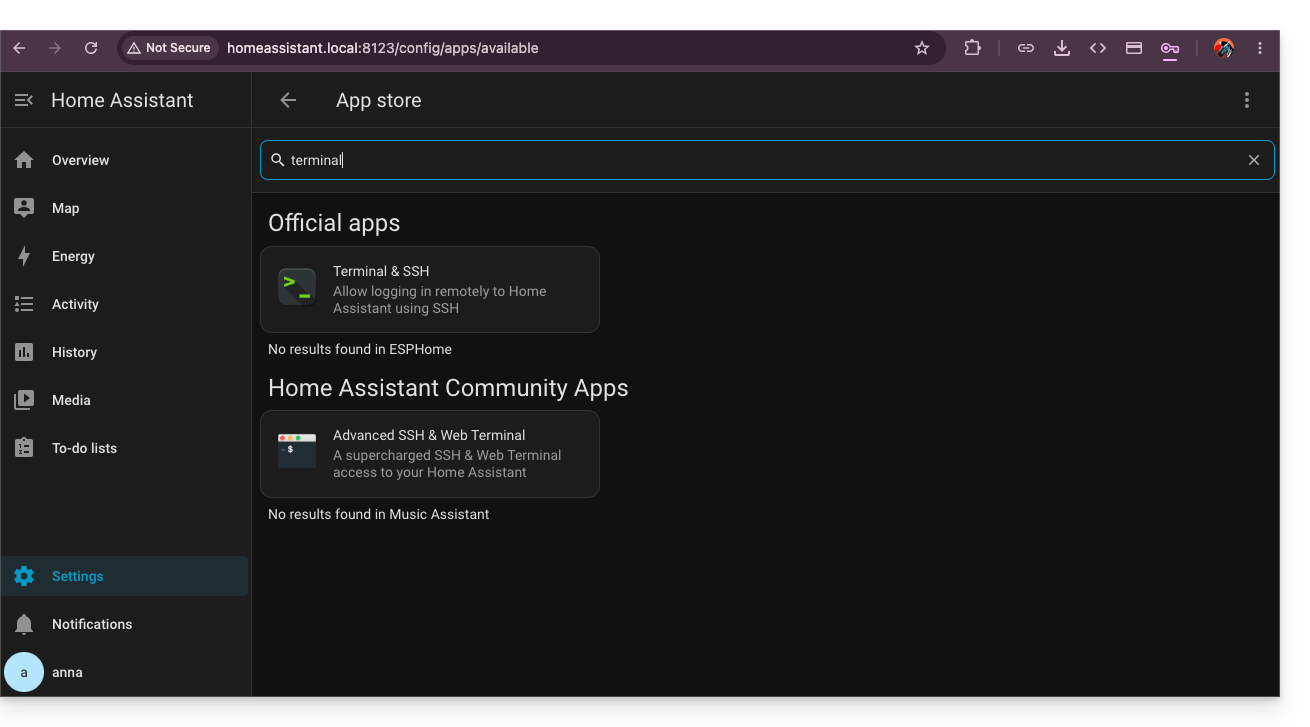
- Neste terminal, insira o comando
wget -O - https://get.hacs.xyz | bash -: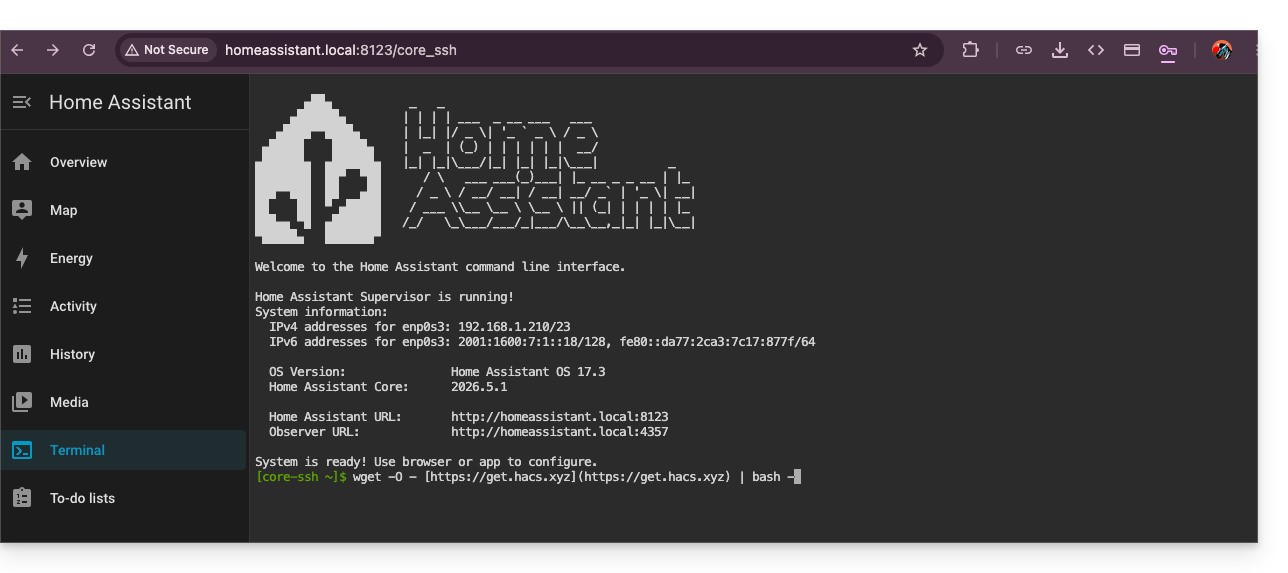
- Após a instalação do HACS, reinicie o Home Assistant.
- Ative o HACS procurando-o nas integrações:
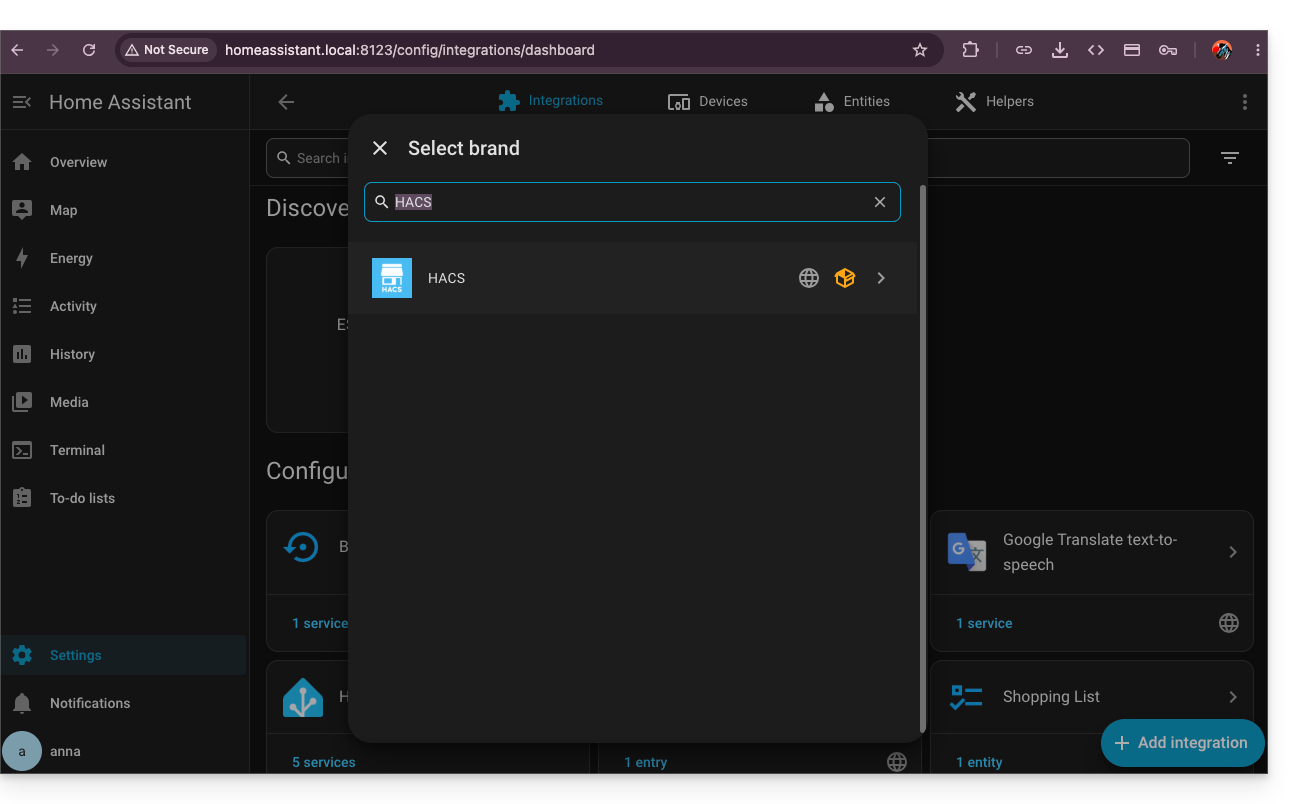
- Após a validação via Github, volte ao HACS instalado na sua barra lateral esquerda e clique no menu de ação ⋮ no canto superior direito da interface do HACS para escolher os repositórios personalizados:
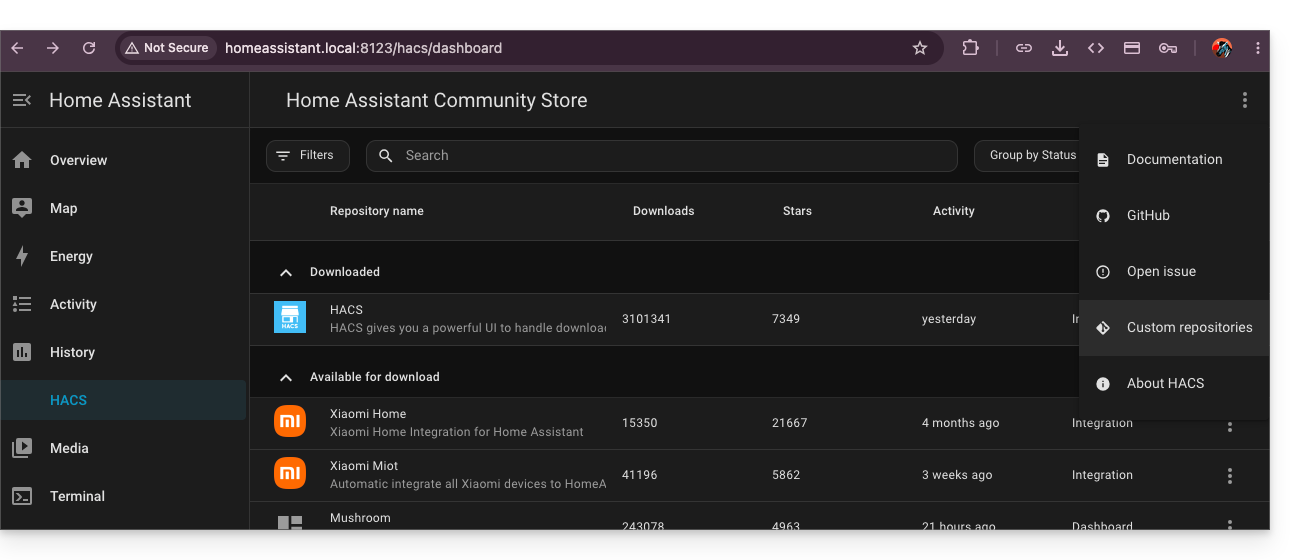
- Insira a URL
https://github.com/cy-bertrand/Infomaniak-dyndns-hae escolha o tipo Integração, antes de clicar em Adicionar: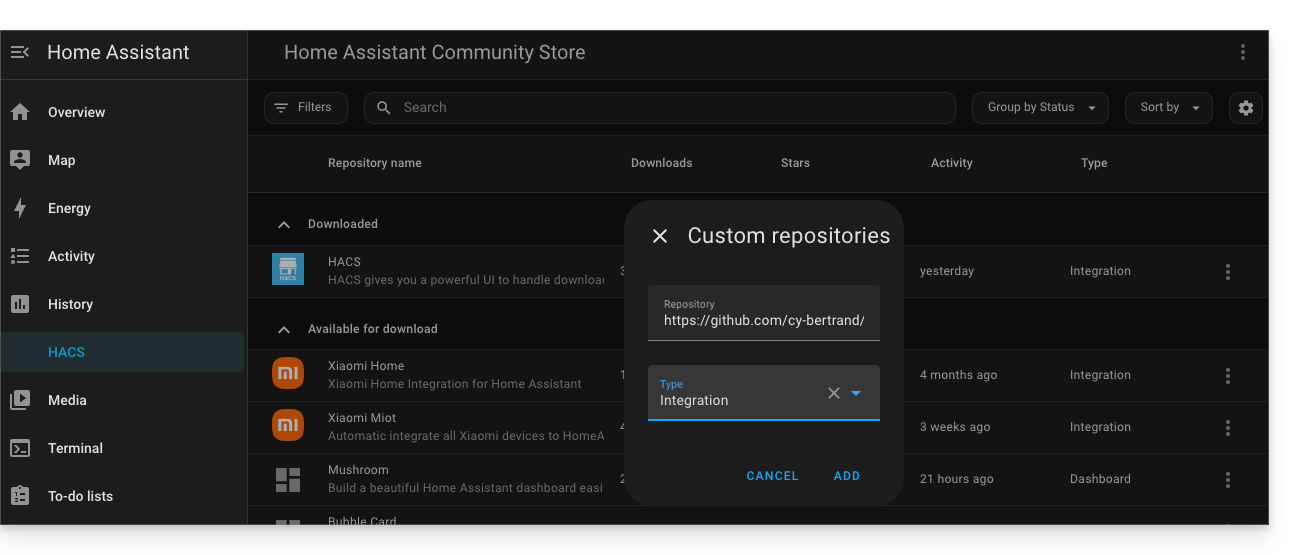
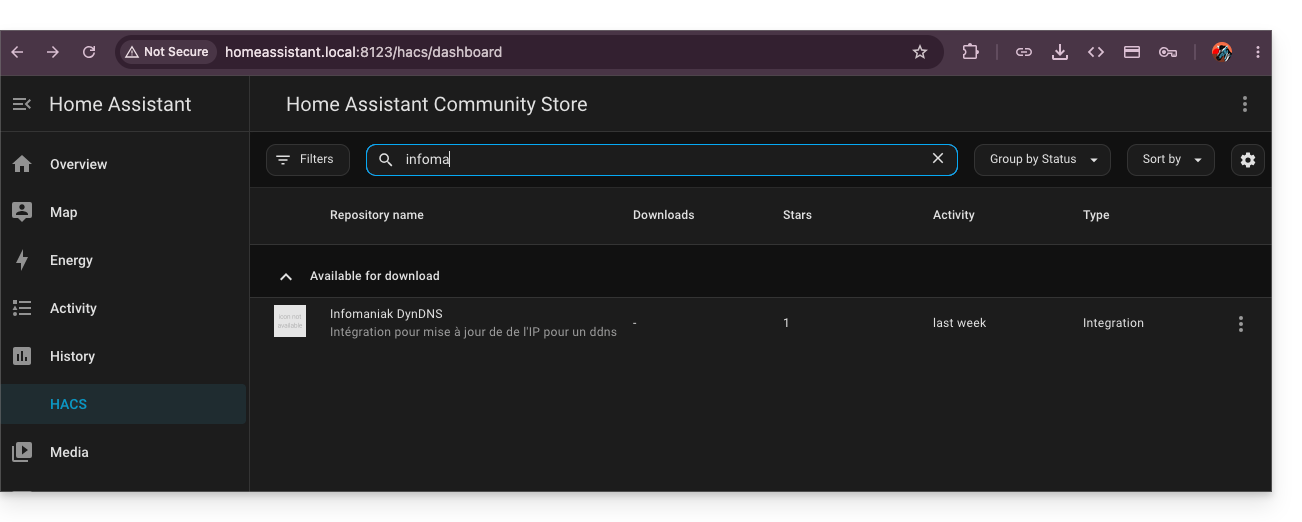
- Em seguida, procure por Infomaniak DynDNS e clique nele:
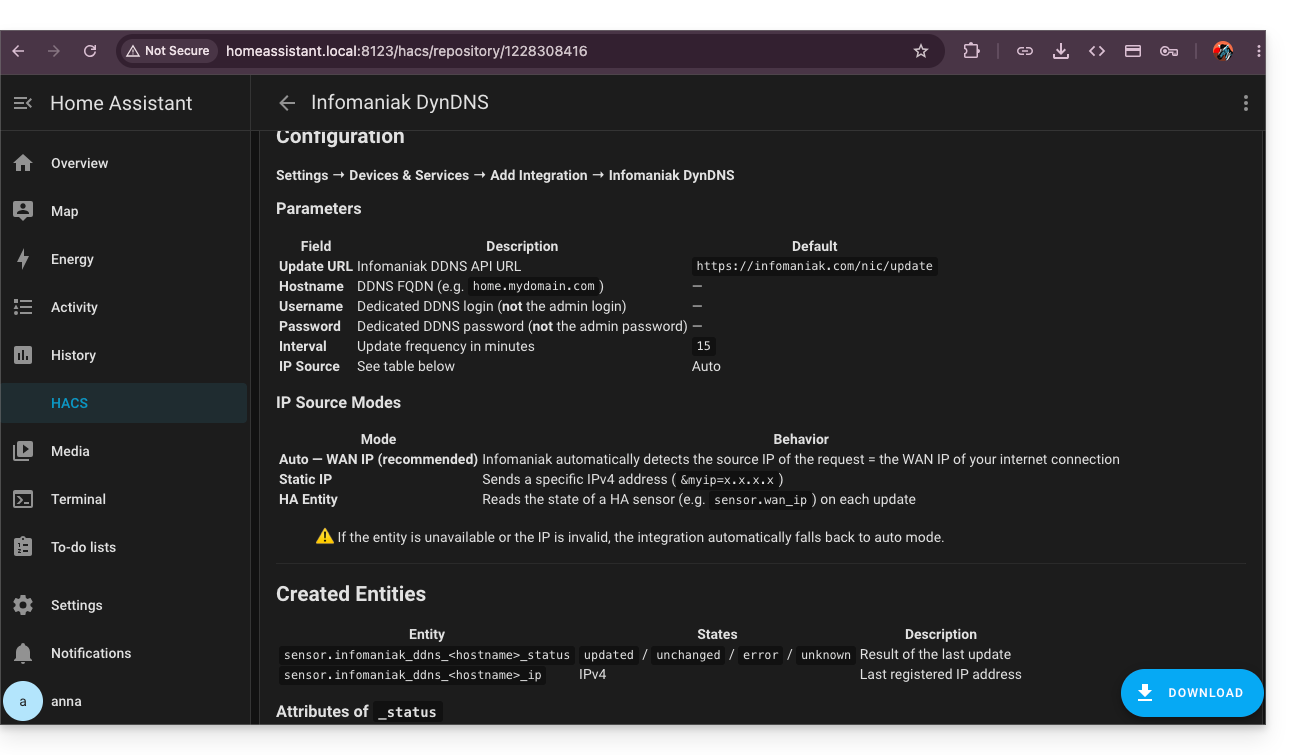
- Instale este serviço clicando no botão Download no canto inferior direito:
- Reinicie o Home Assistant.
Configurar o Infomaniak DynDNS — Integração do Home Assistant
Para isso:
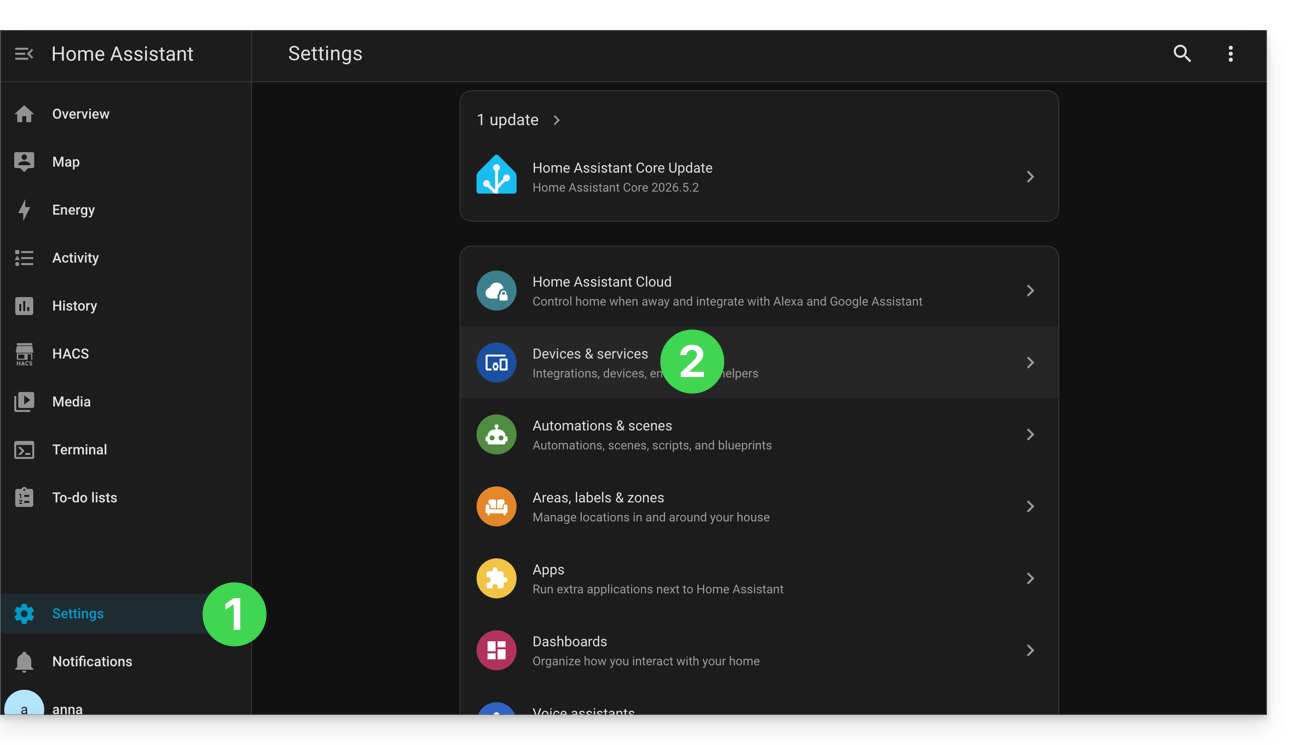
- Clique em Configurações no menu lateral esquerdo do HA.
- Clique em Dispositivos e serviços:
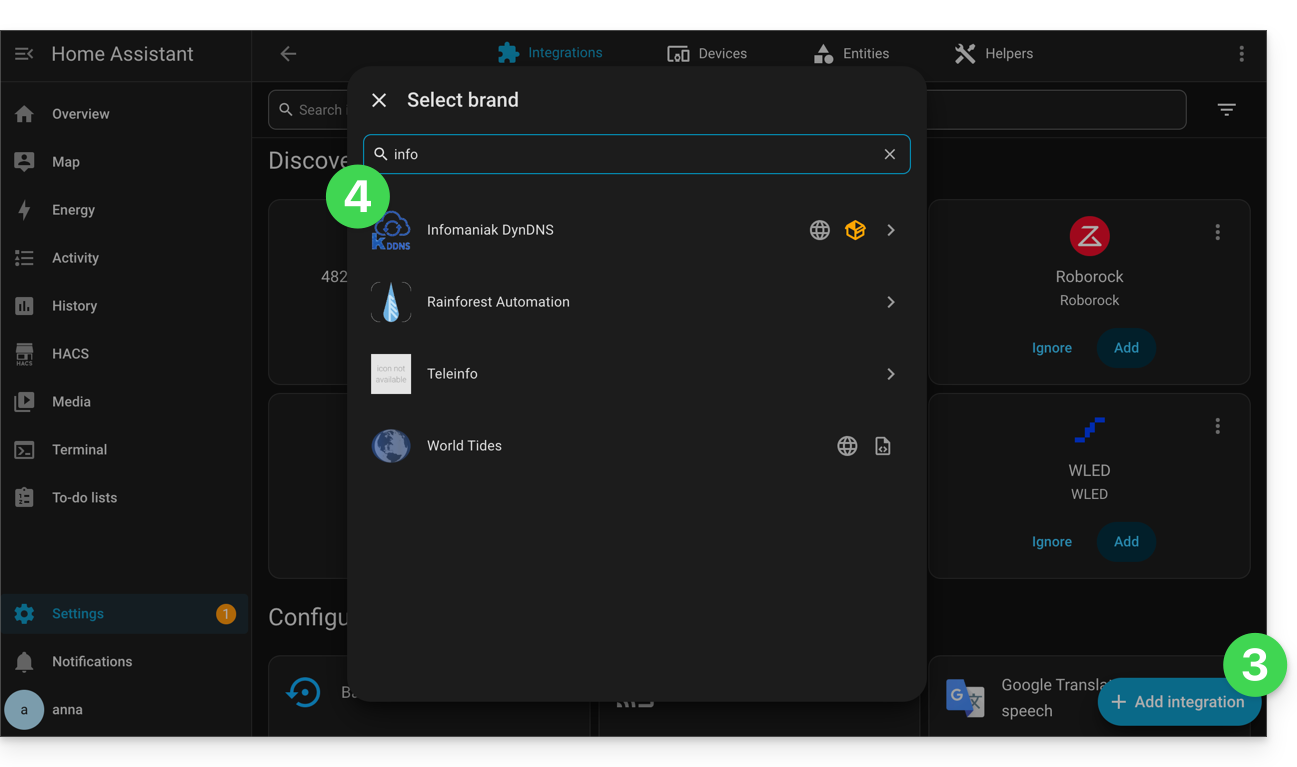
- Clique no botão para Adicionar integração.
- Clique em Infomaniak DynDNS:
- Configure o seu equipamento:
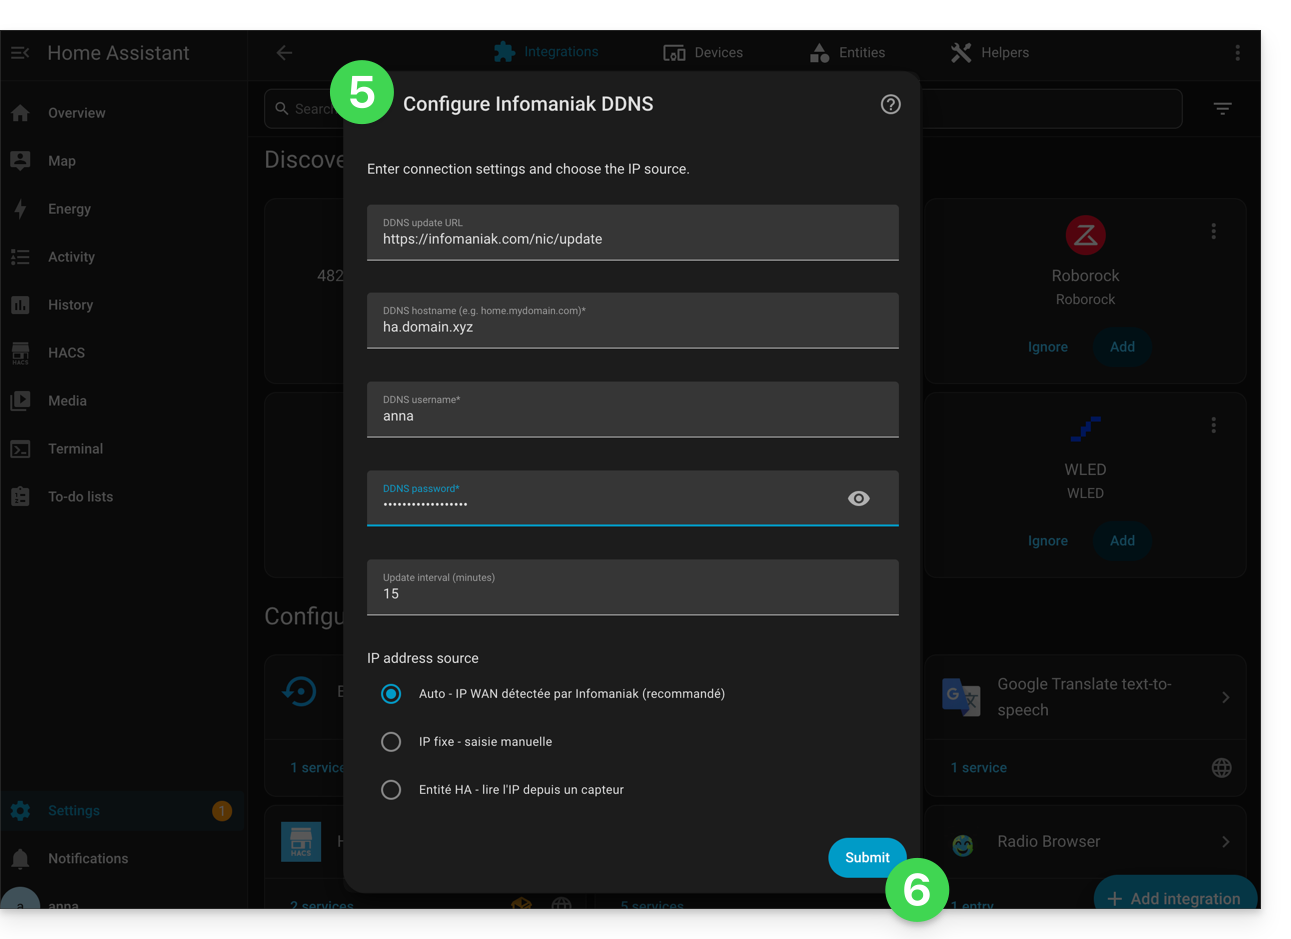
- Nome do host: o URL configurado no Manager durante a adição do Dynamic DNS
- Nome de utilizador: o identificador definido no Manager durante a adição do Dynamic DNS
- Palavra-passe: a palavra-passe definida no Manager durante a adição do Dynamic DNS
- Valide na parte inferior da página.
- Atribua um nome à entidade e guarde as suas alterações clicando em Concluir:
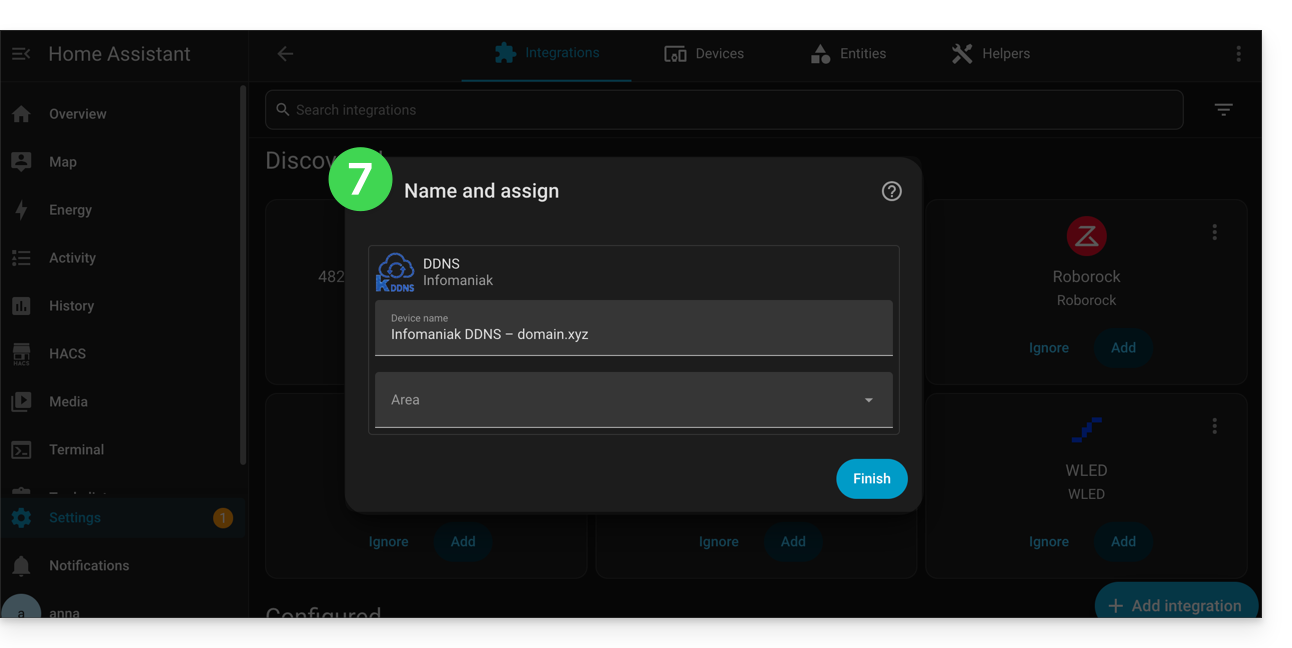
O Home Assistant verificará o IP externo a cada 15 minutos. Se este tiver mudado, o DNS será atualizado. Desta forma, o seu nome de domínio apontará continuamente para a sua instalação de automação residencial, mesmo que o seu provedor de serviços de Internet altere o seu endereço IP público.
Consulte também a documentação oficial do plugin.
Link para esta FAQ: https://faq.infomaniak.com/1665
Esta seção de perguntas frequentes foi útil?
Este guia explica como suspender a gestão administrativa de um produto, de modo que nenhum utilizador da Organização possa mais utilizá-lo no Manager Infomaniak. Também é possível bloquear um utilizador da sua Organização, sem o eliminar.
Introdução
- Ao bloquear a gestão de um produto:
- Apenas os administradores e o responsável legal poderão desbloqueá-lo.
- Os utilizadores com direitos limitados (colaboradores e clientes) que tenham acesso a este produto não poderão mais gerir o mesmo.
- É enviado um e-mail aos utilizadores da Organização.
Bloquear um produto
Pré-requisitos
- Ser Administrador ou Responsável legal na Organização (os utilizadores com direitos limitados (colaboradores e clientes) que têm acesso a este produto não poderão fazê-lo).
Para bloquear ou desbloquear determinados produtos para toda a Organização:
- Clique aqui para acessar o gerenciamento de produtos no painel de controle Infomaniak (precisa de ajuda?).
- Acesse o serviço que deseja bloquear.
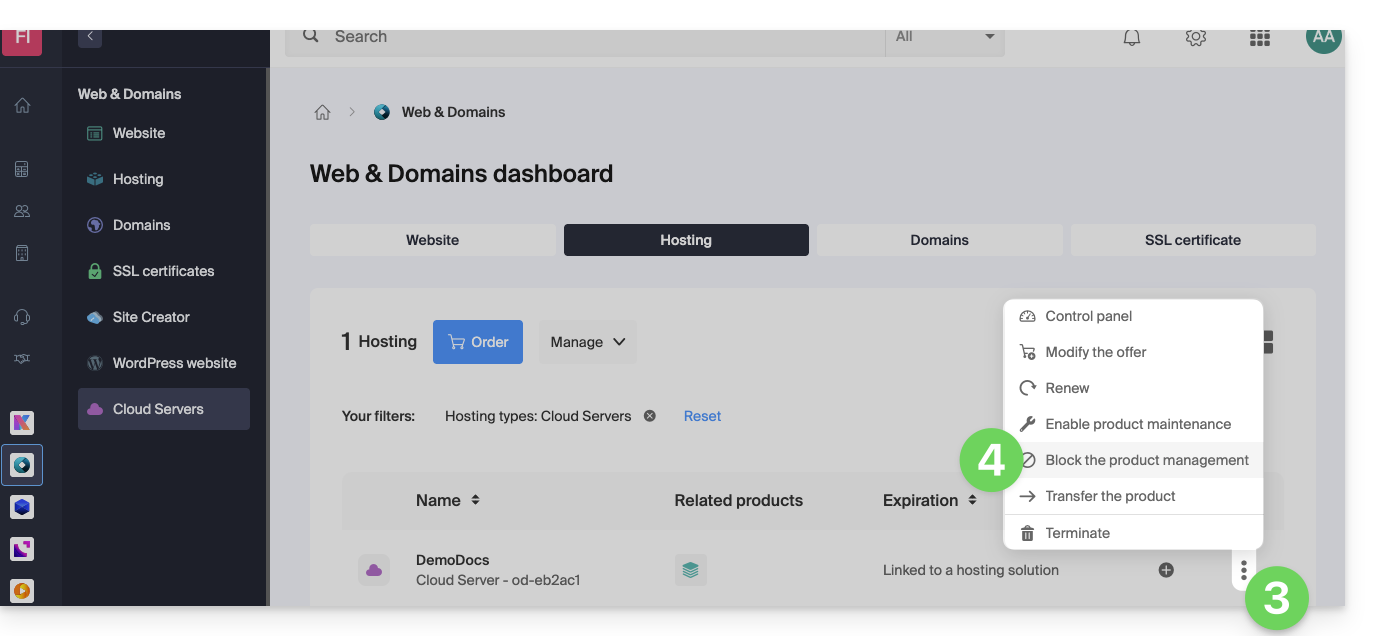
- Clique no menu de ação ⋮, localizado à direita do item em questão.
- Clique em Bloquear a gestão do produto:
- Exemplo 1, Servidor Cloud:
- Exemplo 2, nome de domínio:
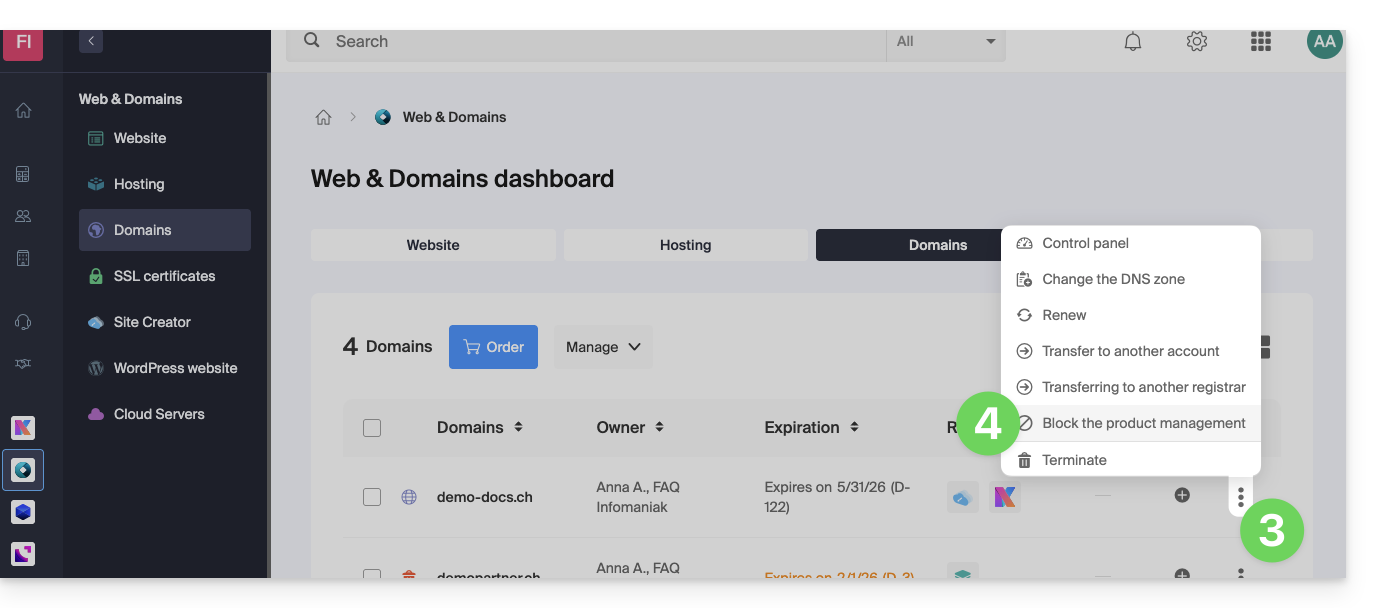
- Exemplo 1, Servidor Cloud:
- Confirme a suspensão.
Suspender os e-mails
Um Serviço de Email não pode ser bloqueado da forma indicada acima, mas pode ser colocado em manutenção.
Pré-requisitos
- Ser administrador ou responsável legal; os utilizadores com direitos limitados (colaboradores e clientes) que tenham acesso a este produto não poderão fazê-lo.
Para suspender os endereços de e-mail:
- Clique aqui para acessar o gerenciamento do seu produto no Manager Infomaniak (precisa de ajuda?).
- Clique diretamente no nome atribuído ao produto em questão.
- Clique em Gerenciar.
- Clique em Ativar a manutenção:
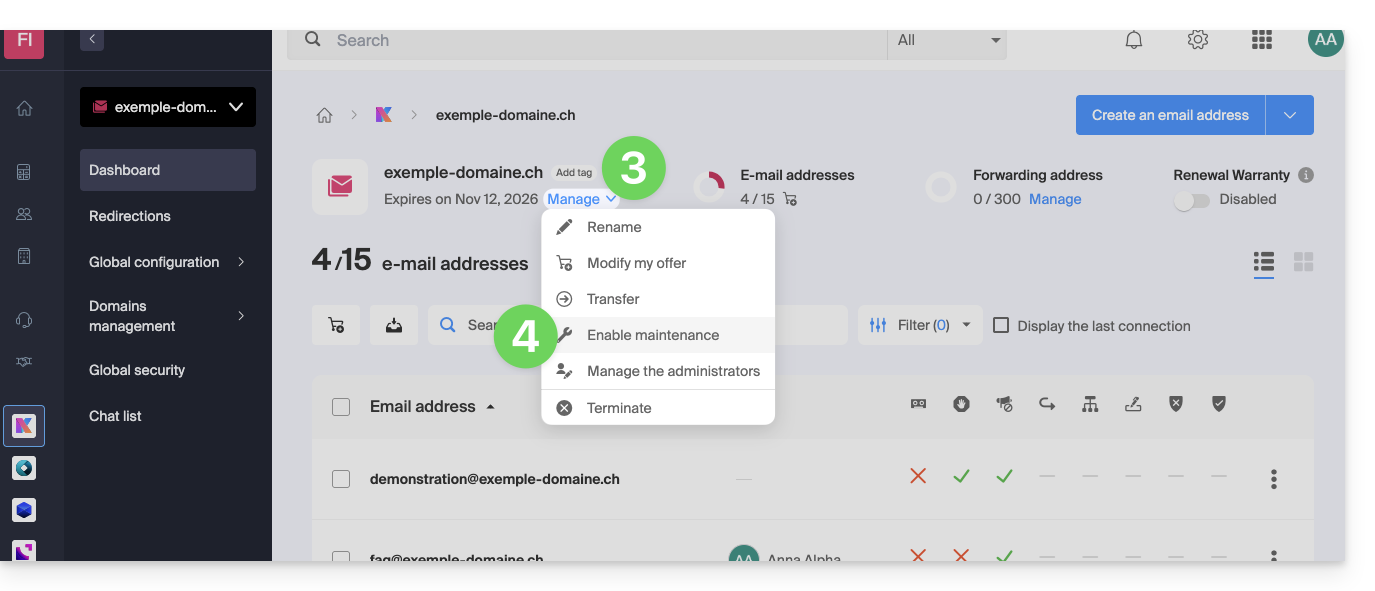
- Confirme a suspensão do uso dos endereços de e-mail clicando no botão vermelho (o recebimento não é interrompido, mas a consulta é impossível):
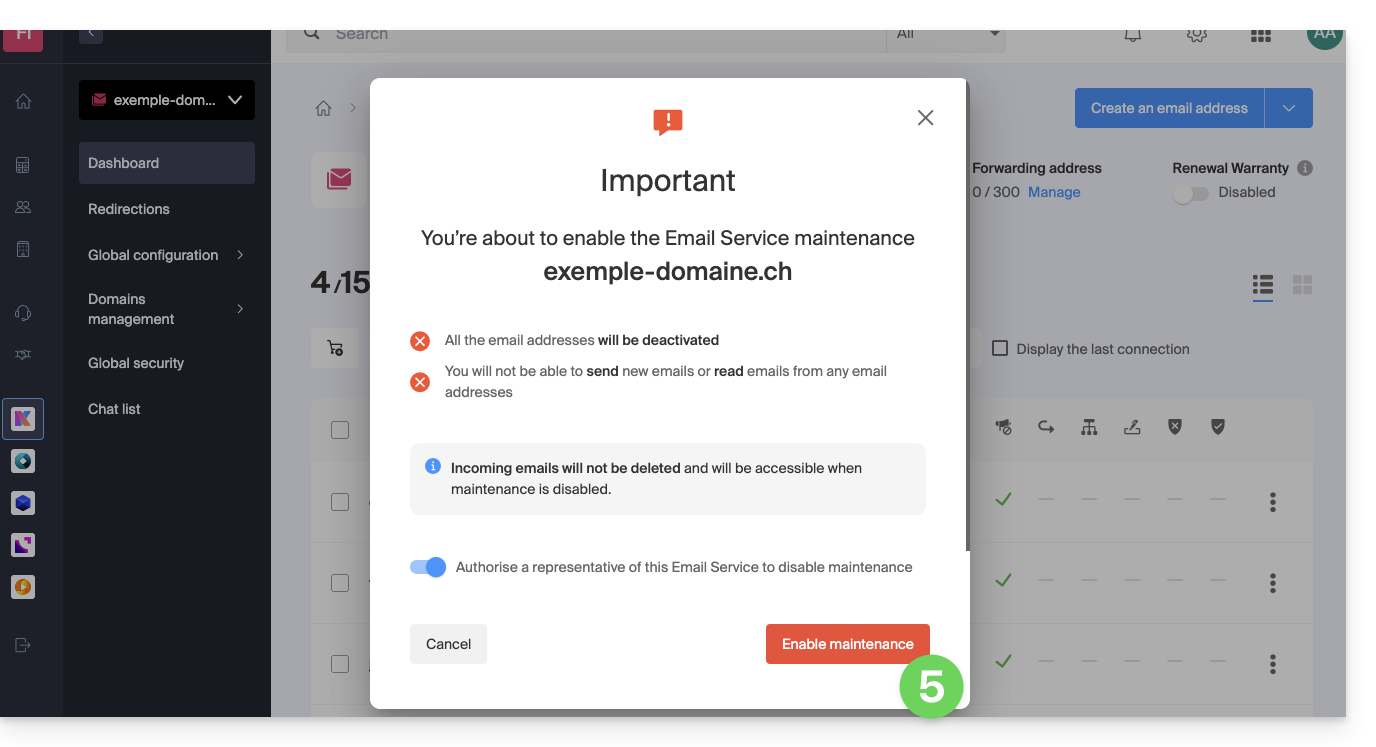
Bloquear um usuário da Organização
Para bloquear rapidamente um utilizador da Organização, em caso de incidente de segurança, aceda à gestão dos seus utilizadores como Administrador ou Responsável legal da Organização:
- Clique aqui para aceder à gestão de utilizadores no Manager Infomaniak (precisa de ajuda?).
- Clique no utilizador em questão:
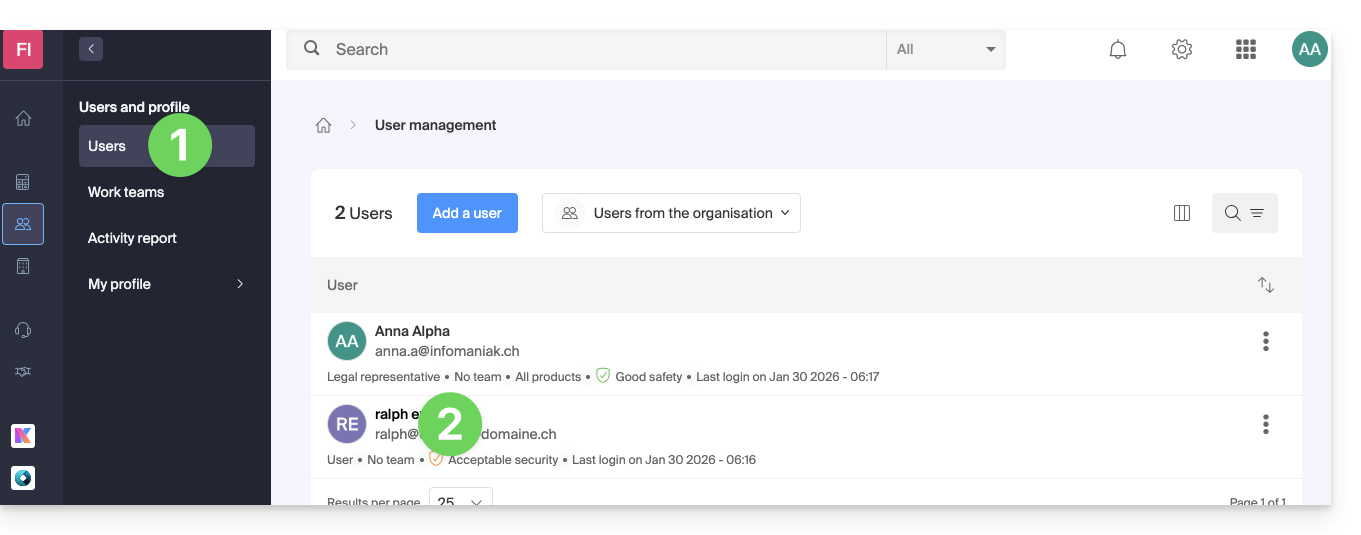
- No botão Gerir, no topo da página, pode remover o utilizador da Organização (o que também remove os seus diferentes acessos de gestão aos produtos aos quais tinha acesso).
- Mais abaixo, pode gerir de forma mais detalhada os produtos aos quais o utilizador deve ter acesso:
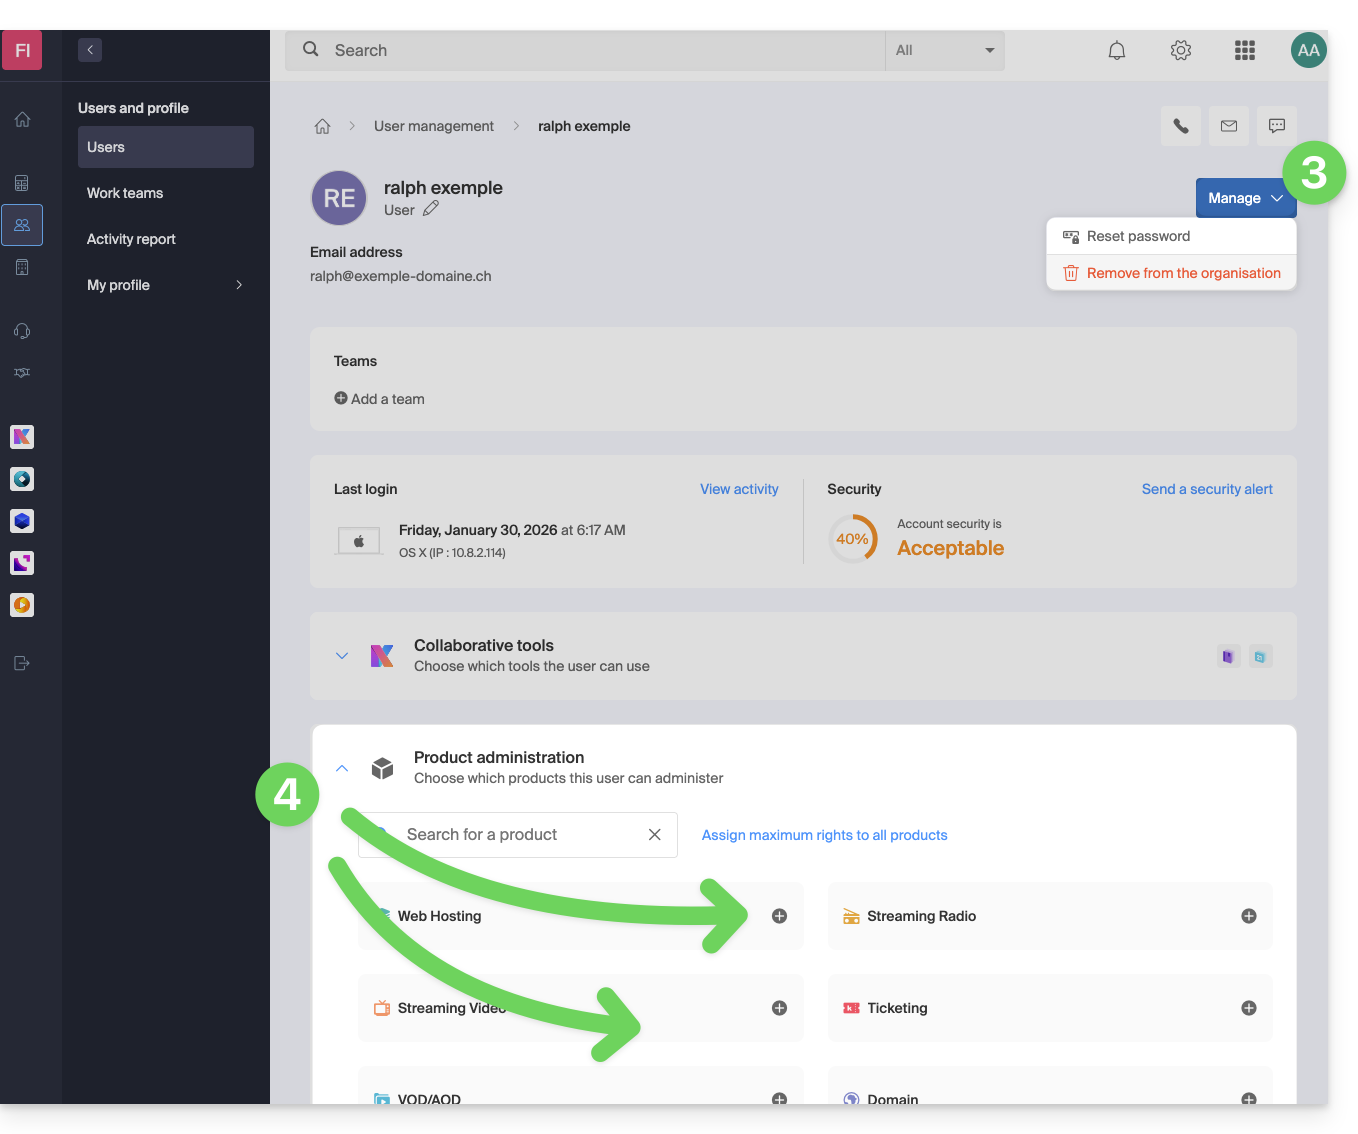
Desta forma, serviços críticos como a interface Manager da sua Organização, a aplicação web kDrive e a aplicação web Mail podem tornar-se inacessíveis para este utilizador.
Dependendo da situação, consulte também estes links para bloquear outros serviços, como a correspondência (IMAP / SMTP) ou serviços web.
Para não bloquear o utilizador, mas sim indicar-lhe um procedimento a seguir para proteger a sua conta, consulte este outro guia.
Link para esta FAQ: https://faq.infomaniak.com/1689
Esta seção de perguntas frequentes foi útil?
Este guia explica como obter o código EPP do seu nome de domínio na Namecheap para transferi-lo para a Infomaniak.
Introdução
- Os termos "
EPP", "AuthCode", "AuthInfo", "código de transferência" e "código de autorização" referem-se a sequências alfanuméricas específicas de um domínio, cujo objetivo principal é verificar a autorização do proprietário antes de uma transferência entre registradores. - Consulte o guia principal sobre o restante do processo de transferência.
- ⚠️ Trata-se de transferir um nome de domínio que você possui junto a um fornecedor diferente da Infomaniak, para que a gestão futura desse domínio seja feita pela Infomaniak; portanto, não se trata de uma transferência interna de um titular para outro, e o código a ser obtido não é, portanto, um código para uma transferência interna para o seu fornecedor atual.
Transferir o nome de domínio para a Infomaniak
Para obter o código de autorização do seu provedor atual:
- Clique aqui para acessar a interface de gerenciamento dos seus produtos no seu registrador atual.
- Clique em Lista de domínios no menu lateral esquerdo.
- Clique no botão Gerenciar à direita do nome de domínio correspondente.
- Clique no botão Authcode para obter o código de autorização por e-mail.
- Depois de obter o código de autorização, consulte o guia principal da Infomaniak sobre o restante do processo de transferência do nome de domínio.
Link para esta FAQ: https://faq.infomaniak.com/1703
Esta seção de perguntas frequentes foi útil?
Este guia explica as notificações WDPR (Sistema de Relatórios de Problemas de Dados WHOIS) e WHOIS relacionadas com a gestão dos seus nomes de domínio.
WDPR e WHOIS: o que são?
- WHOIS: diretório público que reúne as informações de contato do proprietário de um domínio (nome, e-mail, telefone).
- WDPR: sistema da ICANN que permite denunciar informações WHOIS imprecisas ou desatualizadas.
- Precisão dos dados: a ICANN exige que estas informações estejam atualizadas. Dados incorretos podem levar à suspensão ou cancelamento do domínio.
- Confidencialidade: pode ocultar os seus dados pessoais através de um serviço de confidencialidade WHOIS.
Tipos de mensagens recebidas
- Notificação de problema: um terceiro reportou um erro nos seus dados de contacto; deve verificá-los e corrigi-los rapidamente.
- Lembrete de atualização: e-mail periódico obrigatório para confirmar se as suas informações ainda são válidas.
- Confirmação: validação de que as suas alterações foram guardadas após uma atualização.
O cumprimento destas diretrizes é fundamental para a segurança do seu domínio e para evitar qualquer interrupção de serviço.
Modificar os seus dados ou o idioma das mensagens
Pode modificar os seus dados de contacto ou alterar o idioma das notificações (francês, inglês, etc.) diretamente na sua interface de gestão.
Link para esta FAQ: https://faq.infomaniak.com/1710
Esta seção de perguntas frequentes foi útil?
Este guia esclarece a distinção entre o pagamento financeiro de um serviço e a posse dos direitos de propriedade associados.
O pagamento não confere a propriedade
Pagar as faturas de um serviço (nome de domínio, hospedagem) não confere automaticamente direitos de propriedade sobre ele. De acordo com os Termos e Condições Gerais da Infomaniak, o titular oficial continua sendo a pessoa ou entidade cujo nome está associado ao serviço, mesmo que o pagamento seja efetuado por um terceiro ou um Parceiro.
Esta distinção é particularmente importante durante uma transferência de produto entre Organizações: o pagador não é necessariamente o gestor nem o proprietário legal.
Verifique e atualize suas informações
Para garantir seus direitos sobre um serviço, certifique-se de que as informações de identificação estejam em seu nome ou no nome de sua empresa. Verifique as seguintes informações:
- Seu perfil Infomaniak
- A Organização proprietária do produto
- As informações de faturamento
- O proprietário legal do nome de domínio (registrante)
Em caso de litígio, apenas o titular designado nas interfaces da Infomaniak é reconhecido como responsável e detentor dos direitos.
Link para esta FAQ: https://faq.infomaniak.com/1721
Esta seção de perguntas frequentes foi útil?
Este guia detalha as particularidades relacionadas com os prazos de validade dos nomes de domínio quando são transferidos de um registo para outro.
Introdução
- As datas de validade dos nomes de domínio referem-se ao período durante o qual o proprietário de um nome de domínio pagou pelo registo desse nome.
- É crucial que os proprietários de nomes de domínio monitorem atentamente as datas de validade e renovem o seu registo a tempo para evitar qualquer interrupção do serviço ou ter de pagar taxas adicionais de recuperação.
Transferir um domínio para a Infomaniak
Quando um domínio é transferido para a Infomaniak, a nova data de validade (data até à qual o domínio estará registado, válido e funcional) após a transferência será a data…
- … já existente antes da transferência + 365 dias, no mínimo.
Exemplo:
- Nome de domínio com validade em 01/12/2025 antes da transferência…
- A transferência ocorre em 01/10/2025, por exemplo (não tem importância nem impacto)…
- A validade passa a ser 01/12/2026 após a transferência para a Infomaniak (é adicionado 1 ano após a transferência).
Exceções de acordo com as extensões de domínio
As políticas de transferência e os efeitos nas datas de validade podem variar de acordo com a extensão do domínio. Cada extensão de domínio (como .com, .net, .org, etc.) é gerida por uma entidade reguladora específica, e estas podem ter regras diferentes relativamente às transferências e às datas de validade.
A regra descrita no capítulo anterior não se aplica a certas extensões, para as quais a nova data de validade após a transferência será a data…
- … já existente antes da transferência, sem incremento ou alteração:
.CH. - … da data da transferência + 365 dias no mínimo:
.BEe.DE.
As transferências de propriedade de um nome de domínio também podem afetar as datas de vencimento. Quando um nome de domínio é transferido de um proprietário para outro, a data de vencimento pode, por vezes, ser alterada, dependendo das políticas do registrador.
Link para esta FAQ: https://faq.infomaniak.com/1790
Esta seção de perguntas frequentes foi útil?
Este guia explica como modificar os DNS (Servidores de Nomes) de um domínio registado na Infomaniak.
Pré-requisitos
- Possuir um nome de domínio na Infomaniak ou, no mínimo, uma zona DNS.
- Compreender:
- o funcionamento de um domínio e de uma zona DNS antes de modificar esta última.
- que qualquer adição/modificação DNS pode levar até 48 horas para se propagar.
Alteração de DNS
Para alterar os DNS de um nome de domínio gerenciado pela Infomaniak e, assim,controlar a direção que o tráfego Web e de e-mail deve tomar:
- Clique aqui para acessar o gerenciamento do seu domínio no Manager Infomaniak (precisa de ajuda?).
- Clique diretamente no nome atribuído ao domínio em questão:
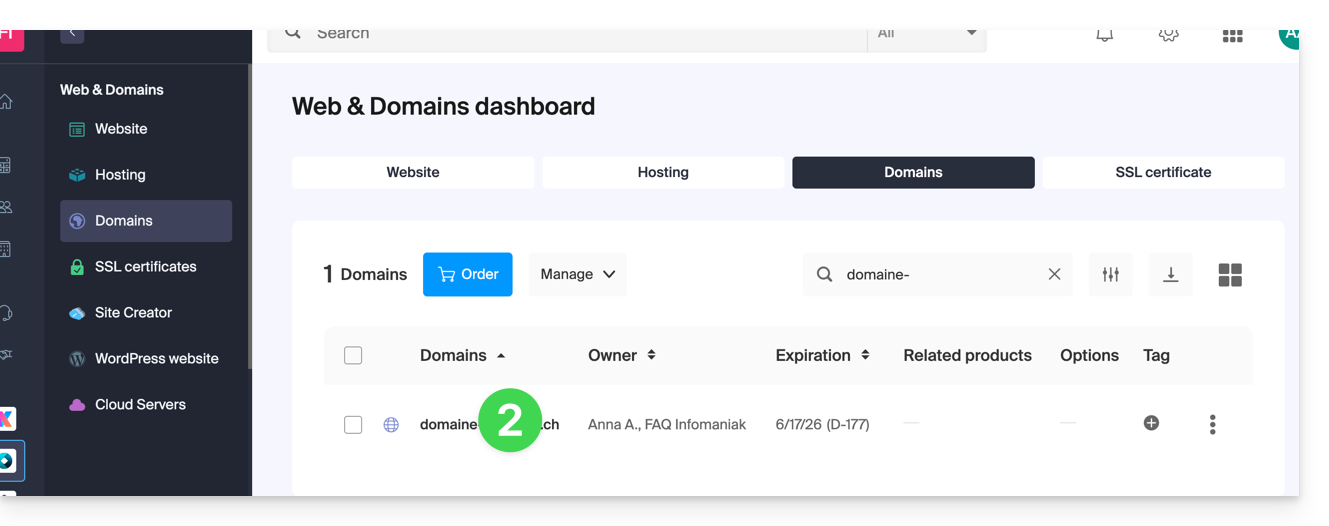
- Clique em Servidores DNS no menu lateral esquerdo.
- Clique no botão azul Editar os servidores DNS:
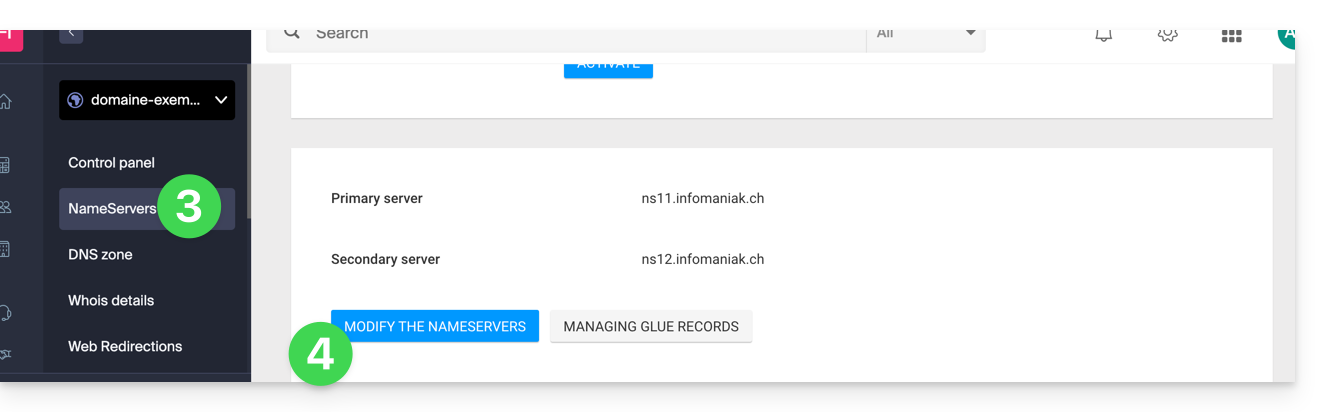
- Se o seu site estiver hospedado na Infomaniak, marque Servidores de nomes Infomaniak…
- Caso contrário, marque Servidores de nomes personalizados para inserir os nomes dos servidores abaixo e valide na parte inferior da página.
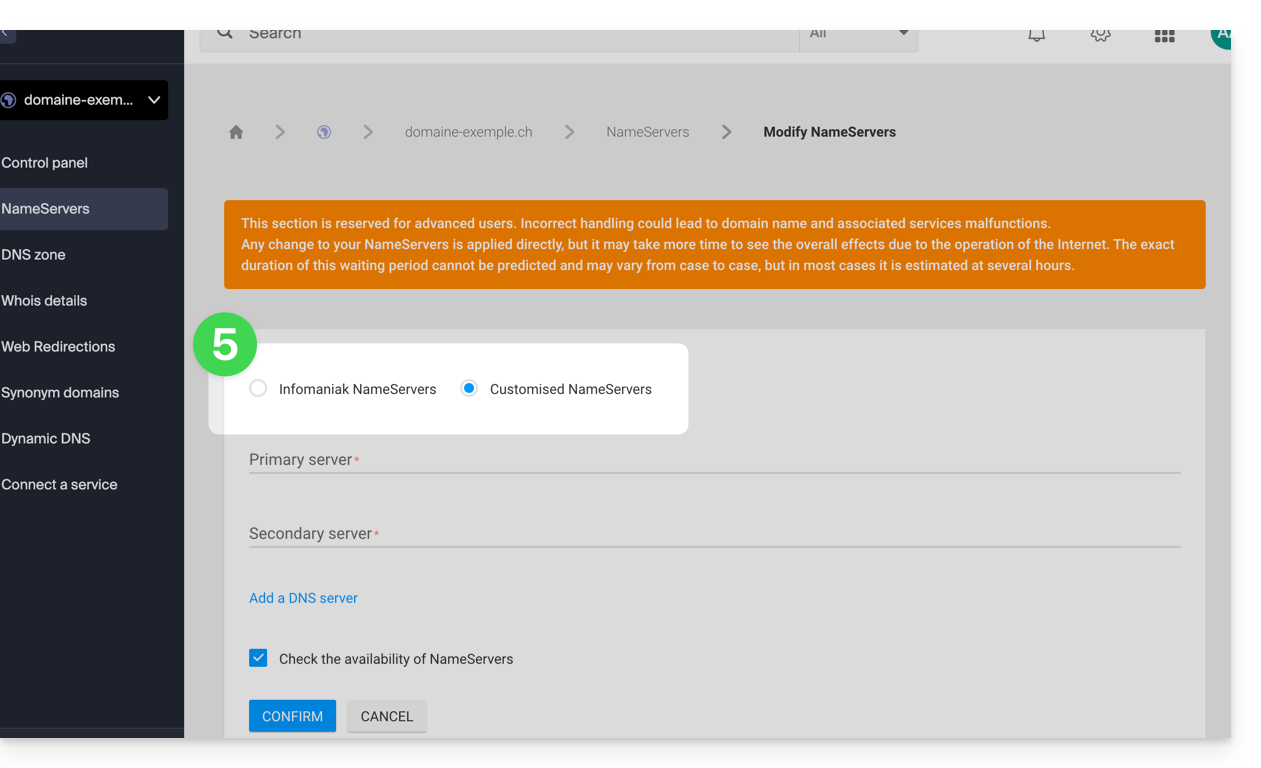
- Caso contrário, marque Servidores de nomes personalizados para inserir os nomes dos servidores abaixo e valide na parte inferior da página.
Modificação em lote
Para modificar os DNS de vários nomes de domínio em lote:
- Clique aqui para acessar o gerenciamento dos seus domínios no Manager Infomaniak (precisa de ajuda?).
- Selecione os nomes de domínio desejados.
- Clique em ⋮ na parte inferior da tela, se necessário.
- Clique em Editar os servidores DNS:
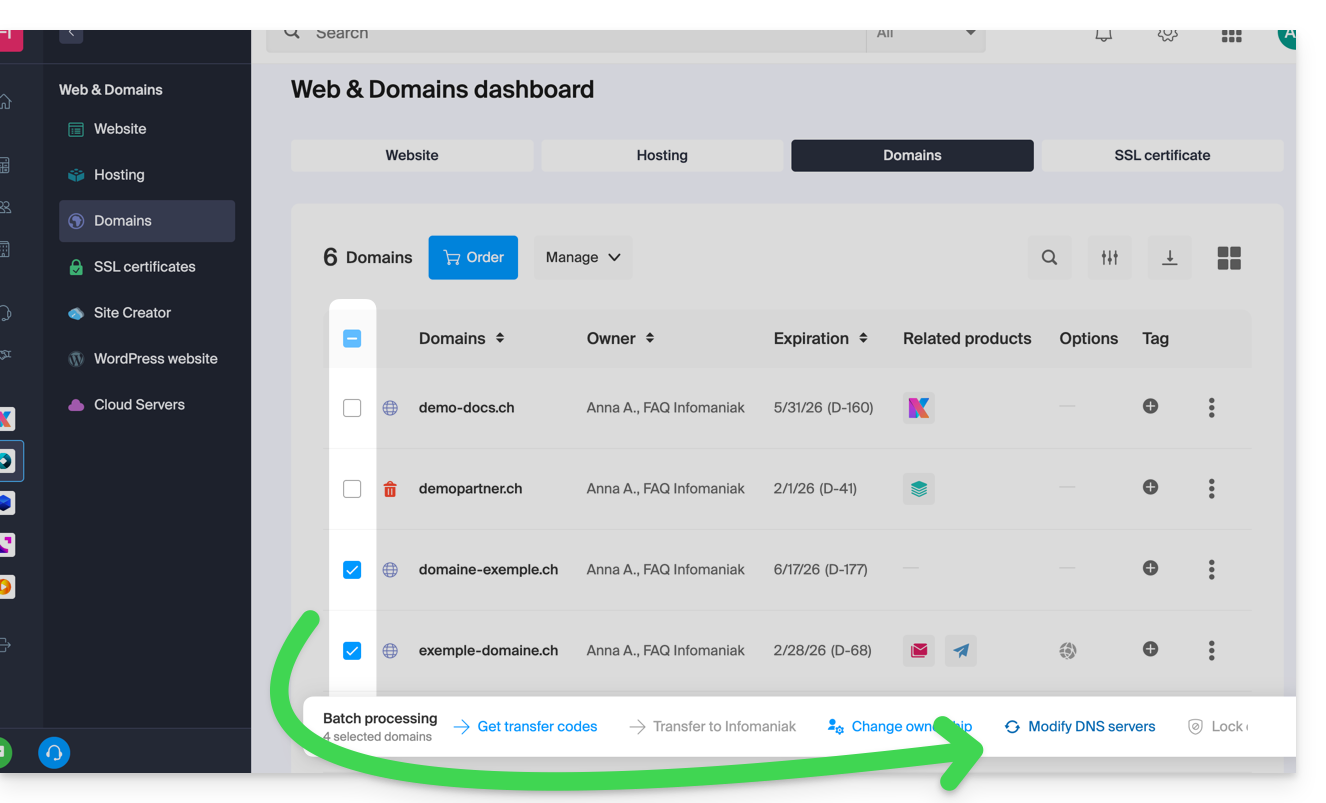
Se preferir modificar o conteúdo da zona DNS e, consequentemente, alterar os diferentes registos DNS contidos na zona, consulte este outro guia.
Link para esta FAQ: https://faq.infomaniak.com/1798
Esta seção de perguntas frequentes foi útil?
Este guia explica como obter o código EPP do seu nome de domínio na Gandi para poder transferi-lo para a Infomaniak.
Introdução
- Os termos "
EPP", "AuthCode", "AuthInfo", "código de transferência" e "código de autorização" referem-se a sequências alfanuméricas específicas de um domínio, cujo objetivo principal é verificar a autorização do proprietário antes de uma transferência entre registradores. - Consulte o guia principal sobre o restante do processo de transferência.
- ⚠️ Trata-se de transferir um nome de domínio que você possui junto a um fornecedor diferente da Infomaniak, para que a gestão futura desse domínio seja feita pela Infomaniak; portanto, não se trata de uma transferência interna de um titular para outro, e o código a ser obtido não é, portanto, um código para uma transferência interna para o seu fornecedor atual.
Transferir o nome de domínio para a Infomaniak
Para obter o código de autorização do seu provedor atual:
- Consulte o procedimento completo fornecido pela Gandi para obter o código e guardá-lo em segurança:
- Depois de obter o código de autorização, consulte o guia principal da Infomaniak sobre o restante do processo de transferência do nome de domínio.
Link para esta FAQ: https://faq.infomaniak.com/1802
Esta seção de perguntas frequentes foi útil?
Este guia explica como obter o código EPP do seu nome de domínio na IONOS (antiga 1&1) para transferi-lo para a Infomaniak.
Introdução
- Os termos "
EPP", "AuthCode", "AuthInfo", "código de transferência" e "código de autorização" referem-se a sequências alfanuméricas específicas de um domínio, cujo objetivo principal é verificar a autorização do proprietário antes de uma transferência entre registradores. - Consulte o guia principal sobre o restante do processo de transferência.
- ⚠️ Trata-se de transferir um nome de domínio que você possui junto a um fornecedor diferente da Infomaniak, para que a gestão futura desse domínio seja feita pela Infomaniak; portanto, não se trata de uma transferência interna de um titular para outro, e o código a ser obtido não é, portanto, um código para uma transferência interna para o seu fornecedor atual.
Transferir o nome de domínio para a Infomaniak
Para obter o código de autorização do seu provedor atual:
- Consulte o procedimento completo fornecido pela IONOS para obter o código e guardá-lo em segurança.
- Depois de obter o código de autorização, consulte o guia principal da Infomaniak para obter informações sobre o restante do processo de transferência do nome de domínio.
Link para esta FAQ: https://faq.infomaniak.com/1803
Esta seção de perguntas frequentes foi útil?