Base de conhecimento
1000 perguntas frequentes, 500 tutoriais e vídeos explicativos. Aqui, você encontra apenas soluções!
Este guia explica como obter o código EPP do seu nome de domínio na Scaleway para poder transferi-lo para a Infomaniak.
Introdução
- Os termos "
EPP", "AuthCode", "AuthInfo", "código de transferência" e "código de autorização" referem-se a sequências alfanuméricas específicas do domínio, cujo objetivo principal é verificar a autorização do proprietário antes de uma transferência entre registradores. - Consulte o guia principal sobre o restante do processo de transferência.
- ⚠️ Trata-se de transferir um nome de domínio que você possui junto a um fornecedor diferente da Infomaniak, para que a gestão futura desse domínio seja feita pela Infomaniak; portanto, não se trata de uma transferência interna de um titular para outro, e o código a ser obtido não é, portanto, um código para uma transferência interna para o seu fornecedor atual.
Transferir o nome de domínio para a Infomaniak
Para obter o código de autorização do seu provedor atual:
- Consulte o procedimento completo fornecido pela Scaleway para obter o código e guardá-lo em segurança:
- Depois de obter o código de autorização, consulte o guia principal da Infomaniak para obter informações sobre o restante do processo de transferência do nome de domínio.
Link para esta FAQ: https://faq.infomaniak.com/1804
Esta seção de perguntas frequentes foi útil?
Este guia explica como obter o código EPP do seu nome de domínio na GoDaddy para transferi-lo para a Infomaniak.
Introdução
- Os termos "
EPP", "AuthCode", "AuthInfo", "código de transferência" e "código de autorização" referem-se a sequências alfanuméricas específicas de um domínio, cujo objetivo principal é verificar a autorização do proprietário antes de uma transferência entre registradores. - Consulte o guia principal sobre o restante do processo de transferência.
- ⚠️ Trata-se de transferir um nome de domínio que você possui junto a um fornecedor diferente da Infomaniak, para que a gestão futura desse domínio seja feita pela Infomaniak; portanto, não se trata de uma transferência interna de um titular para outro, e o código a ser obtido não é, portanto, um código para uma transferência interna para o seu fornecedor atual.
Transferir o nome de domínio para a Infomaniak
Para obter o código de autorização do seu provedor atual:
- Consulte o procedimento completo fornecido pela GoDaddy para obter o código e guardá-lo em segurança.
- Depois de obter o código de autorização, consulte o guia principal da Infomaniak sobre o restante do processo de transferência do nome de domínio.
Link para esta FAQ: https://faq.infomaniak.com/1805
Esta seção de perguntas frequentes foi útil?
Este guia explica como obter o código EPP do seu nome de domínio na Namebay para poder transferi-lo para a Infomaniak.
Introdução
- Os termos "
EPP", "AuthCode", "AuthInfo", "código de transferência" e "código de autorização" referem-se a sequências alfanuméricas específicas de um domínio, cujo objetivo principal é verificar a autorização do proprietário antes de uma transferência entre registradores. - Consulte o guia principal sobre o restante do processo de transferência.
- ⚠️ Trata-se de transferir um nome de domínio que você possui junto a um fornecedor diferente da Infomaniak, para que a gestão futura desse domínio seja feita pela Infomaniak; portanto, não se trata de uma transferência interna de um titular para outro, e o código a ser obtido não é, portanto, um código para uma transferência interna para o seu fornecedor atual.
Transferir o nome de domínio para a Infomaniak
Para obter o código de autorização do seu provedor atual:
Assista ao vídeo para obter o código de autorização e guarde-o em um local seguro:
- Depois de obter o código de autorização, consulte o guia principal da Infomaniak para obter informações sobre o restante do processo de transferência do nome de domínio.
Link para esta FAQ: https://faq.infomaniak.com/1807
Esta seção de perguntas frequentes foi útil?
Este guia explica como obter o código EPP do seu nome de domínio na OVH para que possa transferi-lo para a Infomaniak.
Introdução
- Os termos "
EPP", "AuthCode", "AuthInfo", "código de transferência" e "código de autorização" referem-se a sequências alfanuméricas específicas do domínio, cujo objetivo principal é verificar a autorização do proprietário antes de uma transferência entre registradores. - Consulte o guia principal sobre o restante do processo de transferência.
- ⚠️ Trata-se de transferir um nome de domínio que você possui junto a um fornecedor diferente da Infomaniak, para que a gestão futura desse domínio seja feita pela Infomaniak; portanto, não se trata de uma transferência interna de um titular para outro, e o código a ser obtido não é, portanto, um código para uma transferência interna para o seu fornecedor atual.
Transferir o nome de domínio para a Infomaniak
Para obter o código de autorização do seu provedor atual:
- Consulte o procedimento completo fornecido pela OVH para obter o código e guardá-lo em segurança.
- Depois de obter o código de autorização, consulte o guia principal da Infomaniak sobre o restante do processo de transferência do nome de domínio.
Link para esta FAQ: https://faq.infomaniak.com/1808
Esta seção de perguntas frequentes foi útil?
Este guia explica como obter o código EPP do seu nome de domínio na Amen para poder transferi-lo para a Infomaniak.
Introdução
- Os termos "
EPP", "AuthCode", "AuthInfo", "código de transferência" e "código de autorização" referem-se a sequências alfanuméricas específicas de um domínio, cujo objetivo principal é verificar a autorização do proprietário antes de uma transferência entre registradores. - Consulte o guia principal sobre o restante do processo de transferência.
- ⚠️ Trata-se de transferir um nome de domínio que você possui junto a um fornecedor diferente da Infomaniak, para que a gestão futura desse domínio seja feita pela Infomaniak; portanto, não se trata de uma transferência interna de um titular para outro, e o código a ser obtido não é, portanto, um código para uma transferência interna para o seu fornecedor atual.
Transferir o nome de domínio para a Infomaniak
Para obter o código de autorização do seu provedor atual:
- Consulte o procedimento completo fornecido pela Amen para obter o código e guardá-lo em segurança.
- Depois de obter o código de autorização, consulte o guia principal da Infomaniak sobre o restante do processo de transferência do nome de domínio.
Link para esta FAQ: https://faq.infomaniak.com/1809
Esta seção de perguntas frequentes foi útil?
Este guia resume as etapas principais para transferir um nome de domínio para a Infomaniak e o orienta para as instruções específicas do seu provedor atual.
Introdução
- Verifique se o domínio foi criado ou transferido há mais de 60 dias.
- Certifique-se de que tem acesso ao endereço de e-mail associado ao contato administrativo do domínio.
- Anote e guarde os seus registos DNS atuais caso os seus serviços de alojamento (sites, e-mails) permaneçam temporariamente num fornecedor externo.
- Recupere o código de autorização (
AuthCode/EPP- veja abaixo) e verifique se a proteção contra transferência está desativada no seu fornecedor atual.
1. Obtenha o código de autorização de acordo com o seu registrador
Selecione o seu registrador atual na lista abaixo para consultar o procedimento passo a passo dedicado à obtenção do código AuthCode e ao desbloqueio do domínio:
- Amen
- EuroDNS
- Gandi
- GoDaddy
- Hostinger
- Hostpoint
- IONOS (antiga 1and1)
- Namebay
- Namecheap
- o2switch
- OVH
- PlanetHoster
- Scaleway (antiga Online SAS)
- Squarespace (antigo Google Domains)
- Swisscom
- Swizzonic (antigo Switchplus)
Procedimentos específicos para algumas extensões
2. O seu provedor não está na lista?
Se o seu registrador atual não estiver na lista acima, consulte este outro guia completo e detalhado para transferir um domínio para a Infomaniak.
3. Transferências múltiplas
Se precisar migrar vários nomes de domínio em uma única operação, utilize diretamente a ferramenta de transferência em lote da Infomaniak.
Precisa de ajuda para migrar também seus sites e endereços de e-mail? Consulte o guia de migração de serviços ou entre em contato com o suporte da Infomaniak.
Link para esta FAQ: https://faq.infomaniak.com/1814
Esta seção de perguntas frequentes foi útil?
O padrão BIMI (Brand Indicators for Message Identification, indicadores de marca para a identificação de mensagens) oferece a possibilidade de as empresas incorporarem o seu logótipo nos e-mails enviados.
Introdução
- As aplicações Infomaniak (e de outras empresas em todo o mundo – consulte o capítulo em caso de problemas abaixo) são compatíveis com BIMI e exibirão os logotipos ao lado das mensagens de e-mail recebidas.
- Os Serviços de E-mail Infomaniak permitem configurar o e-mail com o seu logotipo; as vantagens são muitas:
- aumento da confiança: os destinatários podem identificar visualmente os seus e-mails, reduzindo assim os riscos de phishing.
- reforço da marca: um logotipo bem visível nas caixas de entrada reforça o reconhecimento da marca.
- melhor entregabilidade: os e-mails que cumprem os requisitos do DMARC têm mais probabilidade de chegar à caixa de entrada principal.
1. Criar um logotipo
Crie um logotipo no formato SVG (Scalable Vector Graphics). Este formato é obrigatório, pois garante uma qualidade ótima, independentemente do dispositivo ou do tamanho da tela.
Para ser importado na interface Infomaniak (veja abaixo), o arquivo não deve exceder 10 MB, mas também pode ser hospedado em um servidor seguro acessível publicamente, bastando indicar seu URL para o registro DNS BIMI.
2. Obter o certificado VMC
É necessária uma certificação de logotipo verificado (VMC); ela comprova que você é o proprietário legítimo do logotipo. Você pode obter essa certificação junto a autoridades de certificação reconhecidas, como DigiCert e Entrust.
Quando seu certificado VMC for emitido, você receberá um arquivo PEM contendo o certificado da entidade. Este arquivo PEM integra seu logotipo no formato SVG, bem como o VMC.
3. Adicionar o logotipo ao Serviço de Email
Pré-requisitos
- Todos os indicadores de segurança globaldo seu serviço de e-mail devem estar verdes (SPF + DKIM + DMARC)!
Para aceder ao Serviço de Email e definir o logótipo da sua empresa:
- Clique aqui para aceder à gestão do seu Serviço de Email no Manager Infomaniak (precisa de ajuda?).
- Clique diretamente no nome atribuído ao Serviço de Email em questão.
- Clique em Segurança global no menu lateral esquerdo.
- Clique no botão Criar (na secção BIMI):
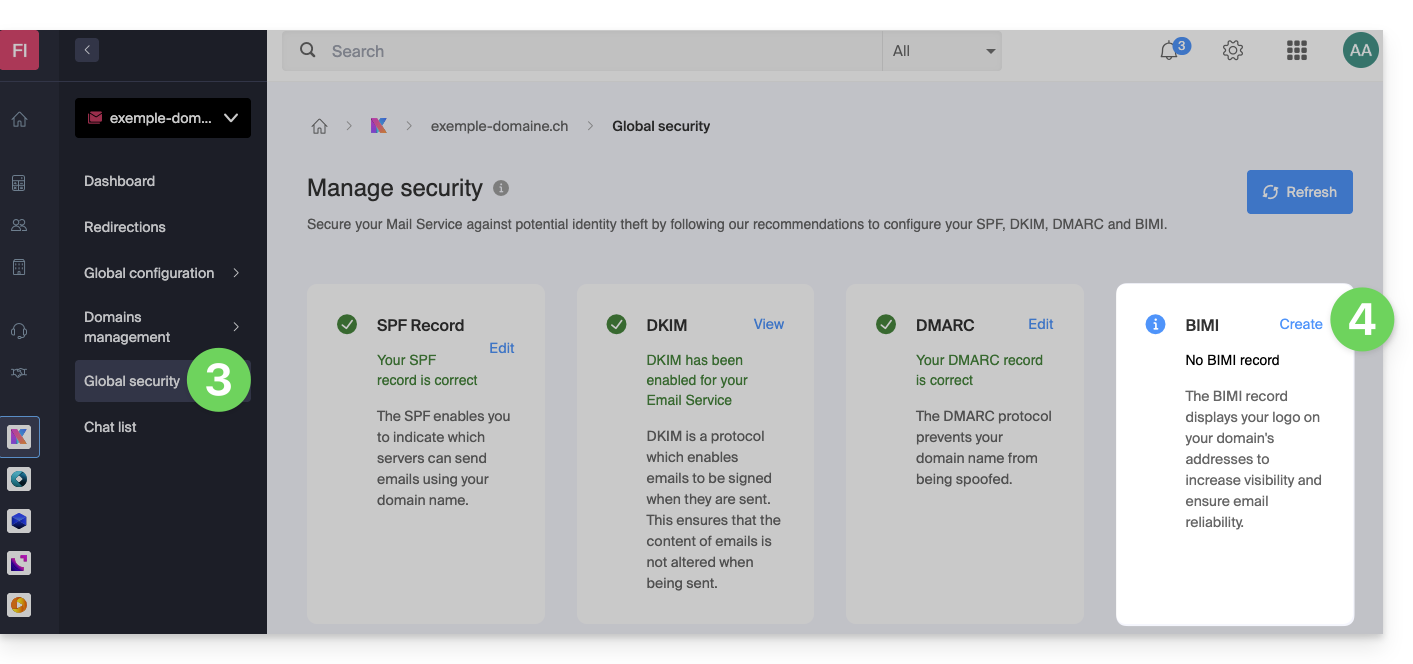
- Preencha as informações solicitadas com base nos documentos recebidos (ver capítulo 2 acima) e não se esqueça de guardar.
Em caso de problema
- Se o botão Criar na caixa BIMI permanecer acinzentado, verifique cuidadosamente as mensagens informativas: o DMARC pode existir, mas não atingir a porcentagem de rejeição exigida, portanto, ajuste as configurações de acordo com as instruções.
- Quando existem vários domínios associados ao Serviço de Email, é importante garantir que possui um certificado em cada domínio associado, caso deseje utilizar o BIMI nesses domínios.
- Note que o Apple Mail suporta o BIMI, ao contrário do Microsoft Outlook, do Thunderbird e do aplicativo Mail da Samsung, que ainda não o implementaram totalmente.
Desativar o BIMI
Para desativar o BIMI, basta acessar a página de gerenciamento do nome de domínio vinculado ao Serviço de E-mail e remover o registro TXT correspondente.
Link para esta FAQ: https://faq.infomaniak.com/1816
Esta seção de perguntas frequentes foi útil?
Este guia explica como renovar ou restaurar um nome de domínio registado na Infomaniak.
Introdução
- Você é automaticamente notificado por e-mail (no endereço que você indicou) quando um de seus nomes de domínio está prestes a expirar.
- Se este nome de domínio não for renovado antes da data de expiração, ele entrará em um período de resgate durante o qual ainda é possível recuperá-lo/restaurá-lo.
- As taxas de restauração e a duração do período de resgate são variáveis, dependendo da extensão em questão.
- Após o término do período de resgate, o nome de domínio fica livre e pode ser reservado novamente por qualquer pessoa.
- Se o seu domínio for importante para as suas atividades, a Garantia de Renovação oferece a segurança de que você nunca o perderá: a Infomaniak fará tudo o que estiver ao seu alcance para garantir que você possa mantê-lo, mesmo que não envie uma notificação dentro do prazo.
Renovar um nome de domínio antes do vencimento
A renovação de um ou mais nomes de domínio ocorre exatamente da mesma forma que qualquer outra renovação de serviços Infomaniak. Consulte este outro guia se precisar de informações sobre como renovar o produto em questão.
Restaurar um nome de domínio após a expiração
Para restaurar um domínio durante o período de resgate:
- Clique aqui para acessar o gerenciamento do seu produto no painel de controle Infomaniak (precisa de ajuda?).
- Um domínio expirado é indicado como tal:
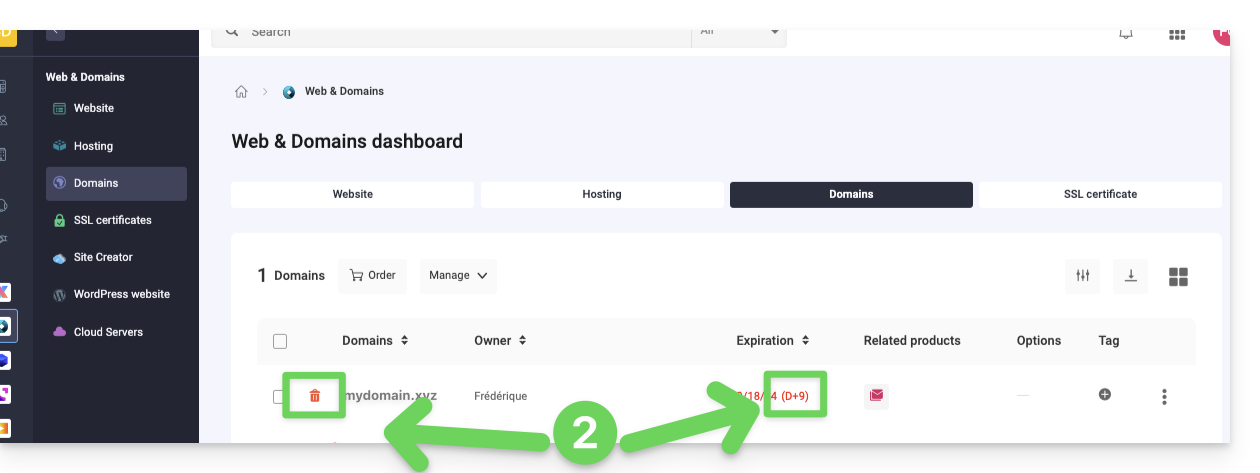
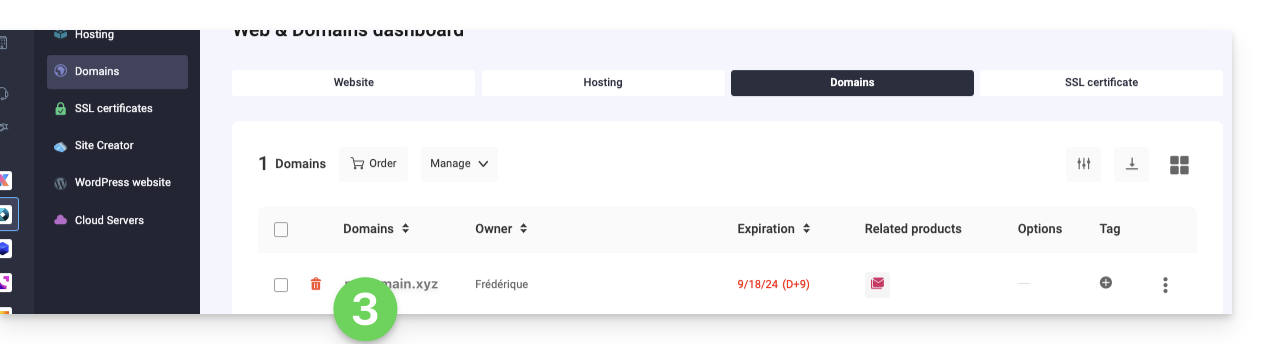
- Clique diretamente no nome atribuído ao produto em questão:
- Clique no botão Restaurar:
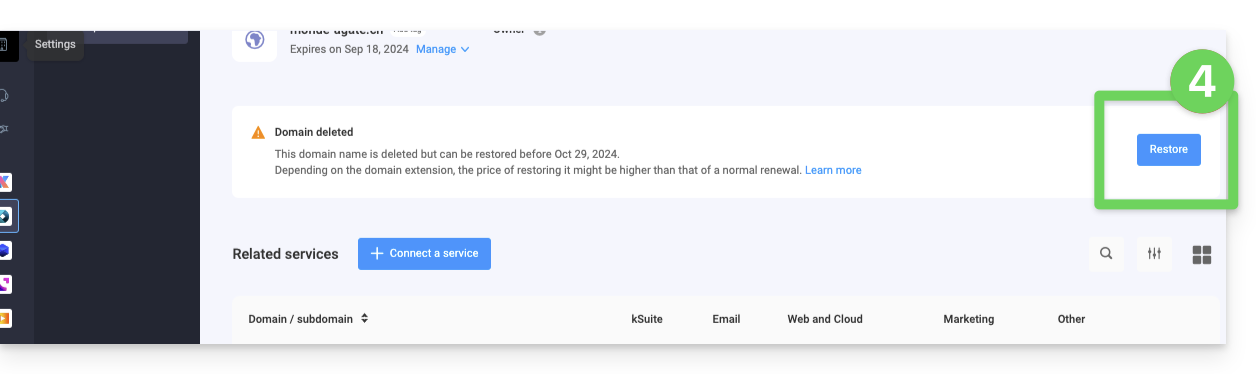
- Siga as etapas de restauração até o final.
Resolver um problema
O que fazer se o domínio não aparecer na sua conta?
- Verifique se está conectado com a conta Infomaniak correta (conta de usuário) e se está exibindo a organização correta, caso esteja vinculado a várias entidades.
- Acesse a seção DOMÍNIO do painel de controle.e não a uma seção de produtos faturados ou a serem renovados.
- Recompre o nome de domínio, caso ele não tenha sido reservado desde então.
Link para esta FAQ: https://faq.infomaniak.com/1825
Esta seção de perguntas frequentes foi útil?
Este guia detalha os diferentes estados em que um nome de domínio pode se encontrar.
Estados habituais
"Ativo" ou "OK"
O nome de domínio está declarado nos DNS, o nome de domínio está ativo e desbloqueado. Todas as operações administrativas e/ou técnicas são possíveis.
"Registrar-Lock / Registry-Lock" ou "clientTransferProhibited"
O nome de domínio está registrado nos DNS. O nome de domínio está ativo e bloqueado para protegê-lo, especialmente contra solicitações de transferência ilegítimas.
Estados que exigem uma ação ou monitoramento
"Registrar-Hold / Registry-Hold"
Este estado é aplicado quando o domínio expira (não é renovado). A única operação possível é, então, a renovação. As operações administrativas e/ou técnicas não são possíveis.
"RedemptionPeriod"
Este status ocorre se o domínio não foi renovado. Consulte este outro guia se precisar de mais informações sobre o assunto.
"PendingRestore"
Este status aparece durante um pedido de restauração. O registrador tem 7 dias para comunicar ao registro todas as informações necessárias para a restauração.
"PendingDelete"
Este estado sucede ao estado RedemptionPeriod após 30 dias, caso não tenha sido feita nenhuma solicitação de recuperação. O nome será apagado durante um período de 15 dias antes de retornar ao domínio público.
No caso de uma extensão de domínio .fr
"Ativo"
O nome de domínio está registrado no DNS (totalmente operacional).
"Congelado"
O nome de domínio está registrado no DNS, mas nenhuma operação administrativa e/ou técnica é possível. Possíveis causas: consulte o artigo 6.1 da carta da AFNIC.
"Bloqueado"
O nome de domínio não está mais registrado no DNS; ele não está mais funcional e nenhuma operação administrativa e/ou técnica é possível. Possíveis causas: consulte o artigo 6.2 da carta da AFNIC.
Link para esta FAQ: https://faq.infomaniak.com/1826
Esta seção de perguntas frequentes foi útil?
Este guia explica como reiniciar a transferência de um nome de domínio para a Infomaniak em caso de falha.
Reiniciar manualmente uma transferência de domínio
Quando a transferência de um nome de domínio falha, você recebe um e-mail com a possível razão do problema.
A mensagem também contém um link para reiniciar o pedido de transferência sem pagar novamente as taxas de transferência.
Em caso de problema:
- Clique aqui para acessar o gerenciamento do seu domínio no Manager Infomaniak (precisa de ajuda?).
- Clique diretamente no nome atribuído ao domínio em questão.
- Siga atentamente as instruções exibidas em fundo vermelho na parte superior da página.
Link para esta FAQ: https://faq.infomaniak.com/1842
Esta seção de perguntas frequentes foi útil?
Este guia explica como alterar as informações de contato associadas a um nome de domínio, ou seja, as informações “WHOIS” do proprietário/titular/responsável.
Introdução
- A particularidade dos nomes de domínio é que todos têm um proprietário cujas informações de contato são específicas do próprio domínio, independentes da conta Infomaniak que gere o produto.
- Essas informações, conhecidas como WHOIS, indicam detalhes como nome, sobrenome, endereço postal, endereço de e-mail, etc., e podem ser consultadas online por meio de serviços WHOIS, como whois.infomaniak.com ou whois.nic.swiss.
- Informações de contato adicionais e privadas geralmente existem fora do WHOIS público e nunca são visíveis e/ou comunicadas pela Infomaniaksem autenticação prévia!
- Essas informações serão sempre consideradas em caso de litígio sobre a titularidade de um nome de domínio.é, portanto, importante manter essas informações atualizadas mesmo que você ative a opção Proteção de Domínio para ocultar informações.
Aceder aos diferentes tipos de contactos relacionados com os nomes de domínio
Para aceder a estes dados de contacto dos gestores de domínio:
- Clique aqui para acessar o gerenciamento do seu produto no Manager Infomaniak (precisa de ajuda?).
- Clique diretamente no nome atribuído ao produto em questão:
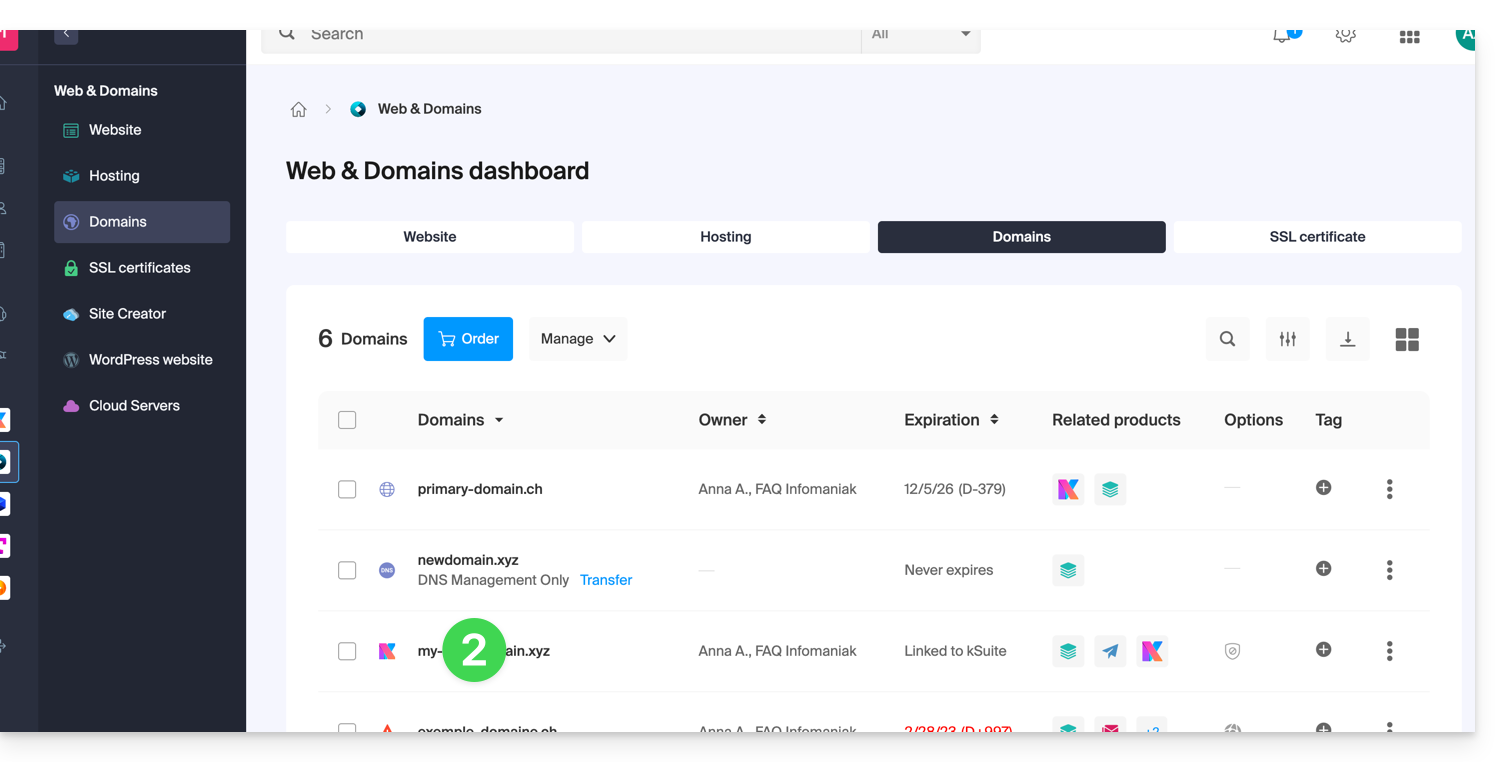
- Clique em Informações WHOIS no menu lateral esquerdo:
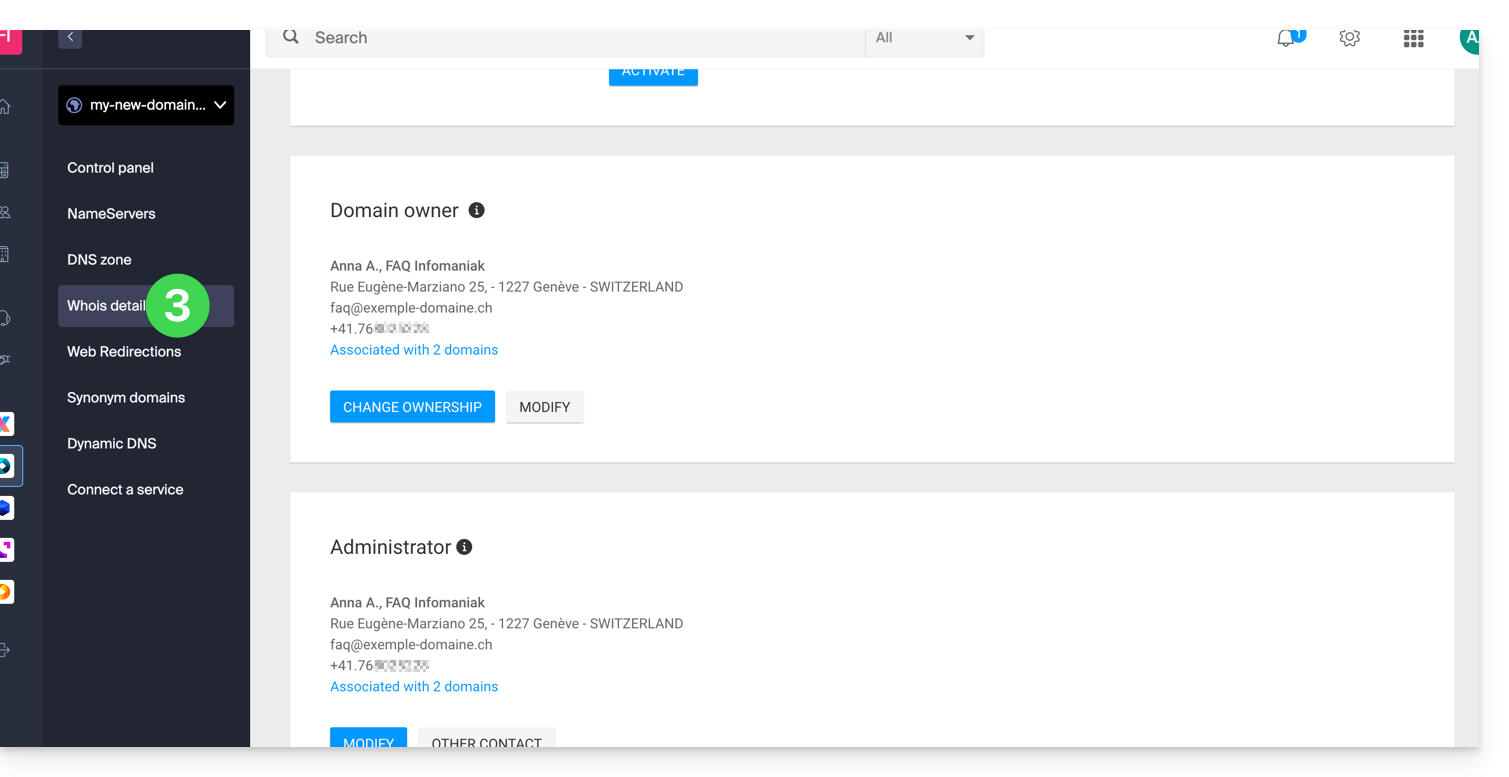
Contactar o Proprietário
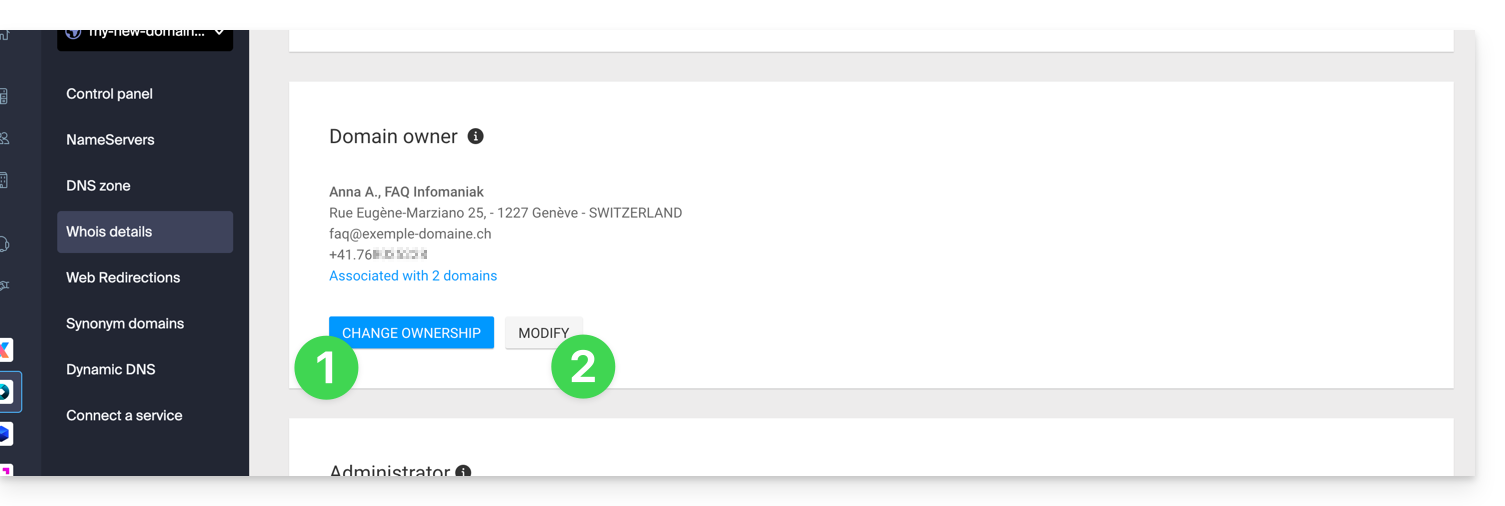
- Clique no botão Alterar proprietário para criar um novo contato ou selecionar um já utilizado em um dos outros domínios da Organização, sendo necessário obter o consentimento de ambas as partes antes da aplicação.
- Clique no botão Editar para modificar o idioma (de alguns envios), bem como as informações de contato e o número de telefone (um e-mail é enviado para o endereço de e-mail indicado para solicitar a confirmação das alterações).
Mais detalhes abaixo, neste guia.
Contactar o Administrador
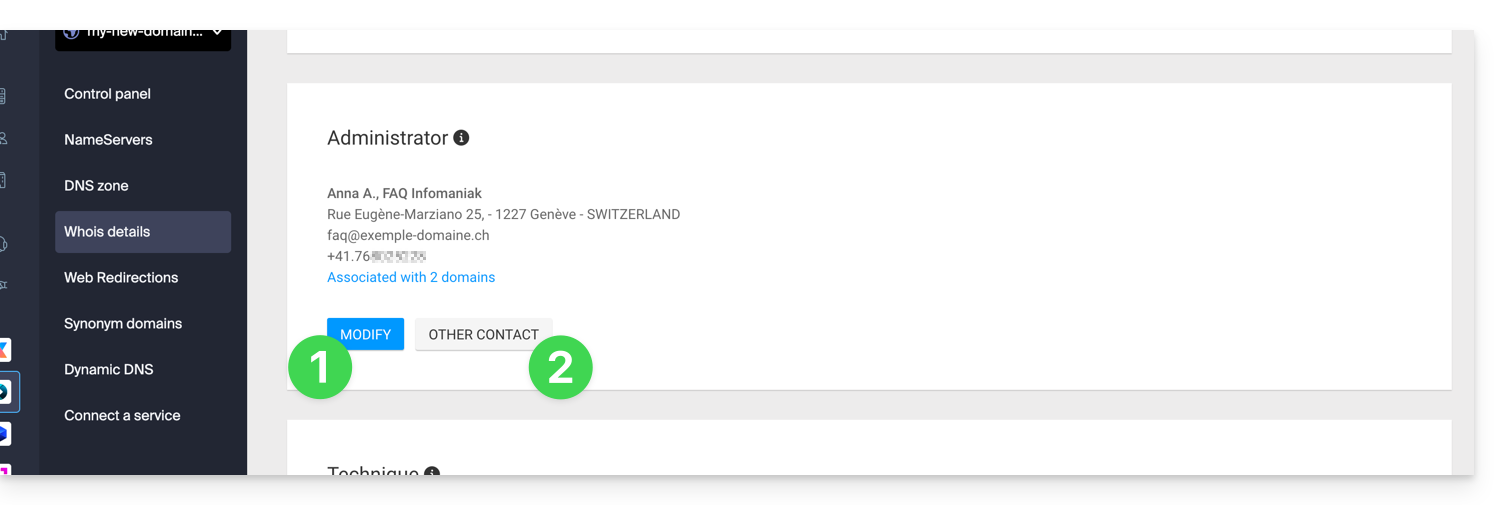
- Clique no botão Editar para modificar o idioma (de alguns envios), bem como as informações de contato e o número de telefone (um e-mail será enviado para o endereço de e-mail indicado para solicitar a confirmação das alterações).
- Clique em Outro Contato para criar um novo contato ou selecionar um contato previamente utilizado em um dos outros domínios da Organização, sendo necessário obter o consentimento de ambas as partes antes da aplicação.
Mais detalhes abaixo, neste guia.
Contato Técnico
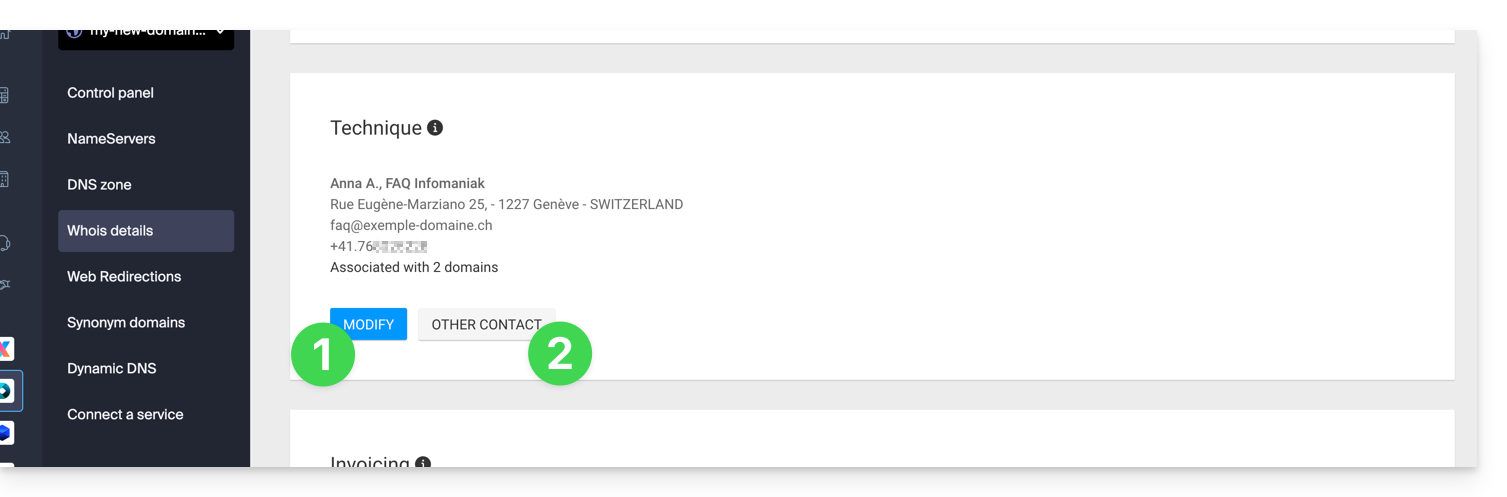
- Clique no botão Editar para modificar o idioma (de alguns envios), bem como as informações de contato e o número de telefone (um e-mail será enviado para o endereço de e-mail indicado, solicitando a confirmação das alterações).
- Clique em Outro Contato para criar um novo contato ou selecionar um contato previamente utilizado em um dos outros domínios da Organização, sendo necessário obter o consentimento de ambas as partes antes da aplicação.
Mais detalhes abaixo neste guia.
Contato da Faturação
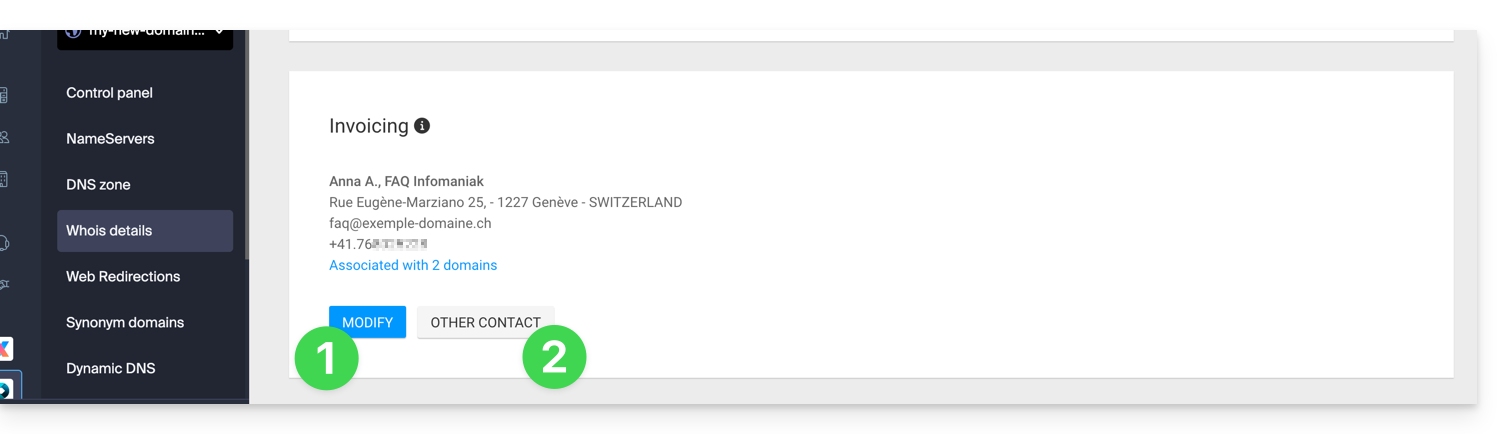
- Clique no botão Editar para modificar o idioma (de alguns envios), bem como as informações de contato e o número de telefone (um e-mail será enviado para o endereço de e-mail indicado para solicitar a confirmação das alterações).
- Clique em Outro Contato para criar um novo contato ou selecionar um contato previamente utilizado em um dos outros domínios da Organização, sendo necessário obter o consentimento de ambas as partes antes da aplicação.
Mais detalhes abaixo, neste guia.
Modificar os dados de contacto WHOIS
Sem criar uma nova ficha de contato, você pode modificar:
- o endereço postal (rua, código postal, país, etc.)
- o número de telefone
- o idioma (de alguns envios)
Ao criar uma nova ficha de contato, você poderá especificar:
- Tipo de contato (Empresa, Pessoa física, Associação, outro)
- Nome / Sobrenome
- o endereço de e-mail
- o endereço postal (rua, código postal, país, etc.)
- o número de telefone
- o idioma (de certos envios)
Qualquer alteração nas informações de contato WHOIS deverá ser validada pelo contato atual. Este último receberá um e-mail com um link de validação válido por dois diaspara validar as alterações: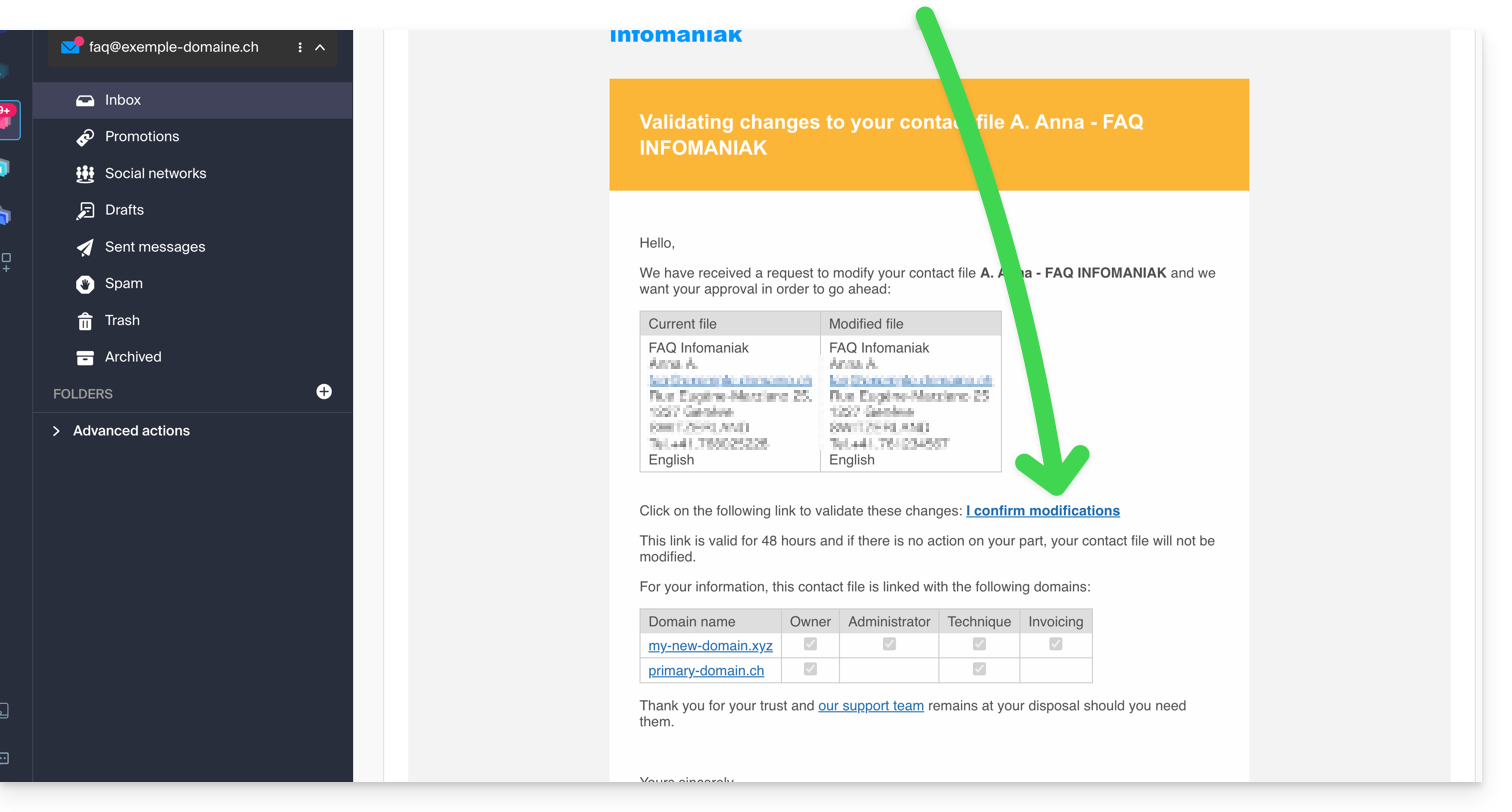
O e-mail também indica os outros nomes de domínio afetados pela operação (e quais tipos de contatos são afetados pela alteração).
Enquanto aguarda a validação, uma mensagem é exibida na página de gestão do domínio: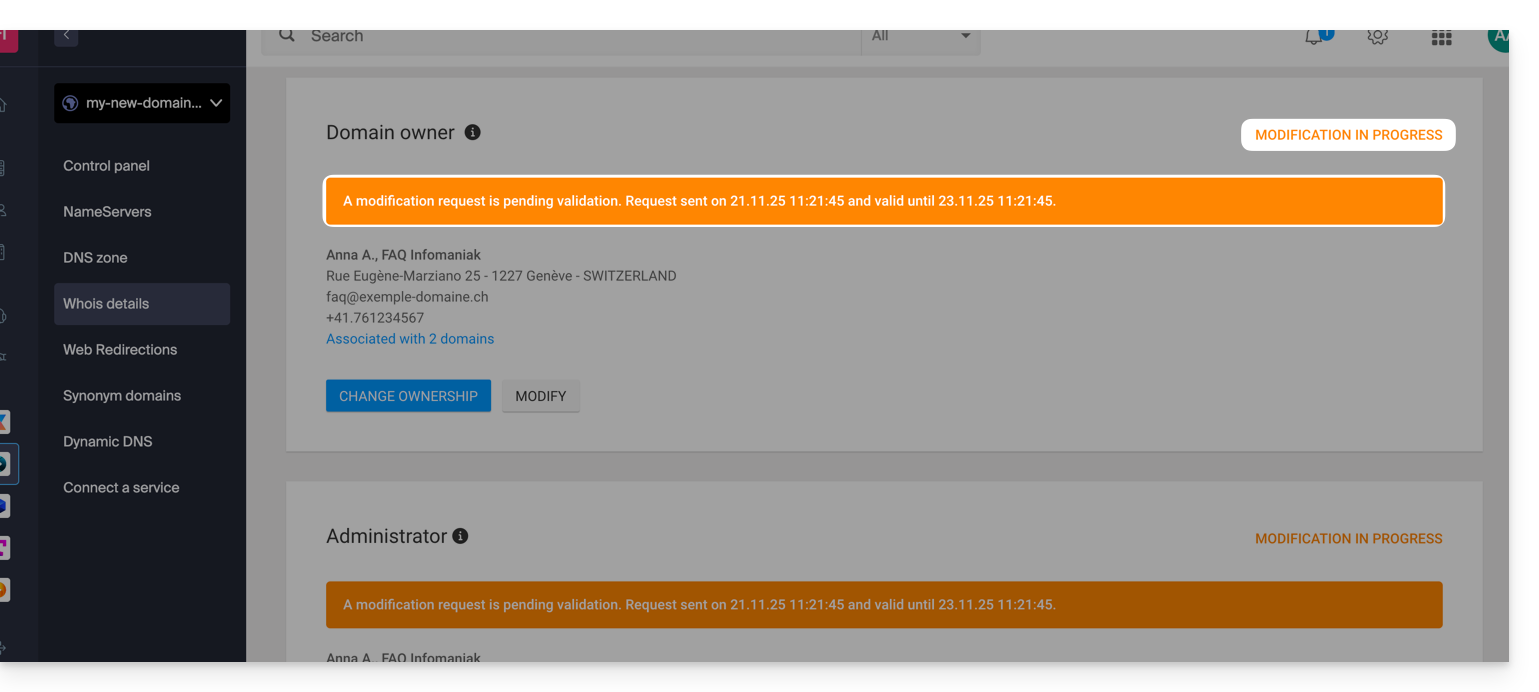
A alteração não será efetuada se todas as ações não forem realizadas integralmente e antes do prazo expirar!
Saiba mais
Dependendo da extensão do domínio em questão, estas operações podem implicar custos.
Também pode fazê-lo em vários domínios ao mesmo tempo: um ficheiro de contacto pode estar associado a vários domínios; a modificação de um ficheiro refletir-se-á automaticamente em todos os domínios que tiverem o mesmo contacto WHOIS.
Consulte também os guias relativos a extensões específicas, como o .es ou o .se…
Link para esta FAQ: https://faq.infomaniak.com/1853
Esta seção de perguntas frequentes foi útil?
Este guia detalha a monetização de nomes de domínio, geralmente realizada através do estacionamento de nomes de domíniomantendo as informações de contato do revendedor ocultas.
Estacionamento de domínio
O estacionamento de nome de domínio é uma técnica que consiste em registrar um nome de domínio sem o utilizar imediatamente para um site.
Em vez disso, o nome de domínio é "registado" e geralmente exibe uma página com anúncios publicitários gerados por uma rede de afiliados.
O proprietário do nome de domínio "registado" pode, então, ganhar dinheiro com esses anúncios, obtendo uma fonte de receita passiva.
A Infomaniak autoriza esta prática, desde que sejam respeitadas as leis sobre publicidade online e marcas comerciais.
E se você for o visitante?
Tenha cuidado: algumas páginas de estacionamento de nomes de domínio podem ser semelhantes a sites legítimos, o que pode causar confusão nos utilizadores que tentam aceder a um site específico, e outras podem estar infetadas com malware, o que pode ser perigoso para a segurança informática dos utilizadores.
Link para esta FAQ: https://faq.infomaniak.com/1861
Esta seção de perguntas frequentes foi útil?
Este guia explica as mensagens que pode receber mencionando ERRP (Política de Lembrete de Expiração e Renovação) ou expiração do domínio.
Introdução
- Estas mensagens estão relacionadas com as notificações e as regras de gestão de nomes de domínio na Internet.
- O objetivo é informá-lo sobre os prazos de renovação, para evitar qualquer interrupção dos seus serviços online, como o seu site ou os seus endereços de e-mail.
ERRP (Expiration Reminder Renewal Policy)
O ERRP é uma política estabelecida pela ICANN (Internet Corporation for Assigned Names and Numbers). Ela obriga os registradores (empresas que registram e gerenciam nomes de domínio, como a Infomaniak ou outras) a informar os titulares de domínios quando estes estiverem próximos da data de expiração. O objetivo é permitir que os proprietários renovem seus domínios a tempo e evitem qualquer interrupção do serviço.
Princípios de funcionamento
- Lembretes de renovação: o registrador deve enviar várias notificações antes e depois da data de vencimento. Geralmente:
- 30 dias antes do vencimento,
- 7 dias antes do vencimento,
- 1 dia após o vencimento.
- Conteúdo das mensagens: cada e-mail deve especificar o domínio em questão, a data de vencimento e as instruções claras para efetuar a renovação.
- Endereço de envio: os lembretes são enviados para o endereço de e-mail registrado no domínio. Portanto, é importante manter este endereço atualizado nas suas informações de contato.
Expiração de um nome de domínio
Quando um domínio não é renovado antes da data de expiração, ele passa por várias etapas antes de ser definitivamente removido. Veja o que geralmente acontece:
- Período de tolerância: após a expiração, o titular ainda tem um prazo de 30 a 45 dias para renovar o domínio sem custos adicionais. Durante este período, o site ou os serviços relacionados podem ser temporariamente desativados.
- Período de resgate (Redemption Grace Period): se o domínio não for renovado durante o período de tolerância, ele entrará em uma fase de resgate. O titular ainda pode recuperar o domínio, mas serão aplicadas taxas adicionais. Este período geralmente dura cerca de 30 dias.
- Exclusão do domínio: se nenhuma ação for realizada após o período de resgate, o domínio será removido do registro e ficará disponível para qualquer novo registro.
E-mails que mencionam ERRP e o vencimento de um domínio
Os e-mails que mencionam ERRP ou o vencimento de um domínio seguem as diretrizes da ICANN. Eles servem para informar os titulares sobre as ações necessárias para manter seus domínios ativos.
- Alerta inicial: um primeiro e-mail é enviado aproximadamente 30 dias antes da data de expiração. Ele informa o titular de que o domínio está se aproximando da data limite e inclui instruções para efetuar a renovação.
- Lembrete urgente: um segundo e-mail é enviado 7 dias antes da data de expiração, lembrando a importância de renovar o domínio para evitar qualquer interrupção do serviço.
- Notificação pós-expiração: um último e-mail é enviado logo após a expiração, informando que o domínio ainda pode ser renovado durante o período de tolerância.
Essas notificações são essenciais para garantir que os proprietários mantenham o controle de seus domínios e que seus sites ou serviços associados permaneçam disponíveis sem interrupção.
Link para esta FAQ: https://faq.infomaniak.com/1878
Esta seção de perguntas frequentes foi útil?
Este guia explica como criar um registo MX personalizado (mx.domain.xyz, assumindo que domain.xyz lhe pertence) para utilizar posteriormente na configuração MX do seu NAS.
Um registo MX não pode ser declarado diretamente como um endereço IP, por exemplo, 178.123.456.789.
Registo MX personalizado
Para aceder aos seus nomes de domínio:
- Clique aqui para acessar o gerenciamento do seu domínio no painel de controle Infomaniak (precisa de ajuda?).
- Clique diretamente no nome atribuído ao domínio em questão.
- Clique em Zona DNS no menu lateral esquerdo.
- Clique no botão azul Adicionar um registo:
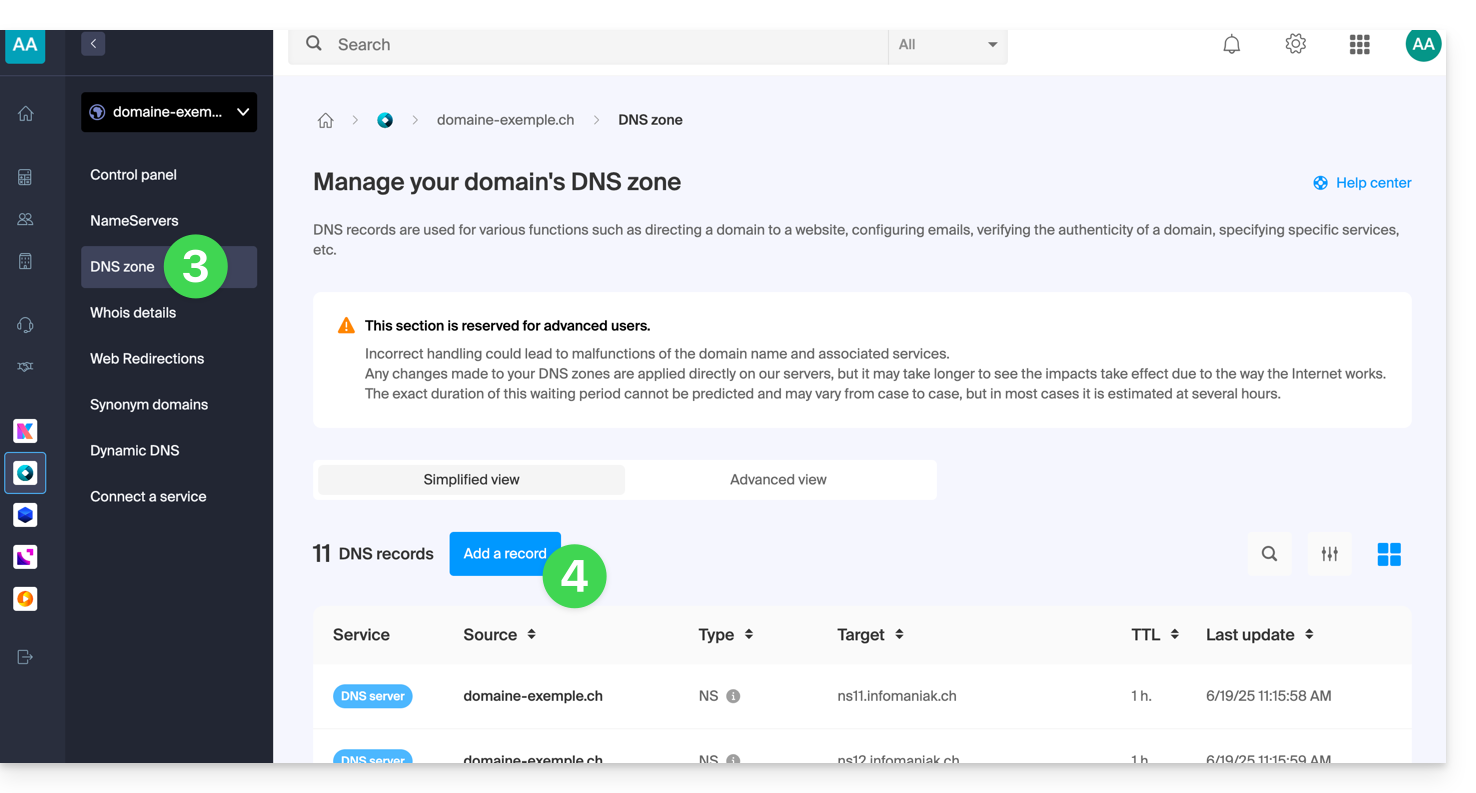
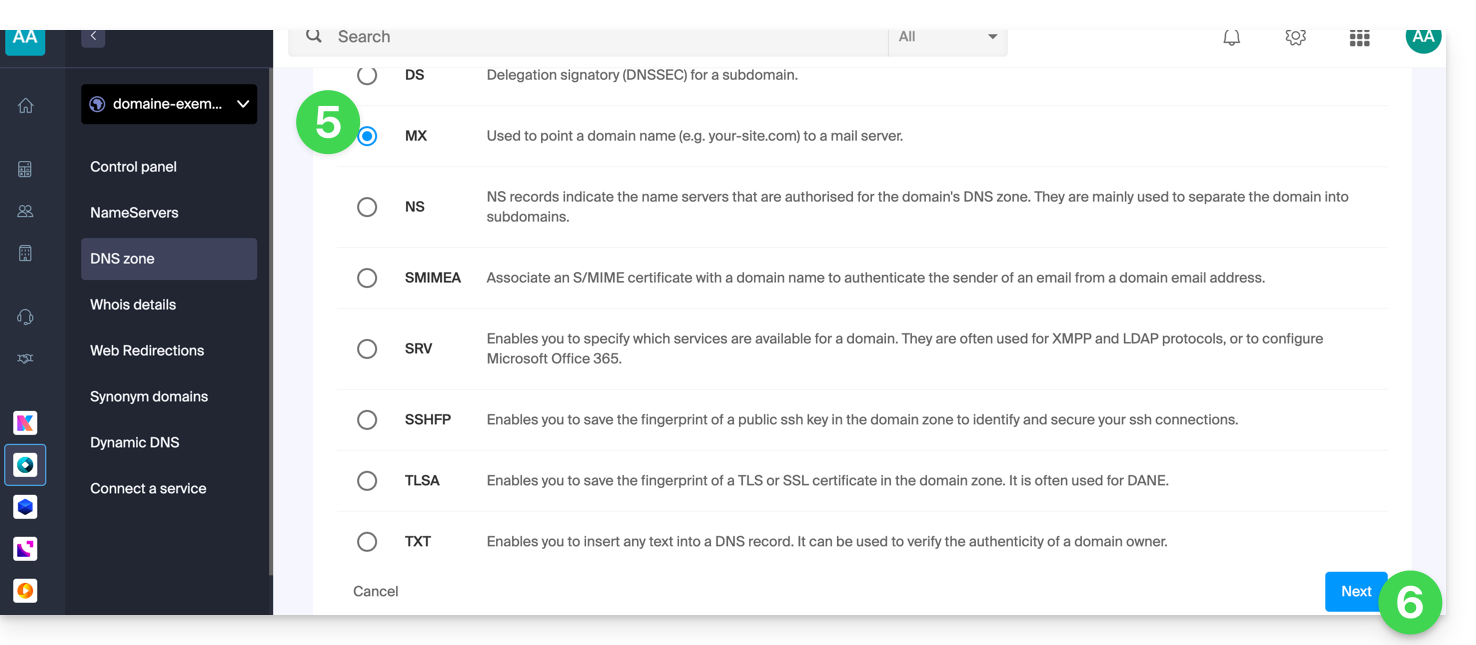
- Selecione MX como tipo de registro.
- Clique em Seguinte:
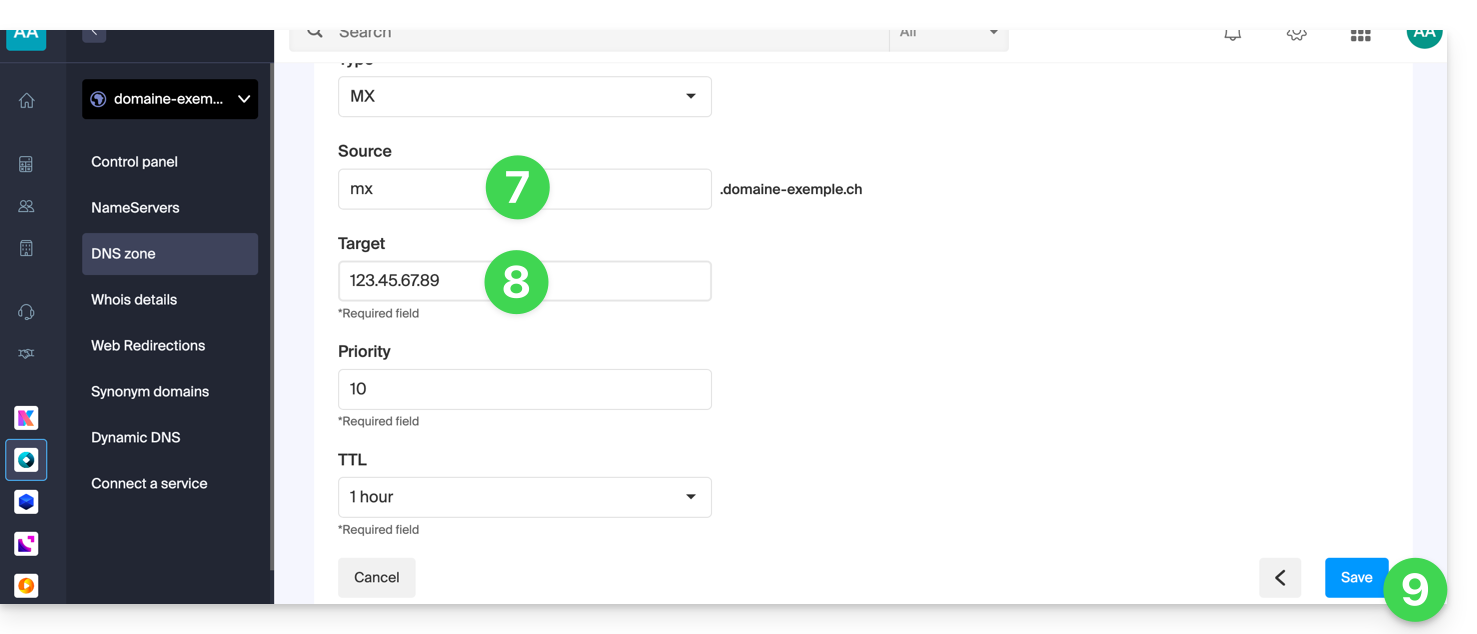
- Indique o registro MX desejado (por exemplo, "
mx.domain.xyz"). - Configure o registro para apontar para o endereço IP desejado (destino).
- Clique no botão Guardar:
Link para esta FAQ: https://faq.infomaniak.com/1896
Esta seção de perguntas frequentes foi útil?
Este guia explica como acessar sua central de automação residencial Jeedom (que está localizada atrás de um endereço IP dinâmico, fornecido pelo seu provedor de serviços de Internet) com um nome de domínio na Infomaniak, através da opção gratuita DynDNS.
Introdução
- A integração que você instala funciona como um mensageiro: ela monitora constantemente o endereço IP da sua rede local.
- Assim que detecta que o seu provedor de acesso alterou o seu IP, ela envia instantaneamente um sinal para a Infomaniak.
- A Infomaniak atualiza então o seu nome de domínio (ex:
jee.domain.xyz) para que ele aponte para o novo endereço IP.
Conectar o Jeedom a um nome de domínio
Pré-requisitos
- Possuir uma instalação Jeedom (em um Raspberry Pi 5, por exemplo) conectada à Internet com um endereço IP dinâmico.
- Um DNS dinâmico deve ter sido criado no domínio em questão.
Em seguida:
- Instale o plugin oficial e gratuito DynDNS na sua aplicação Jeedom, a partir do Market.
- Ative o plugin como de costume.
- Configure um novo equipamento, selecionando Infomaniak na lista de serviços:
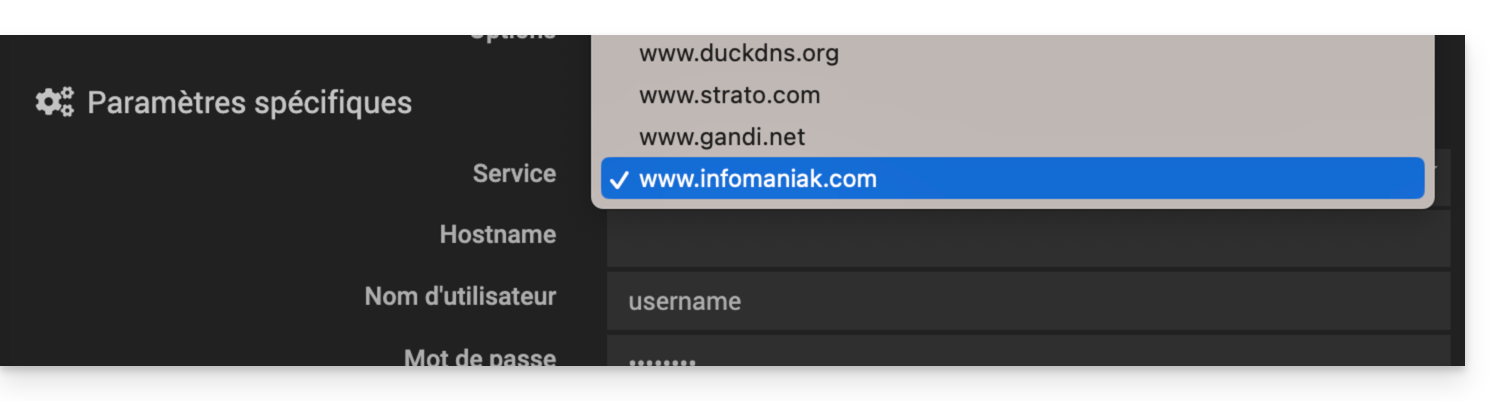
- Nome do host: o URL configurado no Manager durante a adição do Dynamic DNS
- Nome de usuário: o identificador definido no Manager durante a adição do Dynamic DNS
- Senha: a senha definida no Manager durante a adição do Dynamic DNS
O Jeedom verificará o IP externo a cada 15 minutos. Se este tiver mudado, o DNS será atualizado. Assim, o seu nome de domínio apontará continuamente para a sua instalação de automação residencial, mesmo que o seu provedor de acesso à Internet altere o seu endereço IP público.
Consulte também a documentação oficial do plugin.
Link para esta FAQ: https://faq.infomaniak.com/1913
Esta seção de perguntas frequentes foi útil?
Este guia explica como encomendar uma zona DNS na Infomaniak.
Introdução
- Ter a zona DNS na Infomaniak é útil se o seu nome de domínio estiver registado noutro local (fornecedor/registrador terceirizado) e se pretender associar facilmente este domínio aos produtos Infomaniak.
- De facto, não basta ter um site
domain.xyzna Infomaniak e indicar os 2 endereços DNS da Infomaniak no registrador do nome de domínio (se este não for a Infomaniak) para que o site seja exibido quando se digitadomain.xyznum navegador. - Você deve adicionar uma zona DNS no mesmo local que a hospedagem para que o site funcione corretamente.
- Isso também será particularmente útil se o provedor que gerencia seu nome de domínio não oferecer gerenciamento de zona DNS.
Encomendar uma zona DNS
Para tal:
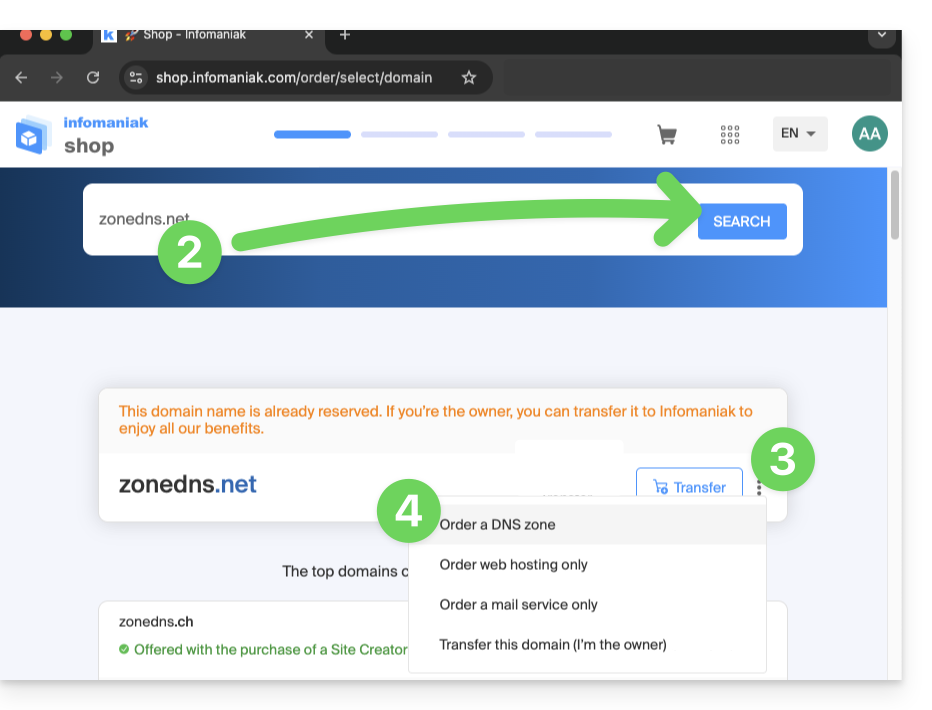
- Clique aqui para acessar a loja de domínios da Infomaniak.
- Inicie uma pesquisa com o nome do domínio registrado em outro lugar.
- Clique em o menu de ação ⋮ localizado à direita do resultado obtido.
- Selecione Encomendar uma zona DNS:
- Conclua a compra.
- Após ser adicionada ao seu painel de controle, a zona poderá ser editada.
Link para esta FAQ: https://faq.infomaniak.com/1914
Esta seção de perguntas frequentes foi útil?
Este guia explica como vincular um nome de domínio gerenciado pela Infomaniak a uma oferta Google Sites.
Introdução
- Um site criado no Google não poderá ser exportado para ser hospedado em servidores de terceiros, como os da Infomaniak, por exemplo.
- Recomenda-se, portanto, criar o site diretamente na Infomaniak com a ajuda do Site Creator ou do WordPress.
Associar o Google Sites ao seu domínio Infomaniak
Para configurar o seu domínio no Google Sites:
- Crie ou prepare o seu site no Google Sites.
- Nas configurações do Google Sites, aceda à opção "Usar um domínio personalizado".
- Adicione o seu domínio personalizado.
O Google solicitará que você verifique o seu domínio através de registos DNS (remova todos os registos A e CNAME antigos associados, se necessário, e adicione os novos):
Registros A
Para alcançar o resultado desejado pelo Google, por exemplo, 4 IPs diferentes…
- Host:
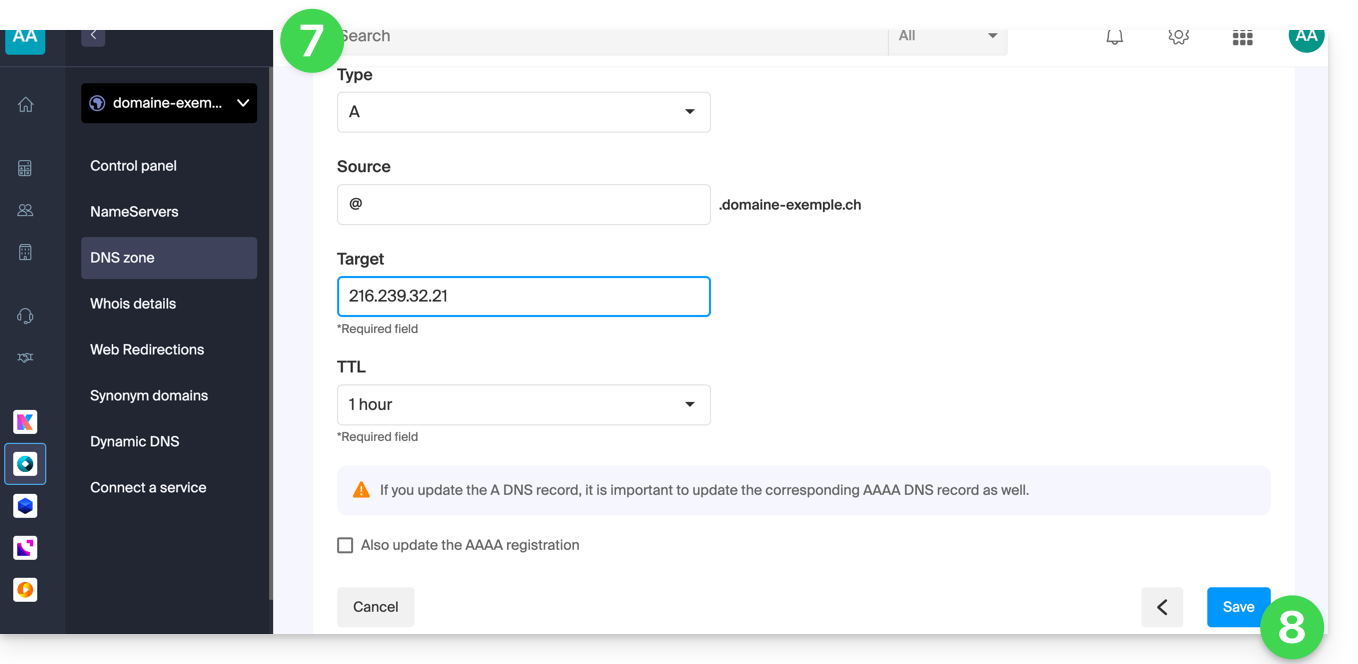
@aponta para:216.239.32.21 - Host:
@aponta para:216.239.34.21 - Host:
@aponta para:216.239.36.21 - Host:
@aponta para:216.239.38.21
… crie os registos do tipo “A” com estes valores de IP como destino:
- Clique aqui para aceder à gestão do seu domínio no Manager Infomaniak (precisa de ajuda?).
- Clique diretamente no nome atribuído ao domínio em questão.
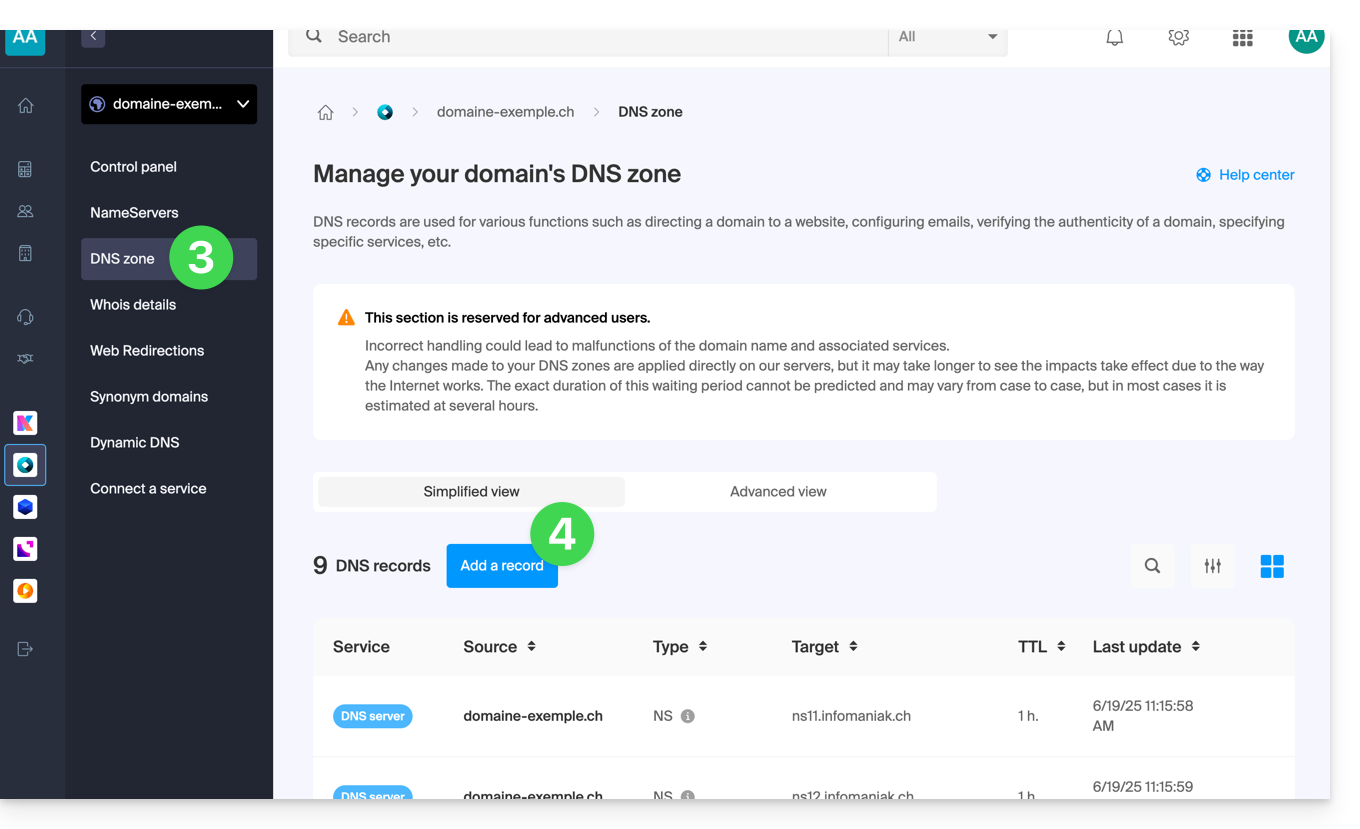
- Clique em Zona DNS no menu lateral esquerdo.
- Clique no botão azul Adicionar entrada:
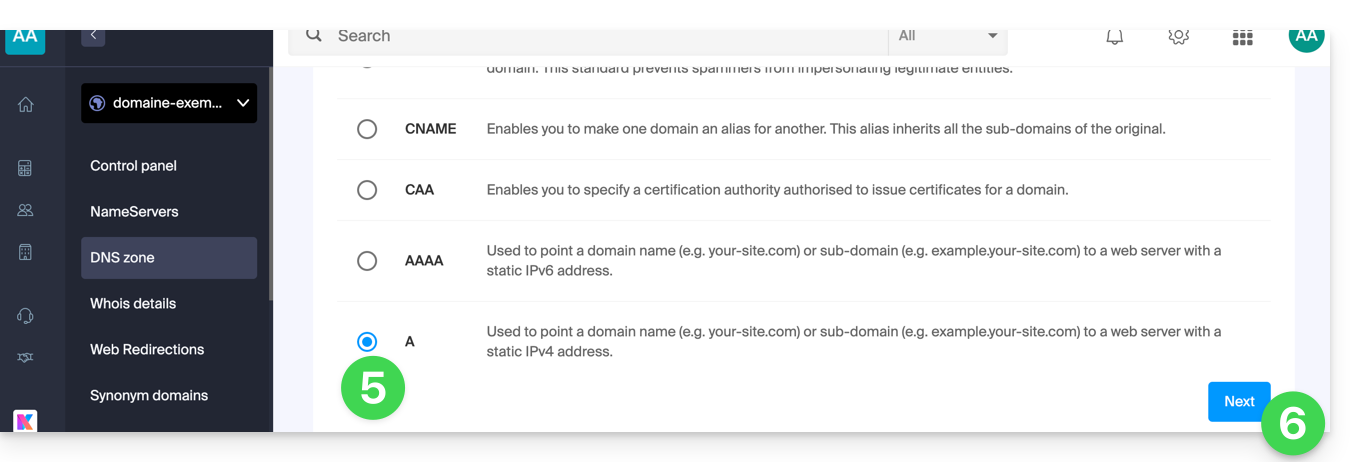
- Escolha o tipo de registo A.
- Clique em Seguinte:
- Preencha os diferentes campos com as suas informações.
- Salve as alterações efetuadas:
- Repita o processo a partir do ponto 4 se tiver vários registos para adicionar.
Registo CNAME
Para alcançar o resultado solicitado pelo Google, crie um registo CNAME com os seguintes valores:
- Servidor:
www - Aponta para:
ghs.googlehosted.com
Para isso:
- Clique aqui para acessar o gerenciamento do seu domínio no Manager Infomaniak (precisa de ajuda?).
- Clique diretamente no nome atribuído ao domínio em questão.
- Clique em Zona DNS no menu lateral esquerdo.
- Clique no botão azul Adicionar entrada:
- Escolha o tipo de registro CNAME.
- Clique em Seguinte:
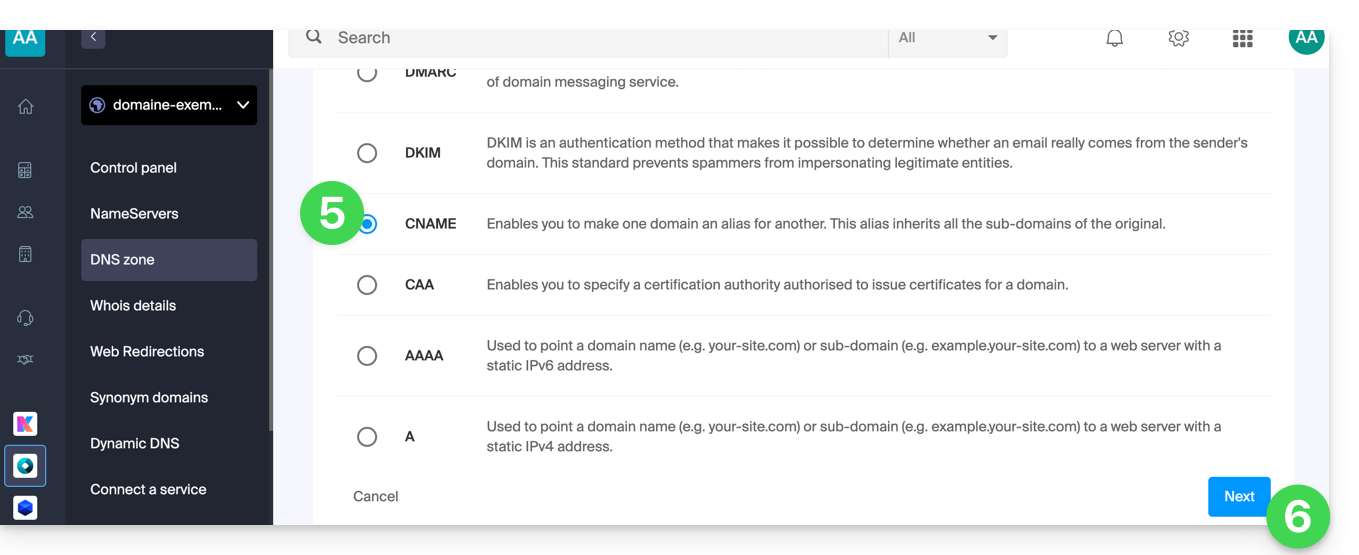
- Preencha os diferentes campos com as suas informações.
- Salve as alterações efetuadas:
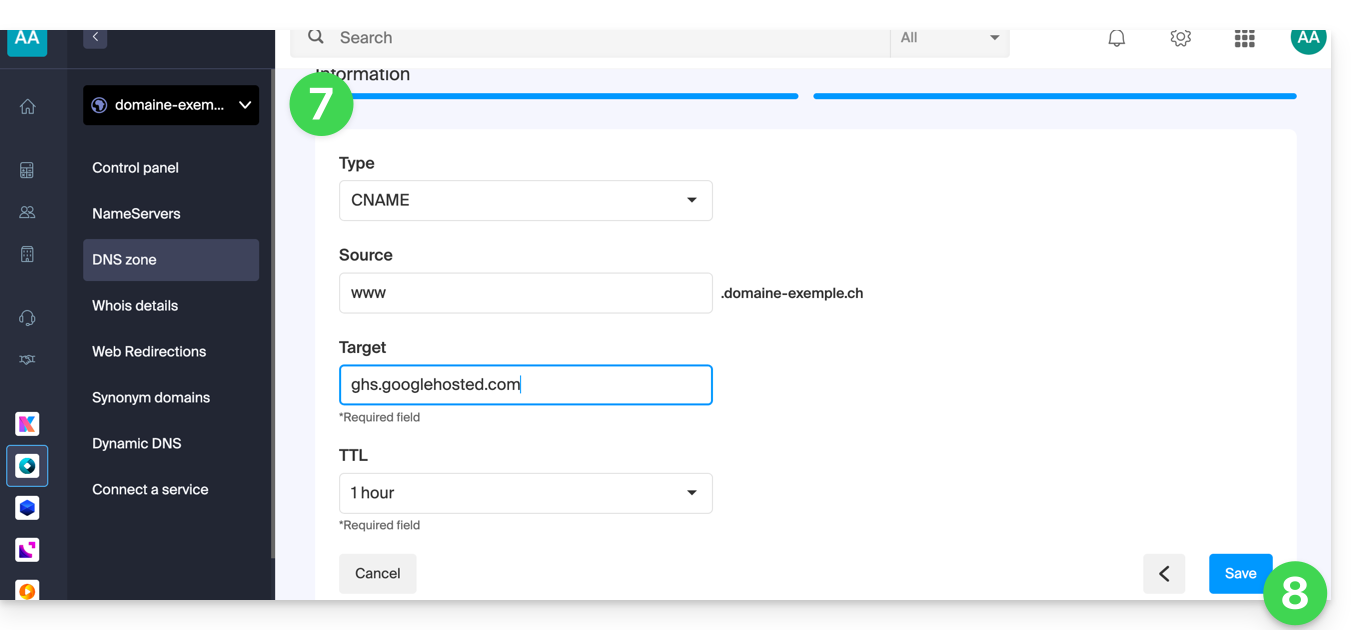
Verifique o seu domínio (Verificação do Site do Google)
Após configurar os registros DNS, volte para o Google Sites para concluir a verificação. Isso pode levar até 24 horas devido à propagação do DNS.
Validação final
Após a propagação das alterações, o seu site deverá funcionar com o domínio personalizado. Se tiver algum problema, verifique os registos DNS ou contacte o Google.
Link para esta FAQ: https://faq.infomaniak.com/1917
Esta seção de perguntas frequentes foi útil?
Este guia explica como substituir o nome de domínio principal associado a um Serviço de Email, caso deseje, por exemplo, alterar a grafia de tudo o que vem após o símbolo @ do seu endereço de email (= o nome de domínio). Se o seu Serviço de Email estiver integrado numa kSuite, então terá de atuar diretamente no domínio da kSuite.
Introdução
- Você também pode seguir este procedimento se o objetivo for ter endereços de e-mail totalmente novos, mantendo o histórico de seus e-mails no Mail (já que o endereço de e-mail continuará existindo, por exemplo, info@primeiro-domínio.xyz se tornará info@novo-domínio.xyz sem alteração em seu conteúdo).
- De fatonão é possível simplesmente alterar a grafia do nome de domínio em questão; portanto, é necessário substituir o nome de domínio atual associado aos seus endereços de e-mail por outro nome de domínio.
- Para simplesmente adicionar um nome de domínio adicional, consulte este outro guia.
- Para, em vez disso, modificar a parte do seu endereço de e-mail que aparece antes do símbolo "arroba"
@, consulte este outro guia. - Note também que pode renomear o seu produto (exemplo) no painel de controlo Infomaniak, mas alterar o nome de um Serviço de Email não tem absolutamente nenhum impacto nos seus endereços; é necessário atuar no nome de domínio.
Se o seu Serviço de Email estiver integrado numa kSuite, então terá de atuar diretamente no domínio da kSuite.
Alterar o nome de domínio do Serviço de Email
Pré-requisitos
- Ter o novo nome de domínio (se necessário, crie-o previamente).
- Consultar as instruções deste outro guia e aplicar as instruções correspondentes à sua situação (para garantir que o nome de domínio funcione quando for associado ao seu Serviço de Email).
Depois que o novo nome de domínio estiver pronto para ser usado no lugar do antigo, é preciso adicioná-lo ao Serviço de E-mail e, em seguida, realizar uma inversão:
- Clique aqui para acessar o gerenciamento do seu produto no Manager Infomaniak (precisa de ajuda?).
- Clique diretamente no nome atribuído ao produto em questão.
- Clique em Gerenciamento de domínios no menu lateral esquerdo
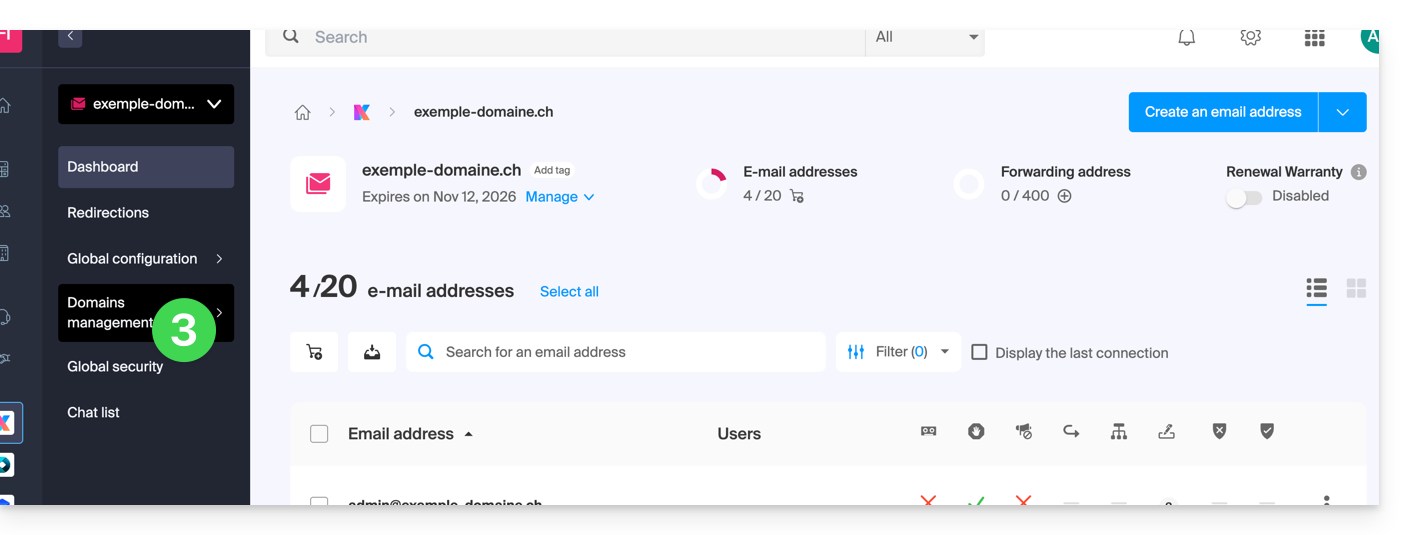
- Clique em Domínios associados ao serviço no menu lateral esquerdo.
- Clique no botão azul Adicionar um domínio associado:
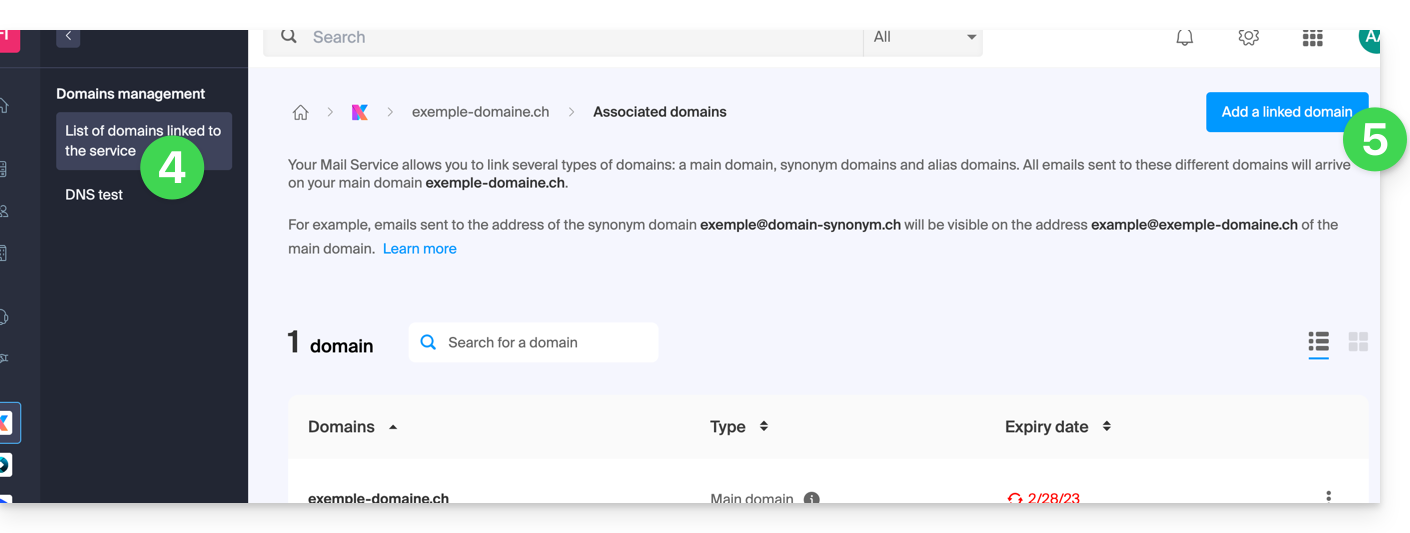
- É possível:
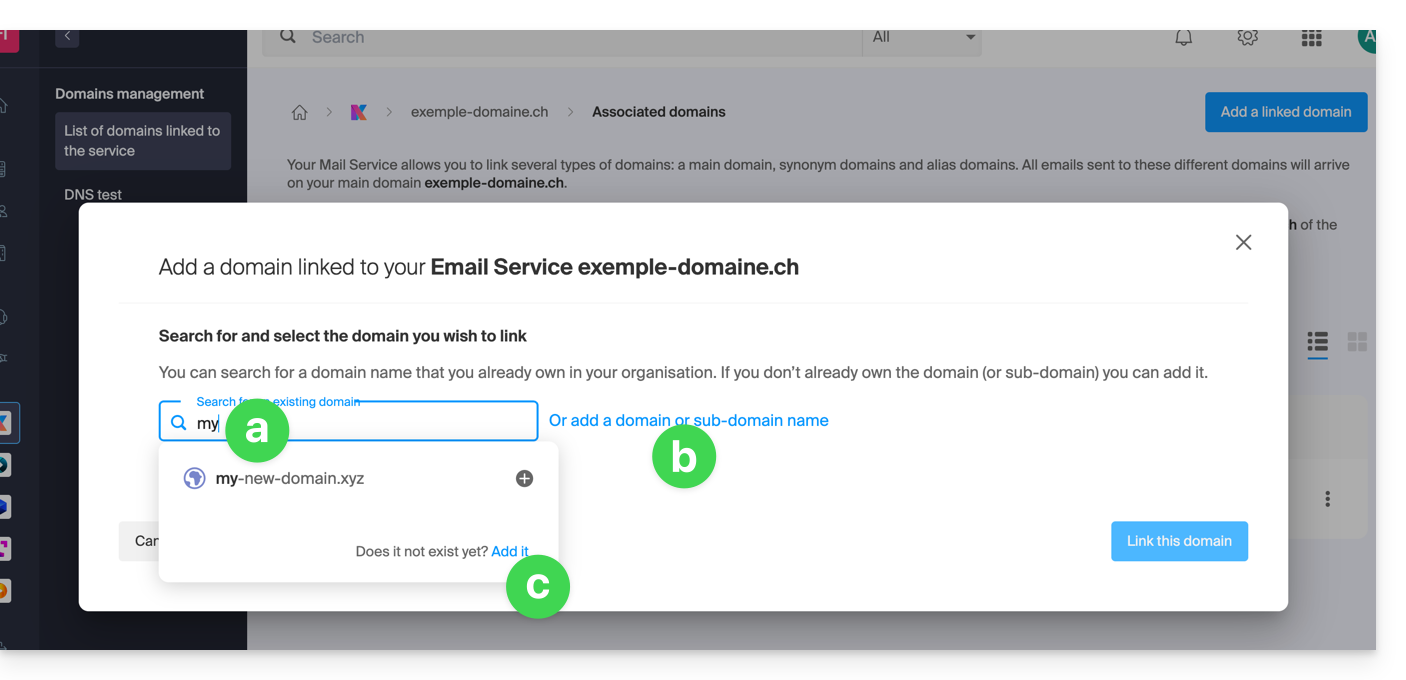
- Pesquisar um domínio existente na Organização à qual você está conectado; isso vinculará e atualizará automaticamente a zona DNS do domínio adicionado.
- Adicionar um nome de domínio ou subdomínio para indicar manualmente o nome de domínio ou subdomínio a ser usado (ideal se o nome de domínio estiver em outro lugar).
- Comprar um novo nome de domínio (ver pré-requisitos).
a: O domínio existe no nível da Organização
Antes de prosseguir, certifique-se de desvincular o nome de domínio caso ele tenha sido definido como um domínio sinônimo anteriormente.
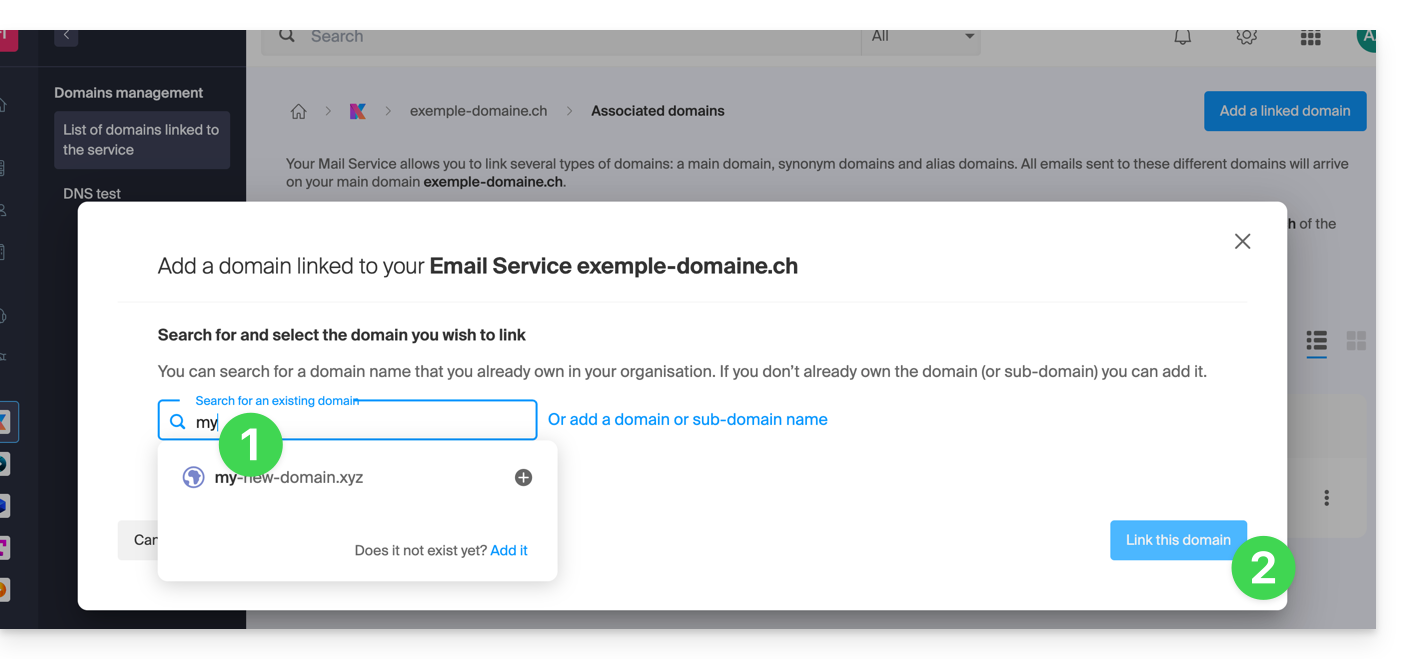
- Clique no nome de domínio sugerido.
- Clique no botão azul Associar este domínio:
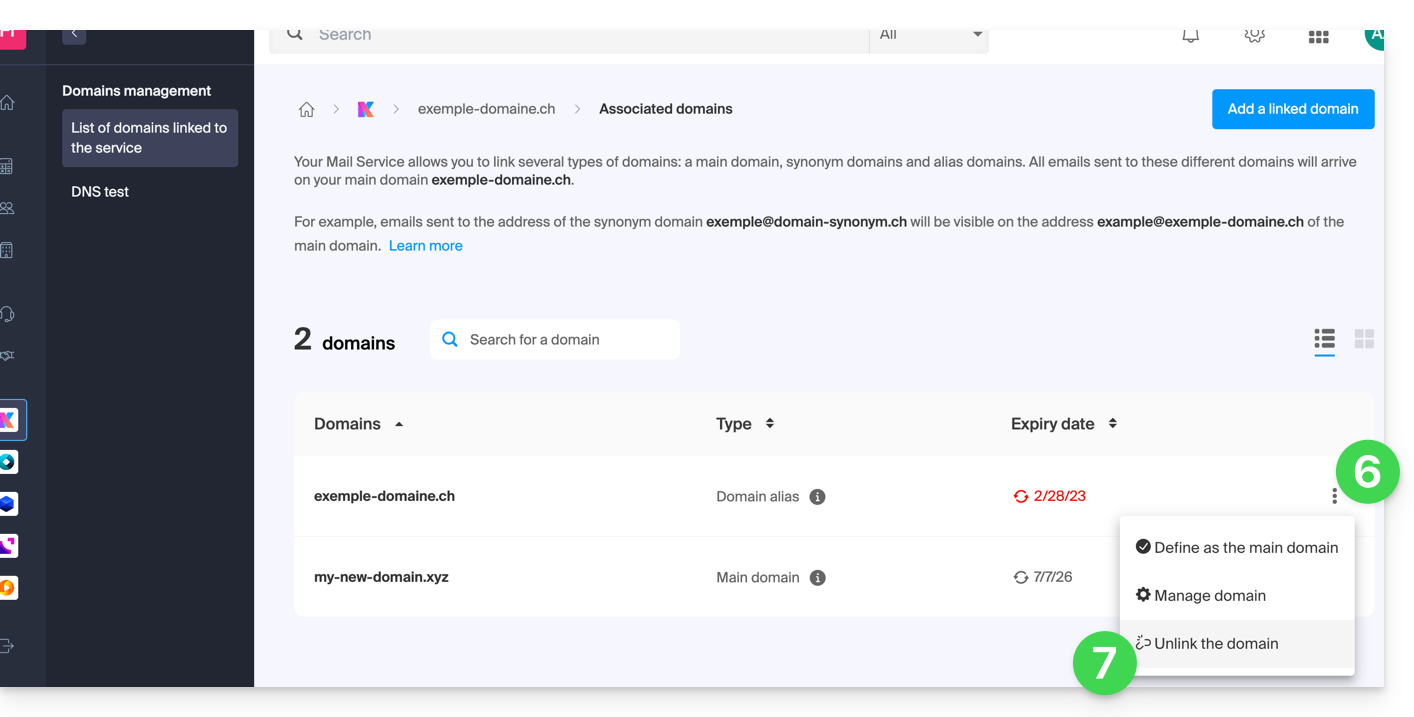
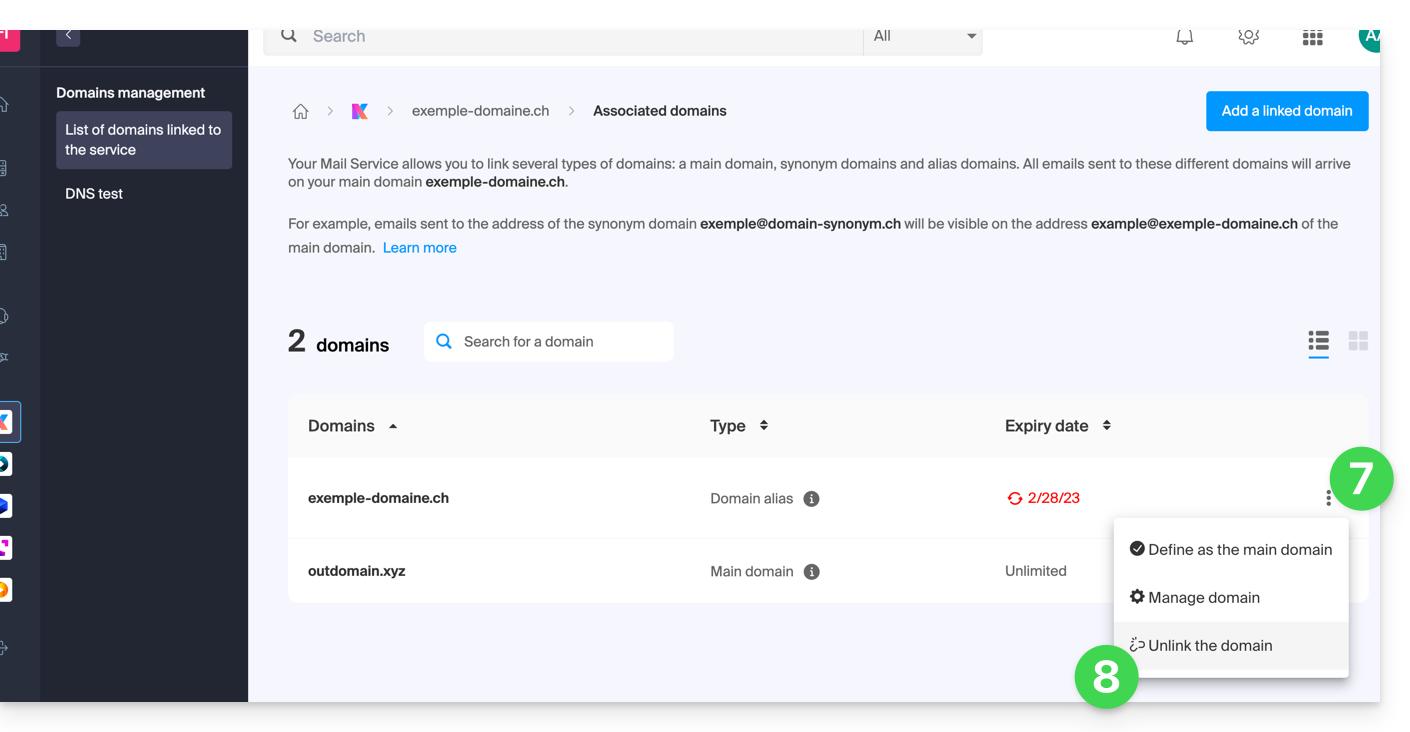
- Clique no ícone ⋮ à direita do novo nome de domínio adicionado.
- Clique em Definir como domínio principal (é necessário ter desassociado o nome de domínio sinônimo do nome de domínio principal, caso houvesse uma associação anterior):

- Confirme a inversão e aguarde até que a operação seja concluída.
- Clique no ícone ⋮ à direita do nome de domínio antigo.
- Clique em Desvincular o domínio:
- Confirme a desvinculação, verificando se deseja remover os DNS associados durante a operação.
Chegou ao fim: o Serviço de Email agora responde a um novo nome de domínio.
b: O domínio existe, mas está alojado noutro local
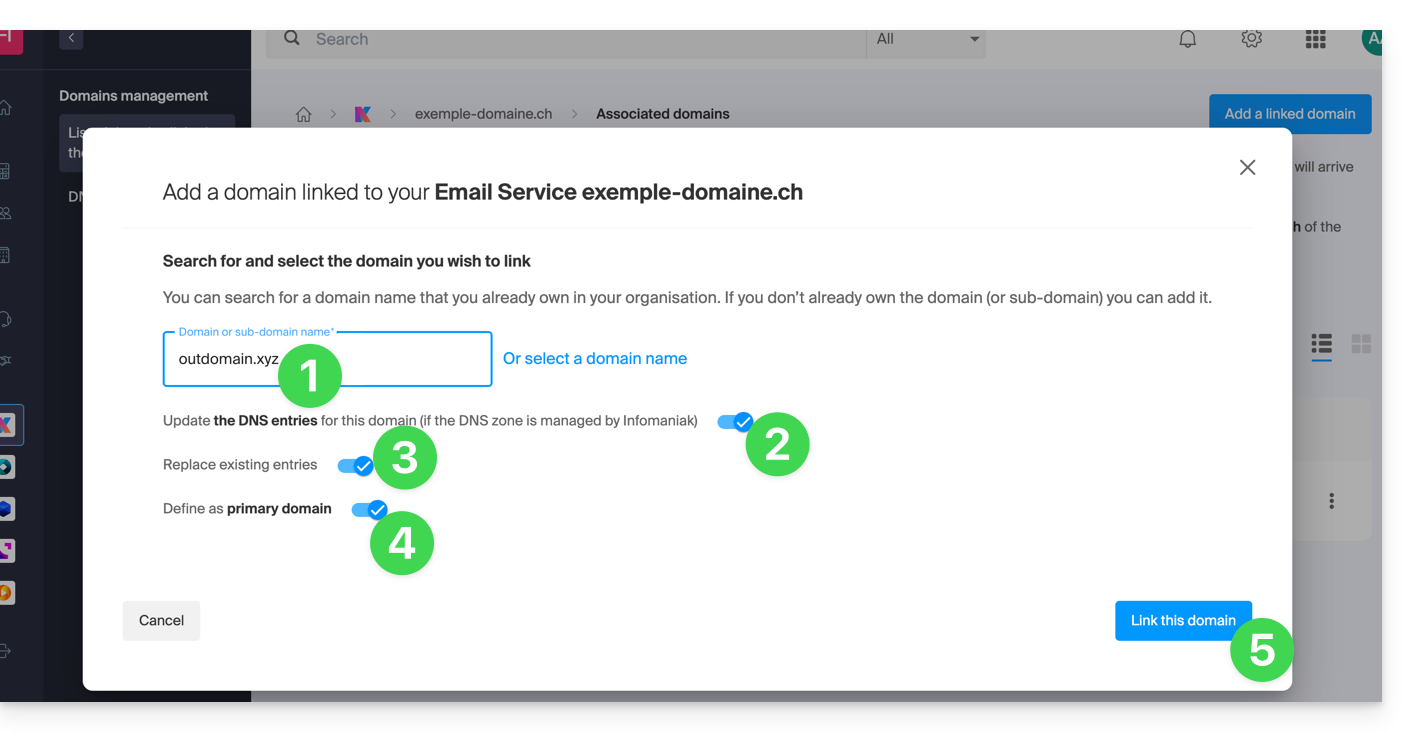
- Após clicar em Adicionar um domínio ou subdomínio, insira o nome de domínio que será usado para substituir o nome atual.
- Ative a atualização dos registros DNS (se a situação do nome de domínio permitir, a zona DNS do nome de domínio será atualizada automaticamente).
- Se o ponto 2 acima estiver ativo, ative a substituição das entradas existentes.
- Ative a inversão do nome de domínio (para evitar etapas adicionais, como no ponto "a" acima).
- Clique no botão azul Ligar este domínio:
- Aguarde enquanto a operação é realizada.
- Clique no ícone ⋮ à direita do nome de domínio antigo.
- Clique em Desvincular domínio:
Link para esta FAQ: https://faq.infomaniak.com/1934
Esta seção de perguntas frequentes foi útil?
Este guia explica como adicionar um novo nome de domínio a um site Infomaniak.
Introdução
- Quando adiciona um novo nome de domínio a um site, fala-se em domínio associado, mas também em alias.
- Um domínio alias, neste caso, é um nome de domínio adicional, também associado a um site existente.
- Para que o site
domain.xyzseja acessível com um nome de domínio completamente diferente, comoprivate.abc, por exemplo, é necessário adicionarprivate.abccomo alias do site. - Segundo exemplo, para que o site
domain.xyzseja também acessível comwww.domain.xyz, é necessário adicioná-lo como alias ao domíniodomain.xyz. Neste exemplo,domain.xyzé o site principal do aliaswww.domain.xyz. Em geral, o aliaswwwjá é adicionado automaticamente e está presente…
- Para que o site
Adicionar um alias a um site existente
Pré-requisitos
- Se o nome de domínio (destinado a tornar-se um alias) ou a sua zona DNS for gerido pela Infomaniak, está tudo bem. Caso contrário:
- O registo A do nome de domínio deve apontar para a Infomaniak.
- Para simplificar, pode confiar a gestão do domínio à Infomaniak.
- Também é necessário que o futuro alias não seja já um alias, caso em que será necessário desassociá-lo do site atual previamente (o mesmo se for um sinónimo).
Para adicionar um domínio adicional que será associado ao seu site:
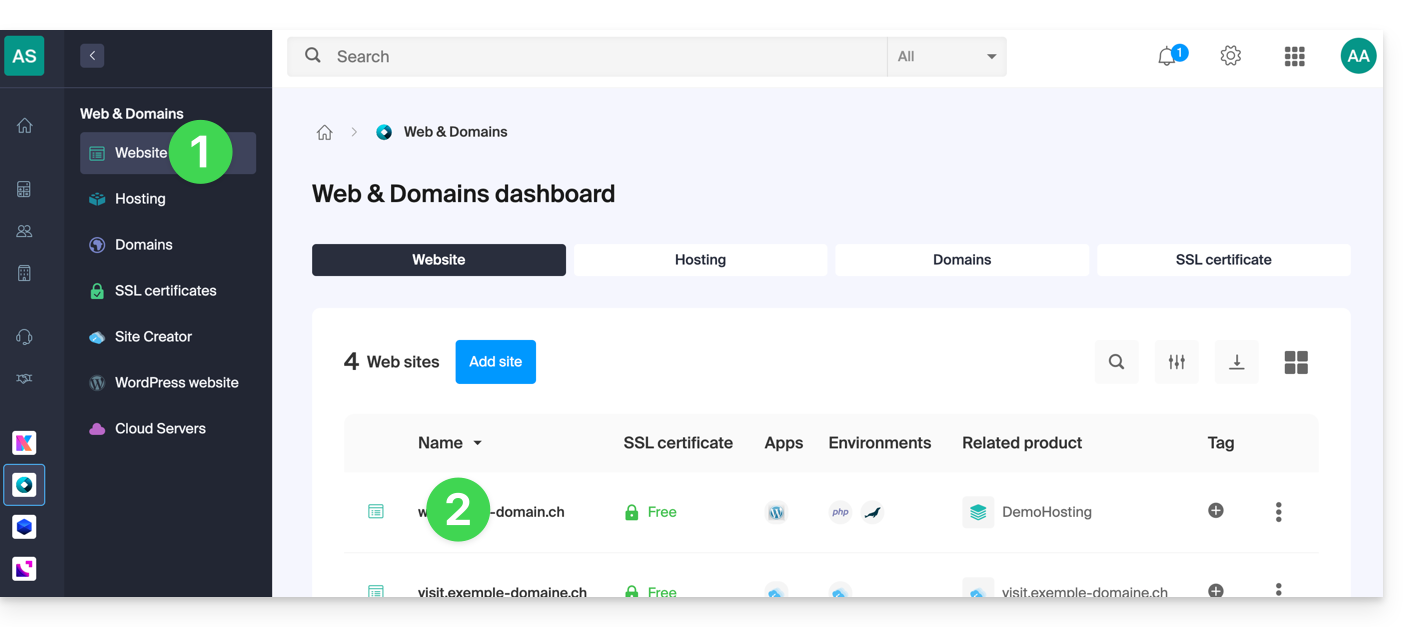
- Clique aqui para acessar o gerenciamento do seu site no Manager Infomaniak (precisa de ajuda?).
- Clique diretamente no nome atribuído ao site em questão:
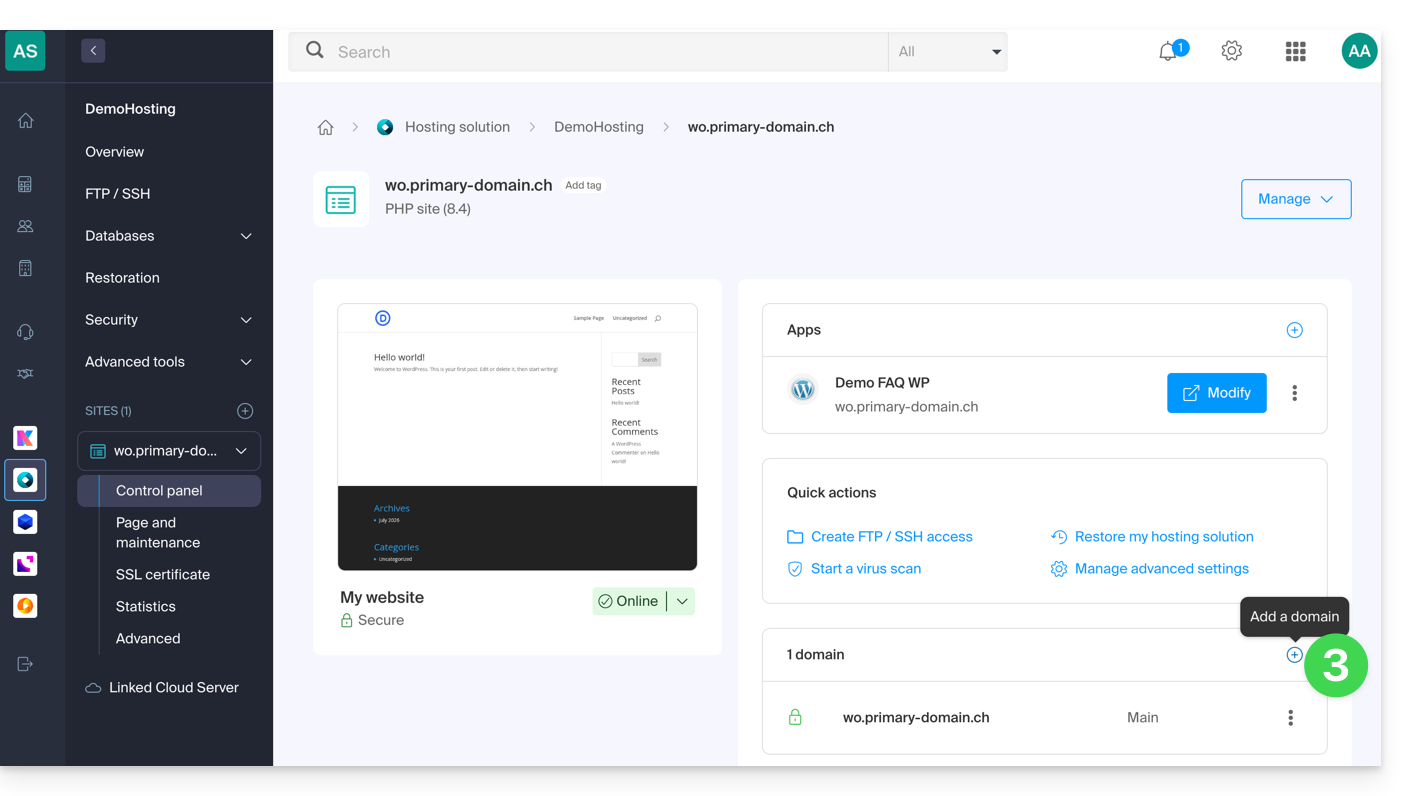
- Em seguida, clique no botão Adicionar domínio:
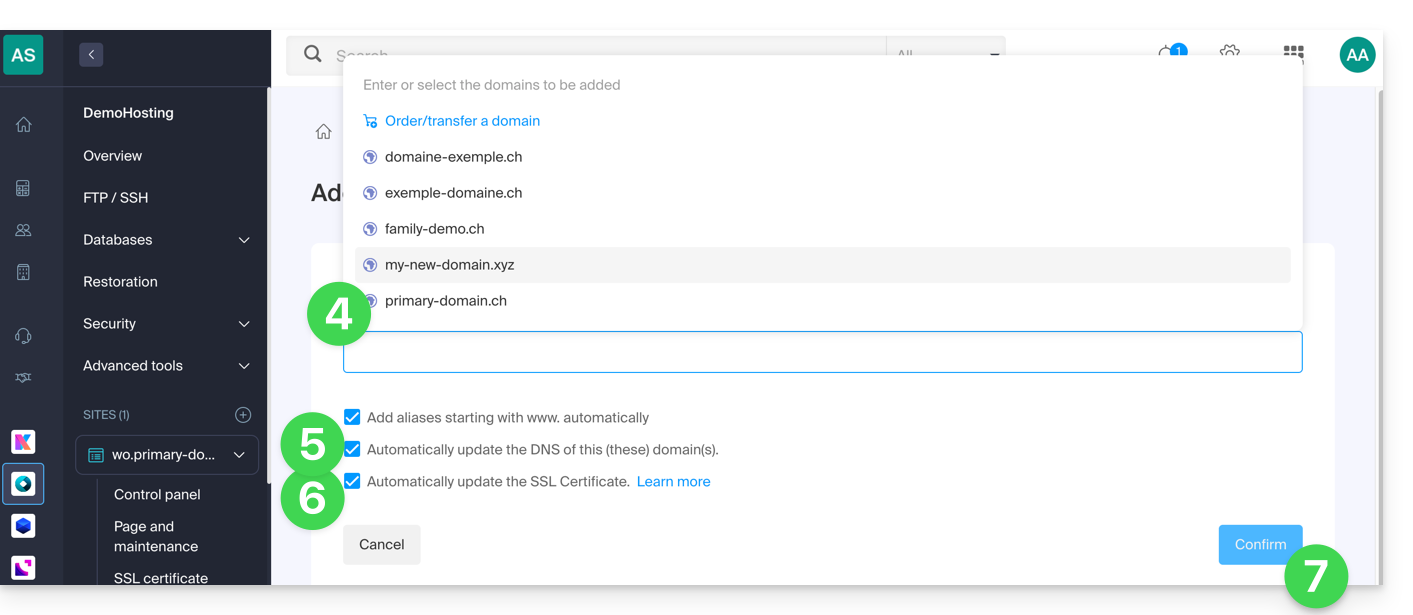
- Insira o(s) nome(s) de domínio a serem adicionados, separando-os com a tecla Enter.
- Se o alias ou sua zona DNS for gerenciado pela Infomaniak, é possível atualizar automaticamente as entradas DNS. Caso contrário, faça as alterações necessárias junto ao seu registrador ou transfira o gerenciamento do nome de domínio para a Infomaniak.
- Se você tiver um certificado SSL, como o Let's Encrypt, pode solicitar que ele seja atualizado aqui para incluir os novos nomes.
- Clique em Validar para concluir o procedimento:
- Os domínios vinculados ao site são atualizados:
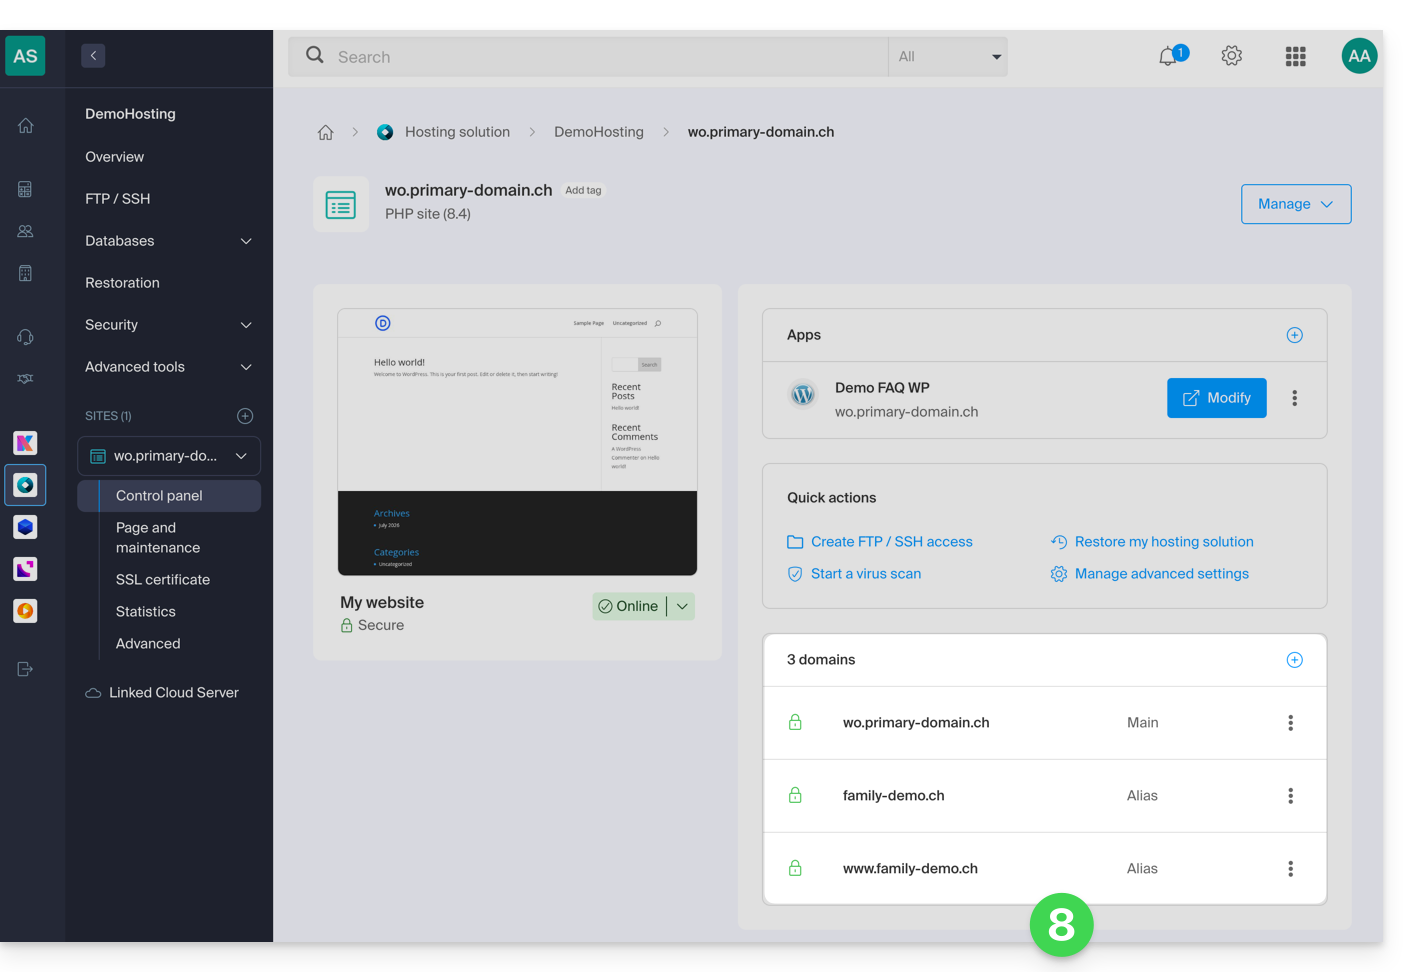
Para definir o alias como domínio principal, consulte este outro guia.
Link para esta FAQ: https://faq.infomaniak.com/1946
Esta seção de perguntas frequentes foi útil?
Este guia destina-se aos utilizadores que pretendem gerir registos Glue (ou "registos de ligação") na Infomaniak.
Introdução
- Os registros "glue" são cruciais para vincular um nome de domínio aos seus servidores de nomes associados, fornecendo diretamente os endereços IP desses servidores.
- Por exemplo, para o domínio
domain.xyz, os registros "glue" especificam os servidores de nomes (ns1.domain.xyzens2.domain.xyz), bem como seus endereços IP (192.0.2.10e192.0.2.11).
- Por exemplo, para o domínio
- Isso acelera a resolução DNS, permitindo que navegadores e serviços online encontrem seu site de forma mais rápida e eficiente.
- Atenção: adicionar um servidor DNS não o adiciona automaticamente à zona DNS: é necessário atualizar manualmente a zona DNS do seu domínio!
Criar registros "Glue"...
… via “registro A”
Este método consiste em criar um registro A (endereço) para ns1.domain.xyz, apontando para o IP do servidor DNS. Isso terá o efeito de registrar o IP no registrador. Em seguida, você poderá adicionar ns1.domain.xyz, que será reconhecido e redirecionado para o servidor DNS correto.
domain.xyz. 3600 IN NS ns1.domain.xyz.domain.xyz. 3600 IN NS ns2.domain.xyz.
ns1.domain.xyz. 3600 IN A 192.0.2.10ns2.domain.xyz. 3600 IN A 192.0.2.11
… através do botão “Colar registros”
Esta forma de proceder permite criar, mas também modificar, registros de colagem existentes:
- Clique aqui para acessar o gerenciamento do seu produto no Manager Infomaniak (precisa de ajuda?).
- Clique diretamente no nome atribuído ao produto em questão.
- Clique em Servidores DNS no menu lateral esquerdo.
- Clique no botão Gerenciar os registros de cola:
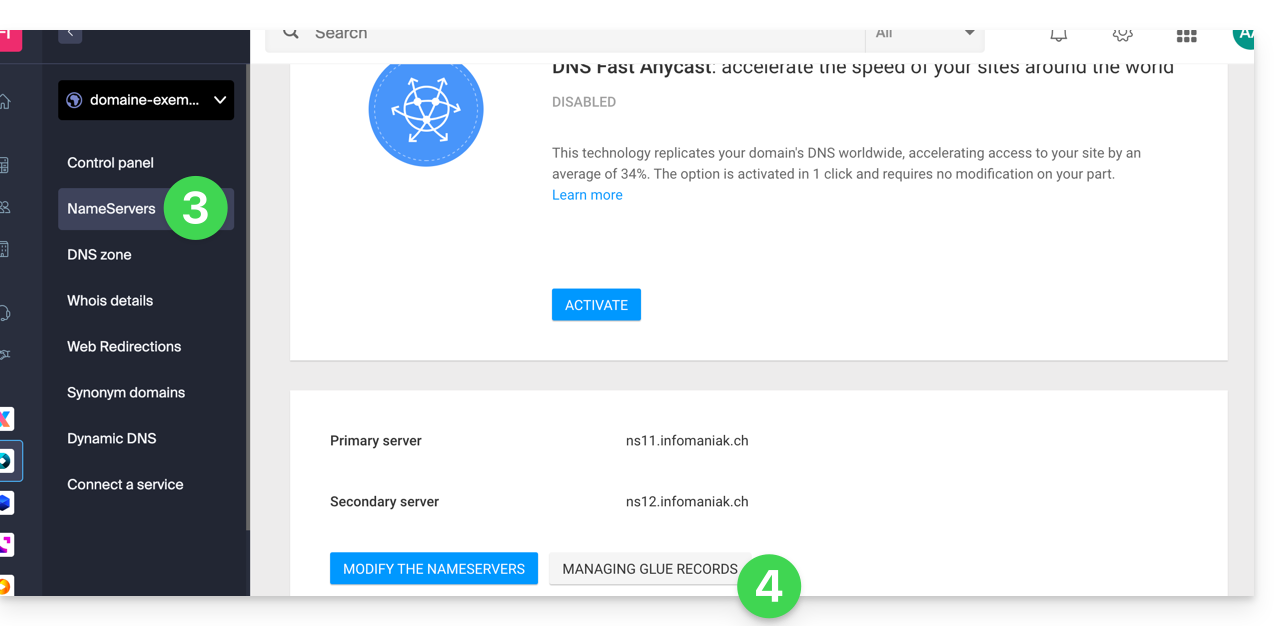
- Clique no botão Adicionar servidor:
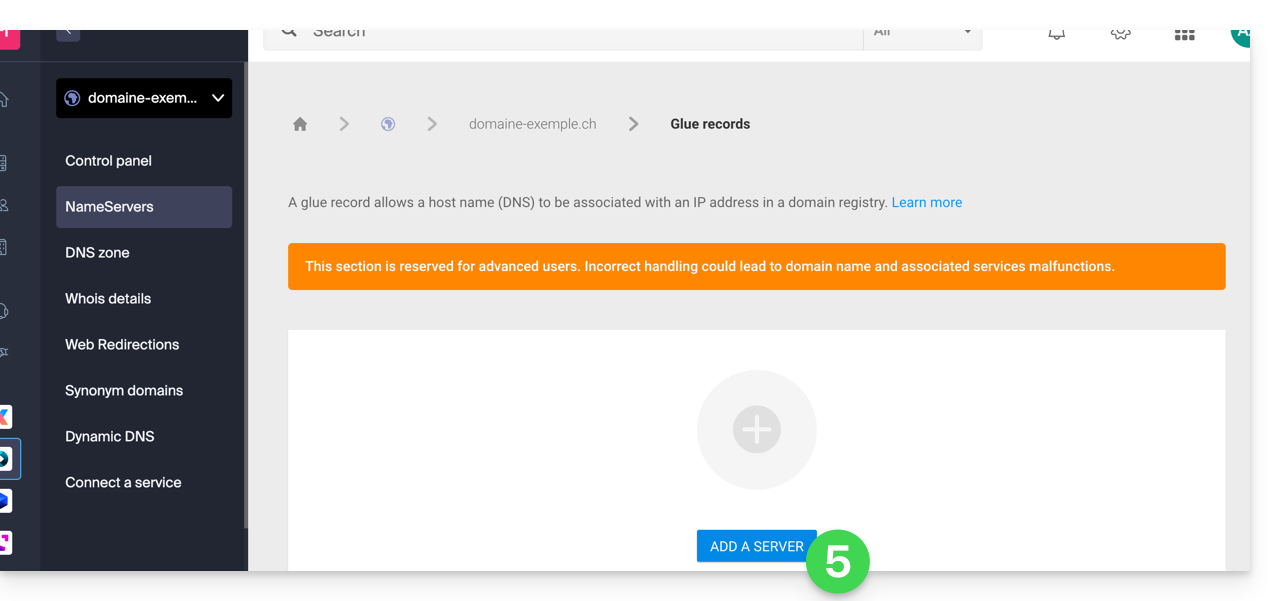
- Preencha o nome do servidor a ser adicionado e o seu endereço IP.
- Clique no botão Confirmar.
Link para esta FAQ: https://faq.infomaniak.com/1953
Esta seção de perguntas frequentes foi útil?