Base de conhecimento
1000 perguntas frequentes, 500 tutoriais e vídeos explicativos. Aqui, você encontra apenas soluções!
This guide explains how to modify the dates and times of sales closures within the Infomaniak ticketing system.
Sales end parameters
You can modify the date and time of closure at each level independently: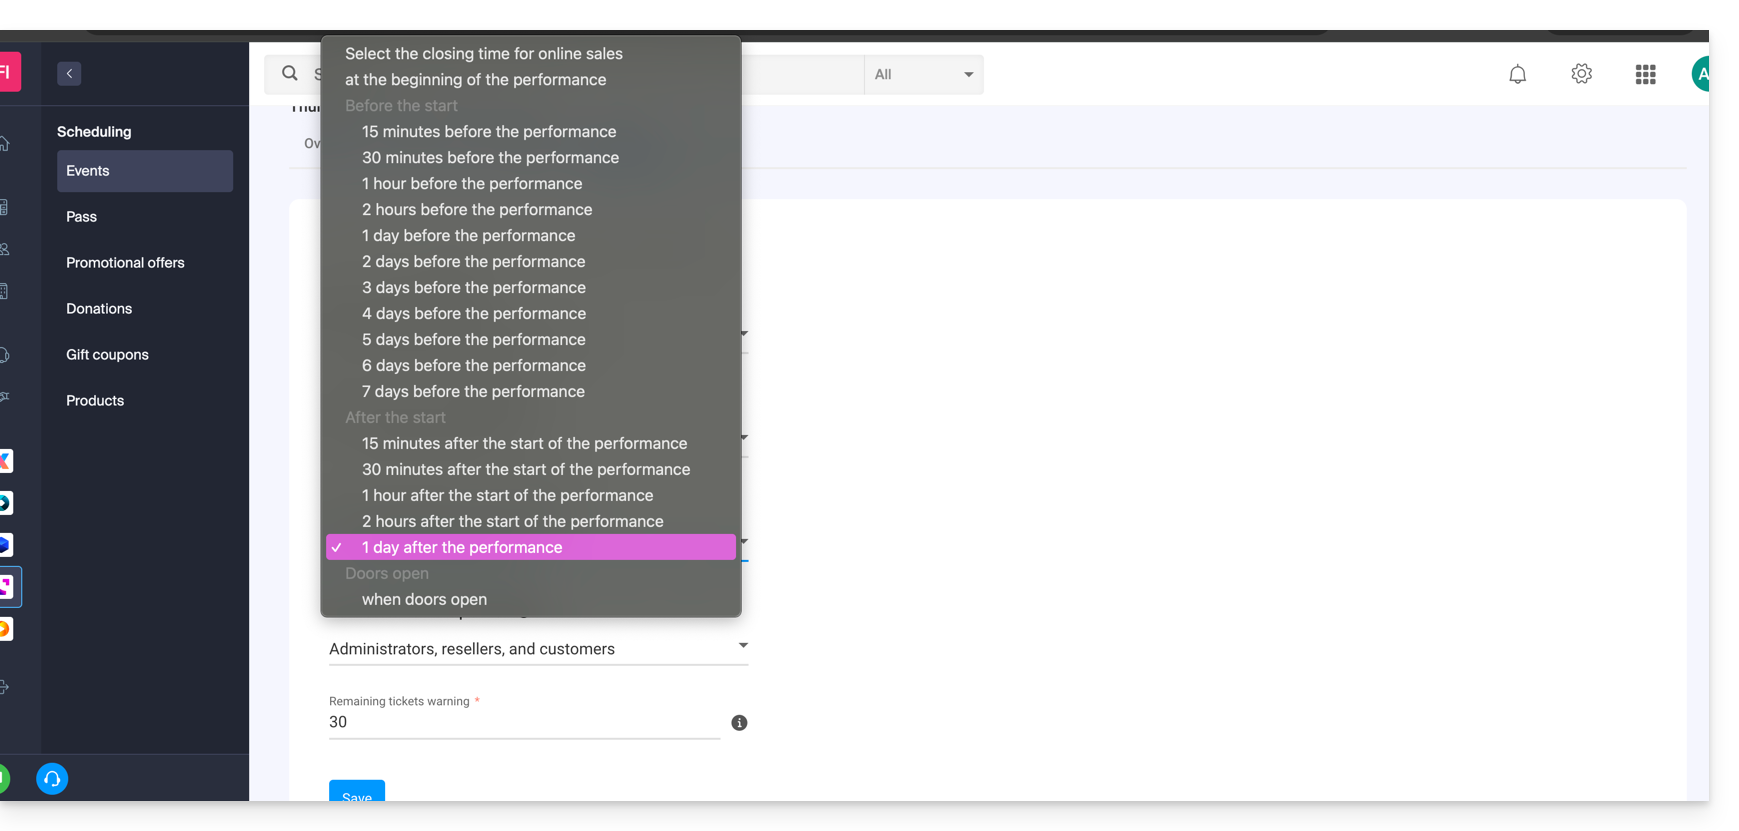
- End of online sales
- Allows you to close the event sales from your online ticketing system and on the Infomaniak portal. People will no longer be able to order tickets online for this event from a website.
- End of Reseller Counter Sales
- Defines when people with restricted access to the counter only will stop their sales from the counter on the manager or tablet.
- End of Administrator Counter Sales
- For administrators conducting sales from the Counter accessible from the manager or tablet.
Setting up sales end parameters
These parameters can be set when creating an event, during the third step of the procedure by activating the option Modify sales closure: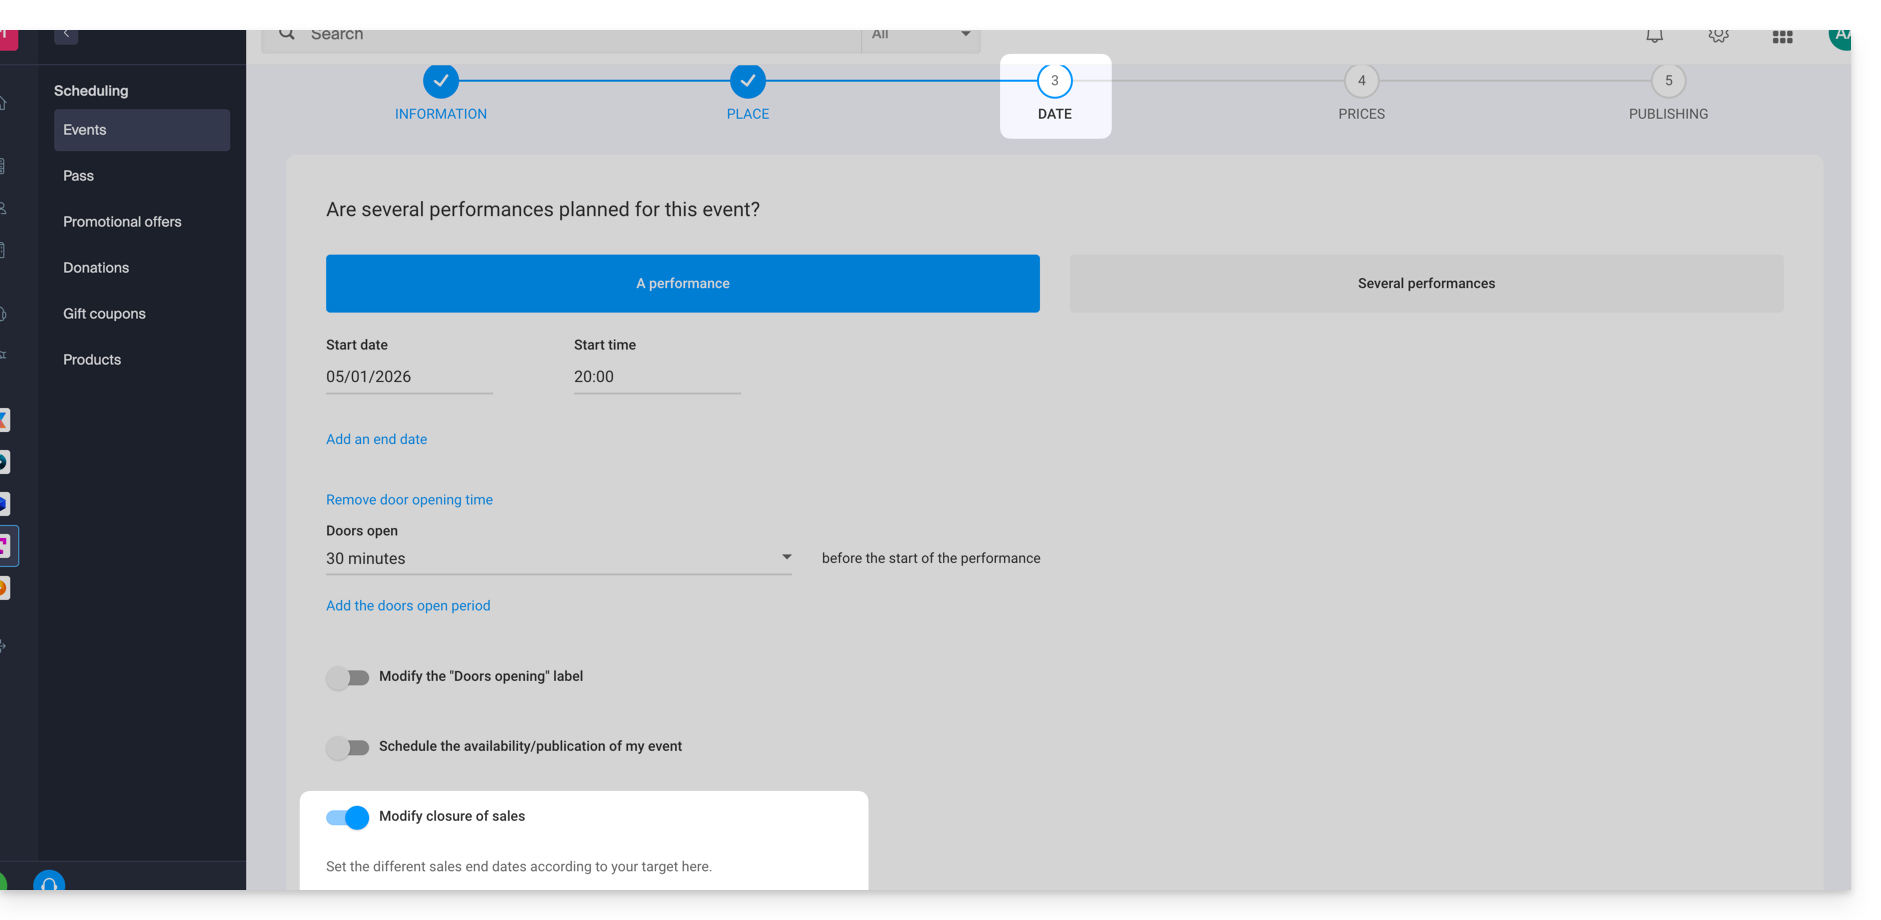
They can be edited at the event level once it is created by going to the Settings tab: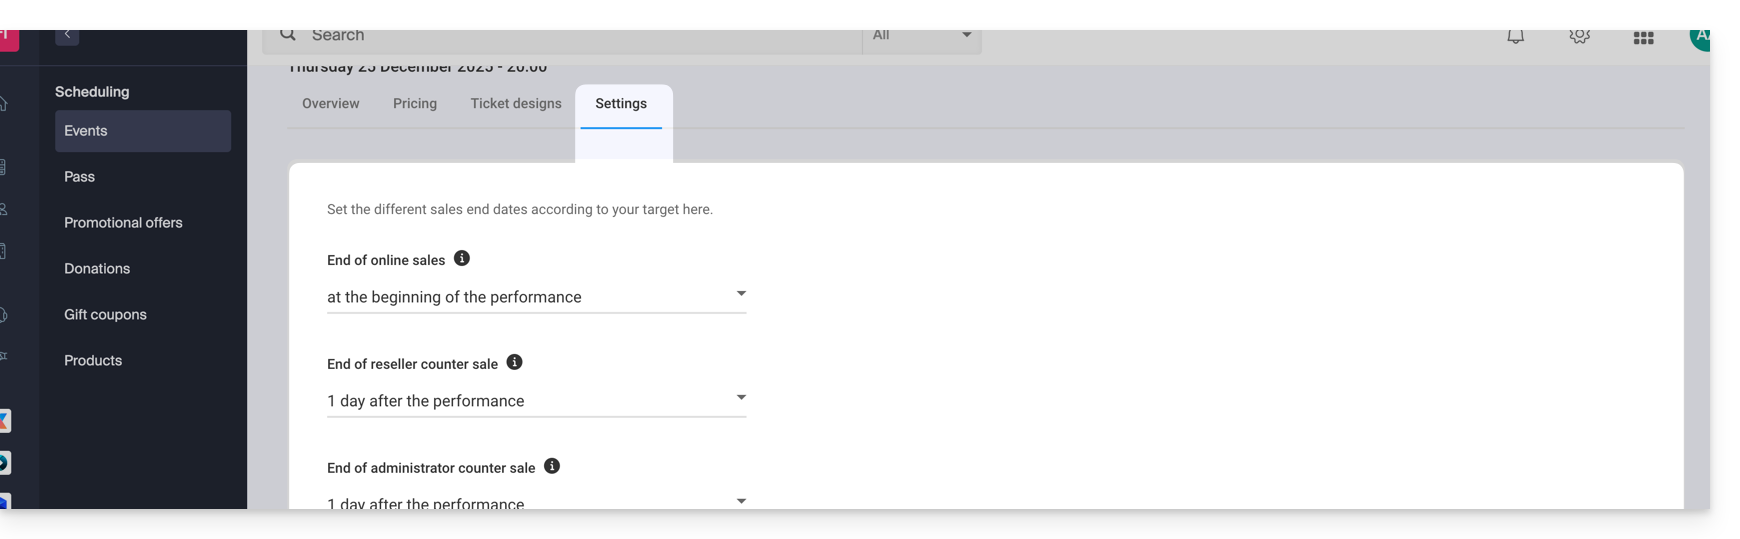
For multi-date events
The Settings tab is located at each performance. However, it is possible to modify the end of sales for multiple dates at once by using the actions on multiple dates:
- Go to the Dates tab of your event.
- Switch to list mode:

- Select the dates you want to configure.
- Click on Actions and Modify performance parameters:

Link para esta FAQ: https://faq.infomaniak.com/1326
Esta seção de perguntas frequentes foi útil?
Este guia explica como consultar seus extratos mensais (no âmbito do sistema de faturamento da Infomaniak), imprimir os documentos contábeis correspondentes, configurar sua conta bancária para receber seus pagamentos e, se necessário, solicitar um adiantamento excepcional.
Introdução
- O sistema de emissão de bilhetes da Infomaniak gera um relatório no início de cada mês, resumindo as vendas online do mês anterior.
- Este relatório tem em conta todas as vendas efetuadas, deduzindo as comissões aplicáveis.
- O valor líquido é, em seguida, automaticamente transferido para a sua conta bancária durante a primeira semana do mês, independentemente do estado do evento.
Adicionar e selecionar uma conta bancária
Antes de qualquer pagamento, você deve indicar uma conta bancária a partir do menu "Pagamentos Infomaniak" na seção "Contabilidade" do seu sistema de bilheteria…
Depois de adicionar a conta, é imprescindível selecioná-la no topo da página, no menu suspenso “Configurações”.
Se uma conta bancária já foi utilizada para um pagamento (valor diferente de 0 na coluna Faturas), ela não poderá mais ser modificada por motivos de segurança.
Consultar e imprimir um extrato
Para consultar ou descarregar um extrato mensal em formato PDF:
- Clique aqui para acessar o gerenciamento do seu produto no Manager Infomaniak (precisa de ajuda?).
- Clique diretamente no nome atribuído ao sistema de bilheteira relacionado ao evento.
- Clique em Contabilidade no menu lateral esquerdo.
- Na seção Pagamentos recebidos e arquivados, selecione o relatório desejado (geral ou detalhado).
- Clique para imprimir ou descarregar o PDF.
A impressão do relatório só é possível se o período mensal estiver arquivado.
Solicitar um adiantamento
Se necessário, pode solicitar um adiantamento, no máximo uma vez por semana e até o dia 25 do mês:
- O processamento é efetuado em até 48 horas úteis.
- É aplicada uma taxa administrativa de 5 CHF.
- Os pedidos de adiantamento são suspensos 5 dias antes do final do mês.
Link para esta FAQ: https://faq.infomaniak.com/1331
Esta seção de perguntas frequentes foi útil?
Este guia explica como configurar doações (no âmbito do sistema de bilheteira Infomaniak).
Introdução
- Ao oferecer a opção de doações, você permite que os clientes apoiem sua organização ou evento.
- As doações pagas online estarão sujeitas a uma taxa, relacionada às despesas bancárias.
- As campanhas de doações podem ter o status ativo ou inativo, mas permanecerão visíveis em todos os casos no painel, juntamente com os vales-presente.
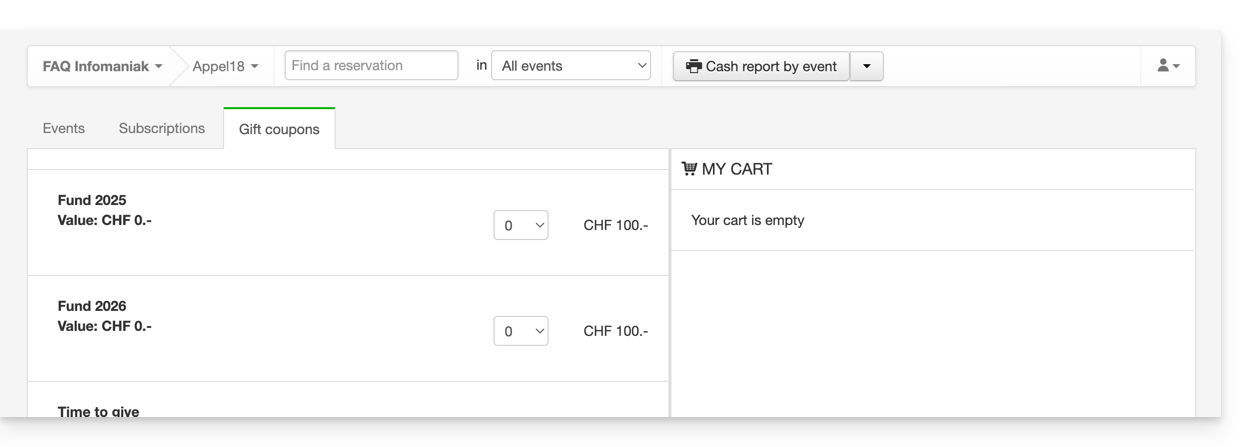
Configuração das doações
Para isso:
- Clique aqui para acessar o gerenciamento do seu produto no Manager Infomaniak (precisa de ajuda?).
- Clique diretamente no nome atribuído ao sistema de bilheteira relacionado ao evento.
- Clique em Programação no menu lateral esquerdo.
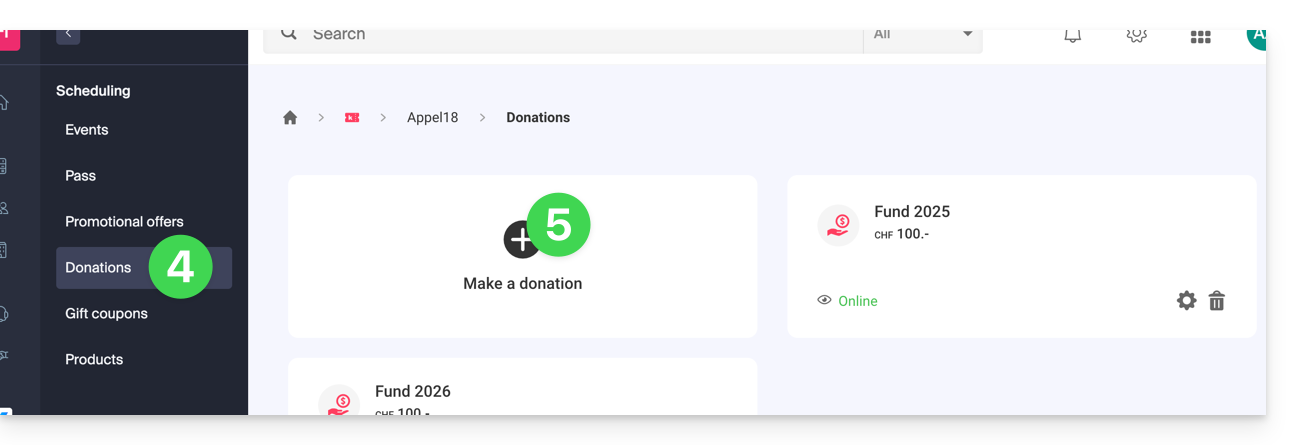
- Clique em Doações no menu lateral esquerdo.
- Clique em Adicionar doação:
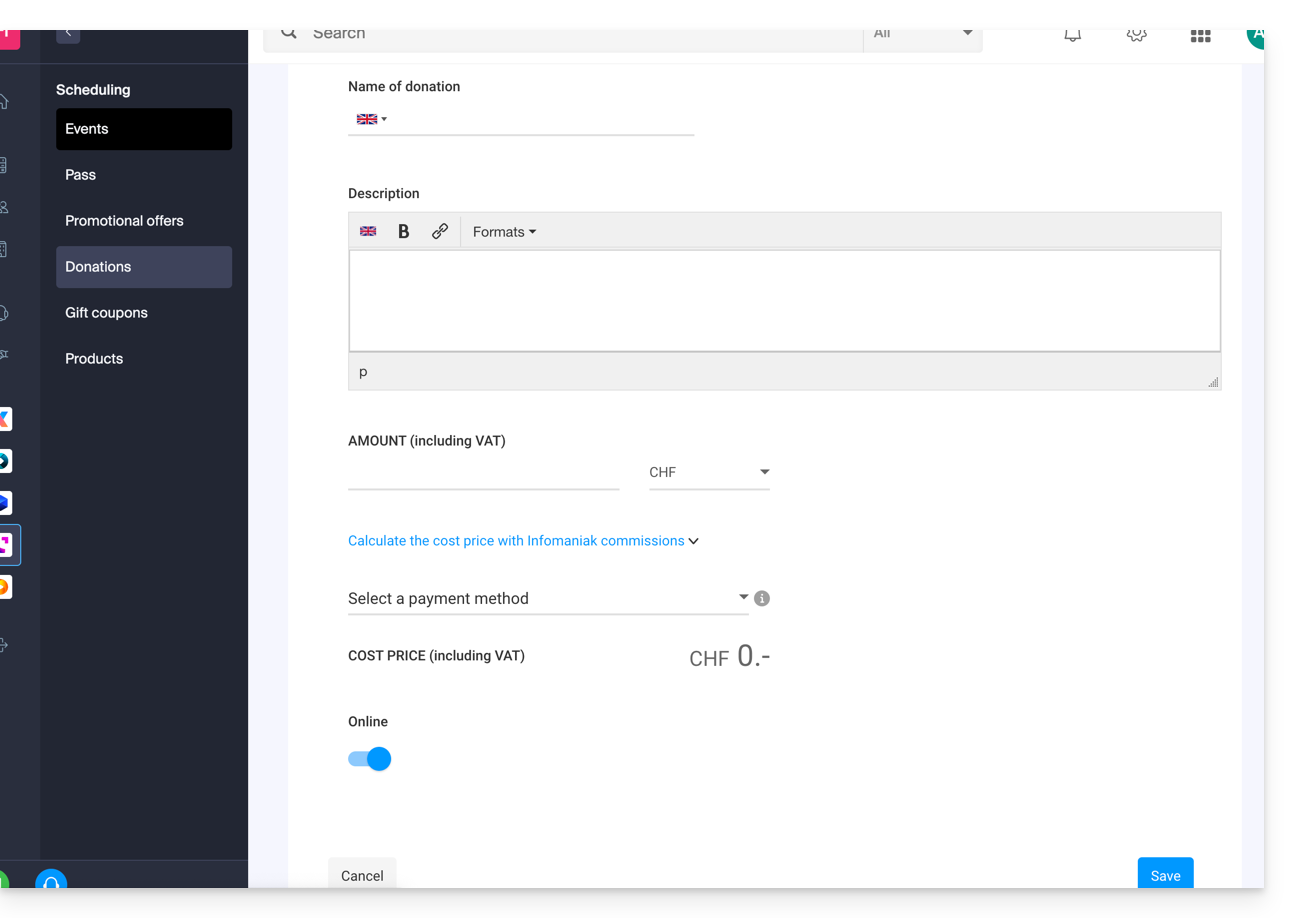
- Preencha os campos no assistente e, em seguida, clique no botão Salvar na parte inferior da página:
Link para esta FAQ: https://faq.infomaniak.com/1367
Esta seção de perguntas frequentes foi útil?
Este guia detalha a ferramenta de integração do seu sistema de bilheteira (no âmbito do sistema de bilheteira Infomaniak) para promover ao máximo os seus eventos.
Introdução
- Com apenas alguns cliques, você poderá configurar todas as opções da loja online e publicá-la para iniciar suas vendas.
- Não é necessário atualizar os links a cada temporada ou edição do seu evento: mantenha o mesmo link e atualize simplesmente os elementos que ele contém.
Caso possua, seus antigos URLs de venda de ingressos continuarão funcionando e serão automaticamente redirecionados para sua nova loja online. No entanto, é recomendável fazer uma migração para esta nova ferramenta para qualquer nova temporada ou edição de seus eventos.
Gerenciar a apresentação de seus eventos online
Para aceder às opções de bilheteira online:
- Clique aqui para aceder à gestão do seu produto no painel de controlo Infomaniak (precisa de ajuda?).
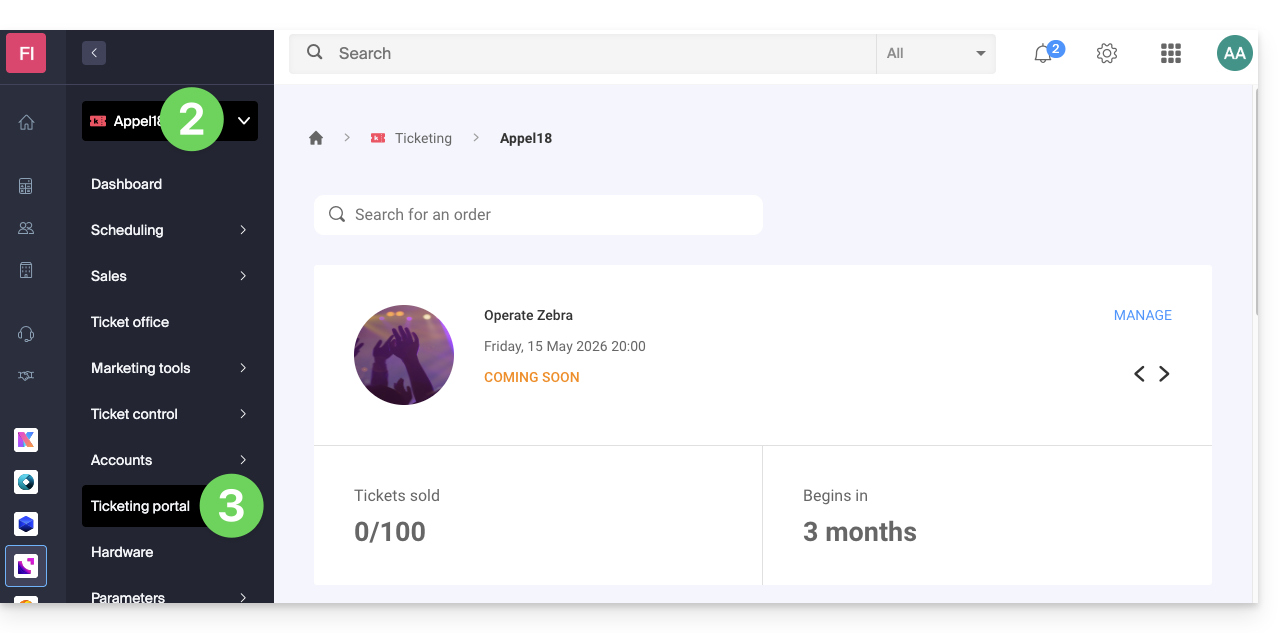
- Clique diretamente no nome do sistema de bilheteira em questão.
- Clique em Portal de Bilheteira no menu lateral esquerdo:
- Clique em Loja Online no menu lateral esquerdo:
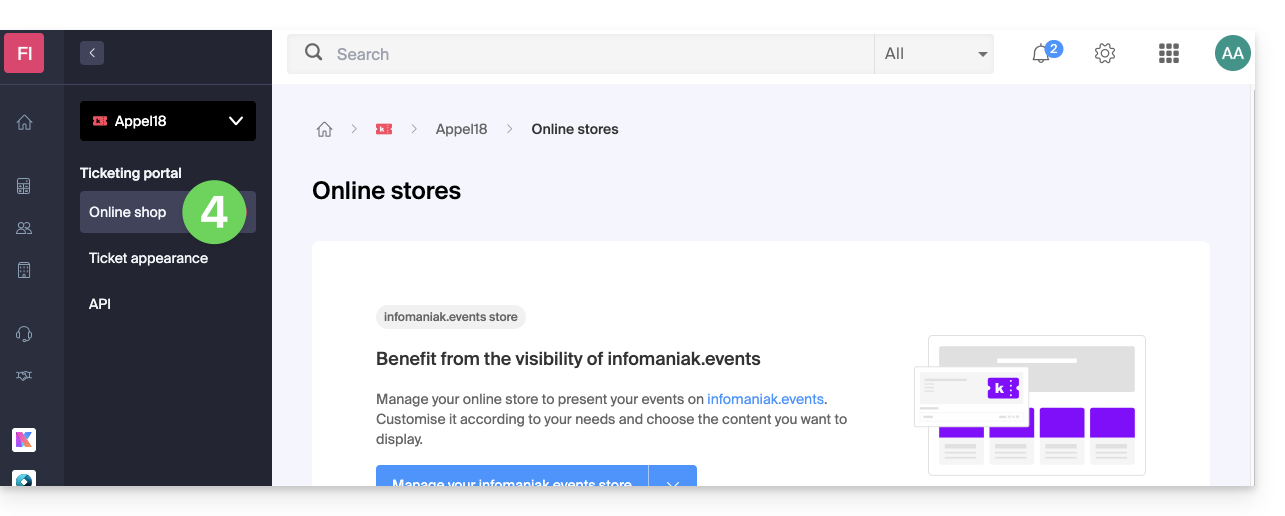
Você será direcionado para a página das lojas online do Portal de bilheteira: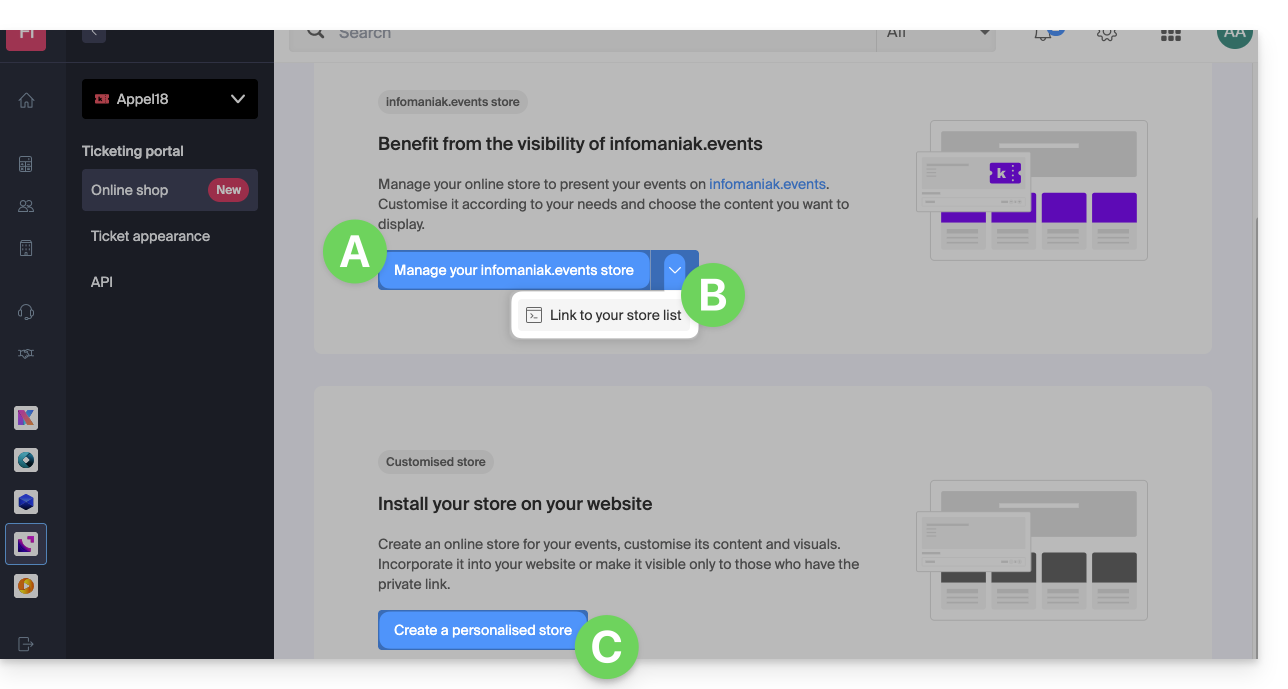
A. Criar uma loja visível em infomaniak.events
- Torne os seus eventos visíveis na pesquisa do portal de eventos Infomaniak.
- Permitir que os motores de busca tradicionais indexem seus eventos.
- Personalizar a aparência da loja principal do seu sistema de bilheteria.
B. Integrar seus múltiplos sistemas de bilheteria
- Acesse uma página que reúne todas as lojas "infomaniak.events" da sua organização.
C. Criar uma loja personalizada
- Criar lojas para atender às suas necessidades específicas (por exemplo, integrá-las em suas páginas).
- Adicionar scripts HTML/JavaScript ou CSS (para utilizadores avançados/desenvolvedores).
Link para esta FAQ: https://faq.infomaniak.com/1563
Esta seção de perguntas frequentes foi útil?
Link para esta FAQ: https://faq.infomaniak.com/1572
Esta seção de perguntas frequentes foi útil?
Este guia explica como efetuar vendas a partir de uma conta de organizador, bem como as vendas no local (no âmbito do sistema de bilheteira Infomaniak). Se, por exemplo, pretender imprimir bilhetes gratuitos, convites, bilhetes VIP ou pagos, pode efetuar uma encomenda a partir do balcão e gerar esses bilhetes.
Aceder ao balcão
Para isso:
- Clique aqui para acessar o gerenciamento do seu produto no Manager Infomaniak (precisa de ajuda?).
- Clique diretamente no nome atribuído ao balcão de bilhetes relacionado ao evento.
- Clique em Balcão no menu lateral esquerdo:
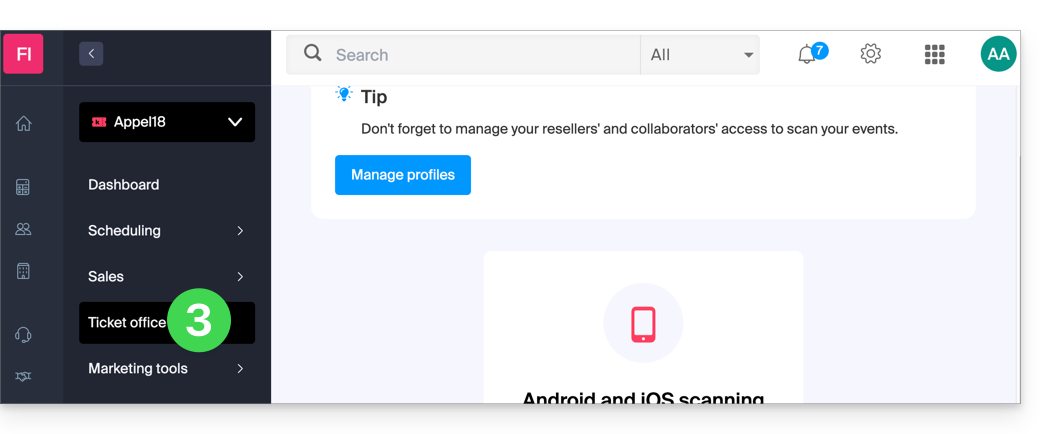
Criar uma nova encomenda a partir do balcão
Para tal:
- Escolha se a venda se refere a um evento, um passe ou um vale-presente:
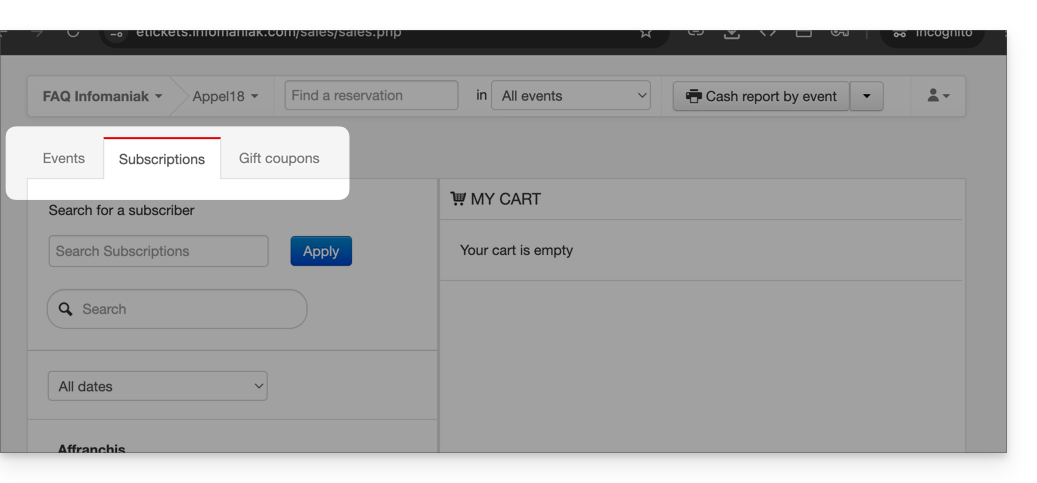
- Escolha o evento ou o artigo desejado, bem como o número de bilhetes a adicionar ao carrinho:
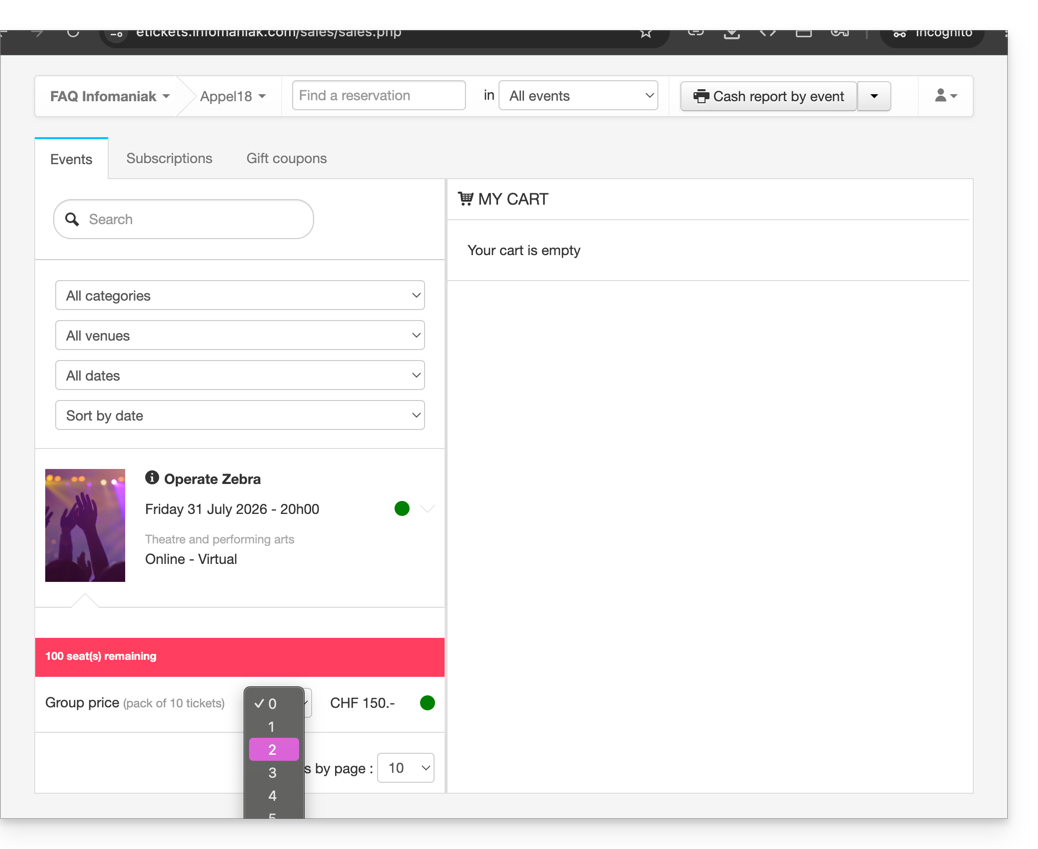
- Defina as configurações no carrinho, como a localização no mapa do local, as informações dos formulários por preço e o uso de um código promocional ou vale-presente:
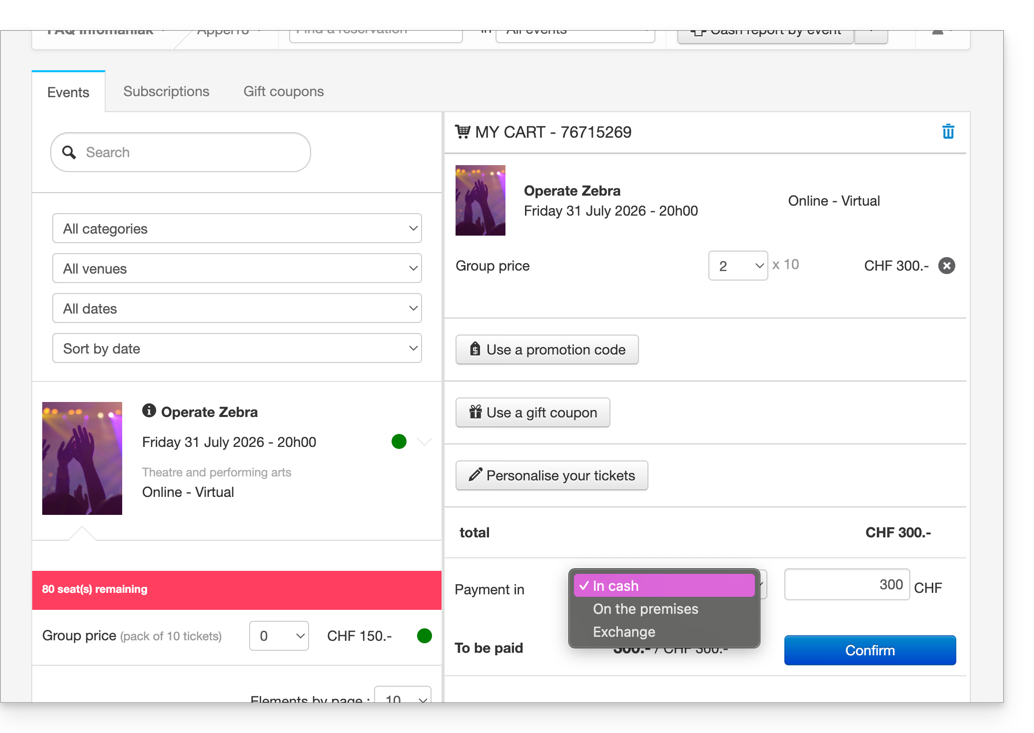
- É possível personalizar as informações que serão exibidas nos bilhetes a serem impressos.
- Definir um método de pagamento; para um bilhete gratuito, como por exemplo para um convite, deverá escolher o método de pagamento Gratuito/Convite.
- Após preencher as informações, Validar o pedido.
Associar o pedido a um cliente
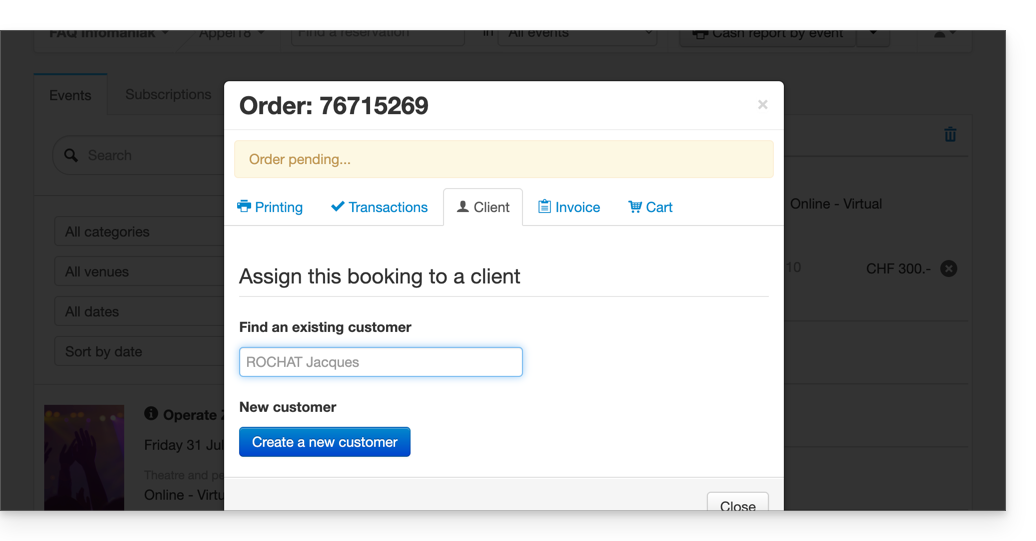
No balcão, a atribuição de um pedido a um cliente é opcional. É, portanto, necessário indicar o cliente se desejar poder localizar um pedido pelo nome ou endereço de e-mail do cliente, enviar os bilhetes por e-mail ou exibir o nome e o apelido do cliente no bilhete.
Para isso, será necessário clicar na aba Cliente e procurar um cliente existente ou criar um novo cadastro de cliente.
Se a venda se referir a um passe e um endereço de e-mail estiver associado a esse passe, o cliente será sugerido diretamente.
Imprimir ou enviar os bilhetes
É possível imprimir ou enviar os bilhetes por e-mail. Para isso, basta ir ao separador correspondente e escolher o tipo de impressão ou de envio por e-mail.
Outras utilizações do balcão
O balcão permite realizar outras operações importantes, como a troca de bilhetes ou a validação de reservas; consulte este outro guia.
Link para esta FAQ: https://faq.infomaniak.com/1574
Esta seção de perguntas frequentes foi útil?
Link para esta FAQ: https://faq.infomaniak.com/1578
Esta seção de perguntas frequentes foi útil?
Link para esta FAQ: https://faq.infomaniak.com/1580
Esta seção de perguntas frequentes foi útil?
Este guia explica como adicionar utilizadores como revendedores para que possam vender bilhetes para os seus eventos (no âmbito do sistema de bilheteira Infomaniak).
Introdução
- Se você tiver pontos de venda, parceiros ou simplesmente caixas na entrada do evento, poderá conceder a eles acessos de revendedor.
- Dessa forma, você poderá conceder a eles os direitos de venda diretamente no balcão.
Adicionar um revendedor
Para isso:
- Clique aqui para acessar o gerenciamento de usuários no Painel de Controle Infomaniak (precisa de ajuda?).
- Clique no botão Adicionar usuário na parte superior:
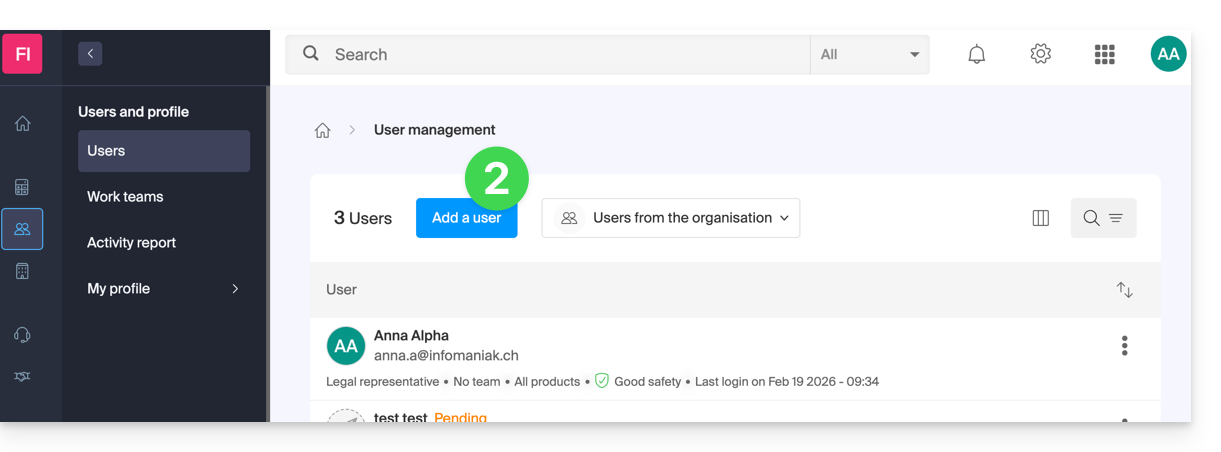
- Insira as diferentes informações do usuário.
- Escolha Usuário como função:
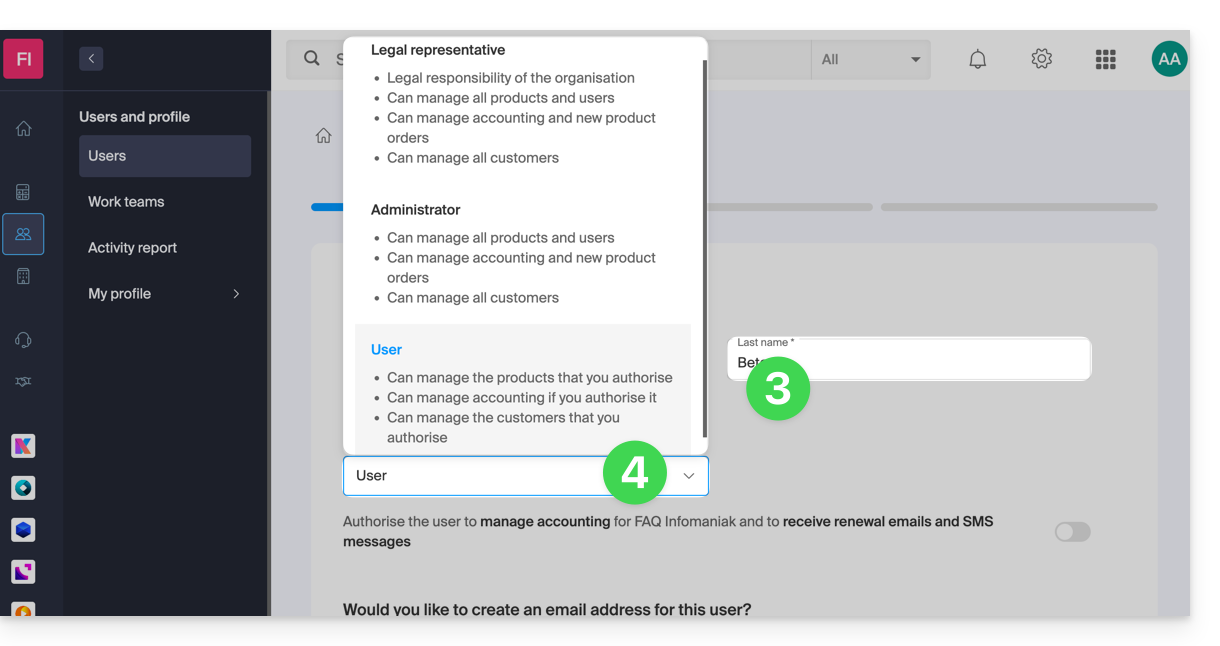
- Passe para a etapa seguinte (seleção de um possível grupo de trabalho) e finalize o convite.
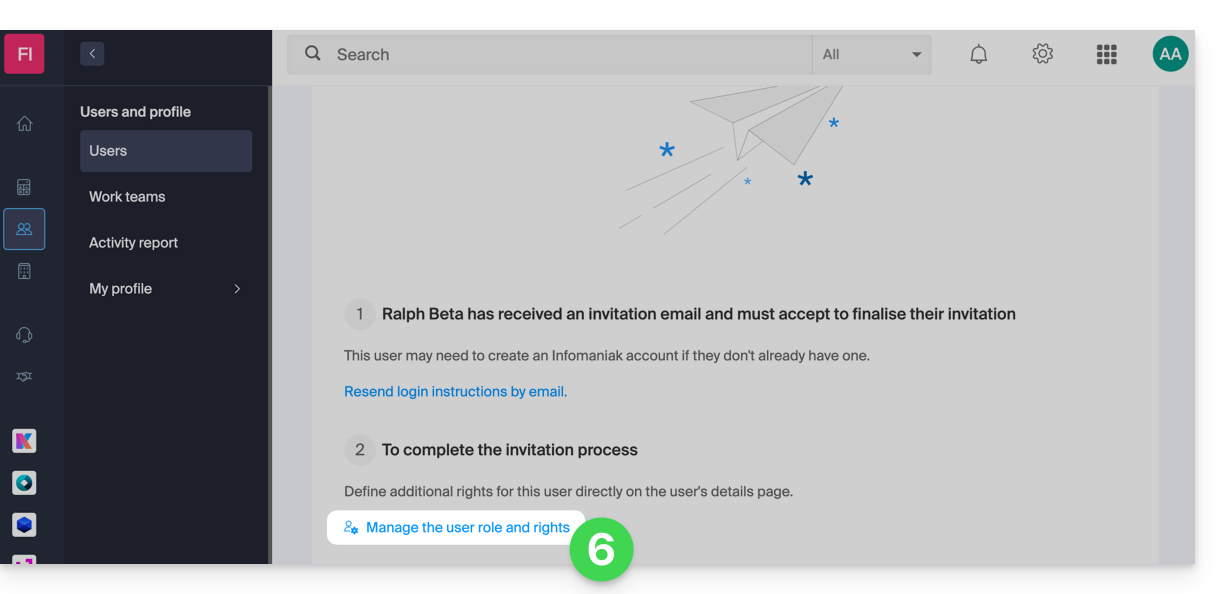
- Clique para escolher as permissões de acesso aos produtos:
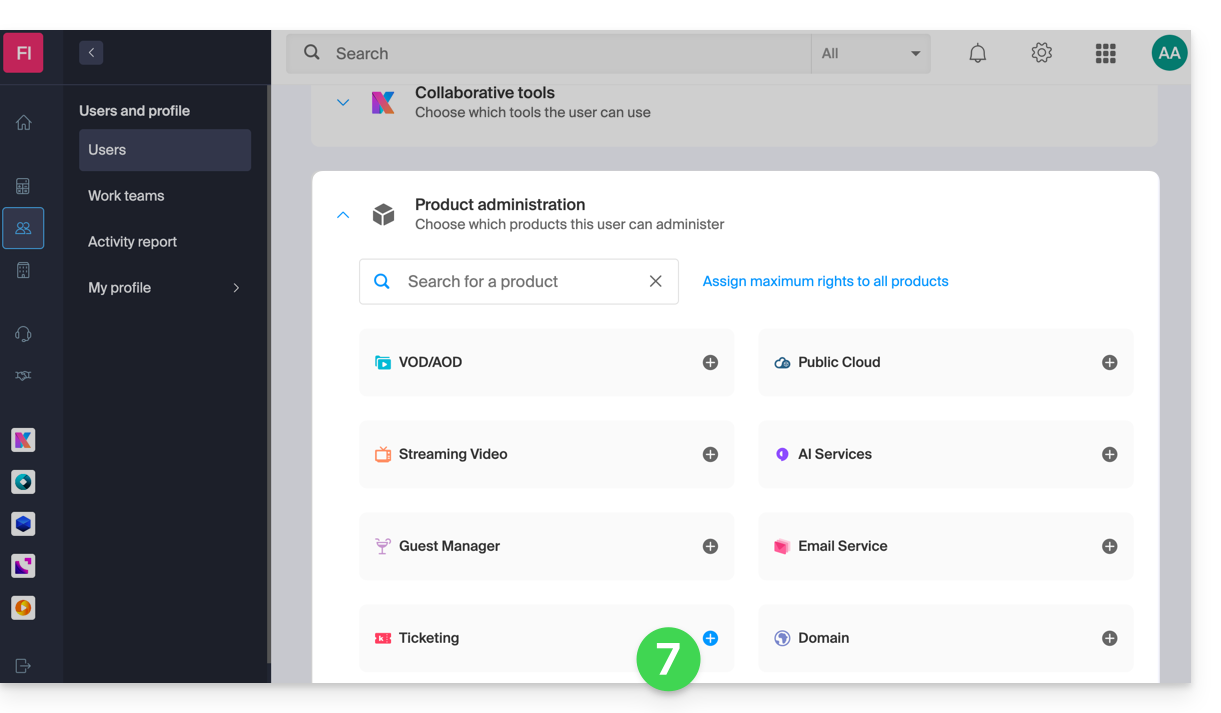
- Desenvolva a seção de administração de produtos para clicar em Bilheteira:
- Um painel lateral é aberto — selecione as caixas para conceder acesso às bilheteiras correspondentes:
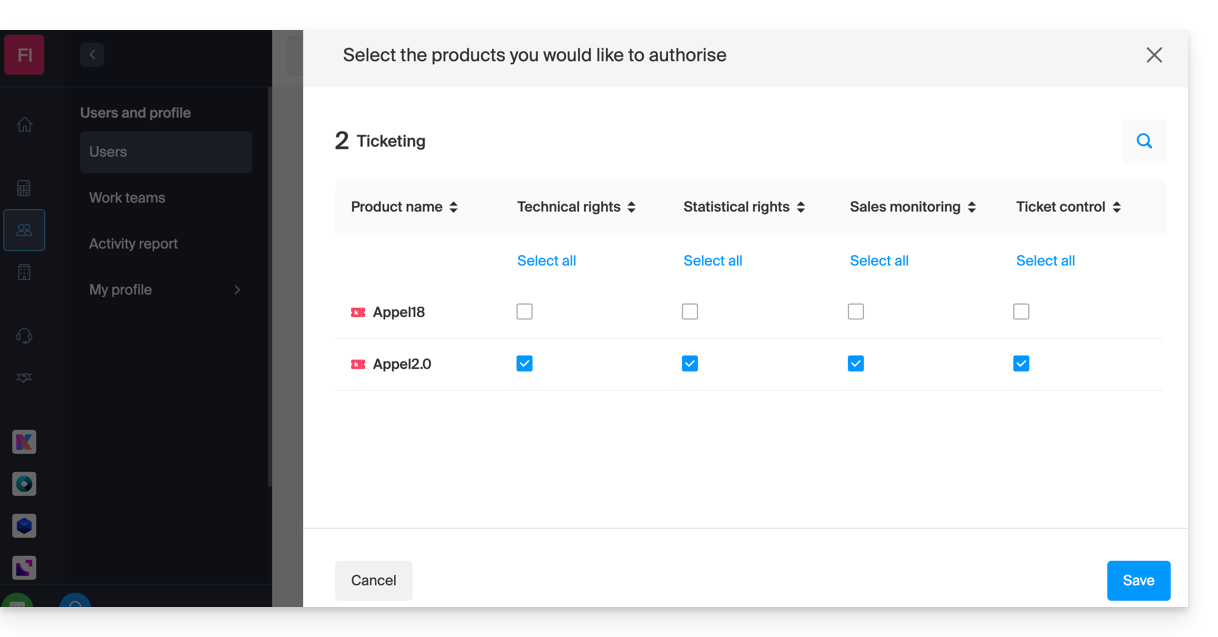
- Salve a sua seleção.
Detalhes dos direitos e acessos dos utilizadores
1. Responsáveis
- Proprietário do grupo (responsável legal da conta)
- Administrador do grupo
- Administrador de faturamento
- Contabilidade
2. Utilizadores
- Administrativo — nenhum direito atribuído
3. Técnica
- Gestão da Programação
- Clientes
- Envio de e-mails
- Exportação de clientes
- Código promocional (geração de códigos)
- Design da loja / bilhetes
- Integração do sistema de emissão de bilhetes
- Configurações
4. Estatísticas
- Detalhes das vendas
5. Verificação de bilhetes
- Verificação de bilhetes
6. Venda de bilhetes
- Venda de bilhetes
- Pontos de venda
- Clientes (exceto Mailing, exportação e gestão de códigos promocionais)
- Gestão dos cartões de membro
7. Gestão da Equipa
- Equipe
Próximo passo
Agora pode criar perfis para detalhar os acessos dos revendedores…
Link para esta FAQ: https://faq.infomaniak.com/1581
Esta seção de perguntas frequentes foi útil?
A seguir, os diferentes formatos de bilhetes disponíveis para venda no local (no âmbito do sistema de bilheteira Infomaniak).
Impressão com a impressora térmica
- Formato Espetáculo: 82 x 203,2 mm

- Formato Cinema: 101,6 x 76,2 mm

Utilização de bilhetes digitais
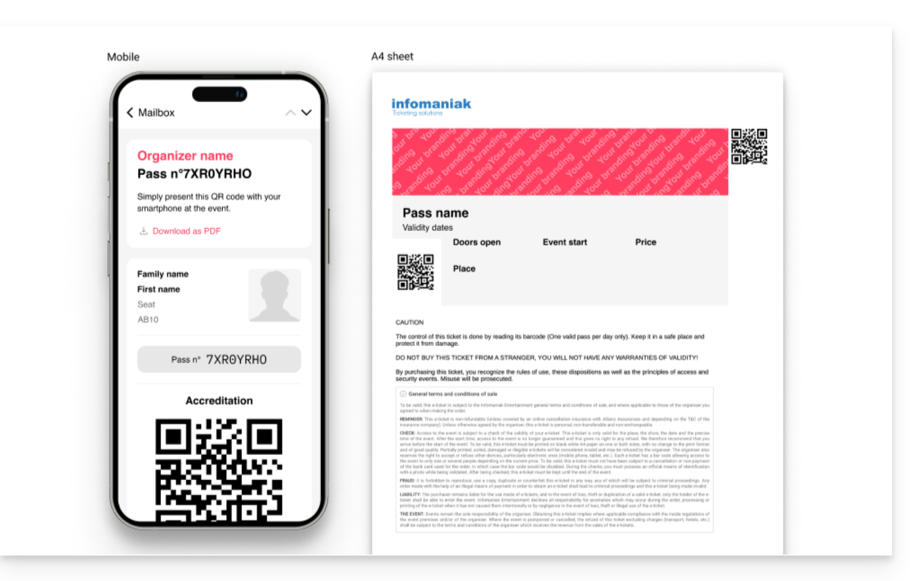
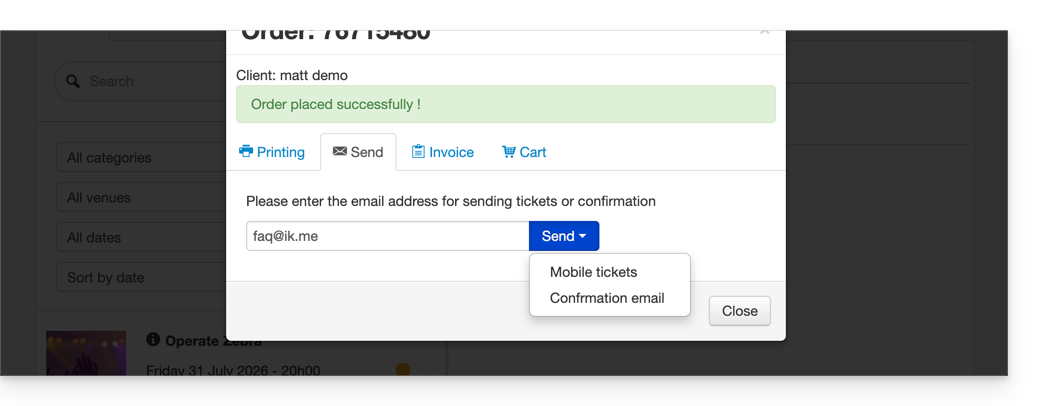
Também é possível enviar os bilhetes digitais diretamente para o endereço de e-mail do cliente.
- Para isso, ao finalizar o pedido, basta vincular uma ficha de cliente:
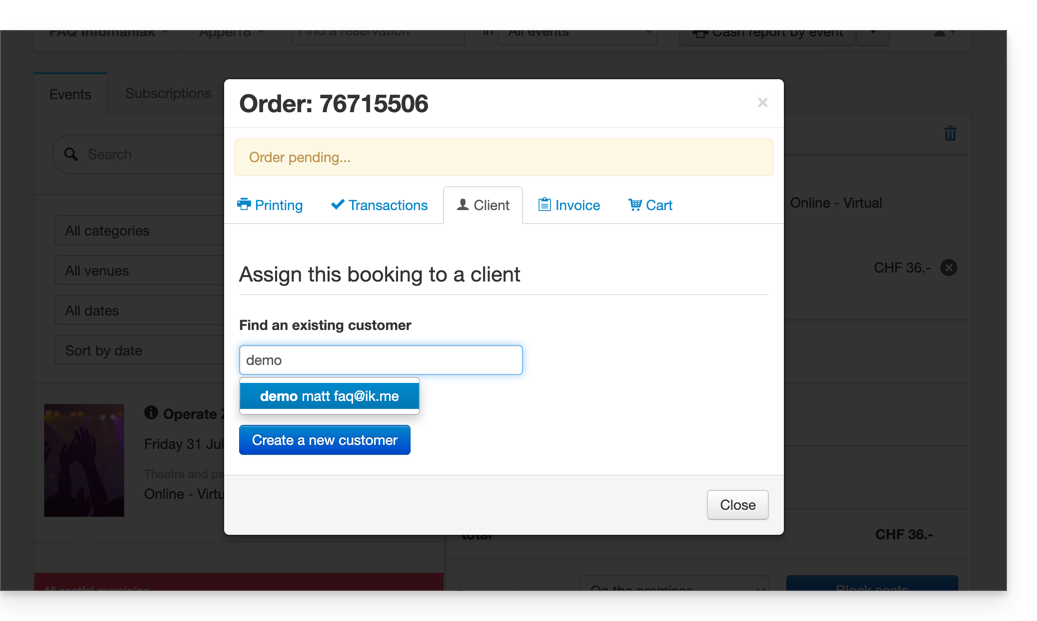
- Em seguida, a opção de envio dos bilhetes aparecerá diretamente na janela de validação do pedido:
Link para esta FAQ: https://faq.infomaniak.com/1583
Esta seção de perguntas frequentes foi útil?
Este guia apresenta uma lista de verificação com os pontos importantes a serem verificados antes de colocar online a venda de bilhetes (no âmbito do sistema de bilheteira Infomaniak), para promover os seus eventos junto do público da melhor forma.
Percorra a lista de verificação
Aqui está a lista dos elementos mais importantes a verificar antes de publicar um sistema de bilheteira para o seu evento.
O sistema de bilheteira deve estar visível (ponto 7b abaixo) para que possa verificar a visibilidade na loja. Pode estar visível e em modo teste (ponto 7a) para evitar que seja publicado publicamente.
- Uma conta bancária foi adicionada no menu Contabilidade > Recebimentos Infomaniak?
- O link de integração foi obtido e integrado?
- Atenção: o link de integração tem suas próprias configurações, permitindo exibir/ocultar os eventos no submenu “Conteúdo”.
- Certifique-se de que os eventos de interesse estejam em “Ativos” (apenas se o parâmetro “escolher manualmente os elementos a serem exibidos” estiver ativado).
- As tarifas, zonas e eventos estão no modo Visível? Para verificar:
- Evento: Configurações > Evento > texto verde/laranja/vermelho com o símbolo de um olho abaixo do evento.
- Zona: Configurações > Evento > Preços > símbolo de um olho à direita de cada zona.
- Tarifas: como as zonas, mas abra as zonas para ver as tarifas que contêm.
- Os métodos de pagamento desejados (Vendas > Métodos de pagamento) estão ativados?
- As informações do organizador estão atualizadas (Configurações > Configurações de bilheteira > informações de contato do organizador)?
- É obrigatório um endereço de e-mail e é altamente recomendável um número de telefone em que se possa entrar em contato.
- O IVA está definido corretamente?
- Os passes/assinaturas estão corretos? (Programação > Passes)
- Contêm todos os eventos aos quais dão acesso?
- As suas capacidades e preços estão corretos?
- Estão visíveis na loja? (símbolo de olho à esquerda de cada passe na lista)
- No menu Configurações > Configurações do sistema de emissão de bilhetes:
- Desative o modo de teste/demonstração.
- Ative o sistema de emissão de bilhetes.
Consulte também o guia de início para ter uma visão geral das possibilidades que a sua ferramenta de emissão de bilhetes oferece.
Link para esta FAQ: https://faq.infomaniak.com/1585
Esta seção de perguntas frequentes foi útil?
This guide explains how to configure the floor plan when it has been activated for an event (as part of the Infomaniak ticketing system).
Prerequisites
- Own and have activated a floor plan for the event in question.
- Have activated and created at least one pricing zone.
Apply zones to the floor plan
To access event pricing from the ticketing system:
- Click here to access your product management on the Infomaniak Manager (need help?).
- Click directly on the name assigned to the ticketing system concerned by the event.
- Click on Programming in the left sidebar.
- Click on Events in the left sidebar.
- Click on the event in question.
- Click on the Pricing tab.
- If the event has multiple dates, this section is replaced by “Dates” which opens a calendar.
- Click on the calendar date to join the pricing…
Once in this menu, it is necessary to have at least one zone activated:
- Click on the action menu ⋮ located to the right of the zone in question.
- Make sure the box “Zone with numbered seats” is activated:

- A seat symbol must be next to the zone name in the pricing list.
- Then click on the “Manage floor plan” button above the zones to open the floor plan management menu:

The logic here is to assign a zone to each seat, row, or section according to the needs of the event.
For example, below, a green zone and a red zone are distinguished. To assign seats to a zone:
- Select the seats by hovering over all the seats, or to select the entire row, click on its number.
- Click on each seat to configure, a black circle surrounds them indicating that they are selected.
- It is possible to click on the name of each row (A, B, C) to select all the seats in the row, and even to click on the name of the section (here, right, left, middle) to select all the seats in the section.
- Then click on the area to link to the selected seats.
- In the Zones menu that appears in the lower half of the page, click on the zone to assign.
- The background of the selected seats will change to the color of the zone.
- Repeat the operation for each remaining zone to assign.
Block online sales for a seat/row/section
By default, all seats are available for online sale.
To block the online sale of certain seats, configure the restrictions directly in the seating plan:
- To block the sales of certain particular seats, open the seating plan management menu as explained above, and select (black circle) the seats/rows/sections.
- Instead of selecting the zones in the bottom menu, choose the type of Access:
- No restriction = default state, customers can purchase the seat
- Reserved for organizers = Only people with Admin status on the organization can purchase the ticket from the ticket office
- Reserved for resellers = Resellers can make the purchase from the ticket office (normal users/collaborators on the organizer with sales rights)
The section visible at the bottom named “Reserve” is no longer used and can be ignored.
Once the plan is configured, the seats can be put on sale. Make sure to assign a price to each zone.
See who a specific seat is assigned to
To obtain information related to seat assignments and identify the people who have reserved or occupied each seat according to the seating plan, you can use the seating plan management menu which displays purchased seats with an orange fill.
If you click on the seat, the order information is displayed, and a link to the customer record is provided: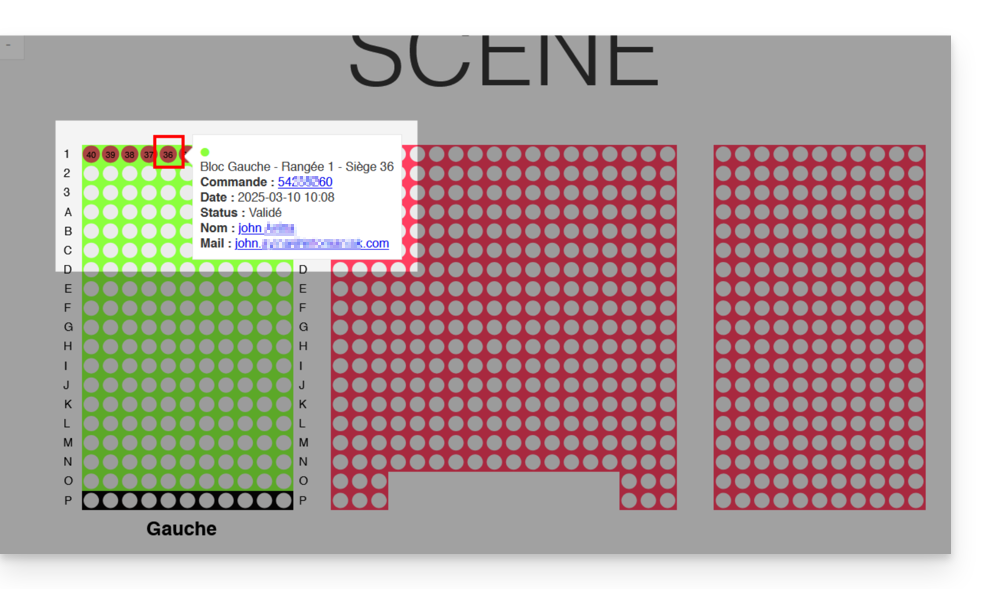
Link para esta FAQ: https://faq.infomaniak.com/1586
Esta seção de perguntas frequentes foi útil?
Este guia explica como modificar os direitos de acesso aos produtos para um utilizador da sua Organização no Manager Infomaniak.
Introdução
- Desde que abriu a sua conta na Infomaniak, faz parte de pelo menos uma Organização (❓: ajuda).
- Se estava sozinho e não se tratava de um convite, uma Organização foi criada em seu nome e você se torna automaticamente o responsável legal.
- Caso contrário, você pertence à Organização que o convidou (para participar da sua kSuite, para gerenciar um produto, etc.).
- É possível alterar o papel de um utilizador dentro da sua Organização (❓: ajuda).
- Você pode então definir se um usuário…
- … faz parte da sua Organização e se ele deve se tornar:
- Responsável legal
- Administrador
- Colaborador (esta parte é detalhada abaixo…)
- … é externo à sua Organização (direitos limitados):
- Os usuários externos não são considerados nos compartilhamentos de calendários e agendas de endereços com toda a Organização.
- … faz parte da sua Organização e se ele deve se tornar:
Quem pode acessar o quê…
Pré-requisitos
- Alterne previamente para a Organização desejada, caso não encontre a lista de utilizadores esperada (❓: ajuda).
- Ser Administrador ou Representante legal na Organização (❓: ajuda).
- Ter adicionado um utilizador como colaborador (❓: ajuda).
O guia abaixo permite gerenciar o acesso aos produtos para colaboradores e usuários externos. De fato, um responsável legal ou um administrador tem, de qualquer forma, acesso a todos os produtos existentes na organização e visíveis no Gerenciador Infomaniak.
Para modificar os acessos aos produtos de um utilizador da Organização:
- Clique aqui para aceder à gestão de utilizadores no Manager Infomaniak (❓: ajuda).
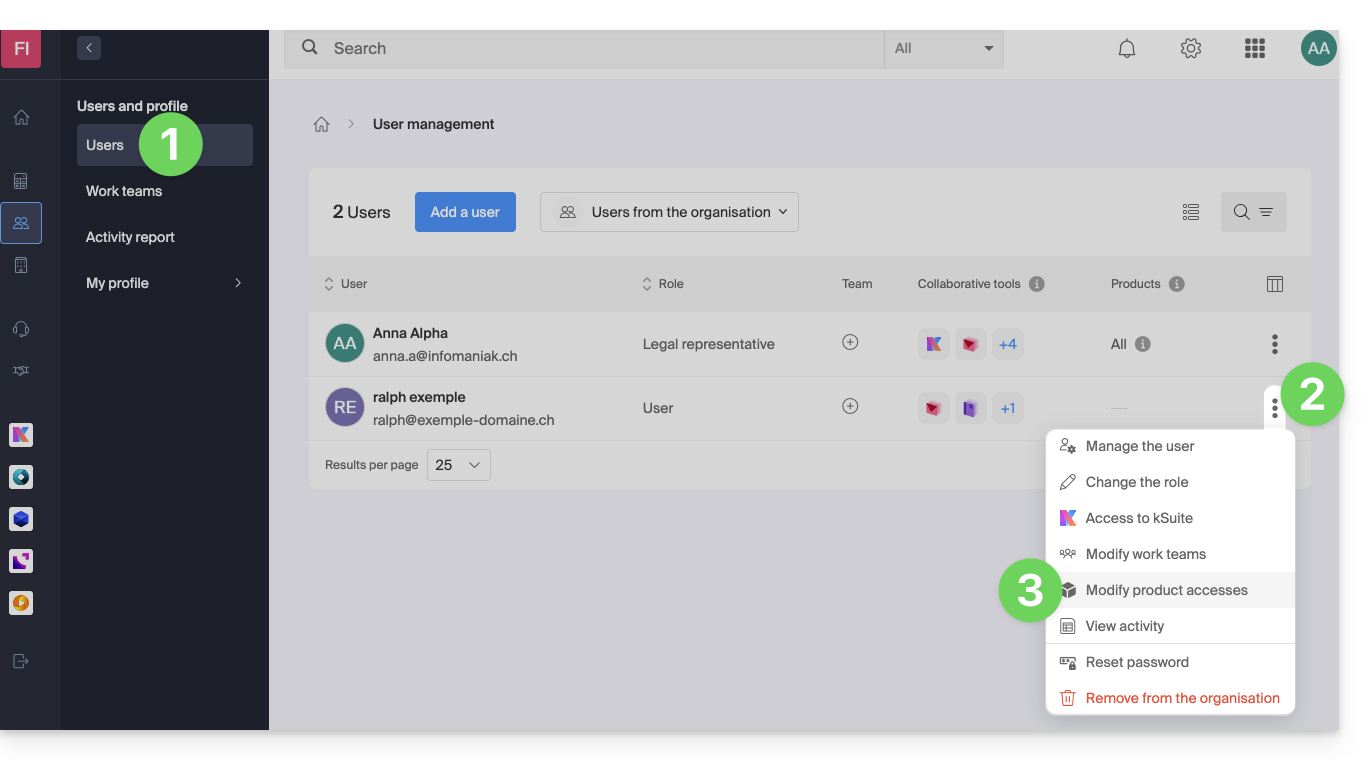
- Clique no menu de ações ⋮ localizado à direita do utilizador em questão.
- Clique em Editar acessos aos produtos:
- Você pode conceder acesso total a tudo com as permissões máximas em um único clique.
- Caso contrário, clique na categoria de produto à qual deseja conceder acesso.
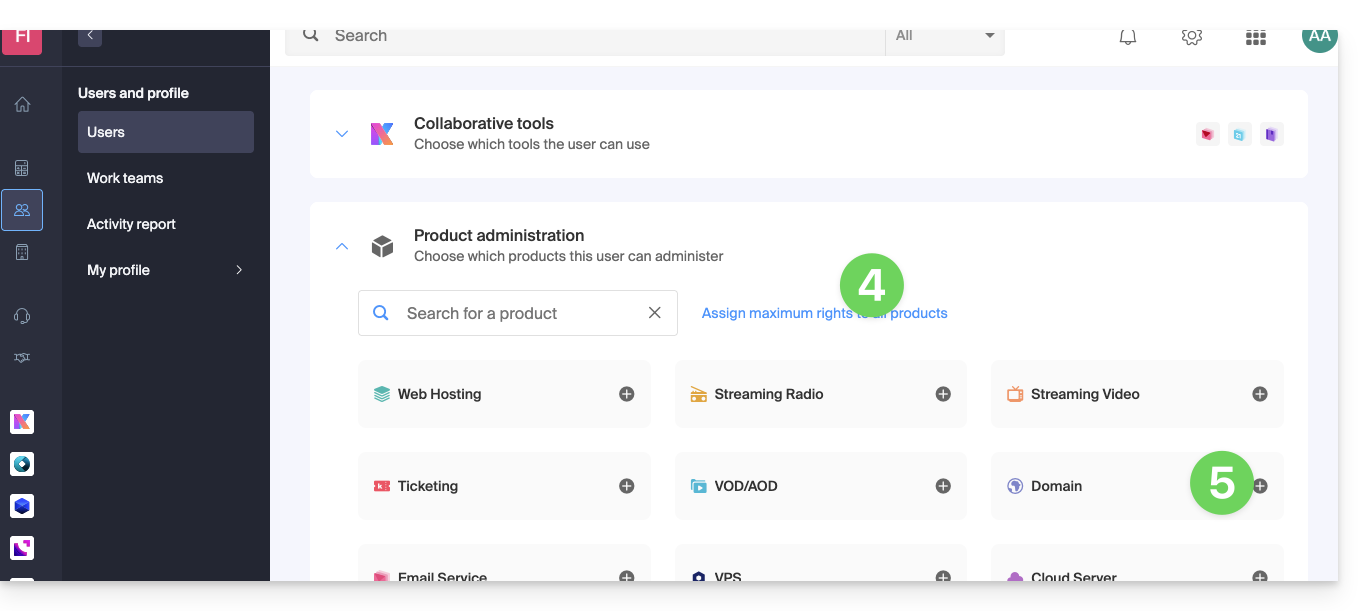
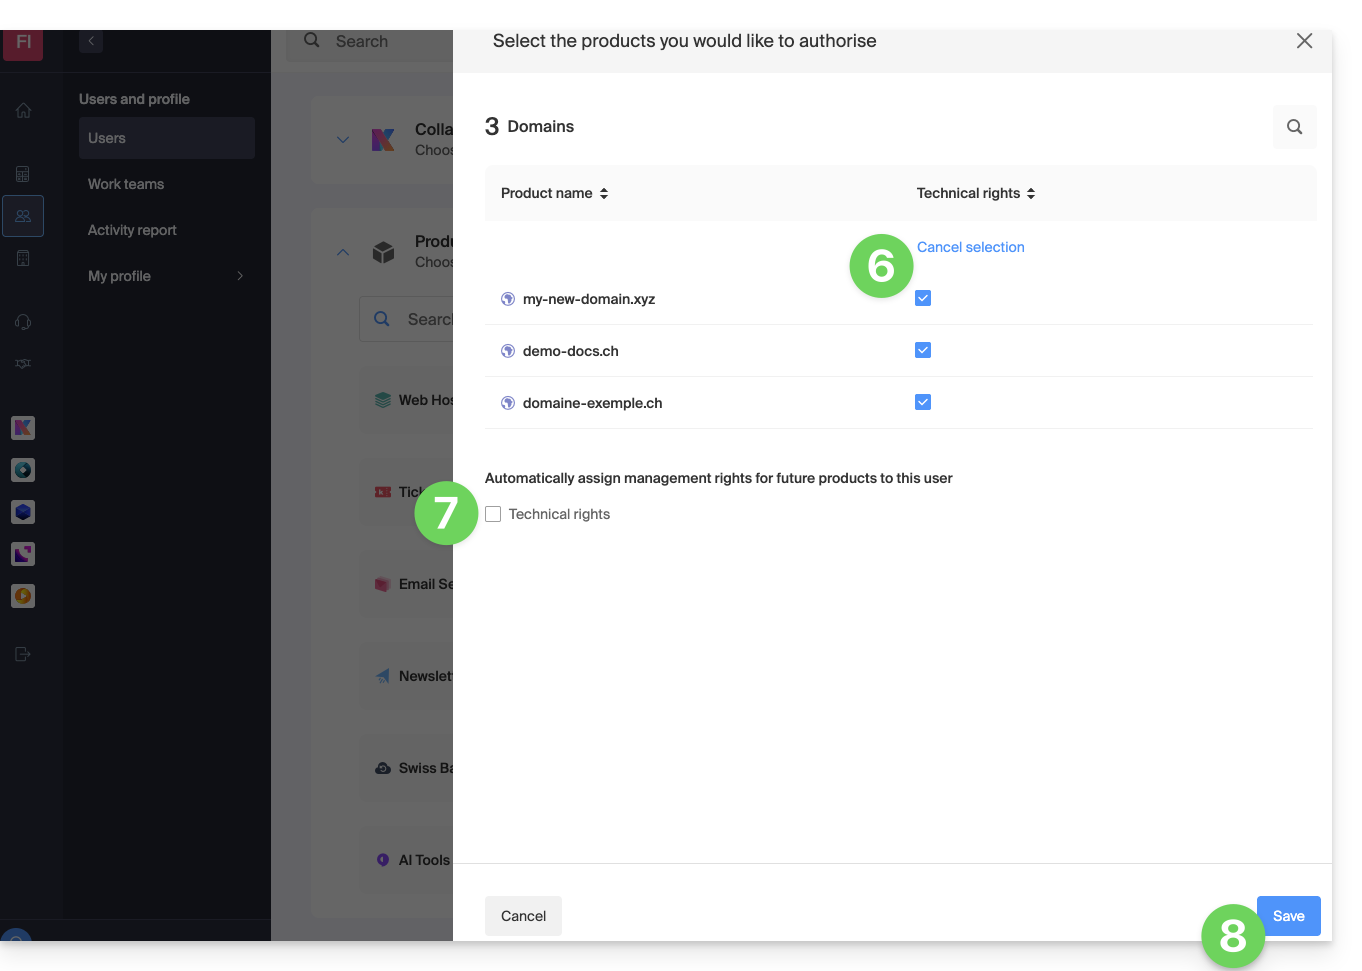
- Selecione o(s) produto(s) necessário(s).
- Se selecionou vários produtos, decida se um produto adicional futuro deverá ser automaticamente visível para o utilizador (e com que tipo de permissões❓: ajuda).
- Clique no botão Guardar:
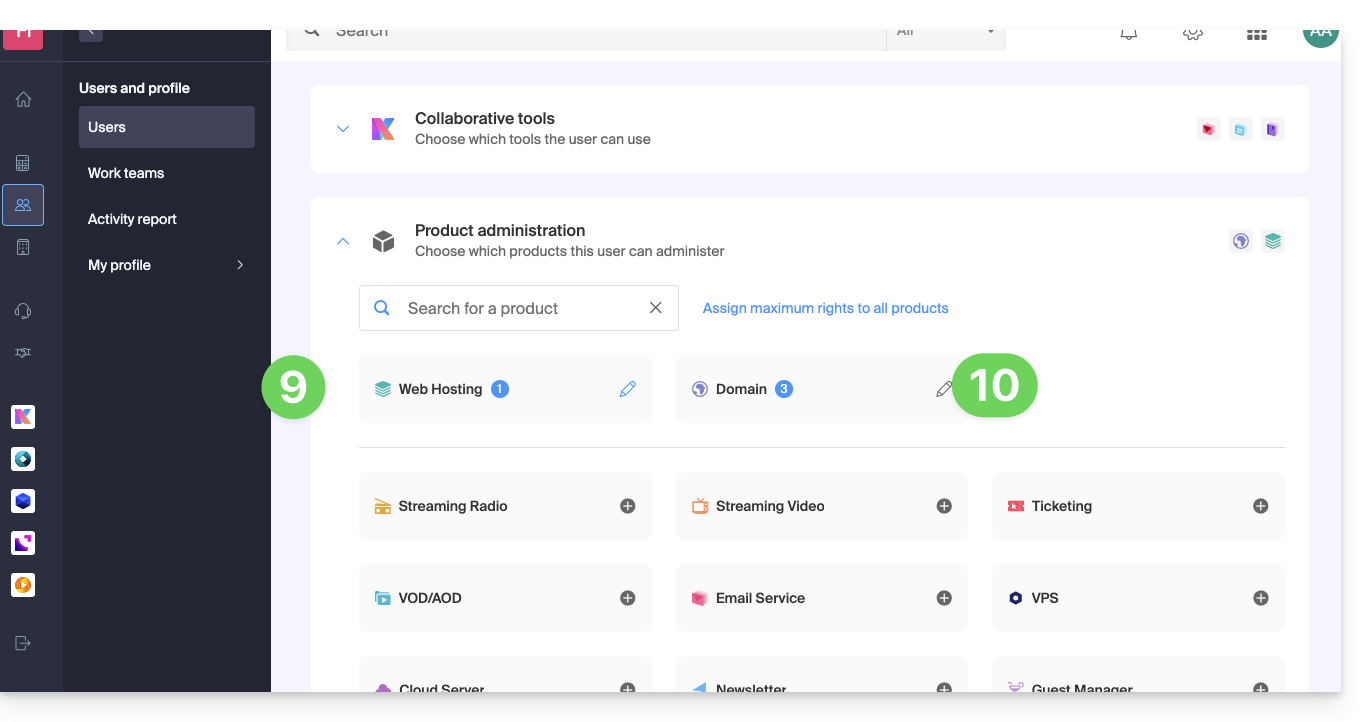
- Os direitos são concedidos imediatamente.
- Clique no ícone lápis ✎ para modificar as permissões:
- Repita o processo a partir do passo 5 se precisar conceder acesso a vários produtos.
Utilização do serviço / Gestão do serviço
Atenção, na tabela dos seus produtos, é importante distinguir os acessos aos produtos (como o kDrive, por exemplo, dentro da kSuite) e os acessos à gestão dos produtos: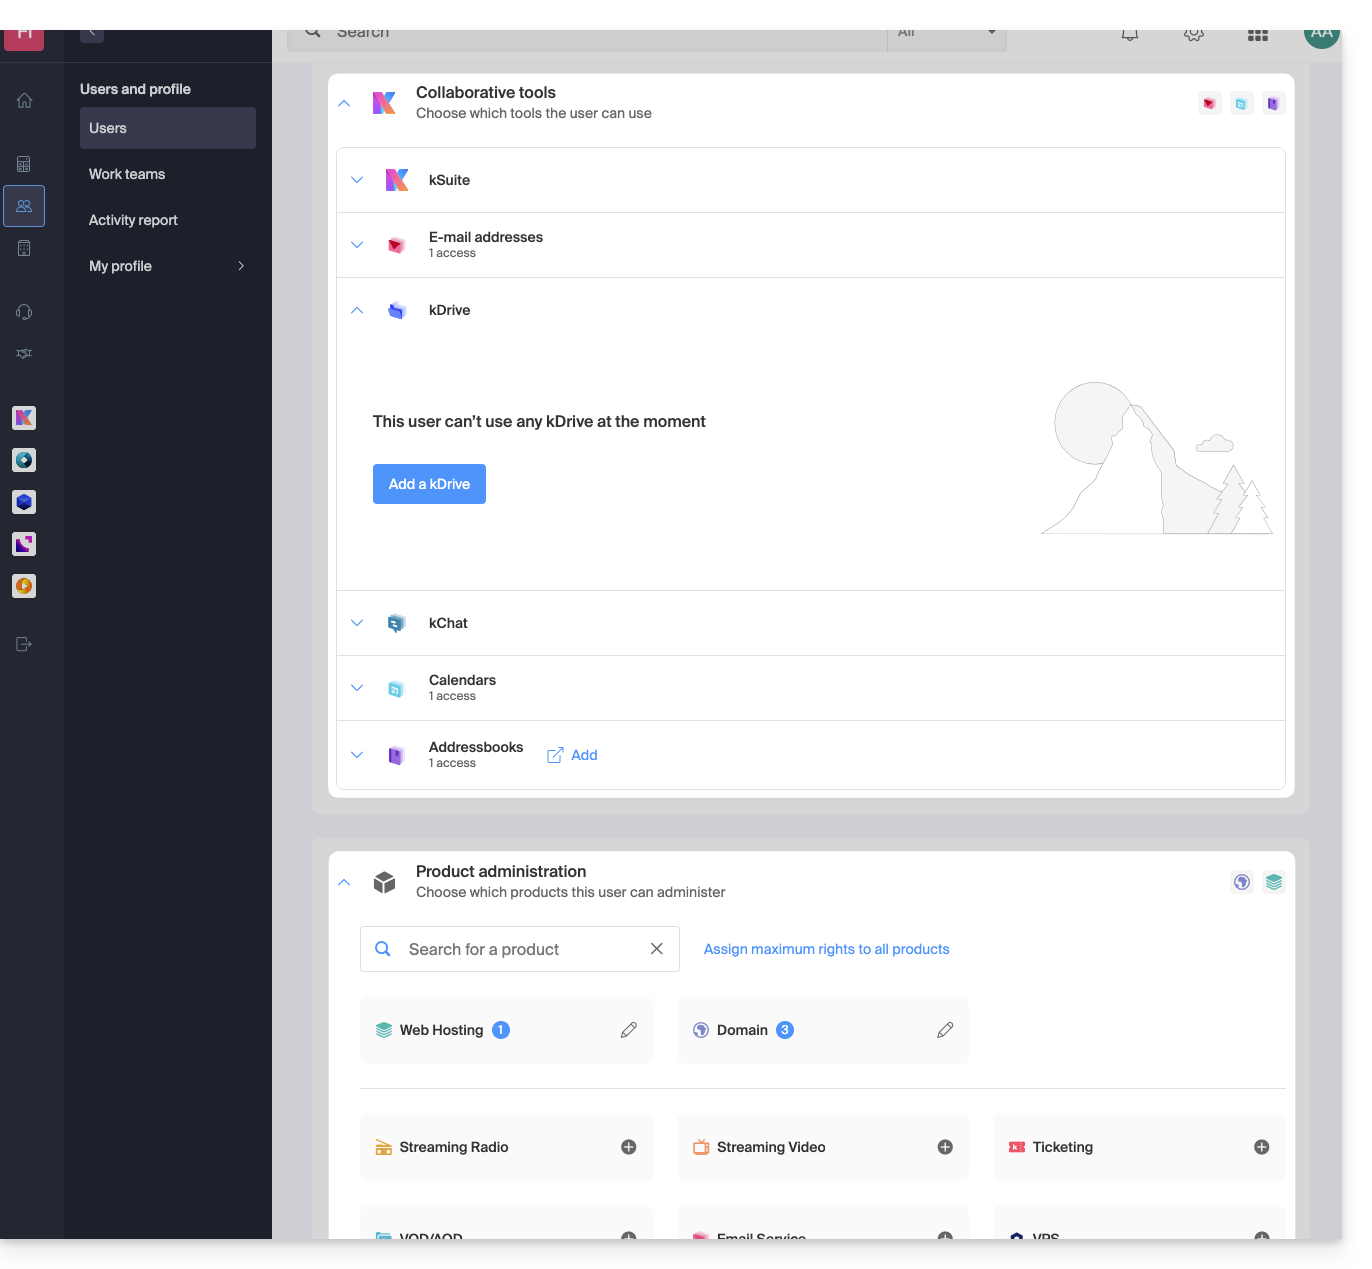
É possível autorizar um utilizador a utilizar o kDrive (poderá criar um PDF, por exemplo) sem, no entanto, lhe conceder um direito de gestão do serviço kDrive (não poderá alterar o plano, convidar um novo utilizador, cancelar, etc.).
Direitos técnicos / Direitos estatísticos
Com alguns serviços, como o kDrive, é possível conceder a um colaborador direitos TÉCNICOS e/ou ESTATÍSTICOS (adiciona acesso ao painel de controle, links de compartilhamento, estatísticas de armazenamento, usuários ativos, dispositivos conectados, atividade no kDrive):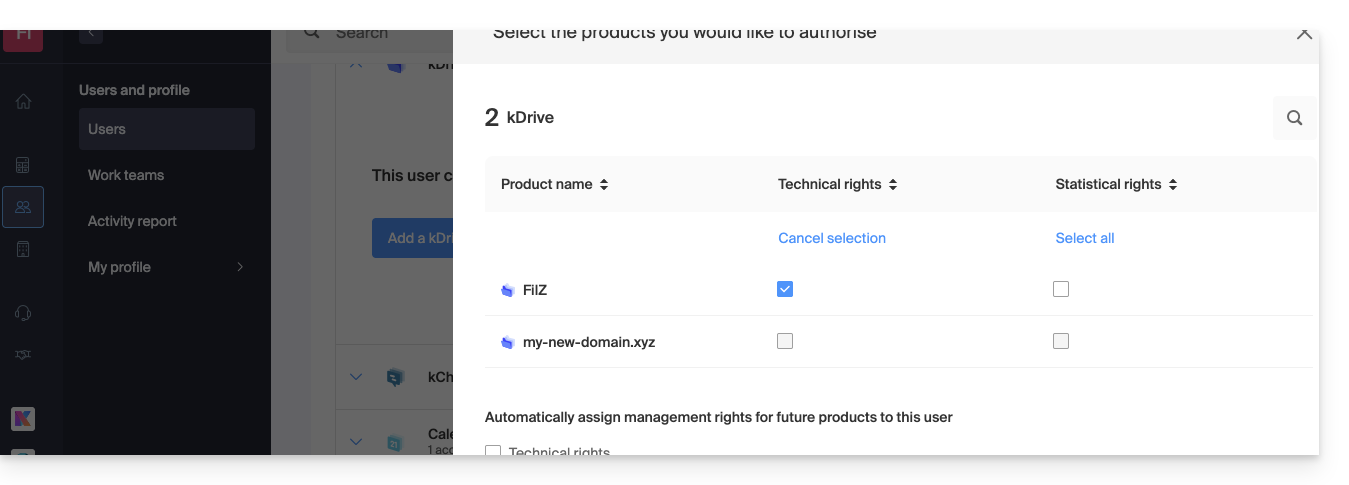
Outros serviços, como os domínios, não possuem uma seção ESTATÍSTICA: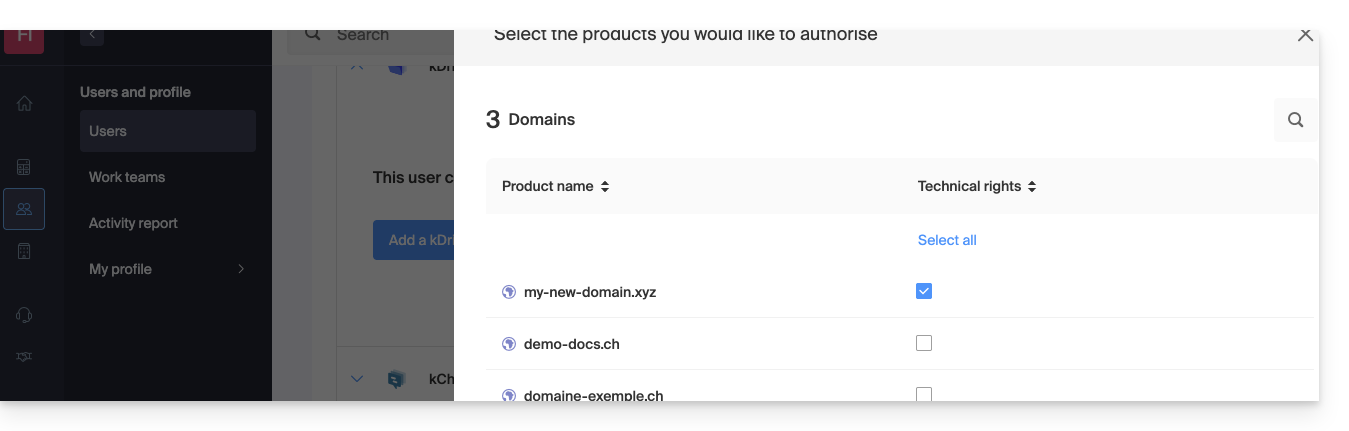
Certos serviços específicos, como a venda de bilhetes, permitem conceder direitos ainda mais detalhados: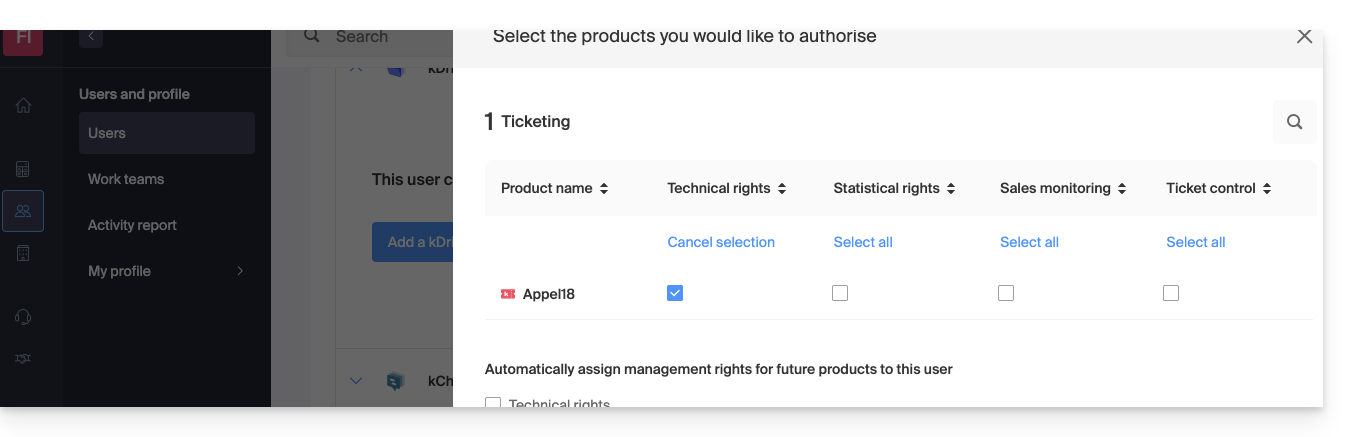
Acesso facilitado: os Grupos
Para facilitar a atribuição de permissões de acesso a um produto que se encontra na sua Organização, existem os Grupos (❓: ajuda). Estes permitem criar equipas que estão associadas a produtos Infomaniak com as permissões desejadas, o que é muito útil para conceder a um novo colaborador da sua Organização o acesso aos produtos de que ele precisará nas suas atividades diárias.
Link para esta FAQ: https://faq.infomaniak.com/1610
Esta seção de perguntas frequentes foi útil?
Este guia explica como duplicar um evento, no âmbito do sistema de bilheteira Infomaniak, de forma única ou recorrente.
Introdução
- Se necessário, consulte este outro guia sobre a duplicação de um evento em um segundo sistema de bilheteira.
Duplicar um evento
Para duplicar um evento, temporada ou edição anterior, por exemplo:
- Clique aqui para acessar o gerenciamento do seu produto no Manager Infomaniak (precisa de ajuda?).
- Clique diretamente no nome atribuído ao evento no qual o evento a ser duplicado está localizado.
- Clique em Programação no menu lateral esquerdo.
- Clique em Eventos no menu lateral esquerdo.
- Clique em o menu de ação ⋮ localizado à direita do evento que deseja duplicar.
- Clique em Duplicar:

- Na janela que se abre, escolha duplicar o evento de forma única (uma única vez) ou de forma recorrente (várias vezes):
- A duplicação de forma recorrente permite duplicar o evento durante todo o período, escolhendo os dias (de segunda a domingo) em que deseja que este evento seja duplicado.
- Se necessário, indique o novo nome do evento, as novas datas e os outros parâmetros de apresentação do seu evento.
- Clique em Confirmar para iniciar a duplicação.
Após a conclusão da duplicação, atualize a página e determine se os eventos devem ser visíveis para os clientes ou ocultos para os clientes e/ou revendedores, ou completos para os clientes e/ou revendedores. Também pode duplicar os assentos no caso de salas numeradas.
Link para esta FAQ: https://faq.infomaniak.com/1627
Esta seção de perguntas frequentes foi útil?
Este guia explica como importar bilhetes gerados por outro fornecedor ou revendedor externo para o seu evento, no âmbito do sistema de bilheteira Infomaniak.
Pré-requisitos
- A importação de bilhetes de terceiros exige que o evento já tenha sido criado na sua plataforma de bilheteira Infomaniak.
- É necessário também ter a lista de bilhetes num ficheiro em formato CSV, com o campo do código de barras que será impresso no bilhete.
Aceder às opções de importação
Para tal:
- Clique aqui para acessar o gerenciamento do seu produto no painel de controle Infomaniak (precisa de ajuda?).
- Clique diretamente no nome atribuído ao sistema de bilheteria relacionado ao evento.
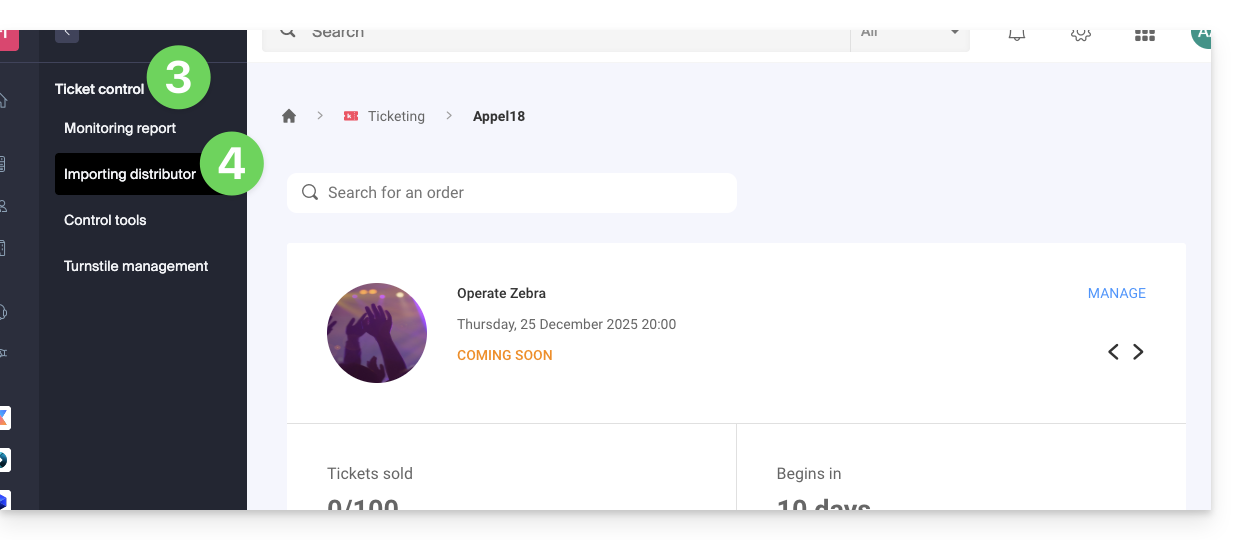
- Clique em Gerenciar tickets no menu lateral esquerdo.
- Clique em Importar distribuidor no menu lateral esquerdo:
Importar o arquivo CSV
Para isso:
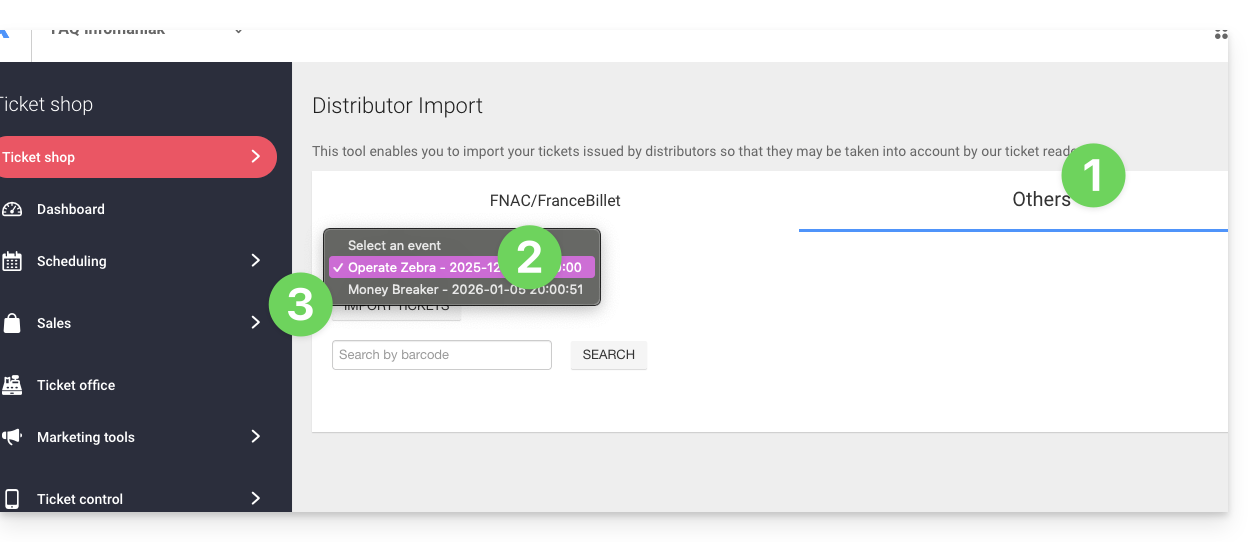
- Clique na aba FNAC/FranceBillet ou Outros dependendo do revendedor.
- Escolha um evento para o qual deseja importar os bilhetes.
- Clique em Importar tickets:
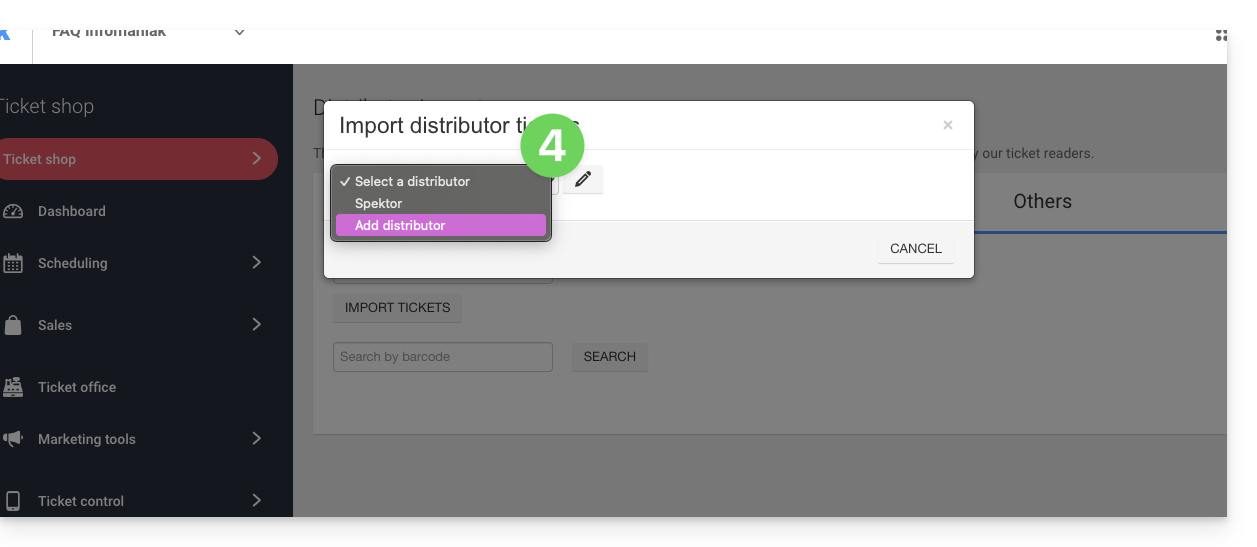
- Selecione um distribuidor existente no menu suspenso ou crie um:
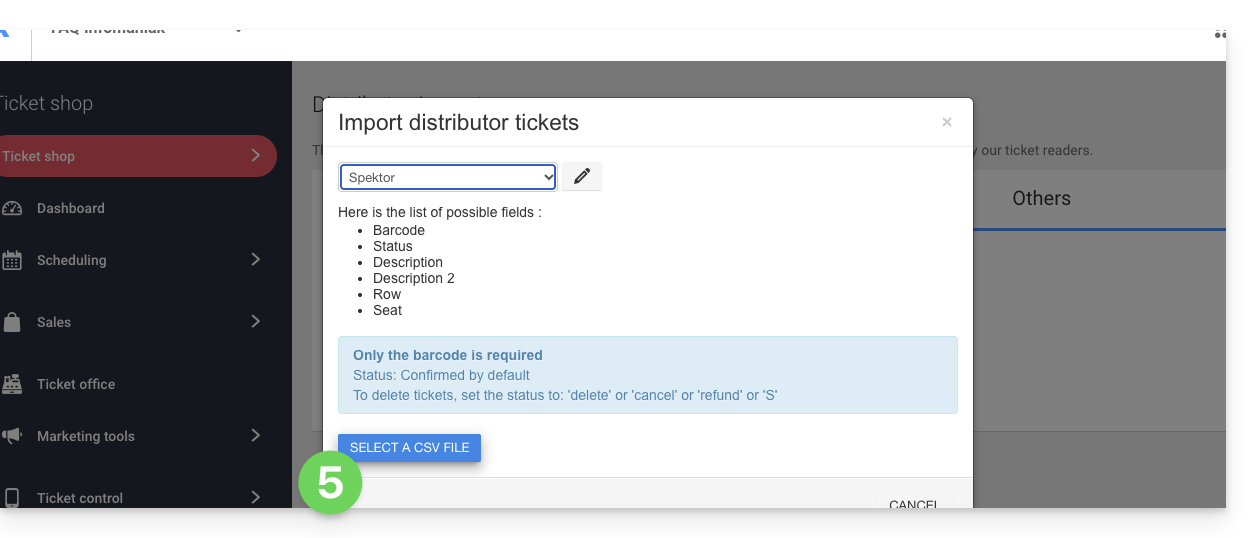
- Clique no botão Escolher um ficheiro CSV e carregue o ficheiro CSV fornecido pelo distribuidor:
- Selecione as linhas a importar. Atenção:
- Verifique a primeira e a última linha das informações importadas.
- Estas podem conter cabeçalhos ou linhas vazias que podem causar um erro durante a importação.
- Utilize as opções na parte superior da página para definir o número de primeiras e últimas linhas a ignorar:

- Associe as colunas às informações a serem importadas.
- O código de barras do bilhete é o único campo obrigatório.
- Se estiver a importar bilhetes de outro sistema de bilheteira Infomaniak, selecione a coluna 8, que corresponde ao código QR (no formato 2000000000A^0^100000000):

- Verifique as informações importadas e valide:
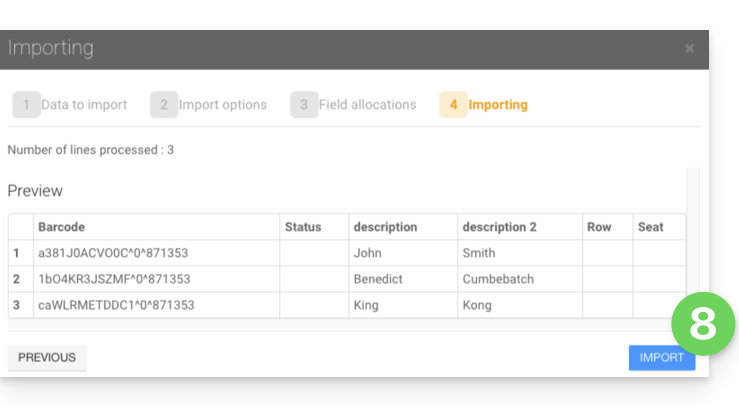
- Os tickets importados serão exibidos em uma tabela na parte inferior da página:
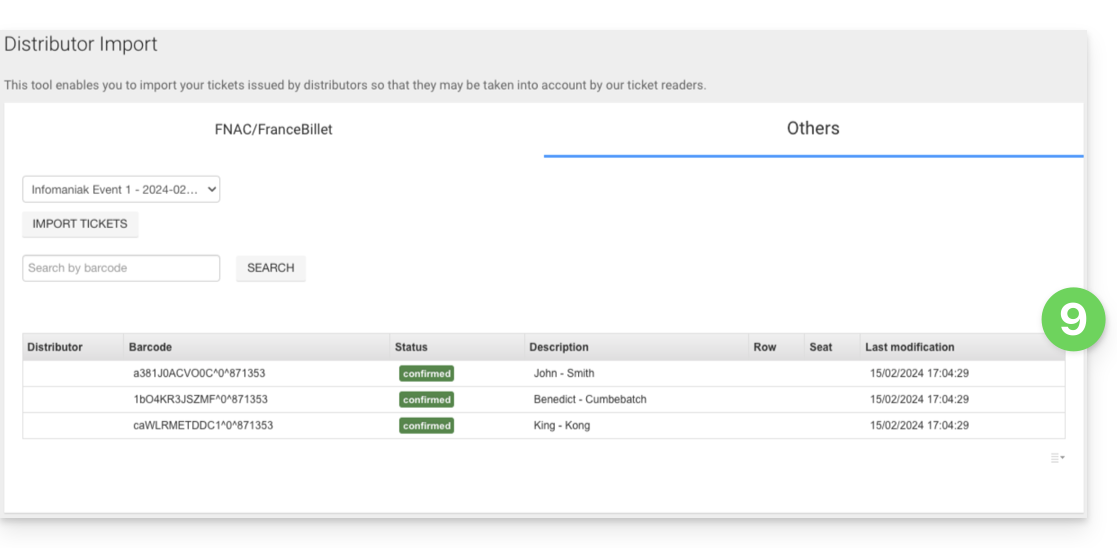
Gerenciamento dos tickets importados
Após a importação dos bilhetes, estes poderão ser verificados com a aplicação de controlo de bilhetes (disponível em iOS e Android).
Serão também contabilizados na coluna FNAC ou Outros na ferramenta de relatório de controlo disponível a partir do menu à esquerda, Controlo de bilhetes, Relatório de controlo:
Link para esta FAQ: https://faq.infomaniak.com/1705
Esta seção de perguntas frequentes foi útil?
Este guia explica o funcionamento das comissões aplicadas às suas vendas (no âmbito do sistema de bilheteira Infomaniak).
Bilhetes gratuitos
A Infomaniak não aplica quaisquer comissões sobre a venda de bilhetes gratuitos.
- Se o preço dos seus bilhetes for de CHF 0.- ou 0.- €, não pagará absolutamente nada pela venda desses bilhetes.
- Atenção: é o valor do bilhete que conta, e não o método de pagamento.
- Um bilhete pago validado com o método de pagamento gratuito/convite não é, portanto, considerado um bilhete gratuito.
- Para criar um plano gratuito para os seus convidados, consulte este outro guia.
Os bilhetes pagos
As comissões da Infomaniak sobre os bilhetes pagos são compostas por 3 partes:
- Uma comissão fixa que permanece constante, independentemente do preço do bilhete ou do método de pagamento.
- Uma comissão em percentual do preço do bilhete, aplicada em todas as vendas online.
- As taxas bancárias das transações online, que variam de acordo com o método de pagamento utilizado.
| Vendas online | Vendas no local | |||||||||
|---|---|---|---|---|---|---|---|---|---|---|
| Comissão total | ||||||||||
| Comissões bancárias (variável conforme o método de pagamento) | ||||||||||
| Comissão Infomaniak (percentual do preço do bilhete) | Comissão total | |||||||||
| Comissão Infomaniak (fixa) | Comissão Infomaniak (fixa) | |||||||||
Para consultar a lista completa das taxas de comissão, consulte a página de preços na página de vendas.
Como são pagas as comissões?
- As comissões da Infomaniak serão calculadas automaticamente quando o relatório mensal for gerado.
- Serão deduzidas do valor total das vendas mensais, desde que o saldo seja suficiente.
- Será enviada uma fatura caso o saldo seja insuficiente.
Link para esta FAQ: https://faq.infomaniak.com/1746
Esta seção de perguntas frequentes foi útil?
Este guia explica como usar a funcionalidade preços por grupo (no âmbito do sistema de bilheteira Infomaniak).
Introdução
- Esta tarifa permite que os visitantes comprem vários ingressos de uma só vez, com um único clique.
- Esta opção é particularmente útil para famílias, turmas escolares ou ofertas especiais em grupo.
- Embora o comprador faça apenas uma compra, a tarifa de grupo agrupa vários bilhetes numa única compra.
- Serão emitidos vários bilhetes, e cada membro do grupo poderá apresentar o seu próprio bilhete no momento do evento.
Gerenciar as tarifas em grupo do seu evento
Para isso:
- Clique aqui para acessar o gerenciamento do seu produto no Manager Infomaniak (precisa de ajuda?).
- Clique diretamente no nome atribuído à bilheteria relacionada ao evento.
- Clique em Programação no menu lateral esquerdo.
- Clique em Eventos no menu lateral esquerdo.
- Clique diretamente no nome do evento.
- Em seguida, clique na aba Preços.
- Clique em Adicionar tarifa:
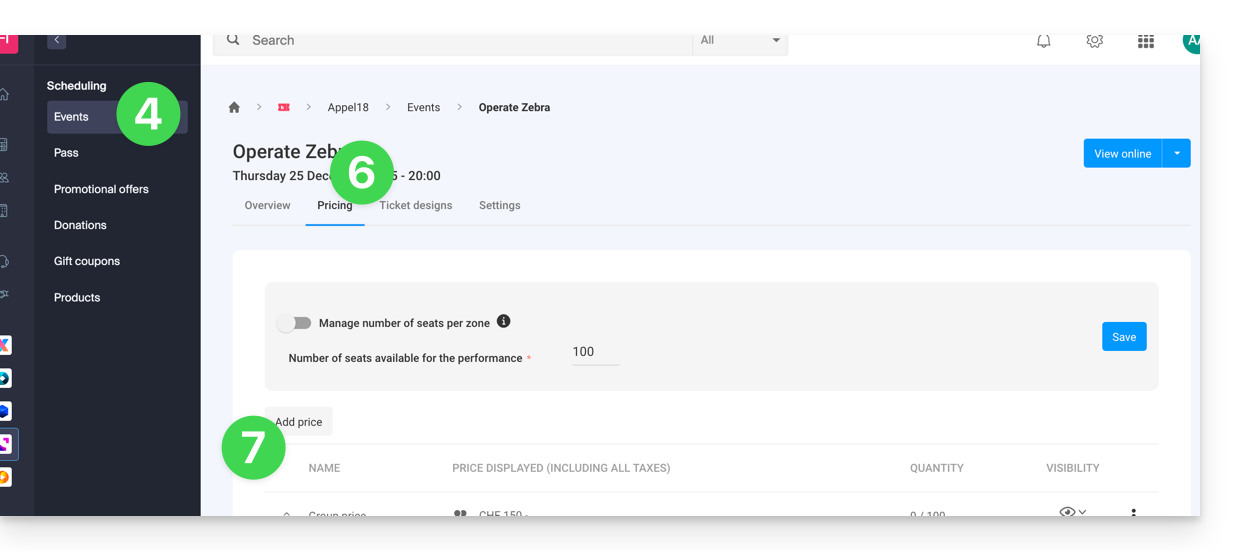
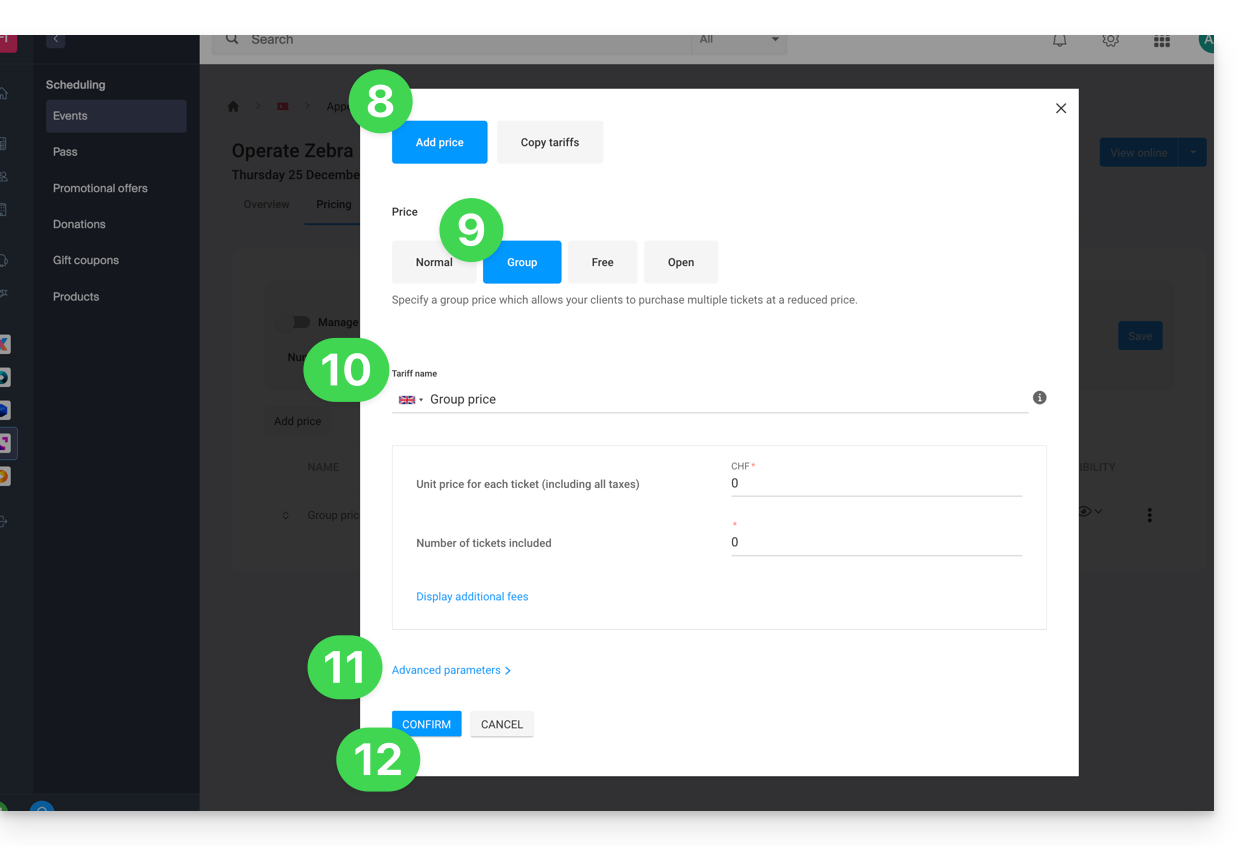
- Escolha Adicionar tarifa.
- Escolha a tarifa de grupo.
- Especifique:
- o nome
- o número de bilhetes incluídos na tarifa
- o preço de cada bilhete individual (o preço da tarifa de grupo será igual ao preço individual multiplicado pelo número de bilhetes)
- Ative as eventuais configurações avançadas.
- Clique em Confirmar:
A exibição dos preços varia de acordo com o tipo de evento: para um evento com várias datas, o gerenciamento é feito por meio de um menu de ações no botão "Editar", enquanto para um evento com uma única data, os preços aparecem diretamente na guia "Preços" na parte superior da página.
Link para esta FAQ: https://faq.infomaniak.com/2533
Esta seção de perguntas frequentes foi útil?
Este guia explica como criar eventos com várias datas (no âmbito do sistema de bilheteira Infomaniak).
Criar um evento com várias datas
Para isso:
- Clique aqui para acessar o gerenciamento do seu produto no Manager Infomaniak (precisa de ajuda?).
- Clique diretamente no nome do serviço de bilheteira em questão.
- Clique em Programação no menu lateral esquerdo.
- Clique em Eventos no menu lateral esquerdo.
- Clique no botão Adicionar evento.
- Na etapa Data e Local, será possível escolher a opção Várias sessões:
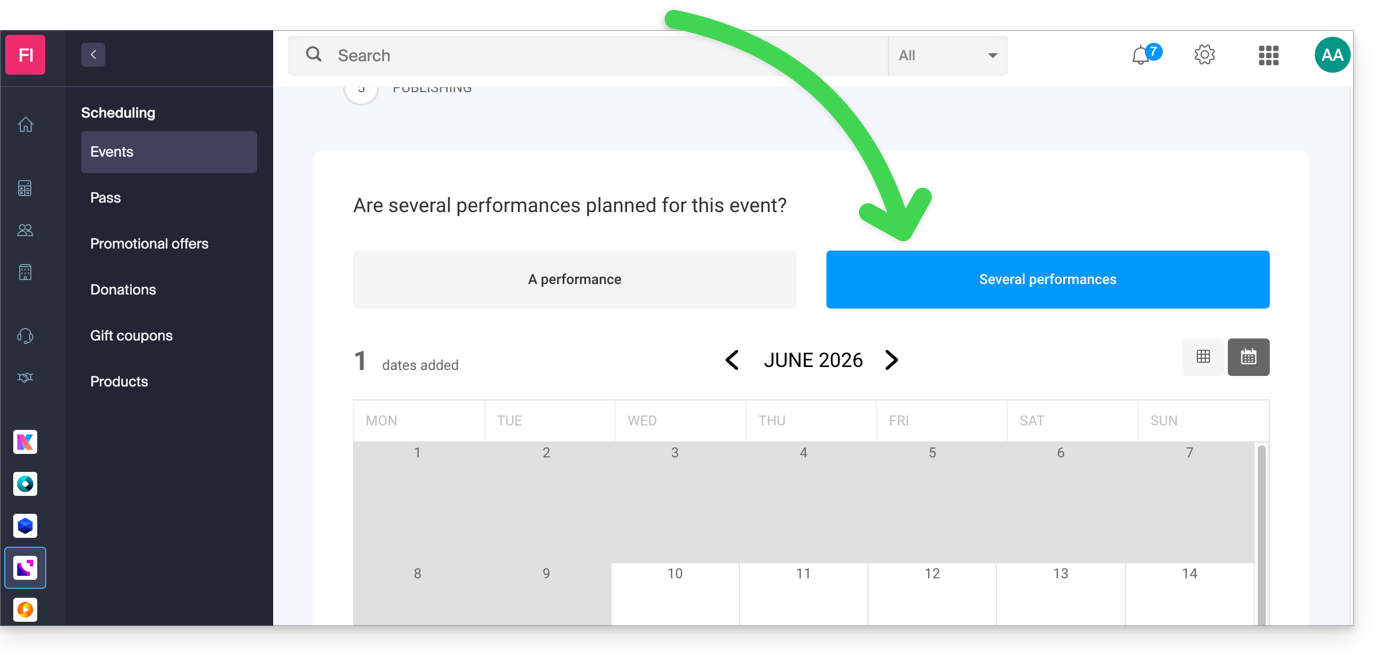
- Uma interface com um calendário será exibida. Escolha a data de início do evento.
- É possível definir se o evento dura vários dias, semanas, meses ou se é recorrente várias vezes no mesmo dia:
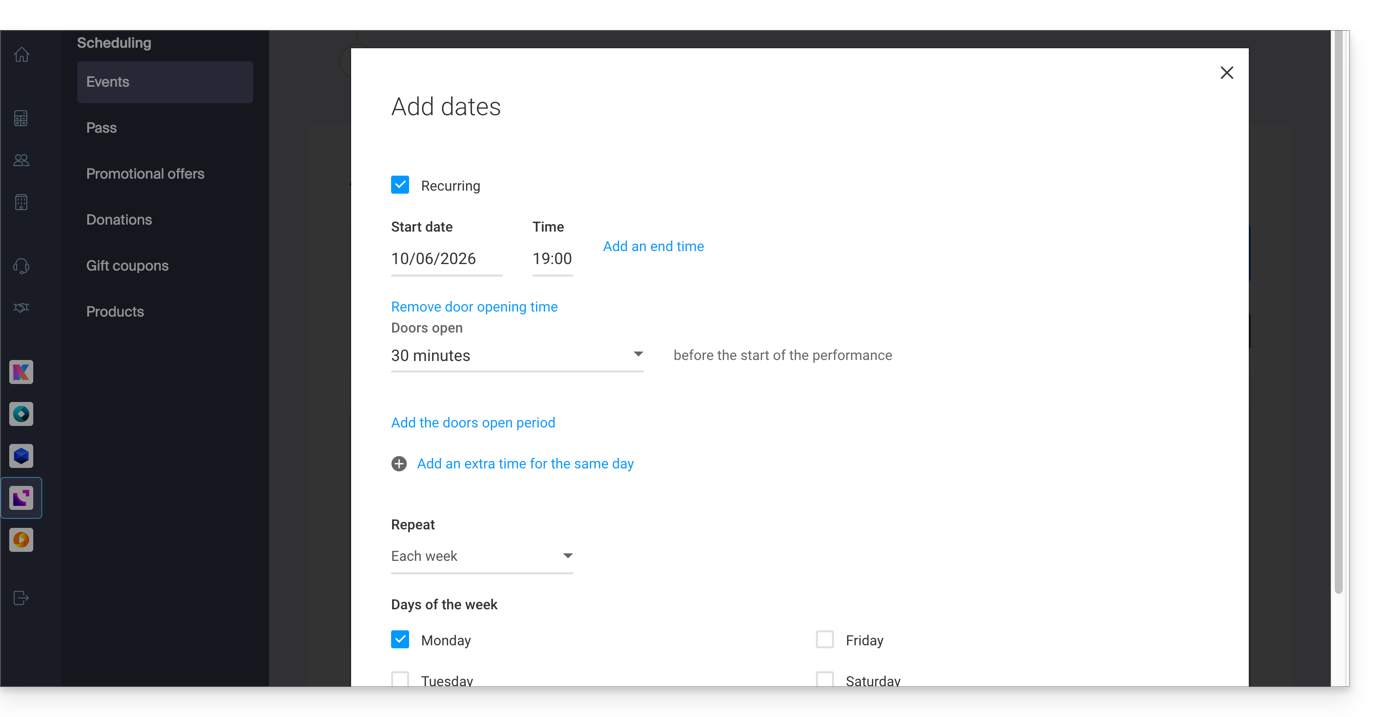
- Depois que o evento é criado e disponibilizado para venda, é possível acompanhar a evolução dos pedidos para cada data, utilizando uma visualização em modo Lista:
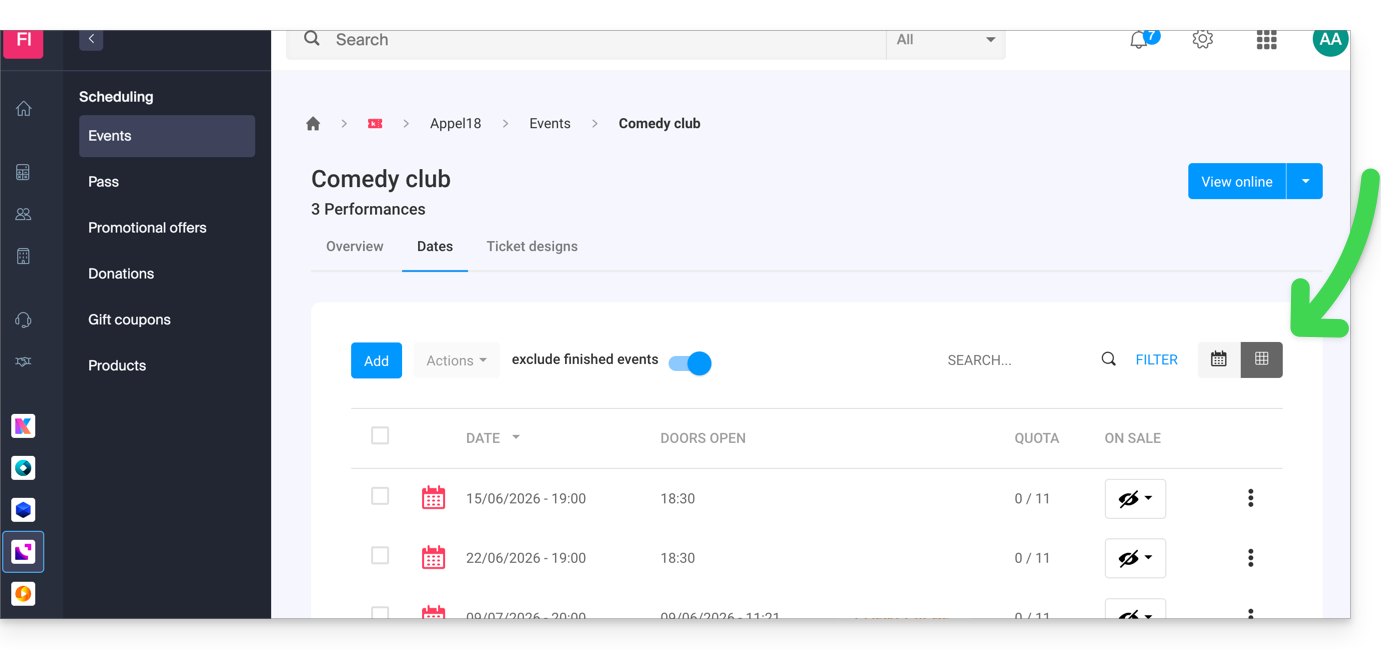
Link para esta FAQ: https://faq.infomaniak.com/2574
Esta seção de perguntas frequentes foi útil?
Este guia explica o funcionamento do prazo de pagamento antes do cancelamento de um pedido (no âmbito do sistema de bilheteira Infomaniak).
Pré-requisitos
- Esta funcionalidade é oferecida apenas para pedidos que utilizam o método de pagamento "Pagamento por fatura".
- Por padrão, o prazo é de 30 dias após o pedido. Um lembrete será enviado automaticamente 10 dias e 20 dias após a data do pedido. No 30º dia, o pedido será cancelado e um e-mail será enviado ao cliente para informá-lo sobre o cancelamento do seu pedido.
Configurar o prazo antes do cancelamento do pedido
Quando os bilhetes para um dos seus eventos são comprados com o método de pagamento "Pagamento por fatura", é possível configurar uma regra de prazo antes do cancelamento automático do pedido.
- Clique aqui para acessar o gerenciamento do seu produto no painel de controle Infomaniak (precisa de ajuda?).
- Clique diretamente no nome atribuído ao sistema de bilheteria relacionado ao evento.
- Clique em Vendas no menu lateral esquerdo.
- Clique em Métodos de pagamento no menu lateral esquerdo.
- Clique no ícone ⏵ para expandir as configurações do item “Na fatura”:
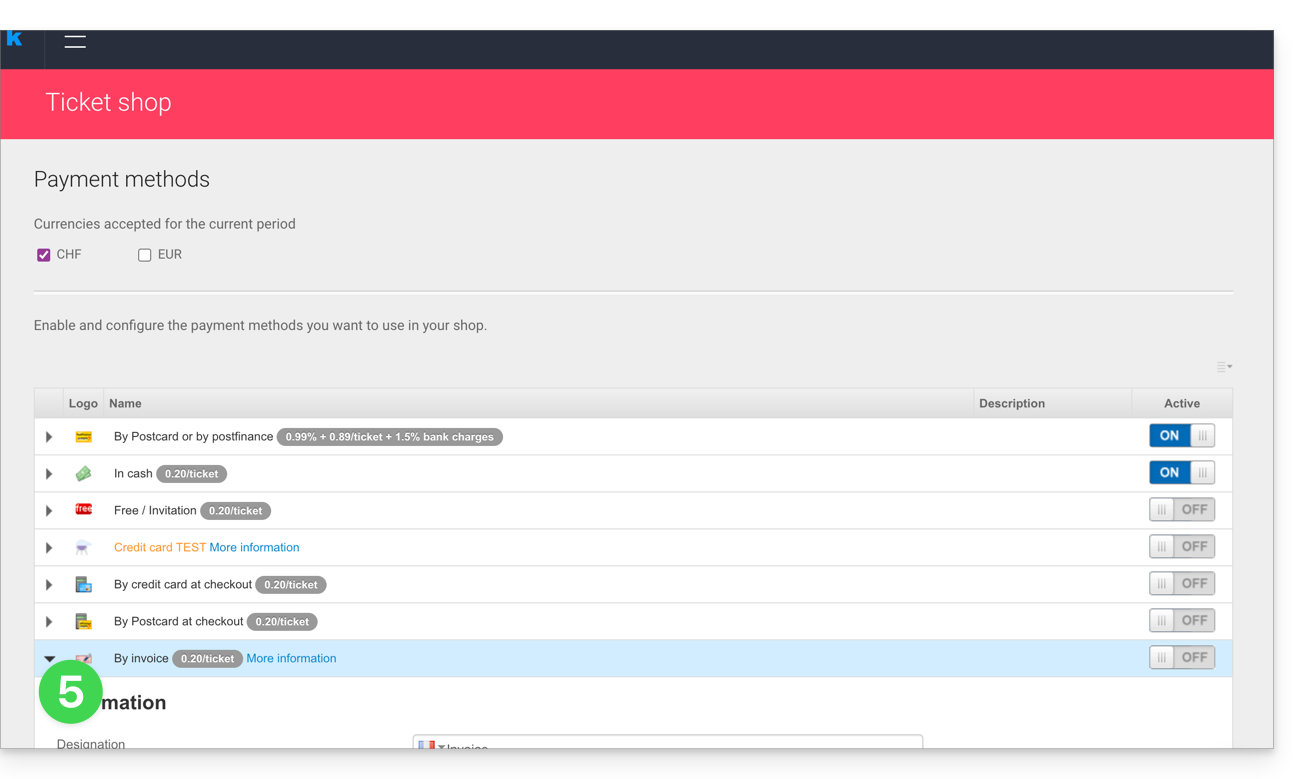
- Defina o período de disponibilidade deste método de pagamento, o número de dias antes de reenviar uma solicitação de pagamento ao cliente e o número de tentativas:
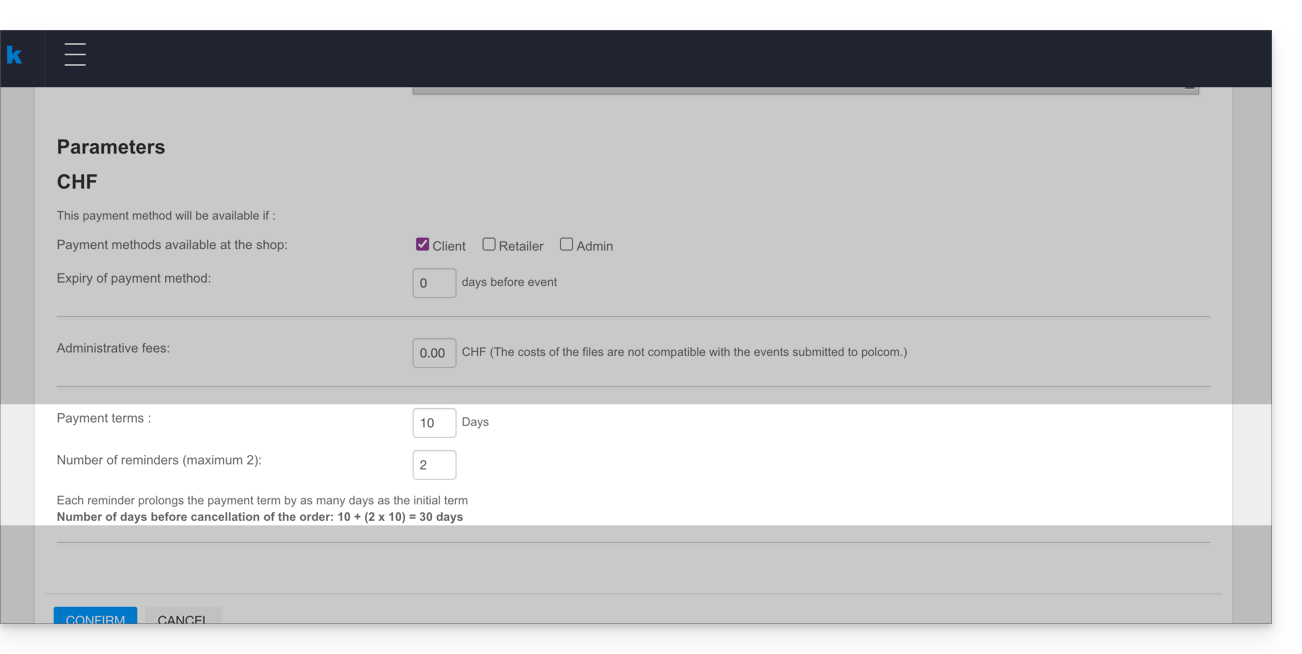
Cada lembrete prolonga o prazo de pagamento pelo mesmo número de dias do prazo inicial. O pedido é automaticamente cancelado ao final do período de cobrança, que é calculado da seguinte forma:
- Número de dias antes do primeiro lembrete + (número de lembretes multiplicado pelo número de dias antes do primeiro lembrete).
- No exemplo acima, o resultado é: 5 + (2x5) = 15, ou seja, o cancelamento ocorrerá 15 dias após o primeiro lembrete.
Link para esta FAQ: https://faq.infomaniak.com/2597
Esta seção de perguntas frequentes foi útil?
Link para esta FAQ: https://faq.infomaniak.com/2600
Esta seção de perguntas frequentes foi útil?