Base de conhecimento
1000 perguntas frequentes, 500 tutoriais e vídeos explicativos. Aqui, você encontra apenas soluções!
Este guia destina-se a desenvolvedores e usuários avançados e apresenta as possibilidades oferecidas pela API Infomaniak.
Introdução
- A API Infomaniak permite que você aproveite todo o potencial do ecossistema Infomaniak em seus aplicativos e usando a linguagem de sua preferência.
- A API Infomaniak é uma API REST; o protocolo utilizado é HTTP, as requisições e as respostas são codificadas no formato JSON; a autenticação é realizada por meio do protocolo OAuth 2.
- O acesso e a utilização da API Infomaniak são totalmente gratuitos.
Protocolo de utilização da API Infomaniak
Com a API, você poderá automatizar uma ampla gama de ações e tarefas nos produtos e serviços Infomaniak, sem precisar usar as interfaces dos produtos. Alguns exemplos de uso:
- Armazenar dados.
- Enviar campanhas de e-mail marketing.
- Transmitir fluxos de vídeo ou rádio.
- Encomendar ou gerir produtos.
- … e muito mais!
Por exemplo, para um Serviço de E-mail: gestão de caixas de e-mail, gestão de alias, gestão de respostas automáticas, gestão de pastas, etc. Para o kChat, publique uma mensagem em um canal…
Crie suas primeiras requisições com a API Infomaniak
Consulte a documentação disponível apenas em inglês sobre as funcionalidades oferecidas pela API.
Formato das requisições
A API Infomaniak é uma API REST. O protocolo utilizado é o HTTP, e as requisições e respostas são codificadas em JSON. A autenticação é realizada através do protocolo OAuth 2.
Para iniciar uma requisição, é necessário utilizar a seguinte sintaxe: /{versão}/{caminho_do_comando}. É possível não indicar a versão, mas, nesse caso, será aplicada a versão mais recente. Consulte todas as requisições disponíveis com a API Infomaniak.
Códigos de resposta da API
Ao utilizar a API Infomaniak, poderá encontrar diferentes códigos de resposta. Estes códigos indicam o estado da sua solicitação. Consulte a lista completa.
Limites e Restrições
Existe um limite de 60 requisições por minuto com a API Infomaniak. Este limite não pode ser aumentado. O uso da API é restrito aos produtos listados na documentação oficial. Adições regulares de produtos e serviços são feitas nesta documentação. Se o produto ou serviço que lhe interessa estiver na documentação, poderá usar as seguintes requisições: GET; POST; PATCH; PUT; DELETE.
Saiba mais
Link para esta FAQ: https://faq.infomaniak.com/2581
Esta seção de perguntas frequentes foi útil?
Este guia explica como criar e gerenciar seus tokens de autenticação para interagir com a API Infomaniak de forma segura.
Introdução
- Características dos tokens:
- Número: sem limite de criação
- Validade: ilimitada por padrão (personalizável no momento da criação)
- Inatividade: um token é automaticamente desativado se não for utilizado durante um ano
- Exemplo de utilização:
Gerenciar os tokens da API
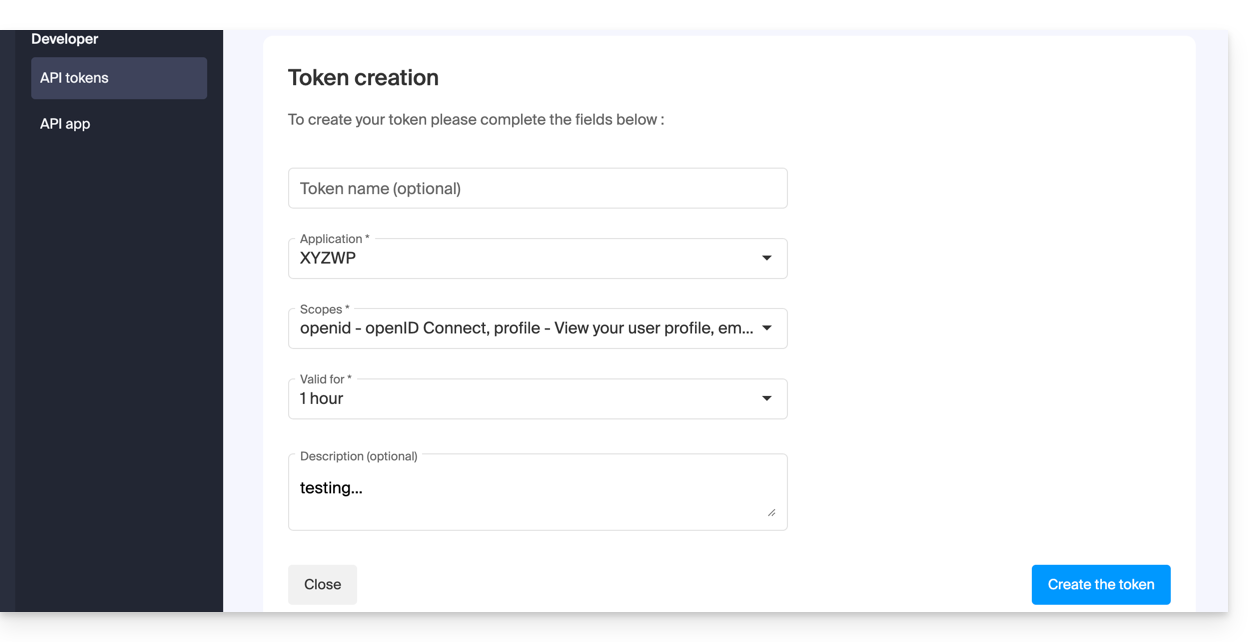
Ao criar, você deve definir a aplicação e o escopo de acesso:
- Acesse a gestão de tokens no painel de controle (precisa de ajuda?).
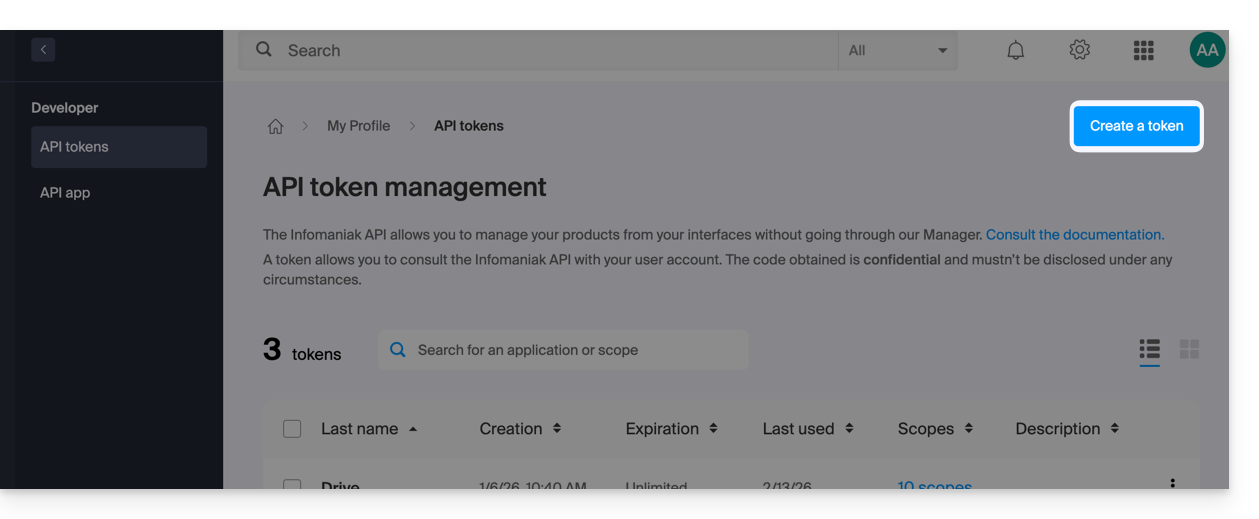
- Clique em Criar um token:
- Selecione o produto/aplicativo e o período de validade:
- Confirme a operação com a sua senha de conta.
- Importante: copie o token e guarde-o num local seguro; ele não será mais exibido posteriormente.
Para remover tokens, selecione-os e clique no botão de revogação que aparece: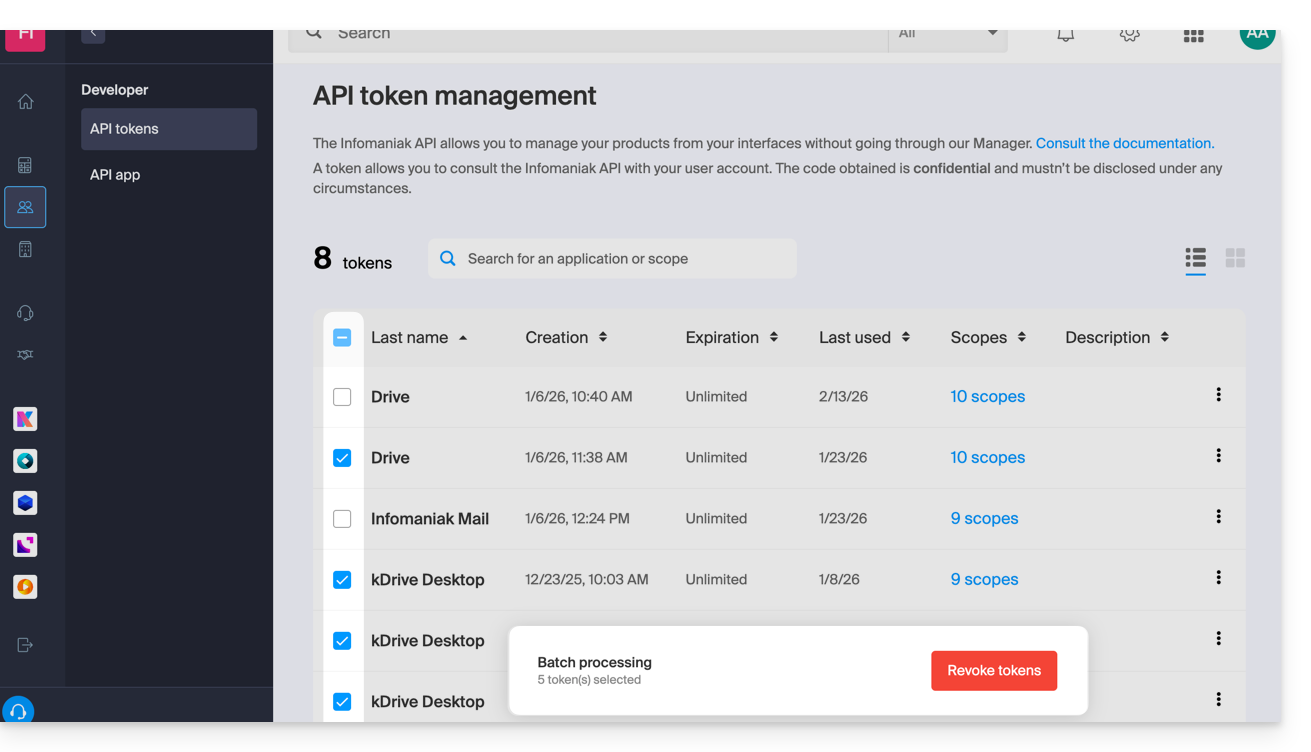
Link para esta FAQ: https://faq.infomaniak.com/2582
Esta seção de perguntas frequentes foi útil?
Link para esta FAQ: https://faq.infomaniak.com/2585
Esta seção de perguntas frequentes foi útil?
Link para esta FAQ: https://faq.infomaniak.com/2589
Esta seção de perguntas frequentes foi útil?
Link para esta FAQ: https://faq.infomaniak.com/2590
Esta seção de perguntas frequentes foi útil?
Link para esta FAQ: https://faq.infomaniak.com/2591
Esta seção de perguntas frequentes foi útil?
Este guia destina-se aos clientes da Infomaniak que possuem uma empresa registada num país da União Europeia (UE) e detalha como inserir ou modificar o seu número de IVA europeu para permitir a aplicação das regras de faturação adequadas.
Introdução
- As empresas da UE podem beneficiar do mecanismo de autoliquidação do IVA ao fornecerem um número de IVA intracomunitário válido. Neste caso, a Infomaniak não cobra o imposto, e cabe à empresa declarar e pagar o IVA no seu país de residência.
- Para uma empresa suíça, este número não é aplicável:
- A Suíça tem o seu próprio sistema fiscal, distinto do da UE.
- As empresas suíças estão sujeitas ao IVA suíço e não estão abrangidas pelos mecanismos de autoliquidação aplicáveis às trocas intracomunitárias da UE.
Adicione o seu número de IVA
Poderá inserir o seu número de IVA ao encomendar o seu primeiro produto Infomaniak, quando lhe forem solicitadas as informações da empresa (correspondentes à sua Organização).
Para adicionar ou modificar o número de IVA a qualquer momento:
- Clique aqui para para acessar o gerenciamento das informações da sua Organização no Gerenciador Infomaniak.
- Preencha o campo número de IVA:
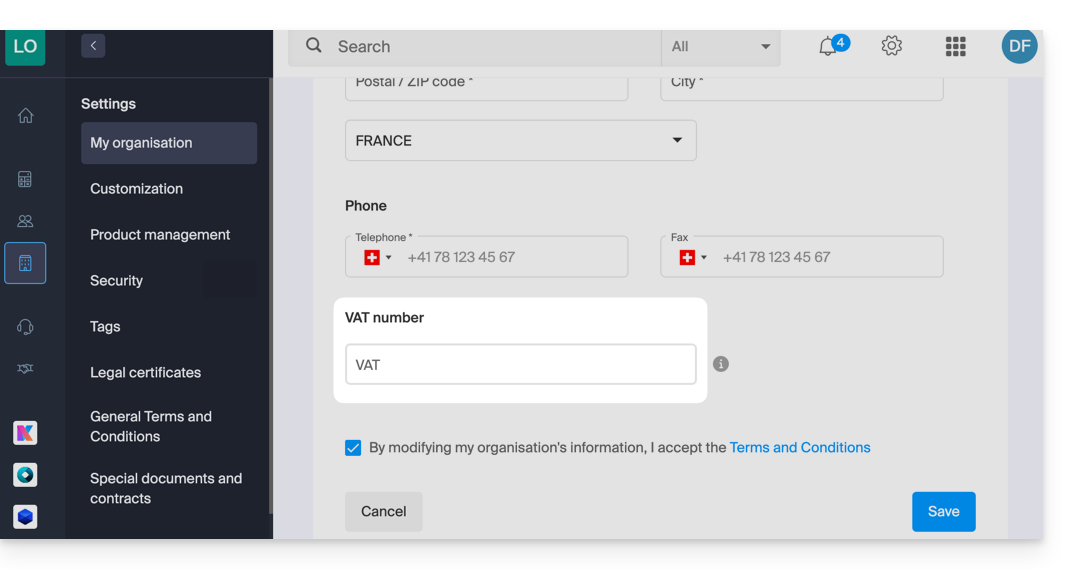
- Leia e marque a caixa dos termos e condições de utilização e, em seguida, clique em Guardar.
Se necessário, consulte este outro guia sobre os outros parâmetros que podem ser modificados.
Link para esta FAQ: https://faq.infomaniak.com/2599
Esta seção de perguntas frequentes foi útil?
Este guia explica como ativar ou desativar a opção Garantia de Renovação para os produtos Infomaniak.
Introdução
- A Garantia de Renovação é uma medida de segurança adicional para garantir a continuidade dos seus produtos, caso não tenha conseguido renová-los dentro do prazo ou se uma renovação automática não tenha funcionado; ela permite garantir que não haverá interrupção do serviço.
- A Infomaniak renovará os produtos por você e emitirá uma fatura que você poderá encontrar na sua conta.
- Esta opção está disponível no momento da encomenda (exceto para o produto NAS Synology) ou após a compra.
Ativar a opção de Renovação da Garantia
Um produto de cada vez
Para ativar a Garantia de Renovação no produto de sua escolha:
- Clique aqui para acessar o gerenciamento de pagamentos no Manager Infomaniak (precisa de ajuda?).
- Clique no menu de ação ⋮ localizado à direita do item correspondente.
- Escolha ativar a opção:
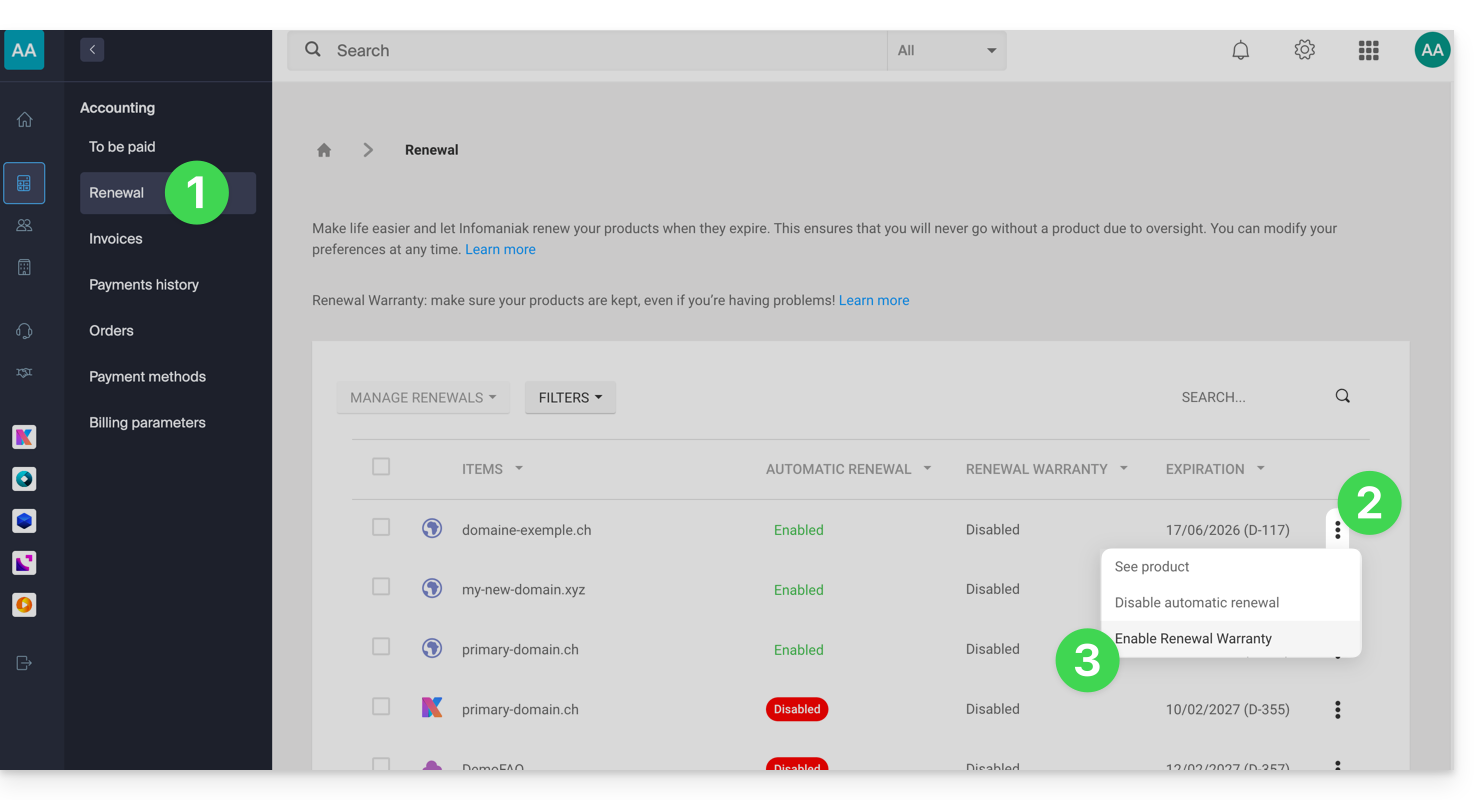
- Siga as instruções na janela que foi aberta.
Todos os produtos de uma vez
Para ativar a Garantia de Renovação em vários dos seus produtos:
- Clique aqui para acessar o gerenciamento das renovações no Manager Infomaniak (precisa de ajuda?).
- Clique na caixa no topo da coluna para selecionar todos os seus produtos com um único clique.
- Clique no botão Gerenciar renovações.
- Escolha ativar a opção:
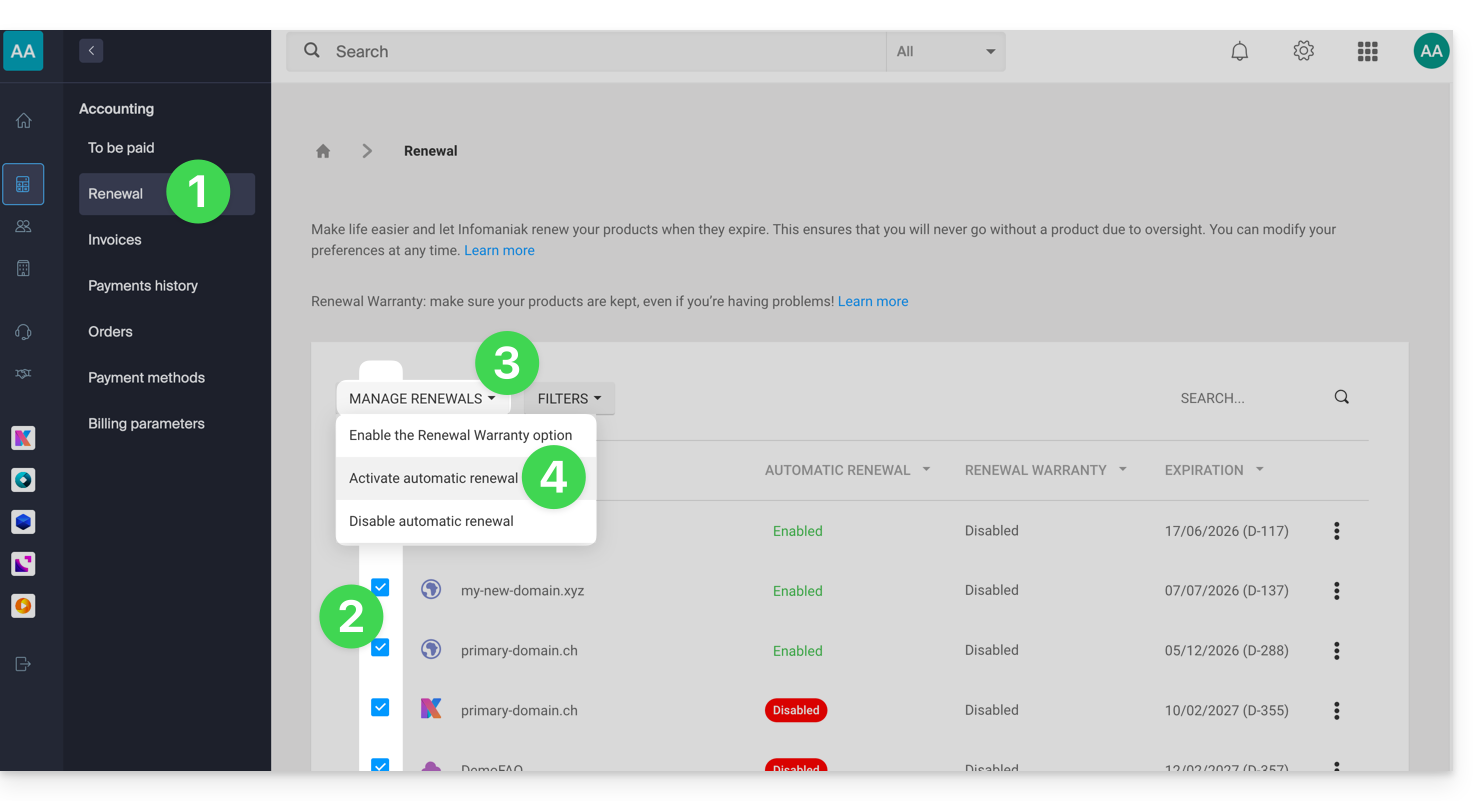
- Siga as instruções na janela que se abriu.
Desativar a opção de Renovação da Garantia
Um produto de cada vez
Para desativar a Renovação da Garantia no produto de sua escolha:
- Clique aqui para acessar o gerenciamento de pagamentos no Manager Infomaniak (precisa de ajuda?).
- Clique no menu de ação ⋮ localizado à direita do item correspondente.
- Escolha desativar a opção:
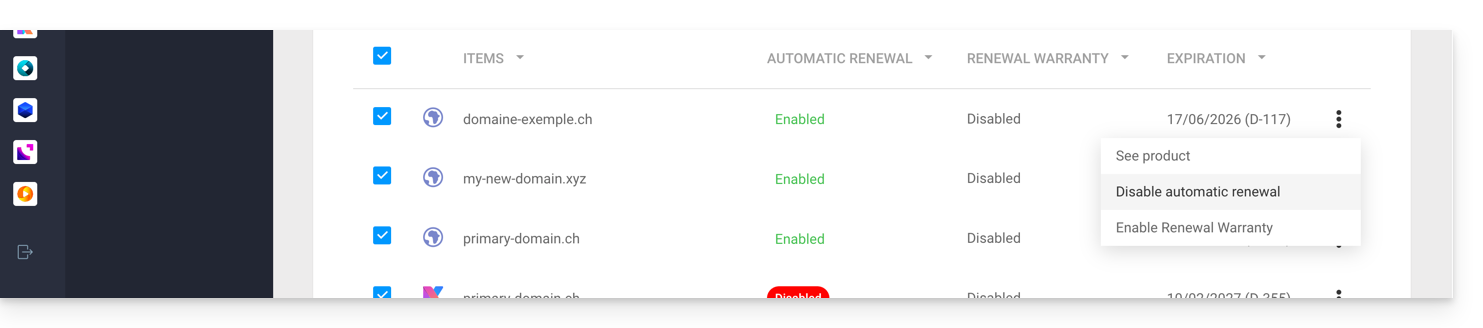
- Siga as instruções na janela que foi aberta.
Todos os produtos de uma vez
Para desativar a Renovação Garantida em vários dos seus produtos:
- Clique aqui para acessar o gerenciamento das renovações no Manager Infomaniak (precisa de ajuda?).
- Clique na caixa no topo da coluna para selecionar todos os seus produtos com um único clique.
- Clique no botão Gerenciar renovações.
- Escolha desativar a opção:
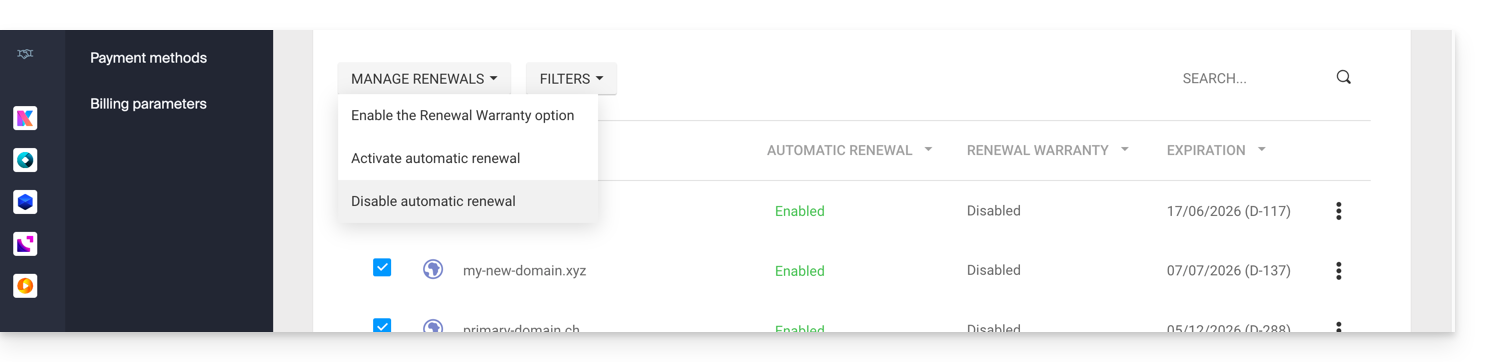
- Siga as instruções da janela que se abriu.
Link para esta FAQ: https://faq.infomaniak.com/2637
Esta seção de perguntas frequentes foi útil?
A Infomaniak tem como prioridade garantir a segurança dos dados, adotando uma abordagem abrangente e diversificada em relação à segurança. Para os denunciantes, a empresa implementou um sistema interno que permite denunciar irregularidades de forma segura e anônima, sem receio de retaliações. Este mecanismo de proteção é conhecido e acessível a todos os funcionários, reforçando assim a transparência e a responsabilidade dentro da organização.
Prazos de tratamento
A Infomaniak demonstra o seu compromisso com medidas concretas e eficazes para proteger aqueles que denunciam anomalias. A empresa compromete-se a tratar cada denúncia efetuada através do seu formulário de denúncia em prazos definidos, a fim de garantir uma resposta rápida e manter a confiança dos seus utilizadores.
Para garantir um tratamento eficaz e transparente, a Infomaniak estabeleceu um processo estruturado com prazos precisos:
- Compromete-se a confirmar o recebimento de todas as denúncias em 24 horas após a sua submissão, permitindo que os denunciantes confirmem que o seu pedido foi devidamente recebido pelas equipas técnicas competentes.
- Em seguida, a empresa realiza uma avaliação preliminar em 5 dias úteis para determinar a admissibilidade da denúncia e identificar os recursos necessários para o seu tratamento. Esta fase permite classificar o nível de prioridade e encaminhar o caso para as equipas especializadas apropriadas.
- Quando uma investigação se torna necessária, a Infomaniak realiza uma análise aprofundada num prazo máximo de 30 dias úteis, dependendo da natureza e da complexidade do caso relatado. Este período permite que as equipas de segurança realizem as verificações técnicas necessárias, recolham as provas necessárias e avaliem o impacto potencial da situação relatada.
- Por fim, a empresa compromete-se a finalizar a análise e implementar as ações corretivas apropriadas num prazo de 60 dias úteis, sempre que tecnicamente possível.
Esta última etapa inclui a implementação de medidas preventivas, a comunicação dos resultados às partes interessadas e o acompanhamento das recomendações emitidas para evitar a recorrência dos problemas identificados.
A Infomaniak também se compromete a manter os reclamantes informados sobre o andamento de uma reclamação, desde que o reclamante tenha preenchido o formulário indicando um endereço de e-mail de contacto.
Consulte também o artigo do blog sobre este tema.
Link para esta FAQ: https://faq.infomaniak.com/2641
Esta seção de perguntas frequentes foi útil?
Este guia explica como sair de uma conta Infomaniak (conta de utilizador) através do Manager Infomaniak. Após efetuar o logout, é fácil voltar a iniciar sessão numa conta Infomaniak diferente e, assim, aceder a outra Organização ou a um utilizador com um papel diferente na mesma Organização.
Sair e voltar a iniciar sessão com as credenciais Infomaniak
Para sair de uma conta Infomaniak e fazer login em outra:
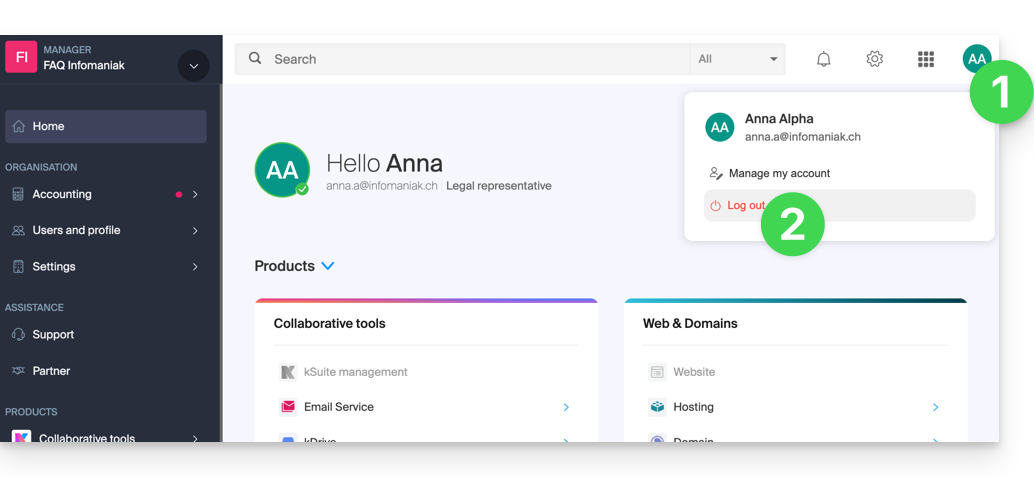
- Clique em ícone com as suas iniciais / avatar no canto superior direito doManager Infomaniak.
- Clique em Sair:
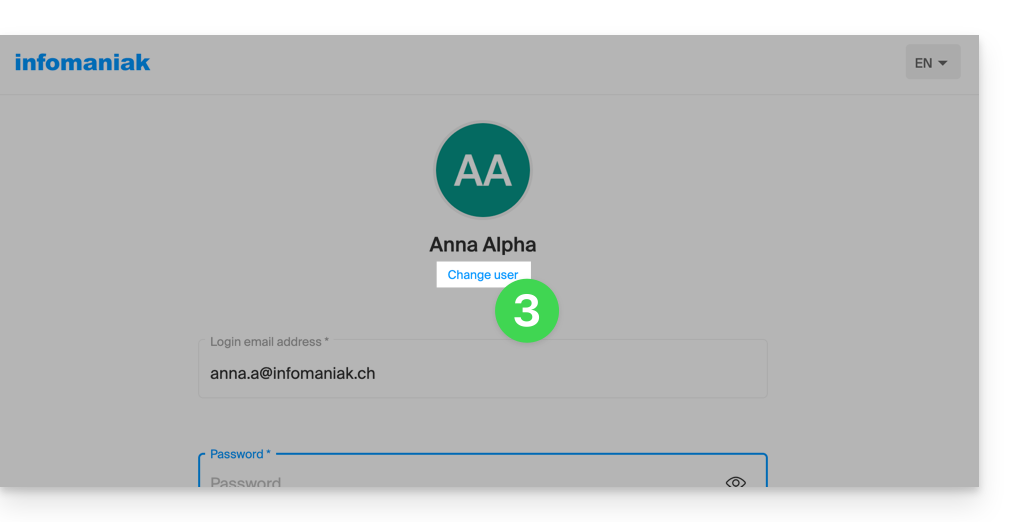
- Clique em Mudar de utilizador:
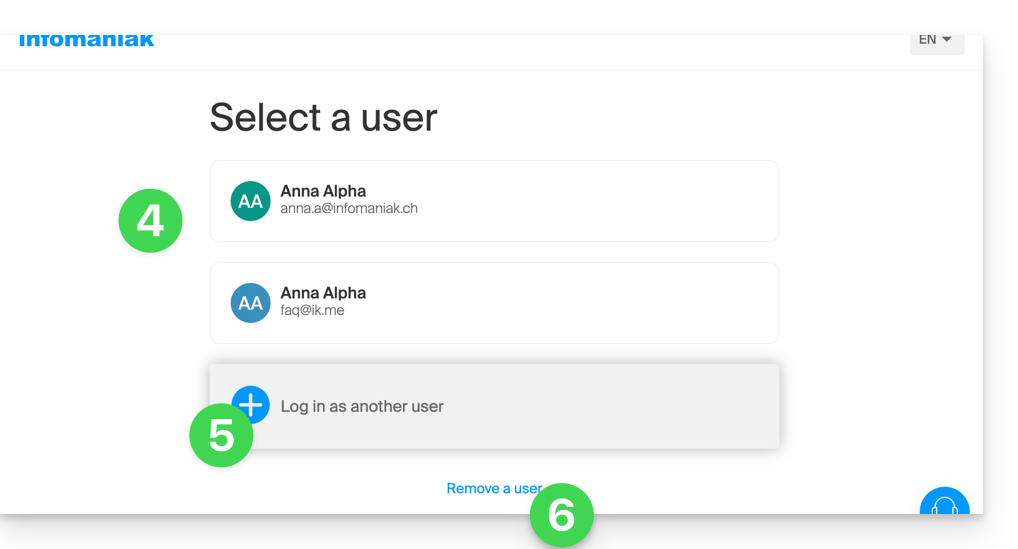
- Escolha outro utilizador pré-registado…
- … ou clique no botão para iniciar sessão com novas credenciais…
- … ou, ainda, exclua um dos utilizadores já registados:
- Insira as informações de login e clique no botão Login.
Depois de se conectar com vários utilizadores diferentes a partir do mesmo dispositivo, poderá encontrar as suas diferentes contas Infomaniak e alternar entre elas:
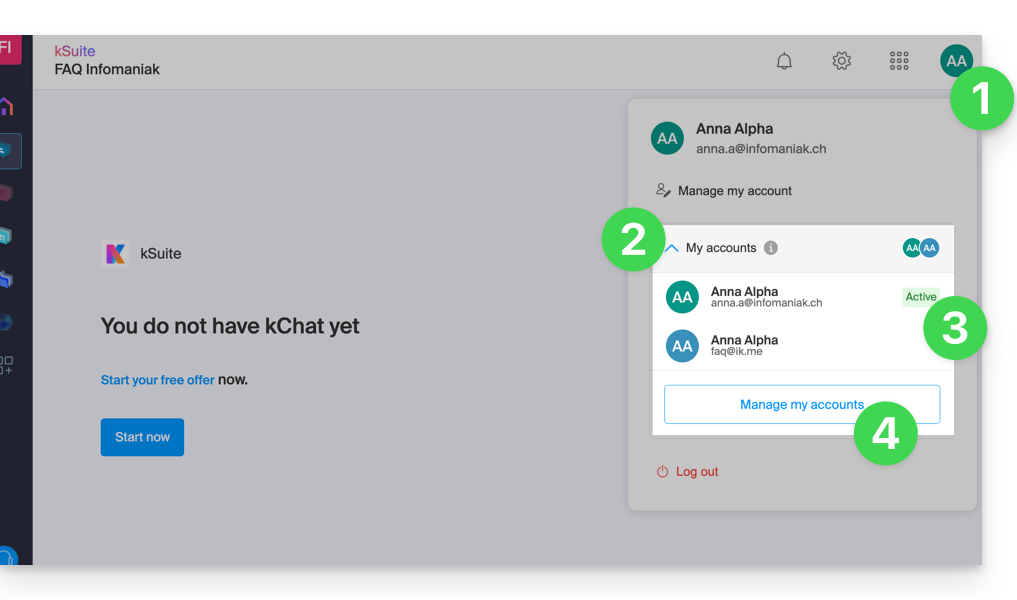
- Clique em ícone com as suas iniciais / avatar no canto superior direito doManager Infomaniak.
- Clique no ícone Minhas contas para expandir a lista de contas salvas.
- Clique em uma das contas inativas para alternar para ela.
- Clique no botão Gerenciar contas para adicionar ou remover uma de suas contas (consulte o ponto 4 do capítulo acima):
Se o seu usuário estiver associado a várias Organizações, ele pode simplesmente alternar entre elas sem precisar se desconectar e reconectar.
Link para esta FAQ: https://faq.infomaniak.com/2642
Esta seção de perguntas frequentes foi útil?
Este guia ajuda você a entender o que é um Cliente no contexto do Programa de Parceiros da Infomaniak.
Definição
Um Cliente é uma pessoa física ou jurídica que escolheu a Infomaniak como seu provedor de hospedagem para adquirir e gerenciar produtos. Se você ainda não possui nenhum produto na Infomaniak, durante o processo de pedido, será solicitado que você crie uma conta.
O Cliente pode adicionar um Parceiro que faça parte do Programa de Parceiros da Infomaniak e conceder-lhe direitos de acesso completos ou limitados à sua conta e aos seus produtos.
O Parceiro será responsável por atender às solicitações de suporte para os produtos que gerencia.
Como Cliente do Parceiro, você deverá entrar em contato apenas com ele para qualquer solicitação de suporte.
Link para esta FAQ: https://faq.infomaniak.com/2666
Esta seção de perguntas frequentes foi útil?
Este guia explica como adicionar um Cliente no âmbito do Programa de Parceiros da Infomaniak.
Pré-requisitos
- Apenas os responsáveis legais da Organização Parceira estão autorizados a adicionar Clientes.
Adicionar um Cliente "sob gestão"
Para adicionar um Cliente no âmbito da sua atividade de Parceiro:
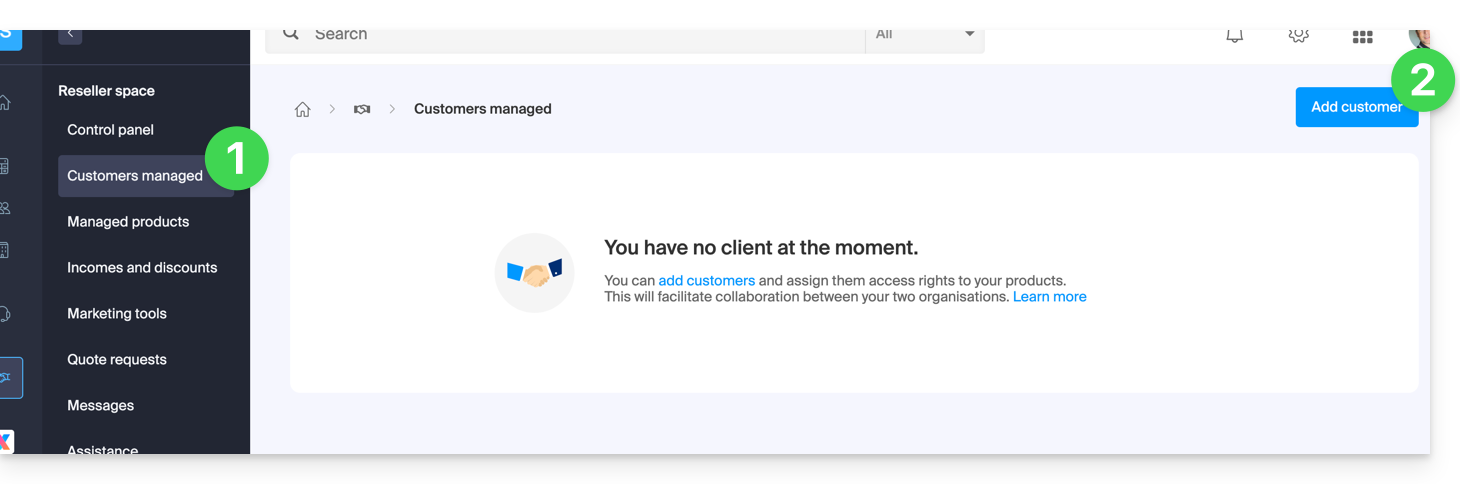
- Clique aqui para aceder aos seus Clientes sob gestão no Espaço de Parceiros do painel de controlo Infomaniak (precisa de ajuda?).
- Clique no botão azul “Adicionar um cliente” no canto superior direito:
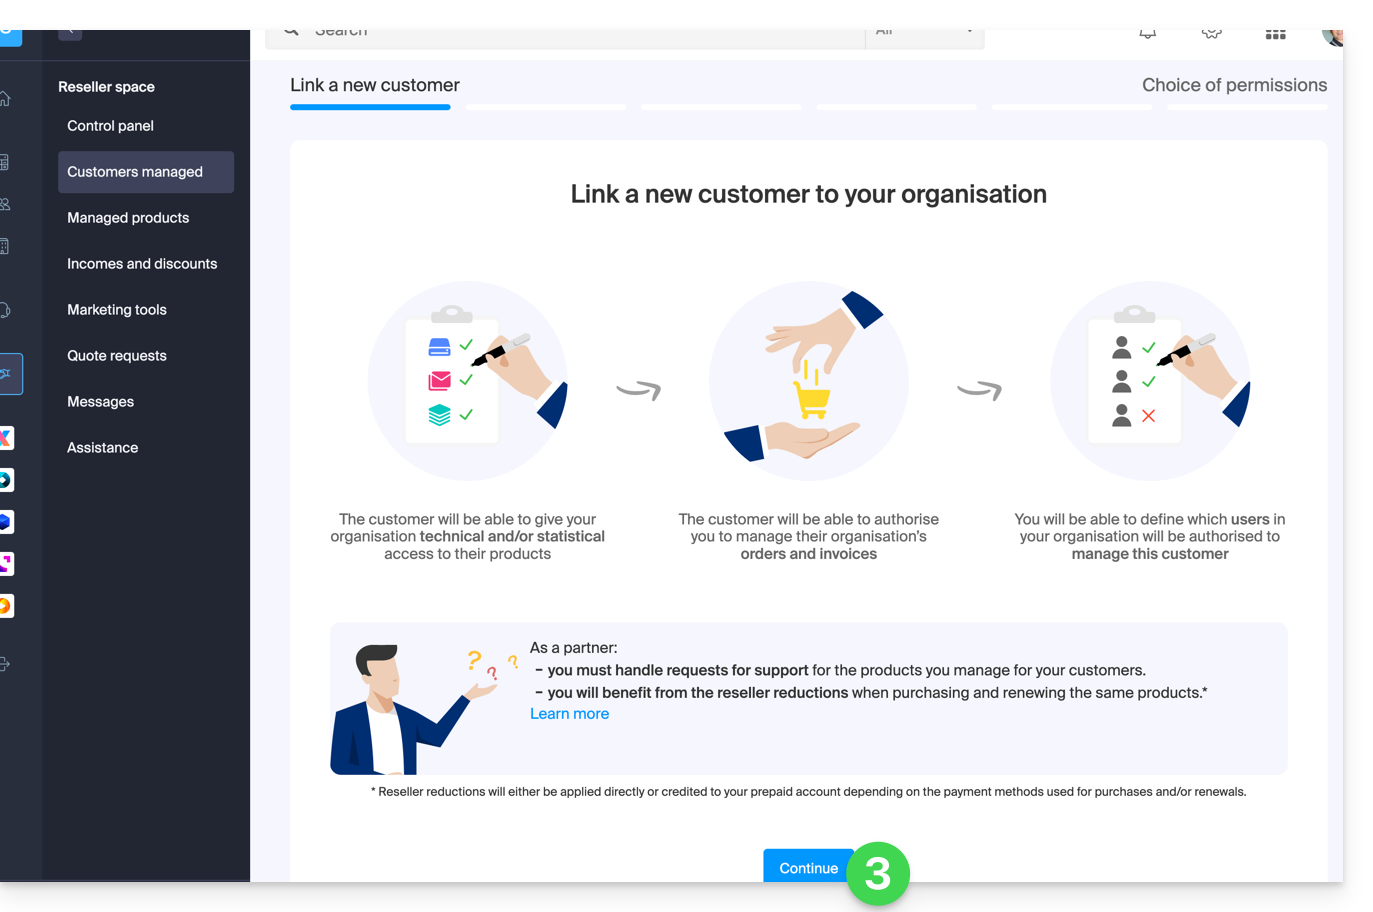
- Siga o procedimento para concluir:
- O pedido pendente será visível no seu painel de controlo:
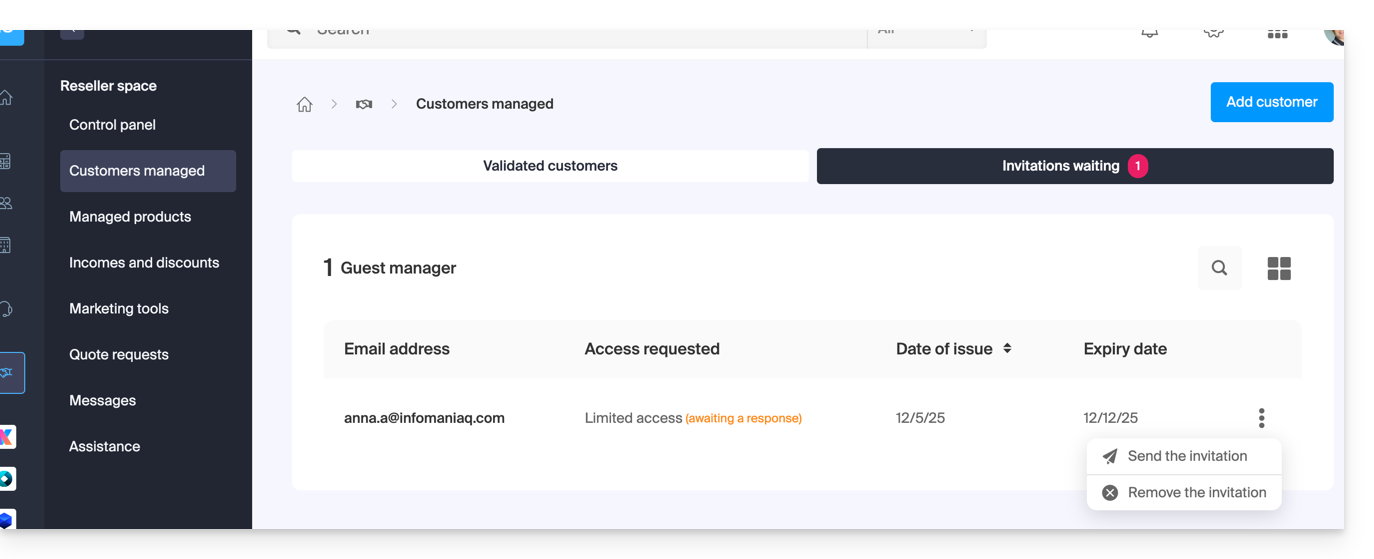
- O cliente receberá um e-mail com o pedido dos diferentes acessos e terá a possibilidade de decidir se concede direitos de acesso diferentes dos solicitados pelo parceiro.
- Após a aceitação do convite por um cliente, verifique os direitos de acesso concedidos, bem como os meios de pagamento utilizados (se aplicável) no perfil do seu cliente.
Aceder à conta do cliente e aos seus produtos…
... na qualidade de responsável legal ou administrador Parceiro
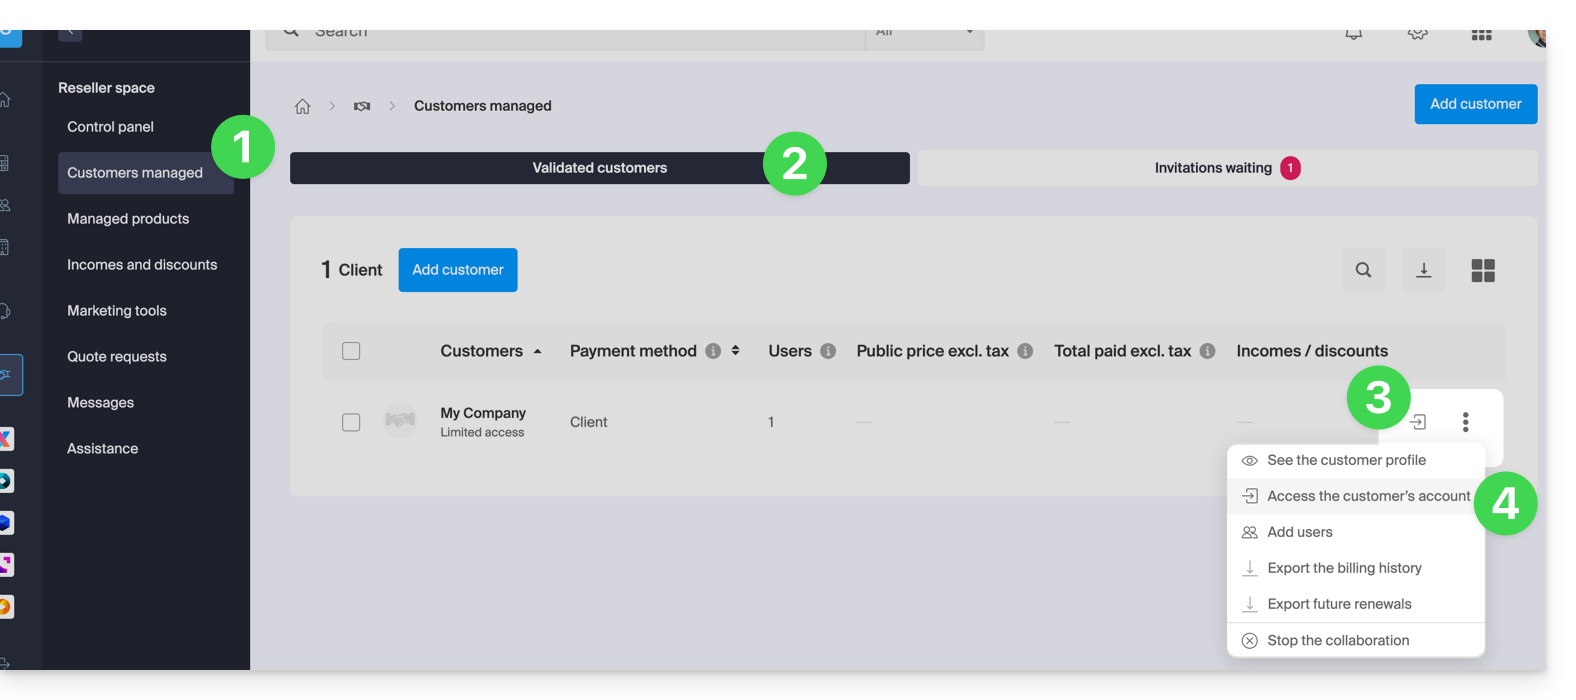
- Clique aqui para aceder aos seus Clientes sob gestão no Espaço de Revenda do Gestor Infomaniak (precisa de ajuda?).
- Clique, se necessário, na aba Clientes validados.
- Clique no ícone à direita do cliente em questão na tabela exibida para acessar o painel de controle dele.
- Clique no menu de ação ⋮ à direita do cliente em questão na tabela exibida para acessar mais opções (como a exportação de dados para um arquivo CSV (formato .csv) por exemplo):
… como colaborador da Organização Parceira
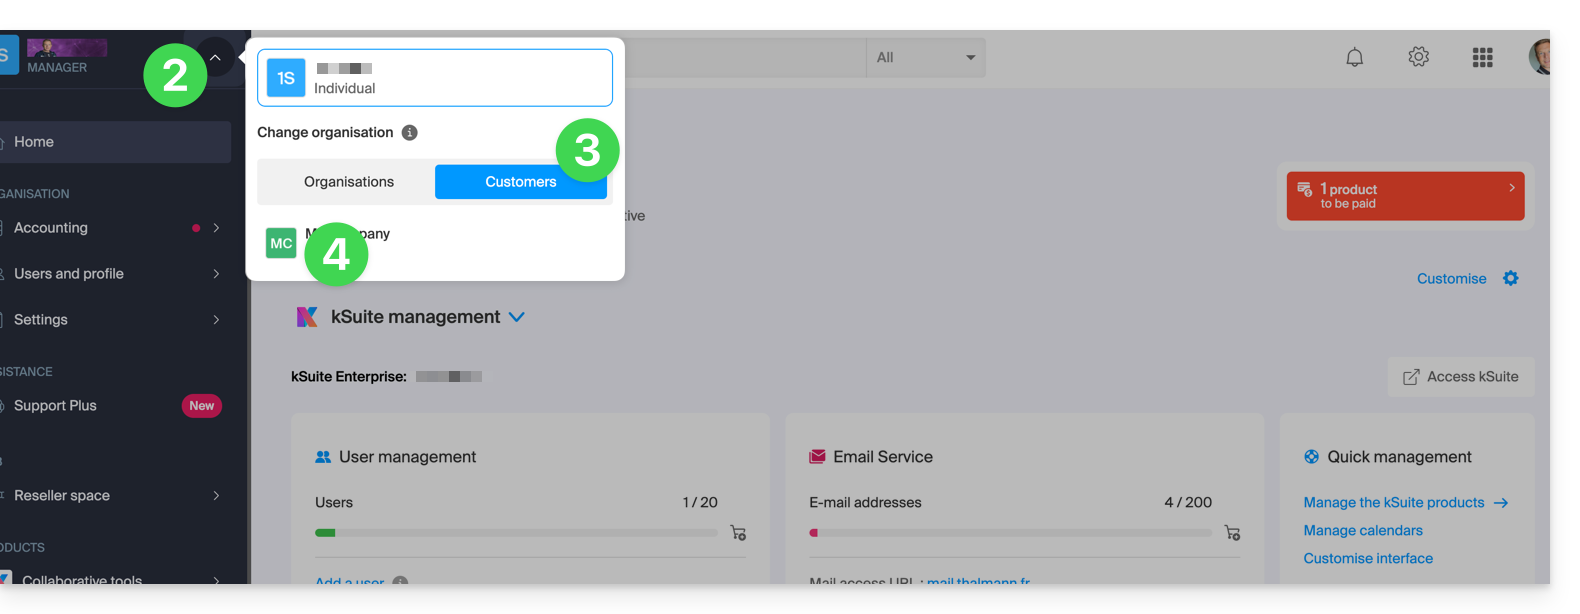
- Clique aqui para acessar o painel de controle Infomaniak.
- Clique na seta para baixo no canto superior esquerdo do seu menu lateral.
- Clique na aba Clientes.
- Clique no cliente desejado no menu que aparece para acessar o painel de controle Infomaniak:
Link para esta FAQ: https://faq.infomaniak.com/2668
Esta seção de perguntas frequentes foi útil?
Este guia explica como conceder acesso a um Parceiro (entre os Parceiros recomendados pela Infomaniak) aos produtos da sua Organização presentes no Manager Infomaniak, ou seja, a interface de administração dos seus produtos.
Introdução
- Se o Parceiro já estiver vinculado à organização do Cliente antes do convite, por exemplo, como usuário externo, seu status será atualizado após o início da parceria.
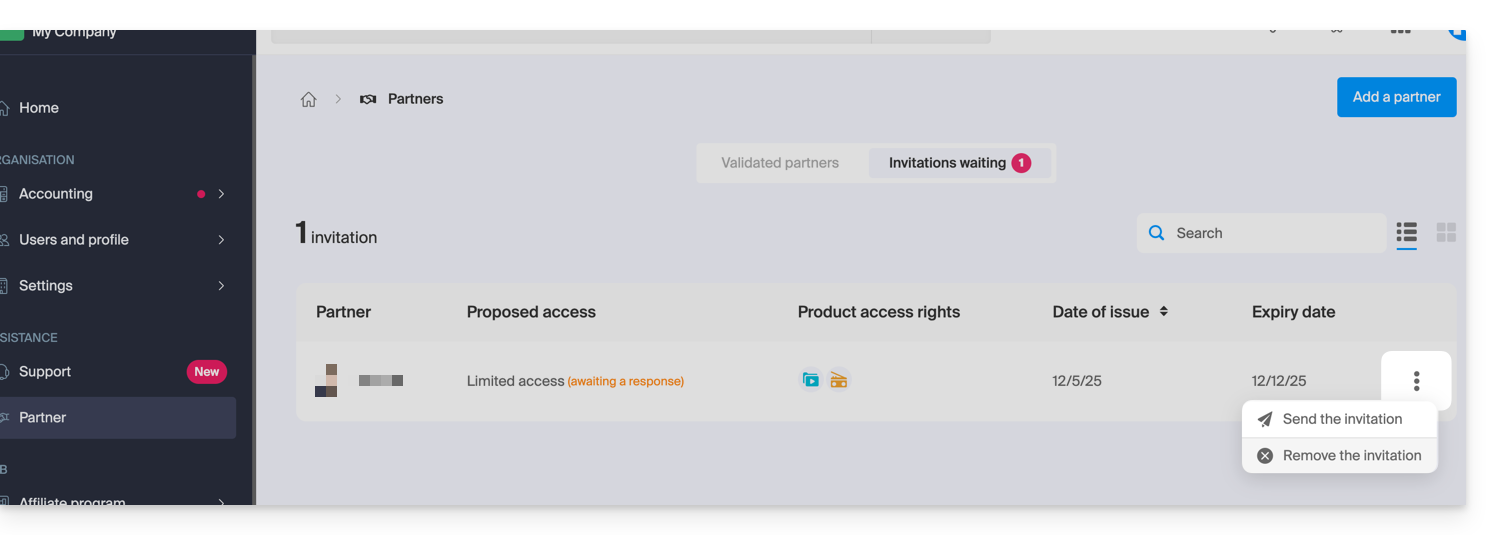
- O convite pendente pode ser reenviado ou excluído antes de ser aceito.clicando em Parceiro no menu lateral esquerdo do Gerenciador de Clientes:
- A qualquer momento, uma parceria pode ser encerrada.
Como Cliente, adicione um Parceiro conhecido
Pré-requisitos
- Ser o responsável legal da organização.
Para autorizar o acesso de um Parceiro a alguns dos seus produtos:
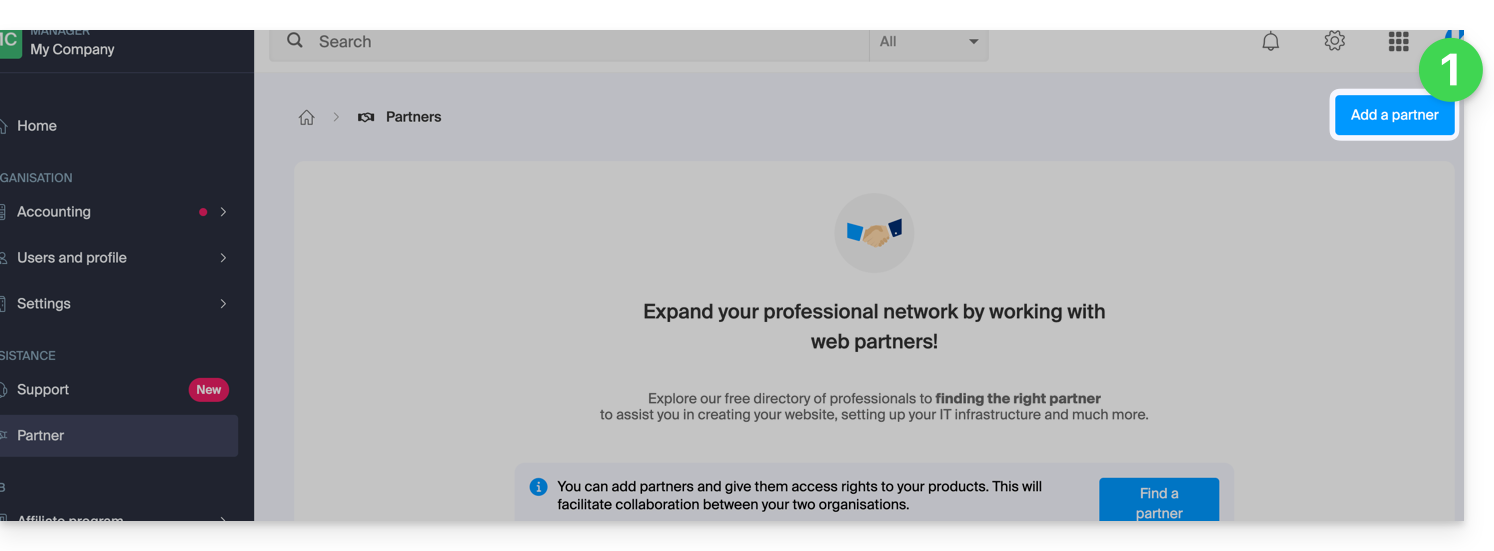
- Clique aqui para acessar a seção de adição de um Parceiro no painel de controle Infomaniak (precisa de ajuda?):
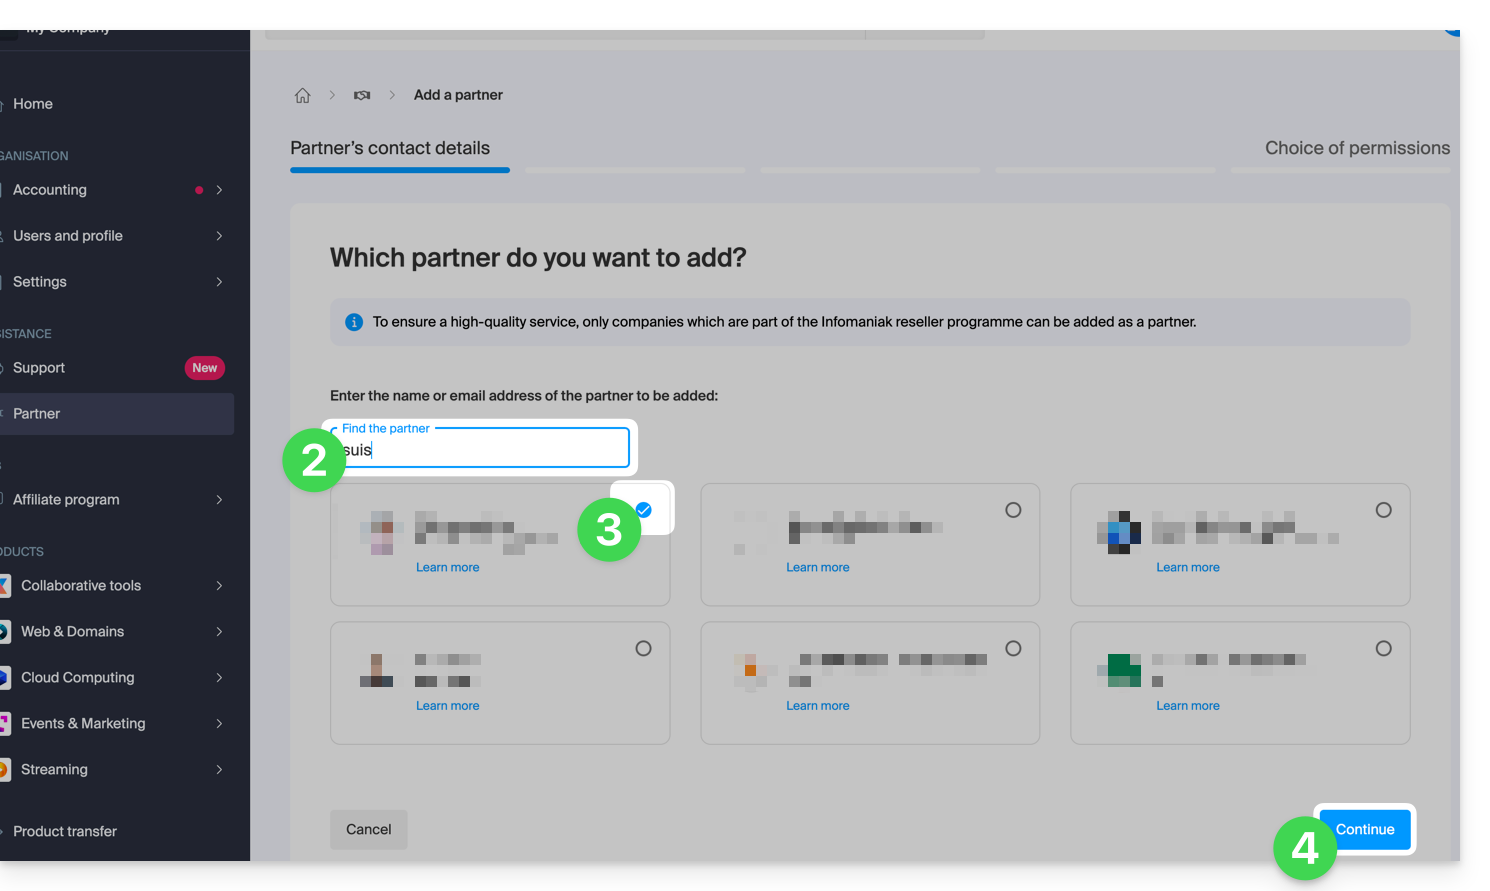
- Insira o nome ou o endereço de e-mail do Parceiro a quem você concederá acesso.
- Marque a caixa para selecionar o Parceiro correspondente nos resultados da pesquisa.
- Clique no botão azul para Continuar:
- O próximo passo apresenta uma escolha importante sobre as permissões concedidas ao Parceiro; as duas opções são detalhadas abaixo…
Conceder ao parceiro acesso...
... limitado
- Clique no botão à esquerda para escolher conceder ao Parceiro um acesso limitado:
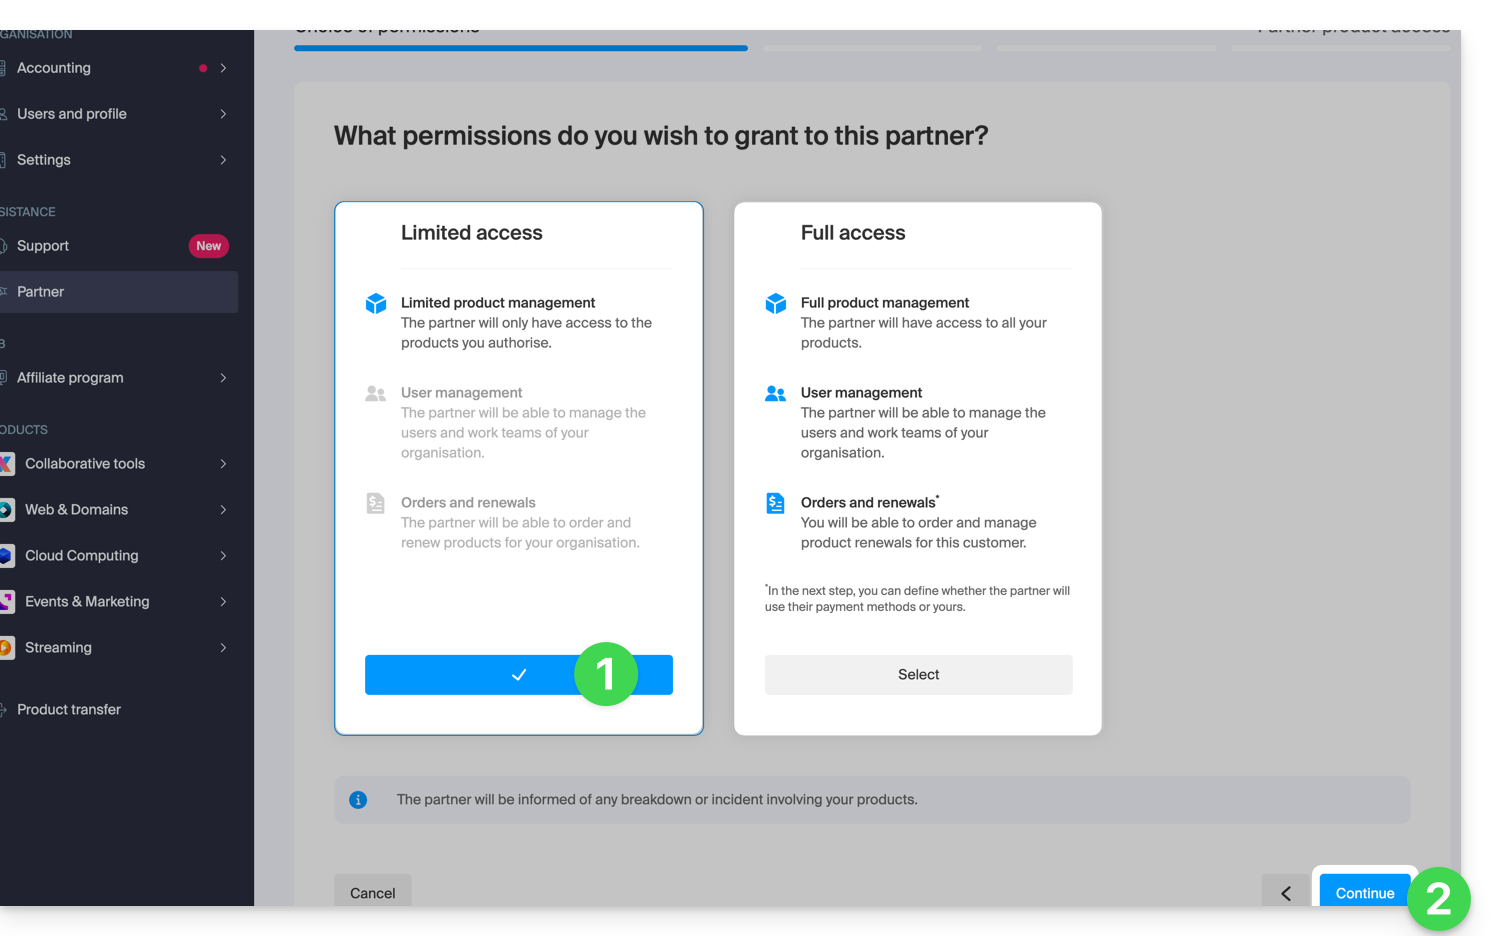
- Clique no botão para Continuar.
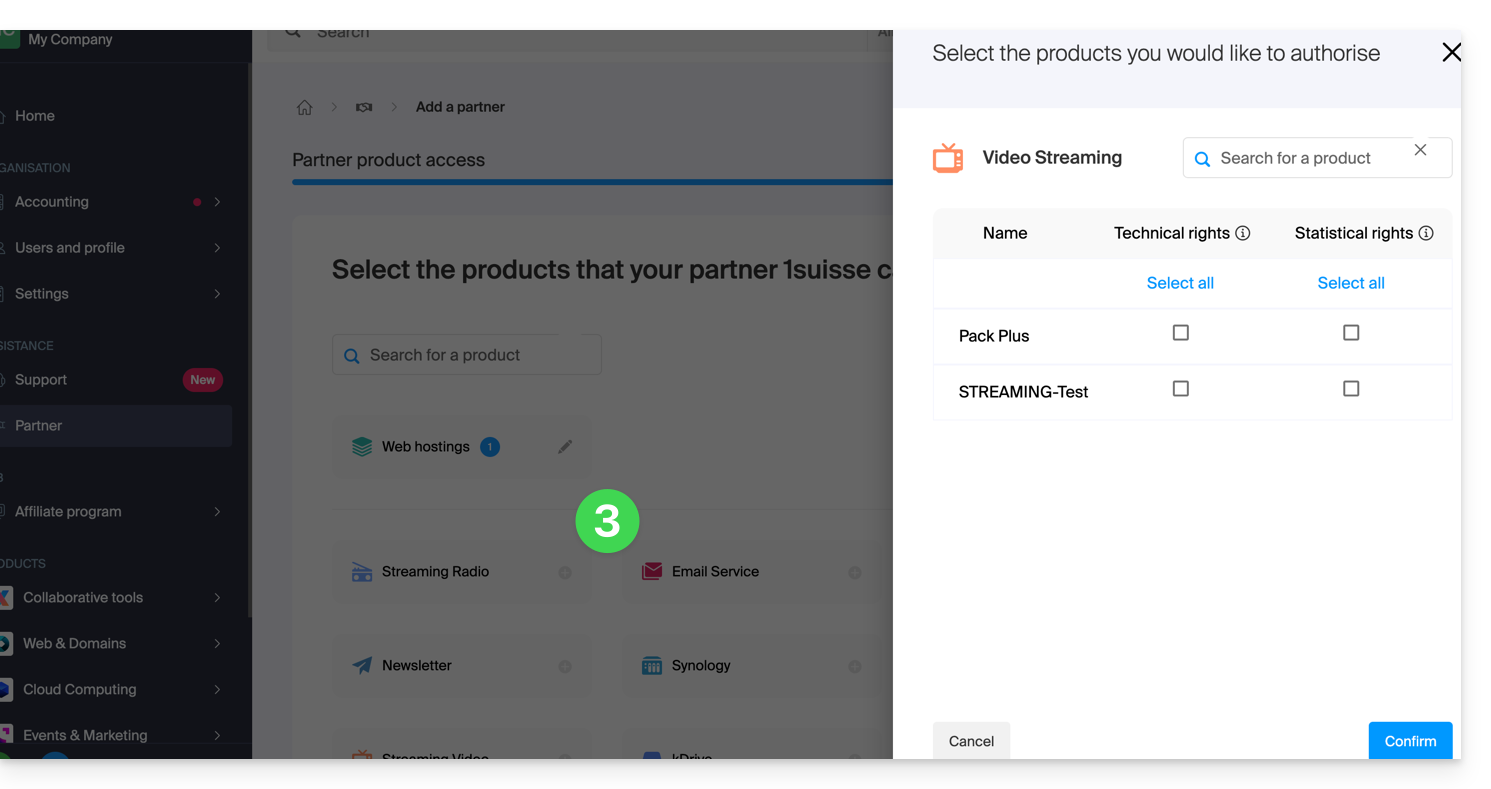
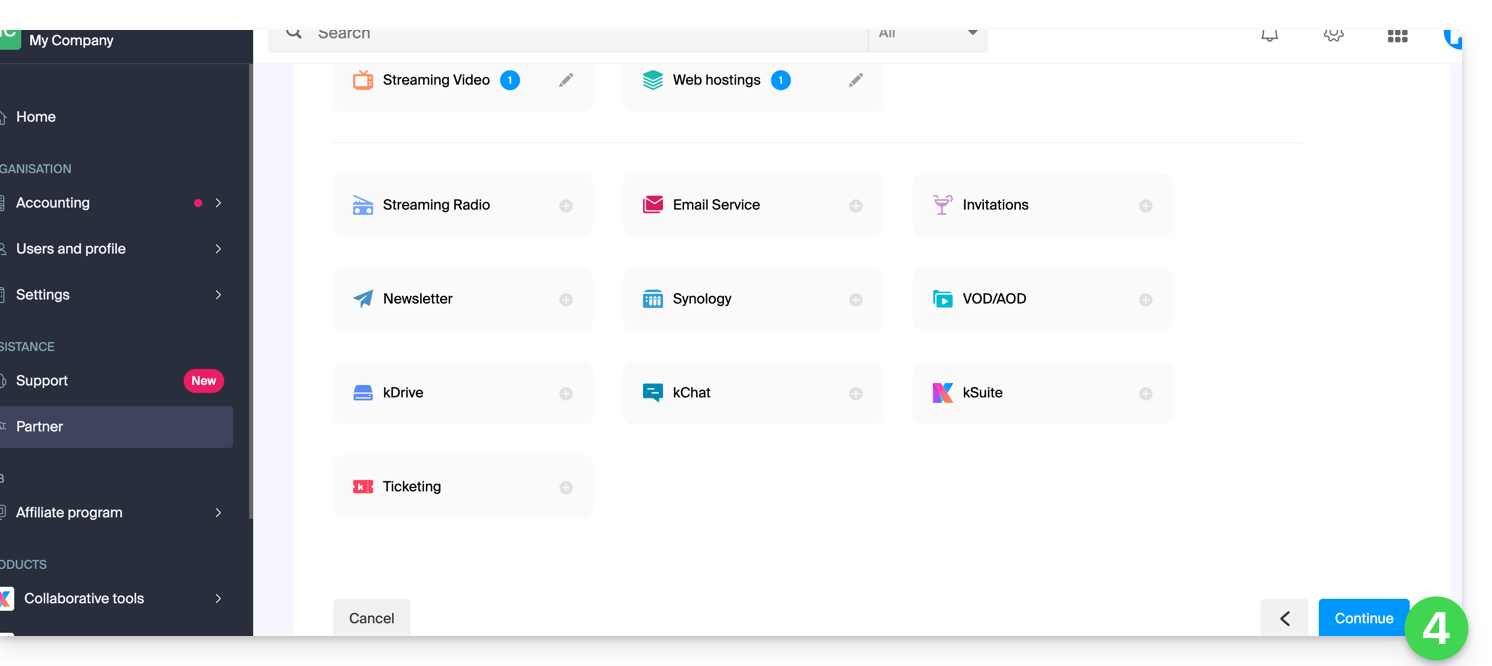
- Clique na categoria de produto correspondente e, no painel que se abre, clique no produto desejado; repita o processo para todos os produtos aos quais deseja conceder acesso:
- Clique no botão azul no canto inferior direito para Continuar:
- Um e-mail é enviado automaticamente ao Parceiro convidado, contendo um link que permite a ele aceitar (ou recusar) a proposta de gestão:
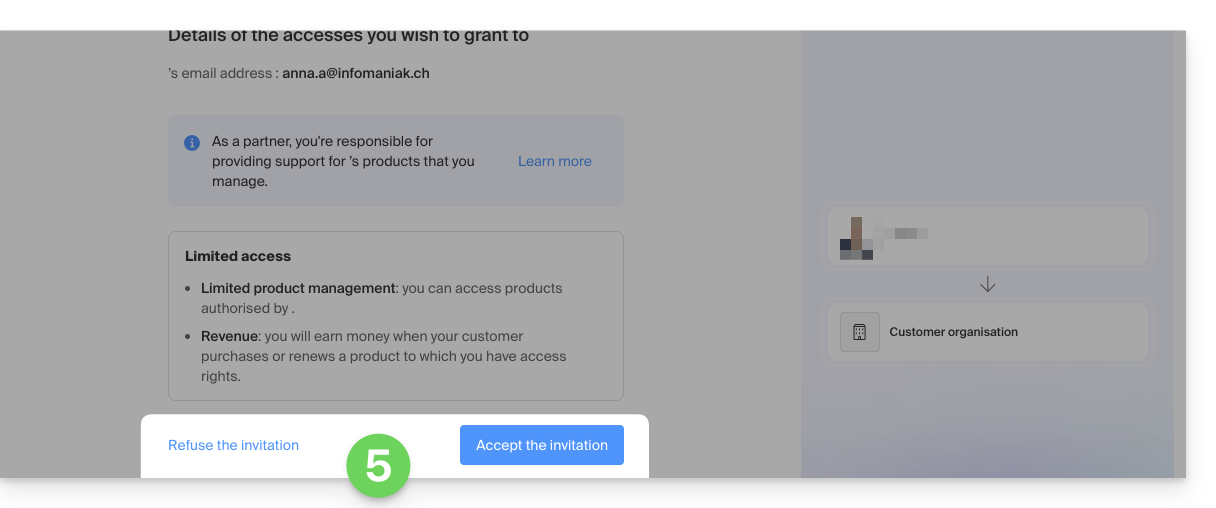
- Após a aceitação da proposta, o painel do Parceiro dá acesso à Organização do Cliente e aos produtos aos quais lhe foi concedido o direito de acesso.
... completo
- Clique no botão da direita para escolher conceder ao Parceiro um acesso completo.
- Clique no botão azul no canto inferior direito para Continuar:
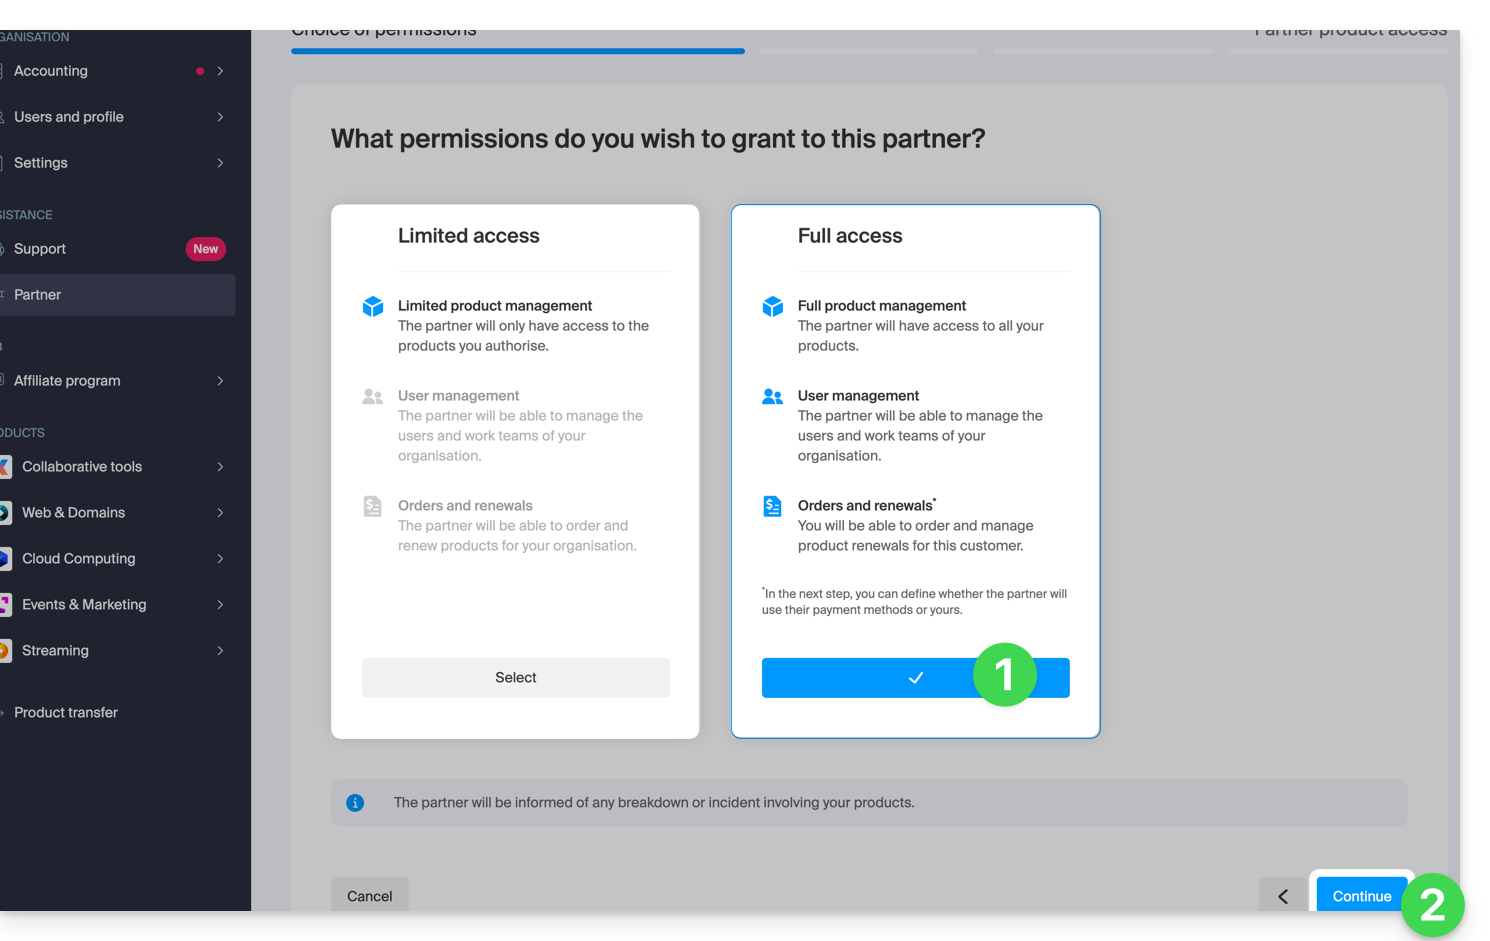
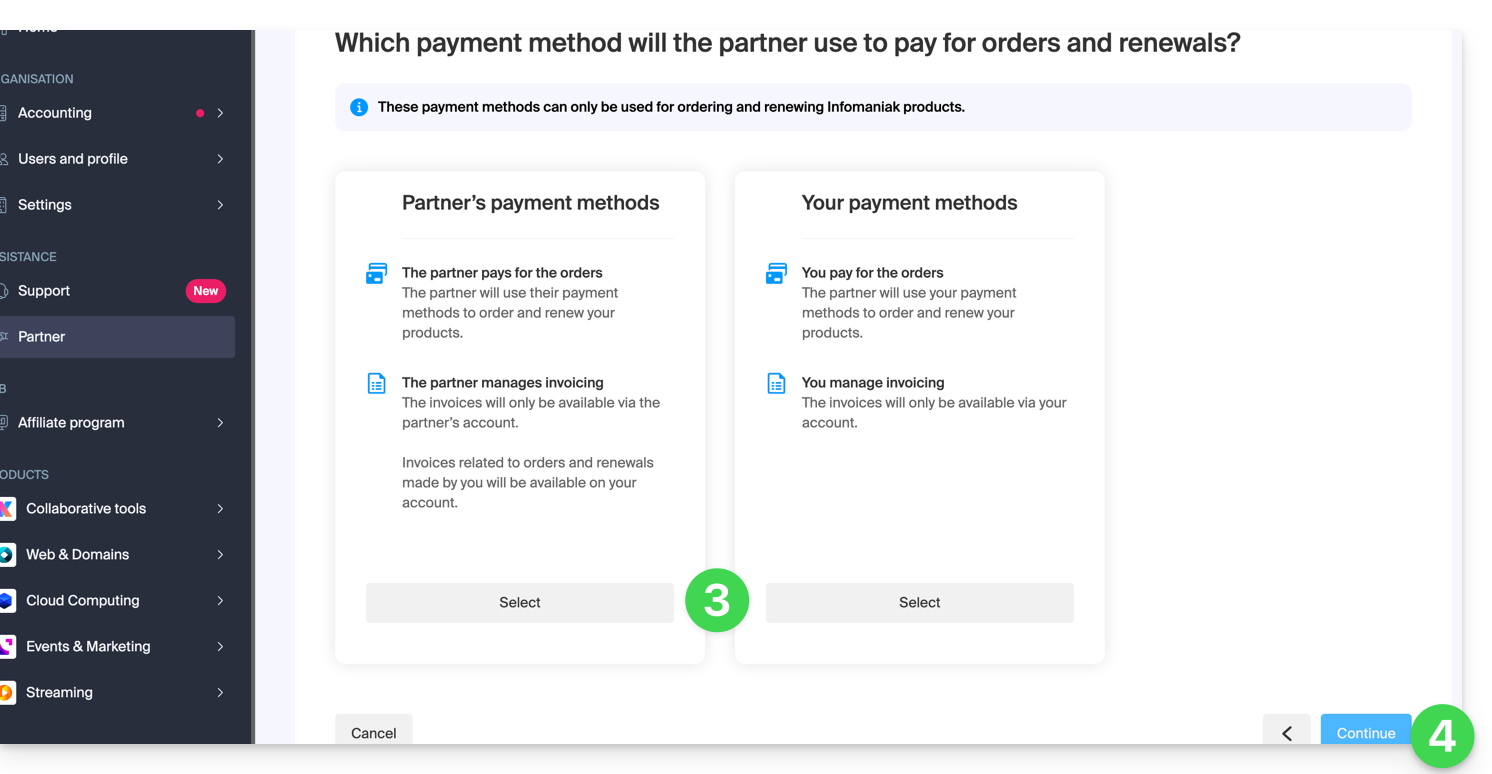
- O cliente deve escolher se deseja confiar também sua carteira ao parceiro.
- Clique no botão azul no canto inferior direito para Continuar:
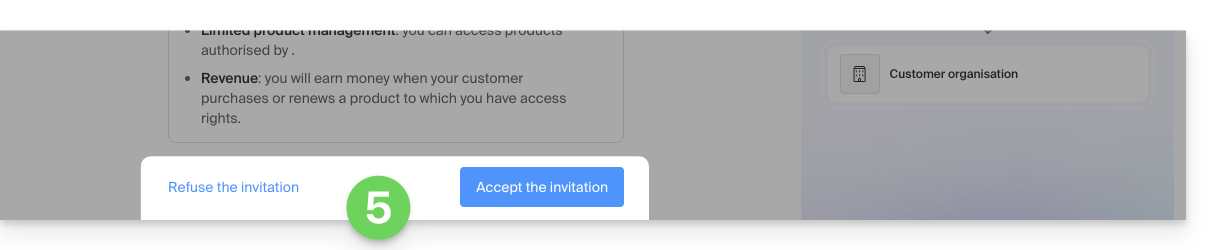
- Um e-mail é enviado automaticamente ao Parceiro convidado, contendo um link que permite a ele aceitar (ou recusar) a proposta de gestão:
- Após a aceitação da proposta, o painel do Parceiro oferece acesso a toda a organização do Cliente.
Link para esta FAQ: https://faq.infomaniak.com/2669
Esta seção de perguntas frequentes foi útil?
Este guia explica quais são as diferenças entre os dois tipos de autorização de acesso possíveis quando o Parceiro deseja iniciar uma parceria, escolhendo o Cliente que ficará sob sua gestão.
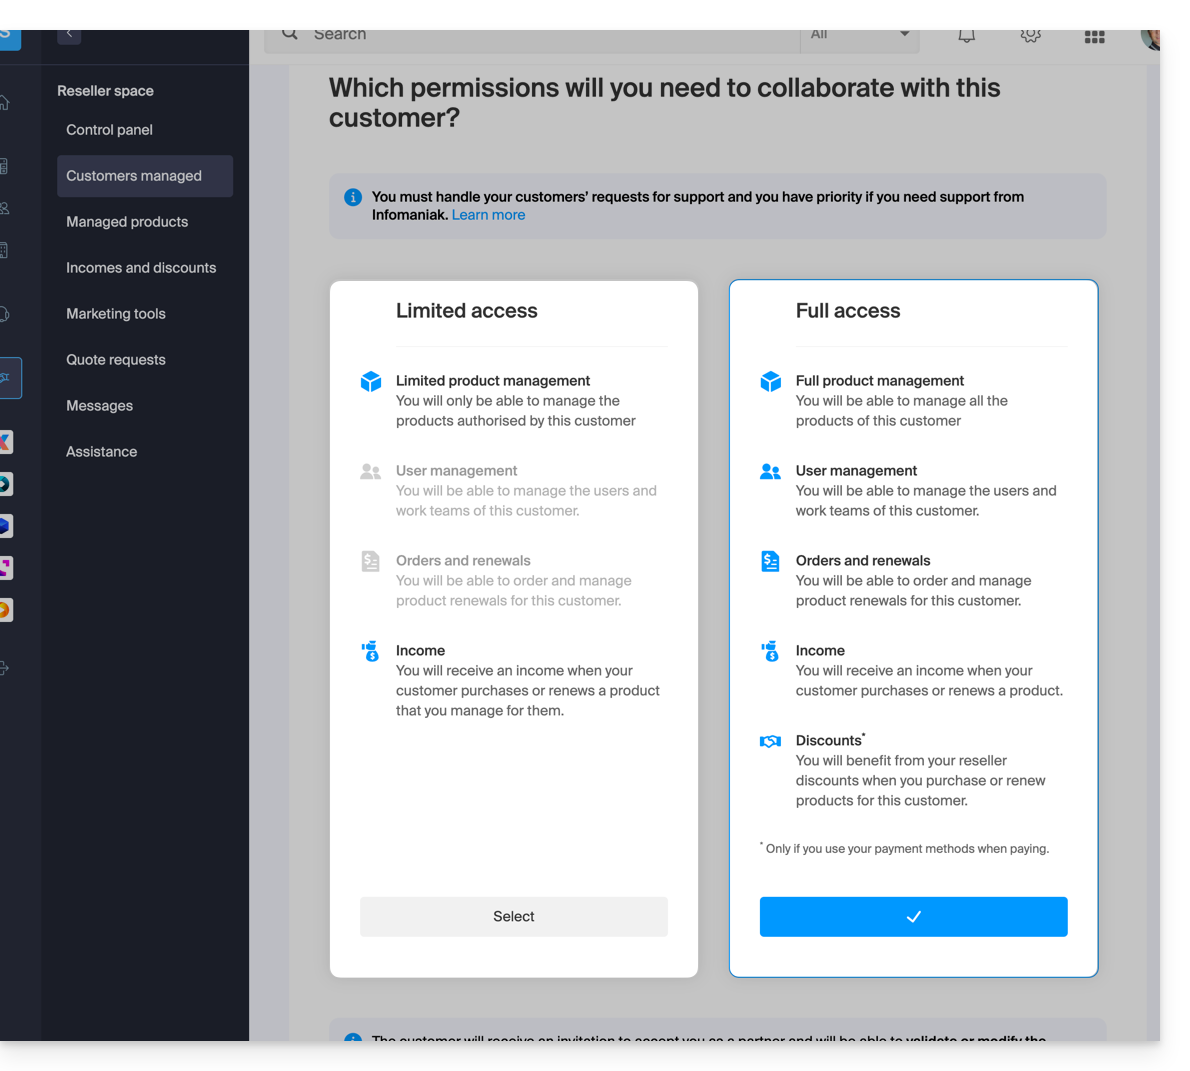
Acesso limitado
Ao fazer esta escolha:
- o Cliente
- concede ao seu Parceiro o acesso especificamente a determinados produtos
- pode ter vários Parceiros com acesso limitado na sua Organização, desde que gerem produtos diferentes
- o Parceiro
- gerencia apenas os produtos que o Cliente atribuiu para sua gestão (Gestão limitada de produtos)
- pode gerenciar os usuários e os Grupos do Cliente (Gestão de usuários)
- não pode encomendar e renovar produtos para seu Cliente (Encomendas e renovações)
- recebe uma receita quando o Cliente efetua compras ou renova produtos para os quais o Parceiro tem a gestão (Receita)
Acesso completo
Ao fazer esta escolha:
- o Cliente
- concede ao seu Parceiro acesso a todos os seus produtos (Gestão completa dos produtos)
- só pode ter um único Parceiro com acesso completo na sua Organização
- o Parceiro
- pode gerir os utilizadores e os Grupos do Cliente (Gestão de utilizadores)
- pode encomendar e renovar produtos para o seu Cliente (Encomendas e renovações)
- recebe uma remuneração por cada encomenda ou renovação de produto (Remuneração)
- beneficia de descontos de revendedor ao comprar ou renovar produtos para o seu Cliente, apenas se utilizar os seus próprios métodos de pagamento (Descontos)
- o Cliente e o Parceiro podem definir quais serão os métodos de pagamento utilizados para as encomendas e renovações (Métodos de pagamento)
O tipo de autorização concedida ao Parceiro pode ser alterado a qualquer momento, e apenas pelo Cliente.
Link para esta FAQ: https://faq.infomaniak.com/2670
Esta seção de perguntas frequentes foi útil?
Link para esta FAQ: https://faq.infomaniak.com/2671
Esta seção de perguntas frequentes foi útil?
Este guia ajuda você a entender os conceitos de comissão e cashback (rendimento) recorrente no âmbito do Programa de Parceiros da Infomaniak.
Pré-requisitos
- Compreender as diferenças entre os 2 tipos de permissões que vinculam um Cliente ao Parceiro, podendo ser definidas a partir do painel de controlo.
- Compreender as diferenças entre os 2 tipos de métodos de pagamento que vinculam um Cliente ao Parceiro, podendo ser definidos a partir do painel de controlo.
Reembolso
Trata-se de um valor correspondente à diferença entre o preço de tabela e o preço preferencial do qual o Parceiro beneficia como revendedor da Infomaniak.
Este valor é creditado como cashback na conta pré-paga do Parceironos seguintes casos:
Parceria com acesso total (meios de pagamento do Cliente)
- Quando o Cliente faz um pedido ou renova um produto.
- Quando o Parceiro faz um pedido ou renova um produto em nome do seu cliente, utilizando os meios de pagamento do mesmo.
Parceria com acesso total (métodos de pagamento do Parceiro)
- Quando o Cliente faz um pedido ou renova um produto.
Parceria com acesso limitado
- O Cliente faz um pedido ou renova um produto que está sob a gestão do Parceiro.
Desconto
Um Parceiro beneficia de descontos em pedidos e renovações devido ao seu estatuto de revendedor Infomaniak. O desconto aplica-se no seguinte caso:
Parceria com acesso total (métodos de pagamento do Parceiro)
- Quando o Parceiro faz um pedido ou renova um produto em nome do seu cliente, utilizando os seus próprios métodos de pagamento.
Acumulação
O desconto é cumulativo com a tarifa progressiva dos serviços de hospedagem Web/Mail.
Com 35 serviços de hospedagem web, você paga, por exemplo, apenas CHF 208,32 por mês por serviço, em vez de CHF 347,20, o que representa um desconto total de -40%.
Detalhe do cálculo em CHF (sem impostos):
- preço normal para 35 hospedagens web: CHF 347,20
- com desconto de parceiro de 20%: CHF 277,76
- preço final para parceiros com desconto progressivo de 25%: CHF 208,32
Detalhe do cálculo em euros (sem IVA):
- preço normal para 35 hospedagens web: 201,25 €
- com desconto de parceiro de 20%: 161 €
- preço para parceiros final com desconto progressivo de 25%: 120,75 €
O desconto progressivo (- 25%) é aplicado, portanto, ao valor restante após a aplicação do desconto para parceiros (- 20%).
Link para esta FAQ: https://faq.infomaniak.com/2672
Esta seção de perguntas frequentes foi útil?
Este guia explica como encerrar uma parceria entre um Cliente e um Parceiro no âmbito do Programa de Parceiros da Infomaniak.
Encerrar a parceria…
... como Cliente
Para isso:
- Clique aqui para acessar o gerenciamento de suas parcerias no Gerenciador Infomaniak (precisa de ajuda?).
- Clique no menu de ação ⋮ à direita do Parceiro em questão na tabela que é exibida.
- Clique em Interromper a colaboração:
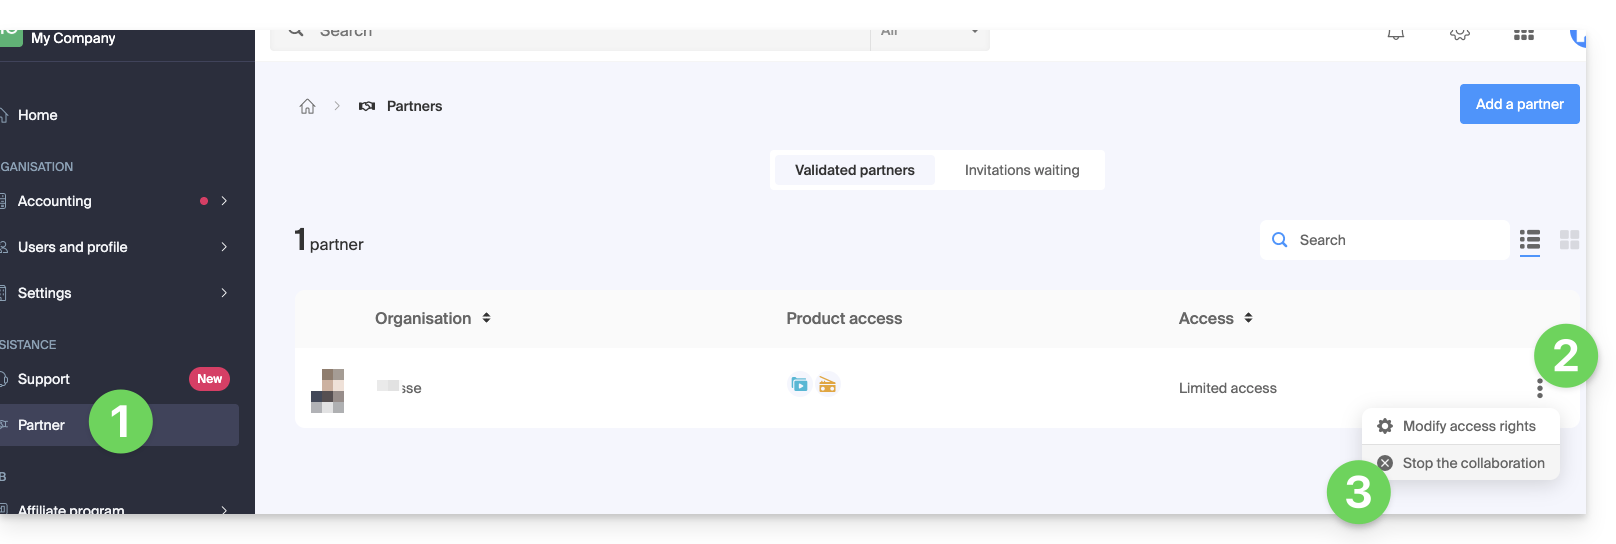
- Confirme, pela primeira vez, a remoção do Parceiro.
- Confirme definitivamente inserindo a senha da sua conta Infomaniak.
- A parceria foi cancelada com sucesso.
... como Parceiro
Para isso:
- Clique aqui para aceder aos seus Clientes geridos no Espaço de Revenda do Manager Infomaniak (precisa de ajuda?).
- Clique no menu de ação ⋮ à direita do Cliente em questão na tabela que é exibida.
- Clique em Interromper a colaboração:
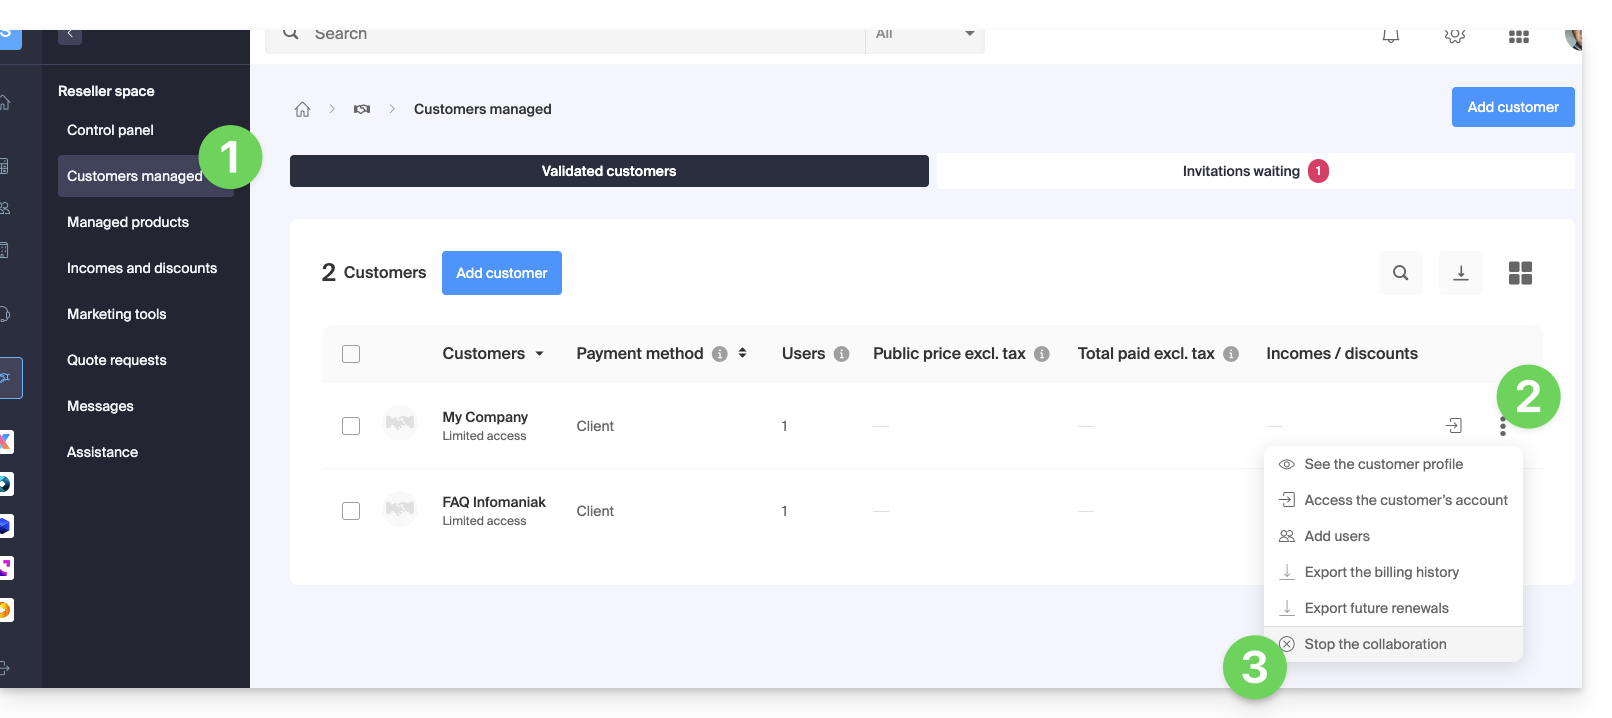
- Confirme, pela primeira vez, a remoção do Cliente.
- Confirme definitivamente ao inserir a senha da sua conta Infomaniak.
- A parceria foi cancelada com sucesso.
Link para esta FAQ: https://faq.infomaniak.com/2673
Esta seção de perguntas frequentes foi útil?
Link para esta FAQ: https://faq.infomaniak.com/2679
Esta seção de perguntas frequentes foi útil?
Este guia ajuda a resolver os problemas de conexão nos aplicativos móveis Infomaniak (kDrive, Euria, SwissTransfer, Mail) quando a mensagem de segurança "o seu dispositivo não é reconhecido como seguro" aparece no Android.
Dificuldades de conexão: "O seu dispositivo não é reconhecido como seguro"
Este bloqueio está relacionado com os protocolos de segurança do Google (API de Integridade do Google Play). A Infomaniak utiliza estes padrões para garantir que os dados não são consultados num dispositivo cuja segurança possa estar comprometida.
Isto geralmente ocorre nos seguintes casos:
- Utilização de um sistema operativo não oficial (ROM personalizada / LineageOS).
- Dispositivo com acesso root ou bootloader desbloqueado.
- Versão do Android muito antiga ou não certificada pelo Google.
- Alguns modelos de smartphones (ex: Huawei sem os serviços Google oficiais).
Solução alternativa imediata
Se o seu dispositivo estiver funcionando corretamente, mas a mensagem persistir, pode contornar o bloqueio forçando uma nova autenticação manual:
- Na tela de login do aplicativo, clique no ícone seta/chevron para baixo ao lado da sua conta ou do seu avatar.
- Selecione a opção "Entrar com outra conta" (mesmo que seja a mesma conta).
- Insira manualmente as suas credenciais (endereço de e-mail Infomaniak e palavra-passe).
Este método permite ignorar o token de autenticação anterior e validar o acesso através de uma nova sessão segura.
Link para esta FAQ: https://faq.infomaniak.com/2685
Esta seção de perguntas frequentes foi útil?
Este guia explica como recuperar o acesso aos serviços Infomaniak (manager.infomaniak.com e ksuite.infomaniak.com/mail, por exemplo) em caso de problemas com o aplicativo móvel Infomaniak Authenticator (aplicativo iOS/Android), caso tenha escolhido este método de segurança ao ativar a autenticação de dois fatores.
Antes de trocar de dispositivo móvel
Se pretende trocar de dispositivo iOS/Android no qual a aplicação Infomaniak Authenticator está instalada, antes disso:
- Inicie sessão uma última vez com a autenticação de dois fatores no painel de controlo Infomaniak.
- Desative a segurança temporariamente (ou altere o método de verificação para obter um código por SMS, por exemplo).
- Em seguida, no novo dispositivo, instale e abra o aplicativo móvel Infomaniak Authenticator para reautenticar com a autenticação de dois fatores através do Infomaniak Authenticator !
Após uma alteração de dispositivo móvel
Se já for tarde demais e você não tiver seguido o método acima, verifique no aplicativo móvel Infomaniak Authenticator se sua conta ainda está presente; pode ser que você simplesmente não esteja mais recebendo a notificação de solicitação de autorização de login SIM/NÃO.
Se a sua conta estiver visível na aplicação Infomaniak Authenticator, então, quando esta estiver aberta, deverá aparecer uma solicitação de confirmação de login, caso tente iniciar sessão a partir do navegador ou de um serviço Infomaniak.
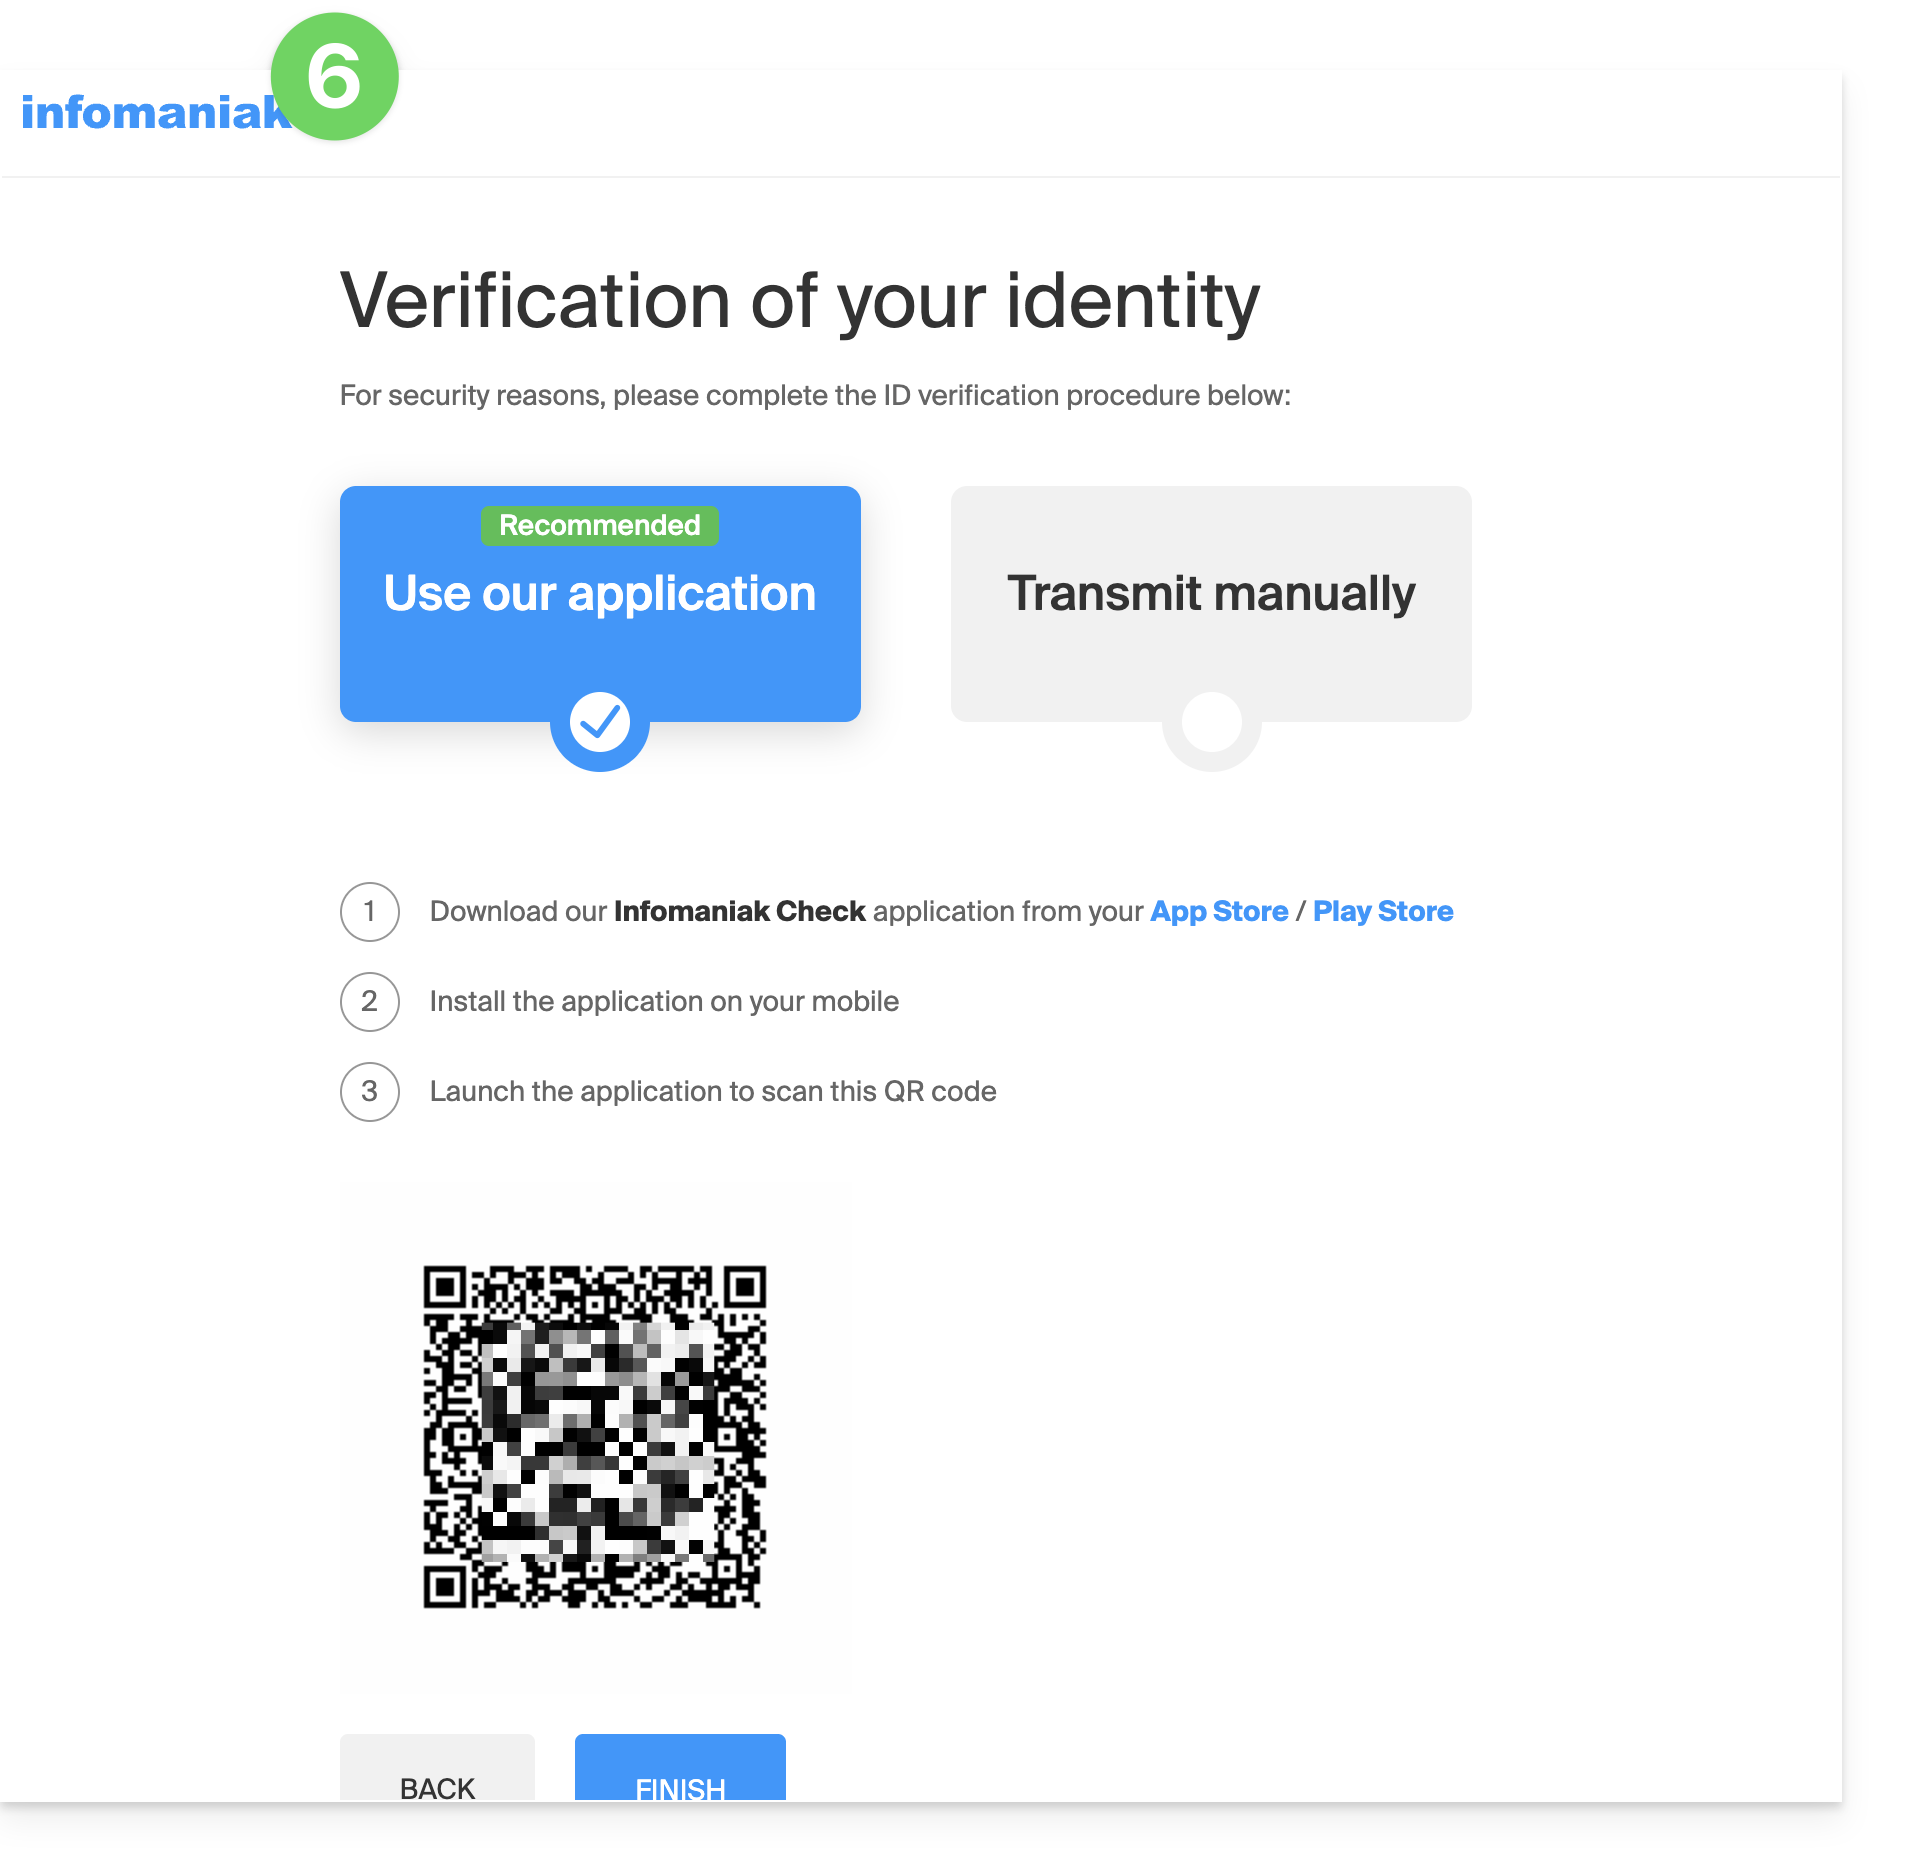
Se já for tarde demais, e nenhuma conta é exibida no aplicativo móvel Infomaniak Authenticatore você não tem mais acesso ao dispositivo que recebe o SMS de verificação ou a qualquer outra possibilidade de autenticação entre as configuradas, não é necessário ligar para a Infomaniak; nesse caso, não há outra opção, você deverá fornecer um certo número de elementos de segurança manualmente ou através do aplicativo Infomaniak Check (kCheck) para obter novamente o acesso à sua conta:
- Clique aqui para acessar a página de login do Gerenciador Infomaniak.
- Insira o nome de usuário e a senha corretos:
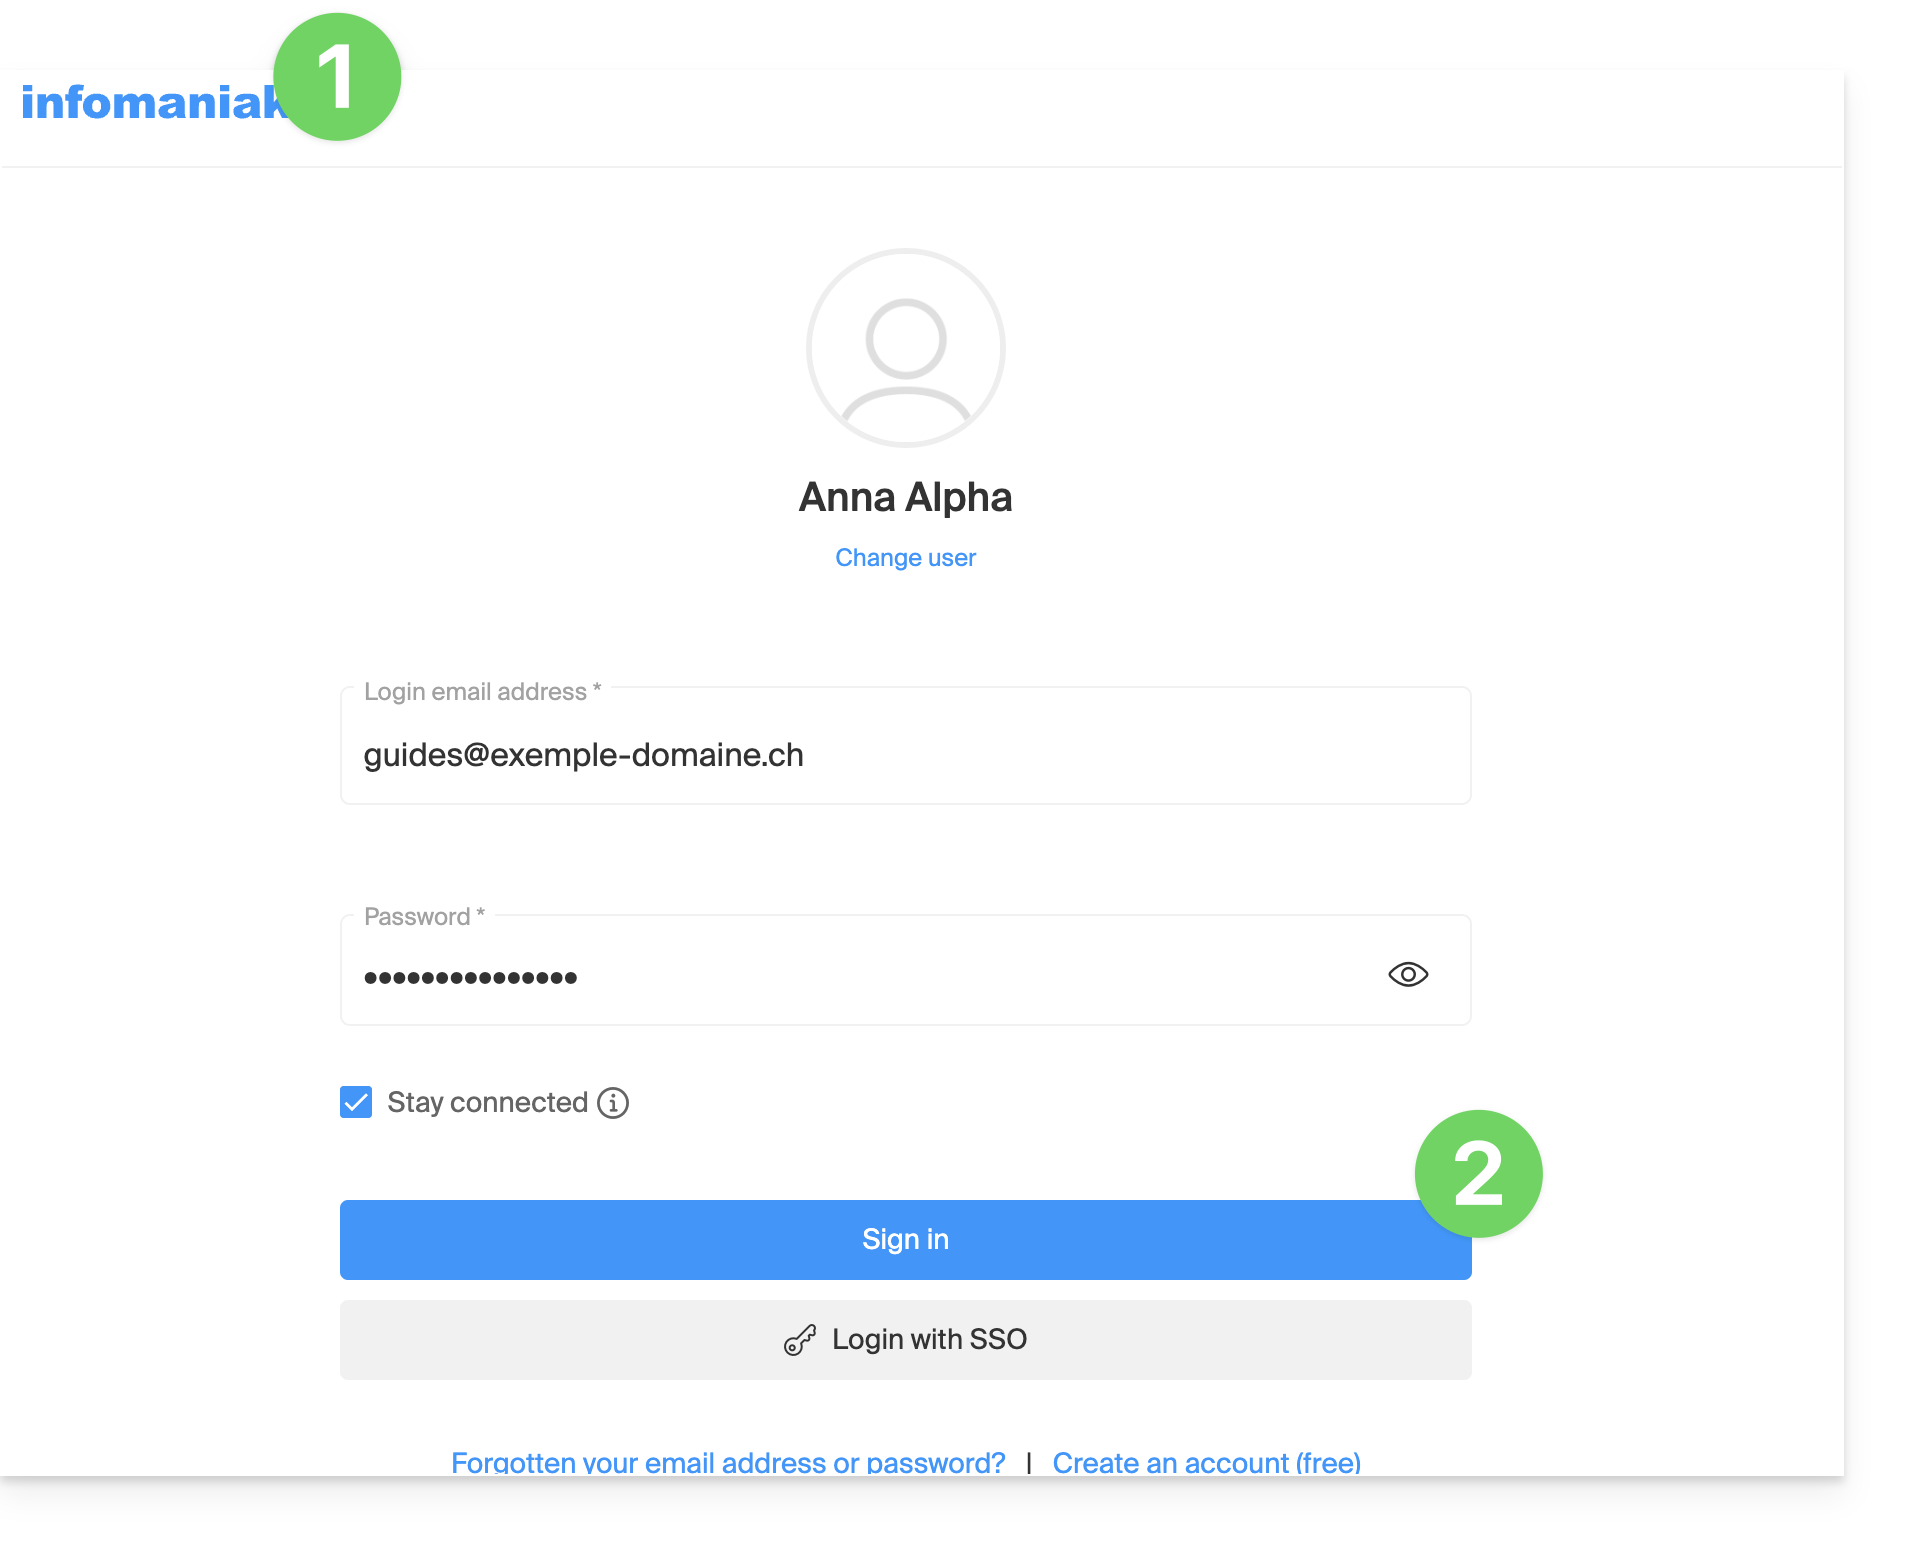
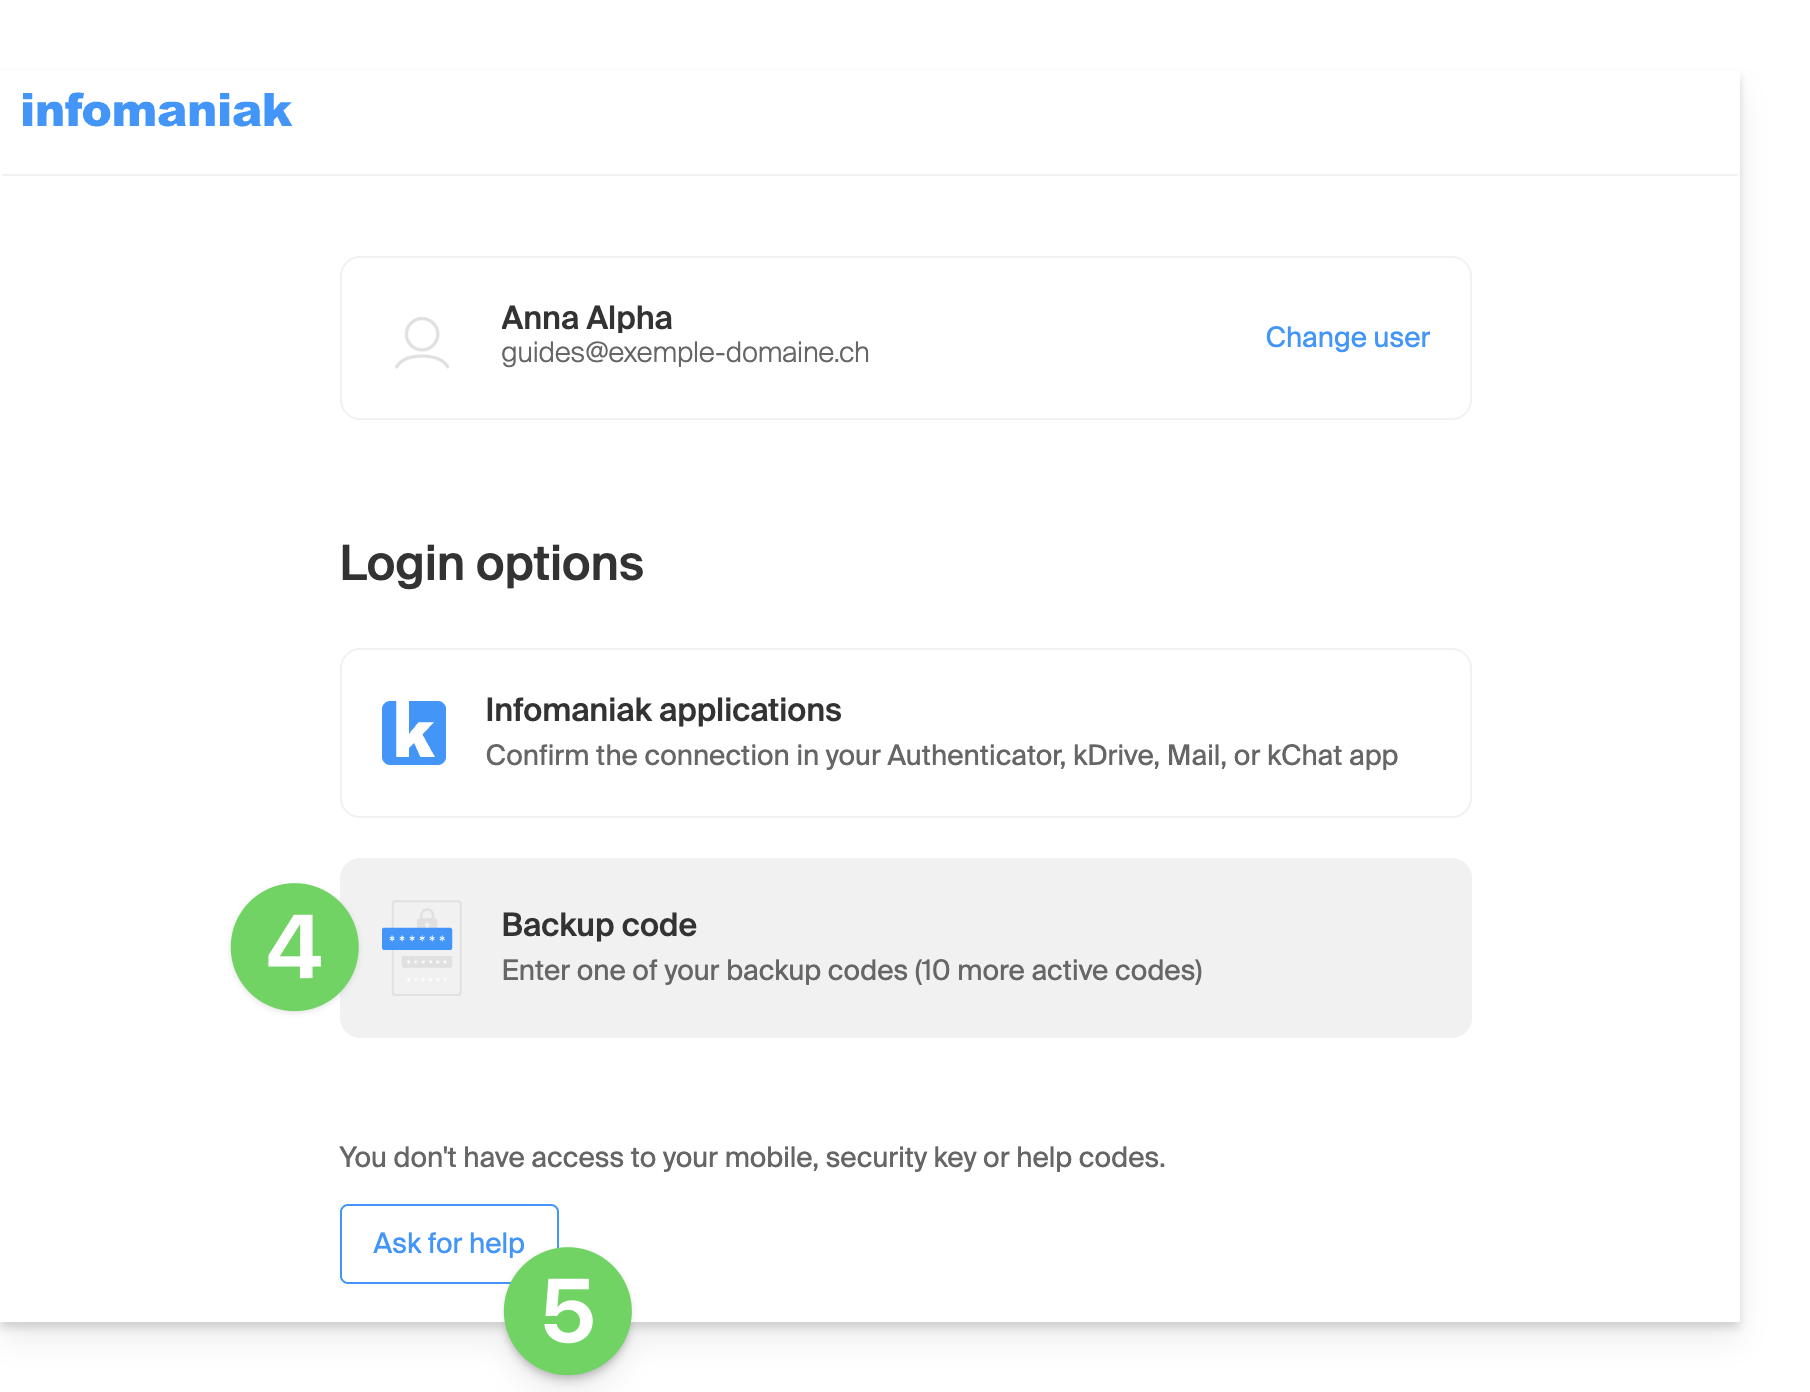
- Ao solicitar a autenticação adicional, clique em métodos alternativos:
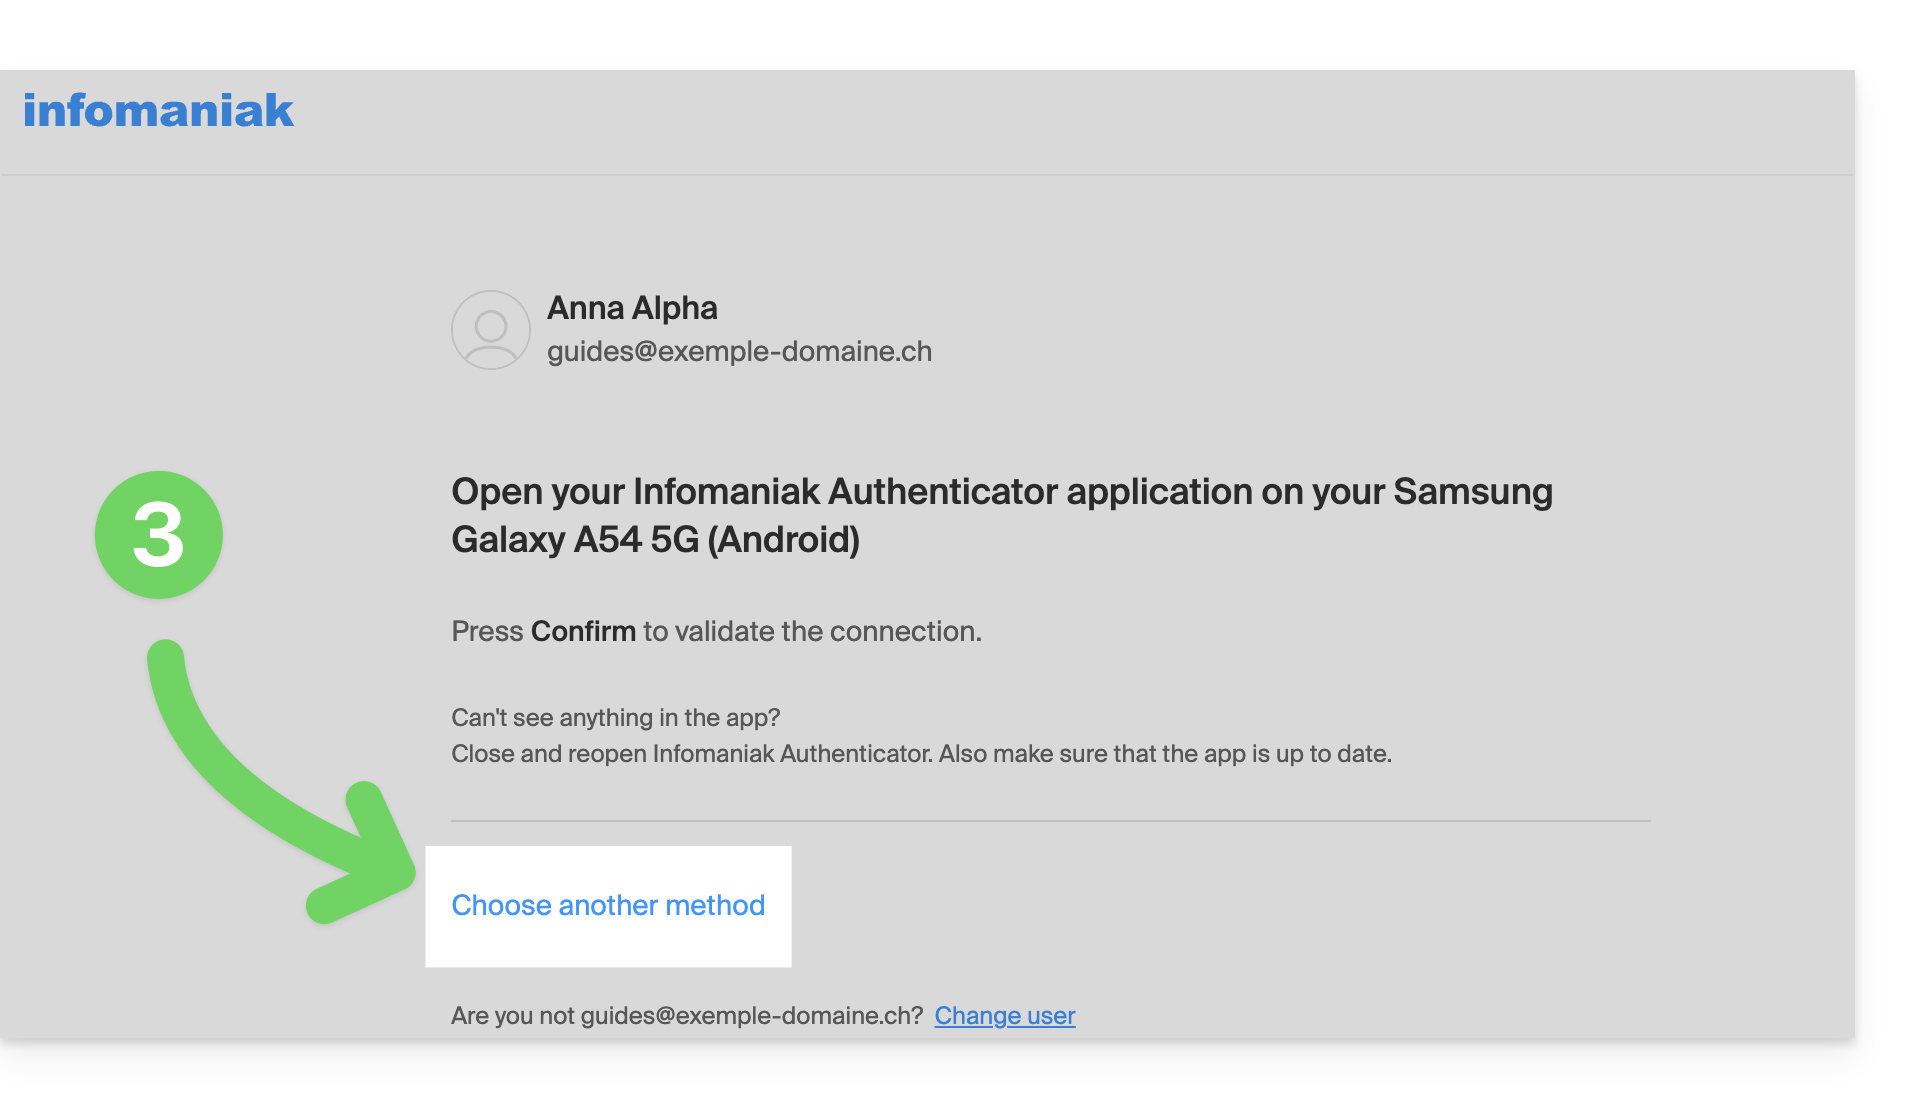
- Escolha inserir um dos seus códigos de recuperação se tiver feito o download da folha ao ativar a autenticação de dois fatores.
- Caso contrário, selecione a última opção do pedido de ajuda para acessar o formulário onde poderá enviar os seus documentos de identificação e uma selfie:
- Siga o procedimento até o fim e aguarde:
Link para esta FAQ: https://faq.infomaniak.com/2762
Esta seção de perguntas frequentes foi útil?