Base de conhecimento
1000 perguntas frequentes, 500 tutoriais e vídeos explicativos. Aqui, você encontra apenas soluções!
Este guia ajuda você a assinar o Suporte Premium da Infomaniak.
Conheça o Suporte Premium
Para gerenciar sua oferta de Suporte Premium:
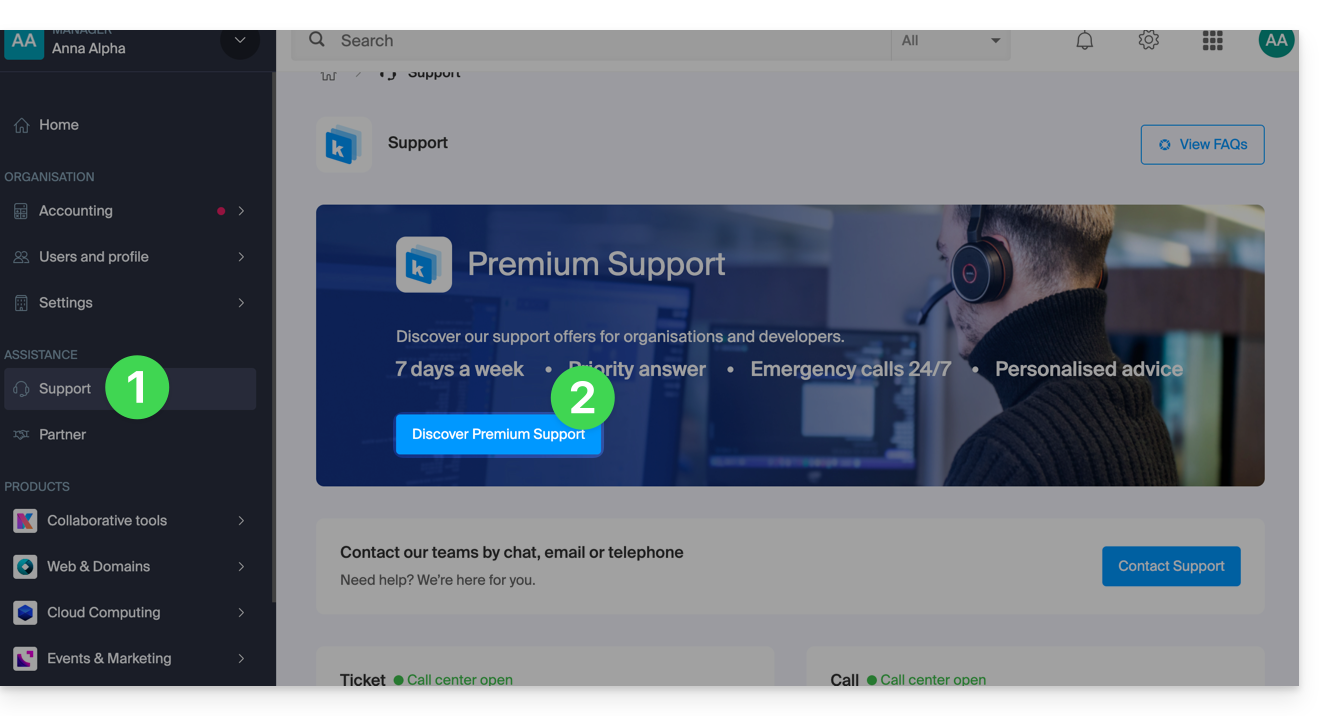
- Clique aqui para acessar o gerenciamento do Suporte da sua Organização no Manager Infomaniak.
- Clique no botão para iniciar o registo:
Link para esta FAQ: https://faq.infomaniak.com/2785
Esta seção de perguntas frequentes foi útil?
Este guia aborda as regulamentações sobre proteção de dados na Suíça e na Europa e as medidas tomadas pela Infomaniak para proteger os dados dos seus clientes e os dados nos serviços de hospedagem web e serviços de e-mail.
Compreendendo a diferença entre segurança e privacidade dos dados
A segurança dos dados visa impedir o acesso não autorizado às suas informações. Ela se baseia em medidas como criptografia, firewalls ou VPNs. Uma falha de segurança pode ter consequências desastrosas: imagine que um hacker roube toda a sua base de dados de clientes e exija um resgate para recuperá-la. Esse tipo de ataque – o ransomware – pode paralisar uma empresa da noite para o dia.
A privacidade dos dados diz respeito a quem pode ter acesso às suas informações e como elas são utilizadas. Mesmo que os seus dados estejam protegidos contra ataques cibernéticos, eles podem ser coletados, analisados e revendidos… de forma totalmente legal.
Exemplo: você armazena cuidadosamente as informações dos seus clientes, mas, sem saber, um serviço que você utiliza compartilha – de forma anônima – esses dados com terceiros. Resultado? Seus concorrentes podem obter análises valiosas sobre o seu mercado e segmentar seus próprios clientes sem nunca precisar de um ataque cibernético.
LPD & RGPD
Na Suíça, a LPD (Lei Federal sobre a Proteção de Dados) e a nLPD (a "nova Lei" em vigor desde setembro de 2023) protegem a privacidade dos residentes, regulamentando a coleta e o tratamento de dados pessoais pelas organizações.
Por sua vez, o RGPD (Regulamento Geral sobre a Proteção de Dados) da UE, em vigor desde maio de 2018, afeta as empresas globais que processam dados de residentes europeus, incluindo na Suíça. Enquanto a LPD se aplica aos dados de residentes suíços, o RGPD diz respeito aos dados de residentes da UE. As empresas suíças que gerem dados europeus devem cumprir os requisitos do RGPD, nomeadamente a designação de um Encarregado de Proteção de Dados e a realização de Análises de Impacto em caso de processamento de risco.
O seu papel enquanto Cliente Infomaniak
No que diz respeito aos dados alojados que lhe pertencem — e, em particular, se estes contiverem dados pessoais dos seus visitantes, contactos ou clientes —, é da sua responsabilidade garantir a sua conformidade.
Ao processar estes dados pessoais, é essencial informar os utilizadores sobre a finalidade e as modalidades deste processamento. Isto é geralmente feito através de uma política de privacidade ou de um acordo de processamento de dados (APD).
Acordo entre o responsável pelo tratamento e o subcontratante
Um APD (Acordo de Processamento de Dados), denominado em alemão AVV (Auftragsverarbeitungsvertrag), em italiano ATD (Accordo di Trattamento dei Dati) e em espanhol CTA (Contrato de Tratamiento de Datos), traduz-se por Acordo de tratamento de dados ou Contrato de subcontratação de dados pessoais.
Trata-se de um contrato obrigatório previsto pelo RGPD entre um responsável pelo tratamento e um subcontratante. Define a finalidade, a duração, a natureza do tratamento, bem como as obrigações e medidas de segurança. O seu objetivo é proteger os dados pessoais confiados a um prestador de serviços.
Este certificado RGPD (em formato PDF) pode ser gerado e descarregado a partir do painel de controlo (acessível aos utilizadores da organização que são proprietários ou administradores):
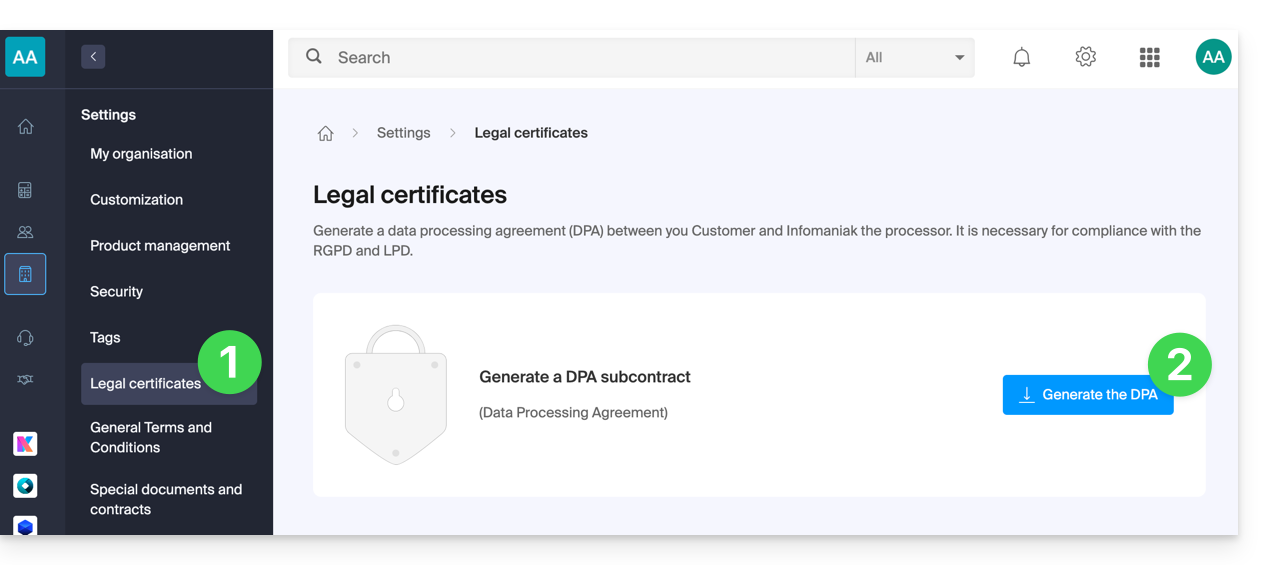
- Clique aqui para aceder à gestão dos Acordos de Tratamento de Dados no painel de controlo Infomaniak (precisa de ajuda?).
- Clique no botão Gerar para descarregar o documento PDF personalizado:
Aqui estão algumas dicas:
- Informe sobre todos os tratamentos de dados, e não apenas sobre aqueles relacionados com o site.
- Garanta que a declaração de privacidade seja facilmente acessível no site, por exemplo, no rodapé de cada página.
- Em geral, não é necessário obter a aprovação do utilizador para as declarações de privacidade (por exemplo, para formulários); basta indicar onde encontrar a declaração (exemplo Site Creator).
- Tenha em mente que as novas regras de informação mais detalhadas podem exigir ajustes nas declarações de privacidade existentes.
É crucial diferenciar entre a segurança das infraestruturas onde os seus dados estão alojados e a gestão e implementação dos dados do seu lado. Como fornecedor de alojamento, a Infomaniak atua como subcontratante para as suas obrigações relacionadas com o RGPD. Neste contexto, as suas políticas de privacidade e de utilização de cookies, bem como os seus termos e condições, oferecem-lhe as garantias necessárias quanto à sua conformidade como subcontratante.
Se necessário, pode encontrar profissionais ou guias online para o ajudar no processo de conformidade.
O papel da Infomaniak
Tal como as empresas que trabalham com dados de utilizadores, a Infomaniak deve cumprir a LPD e, como entre esses utilizadores existem cidadãos europeus, também o RGPD:
- a política de privacidade de dados detalha os dados que a Infomaniak guarda para fornecer e executar os seus serviços
- a política relacionada com a proteção dos seus dados pessoais descreve os compromissos da Infomaniak na sua qualidade de subcontratante que aloja todos os seus dados, incluindo dados de caráter pessoal
Estes compromissos, transcritos nas condições gerais e nas condições particulares, são os seguintes:
- armazenar os seus dados nos centros de dados exclusivamente localizados na Suíça e nunca transferir as suas informações para fora destas infraestruturas
- aplicar normas de segurança rigorosas e melhorar constantemente os processos para garantir um elevado nível de segurança em todos os serviços
- informá-lo prontamente em caso de violação dos seus dados
- garantir a transparência em relação a si quando a Infomaniak recorre a subcontratantes que possam tratar os seus dados
- reforçar e desenvolver as medidas de segurança física para impedir qualquer acesso não autorizado às infraestruturas onde os seus dados são armazenados
- implementar sistemas de isolamento físico e/ou lógico (dependendo dos serviços) para separar os alojamentos dos diferentes clientes; além disso, a Infomaniak realiza testes de intrusão anuais para garantir a segurança dos dados entre os clientes
- demonstrar grande capacidade de resposta na atualização segura dos sistemas sob sua responsabilidade
Gerenciar os cookies do site infomaniak.com
Ao visitar a página infomaniak.com, você deverá fazer uma escolha para aceitar determinados cookies. Para alterar essa escolha posteriormente, acesse suas preferências na parte inferior da página do site: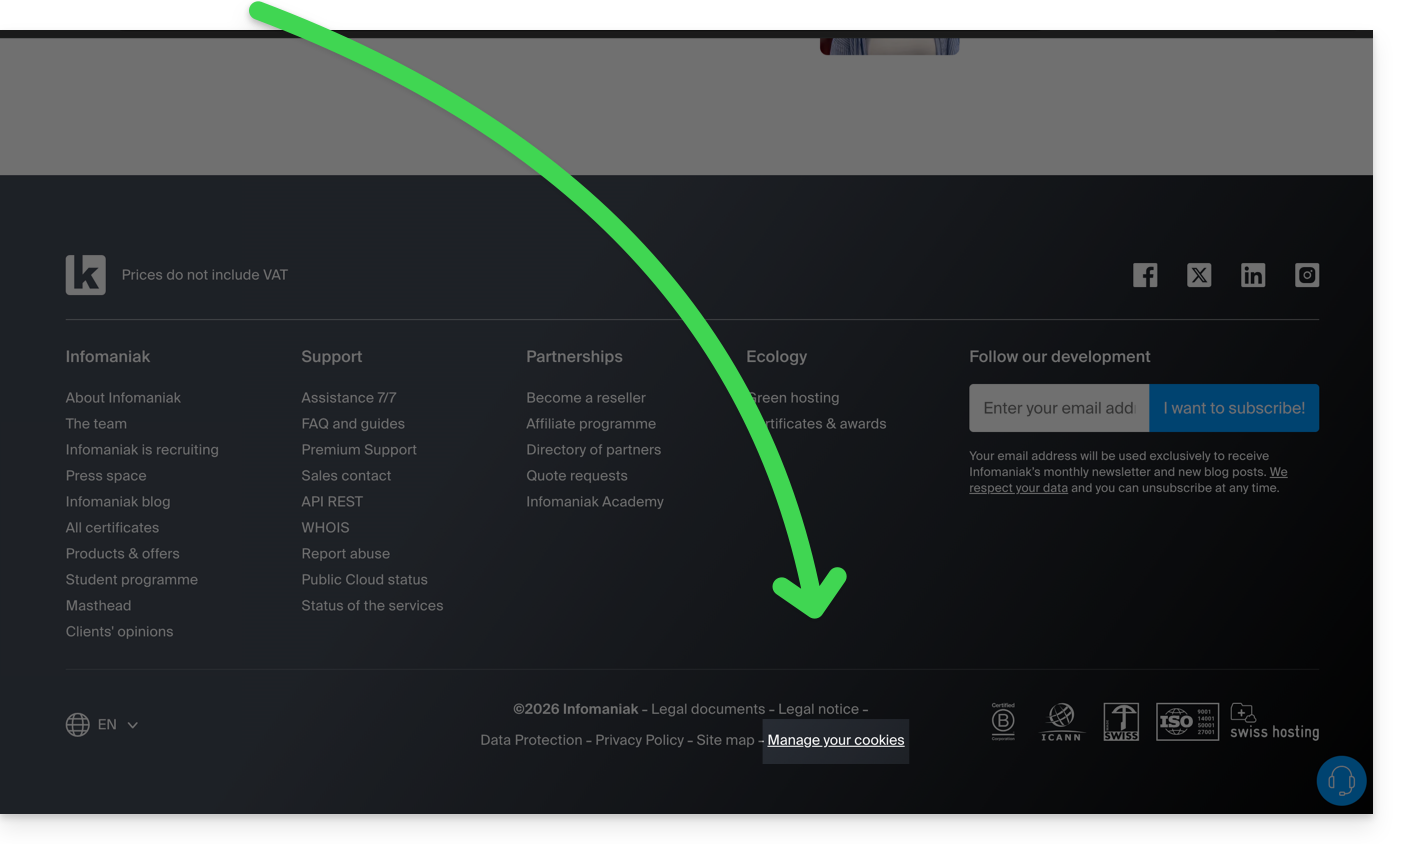
Link para esta FAQ: https://faq.infomaniak.com/2820
Esta seção de perguntas frequentes foi útil?
Este guia explica como adicionar, modificar ou remover utilizadores de uma Organização no Manager Infomaniak.
Introdução
- Desde que abriu a sua conta na Infomaniak, faz parte de pelo menos uma Organização.
- Se estava sozinho e não se tratava de um convite, uma Organização foi criada em seu nome e você se torna automaticamente o responsável legal.
- Caso contrário, você pertence à Organização que o convidou (para participar da kSuite, para gerenciar um produto, etc.).
- Apenas um proprietário/responsável legal pode efetuar modificações.
- Um eventual colaborador que também tenha acesso à sua Organização não terá a possibilidade de efetuar modificações a partir de sua conta restrita.
Adicionar um novo utilizador
Como utilizador da Organização com permissões suficientes, pode:
- adicionar um novo utilizador.
- Pode ser uma pessoa totalmente externa à Infomaniak,
- ou que já possua a sua própria conta de utilizador Infomaniak, que poderá, se desejar, reutilizar, estendendo-a à sua Organização.
Ao adicionar, poderá:
- especificar o seu papel dentro da Organização,
- os produtos aos quais terá acesso,
- bem como as preferências de contato administrativo.
Remover um usuário
Como utilizador da Organização com permissões suficientes, pode:
Modificar as permissões/direitos de um utilizador
Como utilizador da Organização com permissões suficientes, pode:
- alterar o papel de outro utilizador,
- gerir os produtos aos quais ele tem acesso e as permissões mais detalhadas, caso se trate de acesso a um endereço de e-mail, por exemplo,
- assim como as preferências de contato administrativo, sejam elas suas ou de terceiros.
Substituir um responsável legal
Paraalterar o responsável legal de uma Organização no Manageré necessário remover o utilizador que tem o papel de responsável legal, o que implica nomear previamente um novo responsável legal (de facto, é impossível remover um responsável legal se não houver outro responsável legal para a Organização).
Gerir os utilizadores por grupo (equipa de trabalho)
Pode organizar os utilizadores da Organização em grupos.
Link para esta FAQ: https://faq.infomaniak.com/2821
Esta seção de perguntas frequentes foi útil?
Este guia aborda a gestão das palavras-passe de aplicações a partir do painel de controlo Infomaniak.
Introdução
Uma senha de aplicativo não é uma senha de dispositivo – ela não permitirá sincronizar um endereço de e-mail.
- As senhas de aplicativo permitem estabelecer uma conexão autenticada entre certas ferramentas e serviços, mesmo que a autenticação de dois fatores (2FA) esteja ativada.
- Para sincronizar, por exemplo, os contatos e as agendas da sua conta Infomaniak com um dispositivo móvel ou um software/cliente de e-mail, siga as instruções do guia abaixo para gerar uma nova senha específica para esta aplicação.
- É possível gerar várias senhas específicas (por exemplo, 1 para os contatos e 1 para as agendas) ou usar a mesma senha para a sincronização dos dois serviços.
Criar uma senha de aplicativo
Para isso:
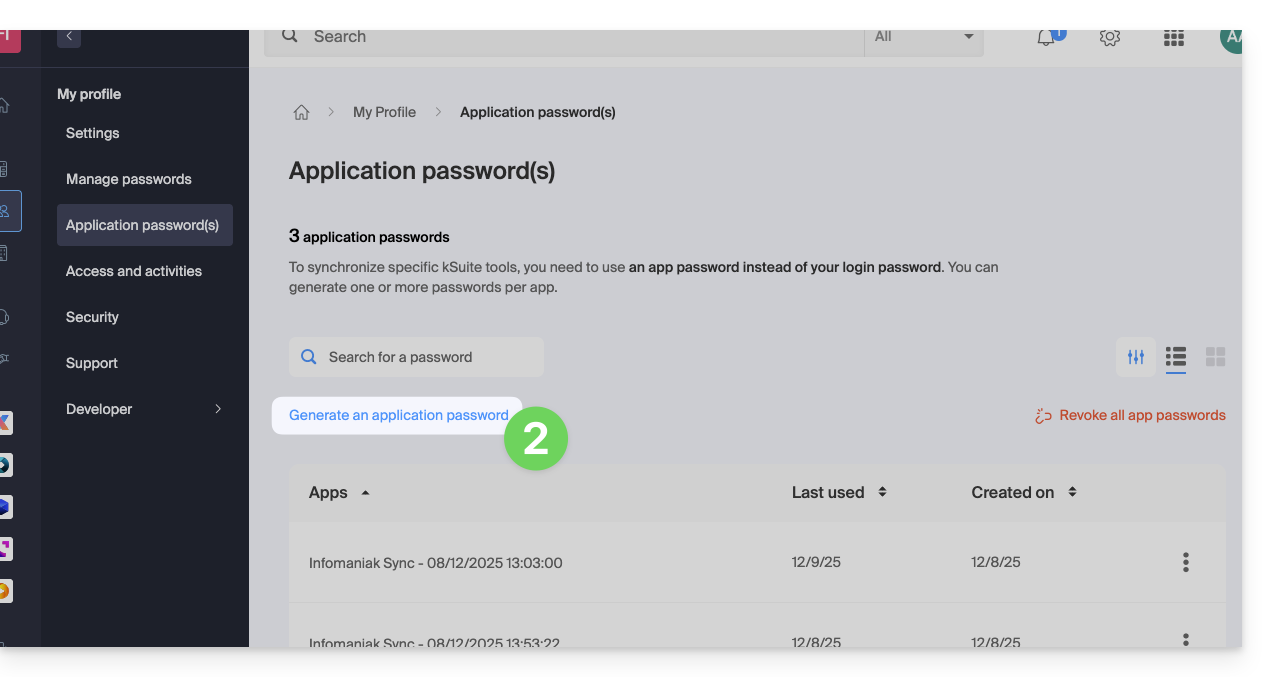
- Clique aqui para acessar o gerenciamento de senhas de aplicativos no Manager Infomaniak.
- Clique em Gerar uma senha de aplicativo:
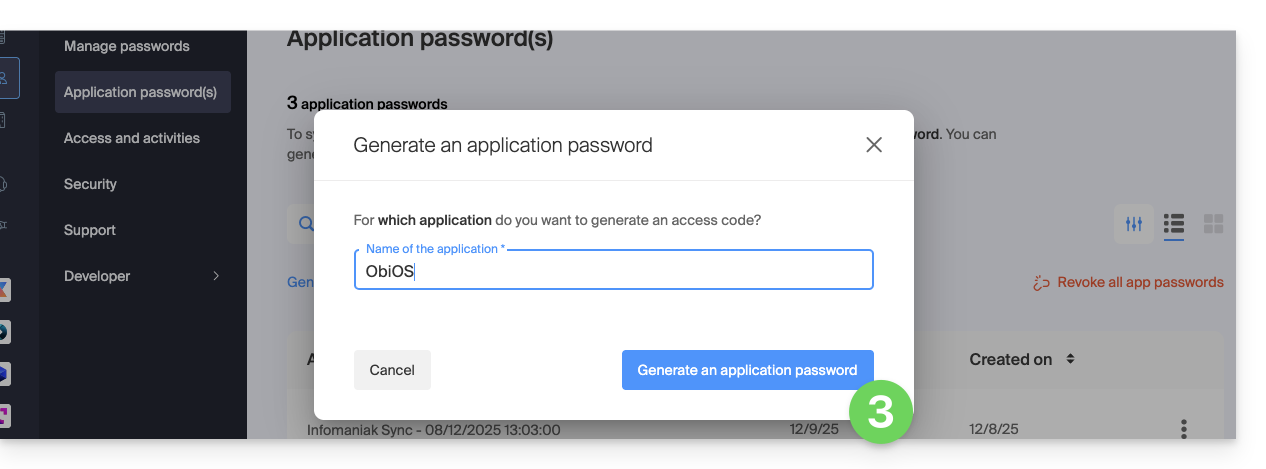
- Indique um nome para a senha do aplicativo na caixa de diálogo e, em seguida, clique em Gerar uma senha do aplicativo:
- Copie e guarde a senha do aplicativo gerada em um local seguro, mas de fácil acesso,ela não estará mais disponível após o fechamento da janela.
Revogar as senhas de aplicativos
No mesmo local, você pode remover uma ou mais senhas de aplicativos quando elas se tornarem desnecessárias:
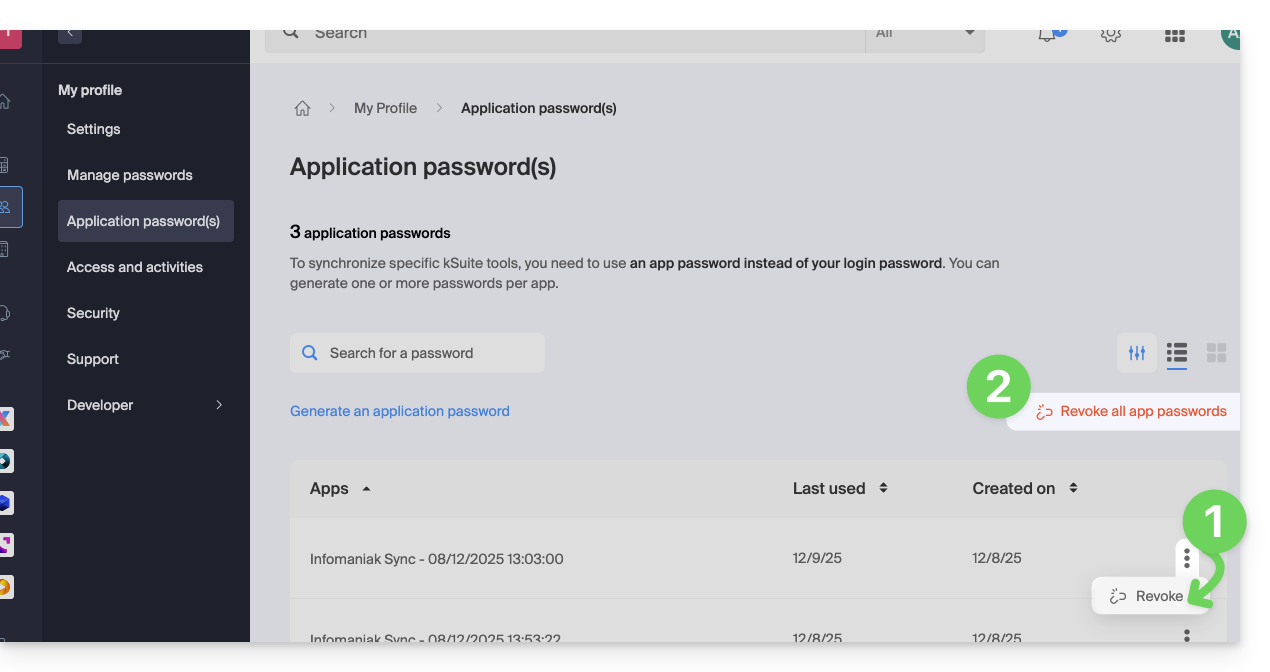
- Clique no botão de ação ⋮ à direita de cada senha e, em seguida, revogue-as…
- ou clique em Revogar tudo na parte superior da tabela:
Link para esta FAQ: https://faq.infomaniak.com/2855
Esta seção de perguntas frequentes foi útil?
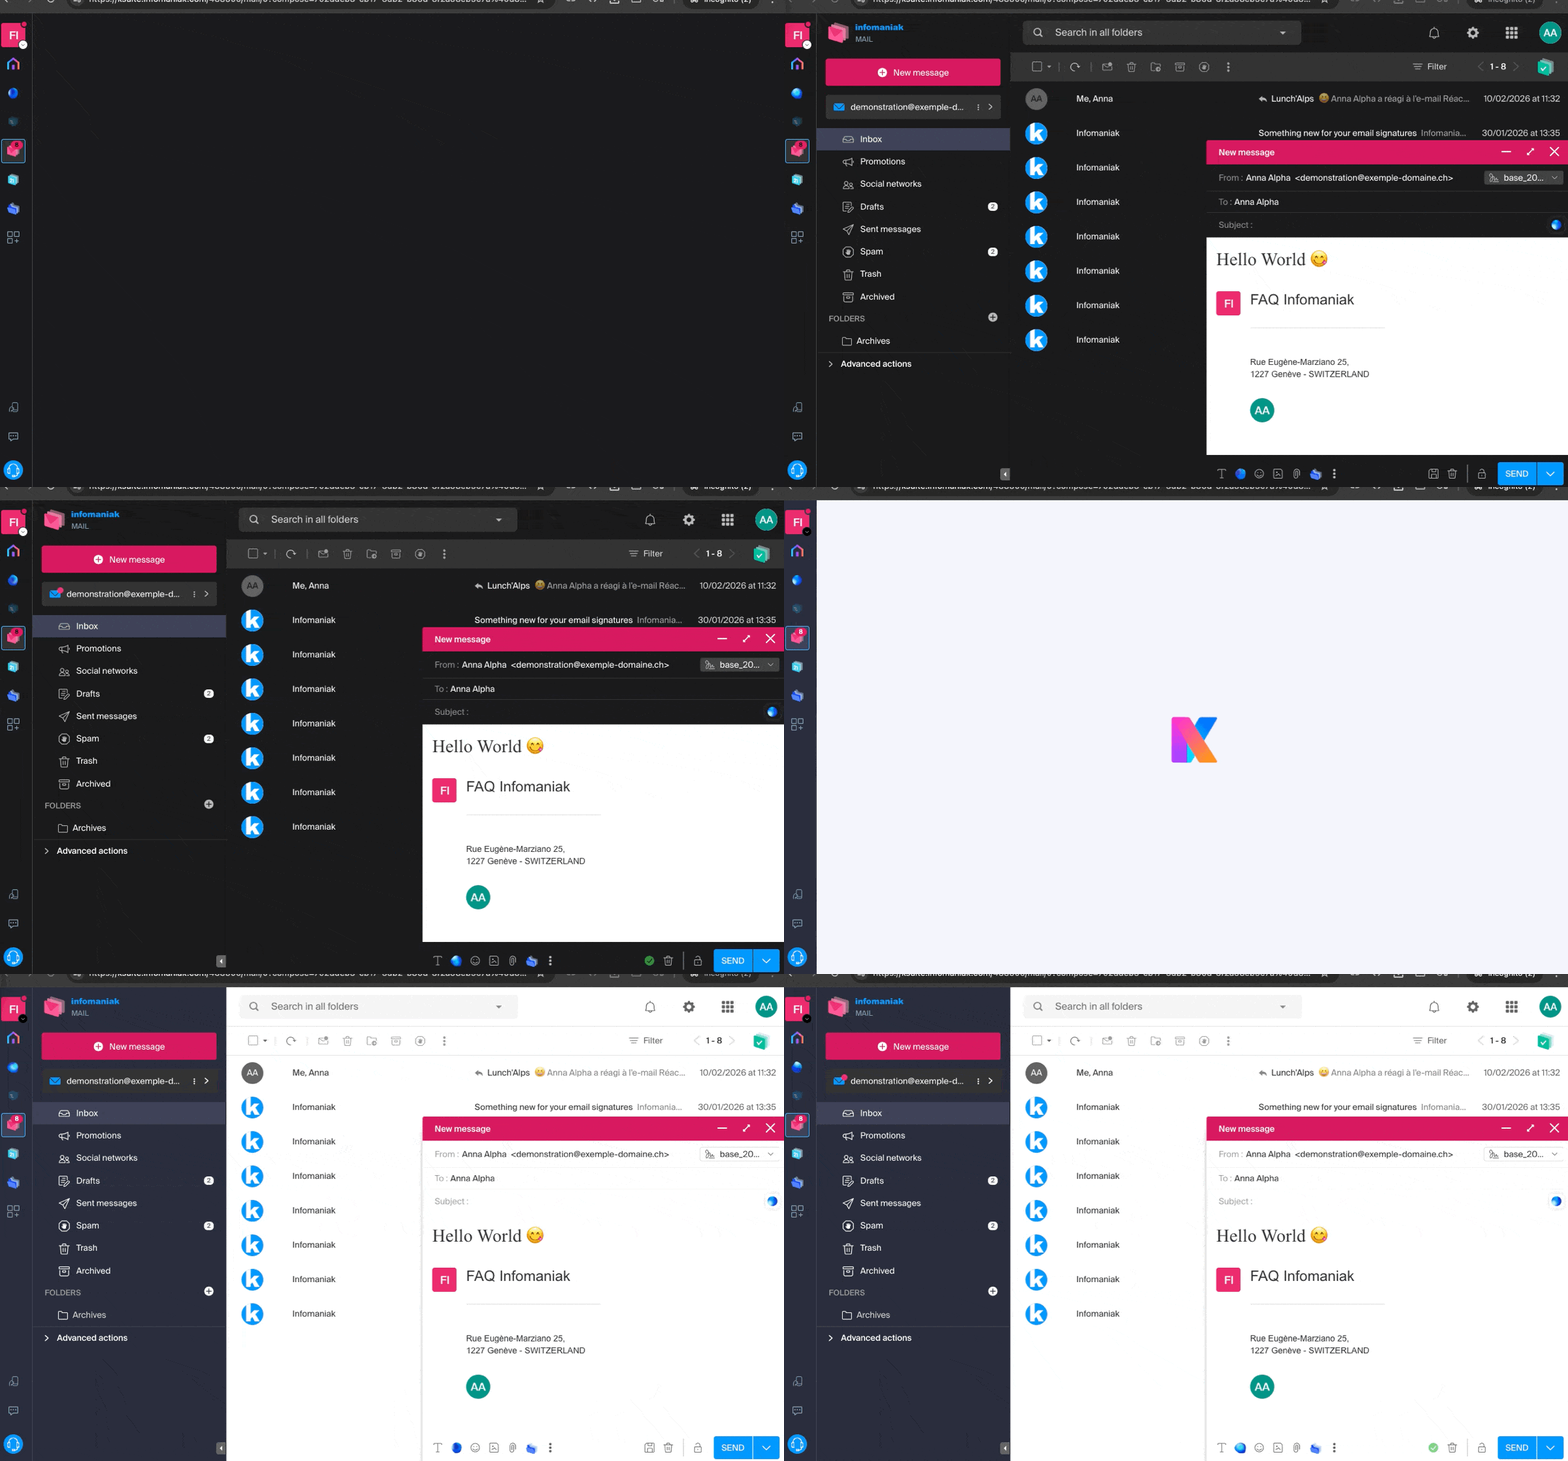
As ferramentas Infomaniak, como o aplicativo web Mail Infomaniak (serviço online ksuite.infomaniak.com/mail) ou as interfaces Calendar, Contacts, kSuite… podem ser exibidas no modo claro ou no modo escuro, inclusive com base nas configurações do seu sistema operacional:
Ativar um modo manual
Para escolher manualmente um tema escuro ou claro, sem se basear em um possível tema diferente definido no sistema operacional:
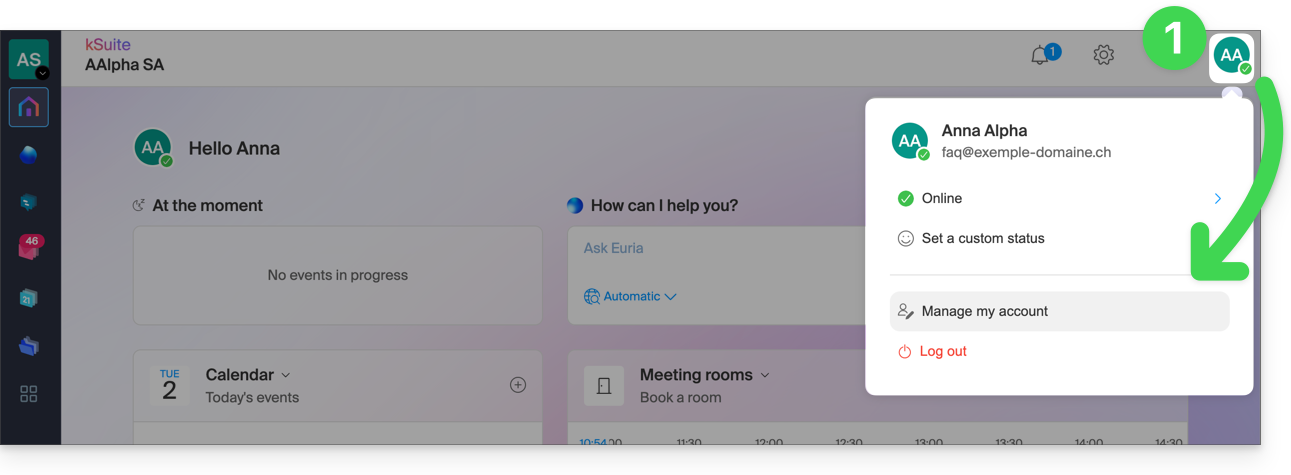
- Clique aqui (ou no ícone com suas iniciais/avatar no canto superior direito do Gerenciador Infomaniak) para “Gerenciar minha conta”:
- Em seguida, clique em Aparência no menu lateral esquerdo.
- Clique em Claro para aplicar o modo claro:
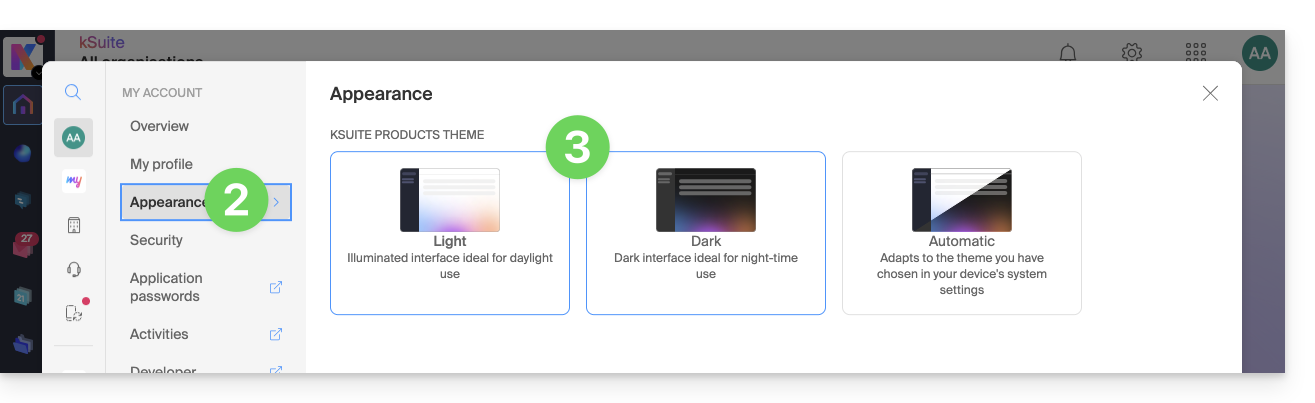
- Clique em Escuro para ativar o “modo noturno”.
Ativar o modo automático
O modo automático baseia-se nas configurações do seu sistema operativo (macOS / Windows...):
- Clique aqui ou no ícone com suas iniciais/avatar no canto superior direito do Gerenciador Infomaniak para "Gerenciar minha conta":
- Clique em Aparência no menu lateral esquerdo.
- Clique no modo Automático:
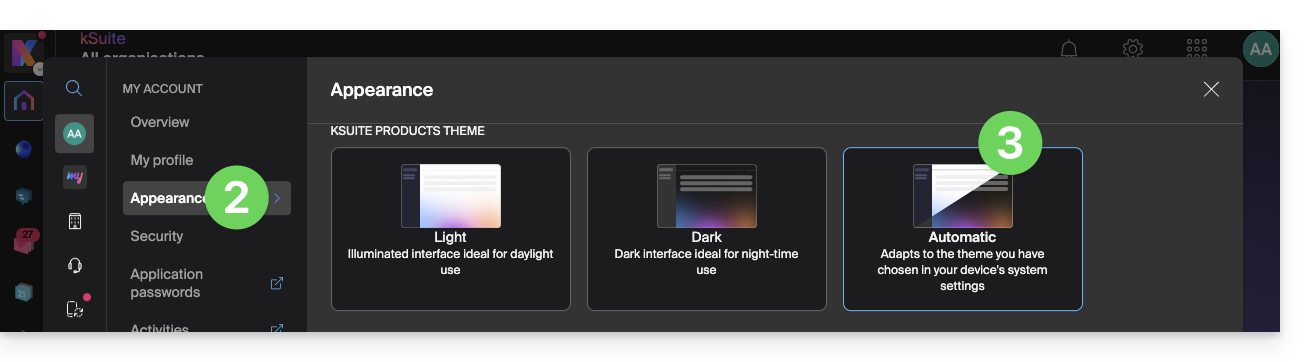
Em seguida, se desejar alterar o tema claro ou escuro do seu computador, para que o modo automático do Manager leve em consideração suas preferências…
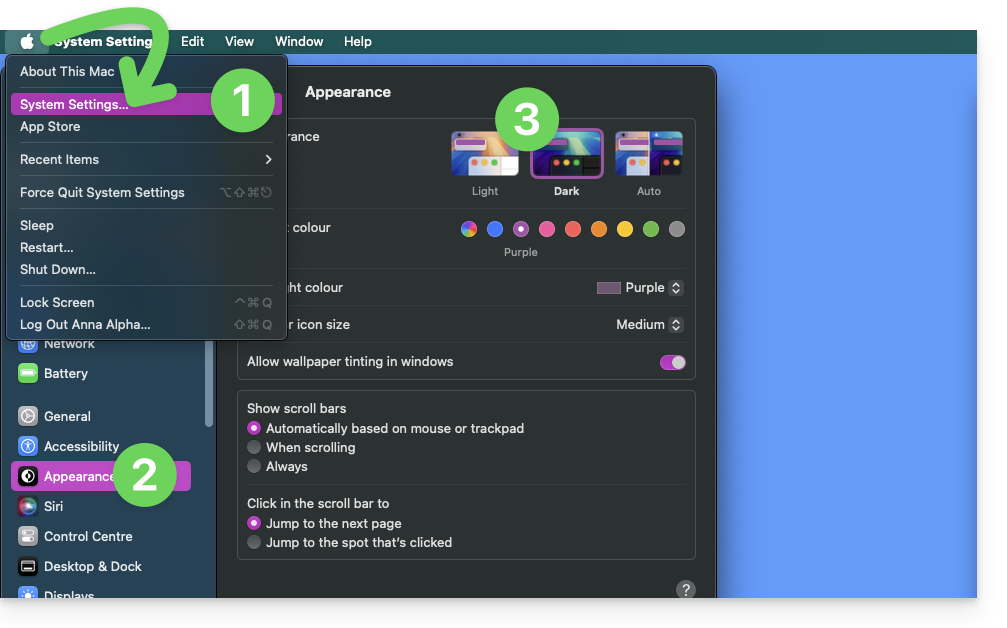
… no macOS
- Clique em Preferências do Sistema…
- Clique em Aparência.
- Escolha o modo desejado à direita:
… no Windows
- No menu Iniciar, abra Configurações > Personalização.
- Selecione Cores e, em seguida, Escolha o seu modo:
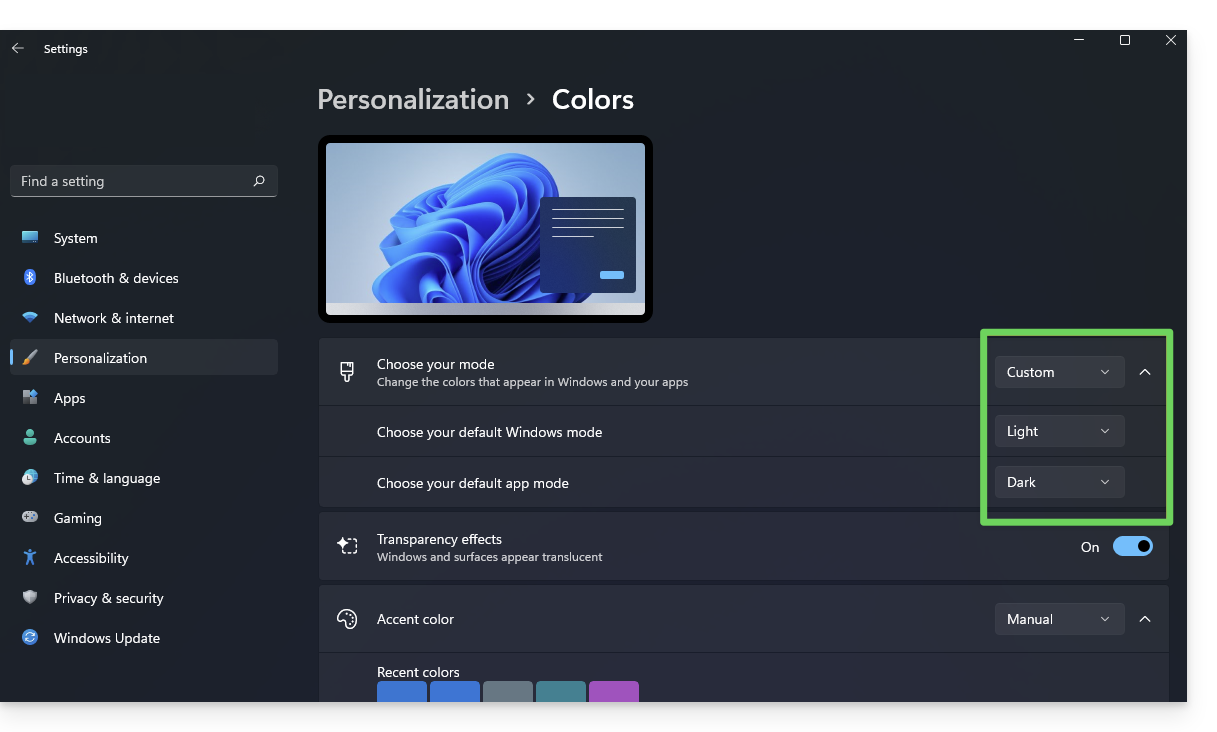
- Pode escolher entre Claro, Escuro ou Personalizado.
- Se selecionar Personalizado, terá a possibilidade de escolher um modo Windows predefinido e um modo de aplicação predefinido diferente.
E nos dispositivos móveis?
O tema escuro está ativado nos dispositivos móveis para as páginas de login e de criação de conta Infomaniak; ele se adapta automaticamente às preferências do sistema móvel, oferecendo assim uma experiência visual consistente entre os aplicativos móveis e o login/criação de conta.
Link para esta FAQ: https://faq.infomaniak.com/2870
Esta seção de perguntas frequentes foi útil?
Este guia detalha os passos a serem seguidos quando pretende “libertar” a gestão de um endereço de e-mail que esteja atualmente “limitado” pelo uso de uma conta Infomaniak com o mesmo nome.
Introdução
- Por exemplo, o endereço de e-mail
benevolno Serviço de E-mailexample.xyznão poderá mais ser compartilhado com outros utilizadores a partir do momento em que uma conta Infomaniak for criada com um identificador de login no formato do endereço de e-mailbenevol@example.xyz. - Consequentemente, existe um procedimento para que o administrador de um Serviço de E-mail possa, se necessário, ativar a liberação da conta Infomaniak correspondente.
- O endereço de e-mail correspondente, que antes estava associado e acessível, não estará mais, mas os dados da conta não serão apagados.
- Apenas o endereço de login deve ser fornecido em um formato diferente pelo usuário em questão.
Solicitar a liberação da conta Infomaniak bloqueada
Para ativar a exclusão do identificador de login quando este for idêntico a um endereço de e-mail que não pode mais ser compartilhado, o administrador do Serviço de E-mail deve acessar o Manager:
- Clique aqui para acessar o gerenciamento do seu produto no Manager Infomaniak (precisa de ajuda?).
- Clique diretamente no nome atribuído ao produto em questão.
- Clique no endereço de e-mail correspondente na tabela que aparece.
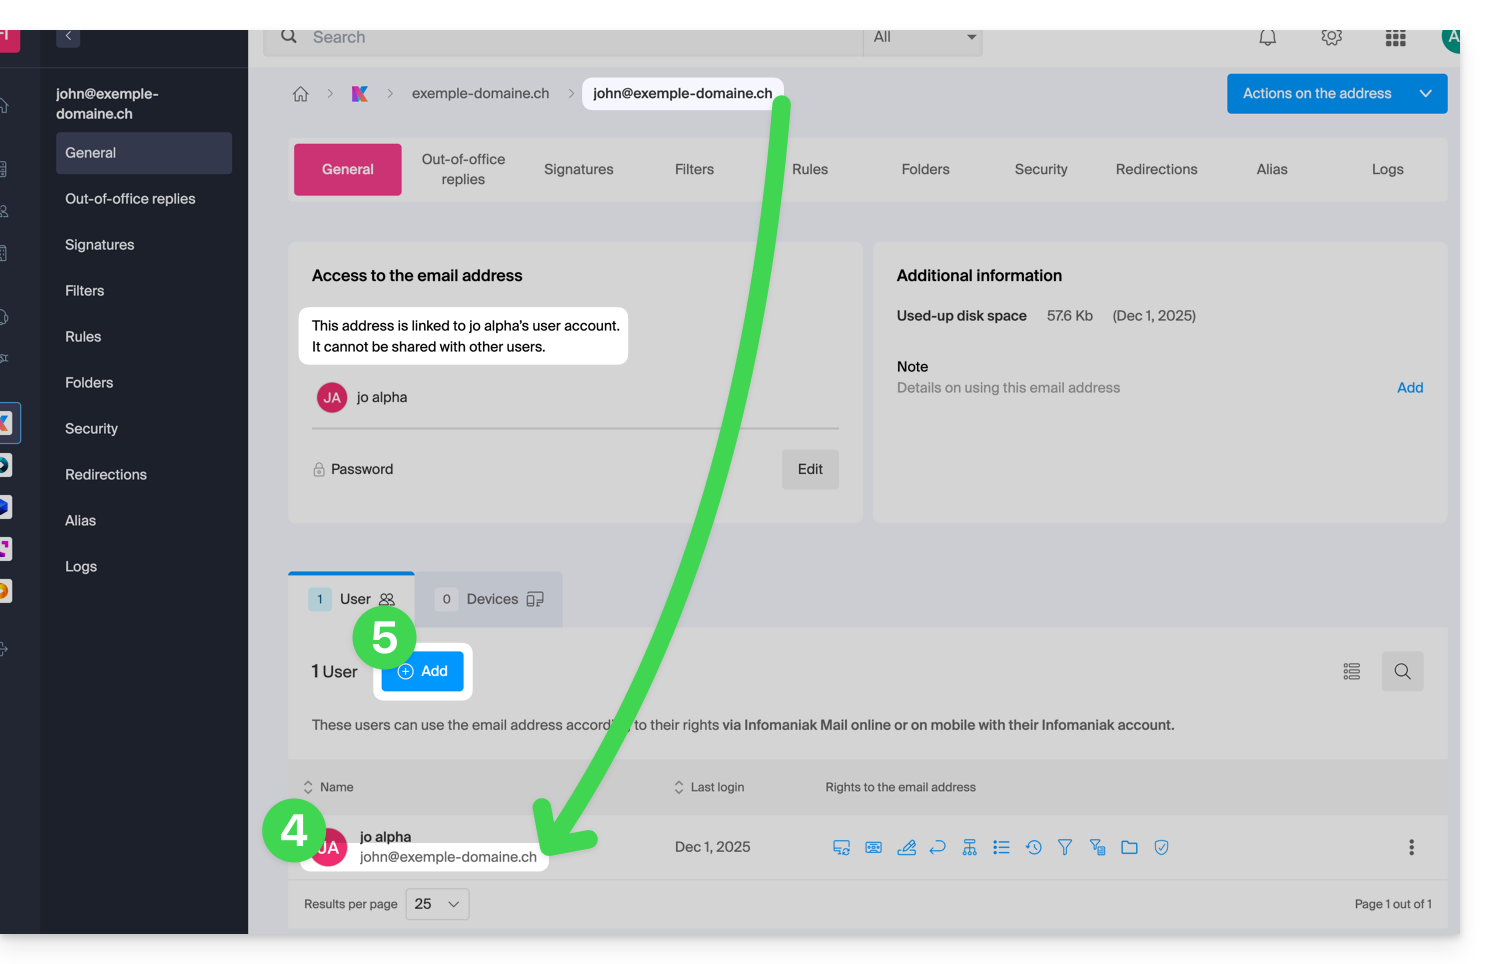
- Na aba Geral, é possível visualizar os utilizadores que consultaram este endereço e, entre eles, encontrar o utilizador correspondente.
- Clique no botão Adicionar na secção Utilizadores (operação que, aliás, não é possível realizar atualmente):
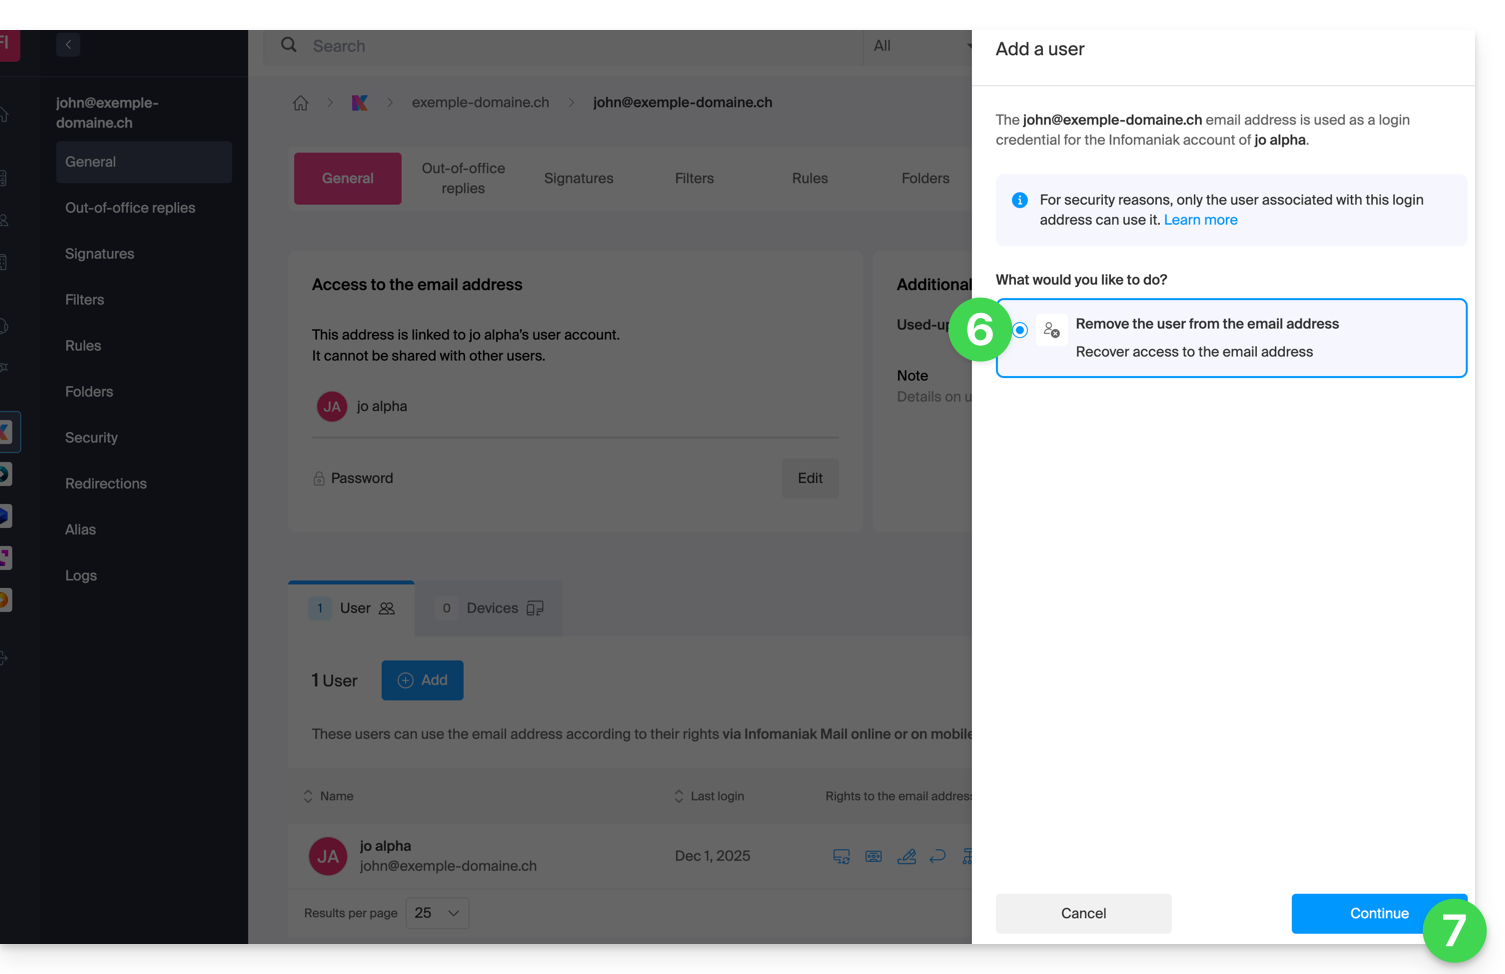
- Na parte lateral direita, abre-se o assistente para liberar o endereço; clique no botão de rádio para ativar a operação.
- Clique em Continuar:
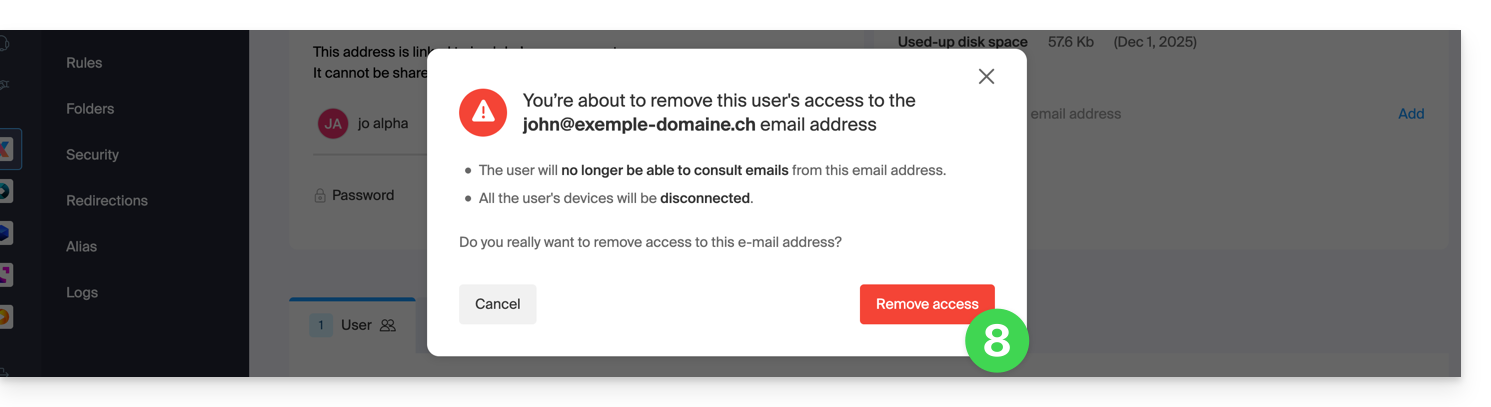
- Confirme a operação de desativação do utilizador:
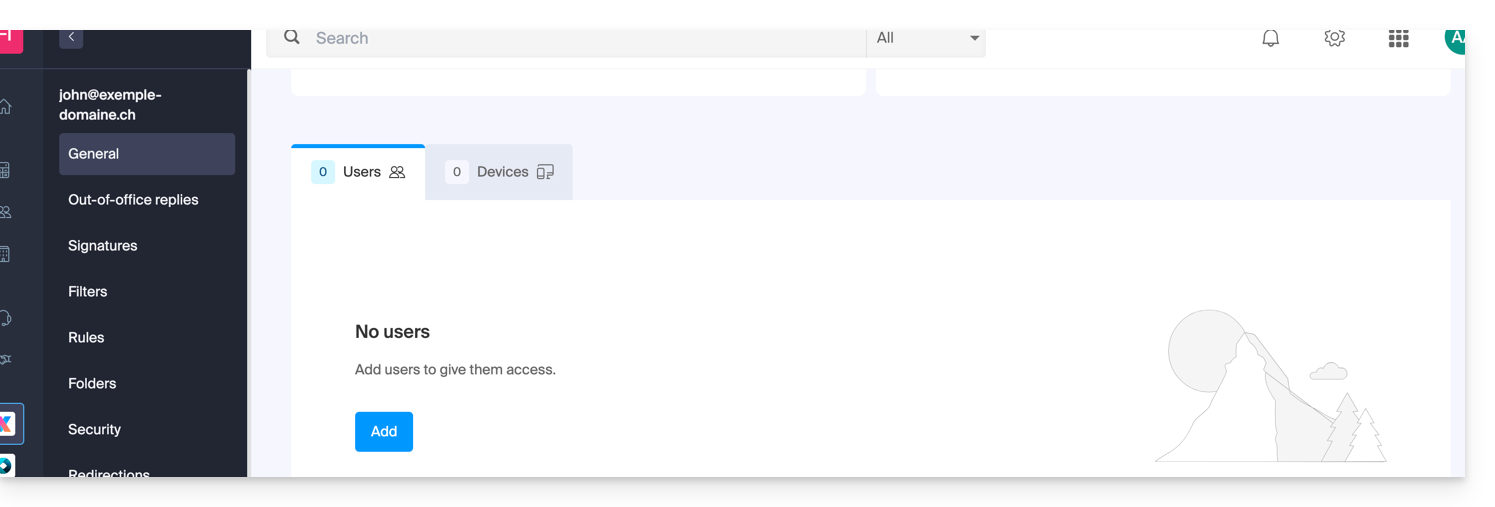
- O utilizador associado desaparece da página de utilizadores:
- Paralelamente, ele recebe uma mensagem SMS semelhante ao exemplo abaixo, no número de telefone que indicou durante o registro:
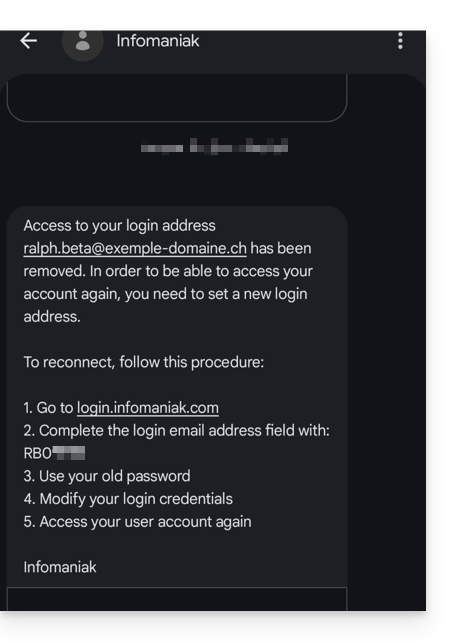
- Essa mensagem SMS indica o procedimento a ser seguido para reconectar-se à sua conta Infomaniak com outro endereço de e-mail de sua escolha (veja abaixo).
Recuperar o acesso à conta Infomaniak
Para poder voltar a aceder à sua conta Infomaniak, agora que não é mais possível fazê-lo com o endereço de e-mail antigo, o utilizador da conta Infomaniak deve aceder ao endereço indicado no SMS:
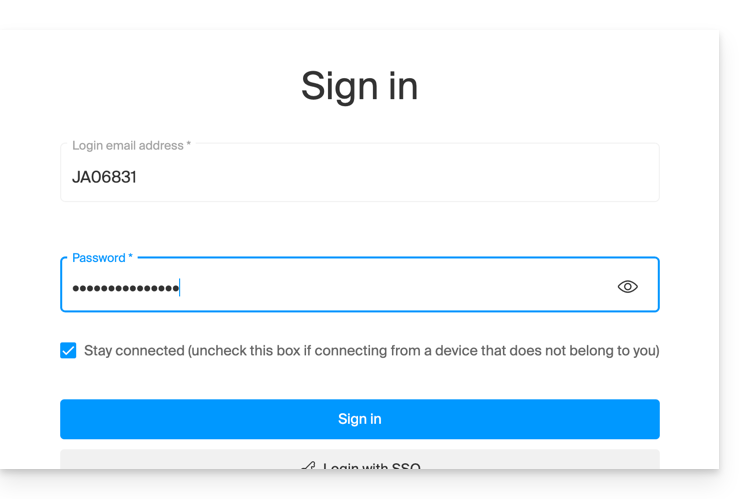
- Clique aqui para acessar a página de login.
- Insira o nome de usuário especificado no SMS (geralmente as iniciais da sua conta seguidas de uma sequência de números).
- Insira a senha habitual (ela não foi alterada):
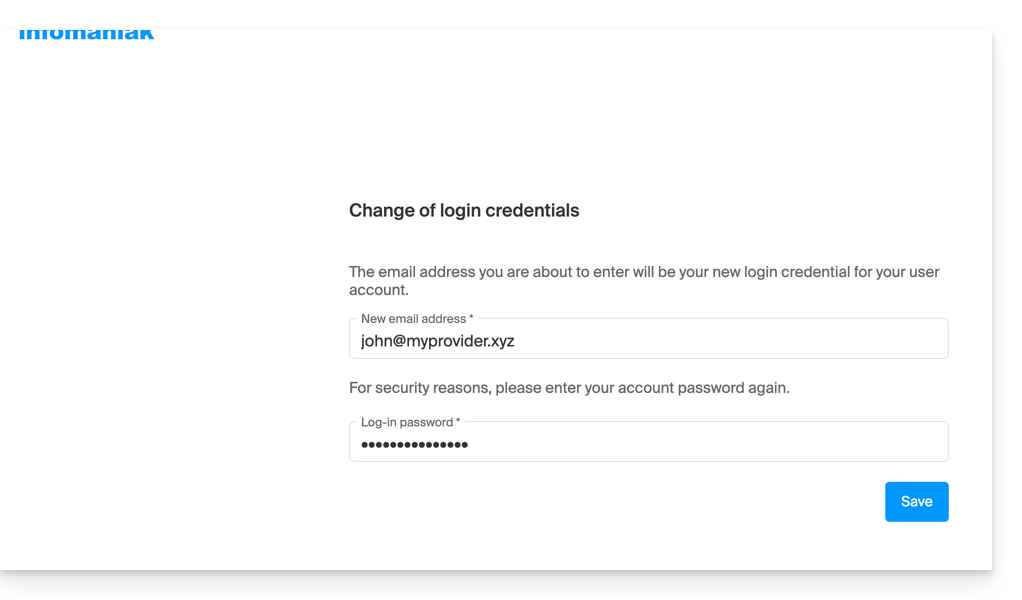
- Insira as novas informações solicitadas:
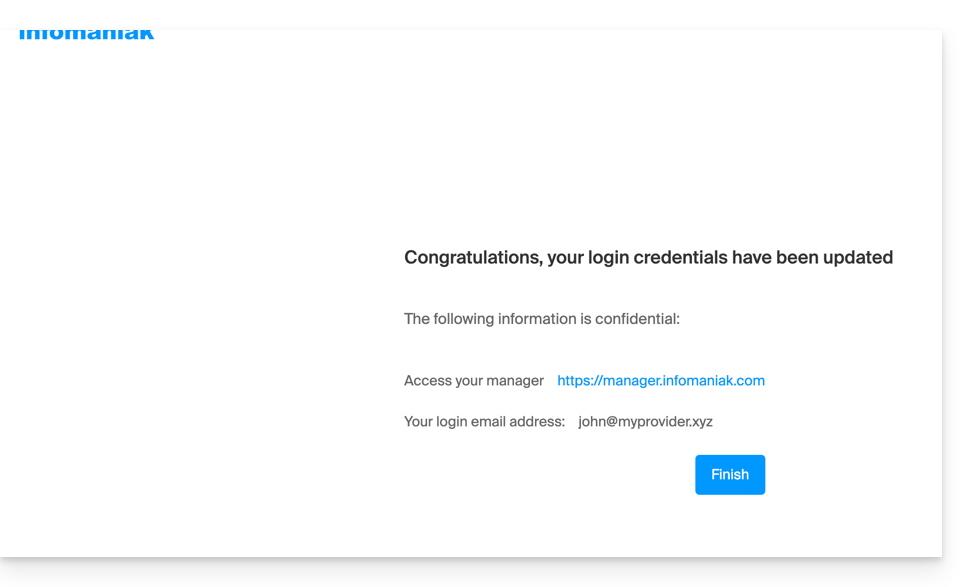
- Você será conectado novamente à sua conta:
Link para esta FAQ: https://faq.infomaniak.com/2895
Esta seção de perguntas frequentes foi útil?
Este guia é para si caso pretenda efetuar uma transferência bancária IBAN em euros para regularizar um pagamento à Infomaniak.
Dados bancários para qualquer transferência em €
A seguir, encontra as coordenadas bancárias IBAN da Infomaniak que deves utilizar para efetuar os teus pagamentos por transferência bancária em euros para a Infomaniak:
Titular da conta: Infomaniak Network SA
IBAN: BE71 9057 8706 4269
BIC: TRWIBEB1XXX
Banco: Wise
As transferências enviadas para qualquer outro IBAN da Infomaniak não serão processadas e serão automaticamente devolvidas ao banco emissor.
Para suas ferramentas de pagamento e contabilidade (banco online, transferências programadas, ERP, etc.), utilize apenas as informações acima para evitar atrasos ou rejeições de pagamento.
Existe algo mais simples do que uma transferência bancária?
Sim. Para garantir a continuidade ideal dos seus serviços, recomenda-se que registre um método de pagamento com débito imediato, como um cartão de crédito/débito. Este método de pagamento permite, nomeadamente:
- a renovação automática dos seus serviços
- a redução dos riscos associados às transferências manuais
Alterar a moeda
A moeda EUR / CHF corresponde ao país registado para a sua Organização. Consulte este outro guia para alterar as informações de registo e obter faturas numa moeda diferente.
Verifique se uma fatura é legítima e se foi emitida pela Infomaniak
Para ter 100% de certeza de que um aviso de pagamento é legítimo e para saber a qual serviço ele se refere:
- Clique aqui para acessar o painel de controle Infomaniak.
- Verifique no canto superior esquerdo se você está na organização correta, onde seus produtos estão localizados.
- Acesse Faturação > Pendentes.
- Ao escolher o pagamento por IBAN, os dados bancários corretos são exibidos automaticamente.
Entre em contato com o suporte da Infomaniak em caso de dúvidas ou perguntas.
Link para esta FAQ: https://faq.infomaniak.com/2898
Esta seção de perguntas frequentes foi útil?
Este guia explica como validar a autenticação de dois fatores, ou verificação em duas etapas, através de um aplicativo Infomaniak já instalado nos seus dispositivos.
Introdução
- Consulte este outro guia sobre como ativar a funcionalidade de autenticação de dois fatores.
Receber uma notificação quando for solicitado um pedido de autorização de login através das aplicações Infomaniak
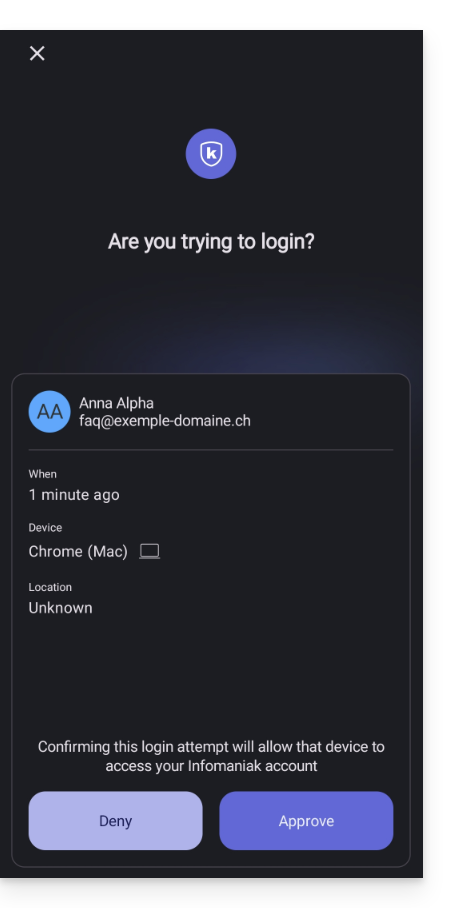
Assim que ativar a autenticação de dois fatores (2FA) configurando um dos métodos propostos,as aplicações Infomaniak (Mail, Euria, kDrive…) permitirão que valide automaticamente a conexãoao efetuar login a partir de outro dispositivo:
- Uma janela será aberta para solicitar que valide a conexão, caso ela realmente seja iniciada por você:
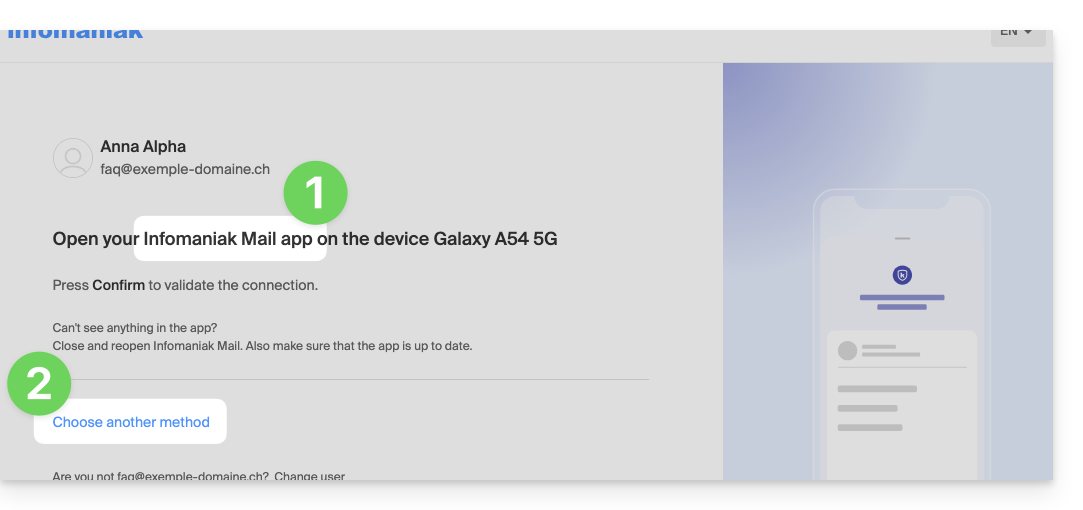
- Você pode, evidentemente, solicitar que o pedido de validação seja enviado para um dos outros métodos de registro:
- Nesse caso, você acessadiferentes métodos de autenticação de dois fatores já registados na sua conta:
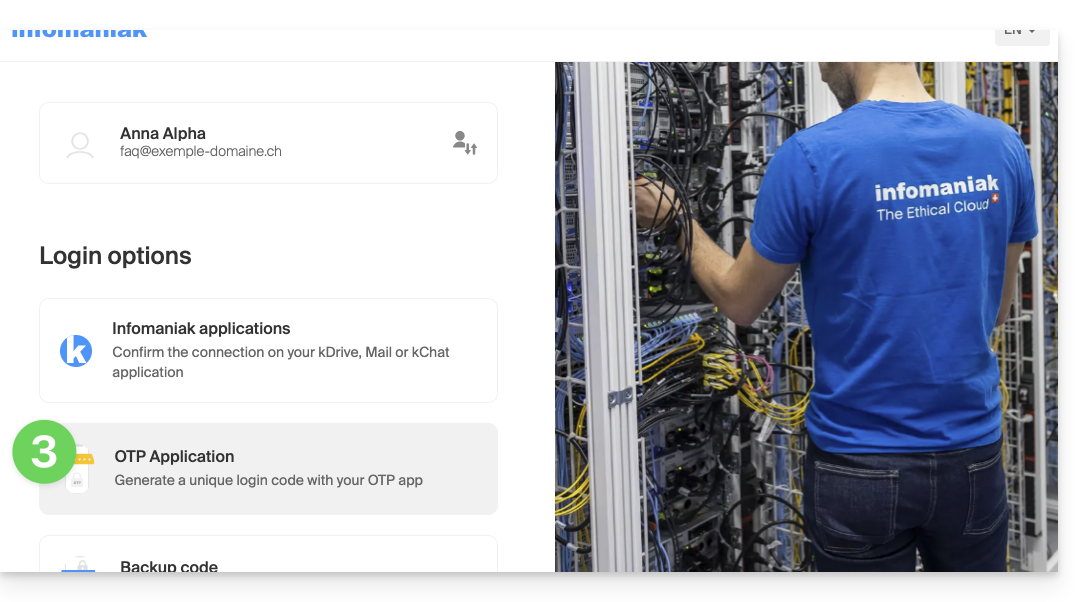
Se tiver ativado vários métodos de validação (SMS, aplicação OTP, etc.), pode definir qual será proposto por defeito em cada sessão de início de sessão. Note, no entanto, que o método preferencial continuará a ser o da validação na aplicação Infomaniak instalada (Mail, Euria, kDrive, etc.) nos seus dispositivos:
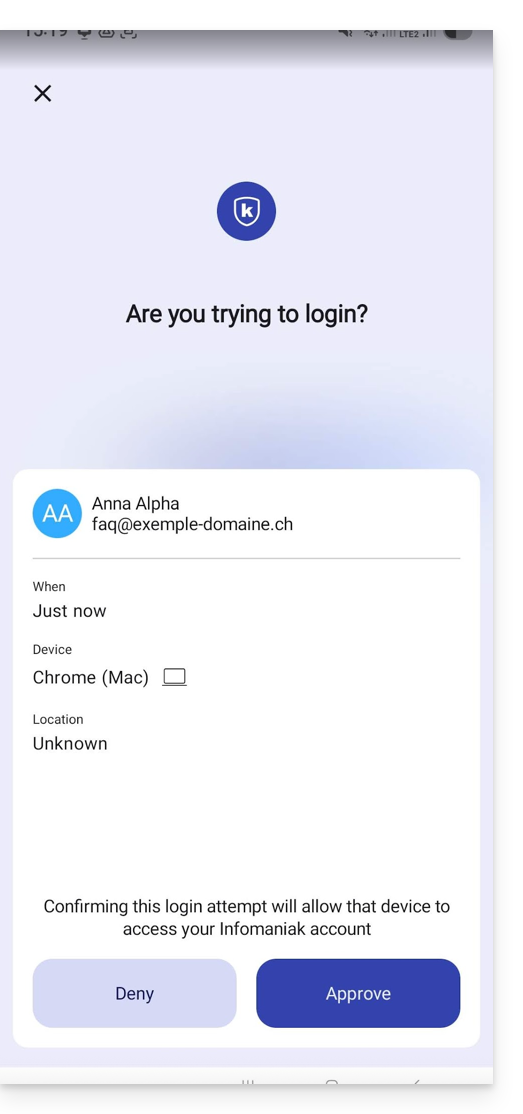
- A notificação é exibida em tela cheia quando você abre o aplicativo especificado, e um botão permite que você valide a conexão (para confirmar se é você mesmo):
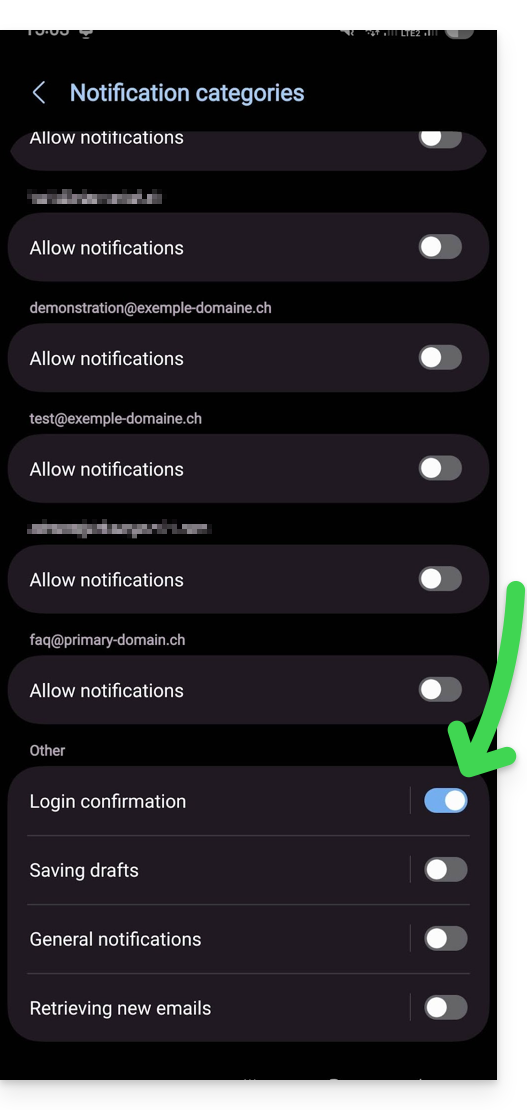
- Nas configurações do Android dos aplicativos Infomaniak (por exemplo, Mail), você pode escolher ativar apenas a notificação de solicitação de autenticação de login:
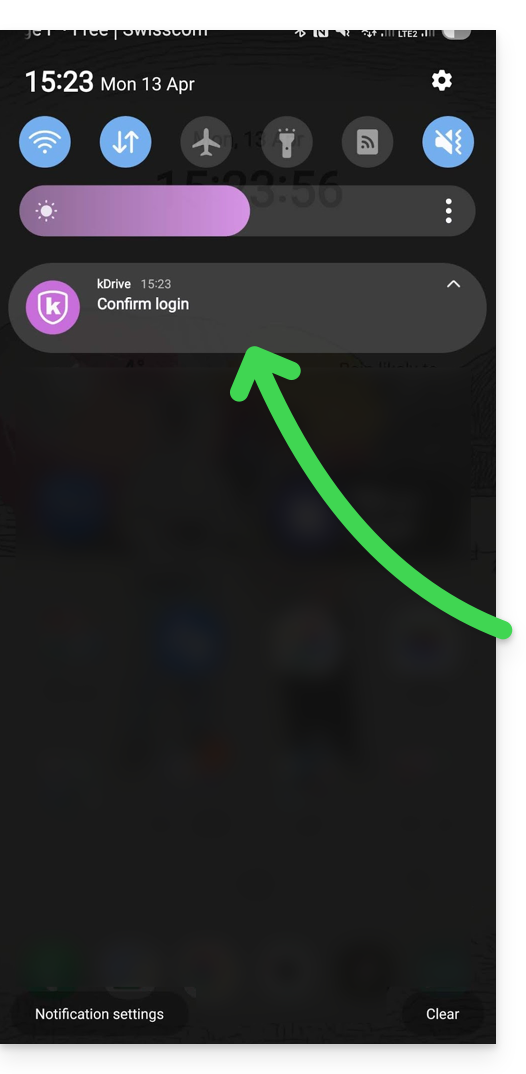
- Assim, uma notificação Android informa sobre a solicitação de autenticação em andamento, e você pode abrir o aplicativo diretamente a partir da notificação:
Link para esta FAQ: https://faq.infomaniak.com/2899
Esta seção de perguntas frequentes foi útil?
Este guia explica como adicionar uma referência global que será exibida em todos os seus próximos documentos de faturamento.
Introdução
- Esta referência, com um máximo de 128 caracteres, aparecerá nas suas faturas e documentos pro forma.
- Será aplicada automaticamente por padrão em todos os seus próximos documentos, não sendo necessário inseri-la novamente a cada vez!
Adicionar uma referência global a partir das suas configurações de faturação
Pré-requisitos
- Ser Administrador ou Representante legal na organização…
- … ou ter uma conta de utilizador simples, mas com a permissão de gerir a contabilidade ativada:
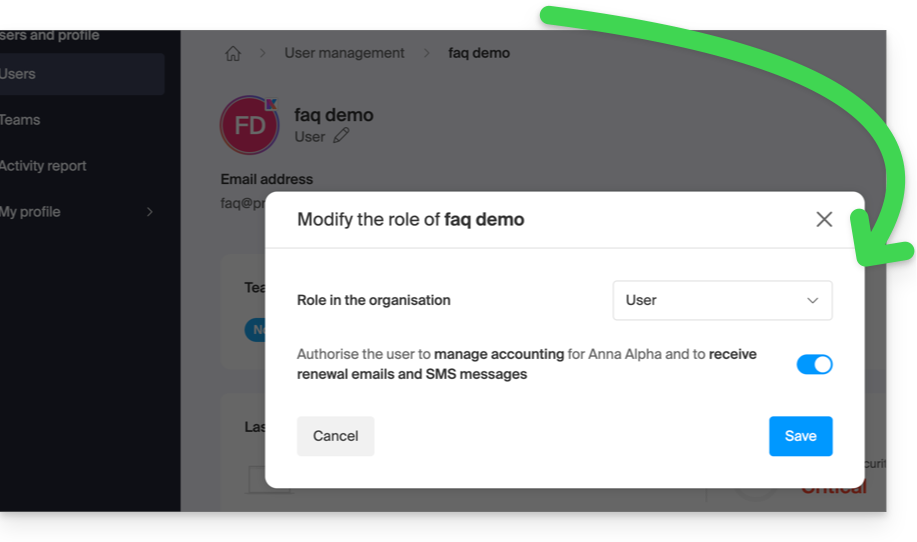
- … ou ter uma conta de utilizador simples, mas com a permissão de gerir a contabilidade ativada:
Para adicionar a nota interna global desejada:
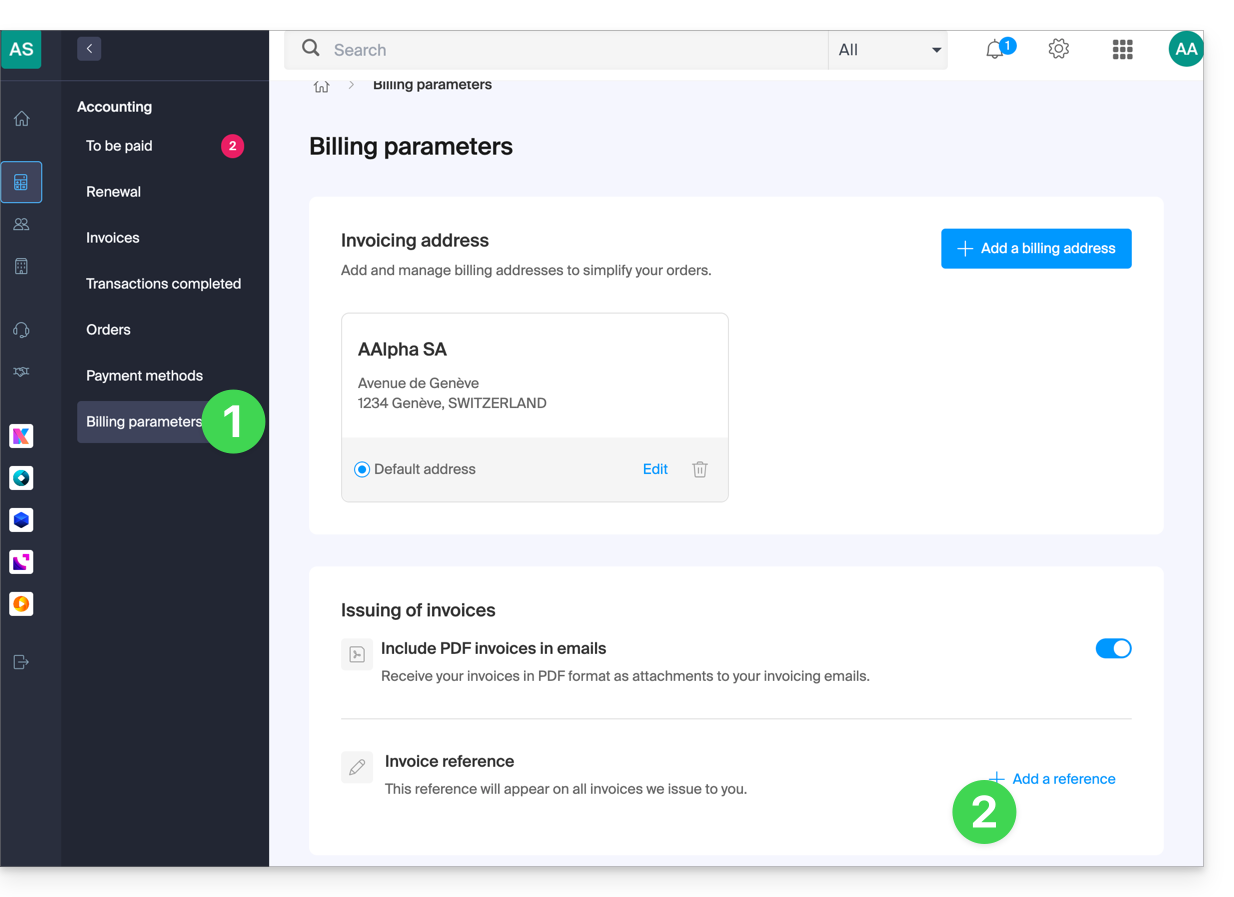
- Clique aqui para acessar a página de configuração/contabilidade no painel de controle Infomaniak (precisa de ajuda?).
- Clique no + para Adicionar uma referência:
- Preencha o campo com a sua nota interna.
- Confirme com o botão (a referência também pode ser eliminada no mesmo local com o botão Lixeira):
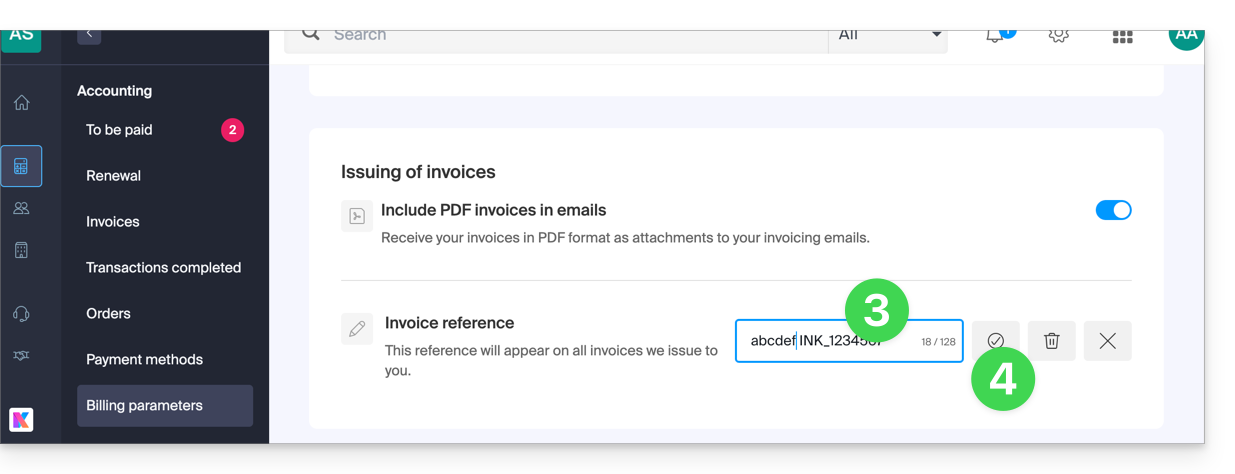
- Encontre a referência adicionada nos seus documentos
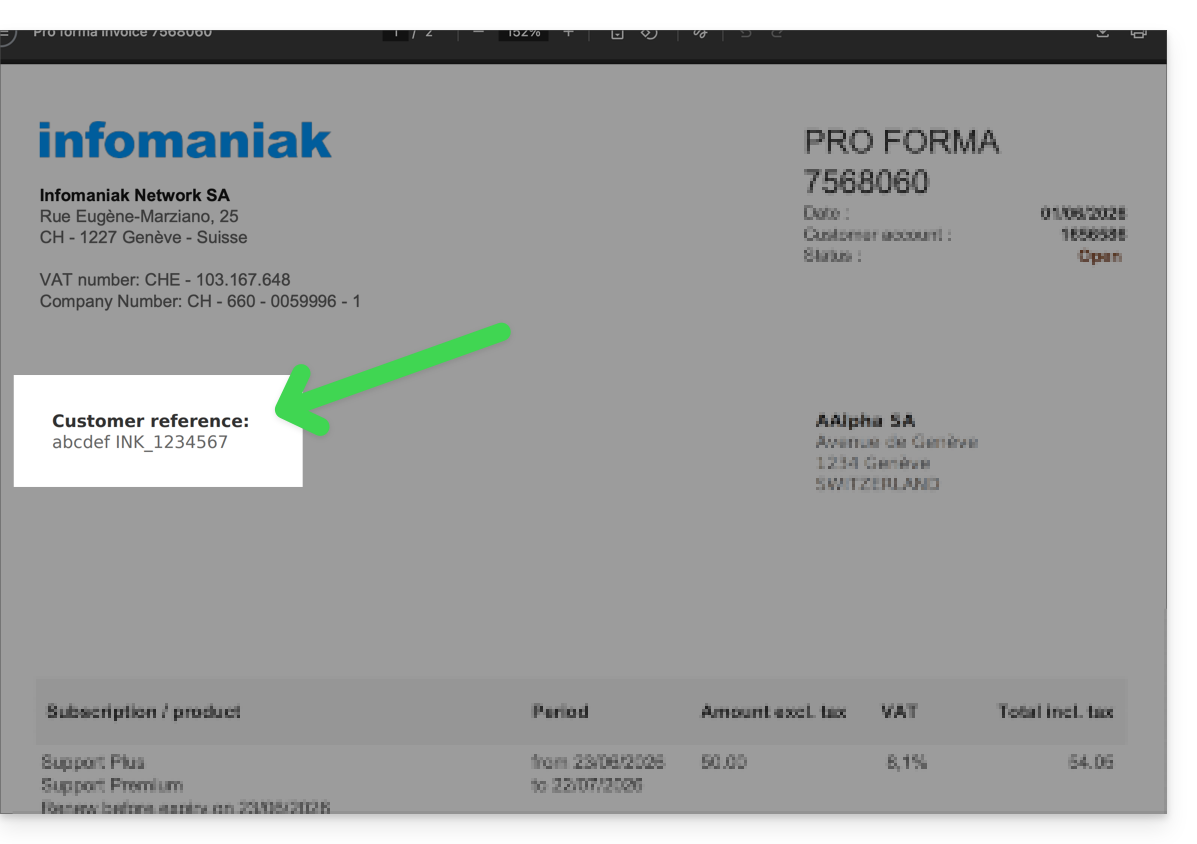
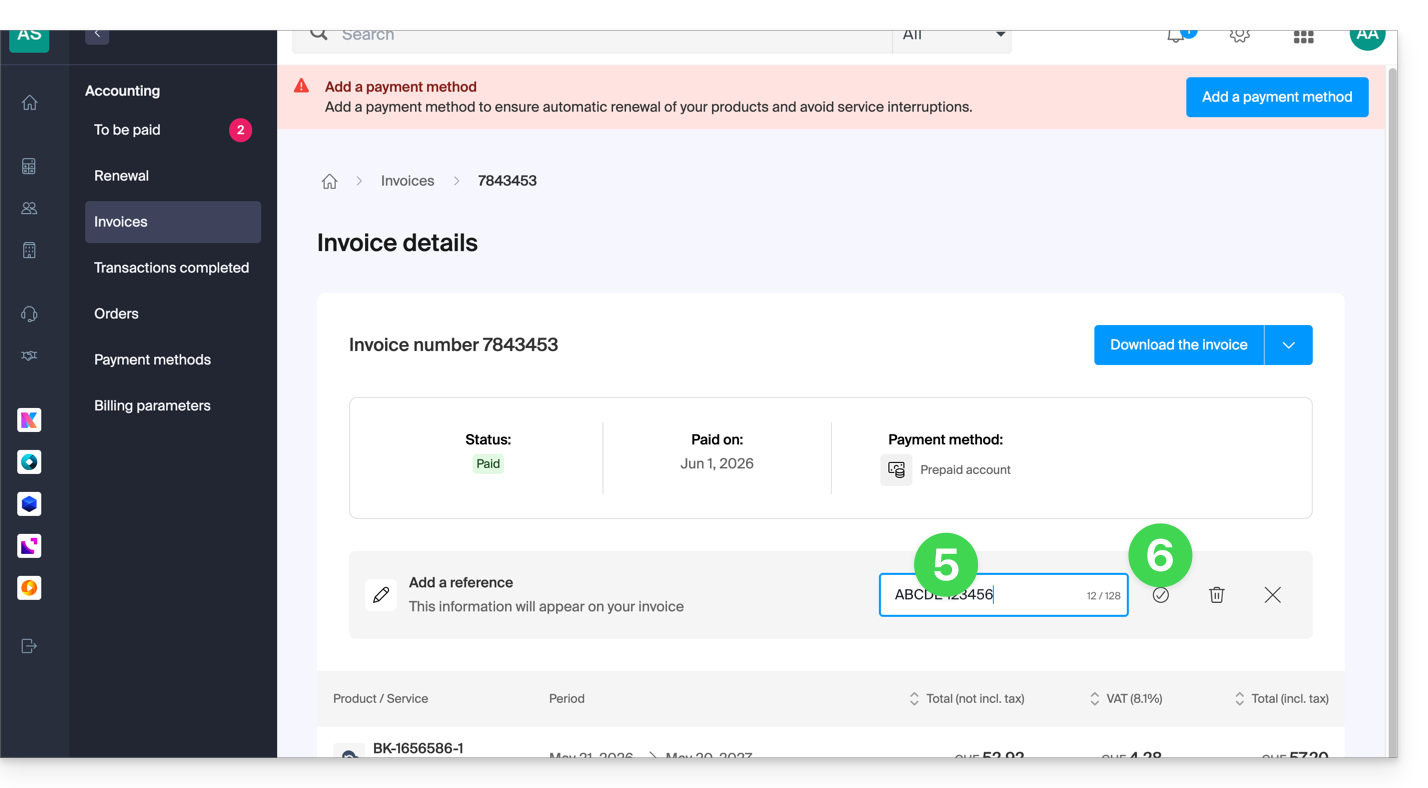
Adicionar uma referência personalizada a um único documento
Atenção, esta referência substitui a nota geral configurada acima:
- Clique aqui para acessar a página de configuração/contabilidade no Manager Infomaniak (precisa de ajuda?).
- Clique no menu de ações ⋮ à direita do documento em questão.
- Clique em Ver detalhes:
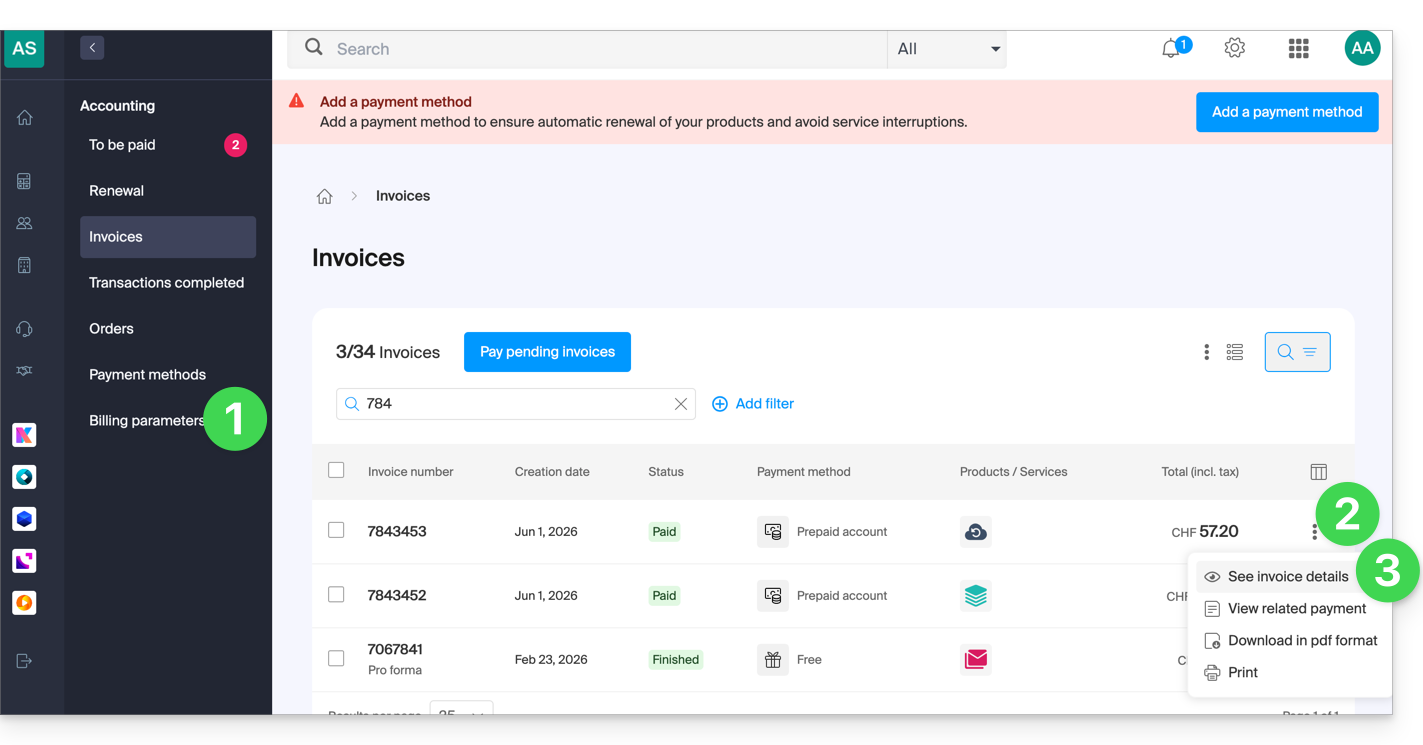
- Clique em + para Adicionar uma referência:
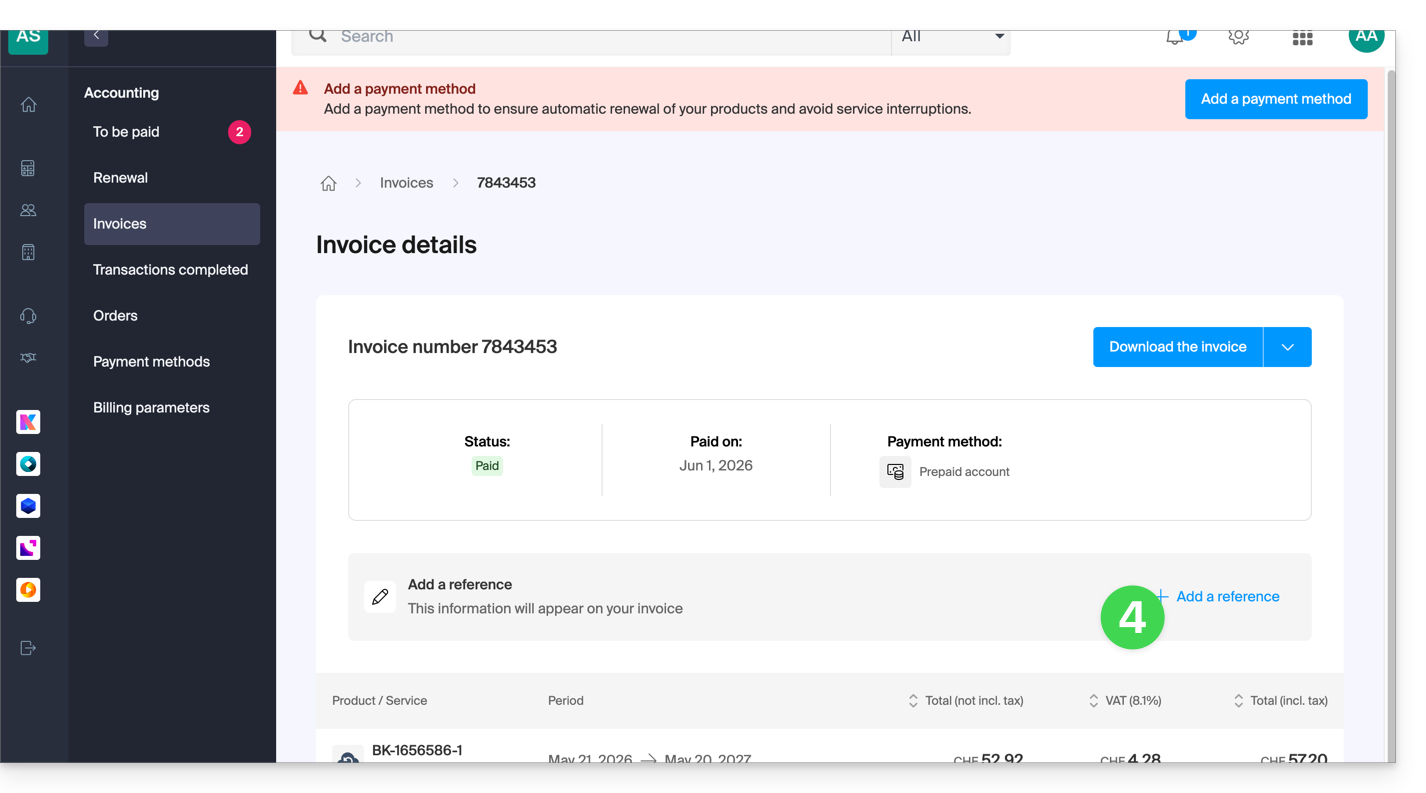
- Preencha o campo com a sua nota interna.
- Confirme com o botão (a referência também pode ser eliminada no mesmo local com o botão Lixeira):
Link para esta FAQ: https://faq.infomaniak.com/2908
Esta seção de perguntas frequentes foi útil?