Knowledge base
1000 FAQs, 500 tutorials and instructional videos. Here, there are only solutions!
Jelastic provides an add-on that allows you to install packages requiring sudo permissions without needing root access.
Additional information
The Yum Packages Installer add-on allows you to install packages not provided by default in Jelastic containers (RPM packages, development tools, etc.) using yum. It offers an alternative for installing packages when direct root access is not available.
All the information required to use this add-on is described in the readme of the add-on.
Examples of common actions performed via the add-on:
- Install compilation tools:
gcc autoconf make - Install an external RPM: provide the full URL of the RPM in the installation field.
Link to this FAQ:
Has this FAQ been helpful?
This guide provides instructions for creating a multi-datacenter high-availability infrastructure with Jelastic Cloud.
Preamble
- The principle of a multi-datacenter high-availability infrastructure is to replicate all necessary elements (web server, database server, and load balancer) in another datacenter to ensure the operation of your sites and apps in case of unexpected events (traffic spikes, hardware failure, network outage, etc.).
- The advantages of a multi-datacenter high-availability infrastructure are numerous:
- In case of an unexpected event on a server, another server immediately takes over; your sites and apps remain accessible.
- In case of a disruption with a component of a datacenter, the replicated infrastructure in the other datacenter immediately takes over; your sites and apps remain accessible.
- In case of significant traffic spikes, the traffic is distributed between the two infrastructures by load balancers; your sites and apps remain accessible and fast.
Setting up a high-availability infrastructure with Jelastic Cloud
For the purposes of this example, 2 web servers with 2 load balancers will be set up, each of these elements being hosted in Switzerland in a different Infomaniak datacenter.
Before proceeding, log in to the administration interface of your Jelastic Cloud server:
- Click here to access the management of your product on the Infomaniak Manager (need help?).
- Click on Log in to Jelastic Cloud:
1. Creating web servers
A web server hosts the content of your sites (php files, images, pdfs, etc.).
Here are the actions to perform to create the first server:
- Click on New environment.
- Click on the PHP tab.
- In App. Servers, choose for example an Apache server.
- Adjust the environment resources according to your needs.
- Choose Geneva DC2 for the server location.
- Rename the environment to easily identify it later (for example DC2-apache).
- Click on Create.
Create the second web server in another datacenter:
- Click on New environment.
- Click on the PHP tab.
- In App. Servers, choose for example a Apache server.
- Adjust the environment resources according to your needs.
- Choose Geneva DC3 for the server location.
- Rename the environment to easily identify it later (for example DC3-apache).
- Click on Create.
2. Creation of load balancers
A load balancer allows you to distribute the load and traffic of your sites between your web servers.
Here are the actions to perform to create the first server:
- Click on New environment.
- Click on the PHP tab.
- In Load Balancing, choose for example an NGINX server.
- Adjust the environment resources according to your needs.
- Choose Geneva DC2 for the server location.
- Rename the environment to easily identify it later (for example DC2-nginx).
- Click on Create.
Create the second load balancer in another datacenter:
- Click on New environment.
- Click on the PHP tab.
- In Load Balancing, choose for example an NGINX server.
- Adjust the environment resources according to your needs.
- Choose Geneva DC3 for the server location.
- Rename the environment to easily identify it later (for example DC3-nginx).
- Click on Create.
3. Configuration of load balancers and domain name
Now, you just need to tell the load balancers which web servers they should distribute the traffic to.
Start by creating the load-balancer.conf file on both load balancers:
- Connect via SSH to the
DC2-nginxserver by clicking on the Web SSH button of the environment. - Open the load-balancer.conf file:
nano /etc/nginx/conf.d/load-balancer.conf. - Adjust the file code with the URL of your web servers:
http {
upstream backend {
server apache-dc2.jcloud-ver-jpc.ik-server.com;
server apache-dc3.jcloud.ik-server.com;
}
server {
listen 80;
location / {
proxy_pass http://backend;
}
}
}
- Repeat these 3 steps for the
DC3-nginxserver.
Modify the load balancers configuration file:
- Connect via SSH to the
DC2-nginxserver by clicking on the Web SSH button of the environment. - Create the following configuration file:
nano /etc/nginx/nginx.conf. - Adjust the server configuration file URL:
user nginx;
worker_processes auto;
worker_rlimit_nofile 2048;
load_module modules/ngx_stream_module.so;
#load_module modules/ngx_http_modsecurity_module.so;
error_log /var/log/nginx/error_log info;
events {
worker_connections 2048;
use epoll;
}
include /etc/nginx/conf.d/load-balancer.conf;
- Restart the NGINX service:
sudo /etc/init.d/nginx restart. - Repeat these four steps for the server
DC3-nginx.
It is now necessary to indicate to your domain name on which servers the traffic should be redirected.
Prior to this, install a public IP address on your load balancers:
- Deploy the server node DC2-nginx.
- Hover over the Public IP line and click on the + that appears on the right.
- Add a public IPv4.
- Repeat these 3 steps for the server DC3-nginx.
At this stage, all you have to do is create two A records in the DNS zone of your domain name with the public IP of your two load balancers.
To ensure that changes are quickly taken into account, it is recommended to configure the A records with a TTL of 5 minutes.
In this example, the domain redirects your visitors to the load balancers, which in turn redirect the traffic to the web servers.
4. High availability infrastructure test
To test the proper functioning of your infrastructure, enter your domain name in a web browser and try in turn to disable an element of your infrastructure (one of the two load balancers, one of the two web servers). If everything works, you should still be able to access the content hosted on one of the two web servers.
Warning: data replication between web servers or database servers must be set up by you.
Link to this FAQ:
Has this FAQ been helpful?
This guide concerns the mobile app kCheck (application for iOS/Android smartphone or tablet), created to simplify identity verification procedures and strengthen the security of your Infomaniak account.
Preamble
- For security reasons, to guarantee the identity of the person making a specific request to Infomaniak, an identity verification procedure may be triggered in the following cases (non-exhaustive list):
- forgetting an Infomaniak account password (user account)
- forgetting a login email address
- deactivation of double authentication (2FA)
- unlocking an Infomaniak account
- during the first transfer of revenue for the product Ticketing
- when ordering a product (suspicion of spam or fraud, brand name, etc.)
- This application allows you to securely transfer the requested items.
- Infomaniak respects your privacy: the information transmitted via the kCheck application will be kept until the complete processing of your file; it will in all cases be automatically deleted after 72 hours in case of non-processing of this request.
Start identity verification
Prerequisites
- A QR code or a link provided by Infomaniak.
- The mobile app kCheck installed on your device iOS (iPhone, etc.) or Android.
- An Internet connection on the mobile device.
You can then have your identity verified with kCheck:
- Launch the kCheck app on your mobile.
- Press Start.
- Press Scan a QR code.
- Point the QR code provided using the camera.
- Enter your mobile phone number.
- Enter the confirmation code received.
- Authorize geolocation (mandatory to continue the procedure).
- Select the type of ID you have (ID card or passport).
- Follow the steps to photograph your ID.
- Take a selfie (of yourself) with your ID in your hand in front of you.
Your documents will then be securely transmitted to Infomaniak support. These requests are processed on a priority basis with an average response time of 2 hours during opening hours.
If your order is blocked...
For security reasons, some orders may be automatically blocked.
At the time of your order, an e-mail is sent to the email address connected to your Infomaniak Manager account. This email contains the procedure to unblock your order. If you do not find it, you can resend it from your Manager by clicking on Resend procedure from the red banner informing you of the blockage.
Prerequisites
- Open the email containing the unblocking procedure.
- The mobile app kCheck installed on your device iOS (iPhone, etc.) or Android.
- An Internet connection on the mobile device.
You can then start the unblocking procedure with kCheck:
- Launch the kCheck app on your mobile.
- Press Start.
- Press Scan a QR code.
- Scan the QR code present in the email.
- Follow the unblocking procedure to the end.
Special cases
- If there is no response from you within a 10-day period, the order is automatically canceled and the payment is fully refunded to the payment method used.
- In case you do not have a mobile device to follow this procedure, contact Infomaniak support.
Link to this FAQ:
Has this FAQ been helpful?
This guide details how to back up the data from your folders and nodes on Jelastic Cloud using the OpenStack Swift protocol on Swiss Backup, the backup solution in an independent Swiss cloud.
Introduction
- To back up the data, an extension for Virtuozzo (Jelastic Cloud) is available in the node's add-ons.
- Learn more about the extension (add-on) on Github.
Configure the Swiss Backup extension on Jelastic Cloud
Prerequisites
- Use Jelastic Cloud (at least one Jelastic environment must be active with the extension installed for your backups to be visible).
- Have an Swiss Backup Infomaniak account with an available device quota (minimum 1) for a Cloud backup.
- Add 1 device of type Cloud to obtain the OpenStack Swift parameters.
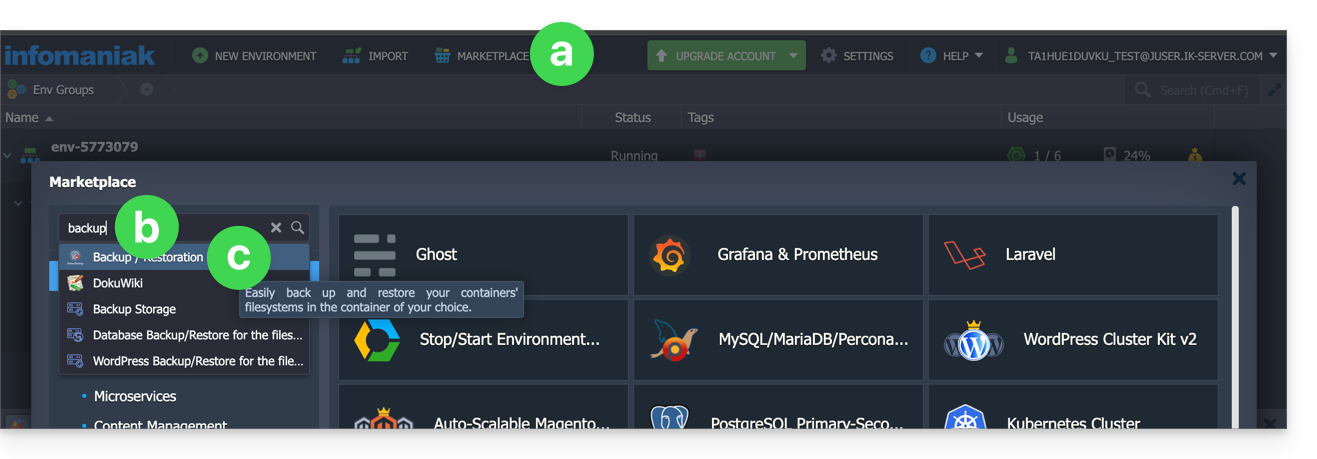
To add the extension useful for Swiss Backup on Jelastic Cloud:
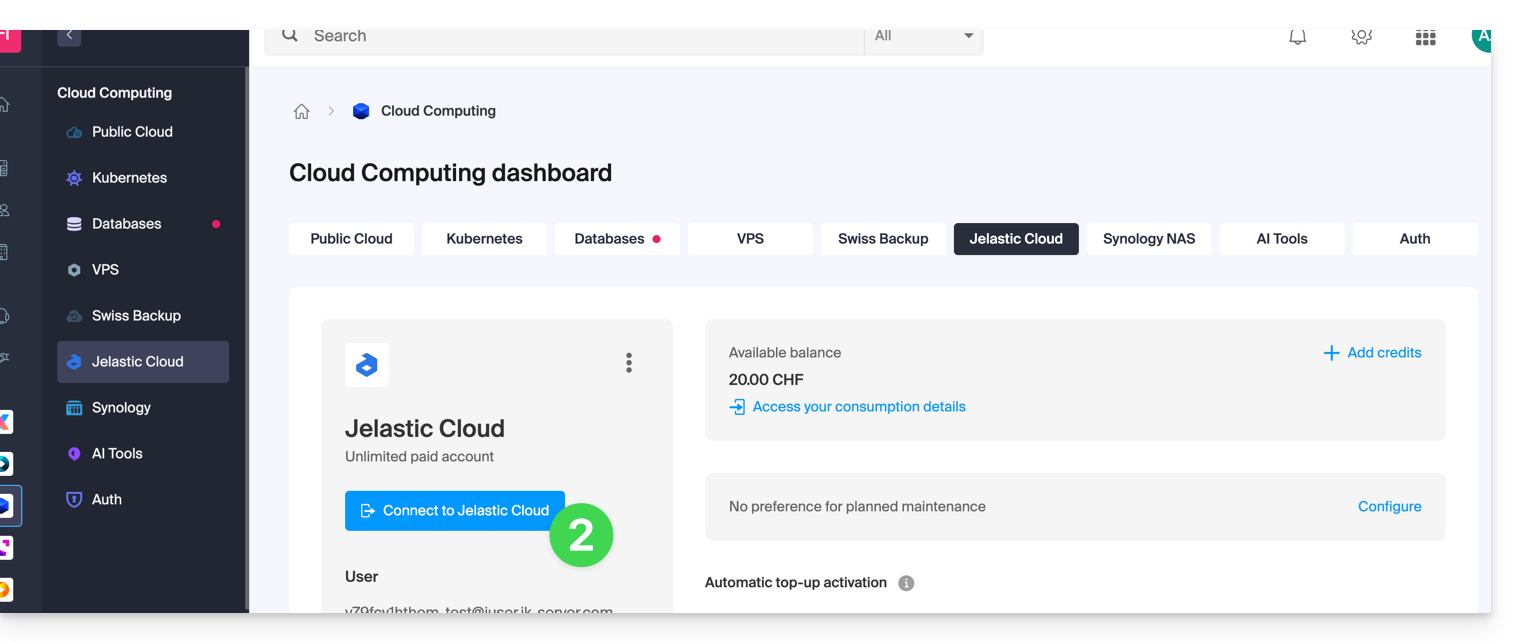
- Log in to the Jelastic Cloud Dashboard of your server.
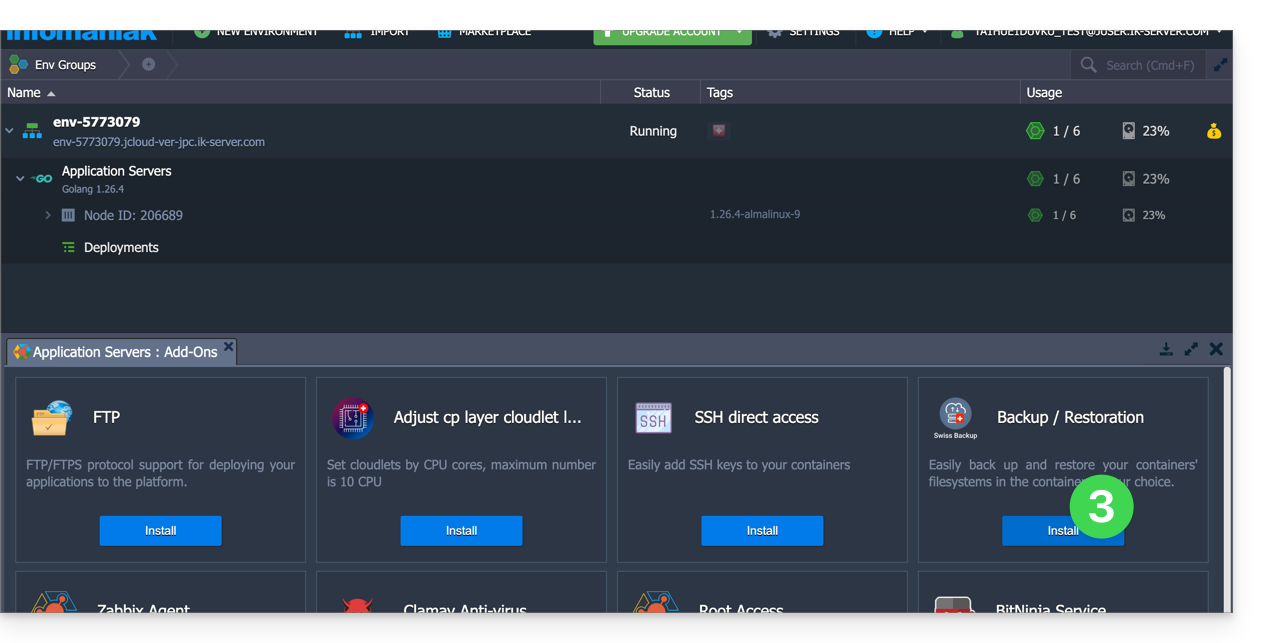
- Go to the node's add-ons section:

- Search for and install the Backup / Restoration extension:
Two types of backup are then possible and detailed below:
- Back up specific folders.
- Create a snapshot of an entire node.
Back up specific folders
To back up specific directories:
- Enter the username and password according to the information specific to your device.
- Check Backup your data.
- Check Backup specific folders
- Enter the absolute path of the folders to be backed up in the Folders to backup field; it is possible to specify several folders by separating each path with a comma, for example:
/root/admin/, /home/user1/, /jelastic/containers/(in this example, 3 folders have been specified)…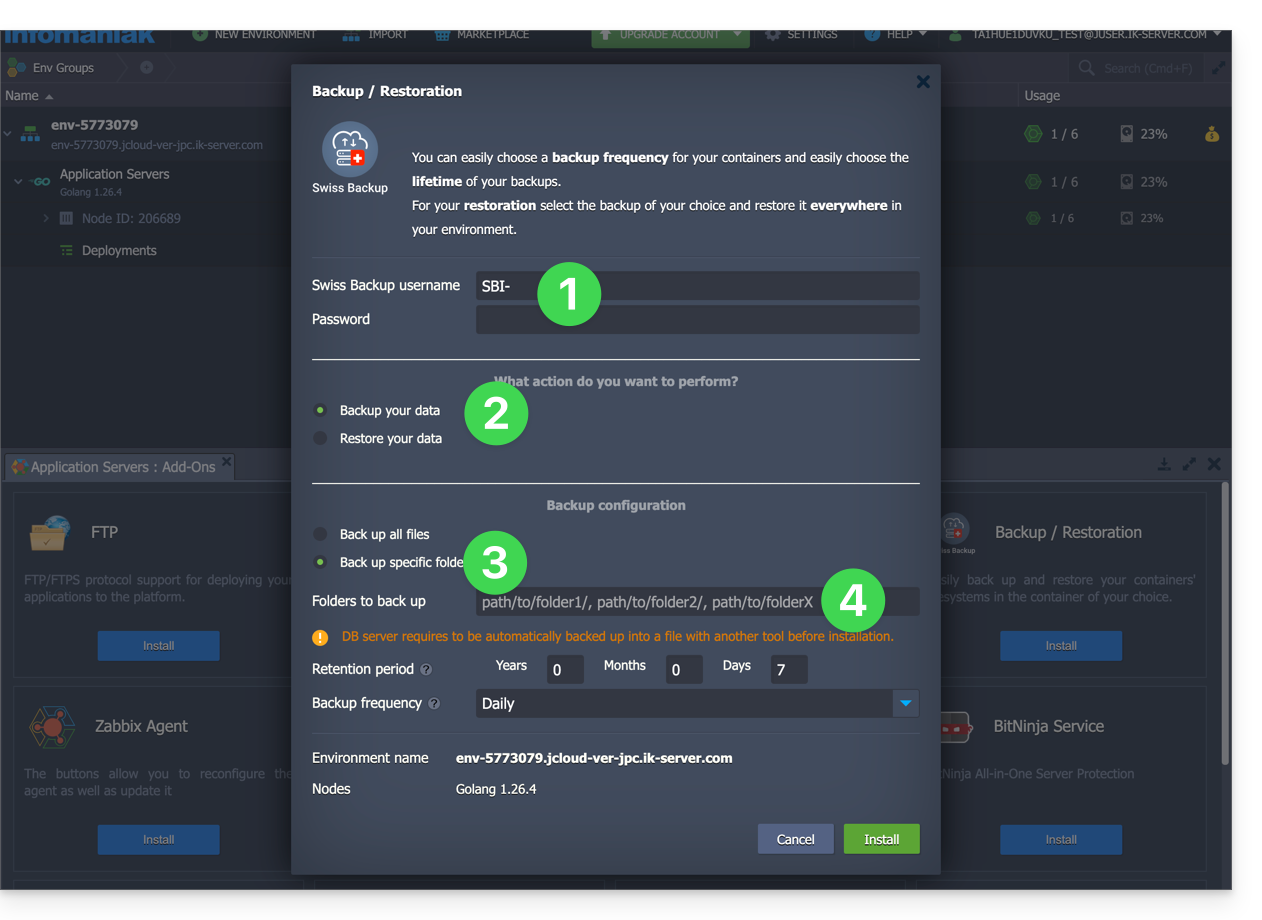
Next, you need to define the frequency of the backups (see below).
Back up an entire node
To back up an entire node:
- Enter the username and password for your Swift device on Swiss Backup.
- Check Backup your data.
- Check Backup all files to back up the entire file system of a node; some files are automatically excluded:
- the
/dev,/proc,/sys,/rundirectories - file systems that are not mounted as part of the root partition, including virtual file systems
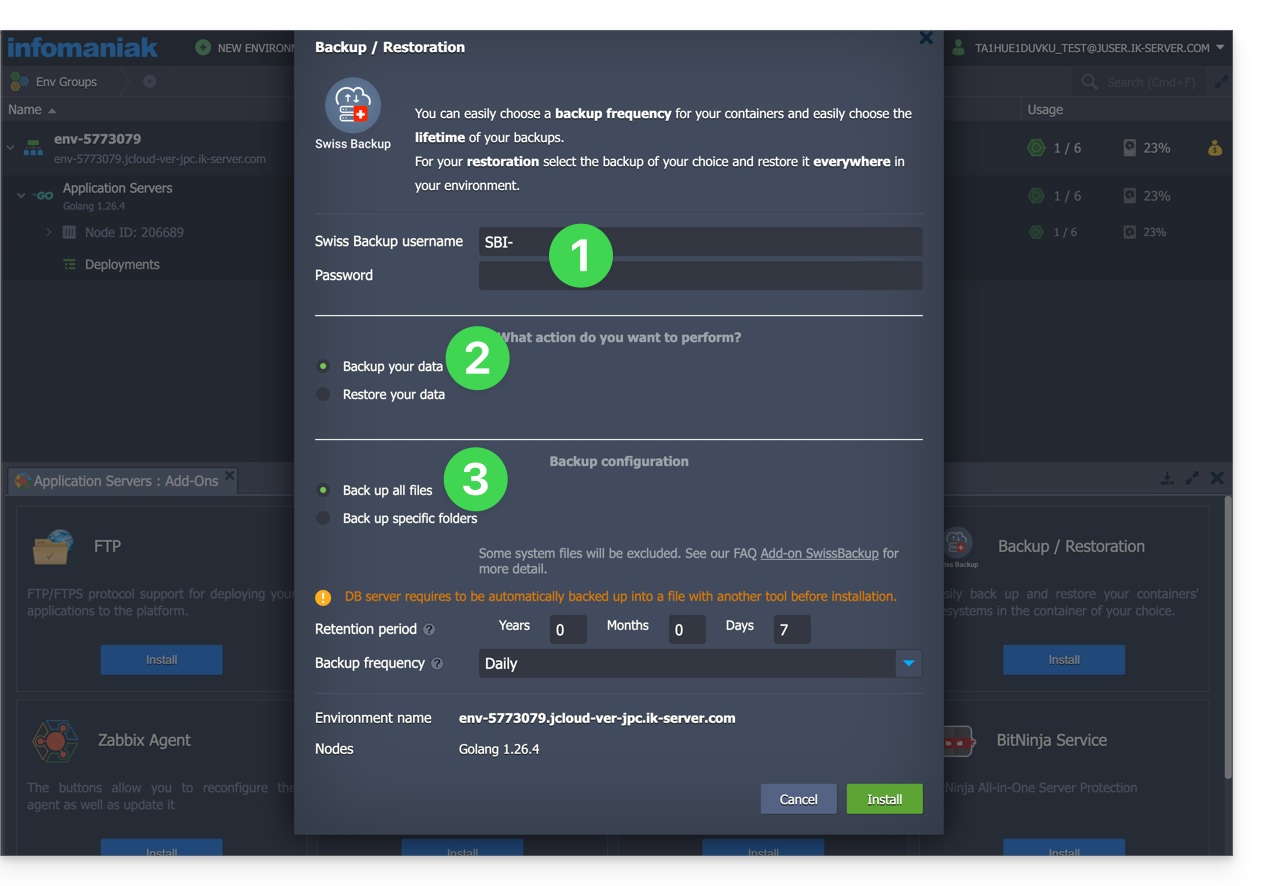
- the
Next, you need to define the frequency of the backups.
Define the frequency and retention policy for backups
Two options are available for performing the backup:
- daily (at 8 PM UTC)
- every hour (at the beginning of the hour, for example at 1 PM, 2 PM, etc.)
You can define the retention period for your backups in years, months, days, and hours. To keep your backups indefinitely, simply set the parameters to 0.
For example, if you perform backups every hour and set a retention policy of 1 year, 2 months, 4 days, 2 hours, this means that each backup will be available for a period of 1 year, 2 months, 4 days, 2 hours (=10322 backups). Note that backups are deleted every Sunday at 10:30 PM (UTC).
Warning: Do not set all parameters to 0, as permanent backups can lead to backup failures.
Recommended limits:
- Year: 1
- Month: 12
- Days: 99
For an hourly backup (every hour), a maximum retention of one month is recommended. Beyond this value, some backups may fail.
Restore backups
Restore data from a node
- Log in to the Jelastic Dashboard of your server.
- You will probably need to re-install (restart) the add-on from the Marketplace:
- Click on Marketplace.
- Search for “backup”…
- Click on the "Backup / Restoration" add-on:
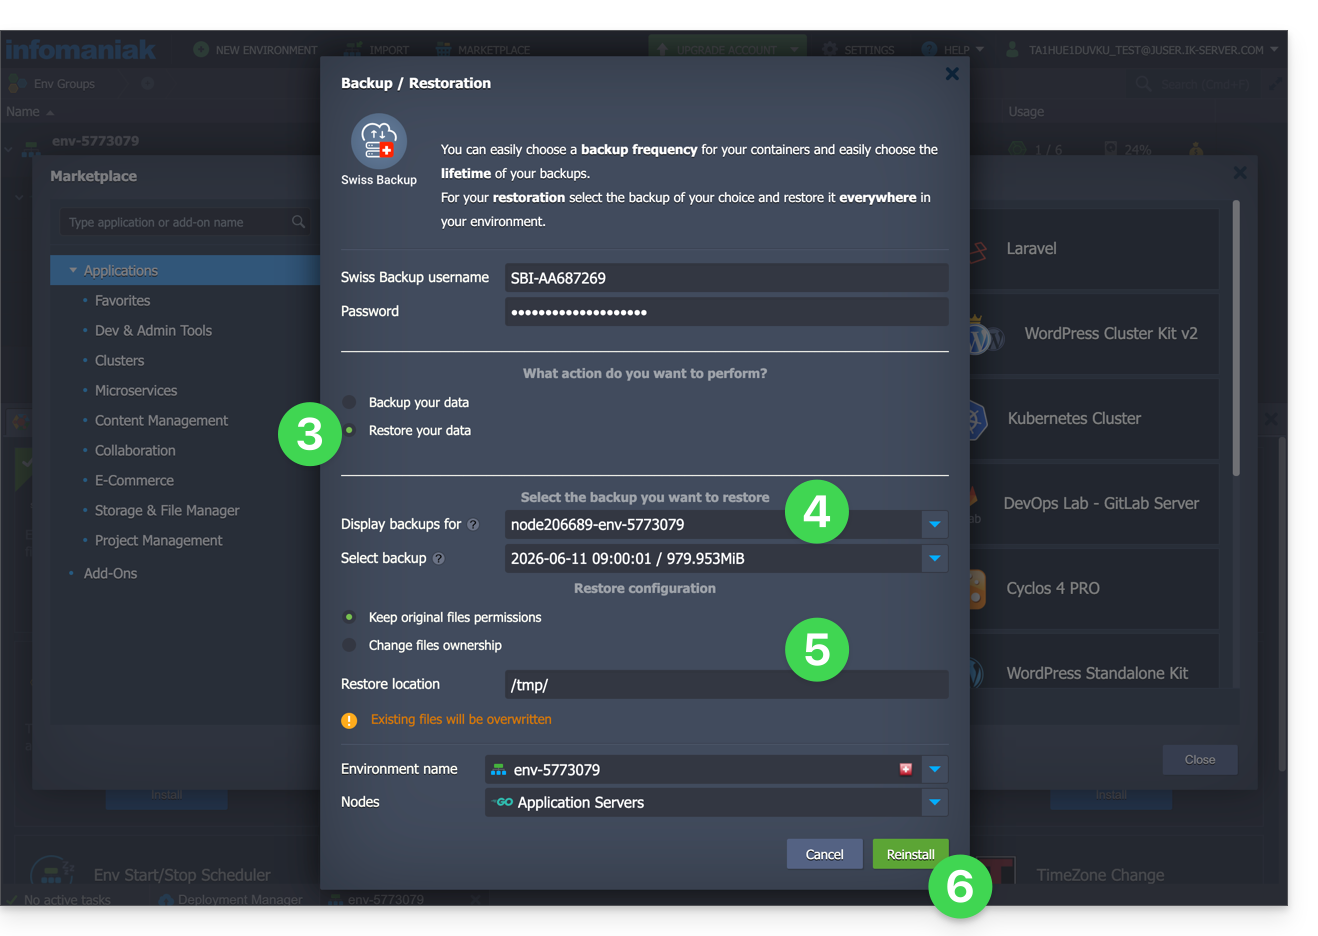
- Once the extension has been added and the username and password for your Swift device on Swiss Backup have been entered, check Restore your data.
- Select the node that contains the backup to be restored.
- Select the backup to be restored and the folder for restoration.
- Click on the Restore button:
Restore specific folders from a snapshot (CLI)
Each backup corresponds to a unique ID. You can include and exclude folders from your snapshots during a restore. To view your snapshots:
. /home/.config/swissbackup/openrc.shrestic snapshots
- Use
--excludeand--includeto restrict the restore to a subset of files in the snapshot; for example, to restore a single file:restore 79766175 --target /tmp/restore-work --include /work/foo
There are case-insensitive variants of --exclude and --include called --iexclude and --iinclude. These options behave the same way but ignore the case of the paths.
Modify the backup configuration
To do this:
- Log in to the Jelastic Dashboard of your server.
- Once the extension has been added and the username and password for your Swift device on Swiss Backup have been entered, modify the configuration as desired.
The backup schedule is defined by a cron job, and backups are performed using the restic tool.
To manually modify the backup schedule (CLI), as the root user, run the crontab -l command to display the current schedules:
- The line containing
retention-all.shcorresponds to the backup task. - The line containing
purge.shcorresponds to the backup retention task.
Example:

Modify the schedule using the crontab -e command.
You can modify the line containing the retention-all.sh or retention.sh script; these scripts launch your backups. Note: the cron jobs are designed to avoid causing problems between backups and multiple deletions. Pay attention to the time required for backups and deletions…
- Learn more about cron jobs: crontab.guru
- Learn more about restic: restic.net
Manually Delete Backups (CLI)
To do this:
- Source the configuration file:
. /home/.config/swissbackup/openrc.sh - Display the available backups:
restic snapshots - Delete the desired backup:
restic forget IdBackup --prune - Delete all backups of a file except one:
restic forget --tag folders --keep-last 1 --prune

Remove the Backup Schedule
This button allows you to delete the schedule for your backup: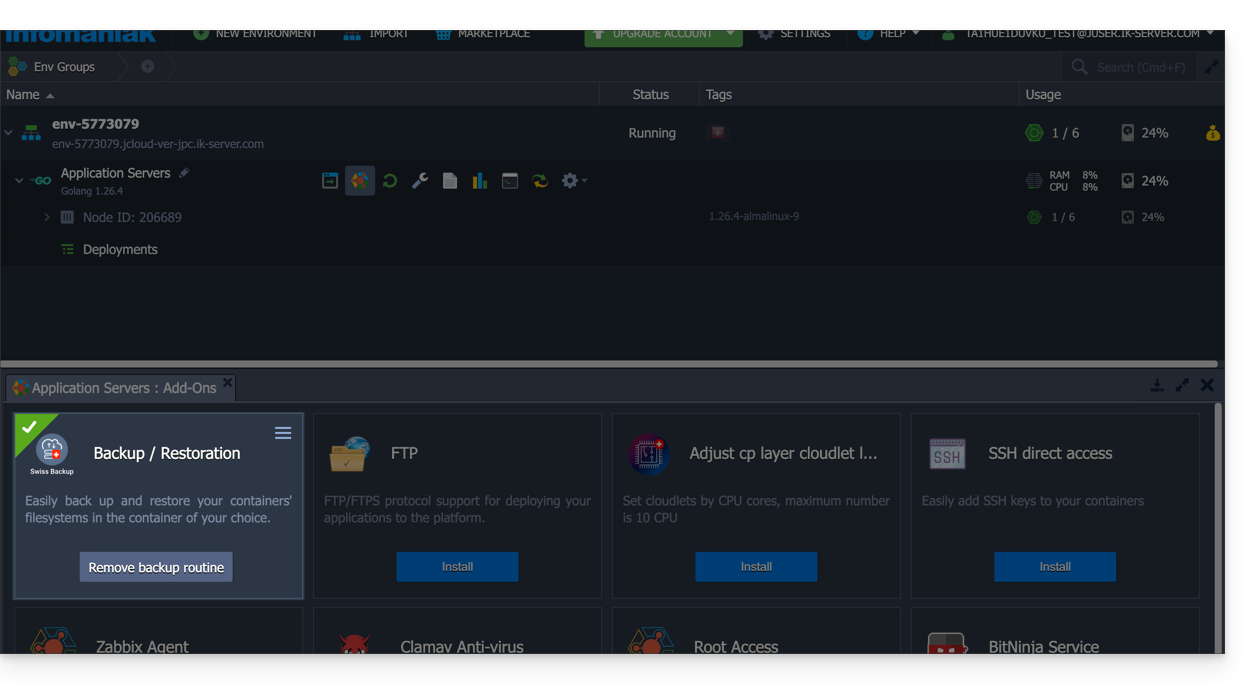
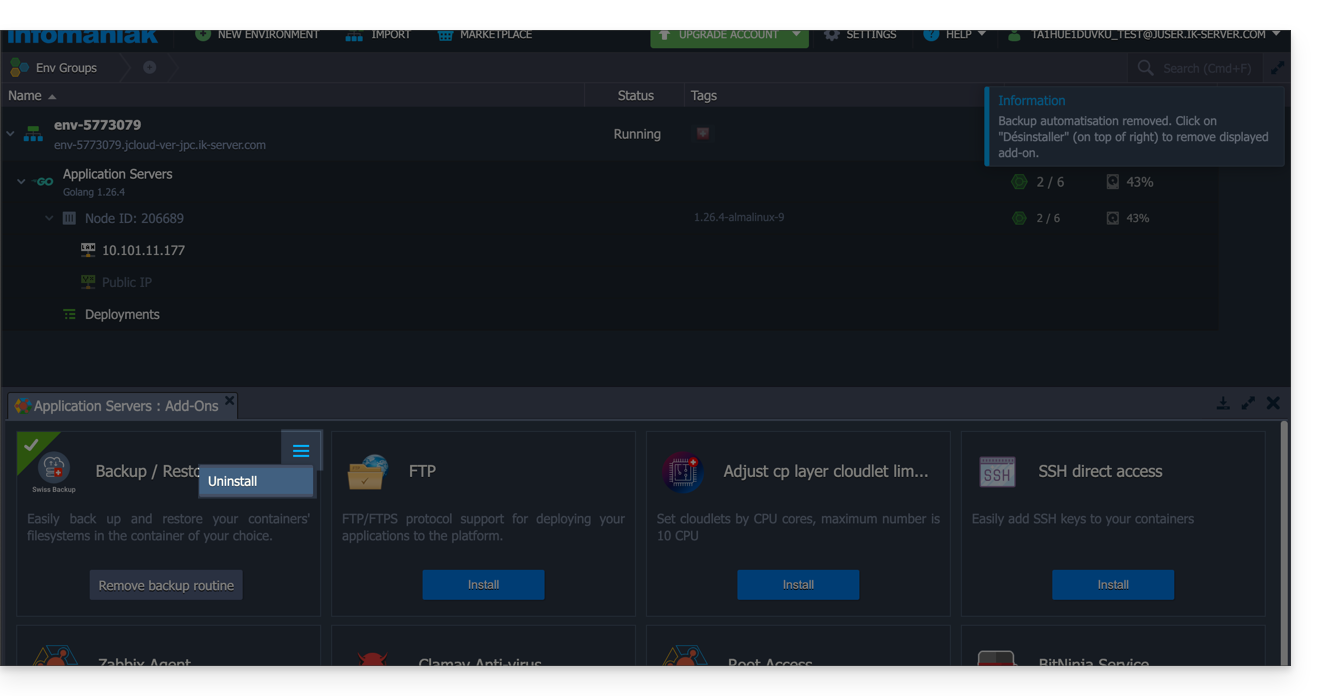
Uninstall the Swiss Backup extension
You must delete the backup schedule (see above) before you can delete the Swiss Backup extension:
Link to this FAQ:
Has this FAQ been helpful?
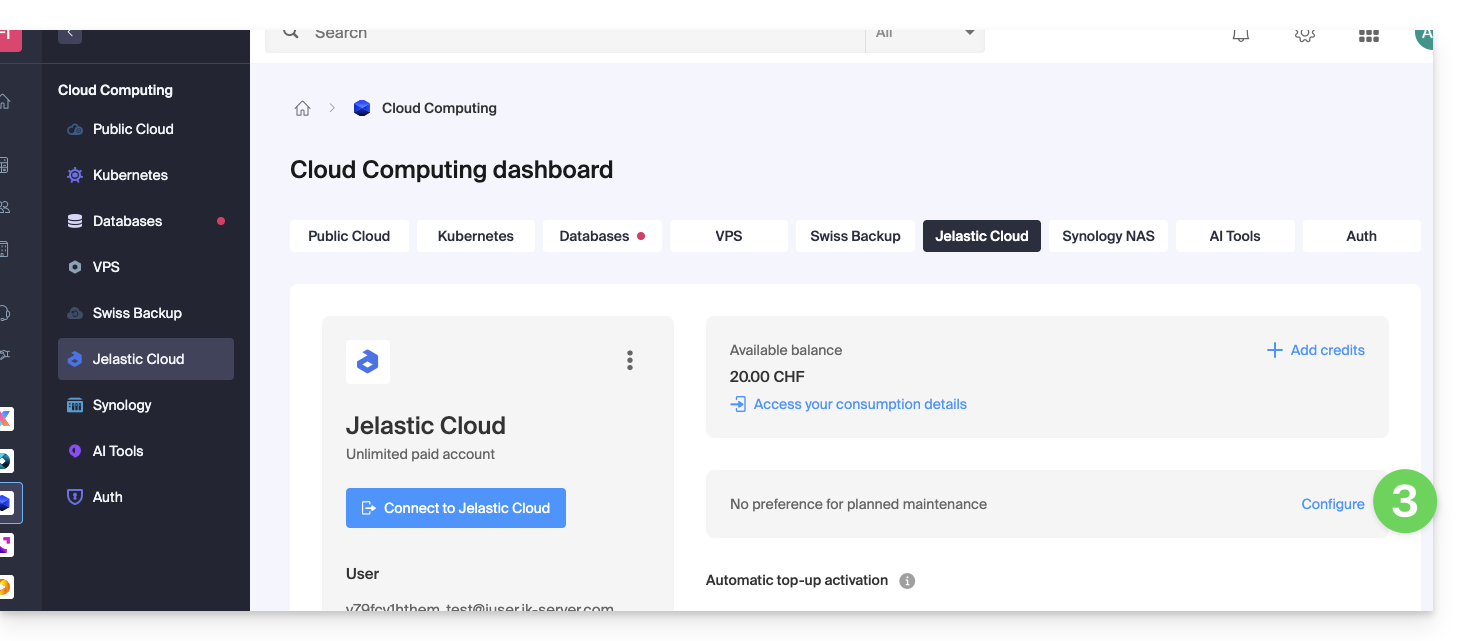
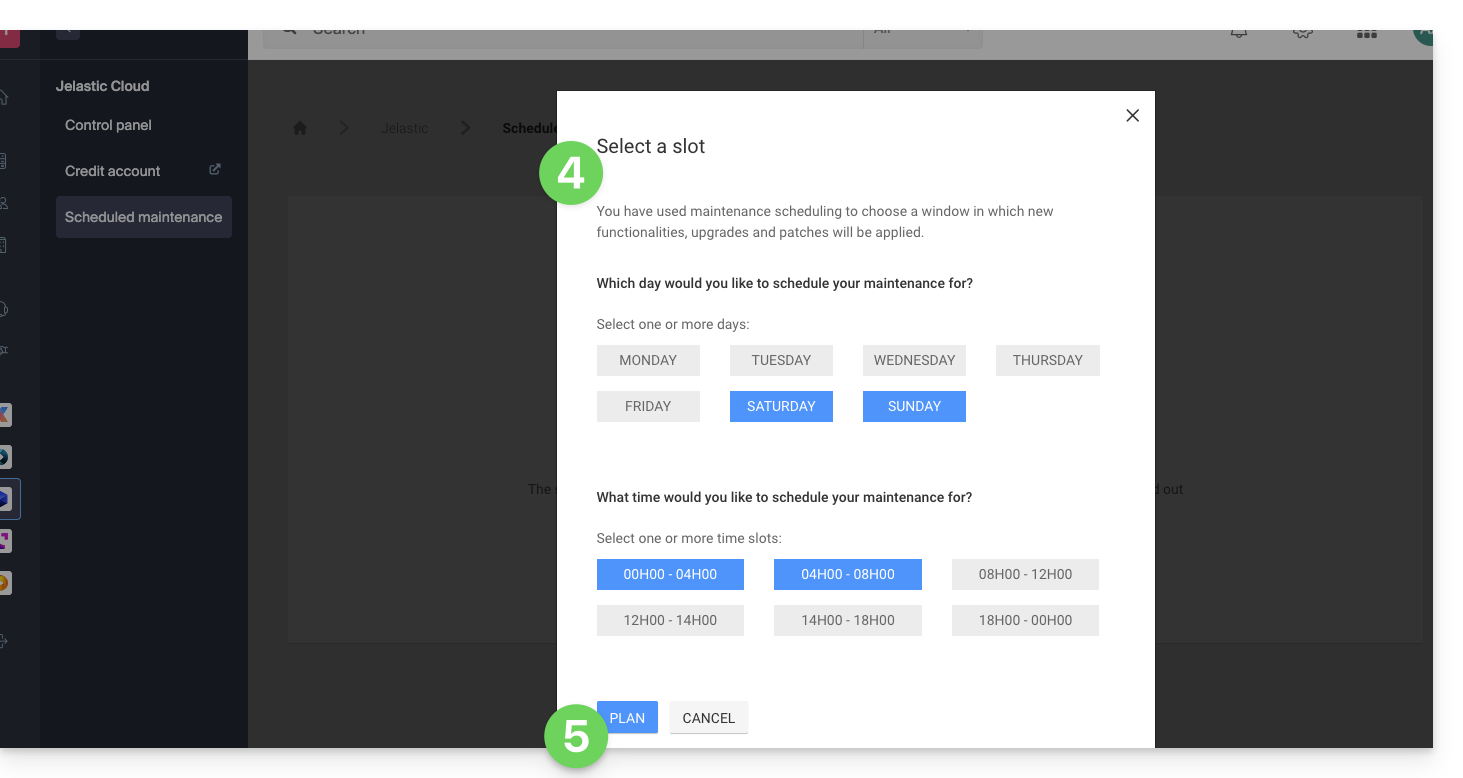
This guide explains how to customize the time slot(s) during which Infomaniak can perform maintenance to update your services (new features, fixes, etc.).
Preamble
- This feature is only available for:
- Cloud Servers
- Cloud VPS / Lite VPS
- Jelastic Cloud
- Without any indication from you, scheduled maintenance is usually performed by Infomaniak between 10 PM and 6 AM.
Modify the scheduled maintenance period
To do this:
- Click here to access the service for which you want to schedule maintenance on the Infomaniak Manager (need help?).
- Click directly on the name assigned to the product concerned.
- Click on Scheduled Maintenance in the left sidebar or on the central page depending on the service concerned (below Jelastic):
- Same principle for a VPS:
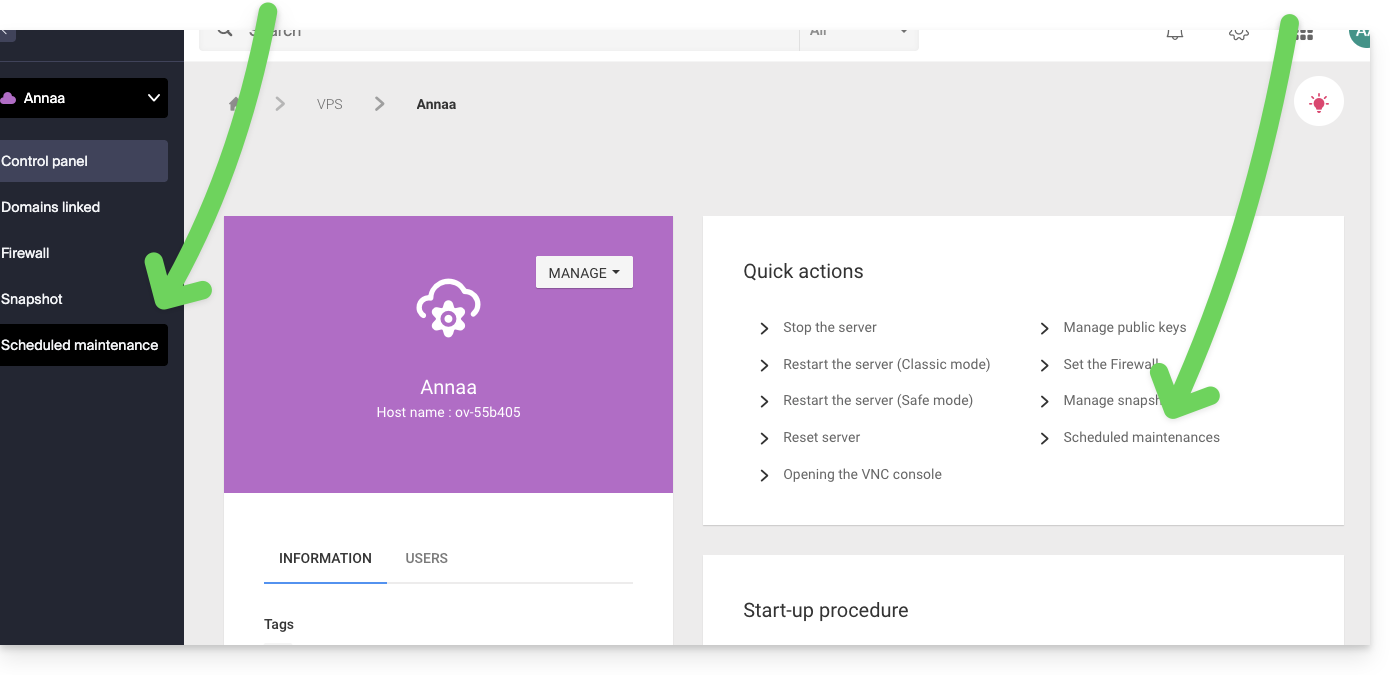
- Same principle for a VPS:
- Click the buttons to define, in blue, a preferred intervention slot.
- Validate by clicking the button at the bottom:
Link to this FAQ:
Has this FAQ been helpful?
This guide details how to transfer an Infomaniak Jelastic Cloud environment from one account to another; you can also refer to the official Jelastic documentation (in English only).
Prerequisites
- An environment can be transferred from any type of Jelastic Cloud account (trial, beta, deactivated, etc.); however, it is essential that the recipient of the transfer has a paid account.
- Also ensure that the destination account has not reached:
- the maximum number of cloudlets per container
- the maximum number of compute nodes available for an environment
- the maximum number of environments on the account
- Use the user email address of the destination account, which is found under the user section in the Jelastic dashboard of the destination account:

Transfer procedure
To perform the transfer:
- Log in to your Jelastic Cloud platform (you are leaving the Infomaniak Manager).
- Click on the Settings button next to the environment to be transferred:

- From the Settings menu, select the Change Owner option.
- Enter the email address of the destination account, then click Send:

- If the destination account exists and meets the transfer criteria, a notification indicating the sending of the request will appear.
- An icon will appear next to the environment to be transferred until the transfer request is accepted by the new owner.
- Once the transfer request is accepted, the environment is removed from your account.
It is possible to cancel the transfer procedure from the Settings menu, Change Owner, cancel the transfer request.
Once the transfer is complete, it is possible to cancel the Jelastic product from your account, all credits still available at the time of cancellation will be automatically transferred to your Infomaniak prepaid account.
Link to this FAQ:
Has this FAQ been helpful?