Knowledge base
1000 FAQs, 500 tutorials and instructional videos. Here, there are only solutions!
Contact Infomaniak / Authorize access to services
This guide explains how to contact and authorize Infomaniak Support to access your online productsand especially regarding their content, and provide useful details when submitting a support request.
Contact Infomaniak Support
Certain email addresses, such as support@infomaniak.com, are not intended to receive direct support requests.
Messages sent to these addresses are not processed by our teams and do not allow us to track your request.
To ensure proper handling, each request must be submitted solely through the support center:
- This process generates a ticket, automatically routes the request to the relevant department, and ensures complete follow-up until it is resolved.
- Once the request is registered, communication can then continue directly via email with support.
Before contacting support, we also recommend consulting the knowledge base, which contains many guides and answers to frequently asked questions.
Allow Support to access a type of content
Infomaniak Support may ask you to grant temporary access to a portion of your content; this helps save time in the diagnosis by avoiding unnecessary back-and-forth communication:
- This access is strictly limited to the context of the analysis and is only used to identify the source of the problem:
- Only Infomaniak employees directly handling your support request will have access.
- Access is only granted from Infomaniak's controlled facilities.
- In accordance with Infomaniak's privacy policy, your data will never be used for other purposes:
- You can revoke this access at any time.
- Otherwise, it will automatically expire after 7 days.
To allow Infomaniak to access a specific part of your services (granting access to one piece of content never grants access to others; each authorization is specific and independent):
- Click here to access access management in the Infomaniak Manager.
- Click on the toggle switch to allow access to the content of…
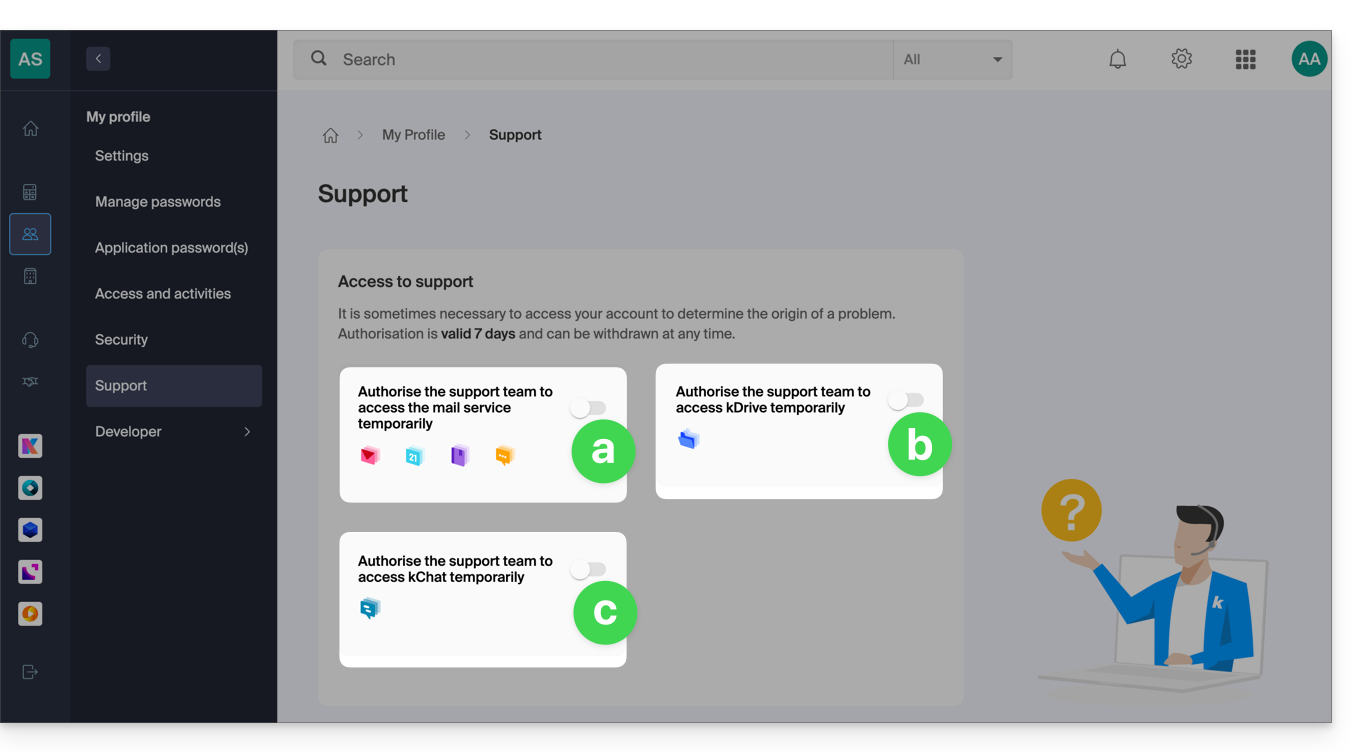
- … email addresses associated with the Mail web app from Infomaniak (online service ksuite.infomaniak.com/mail) + contacts & calendars,
- … folders from one or more existing kDrive accounts within the Organizations that the current user belongs to,
- … discussions from one or more existing kChat products within the Organizations that the current user belongs to.
With kSuite, you can also do this by clicking here or proceed as follows to achieve this:
- Click on the Settings icon in the top right corner of your kSuite window.
- Click on Support in the left-hand menu:
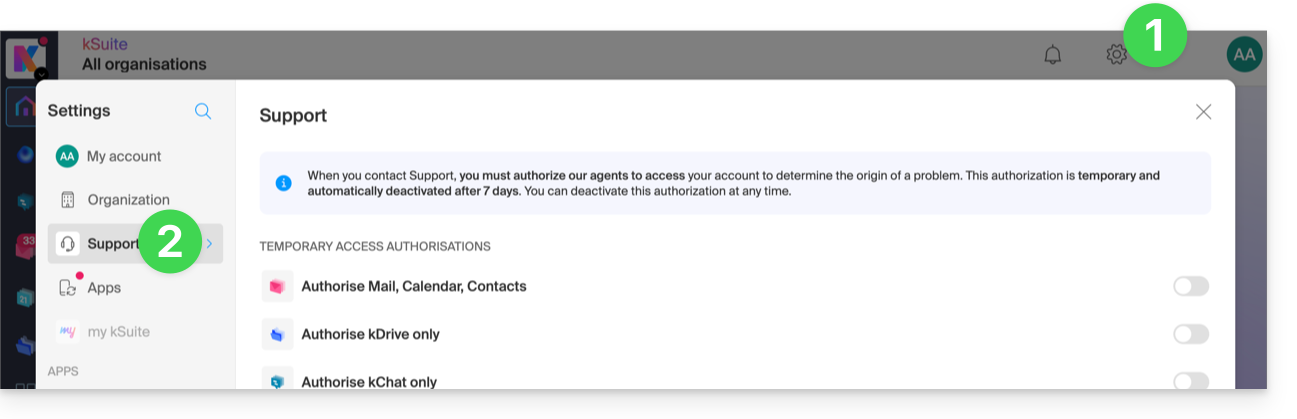
- Click on the toggle switch to allow access to the content of…
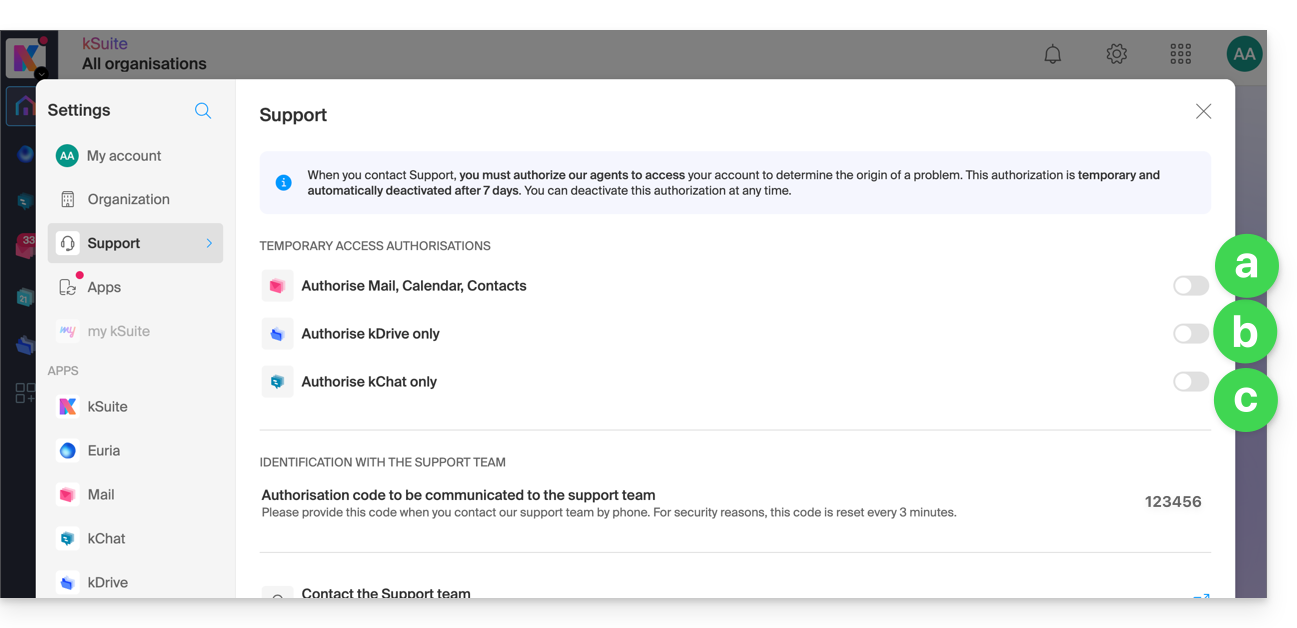
You can also easily share a single, specific email.
Taking screenshots
… on Windows
Microsoft offers a software program pre-installed that is dedicated to taking screenshots. But to take them manually:
- Display what you want to show on the screen.
- Press the PRINTSCREEN key on your keyboard once (or
PRTSCR,IMPR. ECRAN, etc.). - In Microsoft Word (or similar), go to "Edit" -> "Paste" to place your image on the page.
- Save your file.
- Repeat steps 1 to 5 as many times as the number of screenshots you want.
… on macOS
- Press the "
CMD" + "shift" (the upward-pointing arrow — Shift) + "3" keys simultaneously. - Each time you press these keys, an image file is created on your computer's desktop.
… on iOS (iPhone, iPad...)
- Simultaneously press the "
Power" + "Home" buttons (the only two physical buttons). - Then, retrieve the screenshots in the "Photos" app on your device.
… on Android (e.g. Samsung, LG or Huawei)
- Simultaneously press the “Volume Down” button (on the side) and the lock button.
- The captured image is automatically saved in a Screenshots folder in the gallery.
Copy the content of an alert window
… on Windows
To copy and paste an error message displayed in a Windows “popup” window as text, simply press the CTRL + C key on your keyboard to copy the message to the clipboard. You can then paste it (CTRL + V) into the body of the message you are sending.
Accessing the browser's JavaScript console
… on Windows
Chrome, Firefox, and Safari: enter the key combination CTRL + SHIFT + i
Internet Explorer and Edge: press the F12 key
… on macOS
Chrome: enter the key combination ⌘ + ⌥ + J
Safari: enter the key combination ⌘ + ⌥ + C
- Then, click on the icon with a crossed circle or similar to reset the log.
- Display the page of your website that is experiencing the issue.
- The console tab displays JavaScript errors and online resources that could not be found.
Link to this FAQ: https://faq.infomaniak.com/913
Has this FAQ been helpful?