Knowledge base
1000 FAQs, 500 tutorials and instructional videos. Here, there are only solutions!
Copy Microsoft email content (custom domain) to Infomaniak
This guide explains how to transfer to Infomaniak email addresses currently hosted by Microsoft, within Microsoft 365, using an IMAP import tool.
Introduction
- The operation does not affect either the data already present at the destination address or the data at the source address.
- The entire external mailbox will be imported.
- Once the import process has started, it is no longer possible to interrupt it.
- Any duplicates will be handled: identical content will only be copied once.
- Consult this other guide if you are looking for alternatives to this IMAP process.
Import your entire email history
1. Microsoft Prerequisites
- Enable the POP/IMAP/SMTP features that are disabled by default (need help?).
2. Infomaniak Prerequisites
- You must have a Mail Service on your Infomaniak Manager.
- Have a number of available addresses or adjust it if necessary.
- Make sure your email is properly secured
- Create one or more addresses on this Mail service.
- If you have many (10+) email addresses to create, please refer to this other guide regarding bulk creation.
- The destination email address must be linked to the user (= the Infomaniak account) you are using.
3. Import your email content from Microsoft to Infomaniak
- Click here to access the import tool (online service https://import-email.infomaniak.com).
- If necessary, log in to your Infomaniak account for the relevant organization. The import will be done to one of the email addresses associated with the Infomaniak Mail web interface (online service ksuite.infomaniak.com/mail) of the Infomaniak account you are using.
- Click on the IMAP import option.
- Click on single import.
- Fill in the field on the left with your source email address (from which the content will be copied).
- Click on the "Sign in with Microsoft" button that appears:
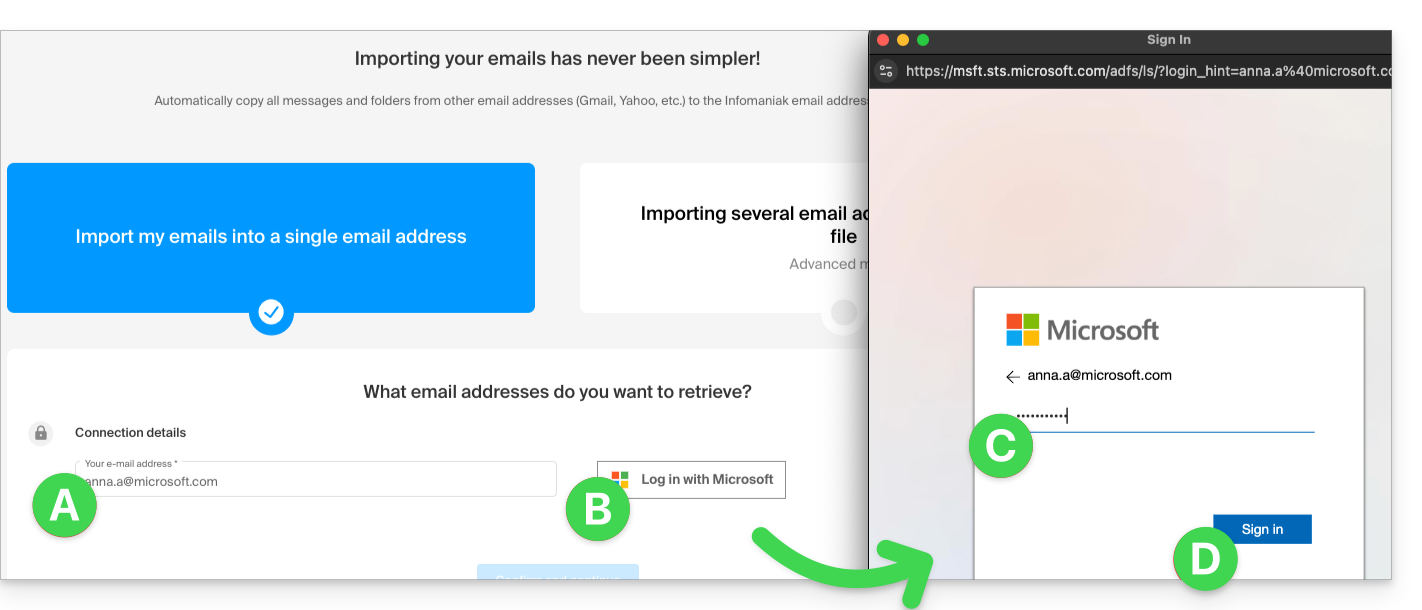
- Make sure you are signing in to the Microsoft account that you want to use for email migration.
- Confirm that you authorize the Infomaniak tool to connect to your account (automatic process).
- Once you confirm the pop-up, choose the email address to which you want to import the emails; the drop-down menu lists the email addresses currently associated with your Infomaniak Web Mail interface (online service ksuite.infomaniak.com/mail) for the Infomaniak account you are logged into.
- After selecting the desired destination address from the list, click the blue Import emails button.
- The copy process has started. You can wait and view the result on the page once the import is complete, or close the window (the import will continue in the background, and progress can be tracked - see below).
- A confirmation email will be automatically sent to all email addresses involved in the operation once the import is complete, indicating the number of messages copied.
- Tracking is available in the settings of the destination email address, and only on the web app Mail (online service ksuite.infomaniak.com/mail).
- Tracking allows you to view the import history for the address in question.
4. Adjust the application settings
Once you have taken the necessary steps to ensure that the domain name associated with your email account works with Infomaniak, modify the settings of the email software/clients you use so that they connect correctly to the Infomaniak servers: follow the configuration wizard.
Link to this FAQ: https://faq.infomaniak.com/365
Has this FAQ been helpful?