Knowledge base
1000 FAQs, 500 tutorials and instructional videos. Here, there are only solutions!
Ticketing: create and configure a pass
This guide explains how to create a pass (within the Infomaniak ticketing system). The pass can then be configured in several steps:
- Define the type during creation (subscription, ticket package, etc.) as well as the basic information and parameters (below)
- Associate events with passes
- Configure the visual appearance and information related to the pass
- Define and collect information from subscribers that will be linked to the passes
1. Start creating a pass
To do this:
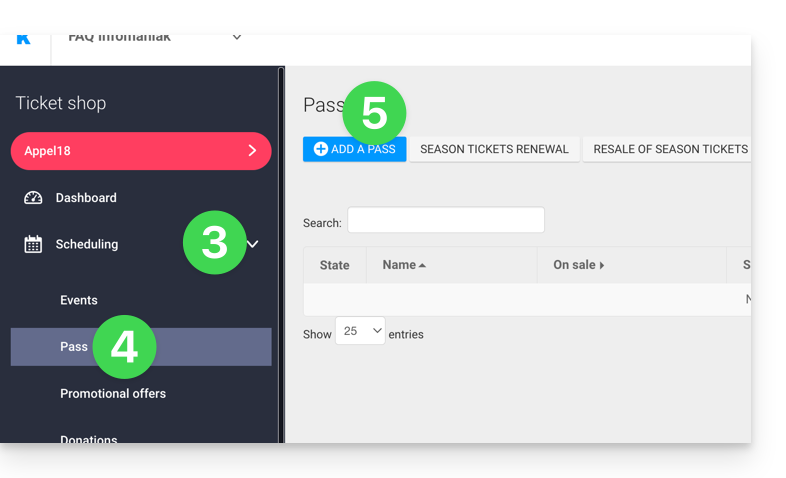
- Click here to access the management of your product in the Infomaniak Manager (need help?).
- Click directly on the name assigned to the ticketing system for the event.
- Click on Scheduling in the left-hand menu.
- Click on Pass in the left-hand menu.
- Click on Add a pass:
Pass name and description
This section allows you to define the pass name and a description for the pass: 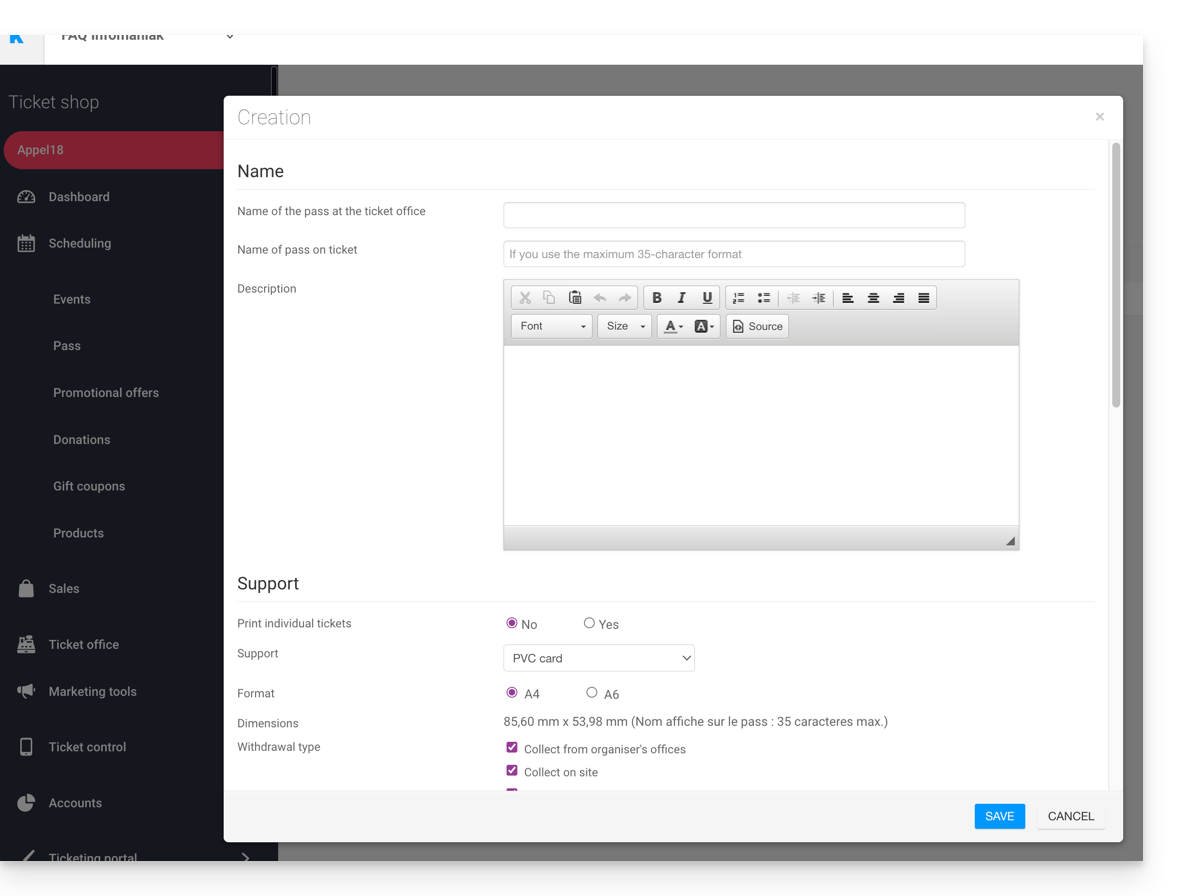
It is recommended to use a sufficiently short name in the Pass Name on Ticket field, as this will be printed directly on the pass.
Pass Support
You can choose from two types of support: 
- The PVC card, similar to a credit card, is often used for seasonal or annual subscriptions.
- Pay attention to the text size used for the Name displayed on the ticket, which will be reproduced here and limited to 35 characters.
- Choose the appropriate pick-up method that will be made available to the customer.
- The Phone/Paper format prioritizes the use of a mobile phone but also allows printing the ticket on an A4 or A6 sheet.
- The visitor will receive their pass in digital format in an email.
- They can download their pass in PDF format from the link included in the email.
Infomaniak does not send physical passes or tickets to visitors. Sending the pass is the responsibility of the organizer.
The appearance of the pass can be configured once the pass has been created (see step 3).
Manage the display during scan-based checks
The two options presented here allow you to define the parameters used for password checks:
- Passes will have random barcodes when created, but the organizer can freely modify them from the pass management section.
- The icon that will be displayed when checking the pass:

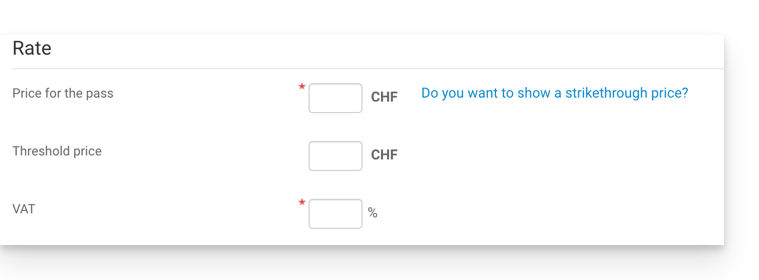
Pass price
- Enter the desired amount:
Validity period
- The validity period will be used if you want to ensure that this pass is only available for a limited time.
- For example, you can configure a ticket package that can only be used during the winter season, for a seasonal promotion.
- Please note that if a pass is outside its validity period, it will be possible to purchase it, but it cannot be used or accessed to add tickets to it.
Types of passes
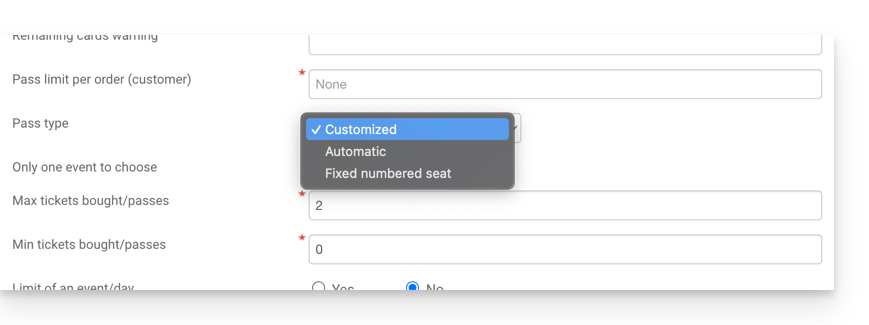
1. Custom
This pass allows the customer to choose events and dates from the available options. Therefore, the limitations of the pass must be defined:
- Only one event can be selected:
- The customer can only choose one event, but depending on the ticket limit, they can choose one or more tickets for the selected event.
- Please note: When a customer purchases a pass, the system will deduct the number of tickets entered in this field from all events associated with the pass.
- These tickets will be "reserved" for this pass.
- When the customer uses the pass at the scanners, the system will release the tickets for all other events.
- Maximum tickets
- The number of tickets that can be associated with the pass.
- Minimum tickets
- If a minimum of 0 is set, the customer can purchase an empty pass and choose their seats later.
- Any number other than 0 will require the customer to choose tickets when purchasing the pass.
- Limit of one event per day
- The pass is limited to one event per day.
- The customer cannot order more than one ticket per day for this pass.
- All tickets on the same day
- Allows you to choose a date and then select the events for that date.
- Limit the number of events per pass
- This option allows you to define whether a customer can attend the same event multiple times (in the case of multiple dates).
- If enabled, the customer can only book one ticket per event with the "same name" (or "same performance") for this pass.
- Note: the spelling of the event name must be identical.
- Minimum number of different events per pass
- The customer must book tickets for at least as many different events as are available on the pass.
- This is used to prevent visitors from booking all their tickets for a single event.
2. Automatic
The pass will not be customizable by the customer: it will automatically include the tickets defined by the organizer.
3. Fixed numbered seat
If the event takes place in a venue with a seating plan, this type of pass allows the customer to choose a pass with a numbered seat on the seating plan. This seat will remain the same for all events associated with the pass that take place in the same venue.
An organizer may want to set up passes with registration validation.
After creating the pass, the next step is to associate it with the corresponding events and configure the various available options.
Link to this FAQ: https://faq.infomaniak.com/2770
Has this FAQ been helpful?