Knowledge base
1000 FAQs, 500 tutorials and instructional videos. Here, there are only solutions!
Using Infomaniak DynDNS with a Synology NAS
This guide explains how to access a Synology NAS connected to the internet with a dynamic IP address from Infomaniak via a domain name.
Prerequisites
- Have a Synology NAS connected to the internet with a dynamic IP address.
- A dynamic DNS must have been created on the domain in question from the Infomaniak Manager (❓: help).
Link a Synology NAS to a domain name
1. Add Infomaniak as a service provider
- Open the Synology NAS management interface (DSM).
- Go to the Control Panel.
- Click on External Access (under the Connectivity section).
- Click on the Customize button (under the DDNS tab):
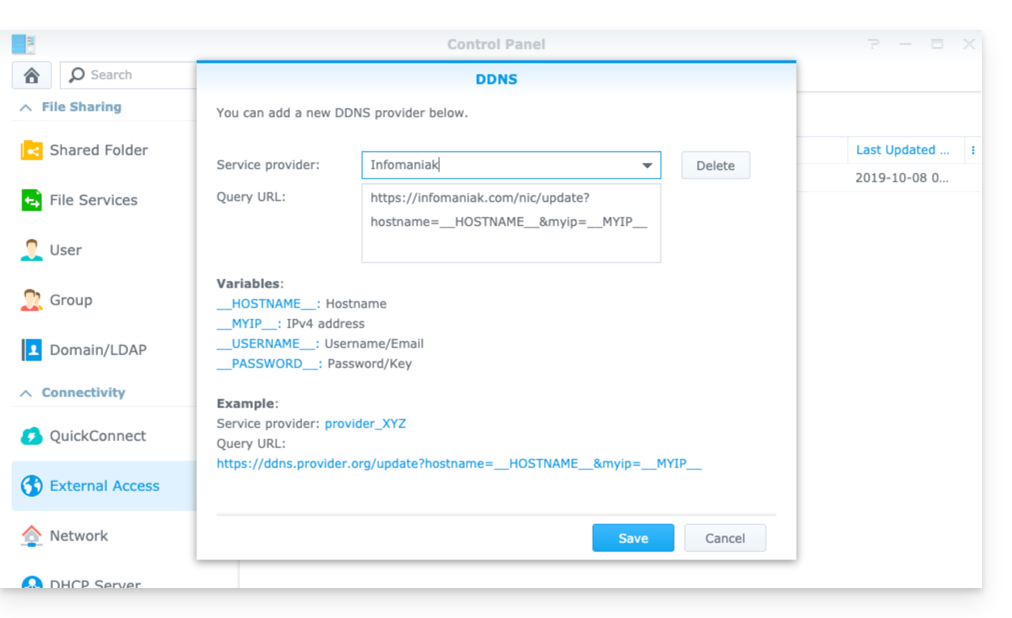
- Service provider:
Infomaniak - Query URL:
https://infomaniak.com/nic/update?hostname=__HOSTNAME__&myip=__MYIP__ - Click Save.
2. Add the dynamic DNS to Synology
Now that Infomaniak has been added as a service provider:
- Open the Synology NAS management interface (DSM).
- Go to the Control Panel.
- Click on External Access (under the Connectivity section).
- Click on the Add button:
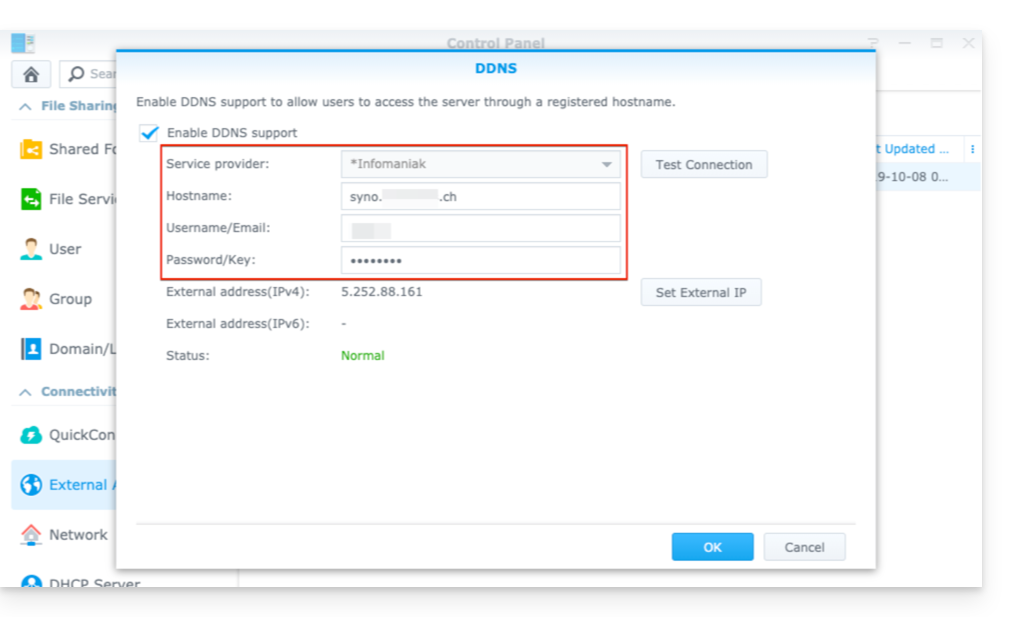
- Service provider:
Infomaniak(the profile created in the previous step) - Hostname: The
URLconfigured in the Manager when adding the Dynamic DNS (❓: help). - Username: The
IDdefined in the Manager when adding the Dynamic DNS (❓: help). - Password:
the passworddefined in the Manager when adding the Dynamic DNS (❓: help).
From this point on, the dynamic IP address of your Synology NAS will be automatically synchronized with your domain name.
3. NAT Configuration for Synology DDNS
To make your NAS accessible from outside your network, you need to configure its NAT settings. By default, Synology NAS devices use ports 5000 and 5001 (❓: help).
You can access your NAS using the following syntax: http://votre-domaine:5000 or https://votre-domaine:5001.
4. Configuring a “Reverse Proxy”
If you do not want to specify ports :5000 or :5001 in your URLs, you can configure a Reverse Proxy from your Synology NAS, and redirect URLs to port 443 for port 5001 and port 80 for port 5000 (❓: help).
Link to this FAQ: https://faq.infomaniak.com/2368
Has this FAQ been helpful?