Knowledge base
1000 FAQs, 500 tutorials and instructional videos. Here, there are only solutions!
Back up your QNAP with rClone or HBS to Swiss Backup (Swift)
This guide details how to back up a QNAP NAS using rClone or HBS via the OpenStack Swift protocol on Swiss Backup, the backup solution in an independent Swiss cloud.
Connection via rClone
Prerequisites
- Have an Infomaniak Swiss Backup space with available device quota (minimum 1) for a Cloud backup.
- Add 1 device of type Cloud to obtain the OpenStack Swift settings.
- Install the rClone application (https://www.qnapclub.eu/en/qpkg/330) or HBS (https://www.qnap.com/en/software/hybrid-backup-sync) on the QNAP.
To configure a new backup:
- Copy the content below into the
rclone.conffile in the user's.config/rclonedirectory (e.g.,/share/homes/backupuser/.config/rclone/rclone.conf). - Check the configuration with "
rclone config". - Start the copy process with the command "
rclone sync /share/to/sync Infomaniak:default".
Replace SBI-XXXXXXXX and "passwd" with the information specific to your device (refer to this other guide):
[sb_project_SBI-XXXXXXXX]
type = swift
user = SBI-XXXXXXXX
key = passwd
auth (1) = {{URL_8}}
domain = default
tenant = sb_project_SBI-XXXXXXXX
tenant_domain = default
region = RegionOne
storage_url =
auth_version =
Connecting via HBS (Hybrid Backup Sync)
To configure a new backup:
- Open HBS and go to Backup & Restore, then click on Create new Backup job.
- Select the NAS folder to back up, then click Next.
- Choose OpenStack Swift, then enter the information as indicated below:
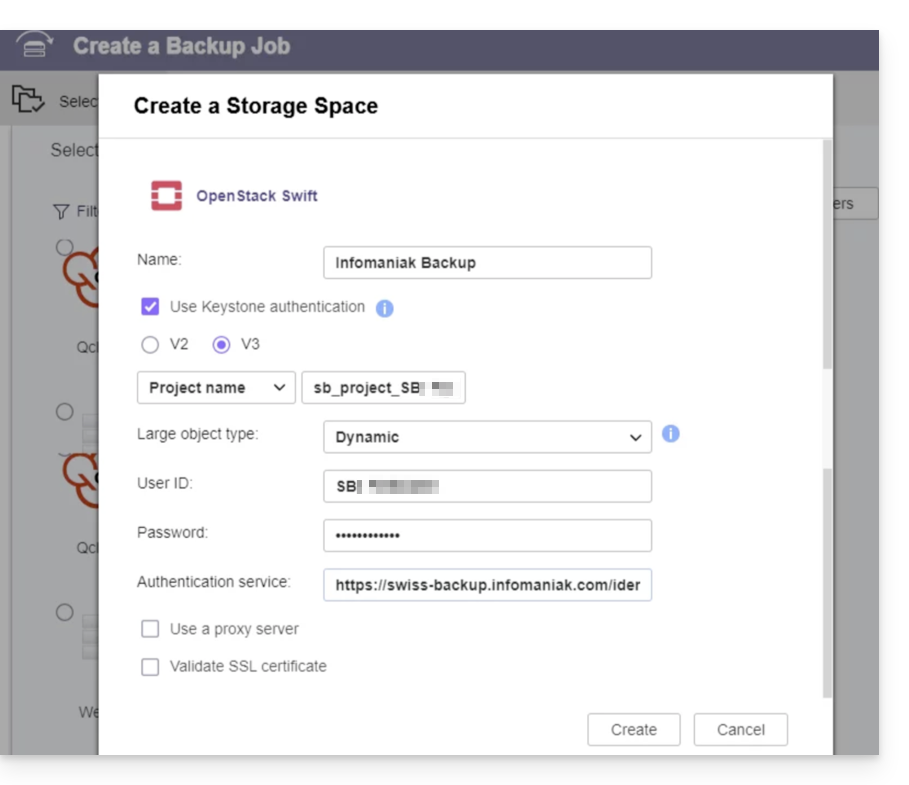
- Name: give a name to the backup
- Select “
Use Keystone Infrastructure” - Select “
V3” - Project name:
sb_project_SBI-XXXXXXXX(replaceSBI-XXXXXXXXwith your own ID, same below) - User ID:
SBI-XXXXXXXX - Password: the one generated on Swiss Backup
- Authentication service (1):
https://swiss-backup.infomaniak.com/identity/v3
- Click on Create.
- Region name:
RegionOne - Bucket name:
default - Multipart Size: leave as
128MB - Click on Select.
- Click on default under the destination and then click on OK.
- Give the task a name.
- Then, configure the desired settings, such as the backup frequency and bandwidth limitation.
- Click on Create.
(1) The indication "//swiss-backup02", "//swiss-backup03" etc. changes depending on the cluster number indicated in the Manager under Cloud storage information in the "Location" section; and if your Swiss Backup device was created before October 2020, you will need to use https://swiss-backup.infomaniak.com/identity/v3.
Link to this FAQ: https://faq.infomaniak.com/2319
Has this FAQ been helpful?