Knowledge base
1000 FAQs, 500 tutorials and instructional videos. Here, there are only solutions!
Add Infomaniak DKIM to Cloudflare
This guide explains which DKIM to add to secure Infomaniak email if it is based on a domain name whose DNS records are managed by Cloudflare.
Introduction
- If you manage your emails with Infomaniak, as well as the domain name associated with them, but DNS management is handled by Cloudflare, then you need to add the DKIM on the Cloudflare interface.
Add a DKIM on Cloudflare
Prerequisites
- Consult this other guide to learn how to display the DKIM record for your Infomaniak email account.
- Display the DKIM record so you can copy and paste it. Example:
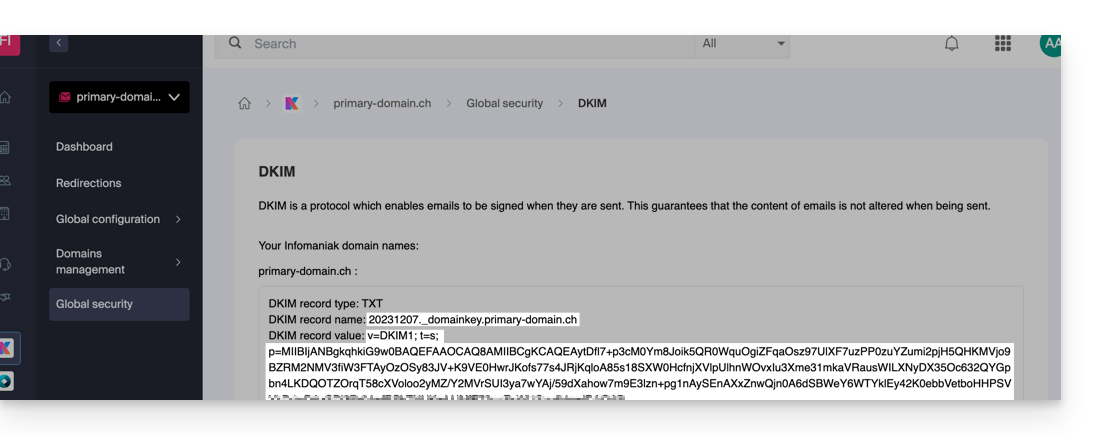
Then, follow the procedure below to correctly enable DKIM, thereby improving the security and deliverability of emails for the domain in question:
- Click here to access your Cloudflare account.
- Select the domain in question.
- In the DNS section, find and delete any existing NS records for "
_domainkey" that point to Infomaniak. - Click the Add record button to open the input form.
- Fill in the fields using the data obtained from the Infomaniak Manager, following the standard configuration for a DKIM record of type TXT:
| Cloudflare Field | Value to Enter | Important Notes |
|---|---|---|
| Type | TXT (text) | Choose the standard type for DKIM keys. |
| Name (Host) | The DKIM selector (e.g. 20240112) | Enter only the selector, as Cloudflare will automatically add the domain name and the ._domainkey suffix for you. Refer to the Cloudflare documentation if needed. |
| Content (Value) | The public key (the long string) | Paste the entire DKIM public key provided (the part after p=) |
| TTL | Auto | Leave the default value for optimal management by Cloudflare. |
Make sure the Proxy Status (cloud) is set to DNS Only (grayed out) for email authentication records.
Backup and Propagation
After carefully verifying the accuracy of the Selector and Public Key, click the Save button. This will validate the addition of your DKIM record to the Cloudflare DNS zone.
Any DNS addition or modification may take up to 48 hours to propagate.
Once this period has elapsed, you can use online verification tools to confirm that the DKIM record has been published and is valid. This validation ensures that your Infomaniak emails will be correctly signed and that their deliverability will be optimal.
Link to this FAQ: https://faq.infomaniak.com/1619
Has this FAQ been helpful?