Base de conhecimento
1000 perguntas frequentes, 500 tutoriais e vídeos explicativos. Aqui, você encontra apenas soluções!
Este guia explica por que você pode receber um e-mail de segurança automático sobre sua conta Infomaniak (ou seja, sua conta de usuário).
Introdução
- Atenção: estão a circular mensagens falsas que imitam o e-mail de segurança da Infomaniak.
- Se não tiver a certeza da autenticidade do aviso, aceda ao painel de controlo Infomaniak e verifique a atividade recente em vez de clicar em qualquer link potencialmente malicioso que possa estar presente na mensagem falsa.
Mensagens automáticas de alerta
1. Acesso a partir de um novo local
Um e-mail de segurança é enviado automaticamente sempre que uma nova conexão à sua conta Infomaniak é efetuada a partir de um novo local: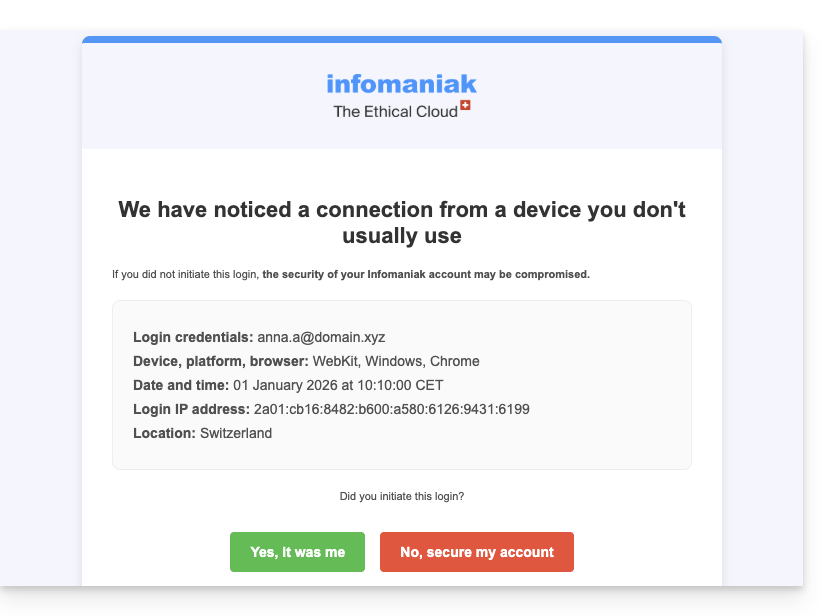
Isto pode acontecer, por exemplo, se utilizar o modo de navegação privada do seu navegador ou se aceder à sua conta a partir de um novo computador.
Se receber este e-mail logo após ter feito login na sua conta Infomaniak, pode ignorar o aviso de login!
2. Tentativa de login (senha incorreta)
Um e-mail de segurança é enviado automaticamente quando alguém insere uma senha incorreta após inserir o endereço de e-mail para acessar o Manager: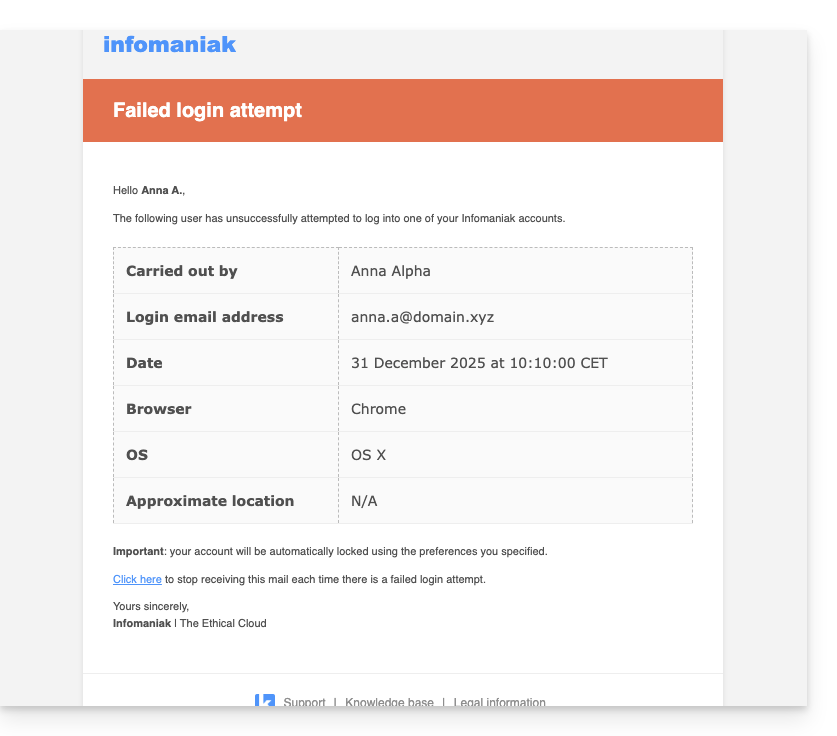
Consultar as atividades recentes no Manager
Pode consultar as atividades recentes da sua conta Infomaniak e da sua Organização Infomaniak em: aqui e aqui:
Se detetar ações ilegítimas, que não acredita ter realizado, e/ou em caso de suspeita de intrusão:
- Consulte este outro guia para proteger rapidamente suas ferramentas.
- Ative a autenticação de dois fatores em sua conta para aumentar a segurança e garantir que apenas você receba um código exclusivo que autoriza o acesso.
- Altere a senha do Manager.
- Altere as senhas dos endereços de e-mail associados ao Mail Infomaniak.
Link para esta FAQ: https://faq.infomaniak.com/88
Esta seção de perguntas frequentes foi útil?
Este guia explica como, quando você pertence a várias Organizações, alternar entre a visualização de uma Organização e outraatravés da interface web Mail da Infomaniak (ksuite.infomaniak.com/mail) para aceder aos endereços de email associados a cada uma delas.
Introdução
- Cada endereço de e-mail hospedado na Infomaniak está associado a uma Organização específica, aquela na qual o Serviço de E-mail é criado.
- A interface web Mail exibe os endereços de e-mail vinculados à Organização atualmente selecionada.
- Para consultar um endereço de e-mail diferente pertencente a outra organização, basta alternar para a organização correspondente.
- Deseja consultar simultaneamente endereços de e-mail hospedados por diferentes organizações? Simplesmente abra várias abas no seu navegador, cada uma dedicada a uma organização.
- O princípio é o mesmo na interface onde você gerencia seus produtos, o Manager Infomaniak (consulte este outro guia).
Alternar entre diferentes organizações no Mail Infomaniak
Para exibir os endereços de e-mail presentes em outra organização à qual sua conta Infomaniak está associada:
- Clique aqui para aceder à interface web do Mail Infomaniak.
- Clique no nome da Organização ativa ou na seta para baixo localizada no canto superior esquerdo da interface:
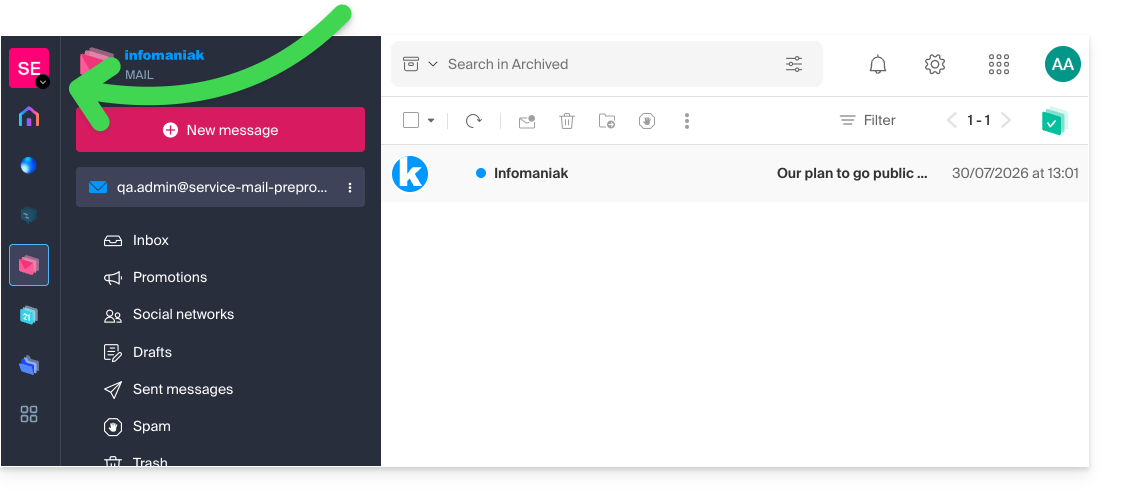
- No menu suspenso que se abre, clique no nome da Organização à qual deseja ter acesso:
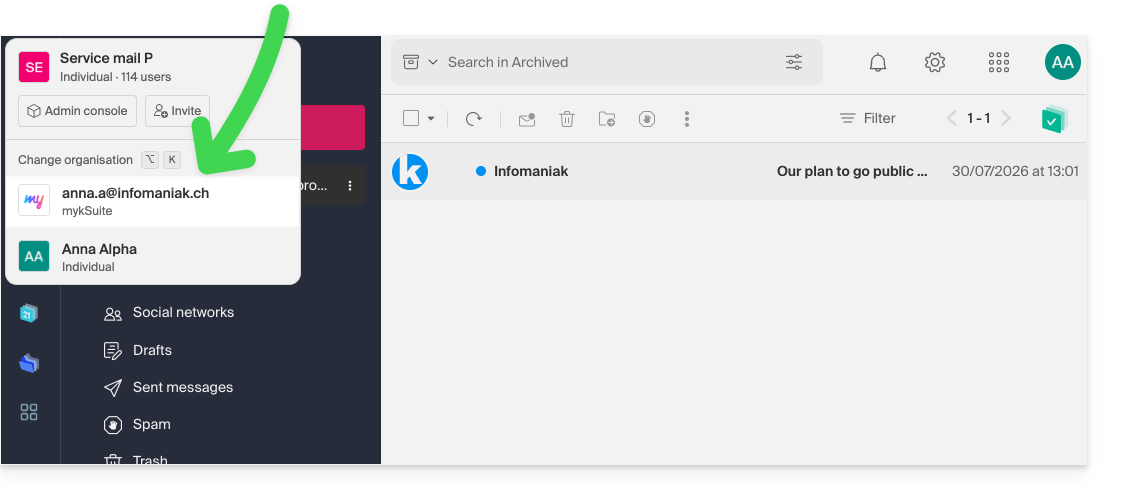
- A interface é atualizada imediatamente e carrega a lista de endereços de e-mail autorizados para esta Organização:
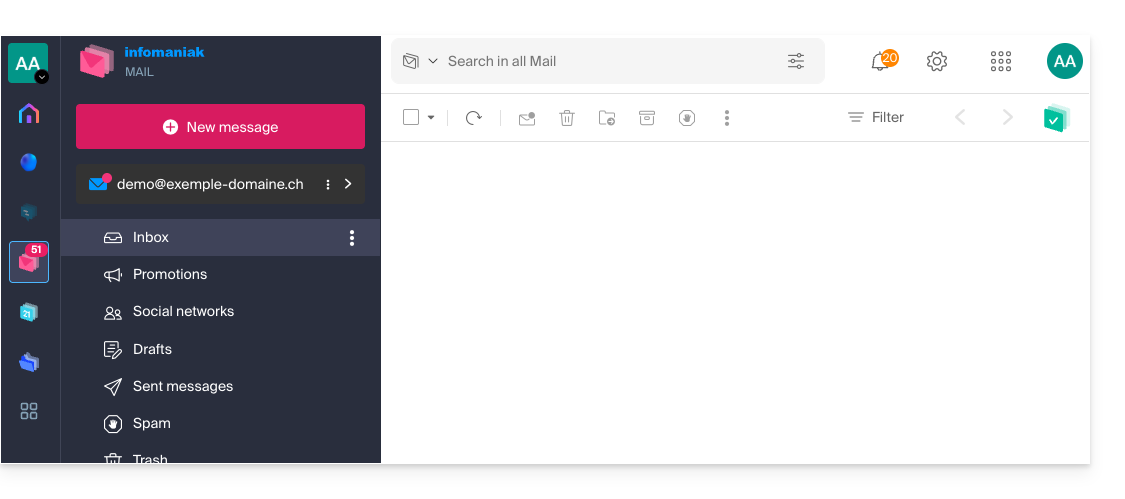
- Repita o procedimento a partir do ponto 2 para alternar para outra Organização a qualquer momento.
Link para esta FAQ: https://faq.infomaniak.com/108
Esta seção de perguntas frequentes foi útil?
Este guia explica como arquivar temporariamente um e-mail até uma data/hora específica, na aplicação web Mail da Infomaniak (serviço online ksuite.infomaniak.com/mail).
Introdução
- A função de suspensão também está disponível no aplicativo móvel Infomaniak Mail (aplicativo para smartphones ou tablets iOS/Android).
- No máximo, um total de 1000 conversas da caixa de entrada pode ser colocado em suspensão, por um período máximo de 1 ano (essa suspensão pode ser interrompida ou alterada temporalmente a qualquer momento).
- kSuite Free / my kSuite / Serviço de E-mail Starter não permitem a personalização do horário ao colocar em espera.
Funcionamento
Durante este período de espera (função adiar ou lembrar):
- A conversa é movida para uma pasta "Em espera", visível no aplicativo Mail, onde é exibido o número de conversas em espera.
- Se uma nova mensagem chegar em uma conversa que está em espera, esta será automaticamente cancelada e a conversa ficará visível na caixa de entrada.
- Quando o prazo expirar:
- A conversa retorna automaticamente para a caixa de entrada, em primeira posição, com uma notificação especial.
- A mensagem, até que seja lida, exibirá a indicação "Em espera desde X" (X sendo a data em que a mensagem retornou para a caixa de entrada).
Em um aplicativo/cliente de e-mail do tipo Outlook, usando IMAP:
- Quando uma conversa é colocada em espera, ela permanece na sua posição original.
- Se mover manualmente uma mensagem que está em espera, a funcionalidade não será mais aplicada nessa mensagem na aplicação web.
- Quando o prazo se aproxima, a conversa volta a aparecer na primeira posição, como no aplicativo web, e é exibida uma notificação padrão de "nova mensagem".
Arquivar temporariamente um e-mail
Pré-requisitos
- Ativar o modo de conversas para os seus endereços de e-mail na aplicação Web Mail Infomaniak (serviço online ksuite.infomaniak.com/mail).
Em seguida, para fazer com que uma de suas mensagens desapareça temporariamente entre todos os seus e-mails e reapareça em sua caixa de entrada no momento futuro que você programar:
- Clique aqui para acessar os e-mails em seu kSuite Infomaniak (❓: ajuda).
- Abra a mensagem para ser lembrado mais tarde.
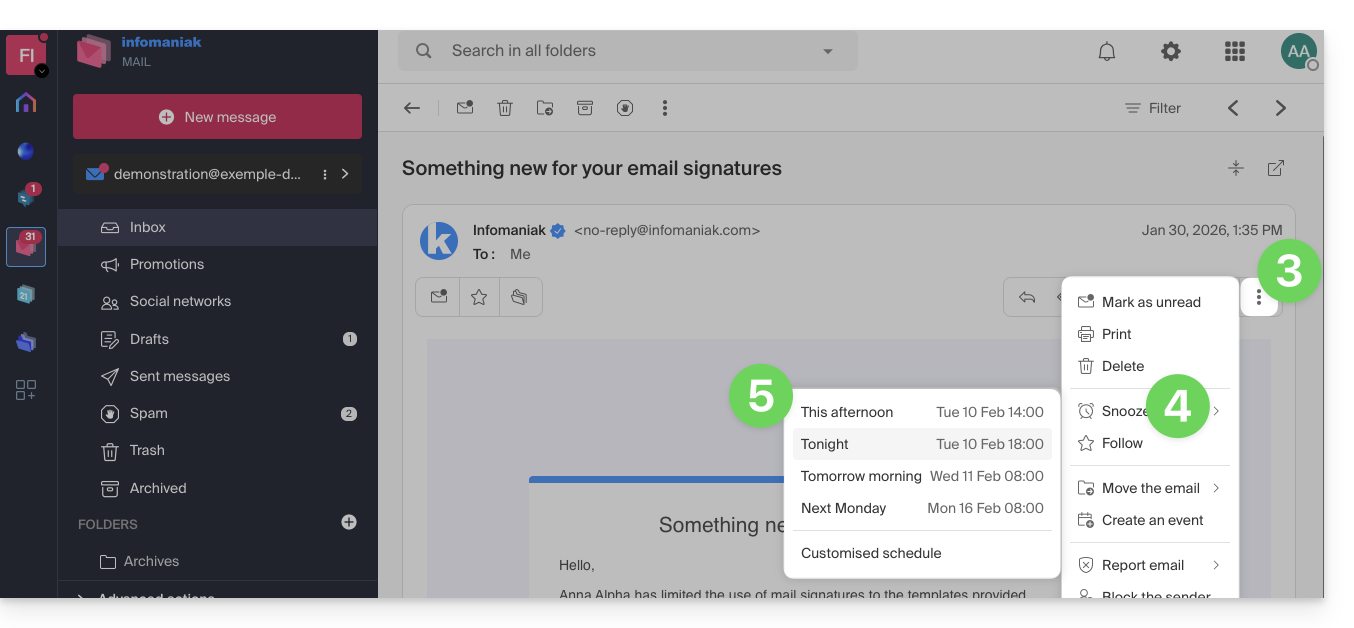
- Clique no menu de ações ⋮ no canto superior direito.
- Clique na função Lembrar.
- Escolha até quando a mensagem deve desaparecer da sua caixa de entrada, entre as opções predefinidas ou personalizando a duração:
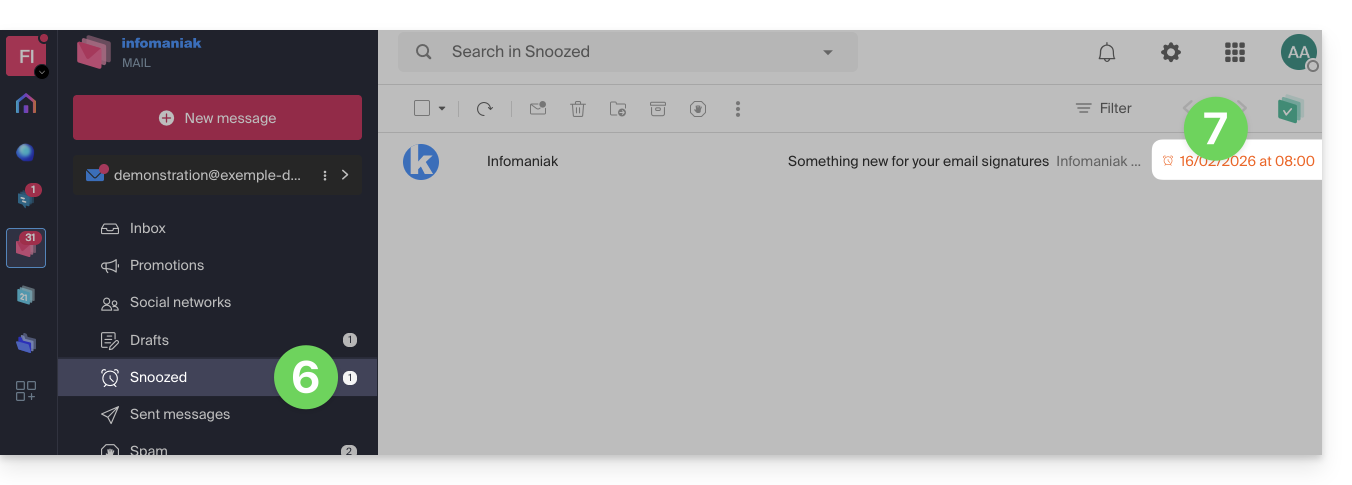
- Após ser colocado em espera, a mensagem é exibida em uma nova pasta dedicada às mensagens em espera.
- A data/hora de término da espera é exibida ao lado de cada mensagem:
Para ativar o acesso a esta funcionalidade diretamente a partir da barra de ações acima de um e-mail:
- Clique aqui para aceder aos e-mails na sua kSuite Infomaniak (❓: ajuda).
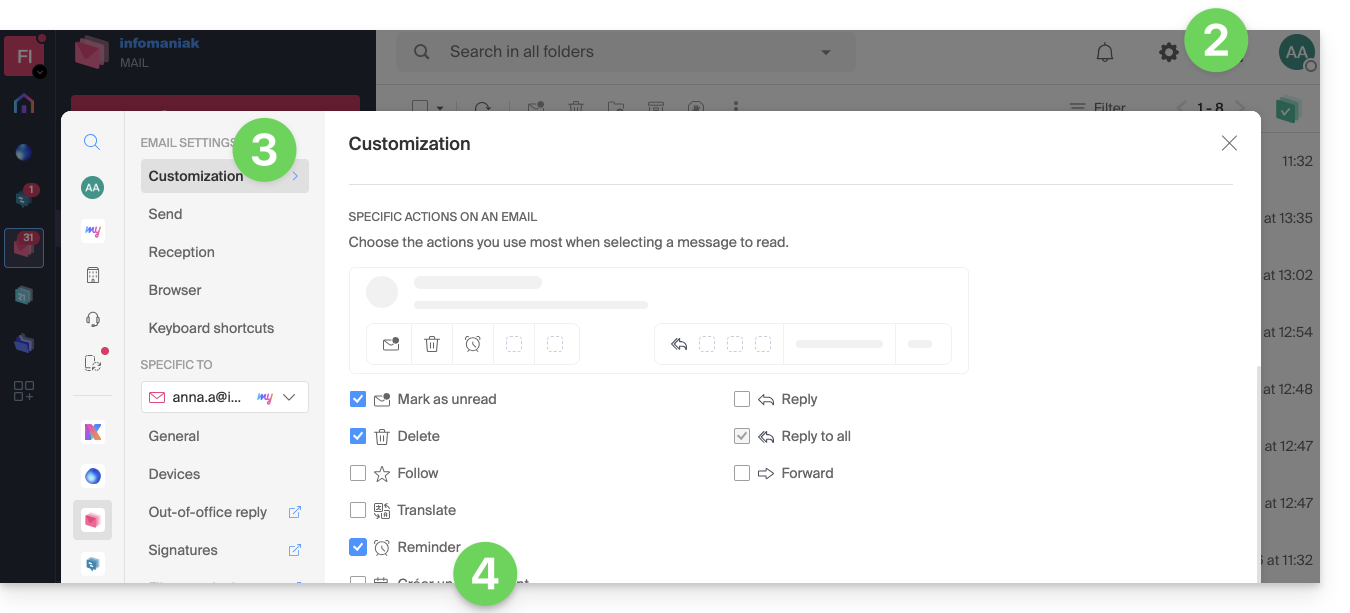
- Clique em Definições no canto superior direito.
- Clique em Personalização no menu lateral esquerdo.
- Ative a funcionalidade de lembrete de mensagem na seção Ações específicas em um e-mail:
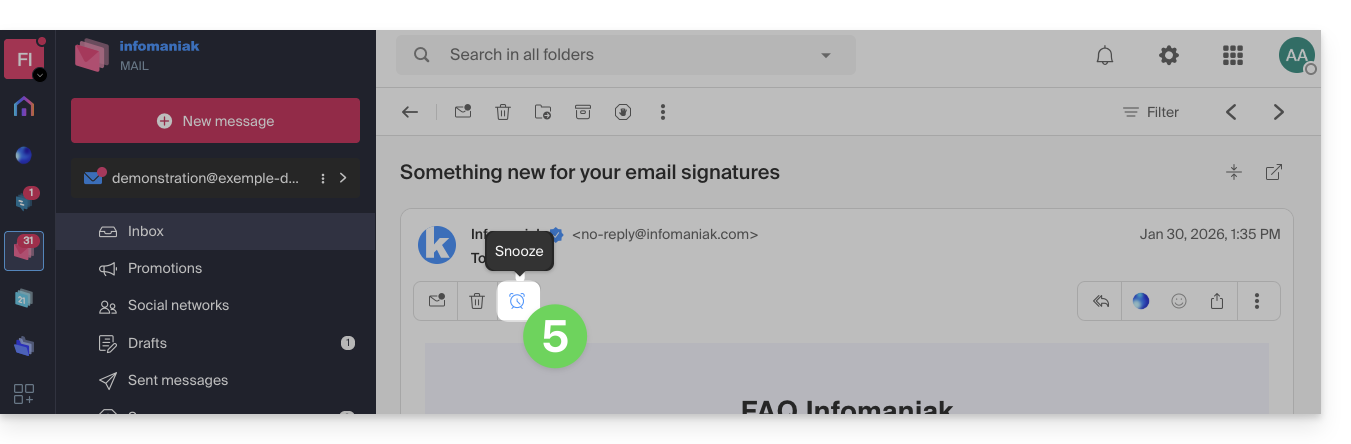
- Volte à sua mensagem, assim terá a possibilidade de colocá-la em espera diretamente da barra de ações:
Para ativar o acesso a esta funcionalidadediretamente da lista de mensagens na sua caixa de entrada:
- Clique aqui para acessar os e-mails no seu kSuite Infomaniak (❓: ajuda).
- Clique em Configurações no canto superior direito.
- Clique em Personalização no menu lateral esquerdo.
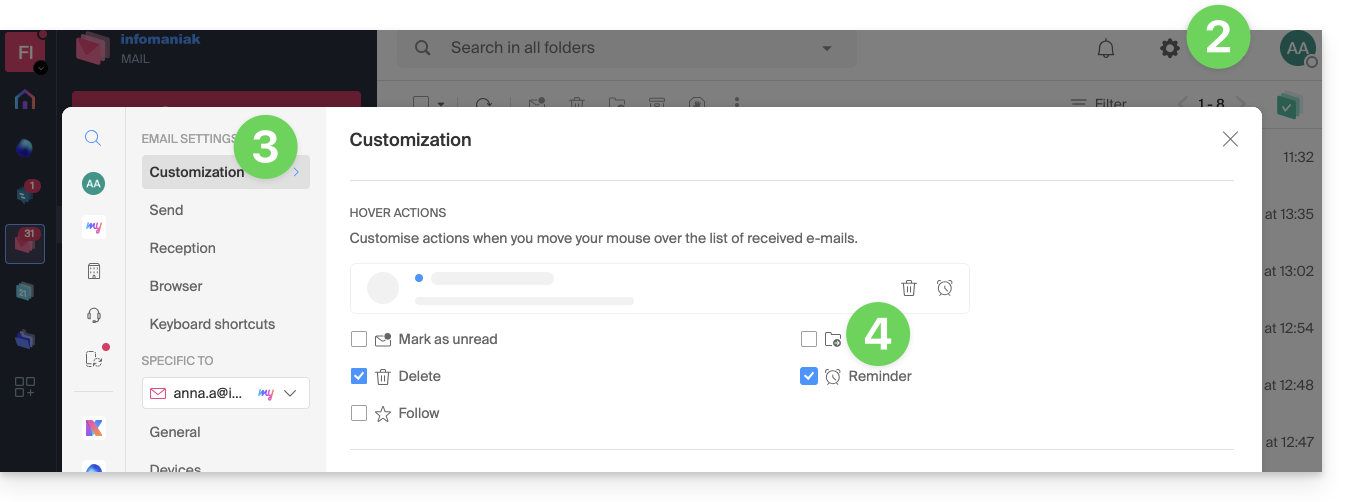
- Ative a funcionalidade de lembrete de mensagem na secção Ações ao passar o rato:
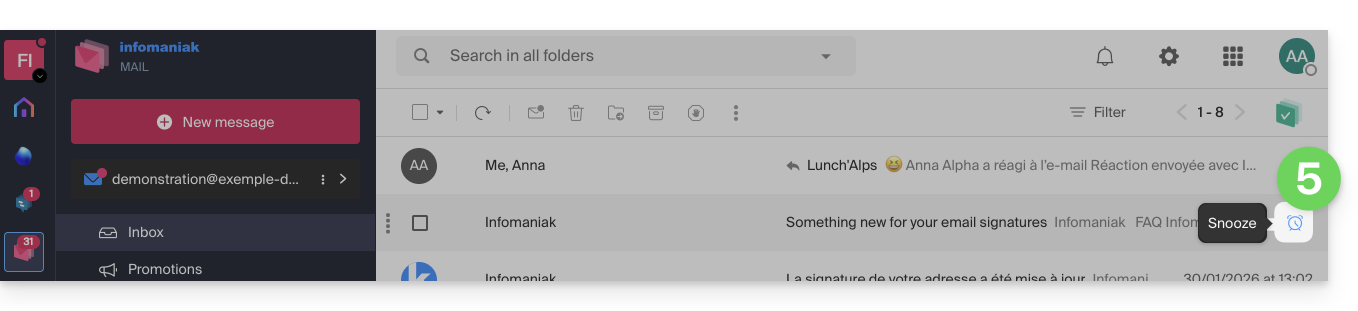
- Volte à caixa de entrada, para poder colocar um dos seus e-mails em espera diretamente na lista:
- Pode colocar vários e-mails em espera ao mesmo tempo, selecionando-os (uma seleção máxima de 5 e-mails) e, em seguida, clicando com o botão direito do rato para escolher a opção de colocar em espera.
Link para esta FAQ: https://faq.infomaniak.com/207
Esta seção de perguntas frequentes foi útil?
Este guia explica como alterar o nome e o apelido que a Infomaniak exibe quando você está conectado à sua conta Infomaniak (= conta de usuário) dentro de uma Organização no Manager, bem como o avatar da sua conta.
Introdução
- Para modificar o identificador de login, consulte este outro guia.
- Para modificar o número de telefone, consulte este outro guia.
- Para gerir os detalhes da Organização à qual pertence, consulte este outro guia.
Modificar os dados de contacto da conta Infomaniak
Para editar seus dados pessoais:
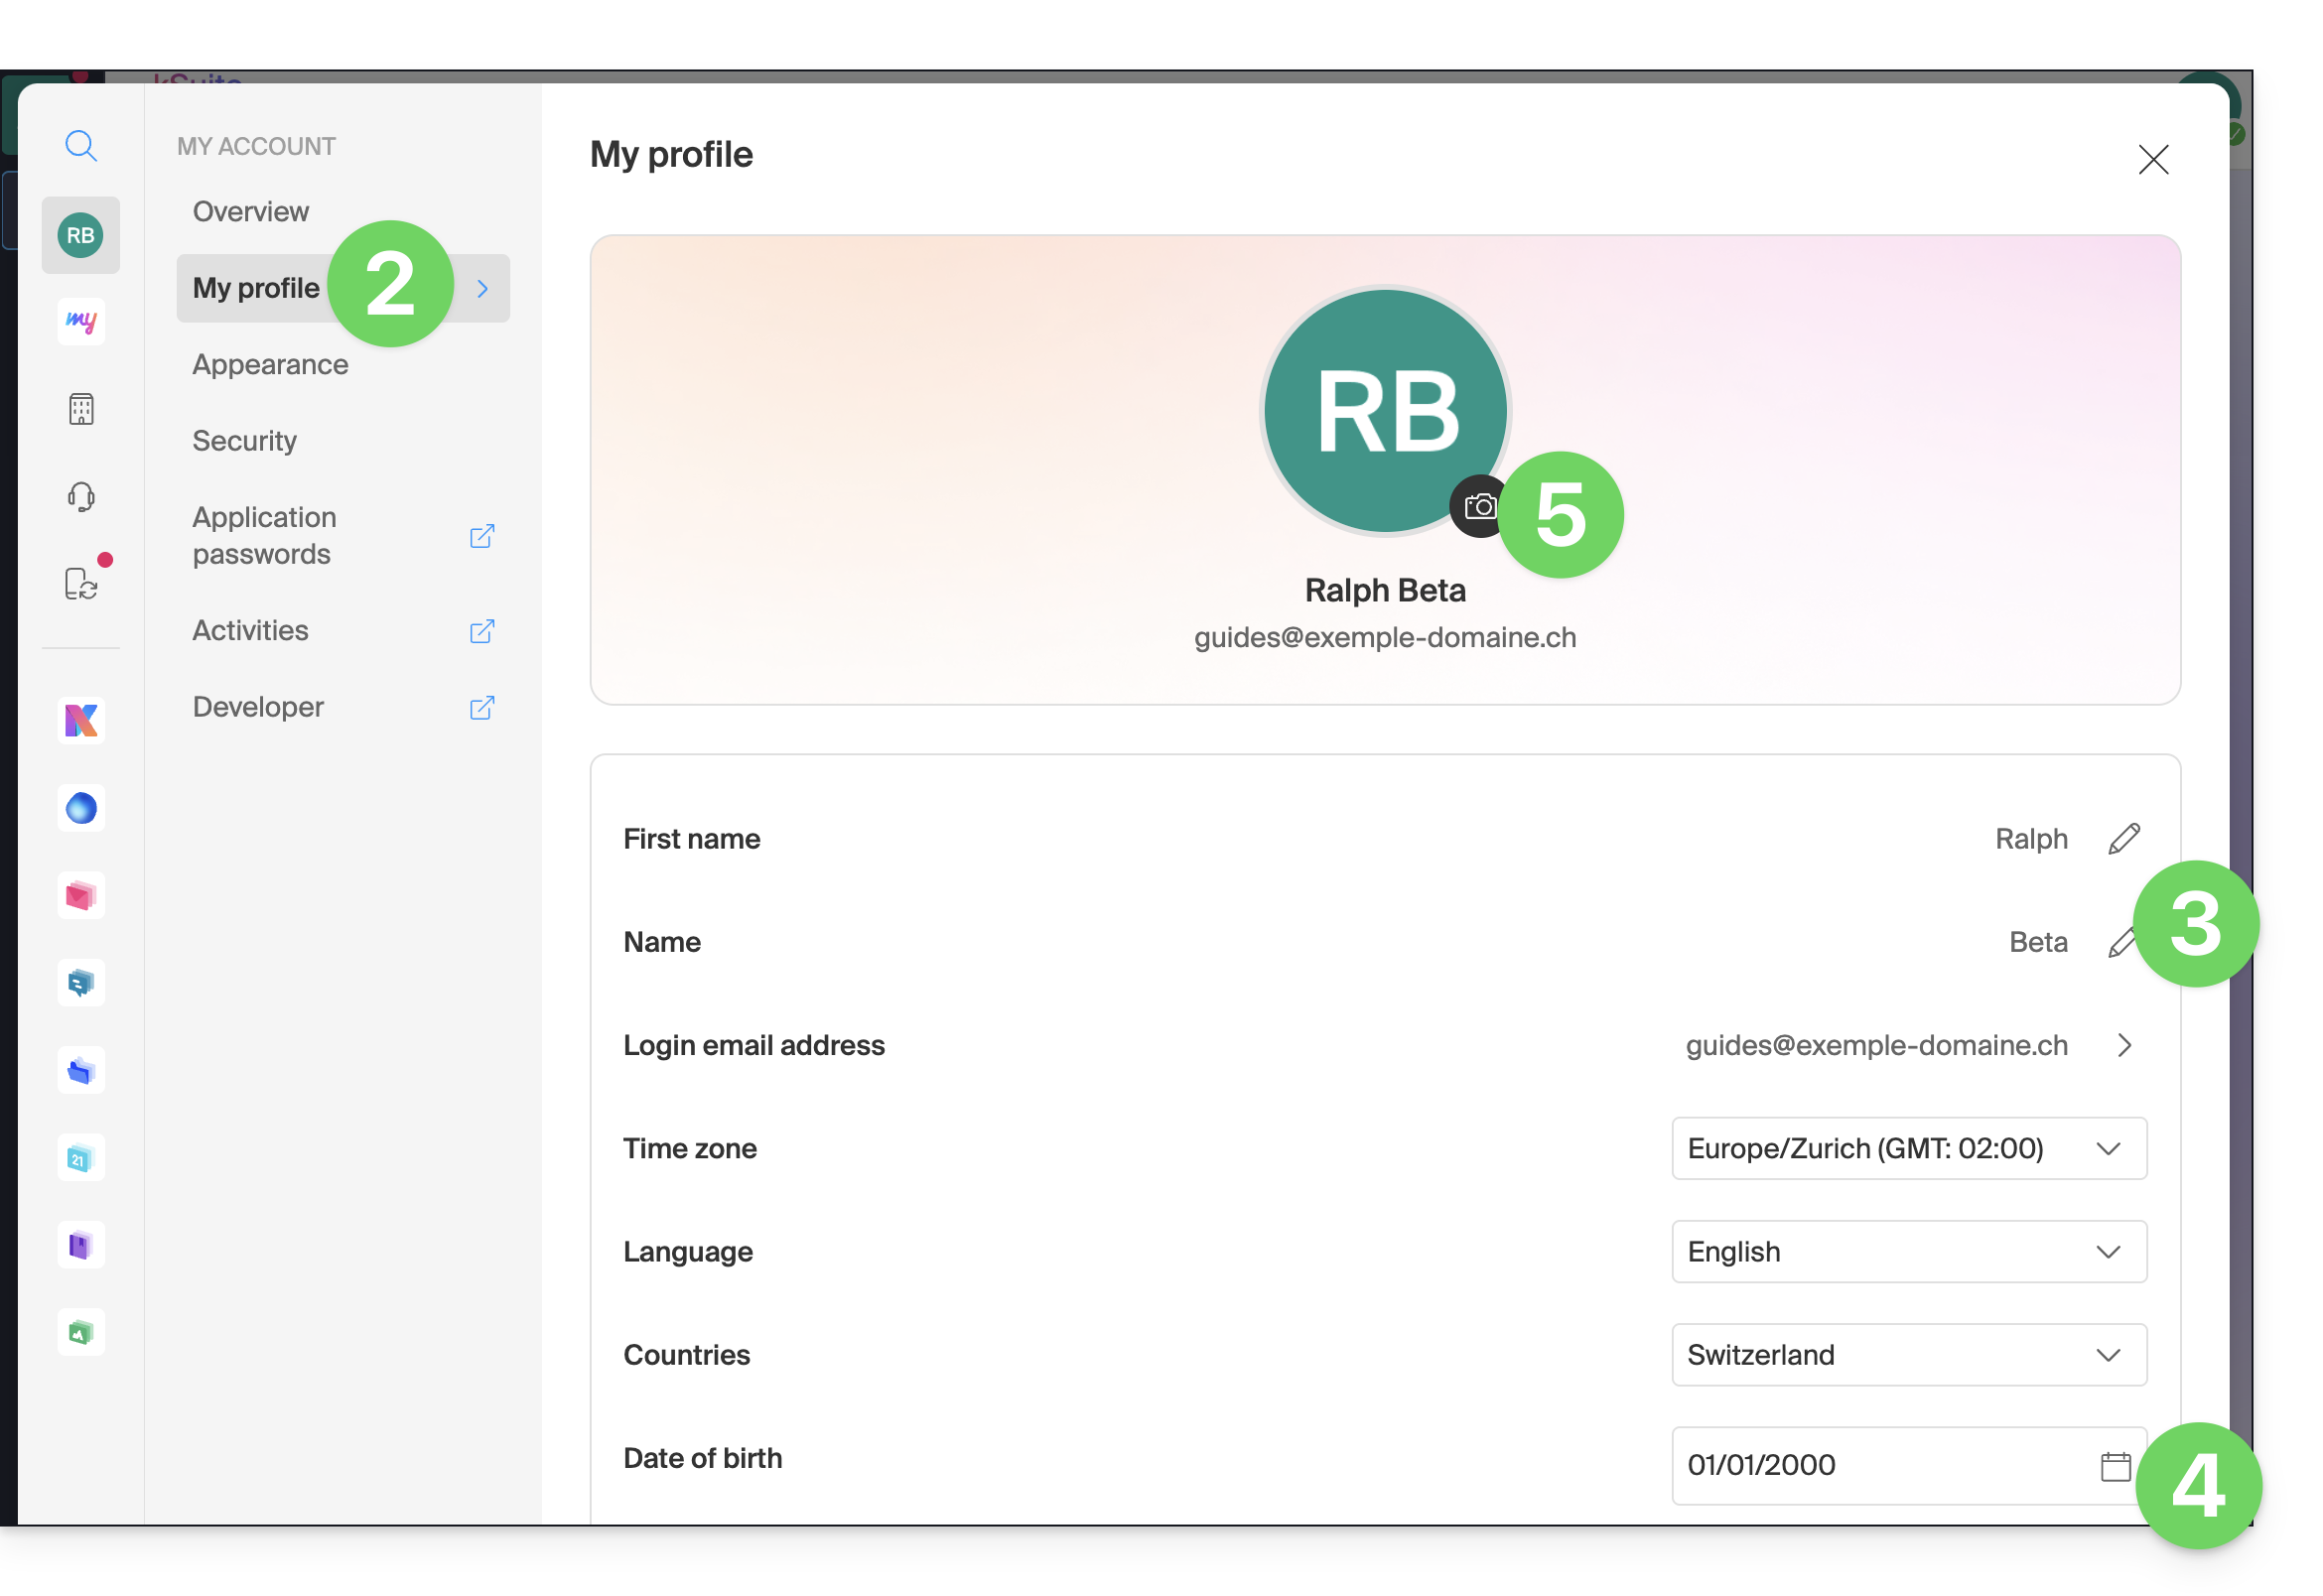
- Clique aqui ou, no canto superior direito, em suas iniciais/avatar, para “Gerenciar minha conta”:
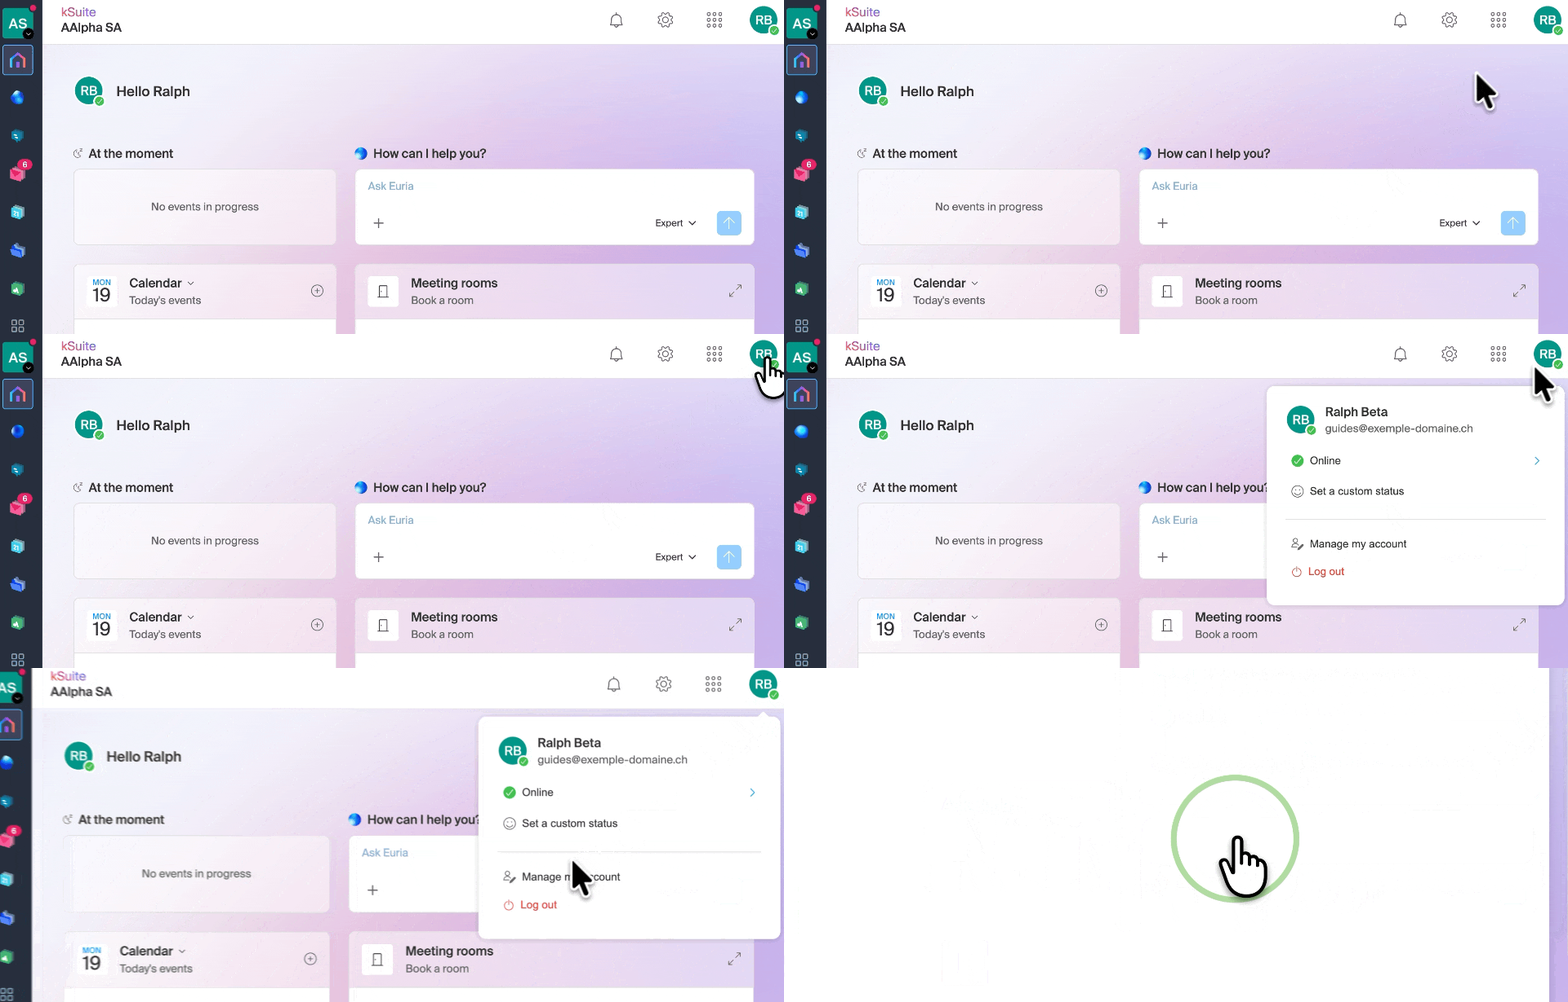
- Clique em Meu perfil no menu lateral esquerdo.
- Altere seu nome e sobrenome na parte direita.
- Você também pode especificar sua data de nascimento.
- Você pode adicionar uma foto de perfil à sua conta Infomaniak, que será exibida no lugar de suas iniciais; recomenda-se importar uma imagem com, no mínimo, 210 pixels de largura:
Link para esta FAQ: https://faq.infomaniak.com/220
Esta seção de perguntas frequentes foi útil?
Este guia explica como ativar ou desativar os pedidos de confirmação de receção/leitura a partir da aplicação web Mail Infomaniak (serviço online ksuite.infomaniak.com/mail).
Introdução
- As solicitações de confirmação de recebimento e/ou leitura são compatíveis com a maioria dos sistemas de mensagens.
- No entanto, elas dependem da ação do usuário e das configurações do seu sistema de mensagens.
- O recebimento (ou não recebimento) de uma confirmação de leitura não garante nada (os registros podem ser mais adequados para alguns casos).
Solicitar um comprovante de recebimento/leitura
Para permitir que o seu destinatário confirme facilmente o recebimento da sua mensagem enviada a partir do aplicativo web Mail Infomaniak (serviço online ksuite.infomaniak.com/mail):
- Clique aqui para acessar o aplicativo web Mail Infomaniak (serviço online ksuite.infomaniak.com/mail).
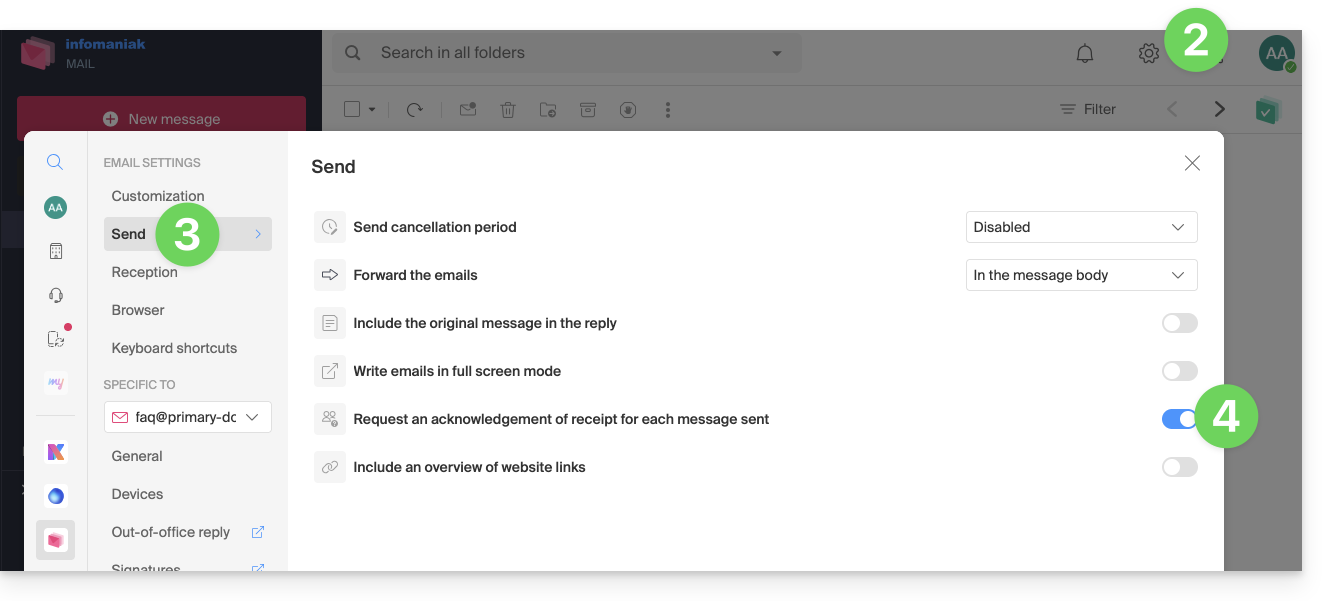
- Clique em Configurações no canto superior direito.
- Clique em Envio no menu lateral esquerdo.
- Ative o botão de alternância para solicitar uma confirmação de recebimento/leitura:
Observe que também é possível ativá-lo caso a caso ao enviar sua mensagem no Mail, nas opções de redação, clicando em ⋮ e, em seguida, na opção desejada: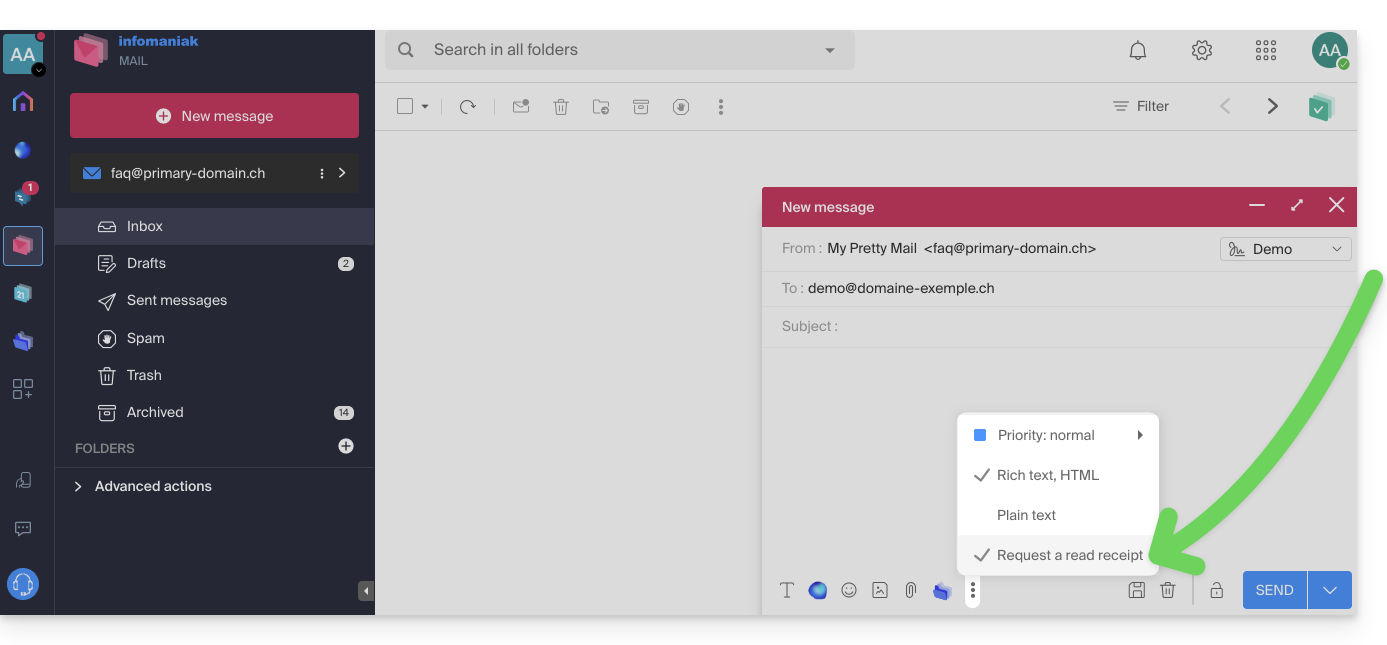
Confirmar o recebimento da mensagem
Se receber um e-mail e o consultar na aplicação web Mail Infomaniak (serviço online ksuite.infomaniak.com/mail), e o remetente tiver solicitado especificamente que seja notificado, pode confirmar o recebimento da mensagem ao lê-la: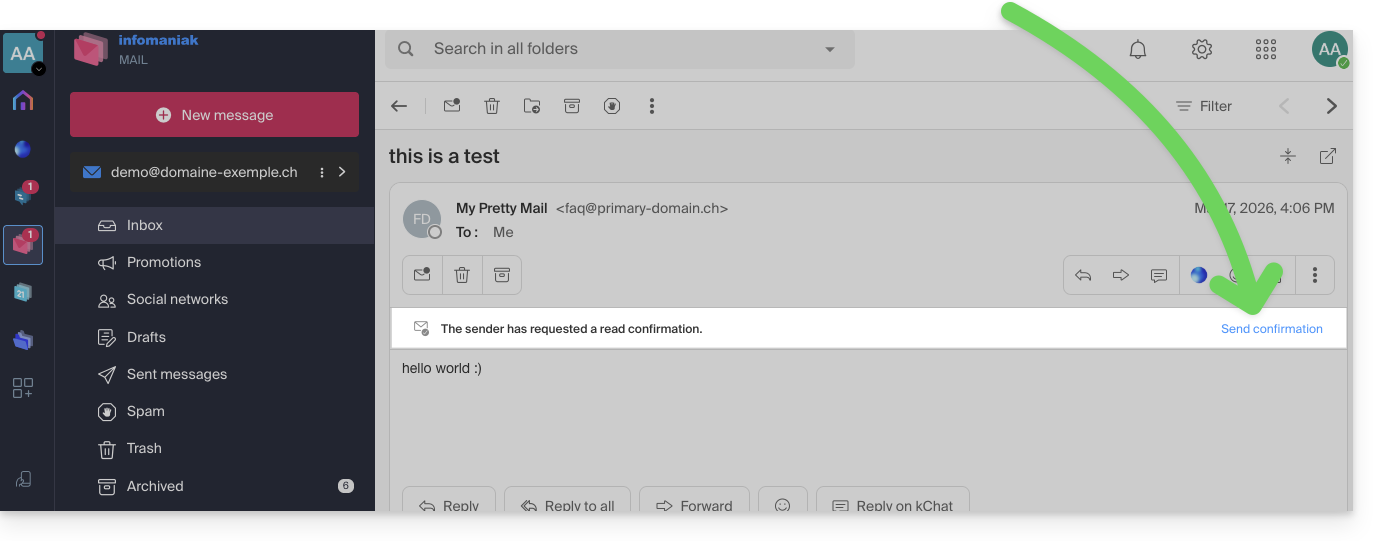
Link para esta FAQ: https://faq.infomaniak.com/240
Esta seção de perguntas frequentes foi útil?
Este guia permite que você descubra rapidamente as funções essenciais da Euria, a inteligência artificial à sua disposição dentro do kSuite, com um desempenho notável, especialmente com o aplicativo Web Mail da Infomaniak (serviço online ksuite.infomaniak.com/mail). O assistente também está disponível no aplicativo móvel Infomaniak Mail (aplicativo para smartphone ou tablet iOS / Android).
✘ INDISPONÍVEL com
kSuite Free
my kSuite (ik.me, etik.com, ikmail.com)
Aceder ao assistente
Pré-requisitos
- Leia e compreenda este outro guia sobre o modelo utilizado e as responsabilidades de cada um.
Para aceder ao assistente de redação:
- Clique aqui para acessar o aplicativo web Mail da Infomaniak (serviço online ksuite.infomaniak.com/mail).
- Faça login com as credenciais da sua conta Infomaniak (e não com a senha do seu endereço de e-mail).
- Se necessário, associe os endereços de e-mail que pretende gerir ao Mail Infomaniak.
O assistente de redação ajuda você a redigir um texto com o auxílio da inteligência artificial, sobre o tema de sua escolha, inclusive se ele precisar ser baseado em elementos presentes na conversa de e-mail em andamento; use-o, por exemplo, para redigir:
- uma nova mensagem que deve conter elementos específicos,
- uma resposta a uma mensagem recebida,
- uma reformulação de um trecho de texto,
- uma sintaxe gramatical correta,
- etc.
Você também pode resumir o conteúdo de qualquer e-mail.
Usar o Euria ao criar uma nova mensagem
Pode pedir ao Euria para redigir um texto com base nas suas ideias, que deverá fornecer:
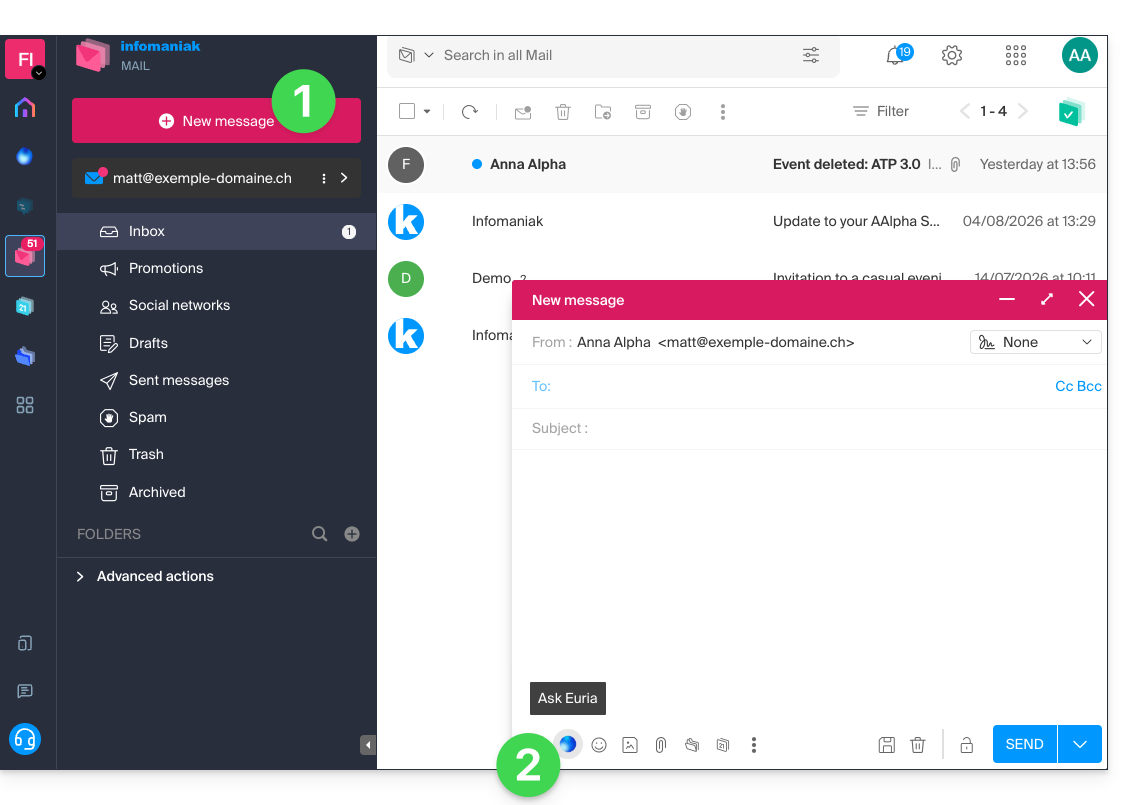
- Clique em Nova mensagem no canto superior esquerdo da interface do Mail.
- Clique no ícone Euria na barra de edição para abrir o assistente:
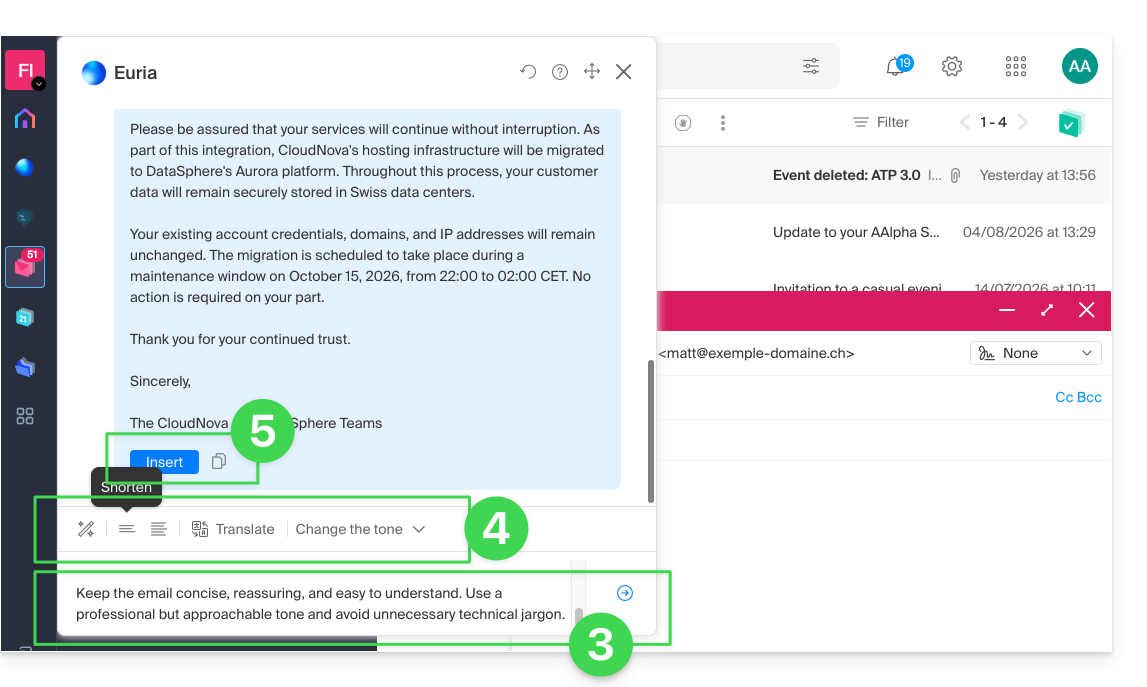
- Indique ao assistente o que deseja escrever, como se estivesse a conversar com uma pessoa.
- Depois de a IA apresentar uma proposta, ajuste o comprimento e altere o tom, se necessário, para obter uma resposta mais informal.
- Insira a sugestão na sua mensagem ou copie o texto para a área de transferência:
Utilizar o Euria ao redigir a mensagem
Você também pode usar o assistente de redação selecionando um trecho do texto que está escrevendo e, em seguida, escolhendo a opção desejada no menu de contexto que aparece: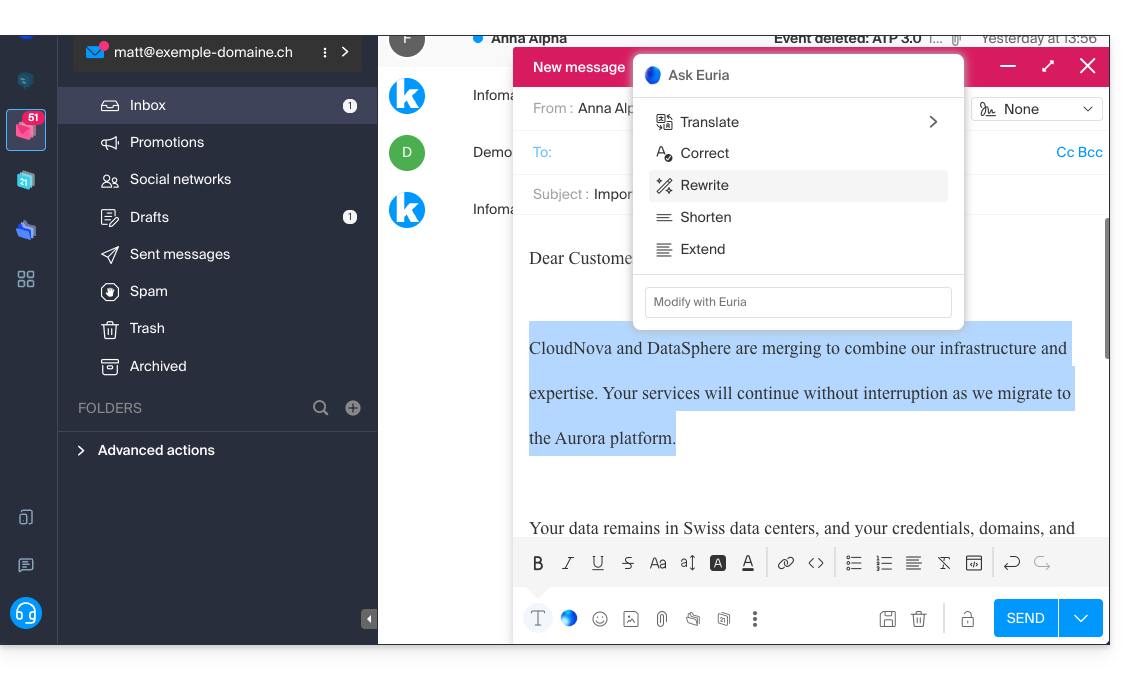
- Abrir o assistente para solicitar sugestões.
- Corrigir a gramática.
- Reformular a frase para obter uma nova versão.
- Encurtar o texto sugerido, removendo alguns elementos desnecessários.
- Redigir mais texto, complementar a conversa.
Sugerir uma resposta com o Euria ao ler um e-mail
Pode iniciar o Euria ao consultar uma mensagem recebida à qual pretende responder rapidamente:
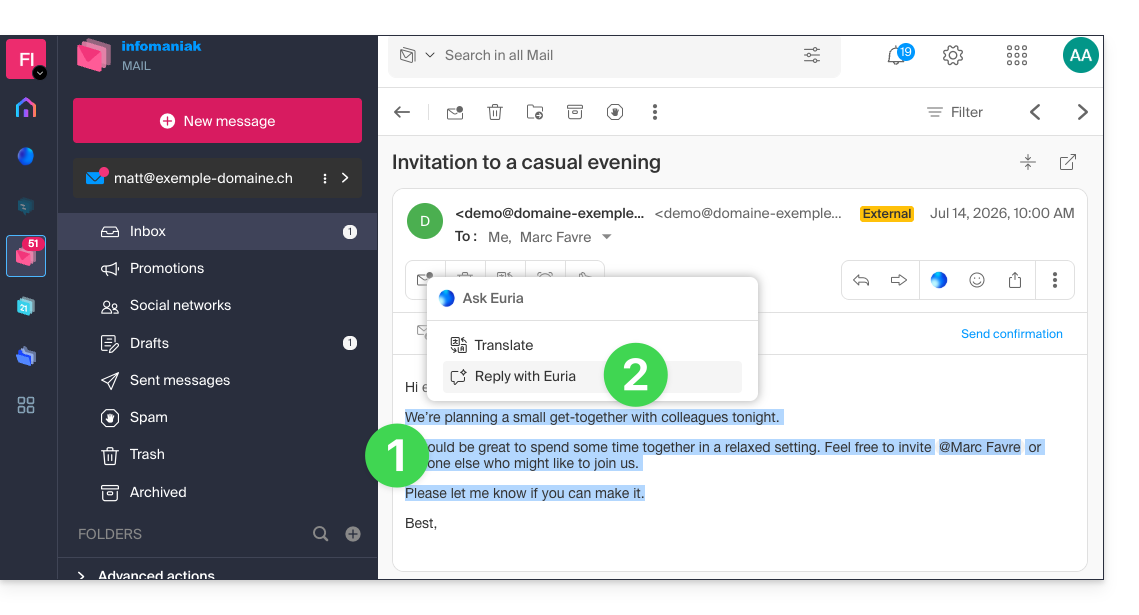
- Selecione com o mouse o trecho no qual basear a resposta.
- Escolha responder com o Euria no menu de contexto que aparece:
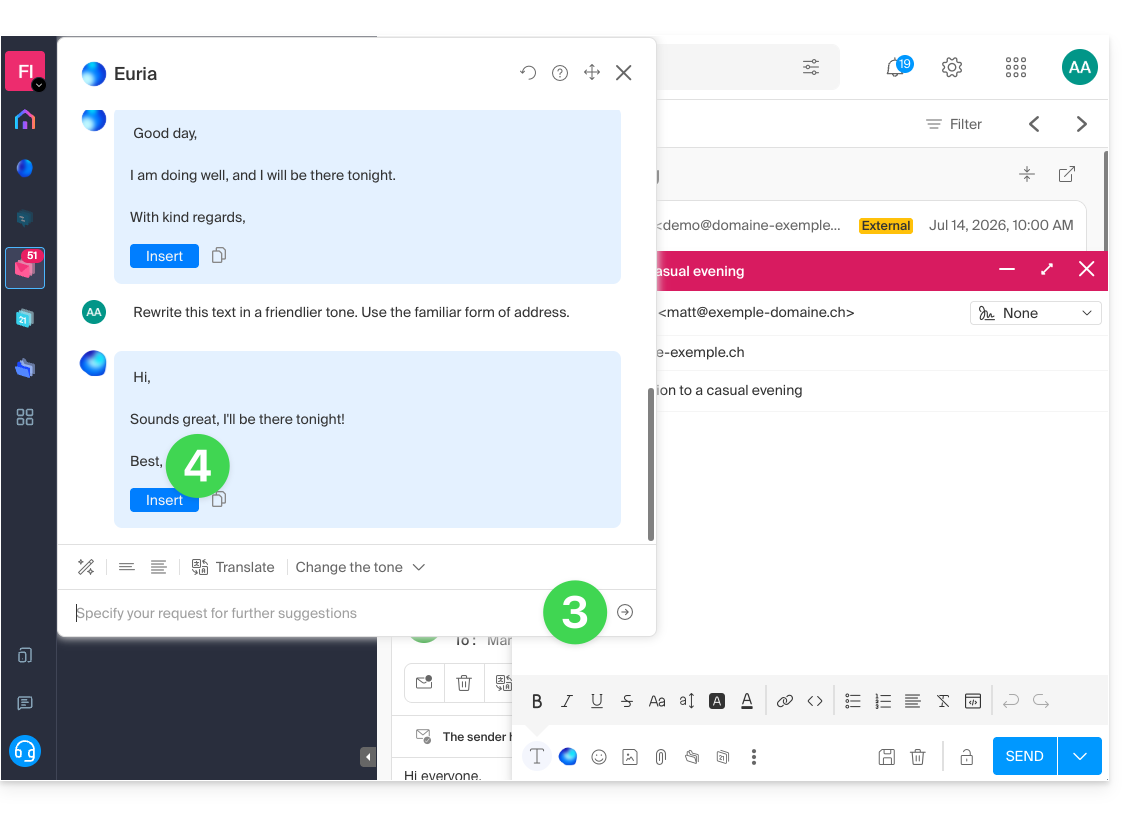
- Indique ao assistente o que deseja que seja respondido, como se estivesse a conversar com uma pessoa.
- Insira a sugestão que será exibida na mensagem de resposta gerada automaticamente:
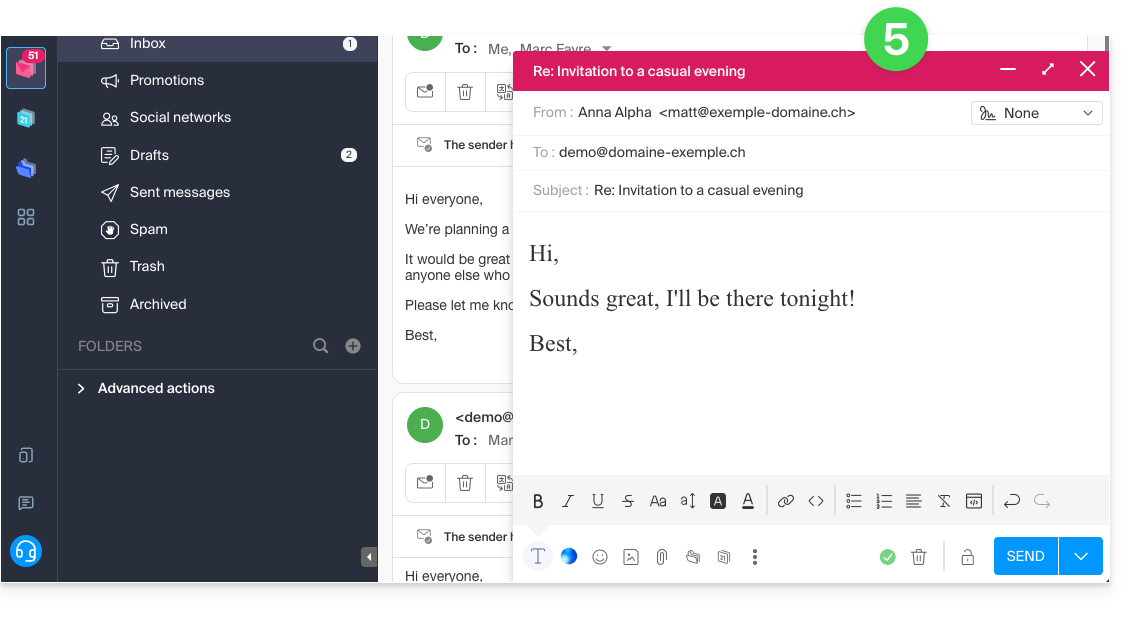
- Resta apenas reler e enviar:
Sugira o assunto do e-mail com o Euria
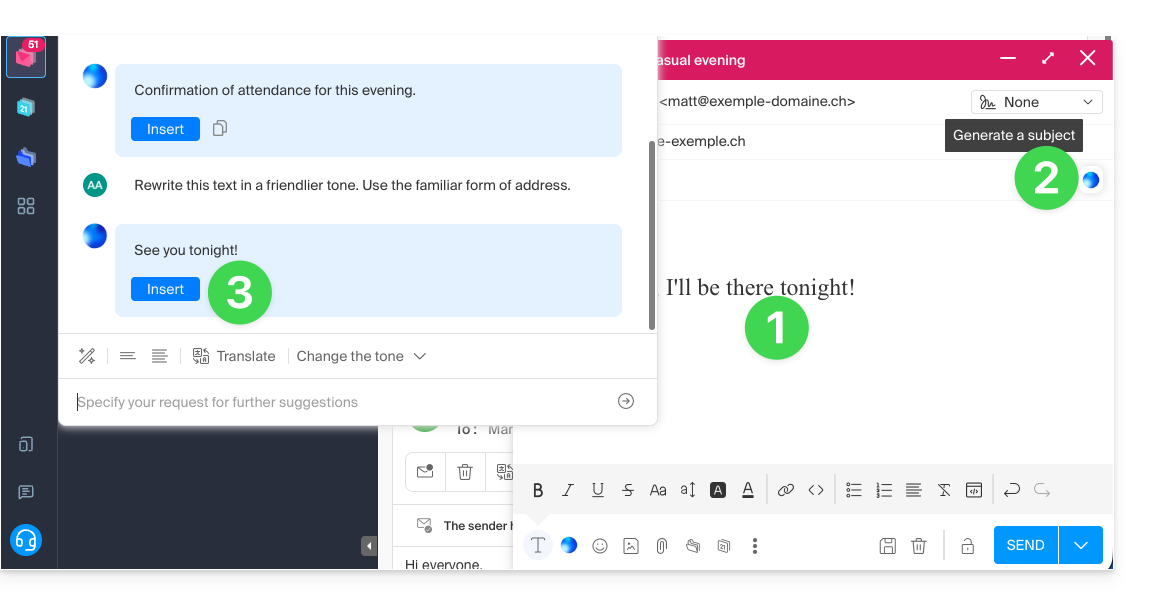
Ao começar a redigir uma nova mensagem, o assistente pode inserir um título adequado à sua mensagem no campo Assunto:
- Insira o texto.
- Clique no ícone Euria à direita do campo Assunto:
- Insira a sugestão se ela for adequada:
- Se já houver um assunto inserido no campo (por exemplo, porque você inseriu uma nova mensagem + assunto gerado pelo assistente e, em seguida, solicitou uma nova mensagem ao assistente), o assistente oferecerá substituí-lo por um assunto mais adequado.
Desativar o assistente
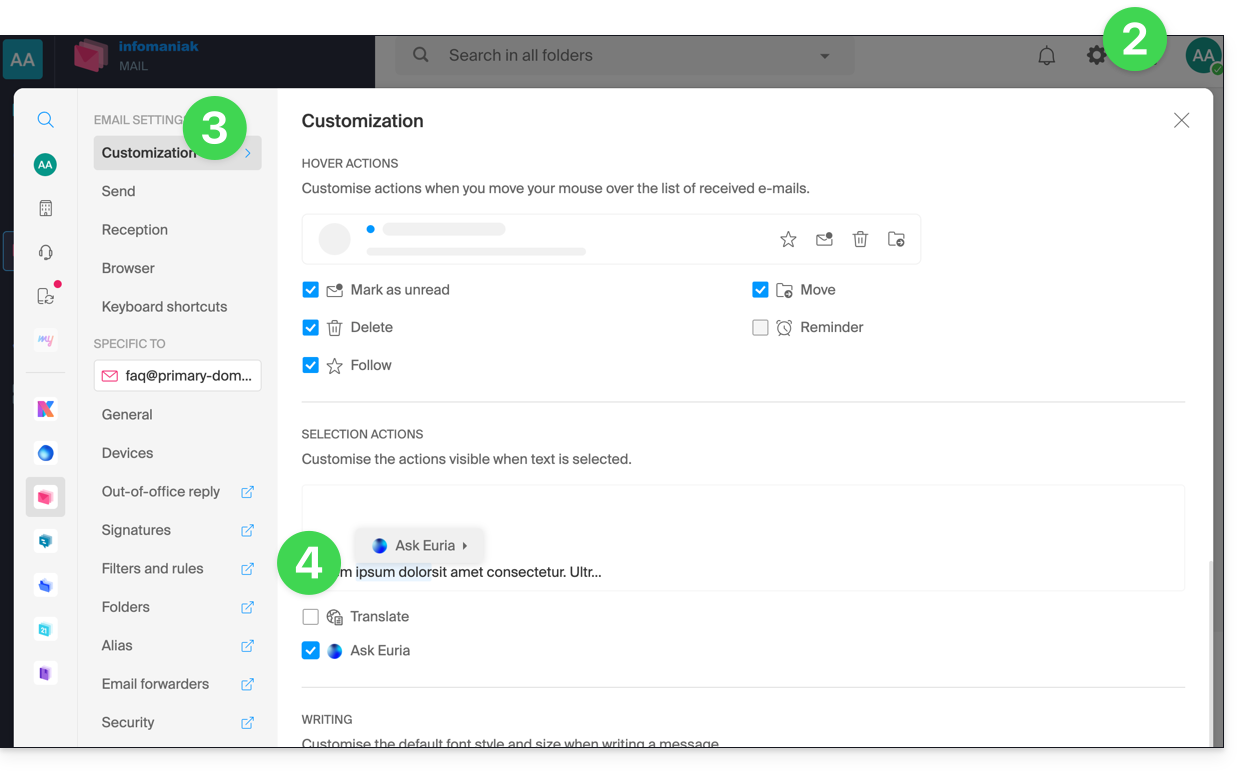
Pode configurar os elementos (traduções / Euria) que são exibidos quando clica na sua mensagem:
- Clique aqui para acessar o aplicativo web Mail da Infomaniak (serviço online ksuite.infomaniak.com/mail).
- Clique em Configurações no canto superior direito.
- Clique em Personalizar no menu lateral esquerdo.
- Marque ou desmarque as ações que deseja que sejam executadas ao clicar:
Link para esta FAQ: https://faq.infomaniak.com/269
Esta seção de perguntas frequentes foi útil?
Este guia permite que você descubra rapidamente as funções essenciais do Euria, a inteligência artificial à sua disposição dentro do kSuite, que oferece um excelente desempenho, especialmente para resumir e-mails no aplicativo web Mail da Infomaniak (serviço online ksuite.infomaniak.com/mail).
✘ INDISPONÍVEL com
kSuite Free
my kSuite (ik.me, etik.com, ikmail.com)
Resumir um e-mail
Pré-requisitos
- Leia e compreenda este outro guia sobre o modelo utilizado e as responsabilidades de cada um.
Para aceder à funcionalidade de resumo:
- Clique aqui para acessar os e-mails em seu kSuite Infomaniak (❓: ajuda).
- Faça login com as credenciais da sua conta Infomaniak (e não com a senha do seu endereço de e-mail).
- Abra a mensagem que deseja resumir (ela pode estar em qualquer pasta).
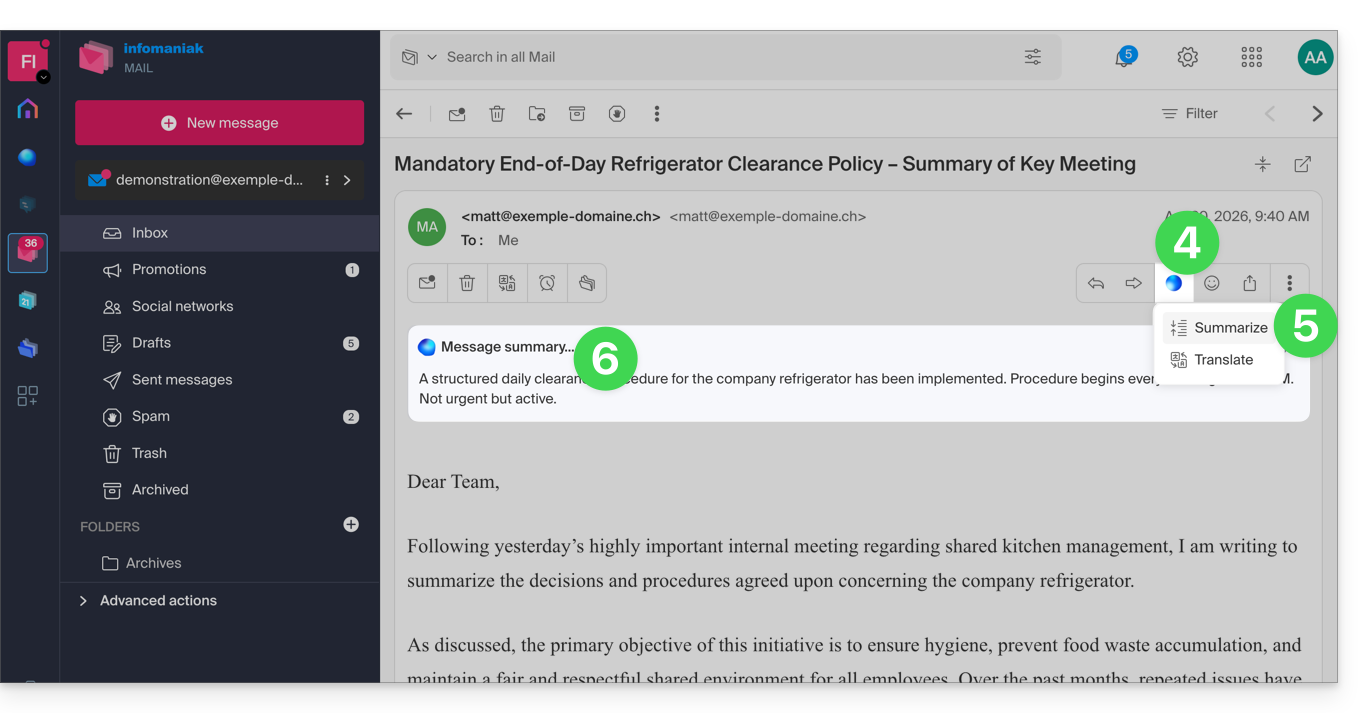
- Clique no botão Euria localizado na barra de ferramentas superior.
- Clique em Resumir.
- O resumo da mensagem é exibido em um bloco acima da mensagem original (visível apenas para você):
Link para esta FAQ: https://faq.infomaniak.com/308
Esta seção de perguntas frequentes foi útil?
Este guia ajudará você a resolver o problema caso, após enviar um e-mail, receba uma mensagem com a razão da falha "Mensagem de spam rejeitada" ou "5.7.0 AV: A mensagem foi rejeitada pelo filtro de regras de cabeçalho. 554 Verifique a mensagem e tente novamente" ...
Verifique obrigatoriamente
Verifique se o seu e-mail não continha:
- palavras ou frases que são frequentemente associadas a spam, pois podem ser identificadas como uma mensagem indesejada e rejeitadas
- qualquer indicação incomum na assinatura, um link formulado de forma incorreta (
http//.domain.xyz, por exemplo), etc. - um anexo com uma das seguintes extensões proibidas:
.exe,.com,.cmd,.cpl,.hta,.scf,.sct,.lnk,.bat,.js,.jse,.wsh,.ws,.wsf,.wsc,.vbe,.vb,.vbs,.shs,.pif,.scr... incluindo dentro de um arquivo compactado (.zip, por exemplo)
Para enviar um arquivo (js ou exe, por exemplo) cuja ausência de vírus foi confirmada, armazene-o no seu espaço de hospedagem e crie um link para ele. Se o arquivo for grande e você o enviar a partir do aplicativo web Mail Infomaniak (serviço online ksuite.infomaniak.com/mail), ele será, de qualquer forma, colocado em um servidor temporário, permitindo o envio ao seu destinatário, que receberá, nesse caso, um link para download. Você também pode usar o Swisstransfer.com.
Verifique também o seu registro SPF. Se o seu domínio não tiver um registro SPF ou se este registro estiver incorreto, isso provavelmente resultará na rejeição da sua mensagem.
Se considerar que recebeu uma mensagem de erro "Mensagem de spam rejeitada" sem motivo aparente, entre em contato com o suporte da Infomaniak.
Link para esta FAQ: https://faq.infomaniak.com/316
Esta seção de perguntas frequentes foi útil?
Este guia explica como migrar para a Infomaniak os endereços de e-mail atualmente hospedados pela Microsoft, dentro do Microsoft 365, com a ajuda de uma ferramenta de importação via IMAP.
Introdução
- A operação não afeta os dados já existentes no endereço de destino, nem os dados do endereço de origem.
- Será importada a totalidade da caixa de correio externa.
- Uma vez iniciado o processo de importação, não é mais possível interrompê-lo.
- Os eventuais duplicados são gerenciados: um conteúdo idêntico será copiado apenas uma vez.
- Consulte este outro guia se procura alternativas a este processo via IMAP.
Importar todo o seu histórico de e-mails
1. Pré-requisitos da Microsoft
- Ativar as funcionalidades POP/IMAP/SMTP que estão desativadas por padrão (precisa de ajuda?).
2. Pré-requisitos Infomaniak
- Ter um Serviço de Email na sua Central de Gestão Infomaniak.
- Ter à disposição um número de endereços disponíveis ou ajustá-lo caso seja necessário.
- Verificar se a conta de e-mail está devidamente protegida
- Criar um ou vários endereços neste serviço de e-mail.
- Se tiver muitos (10+) endereços de e-mail para criar, consulte este outro guia sobre a criação em massa.
- O endereço de e-mail de destino deve estar associado ao utilizador (= à conta Infomaniak) que está a utilizar.
3. Importar o conteúdo de e-mail da Microsoft para a Infomaniak
- Clique aqui para aceder à ferramenta de importação (serviço online https://import-email.infomaniak.com).
- Se necessário, inicie sessão na sua conta Infomaniak na organização em questão, pois a importação será feita para um dos endereços de e-mail associados à interface Web Mail da Infomaniak (serviço online ksuite.infomaniak.com/mail) da conta Infomaniak que está a utilizar.
- Clique em "Importar via IMAP".
- Clique em Importar.
- Preencha o campo da esquerda com o seu endereço de e-mail de origem (de onde o conteúdo será copiado).
- Clique no botão "Conectar com a Microsoft" que apareceu:
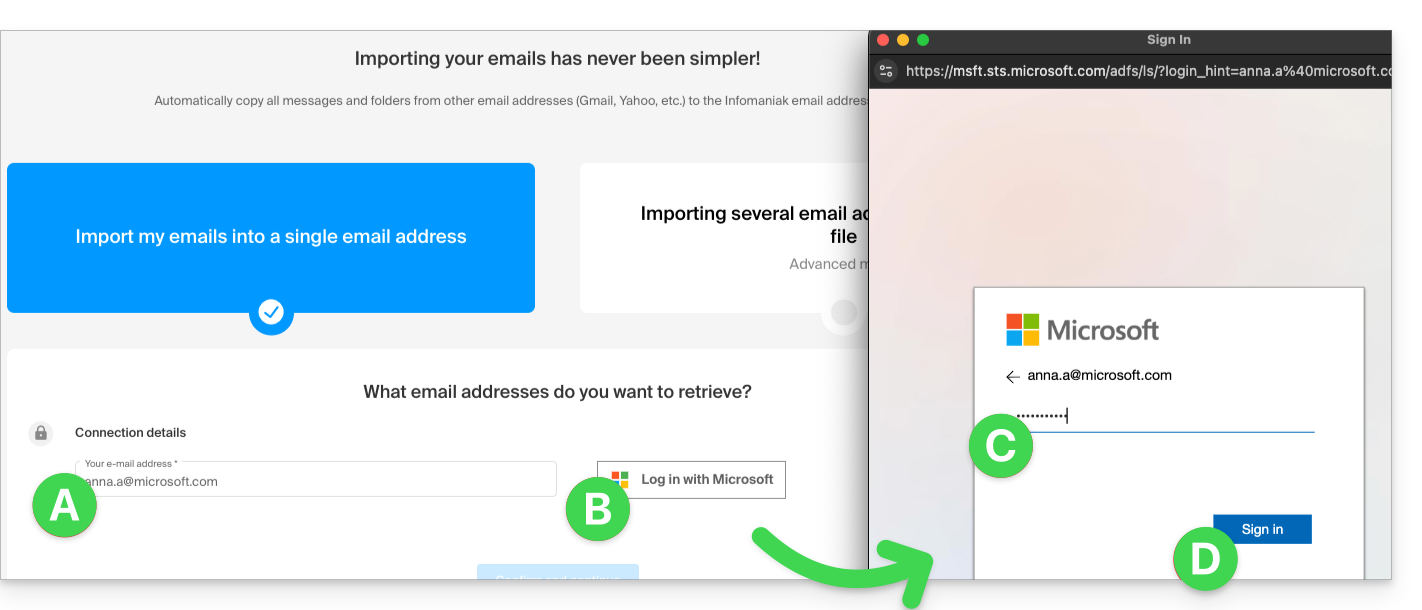
- Verifique se está a conectar-se à conta Microsoft correta para a cópia dos e-mails.
- Confirme que autoriza a ferramenta Infomaniak a conectar-se à sua conta (processo automático).
- Após confirmar a janela pop-up, escolha para qual endereço de e-mail importar os e-mails. O menu suspenso lista os endereços de e-mail atualmente associados à sua interface Web Mail Infomaniak (serviço online ksuite.infomaniak.com/mail) da conta Infomaniak com a qual você está conectado.
- Após selecionar o endereço de destino desejado na lista, clique no botão azul Importar e-mails.
- A cópia está a iniciar, pode aguardar e verificar o resultado na página quando a importação estiver concluída, ou fechar a janela (a importação continua em segundo plano e o progresso pode ser acompanhado – consulte abaixo).
- Um e-mail de confirmação será enviado automaticamente para todos os endereços de e-mail envolvidos na operação, assim que a importação for concluída, indicando o número de mensagens copiadas.
- Um rastreamento está disponível nas configurações do endereço de e-mail de destino, apenas no aplicativo web Mail (serviço online ksuite.infomaniak.com/mail).
- O rastreamento permite visualizar o histórico das importações no endereço em questão.
4. Ajustar as configurações das aplicações
Assim que tiver feito o necessário para que o nome de domínio associado ao seu e-mail funcione com a Infomaniak, modifique as configurações dos softwares/clientes de e-mail que utiliza para que estes se conectem corretamente aos servidores da Infomaniak: siga o assistente de configuração.
Link para esta FAQ: https://faq.infomaniak.com/365
Esta seção de perguntas frequentes foi útil?
Este guia explica por que algumas anexos enviados a partir do Microsoft Outlook chegam no formato winmail.dat no seu endereço de e-mail hospedado na Infomaniak e como resolver o problema de forma definitiva no lado do remetente (onde ele é criado).
Introdução
winmail.daté o contêiner usado pelo Outlook/Exchange quando uma mensagem é enviada em RTF/TNEF.- Ele encapsula a formatação e os anexos.
- Muitos softwares/clientes de e-mail não Microsoft não conseguem interpretar o TNEF:
- a formatação desaparece e os anexos se tornam um único arquivo
winmail.dat.
- a formatação desaparece e os anexos se tornam um único arquivo
Importante: a geração de um arquivo winmail.dat não depende da Infomaniak; o problema surge no remetente (Outlook/Exchange) e deve ser corrigido em seu computador ou pelo administrador do Microsoft 365.
Resolver o problema (ações a serem solicitadas ao remetente)
O mais eficaz é alterar a configuração do Outlook no remetente.
Desativar o RTF/TNEF e reenviar a mensagem em HTML ou texto simples
- Outlook “clássico” para Windows (Microsoft 365/2021/2019, aplicativo Win32)
Menu:Arquivo > Opções > Email
Redação:Redigir mensagens no formato:escolher HTML (ou Texto simples).
Formato da mensagem: emAo enviar mensagens em formato de texto formatado para destinatários da Internet, selecionar Converter para HTML (ou Converter para texto simples).
Caso a caso (um único e-mail): na janela de mensagem, guiaFormato do texto> escolher HTML.
- Novo Outlook para Windows (aplicação baseada no Outlook na Web)
Menu:Configurações (ícone de engrenagem) > Correio > Redigir e responder
Formato das mensagens:Redigir mensagens em:escolher HTML (ou Texto simples).
Este cliente não oferece uma opção RTF; o envio em HTML/texto evita o arquivowinmail.dat.
- Outlook na Web (Exchange Online/Outlook.com)
Menu:Configurações > Correio > Redigir e responder > Formato das mensagens> escolher HTML (ou Texto simples).
- Outlook para Mac
Menu:Outlook > Preferências > Redação> marque/desmarque Redigir mensagens em HTML por padrão.
Para uma única mensagem: na janela de redação, guia Opções > alterne entre HTML ou Texto simples.
Observações: se o remetente anexou arquivos, eles serão legíveis para todos os destinatários, desde que a mensagem seja enviada em HTML/texto. Compactar os anexos (.zip) não impede que o Outlook encapsule a mensagem se o RTF/TNEF ainda estiver ativo.
Desativar o RTF para destinatários específicos (você, por exemplo)
- Outlook “clássico” para Windows: abra o cartão de contato > clique duas vezes no endereço de e-mail > Propriedades do Outlook > Formato da Internet: selecione Enviar apenas no formato de texto (ou Deixar o Outlook decidir se o administrador já estiver forçando a conversão).
- Limpar o preenchimento automático (pode “memorizar” o RTF para um destinatário):
Arquivo > Opções > Correio > Enviar mensagens > Limpar a lista de preenchimento automáticoe, em seguida, digitar o endereço manualmente na próxima vez que enviar uma mensagem.
- Administradores do Microsoft 365 (no remetente): no Centro de administração do Exchange:
Fluxo de correio > Domínios remotos > Padrão> Formato de texto enriquecido: escolher Nunca. No PowerShell:Set-RemoteDomain Default -TNEFEnabled $false.
Em caso de falha: utilize outro cliente de e-mail para o envio (por exemplo, Thunderbird) ou verifique se os convites do Calendário estão sendo enviados em formato iCalendar (Arquivo > Opções > Calendário > ativar Utilizar o formato iCalendar para os destinatários externos).
Se não quiser entrar em contato novamente com o remetente
Pode extrair o conteúdo de winmail.dat com ferramentas de decodificação TNEF (online ou aplicativos para desktop). Pesquise por “abrir winmail.dat” e escolha uma ferramenta confiável para o seu sistema (Windows, macOS, Linux). Isso geralmente restaura os anexos, mas não é uma solução definitiva. Além disso, a confidencialidade e a segurança não são garantidas durante essas operações.
Link para esta FAQ: https://faq.infomaniak.com/460
Esta seção de perguntas frequentes foi útil?
Este guia explica quais são os protocolos e portas que podem ser utilizados com os serviços de e-mail da Infomaniak (nomeadamente o Serviço de E-mail).
Portas e parâmetros recomendados para a configuração do cliente
Quando solicitado durante a configuração de um software/cliente de e-mail (Outlook, Thunderbird, dispositivo móvel, etc.), utilize as configurações abaixo.
Configurações comuns a todas as contas
- Nome do servidor:
mail.infomaniak.com - Autenticação: obrigatória (nome de utilizador = endereço de e-mail completo)
| Protocolo / Uso | Porta | Mecanismo de segurança |
|---|---|---|
| IMAPs – tráfego de entrada (recomendado) | 993 | SSL / TLS (implícito) |
| SMTP – tráfego de saída (opção 1: padrão IETF) | 587 | STARTTLS (explícito) |
| SMTP – tráfego de saída (opção 2: criptografia implícita) | 465 | SSL / TLS (implícito) |
Nota técnica: a porta 587 com STARTTLS é a prática padrão da IETF para o envio seguro de e-mails. A porta 465 é uma alternativa segura que utiliza criptografia implícita.
Se você preencher outros parâmetros ou desativar a criptografia, podem ocorrer erros de envio de e-mail.
Outras portas suportadas (não criptografadas ou para compatibilidade com versões anteriores)
Portas alternativas:
- Porta
143: porta padrão para a receção IMAP (não criptografada, utilize a993). - Porta
110: porta padrão para a receção POP3 (não criptografada, utilize a995). - Porta
995: porta segura para a receção POP3s (opção segura POP3). - Porta
25: porta padrão para a transferência de servidor para servidor (pode suportar STARTTLS para envio, mas a porta587continua sendo o padrão para clientes).
Compatibilidade de autenticação e criptografia:
- A autenticação STARTTLS é suportada nas portas não criptografadas (
143,110,25) para ativar a criptografia TLS. - A autenticação SMTP é suportada através dos métodos LOGIN ou PLAIN.
Utilização da API e segurança das transferências
A API Infomaniak não oferece nenhuma conexão direta com a caixa de correio, pois o IMAP e o SMTP já funcionam como interfaces ("API"). Para interagir com a caixa de correio por meio de programação, utilize uma biblioteca dedicada (por exemplo, em Python: email.examples e imaplib).
Exemplo para exibir e-mails a partir de PHP:imap_open("{mail.infomaniak.com:993/imap/ssl}", $email, $password);
O mecanismo MTA-STS não está implementado nem verificado; a Infomaniak utiliza, em vez disso, DANE (DNS-based Authentication of Named Entities) para garantir uma conexão criptografada entre servidores quando as seguintes condições são cumpridas:
- O cliente envia um e-mail para um domínio que configurou o DANE.
- O cliente recebe um e-mail de um servidor SMTP que utiliza o DANE.
Em todos os outros casos (na ausência de DANE), a conexão criptografada permanece opcional.
Link para esta FAQ: https://faq.infomaniak.com/468
Esta seção de perguntas frequentes foi útil?
Este guia permite encontrar o endereço IP público do seu dispositivo, o que pode ser útil em algumas solicitações de suporte.
Exibir o endereço IP público no dispositivo conectado
Clique aqui para obter o endereço IP público do seu dispositivo nos formatos IPv4 e IPv6.
Métodos alternativos
Visite ipinfo.io ou ifconfig.me.
… no macOS
- A partir de uma aplicação do tipo
Terminal(interface de linha de comando,CLI /Command Line Interface) no seu dispositivo, execute o comandocurl ifconfig.mee pressione Enter. - O endereço exibido é o endereço IP público do computador.
Lembre-se de que este endereço pode mudar periodicamente, especialmente se o roteador for reiniciado ou se o provedor de serviços de Internet usar uma atribuição dinâmica de endereços IP.
Para automatizar a pesquisa do endereço IP público, use comandos ou scripts que consultem serviços como api.ipify.org...
Link para esta FAQ: https://faq.infomaniak.com/528
Esta seção de perguntas frequentes foi útil?
Este guia permite resolver um erro de e-mail do tipo "535 5.7.0 autenticação falhou".
Resolver um erro de autenticação
O serviço de autenticação de e-mail presente nos servidores pode apresentar um problema durante alguns segundos, em casos excepcionais, durante eventos incomuns na infraestrutura, por exemplo.
Se ocorrer um erro 535 5.7.0 autenticação falhou:
- Aguarde alguns minutos e tente enviar a mensagem novamente. Desta vez, ela deverá ser enviada.
Se o problema persistir, verifique os pontos indicados em este outro guia.
Link para esta FAQ: https://faq.infomaniak.com/554
Esta seção de perguntas frequentes foi útil?
Este guia explica como conectar o aplicativo móvel Microsoft Outlook (aplicativo para smartphone ou tablet iOS / Android) a um endereço de e-mail hospedado na Infomaniak.
Introdução
- Em vez da configuração manual abaixo, recomenda-se usar o aplicativo Infomaniak Mail (iOS / Android) para usufruir dos benefícios de segurança da Infomaniak.
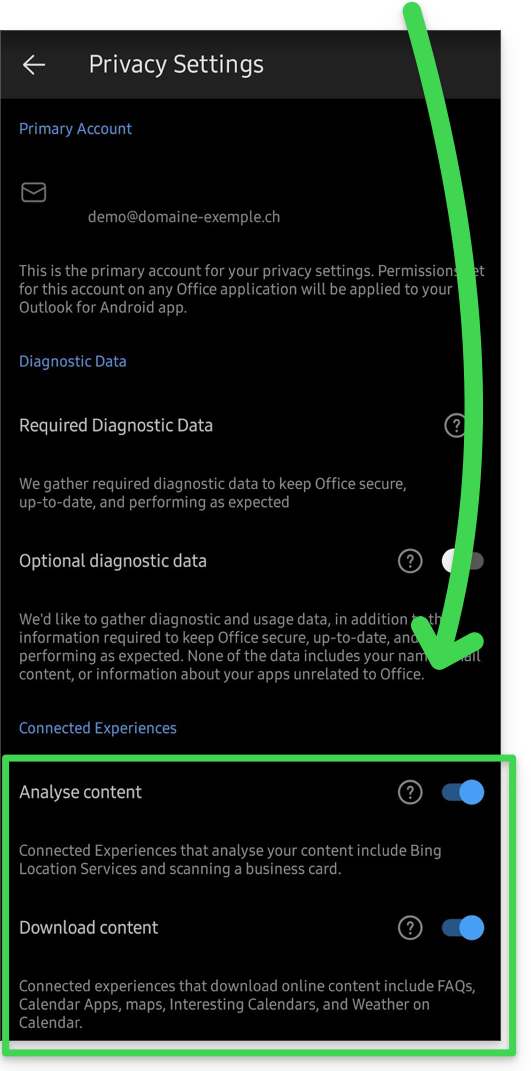
- O aplicativo da Microsoft está configurado por padrão para analisar seus dados:
Adicionar o endereço de e-mail à aplicação
Pré-requisitos
- Criar o endereço de e-mail (❓: ajuda my kSuite | Serviço de E-mail/kSuite).
- Criar uma senha para o dispositivo (❓: ajuda my kSuite | Serviço de E-mail/kSuite).
- Verifique se a configuração do domínio está correta (❓: ajuda).
Para configurar o aplicativo de e-mail:
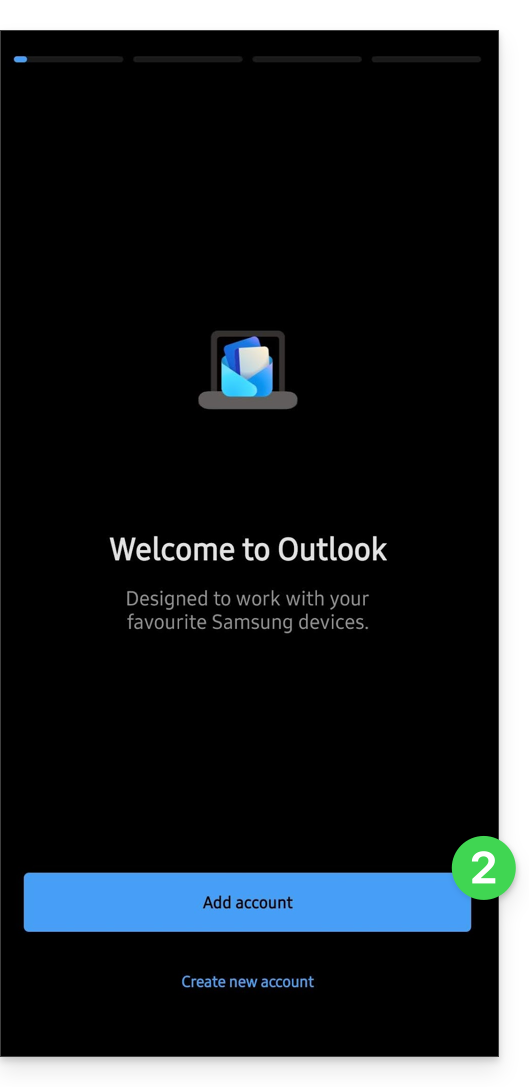
- Abra a aplicação.
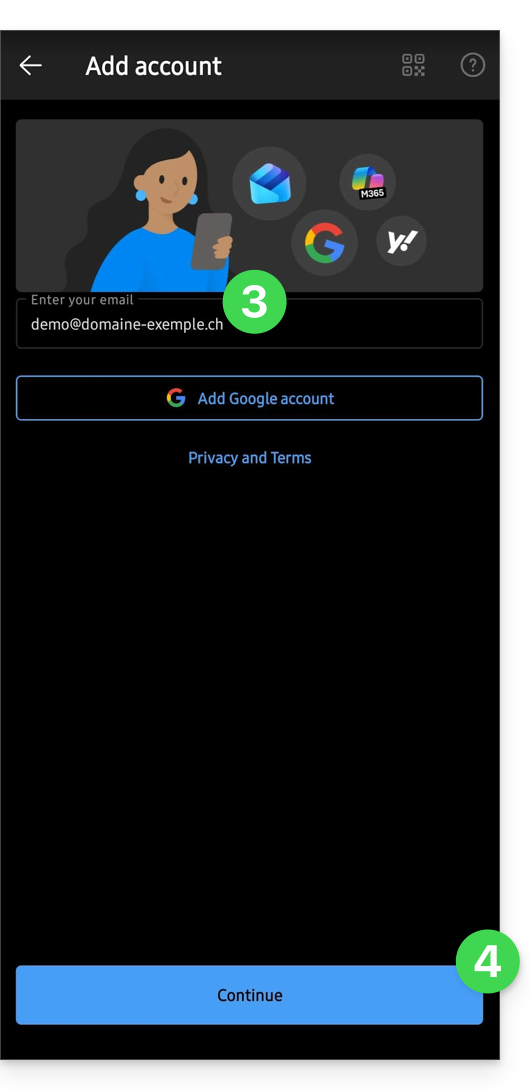
- Clique em Adicionar conta:
- Insira o endereço de e-mail que deseja associar.
- Clique em Continuar:
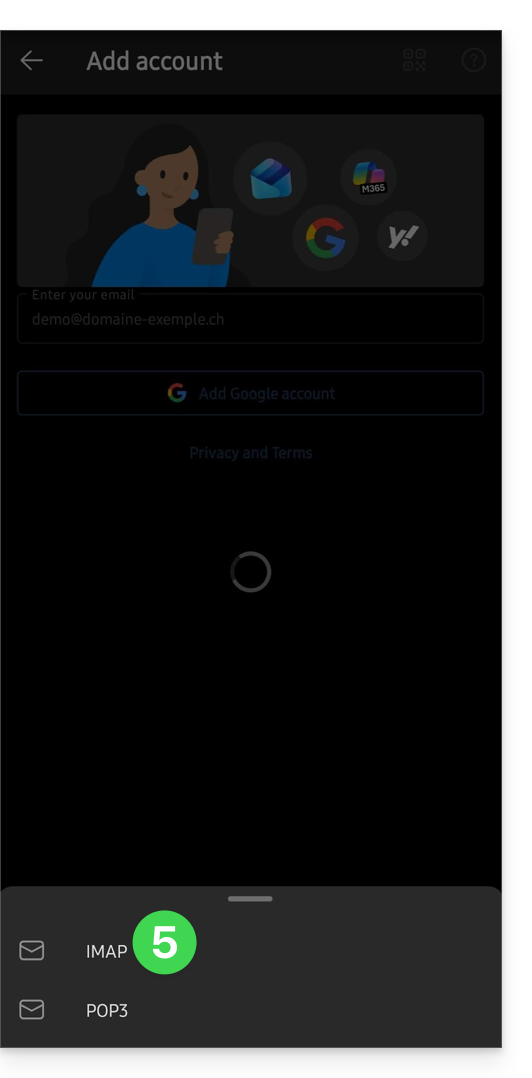
- Clique em IMAP :
- Ative o botão de alternância para ativar as configurações avançadas.
- Preencha as informações em falta (❓: ajuda).
- Clique no ícone ✓ no canto superior direito.
- Se necessário, escolha adicionar uma conta adicional ou clique em Mais tarde.
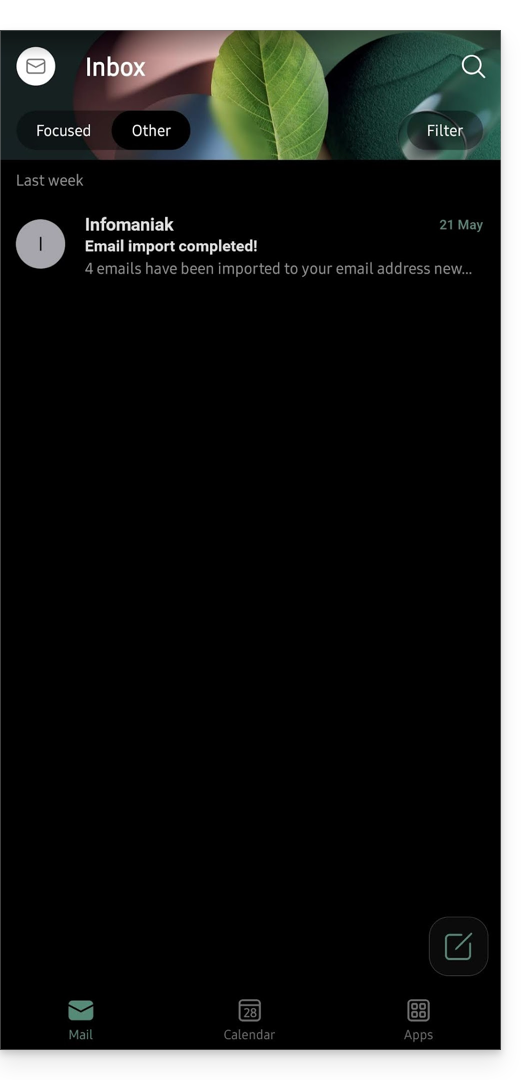
- Pronto, o seu endereço de e-mail está agora configurado na aplicação:
Parâmetros recomendados
- Servidor IMAP de entrada =
mail.infomaniak.com - Porta IMAP =
993(com SSL) - Servidor SMTP de saída =
mail.infomaniak.com - Porta SMTP e protocolo de criptografia e comando/método para ativar este protocolo:
587+ STARTTLS - Nome de utilizador/username = o endereço de e-mail completo e integral (❓: ajuda).
- Senha/password = a senha gerada para o endereço de e-mail que você deseja consultar (❓: ajuda my kSuite | Serviço de e-mail/kSuite).
- Autenticação obrigatória para o envio de e-mails:
- Ative-a nas configurações SMTP do seu aplicativo.
- Marque "usar as mesmas configurações do servidor de entrada" ou, dependendo do software/cliente de e-mail, insira um nome de usuário (= endereço de e-mail completo) e a senha gerada.
Consulte este outro guia se precisar de informações sobre outras portas e protocolos de e-mail compatíveis (SSL/TLS, por exemplo).
Em caso de problemas
Verifique se o serviço de e-mail está configurado de forma otimizada (❓: ajuda).
Não é necessário entrar em contato com o suporte da Infomaniak se o seu endereço de e-mail funcionar corretamente fora do aplicativo. O erro mais comum está relacionado ao uso de uma senha incorreta. Os guias de solução de problemas ajudarão você a resolver qualquer problema:
- Consulte as soluções apresentadas neste outro guia sobre o serviço de e-mail em geral.
- Este outro guia aborda especificamente o Outlook.
… e se o seu Outlook deixou de funcionar após uma alteração da palavra-passe do e-mail, consulte este outro guia.
Link para esta FAQ: https://faq.infomaniak.com/575
Esta seção de perguntas frequentes foi útil?
Este guia detalha as medidas de segurança implementadas nas ofertas de e-mail da Infomaniak, com o objetivo de detetar utilizações abusivas e anormais de um endereço de e-mail. Estas medidas protegem-no contra o uso malicioso do seu computador ou da sua conta.
Número de destinatários por mensagem enviada
Independentemente do plano de e-mail escolhido, seja ele gratuito ou pago,o número total de destinatários inscritos em um e-mail é limitado a100.
Esta restrição aplica-se independentemente do campo utilizado para inserir os endereços de e-mail dos destinatários (Para, CC ou Cco).
Para o envio de e-mails para um grande número de destinatários, recomenda-se vivamente a utilização de uma ferramenta de newsletter, como a que a Infomaniak oferece.
Outros limites de e-mail
Link para esta FAQ: https://faq.infomaniak.com/580
Esta seção de perguntas frequentes foi útil?
Este guia detalha como desativar o protocolo SMTP, impedindo que um determinado utilizador envie e-mails a partir de um determinado endereço de e-mail.
Introdução
- Remover o direito de envio de um utilizador impedirá que ele envie uma mensagem (nova, resposta, reação, etc.) a partir da aplicação web Mail Infomaniak (serviço online ksuite.infomaniak.com/mail) e da aplicação móvel.
- Se o utilizador em questão também estiver especificado em dispositivos conectados, o envio também será impossível a partir de um software/cliente de e-mail como Outlook, Apple Mail, Thunderbird, etc.
- Existe uma permissão específica relativa às mensagens de ausência, caso deseje também impedir que este tipo de mensagem seja enviado.
Impedir que um utilizador envie mensagens a partir de um determinado endereço de e-mail
Novo utilizador
Deseja permitir que um novo colaborador consulte um endereço de e-mail (possibilitando a leitura de e-mails recebidos), mas sem lhe permitir enviar novas mensagens?
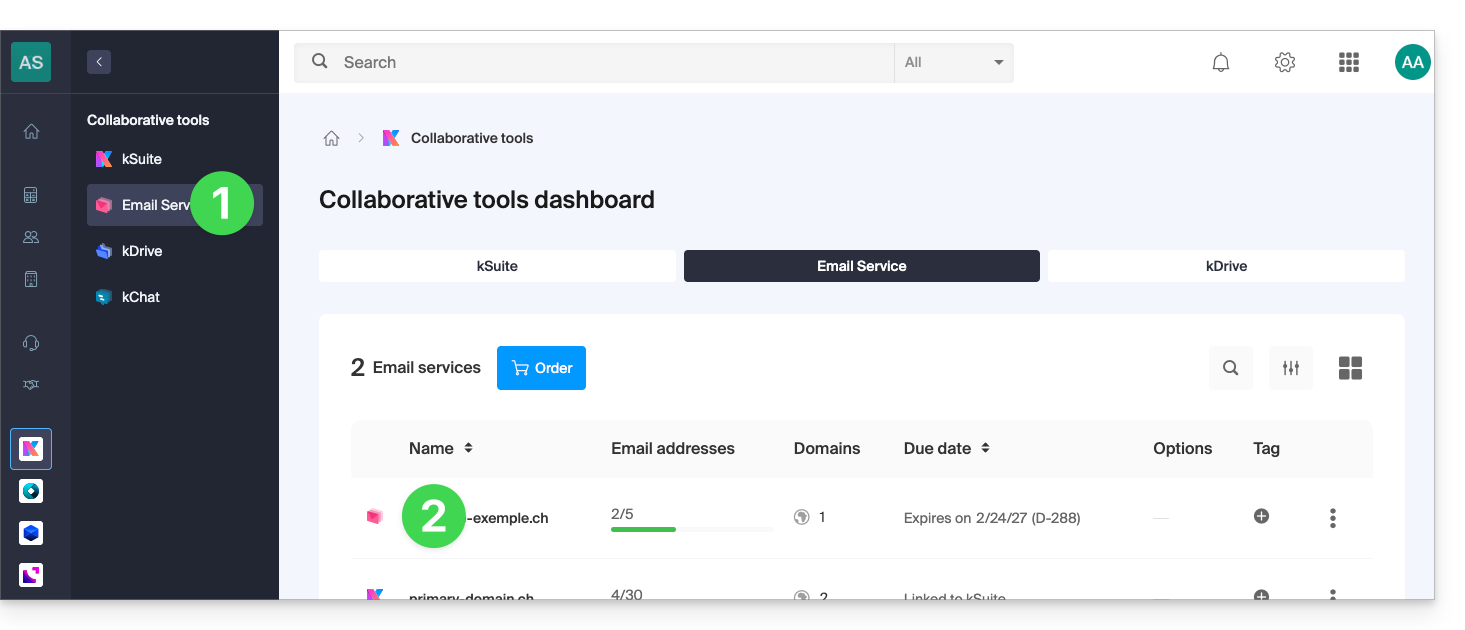
- Clique aqui para acessar o gerenciamento do Serviço de E-mail no seu Painel de Controle Infomaniak (❓: ajuda).
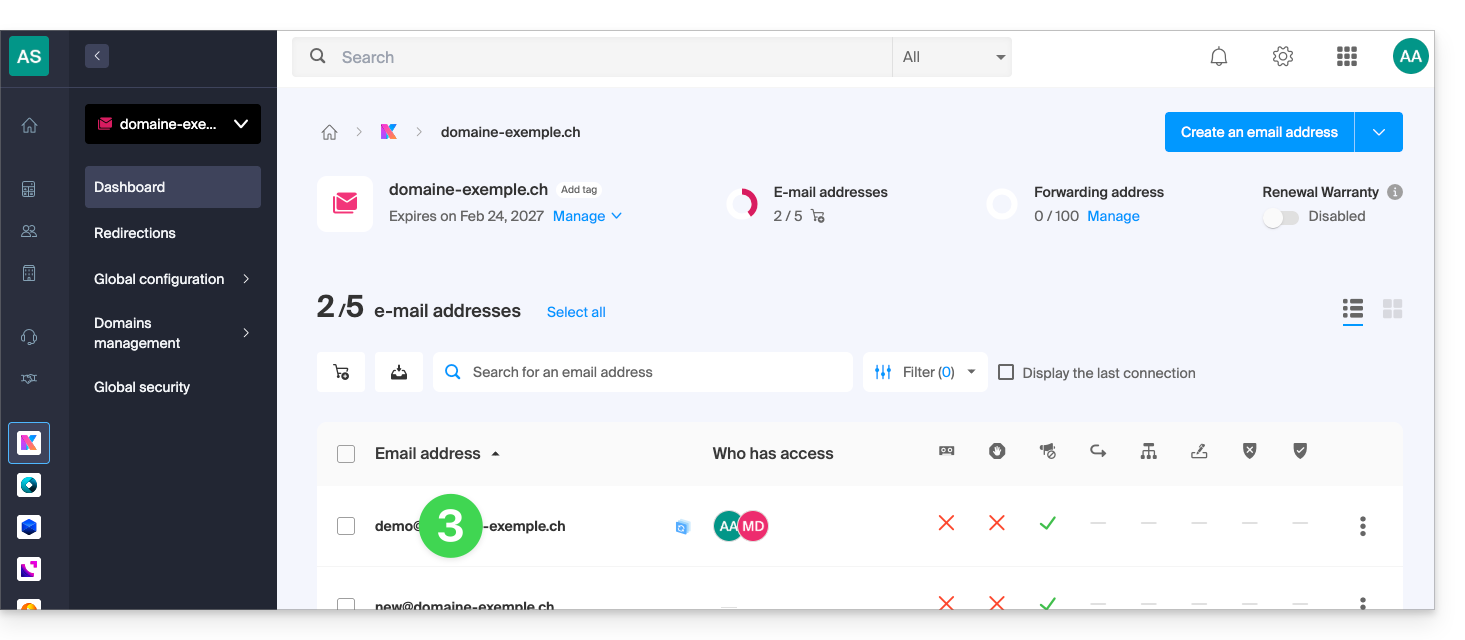
- Clique no nome do Serviço de E-mail desejado:
- Clique em o endereço de e-mail correspondente na tabela que aparece:
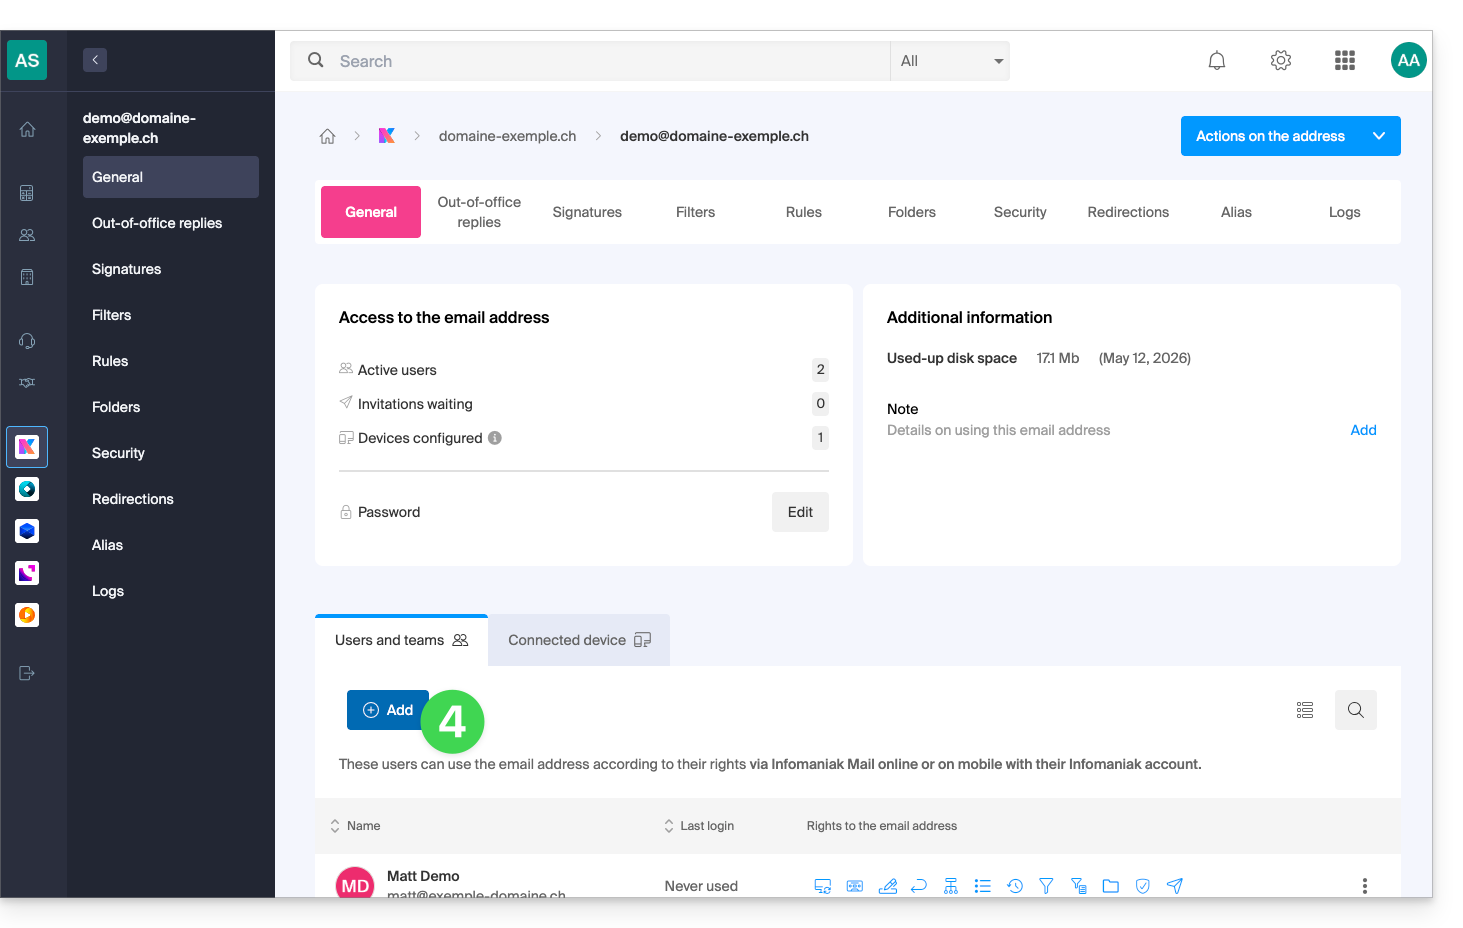
- Clique em Adicionar para adicionar um novo utilizador:
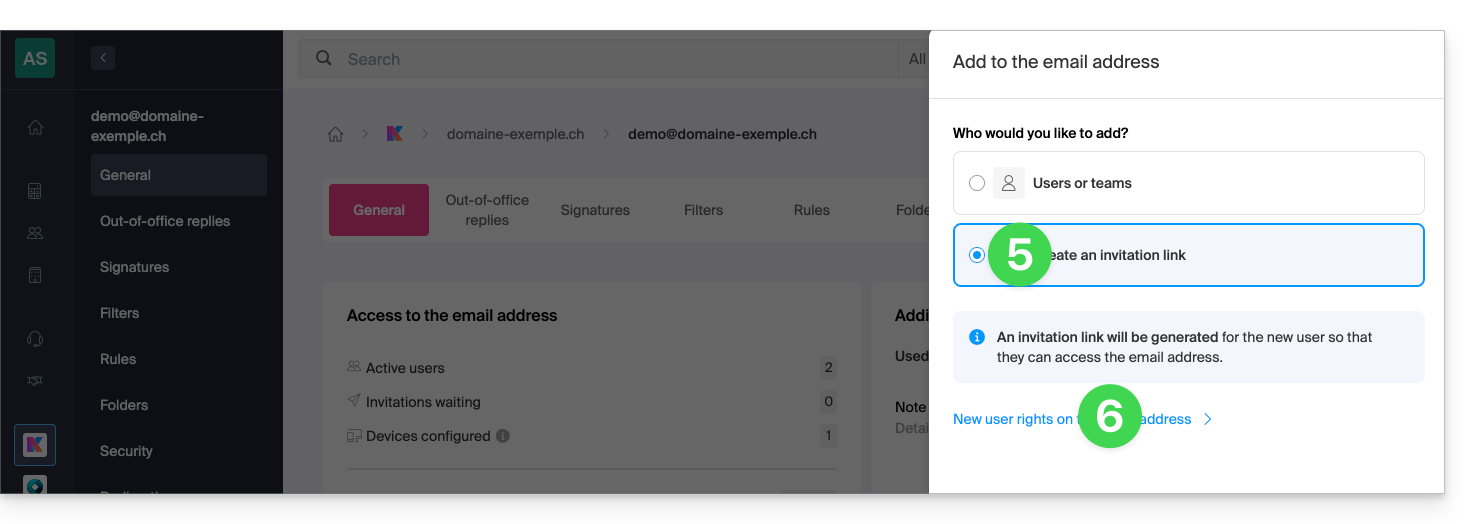
- Neste exemplo, o colaborador é externo, portanto, clique em Criar um link de convite.
- Clique para gerenciar as permissões deste usuário no endereço de e-mail em questão:
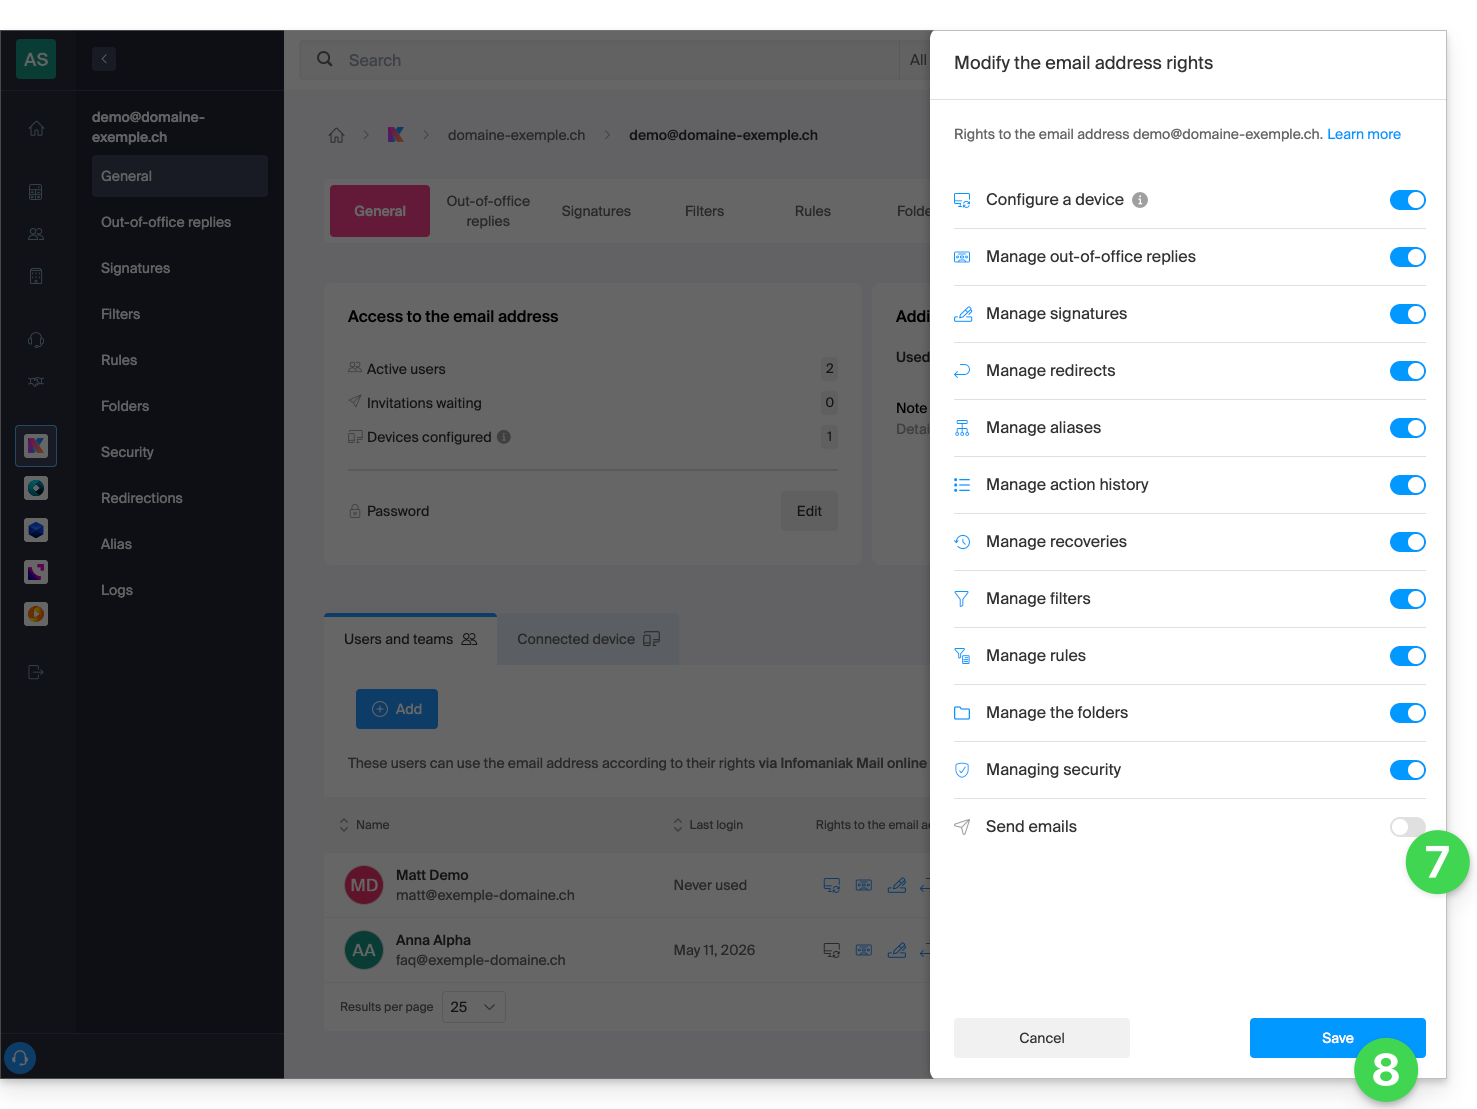
- Clique em Enviar e-mails para revogar o direito de envio.
- Salve a alteração:
- Clique em Adicionar para finalizar o convite:
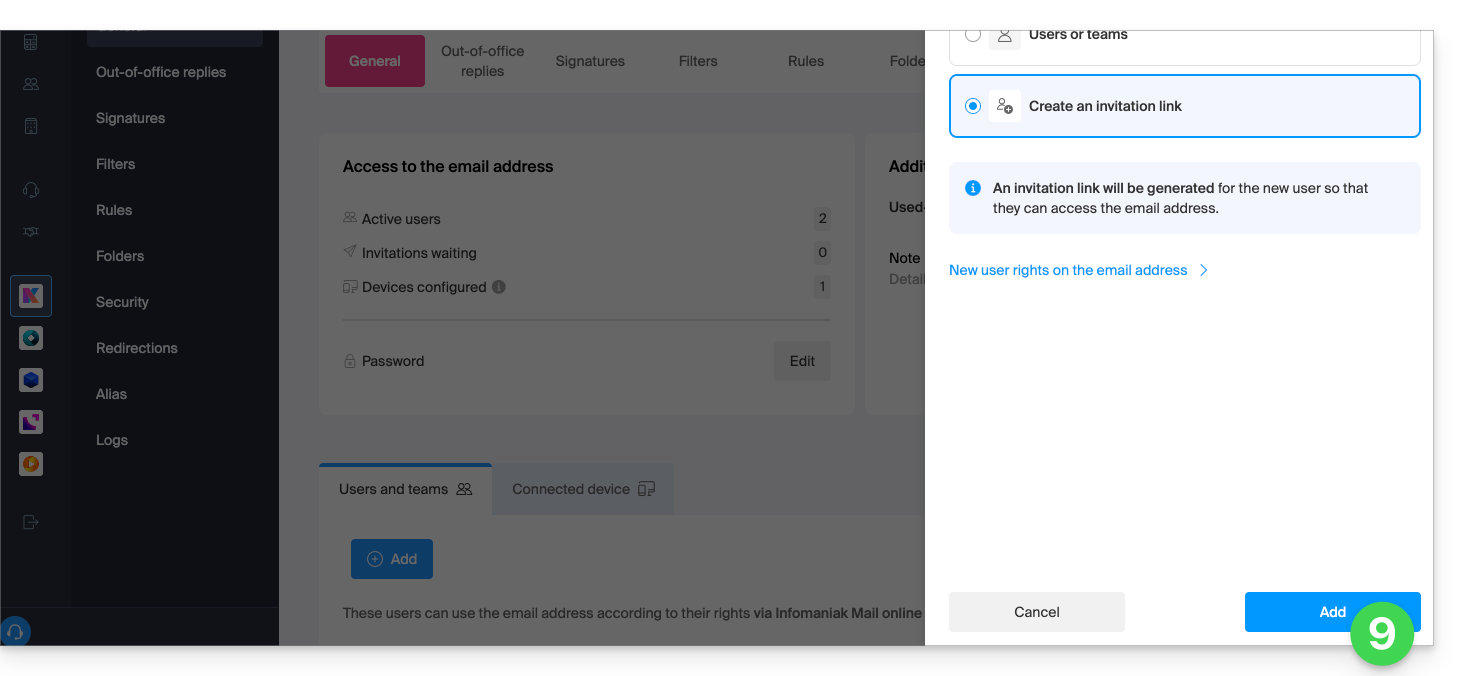
- Insira um endereço de e-mail para o qual enviar o convite.
- Clique em Enviar:
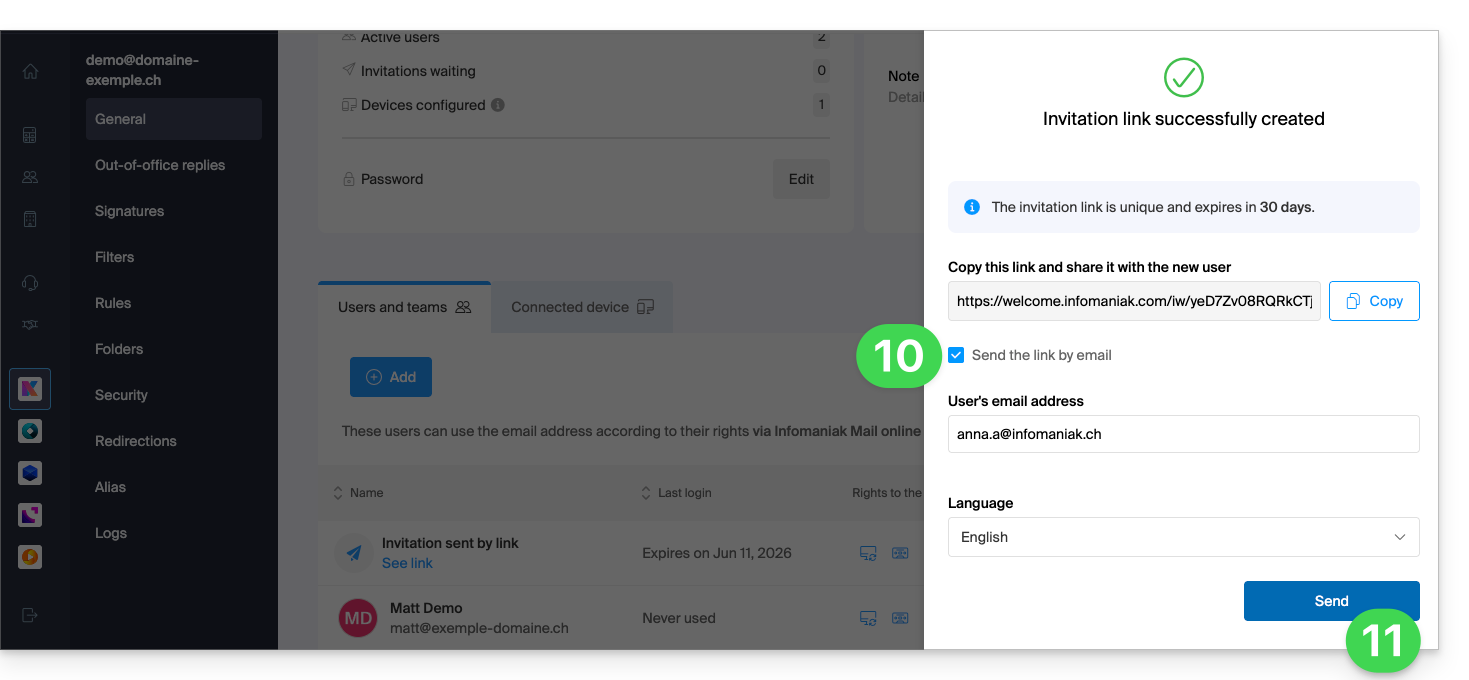
O utilizador convidado aceita o convite: ele terá acesso ao endereço de e-mail e às suas mensagens, mas o botão para compor uma nova mensagem permanecerá desativado, sem que ele possa redigir um rascunho (ou mesmo responder, reagir, etc., pois esses botões também estarão desativados):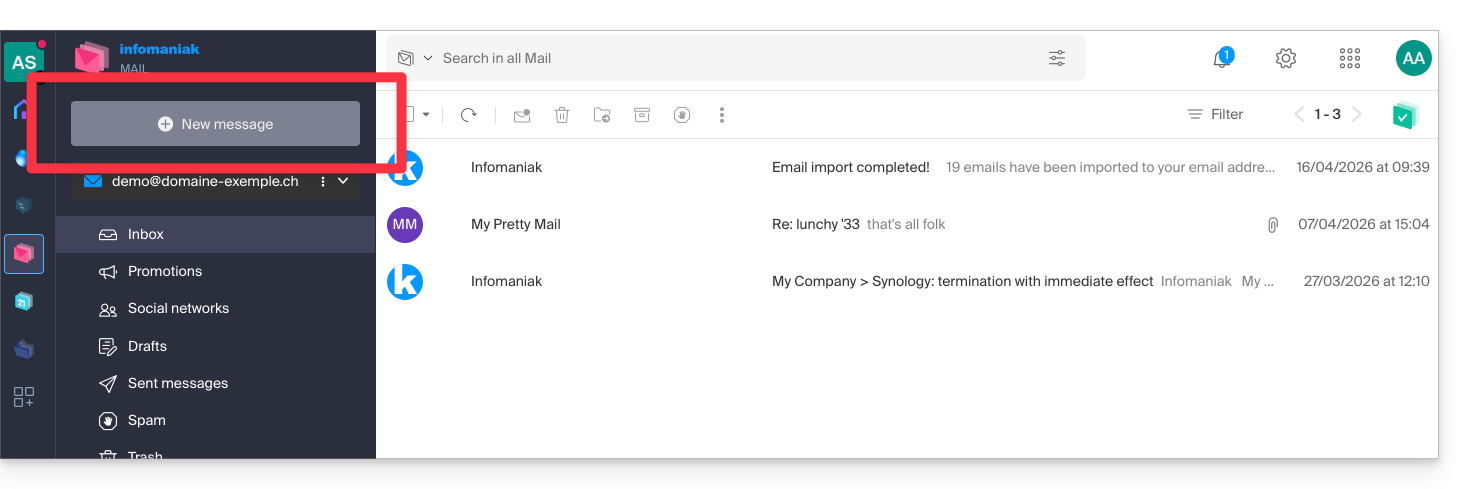
Impedir o envio para um utilizador existente
Deseja permitir que colaboradores continuem a consultar um endereço de e-mail (podendo ler os e-mails recebidos), mas sem lhes permitir enviar novas mensagens?
- Clique aqui para acessar o gerenciamento do Serviço de E-mail no seu Painel de Controle Infomaniak (❓: ajuda).
- Clique no nome do Serviço de E-mail desejado:
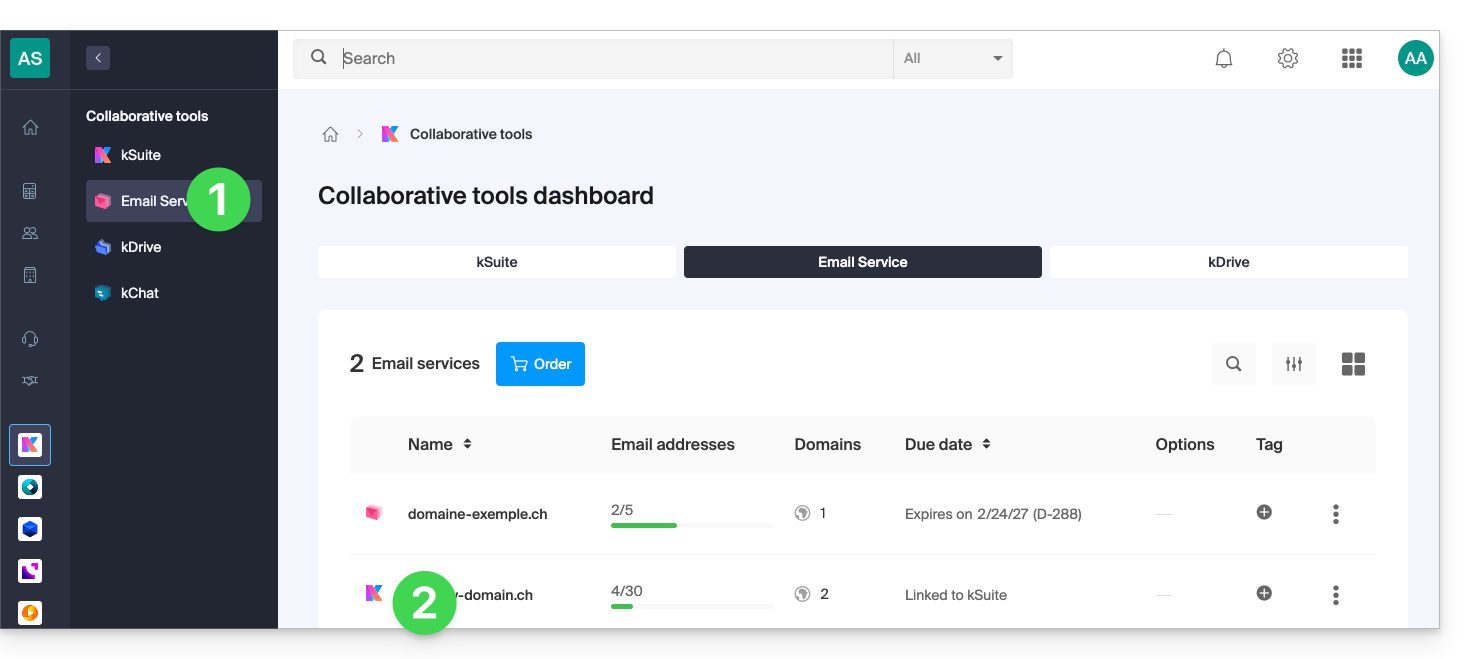
- Clique em o endereço de e-mail em questão na tabela que aparece:
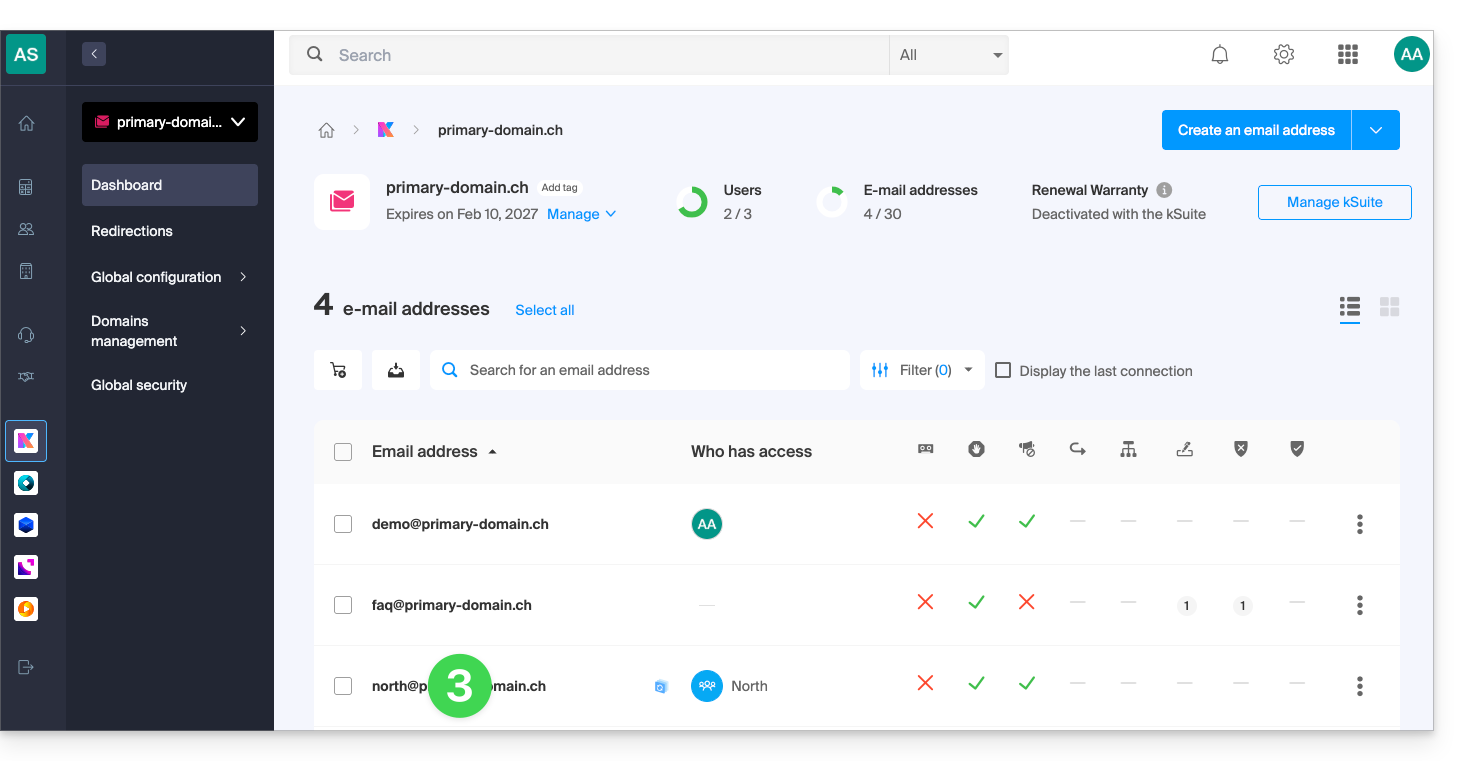
- Clique em Envio de e-mails para remover o direito de envio:
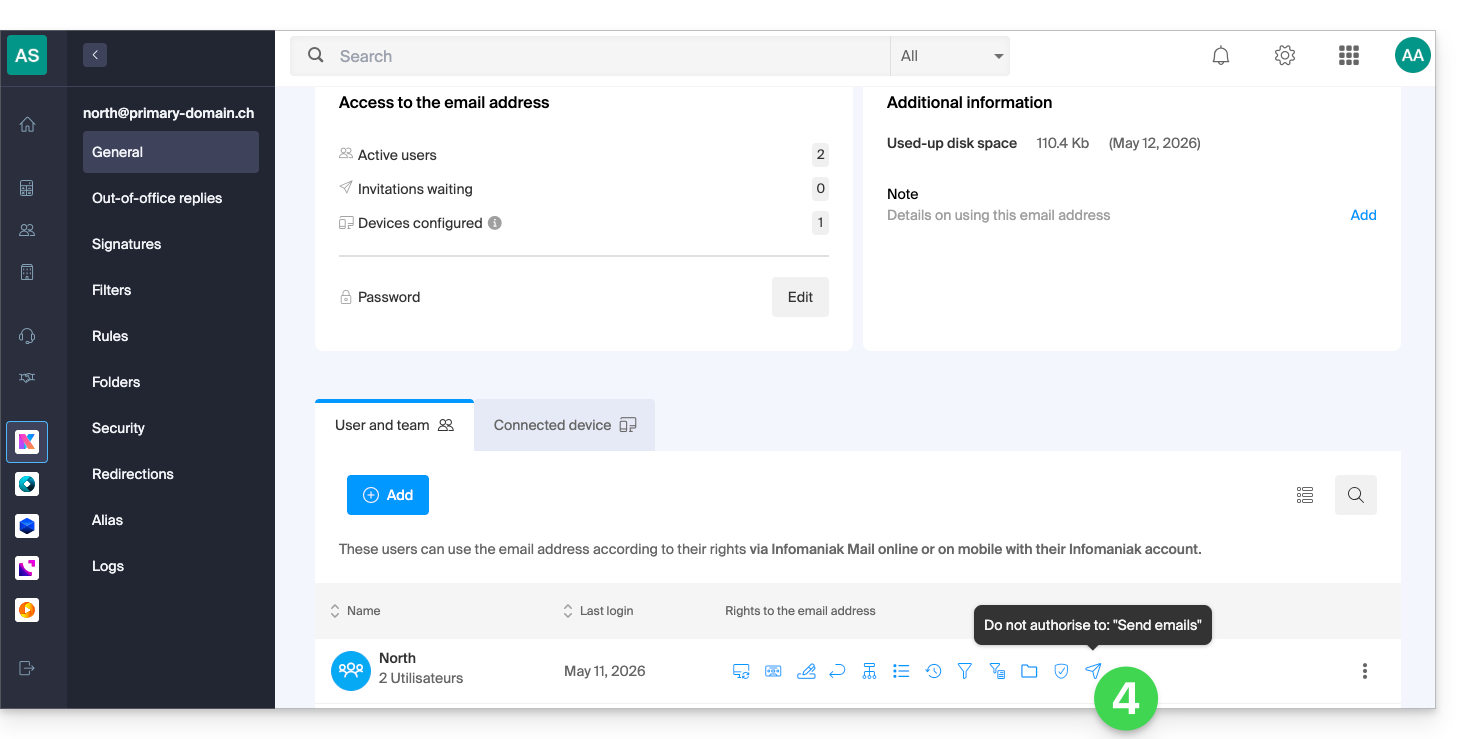
O utilizador terá acesso ao endereço de e-mail e às suas mensagens, mas o botão para compor uma nova mensagem permanecerá desativado, impossibilitando a redação de um rascunho (ou mesmo a resposta, reação, etc., pois esses botões também estarão desativados):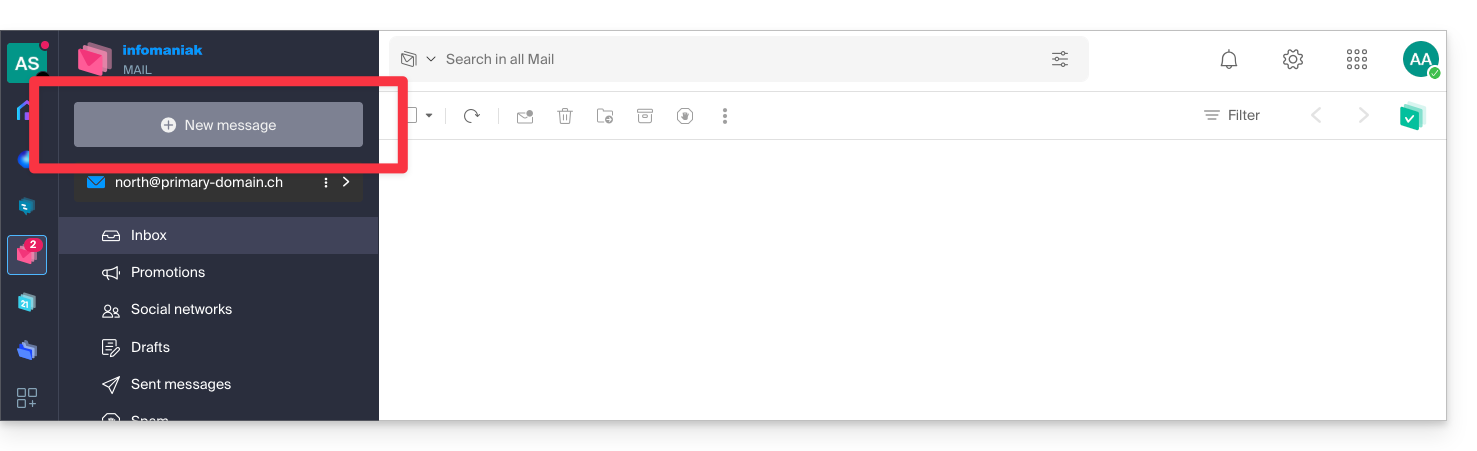
Impedir o envio a partir de um software/cliente de e-mail SMTP
Se desejar impedir que o utilizador envie mensagens a partir de um software/cliente de e-mail ou de qualquer dispositivo fixo ou móvel que contenha uma aplicação de e-mail SMTP, comece por seguir os passos acima.
Em seguida, terá de criar uma palavra-passe (= "dispositivo conectado") associada a este utilizador (portanto, no ponto 8 de este outro guia, em vez de “Sem utilizador”, deverá especificar o identificador do colaborador em questão, já adicionado no separador utilizadores):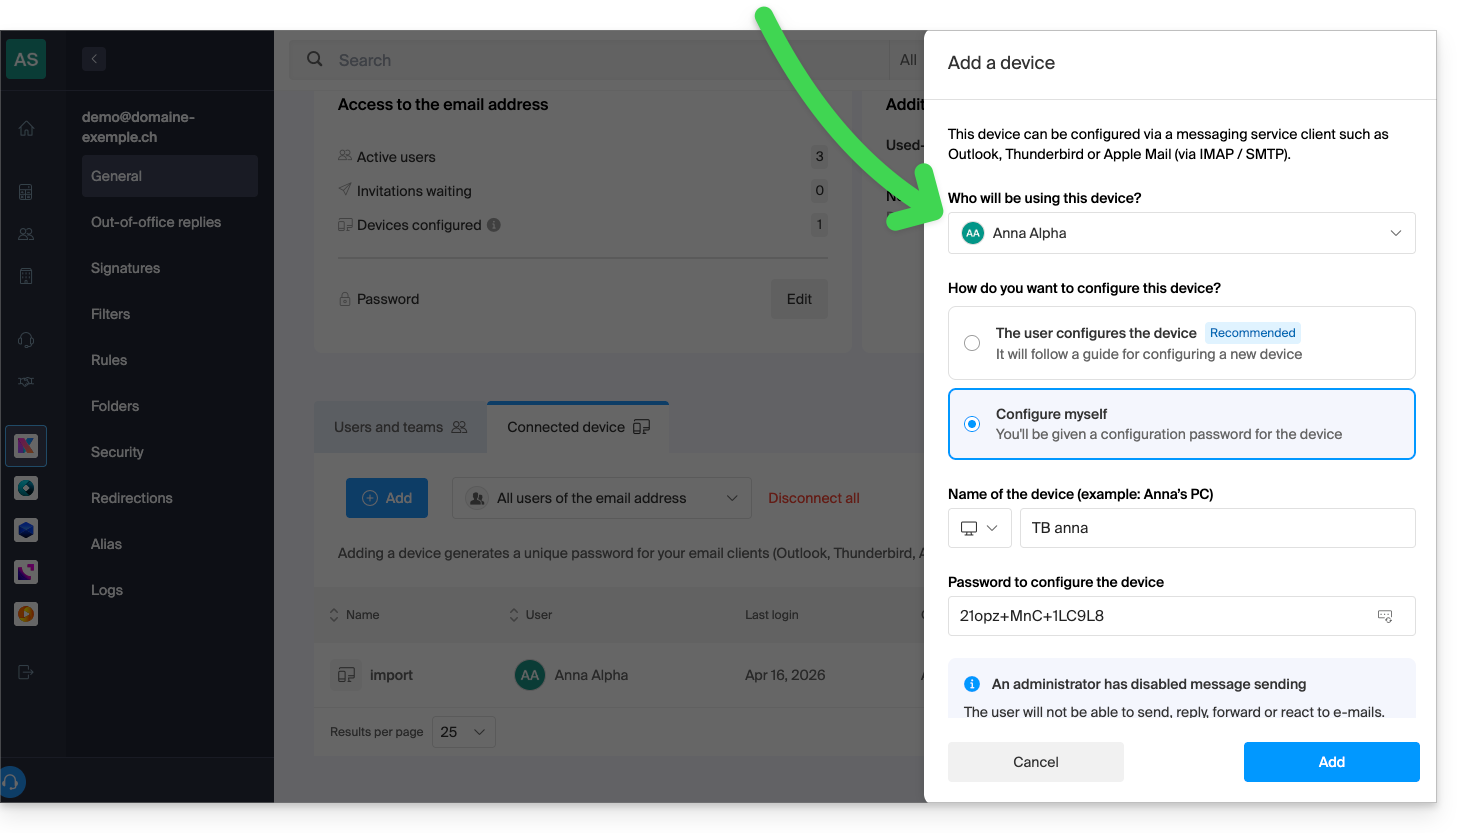
Dessa forma, o software/cliente de e-mail poderá ser configurado para receber e-mails, mas não permitirá o envio, gerando continuamente um erro (solicitação de senha) se o usuário insistir em enviar um e-mail: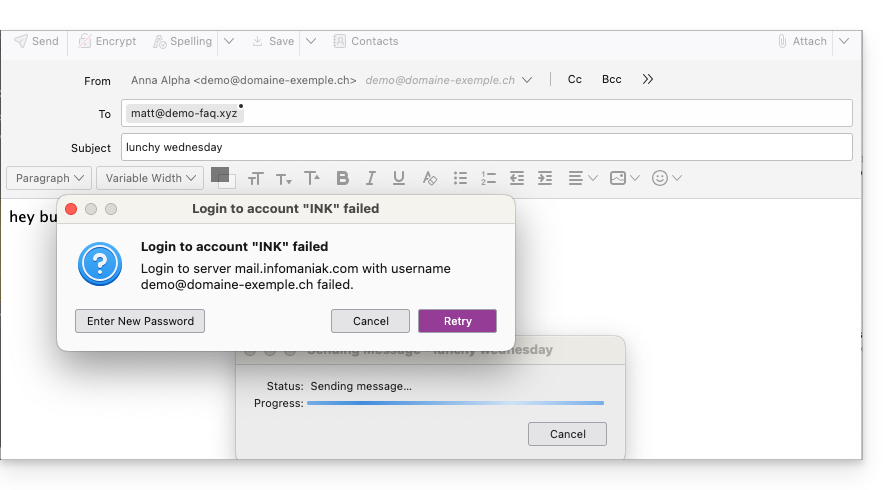
Link para esta FAQ: https://faq.infomaniak.com/593
Esta seção de perguntas frequentes foi útil?
Este guia explica como transferir para a Infomaniak os endereços de e-mail atualmente hospedados pela Yahoo, com a ajuda de uma ferramenta de importação por IMAP.
Introdução
- A operação não afeta os dados já existentes no endereço de destino, nem os dados do endereço de origem.
- A totalidade da caixa externa será importada.
- Uma vez iniciado o processo de importação, não é mais possível interrompê-lo.
- Os eventuais duplicados são gerenciados: um conteúdo idêntico será copiado apenas uma vez.
- Consulte este outro guia se procura alternativas a este processo via IMAP.
Importar todo o seu histórico de e-mails
1. Pré-requisitos do Yahoo
- Para permitir que o assistente Infomaniak acesse sua conta Yahoo, clique em https://login.yahoo.com/account/security#other-apps e configure uma senha de aplicativo, gerada automaticamente pelo Yahoo.
- Será necessário copiá-lo e, em seguida, colá-lo no lugar da sua senha no assistente Infomaniak para copiar seus e-mails; para gerar a senha:
- Faça login na sua conta Yahoo.
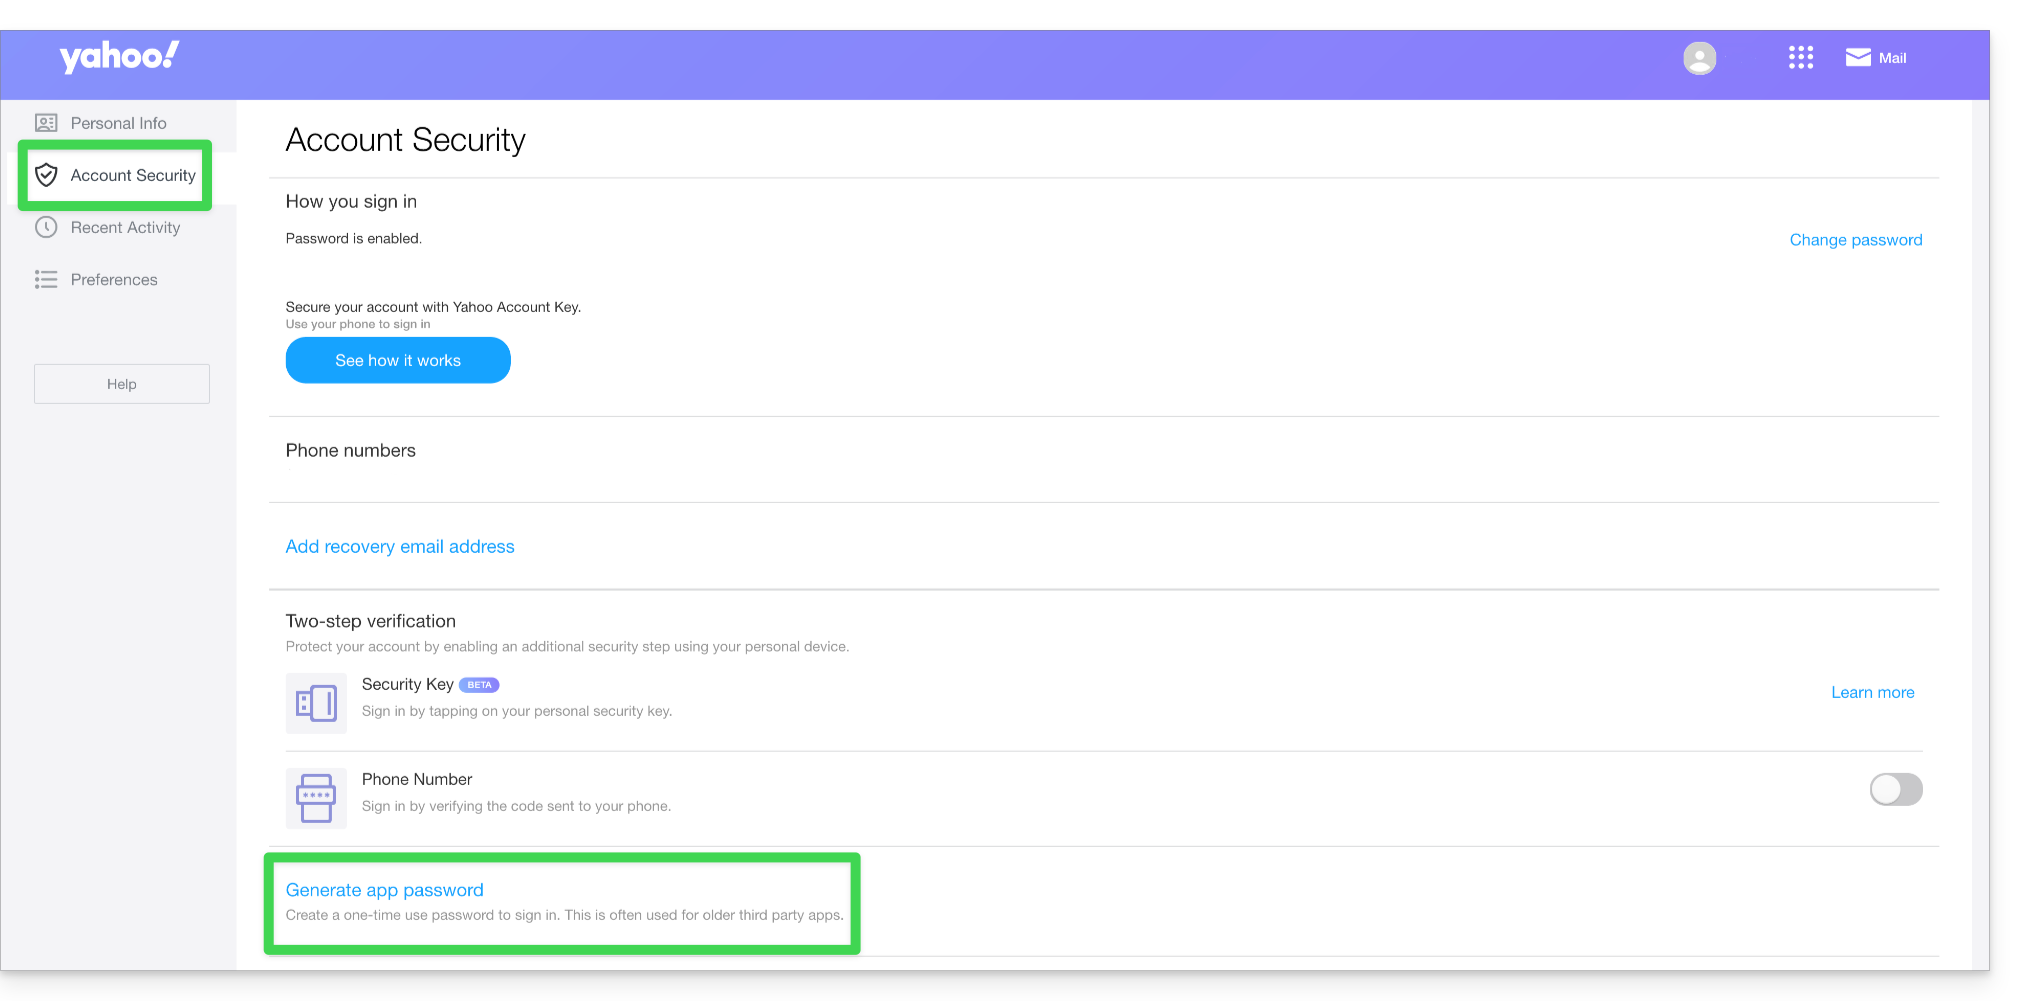
- Acesse a guia Segurança da Conta.
- Clique em Gerar senha de aplicativo:
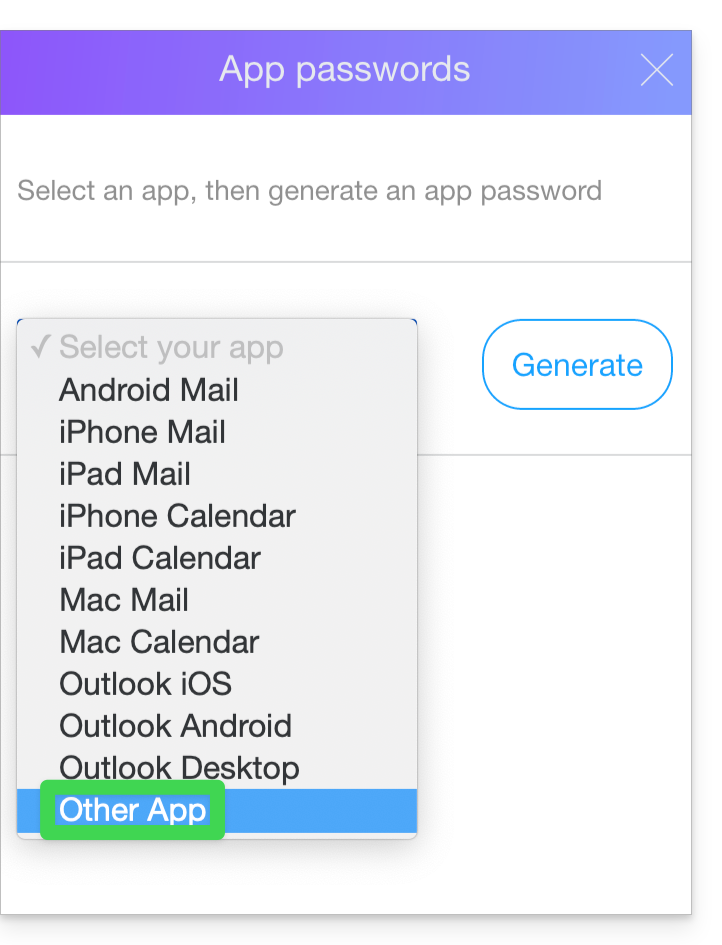
- Escolha Outro aplicativo:
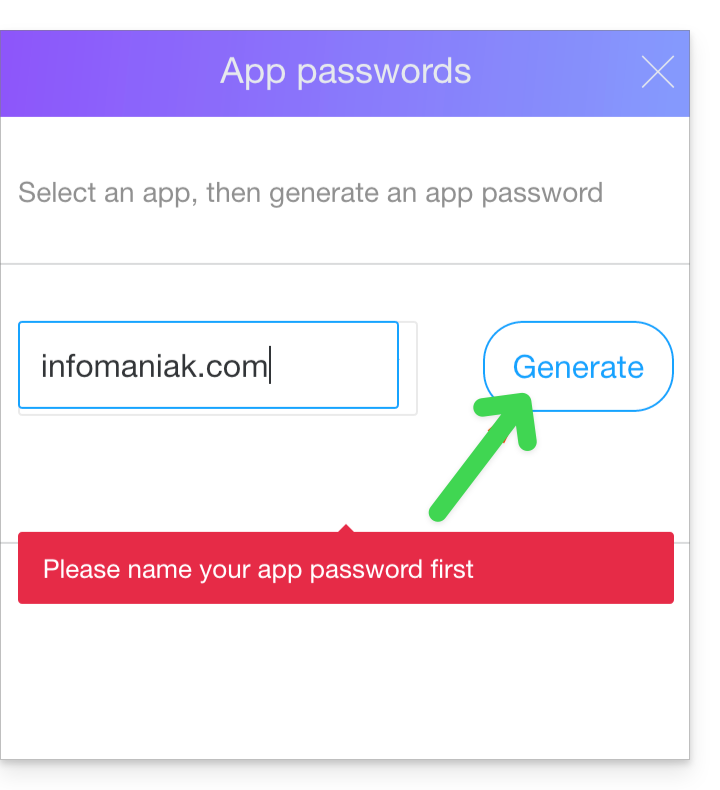
- Indique um nome de aplicativo, por exemplo, Infomaniak, e clique em Gerar:
- Copie a senha do aplicativo.
2. Pré-requisitos Infomaniak
- Ter um Serviço de Email no seu Painel de Controle Infomaniak.
- Dispor de um quota de endereços disponíveis ou ajuste-a previamente, se necessário.
- Certifique-se de que a sua conta de e-mail está devidamente protegida
- Crie um ou mais endereços neste serviço de e-mail.
- Se precisar de criar muitos endereços de e-mail (10 ou mais), consulte este outro guia sobre a criação em massa.
- O endereço de e-mail de destino deve estar associado ao utilizador (= à conta Infomaniak) que está a utilizar.
3. Importar o conteúdo de e-mail do Yahoo para o Infomaniak
- Clique aqui para acessar a ferramenta de importação (serviço online https://import-email.infomaniak.com).
- Se necessário, faça login na sua conta Infomaniak na organização correspondente, pois a importação será feita para um dos endereços de e-mail associados à interface web Mail da Infomaniak (serviço online ksuite.infomaniak.com/mail) da conta Infomaniak que você está usando.
- Clique em "Importar via IMAP".
- Clique em "Importação única".
- Preencha o campo da esquerda com o seu endereço de e-mail de origem (cujo conteúdo será copiado).
- Preencha o campo da direita com a senha desse mesmo endereço de e-mail de origem (consulte os requisitos).
- Clique em Confirmar.
- Se necessário, insira um segundo endereço de e-mail para ser importado ao mesmo tempo.
- Escolha o endereço de e-mail para o qual deseja importar os e-mails; o menu suspenso lista os endereços de e-mail atualmente associados à sua interface Web Mail Infomaniak (serviço online ksuite.infomaniak.com/mail) da conta Infomaniak com a qual está conectado.
- Após selecionar o endereço de destino desejado na lista, clique no botão azul Importar e-mails.
- A cópia está a iniciar. Pode aguardar e verificar o resultado na página quando a importação estiver concluída, ou fechar a janela (a importação continua em segundo plano e o progresso pode ser acompanhado – veja abaixo).
- Um e-mail de confirmação será enviado automaticamente para todos os endereços de e-mail envolvidos na operação, assim que a importação for concluída, indicando o número de mensagens copiadas.
- Um rastreamento está disponível nas configurações do endereço de e-mail de destino, apenas no aplicativo web Mail (serviço online ksuite.infomaniak.com/mail).
- O rastreamento permite visualizar o histórico das importações no endereço em questão.
4. Ajustar as configurações das aplicações
Se necessário, assim que tiver configurado o nome de domínio associado à sua conta de e-mail para funcionar com a Infomaniak, modifique as configurações dos programas/clientes de e-mail que utiliza para que estes se conectem corretamente aos servidores da Infomaniak: siga o assistente de configuração.
Link para esta FAQ: https://faq.infomaniak.com/611
Esta seção de perguntas frequentes foi útil?
Este guia explica como gerir as palavras-passe de um endereço de e-mail a partir da aplicação web Mail Infomaniak (serviço online ksuite.infomaniak.com/mail).
As outras opções de acesso e gestão são apresentadas no guia principal.
Pré-requisitos
- Ter permissão para gerenciar os dispositivos: é possível que o administrador do Serviço de Email tenha definido essa restrição.removeu este direito da sua conta de administrador (❓: ajuda).
Adicionar ou remover um dispositivo conectado
Criar e exibir uma nova senha para adicionar o endereço de e-mail no seu computador, aplicativo móvel, etc.
Para gerenciar a senha de um endereço de e-mail já vinculado ao seu aplicativo Web Mail Infomaniak:
- Clique aqui para acessar os e-mails no seu kSuite Infomaniak (❓: ajuda).
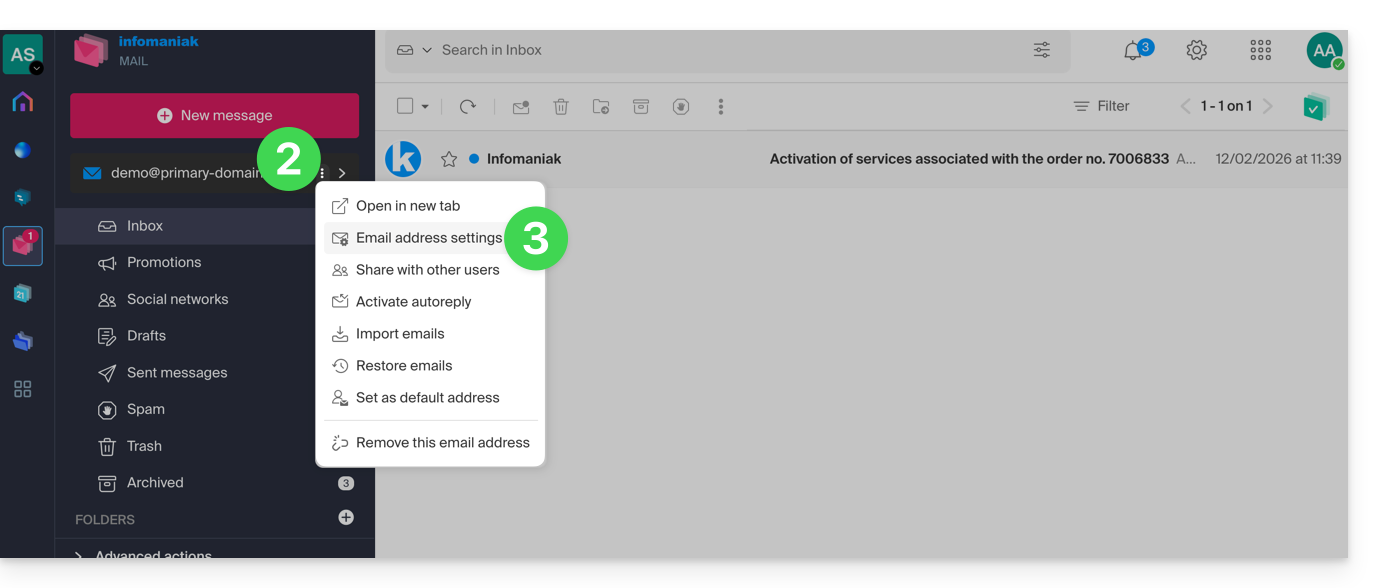
- Clique no menu de ação ⋮ à direita do endereço de e-mail em questão.
- Clique em Configurações do endereço:
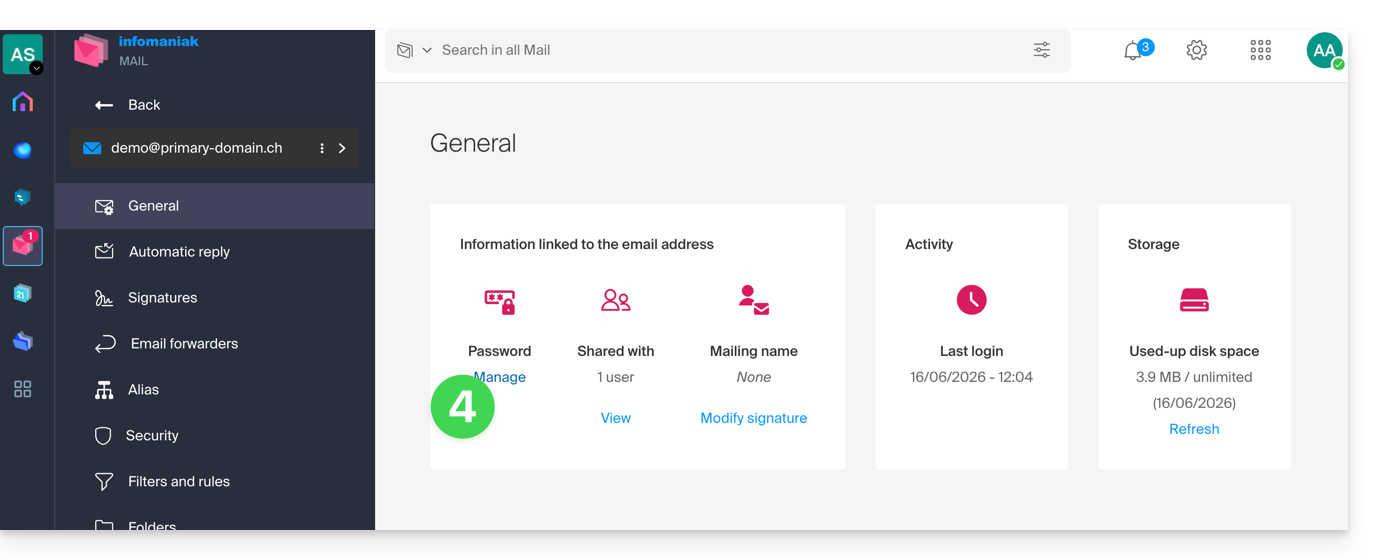
- Clique em Gerenciar a senha:
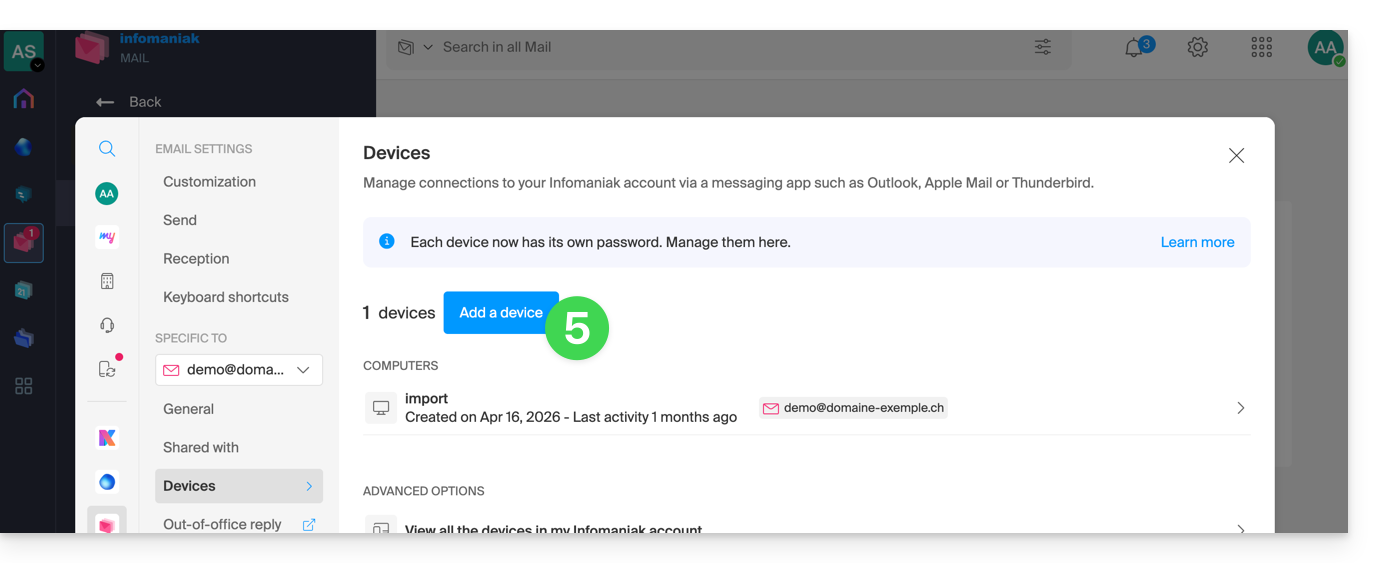
- Clique em Adicionar dispositivo:
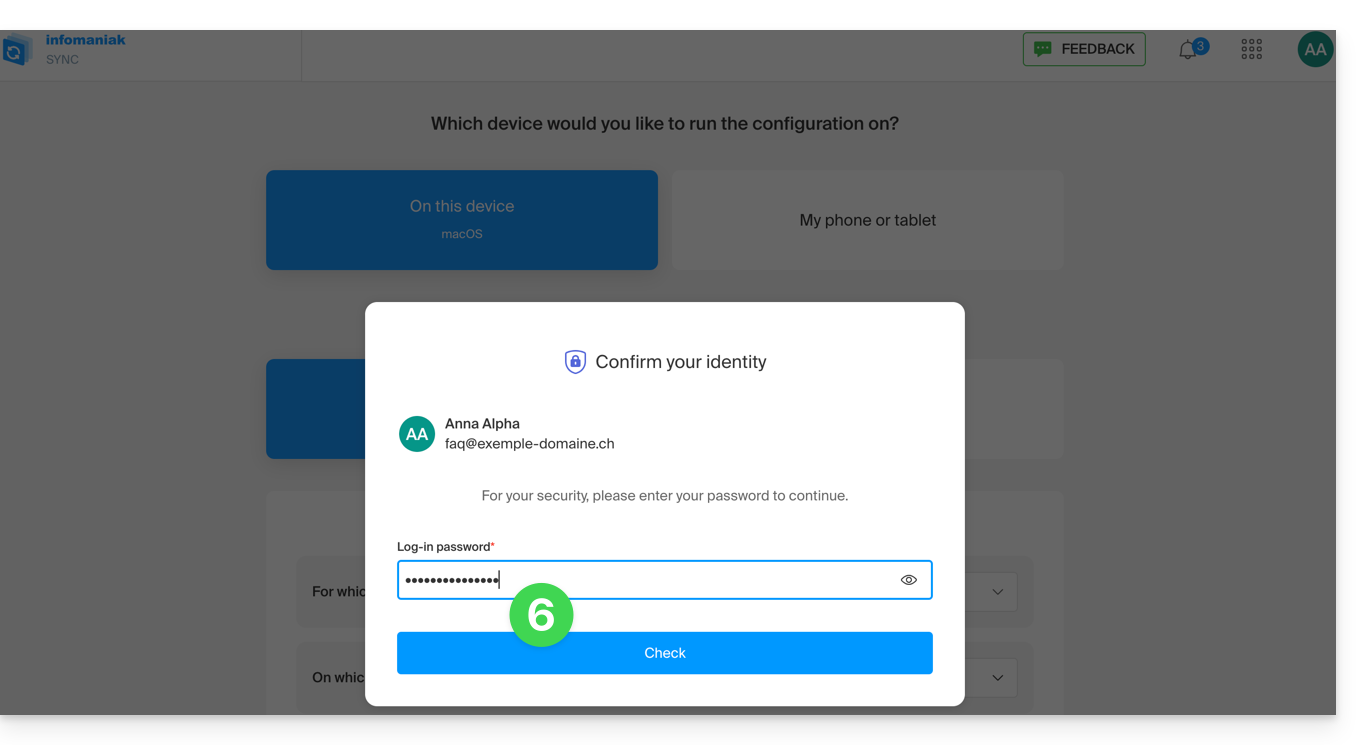
- Insira a senha para acessar sua conta Infomaniak, caso seja solicitada:
- O assistente de configuração será aberto na secção MAIL; verifique ou selecione o endereço de e-mail correspondente no menu suspenso.
- Selecione “novo dispositivo” no menu suspenso:
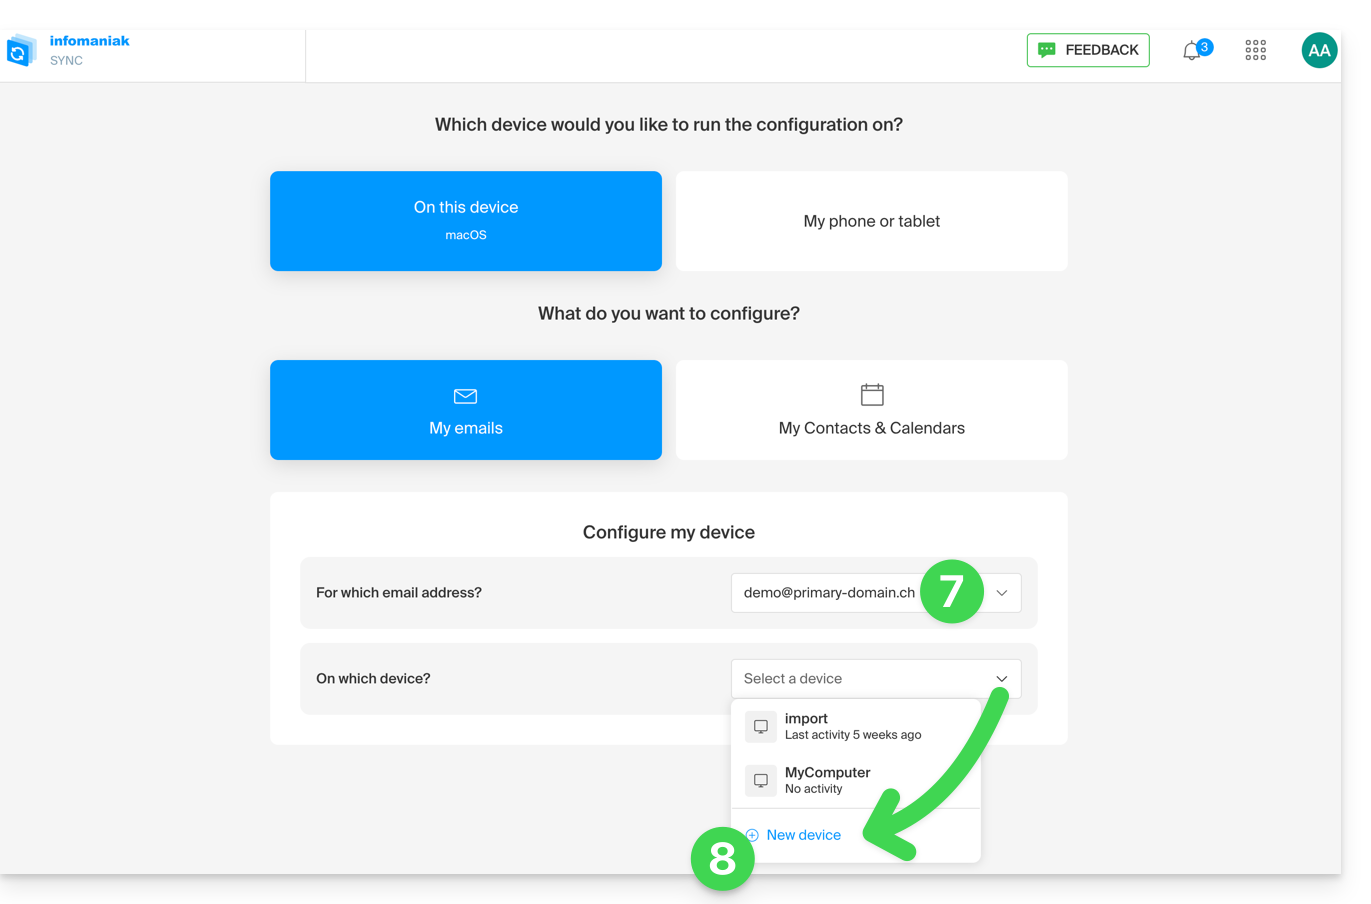
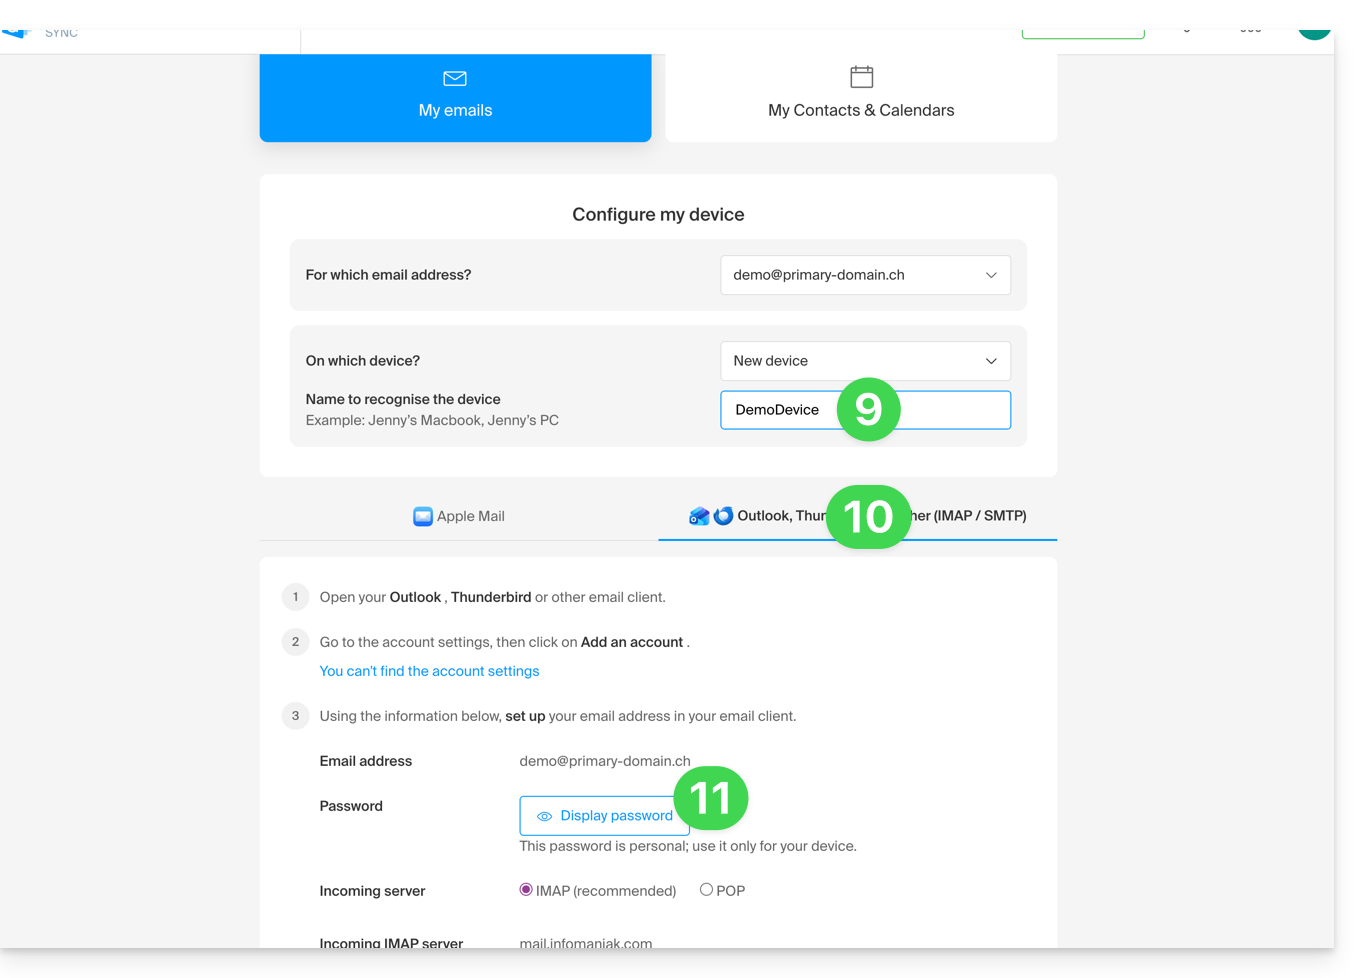
- Forneça uma descrição para o dispositivo.
- Clique na aba correspondente à sua necessidade: seja o procedimento para o Apple Mail (❓: ajuda), seja qualquer outra configuração IMAP/SMTP.
- Desça e clique no botão para gerar uma senha:
- Uma nova senha criada e funcional será exibida:
- você pode modificá-la clicando no botão, mas não se esqueça de salvá-la:
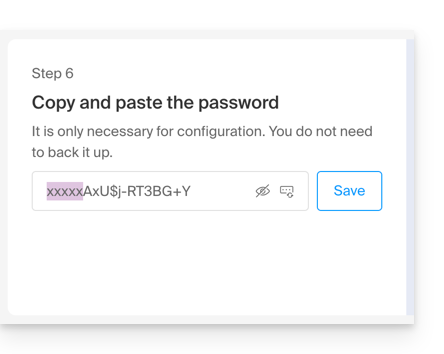
- você pode modificá-la clicando no botão, mas não se esqueça de salvá-la:
- Em seguida, copie-o e guarde-o em segurança (num gestor de palavras-passe, por exemplo); não será mais possível exibi-lo posteriormente.
Remover uma palavra-passe para interromper o acesso de um computador, aplicação móvel, etc.
A qualquer momento, é possível gerenciar os acessos criados/utilizados:
- Clique em Configurações no canto superior direito.
- Verifique ou selecione o endereço de e-mail correspondente no menu suspenso do menu lateral esquerdo.
- Clique em Dispositivos no menu lateral esquerdo.
- Clique no dispositivo em questão:
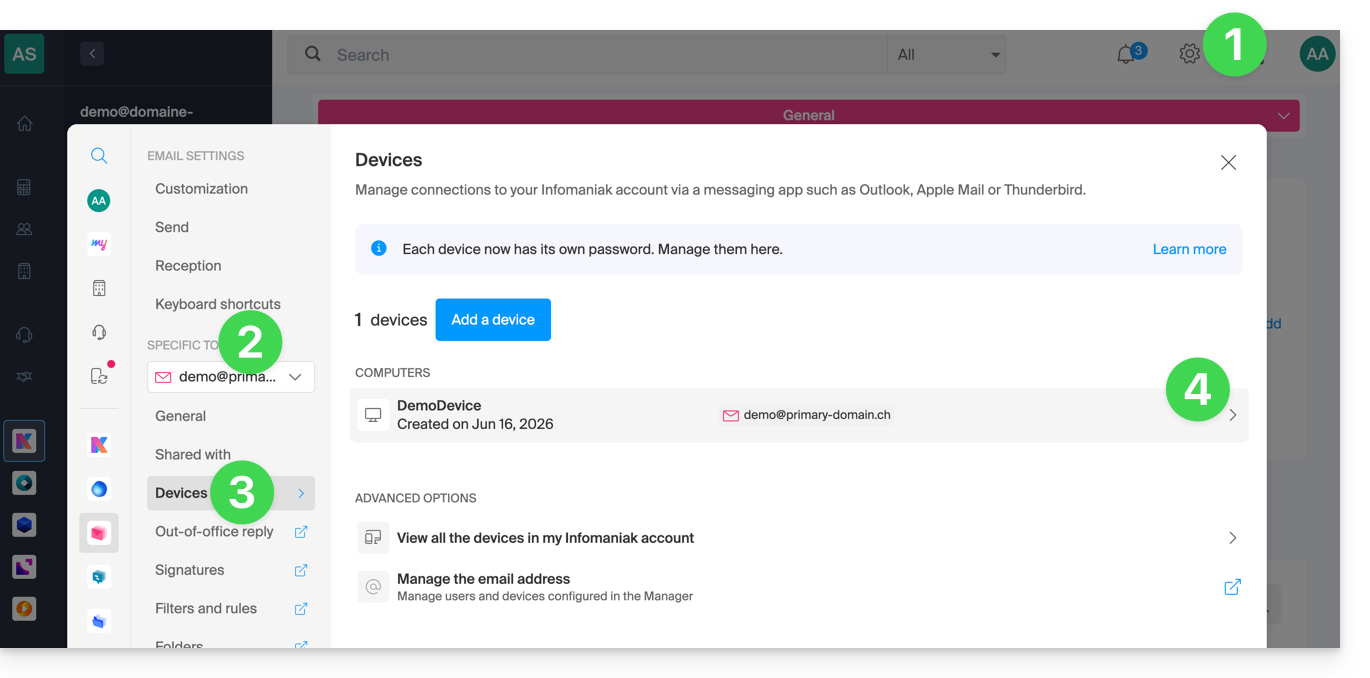
- Clique no botão para desconectar o dispositivo.
- Confirme o logout do dispositivo em questão:
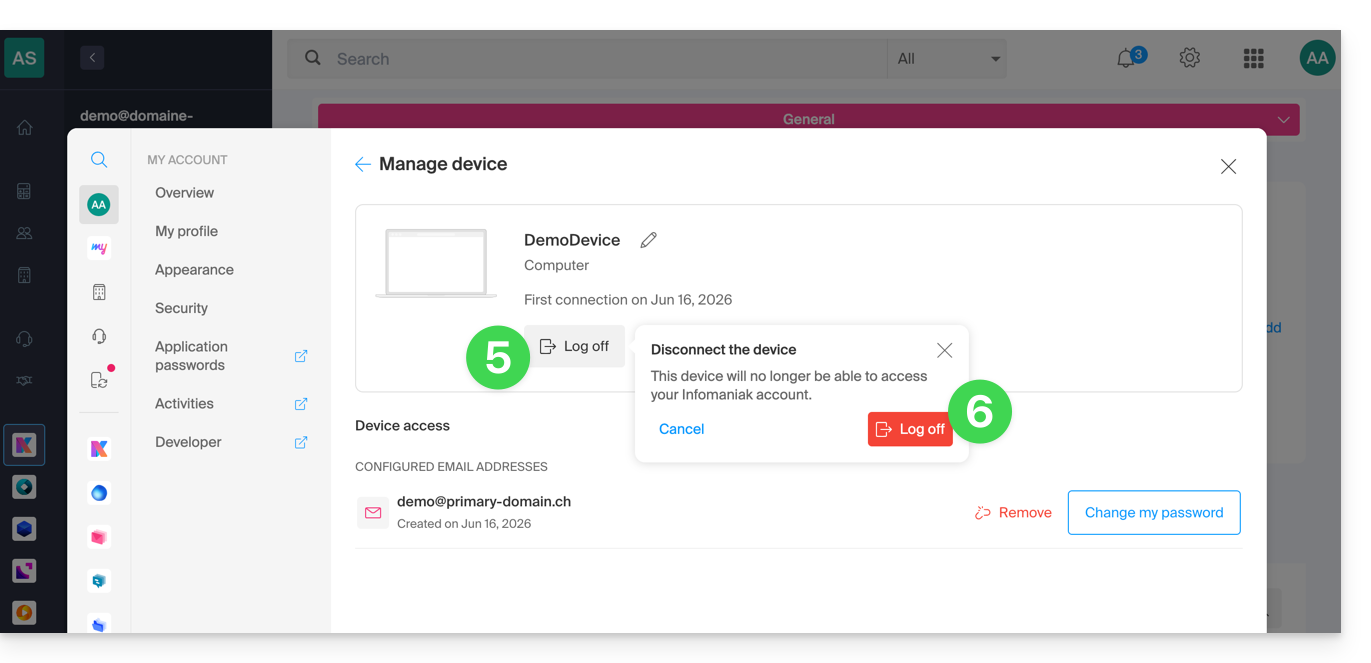
Link para esta FAQ: https://faq.infomaniak.com/711
Esta seção de perguntas frequentes foi útil?
Este guia detalha as ações a serem realizadas com prioridade caso não observe nenhuma diferença entre o seu site após uma alteração que tenha efetuado, e a sua versão anterior à alteração. Estas dicas também são válidas caso encontre problemas ao utilizar a interface dos produtos Infomaniak.
Introdução
- Durante a sua navegação, um navegador como o Brave, Chrome, Edge, Firefox, Opera, Safari… guarda num espaço reservado os dados consultados, com o objetivo de evitar solicitar novamente ao servidor os dados já consultados, para poupar tempo e recursos.
- O seu cache pode conter uma grande quantidade de dados e, por vezes, o navegador tem dificuldades. Os sites podem então ser exibidos incorretamente ou exibir uma versão desatualizada.
- Limpar o cache garante que você está visualizando a versão mais recente da página ou pasta acessada.
Limpar o cache do navegador…
… no Safari
Escolha a sua versão do macOS para consultar a ajuda correspondente da Apple.
… sobre as ferramentas do Google (Chrome, Android, etc.)
Consulte a ajuda do Google.
… no Firefox
Consulte a ajuda da Mozilla.
… no Edge / Internet Explorer
Consulte a ajuda da Microsoft.
Link para esta FAQ: https://faq.infomaniak.com/793
Esta seção de perguntas frequentes foi útil?
Este guia explica como copiar o conteúdo de um ou mais endereços de e-mail externos (todas as mensagens de e-mail, pastas, subpastas, ou seja, toda a estrutura da sua caixa de e-mail existente em outros provedores) para um ou mais dos seus endereços existentes na Infomaniak, graças à ferramenta de importação Infomaniak!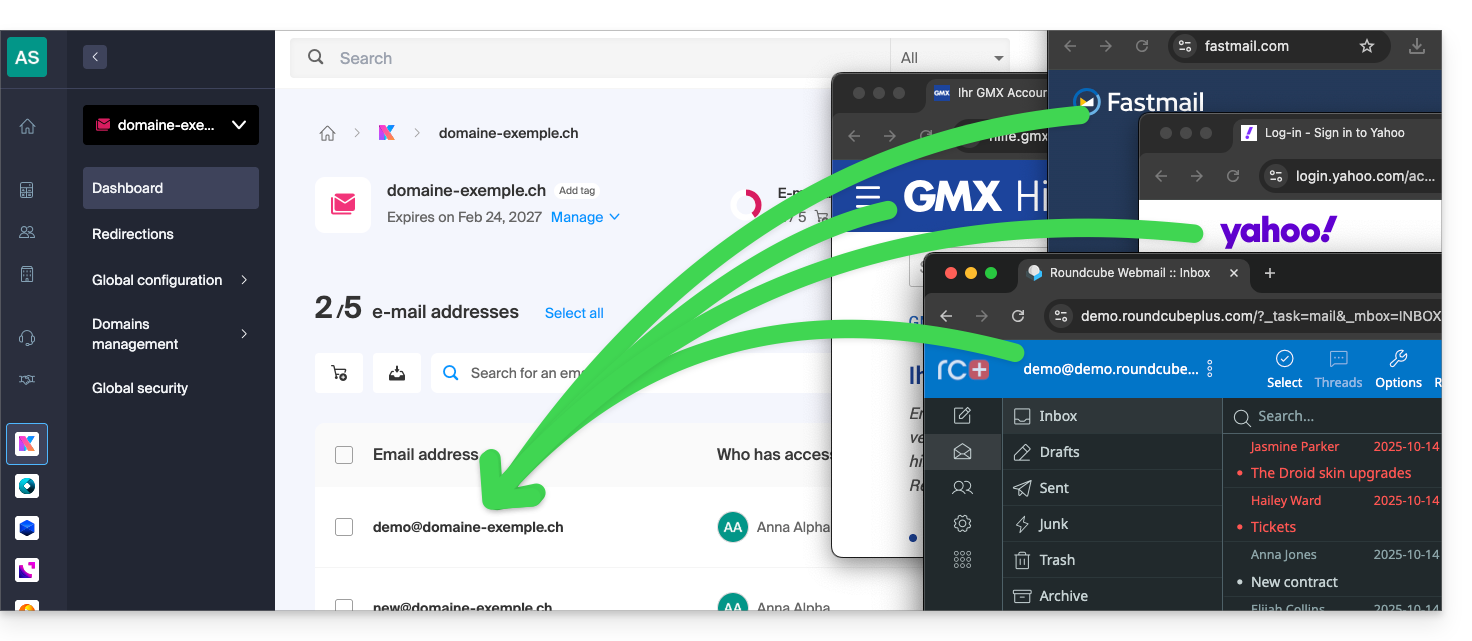
Introdução
- É fácil migrar toda a estrutura das suas mensagens de e-mail para a Infomaniak – descubra as ofertas.
- A operação não afeta os dados já existentes no endereço de destino, nem os dados do endereço de origem.
- Todo o conteúdo da caixa de correio externa será importado por cópia.
- Uma vez iniciado o processo de importação, não é mais possível interrompê-lo.
- Os eventuais duplicados são geridos: um conteúdo idêntico será copiado apenas uma vez.
Iniciar a cópia para um endereço de e-mail Infomaniak
Existem várias opções para importar e-mails:
- Deseja copiar e-mails já existentes na Infomaniak (por exemplo, @ik.me) para outra caixa de correio também na Infomaniak?
- Consulte este outro guia para copiar o conteúdo dos e-mails internamente.
- Você possui um arquivo/arquivo compactado no formato MBOX e deseja importá-lo diretamente para um endereço existente na Infomaniak?
- Consulte este outro guia para importar o conteúdo do arquivo
.mboxe, assim, importar seus e-mails, independentemente de sua origem, para a Infomaniak. - Esta é a solução ideal para transferir facilmente o conteúdo do Google, pois um arquivo MBOX pode ser obtido muito facilmente através do Google Takeout.
- Consulte este outro guia para importar o conteúdo do arquivo
- Se não conseguiu obter um ficheiro MBOX dos seus e-mails, pode copiar e-mails de um fornecedor externo através da ferramenta de importação por IMAP; clique no link correspondente ao fornecedor de e-mail que pretende importar:
- endereços @ Bluewin
- endereços @ Gmail ou domínio personalizado Google
- endereços @ GMX
- endereços @ domínio personalizado Microsoft 365
- endereços @ Orange
- endereços @ domínio personalizado Swisscom
- endereços @ Yahoo
- Qualquer outro fornecedor de e-mail, como Gandi, Hotmail, Hostinger, Sunrise, etc.
- Você também pode simplesmente configurar um redirecionamento de e-mails, mas este só terá efeito nos e-mails futuros que chegarem à sua caixa de entrada.
Link para esta FAQ: https://faq.infomaniak.com/837
Esta seção de perguntas frequentes foi útil?