Base de conhecimento
1000 perguntas frequentes, 500 tutoriais e vídeos explicativos. Aqui, você encontra apenas soluções!
Este guia explica como, quando você pertence a várias Organizações, alternar entre a visualização de uma Organização e outraatravés do Painel de Controle Infomaniak.
Introdução
- Desde que abriu a sua conta na Infomaniak, faz parte de pelo menos uma Organização.
- Se estava sozinho e não se tratava de um convite, uma Organização foi criada em seu nome e você se torna automaticamente o Responsável Legal.
- Caso contrário, você pertence à Organização que o convidou (para participar da sua kSuite, para gerenciar um produto, etc.) com um papel definido.
- Você pode sair de Organizações.
- É perfeitamente possível ter acesso a várias Organizações com as mesmas credenciais de login e alternar rapidamente entre elas.
- O princípio é o mesmo na interface Mail da Infomaniak (consulte este outro guia).
Exibir uma das outras Organizações da mesma conta de utilizador
Para alternar para outra Organização da qual você faz parte:
- Clique aqui para fazer login e acessar o gerenciamento de seus serviços e produtos no Painel de Controle Infomaniak.
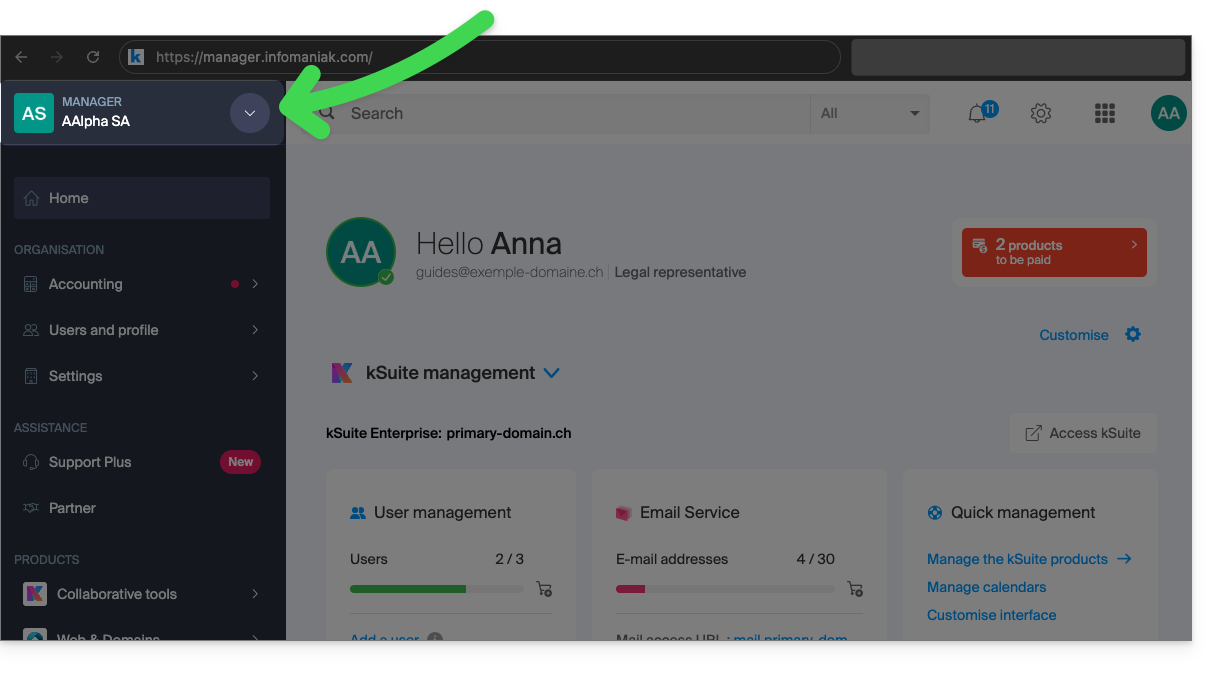
- Clique na seta para baixo no canto superior esquerdo da interface do Manager, à direita do nome da Organização em que você está atualmente:
- No menu que se abriu, clique no nome da Organização à qual deseja acessar:
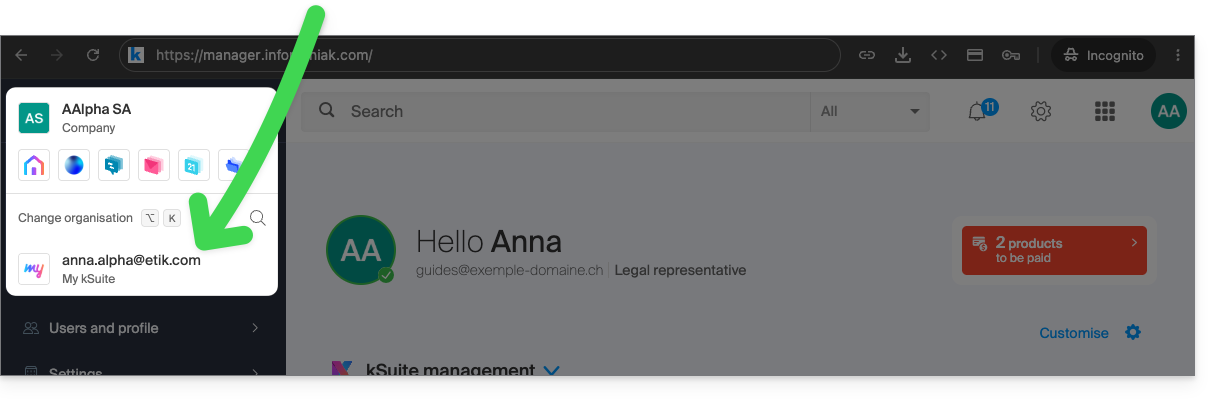
- Se você pertence a muitas Organizações, pode clicar na lupa para inserir o nome da Organização que procura.
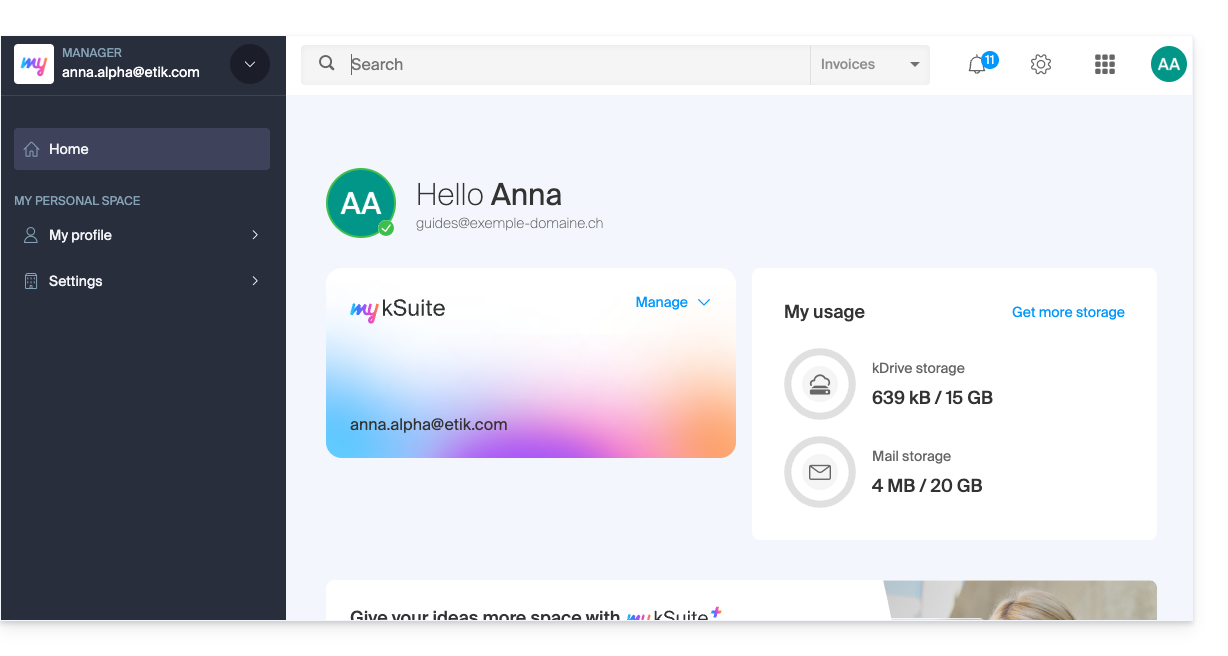
- A alteração da Organização é imediata, você é redirecionado automaticamente (neste caso, para uma conta my kSuite):
- Comece novamente no passo 2 para retornar a uma das outras Organizações.
Link para esta FAQ: https://faq.infomaniak.com/1989
Esta seção de perguntas frequentes foi útil?
Este guia explica como verificar a versão do sistema operacional do servidor do seu Serviço de Hospedagem Web.
Introdução
- Mesmo que o Debian ou um pacote pareça estar desatualizado, as versões exibidas não apresentam vulnerabilidades:
- A Infomaniak mantém essas versões atualizadas por meio de correções internas regulares em todos os componentes e sistemas utilizados.
- As versões são escolhidas pela sua estabilidade e, em seguida, reforçadas com medidas de segurança que os testes convencionais não detectam.
- Se você ou seus clientes identificarem uma falha em um produto Infomaniak, por favor, envie um POC (prova de conceito). Embora raros, esses casos são tratados rapidamente.
- A segurança dos dados é da responsabilidade do usuário: a Infomaniak não pode ser responsabilizada por uma má gestão ou utilização das credenciais de acesso.
Qual sistema operacional no meu site?
Para saber a versão:
- Conecte-se ao servidor via SSH (precisa de ajuda?).
Execute o seguinte comando:
lsb_release -aVocê receberá informações do seguinte tipo:
Distributor ID: Debian
Description: Debian GNU/Linux 7.9 (wheezy)
Release: 7.9
Codename: wheezy
Link para esta FAQ: https://faq.infomaniak.com/1995
Esta seção de perguntas frequentes foi útil?
Este guia explica como remover um domínio alias de uma hospedagem web Infomaniak. O nome de domínio principal do site não estará mais vinculado a qualquer outro nome de domínio.
Isso permite, por exemplo, criar posteriormente uma nova hospedagem web ou site distinto para o nome de domínio que foi desvinculado.
Pré-requisitos
- Ter desvinculado o nome de domínio sinônimo do nome de domínio principal, caso houvesse associação anterior.
Remover o domínio alias
Para remover um nome de domínio alias do seu site:
- Clique aqui para acessar o gerenciamento do seu site no Manager Infomaniak (precisa de ajuda?).
- Clique diretamente no nome atribuído ao site em questão:
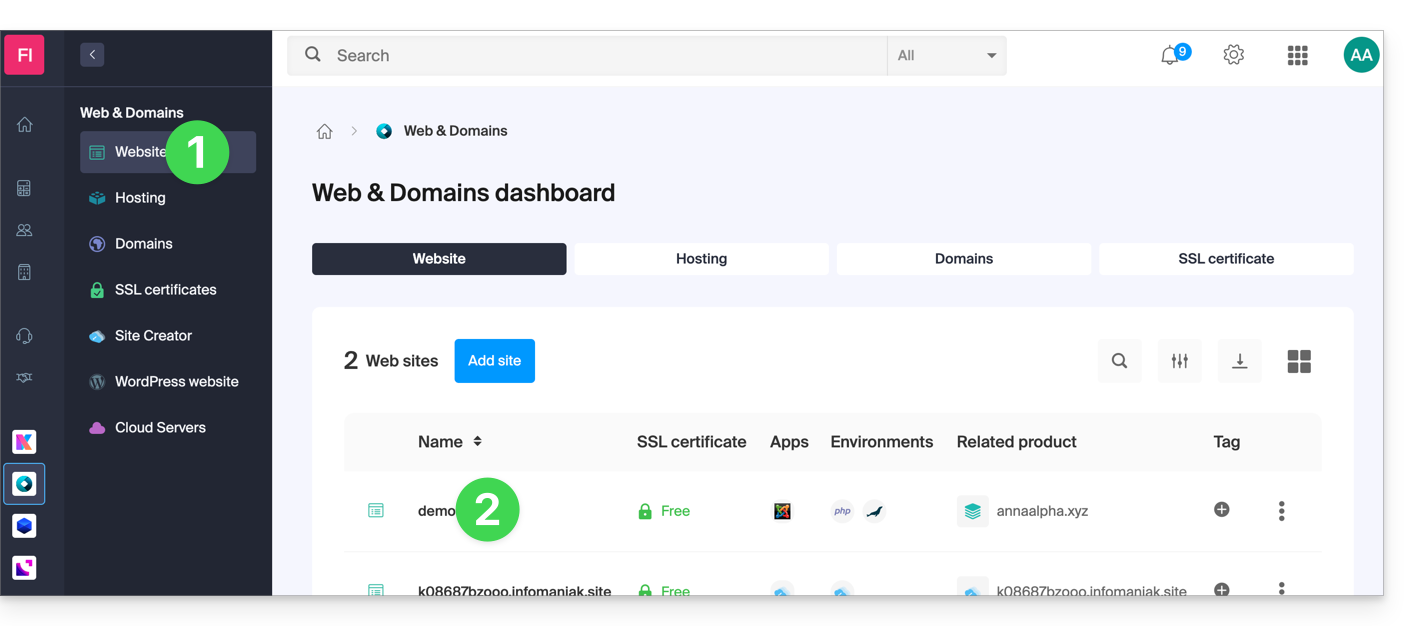
- Clique no menu de ação ⋮ à direita do domínio a ser removido.
- Escolha Desvincular:
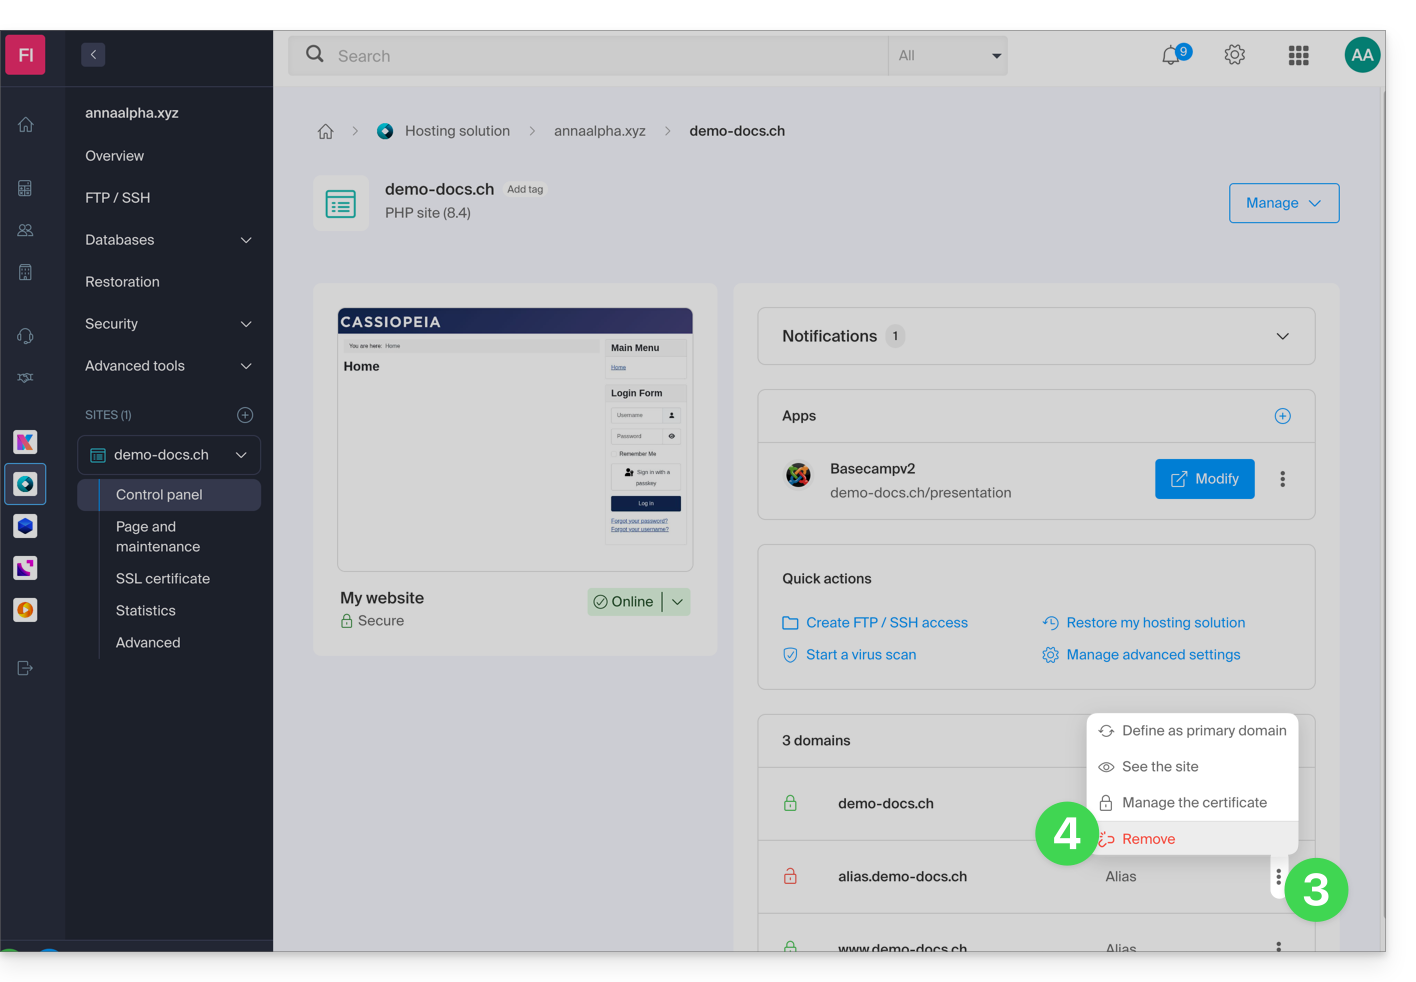
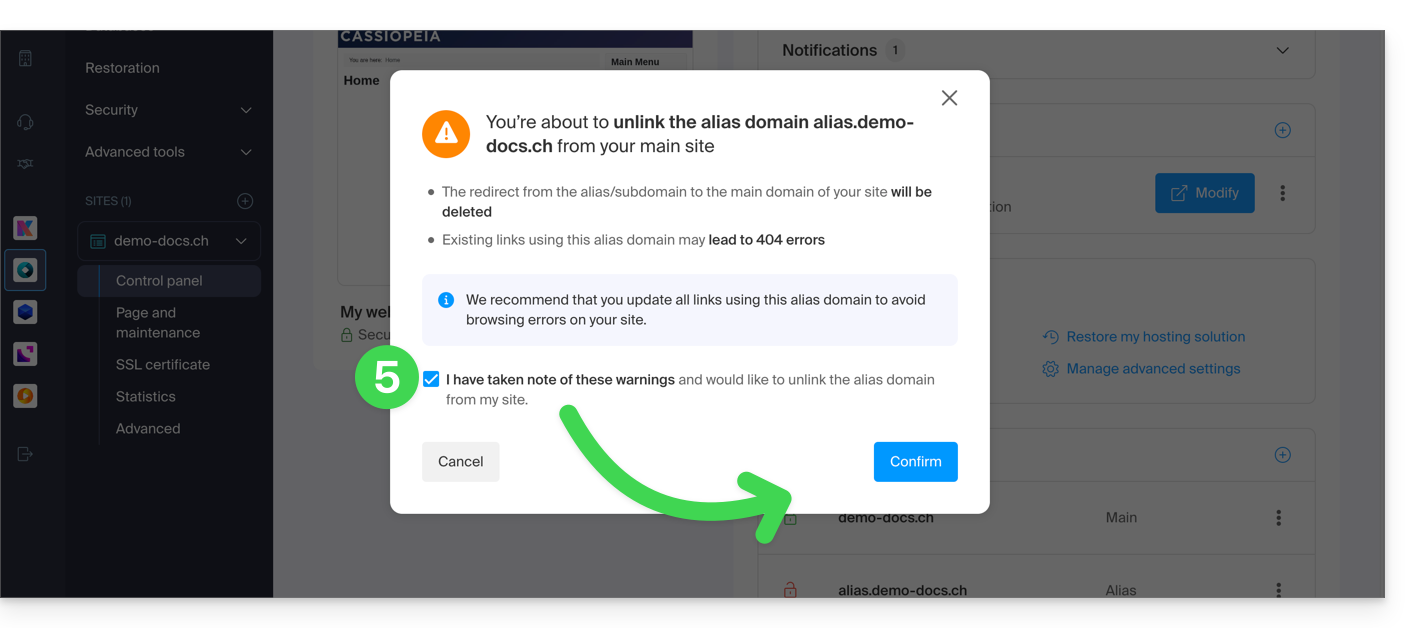
- Confirme a remoção do alias:
Link para esta FAQ: https://faq.infomaniak.com/1997
Esta seção de perguntas frequentes foi útil?
Este guia explica como adicionar um domínio sinônimo a um nome de domínio.
Introdução
- Um domínio sinônimo é um nome de domínio que pode servir como nome secundário para outro domínio.
- Quando um domínio sinônimo é adicionado, ele herda automaticamente o conteúdo da zona DNS do domínio principal (incluindo os registros
MX,A, etc.), bem como seu alojamento Web e Mail. - Em vez disso, você também pode adicionar um (domínio) alias a um site ou adicionar um (domínio) alias a um Serviço Mail.
Adicionar um domínio sinônimo a um domínio
Pré-requisitos
- O nome de domínio do futuro sinônimo ou a gestão da sua zona DNS…
- … deve estar registado na Infomaniak,
- … deve estar configurado com os DNS Infomaniak,
- … não deve estar ainda associado a nenhum produto.
- O nome de domínio no qual será colocado o sinônimo…
- … não deve estar associado ao produto Newsletter Infomaniak.
Para acessar seus nomes de domínio:
- Clique aqui para acessar a gestão do seu domínio no Manager Infomaniak (precisa de ajuda?).
- Clique diretamente no nome atribuído ao domínio principal em questão:
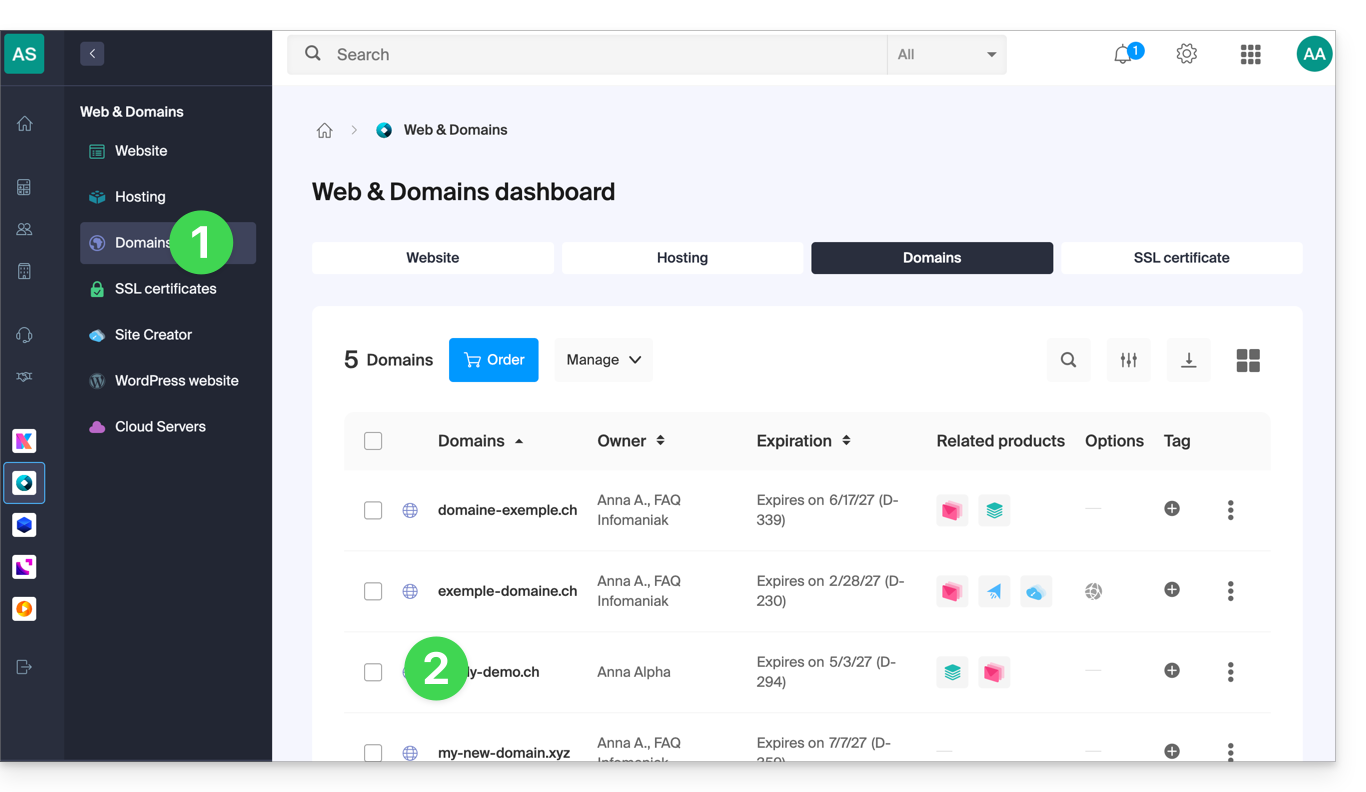
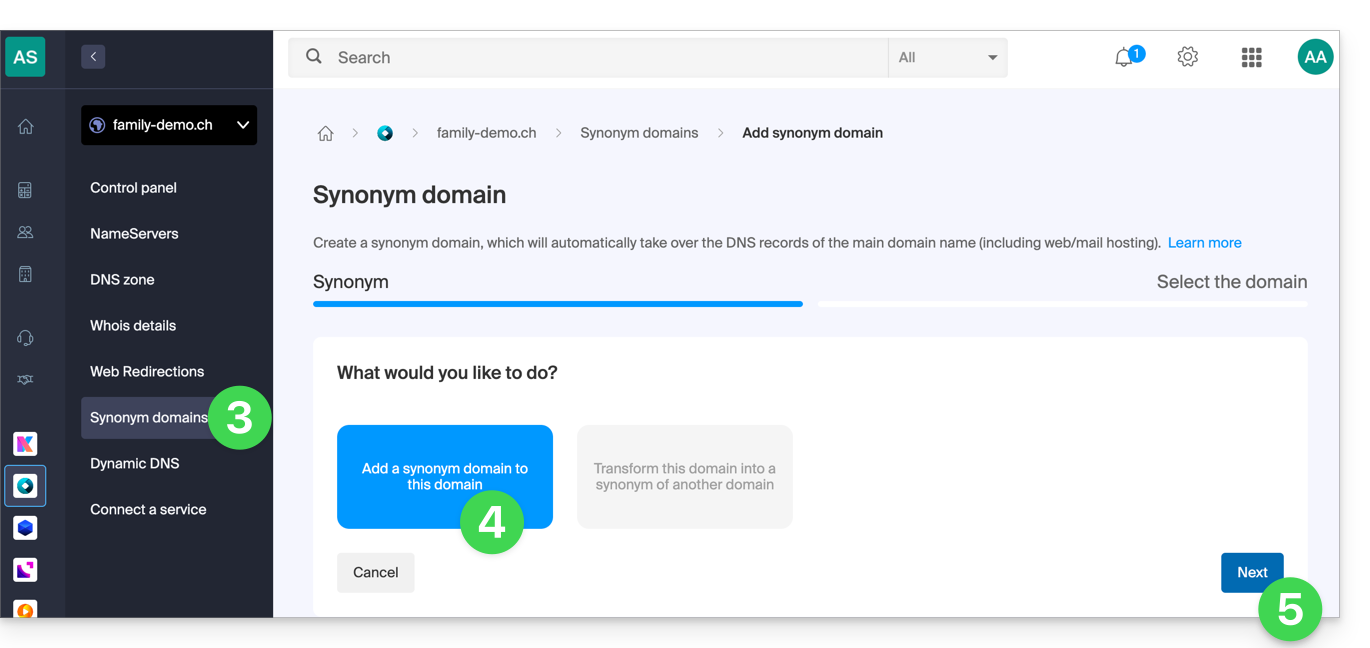
- Clique em Domínios sinónimos no menu lateral esquerdo.
- Escolha adicionar um sinónimo.
- Clique em Seguinte:
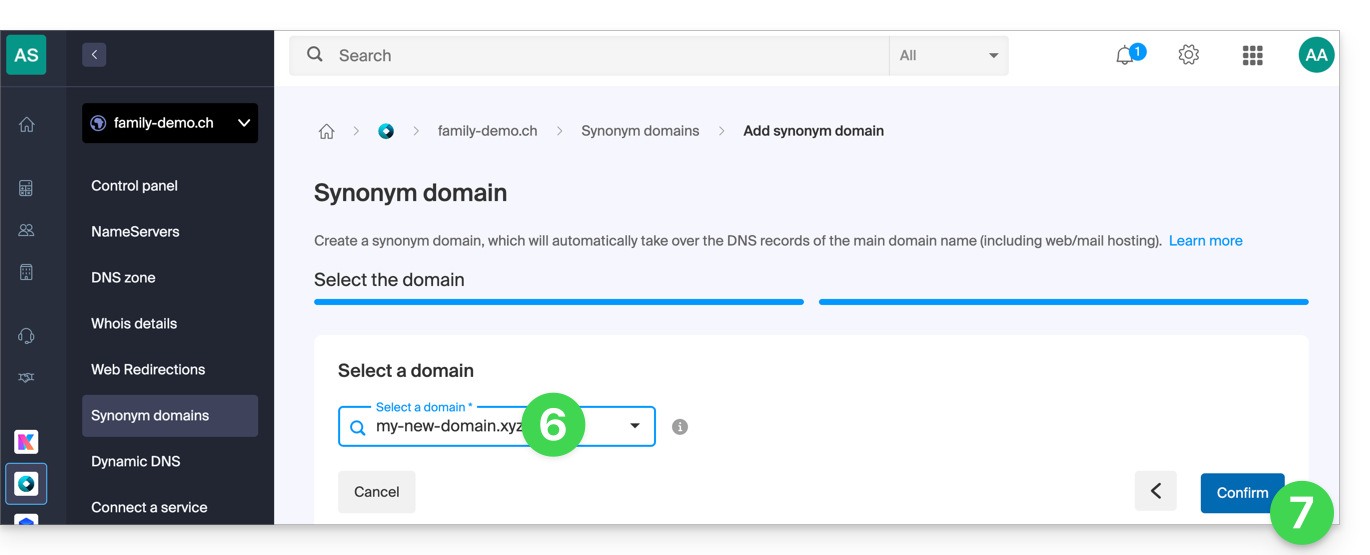
- Escolha um domínio existente nesta Organização ou registe um novo domínio antecipadamente.
- Clique no botão para Confirmar:
- Pronto:
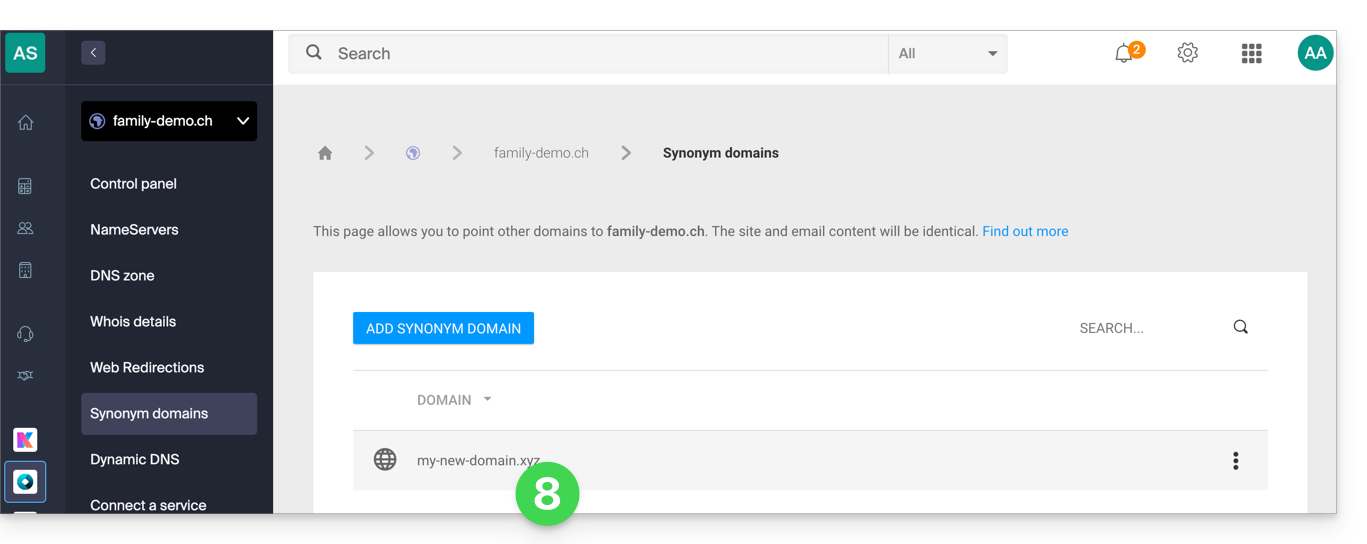
Consulte este outro guia se precisar de informações sobre como desassociar um nome de domínio sinónimo.
Link para esta FAQ: https://faq.infomaniak.com/1999
Esta seção de perguntas frequentes foi útil?
Este guia explica como, após adquirir um nome de domínio na Infomaniak, obter gratuitamente um Serviço de Email + uma hospedagem Web.
Introdução
- Para cada nome de domínio registado ou transferido para a Infomaniak, pode beneficiar gratuitamente de:
- um endereço de email que lhe dá acesso, nomeadamente, à aplicação Mail Infomaniak
- e um espaço web de 10 MB para uma página básica.
- Também é possível ter um Serviço de Email gratuito ao mesmo tempo que possui uma oferta Web paga, ou vice-versa.
- Em vez de um serviço de e-mail do tipo Starter, também existe a kSuite.
Ativar a oferta Starter Mail + Web
Pré-requisitos
- Ter um nome de domínio na Infomaniak (uma zona DNS não é suficiente).
- Dependendo do tipo desejado (Mail ou Web), certifique-se de que não haja um produto correspondente já associado ao nome de domínioe isso em qualquer Organização Infomaniak existente.
Para encomendar um Serviço de Email Starter e Hospedagem Web Starter incluídos com cada domínio:
- Clique aqui para acessar o gerenciamento do seu produto no Manager Infomaniak (precisa de ajuda?).
- Clique diretamente no nome atribuído ao produto em questão:
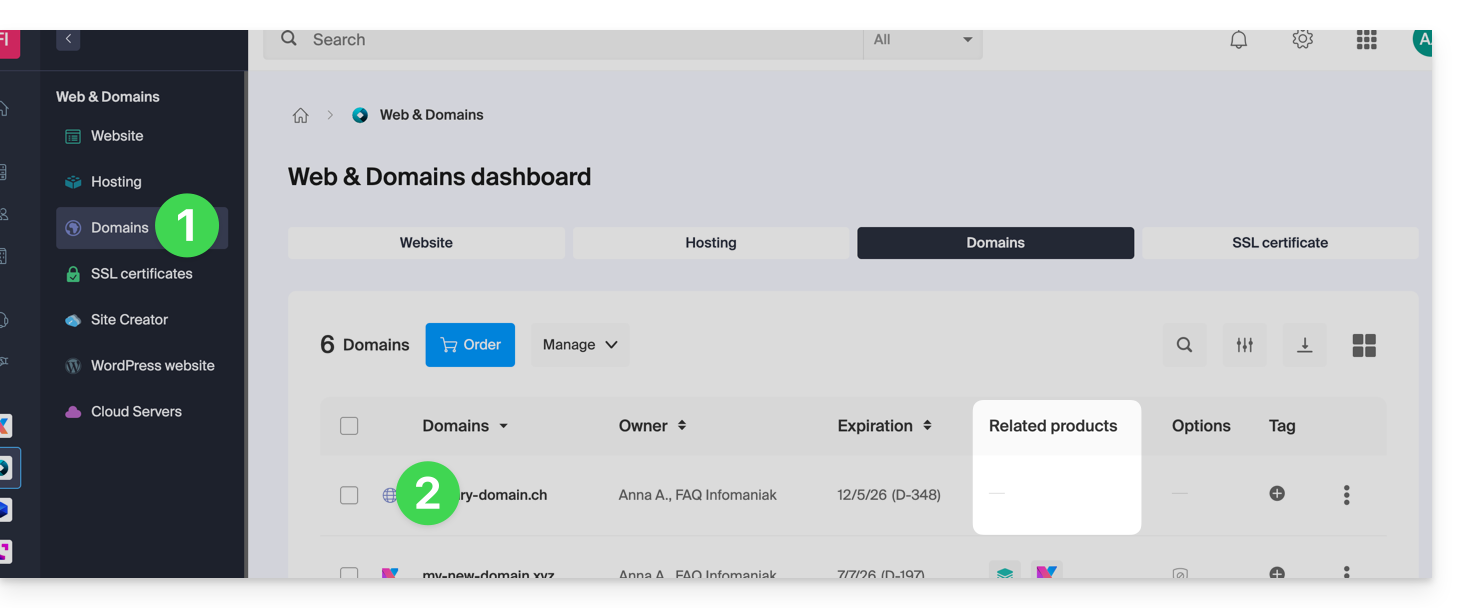
- É necessário que nenhum produto esteja vinculado ao domínio no momento (visível na coluna de produtos vinculados).
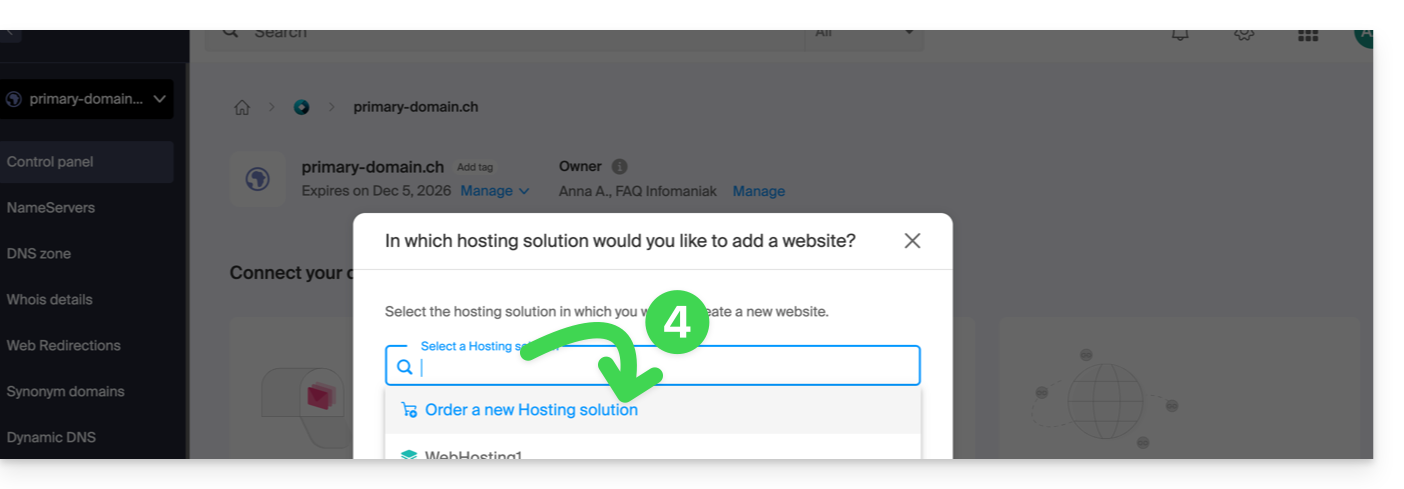
- Clique em um dos atalhos para Conectar um serviço (e-mail ou web):
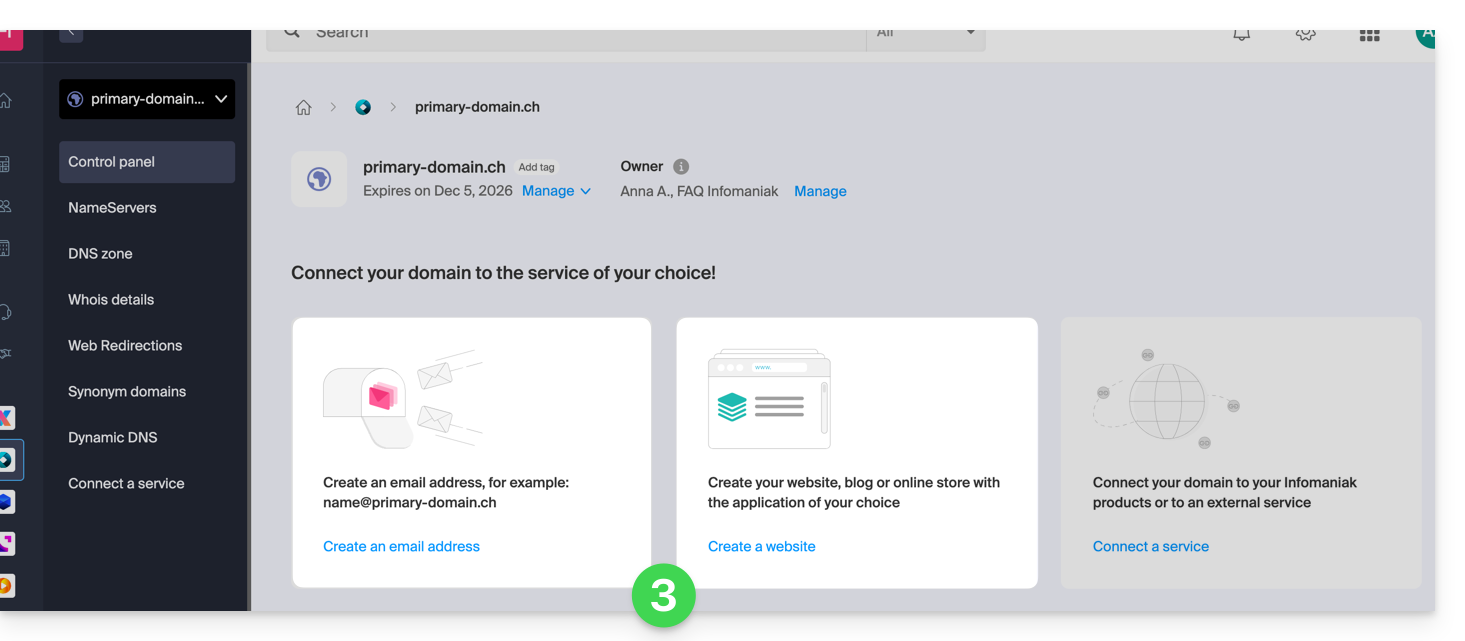
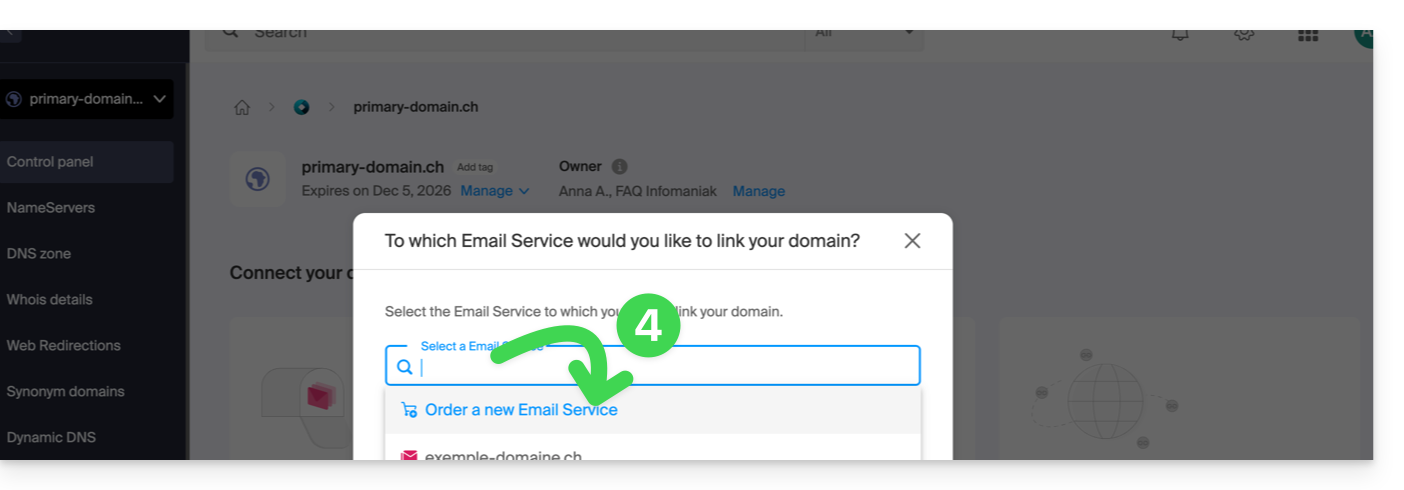
- Em ambos os casos, clique em Encomendar…:
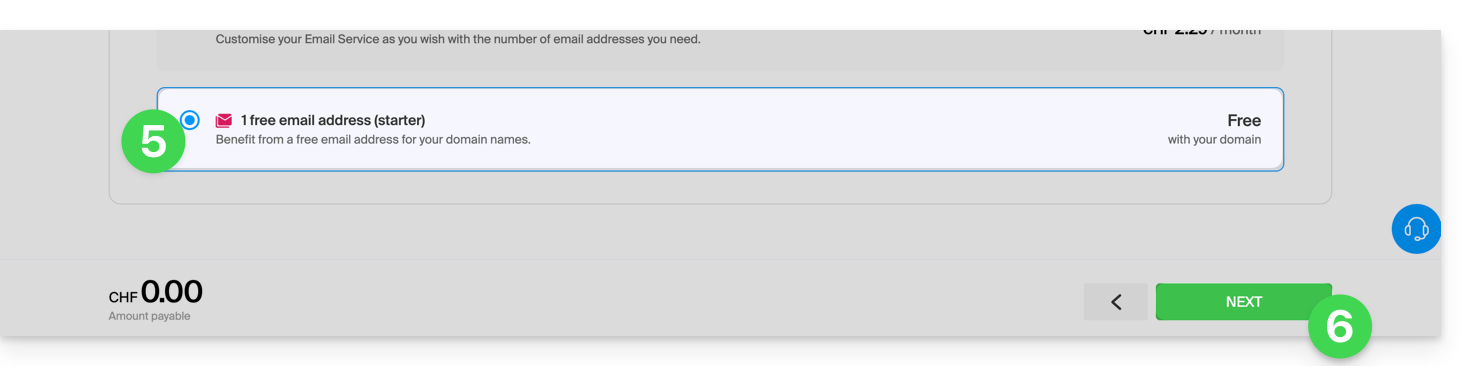
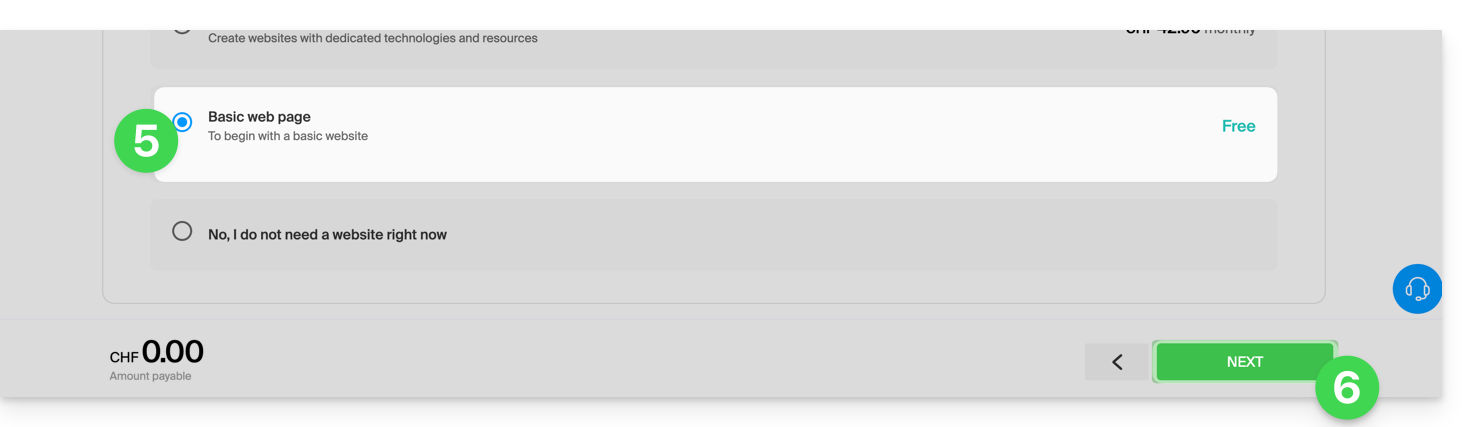
- Você poderá escolher o serviço gratuito correspondente (e-mail ou web) e, na etapa seguinte, será solicitado que escolha o outro (e-mail ou web), se desejar.
- Clique na parte inferior da página para continuar:
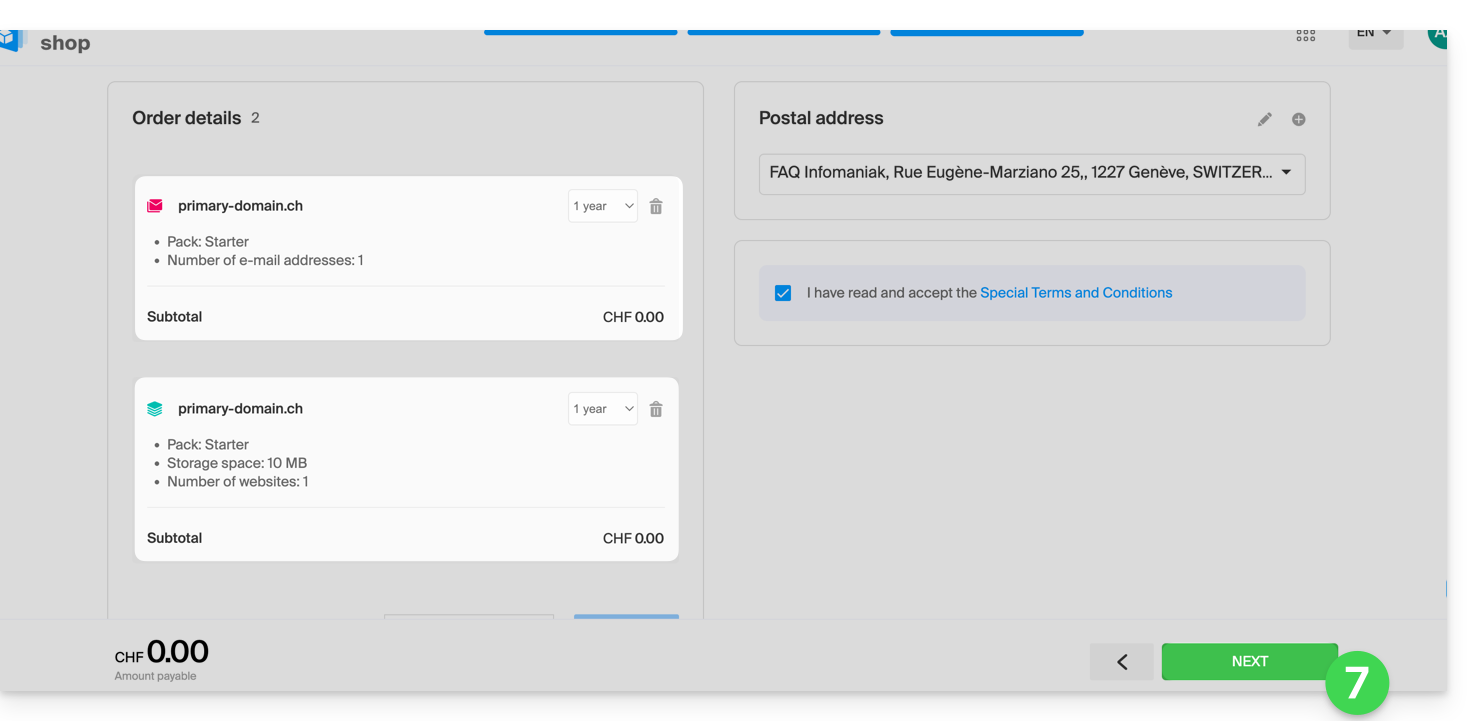
- Conclua o pedido:
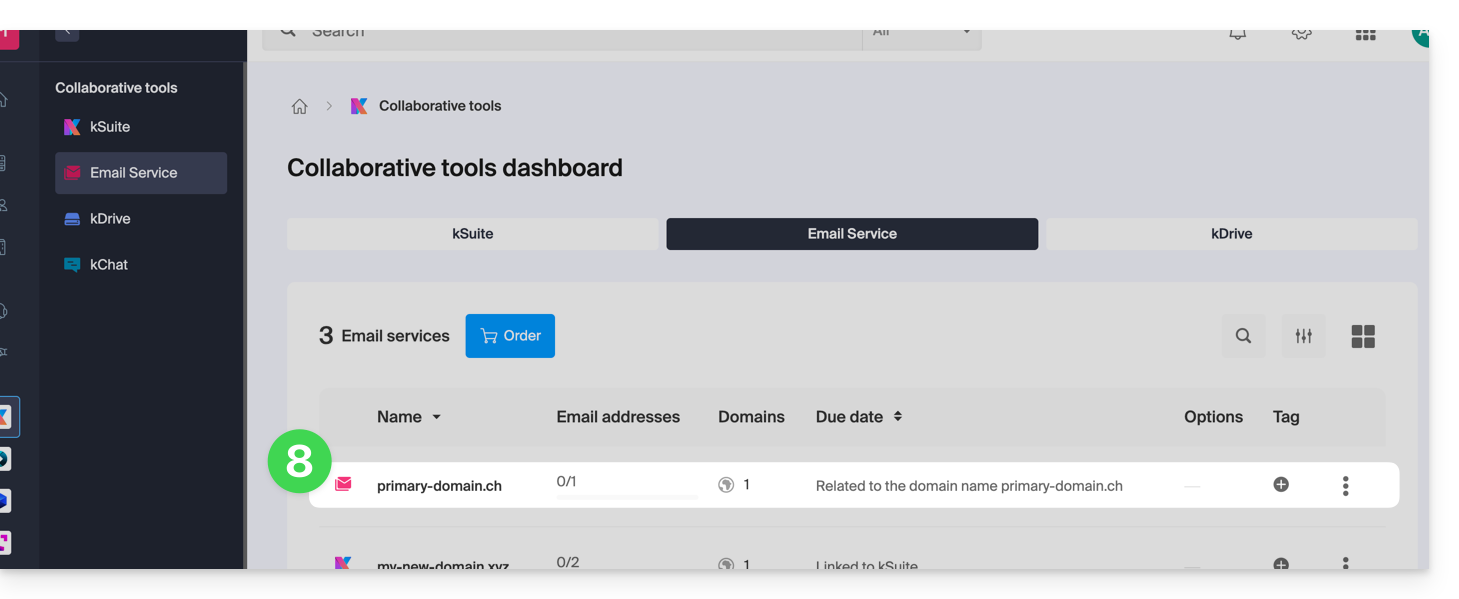
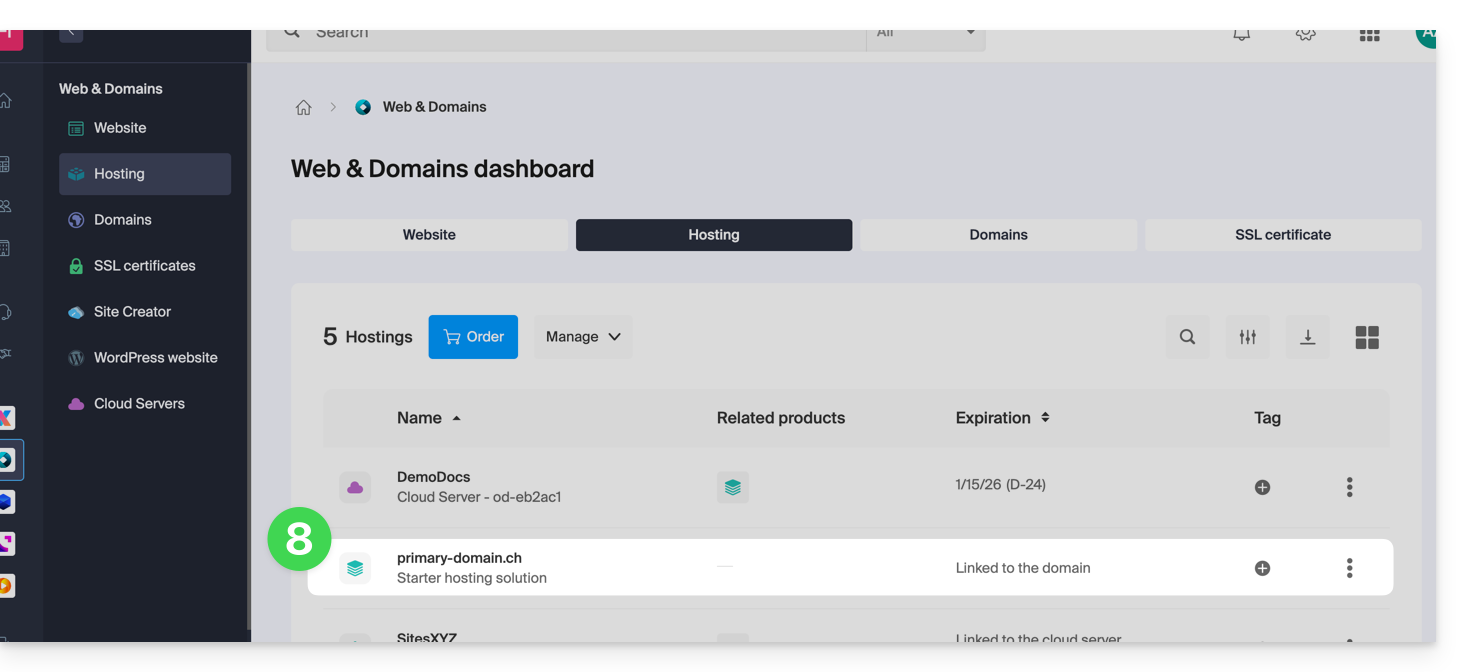
- Volte para o seu Painel de Controle Infomaniak para descobrir e usar seus novos produtos:
Usar seus produtos Starter
- Crie o endereço de e-mail desejado no seu Serviço de E-mail Starter.
- Para usar o espaço web de 10 MB e criar uma página web básica no seu Serviço de Hospedagem Web Starter, utilize:
- o editor de página
- ou o Web FTP no painel de controle para gerenciar suas páginas HTML
- ou qualquer software/cliente FTP com o protocolo FTP clássico
Como atualizar um plano Starter
- Modificar um plano Mail (clique aqui)
- Modificar uma oferta de Web (clique aqui).
Em caso de problema com uma hospedagem Starter
Um serviço de hospedagem web do tipo Starter não oferece suporte a IPv6. Portanto, preste atenção aos registros AAAA na zona DNS do domínio em questão, pois eles podem impedir a ativação do SSL; consulte também este outro guia.
Link para esta FAQ: https://faq.infomaniak.com/2002
Esta seção de perguntas frequentes foi útil?
Obrigado por confiar à Infomaniak a hospedagem do seu site.
Introdução
- Uma hospedagem web é um espaço de armazenamento disponível em um computador, também chamado de "servidor", conectado à Internet e gerenciado por um provedor de hospedagem web, a Infomaniak.
- Este espaço de armazenamento, disponibilizado para profissionais e usuários particulares, serve para instalar sites ou outros tipos de ferramentas (CRM, extranet, intranet…) que devem ser acessíveis via Internet.
- Estes guias permitem que utilize rapidamente as funções essenciais do seu novo produto, a sua hospedagem web, que pode acolher vários sites.
Por onde começar?
- Criar um site WordPress
- Criar o site com o Site Creator
- Instalar uma aplicação web (ownCloud, Joomla, Typo3, Drupal, phpBB, Simple Machines Forum, Magento, Prestashop, …)
- Gerenciar suas contas/usuários FTP
- Gerenciar e publicar arquivos em sua hospedagem via Web FTP
- Gerenciar seus bancos de dados MySQL
- Adicionar um site ou subdomínio ao seu alojamento (multissítios/multidomínios)incluindo um site Node.js
- Associar outro nome de domínio a um site existente (domínio alias)
- Visualizar o seu site mesmo que o seu nome de domínio ainda não esteja a apontar para os servidores da Infomaniak
IMPORTANTE: o nome de domínio…
Para ser acessível ao público na Internet, um serviço de hospedagem web deve estar associado a um nome de domínio!
O seu nome de domínio não é gerido pela Infomaniak? Ou está numa Organização diferente daquela do seu alojamento web? Consulte este outro guia para configurar os DNS ou os "registos A"para associar o nome de domínio ao seu alojamento web.
Em caso de problema
Para resolver um problema, consulte a base de conhecimento de Hospedagem Web antes de entrar em contato com o suporte da Infomaniak.
Clique aqui para partilhar uma opinião ou sugestão sobre um produto Infomaniak.
Link para esta FAQ: https://faq.infomaniak.com/2004
Esta seção de perguntas frequentes foi útil?
Este guia explica como ativar a compressão dos seus recursos (CSS, HTML, JSON, JS) para acelerar o carregamento do seu Hospedagem Web.
Introdução
- Ao comprimir seus arquivos, você reduz o tamanho deles, o que diminui o tempo de transferência para o navegador dos seus visitantes.
- A velocidade de carregamento é um critério importante para os motores de busca, como o Google.
- O Gerenciador Infomaniak permite modificar seus arquivos
.htaccesse.user.ini.- Uma cópia de segurança é criada automaticamente por precaução.
- A modificação pode levar até 5 minutos para ser aplicada em toda a infraestrutura.
Ativar a compressão Gzip
O procedimento através do Manager ativa um dos algoritmos de compressão mais eficientes suportados pelo seu navegador:
- Clique aqui para aceder à gestão do seu site no Manager Infomaniak (precisa de ajuda?).
- Clique diretamente no nome atribuído ao site em questão.
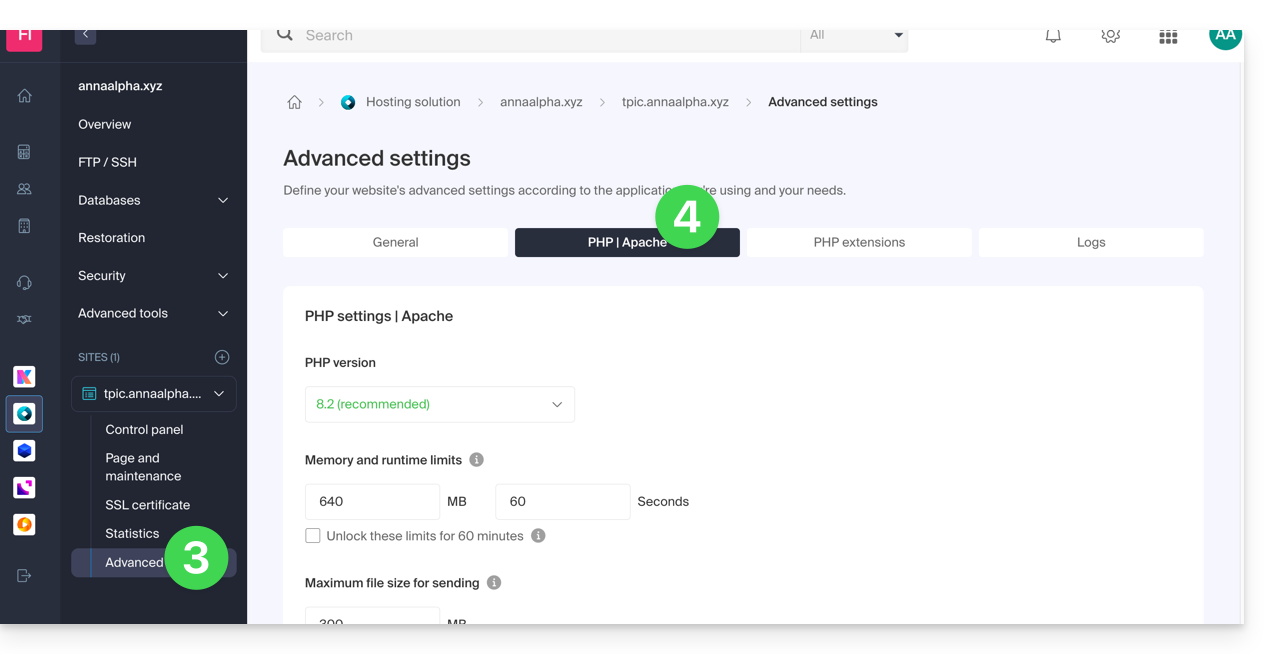
- Clique em Avançado no menu lateral esquerdo.
- Clique na aba Apache:
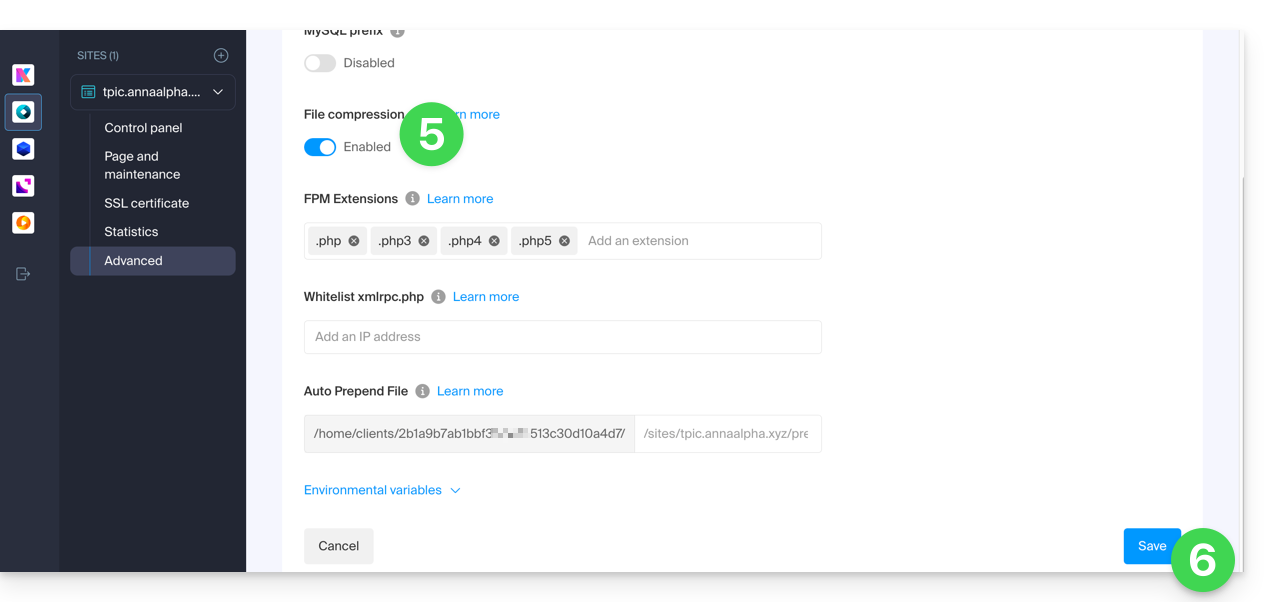
- Ative a opção Compressão de arquivos.
- Clique em Guardar na parte inferior da página:
Verifique se o cabeçalho de compressão está ativo
Após a ativação, o seu servidor enviará um cabeçalho HTTP Content-Encoding: gzip. Pode testar o seu site com estas ferramentas:
- Google PageSpeed Insights (recomendado para uma análise completa).
- Teste Gzip/Brotli do GiftOfSpeed (ferramenta moderna e rápida).
- Inspetor do navegador: pressione
F12> Guia Rede > Clique na sua página > Verifique os cabeçalhos da resposta.
Link para esta FAQ: https://faq.infomaniak.com/2013
Esta seção de perguntas frequentes foi útil?
Este guia apresenta o uso do MySQL nos serviços de hospedagem da Infomaniak, em particular o funcionamento das proceduras armazenadas.
Introdução
- Os “procedimentos armazenados” e as “rotinas armazenadas” não estão disponíveis em uma hospedagem web compartilhada.
Entendendo os procedimentos e rotinas armazenadas
Se os procedimentos armazenados são indispensáveis para o seu projeto e você utiliza atualmente uma hospedagem compartilhada, é aconselhável considerar um VPS ou um servidor dedicado, que oferecem mais controle e recursos.
Os procedimentos armazenados são um meio eficaz de automatizar tarefas e integrar a lógica de negócios diretamente no banco de dados. Assim, é possível obter aplicações mais eficientes e mais fáceis de manter.
Em um Servidor Cloud, desde que o usuário tenha os direitos de administrador na base MySQL em questão, ele possui as permissões necessárias para executar instruções SQL, incluindo o comando EXECUTE, usado para iniciar procedimentos armazenados já presentes no banco de dados.
O usuário também possui os privilégios necessários para criar novos procedimentos armazenados.A criação de um procedimento armazenado é feita através de uma sintaxe SQL específica que define as instruções a serem executadas, seguida do seu registo na base de dados.
Exemplo
DELIMITER // CREATE PROCEDURE GetUserCount() BEGIN SELECT COUNT(*) AS total_users FROM users; -- Retorna o número total de utilizadores na tabela END // DELIMITER ; -- Executa o procedimento armazenado CALL GetUserCount();
Link para esta FAQ: https://faq.infomaniak.com/2014
Esta seção de perguntas frequentes foi útil?
Este guia explica como modificar o URL do seu site a partir da aplicação WordPress instalada no seu Hospedagem Web Infomaniak (apenas no caso de ter instalado o WordPress através das ferramentas dedicadas oferecidas pela Infomaniak).
Isto permite atribuir um nome de domínio diferente ao seu site WordPress.
Pré-requisitos
- O nome de domínio que pretende utilizar deve ser previamente adicionado como alias do domínio principal no site em questão.
Modificar o endereço de um site WordPress
Para alterar o endereço do site criado com o WordPress Infomaniak para outro nome de domínio que já esteja na mesma Organização:
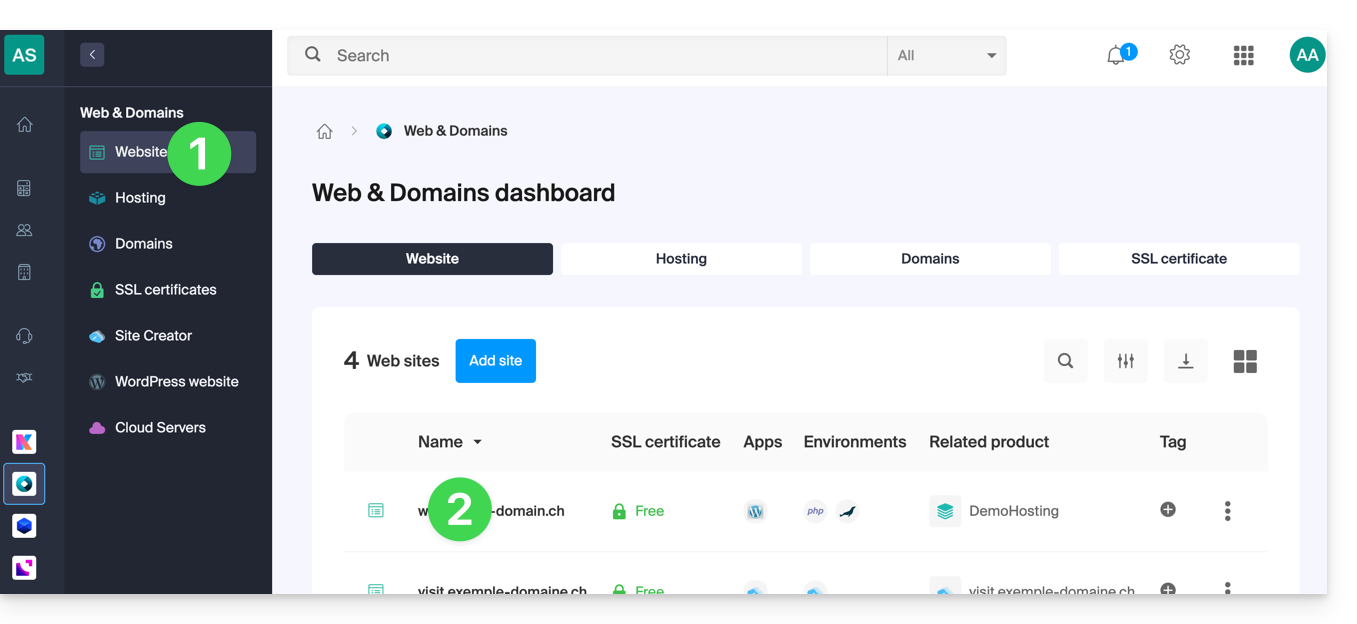
- Clique aqui para aceder à gestão do seu site WordPress no Manager Infomaniak (precisa de ajuda?).
- Se o seu site não aparecer aqui, é porque não foi instalado através das ferramentas Infomaniak… consulte a documentação oficial.
- Clique diretamente no nome atribuído ao site em questão:
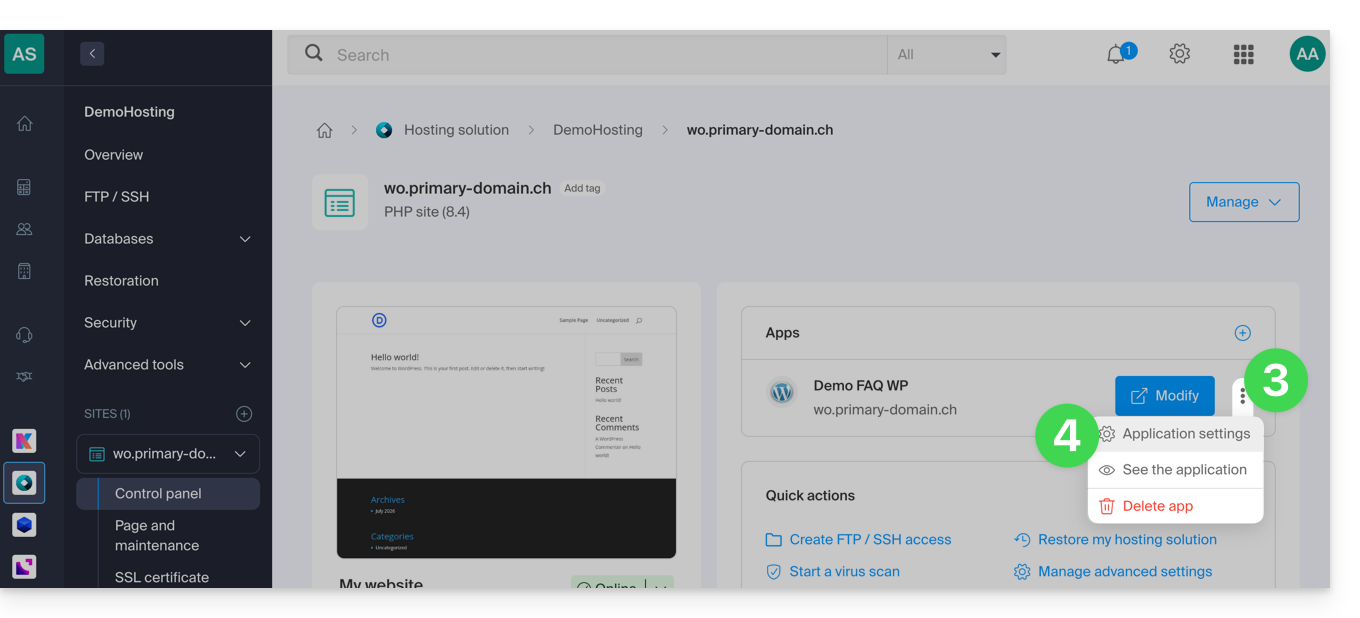
- Clique no menu de ação ⋮ localizado à direita da Aplicação Web em questão.
- Clique em Configurações da aplicação:
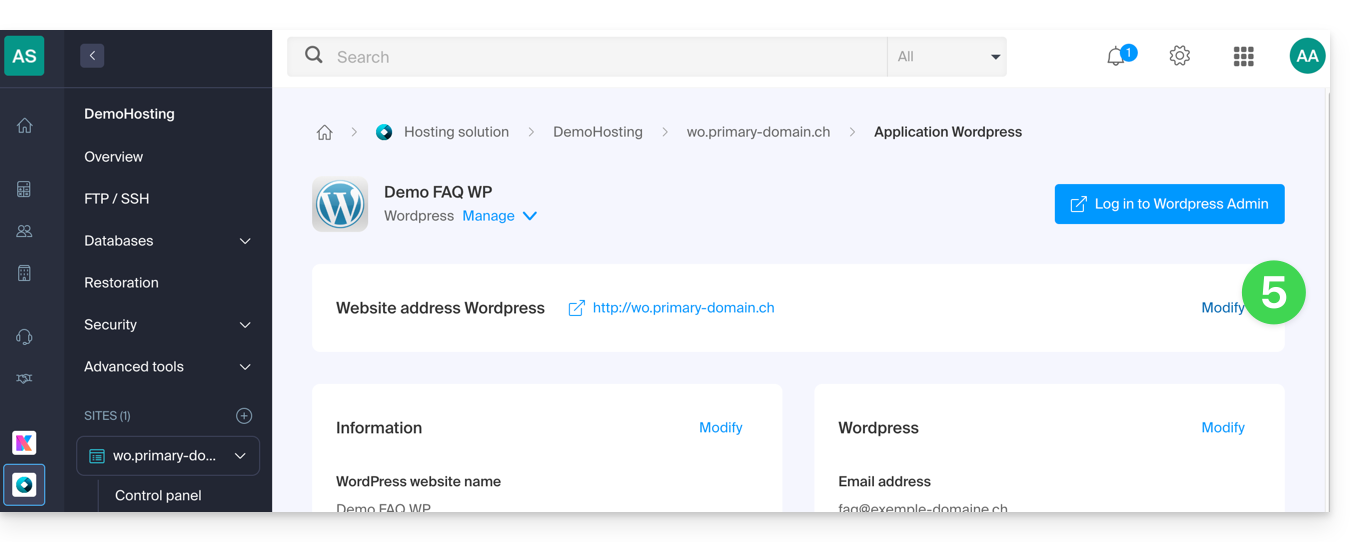
- Clique em Editar à direita do WordPress:
- Em URL do site, selecione o endereço desejado no menu suspenso:
- Se você não seguiu os pré-requisitos acima, o domínio desejado não aparecerá, mesmo que esteja registrado na mesma Organização.
- Se você adicionou o domínio como um alias do site, o domínio desejado aparecerá e você poderá selecioná-lo para que ele substitua o domínio anterior.
- Clique no botão Salvar:
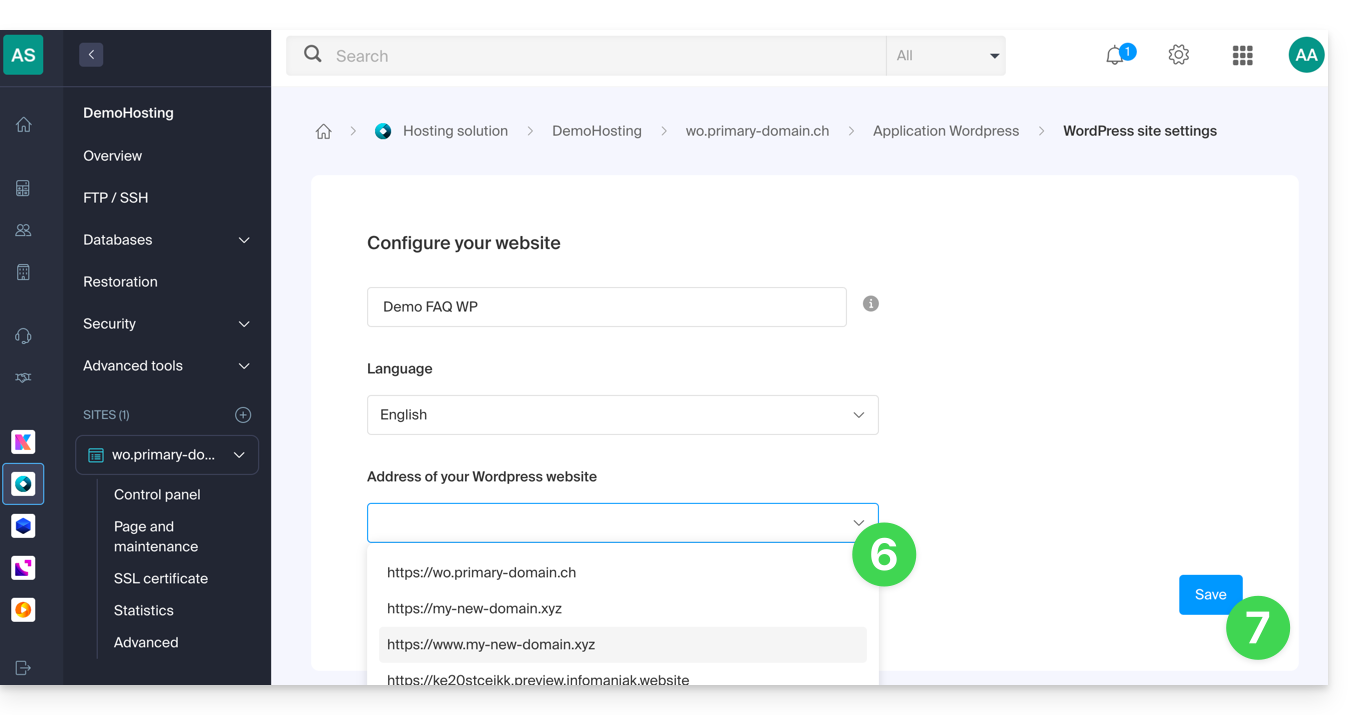
Domínio… .preview.infomaniak.website?
Entre as URLs presentes no menu suspenso, a URL de visualização permite acessar seu site WordPress caso o nome de domínio do site ainda não esteja corretamente configurado para apontar para seu aplicativo WordPress.
Link para esta FAQ: https://faq.infomaniak.com/2016
Esta seção de perguntas frequentes foi útil?
Este guia explica quais são as diferenças entre as ofertas de hospedagem web da Infomaniak para ajudá-lo a escolher a melhor solução de acordo com suas necessidades de TI.
Se você deseja hospedar seu serviço de e-mail, consulte este outro guia.
1. Criador de Sites
Ofertas independentes, que não dependem de um serviço de hospedagem como o apresentado no ponto 3.
Site Creator é uma solução completa que permite criar facilmente um site institucional, um blog ou uma loja virtual sem a necessidade de conhecimentos técnicos específicos. Oferecido como uma solução independente (standalone, sem a necessidade de hospedagem web tradicional), está disponível em diversas opções, de acordo com as suas necessidades:
- Site Creator Free: uma versão gratuita para testar e personalizar uma página web com as funcionalidades básicas
- Site Creator Lite: ideal para publicar um site institucional ou um blog (até 6 páginas web, 15 GB de espaço em disco e nome de domínio oferecido por 1 ano)
- Site Creator Pro: a solução completa para lojas online (páginas ilimitadas, 50 GB de espaço em disco, funcionalidades de comércio eletrônico com gestão de pagamentos e de estoque, nome de domínio oferecido por 1 ano)
Saiba mais sobre as ofertas Site Creator e compare os recursos.
2. Hospedagem Web Starter
A hospedagem web simples e gratuita
A hospedagem web Starter é oferecida gratuitamente com cada nome de domínio registrado na Infomaniak. Ela oferece 10 MB de espaço em disco para criar um site (páginas básicas em linguagem HTML apenas – sem PHP, sem banco de dados), mesmo sem conhecimento específico, graças à ferramenta Página de Boas-vindas.
- Registar ou transferir um nome de domínio para a Infomaniak
- Saber mais sobre as vantagens incluídas com um nome de domínio
3. Hospedagem web compartilhada
A oferta ideal para criar seus sites
Estas soluções de hospedagem web são ofertas compartilhadas (os sites serão hospedados em servidores cujos recursos são compartilhados com outros clientes). Para garantir a confiabilidade destes serviços compartilhados, os servidores Infomaniak utilizam, em média, apenas 40% da capacidade dos processadores e são equipados com discos SSD profissionais de última geração.
A hospedagem web oferece um mínimo de 250 GB de espaço em disco e permite gerenciar vários sites com vários nomes de domínio. Esta oferta inclui todas as tecnologias normalmente utilizadas para criar sites profissionais: PHP, MySQL, acesso FTP e SSH, certificados SSL e instalação fácil de WordPress ou CMS populares, etc. Também é possível adicionar um site Node.js e/ou Site Creator.
Note que, sem qualquer tipo de hospedagem, também é possível obter e utilizar o Site Creator de forma “autónoma”. Consulte este outro guia.
3. Servidor Cloud
A hospedagem web profissional
Com um Servidor Cloud,os recursos que lhe são alocados não são partilhados com outros clientese pode personalizar a configuração de hardware e software do seu servidor de acordo com as suas necessidades. Um Servidor Cloud também permite utilizar componentes que não estão disponíveis em alojamentos Web partilhados (Node.js, mongoDB, Sol, FFMPEG, etc.).
- Um Servidor Cloud permite administrar facilmente o seu servidor através da mesma interface de administração dos serviços de hospedagem web – você gerencia os sites da mesma forma.
- Um VPS permite gerenciar o seu servidor de forma 100% autônoma, com a versão do Windows ou a distribuição Linux de sua escolha (
Debian,Ubuntu,openSUSE, ...) – são necessárias sólidas competências técnicas para utilizar um VPS, incluindo o VPS Lite.
4. Public Cloud (et Kubernetes Service)
Solução IaaS aberta, comprovada e segura
Para a Infomaniak, é a infraestrutura que impulsiona o kDrive, o Swiss Backup e o Webmail, serviços utilizados por vários milhões de utilizadores. Mas a Cloud Pública está acessível a todos e disponibiliza os recursos de que precisa para o desenvolvimento dos seus projetos.
Com as ofertas personalizadas e sob medida, você não terá dificuldades em gerenciar seu orçamento de desenvolvimento. Sem custos de ativação. Sem valor mínimo. Cancelável a qualquer momento. Você paga apenas pelos recursos efetivamente utilizados com o Public Cloud no final de cada mês, o mesmo para o Kubernetes Service.
5. Jelastic Cloud
Hospedagem web personalizada com as tecnologias de sua preferência
Jelastic Cloud permite criar ambientes de desenvolvimento personalizados com as tecnologias de sua preferência (PHP, Java, Docker, Ruby, etc.). É uma oferta de nuvem flexível:
- Redimensionamento horizontal e vertical dos recursos.
- Pagamento com base no consumo real dos recursos.
- Personalização fácil da sua infraestrutura (redundância, IP, SSL, balanceamento de carga, etc.).
Link para esta FAQ: https://faq.infomaniak.com/2019
Esta seção de perguntas frequentes foi útil?
Este guia detalha o envio de e-mails autenticados a partir de um site / CMShospedado pela Infomaniak.
Introdução
- Configurar o envio de e-mails do seu site através de um servidor SMTP autenticado permite melhorar a fiabilidade e a segurança dos envios, em comparação com a função PHP
mail()utilizada sem autenticação:- maior fiabilidade na entrega de e-mails,
- segurança reforçada,
- detecção mais precisa de erros de envio,
- melhor compatibilidade com os serviços de mensagens,
- e melhor rastreabilidade dos envios.
Exemplos de configuração SMTP
Pré-requisitos
- Ter um serviço de e-mail.
- Você pode usar o Serviço de E-mail oferecido pela Infomaniak ou qualquer outro serviço de e-mail de sua preferência.
- Criar uma senha para o dispositivo (❓: ajuda my kSuite | Serviço de E-mail/kSuite).
- Utilizar as configurações recomendadas:
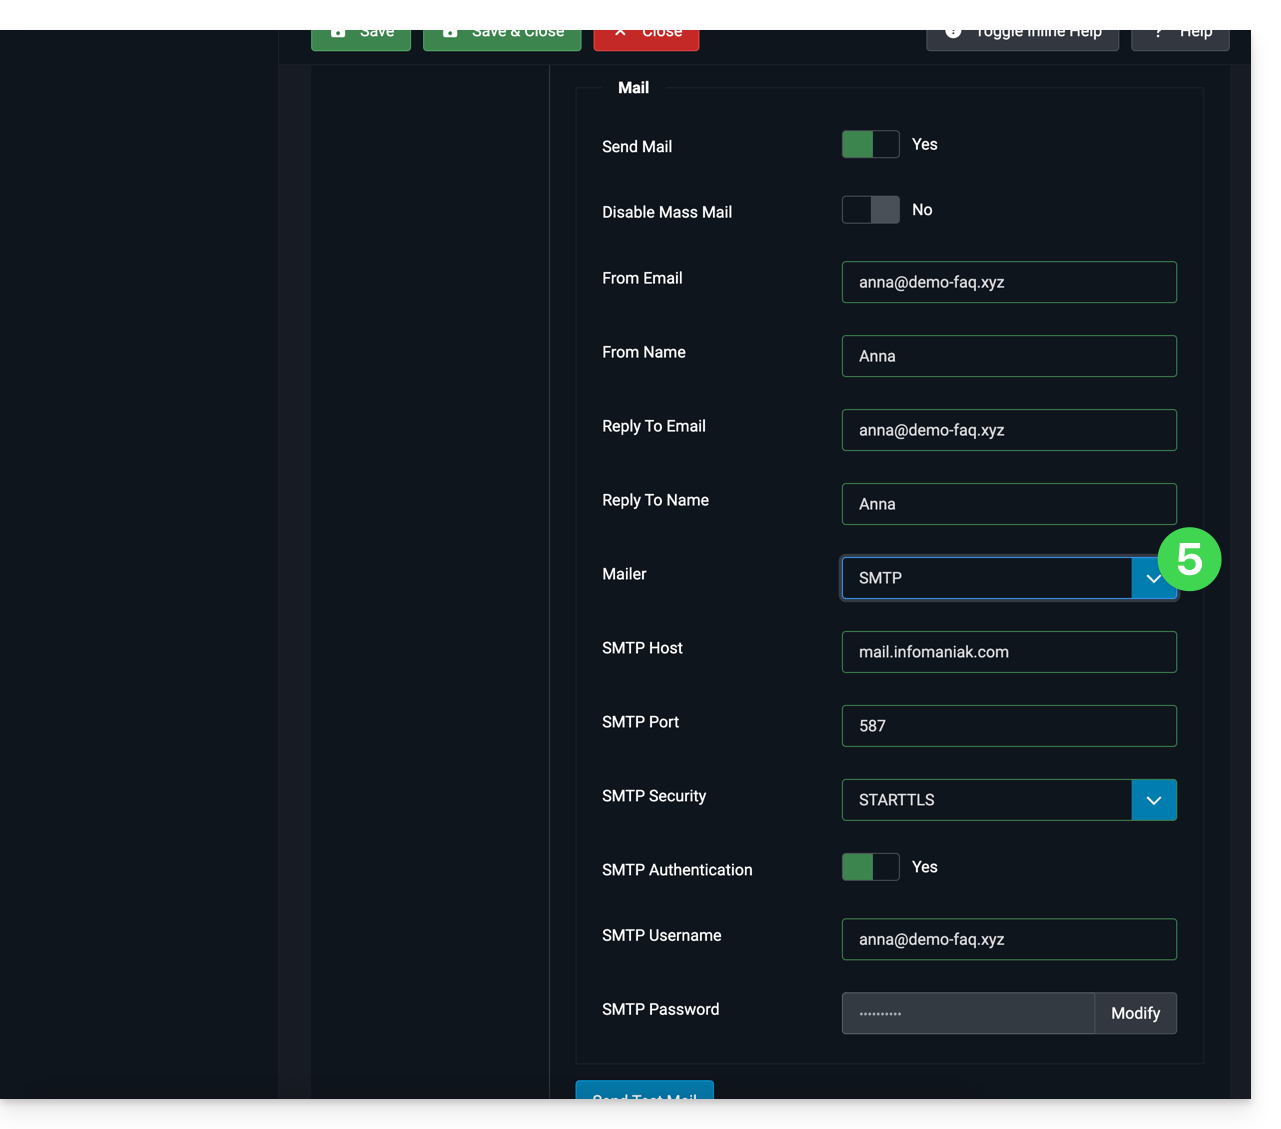
- Servidor SMTP de saída =
mail.infomaniak.com - Porta SMTP e protocolo de criptografia e comando/método para ativar este protocolo:
587+ STARTTLS - Nome de usuário/username = o endereço de e-mail completo
- Senha/password = a senha gerada para o endereço de e-mail que você deseja usar
- Autenticação obrigatória para o envio de e-mails:
- Ela é ativada nas configurações SMTP do seu CMS.
- Marque "usar as mesmas configurações do servidor de entrada" ou, dependendo do CMS, insira um nome de usuário (= endereço de e-mail completo) e a senha gerada.
- Servidor SMTP de saída =
WordPress
Para permitir que o seu site envie e-mails, utilize um endereço de e-mail do seu domínio (por exemplo, e-mail@dominio-site.xyz) e configure as definições SMTP (consulte os pré-requisitos):
- Aceda ao painel de administração do WordPress.
- Instale uma extensão SMTP (WP Mail SMTP funciona).
- Configure a extensão, por exemplo:
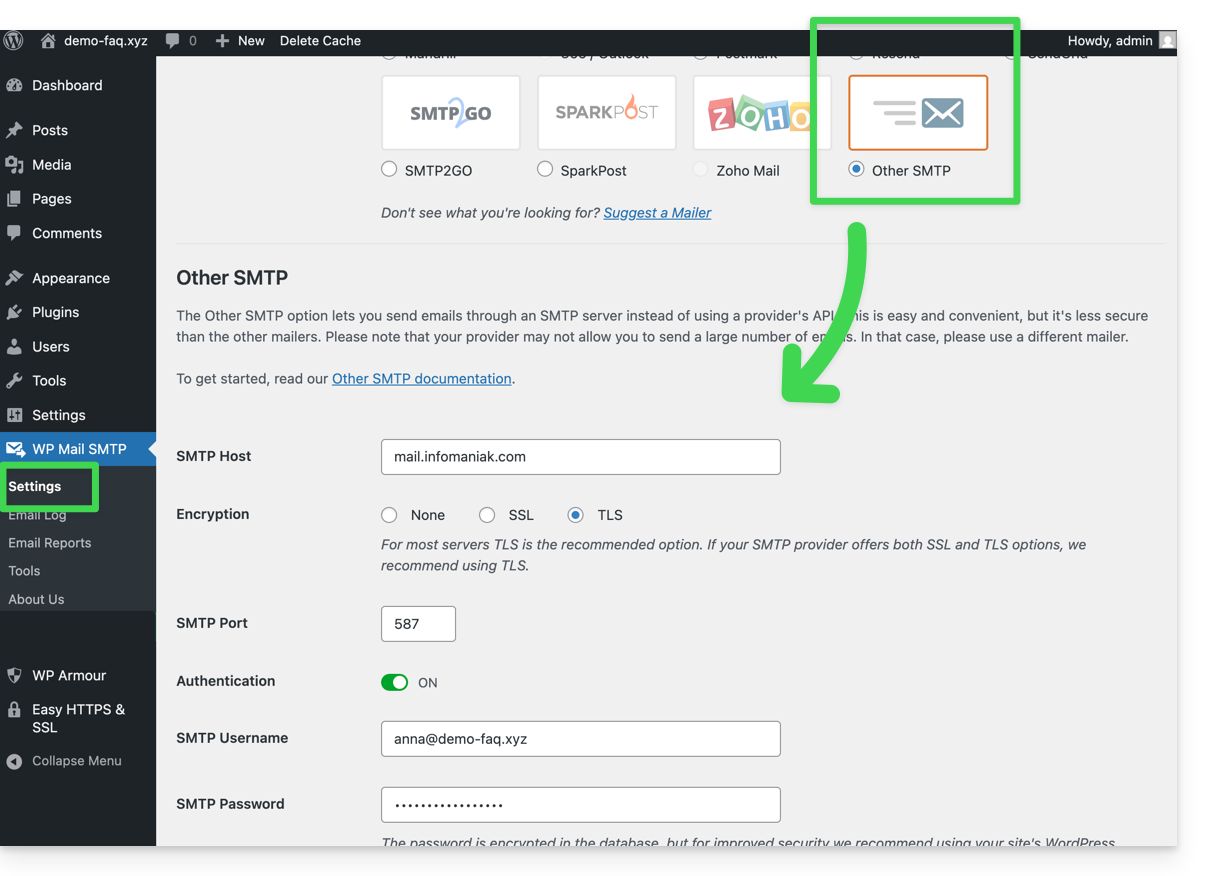
A partir desse momento, um e-mail enviado a partir de um formulário de contato presente no site (formulário padrão Divi, por exemplo) será enviado por meio de um método SMTP.
Para verificar isso, basta analisar os cabeçalhos de uma mensagem recebida por este meio, nomeadamente a linha x-mailer, que pode indicar, por exemplo, WPMailSMTP/Mailer/smtp em vez de PHPMailer.
Observação: o x-mailer pode ser qualquer indicação, não necessariamente representativa do método de envio real!
Prestashop
Para permitir que o seu site envie e-mails, utilize um endereço de e-mail do seu domínio (por exemplo, e-mail@dominio-site.xyz) e insira os parâmetros SMTP (consulte os pré-requisitos):
- Faça login no painel de administração do Prestashop.
- Acesse Configurações avançadas e, em seguida, E-mail.
- Configure o envio via SMTP:
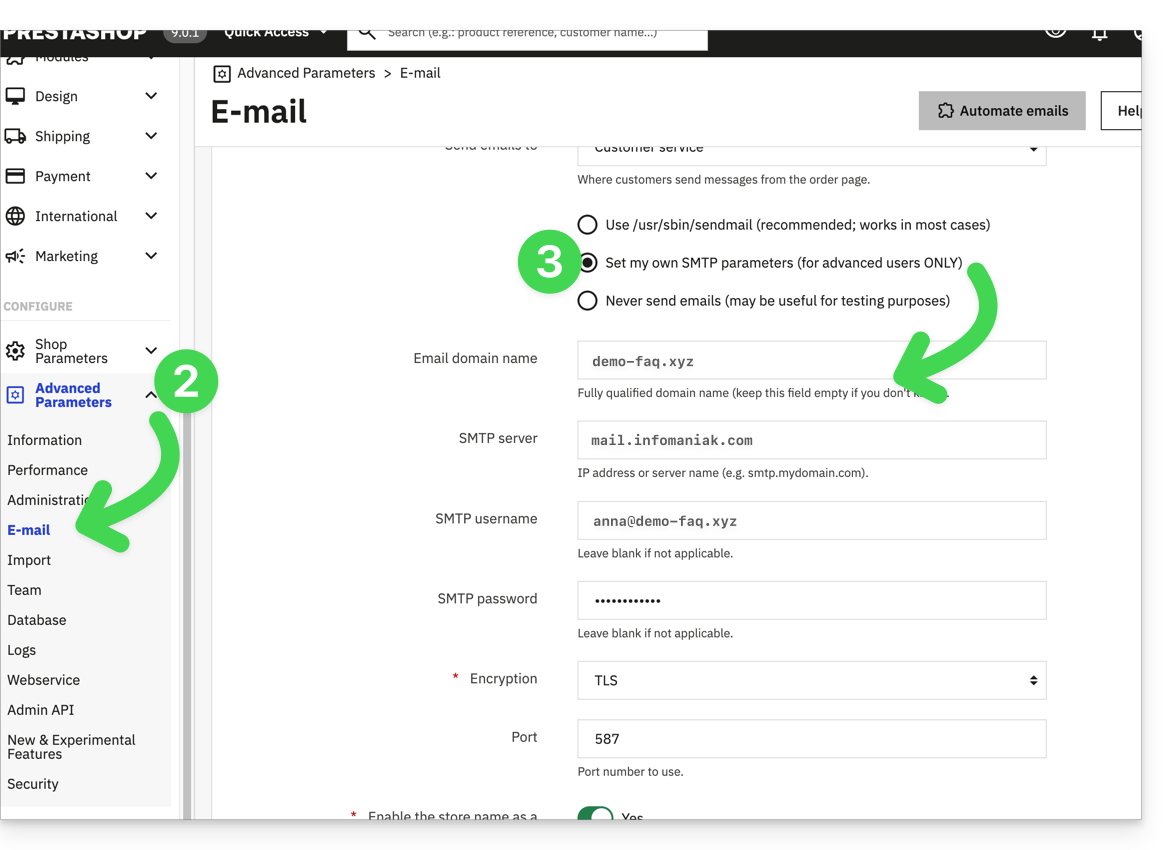
Em seguida, verifique (para evitar um erro como Could not instantiate mail function ou sender mismatch) se o endereço que você configurou nestas configurações avançadas corresponde ao endereço que o Prestashop usa para os envios. Para isso:
- Faça login no painel de administração do Prestashop.
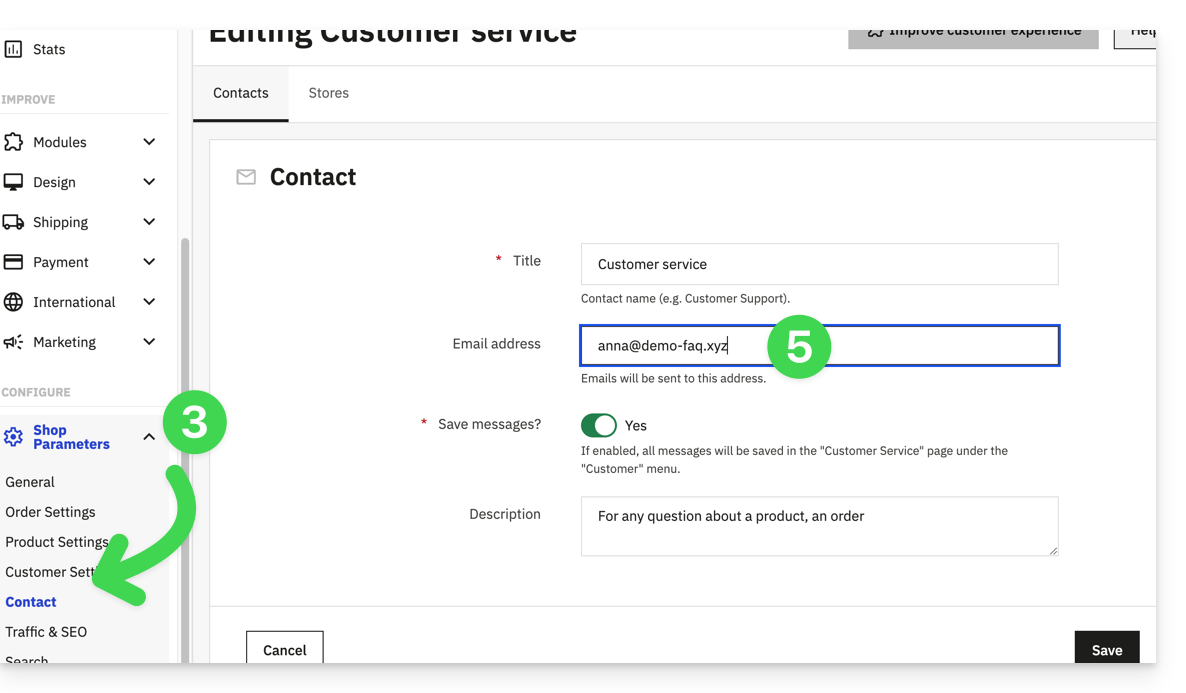
- Acesse Configurações da loja.
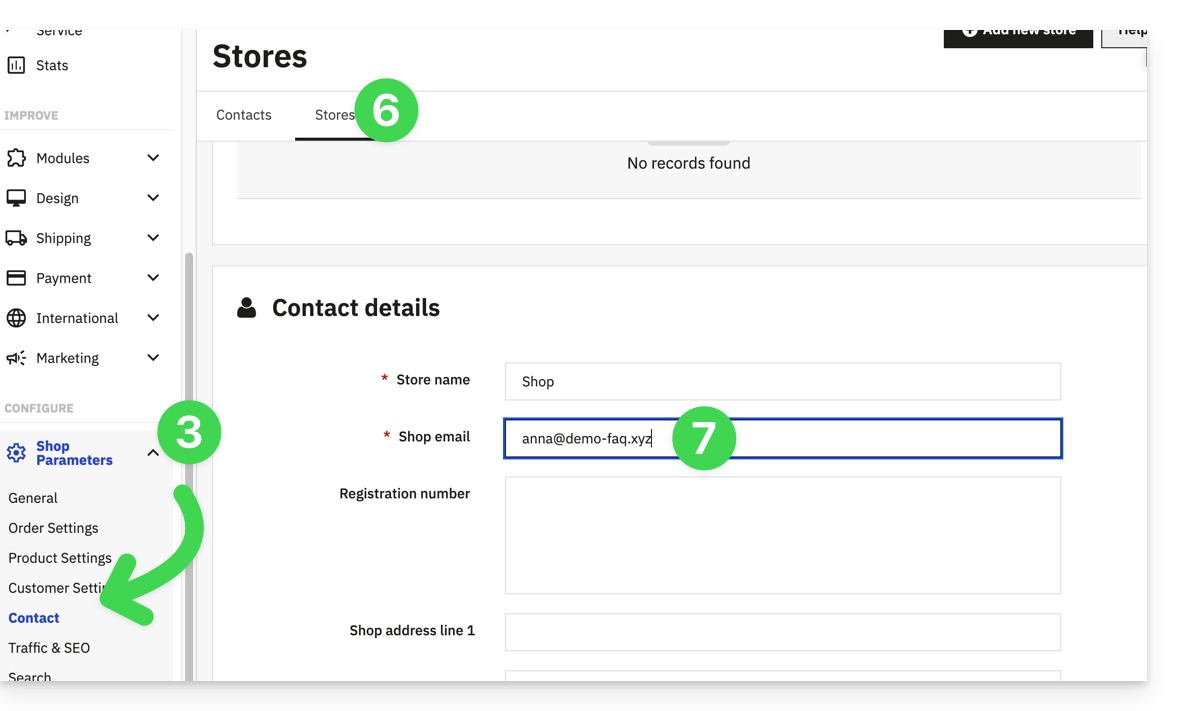
- Clique em Contato no menu lateral esquerdo.
- Na aba Contatos, verifique se o endereço de e-mail mencionado é o mesmo que o configurado anteriormente.
- Edite os endereços de e-mail, se necessário:
- Clique na aba Lojas.
- Verifique (e corrija, se necessário) se o endereço de e-mail indicado é o mesmo que o configurado anteriormente:
Joomla
Para permitir que o seu site envie e-mails, utilize um endereço de e-mail do seu domínio (por exemplo, e-mail@dominio-site.xyz) e configure as definições SMTP (consulte os pré-requisitos):
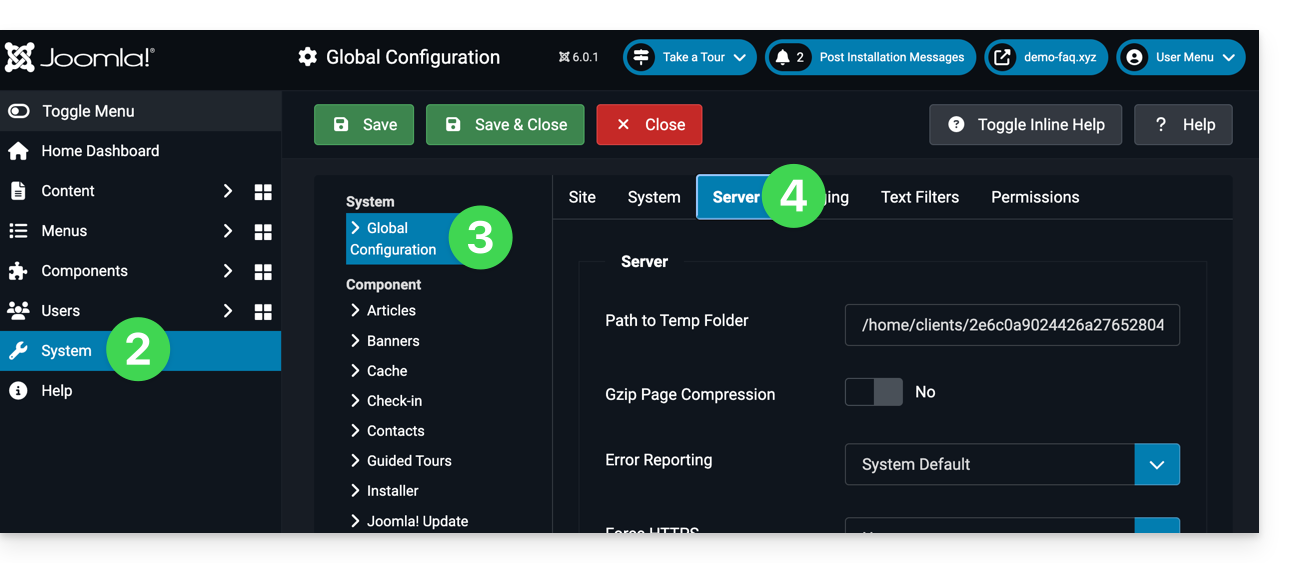
- Inicie sessão no painel de administração do Joomla.
- Clique em Sistema no menu lateral esquerdo.
- Clique em Configuração geral.
- Clique na aba Servidor:
- Configure o envio através do método SMTP:
Link para esta FAQ: https://faq.infomaniak.com/2023
Esta seção de perguntas frequentes foi útil?
Este guia explica como transferir um produto Infomaniak de uma Organização para outra.
Preâmbulo
- É possível mover quase todos os produtos contratados junto à Infomaniak para uma interface Manager Infomaniak diferente daquela em que o produto se encontra atualmente; trata-se, portanto, de uma transferência interna, de Organização para Organização.
- kSuite não pode ser transferida.
- Os utilizadores que atualmente têm acesso aos produtos selecionados não serão transferidos (e, portanto, poderão perder o acesso aos produtos).
- No que diz respeito ao kDrive: os utilizadores que atualmente têm acesso ao kDrive serão integrados na nova Organização.
- Eles manterão o seu acesso e as suas permissões do kDrive, mas quaisquer direitos de gestão que possuam sobre o próprio produto serão perdidos.
- Os Grupos (anteriormente "equipas de trabalho") também não são transferidos, e os direitos geridos através dos Grupos também serão perdidos.
- Se o seu utilizador tiver acesso a várias Organizações, é ainda mais fácil transferir o produto escolhido para uma delas.
- As faturas dos produtos selecionados não serão transferidas.
- Esta operação não causa nenhuma interrupção.
Gerar um link de transferência
Pré-requisitos
- Ser Administrador ou Representante legal na Organização (❓: ajuda).
Para transferir um produto:
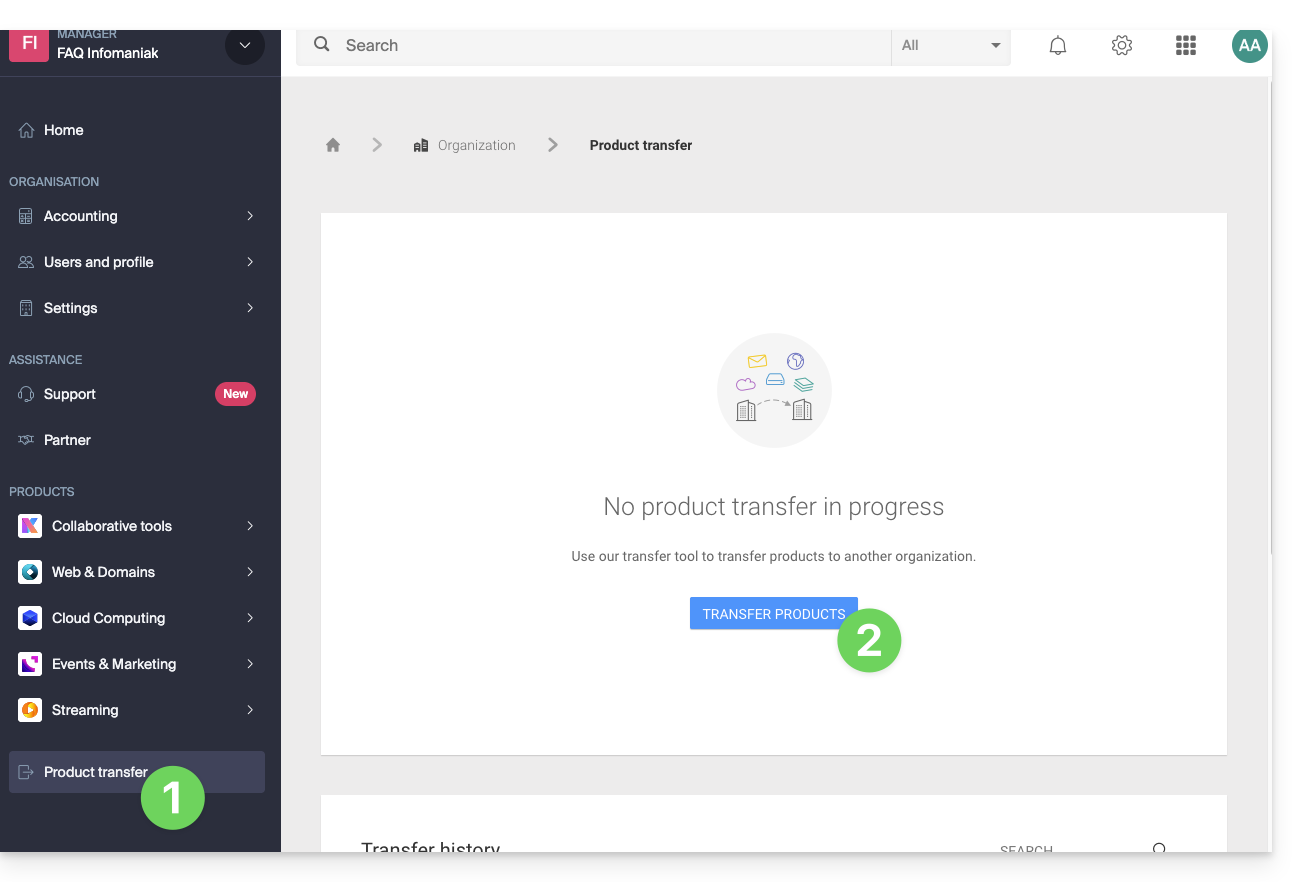
- Clique aqui para acessar a gestão de transferências de produtos no Manager Infomaniak (❓: ajuda).
- Clique no botão Transferir produtos:
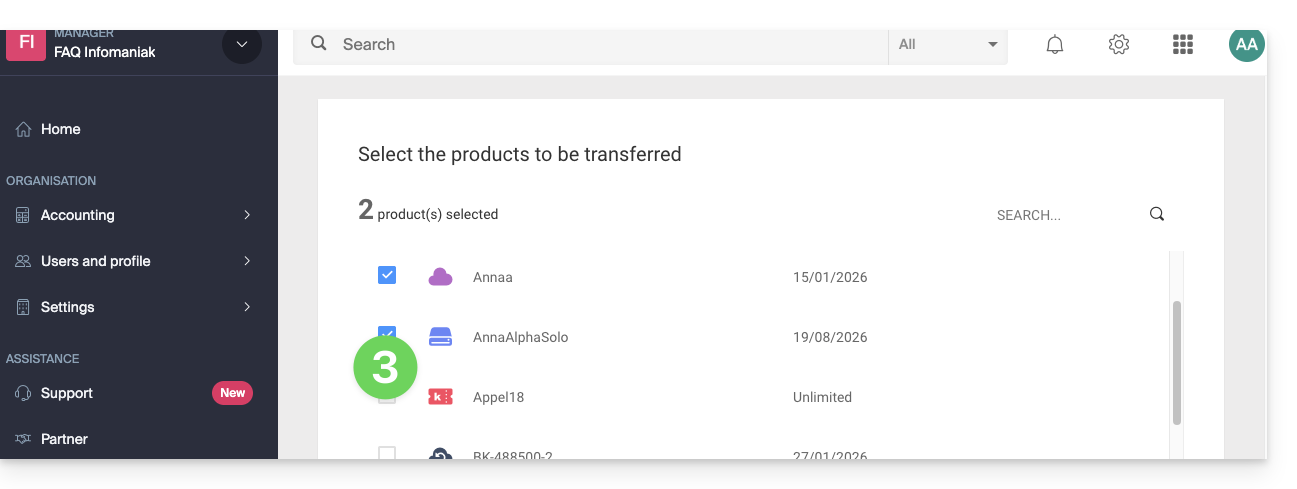
- Marque o(s) produto(s) que deseja transferir:
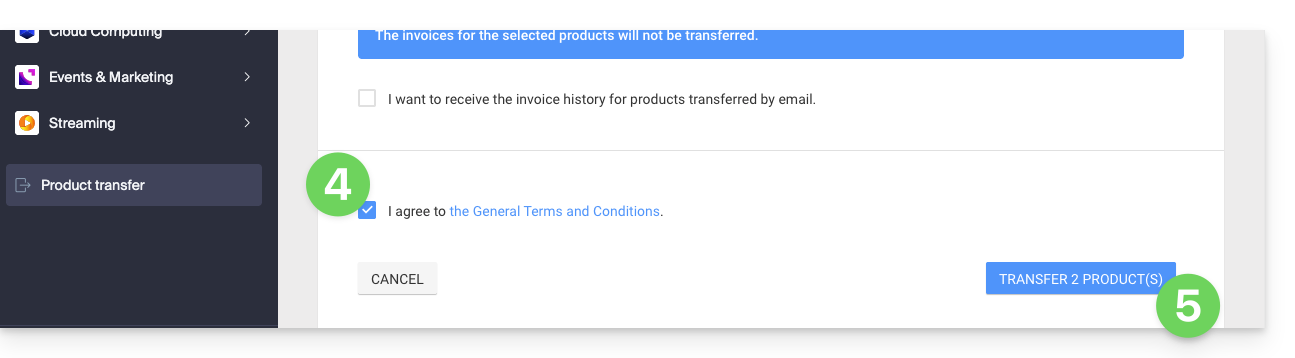
- Leia e aceite os termos e condições.
- Clique no botão Transferir:
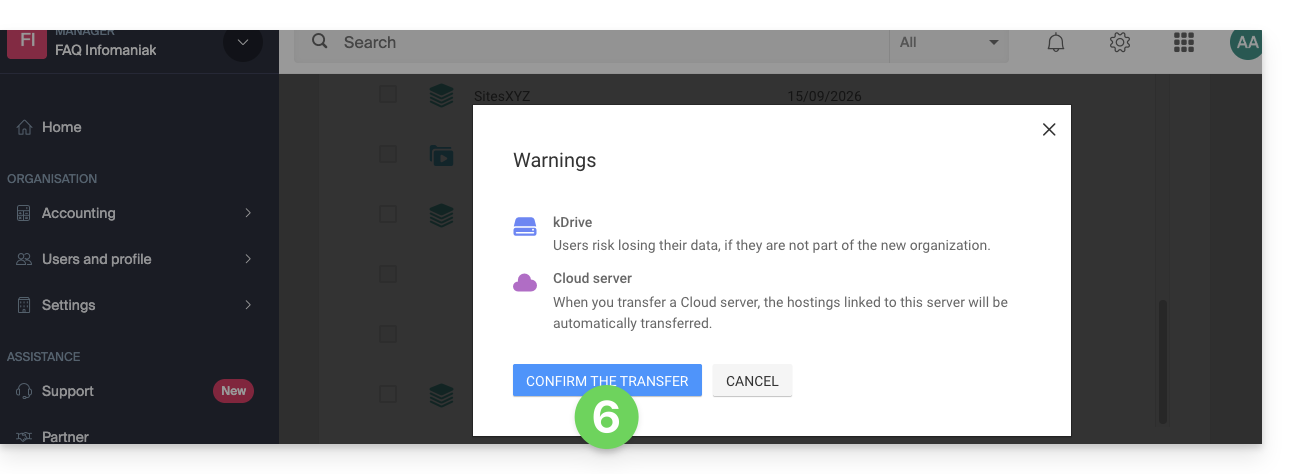
- Leia e valide os avisos, se houver:
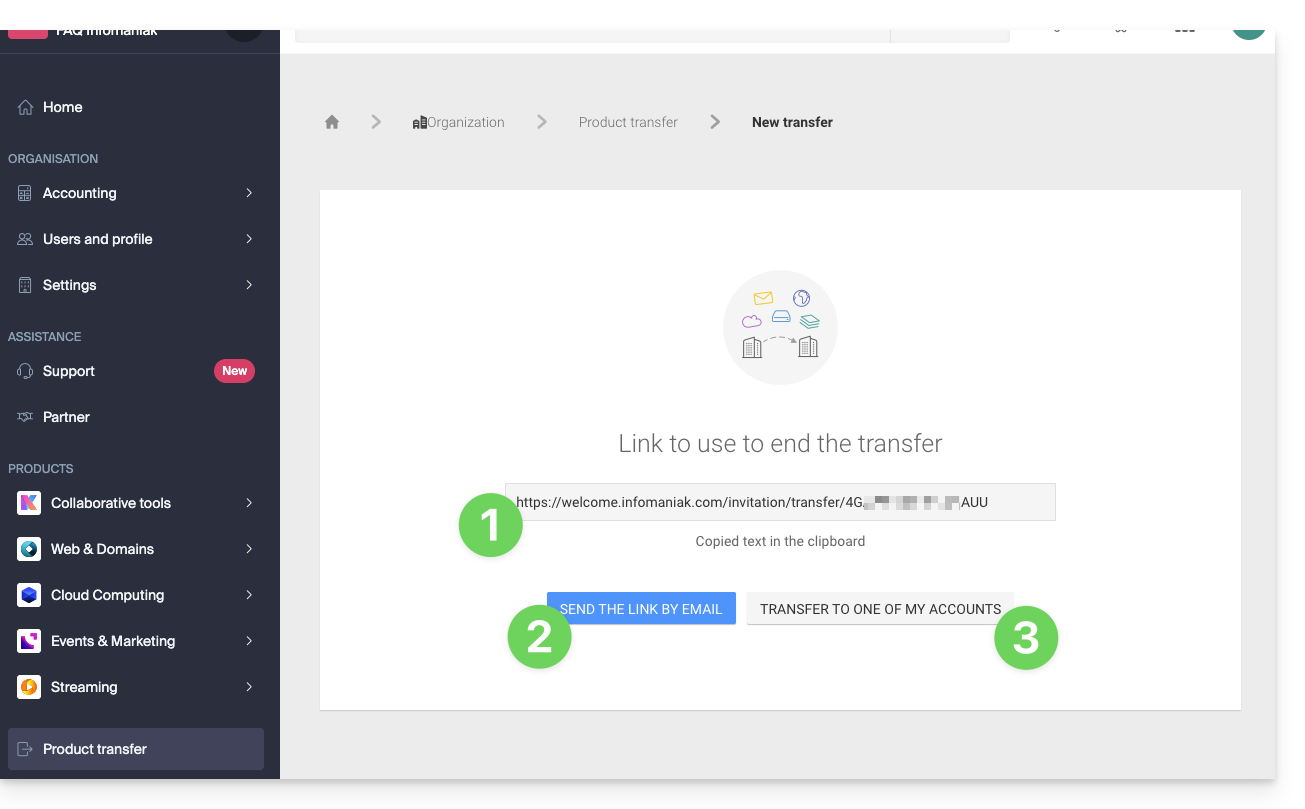
A transferência foi iniciada. Agora, você pode:
- Copiar o link de transferência…
- ou enviá-lo para o endereço de e-mail desejado…
- ou selecionar diretamente uma das Organizações às quais o seu utilizador está associado, e o produto selecionado será transferido para essa organização:
Em qualquer momento, pode voltar à página de transferência de produtos para encontrar as opções listadas acima:
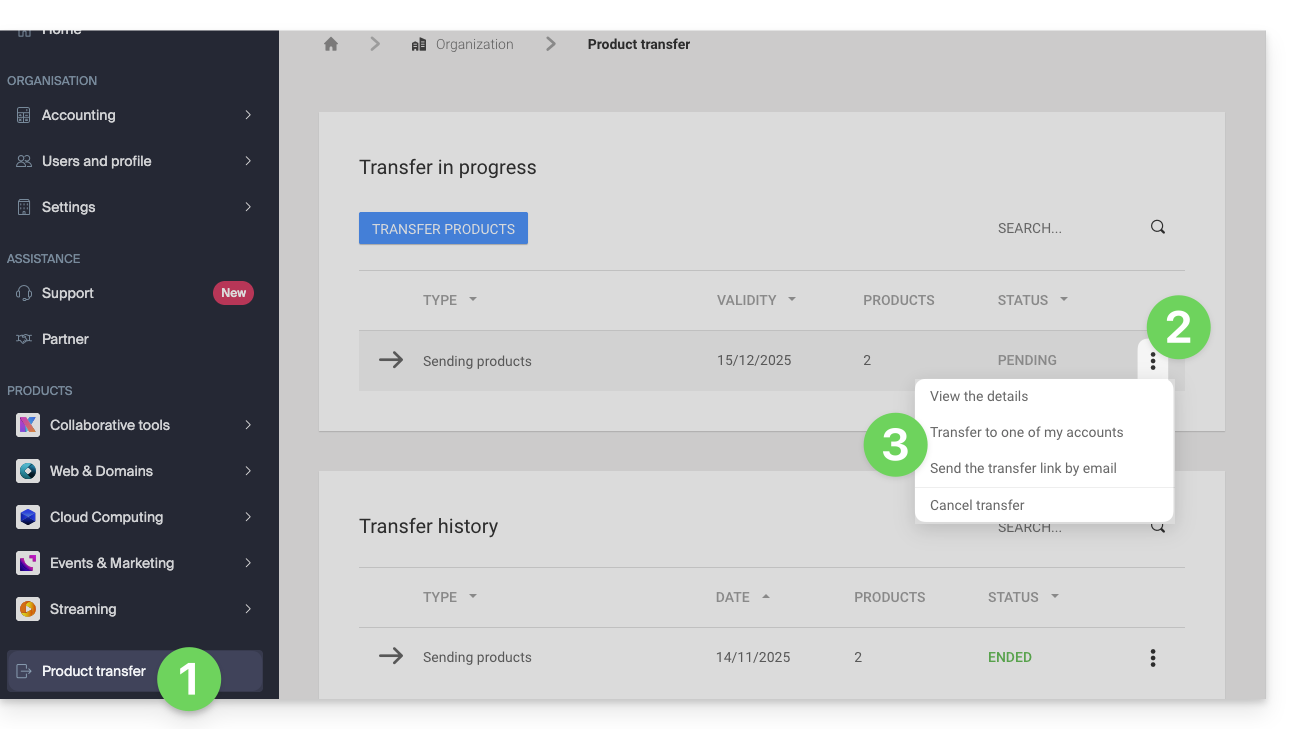
Método alternativo
No caso de uma transferência única, você também pode acessar diretamente o painel do produto em questão e clicar em Gerenciar (exemplo na imagem abaixo). No entanto, como este menu nem sempre está presente, é melhor optar pelo primeiro método descrito acima, que, além disso, permite a transferência em lote: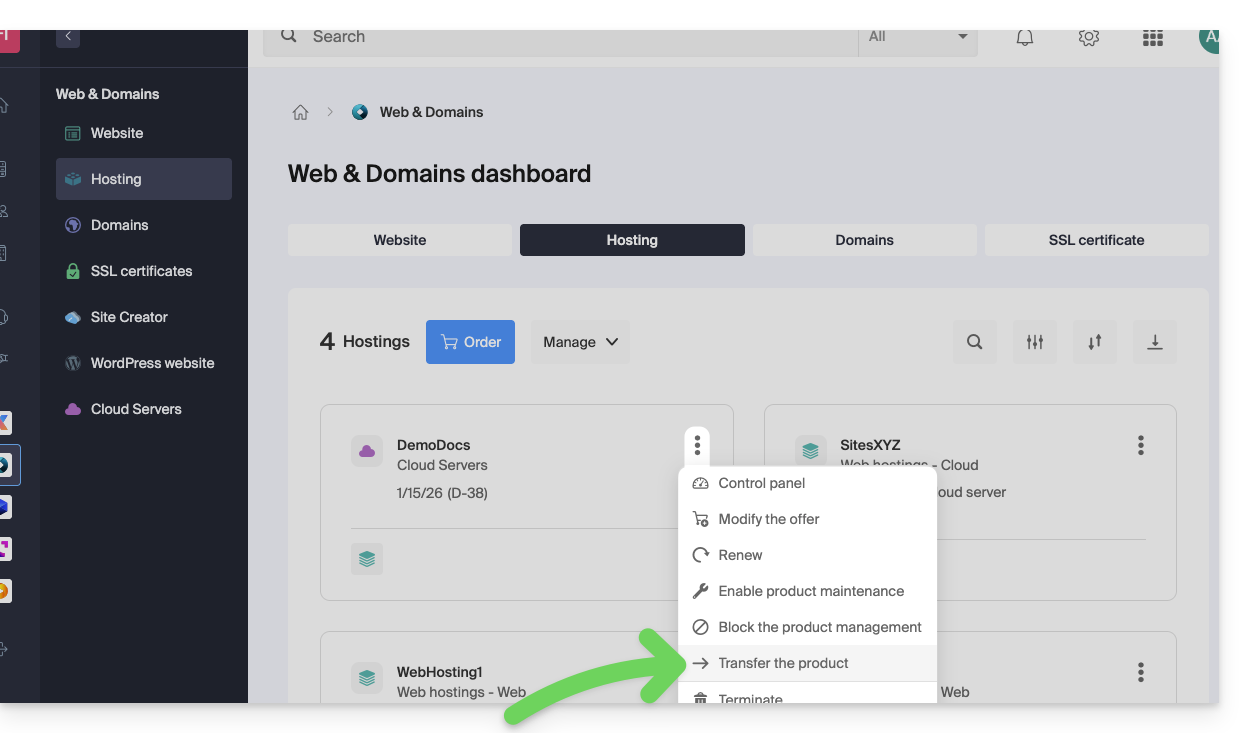
Consulte este outro guia sobre Jelastic Cloud.
Receber o produto
Após o início de uma transferência de produto por um usuário…
1. Certifique-se de estar na organização que deve receber o produto
- Clique aqui para acessar o painel de controle na organização que deverá receber o(s) produto(s).
- O utilizador especificado ao iniciar sessão na conta Infomaniak deve ter permissões de administrador.
- Se necessário, pode criar uma nova Organização para receber produtos (❓: ajuda).
2. Executar o link obtido
- Clique no link obtido na primeira etapa acima.
- Você também pode simplesmente colá-lo em um navegador, estando conectado à conta Infomaniak correta.
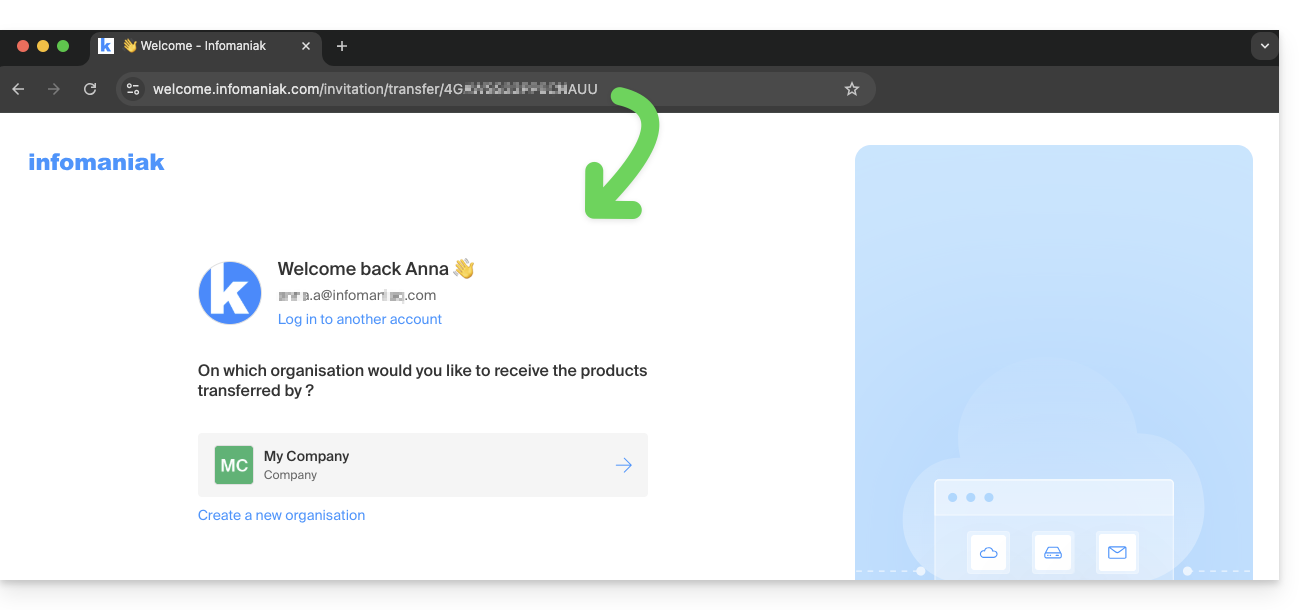
3. Validar a transferência de produtos
- Se necessário, escolha a Organização de destino usando o menu suspenso.
- Leia e aceite os termos e condições.
- Clique no botão Receber os produtos (se o botão não estiver clicável, certifique-se de ter selecionado a Organização):
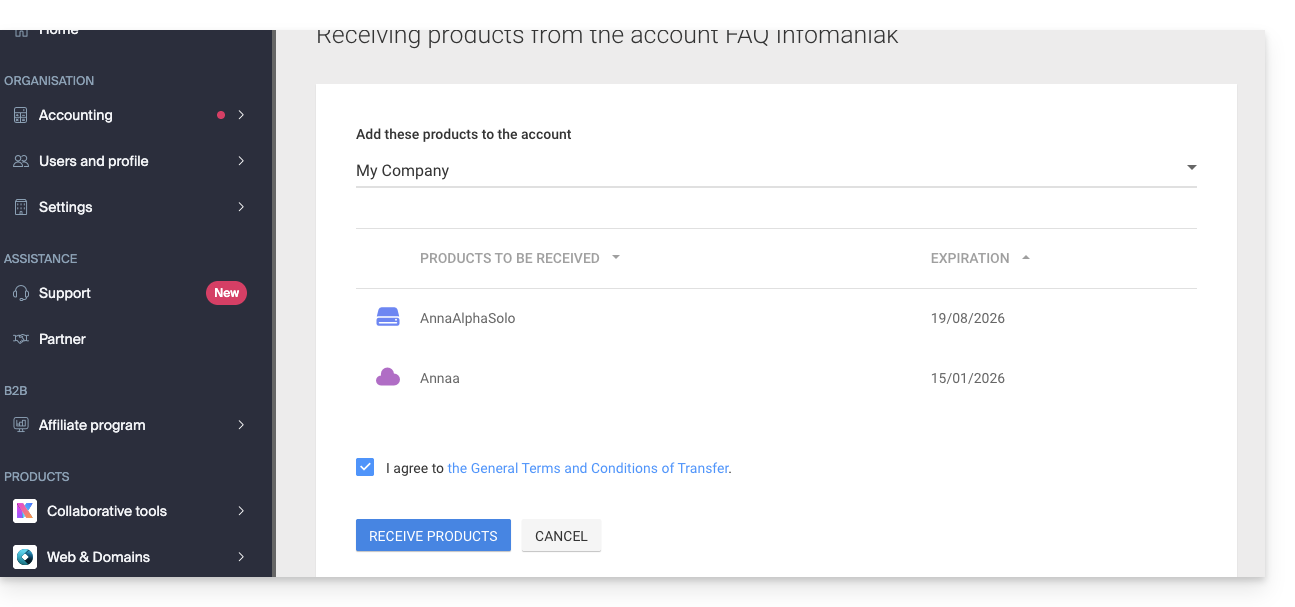
Encontre a qualquer momento as transferências em andamento ou concluídasa partir do ícone inferior no menu lateral esquerdo doGerenciador Infomaniak: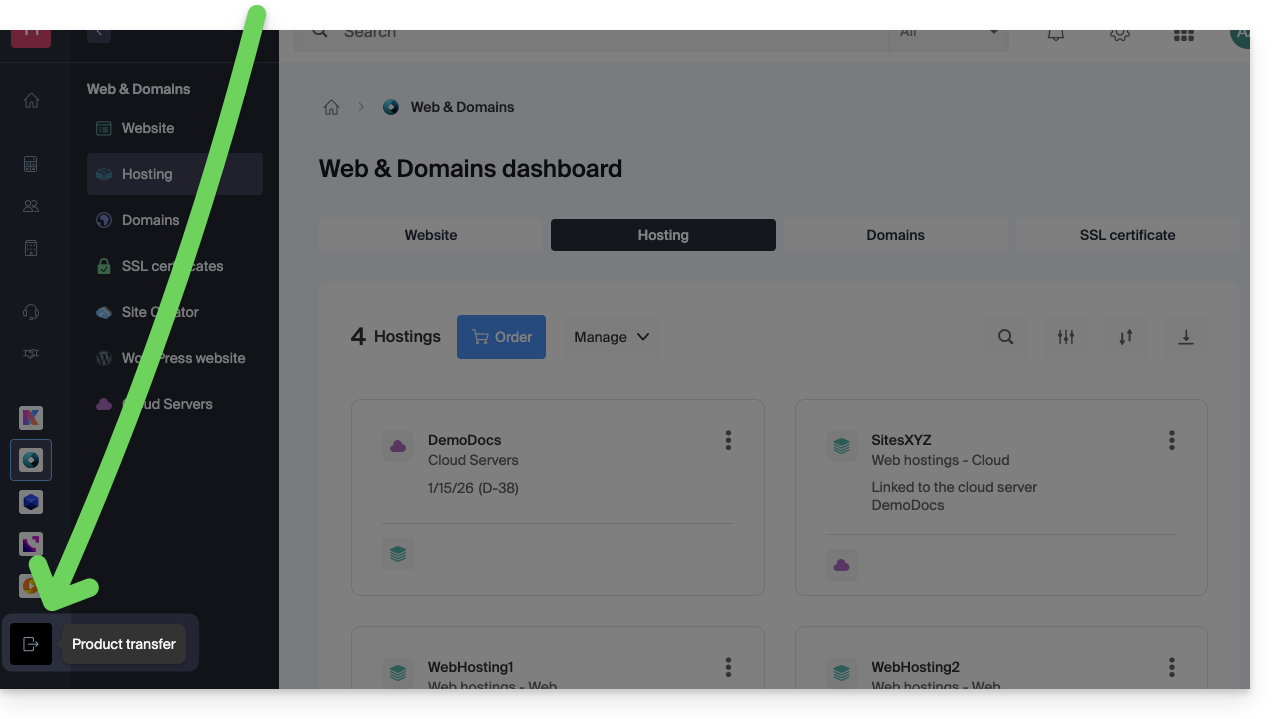
Link para esta FAQ: https://faq.infomaniak.com/2024
Esta seção de perguntas frequentes foi útil?
Este guia explica como vincular um nome de domínio a um Serviço de Hospedagem Web Infomaniak.
Onde está localizado o seu nome de domínio?…
… Na Infomaniak, mesmo para Organizações
Se o seu nome de domínio estiver registado na Infomaniak e estiver na mesma conta de utilizador ou organização que o serviço de e-mail, então não é preciso fazer nada.
- Consulte este outro guia para verificar e corrigir eventuais erros de configuração.
… Na Infomaniak, organização diferente
Se o seu nome de domínio estiver registado na Infomaniak, mas numa conta de utilizador ou Organização diferente, então:
- Edite a zona DNS, especificando o endereço IP do site como um registo A.
- Qualquer adição/modificação DNS pode demorar até 48 horas para se propagar.
OU
- Mova-o dentro da mesma Organização.
… Na Infomaniak com DNS externos
Se o seu nome de domínio tiver DNS que não sejam os da Infomaniak, então:
- Edite a zona DNS atual no local onde ela está (se necessário, consulte a ajuda do fornecedor em questão) e especifique o endereço IP do site na forma de um registro A.
- Qualquer adição/modificação de DNS pode levar até 48 horas para se propagar.
OU
- Altere os DNS atuais e selecione a opção de usar os DNS da Infomaniak.
- Qualquer adição ou modificação de DNS pode levar até 48 horas para ser propagada.
- Consulte este outro guia para verificar e corrigir possíveis erros de configuração.
… Em outro lugar, com DNS externos
Se o seu nome de domínio tiver DNS que não sejam os da Infomaniak, então:
- Edite a zona DNS atual no local onde ela se encontra (se necessário, consulte a ajuda do provedor em questão) e especifique nela o endereço IP do site no formato de um registro A.
- Qualquer adição/modificação DNS pode levar até 48 horas para ser propagada.
OU
- Altere os DNS atuais (se necessário, consulte a ajuda do provedor em questão) e especifique os DNS da Infomaniak (isso implica em ter uma zona DNS na Infomaniak).
- Qualquer adição/modificação DNS pode levar até 48 horas para ser propagada.
- Esta zona DNS na Infomaniak será configurada corretamente, mas consulte este outro guia para verificar e corrigir eventuais erros de configuração.
… Em outro lugar, mas você o está transferindo
Se o seu nome de domínio estiver registado noutro registrador e desejar transferi-lo para o mesmo local onde está alojado o seu site Infomaniak, então:
- Transfira o nome de domínio para a Infomaniak (este será configurado corretamente, mas consulte este outro guia para verificar e corrigir eventuais erros de configuração).
- Se o nome de domínio for destinado a ser um alias do seu site principal, você deve adicionar o alias ao seu site.
Link para esta FAQ: https://faq.infomaniak.com/2025
Esta seção de perguntas frequentes foi útil?
Este guia explica como…
- … gerar um
CSRe uma chave privada para solicitar um certificado de terceiros a uma autoridade de certificação (CA), - … importe este certificado para o seu site Infomaniak, utilizando o
CRTobtido junto daCA.
Introdução
- Embora a Infomaniak ofereça todos os certificados SSL de que você possa precisar…
- certificados gratuitos Let's Encrypt para sites pessoais (possível apenas com sites hospedados na Infomaniak),
- certificados DV da Sectigo para sites profissionais/pessoais que não estão registrados no registro comercial,
- certificados EV da Sectigo para empresas registradas no registro comercial,
- … também é possível instalar um certificado SSL obtido em outro lugar (certificado intermediário de uma autoridade de certificação de sua escolha), certificados personalizados ou autoassinados.
1. Gerar um CSR (Certificate Signing Request)
Um CSR (Certificate Signing Request ou Pedido de Assinatura de Certificado) é um arquivo codificado que contém as informações necessárias para solicitar um certificado SSL/TLS.
Ela deve ser gerada por você, para garantir que a chave privada permaneça sob seu controle, usando, por exemplo, o OpenSSL.
Adapte e execute o seguinte comando a partir de um aplicativo do tipo Terminal (interface de linha de comando, CLI /Command Line Interface) no seu dispositivo:
openssl req -utf8 -nodes -sha256 -newkey rsa:2048 -keyout domain.xyz.key -out domain.xyz.csr -addext "subjectAltName = DNS:domain.xyz, DNS:www.domain.xyz"
Explicações
newkey rsa:2048: Gera uma nova chave RSA de 2048 bits.keyout domain.xyz.key: Especifica o arquivo onde a chave privada será salva.out domain.xyz.csr: Especifica o arquivo onde a CSR será armazenada.addext “subjectAltName = ...”: Adiciona domínios adicionais através da extensãoSAN (Subject Alternative Name), necessário para incluir todos os domínios desejados no certificado (o domínio principal domain.xyz + qualquer outro domínio ou subdomínio associado, como www.domain.xyz).
Após a geração, pode verificar o conteúdo do CSR com o seguinte comando:
openssl req -in domain.xyz.csr -noout -textIsso permite verificar se todos os domínios listados em subjectAltName estão corretamente incluídos.
Após gerar a CSR, você pode enviá-la à autoridade de certificação (CA) para obter seu certificado SSL/TLS.
2. Importar o certificado externo
Após a validação, a CA emite um certificado (domain.xyz.crt) e, por vezes, um certificado intermediário (ca_bundle.crt).
Para aceder à gestão dos certificados SSL:
- Clique aqui para aceder à gestão do seu site no Manager Infomaniak (precisa de ajuda?).
- Clique diretamente no nome atribuído ao site em questão:
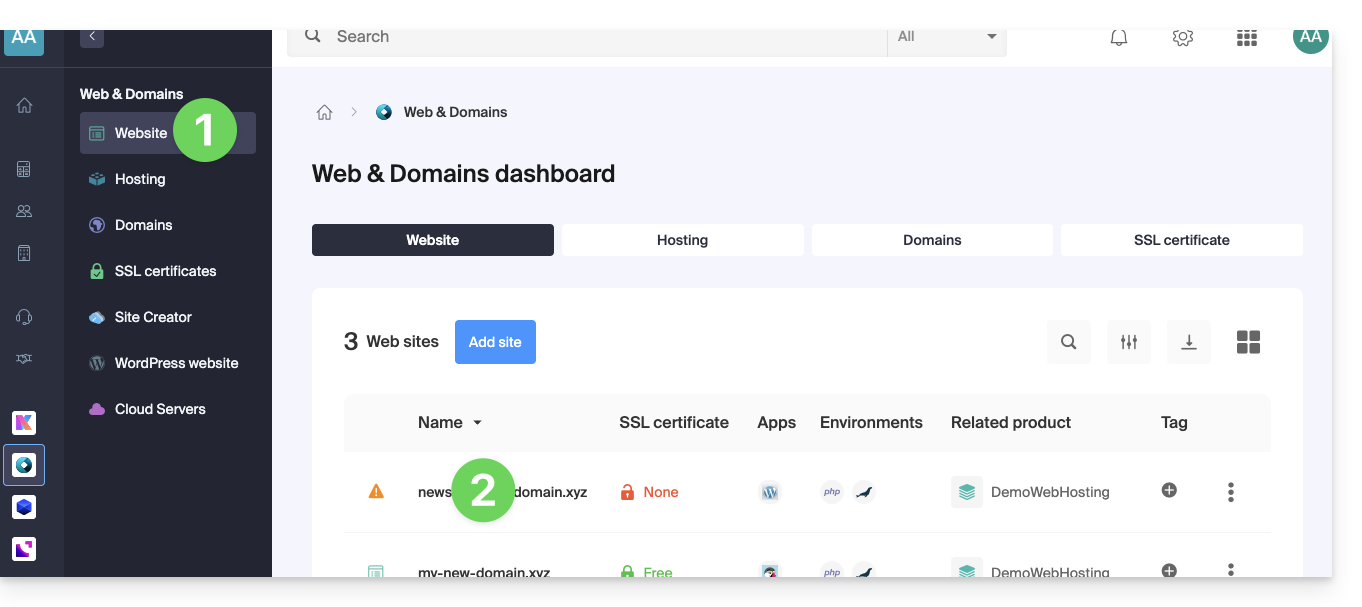
- Clique em Certificados SSL no menu lateral esquerdo.
- Clique no botão azul Instalar certificado:
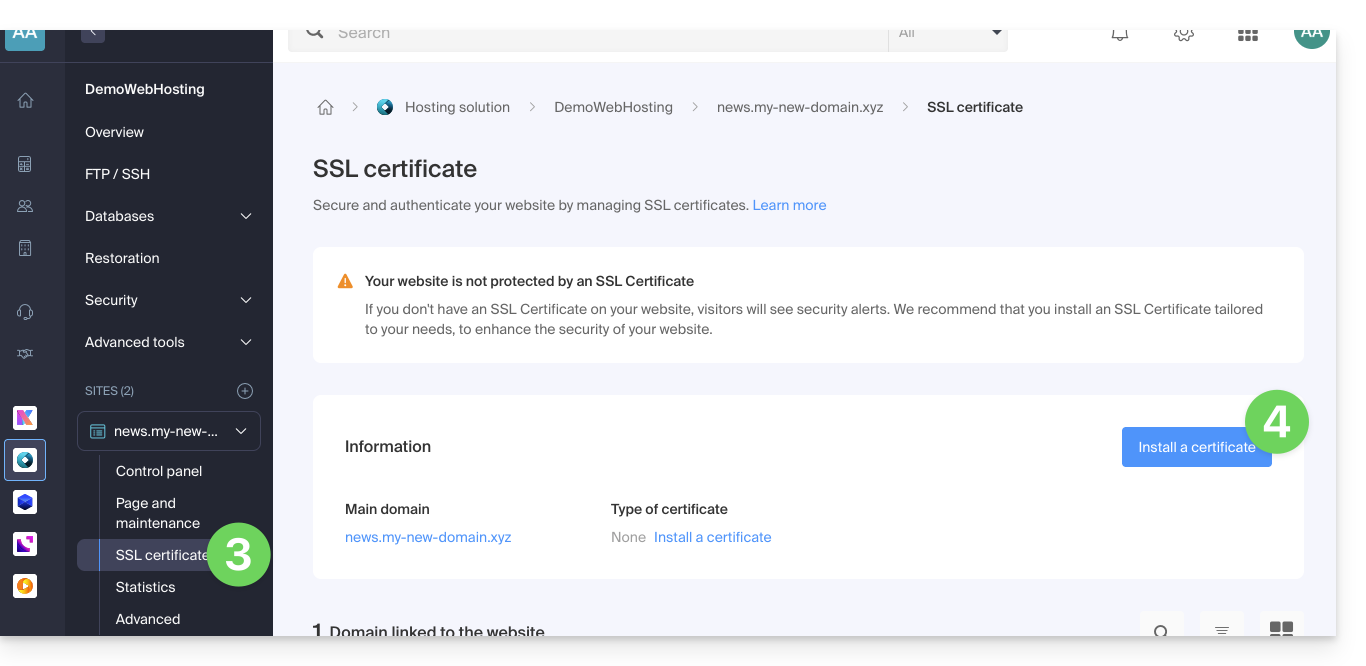
- Escolha o certificado personalizado.
- Clique no botão Seguinte:
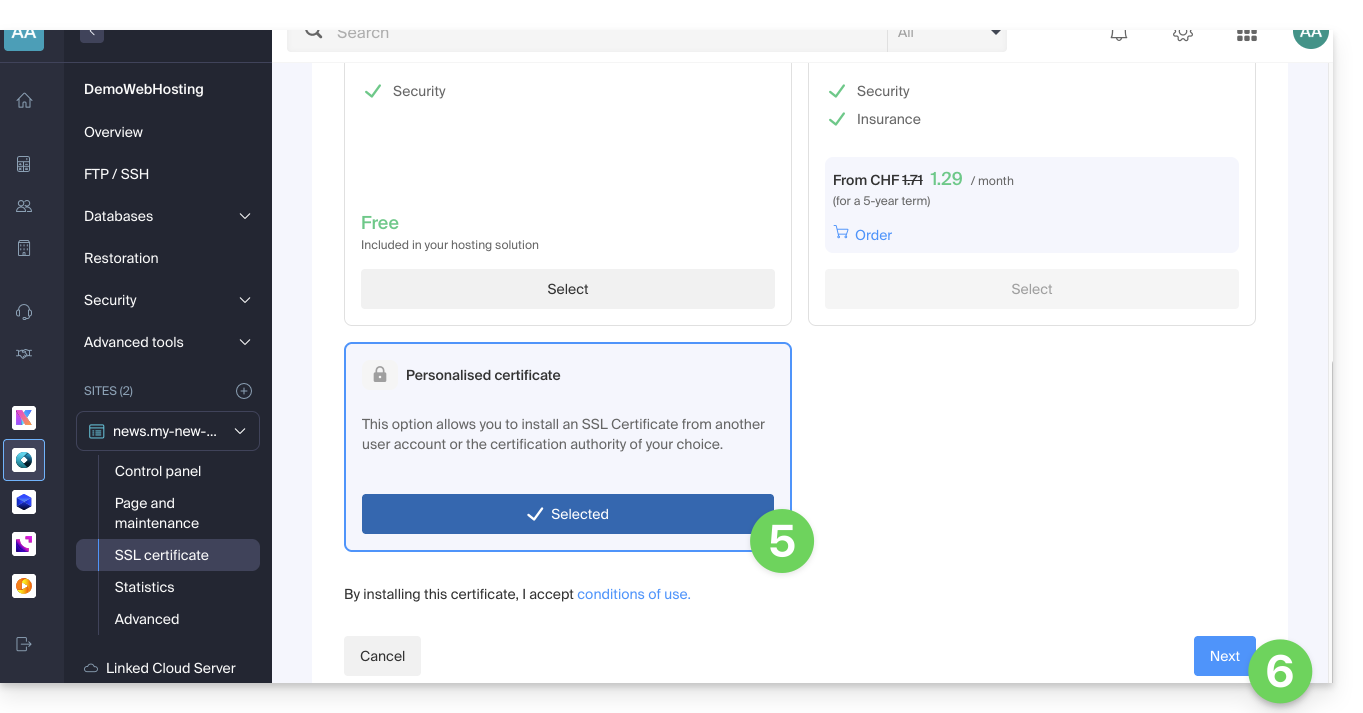
- Importe o seu certificado e a chave privada, seja importando os ficheiros
.crte.key, seja copiando e colando. - Clique em Concluir:
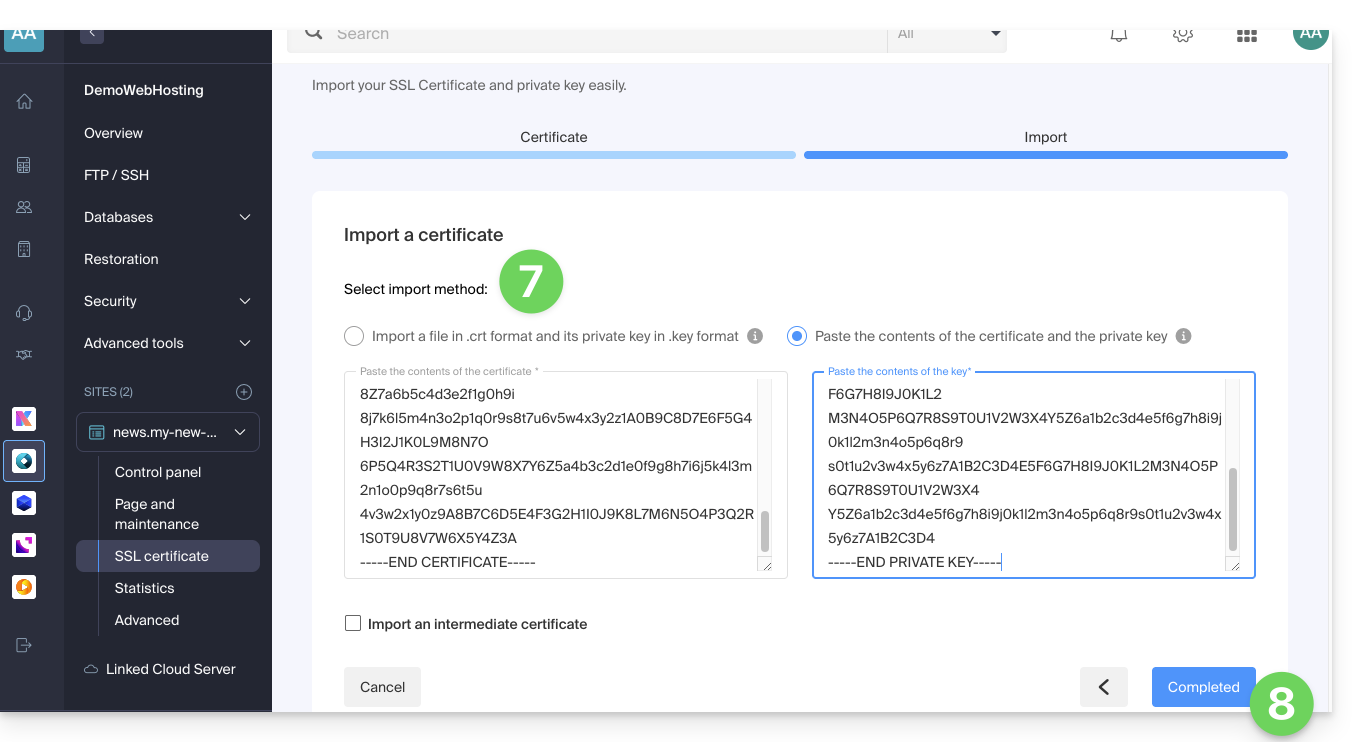
Comando alternativo para gerar um certificado autoassinado (opcional)
Se desejar um certificado local apenas para testes ou sem passar por uma CA (não recomendado para produção), pode usar este comando:
openssl req -x509 -nodes -days 365 -newkey rsa:2048 -keyout domain.xyz.key -out domain.xyz.crt -addext “subjectAltName = DNS:domain.xyz, DNS:www.domain.xyz”Isso gera tanto um certificado autoassinado (domain.xyz.crt) quanto uma chave privada (domain.xyz.key). No entanto, os certificados autoassinados não são reconhecidos como válidos por navegadores ou sistemas públicos. Eles são adequados apenas para ambientes internos ou de desenvolvimento.
Importar um certificado intermediário
Ao adicionar um certificado SSL personalizado, é possível importar o certificado intermediário (através da importação do arquivo .crt ou copiando e colando os dados fornecidos pela entidade certificadora):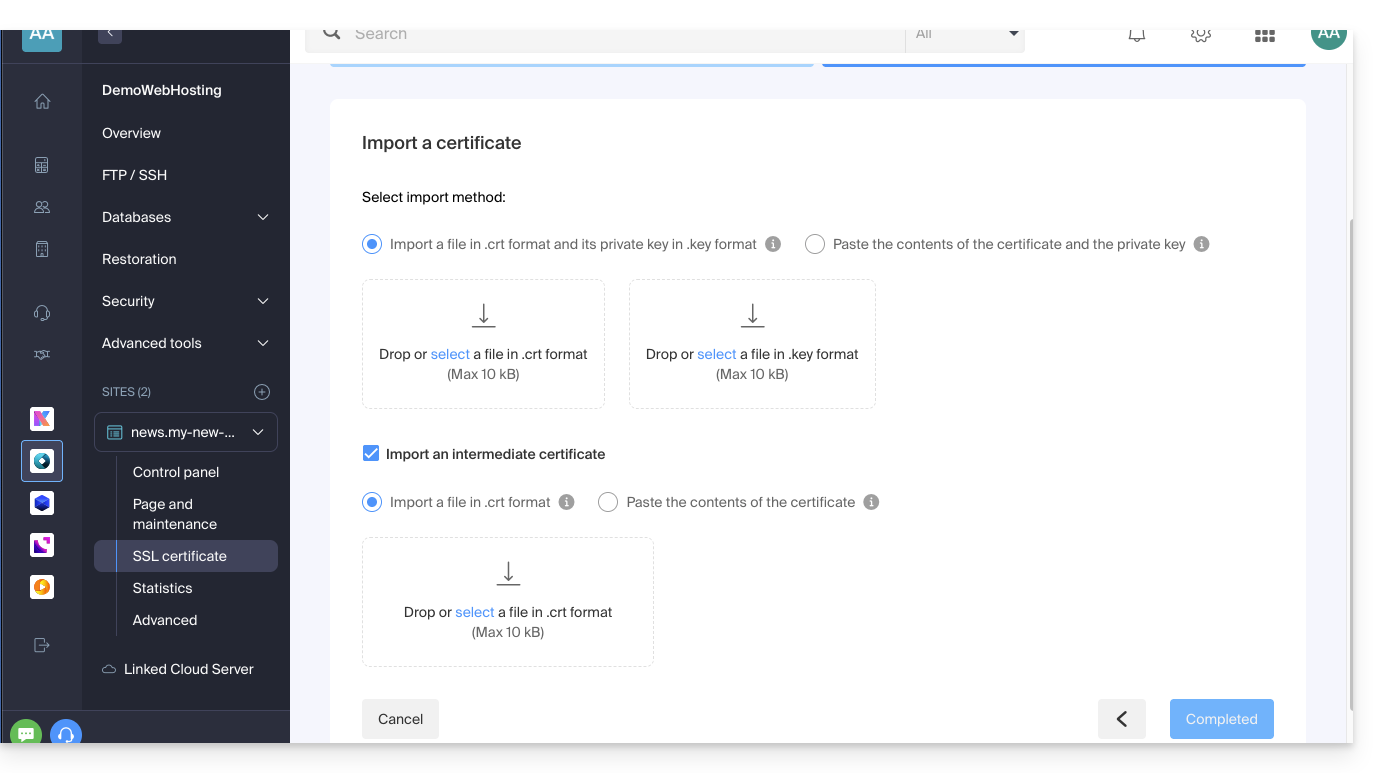
Link para esta FAQ: https://faq.infomaniak.com/2027
Esta seção de perguntas frequentes foi útil?
Este guia explica como apagar uma pasta ou um ficheiro via SSH, o que pode ser útil, por exemplo, quando não é possível apagar um ficheiro com um software/cliente FTP ou com o FTP Web no painel de controlo.
Comando SSH para apagar uma pasta/ficheiro
Para apagar um ficheiro ou diretório, é necessário utilizar o comando rm.
Para eliminar os ficheiros Data.php e Data.txt, por exemplo, é necessário executar o seguinte comando:
rm Data.php Data.txtPara eliminar um diretório, é necessário, primeiro, eliminar o seu conteúdo e, em seguida, utilizar o seguinte comando:
rmdir Folder/Para eliminar todos os ficheiros no formato html, é necessário executar o seguinte comando:
rm *.htmlLink para esta FAQ: https://faq.infomaniak.com/2032
Esta seção de perguntas frequentes foi útil?
Este guia explica como adicionar ou modificar um ou mais registos do tipo CNAME e DNAME na zona DNS (de um nome de domínio) gerida no Manager Infomaniak.
Introdução
- O tipo de registro
CNAMEpermite apontar um subdomínio para um endereço de site.- Este é o método geralmente usado para fazer com que o subdomínio
wwwfuncione com seu site ou para redirecionar um subdomínio para uma pasta do servidor web onde seu site está hospedado.
- Este é o método geralmente usado para fazer com que o subdomínio
- O tipo de registro
DNAME, para «delegation name», é particularmente útil ao reorganizar domínios ou para transições suaves de uma parte da sua infraestrutura para outra, preservando a estrutura hierárquica dos subdomínios.- Um
DNAMEcria um alias para um domínio inteiro e todos os seus subdomínios.
- Um
- Ao contrário do
CNAME, que se aplica apenas a um único nome de host específico, oDNAMEredireciona automaticamente todos os subdomínios. Exemplo:- Um
DNAMEparaabc.site1.comque aponta parasite2.comirá redirecionar automaticamentexyz.abc.site1.comparaxyz.site2.com,new.login.abc.site1.comparanew.login.site2.come assim por diante.
- Um
- ⚠ Um registro
DNAMEnão pode ser usado no nível da zona raiz de um domínio (comosite1.comdiretamente). Geralmente, é usado em um subdomínio. Se você deseja redirecionar o domínio principal, deverá usar outros tipos de registros, como umA,AAAAouCNAME(com algumas restrições para este último).
Modificar a zona DNS
Para gerir este tipo de registo numa zona DNS:
- Clique aqui para acessar o gerenciamento do seu domínio no Manager Infomaniak (precisa de ajuda?).
- Clique diretamente no nome atribuído ao domínio em questão.
- Clique em Zona DNS no menu lateral esquerdo.
- Clique no botão para adicionar um registo:
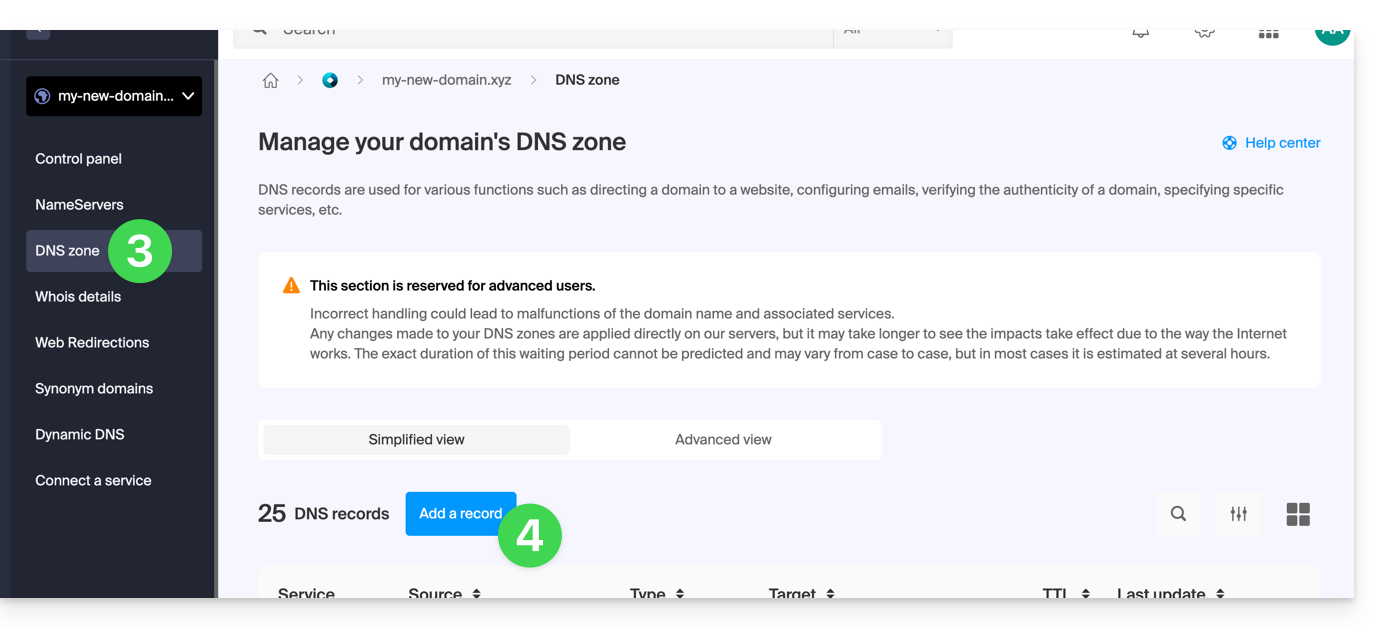
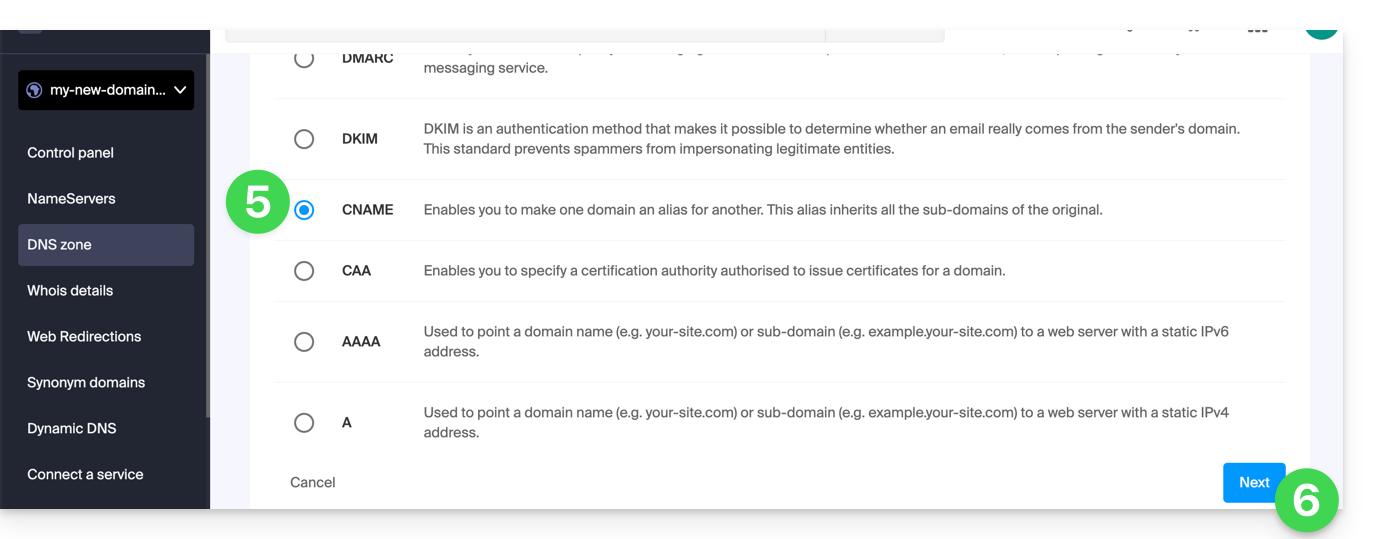
- Clique no botão de rádio correspondente para adicionar um registro.
- Clique no botão Avançar:
- Insira os valores necessários para a sua zona DNS.
- Mantenha o valor padrão para o TTL.
- Clique no botão Guardar:
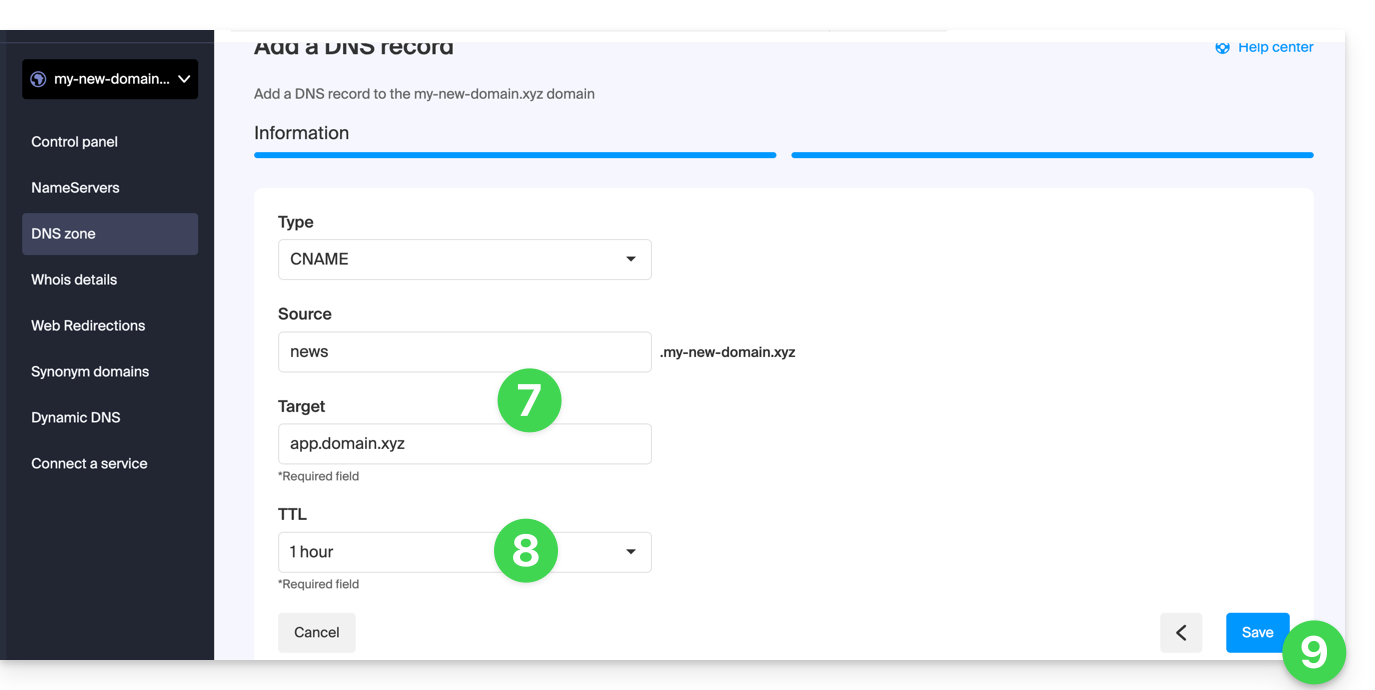
Link para esta FAQ: https://faq.infomaniak.com/2033
Esta seção de perguntas frequentes foi útil?
Este guia explica comocriar subdomínios em uma hospedagem Infomaniak existente, utilizando um arquivo .htaccess.
✘ INDISPONÍVEL com
Site Creator Lite
hospedagens Starter
Preâmbulo
- A hospedagem pode estar localizada em uma oferta de Hospedagem Web compartilhada ou em um Servidor Cloud Infomaniak.
- Os subdomínios podem ser adicionados muito facilmente na sua hospedagem atual, pois a oferta básica inclui 20 sites por hospedagem (sites = subdomínios).
- Se não quiser usar este número de sites disponíveis, pode seguir o método abaixo.
Criar um subdomínio como atalho
Os subdomínios criados desta forma facilitam a organização de uma hospedagem. Por exemplo, o endereço vlog.domain.xyz será o atalho do endereço domain.xyz/vlog. Ou seja, o endereço vlog.domain.xyz redirecionará para a pasta vlog, que deverá estar localizada na raiz do site domain.xyz. Neste exemplo, vlog é o subdomínio de domain.xyz.
1. Adicionar o subdomínio como um alias do seu site
Para isso:
- Siga o procedimento para adicionar um alias, mas leia atentamente os pontos 2 e 3 abaixo.
- No campo para adicionar o domínio associado, insira o endereço completo do subdomínio (por exemplo,
vlog.domain.xyz). - Se o seu domínio ou a sua zona DNS for gerido na Infomaniak, ative as duas opções seguintes: Atualizar as entradas DNS para este domínio e Substituir as entradas já existentes; caso contrário, crie um registo A no seu registrador com as seguintes informações:
- campo: o endereço URL completo do subdomínio (por exemplo,
vlog.domain.xyz) - destino: o endereço IPv4 (registo A) do seu site (consulte este outro guia para encontrar o registo A do seu site)
- campo: o endereço URL completo do subdomínio (por exemplo,
2. Modificar o ficheiro htaccess do seu site
Importante: as instruções a seguir são fornecidas apenas como referência. Pode ser necessário adaptar o código para que ele funcione na sua situação.
Usando seu software/cliente FTP ou o Web FTP no painel de controle, adicione e adapte o seguinte código ao arquivo .htaccess, que se encontra na raiz do seu site:
RewriteCond %{HTTP_HOST} ^(.*)\.domain\.xyz [NC]
RewriteCond %{DOCUMENT_ROOT}/%1/ -d
RewriteCond %1::%{REQUEST_URI} !^(.*?)::/\1/?
RewriteRule "^(.*)$" "%{DOCUMENT_ROOT}/%1/$1" [L]
Explicações para a terceira linha: https://stackoverflow.com/a/15981056
Substitua na primeira linha:
domainpelo seu nome de domínioxyzpela extensão do seu nome de domínio (ch, fr, etc.)
Agora, o endereço vlog.domain.xyz deve exibir o conteúdo da pasta vlog, que está localizada na raiz do seu site. Se não for o caso, verifique se a pasta vlog realmente existe na raiz do seu site.
Link para esta FAQ: https://faq.infomaniak.com/2036
Esta seção de perguntas frequentes foi útil?
Este guia explica como alterar a versão PHP disponível para os sites do seu Hospedagem Web Infomaniak.
Introdução
- É possível migrar de uma versão PHP antiga e potencialmente vulnerável para uma versão mais recente, mas não será mais possível retornar a essa versão vulnerávelpor motivos de segurança.
- A alteração é efetivada imediatamente e permanentemente.
- Consulte este outro guia se precisar de informações sobre a configuração da versão do PHP utilizada em SSH.
- Pode ser necessário atualizar o seu alojamento antes de poder aceder às versões mais recentes do PHP oferecidas pela Infomaniak.
Alterar a versão de PHP utilizada para um site
É possível alterar facilmente a versão de PHP utilizada em todo um site:
- Clique aqui para acessar o gerenciamento do seu site no Manager Infomaniak (precisa de ajuda?).
- Clique diretamente no nome atribuído ao site em questão.
- Clique em Mais informações.
- Clique em Editar:
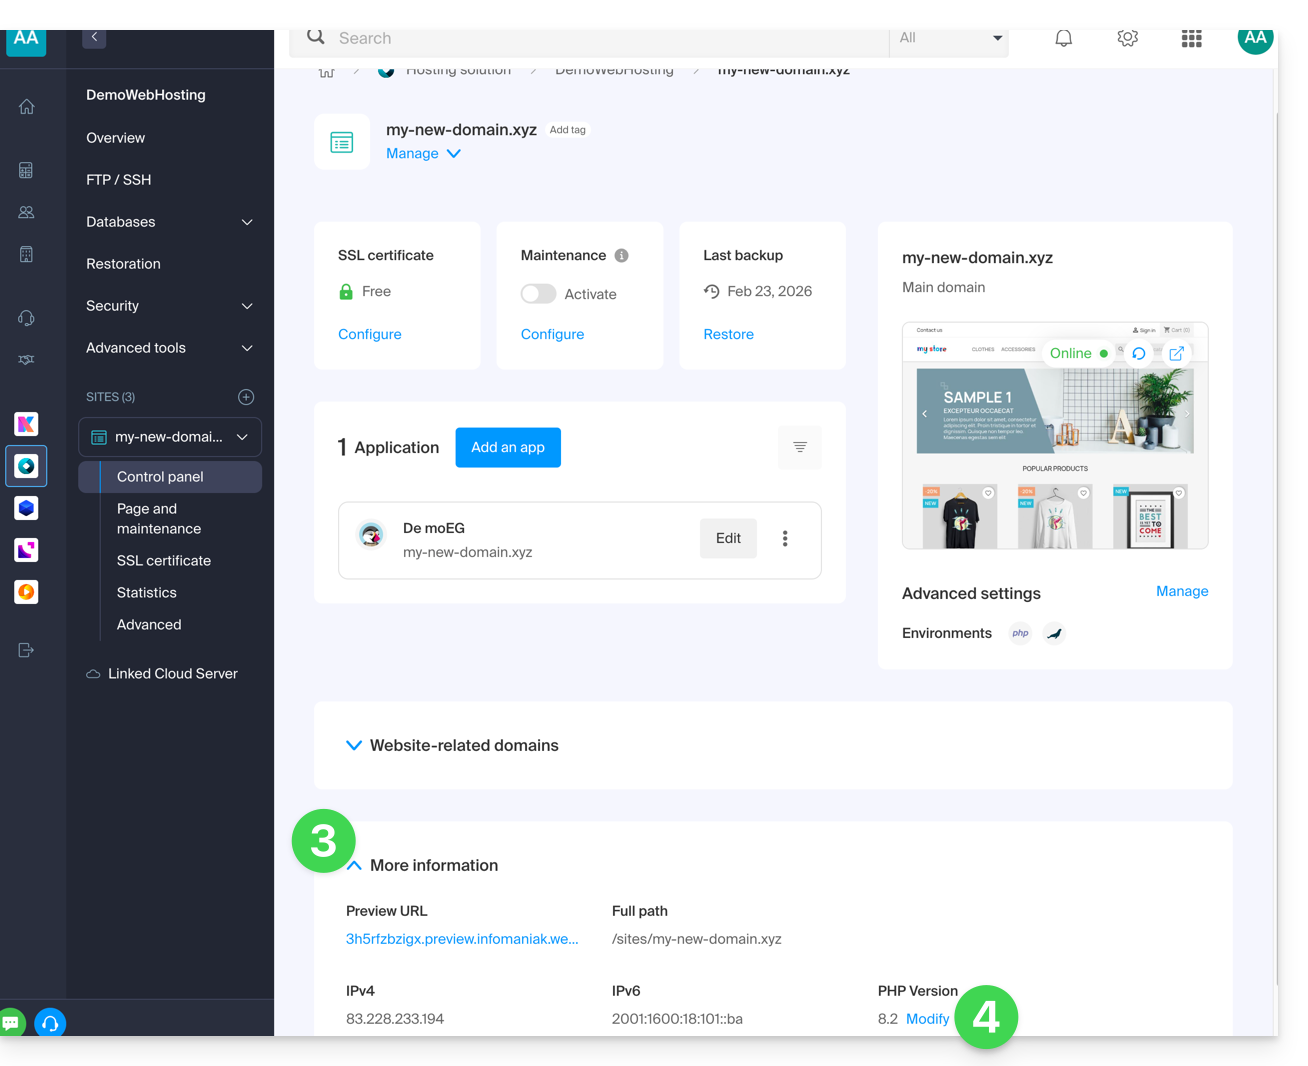
- Escolha a versão de PHP desejada.
- Clique em Guardar na parte inferior da página para guardar a alteração:
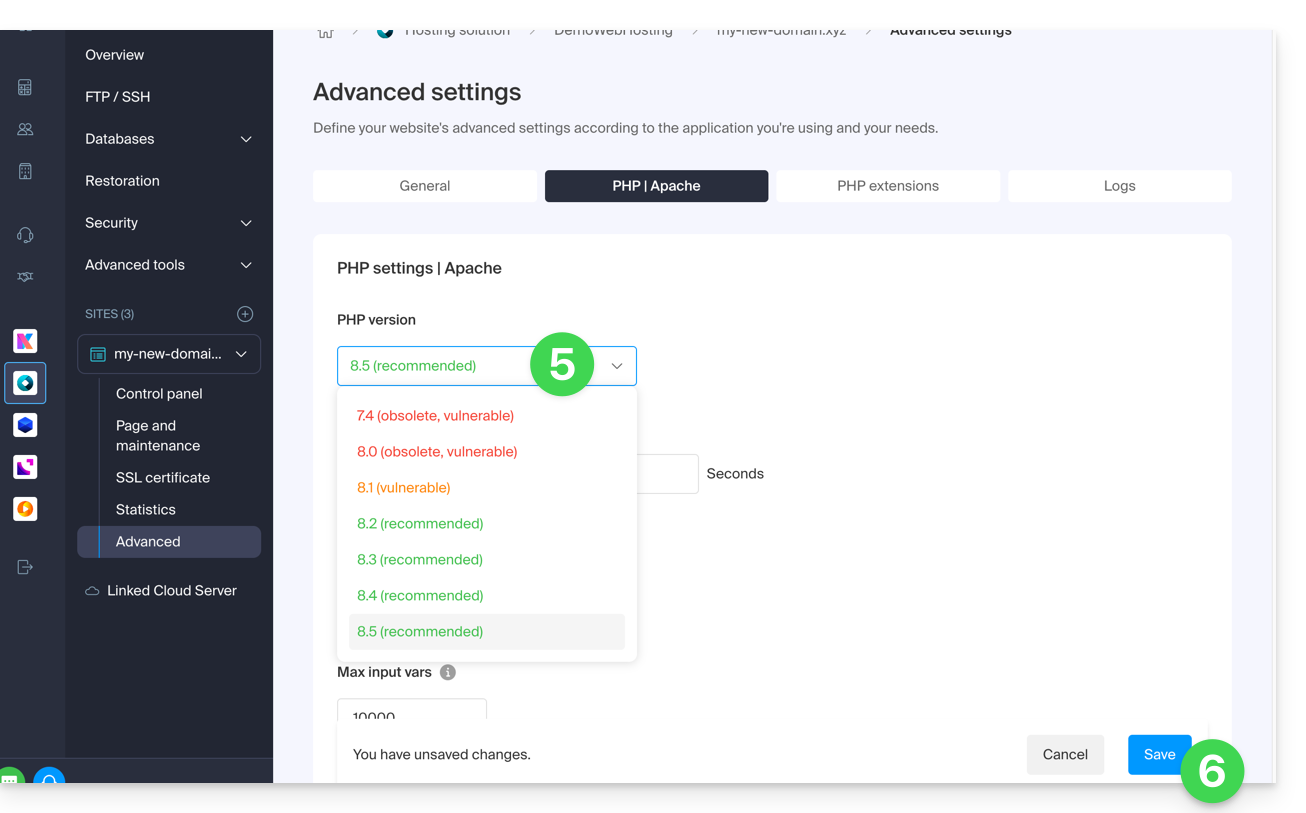
Link para esta FAQ: https://faq.infomaniak.com/2053
Esta seção de perguntas frequentes foi útil?
Este guia explica como conectar-se ao seu Hospedagem Web usando uma chave SSH.
✘ INDISPONÍVEL com
sites do tipo Node.js
hospedagens Starter
Pré-requisitos
- Criar uma conta FTP + SSH a partir do painel de controlo Infomaniak.
- Criar uma chave SSH com um algoritmo seguro, por exemplo
ed25519:ssh-keygen -t ed25519pois, com uma chave RSA (
ssh-keygenoussh-keygen -t rsa), a conexão será recusada e o seguinte erro será retornado no modo detalhado:debug1: send_pubkey_test: no mutual signature algorithm
Inserir a chave SSH
Para isso:
- Conecte-se ao servidor via SSH (precisa de ajuda?).
Acesse o diretório raiz da sua hospedagem:
cd ~Crie o diretório «
.ssh»:mkdir .ssh- Altere as permissões do diretório
.sshpara CHMOD 700. - Crie o arquivo
authorized_keyse cole nele sua chave SSH pública em uma única linha (importante). - Altere as permissões do arquivo
authorized_keyspara CHMOD 600.
O encaminhamento de agente SSH (ForwardAgent / ssh -A) não é suportado na infraestrutura Infomaniak, pois essa funcionalidade de encaminhamento de agente SSH apresenta riscos de segurança significativos.
Link para esta FAQ: https://faq.infomaniak.com/2054
Esta seção de perguntas frequentes foi útil?
Este guia explica como adicionar gratuitamente um tema da Elegant Themes (Divi) a um site WordPress já instalado através do instalador Infomaniak.
Pré-requisitos
- O seu site WordPress deve ser instalado através das ferramentas Infomaniak WordPress para utilizar estes temas e extensões.
- O tema pode ser adicionado durante a instalação (aproximadamente na etapa 14 deste outro guia) ou ativado posteriormente.
- Para usufruir do suporte da Elegant Themes (serviço de apoio ao cliente), deve subscrever um plano da Elegant Themes.
Adicionar um tema da Elegant Themes
Para isso:
- Clique aqui para acessar o gerenciamento do seu site WordPress no Manager Infomaniak (precisa de ajuda?).
- Se o seu site não aparecer aqui, é porque não foi instalado através das ferramentas Infomaniak (consulte os pré-requisitos).
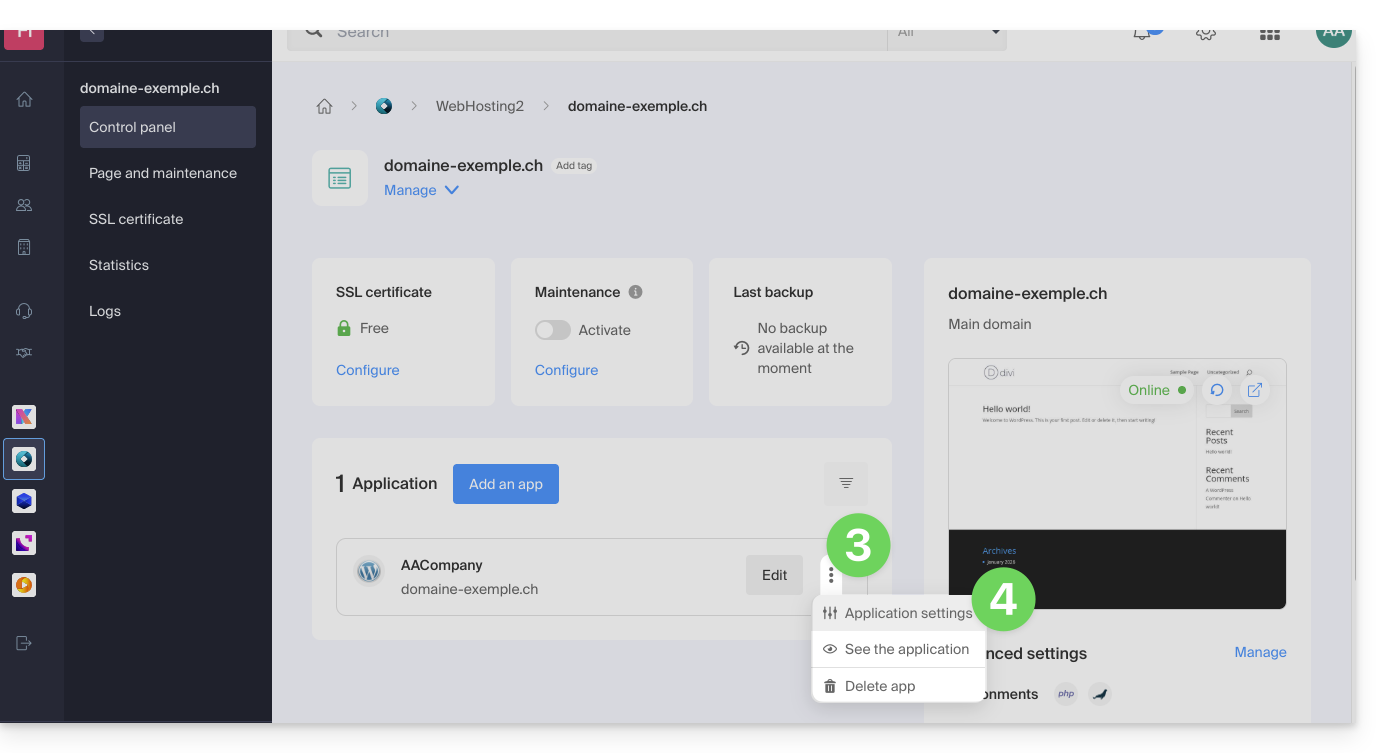
- Clique diretamente no nome atribuído ao produto em questão:
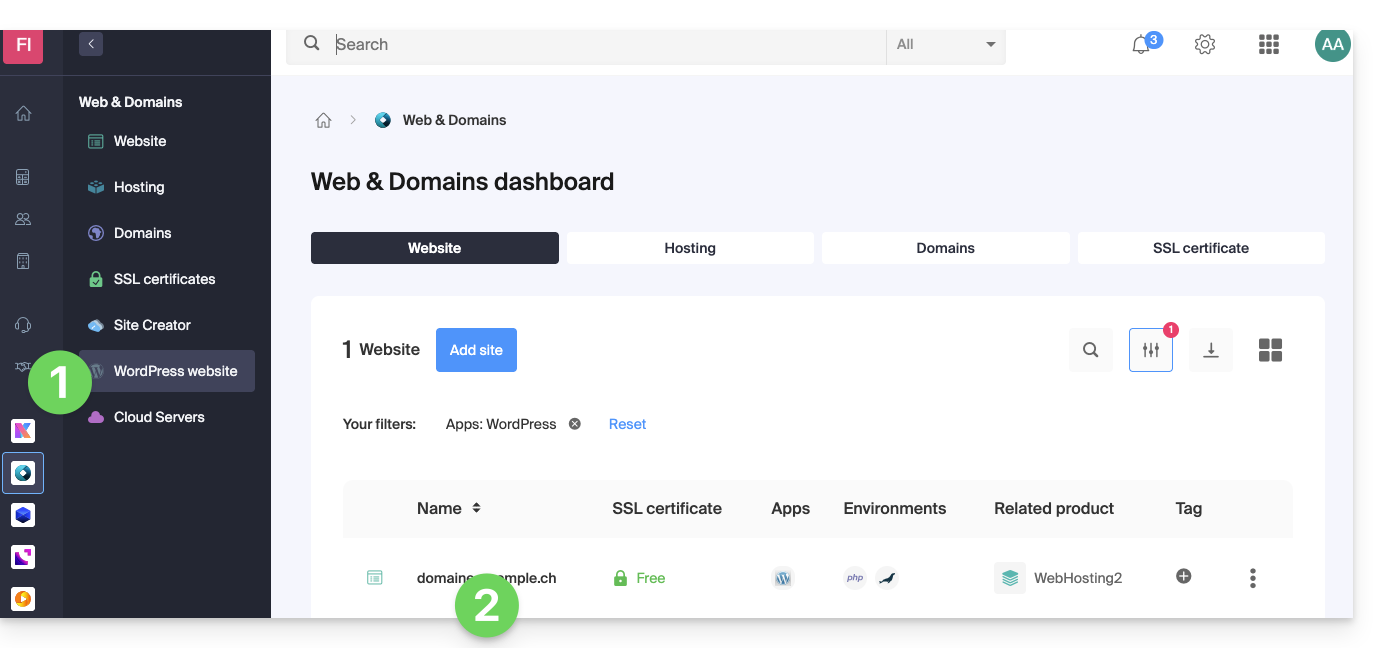
- Clique no menu de ações ⋮ localizado à direita da aplicação web em questão.
- Clique em Configurações no aplicativo:
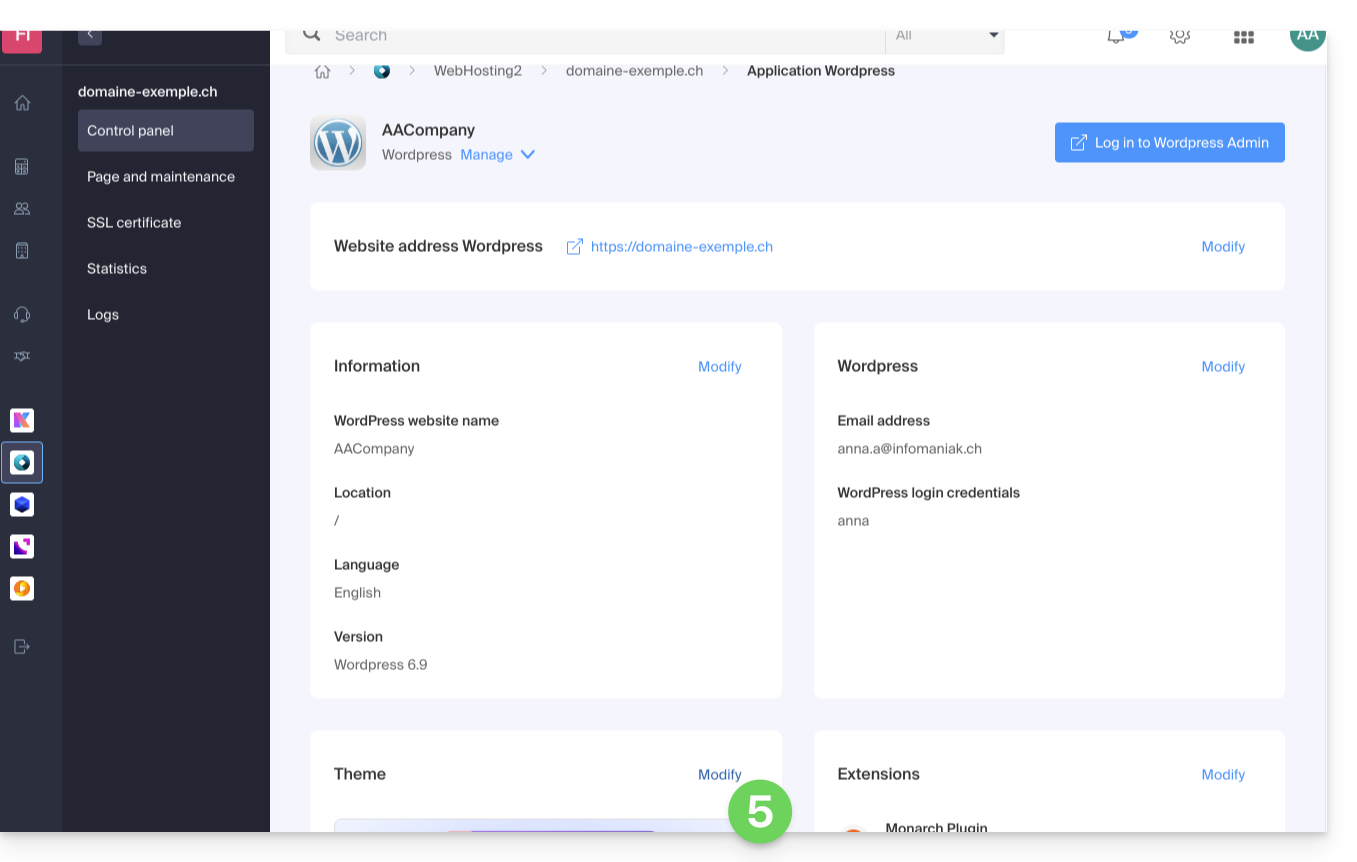
- Clique em Editar em Tema:
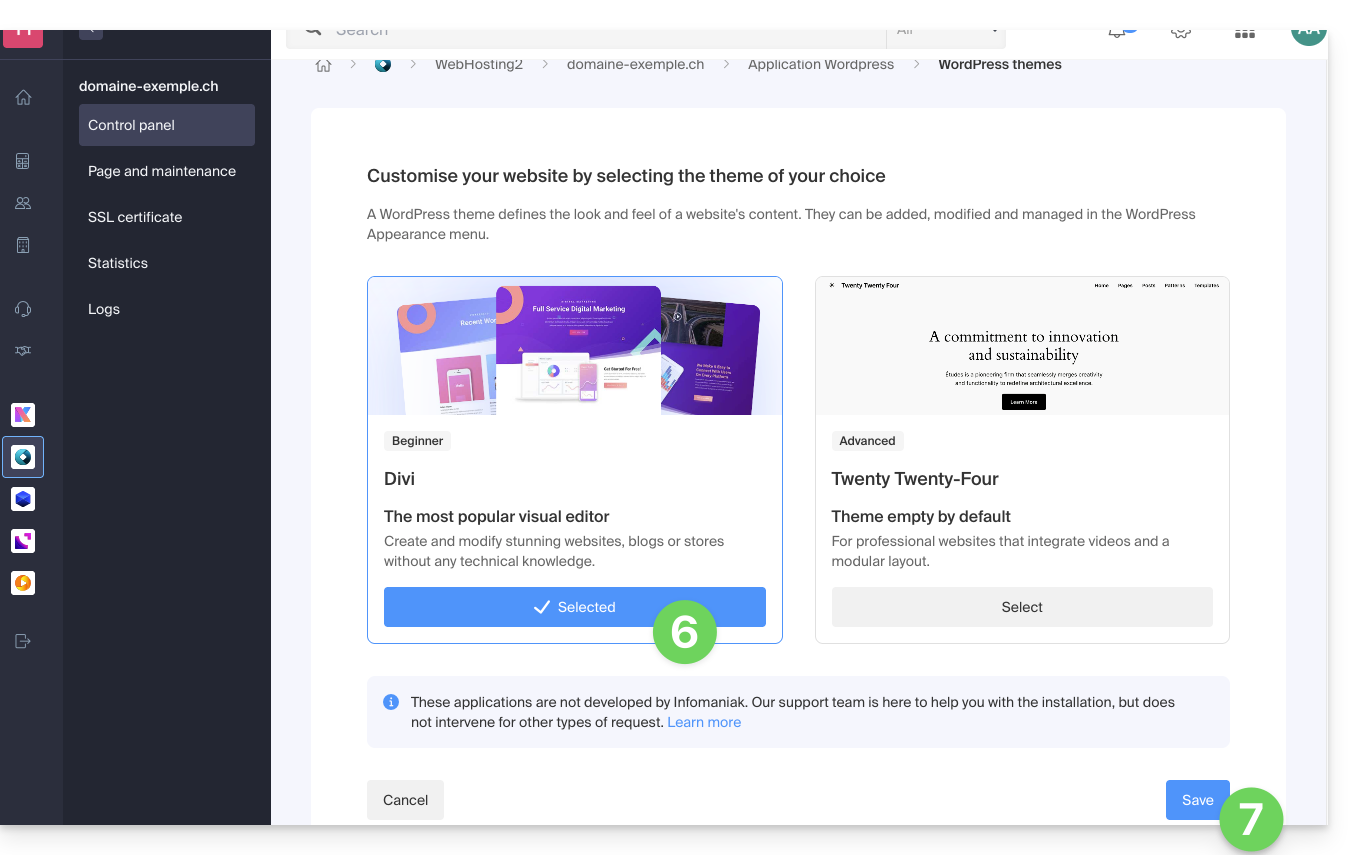
- Selecione o tema desejado.
- Clique no botão Guardar:
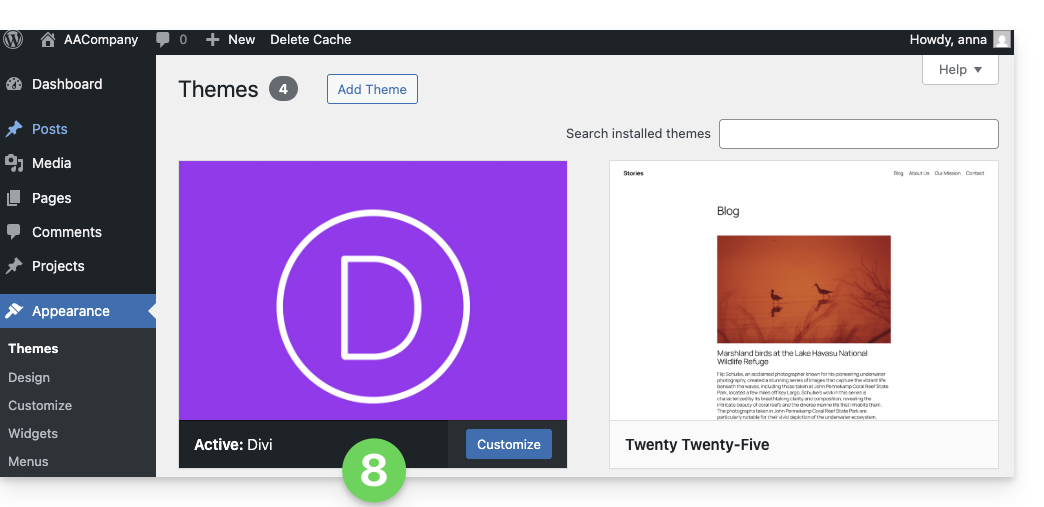
- O tema foi aplicado e está disponível para ser configurado na sua interface de administração WordPress:
Link para esta FAQ: https://faq.infomaniak.com/2056
Esta seção de perguntas frequentes foi útil?