Base de conhecimento
1000 perguntas frequentes, 500 tutoriais e vídeos explicativos. Aqui, você encontra apenas soluções!
Este guia técnico detalha os limites de recursos nos serviços de hospedagem web Infomaniak. É essencial distinguir o tempo real (relógio) do tempo de cálculo (processador) para compreender a origem das interrupções de scripts.
1. Tempo de conexão MySQL (E/S)
Limite: 30 segundos reais
Este limite corresponde ao tempo absoluto decorrido, medido com um cronômetro. Refere-se à comunicação entre o PHP e o servidor de base de dados (MySQL/MariaDB).
Assim que uma conexão é aberta, o servidor de banco de dados aloca um tempo máximo de 30 segundos para receber a solicitação, executá-la e retornar os resultados. Se esse tempo for excedido (geralmente devido a uma consulta SQL mal otimizada), o servidor MySQL interrompe abruptamente a conexão. Isso geralmente gera o erro MySQL server has gone away.
2. Tempo de processamento PHP (CPU)
Limite: 10 segundos de CPU
Este limite refere-se exclusivamente à capacidade de processamento utilizada pelo servidor web para executar o código PHP.
É crucial notar que o tempo de espera não é contabilizado. Quando o PHP aguarda uma resposta do banco de dados, ele fica em pausa e praticamente não consome tempo de CPU. Consequentemente, um script será interrompido pelo servidor web apenas se realizar cálculos intensivos (loops complexos, criptografia, processamento de arquivos) por mais de 10 segundos acumulados.
Interação dos dois limites
Para garantir a estabilidade da aplicação, cada operação deve cumprir simultaneamente estas duas restrições distintas:
- A aplicação tem um tempo total de 30 segundos para interagir com a base de dados (latência da rede + execução SQL).
- O aplicativo tem 10 segundos de tempo de processamento puro para tratar os dados recebidos.
Exemplo de funcionamento válido: um script que aguarda 25 segundos por uma resposta complexa do MySQL (E/S) e, em seguida, processa o resultado durante 2 segundos (CPU) funcionará perfeitamente, pois não excedeu nenhuma das duas cotas individuais, mesmo que o tempo total seja de 27 segundos.
Link para esta FAQ: https://faq.infomaniak.com/481
Esta seção de perguntas frequentes foi útil?
Este guia explica como redirecionar o tráfego de um nome de domínio alias (sinônimo) para o seu domínio principal ou forçar a exibição do domínio principal na barra de endereço do navegador.
Prevenir conteúdo duplicado.
Imagine que o seu site esteja hospedado no domínio principal example.com e que tenha configurado um domínio alias, como example-alias.com.
Por padrão, quando um visitante insere um ou outro destes endereços no seu navegador, a URL digitada permanece visível. Isso pode gerar conteúdo duplicado, o que prejudica o SEO (otimização para motores de busca).
Para evitar isso, você pode forçar o redirecionamento: se um visitante digitar example-alias.com, ele será automaticamente redirecionado para example.com.
Essa configuração é feita no arquivo .htaccess, localizado na raiz da sua hospedagem (geralmente na pasta /web, acessível via FTP). Se este arquivo ainda não existir, você deverá criá-lo.
Em seguida, insira as seguintes diretivas no arquivo:
RewriteEngine On

# Força a redireção para HTTPS e para o domínio canônico
RewriteCond %{HTTP:X-Forwarded-Proto} !https [OR]
RewriteCond %{HTTP_HOST} !^example\.com$ [NC]
RewriteRule ^(.*)$ https://example.com/$1 [R=301,L]
Adapte o código acima de acordo com as suas necessidades:
- Substitua
example.compelo seu nome de domínio principal e sua extensão (.com, .org, .ch, etc.). Adicionewww.antes do seu domínio se preferir forçar a exibição do subdomíniowww. - Se ocorrer um ciclo de redirecionamento, você pode substituir a condição de protocolo por
RewriteCond %{HTTPS} off(especialmente se sua hospedagem não usar um proxy reverso).
Para saber mais, consulte a documentação sobre redirecionamentos automáticos para HTTPS.
Link para esta FAQ: https://faq.infomaniak.com/482
Esta seção de perguntas frequentes foi útil?
Este guia aborda a sincronização dos servidores através do protocolo NTP (Network Time Protocol) e a configuração do fuso horário nos servidores da Infomaniak.
Sincronização precisa dos servidores via NTP
Os servidores da Infomaniak estão todos sincronizados através do protocolo NTP. A empresa disponibiliza os seus próprios servidores NTP stratum-1, acessíveis ao público, para uma utilização flexível.
Para integrar estes servidores nas suas configurações, utilize o seguinte registo: pool.ntp.infomaniak.ch.
A configuração padrão do fuso horário é UTC. No entanto, as funções PHP são projetadas para levar em consideração diferentes fusos horários, de acordo com as necessidades específicas.
Para ajustar o fuso horário em seus scripts PHP, use a função date_default_timezone_set('UTC').
MySQL: particularidades temporais
A infraestrutura Infomaniak suporta as funcionalidades que permitem trabalhar com dados temporais de forma precisa e eficiente, tendo em conta os fusos horários, o que é crucial para muitas aplicações modernas:
- O MySQL utiliza uma base de dados de fusos horários para armazenar e gerir informações sobre os fusos horários.
- A tabela
mysql.time_zonecontém os dados dos fusos horários, incluindo informações sobre os desvios de tempo, os nomes dos fusos horários, etc. - A função CONVERT_TZ é utilizada para converter um horário de um fuso horário para outro no MySQL, com a seguinte sintaxe:
CONVERT_TZ(dt, from_tz, to_tz), onde:dté a data/hora a ser convertida.from_tzé o fuso horário de origem.to_tzé o fuso horário de destino.
- Exemplo:
CONVERT_TZ('2024-05-14 12:00:00', 'UTC', 'America/New_York')converterá o horário 12:00:00 UTC para o horário local de Nova Iorque.
Link para esta FAQ: https://faq.infomaniak.com/487
Esta seção de perguntas frequentes foi útil?
Este guia permite resolver um erro do tipo "Consulta inválida: o servidor MySQL ficou inativo".
Introdução
- Este tipo de erro geralmente ocorre porque uma conexão MySQL permanece aberta sem enviar solicitações durante um período de tempo que excede o limite após o qual a conexão é fechada: http://dev.mysql.com/doc/refman/5.7/en/gone-away.html
- As variáveis
wait_timeouteinteractive_timeoutque controlam essa desconexão estão definidas em 30 segundos: http://dev.mysql.com/doc/refman/5.0/en/communication-errors.html
Soluções
Para evitar o erro "O servidor MySQL foi desligado", aqui estão várias abordagens possíveis:
Verificação e reconexão automática
Antes de executar uma consulta, recomenda-se testar se a conexão MySQL ainda está ativa. Se a conexão foi fechada, você pode restabelecê-la automaticamente antes de prosseguir com sua consulta. Aqui está um exemplo em PHP:
if (!mysqli_ping($connexion)) {
mysqli_close($connexion);
$connexion = mysqli_connect($host, $user, $password, $database);
}
A função mysqli_ping() verifica se a conexão ainda é válida. Se não for, o script fecha a conexão e abre uma nova.
Envio regular de "ping"
Outra opção é executar um script que envie regularmente um "ping" para o banco de dados, a fim de manter a conexão ativa. Por exemplo, você pode criar uma tarefa agendada (cron job) que envie uma consulta leve, como SELECT 1;, em intervalos regulares.
Ajuste das configurações MySQL (Servidor Cloud)
Com um Servidor Cloud, você pode aumentar os valores das variáveis wait_timeout e interactive_timeout no menu MySQL do seu servidor para prolongar a duração da conexão antes que ela seja encerrada.
Link para esta FAQ: https://faq.infomaniak.com/499
Esta seção de perguntas frequentes foi útil?
Este guia apresenta a função do arquivo browscap.ini, utilizado pelo PHP para identificar certas características de um navegador web (nome, versão, sistema operacional e capacidades) a partir do seu cabeçalho HTTP User-Agent.
Atualmente, o uso de browscap.ini destina-se principalmente a garantir a compatibilidade com aplicações existentes. Para novos desenvolvimentos, métodos mais modernos são geralmente preferidos.
Utilização com a função get_browser()
A função nativa do PHP get_browser() requer acesso a um arquivo browscap.ini atualizado para identificar as características do navegador que fez a solicitação.
Nos serviços de hospedagem web da Infomaniak, este arquivo geralmente está disponível no seguinte local:
/opt/php/lib/php/browscap.iniSe necessário, pode verificar o conteúdo utilizando o seguinte script:
<?php
header('Content-Type: text/plain');

$file = '/opt/php/lib/php/browscap.ini';

if (file_exists($file)) {
    echo file_get_contents($file);
} else {
    echo 'Arquivo não encontrado.';
}
Devido ao seu tamanho e ao custo do seu carregamento, o uso de browscap.ini pode ter um impacto no desempenho das aplicações que dependem de get_browser().
Alternativas recomendadas
Para novos projetos, geralmente é preferível usar soluções mais adequadas às práticas atuais de desenvolvimento web:
- Bibliotecas PHP instaladas com o Composer, como
matomo/device-detectorouwhichbrowser/parser, que oferecem uma detecção de navegadores e dispositivos mais completa e regularmente atualizada. - Dicas do Agente do Usuário (UA-CH), quando o navegador as suporta, para obter informações estruturadas por meio dos mecanismos previstos pelos padrões HTTP atuais.
- Detecção de recursos, verificando diretamente a disponibilidade de um recurso (por exemplo, em JavaScript ou com a regra CSS
@supports) em vez de deduzir o comportamento com base no navegador utilizado.
Link para esta FAQ: https://faq.infomaniak.com/505
Esta seção de perguntas frequentes foi útil?
Este guia é sobre Django, um framework de código aberto para desenvolvimento web em Python, conhecido pela sua robustez e rapidez no desenvolvimento.
Instalação do Django
Pré-requisitos
- Uma hospedagem adequada:
- Para implantar uma aplicação Python que exige um servidor de aplicações em funcionamento contínuo, uma hospedagem web compartilhada padrão não é recomendada.
- É necessário acesso completo ao servidor via SSH.
- Ambiente técnico:
- Python 3 instalado no servidor, bem como o gerenciador de pacotes
pip.
- Python 3 instalado no servidor, bem como o gerenciador de pacotes
- Conhecimentos básicos:
- Familiaridade com a interface de linha de comando (CLI) no Linux e com o gerenciamento de ambientes virtuais Python (como
venv).
- Familiaridade com a interface de linha de comando (CLI) no Linux e com o gerenciamento de ambientes virtuais Python (como
Aqui estão os passos gerais para configurar o seu ambiente no seu servidor:
É necessário instalar o Django em planos de hospedagem web que garantam controlo total sobre o ambiente de execução, como os VPS Cloud / VPS Lite: descubra os diferentes tipos de hospedagem web da Infomaniak.
- Conecte-se ao seu servidor VPS via SSH.
- Crie e ative um ambiente virtual dedicado ao seu projeto, para isolar as suas dependências (ex:
python3 -m venv my_environnemente, em seguida,source my_environnement/bin/activate). - Instale o framework usando o gerenciador de pacotes:
pip install django. - Inicialize seu novo projeto com o comando:
django-admin startproject name_of_project.
Colocação em produção
Atenção, o servidor de desenvolvimento integrado ao Django (iniciado via runserver) não foi concebido para um ambiente de produção. Para disponibilizar o seu site na Internet de forma segura no seu VPS Infomaniak, será necessário configurar um servidor de aplicações (como Gunicorn ou uWSGI) por detrás de um proxy reverso (Reverse Proxy), como Nginx ou Apache.
Link para esta FAQ: https://faq.infomaniak.com/516
Esta seção de perguntas frequentes foi útil?
Este guia permite encontrar o endereço IP público do seu dispositivo, o que pode ser útil em algumas solicitações de suporte.
Exibir o endereço IP público no dispositivo conectado
Clique aqui para obter o endereço IP público do seu dispositivo nos formatos IPv4 e IPv6.
Métodos alternativos
Visite ipinfo.io ou ifconfig.me.
… no macOS
- A partir de uma aplicação do tipo
Terminal(interface de linha de comando,CLI /Command Line Interface) no seu dispositivo, execute o comandocurl ifconfig.mee pressione Enter. - O endereço exibido é o endereço IP público do computador.
Lembre-se de que este endereço pode mudar periodicamente, especialmente se o roteador for reiniciado ou se o provedor de serviços de Internet usar uma atribuição dinâmica de endereços IP.
Para automatizar a pesquisa do endereço IP público, use comandos ou scripts que consultem serviços como api.ipify.org...
Link para esta FAQ: https://faq.infomaniak.com/528
Esta seção de perguntas frequentes foi útil?
Este guia explica como usar o PHPMailer com as soluções de hospedagem web da Infomaniak para enviar e-mails a partir de um site.
⚠ ATENÇÃO ⚠
A Infomaniak garante a conformidade dos seus serviços com os protocolos padrão (IMAP, S3, etc.), mas não oferece suporte adicional para serviços ou softwares externos, pois a configuração destes pode variar dependendo do fornecedor ou do editorEste guia é fornecido apenas como referência, e a sua implementação é da sua responsabilidade (ver: Política de suporte / Art. 11.9 dos Termos de Uso). Se necessário, um profissional qualificado pode auxiliá-lo.
Introdução
- O PHPMailer é uma biblioteca PHP que permite criar e enviar e-mails a partir de um site, especialmente via SMTP.
- Permite, em particular, enviar mensagens em formato HTML, adicionar uma versão de texto alternativa, gerenciar anexos e usar a autenticação SMTP.
- Para o envio autenticado via SMTP, o ambiente PHP utilizado pelo site deve ser compatível com uma conexão criptografada recente, nomeadamente TLS 1.2 ou superior.
- Uma versão muito antiga de PHP ou da biblioteca OpenSSL utilizada pelo PHP pode provocar um erro de conexão ou de autenticação, mesmo que o endereço de e-mail e a senha estejam corretos.
- Não utilize o PHP 5.3/5.4 para este tipo de envio; utilize uma versão recente e atualizada do PHP.
- Com o envio SMTP autenticado, o endereço utilizado como remetente deve corresponder ao endereço de e-mail utilizado para a autenticação SMTP.
Instalar o PHPMailer
Para usar o PHPMailer, instale a biblioteca nos arquivos do seu site.
- Faça o download do PHPMailer a partir do seu repositório oficial ou instale-o com o Composer, caso o seu projeto o utilize.
- Copie os arquivos do PHPMailer para um diretório do seu site via FTP.
Carregue os ficheiros necessários no seu script PHP, adaptando o caminho de acordo com a localização escolhida:
use PHPMailer\PHPMailer\PHPMailer;
use PHPMailer\PHPMailer\Exception;

require **DIR** . '/PHPMailer/src/Exception.php';
require **DIR** . '/PHPMailer/src/PHPMailer.php';
require **DIR** . '/PHPMailer/src/SMTP.php';
Configurar o envio SMTP com a Infomaniak
Utilize as seguintes configurações SMTP autenticadas:
- Servidor SMTP:
mail.infomaniak.com - Porta:
465 - Criptografia:
SMTPS/ SSL-TLS - Autenticação: obrigatória
- Nome de utilizador: o endereço de e-mail completo
- Senha: a senha do endereço de e-mail utilizado
Exemplo de configuração completa:
<?php

use PHPMailer\PHPMailer\PHPMailer;
use PHPMailer\PHPMailer\Exception;

require **DIR** . '/PHPMailer/src/Exception.php';
require **DIR** . '/PHPMailer/src/PHPMailer.php';
require **DIR** . '/PHPMailer/src/SMTP.php';

$mail = new PHPMailer(true);

try {
// Configuration SMTP
$mail->isSMTP();
$mail->Host       = 'mail.infomaniak.com';
$mail->SMTPAuth   = true;
$mail->Username   = '[sender@domain.xyz](mailto:sender@domain.xyz)';
$mail->Password   = 'mot_de_passe_de_l_adresse_mail';
$mail->SMTPSecure = PHPMailer::ENCRYPTION_SMTPS;
$mail->Port       = 465;
$mail->CharSet    = 'UTF-8';

```
// Expéditeur
// L'adresse doit correspondre à celle utilisée pour l'authentification SMTP.
$mail->setFrom('sender@domain.xyz', 'Nom du site');

// Destinataire
$mail->addAddress('recipient@example.com');

// Adresse de réponse facultative
$mail->addReplyTo('sender@domain.xyz', 'Nom du site');

// Contenu du message
$mail->isHTML(true);
$mail->Subject = 'Message envoyé depuis le site';
$mail->Body    = '<p>Contenu HTML du message.</p>';
$mail->AltBody = 'Contenu texte du message.';

$mail->send();
echo 'Message envoyé';
```

} catch (Exception $e) {
echo 'Le message n'a pas pu être envoyé. Erreur: ' . htmlspecialchars($mail->ErrorInfo);
}
Se a sua aplicação exigir o uso da porta 587, utilize STARTTLS:
$mail->SMTPSecure = PHPMailer::ENCRYPTION_STARTTLS;
$mail->Port       = 587;
Verifique a versão do PHP e a compatibilidade TLS
O envio SMTP autenticado requer uma conexão criptografada recente. Se o site usar uma versão muito antiga do PHP, por exemplo, o PHP 5.3, ou uma biblioteca OpenSSL muito antiga, o PHPMailer pode falhar antes ou durante a autenticação. Os erros podem, então, ser enganosos, por exemplo:
SMTP connect() failedNão foi possível autenticarstream_socket_enable_crypto()- um erro de autenticação, mesmo que a senha esteja correta
Nesse caso, verifique os seguintes pontos:
- a versão do PHP utilizada pelo site;
- a versão do OpenSSL utilizada pelo PHP;
- a versão do PHPMailer utilizada pelo seu projeto;
- a correspondência entre a porta SMTP e a encriptação escolhida.
Para uma configuração confiável, utilize uma versão recente de PHP, compatível com TLS 1.2 ou superior, bem como uma versão atual do PHPMailer. Consulte estes guias, se necessário:
- Alterar a versão de PHP de um site
- Resolver um problema PHP relacionado a uma versão desatualizada
- Exibir as informações técnicas do site
Como resolver um erro de incompatibilidade de remetente
O erro Incompatibilidade de remetente, código SMTP: 550, informações adicionais do SMTP: 5.7.1 pode ocorrer quando o endereço usado como remetente não corresponde ao endereço de e-mail usado para a autenticação SMTP. Exemplo a ser evitado:
$mail->Username = 'sender@domain.xyz';
$mail->setFrom('another-address@domain.xyz', 'Nom du site');
Neste exemplo, o script autentica-se com sender@domain.xyz, mas tenta enviar a mensagem com um endereço de remetente diferente.
Utilize o mesmo endereço de e-mail para a autenticação SMTP e para o remetente:
$mail->Username = 'sender@domain.xyz';
$mail->setFrom('sender@domain.xyz', 'Nom du site');
O nome do remetente pode ser personalizado, mas o endereço de e-mail deve permanecer consistente com a conta SMTP utilizada.
No caso de um formulário de contato
Se um visitante inserir o endereço de e-mail em um formulário, não o utilize como endereço do remetente da mensagem. Utilize o endereço de e-mail autenticado como remetente e adicione o endereço do visitante como endereço de resposta.
Exemplo:
$mail->Username = 'sender@domain.xyz';
$mail->setFrom('sender@domain.xyz', 'Formulaire du site');
$mail->addReplyTo($email_visiteur);
Esta configuração permite responder ao visitante a partir do seu software de e-mail, sem enviar a mensagem com um endereço de remetente não autorizado.
Ativar o modo de depuração temporariamente
Em caso de erro, ative temporariamente o modo de depuração do PHPMailer para obter mais detalhes sobre a conexão SMTP:
$mail->SMTPDebug = 2;
$mail->Debugoutput = 'html';
Desative este modo após os seus testes para não exibir informações técnicas aos visitantes do site.
Saiba mais
Link para esta FAQ: https://faq.infomaniak.com/576
Esta seção de perguntas frequentes foi útil?
Este guia aborda o uso da tecnologia Java, que, principalmente no que diz respeito ao consumo de memória RAM, é incompatível com as restrições das ofertas de hospedagem compartilhada da Infomaniak. As aplicações Java costumam consumir muitos recursos, o que pode afetar o desempenho e a estabilidade dos servidores compartilhados entre vários utilizadores.
Suporte limitado a applets do lado do cliente
Apenas os applets Java do lado do cliente, ou seja, aqueles executados no navegador da web do usuário, são suportados pelos servidores compartilhados. Esses applets não exigem muitos recursos do servidor e, portanto, não apresentam os mesmos problemas que as aplicações Java do lado do servidor. Consequentemente, nenhum produto que utilize a tecnologia Java do lado do servidor é suportado.
Produtos e tecnologias não suportados
A seguir, uma lista não exaustiva dos produtos e tecnologias específicas que não são suportados nos servidores compartilhados:
- Apache OFBiz
- Greenstone
- Opentaps
- Compiere (que requer o Tomcat)
- Play!
- Solr
- Resin
- JBoss
- Scala
- jftp
- Jakarta EE (anteriormente Java 2 Platform, Enterprise Edition, ou J2EE, e depois Java Platform, Enterprise Edition ou Java EE)
Esta política tem como objetivo garantir um desempenho ideal e uma utilização justa dos recursos para todos os utilizadores dos servidores partilhados.
Link para esta FAQ: https://faq.infomaniak.com/591
Esta seção de perguntas frequentes foi útil?
Este guia aborda a execução da linguagem C# e do framework .NET através da implementação Mono nos serviços de hospedagem da Infomaniak.
Tecnologias para o desenvolvimento de software
Para utilizar a linguagem C# e o framework .NET com a implementação Mono, a fim de desenvolver aplicações de software que possam ser implementadas e executadas em várias plataformas, fora do ambiente Windows, recomenda-se optar por soluções como:
A flexibilidade e a portabilidade oferecidas por esses ambientes multiplataforma significam que uma hospedagem web compartilhada não permite a execução de projetos baseados em C#, .NET ou Mono.
Link para esta FAQ: https://faq.infomaniak.com/607
Esta seção de perguntas frequentes foi útil?
Este guia explica como modificar uma oferta de Hospedagem Web existente, para, por exemplo, poder hospedar sites adicionais caso o limite máximo de sites tenha sido atingido, ou obter uma solução de hospedagem mais recente para usufruir das versões mais recentes de PHP e MySQL.
Encomendar sites, espaço em disco ou IPs adicionais
Para acessar o configurador da hospedagem web:
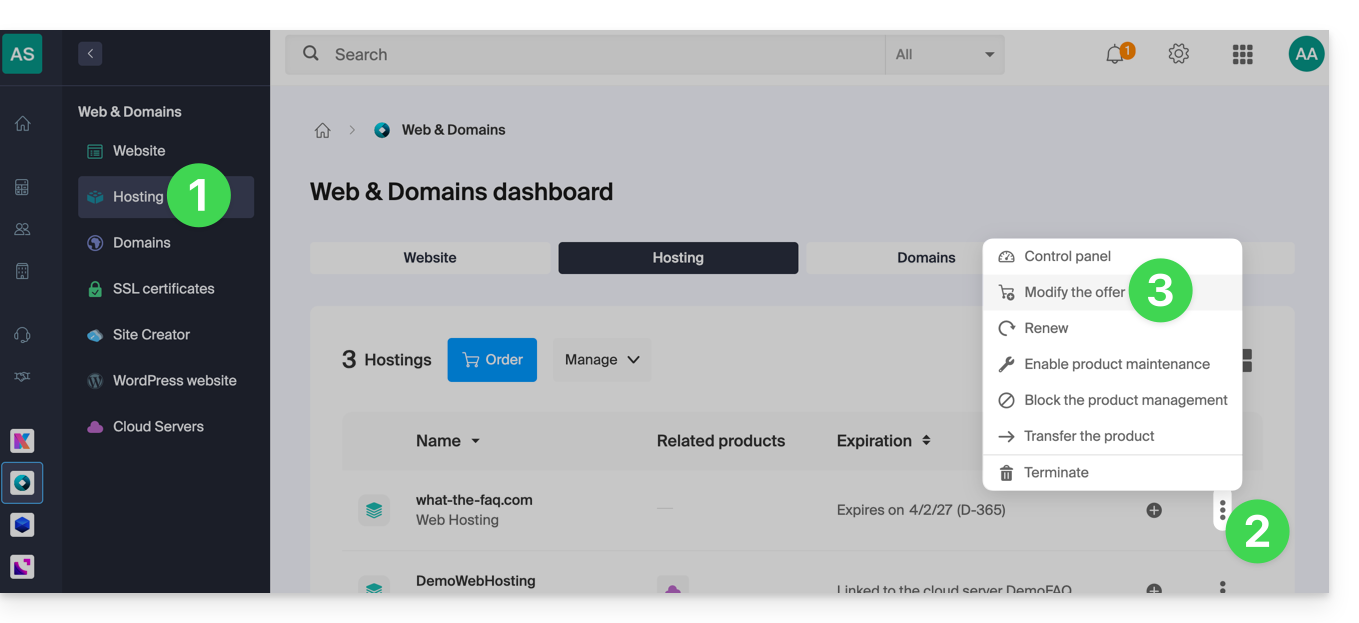
- Clique aqui para acessar o gerenciamento da sua hospedagem no Manager Infomaniak (precisa de ajuda?).
- Clique em o menu de ações ⋮, localizado à direita do serviço de hospedagem em questão.
- Clique em Modificar o plano:
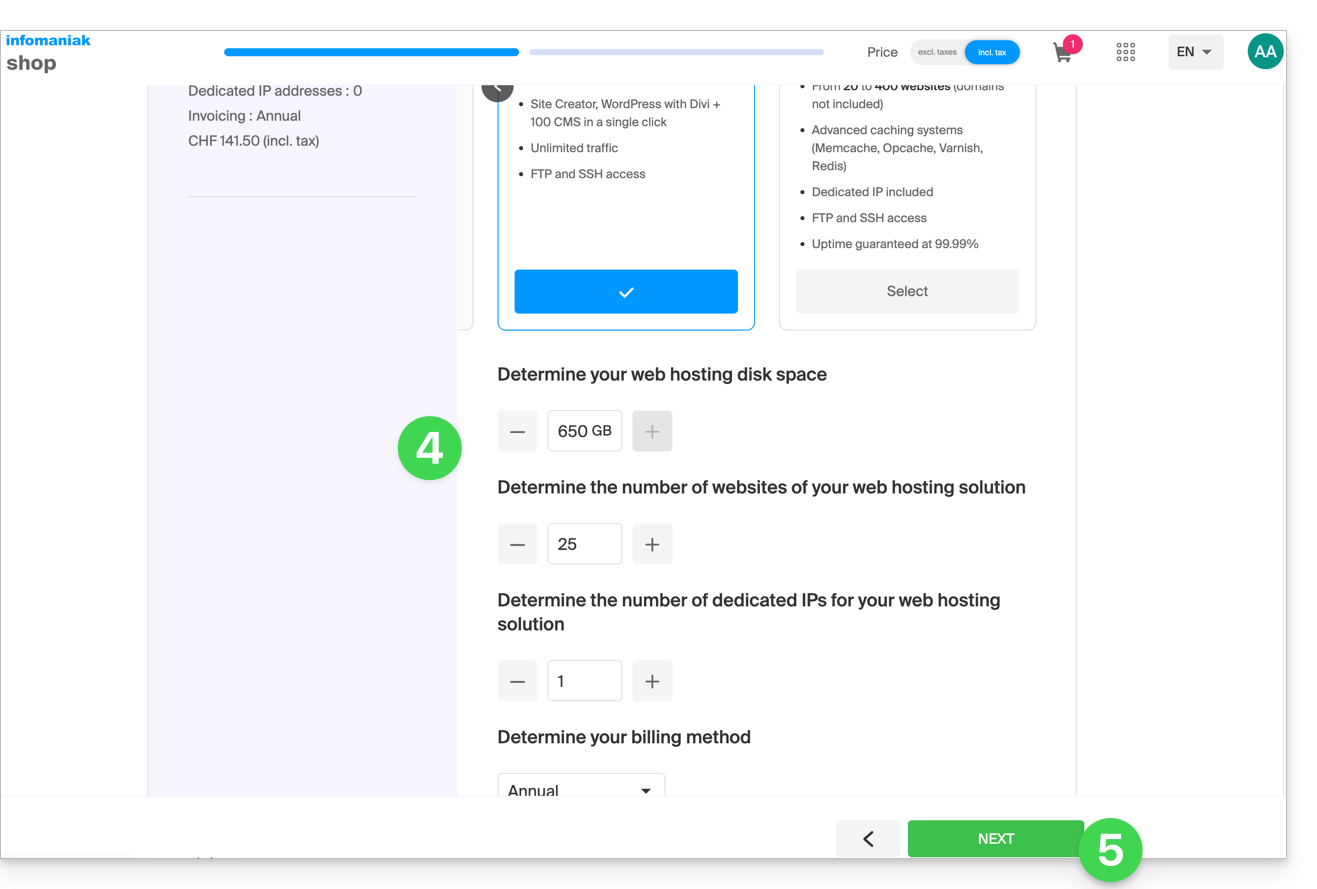
- Aumente os valores que deseja modificar.
- Clique no botão Seguinte para prosseguir com o pagamento das alterações efetuadas no alojamento:
Migrar para um servidor mais recente
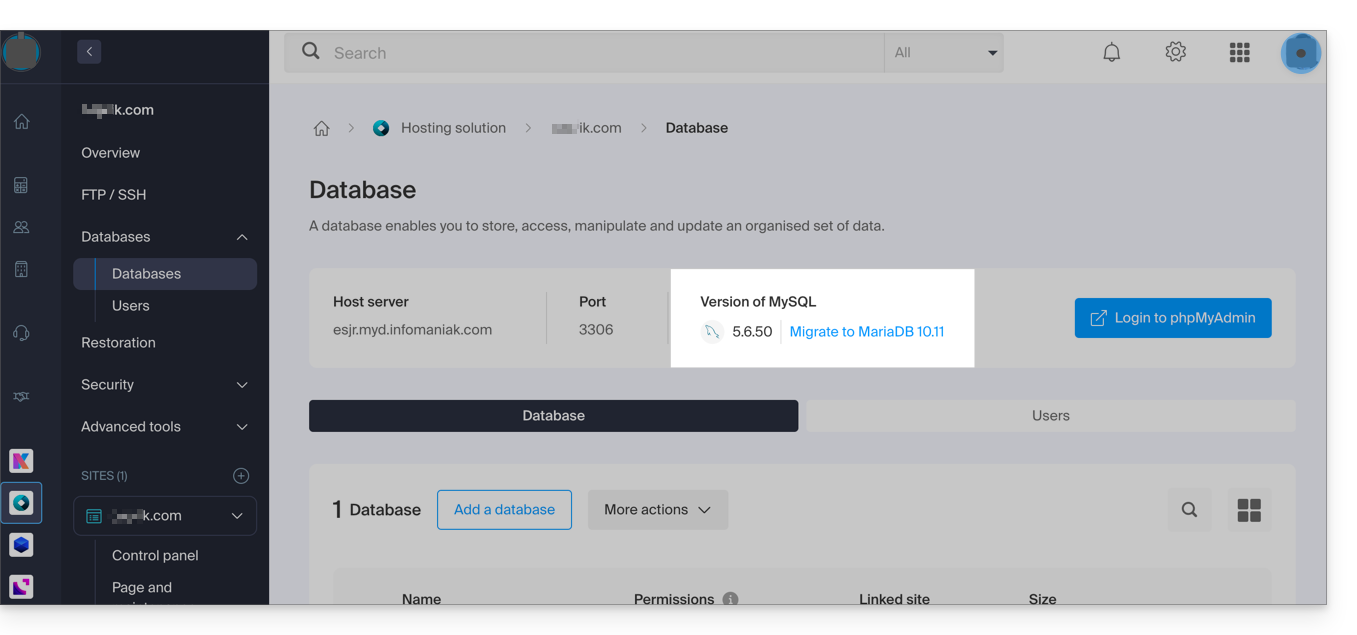
Para obter uma solução de hospedagem em um servidor mais recente e, assim, beneficiar-se, entre outras coisas, das versões mais recentes de PHP e MySQL, você pode…
- … consulte este outro guia e siga o procedimento indicado nele até o fim:
- … consulte este outro guia e siga o procedimento indicado nele até o ponto 4 e, em seguida, clique no botão para atualizar:
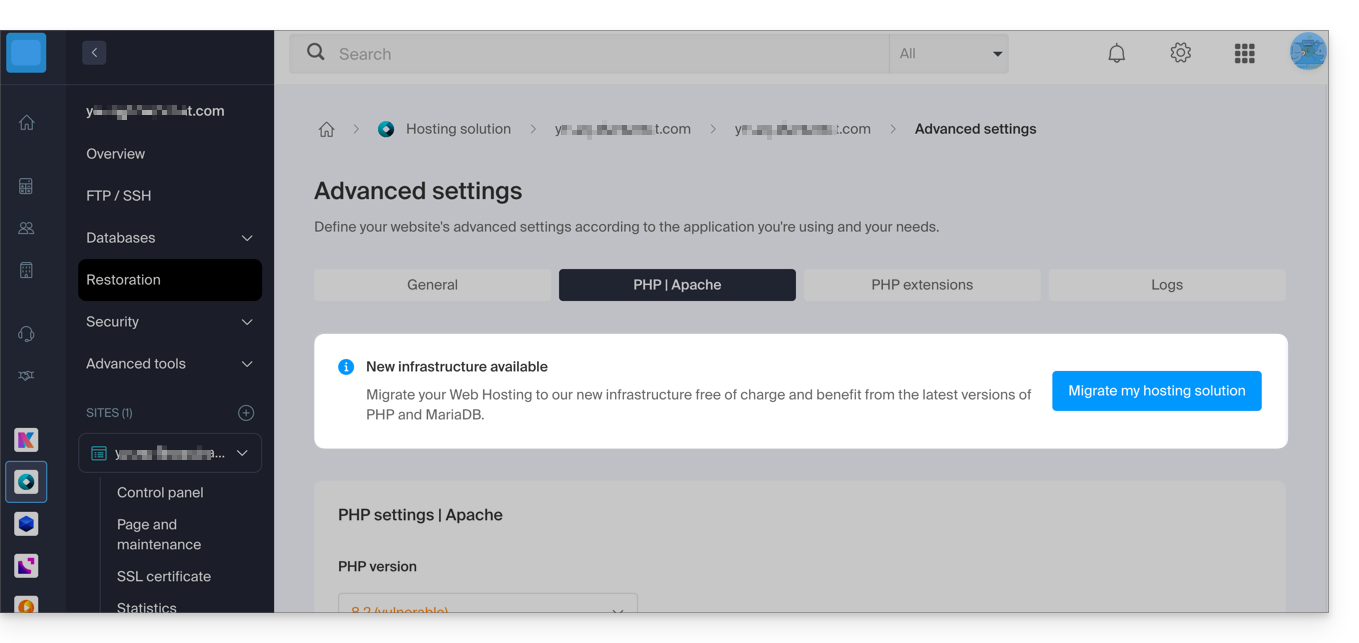
Se nenhum banner de informação for exibido, significa que você já possui uma oferta de hospedagem recente.
Link para esta FAQ: https://faq.infomaniak.com/626
Esta seção de perguntas frequentes foi útil?
Este guia explica como hospedar uma aplicação ASP, ASP.NET Framework ou ASP.NET Core (.NET moderno) nas infraestruturas Cloud da Infomaniak.
Introdução
- As ofertas de Hospedagem Web e de Servidor Cloud Gerenciado são baseadas em uma infraestrutura Linux/Apache; elas não oferecem suporte ao IIS (Internet Information Services) nem à execução nativa de aplicações desenvolvidas para Microsoft Windows (ASP clássico ou ASP.NET Framework).
- As soluções e alternativas são apresentadas abaixo.
Detalhes das soluções de hospedagem compatíveis
1. VPS Cloud com Windows Server ASP clássico (ASP 3.0) e ASP.NET Framework (v1.0 a 4.8)
Para aplicações que dependem do ecossistema Windows tradicional (IIS, VBScript, C#, .NET Framework):
- Implemente um VPS Cloud ou VPS Lite com Windows Server (versões 2019, 2022 ou 2025).
- Ative a função Servidor Web (IIS) com acesso de administrador completo via RDP.
2. Jelastic Cloud (ASP.NET Core e .NET moderno)
Para aplicações ASP.NET Core multiplataforma:
- Implantação simplificada através de contêiner Docker ou ambiente de execução .NET.
- Redimensionamento automático dos recursos (CPU/RAM) e alta disponibilidade.
3. VPS Cloud Linux ASP.NET Core (.NET 6, 8, 9+)
Você também pode hospedar uma aplicação ASP.NET Core em um VPS Cloud Linux (Debian, Ubuntu, etc.) configurado com um proxy reverso (Nginx ou Apache) em frente ao servidor Kestrel do .NET.
4. Nuvem Pública (OpenStack)
Adequado para projetos empresariais que necessitam de uma rede privada virtual (VPN), armazenamento em blocos/objetos ou uma implementação híbrida em grande escala.
Link para esta FAQ: https://faq.infomaniak.com/631
Esta seção de perguntas frequentes foi útil?
Este guia explica como limitar o hotlinking dos arquivos hospedados no seu Hospedagem Web Infomaniak.
Introdução
- O hotlinking consiste em um site de terceiros exibir diretamente imagens, vídeos ou outros arquivos hospedados em seu servidor, utilizando a URL pública, sem hospedá-los no próprio site.
- Essa prática utiliza os recursos de sua hospedagem (largura de banda, conexões HTTP e recursos do servidor) sem sua autorização. Também pode prejudicar seus direitos autorais ou o controle da distribuição de seu conteúdo.
- Embora as capacidades de rede atuais tornem o impacto na largura de banda geralmente menos crítico do que antes, ainda é recomendado limitar o hotlinking para evitar o consumo desnecessário dos recursos da sua hospedagem.
Impedir o hotlinking com um arquivo .htaccess
Se o seu site utiliza o servidor web Apache e o módulo mod_rewrite, pode restringir o acesso direto a determinados ficheiros ao adicionar regras no ficheiro .htaccess, localizado na raiz do seu site.
O exemplo abaixo protege os principais formatos de imagem, incluindo os formatos modernos WebP e AVIF:
RewriteEngine On

# Permitir solicitações sem um cabeçalho Referer
RewriteCond %{HTTP_REFERER} !^$

# Permitir solicitações do seu próprio domínio (substitua pelo seu domínio)
RewriteCond %{HTTP_REFERER} !^https?://(www\.)?votre-domaine\.com [NC]

# Permitir os principais motores de busca
RewriteCond %{HTTP_REFERER} !^https?://(www\.)?google\. [NC]
RewriteCond %{HTTP_REFERER} !^https?://(www\.)?bing\. [NC]
RewriteCond %{HTTP_REFERER} !^https?://(www\.)?yahoo\. [NC]

# Bloquear o hotlinking para arquivos de imagem
RewriteRule \.(jpg|jpeg|png|gif|svg|webp|avif)$ - [F,NC,L]
A adaptar antes da utilização:
- Substitua
seu-dominio.compelo seu próprio nome de domínio. - As solicitações que não contêm um cabeçalho HTTP
Referersão permitidas, a fim de preservar a compatibilidade com alguns navegadores, aplicativos ou mecanismos de proteção de privacidade que não transmitem esse cabeçalho. - As regras que permitem aos principais motores de busca acessar as imagens permitem que seus robôs as indexem. Removê-las impedirá a indexação dessas imagens.
- A regra utiliza a opção
[F], que retorna uma resposta HTTP403 Forbidden. Este método bloqueia imediatamente a solicitação sem fornecer conteúdo adicional, o que limita o consumo dos recursos do servidor.
Se você utiliza o Cloudflare como CDN na frente da sua hospedagem Infomaniak, também pode ativar a funcionalidade Proteção contra Hotlink a partir da sua interface de administração para bloquear esse tipo de acesso antes que ele chegue à sua hospedagem.
Link para esta FAQ: https://faq.infomaniak.com/678
Esta seção de perguntas frequentes foi útil?
Este guia apresenta comandos que podem ser executados com o objetivo de testar uma conexão ou uma rede e, assim, identificar com mais precisão a possível origem do erro.
Executar um Telnet…
TELNET permite testar a conexão a um servidor, sem considerar as configurações adicionais de uma aplicação de e-mail ou FTP, para determinar a origem de um problema. Se a conexão não for estabelecida em um servidor SMTP, por exemplo, você deverá verificar se o seu firewall não está bloqueando a porta 587 ou 465.
… no macOS
- Procure por Utilitário de rede.
- Acesse a aba
Ping,LookupouTraceroute, dependendo do que você deseja testar. - Você também pode usar um aplicativo do tipo
Terminal(interface de linha de comando,CLI / Command Line Interface) no seu dispositivo e, dependendo do que você deseja testar, insira:traceroute [servidor]nc [servidor] [porta]
Substitua[servidor]pelo nome do servidor ou seu endereço IP, idem para[port]…
… no Windows
Ative o Telnet, se necessário.
- Utilize um aplicativo do tipo
Terminal(interface de linha de comando,CLI / Command Line Interface) no seu dispositivo, por exemplo, digitando Executar e depoiscmd. - Na janela que se abre, dependendo do que deseja testar, digite:
tracert [servidor]telnet [servidor] [porta]
Exemplo:telnet mail.infomaniak.com 587(permite testar a porta SMTP caso o seu software/cliente de e-mail não permita o envio de e-mails)…
… no Android
- Utilize o aplicativo Simple Telnet Client, que permite testar de forma muito simples, preenchendo apenas dois campos (por exemplo,
mail.infomaniak.come a porta143ou993)…
Efetuar um PING
PING permite verificar se uma máquina está acessível pela Internet. Também pode usar esta ferramenta para confirmar se está a comunicar com a máquina correta, por exemplo, após uma alteração de DNS, verificando o endereço IP obtido. É possível efetuar um ping num nome de domínio, num hostname ou num endereço IP.
O protocolo PING está definitivamente bloqueado nos serviços de hospedagem compartilhada da Infomaniak.
Link para esta FAQ: https://faq.infomaniak.com/727
Esta seção de perguntas frequentes foi útil?
Este guia explica como trabalhar sem o módulo PECL SSH2 client, que não está disponível nos serviços de hospedagem web e servidores em nuvem da Infomaniak, utilizando, em vez disso, a biblioteca phpseclib, que funciona em PHP nativo sem a necessidade de uma extensão específica.
Introdução
- O uso de
PECL SSH2 clientcausa erros do tipoNenhum algoritmo de troca de chaves compatível encontradoouIncapaz de trocar chaves de criptografiana sua versão mais recente. Phpseclibpermite:- Autenticação SSH por senha ou chave privada.
- Execução de comandos remotos.
- Transferência de arquivos seguros (SFTP).
- Gerenciamento de chaves SSH.
Utilizar phpseclib
Para integrar uma conexão SSH em um script PHP, utilize phpseclib da seguinte forma:
use phpseclib3\Net\SSH2;
use phpseclib3\Crypt\PublicKeyLoader;

$ssh = new SSH2('domain.xyz');
$key = PublicKeyLoader::load(file_get_contents('/path/to/private_key'));

if (!$ssh->login('utilisateur', $key)) {
    exit('Autenticação falhou');
}

echo $ssh->exec('ls -la');
Link para esta FAQ: https://faq.infomaniak.com/767
Esta seção de perguntas frequentes foi útil?
Este guia detalha as ações a serem realizadas com prioridade caso não observe nenhuma diferença no seu site após uma alteração que tenha efetuado, em comparação com a versão anterior à alteração. Estas dicas também são válidas caso encontre problemas ao utilizar a interface dos produtos Infomaniak.
Introdução
- Durante a sua navegação, um navegador da web guarda, num espaço reservado, os dados consultados, com o objetivo de evitar solicitar novamente ao servidor os dados já consultados, para poupar tempo e recursos.
- O seu cache pode conter uma enorme quantidade de dados e, por vezes, o navegador pode ter problemas. Os sites podem então ser exibidos incorretamente ou exibir uma versão desatualizada.
- Limpar o cache garante que você está visualizando a versão mais recente da página ou pasta acessada.
Limpar o cache do navegador da web…
… no Safari
Escolha a sua versão do macOS para consultar a documentação de suporte da Apple correspondente.
… sobre as ferramentas do Google (Chrome, Android, etc.)
Consulte a Central de Ajuda do Google.
… no Firefox
Consulte a página de ajuda da Mozilla.
… no Edge / Internet Explorer
Consulte a ajuda da Microsoft.
Link para esta FAQ: https://faq.infomaniak.com/793
Esta seção de perguntas frequentes foi útil?
Este guia detalha as funcionalidades disponíveis para a gestão de bases de dados relacionais nos serviços de alojamento Infomaniak.
Utilização de Vistas, Triggers, Procedimentos armazenados e Rotinas
No que diz respeito ao gerenciamento de bancos de dados relacionais, a funcionalidade das visualizações ("views") está disponível por padrão, permitindo que os usuários criem visualizações para simplificar o gerenciamento e a apresentação dos dados.
No entanto, algumas funcionalidades avançadas que permitem uma manipulação mais precisa e complexa dos dados, como…
- “gatilhos”
- procedimentos armazenados ("stored procedures")
- rotinas
- e a criação de funções
… estão disponíveis apenas em Servidores Cloud.
Não são permitidas em servidores compartilhados.
Esta restrição deve-se principalmente aos riscos potenciais para a estabilidade da infraestrutura. Uma configuração inadequada ou o uso excessivo destas funcionalidades pode criar ciclos infinitos ou sobrecargas significativas, afetando não só o desempenho do servidor em questão, mas também a experiência de todos os clientes alojados na mesma infraestrutura.
Resolver um problema de importação de um ficheiro de cópia de segurança MySQL/MariaDB
Ao exportar e, em seguida, reimportar um banco de dados MySQL ou MariaDB através da interface de hospedagem da Infomaniak, pode acontecer que a operação falhe devido a erros relacionados aos DEFINER dos gatilhos ou das visualizações. Este caso ocorre quando os objetos do banco de dados foram criados com um usuário específico (chamado definer) que não existe mais no momento da importação.
Na prática, o processo de exportação e importação utiliza um usuário temporário, usado apenas durante essas operações. Após a exclusão desse usuário, as visualizações ou gatilhos definidos com esta conta como DEFINER tornam-se inválidos, causando erros do tipo:
Erro geral: 1449 O utilizador especificado como definidor ('xxxx_temp_1'@'%') não existe
Para evitar este problema, é possível corrigir o ficheiro de cópia de segurança (dump.sql ou dump.sql.gz) antes da sua importação, substituindo as definições de definer por CURRENT_USER. Isto permite associar automaticamente os triggers e views ao utilizador em vigor no momento da importação.
Aqui está um exemplo de comando para modificar o arquivo de despejo antes da importação:
sed -E 's/DEFINER=`[^`][^`]*`@`[^`][^`][^`]*`/DEFINER=CURRENT_USER/g' dump.sql > dump-corrected.sql
Após realizar essa substituição, o arquivo corrigido pode ser importado normalmente através do Gerenciador Infomaniak. Esse comportamento é conhecido e está relacionado ao funcionamento dos usuários temporários durante o processo de cópia/restauração. Nenhuma modificação no processo de exportação/importação está prevista a curto prazo, mas o assunto continua sendo avaliado em termos de infraestrutura.
Para obter mais informações sobre a variável CURRENT_USER, consulte a documentação oficial de:
Link para esta FAQ: https://faq.infomaniak.com/821
Esta seção de perguntas frequentes foi útil?
Este guia explica como alterar a senha de um banco de dados MySQL/MariaDB em um Serviço de Hospedagem Web.
Introdução
- Consulte este outro guia se precisar de informações sobre como atualizar as informações de login (scripts, sites, etc.) em caso de alteração da senha do banco de dados.
- Um usuário de banco de dados criado após a instalação de uma Aplicação Web (oferecida pela Infomaniak) não poderá ser modificado.
- Para acessar o banco de dados ao qual ele está vinculado, é necessário criar um novo usuário de banco de dados com a senha de sua escolha e, em seguida, atribuir a ele os direitos sobre o banco de dados desejado.
Alterar a senha do MySQL, MariaDB, etc.
Para isso, é necessário intervir no usuário associado ao banco de dados em questão e alterar a senha dele (sem precisar fornecer a senha antiga) através do painel de controle Infomaniak:
- Clique aqui para acessar o gerenciamento do seu serviço de hospedagem no painel de controle Infomaniak (precisa de ajuda?).
- Clique diretamente no nome atribuído ao serviço de hospedagem em questão:
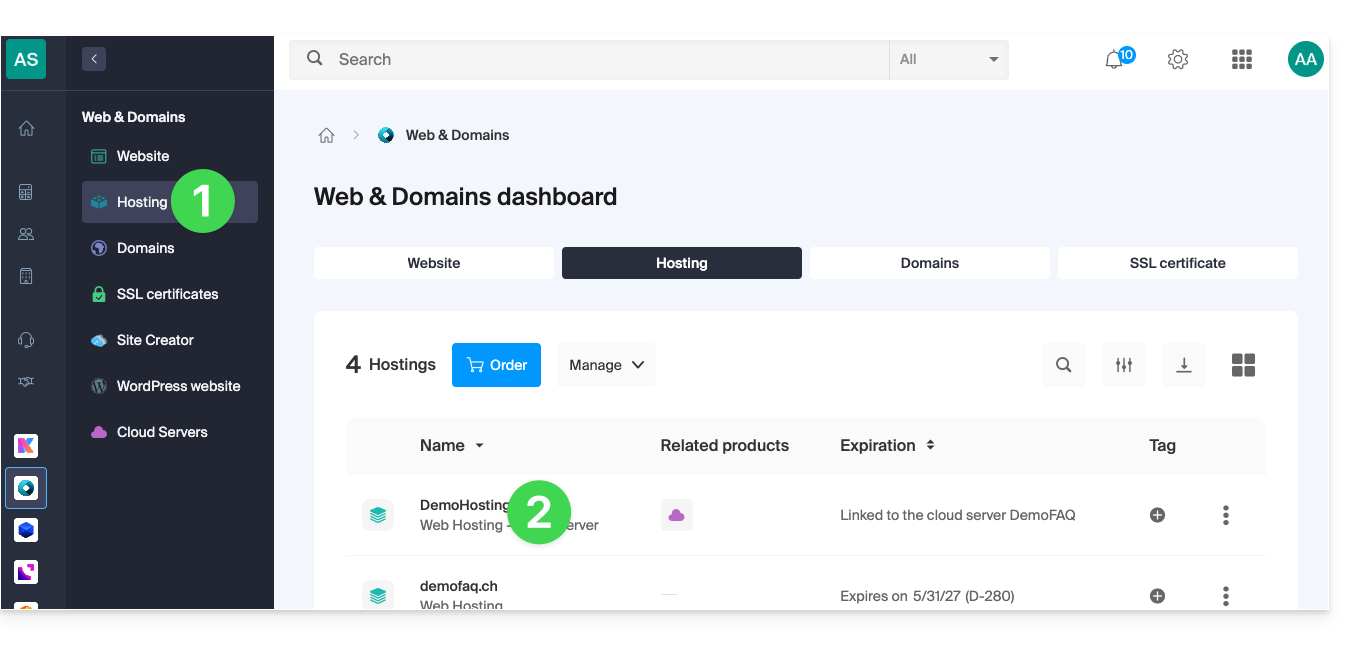
- Clique em Bases de dados no menu lateral esquerdo.
- Clique no menu Utilizadores.
- Clique em o menu de ações ⋮ localizado à direita do item em questão.
- Clique em Editar:
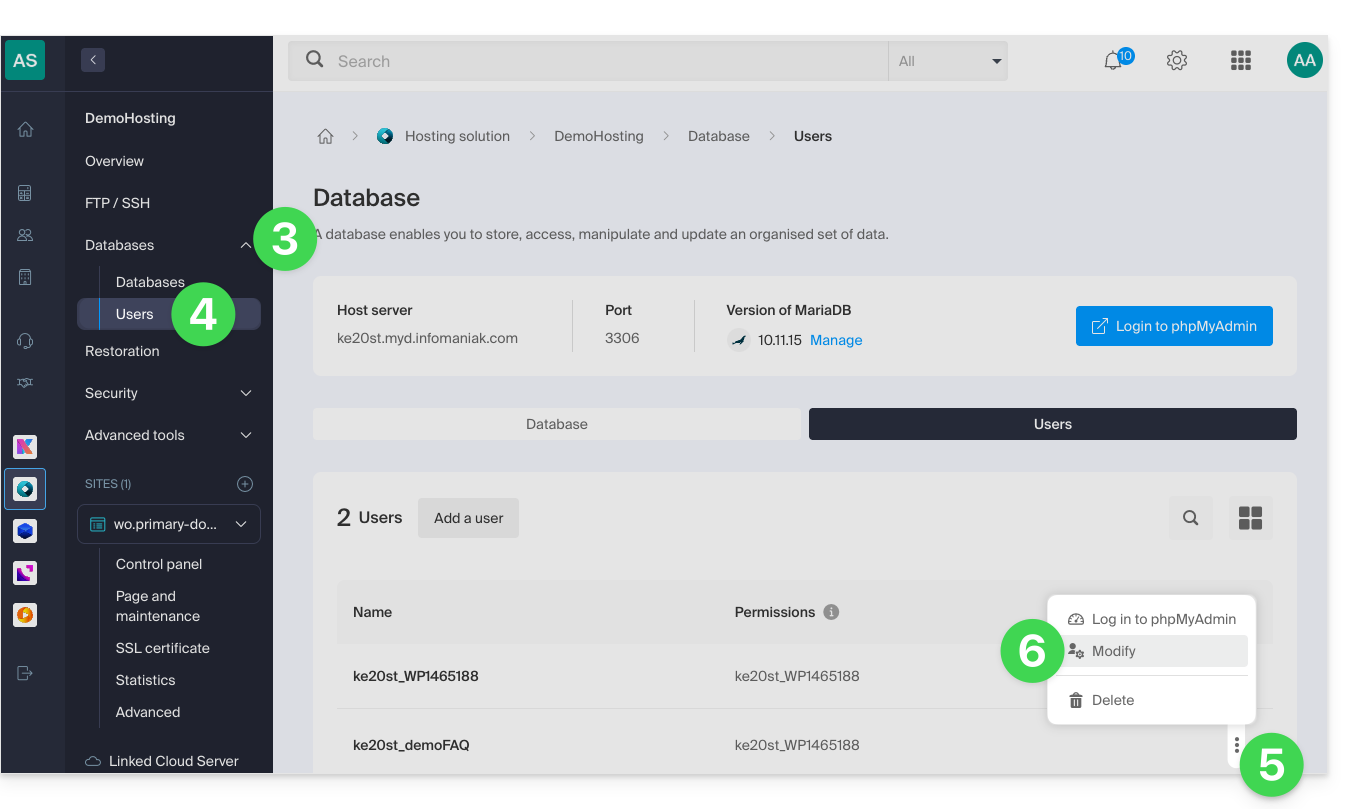
- Clique em Alterar senha.
- Insira a nova senha desejada.
- Clique no botão Guardar:
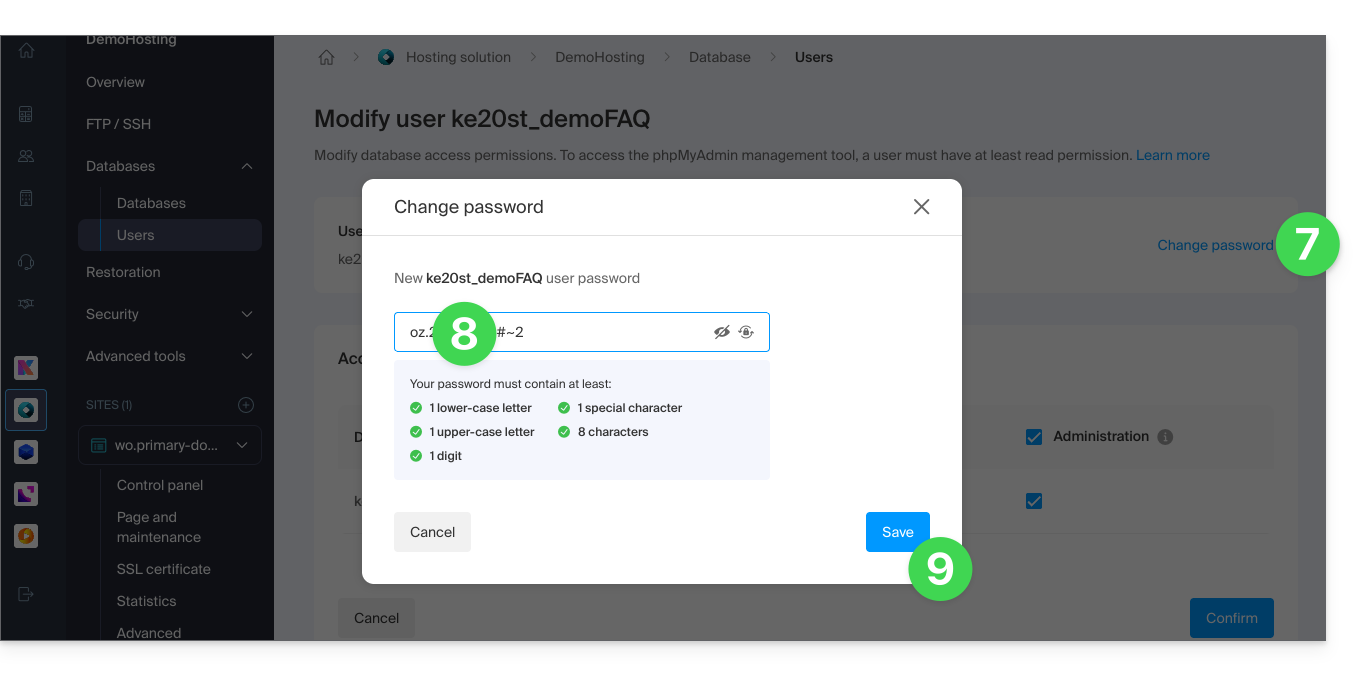
- Se necessário, pode configurar os novos direitos (leitura / escrita / administração) do utilizador para o acesso às bases de dados existentes no alojamento.
Link para esta FAQ: https://faq.infomaniak.com/846
Esta seção de perguntas frequentes foi útil?
Este guia explica como iniciar uma análise do conteúdo de uma Hospedagem Web para detectar e remover arquivos que contenham vírus e outros scripts maliciosos que possam ameaçar a segurança de sites.
Introdução
- Você receberá um e-mail quando a operação for concluída (a análise antivírus pode demorar um pouco; o painel de controle pode ser fechado).
- A Infomaniak garante a proteção das hospedagens, analisando exclusivamente as pastas dos sites (webroot); fora isso, nenhuma análise síncrona é realizada no restante da hospedagem.
- Considere também a ferramenta de detecção de vulnerabilidades para monitorizar eventuais falhas corrigidas automaticamente nos seus sites.
Iniciar uma análise antivírus dos sites
Para analisar o conteúdo potencialmente infetado:
- Clique aqui para aceder à gestão do seu alojamento no Manager Infomaniak (precisa de ajuda?).
- Clique diretamente no nome atribuído ao alojamento em questão.
- Clique em Segurança no menu lateral esquerdo.
- Clique em Antivírus no menu lateral esquerdo.
- Clique no botão azul Analisar:
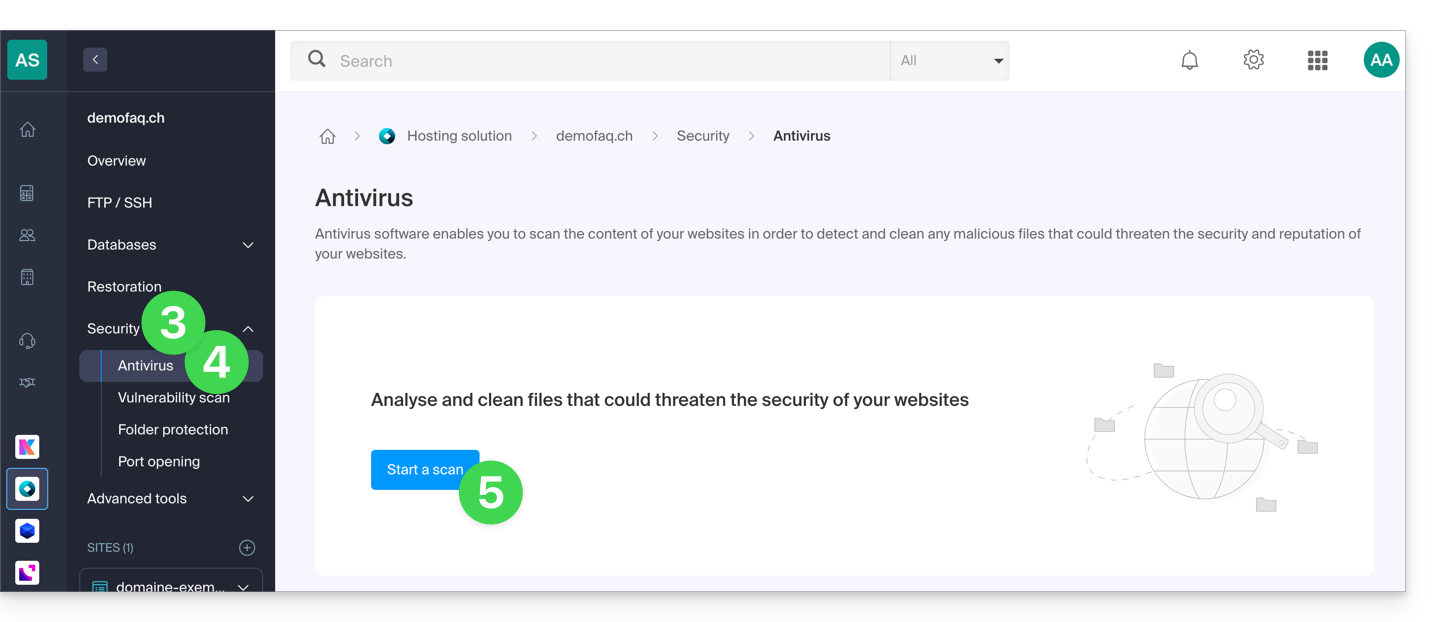
- Selecione o(s) site(s) a serem analisados.
- Clique no botão azul Iniciar análise:
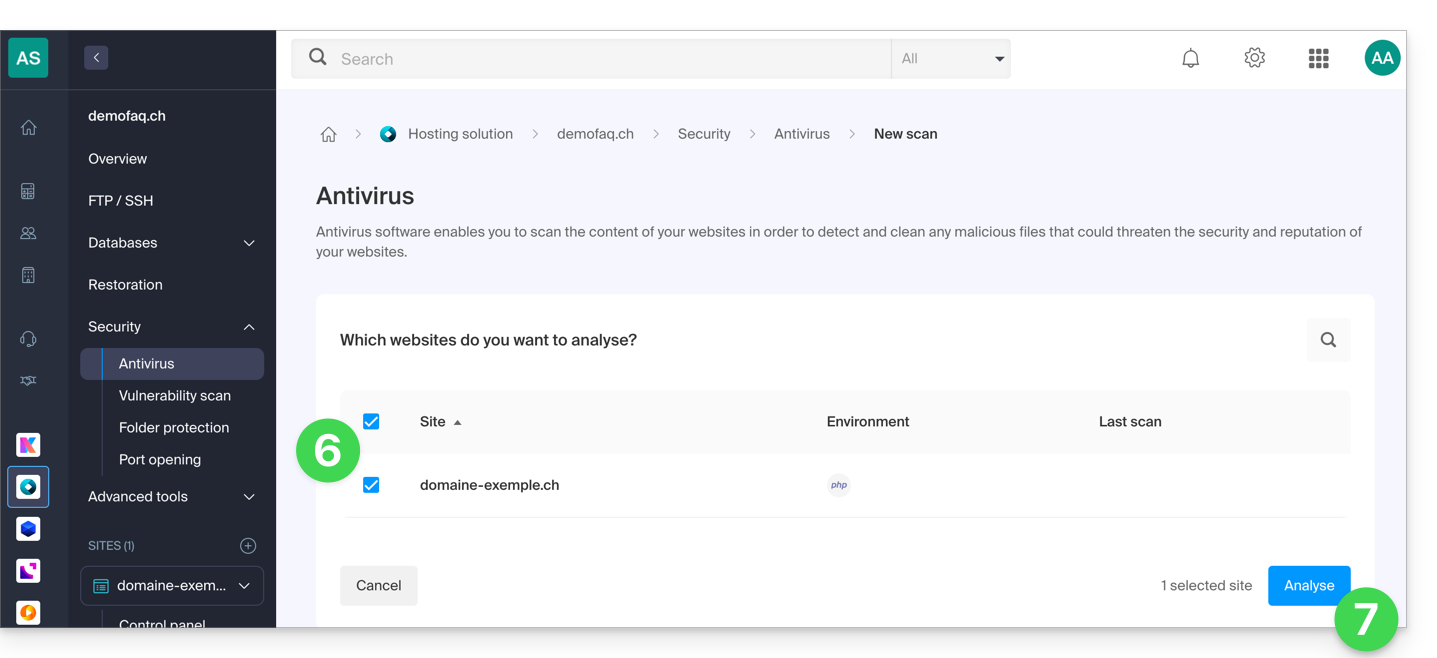
- Siga o procedimento até que a análise dos arquivos seja iniciada.
Link para esta FAQ: https://faq.infomaniak.com/857
Esta seção de perguntas frequentes foi útil?
Este guia explica como instalar rapidamente aplicações, extensões PHP e tecnologias (lista não exaustiva abaixo) em apenas alguns cliques no Servidor Cloud, e apenas nele.
Consulte este outro guia se procura informações sobre aplicações web adicionais que podem ser instaladas em qualquer tipo de alojamento, incluindo as ofertas padrão/partilhadas.
Instalar (ou desinstalar) aplicações/extensões PHP…
Para encontrar a lista de tecnologias e proceder à sua instalação:
- Clique aqui para acessar o gerenciamento do seu Servidor Cloud no painel de controle Infomaniak (precisa de ajuda?).
- Clique diretamente no nome atribuído ao Servidor Cloud em questão:
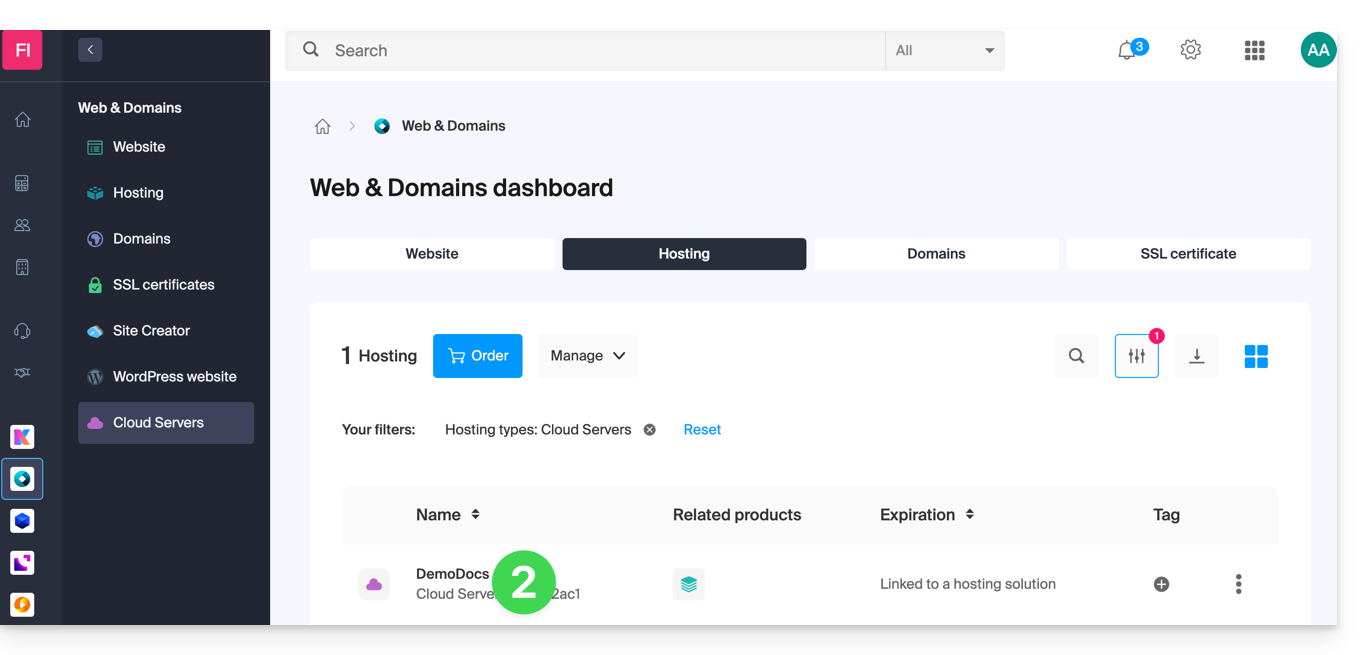
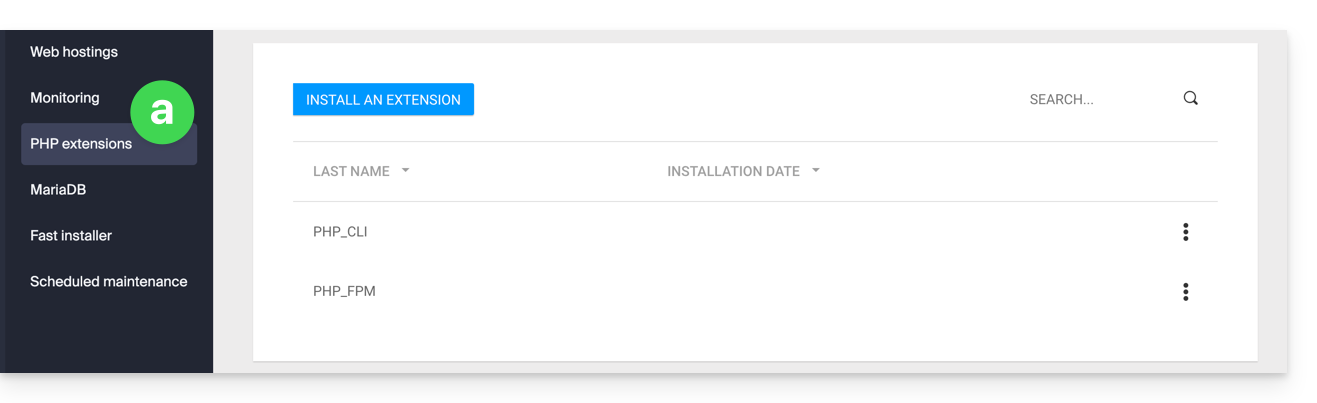
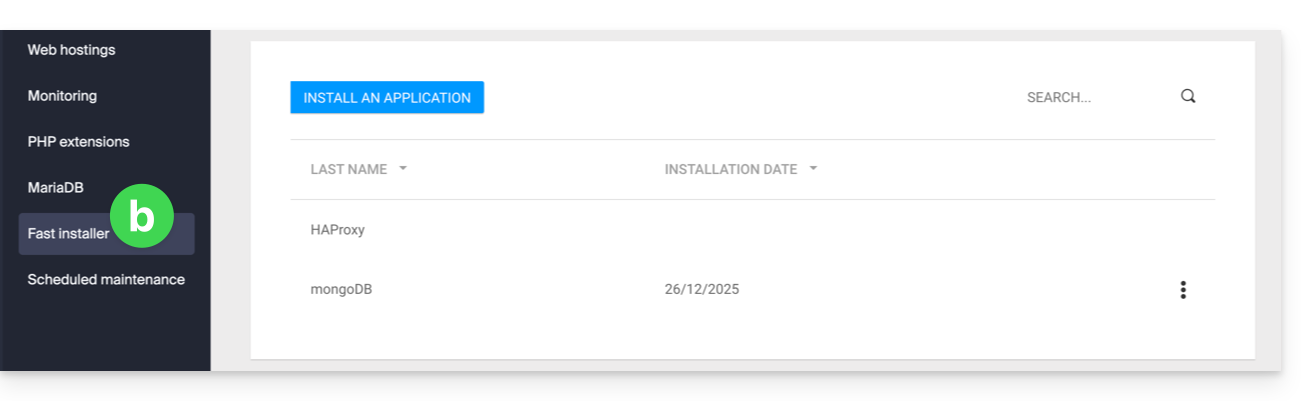
- Clique no menu lateral esquerdo:
- Extensões PHP
- Instalador Rápido
- Extensões PHP
- Clique no menu de ação ⋮ à direita da extensão que deseja desinstalar na tabela exibida.
- Clique em Desinstalar.
- Caso contrário, clique no botão azul.Instalar uma extensão / Instalar um aplicativo:
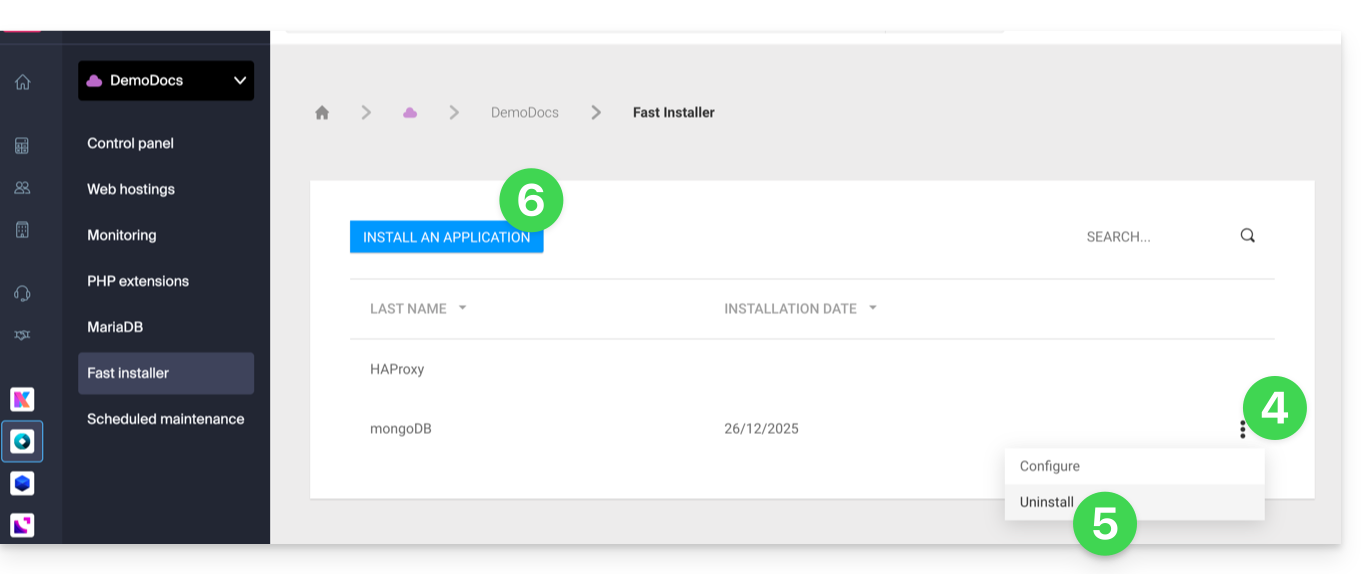
- Em seguida, escolha a nova instalação desejada:
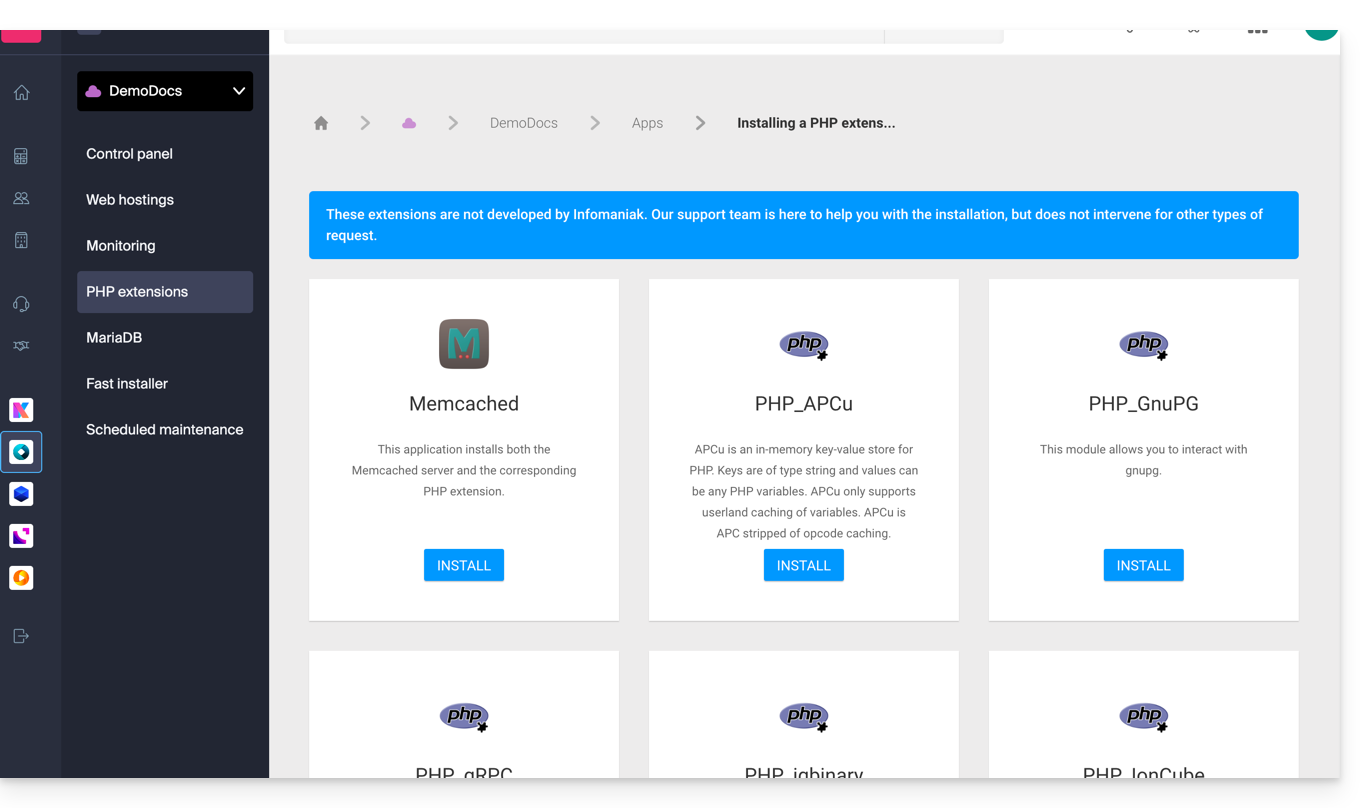
Lista não exaustiva de aplicativos e extensões disponíveis
AdvanceCOMPBuildEssentialelectron_devExifToolFFmpeg↗ guiaGhostscriptGifsicleGraphicsMagickHAProxyImagemagick↗ guiaJpegoptimlibjpeg_turbolibqrencodelibX11_xcb1MidnightCommanderMemcached↗ guiamongoDB↗ guiaNVM – Gerenciador de versões do NodeOptiPNGp7zipPDFtkPHP_APCuPHP_CLI↗ guiaPHP_FPMPHP_GnuPGPHP_gRPCPHP_igbinaryPHP_IonCube↗ guiaPHP_OPcachePHP_PDFPHP_PDO_ODBC↗ guiaPHP_SwoolepipPngcrushPngquantRedis↗ guiaRRDTool The Round Robin Database ToolRubyCompasssystemd↗ guiatesseract_ocrvarnish↗ guiavirtualenvWebPxauthxpdfxvfbZSH
Link para esta FAQ: https://faq.infomaniak.com/877
Esta seção de perguntas frequentes foi útil?