Base de conhecimento
1000 perguntas frequentes, 500 tutoriais e vídeos explicativos. Aqui, você encontra apenas soluções!
Este guia explica como entrar em contato com o Suporte da Infomaniak e autorizá-lo a acessar seus produtos onlinee, em particular, ao seu conteúdo, e fornecer detalhes úteis ao solicitar suporte.
Contactar o Suporte Infomaniak
Alguns endereços de e-mail, como support@infomaniak.com, não se destinam a receber pedidos de suporte diretos.
As mensagens enviadas para estes endereços não são tratadas pelas equipas e não permitem criar um acompanhamento da solicitação.
Para garantir um tratamento adequado, cada solicitação deve ser submetida exclusivamente através do centro de suporte:
- Este processo permite gerar um ticket, encaminhar automaticamente o pedido para o departamento responsável e garantir um acompanhamento completo até a sua resolução.
- Após o registo do pedido, a comunicação pode prosseguir diretamente por e-mail com o suporte.
Antes de entrar em contato com o suporte, também é recomendável consultar a base de conhecimento, que reúne diversos guias e respostas para as perguntas frequentes.
Permitir que o Suporte acesse um tipo de conteúdo
O Suporte da Infomaniak pode solicitar que conceda acesso temporário a uma parte do seu conteúdo. Isso permite economizar tempo no diagnóstico, evitando trocas de informações desnecessárias:
- Este acesso é estritamente limitado ao contexto da análise e serve apenas para identificar a origem do problema encontrado:
- Apenas os colaboradores da Infomaniak que estão tratando diretamente da sua solicitação de suporte.
- O acesso é feito exclusivamente a partir das instalações controladas da Infomaniak.
- De acordo com a política de privacidade da Infomaniak, os seus dados nunca serão utilizados para outros fins:
- Pode revogar este acesso a qualquer momento.
- Caso contrário, este expira automaticamente após 7 dias.
Para permitir que a Infomaniak aceda a uma parte específica dos seus serviços (autorizar o acesso a um conteúdo nunca abre o acesso aos outros; cada autorização é específica e independente):
- Clique aqui para acessar a gestão de acessos no Manager Infomaniak.
- Clique no botão de alternância para permitir o acesso ao conteúdo de…
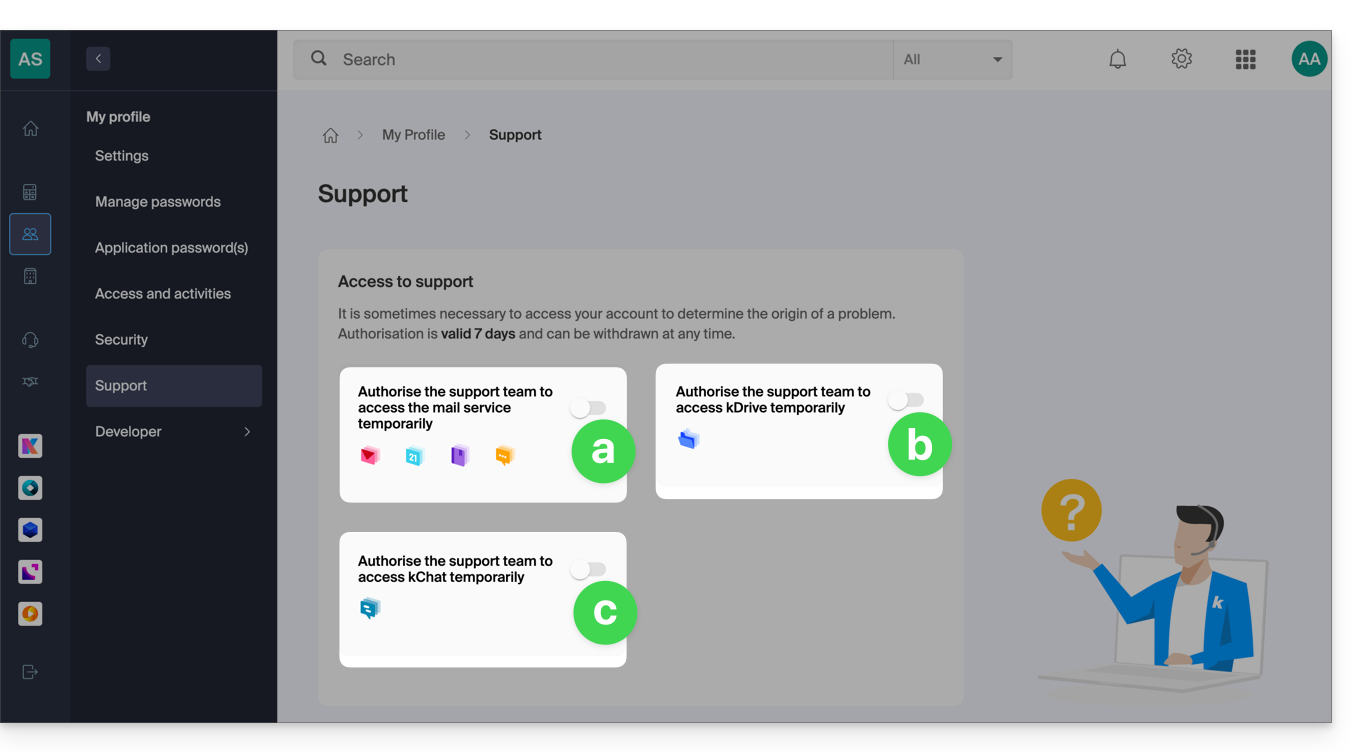
- … os endereços de e-mail associados ao aplicativo web Mail da Infomaniak (serviço online ksuite.infomaniak.com/mail) + contatos e calendários,
- … as pastas existentes no(s) kDrive das organizações das quais o utilizador atual faz parte,
- … as conversas existentes no(s) produto(s) kChat das organizações das quais o utilizador atual faz parte.
Com o kSuite, também pode fazê-lo clicando aqui ou seguir estes passos para o conseguir:
- Clique no ícone Configurações no canto superior direito da sua janela kSuite.
- Clique em Suporte no menu lateral esquerdo:
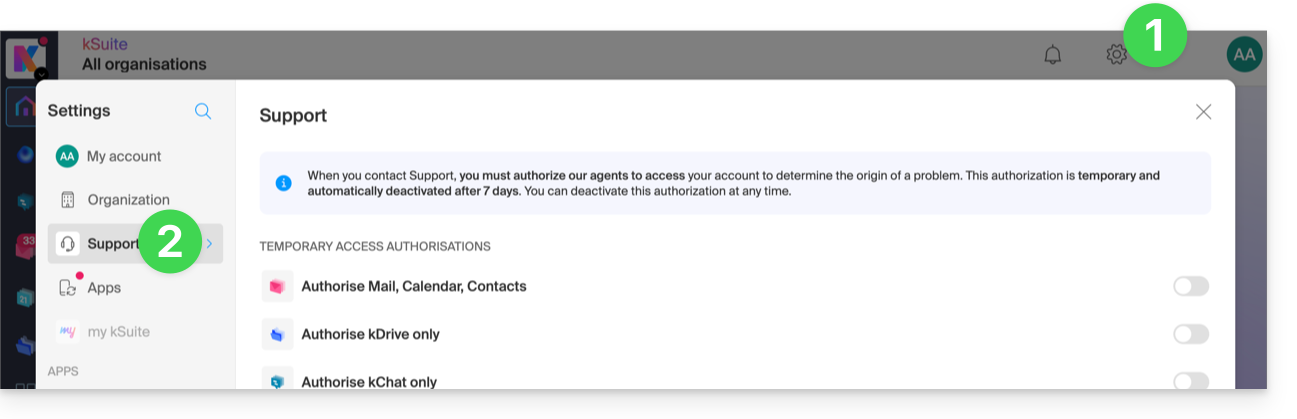
- Clique no botão de alternância para permitir o acesso ao conteúdo de…
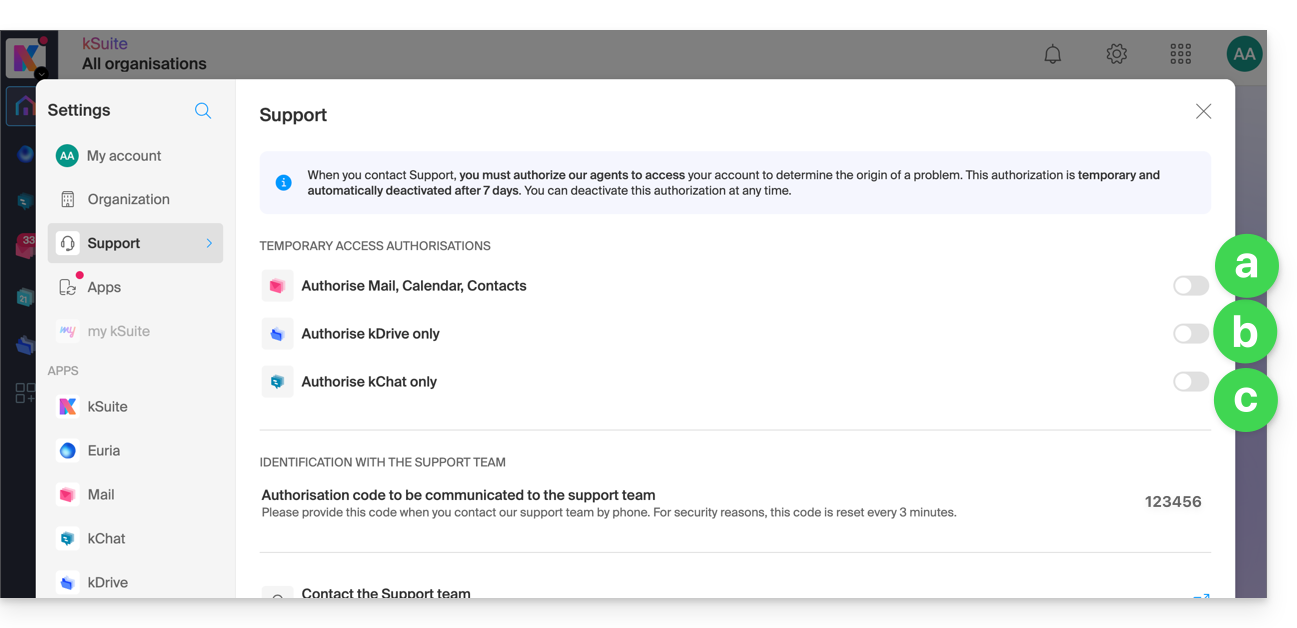
Também pode partilhar um único e-mail específico de forma muito fácil.
Fazer capturas de tela
… no Windows
A Microsoft oferece um software pré-instalado dedicado à criação de capturas de tela. Mas, para criá-las manualmente:
- Exiba o que você quer/precisa mostrar na tela.
- Pressione a tecla PRINTSCREEN do seu teclado (ou
PRTSCR,IMPR. ECRAN, etc.) uma vez. - No Microsoft Word (ou similar), vá em "Editar" -> "Colar" para inserir a sua imagem na página.
- "Salvar" o seu arquivo.
- Repita a operação do ponto 1 ao ponto 5 tantas vezes quanto o número de capturas desejadas.
… no macOS
- Pressione simultaneamente as teclas "
CMD" + "shift" (a seta para cima — maiúscula) + a tecla "3". - A cada toque nessas teclas, um arquivo de imagem é criado na área de trabalho do seu computador.
… no iOS (iPhone, iPad...)
- Pressione simultaneamente os botões "
Power" + "Home" (os dois únicos botões físicos). - Em seguida, recupere as capturas de tela no aplicativo "Fotos" do seu dispositivo.
… no Android (por exemplo, Samsung, LG ou Huawei)
- Pressione simultaneamente o botão “Volume Baixo” (na lateral) e o botão de bloqueio.
- A imagem capturada é, assim, automaticamente guardada numa pasta chamada "Capturas de Ecrã" na galeria.
Copiar o conteúdo de uma janela de alerta
… no Windows
Para copiar e colar como texto uma mensagem de erro presente numa janela “pop-up” do Windows, basta pressionar a tecla CTRL + C no seu teclado para copiar a mensagem para a área de transferência. Em seguida, poderá colá-la (CTRL + V) no corpo da mensagem que está a enviar.
Acessar o console Javascript do navegador
… no Windows
Chrome, Firefox e Safari: pressione a combinação de teclas CTRL + MAJ + i
Internet Explorer e Edge: pressione a tecla F12
… no macOS
Chrome: pressione a combinação de teclas ⌘ + ⌥ + J
Safari: pressione a combinação de teclas ⌘ + ⌥ + C
- Em seguida, clique no ícone de círculo com uma barra ou similar para reiniciar o registro.
- Exiba a página do seu site que está apresentando o problema.
- A guia Console exibe os erros JavaScript e os recursos online não encontrados.
Link para esta FAQ: https://faq.infomaniak.com/913
Esta seção de perguntas frequentes foi útil?
Este guia explica como alterar a senha de uma conta FTP ou FTP/SSH para o site de um Hospedagem Web Infomaniak.
Alterar a senha de um usuário FTP existente
Para acessar o site em uma hospedagem web e modificar as configurações de acesso FTP:
- Clique aqui para acessar o gerenciamento da sua hospedagem no Manager Infomaniak (precisa de ajuda?).
- Clique diretamente no nome atribuído ao alojamento em questão:
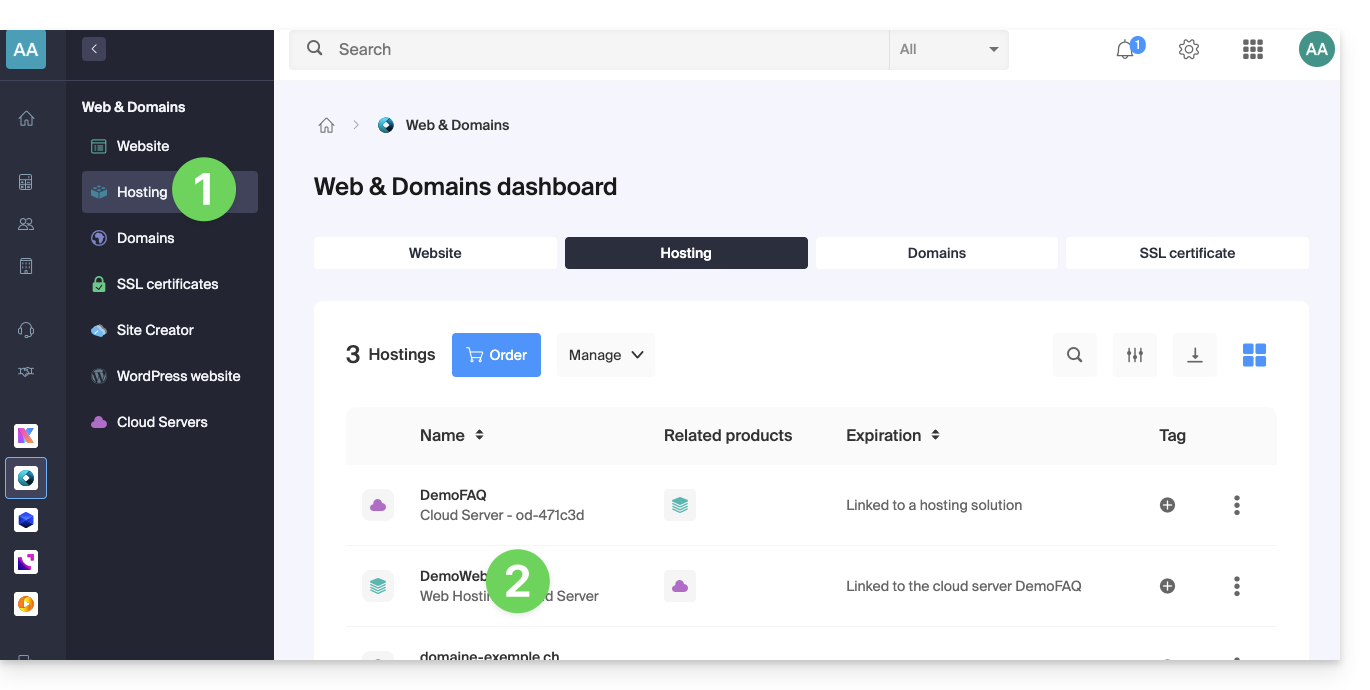
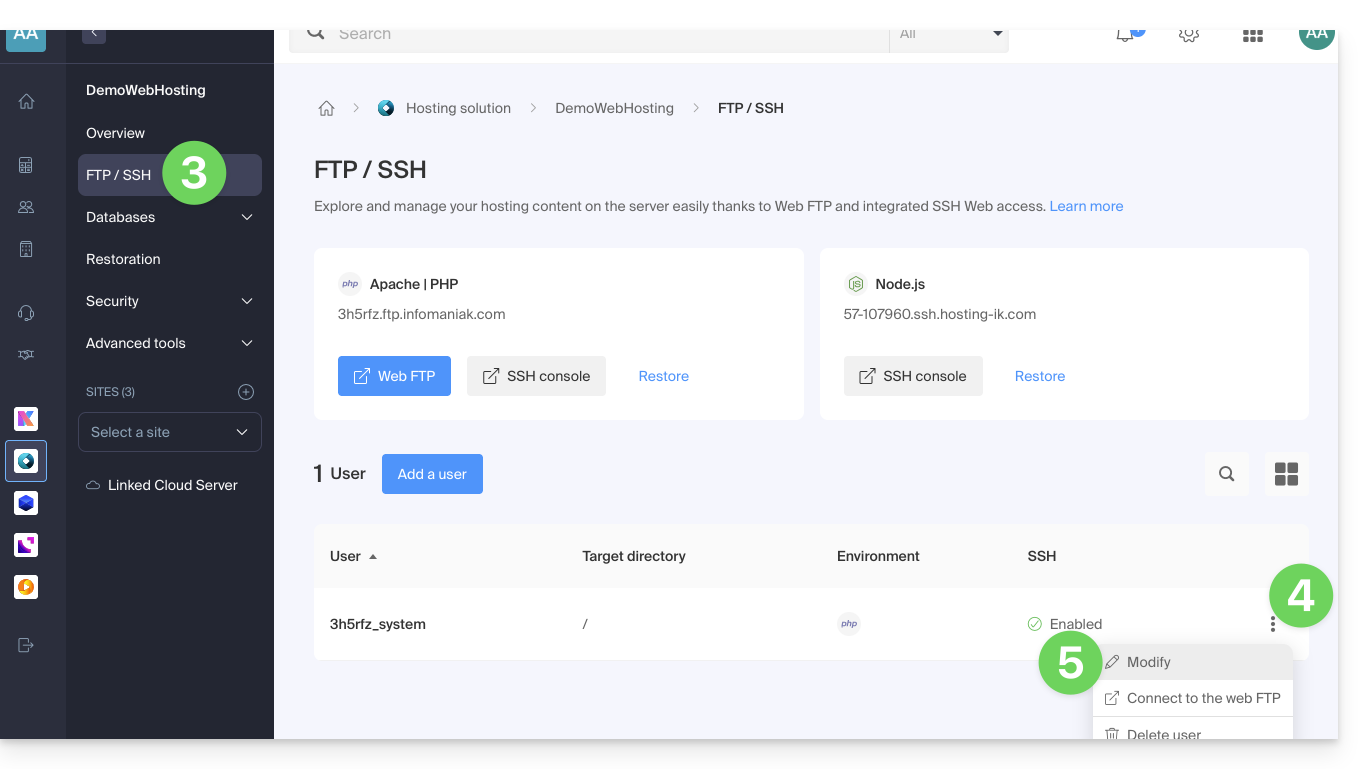
- Clique em FTP / SSH no menu lateral esquerdo.
- Clique no menu de ação ⋮ à direita de uma conta existente.
- Clique em Editar:
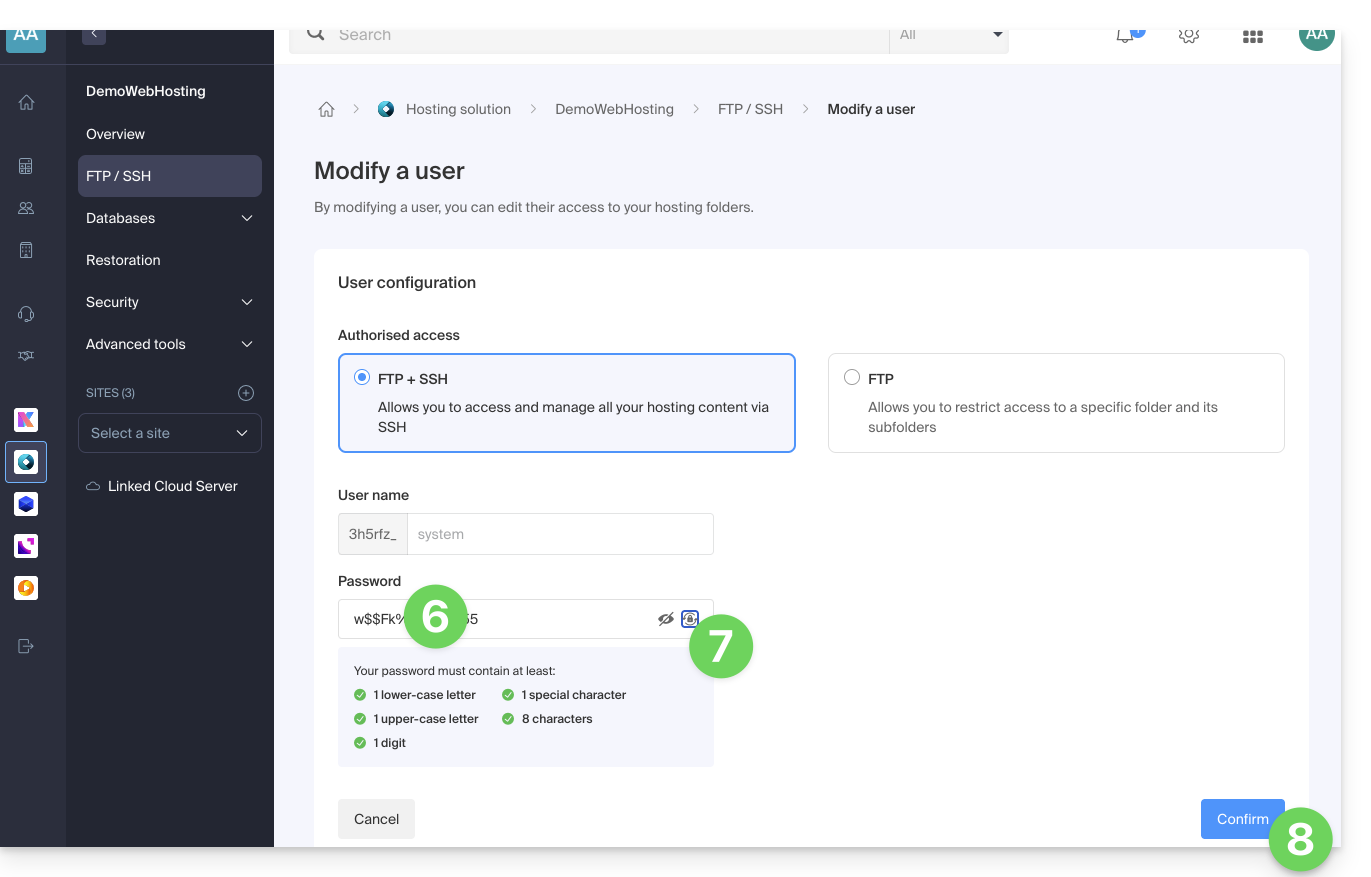
- Insira diretamente a nova senha que será utilizada nos seus acessos por FTP ou SSH.
- Se necessário, você pode gerar uma senha forte.
- Confirme as alterações:
Link para esta FAQ: https://faq.infomaniak.com/916
Esta seção de perguntas frequentes foi útil?
Este guia explica como modificar a pasta de destino na qual o seu site está armazenado em um Serviço de Hospedagem Web Infomaniak.
Introdução
- Numa hospedagem web da Infomaniak, é possível instalar vários sites web com seus próprios nomes de domínio (gestão de múltiplos sites).
- Cada um desses sites é armazenado numa pasta da sua hospedagem, que é o destino do site. É possível modificar livremente o destino de um site. Exemplo:
- O site
domain.xyztem como destino, por exemplo, a pasta/web… - Você publica um site numa nova subpasta de
/web, com o nome, por exemplo,/web/v2… - Ao modificar o destino
/webdo sitedomain.xyzpara/web/v2, o sitedomain.xyzexibirá o conteúdo da pasta/web/v2, sem incluir esse caminho na barra de endereço do navegador e sem deixar acesso a eventuais arquivos ainda localizados em/web.
- O site
- Recomenda-se não criar a pasta "
v2" dentro de uma subpasta de "web", mas sim ao lado, criando a pasta na raiz da sua hospedagem. - Essas pastas existem realmente no servidor, mas você não é obrigado a se conectar via FTP para gerenciá-las.
Exibir a pasta dos seus sites
Para encontrar informações sobre a pasta onde seu site está armazenado:
- Clique aqui para acessar o gerenciamento do seu site no Manager Infomaniak (precisa de ajuda?).
- Clique diretamente no nome atribuído ao site em questão.
- Clique, em seguida, na seta para baixo para expandir a seção Informações deste site.
- A indicação destacada abaixo é o local do site de exemplo:

Modificar o destino ou a pasta de um site
Para gerir a localização de um site dentro da sua hospedagem:
- Clique aqui para acessar o gerenciamento do seu produto no Manager Infomaniak (precisa de ajuda?).
- Clique diretamente no nome atribuído ao produto em questão.
- Clique em Gerenciar na seção Configurações avançadas:

- Gerencie o local desejado para o site.
- Clique no botão Salvar na parte inferior da página:

Link para esta FAQ: https://faq.infomaniak.com/963
Esta seção de perguntas frequentes foi útil?
Este guia ajuda a identificar e corrigir erros do tipo 404, as páginas em branco ou os sites que não são exibidosquando não for possível acessar o serviço de hospedagem a partir do seu navegador.
Pontos a serem verificados obrigatoriamente
Recomenda-se vivamente que siga os seguintes passos:
- Verifique a ligação à Internet: visite um site de terceiros, como https://www.ch.ch ou https://www.microsoft.com. Se estes sites não estiverem acessíveis, contacte o seu fornecedor de serviços de Internet (ISP), pois o problema reside na sua ligação.
- Limpar o cache do navegador para forçar o recarregamento da página; saiba mais.
- Testar a visibilidade do site para terceiros: peça a conhecidos fora da sua rede local para testarem o acesso ou utilize o serviço https://downforeveryoneorjustme.com para verificar se o site está fora de serviço para todos ou apenas para você.
- Utilizar um proxy para simular uma conexão ao seu site a partir de outro local geográfico.
- Verificar se o nome de domínio não está expirado: a hospedagem e o domínio são duas entidades distintas. A sua hospedagem pode estar ativa na Infomaniak (verifique no Painel de Controle), enquanto o domínio pode ter expirado. Faça uma pesquisa WHOIS e entre em contato com o registrador, se necessário.
- Consulte o arquivo de configuração do seu script ou CMS para verificar as informações de conexão ao banco de dados (nome, endereço, usuário e senha); saiba mais.
Se o problema persistir
Por favor, entre em contato com o suporte da Infomaniak por escrito, fornecendo as seguintes informações:
- Nome do site em questão.
- O seu endereço IP público no momento dos testes (disponível em https://www.infomaniak.com/ip).
Link para esta FAQ: https://faq.infomaniak.com/978
Esta seção de perguntas frequentes foi útil?
Este guia explica por que um site pode ficar "inoperante" ou deixar de exibir qualquer conteúdo após a alteração de uma senha em um Serviço de Hospedagem Web.
Conexão interrompida com o banco de dados
Quando o seu site e, em particular, um script (CMS, WordPress, Prestashop ou qualquer outra aplicação que utilize as bases de dados MySQL) não consegue estabelecer ligação à base de dados MySQL MariaDB ou outra, pode aparecer uma mensagem de erro, como:
Erro ao conectar à base de dadosErro de base de dados: Impossível conectar-se à base de dados: Não foi possível conectar-se ao MySQLNão é possível estabelecer a ligação à base de dados
Lembrar-se da última ação realizada…
Caso ocorra um erro no seu site, é sempre importante verificar o histórico recente. Nesse caso, houve…
- … alguma ação da sua parte no arquivo de configuração do script em questão? Ele foi afetado, modificado ou movido?
Às vezes, a inserção involuntária de um espaço antes ou depois de uma palavra pode interromper a ligação entre o servidor web e o servidor de banco de dados. Reverta suas modificações nos arquivos.
Se necessário, restaure uma versão anterior dos arquivos que você modificou recentemente. - … uma ação ao nível da palavra-passe da base de dados no Manager Infomaniak?
Se alterar a palavra-passe da sua base de dados através do Manager Infomaniak, o seu script, que procura informações nas bases de dados, deixará de exibir qualquer informação.Alterar algo no painel de controle Infomaniak significa que essa alteração deve ser aplicada em todos os outros locais. Essa alteração que você fez no painel de controle também deve ser refletida/aplicada no arquivo de configuração do script, conectando-se via FTP e modificando o arquivo correspondente, geralmente "wp-config.php", "configuration.php" ou similar. - … uma migração de servidor anunciada pela Infomaniak?
Se este erro for consequência de uma migração de servidor ou de outra operação anunciada por e-mail e relacionada com o produto em questão, não hesite em contactar o suporte da Infomaniak.
Link para esta FAQ: https://faq.infomaniak.com/986
Esta seção de perguntas frequentes foi útil?
Este guia detalha a gestão de acessos e a segurança para as suas bases de dados (MySQL, MariaDB e MongoDB) num Servidor Cloud gerido.
Introdução
- O firewall está acessível no seu painel de controlo, mesmo que nenhum site Apache esteja configurado (útil para projetos exclusivamente Node.js, por exemplo).
- Relativamente ao acesso às bases de dados MySQL a partir de outra hospedagem web Infomaniak, consulte este outro guia.
- Relativamente ao MongoDB:
- Para garantir a segurança dos seus dados, o sistema impede o registo se tentar desativar o modo
local_onlysem ativar aautenticação. - As cópias de segurança automáticas da Infomaniak não incluem as bases de dados MongoDB.
- Para garantir a segurança dos seus dados, o sistema impede o registo se tentar desativar o modo
Permitir o acesso de saída (Infomaniak → exterior)
A partir de uma hospedagem web ou de um servidor em nuvem Infomaniak, as requisições para bancos de dados externos são permitidas por padrão, sem restrição de porta.
Permitir o acesso de entrada (externo → Infomaniak)
Para acessar seus bancos de dados de fora, você precisa ter um Servidor Cloud e abrir as portas correspondentes no firewall do seu servidor:
- MySQL / MariaDB: porta
3306(TCP) - MongoDB: porta
27017(TCP)
Configurar o acesso remoto para o MongoDB
Por padrão, o MongoDB aceita apenas conexões locais.
Antes de tornar sua instância pública (acesso remoto), você deve, obrigatoriamente, criar um usuário em seu banco de dados.
Para permitir o acesso remoto através do Fast Installer, você deve ajustar a configuração, respeitando regras de segurança rigorosas.
- Clique aqui para acessar a gestão do seu Servidor Cloud no Manager Infomaniak (precisa de ajuda?).
- Clique diretamente no nome atribuído ao Servidor Cloud em questão.
- Clique em Instalação Rápida no menu lateral esquerdo.
- Clique em MongoDB.
- Clique no menu de ação ⋮ à direita da instância e escolha Configurar.
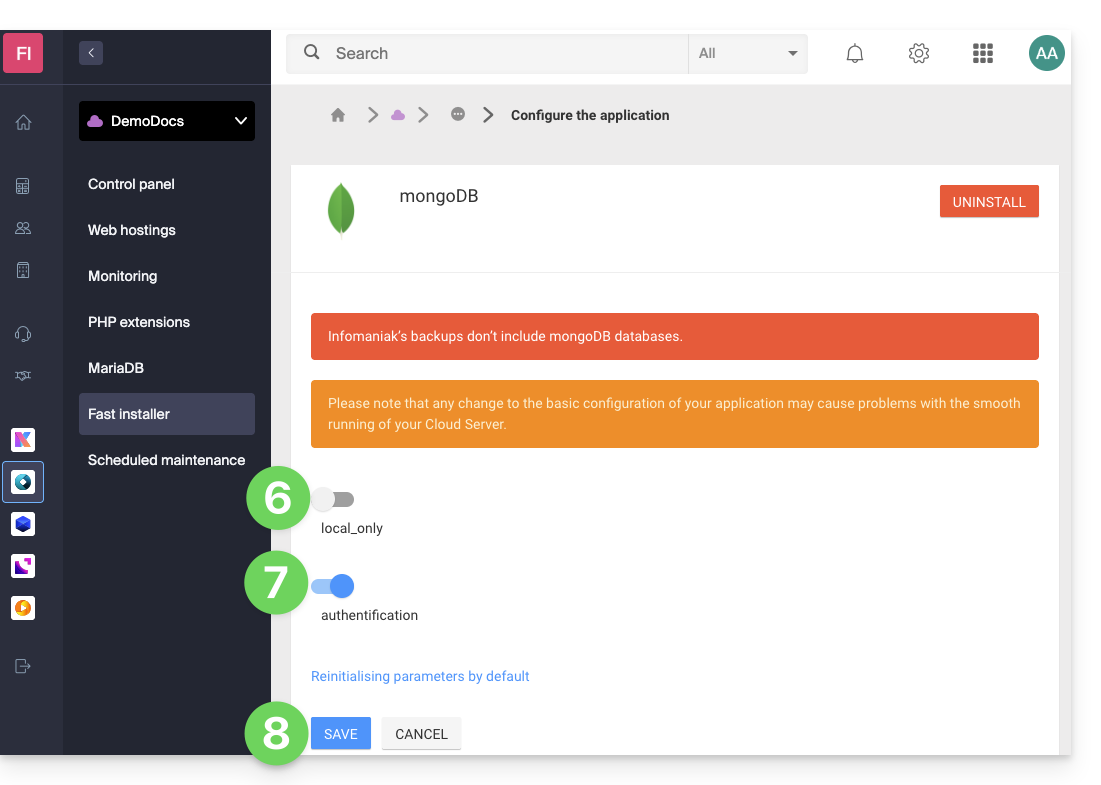
- Desative a opção
local_only. - Ative a opção
authentification. - Salve as alterações:
Link para esta FAQ: https://faq.infomaniak.com/1017
Esta seção de perguntas frequentes foi útil?
Este guia detalha como fazer o backup dos dados dos seus serviços de hospedagem web (Starter, compartilhados ou Servidor Cloud) usando a aplicação restic através do protocolo OpenStack Swift no Swiss Backup, a solução de backup em uma nuvem suíça independente.
Introdução
- Existem outras soluções para fazer backup dos seus dados web: consulte este outro guia.
Instalar o Restic
Pré-requisitos
- Utilizar uma hospedagem web.
- Ter um espaço Swiss Backup Infomaniak com uma quota de dispositivo disponível (mínimo 1) para uma cópia de segurança na nuvem.
- Adicionar 1 dispositivo do tipo Nuvem para obter as configurações OpenStack Swift.
Para isso:
Faça o download do binário linux_amd64 do repositório GitHub do restic:
wget -O restic.bz2 {{URL_8}}⚠️ O link de download pode variar no lançamento de novas versões; a versão
0.14utiliza a compressão padrão.Descompacte o arquivo e torne o binário executável:
bunzip2 restic.bz2
chmod +x restic
Configurar o Restic
Criação de uma chave de criptografia para criptografar os dados
- A chave não pode ser alterada e, em caso de perda, os dados não poderão mais ser lidos.
- Coloque esta chave num ficheiro legível pelo Restic.
Exemplo de geração de uma chave:
openssl rand -base64 16 > restickey
Configuração do restic
Para configurar a cópia de segurança:
Crie um arquivo resticconfig com o seguinte conteúdo, adaptando-o de acordo com as informações específicas do seu dispositivo:
echo "export OS_AUTH_URL={{URL_10}} export OS_REGION_NAME=RegionOne export OS_PROJECT_NAME=sb_project_SBI-XXXX export OS_PASSWORD='' export OS_USER_DOMAIN_NAME=default export OS_USERNAME=SBI-XXXX export OS_PROJECT_DOMAIN_NAME=default export RESTIC_REPOSITORY=swift:sb_project_SBI-XXXX:/bucket name export RESTIC_PASSWORD_FILE=restickey" > resticconfOS_AUTH_URLURL de acesso ao cluster Swiss Backup (1)OS_PROJECT_NAMEeOS_USERNAME: substitua SBI-XXXX pelo seu identificadorOS_PASSWORD: substitua pela senha gerada durante a ativaçãoRESTIC_REPOSITORY- substitua SBI-XXXX pelo seu identificador
- substitua o
bucket namepelo nome que deseja dar ao seu contêiner que armazenará os backups
RESTIC_PASSWORD_FILE: substitua pelo caminho completo para o arquivo que contém a chave de criptografia
Carregue a configuração do Restic executando o seguinte comando:
source resticconfInicialize o bucket com o seguinte comando:
./restic -r $RESTIC_REPOSITORY init
(1) A indicação "//swiss-backup02", "//swiss-backup03", etc., muda de acordo com o número do cluster indicado no Manager, em Informações de armazenamento na nuvem, em "Localização"; e se o seu dispositivo Swiss Backup foi criado antes de outubro de 2020, você deverá usar https://swiss-backup.infomaniak.com/identity/v3.
Fazer backup dos seus arquivos
Para fazer backup dos seus arquivos, basta executar o seguinte comando:
./restic backup
#Example: Backing up the entire hosting account
./restic backup ./
#Example: Backing up the “sites” folder
./restic backup sites/
O primeiro snapshot demora mais (várias horas, dependendo da quantidade de dados), pois todos os arquivos são copiados, enquanto os seguintes usarão o princípio diferencial.
Fazer backup das bases de dados
O Restic permite ler dados provenientes do stdin, para gravar a saída de um programa.
Utilize o seguinte comando para efetuar uma cópia de segurança de uma base de dados MySQL individual:
mysqldump --databases db_name -u db_username -p | restic backup --stdin --stdin-filename database_dump.sql Para fazer o backup de todos os bancos de dados, execute o comando mysqldump para extrair todos os bancos de dados do servidor e, em seguida, redirecione a saída para o Restic:
mysqldump -u -p --all-databases | restic backup --stdin --stdin-filename all_databases.sql
Listar os backups
Para listar as suas cópias de segurança, pode usar o seguinte comando:
./restic snapshots
Restaurar uma cópia de segurança
Você pode restaurar um backup com o seguinte comando:
./restic restore --target
Automatizar
No Servidor Cloud, é possível adicionar uma tarefa cron para automatizar o lançamento da cópia de segurança.
Em uma hospedagem compartilhada, esta opção não está disponível.
Link para esta FAQ: https://faq.infomaniak.com/1019
Esta seção de perguntas frequentes foi útil?
Este guia explica como descarregar ou exportar um certificado SSL a partir do painel de controlo Infomaniak.
Introdução
- O download do certificado gera um arquivo no formato
.zip. - O arquivo contém os arquivos
.keye.crt(bem como_windows.pfxe.protected.key, dependendo do tipo de certificado):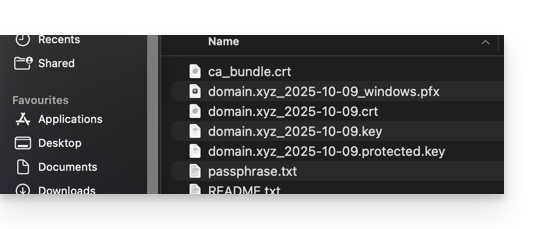
- Recomenda-se armazenar este certificado e a sua chave privada num local seguro, pois esta última poderá permitir o acesso aos seus dados encriptados.
Exportar ou descarregar um certificado SSL
Para aceder à gestão dos seus certificados:
- Clique aqui para aceder à gestão do seu produto no painel de controlo Infomaniak (precisa de ajuda?):
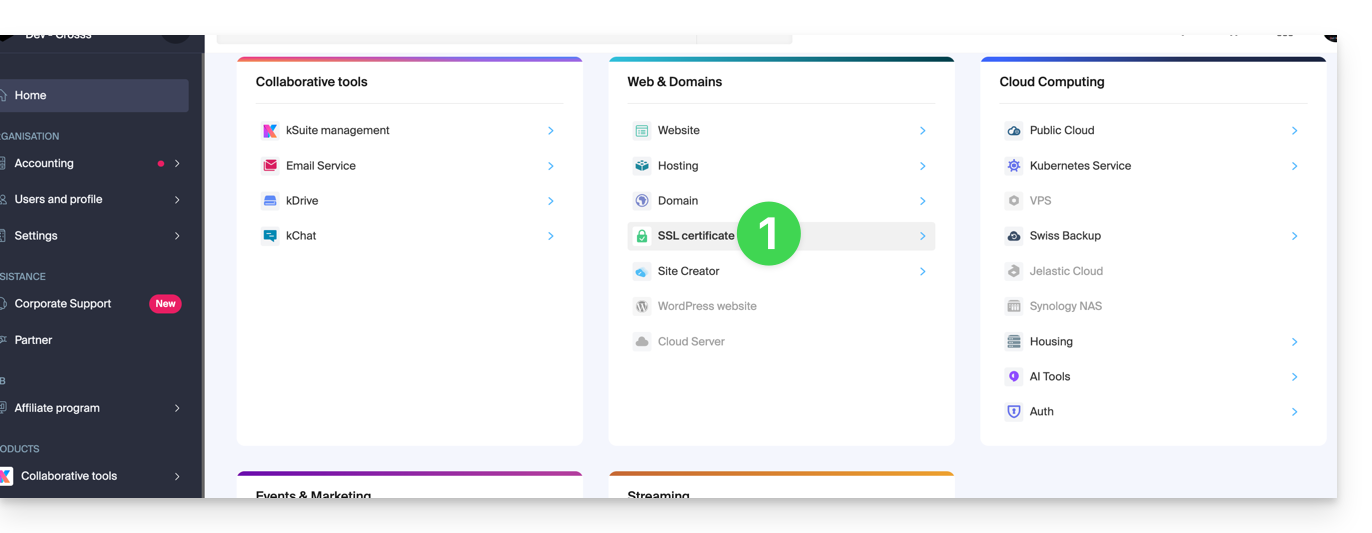
- Filtre os tipos de certificado, se necessário, clicando no ícone correspondente.
- Visualize os diferentes tipos de certificados, como Let's Encrypt, Sectigo DV & EV...
- Adicione os certificados que devem ser exibidos.
- Aplique os filtros:
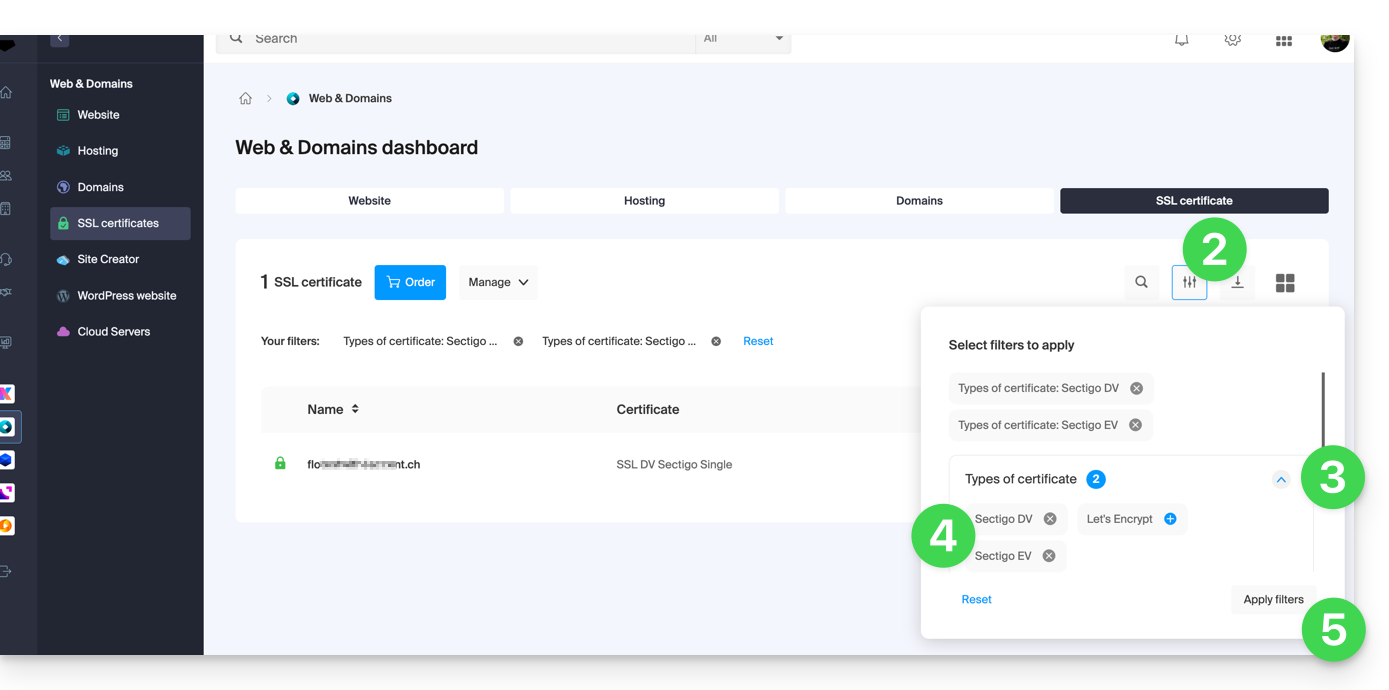
- A tabela exibe apenas os tipos de certificados que você selecionou.
Exportar um certificado Let's Encrypt
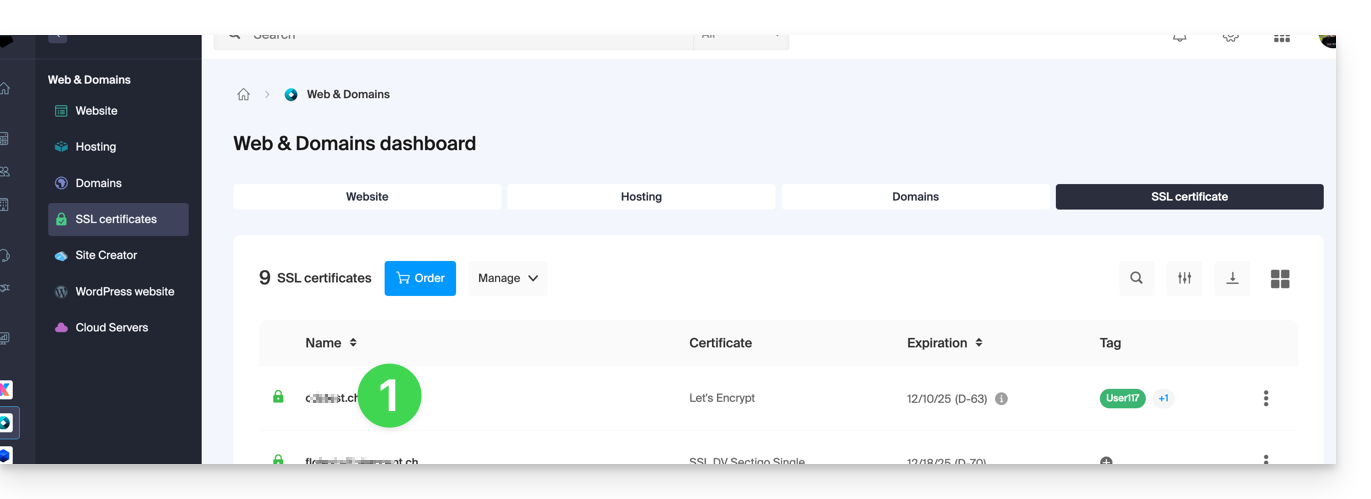
- Clique diretamente no nome atribuído ao certificado Let's Encrypt na lista:
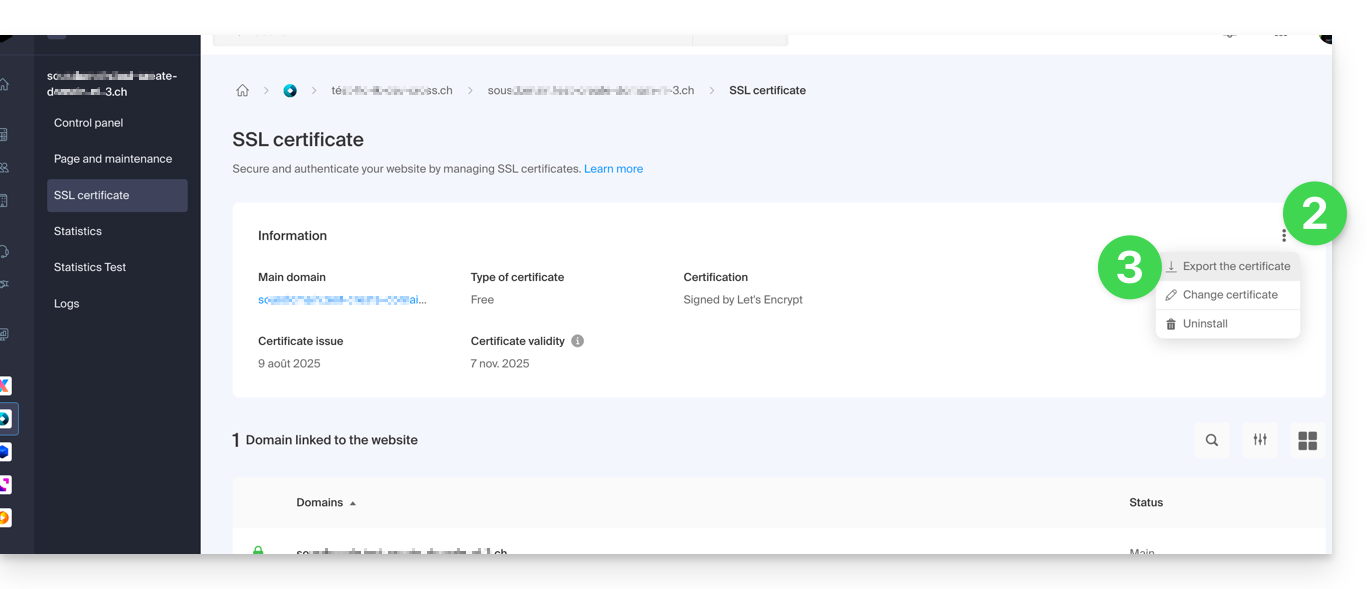
- Clique no menu de ação ⋮ à direita do item correspondente na tabela que é exibida.
- Selecione Exportar certificado e siga as instruções para baixar o arquivo para o seu dispositivo:
Exportar um certificado Sectigo
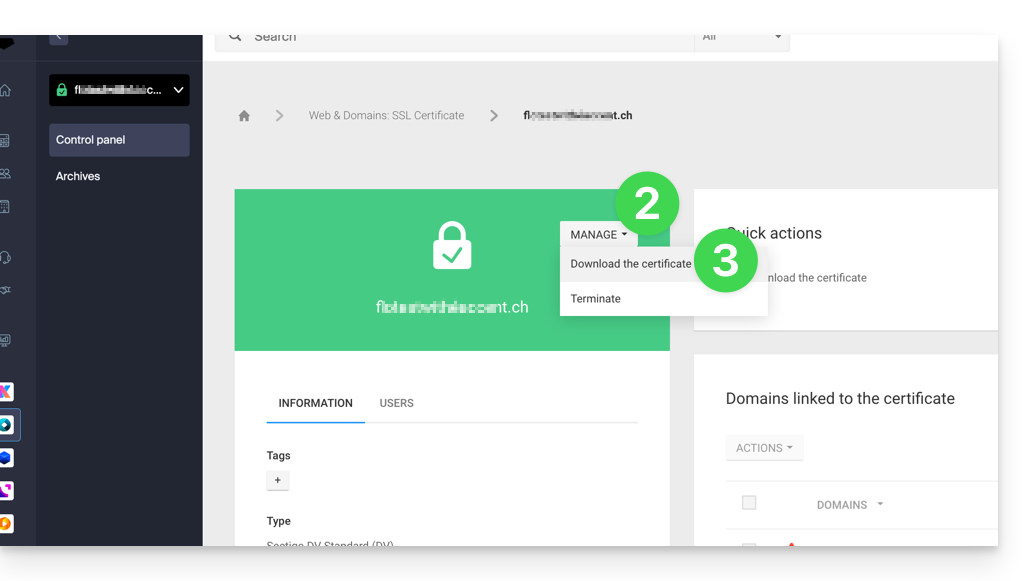
- Clique diretamente no nome atribuído ao certificado na lista de certificados.
- Clique no botão Gerenciar.
- Clique em Descarregar o certificado e siga as instruções para descarregar o arquivo no seu dispositivo:
Link para esta FAQ: https://faq.infomaniak.com/1034
Esta seção de perguntas frequentes foi útil?
Este guia explica como resolver os erros de acesso ao seu Hospedagem Web após uma alteração de endereço IP (migração de servidor, por exemplo).
Introdução
- Para economizar tempo, o seu sistema mantém uma tabela de correspondência entre os nomes de domínio e os endereços IP.
- Se o site mudar de "servidor" (de IP), o seu computador tenta acessar o endereço antigo.
- Limpar o cache força o sistema a solicitar o novo endereço aos servidores DNS.
Se o seu computador mantiver o endereço antigo na memória,limpar o cache DNS permite restabelecer a conexão.
Limpar o cache DNS…
… no Windows
Use o prompt de comando para atualizar as configurações de rede:
- Abra o menu Iniciar.
- Digite cmd e pressione Enter.
- Na janela preta que se abre, digite o seguinte comando e pressione Enter:
ipconfig /flushdns
… no macOS
Nas versões mais recentes do macOS, o procedimento é realizado através do Terminal:
- Abra o Terminal (através do Spotlight ou Aplicações > Utilitários).
- Copie e cole o seguinte comando:
sudo dscacheutil -flushcache; sudo killall -HUP mDNSResponder - Insira sua senha de sessão (ela não será exibida durante a digitação) e valide.
… no Linux
A maioria das distribuições modernas utiliza o systemd-resolved. Abra o seu terminal e execute:
sudo resolvectl flush-caches
Observação: se estiver a utilizar um serviço mais antigo, o comandosudo systemctl restart nscd continua válido.
Link para esta FAQ: https://faq.infomaniak.com/1041
Esta seção de perguntas frequentes foi útil?
Este guia apresenta soluções para erros do tipo “Site malicioso! O site foi sinalizado como um site malicioso e foi bloqueado com base nas suas preferências de segurança” (“STOP! This Website Can Harm Your Computer!” em inglês).
Quem colocou esta mensagem?
Esta mensagem de erro ou aviso…
- … NÃO é adicionada pela Infomaniak.
- … é gerado com base em dados exclusivos do Google, utilizando, entre outros, https://www.stopbadware.org/.
- … pode deixar de aparecer diretamente porque…
- … você não está mais indexado pelo Google.
- … você está usando um navegador que não se baseia nos controles do Google.
O que fazer?
Se isso não se referir ao site que você gerencia, consulte a ajuda do Google sobre o assunto.
Se o site for seu, consulte as dicas abaixo:
- Verifique o código-fonte da página publicada: certamente haverá código adicional em comparação com as páginas que ainda estão íntegras; pode ser um iframe malicioso ou alguma inclusão…
- Na página em questão, clique no botão "Por que este site foi bloqueado" e siga as instruções…
- Consulte a documentação do Google sobre o assunto.
- Acompanhe a ferramenta de detecção de vulnerabilidades, que poderá resolver o problema enquanto isso.
Link para esta FAQ: https://faq.infomaniak.com/1070
Esta seção de perguntas frequentes foi útil?
Este guia permite resolver um possível erro 530, reduzindo o número de conexões FTP simultâneas nos Serviços de Hospedagem Web.
Resolver um erro 530
O número de conexões FTP que podem ser estabelecidas simultaneamente para o espaço FTP de uma hospedagem é limitado a 25.
A mensagem de erro 530 Desculpe, o número máximo de clientes (25) para este usuário já está conectado geralmente aparece após várias conexões simultâneas com um software/cliente FTP que não gerencia bem as desconexões ou que tenta abrir várias conexões ao mesmo tempo, pensando em acelerar o download.
Depois de receber este erro, feche o programa FTP e aguarde 30 minutos para que o servidor encerre as conexões ativas e você possa se reconectar.
Você também pode criar um novo usuário FTP e se conectar com ele.
Para evitar essa situação com o FileZilla, acesse o menu Editar -> Configuração e, na aba Transferências, defina o número de transferências simultâneas para 2.
Recomenda-se usar o Web FTP no painel de controle.
Link para esta FAQ: https://faq.infomaniak.com/1082
Esta seção de perguntas frequentes foi útil?
Este guia explica como gerenciar os arquivos de uma Hospedagem Web com um software/cliente FTP.
Introdução
- Para gerenciar os arquivos da sua hospedagem web de forma simples e rápida, sem precisar instalar um aplicativo ou inserir credenciais FTP, use o Web FTP no painel de controle (ele permite, entre outras coisas, alterar o proprietário de arquivos e compactar/descompactar arquivos
zip). - Em relação a protocolos suportados pela Infomaniak (FTP, SFTP, etc.) dependendo do seu plano de hospedagem (Starter, Node.js, etc.), consulte este outro guia.
Parâmetros a fornecer para softwares FTP
Pré-requisitos
- Criar uma conta FTP/SSH.
- Instalar um programa/cliente FTP como Filezilla, Cyberduck, Commander One, Transmit, etc.
Independentemente do software/cliente FTP que utilizar, os 3 parâmetros essenciais para configurar um acesso FTP são sempre:
- nome do host: endereço do servidor FTP
- nome de utilizador: nome da conta FTP
- palavra-passe: a da conta FTP
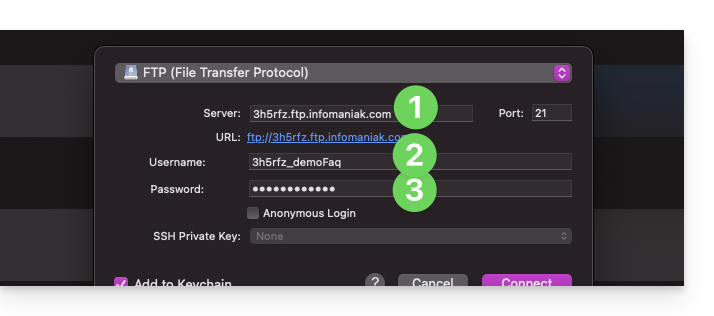
- O número da porta deve geralmente ser deixado com as configurações padrão.
- O tipo e o modo de conexão devem geralmente ser deixados com as configurações padrão.
- Se for proposta uma limitação do número de conexões simultâneas, recomenda-se ativá-la.
Obter as informações de acesso à hospedagem
Você encontrará todas as informações no seu painel de controle Infomaniak:
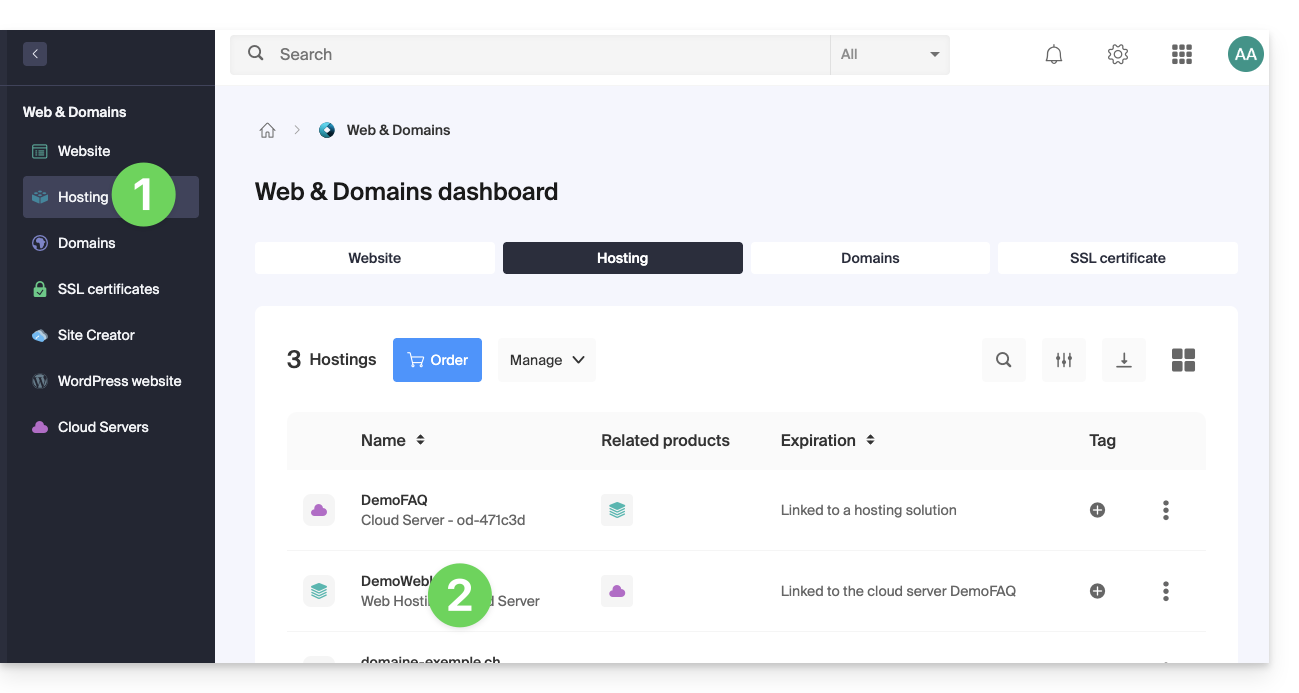
- Clique aqui para acessar o gerenciamento do seu serviço de hospedagem no painel de controle Infomaniak (precisa de ajuda?).
- Clique diretamente no nome atribuído ao serviço de hospedagem em questão:
- Clique em FTP (ou FTP / SSH) no menu lateral esquerdo
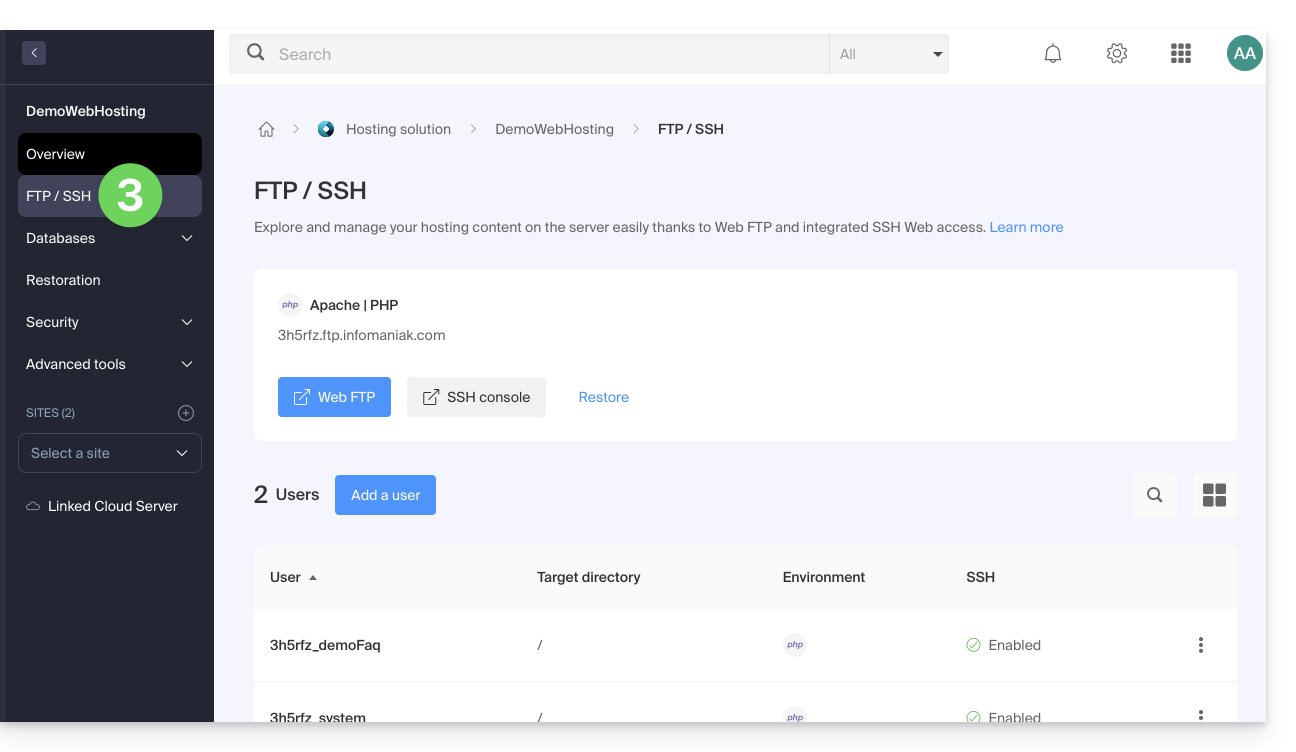
1. Nome do host FTP
O nome do host a ser usado no seu software/cliente FTP é especificado na parte superior da página obtida no passo 3 acima, e um ícone permite copiar o endereço para a área de transferência.
Plano Starter – página web básica
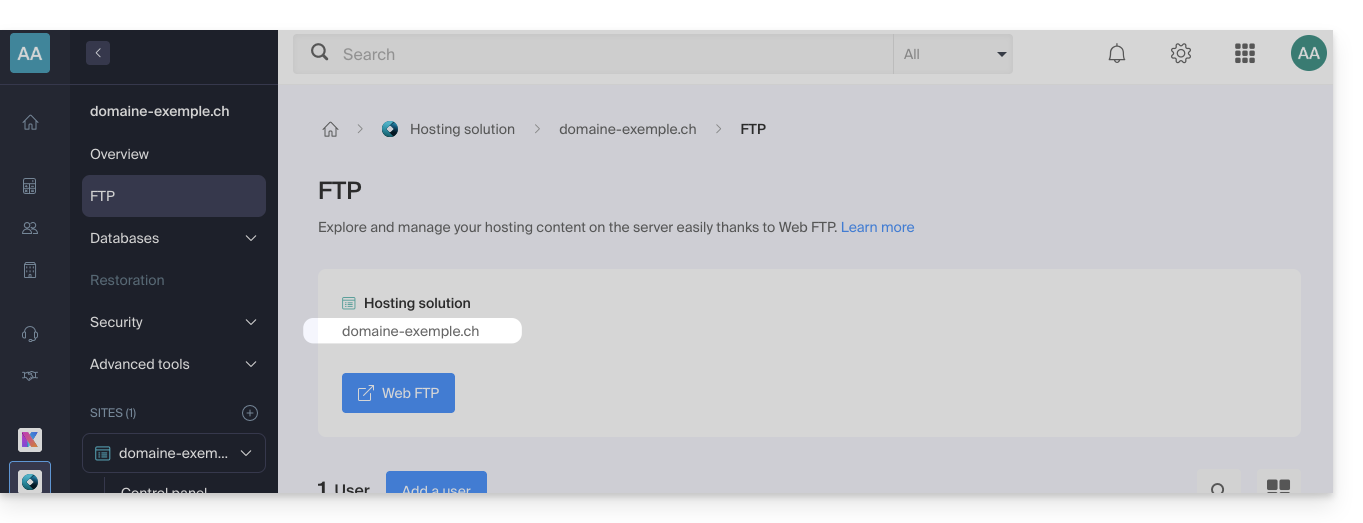
Se o domínio indicado não estiver funcional (por exemplo, se não apontar para o endereço IP da hospedagem), utilize o endereço IP como nome do host, no formato 123.45.678.123 (consulte este outro guia).
Hospedagem Web paga
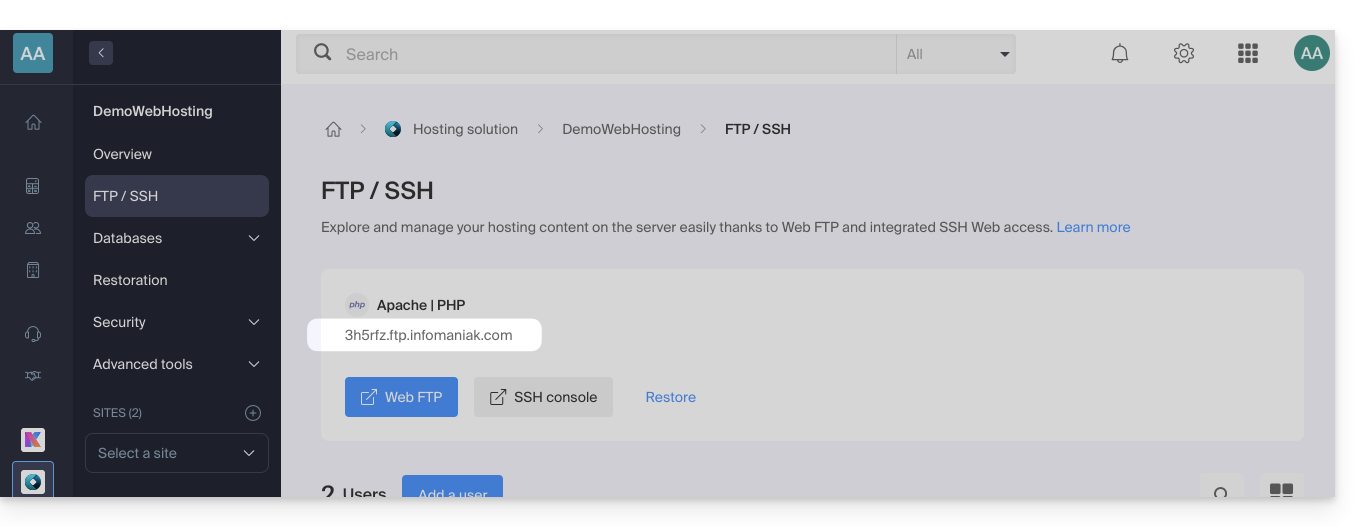
Utilize o nome de host no formato xyzb.ftp.infomaniak.com, por exemplo.
2. Nome de usuário FTP
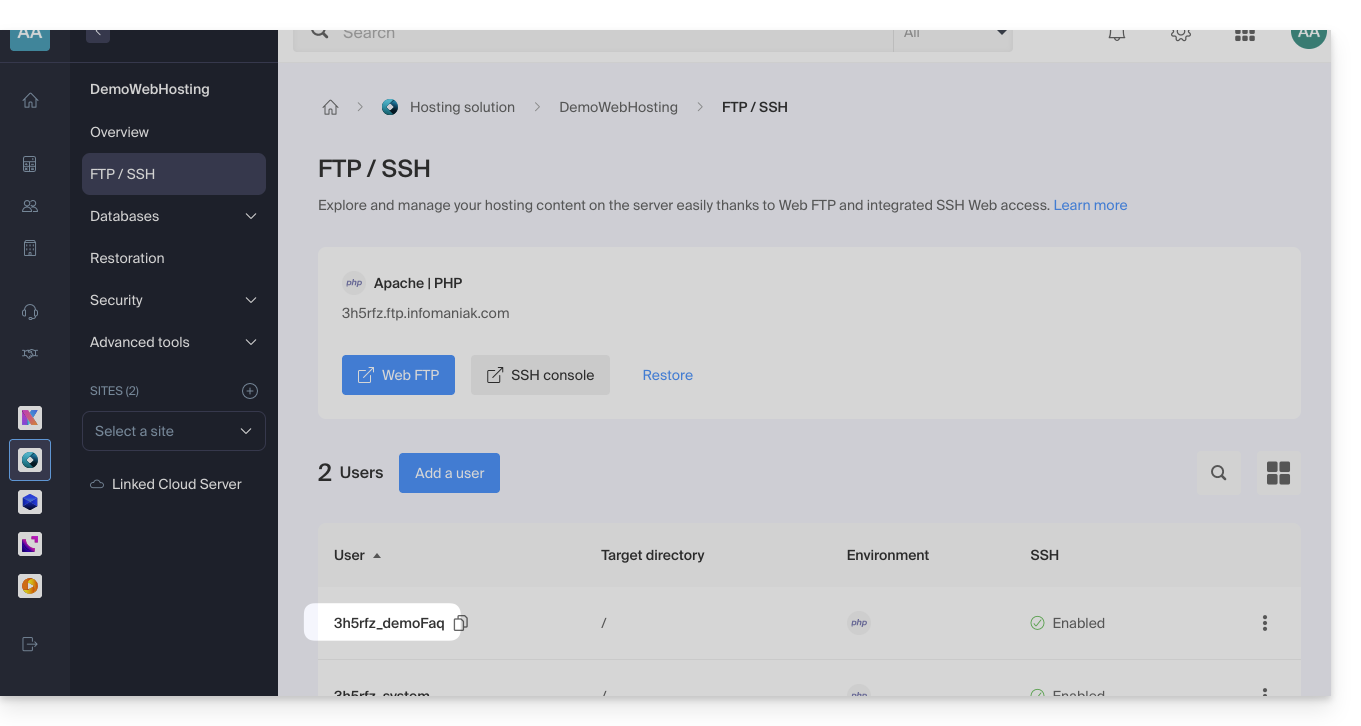
O nome de usuário é o nome da conta a ser criada no seu painel de controle: xyzb_abcdefg, por exemplo.
3. Senha do usuário FTP
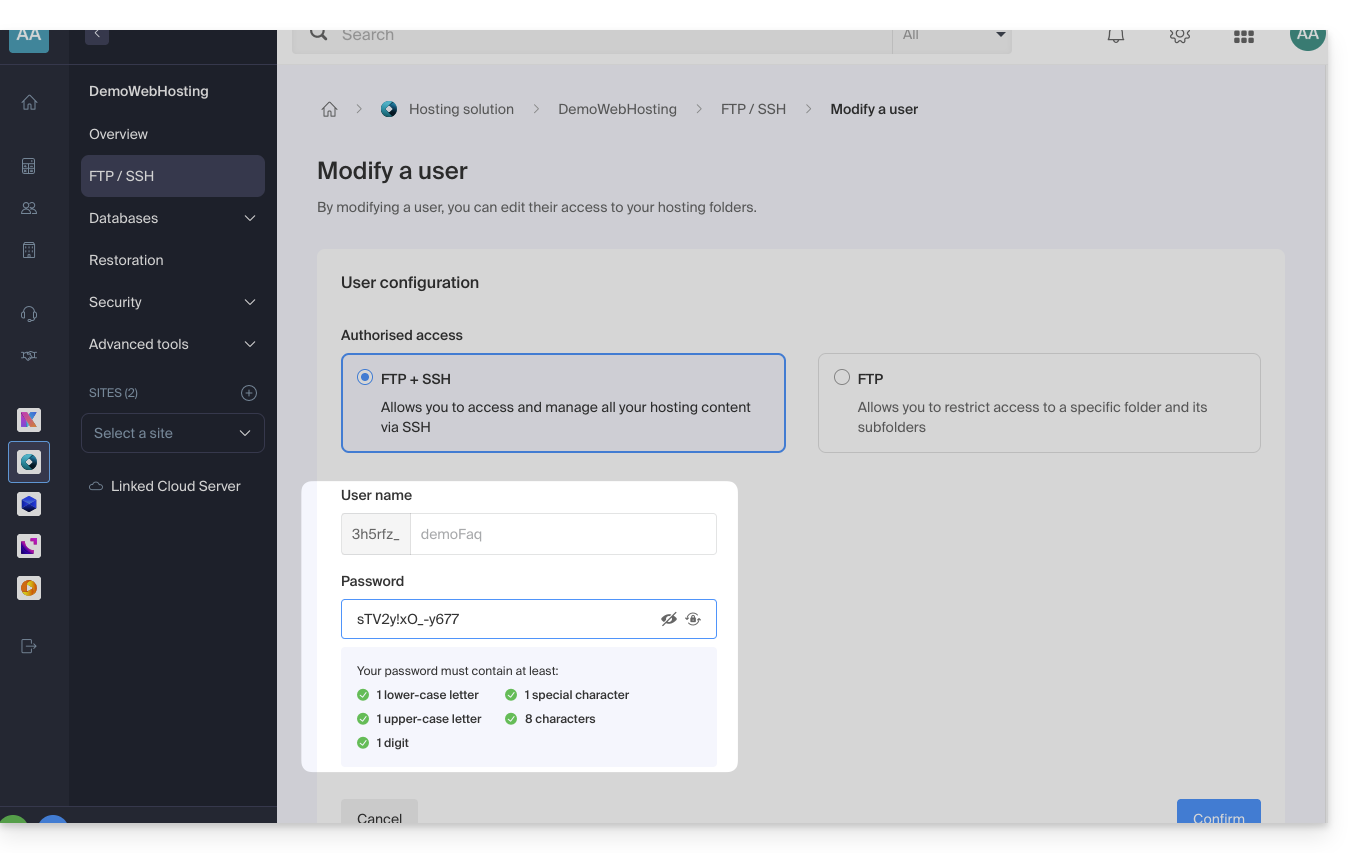
A senha do usuário FTP é definida pelo criador da conta FTP. Em caso de esquecimento, edite a conta FTP clicando nela e defina uma nova senha.
Não é possível exibir uma senha já aplicada; é necessário definir uma nova senha se você não se lembrar da senha atualmente definida.
Assim que a conexão for estabelecida…
Ao inserir os 3 parâmetros necessários, o seu aplicativo FTP deverá exibir a estrutura de diretórios da sua hospedagem: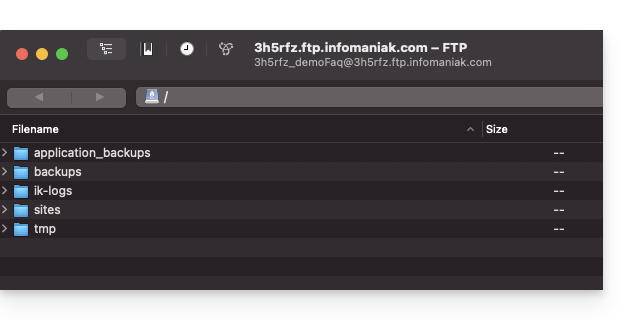
Link para esta FAQ: https://faq.infomaniak.com/1083
Esta seção de perguntas frequentes foi útil?
Este guia trata do cache de consultas MySQL, que, quando ativado, armazena em memória os resultados das consultas já executadas.
Introdução
- Cache de consultas MySQL permite acelerar consultas idênticas subsequentes, evitando que sejam executadas novamente.
- Isso pode melhorar o desempenho geral do servidor de banco de dados, reduzindo a carga e diminuindo o tempo de resposta para consultas frequentes.
query_cache_type: ON ou OFF?
Nos Serviços de Hospedagem Web compartilhados (portanto, fora do Servidor Cloud), o cache de consultas MySQL não está ativado nem pode ser ativado.
No Servidor Cloud, ative o Cache de Consultas MySQL através do Instalador Rápido.
Link para esta FAQ: https://faq.infomaniak.com/1085
Esta seção de perguntas frequentes foi útil?
Este guia explica como modificar o valor da diretiva PHP include_path.
Modificar o include_path
Tal como qualquer outro parâmetro PHP, o include_path é definido no ficheiro .user.ini.
Aqui está um exemplo de caminho a utilizar no seu ficheiro .user.ini:
- O ponto (
.) no início permite manter o diretório atual na pesquisa. - Le point (
.) au début permet de conserver le répertoire courant dans la recherche. - Os dois pontos (
:) servem como separador entre as diferentes pastas.
Consulte este outro guia sobre o phpinfo para verificar se a sua nova diretiva foi aplicada (a alteração pode demorar alguns minutos a ser refletida).
Embora este método ainda funcione, o uso do autoloader do Composer é hoje a solução preferencial para a gestão das inclusões.
Link para esta FAQ: https://faq.infomaniak.com/1108
Esta seção de perguntas frequentes foi útil?
Este guia indica como modificar a diretiva error_reporting() no seu site.
Ativar o relatório de erros
Indique as 2 informações a seguir no seu arquivo .user.ini:
display_errors=on
error_reporting=E_ALL & ~E_NOTICE & ~E_STRICT
Se o seu navegador não exibir erros ou avisos, significa que não há nenhum.
Desativar a exibição de erros PHP
Para WordPress, edite o arquivo wp-config.php e substitua a linha:
define('WP_DEBUG', false);por:
ini_set('display_errors','Off');
ini_set('error_reporting', E_ALL );
define('WP_DEBUG', false);
define('WP_DEBUG_DISPLAY', false);Alternativamente, pode adicionar o seguinte código no ficheiro .user.ini:
display_errors=offLink para esta FAQ: https://faq.infomaniak.com/1115
Esta seção de perguntas frequentes foi útil?
Este guia destina-se a desenvolvedores e webmasters que encontram problemas na exibição de caracteres especiais (por exemplo, acentos, caracteres árabes, chineses, emojis, etc.), seja em um site Infomaniak ou em seu banco de dados.
Introdução
- Causas frequentes de caracteres exibidos incorretamente que aparecem no lugar de caracteres especiais ou emojis como
??:- Conexão PHP em
utf8em vez deutf8mb4 - Tabela ou coluna MySQL em
latin1ouutf8em vez deutf8mb4 - Arquivo SQL codificado de forma diferente do parâmetro de importação
- Arquivos HTML/CSS/JS com codificação incorreta
- Ausência ou declaração incorreta do charset no lado HTML, PHP ou HTTP
- Conexão PHP em
- Soluções habituais:
- Usar
utf8mb4em todos os lugares: base de dados, conexões, tabelas, colunas, arquivos, cabeçalhos - Validar a codificação de todos os arquivos e backups
- Testar a exibição de emojis, acentos e outros caracteres multilíngues
- Usar
- Consulte também este outro guia para forçar uma codificação diferente ao conectar-se a um banco de dados MySQL.
Utilize um editor de texto que suporte o salvamento em UTF-8 sem BOM (Visual Studio Code, Sublime Text, Notepad++...)
1. Utilize UTF-8 ou UTF-8MB4 em todos os lugares
A codificação utf8 do MySQL não suporta caracteres de 4 bytes, como emojis. Estes serão exibidos como ??. Portanto, é necessário utilizar utf8mb4, que é uma implementação completa e verdadeira de UTF-8.
2. HTML – Declaração correta da codificação
No <head> das suas páginas HTML:
Certifique-se também de que os arquivos CSS/JS estão salvos em UTF-8 (sem BOM).
Assurez-vous aussi que les fichiers CSS/JS sont enregistrés en UTF-8 (sans BOM).
3. PHP – Forçar UTF-8 ou UTF-8MB4
a) Cabeçalhos HTTP
```html header('Content-Type: text/html; charset=utf-8'); ```
b) Conexão MySQL (API MySQL)
b) Connexion MySQL (API MySQL)
$connection = mysql_connect($host, $user, $pass);
mysql_set_charset('utf8mb4', $connection);
c) Conexão PDO
 $dsn = "mysql:host=localhost;dbname=ma_base;charset=utf8mb4";
$pdo = new PDO($dsn, $user, $pass, [
    PDO::ATTR_ERRMODE => PDO::ERRMODE_EXCEPTION
]);
4. Banco de dados MySQL
a) Configuração no phpMyAdmin
- O banco de dados, as tabelas e as colunas devem estar em
utf8mb4_unicode_ciouutf8mb4_general_ci. - Na guia Operações, escolha
utf8mb4_unicode_cipara o agrupamento.
b) Comandos SQL úteis
ALTER DATABASE ma_base CHARACTER SET = utf8mb4 COLLATE = utf8mb4_unicode_ci;
ALTER TABLE ma_table CONVERT TO CHARACTER SET utf8mb4 COLLATE utf8mb4_unicode_ci;
c) Após a conexão PHP
mysqli_query($conn, "SET NAMES 'utf8mb4'");
mysqli_query($conn, "SET CHARACTER SET 'utf8mb4'");
5. Ficheiro .user.ini / .htaccess
Para forçar a codificação no lado do servidor (Apache):
AddDefaultCharset utf-8
Header set Content-Type "text/html; charset=utf-8"
# Para PHP
php_value default_charset UTF-8
php_value mbstring.internal_encoding UTF-8
6. Importação/exportação de arquivos SQL
Erros como é sendo substituído por ? ou um emoji ☺ sendo substituído por ?? geralmente são causados por um desalinhamento de codificação.
Verifique a codificação do arquivo SQL antes de importar. Use iconv, se necessário:
iconv -f ISO-8859-1 -t UTF-8 dump.sql > dump_utf8.sqlNo phpMyAdmin, especifique a codificação da importação (por exemplo, UTF-8, UTF-8MB4 ou latin1, dependendo do arquivo).
Link para esta FAQ: https://faq.infomaniak.com/1124
Esta seção de perguntas frequentes foi útil?
Este guia explica como usar o gerenciador de arquivos Web FTP, que permite gerenciar de forma simples e rápida o conteúdo dos seus Serviços de Hospedagem Web.
Introdução
- O serviço online Web FTP / Gerenciador FTP não requer acesso especial, desde que você tenha os direitos de gerenciamento de uma hospedagem presente no Gerenciador Infomaniak e esteja conectado a ele.
- Portanto, não é necessário ter uma conta FTP e sua senha, a senha da conta Infomaniak é suficiente.
- Isso permite:
- criar arquivos,
- navegar pelas pastas,
- manipular arquivos existentes (copiar, renomear, mover, excluir, descompactar…),
- editar e visualizar arquivos de texto, php e html com menos de 1 MB,
- transferir arquivos com menos de 50 MB entre o seu computador e o servidor:
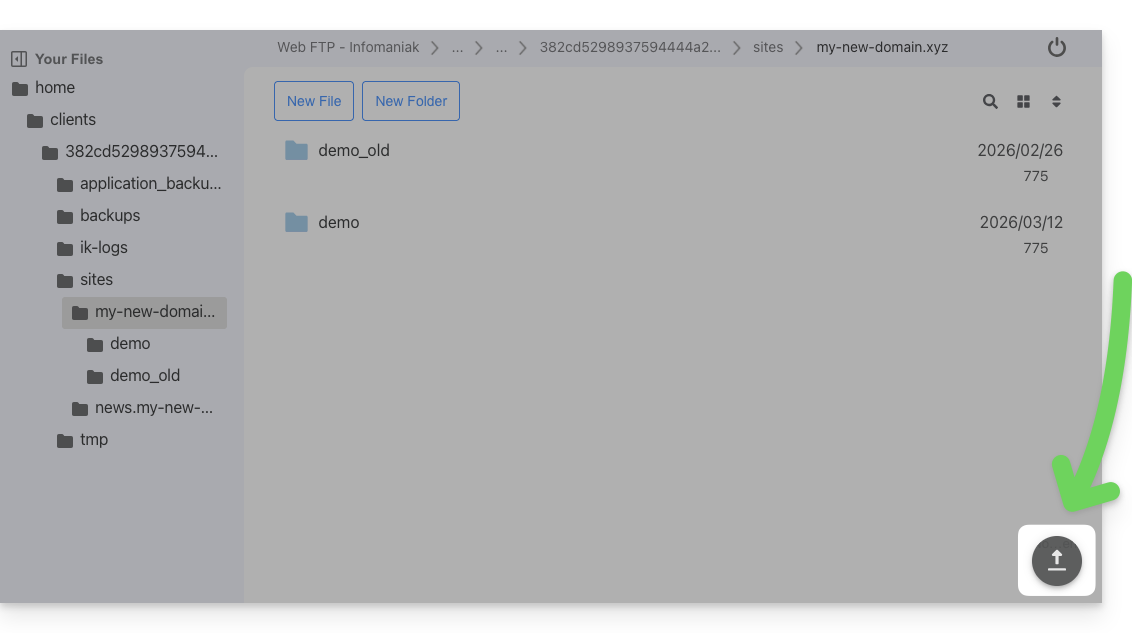
- incluindo por meio de arrastar e soltar diretamente do computador para a janela Web FTP:
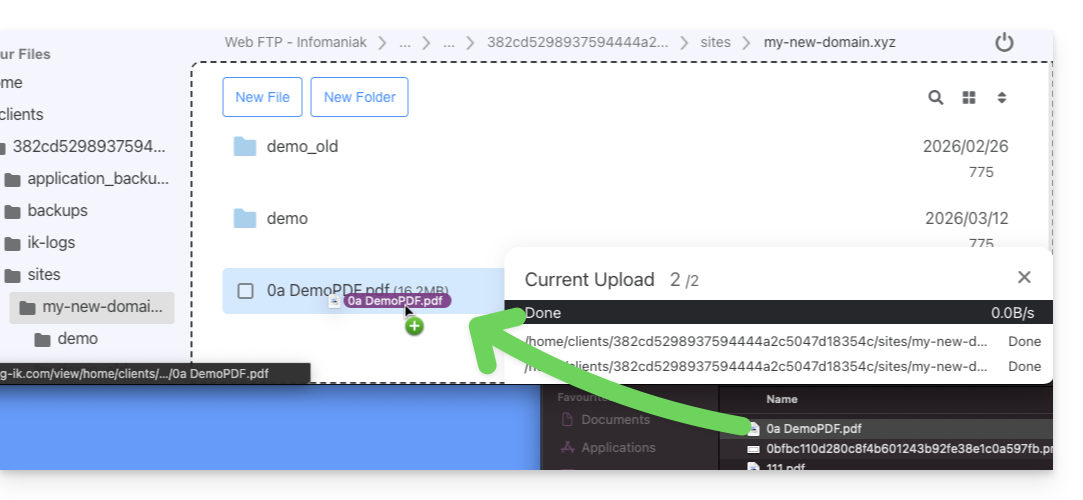
- para exceder esse limite e para obter recursos de trabalho em segundo plano, retomada de transferências após interrupção, limitação de taxas, etc., use um software/cliente FTP (❓: ajuda).
- incluindo por meio de arrastar e soltar diretamente do computador para a janela Web FTP:
Aceder ao servidor via FTP na Web
Para aceder rapidamente ao servidor do site por FTP ou SSH:
- Clique aqui para acessar o gerenciamento da sua hospedagem no painel de controle Infomaniak (❓: ajuda).
- Clique diretamente no nome atribuído à hospedagem em questão:
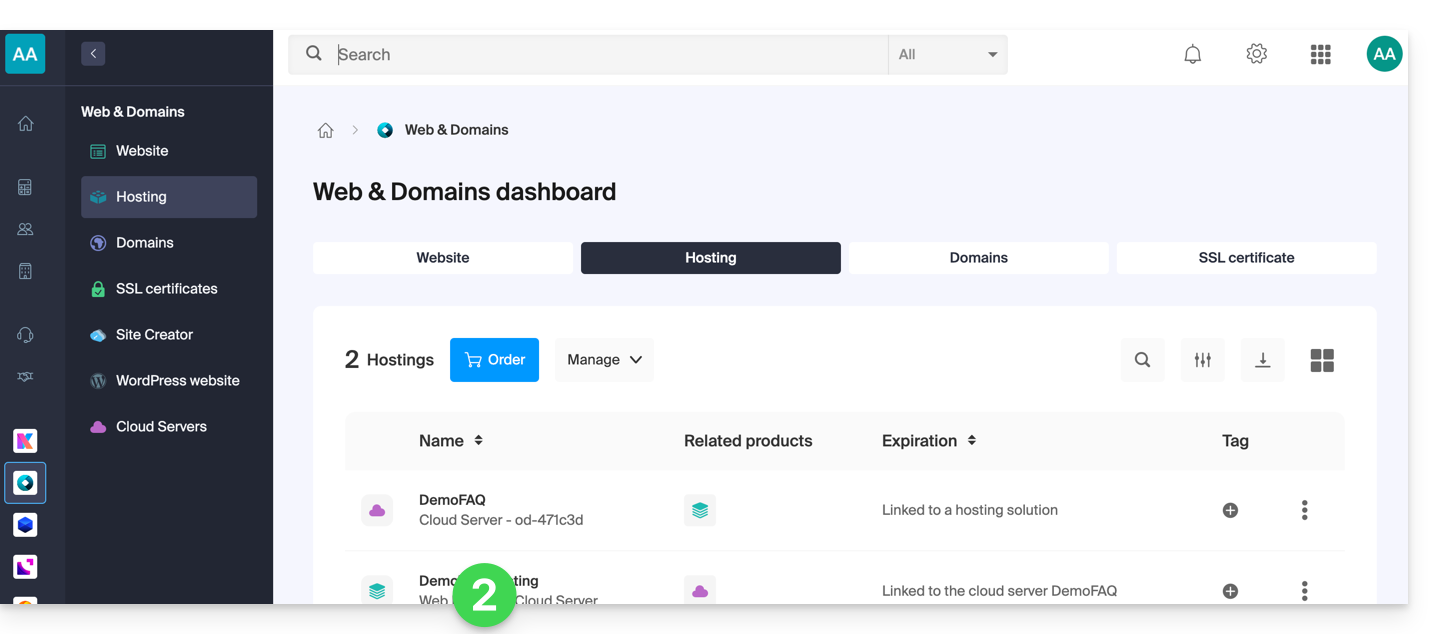
- Clique em FTP / SSH no menu lateral esquerdo.
- Clique nos botões
Web FTPouConsola SSHdisponíveis: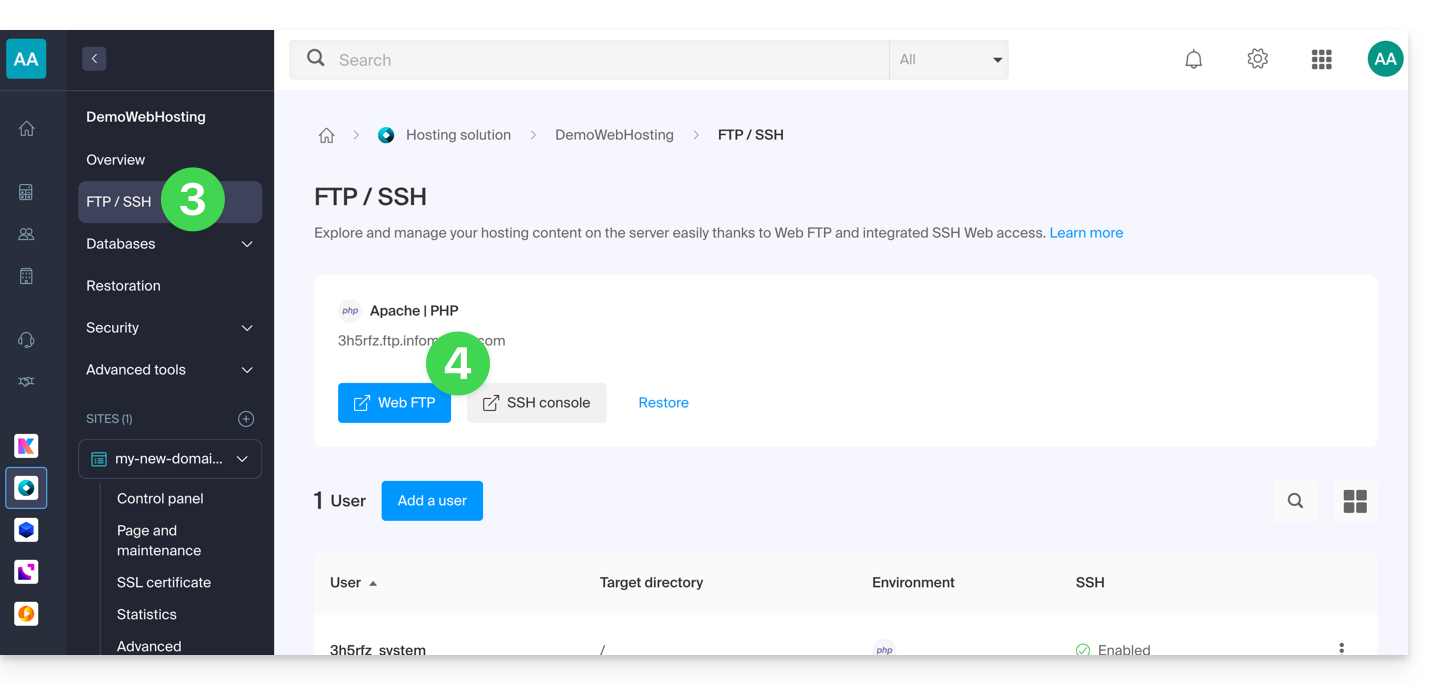
Link para esta FAQ: https://faq.infomaniak.com/1130
Esta seção de perguntas frequentes foi útil?
Este guia explica como otimizar um site hospedado em um Serviço de Hospedagem Web para torná-lo mais rápido e oferecer uma navegação fluida a todos os seus visitantes, independentemente da velocidade da conexão deles.
O papel do provedor de hospedagem
A velocidade de carregamento de um site depende de vários fatores: desempenho do servidor, infraestrutura de rede do provedor de hospedagem, conexão de internet do visitante e otimização do próprio site.
Como provedor de hospedagem, a Infomaniak se esforça para oferecer o melhor em hospedagem, aprimorando continuamente seus produtos e sua infraestrutura:
- Todos os serviços de hospedagem utilizam discos SSD de última geração.
- A infraestrutura beneficia de mais de 70 Gbit/s de interconexão e redundância com parceiros como Cogent ou Level3.
- Para lidar com os picos de tráfego, os servidores utilizam processadores Intel Xeon de 64 bits, que são atualizados regularmente. Os servidores partilhados utilizam, em média, apenas 40% da capacidade dos seus processadores.
Quando submete um pedido de suporte relacionado com lentidão, a Infomaniak verifica os seguintes pontos:
- O servidor da sua hospedagem está funcionando normalmente e não apresentou nenhum incidente nas últimas 48 horas.
- A infraestrutura de rede não sofreu nenhuma interrupção durante o mesmo período.
O papel do proprietário do site e do webmaster
A Infomaniak não interfere no conteúdo dos servidores nem no desenvolvimento dos sites. A criação e a manutenção de um site são atividades distintas, embora utilizem as ferramentas e os serviços disponibilizados pelo provedor de hospedagem.
Analisar a causa da lentidão
Aqui estão as ações a serem tomadas se você notar lentidão no seu site:
- Aplique as recomendações do Google PageSpeed Insights. Estes pontos dizem respeito ao design do site e não à configuração do servidor. Consulte este outro guia se o teste recomendar ativar a compressão dos recursos.
- Em caso de lentidão verificada a partir do exterior, ative o DNS Fast Anycast.
- Instale um sistema de cache para reduzir o número de acessos redundantes aos bancos de dados e acelerar o carregamento das páginas.
- Considere a utilização de um CDN.
- Teste o tempo de resposta do servidor ou TTFB.
- Analise seu alojamento para detetar possíveis vírus.
- Limpe regularmente as suas bases de dados, eliminando as entradas desnecessárias.
- Utilize a versão mais recente de PHP compatível com o seu site ou CMS.
- Evite imagens, contadores ou outros conteúdos multimídia hospedados em servidores externos: se não estiverem acessíveis, seu site parecerá lento.
- Desative as extensões WordPress desnecessárias ou que consomem muitos recursos.
- Mantenha seus CMS e aplicativos web atualizados regularmente.
- Limite o impacto de robôs de indexação excessivamente agressivos, configurando um Crawl-delay.
- Analise os registros de erro: corrigir os erros gerados pelo seu site melhora o seu desempenho.
- Consulte os registros de consultas lentas para identificar as consultas SQL que demoram mais de 5 segundos para serem executadas e otimize-as (exemplos de otimização).
- Adicione um motor de cache de servidor, como Memcached (disponível apenas em servidores Cloud).
- Aumente o valor de max_children (apenas em servidores Cloud).
Se o problema persistir
Se você ou seu webmaster não conseguirem identificar a causa da lentidão, entre em contato com o suporte da Infomaniak por escrito, fornecendo as seguintes informações:
- Nome do site hospedado.
- Datas e horários exatos em que ocorreram as lentidões.
- Nome da base de dados ou da conta FTP, caso aplicável.
- O seu endereço IP público durante os testes (visível em https://www.infomaniak.com/ip).
- Tipo de lentidão (visualização, transferências FTP, etc.).
- Indique se você acessa normalmente o site da Infomaniak durante esses períodos.
- Resultado completo de um traceroute para
84.16.66.66. - Resultado de um teste de velocidade no speedtest.net, selecionando a Infomaniak como servidor de destino.
Se as suas necessidades evoluírem
Se a hospedagem compartilhada já não for suficiente, considere migrar para um Servidor Cloud. O seu site poderá ser migrado facilmente para usufruir de recursos dedicados e tecnologias de cache avançadas.
Link para esta FAQ: https://faq.infomaniak.com/1137
Esta seção de perguntas frequentes foi útil?
Este guia destina-se a desenvolvedores que desejam usar o ORM Propel em um ambiente de hospedagem onde o acesso à linha de comando é restrito.
Introdução
- O ORM permite vincular os objetos de uma aplicação às tabelas de um banco de dados. Os dados são manipulados por meio de objetos
PHP, em vez de escreverSQLdiretamente. Propelé a camada de abstração que gerencia essas interações (relações, junções, paginação) para simplificar a manutenção do código.
Particularidades e limitações
Propelnão está pré-instalado viaPear.- Você deve instalá-lo manualmente em seu projeto.
- É imperativo baixar a versão "Pacote Convencional" de
Propel.
- Os comandos CLI (como
propel-gen) não podem ser executados no servidor.- Consequentemente,
Propelsó pode ser usado no modo "Runtime" em produção. A geração das classes (build) deve ser realizada localmente. - O fluxo de trabalho consiste em gerar o código em um ambiente de desenvolvimento e, em seguida, transferir os arquivos resultantes para o servidor.
- Consequentemente,
- Dependências:
- Todas as bibliotecas necessárias para
Propelestão disponíveis, com exceção dePhing. - A ausência de
Phingnão afeta a produção, pois esta ferramenta é necessária apenas durante a fase de geração local.
- Todas as bibliotecas necessárias para
Link para esta FAQ: https://faq.infomaniak.com/1142
Esta seção de perguntas frequentes foi útil?
Este guia destina-se aos utilizadores que escolheram a Infomaniak, um provedor de hospedagem comprometido com o planeta: abaixo, encontrará os detalhes do método de cálculo utilizado para apresentar as emissões de CO2 nas faturas, bem como sugestões para reduzir a sua própria pegada digital.
Introdução
- Para os serviços de hospedagem web e e-mail, a Infomaniak apresenta a quantidade de CO2 emitida anualmente, dado que se baseia em um método rigoroso de Análise do Ciclo de Vida (ACV), que soma dois fatores-chave:
- O impacto material (ciclo de vida completo)
- Com base nos fatores de emissão do banco de dados ResilioDB, o cálculo integra as emissões geradas durante a fabricação (BLD), o transporte (DIS) e o fim da vida útil/reciclagem (EOL) de cada equipamento (servidores, RAM, discos, etc.).
- O impacto energético (consumo real)
- O consumo real de energia dos servidores é medido por meio de sondas IPMI.
- Essa energia é então convertida em equivalente de CO2 de acordo com a matriz energética específica da Infomaniak, que é de baixo teor de carbono (11,77 g de CO2eq/kWh).
- O impacto material (ciclo de vida completo)
- O impacto total é então distribuído de acordo com a unidade de uso dos clientes (por site hospedado ou por caixa de e-mail).
Como agir ao seu nível?
Se o provedor de hospedagem otimizar suas infraestruturas, o usuário final também desempenha um papel fundamental. Veja como reduzir o impacto ambiental dos seus serviços.
Para sites
O objetivo é minimizar o consumo de energia dos servidores e dos dispositivos dos visitantes:
- Otimização técnica: comprimir as imagens, reduzir o tamanho dos scripts e usar formatos modernos (WebP).
- Design simplificado: limitar os vídeos com reprodução automática, os anúncios e os scripts pesados que consomem largura de banda.
- Boas práticas: Para o WordPress, em particular, recomenda-se consultar as páginas do GreenIT.
Para o serviço de e-mail
A comunicação por e-mail também pode ser otimizada:
- Simplicidade: Priorizar e-mails em texto simples em vez de HTML e limitar as assinaturas gráficas pesadas.
- Anexos: Prefira o envio de links para download (via kDrive ou SwissTransfer) em vez de anexos volumosos ou utilize o formato PDF compactado.
- Limpeza: Cancele a inscrição em newsletters desnecessárias e utilize ferramentas de rastreamento para evitar o envio de e-mails não abertos.
Recomenda-se monitorizar regularmente as estatísticas para melhorar o desempenho ambiental. Enquanto aguarda as futuras ferramentas integradas da Infomaniak, é possível analisar o impacto das páginas web através do GreenFrame.io.
Link para esta FAQ: https://faq.infomaniak.com/1160
Esta seção de perguntas frequentes foi útil?