Base de conhecimento
1000 perguntas frequentes, 500 tutoriais e vídeos explicativos. Aqui, você encontra apenas soluções!
Este guia explica como proteger os vídeos hospedados num serviço VOD Infomaniak através de uma chave única (token).
Introdução
- Importante: esta proteção aplica-se apenas às integrações padrão por
iframeque utilizam o reprodutor Infomaniak (❓: ajuda). - Outros modos de restrição também estão disponíveis: por palavra-passe (❓: ajuda) ou por bloqueio geográfico (GeoIP). (❓: ajuda).
- Você pode personalizar as imagens de visualização exibidas quando o acesso é negado (❓: ajuda).
Como funciona a proteção por chave única
A restrição por chave única permite proteger o acesso aos arquivos de uma pasta, exigindo um token temporário específico para cada utilizador.
Este token é gerado exclusivamente por si (no lado do servidor) e deve ser transmitido como parâmetro ao aceder ao arquivo. Este mecanismo é ideal para casos de uso como o Pay-Per-View ou a distribuição com acesso restrito.
Observação: a integração e a geração dinâmica dos tokens devem ser desenvolvidas na sua própria aplicação web. Se a chave fornecida for inválida ou estiver expirada, o Player retorna um erro 403 Acesso proibido.
Ativar a restrição em uma pasta de VOD
Quando uma restrição é configurada em uma pasta, ela é aplicada automaticamente a todos os conteúdos que já estão nela ou que forem importados posteriormente.
- Aceder ao painel de controlo: clique aqui para aceder à gestão do seu produto VOD/AOD (❓: ajuda).
- Selecionar o produto: clique no nome atribuído ao seu serviço VOD:
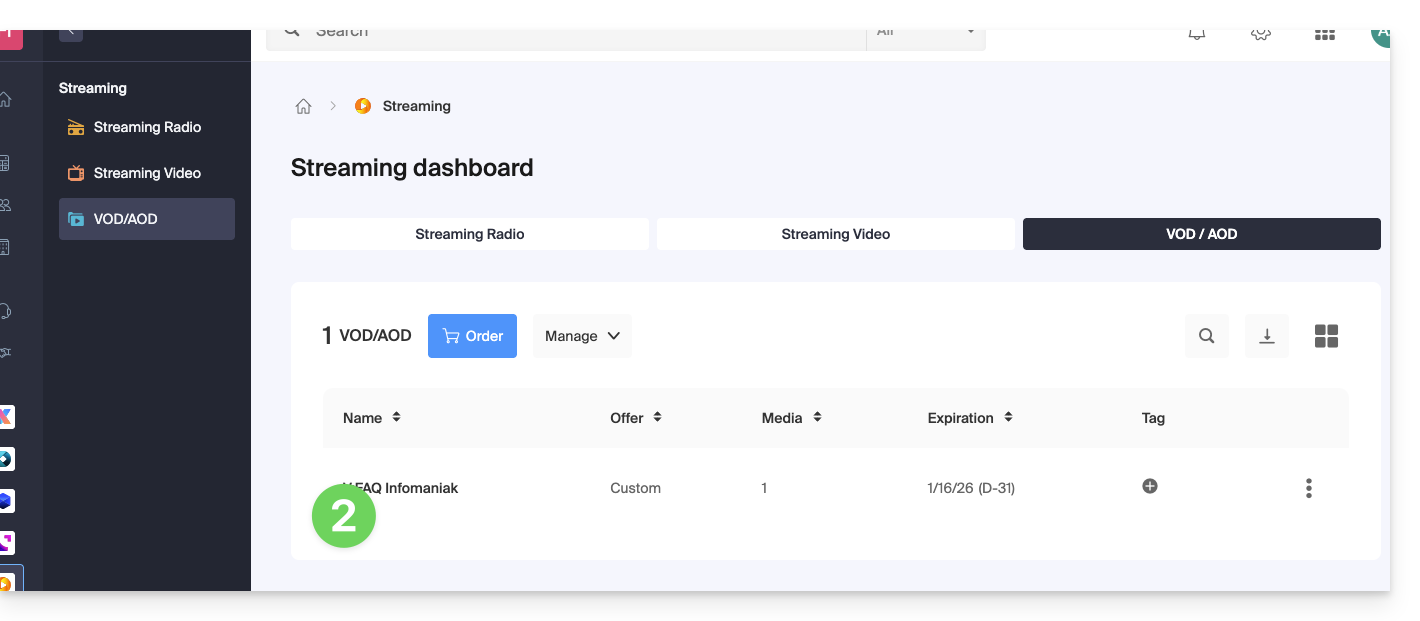
- No menu lateral esquerdo, vá para Mídia e, em seguida, Gerenciamento de mídia.
- Criar ou configurar uma pasta: clique no ícone de criação de Nova pasta:
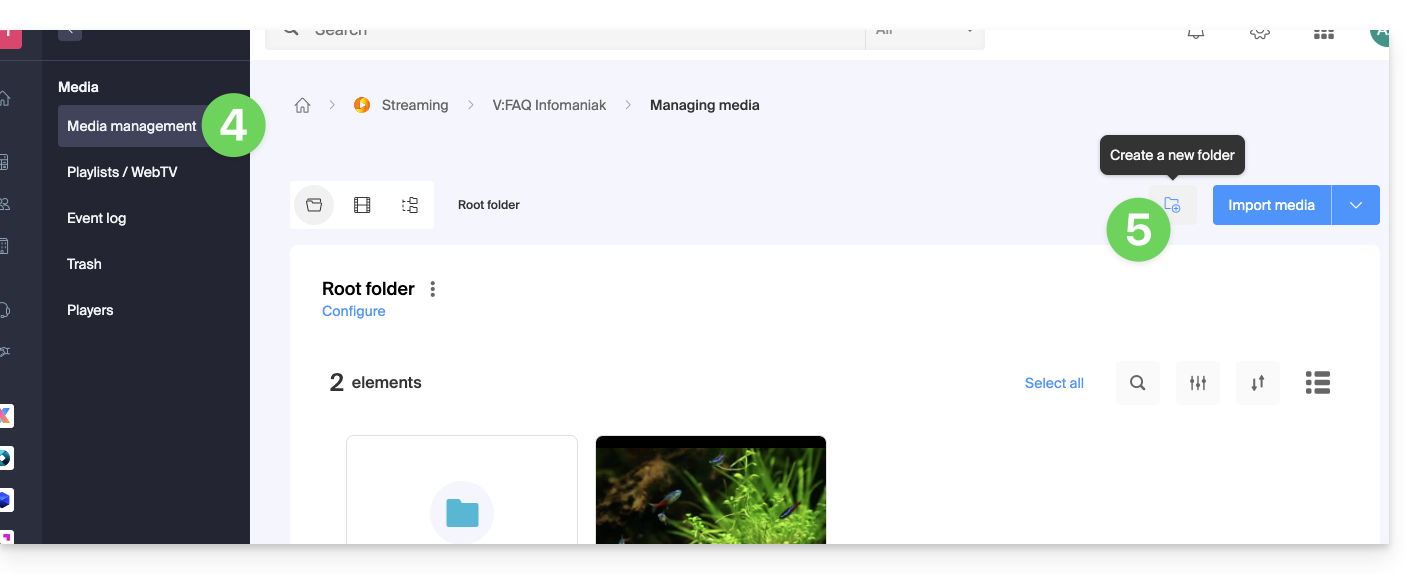
- Insira o nome da pasta e clique em Criar pasta.
- Acesse as configurações da pasta clicando em Configuração:
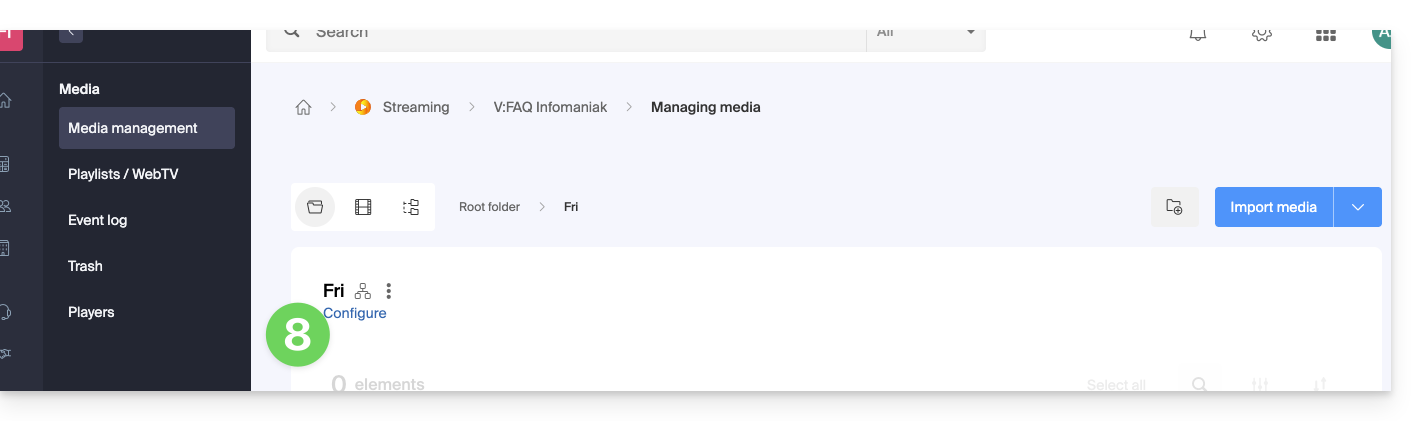
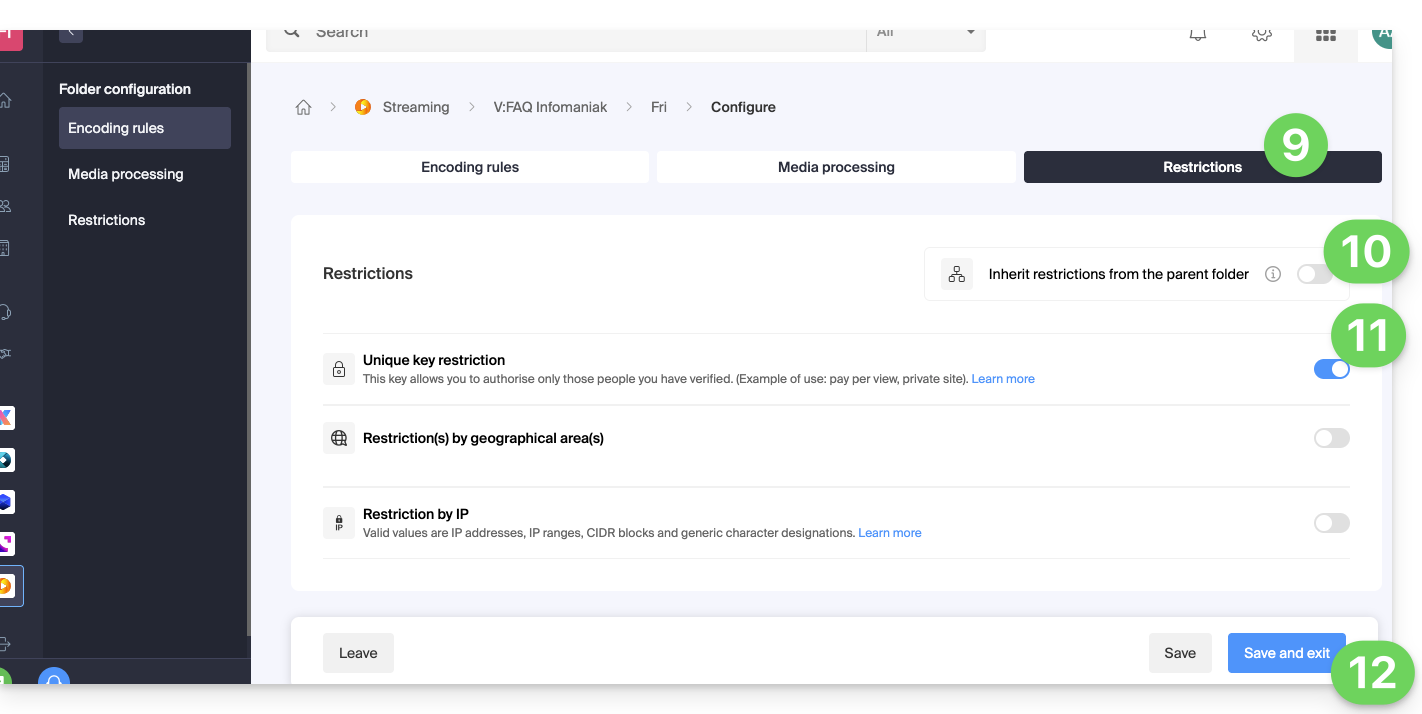
- Abra a aba Restrições.
- Se necessário, desative o botão de alternância para quebrar a herança da pasta pai, a fim de aplicar regras específicas.
- Ative a opção de restrição por Chave única.
- Clique em Salvar para confirmar:
Procedimento de integração técnica
1. Criar um token de acesso à API
Para interagir com a API VOD, gere primeiro uma chave de API global a partir da sua conta (❓: ajuda).
2. Gerar o token de reprodução (Playback Token)
No lado do servidor, sua aplicação deve executar uma requisição POST para cada usuário único antes de exibir o reprodutor.
Importante: a página que gera este token não deve ser armazenada em cache para garantir a unicidade da chave.
Pedido da API (❓: ajuda):
POST https://api.vod2.infomaniak.com/api/pub/v1/channel/channel_id/share/share_id/token
• channel_id: identificador do seu canal VOD (ex.: 1227)
• share_id: identificador único do conteúdo (ex.: extraído da URL de incorporação: https://api.vod2.infomaniak.com/res/embed/1jhvl2uqa5rdf.html)
3. Inserir o token no código Iframe
Passe o token obtido na etapa anterior como parâmetro na URL (?token=...) no código de integração do seu iframe:
<iframe frameborder="0" width="720" height="360" src="https://api.vod2.infomaniak.com/res/embed/1jhvl2uqa5rdf.html?token=st=1637143497~exp=1637143797~acl=/hls/1jhvl2uq4dnra/1jhvl2uq4dnmd/*~hmac=914aa838bdba141ec85db74266b54278572a1353a49e8851e4fd096dc6372127" allowfullscreen></iframe>
Link para esta FAQ: https://faq.infomaniak.com/1366
Esta seção de perguntas frequentes foi útil?
Este guia explica como inserir um logotipo ou uma marca d'água nos seus vídeos do espaço VOD Infomaniak, para reforçar a sua imagem de marca e proteger os seus conteúdos contra o uso não autorizado.
Introdução
- Existem dois métodos distintos para exibir uma imagem nos seus conteúdos:
- através da configuração de um Player
- ou através das regras de uma Pasta de importação.
- Estas duas tecnologias são independentes: se as ativar simultaneamente, o logótipo do Player sobrepor-se-á ao logótipo já incorporado no vídeo.
1. Sobreposição através do reprodutor de vídeo
Na gestão de um reprodutor, o logotipo selecionado é adicionado como sobreposição durante a reprodução: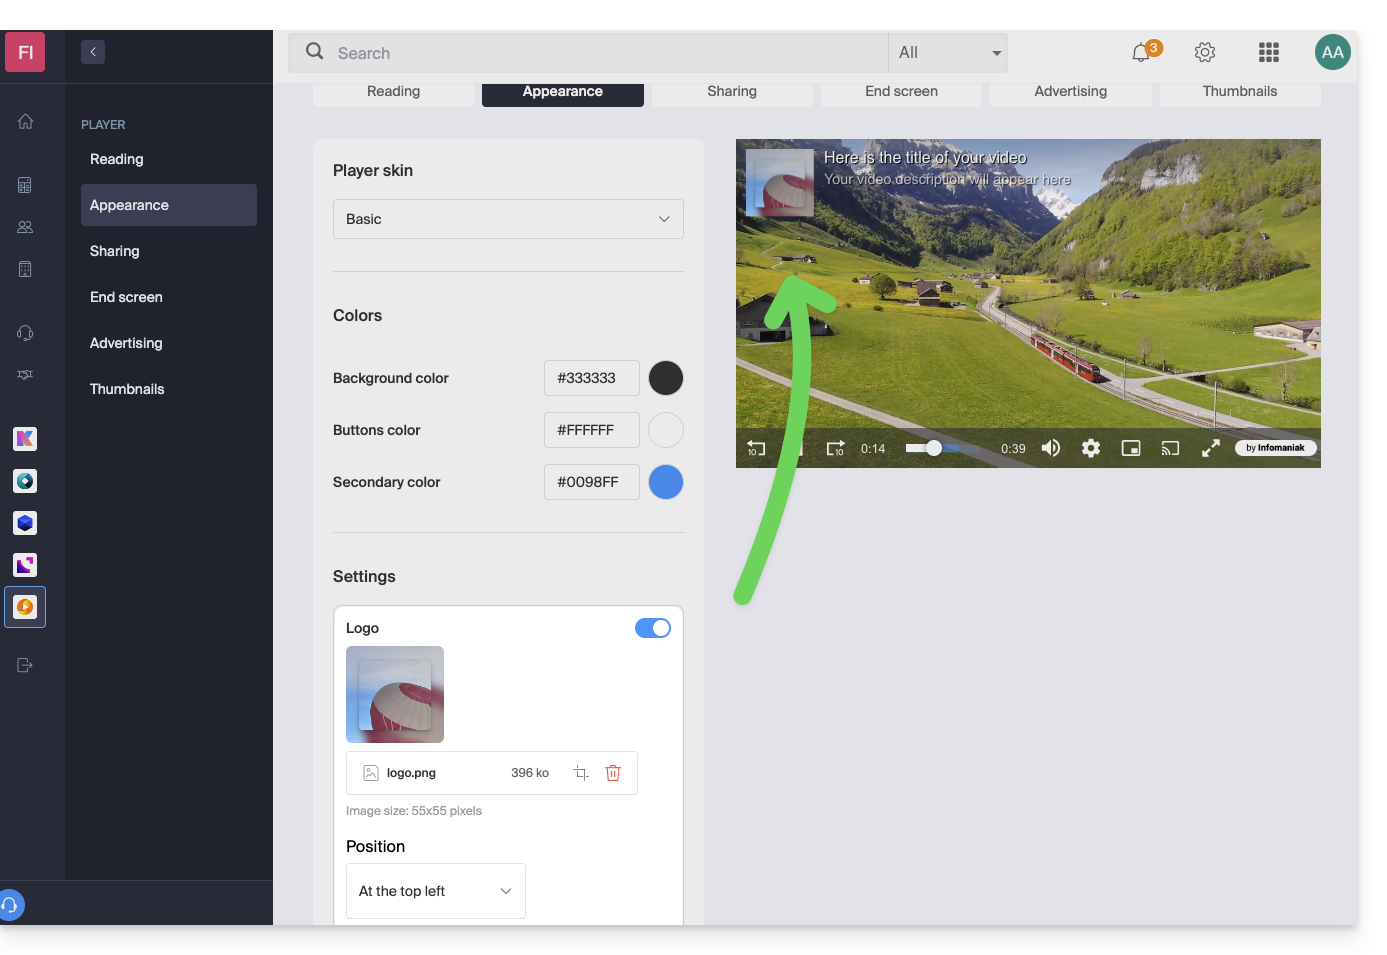
- Vantagens: grande flexibilidade.
- Você pode modificar ou remover o logotipo a qualquer momento sem alterar o arquivo original.
- O mesmo conteúdo multimídia pode ser exibido por meio de diferentes reprodutores com logotipos distintos.
- Limitação: se um usuário acessar diretamente o fluxo de vídeo original (URL direta), o logotipo não será visível.
2. Inserção por meio de uma pasta de importação
Na configuração de uma pasta (raiz ou subpasta), a imagem é inserida diretamente no fluxo de vídeo durante o processo de codificação: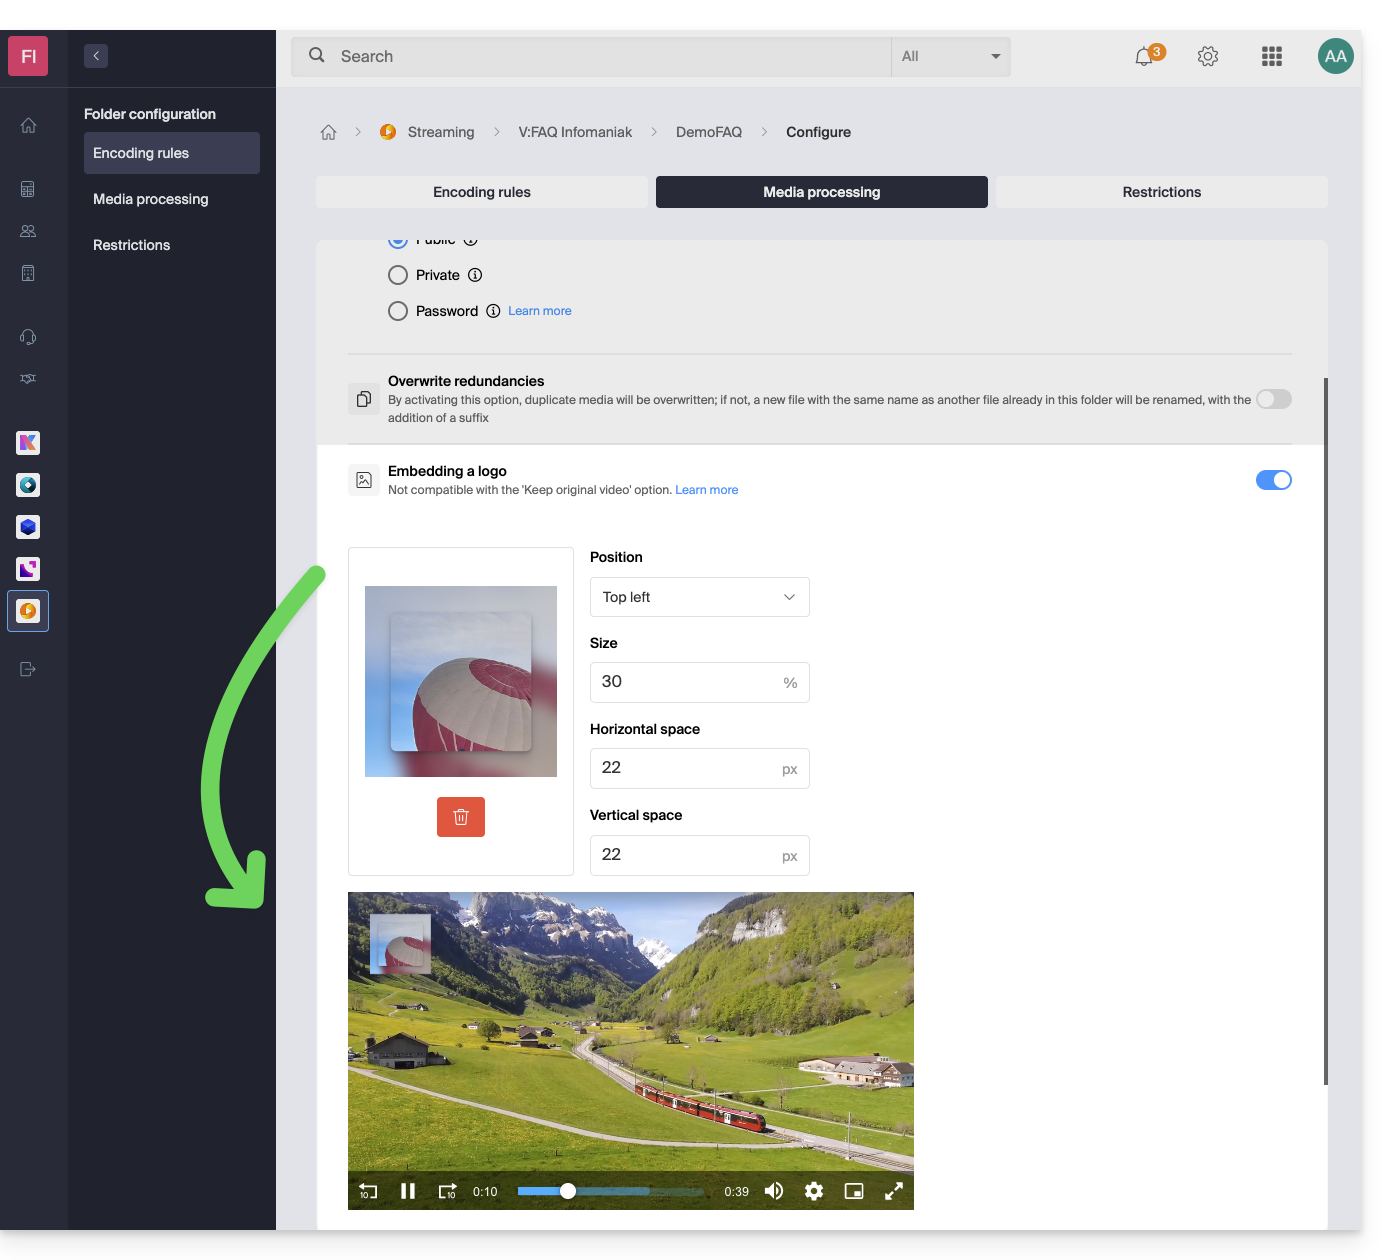
- Vantagem: segurança máxima.
- O logotipo faz parte integrante do arquivo de vídeo (incorporado).
- Ele permanece visível, independentemente do modo de reprodução ou download.
- Desvantagem: falta de flexibilidade.
- Após o processamento do vídeo, o logotipo não pode mais ser modificado ou removido.
- Qualquer alteração posterior exigirá uma nova importação do arquivo.
Link para esta FAQ: https://faq.infomaniak.com/1403
Esta seção de perguntas frequentes foi útil?
Este guia explica como obter e configurar notificações em caso de incidente ou de consumo excessivo de VOD/AOD.
Alertas por e-mail
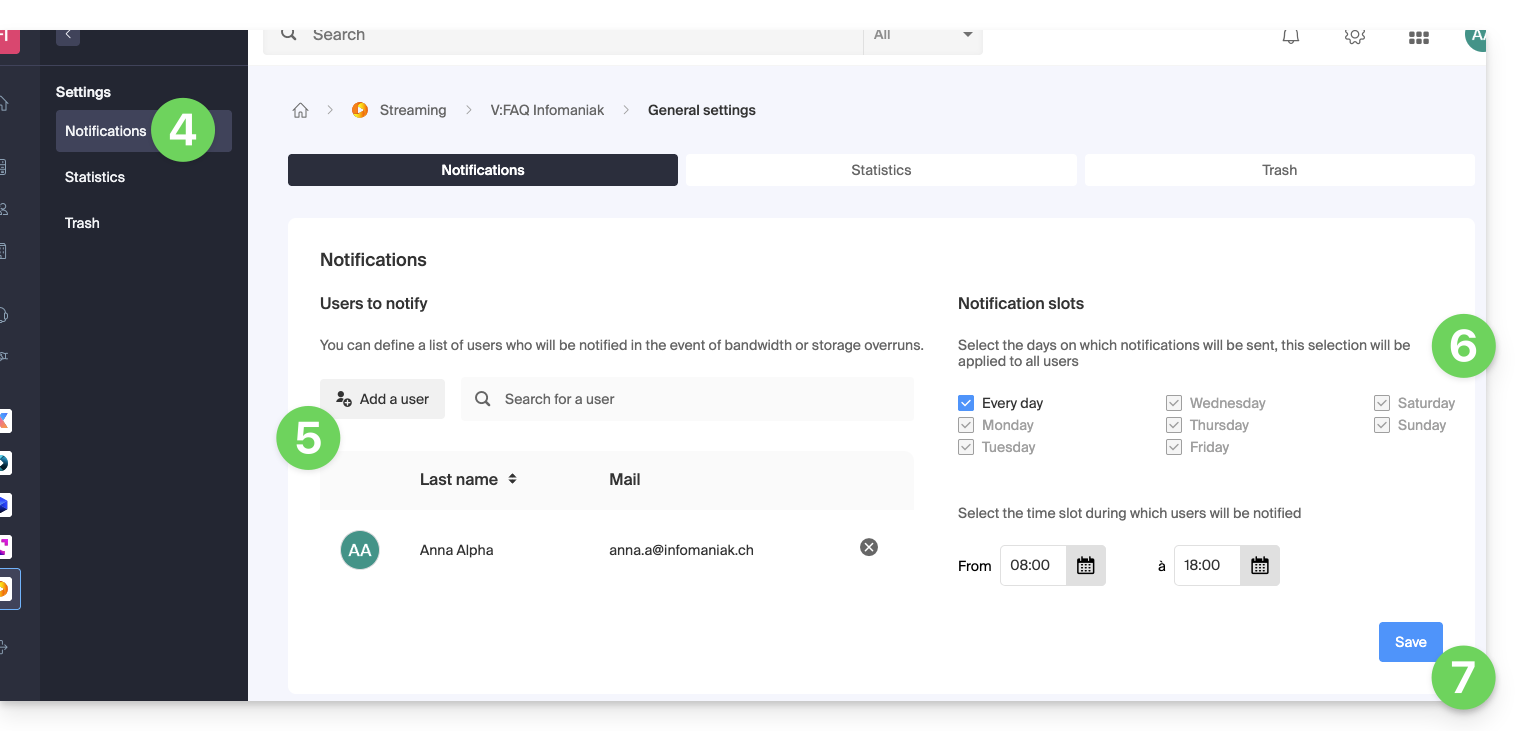
Para configurar as notificações:
- Clique aqui para acessar a gestão do seu produto no Manager Infomaniak (precisa de ajuda?).
- Clique diretamente no nome atribuído ao produto em questão.
- Clique em Configurações no menu lateral esquerdo.
- Clique em Notificações no menu lateral esquerdo.
- Adicione os utilizadores da Organização que devem receber notificações por e-mail.
- Configure os horários de monitorização (dias da semana / horas).
- Guarde as alterações:
Link para esta FAQ: https://faq.infomaniak.com/1418
Esta seção de perguntas frequentes foi útil?
Este guia explica como transmitir ao vivo uma lista de vídeos do serviço VOD através do produto Streaming de vídeo.
Introdução
- Esta funcionalidade permite utilizar o serviço VOD para criar uma lista de reprodução de vídeos e, em seguida, utilizar o serviço de transmissão de vídeo para transmiti-los em tempo real, por exemplo, no contexto de um canal de videoclipes, telecompra, documentários, etc.
- É possível inserir anúncios entre cada vídeo, manualmente ou através da utilização de tags VAST.
- A lista de reprodução será reproduzida em loop continuamente até que o usuário a interrompa.
Transmitir uma lista de reprodução VOD em streaming ao vivo
Pré-requisitos
- Ter um serviço VOD (no mínimo, o espaço VOD gratuito com o serviço de streaming de vídeo).
- Ter um serviço de streaming de vídeo na mesma organização e gerenciado pela mesma conta.
Para criar a lista de reprodução, importe alguns vídeos:
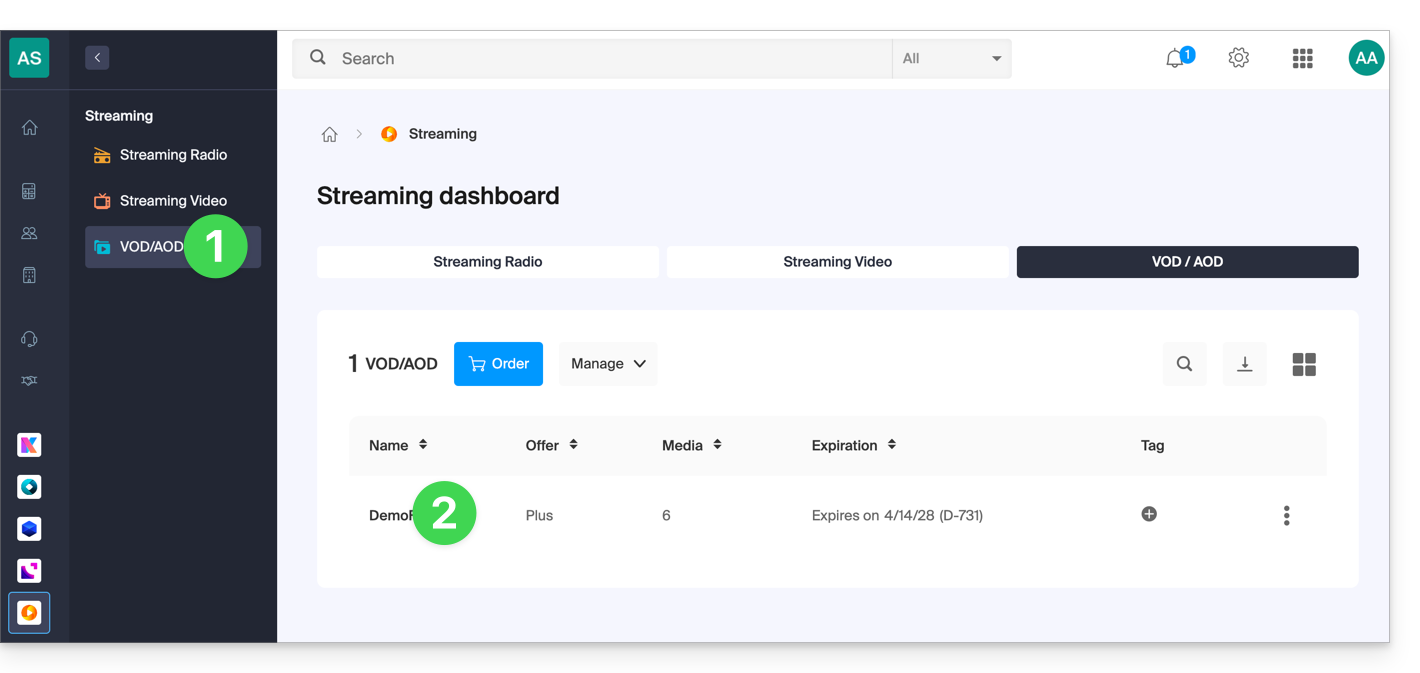
- Clique aqui para acessar o gerenciamento do seu produto no painel de controle Infomaniak (precisa de ajuda?).
- Clique diretamente no nome atribuído ao produto em questão:
- Selecione os arquivos de mídia para importar na seção Importação rápida ou a partir do gerenciador de mídia:
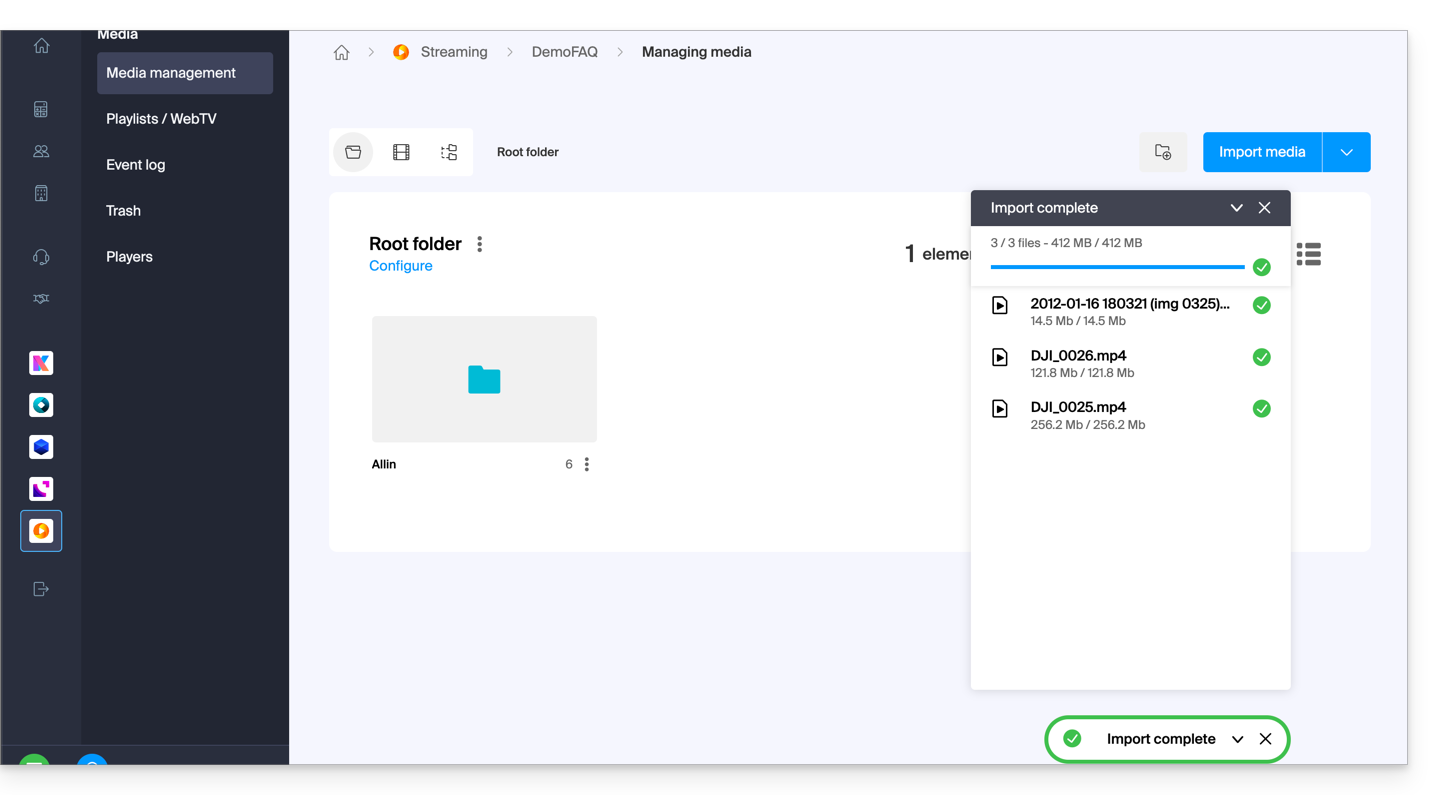
Após a importação dos vídeos:
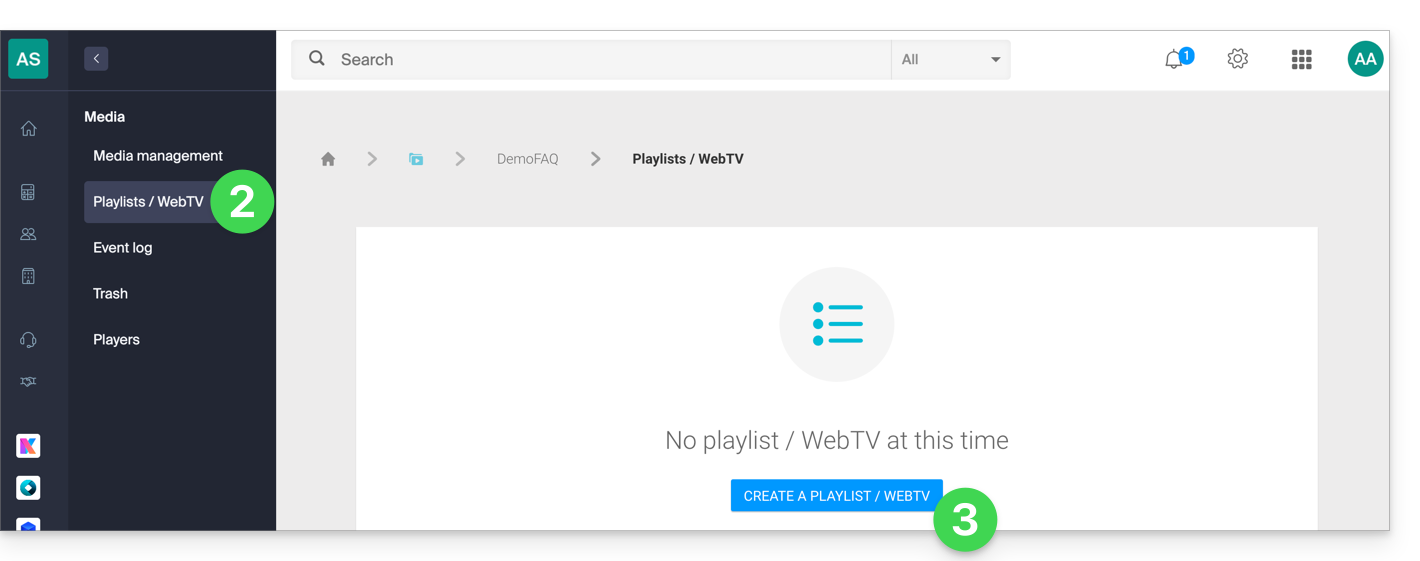
- Clique em Mídia no menu lateral esquerdo.
- Clique em Listas de reprodução / WebTV no menu lateral esquerdo.
- Clique no botão para adicionar uma nova lista de reprodução:
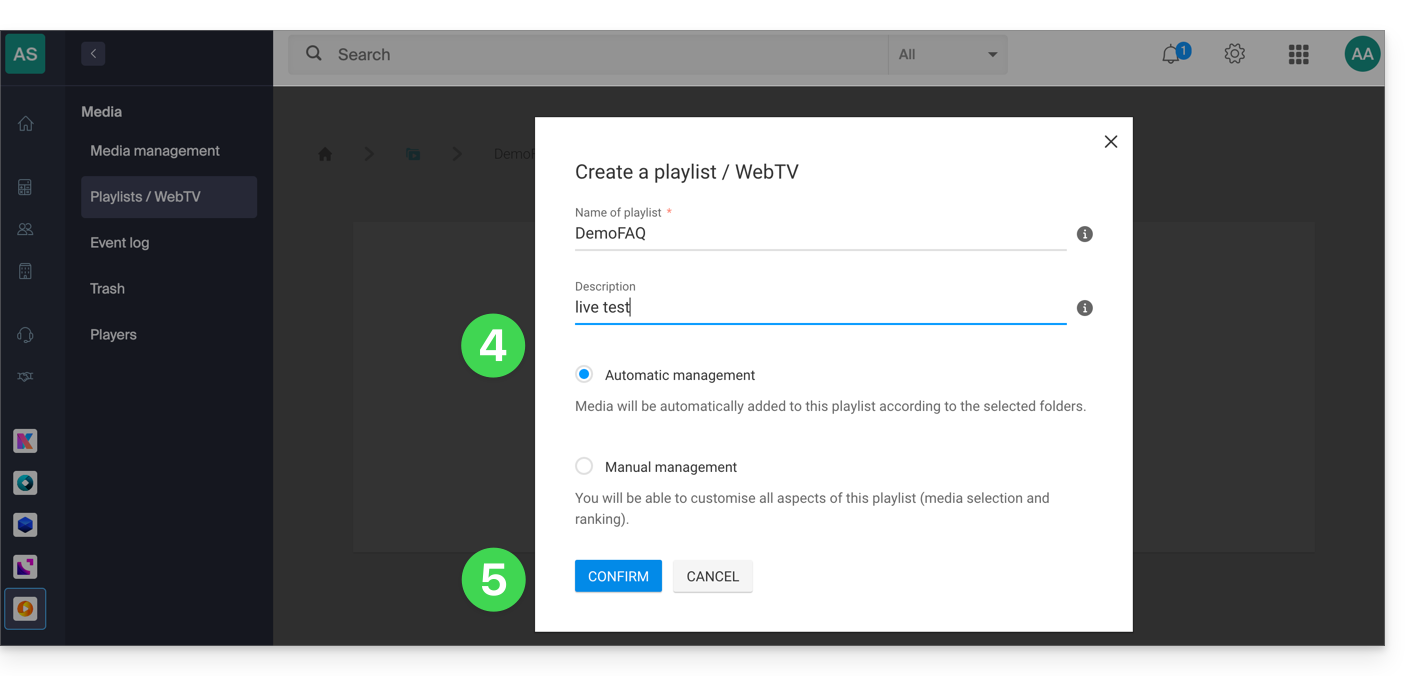
- Dê um nome à lista de reprodução e determine se ela deve ser automática (vinculada a uma pasta) ou manual.
- Confirme:
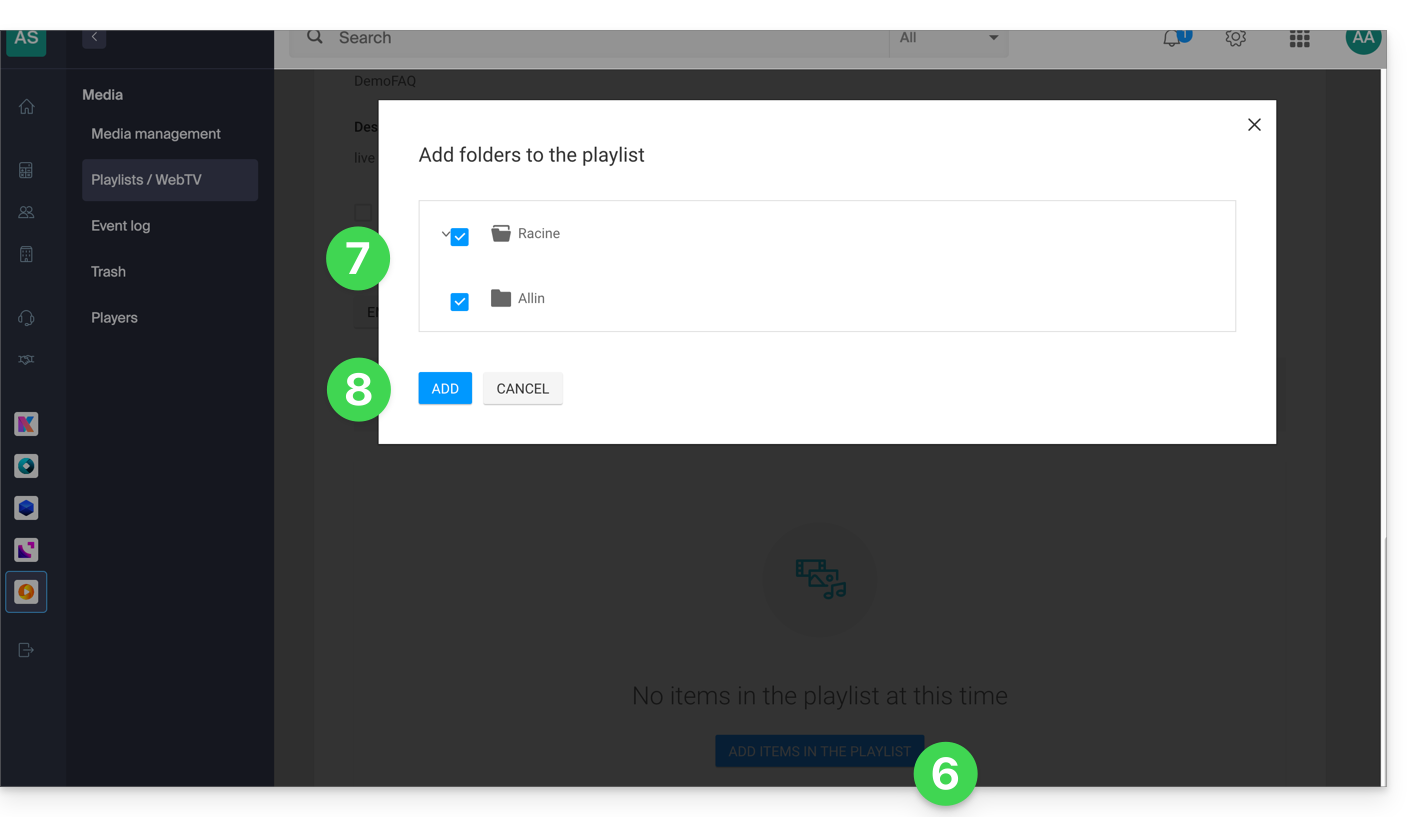
- Clique para adicionar mídia.
- Escolha a pasta ou os vídeos específicos que deseja usar para criar a lista de reprodução.
- Adicione os arquivos de mídia:
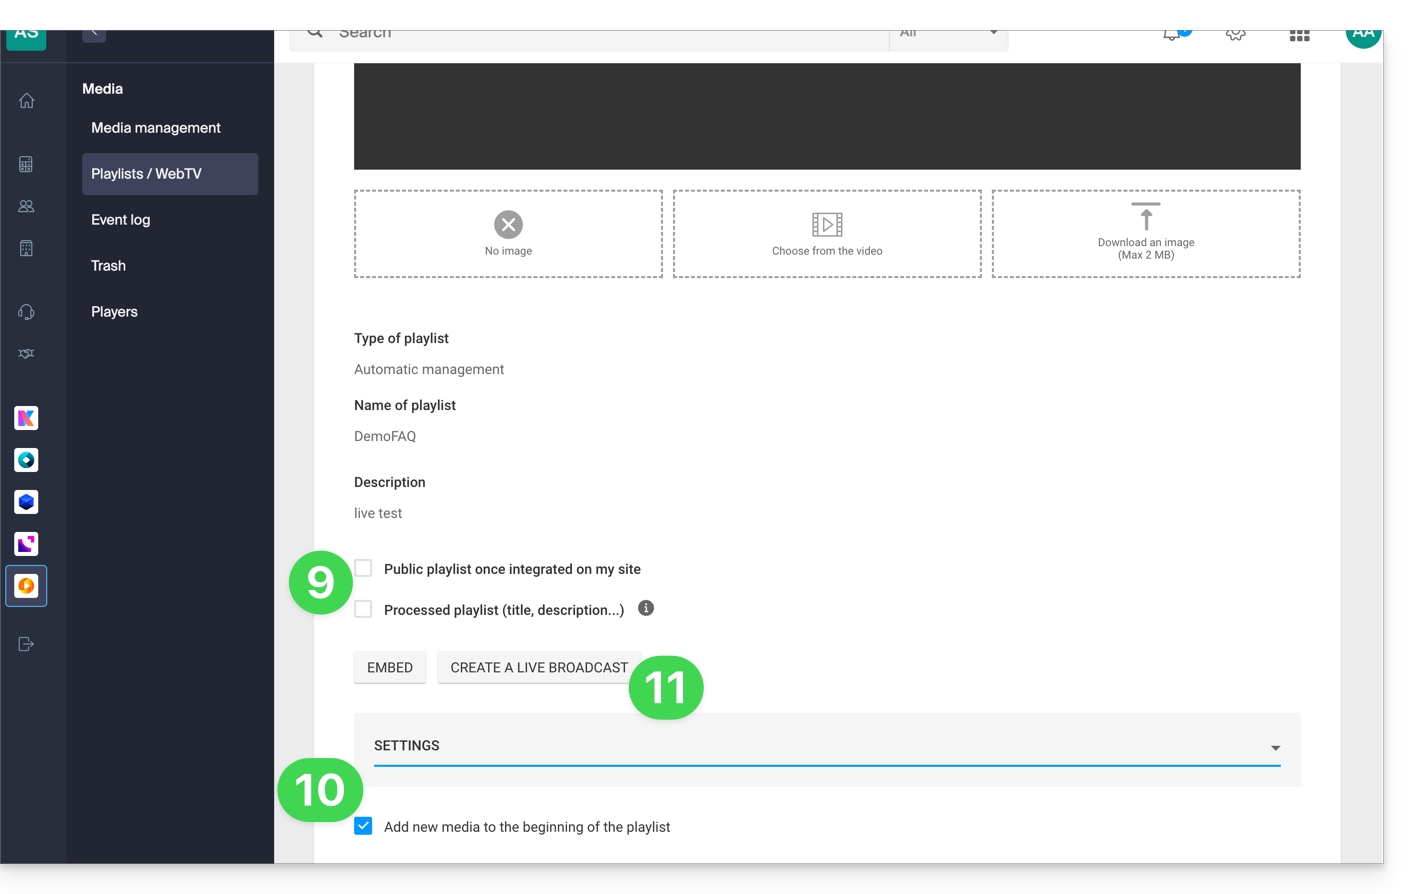
- Escolha se a lista de reprodução deve ser pública e, como acontece com seus arquivos de mídia, se ela deve ser “marcada” como “processada” (status visível apenas para você).
- Nas configurações adicionais, você pode escolher adicionar os arquivos de mídia no início da lista de reprodução em vez de no final.
- Clique no botão Criar uma transmissão ao vivo:
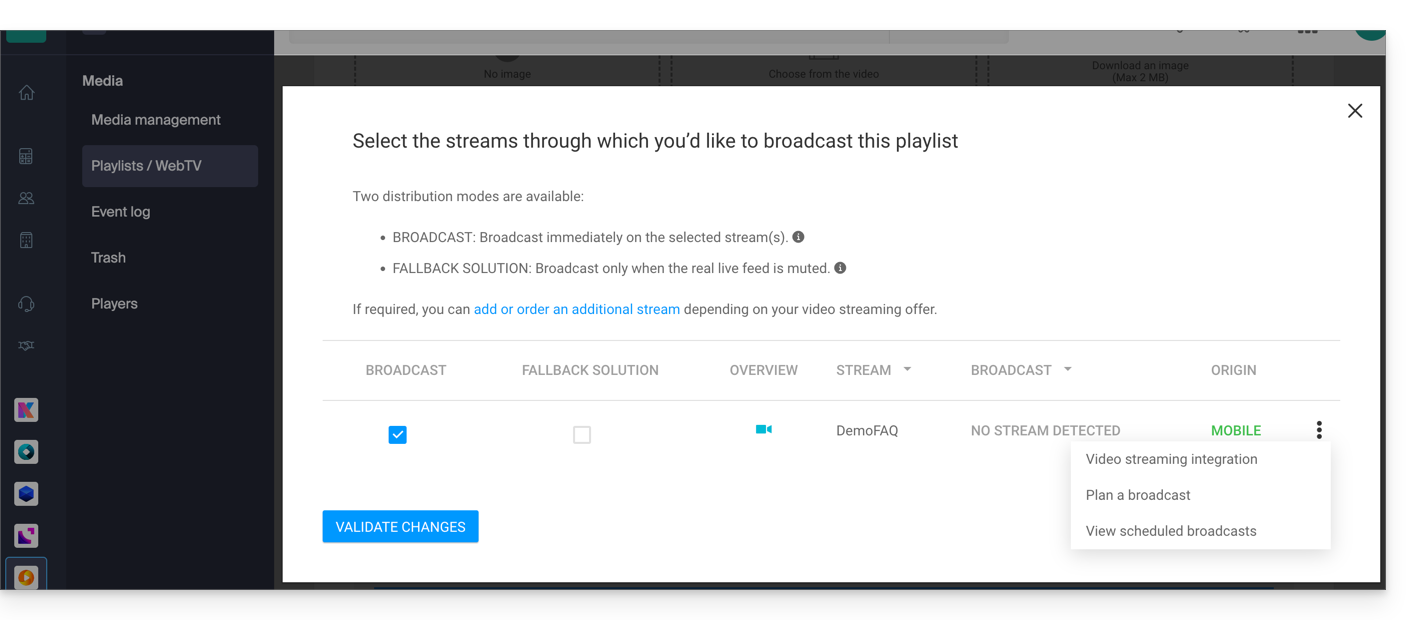
- Escolha o fluxo do serviço de Streaming de vídeo que irá transmitir a lista de reprodução e defina as suas preferências:
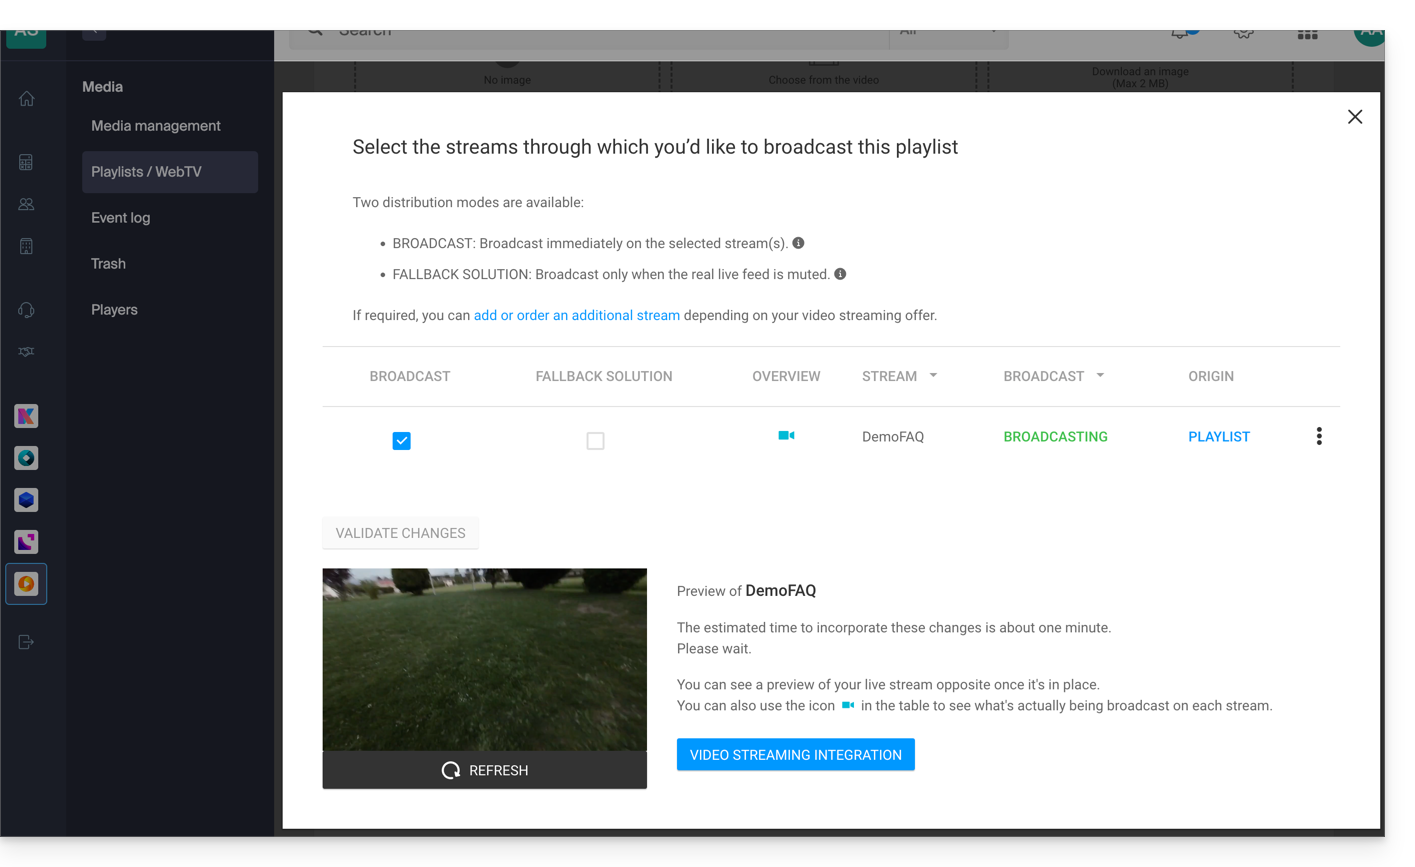
- A validação ocorre quando você estiver pronto para transmitir; a pré-visualização é exibida abaixo:
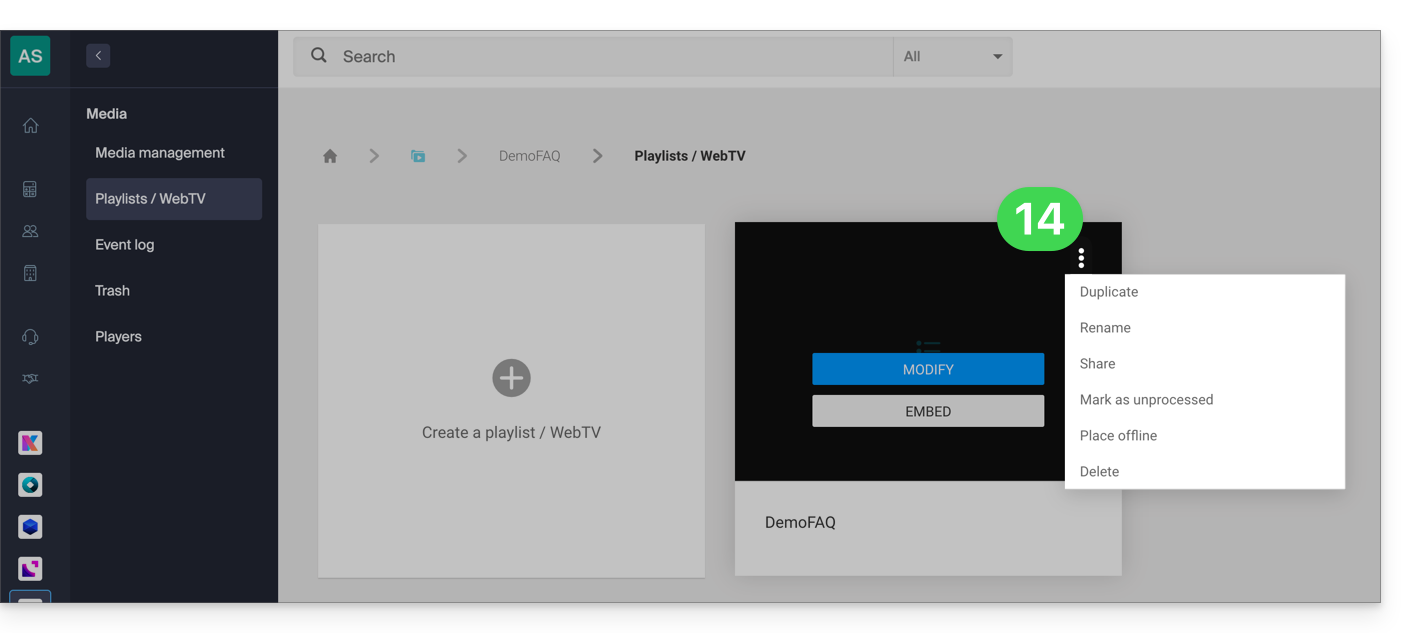
- Cada lista de reprodução pode ser duplicada, renomeada, compartilhada, excluída, etc., diretamente da página de listas de reprodução:
Alguns exemplos de utilização
A transmissão de uma playlist pode servir como solução de contingência assim que uma transmissão ao vivo for interrompida (voluntária ou involuntariamente) e, nesse caso, assumir o controle da transmissão. Assim que o codificador ao vivo retransmite um fluxo, ele retoma o controle da playlist. Isso permite transmitir conteúdo alternativo caso haja um problema na transmissão ao vivo ou se o usuário transmitir apenas conteúdo ao vivo à noite, por exemplo, podendo automatizar a transmissão de conteúdo de uma playlist durante o resto do dia.
Também é possível programar a transmissão de uma lista de reprodução a partir da ferramenta de agendamento do Streaming de vídeo. Assim, é possível escolher intervalos de transmissão de uma lista de reprodução única ou diferentes com antecedência, ou de forma recorrente. O codificador que transmite ao vivo será desconectado automaticamente durante toda a duração da transmissão da lista de reprodução; uma vez que o intervalo de tempo termine, o codificador será reconectado e seu conteúdo será transmitido.
Uma lista de reprodução VOD pode ser criada e editada manualmente (selecionando o vídeo que deve ser adicionado à lista) ou ser dinâmica, se for criada automaticamente a partir de um conjunto de vídeos que se encontram em uma pasta específica e que são adicionados gradualmente. Em ambos os casos,pare e reinicie a transmissão ao vivo para que as novas gravações adicionadas à lista de reprodução sejam consideradas - observe que isso não será mais obrigatório em uma próxima atualização da ferramenta.
Link para esta FAQ: https://faq.infomaniak.com/1448
Esta seção de perguntas frequentes foi útil?
Este guia explica como recuperar o arquivo no seu dispositivo após o envio para o seu espaço VOD/AOD.
Introdução
- Ao enviar um vídeo para o seu espaço VOD, você obtém o link correspondente ao endereço do vídeo no servidor.
- A maioria dos navegadores, ao carregar este endereço, irá "transmitir" o vídeo, ou seja, o vídeo será reproduzido gradualmente, sem que você possa baixar o arquivo inteiro para o seu disco rígido.
- Se você excluiu o vídeo original do seu disco rígido, talvez queira recuperá-lo.
- Não há acesso direto (por FTP, por exemplo) ao servidor que hospeda os vídeos.
Descarregar o ficheiro original
Para aceder a um ficheiro do espaço VOD:
- Clique aqui para acessar o gerenciamento do seu VOD/AOD no Gerenciador Infomaniak (precisa de ajuda?).
- Clique diretamente no nome atribuído ao produto em questão:
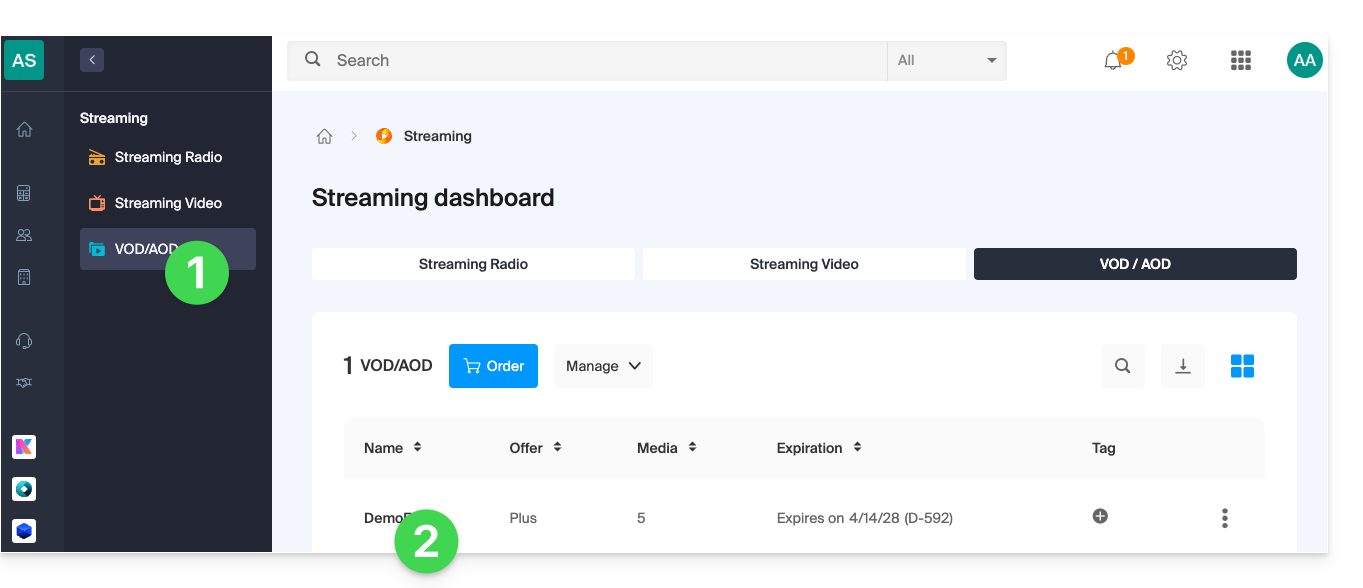
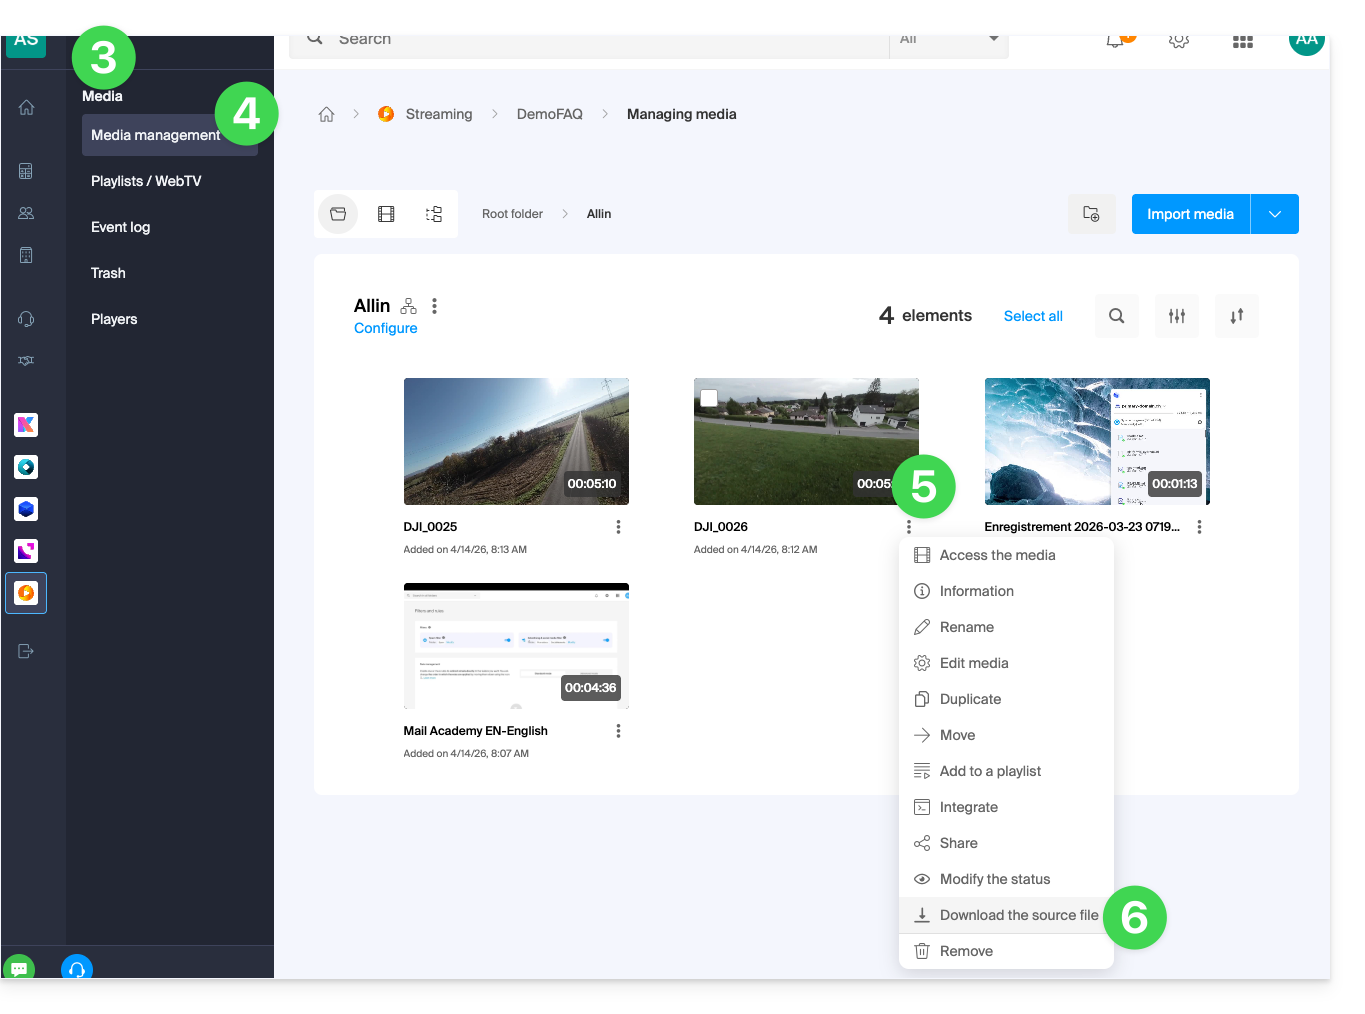
- Clique em Mídia no menu lateral esquerdo.
- Clique em Gerenciamento de mídia no menu lateral esquerdo.
- Clique no menu de ação ⋮ do cartão do arquivo em questão.
- Clique em Descarregar o arquivo original para que o seu navegador web proponha o download do arquivo original para o seu dispositivo:
Link para esta FAQ: https://faq.infomaniak.com/1464
Esta seção de perguntas frequentes foi útil?
Este guia detalha a resolução de problemas relacionados à recuperação automática de mídia com a extensão VOD/AOD para WordPress, especialmente quando a sincronização falha, mesmo com uma conexão estabelecida entre a extensão e o espaço VOD.
Introdução
- Se o plugin VOD do seu CMS não conseguir mais recuperar automaticamente os vídeos do seu espaço VOD, é provável que o utilizador MySQL do banco de dados no qual o CMS está instalado não tenha permissões de administrador.
- Esta situação pode causar um problema durante a instalação do plugin VOD no seu CMS.
Corrigir a recuperação automática de vídeos
A ser realizado no seu serviço de hospedagem web
- Clique aqui para acessar o gerenciamento de hospedagens e sites no seu Painel de Controle Infomaniak (❓: ajuda).
- Clique no nome do produto em questão.
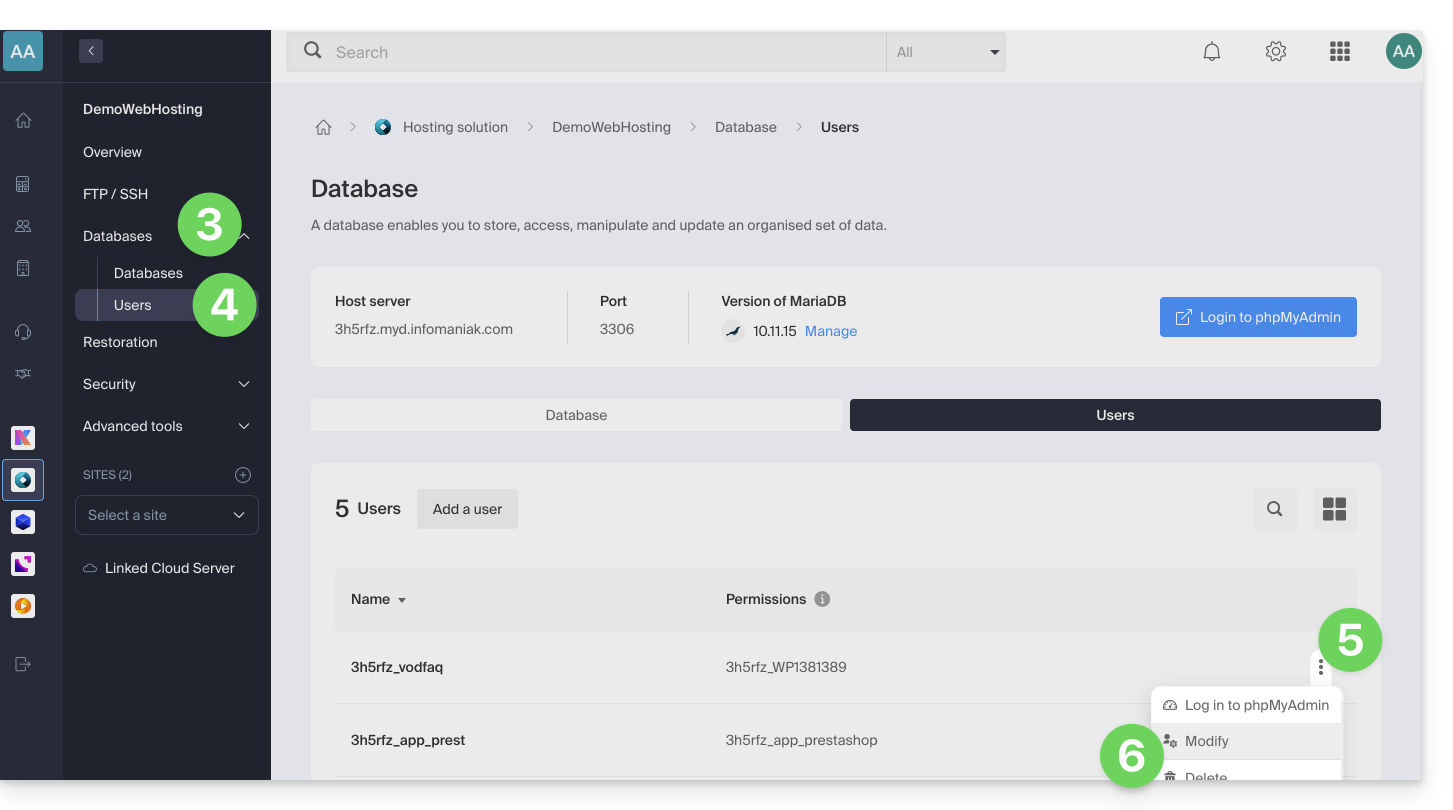
- Clique em Bases de dados no menu lateral esquerdo.
- Clique em Utilizadores no menu lateral esquerdo.
- Clique em o menu de ações ⋮ localizado à direita do usuário que gerencia o banco de dados do seu CMS.
- Clique em Editar:
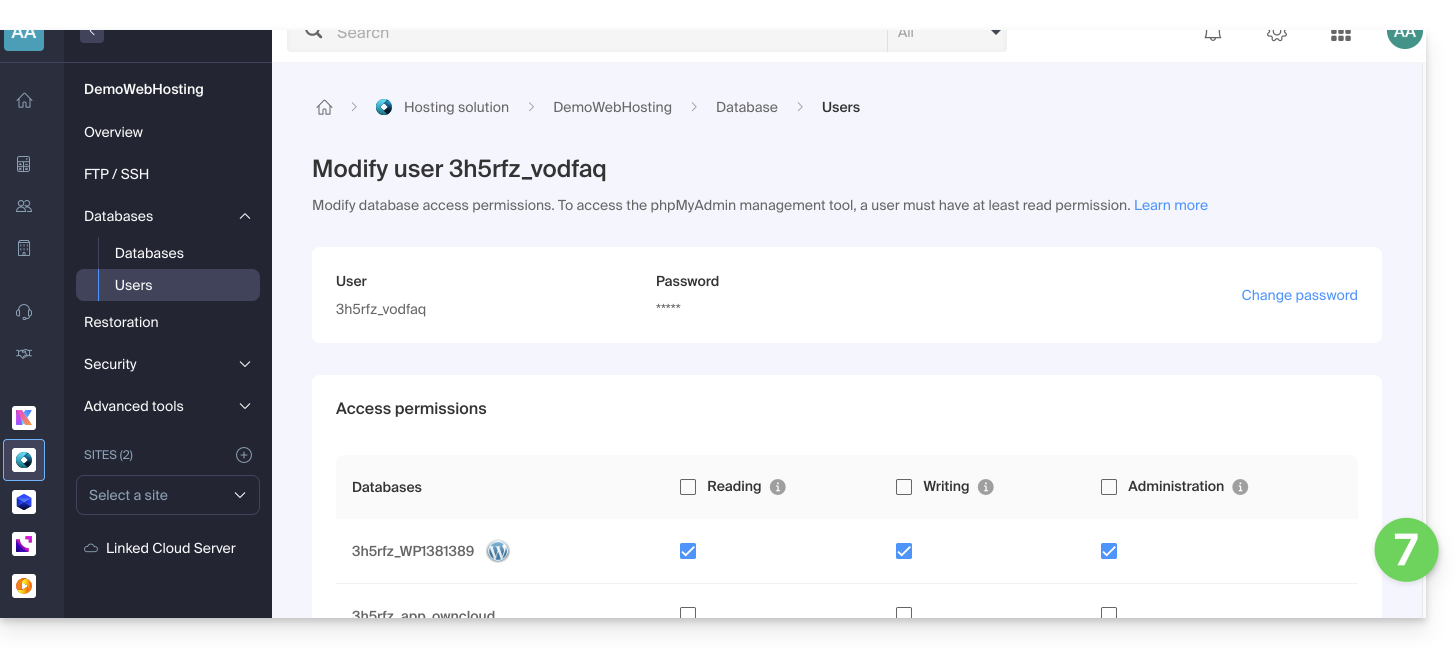
- Se necessário, adicione o direito ADMIN ao utilizador na linha da base de dados correspondente:
- Clique no botão para Confirmar na parte inferior da página.
A realizar no WordPress
- Desinstale o plugin VOD
- Reinstale e ative o plugin VOD (consulte este outro guia)
- Reconfigure a conexão do plugin com a conta VOD Infomaniak
- Faça uma nova solicitação para vincular os arquivos de vídeo
Após a configuração ser restabelecida, os privilégios de administrador do usuário MySQL podem ser revogados, se necessário.
Se um vídeo importado apresentar o status "em conversão" de forma persistente, mesmo após a conclusão no painel de controle, é provável que haja um conflito com extensões de restrição de acesso (como Acesso Restrito a Membros).
Em caso de comportamento anormal, desative temporariamente suas extensões de terceiros para identificar uma possível incompatibilidade de software.
Para forçar a atualização de um vídeo que está bloqueado no estado de conversão, utilize a função Sincronizar disponível nas configurações da extensão VOD no WordPress.
A ser realizado no Gerenciador Infomaniak
Embora a extensão se sincronize periodicamente com a sua conta, o aparecimento de novos elementos (artistas, pastas ou listas de reprodução) pode ser adiado no seu CMS.
Para uma atualização imediata, aceda à secção Gestão VOD > Configuração do seu painel de controlo e ative a Sincronização rápida.
Se novos arquivos de mídia não aparecerem na lista do CMS, verifique a acessibilidade da URL de callback. Este endereço, usado pelo sistema de codificação para notificar seu site sobre a disponibilidade de um vídeo, deve ser, obrigatoriamente, público. Consulte a página Gerenciamento de VOD > Configuração para obter mais informações.
Link para esta FAQ: https://faq.infomaniak.com/1536
Esta seção de perguntas frequentes foi útil?
Este guia explica como gerir as interações entre o seu espaço VOD/AOD Infomaniak e qualquer um dos seus sites WordPress, utilizando uma extensão desenvolvida pela Infomaniak.
Introdução
- Esta extensão WordPress permite recuperar e gerenciar todos os seus vídeos presentes em um espaço VOD/AOD Infomaniak, com atualização automática quando novos vídeos são adicionados.
- Ela gerencia a recuperação automática dos Players existentes e o gerenciamento das playlists.
- Você poderá pesquisar seus vídeos ao redigir um artigo ou uma página ou importar arquivos de mídia diretamente do painel de administração do CMS.
- Incompatibilidades possíveis:
- O plugin não é compatível com Elementor.
- Teste se o problema persiste após a instalação de outro editor.
- O plugin não é compatível com WordPress Multisite.
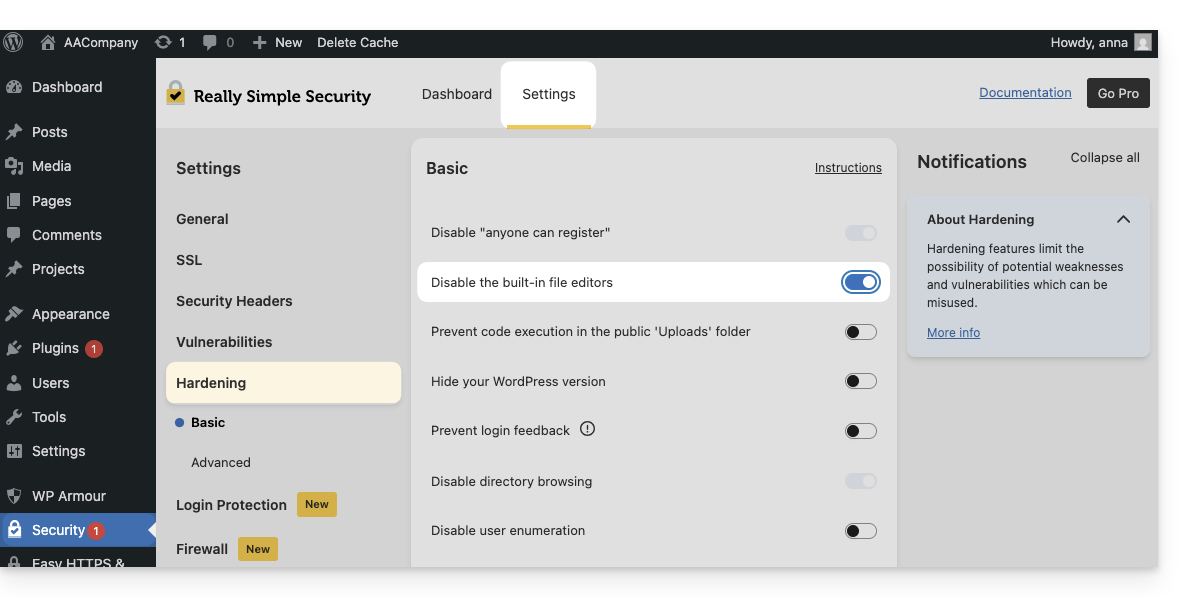
- O plugin não é compatível com Really Simple Security (Really Simple SSL).
- Teste se o problema persiste ativando ou desativando esta configuração da extensão Really Simple Security:
- Teste se o problema persiste após o uso de outro módulo semelhante.
- Se os problemas persistirem, consulte este outro guia.
- Teste se o problema persiste ativando ou desativando esta configuração da extensão Really Simple Security:
- O plugin não é compatível com Elementor.
Obter a extensão VOD Infomaniak
Acesse sua área VOD para obter as informações necessárias para o módulo externo do WordPress:
- Clique aqui para acessar o gerenciamento do seu produto no Manager Infomaniak (precisa de ajuda?).
- Clique diretamente no nome atribuído ao produto em questão:
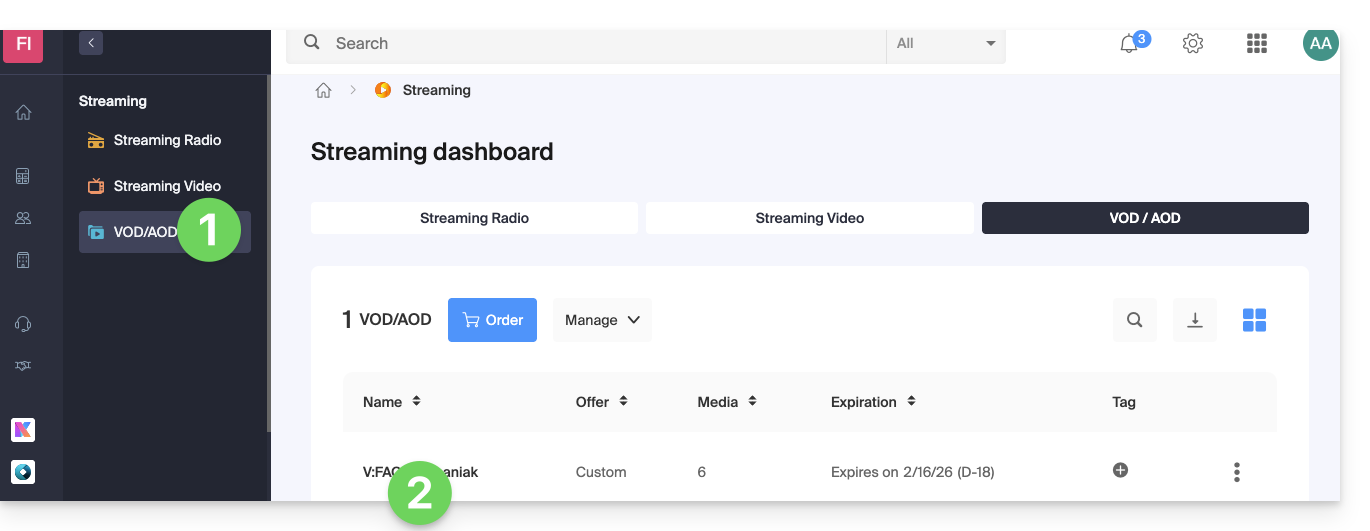
- Clique em Extensões CMS/API no menu lateral esquerdo.
- Clique em Extensões CMS no menu lateral esquerdo.
- Descarregue a extensão WordPress.
- Configure a extensão usando as instruções fornecidas:
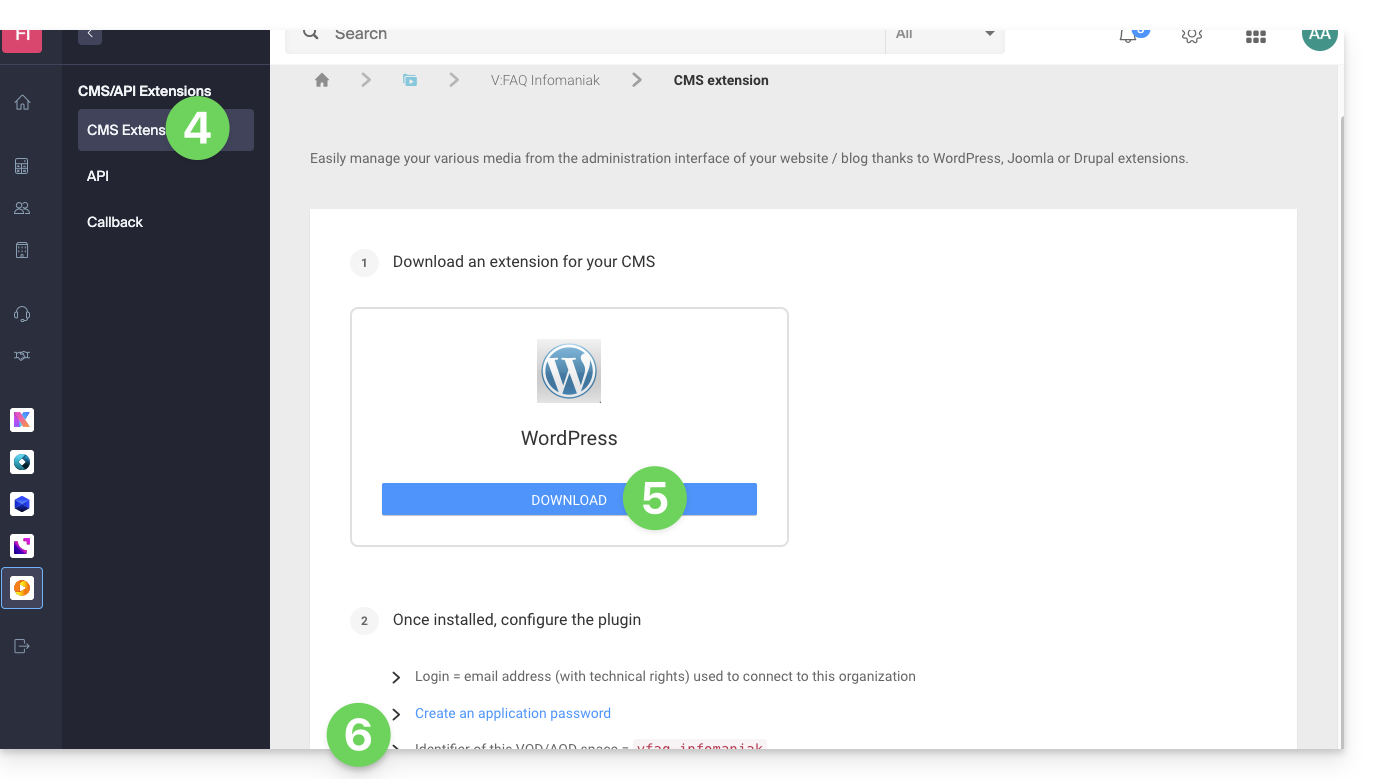
- Recomenda-se criar um novo utilizador na sua Organização com apenas direitos técnicos no produto VOD/AOD e, em seguida, criar a palavra-passe da aplicação a partir desta conta dedicada.
Também pode descarregar a extensão diretamente da biblioteca de extensões WordPress: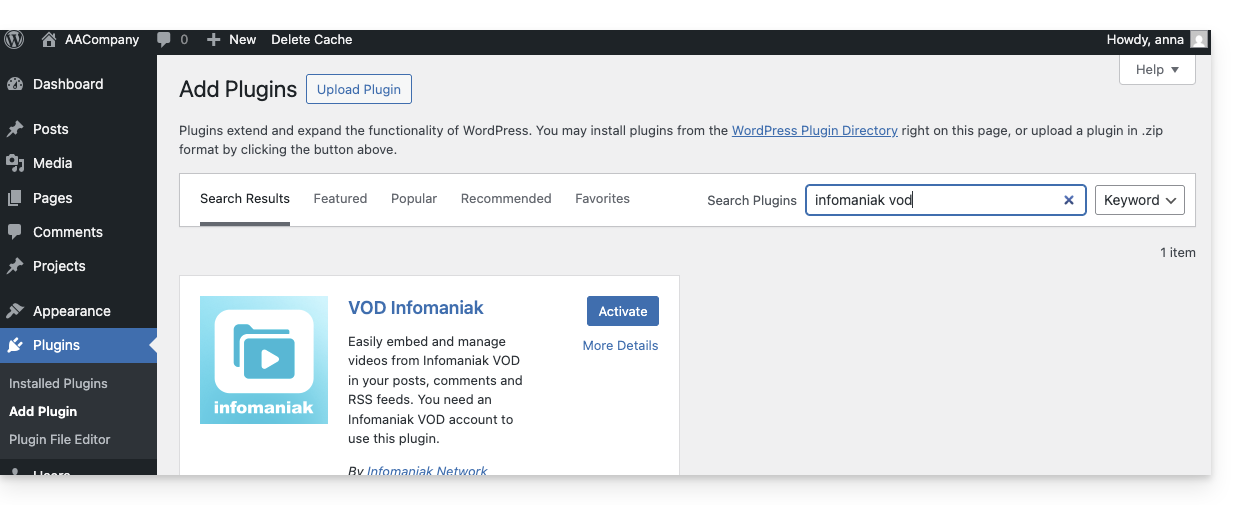
Uma funcionalidade semelhante existe para o Typo3, com a extensão dedicada, que pode ser encontrada e instalada a partir da sua biblioteca de extensões: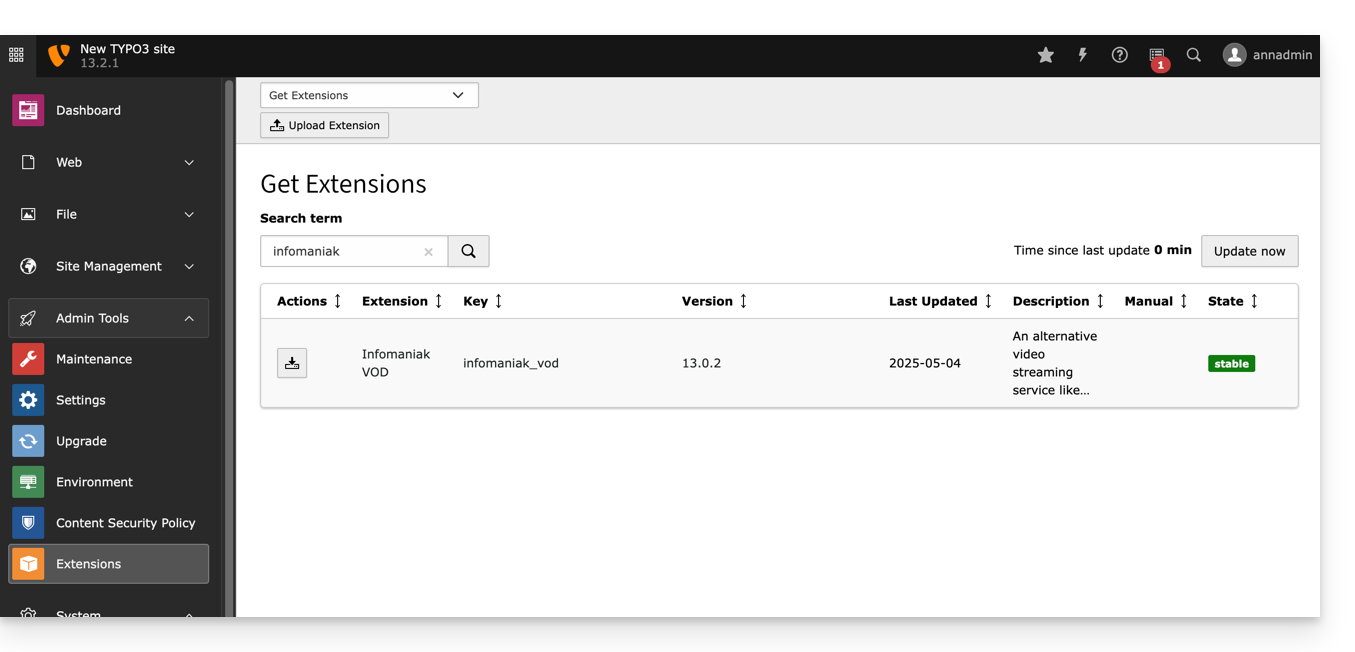
Link para esta FAQ: https://faq.infomaniak.com/1539
Esta seção de perguntas frequentes foi útil?
Este guia explica como modificar a imagem de visualização (miniatura) que representa um vídeo em um serviço VOD.
Introdução
- O uso de GIFs animados não é possível.
- Você também pode gerenciar as imagens de visualização usadas durante a restrição de acesso.
Modificar a miniatura (visualização da mídia)
Para acessar uma mídia no espaço VOD:
- Clique aqui para acessar o gerenciamento do seu VOD/AOD no Manager Infomaniak (precisa de ajuda?).
- Clique diretamente no nome atribuído ao produto em questão:
- Clique em Mídias no menu lateral esquerdo.
- Clique em Gerenciamento de mídias no menu lateral esquerdo.
- Clique na mídia em questão:
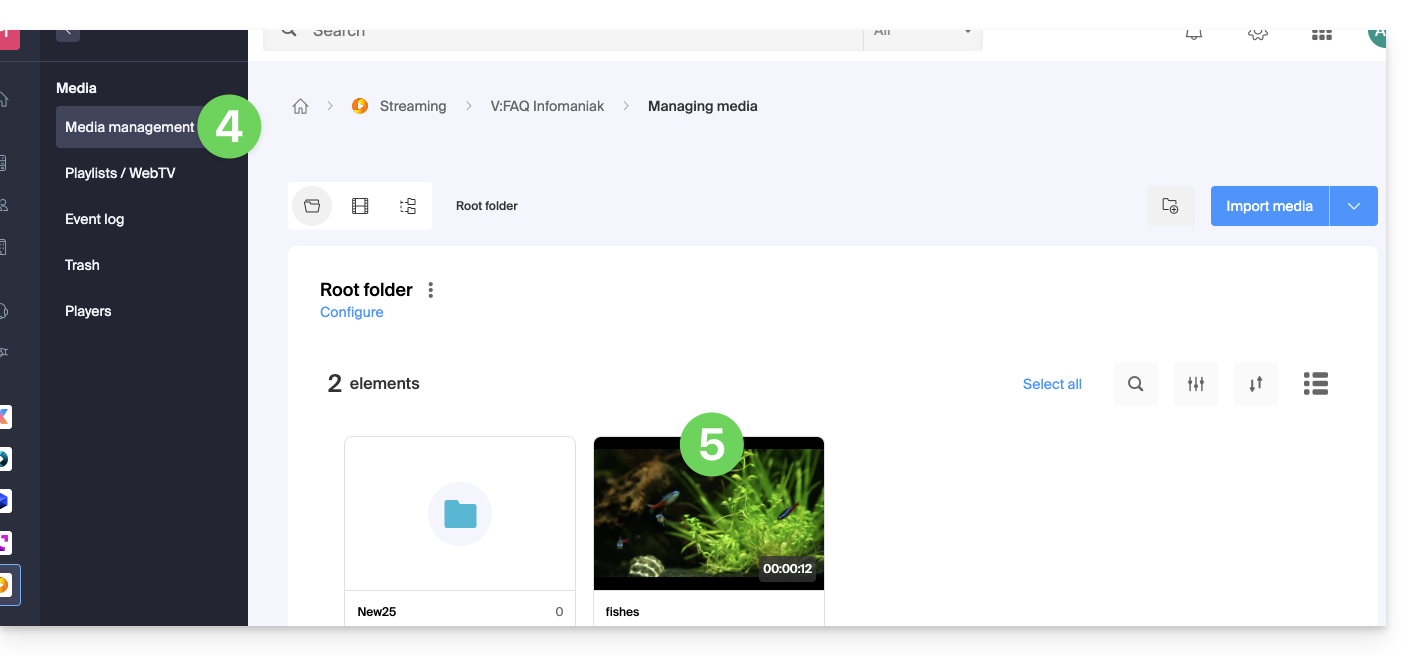
- Clique no botão Editar:
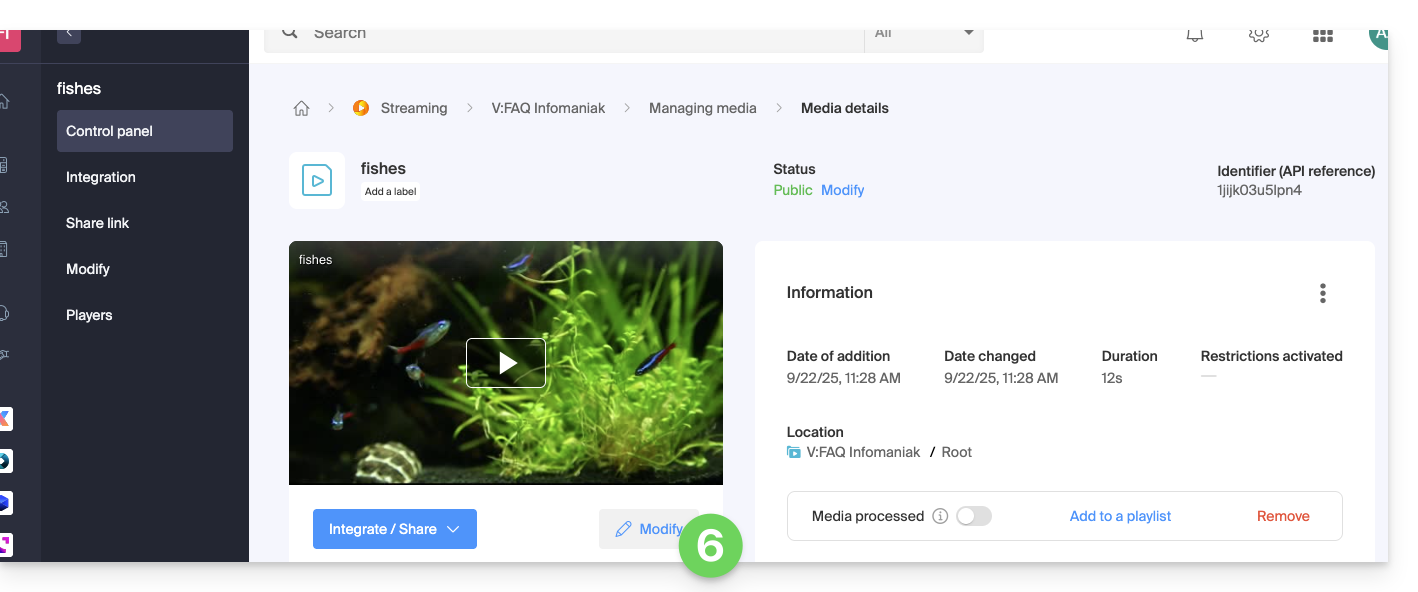
Duas possibilidades estão disponíveis para substituir a imagem padrão do vídeo quando ele está pausado: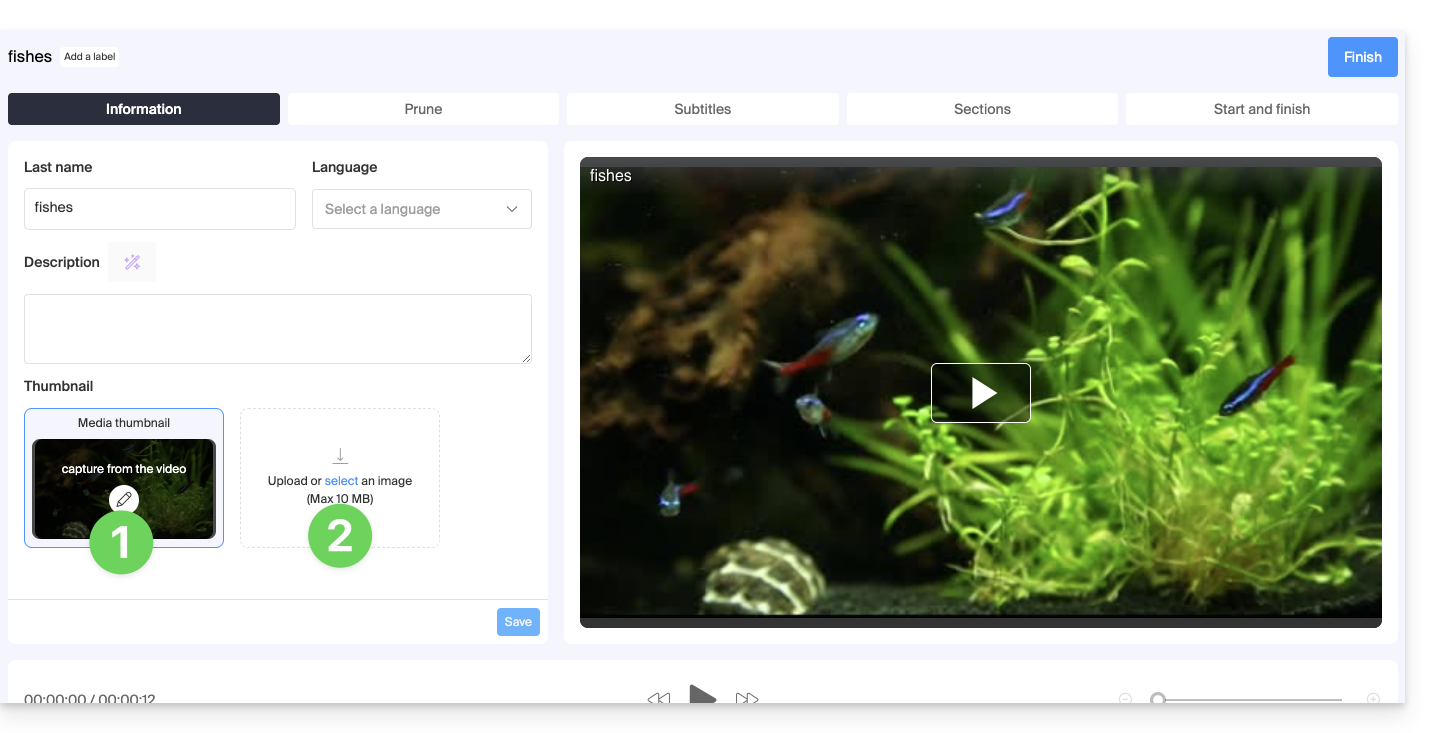
- Selecione uma imagem dentro do próprio vídeo (clique para percorrer o vídeo e pressione o botão para extrair a imagem, que poderá então recortar/redimensionar):
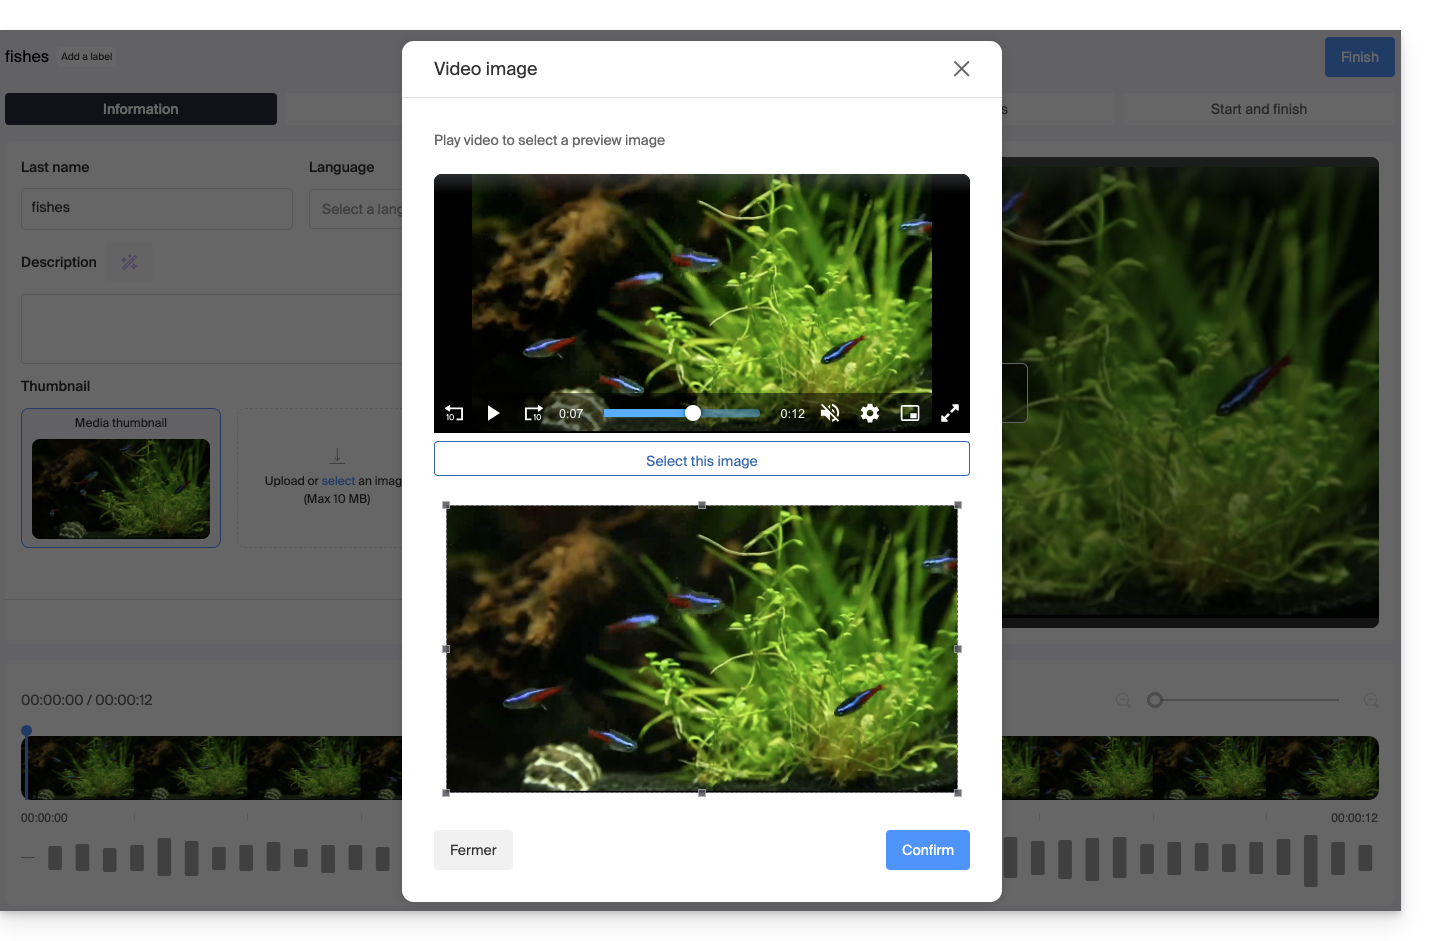
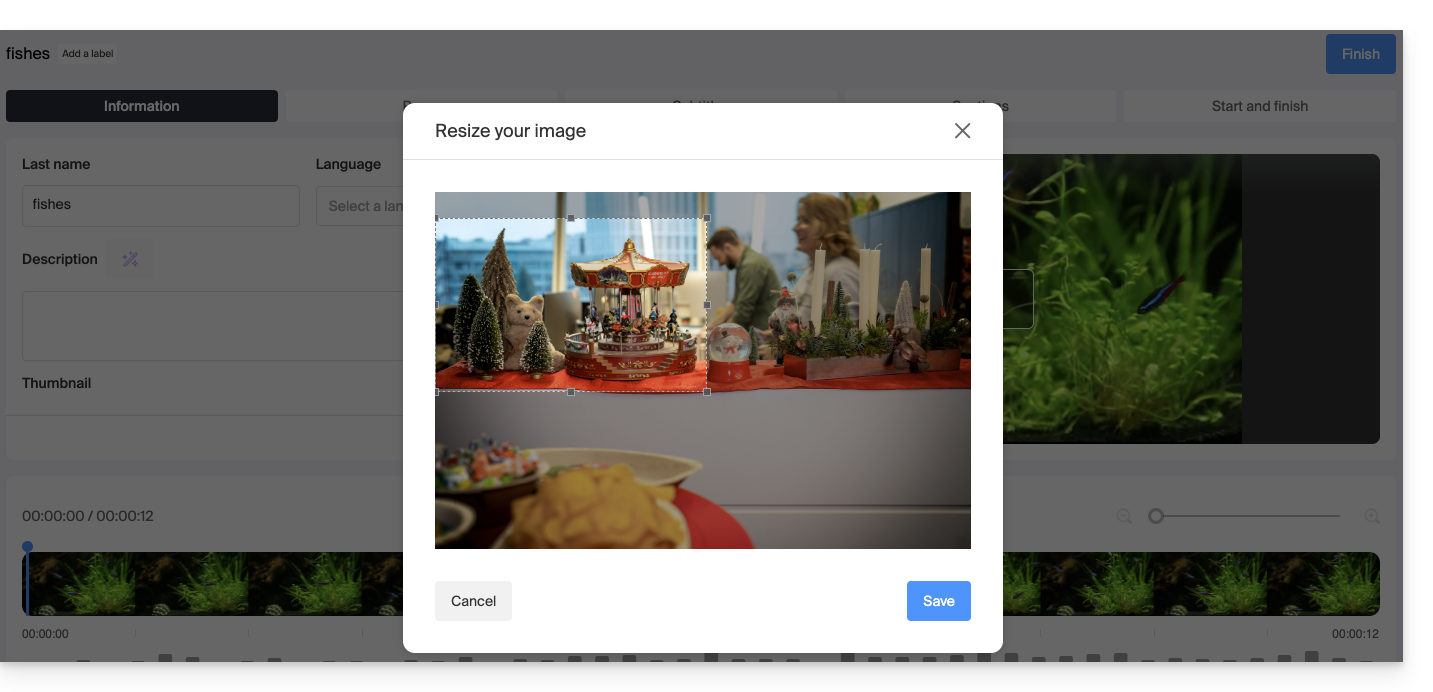
- Carregue uma imagem do seu disco rígido (máximo de 10 MB), que poderá então recortar/redimensionar:
Confirme clicando no botão azul Guardar: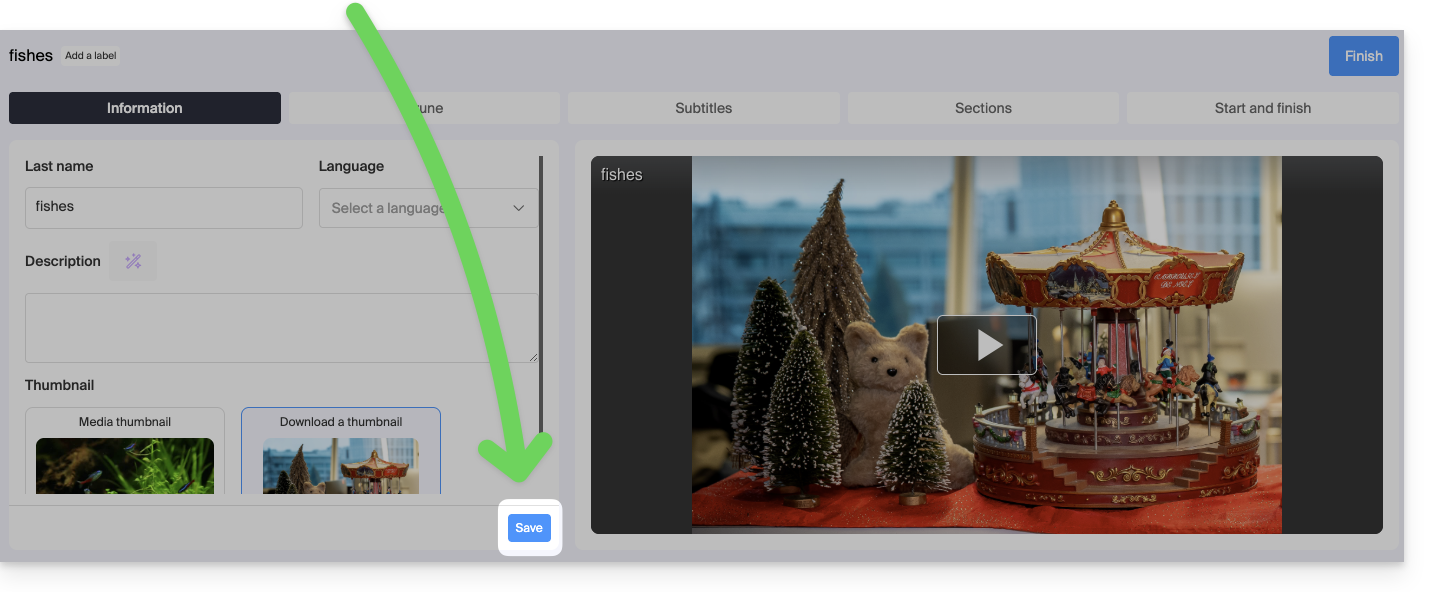
Link para esta FAQ: https://faq.infomaniak.com/1555
Esta seção de perguntas frequentes foi útil?
Este guia detalha algumas das operações realizadas em segundo plano pelo serviço VOD / AOD da Infomaniak.
Funcionamento das requisições SOAP e dos callbacks
No serviço de VOD (vídeo sob demanda) e AOD (áudio sob demanda), algumas operações, como o download de arquivos, são realizadas por meio de requisições SOAP, um protocolo que permite que dois sistemas se comuniquem, frequentemente utilizado para trocar dados entre servidores.
Quando um arquivo é solicitado via SOAP, pode haver um atraso antes que o servidor responda. Esse atraso depende de vários fatores, como o tamanho do arquivo, a carga do servidor ou a qualidade da conexão. O download é iniciado o mais rápido possível, mas é importante saber que existe uma fila de espera: se vários usuários fizerem solicitações ao mesmo tempo, cada uma será processada em ordem, e cada usuário tem um limite de downloads simultâneos.
Callback: uma notificação ao final do download
Um callback é um sistema que permite notificar o cliente (por exemplo, sua aplicação) assim que o download for concluído. Em outras palavras, em vez de aguardar monitorando o download, o sistema "chama" ou envia uma resposta quando tudo estiver pronto. Isso é útil para evitar que sua aplicação fique bloqueada enquanto o arquivo é baixado.
No entanto, também existe um tempo máximo de espera, chamado timeout. Se este tempo for atingido antes do término do download, uma resposta é enviada mesmo assim. Isso não significa que o download falhou, mas sim que a resposta foi dada antes que ele fosse concluído. Nesse caso, o processamento continua em segundo plano.
Arquivos grandes demoram mais
Quando o arquivo solicitado é grande (por exemplo, várias centenas de megabytes ou até mesmo vários gigabytes), o download pode demorar vários minutos. Esse tempo depende muito do servidor remoto: alguns são muito rápidos, outros menos. O sistema tenta gerenciar isso da melhor forma possível, mas é importante ter em mente que o tempo de resposta nem sempre será imediato.
Chamadas bloqueantes e não bloqueantes
Por padrão, alguns clientes SOAP esperam que o servidor termine de responder antes de continuar. Nesse caso, fala-se em uma chamada bloqueante: sua aplicação fica inativa até que a resposta chegue. Isso pode ser problemático se a resposta demorar.
Felizmente, é frequentemente possível configurar o cliente SOAP para que ele não bloqueie. Nesse caso, fala-se em uma chamada não bloqueante. Isso permite enviar várias solicitações uma após a outra sem ter que esperar pela resposta de cada chamada. É mais rápido e mais eficiente, especialmente quando você processa vários arquivos em sequência.
Link para esta FAQ: https://faq.infomaniak.com/1626
Esta seção de perguntas frequentes foi útil?
Este guia explica como adicionar legendas aos vídeos do seu espaço VOD Infomaniak.
Introdução
- As legendas dos seus vídeos não alteram o vídeo em si; o vídeo não é modificado, trata-se apenas de um ficheiro *
.srtcarregado pelo Player. - Pode gerir a reprodução automática das legendas diretamente no Player (separador #1).
Gerenciar legendas
Para acessar um arquivo de mídia no espaço VOD:
- Clique aqui para acessar o gerenciamento do seu VOD/AOD no Gerenciador Infomaniak (precisa de ajuda?).
- Clique diretamente no nome atribuído ao produto em questão:
- Clique em Mídia no menu lateral esquerdo.
- Clique em Gerenciamento de mídia no menu lateral esquerdo.
- Clique no elemento multimídia em questão:
- Clique no botão Editar:
- Clique na aba Legendas.
- Clique no botão Adicionar idioma para escolher um dos 3 métodos de geração de legendas:
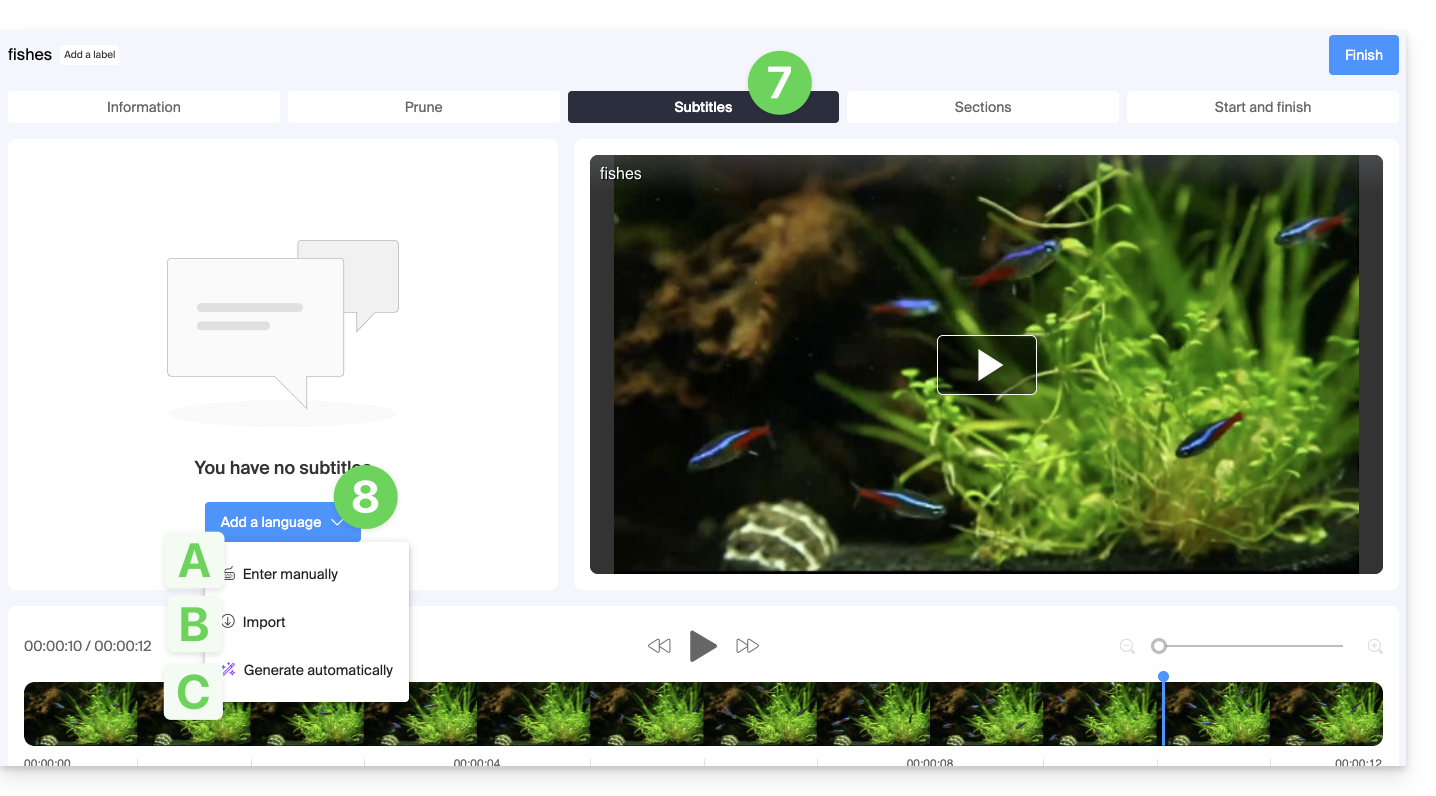
A. Criação de legendas de forma manual
Com este modo de legendagem, você insere manualmente cada um dos textos que devem ser exibidos no código de tempo especificado, e isso para cada um dos idiomas: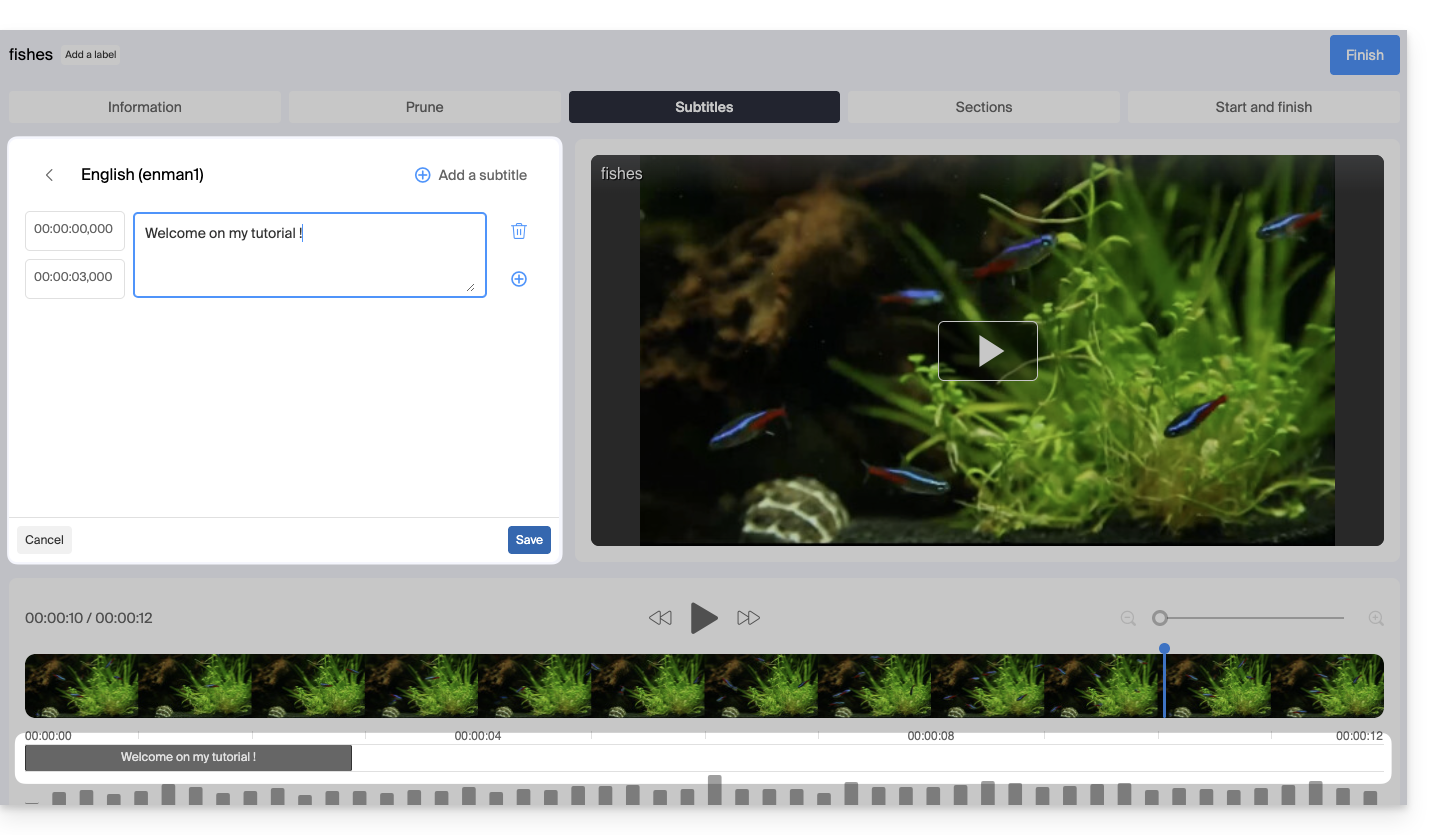
B. Importação de um arquivo de legendas
Você pode importar um arquivo do tipo SubRip (*.srt) ou SubViewer (*.sbv e *.sub) para adicionar legendas ao seu vídeo, utilizando um arquivo separado com as legendas já preparadas: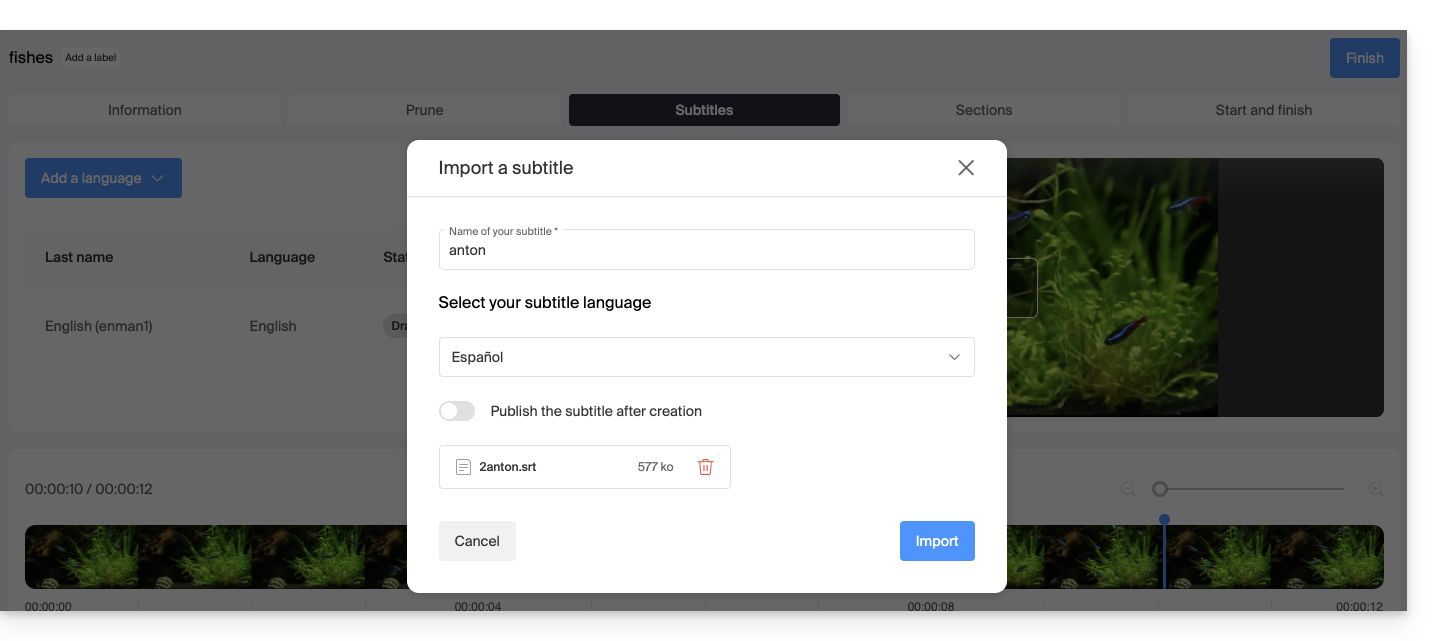
O botão de alternância permite ativar ou desativar a publicação das legendas no reprodutor. Isso permite, em particular, verificar se o conteúdo está correto antes de publicar e compartilhar o vídeo.
C. Gerar legendas automaticamente
Pode criar legendas diretamente a partir do áudio disponível no seu ficheiro multimédia. Os textos são gerados através de inteligência artificial (IA).
Leia e compreenda este outro guia sobre o modelo utilizado e as responsabilidades de cada um. Recomenda-se também verificar manualmente o conteúdo gerado, especialmente os nomes próprios, que por vezes podem estar mal escritos.
Traduzir legendas automaticamente
Quando uma legenda já existe, você pode adicionar um idioma adicional no mesmo local, fazendo com que o texto seja traduzido automaticamente (especifique o idioma atual):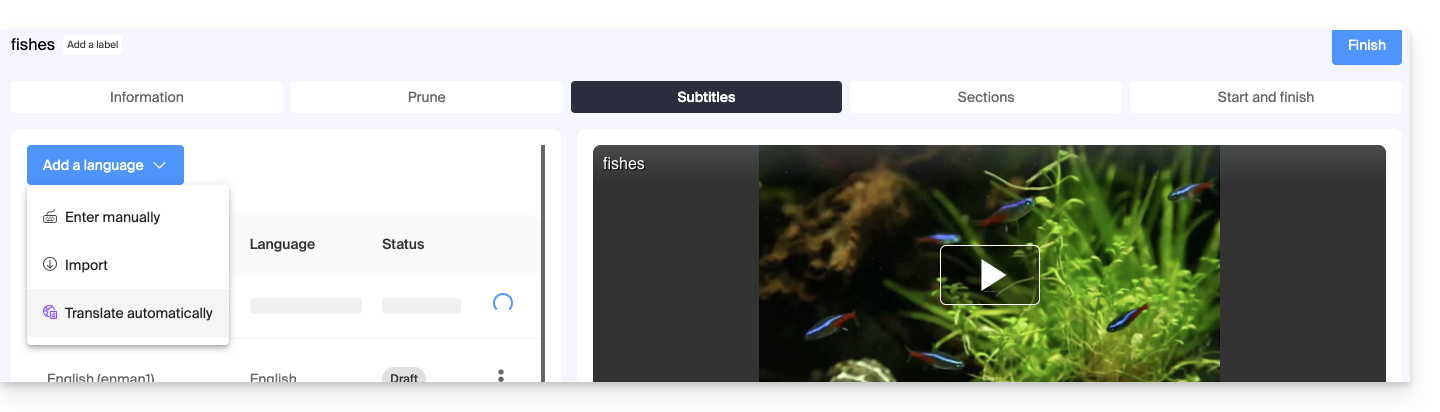 Isso irá gerar a legenda adequada no idioma desejado: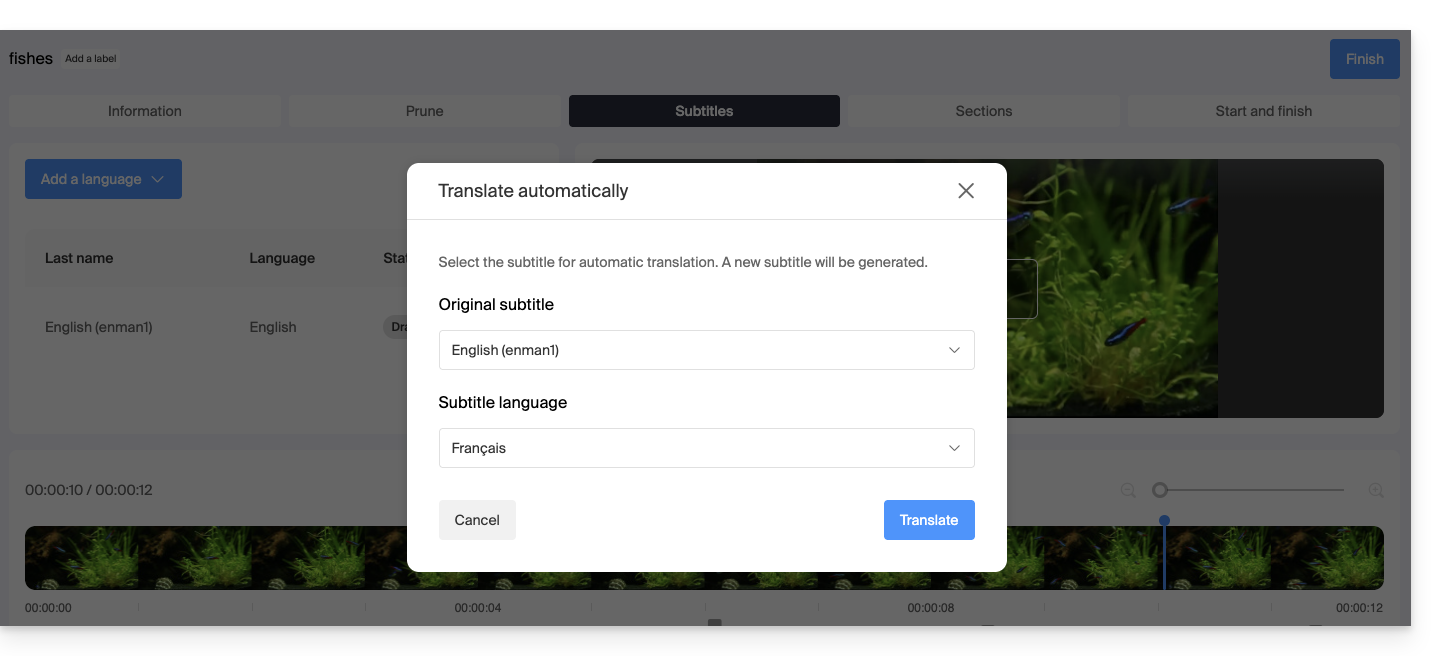
Ações em uma legenda
Clique no menu de ações ⋮ localizado à direita de uma legenda para obter opções adicionais, como duplicação ou tradução automática: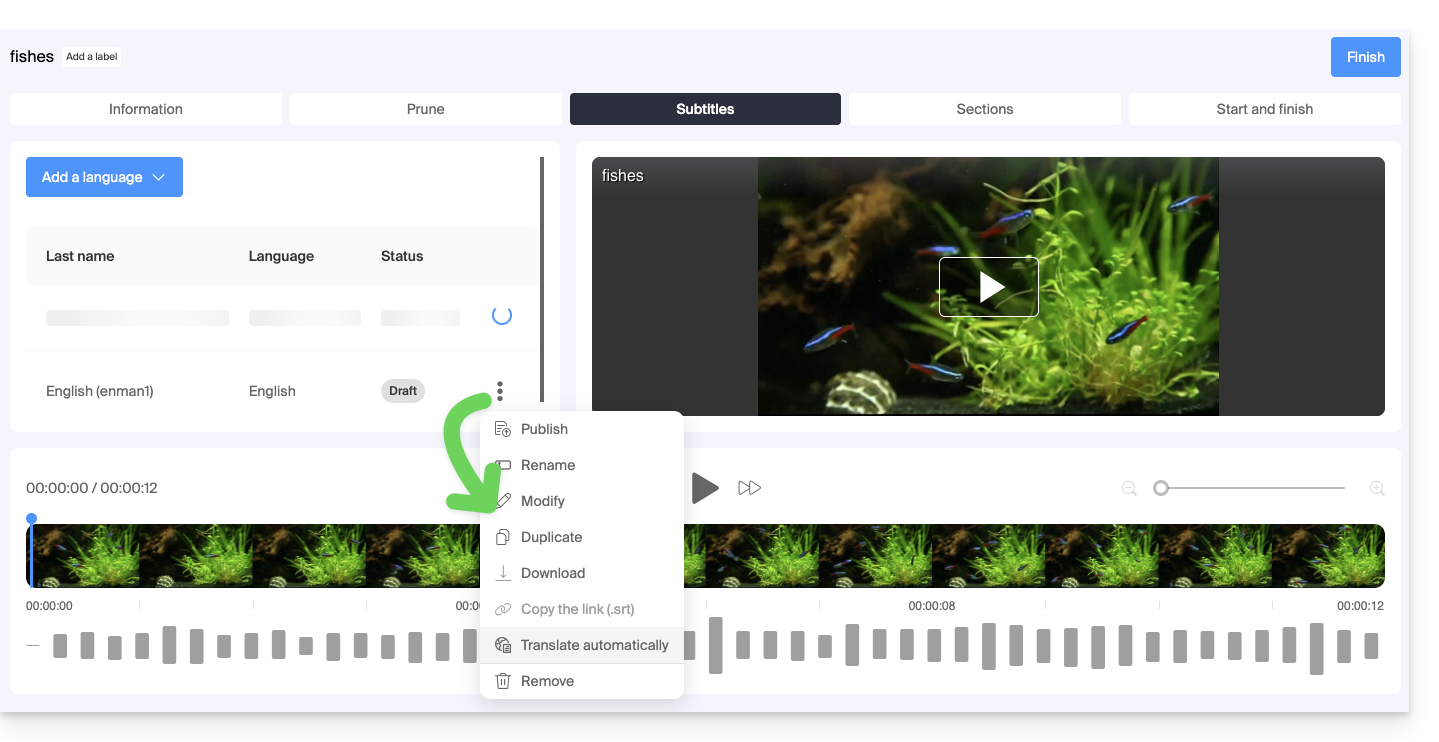
Legendar automaticamente os novos vídeos
A pasta Raiz ou as subpastas do seu espaço VOD podem ter regras que são executadas sempre que um novo arquivo de mídia é adicionado. Uma dessas regras pode ser configurada para gerar automaticamente as legendas usando o método C descrito acima. Para configurar esta regra:
- Clique aqui para acessar o gerenciamento do seu VOD/AOD no Manager Infomaniak (precisa de ajuda?).
- Clique diretamente no nome atribuído ao produto em questão.
- Clique em Mídia no menu lateral esquerdo.
- Clique em Gerenciamento de mídia no menu lateral esquerdo.
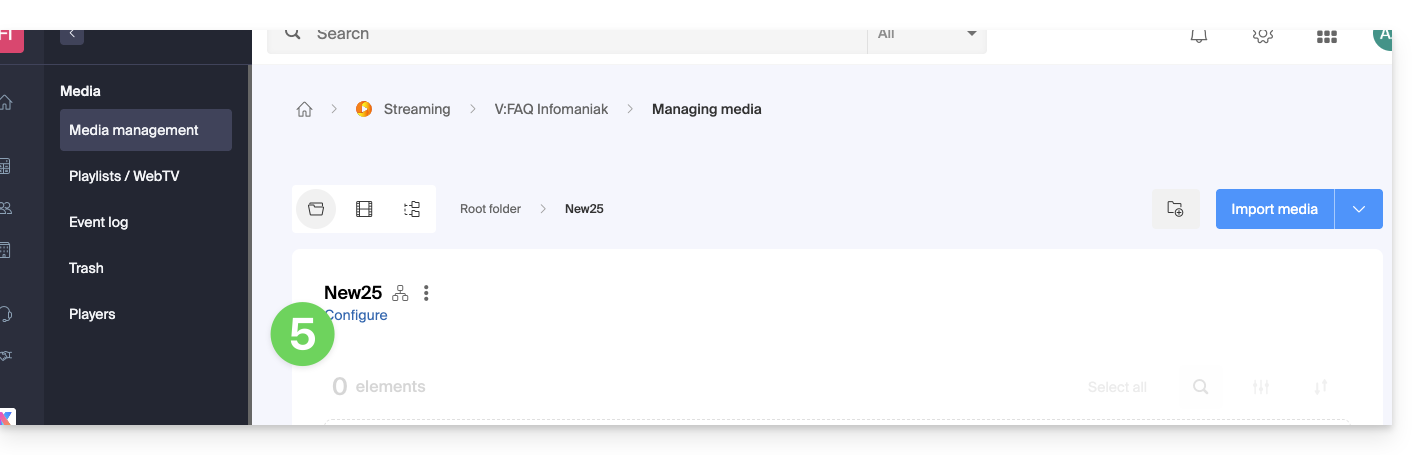
- Clique em Configurar na página da pasta Raiz ou da pasta de sua escolha:
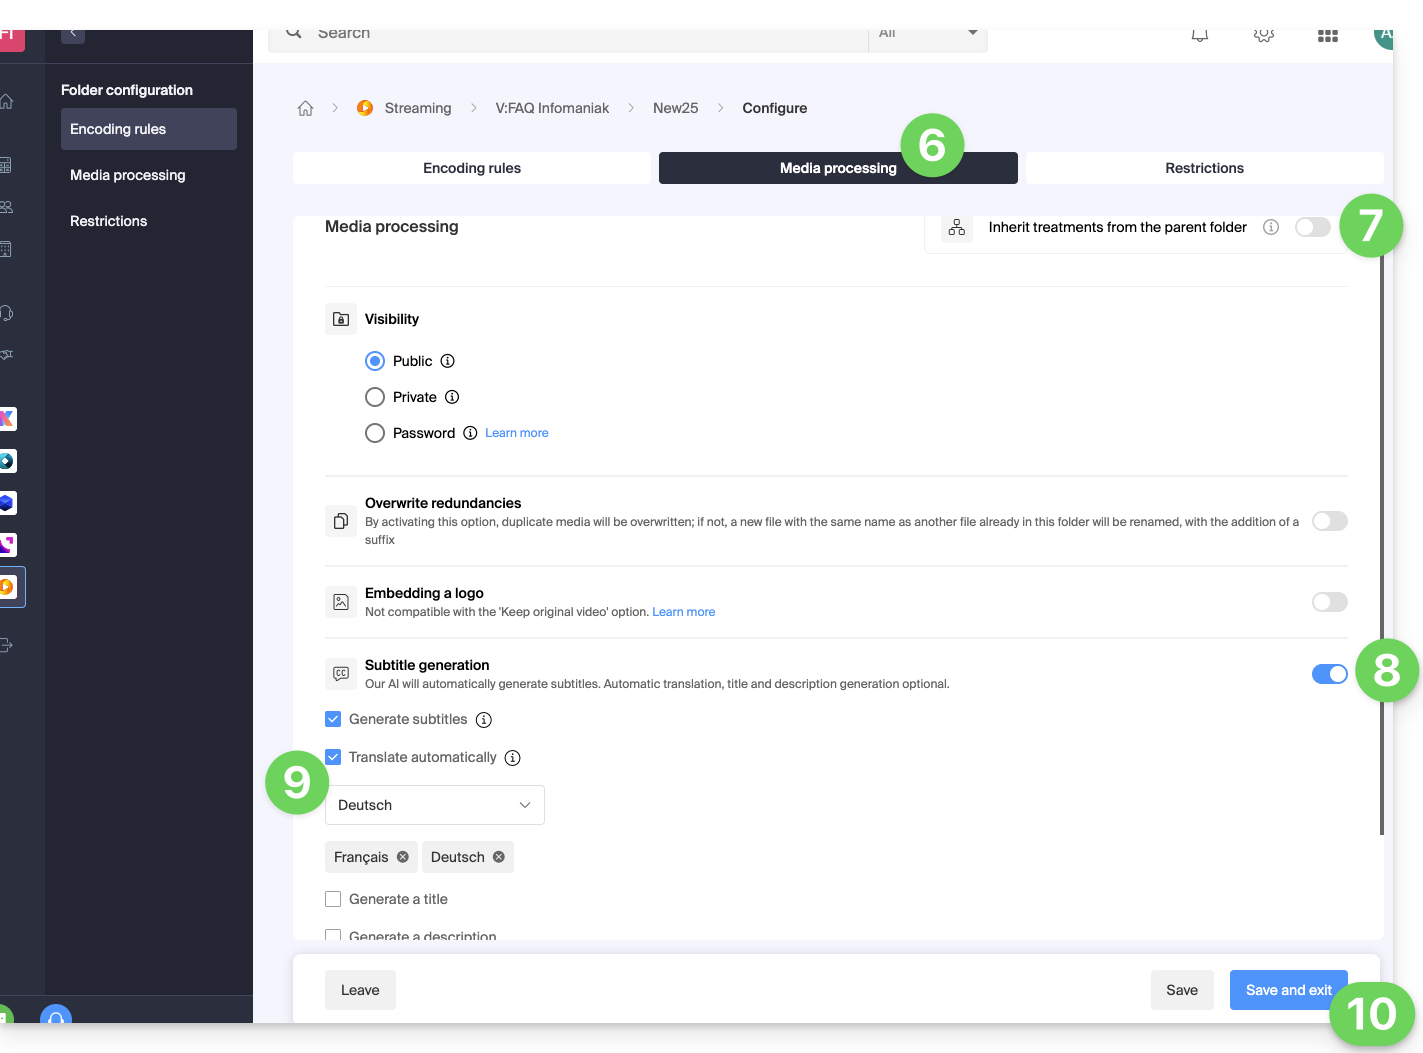
- Clique na aba Processamento de mídia.
- Verifique se as configurações não estão definidas para serem herdadas da pasta pai (ou configure a pasta pai diretamente) e, em seguida, salve as alterações, se necessário (item 10 abaixo).
- Ative a geração de texto.
- Configure o que deve ser gerado (legendas, título do vídeo, resumo/descrição, bem como as possíveis traduções, dependendo do idioma do visitante).
- Salve as alterações:
Link para esta FAQ: https://faq.infomaniak.com/1628
Esta seção de perguntas frequentes foi útil?
É possível editar um vídeo que já foi carregado em um serviço de vídeo sob demanda. Não é possível usar esta ferramenta no caso de um arquivo de mídia que contenha apenas áudio.
Encurtar/editar um vídeo
Para acessar um arquivo na área VOD:
- Clique aqui para acessar o gerenciamento do seu VOD/AOD no Manager Infomaniak (precisa de ajuda?).
- Clique diretamente no nome atribuído ao produto em questão:
- Clique em Mídia no menu lateral esquerdo.
- Clique em Gerenciar mídia no menu lateral esquerdo.
- Clique na mídia desejada:
- Clique no botão Editar:
- Clique na aba EDITAR.
- Reduza o tamanho do vídeo na parte inferior da página, conforme necessário.
- Clique em Salvar (ou Pré-visualizar, se necessário):
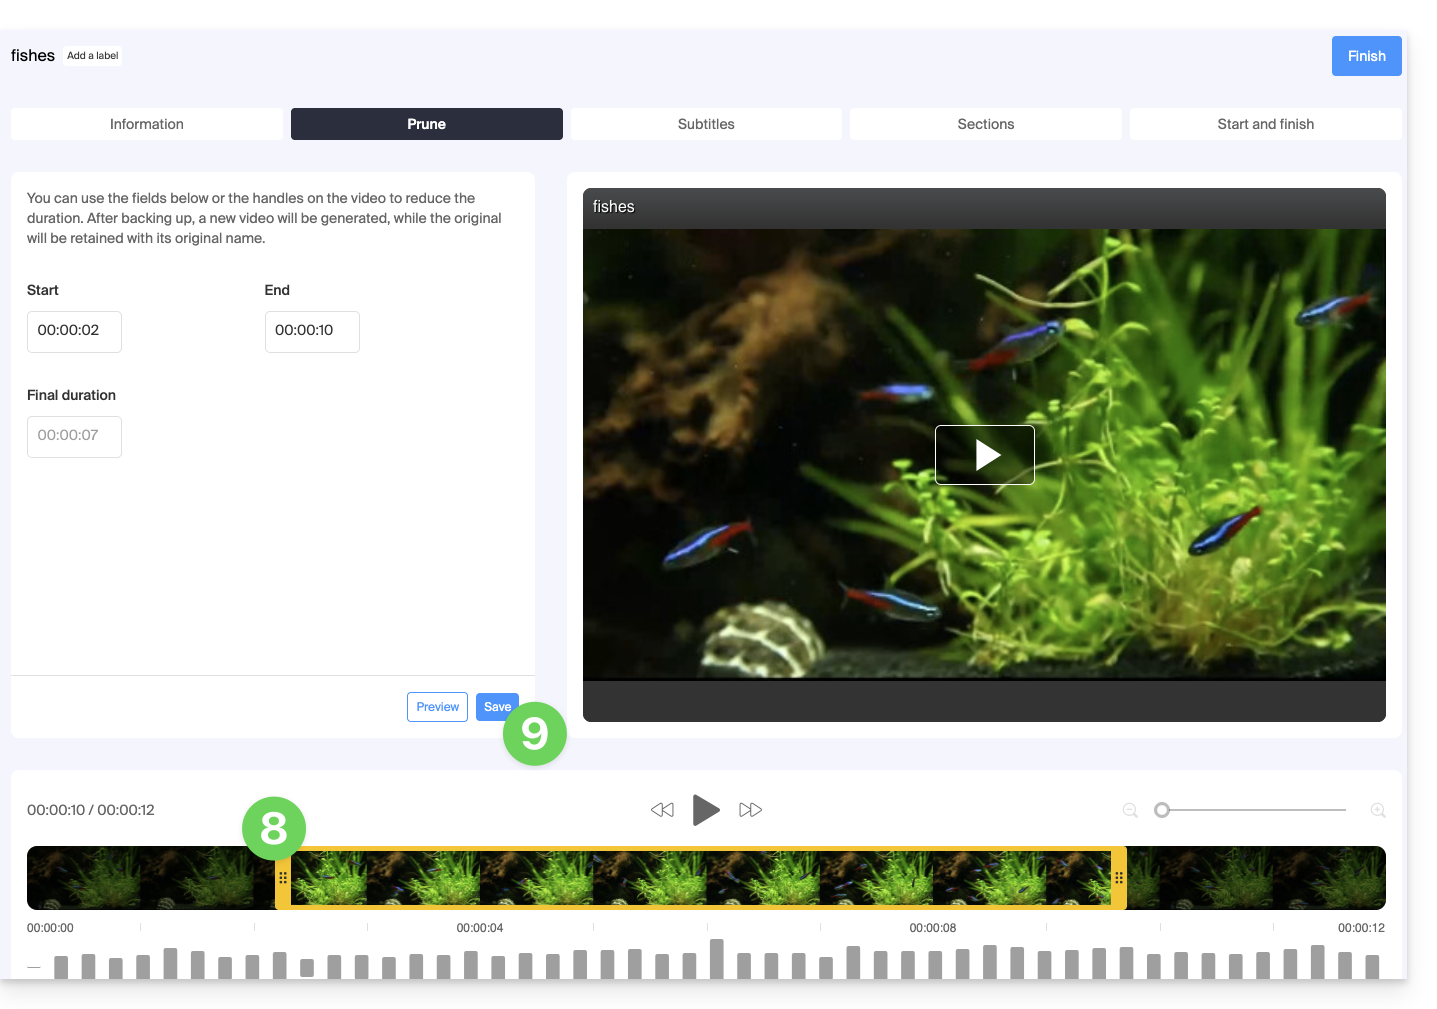
- O corte do seu arquivo de mídia irá gerar um novo vídeo; o arquivo original será mantido com o nome original:
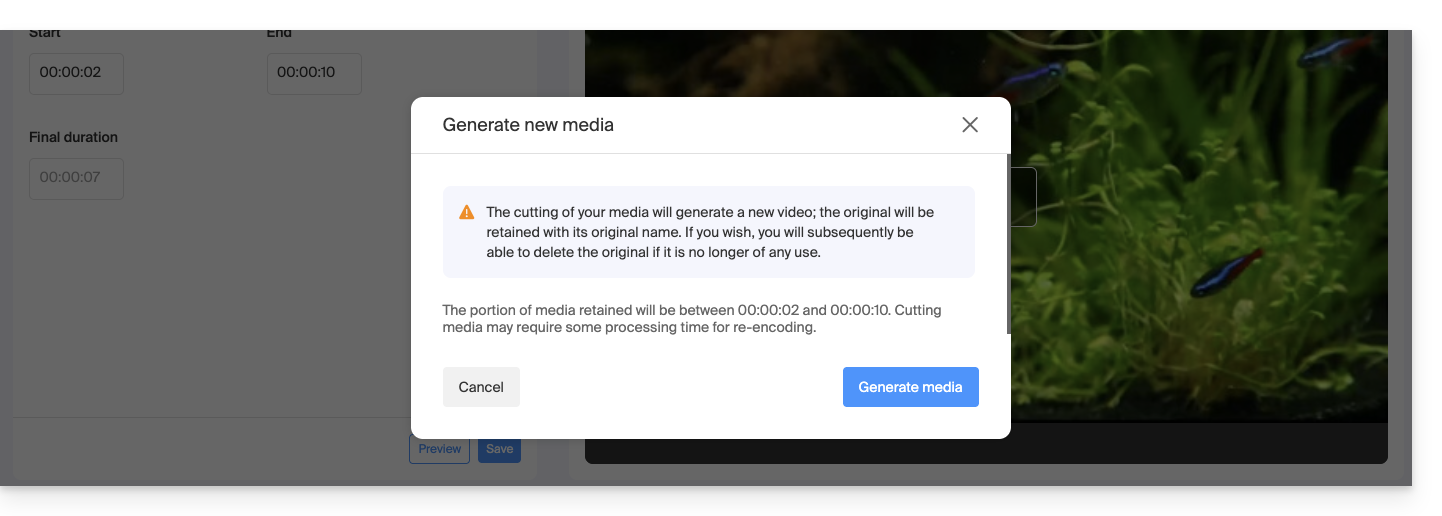 Se desejar, poderá excluí-lo posteriormente, caso não seja mais necessário.
Link para esta FAQ: https://faq.infomaniak.com/1671
Esta seção de perguntas frequentes foi útil?
Ao reproduzir um vídeo incorporado em uma página, a mensagem "Conta suspensa" é exibida quando o produto VOD/AOD ao qual o vídeo pertence foi bloqueado.
A causa do bloqueio pode ser variada, portanto, entre em contato o mais rápido possível com o administrador do espaço VOD/AOD para obter mais informações.
Link para esta FAQ: https://faq.infomaniak.com/1687
Esta seção de perguntas frequentes foi útil?
Este guia aborda a criação de capítulos em um vídeo do serviço VOD e a personalização da exibição do menu (miniatura, título, descrição, etc.).
Introdução
- O ficheiro de vídeo deve ser codificado em
MP4para ter acesso à edição (criação + modificação) dos capítulos. - A edição dos capítulos não será possível num vídeo FLV, mas este último exibirá, mesmo assim, os capítulos no reprodutor de vídeo, caso também tenha sido codificado em MP4 em paralelo.
- Se o vídeo MP4 for excluído, os capítulos permanecerão no arquivo FLV, mas sem possibilidade de edição.
- Não é possível usar esta ferramenta no caso de um arquivo de mídia que contenha apenas áudio.
Criação da estrutura de capítulos
Para acessar um arquivo de mídia no espaço VOD:
- Clique aqui para acessar o gerenciamento do seu VOD/AOD no Gerenciador Infomaniak (precisa de ajuda?).
- Clique diretamente no nome atribuído ao produto em questão:
- Clique em Mídia no menu lateral esquerdo.
- Clique em Gerenciamento de mídia no menu lateral esquerdo.
- Clique no meio em questão:
- Clique no botão Editar:
- Clique na aba Capítulos.
- Escolha a posição do primeiro capítulo.
- Clique no botão azul para criar e configurar o primeiro capítulo:
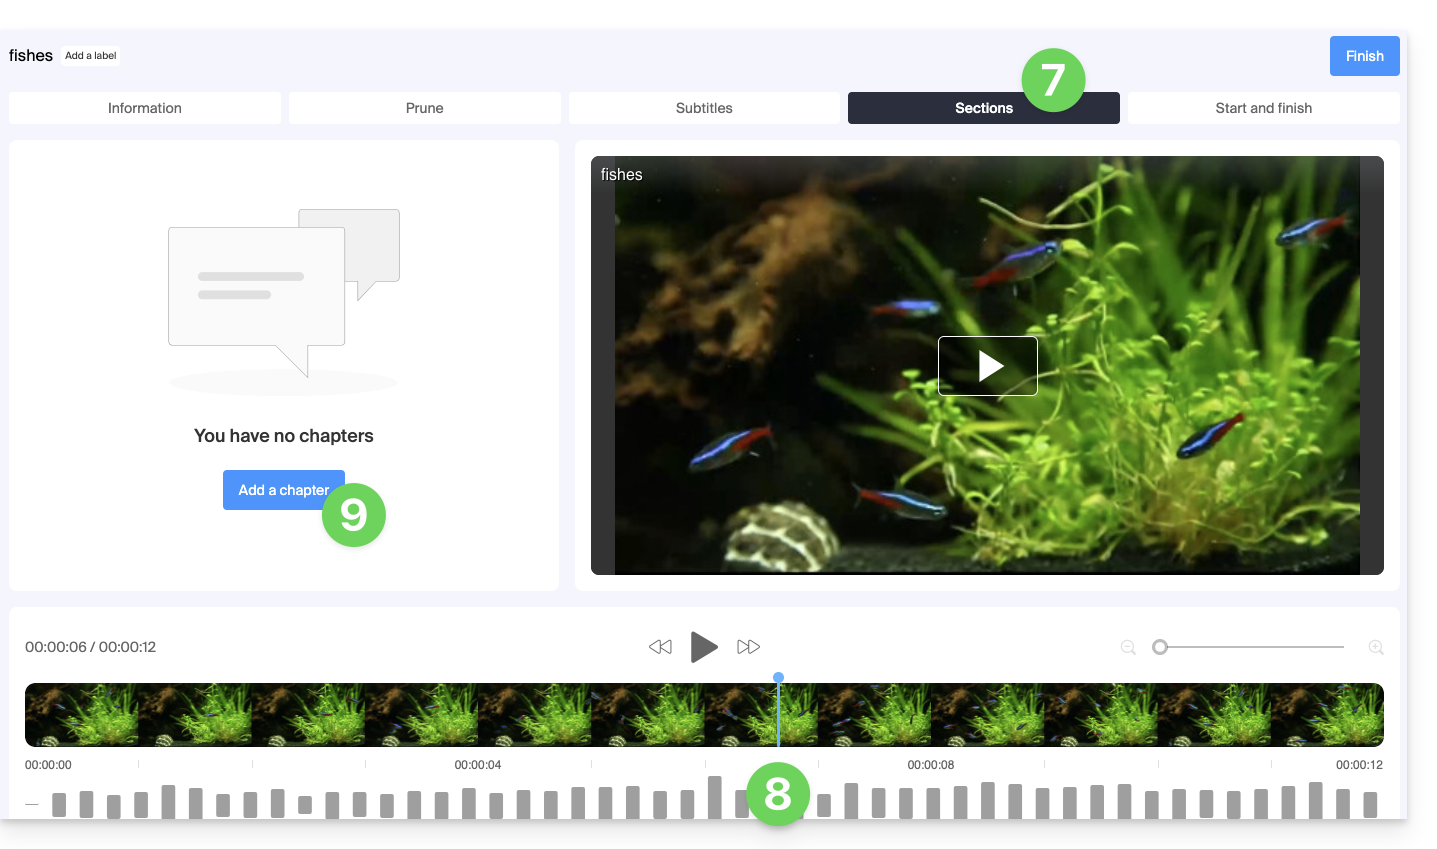
- Edite o primeiro capítulo (informações, miniatura) e salve com o botão para Adicionar o capítulo:
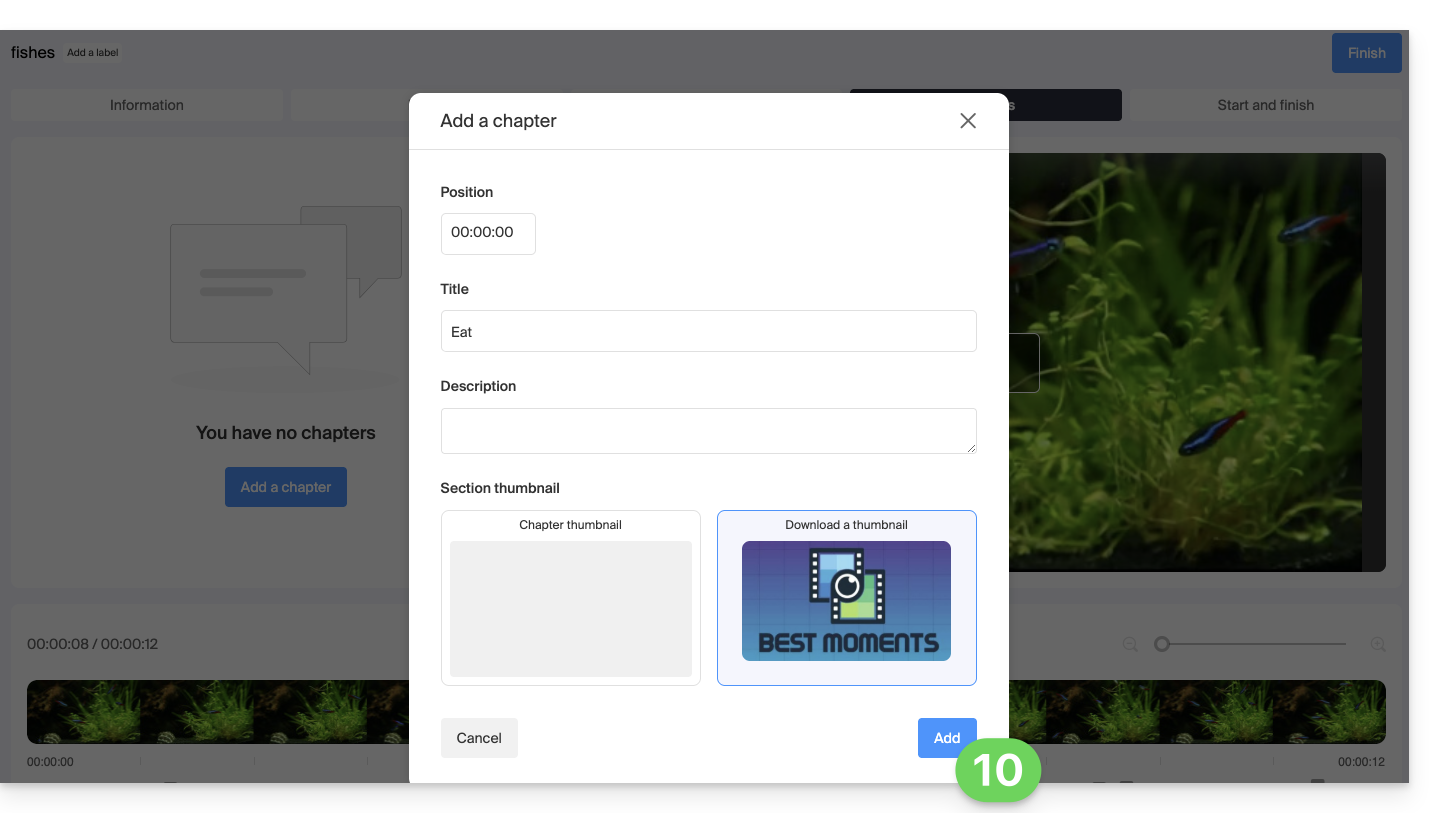
- Repita o processo para os capítulos seguintes.
- Pode alterar a posição dos seus capítulos clicando diretamente na linha do tempo:
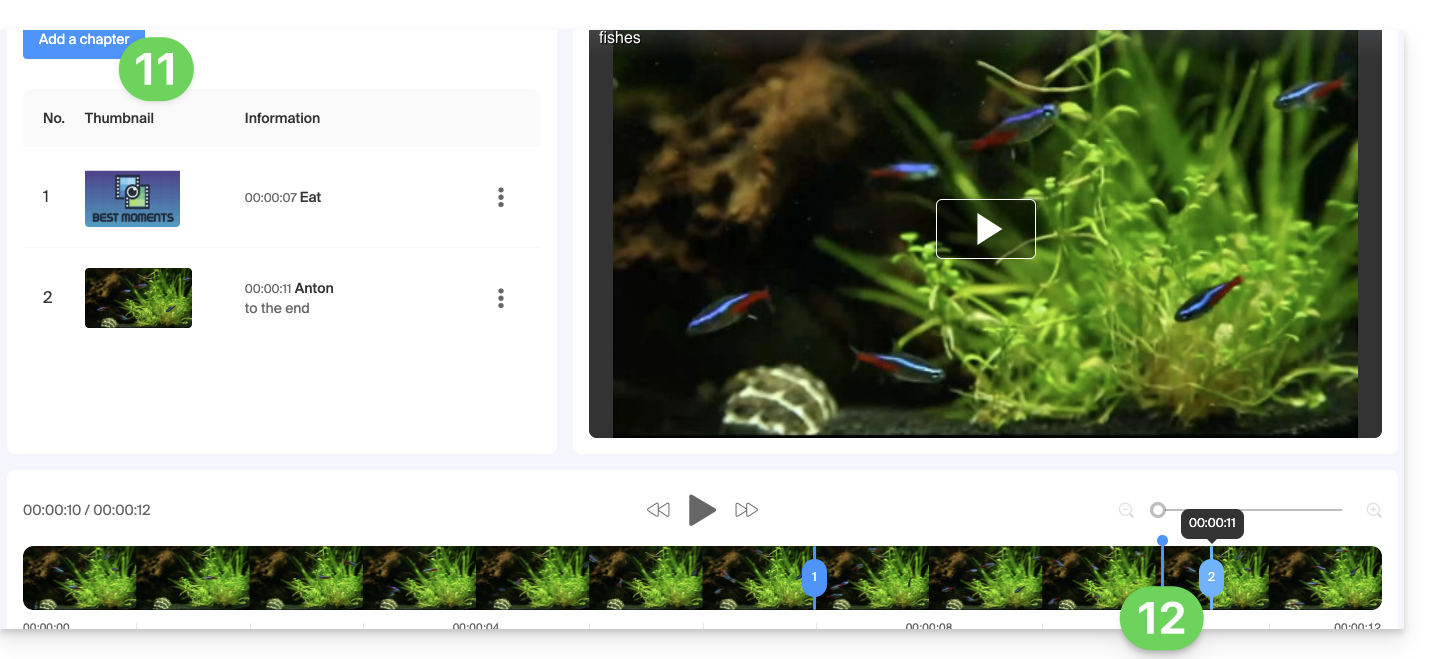
- Conclua a edição dos capítulos com o botão no canto superior direito.
Link para esta FAQ: https://faq.infomaniak.com/1769
Esta seção de perguntas frequentes foi útil?
Este guia explica como integrar no reprodutor VOD/AOD, que serve para transmitir o seu vídeo, um botão sobreposto ao vídeo, no qual o espectador poderá clicar e, assim, partilhar facilmente o link do vídeo (ou incorporar o próprio vídeo).
Introdução
- É possível realizar um compartilhamento automático no Facebook, X (antigo Twitter), LinkedIn e WhatsApp, mas também é possível fornecer um código HTML para integrar o reprodutor no local desejado pelo usuário.
- O compartilhamento também pode ser iniciado dentro da própria biblioteca de mídia.
Adicionar um link de compartilhamento no reprodutor
Para acessar o espaço VOD:
- Clique aqui para acessar o gerenciamento do seu produto no painel de controle Infomaniak (precisa de ajuda?).
- Clique diretamente no nome atribuído ao produto em questão:
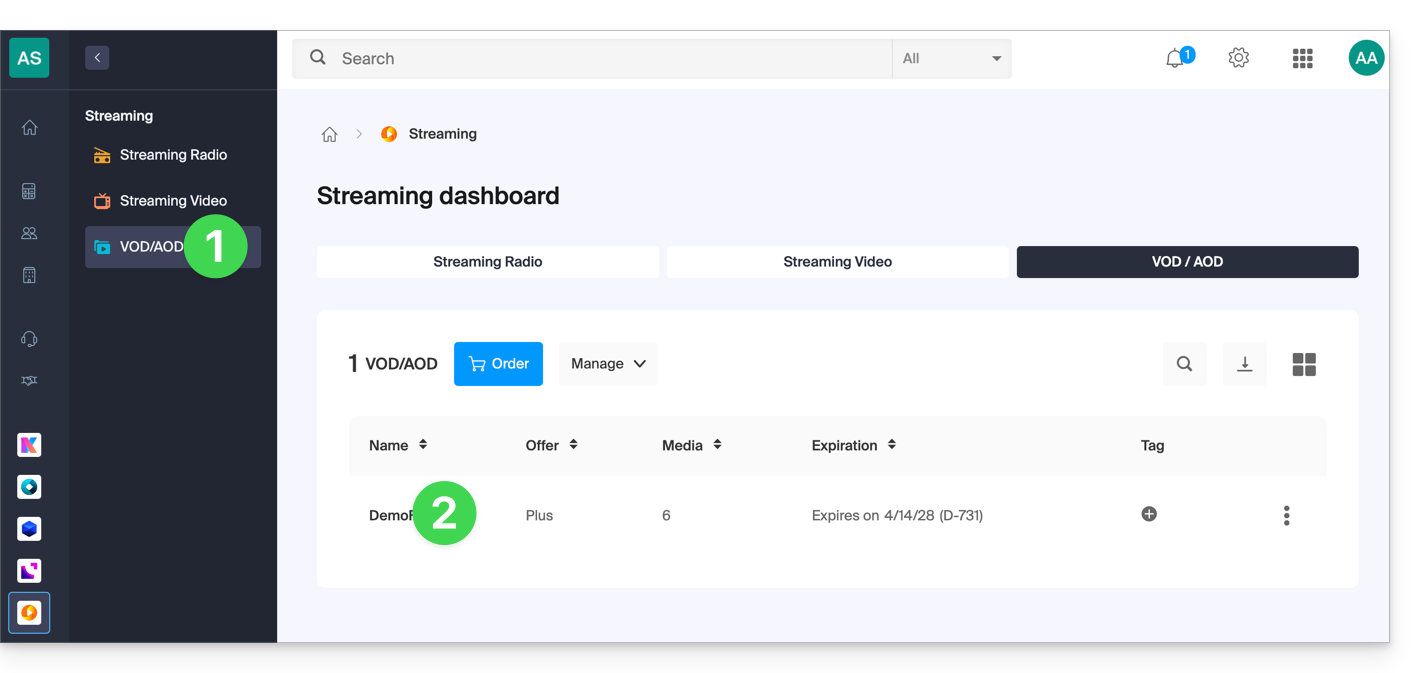
- Clique em Utilizadores no menu lateral esquerdo.
- Clique no elemento correspondente na tabela que é exibida.
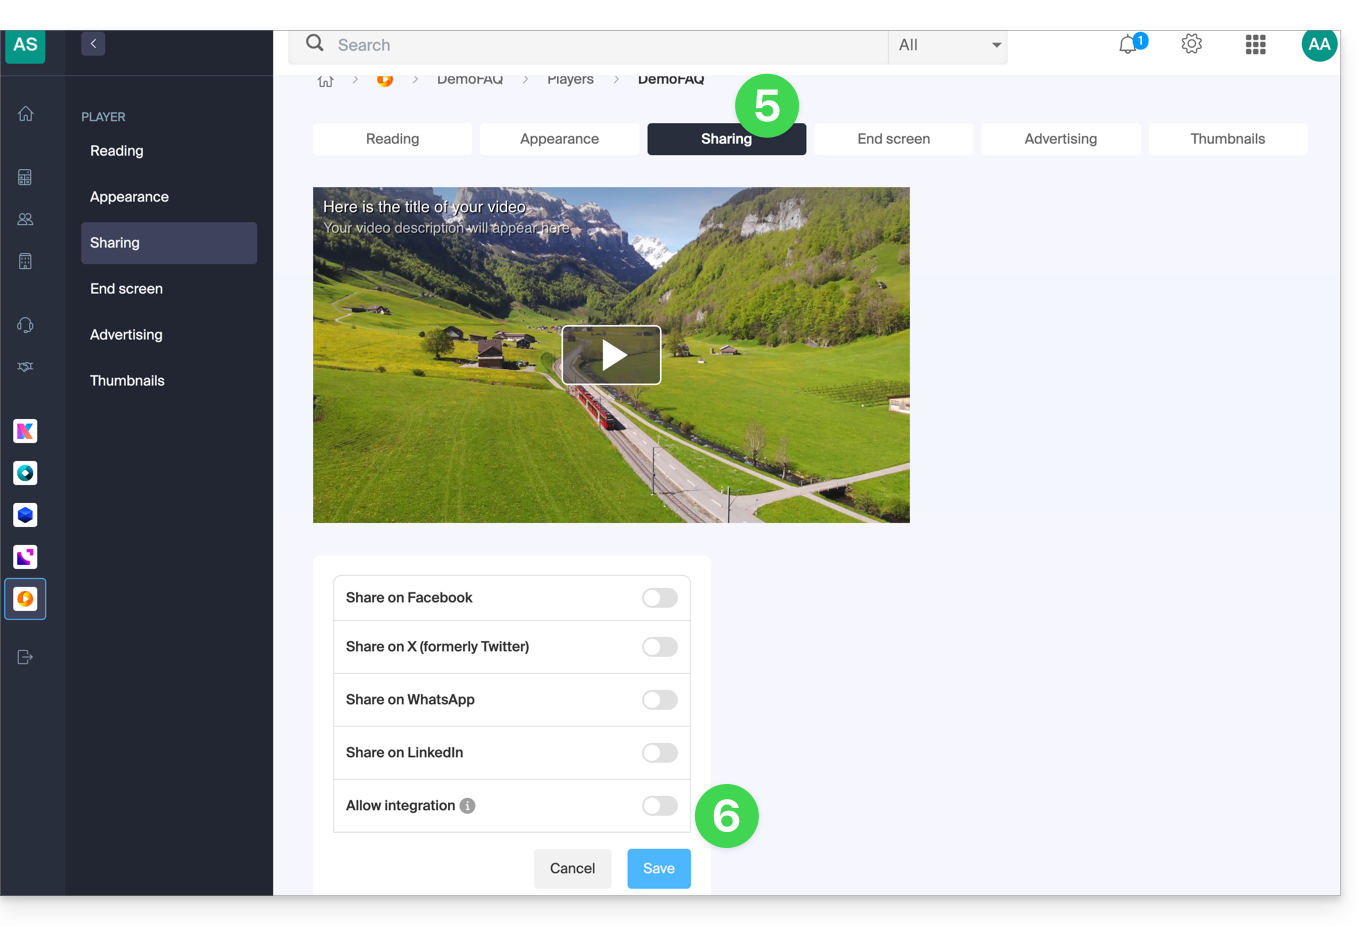
- Clique na aba Partilhar.
- Ative uma das opções de partilha com as configurações desejadas:
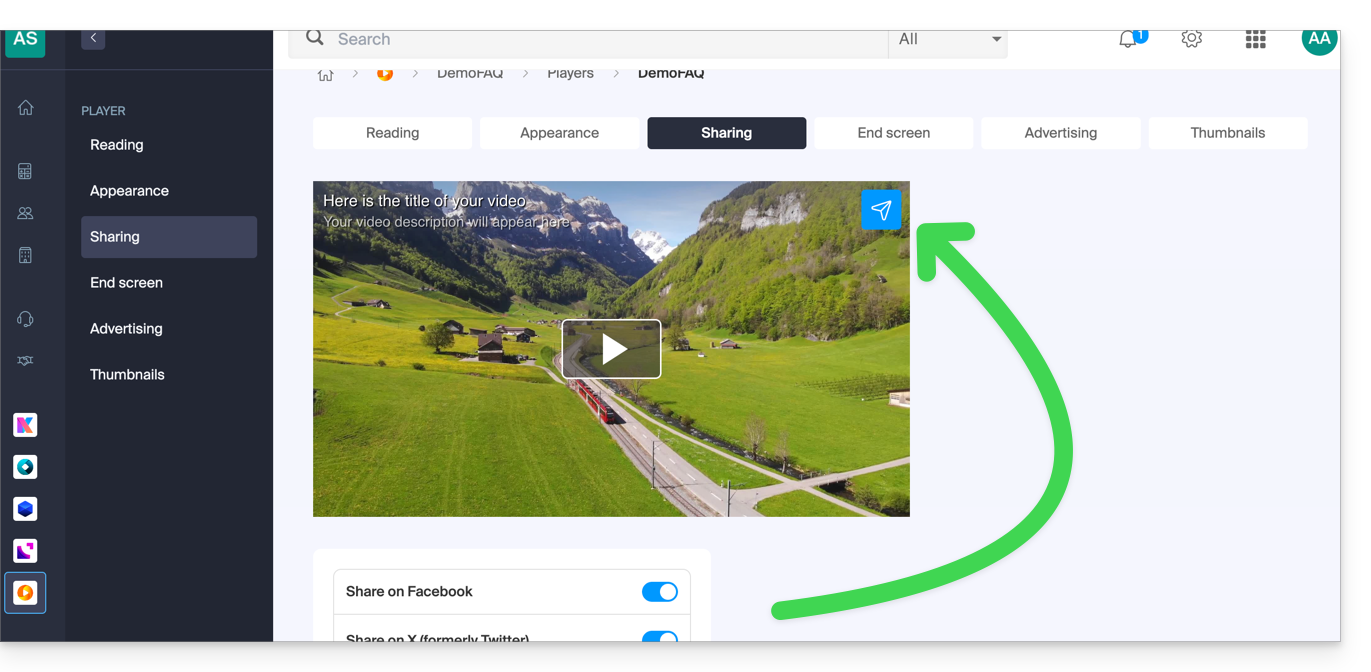
- No Player, aparece um ícone que representa a possibilidade de compartilhamento para o usuário:
- Não se esqueça de salvar suas alterações, se necessário.
Link para esta FAQ: https://faq.infomaniak.com/1818
Esta seção de perguntas frequentes foi útil?
Este guia explica como proteger vídeos importados num serviço VOD Infomaniak com uma palavra-passe.
Introdução
- Para reproduzir um vídeo num reprodutor configurado no serviço VOD, será necessária uma palavra-passe, sem a qual a reprodução não será possível.
- Não é possível especificar várias palavras-passe diferentes para o mesmo vídeo.
- Outras restrições de acesso podem ser ativadas e afetam o acesso ao ficheiro: token | geoip
- Pode gerir as imagens de visualização utilizadas durante a restrição de acesso.
Proteger um vídeo com uma palavra-passe
A proteção com uma palavra-passe pode ser configurada de várias formas.
1. Palavra-passe ao nível da pasta de importação
Se a palavra-passe for definida uma vez para a pasta de destino, todas as novas importações de conteúdos multimédia terão automaticamente essa palavra-passe ao serem reproduzidas. No entanto, é possível alterar a visibilidade de cada vídeo individualmente (consulte abaixo).
Para configurar esta pasta:
- Clique aqui para aceder à gestão do seu VOD/AOD no Manager Infomaniak (precisa de ajuda?).
- Clique diretamente no nome atribuído ao produto em questão:
- Clique em Mídia no menu lateral esquerdo.
- Clique em Gerenciamento de mídia no menu lateral esquerdo.
- Clique no ícone para criar uma Nova pasta:
- Dê um nome à pasta.
- Clique no botão azul para Criar a pasta.
- Clique em Configuração:
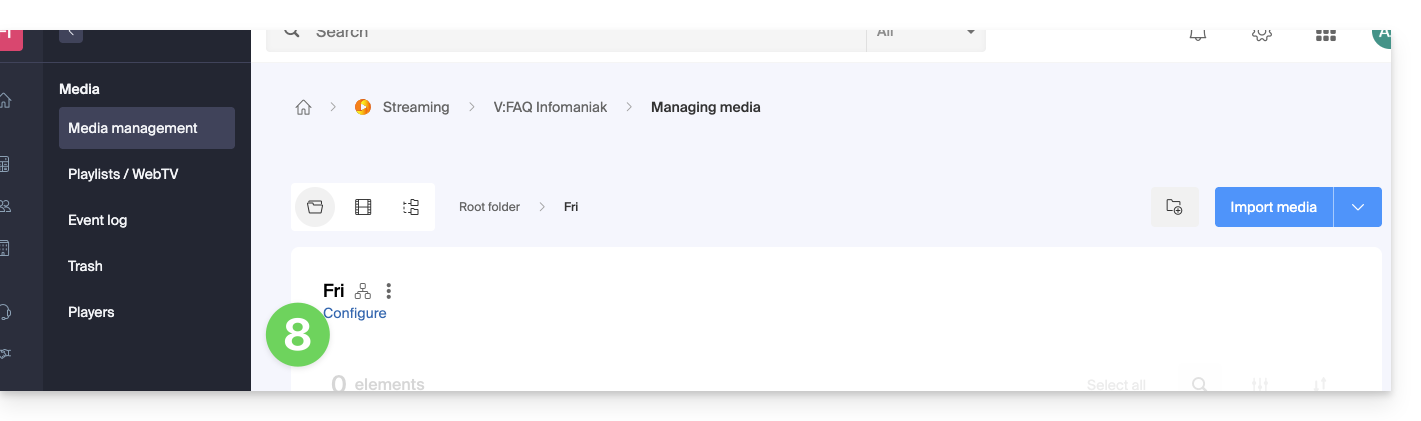
- Clique na aba Processamento de mídia.
- Desative, se necessário, o botão (interruptor) para remover a herança da pasta pai, para que possa configurar suas próprias regras para esta pasta específica.
- Em Visibilidade, escolha a opção Senha e insira uma nova senha com no mínimo 6 caracteres.
- Clique em Salvar depois de configurar as diferentes opções desejadas:
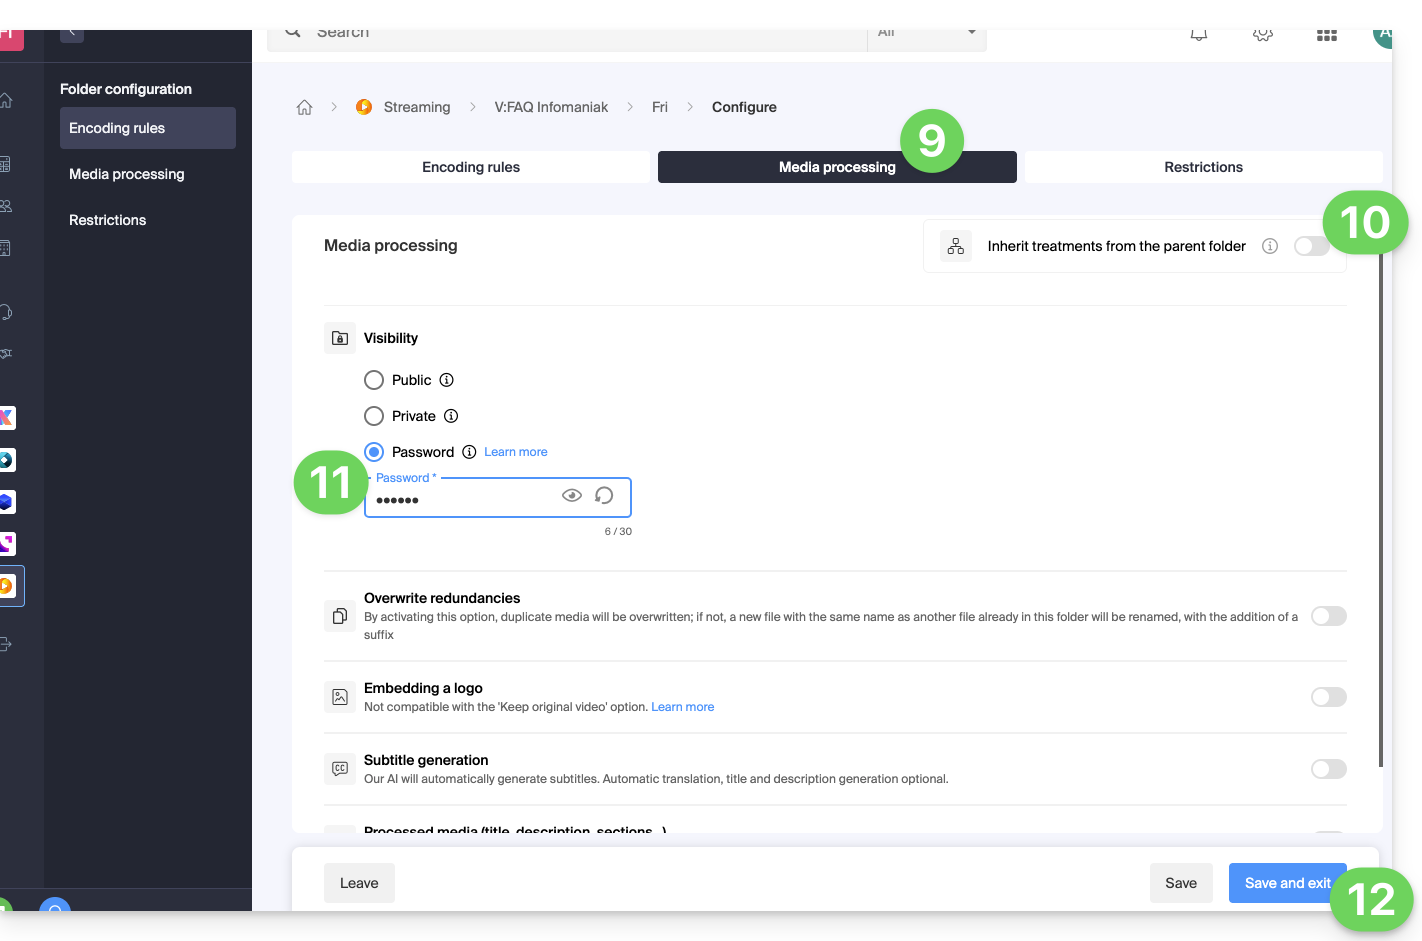
- Carregue novos vídeos nesta pasta para que eles sejam protegidos por senha ao serem reproduzidos.
Um vídeo já codificado em outro local do seu espaço VOD não será protegido automaticamente, mesmo que seja movido para dentro desta pasta. Será necessário alterar seu status manualmente (veja abaixo).
2. Senha definida manualmente para cada vídeo
Para alterar a visibilidade de um vídeo em um serviço VOD:
- Clique aqui para acessar o gerenciamento do seu VOD/AOD no Manager Infomaniak (precisa de ajuda?).
- Clique diretamente no nome atribuído ao produto em questão.
- Clique em Mídia no menu lateral esquerdo.
- Clique em Gerenciamento de mídia no menu lateral esquerdo.
- Clique no vídeo em questão.
- Clique em Editar na seção Status.
- Para modificar a visibilidade desta mídia, escolha a opção Senha e insira uma nova senha com no mínimo 6 caracteres.
- Clique no botão azul para Modificar o status:
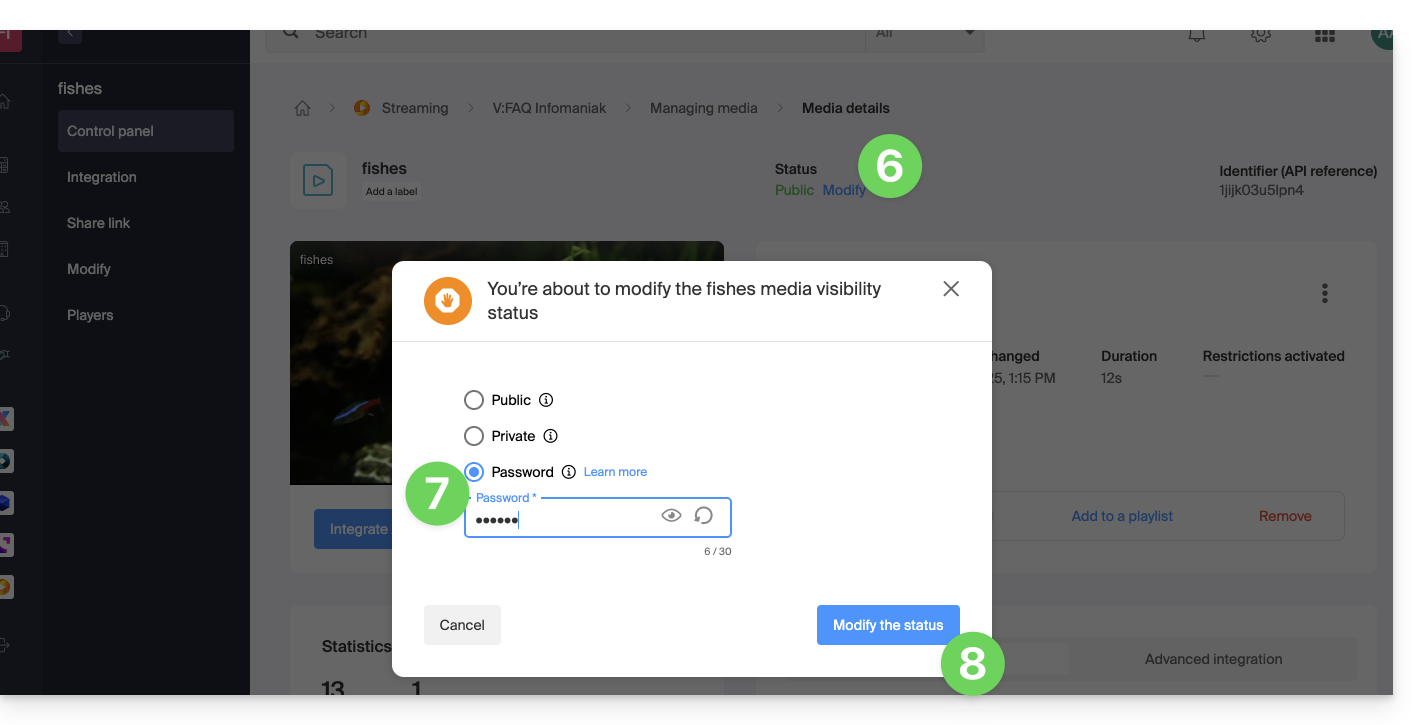
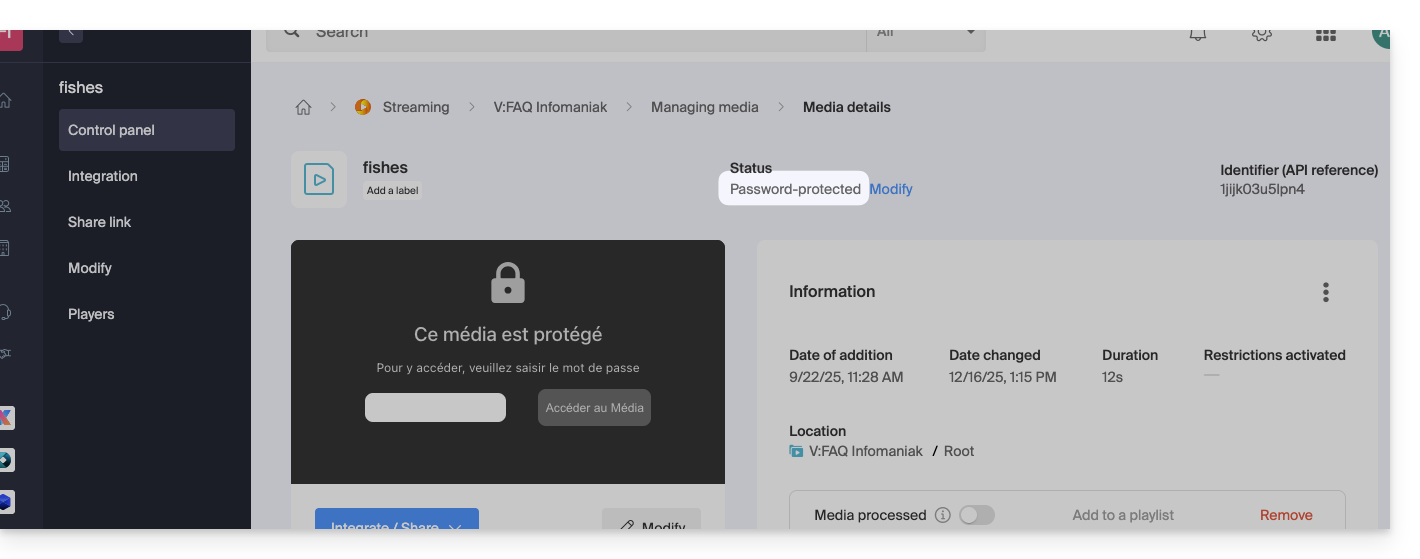
- O vídeo fica protegido por senha:
Link para esta FAQ: https://faq.infomaniak.com/1824
Esta seção de perguntas frequentes foi útil?
Este guia explica como mover um arquivo de mídia que foi carregado em um espaço VOD/AOD para outra pasta.
Introdução
- Durante uma transferência, o ficheiro mantém as suas diferentes codificações.
- Não é recodificado e, portanto, não herda as codificações da pasta de destino.
Gerenciar os conteúdos de vídeo sob demanda (VOD) / vídeo sob demanda por assinatura (AOD)
Para acessar os conteúdos:
- Clique aqui para acessar o gerenciamento do seu produto no Manager Infomaniak (precisa de ajuda?).
- Clique diretamente no nome atribuído ao produto em questão.
- Clique em Mídia no menu lateral esquerdo.
- Clique em Gerenciamento de mídia no menu lateral esquerdo.
- Selecione um ou mais arquivos.
- Escolha a opção desejada na parte inferior da página:
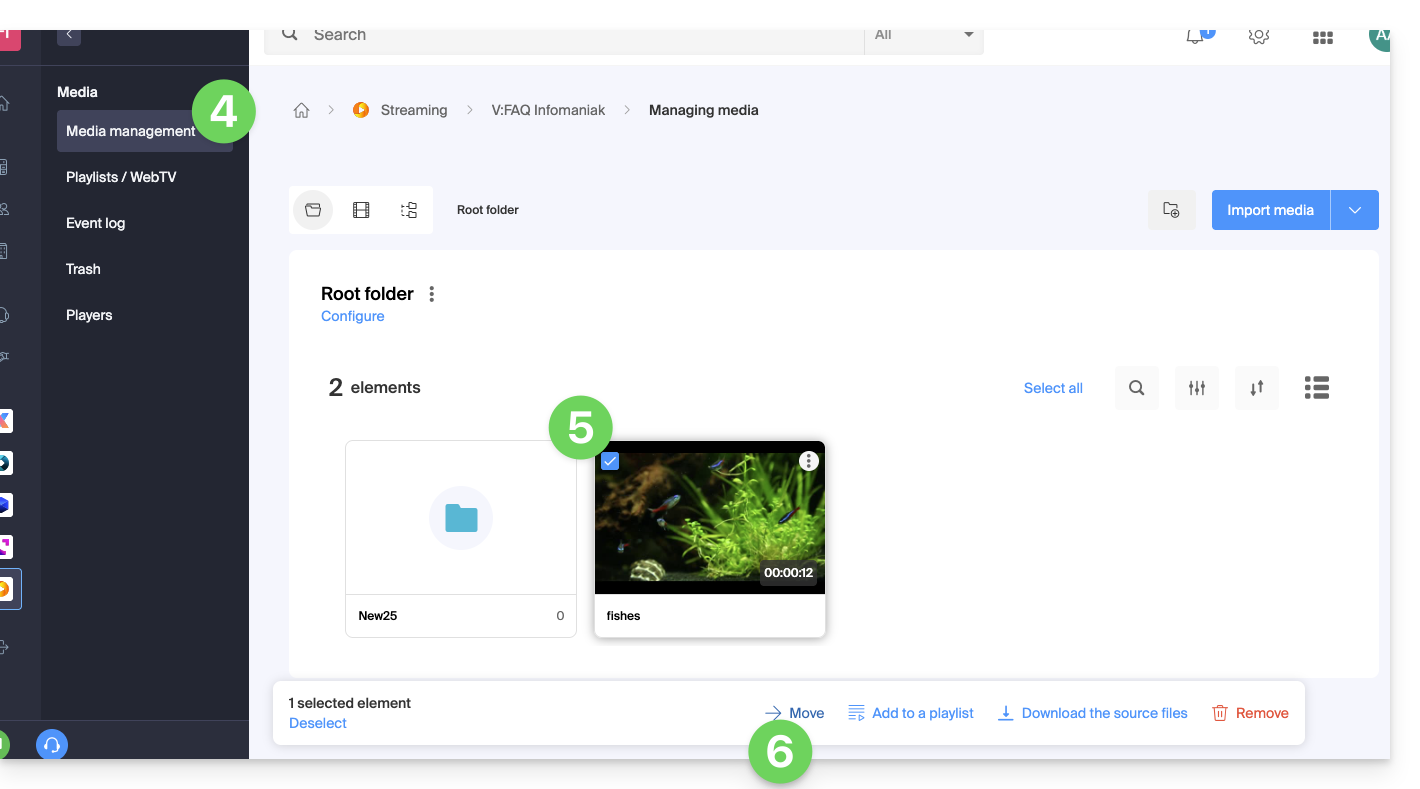
- … ou clique em um arquivo para abri-lo e clique no menu de ação ⋮ à direita:
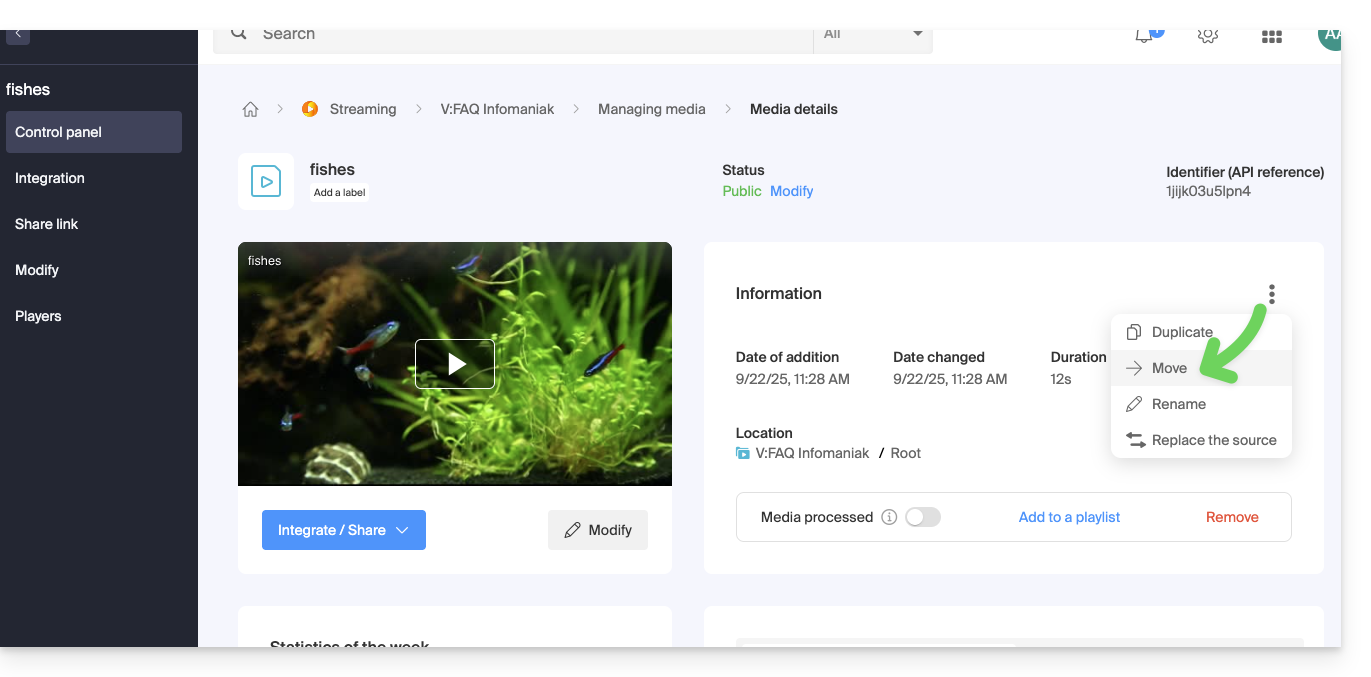
- … ou clique em um arquivo para abri-lo e clique no menu de ação ⋮ à direita:
Link para esta FAQ: https://faq.infomaniak.com/1876
Esta seção de perguntas frequentes foi útil?
Este guia explica como proibir o acesso aos vídeos importados em um serviço VOD Infomaniak, com base em critérios geográficos e/ou endereços IP.
Introdução
- Atenção: a proteção só é eficaz no caso de uma integração padrão por iframe e, portanto, através do uso do Player Infomaniak.
- Outras restrições de acesso podem ser ativadas e dizem respeito ao acesso ao arquivo: token | senha
- Você pode gerenciar as imagens de visualização usadas durante a restrição de acesso.
Restringir o acesso via GeoIP
As restrições geográficas e por IP são configuradas no nível da pasta de importação e protegerão todos os vídeos da pasta. Para configurar esta pasta:
- Clique aqui para acessar o gerenciamento do seu VOD/AOD no Manager Infomaniak (precisa de ajuda?).
- Clique diretamente no nome atribuído ao produto em questão:
- Clique em Mídia no menu lateral esquerdo.
- Clique em Gerenciamento de mídia no menu lateral esquerdo.
- Clique no ícone para criar uma Nova pasta:
- Dê um nome à pasta.
- Clique no botão azul para Criar a pasta.
- Clique em Configuração:
- Clique na aba Restrições.
- Desative, se necessário, o botão de alternância (toggle switch) para remover a herança da pasta principal, para poder configurar suas próprias regras nesta pasta específica.
- Ative o botão de alternância (toggle switch) para poder definir uma lista de países e o que deve ser feito com eles:
- Permitir apenas os países da lista para acessar os arquivos (todo o resto do mundo é bloqueado).
- Permitir o mundo todo, exceto os países da lista, que serão bloqueados.
- Ative o botão de alternância (toggle switch) para poder definir uma lista de IPs ou intervalos de IPs que devem ser permitidos ou proibidos (o caractere
*é permitido). - Clique em Salvar depois de configurar as diferentes restrições desejadas:
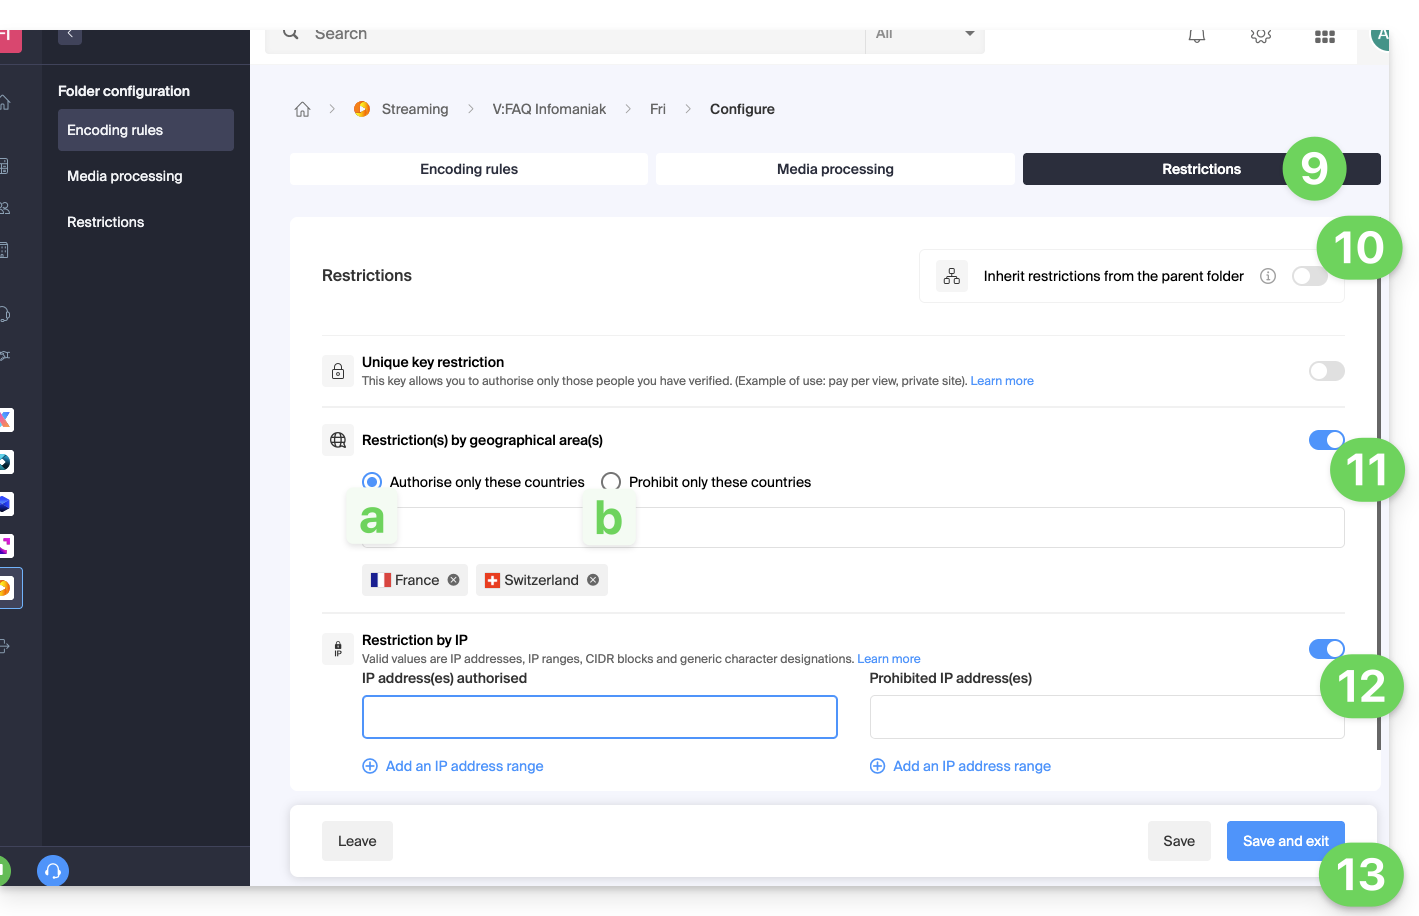
- Carregue novos vídeos nesta pasta para que sejam restritos de acordo com suas regras rigorosas quando forem reproduzidos.
Link para esta FAQ: https://faq.infomaniak.com/1881
Esta seção de perguntas frequentes foi útil?
Este guia explica como enviar novos arquivos de mídia para um espaço VOD/AOD da Infomaniak. Consulte este outro guia se desejar substituir um arquivo de mídia já importado.
Adicionar e codificar um novo arquivo de mídia
Para enviar um arquivo de mídia para que ele seja codificado e transmitido a partir do seu espaço VOD:
- Clique aqui para acessar o gerenciamento do seu produto no Manager Infomaniak (precisa de ajuda?).
- Clique no nome do produto em questão:
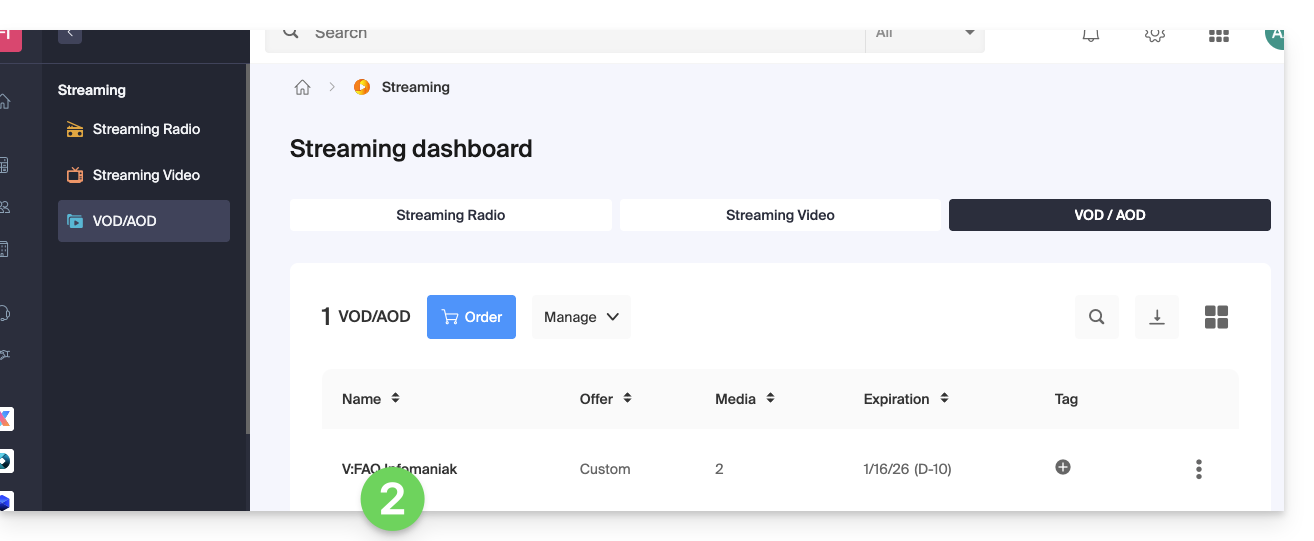
Existem várias maneiras de importar seus arquivos:
- A partir da página inicial (painel de controlo do espaço VOD/AOD):
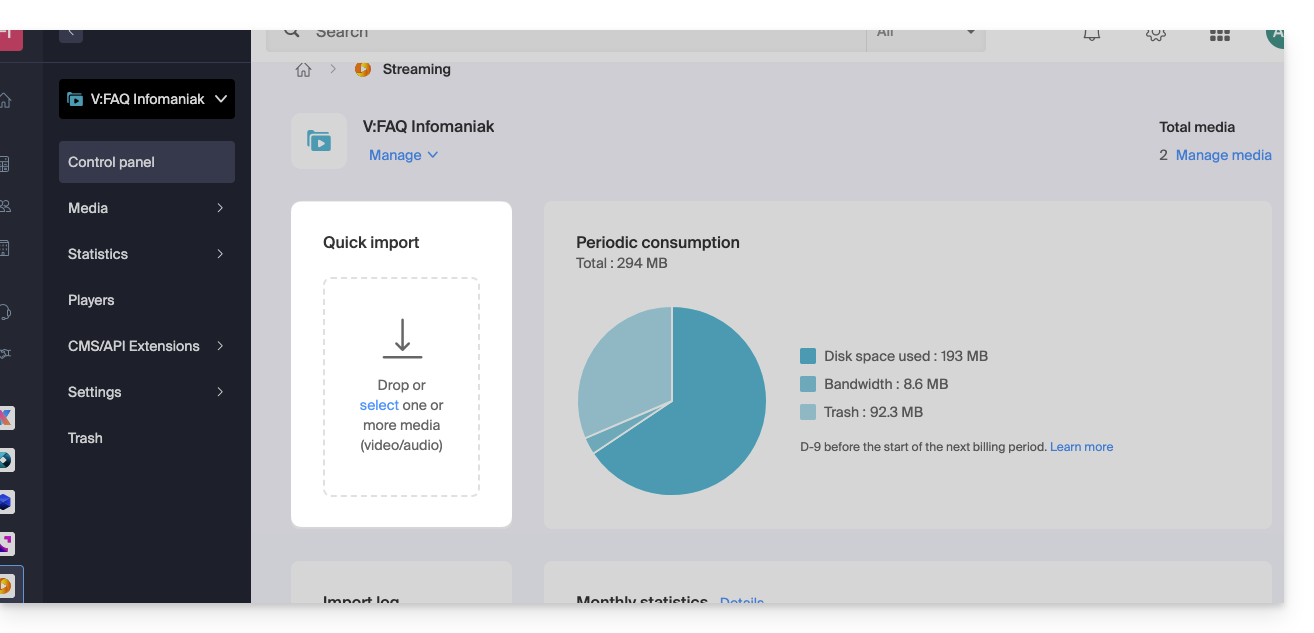
- A partir da página de Mídia:
- Clique em Mídia no menu lateral esquerdo:
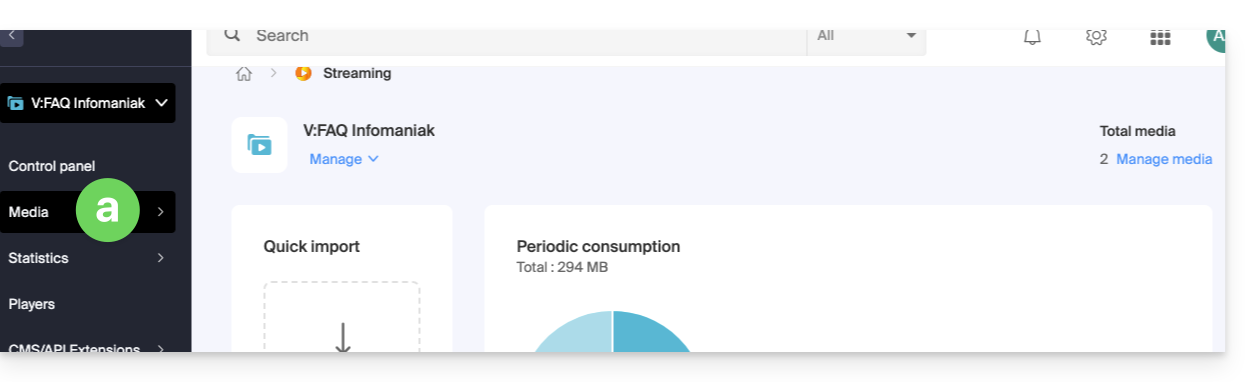
- Clique em Gestão de mídia no menu.
- Crie ou aceda a uma pasta de importação, se necessário:
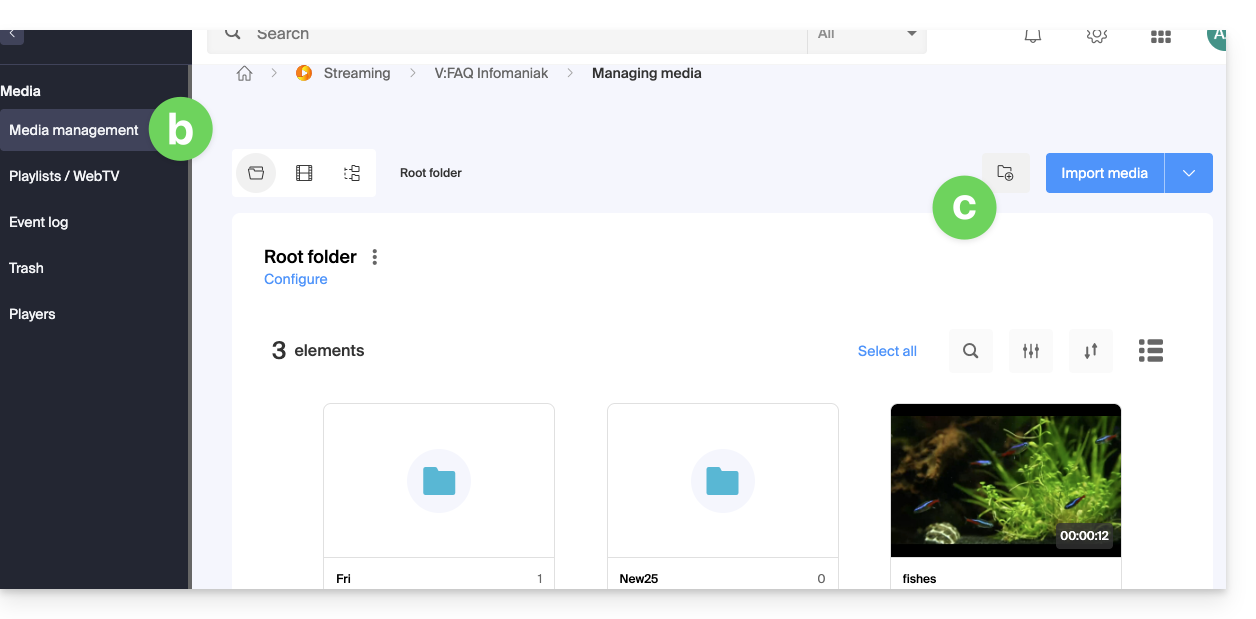
- Clique em Mídia no menu lateral esquerdo:
A partir desta página, várias opções estão disponíveis:
- Clique no botão azul Importar mídia:
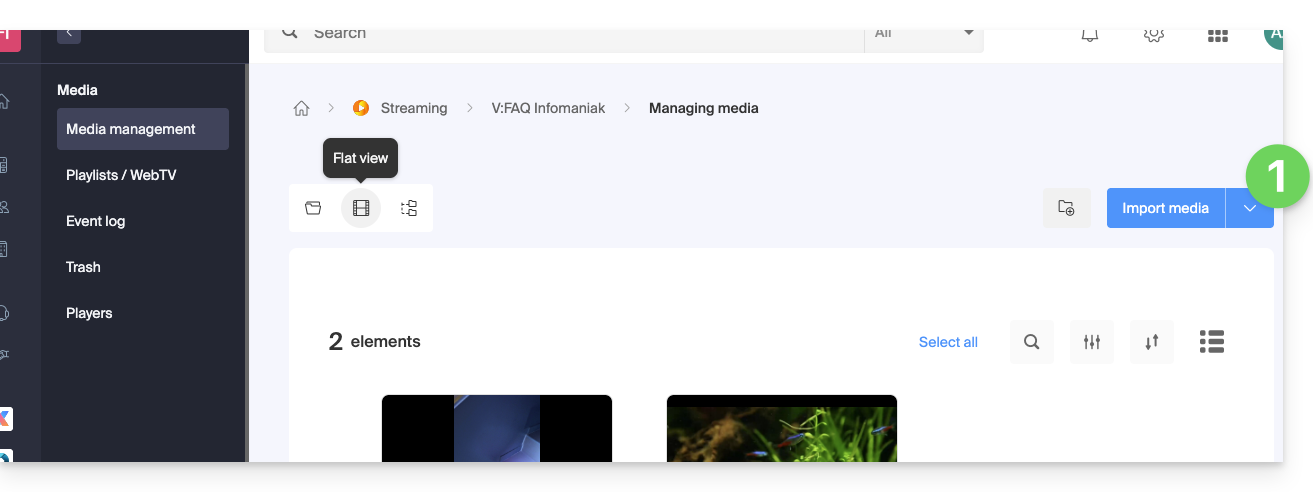
- Escolha um método de envio:
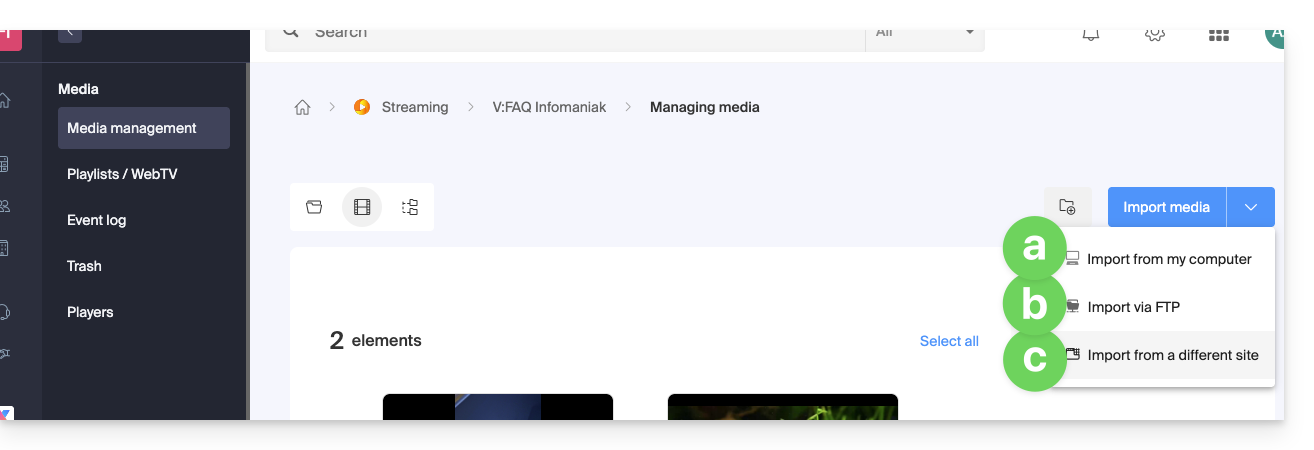
- Importar do dispositivo (limite máximo por arquivo:
50 GB)
Permite selecionar um arquivo do seu disco rígido ou mídia externa: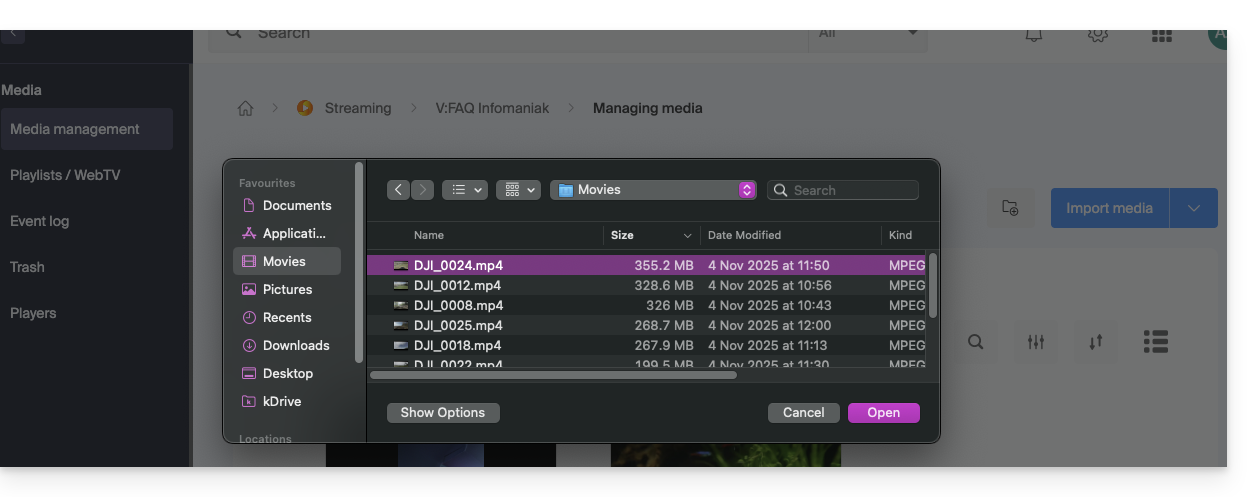
- Importar via FTP (sem limite de tamanho, mas depende do espaço em disco disponível)
Ative o modo TLS no seu software FTP. As configurações e o gerenciamento de usuários FTP podem ser personalizados na página: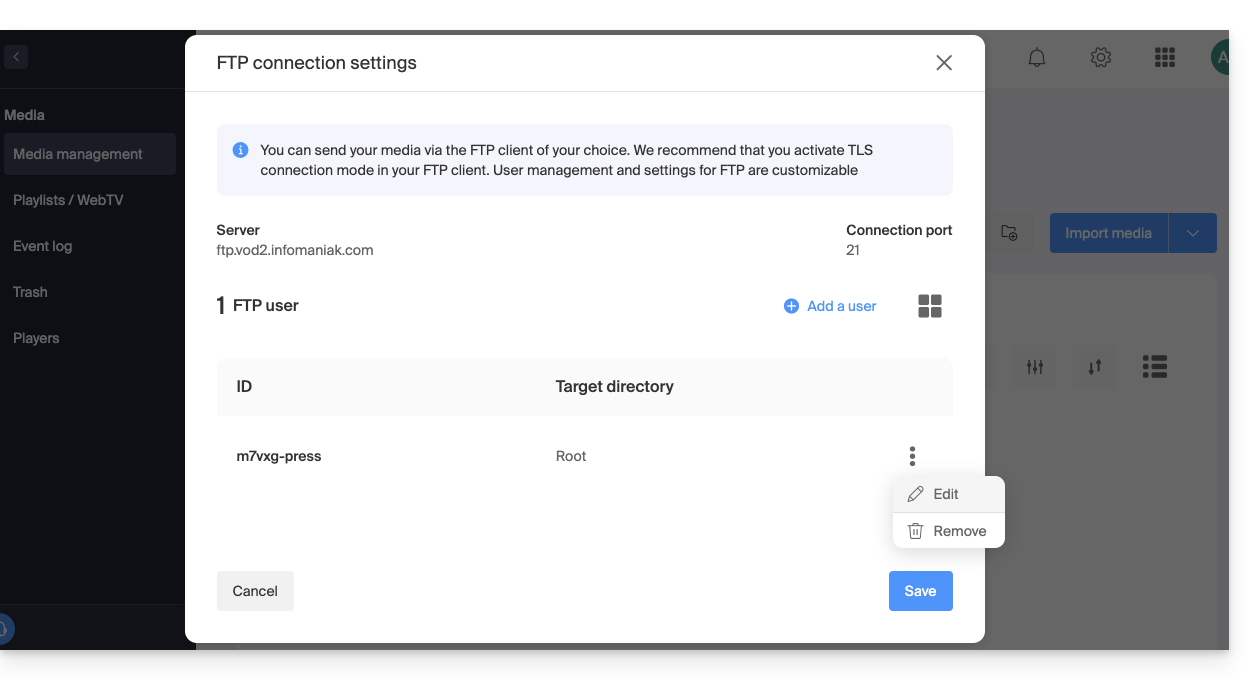
Se você usar um software de edição que suporte publicação FTP (como o Adobe Premiere), poderá exportar diretamente para o espaço VOD. A codificação começará automaticamente. Caso contrário, use um cliente FTP como o FileZilla. - De um site externo (limite máximo por arquivo:
40 GB)
Permite inserir a URL de uma mídia hospedada online, incluindo aquelas protegidas por senha: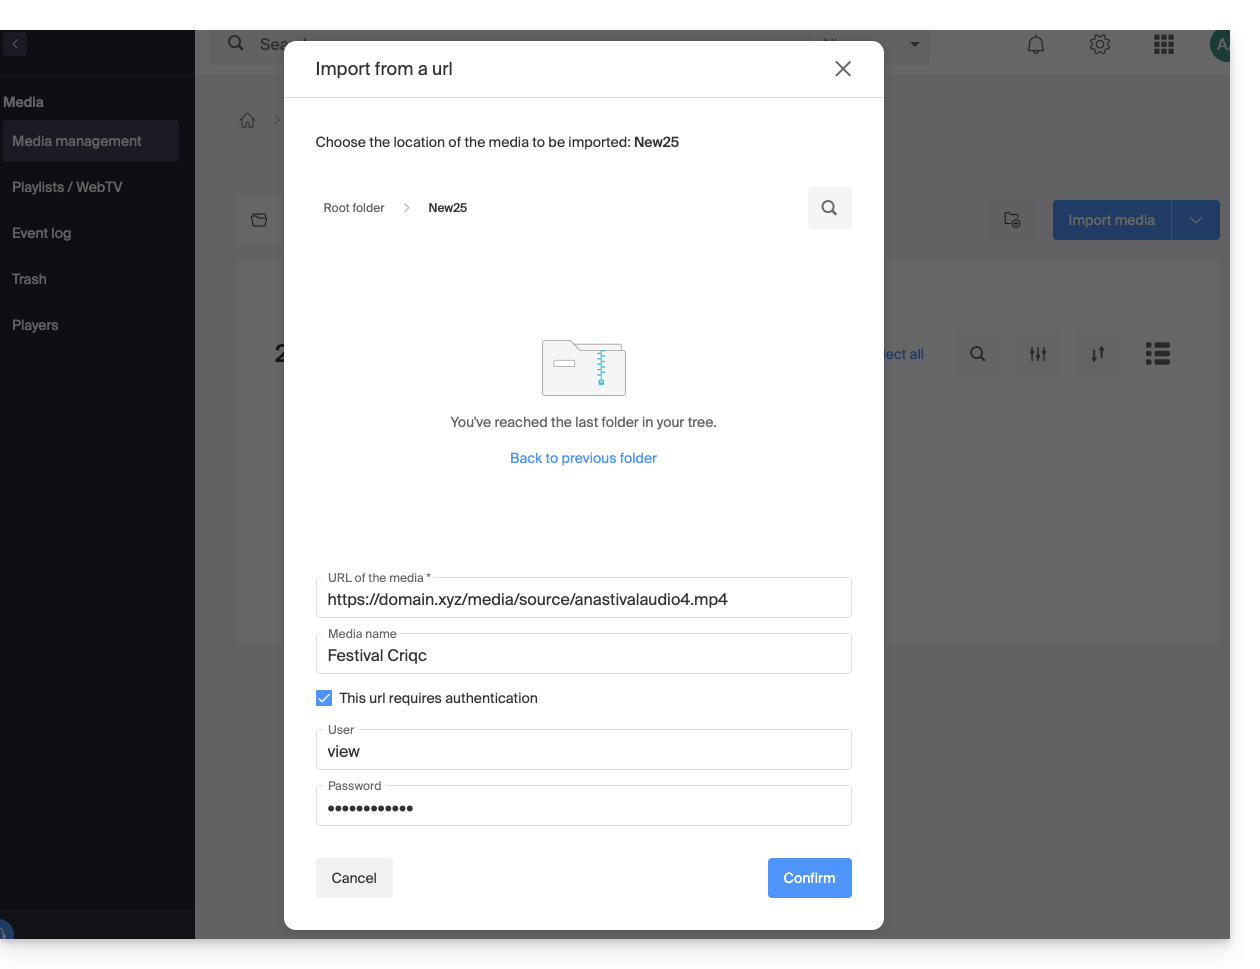
- Importar do dispositivo (limite máximo por arquivo:
Outro método consiste em usar a API Infomaniak (limite máximo por arquivo: 40 GB). A documentação está disponível no menu lateral esquerdo, em API: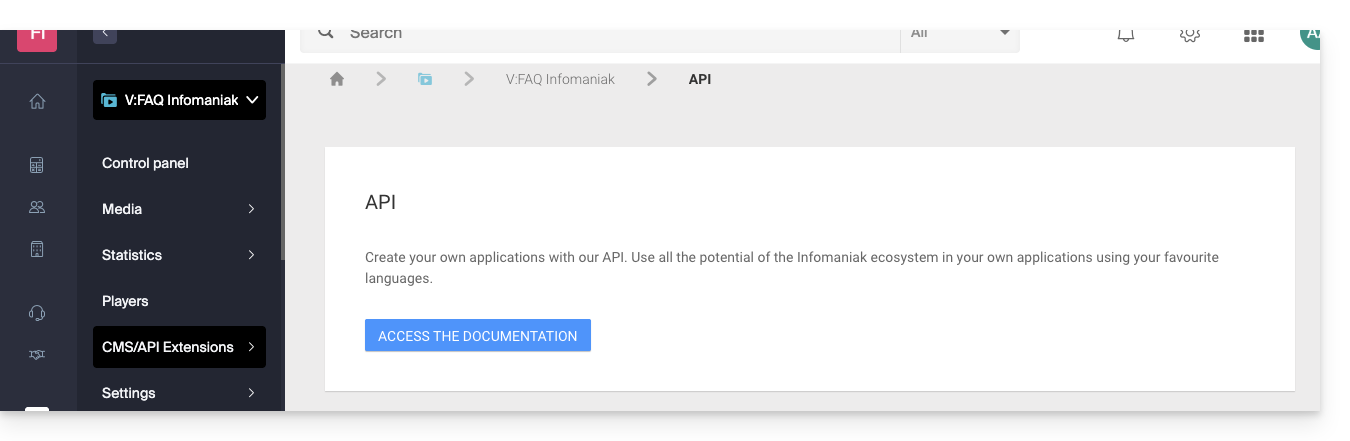
Formatos suportados
Tipos de ficheiros suportados:
- Vídeo:
3gp,asf,avi,f4v,flv,m2ts,m2v,m4v,mkv,mov,mp4,mpeg,mpg,rm,ts,webm,wmv - Áudio:
aac,flac,m4a,mp2,mp3,ogg,tta,vob,wav,wma
Link para esta FAQ: https://faq.infomaniak.com/1884
Esta seção de perguntas frequentes foi útil?
É possível gerenciar as ações de início e fim de um vídeo que já foi carregado em um serviço VOD. Não é possível usar esta ferramenta no caso de um arquivo de mídia que seja apenas de áudio.
Gerenciar a tela final (e o salto da introdução)
Para acessar um arquivo na área VOD:
- Clique aqui para acessar o gerenciamento do seu VOD/AOD no Manager Infomaniak (precisa de ajuda?).
- Clique diretamente no nome atribuído ao produto em questão:
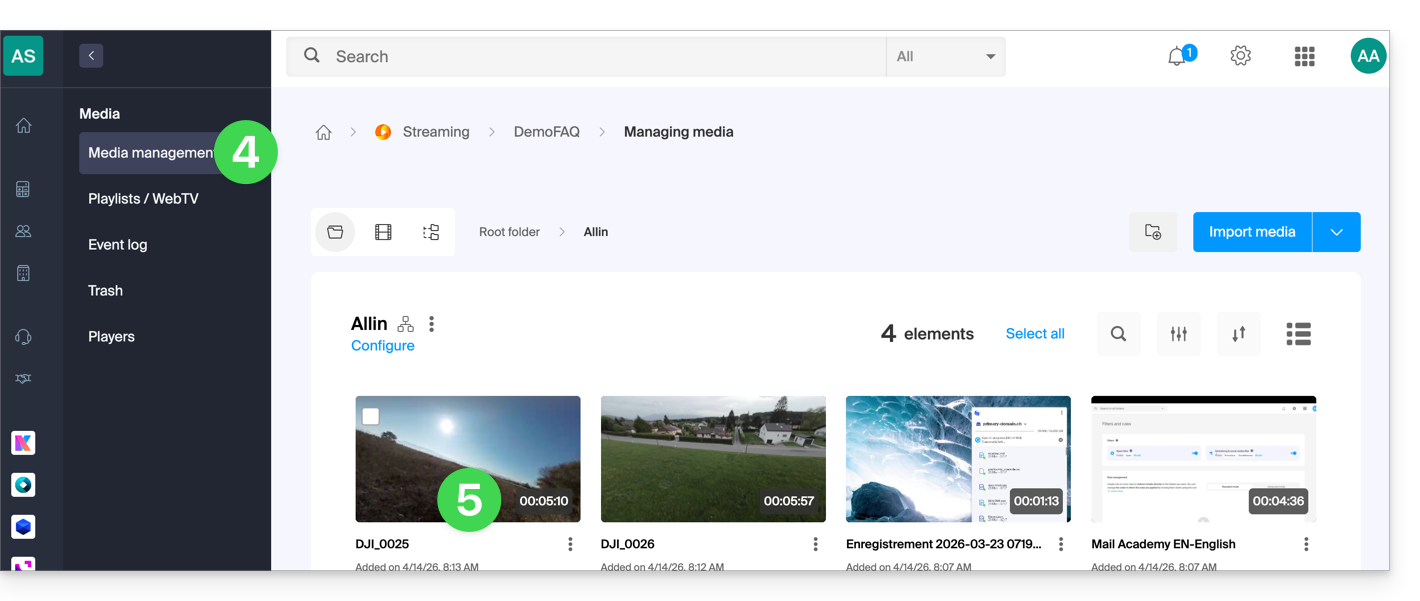
- Clique em Mídia no menu lateral esquerdo.
- Clique em Gerenciar mídia no menu lateral esquerdo.
- Clique na mídia desejada:
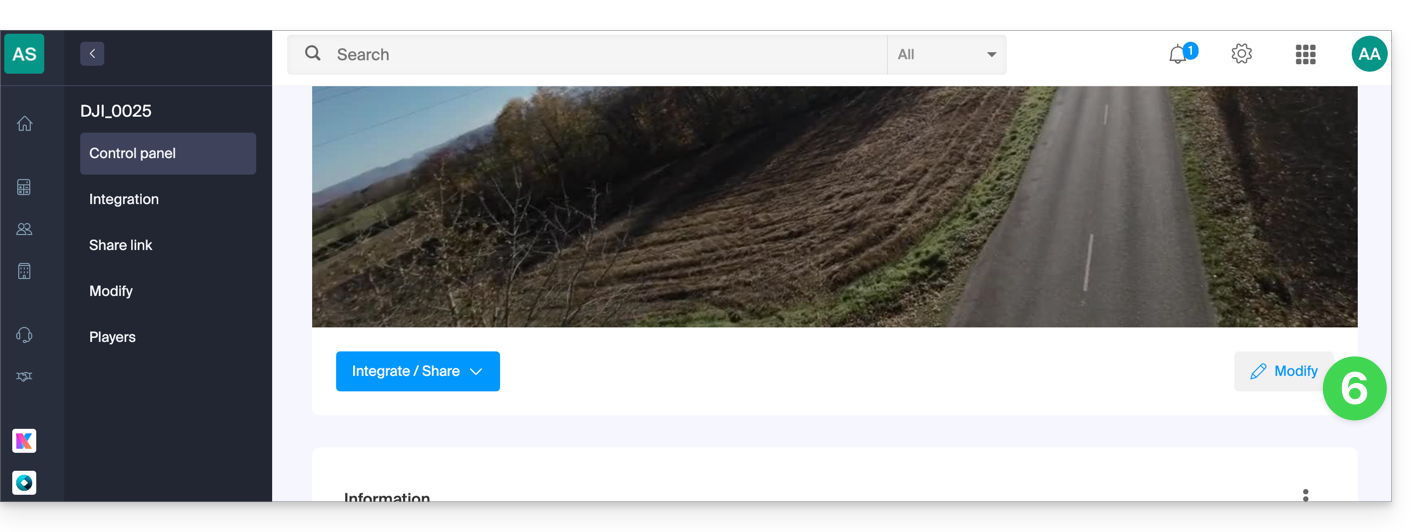
- Clique no botão Editar:
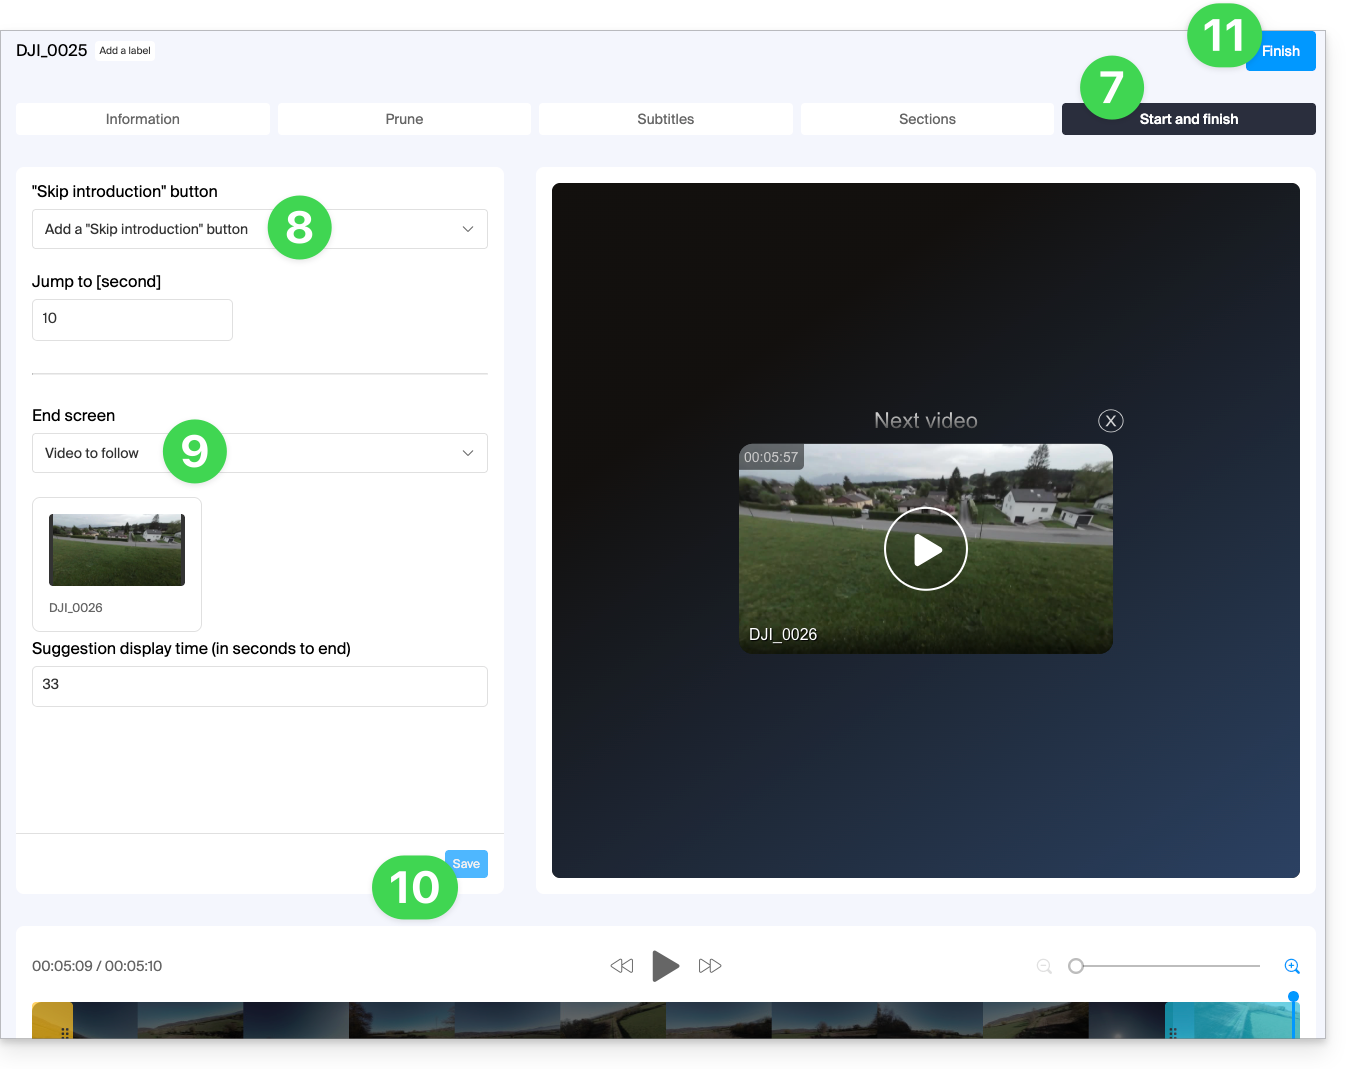
- Clique na aba INÍCIO E FIM.
- Escolha a ação desejada para o início da reprodução: adicione um botão para avançar um número predefinido de segundos, para pular uma introdução, por exemplo…
- caso contrário, você pode escolher se esta configuração deve ser baseada nas preferências do reprodutor (consulte o ponto
ddeste outro guia):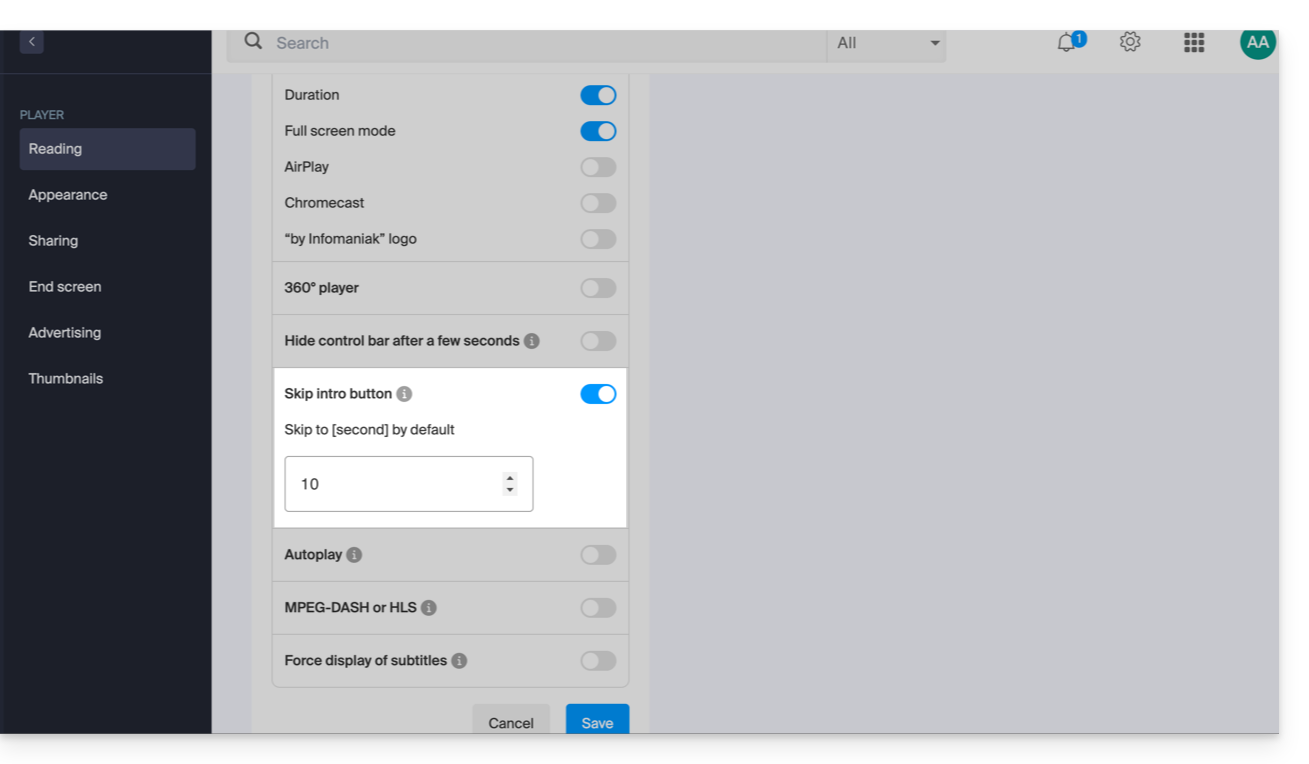
- caso contrário, você pode escolher se esta configuração deve ser baseada nas preferências do reprodutor (consulte o ponto
- Escolha a ação que deve ser proposta no final do vídeo: proposta de um vídeo selecionado manualmente e exibido por um número predefinido de segundos, ou exibição de uma proposta de 6 vídeos.
- Clique em Guardar.
- Clique em Concluir para sair:
Link para esta FAQ: https://faq.infomaniak.com/1921
Esta seção de perguntas frequentes foi útil?
Este guia explica como obter o link dos arquivos de vídeo/áudio importados para um serviço VOD/AOD Infomaniak.
Recuperar o link do arquivo de mídia de acordo com sua codificação
O link pode ser obtido na sua interface VOD:
- Clique aqui para acessar o gerenciamento do seu produto no Manager Infomaniak (precisa de ajuda?).
- Clique diretamente no nome atribuído ao produto em questão:
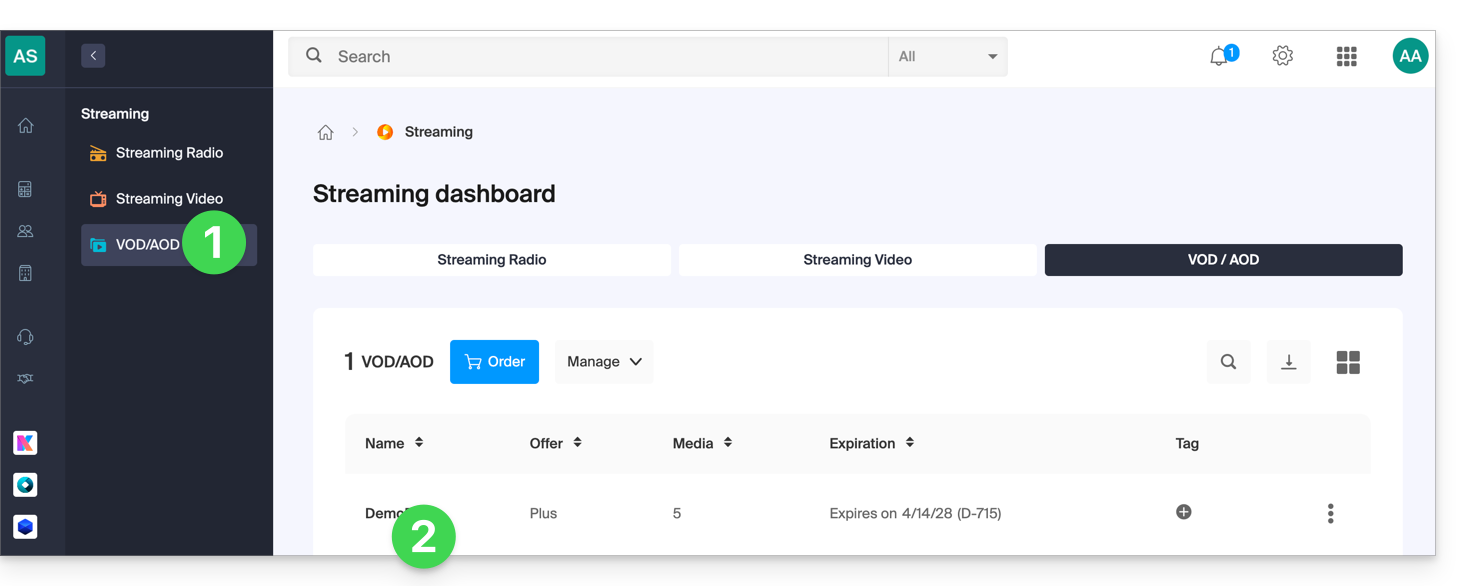
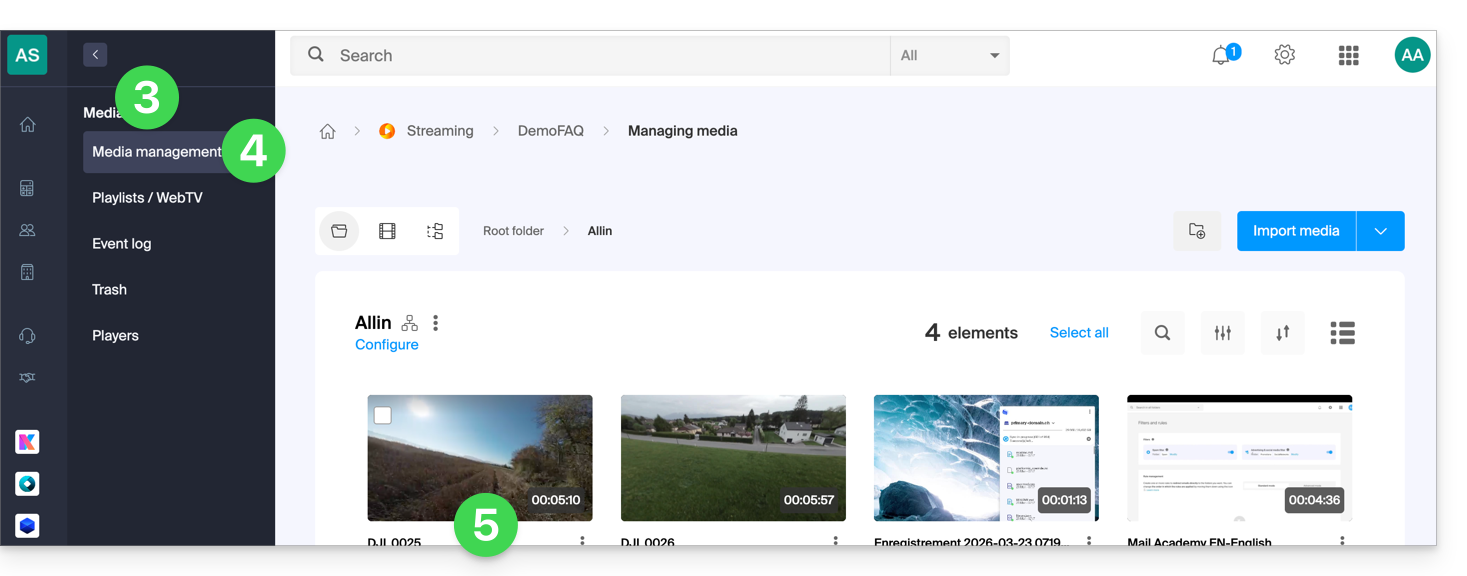
- Clique em Mídia no menu lateral esquerdo.
- Clique em Gerenciar mídia no menu lateral esquerdo.
- Clique na mídia correspondente na tabela que é exibida:
- Clique no menu de ação ⋮ à direita da entrada correspondente na tabela exibida.
- Escolha Copiar link para obter o link direto para o arquivo, por exemplo, no formato
.mp4: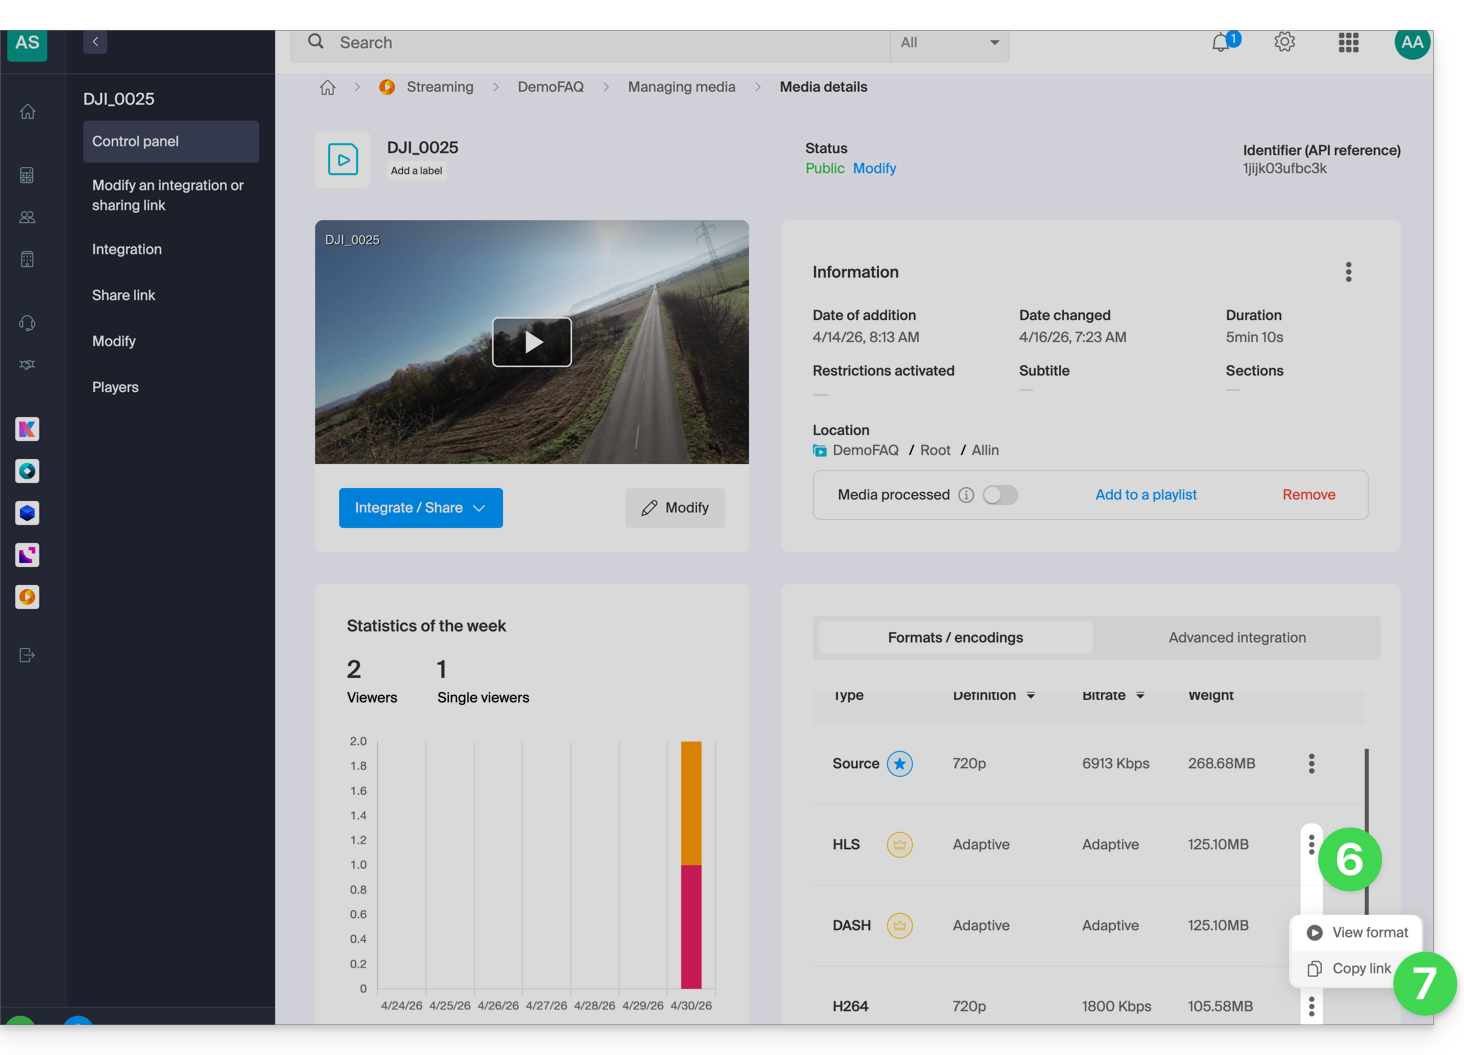
Link para esta FAQ: https://faq.infomaniak.com/2062
Esta seção de perguntas frequentes foi útil?