Base de conhecimento
1000 perguntas frequentes, 500 tutoriais e vídeos explicativos. Aqui, você encontra apenas soluções!
Este guia detalha as possibilidades de personalização da Organização Infomaniak, incluindo URLs personalizadas (endereços Custom Brand) para o Manager e as ferramentas kSuite, como o kDrive ou o Euria.
Custom Brand é um serviço já incluído no kSuite Enterprise.
Criação de URLs personalizadas
Para obter uma marca personalizada:
- Clique aqui para acessar o Custom Brand no painel de controle Infomaniak (precisa de ajuda?).
- Clique no botão azul Experimente Grátis (na seção Custom Brand)
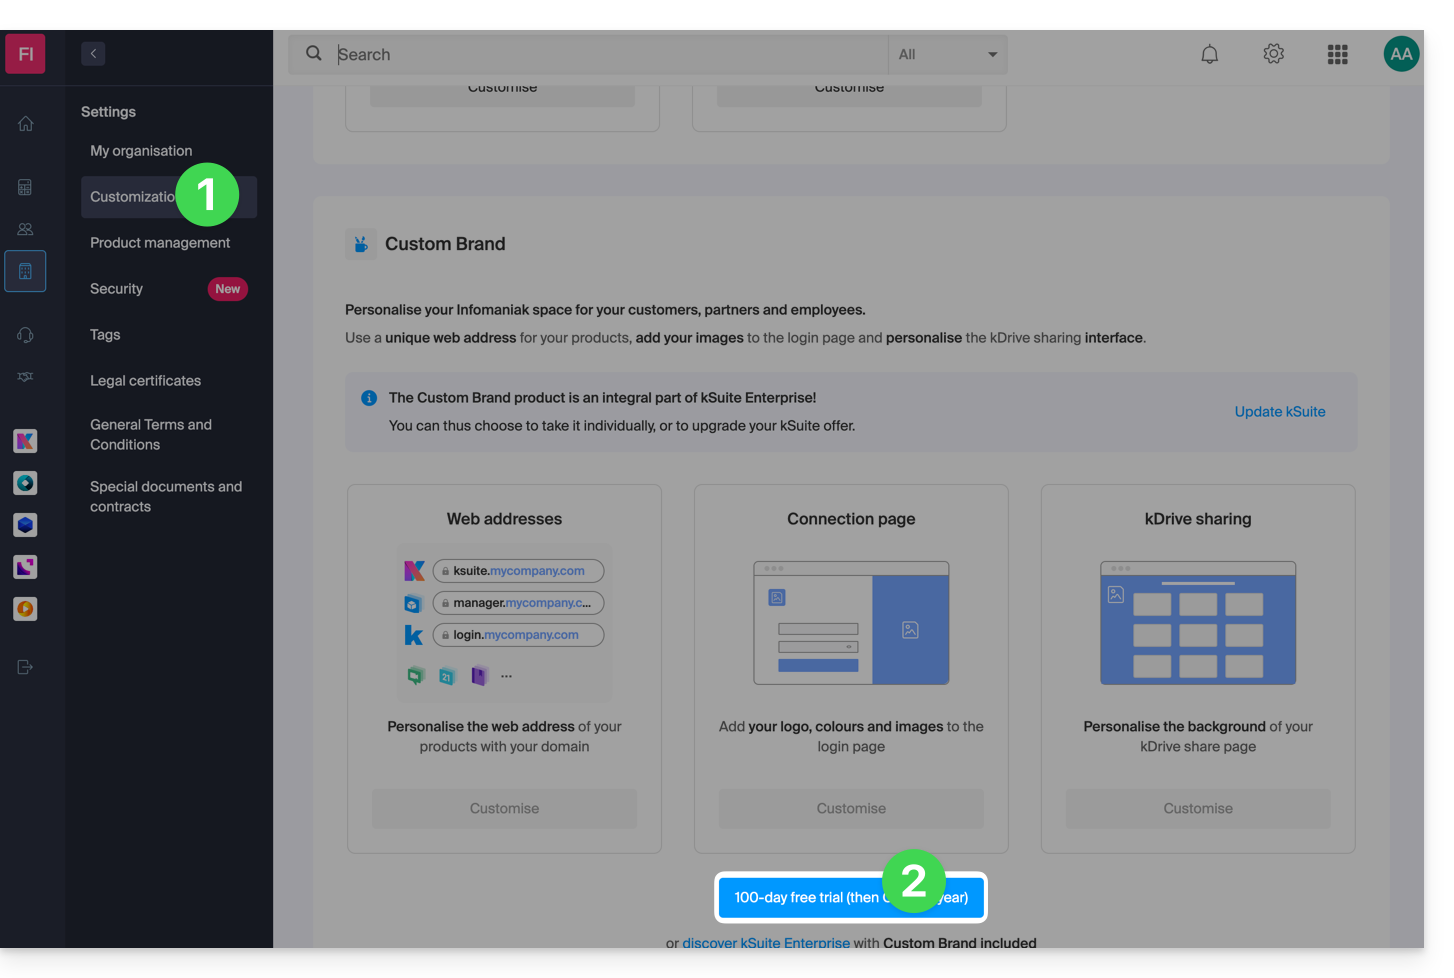
- Indique o nome de domínio que deseja usar no seu endereço web personalizado:
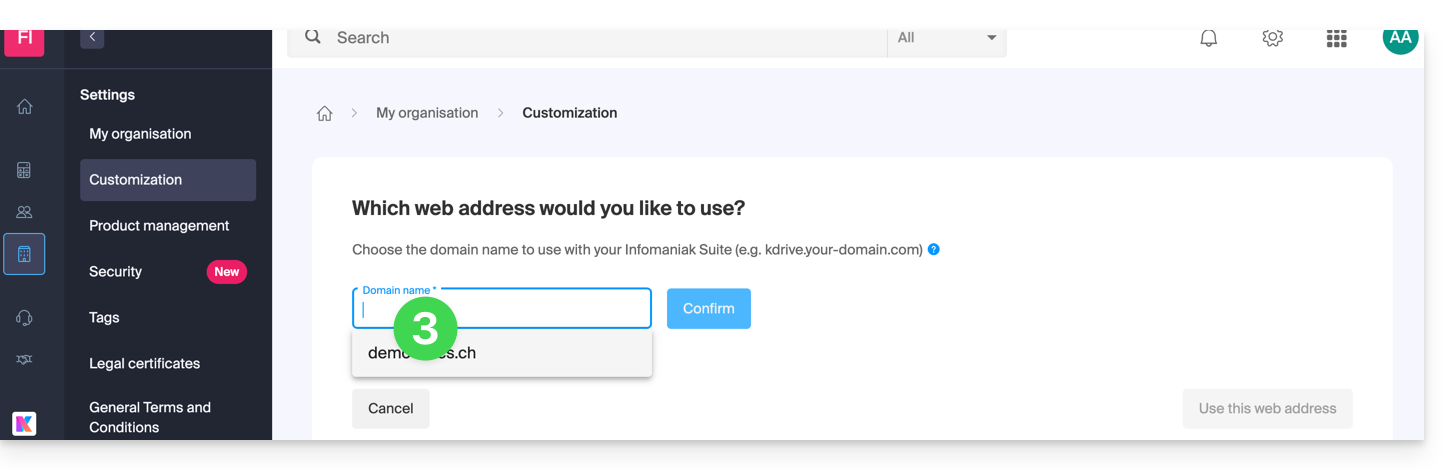
- Se ainda não tiver um nome de domínio, poderá encomendar um nesta etapa.
- Se o seu nome de domínio já estiver a ser usado para outro serviço, poderá escolher outro ou usar um subdomínio (exemplo:
my.domain.xyz).
- Ao escolher o nome de domínio, a interface apresentará exemplos de endereços web personalizados (exemplo: manager.domain.xyz).
- Clique no botão azul “Este endereço web é adequado para mim” ou selecione outro nome de domínio ou subdomínio até encontrar um endereço web personalizado que lhe agrade.
- A preparação dos endereços web personalizados pode demorar alguns minutos. Um e-mail de confirmação da criação será enviado para o endereço de e-mail do proprietário da conta.
Para desativar o acesso por meio de URLs personalizadas:
- Clique no botão azul Desativar no canto superior direito da seção Marca Personalizada:
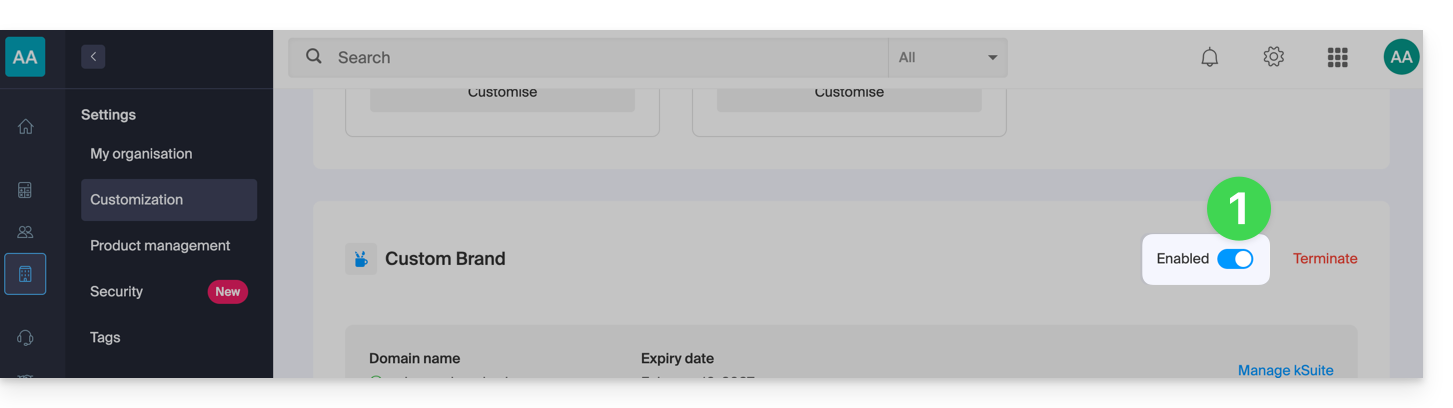
- Pode reativar os endereços posteriormente através do mesmo botão.
- Também pode remover completamente este serviço.
Personalização da interface
Além da personalização dos endereços web dos seus produtos Infomaniak, é possível adicionar um logotipo. Também poderá personalizar a sua página de início de sessão através de uma apresentação de slides com 3 imagens:
- Clique aqui para acessar a seção Marca Personalizada no painel de controle Infomaniak (precisa de ajuda?).
- Clique no botão azul Personalizar (na seção Marca Personalizada):
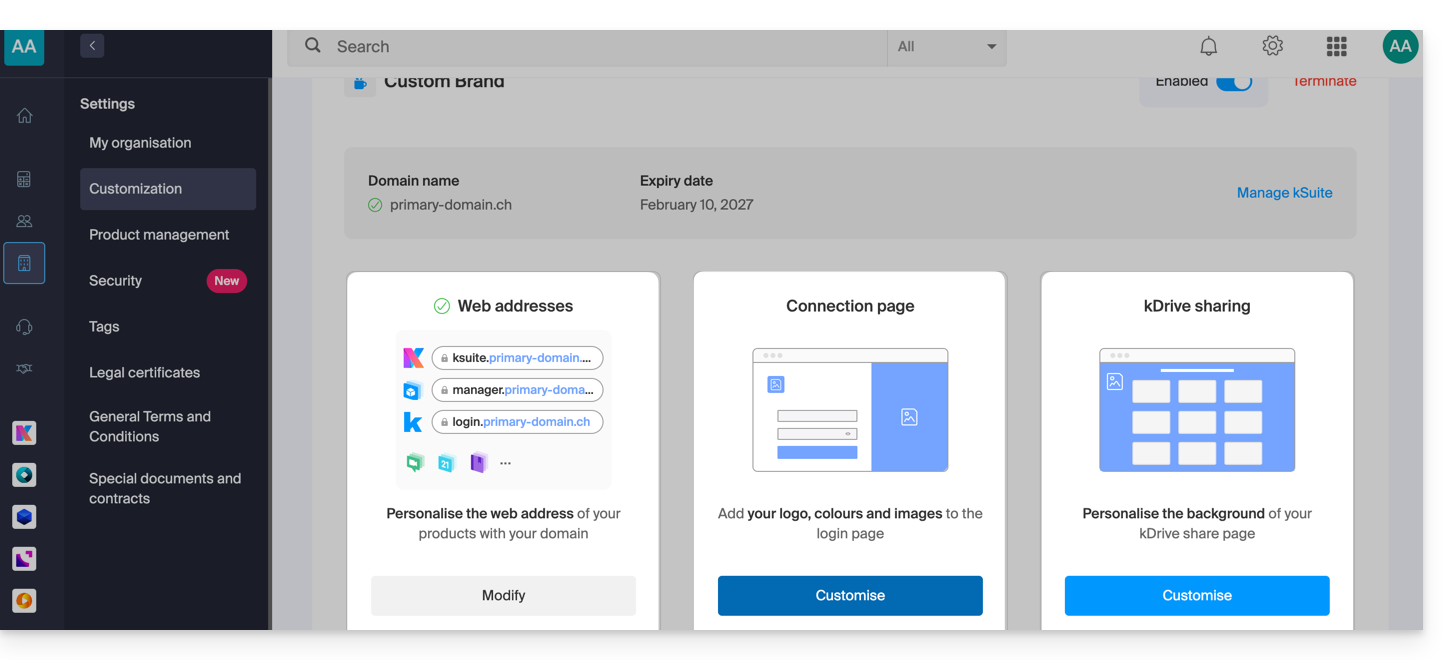
- Carregue uma imagem ou clique em Selecionar imagem para adicioná-la como logotipo.
- Redimensione a imagem com a ferramenta, caso ela exceda o tamanho máximo de 270 x 70 pixels.
- A ferramenta permite visualizar como o seu logotipo será exibido em um tema escuro ou em um tema claro.
- Clique em Validar.
- Para personalizar a sua página de início de sessão, clique no botão azul Seguinte, no extremo direito.
- Nos dois campos de seleção de cores, escolha a cor do texto e dos botões de início de sessão.
- Carregue ou clique em Selecionar imagem para criar um slideshow com 3 imagens à direita da página de login (as imagens devem ter, no mínimo, 865 x 1200 pixels).
- Clique em Adicionar e, em seguida, em Concluir para guardar as alterações.
Link para esta FAQ: https://faq.infomaniak.com/2467
Esta seção de perguntas frequentes foi útil?
Este guia explica como iniciar uma reunião online com o kMeet, a solução ética de videoconferência gratuita da Infomaniak.
Introdução
- Não há limite de participantes nas ofertas kSuite pagas.
- Os participantes podem escrever em um chat comum (❓: ajuda), anotar um compartilhamento de tela (❓: ajuda) e até mesmo controlar um dispositivo remoto (❓: ajuda).
- É possível criar uma sala de reunião com antecedência e convidar os participantes criando um evento associado no calendário Infomaniak (❓: ajuda).
- Também é possível compartilhar o fluxo de vídeo em uma transmissão Streaming de vídeo (❓: ajuda), por exemplo, para não depender da conexão com o kMeet.
- Marca personalizada: a criação de salas em um domínio específico (por exemplo: kMeet.domain.xyz) ainda não é suportada pela aplicação de desktop (principalmente no Linux).
Criar uma sala de reunião virtual
Para isso:
- Inicie o kMeet através de kmeet.infomaniak.com ou a partir de uma das aplicações para computador ou dispositivos móveis.
- Inicie uma nova reunião:
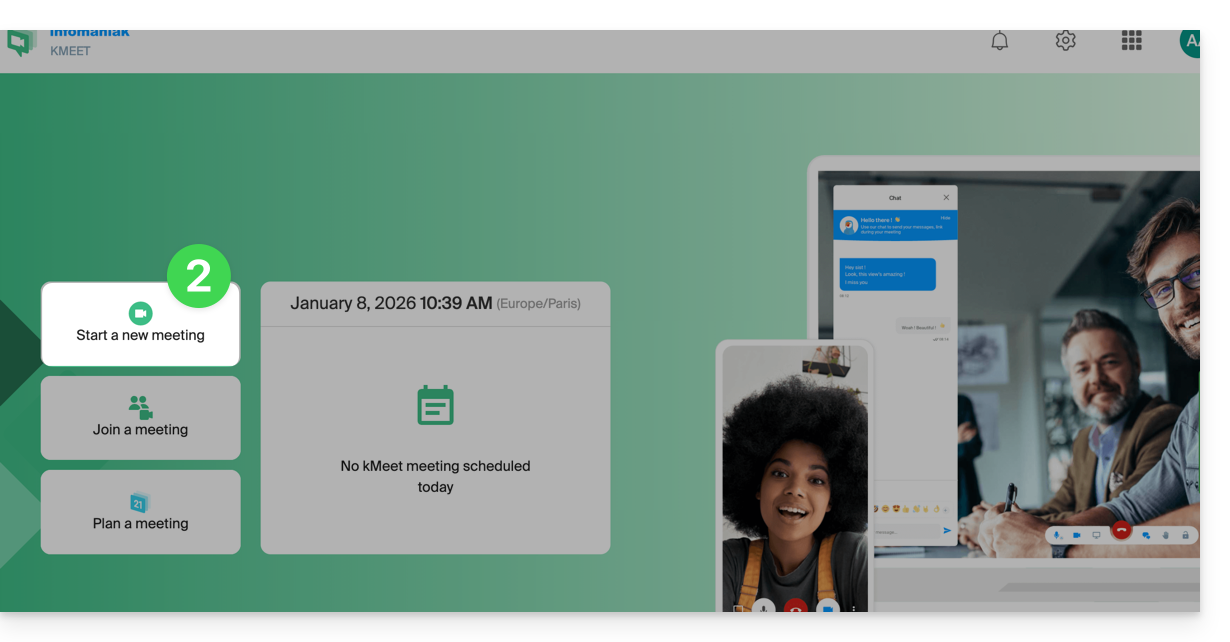
- Indique um nome para a sua sala de reunião.
- Autorize o acesso à sua webcam e microfone a partir do seu navegador ou da aplicação (❓: ajuda).
- Insira um pseudónimo ou o seu nome e apelido.
- Se necessário, ative o controle de participantes (❓: ajuda), uma senha ou uma chave de criptografia personalizada (❓: ajuda).
- Clique em Participar da reunião.
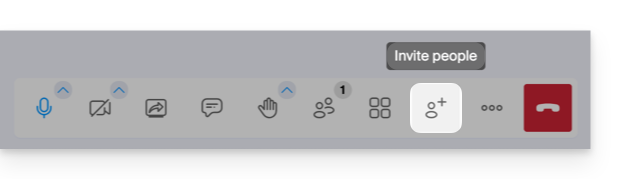
- Compartilhe o link da sala para convidar os participantes a se juntarem a você:
Link para esta FAQ: https://faq.infomaniak.com/2475
Esta seção de perguntas frequentes foi útil?
Este guia permite que você descubra rapidamente as funções essenciais de Euria, a inteligência artificial à sua disposição dentro de kSuite, que é especialmente eficaz para resumir discussões no aplicativo kChat.
Introdução
- Euria pode ajudá-lo a realizar todo tipo de cálculos, traduções, fornecer informações sobre diferentes tópicos e responder às suas perguntas.
- Leia este outro guia sobre o modelo utilizado e as responsabilidades de cada um.
- Assim que um novo usuário é adicionado, ele recebe uma mensagem de Euria dando-lhe as boas-vindas.
- Leia este outro guia sobre as possibilidades de discussão com a IA no kChat.
Resumir automaticamente uma mensagem do kChat
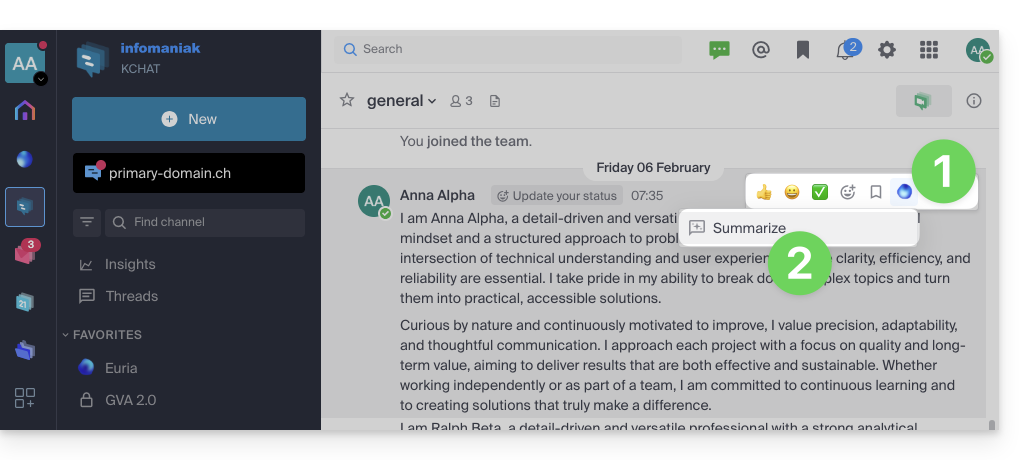
Para obter o resumo de uma mensagem do kChat:
- Passe o mouse sobre a mensagem e selecione o ícone de ações da Euria no canto superior direito.
- Clique em Resumir o tópico de discussão:
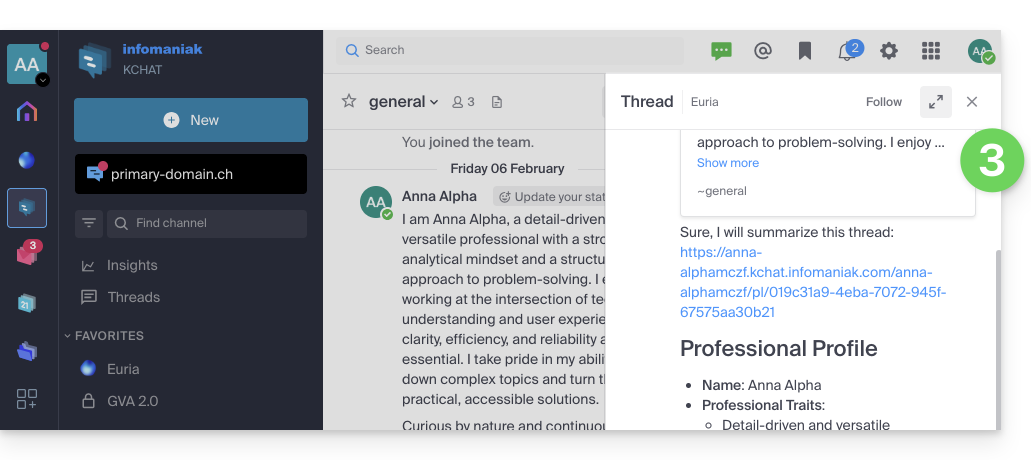
- Obtenha o resumo, gerado pela Euria no painel lateral direito:
Link para esta FAQ: https://faq.infomaniak.com/2480
Esta seção de perguntas frequentes foi útil?
Este guia detalha as limitações específicas da oferta my kSuite (ik.me, etik.com, ikmail.com) e as vantagens da oferta my kSuite+.
Limitações da oferta my kSuite
A oferta my kSuite impõe algumas limitações que a my kSuite+ não impõe…
E-mail, contactos e calendários
- Espaço em disco limitado a 20 GB de armazenamento para e-mails.
- Sem modo avançado nas regras de organização de mensagens.
- Não é possível criar alias para o seu e-mail.
- Assinatura "my kSuite" obrigatória.
- Sem link de compartilhamento de e-mail.
- Apenas 1 livro de endereços, 1 calendário.
- Conservação (30 dias) das cópias de segurança dos e-mails; recuperáveis ao alterar o plano.
kDrive
- 1 única pasta de depósito kDrive.
- 25 links de compartilhamento kDrive (sem configuração de duração, senha, etc.).
- Conservação das versões anteriores dos seus ficheiros: 30 versões em 30 dias (60 em 120 dias para my kSuite+, algumas das quais para sempre).
- Lixeira com 30 dias (60 para my kSuite+).
- Nenhuma estatística.
- Nenhuma edição/assinatura de arquivos PDF.
Limitações das ofertas my kSuite e my kSuite+
Clique nos links abaixo para saber mais detalhes:
- Oferta limitada a um endereço por conta (vinculado a um número de telefone europeu).
- É obrigatório indicarum número de telefone celular válido para confirmaro registro.
- Número limitado de e-mails enviados por dia, de redirecionamentos de e-mail e de destinatários únicos por mensagem.
- Sem assinatura de e-mail personalizável.
- Colocar um e-mail em espera e agendamento de envio: funcionalidades restritas (sem personalização) no my kSuite e personalizáveis com o my kSuite+.
- 15 GB de armazenamento na nuvem com o my kSuite, 1/2/6/12 TB com o my kSuite+.
- O registo só é possível para pessoas residentes nos países membros da OCDE (lista oficial), nomeadamente:
- Alemanha
- Austrália
- Áustria
- Bélgica
- Canadá
- Chile
- Colômbia
- Coreia do Sul
- Costa Rica
- Dinamarca
- Espanha
- Estónia
- Estados Unidos
- Finlândia
- França
- Grécia
- Guadalupe
- Guiana Francesa
- Hungria
- Irlanda
- Islândia
- Israel
- Itália
- Japão
- Letónia
- Lituânia
- Luxemburgo
- Martinica
- Maiote
- México
- Mónaco
- Nova Caledónia
- Nova Zelândia
- Noruega
- Países Baixos
- Polónia
- Polinésia Francesa
- Portugal
- República Checa
- Reunião
- Reino Unido
- São Bartolomeu
- São Martinho
- São Pedro e Miquelão
- Eslováquia
- Eslovénia
- Suécia
- Suíça
- Territórios Franceses do Sul
- Turquia
- Wallis e Futuna
Oferta my kSuite+
A oferta my kSuite+ permite enviar mais mensagens por dia para um número maior de destinatários únicos de uma só vez.
Para o ajudar a identificar a oferta my kSuite / kSuite mais adequada às suas necessidades, consulte este outro guia.
Para enviar e-mails para um grande número de destinatários, existe uma ferramenta de newsletter.
Link para esta FAQ: https://faq.infomaniak.com/2485
Esta seção de perguntas frequentes foi útil?
Este guia explica como gerir um calendário e os seus eventos na aplicação móvel Google Agenda (aplicação para smartphone ou tablet iOS/Android) e/ou na aplicação web Calendar Infomaniak (serviço online ksuite.infomaniak.com/calendar), mantendo todos os dados totalmente sincronizados através da aplicação móvel Infomaniak kSync (aplicação para smartphone ou tablet Android).
Introdução
- Consulte este outro guia se desejar apenas exibir um calendário Infomaniak em modo de somente leitura no Google Agenda (aplicativo web e móvel).
- O inverso também é possível se desejar apenas exibir um calendário Google em modo de somente leitura no aplicativo web Calendar Infomaniak (serviço online ksuite.infomaniak.com/calendar).
- O procedimento abaixo permite editar os eventos do calendário em ambos os lados, mas apenas na versão móvel do aplicativo Google Agenda.
Sincronizar o calendário Infomaniak e o dispositivo móvel
Pré-requisitos
- Descarregue a aplicação móvel Android Google Agenda.
- Descarregue a aplicação móvel Infomaniak kSync (aplicação para smartphone ou tablet Android) aqui:

- A aplicação kSync também está disponível em F-droid.
- Instale o kSync.
Em seguida, inicie o aplicativo kSync no seu dispositivo Android. Um assistente passo a passo o ajudará a configurar o aplicativo de acordo com suas necessidades:
- Decida se deseja sincronizar as tarefas.
- Permita que o kSync acesse os elementos necessários no dispositivo, principalmente o calendário.
- Permita que o aplicativo seja executado em segundo plano para uma melhor sincronização (consome mais bateria); as configurações também podem ser ajustadas no próprio aplicativo:
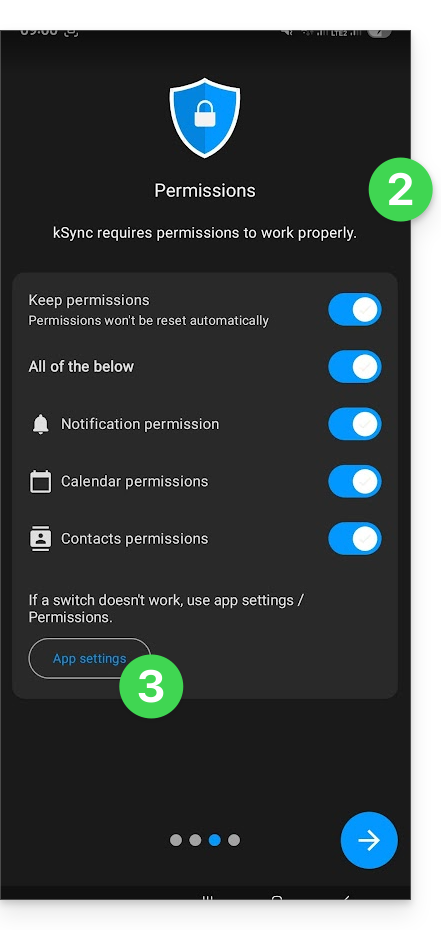
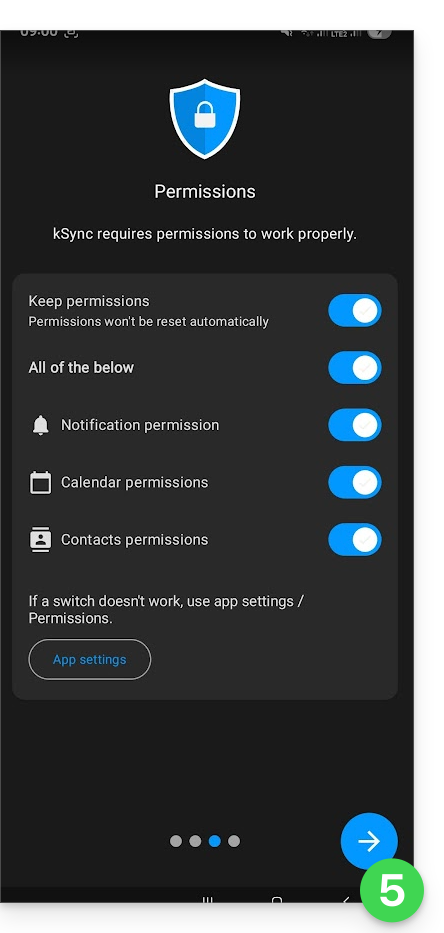
- O importante é conceder as permissões de acesso aos serviços que você deseja sincronizar:
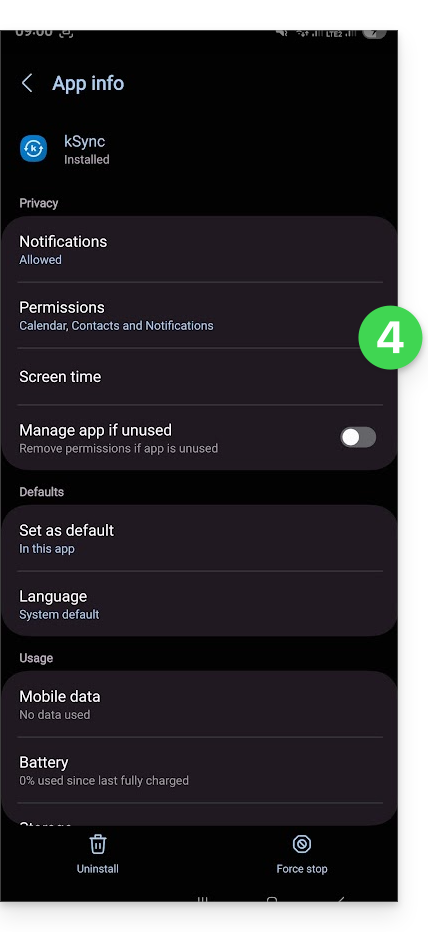
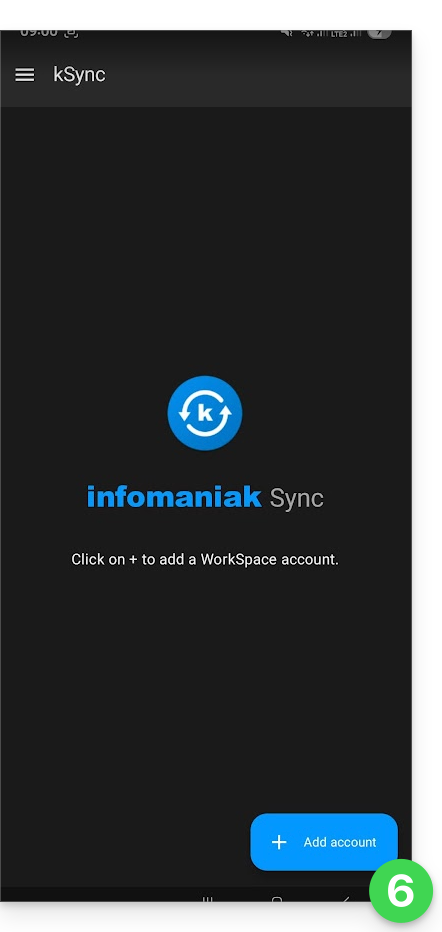
- Volte para o aplicativo kSync e continue a configuração:
- Toque para adicionar uma conta de usuário Infomaniak (aquela com a qual você acessa seus serviços Infomaniak):
- Por exemplo, no aplicativo Web Calendar, o menu do usuário no canto superior direito informa o e-mail de login utilizado.
- É então possível acessar os calendários da Organização à qual o usuário atual está vinculado:
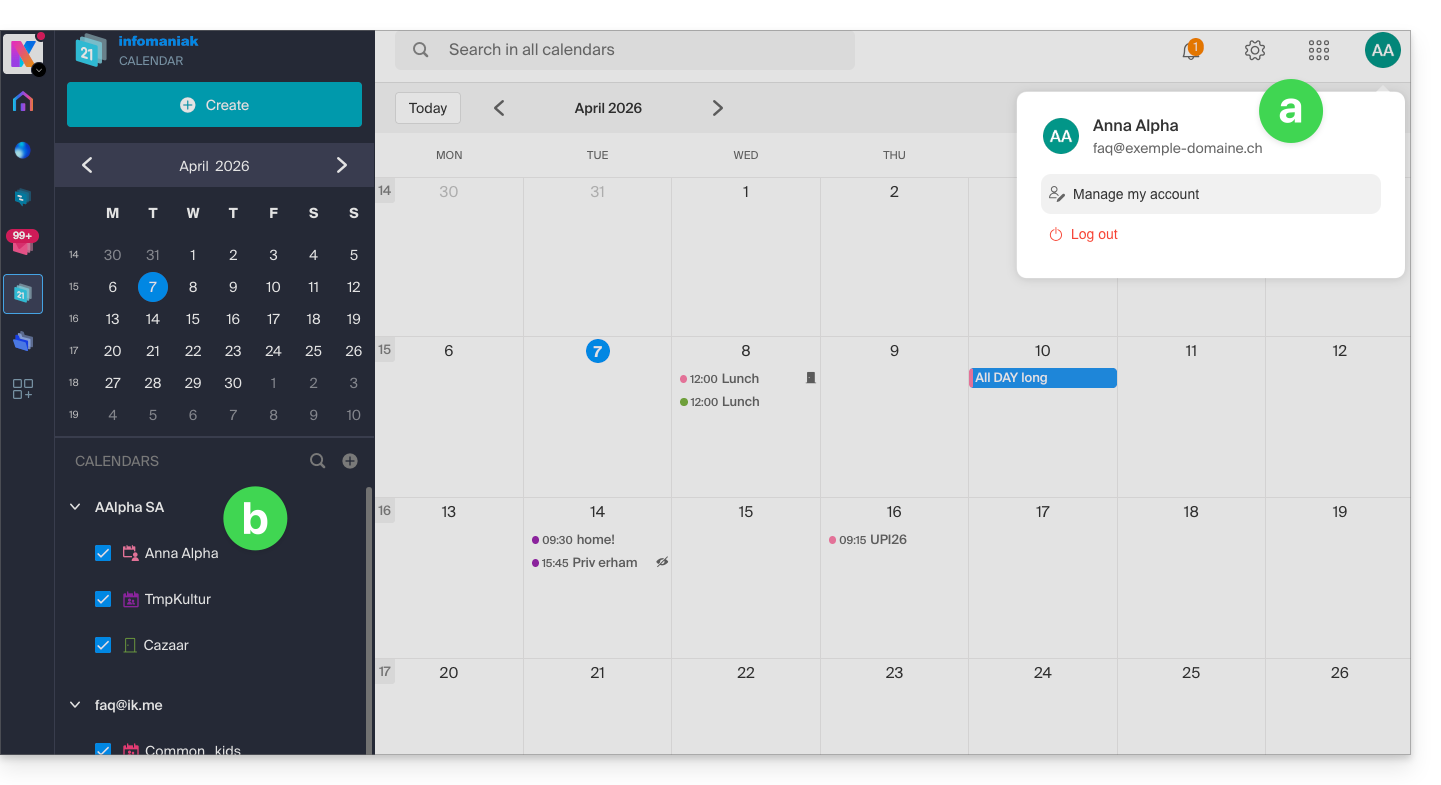
- São esses dados que serão sincronizados no seu dispositivo quando você fizer login na mesma conta Infomaniak no kSync…
- Insira suas credenciais de login da Infomaniak (consulte o item a acima).
- Pressione o botão para fazer login:
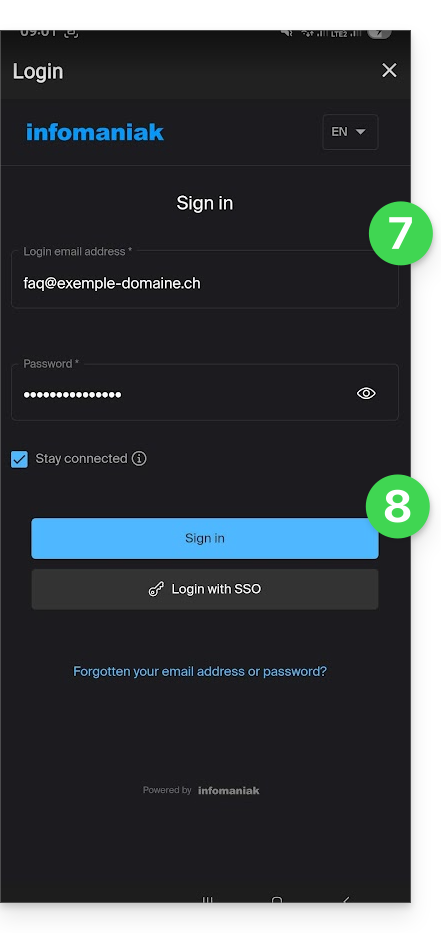
- Efetue os passos da autenticação de dois fatores, tal como faz nas suas sessões habituais.
- Após iniciar sessão no kSync, ative os calendários que pretende sincronizar (entre os que são exibidos, selecione os que estão associados à sua conta Infomaniak) na secção CALDAV:
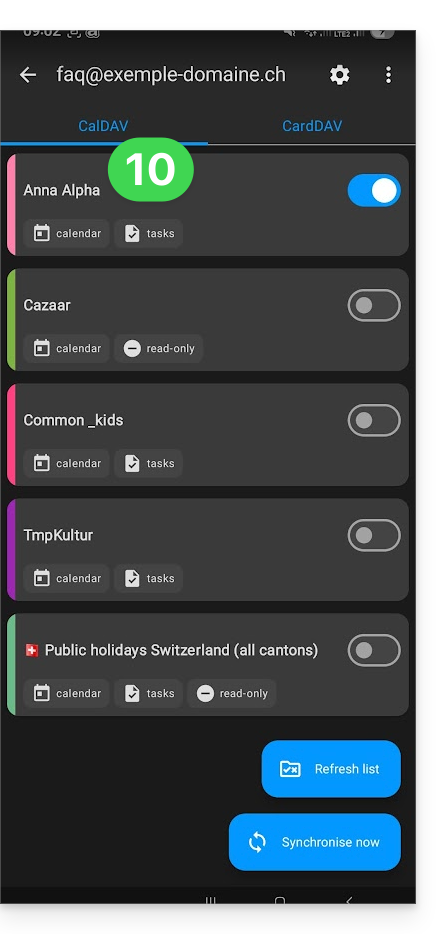
- Inicie a sincronização com o botão localizado no canto inferior direito.
Sincronização automática do calendário nativo
- Neste momento,é a aplicação nativa do seu dispositivo Android queCalendário Samsungpor exemplo, em dispositivos da marca Samsungque será sincronizada e exibirá os eventos do seu calendário Infomaniak (por vezes, é necessário ativar a conta na aplicação em questão):
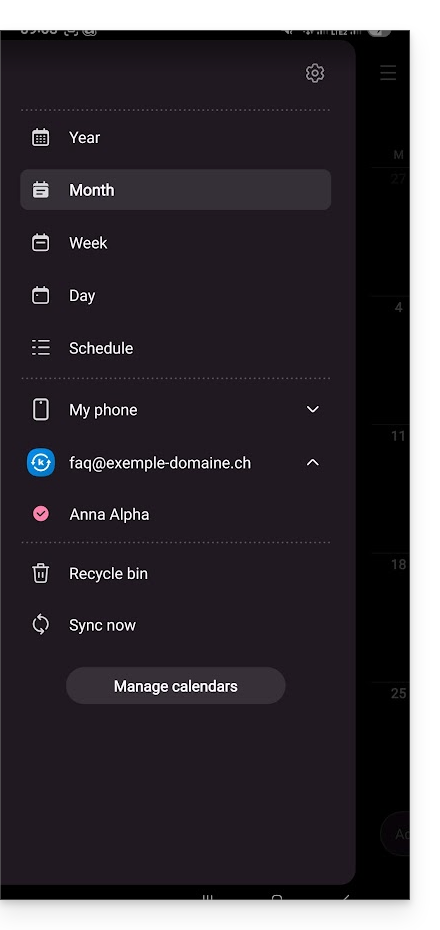
- Um evento adicionado e/ou modificado em uma ou outra interface será automaticamente sincronizado em todos os lugares:
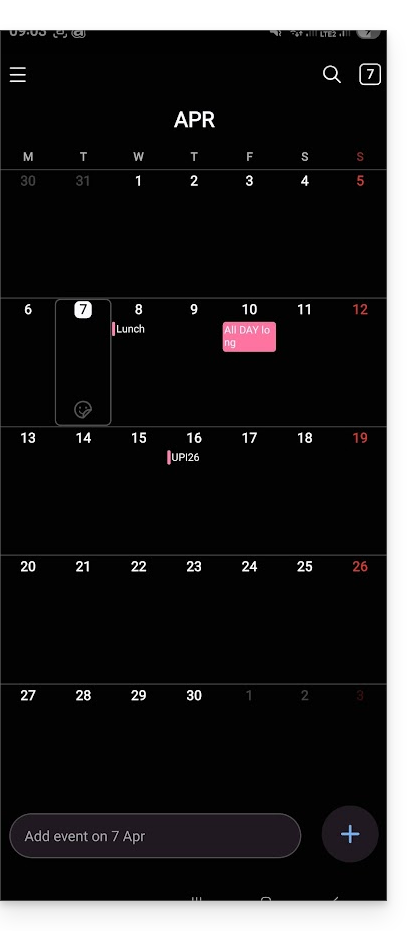
Ativar o calendário no Google Agenda
Para encontrar o seu calendário Infomaniak no Google Agenda e poder editar os seus eventos:
- Abra o Google Agenda no seu dispositivo Android.
- Toque no botão de menu com três linhas horizontais ☰ no canto superior esquerdo da interface:
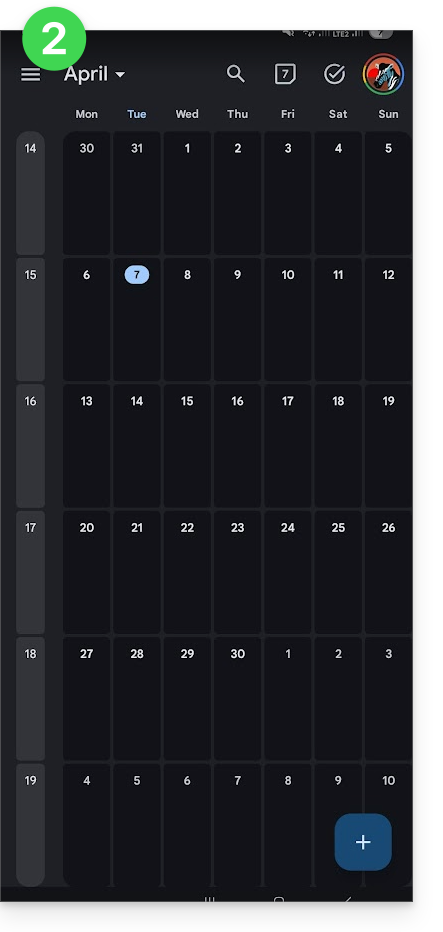
- Toque em Configurações na parte inferior do menu:
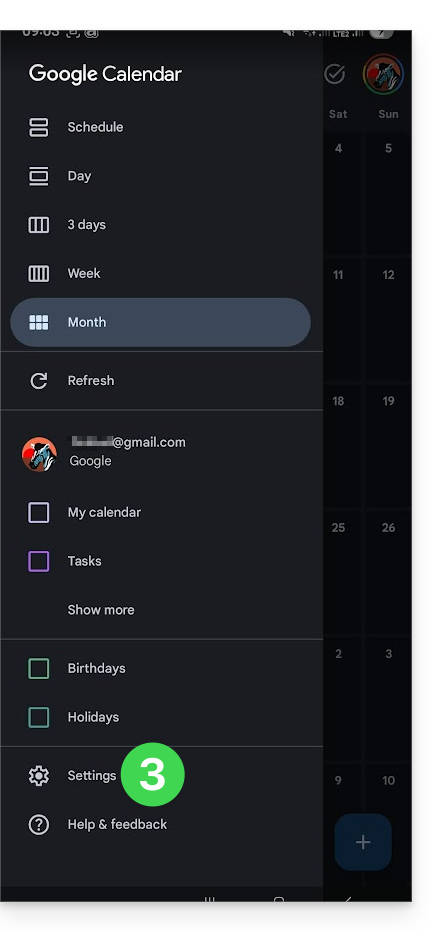
- Toque em Gerenciar contas:
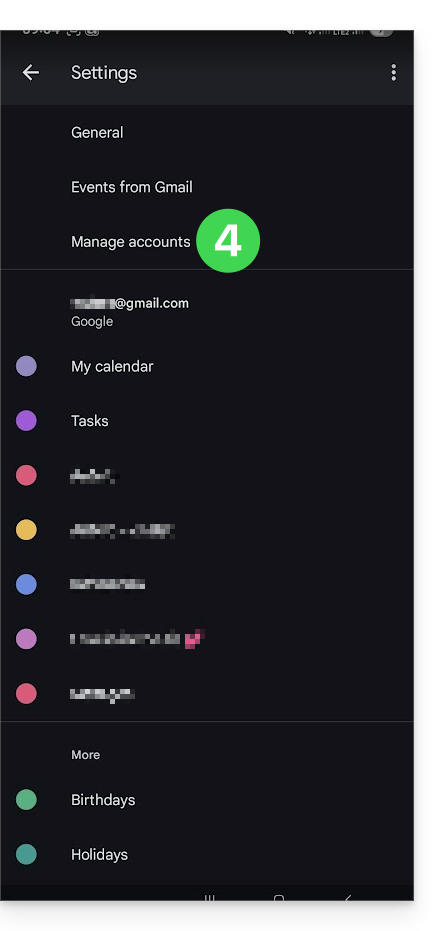
- Ative a conta correspondente ao seu calendário Infomaniak:
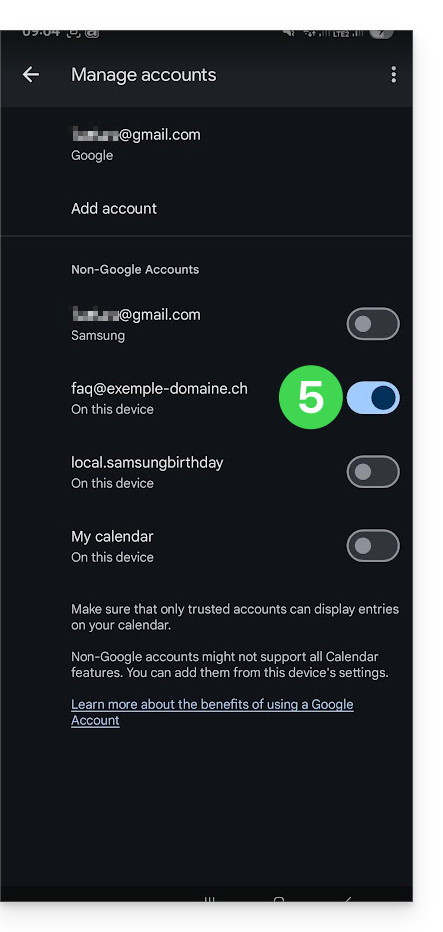
- Volte à página anterior e verifique se o calendário Infomaniak aparece entre as contas e, se necessário, altere a cor:
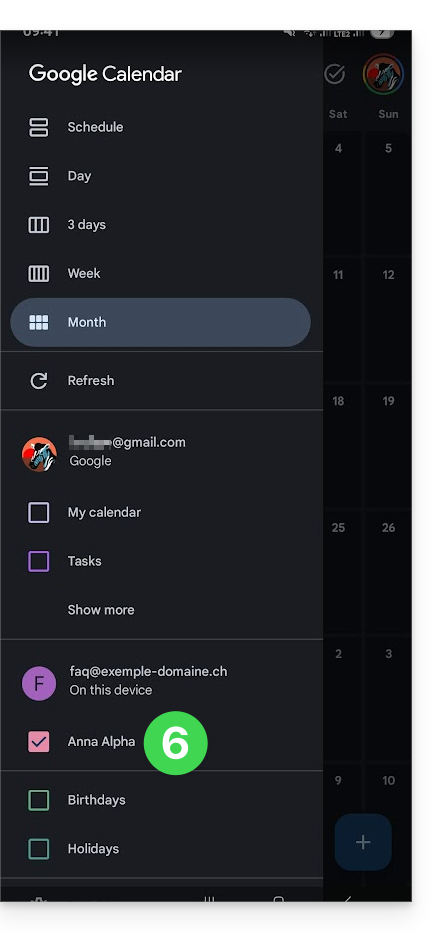
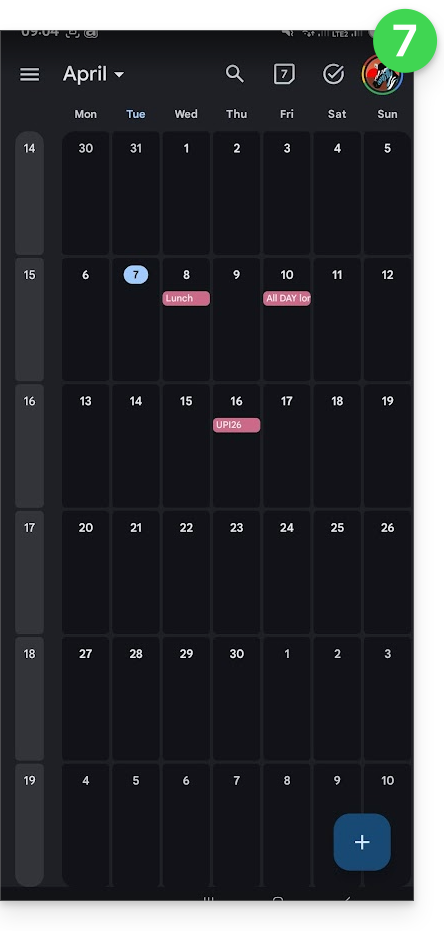
- Pronto, o Google Agenda está sincronizado com o calendário Infomaniak. Qualquer evento adicionado e/ou modificado em uma das interfaces será automaticamente sincronizado em todos os lugares:
Link para esta FAQ: https://faq.infomaniak.com/2486
Esta seção de perguntas frequentes foi útil?
Este guia tem como objetivo ajudá-lo a compreender a estrutura dos seus serviços Infomaniak, familiarizando-o com o vocabulário utilizado e facilitando a gestão das suas interfaces de administração, principalmente ao utilizar o my kSuite (ik.me, etik.com, ikmail.com).
Introdução
- A Organização é o termo que representa o agrupamento dos serviços Infomaniak e dos utilizadores (você e eventuais colaboradores, membros da família, etc.).
- Para compreender o que representa realmente uma Organização, este guia está estruturado em torno de várias situações possíveis atualmente:
- Qualquer novo registo para um endereço gratuito my ksuite (ik.me / etik.com / ikmail.com).
- Qualquer novo registo para outros serviços Infomaniak.
- Utilização combinada de my kSuite e dos outros serviços do ecossistema:
- Registar-se no my kSuite especificando uma conta Infomaniak existente
- Adquirir produtos Infomaniak tendo apenas uma conta my kSuite
1. Inscrição no my kSuite (ik.me / etik.com / ikmail.com)
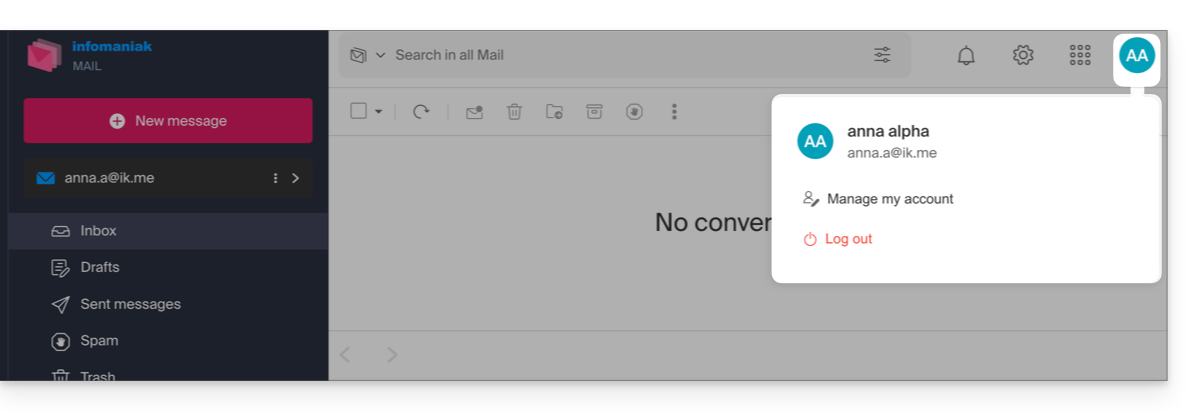
Ao se inscrever em welcome.infomaniak.com/signup/myksuite, você escolheu o nome para o seu endereço de e-mail, por exemplo, anna.a@ik.me, e, em seguida, forneceu um número de telefone pessoal: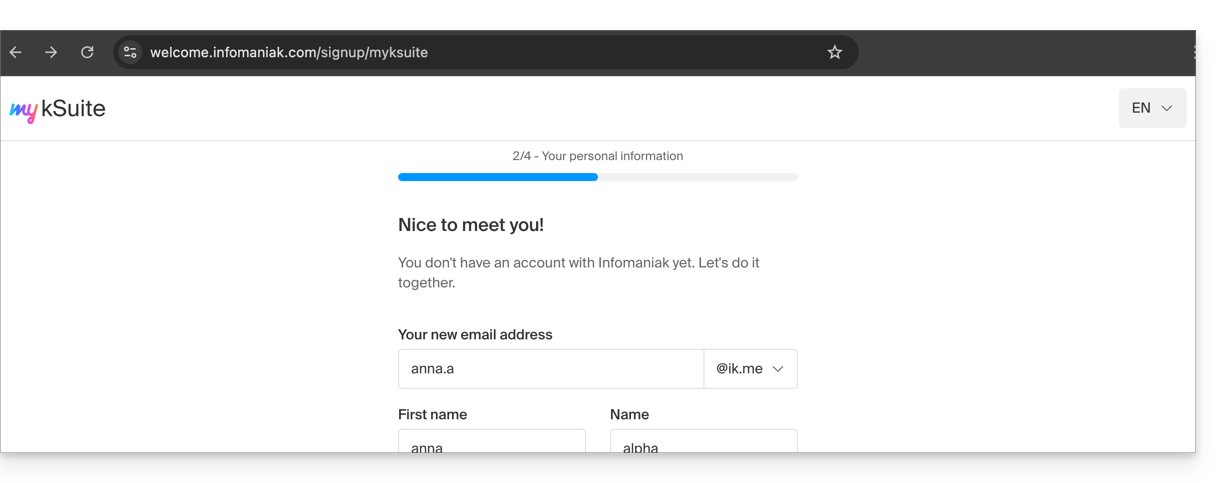
- Após a validação do registo, aceda ao seu endereço de e-mail anna.a@ik.me através da aplicação web Mail
ksuite.infomaniak.com/mail: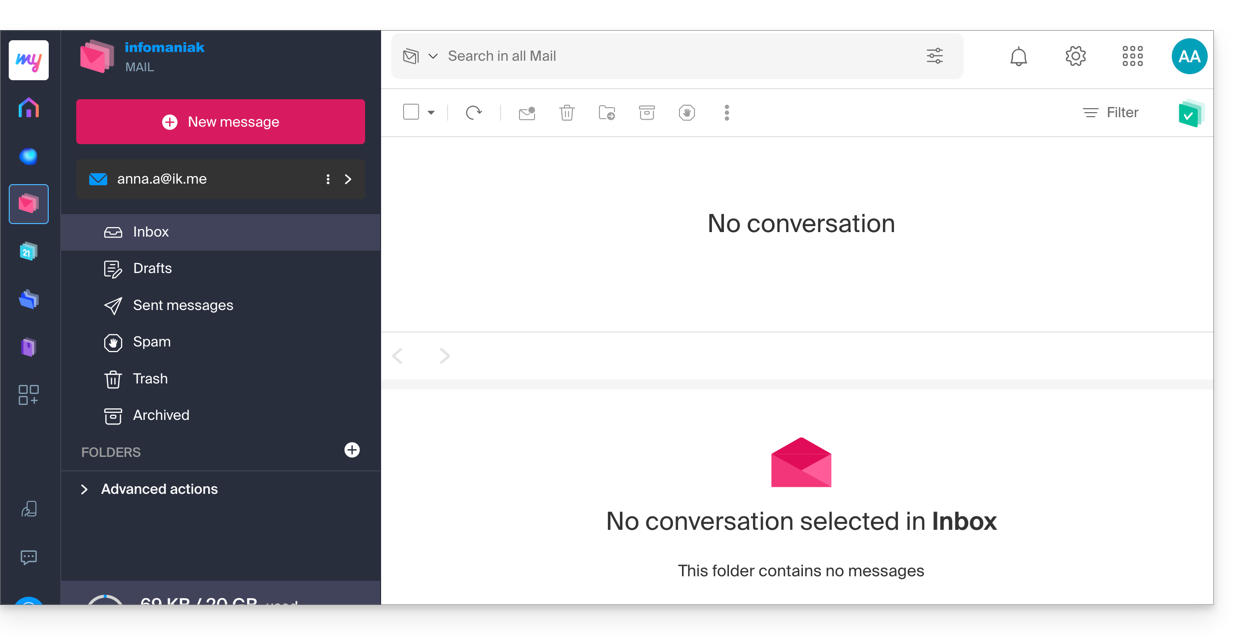
- Podemos distinguir:
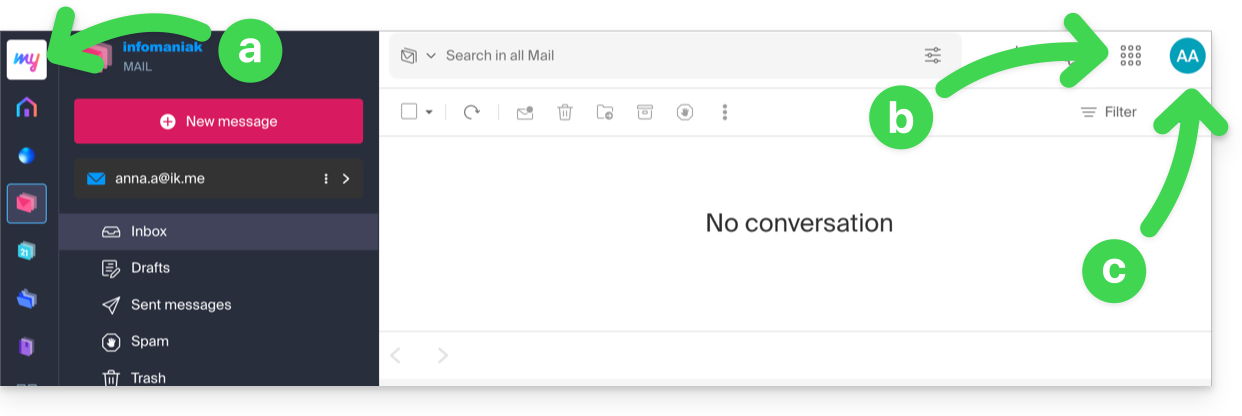
- O logótipo/tipo da sua Organização, que, neste caso, indica que se trata de uma conta my kSuite.
- O botão permite aceder ao Manager
manager.infomaniak.come às outras aplicações/outros serviços relacionados com o my kSuite: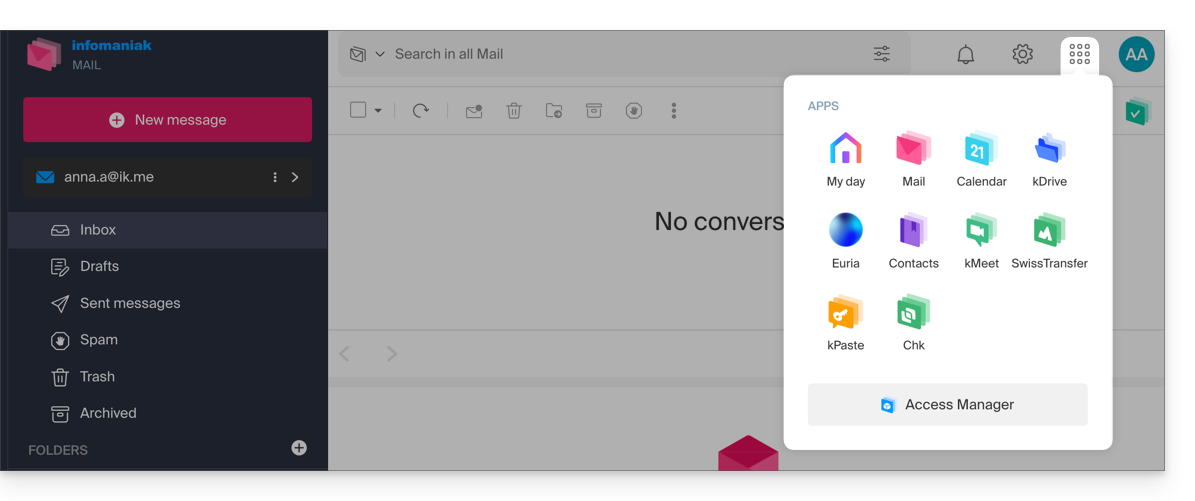
- O Manager, neste caso, conterá apenas informações sobre a gestão da sua conta my kSuite:
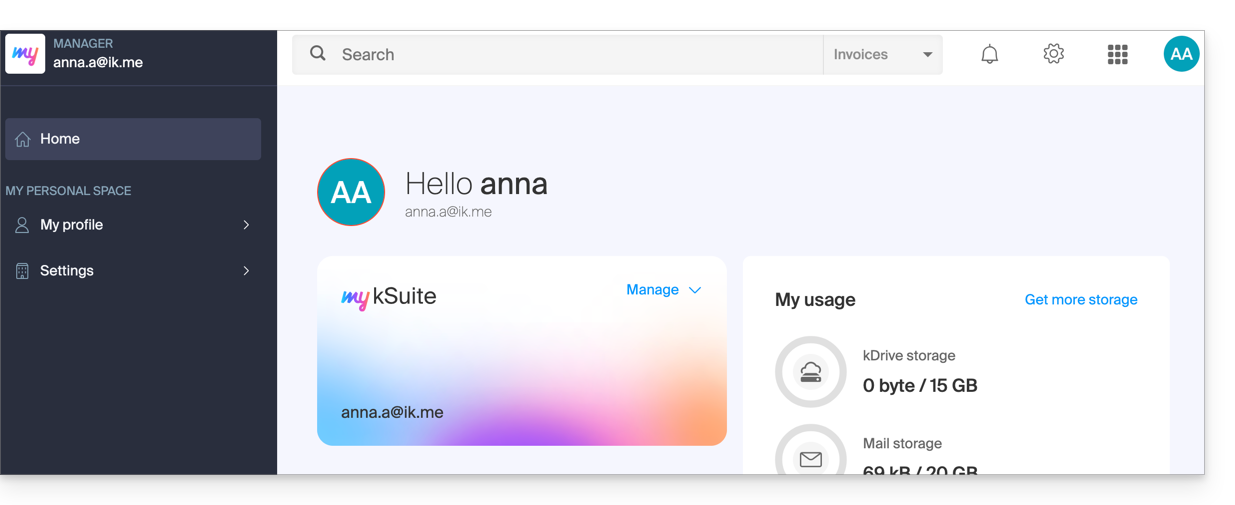
- O Manager, neste caso, conterá apenas informações sobre a gestão da sua conta my kSuite:
- As iniciais correspondem à sua conta Infomaniak (nome/sobrenome indicados no registo):
Esta conta my kSuite não poderá conter diretamente produtos de hospedagem ou kSuite Pro com um nome de domínio, etc. A seção seguinte deste guia explica como criar uma Organização mais completa, se necessário.
Note que não é possível exportar seus serviços my kSuite para outra Organização.
Para usar seu novo endereço de e-mail my kSuite no aplicativo web Mail, consulte este outro guia.
2. Registro e compra de hospedagem, domínio, etc.
Ao se registrar em welcome.infomaniak.com/signup/, você escolheu seu identificador de login, que é um endereço de e-mail pessoal, por exemplo, anna.alpha@orange.fr :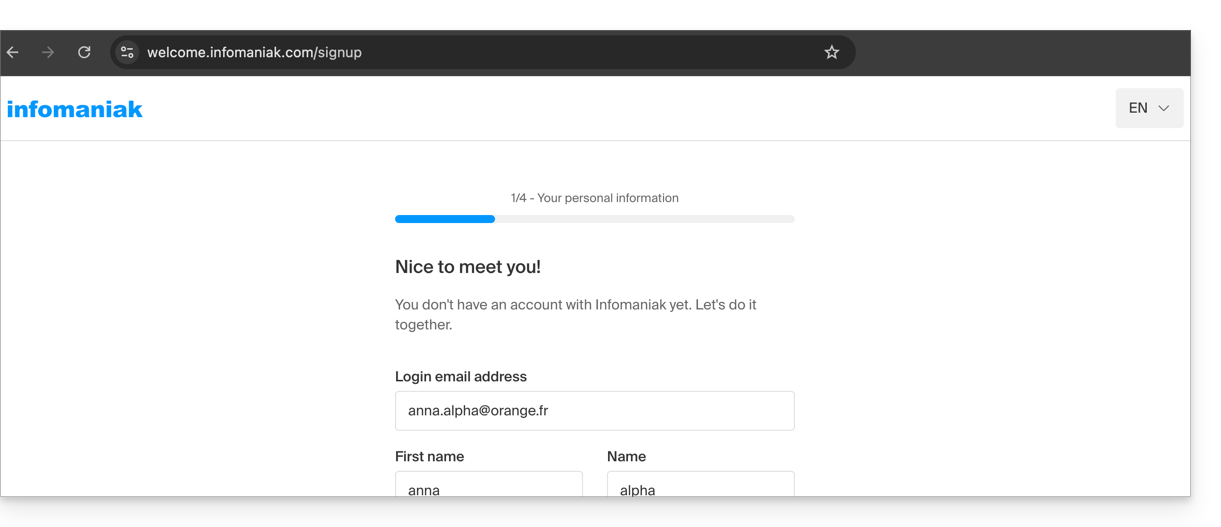
Em seguida, você escolheu o tipo de organização que deseja criar (pessoal ou para uma empresa, associação, etc.):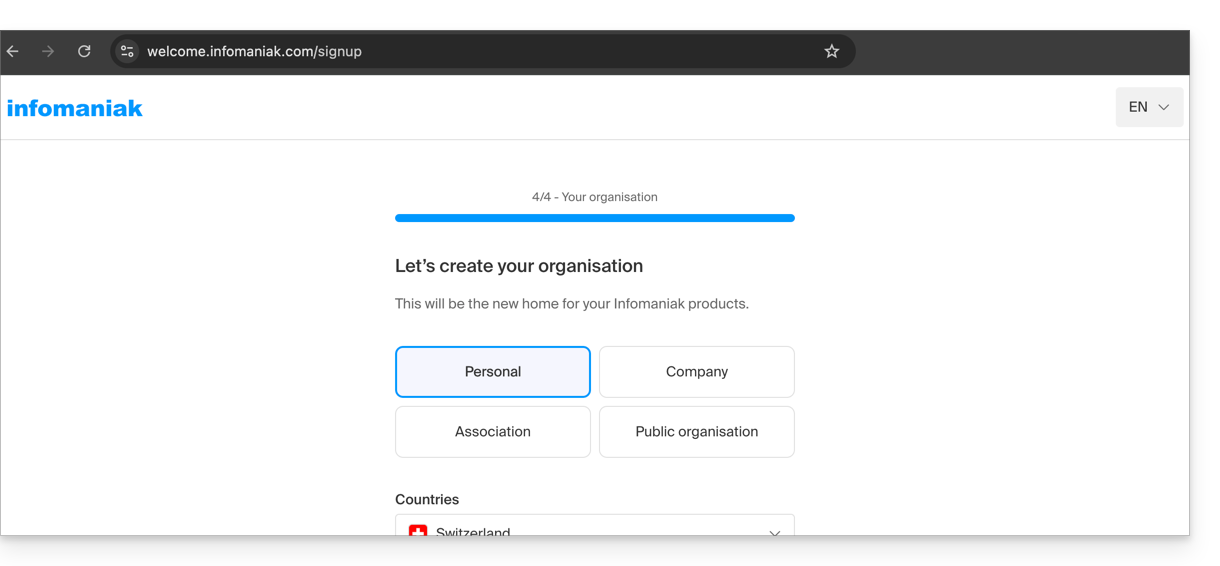
- Após a validação do registo, acede ao painel de controlo em
manager.infomaniak.come a sua Organização é, por enquanto, uma “estrutura vazia”, da qual é o único representante legal: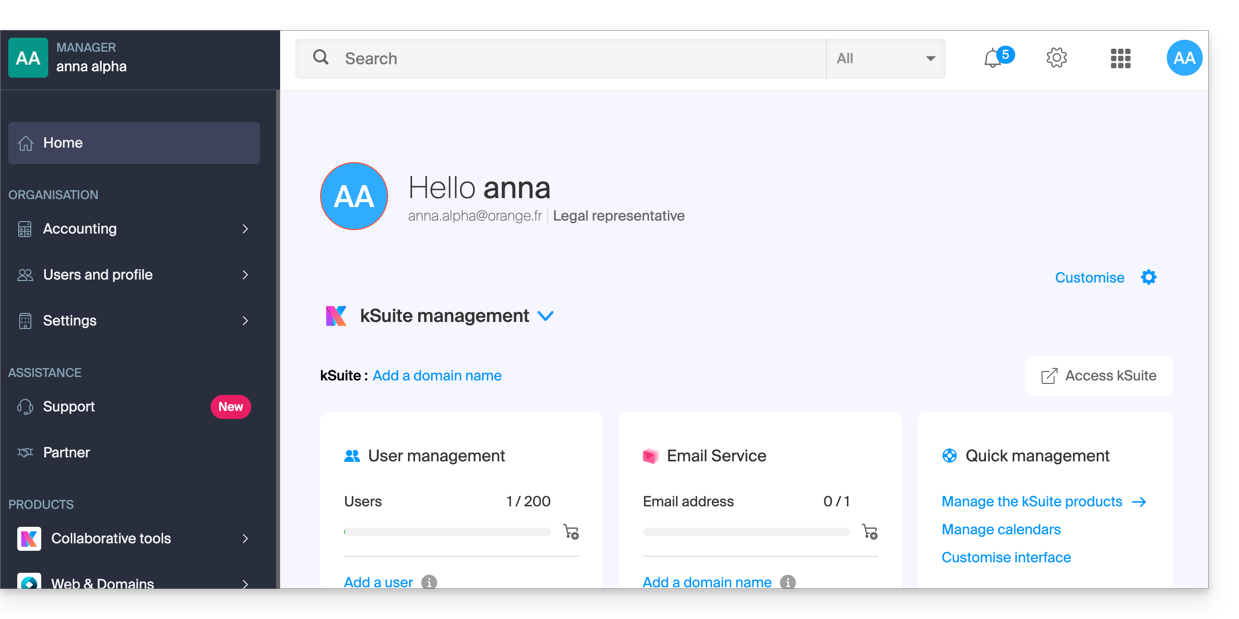
- Podemos distinguir:
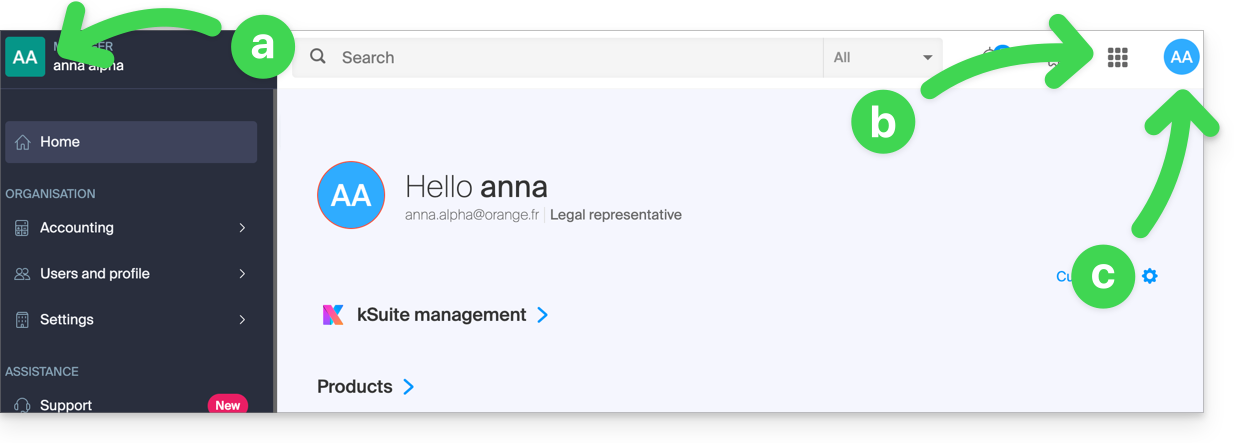
- O logótipo/tipo da sua Organização, que, neste caso, indica que se trata de uma Organização pessoal (nomeada automaticamente no momento da criação, através do nome/sobrenome do criador); isto pode ser personalizado.
- O botão permite aceder ao kSuite
ksuite.infomaniak.come às outras aplicações/outros serviços relacionados com o kSuite Free adicionado à sua nova Organização: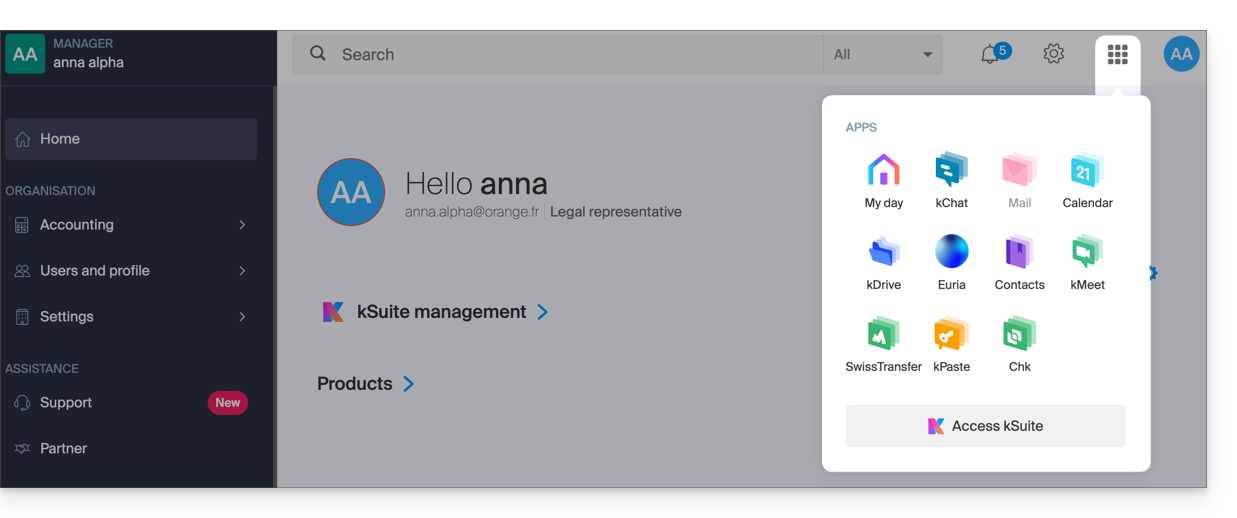
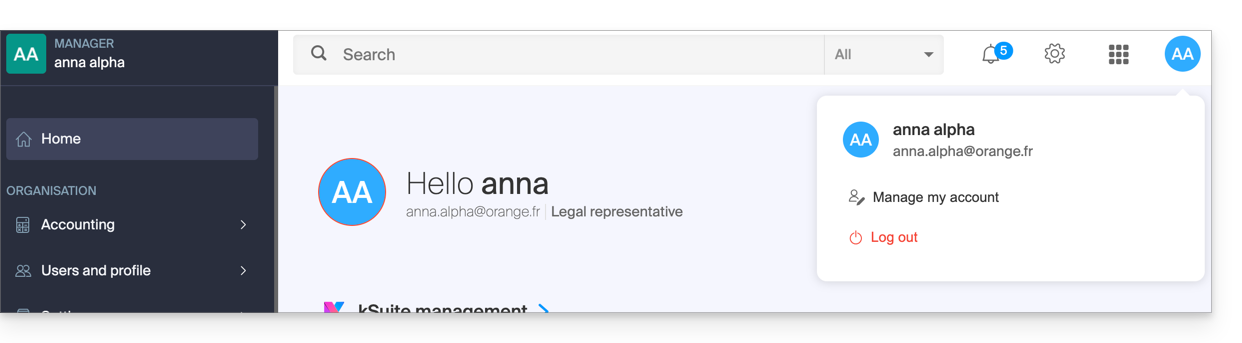
- As iniciais correspondem à sua conta Infomaniak (nome/sobrenome indicados no registo):
3. Utilização combinada
O que acontece se você se inscrever no my kSuite, indicando uma conta Infomaniak que você já possui para utilizar produtos de hospedagem?
Ou como proceder se você deseja adquirir produtos de hospedagem quando possui apenas uma conta my kSuite?
Inscreva-se no my kSuite especificando uma conta existente
Ao se inscrever em welcome.infomaniak.com/signup/myksuite, você pode optar por fazer login com uma conta existente…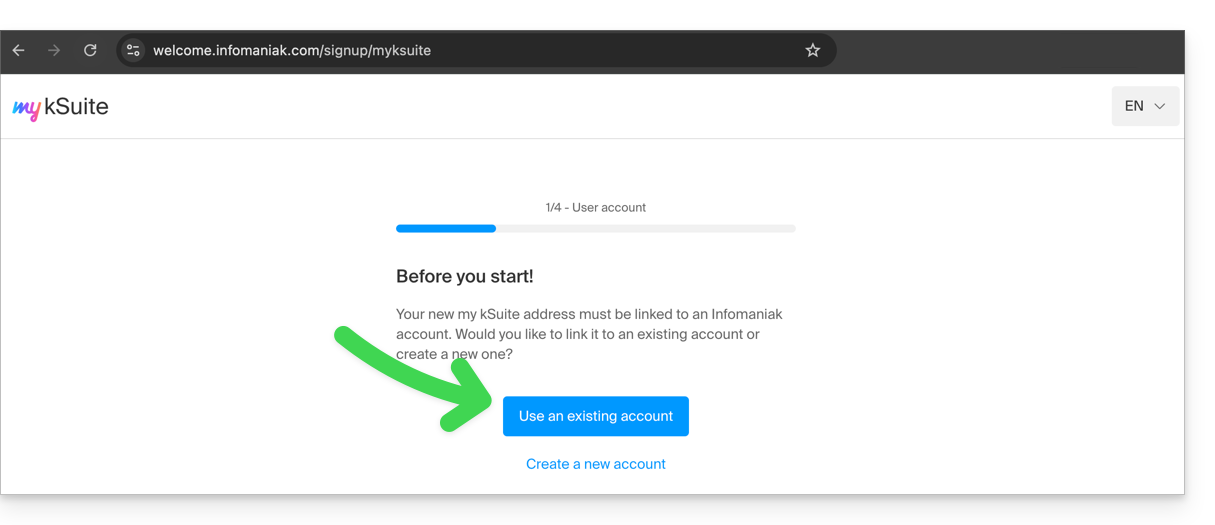
- Obviamente, não deve inserir uma conta my kSuite (
anna.a@ik.me, por exemplo) como uma conta existente, pois você não pode ter vários endereços de e-mail ik.me / etik.com / ikmail.com: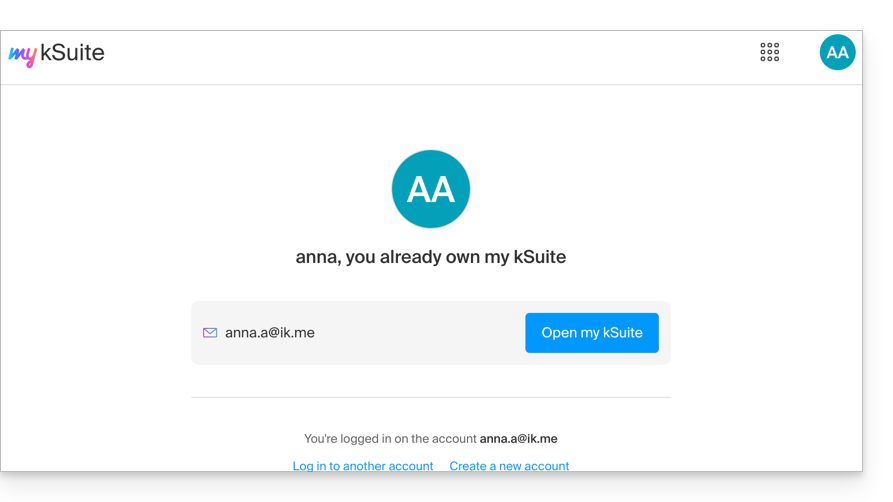
- Insira os dados da sua conta de Organização existente,
anna.alpha@orange.fr: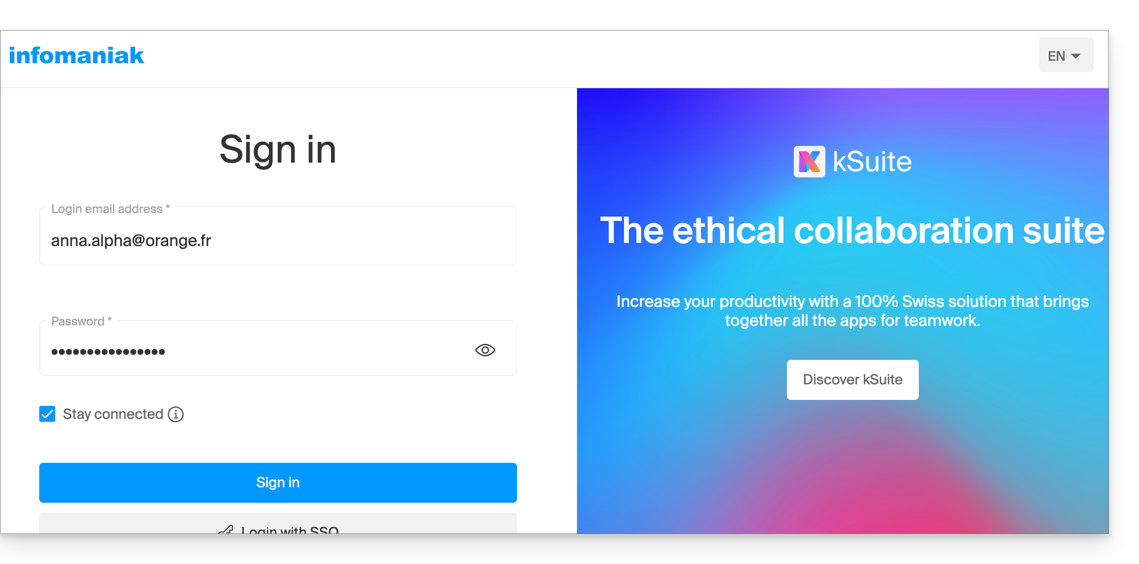
- Assim, é proposta a criação de uma conta my kSuite:
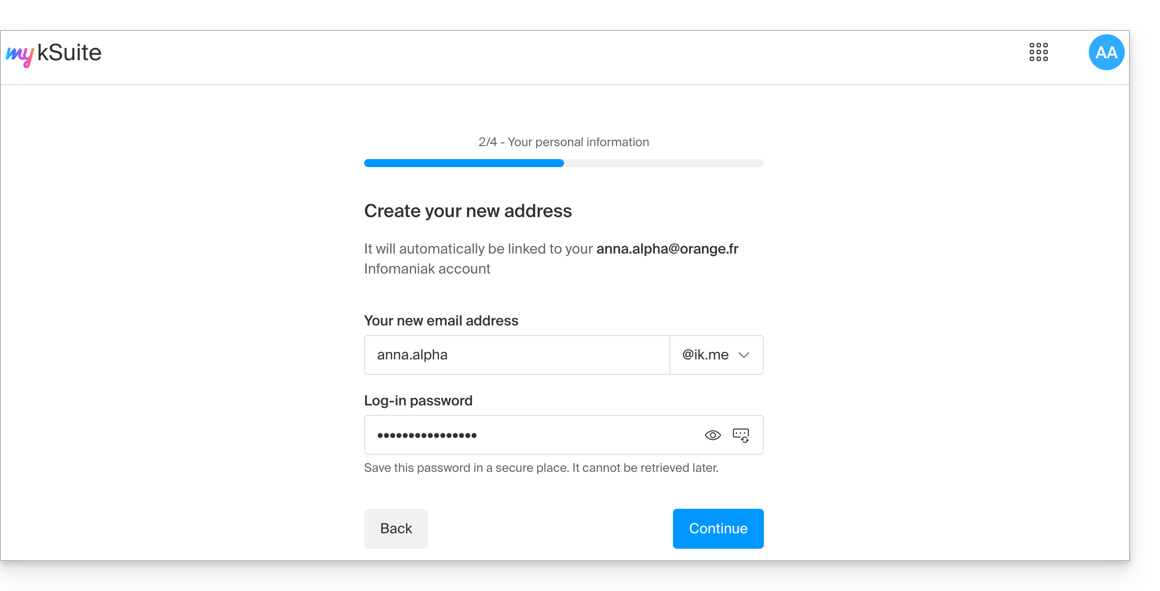
- Após a validação do registo, acede ao painel de controlo em
manager.infomaniak.com:- a sua organização anterior fica visível…
- separada da my kSuite atualmente selecionada:
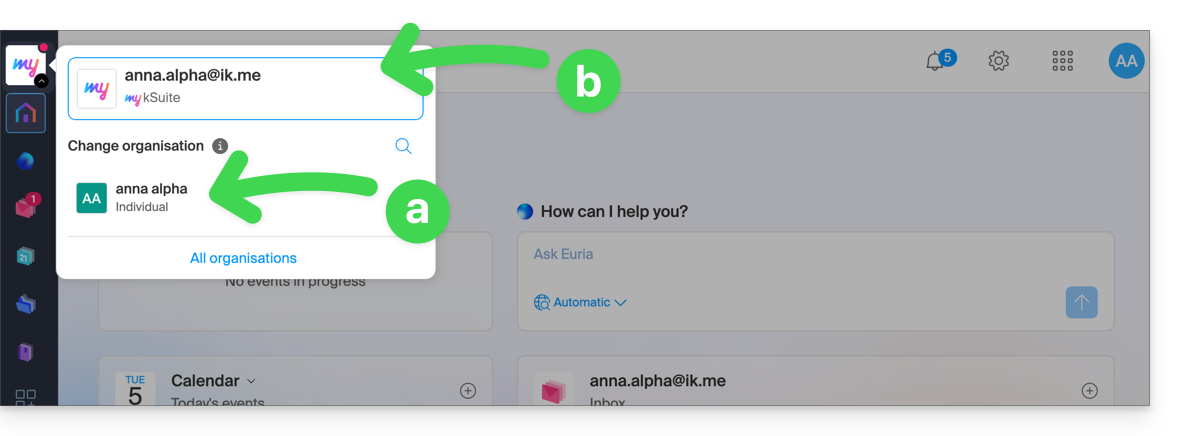
- Clique numa das organizações/my kSuite deste menu (sempre acessível no canto superior esquerdo) para alternar entre elas.
Adquirir produtos tendo apenas uma conta my kSuite
Outra situação: você deseja adquirir em www.infomaniak.com um dos serviços oferecidos pela Infomaniak, por exemplo, um nome de domínio para o seu futuro site/e-mail: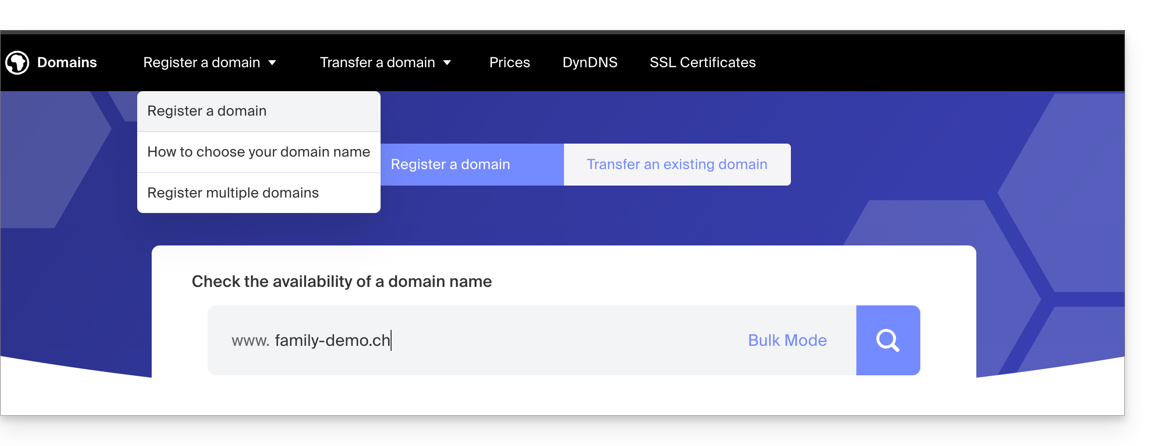
- Você será redirecionado para a loja Infomaniak; prossiga para a próxima etapa:
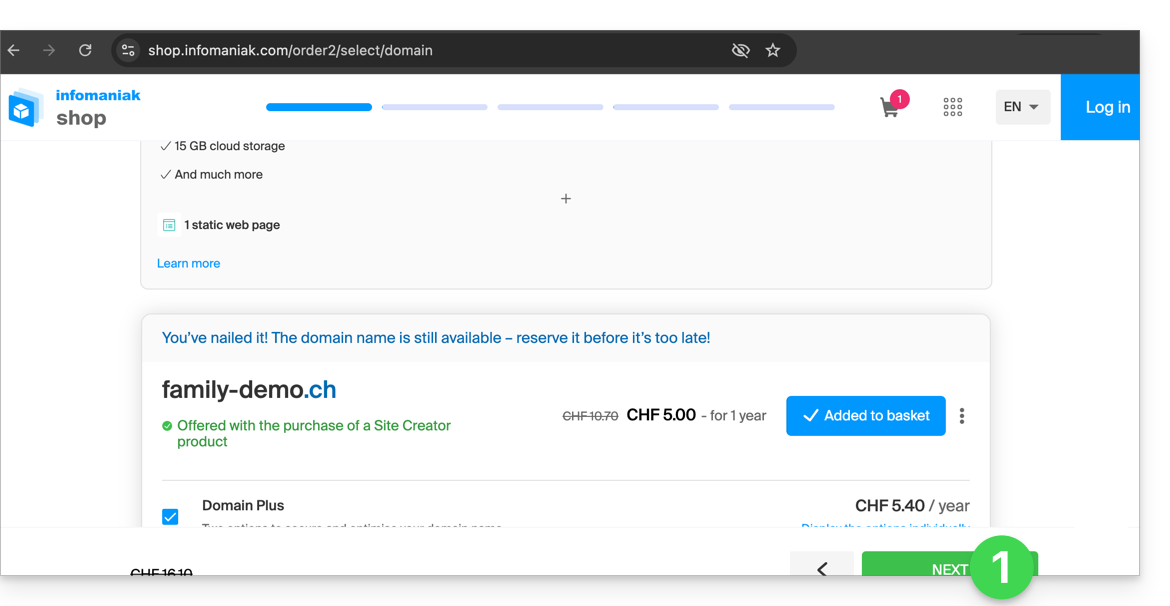
- Na etapa em que você deve inserir seu possível identificador Infomaniak existente, insira sua conta my kSuite existente (
anna.alpha@ikmail.comneste exemplo):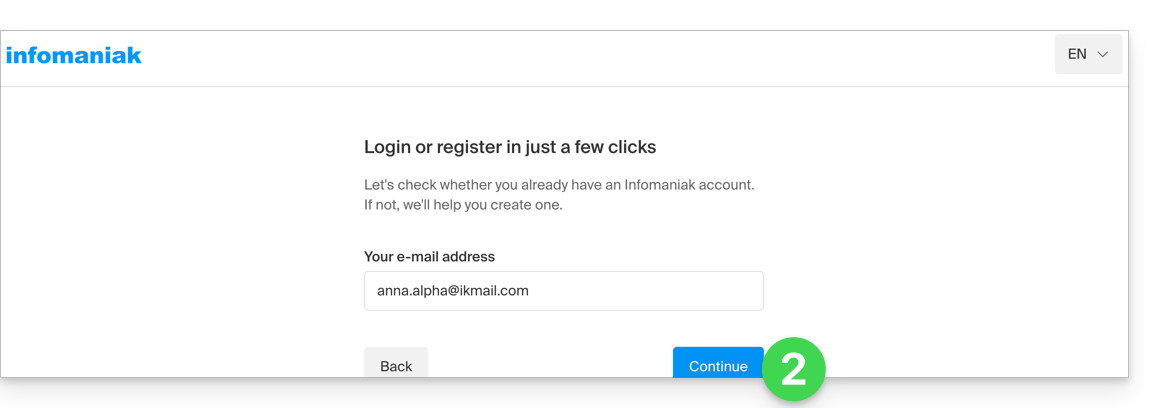
- O seu identificador existente foi reconhecido, precisa de se autenticar:
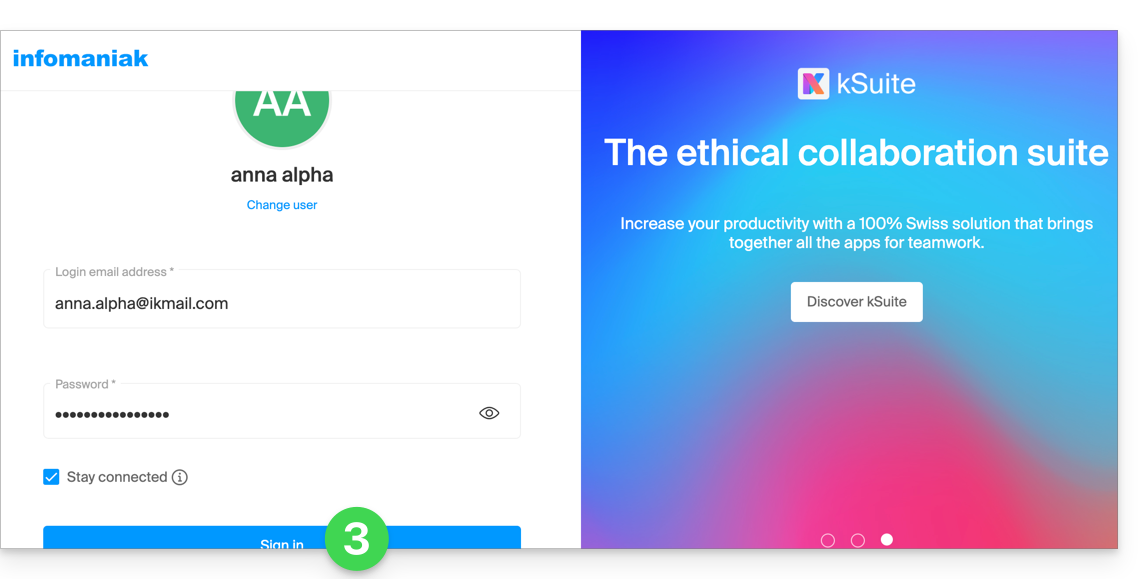
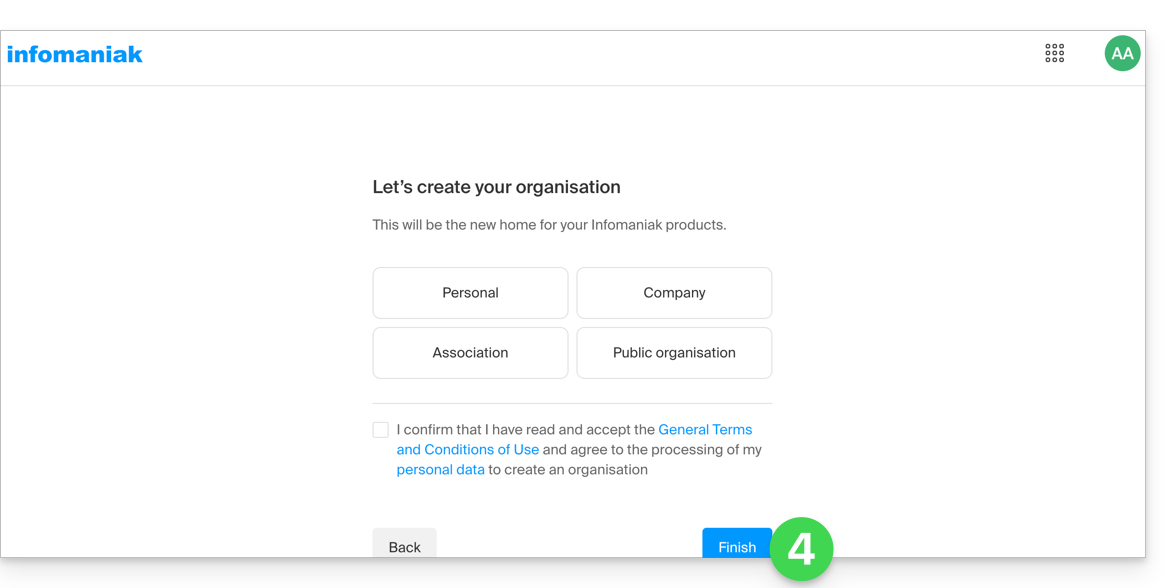
- Em seguida, terá de passar obrigatoriamente pela etapa de criação da Organização; escolha o tipo de Organização que deseja criar (pessoal ou para uma empresa, associação, etc.):
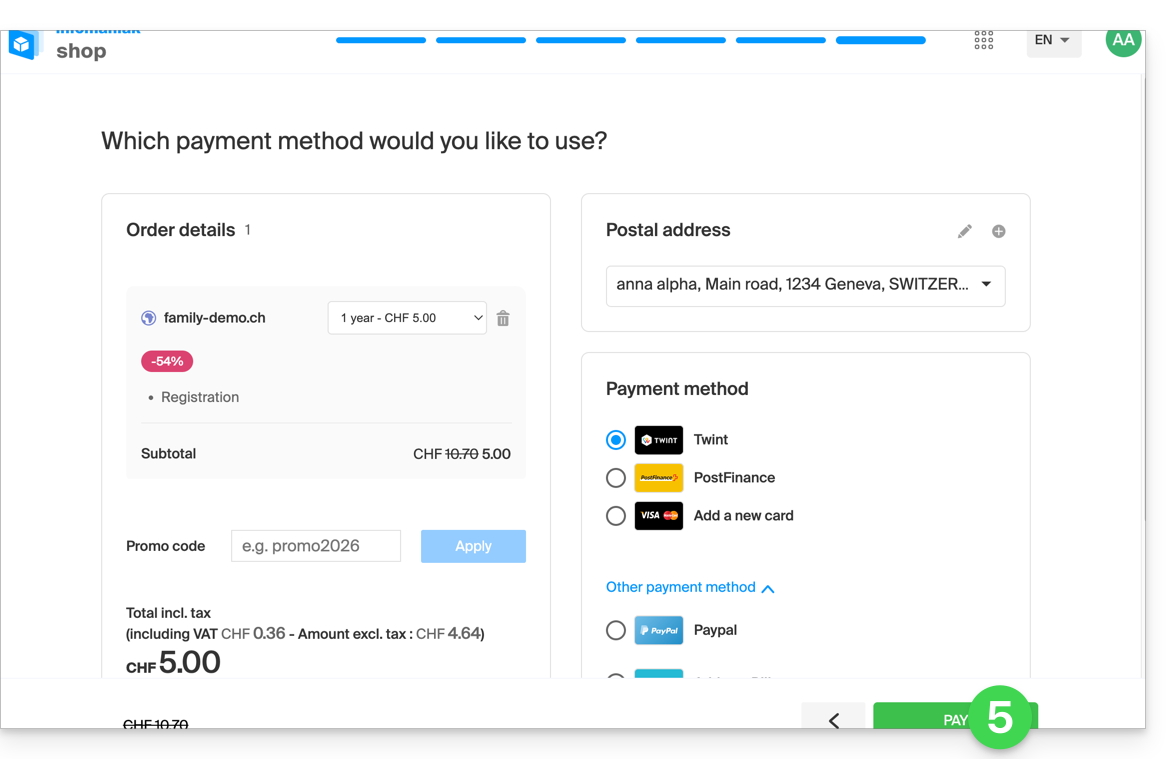
- Para finalizar a compra, serão solicitadas as informações da Organização para a faturação (elas também servem para gerar um titular para o nome de domínio encomendado); basta concluir o pedido:
- Após a conclusão do pedido, aceda ao painel de controlo em
manager.infomaniak.com: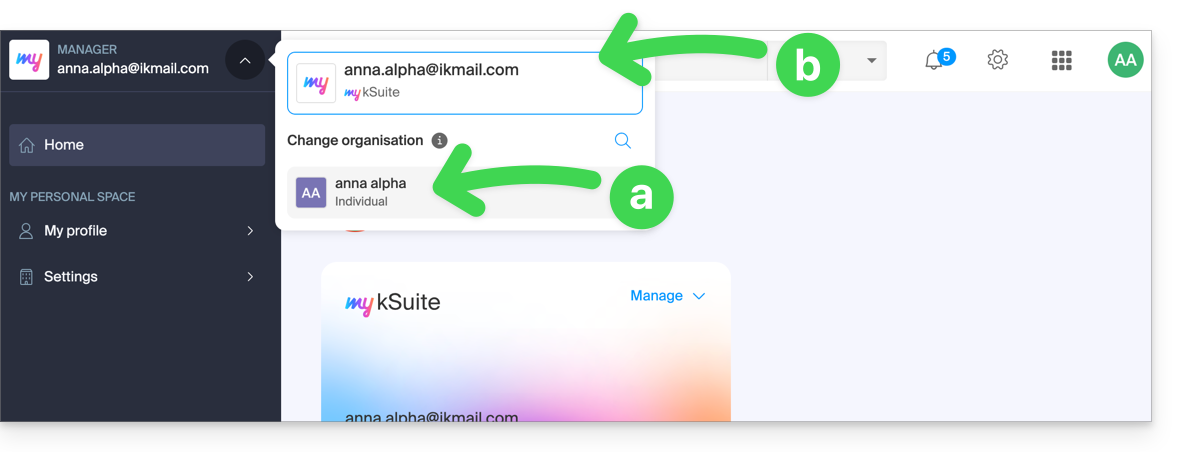
- a sua nova Organização fica visível…
- separada da my kSuite atualmente selecionada.
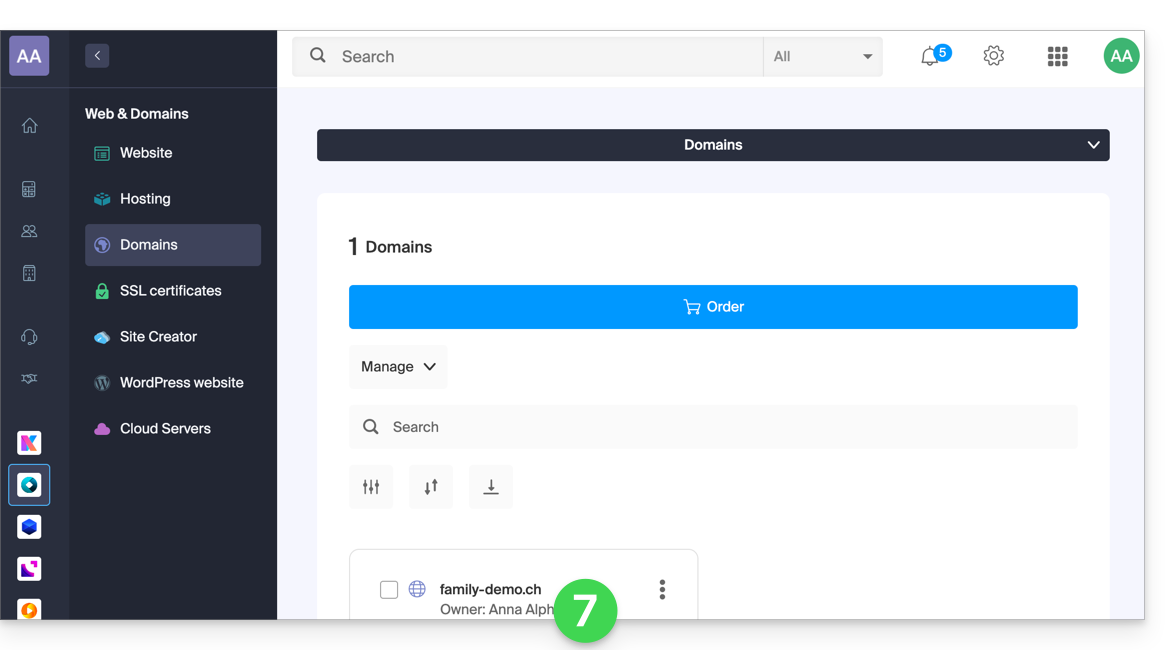
- Clique na nova Organização para alternar para ela e gerir os seus produtos encomendados:
- Para alternar entre as Organizações/my kSuite, clique neste menu (sempre acessível no canto superior esquerdo):
- Primeiro, para chegar à página principal do painel de controle,
- depois, no ícone que permite escolher o destino:
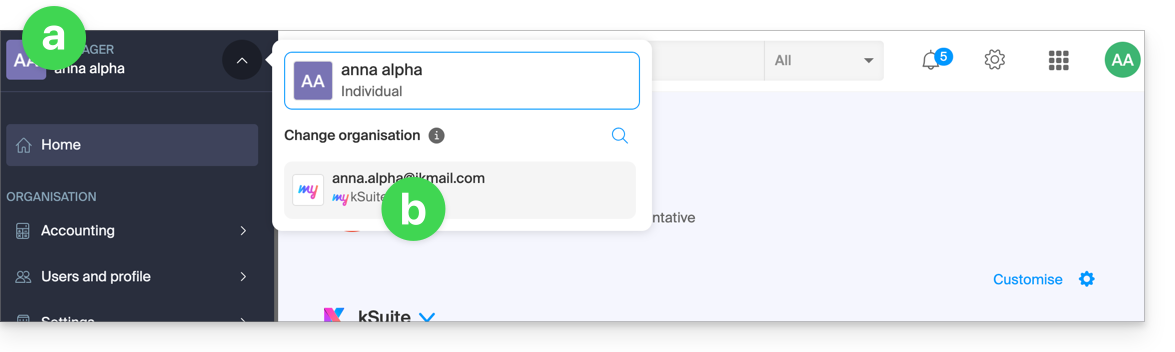
- Assim, você poderá acessar seu endereço de e-mail my kSuite.
Para entender as diferentes "Suítes" Infomaniak (kSuite Pro, my kSuite...), consulte este outro guia.
Link para esta FAQ: https://faq.infomaniak.com/2489
Esta seção de perguntas frequentes foi útil?
A oferta kSuite da Infomaniak facilita a criação e, posteriormente, o uso de diversos produtos Infomaniak (kDrive, Serviço de Email, kChat...) integrados em torno de um nome de domínio.
Migrar para kSuite
Ao subscrever o kSuite, terá produtos distintos dos seus produtos existentes.
No entanto, se já possui um kDrive ou um Serviço de Email,você pode atualizar seus produtos para kSuite:
- Consulte este guia para atualizar um kDrive para kSuite…
- Consulte este outro guia para migrar um Serviço de Email para a kSuite…
Para ajudar a identificar a oferta kSuite mais adequada às suas necessidades, consulte este outro guia.
E o contrário?
Não é possível separar os produtos kSuite em produtos distintos da oferta.
Se desejar cancelar um dos produtos da sua kSuite, é necessário cancelar a kSuite por completo, tendo previamente feito uma cópia de segurança das informações que pretende guardar, e, em seguida, solicitar novamente os produtos correspondentes a essas informações.
Link para esta FAQ: https://faq.infomaniak.com/2494
Esta seção de perguntas frequentes foi útil?
Este guia ajuda você a começar a usar o kSuite, integrando um Serviço de Email já existente na sua organização.
Introdução
- Para o ajudar a identificar a oferta kSuite mais adequada às suas necessidades, consulte este outro guia.
- Também pode integrar o kDrive, caso este não esteja incluído numa kSuite.
Migrar um Serviço de E-mail para o kSuite
A forma mais simples, caso ainda não exista nenhum kSuite na sua organização, é encomendar um novo e indicar o nome de domínio correspondente ao seu Serviço de E-mail atual. Este será, então, integrado no novo kSuite.
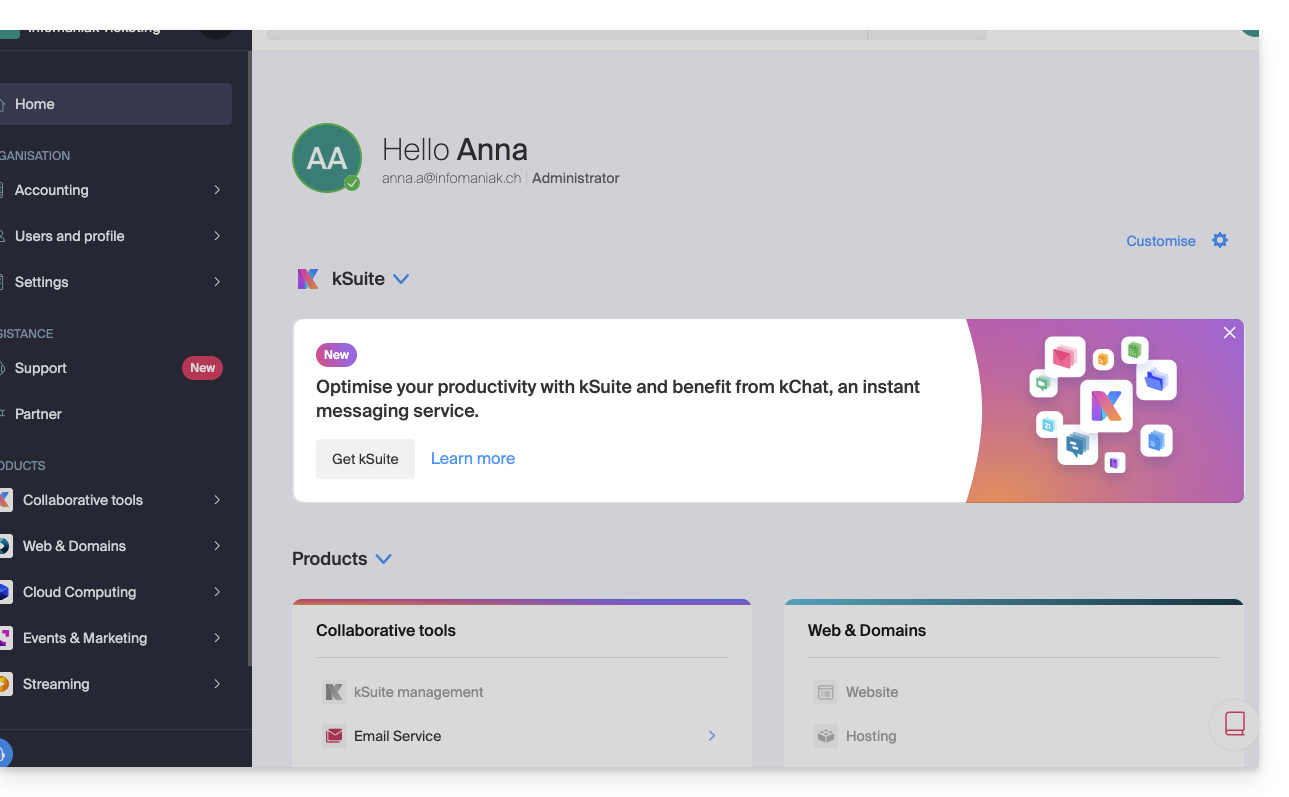
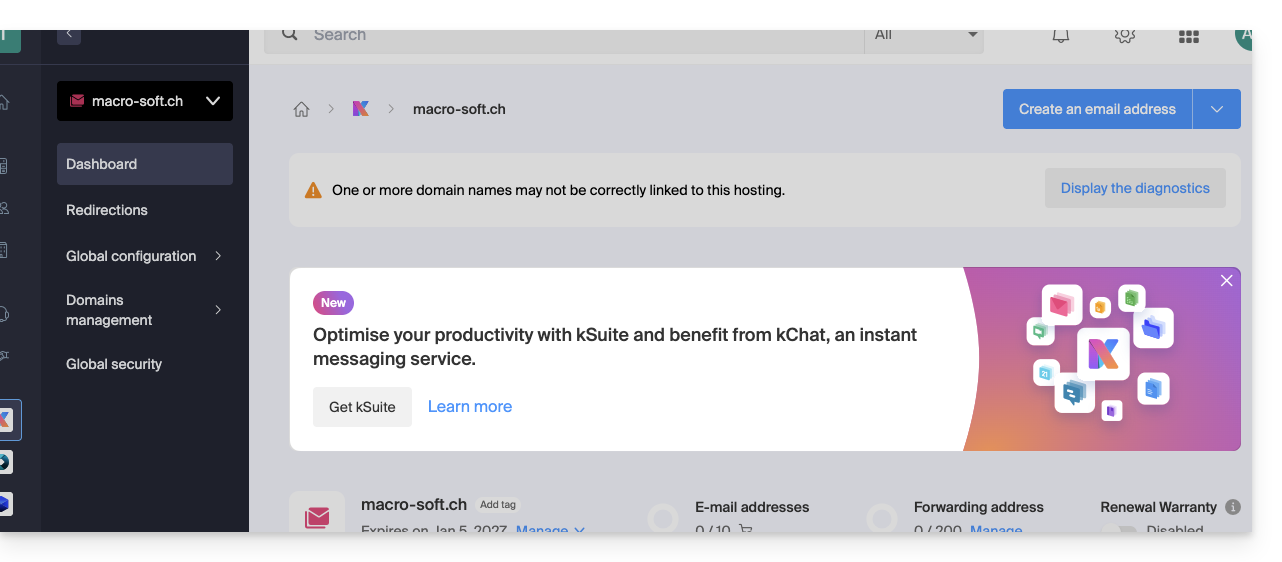
Você também pode fazer isso a partir de uma barra de informações visível…
- … na página inicial da sua interface Manager:
- … na página de gestão do seu Serviço de Email, fora do kSuite atual:
Link para esta FAQ: https://faq.infomaniak.com/2495
Esta seção de perguntas frequentes foi útil?
Este guia explica como atualizar o seu plano my kSuite (ik.me, etik.com, ikmail.com) e migrar para um plano pago my kSuite+, por exemplo, para aumentar o espaço de armazenamento máximo. Você manterá o endereço de e-mail criado quando assinou o plano gratuito.
Introdução
- Para o ajudar a identificar a oferta my kSuite / kSuite mais adequada às suas necessidades, consulte este outro guia.
- Consulte este outro guia sobre as limitações específicas da oferta my kSuite e as vantagens da oferta my kSuite+.
- Não é obrigatório fazer upgrade para my kSuite+ para adicionar serviços: consulte este outro guia sobre as Organizações.
- Também é possível voltar para my kSuite após subscrever my kSuite+, mas as taxas incorridas continuam a ser devidas.
Migrar para o my kSuite+
Para aceder à oferta my kSuite atual e mudar para uma oferta superior:
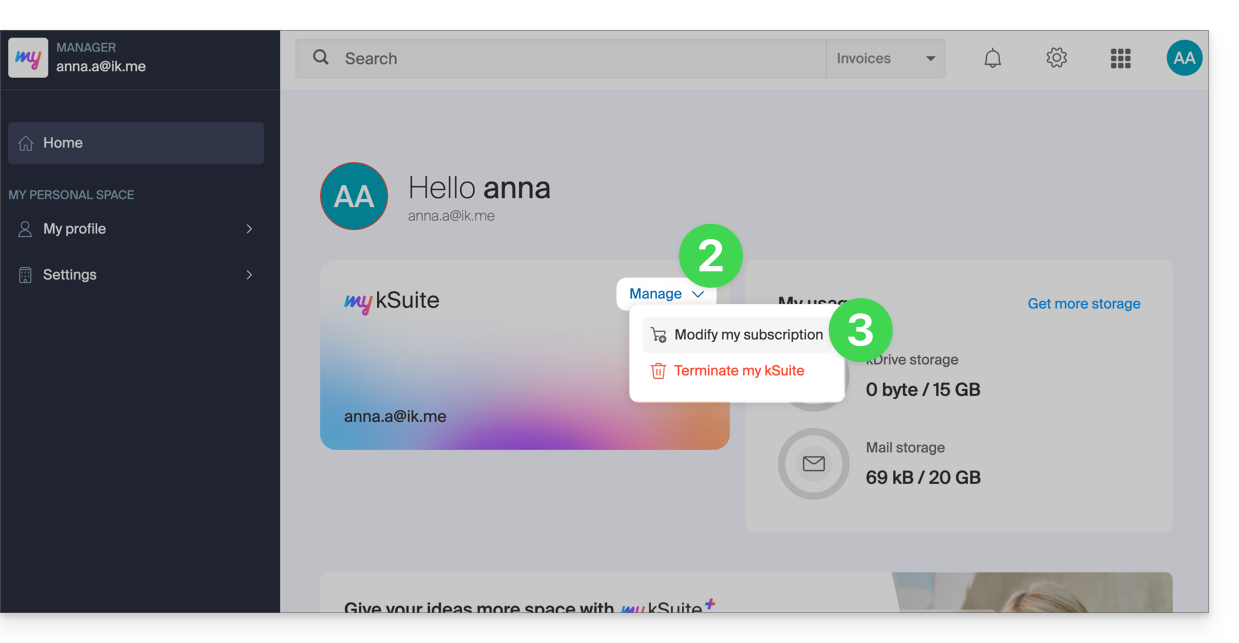
- Clique aqui para acessar o painel de controle da sua oferta my kSuite.
- Clique na seta para baixo à direita de Gerenciar.
- Escolha Alterar o meu plano para converter o plano gratuito num plano pago e mais completo:
- O inverso (sair do my kSuite+ para voltar ao my kSuite) também é possível, no mesmo local.
Encomendar um novo kDrive
Não há limite para o número de kDrives (pagos) que pode adicionar à sua conta Infomaniak. Encomende um novo kDrive, se necessário.
Link para esta FAQ: https://faq.infomaniak.com/2496
Esta seção de perguntas frequentes foi útil?
Este guia é para você se estiver procurando por uma oferta completa de e-mail e armazenamento colaborativo de dados. O objetivo é ajudá-lo a compreender melhor as diferentes soluções de produtos Infomaniak quando estiver indeciso ou não souber qual escolher…
Se procura hospedar um site, consulte este outro guia. Se está indeciso entre as diferentes ofertas de Mail, consulte este outro guia.
As diferentes ofertas em resumo
Aqui está um resumo das diferentes opções (excluindo as ofertas de hospedagem web):
| Gratuitas (ou domínio pago) | Pagos |
|---|---|
my kSuite
| my kSuite+
|
Serviço de E-mail Starter
| Serviço de E-mail Premium
|
kSuite Pro: Gratuito
| kSuite Pro: Standard / kSuite Business / kSuite Enterprise
|
Pacotes gratuitos ou pagos
A Infomaniak oferece várias soluções de e-mail com ou sem ferramentas de colaboração adicionais:
- Um Serviço de Email é o nome dado ao serviço de mensagens criado pela Infomaniak na Suíça. Pode encomendar um Serviço de Email independentemente do kSuite.
- kSuite Pro é uma coleção de serviços Infomaniak que inclui, nomeadamente, um Serviço de Email e está estruturado em torno de um nome de domínio pessoal.
- my kSuite e my kSuite+ são versões limitadas do kSuite que não exigem um nome de domínio e que também podem atender perfeitamente às suas necessidades em termos de e-mail. No painel de controlo Infomaniak, estas ofertas serão “separadas” do restante.
Custo das ofertas de e-mail simples
Este serviço de e-mail pode ser…
- … gratuito se você optar por um endereço com um nome de domínio genérico (o que vem depois do símbolo
@), criado pela Infomaniak (ik.me,etik.com,ikmail.com), ao escolher o plano my kSuite (o plano my kSuite+ remove algumas limitações do my kSuite). - … a um custo muito baixo, se você se contentar com uma ou duas contas de e-mail gratuitas em um nome de domínio que você paga (existem nomes de domínio por menos de 5 CHF/€ por ano, que serão seus únicos custos e permitirão personalizar seus endereços de e-mail) ao contratar:
- a oferta Starter (apenas 1 conta de e-mail)
- ou a oferta kSuite Pro
Precisa de um grande número de contas de e-mail?
Se precisar de várias contas de e-mail no mesmo domínio, pode adquirir um Serviço de E-mail (mínimo de 5 contas de e-mail) ou o kSuite Pro, que está disponível em 4 versões diferentes:
- Free
- Padrão
- Empresarial
- Empresarial
O ponto comum a todas as ofertas de e-mail é que você deve possuir uma conta de usuário na Infomaniak (um identificador de login na forma de um endereço de e-mail, bem como uma senha) que o levará à sua Organização, onde estará localizada sua caixa de e-mail. Consulte também este outro guia.
Ferramentas adicionais (kDrive…)
Se escolher uma Suite (kSuite ou my kSuite / my kSuite+), esta conta de utilizador direcioná-lo-á para a sua Organização, onde encontrará a suite de ferramentas, incluindo o seu e-mail, mas também o kDrive, o kChat, etc.
Clique nos links para acessar as tabelas comparativas que detalham todas as funcionalidades disponíveis de acordo com o plano:
- O kDrive pode ser obtido ao criar uma conta my kSuite ou my kSuite+.
- o kDrive pode ser adquirido de forma independente em 3 versões diferentes:
- Solo
- Team
- Pro
- o kDrive pode ser adquirido ao subscrever (gratuitamente ou através de uma assinatura paga) o kSuite Pro, que está disponível em 4 versões diferentes:
- Free
- Standard
- Business
- Enterprise
Gostaria de fazer parte da Infomaniak?
Consulte este outro guia.
Link para esta FAQ: https://faq.infomaniak.com/2497
Esta seção de perguntas frequentes foi útil?
Este guia apresenta os endereços dos servidores IMAP mais comuns.
Introdução
- Estes endereços são fornecidos apenas como referência e podem ser usados para realizar a cópia do conteúdo dos seus antigos endereços de e-mail para o seu endereço de e-mail Infomaniak.
- Nem todos foram verificados individualmente e podem mudar sem aviso prévio.
- Para Gmail, Yahoo, Outlook e iCloud, geralmente é necessário gerar uma "Senha de aplicativo" nas configurações de segurança da sua conta original para autorizar a cópia.
- Se necessário, não hesite em contactar o seu antigo fornecedor de e-mail para solicitar o servidor de e-mail exato a ser inserido.
Endereços do servidor IMAP
| Fornecedor | Nome do host IMAP / Servidor |
|---|---|
| 1&1 (IONOS) | imap.ionos.fr |
| 9 Empresarial | imap.9business.fr |
| 9 Telecom / Neuf | imap.neuf.fr |
| Alice | imap.aliceadsl.fr |
| Altern.org | imap.altern.org |
| AOL | imap.aol.com |
| Apple (iCloud / me.com) | imap.mail.me.com |
| Bouygues Telecom (Bbox) | imap4.bbox.fr |
| Caramail / GMX | imap.gmx.com |
| Cegetel | imap.cegetel.net |
| Club Internet | imap.club-internet.fr |
| Gratuito | imap.free.fr |
| Freesurf | imap.freesurf.fr |
| Gmail (Google) | imap.gmail.com |
| Hotmail / Outlook / MSN | imap-mail.outlook.com— contas pessoais (@hotmail, @outlook, @live, @msn)outlook.office365.com — Microsoft 365 / Exchange (profissional) |
| Infomaniak | mail.infomaniak.com |
| La Poste | imap.laposte.net |
| Mailo (antigo NetCourrier) | imap.mailo.com |
| Noos | imap.noos.fr |
| Numericable | imap.numericable.fr |
| o2switch | server-name.o2switch.net(consulte o seu e-mail de boas-vindas) |
| Online.net | imap.online.net |
| Orange / Wanadoo | imap.orange.fr |
| OVH (Servidor compartilhado) | ssl0.ovh.net |
| OVH (Pro / Exchange) | pro1.mail.ovh.net (ou ex.mail.ovh.net) |
| Proton Mail | A cópia direta não é possível |
| SFR | imap.sfr.fr |
| Skynet (Belgacom / Proximus) | imap.proximus.be |
| Tele2 | imap.tele2.com |
| Telenet | imap.telenet.be |
| Videotron | imap.videotron.ca |
| Yahoo Mail | imap.mail.yahoo.com |
Link para esta FAQ: https://faq.infomaniak.com/2508
Esta seção de perguntas frequentes foi útil?
Este guia explica como responder a um e-mail visível no aplicativo web Mail Infomaniak (serviço online ksuite.infomaniak.com/mail) enviando a resposta diretamente no aplicativo web kChat (serviço online ksuite.infomaniak.com/kchat) ou no aplicativo desktop, na forma de uma mensagem privada para o remetente do e-mail.
Introdução
- Esta funcionalidade permite responder a um e-mail diretamente no kChat, com um lembrete da mensagem original para facilitar a compreensão.
- O objetivo é otimizar a colaboração, permitindo responder rapidamente a um e-mail sem sair do ambiente kSuite.
- Reduz o número de idas e vindas entre a caixa de e-mail tradicional e o espaço de trabalho colaborativo.
Enviar uma resposta a um e-mail através do kChat
Pré-requisitos
- O botão que dá acesso à funcionalidade só será exibido se o e-mail for recebido de um remetente associado à kSuite e, além disso, na mesma Organização do utilizador que pretende responder.
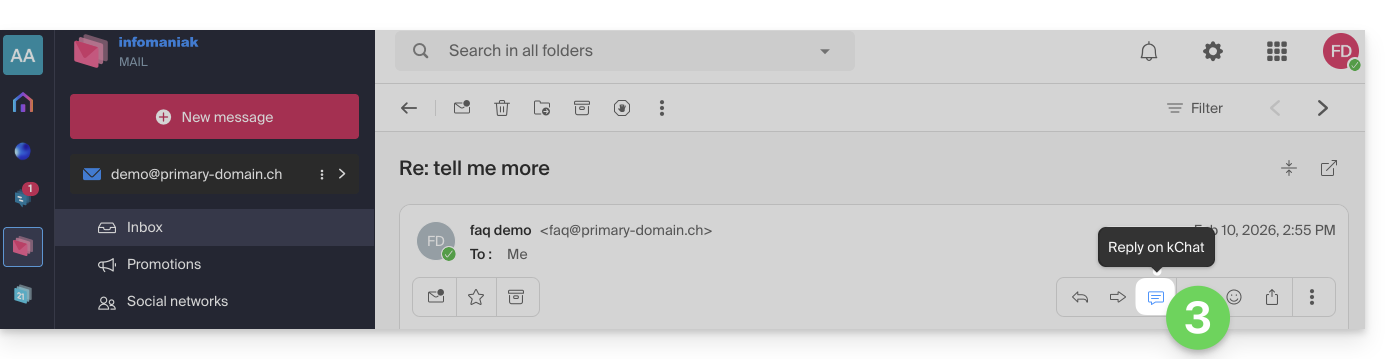
- Para exibir um atalho para esta funcionalidade, como no primeiro item 3 abaixo, consulte este outro guia.
Quando você receber um e-mail de um colega e quiser responder diretamente no kChat:
- Clique aqui para acessar o aplicativo web Mail Infomaniak (serviço online ksuite.infomaniak.com/mail).
- Abra a mensagem à qual deseja responder usando o kChat.
- Clique no ícone kChat na barra de ferramentas do e-mail:
- Também é possível clicar em um botão abaixo da mensagem:
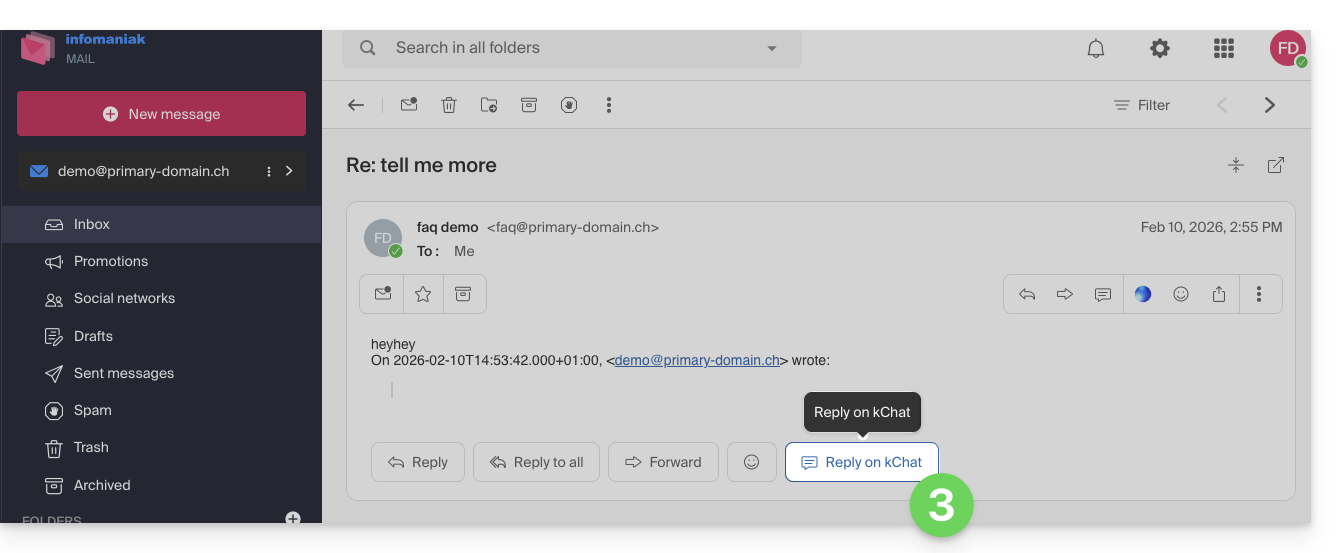
- Também é possível clicar em um botão abaixo da mensagem:
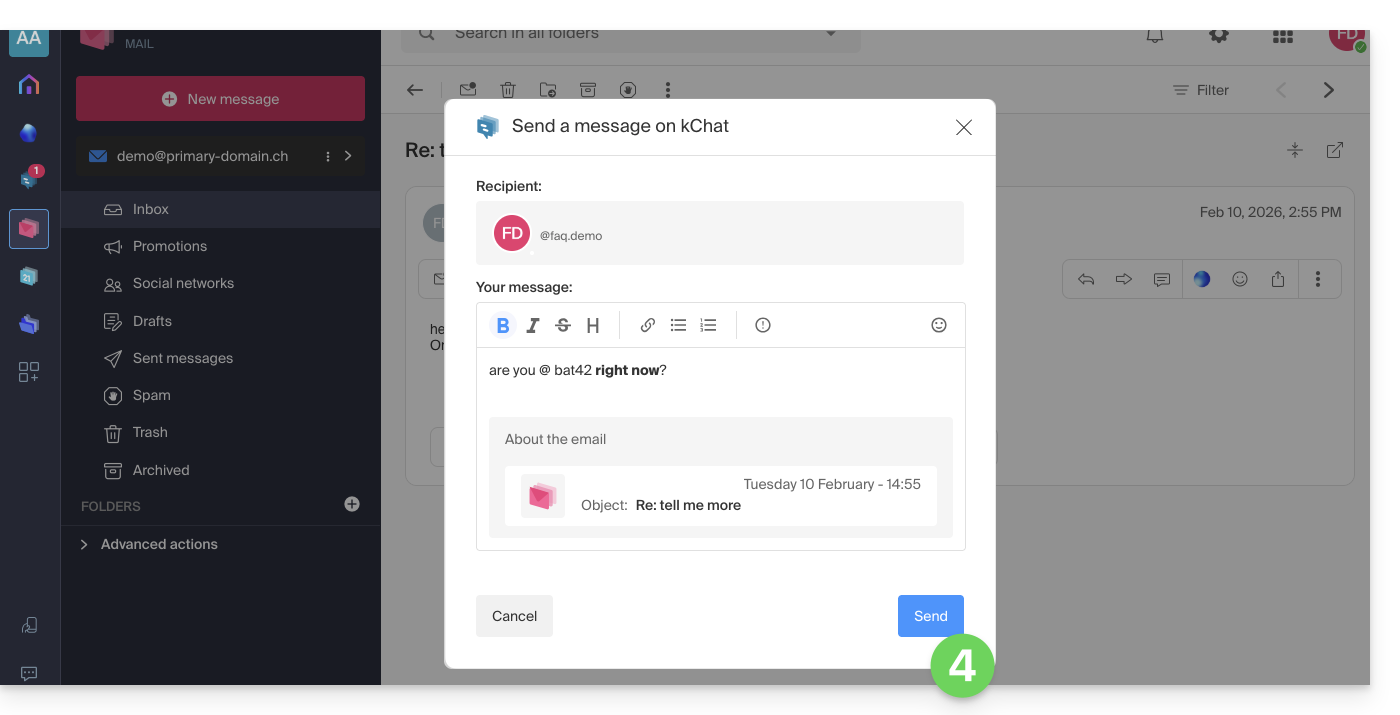
- Escreva sua mensagem kChat, formate-a, se necessário, e clique no botão Enviar no canto inferior direito:
- O seu destinatário recebe a mensagem no kChat, juntamente com uma caixa que exibe o e-mail original (data e hora, assunto):
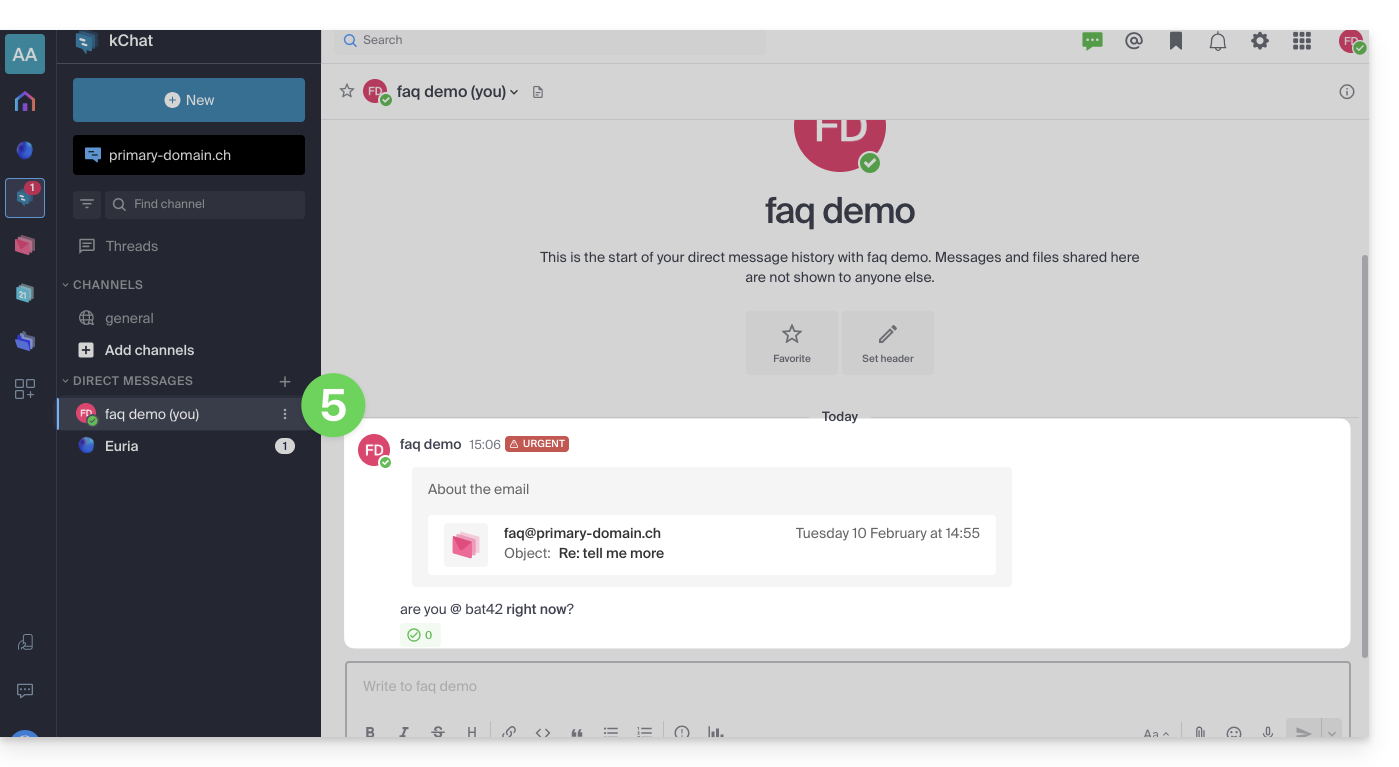
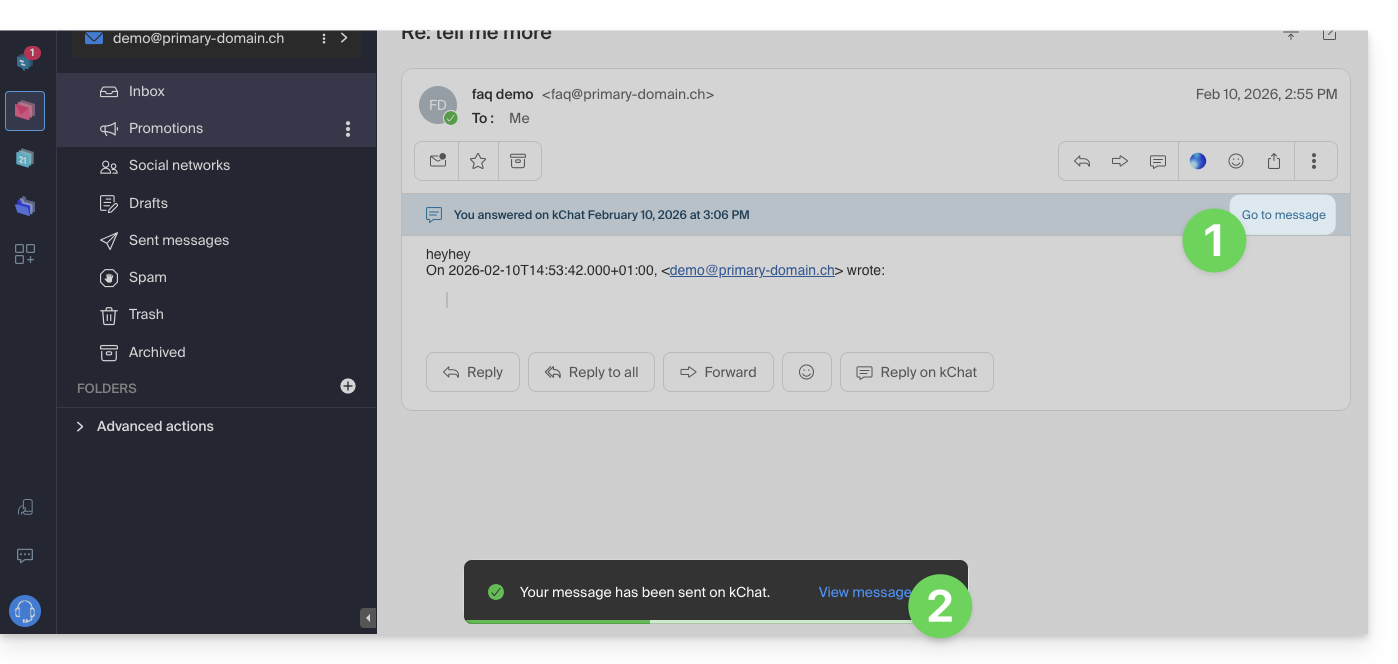
Pode aceder a esta mensagem no kChat (no histórico das mensagens privadas trocadas com o seu destinatário, como mostrado acima), mas também:
- em uma barra de informações na conversa de e-mail,
- na mensagem de confirmação de envio:
Link para esta FAQ: https://faq.infomaniak.com/2512
Esta seção de perguntas frequentes foi útil?
Este guia explica como criar, guardar e editar um ficheiro do tipo Office (texto, planilha, apresentação…) no aplicativo web kDrive (serviço online ksuite.infomaniak.com/kdrive) e no aplicativo móvel kDrive (aplicativo para smartphone ou tablet iOS / Android).
Observação para usuários de arquivos LibreOffice: para evitar problemas de exibição ou formatação no kDrive, converta sempre seus arquivos LibreOffice (ODF: .ods, .odt, .odp) para seus equivalentes Microsoft Office XML (.xlsx, .docx, .pptx) antes da edição online.
Utilizar o editor nativo
O kDrive integra nativamente as aplicações Docs, Grids e Points, que permitem criar, editar e colaborar online em documentos do tipo Word .docx, Excel .xlsx e PowerPoint .ppsx. Assim, poderá trabalhar com:
- documento de texto
- planilha
- apresentação
- bloco de notas
- documento draw.io para diagramas, esquemas e wireframes
Uma funcionalidade permite adicionar um marcador (atalho para uma seção favorita do seu documento ou o equivalente a uma âncora de página web) que você poderá compartilhar facilmente com seus contatos. Você também poderá notificar facilmente um usuário da sua organização diretamente no documento.
Consulte o guia sobre o assunto.
Utilizar o Microsoft Office Online
Outra solução de edição está disponível (é necessário o kDrive Pro ou o kSuite Business / Enterprise): o editor Microsoft Office Online.
Consulte o guia sobre este tema.
Definir o editor padrão
✘ INDISPONÍVEL com
kSuite Free / kSuite Standard
my kSuite / my kSuite+ (ik.me, etik.com, ikmail.com)
kDrive Solo / kDrive Team / kDrive Pro
Para definir qual editor usar sempre por padrão para abrir seus arquivos colaborativos do tipo Office (texto, planilha, apresentação…) entre as duas opções apresentadas acima:
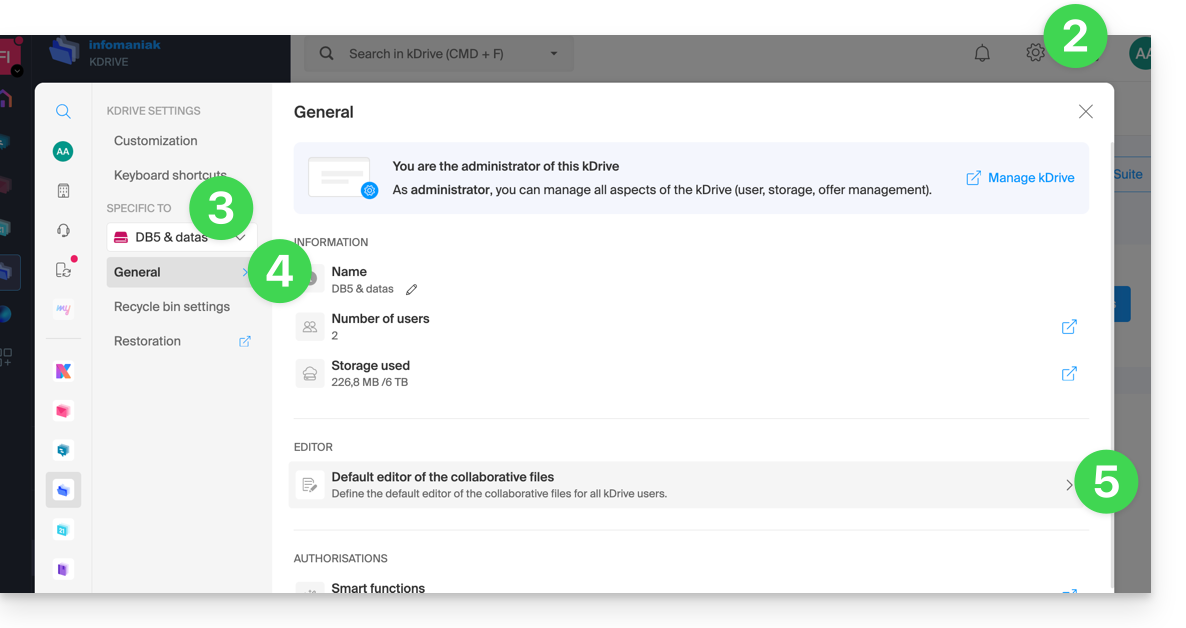
- Clique aqui para acessar o aplicativo web kDrive da Infomaniak (serviço online ksuite.infomaniak.com/kdrive).
- Clique no ícone Configurações no canto superior direito.
- Verifique ou selecione o kDrive correspondente no menu suspenso do menu lateral esquerdo.
- Clique em Geral no menu lateral esquerdo.
- Clique em Editor padrão:
- Escolha o editor padrão para os ficheiros:
.docx/.doc.xlsx/.xls.pptx/.ppt
Link para esta FAQ: https://faq.infomaniak.com/2531
Esta seção de perguntas frequentes foi útil?
Este guia explica como modificar uma oferta de Serviço de Email Infomaniak, a solução eficiente e segura para hospedar os seus endereços de email, de forma a aumentar ou reduzir a quota de endereços de email disponível.
Introdução
- Consulte este outro guia se desejar simplesmente criar ou eliminar um endereço de e-mail no seu Serviço de E-mail existente, sem alterar o número de endereços de e-mail disponíveis.
- Se o seu Serviço de E-mail ainda não faz parte de uma kSuite, consulte este outro guia para considerar uma possível alteração de plano.
Modificar a cota de endereços em um Serviço de Email
Pré-requisitos
- Ter um Serviço de Email no seu Painel de Controle Infomaniak.
Para ver o número de endereços de email atualmente disponíveis no seu Serviço de Email e, se necessário, encomendar mais (ou remover alguns):
- Clique aqui para acessar o gerenciamento do seu produto no Manager Infomaniak (precisa de ajuda?).
- Clique diretamente no nome atribuído ao produto em questão.
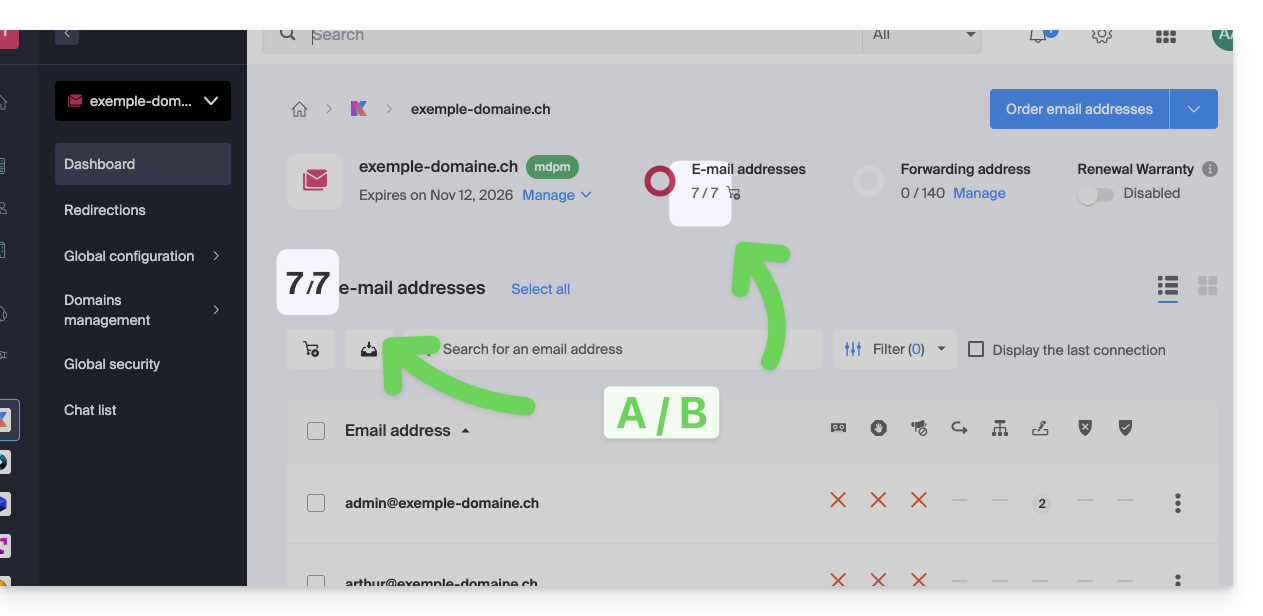
- O número de endereços de e-mail criados (A) e o número total de endereços disponíveis (B) no Serviço é exibido na parte superior da página:
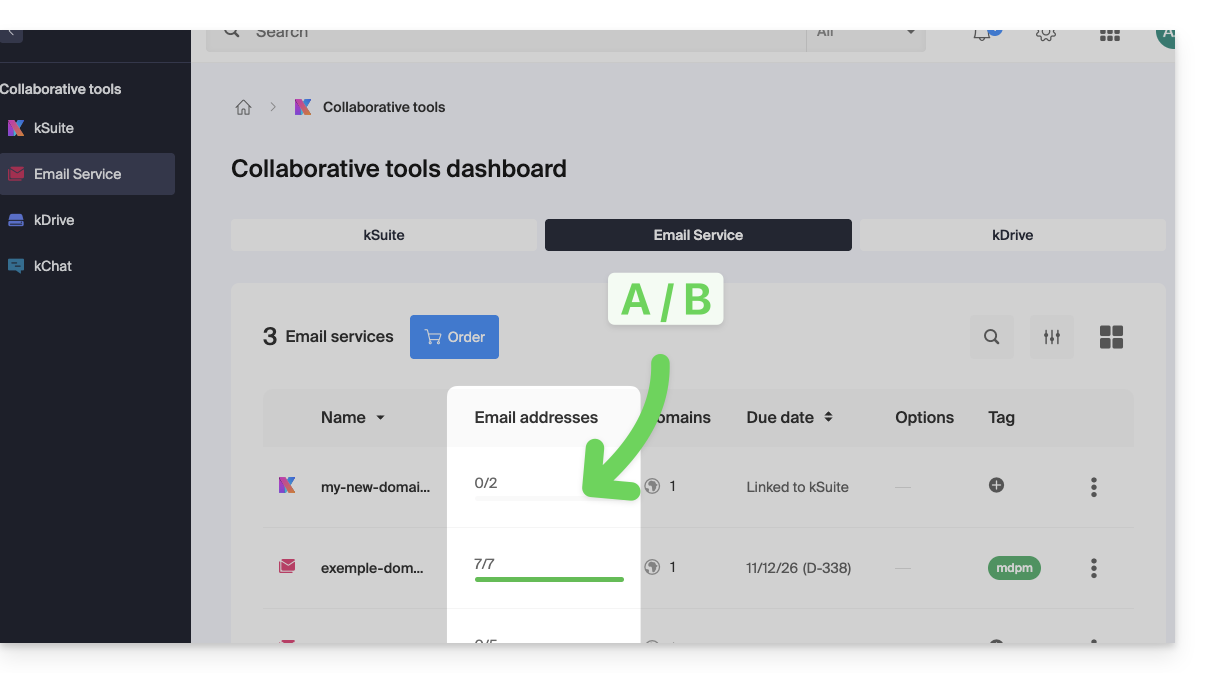
- Note que também pode visualizar a quota diretamente no ponto 1, quando estiver na página que lista os seus Serviços de E-mail:
- Note que também pode visualizar a quota diretamente no ponto 1, quando estiver na página que lista os seus Serviços de E-mail:
Aumentar o número de endereços de e-mail disponíveis
Para aumentar o número de endereços de e-mail disponíveis no seu Serviço de E-mail, permitindo que crie novos endereços de e-mail para si ou para os seus familiares:
- Clique aqui para aceder à gestão do seu produto no painel de controlo Infomaniak (precisa de ajuda?).
- Clique diretamente no nome atribuído ao produto em questão.
- Clique no ícone do carrinho de compras, localizado na parte superior:
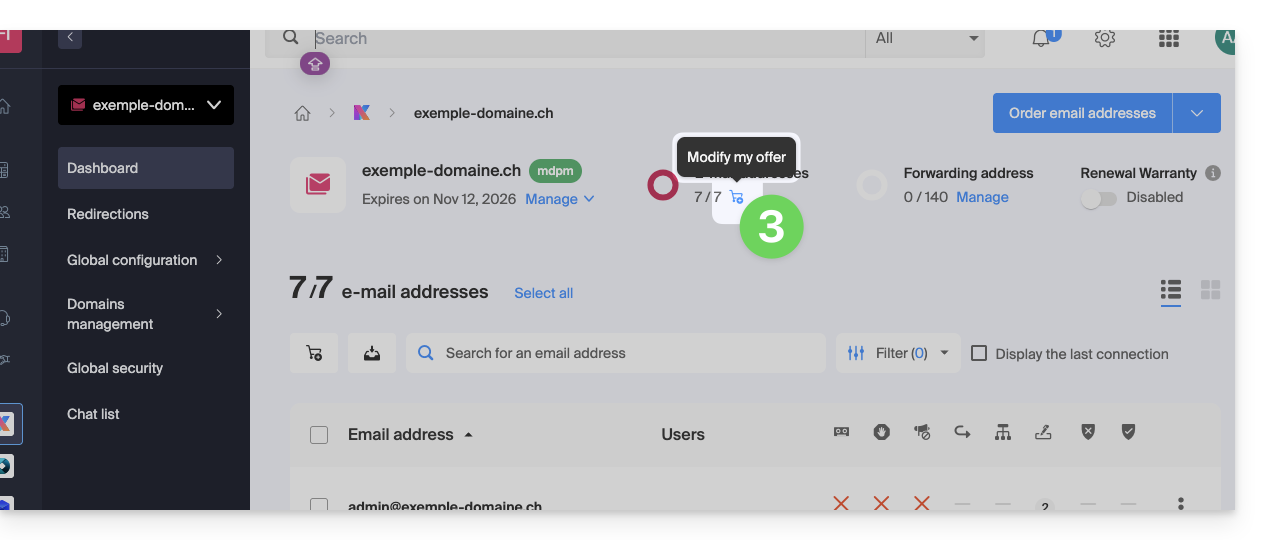
- Ajuste a quota desejada e prossiga com o pedido do número de endereços adicionais no domínio do Serviço de Email.
- Conclua o processo de pagamento; agora você pode criar seus endereços de email adicionais:
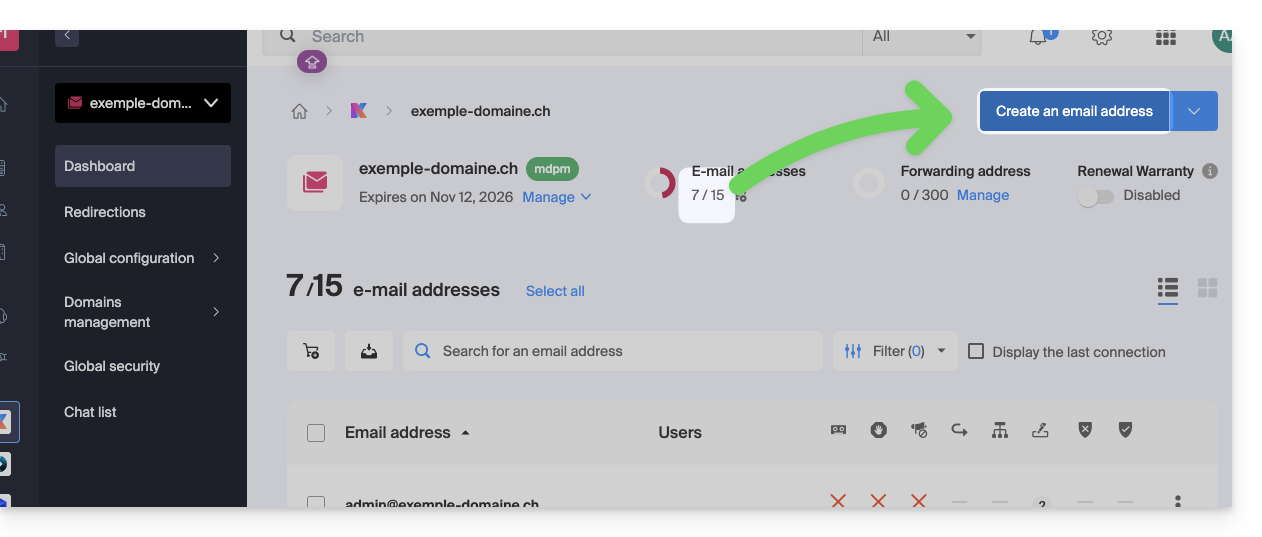
Reduzir o número de endereços de e-mail disponíveis
Para reduzir o número de endereços de e-mail disponíveis no seu Serviço de E-mail, permitindo que pague apenas pelo número de endereços que realmente deseja e utiliza no próximo período de renovação (o mínimo é de 5 endereços para qualquer Serviço de E-mail, exceto o Serviço de E-mail Starter), se necessário, remova os endereços de e-mail excedentes e, em seguida:
- Clique aqui para acessar o gerenciamento do seu produto no Manager Infomaniak (precisa de ajuda?).
- Clique diretamente no nome atribuído ao produto em questão.
- Clique no ícone do carrinho na parte superior:
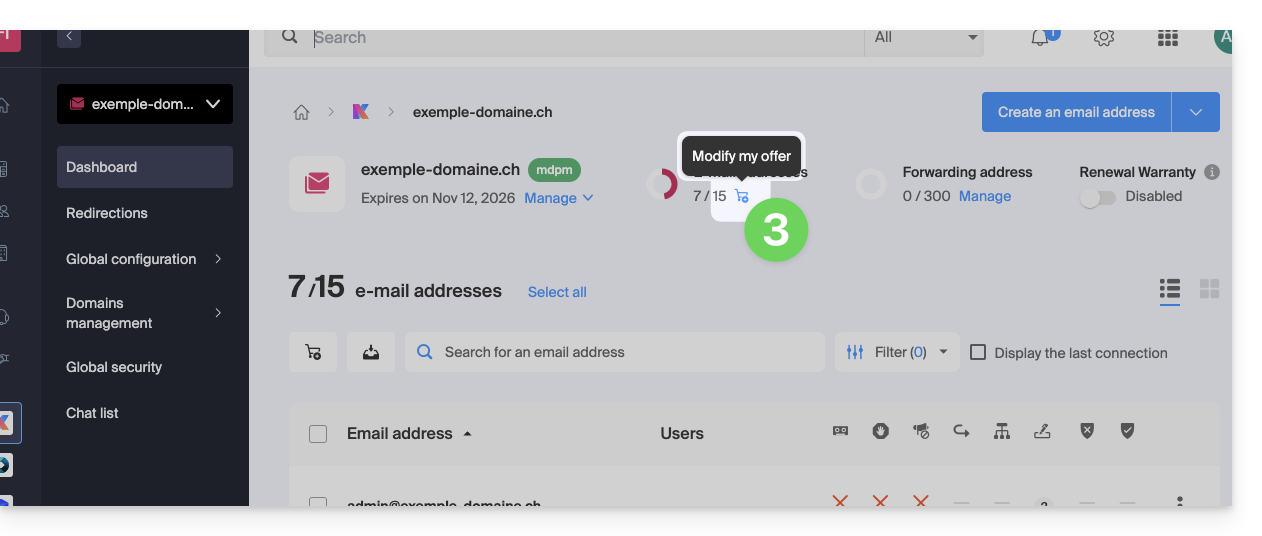
- Ajuste a quota desejada e conclua o processo, lendo atentamente as informações importantes exibidas na tela.
Link para esta FAQ: https://faq.infomaniak.com/2541
Esta seção de perguntas frequentes foi útil?
Este guia detalha a gestão do diretório da Organização, ou seja, um catálogo de endereços “especial” presente na aplicação web Contactos da Infomaniak (serviço online ksuite.infomaniak.com/contacts).
Introdução
- O diretório da Organização é "criado automaticamente" pelos diferentes utilizadores que compõem uma das Organizações às quais o seu utilizador está associado.
- Se forem criados Grupos dentro da Organização, estes serão visíveis no diretório da Organização:
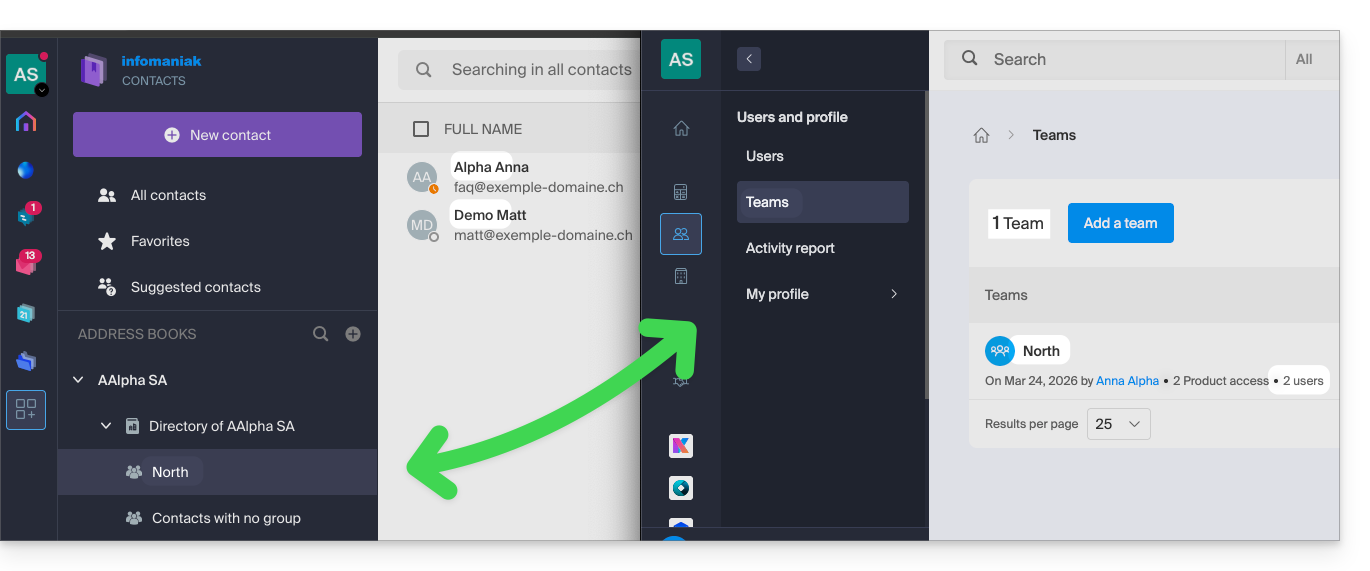
- Este catálogo de endereços é sincronizado automaticamente com todos os utilizadores internos da sua organização.
- Um administrador da organização pode tornar privadas algumas entradas do catálogo, ocultando-as aos utilizadores com menos permissões:
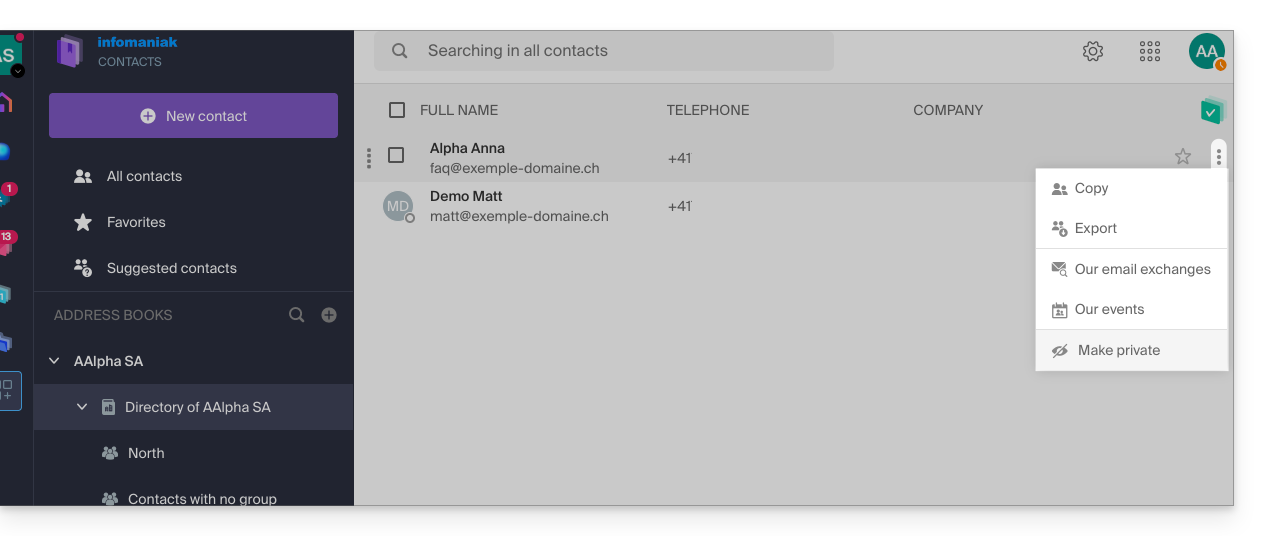
- Não é possível exportá-lo nem renomeá-lo.
- Pode alterar a sua cor de exibição:
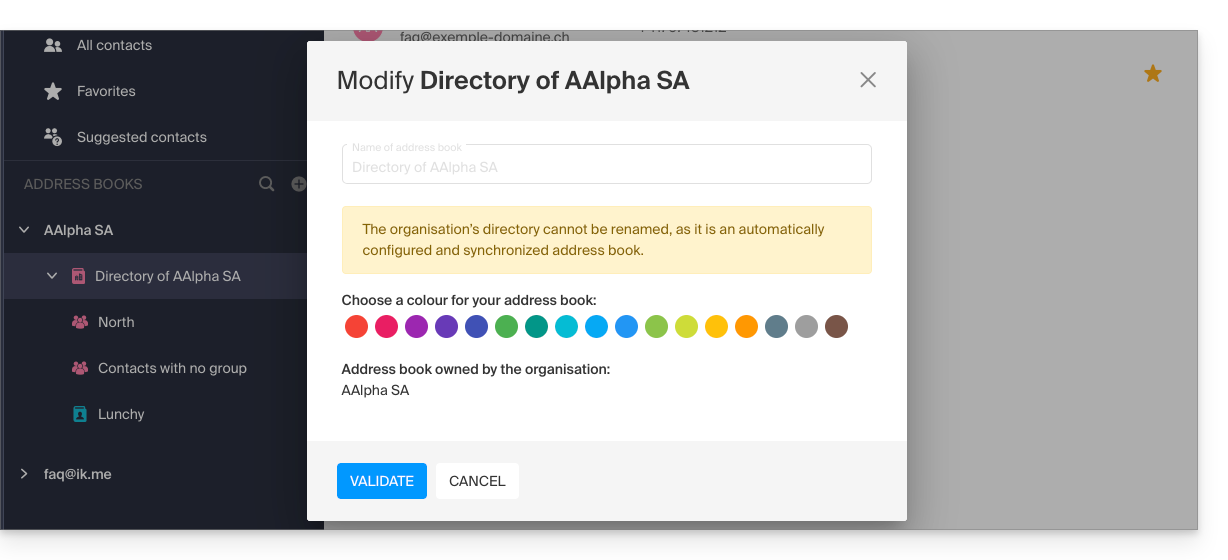
- Pode alterar a sua cor de exibição:
Aceder ao diretório
Se o seu identificador de login corresponder e pertencer a uma ou mais Organizações, é possível aceder aos diferentes diretórios dessas Organizações:
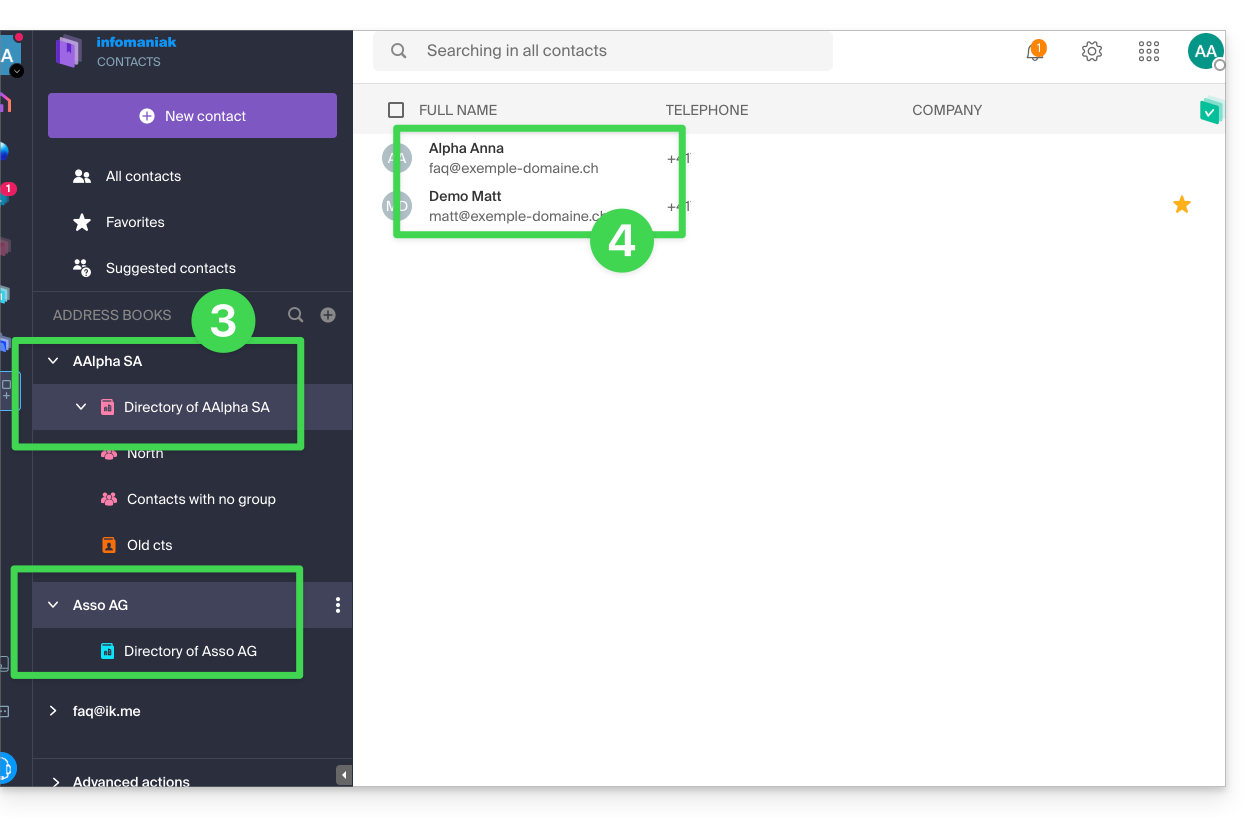
- Clique aqui para aceder à aplicação web Contactos Infomaniak (serviço online ksuite.infomaniak.com/contacts).
- Clique na seta para baixo à esquerda do nome da Organização em questão.
- Clique em Diretório de {nome da Organização}…
- Os contactos da Organização selecionada são exibidos à direita:
Modificar os dados de contacto de um contacto do diretório
Você pode fazer muitas coisas (copiar, exportar o contato, visualizar os e-mails trocados ou os eventos do calendário, adicionar aos favoritos, ligar, etc.) clicando no contato da lista de endereços do Diretório da Organização.No entanto, você não poderá alterar os dados de contato em nome da pessoa.: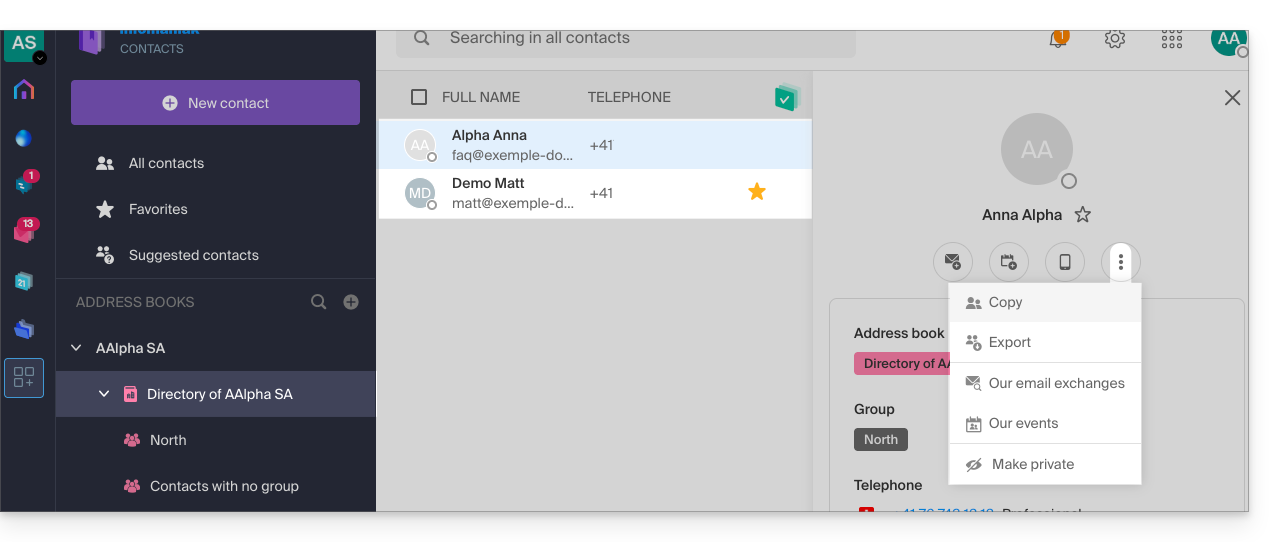
Para modificar as informações principais, a pessoa em questão (aquela para quem a alteração deve ser feita) deve fazer login em o seu perfil e altere-o (veja abaixo):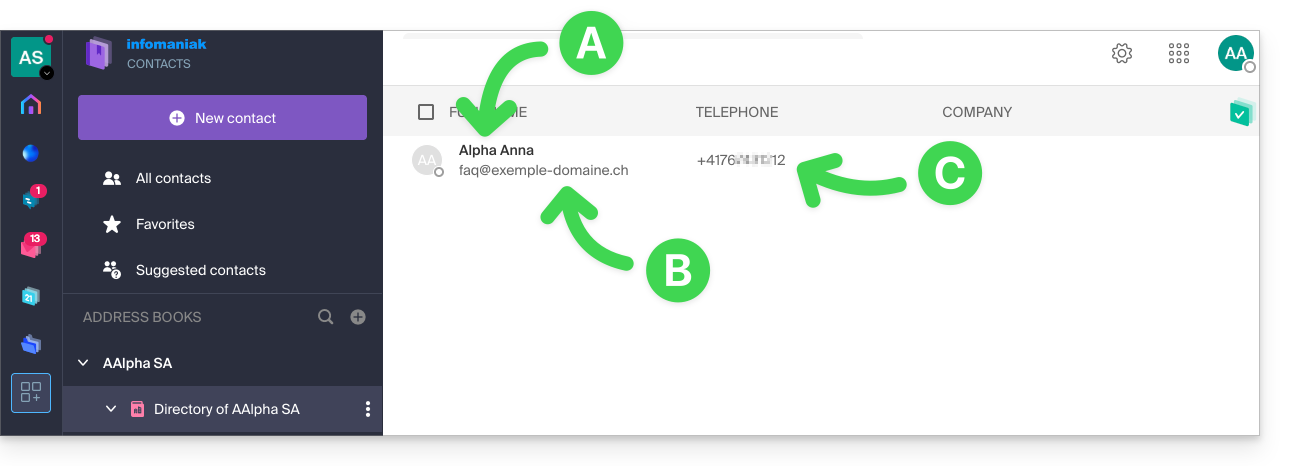
A. Nome e apelido
Para alterar o nome e o sobrenome exibidos em um dos cadernos de Organização, o usuário em questão (aqui faq@exemple-domaine.ch) deve fazer login em sua conta e modificar suas informações de contato. Consulte este outro guia sobre o assunto.
B. Endereço de e-mail
Para alterar o endereço de e-mail exibido em um catálogo da Organização, o usuário em questão deve fazer login em sua conta e modificar suas informações de contato. Consulte este outro guia sobre o assunto.
C. Número de telefone
Para alterar o número de telefone exibido em um catálogo da Organização, o usuário em questão deve fazer login em sua conta e modificar suas informações de contato. Consulte este outro guia sobre o assunto.
Link para esta FAQ: https://faq.infomaniak.com/2558
Esta seção de perguntas frequentes foi útil?
Este guia permite que você descubra rapidamente as funções essenciais do Euria, a inteligência artificial à sua disposição dentro do kSuite, com um desempenho notável, especialmente com o aplicativo Web kDrive da Infomaniak (serviço online ksuite.infomaniak.com/kdrive).
✘ INDISPONÍVEL com
kSuite Free / kSuite Standard
my kSuite / my kSuite+ (ik.me, etik.com, ikmail.com)
kDrive Solo / kDrive Team / kDrive Pro
Utilize a IA para seus arquivos no kDrive
Pré-requisitos
- Ser Administrador ou Representante legal na Organização (❓: ajuda).
- Ative o Euria para todos os utilizadores do seu kDrive: siga o assistente que aparece quando acede ao kDrive (❓: ajuda).
- Leia e compreenda este outro guia sobre o modelo utilizado e as responsabilidades de cada um.
Para acessar o Euria no kDrive:
- Clique aqui para acessar o aplicativo web kDrive da Infomaniak (serviço online ksuite.infomaniak.com/kdrive).
- Abra um documento PDF (o Euria também está disponível com outros tipos de ficheiro de texto/código:
.md,.txt,.json,.php, etc.) ou clique com o botão direito no ficheiro em questão: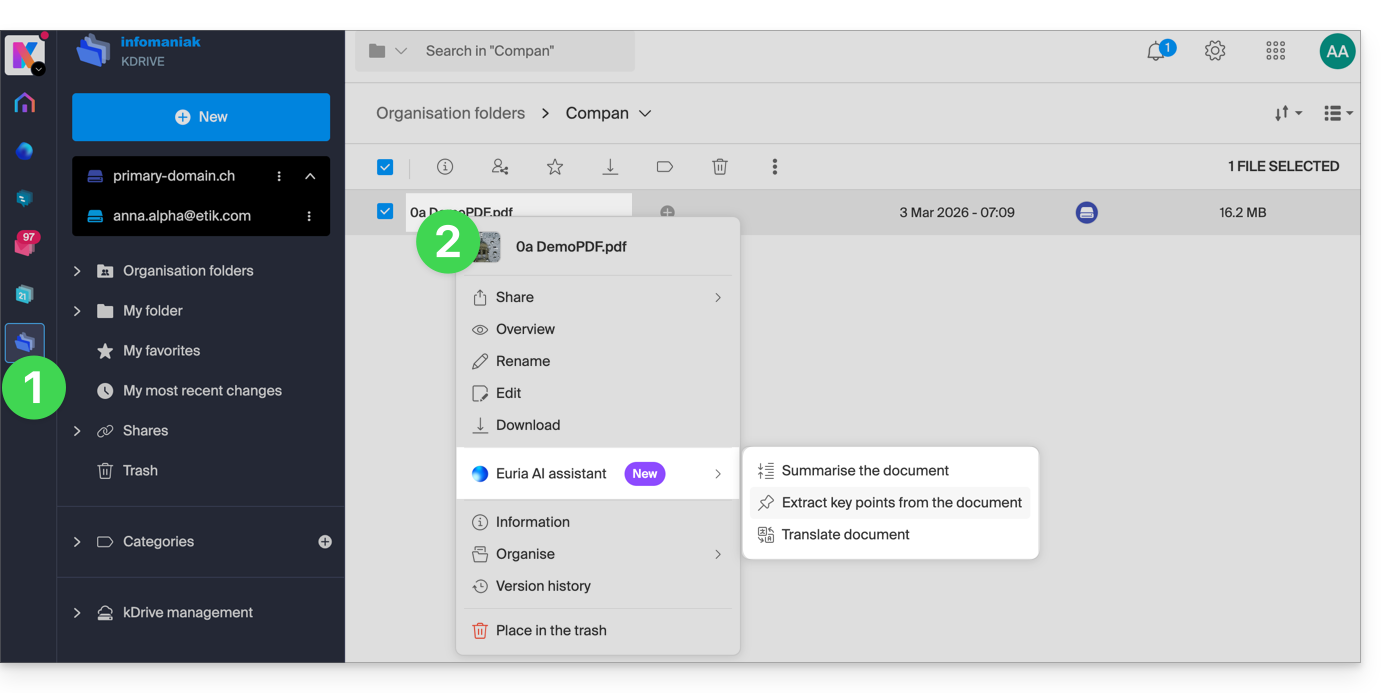
- O Euria será aberto num painel lateral à direita; se o fechar, o Euria continua acessível através do ícone redondo localizado no canto superior direito:
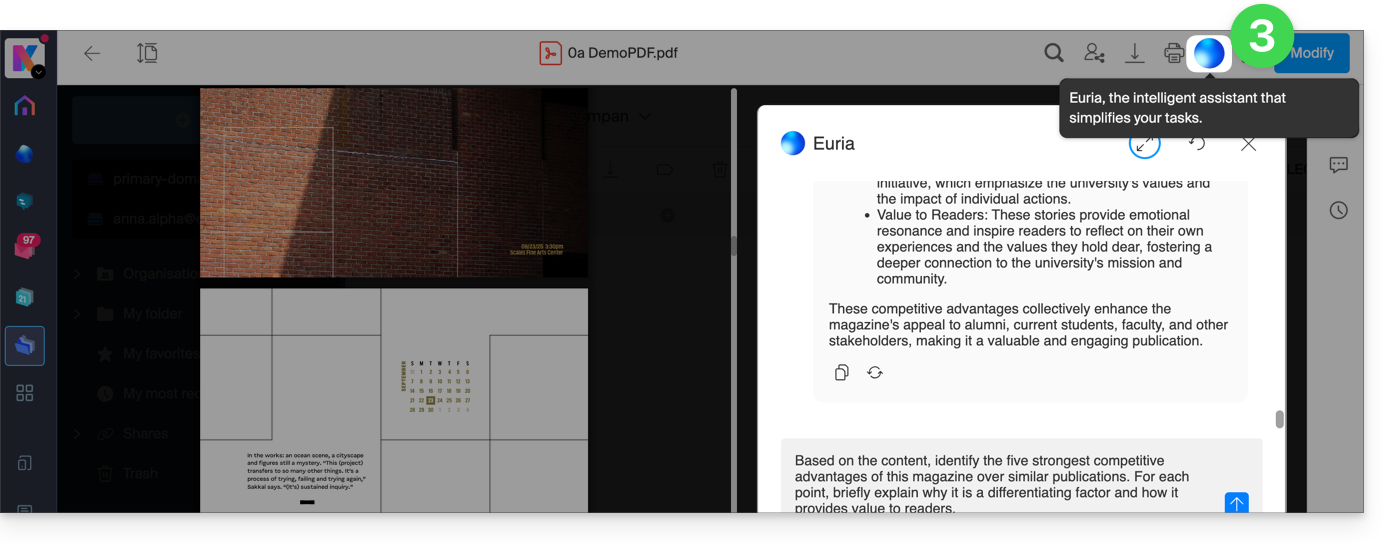
Como a Euria pode ajudar?
A Euria ajuda você a aproveitar ao máximo o documento que abriu (e apenas este); ela pode, por exemplo:
- responder às suas perguntas sobre o seu conteúdo (detalhes, estatísticas, alterações)
- resumir os pontos principais (e até mesmo simplificar ainda mais, especialmente se especificar “para uma criança de 10 anos”…)
- traduzi-lo
- fornecer metadados (tamanho, data de criação ou modificação)
- explicar os termos ou acrônimos que nele constam
Por exemplo, se o documento for um relatório extenso sobre o ano que passou, você pode perguntar qual é o tamanho atual do departamento de Desenvolvimento, quais são os projetos prioritários ou qual foi a última data de modificação do documento…
Criar um evento para a sua agenda
Com um documento que mencione uma reunião (médica, por exemplo), pode pedir à Euria para criar um trecho de código que, depois de copiado e colado num ficheiro adequado, lhe permitirá adicionar um evento ao seu calendário. Exemplo de formulação: “Cria um evento no formato ics, utilizando os detalhes desta reunião”.
O Euria também pode extrair eventos de um documento mais complexo: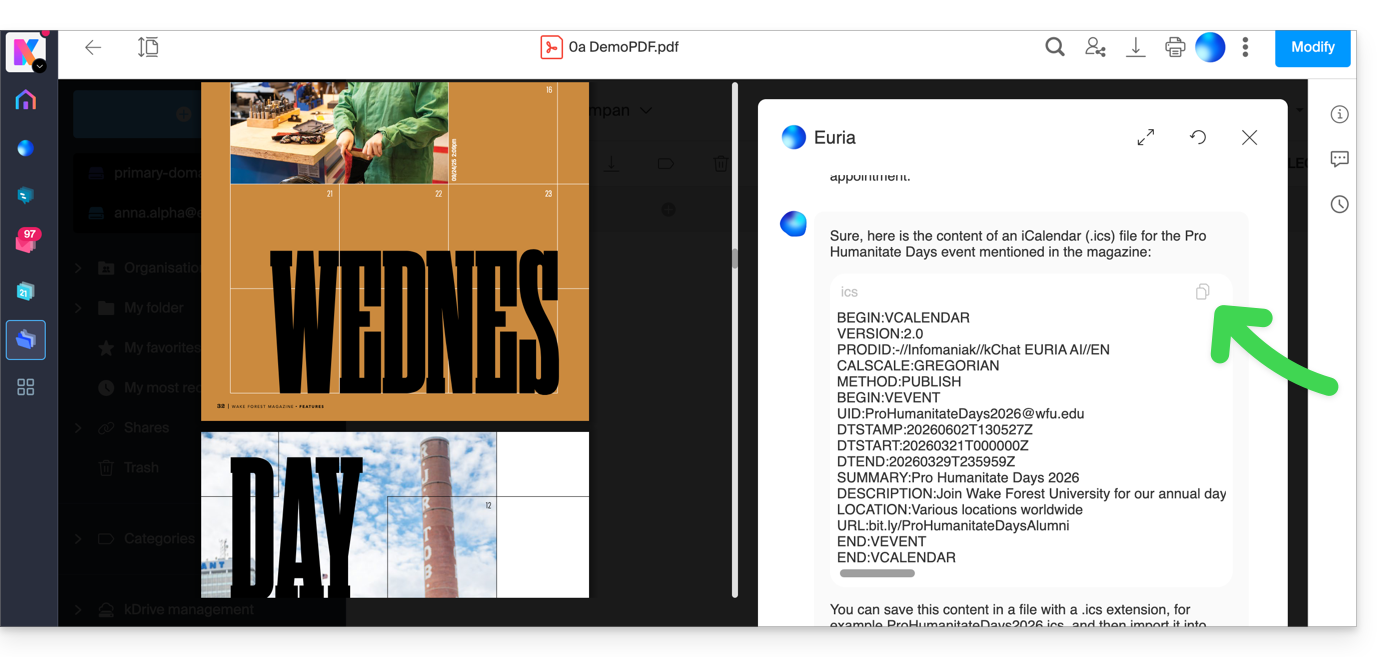
O Euria vai explicar o que fez (um código VCALENDAR) e o que você precisa fazer: criar um novo arquivo com a extensão .ics contendo o código que ele gerou e abri-lo no seu computador para importá-lo no seu aplicativo de agenda habitual ou importá-lo no seu calendário kSuite (❓: ajuda)…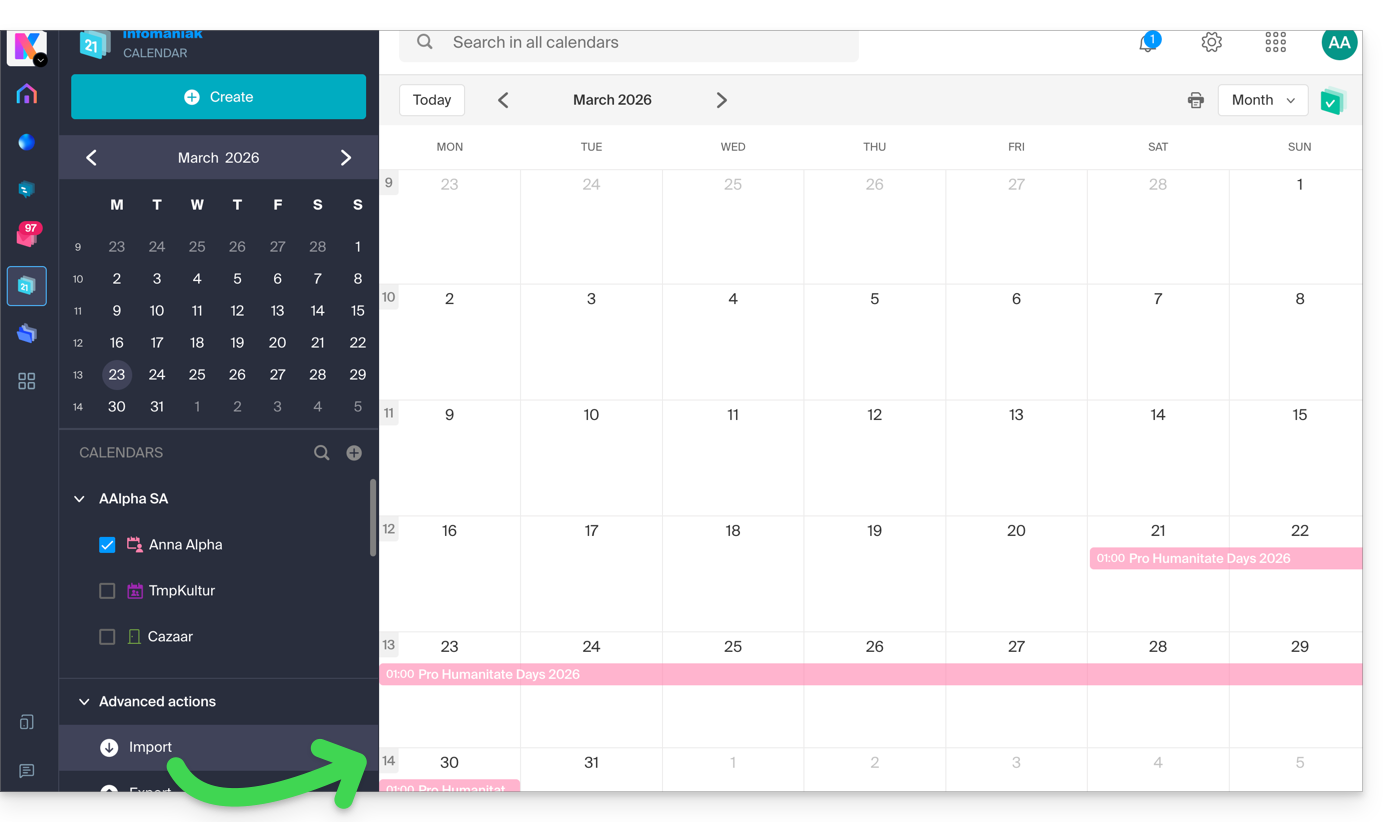
Criar uma árvore genealógica dos personagens
Com um livro armazenado no seu kDrive, pode pedir à Euria para criar uma árvore genealógica precisa e completa, mostrando as relações entre todas as personagens. Assim, obterá uma lista de nomes/sobrenomes com as respetivas relações.
Mas pode levar a experiência ainda mais longe, pedindo depois um diagrama “Mermaid” com base nessa lista. Basta copiar e colar o código proposto pela Euria numa ferramenta como mermaid.live:
Analisar uma pesquisa, redigir um artigo de blog
A partir de um documento do tipo pesquisa/relatório, você pode solicitar que a Euria redija um novo artigo com o tom desejado e direcionado ao público-alvo. Exemplo: “Com base em tudo isso, escreva um artigo de blog com um título atraente e um texto de no máximo 400 palavras, para um público-alvo de mulheres de 30 a 40 anos.”.
Além disso, você pode pedir para ele identificar “quais são os vieses desta pesquisa” ouquais elementos mereceriam ser aprofundados ou verificados. A Euria pode, assim, ajudá-lo a adotar uma postura crítica face a uma investigação ou reportagem, apontando as eventuais lacunas, exageros ou preconceitos.
Ela também pode reformular as conclusões da pesquisa para diferentes públicos (profissionais, adolescentes, leitores curiosos, etc.), sugerir ângulos alternativos para um artigo derivado ou gerar títulos, introduções ou resumos de acordo com o nível de complexidade desejado.
O objetivo é extrair o máximo de valor editorial de um mesmo conteúdo original, diversificando as formas, os tons e os pontos de vista.
Link para esta FAQ: https://faq.infomaniak.com/2566
Esta seção de perguntas frequentes foi útil?
Este guia explica como planear rapidamente um evento, como uma reunião entre vários utilizadores, a partir da aplicação web Mail Infomaniak (serviço online ksuite.infomaniak.com/mail) através das funcionalidades do Calendar Infomaniak.
Criar um evento com os destinatários do e-mail
Para iniciar o assistente de agendamento, que permite criar rapidamente um evento em conjunto com os participantes (remetentes/destinatários) do e-mail em que você está:
- Clique aqui para acessar o aplicativo web Mail da Infomaniak (serviço online ksuite.infomaniak.com/mail).
- Abra a mensagem do remetente (ou a conversa entre vários participantes) com quem deseja organizar uma reunião/evento em conjunto.
- Clique no menu de ações ⋮ no canto superior direito da mensagem aberta.
- Clique em Agendar no Calendário.
- Clique em Criar evento:
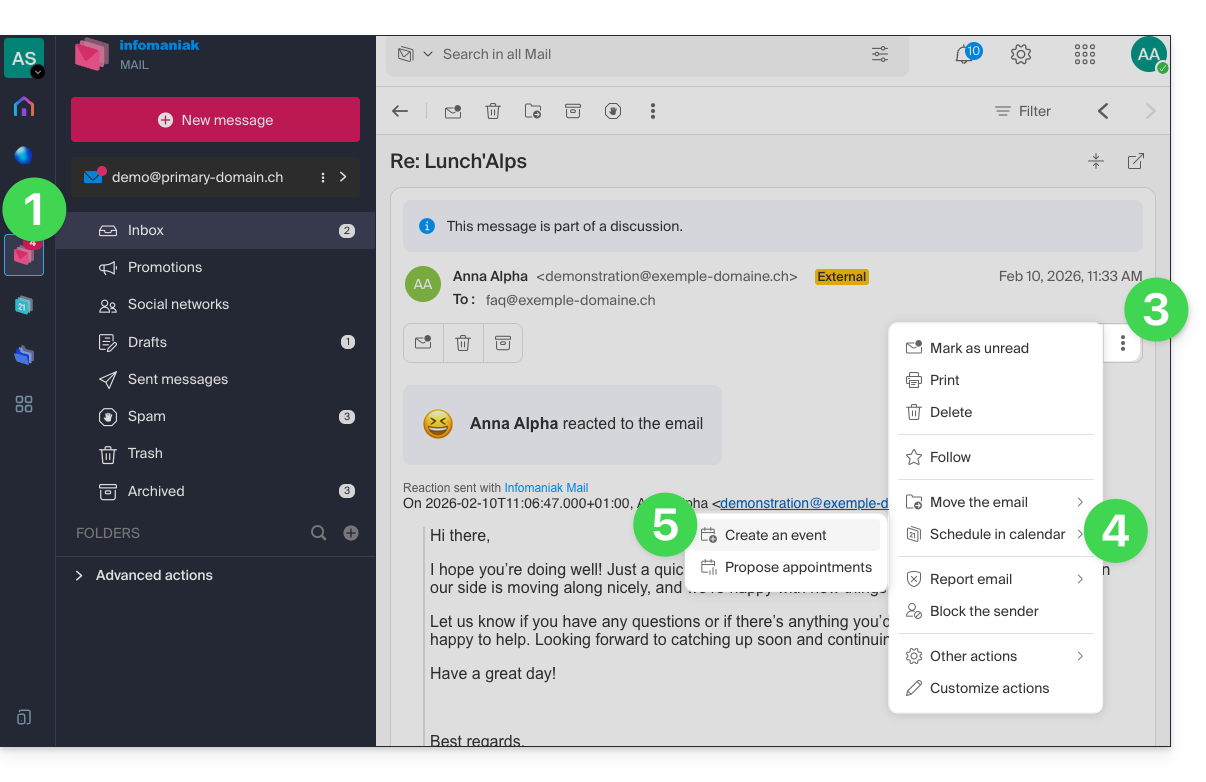
- O assistente do aplicativo Calendar da Infomaniak é exibido.
- O título da reunião é gerado automaticamente a partir do assunto do e-mail, mas é possível modificá-lo.
- A duração do evento (e o seu horário durante o dia) é gerada automaticamente, o mais próximo possível do momento presente, mas é possível modificá-la, assim como uma possível sala pode ser adicionada abaixo.
- Os participantes da discussão são adicionados automaticamente a partir do endereço de e-mail.
- Verifique ou altere o calendário utilizado.
- Salve as informações para criar o evento e os convites:
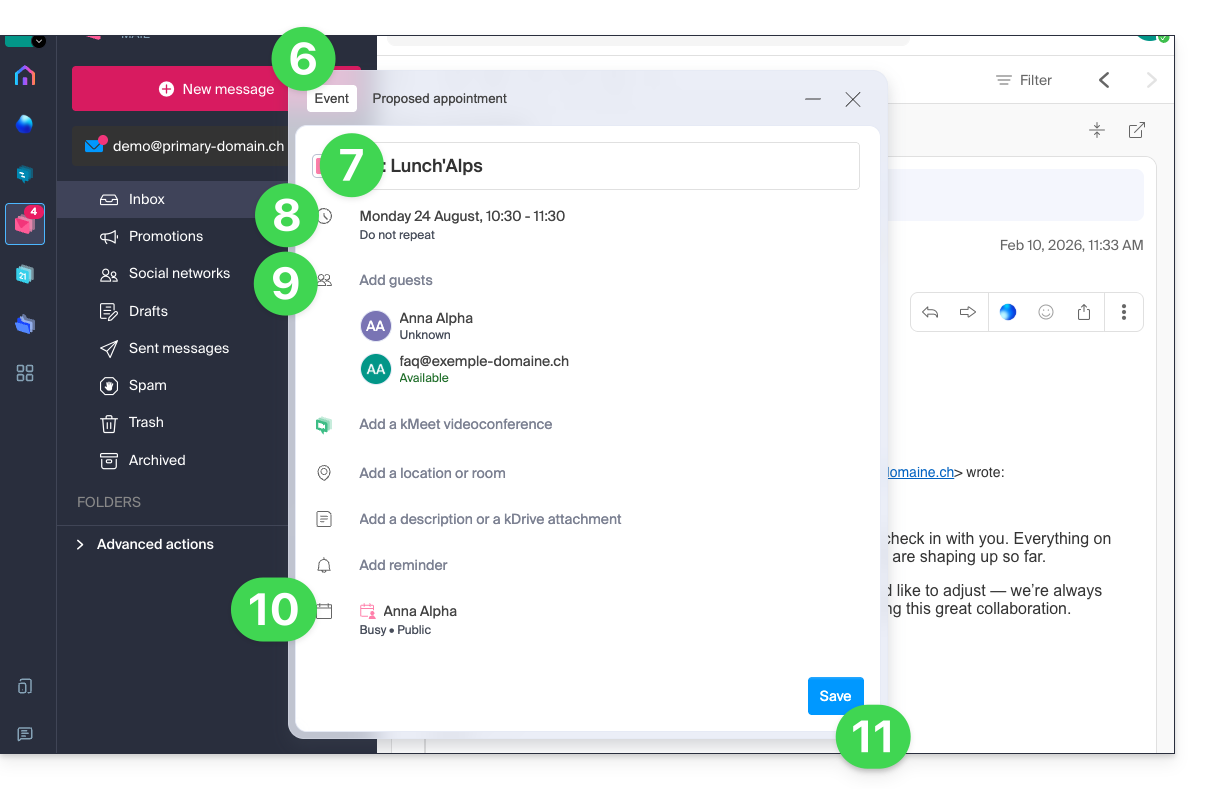
Propor horários para uma reunião
Para propor um novo evento em conjunto com os participantes (remetentes/destinatários) do e-mail em que se encontra, através de um pedido de reunião:
- Clique aqui para acessar o aplicativo web Mail da Infomaniak (serviço online ksuite.infomaniak.com/mail).
- Abra a mensagem do remetente (ou a conversa entre vários participantes) com quem deseja organizar uma reunião/evento em conjunto.
- Clique no menu de ação ⋮ no canto superior direito da mensagem aberta.
- Clique em Agendar no Calendar.
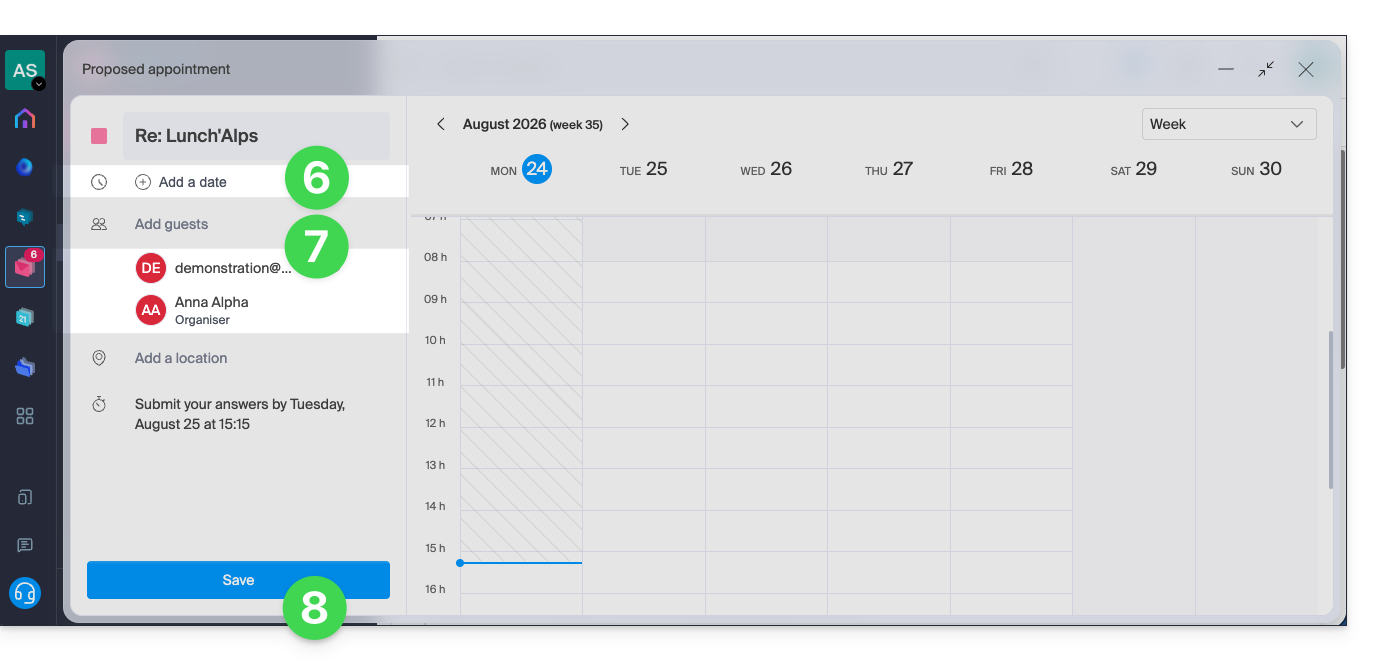
- Clique em Propor horário:
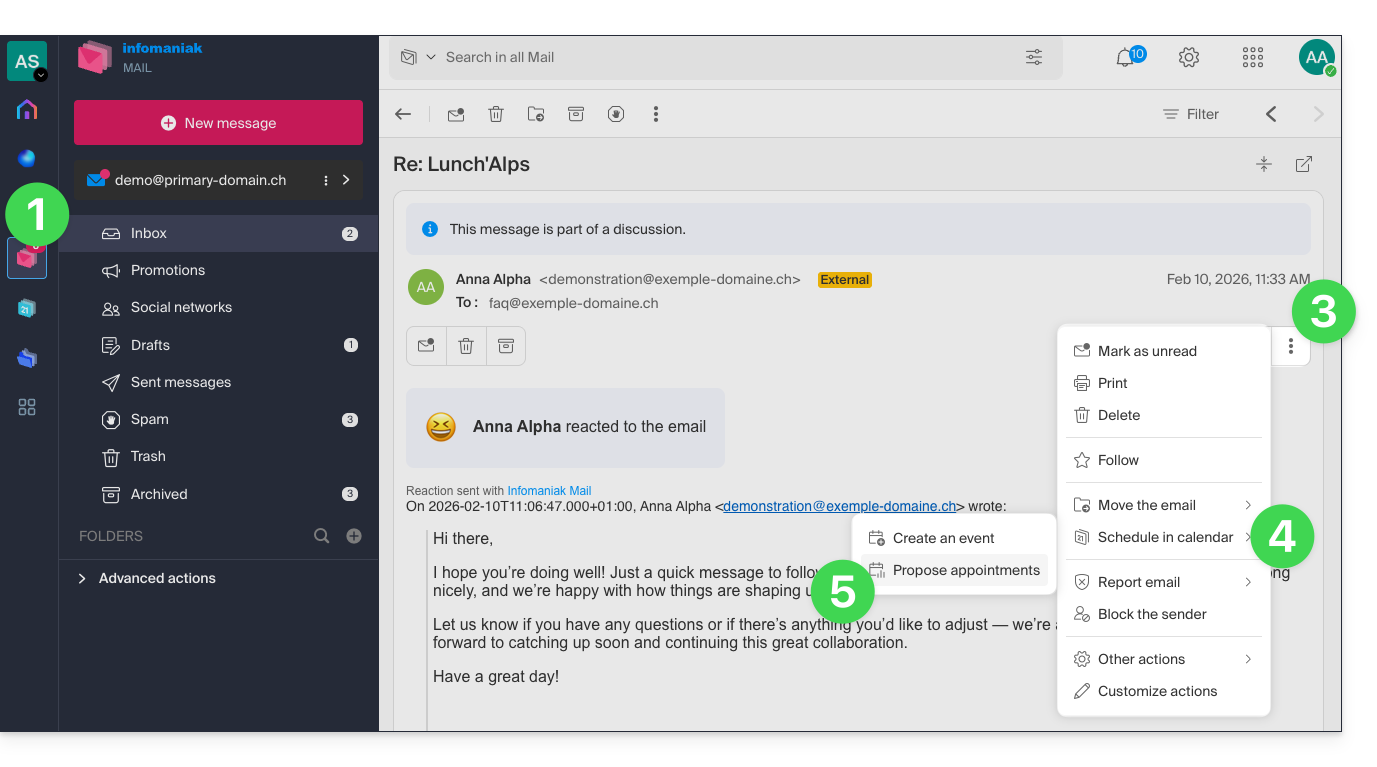
- Em seguida, deverá indicar as datas/horários propostos para agendar uma reunião com os seus contactos.
- Os remetentes dos e-mails são adicionados automaticamente.
- Não se esqueça de guardar:
Consulte este outro guia para saber mais sobre esta funcionalidade.
Link para esta FAQ: https://faq.infomaniak.com/2572
Esta seção de perguntas frequentes foi útil?
Este guia é para você se deseja alterar seu provedor de e-mail atual e hospedar seus e-mails na Infomaniak.
Introdução
- Para o ajudar a identificar a oferta mais adequada às suas necessidades, consulte este outro guia.
- Para não perder nenhuma mensagem e evitar interrupções:
- Siga a ordem dos diferentes links propostos, que serão abertos em um novo separador do seu navegador, e volte para este guia principal após cada etapa concluída.
- Se necessário, também pode migrar os seus:
Está a contratar apenas um Serviço de Email
A seguir, apresentamos as diferentes etapas para migrar seu serviço de e-mail para a Infomaniak com total segurança.
Etapa 1
É necessário solicitar o serviço de e-mail seguindo este guia.
No momento da solicitação, você pode optar por transferir o nome de domínio ao mesmo tempo ou solicitar apenas o serviço de e-mail.
Em seguida, pode importar o conteúdo das suas antigas contas para a Infomaniak: consulte este outro guia.
Passo 2
Depois de configurar os endereços e importar o seu conteúdo antigo, poderá associar o seu nome de domínio externo ao seu Serviço de Email Infomaniakpara começar a receber e-mails na Infomaniak. Será necessário seguir o capítulo "Associar o domínio externo ao seu Serviço de E-mail" deste guia.
Aqui encontrará os registros MX/SPF que deverá adicionar à zona DNS do seu nome de domínio:
SPF
Tipo: TXT
Host: Deixar em branco
Destino: v=spf1 include:spf.infomaniak.ch -all
MX
Prioridade: 5
Host: Deixar em branco
Destino: mta-gw.infomaniak.ch (para Gandi, é necessário adicionar um ponto no final: "mta-gw.infomaniak.ch.")
Etapa 3 (opcional)
Quando tudo estiver a funcionar corretamente e, caso ainda não o tenha feito, pode transferir o seu nome de domínio: consulte este outro guia.
Assim que a transferência for iniciada, deverá ter acesso à zona DNS do seu nome de domínio no painel de controlo Infomaniak. Poderá então verificar…
1. … no diagnóstico DNS se existem correções a efetuar e, se necessário, adicionar as entradas DNS que seriam necessárias para outros serviços utilizados com o seu nome de domínio (newsletter ou outro).
2. … na aba segurança global do seu serviço de e-mail para verificar se o DKIM está ativado.
Se e-mails foram recebidos durante a migração no seu antigo provedor, você pode importar novamente o conteúdo dos seus antigos endereços para a Infomaniak seguindo este guia (os duplicados são gerenciados).
Você está adquirindo uma kSuite
A seguir, as diferentes etapas para migrar seu serviço de e-mail externo para uma kSuite Infomaniak com total segurança.
Passo 1
Encomende o kSuite a partir desta página.
Assim que o pedido for concluído, acesse sua kSuite e adicione seu nome de domínio a ela.
Em seguida, você pode criar seus endereços de e-mail e até mesmo importar o conteúdo de seus antigos endereços: consulte este outro guia.
Passo 2
Depois de configurar os endereços e importar o seu conteúdo antigo, conecte o seu domínio externo ao seu Serviço de E-mail Infomaniak para começar a receber e-mails no Infomaniak. Consulte o capítulo "Ligar o domínio externo ao seu Serviço de E-mail" deste outro guia.
Aqui encontrará os registros MX/SPF que deve adicionar à zona DNS do seu nome de domínio:
SPF
Tipo: TXT
Host: Deixar em branco
Destino: v=spf1 include:spf.infomaniak.ch -all
MX
Prioridade: 5
Servidor: Deixar em branco
Destino: mta-gw.infomaniak.ch (para Gandi, é necessário adicionar um ponto no final: "mta-gw.infomaniak.ch.")
Etapa 3 (opcional)
Quando tudo estiver a funcionar corretamente e, caso ainda não o tenha feito, pode transferir o seu nome de domínio: consulte este outro guia.
Assim que a transferência for iniciada, deverá ter acesso à zona DNS do seu nome de domínio no painel de controlo Infomaniak. Poderá, assim, verificar…
1. … no diagnóstico DNS, caso haja correções a serem feitas e, se necessário, adicione as entradas DNS que seriam necessárias para outros serviçosutilizados com o seu nome de domínio (newsletter ou outro).
2. … no separador segurança global do seu serviço de e-mail se o DKIM estiver ativado.
Se tiver recebido e-mails durante a migração do seu antigo provedor, pode importar novamente o conteúdo dos seus antigos endereços para a Infomaniak seguindo este guia (os duplicados são gerenciados).
Link para esta FAQ: https://faq.infomaniak.com/2575
Esta seção de perguntas frequentes foi útil?
Este guia destina-se a desenvolvedores e usuários avançados e apresenta as possibilidades oferecidas pela API Infomaniak.
Introdução
- A API Infomaniak permite que você aproveite todo o potencial do ecossistema Infomaniak em seus aplicativos e usando a linguagem de sua preferência.
- A API Infomaniak é uma API REST; o protocolo utilizado é HTTP, as requisições e as respostas são codificadas no formato JSON; a autenticação é realizada por meio do protocolo OAuth 2.
- O acesso e a utilização da API Infomaniak são totalmente gratuitos.
Protocolo de utilização da API Infomaniak
Com a API, você poderá automatizar uma ampla gama de ações e tarefas nos produtos e serviços Infomaniak, sem precisar usar as interfaces dos produtos. Alguns exemplos de uso:
- Armazenar dados.
- Enviar campanhas de e-mail marketing.
- Transmitir fluxos de vídeo ou rádio.
- Encomendar ou gerir produtos.
- … e muito mais!
Por exemplo, para um Serviço de E-mail: gestão de caixas de e-mail, gestão de alias, gestão de respostas automáticas, gestão de pastas, etc. Para o kChat, publique uma mensagem em um canal…
Crie suas primeiras requisições com a API Infomaniak
Consulte a documentação disponível apenas em inglês sobre as funcionalidades oferecidas pela API.
Formato das requisições
A API Infomaniak é uma API REST. O protocolo utilizado é o HTTP, e as requisições e respostas são codificadas em JSON. A autenticação é realizada através do protocolo OAuth 2.
Para iniciar uma requisição, é necessário utilizar a seguinte sintaxe: /{versão}/{caminho_do_comando}. É possível não indicar a versão, mas, nesse caso, será aplicada a versão mais recente. Consulte todas as requisições disponíveis com a API Infomaniak.
Códigos de resposta da API
Ao utilizar a API Infomaniak, poderá encontrar diferentes códigos de resposta. Estes códigos indicam o estado da sua solicitação. Consulte a lista completa.
Limites e Restrições
Existe um limite de 60 requisições por minuto com a API Infomaniak. Este limite não pode ser aumentado. O uso da API é restrito aos produtos listados na documentação oficial. Adições regulares de produtos e serviços são feitas nesta documentação. Se o produto ou serviço que lhe interessa estiver na documentação, poderá usar as seguintes requisições: GET; POST; PATCH; PUT; DELETE.
Saiba mais
Link para esta FAQ: https://faq.infomaniak.com/2581
Esta seção de perguntas frequentes foi útil?
Este guia apresenta os Grupos, sistema de gestão de utilizadores da sua Organização, disponível no Painel de Controlo Infomaniak.
Introdução
- Para facilitar o acesso e a adição de um colaborador ao ecossistema Infomaniak, a funcionalidade Grupos permite criar equipas de utilizadores e conceder-lhes, em poucos cliques, acesso aos serviços de que necessitam.
- É perfeitamente possível:
- associar recursos (Mail, kDrive, kChat) logo na criação do Grupo para automatizar o processo de integração,
- ajustar os níveis de permissão individualmente: para o kDrive, a permissão individual tem precedência sobre a do Grupo, enquanto para o Mail, as permissões são cumulativas.
- adicionar o mesmo utilizador a vários Grupos,
- convidar utilizadores externos à sua Organização para um dos seus Grupos,
- adicionar um ou vários utilizadores de uma só vez a um Grupo,
- definir um chefe de equipa para identificar facilmente um responsável de projeto ou a pessoa de contacto.
Gerenciar seus Grupos
O gerenciamento de Grupos agora permite uma centralização completa. Não é mais necessário intervir em cada ferramenta separadamente: tudo é gerenciado a partir do Gerenciador Infomaniak para uma reorganização fluida de seus colaboradores. Consulte os guias sobre o assunto:
Exemplos
- Você cria um Grupo para um novo departamento: associe-o imediatamente às suas caixas de e-mail, às suas pastas de organização kDrive e aos seus canais de discussão kChat dedicados; cada novo colaborador adicionado à equipe receberá automaticamente todos esses acessos.
- Você é uma agência Web e deseja conceder acesso às suas equipes de webmasters a todos os seus serviços de hospedagem Web: basta criar um novo grupo, escolher todos os serviços de hospedagem aos quais eles precisarão de acesso e convidá-los a participar do Grupo.
- Você possui um kDrive: autorize o acesso a uma pasta para um Grupo e ajuste o acesso de acordo com os usuários adicionados ou removidos da equipe ao longo do tempo.
- Você utiliza serviços de Streaming ou de Venda de Ingressos e deseja conceder acesso às suas equipes: crie um novo Grupo que terá acesso a esses dois produtos ou dois Grupos distintos que terão acesso aos dois produtos de forma totalmente independente.
Link para esta FAQ: https://faq.infomaniak.com/2585
Esta seção de perguntas frequentes foi útil?