Base de conhecimento
1000 perguntas frequentes, 500 tutoriais e vídeos explicativos. Aqui, você encontra apenas soluções!
Este guia explica como guardar e exportar os seus contactos a partir dos catálogos de endereços da aplicação web Contacts Infomaniak (serviço online ksuite.infomaniak.com/contacts).
Introdução
- Não é possível exportar um diretório da Organização.
- A exportação gera um arquivo do tipo vCard com a extensão .vcf.
Exportar contactos
Para selecionar os contactos ou a lista de contactos a exportar:
- Clique aqui para acessar o aplicativo web Contatos Infomaniak (serviço online ksuite.infomaniak.com/contacts).
- Clique na seta para baixo para expandir a seção Ações avançadas.
- Clique no menu Exportar.
- Clique no livro de endereços que deseja exportar.
- Clique no botão Exportar:
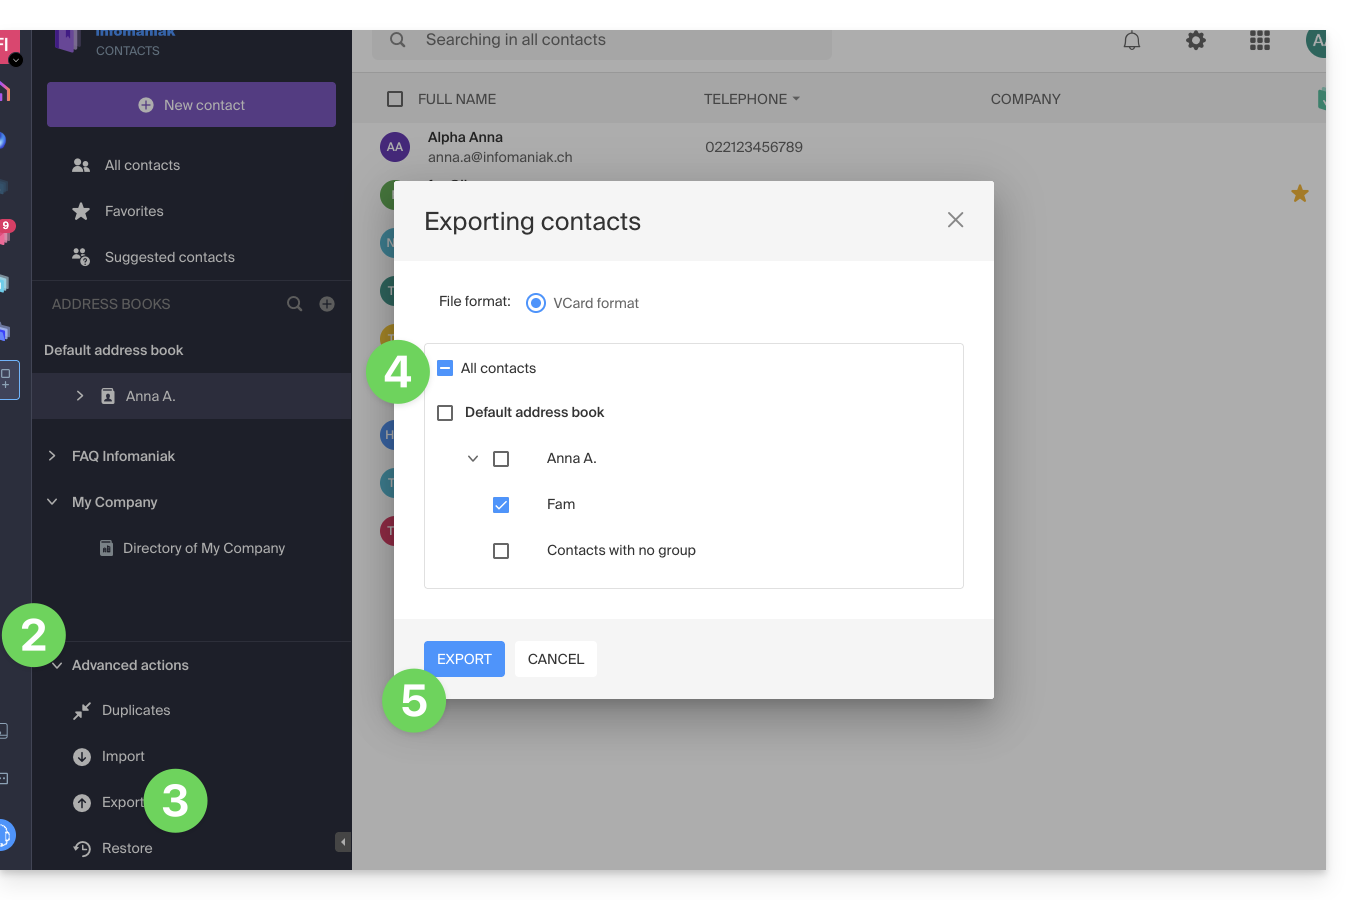
- Escolha o local no seu dispositivo onde deseja guardar o ficheiro vCard com os seus contactos.
Em seguida, você poderá abri-lo nos contatos do macOS ou em qualquer aplicativo compatível.
Link para esta FAQ: https://faq.infomaniak.com/2593
Esta seção de perguntas frequentes foi útil?
Este guia explica como exportar um calendário no formato .ics a partir do Yahoo Mail, para que possa importá-lo facilmente nas suas ferramentas Infomaniak.
Exportar o calendário do Yahoo
Para recuperar o seu calendário:
- Aceda à sua conta de e-mail Yahoo Mail e aceda à agenda clicando no ícone de calendário que se encontra no painel lateral direito.
- Clique no menu Ações (representado por uma engrenagem) associado ao seu calendário e, em seguida, escolha Partilhar…
- Na janela que aparece, selecione o calendário desejado e clique em Continuar.
- Marque a opção Gerar links.
- Clique no link que aparece abaixo da mensagem « Para importação em uma aplicação de calendário (ICS) » para baixar e salvar o arquivo
.icsno seu computador.
Se necessário, consulte este outro guia.
Link para esta FAQ: https://faq.infomaniak.com/2594
Esta seção de perguntas frequentes foi útil?
Este guia explica como exportar os seus calendários e as suas listas de contactos do Proton, para que possa importá-los facilmente para as suas ferramentas Infomaniak.
Exportar um calendário
Para recuperar seus eventos (geralmente no formato .ics):
- Acesse sua conta Proton Calendar.
- Vá para Configurações (ícone de engrenagem) e depois Todas as configurações.
- Selecione Calendários no menu lateral.
- Procure o calendário desejado e clique em Exportar.
Se necessário, consulte este outro guia.
Exportar uma lista de contactos
Para recuperar os seus contactos (no formato .vcf):
- Acesse o aplicativo Proton Contacts.
- No menu lateral, clique simplesmente no botão Exportar contatos.
Para mais detalhes, consulte este outro guia.
Link para esta FAQ: https://faq.infomaniak.com/2595
Esta seção de perguntas frequentes foi útil?
Este guia explica como exportar uma lista de contactos do Bluewin.
Exportar contactos
Consulte este outro guia específico sobre este tema ou a FAQ da Swisscom.
Link para esta FAQ: https://faq.infomaniak.com/2596
Esta seção de perguntas frequentes foi útil?
Este guia explica como redirecionar e-mails de um endereço Gmail, Bluewin, Outlook, Proton, Yahoo, etc., para o seu endereço de e-mail gerenciado pela Infomaniak.
Introdução
- Ao configurar um redirecionamento automático de todos os e-mails recebidos para o seu sistema de e-mail anterior, você pode começar a usar imediatamente seu novo endereço de e-mail Infomaniak, tendo a certeza de que não perderá nenhuma mensagem.
- Ao responder aos seus e-mails a partir do seu novo endereço Infomaniak, os seus contactos usarão automaticamente este endereço para lhe escrever no futuro.
- Você também pode importar o conteúdo de outro provedor de e-mail diretamente para o seu endereço Infomaniak.
- Para obter ajuda adicional, entre em contato com o provedor no qual você deseja ativar o redirecionamento de mensagens.
Guias específicos
Consulte os guias oficiais de acordo com o seu fornecedor anterior:
- Gmail
- iCloud
- Microsoft (Outlook / Hotmail / Live)
- Orange
- Proton Mail (atenção, requer um plano pago)
- Sunrise:
- Clique aqui para acessar o Sunrise Mail.
- Clique em Caixa de entrada.
- Clique em Configurações => Gerenciar a caixa de entrada.
- Insira o endereço de e-mail correspondente em «Encaminhamento».
- Yahoo (atenção, requer Yahoo Mail Pro)
Bluewin
- Bluewin (consulte também abaixo):
- Clique aqui para se conectar ao Bluewin.
- Clique em Configurações e, em seguida, em Redirecionamento automático.
- Clique em Configurar redirecionamento automático.
- Siga as instruções para configurar o redirecionamento automático.
- Bluewin (método alternativo):
- Clique aqui para se conectar ao MySwisscom.
- Clique no menu "Mais" e, em seguida, em “Configurações”:

- Clique em seguida em “Gerenciar transferências”:

GMX
Clique nestes elementos na ordem para configurar uma regra de redirecionamento a partir do GMX:
Link para esta FAQ: https://faq.infomaniak.com/2598
Esta seção de perguntas frequentes foi útil?
Este guia explica como criar, salvar e editar um arquivo colaborativo do tipo Office (texto, planilha, apresentação…) no aplicativo web kDrive (serviço online ksuite.infomaniak.com/kdrive) e no aplicativo móvel kDrive (aplicativo para smartphone ou tablet iOS / Android) com o editor Microsoft Office.
✘ INDISPONÍVEL com
kSuite Free / kSuite Standard
my kSuite / my kSuite+ (ik.me, etik.com, ikmail.com)
kDrive Solo / kDrive Team
Preâmbulo
- O Microsoft Office Online integrado ao kDrive existe apenas em uma única versão; portanto, não é possível alterar ou aprimorar suas funcionalidades modificando uma licença Microsoft: esta versão autônoma é a única oferecida pela Microsoft para este tipo de integração, e nenhuma versão mais completa é fornecida ou está disponível para esta infraestrutura.
- Tecnicamente, a integração do Office Online no kDrive baseia-se numa infraestrutura alojada nos próprios data centers da Infomaniak, garantindo que os documentos nunca saem do seu ambiente seguro e nunca são transmitidos à Microsoft.
- Consulte este outro guia sobre as funcionalidades oferecidas pelo editor nativo no kDrive.
- Para definir este editor como padrão, consulte este outro guia.
Integrar o Microsoft Office ao kDrive
Pré-requisitos
- Ter uma conta Microsoft empresarial com licenças Microsoft 365 que permitam a inserção de modificações no Office Online (Business, Business Premium, ProPlus, E3, E4 ou E5).
- No caso de utilização em tablets com mais de 10 polegadas, é necessário ter uma licença O365.
- Peso máximo dos arquivos para usufruir da integração:
.docx(inferior a 100 MB).xlsx(inferior a 100 MB).pptx(inferior a 2 GB)
- Aplicativos móveis Microsoft compatíveis:
- Android: Word | Excel | PowerPoint
- iOS: Word | Excel | PowerPoint
Para editar os ficheiros do tipo Office armazenados no kDrive diretamente com a aplicação Microsoft Online dedicada:
- Clique aqui para aceder à aplicação web kDrive da Infomaniak (serviço online ksuite.infomaniak.com/kdrive).
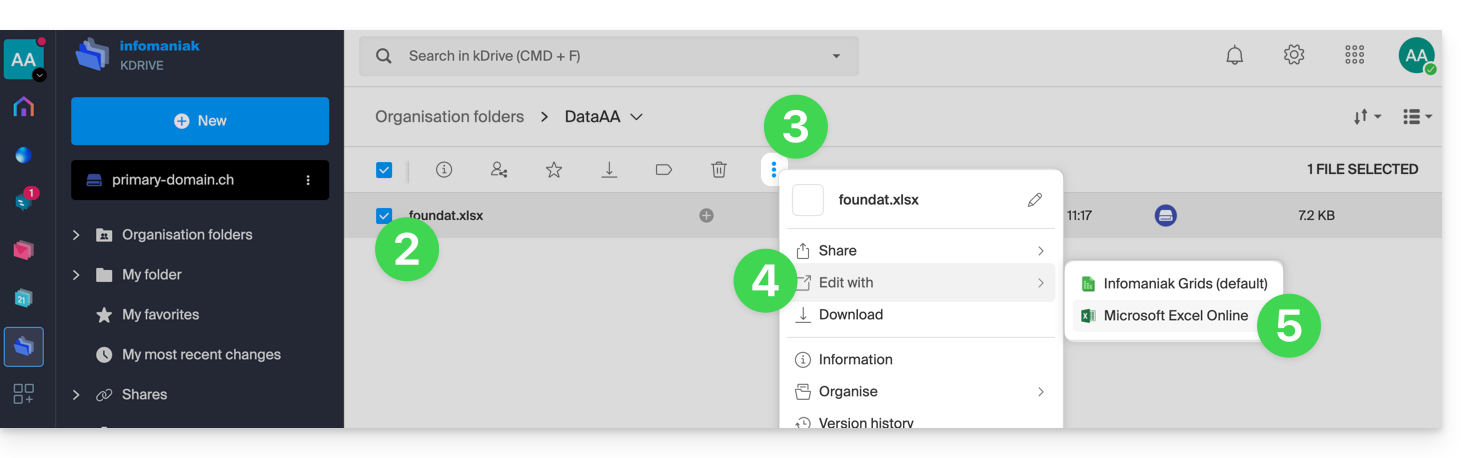
- Selecione o arquivo que deseja editar (ou clique com o botão direito do mouse no arquivo e, nesse caso, vá para a etapa 4).
- Clique no menu de ações ⋮ na barra de ferramentas.
- Clique em Editar com…
- Clique em Microsoft Excel Online (ou no aplicativo Microsoft correspondente ao tipo do seu documento):
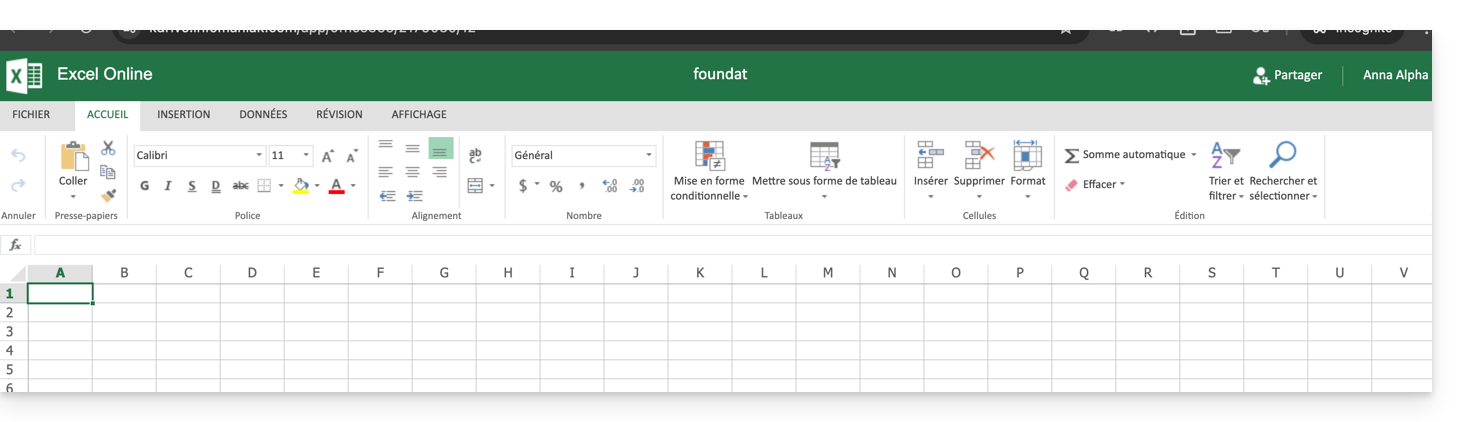
- O seu documento abre no editor Microsoft Office Online:
Link para esta FAQ: https://faq.infomaniak.com/2627
Esta seção de perguntas frequentes foi útil?
Este guia explica como vincular um nome de domínio à oferta kSuite Infomaniak.
Gerenciar o domínio kSuite
Para começar:
- Clique aqui para acessar o gerenciamento do seu kSuite no Manager Infomaniak (precisa de ajuda?).
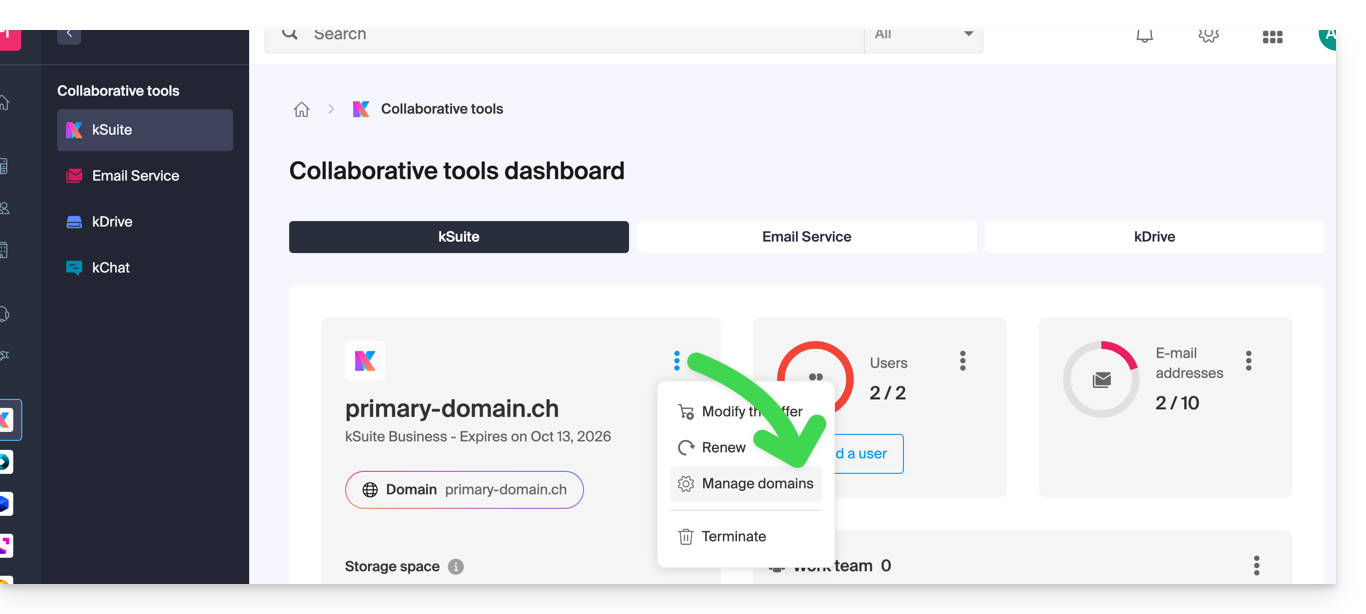
- Se um domínio já estiver vinculado, você pode gerenciá-lo clicando no menu de ação ⋮ à direita do nome da kSuite e, em seguida, em Gerenciar domínios:
- Se nenhum domínio estiver vinculado, você pode adicionar um clicando no botão:
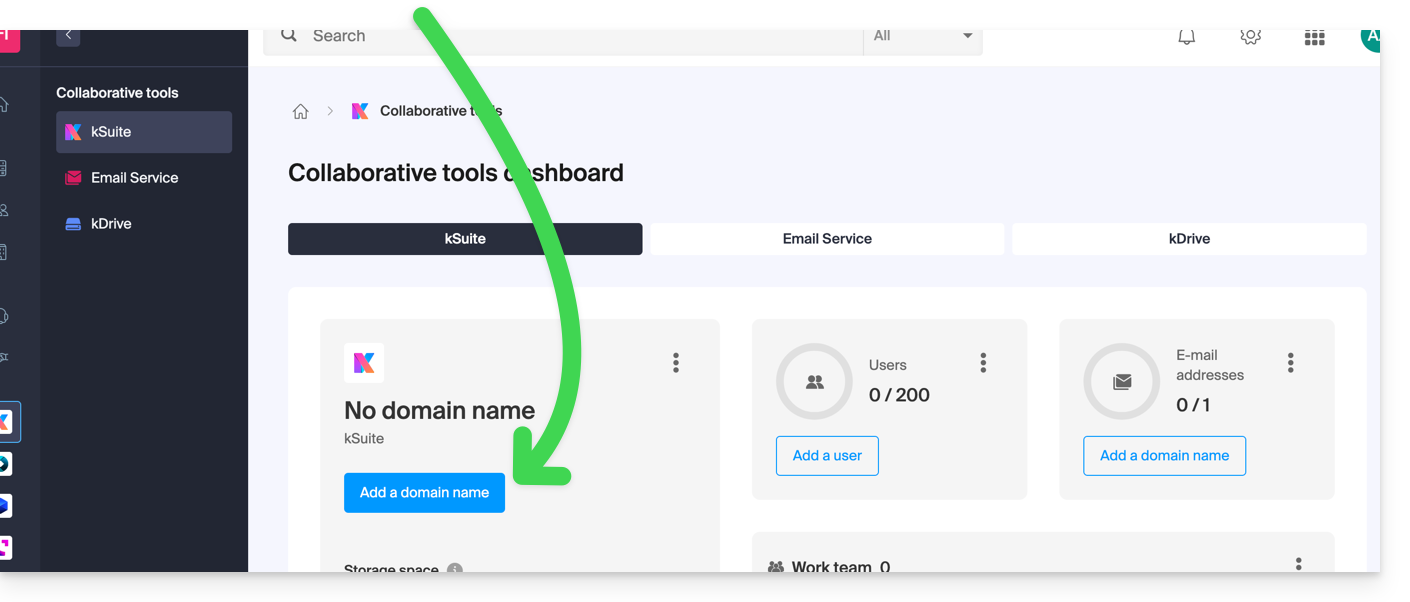
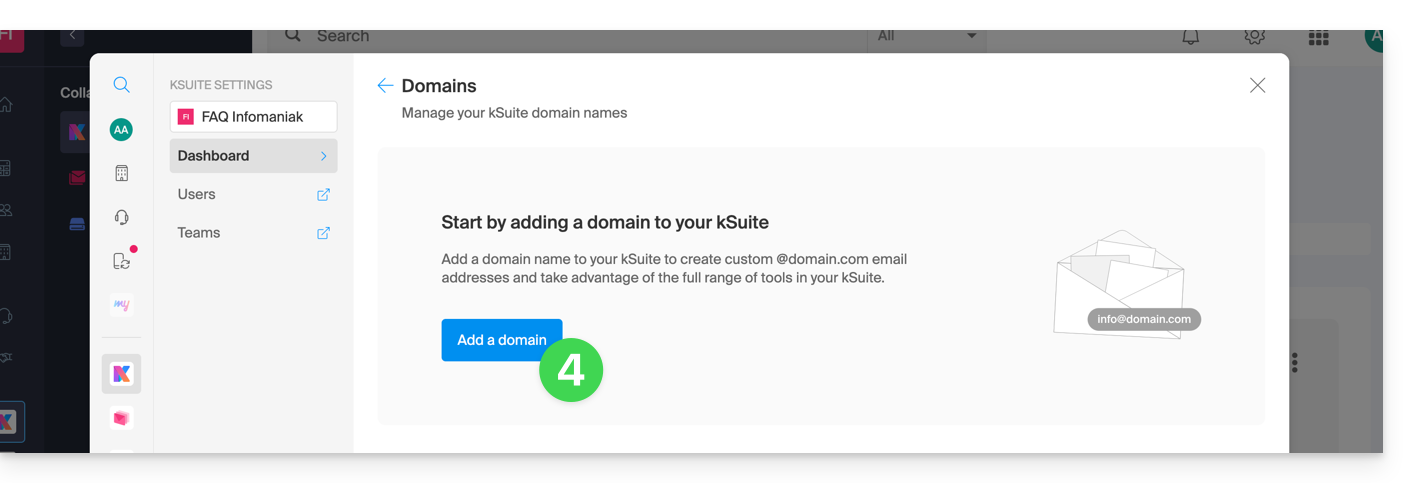
- Clique no botão para adicionar um domínio:
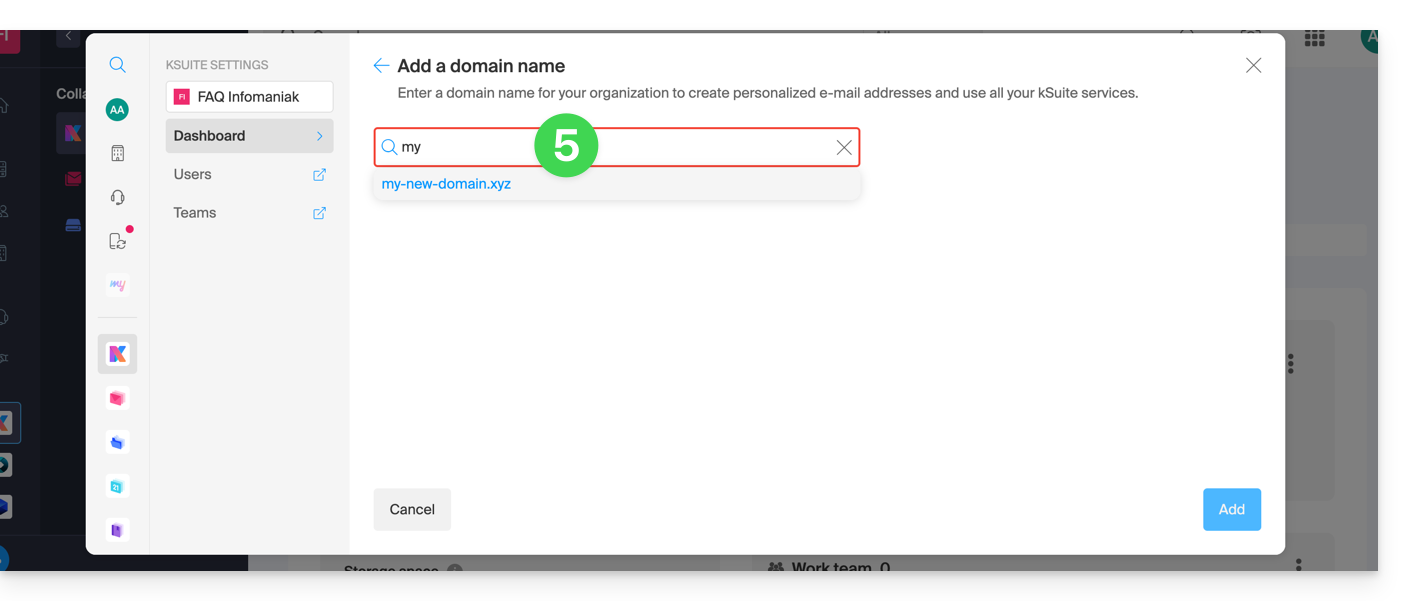
- Escolha o domínio a associar entre os domínios da sua Organização (ainda disponíveis, ou seja, não associados a nenhum serviço) ou insira um nome de domínio externo:
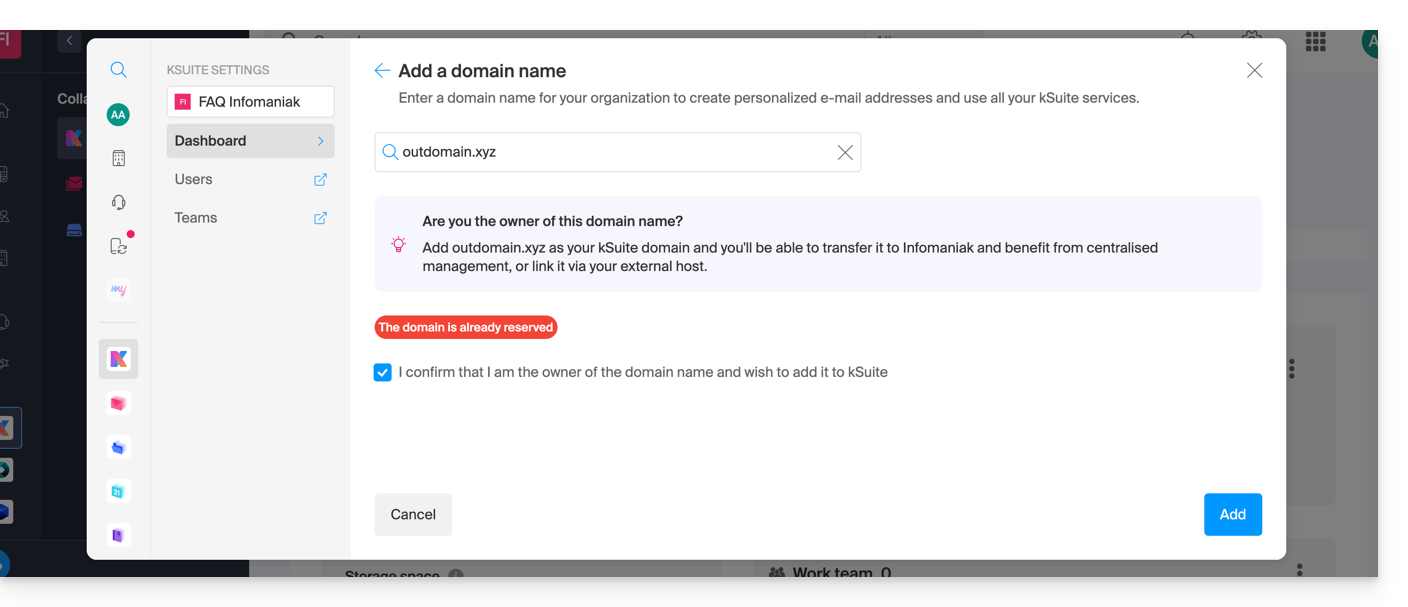
- Dependendo da situação do seu domínio (consulte também as informações abaixo), será necessário realizar algumas operações preliminares…
- … ou até mesmo adquirir um domínio, se necessário:
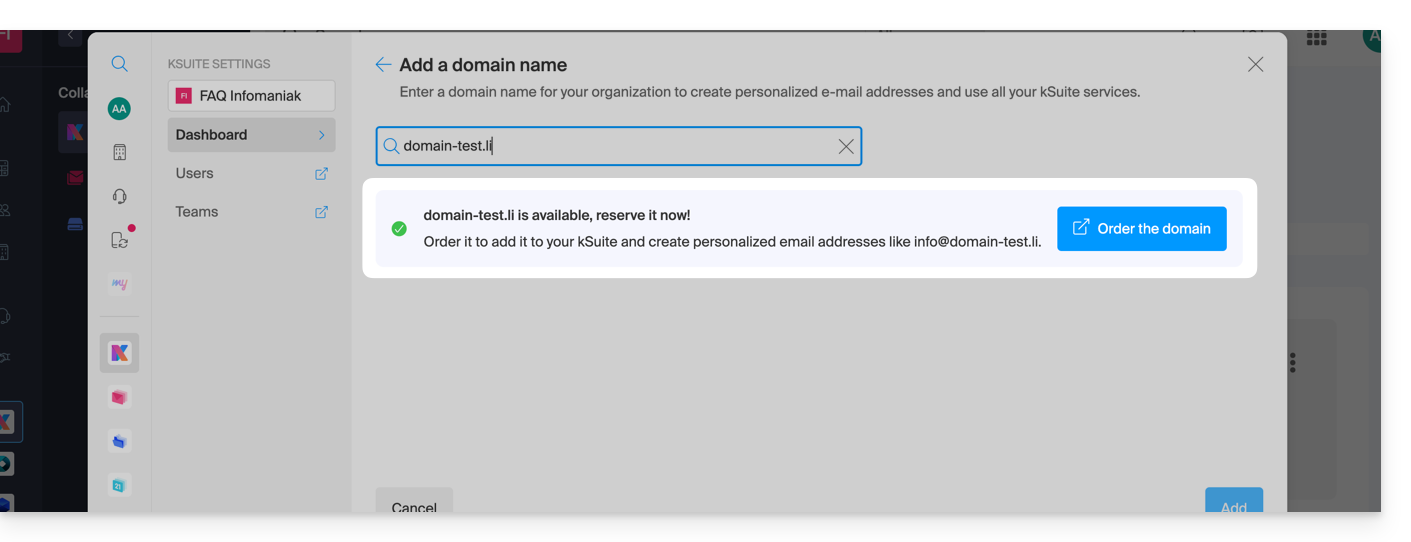
- Dependendo da situação do seu domínio (consulte também as informações abaixo), será necessário realizar algumas operações preliminares…
Se o nome de domínio estiver…
… na Infomaniak, na mesma Organização
Se o seu nome de domínio estiver registado na Infomaniak e estiver na mesma conta de utilizador ou Organização que o serviço de e-mail, não precisa fazer nada.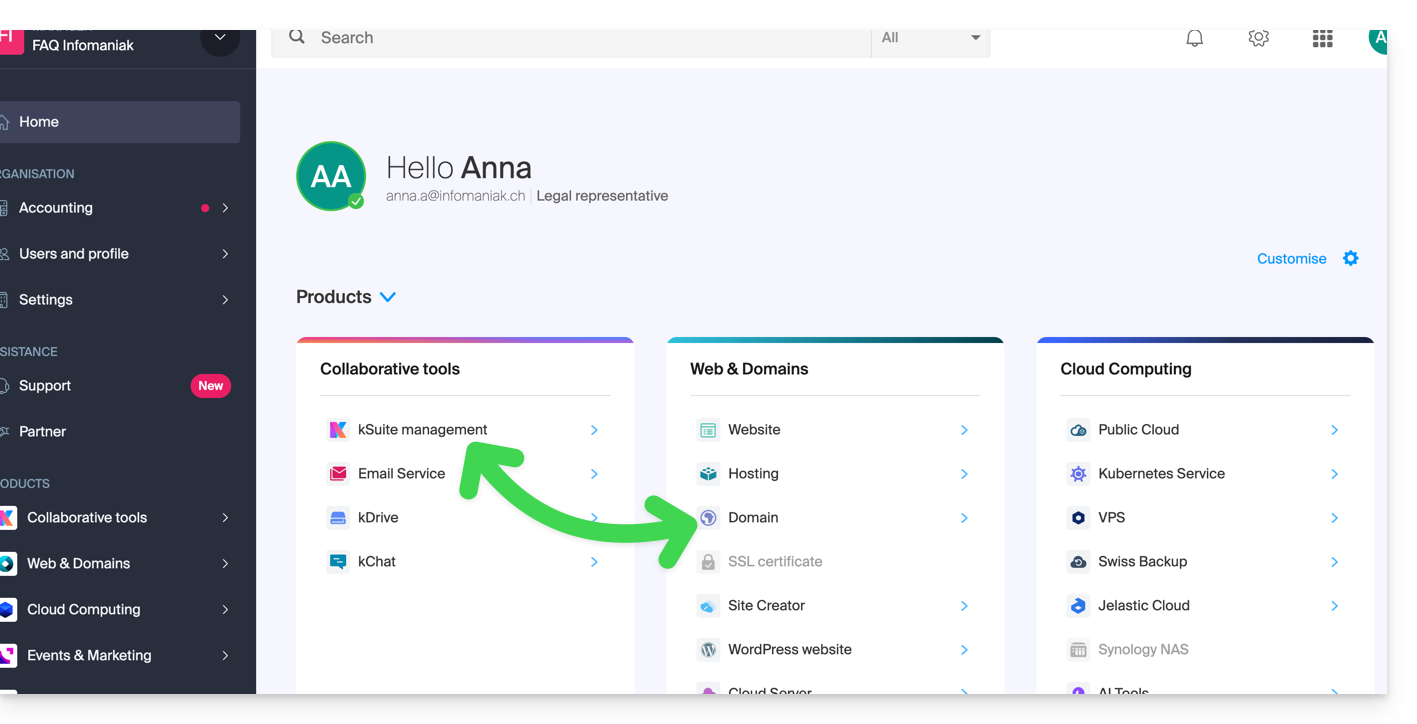
Basta adicioná-lo à sua kSuite: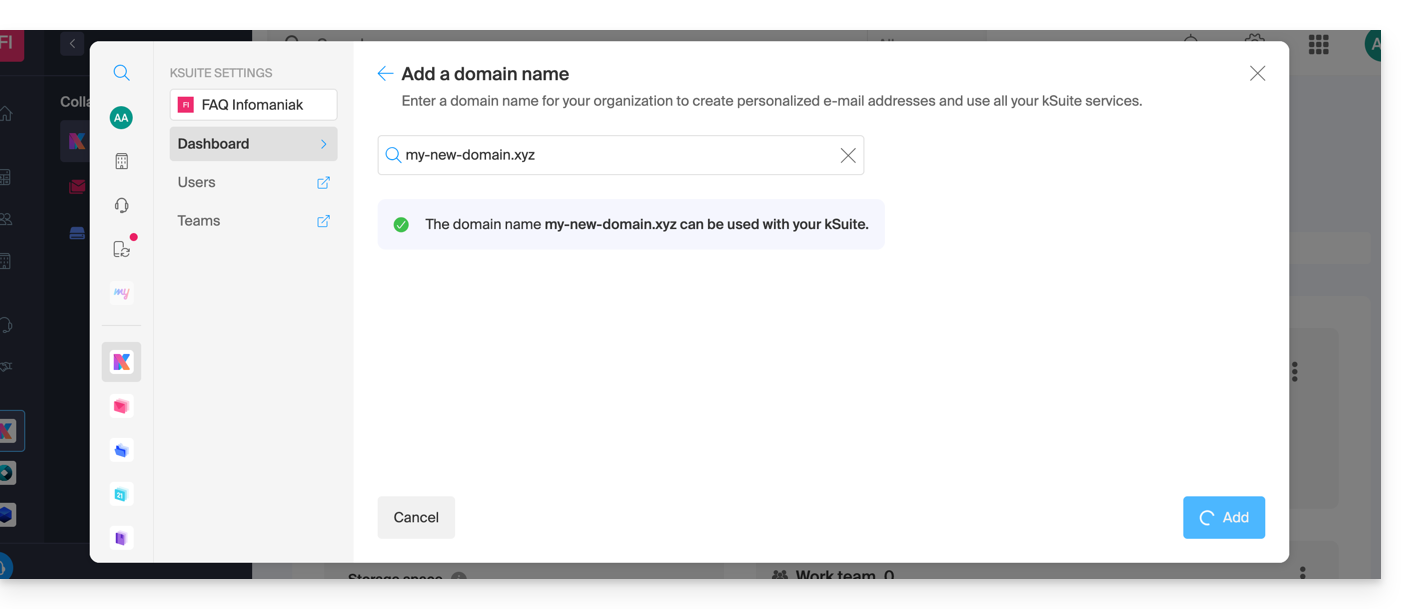
O domínio será adicionado e ficará visível no painel de controle: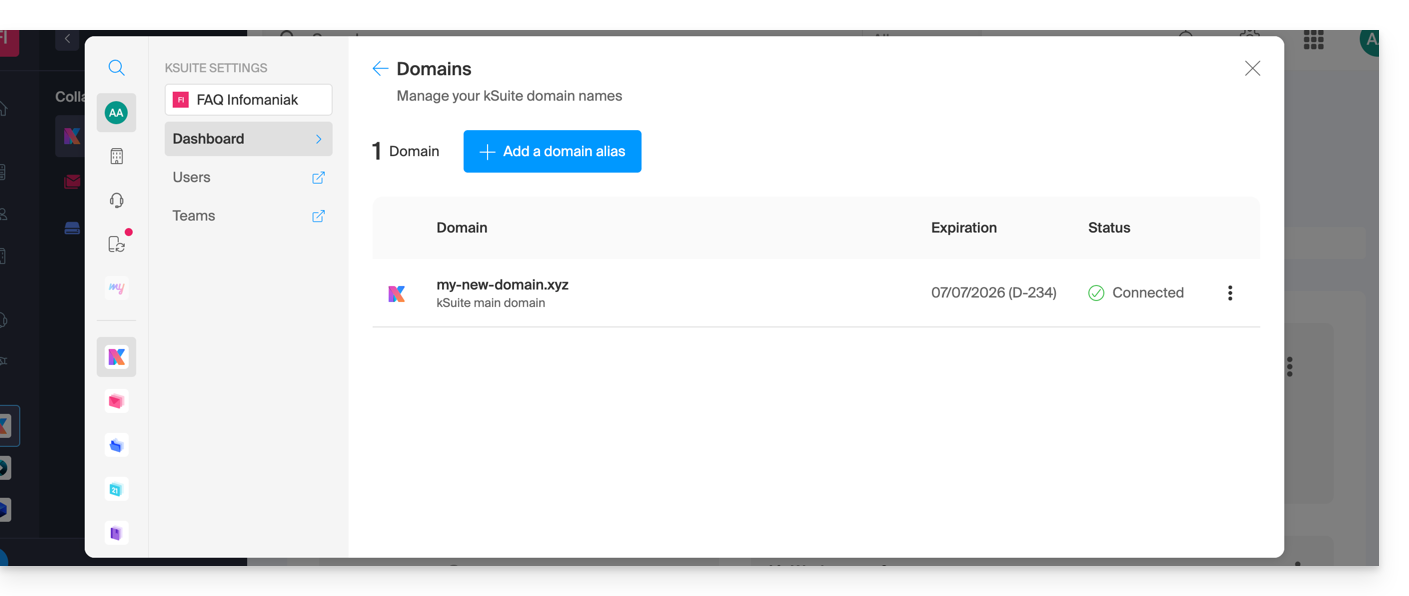
- Consulte este outro guia para verificar e corrigir eventuais erros de configuração.
... na Infomaniak, mesmo que já tenha uma Organização e esteja vinculado a um Serviço de Email ou kDrive
Sem problemas, você pode converter seus produtos existentes em kSuite.
… na Infomaniak, organização diferente
Se o seu nome de domínio estiver registado na Infomaniak, mas numa conta de utilizador ou organização diferente, então:
- Edite a sua zona DNS, especificando o registo MX da Infomaniak (+ SPF e DKIM).
- Qualquer adição/modificação DNS pode demorar até 48 horas para se propagar (❓: ajuda).
OU
- Transfira-o para dentro da mesma Organização.
Em geral, uma mensagem indicará essa situação: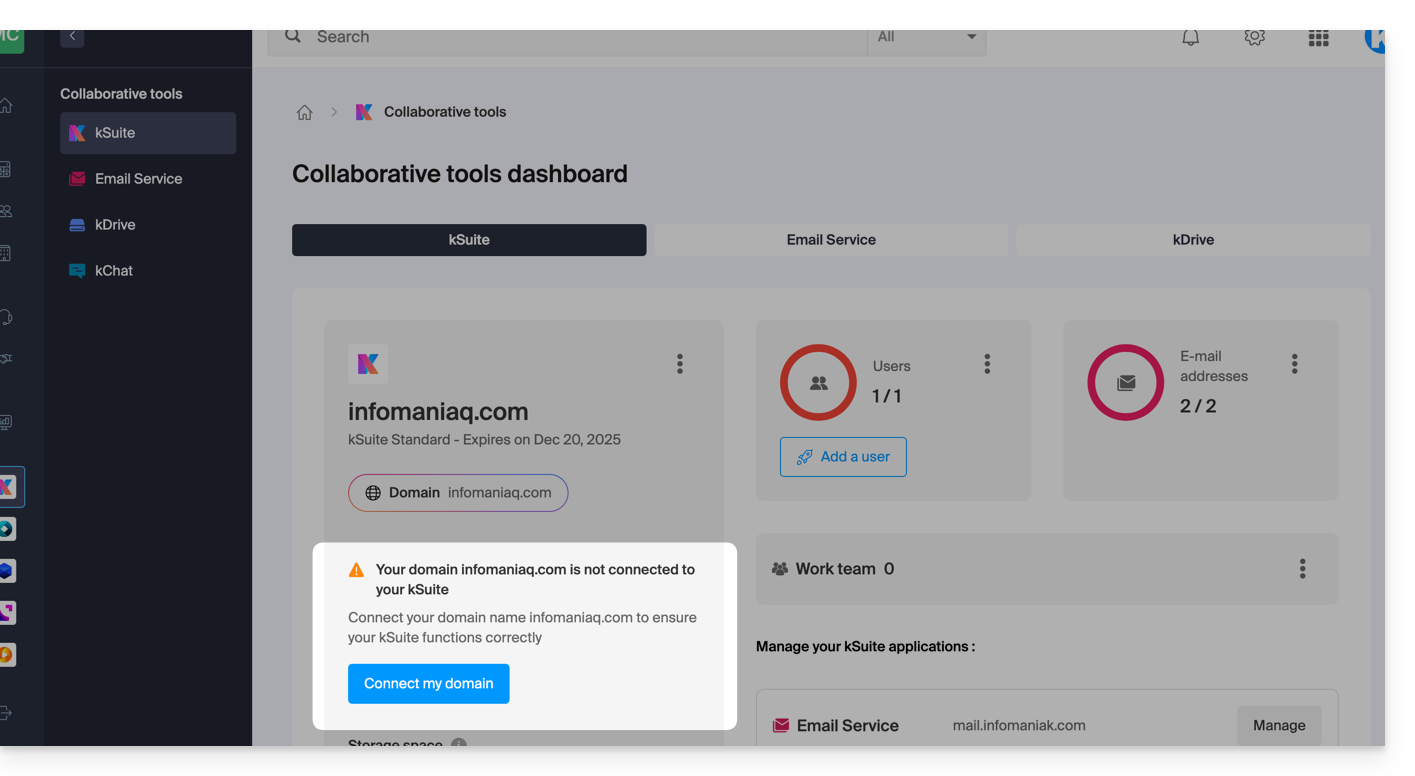
… e as informações técnicas, que devem ser inseridas no local onde o domínio está hospedado, serão apresentadas: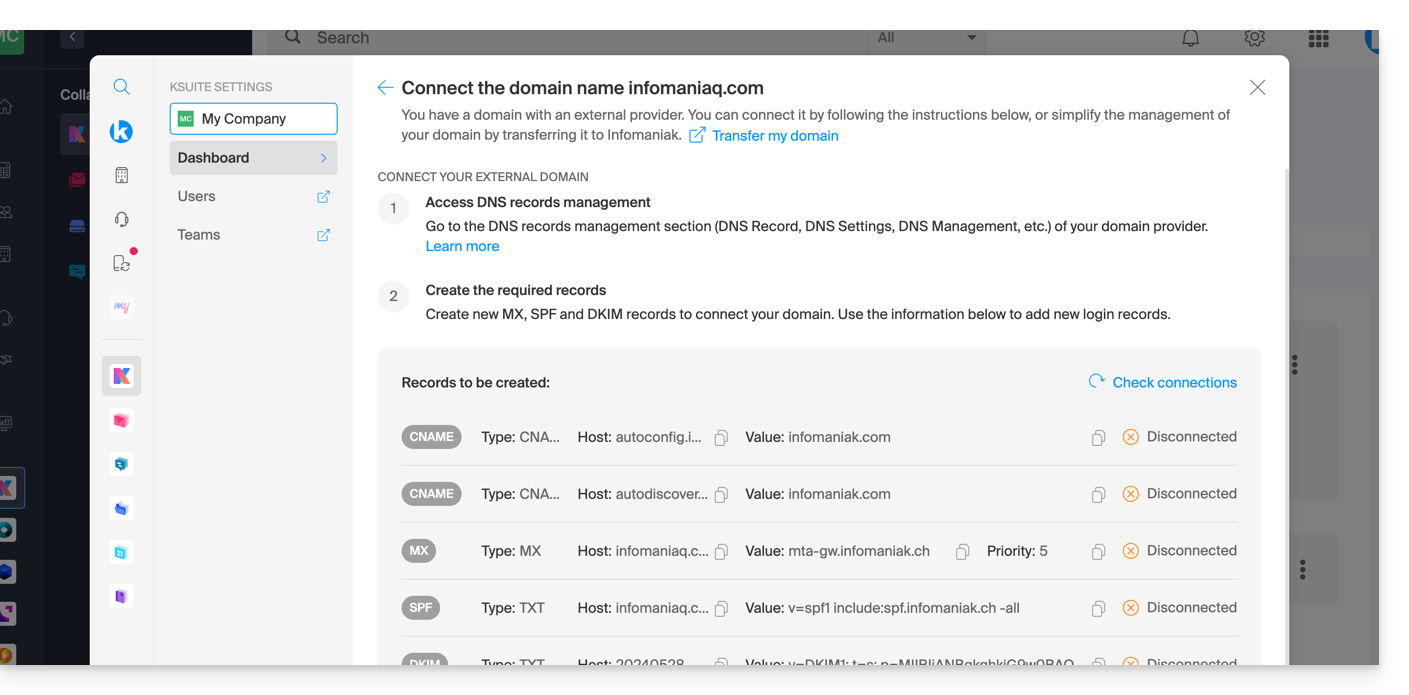
… na Infomaniak com DNS externos
Se o seu nome de domínio tiver DNS que não sejam os da Infomaniak, então:
- Edite a zona DNS atual no local onde ela se encontra (se necessário, consulte a ajuda do fornecedor em questão) e especifique o MX da Infomaniak (+ SPF e DKIM).
- Qualquer adição/modificação de DNS pode levar até 48 horas para se propagar (❓: ajuda).
OU
- Altere os DNS atuais e selecione a opção de usar os DNS da Infomaniak.
- Qualquer adição ou modificação de DNS pode levar até 48 horas para ser propagada (❓: ajuda).
- Consulte este outro guia para verificar e corrigir possíveis erros de configuração.
Isso será indicado (veja as imagens acima).
… e também com DNS externos
Se o seu nome de domínio estiver registado noutro registrador e tiver DNS diferentes dos da Infomaniak, então:
- Edite a zona DNS atual no local onde ela está (se necessário, consulte a ajuda do fornecedor em questão) e especifique o MX da Infomaniak (+ SPF e DKIM).
- Qualquer adição/modificação de DNS pode demorar até 48 horas para se propagar (❓: ajuda).
OU
- Altere os DNS atuais (se necessário, consulte a ajuda do provedor em questão) e especifique os DNS da Infomaniak (isso implica em ter uma zona DNS na Infomaniak).
- Qualquer adição/modificação de DNS pode levar até 48 horas para ser propagada (❓: ajuda).
- Esta zona DNS na Infomaniak será configurada corretamente, mas consulte este outro guia para verificar e corrigir eventuais erros de configuração.
Isso será indicado (veja as imagens acima).
… em outro lugar, mas você o transfere
Se o seu nome de domínio estiver registado noutro registradore desejar transferi-lo para o mesmo local onde está alojada a sua conta de e-mail Infomaniak, então:
- Transfira o nome de domínio para a Infomaniak (este será configurado corretamente, mas consulte este outro guia para verificar e corrigir eventuais erros de configuração).
Caso contrário, considere a encomenda de um novo nome de domínio, se necessário.
Link para esta FAQ: https://faq.infomaniak.com/2629
Esta seção de perguntas frequentes foi útil?
Este guia explica como associar vários nomes de domínio a uma kSuite existente, adicionando domínios adicionais.
Pré-requisitos
- Ter o novo nome de domínio (se necessário, crie-o previamente❓: ajuda).
- Consulte as instruções deste outro guia e siga as instruções correspondentes à sua situação (para garantir que o nome de domínio funcione quando for associado à sua kSuite).
Adicionar um nome de domínio ao kSuite
Depois que o novo nome de domínio estiver pronto para ser usado em conjunto com o antigo, é preciso adicioná-lo ao kSuite:
- Clique aqui para acessar o gerenciamento do seu kSuite (❓: ajuda).
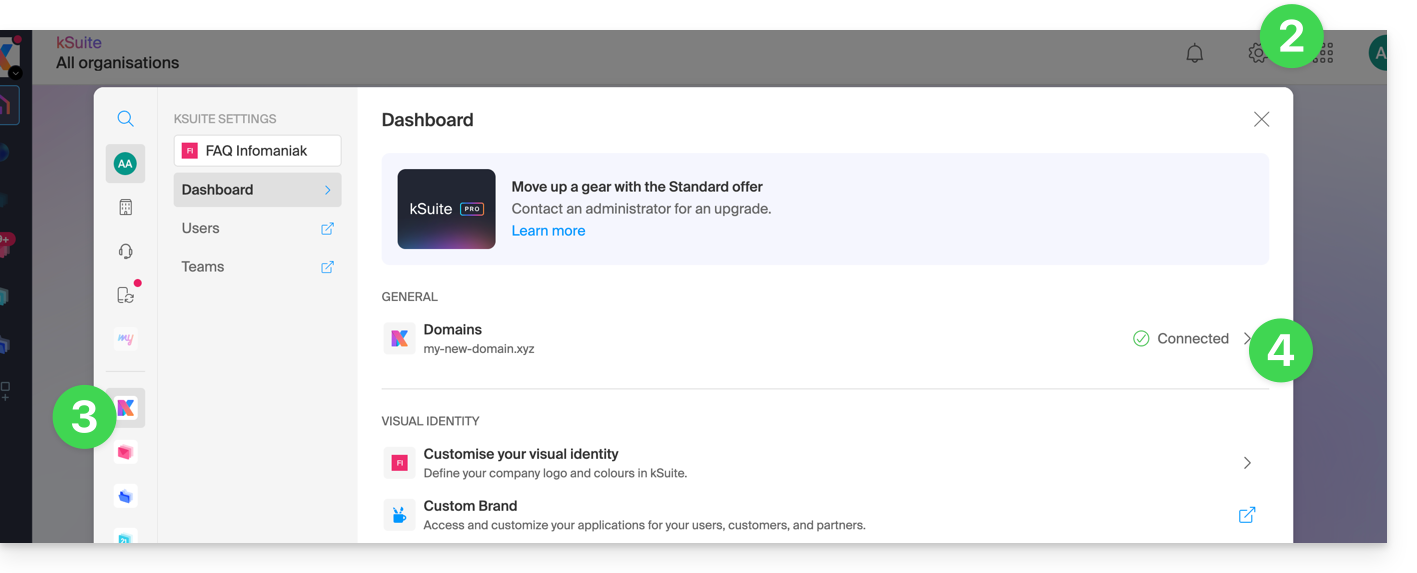
- Clique no ícone Configurações no canto superior direito.
- Clique em kSuite no menu lateral esquerdo.
- Clique em Domínios:
- Clique no botão azul Adicionar um domínio alias:

- Escolha o domínio a ser associado entre os domínios da sua Organização (ainda disponível, ou seja, não associado a nenhum serviço) ou insira um nome de domínio externo (consulte os pré-requisitos).
- Clique no botão para adicionar o domínio:
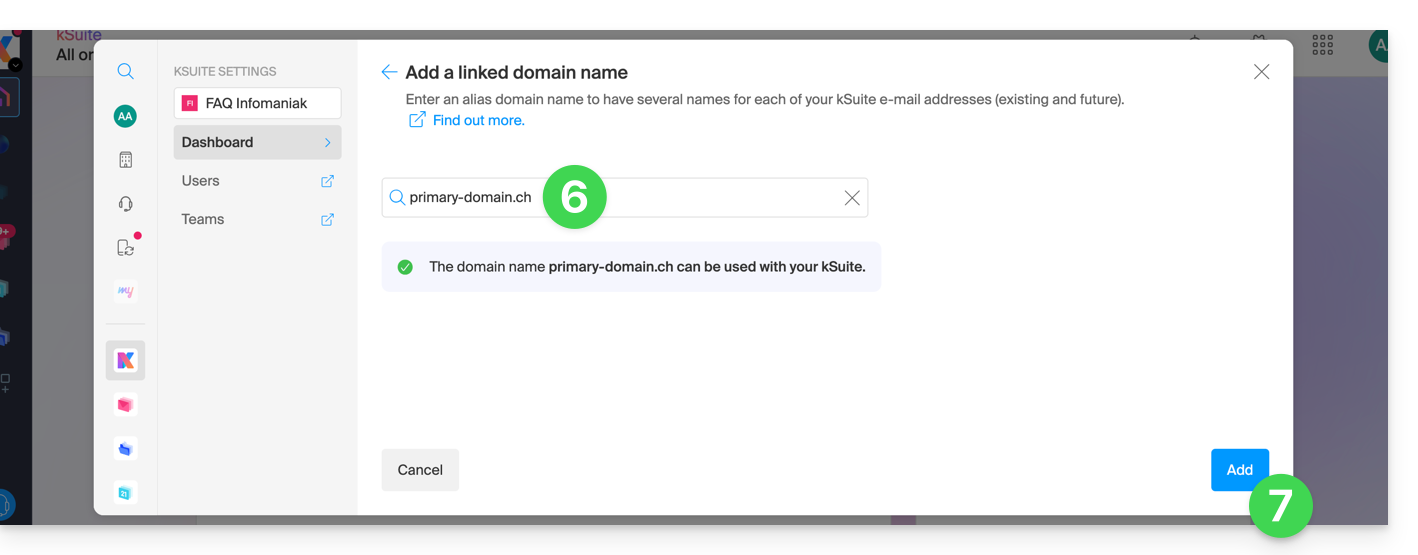
- O domínio foi associado com sucesso:
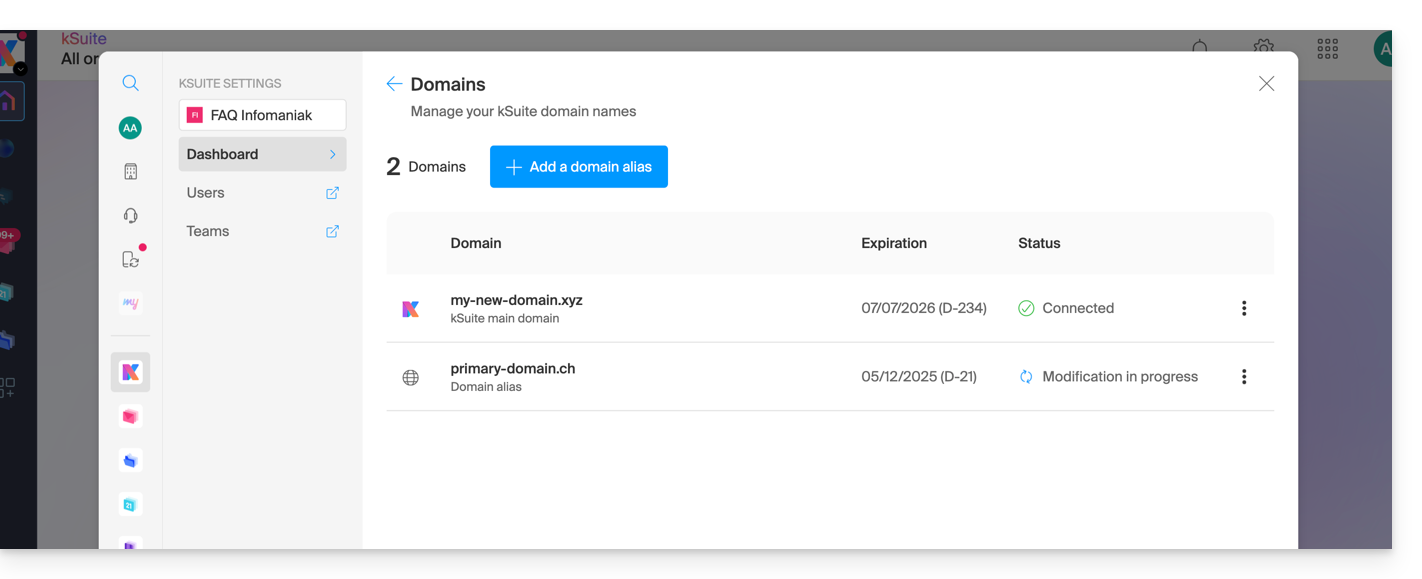
Você também pode considerar uma inversão do nome de domínio adicional vinculado ao kSuite, com seu domínio principal, a fim de modificar o nome de domínio do seu kSuite (❓: ajuda).
Link para esta FAQ: https://faq.infomaniak.com/2640
Esta seção de perguntas frequentes foi útil?
A Infomaniak tem como prioridade garantir a segurança dos dados, adotando uma abordagem abrangente e diversificada em relação à segurança. Para os denunciantes, a empresa implementou um sistema interno que permite denunciar irregularidades de forma segura e anônima, sem receio de retaliações. Este mecanismo de proteção é conhecido e acessível a todos os funcionários, reforçando assim a transparência e a responsabilidade dentro da organização.
Prazos de tratamento
A Infomaniak demonstra o seu compromisso com medidas concretas e eficazes para proteger aqueles que denunciam anomalias. A empresa compromete-se a tratar cada denúncia efetuada através do seu formulário de denúncia em prazos definidos, a fim de garantir uma resposta rápida e manter a confiança dos seus utilizadores.
Para garantir um tratamento eficaz e transparente, a Infomaniak estabeleceu um processo estruturado com prazos precisos:
- Compromete-se a confirmar o recebimento de todas as denúncias em 24 horas após a sua submissão, permitindo que os denunciantes confirmem que o seu pedido foi devidamente recebido pelas equipas técnicas competentes.
- Em seguida, a empresa realiza uma avaliação preliminar em 5 dias úteis para determinar a admissibilidade da denúncia e identificar os recursos necessários para o seu tratamento. Esta fase permite classificar o nível de prioridade e encaminhar o caso para as equipas especializadas apropriadas.
- Quando uma investigação se torna necessária, a Infomaniak realiza uma análise aprofundada num prazo máximo de 30 dias úteis, dependendo da natureza e da complexidade do caso relatado. Este período permite que as equipas de segurança realizem as verificações técnicas necessárias, recolham as provas necessárias e avaliem o impacto potencial da situação relatada.
- Por fim, a empresa compromete-se a finalizar a análise e implementar as ações corretivas apropriadas num prazo de 60 dias úteis, sempre que tecnicamente possível.
Esta última etapa inclui a implementação de medidas preventivas, a comunicação dos resultados às partes interessadas e o acompanhamento das recomendações emitidas para evitar a recorrência dos problemas identificados.
A Infomaniak também se compromete a manter os reclamantes informados sobre o andamento de uma reclamação, desde que o reclamante tenha preenchido o formulário indicando um endereço de e-mail de contacto.
Consulte também o artigo do blog sobre este tema.
Link para esta FAQ: https://faq.infomaniak.com/2641
Esta seção de perguntas frequentes foi útil?
Este guia detalha o funcionamento do armazenamento de dados provenientes dos seus diferentes produtos kSuite.
Introdução
- O espaço utilizado para o armazenamento de dados é:
- compartilhado entre os diferentes utilizadores da sua kSuite,
- e compartilhado entre alguns dos produtos que a compõem (kDrive e kChat, por exemplo).
- A quantidade de espaço de armazenamento total depende da sua subscrição e do número de utilizadores escolhido:
- Corresponde à quantidade de espaço de armazenamento máximo que pode ser utilizada por todos os seus utilizadores.
- Não existe uma quota por utilizador.
Os dados provenientes do Serviço de Email não são contabilizados no espaço de armazenamento kSuite.
Aumentar ou diminuir o espaço de armazenamento kSuite
Precisa de mais espaço para armazenar os seus dados kSuite?
- Altere o plano e adicione utilizadores ou mude para um plano superior que inclua mais utilizadores.
- Quanto maior o número de utilizadores incluídos no seu plano, maior será o espaço de armazenamento.
Também pode libertar espaço de armazenamento ao eliminar permanentemente ficheiros do kDrive ou do kChat.
Não é possível:
- reduzir o espaço de armazenamento,
- diminuir para um número inferior de utilizadores kSuite, dependendo do espaço de armazenamento disponível e já utilizado.
Link para esta FAQ: https://faq.infomaniak.com/2680
Esta seção de perguntas frequentes foi útil?
Este guia ajuda a resolver os problemas de conexão nos aplicativos móveis Infomaniak (kDrive, Euria, SwissTransfer, Mail) quando a mensagem de segurança "o seu dispositivo não é reconhecido como seguro" aparece no Android.
Dificuldades de conexão: "O seu dispositivo não é reconhecido como seguro"
Este bloqueio está relacionado com os protocolos de segurança do Google (API de Integridade do Google Play). A Infomaniak utiliza estes padrões para garantir que os dados não são consultados num dispositivo cuja segurança possa estar comprometida.
Isto geralmente ocorre nos seguintes casos:
- Utilização de um sistema operativo não oficial (ROM personalizada / LineageOS).
- Dispositivo com acesso root ou bootloader desbloqueado.
- Versão do Android muito antiga ou não certificada pelo Google.
- Alguns modelos de smartphones (ex: Huawei sem os serviços Google oficiais).
Solução alternativa imediata
Se o seu dispositivo estiver funcionando corretamente, mas a mensagem persistir, pode contornar o bloqueio forçando uma nova autenticação manual:
- Na tela de login do aplicativo, clique no ícone seta/chevron para baixo ao lado da sua conta ou do seu avatar.
- Selecione a opção "Entrar com outra conta" (mesmo que seja a mesma conta).
- Insira manualmente as suas credenciais (endereço de e-mail Infomaniak e palavra-passe).
Este método permite ignorar o token de autenticação anterior e validar o acesso através de uma nova sessão segura.
Link para esta FAQ: https://faq.infomaniak.com/2685
Esta seção de perguntas frequentes foi útil?
Este guia explica como substituir o nome de domínio principal associado a uma kSuite.
Introdução
- Alterar o domínio associado ao kSuite é útil se o nome da sua empresa mudar.
- Isso afeta:
- Marca personalizada (e, portanto, os URLs personalizados que direcionam para as suas ferramentas, como o kDrive ou o Euria)
- Serviço de e-mail (e, portanto, os seus endereços de e-mail)
Modificar o nome de domínio do kSuite
Pré-requisitos
- Ter o novo nome de domínio (se necessário, crie-o previamente).
- Consultar as instruções deste outro guia e aplicar as instruções correspondentes à sua situação (para garantir que o nome de domínio funcione quando for associado à sua kSuite).
- Adicionar o nome de domínio ao kSuite.
Depois que o novo nome de domínio estiver pronto para ser usado em substituição ao antigo:
- Clique aqui para acessar o gerenciamento do seu kSuite (precisa de ajuda?).
- Clique no ícone Configurações no canto superior direito.
- Clique em kSuite no menu lateral esquerdo.
- Clique em Domínios:
- Clique em o menu de ações ⋮, localizado à direita do domínio que você deseja usar para substituir o domínio atual.
- Clique em Definir como domínio principal:
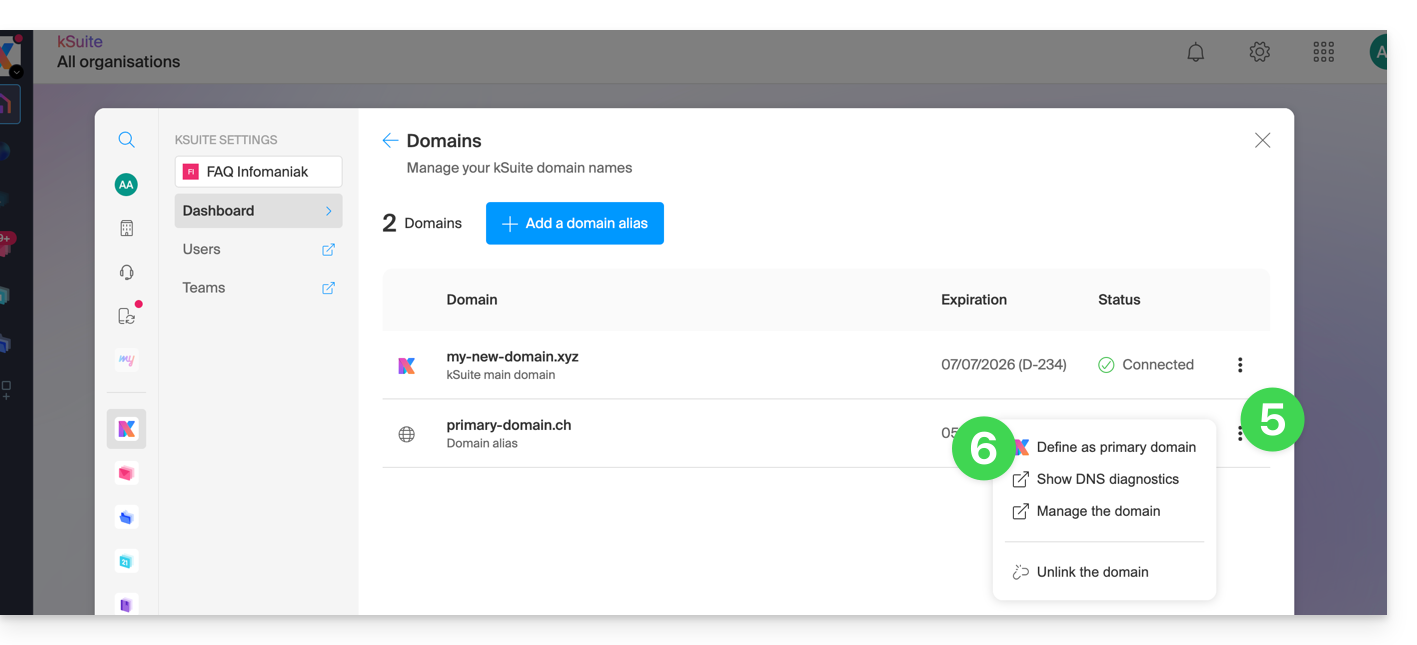
- As informações são exibidas, clique no botão Continuar.
- Leia as informações na tela e confirme que as leu.
- Clique no botão Continuar:

- Clique no botão Confirmar:
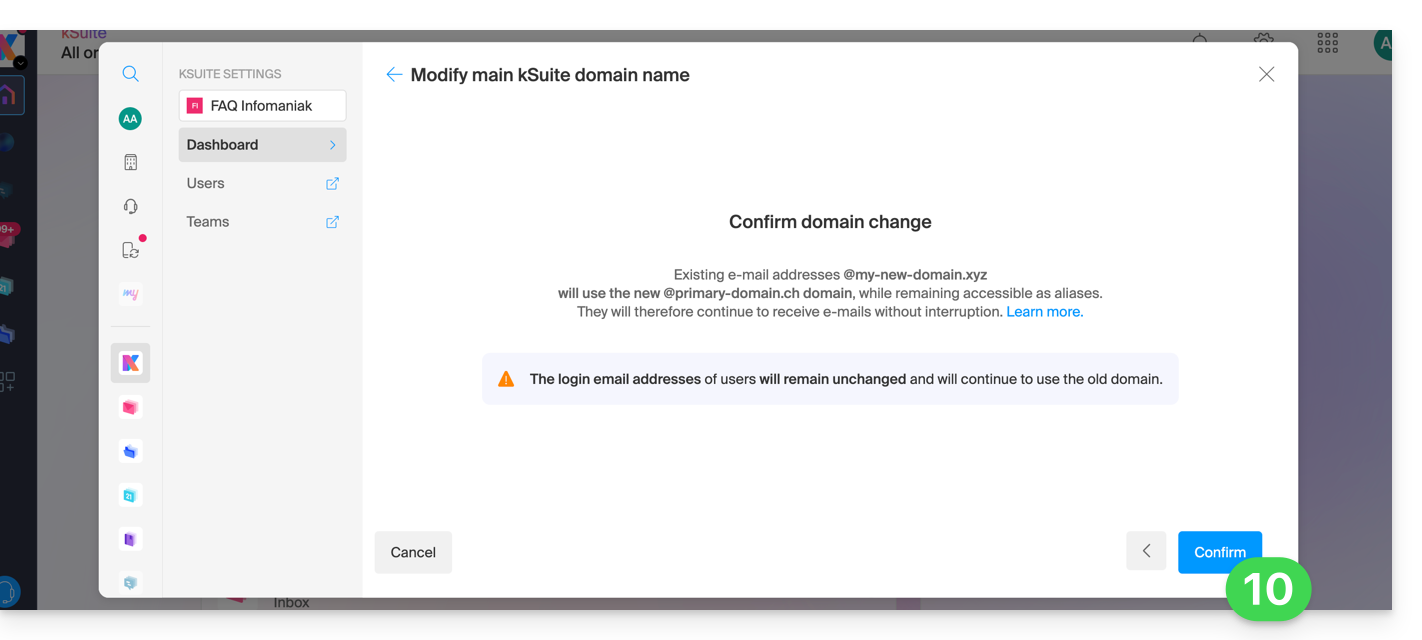
Impacto no Serviço de E-mail
Ao inverter o nome de domínio da kSuite acima, o Serviço de E-mail dentro da kSuite é atualizado automaticamente. Você passará de:
… para isto:
Link para esta FAQ: https://faq.infomaniak.com/2701
Esta seção de perguntas frequentes foi útil?
Este guia explica como transferir para a Infomaniak os endereços de e-mail atualmente hospedados pela GMX, com a ajuda de uma ferramenta de importação por IMAP.
Introdução
- A operação não afeta os dados já existentes no endereço de destino, nem os dados do endereço de origem.
- A totalidade da caixa externa será importada.
- Uma vez iniciado o processo de importação, não é mais possível interrompê-lo.
- Os eventuais duplicados são gerenciados: um conteúdo idêntico será copiado apenas uma vez.
- Consulte este outro guia se procura alternativas a este processo via IMAP.
Importar todo o seu histórico de e-mails
1. Pré-requisitos do GMX
- Ativar as funcionalidades POP/IMAP/SMTP que estão desativadas por padrão (precisa de ajuda?).
2. Pré-requisitos Infomaniak
- Ter um Serviço de Email na sua Central de Gestão Infomaniak.
- Ter à disposição um número de endereços disponíveis ou ajustá-lo caso seja necessário.
- Certificar-se de que a conta de e-mail está devidamente protegida
- Criar um ou vários endereços neste serviço de e-mail.
- Se tiver muitos (10+) endereços de e-mail para criar, consulte este outro guia sobre a criação em massa.
- O endereço de e-mail de destino deve estar associado ao utilizador (= à conta Infomaniak) que está a utilizar.
3. Importar o conteúdo de e-mail do GMX para o Infomaniak
- Clique aqui para acessar a ferramenta de importação (serviço online https://import-email.infomaniak.com).
- Se necessário, inicie sessão na sua conta Infomaniak na organização em questão, pois a importação será efetuada para um dos endereços de e-mail associados à interface Web Mail da Infomaniak (serviço online ksuite.infomaniak.com/mail) da conta Infomaniak que está a utilizar.
- Clique em "Importar por IMAP".
- Clique em Importação única.
- Preencha o campo à esquerda com o seu endereço de e-mail de origem (do qual deseja copiar o conteúdo):
username@gmx.ch, por exemplo
- Preencha o campo da direita com a senha deste mesmo endereço de e-mail de origem (consulte os requisitos).
- Modifique, se necessário, as Configurações avançadas para especificar um endereço de servidor IMAP:
- Insira o nome do servidor IMAP
imap.gmx.ch(ou .net, .com, etc., dependendo do seu endereço de e-mail no ponto 4 acima). - Deixe a porta padrão (993) e o SSL ativados.
- Insira o nome do servidor IMAP
- Clique em Confirmar.
- Se necessário, insira um segundo endereço de e-mail para ser importado simultaneamente.
- Escolha o endereço de e-mail para o qual deseja importar os e-mails; o menu suspenso lista os endereços de e-mail atualmente associados à sua interface Web Mail Infomaniak (serviço online ksuite.infomaniak.com/mail) da conta Infomaniak com a qual está conectado.
- Após selecionar o endereço de destino desejado na lista, clique no botão azul Importar e-mails.
- A cópia está a iniciar, pode aguardar e verificar o resultado na página após a conclusão da importação, ou fechar a janela (a importação continua em segundo plano e o acompanhamento está disponível – veja abaixo).
- Um e-mail de confirmação será enviado automaticamente para todos os endereços de e-mail envolvidos na operação, assim que a importação for concluída, indicando o número de mensagens copiadas.
- Um rastreamento está disponível nas configurações do endereço de e-mail de destino, apenas no aplicativo web Mail (serviço online ksuite.infomaniak.com/mail).
- O rastreamento permite visualizar o histórico das importações no endereço em questão.
4. Ajustar as configurações das aplicações
Assim que tiver configurado o nome de domínio associado à sua conta de e-mail para funcionar com a Infomaniak, modifique as configurações dos programas/clientes de e-mail que utiliza para que estes se conectem corretamente aos servidores da Infomaniak: siga o assistente de configuração.
Link para esta FAQ: https://faq.infomaniak.com/2715
Esta seção de perguntas frequentes foi útil?
Este guia explica como eliminar contactos duplicados numa lista de contactos da aplicação web Contacts da Infomaniak.
Eliminar contactos duplicados
Para visualizar os contactos duplicados existentes nos seus catálogos de contactos Infomaniak e fundi-los (ou ocultá-los):
- Clique aqui para aceder à aplicação web Contactos Infomaniak (serviço online ksuite.infomaniak.com/contacts).
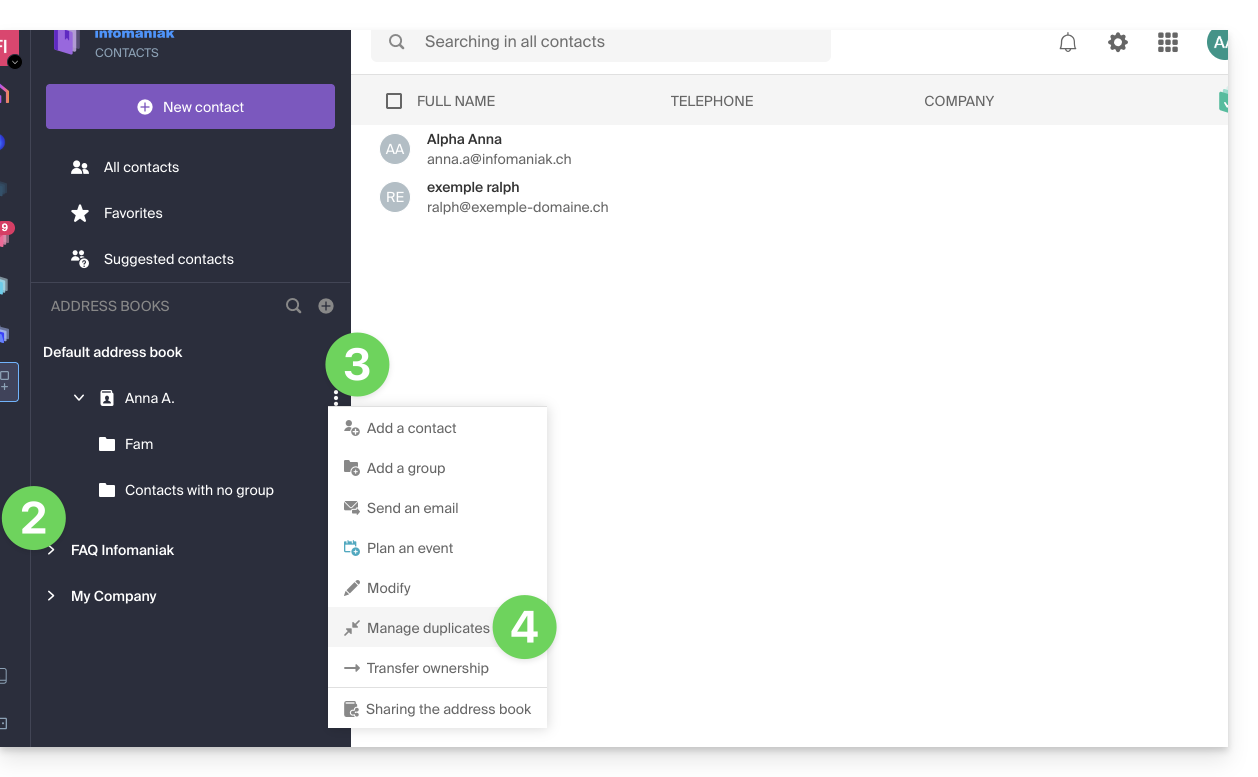
- Clique no ícone de seta para baixo para expandir a lista de agendas, se necessário.
- Clique no menu de ações ⋮ à direita da agenda desejada.
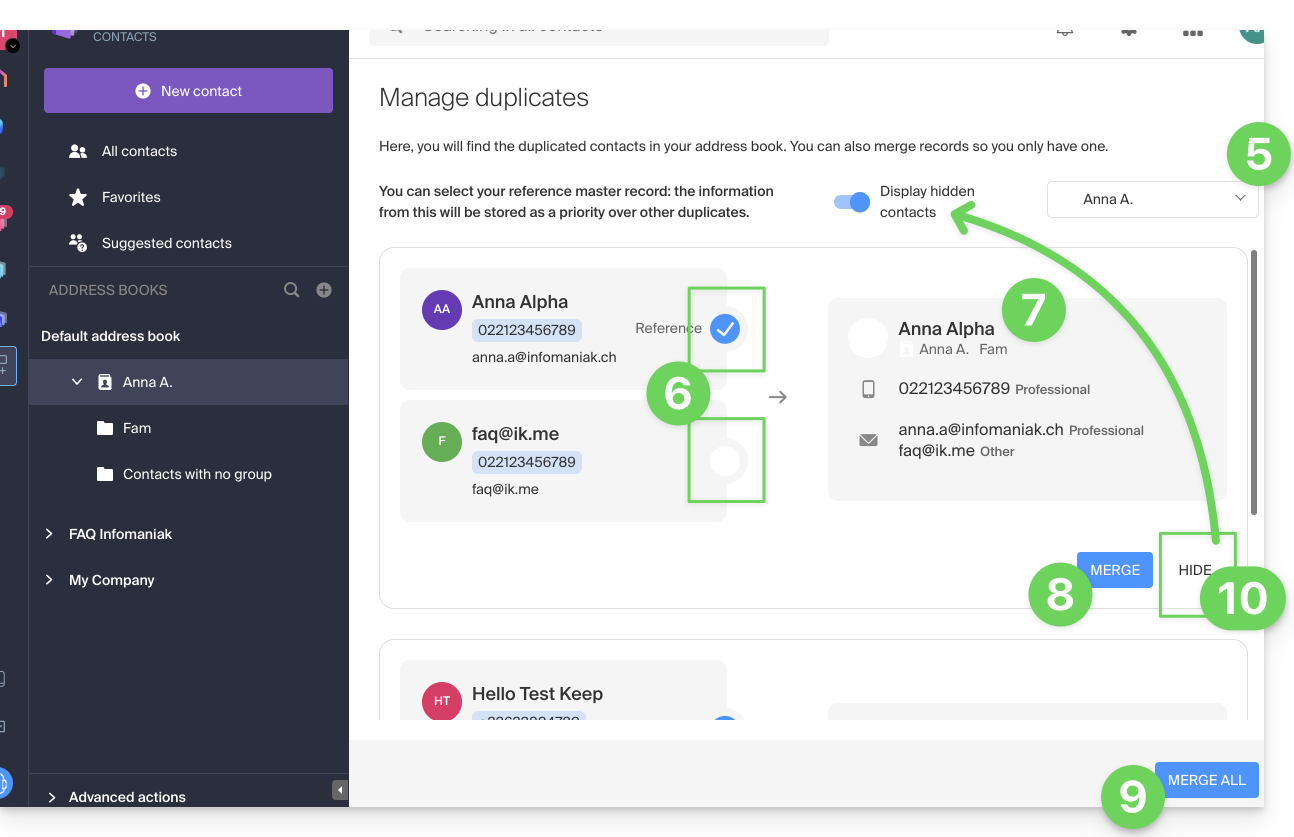
- Clique em Gerenciar duplicatas:
- Se necessário, selecione o catálogo de endereços no qual deseja procurar as duplicatas.
- Clique na ficha que deve ser a referência a ser mantida; as informações idênticas são destacadas em azul.
- Visualize e verifique as informações das fichas duplicadas que serão adicionadas à ficha de referência (item 6 acima):
- Clique no botão azul Combinar para processar cada duplicata individualmente…
- … ou em Combinar tudo para processar todas as duplicatas.
- Você também pode ocultar um duplicado para não o processar e revê-lo clicando no botão de alternância (toggle switch) na parte superior da página:
Atenção: você não pode cancelar esta operação (consulte este outro guia se precisar de informações sobre a restauração de agendas).
Link para esta FAQ: https://faq.infomaniak.com/2794
Esta seção de perguntas frequentes foi útil?
Este guia explica como adicionar, modificar ou remover utilizadores de uma Organização no Manager Infomaniak.
Introdução
- Desde que abriu a sua conta na Infomaniak, faz parte de pelo menos uma Organização.
- Se estava sozinho e não se tratava de um convite, uma Organização foi criada em seu nome e você se torna automaticamente o responsável legal.
- Caso contrário, você pertence à Organização que o convidou (para participar da kSuite, para gerenciar um produto, etc.).
- Apenas um proprietário/responsável legal pode efetuar modificações.
- Um eventual colaborador que também tenha acesso à sua Organização não terá a possibilidade de efetuar modificações a partir de sua conta restrita.
Adicionar um novo utilizador
Como utilizador da Organização com permissões suficientes, pode:
- adicionar um novo utilizador.
- Pode ser uma pessoa totalmente externa à Infomaniak,
- ou que já possua a sua própria conta de utilizador Infomaniak, que poderá, se desejar, reutilizar, estendendo-a à sua Organização.
Ao adicionar, poderá:
- especificar o seu papel dentro da Organização,
- os produtos aos quais terá acesso,
- bem como as preferências de contato administrativo.
Remover um usuário
Como utilizador da Organização com permissões suficientes, pode:
Modificar as permissões/direitos de um utilizador
Como utilizador da Organização com permissões suficientes, pode:
- alterar o papel de outro utilizador,
- gerir os produtos aos quais ele tem acesso e as permissões mais detalhadas, caso se trate de acesso a um endereço de e-mail, por exemplo,
- assim como as preferências de contato administrativo, sejam elas suas ou de terceiros.
Substituir um responsável legal
Paraalterar o responsável legal de uma Organização no Manageré necessário remover o utilizador que tem o papel de responsável legal, o que implica nomear previamente um novo responsável legal (de facto, é impossível remover um responsável legal se não houver outro responsável legal para a Organização).
Gerir os utilizadores por grupo (equipa de trabalho)
Pode organizar os utilizadores da Organização em grupos.
Link para esta FAQ: https://faq.infomaniak.com/2821
Esta seção de perguntas frequentes foi útil?
Este guia explica como copiar o conteúdo de um ou mais endereços de e-mail Infomaniak (todas as mensagens de e-mail, pastas, subpastas, ou seja, toda a estrutura da sua caixa de e-mail) para um ou mais dos seus outros endereços existentes também na Infomaniak(independentemente do Serviço de Email), graças à ferramenta de importação Infomaniak!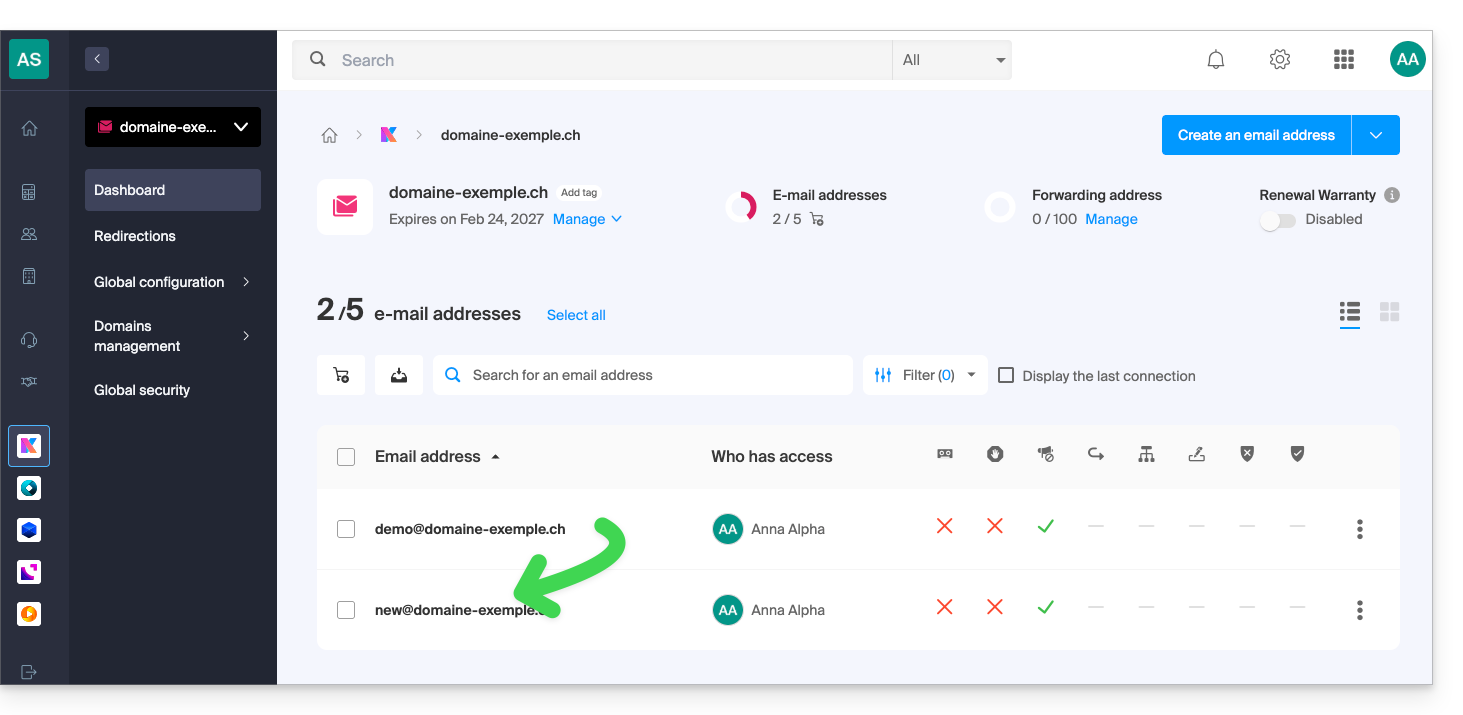
Introdução
- A operação não afeta os dados já existentes no endereço de destino, nem os dados do endereço de origem.
- Será importada a totalidade da caixa de correio.
- Uma vez iniciado o processo de importação, não é mais possível interrompê-lo.
- Os possíveis duplicados são gerenciados: um conteúdo idêntico será copiado apenas uma vez.
Copiar e-mails de uma conta Infomaniak para outra
Pré-requisitos
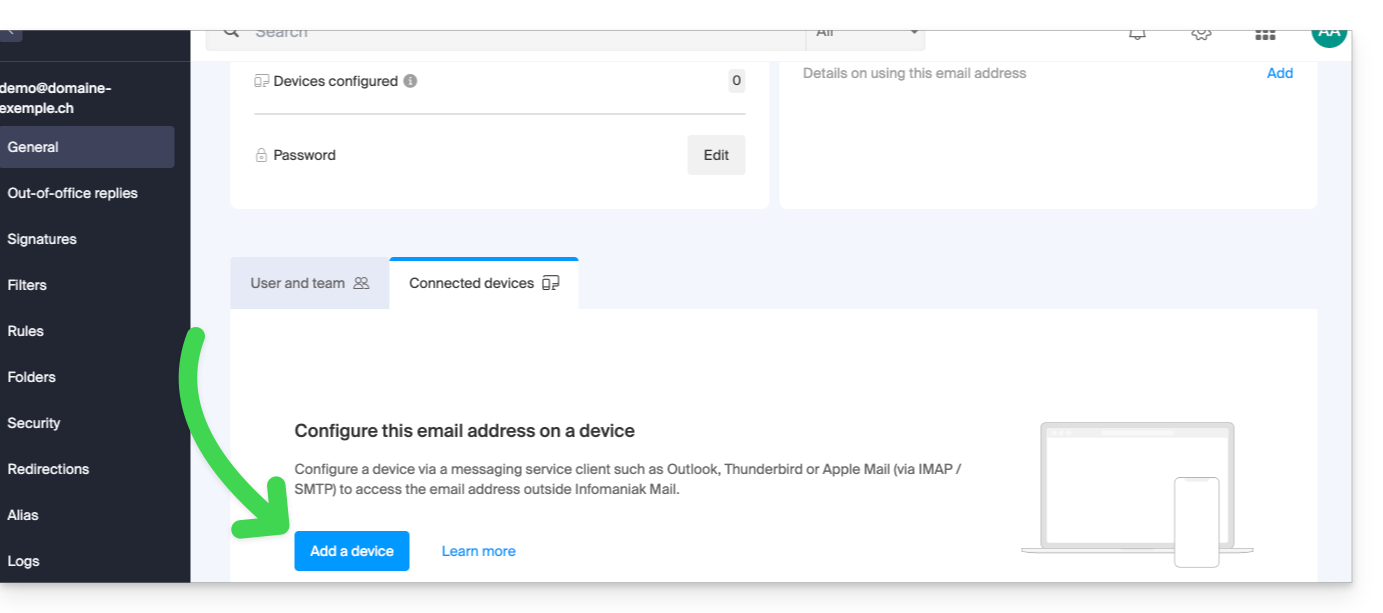
- Adicionar uma senha de dispositivo ao endereço de origem (aquele de onde o conteúdo deve ser recuperado):
- A senha de acesso à conta Infomaniak com o mesmo nome não é a senha esperada.
- É necessária uma senha específica para o endereço de e-mail em questão = uma senha de dispositivo:
- O endereço de e-mail de destino deve estar associado ao usuário (= à conta Infomaniak) que você está usando.
Em seguida, para importar o conteúdo do e-mail:
- Clique aqui para acessar a ferramenta de importação (serviço online https://import-email.infomaniak.com).
- Se necessário, inicie sessão na sua conta Infomaniak na organização em questão; de facto, a importação será efetuada para um dos endereços de e-mail associados à interface Web Mail Infomaniak (serviço online ksuite.infomaniak.com/mail) da conta Infomaniak que está a utilizar.
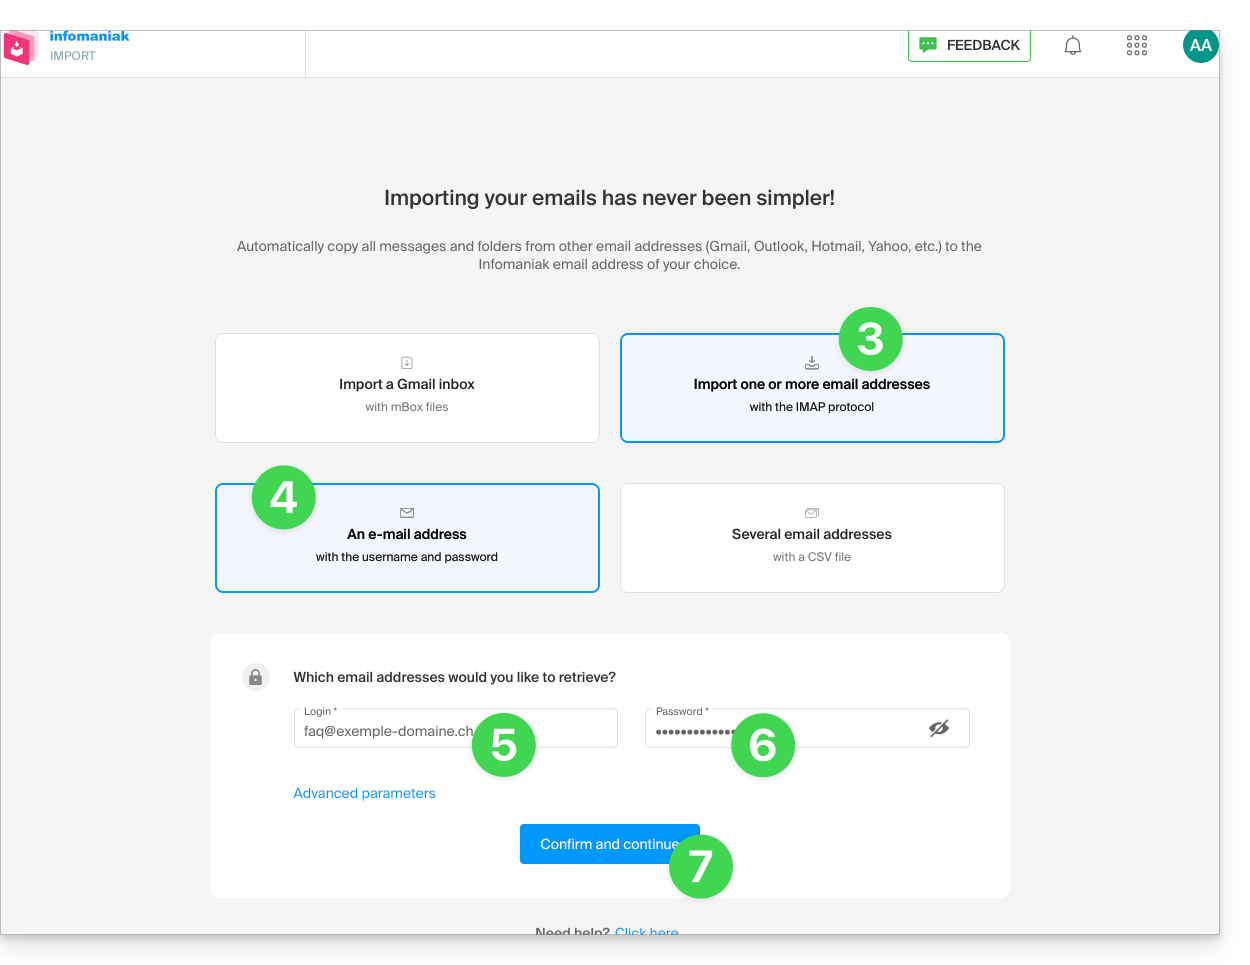
- Clique em "Importar por IMAP".
- Clique em Importar.
- Preencha o campo à esquerda com o seu endereço de e-mail de origem (de onde o conteúdo será copiado).
- Preencha o campo da direita com a senha deste mesmo endereço de e-mail de origem (consulte os requisitos).
- Clique em Confirmar:
- Se necessário, adicione um segundo endereço de e-mail para ser importado simultaneamente.
- Escolha para qual endereço de e-mail importar os e-mails; o menu suspenso lista os endereços de e-mail atualmente associados à sua interface Web Mail Infomaniak (serviço online ksuite.infomaniak.com/mail) da conta Infomaniak com a qual você está conectado.
- É obviamente impossível copiar os e-mails para o endereço idêntico à origem.
- Após selecionar o endereço de destino desejado na lista, clique no botão azul Importar e-mails:
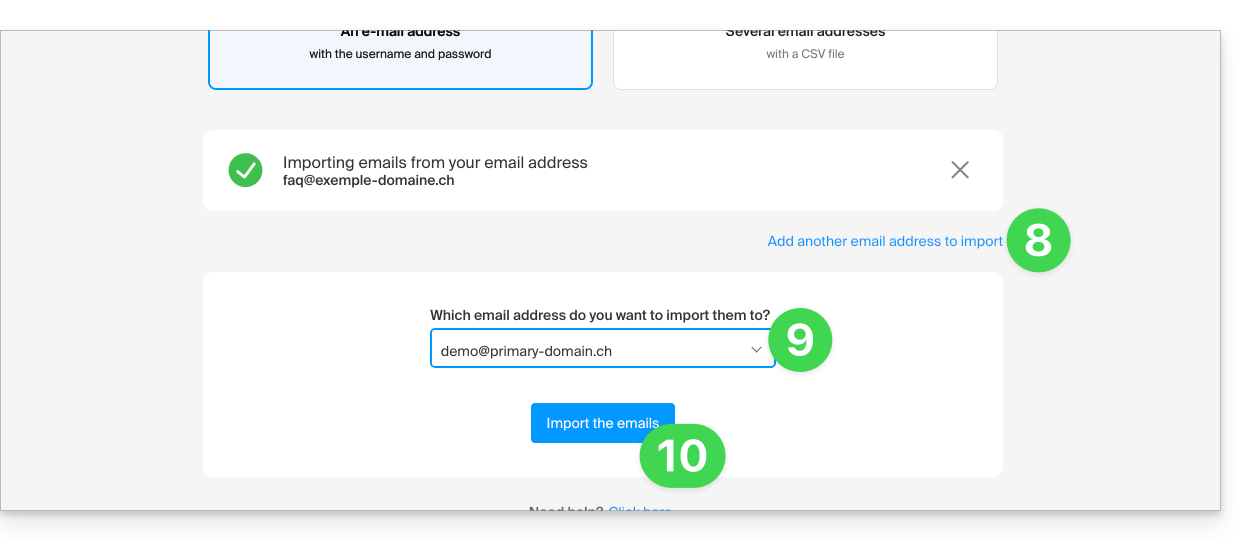
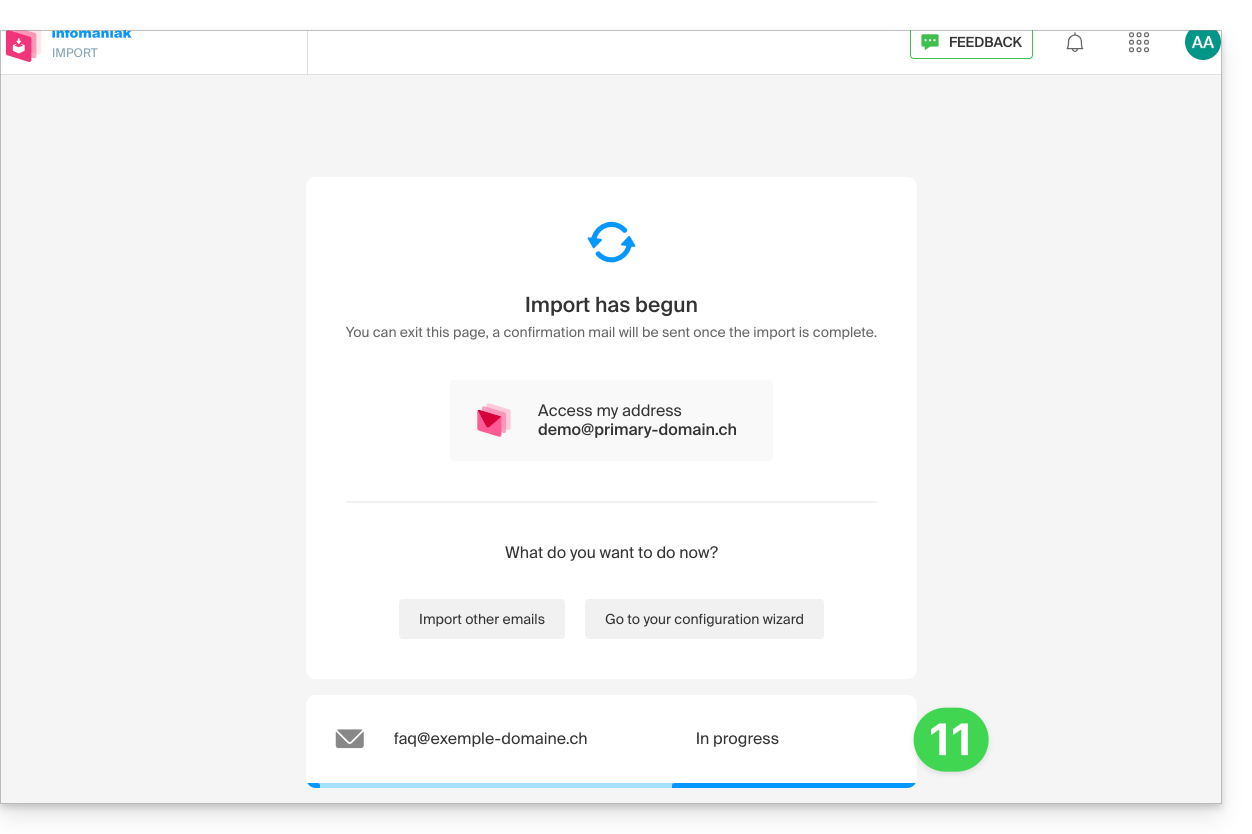
- A cópia é iniciada. Pode aguardar e verificar o resultado na página após a conclusão da importação, ou fechar a janela (a importação continua em segundo plano e o acompanhamento está disponível – veja abaixo):
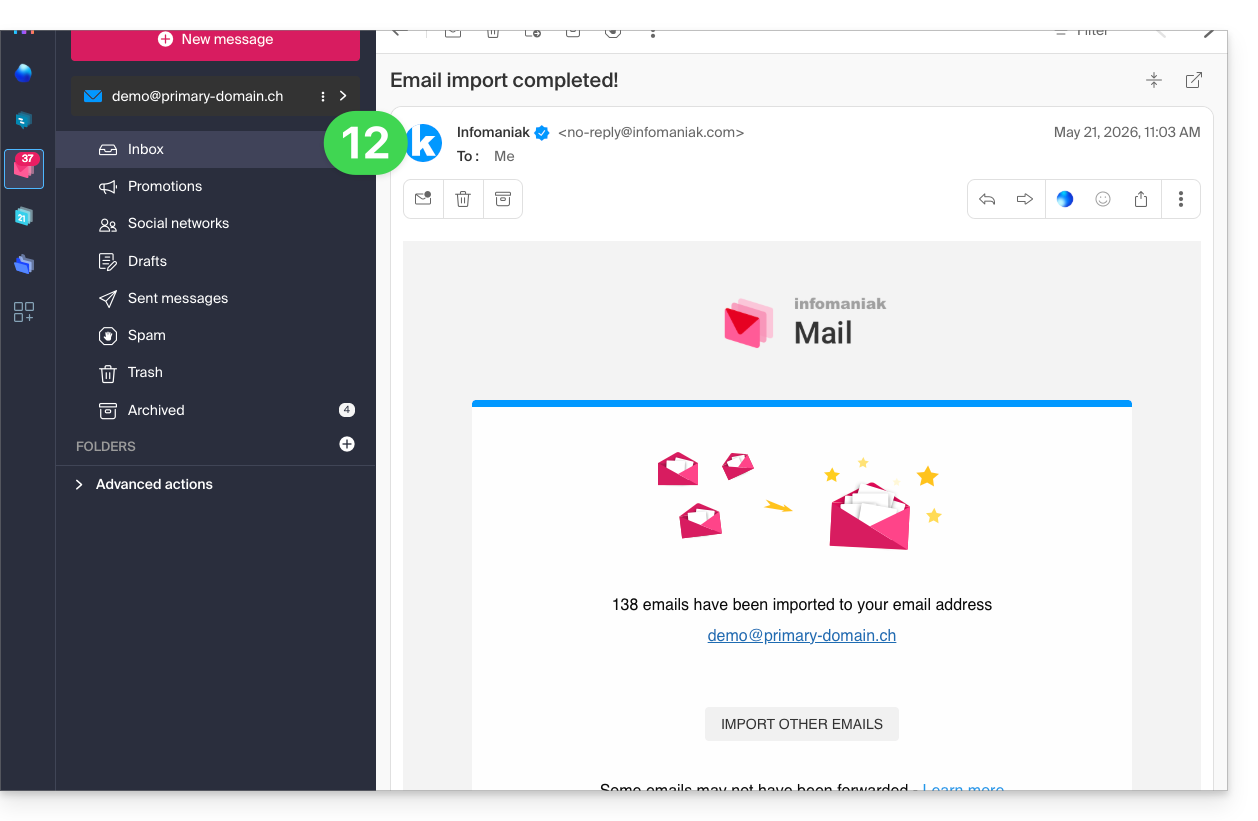
- Um e-mail de confirmação será enviado automaticamente para todos os endereços de e-mail envolvidos na operação, assim que a importação for concluída, indicando o número de mensagens copiadas:
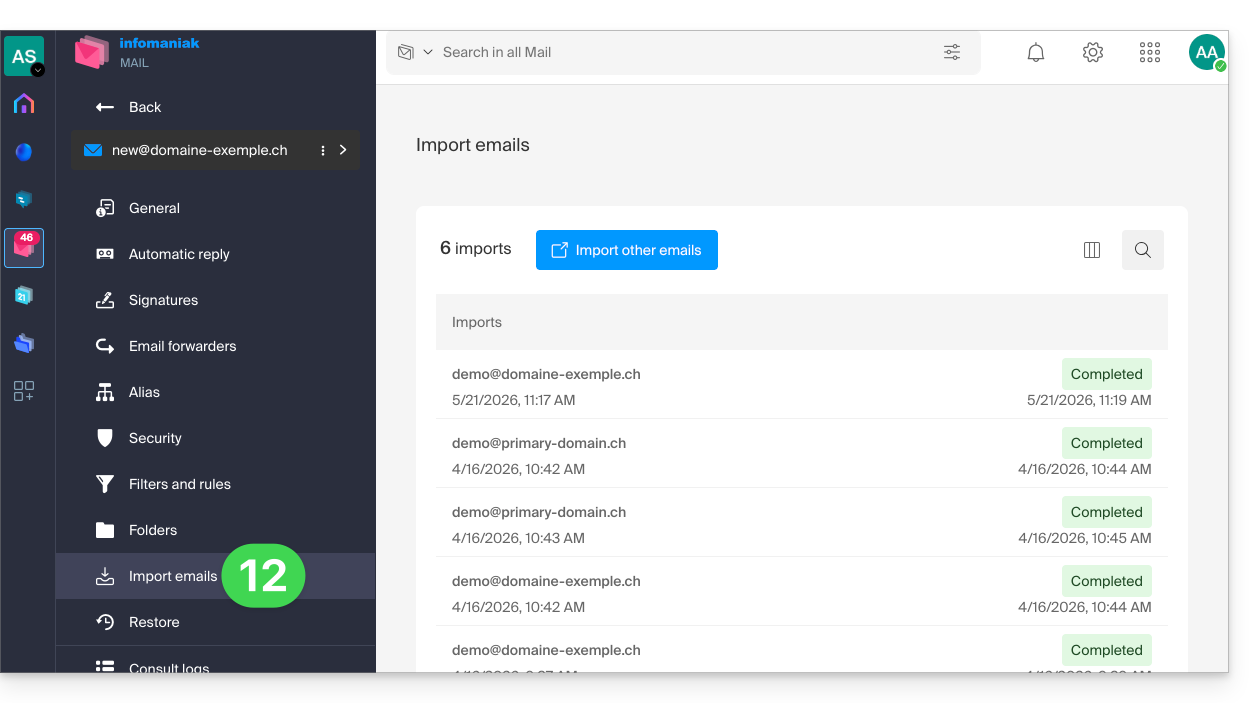
- O acompanhamento está disponível nas configurações do endereço de e-mail de destino, apenas na aplicação web Mail (serviço online ksuite.infomaniak.com/mail):
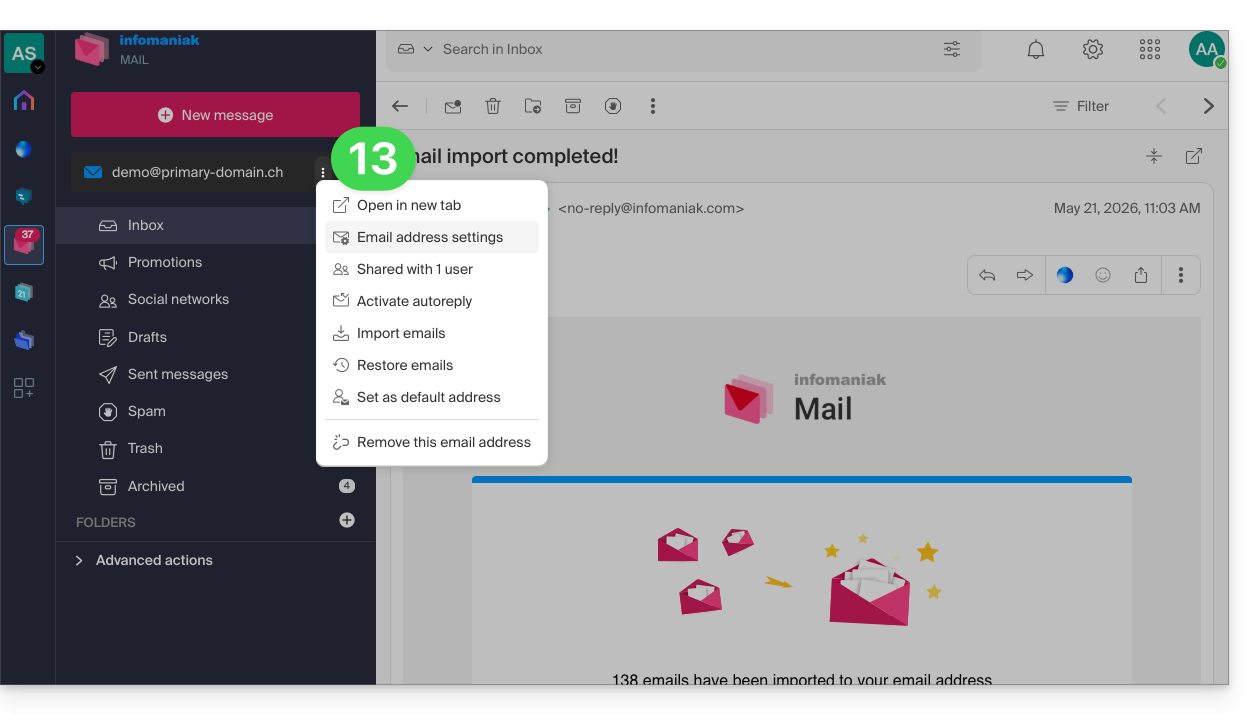
- O acompanhamento permite visualizar o histórico das importações no endereço em questão:
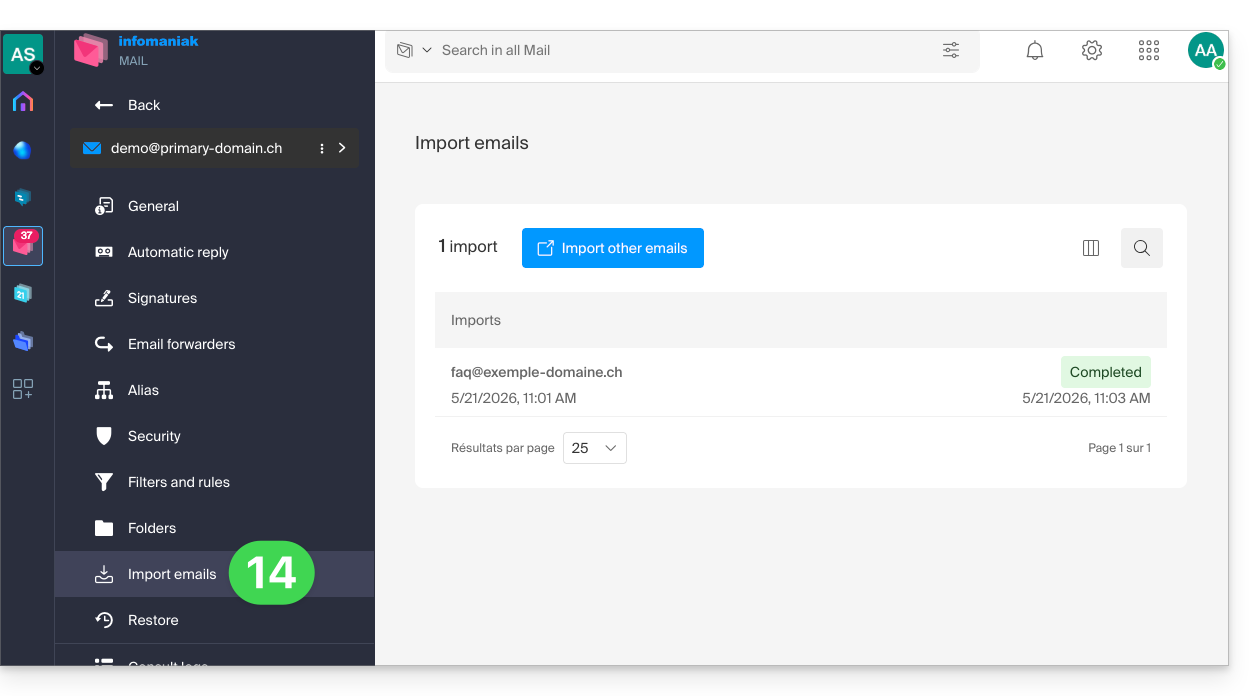
Copiar o conteúdo de vários endereços Infomaniak em lote
Pré-requisitos
- Adicionar uma senha de dispositivo a cada endereço de origem Infomaniak (aqueles dos quais o conteúdo deverá ser recuperado).
- A senha de acesso à conta Infomaniak com o mesmo nome não é a senha esperada.
- É necessária uma senha específica para cada um dos endereços de e-mail em questão = uma senha de dispositivo por endereço.
- Os endereços de e-mail de destino devem estar associados ao utilizador (= à conta Infomaniak) que está a utilizar.
Para importar o conteúdo de vários endereços de e-mail Infomaniak (máximo de 25 por 25) para um ou mais endereços de e-mail de destino:
- Clique aqui para aceder à ferramenta de importação (serviço online https://import-email.infomaniak.com).
- Se necessário, inicie sessão na sua conta Infomaniak na organização em questão, pois a importação será efetuada para um dos endereços de e-mail associados à interface Web Mail da Infomaniak (serviço online ksuite.infomaniak.com/mail) da conta Infomaniak que está a utilizar.
- Clique em IMAP para importar.
- Clique no modo avançado: Importar vários endereços de e-mail a partir de um arquivo CSV (formato
.csv). - Descarregue o modelo
CSVfornecido como exemplo: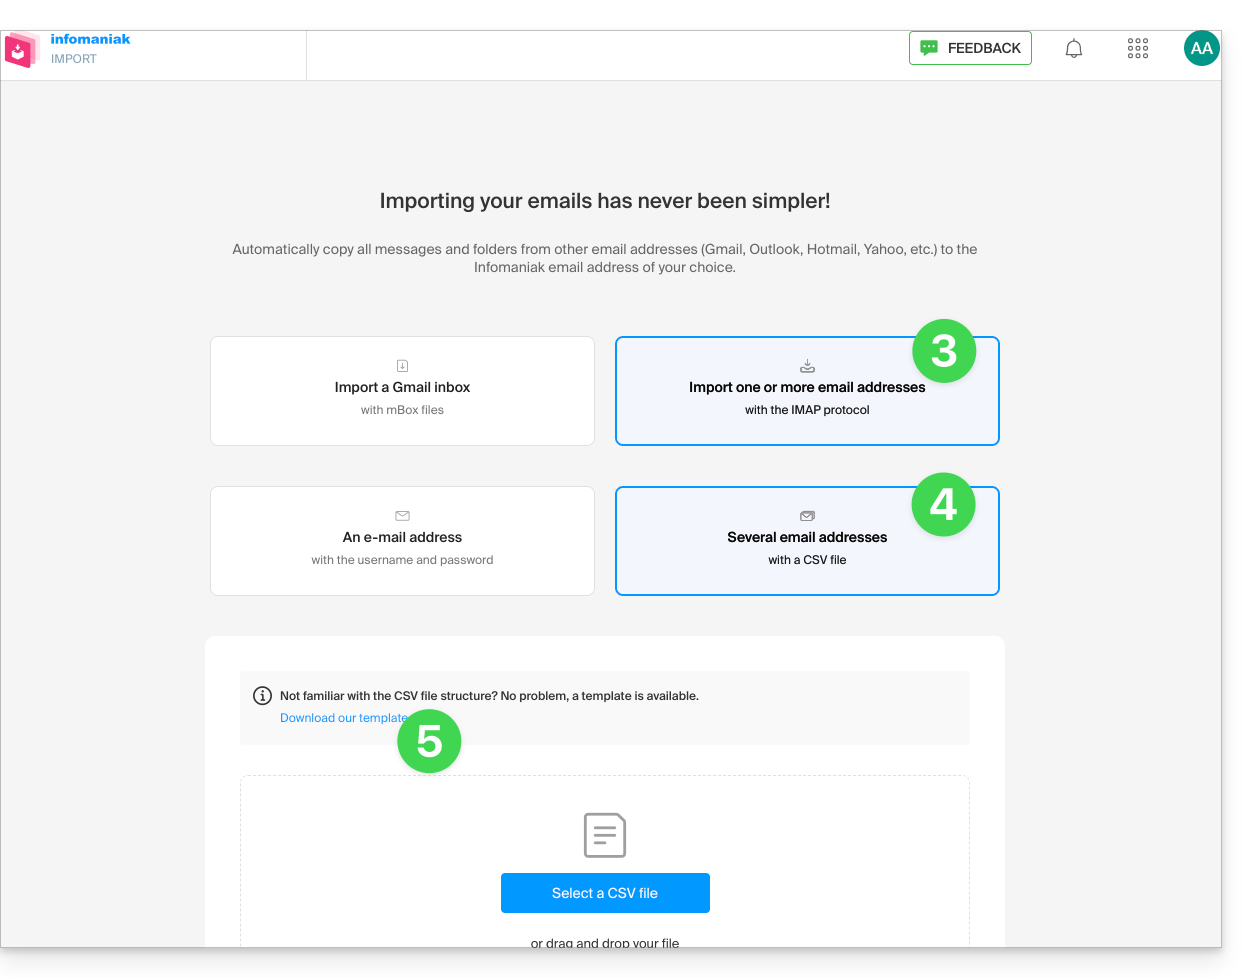
- O modelo tem o seguinte formato:
endereço de e-mail de origem@domínio.com;senha de origem;imap.servidor-de-origem.com;porta de origem(993);SSL de origem(1 ou 0);endereço de e-mail de destino - Isto significa, no caso presente:
endereço de e-mail de origem;senha do e-mail de origem;mail.infomaniak.com;993;1;endereço de e-mail de destino, tudo isto sem espaços (exemplo abaixo)
- O modelo tem o seguinte formato:
- Edite o ficheiro
csvpara criar um ficheiro com as informações corretas necessárias para a cópia (ver pré-requisitos):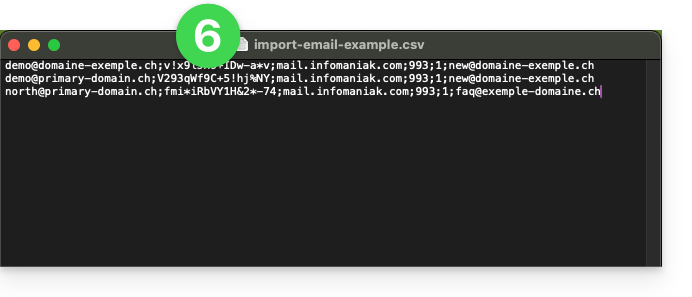
- Carregue o arquivo usando o botão Selecionar um arquivo CSV.
- Depois que o arquivo for carregado na página da ferramenta, corrija ou ignore quaisquer erros; clique em Importar:
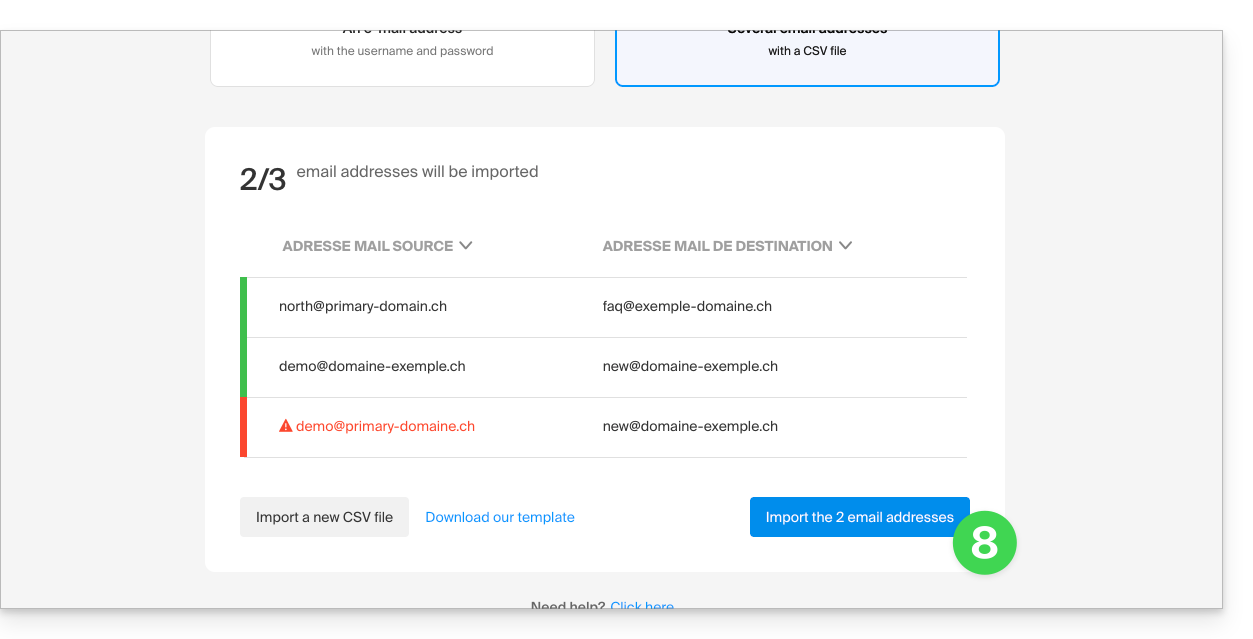
- A cópia está a iniciar, pode aguardar e verificar o resultado na página quando a importação estiver concluída, ou fechar a janela (a importação continua em segundo plano e o acompanhamento está disponível – consulte abaixo).
- Um e-mail de confirmação será enviado automaticamente para todos os endereços de e-mail envolvidos na operação, assim que a importação for concluída, indicando o número de mensagens copiadas.
- O acompanhamento está disponível nas configurações dos endereços de e-mail de destino, apenas no aplicativo web Mail (serviço online ksuite.infomaniak.com/mail).
- O acompanhamento permite visualizar o histórico das importações:
Link para esta FAQ: https://faq.infomaniak.com/2826
Esta seção de perguntas frequentes foi útil?
Este guia explica como iniciar uma conversa oral ou em vídeo entre um ou mais utilizadores kChat, com a solução ética de videoconferência gratuita da Infomaniak, kMeet.
Introdução
- A função de chamada no kChat está disponível em todas as versões Web (navegador), móvel (iOS/Android) e desktop (macOS/Windows).
Criar uma reunião entre utilizadores do kChat
Para poder conversar em uma sala virtual usando o microfone e a webcam do seu dispositivo, basta pressionar o botão Ligar, visível em qualquer conversa do kChat, canal privado, público, através do aplicativo ou diretamente no navegador: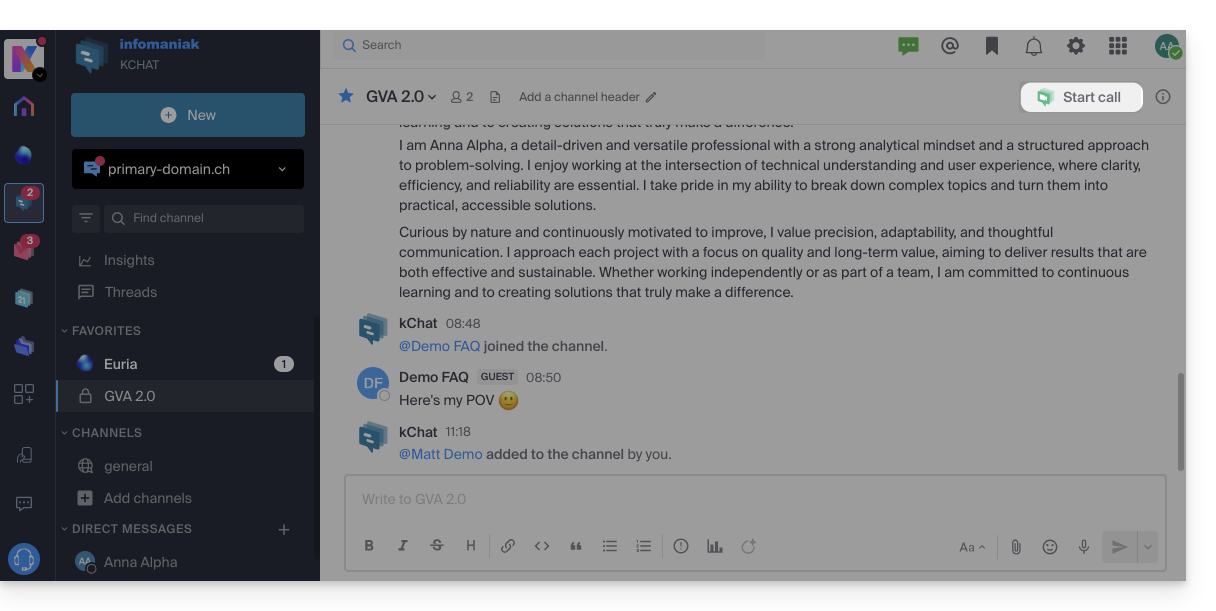
- Ligue diretamente para um usuário se você estiver em uma conversa direta com ele, ou inicie uma chamada para todos os membros de um canal se você iniciar a reunião a partir do canal.
- Ligar para um utilizador que está no modo “Não perturbar” não irá ativar o toque nem exibir uma notificação de chamada no dispositivo dele, mas ele verá a mensagem na conversa.
- O microfone é ativado por padrão quando a chamada é aceita, mas a câmera não.
- Visualize os participantes da reunião (quem aceitou, recusou ou não compareceu) usando os avatares na mensagem do kChat.
- Assim que a chamada começar, um emoji aparecerá no seu status do kChat para indicar que você está ocupado na conversa.
- Uma mensagem enviada durante a videoconferência (kMeet) também será visível na conversa do kChat (e vice-versa).
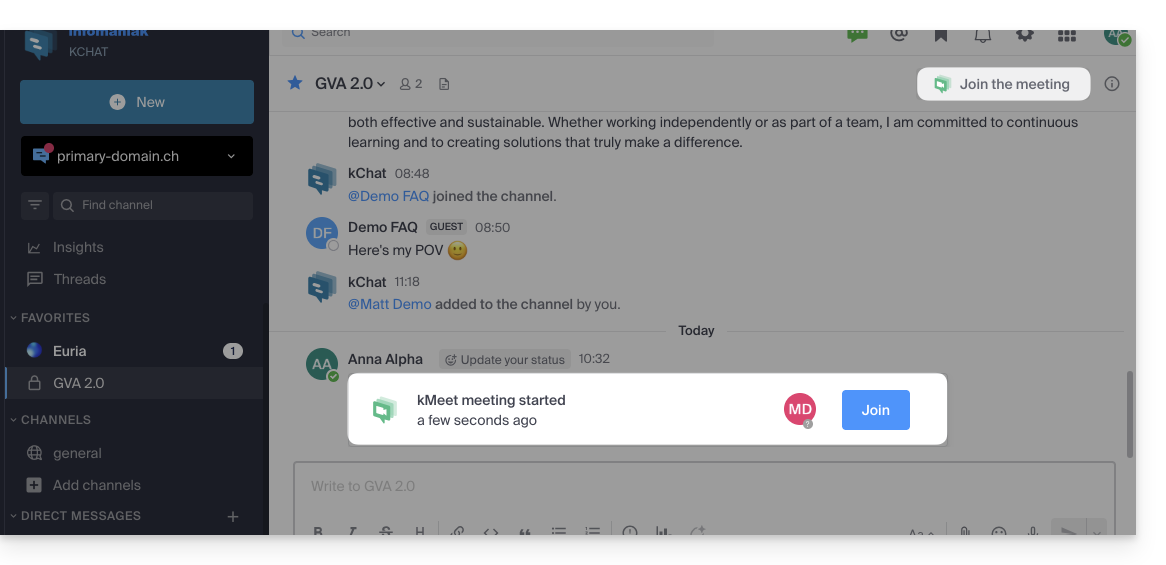
- Informações sobre o início e o fim da reunião são exibidas automaticamente no histórico de conversas do kChat correspondente:
Particularidades para chamadas em canais
- A chamada não tocará nos dispositivos dos destinatários, mas eles verão uma mensagem no kChat, bem como uma notificação.
- Uma mensagem (de alerta) será exibida se você tentar iniciar uma chamada em um canal com mais de 7 usuários.
Consulte este outro guia se você precisar de informações sobre o kMeet.
Link para esta FAQ: https://faq.infomaniak.com/2827
Esta seção de perguntas frequentes foi útil?
Este guia permite que você descubra rapidamente as funções essenciais da Euria, a inteligência artificial à sua disposição dentro do kSuite, que se destaca, em particular, como um agente de conversação no aplicativo kChat.
Introdução
- A Euria pode ajudá-lo a realizar todo o tipo de cálculos, traduções, fornecer informações sobre diferentes tópicos e responder às suas perguntas.
- Leia este outro guia sobre o modelo utilizado e as responsabilidades de cada um.
- Assim que um novo usuário é adicionado, ele recebe uma mensagem da Euria, dando-lhe as boas-vindas.
- Leia este outro guia sobre as possibilidades de resumos gerados por IA no kChat.
Adicionar a Euria aos contatos do kChat
Os bots atualmente disponíveis no kChat já fazem parte dos seus contatos.
Se você ainda não os vir, clique no menu lateral esquerdo do kChat…
- … na pesquisa de canal (os bots também aparecem como canais)
- … ou no ícone + ao lado de Mensagens diretas para pesquisar o bot
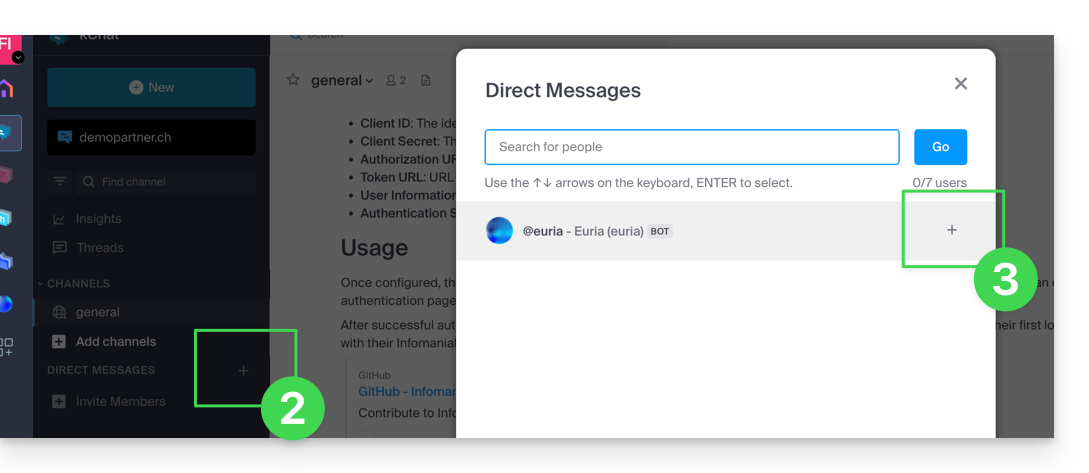
- Adicione os bots identificados como tal com a etiqueta [bot] ou pesquise o termo bot ou chat.
Não crie uma conversa em grupo entre os bots e você, pois isso não funcionará. É necessário criar um canal de discussão privado entre cada bot individualmente e você.
Basta então escrever para ele como se estivesse a conversar com um conhecido: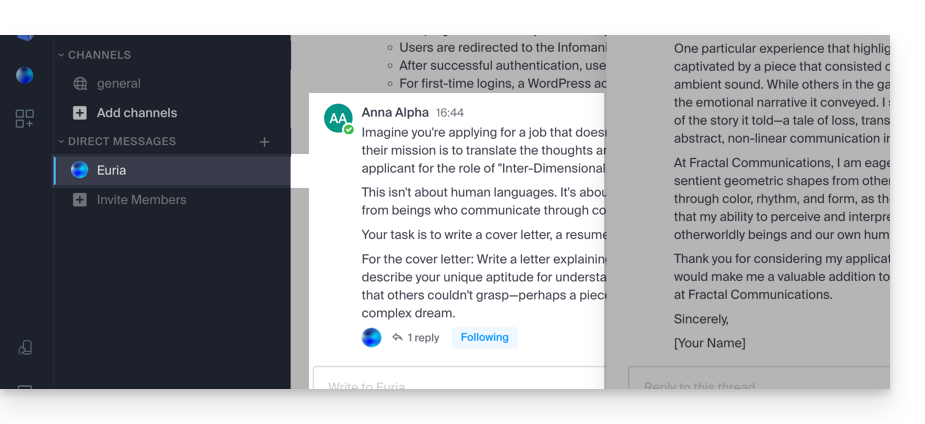
Link para esta FAQ: https://faq.infomaniak.com/2840
Esta seção de perguntas frequentes foi útil?
Este guia explica como adicionar um utilizador totalmente externo ao kChat.
Introdução
- Um administrador do kChat pode convidar um utilizador totalmente externo à sua organização, que não será contabilizado como um utilizador.
- Este utilizador será, no entanto, solicitado a criar uma conta Infomaniak caso ainda não possua uma.
- Para adicionar um utilizador kChat e conceder-lhe mais permissões (será contabilizado como um utilizador kSuite), consulte este outro guia.
Convidar um utilizador para participar numa conversa num canal privado
Pré-requisitos
- Ser administrador do kChat:
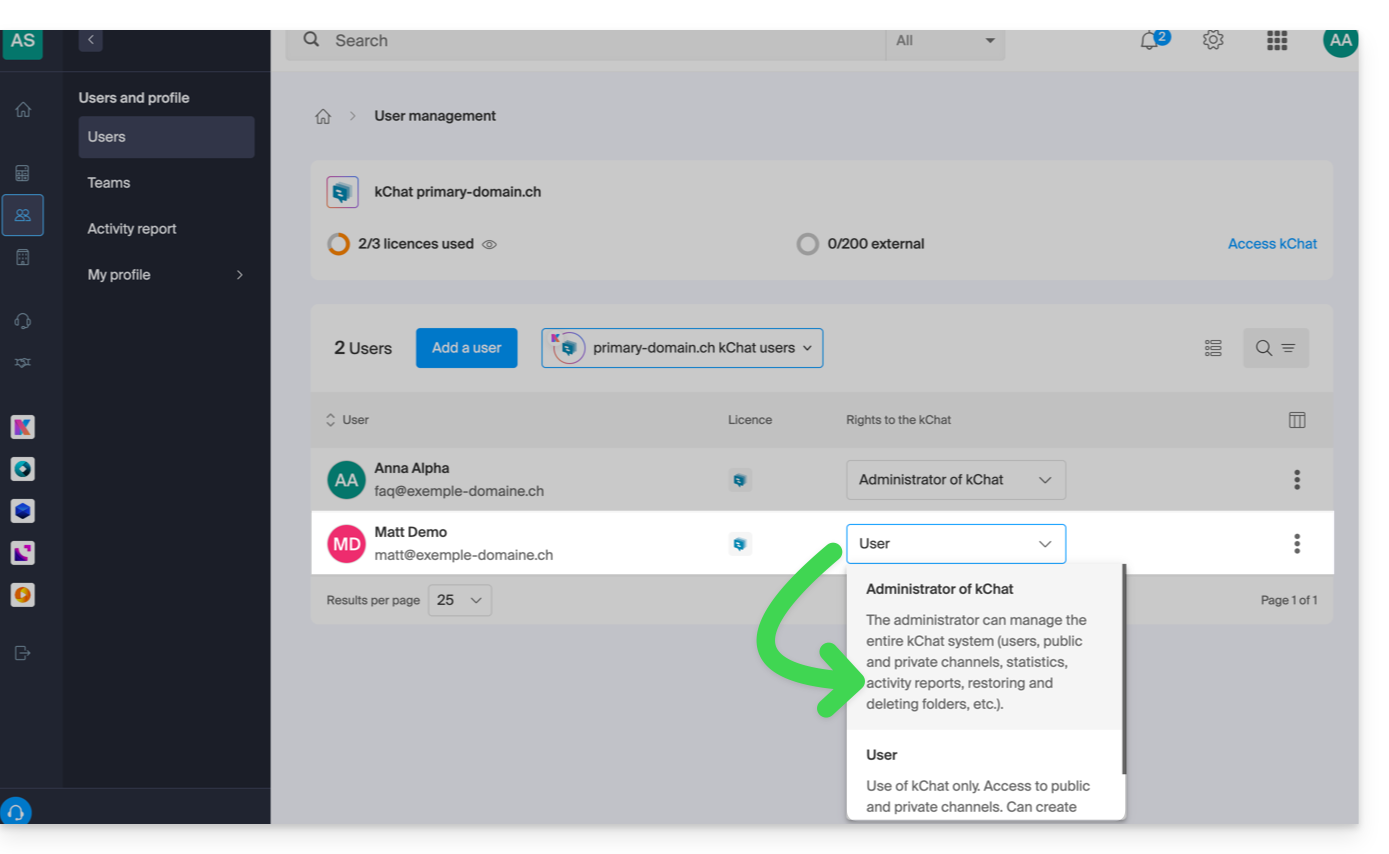
- Não importa o cargo na Organização; ser administrador da Organização na qual existe a kSuite (e, portanto, o kChat) não é obrigatório e, de qualquer forma, não é suficiente:
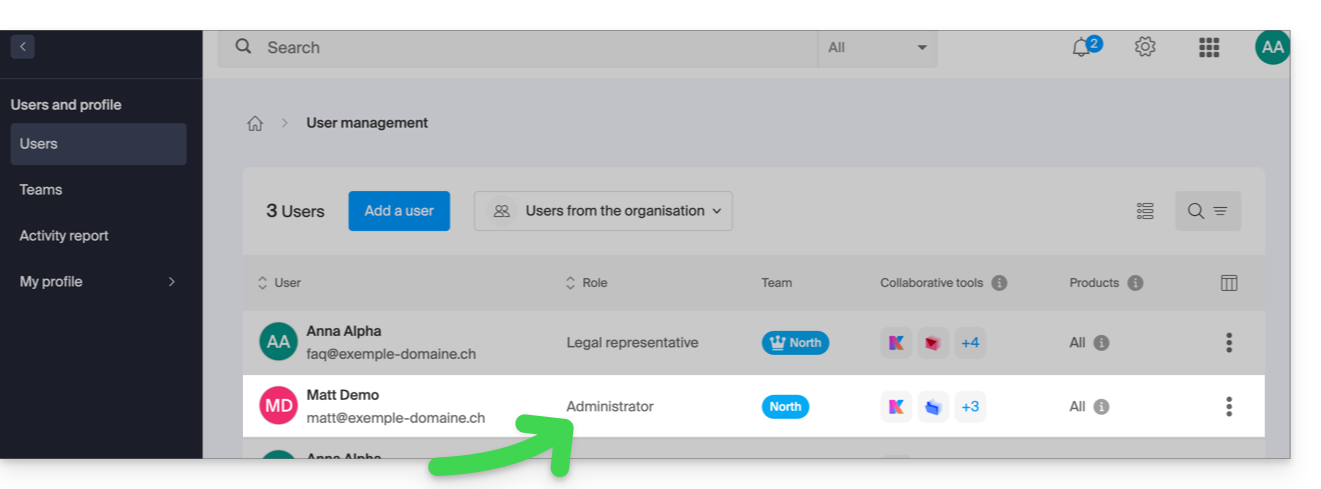
- Não importa o cargo na Organização; ser administrador da Organização na qual existe a kSuite (e, portanto, o kChat) não é obrigatório e, de qualquer forma, não é suficiente:
Em seguida, para enviar um convite por e-mail a partir do kChat:
- Clique aqui para acessar o aplicativo web kChat (serviço online ksuite.infomaniak.com/kchat) ou abra o aplicativo desktop kChat (aplicativo para computador em macOS / Windows / Linux).
- Clique no botão para Convidar membros:
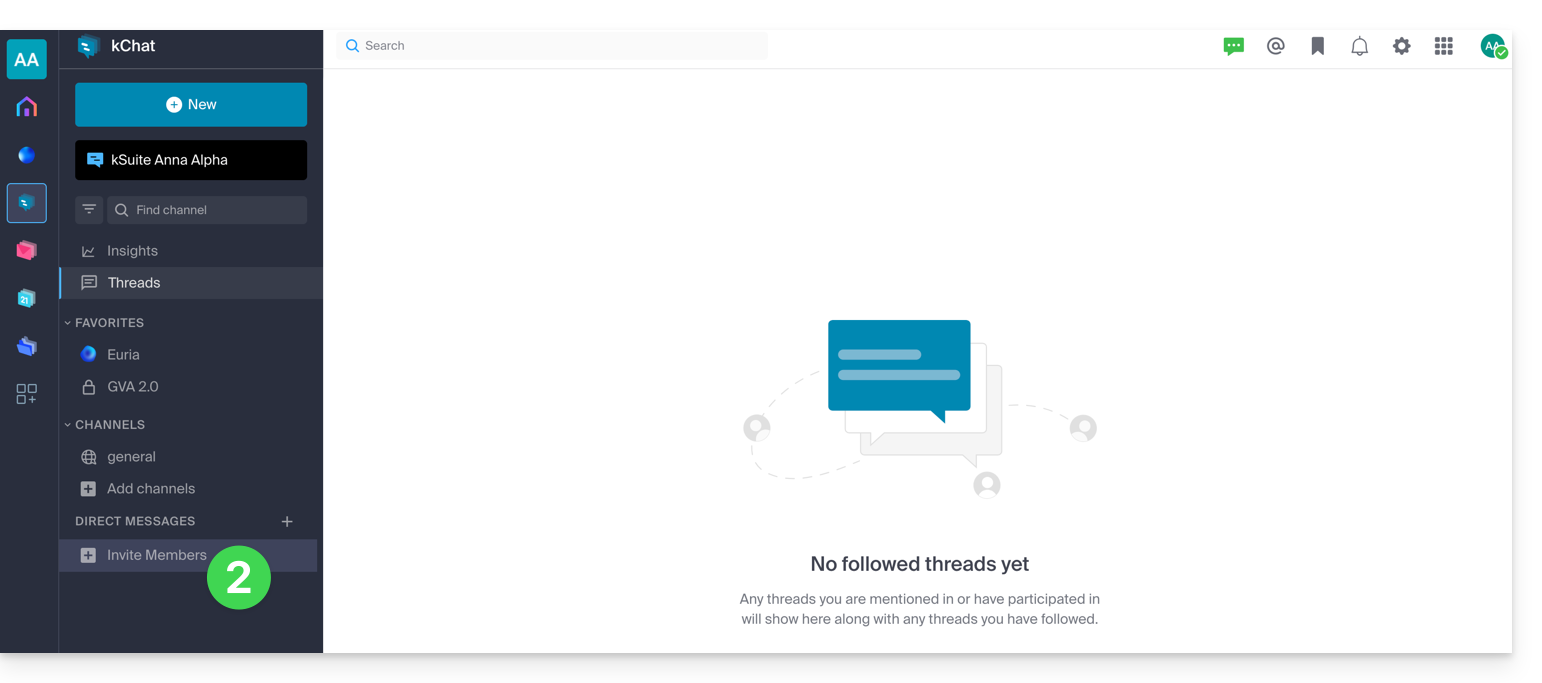
- Especifique o endereço de e-mail da pessoa que deseja convidar.
- Clique no endereço de e-mail para adicioná-lo como convidado:
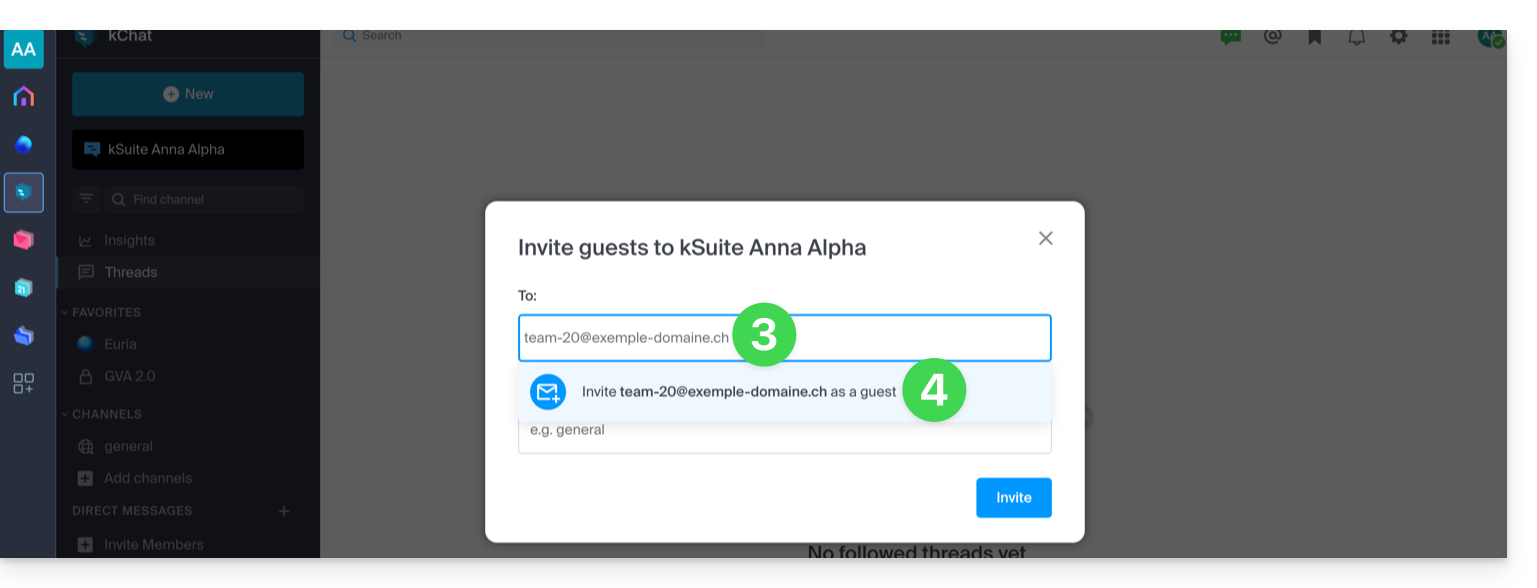
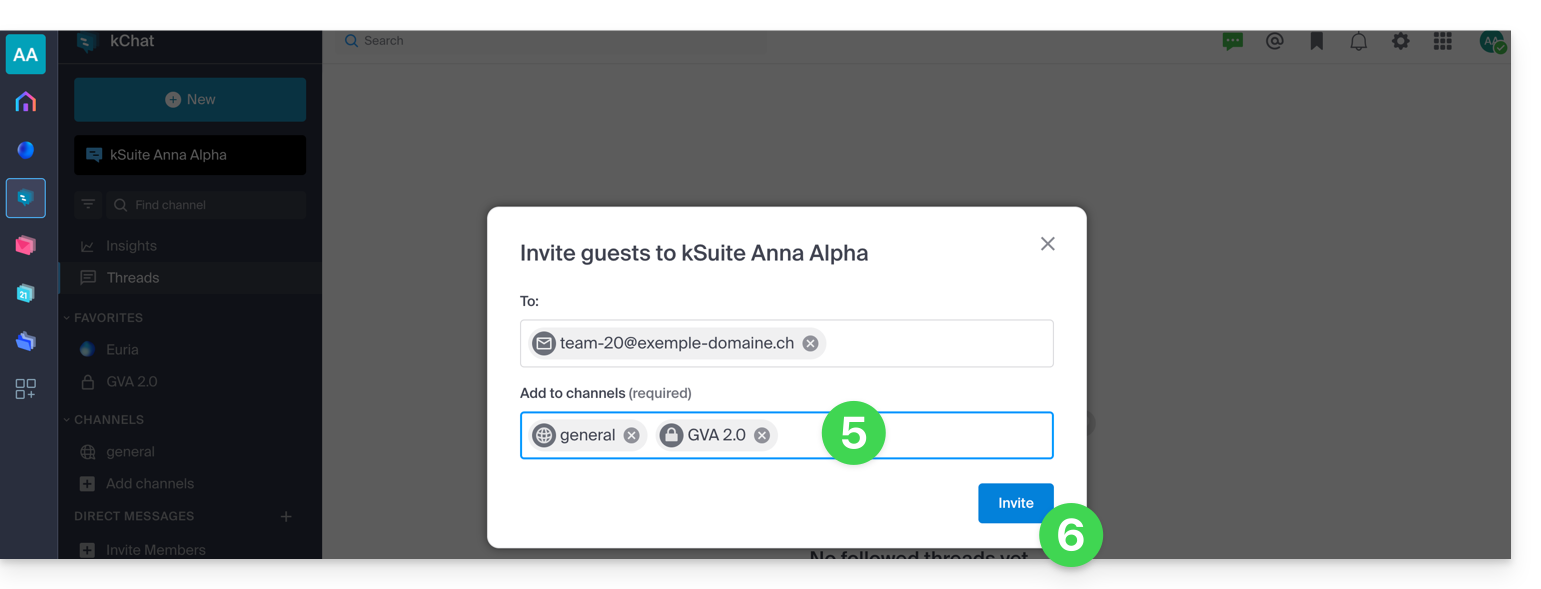
- Especifique o(s) canal(is) aos quais essas pessoas poderão ter acesso.
- Clique no botão azul para enviar o convite:
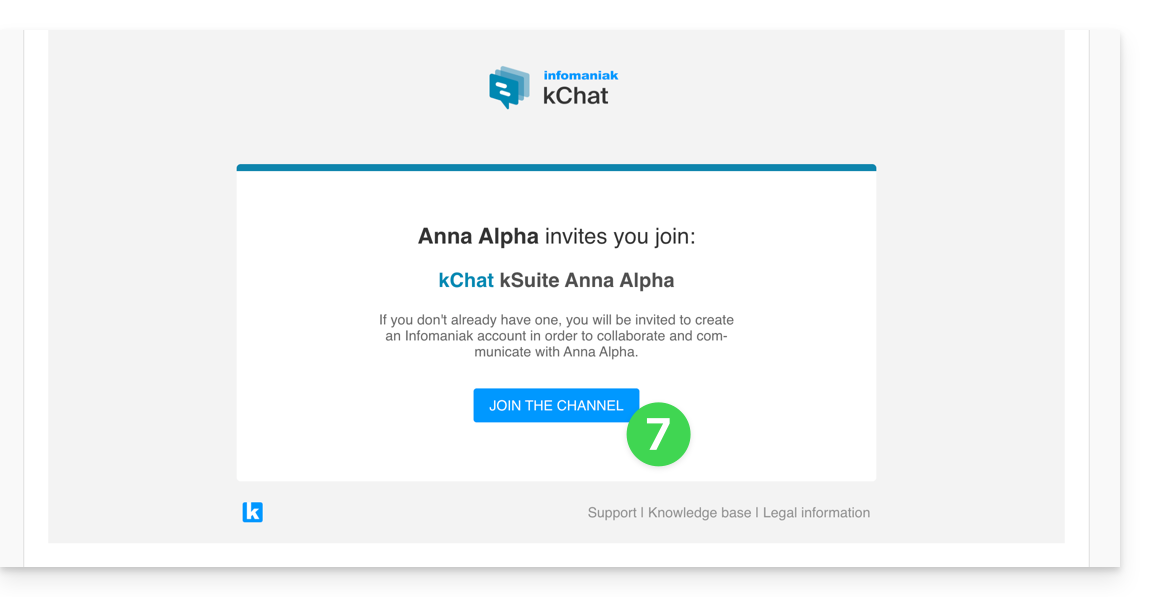
- A pessoa convidada recebe um e-mail com um link que a direciona para a interface kChat e para o canal compartilhado com ela:
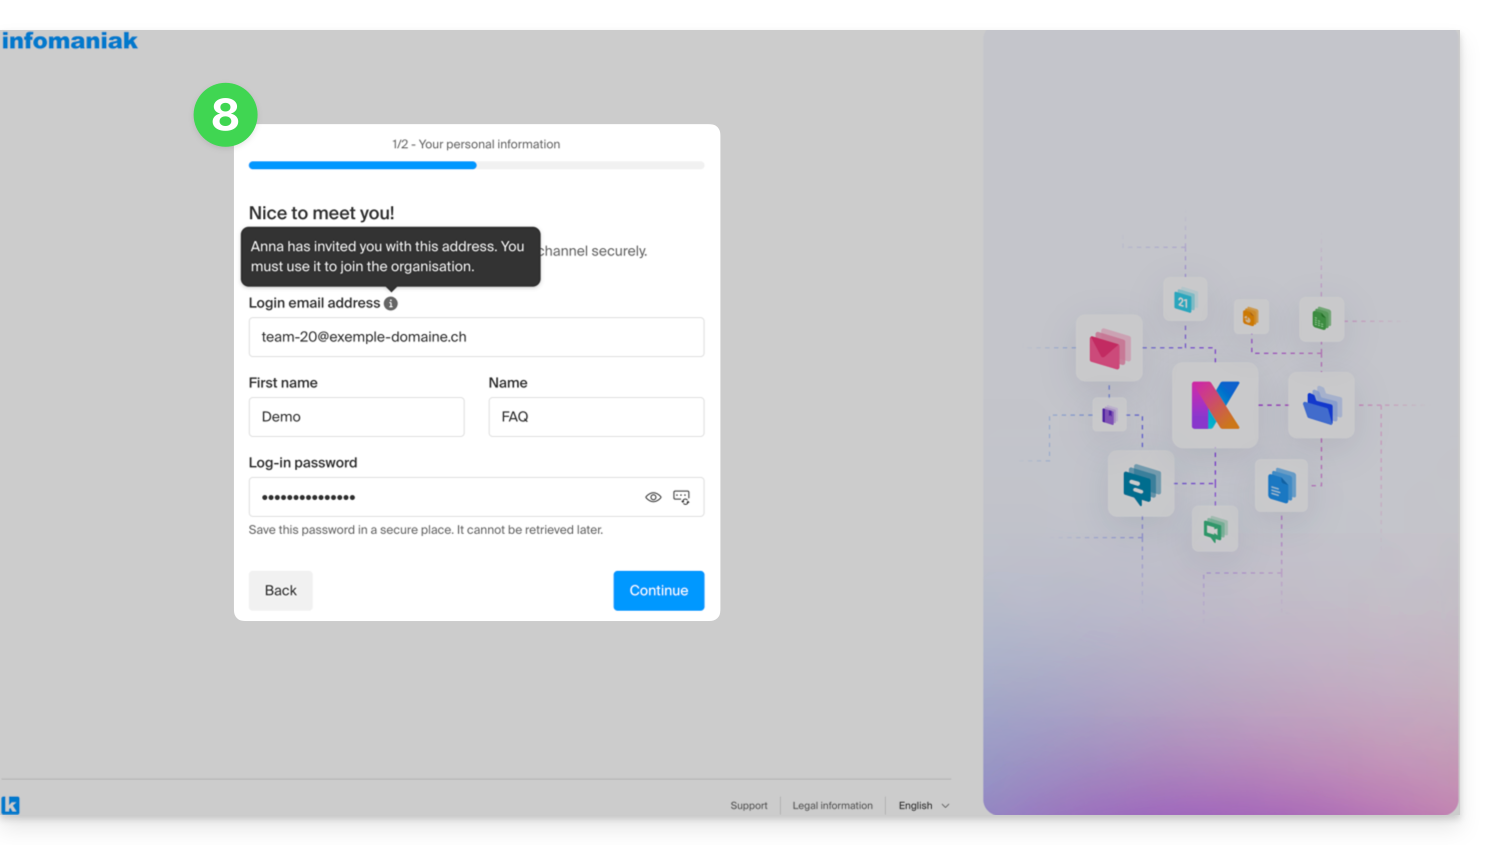
- Obviamente, existe uma fase de registo caso o utilizador ainda não tenha uma conta Infomaniak (durante esse período, o utilizador convidado é listado como em espera no canal kChat em questão):
- Note que ele não será listado como em espera no kSuite ou em outro lugar, pois é um utilizador externo com acesso restrito; e, enquanto o registo não for concluído, a quota permanece em 0 utilizadores externos:
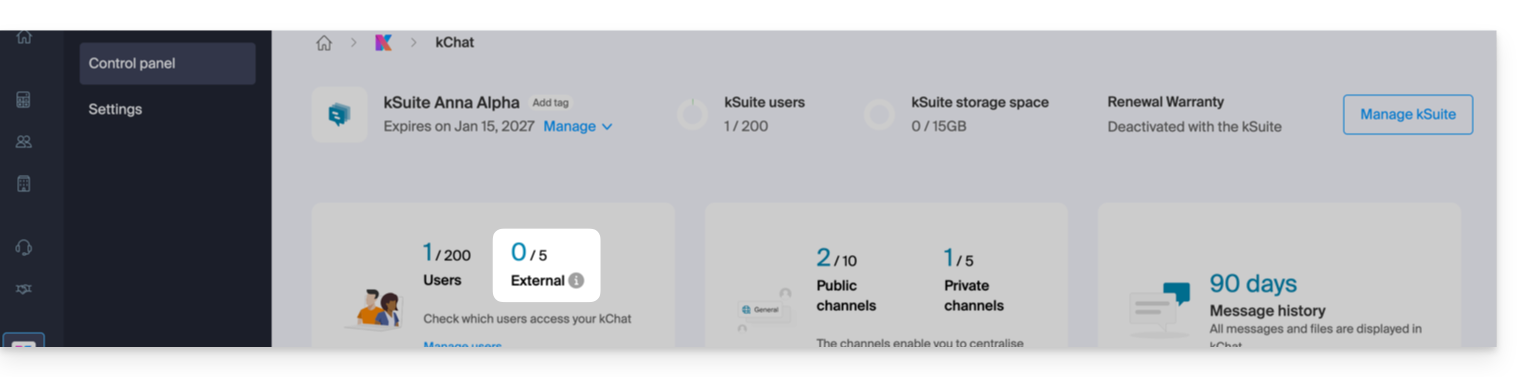
- Note que ele não será listado como em espera no kSuite ou em outro lugar, pois é um utilizador externo com acesso restrito; e, enquanto o registo não for concluído, a quota permanece em 0 utilizadores externos:
- Após a conclusão do registo, o convidado pode aceder ao kChat, uma versão restrita e limitada aos canais especificados pelo administrador durante a criação do convite:
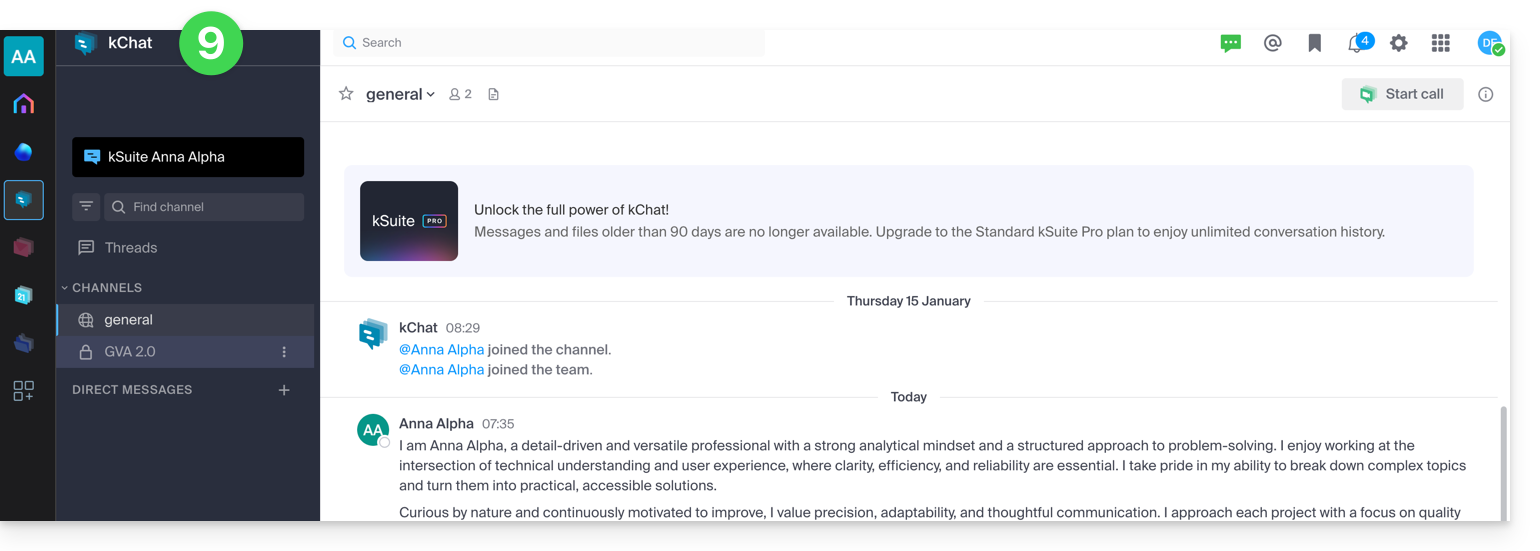
- Ele pode iniciar uma conversa privada com outros usuários:
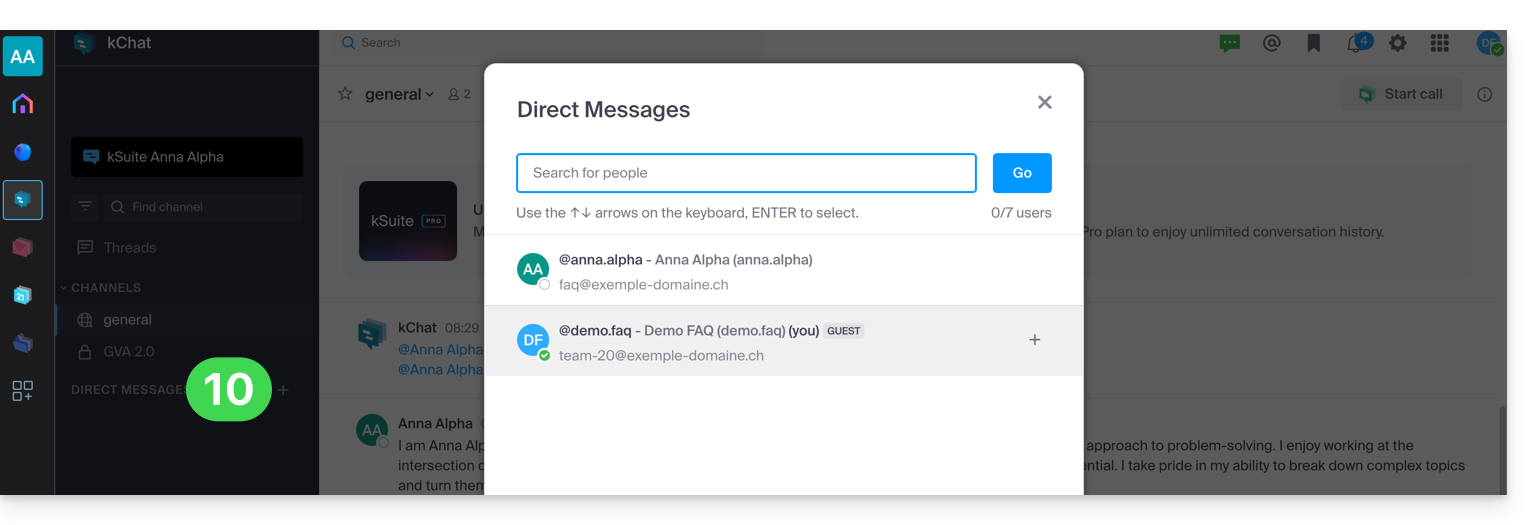
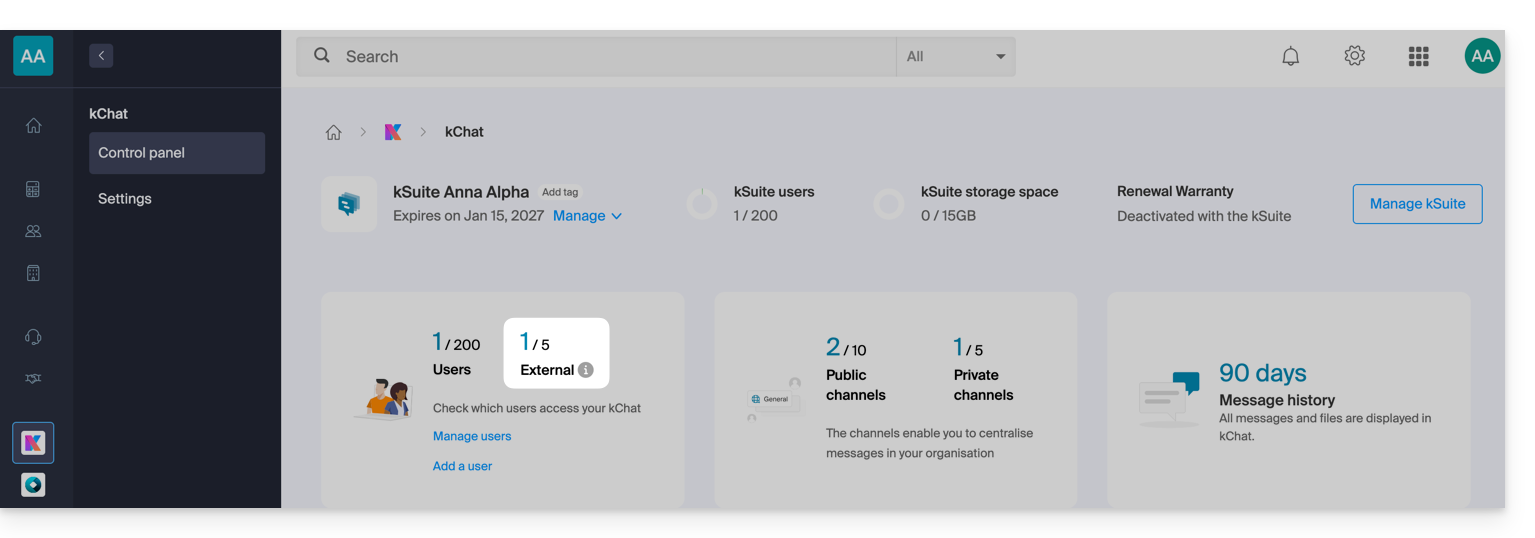
- No painel de controle do administrador, após o registro bem-sucedido do usuário externo, você verá a indicação de 1 usuário externo no seu painel de controle:
- E agora você verá a indicação no kChat de que o usuário tem acesso ao seu canal privado:
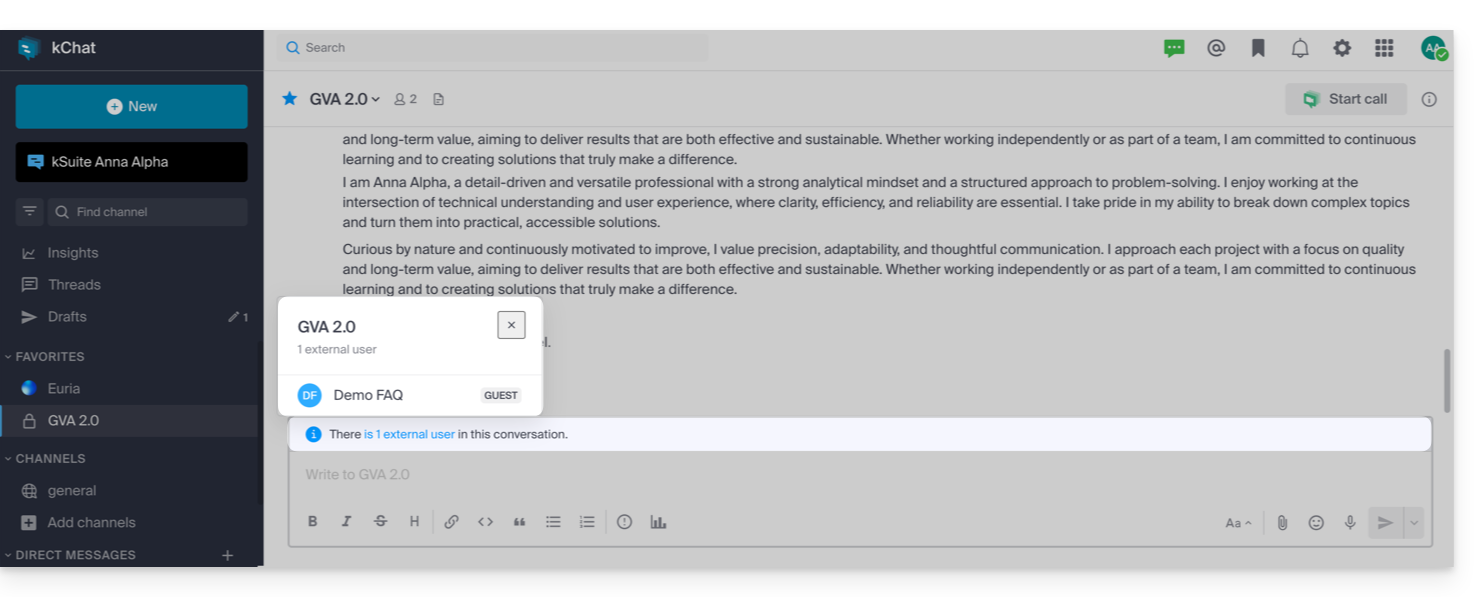
- No painel de controle do administrador, após o registro bem-sucedido do usuário externo, você verá a indicação de 1 usuário externo no seu painel de controle:
Permissões do usuário convidado
Os convidados podem…
- … fixar mensagens em canais
- … usar "comandos de barra" (com exceção de comandos restritos, como convidar membros, renomear canais, modificar cabeçalhos, etc.)
- … marcar um canal como favorito
- … silenciar um canal
- … atualizar o perfil
- … utilizar métodos de autenticação diferentes dos utilizados pelos outros utilizadores
- … utilizar a aplicação kChat: o utilizador convidado pode abrir a aplicação (Web, móvel ou desktop), quer seja já membro de um kChat ou não; este princípio de funcionamento é diferente do kDrive, por exemplo.
Os convidados não podem…
- … descobrir canais públicos
- … participar em grupos abertos
- … criar mensagens diretas ou mensagens de grupo com membros que não pertencem ao mesmo canal
- … convidar pessoas
Em caso de problema
Se você é administrador da Organização, mas ainda assim não consegue convidar um novo usuário no kChat, verifique se você é realmente administrador dentro do kChat, pois é possível ser apenas um usuário/colaborador, mesmo sendo o único usuário com licença no kSuite, por exemplo:
- Clique aqui para acessar o gerenciamento de usuários da Organização no Manager Infomaniak (precisa de ajuda?).
- Clique no seu nome de utilizador:
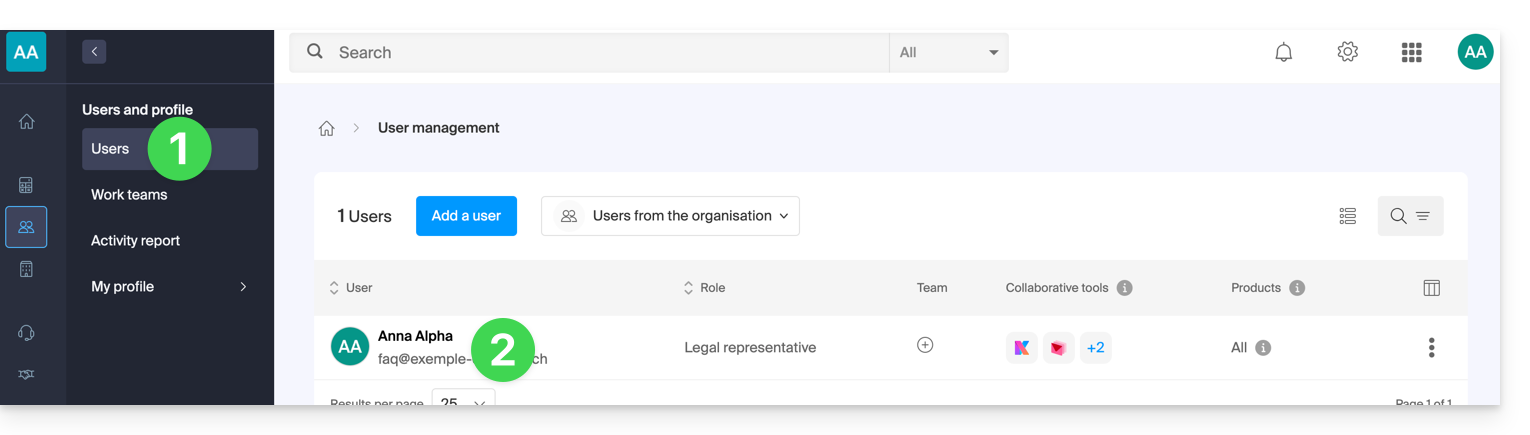
- Clique na seta para baixo para expandir as ferramentas de colaboração kSuite:
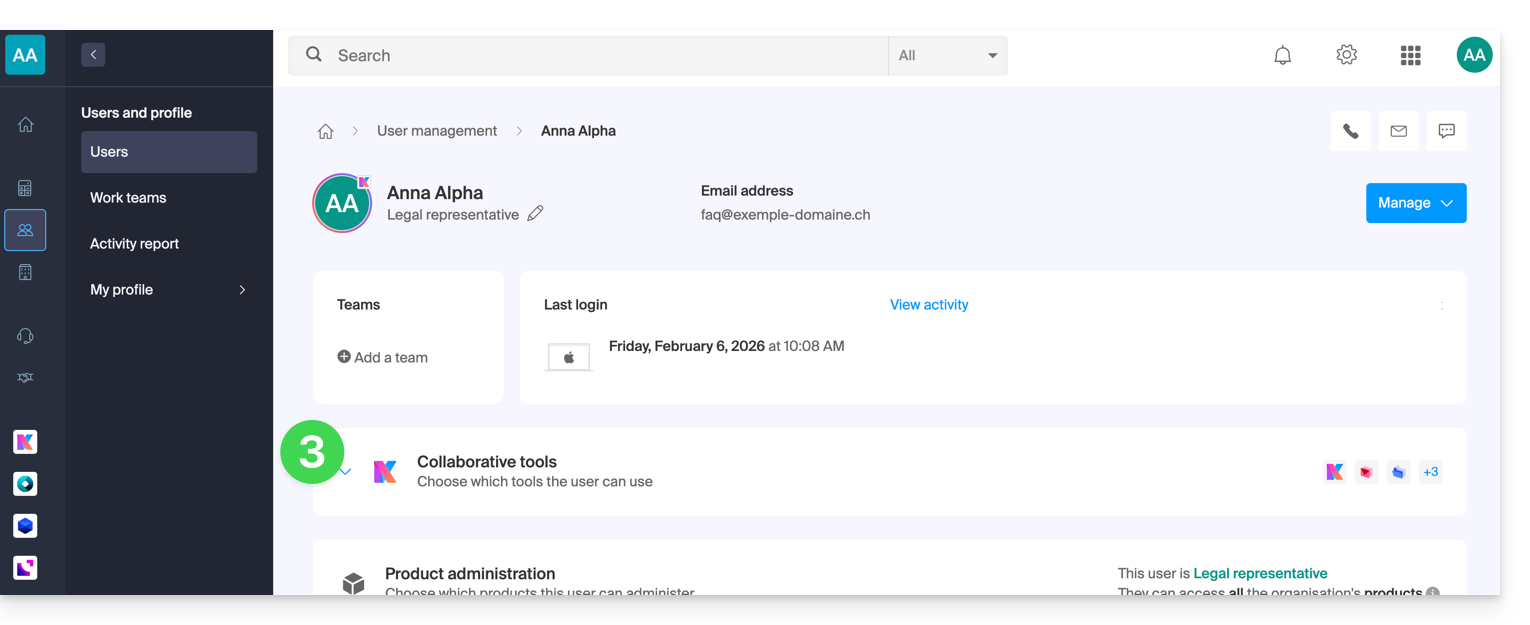
- No kChat, altere o papel de utilizador para administrador:
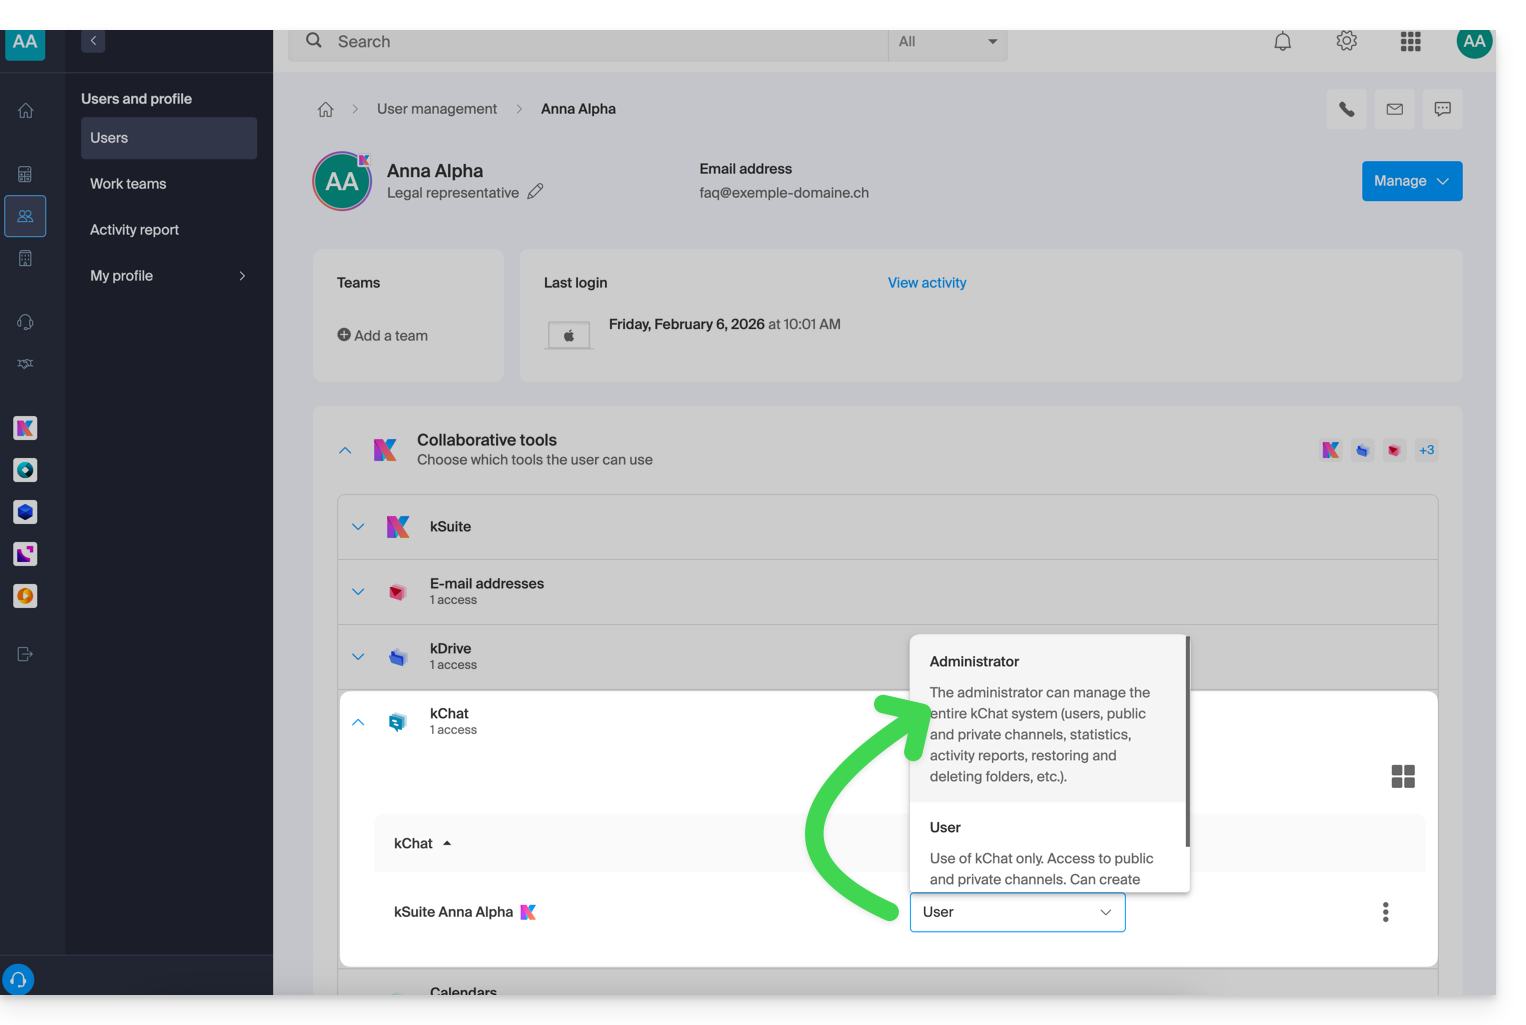
Link para esta FAQ: https://faq.infomaniak.com/2846
Esta seção de perguntas frequentes foi útil?
As ferramentas Infomaniak, como o aplicativo web Mail Infomaniak (serviço online ksuite.infomaniak.com/mail) ou as interfaces Calendar, Contacts, kSuite… podem ser exibidas no modo claro ou no modo escuro, inclusive com base nas configurações do seu sistema operacional:
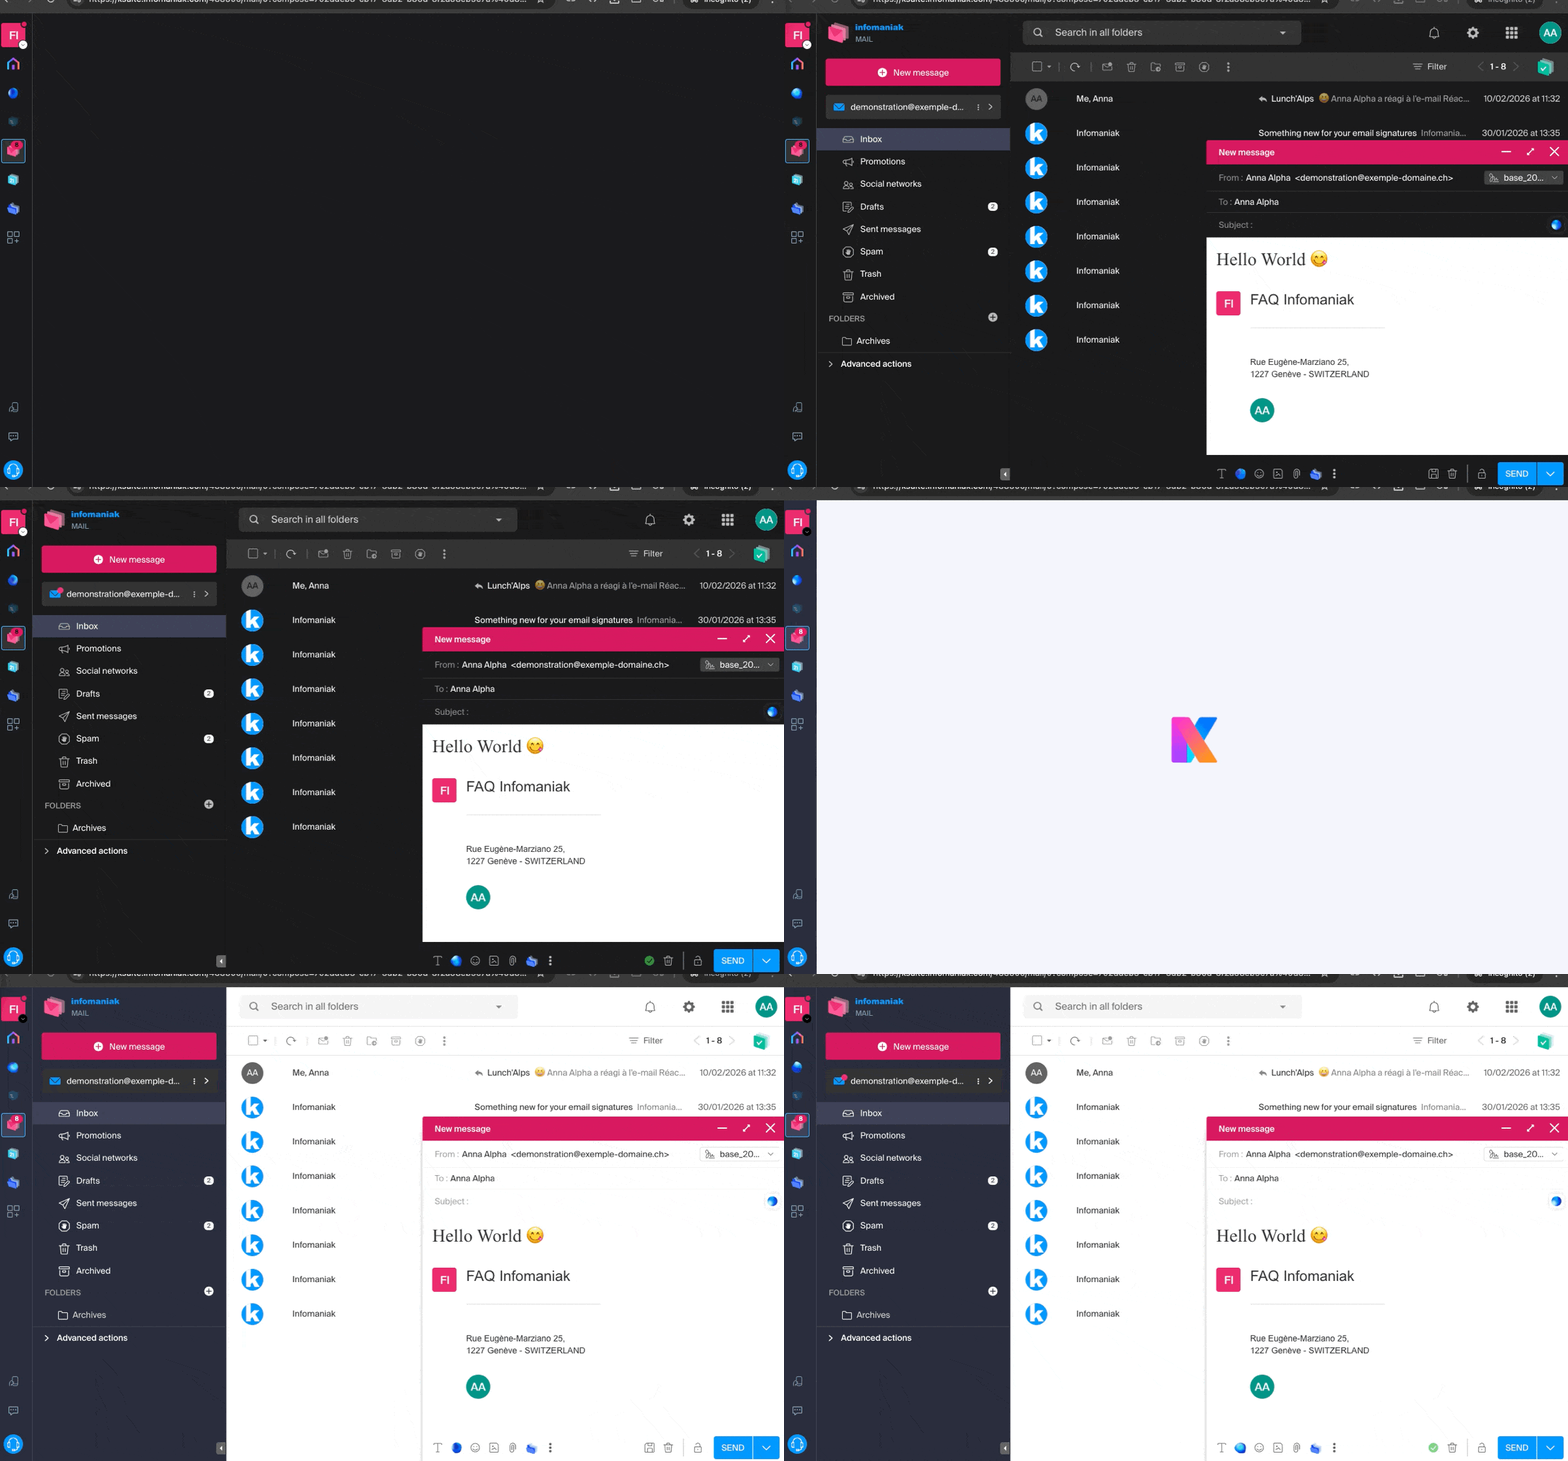
Ativar um modo manual
Para escolher manualmente um tema escuro ou claro, sem se basear em um possível tema diferente definido no sistema operacional:
- Clique aqui (ou no ícone com suas iniciais/avatar no canto superior direito do Gerenciador Infomaniak) para “Gerenciar minha conta”:
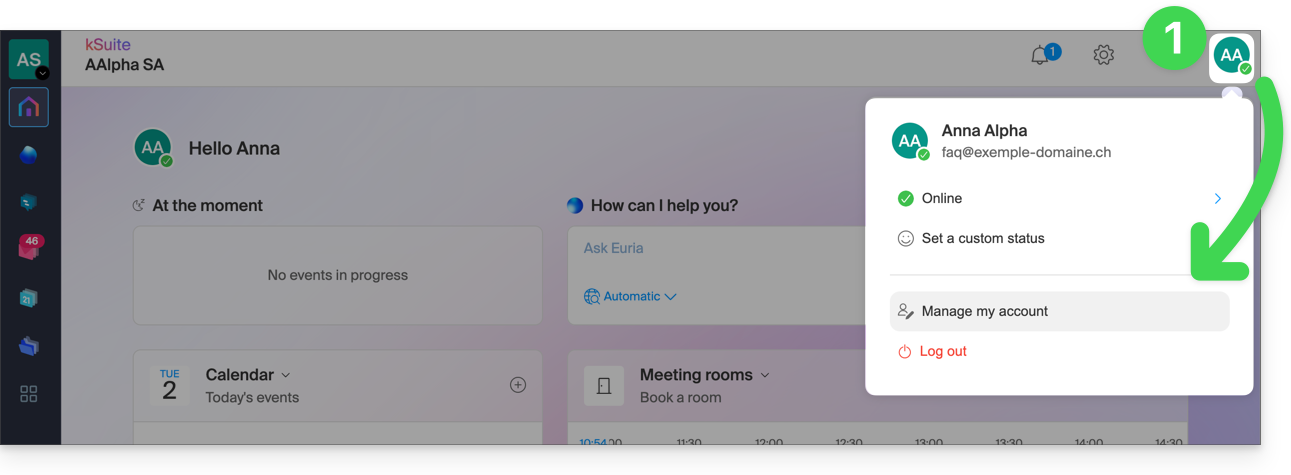
- Em seguida, clique em Aparência no menu lateral esquerdo.
- Clique em Claro para aplicar o modo claro:
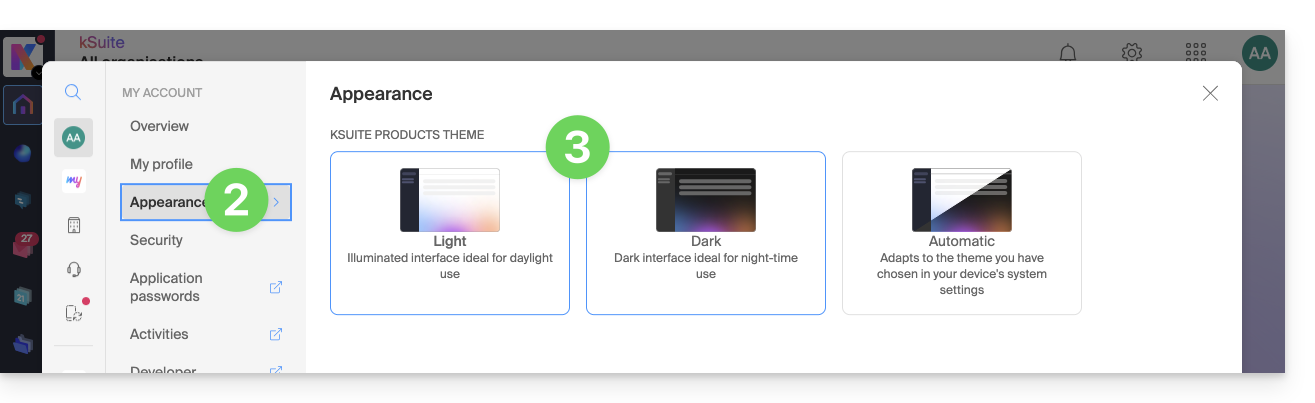
- Clique em Escuro para ativar o “modo noturno”.
Ativar o modo automático
O modo automático baseia-se nas configurações do seu sistema operativo (macOS / Windows...):
- Clique aqui ou no ícone com suas iniciais/avatar no canto superior direito do Gerenciador Infomaniak para "Gerenciar minha conta":
- Clique em Aparência no menu lateral esquerdo.
- Clique no modo Automático:
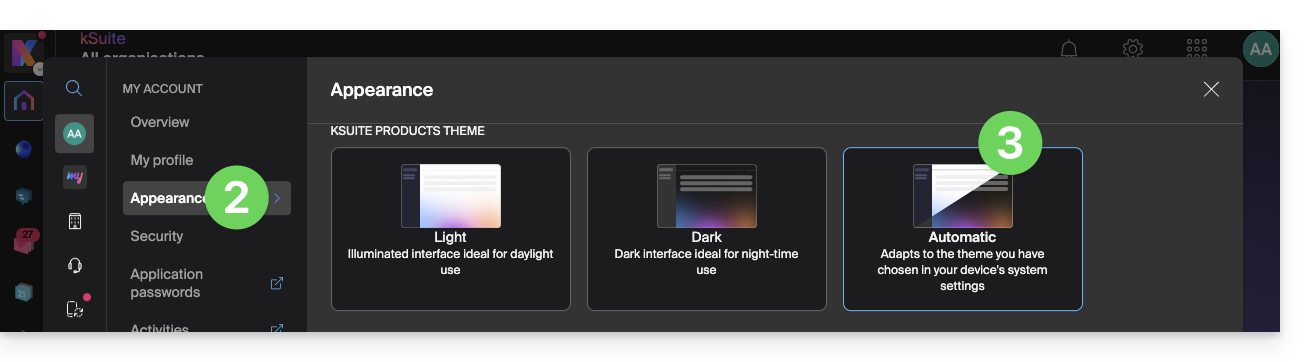
Em seguida, se desejar alterar o tema claro ou escuro do seu computador, para que o modo automático do Manager leve em consideração suas preferências…
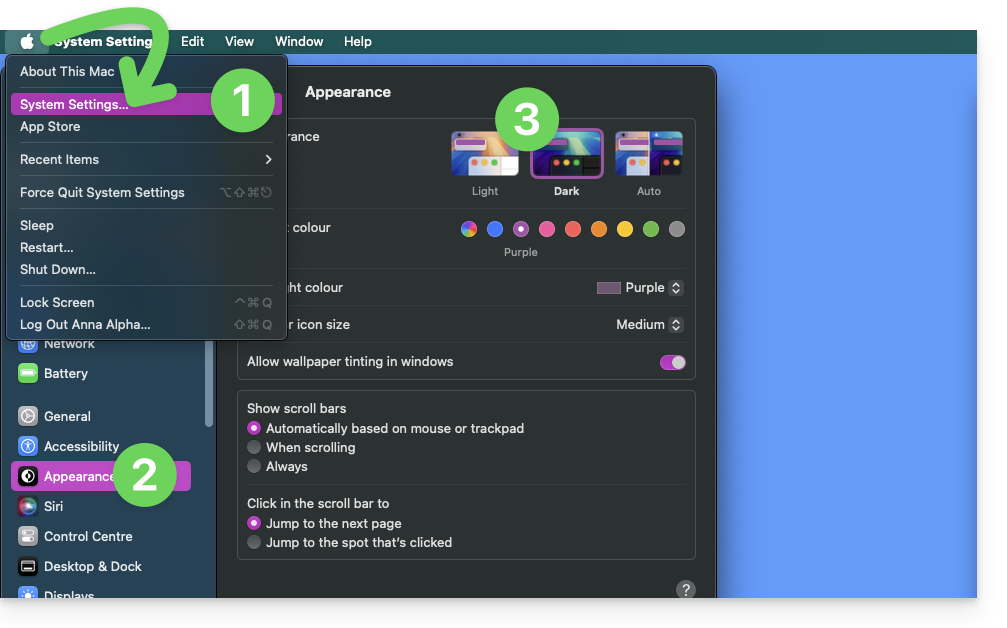
… no macOS
- Clique em Preferências do Sistema…
- Clique em Aparência.
- Escolha o modo desejado à direita:
… no Windows
- No menu Iniciar, abra Configurações > Personalização.
- Selecione Cores e, em seguida, Escolha o seu modo:
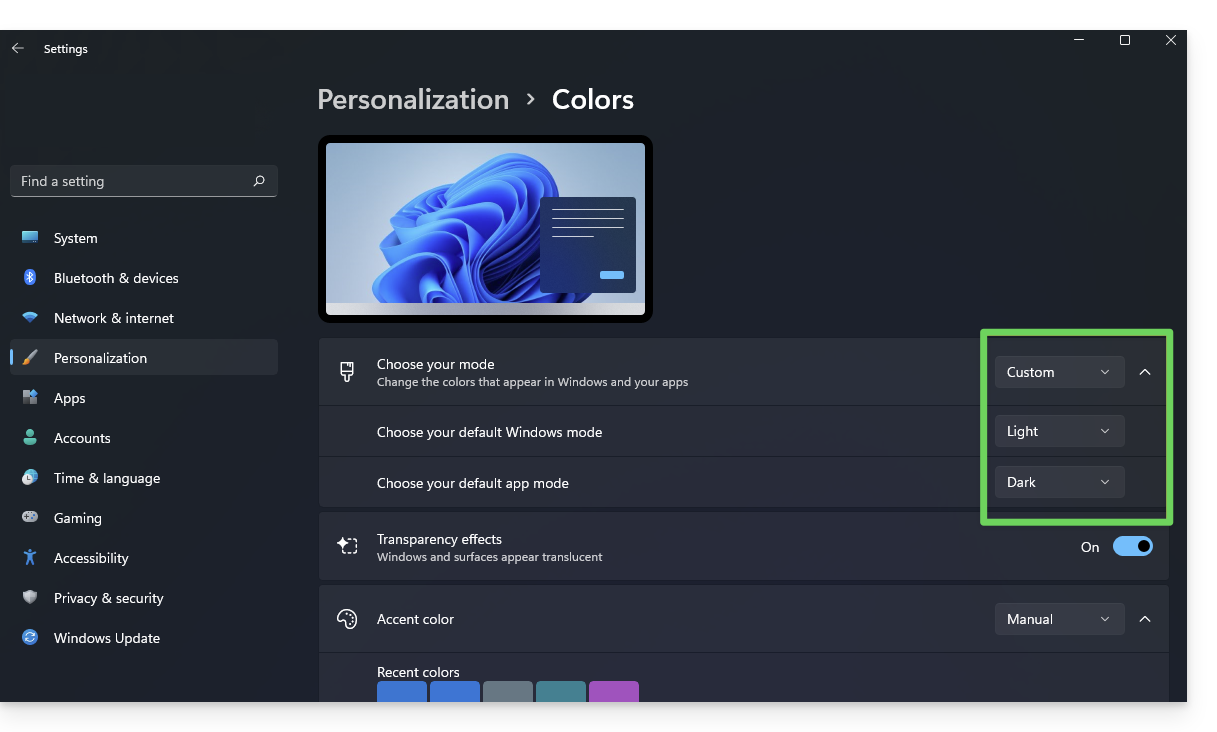
- Pode escolher entre Claro, Escuro ou Personalizado.
- Se selecionar Personalizado, terá a possibilidade de escolher um modo Windows predefinido e um modo de aplicação predefinido diferente.
E nos dispositivos móveis?
O tema escuro está ativado nos dispositivos móveis para as páginas de login e de criação de conta Infomaniak; ele se adapta automaticamente às preferências do sistema móvel, oferecendo assim uma experiência visual consistente entre os aplicativos móveis e o login/criação de conta.
Link para esta FAQ: https://faq.infomaniak.com/2870
Esta seção de perguntas frequentes foi útil?