Base de conhecimento
1000 perguntas frequentes, 500 tutoriais e vídeos explicativos. Aqui, você encontra apenas soluções!
Este guia explica como resolver possíveis problemas durante uma reunião kMeet, a videoconferência segura, ilimitada e gratuita da Infomaniak.
Para um problema específico relacionado ao vídeo, consulte este outro guia; para o áudio, este outro guia. Em todos os casos, recomenda-se usar o aplicativo para desktop kMeet (aplicativo de desktop para macOS / Windows / Linux) se ocorrer um problema com o aplicativo web kMeet da Infomaniak (serviço online kmeet.infomaniak.com) ou vice-versa.
Não é possível ver ou ouvir o interlocutor
Se a conferência já tiver sido iniciada e o seu interlocutor tiver ligado a câmera e o microfone, mas, mesmo assim, não o vir nem o ouvir, peça-lhe para verificar se existe algum firewall no seu computador ou na rede da empresa.
Um firewall pode autorizar soluções como o Google Meet ou o Microsoft Teams, sem, no entanto, autorizar os fluxos kMeet.
Nas configurações do seu firewall, é necessário autorizar o seguinte:
- Protocolo UDP:
443. - Para o servidor TURN (recomendado), adicione a porta TCP
443. - Autorize os seguintes endereços IP:
185.125.24.0/24(TCP)185.125.24.0/24(UDP)
Também pode alterar a conexão (de Wi-Fi para 4G/5G, por exemplo) para verificar se um firewall é a causa das dessincronizações.
Impossível compartilhar a tela
Ao usar a solução de videoconferência kMeet, se o botão para compartilhar a tela não estiver disponível e/ou permanecer desativado, verifique as configurações de segurança no seu computador/sistema operacional em relação a…
- … o aplicativo kMeet
- … o navegador (se você usar o kMeet diretamente online, sem usar o aplicativo):
No macOS, por exemplo, verifique e ative as permissões necessárias:
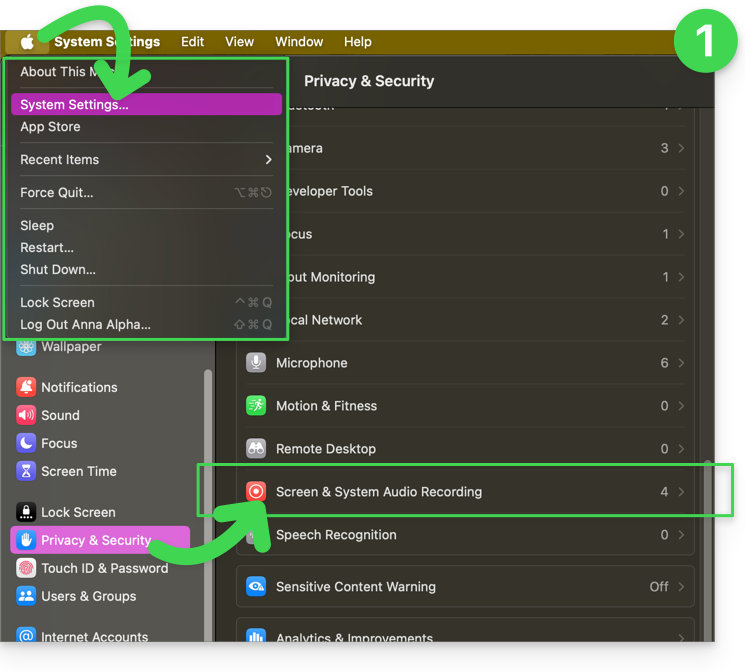
- Acesse Preferências do Sistema, em Privacidade e Segurança e, em seguida, Gravação de tela:
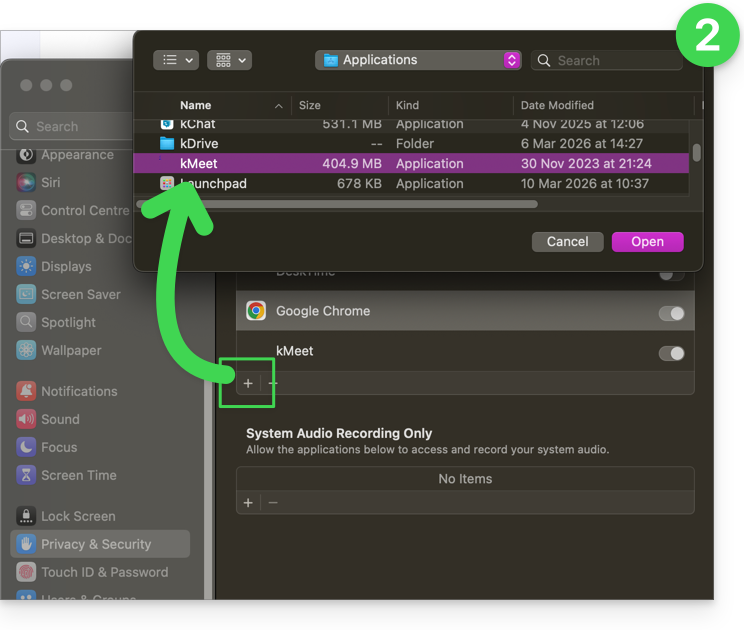
- Adicione o seu navegador, se necessário, e até mesmo o kMeet, caso tenha a aplicação para desktop instalada no seu computador:
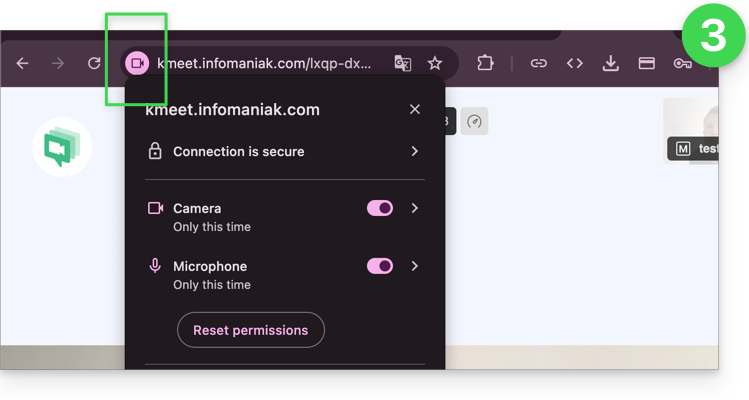
- Em seguida, familiarize-se com os ícones presentes na barra de endereço do seu navegador e verifique se há algum problema de permissão clicando nos símbolos:
Link para esta FAQ: https://faq.infomaniak.com/289
Esta seção de perguntas frequentes foi útil?
Este guia explica como adicionar um simples novo evento único a um calendário na aplicação web Calendar da Infomaniak (serviço online ksuite.infomaniak.com/calendar).
Introdução
- Para criar um evento recorrente / evento que se repete regularmente, consulte este outro guia.
- Para agendar uma reunião entre vários utilizadores e encontrar o melhor horário, consulte este outro guia sobre o assistente de agendamento de reuniões.
Adicionar um novo evento
Para agendar um evento único em um calendário gerenciado pela Infomaniak:
- Clique aqui para acessar o aplicativo web Calendar da Infomaniak (serviço online ksuite.infomaniak.com/calendar).
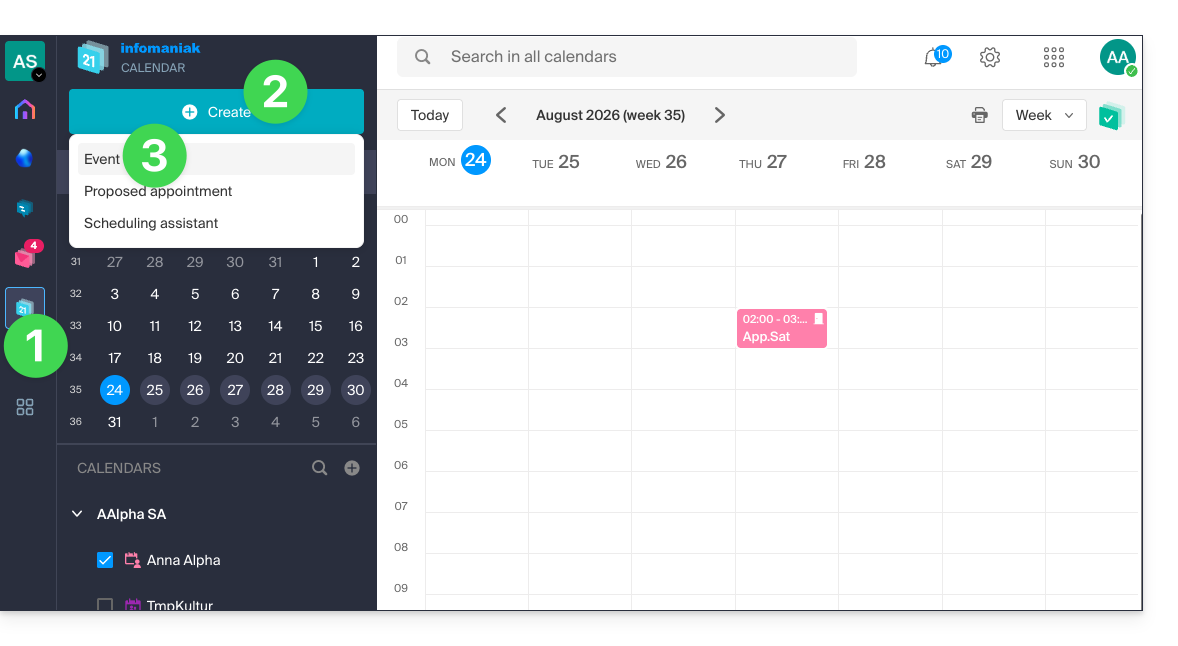
- Clique no botão Criar no canto superior esquerdo.
- Clique em Evento:
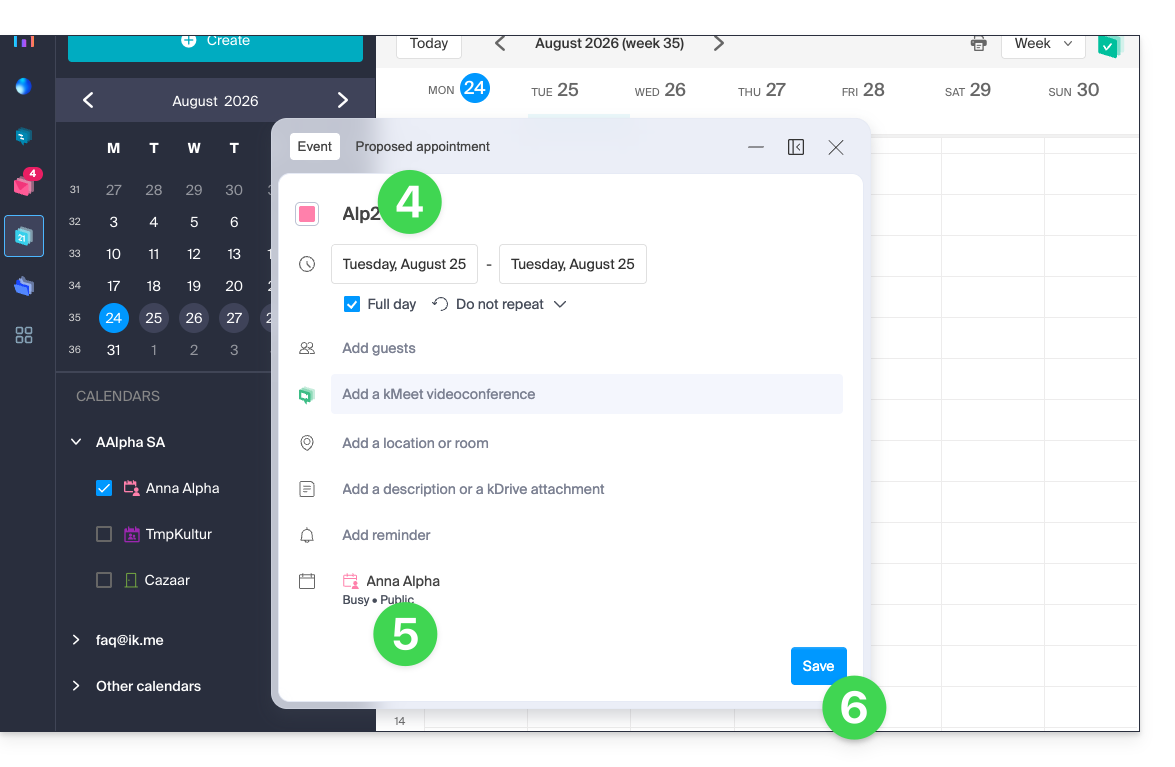
- Preencha os diferentes campos:
- Cor e título (assunto) do evento
- Data/hora ou duração, possível recorrência
- Os participantes (consulte abaixo)
- Link kMeet se o evento corresponder a uma reunião entre várias pessoas
- O local geográfico ou sala de reunião.
- Descrição ou anexo do kDrive
- Prazo para lembrete (notificação)
- Calendário em questão
- Escolha:
- o calendário em questão
- se o evento deve ter o status ocupado ou livre (para não impedir a marcação de outros compromissos)
- se deve ser público ou privado (e, neste caso, ninguém verá o evento no seu calendário, a menos que tenha permissões de edição)
- Clique em SALVAR para adicionar o evento ao calendário selecionado:
Você também pode clicar diretamente no calendário para adicionar um novo evento, arrastando o ponteiro do mouse sobre o período de tempo desejado: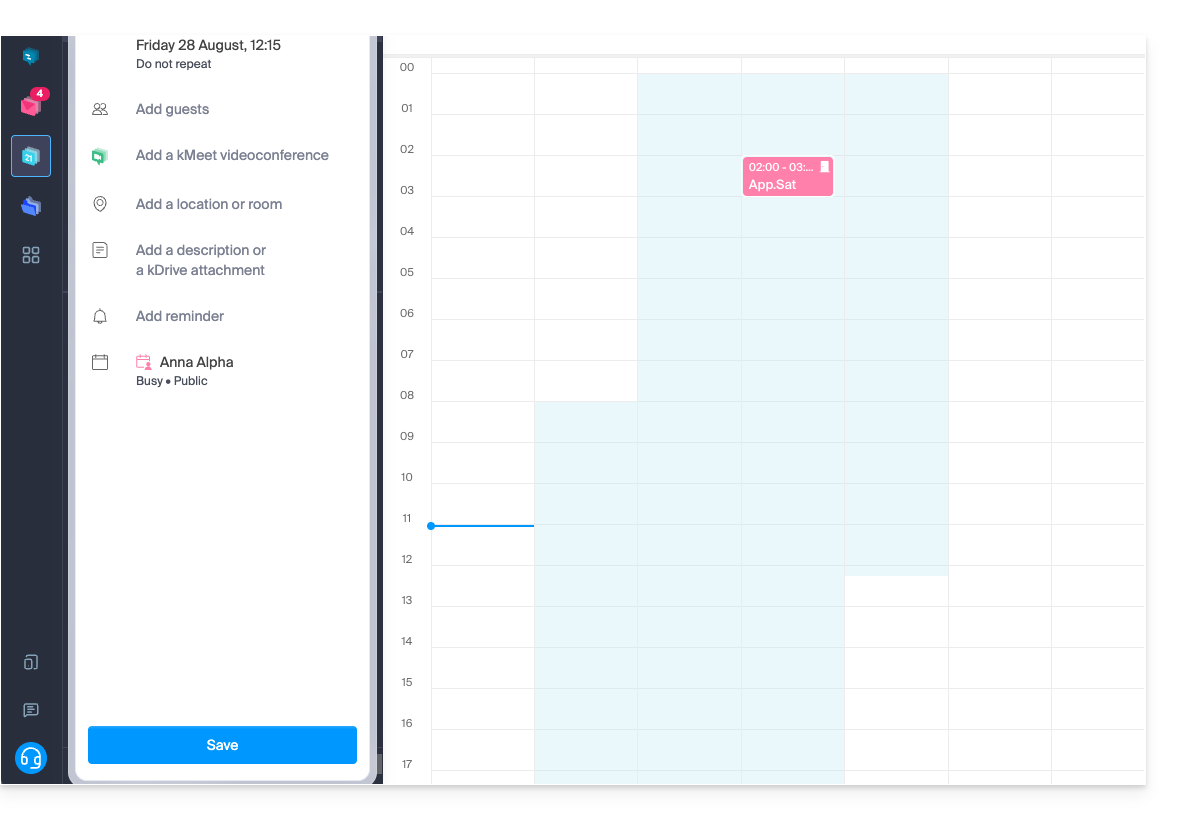
A janela de edição pode ser movida na tela e até mesmo inserida no painel lateral esquerdo para uma melhor visualização do calendário: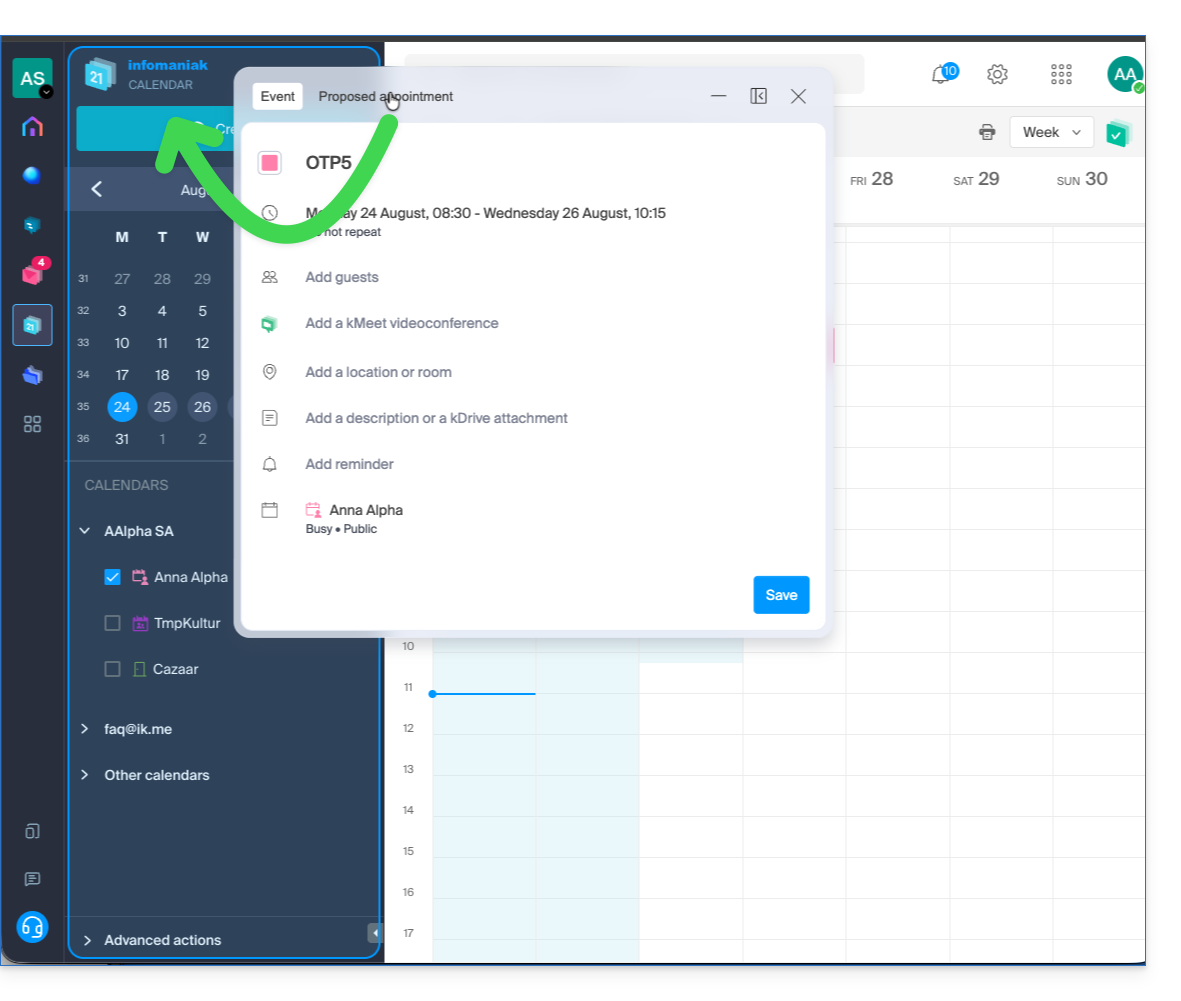
Adicionar participantes ao evento
Para convidar utilizadores, adicione o nome ou o endereço de e-mail deles durante a criação do evento ou posteriormente: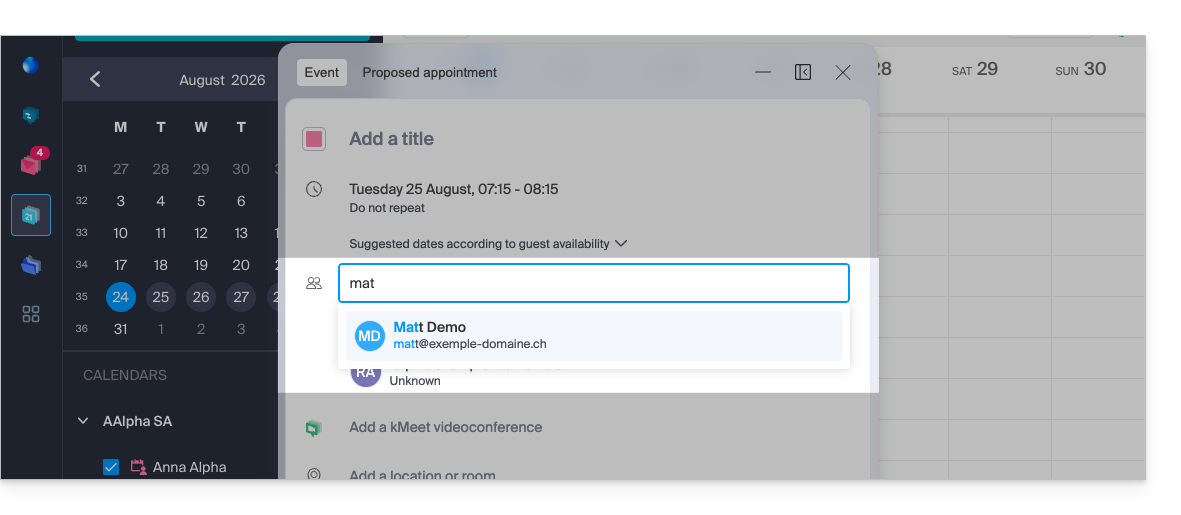
Será informado sobre a confirmação ou recusa da presença deles, caso sigam o procedimento enviado por e-mail no momento da criação do evento.
Qualquer atualização de um evento agendado também será enviada por e-mail a todos os participantes.
Link para esta FAQ: https://faq.infomaniak.com/956
Esta seção de perguntas frequentes foi útil?
Este guia explica como transmitir uma reunião online kMeet em um fluxo separado, acessível por meio de uma URL exclusiva, graças ao Streaming de Vídeo Infomaniak.
✘ INDISPONÍVEL com
kSuite Free / kSuite Standard
my kSuite / my kSuite+ (ik.me, etik.com, ikmail.com)
Preâmbulo
- Transmitir uma reunião, como uma conferência, em um fluxo de Streaming de Vídeo, em vez de dentro da aplicação kMeet, apresenta várias vantagens:
- Transmissão pública em larga escala sem a necessidade de restringir o acesso a um público limitado a pessoas convidadas.
- Atrair um público mais amplo, como em conferências, webinars ou eventos ao vivo, onde centenas ou milhares de espectadores podem acompanhar o evento sem participar de uma chamada privada.
- Permite alcançar um número ilimitado de espectadores.
- Não é necessário gerenciar o acesso para cada participante; o fluxo é simplesmente acessível por meio de um link.
- Um simples navegador como Brave, Chrome, Edge, Firefox, Opera, Safari… é suficiente para acessar o fluxo de streaming.
- Acesso passivo: os espectadores não são obrigados a participar ativamente ou interagir; eles podem simplesmente assistir ao evento sem se registrar ou fazer login, o que é mais adequado para grandes eventos.
- Não há interrupções de áudio ou perturbações relacionadas ao gerenciamento de microfones; isso permite manter um fluxo mais suave e focado no orador.
- Resolução de transmissão mais alta, pois o kMeet pode ser limitado por restrições de largura de banda e ter uma qualidade de vídeo inferior para evitar a sobrecarga da rede.
Criar o link de compartilhamento para streaming de vídeo
Pré-requisitos
- É preciso ser moderador do kMeet para poder criar um link de transmissão ao vivo.
- Não é necessário ter uma oferta de streaming de vídeo Infomaniak.
Em seguida:
- Inicie o kMeet através de ksuite.infomaniak.com/kmeet ou a partir de uma das aplicações para computador ou dispositivos móveis.
- Dentro da reunião, clique no menu de ações ○○○ na barra de ferramentas do kMeet.
- Escolha Iniciar a transmissão ao vivo:
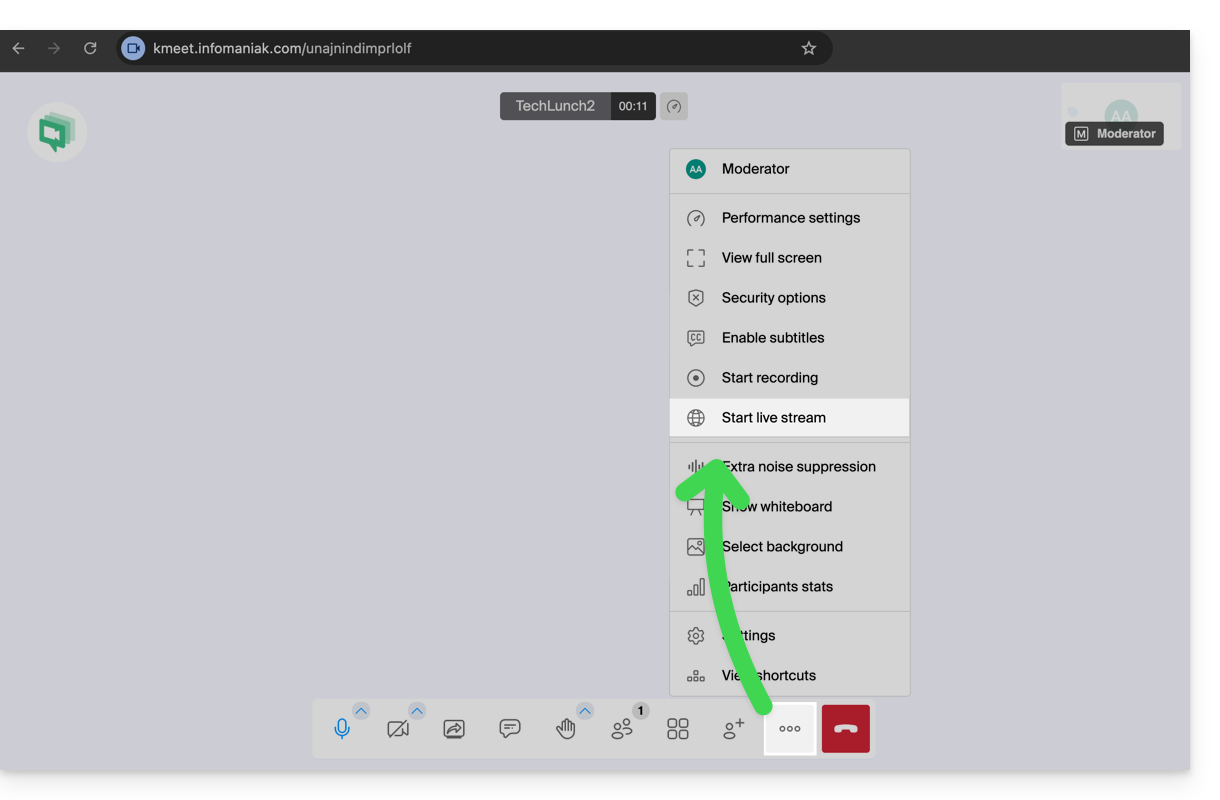
- Clique no botão para Iniciar:
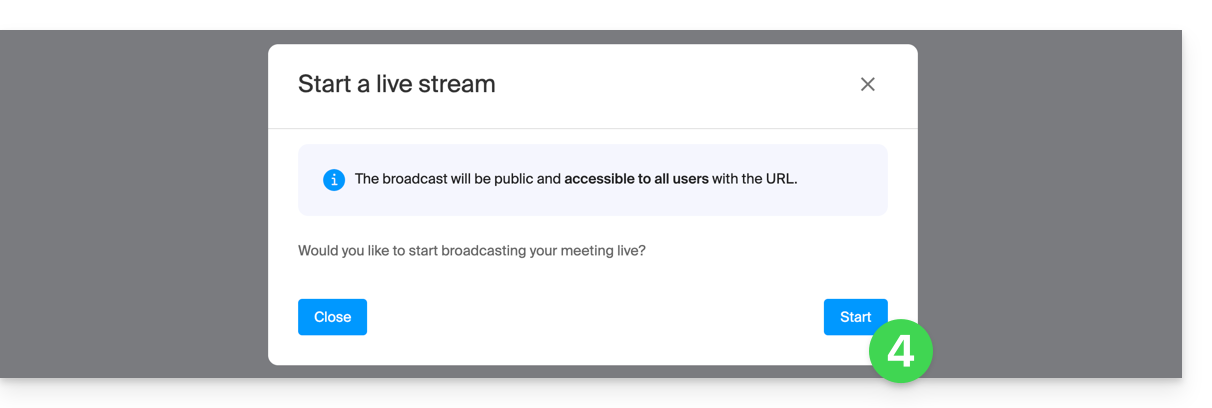
- Aguarde enquanto o fluxo de Streaming de Vídeo é criado;um símbolo exibido no kMeet, juntamente com um sinal sonoro, indica o início da transmissão por streaming de vídeo.
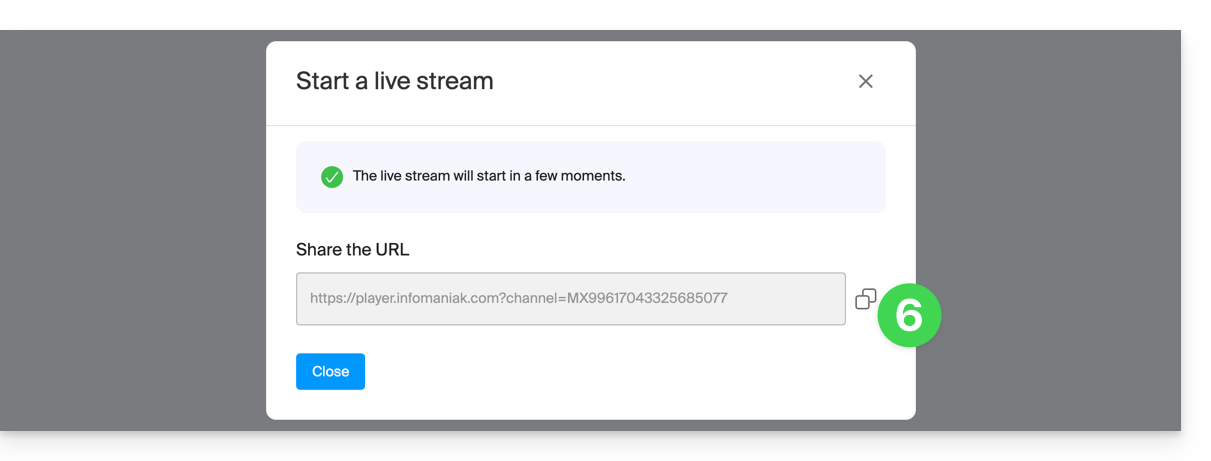
- No mesmo local, após a exibição do link do streaming, clique no ícone à direita para copiar a URL correspondente ao fluxo ao vivo; cole a URL em uma mensagem destinada aos participantes ou a qualquer pessoa que deva assistir à transmissão ao vivo:
O fluxo é transmitido continuamente por um máximo de 24 horas e não estará mais acessível assim que a reunião kMeet for interrompida.
Link para esta FAQ: https://faq.infomaniak.com/1355
Esta seção de perguntas frequentes foi útil?
Este guia explica como usar a funcionalidade do kMeet, a solução ética de videoconferência gratuita da Infomaniak, que permiteexibir legendas em tempo real durante as reuniões, facilitando assim a compreensão das comunicações e atendendo às necessidades de acessibilidade, e até mesmo de tradução posterior.
Pré-requisitos
- O moderador da reunião virtual deve ter, no mínimo, o kSuite (apenas as ofertas Business ou Enterprise).
- Se ativar as legendas, todos os participantes (mesmo os anônimos ou sem kSuite) poderão ativar a funcionalidade de transcrição automática.
Legendar automaticamente o que os participantes dizem
Pode exibir uma transcrição automática do que os participantes dizem em uma reunião kMeet:
- Clique aqui para acessar o kMeet em seu kSuite Infomaniak (ou inicie o aplicativo móvel/desktop — ❓: ajuda).
- Inicie uma reunião (❓: ajuda) ou participe de uma (❓: ajuda).
- Autorize o acesso, no mínimo, ao seu microfone.
- Clique no ícone ○○○ na barra de ferramentas.
- Clique em Ativar legendas.
- O que for dito pelos participantes será exibido na parte inferior da sua janela kMeet:
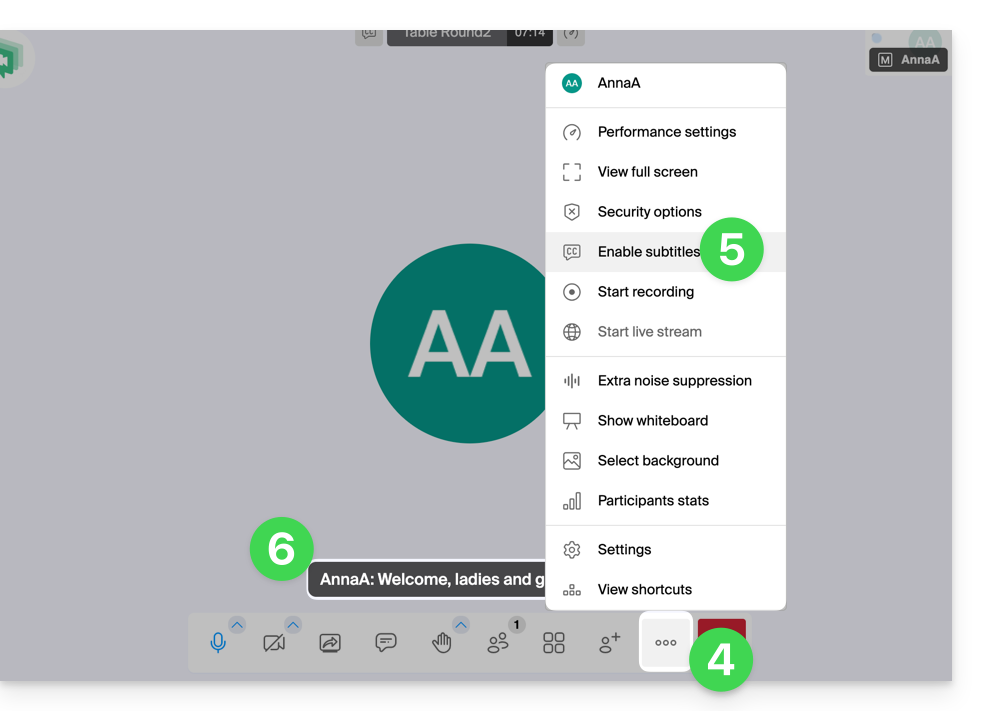
- Para interromper a exibição das legendas na tela, clique novamente no menu correspondente (ver ponto 5 acima).
Em caso de problemas, consulte este outro guia.
Link para esta FAQ: https://faq.infomaniak.com/1431
Esta seção de perguntas frequentes foi útil?
Este guia explica como gerar um resumo de uma reunião online organizada com kMeet, a solução ética de videoconferência gratuita da Infomaniak.
Obter um relatório de reunião kMeet
Pré-requisitos
- Ter um kDrive pago (independente ou incluído em uma oferta kSuite, my kSuite+, etc.).
- Não crie uma videoconferência cifrada com uma chave personalizada.
Para ativar a funcionalidade de ata (registro) para as suas videoconferências:
- Inicie o kMeet através de kmeet.infomaniak.com ou a partir de uma das aplicações para computador e dispositivos móveis.
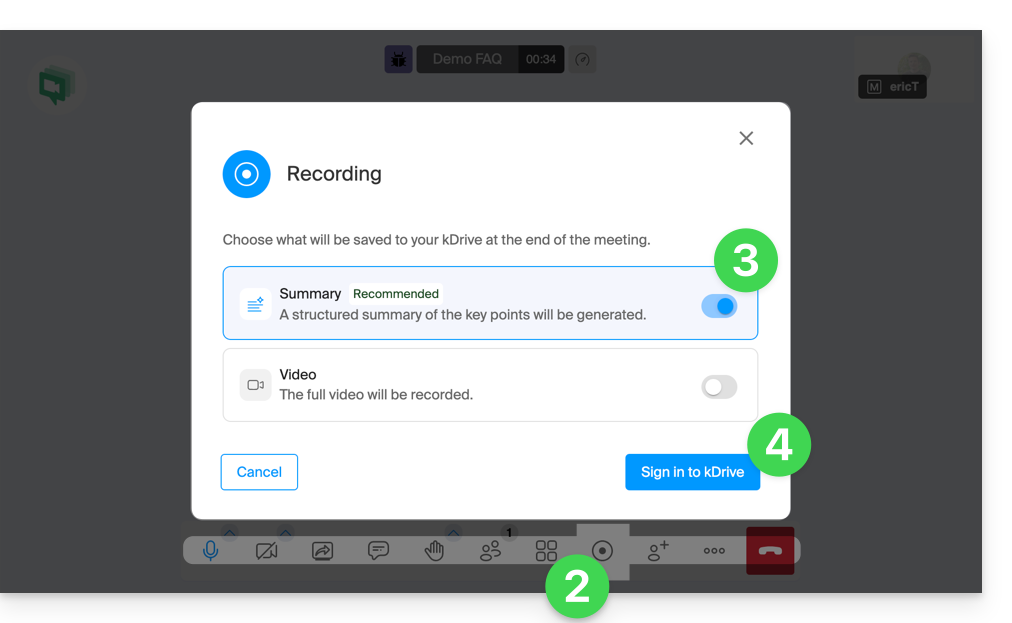
- Clique no ícone ◉ Iniciar a gravação (consulte este outro guia para mais informações).
- Ative o resumo.
- Faça login na sua conta Infomaniak:
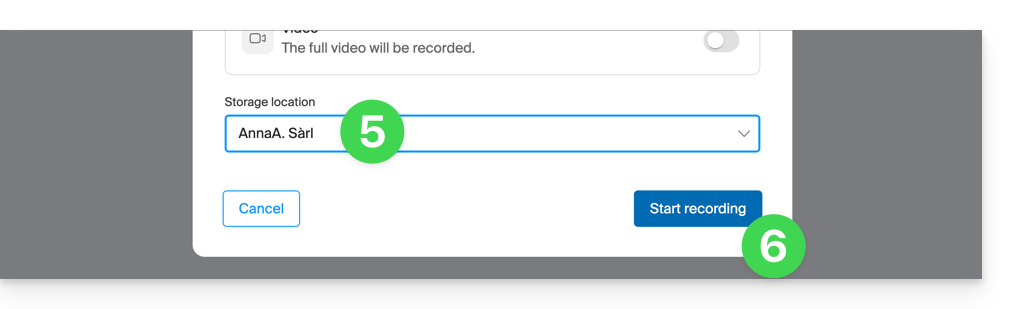
- Selecione um kDrive onde deseja salvar a videoconferência.
- Em seguida, clique no botão para iniciar a gravação:
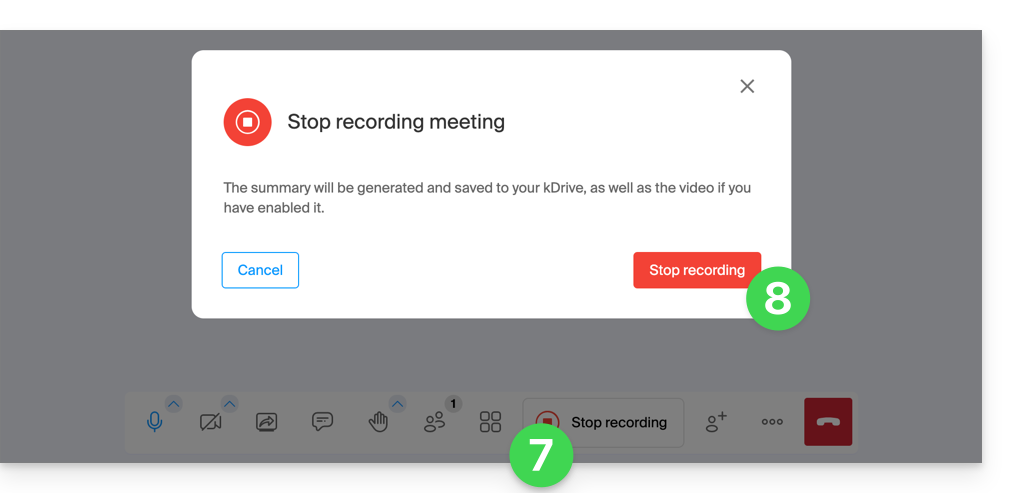
- Para parar a gravação do vídeo, clique em Parar gravação.
- Confirme:
- Escolha se deseja acessar o relatório diretamente no kDrive:
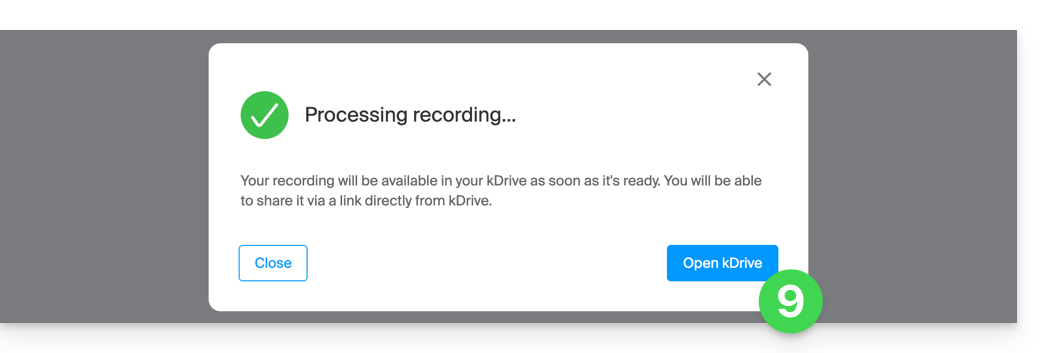
- O relatório está disponível na raiz do kDrive selecionado, no formato de texto
.md; você pode consultá-lo diretamente no kDrive.
Este resumo das suas conversas será redigido no idioma mais utilizado durante a discussão gravada.
Link para esta FAQ: https://faq.infomaniak.com/2035
Esta seção de perguntas frequentes foi útil?
Este guia trata das “salas de discussão” que podem ser configuradas durante uma reunião online organizada com kMeet, a solução ética de videoconferência gratuita da Infomaniak.
Introdução
- Essas salas de subgrupos permitem dividir uma reunião principal em várias discussões simultâneasem espaços virtuais distintos.
- Apenas um moderador pode criar essas salas e gerenciar os participantes entre a sala principal e os subgrupos.
Criar uma sala adicional
Para adicionar uma ou mais salas adicionais:
- Inicie o kMeet como moderador através de kmeet.infomaniak.com ou a partir de uma das aplicações para computador ou dispositivos móveis.
- Depois que os participantes estiverem na reunião, clique no ícone de múltiplos utilizadores na barra de ferramentas do kMeet.
- Clique no botão para adicionar uma sala adicional:

- Os participantes podem então entrar na sala criada ou sair dela (ao exibir o menu usando o mesmo botão do item 2 acima):

- O moderador também pode forçar um dos participantes a entrar em uma das salas secundárias clicando no menu de ações à direita na lista:

Link para esta FAQ: https://faq.infomaniak.com/2397
Esta seção de perguntas frequentes foi útil?
Este guia ajuda a resolver os problemas de áudio (microfone e alto-falantes) com o kMeet, a solução de videoconferência ética da Infomaniak.
Introdução
- Para funcionar, o kMeet precisa, obrigatoriamente, obter sua permissão para acessar o microfone.
- Essa solicitação geralmente aparece por meio de uma janela pop-up no canto superior esquerdo de um navegador como Brave, Chrome, Edge, Firefox, Opera, Safari… ou durante o primeiro lançamento do aplicativo.
- Um problema de áudio pode ser de dois tipos:
- ou os outros não conseguem ouvi-lo (problema do microfone),
- ou você não consegue ouvir os outros (problema dos alto-falantes/saída).
Possíveis soluções para problemas de áudio
1. Verificar o hardware e as configurações básicas
- O botão "Mudo": verifique se o seu microfone não está desativado na interface kMeet (ícone do microfone vermelho) ou através de um botão físico no seu auscultador/microfone:
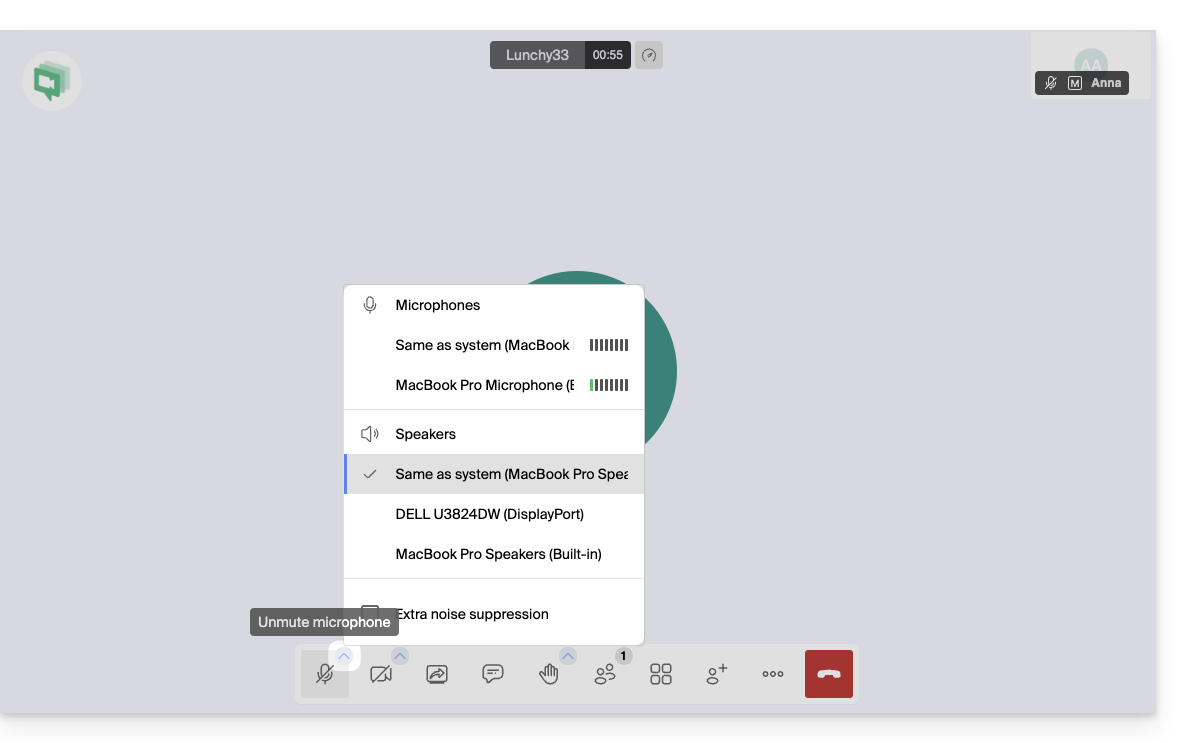
- Conexões: se estiver a usar um auscultador ou microfone externo, desligue-o e volte a ligá-lo (dê preferência às portas USB diretas em vez de hubs).
- Volume do sistema: verifique se o volume do seu computador ou dispositivo móvel não está em zero ou no modo "Não perturbar".
2. Configurar as configurações de áudio no kMeet (Computador)
Tanto na aplicação quanto no navegador, você pode escolher precisamente seus dispositivos:
- Acesse as Configurações:
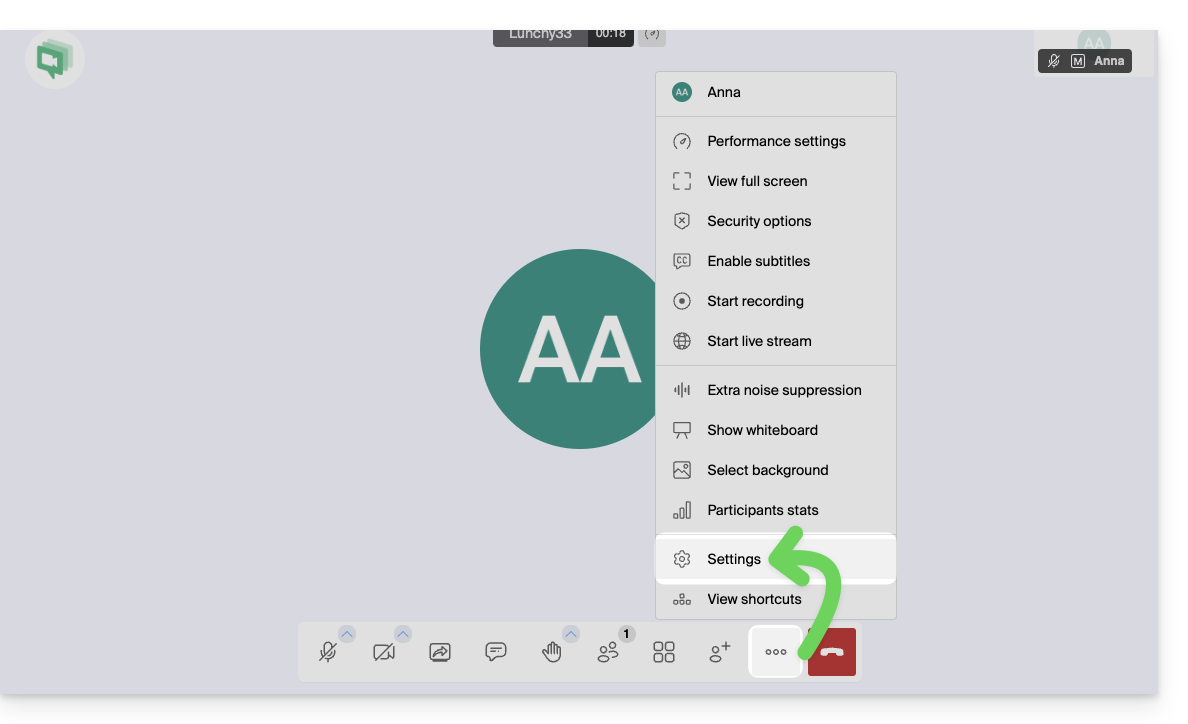
- Vá para a aba Áudio:
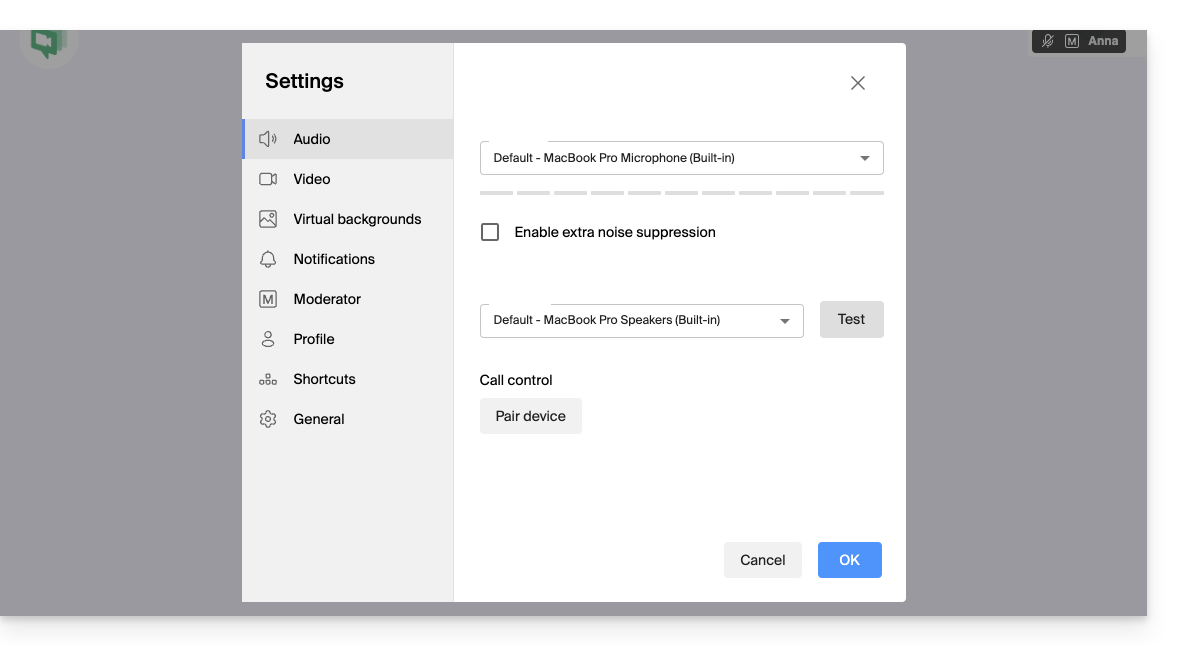
- Microfone: selecione o dispositivo correto na lista.
- Fale: uma barra de volume azul deve se mover se o microfone captar som.
- Saída de áudio: selecione os seus alto-falantes ou o seu fone de ouvido.
- Clique em "Testar" para verificar se consegue ouvir o som de teste.
3. (Re)autorizar o microfone no navegador
Se você usa o kMeet através de um navegador como Brave, Chrome, Edge, Firefox, Opera, Safari…:
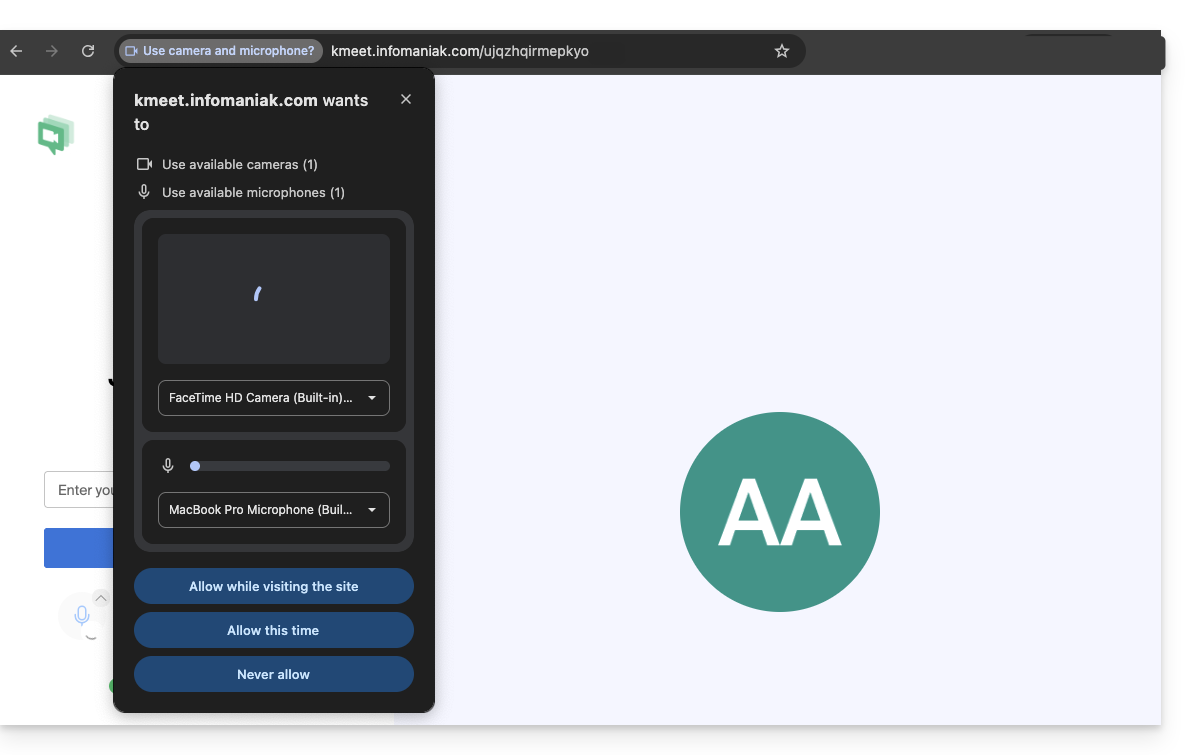
- Clique no ícone de cadeado (ou nas configurações do site) à esquerda do endereço URL (kmeet.infomaniak.com).
- Verifique se a opção "Microfone" está definida como Permitir.
- Se alterar esta configuração, mas não notar nenhuma alteração, atualize a página (F5).
4. Verificar as permissões do sistema (Windows, macOS, dispositivos móveis)
No macOS (frequentemente esquecido):
- Acesse o menu Apple > Preferências do Sistema > Privacidade e Segurança.
- Clique em Microfone.
- Verifique se o seu navegador ou a aplicação kMeet está devidamente selecionado.
No Windows:
- Acesse Configurações > Privacidade e segurança > Microfone.
- Verifique se a opção "Acesso ao microfone" está ativada.
- Verifique se "Permitir que os aplicativos de desktop acessem seu microfone" também está ativado para o kMeet ou seu navegador.
No dispositivo móvel (iOS e Android):
- iOS: Definições > kMeet > Verifique se a opção Microfone está ativada. Verifique também em Definições > Privacidade > Microfone.
- Android: Configurações > Aplicações > kMeet > Permissões > Microfone > Permitir quando a aplicação estiver em uso.
5. Caso particular: Desativar as extensões de bloqueio
Algumas extensões de navegador (bloqueadores de anúncios, extensões de proteção de privacidade como uBlock Origin ou Privacy Badger) podem, por vezes, bloquear os fluxos de áudio/vídeo.
- Tente desativar as suas extensões ou abrir o link kMeet numa janela de navegação privada para testar.
6. Sobre o Firefox e o WebRTC
Pode tentar desativar o WebRTC no Firefox para testar (através de media.peerconnection.enabled = false), mas não é recomendado: o kMeet utiliza a tecnologia WebRTC para funcionar; se a desativar, a videoconferência poderá deixar de funcionar completamente.
Se o Firefox estiver apresentando problemas:
- Verifique nas configurações do Firefox > Privacidade e segurança > Permissões.
- Ao lado de "Microfone", clique em Configurações e verifique se o endereço kmeet.infomaniak.com não está na lista "Bloquear".
- Verifique também se a Reprodução automática está permitida para o áudio no kMeet.
7. Em último caso: Mude de dispositivo
Se o problema persistir, provavelmente trata-se de uma falha de hardware ou de um conflito de drivers no dispositivo:
- Participe da reunião a partir de outro dispositivo (mude do computador para o smartphone usando o aplicativo kMeet).
- Obtenha o link/código da reunião por meio dos compartilhamentos/convites:

Link para esta FAQ: https://faq.infomaniak.com/2441
Esta seção de perguntas frequentes foi útil?
Este guia ajuda a resolver eventuais problemas de acesso à câmara com o kMeet, a solução de videoconferência ética oferecida pela Infomaniak.
Com as normas de segurança atuais, um navegador como Brave, Chrome, Edge, Firefox, Opera, Safari… ou uma aplicação instalada num sistema operativo como Windows ou macOS deverá obrigatoriamente solicitar a sua autorização para aceder ao microfone e à câmara assim que uma videoconferência for iniciada.
Autorizar o acesso à câmera
Para isso:
- Clique aqui para acessar o kMeet em seu kSuite Infomaniak (ou inicie o aplicativo móvel/desktop — ❓: ajuda).
- Inicie uma reunião (❓: ajuda).
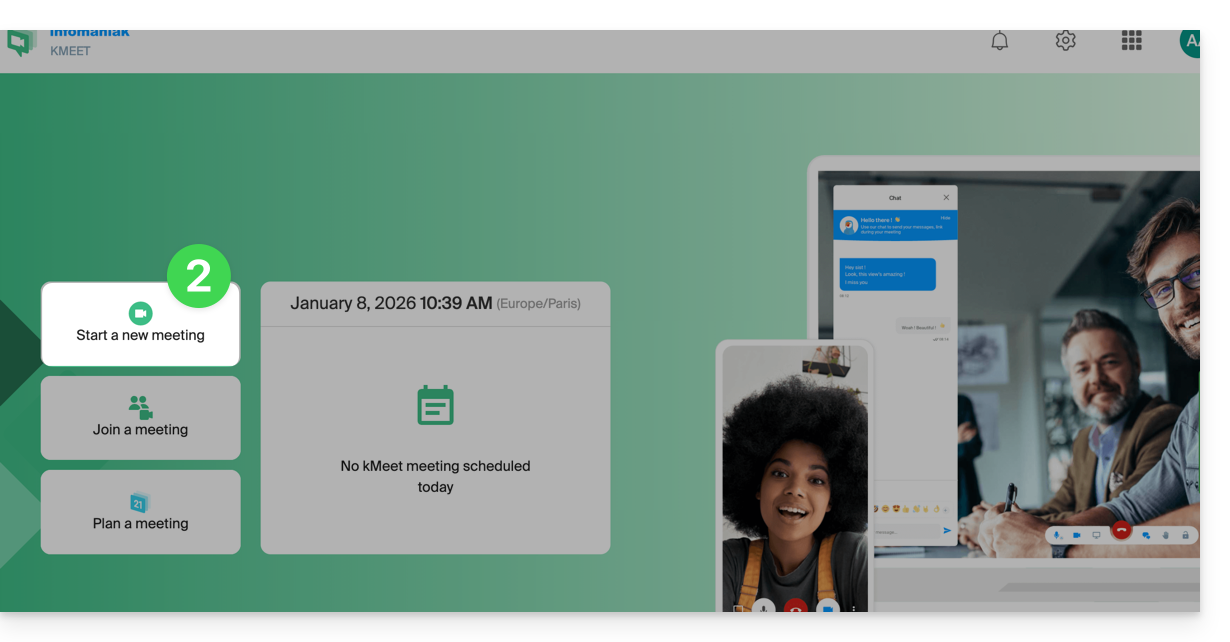
- Indique um nome para a sua sala de reunião.
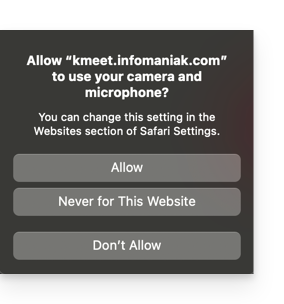
- Continue, uma janela pop-up deverá solicitar que autorize o navegador a aceder ao seu microfone e à sua câmara:
- Se a janela pop-up não aparecer automaticamente, verifique os ícones presentes na barra de cabeçalho do seu navegador:
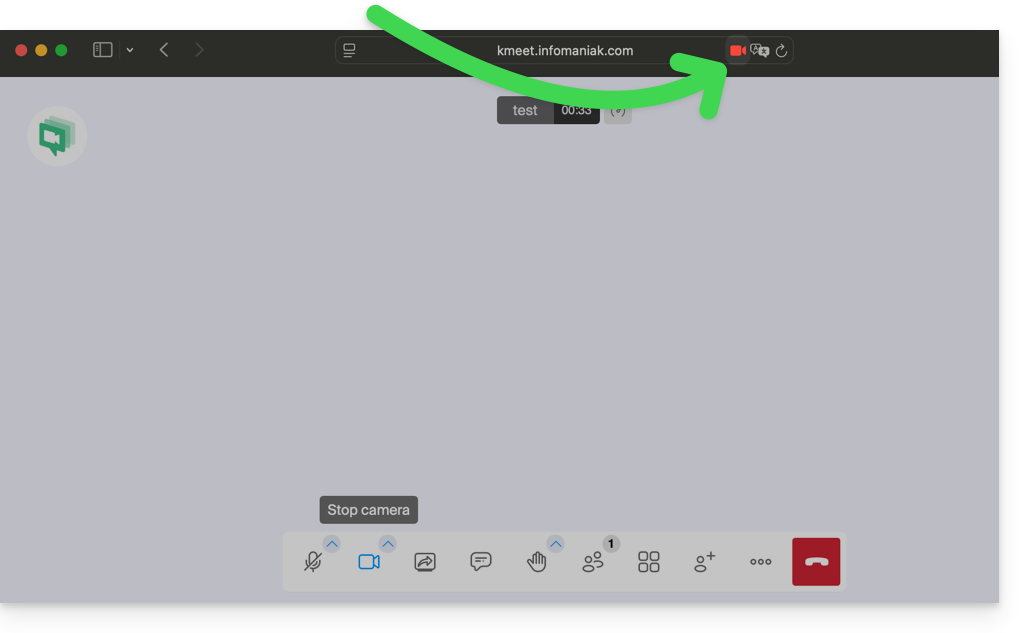
ou aqui: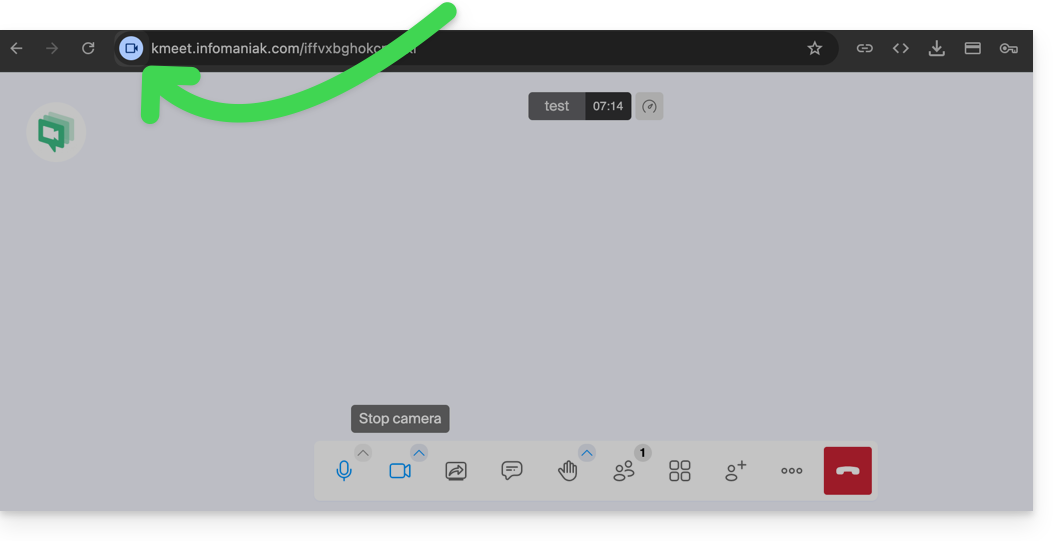
- As configurações do seu navegador (neste caso, o Chrome) também podem permitir que você ajuste as configurações de permissão e escolha a câmera, caso haja várias disponíveis:
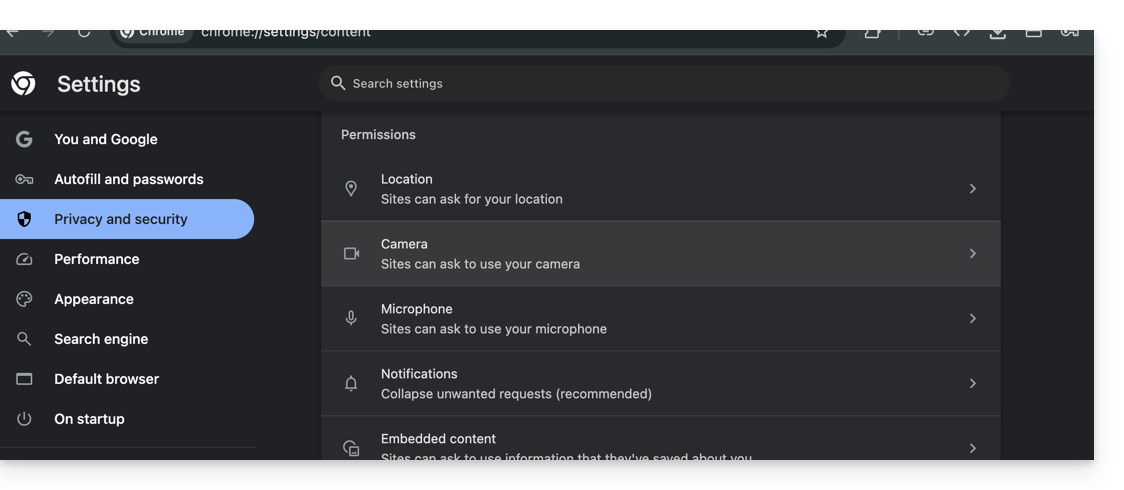
A sua câmara não funciona? Verifique a proteção física.
Se a imagem permanecer escura, mesmo com a câmara ativada, é possível que a lente esteja coberta por uma proteção de privacidade integrada.
Muitos computadores portáteis têm um pequeno cursor mecânico acima do ecrã:
- Observe a lente da câmara na parte superior do seu ecrã.
- Se vir um ponto vermelho ou uma pastilha opaca na lente, a proteção está fechada.
- Deslize o cursor lateralmente para libertar a imagem.
Observação: como este dispositivo é mecânico, nenhum ajuste de software poderá ativar a imagem enquanto o mecanismo não for acionado manualmente.
Link para esta FAQ: https://faq.infomaniak.com/2452
Esta seção de perguntas frequentes foi útil?
Este guia explica como adicionar uma senha e uma criptografia de ponta a ponta a uma reunião kMeet, a solução ética de videoconferência gratuita da Infomaniak.
Proteger uma reunião com uma senha
Ao criar a sua sala de reunião, pode protegê-la com uma palavra-passe que deverá transmitir a todos os participantes para que possam aceder à sala:
- Clique aqui para aceder ao kMeet na sua kSuite Infomaniak (ou inicie a aplicação móvel/desktop —❓: ajuda).
- Inicie uma reunião (❓: ajuda).
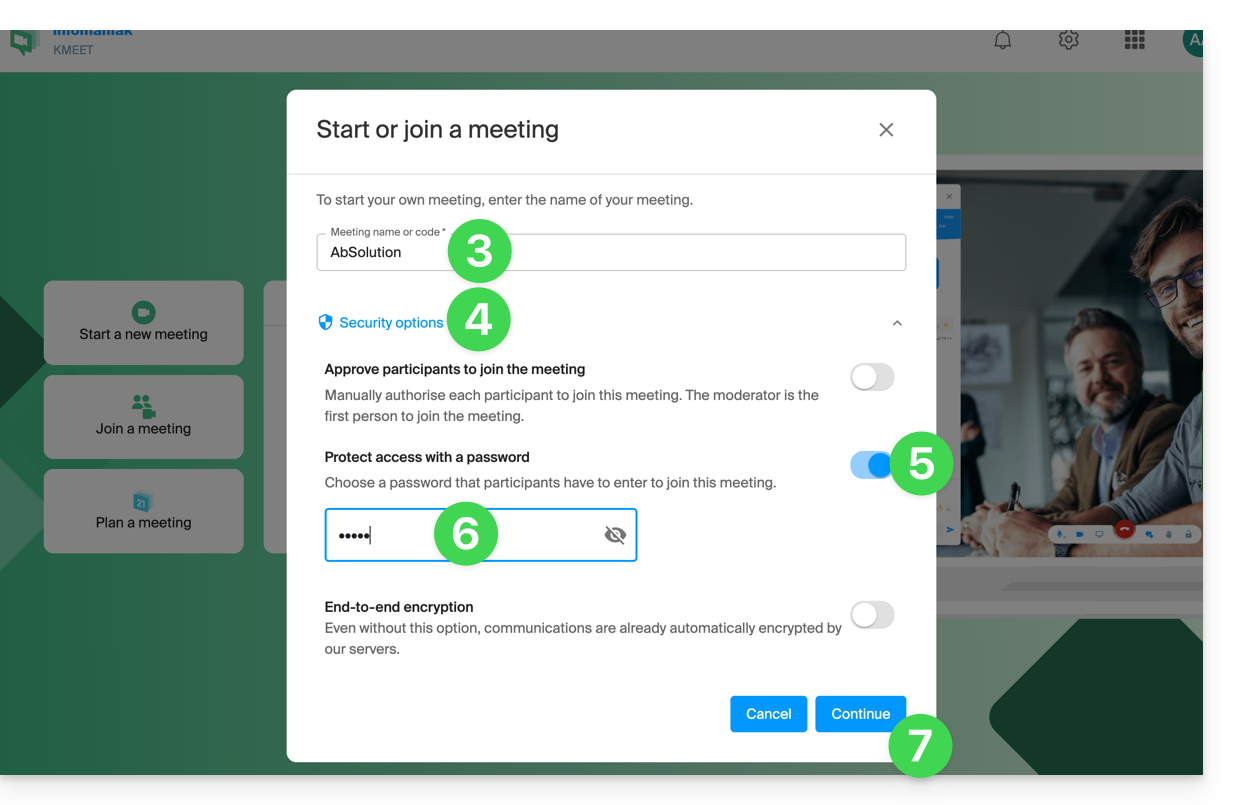
- Indique um nome para a sua sala de reunião.
- Clique em Opções de segurança.
- Ative o botão para Proteger o acesso.
- Crie a senha.
- Continue para iniciar a reunião:
- Especifique o nome que deseja usar como participante da reunião.
- Compartilhe o link ou o código da reunião, bem como a senha, com seus participantes:
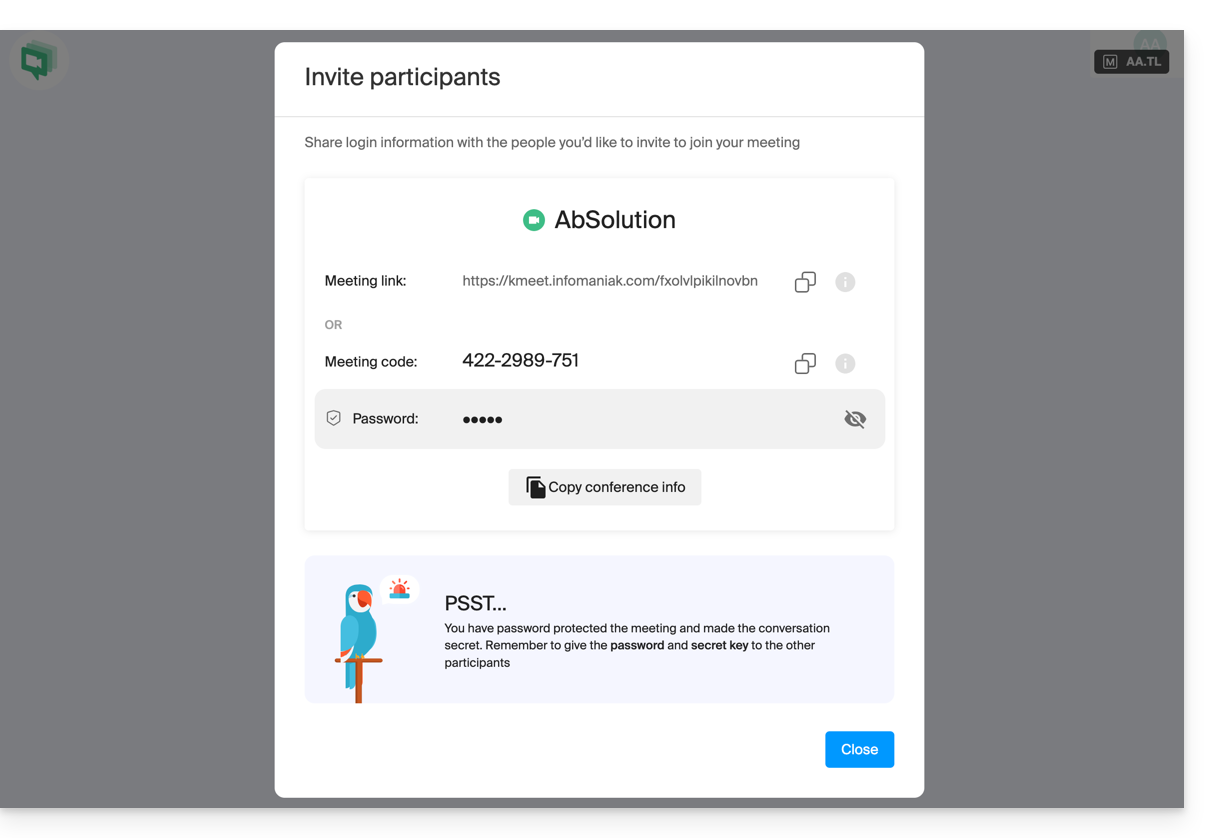
- Você poderá revisar a senha, se necessário, ao convidar participantes por meio do botão dedicado:
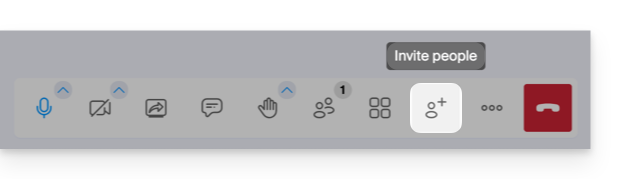
- Você poderá revisar a senha, se necessário, ao convidar participantes por meio do botão dedicado:
Proteger uma sala de conferência com criptografia de ponta a ponta (E2E)
Pré-requisitos
- Funcionalidade experimental: a criptografia de ponta a ponta está atualmente em fase experimental.
- A sua ativação desativa os serviços fornecidos pelo servidor, como a participação através de dispositivos móveis.
- Navegadores compatíveis: esta opção requer um navegador baseado em Chromium 83 ou superior (Chrome, Edge, Opera, Brave) que suporte os insertable streams.
- A criptografia E2E não funciona no Firefox, nem nas aplicações móveis, nem na aplicação de ambiente de trabalho kMeet no Linux.
- As pessoas que participarem na reunião com um navegador ou dispositivo não compatível não poderão ver nem ouvir.
Para ativar a criptografia, siga o procedimento de criação de sala descrito acima até o passo 4. Uma vez nas opções de segurança:
- Ative o botão de alternância (toggle switch) para criptografar de ponta a ponta:
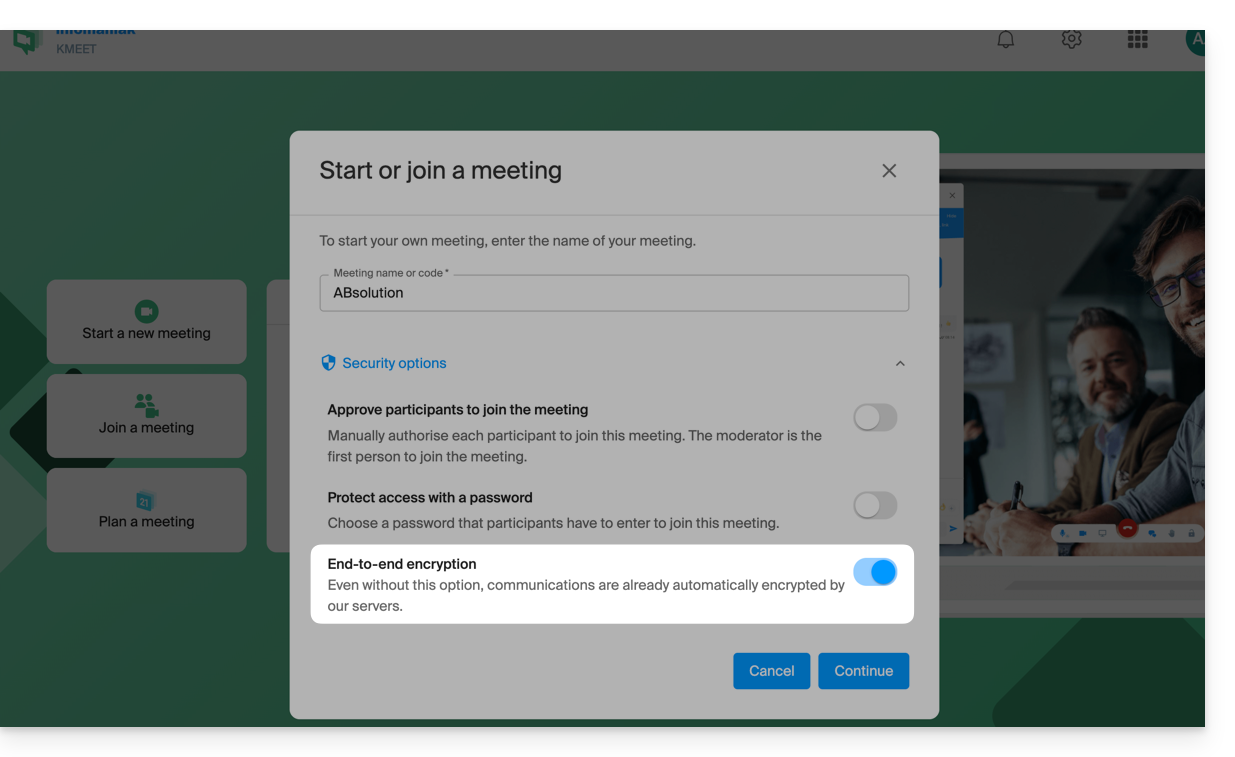
- Ao iniciar a videoconferência, uma mensagem de áudio será reproduzida para anunciar a ativação da criptografia de ponta a ponta.
Link para esta FAQ: https://faq.infomaniak.com/2464
Esta seção de perguntas frequentes foi útil?
Este guia explica como iniciar a gravação de uma reunião online organizada com kMeet, a solução ética de videoconferência gratuita da Infomaniak, para obter um vídeo da apresentação armazenado no kDrive da Infomaniak.
Introdução
- O registo do vídeo
- é feito no servidor
- não gera qualquer carga para o computador do participante que o iniciou
- está no formato de vídeo
.mp4 - tem uma duração máxima de 3 horas.
- O vídeo não estará disponível até que alguém interrompa a gravação manualmente.
Gravar uma reunião kMeet no kDrive em vídeo
Pré-requisitos
- Possuir um kDrive (autónomo/independente ou integrado numa oferta kSuite, my kSuite, etc.).
- Não criar uma videoconferência cifrada com uma chave personalizada (❓: ajuda).
Para gravar a reunião no kDrive:
- Clique aqui para acessar o kMeet na sua kSuite Infomaniak (ou inicie o aplicativo móvel/desktop — ❓: ajuda).
- Inicie uma reunião (❓: ajuda).
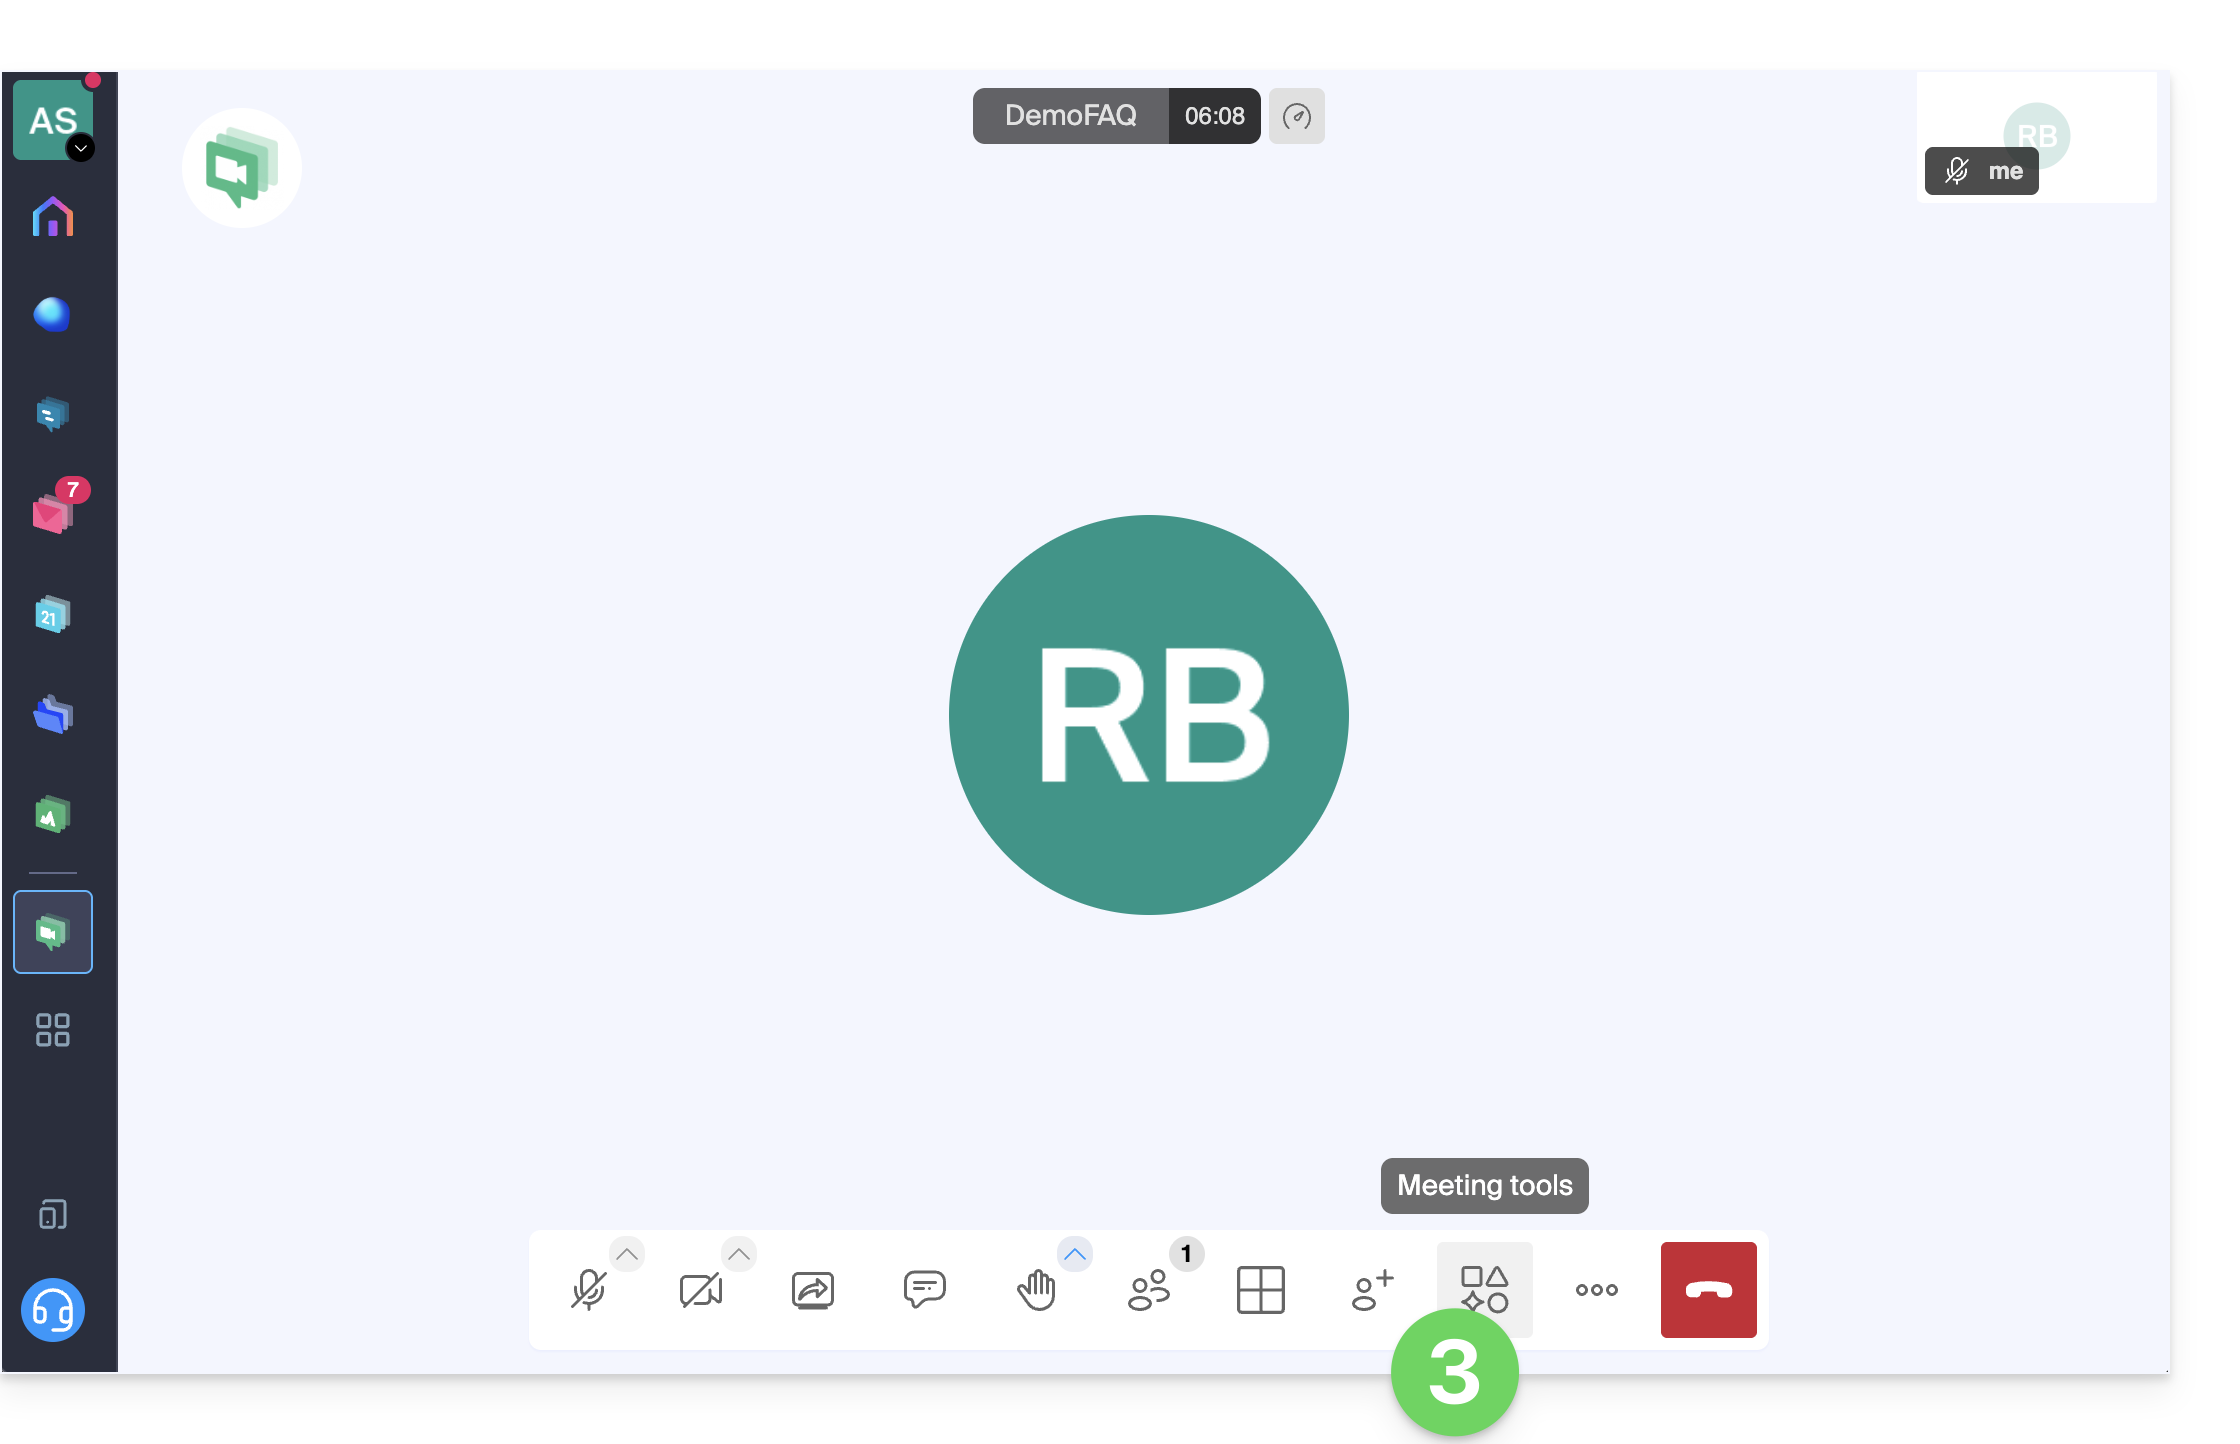
- Clique em Ferramentas de reunião na barra de ferramentas inferior:
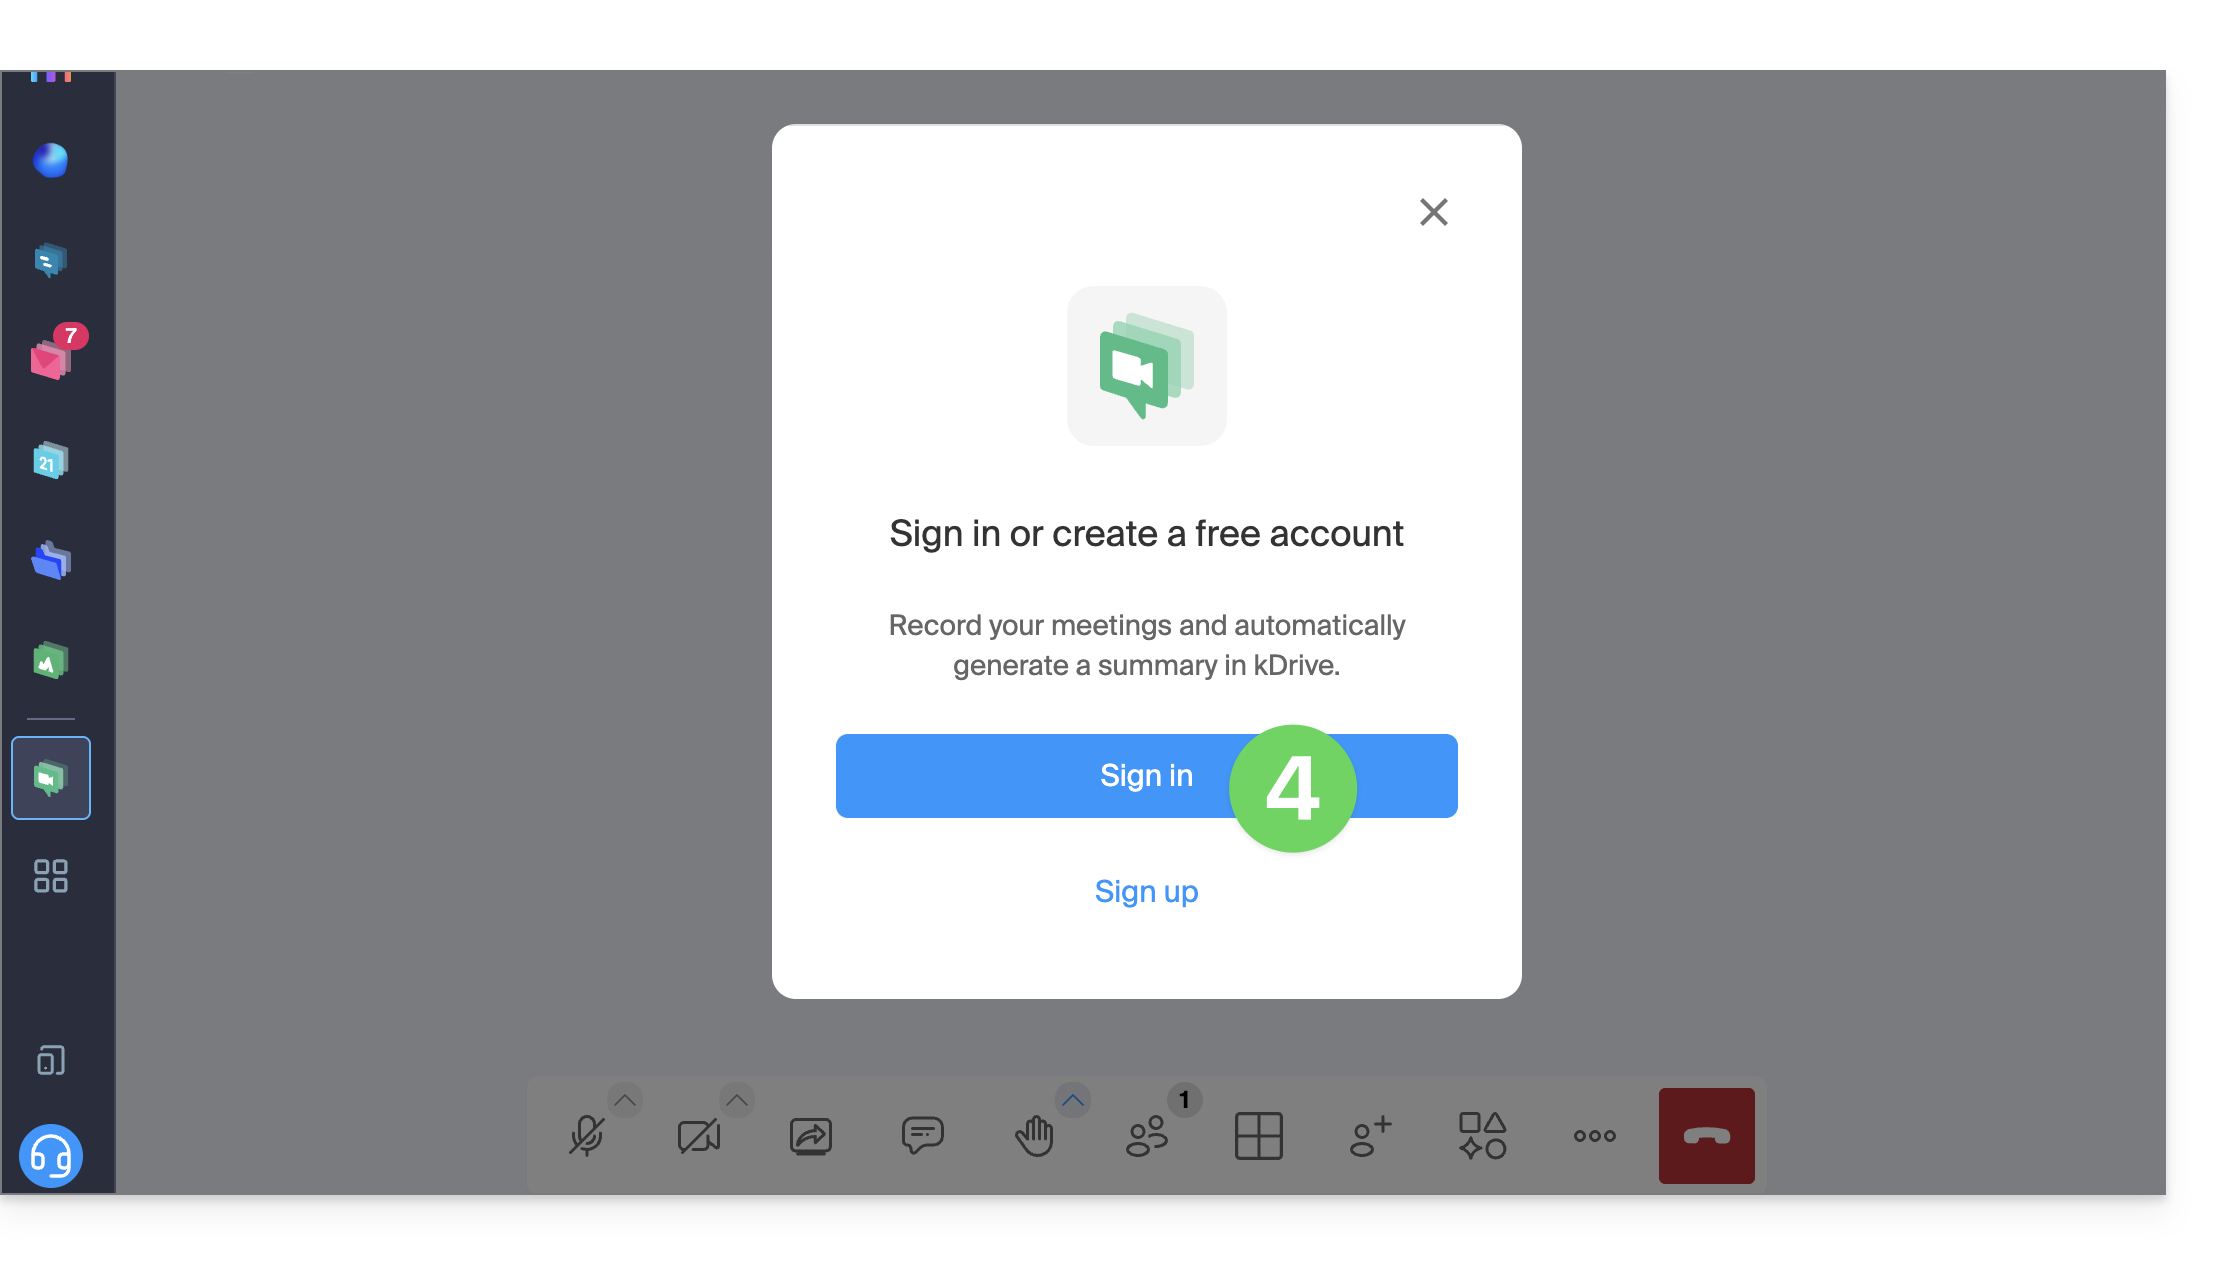
- Se necessário, clique para fazer login:
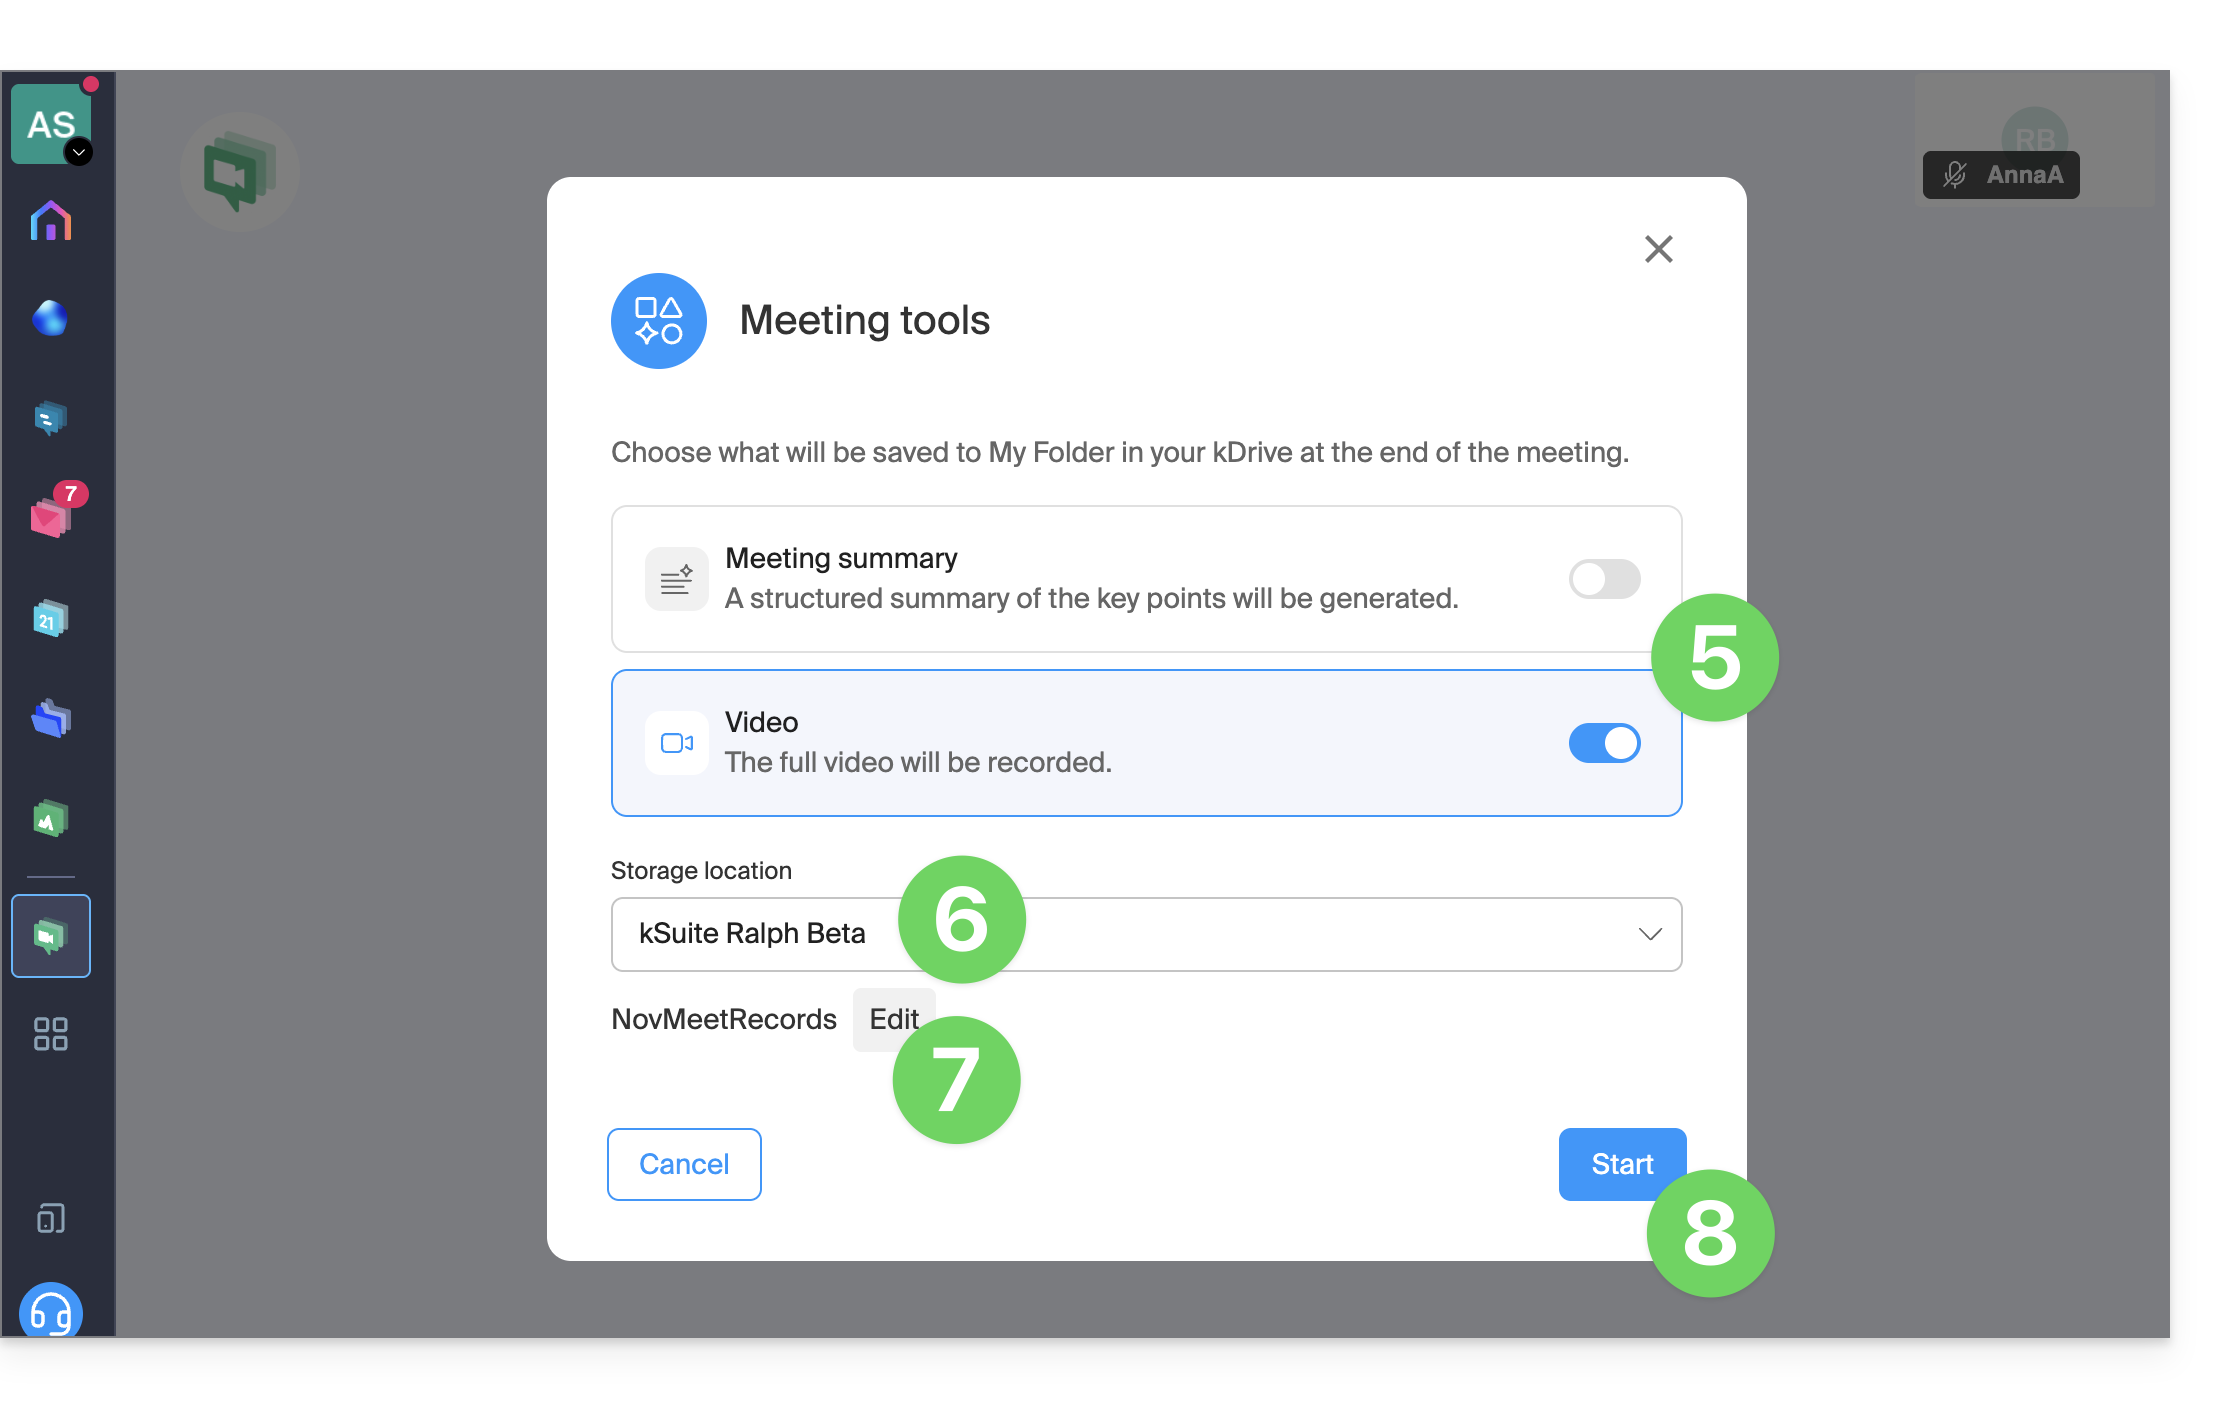
- Ative a gravação de vídeo (e/ou a função de resumo de texto —❓: ajuda).
- Selecione um kDrive para salvar a videoconferência.
- Edite o local no kDrive onde os futuros vídeos serão salvos.
- Clique no botão para iniciar a gravação. Uma mensagem sonora indicará aos participantes o início da gravação:
- Se um participante entrar na reunião posteriormente, ele também receberá uma mensagem sonora ao se conectar, alertando sobre a gravação em andamento.
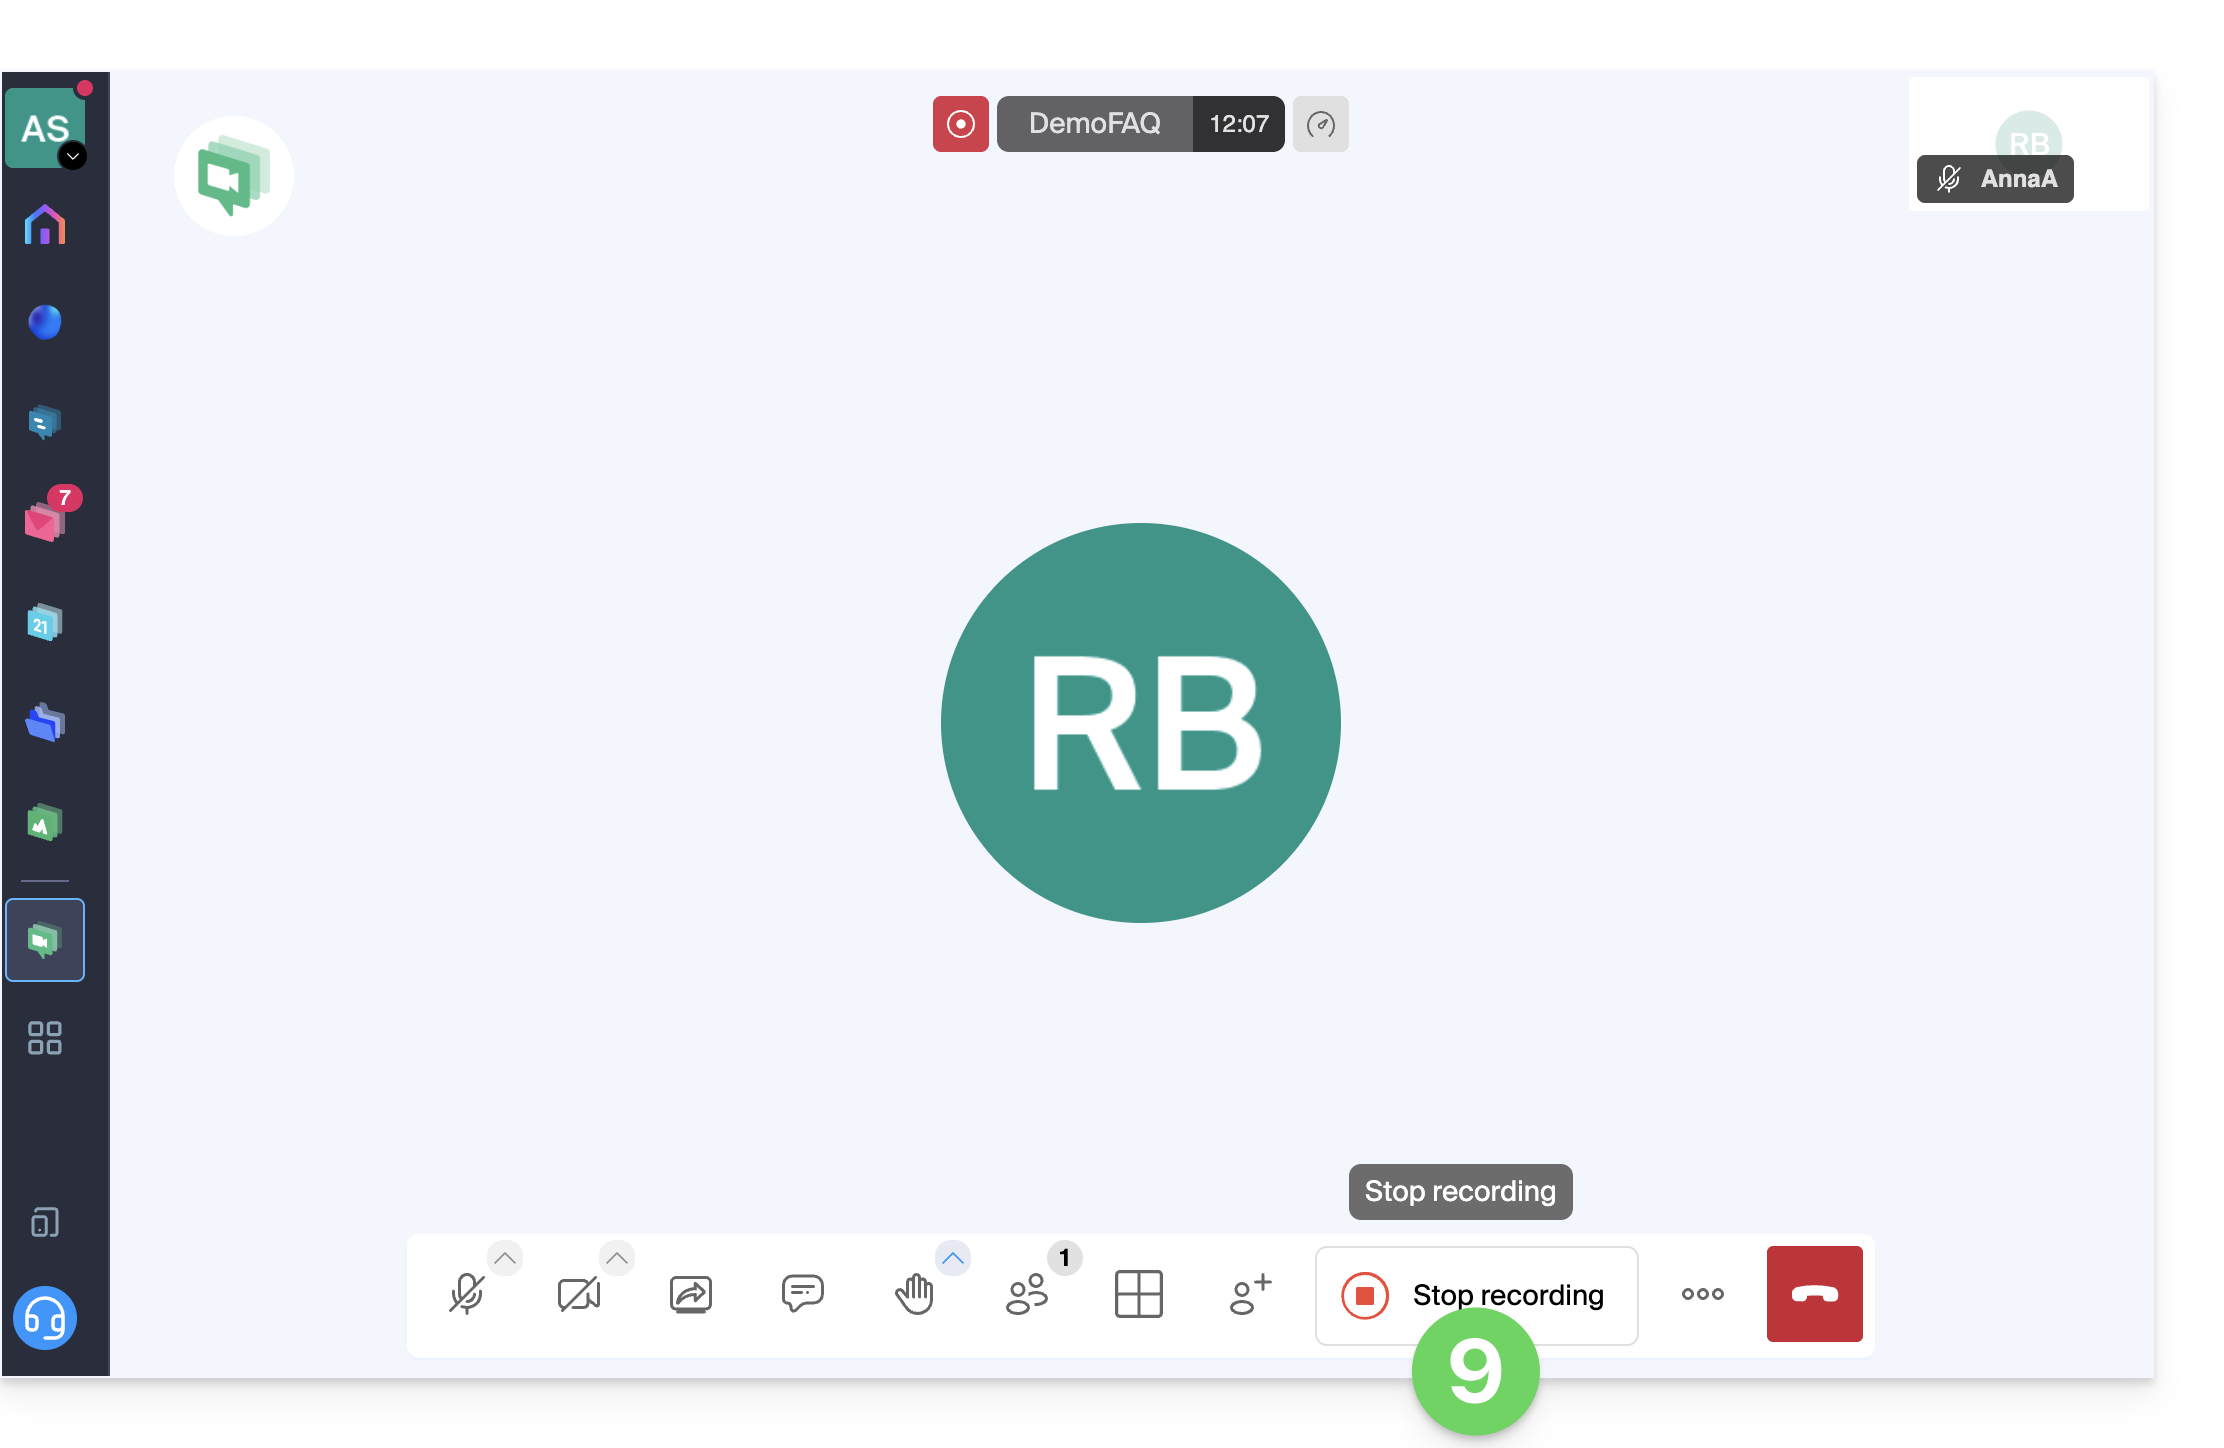
- Para parar a gravação do vídeo, clique em Parar gravação:
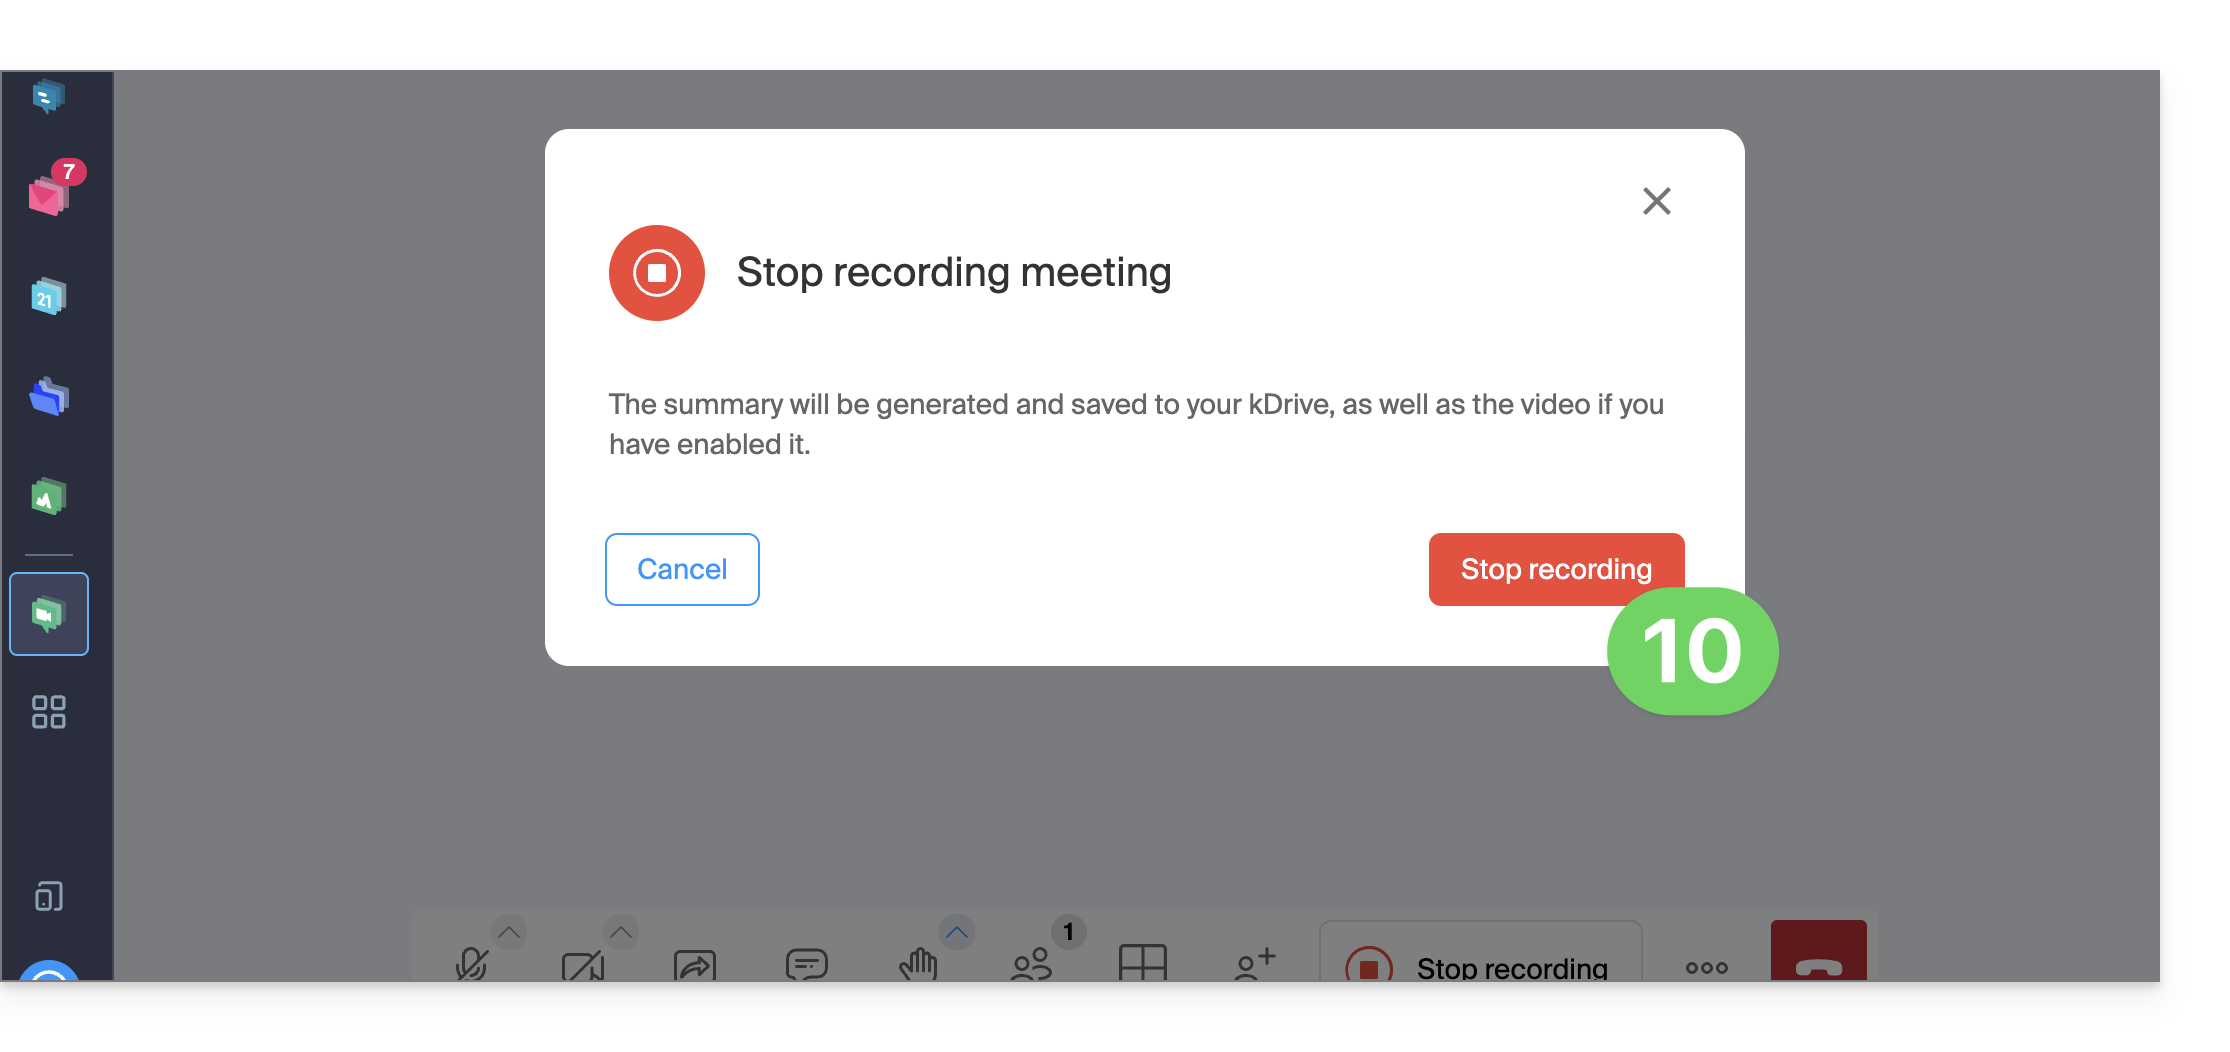
- Confirme:
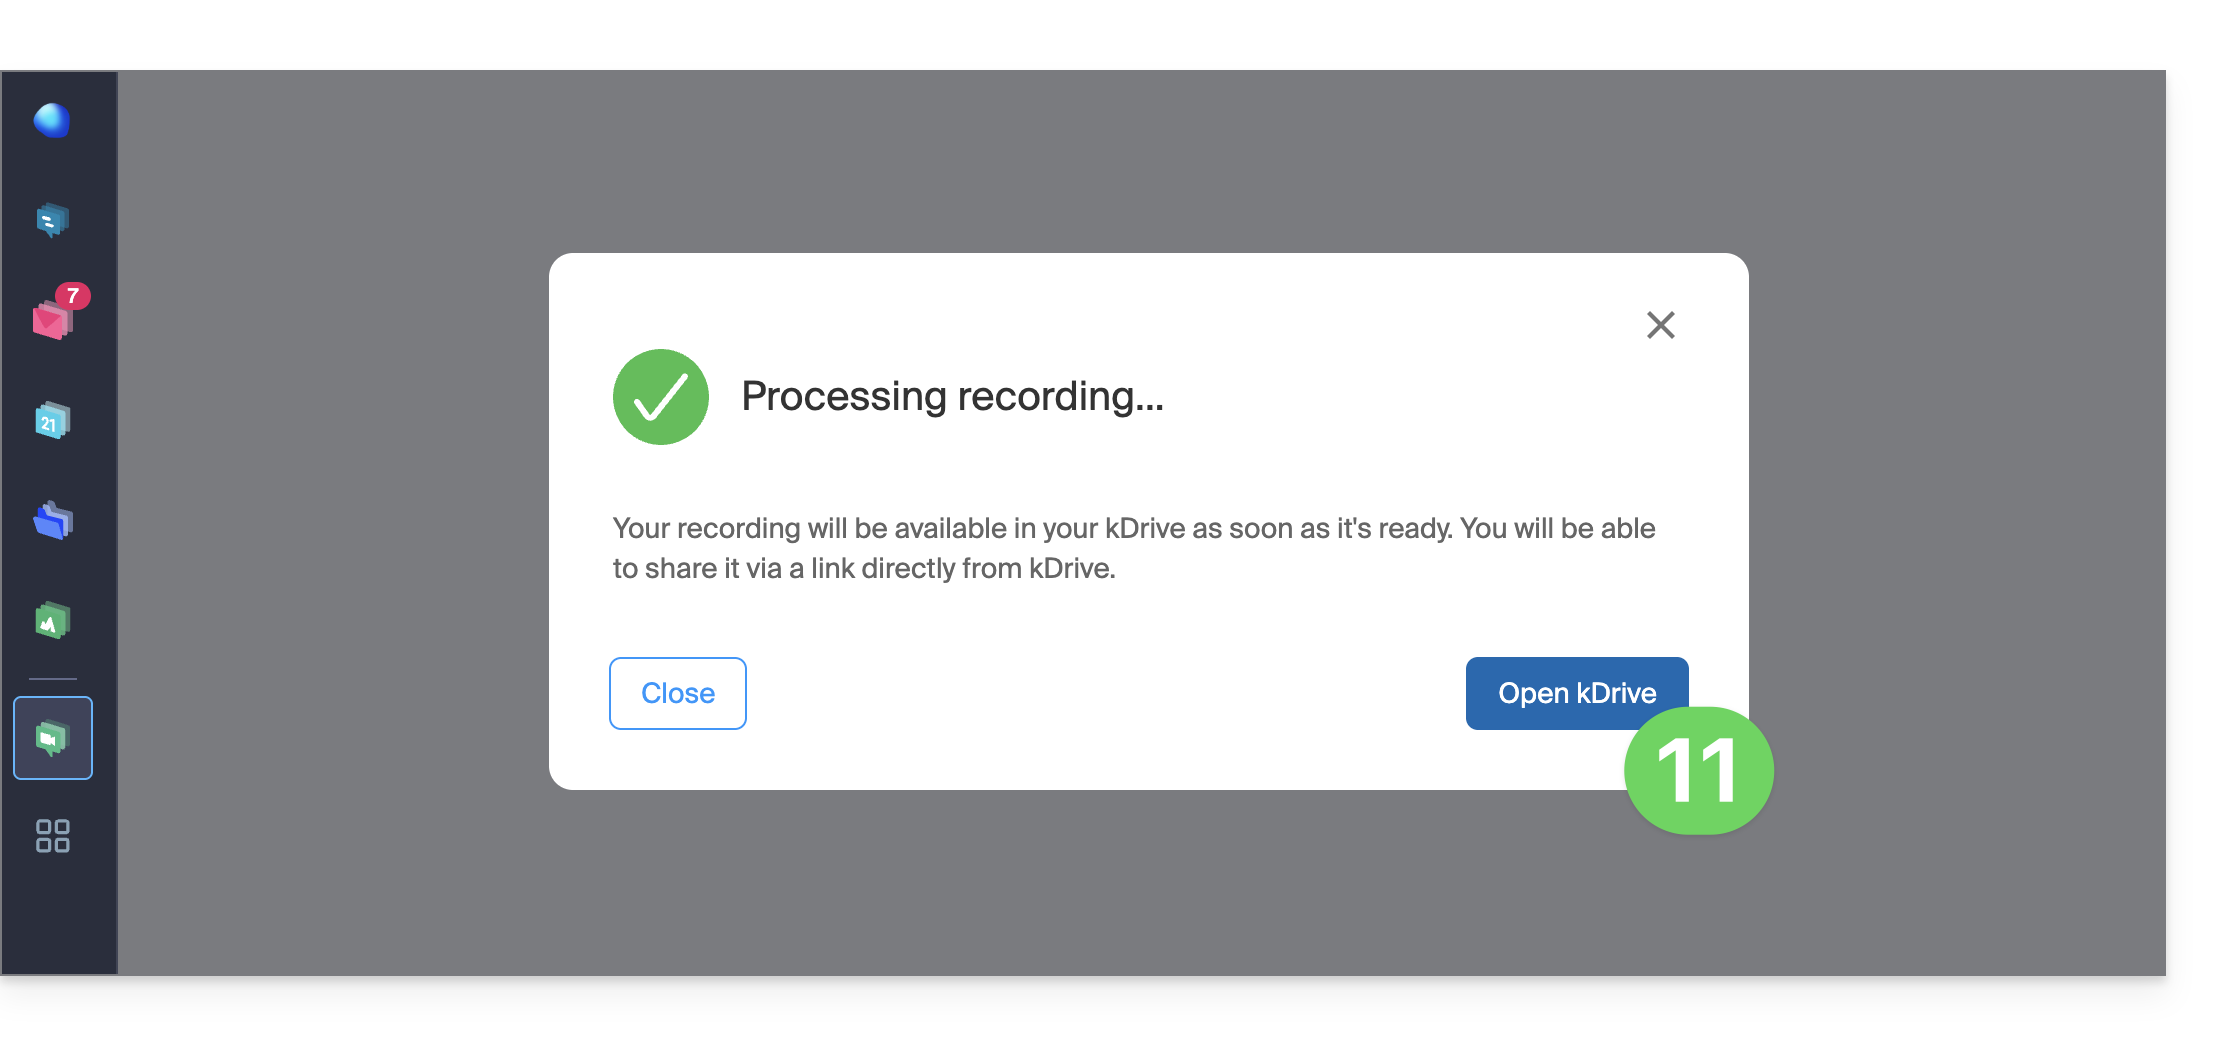
- Escolha se deseja ir para o local do arquivo no kDrive:
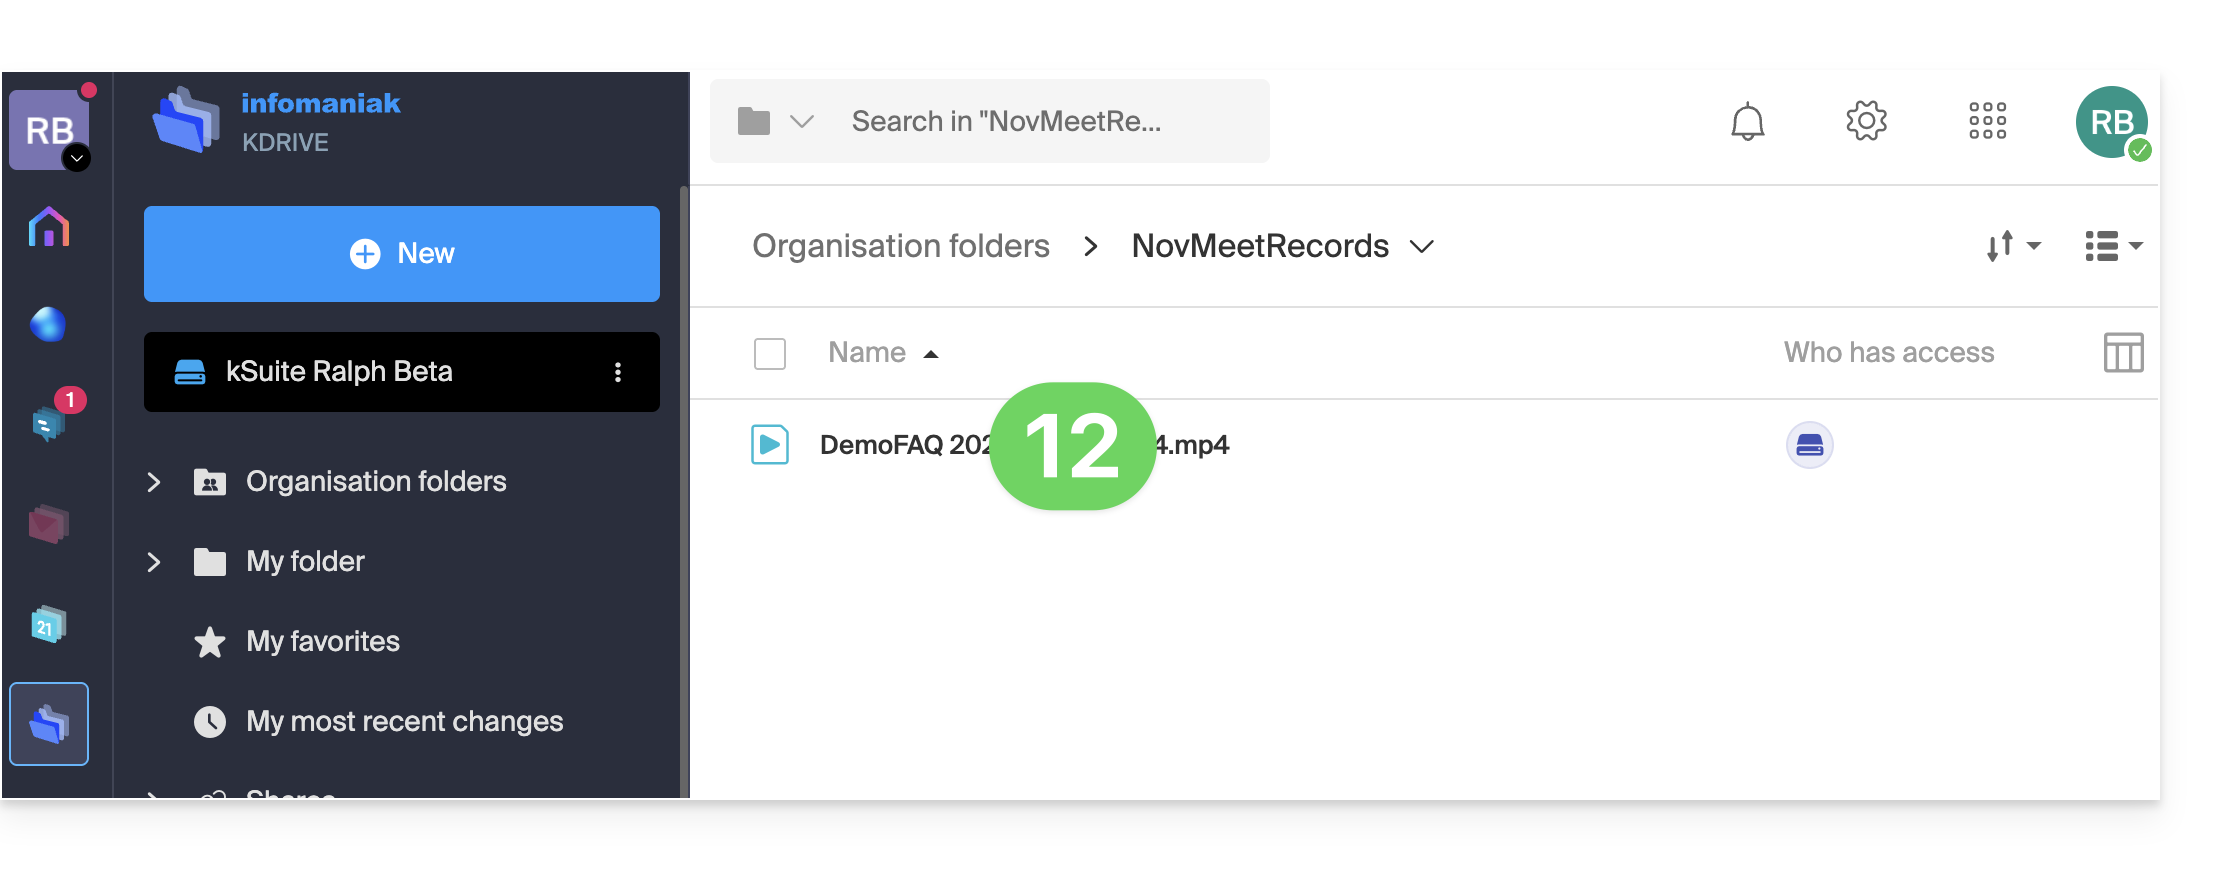
- O ficheiro é guardado na pasta raiz do kDrive selecionado:
Link para esta FAQ: https://faq.infomaniak.com/2472
Esta seção de perguntas frequentes foi útil?
Este guia explica como participar numa videoconferência kMeet, a solução de videoconferência gratuita da Infomaniak.
Introdução
- Para obter e partilhar rapidamente o link da reunião em curso, o criador deve clicar no ícone de utilizador com um sinal de mais (
+):
Entrar numa sala de reunião
Para participar de uma reunião kMeet que um administrador já iniciou:
- Clique aqui para acessar o kMeet em seu kSuite Infomaniak (ou inicie o aplicativo móvel/desktop — ❓: ajuda).
- Clique no botão para Participar de uma reunião.
- Indique o código da reunião (por exemplo,
001-0002-003) ou o link (que você também pode abrir diretamente) – leia a introdução abaixo se não encontrar como obter o link da discussão. - Clique no botão OK:
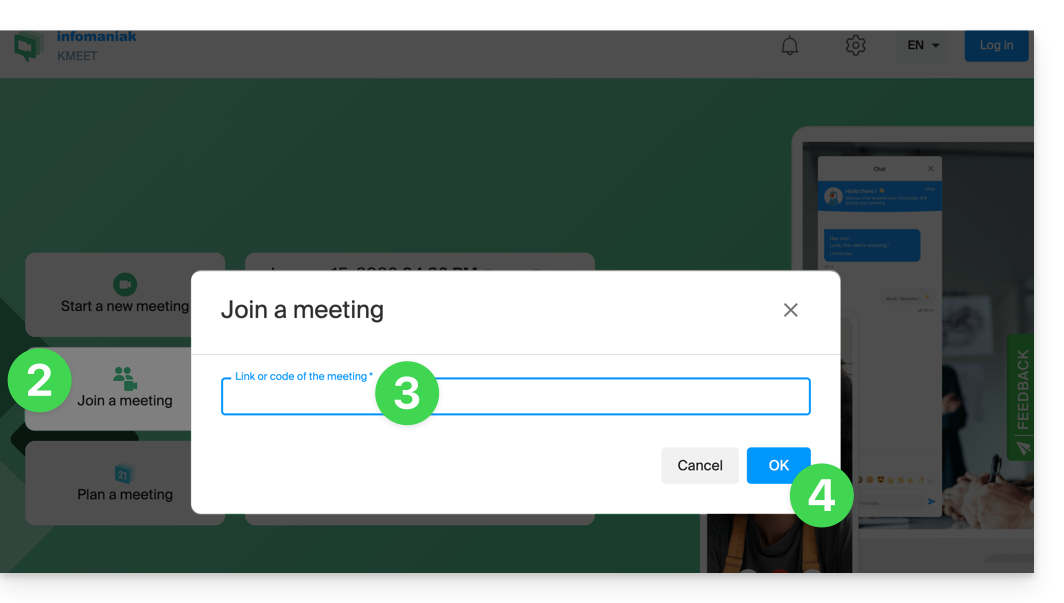
- Se necessário, autorize o acesso à sua webcam e ao seu microfone a partir do seu navegador ou de uma das aplicações:
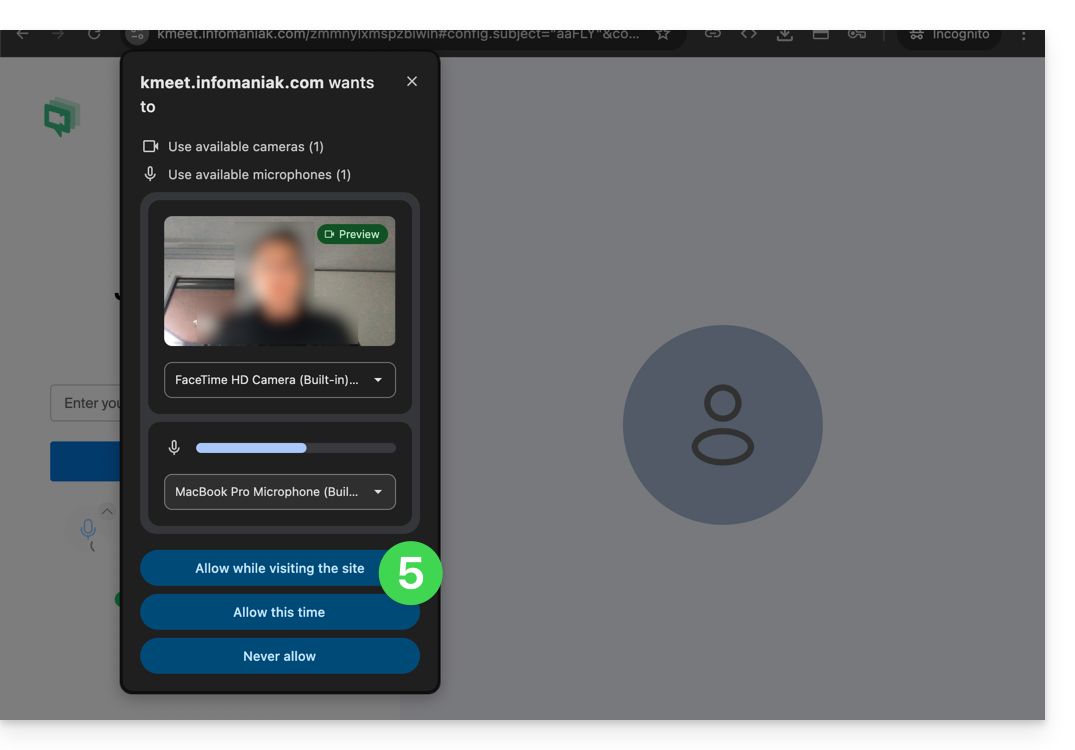
- Insira um apelido ou o seu nome e sobrenome.
- Ajuste as configurações de acordo com as suas preferências (por exemplo, se desejar desativar a câmera).
- Clique no botão azul para participar da reunião:
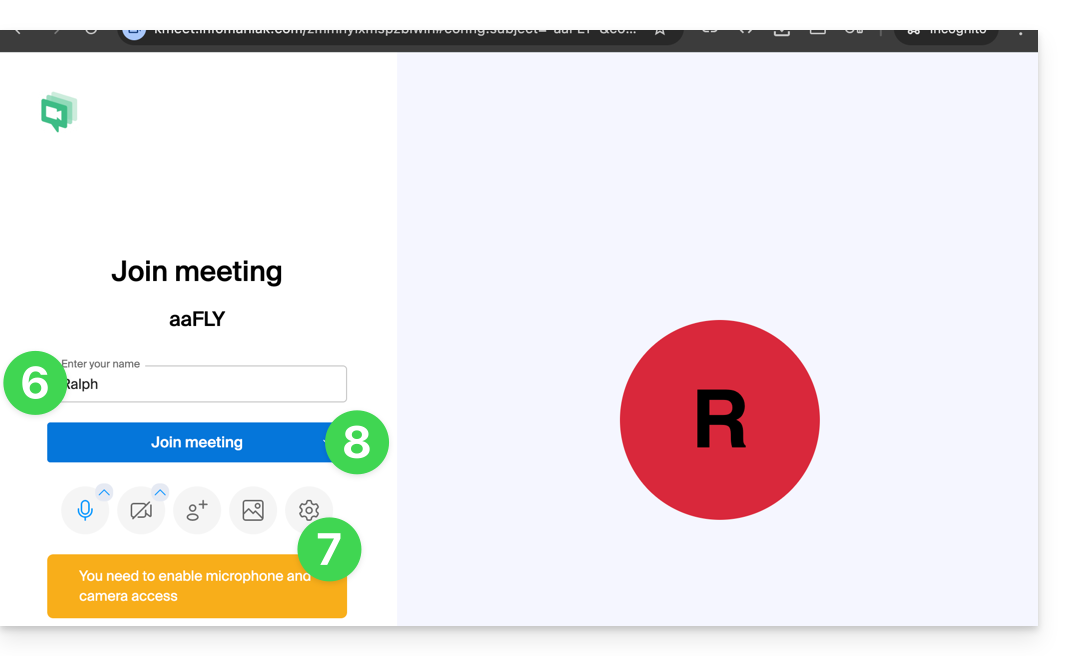
- Se necessário, insira a senha de acesso e/ou a chave de criptografia fornecida pelo organizador da reunião.
Link para esta FAQ: https://faq.infomaniak.com/2473
Esta seção de perguntas frequentes foi útil?
Obrigado por escolher o kMeet Infomaniak como solução de videoconferência para particulares e empresas:
- Chamadas de áudio e vídeo ilimitadas
- Acesso sem registo
- Compatibilidade Web, móvel e desktop
- Chat integrado e reações (emojis, sons)
- Compartilhamento de tela com ferramentas de desenho, controle remoto
- Salas de discussão (salas de subdivisão)
- Integração com a agenda (criação de link de videoconferência)
- Integração com o kDrive para o armazenamento das gravações de reuniões
- Integração com o kChat para as chamadas de vídeo
- Respeito pela privacidade (sem publicidade, hospedagem na Suíça)
- Segurança com criptografia AES-256
- Ecologicamente responsável (energia renovável, compensação de CO₂)
O que deseja fazer?
- Criar uma reunião online
- Participar de uma reunião
- Descarregue a aplicação kMeet nos seus dispositivos macOS, Windows, Linux, iOS (iPhone/iPad) e Android.
- Gerir os participantes (moderação)
- Criar uma sala de reunião secundária no kMeet
- Proteger o acesso a uma reunião com senha e/ou uma chave de criptografia
- Gravar e partilhar uma videoconferência
- Partilhar o ecrã com os participantes
- Controlar remotamente um dispositivo com o kMeet
- Iniciar o chat durante uma reunião online
- Transmitir o fluxo kMeet por streaming de vídeo
- Desenhar no kMeet
- Substituir o Skype pelo kMeet
Tem alguma pergunta, problema ou sugestão?
- Resolver um problema de áudio, vídeo, permissão de acesso ao dispositivo…
- Em caso de problema, consulte a base de conhecimento antes de entrar em contato com o suporte.
- Clique aqui para partilhar uma opinião ou sugestão sobre um produto Infomaniak.
Link para esta FAQ: https://faq.infomaniak.com/2474
Esta seção de perguntas frequentes foi útil?
Este guia explica como iniciar uma reunião online com o kMeet, a solução ética de videoconferência gratuita da Infomaniak.
Introdução
- Não há limite de participantes nas ofertas kSuite pagas.
- Os participantes podem escrever em um chat comum (❓: ajuda), anotar um compartilhamento de tela (❓: ajuda) e até mesmo controlar um dispositivo remoto (❓: ajuda).
- É possível criar uma sala de reunião com antecedência e convidar os participantes criando um evento associado no calendário Infomaniak (❓: ajuda).
- Também é possível compartilhar o fluxo de vídeo em uma transmissão Streaming de vídeo (❓: ajuda), por exemplo, para não depender da conexão com o kMeet.
- Marca personalizada: a criação de salas em um domínio específico (por exemplo: kMeet.domain.xyz) ainda não é suportada pela aplicação de desktop (principalmente no Linux).
Criar uma sala de reunião virtual
Para isso:
- Clique aqui para acessar o kMeet em seu kSuite Infomaniak (ou inicie o aplicativo móvel/desktop — ❓: ajuda).
- Inicie uma reunião (❓: ajuda).
- Indique um nome para a sua sala de reunião.
- Autorize o acesso à sua webcam e microfone a partir do seu navegador ou da aplicação (❓: ajuda).
- Insira um pseudónimo ou o seu nome e apelido.
- Se necessário, ative o controle de participantes (❓: ajuda), uma senha ou uma chave de criptografia personalizada (❓: ajuda).
- Clique em Participar da reunião.
- Compartilhe o link da sala para convidar os participantes a se juntarem a você:
Link para esta FAQ: https://faq.infomaniak.com/2475
Esta seção de perguntas frequentes foi útil?
Este guia explica como autorizar ou recusar manualmente participantes em uma reunião kMeet.
Introdução
- Depois de ativar a opção, cada participante pode aprovar a entrada dos participantes seguintes.
- Se uma reunião for criada a partir do calendário Infomaniak, um link kMeet pode ser adicionado, e este estará acessível a todos os participantes do evento. Por isso, recomenda-se que o criador do evento se conecte um pouco antes dos participantes, caso deseje configurar a sua reunião (adicionar uma sala de espera ou uma senha, etc.).
Aprovar ou rejeitar participantes
Para isso:
- Clique aqui para acessar o kMeet em seu kSuite Infomaniak (ou inicie o aplicativo móvel/desktop — ❓: ajuda).
- Inicie uma reunião (❓: ajuda).
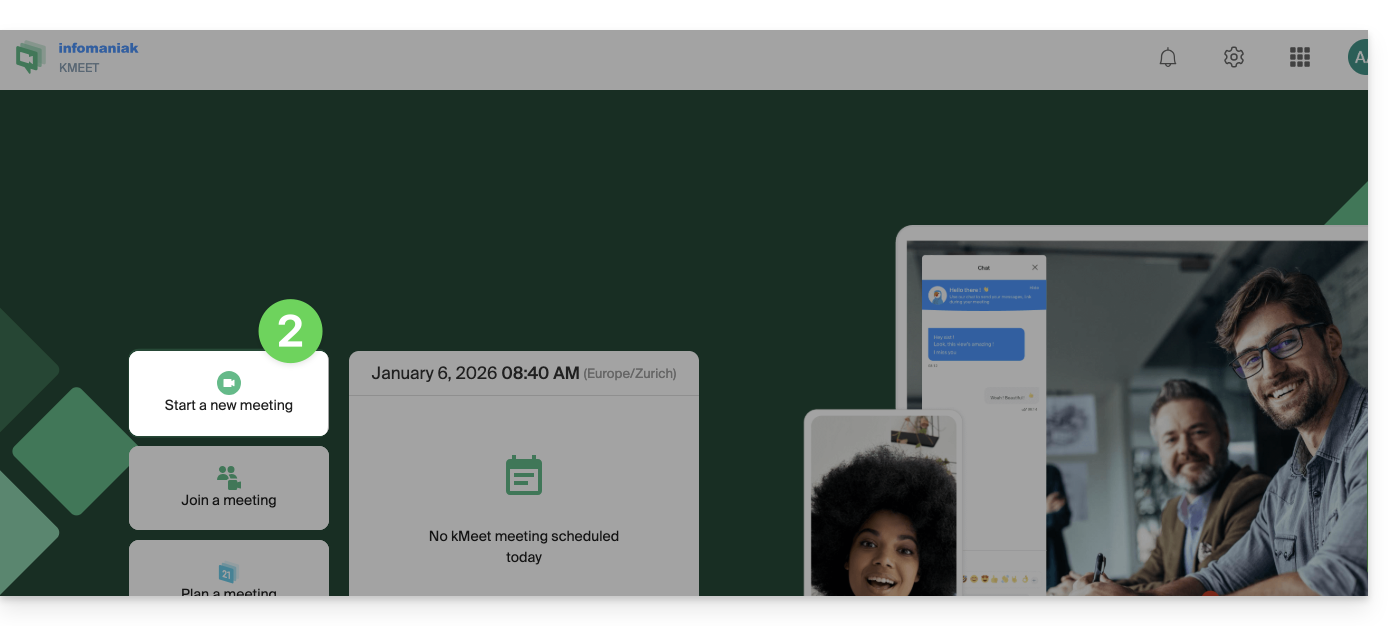
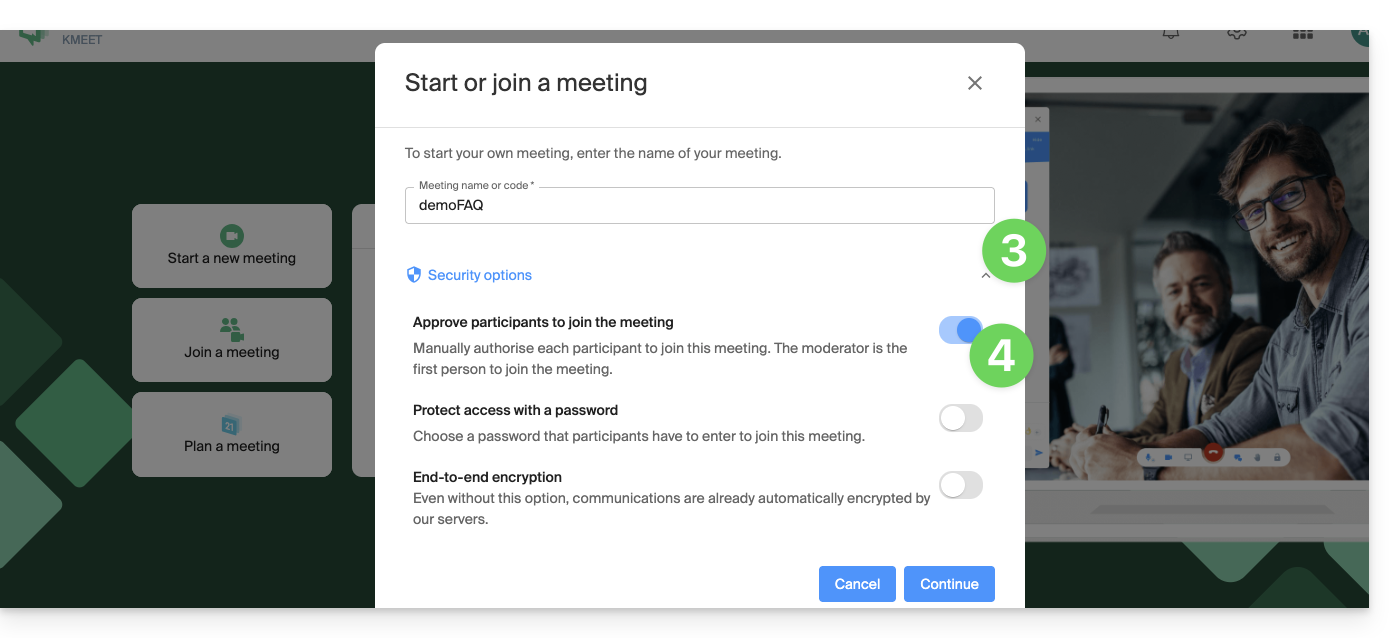
- Clique no ícone de seta para baixo abaixo do nome da reunião para expandir as opções avançadas.
- Ative o controle dos participantes:
- Inicie a reunião.
- Compartilhe o link ou o código da reunião e, se necessário, a senha e/ou a chave de criptografia com os participantes.
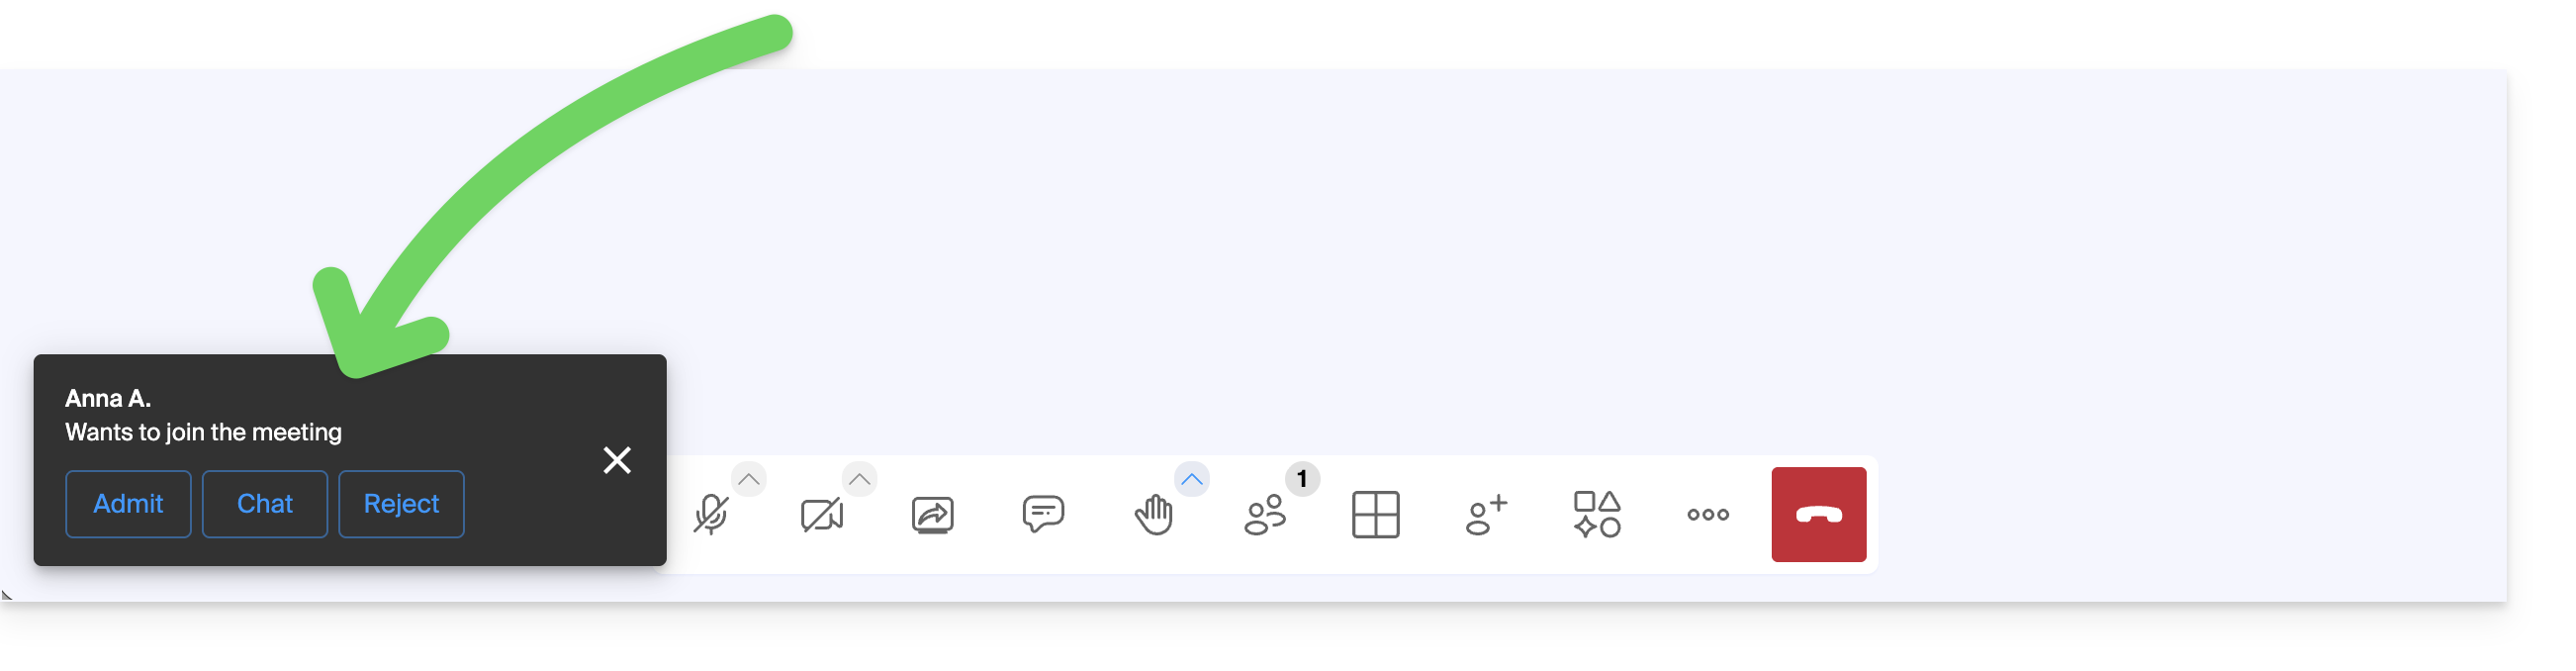
- Quando os participantes tentarem entrar na reunião, uma notificação sonora o(a) convida a autorizá-los ou não a entrar na sala:
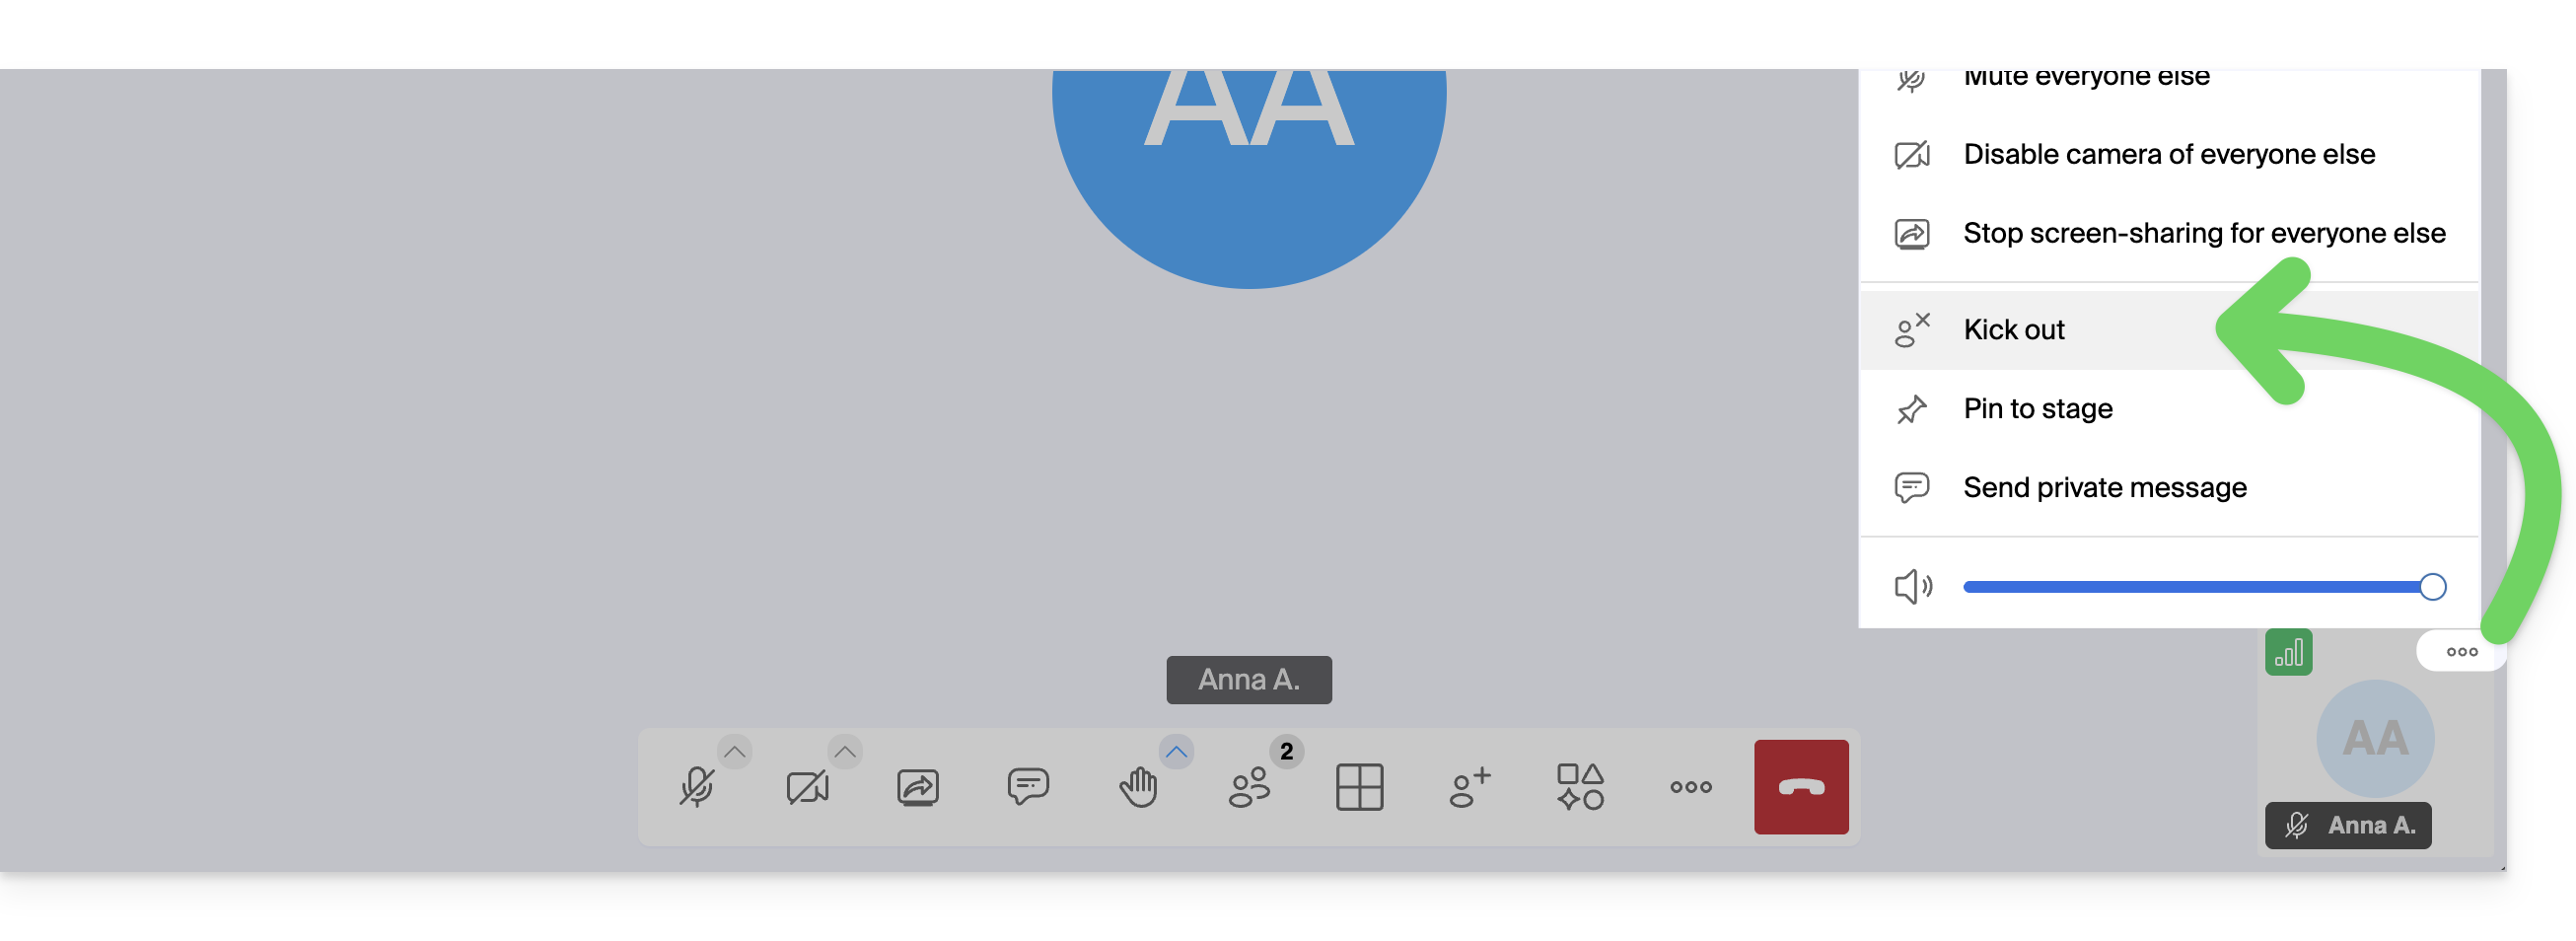
- Pode excluir um participante, que já foi aceito, durante a reunião:
- O moderador também pode desativar a "sala de espera" ativada no ponto 4 acima, após o início da reunião:
- Clique no ícone ○○○ na barra de ferramentas.
- Clique em Opções de segurança:
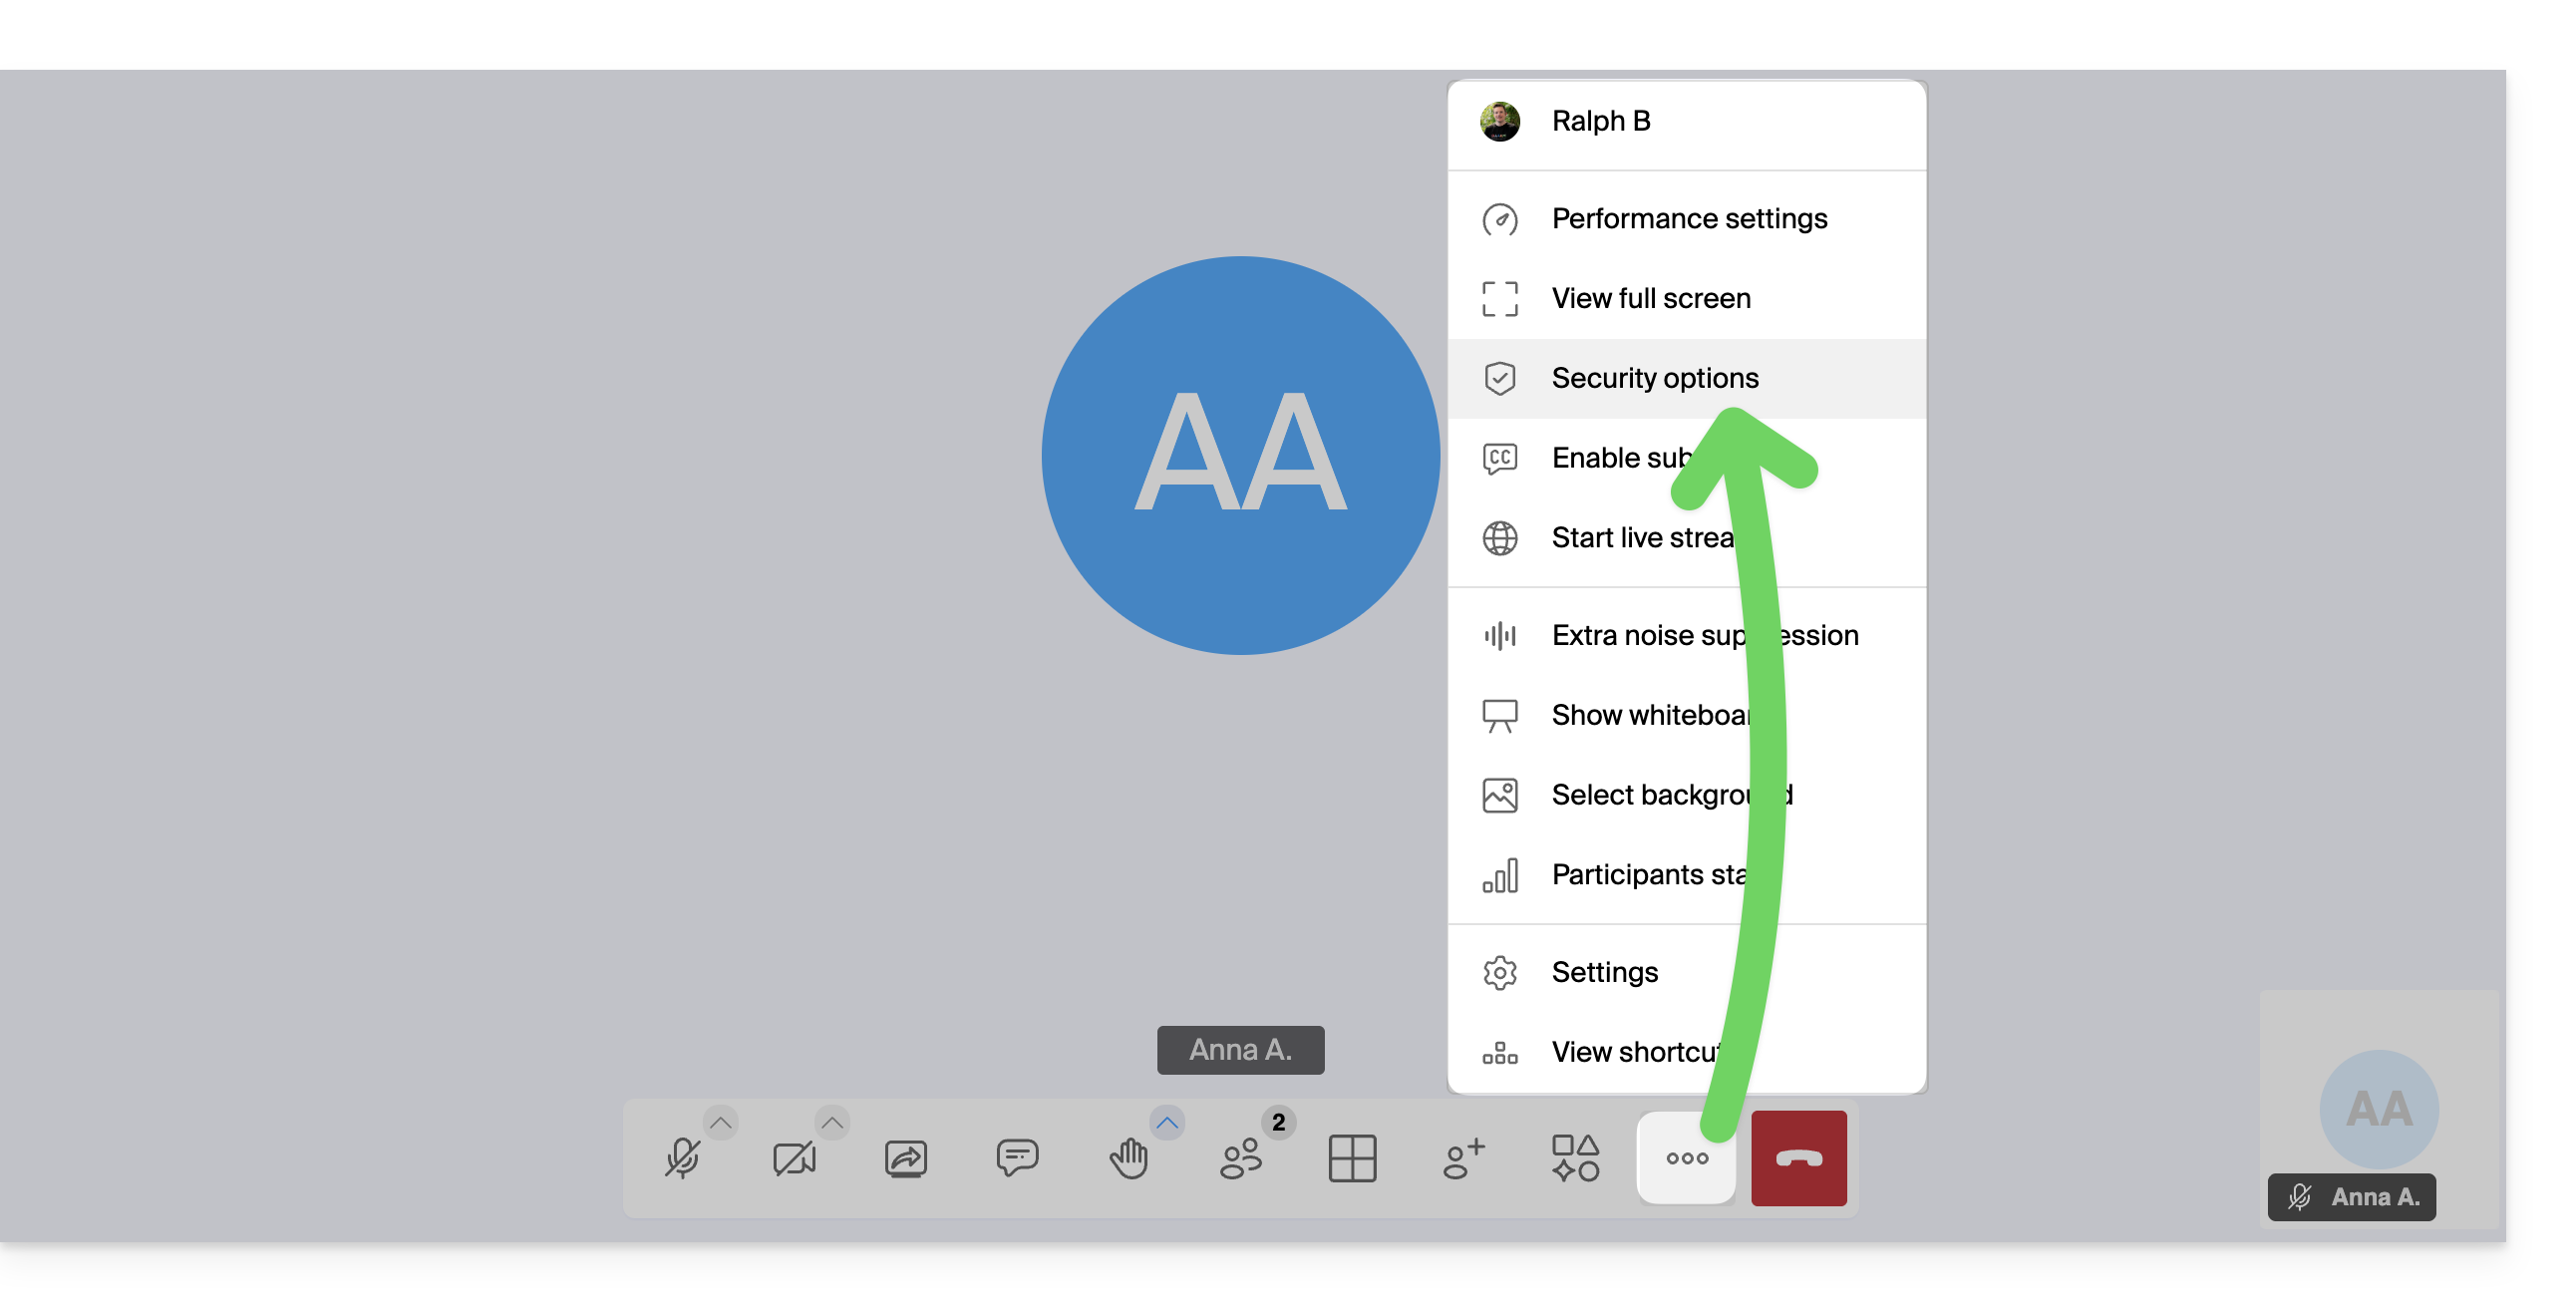
- Desative a opção para não precisar mais gerenciar as novas entradas na reunião:
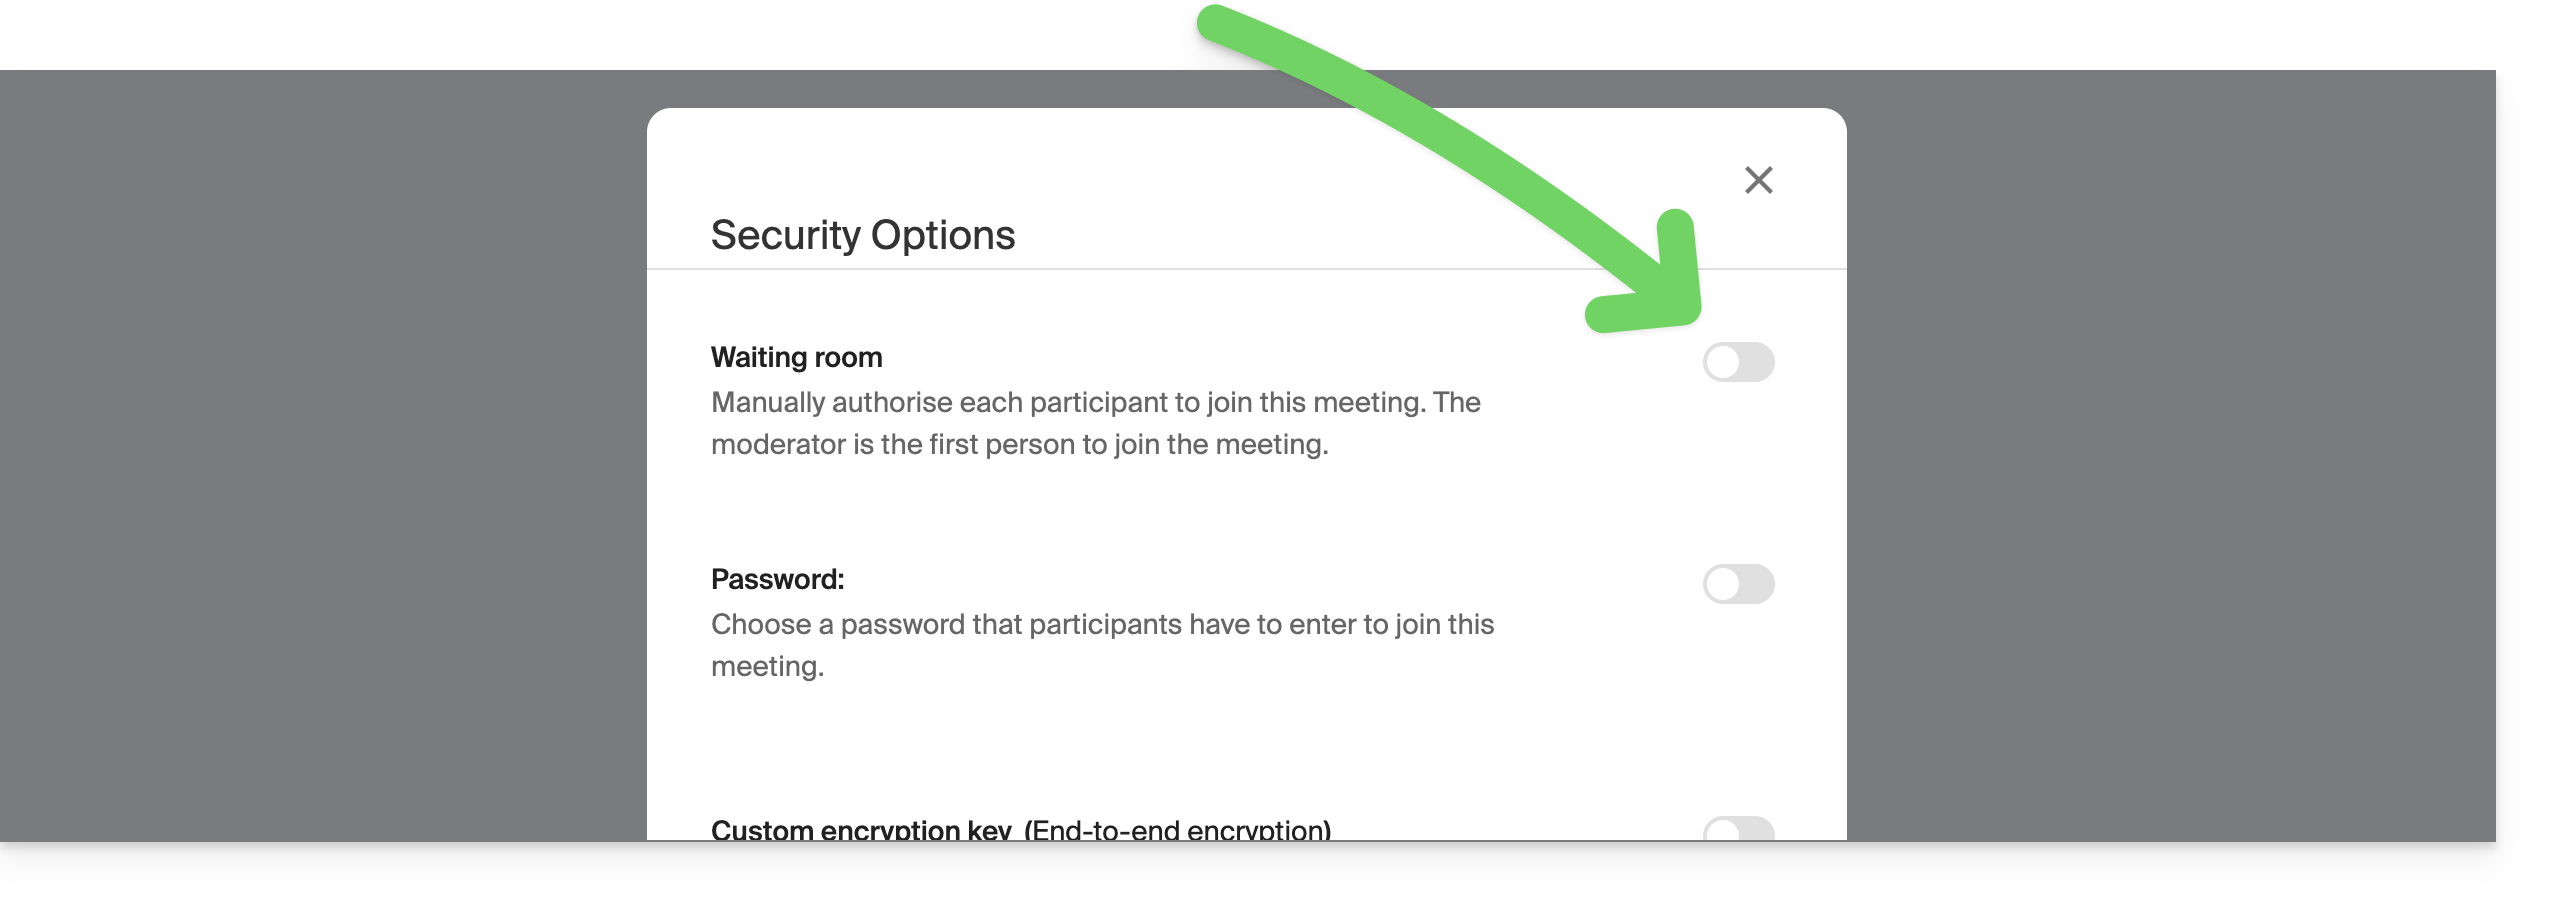
Opções de moderação
Outras opções de moderação estão disponíveis:
- Clique no ícone ○○○ na barra de ferramentas.
- Clique em Configurações:
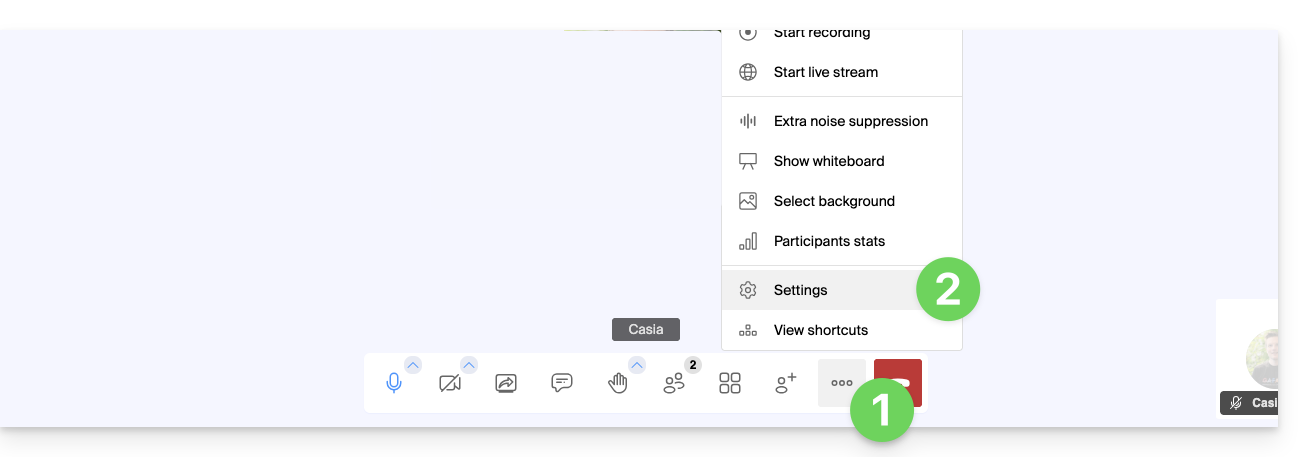
- Clique em Moderação.
- As opções permitem gerir o comportamento esperado durante as conexões de novos participantes:
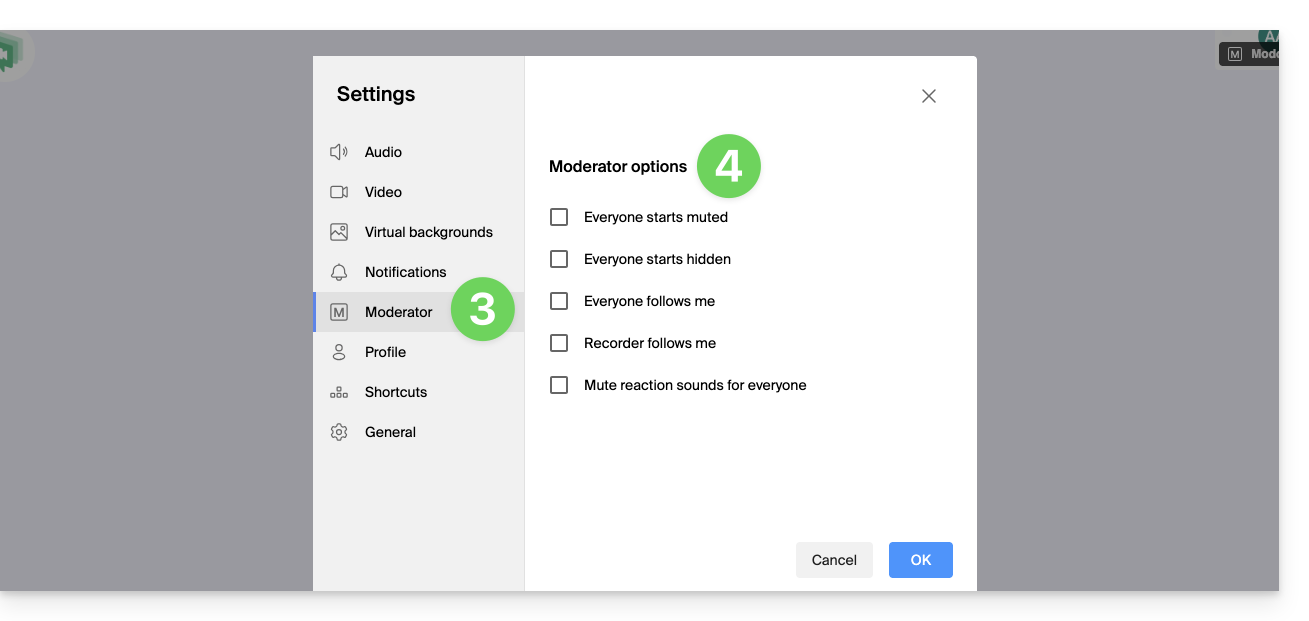
- todos os participantes iniciam com o microfone desativado
- todos os participantes iniciam com a câmara desativada
- todos os participantes têm a mesma visualização da interface que o moderador (visualização de um determinado participante em destaque no layout, etc.), que pode ser modificada a qualquer momento pelos utilizadores, mas o moderador pode atualizá-la a qualquer momento para forçar o acompanhamento
- a gravação utilizará a mesma visualização da interface que o moderador (visualização de um determinado participante em destaque no layout, etc.)
- os emojis de reação não produzem qualquer som
Link para esta FAQ: https://faq.infomaniak.com/2476
Esta seção de perguntas frequentes foi útil?
Este guia explica como usar a funcionalidade de compartilhamento de tela do kMeet, a solução ética de videoconferência gratuita da Infomaniak.
Pré-requisitos
- Ter o aplicativo desktop kMeet (aplicativo para computador macOS/Windows) ou o aplicativo móvel kMeet (aplicativo para smartphone ou tablet Android).
- O aplicativo Web kMeet (serviço online kmeet.infomaniak.com) também é compatível.
- O compartilhamento de tela ainda não é possível com o aplicativo móvel iOS.
- Se for a primeira vez que você usa ou compartilha a tela, as permissões solicitadas pelo sistema operacional (macOS, Windows…) ou por um navegador como Chrome, Edge, Firefox… podem exigir uma reinicialização do aplicativo e, consequentemente, uma interrupção da reunião.
É melhor preparar com antecedência os aspetos técnicos para não se encontrar numa situação delicada durante a transmissão; consulte este outro guia sobre o assunto.
Iniciar o compartilhamento de tela
Para iniciar o compartilhamento da sua tela:
- Clique aqui para acessar o kMeet no seu kSuite Infomaniak (ou inicie o aplicativo móvel/desktop — ❓: ajuda).
- Inicie uma reunião (❓: ajuda) ou participe de uma (❓: ajuda).
- Clique no ícone de tela com setas para Compartilhar sua tela:
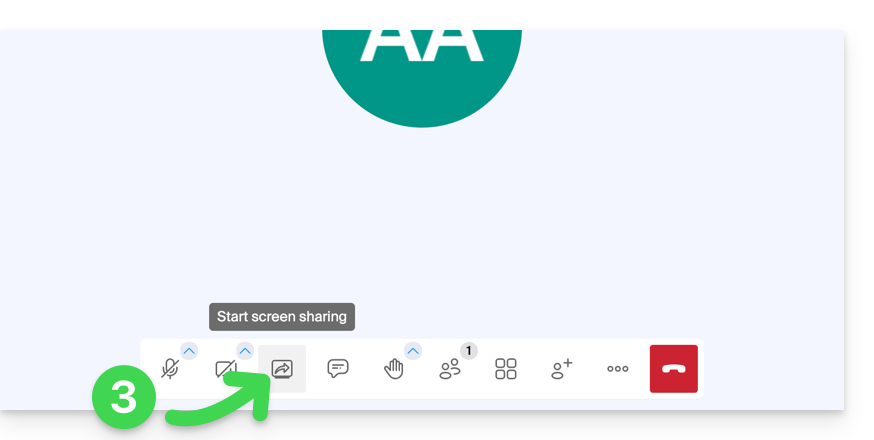
- Leia o aviso exibido pelo seu dispositivo e confirme a permissão de acesso ao conteúdo da tela.
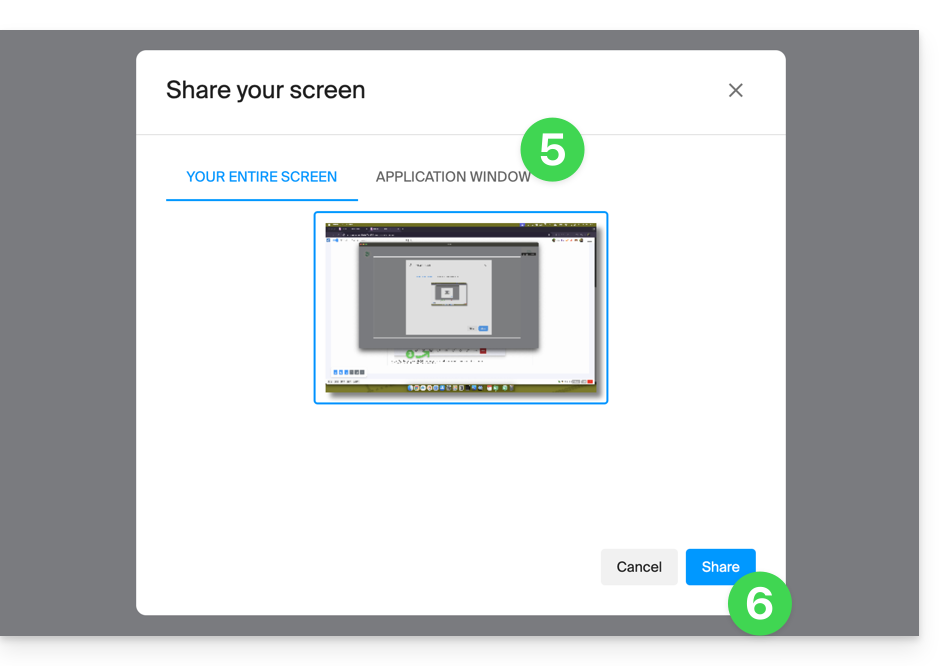
- Por padrão, toda a sua tela será compartilhada na etapa seguinte, mas você também pode escolher uma janela específica, como a de um aplicativo, por exemplo, para restringir a visualização dos participantes a uma atividade específica do dispositivo.
- Atenção: se o objetivo do compartilhamento for permitir que os participantes interajam desenhando, é necessário escolher o compartilhamento da tela completa.
- Clique no botão para iniciar o compartilhamento:
- Para interromper a transmissão, clique novamente no ícone na barra de ferramentas.
Link para esta FAQ: https://faq.infomaniak.com/2477
Esta seção de perguntas frequentes foi útil?
Este guia explica como usar a funcionalidade de bate-papo por meio do chat integrado ao kMeet, a solução ética de videoconferência gratuita da Infomaniak.
Iniciar o chat entre os participantes do kMeet
Para isso:
- Clique aqui para acessar o kMeet em seu kSuite Infomaniak (ou inicie o aplicativo móvel/desktop — ❓: ajuda).
- Inicie uma reunião (❓: ajuda) ou participe de uma (❓: ajuda).
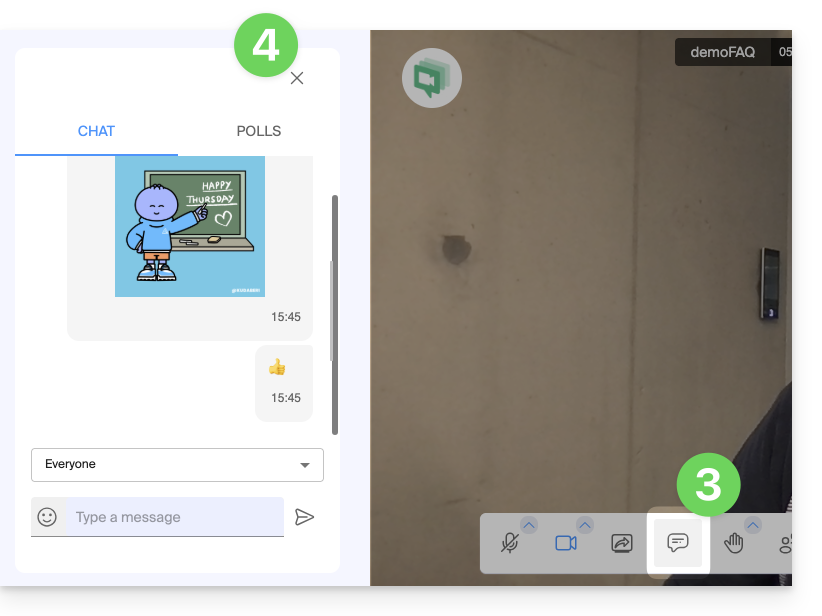
- Clique no ícone de balão de mensagem na barra de ferramentas para abrir/fechar o chat e conversar a partir de um painel lateral à esquerda.
- Feche o painel de chat/pesquisas, se necessário:
- Feche o painel de chat/pesquisas, se necessário:
Reagir ao vivo, criar uma enquete
- O chat suporta o uso de emojis.
- Também é possível:
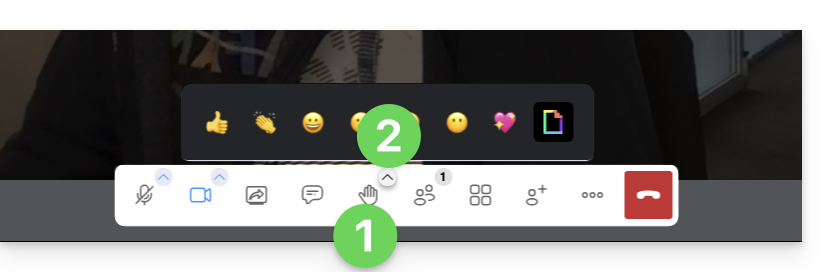
- pedir a palavra através do ícone de mão (Levantar/Abaixar a mão)
- reagir com emojis visuais (e sonoros) e GIFs — eles serão exibidos no espaço de conversa
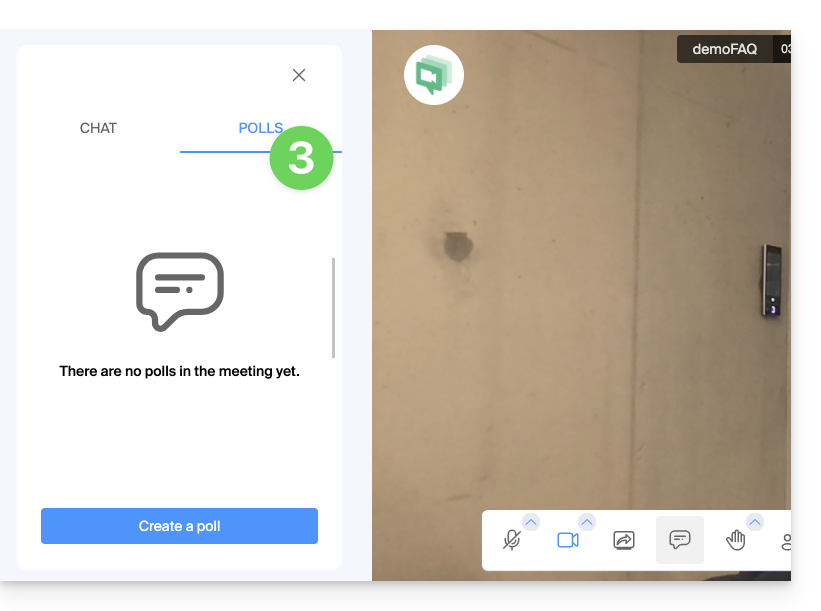
- criar uma enquete entre os participantes (clique na aba Enquetes no painel de chat):
Link para esta FAQ: https://faq.infomaniak.com/2478
Esta seção de perguntas frequentes foi útil?
Este guia explica como usar a funcionalidade de desenho com o kMeet, a solução ética de videoconferência gratuita da Infomaniak, que permite a colaboração visual entre os participantes.
Exibir um quadro branco colaborativo
É possível exibir uma área branca onde todos os participantes poderão inserir informações:
- Inicie o aplicativo kMeet e, em seguida, inicie uma reunião (❓: ajuda) ou participe de uma (❓: ajuda) na qual os usuários deverão estar presentes.
- Após entrar na reunião, clique no menu de ação ○○○ na barra de ferramentas do kMeet.
- Clique em Exibir o quadro branco:
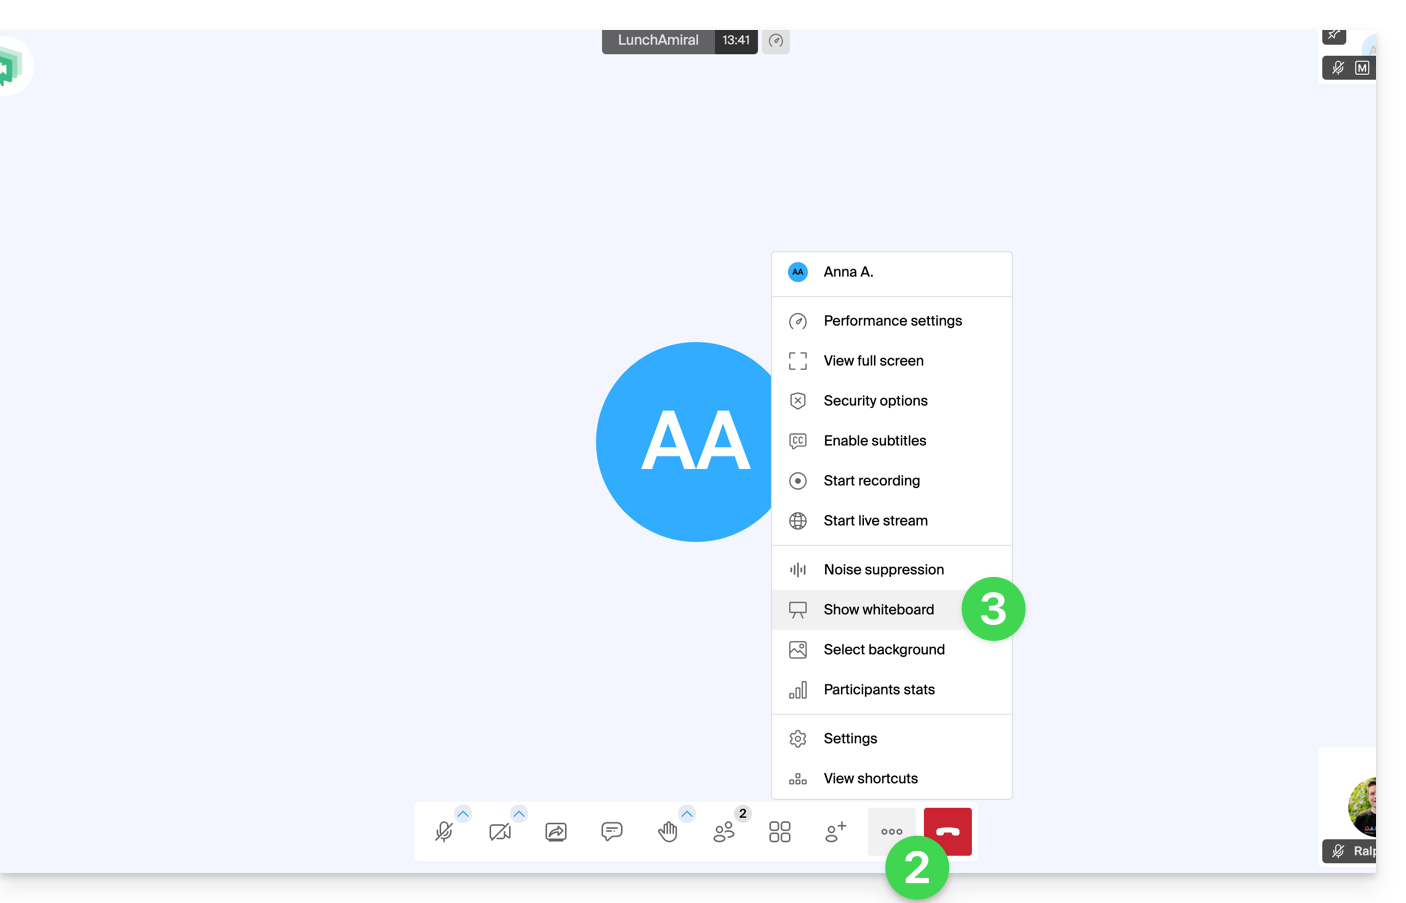
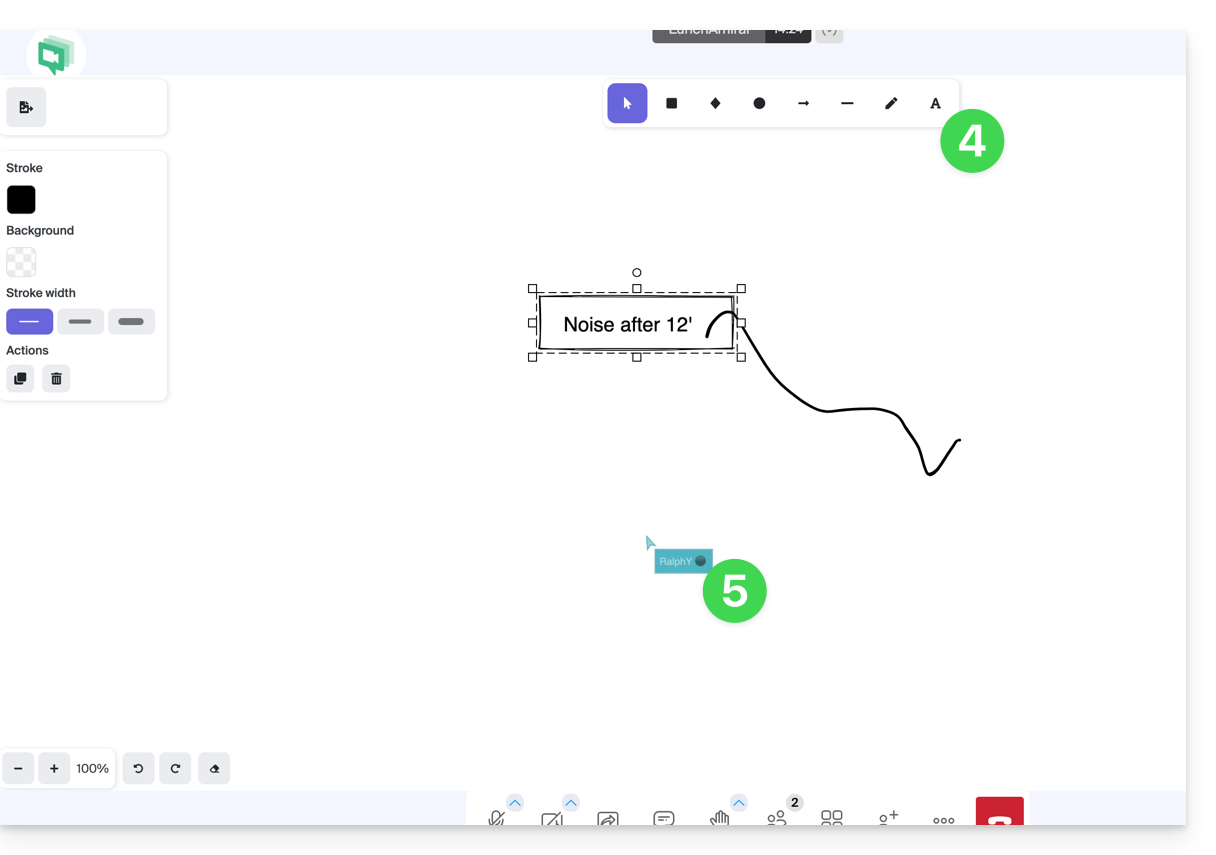
- A área de desenho será exibida para todos os participantes, e cada um poderá inserir o que desejar.
- O cursor de cada participante é exibido:
Desenhar em uma tela compartilhada
Pré-requisitos
- Ter a aplicação de ambiente de trabalho kMeet (aplicação para macOS / Windows / Linux).
- Partilhar o ecrã inteiro e não apenas uma janela da aplicação (ponto 2 abaixo).
Em seguida:
- Inicie o aplicativo kMeet e crie ou participe de uma sala de reunião na qual os usuários deverão estar.
- Um dos participantes inicia o compartilhamento da tela (apenas na versão para desktop – consulte os pré-requisitos).
- A partir daí, os outros participantes da reunião podem desenhar colaborativamente na tela compartilhada:
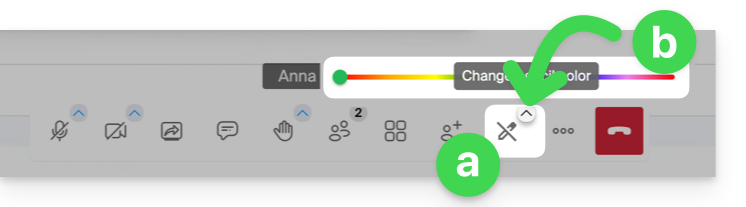
- Clique no ícone de lápis na barra de ferramentas inferior para desenhar na tela.
- Altere a cor da caneta, se necessário:
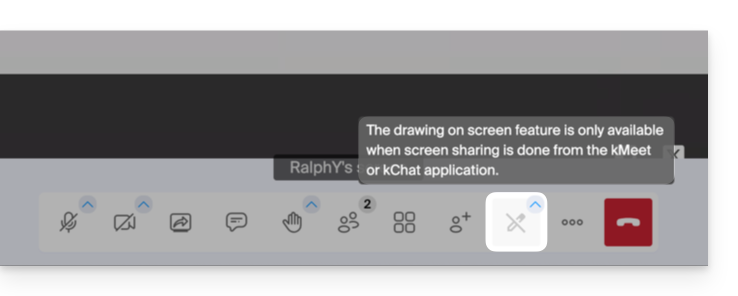
- Se o compartilhamento de tela não for iniciado a partir do aplicativo kMeet (versão para computador), esta mensagem será exibida para os participantes que desejam ativar a função de desenho:
Também é possível assumir o controle do dispositivo durante uma sessão de compartilhamento de tela.
Link para esta FAQ: https://faq.infomaniak.com/2620
Esta seção de perguntas frequentes foi útil?
Este guia explica como usar a funcionalidade de controle remoto de um dispositivo, cujo ecrã é partilhado, com kMeet, a solução ética de videoconferência gratuita da Infomaniak.
Pré-requisitos
- Ter a aplicação de ambiente de trabalho kMeet (aplicação para macOS/Windows).
- Partilhar todo o ecrã e não apenas uma janela de aplicação.
Assumir o controle de um dispositivo
Para que o usuário A possa assumir o controle do computador do usuário B:
- Inicie o aplicativo kMeet e, em seguida, inicie uma reunião (❓: ajuda) ou participe de uma (❓: ajuda) na qual os usuários A e B devem estar presentes.
- O usuário A deve clicar no menu de ações.○○○ no canto superior direito da miniatura do utilizador B.
- O utilizador A deve clicar em Iniciar o controlo remoto e seguir o mesmo caminho para parar o controlo:
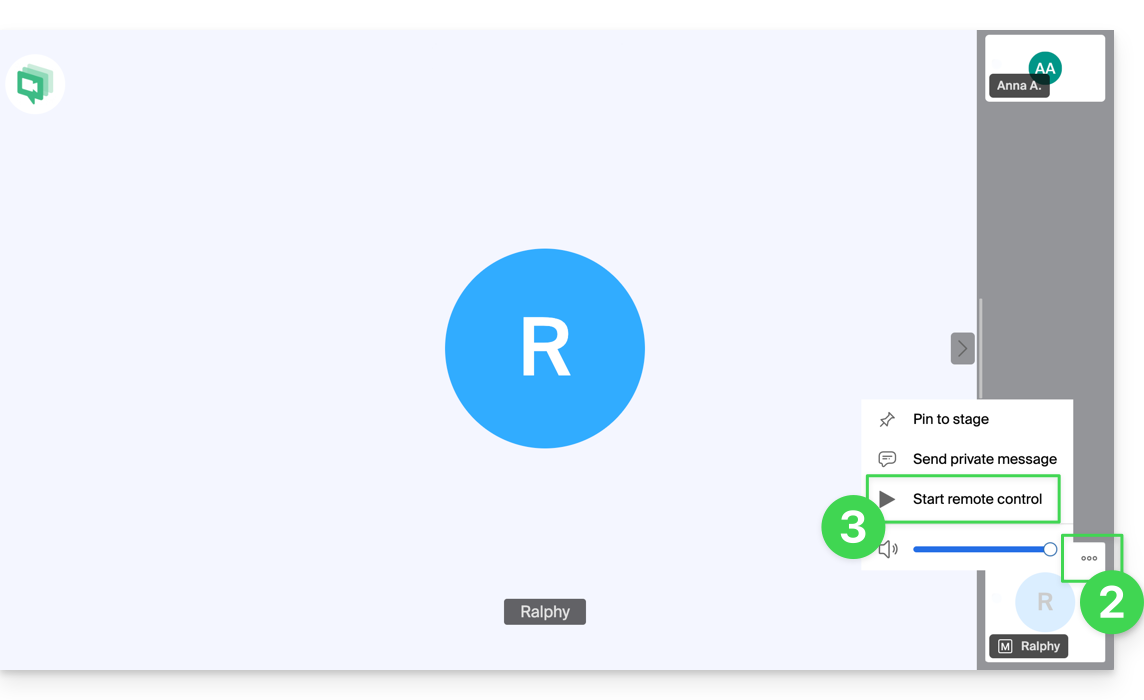
- O utilizador B recebe uma notificação na aplicação para validar e aceitar o pedido de controlo do dispositivo.
Também é possível simplesmente anotar um compartilhamento de tela sem assumir o controle do dispositivo.
Link para esta FAQ: https://faq.infomaniak.com/2622
Esta seção de perguntas frequentes foi útil?
Este guia explica como iniciar uma conversa oral ou em vídeo entre um ou mais utilizadores kChat, com a solução ética de videoconferência gratuita da Infomaniak, kMeet.
Introdução
- A função de chamada no kChat está disponível em todas as versões Web (navegador), móvel (iOS/Android) e desktop (macOS/Windows).
Criar uma reunião entre utilizadores do kChat
Para poder conversar em uma sala virtual usando o microfone e a webcam do seu dispositivo, basta pressionar o botão Ligar, visível em qualquer conversa do kChat, canal privado, público, através do aplicativo ou diretamente no navegador: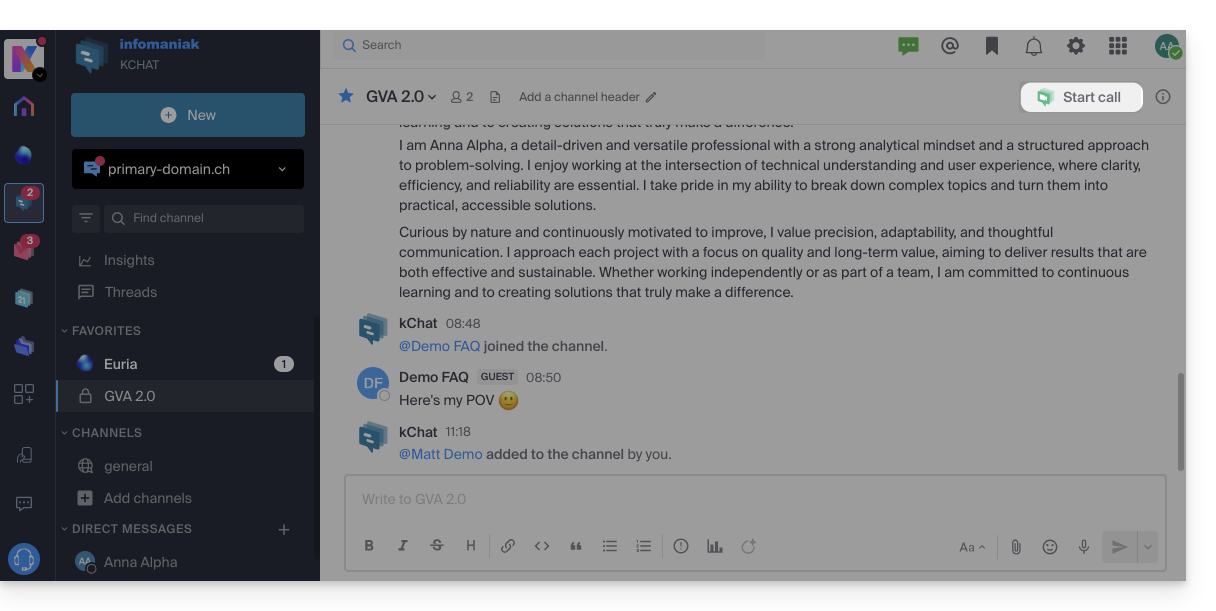
- Ligue diretamente para um usuário se você estiver em uma conversa direta com ele, ou inicie uma chamada para todos os membros de um canal se você iniciar a reunião a partir do canal.
- Ligar para um utilizador que está no modo “Não perturbar” não irá ativar o toque nem exibir uma notificação de chamada no dispositivo dele, mas ele verá a mensagem na conversa.
- O microfone é ativado por padrão quando a chamada é aceita, mas a câmera não.
- Visualize os participantes da reunião (quem aceitou, recusou ou não compareceu) usando os avatares na mensagem do kChat.
- Assim que a chamada começar, um emoji aparecerá no seu status do kChat para indicar que você está ocupado na conversa.
- Uma mensagem enviada durante a videoconferência (kMeet) também será visível na conversa do kChat (e vice-versa).
- Informações sobre o início e o fim da reunião são exibidas automaticamente no histórico de conversas do kChat correspondente:
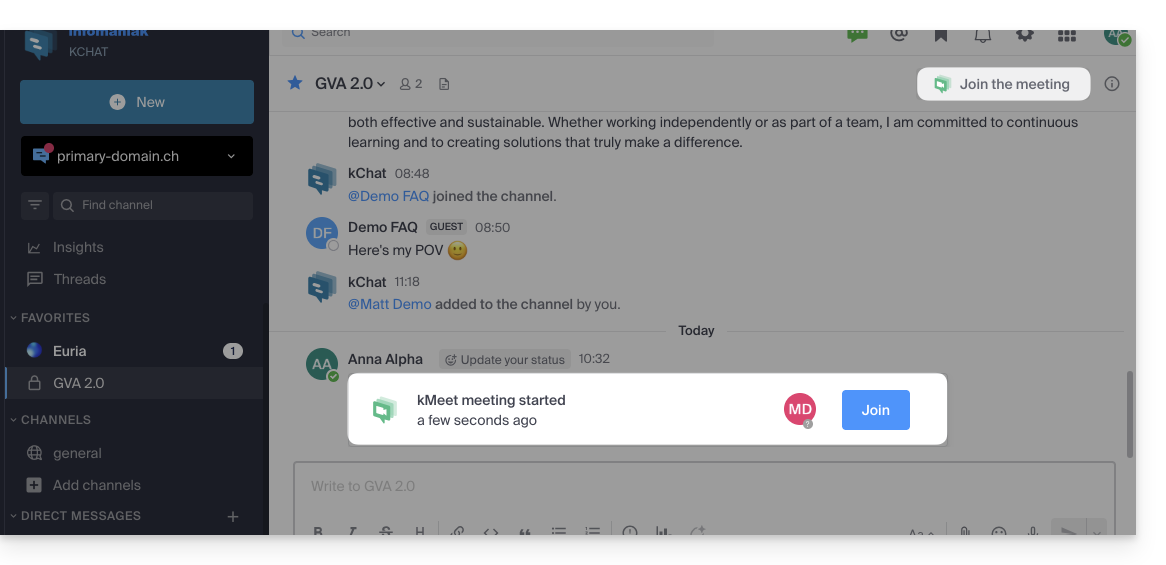
Particularidades para chamadas em canais
- A chamada não tocará nos dispositivos dos destinatários, mas eles verão uma mensagem no kChat, bem como uma notificação.
- Uma mensagem (de alerta) será exibida se você tentar iniciar uma chamada em um canal com mais de 7 usuários.
Consulte este outro guia se você precisar de informações sobre o kMeet.
Link para esta FAQ: https://faq.infomaniak.com/2827
Esta seção de perguntas frequentes foi útil?
A Infomaniak oferece soluções para substituir o Skype, seja para chamadas individuais, reuniões remotas ou comunicação em grupo.
kMeet, a videoconferência para particulares e empresas
Apesar do seu sucesso inicial, a plataforma de comunicação Skype viu o seu uso diminuir face ao surgimento de soluções melhor integradas aos novos modelos de colaboração.
Uma das formas mais simples de substituir o Skype é adotar o kMeet:
- Chamadas de áudio e vídeo ilimitadas
- Acesso sem registo
- Compatibilidade com Web, dispositivos móveis e desktop
- Chat integrado e reações (emojis, sons)
- Compartilhamento de tela com ferramentas de desenho, controle remoto
- Salas de discussão (salas de subdivisão)
- Integração com a agenda (criação de link para videoconferência)
- Integração com o kDrive para armazenamento das gravações de reuniões
- Integração com o kChat para chamadas de vídeo
- Respeito pela privacidade (sem publicidade, hospedagem na Suíça)
- Segurança com criptografia AES-256
- Ecológico (energia renovável, compensação de CO₂)
Substituir o Skype por kMeet
A alternativa kMeet para substituir o Skype pode ser implementada de várias maneiras:
Para iniciar uma comunicação privada entre várias pessoas na Internet, basta que uma delas acesse o kMeet e compartilhe o link da reunião com as outras. Veja o procedimento passo a passo:
- Acesse kmeet.infomaniak.com em um navegador como Brave, Chrome, Edge, Firefox, Opera, Safari…
- Inicie uma reunião (❓: ajuda):
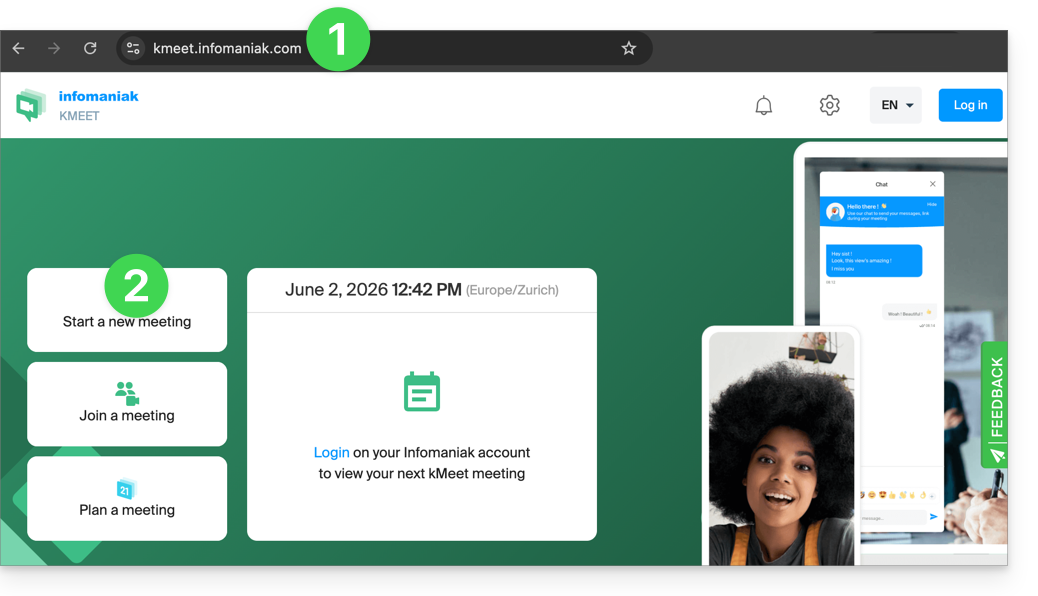
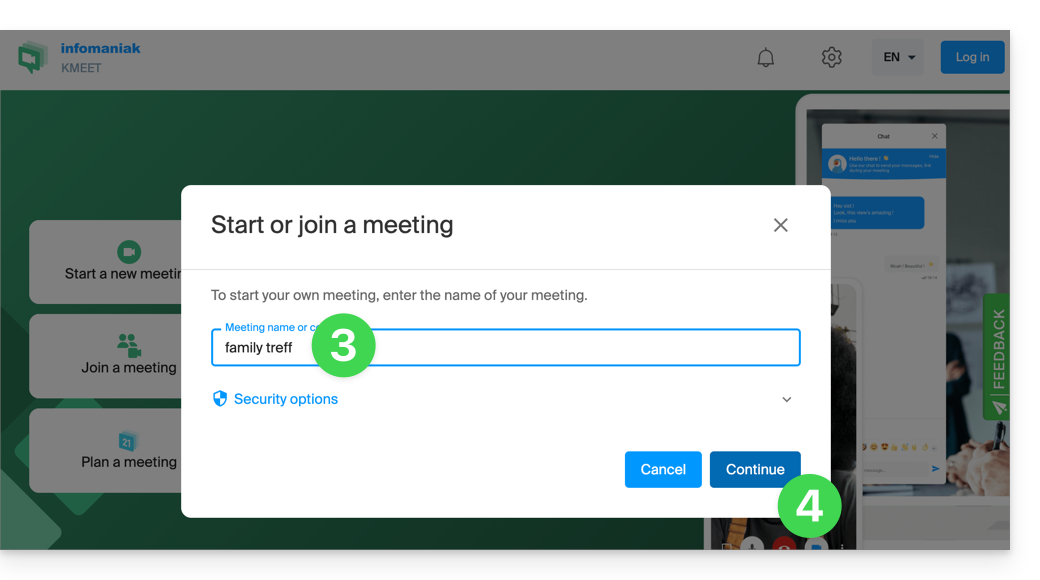
- Insira um nome para a reunião, o que permite indicar aos futuros participantes o tema da discussão à qual se juntarão.
- Clique no botão para Continuar:
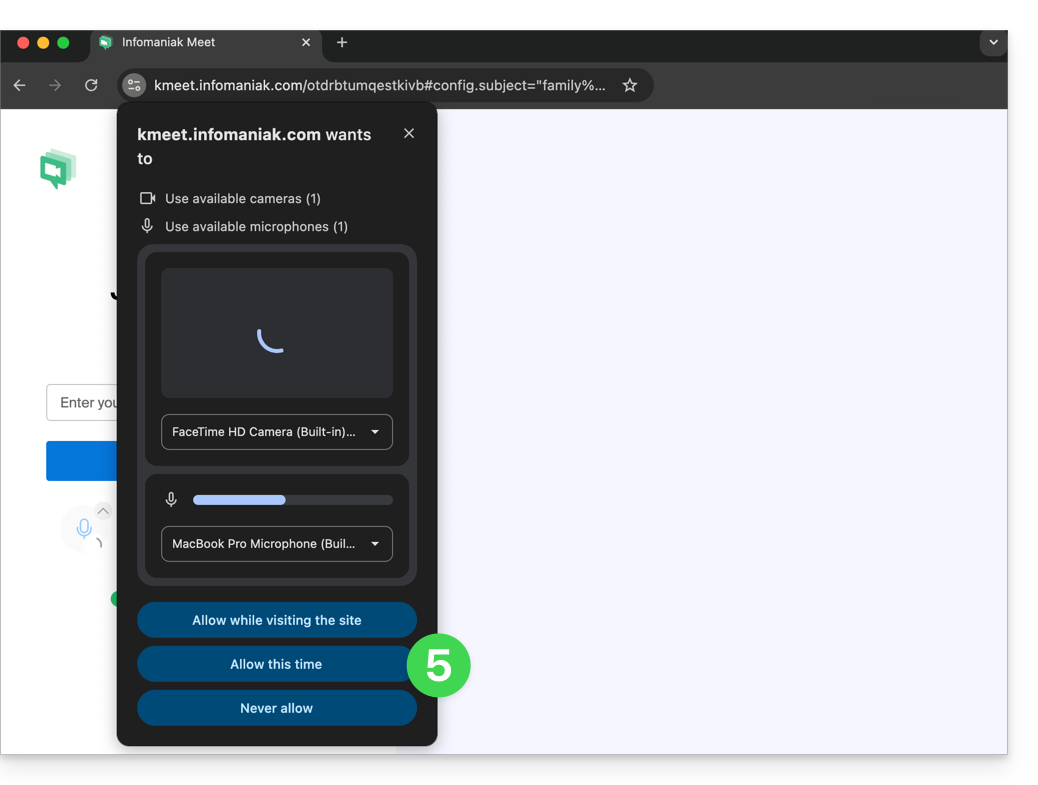
- Conceda as permissões necessárias ao kMeet:
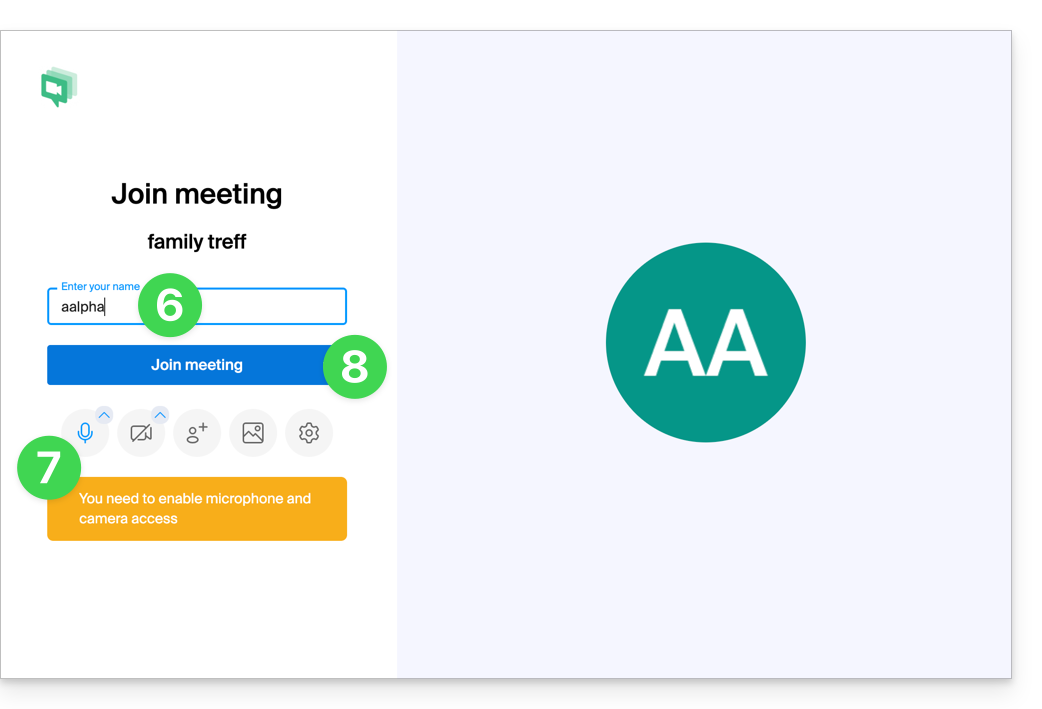
- Insira o seu nome, que será o nome que os outros participantes verão.
- Ative ou desative os eventuais canais de comunicação caso não devam ser utilizados neste momento.
- Clique no botão para entrar na sala de reunião virtual (como primeiro participante, já que, por enquanto, você é o único convidado):
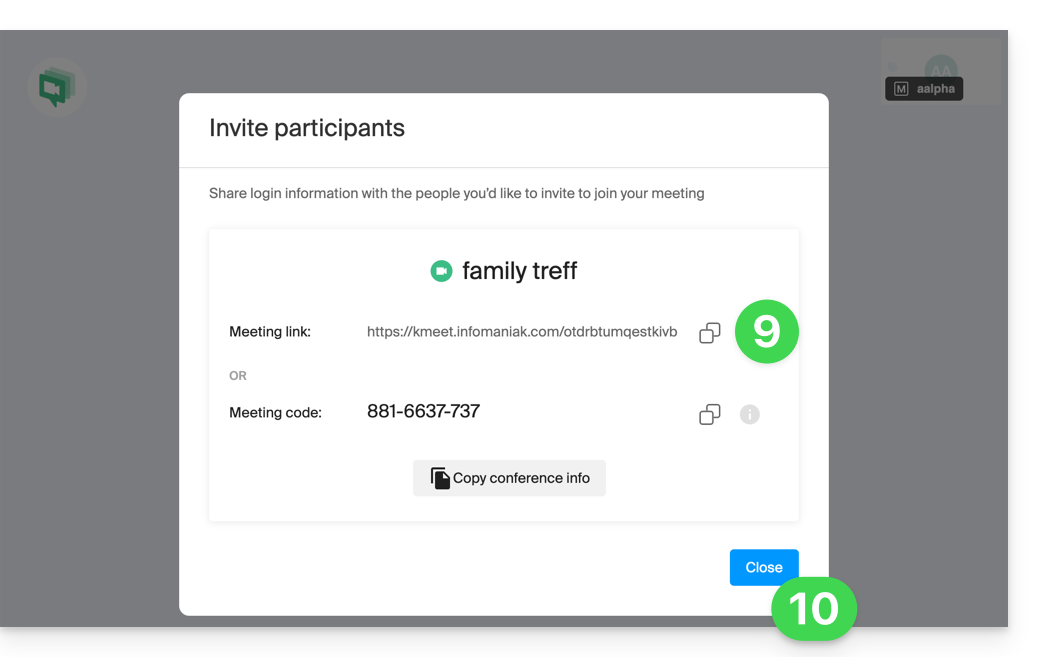
- Pronto, a sala foi criada e agora você pode copiar as informações sobre esta sessão e enviá-las aos seus contatos para que eles possam participar (eles só precisarão clicar no link que você enviar).
- Feche a janela de informações para que todos possam conversar:
- A barra de ferramentas na parte inferior da tela permite ativar ou desativar o microfone, a câmera, etc.:
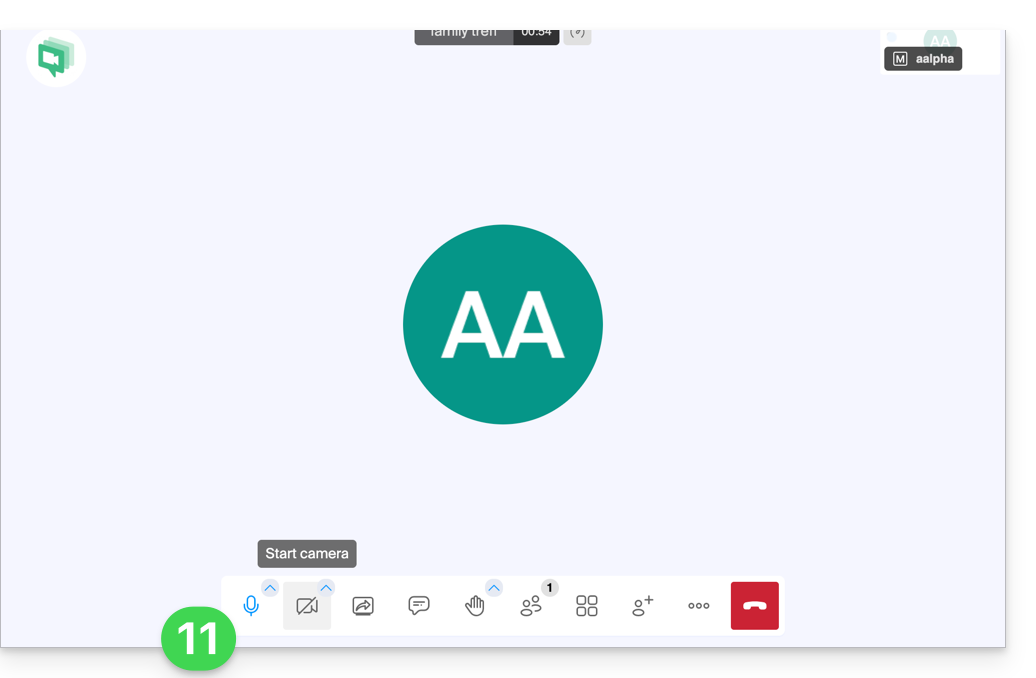
Para descobrir todas as possibilidades que o kMeet oferece, consulte este outro guia.
2. Agendamento e convites com my kSuite
Para trabalhar de forma eficiente, o kMeet pode ser conectado diretamente à sua agenda profissional. Isso significa que, sempre que você criar um evento em seu calendário…
- … um link de videoconferência é gerado automaticamente…
- … os participantes recebem o convite por e-mail com todas as informações…
- … e no dia da reunião, podem participar com um único clique, sem necessidade de inscrição ou instalação de software.
Vantagem: você centraliza a gestão das reuniões, reduz os esquecimentos e simplifica a organização, tudo a partir de uma única interface.
Para implementar esta solução:
- Registe-se gratuitamente no my kSuite para ter um endereço de e-mail, por exemplo
anna.alpha@ikmail.com, e, principalmente, acesso aos serviços Infomaniak. - Aceda ao calendário em ksuite.infomaniak.com/calendar e, em seguida, crie um evento no dia que desejar.
- Adicione participantes ao evento, mesmo que não sejam clientes Infomaniak.
- Clique no botão verde para gerar automaticamente um link kMeet que será adicionado ao evento.
- Clique no botão para salvar o seu evento:
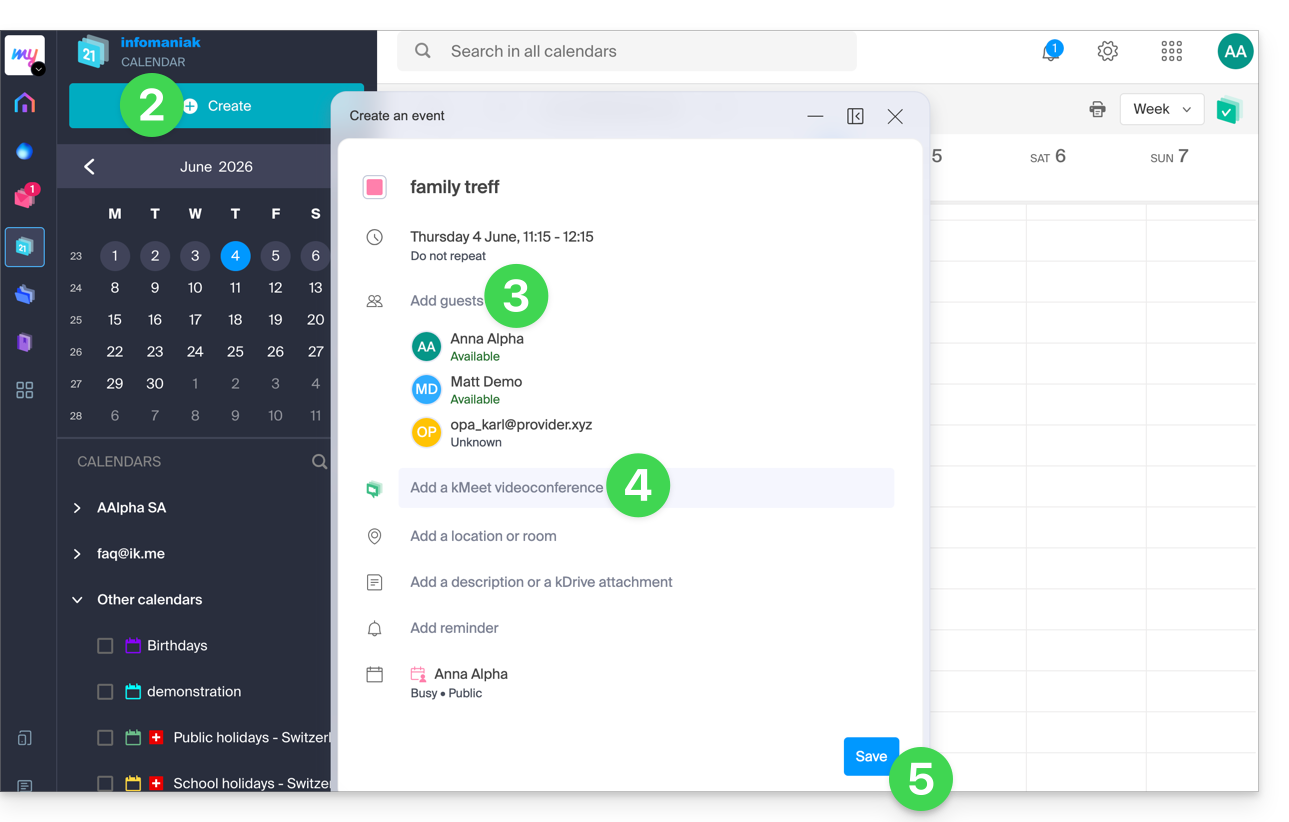
- Responda com SIM à proposta de enviar notificações aos convidados.
- Convites serão então enviados automaticamente por e-mail aos participantes, contendo o link do kMeet, que pode ser clicado para acessar a discussão online no momento oportuno:
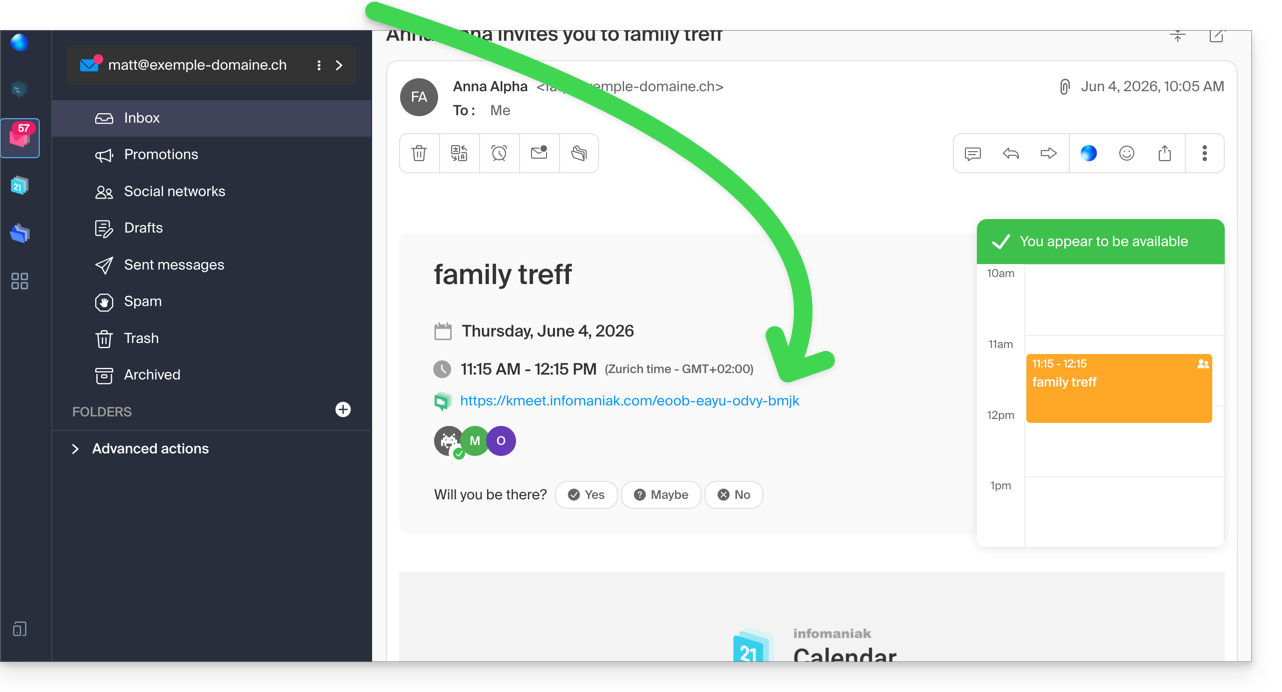
- O link da reunião do kMeet também está visível no evento, diretamente no calendário.
3. Ligar para o seu contato como no Skype
Para iniciar uma conversa a qualquer momento com um contato previamente registado no seu catálogo de endereços, é necessário que ambos tenham o kChat, disponível na kSuite Infomaniak. Para implementar esta solução, que pode ser estendida a um grupo de contatos:
- Registe-se no kSuite para ter acesso aos serviços Infomaniak correspondentes.
- Configure os utilizadores (estes podem até ser externos) no kSuite.
- Instale o aplicativo kChat ou acesse o URL https://ksuite.infomaniak.com/kchat
- Um usuário pode então ser chamado via kChat, o que fará com que o dispositivo do destinatário toque:
- = navegador se o URL do kChat estiver aberto nele, ou computador/dispositivo móvel se o aplicativo kChat estiver instalado.
- Consulte este outro guia para saber mais sobre as chamadas de videoconferência no kChat.
- Em seguida, cabe ao seu contato responder; a chamada será feita com a tecnologia kMeet dentro do kChat ou no aplicativo kMeet, caso este esteja instalado.
Link para esta FAQ: https://faq.infomaniak.com/2890
Esta seção de perguntas frequentes foi útil?