Base de conhecimento
1000 perguntas frequentes, 500 tutoriais e vídeos explicativos. Aqui, você encontra apenas soluções!
Este guia trata de nomes de domínio denominados Premium.
Introdução
- Estes nomes de domínio são designados pelos registos (registry) como domínios com elevado potencial comercial para o SEO ou para a imagem de marca.
- Os preços destes domínios são definidos pelo respetivo registo ou pelo seu proprietário atual e não dependem particularmente das extensões (
.com,.net, etc.). - Um domínio
.artpode custar menos de 10 EUR, mas também pode ser comprado por mais de 300 EUR. - Qualquer pessoa pode comprar um domínio premium.
Como identificar este tipo de domínio
Na loja Infomaniak, os domínios premium são identificados por uma coroa.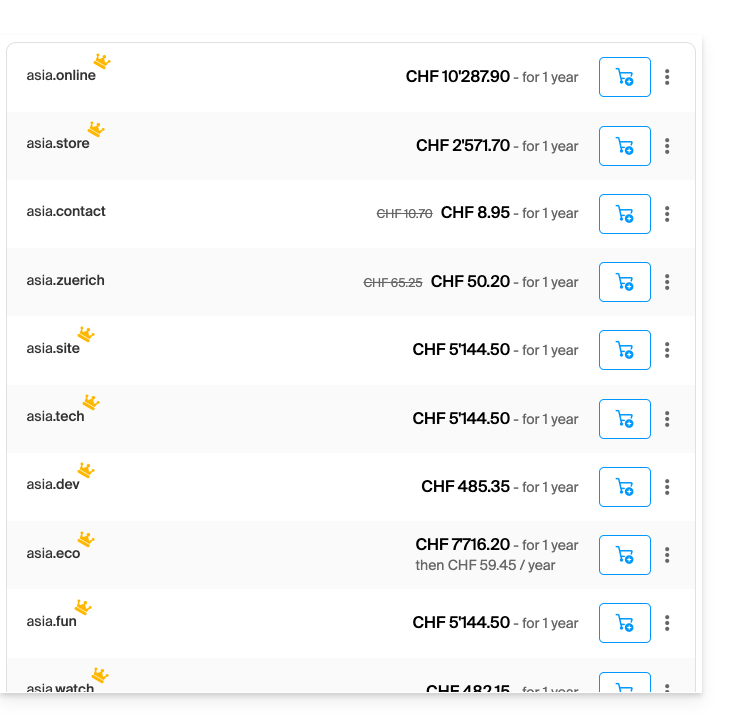
As 3 características de um domínio premium
- Alto valor comercial
- Impactante e fácil de memorizar
- Grande potencial de tráfego
Por que registrar um nome de domínio premium?
- Renovação ao preço padrão: o preço de um domínio premium é elevado no primeiro ano, mas o custo de sua renovação é geralmente o mesmo que o de um domínio padrão.
- Transferência facilitada: o preço de um domínio premium geralmente inclui a transferência do domínio e a alteração de proprietário.
Link para esta FAQ: https://faq.infomaniak.com/2239
Esta seção de perguntas frequentes foi útil?
Este guia trata sobre o Proteção de Privacidade do Domínio, que protege as informações de contato do proprietário de um domínio no diretório WHOIS, e, mais especificamente, as extensões de nomes de domínio compatíveis com este serviço.
Introdução
- A possibilidade de ocultar ou não as informações de contato do proprietário pode variar dependendo da extensão.
- A maioria das extensões de domínio é compatível com a proteção de privacidade de domínio.
Extensões compatíveis com a proteção de privacidade do domínio
Para saber se a extensão que lhe interessa é suportada:
- Acesse esta página.
- Indique a extensão desejada.
- Clique no ícone de lupa para iniciar a pesquisa:
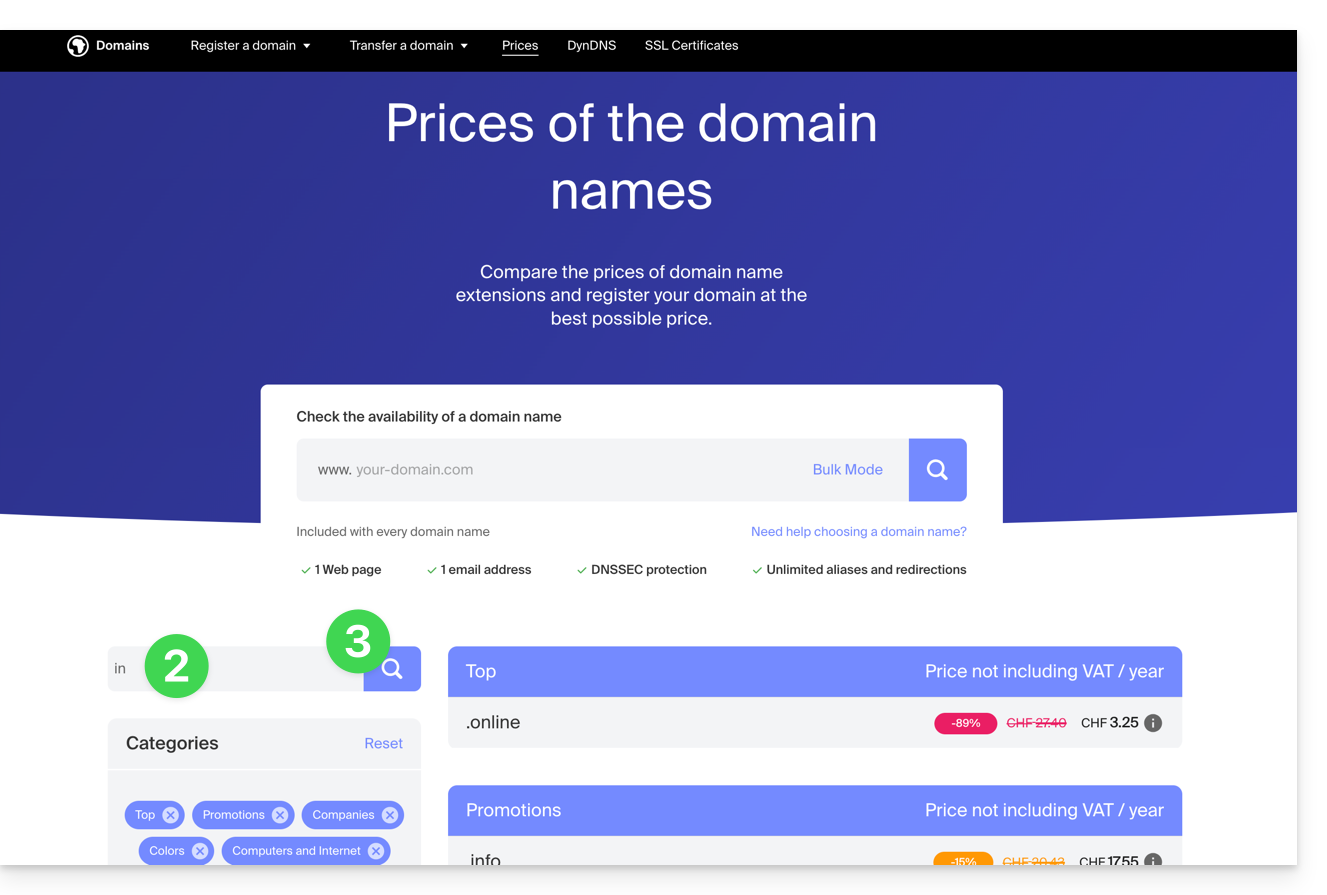
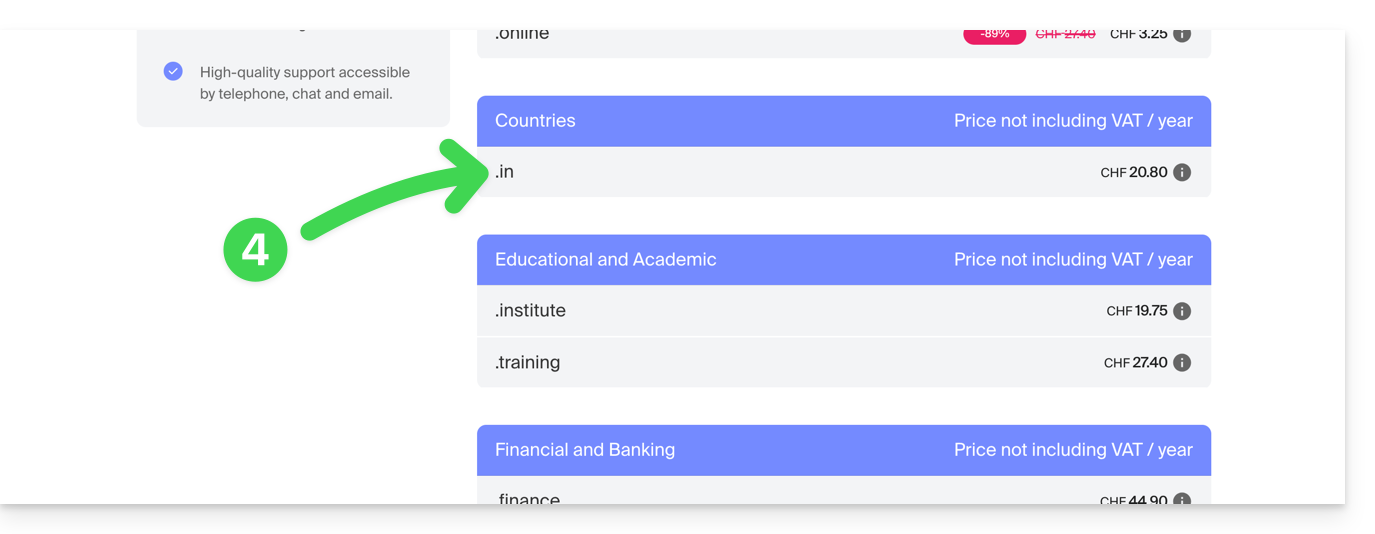
- Clique na extensão desejada entre os resultados exibidos na parte lateral:
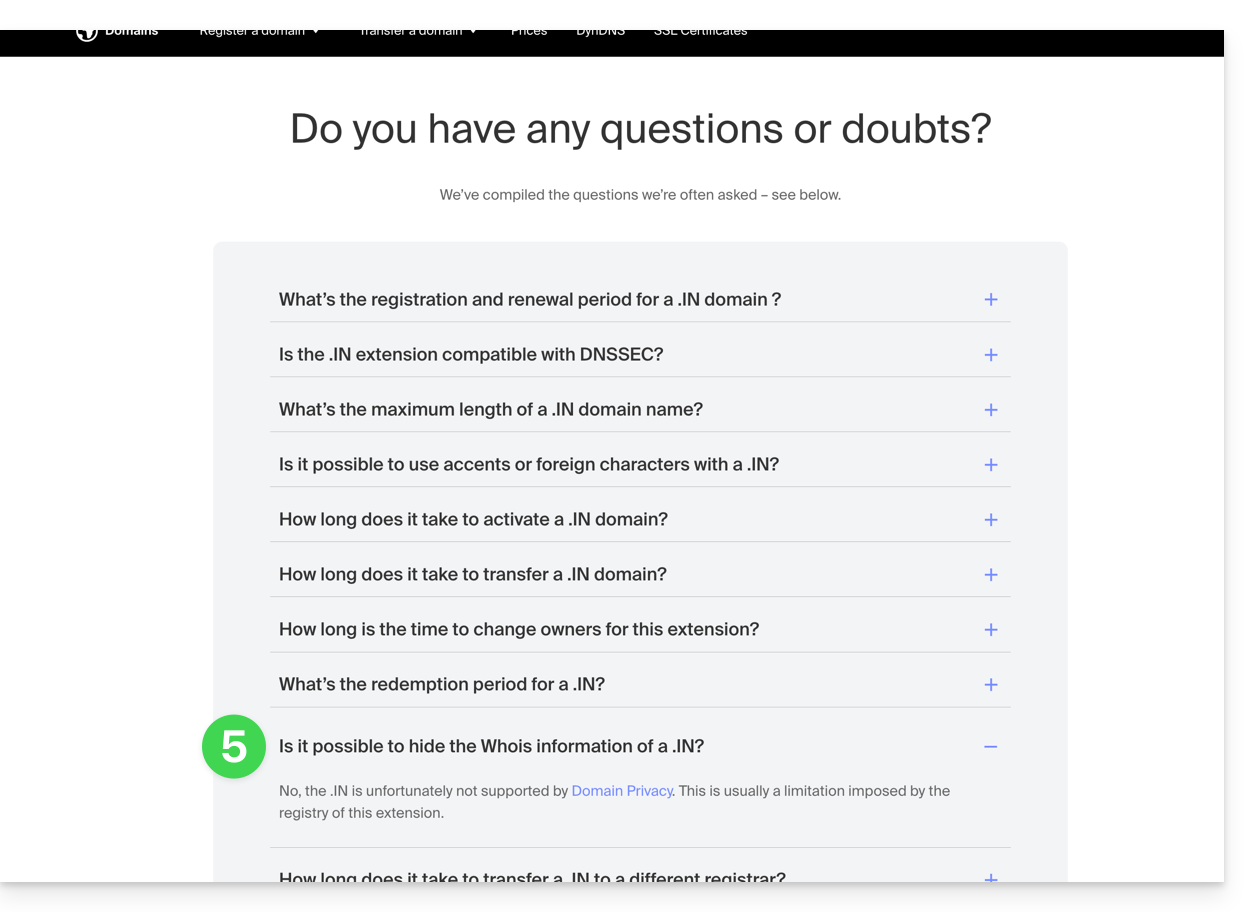
- Desça até à secção Perguntas frequentes e leia as informações necessárias:
Lista não exaustiva fornecida a título de exemplo:
ac
academia
contador
contadores
ator
adulto
aero
agência
força aérea
apartamentos
archi
exército
arte
ásia
associados
leilão
áudio
auto
banda
bar
promoções
basquetebol
melhor
aposta
lance
bicicleta
bingo
bio
biz
preto
blackfriday
azul
boutique
construtores
negócios
táxi
café
cam
câmera
acampamento
capital
cartões
cuidado
carreiras
carros
dinheiro
cassino
gato
catering
centro
ch
chat
barato
natal
igreja
cidade
reclamações
limpeza
clique
clínica
roupas
nuvem
clube
co
treinador
códigos
café
faculdade
com
com.co
comunidade
empresa
computador
condomínios
construção
consultoria
empreiteiros
legal
país
crédito
cartão de crédito
críquete
cruzeiros
cz
dança
data
namoro
ofertas
grau
entrega
democrata
dentário
desi
design
diamantes
dieta
digital
direto
diretório
desconto
médico
cachorro
domínios
download
educação
e-mail
energia
engenheiro
engenharia
empresas
equipamento
imóvel
eventos
câmbio
especialista
exposto
expresso
falha
fé
família
fãs
fazenda
finanças
financeiro
peixe
fitness
voos
florista
flores
fm
futebol
à venda
fundação
fr
frl
fundo
móveis
futebol
galeria
jogo
jogos
gent
presente
presentes
dá
vidro
global
gmbh
ouro
golfe
gráficos
grátis
verde
gripe
grupo
guia
guitarras
guru
gy
haus
saúde
assistência médica
ajuda
hiphop
hiv
hóquei
participações
feriado
hospedar
hospedagem
casa
immo
immobilien
indústrias
info
tinta
instituto
segurar
internacional
investimentos
io
irlandês
jetzt
joias
juegos
kaufen
kim
cozinha
terra
lat
arrendamento
legal
lgbt
li
vida
iluminação
limitado
limusine
link
ao vivo
empréstimo
empréstimos
lol
amor
ltd
maison
gestão
mercado
marketing
eu
mídia
memorial
mobi
moda
moe
dinheiro
hipoteca
nagoya
nome
marinha
net
net.co
rede
notícias
ninja
nom.co
onl
online
org
parceiros
peças
festa
animal de estimação
foto
fotografia
fotos
imagens
quadros
rosa
pizza
pl
lugar
encanamento
mais
pôquer
pornografia
imprensa
pro
produções
promoção
propriedades
imóvel
proteção
pub
pw
qpon
corrida
receitas
vermelho
reabilitação
reisen
aluguéis
reparo
relatório
republicano
descanso
restaurante
avaliação
avaliações
rico
rip
rochas
correr
saarland
venda
salão
sarl
escola
schule
ciência
segurança
serviços
sexo
sexy
sh
shiksha
sapatos
loja
compras
mostrar
solteiros
site
esqui
social
software
solar
soluções
espaço
armazenamento
loja
transmissão
estúdio
estilo
suprimentos
fornecimento
suporte
cirurgia
sistemas
taipei
tatuagem
imposto
táxi
equipe
tecnologia
tenis
tf
teatro
theatre
tienda
dicas
pneus
tk
tm
hoje
tóquio
ferramentas
melhor
tours
cidade
brinquedos
comércio
treinamento
tubo
tv
universidade
uno
férias
vegas
empreendimentos
veterinário
viajes
vídeo
villas
vin
visão
voyage
assistir
webcam
website
whoswho
wiki
ganhar
vinho
trabalhos
mundo
ws
wtf
xyz
yokohama
zona
Link para esta FAQ: https://faq.infomaniak.com/2240
Esta seção de perguntas frequentes foi útil?
Este guia explica como usar a ferramenta Newsletter da Infomaniak com um nome de domínio externo (não gerenciado na Infomaniak).
Pré-requisitos
- O nome de domínio deve ser de sua propriedade.
- Os domínios sinônimos e o domínio principal não podem ser usados para enviar newsletters.
- É possível configurar seus sinônimos como alias.
Associar um domínio externo
Para aceder à gestão dos domínios de envio de newsletters:
- Clique aqui para acessar o gerenciamento do seu produto no painel de controle Infomaniak (precisa de ajuda?).
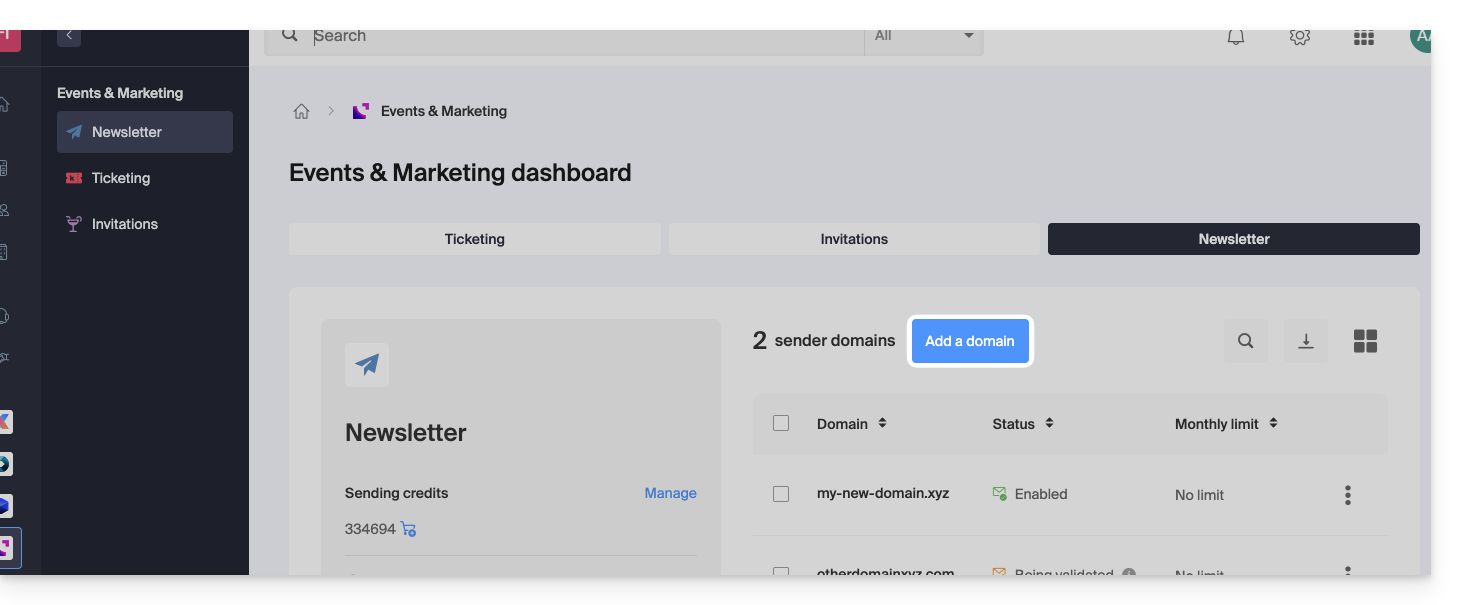
- Se você já possui uma newsletter, clique em Adicionar domínio:
- Caso contrário, clique em Começar gratuitamente:
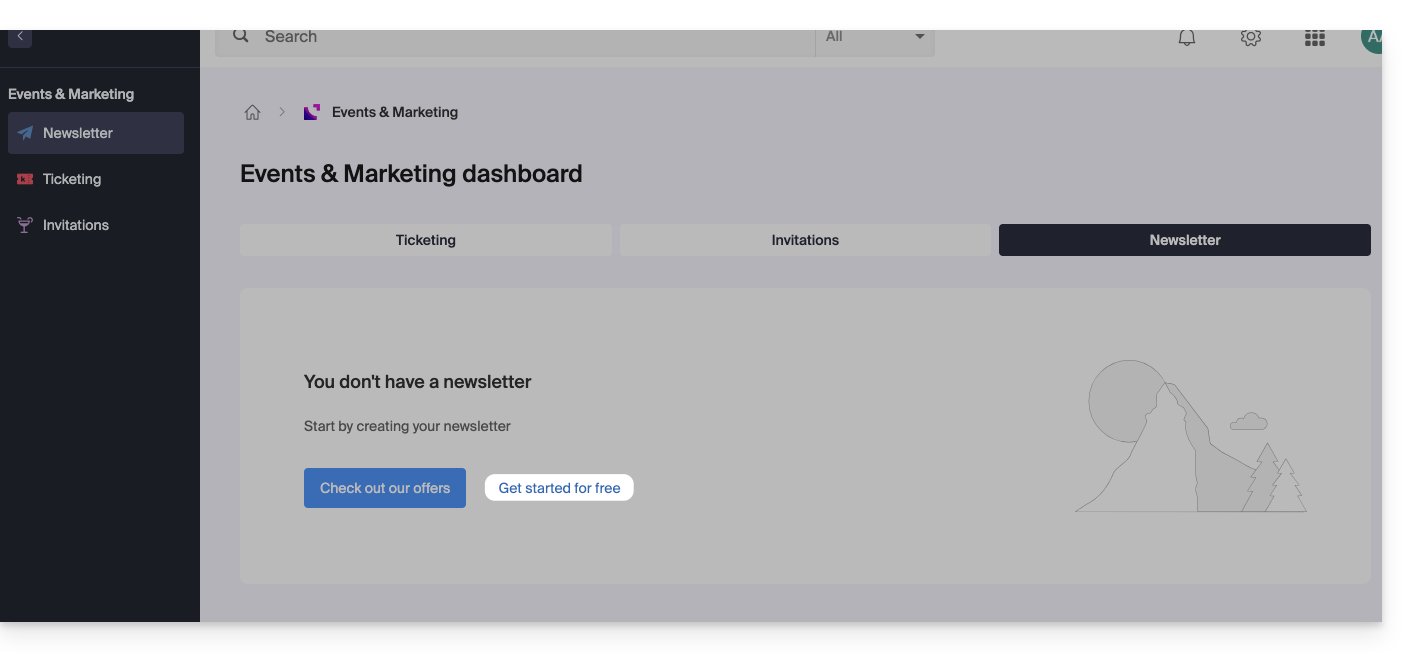
- Caso contrário, clique em Começar gratuitamente:
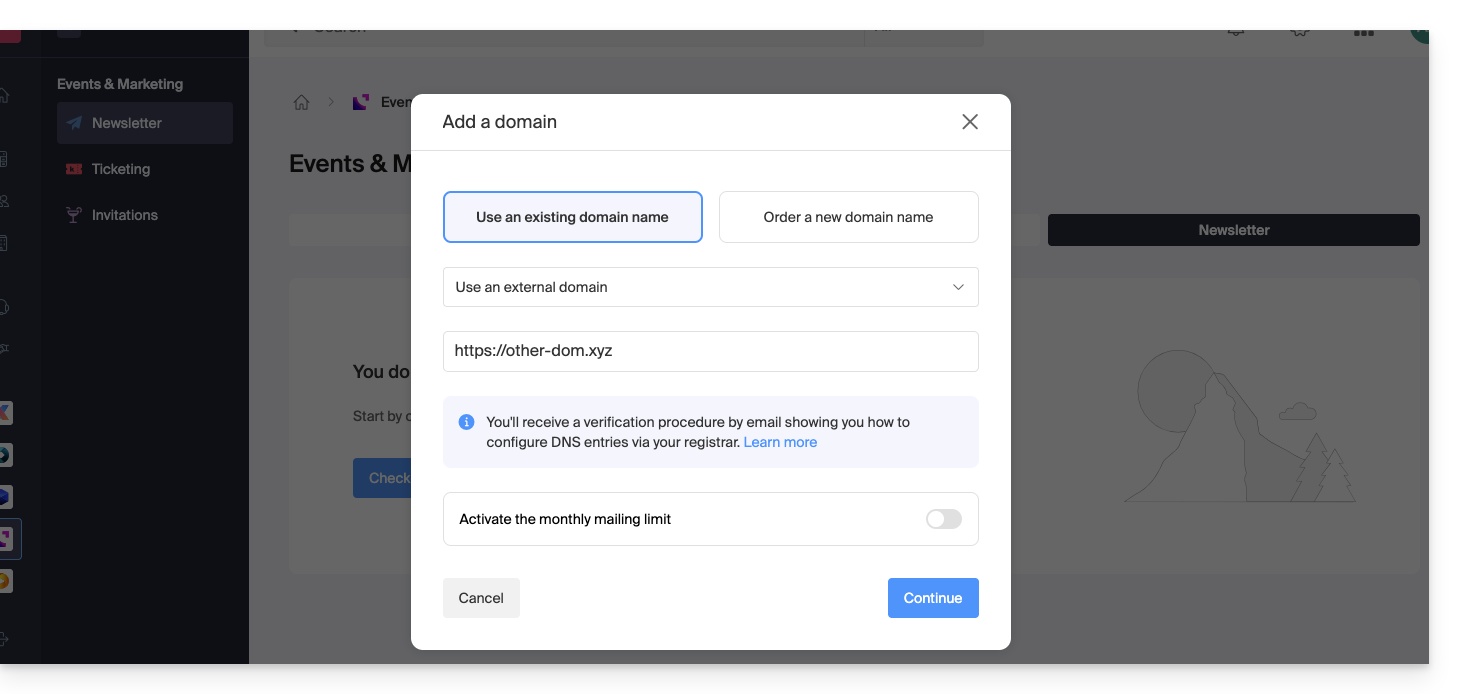
- Selecione Outro domínio no menu suspenso antes de inserir (ou insira diretamente) o nome de domínio com o qual deseja enviar newsletters.
- Escolha um limite mensal, se desejar.
- Clique no botão para Continuar:
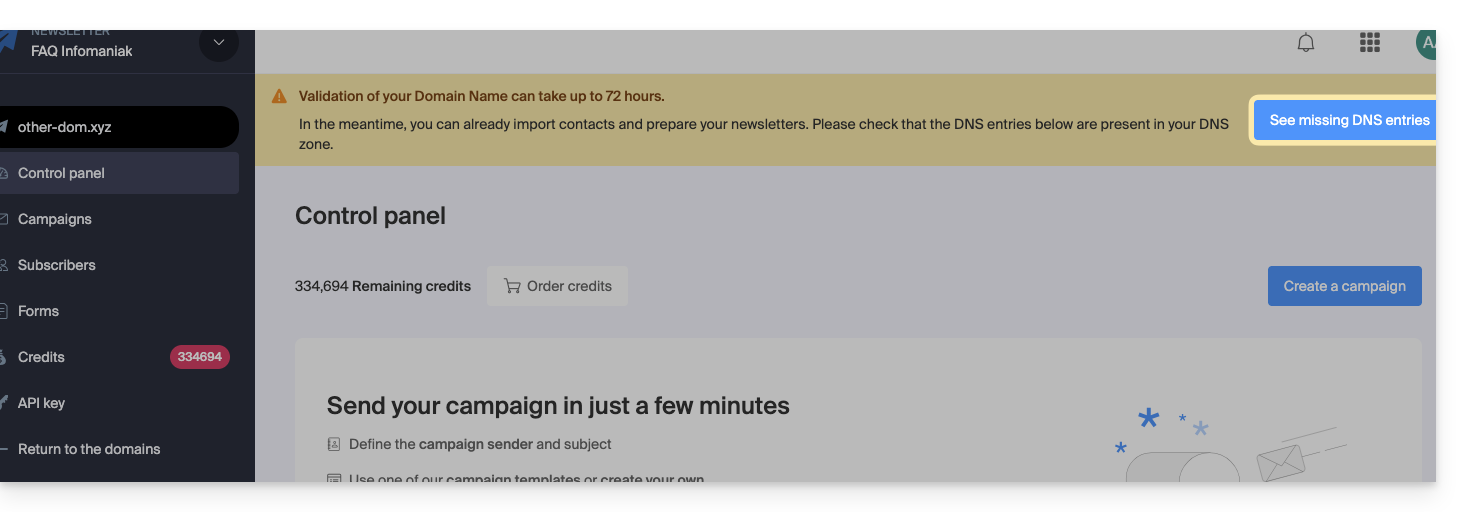
- Adicione no seu registrador os registos TXT / CNAME / DKIM que receberá por e-mail e que poderá consultar na interface ao clicar no botão:
Link para esta FAQ: https://faq.infomaniak.com/2241
Esta seção de perguntas frequentes foi útil?
Este guia apresenta a ferramenta Estado dos domínios, que permite verificar as relações entre…
- NOME DE DOMÍNIO na Infomaniak
e - HOSTING WEB na Infomaniak
… estão corretas, para que o tráfego Web seja direcionado para o local correto.
✘ INDISPONÍVEL com
site do tipo node.js
Introdução
- Para verificar, a ferramenta analisa os registos
A,CNAME, etc. - Desta forma, poderá detetar e corrigir alguns problemas da Web, especialmente se estiverem relacionados com o DNS (informações técnicas que, em termos gerais, determinam para onde deve ser direcionado determinado tráfego da Web), atuando ao nível do seu domínio.
- A correção automática só é possível quando o nome de domínio está presente na mesma Organização do produto ao qual deve ser associado.
- Caso contrário, a correção deverá ser feita manualmente.
Diagnosticar um problema de DNS
Para aceder ao diagnóstico DNS do seu nome de domínio:
- Clique aqui para aceder à gestão do seu produto no Manager Infomaniak (precisa de ajuda?).
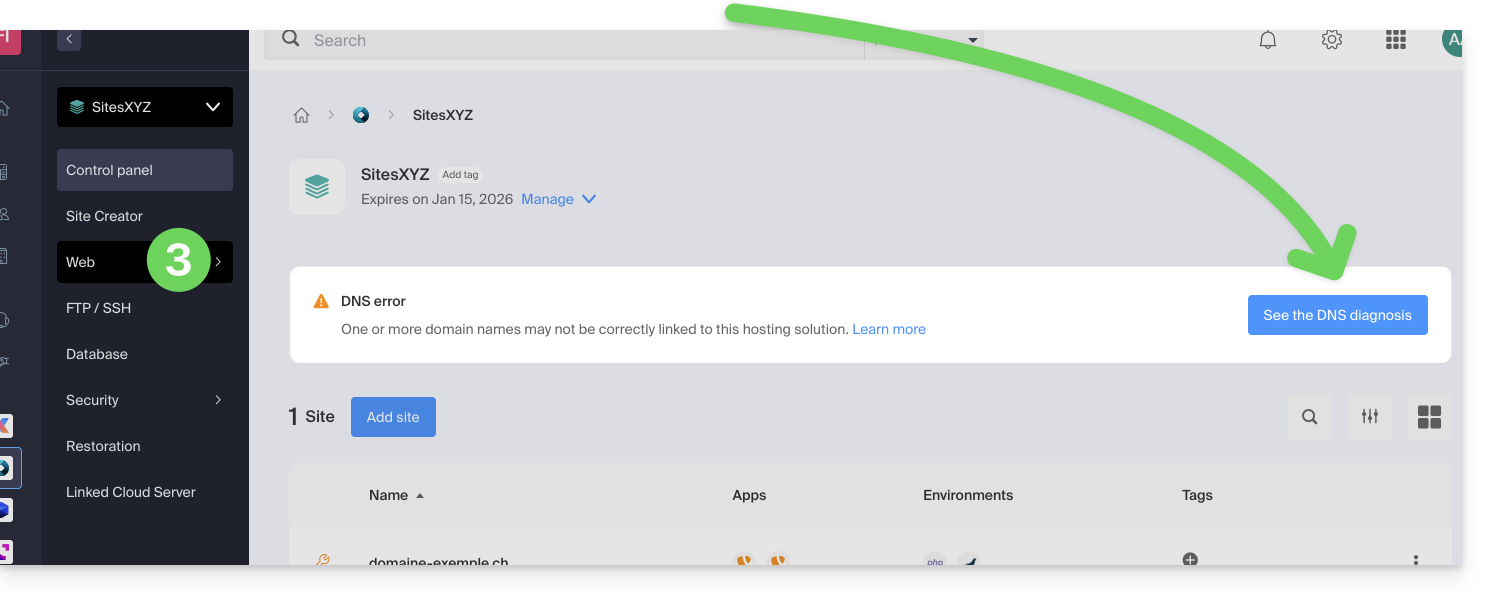
- Clique diretamente no nome atribuído ao produto em questão.
- Clique em Web no menu lateral esquerdo (ou no aviso correspondente para ir diretamente ao passo 6):
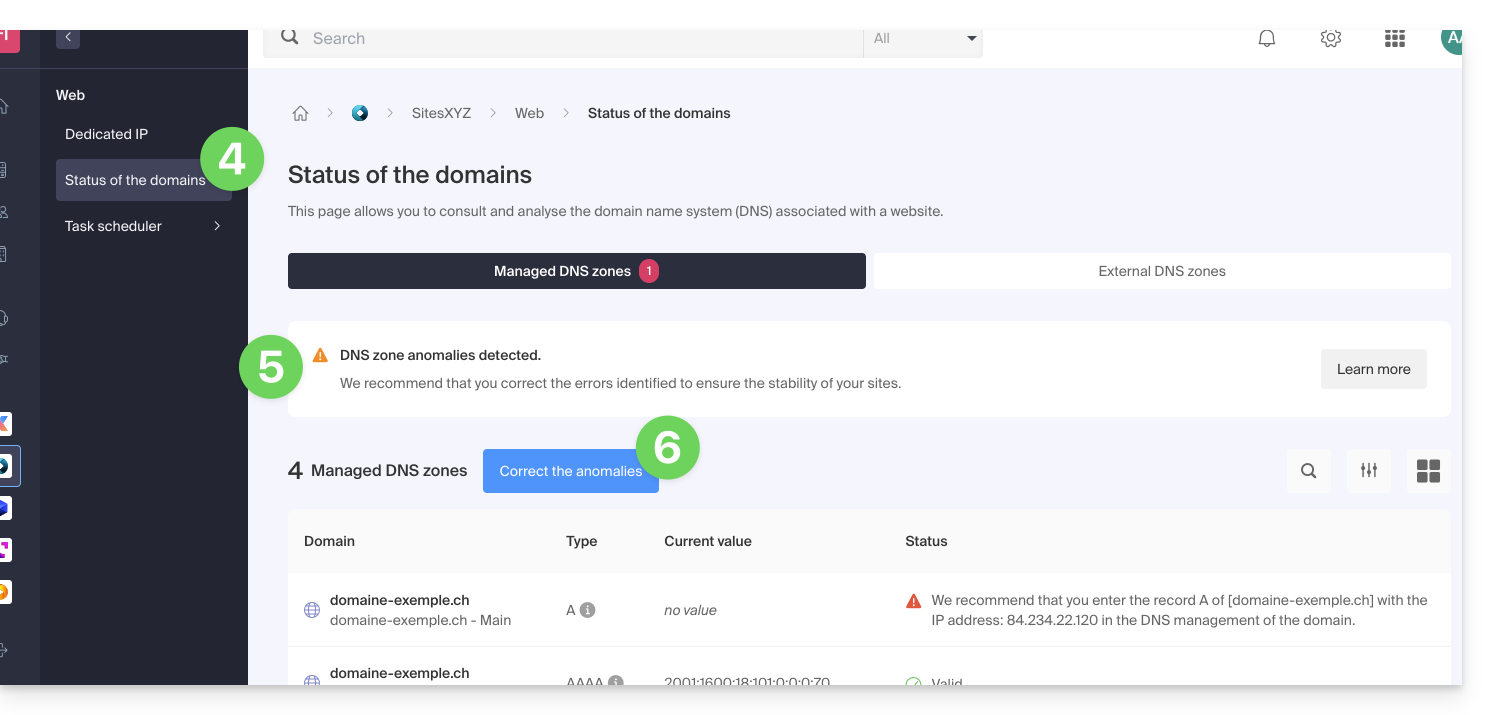
- Clique em Estado dos domínios no menu lateral esquerdo.
- Se forem detetados problemas de DNS, o painel exibirá uma notificação.
- Corrija todos os erros de uma só vez clicando no botão:
Consulte este outro guia sobre o mesmo processo de verificação automática, mas para os Serviços de E-mail.
Link para esta FAQ: https://faq.infomaniak.com/2251
Esta seção de perguntas frequentes foi útil?
O DNS Fast Anycast replica os DNS do seu domínio em todo o mundo para reduzir a latência e aumentar a disponibilidade dos seus sites.
Introdução
- Graças ao DNS Fast Anycast, os DNS do seu domínio são replicados em vários Pontos de Presença (POP) em todo o mundo (lista abaixo).
- Independentemente de onde os seus visitantes se encontrem, eles são redirecionados para o servidor DNS mais próximo, o que, em média, acelera em 34% a velocidade de acesso ao seu site (resolução DNS).
- Além disso, caso um dos seus servidores DNS fique indisponível, o servidor mais próximo assume automaticamente e os seus visitantes continuam a ter acesso ao seu site.
- A replicação dos DNS do seu domínio é automática e não requer nenhuma modificação no seu código.
Gerenciar DNS Fast Anycast
Pré-requisitos
- O DNS Fast Anycast é compatível com todos os sites, independentemente do seu provedor de hospedagem.
- Tudo o que você precisa é de um nome de domínio gerenciado na Infomaniak.
- Transfira o gerenciamento do seu domínio para a Infomaniak, se necessário.
- Consulte este outro guia para gerenciar domínios externos.
Para aceder à opção DNS Fast Anycast:
- Clique aqui para aceder à gestão do seu produto no Manager Infomaniak (precisa de ajuda?).
- Clique diretamente no nome atribuído ao produto em questão.
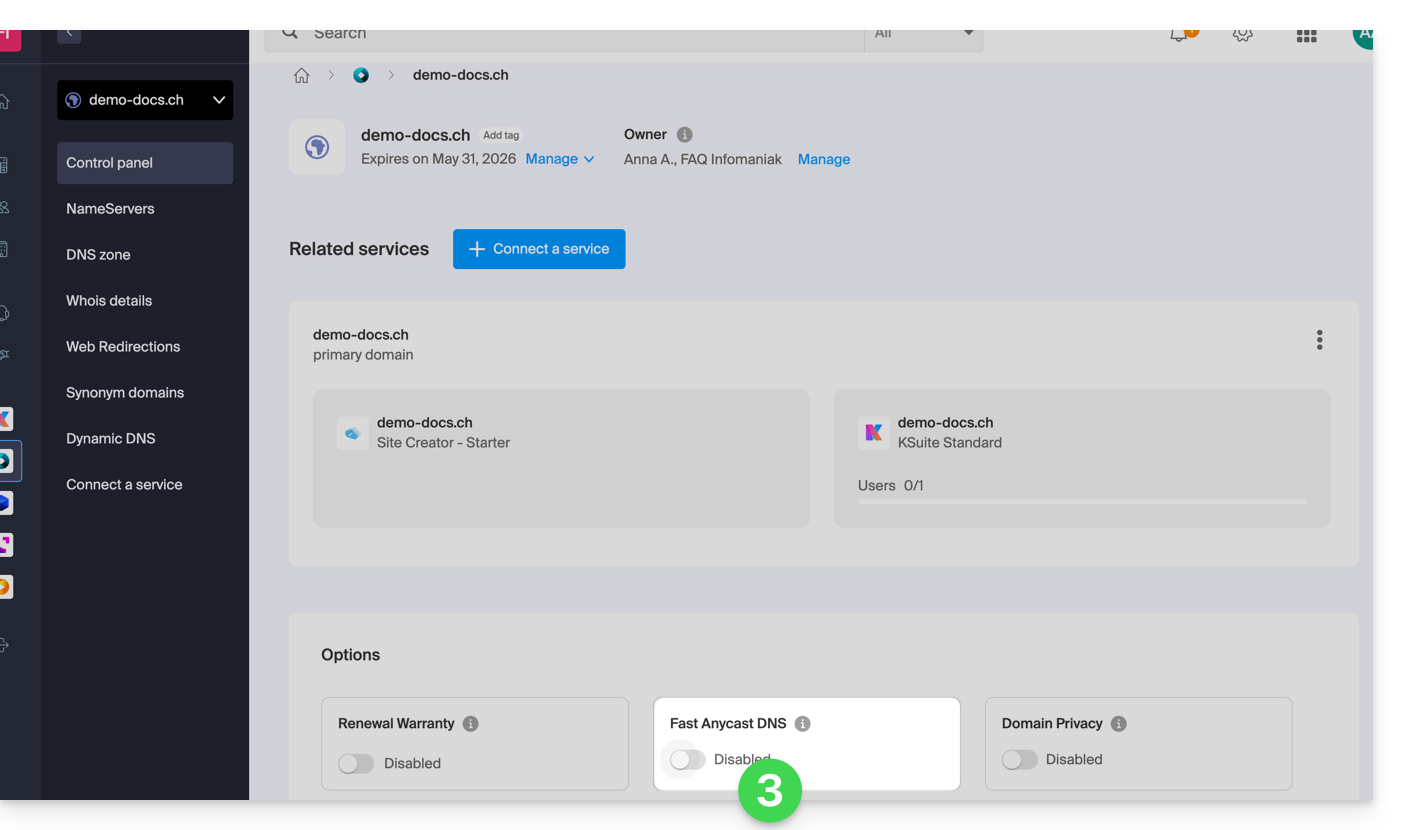
- Ative ou desative o botão de alternância (toggle switch) de DNS Fast Anycast no painel de controlo:
POP – 'Ponto de Presença'
Ao ativar o DNS Fast Anycast no seu domínio, os seus DNS serão automaticamente replicados nos seguintes pontos de presença:
Rede 1
New York, USA (2x)
Paris, France (2x)
Warsaw, Poland (2x)
Dublin, Ireland (2x)
Singapore (2x)
Johannesburg, South Africa
Stockholm, Sweden
Vienna, Austria (2x)
Frankfurt, Germany (2x)
London, United Kingdom
Dallas, USA
Los Angeles, USA (3x)
Amsterdam, Netherlands
Sydney, Australia
São Paulo, Brazil
Miami, USA (2x)
Rede 2
Hong Kong, China
San Jose, USA
Dallas, USA
Reston, USA
Chicago, USA
Seattle, USA
London, United Kingdom
Frankfurt, Germany
Amsterdam, Netherlands
Vienna, Austria
Toronto, Canada
Sydney, Australia
São Paulo, Brazil
Johannesburg, South Africa
Miami, USA
Os pontos de presença estão distribuídos em duas redes que são utilizadas de forma aleatória quando um dos seus visitantes acede ao seu site.
Link para esta FAQ: https://faq.infomaniak.com/2323
Esta seção de perguntas frequentes foi útil?
Este guia fornece informações importantes ao ativar o DNS Fast Anycast e quando a zona DNS do seu domínio não é gerenciada pela Infomaniak.
Introdução
- Você pode estar na situação descrita acima, por exemplo, se seus sites e endereços de e-mail estiverem hospedados em outro lugar que não na Infomaniak.
- Para que o DNS Fast Anycast funcione, é necessário que a zona DNS do seu domínio seja gerenciada pela Infomaniak.
- Se você não entender estas instruções, consulte este outro guia ou entre em contato com seu webmaster ou outro profissional.
Ativar o DNS Fast Anycast com uma zona externa
Aqui estão as ações a serem executadas se seus serviços não forem hospedados pela Infomaniak:
- Acesse o painel de controle do seu provedor de hospedagem e anote todos os registros necessários (A, MX, TXT, CNAME, etc.).
- Use os servidores DNS da Infomaniak com seu nome de domínio.
- Insira os registros coletados na primeira etapa acima para vincular seu domínio aos seus diferentes serviços (sites, endereços de e-mail, etc.).
- Qualquer adição/modificação de DNS pode levar até 48 horas para ser propagada.
Link para esta FAQ: https://faq.infomaniak.com/2325
Esta seção de perguntas frequentes foi útil?
Este guia detalha as particularidades da extensão de nome de domínio .be (para a Bélgica), nomeadamente os procedimentos administrativos a serem seguidos para transferir a gestão de um domínio .be para a Infomaniak.
Introdução
- Tal como acontece com as outras extensões, mas especialmente com as
.be, é muito importante manter atualizadas as informações WHOIS do seu nome de domínio para evitar qualquer suspensão por parte da DNS.be! - Os termos "
EPP", "AuthCode", "AuthInfo", "código de transferência" e "código de autorização" referem-se todos a sequências alfanuméricas específicas do domínio, cujo objetivo principal é verificar a autorização do proprietário antes de uma transferência entre registradores.
Transferir um domínio .be para a Infomaniak
Os domínios em .be estão sujeitos a um procedimento específico para o código de autorização (código EPP). Se o seu antigo registrador lhe forneceu um código de autorização, é provável que este não seja válido. De facto, para obter o código de autorização para um .be, deve:
- clique em «Obter o código de autorização» na página que solicita o código,
- ou aceda a dnsbelgium.be e solicite o código de autorização (código EPP).
Não tente transferir o domínio várias vezes seguidas com o código incorretocaso contrário, o domínio e a transferência serão bloqueados (Falha no comando; entre em contato com o suporte - domínio bloqueado) por várias dezenas de horas, e a Infomaniak não poderá fazer nada a respeito. Você terá que esperar antes de tentar novamente com outro código, que deve ser, sem falta, o correto.
Remover um domínio .be da quarentena
Fora de um período de transferência e devido a informações WHOIS desatualizadas ou a um uso suspeito do seu domínio, o registo belga dnsbelgium.be poderá suspender temporariamente este domínio .be.
Uma consulta WHOIS normal indicará "NÃO DISPONÍVEL", mas você obterá o estado real diretamente no site deles, e, em particular, uma data de disponibilidade antes da qual deverá absolutamente seguir uma das três opções possíveis:
- resolver o problema com a DNSBelgium e transferir o domínio para a Infomaniak,
- resolver o problema com a DNSBelgium e transferir o domínio para outro registrador (ou para a Infomaniak, caso o problema tenha ocorrido com outro registrador),
- ignorar o problema e aguardar a data de disponibilidade para tentar registar o domínio novamente (não recomendado).
Nos dois primeiros casos, será necessário obter de DNSBelgium o período de quarentena e o código de autorização. O processo de (re)registro do domínio na Infomaniak é pago (cerca de 100 €/CHF), por isso é importante manter as informações atualizadas, conforme especificado nos Termos e Condições de Uso.
Verificação necessária
Se encontrar este tipo de erros no WHOIS, no seu site ou através de um aviso por e-mail:
Verificação necessária para domain.beEste site não pode ser acessado. Verifique se há algum erro de digitação em domain.be. DNS_PROBE_FINISHED_NXDOMAINAtivamos este nome de domínio apenas após a validação dos dados de contacto do titular do domínio
… verifique e atualize as suas informações relativas ao nome de domínio para que este volte a funcionar.
Link para esta FAQ: https://faq.infomaniak.com/2336
Esta seção de perguntas frequentes foi útil?
Este guia detalha o procedimento para alterar as informações WHOIS do titular de nomes de domínio, que pode ser aplicado a um lote inteiro de domínios na sua Organização junto da Infomaniak.
Alterar as informações em lote
Para modificar as informações WHOIS de vários nomes de domínio de uma só vez:
- Clique aqui para acessar o gerenciamento do seu domínio no Manager Infomaniak (precisa de ajuda?).
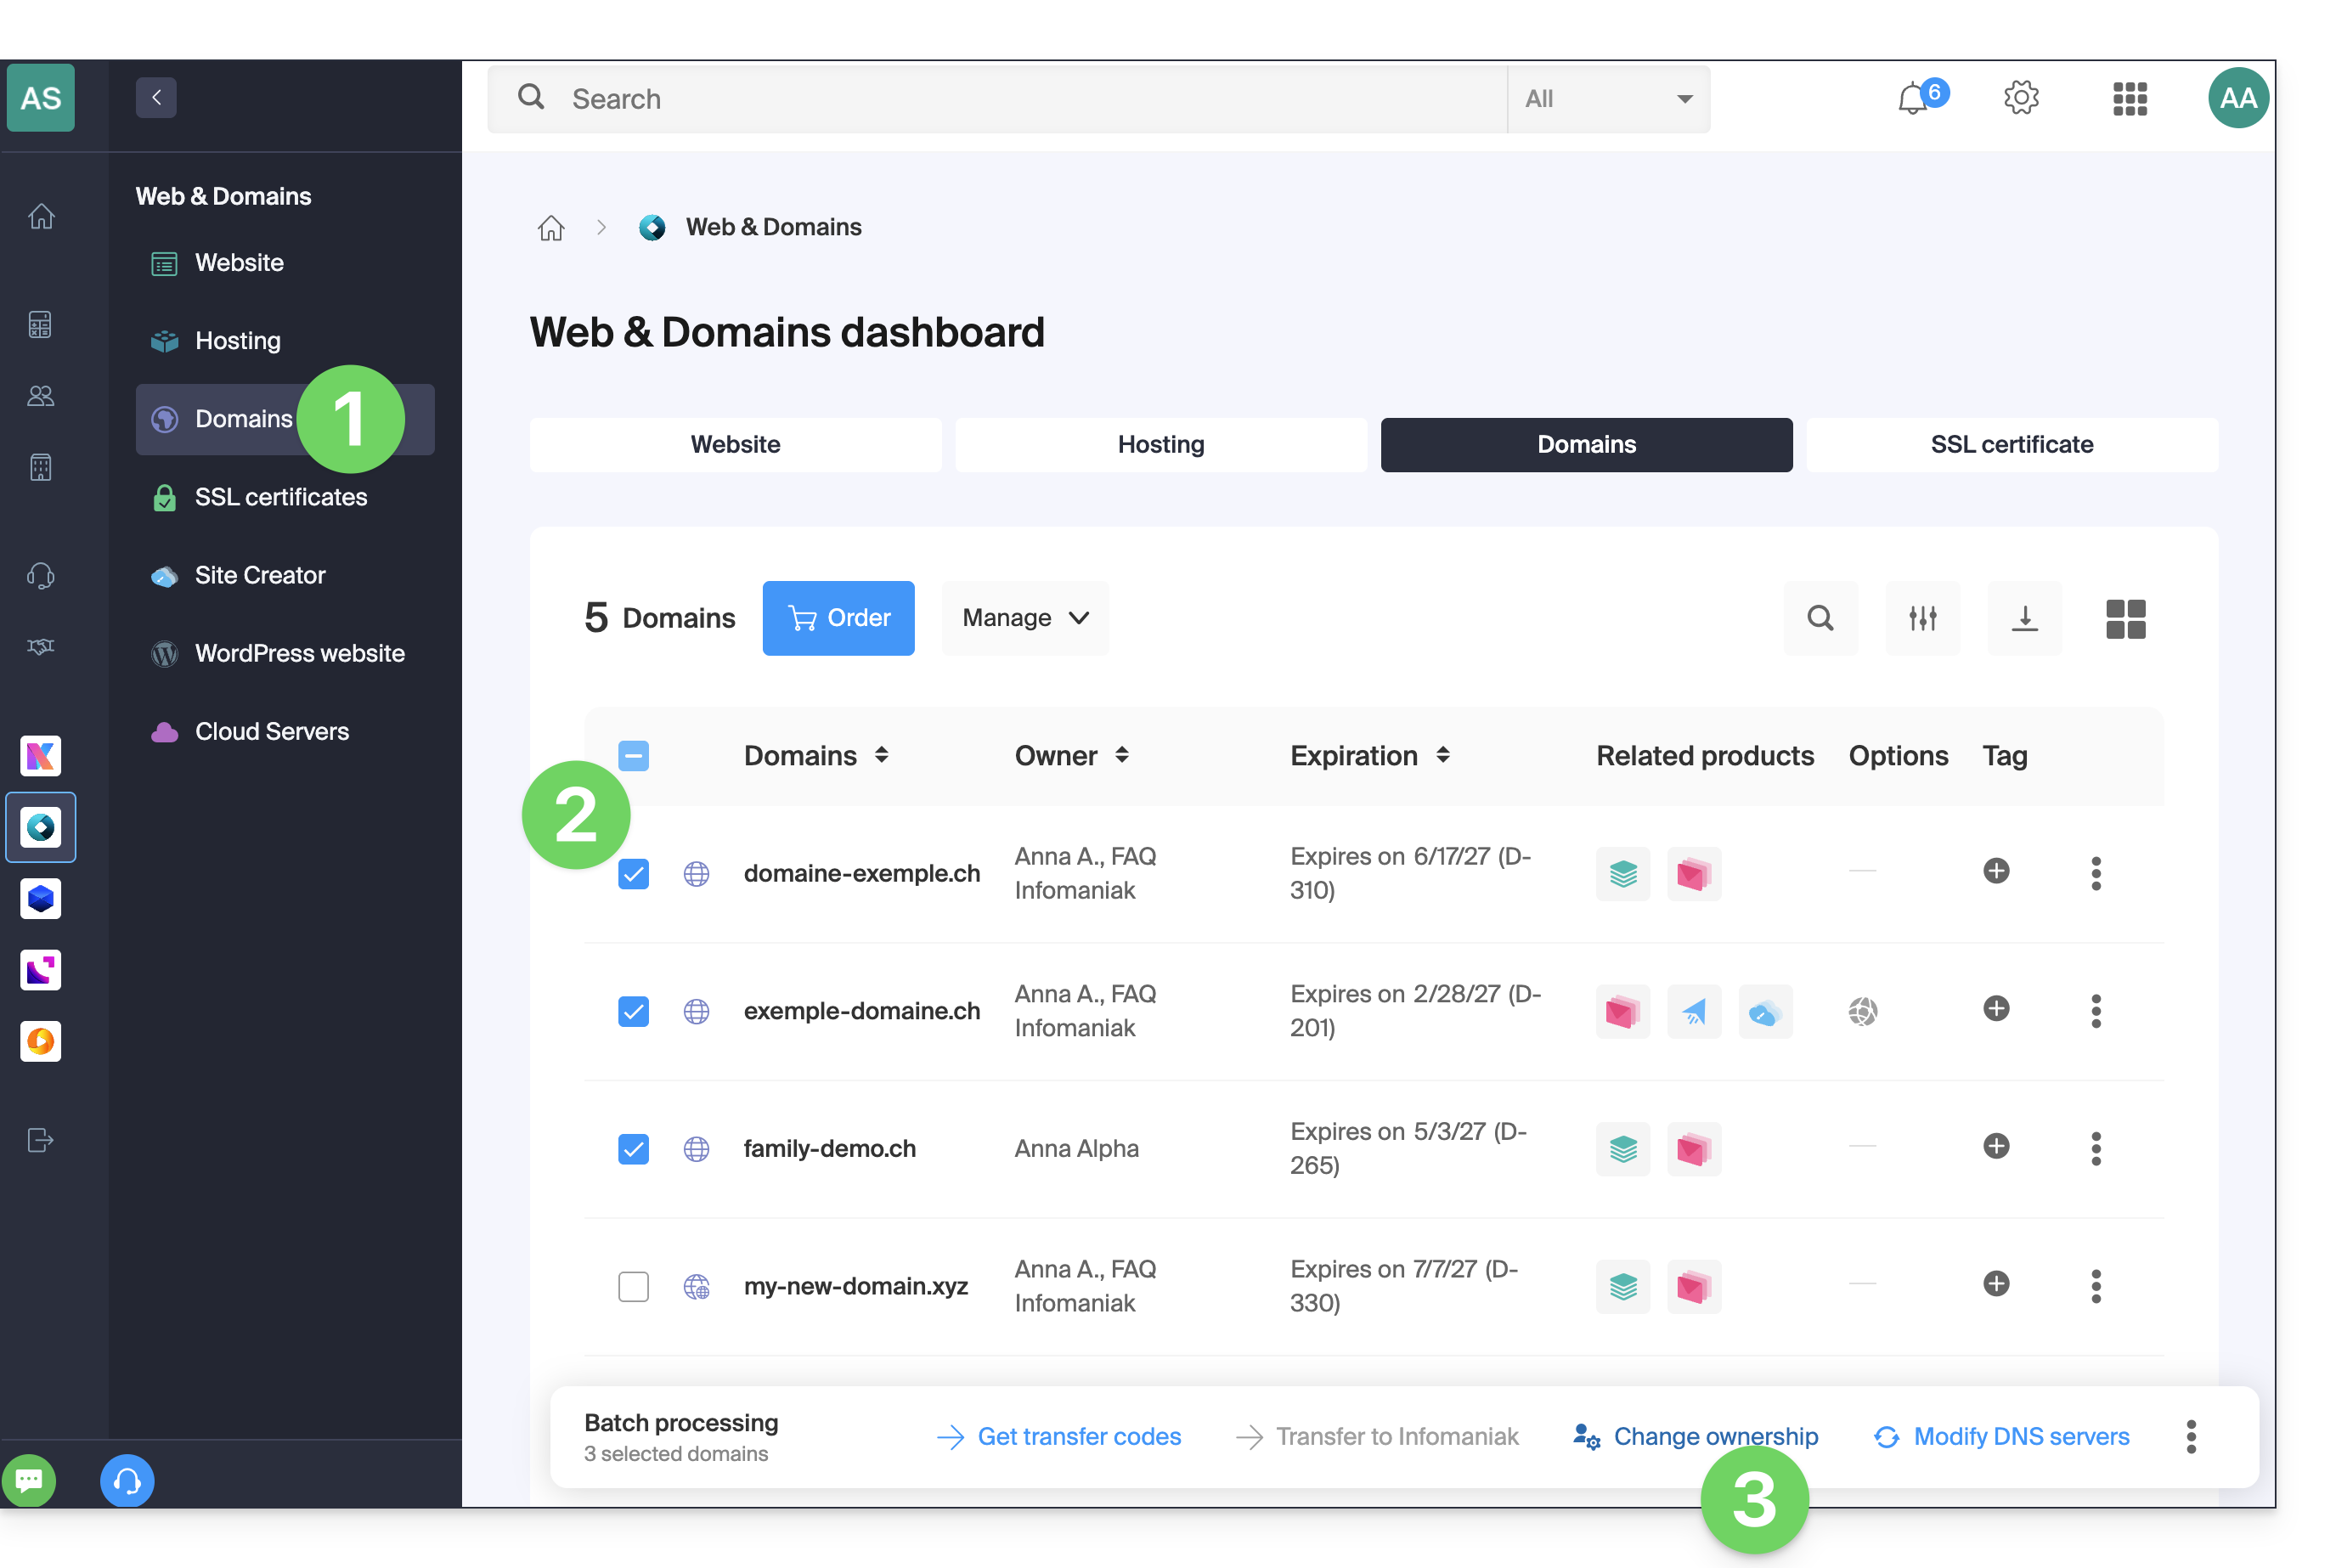
- Selecione os domínios cujo proprietário deve ser alterado usando as caixas de seleção.
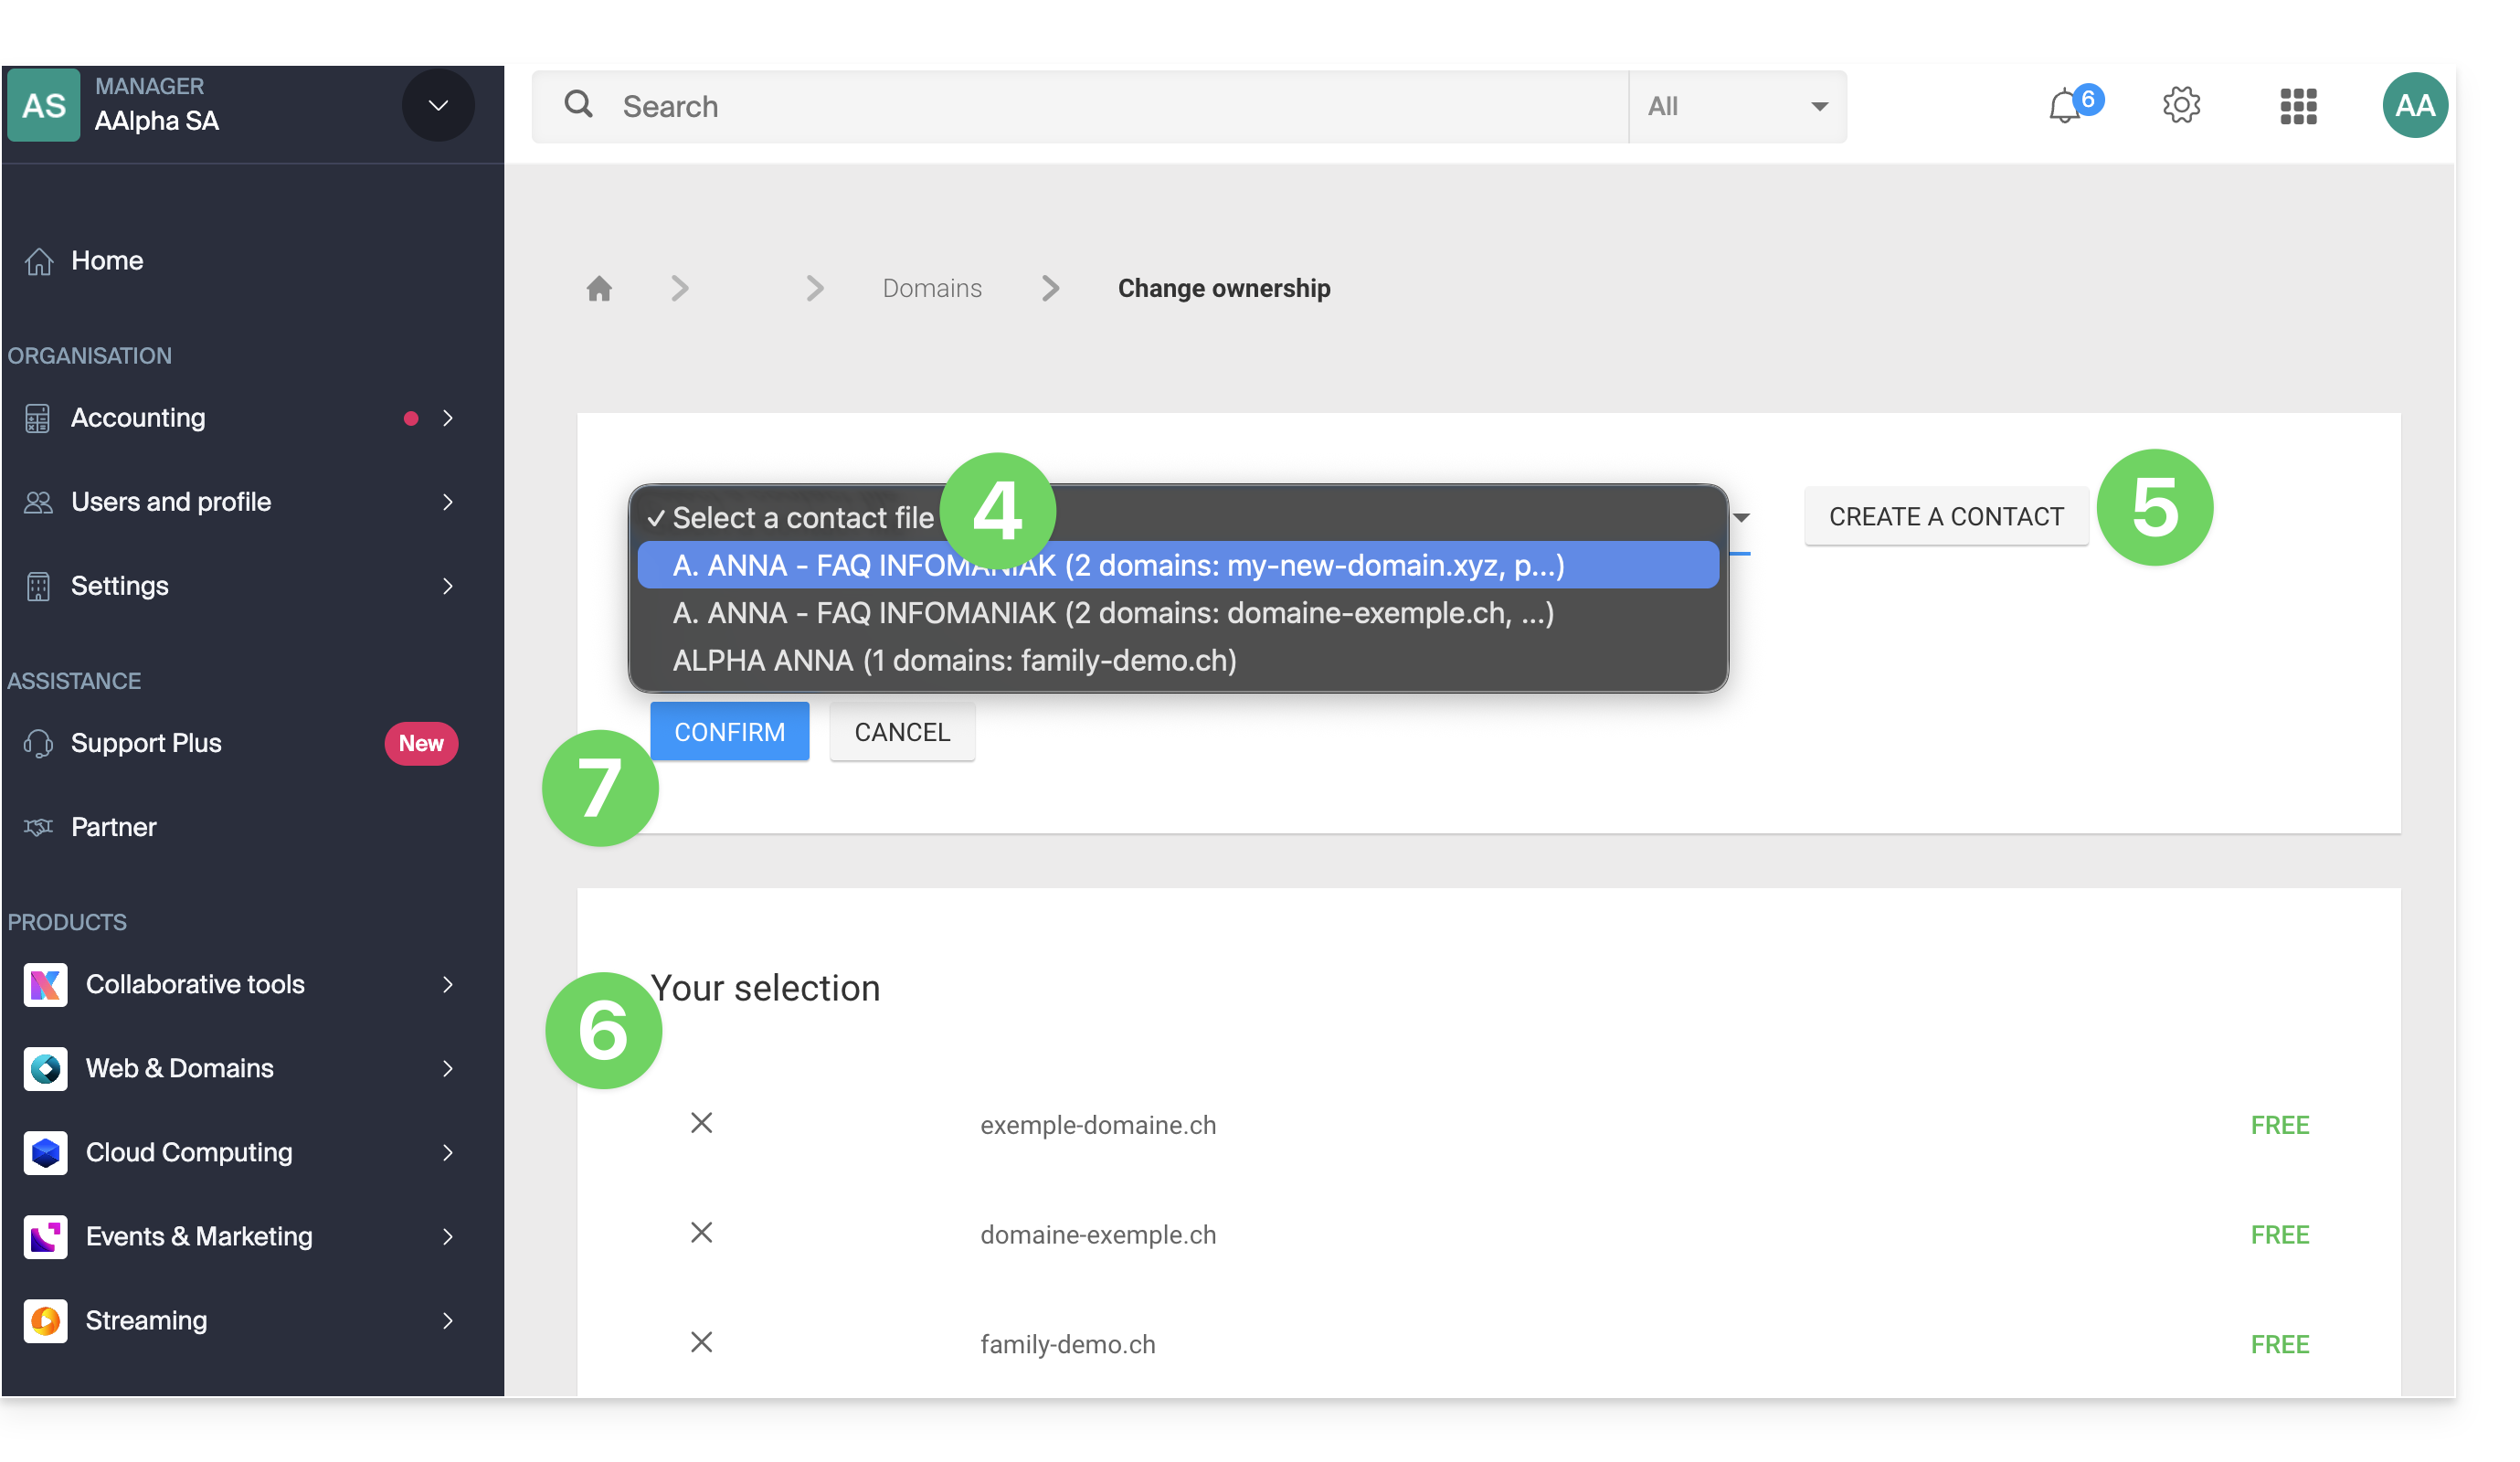
- Clique em Alterar proprietário na parte inferior da tabela:
- Escolha outro contacto já existente…
- … ou clique no botão Adicionar para criar um novo contacto.
- Verifique a sua seleção e eventuais custos de alteração na caixa.
- Clique em Confirmar:
Link para esta FAQ: https://faq.infomaniak.com/2348
Esta seção de perguntas frequentes foi útil?
Este guia explica como configurar um registro DNS dinâmico (Dynamic DNS, DDNS) para um nome de domínio cuja zona DNS é gerenciada na Infomaniak. Esta alternativa gratuita ao Dyn e DynHost é muito útil se você deseja acessar, de fora da rede, dispositivos conectados à Internet com um endereço IP dinâmico (por exemplo, um NAS, uma câmera de vigilância, um roteador/box de Internet/domótica, etc.).
Pré-requisitos
- A zona DNS do nome de domínio deve ser gerenciada na Infomaniak.
- Se necessário, transfira os seus domínios para a Infomaniak.
- O seu dispositivo ou aplicação deve suportar os registos DNS dinâmicos.
Guias específicos
Os seguintes guias permitem associar um nome de domínio a:
- … um NAS Synology
- … um NAS Qnap
- … Zyxel / Sunrise Internet Box / soluções TP-Link
- … um dispositivo UniFI
- … Swisscom Internet Box
- … Fritzbox
- … Jeedom
- … Linux via ddclient
- … potencialmente tudo através da API
Adicionar um DNS dinâmico
Para criar um DNS dinâmico no seu domínio:
- Clique aqui para acessar o gerenciamento do seu domínio no Manager Infomaniak (precisa de ajuda?).
- Clique diretamente no nome atribuído ao domínio em questão.
- Clique em DNS Dinâmico no menu lateral esquerdo.
- Clique no botão azul Adicionar um Dynamic DNS.
- Insira as informações necessárias:
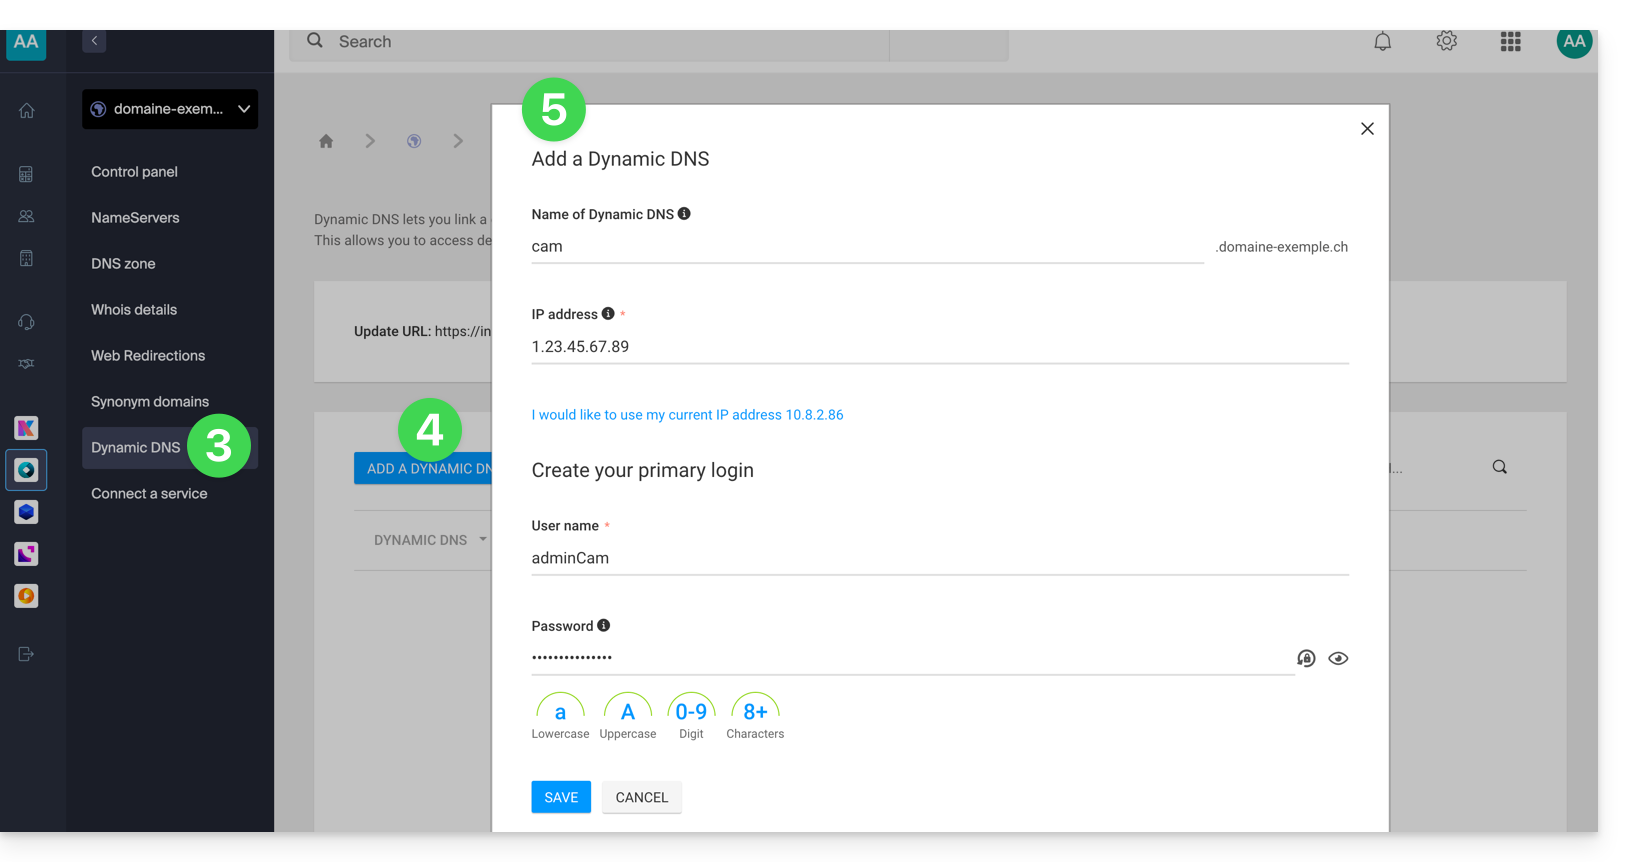
- Escolha o subdomínio desejado ou deixe o campo Nome do Dynamic DNS vazio para usar o domínio principal.
- Insira um endereço IP; este será atualizado dinamicamente pelo seu dispositivo/aplicativo.
- Defina um par identificador / senha (maiúsculas, minúsculas + números, sem símbolos especiais); este último deverá ser inserido na configuração do seu dispositivo/aplicativo.
Link para esta FAQ: https://faq.infomaniak.com/2357
Esta seção de perguntas frequentes foi útil?
Este guia explica como acessar, por meio de um nome de domínio, um NAS Synology conectado à Internet com um endereço IP dinâmico Infomaniak.
Pré-requisitos
- Possuir um NAS Synology conectado à Internet com um endereço IP dinâmico.
- Um DNS dinâmico deve ter sido criado no domínio em questão.
Ligar um NAS Synology a um nome de domínio
1. Adicionar a Infomaniak como fornecedor de serviços
- Abra a interface de gestão do NAS Synology (DSM).
- Acesse o Painel de controle.
- Clique em Acesso externo (na secção Conectividade).
- Clique no botão Personalizar (no separador DDNS):
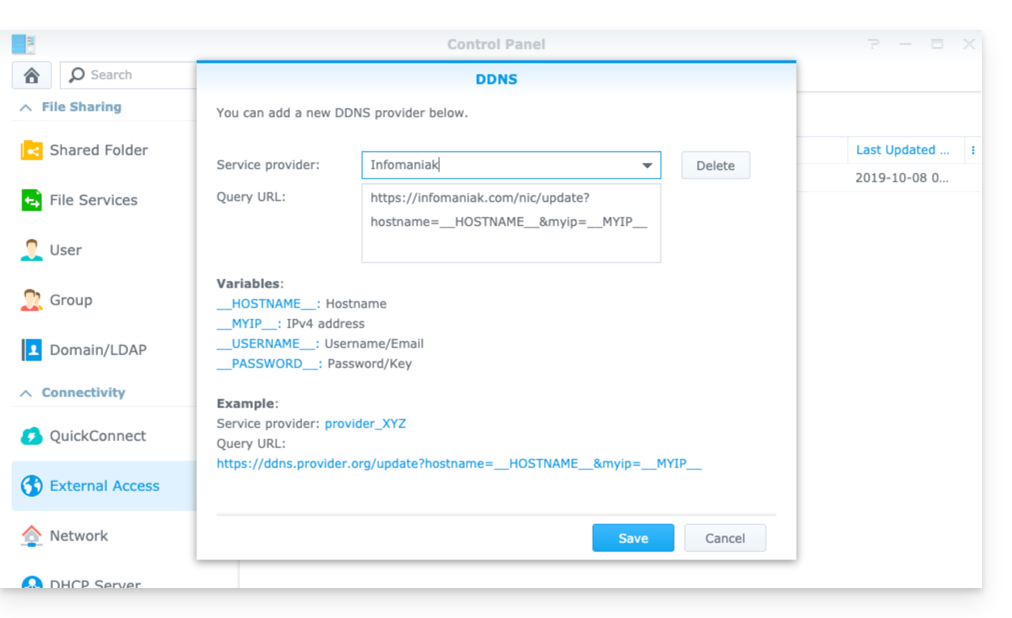
- Fornecedor de serviços:
Infomaniak - URL da consulta:
https://infomaniak.com/nic/update?hostname=__HOSTNAME__&myip=__MYIP__ - Clique em Guardar.
2. Adicionar o DNS dinâmico ao Synology
Agora que a Infomaniak foi adicionada como provedor de serviços:
- Abra a interface de gestão do NAS Synology (DSM).
- Acesse o Painel de controle.
- Clique em Acesso externo (na seção Conectividade).
- Clique no botão Adicionar:
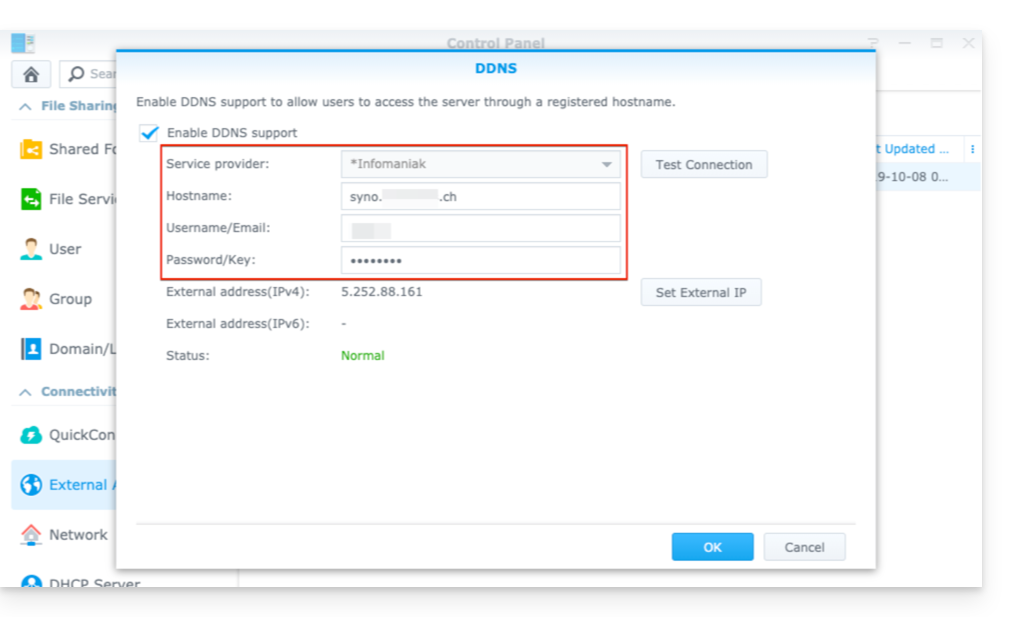
- Fornecedor de serviços:
Infomaniak(o perfil criado na etapa anterior) - Nome do host:
o URLconfigurado no Painel de Controle durante a adição do Dynamic DNS - Nome de usuário:
o identificadordefinido no Painel de Controle durante a adição do Dynamic DNS - Senha:
a senhadefinida no Painel de Controle durante a configuração do Dynamic DNS
A partir deste momento, o endereço IP dinâmico do seu NAS Synology será automaticamente sincronizado com o seu nome de domínio.
3. Configuração NAT para o DDNS Synology
Para tornar o seu NAS acessível a partir do exterior, é necessário configurar o NAT. Por defeito, os NAS Synology utilizam as portas 5000 e 5001.
É possível acessar seu NAS usando a seguinte sintaxe: http://votre-domaine:5000 ou https://votre-domaine:5001.
Consulte a documentação oficial da Synology para obter mais informações.
4. Configuração de um “Proxy Reverso”
Se não quiser especificar as portas :5000 ou :5001 nas suas URLs, é possível configurar um Proxy Reverso a partir do seu NAS Synology e, assim, redirecionar as URLs para a porta 443 para a porta 5001 e para a porta 80 para a porta 5000.documentação oficial da Synology para esta configuração).
Link para esta FAQ: https://faq.infomaniak.com/2368
Esta seção de perguntas frequentes foi útil?
Este guia fornece instruções sobre como usar a API para atualizar seu registro DynDNS (DNS dinâmico) Infomaniak.
Introdução
- Caso não especifique
myip(conforme os exemplos abaixo), o endereço IP de origem da requisição será incluído por padrão. - Certifique-se de conectar um endereço
IPv4ouIPv6, dependendo do tipo de registro a ser atualizado (AouAAAA). - Recomenda-se não utilizar caracteres especiais no nome de utilizador e na palavra-passe.
Utilização da API DynDNS
Efetue uma requisição POST (também é permitida uma requisição GET) para a seguinte URL:
{{URL_1}}
A API requer o protocolo HTTPS. Aqui está um exemplo de requisição:
{{URL_2}}Esta consulta alternativa também pode ser utilizada:
{{URL_3}}Link para esta FAQ: https://faq.infomaniak.com/2376
Esta seção de perguntas frequentes foi útil?
Este guia explica como acessar, por meio de um nome de domínio, um NAS Qnap conectado à Internet com um endereço IP dinâmico.
Pré-requisitos
- Ter um NAS Qnap conectado à Internet com um endereço IP dinâmico.
- Um DNS dinâmico deve ter sido criado no domínio em questão.
Associar um NAS Qnap a um nome de domínio
Para isso:
- Abra a interface de gestão do NAS Qnap.
- Aceda a Rede e Switch Virtual:

- Clique em Adicionar em Serviços de Acesso > DDNS:

- Preencha as seguintes informações:

- Servidor DDNS: Personalizado
- Nome do perfil:
Infomaniak(ou o que desejar) - Nome de usuário: o identificador definido no Painel de Controle durante a adição do DNS Dinâmico
- Senha: a senha definida no Painel de Controle durante a adição do DNS Dinâmico
- Nome do host: a URL configurada no Painel de Controle durante a adição do DNS Dinâmico
- URL:
https://infomaniak.com/nic/update?hostname=%HOST%&myip=%IP%
- Clique em Aplicar.
A partir deste momento, o endereço IP dinâmico do seu NAS será automaticamente sincronizado com o seu nome de domínio.
Link para esta FAQ: https://faq.infomaniak.com/2377
Esta seção de perguntas frequentes foi útil?
Este guia explica como acessar, através de um nome de domínio, um Sunrise Internet Box conectado à Internet com um IP dinâmico.
Pré-requisitos
- Ter uma Box que permita configurar um fornecedor de DNS dinâmico personalizado.
- Um DNS dinâmico deve ter sido criado no domínio em questão.
Ligar uma Sunrise Internet Box a um nome de domínio
Existem diferentes modelos de Sunrise Internet Box. Aqui está um exemplo:
- Aceda à interface de administração da Sunrise Box (por exemplo,
http://192.168.1.1). - Ative o modo de utilizador avançado (botão no canto superior direito).
- Acesse o DynDNS (no canto superior esquerdo):

- Clique na aba DynDNS.
- Ative o cliente Dynamic DNS.
- Escolha o provedor “Personalizado”:

- Preencha os seguintes campos:
- Nome de utilizador = o identificador definido no Painel de controlo durante a adição do Dynamic DNS
- Senha = a senha definida no Painel de controlo durante a adição do Dynamic DNS
- Nome do host = a URL configurada no Painel de controlo durante a adição do Dynamic DNS
- Em seguida, preencha os seguintes campos:

- Servidor:
infomaniak.com - Porta:
443 - Solicitação (copie e cole exatamente como está):
https://infomaniak.com/nic/update?hostname=[DOMAIN]&myip=[IP]&username=[USERNAME]&password=[PASSWORD] - Intervalo de atualização (segundos):
300 - Intervalo para tentar novamente (segundos):
30 - Tentativas máximas:
3
- Servidor:
A interface pode ser apresentada desta forma, mas o princípio permanece o mesmo: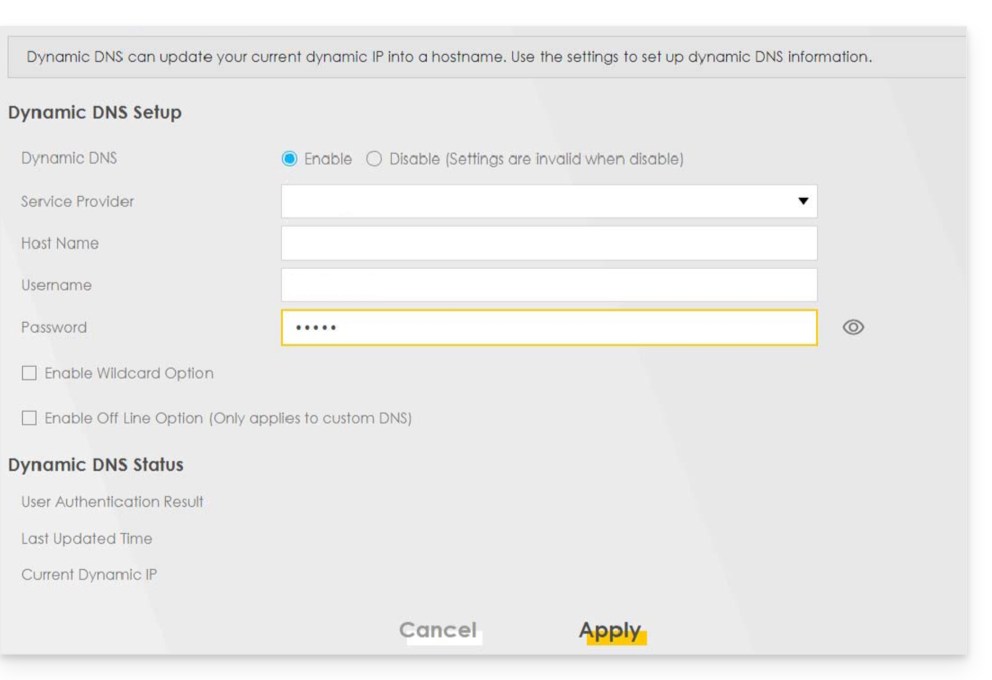
Outros roteadores
O mesmo princípio se aplica a uma solução Omada SDN da TP-Link; o URL de atualização é https://infomaniak.com/nic/update?hostname=[DOMAIN]&myip=[IP]&username=[USERNAME]&password=[PASSWORD]:
E para outros modelos (como Zyxel USG Flex ou ax7501-B1, por exemplo), preencha os campos com base nos dados abaixo:
- Ativar perfil DDNS: ativar
- Tipo de DDNS:
Personalizado pelo utilizador - HTTPS: ativar
- Nome de utilizador: o identificador definido no Painel de controlo Infomaniak ao adicionar o Dynamic DNS (ajuda)
- Senha: a senha definida no Painel de Controle Infomaniak ao adicionar o Dynamic DNS (ajuda)
- Nome de domínio: nome do host com o domínio
- Endereço de ligação principal > Interface: qualquer
- Endereço de ligação secundário > Interface: nenhum
- Servidor DYNDNS: infomaniak.com
- URL (para copiar e colar exatamente como está): /nic/update?password=password(item 5 acima)&username=username(item 4 acima)&hostname=DomainName
- exemplo
/nic/update?password=abcd1234&username=admin&hostname=abc.domain.xyz
- exemplo
Link para esta FAQ: https://faq.infomaniak.com/2378
Esta seção de perguntas frequentes foi útil?
Este guia explica como acessar, através de um nome de domínio, um Fritzbox conectado à Internet com um IP dinâmico.
Pré-requisitos
- Ter uma Box que permita configurar um fornecedor de DNS dinâmico personalizado.
- Um DNS dinâmico deve ter sido criado no domínio em questão.
Associar um Fritz!Box a um nome de domínio
Para isso:
- Abra a interface de gestão da Fritzbox, ativando, se necessário, o modo Avançado.
- Aceda a Internet e, em seguida, a Autorização de acesso.
- Clique na aba DNS Dinâmico:
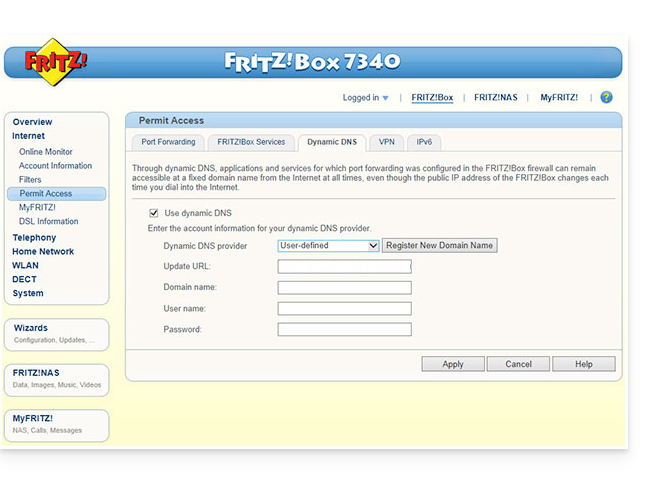
- Escolha o provedor: “Personalizado”.
- Preencha os seguintes campos:
- URL de atualização (conforme exibido abaixo, ou substituindo
ipaddrporip6addrse desejar que o Fritzbox substitua o "placeholder" pelo endereço IPv6 em vez do IPv4):https://infomaniak.com/nic/update?system=dyndns&hostname=<domain>&myip=<ipaddr> - Nome de domínio: a "URL" configurada no Gerenciador durante a adição do Dynamic DNS
- Nome de usuário: o "identificador" definido no Gerenciador durante a adição do Dynamic DNS
- Senha: a “senha” definida no Gerenciador durante a adição do Dynamic DNS
- URL de atualização (conforme exibido abaixo, ou substituindo
- Clique em Aplicar para concluir.
Link para esta FAQ: https://faq.infomaniak.com/2400
Esta seção de perguntas frequentes foi útil?
Este guia explica como obter o código EPP do seu nome de domínio na Squarespace (antigo Google Domains) para transferi-lo para a Infomaniak e reativar gratuitamente este serviço de DDNS (DNS Dinâmico).
Introdução
- Entre 2023 e 2024, todos os domínios registados na Google Domains passaram a ser geridos pela Squarespace, que já não oferece o serviço DDNS (DNS Dinâmico).
- Os termos "
EPP", "AuthCode", "AuthInfo", "código de transferência" e "código de autorização" referem-se todos a sequências alfanuméricas específicas de cada domínio, cujo objetivo principal é verificar a autorização do proprietário antes de uma transferência entre registradores. - Consulte o guia principal sobre o restante do processo de transferência.
- ⚠️ Este processo consiste em transferir um nome de domínio que você possui junto a um provedor diferente da Infomaniak, para que o gerenciamento futuro desse domínio seja feito pela Infomaniak; portanto, não se trata de uma transferência interna de um titular para outro, e o código a ser obtido não é, portanto, um código para uma transferência interna para o seu provedor atual.
Transferir o nome de domínio para a Infomaniak
Para obter o código de autorização junto do seu fornecedor atual:
- Clique aqui para acessar a interface de gerenciamento dos seus produtos no seu registrador atual.
- Consulte o procedimento completo fornecido pela Squarespace para obter o código e guardá-lo em segurança.
- Depois de obter o código de autorização, consulte o guia principal da Infomaniak sobre o restante do processo de transferência do nome de domínio.
- Depois que o domínio for transferido para a Infomaniak, consulte este guia da Infomaniak para recriar, se necessário, o Dynamic DNS que você tinha no Google.
Link para esta FAQ: https://faq.infomaniak.com/2416
Esta seção de perguntas frequentes foi útil?
Este guia explica como adicionar ou modificar um ou mais registos do tipo TXTna zona DNS (de um nome de domínio) gerenciada no Painel de Controle Infomaniak.
Introdução
- O tipo de registo
TXTpermite inserir texto legível na zona DNS de um nome de domínio. - Este é o método geralmente utilizado para contribuir para a prevenção de spam e para verificar a propriedade de um domínio (o Google pode, por exemplo, solicitar isso antes da utilização de alguns dos seus serviços: consulte este outro guia para um exemplo de adição de
TXT, permitindo assim autenticar um domínio).
Modificar a zona DNS
Para gerir este tipo de registo numa zona DNS:
- Clique aqui para acessar o gerenciamento do seu domínio no Manager Infomaniak (precisa de ajuda?).
- Clique diretamente no nome atribuído ao domínio em questão.
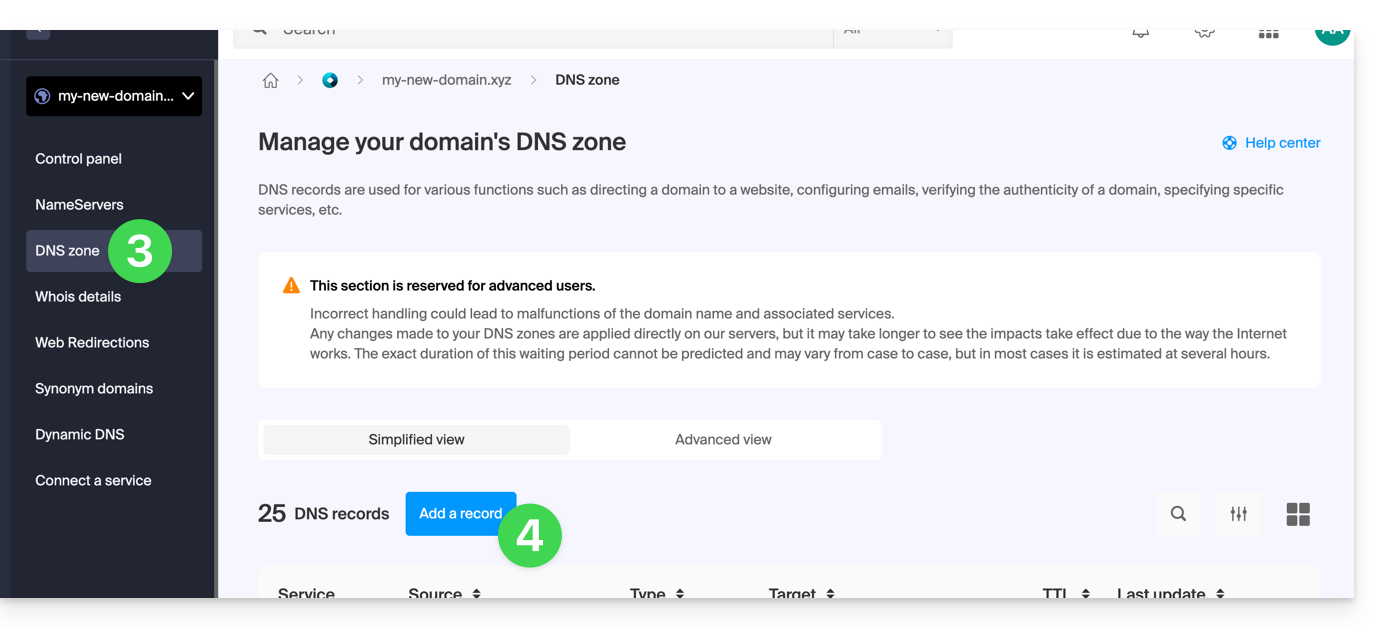
- Clique em Zona DNS no menu lateral esquerdo.
- Clique no botão para adicionar um registo:
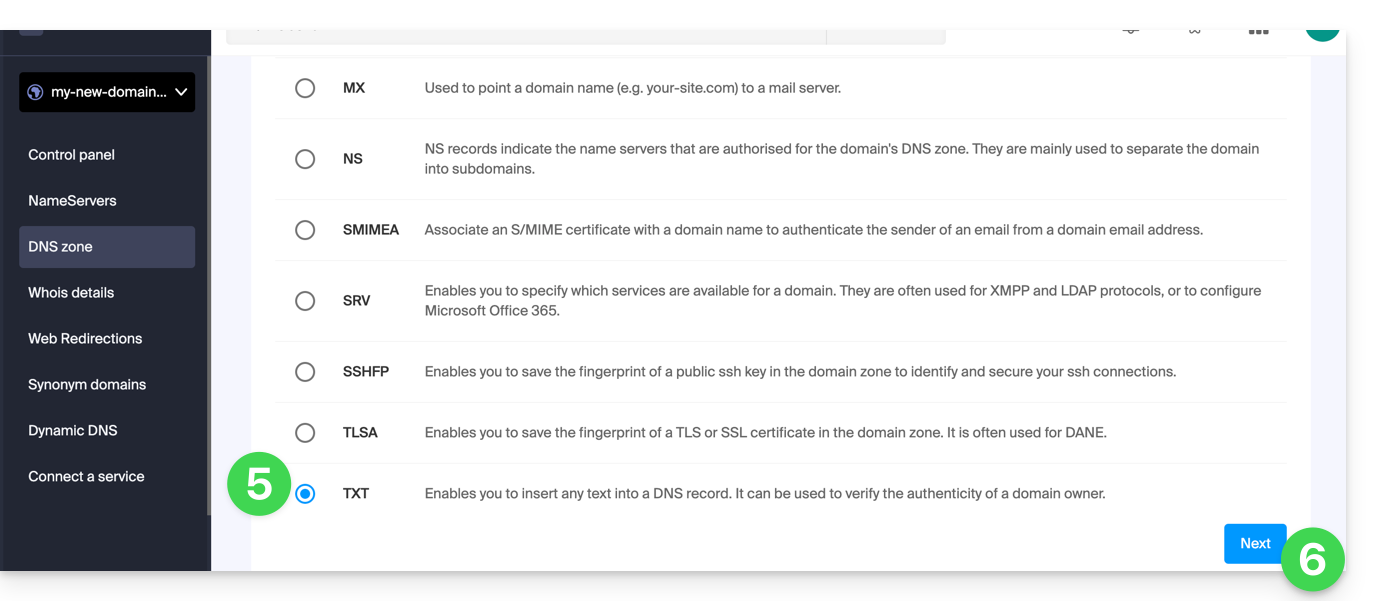
- Clique no botão de rádio TXT para adicionar um registo.
- Clique no botão Seguinte:
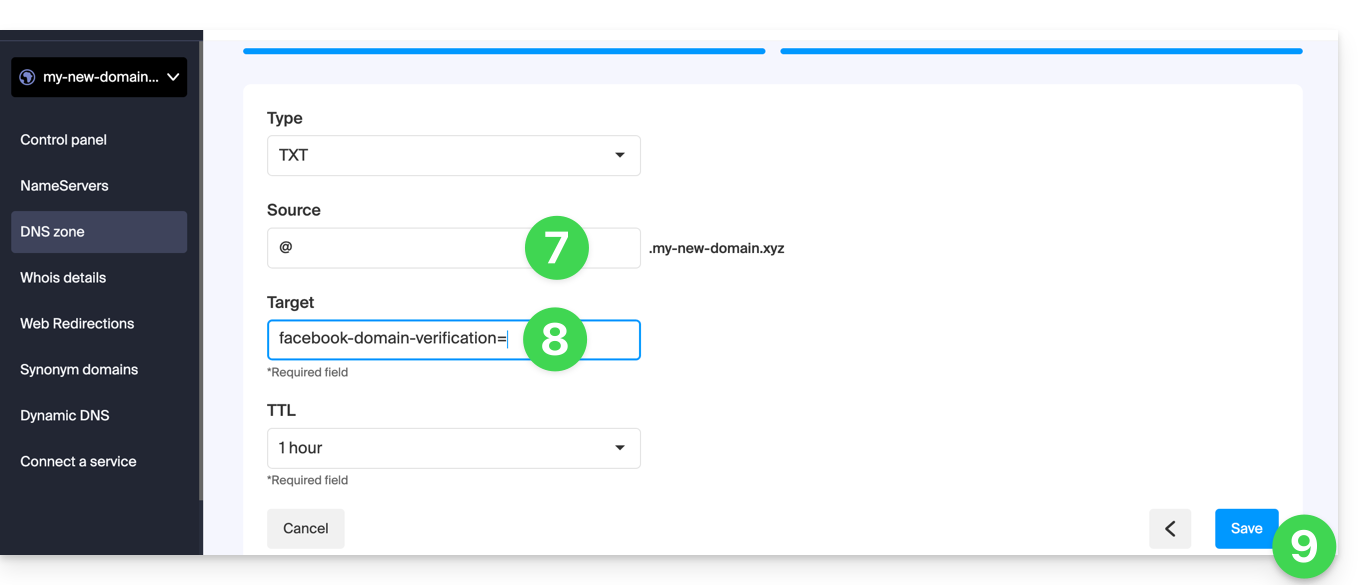
- Insira os valores do TXT necessários para sua zona DNS.
- Mantenha o valor padrão para o TTL.
- Clique no botão Guardar:
Link para esta FAQ: https://faq.infomaniak.com/2460
Esta seção de perguntas frequentes foi útil?
Este guia explica como adicionar um registo do tipo ANAME na zona DNS (de um nome de domínio) gerida no Manager Infomaniak.
Introdução
- O tipo de registo
ANAMEpermite, de forma simplificada, apontar a raiz de um domínio para outro endereço, de forma semelhante a um registo CNAME, mas que pode ser adicionado sem ter de especificar uma origem xyz antes do domínio (xyz.domínio.com, por exemplo). - Portanto, não se trata de um registo DNS propriamente dito e não é apresentado na lista de registos que podem ser selecionados ao editar a zona DNS.
- No entanto, uma vez que se trata de um tipo de alias, consulte abaixo o método a seguir para configurar um
ANAME.
Criar um ANAME
Criar um ANAME equivale a criar um CNAME diretamente na raiz do domínio, e isso não é possível.
Se você tem certeza do que está fazendo, pode seguir este método para criar o equivalente a um ANAME:
- Crie um redirecionamento Web no painel de controle, redirecionando o domínio raiz para o www.
- Adicione um registro CNAME que funcione com o www e aponte para o destino de sua escolha.
Link para esta FAQ: https://faq.infomaniak.com/2493
Esta seção de perguntas frequentes foi útil?
Este guia explica como acessar, através de um nome de domínio, o Swisscom Internet Box conectado à Internet com um IP dinâmico.
Pré-requisitos
- Ter uma Box que permita configurar um fornecedor de DNS dinâmico personalizado.
- Um DNS dinâmico deve ter sido criado no domínio em questão.
Associar o Swisscom Internet Box a um nome de domínio
Para isso:
- Aceda à interface de administração da Swisscom Box (por exemplo,
http://192.168.1.1). - Ative a vista avançada (botão de alternância no canto inferior esquerdo).
- Clique em Rede.
- Clique na aba DynDNS.
- Marque a caixa para Ativar o DynDNS.
- Selecione o provedor
Infomaniakno menu suspenso. - Preencha os seguintes campos:
- Nome do host: o URL configurado no Painel de Controle ao adicionar o Dynamic DNS
- Nome de usuário: o identificador definido no Painel de Controle ao adicionar o Dynamic DNS
- Senha: a senha definida no Painel de Controle ao adicionar o Dynamic DNS
Se o dispositivo indicar que o redirecionamento de porta não é possível porque você não tem um endereço IP público, entre em contato com a Swisscom para que eles desativem o CGnat. Consulte este guia para obter mais informações.
Link para esta FAQ: https://faq.infomaniak.com/2498
Esta seção de perguntas frequentes foi útil?
Você chegou a esta página porque tem um redirecionamento web no seu domínio que está configurado incorretamente. A Infomaniak não consegue identificar o caminho correto deste redirecionamento, por isso você é redirecionado para esta página para ajudá-lo a corrigir esta situação.
Verificação da zona DNS
Para restabelecer o funcionamento do seu redirecionamento, é necessário, em primeiro lugar, remover os vestígios de um redirecionamento antigo configurado incorretamente:
- Acesse sua zona DNS.
- Exclua os registos relevantes (consulte a lista abaixo) que correspondem ao seu redirecionamento.
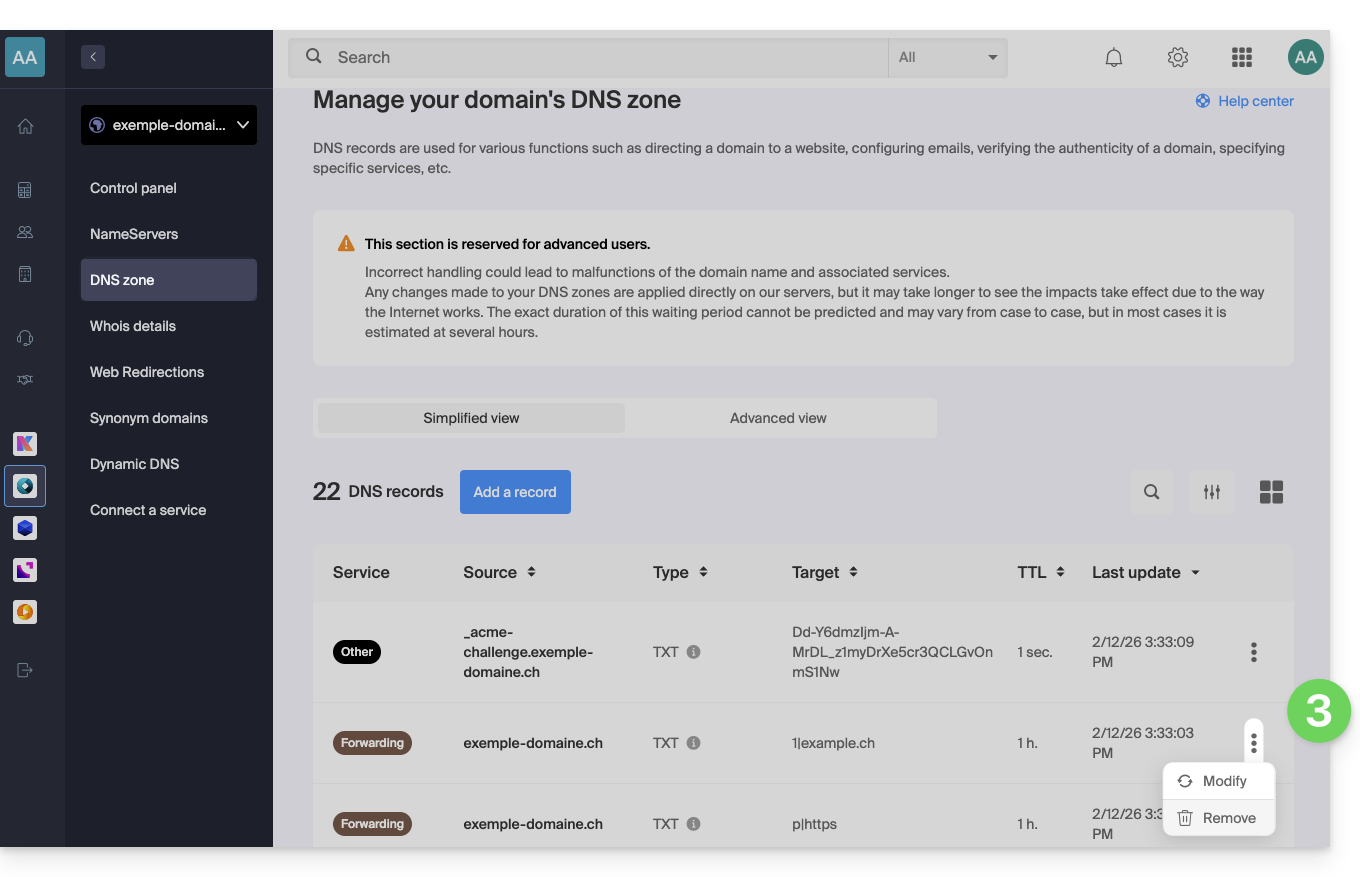
- Clique no menu de ações ⋮ à direita da entrada DNS relevante e selecione Excluir:
- Provavelmente, não encontrará todos os registos mencionados na lista, e isso é perfeitamente normal.
- Qualquer adição/modificação pode demorar até 48 horas para se propagar.
- Recrie o redirecionamento Web.
Lista de registros a serem verificados e removidos
Os registos DNS podem ser do tipo:
Ae apontam paraxx.xx.xx.xx(apenas números)AAAAe que apontam para um endereço IPxxxx:xxxx:x:x::x(números e letras)TXTcujo conteúdo se assemelha a “(número)|(URL)”- por exemplo,
1|infomaniak.comse o seu redirecionamento aponta para infomaniak.com
- por exemplo,
TXTcuja cadeia se assemelha a “(letra)|(texto)”- por exemplo
t|Texto,d|Textoouk|Texto
- por exemplo
Link para esta FAQ: https://faq.infomaniak.com/2506
Esta seção de perguntas frequentes foi útil?
Este guia diz respeito aos nomes de domínio com a extensão .es.
Alterar o proprietário de um domínio .es
Após efetuar o seu pedido de alteração de titular na Infomaniak, receberá um e-mail contendo dois códigos necessários para efetuar a alteração de titular no registo https://www.red.es/es, que gere os nomes de domínio da extensão .es.
Aceder ao red.es
Se já tiver as suas credenciais, inicie sessão diretamente em www.nic.es/sgnd/login.action.
Caso contrário, siga estas instruções para obter as suas credenciais:
- Acesse https://www.dominios.es/es e procure pelo seu nome de domínio.
- Após selecionar o seu domínio, você será redirecionado para a página
Detalhes do domínio, caso o site esteja em inglês. - Recupere o seu identificador (
Identifier) na secçãoADMINISTRATIVE CONTACT PERSON. Geralmente, tem o formato1A4446A-ESNIC-F5. - Aceda a www.nic.es/sgnd/login.action e clique em
Retrieve password. - Insira o identificador obtido para receber por e-mail a sua senha (o envio pode demorar alguns minutos).
- Em seguida, faça login com suas credenciais.
Iniciar a alteração de proprietário
- Após iniciar sessão, selecione o menu
Pedido de transferência de domínio. - Insira o seu nome de domínio para exibir o proprietário atual.
- No campo
IdentificadordeNovo registrador, insira o código de proprietário fornecido pela Infomaniak. - No campo
IdentificadordeNovo ACP(PCA em espanhol), insira o código de administrador fornecido pela Infomaniak. - Clique em
Continuar. - Adicione um documento de verificação de identidade (passaporte ou cartão de identidade) para validar o pedido junto à red.es.
Finalizar a alteração de titularidade
- O novo administrador receberá um e-mail do registo para confirmar a transferência.
- Ele deve iniciar sessão na interface red.es com o seu identificador (código de administrador recebido no primeiro e-mail) antes de confirmar o pedido.
- Tal como anteriormente, ele deve adicionar um documento para verificar a sua identidade.
- No formulário
New registrant's conditions acceptance, preenchaKEY-SYSTEMSno campoAccredited Registrare não altere mais nada para garantir que a transferência seja realizada corretamente. - Um resumo do pedido será exibido, confirmando que a alteração de proprietário foi efetuada.
Link para esta FAQ: https://faq.infomaniak.com/2520
Esta seção de perguntas frequentes foi útil?