Base de conhecimento
1000 perguntas frequentes, 500 tutoriais e vídeos explicativos. Aqui, você encontra apenas soluções!
Este guia explica como vincular um nome de domínio gerenciado pela Infomaniak a um plano de hospedagem Wix.
Introdução
- Um site criado no Wix não poderá ser exportado para que seu conteúdo seja hospedado em servidores de terceiros, como os da Infomaniak, por exemplo.
- Recomenda-se, portanto, criar o site diretamente na Infomaniak com a ajuda do Site Creator ou WordPress.
Associar o Wix ao seu nome de domínio na Infomaniak
Pré-requisitos
- Obtenha os 2 servidores DNS fornecidos pela Wix (do tipo
ns0.wixdns.netens1.wixdns.net, por exemplo).
Para conectar um site hospedado na Wix a um nome de domínio na Infomaniak:
- Clique aqui para acessar o gerenciamento do seu domínio no Manager Infomaniak (precisa de ajuda?).
- Clique diretamente no nome atribuído ao domínio em questão.
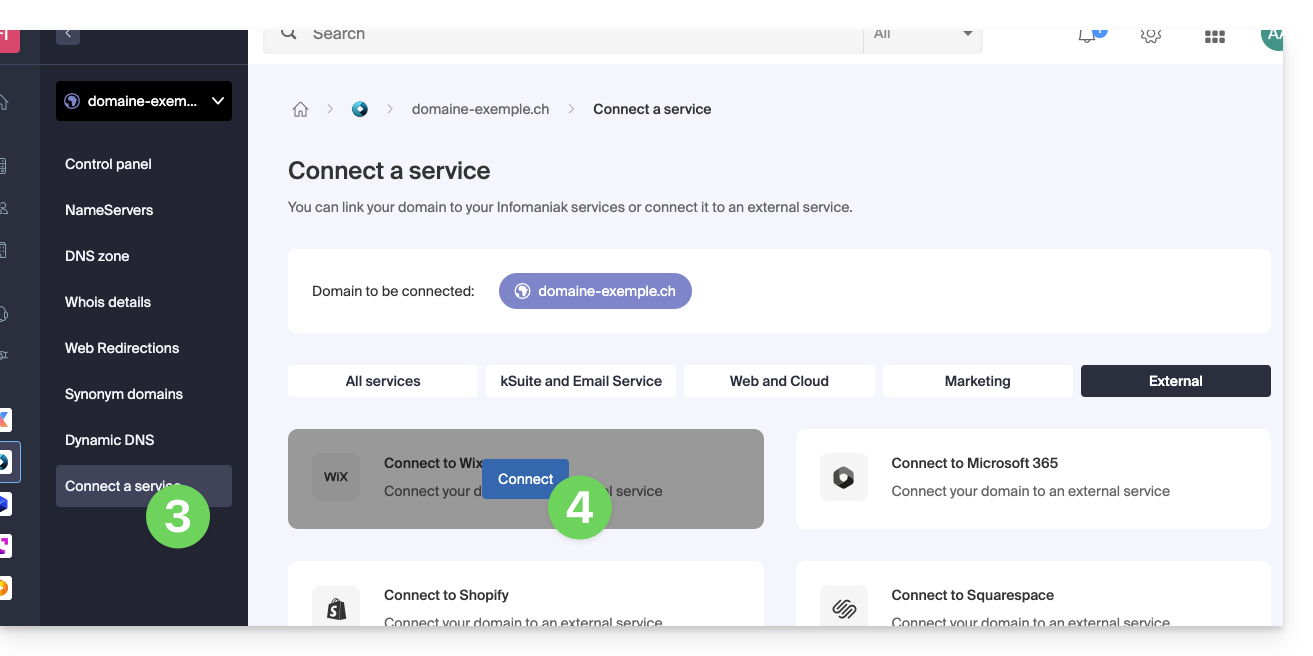
- Clique em Conectar um serviço no menu lateral esquerdo.
- Clique no botão azul Conectar no bloco WIX:
- Insira os 2 DNS do Wix (consulte os requisitos acima).
- Clique no botão Seguinte:
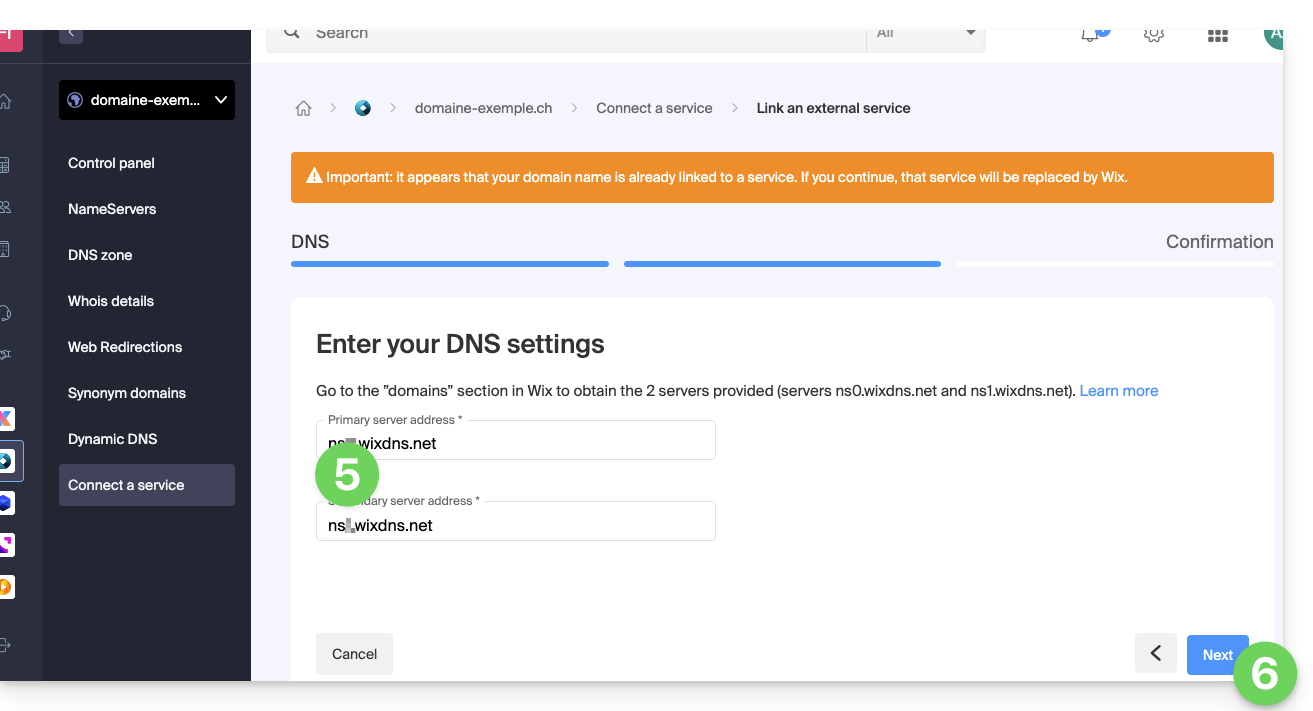
O seu nome de domínio começará a apontar para os servidores Wix algumas horas depois, e todo o tráfego web e de e-mail será redirecionado para a Wix.
Se necessário, é preciso indicar ao Wix que o serviço de e-mail é gerido pela Infomaniak (consulte este outro guia sobre o assunto).
Link para esta FAQ: https://faq.infomaniak.com/2067
Esta seção de perguntas frequentes foi útil?
Este guia explica como substituir o nome de domínio principal associado a um site(exceto para o plano de hospedagem Starter), hospedado na Infomaniak caso deseje, por exemplo, alterar o nome da sua empresa ou modificar a grafia.
Introdução
- Não é possível simplesmente alterar a grafia do nome de domínio em questão.
- É necessário possuir o novo nome de domínio e substituí-lo pelo atual, realizando uma substituição (veja abaixo).
- Após efetuar alterações no nome de domínio, pode ser necessário adaptar o conteúdo do site.
- Também pode renomear o seu produto de Hospedagem Web no painel de controlo Infomaniak, mas alterar o nome de uma hospedagem não tem absolutamente nenhum impacto nas URLs dos sites.
- Durante esta operação, as estatísticas são redefinidas.
Alterar o nome de domínio do site
Pré-requisitos
- Prepare o novo nome de domínio (se necessário, é preciso comprá-lo).
- Instale um certificado SSL válido, caso contrário, a alteração não será proposta.
- Se a alteração desejada for do tipo "subdomínio" para "domínio principal" (
dev.domain.xyz→domain.xyz, por exemplo), consulte este outro guia.
Em seguida, para substituir o nome de domínio atribuído ao site por outro nome de domínio:
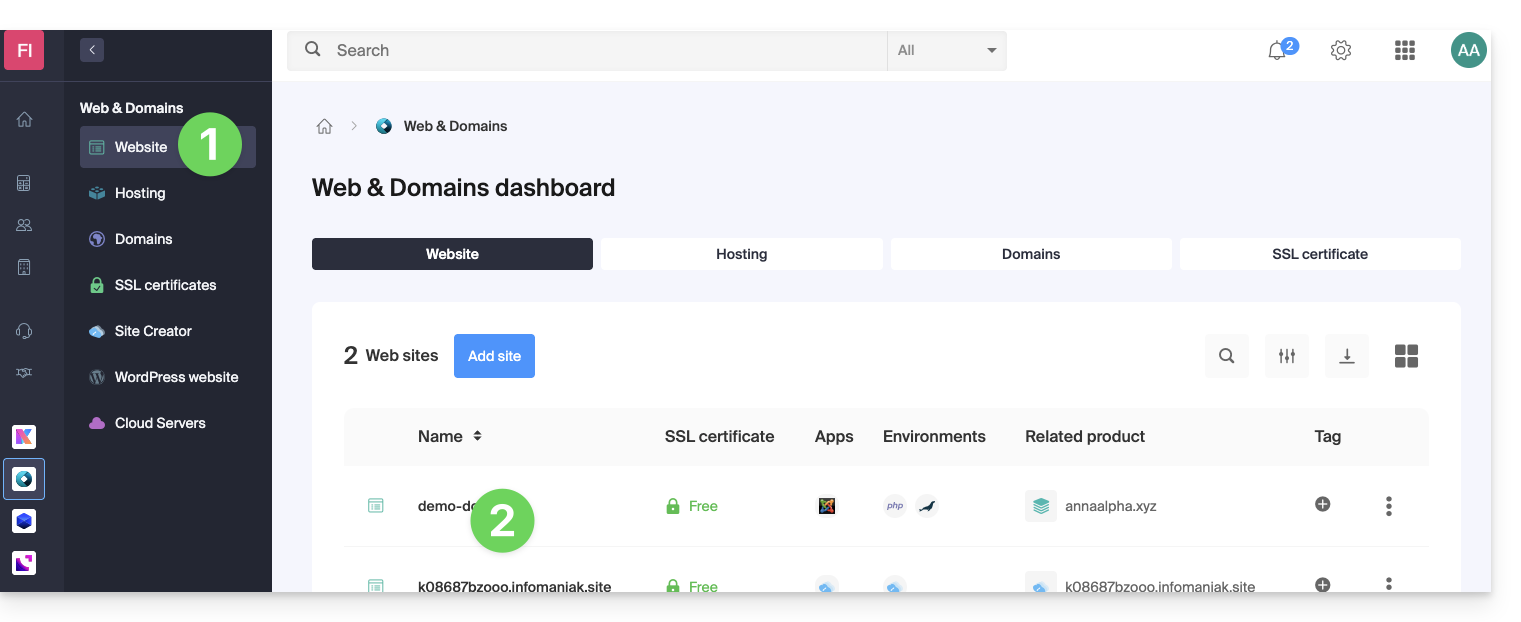
- Clique aqui para acessar o gerenciamento do seu site no Manager Infomaniak (precisa de ajuda?).
- Clique diretamente no nome atribuído ao site em questão:
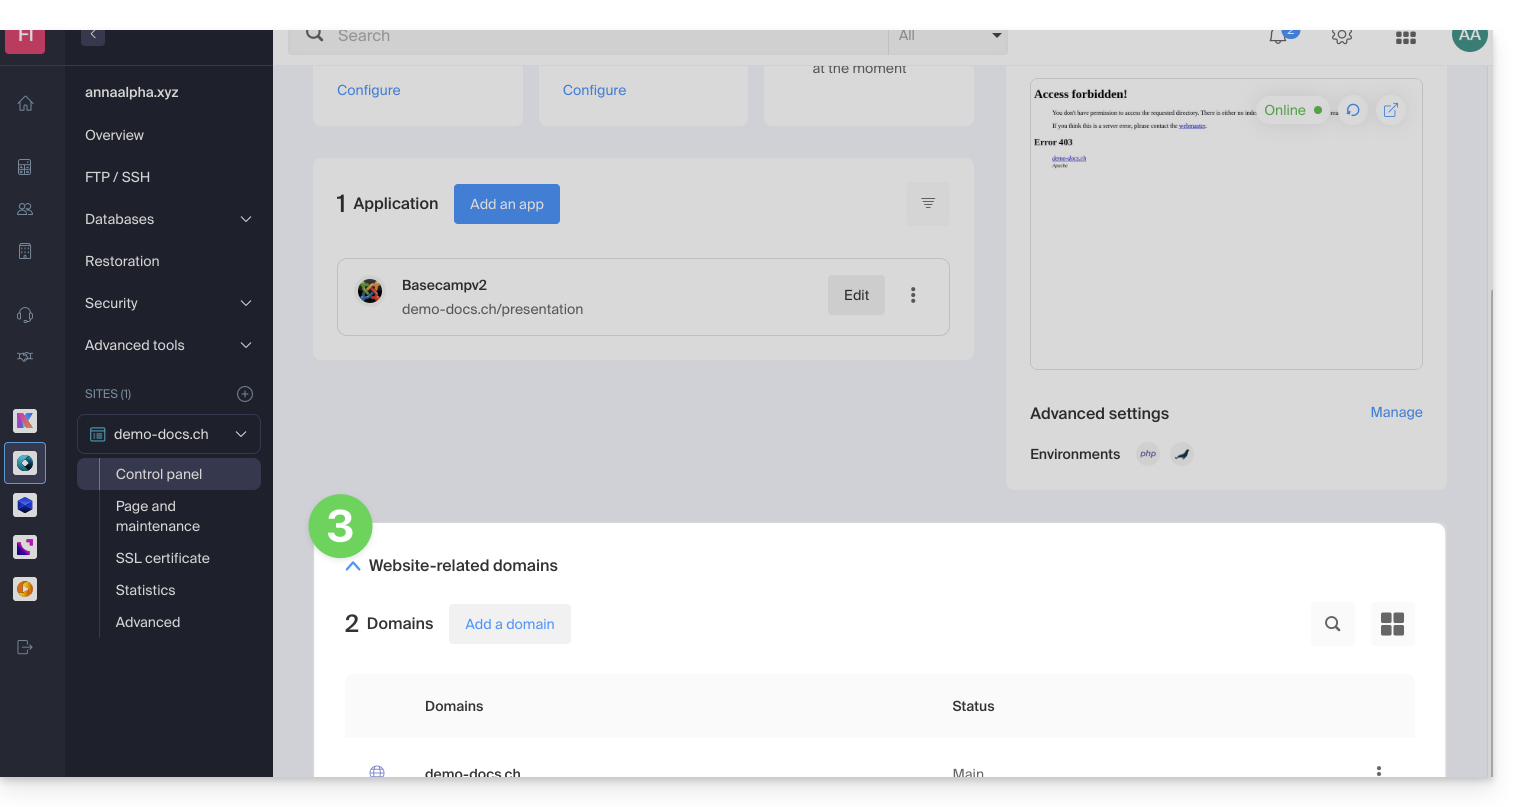
- Em seguida, clique na seta para baixo para expandir a seção Domínios deste site:
- Consulte este outro guia (especialmente a sua secção Pré-requisitos) para associar o novo nome de domínio ao seu site:
- Este novo domínio associado substituirá o nome de domínio principal atual após a inversão que irá realizar abaixo.
- Depois de associar o novo nome de domínio ao seu site, clique no menu de ações ⋮ à direita deste.
- Escolha Definir como domínio principal:
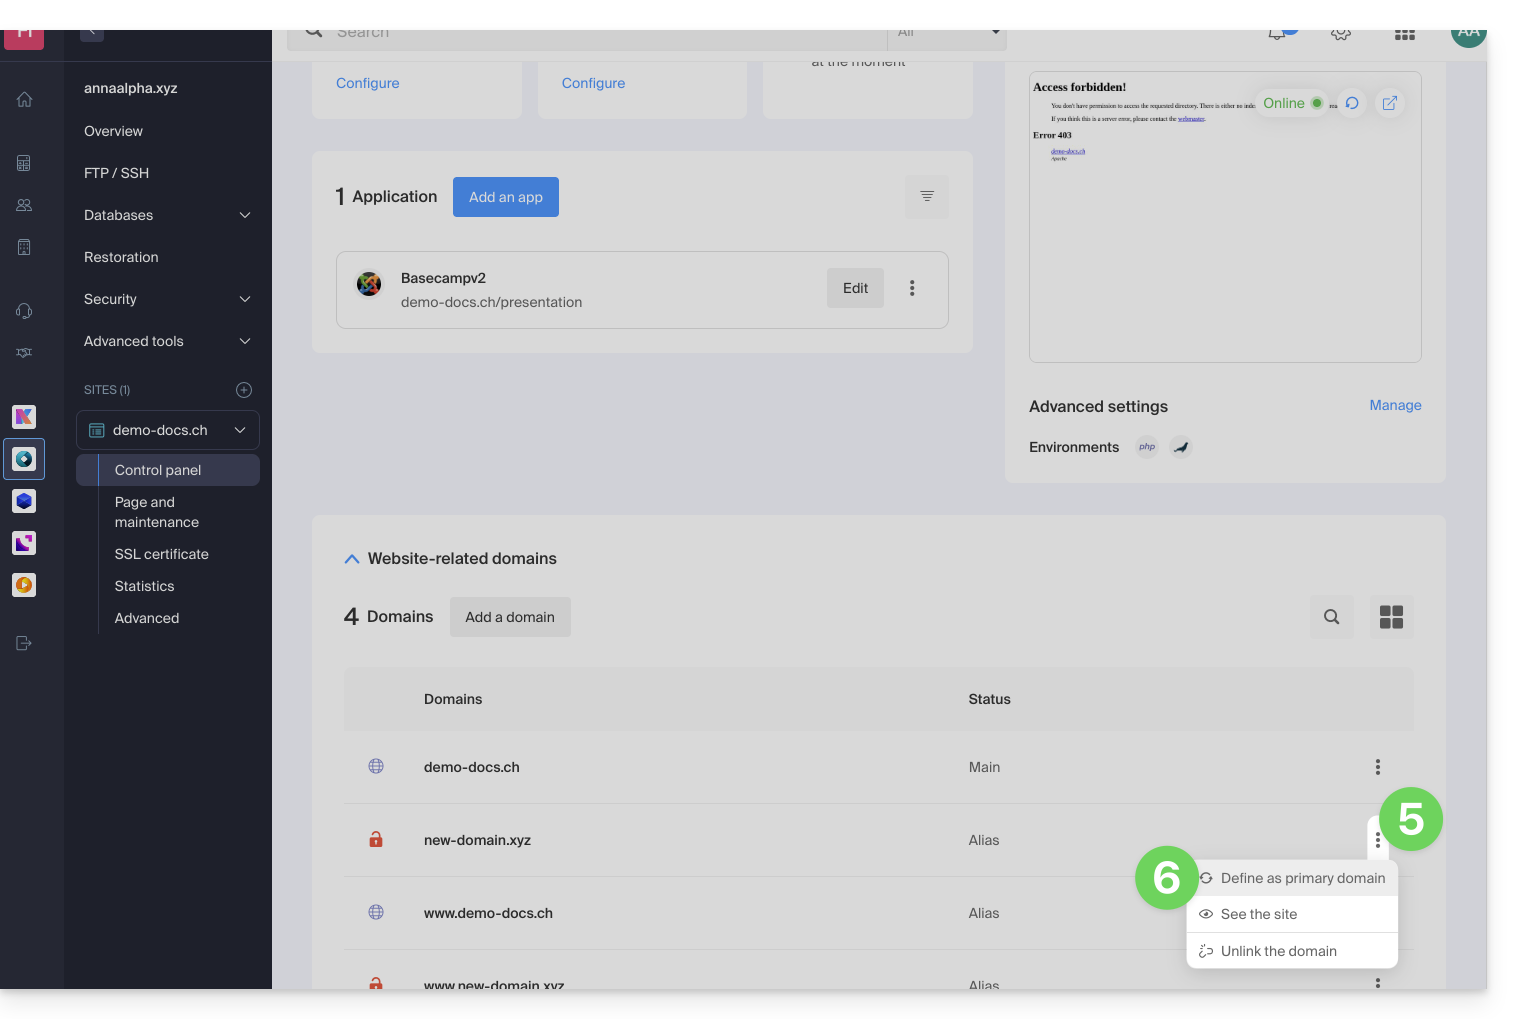
- Se necessário, remova o nome de domínio antigo e suas variantes que se tornaram domínios alias (e não mais domínios principais).
Se você estiver usando um certificado SSL, será necessário atualizá-lo para que ele inclua os aliases adicionados.
Se você estiver usando a opção de IP dedicado, será necessário desinstalá-la e reinstalá-la após a inversão que você realizará.
Adaptar o conteúdo do site ao novo nome
Em alguns casos,a aplicação web utilizada para o desenvolvimento do site precisa de alguns ajustespara funcionar com o novo nome de domínio. Clique no link correspondente ao desenvolvimento do seu site para adaptar o conteúdo:
Link para esta FAQ: https://faq.infomaniak.com/2070
Esta seção de perguntas frequentes foi útil?
Este guia explica como obter o código de autorização (código EPP) de um nome de domínio gerido pela Infomaniak, permitindo assim transferir a gestão de um domínio para outro registrador.
Introdução
- Os termos "
EPP", "AuthCode", "AuthInfo", "código de transferência" e "código de autorização" referem-se a sequências alfanuméricas específicas de um domínio, cujo objetivo principal é verificar a autorização do proprietário antes de uma transferência entre registradores. - Consulte o guia principal sobre os procedimentos de transferência de nomes de domínio.
- O código de autorização é sempre e apenas enviado para o endereço de e-mail do proprietário indicado no WHOIS do domínio.
Obter o código de autorização de um domínio
Para obter o código de autorização de transferência:
- Clique aqui para acessar o gerenciamento do seu domínio no Manager Infomaniak (precisa de ajuda?).
- Clique diretamente no nome atribuído ao domínio em questão:
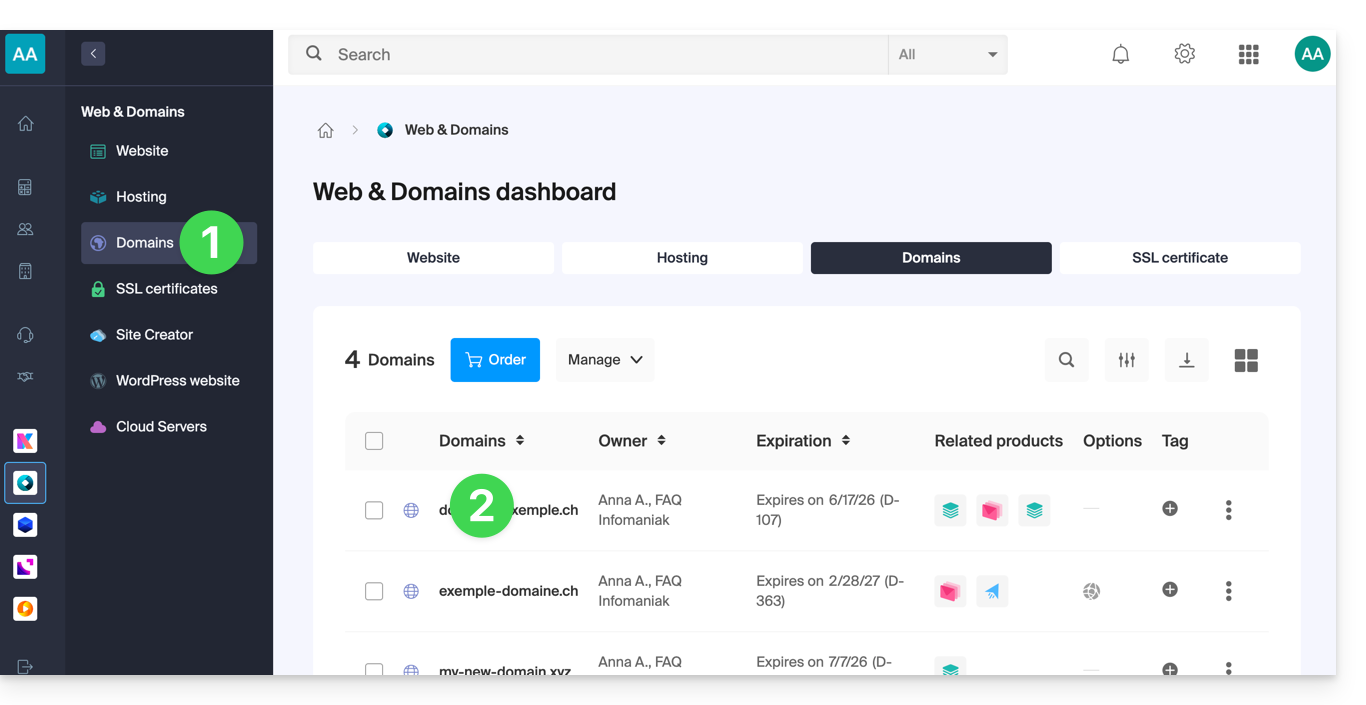
- Clique no botão Gerenciar .
- Clique em Transferir para outro registrador:
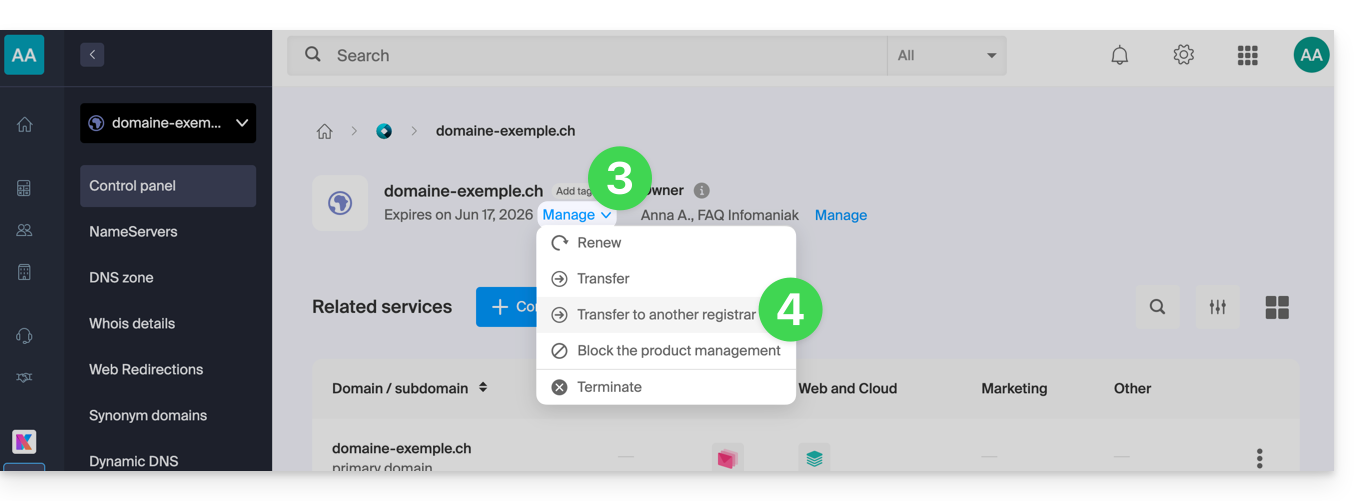
- Se necessário, para autorizar a transferência:
- Clique para desativar a opção Proteção de Privacidade do Domínio.
- Clique para Desbloquear este domínio.
- Clique no botão para Continuar:
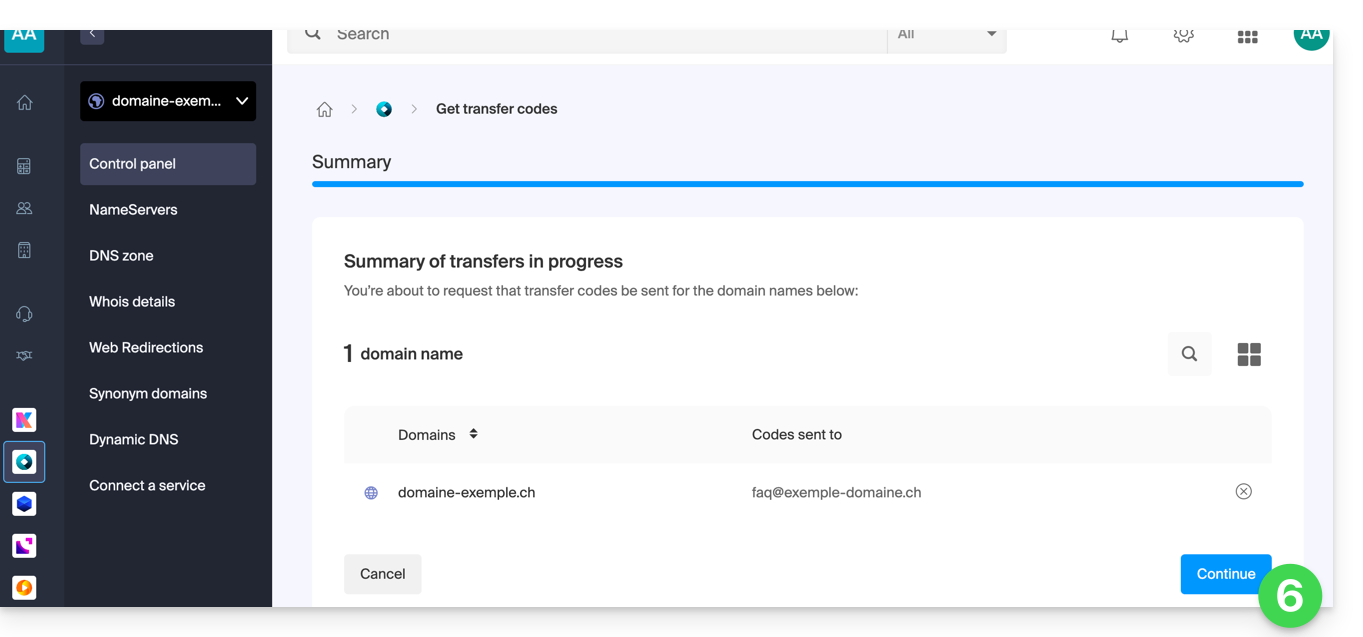
- O código é enviado por e-mail para o endereço de contato (ver introdução acima).
Para reenviar o código, repita o procedimento até o fim.
Particularidades de algumas extensões
- Domínios .de (administrador)
- Domínios .be
- Domínios .lu
- Domínios .pt
- Domínios .se
E depois?
Depois de inserir o código de autorização junto do fornecedor terceirizado e de o processo de transferência ter sido iniciado, a Infomaniak não intervém mais.
Informe-se junto do novo registrador para saber o tempo de transferência durante o qual o nome de domínio ainda estará visível na sua interface Infomaniak.Infelizmente, a Infomaniak não pode intervir em nenhuma operação que permita acelerar a transferência de dados para fora..
Link para esta FAQ: https://faq.infomaniak.com/2075
Esta seção de perguntas frequentes foi útil?
Este guia explica como adicionar ou modificar um ou mais registos do tipo A e AAAA na zona DNS (de um nome de domínio) gerida no Manager Infomaniak.
Introdução
- Este tipo de registo permite apontar um nome de domínio para um endereço IP estático (geralmente um servidor), tipo A para IPv4 e AAAA para IPv6.
- É o método geralmente utilizado para redirecionar o seu nome de domínio para o endereço IP do servidor web onde está alojado o seu site. Além disso, este tipo de apontamento é utilizado automaticamente para associar o seu nome de domínio ao seu site, caso ambos estejam no mesmo local e na mesma organização Infomaniak.
- Você só deve modificar este tipo de registro se tiver uma configuração específica para implementar (por exemplo, para direcionar um subdomínio para uma aplicação externa).
Modificar a zona DNS
Para gerenciar este tipo de registro em uma zona DNS:
- Clique aqui para acessar o gerenciamento do seu domínio no Manager Infomaniak (precisa de ajuda?).
- Clique diretamente no nome atribuído ao domínio em questão.
- Clique em Zona DNS no menu lateral esquerdo.
- Clique no botão para adicionar um registo:
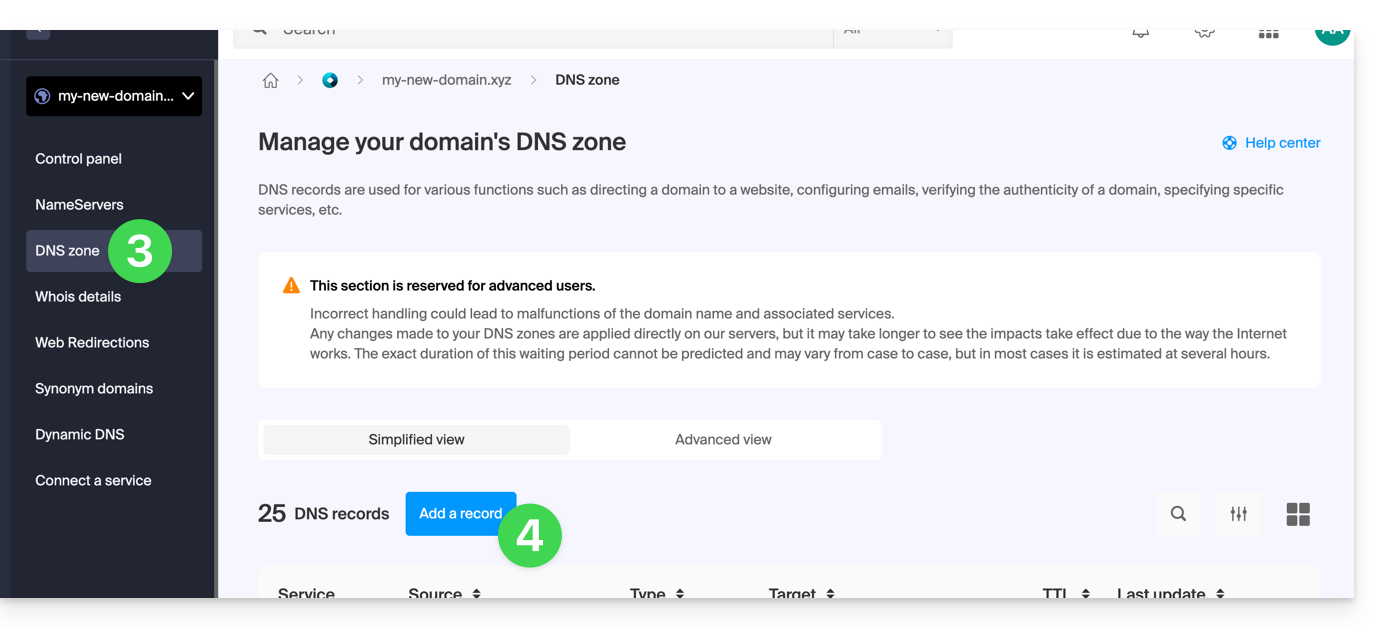
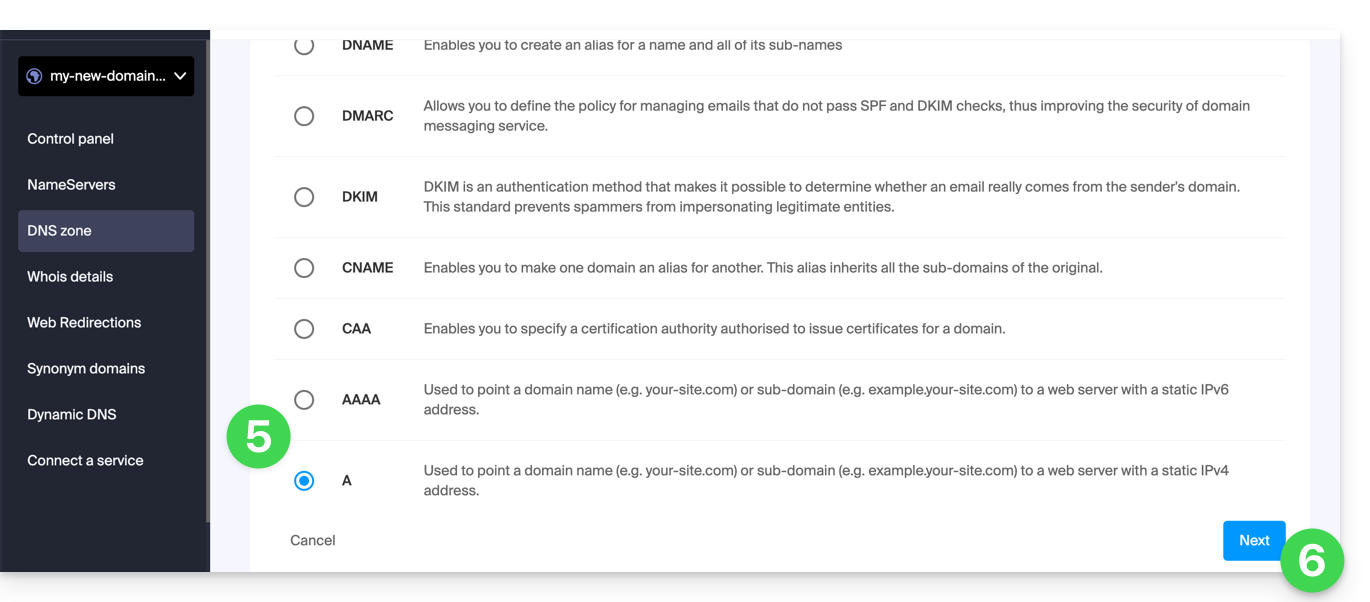
- Clique no botão de rádio A ou AAAA para adicionar um registo.
- Clique no botão Seguinte:
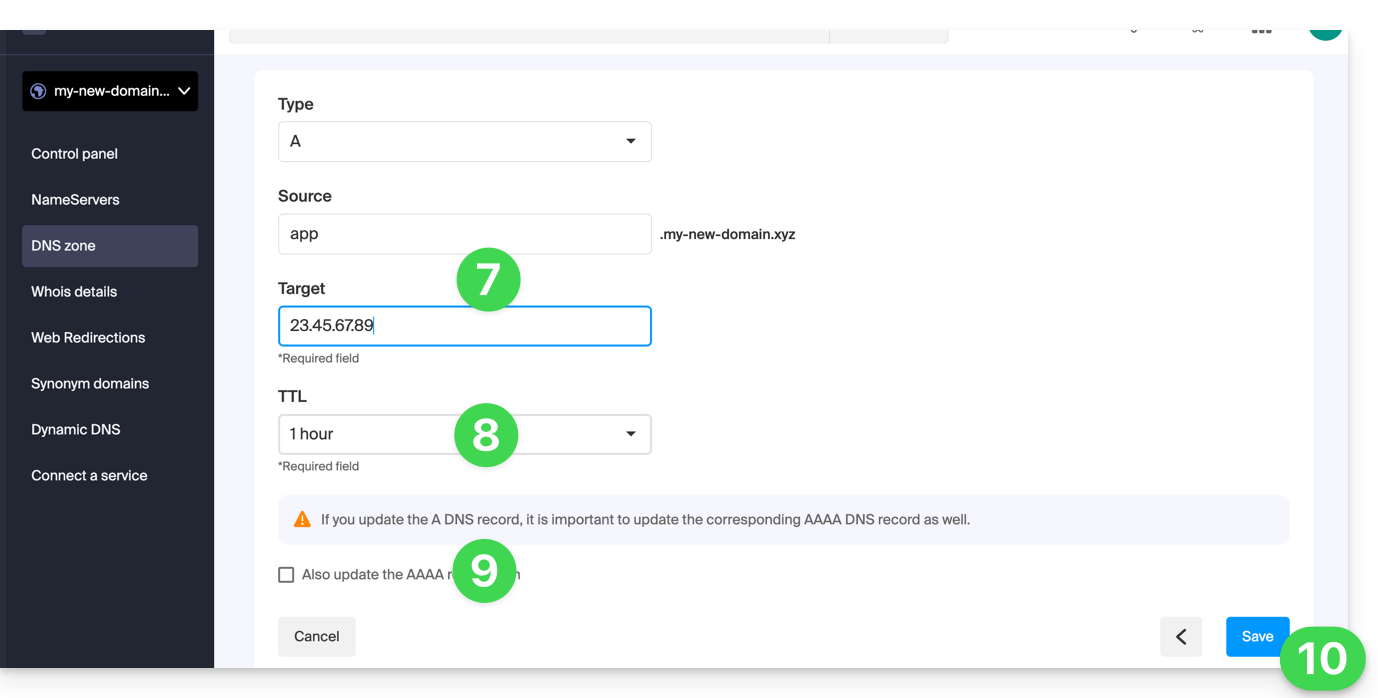
- Insira os valores necessários para a sua zona DNS.
- Deixe o valor padrão para o TTL.
- Se necessário, pode solicitar o ajuste do registo AAAA ativando a caixa de seleção, o que lhe permitirá indicar um IPv6 ao mesmo tempo.
- Clique no botão Guardar:
Link para esta FAQ: https://faq.infomaniak.com/2088
Esta seção de perguntas frequentes foi útil?
Este guia explica como configurar facilmente um redirecionamento do seu nome de domínio gerenciado na Infomaniak.
Introdução
- Um redirecionamento web permite redirecionar um nome de domínio ou um subdomínio para o endereço de internet de sua escolha.
- Este procedimento é válido apenas se os DNS do domínio forem gerenciados pela Infomaniak e se o Custom Brand não estiver ativado.
- Qualquer adição/modificação pode levar até 48 horas para ser propagada.
- Se necessário, crie uma redireção do seu domínio com e sem o www (
domain.xyzewww.domain.xyz).
Redirecionar um domínio para a URL de sua escolha
Para isso:
- Clique aqui para acessar o gerenciamento do seu produto no Manager Infomaniak (precisa de ajuda?).
- Clique diretamente no nome atribuído ao produto em questão.
- Clique em Redirecionamentos Web no menu lateral esquerdo.
- Clique no botão Adicionar redirecionamento:
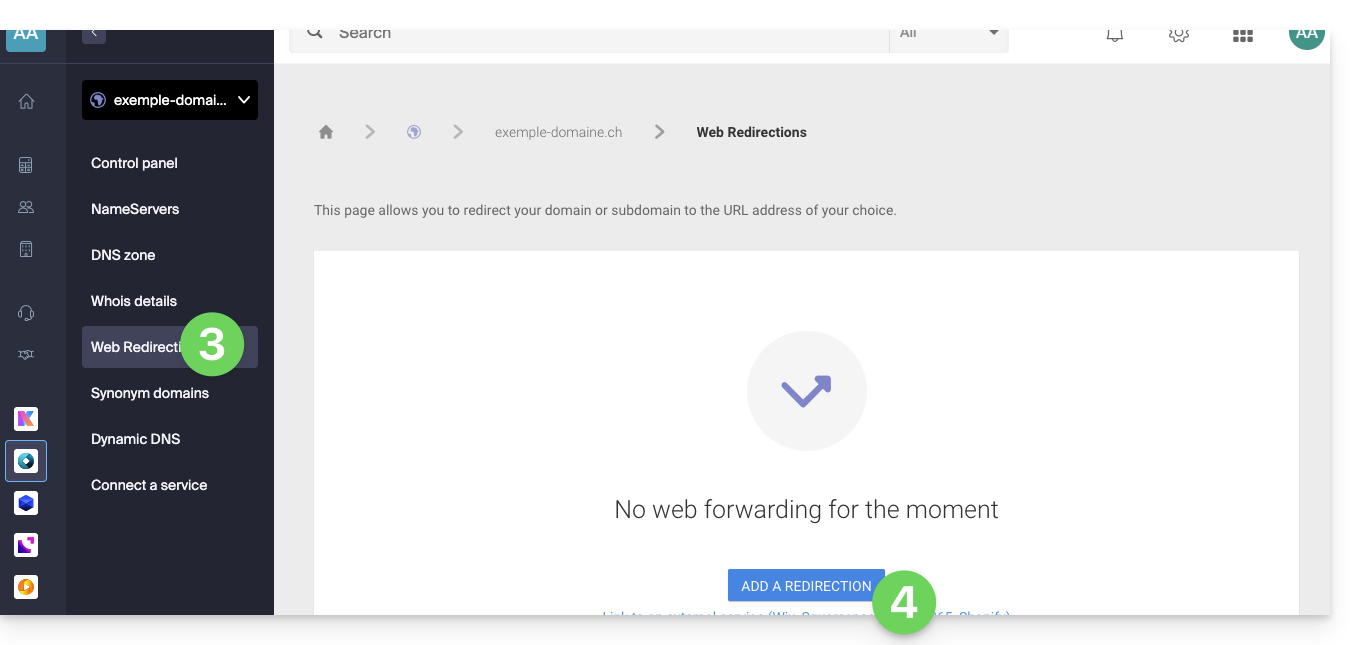
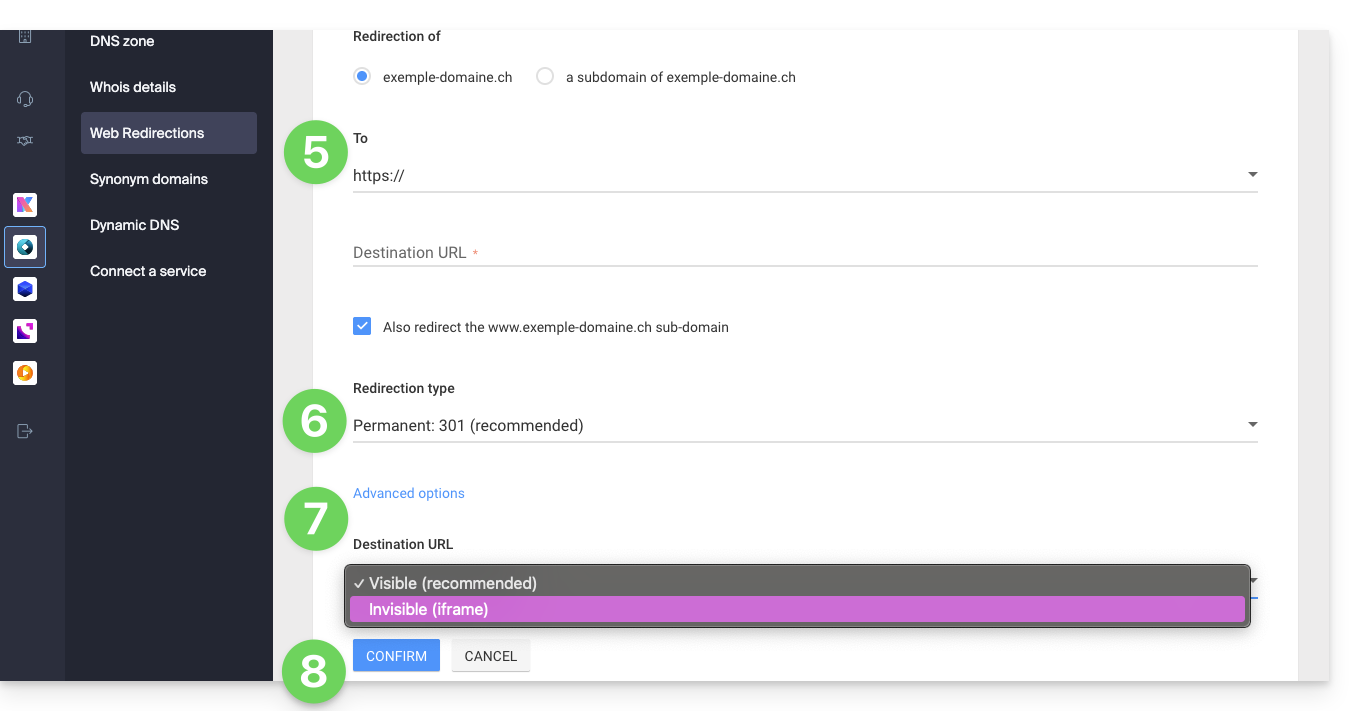
- Insira o endereço de destino (em Para).
- Escolha entre um redirecionamento do tipo 301 ou 302.
- As opções avançadas permitem especificar um redirecionamento na forma de um iframe (invisível, mas não recomendado).
- Clique no botão para Confirmar:
Link para esta FAQ: https://faq.infomaniak.com/2092
Esta seção de perguntas frequentes foi útil?
Este guia explica como ter vários nomes de domínio (tudo o que vem após o símbolo "@" do seu endereço de e-mail) para um Serviço de E-mail existente, adicionando domínios relacionados.
Introdução
- Os endereços de e-mail (existentes e futuros) são automaticamente válidos com todos os domínios associados.
- Para alterar e inverter completamente os nomes de domínio de um Serviço de E-mail, consulte este outro guia.
- Para modificar a parte do seu endereço de e-mail que aparece antes do símbolo "arroba"
@, consulte este outro guia. - Note também que pode renomear o seu produto no painel de controlo Infomaniak, mas alterar o nome de um serviço de e-mail não tem qualquer impacto nos seus endereços; é necessário atuar no nome de domínio.
Adicionar um nome de domínio ao Serviço de Email
Pré-requisitos
- Ter o novo nome de domínio (se necessário, crie-o previamente).
- Consultar as instruções deste outro guia e aplicar as indicações correspondentes à sua situação (para garantir que o nome de domínio funcione quando for associado ao seu Serviço de Email).
Depois que o novo nome de domínio estiver pronto para ser usado em conjunto com o antigo, é preciso adicioná-lo ao Serviço de E-mail:
- Clique aqui para acessar o gerenciamento do seu produto no Manager Infomaniak (precisa de ajuda?).
- Clique diretamente no nome atribuído ao produto em questão.
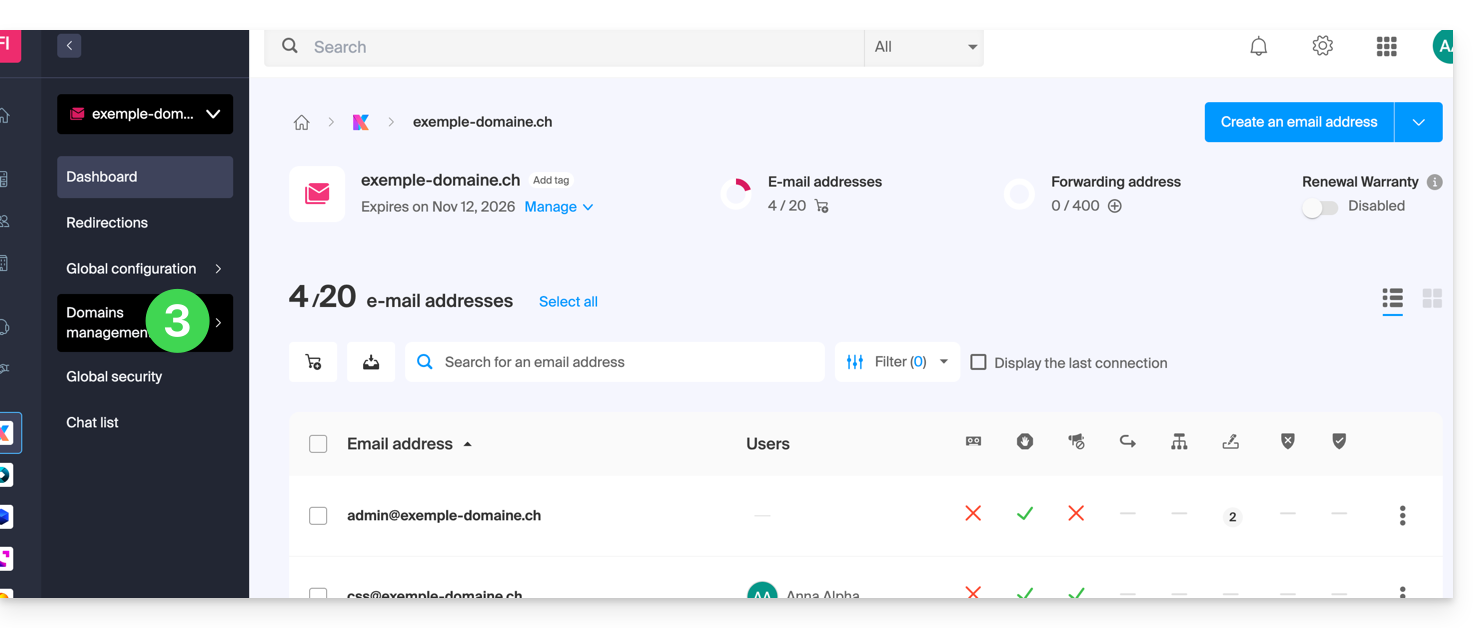
- Clique em Gerenciamento de domínios no menu lateral esquerdo:
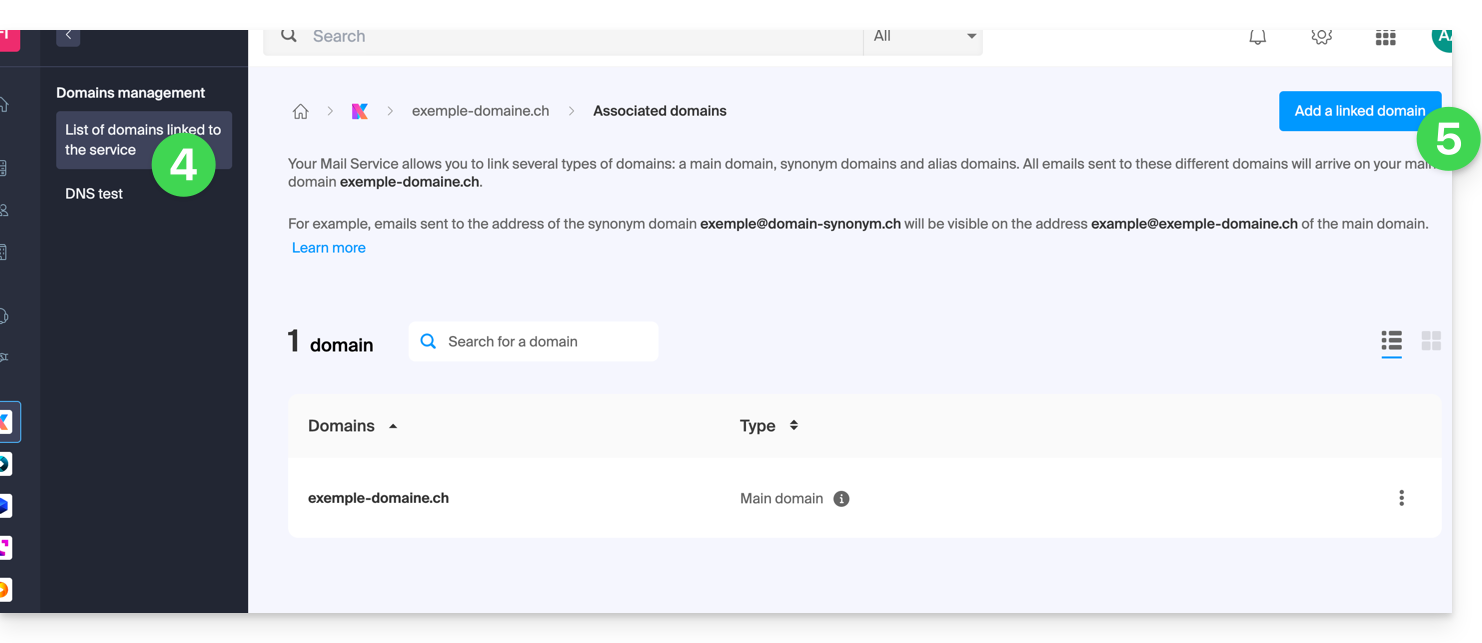
- Clique em Lista de domínios associados ao serviço no menu lateral esquerdo.
- Clique no botão azul Adicionar um domínio associado:
- É possível…
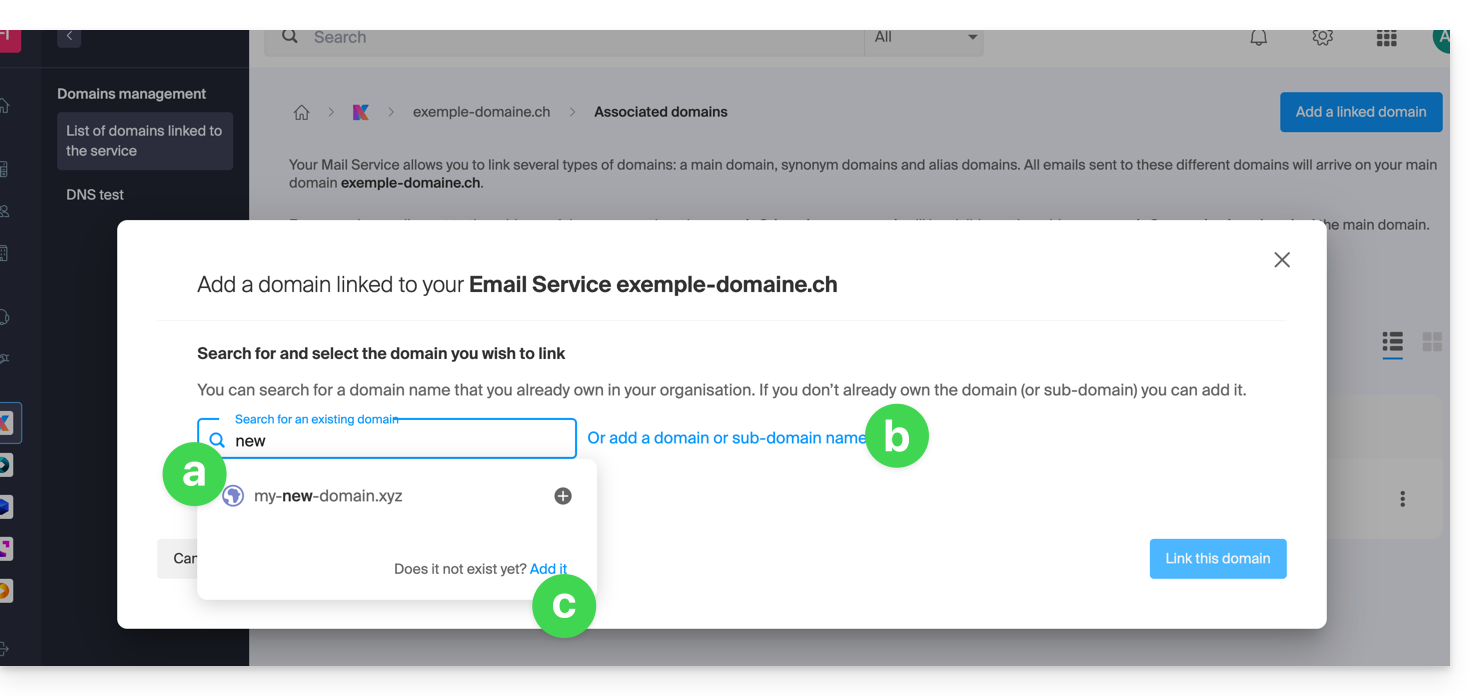
- … Pesquisar um domínio existente na organização à qual você está conectado; isso vinculará e atualizará automaticamente a zona DNS do domínio adicionado.
- … Adicionar um nome de domínio ou subdomínio para indicar manualmente o nome de domínio ou subdomínio a ser usado (ideal se o nome de domínio estiver em outro lugar).
- … Comprar um novo nome de domínio.
a: O domínio existe no nível da Organização
- Clique no nome de domínio sugerido.
- Clique no botão azul Associar este domínio:
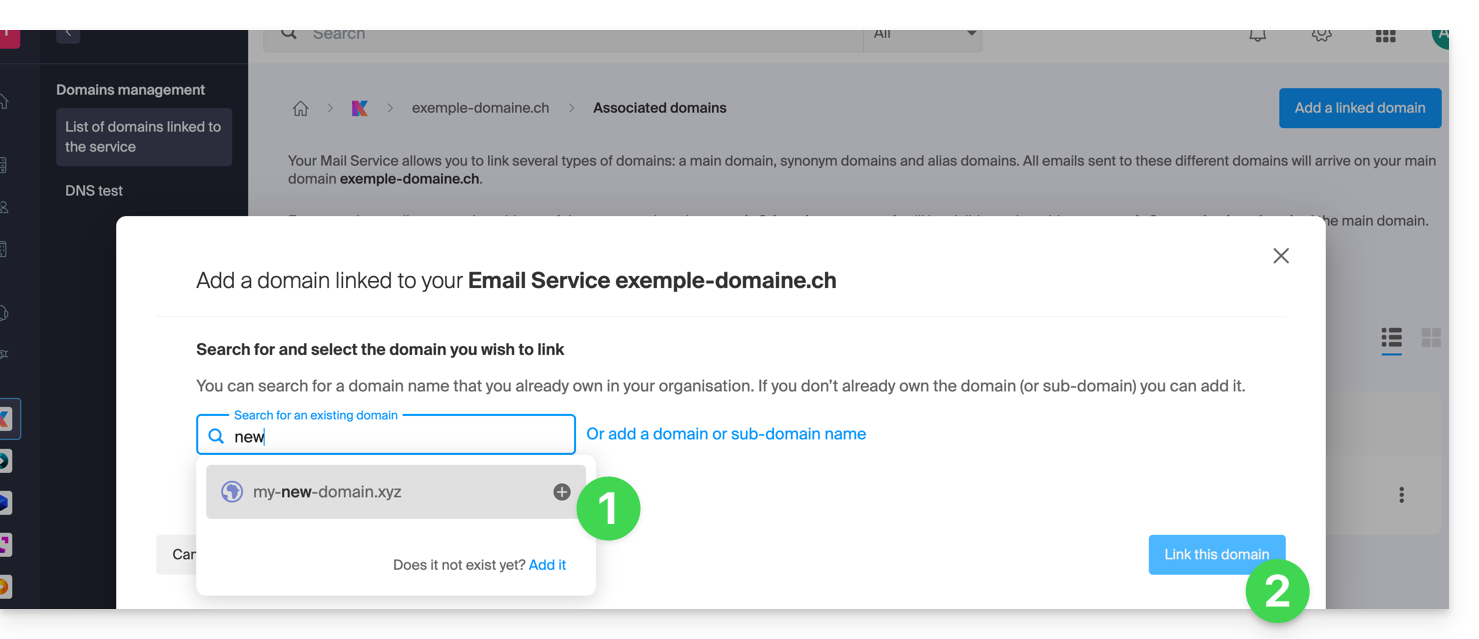
Chegou ao fim: o Serviço de Email agora responde a um segundo nome de domínio: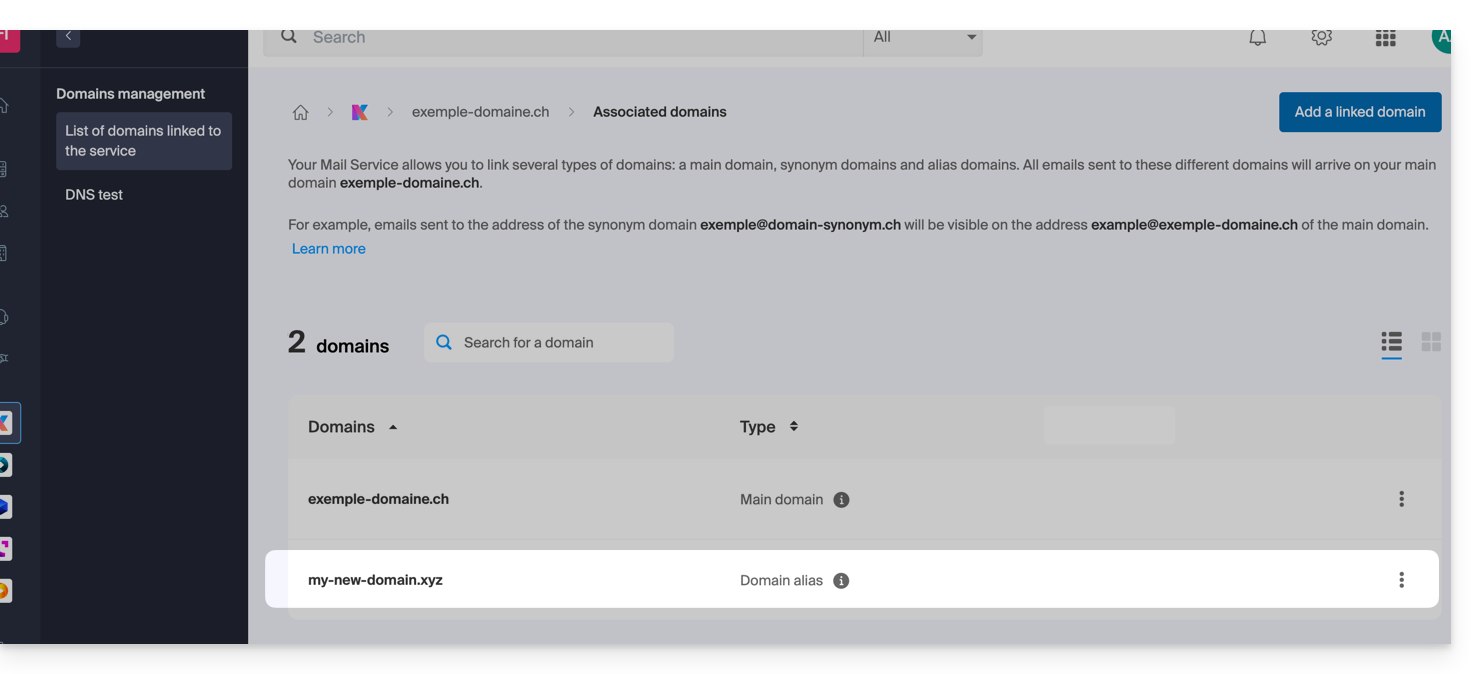
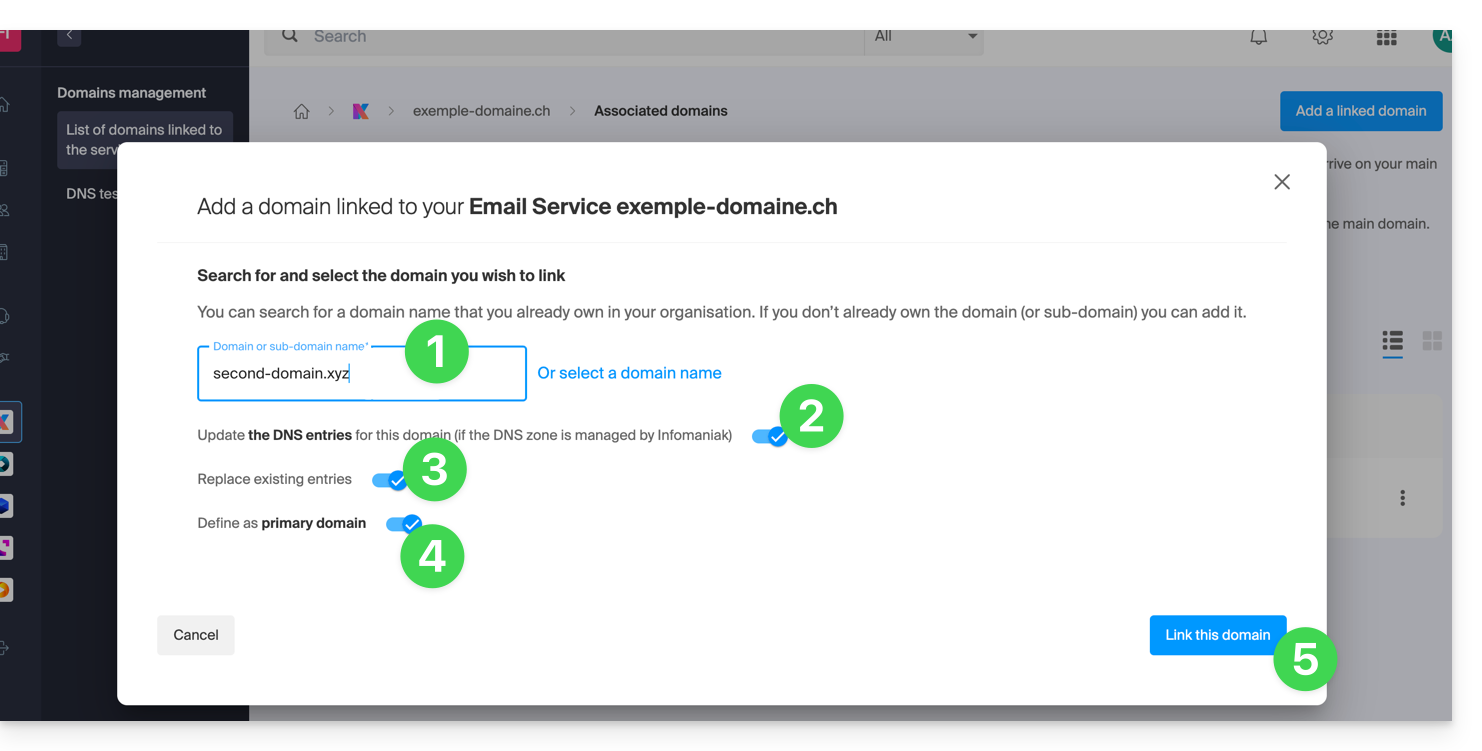
b: O domínio existe, mas está registado noutro local (outra organização, outro registrador…)
- Insira o nome de domínio a ser adicionado.
- Ative a atualização dos registros DNS (se a situação do nome de domínio permitir, a zona DNS do nome de domínio será atualizada automaticamente).
- Se o ponto 2 acima estiver ativo, ative a substituição das entradas existentes.
- Ative a inversão do nome de domínio apenas se desejar definir este novo nome de domínio como o principal (isto é principalmente uma questão administrativa e não técnica).
- Clique no botão azul Associar este domínio:
Exemplo de utilização
O endereço de e-mail contact@une-super-entreprise-familiale.com é um endereço longo. O domínio sinônimo contact@usef.com é mais curto e fácil de lembrar.
Ao adicionar o domínio "usef.com" ao Serviço de E-mail "une-super-entreprise-familiale.com", você autoriza que todas as mensagens enviadas para contact@usef.com (o domínio associado) para que as mensagens sejam enviadas para o endereço contact@une-super-entreprise-familiale.com.
Link para esta FAQ: https://faq.infomaniak.com/2097
Esta seção de perguntas frequentes foi útil?
Este guia explica o que é um serviço de hospedagem web como o da Infomaniak e detalha seu papel, seu escopo de atuação e os limites do suporte técnico oferecido.
Infomaniak, provedor de hospedagem desde 1996
De acordo com a Wikipédia, um provedor de hospedagem web é uma empresa que fornece serviços de hospedagem na Internet para sistemas de computação de pessoas ou entidades que não desejam fazê-lo por conta própria.
Infomaniak também oferece:
- … décadas de experiência em hospedagem e soluções online de alto desempenho.
- … mais de um milhão de utilizadores na Suíça e na Europa que confiam a gestão dos seus dados críticos.
- … uma empresa certificada pelas normas ISO 27001, 9001, 14001, 50001 e comprometida com uma abordagem digital sustentável.
- … 100% de conhecimento tecnológico "fabricado na Suíça", com dados hospedados na Suíça, em seus próprios centros de dados.
- … uma rica base de conhecimento e um suporte ao cliente disponível para o ajudar.
Responsabilidades e limites de intervenção
Como provedor de hospedagem, a Infomaniak instala, protege e mantém atualizada a infraestrutura do servidor, aprimora suas interfaces de gerenciamento (Manager) e auxilia seus clientes no uso ideal das ferramentas fornecidas. A Infomaniak se esforça para oferecer soluções acessíveis a todos; no entanto, o suporte humano para os produtos gratuitos é, por natureza, limitado, a fim de garantir a sustentabilidade desses serviços.
Por motivos de segurança e confidencialidade,nenhum suporte será fornecido sem uma identificação formaldo interlocutor.
O suporte destina-se exclusivamente aos administradores da Organização. Os clientes finais ou os utilizadores que beneficiam de um contrato através de um Parceiro revendedor devem, obrigatoriamente, contactar o seu administrador ou fornecedor de serviços dedicado em primeiro lugar.
Âmbito do suporte técnico
O suporte técnico não oferece assistência para:
- Desenvolvimento e programação: depuração de sites, correção de código-fonte, scripts personalizados (PHP, JS, etc.)
- O uso e a integração das APIs.
- A manutenção de aplicações e o gerenciamento de sites: resolução de problemas, atualização ou gerenciamento de conteúdo para aplicações de terceiros (por exemplo, CMS como WordPress, clientes de e-mail como Outlook, etc.).
- Intervenções locais e personalizadas: acesso remoto, configuração do seu próprio equipamento, instalações ou migrações manuais complexas.
Mas o suporte terá todo o prazer em ajudá-lo com:
- Infraestrutura e Gerenciador: resolução de incidentes relacionados à rede, ao hardware ou às interfaces de gerenciamento Infomaniak.
- Utilização dos serviços Infomaniak: esclarecimento dos processos de configuração e auxílio na utilização de nossas funcionalidades nativas.
- Orientação documental: para o ajudar a encontrar os recursos e guias técnicos adequados, para que possa trabalhar de forma independente.
Uma assistência Premium e um serviço de migração estão disponíveis para necessidades mais específicas.
Encontre ajuda externa
Para obter ajuda relacionada com o conteúdo do seu site, a sua programação ou a organização avançada das suas contas de e-mail, utilize a plataforma de pedidos de orçamento da Infomaniak, que reúne mais de 1000 profissionais verificados, ou consulte o diretório.
Link para esta FAQ: https://faq.infomaniak.com/2103
Esta seção de perguntas frequentes foi útil?
Este guia explica como vincular um nome de domínio ao NAS Synology que você aluga na Infomaniak.
Associar um domínio existente
Para conectar o seu domínio existente na Infomaniak ao seu Synology:
- Clique aqui para acessar o gerenciamento do seu produto no Manager Infomaniak (precisa de ajuda?).
- Clique diretamente no nome atribuído ao Synology em questão.
- Clique em Domínios relacionados no menu lateral esquerdo.
- Clique em Associar um nome de domínio (na secção Domínios associados):
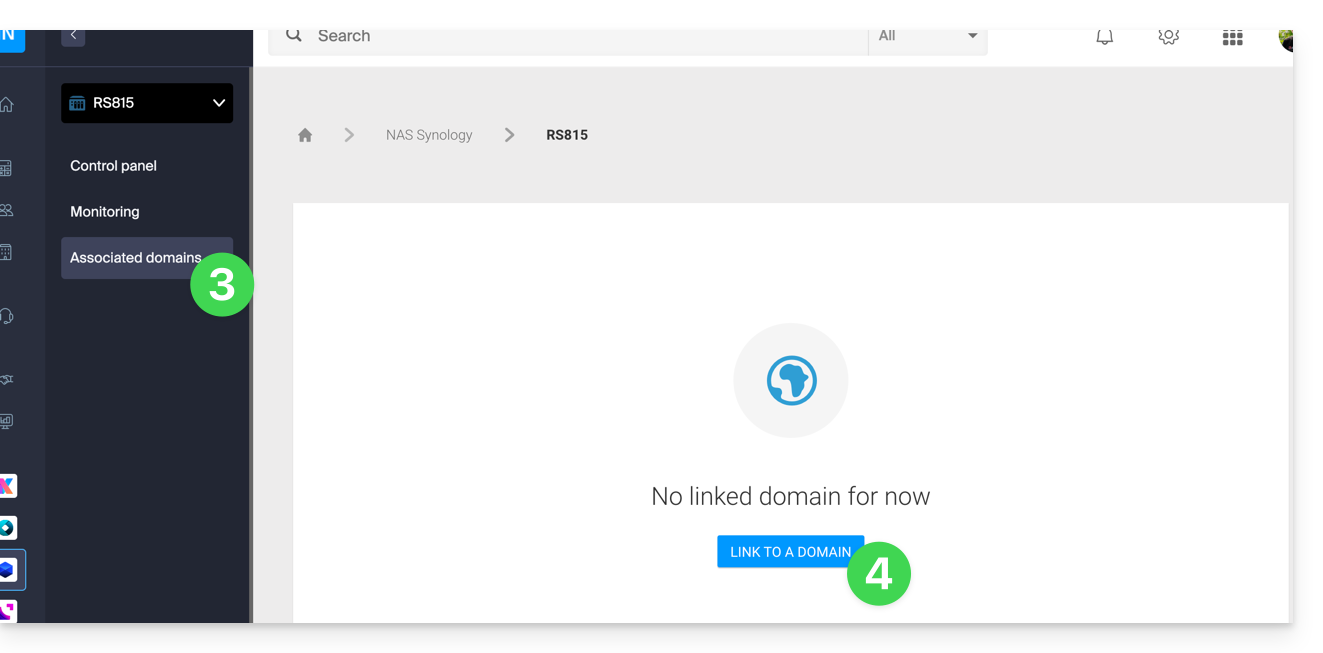
- Insira um possível subdomínio.
- Escolha um dos nomes de domínio registados na sua Organização.
- Clique no botão para Confirmar:
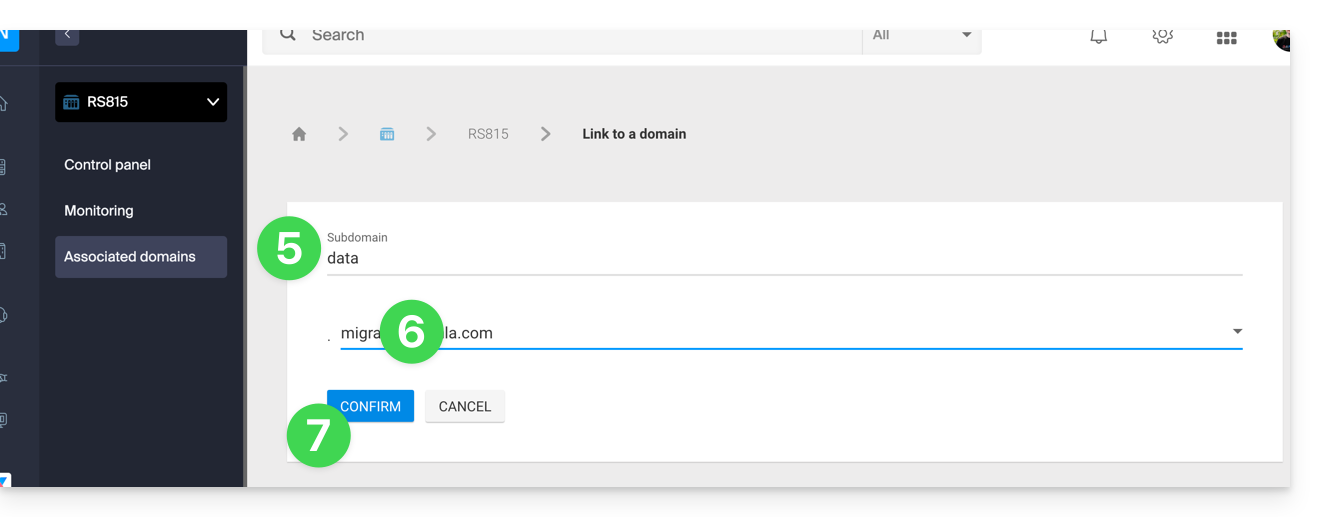
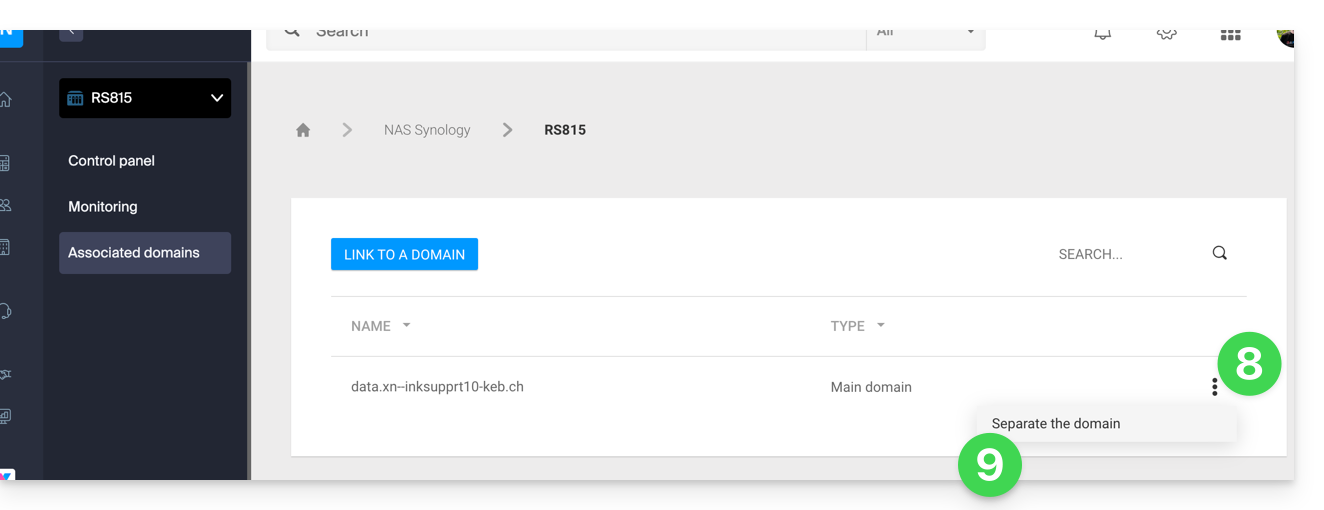
- O domínio está associado ao dispositivo; para remover a associação, clique no menu de ação ⋮ à direita do item correspondente na tabela exibida.
- Clique em Desassociar o domínio e confirme:
Link para esta FAQ: https://faq.infomaniak.com/2106
Esta seção de perguntas frequentes foi útil?
Este guia explica como adicionar ou modificar um registo MX na zona DNS de um nome de domínio gerido a partir do Manager Infomaniak.
Introdução
- Um registro MX indica aos servidores de e-mail para qual servidor/provedor encaminhar as mensagens destinadas ao seu nome de domínio.
- As alterações efetuadas no painel de controlo Infomaniak só são tidas em conta se o nome de domínio utilizar a zona DNS correspondente.
- Qualquer adição/modificação de DNS pode levar até 48 horas para se propagar; durante este período, algumas mensagens podem ainda ser direcionadas de acordo com a configuração anterior.
Registros MX para o serviço de e-mail Infomaniak
A Infomaniak configura automaticamente o registo MX necessário quando o nome de domínio e o Serviço de Email são criados na mesma Organização no Gestor Infomaniak.
Se a sua configuração exigir a adição manual do registo MX para direcionar as mensagens recebidas para a Infomaniak, insira os seguintes valores:
- Anfitrião / Origem: deixe este campo em branco para aplicar o registo ao domínio principal
- Destino:
mta-gw.infomaniak.ch - Prioridade:
5
O destino deve ser inserido na forma de um nome de host, sem https://, sem endereço de e-mail e sem caminho adicional.
Variação específica para algumas interfaces DNS
Algumas interfaces, nomeadamente a da Gandi, exigem um ponto no final do destino para indicar que se trata de um nome de host completo. Neste caso, introduza:
mta-gw.infomaniak.ch.
Se for utilizado outro registo MX ou se vários registos MX estiverem configurados, a Infomaniak não pode garantir a receção correta das mensagens.
Modificar a zona DNS
Para adicionar um registo MX na zona DNS:
- Clique aqui para acessar o gerenciamento dos seus domínios no Manager Infomaniak (precisa de ajuda?).
- Clique diretamente no nome atribuído ao domínio em questão.
- Clique em Zona DNS no menu lateral esquerdo.
- Clique no botão para adicionar um registo:
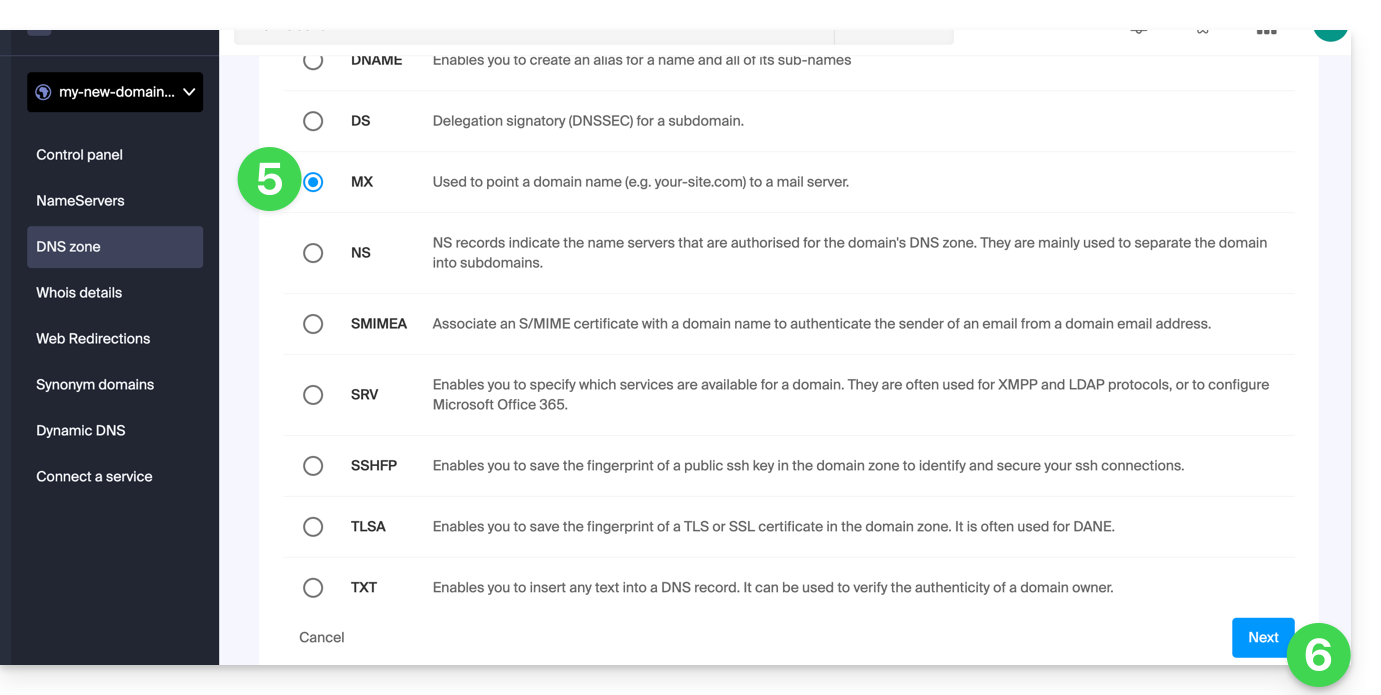
- Selecione o tipo de registo MX.
- Clique no botão Seguinte:
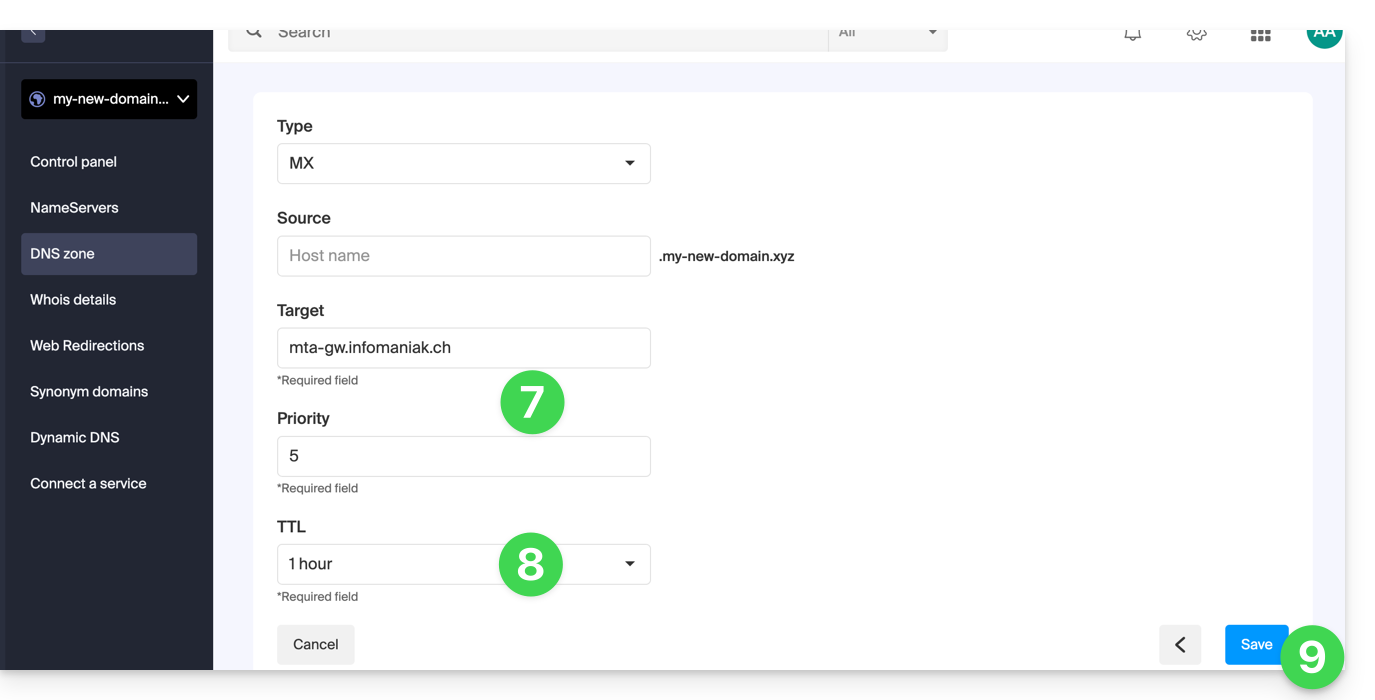
- Preencha os valores solicitados:
- para o serviço de e-mail do domínio principal, deixe o campo Servidor ou Origem em branco
- insira no campo Destino o nome do servidor de e-mail fornecido pelo provedor
- preencha a prioridade indicada por este provedor
- Mantenha o valor padrão proposto para o TTL, a menos que o seu provedor de e-mail indique o contrário.
- Clique no botão Guardar:
Após guardar, o registo MX aparecerá na tabela da zona DNS: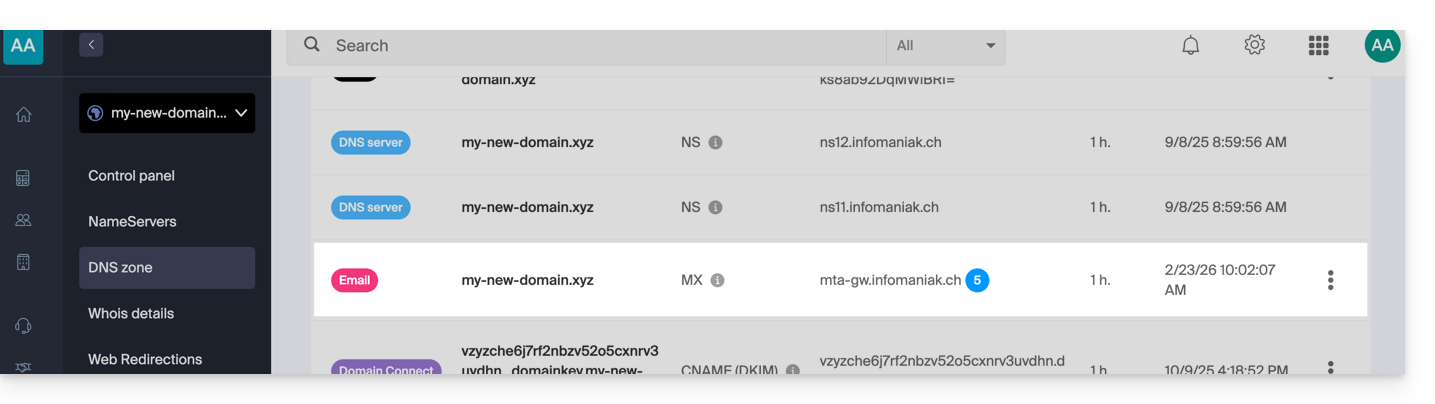
Para enviar mensagens com o serviço de e-mail da Infomaniak, o nome de domínio também deve ter um registro SPF configurado corretamente.
Saiba mais
Link para esta FAQ: https://faq.infomaniak.com/2110
Esta seção de perguntas frequentes foi útil?
Este guia explica como converter uma oferta Web Starter gratuita em uma oferta paga mais completa e aprimorada, como uma Hospedagem Web compartilhada ou uma hospedagem Web em Servidor Cloud.
Introdução
- Ao comprar um nome de domínio na Infomaniak, você pode adicionar 1 endereço de e-mail gratuito e um espaço web básico de 10 MB.
- Com alguns cliques, é possível aprimorar esta oferta para desfrutar de uma experiência mais completa.
Alterar a oferta Starter - página Web básica
Para aprimorar esta oferta gratuita:
- Clique aqui para acessar o gerenciamento da sua hospedagem no Manager Infomaniak (precisa de ajuda?).
- Clique no menu de ação ⋮ localizado à direita do item correspondente.
- Clique em Alterar a oferta:
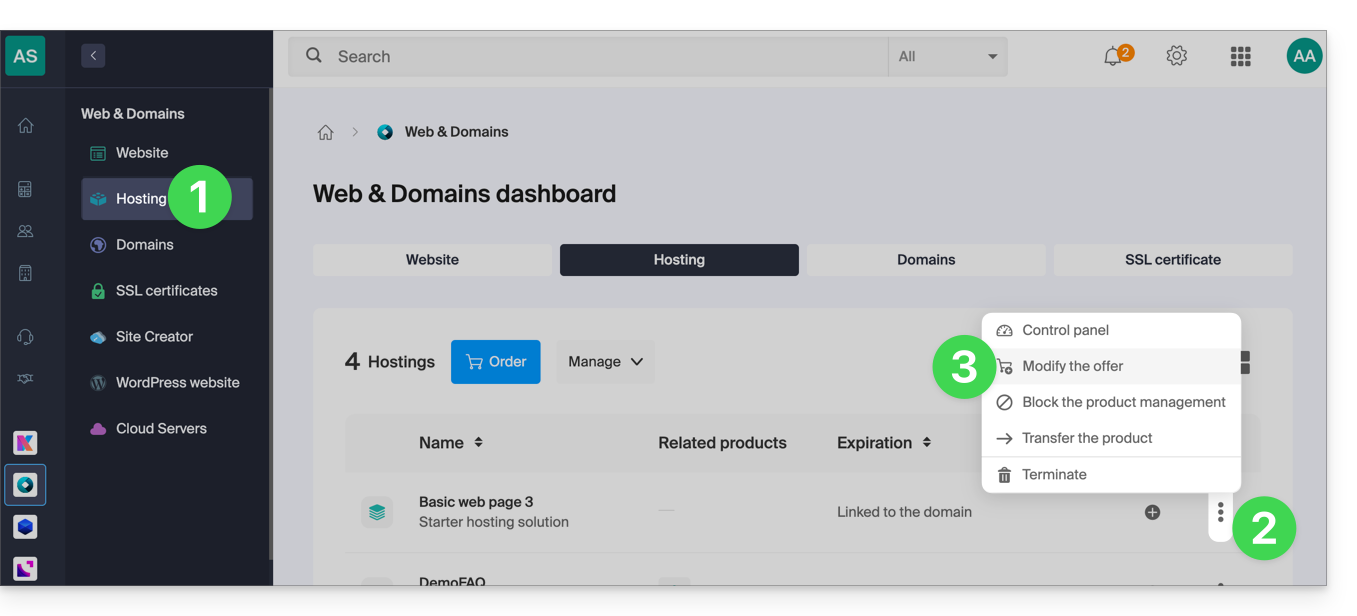
- Siga o assistente para escolher o novo tipo de hospedagem, efetue o pagamento para concluir a alteração da oferta.
Link para esta FAQ: https://faq.infomaniak.com/2111
Esta seção de perguntas frequentes foi útil?
Este guia explica como converter uma oferta Mail Starter gratuita para uma oferta mais completa e aprimorada, por exemplo, kSuite Free ou outros planos do kSuite Pro.
Introdução
- Ao adquirir um nome de domínio na Infomaniak, você obtém1 endereço de e-mail gratuito e um espaço web básico de 10 MB: esta é a oferta Starter.
- Com apenas alguns cliques, é possível atualizar essas ofertas para remover as limitações e usufruir de uma experiência aprimorada.
- Para ajudá-lo a identificar a oferta de e-mail mais adequada às suas necessidades, consulte este outro guia.
Alterar o plano Starter – Serviço de e-mail gratuito
Para atualizar o plano Starter:
- Clique aqui para acessar o gerenciamento do seu produto no painel de controle Infomaniak (precisa de ajuda?).
- Clique no menu de ações ⋮ localizado à direita do item em questão.
- Clique em Modificar oferta:
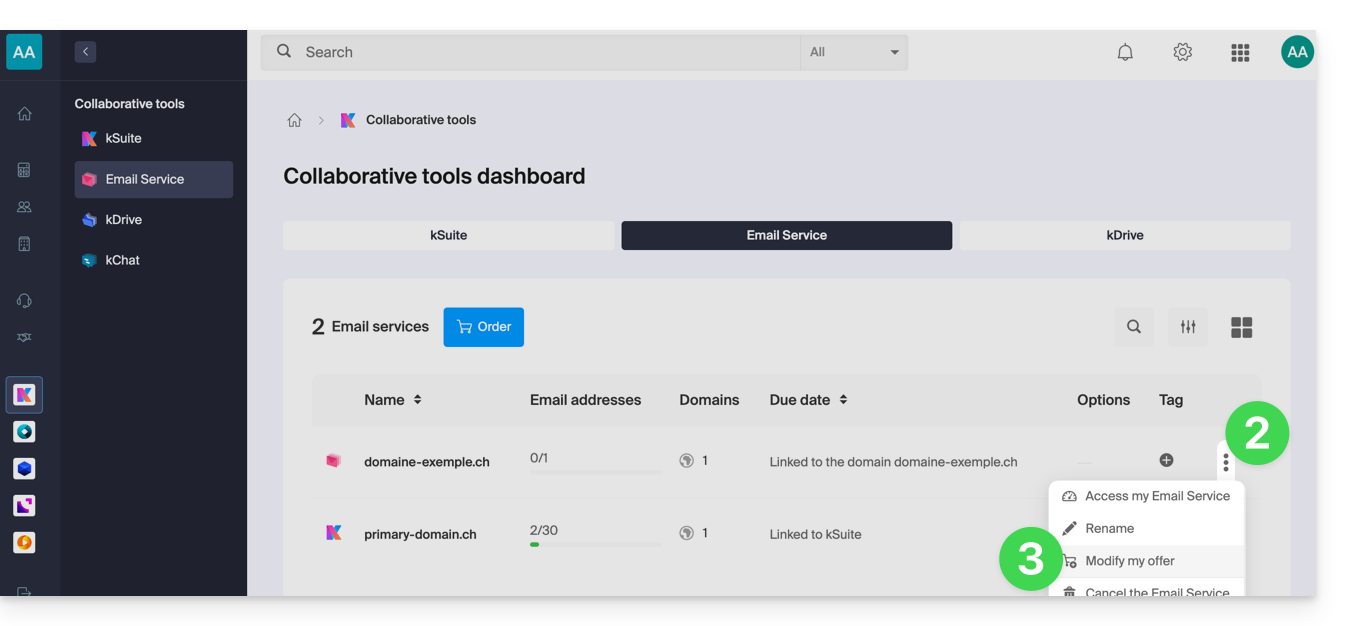
- Ajuste, se necessário.o número de endereços de e-mail a adicionar ao Serviço de E-mailatravés do assistente de pedido, que o ajudará a concluir a alteração do plano até ao fim:
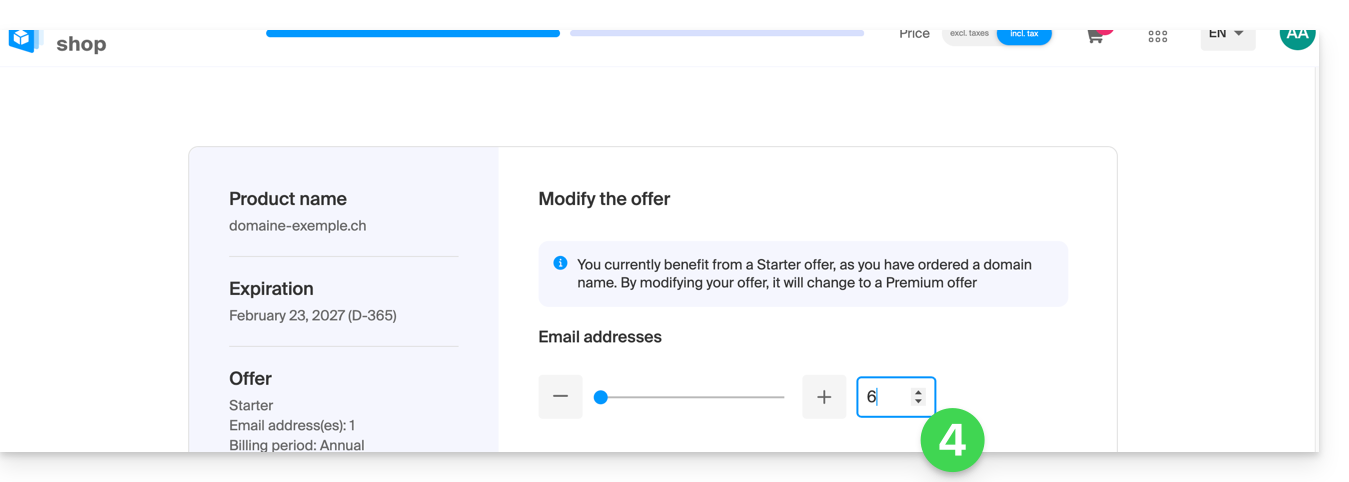
Link para esta FAQ: https://faq.infomaniak.com/2112
Esta seção de perguntas frequentes foi útil?
Este guia apresenta a ferramenta de Diagnóstico DNS, que permite verificar as relações entre…
- NOME DE DOMÍNIO na Infomaniak
e - SERVIÇO DE EMAIL na Infomaniak
… estão corretos, para garantir que o tráfego de email seja direcionado para o local correto.
Introdução
- Para verificar, a ferramenta analisa os registos MX, SPF, etc.
- Dessa forma, você poderá detectar e corrigir alguns problemas do Mail, especialmente se estiverem relacionados aos DNS (informações técnicas que, em termos gerais, determinam para onde deve ser direcionado determinado tráfego de e-mail), atuando no nível do seu domínio.
- A correção automática só é possível quando o nome de domínio está presente na mesma Organização do produto ao qual deve ser associado.
- Caso contrário, a correção deverá ser feita manualmente.
Diagnosticar um problema de DNS
Para aceder ao diagnóstico DNS do seu nome de domínio:
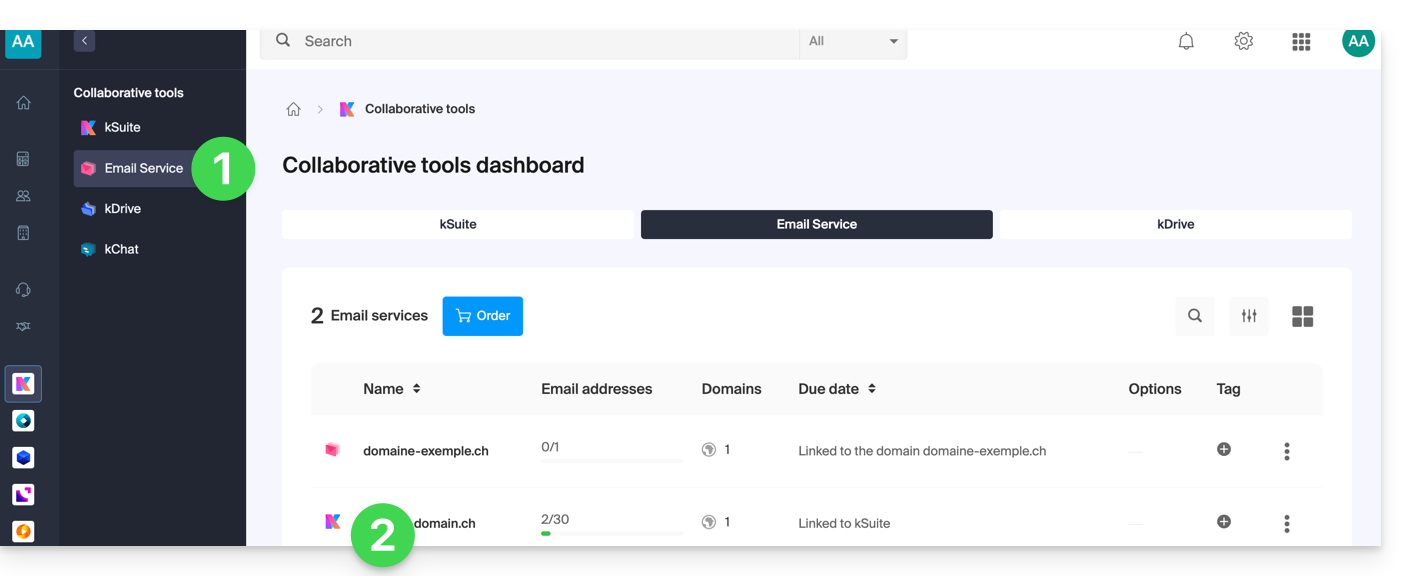
- Clique aqui para acessar o gerenciamento do seu Serviço de E-mail no painel de controle Infomaniak (precisa de ajuda?).
- Clique diretamente no nome atribuído ao produto em questão:
- Clique em Gerenciamento de domínios no menu lateral esquerdo:
- Clique em Diagnóstico DNS no menu lateral esquerdo.
- Clique no botão, se necessário, para atualizar as informações, que devem estar em verde.
- Se forem detetados problemas de DNS, um indicador vermelho na tabela irá sinalizá-los:
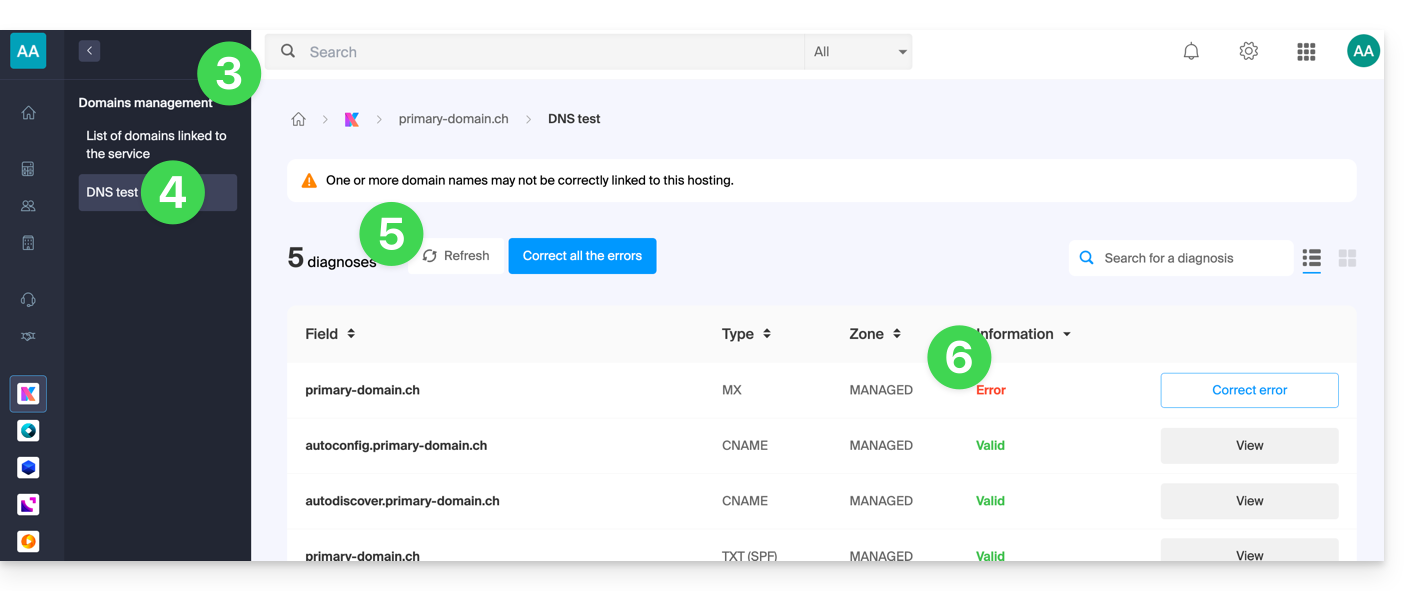
- Corrija cada erro individualmente, clicando no botão à direita do elemento em questão…
- … ou corrija todos os erros de uma só vez com o botão localizado acima da tabela.
Consulte este outro guia sobre o mesmo processo de verificação automática, mas para hospedagem web.
E, se necessário, consulte o diagnóstico de segurança relacionado ao e-mail.
Link para esta FAQ: https://faq.infomaniak.com/2124
Esta seção de perguntas frequentes foi útil?
Este guia detalha os procedimentos administrativos para transferir a gestão de um domínio com a extensão .de para outro registrador diferente da Infomaniak.
Transferir um domínio .de para outro registrador
Enquanto o contato de administrador mencionado no WHOIS do domínio a ser transferido não contiver um endereço localizado na Alemanha, será impossível solicitar o envio do código de transferência. Consulte este outro guia para alterar as informações de contato.
Caso contrário, você pode excluir o nome de domínio e, nesse caso, deverá…
- … ou contactar o suporte da Infomaniak (indicando o endereço de e-mail mencionado nas informações WHOIS) e solicitar a remoção.
- … ou aguardar o vencimento do domínio, após o qual ele será transferido para a DENIC, que poderá ser contatada para solicitar a remoção definitiva.
Link para esta FAQ: https://faq.infomaniak.com/2148
Esta seção de perguntas frequentes foi útil?
Este guia explica como substituir, dentro de uma hospedagem web Infomaniak, o endereço de um site que atualmente é um subdomínio (https://dev.domain.xyz) pelo domínio principal (https://domain.xyz).
Introdução
- As operações em resumo:
- Começamos com um site criado e acessível através da URL do domínio principal
dev.domain.xyz. - Adicionamos um alias
domain.xyz. - Invertemos os dois tipos (o domínio principal torna-se um alias e o alias torna-se o principal).
- Removemos o nome antigo
dev.domain.xyz.
- Começamos com um site criado e acessível através da URL do domínio principal
- Note que a localização do site permanece na pasta original no servidor; o nome desta localização pode ser da forma
/sites/dev.domain.xyz, mas isso não tem absolutamente nenhum impacto no site em produção. - Consulte também o último capítulo de este outro guia.
Inverter um domínio associado
Aqui estão as operações em detalhe para passar de um site com um endereço do tipo subdomínio para um endereço direto (aqui dev.domaine-exemple.ch torna-se domaine-exemple.ch):
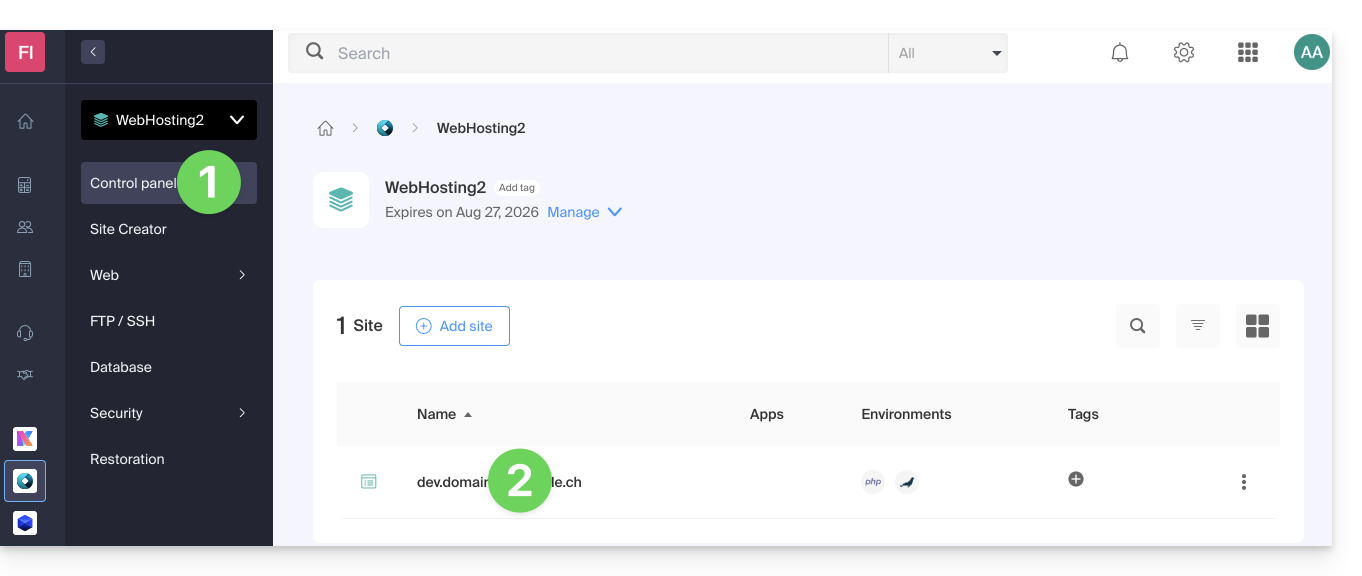
- Clique aqui para acessar a gestão do seu site no Manager Infomaniak (precisa de ajuda?).
- Clique diretamente no nome atribuído ao site em questão:
- Clique, em seguida, no ícone para expandir a parte Domínios deste site:
- Clique no botão Adicionar domínio:
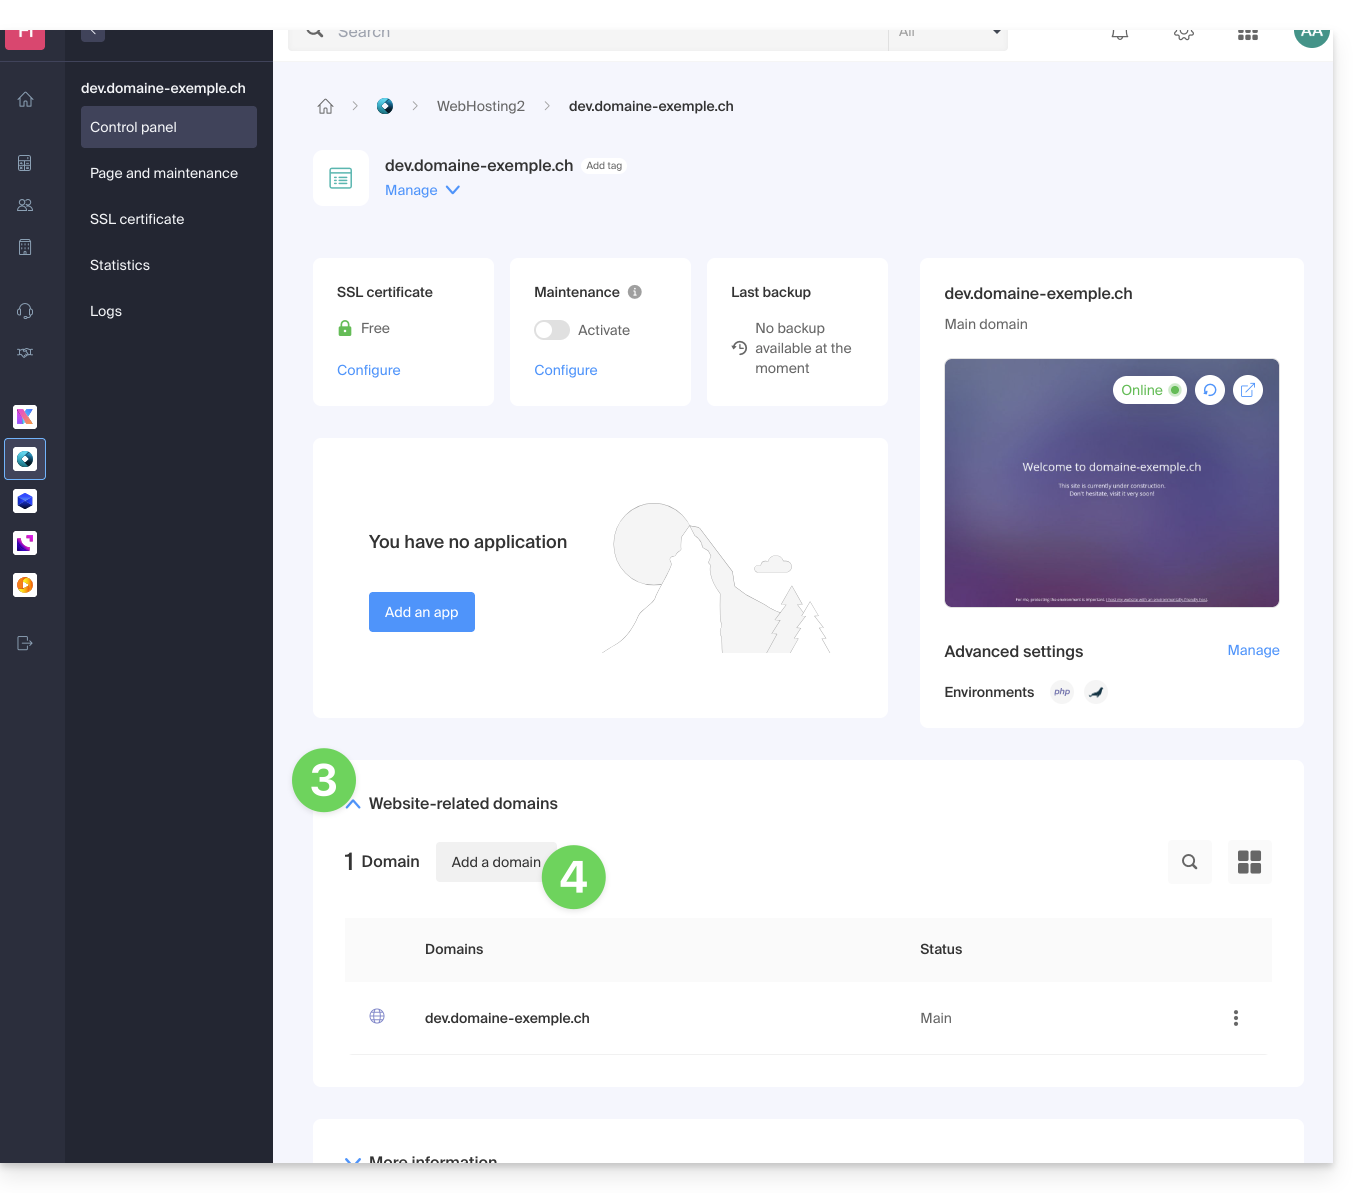
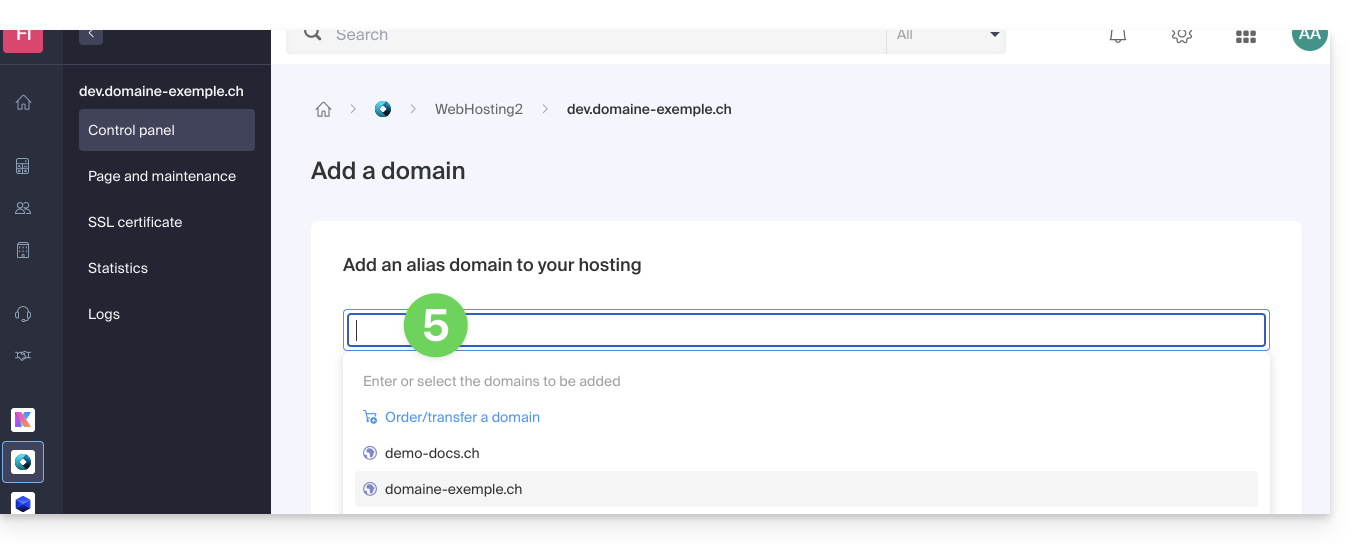
- Adicione o novo nome desejado (se o nome de domínio a ser adicionado estiver na mesma Organização, ele será proposto na lista; caso contrário, insira sua grafia):
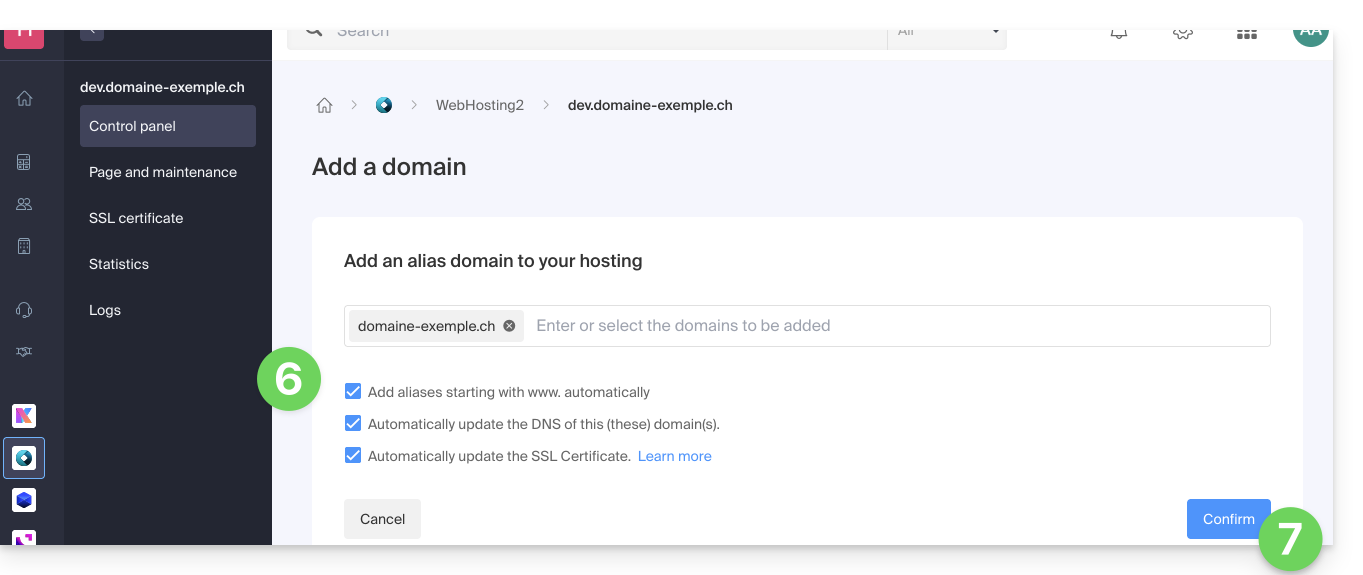
- Ative ou desative as caixas de seleção:
- Se o domínio adicionado não for um subdomínio, é possível solicitar a adição automática da versão
wwwdo domínio. - Atualizar automaticamente (se possível) os registros DNS dos domínios adicionados.
- Atualizar automaticamente os certificados SSL relacionados (se possível).
- Se o domínio adicionado não for um subdomínio, é possível solicitar a adição automática da versão
- Clique no botão para Confirmar e aguarde:
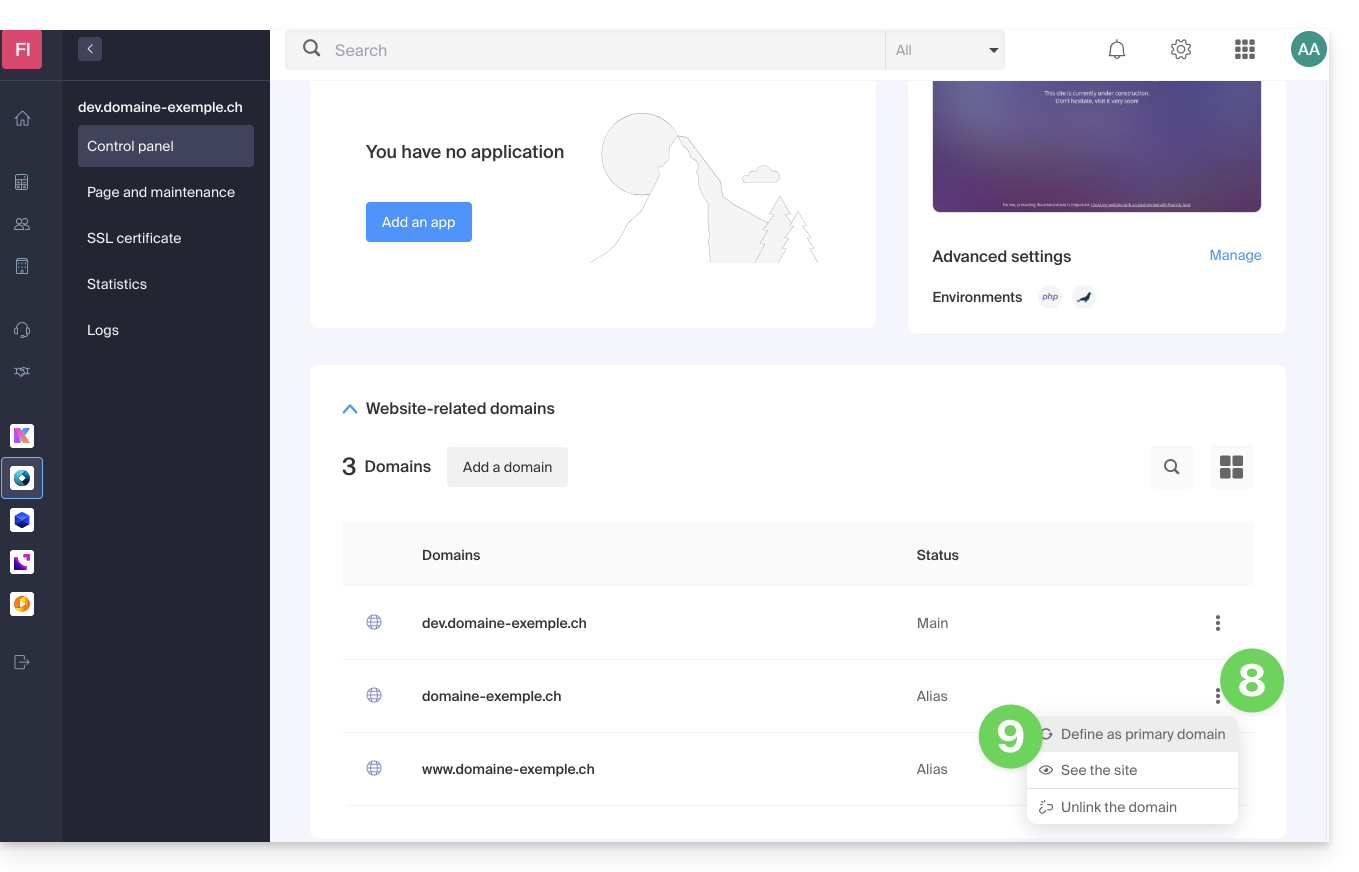
- Após a conclusão da adição, clique no menu de ação ⋮ localizado à direita do domínio que acabou de ser adicionado e que você deseja definir como domínio principal:
- Escolha definir o item como domínio principal:
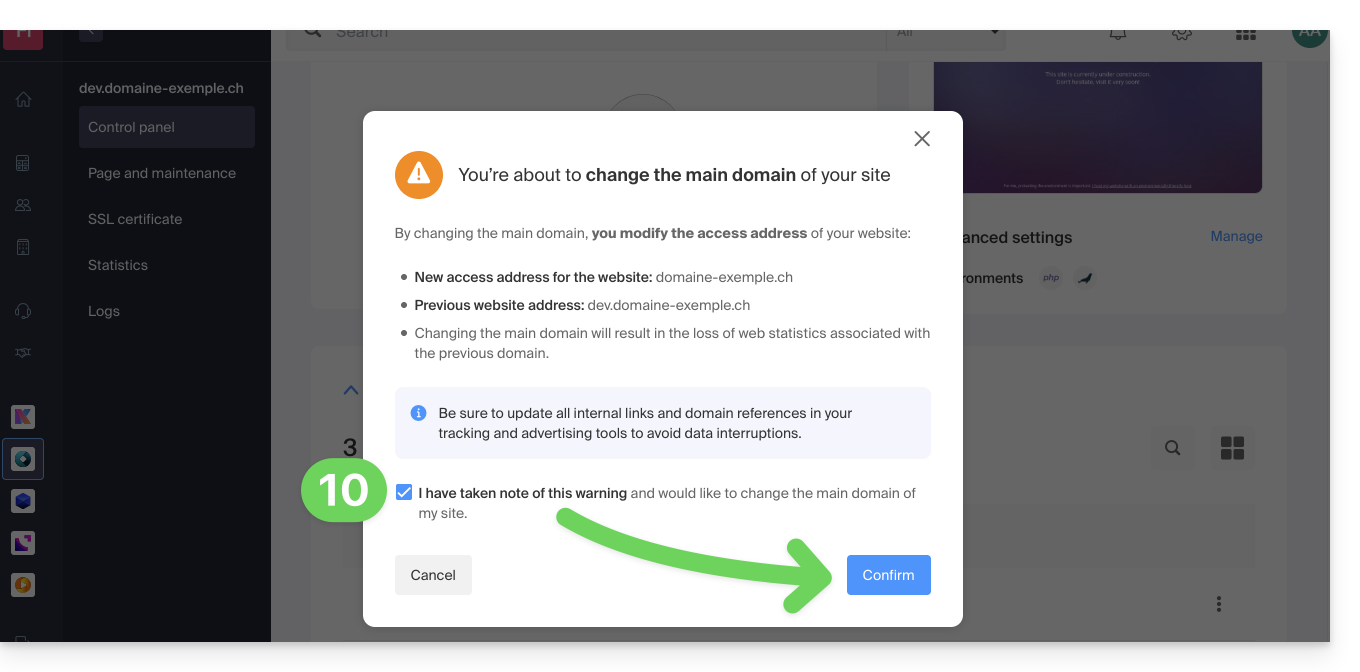
- Valide a operação para prosseguir com a inversão dos domínios:
Link para esta FAQ: https://faq.infomaniak.com/2160
Esta seção de perguntas frequentes foi útil?
Este guia explica como vincular um nome de domínio gerenciado pela Infomaniak a uma oferta de hospedagem Shopify.
Introdução
- Um site criado no Shopify não pode ser exportado para ser hospedado em servidores de terceiros, como os da Infomaniak, por exemplo.
- Portanto, recomenda-se criar o site diretamente na Infomaniak com a ajuda do Site Creator ou WordPress.
Associar o Shopify ao nome de domínio na Infomaniak
Para vincular um site no Shopify a um nome de domínio na Infomaniak:
- Clique aqui para acessar o gerenciamento do seu domínio no Manager Infomaniak (precisa de ajuda?)
- Clique diretamente no nome atribuído ao domínio em questão.
- Clique em Conectar um serviço no menu lateral esquerdo.
- Clique no botão azul Conectar no bloco Shopify:
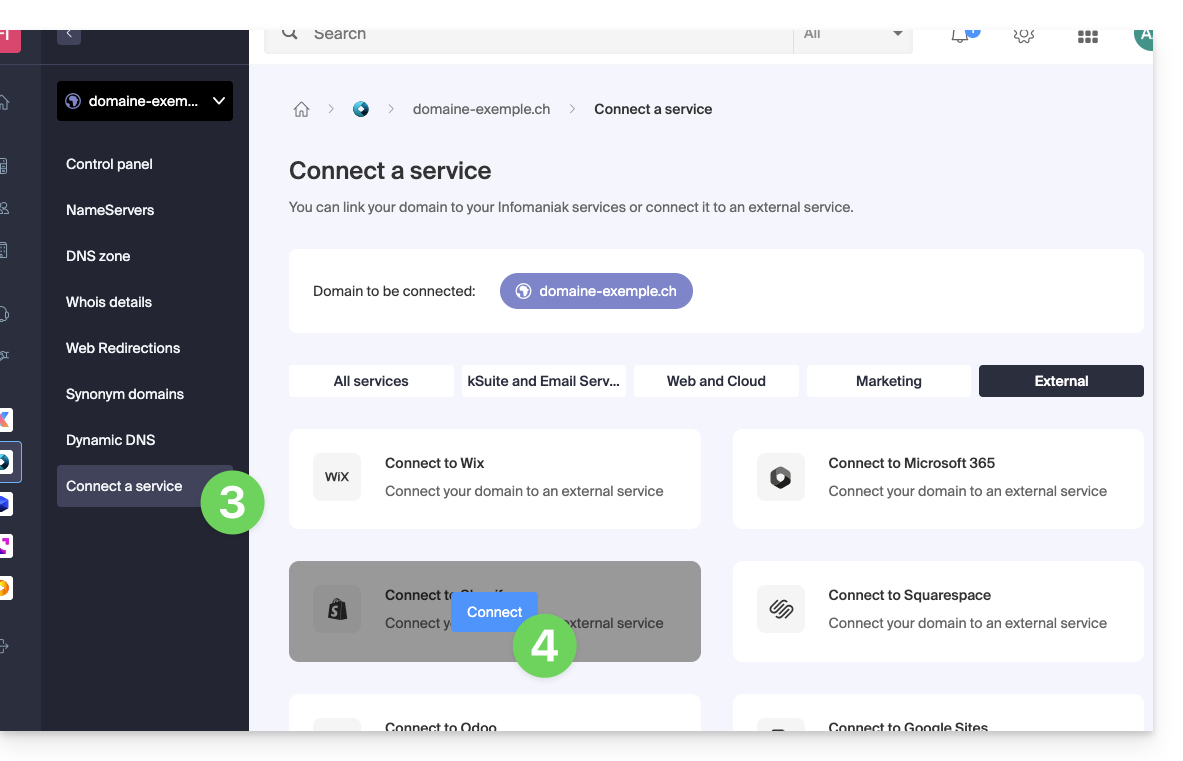
- Os registros A serão substituídos por um registro com o valor
23.227.38.65. - O registro CNAME "www" será modificado para ter o valor
shops.myshopify.com.
- Os registros A serão substituídos por um registro com o valor
- Clique no botão Avançar.
O tráfego da web será direcionado algumas horas depois para os servidores do Shopify.
A configuração de e-mail não é afetada por essas duas modificações de DNS.
Link para esta FAQ: https://faq.infomaniak.com/2164
Esta seção de perguntas frequentes foi útil?
Este guia explica como configurar o DNSSEC na Cloudflare com um domínio registado na Infomaniak.
Pré-requisitos
- A zona DNS do domínio deve ser gerenciada pelo Cloudflare.
Configurar DNSSEC no Cloudflare
Para isso:
- Clique aqui para acessar o console Cloudflare.
- Vá para a aba DNS.
- Clique em Ativar DNSSEC.
- Mantenha as informações obtidas à mão:
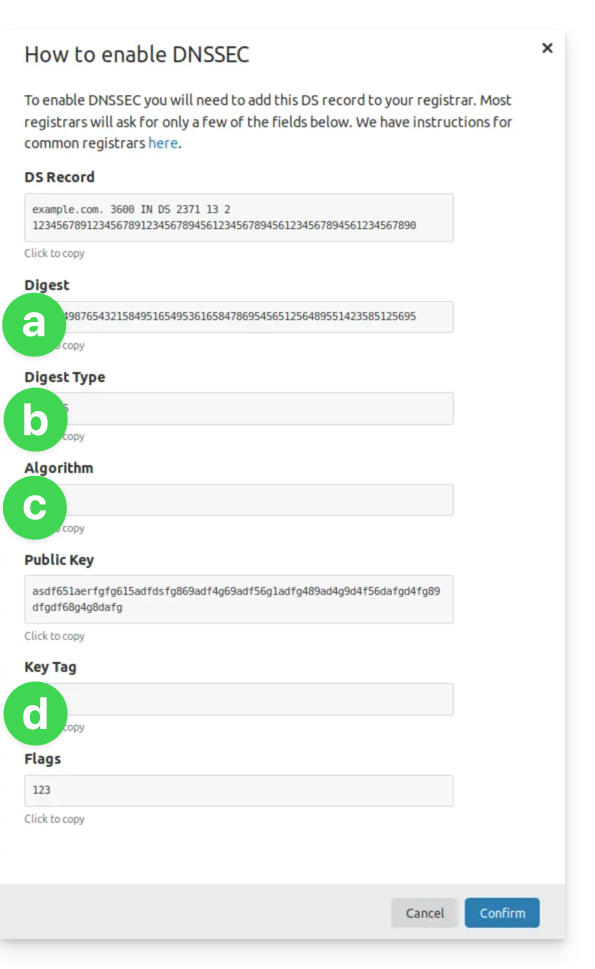
(ver pontos 8 e 10 abaixo)- As informações em a devem ser inseridas em HASH
- As informações em b devem ser inseridas em TIPO DE HASH
- As informações em c devem ser inseridas em ALGORITMO
- As informações em d devem ser inseridas em CHAVE
- Clique aqui para acessar o gerenciamento do seu domínio no Manager Infomaniak.
- Clique diretamente no nome atribuído ao domínio em questão.
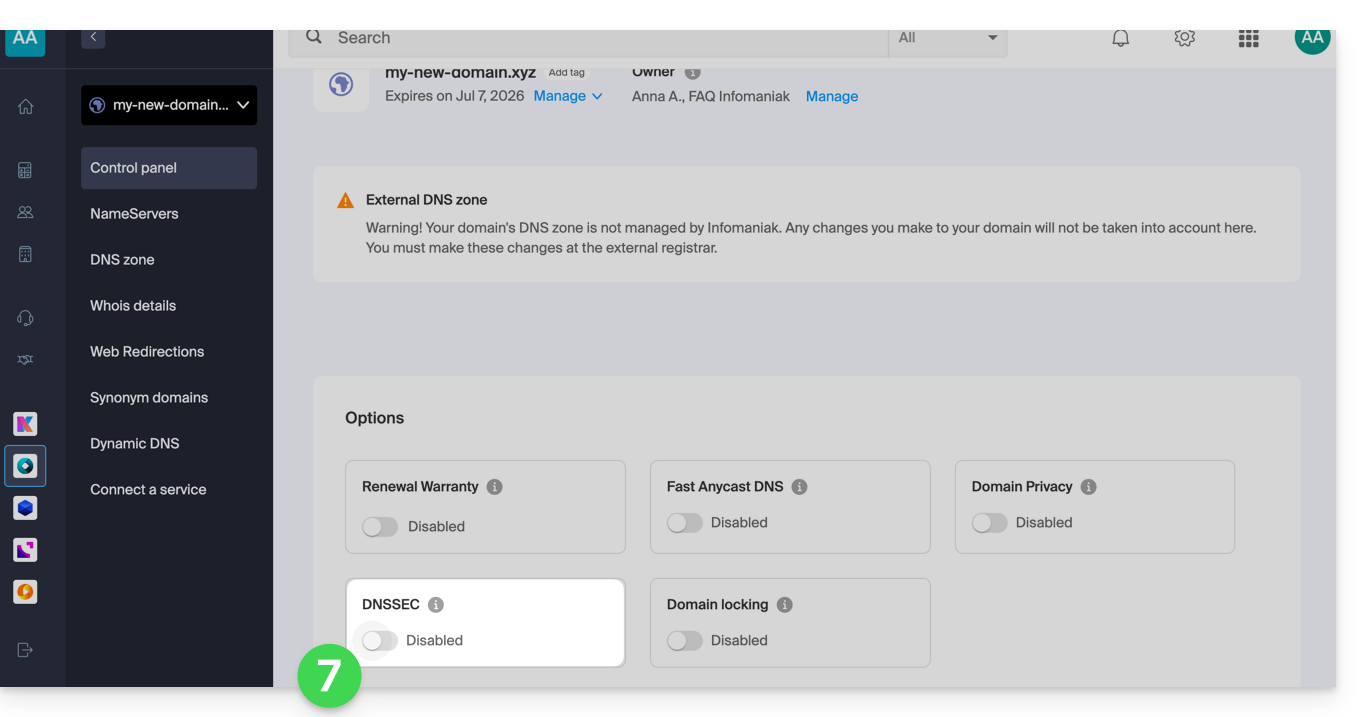
- Ative o DNSSEC a partir do Painel de Controle:
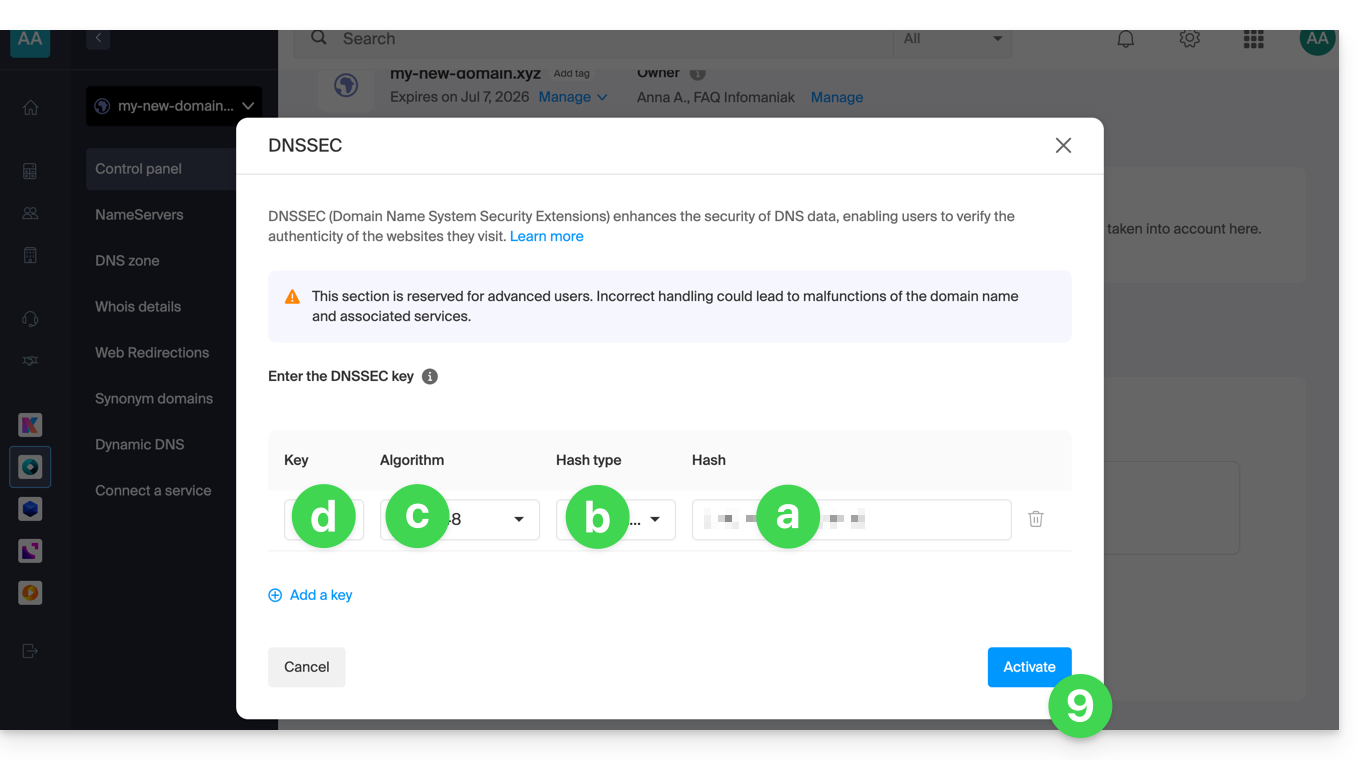
- Na janela que aparece, preencha as informações solicitadas com os dados fornecidos pela Cloudflare (consulte o ponto 4 acima):
- Hash = Digest
- Tipo de Hash = Tipo de Digest
- Algoritmo = Algoritmo
- Chave = Tag da Chave
- Clique em Ativar:
- No caso de um domínio com a extensão
.eu, as indicações necessárias podem ser significativamente diferentes (ver ponto 4 acima):- As indicações em FLAGS devem ser colocadas em BANDEIRAS
- As indicações em PUBLIC KEY devem ser colocadas em CHAVE PÚBLICA
Link para esta FAQ: https://faq.infomaniak.com/2187
Esta seção de perguntas frequentes foi útil?
Este guia explica como adicionar ou modificar um ou vários registros do tipo SPF em uma zona DNS (de um nome de domínio) gerenciada no Manager Infomaniak.
Introdução
- Se o seu nome de domínio estiver registrado na Infomaniak, se o seu e-mail for gerenciado pela Infomaniak, mas o site estiver hospedado em outro provedor (como o Wix), você provavelmente gerencia a zona DNS (e, portanto, o SPF) nesse outro provedor: consulte este outro guia sobre o assunto.
Entendendo os registros do tipo SPF
O tipo de registro SPF (Sender Policy Framework) é um padrão de verificação do nome de domínio do remetente de um e-mail e tem como objetivo reduzir o SPAM. Ele serve para indicar qual servidor tem ou não o direito de enviar e-mails para um domínio. Se o SPF falhar para um e-mail, isso significa que ele não foi enviado de um servidor/endereço IP autorizado pelo administrador do domínio de envio. O e-mail é então considerado como spam.
SPF estrito -all: rejeição de e-mails não autorizados
A Infomaniak instala este tipo de registro automaticamente ao criar um Serviço de E-mail em seu domínio (SPF estrito):
v=spf1 include:spf.infomaniak.ch -allAssim, o servidor destinatário do e-mail que você envia avaliará que qualquer e-mail que não venha dos servidores Infomaniak será rejeitado. Isso impede que pessoas mal-intencionadas falsifiquem endereços de e-mail do seu domínio.
SPF flexível ?all: tolerância para alguns e-mails
Você pode decidir modificar o SPF para um modelo mais flexível:
v=spf1 include:spf.infomaniak.ch ?allNesse caso, o servidor destinatário do e-mail que você está enviando avaliará, de acordo com suas próprias regras, se aceita e-mails que não vêm dos servidores Infomaniak.
Em resumo:
?: o servidor de recebimento aceita a mensagem, mesmo que o remetente não esteja listado no SPF.~: o servidor de recebimento aceita geralmente a mensagem, caso não esteja listada no SPF, mas a identifica como suspeita.-: o servidor de recebimento rejeita a mensagem, caso não esteja listada no SPF (recomendado).
Adicionar um SPF por meio de um registro TXT
Existem 2 maneiras de gerenciar os SPF.
Se você possui um Serviço de E-mail na Infomaniak, a maneira mais simples é acessar a ferramenta de Segurança global para gerenciar os SPF: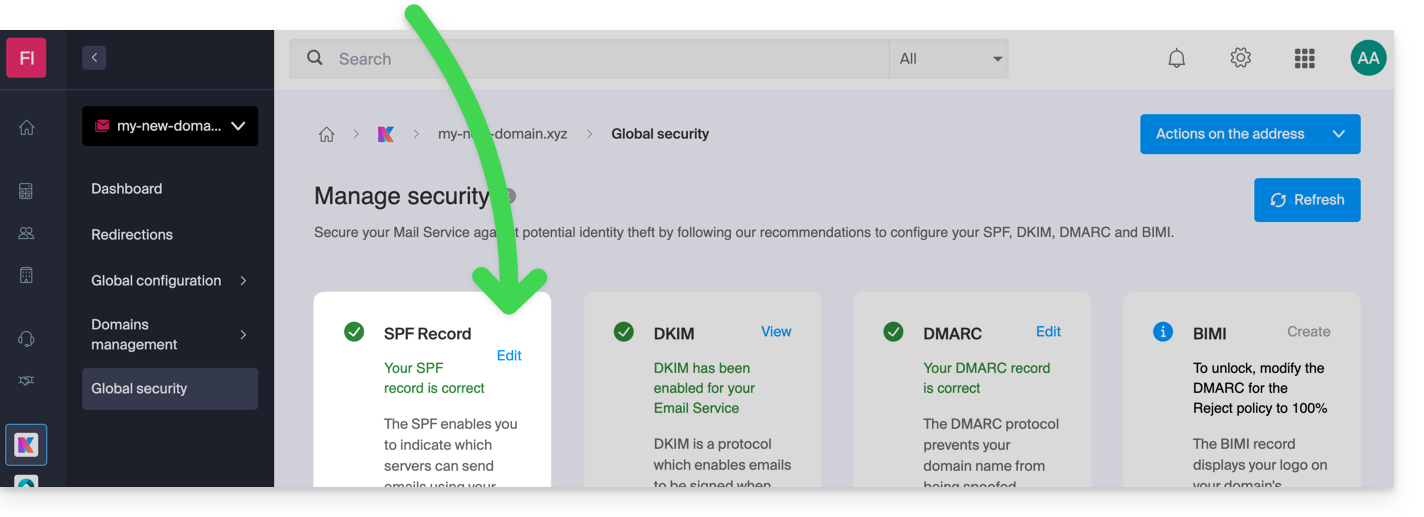
Mas, como o registro SPF é um tipo de registro DNS do tipo TXT, você também pode gerenciá-lo na zona DNS do nome de domínio:
- Clique aqui para acessar o gerenciamento do seu domínio no Manager Infomaniak (precisa de ajuda?).
- Clique diretamente no nome atribuído ao domínio em questão.
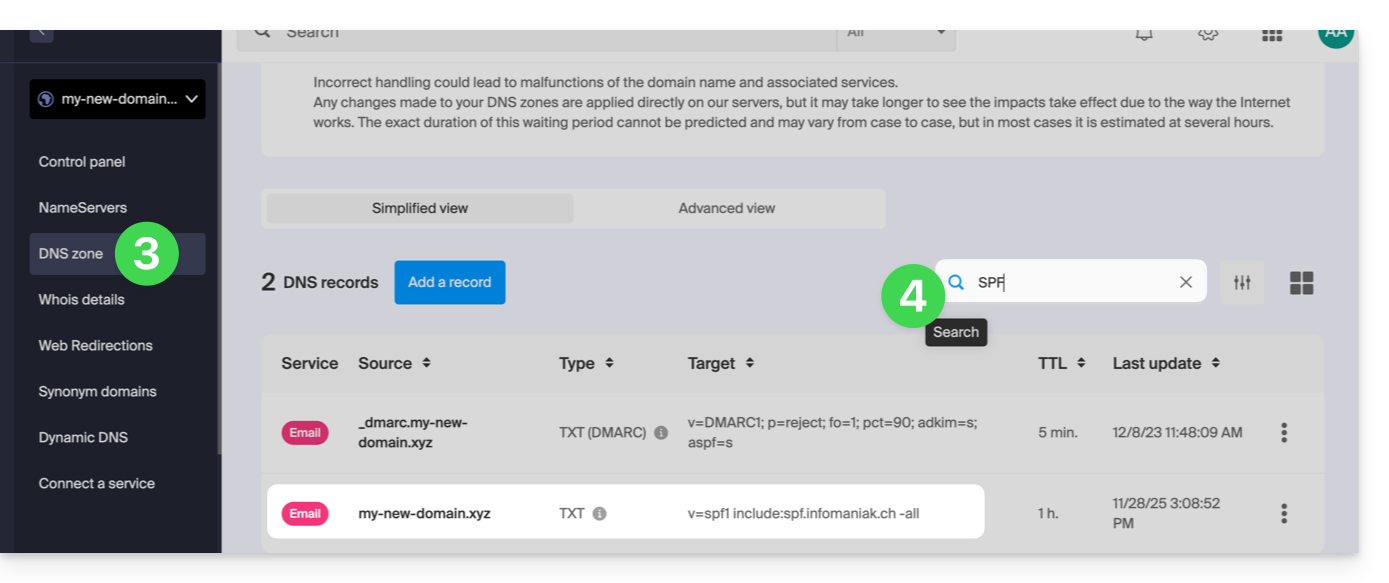
- Clique em Zona DNS no menu lateral esquerdo.
- Verifique na tabela se já existe um registro TXT com um valor que mencione SPF, como aqui:
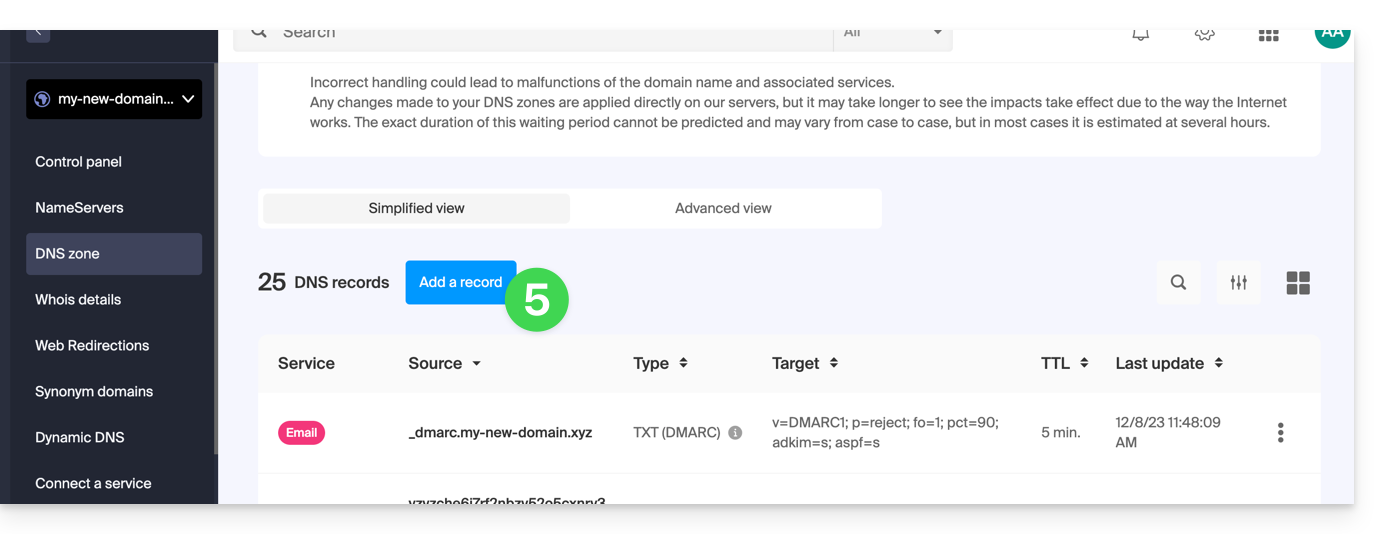
- Clique no botão para adicionar um registo (receberá um erro se tentar adicionar um registo TXT com um valor SPF quando já existir um na zona):
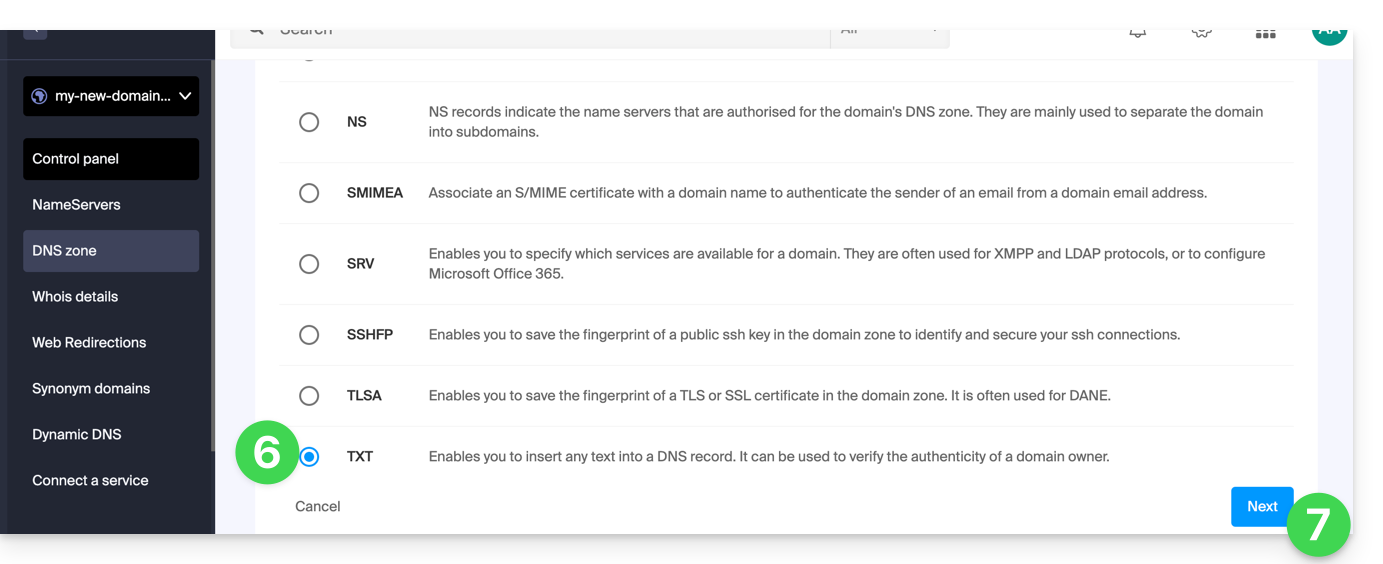
- Clique no botão de rádio TXT para adicionar um registo.
- Clique no botão Seguinte:
- Insira o valor do SPF necessário para a sua zona DNS.
- Deixe o valor predefinido no nível do TTL.
- Clique no botão Guardar:
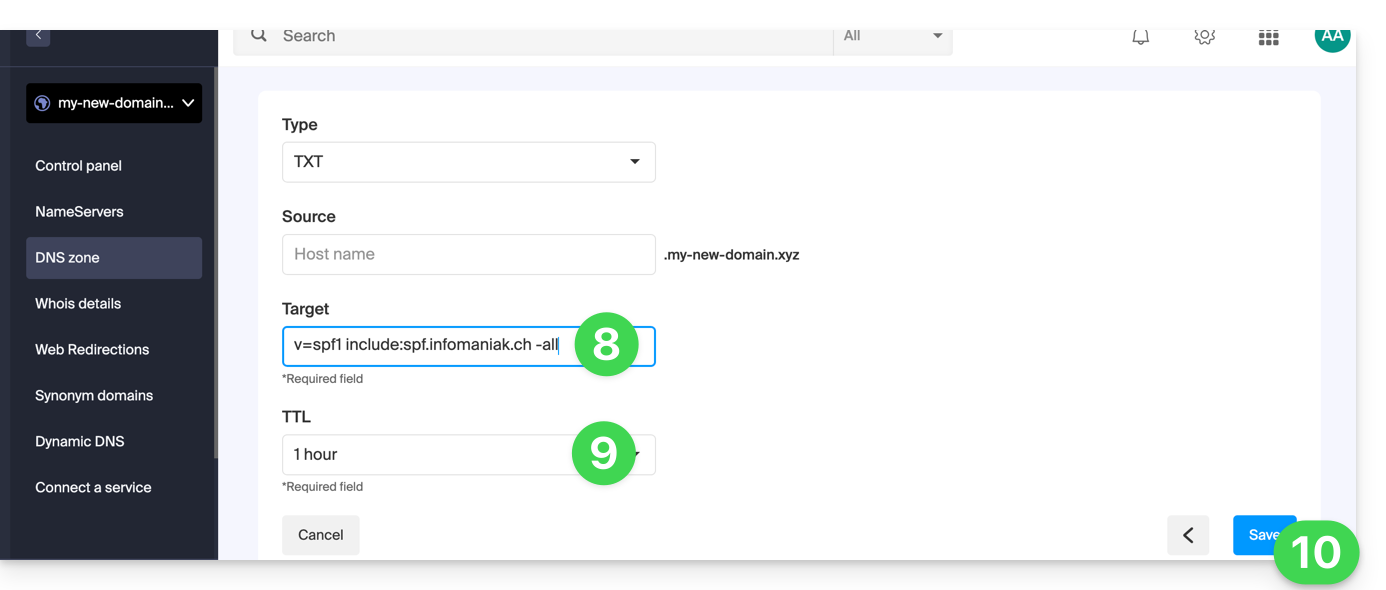
Adicionar vários SPF
Se utilizar outros fornecedores de e-mail em complemento ao Infomaniak, é necessário obter o SPF deles e, em seguida, combiná-lo com o do Infomaniak, seguindo uma sintaxe específica.
Ter vários registos SPF distintos causará erros. É indispensável agrupar vários SPF no mesmo TXT!
Exemplo de 3 SPF para combinar:
- O do Infomaniak:
v=spf1 include:spf.infomaniak.ch -all - Os de 2 fornecedores secundários:
v=spf1 include:the-second-domain.xyz ?allv=spf1 include:the-other-domain.xyz ~all
... o SPF final a inserir na sua zona DNS deverá ter a seguinte forma:
v=spf1 include:spf.infomaniak.ch include:the-second-domain.xyz include:the-other-domain.xyz -allRemova qualquer outra entrada SPF da zona DNS do seu domínio! Qualquer adição/modificação DNS pode demorar até 48 horas para se propagar.
Limites do número de SPF
Os SPF múltiplos são limitados a um máximo de 10 inclusões.
O SPF da Infomaniak geralmente já contém 4 inclusões:
include:relay.mail.infomaniak.chinclude:app.mail.infomaniak.chinclude:newsletter.infomaniak.cominclude:amazonses.com
Verificar o(s) registro(s) SPF
A ferramenta de Segurança global no Manager Infomaniak permite uma verificação e correção facilitada de seus possíveis registros problemáticos.
Em caso de problema, recomenda-se analisar seu nome de domínio no MxToolbox para verificar se o seu SPF contém erros de sintaxe, muitas inclusões ou outro problema que possa levar a um erro: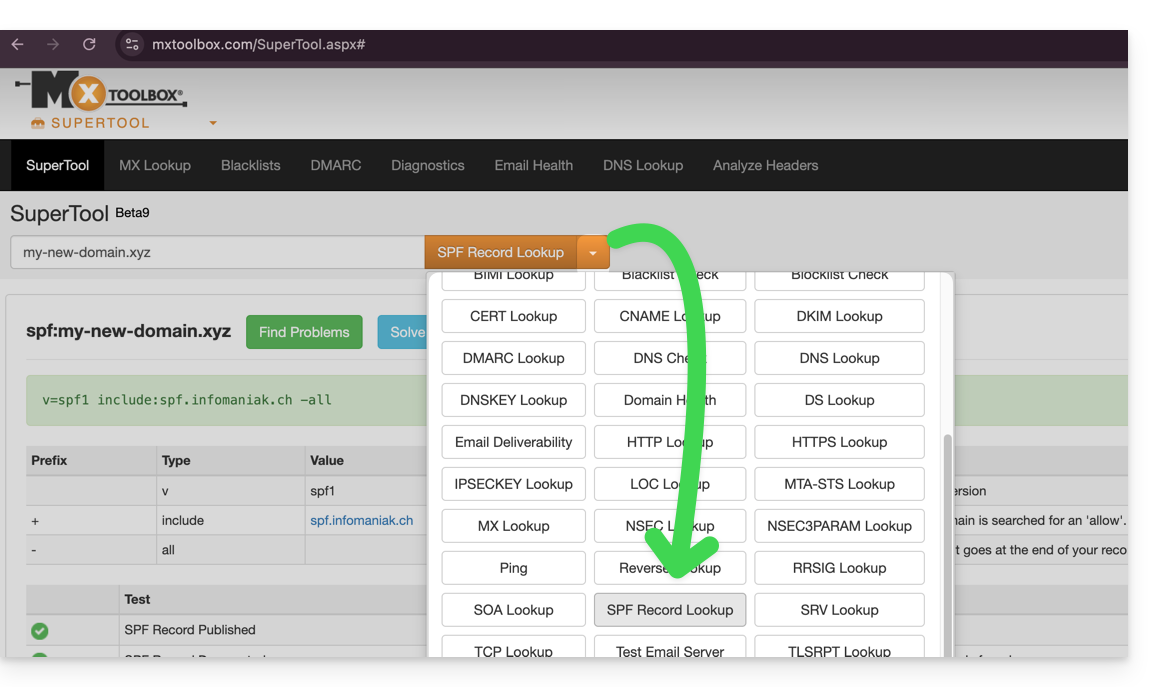
… ou diretamente no endereço https://mxtoolbox.com/spf.aspx.
Link para esta FAQ: https://faq.infomaniak.com/2199
Esta seção de perguntas frequentes foi útil?
Este guia explica o que é o DNSSEC e como essa proteção reforça a segurança dos Domínios na Infomaniak e do tráfego que eles geram.
Introdução
- Cada endereço URL corresponde a um endereço IP e, quando um utilizador insere o endereço URL do seu site no seu navegador, ele recorre a um servidor DNS, cuja função é redirecioná-lo para o endereço IP correspondente ao domínio inserido (tecnicamente, fala-se da resolução DNS).
- Quando o DNSSEC não está ativado no seu nome de domínio, uma pessoa mal-intencionada pode detetar uma falha num servidor DNS e modificar a correspondência entre o seu nome de domínio e o endereço IP do seu site, substituindo-o pelo IP de sua escolha. Nesse caso, o utilizador que inserir o endereço URL do seu site será redirecionado para outro site que não corresponderá ao conteúdo do seu site.
- O DNSSEC permite proteger a autenticidade da resposta fornecida pelo servidor DNS e garante, assim, aos utilizadores da Internet que estão a consultar o site que realmente pretendem.Se um hacker tentasse modificar o endereço IP do seu nome de domínio num servidor DNS protegido por DNSSEC durante a resolução, este último recusaria as suas solicitações, pois estas não seriam autenticadas.
- O DNSSEC é, portanto, uma segurança complementar ao certificado SSL de um site, garantindo ao utilizador que ele está a aceder ao site correspondente ao endereço URL inserido, e o certificado SSL entra em ação para criptografar as trocas de dados entre o navegador web do utilizador e o servidor web do site que ele visita.
Ativar ou desativar DNSSEC
Para saber se o DNSSEC está disponível para um domínio específico, consulte as especificações das extensões relevantes na página (na secção Perguntas frequentes, clicando primeiro na extensão desejada).
O DNSSEC está disponível e já está ativado no momento da compra para a maioria das extensões de nomes de domínio.
Se necessário, o DNSSEC pode ser ativado em poucos cliques nos nomes de domínio totalmente gerenciados na Infomaniak:
- Clique aqui para acessar o gerenciamento do seu produto no Manager Infomaniak (precisa de ajuda?).
- Clique diretamente no nome atribuído ao produto em questão.
- Ative ou desative o DNSSEC a partir do Painel de controlo do domínio:
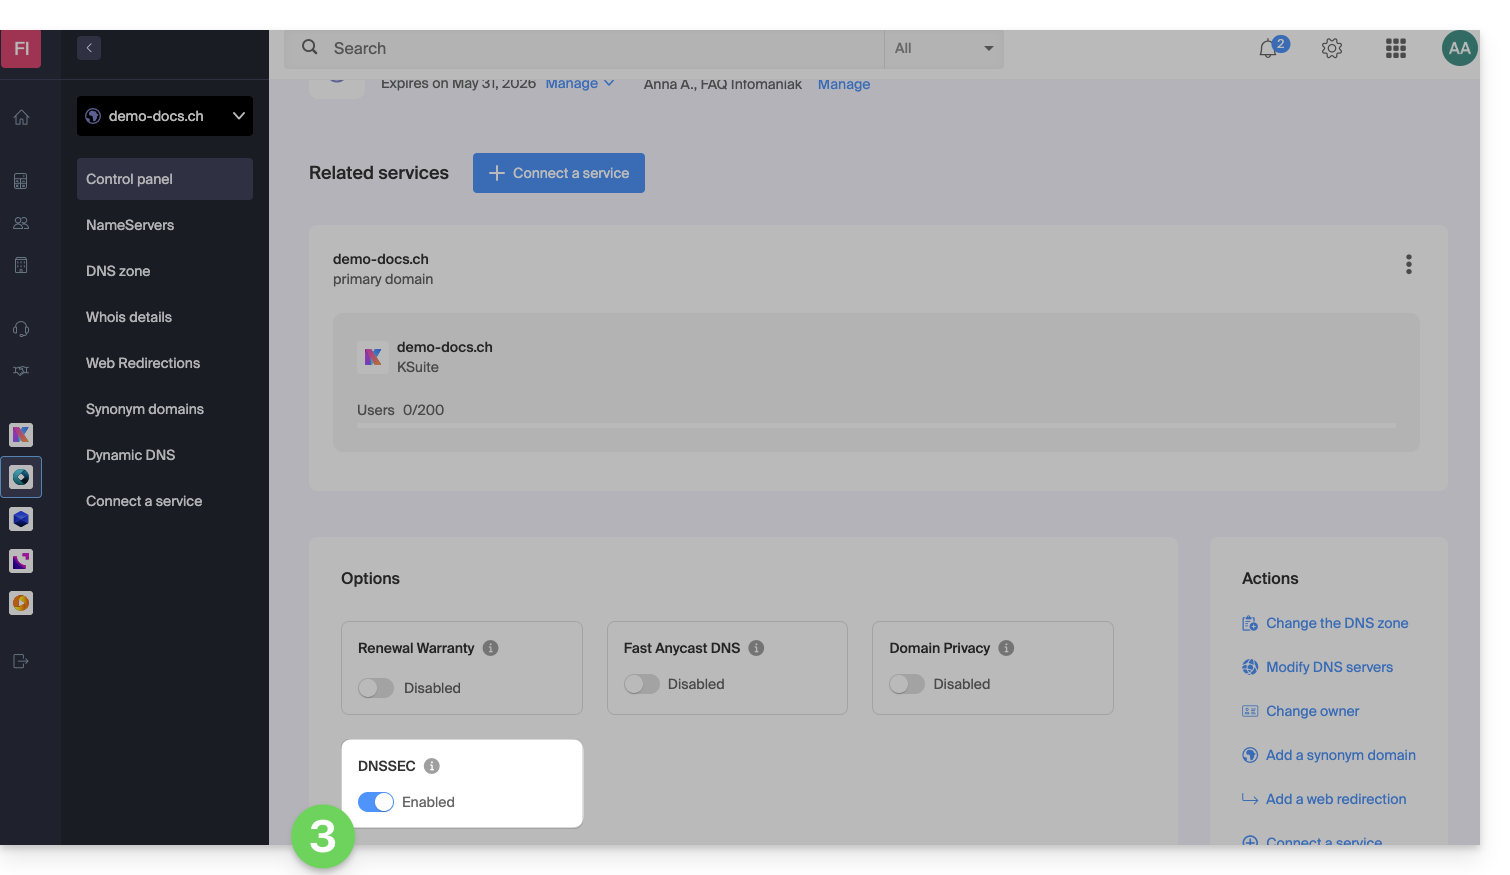
Se a zona DNS do seu domínio for gerida por outro registrador, será necessário fornecer informações técnicas fornecidas por este.Se as informações fornecidas estiverem incorretas, o seu nome de domínio deixará de estar acessível.. Portanto, recomenda-se transferir a gestão completa do seu domínio para a Infomaniakantes de ativar o DNSSEC, caso não esteja familiarizado com esses procedimentos.
Verificar se o DNSSEC está ativado
A propagação do DNSSEC no registo pode demorar várias horas até estar concluída.
Insira o nome de domínio que pretende verificar neste site de análise.
Guia específico
Link para esta FAQ: https://faq.infomaniak.com/2208
Esta seção de perguntas frequentes foi útil?
Se o seu domínio for importante para a sua atividade, entãoGarantia de Renovação é a garantia de que nunca o perderá. Como um registrador líder, a Infomaniak lida diariamente com clientes que não conseguiram renovar o seu domínio a tempo. O site e os endereços de e-mail deixam de estar acessíveis, o que muitas vezes representa um prejuízo significativo para a sua atividade.
A Infomaniak também oferece a possibilidade de proteger suas informações pessoais no WHOIS com o Serviço de Privacidade de Domínio.
É fácil e caro perder um domínio
Um nome de domínio é registado por um período determinado, após o qual deve ser renovado para manter a sua propriedade. Quando um domínio não é renovado, entra num período de resgate e, em seguida, torna-se domínio público, aguardando um novo proprietário.
A fase de resgate é um período de tolerância durante o qual ainda é possível manifestar interesse para manter a propriedade do seu domínio. No entanto, esta medida extrema tem consequências e implica custos. No melhor dos casos, resulta na interrupção do seu site e dos seus endereços de e-mail durante muitas horas, enquanto o seu nome de domínio é retirado do período de resgate com urgência.
No pior dos casos, se não houver intenção de reativar o nome de domínio, ele será perdido.
Garantia de Renovação, a garantia de nunca mais perder um domínio
Com esta garantia, a Infomaniak compromete-se a renovar o seu domínio, caso seja necessário (método de pagamento bloqueado, e-mails de renovação não recebidos, ausência prolongada, etc.), e entrará em contato consigo pessoalmente por e-mail, SMS, telefone e correio para garantir que o mantenha.
A Garantia de Renovação é uma solução única que serve para o proteger da expiração involuntária dos seus domínios. Você continua sendo o único proprietário dos seus domínios e pode cancelar a Garantia de Renovação ou cancelar os seus domínios quando desejar.
Ativar a renovação da garantia em um domínio existente
Consulte este outro guia para ativar a opção em poucos cliques.
Link para esta FAQ: https://faq.infomaniak.com/2235
Esta seção de perguntas frequentes foi útil?
Com o Proteção de Domínio, a Infomaniak permite preservar a confidencialidade das suas informações pessoais (nome, endereço de e-mail, endereço postal e telefone) e protege-o eficazmente contra o SPAM.
Introdução
- Os registradores acreditados pela ICANN têm a obrigação de publicar os dados de contacto do proprietário de um domínio no diretório público WHOIS, que lista todos os domínios registados e serve principalmente para:
- verificar a disponibilidade dos nomes de domínio
- verificar violações de marcas registadas
- contactar o proprietário de um domínio em caso de problemas legais
- Para os clientes preocupados com a privacidade dos seus dados pessoais e que não desejam exibir publicamente o seu endereço de e-mail, número de telefone e endereço postal no diretório WHOIS, o Domain Privacy permite ocultar estes dados reais
- Graças a esta proteção, as pesquisas WHOIS do seu domínio não revelam as suas informações pessoais, mas sim as informações do parceiro Domain Privacy Trustee SA:
- Você fica protegido contra SPAM: empresas de marketing e outras pessoas não podem usar seus dados pessoais.
- Você continua sendo o proprietário total do seu domínio.
- Ainda é possível entrar em contato com você por meio de um formulário seguro que protege sua identidade.
- Descubra as extensões de nomes de domínio suportadas pelo Domain Privacy
Ativar a proteção de privacidade do domínio em um domínio existente
A proteção de privacidade do domínio pode ser ativada em poucos segundos:
- Clique aqui para acessar o gerenciamento do seu domínio no painel de controle Infomaniak (precisa de ajuda?).
- Clique diretamente no nome atribuído ao domínio em questão.
- Ative a opção Proteção de Domínio a partir do painel de controlo:
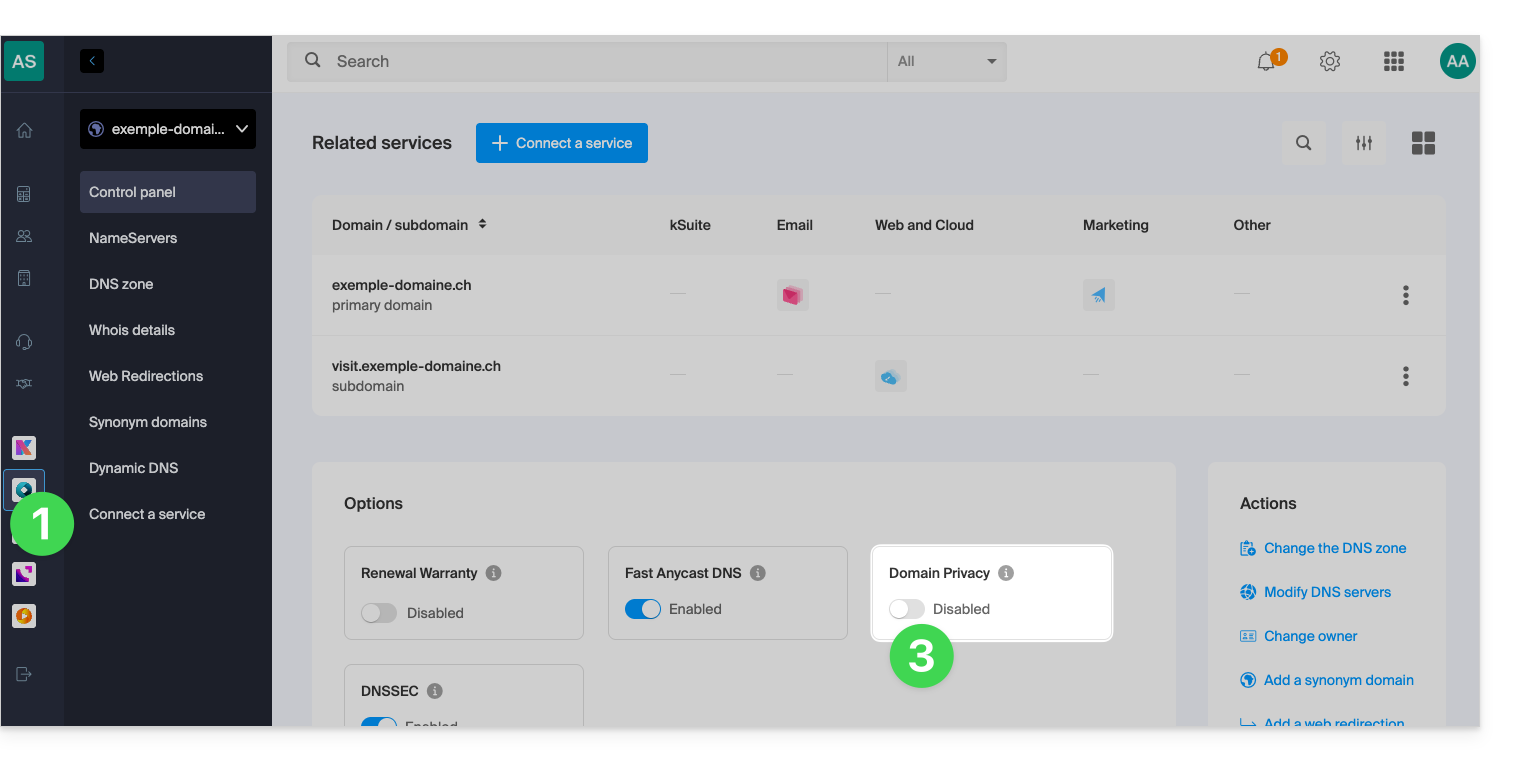
A Infomaniak também oferece a possibilidade de garantir a renovação dos seus domínios com a Garantia de Renovação: esta garantia tem como objetivo assegurar que não perderá domínios que são importantes para o bom funcionamento das suas atividades.
Link para esta FAQ: https://faq.infomaniak.com/2237
Esta seção de perguntas frequentes foi útil?