Base de conhecimento
1000 perguntas frequentes, 500 tutoriais e vídeos explicativos. Aqui, você encontra apenas soluções!
Este guia ajuda a resolver erros de configuração caso tenha dificuldades em associar o seu nome de domínio ao Site Creator.
Problemas frequentes e soluções
Identifique o estado atual do seu domínio para aplicar a solução correspondente:
| Estado do nome de domínio | Solução recomendada |
|---|---|
| Gerido por outro fornecedor (externo) | Encomendar uma zona DNS ou transferir o domínio para a Infomaniak |
| Já associado a um site ou definido como alias (sinônimo) | Excluir o site existente ou desvincular o domínio |
| Utiliza atualmente um endereço IP dedicado | Desinstalar o IP dedicado |
| Protegido por um certificado SSL (autoassinado, DV ou EV) | Desinstalar o certificado |
| Permissões insuficientes na hospedagem | Modificar as permissões de acesso |
Link para esta FAQ: https://faq.infomaniak.com/1956
Esta seção de perguntas frequentes foi útil?
Este guia explica como vincular um nome de domínio a um Serviço de Email Infomaniak.
Se o nome de domínio estiver…
… na Infomaniak, mesmo Organização
Se o seu nome de domínio estiver registado na Infomaniak e estiver na mesma conta de utilizador ou Organização que o serviço de e-mail, então não precisa fazer nada.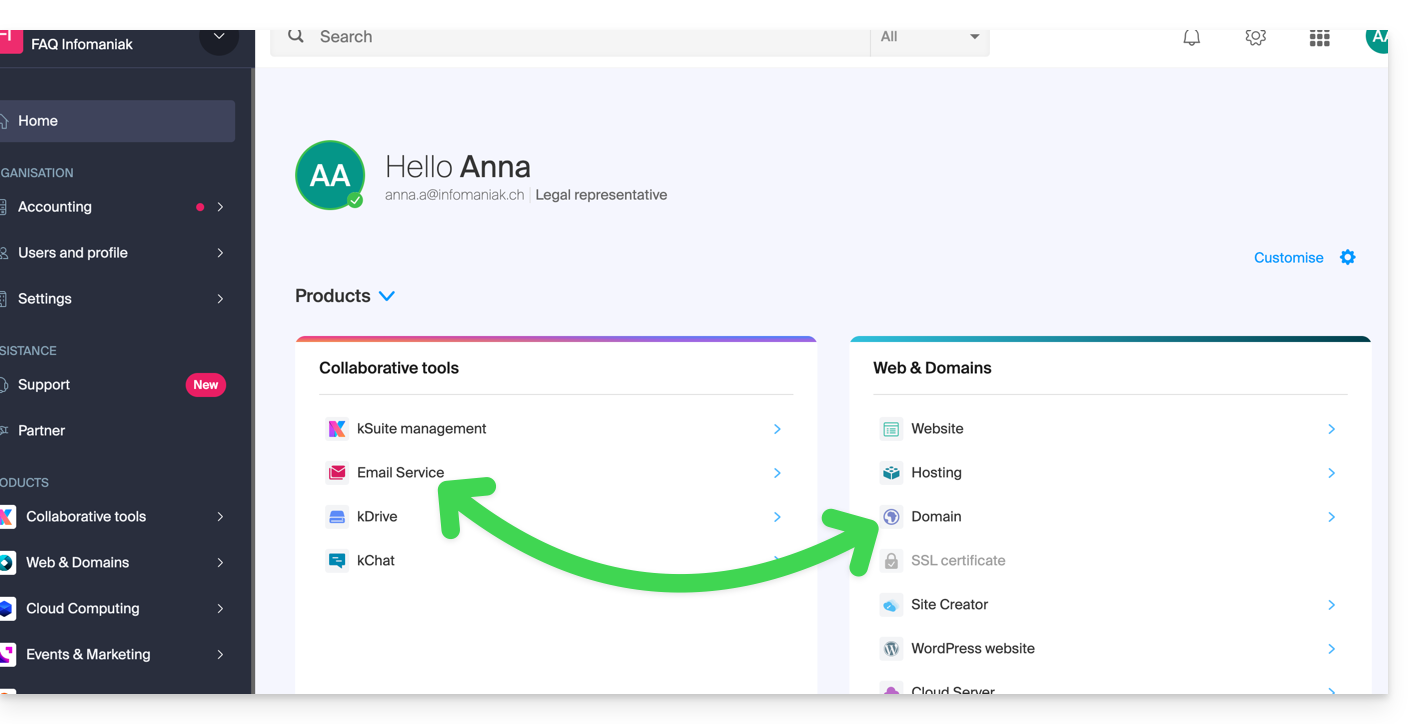
- Consulte este outro guia para verificar e corrigir eventuais erros de configuração.
… na Infomaniak, organização diferente
Se o seu nome de domínio estiver registado na Infomaniak, mas numa conta de utilizador ou Organização diferente, então:
- Edite a zona DNS, especificando o registo MX da Infomaniak (+ SPF e DKIM).
- Qualquer adição/modificação DNS pode demorar até 48 horas para se propagar.
OU
- Mova-o dentro da mesma Organização.
… na Infomaniak com DNS externos
Se o seu nome de domínio tiver DNS que não sejam os da Infomaniak, então:
- Edite a zona DNS atual no local onde ela se encontra (se necessário, consulte a ajuda do fornecedor em questão) e especifique o MX da Infomaniak (+ SPF e DKIM).
- Qualquer adição/modificação de DNS pode demorar até 48 horas para se propagar.
OU
- Altere os DNS atuais e selecione a opção de usar os DNS da Infomaniak.
- Qualquer adição ou modificação de DNS pode levar até 48 horas para ser propagada.
- Consulte este outro guia para verificar e corrigir eventuais erros de configuração.
… ou, se utilizar DNS externos
Se o seu nome de domínio utilizar DNS que não sejam os da Infomaniak, então:
- Edite a zona DNS atual no local onde ela se encontra (se necessário, consulte a ajuda do provedor em questão) e especifique o registro MX da Infomaniak (+ SPF e DKIM).
- Qualquer adição/modificação DNS pode levar até 48 horas para ser propagada.
OU
- Altere os DNS atuais (se necessário, consulte a ajuda do provedor em questão) e especifique os da Infomaniak (isso implica em ter uma zona DNS na Infomaniak).
- Qualquer adição/modificação DNS pode levar até 48 horas para ser propagada.
- Esta zona DNS na Infomaniak será configurada corretamente, mas consulte este outro guia para verificar e corrigir eventuais erros de configuração.
… em outro lugar, mas você o transfere
Se o seu nome de domínio estiver registado noutro registradore desejar transferi-lo para o mesmo local onde está alojada a sua conta de e-mail Infomaniak, então:
- Transfira o nome de domínio para a Infomaniak (este será configurado corretamente, mas consulte este outro guia para verificar e corrigir eventuais erros de configuração).
Caso contrário, considere a aquisição de um novo nome de domínio, se necessário.
Link para esta FAQ: https://faq.infomaniak.com/1979
Esta seção de perguntas frequentes foi útil?
Este guia explica como registrar um nome de domínio na Infomaniak.
Introdução
- Com um novo nome de domínio ou um nome de domínio adicional, muitas possibilidades se abrem para você, incluindo o acesso a serviços gratuitos, como:
- Você também poderá:
- usar seu Serviço de E-mail ou site web existente, mas com uma grafia diferente,
- hospedar um site web aqui ou em um provedor de hospedagem terceirizado,
- etc.
Encomendar o primeiro nome de domínio
Para tal:
- Se necessário, crie uma conta Infomaniak.
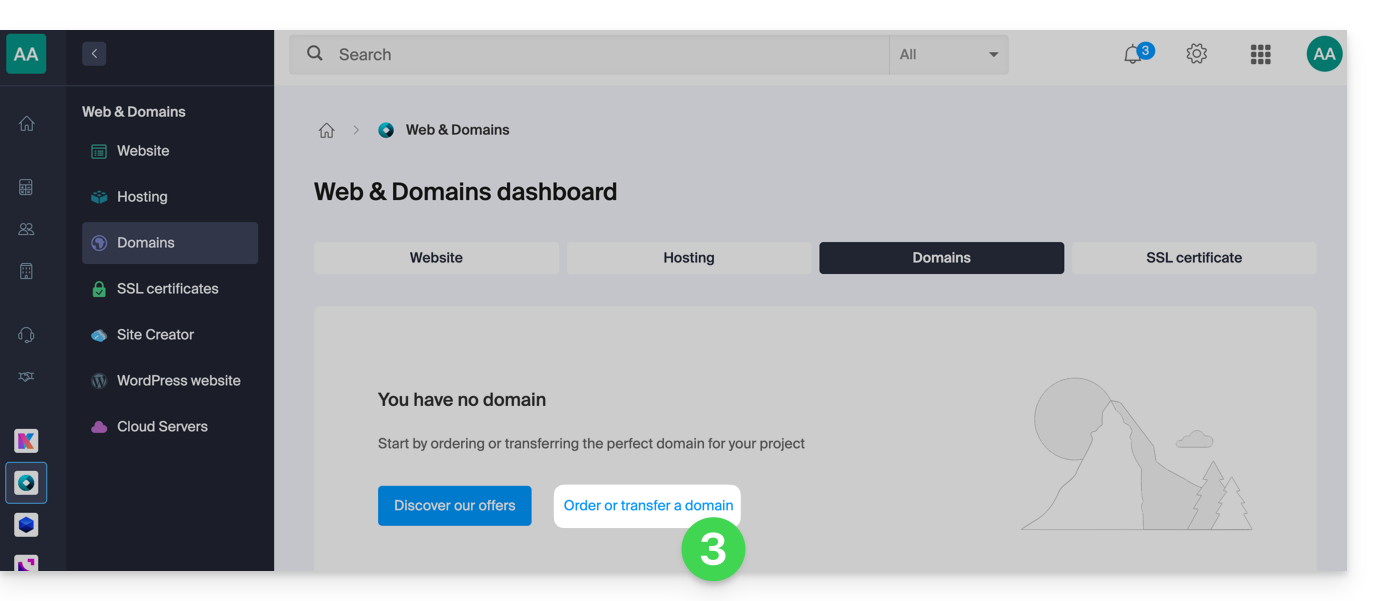
- Clique aqui para acessar o gerenciamento de domínios no Manager Infomaniak.
- Clique para abrir a Loja:
- Se necessário, selecione a Organização na qual deseja registrar o seu domínio:
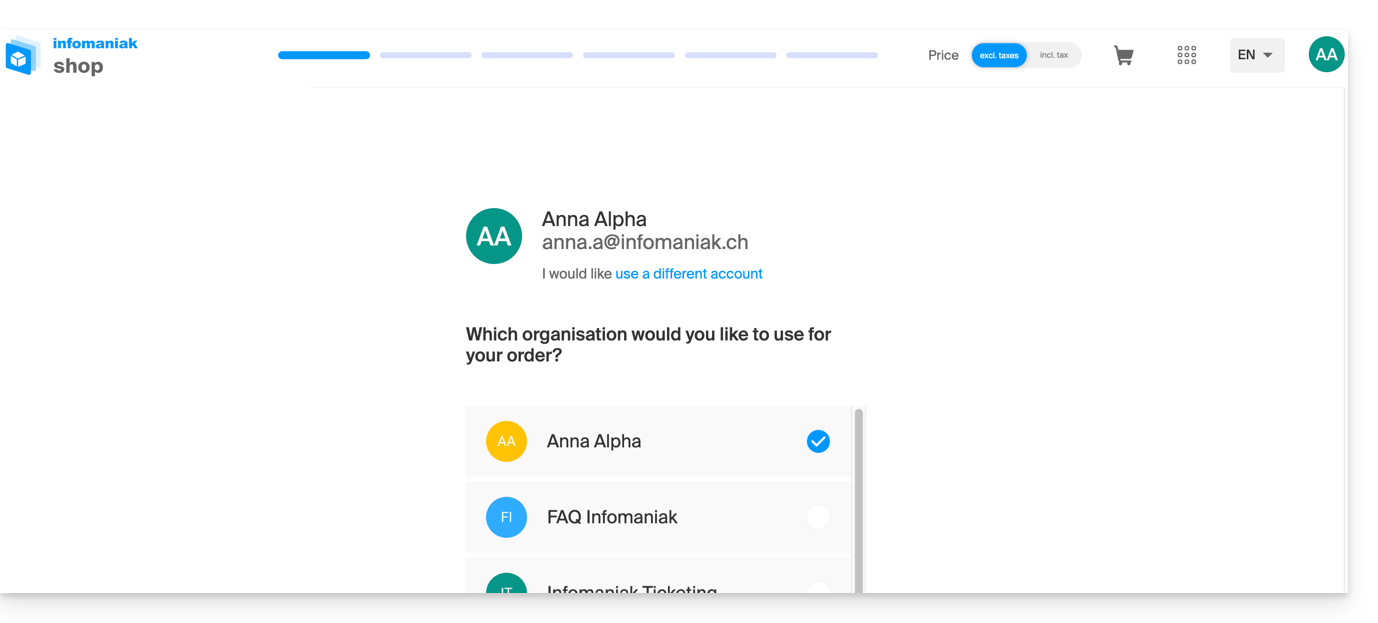
- Se necessário, selecione a Organização na qual deseja registrar o seu domínio:
- Depois de acessar a Loja, insira o nome de domínio que deseja registrar e pesquise:
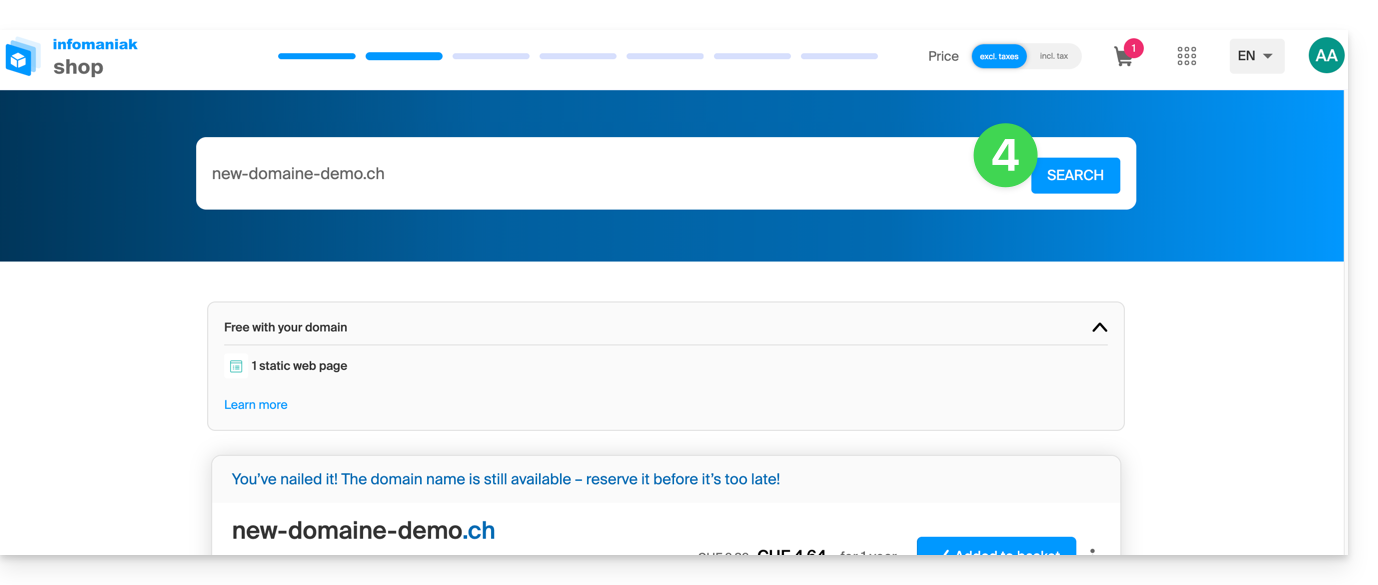
- Marque ou desmarque as opções e extensões adicionais propostas e clique em Seguinte para continuar.
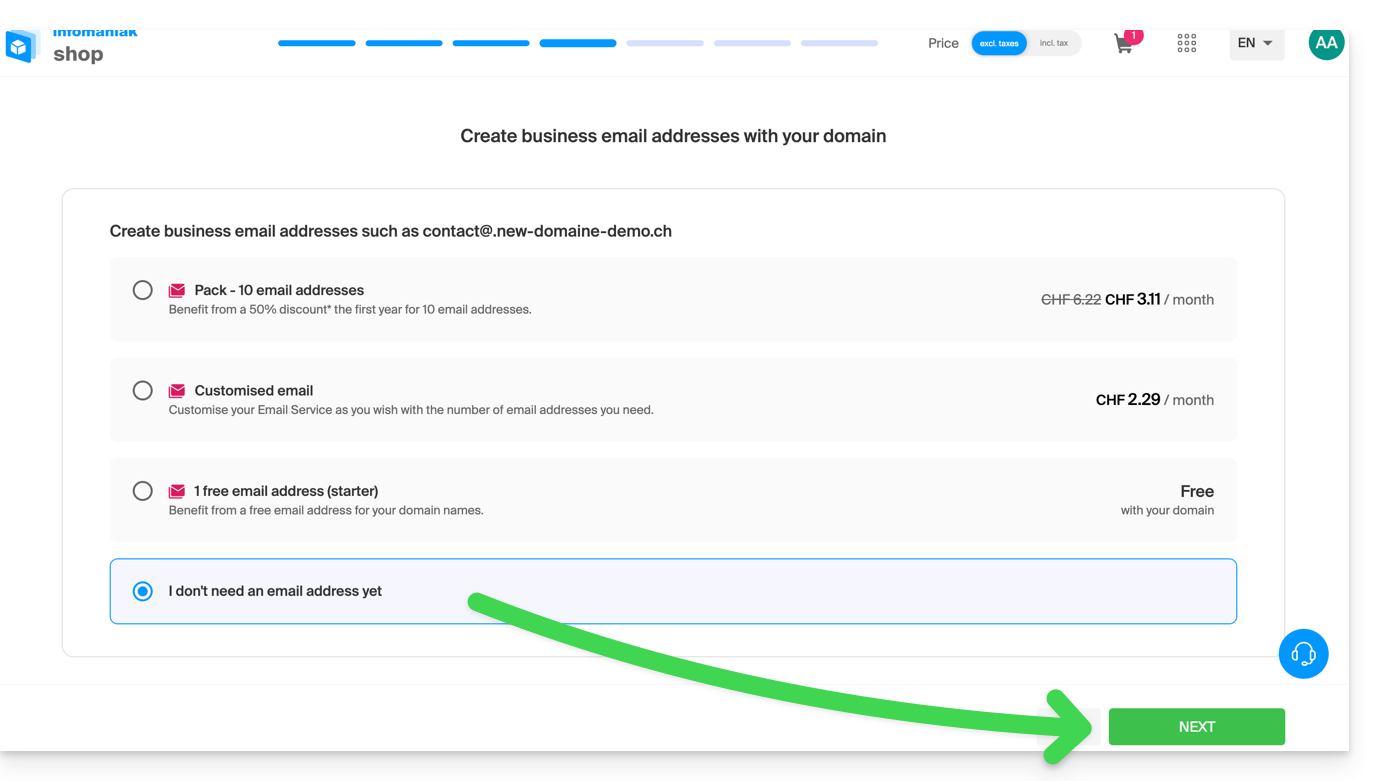
- Escolha as opções desejadas nas páginas seguintes, como o eventual Serviço de Email associado ao nome de domínio:
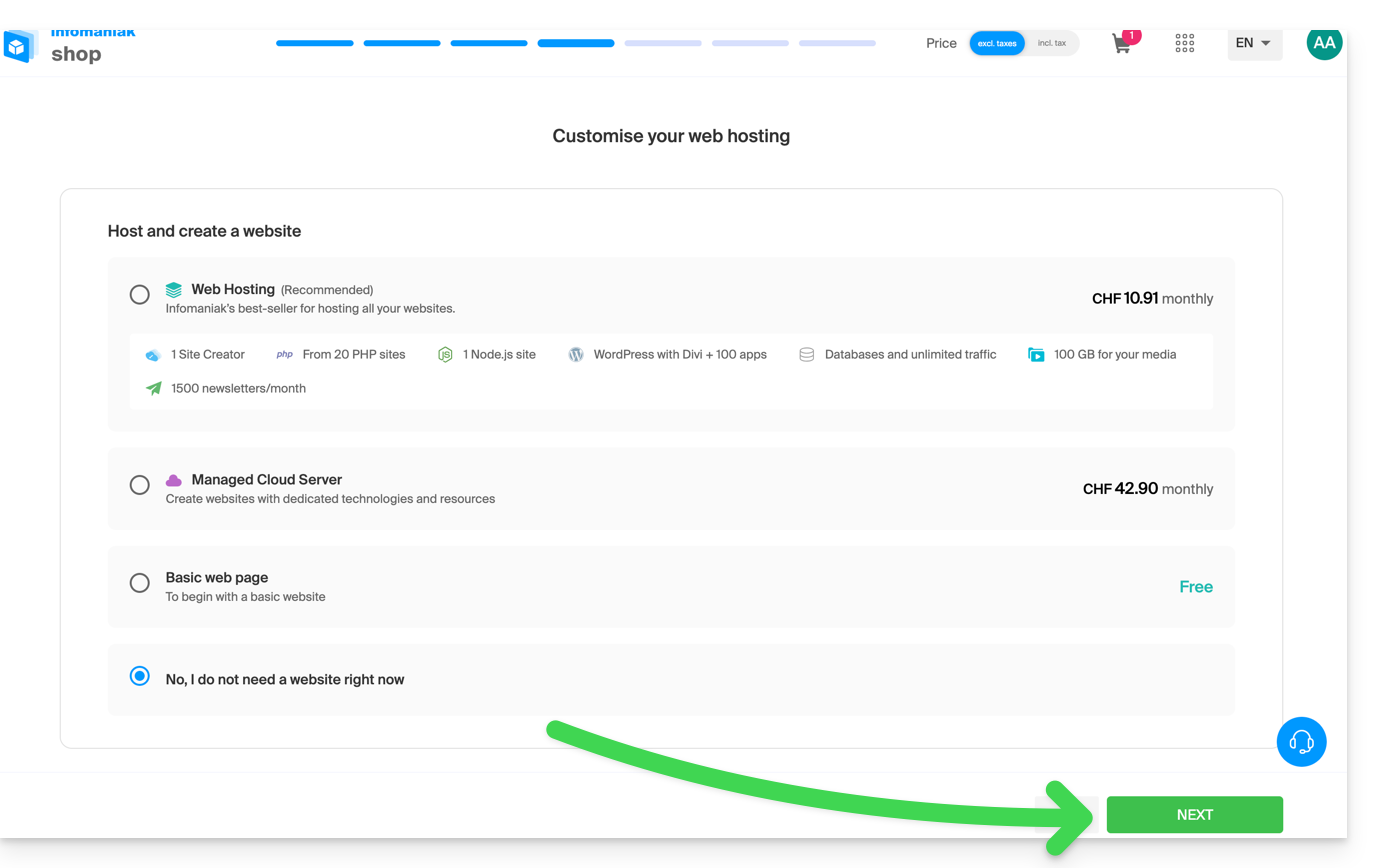
- Selecione as opções desejadas ao longo das páginas, como o possível serviço de hospedagem web associado ao nome de domínio:
- Insira os dados de contato relacionados ao nome de domínio.
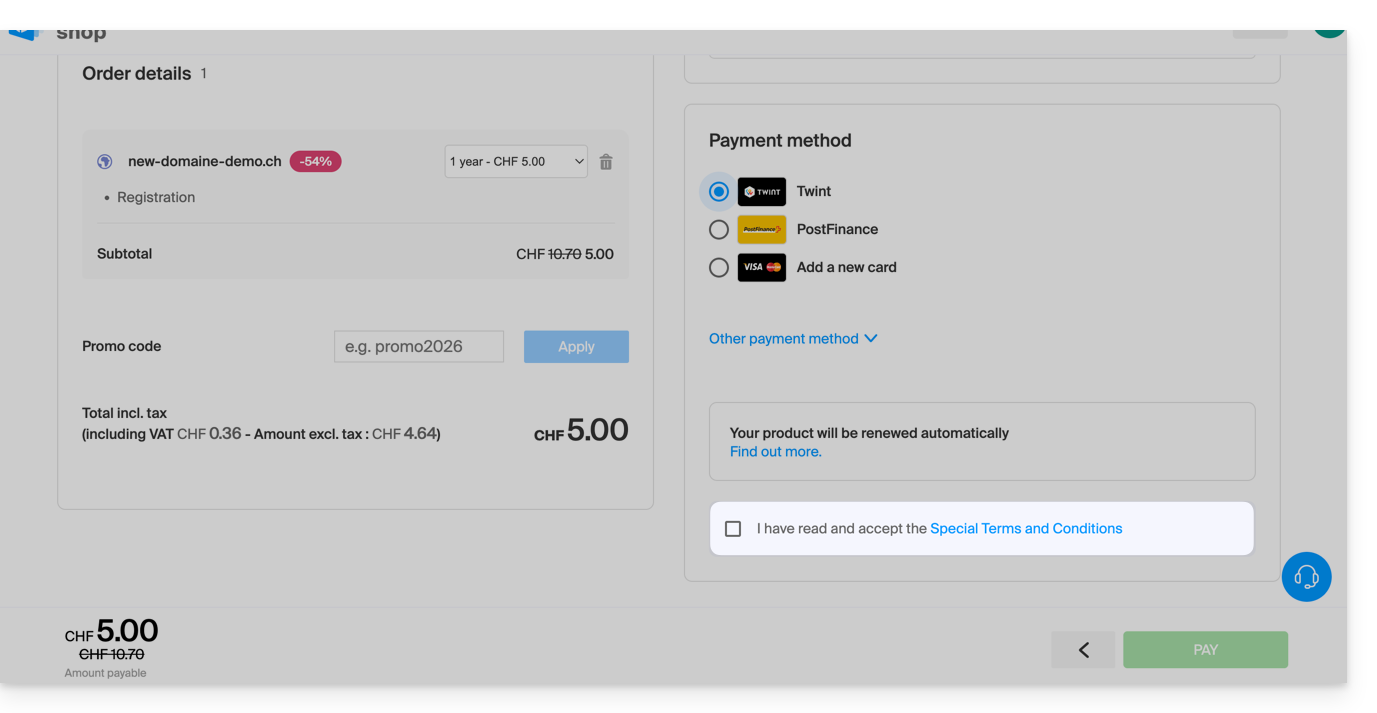
- Conclua a compra, certificando-se de ler e aceitar os Termos e Condições (a caixa pode exigir que você role a página para baixo):
Após fazer o pedido, aguarde algumas horas para que ele seja processado (e, de forma simplificada, para que propagaçãodo seu nome de domínio junto aos Provedores de Serviços de Internet (ISP) em todo o mundo.
Encomendar um nome de domínio adicional
Para tal:
- Clique aqui para acessar o gerenciamento do seu produto no painel de controle Infomaniak (precisa de ajuda?).
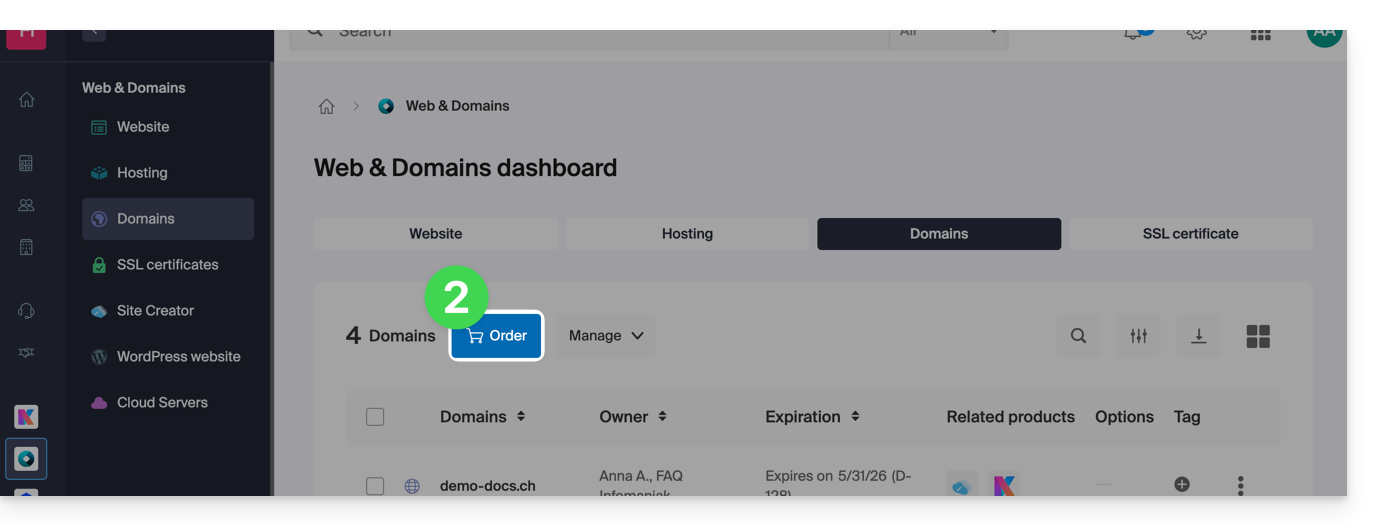
- Clique no botão para Encomendar um domínio adicional:
- Siga o primeiro guia acima, a partir do passo 4.
Verificar a disponibilidade de um nome de domínio
Consulte esta outra página, que permite verificar rapidamente se um domínio está disponível para registro.
Podemos identificar, no mínimo, 3 indicações principais:
- Disponível — neste caso, está tudo bem, pode reservá-lo.
- Transferível — você deve possuí-lo em outro provedor para poder transferi-lo.transferir para a Infomaniak.
- Indisponível — infelizmente, não será possível encomendá-lo enquanto não for abandonado pelo seu titular atual.
Link para esta FAQ: https://faq.infomaniak.com/1987
Esta seção de perguntas frequentes foi útil?
Este guia explica como remover os nomes de domínio adicionais de um Serviço de Email existente (tudo o que vem após o símbolo "@" do seu endereço de email), desvinculando os seus nomes de domínio associados.
Introdução
- Uma vez removido, o nome de domínio fica novamente disponível para encomendar um novo Serviço de Email ou para ser associado a outro Serviço de Email existente.
- É importante notar também que pode renomear o seu produto no painel de controlo Infomaniak, mas alterar o nome de um Serviço de Email não tem qualquer impacto nos seus endereços; é necessário atuar no nome de domínio.
Remover o domínio associado
Pré-requisitos
- Ter dissociado o nome de domínio sinônimo do nome de domínio principal, caso houvesse uma associação anterior.
- Ter definido o nome de domínio a ser desvinculado como um domínio secundário (em vez de domínio principal) — essa inversão pode ser feita seguindo este outro guia no capítulo intitulado "a" a partir do ponto 3.
Para desvincular um nome de domínio do seu Serviço de Email:
- Clique aqui para acessar o gerenciamento do seu produto no Manager Infomaniak (precisa de ajuda?).
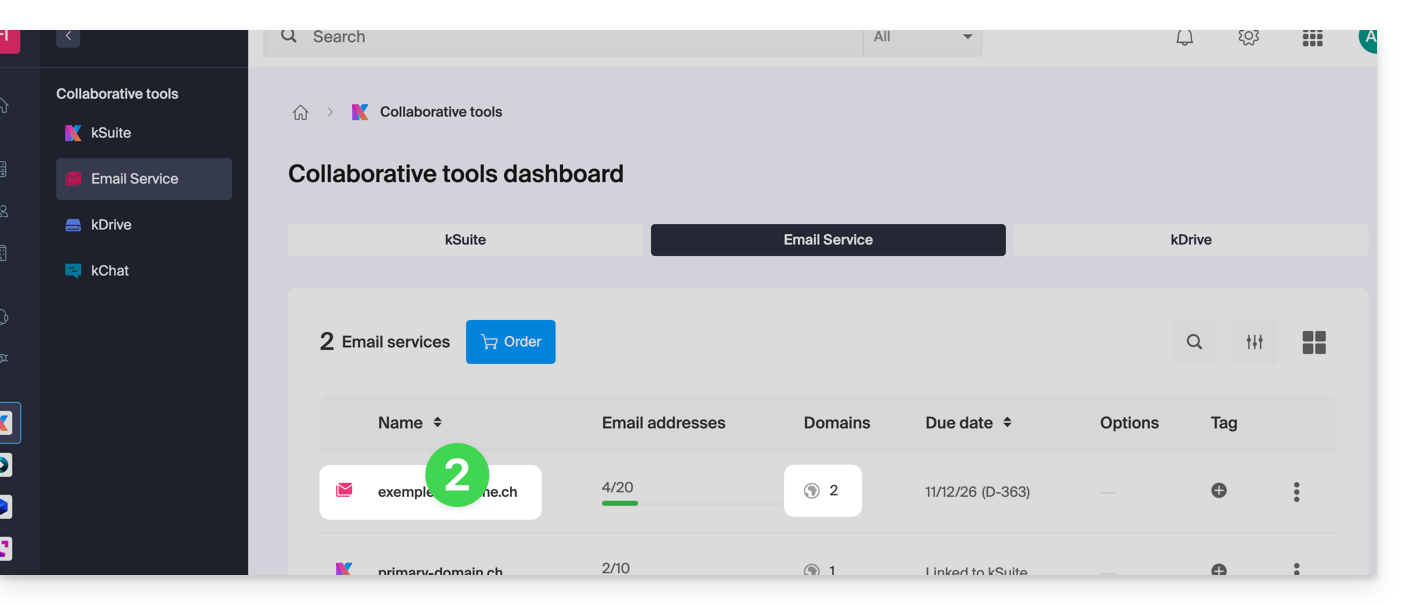
- Clique diretamente no nome atribuído ao produto em questão:
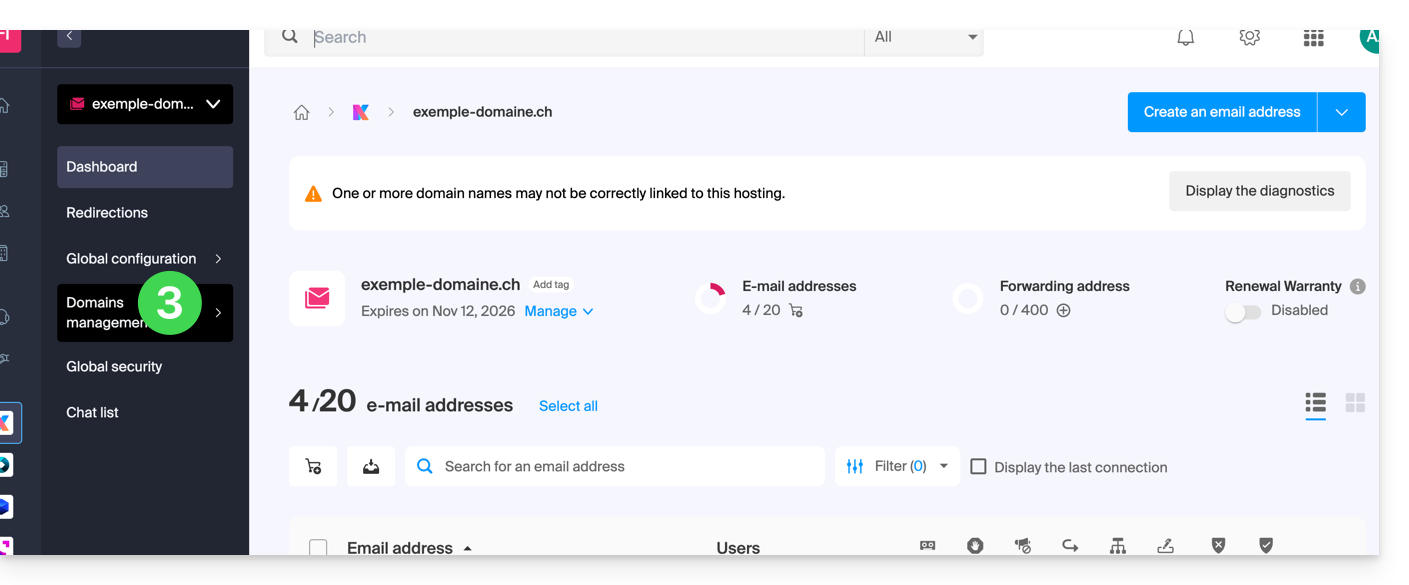
- Clique em Gerenciamento de domínios no menu lateral esquerdo:
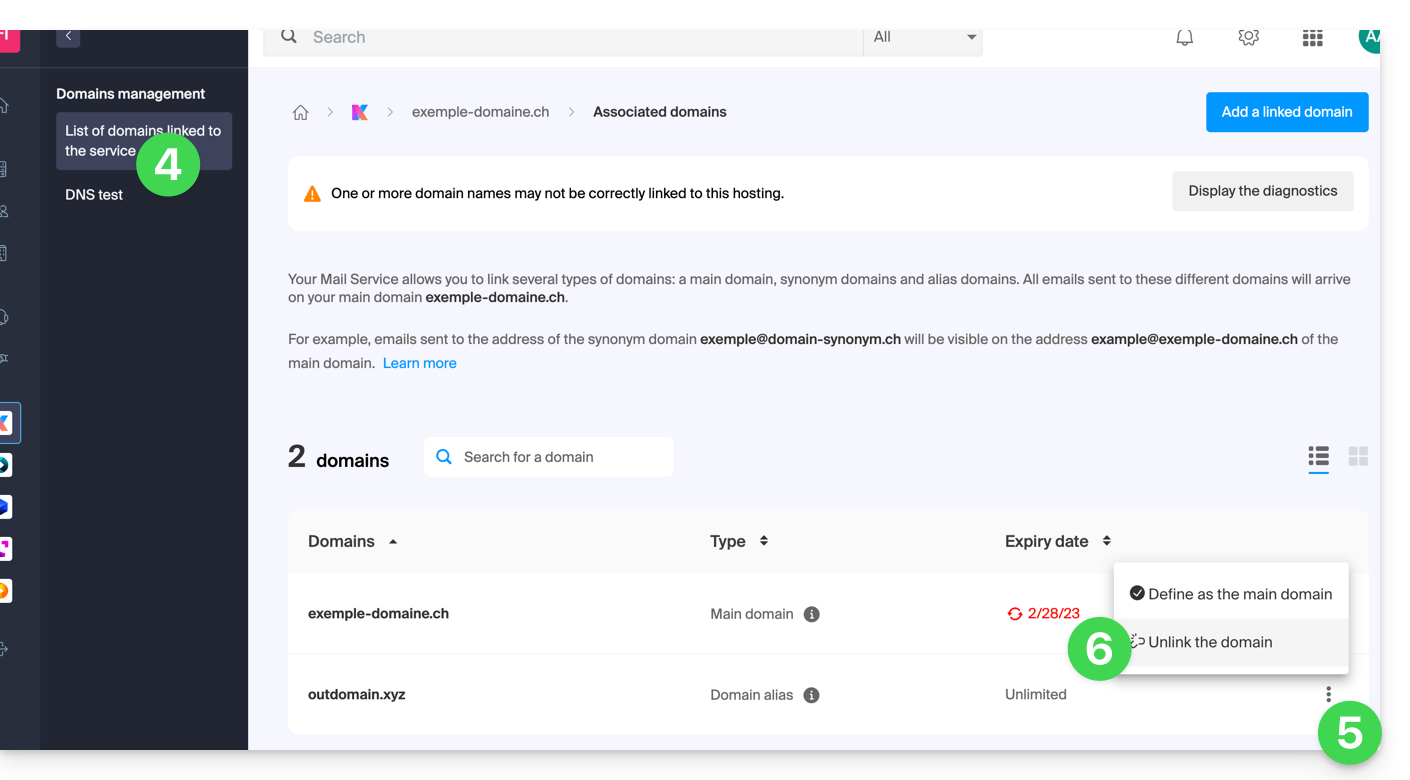
- Clique em Lista de Domínios associados ao serviço no menu lateral esquerdo.
- Clique no ícone ⋮ à direita do nome de domínio que deseja desvincular.
- Clique em Desvincular o domínio (consulte os pré-requisitos se esta opção não estiver disponível):
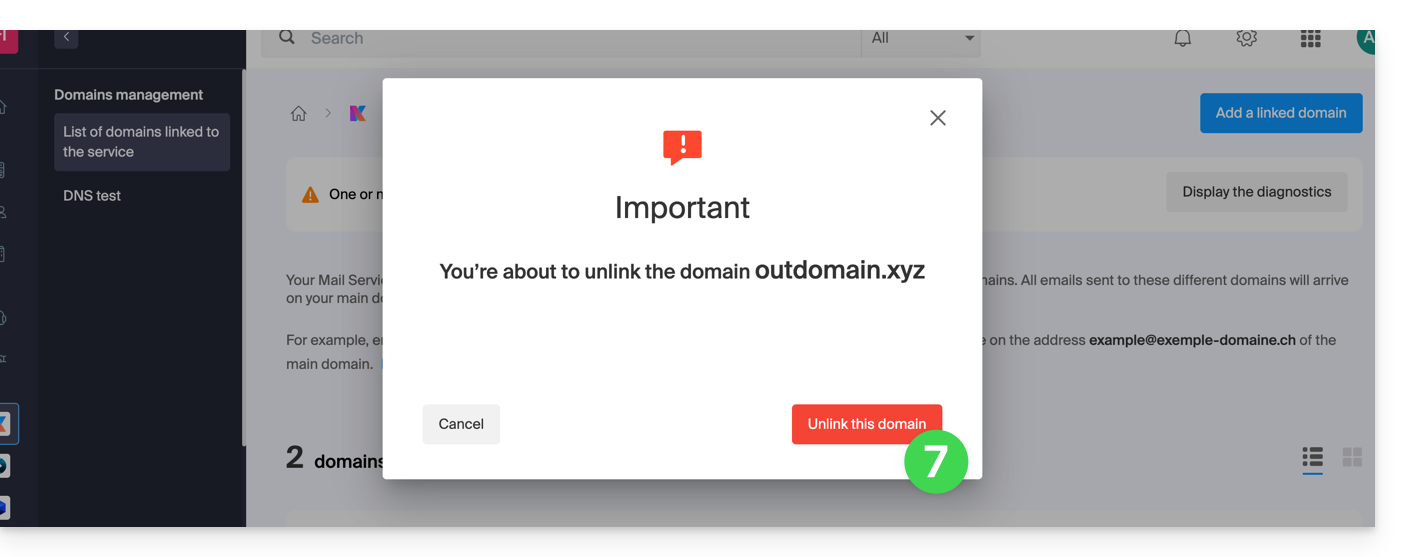
- Confirme a desvinculação:
Link para esta FAQ: https://faq.infomaniak.com/1996
Esta seção de perguntas frequentes foi útil?
Este guia explica como remover um domínio alias de uma hospedagem web Infomaniak. O nome de domínio principal do site não estará mais vinculado a qualquer outro nome de domínio.
Isso permite, por exemplo, criar posteriormente uma nova hospedagem web ou site distinto para o nome de domínio que foi desvinculado.
Pré-requisitos
- Ter desvinculado o nome de domínio sinônimo do nome de domínio principal, caso houvesse associação anterior.
Remover o domínio alias
Para remover um nome de domínio alias do seu site:
- Clique aqui para acessar o gerenciamento do seu site no Manager Infomaniak (precisa de ajuda?).
- Clique diretamente no nome atribuído ao site em questão:
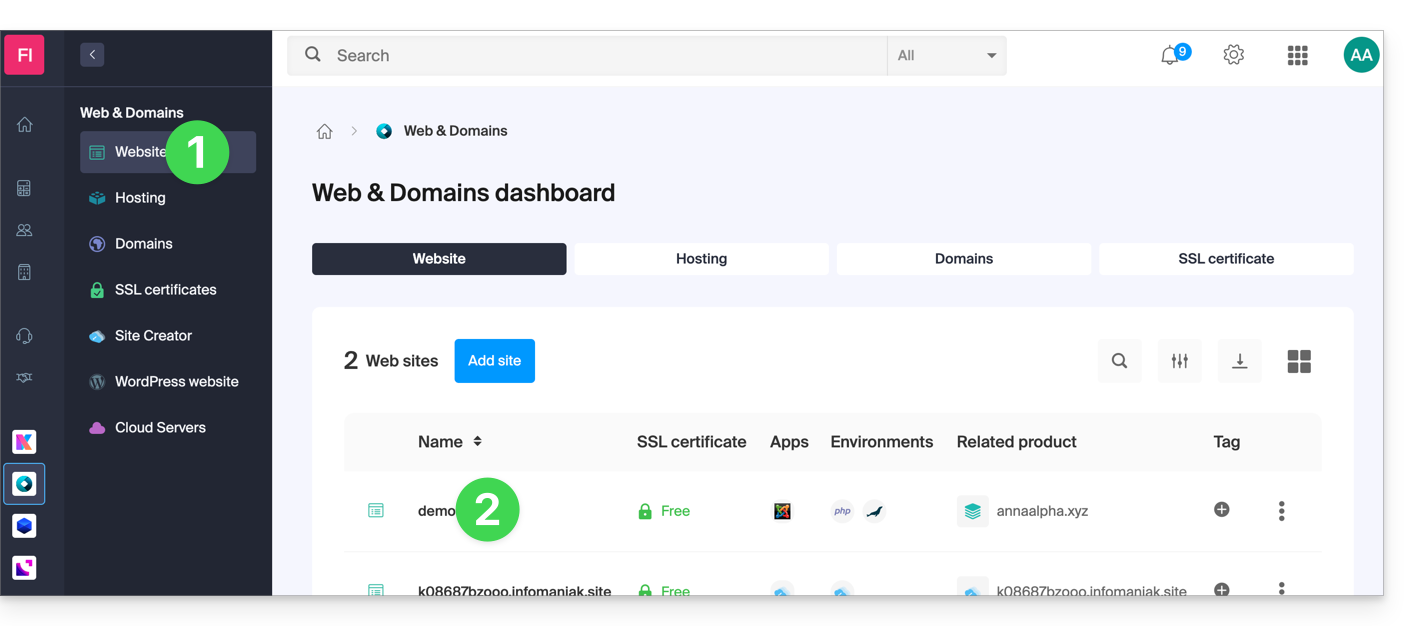
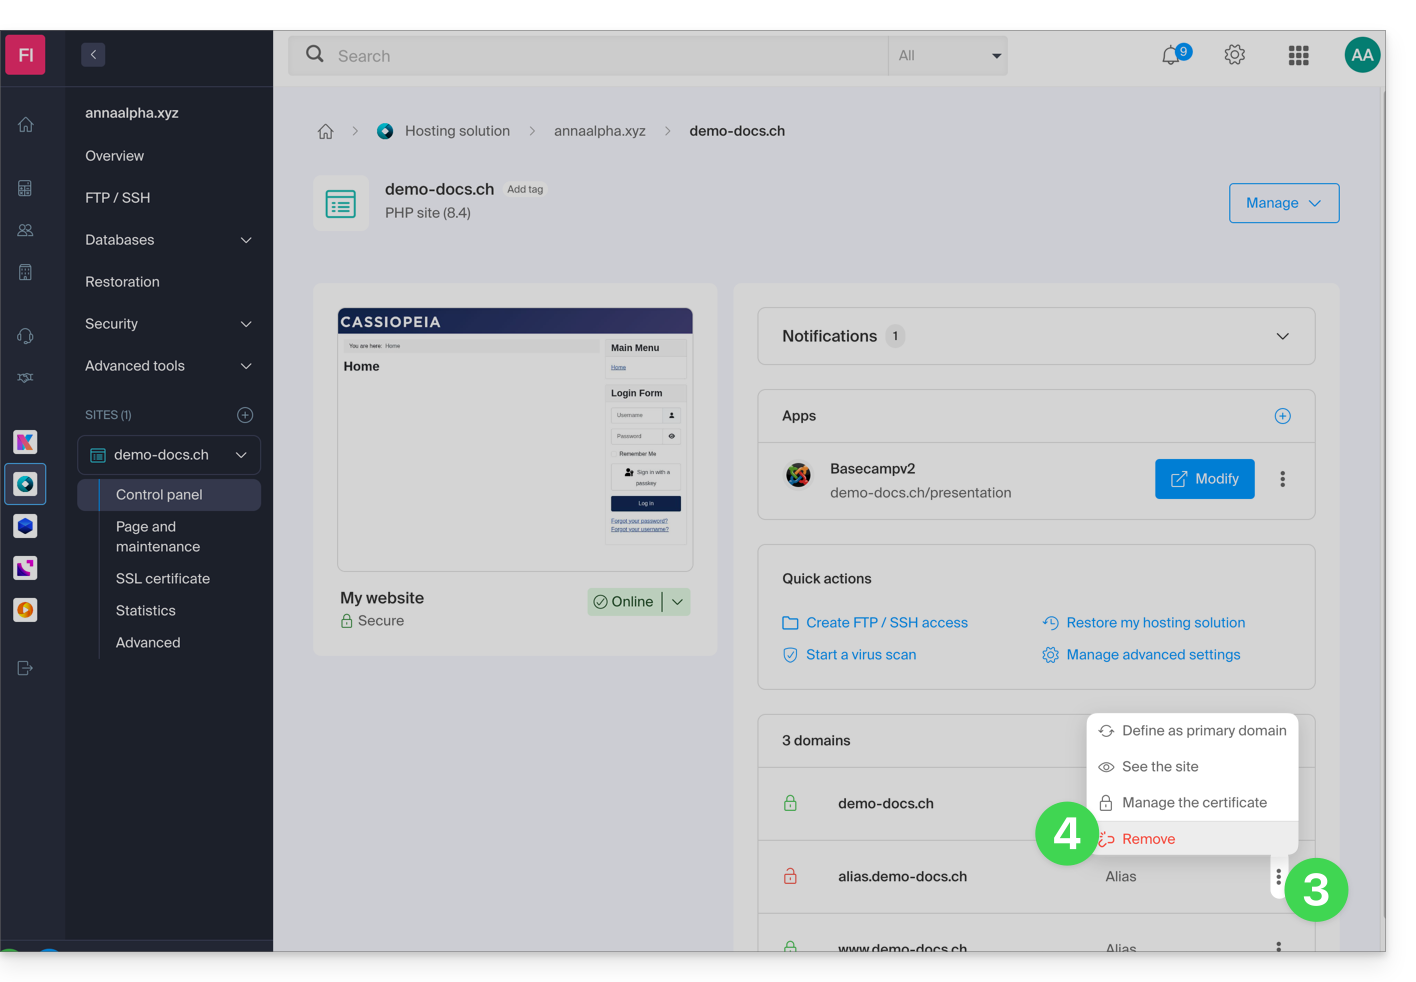
- Clique no menu de ação ⋮ à direita do domínio a ser removido.
- Escolha Desvincular:
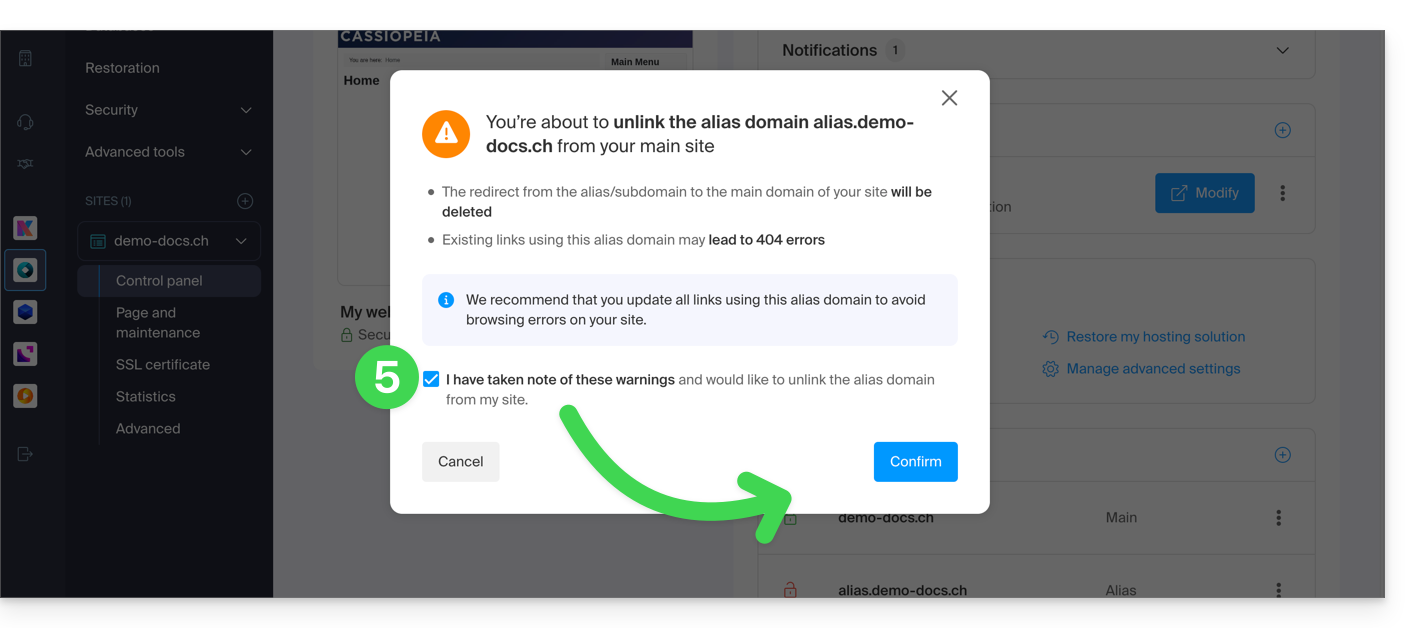
- Confirme a remoção do alias:
Link para esta FAQ: https://faq.infomaniak.com/1997
Esta seção de perguntas frequentes foi útil?
Este guia explica como desvincular um domínio sinônimo de um nome de domínio Infomaniak.
Remover o domínio sinônimo
Para remover o domínio sinônimo a partir do painel de controle do domínio principal:
- Clique aqui para acessar o gerenciamento do seu domínio principal no Manager Infomaniak (precisa de ajuda?).
- Clique diretamente no nome atribuído ao domínio em questão:
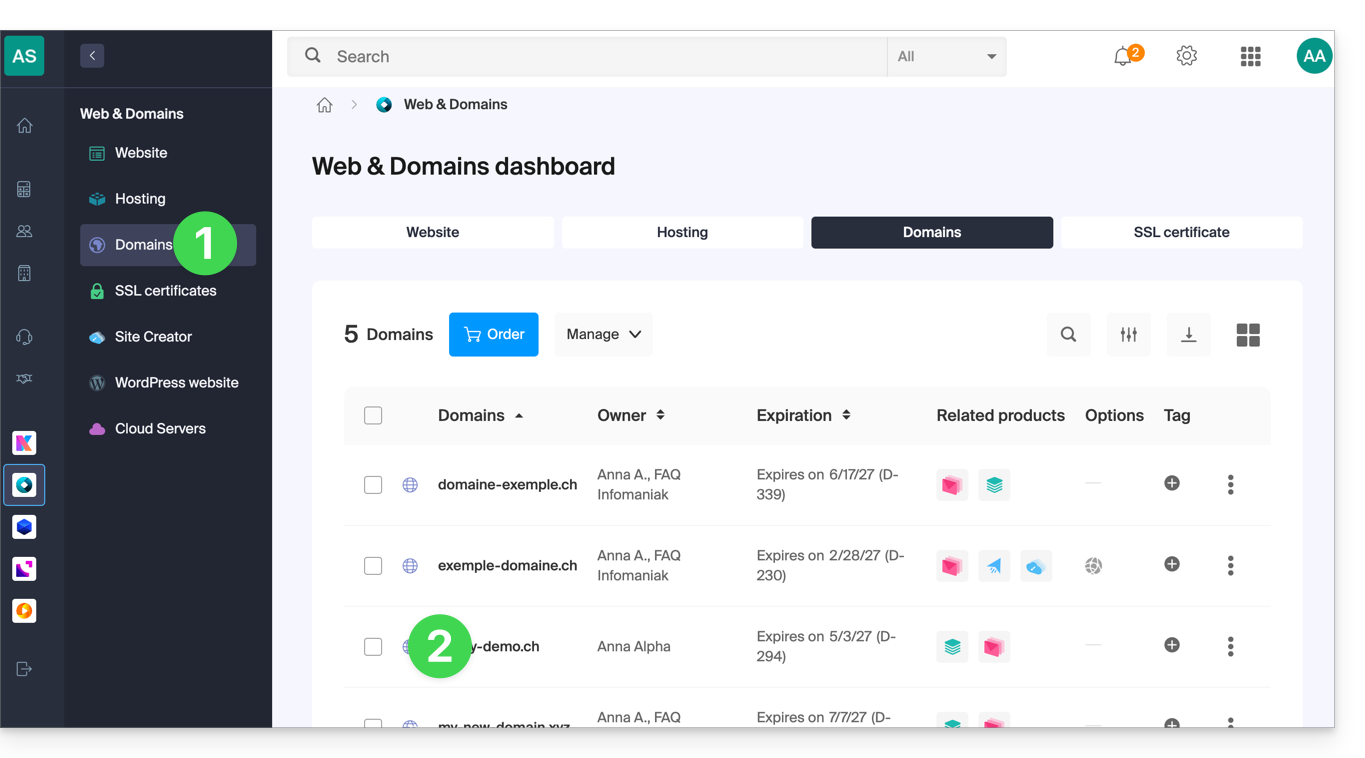
- Clique em Domínios sinônimos no menu lateral esquerdo.
- Clique no menu de ação ⋮ à direita do domínio sinônimo na tabela que aparece.
- Clique em Desvincular este domínio:
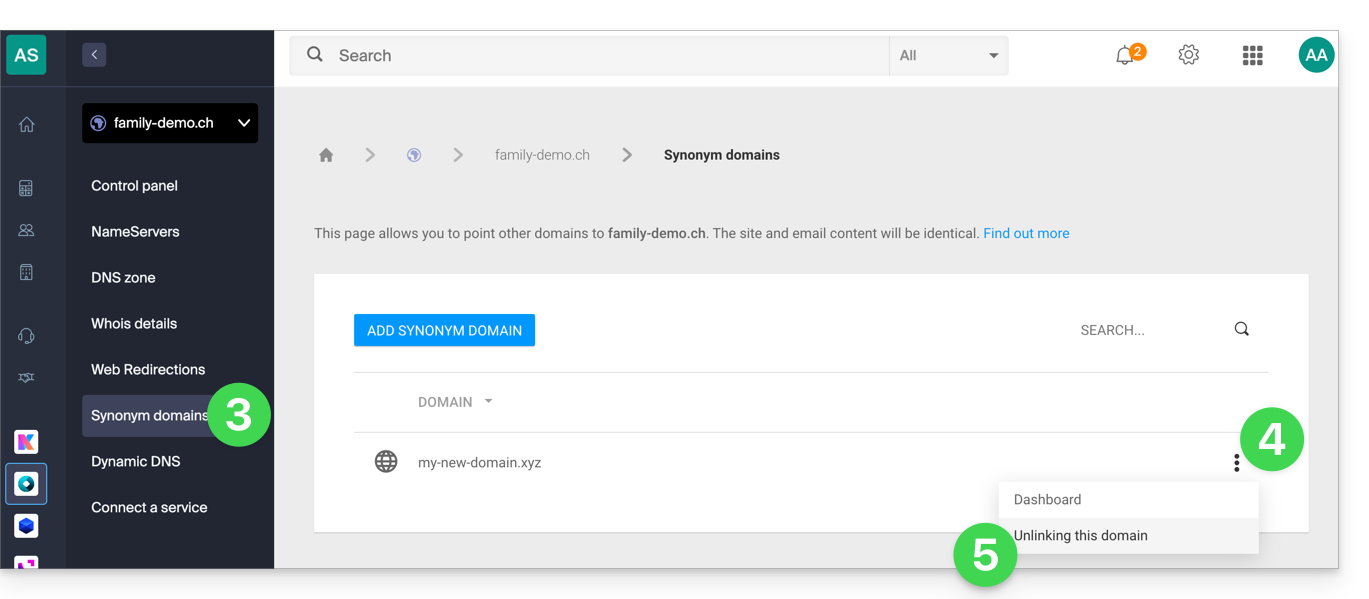
Você também pode fazer o procedimento no sentido inverso, acessando o painel de controle do domínio sinônimo:
- Clique aqui para acessar o gerenciamento do seu domínio sinônimo no Manager Infomaniak (precisa de ajuda?).
- Clique diretamente no nome atribuído ao domínio em questão:
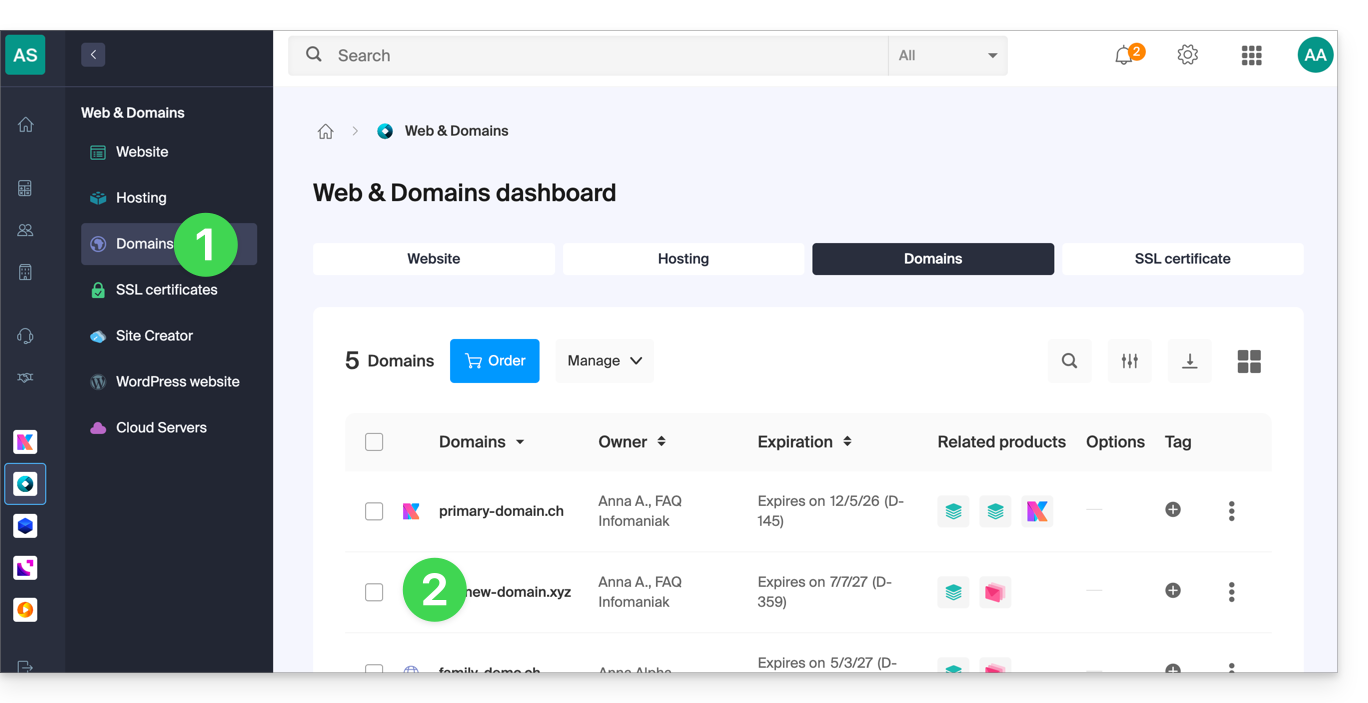
- Clique em Desvincular na barra superior.
- Marque a caixa para confirmar a desvinculação desses 2 domínios.
- Clique no botão vermelho para Desassociar o nome de domínio:
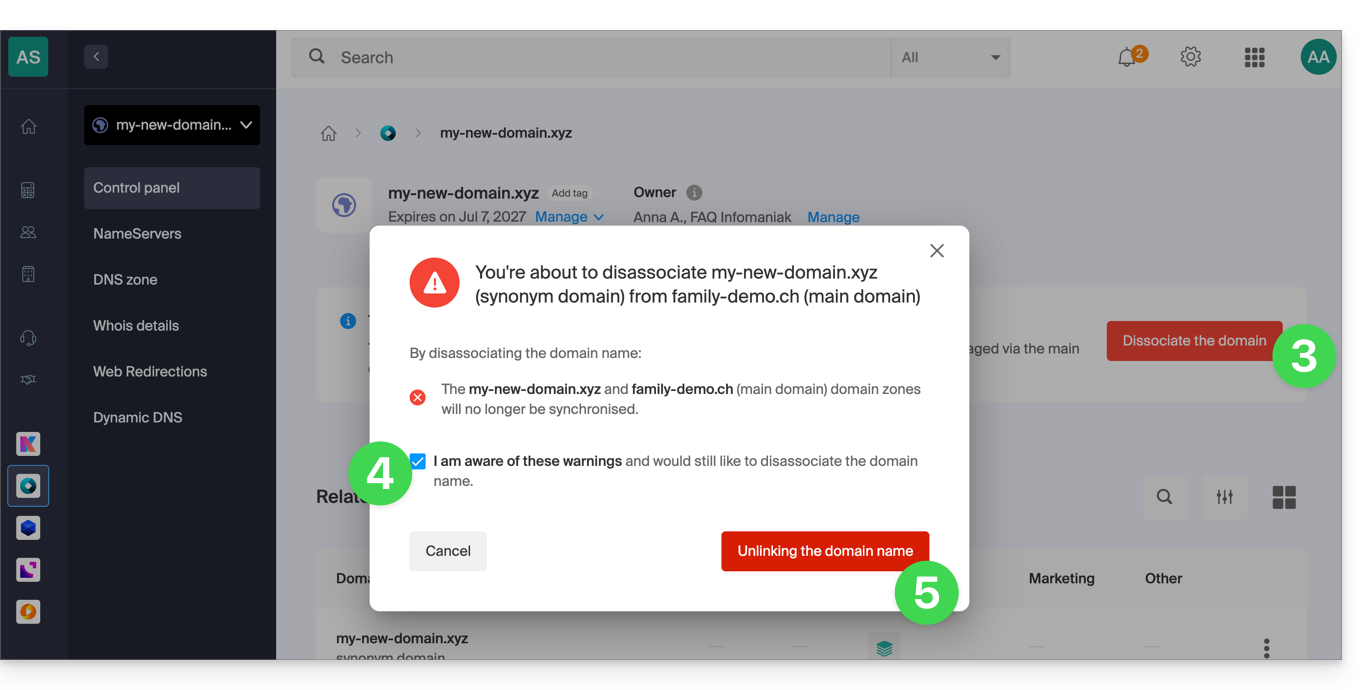
Neste momento, ainda terá de desassociar o domínio alias do seu alojamento Web e/ou Mail, se necessário:
- Consulte este outro guia para desassociar um nome de domínio alias de um Serviço de Mail.
- Consulte este outro guia para desassociar um nome de domínio alias de um alojamento Web.
Link para esta FAQ: https://faq.infomaniak.com/1998
Esta seção de perguntas frequentes foi útil?
Este guia explica como adicionar um domínio sinônimo a um nome de domínio.
Introdução
- Um domínio sinônimo é um nome de domínio que pode servir como nome secundário para outro domínio.
- Quando um domínio sinônimo é adicionado, ele herda automaticamente o conteúdo da zona DNS do domínio principal (incluindo os registros
MX,A, etc.), bem como seu alojamento Web e Mail. - Em vez disso, você também pode adicionar um (domínio) alias a um site ou adicionar um (domínio) alias a um Serviço Mail.
Adicionar um domínio sinônimo a um domínio
Pré-requisitos
- O nome de domínio do futuro sinônimo ou a gestão da sua zona DNS…
- … deve estar registado na Infomaniak,
- … deve estar configurado com os DNS Infomaniak,
- … não deve estar ainda associado a nenhum produto.
- O nome de domínio no qual será colocado o sinônimo…
- … não deve estar associado ao produto Newsletter Infomaniak.
Para acessar seus nomes de domínio:
- Clique aqui para acessar a gestão do seu domínio no Manager Infomaniak (precisa de ajuda?).
- Clique diretamente no nome atribuído ao domínio principal em questão:
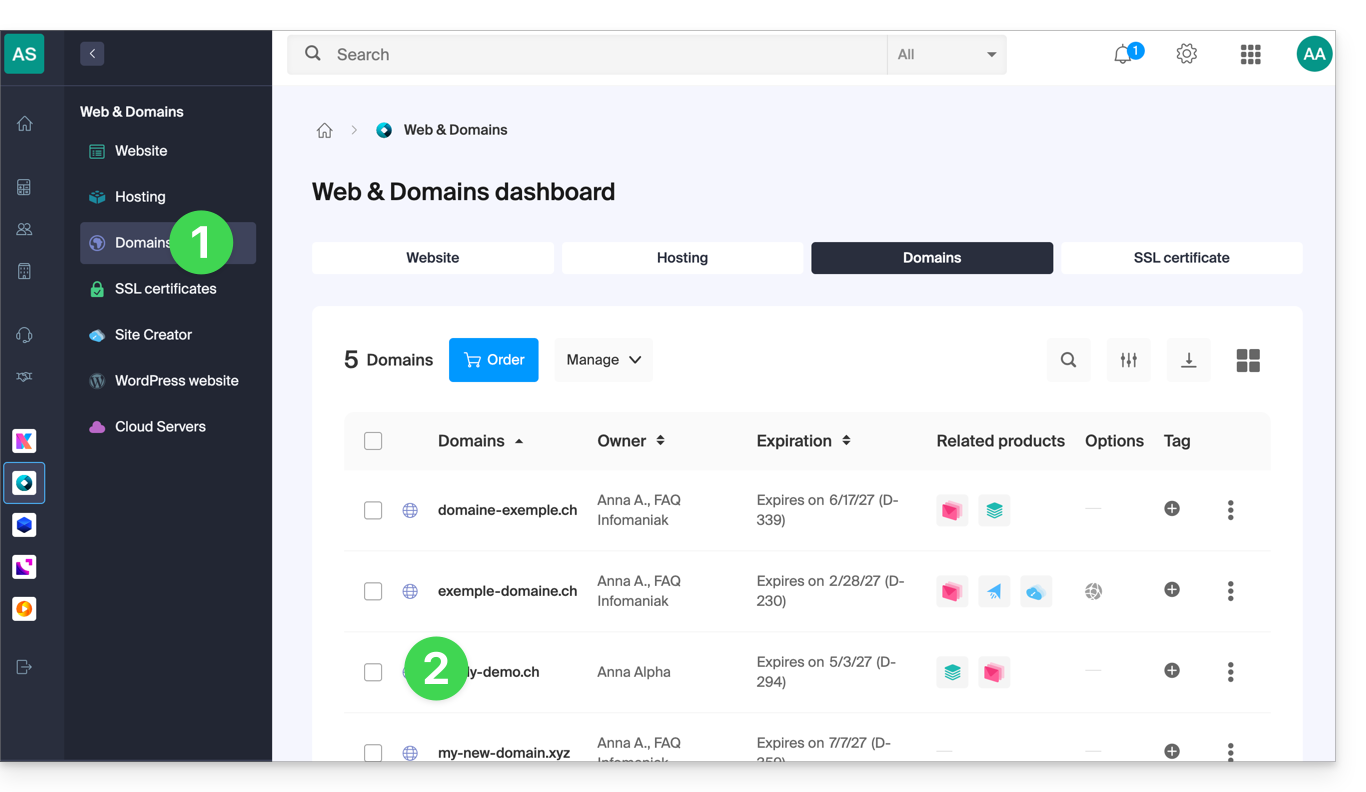
- Clique em Domínios sinónimos no menu lateral esquerdo.
- Escolha adicionar um sinónimo.
- Clique em Seguinte:
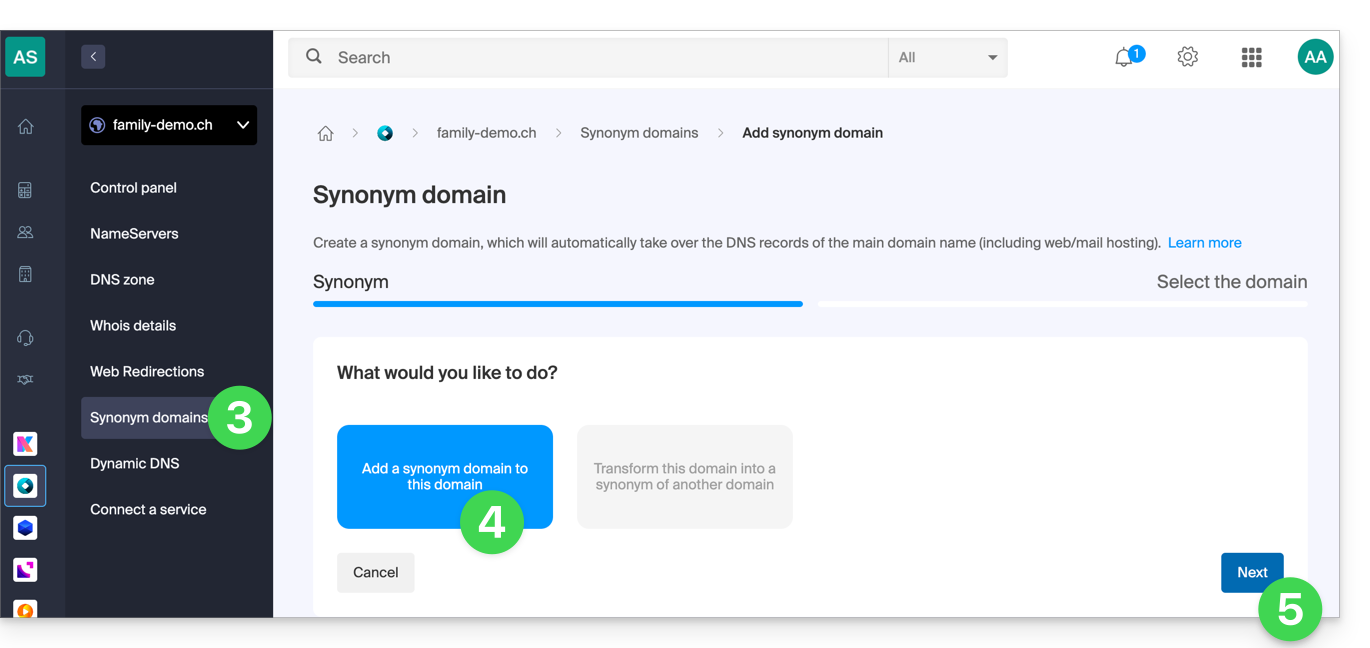
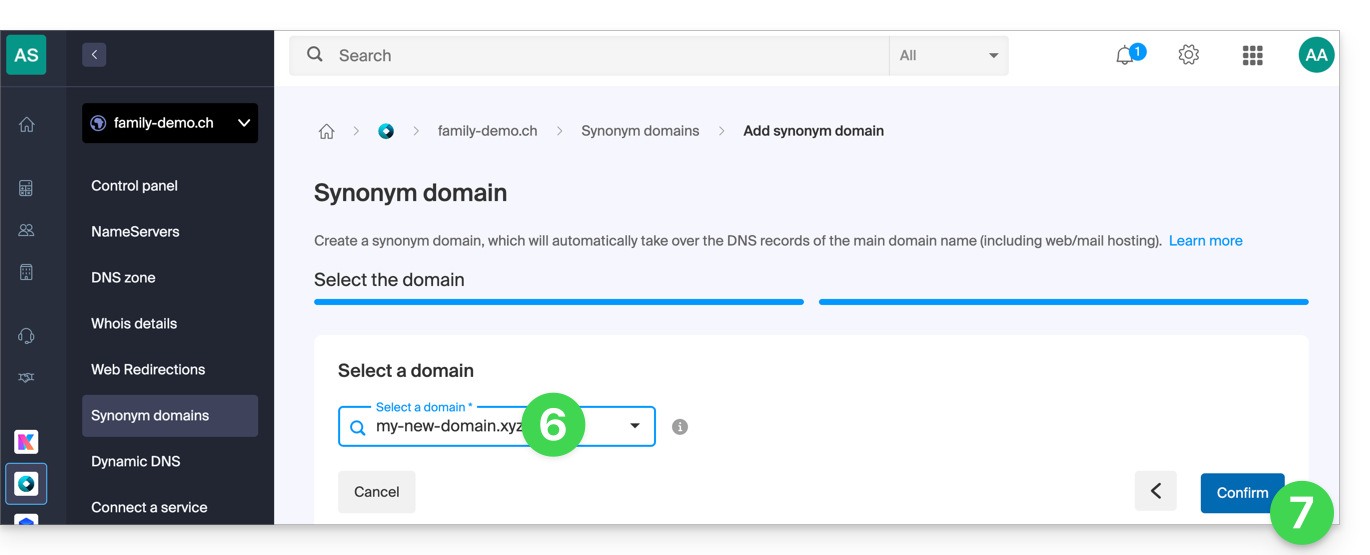
- Escolha um domínio existente nesta Organização ou registe um novo domínio antecipadamente.
- Clique no botão para Confirmar:
- Pronto:
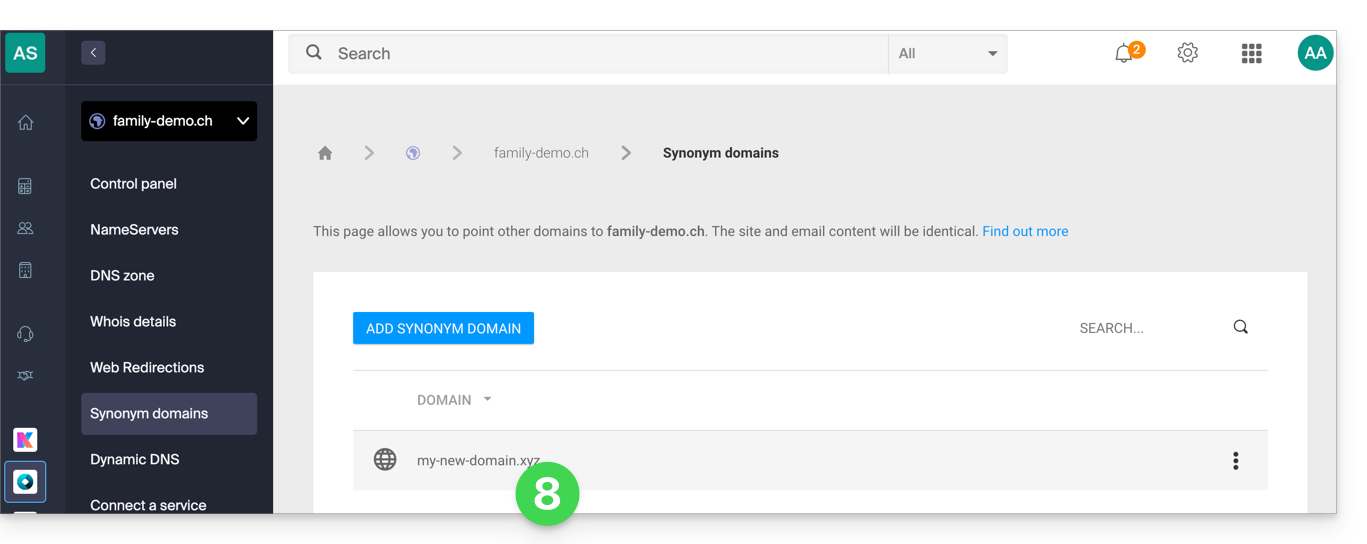
Consulte este outro guia se precisar de informações sobre como desassociar um nome de domínio sinónimo.
Link para esta FAQ: https://faq.infomaniak.com/1999
Esta seção de perguntas frequentes foi útil?
Este guia explica como adicionar, modificar ou remover entradas específicas (registros do tipo A e AAAA, MX, TXT, etc.) na zona DNS de um domínio registrado na Infomaniak.
Pré-requisitos
- Possuir um nome de domínio na Infomaniak ou, no mínimo, uma zona DNS.
- Compreender:
- o funcionamento de um domínio e de uma zona DNS antes de modificar esta última.
- que a zona DNS apresentada aqui é válida e utilizada apenas se os nomes de servidor forem os da Infomaniak.
- que qualquer adição/modificação DNS pode levar até 48 horas para se propagar.
Adicionar um registo (modo simples)
Para configurar os serviços associados ao domínio e permitir a resolução correta dos nomes de domínio para os recursos correspondentes (como sites externos, servidores de e-mail de terceiros, etc.):
- Clique aqui para acessar o gerenciamento do seu domínio no painel de controle Infomaniak (precisa de ajuda?).
- Clique diretamente no nome atribuído ao domínio em questão.
- Clique em Zona DNS no menu lateral esquerdo.
- As entradas atualmente configuradas são listadas na tabela Modo Simples.
- Clique no botão azul Adicionar entrada:
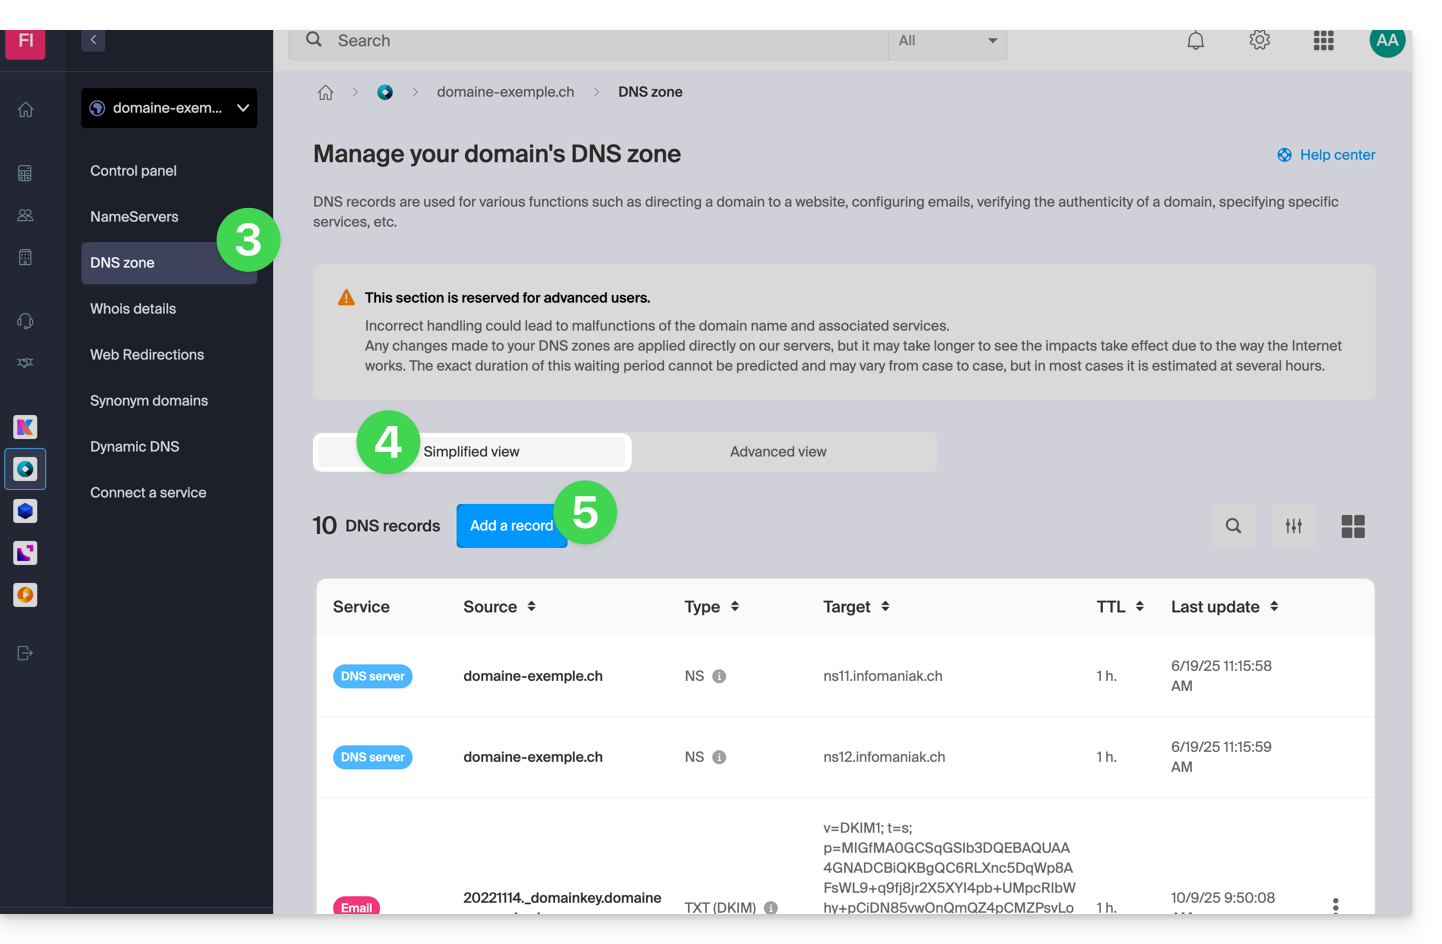
- Escolha o tipo de registro desejado (registros do tipo A e AAAA, MX, TXT, etc.)
- Clique em Seguinte:
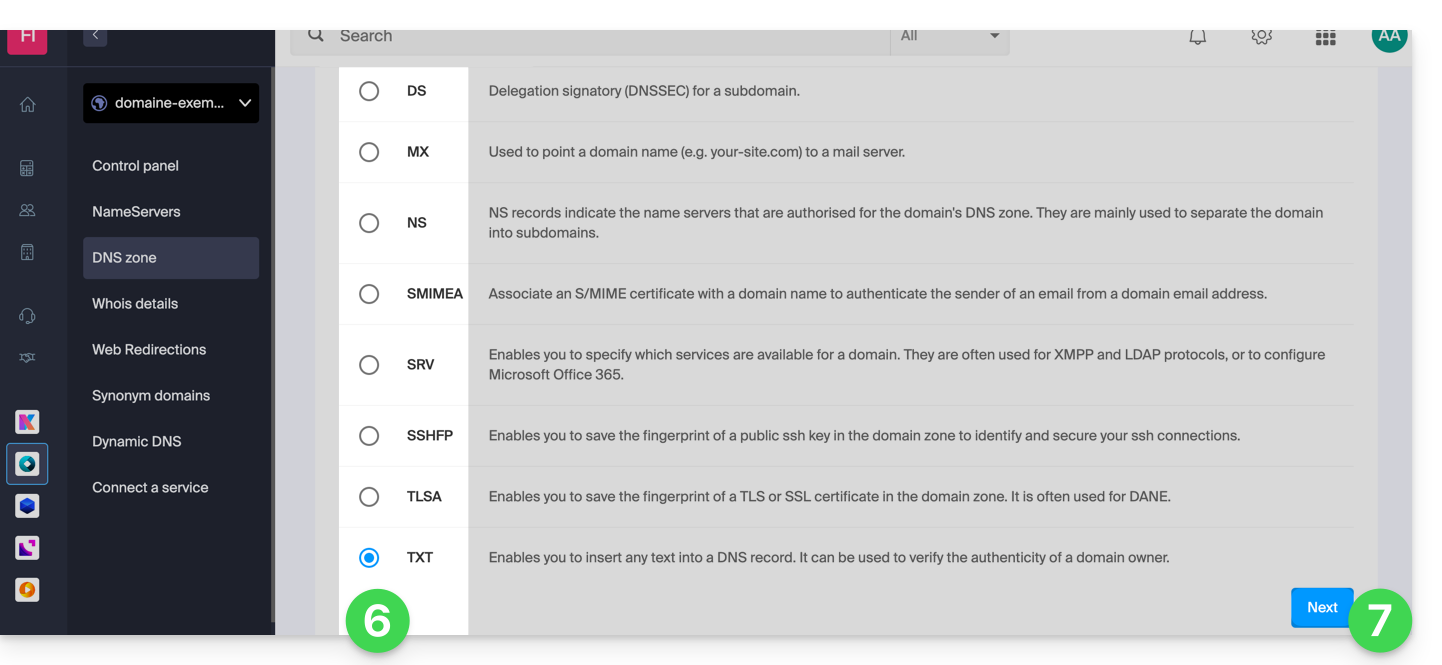
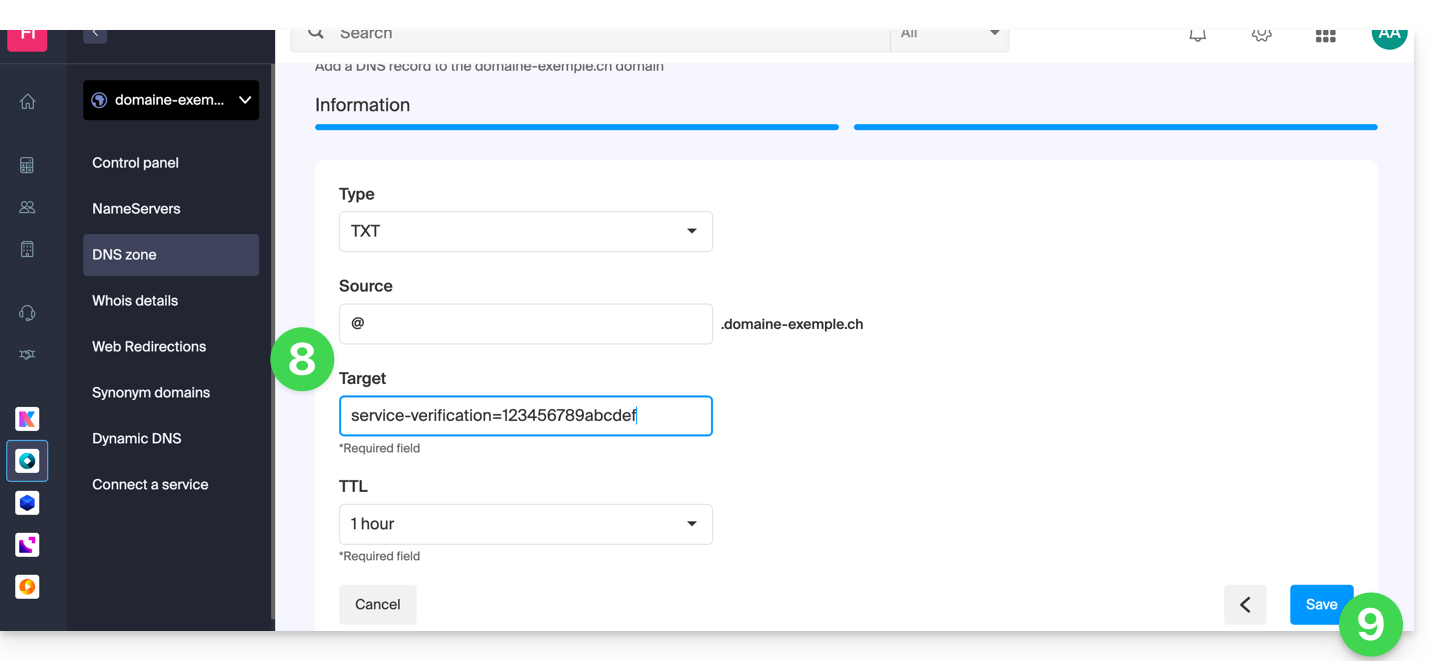
- Preencha os diferentes campos com as suas informações:
- Em Origem, deixe o campo em branco ou indique um possível subdomínio.
- Em Destino, insira a informação obtida do seu fornecedor externo ou qualquer outra indicação útil.
- Deixe o TTL indicado.
- Salve as alterações efetuadas:
Modificar um registo existente
Para modificar um registro DNS já existente:
- Siga os passos de 1 a 4 acima.
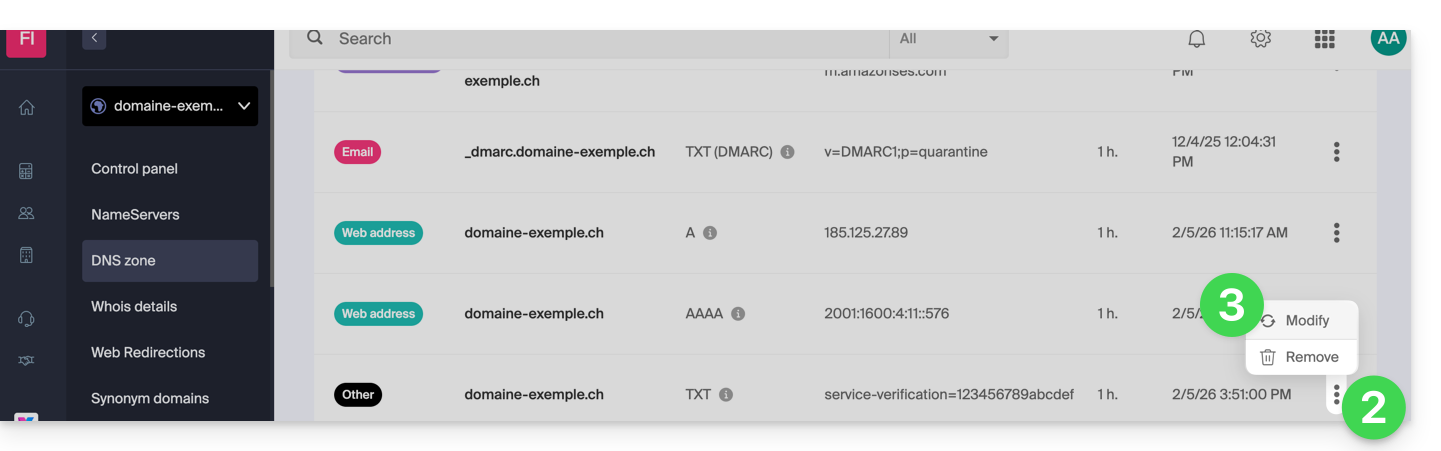
- Clique no menu de ações ⋮, à direita do registro que deseja modificar.
- Clique em Editar para acessar a página de edição:
- Edite as informações desejadas e, em seguida, salve as suas alterações.
Excluir um registo existente
Para remover um registo DNS já existente:
- Siga os passos de 1 a 4 acima.
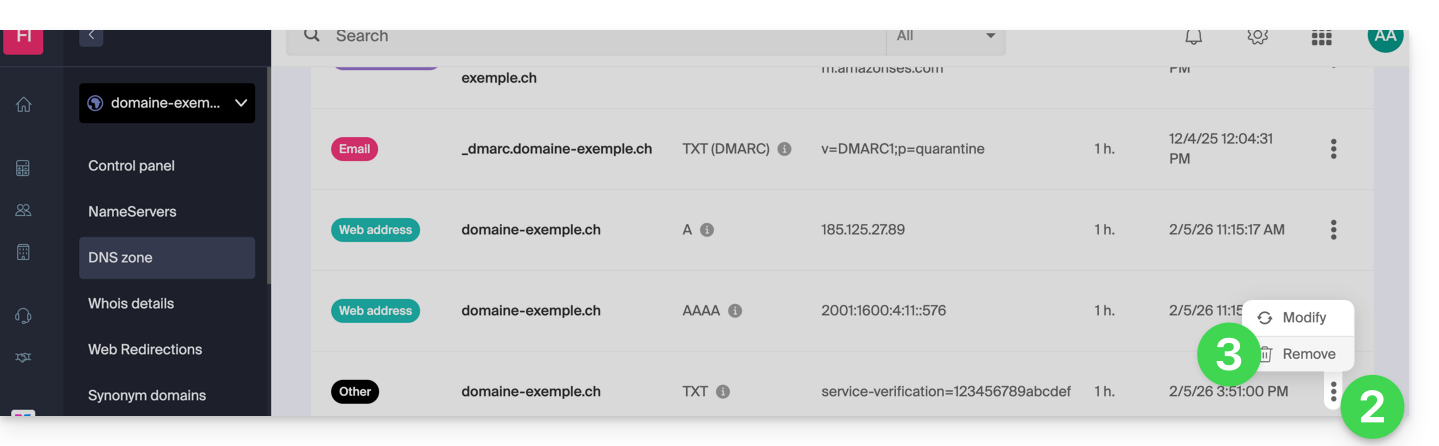
- Clique no menu de ação ⋮ à direita do registro que deseja modificar.
- Clique em Excluir e confirme a exclusão:
Diagnóstico DNS
Uma ferramenta disponível no seu painel de controlo permite corrigir facilmente alguns registos problemáticos. Também pode utilizar um serviço externo e gratuito, como o mencionado na parte inferior de este outro guia.
Modo especialista
Para editar a zona DNS no modo avançado (especialista), o que permite, entre outras coisas, restaurar uma versão anterior dos diferentes registos, consulte este outro guia.
Link para esta FAQ: https://faq.infomaniak.com/2000
Esta seção de perguntas frequentes foi útil?
Este guia explica como, após adquirir um nome de domínio na Infomaniak, obter gratuitamente um Serviço de Email + uma hospedagem Web.
Introdução
- Para cada nome de domínio registado ou transferido para a Infomaniak, pode beneficiar gratuitamente de:
- um endereço de email que lhe dá acesso, nomeadamente, à aplicação Mail Infomaniak
- e um espaço web de 10 MB para uma página básica.
- Também é possível ter um Serviço de Email gratuito ao mesmo tempo que possui uma oferta Web paga, ou vice-versa.
- Em vez de um serviço de e-mail do tipo Starter, também existe a kSuite.
Ativar a oferta Starter Mail + Web
Pré-requisitos
- Ter um nome de domínio na Infomaniak (uma zona DNS não é suficiente).
- Dependendo do tipo desejado (Mail ou Web), certifique-se de que não haja um produto correspondente já associado ao nome de domínioe isso em qualquer Organização Infomaniak existente.
Para encomendar um Serviço de Email Starter e Hospedagem Web Starter incluídos com cada domínio:
- Clique aqui para acessar o gerenciamento do seu produto no Manager Infomaniak (precisa de ajuda?).
- Clique diretamente no nome atribuído ao produto em questão:
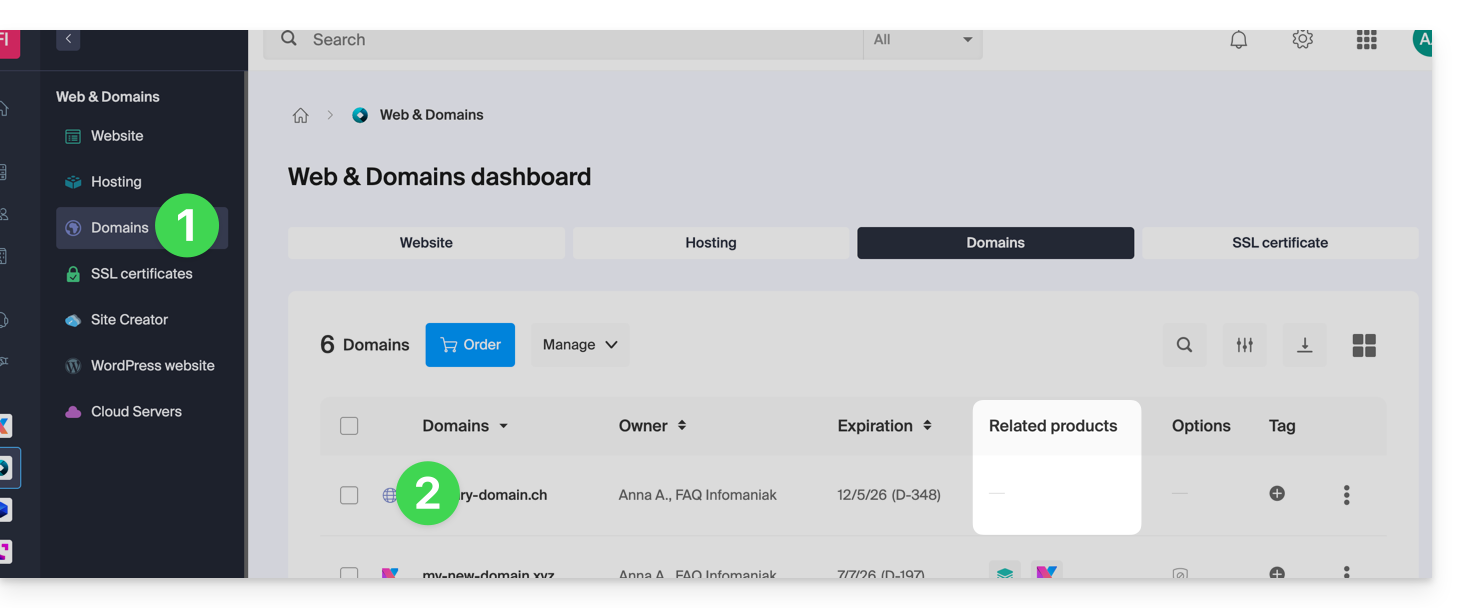
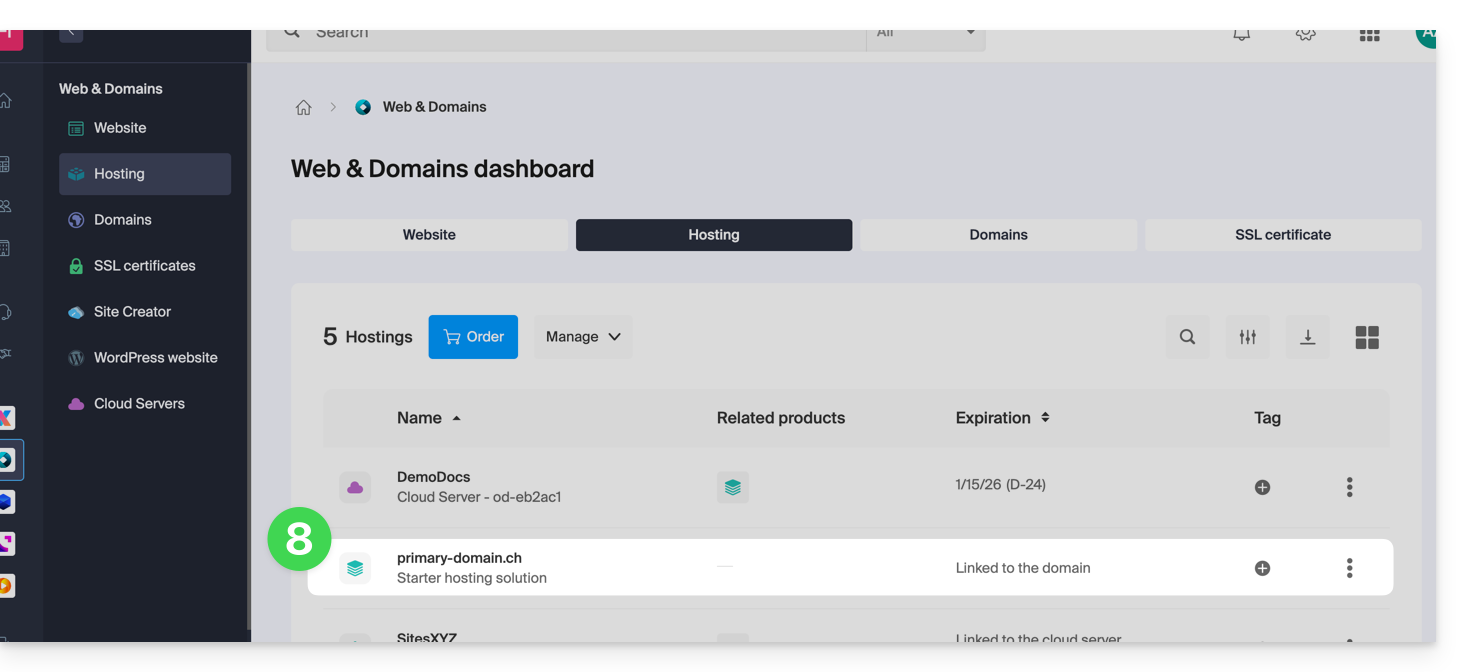
- É necessário que nenhum produto esteja vinculado ao domínio no momento (visível na coluna de produtos vinculados).
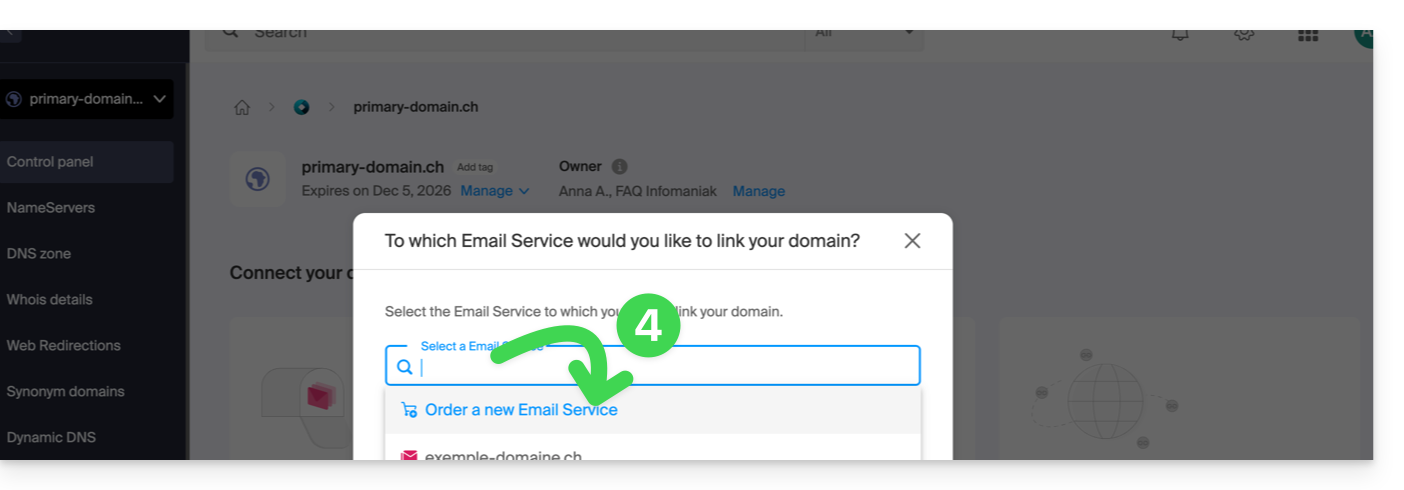
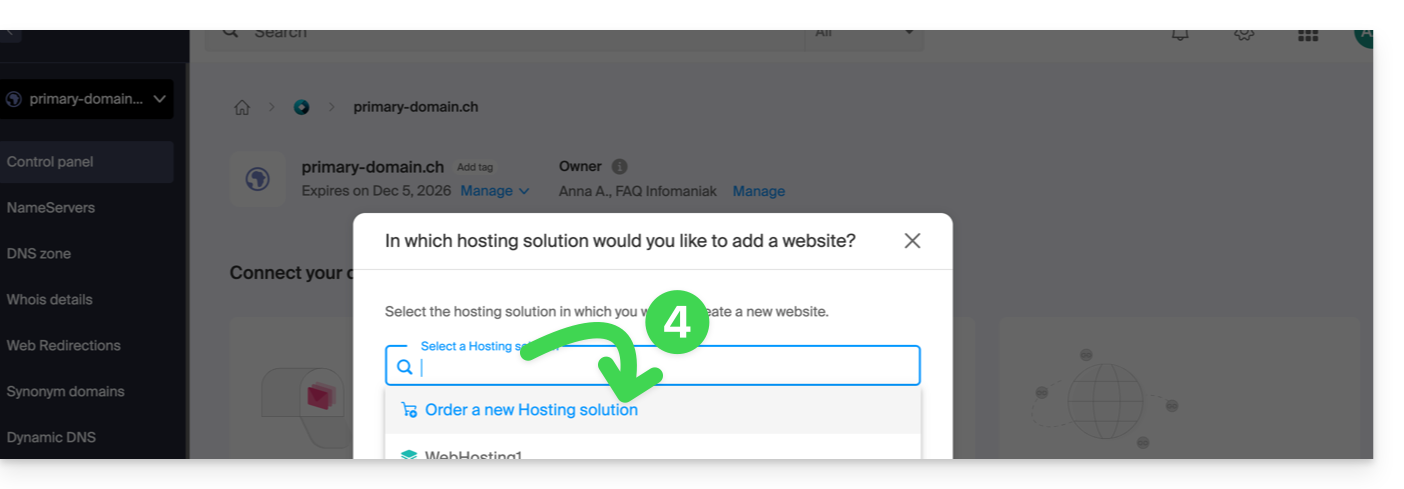
- Clique em um dos atalhos para Conectar um serviço (e-mail ou web):
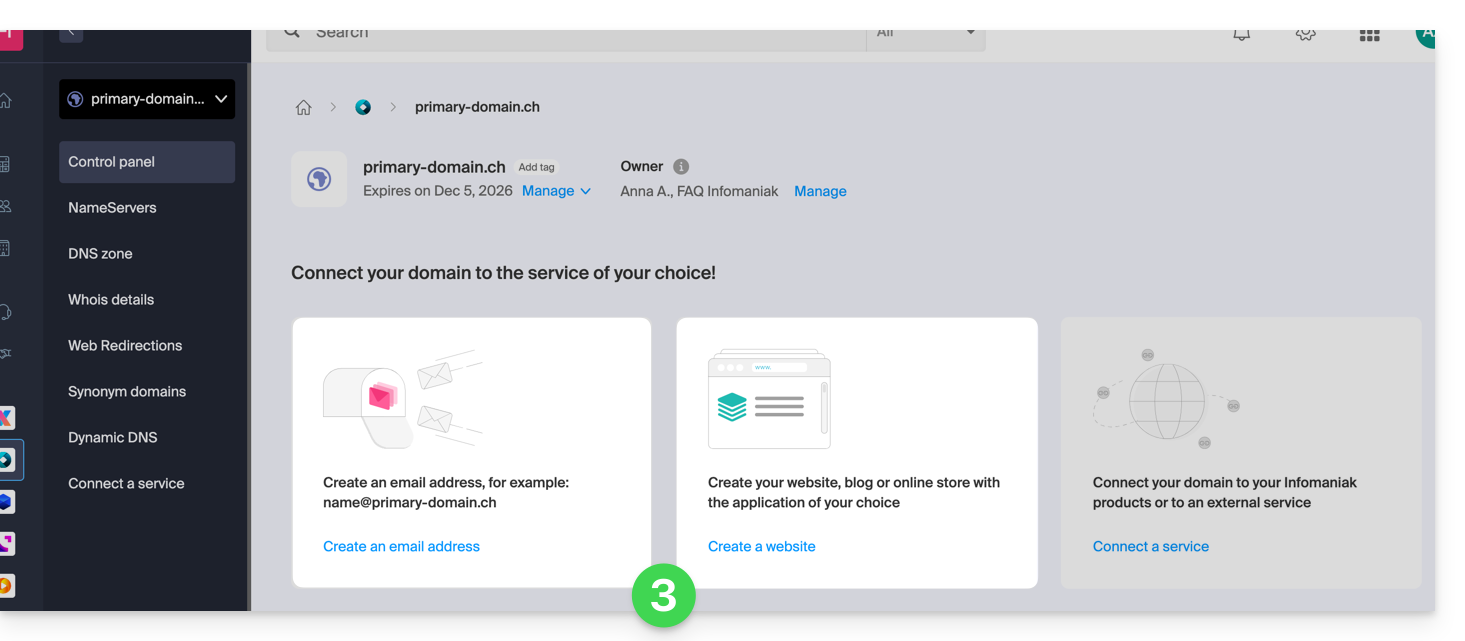
- Em ambos os casos, clique em Encomendar…:
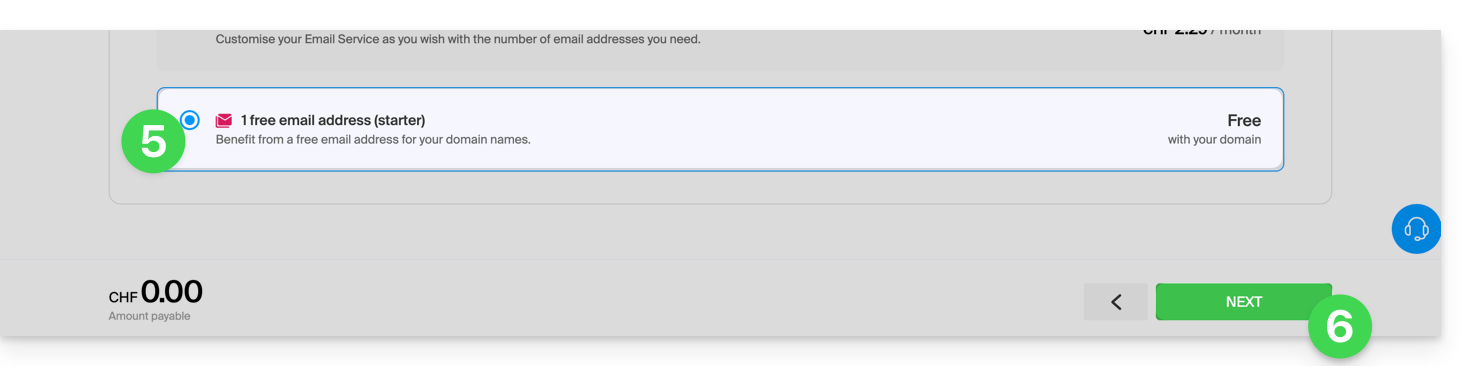
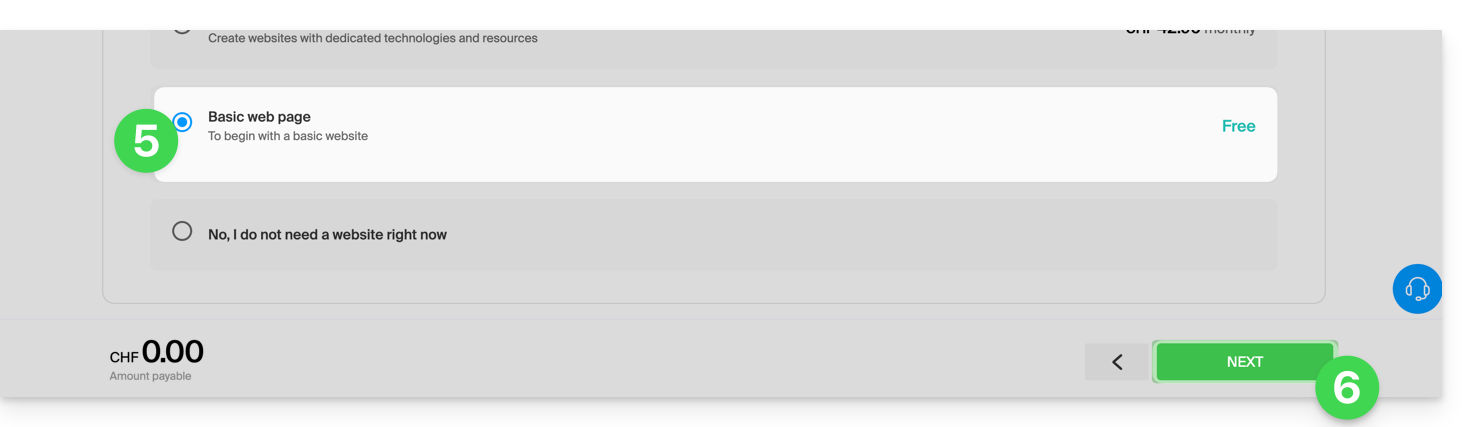
- Você poderá escolher o serviço gratuito correspondente (e-mail ou web) e, na etapa seguinte, será solicitado que escolha o outro (e-mail ou web), se desejar.
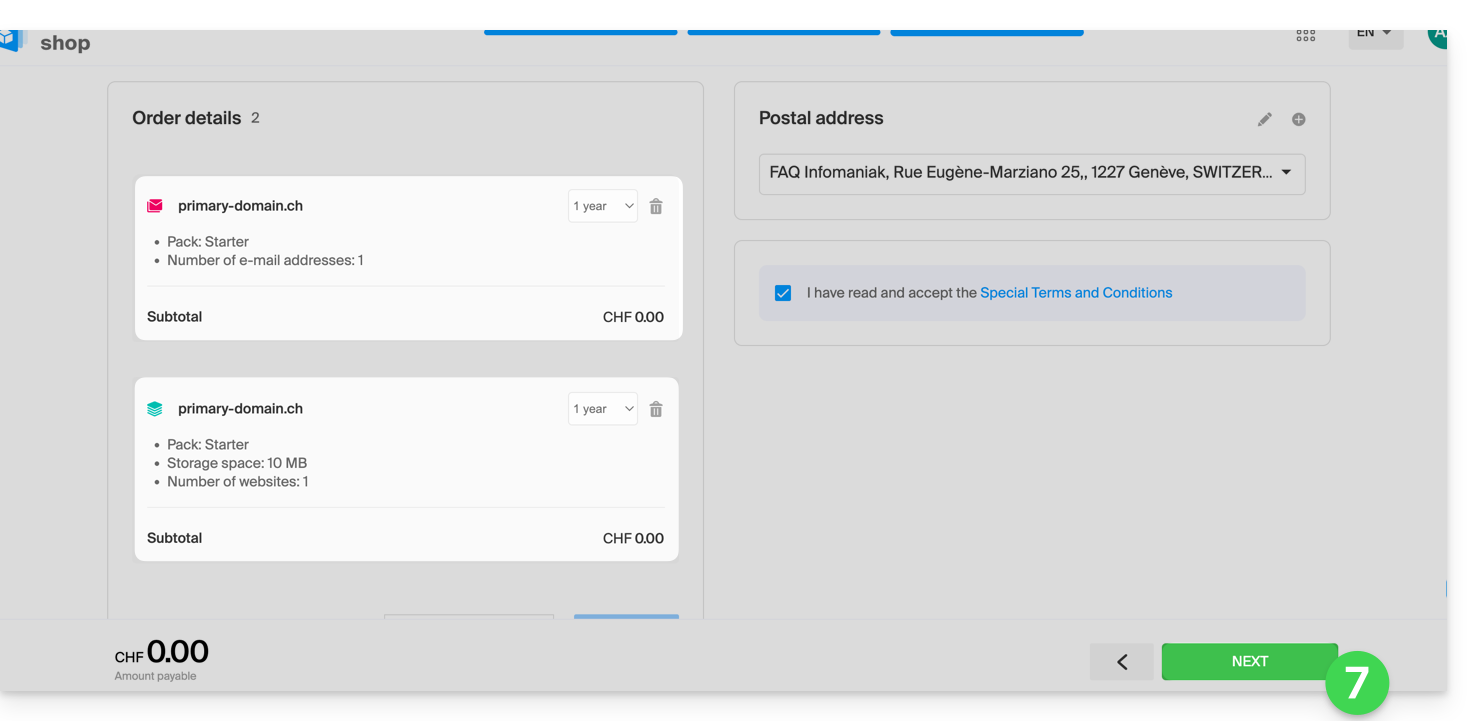
- Clique na parte inferior da página para continuar:
- Conclua o pedido:
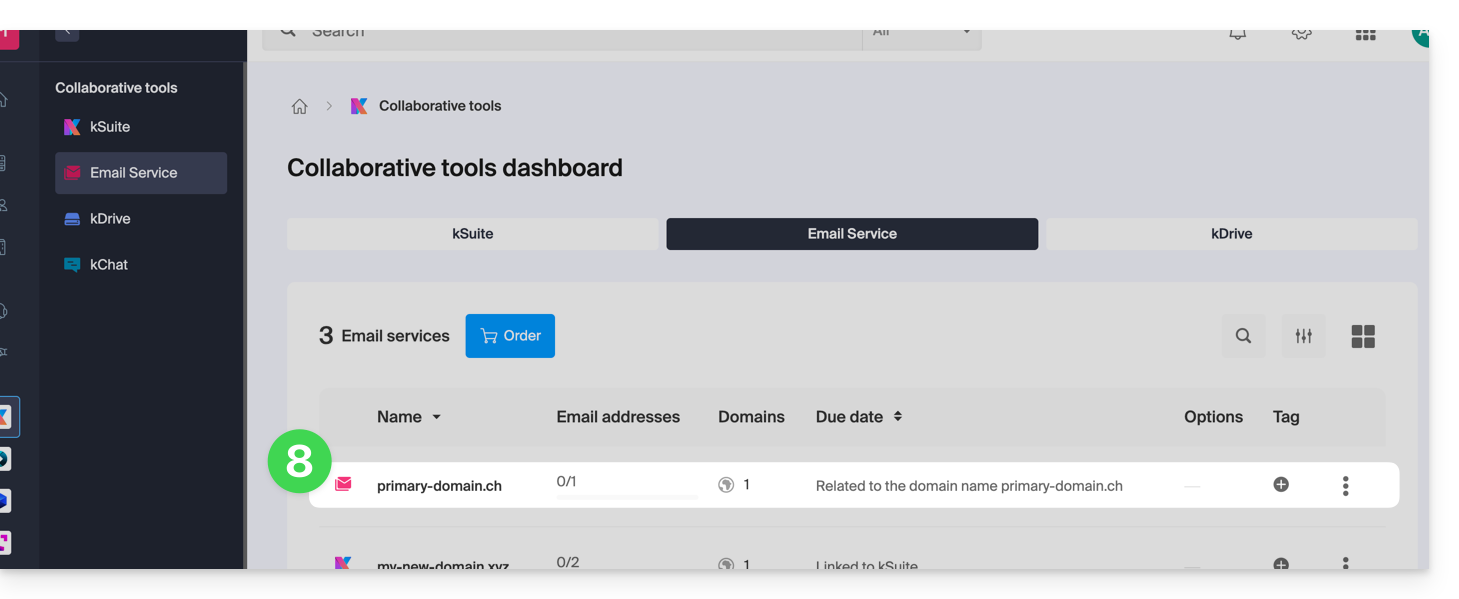
- Volte para o seu Painel de Controle Infomaniak para descobrir e usar seus novos produtos:
Usar seus produtos Starter
- Crie o endereço de e-mail desejado no seu Serviço de E-mail Starter.
- Para usar o espaço web de 10 MB e criar uma página web básica no seu Serviço de Hospedagem Web Starter, utilize:
- o editor de página
- ou o Web FTP no painel de controle para gerenciar suas páginas HTML
- ou qualquer software/cliente FTP com o protocolo FTP clássico
Como atualizar um plano Starter
- Modificar um plano Mail (clique aqui)
- Modificar uma oferta de Web (clique aqui).
Em caso de problema com uma hospedagem Starter
Um serviço de hospedagem web do tipo Starter não oferece suporte a IPv6. Portanto, preste atenção aos registros AAAA na zona DNS do domínio em questão, pois eles podem impedir a ativação do SSL; consulte também este outro guia.
Link para esta FAQ: https://faq.infomaniak.com/2002
Esta seção de perguntas frequentes foi útil?
Obrigado por confiar a gestão dos seus nomes de domínio à Infomaniak.
Este guia permite-lhe utilizar rapidamente as funções essenciais do seu novo produto.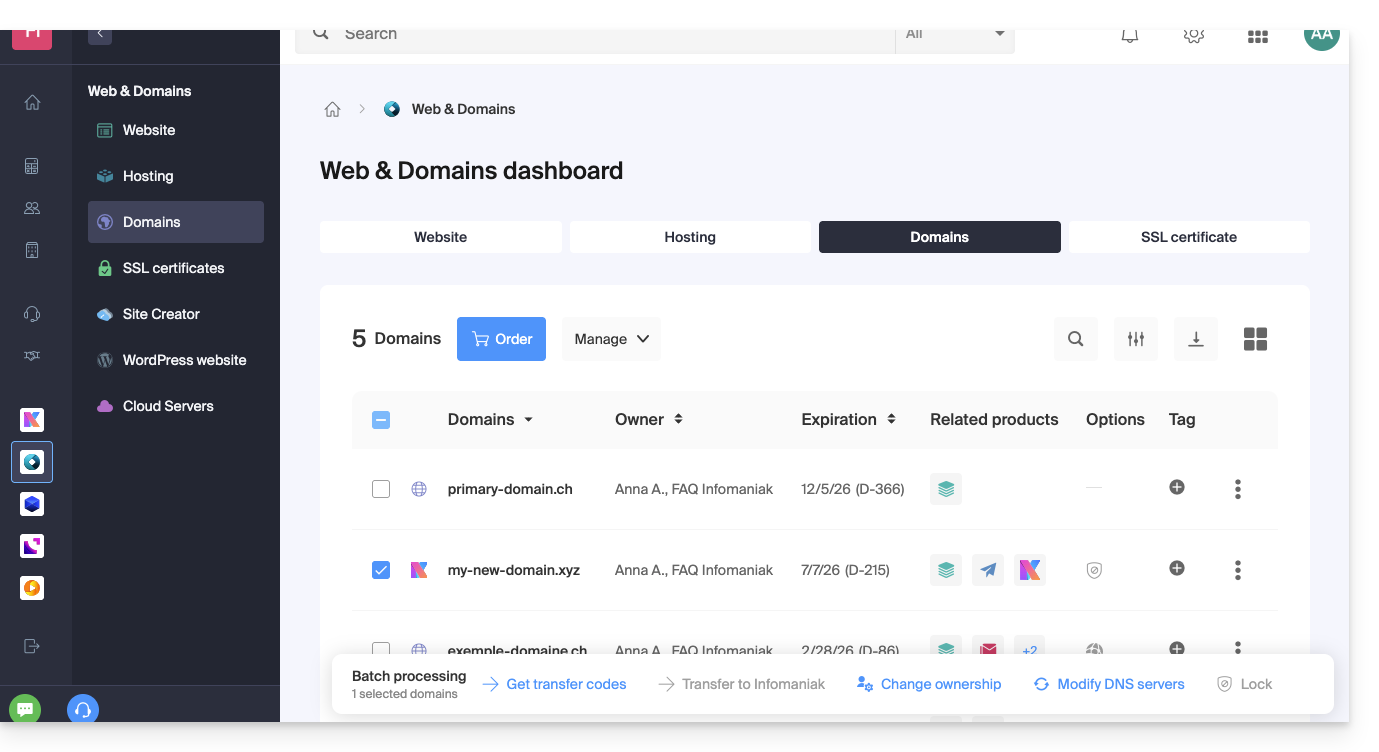
Alguns guias importantes
Administrativos
- Proteger suas informações pessoais no WHOIS
- Proteger seu domínio contra roubo e perda
- Modificar os dados de contacto do nome de domínio
- A quem pertence um nome de domínio?
- Utilizar os serviços gratuitos (e-mail e Web 10 MB) associados a um domínio gerido pela Infomaniak
- Transferir outro nome de domínio para a Infomaniak
Técnicas
- Editar os registos (A, MX, Web, Mail, etc.) de um domínio registado na Infomaniak para, por exemplo, conectar-se a uma hospedagem não gerenciada pela Infomaniak
- Modificar os servidores DNS
- Redirecionar o tráfego
- Configurar o DynDNS
- Associar um nome de domínio ao Serviço de Email
- Associar um nome de domínio adicional ao Serviço de Email
- Desvincular um domínio vinculado ao Serviço de Email
- Vincular um nome de domínio a uma Hospedagem Web Infomaniak
- Associar um nome de domínio adicional a um site
- Desassociar um domínio associado ao site
- Associar um nome de domínio ao NAS Synology Infomaniak
- Associar um nome de domínio ao Wix
- Associar um nome de domínio ao Site Creator
- Associar um nome de domínio à Newsletter
- Associar um nome de domínio Infomaniak a um serviço externo
Caso contrário, encontre o tópico desejado entre as demais FAQs.
Clique aqui para partilhar uma opinião ou sugestão sobre um produto Infomaniak.
Link para esta FAQ: https://faq.infomaniak.com/2003
Esta seção de perguntas frequentes foi útil?
Este guia explica como obter o código EPP do seu nome de domínio na Swizzonic (antiga Switchplus) para transferi-lo para a Infomaniak.
Introdução
- Os termos "
EPP", "AuthCode", "AuthInfo", "código de transferência" e "código de autorização" referem-se a sequências alfanuméricas específicas do domínio, cujo objetivo principal é verificar a autorização do proprietário antes de uma transferência entre registradores. - Consulte o guia principal sobre o restante do processo de transferência.
- ⚠️ Trata-se de transferir um nome de domínio que você possui junto a um fornecedor diferente da Infomaniak, para que a gestão futura desse domínio seja feita pela Infomaniak; portanto, não se trata de uma transferência interna de um titular para outro, e o código a ser obtido não é, portanto, um código para uma transferência interna para o seu fornecedor atual.
Transferir o nome de domínio para a Infomaniak
Para obter o código de autorização do seu provedor atual:
- Consulte o procedimento completo fornecido pela Swizzonic para obter o código e guardá-lo em segurança.
- Depois de obter o código de autorização, consulte o guia principal da Infomaniak sobre o restante do processo de transferência do nome de domínio.
Link para esta FAQ: https://faq.infomaniak.com/2011
Esta seção de perguntas frequentes foi útil?
Este guia explica a diferença entre os termos sinônimo e alias no contexto do serviço de Nome de Domínio oferecido pela Infomaniak.
Introdução
- Consulte este outro guia para adicionar um domínio como sinônimo (ou para o desvincular).
- Entenda a diferença entre domínios e zonas DNS
Domínio sinônimo / domínio alias
Os nomes de domínio ditos sinônimos (ou seja, domínios que dependem totalmente do domínio principal, sem configuração DNS própria) e alias (domínios autônomos, com sua própria configuração DNS) podem ser usados como domínios secundários associados a um domínio principal.
Por exemplo, os domínios pomme.xyz (alias) e banane.xyz (sinônimo) podem redirecionar para um domínio principal comum, como fruits.xyz.
A seguir, a distinção técnica a ser considerada:
- O sinônimo (também chamado de “domínio vinculado” ou “espelho DNS”) utiliza diretamente os servidores DNS do domínio principal. Ele não possui nenhuma zona DNS própria.
- O alias (também chamado de “domínio autônomo redirecionado” ou “alias DNS”) possui seus próprios registros DNS (zona DNS independente), embora aponte para o mesmo servidor ou os mesmos serviços.
| pomme.xyz (domínio alias – com DNS personalizados) ns1.personnalisable.ch ns2.personnalisable.ch | ⇢ | Zona DNS própria Registos A, MX, etc. | Hospedagem Web Serviço de Email |
| fruits.xyz (domínio principal) ns1.infomaniak.ch ns2.infomaniak.ch | } | Zona DNS própria Registos A, MX, etc. | |
| banane.xyz (domínio sinónimo – sem DNS próprios) Recupera automaticamente os DNS do domínio principal (fruits.xyz) |
Link para esta FAQ: https://faq.infomaniak.com/2020
Esta seção de perguntas frequentes foi útil?
Este guia explica como vincular um nome de domínio a um Serviço de Hospedagem Web Infomaniak.
Onde está localizado o seu nome de domínio?…
… Na Infomaniak, mesmo para Organizações
Se o seu nome de domínio estiver registado na Infomaniak e estiver na mesma conta de utilizador ou organização que o serviço de e-mail, então não é preciso fazer nada.
- Consulte este outro guia para verificar e corrigir eventuais erros de configuração.
… Na Infomaniak, organização diferente
Se o seu nome de domínio estiver registado na Infomaniak, mas numa conta de utilizador ou Organização diferente, então:
- Edite a zona DNS, especificando o endereço IP do site como um registo A.
- Qualquer adição/modificação DNS pode demorar até 48 horas para se propagar.
OU
- Mova-o dentro da mesma Organização.
… Na Infomaniak com DNS externos
Se o seu nome de domínio tiver DNS que não sejam os da Infomaniak, então:
- Edite a zona DNS atual no local onde ela está (se necessário, consulte a ajuda do fornecedor em questão) e especifique o endereço IP do site na forma de um registro A.
- Qualquer adição/modificação de DNS pode levar até 48 horas para se propagar.
OU
- Altere os DNS atuais e selecione a opção de usar os DNS da Infomaniak.
- Qualquer adição ou modificação de DNS pode levar até 48 horas para ser propagada.
- Consulte este outro guia para verificar e corrigir possíveis erros de configuração.
… Em outro lugar, com DNS externos
Se o seu nome de domínio tiver DNS que não sejam os da Infomaniak, então:
- Edite a zona DNS atual no local onde ela se encontra (se necessário, consulte a ajuda do provedor em questão) e especifique nela o endereço IP do site no formato de um registro A.
- Qualquer adição/modificação DNS pode levar até 48 horas para ser propagada.
OU
- Altere os DNS atuais (se necessário, consulte a ajuda do provedor em questão) e especifique os DNS da Infomaniak (isso implica em ter uma zona DNS na Infomaniak).
- Qualquer adição/modificação DNS pode levar até 48 horas para ser propagada.
- Esta zona DNS na Infomaniak será configurada corretamente, mas consulte este outro guia para verificar e corrigir eventuais erros de configuração.
… Em outro lugar, mas você o está transferindo
Se o seu nome de domínio estiver registado noutro registrador e desejar transferi-lo para o mesmo local onde está alojado o seu site Infomaniak, então:
- Transfira o nome de domínio para a Infomaniak (este será configurado corretamente, mas consulte este outro guia para verificar e corrigir eventuais erros de configuração).
- Se o nome de domínio for destinado a ser um alias do seu site principal, você deve adicionar o alias ao seu site.
Link para esta FAQ: https://faq.infomaniak.com/2025
Esta seção de perguntas frequentes foi útil?
Este guia explica o funcionamento de um nome de domínio e de uma zona DNS.
Introdução
- Quando navega num site, por exemplo
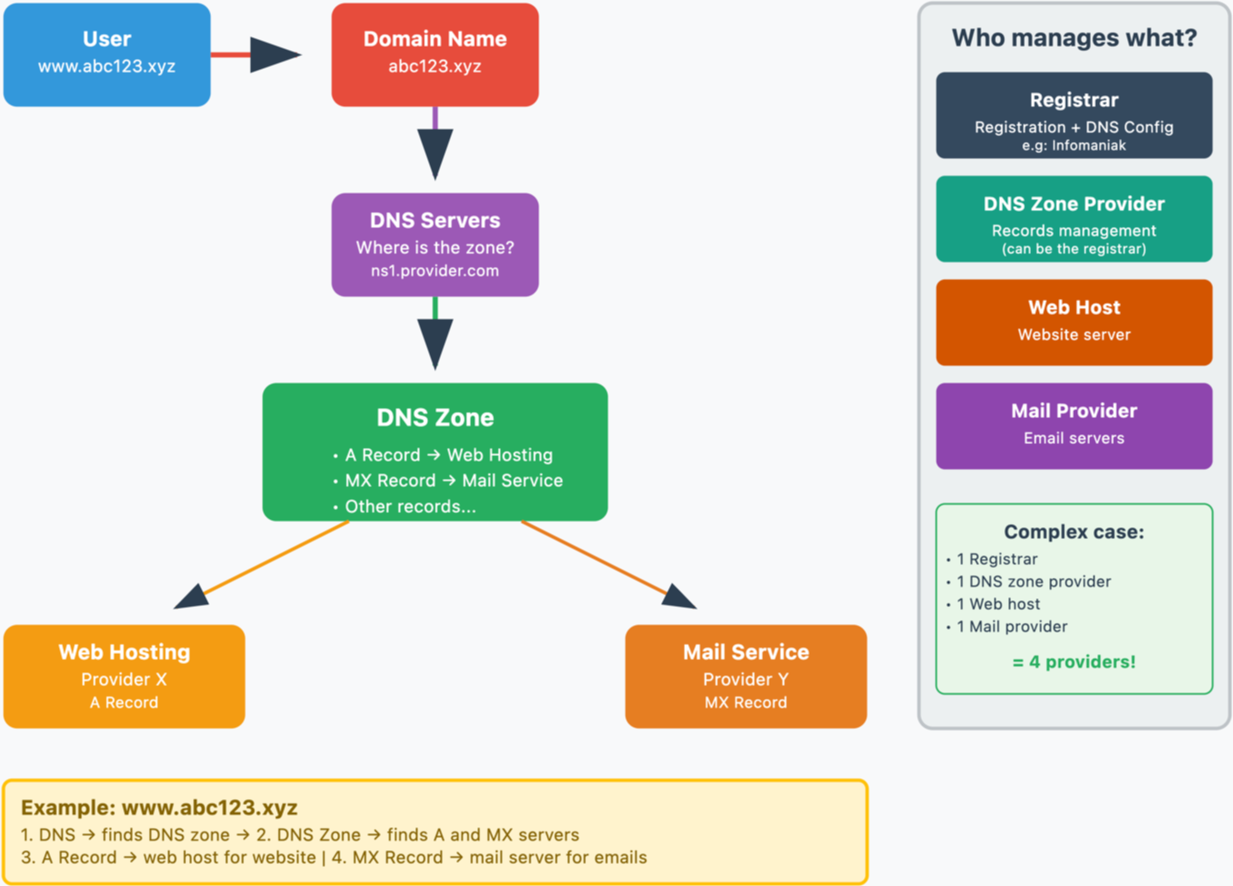
https://www.abc123.xyz,abc123.xyzé o nome de domínio. - Cada nome de domínio possui DNS (Sistema de Nomes de Domínio), que permite indicar onde (em qual provedor, por exemplo) se encontra a zona DNS.
- A zona DNS permite, então, delegar a gestão de diferentes serviços relacionados com o nome de domínio a diferentes prestadores.
- Para um nome de domínio único, é possível, por exemplo, delegar:
- o alojamento web a um prestador X (através do registo do tipo "
A") - e o serviço de e-mail a um prestador Y (através do registo do tipo "
MX")
- o alojamento web a um prestador X (através do registo do tipo "
- Para um nome de domínio único, é possível, por exemplo, delegar:
Nome de domínio, DNS e zona DNS, e depois serviços
Quem gere o quê?
- Cada nome de domínio é reservado e gerido por um registrador. Por exemplo, a Infomaniak é um registrador, um dos mais baratos da Suíça.
- Os DNS de um nome de domínio são configurados junto do registrador que gere o nome de domínio.
- A zona DNS pode ser gerida pelo registrador ou por outro prestador.
- O alojamento web e o serviço de e-mail podem ser geridos por qualquer provedor de alojamento.
No caso mais complexo, é possível ter 1 prestador diferente para os seguintes serviços: reserva do nome de domínio e gestão dos DNS, gestão da zona DNS, alojamento web, serviço de e-mail.
O esquema seguinte resume estas diferentes possibilidades com a participação de prestadores diferentes:
Infomaniak
Como registrador e provedor de alojamento, a Infomaniak pode garantir a gestão de todos estes serviços. Esta é a solução mais simples.
- No caso da Infomaniak, os DNS geralmente têm o formato nsXX.infomaniak.com e nsXX.infomaniak.com (XX como 11 ou 12, por exemplo).
- Você pode modificar os DNS do seu nome de domínio, bem como modificar o "interior" desses DNS, ou seja, modificar a zona DNS de um nome de domínio.
E nessas zonas DNS, para redirecionar o tráfego para os serviços, distinguimos:
- um registro MX que permite direcionar um nome de domínio (
domain.xyz, por exemplo) para um servidor de e-mail. - um registro A que permite direcionar um nome de domínio (
domain.xyz, por exemplo) ou um subdomínio (exemple.domain.xyz, por exemplo) para um servidor web que tenha um endereço IP estático (caso contrário, seria necessário editar constantemente o registro A para inserir o novo endereço IP – consulte este outro guia sobre o assunto).
Algumas situações possíveis
Exemplos e nomes fictícios
| Todos os serviços estão na Infomaniak | |||
|---|---|---|---|
| nome de domínio | domain.xyz | registrado em -> | Infomaniak |
| DNS do nome de domínio | ns1.infomaniak.com… | portanto, a zona DNS deve existir em -> | Infomaniak |
| site hospedado por -> | Infomaniak | portanto, a zona DNS deve conter o registro A | 123.45.67.8, por exemplo |
| serviço de e-mail hospedado por -> | Infomaniak | portanto, a zona DNS deve conter um registro MX | mx-mail.maniak, por exemplo |
| Todos os serviços são da Infomaniak exceto o serviço de e-mail | |||
|---|---|---|---|
| nome de domínio | domain.xyz | registrado em -> | Infomaniak |
| DNS do nome de domínio | ns1.infomaniak.com… | portanto, a zona DNS deve existir em -> | Infomaniak |
| site hospedado por -> | Infomaniak | portanto, a zona DNS deve conter um registro A | 123.45.67.8, por exemplo |
| serviço de e-mail hospedado por -> | Serviço Médico | portanto, a zona DNS deve conter um registro MX | med-mx.net, por exemplo |
| Todos os serviços são da Infomaniak exceto o site | |||
|---|---|---|---|
| nome de domínio | domain.xyz | registrado em -> | Infomaniak |
| DNS do nome de domínio | ns1.infomaniak.com… | portanto, a zona DNS deve existir em -> | Infomaniak |
| site hospedado por -> | Clínica | portanto, a zona DNS deve conter um registro A | 9.87.65.4, por exemplo |
| serviço de e-mail hospedado por -> | Infomaniak | portanto, a zona DNS deve conter um registro MX | mx-mail.maniak, por exemplo |
| Todos os serviços estão na Infomaniak exceto o nome de domínio | |||
|---|---|---|---|
| nome de domínio | domain.xyz | registrado em -> | GoMamie |
| DNS do nome de domínio | ns1.infomaniak.com… | portanto, a zona DNS deve existir em -> | Infomaniak |
| site hospedado por -> | Infomaniak | portanto, a zona DNS deve conter o registro A | 123.45.67.8, por exemplo |
| e-mail hospedado por -> | Infomaniak | portanto, a zona DNS deve conter o registro MX | mx-mail.maniak, por exemplo |
| Todos os serviços estão na Infomaniak exceto a zona DNS | |||
|---|---|---|---|
| nome de domínio | domain.xyz | registrado em -> | Infomaniak |
| DNS do nome de domínio | ns.privateDNS.org… | portanto, a zona DNS deve existir em -> | Private DNS |
| site hospedado por -> | Infomaniak | portanto, a zona DNS deve conter o registro A | 123.45.67.8, por exemplo |
| e-mail hospedado por -> | Infomaniak | portanto, a zona DNS deve conter o registro MX | mx-mail.maniak, por exemplo |
| Nenhum serviço existe na Infomaniak exceto o nome de domínio | |||
|---|---|---|---|
| nome de domínio | domain.xyz | registrado em -> | Infomaniak |
| DNS do nome de domínio | ns.privateDNS.org… | portanto, a zona DNS deve existir em -> | Private DNS |
| site hospedado por -> | Clínica | portanto, a zona DNS deve conter o registro A | 9.87.65.4, por exemplo |
| e-mail hospedado por -> | Medical Service | portanto, a zona DNS deve conter o registro MX | med-mx.net, por exemplo |
| Nenhum serviço existe na Infomaniak exceto a zona DNS | |||
|---|---|---|---|
| nome de domínio | domain.xyz | registrado em -> | GoMamie |
| DNS do nome de domínio | ns1.infomaniak.com… | portanto, a zona DNS deve existir em -> | Infomaniak |
| site hospedado por -> | Clínica | portanto, a zona DNS deve conter o registro A | 9.87.65.4, por exemplo |
| e-mail hospedado por -> | Medical Service | portanto, a zona DNS deve conter o registro MX | med-mx.net, por exemplo |
| Nenhum serviço existe na Infomaniak exceto o e-mail | |||
|---|---|---|---|
| nome de domínio | domain.xyz | registrado em -> | GoMamie |
| DNS do nome de domínio | ns.privateDNS.org… | portanto, a zona DNS deve existir em -> | Private DNS |
| site hospedado por -> | Clínica | portanto, a zona DNS deve conter o registro A | 9.87.65.4, por exemplo |
| e-mail hospedado por -> | Infomaniak | portanto, a zona DNS deve conter registros MX | mx-mail.maniak, por exemplo |
etc.
Link para esta FAQ: https://faq.infomaniak.com/2026
Esta seção de perguntas frequentes foi útil?
Este guia explica como adicionar ou modificar um ou mais registos do tipo CNAME e DNAME na zona DNS (de um nome de domínio) gerida no Manager Infomaniak.
Introdução
- O tipo de registro
CNAMEpermite apontar um subdomínio para um endereço de site.- Este é o método geralmente usado para fazer com que o subdomínio
wwwfuncione com seu site ou para redirecionar um subdomínio para uma pasta do servidor web onde seu site está hospedado.
- Este é o método geralmente usado para fazer com que o subdomínio
- O tipo de registro
DNAME, para «delegation name», é particularmente útil ao reorganizar domínios ou para transições suaves de uma parte da sua infraestrutura para outra, preservando a estrutura hierárquica dos subdomínios.- Um
DNAMEcria um alias para um domínio inteiro e todos os seus subdomínios.
- Um
- Ao contrário do
CNAME, que se aplica apenas a um único nome de host específico, oDNAMEredireciona automaticamente todos os subdomínios. Exemplo:- Um
DNAMEparaabc.site1.comque aponta parasite2.comirá redirecionar automaticamentexyz.abc.site1.comparaxyz.site2.com,new.login.abc.site1.comparanew.login.site2.come assim por diante.
- Um
- ⚠ Um registro
DNAMEnão pode ser usado no nível da zona raiz de um domínio (comosite1.comdiretamente). Geralmente, é usado em um subdomínio. Se você deseja redirecionar o domínio principal, deverá usar outros tipos de registros, como umA,AAAAouCNAME(com algumas restrições para este último).
Modificar a zona DNS
Para gerir este tipo de registo numa zona DNS:
- Clique aqui para acessar o gerenciamento do seu domínio no Manager Infomaniak (precisa de ajuda?).
- Clique diretamente no nome atribuído ao domínio em questão.
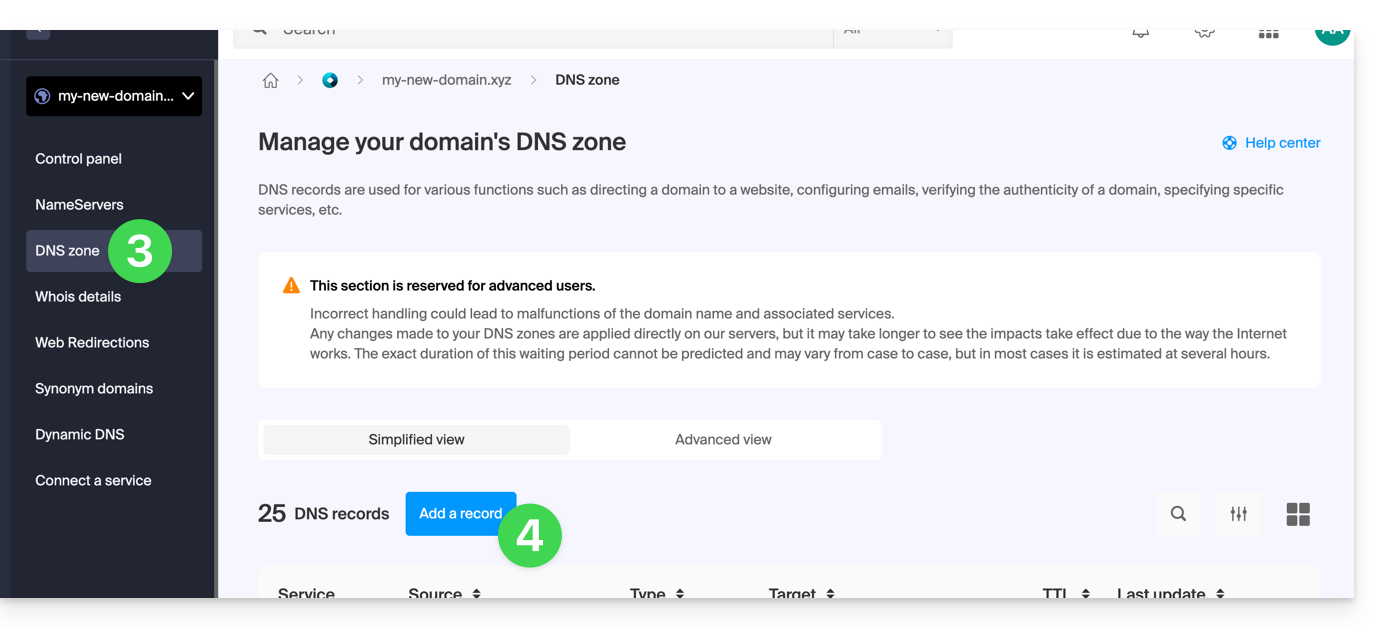
- Clique em Zona DNS no menu lateral esquerdo.
- Clique no botão para adicionar um registo:
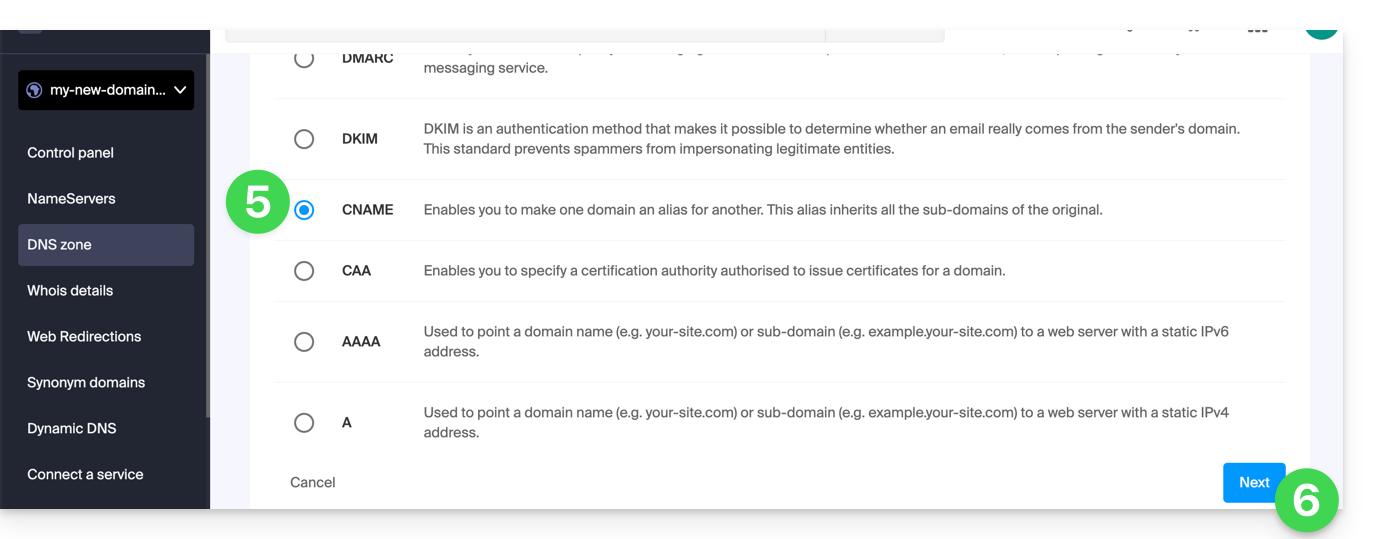
- Clique no botão de rádio correspondente para adicionar um registro.
- Clique no botão Avançar:
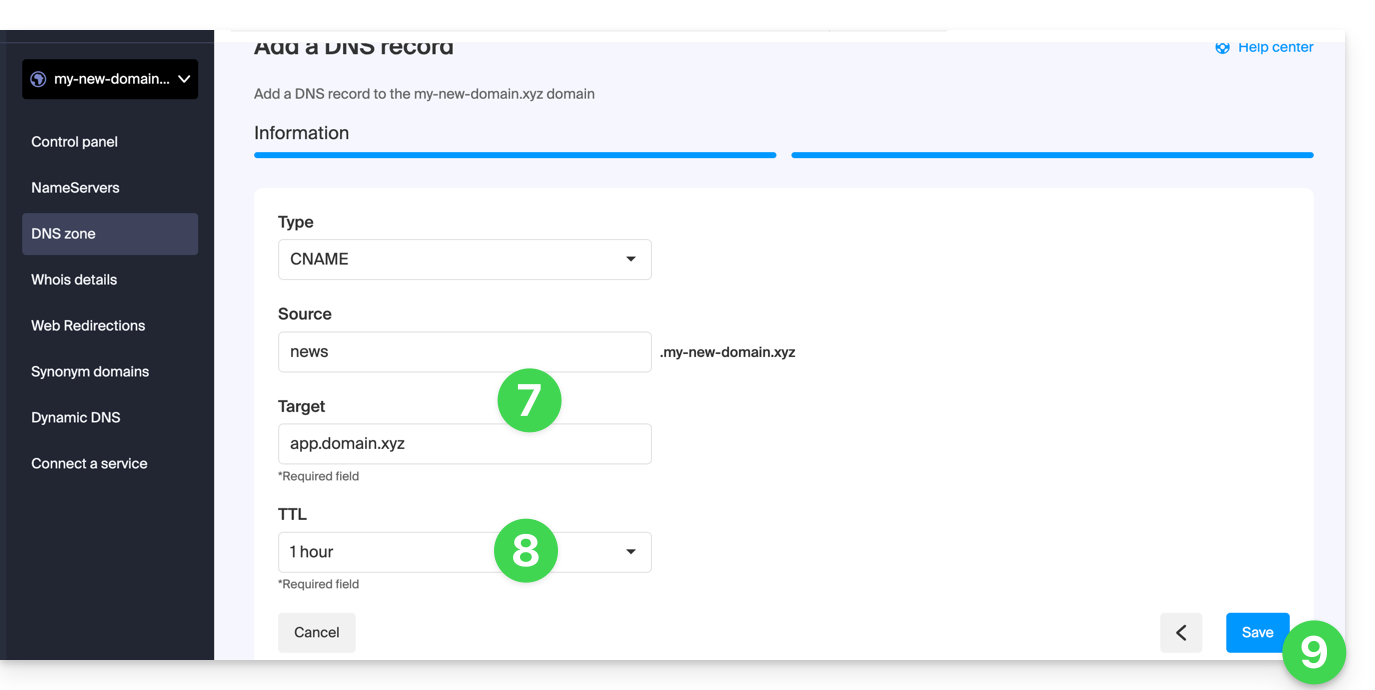
- Insira os valores necessários para a sua zona DNS.
- Mantenha o valor padrão para o TTL.
- Clique no botão Guardar:
Link para esta FAQ: https://faq.infomaniak.com/2033
Esta seção de perguntas frequentes foi útil?
Este guia explica comocriar subdomínios em uma hospedagem Infomaniak existente, utilizando um arquivo .htaccess.
✘ INDISPONÍVEL com
Site Creator Lite
hospedagens Starter
Preâmbulo
- A hospedagem pode estar localizada em uma oferta de Hospedagem Web compartilhada ou em um Servidor Cloud Infomaniak.
- Os subdomínios podem ser adicionados muito facilmente na sua hospedagem atual, pois a oferta básica inclui 20 sites por hospedagem (sites = subdomínios).
- Se não quiser usar este número de sites disponíveis, pode seguir o método abaixo.
Criar um subdomínio como atalho
Os subdomínios criados desta forma facilitam a organização de uma hospedagem. Por exemplo, o endereço vlog.domain.xyz será o atalho do endereço domain.xyz/vlog. Ou seja, o endereço vlog.domain.xyz redirecionará para a pasta vlog, que deverá estar localizada na raiz do site domain.xyz. Neste exemplo, vlog é o subdomínio de domain.xyz.
1. Adicionar o subdomínio como um alias do seu site
Para isso:
- Siga o procedimento para adicionar um alias, mas leia atentamente os pontos 2 e 3 abaixo.
- No campo para adicionar o domínio associado, insira o endereço completo do subdomínio (por exemplo,
vlog.domain.xyz). - Se o seu domínio ou a sua zona DNS for gerido na Infomaniak, ative as duas opções seguintes: Atualizar as entradas DNS para este domínio e Substituir as entradas já existentes; caso contrário, crie um registo A no seu registrador com as seguintes informações:
- campo: o endereço URL completo do subdomínio (por exemplo,
vlog.domain.xyz) - destino: o endereço IPv4 (registo A) do seu site (consulte este outro guia para encontrar o registo A do seu site)
- campo: o endereço URL completo do subdomínio (por exemplo,
2. Modificar o ficheiro htaccess do seu site
Importante: as instruções a seguir são fornecidas apenas como referência. Pode ser necessário adaptar o código para que ele funcione na sua situação.
Usando seu software/cliente FTP ou o Web FTP no painel de controle, adicione e adapte o seguinte código ao arquivo .htaccess, que se encontra na raiz do seu site:
RewriteCond %{HTTP_HOST} ^(.*)\.domain\.xyz [NC]
RewriteCond %{DOCUMENT_ROOT}/%1/ -d
RewriteCond %1::%{REQUEST_URI} !^(.*?)::/\1/?
RewriteRule "^(.*)$" "%{DOCUMENT_ROOT}/%1/$1" [L]
Explicações para a terceira linha: https://stackoverflow.com/a/15981056
Substitua na primeira linha:
domainpelo seu nome de domínioxyzpela extensão do seu nome de domínio (ch, fr, etc.)
Agora, o endereço vlog.domain.xyz deve exibir o conteúdo da pasta vlog, que está localizada na raiz do seu site. Se não for o caso, verifique se a pasta vlog realmente existe na raiz do seu site.
Link para esta FAQ: https://faq.infomaniak.com/2036
Esta seção de perguntas frequentes foi útil?
Este guia explica como configurar uma delegação de zona para um subdomínio.
Pré-requisitos
- Possuir um nome de domínio na Infomaniak ou, no mínimo, uma zona DNS.
- Compreender:
- o funcionamento de um domínio e de uma zona DNS antes de modificar esta última.
- que a zona DNS apresentada aqui é válida e utilizada apenas se os nomes de servidor forem os da Infomaniak.
- que qualquer adição/modificação DNS pode levar até 48 horas para se propagar.
Configurar uma delegação de zona
Para isso:
- Clique aqui para acessar o gerenciamento do seu produto no Manager Infomaniak (precisa de ajuda?).
- Clique diretamente no nome atribuído ao produto em questão.
- Clique em Zona DNS no menu lateral esquerdo.
- Clique na aba Visualização avançada.
- Clique no botão +:
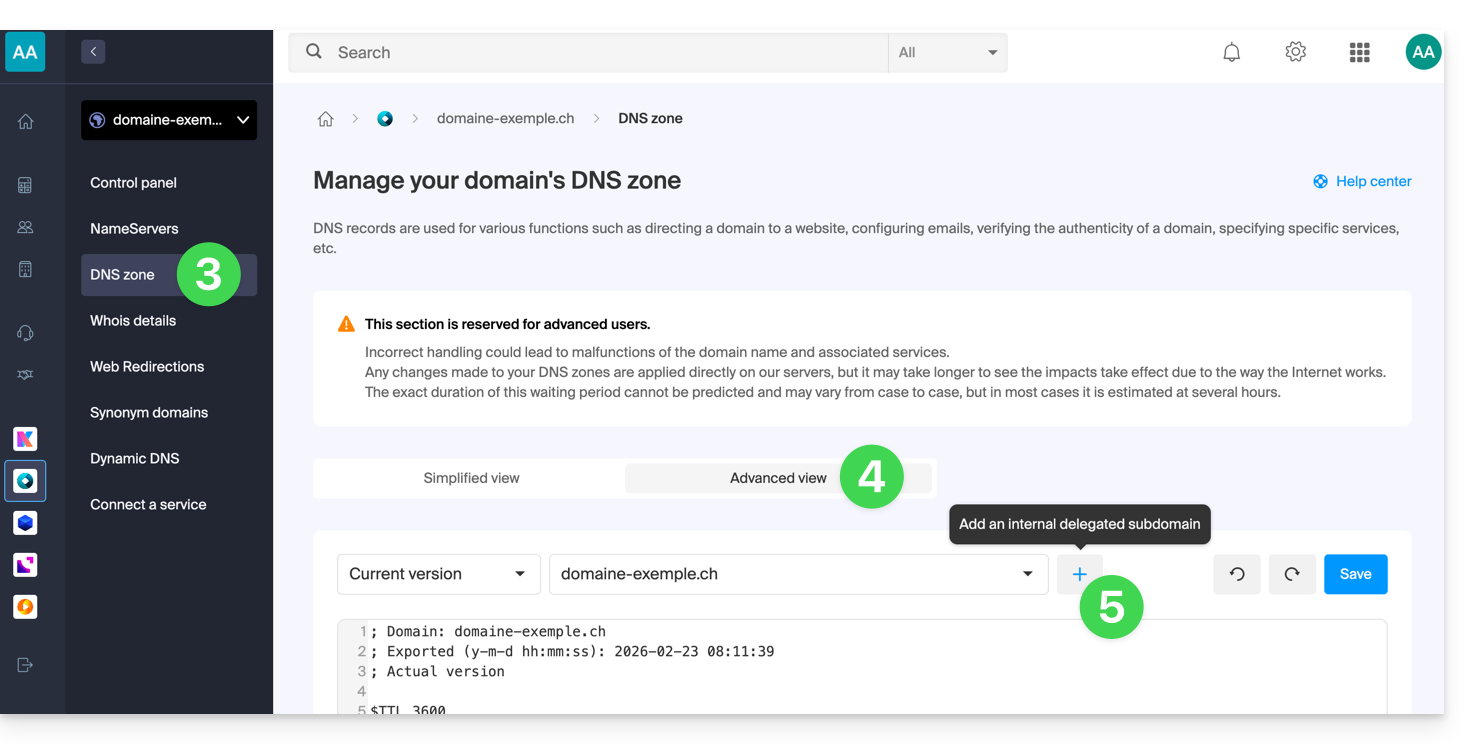
- Insira o subdomínio desejado (por exemplo,
testpara obtertest.domain.xyz) - Agora é possível editar a zona DNS do subdomínio delegado.
Link para esta FAQ: https://faq.infomaniak.com/2050
Esta seção de perguntas frequentes foi útil?
Este guia explica como modificar, em modo avançado (especialista), entradas específicas (registros do tipo A e AAAA, MX, TXT, etc.) dentro da zona DNS de um nome de domínio registrado na Infomaniak.
Se você é iniciante, prefira o modo simples.
Pré-requisitos
- Possuir um nome de domínio na Infomaniak ou, no mínimo, uma zona DNS.
- Compreender:
- o funcionamento de um domínio e de uma zona DNS antes de modificar esta última…
- que a zona DNS apresentada aqui é válida e utilizada apenas se os nomes de servidor forem os da Infomaniak…
- que qualquer adição/modificação DNS pode levar até 48 horas para ser propagada.
Modificar um registro existente
Para configurar os serviços associados ao domínio e permitir a resolução adequada dos nomes de domínio para os recursos correspondentes (como sites externos, servidores de e-mail de terceiros, etc.):
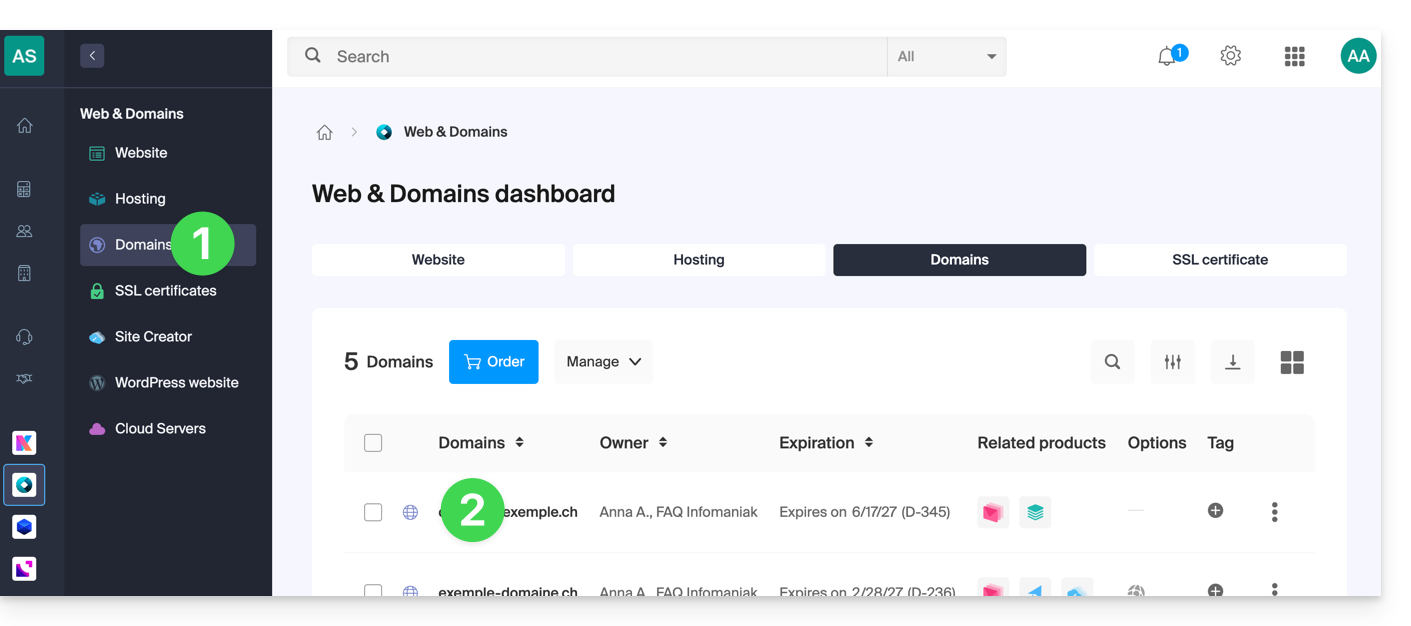
- Clique aqui para acessar o gerenciamento do seu domínio no Manager Infomaniak (precisa de ajuda?).
- Clique diretamente no nome atribuído ao domínio em questão:
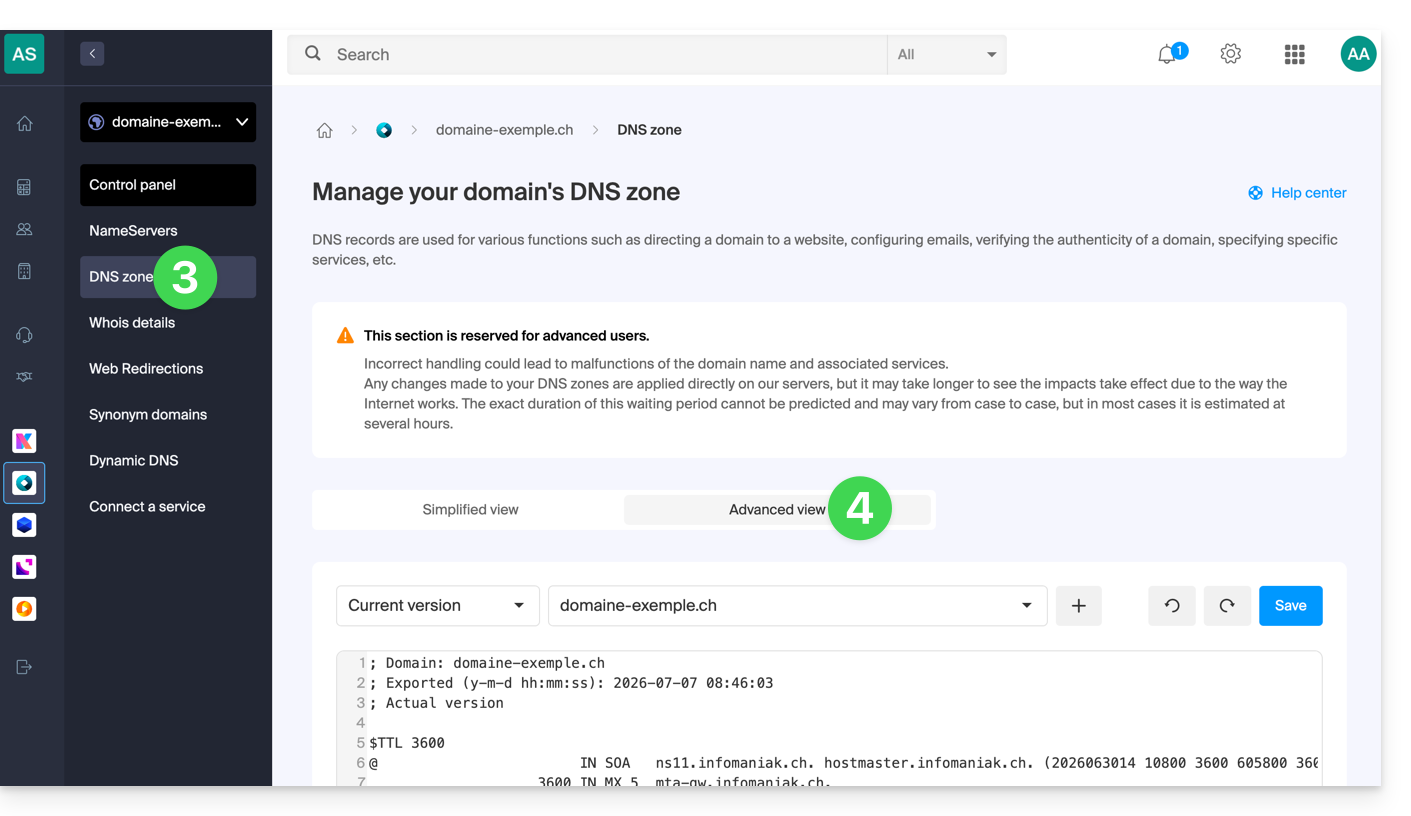
- Clique em Zona DNS no menu lateral esquerdo.
- Clique em Visualização avançada:
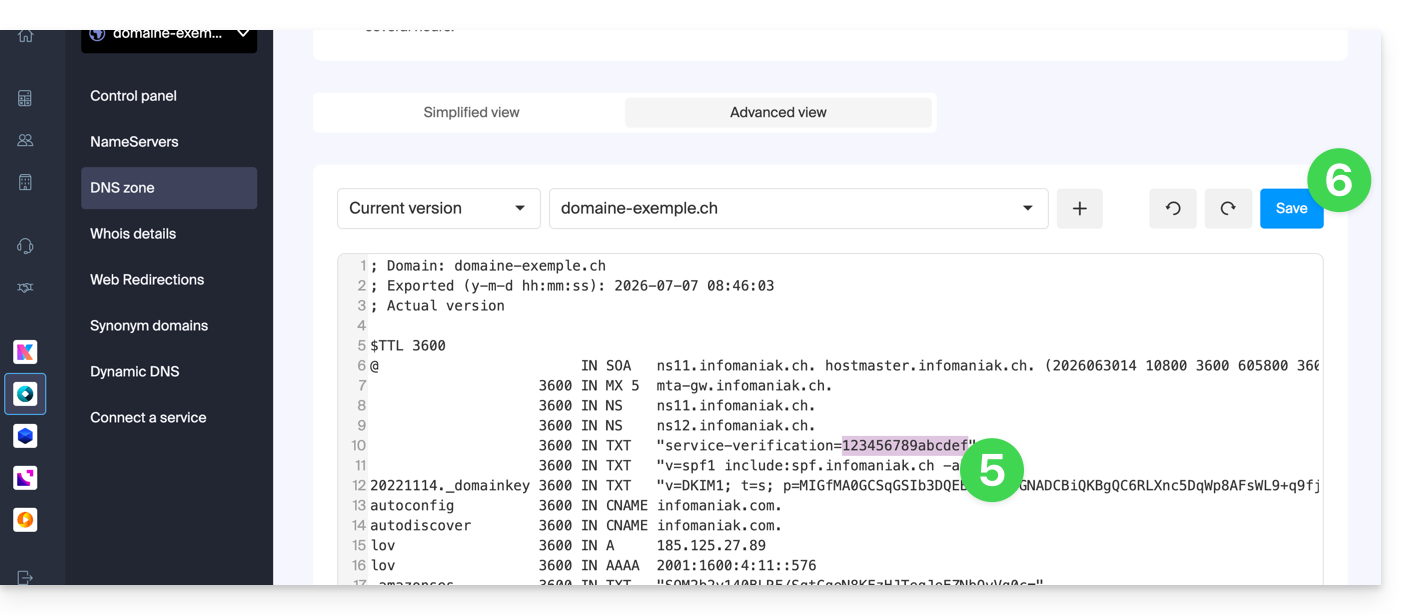
- Edite as informações desejadas.
- A sintaxe aceita é no formato BIND.
- Salve suas alterações:
Restaurar uma zona DNS
Graças ao modo Expert, você pode usar o versionamento para encontrar uma versão anterior da zona DNS do seu nome de domínio e restaurá-la como era em um determinado momento:
- Depois de estar na guia Visualização avançada (veja acima), clique em Versão atual para abrir o menu contendo datas anteriores.
- Clique na data desejada para obter uma pré-visualização das alterações.
- Clique no botão azul Salvar à direita para retornar à versão escolhida:
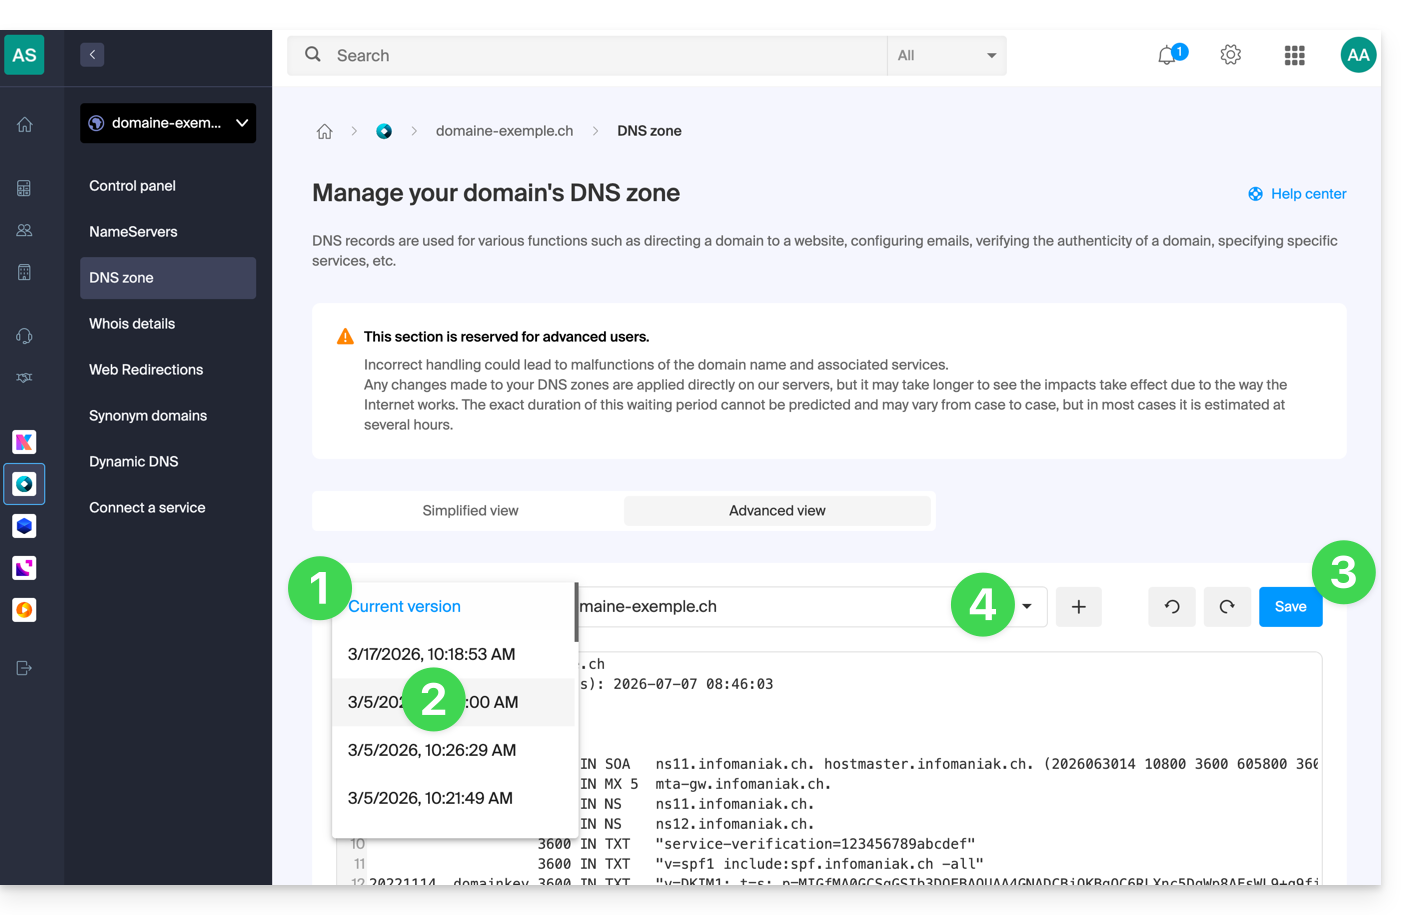
- Clique no segundo menu suspenso, se necessário, para acessar a restauração da configuração de subdomínios delegados.
Diagnóstico DNS
Uma ferramenta disponível no seu painel de controle permite corrigir facilmente alguns registros problemáticos.
Link para esta FAQ: https://faq.infomaniak.com/2051
Esta seção de perguntas frequentes foi útil?
Este guia explica como transferir para a Infomaniak dados (Web, Mail, Domínio e até Cloud) atualmente hospedados em outro localVocê continua sendo o proprietário dos seus dados, sem perda ou interrupção!
Introdução
- Ao centralizar seus nomes de domínio, sites e endereços de e-mail na Infomaniak, você simplifica o gerenciamento de suas faturas e serviços.
- Além disso, a vinculação de seus domínios será feita automaticamente com seu site e endereço de e-mail.
- Dessa forma, você não precisará configurar manualmente os DNS de seus domínios em outro registrador.
Guias específicos
Clique no link correspondente ao seu provedor de hospedagem atual:
- Swisscom: guia completo para migrar os dados Web, Mail e nome de domínio
Guias para qualquer outro provedor de hospedagem
Para não interromper o seu site e os seus e-mails e não perder conteúdo ao importar os seus dados existentes, migre os seus serviços na ordem indicada:
Importar os dados Web (qualquer site PHP, HTML, etc.)
- Para WordPress, consulte especificamente este outro guia…
- Para WordPress, consulte especificamente este outro guia…
Copiar os dados do Mail (endereços e conteúdo das caixas de correio, etc.) para o kSuite ou um simples Serviço de Mail
Transferir o nome de domínio (gestão do domínio, zona DNS, etc.)
Você também pode transferir outros tipos de dados para os servidores Infomaniak:
- Conteúdo do Dropbox, Google Drive, etc.: consulte este outro guia
- Dados em NAS Synology ou QNAP: consulte este outro guia
Link para esta FAQ: https://faq.infomaniak.com/2057
Esta seção de perguntas frequentes foi útil?
Este guia detalha os procedimentos administrativos a serem seguidos para transferir a gestão de um domínio .lu para a Infomaniak.
Transferir um domínio .lu
A transferência de domínio em .lu não requer um código de transferência. Em vez disso, um e-mail de validação será enviado ao administrador do domínio (indicado nas informações WHOIS) para que ele valide a transferência para a Infomaniak.
O proprietário do domínio tem então 15 dias para validar a transferência; caso contrário, a transferência será cancelada.
Após a validação do pedido, a transferência é quase imediata.
Atenção: devido ao processo específico para a transferência de domínios .lu, os pedidos rejeitados não podem ser reembolsados. Qualquer nova tentativa será cobrada como uma nova transferência.
Link para esta FAQ: https://faq.infomaniak.com/2059
Esta seção de perguntas frequentes foi útil?