1000 FAQs, 500 tutorials and explanatory videos. Here, there are only solutions!
Connect to kDrive via WebDAV (get the kDrive ID)
This guide provides instructions to connect to kDrive using the WebDAV connection protocol.
⚠ Available with:
| kSuite | |
| Business | |
| Enterprise | |
| kDrive | Solo |
| Team | |
| Pro |
Preamble
- Connecting via WebDAV allows you to:
- use the WebDAV application of your choice instead of the official kDrive application (only solution if this one is unavailable on your OS, for example macOS 10.14.6),
- use kDrive as a synchronization base for a tool that would allow this via WebDAV (Joplin for example),
- access kDrive from your operating system's file manager.
Obtain the identifier (kDrive ID)
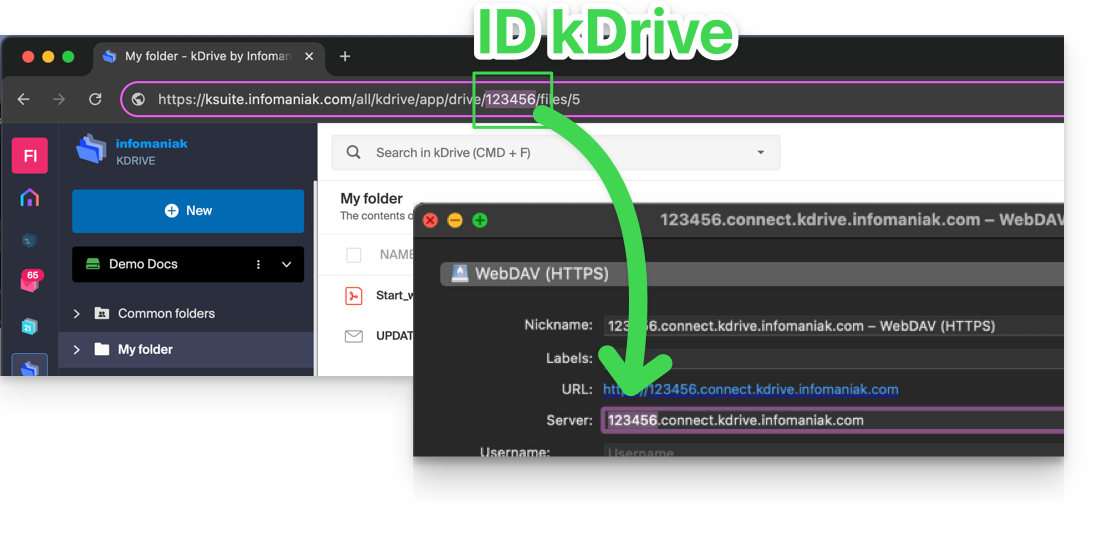
To find out your kDriveID, kDrive client ID:
- Click here to access the Infomaniak kDrive web app (online service ksuite.infomaniak.com/kdrive).
- The kDrive directory structure is displayed in the left sidebar menu.
- The URL
https://ksuite.infomaniak.com/kdrive/app/drive/123456/displayed at the top of your browser contains a number:
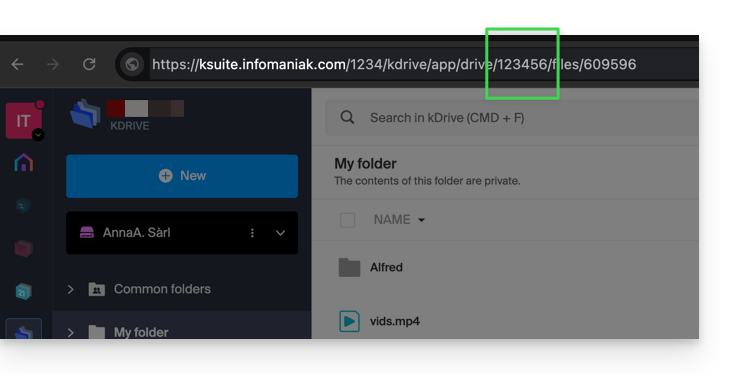
- In some cases, especially when the Organization ID is mentioned in the URL, there may be several series of numbers, but the principle remains the same, you need to take the number displayed after the term “
/drive/”:
This number (in the example 123456) is your kDrive identifier (IDkDrive).
You will therefore need to write https://IDkDrive.connect.kdrive.infomaniak.com each time it is necessary (https://123456.connect.kdrive.infomaniak.com for example as a WebDAV web address).
Connect to kDrive via WebDAV…
Not all offers are WebDAV compatible. Please refer to the box at the top of the page.
… on Windows
To do this:
- Open the File Explorer from the taskbar or the Start menu.
- Select This PC in the left pane.
- In the Computer tab, select Add a network location:

- Click on Next.
- Click on Choose a custom network location:

- Click on Next.
- Enter the server address:
https://IDkDrive.connect.kdrive.infomaniak.com(see the ID kDrive chapter above). - Click on Next.
- For the account settings, use the following information:
- Server address:
https://IDkDrive.connect.kdrive.infomaniak.com(see the ID kDrive chapter above). - Username: email address to log in to your Infomaniak account
- Password: create an application password for this specific use.
- Server address:
- If desired, click the box to save the login information.
- Enter a name for this connection or leave the default indication.
- Click on Finish.
- Two folders will appear, one containing deleted files & folders, the other with the name of your kDrive and containing your data.
… on macOS
For a computer on macOS, follow the Apple instructions, which can result in this:
- Click on the Go menu from the Finder.
- Click on Connect to server:

- Enter the server address:
https://IDkDrive.connect.kdrive.infomaniak.com(see the ID kDrive chapter above). - Click on Connect:

- Confirm the connection by clicking on the blue button.
- Enter the following information:
- Username: email address to log in to your Infomaniak account
- Password: create an application password for this specific use.
- If desired, click the box to save the login information.
- Click on the blue button to connect:

- There you go, the kDrive content is displayed on the Finder:

... on Linux (Gnome)
To do this:
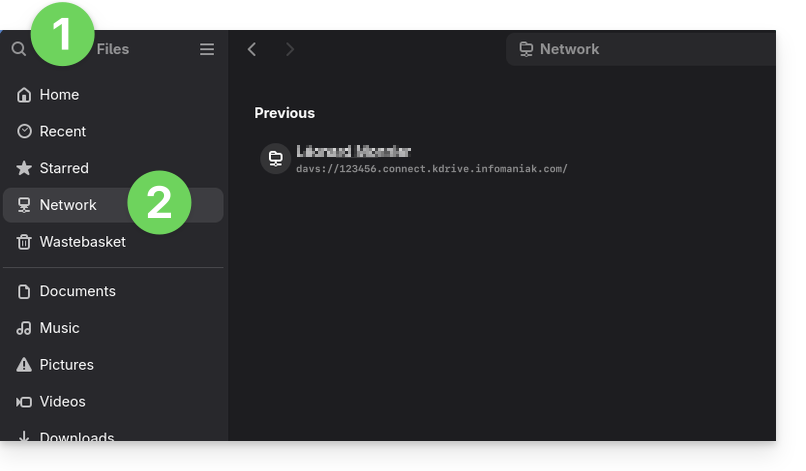
- Open Files.
- In the sidebar, click on Network:

- Enter the server address:
davs://IDkDrive.connect.kdrive.infomaniak.com(read the kDrive ID chapter above). - Click on Connect.
- For the account settings, use the following information:
- Username: email address to log in to your Infomaniak account
- Password: create an application password for this specific use.
- Click on Login.
... with a Windows software
Use the RaiDrive software for quick access to your hosted data. Complete the fields as in the image below:
... with a Windows / macOS software
Use the Cyberduck software for quick access to your hosted data:
- Open Cyberduck.
- In the software menu, go to Bookmark then to New bookmark.
- Select the WebDAV (https) protocol.
- Provide the following information:
- Server address:
https://IDkDrive.connect.kdrive.infomaniak.com(see the ID kDrive chapter above) - Username: email address to log in to your Infomaniak account
- Password: create an application password for this specific use.
- Download folder: the folder where downloaded files will be stored
- Server address:
Most recent software supporting the WebDAV protocol is compatible with kDrive offers among those also supporting WebDAV. Infomaniak cannot guarantee the compatibility of the service with external applications and does not provide support for this protocol. It is recommended to install the kDrive application to avoid any file loss.
Direct WebDAV connection URL to a specific folder
To facilitate a direct connection via WebDAV to a specific folder, you can use the following URL:
https://IDkDrive.connect.kdrive.infomaniak.com/Common documents/Nom du dossier
This simple method allows you to quickly access the desired folder without manually navigating the directory structure. Simply replace "Folder name" with the exact name of the target folder to establish a direct and secure connection via WebDAV. Also, refer to the last part of this other guide for other examples.

