Knowledge base
1000 FAQs, 500 tutorials and instructional videos. Here, there are only solutions!
Ticketing: configure a seating plan once activated
This guide explains how to configure the floor plan when it has been activated for an event (as part of the Infomaniak ticketing system).
Prerequisites
- Own and have activated a floor plan for the event in question.
- Have activated and created at least one pricing zone.
Apply zones to the floor plan
To access event pricing from the ticketing system:
- Click here to access your product management on the Infomaniak Manager (need help?).
- Click directly on the name assigned to the ticketing system concerned by the event.
- Click on Programming in the left sidebar.
- Click on Events in the left sidebar.
- Click on the event in question.
- Click on the Pricing tab.
- If the event has multiple dates, this section is replaced by “Dates” which opens a calendar.
- Click on the calendar date to join the pricing…
Once in this menu, it is necessary to have at least one zone activated:
- Click on the action menu ⋮ located to the right of the zone in question.
- Make sure the box “Zone with numbered seats” is activated:

- A seat symbol must be next to the zone name in the pricing list.
- Then click on the “Manage floor plan” button above the zones to open the floor plan management menu:

The logic here is to assign a zone to each seat, row, or section according to the needs of the event.
For example, below, a green zone and a red zone are distinguished. To assign seats to a zone:
- Select the seats by hovering over all the seats, or to select the entire row, click on its number.
- Click on each seat to configure, a black circle surrounds them indicating that they are selected.
- It is possible to click on the name of each row (A, B, C) to select all the seats in the row, and even to click on the name of the section (here, right, left, middle) to select all the seats in the section.
- Then click on the area to link to the selected seats.
- In the Zones menu that appears in the lower half of the page, click on the zone to assign.
- The background of the selected seats will change to the color of the zone.
- Repeat the operation for each remaining zone to assign.
Block online sales for a seat/row/section
By default, all seats are available for online sale.
To block the online sale of certain seats, configure the restrictions directly in the seating plan:
- To block the sales of certain particular seats, open the seating plan management menu as explained above, and select (black circle) the seats/rows/sections.
- Instead of selecting the zones in the bottom menu, choose the type of Access:
- No restriction = default state, customers can purchase the seat
- Reserved for organizers = Only people with Admin status on the organization can purchase the ticket from the ticket office
- Reserved for resellers = Resellers can make the purchase from the ticket office (normal users/collaborators on the organizer with sales rights)
The section visible at the bottom named “Reserve” is no longer used and can be ignored.
Once the plan is configured, the seats can be put on sale. Make sure to assign a price to each zone.
See who a specific seat is assigned to
To obtain information related to seat assignments and identify the people who have reserved or occupied each seat according to the seating plan, you can use the seating plan management menu which displays purchased seats with an orange fill.
If you click on the seat, the order information is displayed, and a link to the customer record is provided: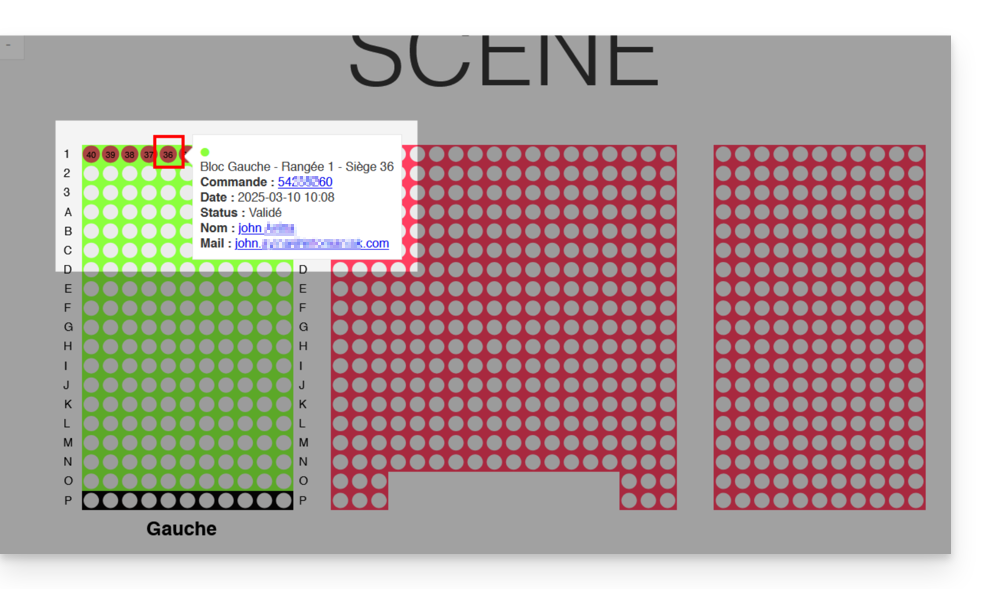
Link to this FAQ: https://faq.infomaniak.com/1586
Has this FAQ been helpful?