Base de conhecimento
1000 perguntas frequentes, 500 tutoriais e vídeos explicativos. Aqui, você encontra apenas soluções!
Este guia aborda a otimização de sites e, mais especificamente, o uso de um motor de cache neles.
Introdução
- Quando a Infomaniak constata que o seu site consome mais recursos do que outros sites no mesmo servidor, é realizada uma análise.
- Na maioria das vezes, verifica-se que uma simples modificação de uma consulta ou de um parâmetro permitiria otimizar o seu site e reduzir a carga do servidor.
- Será então contactado por e-mail com as instruções a seguir, que frequentemente incluem a instalação ou ativação de um motor de cache.
- O consumo de recursos não está necessariamente relacionado com o número de visitantes.
- Um site bem otimizado, atualizado e com um motor de cache corretamente configurado pode suportar dezenas de milhares de visitantes diários, enquanto um site mal otimizado pode consumir muitos recursos com apenas algumas visitas por dia.
- Um motor de cache armazena temporariamente dados frequentemente utilizados para os fornecer mais rapidamente em novas solicitações.
- Isso melhora significativamente a velocidade do site e reduz a carga nos bancos de dados ou serviços web.
- Para instalar um sistema de cache avançado (Redis, Memcached) no Servidor Cloud Infomaniak, consulte este guia.
Ativar um motor de cache…
… sobre o WordPress
O WordPress oferece vários plugins de cache. Aqui estão os mais populares e eficazes:
- WP Rocket (pago, a solução "tudo em um" mais eficiente e fácil de usar).
- WP Super Cache (gratuito, desenvolvido pela Automattic, muito confiável).
- LiteSpeed Cache (gratuito, extremamente completo).
Procedimento de ativação padrão:
- Aceda à sua área de administração do WordPress.
- Vá para Extensões > Adicionar.
- Procure um dos plugins mencionados, instale-o e ative-o.
- Configure as opções de cache: cache de páginas, minificação de CSS/JS e, principalmente, o carregamento lento para as imagens.
Consulte também este outro guia sobre o assunto.
… sobre Joomla (v4 e v5)
- Acesse Sistema > Configuração geral.
- Selecione a aba Sistema.
- Na secção Definições do cache, ative o cache (o modo Conservador é o mais seguro para começar).
- Selecione o gestor de cache (Ficheiro predefinido).
- Em seguida, vá para Sistema > Plugins e certifique-se de que o plugin Sistema - Cache está ativado para armazenar em cache as páginas inteiras.
… no PrestaShop (v1.7 & v8+)
- Vá para Configurações avançadas > Desempenho.
- Smarty: marque "Nunca recompilar os arquivos de modelo" (em produção) e ative o "Cache".
- CCC (Combinar, Comprimir e Armazenar em Cache): ative todas as opções (Cache inteligente CSS, Cache inteligente JS, Otimização Apache).
- Cache: na parte inferior da página, ative a opção "Usar cache". Em um serviço de hospedagem compartilhada, priorize o sistema de arquivos; em um Servidor Cloud, use o Memcached.
… sobre o Drupal (v9, v10 e v11)
O cache está integrado nativamente e é muito eficiente no Drupal:
- Vá para Configuração > Desenvolvimento > Desempenho.
- Marque a opção "Armazenar em cache as páginas para usuários anônimos".
- Defina uma duração para "Tempo máximo de expiração do cache no navegador e no proxy" (ex: 10 minutos).
- Ative a agregação dos arquivos CSS e JavaScript.
… sobre o Contao (v4 e v5)
- O cache é agora gerido principalmente através do ficheiro de configuração
config/config.yamlou através da interface de administração em Layout > Temas > Editar o layout da página. - Defina um "Tempo de expiração do cache" para a página em questão.
- Utilize o Contao Manager para limpar o cache de produção (Cache Symfony) após modificações estruturais.
Verificar a eficácia
Após a ativação, teste o seu site com estas ferramentas gratuitas:
Link para esta FAQ: https://faq.infomaniak.com/1162
Esta seção de perguntas frequentes foi útil?
Este guia explica como denunciar uma tentativa de phishing (phishing, spear phishing, etc.) de que você seria vítima.
Preâmbulo
- O phishing é uma tentativa de fraude e engano, com o objetivo de obter informações confidenciais de forma fraudulenta.
- Geralmente, a vítima recebe em sua caixa de mensagens um e-mail que parece ser da Infomaniak, do seu banco ou de uma entidade confiável, informando que ocorreu um problema em sua conta ou em sua vida cotidiana:
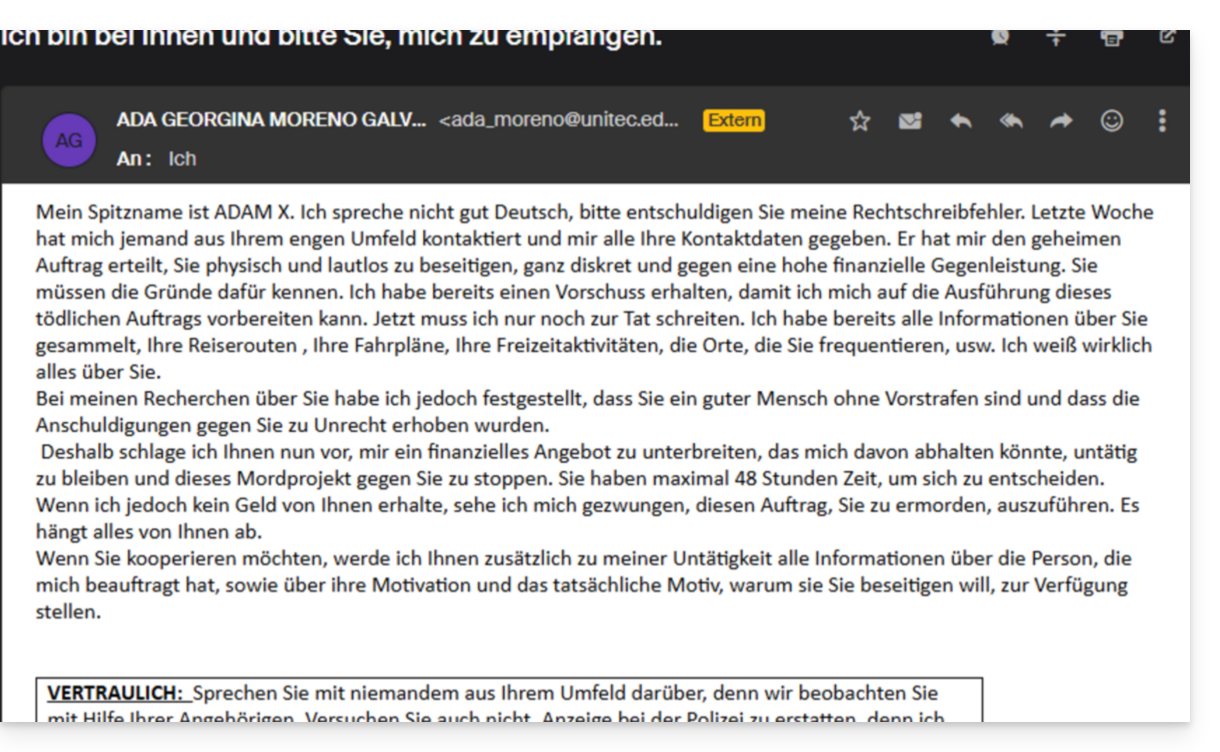
- O objetivo desta usurpação de identidade é, geralmente, que o utilizador aceda voluntariamente a uma página e forneça informações confidenciais que serão posteriormente utilizadas para diversos fins, principalmente financeiros.
- Caso não se trate de uma mensagem “fazendo-se passar por algo que não é”, mas se for apenas uma mensagem publicitária não solicitada, é melhor denunciá-la como spam.
Denunciar um e-mail de phishing
Pré-requisitos
- Verifique se o filtro de spam está ativo.
- Para maior segurança, ative a indicação de e-mail externo.
Em seguida, se você encontrar um e-mail desse tipo diretamente na sua caixa de entrada, terá a possibilidade de tomar medidas para que essas mensagens diminuam e, eventualmente, desapareçam dos sistemas de mensagens:
- Clique aqui para acessar o aplicativo web Mail da Infomaniak (serviço online ksuite.infomaniak.com/mail).
- Abra a mensagem de phishing.
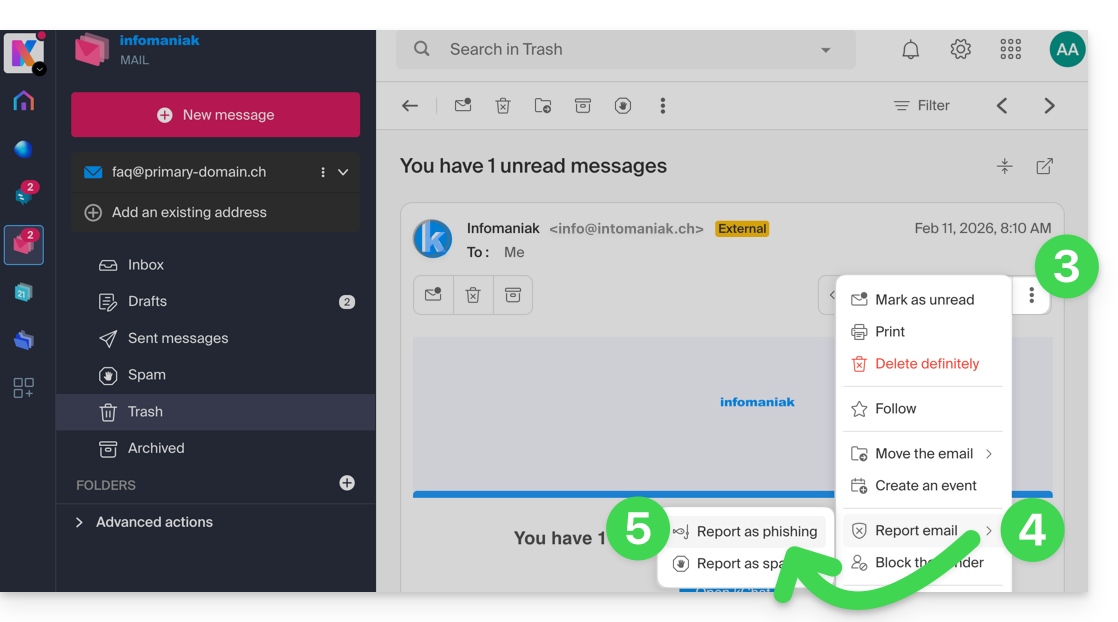
- Clique no menu de ações ⋮, no lado direito.
- Clique em Denunciar mensagem.
- No menu que aparece, selecione Denunciar como phishing:
- Confirme o envio para processamento.
- Exclua o e-mail.
Assim que clicar em Denunciar como phishing, um e-mail será enviado automaticamente para a Infomaniak com todas as informações necessárias para o tratamento da denúncia.
Em caso de um problema mais grave (quando a mensagem é enviada diretamente para você por um conhecido ou contato, e não se trata de um envio em massa), recomenda-se entrar em contato com uma organização como, por exemplo, report.ncsc.admin.ch.
Link para esta FAQ: https://faq.infomaniak.com/1172
Esta seção de perguntas frequentes foi útil?
Este guia explica como consultar o histórico de atividades dos arquivos no servidor do seu serviço de hospedagem Infomaniak.
Registros de atividade do espaço FTP
Para verificar a atividade das transferências no seu espaço FTP, contacte o suporte da Infomaniak e solicite os logs FTP, autenticando-se previamente com as credenciais correspondentes à gestão do seu alojamento web.
O log é atualizado apenas se houver atividade via FTP.
Ajuda para interpretar os logs: http://www.castaglia.org/proftpd/doc/xferlog.html
Link para esta FAQ: https://faq.infomaniak.com/1177
Esta seção de perguntas frequentes foi útil?
A possível indicação information_schema não é relevante para você.
Por favor, ignore-a.
É uma base de dados interna do MySQL que contém um resumo das informações das suas próprias bases de dados.
Link para esta FAQ: https://faq.infomaniak.com/1181
Esta seção de perguntas frequentes foi útil?
Este guia trata do RTMP (Real-Time Messaging Protocol), um serviço que permite transmitir conteúdo multimídia em tempo real na Internet:
- Trata-se de um protocolo proprietário desenvolvido pela Adobe, e a sua utilização requer a configuração de um servidor RTMP dedicado ou a utilização de serviços de alojamento RTMP.
- Os espectadores podem acessar a transmissão ao vivo usando um reprodutor de mídia compatível com RTMP, como o VLC.
Por padrão, o RTMP é bloqueado pelas regras de segurança da Infomaniak.
- Consulte este outro guia para abrir a porta correspondente.
Link para esta FAQ: https://faq.infomaniak.com/1201
Esta seção de perguntas frequentes foi útil?
Este guia é para você se receber o erro O servidor web não existe ao acessar o endereço de um site em um Serviço de Hospedagem Web Infomaniak.
Introdução
- Este tipo de erro geralmente ocorre porque o seu nome de domínio não está corretamente ligado ao seu site (o seu nome de domínio provavelmente aponta para o endereço IP errado ou está mal configurado).
- Exemplo: um domínio
abc.xyzmal configurado, que aponta em IPv4 para uma hospedagem Starter e em IPv6 para uma hospedagem compartilhada…
- Exemplo: um domínio
Resolver um problema de ligação Domínio - Site Web
Para que possamos colocar o seu site novamente online:
- Verifique a zona DNS do seu nome de domínio, especialmente os seus registos A.
- Corrija-os, se necessário, indicando o endereço IP da sua hospedagem.
- Qualquer adição/modificação de DNS pode levar até 48 horas para se propagar.
Para isso, a forma mais simples é usar a ferramenta de Diagnóstico DNS Infomaniak para corrigir o apontamento automaticamente, agrupando previamente os produtos na mesma Organização, se necessário.
Link para esta FAQ: https://faq.infomaniak.com/1213
Esta seção de perguntas frequentes foi útil?
Este guia explica como prevenir ataques cibernéticos e como evitar a invasão do site que você gerencia.
Utilizadores do WordPress: consultem este artigo dedicado.
O papel do provedor de hospedagem
O trabalho da Infomaniak consiste em fornecer uma hospedagem de qualidade, sendo, portanto, primordial responder extremamente rápido às diversas e variadas ameaças às quais qualquer agente da Internet pode estar sujeito. A Infomaniak faz, portanto, todo o possível para tomar o máximo de precauções contra ataques cibernéticos, nomeadamente mantendo atualizadas as diferentes versões das tecnologias utilizadas.
Em caso de ataque cibernético comprovado, se for possível identificar o autor e se o sistema tiver sido comprometido devido a uma falha de segurança da responsabilidade da Infomaniak, e se a integridade dos servidores estiver em causa, a Infomaniak assume a responsabilidade pela resolução do problema.
O papel do proprietário do site e do webmaster
Se a invasão do seu site for da sua responsabilidade (um script desatualizado, uma correção de segurança não aplicada, etc.), a Infomaniak entrará em contato para alertá-lo sobre um problema que precisará ser resolvido rapidamente. Algumas organizações, como a Saferinternet, podem, além disso, suspender o nome de domínio, o que desativará o site e também o serviço de e-mail.
A Infomaniak não pode impedir ataques relacionados a um erro no seu código PHP ou em outro código. Se a invasão não for detectada, geralmente você notará a intrusão rapidamente por meio de elementos suspeitos em suas páginas ou pelo recebimento de muitos e-mails de erro.
Portanto, é da sua responsabilidade cuidar da evolução do seu site ao longo do tempo e, acima de tudo, não o deixar "morrer" esquecido, podendo, para isso, recorrer a um webmaster, que é o profissional indicado para essa tarefa.
As recomendações da Infomaniak
- Atualize regularmente todas as suas aplicações web (WordPress, Joomla, Drupal, ownCloud, etc.).
- Mantenha a versão PHP do seu site atualizada nos servidores Infomaniak.
- Mantenha seu site atualizado migrando para as novas ofertas quando for proposto.
- Adicione um sistema de proteção aos seus formulários de contato (captcha, etc.) e a quaisquer ferramentas de "indicação a amigos" (indique a um amigo...).
- Execute regularmente uma análise antivírus do seu alojamento.
- Monitore a ferramenta de detecção de vulnerabilidades.
- Remova tudo o que não foi desenvolvido por você e cujo autor não tenha feito atualizações/correções nos últimos meses.
- Faça backups regulares do seu site (consulte este outro guia se você usa o WordPress) quando tudo estiver funcionando bem e guarde-os em um local seguro (pois os backups automáticos são armazenados por apenas alguns dias e, às vezes, isso não é suficiente para reverter após detectar uma intrusão).
- Consulte ibarry.ch.
Se surgir algum problema...
- Altere as senhas de suas aplicações web, de suas contas FTP e de seus bancos de dados, verificando previamente se não há vírus em seu computador.
- Restaure um backup, masatualize imediatamente tudo o que puder ser atualizado após a conclusão da restauração.
- Se tiver algum problema com um software de terceiros, entre em contato diretamente com o editor ou com um Parceiro e consulte a política de suporte, bem como o artigo 11.9 dos Termos de Uso da Infomaniak.
Consulte estas recomendações adicionais!
Link para esta FAQ: https://faq.infomaniak.com/1214
Esta seção de perguntas frequentes foi útil?
O módulo CGID para Apache a été désactivé sur les offres d'hébergement Web mutualiséda Infomaniak.
Se necessário, considere mudar para um plano de Servidor Cloud, caso esteja atualmente em um plano de hospedagem web compartilhada. A migração é feita de forma transparente: consulte este outro guia para obter mais informações.
Link para esta FAQ: https://faq.infomaniak.com/1248
Esta seção de perguntas frequentes foi útil?
Este guia diz respeito ao YAZ, uma biblioteca de software utilizada para implementar o protocolo Z39.50, um protocolo de pesquisa e recuperação de informações que permite a comunicação entre diferentes sistemas de bibliotecas (SIGB), como o PMB, amplamente utilizado na França.
Infomaniak para uma gestão eficiente de bibliotecas
Nos Serviços de Hospedagem Web Infomaniak, o PMB é suportado e o YAZ está ativado por padrão.
No entanto, se você encontrar erros como Call to undefined function yaz_connect(), será necessário abrir portas através do painel de controle. A porta 210 é a porta padrão usada para as comunicações Z39.50, mas não hesite em consultar a documentação de seus aplicativos.
Para os planos de hospedagem Infomaniak mais antigos, é necessário considerar uma mudança de plano.
Link para esta FAQ: https://faq.infomaniak.com/1267
Esta seção de perguntas frequentes foi útil?
Este guia explica como aumentar o valor de max_children no Servidor Cloud para aumentar o número de processos PHP simultâneos que podem ser usados pelo seu site. Isso será muito útil para resolver problemas de carregamento infinito das páginas do seu site.
Introdução
- Por padrão, em todos os serviços de hospedagem, o limite de
max_childrené definido em 20.- Embora seja possível aumentar este valor através do painel de controlo Infomaniak, o limite de
max_childrené ajustado automaticamente de acordo com a configuração do seu Servidor Cloud. - Para aumentar este limite em hospedagem partilhada, migre para um Servidor Cloud.
- Embora seja possível aumentar este valor através do painel de controlo Infomaniak, o limite de
- Para entender como calcular com precisão o número de
max_childrennecessários, consulte este artigo sobre o assunto.
Aumentar o valor de max_children
Pré-requisitos
- Certifique-se de que tem recursos suficientes no servidor Cloud.
- Certifique-se de que todos os recursos do servidor Cloud não estão sendo utilizados; caso estejam totalmente em uso, o aumento do valor de
max_childrennão terá efeito (Modificar os recursos do Servidor Cloud). - Verificar o monitoramento dos recursos do seu servidor, caso os recursos do seu servidor atinjam o limite, será necessário verificar a otimização dos processos e do seu site antes de considerar aumentar o valor de
max_children. - Consulte os relatórios de erro PHP na pasta
/ik-logs(registros do processo principal PHP – nome do arquivo: php-fpm.log) para verificar se o limite "max_children" foi excedido... exemplo de erro:[05-Jul-2024 09:08:58] WARNING: [pool www.infomaniak.ch] server reached max_children setting (20), consider raising it
Para acessar o gerenciamento dos parâmetros PHP / Apache do site em que é necessário aumentar o valor de max_children no Servidor Cloud, consulte este outro guia.
Você poderá, por exemplo…
- … escolher um novo valor para
max_children: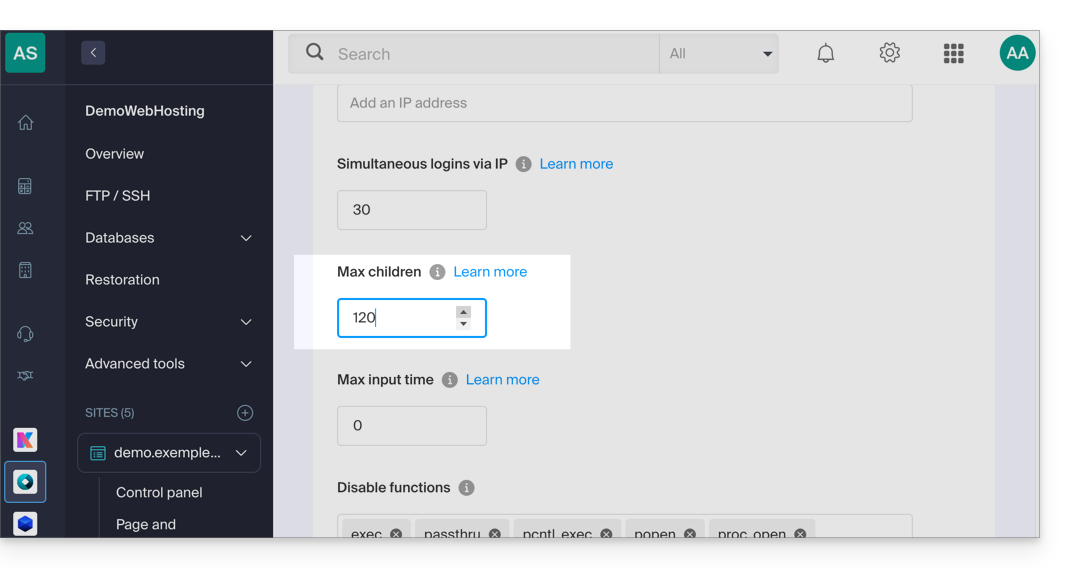
Não se esqueça de guardar as alterações na parte inferior da página.
Limites em função do servidor
Limite de max_children com base nos recursos do Servidor Cloud:
| Configuração do Servidor Cloud | max_children |
|---|---|
| 2 CPUs / 6 GB de RAM | 20 |
| 4 CPUs / 12 GB de RAM | 40 |
| 6 CPUs / 18 GB de RAM | 60 |
| 8 CPUs / 24 GB de RAM | 80 |
| 12 CPUs / 36 GB de RAM | 120 |
| 16 CPUs / 48 GB de RAM | 160 |
| 24 CPUs / 72 GB de RAM | 240 |
| 32 núcleos de CPU / 96 ou 128 GB de RAM | 320 |
Link para esta FAQ: https://faq.infomaniak.com/1270
Esta seção de perguntas frequentes foi útil?
Este guia é para você se deseja realizar testes de vulnerabilidade do seu site/servidor hospedado pela Infomaniak.
Permitidos e restritos
Você pode realizar testes de vulnerabilidade (injeção SQL, XSS, etc.), de intrusão ou testes de penetração (pentest) em sua hospedagem Infomaniak apenas nas seguintes condições:
- entre as 9h e as 17h, horário da Europa Central (CET)
- de segunda a sexta-feira
- com o pacote mínimo, independentemente do software utilizado (por exemplo, AppScan)
- sem realizar qualquer tipo de ataque DoS ou DDoS (Negação de Serviço)
- respeitando os Termos de Uso da Infomaniak, em particular o ambiente de utilização partilhada dos serviços
Qualquer uso indevido poderá resultar no cancelamento antecipado do serviço por parte da Infomaniak.
Link para esta FAQ: https://faq.infomaniak.com/1271
Esta seção de perguntas frequentes foi útil?
Este guia explica como otimizar o armazenamento em cache de recursos web por meio dos cabeçalhos HTTP.
Introdução
- Uma boa estratégia de cache permite melhorar significativamente o desempenho do seu site, evitando a retransmissão desnecessária de arquivos inalterados.
- O cache web baseia-se em dois mecanismos complementares:
- O período de validade do cache (através do cabeçalho
Expires), que indica por quanto tempo um recurso pode ser reutilizado sem contactar o servidor. - A validação condicional (através dos cabeçalhos
Last-Modified/If-Modified-Since), que permite verificar se um recurso foi alterado antes de ser baixado novamente.
- O período de validade do cache (através do cabeçalho
Configuração da duração do cache com Expires
O cabeçalho Expires permite especificar um período durante o qual o navegador pode reutilizar diretamente os recursos do seu cache local. Veja como configurá-lo no seu arquivo .htaccess:
- Crie ou abra o arquivo
.htaccessna raiz do seu site (geralmente em/webou/sites/domain.xyz). Adicione a configuração do módulo
expires:<IfModule mod_expires.c>Defina os períodos de cache adequados para cada tipo de recurso:
ExpiresActive On
ExpiresByType text/html "access plus 1 week"
ExpiresByType image/jpeg "access plus 1 month"
ExpiresByType text/css "access plus 1 month"
ExpiresByType application/javascript "access plus 1 month"
Estas diretivas significam que:
- As páginas HTML serão armazenadas em cache durante uma semana.
- As imagens JPEG, os ficheiros CSS e JavaScript serão armazenados durante um mês.
Ajuste estes períodos de acordo com a frequência com que os seus recursos são atualizados.
Feche a secção de configuração:
</IfModule>
Validação condicional com Last-Modified
Mesmo quando um recurso expirou no cache, nem sempre é necessário baixá-lo novamente por completo. O mecanismo de validação condicional permite que o navegador verifique se a sua versão em cache ainda está atualizada. Este processo funciona da seguinte forma:
- O servidor envia automaticamente um cabeçalho
Last-Modifiedcom cada recurso, indicando a data da última modificação.- O Apache gerencia isso nativamente para arquivos estáticos – nenhuma configuração adicional é necessária.
Quando o navegador solicita novamente o recurso, ele envia um cabeçalho
If-Modified-Sincecontendo a data que tem em cache:GET /resource HTTP/1.1 Host: www.example.com If-Modified-Since: Wed, 21 Oct 2015 07:28:00 GMT- O servidor compara esta data com a data real de modificação do arquivo:
- Se o arquivo não foi alterado, ele simplesmente retorna um código
304 Not Modified, economizando assim largura de banda. - Se o arquivo foi modificado, ele retorna a nova versão com um código
200 OK.
- Se o arquivo não foi alterado, ele simplesmente retorna um código
Link para esta FAQ: https://faq.infomaniak.com/1282
Esta seção de perguntas frequentes foi útil?
Este guia explica por que uma conta FTP (e, na maioria das vezes, também a Hospedagem Web) pode, de repente, ser bloqueada.
Introdução
- A Infomaniak utiliza em todos os servidores partilhados uma solução antivírus para combater o envio de vírus através de FTP e scripts.
- O antivírus permite detetar:
- eventuais invasões de contas FTP
- o envio, intencional ou não, de ficheiros (temas WordPress, módulos fraudulentos, etc.) que contenham linhas de código ou inclusões maliciosas
Detecção de ficheiros maliciosos
O antivírus analisa todos os ficheiros enviados com tamanho inferior a 1 MB para impedir o envio de vírus/scripts de spam/etc.
Caso seja detetado um elemento suspeito, a senha da conta FTP é alterada automaticamente e os arquivos em questão no servidor são bloqueados (FTPban).
O servidor FTP envia então ao cliente FTP uma mensagem do tipo:
550 Vírus detetado e removido: botnet.infomaniak.5.NÃO OFICIALou ainda
550 Vírus detetado e removido: winnow.botnet.ff.trojans.15900.UNOFFICIAL
O que fazer se a conta estiver bloqueada?
Se a sua conta FTP for bloqueada repentinamente, receberá um e-mail; siga o procedimento indicado no e-mail para resolver a situação. Em particular:
- Limpe o seu site e analise o que pretende enviar para o servidor.
- Verifique se as aplicações web e os sistemas de gestão de conteúdo (CMS) que utiliza estão atualizados:
- A causa da maioria dos ataques cibernéticos reside em falhas de segurança em aplicações web desatualizadas ou em palavras-passe demasiado fracas.
Resolver o problema de forma definitiva
Para evitar que o seu site seja novamente pirateado e bloqueado, realize as seguintes ações:
Não publique, em nenhuma circunstância, os mesmos ficheiros contaminados no seu alojamento, pois o site seria novamente bloqueado.
- Atualize as aplicações web (WordPress, Joomla, etc.) e as extensões utilizadas.
- Remova as aplicações web não utilizadas.
- Altere a senha de todas as suas contas FTP.
- Altere as senhas para acessar as aplicações web (WordPress, Joomla, etc.).
- Altere a senha dos usuários dos bancos de dados MySQL.
- Remova os usuários dos bancos de dados MySQL que você não utiliza.
- Utilize uma senha diferente a cada vez, complexa e com, no mínimo, 8 caracteres.
- Inicie uma análise antivírus manualmente no seu serviço de hospedagem.
- Instale e utilize um antivírus atualizado (independentemente do sistema operativo).
- Consulte este outro guia se precisar de informações sobre a monitorização e resolução de vulnerabilidades em scripts hospedados.
Se o seu site não funcionar após uma limpeza, talvez seja necessário substituir alguns dos arquivos excluídos por arquivos íntegros.
Link para esta FAQ: https://faq.infomaniak.com/1302
Esta seção de perguntas frequentes foi útil?
Este guia detalha o uso de scripts Perl ou Python nos serviços de hospedagem da Infomaniak e o gerenciamento de seus módulos.
Pré-requisitos
- Hospedagem web compartilhada: o módulo CGI não está mais disponível; portanto, a execução de scripts Perl e Python não é suportada.
- É necessário migrar para um Servidor Cloud.
- Servidores Cloud Gerenciados: para usufruir das últimas tecnologias, é possível atualizar o seu Servidor Cloud.
Configuração Web (Apache/CGI)
Para executar scripts Python ou Perl através do Apache no Servidor Cloud, a interpretação de arquivos com as extensões .py e .pl não está ativa por padrão.
Com o seu software/cliente FTP ou o Web FTP, adicione e adapte a seguinte diretiva no ficheiro .htaccess localizado na pasta que contém os seus scripts:
AddHandler cgi-script .pl .cgi .py
Options +ExecCGI
Instalação de módulos adicionais
Num Servidor Cloud, tem a possibilidade de instalar bibliotecas de terceiros que não estão presentes por defeito.
Python
- A instalação é feita através do
PIP, que é um gerenciador de pacotes usado para instalar e gerenciar pacotes escritos em Python. - A Infomaniak oferece o
PIPe oPIP3através da ferramenta Fast Installer. - Depois de instalar o PIP, poderá instalar módulos Python especificando
--userno comando. Por exemplo: pip3 install mysql-connector-python --user
Perl
- A adição de módulos Perl também é feita via SSH (console). É necessário instalá-los na estrutura de diretórios do usuário e definir o caminho completo dentro dos scripts.
Informações técnicas importantes
- Caminho do interpretador:
/usr/bin/python - Extensões: os scripts devem ter a extensão
.pl,.cgiou.py. - Limitações: o módulo
mod_pythonnão é suportado.
Resolução de erros (CGIWrap)
Se encontrar o seguinte erro ao carregar uma imagem:
CGIWrap Error: Execution of this script not permitted
Request Data:Extra Path Info: /dossier/.../image.PL.12.34.gif
O servidor interpreta o arquivo como um script porque ele contém ".PL" (ou .PY) em seu nome. Solução: Simplesmente renomeie o arquivo para remover essa menção (exemplo: image-12-34.gif).
Link para esta FAQ: https://faq.infomaniak.com/1307
Esta seção de perguntas frequentes foi útil?
Este guia explica como resolver um problema de importação de um arquivo .csv em uma tabela MySQL. A alternativa proposta consiste em ler o arquivo CSV linha por linha com PHP e inserir os dados no banco de dados MySQL.
Função "LOAD DATA LOCAL INFILE" desativada
A função LOAD DATA LOCAL INFILE permite importar um arquivo CSV diretamente para uma tabela MySQL. No entanto, essa funcionalidade é frequentemente explorada por invasores para obter acesso não autorizado a sites hospedados em servidores que a permitem.
A fim de prevenir qualquer risco de segurança e proteger os dados dos clientes, a Infomaniak desativou a função LOAD DATA LOCAL INFILE. Os usuários que importam seus arquivos CSV via phpMyAdmin (sem marcar a opção “CSV via LOAD DATA”) não serão afetados.
Aqui está um método alternativo para importar dados no formato CSV para uma tabela MySQL. O exemplo abaixo mostra como lidar corretamente com os erros ao abrir o arquivo CSV e inserir os dados no banco de dados.
Este script usa mysqli para se conectar ao banco de dados e consultas preparadas para inserir os dados. Isso garante uma melhor segurança, compatibilidade ideal com as versões recentes de PHP e uma integração simples em seu projeto, seja em um script existente ou em um novo arquivo localizado no diretório /web:
$fileName = "data.csv";

// Conectar ao banco de dados MySQL usando mysqli
$link = new mysqli("localhost", "username", "password", "database");

// Verificar a conexão com o banco de dados
if ($link->connect_error) {
   die("Falha na conexão: " . $link->connect_error);
}

// Abrir o arquivo CSV para leitura
if (($handle = fopen($fileName, "r")) !== FALSE) {

   // Ler cada linha do arquivo CSV
   while (($data = fgetcsv($handle, 1000, ";")) !== FALSE) {

       // Preparar a consulta SQL dinamicamente
       $query = "INSERT INTO `test` VALUES (" . str_repeat('?,', count($data) - 1) . "?)";
       $stmt = $link->prepare($query);

       // Verificar se a preparação da consulta foi bem-sucedida
       if ($stmt === FALSE) {
           die("Falha na preparação da consulta: " . $link->error);
       }

       // Vincular parâmetros (assumindo que todas as colunas são strings)
       $types = str_repeat('s', count($data));
       $stmt->bind_param($types, ...$data);

       // Executar a consulta
       if (!$stmt->execute()) {
           die("Falha na execução da consulta: " . $stmt->error);
       }

       // Fechar a declaração
       $stmt->close();
   }

   // Fechar o arquivo CSV
   fclose($handle);

} else {
   echo "Erro: não foi possível abrir o arquivo.\n";
   exit(1);
}

// Fechar a conexão com o banco de dados
$link->close();
?>
Obter ajuda
Infelizmente, não é possível indicar com precisão em que parte do script estas linhas de código devem ser inseridas.
Se este método apresentar problemas (por exemplo, ao importar vários arquivos CSV simultaneamente sem exibir mensagens de erro), é possível que a estrutura das tabelas ou a indexação dos campos sejam a causa. Nesse caso, entre em contato com o seu administrador de site para que ele faça a verificação.
Consulte também a documentação oficial do PHP relativa à função fgetcsv().
Link para esta FAQ: https://faq.infomaniak.com/1312
Esta seção de perguntas frequentes foi útil?
Este guia ajuda você a proteger a reputação do seu nome de domínio, para manter a confiança dos utilizadores da Internet e dos fornecedores de serviços no seu site ou na sua empresa, com o objetivo de facilitar o bom funcionamento do seu serviço de e-mail.
A reputação na web
Existem diferentes tipos de reputação na Internet, incluindo a reputação pessoal, a reputação empresarial e a reputação de domínio.
A reputação de domínio é, em termos gerais, uma pontuação que determina como os sistemas de e-mail decidem o que permitirão que chegue às caixas de entrada dos utilizadores. Fundamentalmente, a reputação do seu domínio é uma medida da saúde e da legitimidade do seu domínio. Essa reputação pode ser influenciada pela segurança do e-mail e do site.
Por exemplo, a reputação de um domínio pode diminuir se…
- … o site visível no endereço do domínio for alvo de um ataque que resulte no envio em massa de e-mails fraudulentos,
- … o serviço de e-mail do domínio está sendo utilizado para o envio de spam não solicitado.
Se a reputação do seu domínio permanecer negativa, seus e-mails poderão ser marcados como spam e não chegarão ao público-alvo. Isso pode prejudicar a capacidade de entrega dos e-mails (consulte este outro guia em inglês sobre o assunto).
Melhorar a reputação do domínio
Seguindo estas dicas, pode melhorar a reputação do seu domínio e, por exemplo, impulsionar todos os seus esforços de marketing por e-mail:
- Configure e verifique os registos SPF, DKIM e DMARC, que ajudam a proteger o seu domínio contra ataques de falsificação de identidade.
- Verifique a reputação do seu domínio com ferramentas como Google Postmaster Tools, Sender Score, Microsoft SNDS, McAfee ou Talos Intelligence e identifique potenciais problemas.
- Envie e-mails apenas para os utilizadores que escolheram subscrever!
- Obtenha links de confiança ou backlinks…
Consulte este outro guia sobre as RBL.
Link para esta FAQ: https://faq.infomaniak.com/1314
Esta seção de perguntas frequentes foi útil?
Este guia explica como obter o código EPP do seu nome de domínio na Hostpoint para poder transferi-lo para a Infomaniak.
Introdução
- Os termos "
EPP", "AuthCode", "AuthInfo", "código de transferência" e "código de autorização" referem-se a sequências alfanuméricas específicas do domínio, cujo objetivo principal é verificar a autorização do proprietário antes de uma transferência entre registradores. - Consulte o guia principal sobre o restante do processo de transferência.
- ⚠️ Trata-se de transferir um nome de domínio que você possui junto a um fornecedor diferente da Infomaniak, para que a gestão futura desse domínio seja feita pela Infomaniak; portanto, não se trata de uma transferência interna de um titular para outro, e o código a ser obtido não é, portanto, um código para uma transferência interna para o seu fornecedor atual.
Transferir o nome de domínio para a Infomaniak
Para obter o código de autorização do seu provedor atual:
- Consulte o procedimento completo fornecido pela Hostpoint para obter o código e guardá-lo em segurança.
- Depois de obter o código de autorização, consulte o guia principal da Infomaniak sobre o restante do processo de transferência do nome de domínio.
Link para esta FAQ: https://faq.infomaniak.com/1341
Esta seção de perguntas frequentes foi útil?
Este guia irá ajudá-lo, por exemplo, se desejar instalar um pacote como pymysql e este requerer uma versão do Python superior à oferecida por padrão no seu serviço de hospedagem.
Preâmbulo
- Anaconda é uma distribuição gratuita e de código aberto das linguagens de programação Python e R; o seu objetivo é simplificar a gestão de pacotes e a implementação.
- Recomenda-se o uso do Miniconda (versão leve do conda); ele é instalado no seu espaço de usuário, evitando conflitos com o Python do sistema e não exigindo direitos de administrador.
- Consulte a documentação oficial.
1. Descarregar o instalador
Por exemplo, a versão Linux 64 bits para Python 3.11.
user@server:~$ wget https://repo.anaconda.com/miniconda/Miniconda3-py311_23.10.0-1-Linux-x86_64.sh --2024-03-10 12:00:00-- https://repo.anaconda.com/miniconda/Miniconda3-py311_23.10.0-1-Linux-x86_64.sh Resolving repo.anaconda.com... 104.16.131.3, 104.16.130.3 Connecting to repo.anaconda.com|104.16.131.3|:443... connected. HTTP request sent, awaiting response... 200 OK Length: 72787200 (69M) [application/x-sh] Saving to: ‘Miniconda3-py311_23.10.0-1-Linux-x86_64.sh' Miniconda3-py311_23.10.0-1-Linux-x86_64.sh 100% [===================>] 69.42M --.-KB/s in 0.3s2. Verificar a integridade (Hash SHA256)
2. Contrôler l'intégrité (Hash SHA256)
user@server:~$ sha256sum Miniconda3-py311_23.10.0-1-Linux-x86_64.sh
6c714a33ea348303f909194246990422e698889417d74b9714856b3e9a7e6c3a  Miniconda3-py311_23.10.0-1-Linux-x86_64.sh
3. Iniciar a instalação
O argumento -b permite uma instalação silenciosa. Por padrão, o Miniconda será instalado em ~/miniconda3.
user@server:~$ bash Miniconda3-py311_23.10.0-1-Linux-x86_64.sh -b
PREFIX=/home/clients/your_client_hash/miniconda3
Descompactando o pacote...
Coletando metadados do pacote (current_repodata.json): concluído
Resolvendo o ambiente: concluído
Executando a transação: concluído
Instalação concluída.
4. Inicializar e ativar o Conda
Para usar o Conda imediatamente e a cada conexão SSH:
user@server:~$ ~/miniconda3/bin/conda init bash
no change     /home/clients/your_client_hash/miniconda3/condabin/conda
...
modified      /home/clients/your_client_hash/.bashrc

user@server:~$ source ~/.bashrc
5. Instalar um pacote (exemplo: pymysql)
Após a ativação, o prefixo (base) aparece antes do seu prompt de comando. Você pode então instalar suas ferramentas sem usar sudo ou --user.
(base) user@server:~$ python -V
Python 3.11.5

(base) user@server:~$ pip install pymysql
Collecting pymysql
  Downloading PyMySQL-1.1.0-py3-none-any.whl (44 kB)
Installing collected packages: pymysql
Successfully installed pymysql-1.1.0
Link para esta FAQ: https://faq.infomaniak.com/1362
Esta seção de perguntas frequentes foi útil?
Este guia detalha a compatibilidade dos serviços de hospedagem web da Infomaniak com IPv4 e IPv6.
Introdução
- A Infomaniak oferece suporte tanto a IPv4 quanto a IPv6, permitindo uma conectividade ideal para todos os usuários.
- Apenas os serviços de hospedagem Starter (gratuitos) e os planos de hospedagem mais antigos não são compatíveis: faça o upgrade para um Servidor Cloud ou hospedagem compartilhada.
- A compatibilidade com IPv4 e IPv6 significa que o serviço de hospedagem da Infomaniak permite que os sites sejam acessíveis tanto por usuários que utilizam endereços IPv4 quanto IPv6.
- Isso garante que seu site possa ser acessado por todos os tipos de dispositivos e redes, oferecendo uma experiência ideal para seus usuários, independentemente do protocolo que eles utilizem para se conectar à Internet.
IPv4, ou Internet Protocol versão 4
Esta é a primeira versão do protocolo de Internet amplamente utilizada desde a década de 1980. Ele utiliza endereços IP de 32 bits, o que permite identificar e localizar os dispositivos conectados à Internet. No entanto, com o esgotamento dos endereços IPv4, tornou-se necessário desenvolver uma nova versão (leia mais abaixo):
- Exemplo de endereço IPv4: 192.168.0.1
- Neste exemplo, o endereço IPv4 é composto por quatro grupos de números separados por pontos…
- Cada grupo pode conter um número de 0 a 255.
- O endereço 192.168.0.1 é frequentemente usado para representar um endereço IP local em uma rede privada.
- Descubra o IP do seu site: consulte este outro guia…
- Obtenha o IP público da sua conexão de Internet atual: https://chk.me/ip
IPv6, ou Internet Protocol versão 6
É a versão mais recente do protocolo de Internet, introduzida para resolver o problema do esgotamento dos endereços IPv4. O IPv6 utiliza endereços IP de 128 bits, oferecendo um espaço de endereçamento praticamente ilimitado. Também oferece funcionalidades aprimoradas, como segurança, qualidade de serviço e configuração automática de endereço:
- Exemplo de endereço IPv6: 2001:0db8:85a3:0000:0000:8a2e:0370:7334
- Neste exemplo, o endereço IPv6 é composto por oito grupos de números e letras separados por dois pontos…
- Cada grupo pode conter um número hexadecimal de 0 a FFFF.
- O endereço IPv6 é muito mais longo do que o endereço IPv4, oferecendo, assim, um espaço de endereçamento muito maior.
Link para esta FAQ: https://faq.infomaniak.com/1393
Esta seção de perguntas frequentes foi útil?
Este guia explica como configurar uma rede de sites WordPress para gerenciar vários sites a partir de uma única instalação do WordPress Infomaniak, com endereços URL do tipo site1.domain.xyz, site2.domain.xyz ou até mesmo com domain1.com, domain2.com, etc.
Instalação do WordPress multisite
Para começar:
- Instale o WordPress através da Infomaniak no seu espaço de hospedagem com um nome de domínio principal:

- Este primeiro site WordPress deve ser acessível e funcionar corretamente:

- Este primeiro site WordPress deve ser acessível e funcionar corretamente:
- Conecte-se via FTP.
- Edite o arquivo
wp-config.phpdo primeiro site WordPress em questão. - Acima da linha "
/* É só isso, pare de editar! Boas publicações. */" (#94), copie e cole o códigodefine('WP_ALLOW_MULTISITE', true);:
- Salve suas alterações.
- Faça login na administração do seu site WordPress.
- Desative temporariamente todos os plugins do WordPress:

- Acesse o menu FERRAMENTAS para criar uma Rede:
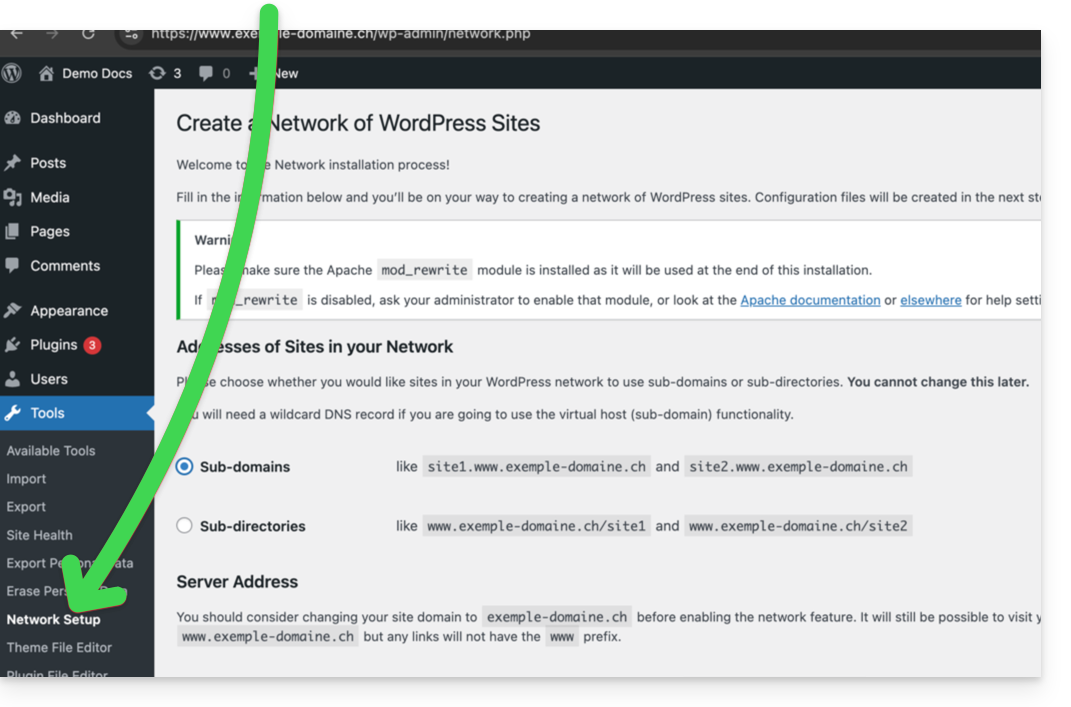
- Escolha o método de criação dos seus diferentes sites WordPress (em subdomínios)…
- Clique no botão de instalação:

- Adicione as informações que aparecem no ecrã nos ficheiros
wp-config.phpe.htaccessno servidor. - Após reconectar-se ao seu WordPress, você terá um novo menu "Meus sites", no qual poderá adicionar e gerenciar seus diferentes sites na mesma rede:

- Reative suas extensões desativadas.
- No Manager, adicione um alias ao seu site no formato
*.seu-domínio-aqui (o asterisco permite criar um alias curinga) com atualização DNS para que oCNAMEcorreto seja adicionado automaticamente na zona:
- Instale ou atualize seus certificados SSL:

- Quando criar um novo site na rede, dando-lhe, por exemplo, o nome
home2, ele poderá ser acessado através dehome2.domain.xyze assim por diante:
Link para esta FAQ: https://faq.infomaniak.com/1417
Esta seção de perguntas frequentes foi útil?