Base de conhecimento
1000 perguntas frequentes, 500 tutoriais e vídeos explicativos. Aqui, você encontra apenas soluções!
Este guia explica como transmitir uma reunião online kMeet em um fluxo separado, acessível por meio de uma URL exclusiva, graças ao Streaming de Vídeo Infomaniak.
✘ INDISPONÍVEL com
kSuite Free / kSuite Standard
my kSuite / my kSuite+ (ik.me, etik.com, ikmail.com)
Preâmbulo
- Transmitir uma reunião, como uma conferência, através de um fluxo de Streaming de Vídeo, em vez de dentro da aplicação kMeet, apresenta várias vantagens:
- Transmissão pública em larga escala sem ter de restringir o acesso a um público limitado a pessoas convidadas.
- Atrair um público mais amplo, como em conferências, webinars ou eventos ao vivo, onde centenas ou milhares de espectadores podem acompanhar o evento sem participar numa chamada privada.
- Permite alcançar um número ilimitado de espectadores.
- Não é necessário gerir o acesso para cada participante; o fluxo é simplesmente acessível através de um link.
- Um simples navegador web é suficiente para aceder ao fluxo de streaming.
- Acesso passivo: os espectadores não são obrigados a participar ativamente ou a interagir; podem simplesmente assistir ao evento sem se registarem ou se conectarem, o que é mais adequado para grandes eventos.
- Não há interrupções de áudio ou perturbações relacionadas com a gestão dos microfones; isso permite manter um fluxo mais suave e focado no orador.
- Resolução de transmissão mais elevada, enquanto o kMeet pode ser limitado por restrições de largura de banda e ter uma qualidade de vídeo inferior para evitar a sobrecarga da rede.
Criar o link de compartilhamento para streaming de vídeo
Pré-requisitos
- É preciso ser moderador do kMeet para poder criar um link de transmissão ao vivo.
- Não é necessário ter uma oferta de streaming de vídeo Infomaniak.
Em seguida:
- Inicie o kMeet através de ksuite.infomaniak.com/kmeet ou a partir de uma das aplicações para computador ou dispositivos móveis.
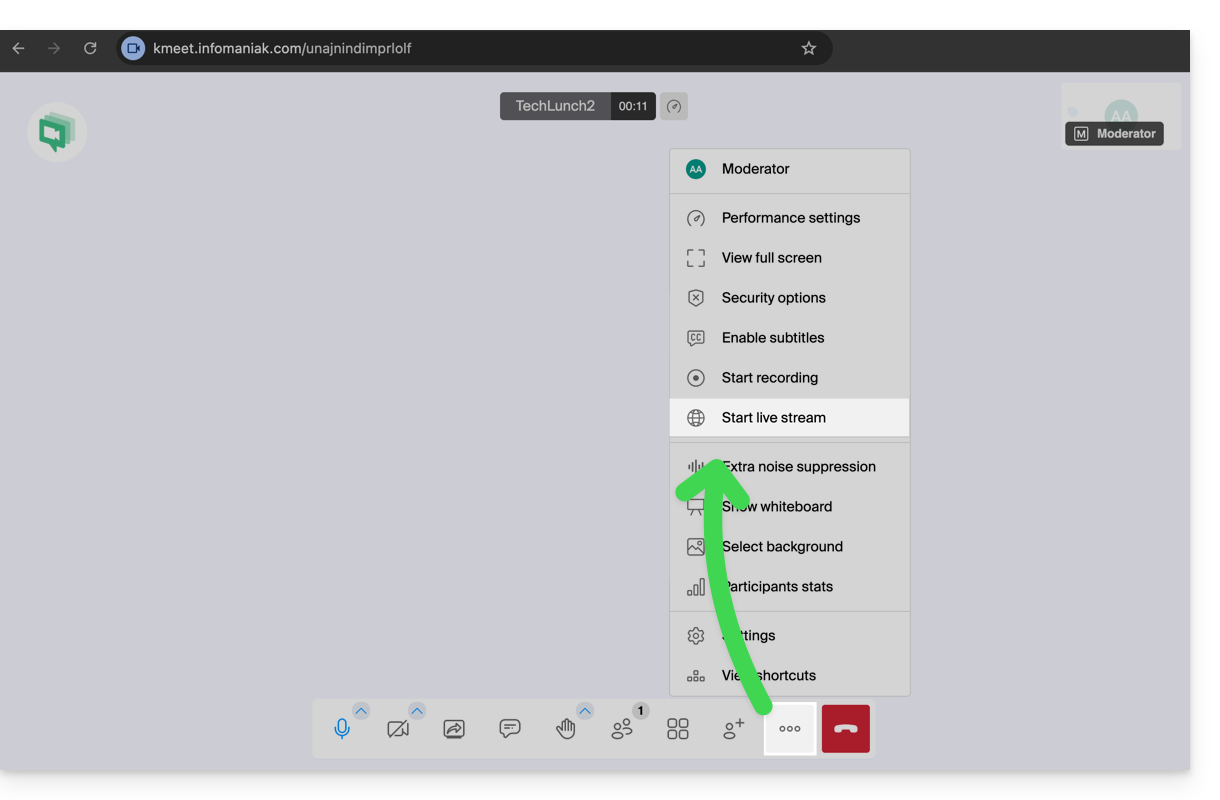
- Dentro da reunião, clique no menu de ações ○○○ na barra de ferramentas do kMeet.
- Escolha Iniciar a transmissão ao vivo:
- Clique no botão para Iniciar:
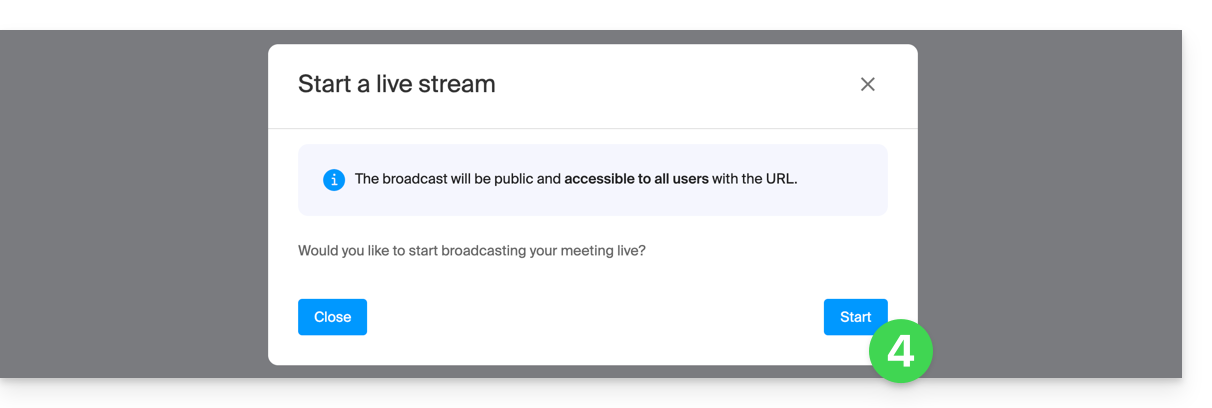
- Aguarde enquanto o fluxo de Streaming de Vídeo é criado;um símbolo exibido no kMeet, juntamente com um sinal sonoro, indica o início da transmissão por streaming de vídeo.
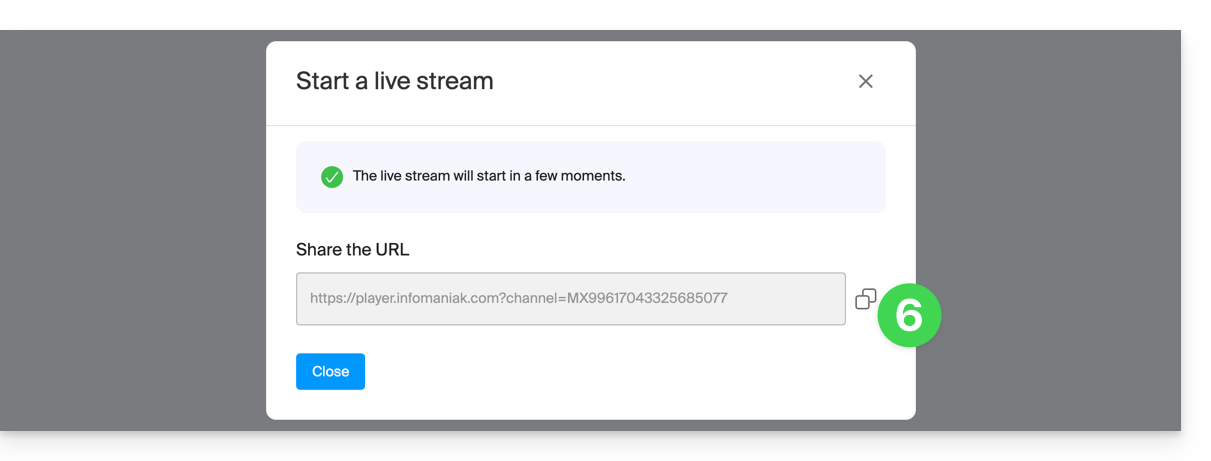
- No mesmo local, após a exibição do link do streaming, clique no ícone à direita para copiar a URL correspondente ao fluxo ao vivo; cole a URL em uma mensagem destinada aos participantes ou a qualquer pessoa que deva assistir à transmissão ao vivo:
O fluxo é transmitido continuamente por um máximo de 24 horas e não estará mais acessível assim que a reunião kMeet for interrompida.
Link para esta FAQ: https://faq.infomaniak.com/1355
Esta seção de perguntas frequentes foi útil?
Transmissão de vídeo, transmissão de TV... são apenas designações diferentes usadas para descrever a mesma tecnologia: o envio de conteúdo em «direto» (ou com um pequeno atraso) que permite a reprodução do conteúdo multimídia à medida que é transmitido. Não há diferença entre esses termos.
Link para esta FAQ: https://faq.infomaniak.com/1374
Esta seção de perguntas frequentes foi útil?
Este guia explica como transmitir ao vivo uma lista de vídeos do serviço VOD através do produto Streaming de vídeo.
Introdução
- Esta funcionalidade permite utilizar o serviço VOD para criar uma lista de reprodução de vídeos e, em seguida, utilizar o serviço de transmissão de vídeo para transmiti-los em tempo real, por exemplo, no contexto de um canal de videoclipes, telecompra, documentários, etc.
- É possível inserir anúncios entre cada vídeo, manualmente ou através da utilização de tags VAST.
- A lista de reprodução será reproduzida em loop continuamente até que o usuário a interrompa.
Transmitir uma lista de reprodução VOD em streaming ao vivo
Pré-requisitos
- Ter um serviço VOD (no mínimo, o espaço VOD gratuito com o serviço de streaming de vídeo).
- Ter um serviço de streaming de vídeo na mesma organização e gerenciado pela mesma conta.
Para criar a lista de reprodução, importe alguns vídeos:
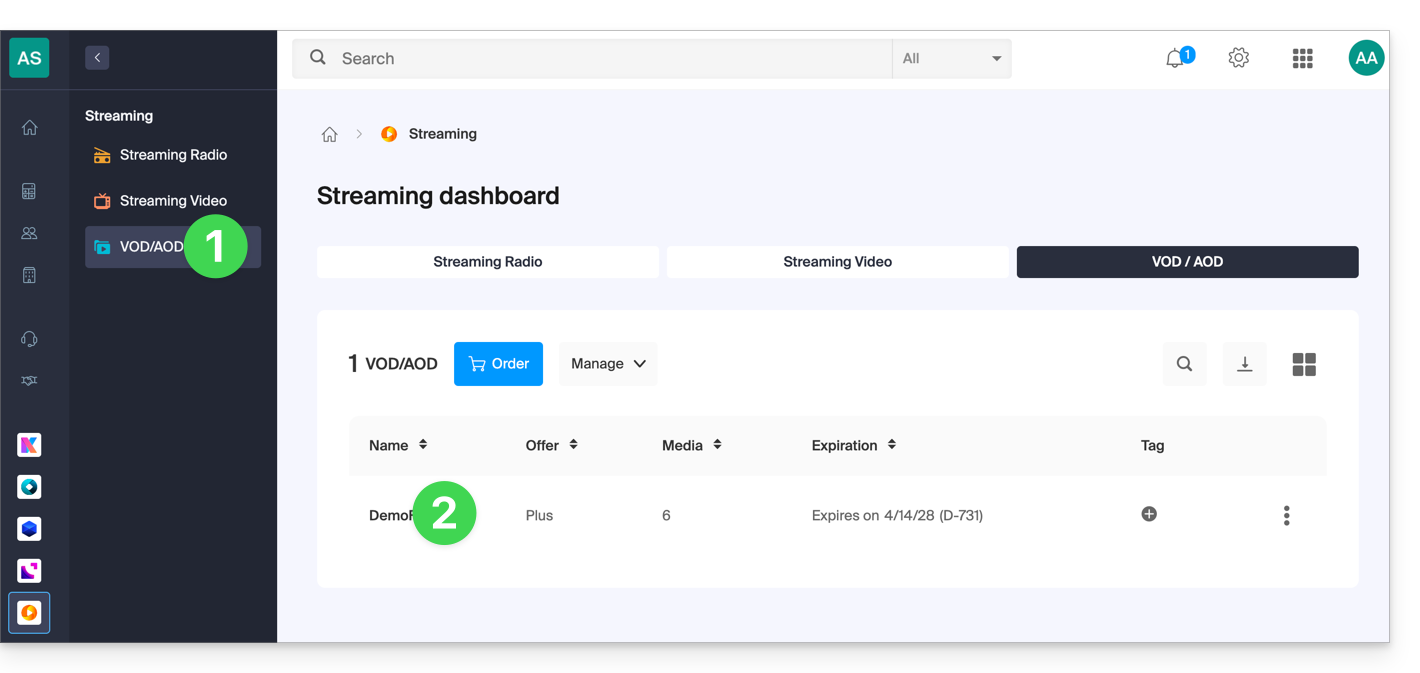
- Clique aqui para acessar o gerenciamento do seu produto no painel de controle Infomaniak (precisa de ajuda?).
- Clique diretamente no nome atribuído ao produto em questão:
- Selecione os arquivos de mídia para importar na seção Importação rápida ou a partir do gerenciador de mídia:
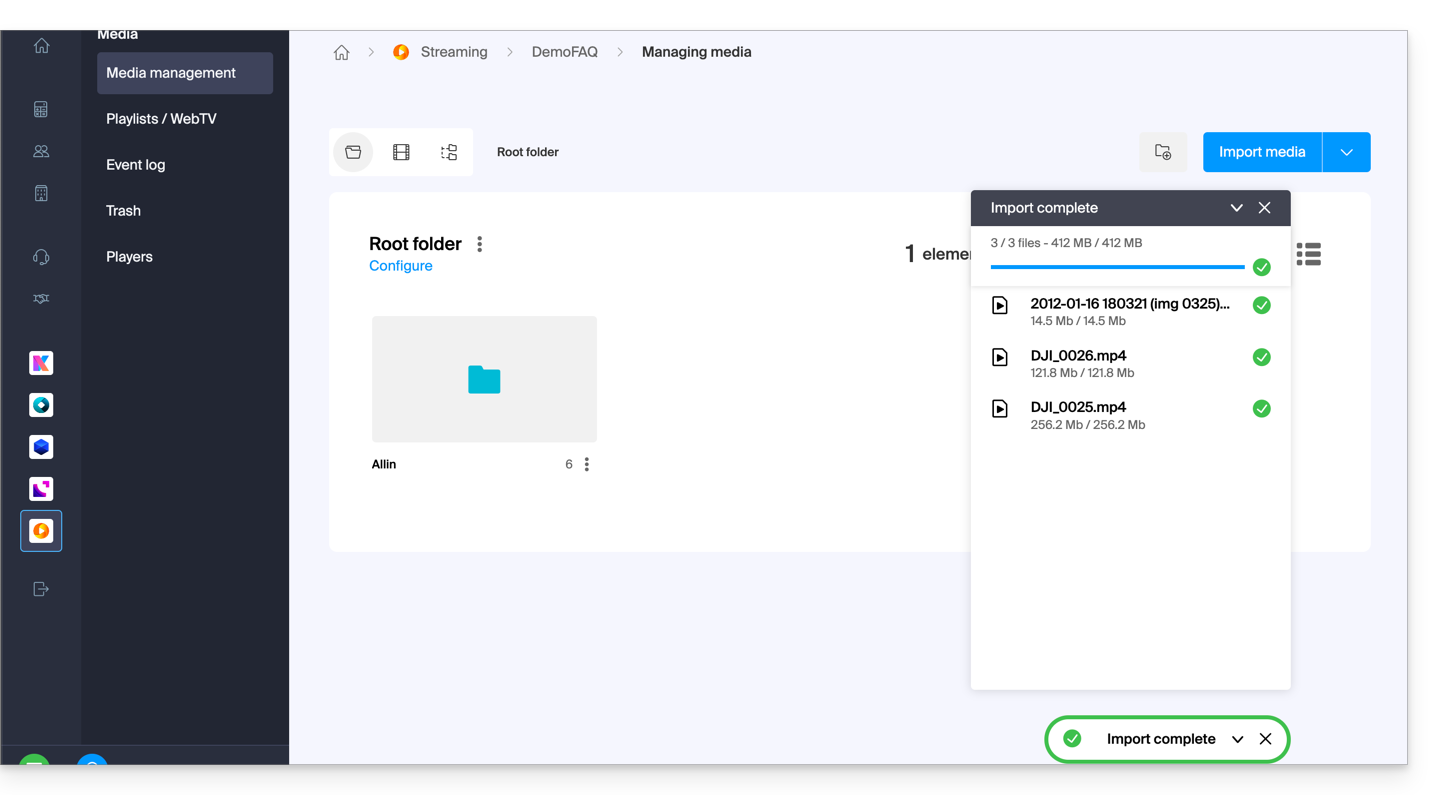
Após a importação dos vídeos:
- Clique em Mídia no menu lateral esquerdo.
- Clique em Listas de reprodução / WebTV no menu lateral esquerdo.
- Clique no botão para adicionar uma nova lista de reprodução:
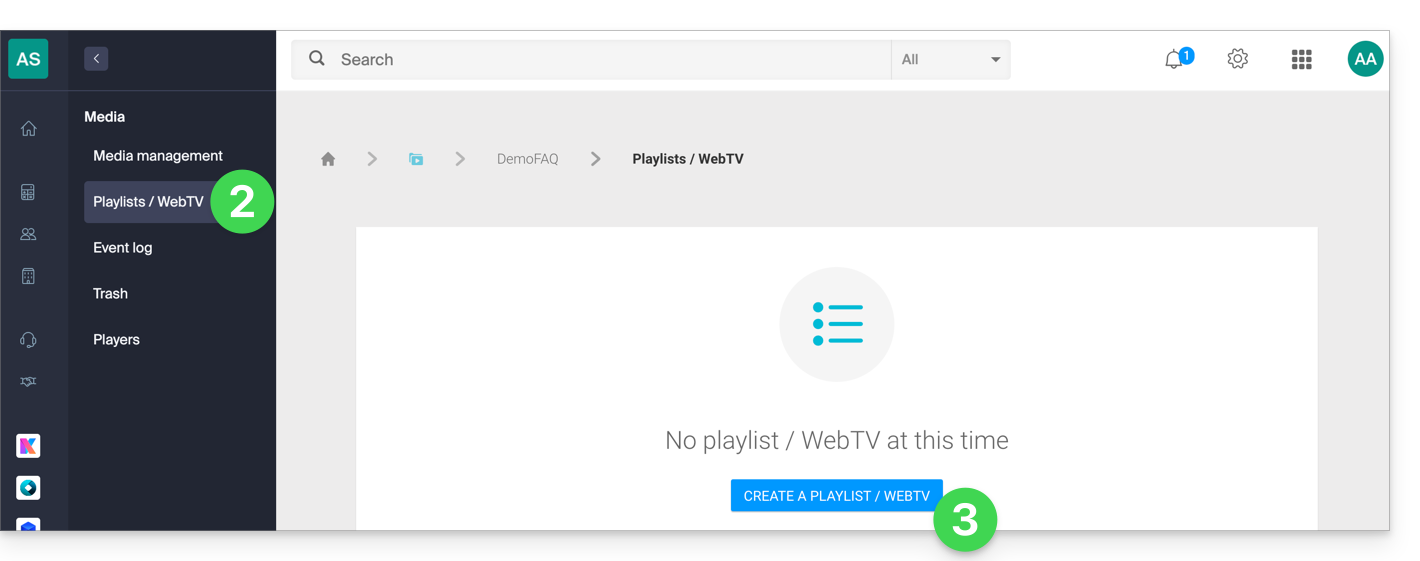
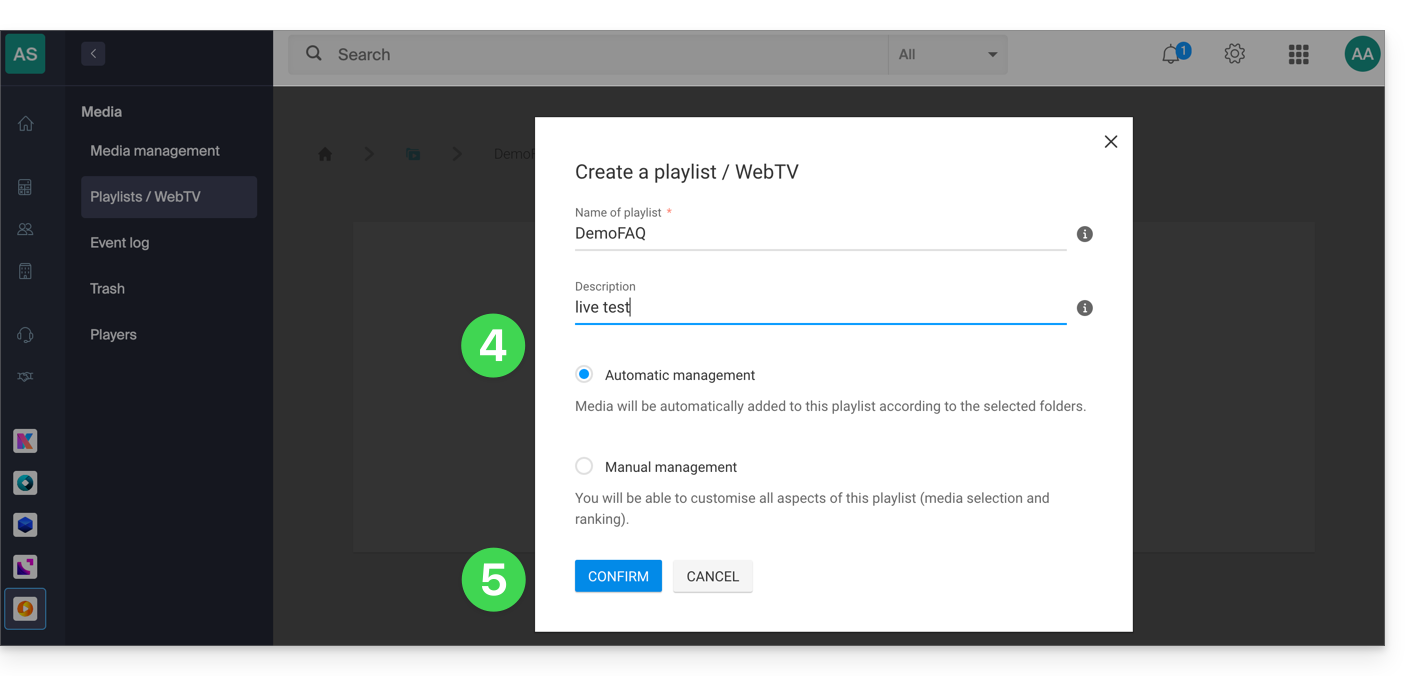
- Dê um nome à lista de reprodução e determine se ela deve ser automática (vinculada a uma pasta) ou manual.
- Confirme:
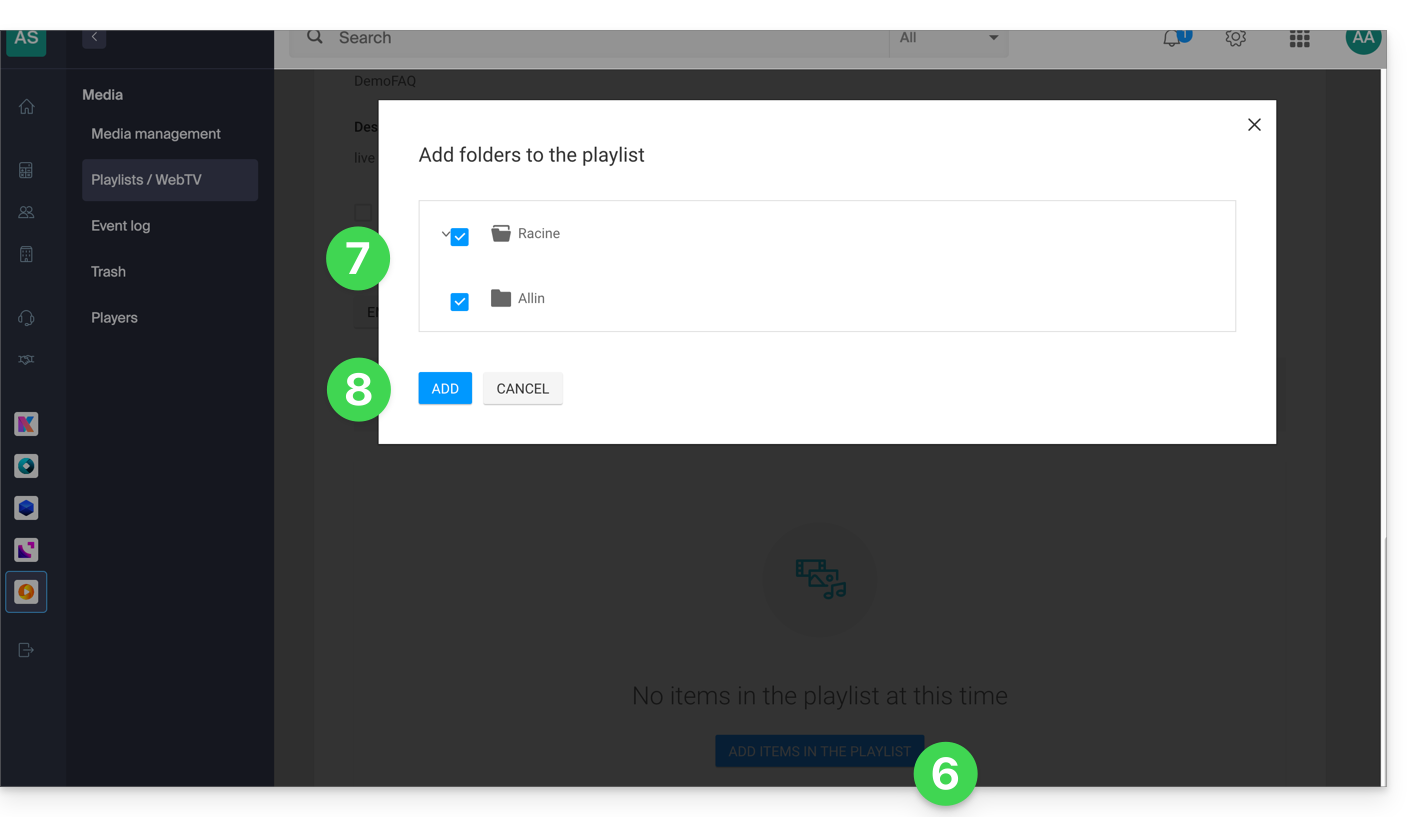
- Clique para adicionar mídia.
- Escolha a pasta ou os vídeos específicos que deseja usar para criar a lista de reprodução.
- Adicione os arquivos de mídia:
- Escolha se a lista de reprodução deve ser pública e, como acontece com seus arquivos de mídia, se ela deve ser “marcada” como “processada” (status visível apenas para você).
- Nas configurações adicionais, você pode escolher adicionar os arquivos de mídia no início da lista de reprodução em vez de no final.
- Clique no botão Criar uma transmissão ao vivo:
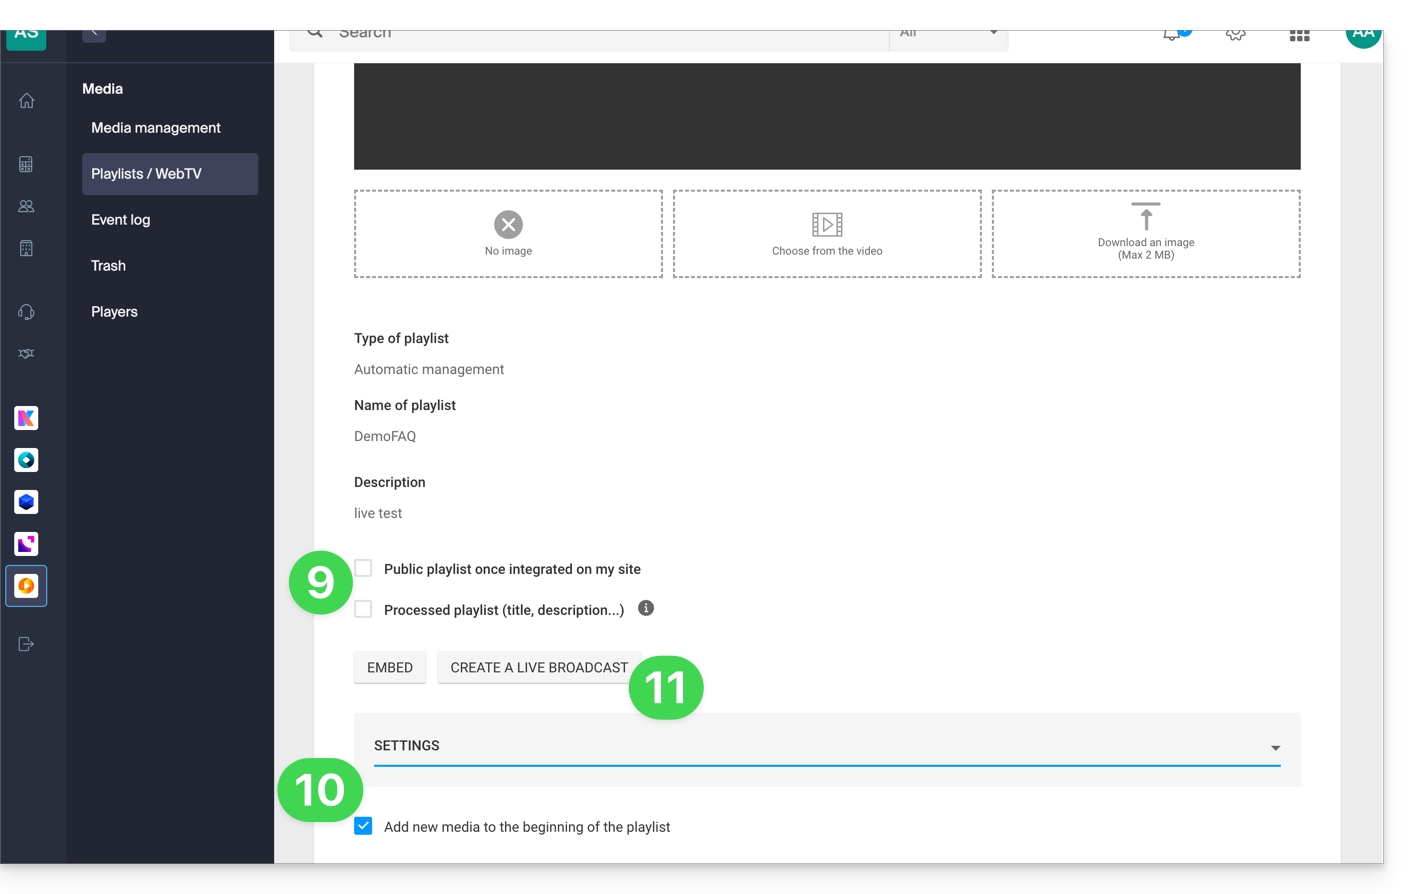
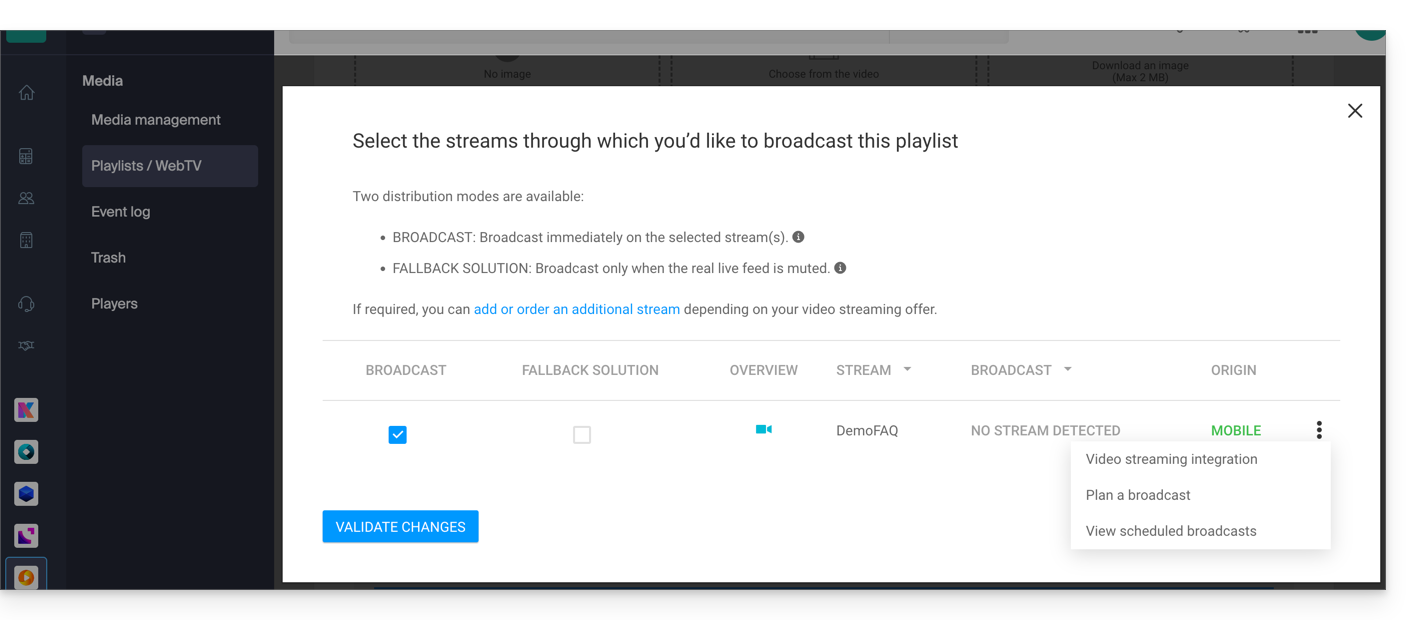
- Escolha o fluxo do serviço de Streaming de vídeo que irá transmitir a lista de reprodução e defina as suas preferências:
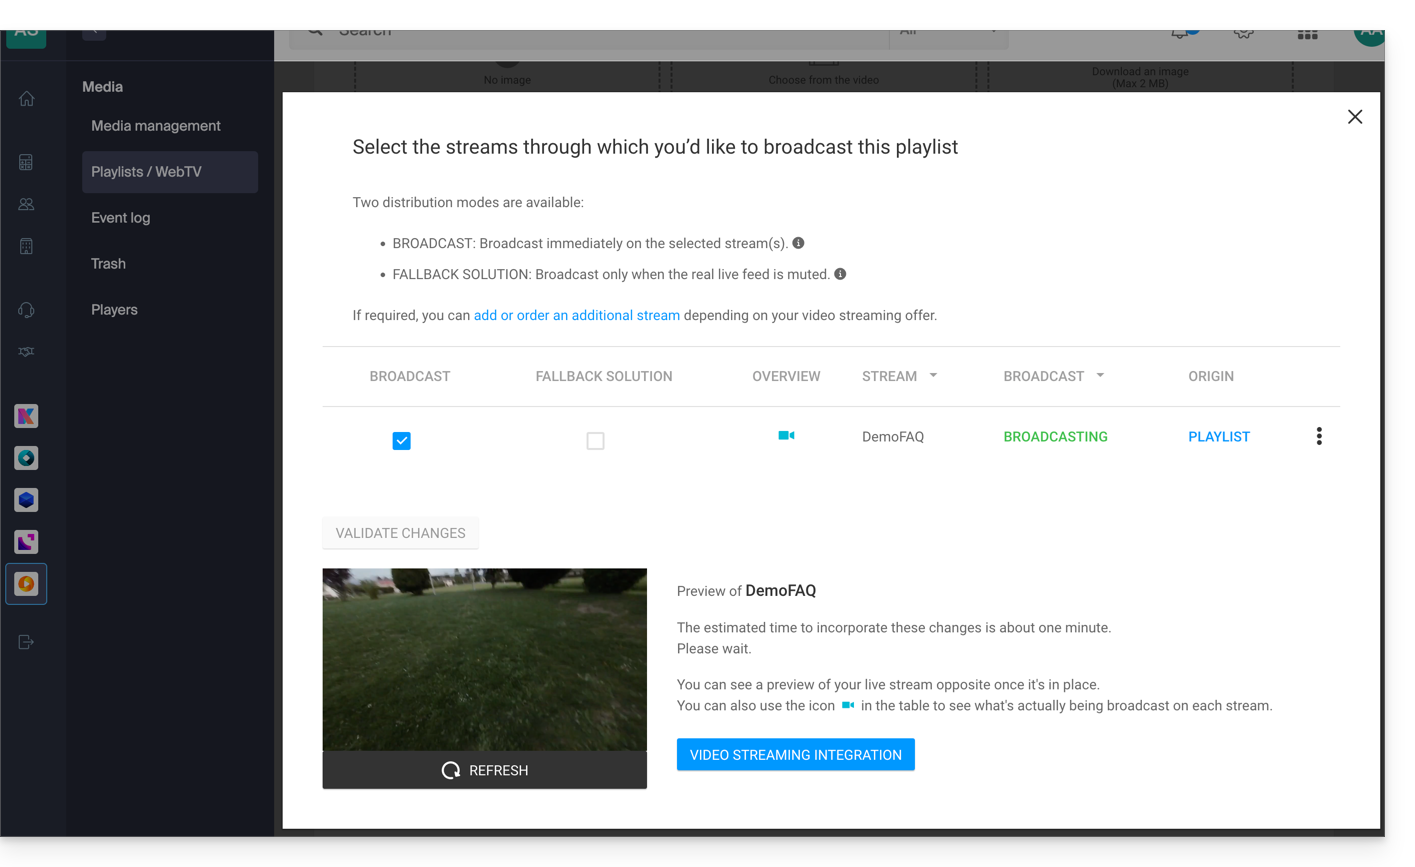
- A validação ocorre quando você estiver pronto para transmitir; a pré-visualização é exibida abaixo:
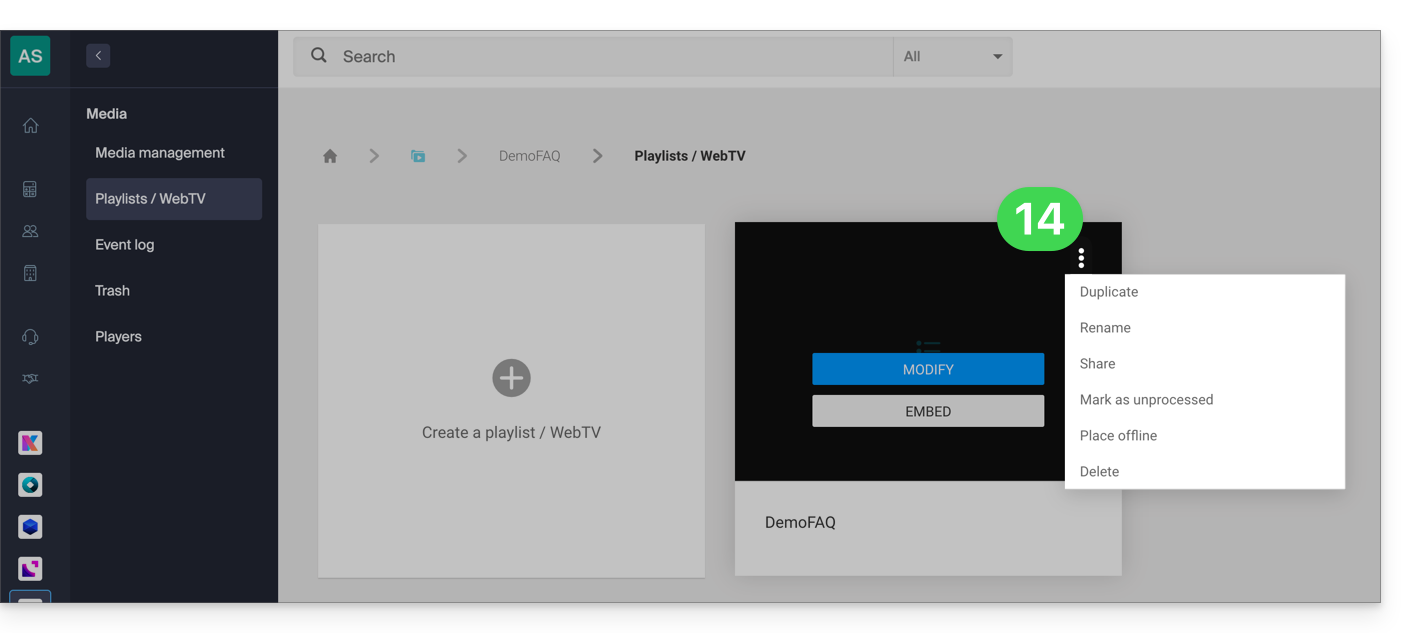
- Cada lista de reprodução pode ser duplicada, renomeada, compartilhada, excluída, etc., diretamente da página de listas de reprodução:
Alguns exemplos de utilização
A transmissão de uma playlist pode servir como solução de contingência assim que uma transmissão ao vivo for interrompida (voluntária ou involuntariamente) e, nesse caso, assumir o controle da transmissão. Assim que o codificador ao vivo retransmite um fluxo, ele retoma o controle da playlist. Isso permite transmitir conteúdo alternativo caso haja um problema na transmissão ao vivo ou se o usuário transmitir apenas conteúdo ao vivo à noite, por exemplo, podendo automatizar a transmissão de conteúdo de uma playlist durante o resto do dia.
Também é possível programar a transmissão de uma lista de reprodução a partir da ferramenta de agendamento do Streaming de vídeo. Assim, é possível escolher intervalos de transmissão de uma lista de reprodução única ou diferentes com antecedência, ou de forma recorrente. O codificador que transmite ao vivo será desconectado automaticamente durante toda a duração da transmissão da lista de reprodução; uma vez que o intervalo de tempo termine, o codificador será reconectado e seu conteúdo será transmitido.
Uma lista de reprodução VOD pode ser criada e editada manualmente (selecionando o vídeo que deve ser adicionado à lista) ou ser dinâmica, se for criada automaticamente a partir de um conjunto de vídeos que se encontram em uma pasta específica e que são adicionados gradualmente. Em ambos os casos,pare e reinicie a transmissão ao vivo para que as novas gravações adicionadas à lista de reprodução sejam consideradas - observe que isso não será mais obrigatório em uma próxima atualização da ferramenta.
Link para esta FAQ: https://faq.infomaniak.com/1448
Esta seção de perguntas frequentes foi útil?
Este guia detalha os elementos necessários para uma transmissão ideal dos seus fluxos no serviço de streaming de vídeo Infomaniak.
Taxa de bits recomendada de acordo com a qualidade do vídeo
Ao codificar seus fluxos, é essencial ajustar a taxa de bits à qualidade desejada:
- Vídeo SD (480p): mínimo de 1000 kbit/s.
- Vídeo HD (720p): entre 2500 e 4000 kbit/s.
- Vídeo Full HD (1080p): entre 5000 e 8000 kbit/s.
- Vídeo 4K Ultra HD (2160p): a partir de 15000 kbit/s.
Garanta uma taxa de transferência de Internet suficiente
Para garantir uma transmissão ininterrupta, recomenda-se ter uma taxa de transferência de Internet pelo menos duas vezes superior à taxa de bits do seu fluxo codificado, por exemplo:
- Para um fluxo em Full HD codificado a 6000 kbit/s, é necessária uma velocidade de Internet mínima de 12 Mbit/s.
- Esta margem evita interrupções devido a variações na conexão ou a outros dispositivos que utilizam a mesma rede.
Use o recurso de múltiplas taxas de bits para máxima adaptabilidade
O recurso de múltiplas taxas de bitspermite que seu fluxo esteja disponível em várias qualidades, adaptadas às conexões dos espectadores. Isso garante:
- Uma experiência fluida para aqueles com largura de banda limitada.
- Qualidade ideal para espectadores com uma conexão rápida.
Otimize seus fluxos para usuários de dispositivos móveis
Os utilizadores de dispositivos móveis podem enfrentar condições de rede instáveis. Para melhorar a experiência deles:
- Codifique com uma taxa de bits máxima de 1000 kbit/s por fluxo para resoluções mais baixas.
- Implemente o multi-bitrate para ajustar a qualidade automaticamente.
Boas práticas para uma codificação e transmissão bem-sucedidas
- Teste a sua conexão de Internet antes de cada transmissão.
- Opte por um codificador fiável e atualize as suas configurações de acordo com as recomendações acima.
- Certifique-se de que a sua rede está dedicada à transmissão para evitar interrupções causadas por outros usos.
- Preveja uma solução de backup (como um modem 4G/5G) em caso de problemas de conexão.
Link para esta FAQ: https://faq.infomaniak.com/1470
Esta seção de perguntas frequentes foi útil?
Este guia aborda a transmissão de fluxos de vídeo provenientes diretamente de câmeras móveis no serviço de Streaming de vídeo Infomaniak.
Transmitir ao vivo…
… com codificador
O funcionamento clássico do streaming de vídeo envolve o uso de um codificador para transformar o fluxo proveniente de uma fonte, como uma câmera ou webcam.
Exemplo com uma GoPro: para transmitir o que ela filma ao vivo (configurando uma webcam, por exemplo), você pode conectá-la através do cabo HDMI à sua placa de captura (uma placa AVerMedia ou Blackmagic Design, por exemplo), que possui uma entrada HDMI.
Use um software como o OBS Studio e configure-o para reconhecer a fonte de vídeo da placa de captura e codificar o fluxo de vídeo, transmitindo-o para o servidor de streaming (Infomaniak).
… sem codificador
Com câmeras adequadas, que fornecem H.264 nativamente, não há mais necessidade de um codificador; você pode conectar sua câmera diretamente ao sistema de streaming de vídeo. A câmera codifica diretamente o fluxo de vídeo em um formato compatível (H.264) e o transmite via RTSP (Real-Time Streaming Protocol) diretamente para o servidor de streaming. No entanto, este sistema só funciona com uma lista limitada de câmeras (veja abaixo). Alguns módulos, como a gravação de vídeo, não são compatíveis com este modo de operação.
Para acessar a configuração:
- Clique aqui para acessar o gerenciamento do seu produto no Manager Infomaniak (precisa de ajuda?).
- Clique diretamente no nome atribuído ao produto em questão.
- Clique no botão para configurar o codificador:

- Clique na fonte IP CAM / EXTERNA

Leia os requisitos na página de configuração antes de continuar a configuração. Consulte também este outro guia.
Câmaras Compatíveis
- Axis
- Séries M: M10X, M11X, M30X, M31X, M7001
- Séries P: P13X, P33X, P55X
- Séries Q: Q1755, Q60X, Q16, Q17, Q19, Q35, Q61, Q62
- Sony
- SNC-CH110, SNC-DH110, SNC-CH210, SNC-DH210
- SNC-CH120, SNC-DH120, SNC-CH140, SNC-DH140
- SNC-CH160, SNC-DH160, SNC-CH180, SNC-DH180
- SNC-CH220, SNC-DH220, SNC-CH240, SNC-DH240
- SNC-CH260, SNC-DH260, SNC-CH280, SNC-DH280
- SNC-RH124, SNC-RH164
- Séries SNC-EB600, SNC-EM600, SNC-EM602RC, SNC-VM600, SNC-VM601, SNC-VB600, SNC-VB630, SNC-WR600, SNC-WR602
- Hikvision
- DS-2CD2020, DS-2CD2032, DS-2CD2042, DS-2CD2120, DS-2CD2132, DS-2CD2142, DS-2CD2152
- Dahua
- IPC-HFW1120S, IPC-HFW1220S, IPC-HFW1320S, IPC-HFW1400S, IPC-HDW1120S, IPC-HDW1220S, IPC-HDW1320S
- Bosch
- NDE-3502, NDE-4502, NDE-5502, NIN-50022, NIN-70122
- Panasonic
- WV-S1110, WV-S1131, WV-S2110, WV-S2131, WV-S3110, WV-S3131
- Samsung Hanwha Techwin
- QND-6010R, QND-6020R, QND-6030R, QND-7010R, QND-7020R, QND-7030R
Link para esta FAQ: https://faq.infomaniak.com/1501
Esta seção de perguntas frequentes foi útil?
Este guia explica como gerir eventuais excedentes de consumo dos fluxos de Streaming de vídeo Infomaniak.
Introdução
- Em caso de ultrapassagem do plano, será gerada uma fatura de cobrança adicional, o que pode resultar em um custo extra, mais ou menos significativo.
- É, portanto, importante escolher a opção correta que será aplicada em caso de consumo excessivo.
Agir antes de atingir o limite
Para aceder ao serviço de streaming de vídeo:
- Clique aqui para acessar o gerenciamento do seu produto no Manager Infomaniak (precisa de ajuda?).
- Clique no menu de ação ⋮ para Gerenciar o produto Streaming Video.
- Clique em Gerenciar excedente:
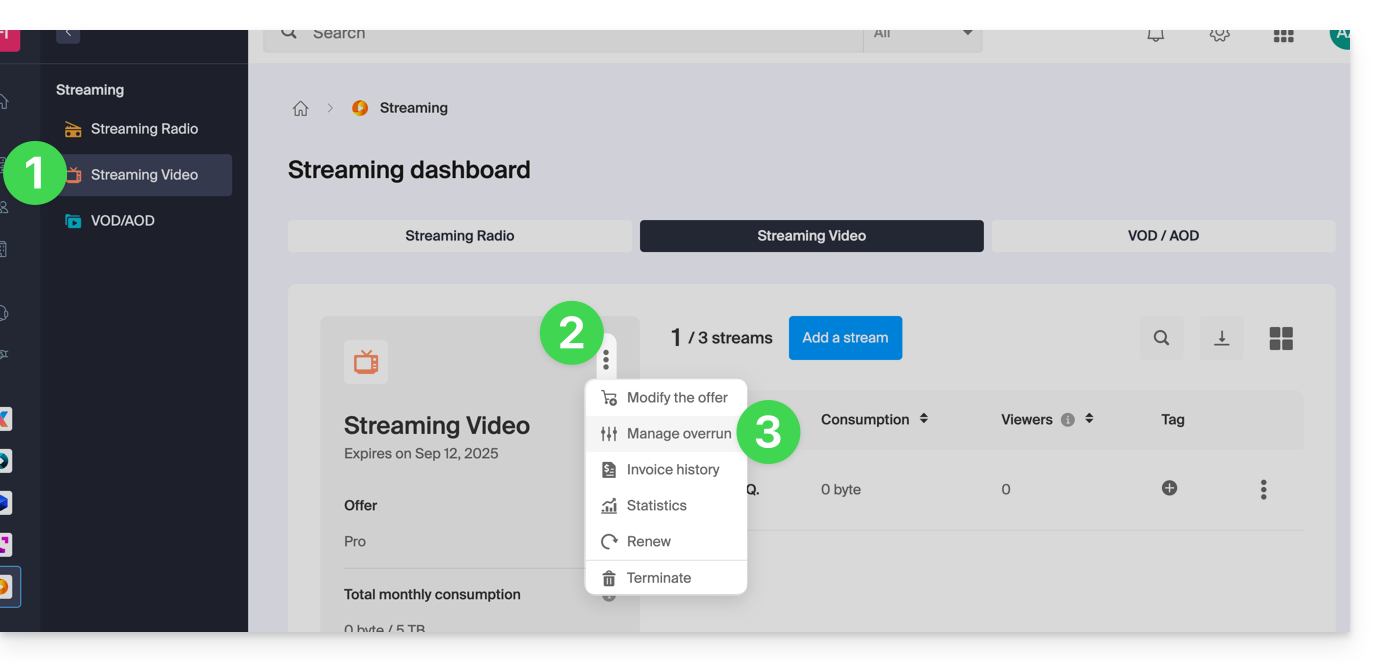
- As 3 opções em caso de excedente são:
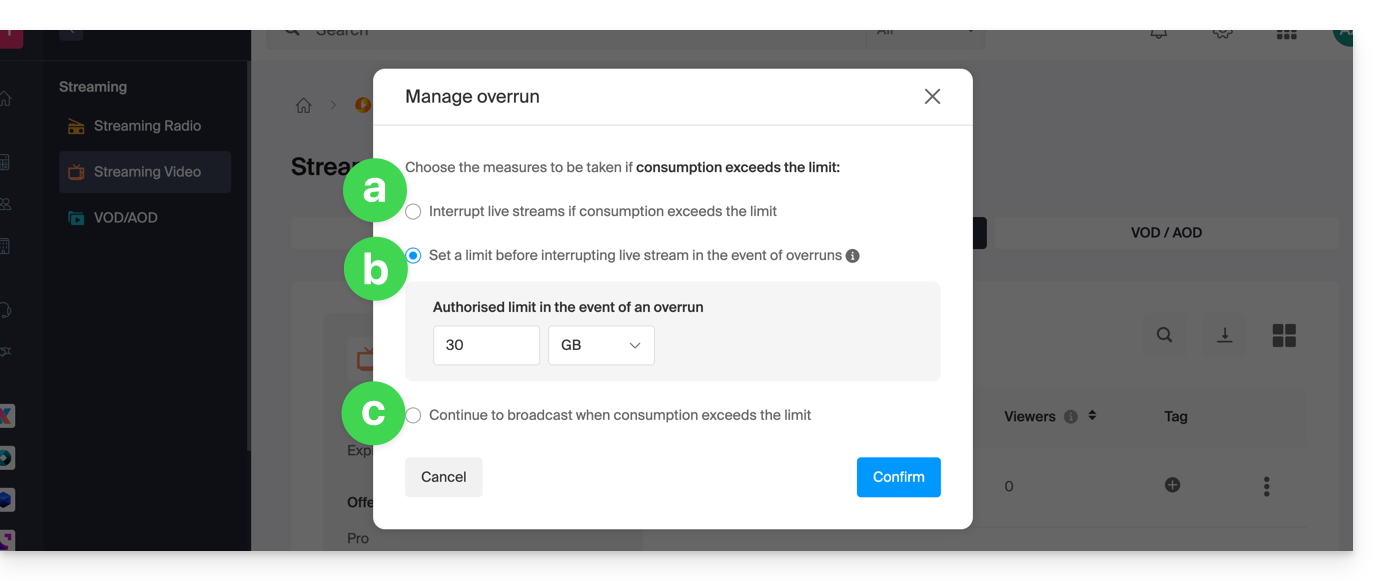
- Interromper a transmissão ao vivo
- Definir um limite (em
GBouTB) antes da interrupção das transmissões ao vivo - Continuar a transmitir
Link para esta FAQ: https://faq.infomaniak.com/1526
Esta seção de perguntas frequentes foi útil?
Este guia explica como impedir o acesso aos fluxos de streaming de vídeo da Infomaniak fora do seu próprio site.
Esta proteção não impede a integração de um fluxo através de uma tag HTML iframe. Utilize a proteção por hash único para um nível de segurança mais elevado.
Restringir o acesso às transmissões a um domínio
Para isso:
- Clique aqui para acessar o gerenciamento do seu produto no Manager Infomaniak (precisa de ajuda?).
- Clique diretamente no nome atribuído ao produto em questão.
- Clique em Configurações no menu lateral esquerdo.
- Clique em Restrições no menu lateral esquerdo.
- Clique na aba Restrição por domínio.
- Defina o(s) site(s)** que devem ser especificamente autorizados a carregar o fluxo.
- Clique no botão Guardar:
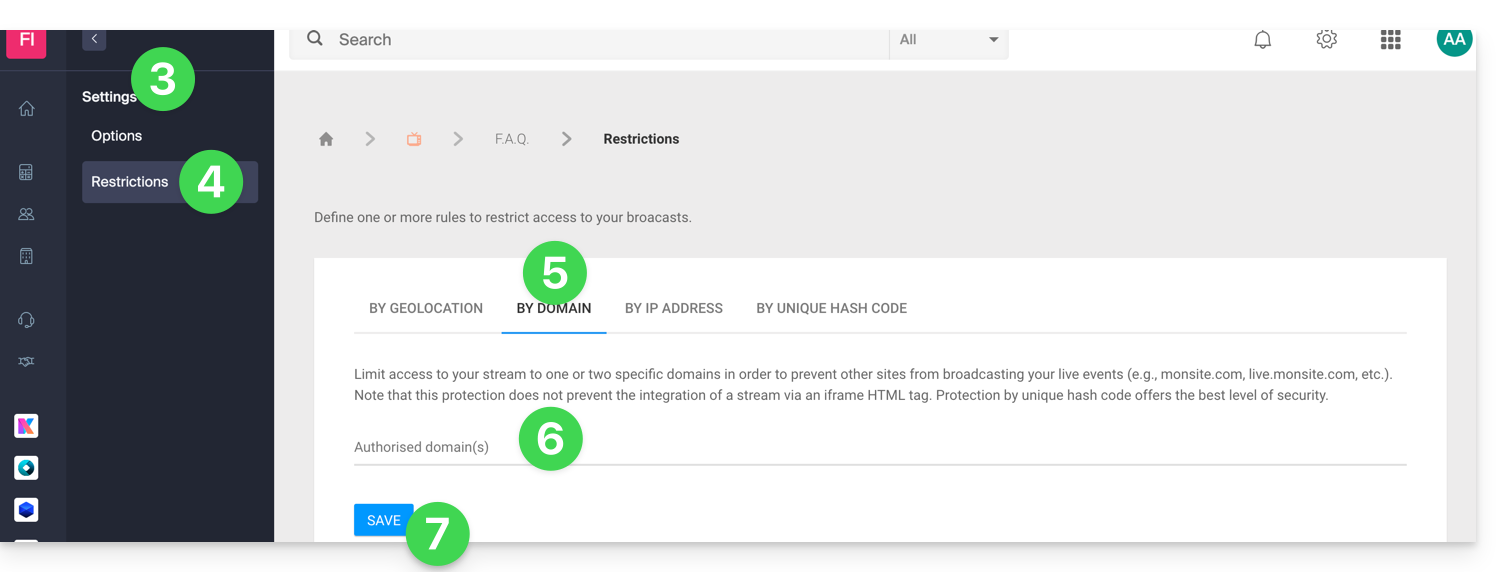
Consulte este outro guia para personalizar a imagem de substituição proposta aos utilizadores que não conseguem aceder ao conteúdo.
Link para esta FAQ: https://faq.infomaniak.com/1543
Esta seção de perguntas frequentes foi útil?
Este guia explica como transmitir um vídeo ao vivo com várias versões de áudio através do serviço de Streaming de vídeo Infomaniak. Não aborda VOD nem um serviço de streaming de áudio (utilizado apenas como complemento, caso escolha a abordagem A abaixo).
Introdução
- Uma transmissão ao vivo Streaming de vídeonão oferece várias faixas de áudio selecionáveis em um único reprodutor.
- Duas topologias possíveis:
- Abordagem A — 1 fluxo de vídeo + 1..N leitores de áudio separados (seleção do idioma no lado da página).
- Abordagem B — N fluxos de streaming de vídeo transmitindo a mesma imagem com um som diferente (um reprodutor por idioma).
Método para obter uma transmissão ao vivo multilíngue
Abordagem A — 1 reprodutor de vídeo + reprodutores de áudio separados
- Ideia geral: você envia um único vídeo ao vivo para a Infomaniak e, na sua página, adiciona reprodutores de áudio (um por idioma). O usuário desativa o som do reprodutor de vídeo e ativa o reprodutor de áudio do idioma desejado.
- Simples no envio: apenas um fluxo de vídeo para enviar à Infomaniak.
- Mais complexo na página: o utilizador tem de alternar entre o som do leitor de vídeo (desativado) e o leitor de áudio (ativado). Pode existir um ligeiro atraso entre a imagem e o áudio.
Para isso:
- Recupere o endereço e a chave de transmissão no painel de controlo Infomaniak (é o «ingest»). Copie-os para o seu software de transmissão.
- Inicie sua transmissão de vídeo ao vivo a partir do software: a Infomaniak recebe a imagem e publica um reprodutor de vídeo que você pode incorporar em seu site.
- Em sua página da web, adicione os reprodutores de áudio (um por idioma). Eles são separados do produto «Transmissão de vídeo»: você os coloca ao lado do reprodutor de vídeo.
- Prever uma pequena interface de seleção de idioma (botões FR/EN/ES…). Quando o usuário escolher um idioma, diminua o volume do reprodutor de vídeo e ative o reprodutor de áudio correspondente.
- Reduzir o atraso (se isso for importante para você): evite as opções de “retroceder” e os processos desnecessários que adicionam atraso; mantenha configurações estáveis em seu software.
A etapa de ingestão é a etapa de conexão: a Infomaniak fornece um endereço de recebimento e uma chave; você os copia e cola no seu software de transmissão (por exemplo, OBS ou um codificador de hardware). Quando você clica em «Iniciar», seu vídeo é enviado para este endereço: a Infomaniak o recebe e pode, em seguida, transmiti-lo aos espectadores; sem este endereço e esta chave, nada acontece na plataforma.
Abordagem B — vários leitores de vídeo (um por idioma)
- Ideia geral: você cria várias transmissões de vídeo ao vivo na Infomaniak, todas com a mesma imagem, mas cada uma em um idioma diferente. Na sua página, o usuário escolhe o idioma e você exibe o reprodutor de vídeo correspondente.
- Mais prático para o usuário: ele simplesmente escolhe um reprodutor "no idioma dele".
- Mais exigente para você: várias transmissões ao vivo para criar/manter e mais dados para enviar simultaneamente.
Para isso:
- Crie uma transmissão ao vivo por idioma no painel de controle Infomaniak. Para cada transmissão, anote o endereço e a chave de transmissão (o «ingest»).
- No seu software de transmissão, duplique a saída de vídeo e atribua a faixa de áudio correta (FR, EN, etc.) a cada cópia. Envie cada cópia para o endereço/chave da transmissão correspondente.
- Deixe que a Infomaniak cuide das configurações de qualidade de vídeo(resolução/qualidade adaptadas à conexão do espectador). Se preferir configurar tudo manualmente, é possível, mas é uma opção mais avançada; mantenha as configurações simples se for iniciante.
- Incorpore um seletor de idioma na sua página: quando o utilizador selecionar «FR», mostre o reprodutor da transmissão ao vivo em francês; se selecionar «EN», mostre o reprodutor da transmissão ao vivo em inglês, etc.
- Verifique a sua conexão de envio: quanto mais idiomas, mais dados você enviará simultaneamente. Faça um teste de carga antes do dia da transmissão.
Cada idioma tem seu próprio canal, portanto seu próprio endereço de recebimento e sua chave; você deve enviar a mesma imagem várias vezes (uma vez por idioma) para a Infomaniak: é sempre a etapa de conexão que permite à plataforma receber cada versão.
Link para esta FAQ: https://faq.infomaniak.com/1630
Esta seção de perguntas frequentes foi útil?
Este guia explica como exibir uma contagem regressiva para a próxima transmissão ao vivo ou durante uma interrupção programada no serviço de streaming de vídeo da Infomaniak.
Acessar o calendário de programação
Para isso:
- Clique aqui para acessar a gestão do seu produto no Manager Infomaniak (precisa de ajuda?).
- Clique diretamente no nome atribuído ao produto em questão:
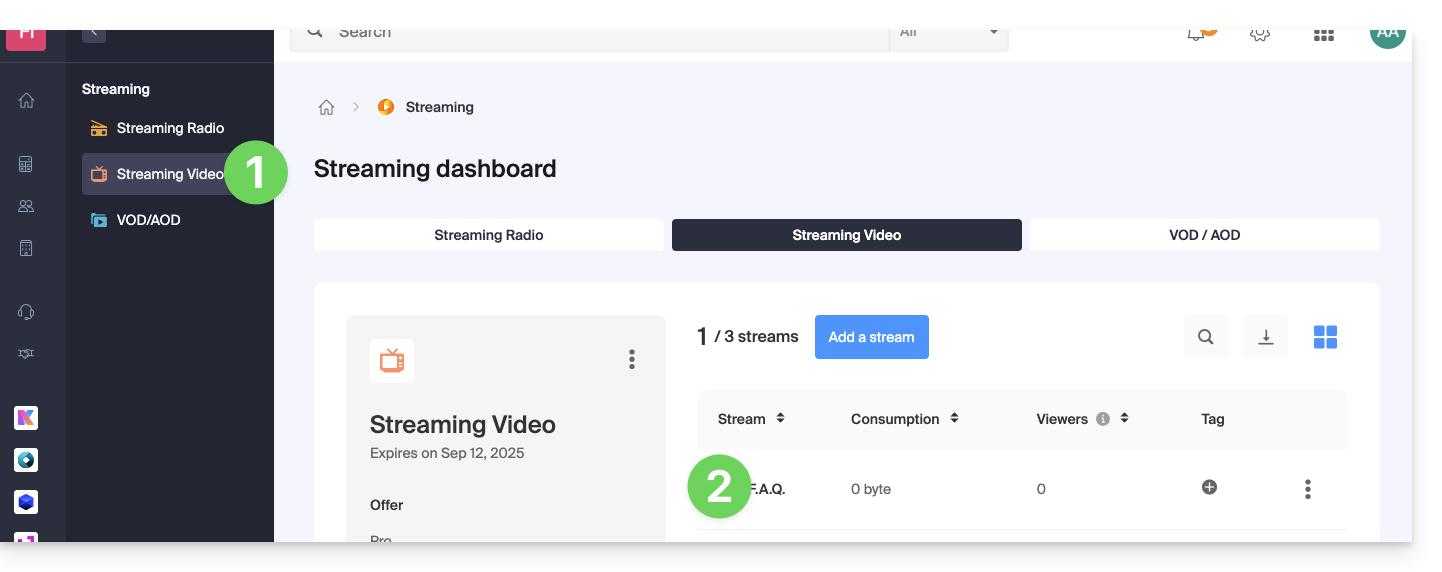
- Clique em Programação no menu lateral esquerdo.
- Clique em Ferramenta de agendamento no menu lateral esquerdo.
- Clique na data desejada:
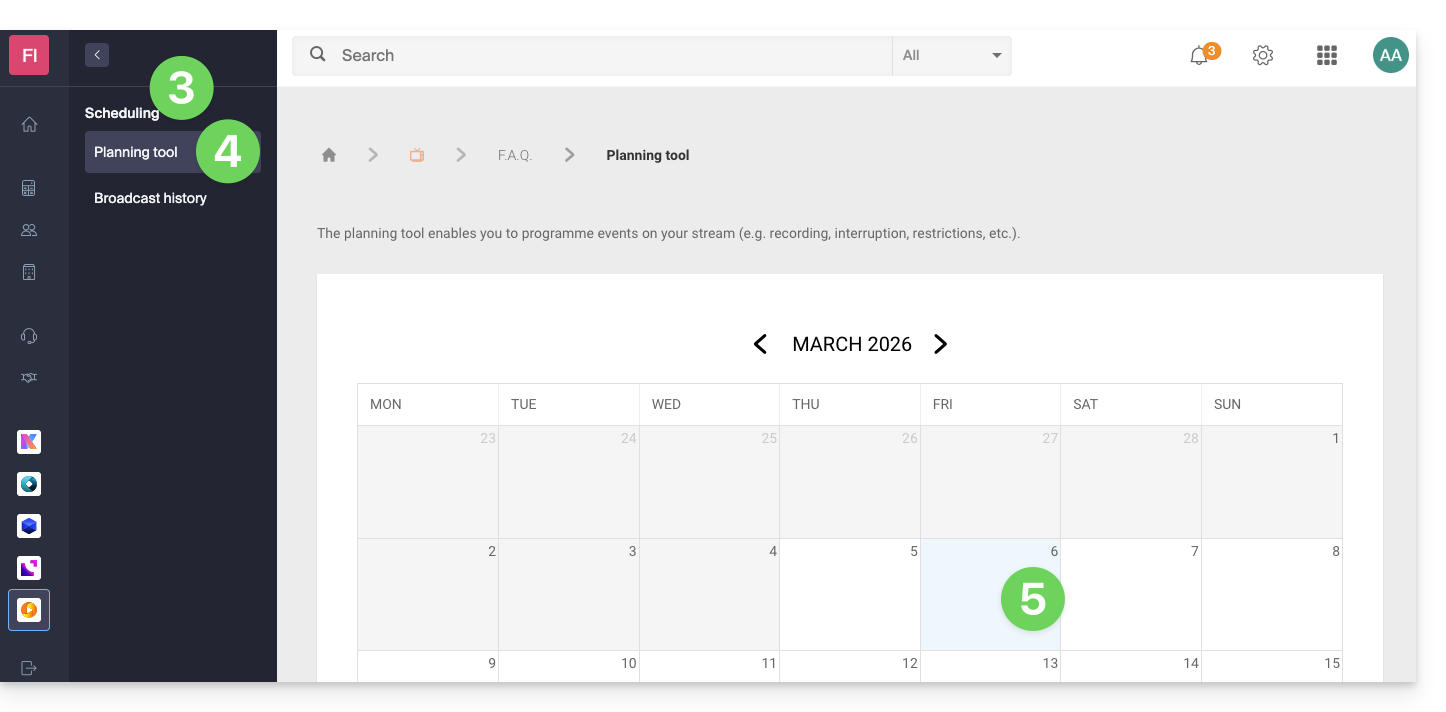
Função de interrupção no agendamento
Por exemplo:
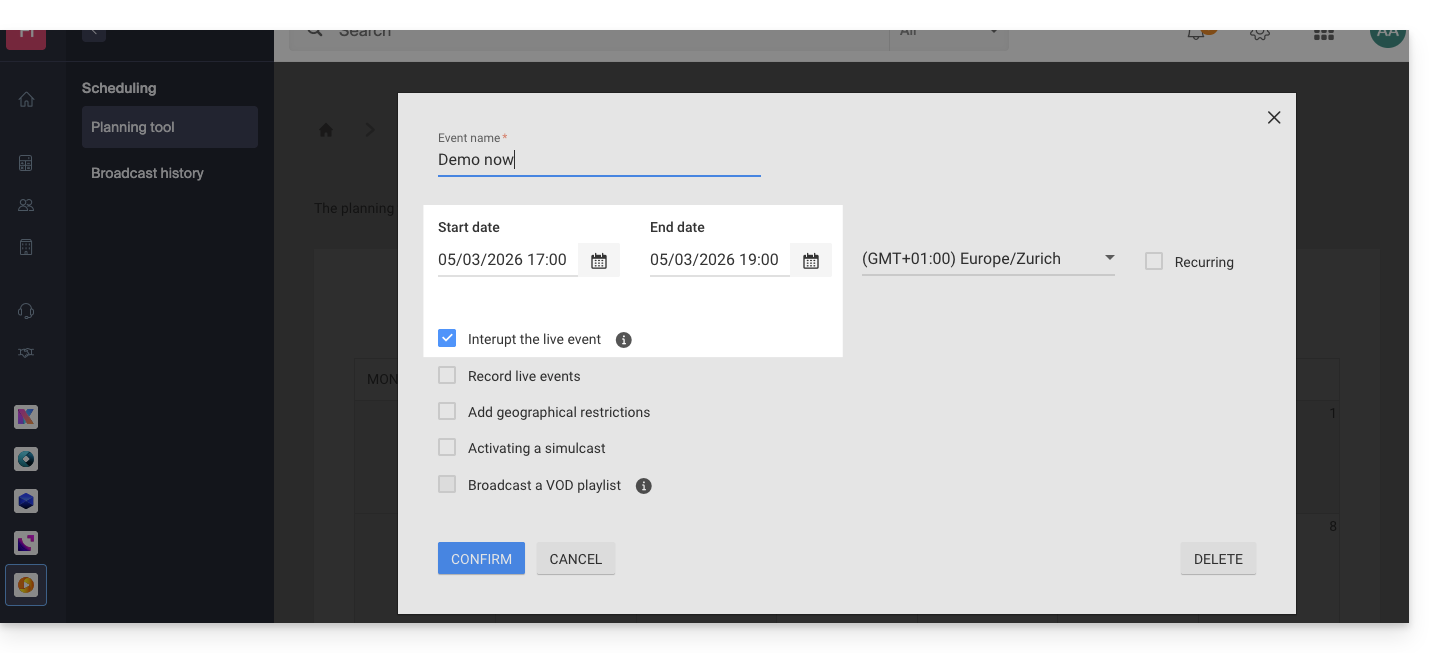
- Esta configuração no calendário serve para interromper uma transmissão ao vivo…
- … e esta configuração no nível da escolha da imagem (miniatura) e do texto do reprodutor de vídeo…
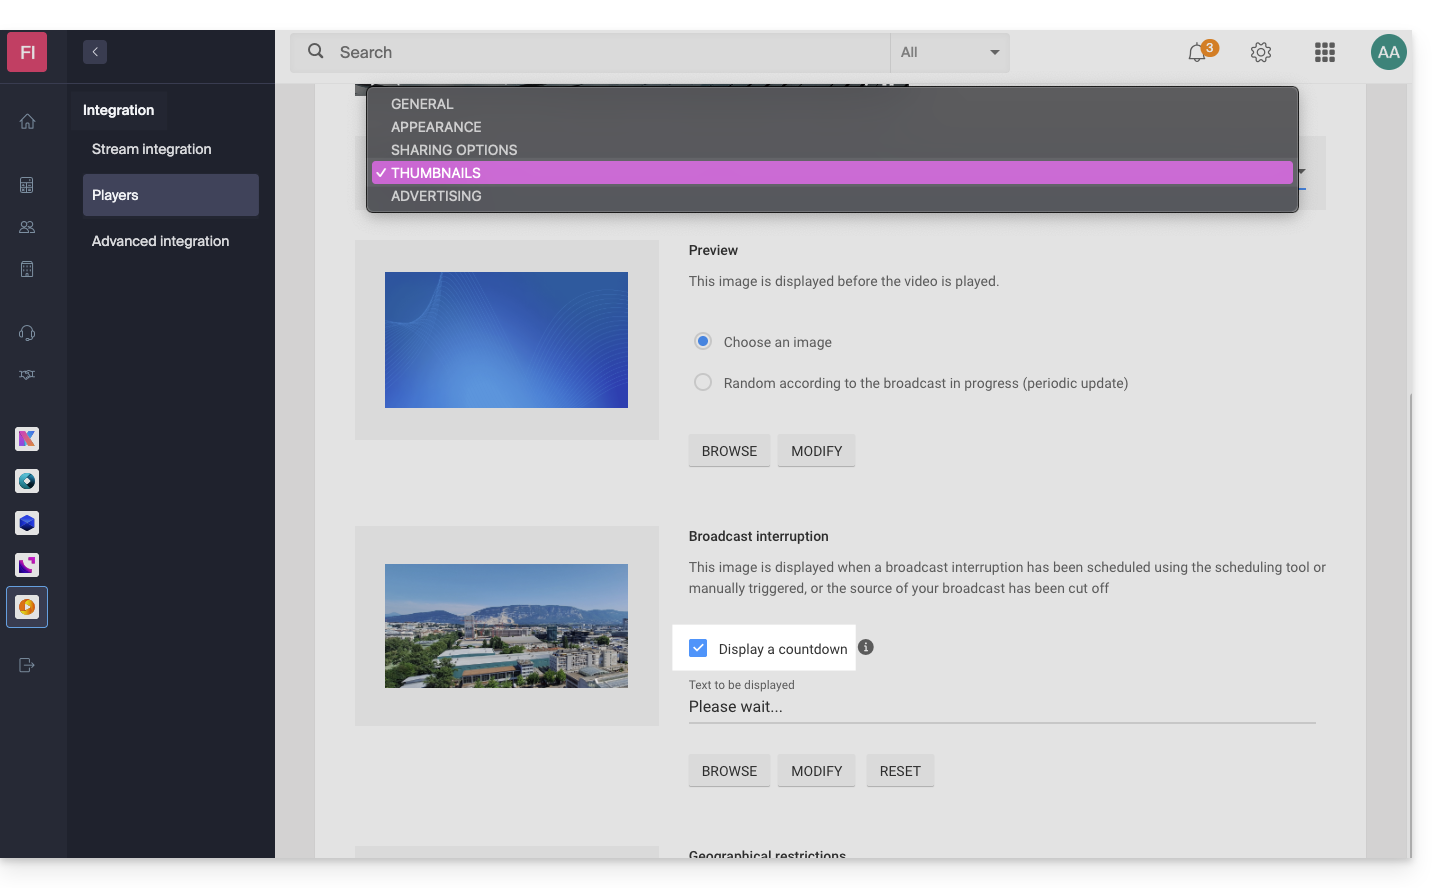
- … exibirá este resultado a partir das 17h, com uma contagem regressiva em segundos de 2 horas visível no reprodutor do seu fluxo de TV:

A contagem regressiva, uma vez programada, funciona em correlação com as interrupções do fluxo, caso você as configure (ou várias em sequência, gerenciando, portanto, o sobreposição). Atenção: é preciso contar 2 minutos para que uma interrupção programada seja refletida na contagem regressiva.
Link para esta FAQ: https://faq.infomaniak.com/1948
Esta seção de perguntas frequentes foi útil?
Este guia descreve as características técnicas necessárias para poder utilizar uma câmara IP (RTSP ou RTMP) com a plataforma de Streaming de vídeo Infomaniak.
Introdução
Existem dois tipos de câmaras compatíveis:
- as câmaras RTSP: os servidores da Infomaniak conectam-se à câmara para obter o fluxo de vídeo através do protocolo RTSP
- as câmeras RTMP: a câmera funciona como codificador e envia o fluxo para os servidores de transmissão da Infomaniak
1. Câmera RTSP (modo PULL)
Algumas câmeras podem transmitir diretamente um fluxo de vídeo e áudio para a Internet, sem a necessidade de um codificador dedicado. Nesses casos, é importante verificar se o seu dispositivo atende aos seguintes requisitos:
- suporte ao protocolo RTSP
- suporte ao codec de vídeo H264 (a menção MPEG4 é insuficiente)
- o dispositivo deve ser acessível pela Internet na porta 554 (outras portas são recusadas)
- o endereço de acesso à câmera deve funcionar em um reprodutor de vídeo (VLC, MPlayer, etc.) e isso, inclusive, a partir de uma rede externa à rede da câmera
2. Câmera RTMP (modo PUSH)
Qualquer câmera capaz de enviar um fluxo de vídeo H264 e áudio AAC para um servidor via protocolo RTMP deve ser compatível com a plataforma de streaming de vídeo.
Link para esta FAQ: https://faq.infomaniak.com/2264
Esta seção de perguntas frequentes foi útil?
Este guia aborda o tema da transmissão em múltiplas taxas de bits ou transcodificação, que permite transmitir um fluxo de vídeo em streaming na melhor qualidade possível, dependendo da conexão de internet dos seus espectadores.
Introdução
- Sem a funcionalidade de múltiplas taxas de bits ou transcodificação, o seu fluxo é transmitido apenas numa única qualidade e os espectadores que não têm uma boa ligação à Internet poderão não conseguir visualizar o seu fluxo.
Transcodificação local vs. Transcodificação na nuvem
Existem duas formas de disponibilizar esta funcionalidade aos seus visitantes: a transcodificação local ou na nuvem.
Vantagens e desvantagens
Deixe a Infomaniak gerenciar a transcodificação
Todo o processo é automático: a Infomaniak configura e transcodifica as diferentes qualidades necessárias, e seus espectadores têm a garantia de poder acompanhar suas transmissões nas melhores condições possíveis, independentemente da velocidade de sua conexão à Internet.
- Será enviado apenas um fluxo com a qualidade máxima.
- Um codificador de software é suficiente, embora seja recomendado ter um codificador de hardware para maior confiabilidade e desempenho.
Gerenciar o transcodificação manualmente, localmente
Todo o processo é manual: você deve configurar as qualidades e o número delas, além de possuir a configuração de rede e o hardware necessários para garantir a transcodificação e o envio dos dados:
- É necessário um codificador para a transcodificação (a Infomaniak oferece codificadores para venda, caso necessário).
- O codificador (ou o servidor dedicado a esta tarefa) deve ser suficientemente potente para transcodificar simultaneamente o seu fluxo em diferentes qualidades. Caso contrário, o fluxo será interrompido e instável para os seus espectadores.
- É necessária uma boa conexão com a Internet para transmitir o fluxo simultaneamente em diferentes qualidades.
Link para esta FAQ: https://faq.infomaniak.com/2265
Esta seção de perguntas frequentes foi útil?
Este guia ajuda você a configurar seu codificador com o serviço de Streaming de vídeo Infomaniak.
Introdução
- A estrutura deste guia é organizada de acordo com a qualidade de codificação escolhida para o seu fluxo:
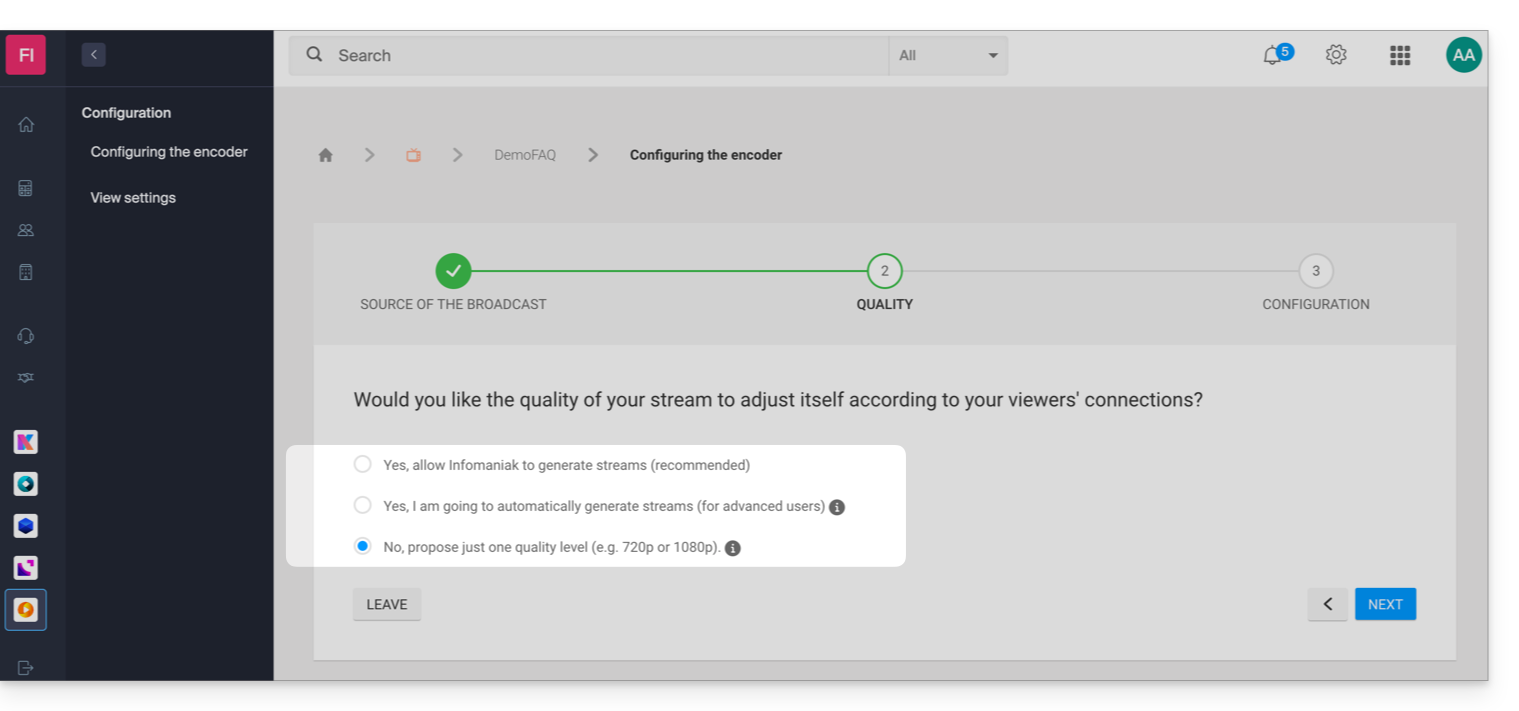
- O sistema de autenticação por URL proposto pela Infomaniak difere da autenticação proposta por padrão por alguns codificadores.
- Estas informações são fornecidas apenas a título indicativoe a configuração do seu codificador pode variar dependendo do seu dispositivo, do seu software e das opções do seu produto (hardware Infomaniak, por exemplo).
- Guia específico para OBS Studio (Open Broadcaster Software).
Requisitos do codificador
Veja como acessar as informações de configuração necessárias para o seu codificador:
- Clique aqui para acessar o gerenciamento do seu produto no Manager Infomaniak (precisa de ajuda?).
- Clique no menu de ação ⋮ à direita do item correspondente na tabela exibida.
- Clique em Configurar o codificador:
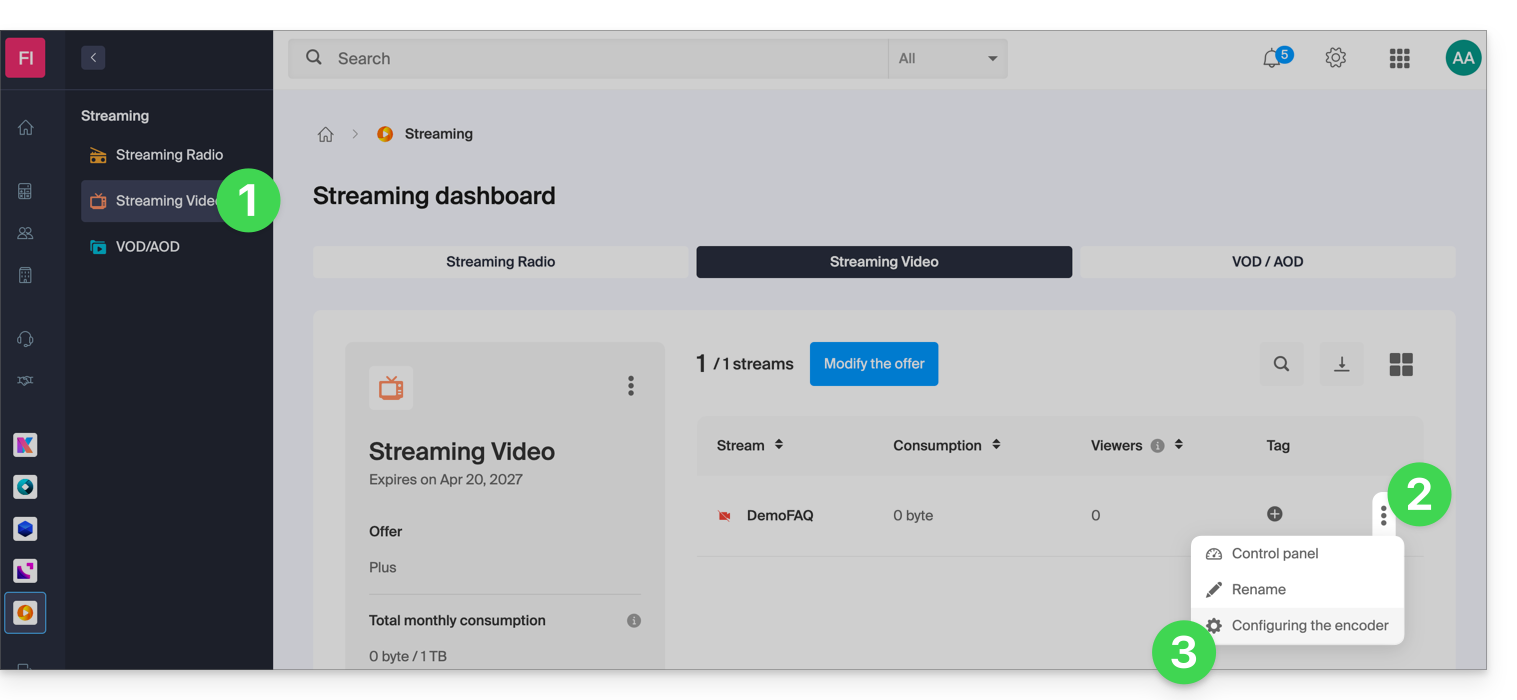
- Siga as instruções adequadas à sua situação.
1. Gestão automática de múltiplas taxas de bits pela Infomaniak
Se optou por deixar a Infomaniak gerir automaticamente a qualidade do seu fluxo:
- Neste caso, as seguintes informações de configuração estão disponíveis:
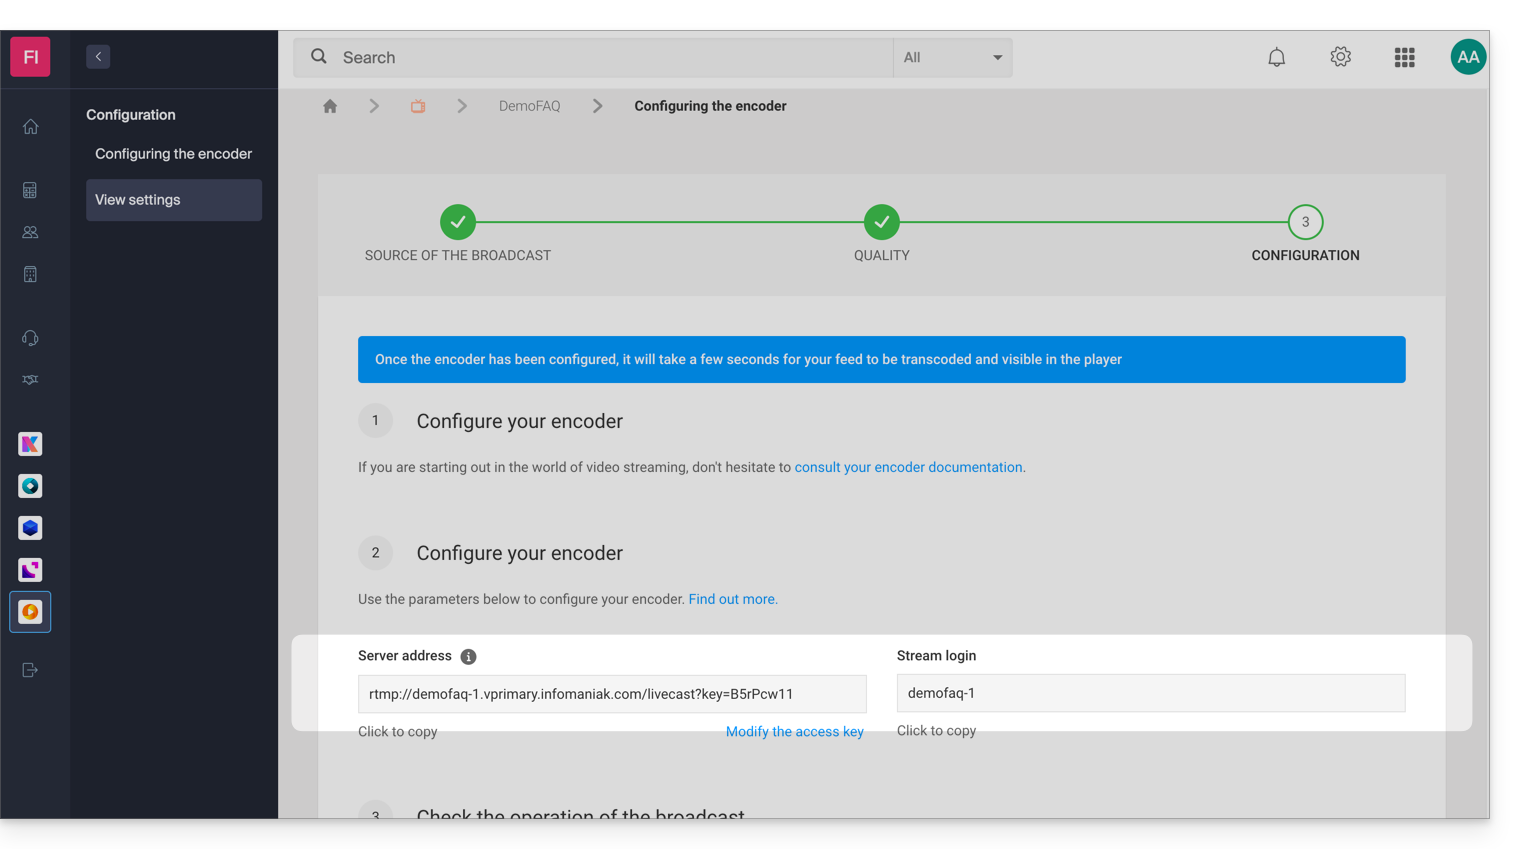
- Neste exemplo, o fluxo tem o nome "DemoFAQ" e a sua chave de autenticação é "B5rPcw11":
- Endereço do servidor:
rtmp://demofaq-1.vprimary.infomaniak.com/livecast?key=B5rPcw11 - Identificador do fluxo:
demofaq-1
- Endereço do servidor:
1.1 Configuração da qualidade da fonte
As qualidades dos fluxos gerados pela Infomaniak dependerão da qualidade da sua fonte (taxa de bits). A título de exemplo, aqui está a lista das qualidades que poderão ser geradas no momento da conexão do seu codificador:
- 1080p com uma taxa de bits de 3 Mbps
- 720p com uma taxa de bits de 1,8 Mbps
- 480p com uma taxa de bits de 0,8 Mbps
- 360p com uma taxa de bits de 0,5 Mbps
- 240p com uma taxa de bits de 0,3 Mbps*
* A resolução 240p será oferecida apenas se a sua taxa de bits original for inferior a 0,8 Mbps.
Recomenda-se definir uma fonte de 1080p com uma taxa de bits de 3,2 Mbps para gerar todas as qualidades disponíveis. Se a taxa de bits da sua fonte for limitada a 1 Mbps, apenas as seguintes resoluções serão geradas: 480p, 360p e 240p.
Importante: verifique se o controle de taxa de bits está definido no modo CBR (taxa de bits constante) no seu codificador. O modo ABR (taxa de bits adaptativa) pode, de fato, distorcer a detecção da taxa de bits da sua fonte.
1.2 O seu codificador requer um endereço de conexão e um identificador de fluxo
Se o seu codificador solicitar um endereço de conexão e um identificador de fluxo, basta inserir o endereço do servidor e o identificador do fluxo no seu codificador.
Neste exemplo, seriam as seguintes informações:
- Endereço do servidor:
rtmp://demofaq-1.vprimary.infomaniak.com/livecast?key=B5rPcw11 - Identificador do fluxo:
demofaq-1
1.3 O seu codificador requer apenas uma URL
Se o seu codificador solicitar apenas uma URL, é necessário combinar o endereço do servidor e o identificador de conexão; neste exemplo, seria a seguinte URL:
rtmp://demofaq-1.vprimary.infomaniak.com/livecast?key=B5rPcw11/demofaq-1
1.4 O seu codificador oferece uma configuração avançada
Se o seu codificador oferecer uma vasta gama de parâmetros, siga as indicações a seguir, que se baseiam sempre no mesmo exemplo:
- Endereço do servidor RTMP:
demofaq-1.vprimary.infomaniak.com - Porta do servidor RTMP:
1935 - Nome de usuário RTMP: deixe este campo em branco (a autenticação é feita por chave, com uma chave no identificador de stream)
- Senha RTMP: deixe este campo em branco (a autenticação é feita por chave, com uma chave no identificador de stream)
- Nome da aplicação RTMP:
livecast?key=B5rPcw11 - Nome do fluxo RTMP:
demofaq-1
2. Gestão manual de múltiplas taxas de bits
Se você decidiu gerenciar manualmente as qualidades do seu fluxo:
- Se utilizar a opção Transcodificação na Nuvem, consulte o ponto 3. Taxa de bits única abaixo.
Neste caso, encontrará uma tabela contendo as diferentes qualidades (taxa de bits/resoluções) que definiu durante a configuração do seu codificador: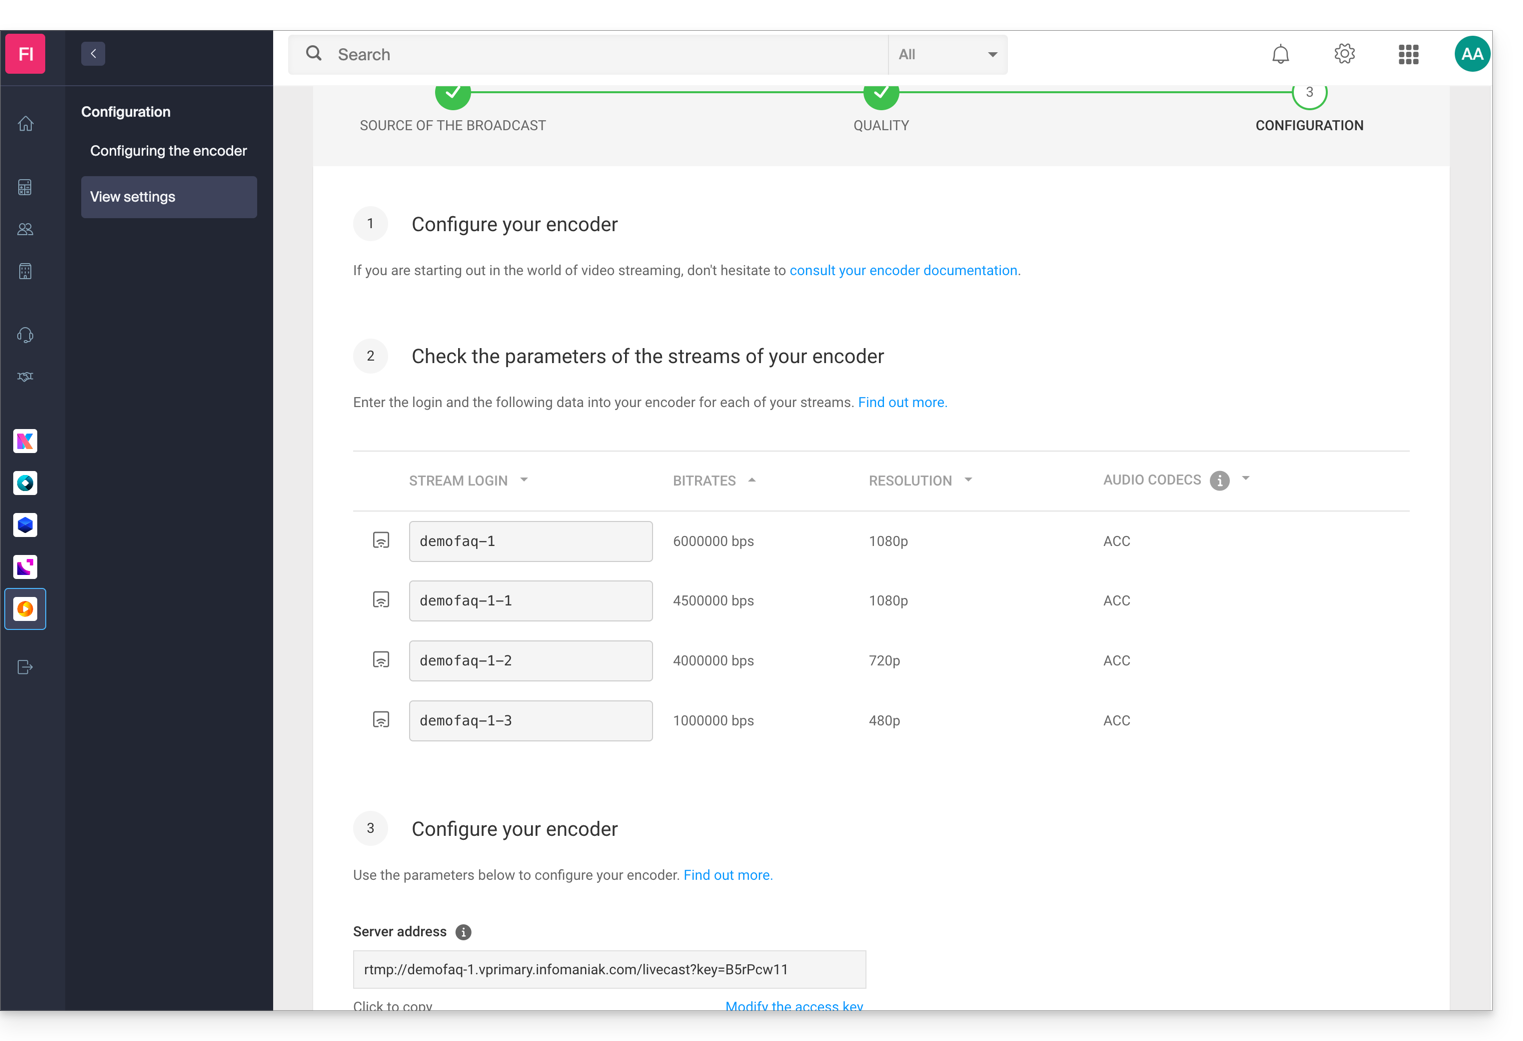
Neste exemplo, as informações seriam as seguintes:
- Endereço do servidor:
rtmp://demofaq-1.vprimary.infomaniak.com/livecast?key=B5rPcw11 - Identificador do fluxo:
demofaq-1
2.1 O seu codificador requer um endereço de conexão e um identificador de fluxo
Se o seu codificador solicitar um endereço de conexão e um ID de fluxo, basta inserir o endereço do servidor e o ID para cada fluxo no seu codificador.
2.2 O seu codificador requer uma URL por fluxo
Se o seu codificador exigir configurações específicas por URL, é necessário agrupar o endereço do servidor e o identificador de conexão para cada taxa de bits. Neste exemplo, seriam as seguintes URLs:
- Taxa de bits 6000000:
rtmp://demofaq-1.vprimary.infomaniak.com/livecast?key=B5rPcw11/demofaq-1 - Taxa de bits 4500000:
rtmp://demofaq-1.vprimary.infomaniak.com/livecast?key=B5rPcw11/demofaq-1-1 - Taxa de bits 4000000:
rtmp://demofaq-1.vprimary.infomaniak.com/livecast?key=B5rPcw11/demofaq-1-2 - Taxa de bits 1000000:
rtmp://demofaq-1.vprimary.infomaniak.com/livecast?key=B5rPcw11/demofaq-1-3
3. Taxa de bits única (uma única qualidade)
Consulte as informações fornecidas no ponto 1. Gestão automática de múltiplas taxas de bits pela Infomaniak ignorando o ponto 1.1.
Link para esta FAQ: https://faq.infomaniak.com/2266
Esta seção de perguntas frequentes foi útil?
Este guia diz respeito à plataforma de Streaming de vídeo Infomaniak, que oferece duas opções para obter fluxos de vídeo para transmissão:
- O modo PUSH: você envia o fluxo para a plataforma Infomaniak…
- O modo PULL: você fornece um endereço URL de origem a partir do qual a Infomaniak irá obter o fluxo; este método permite transmitir um fluxo existente através da Infomaniak.
Câmera IP (modo PUSH)
O caso de uso mais comum diz respeito às câmeras IP, acessíveis a partir de um endereço URL ou um endereço IP.
Para um funcionamento ideal:
- O seu equipamento deve suportar o protocolo RTSP e o codec de vídeo H264 (não confie na indicação MPEG4).
- O seu equipamento deve ser acessível publicamente a partir da Internet na porta 554 (qualquer outra porta será recusada).
- O endereço RTSP deve funcionar em um reprodutor de vídeo (VLC, mplayer, ...).
- O endereço RTSP deve poder ser obtido através da interface de administração do seu equipamento.
Fonte externa (modo PULL)
Também é possível recuperar o fluxo de uma fonte externa, o que permite, por exemplo, processar novamente um fluxo existente, adicionando uma marca d'água, e utilizar os servidores de distribuição da Infomaniak para alcançar um público amplo.
Atualmente, os seguintes formatos de fluxo são suportados:
- RTP
- RTSP
- RTMP
Link para esta FAQ: https://faq.infomaniak.com/2267
Esta seção de perguntas frequentes foi útil?
Este guia explica como inserir uma imagem, um logotipo, uma marca d'água nas suas transmissões de vídeo em streaming, para reforçar a sua imagem de marca e proteger o seu conteúdo contra cópias ou possíveis usos indevidos.
Adicionar a imagem ao fluxo
Você tem a opção de adicionar uma imagem que aparecerá no seu fluxo de vídeo:
- seja através da configuração de um Player (gratuito)…
- O logotipo é sobreposto ao vídeo e não será visível se o fluxo for incorporado fora do Player.
- seja incorporando o logotipo por meio de um transcodificador (opção paga)…
- O logotipo é incorporado no vídeo e será visível em todos os casos; isso requer a re-codificação completa do fluxo ou dos fluxos por um servidor de transcodificação, o que explica o custo deste método.
Em ambos os casos, é possível personalizar os seguintes parâmetros:
- Posição do logotipo (em um dos quatro cantos do reprodutor, espaçamento a partir da borda, etc.).
- Tamanho do logotipo (por exemplo, um logotipo em 50% será duas vezes menor):
- Recomenda-se usar o tamanho nativo para otimizar o carregamento e a qualidade da renderização.
- No caso da transcodificação de vídeo, o tamanho do logotipo é calculado em relação ao vídeo de origem (ou qualidade máxima); o logotipo será redimensionado automaticamente se houver qualidades inferiores, a fim de manter a mesma proporção.
- Opacidade do logotipo.
1. Sobrepor um logotipo através do Player (gratuito)
- Clique aqui para acessar o gerenciamento do seu produto no Manager Infomaniak (precisa de ajuda?).
- Clique diretamente no nome atribuído ao produto em questão.
- Clique em Integração no menu lateral esquerdo.
- Clique em Reprodutores no menu lateral esquerdo.
- Clique no nome do reprodutor que deseja personalizar.
- Clique na aba (ou no menu suspenso) Aparência.
- Adicione o logotipo desejado no formato
png,jpgougif(não animado) e salve-o na parte inferior da página: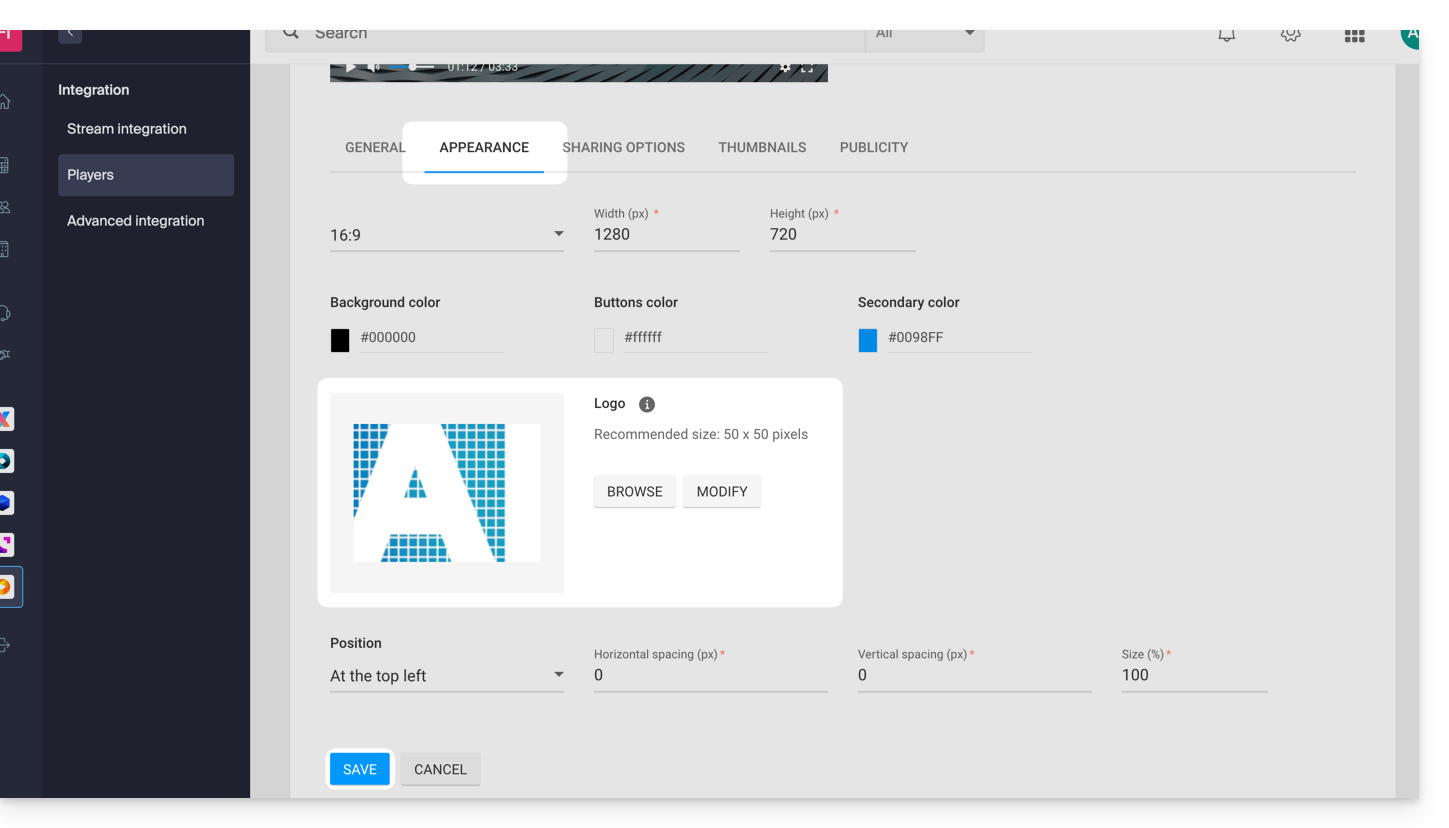
2. Ativar a opção de marca d'água (opção paga)
- Clique aqui para acessar o gerenciamento do seu produto no Manager Infomaniak (precisa de ajuda?).
- Clique diretamente no nome atribuído ao produto em questão.
- Clique em Configurações no menu lateral esquerdo.
- Clique em Opções no menu lateral esquerdo.
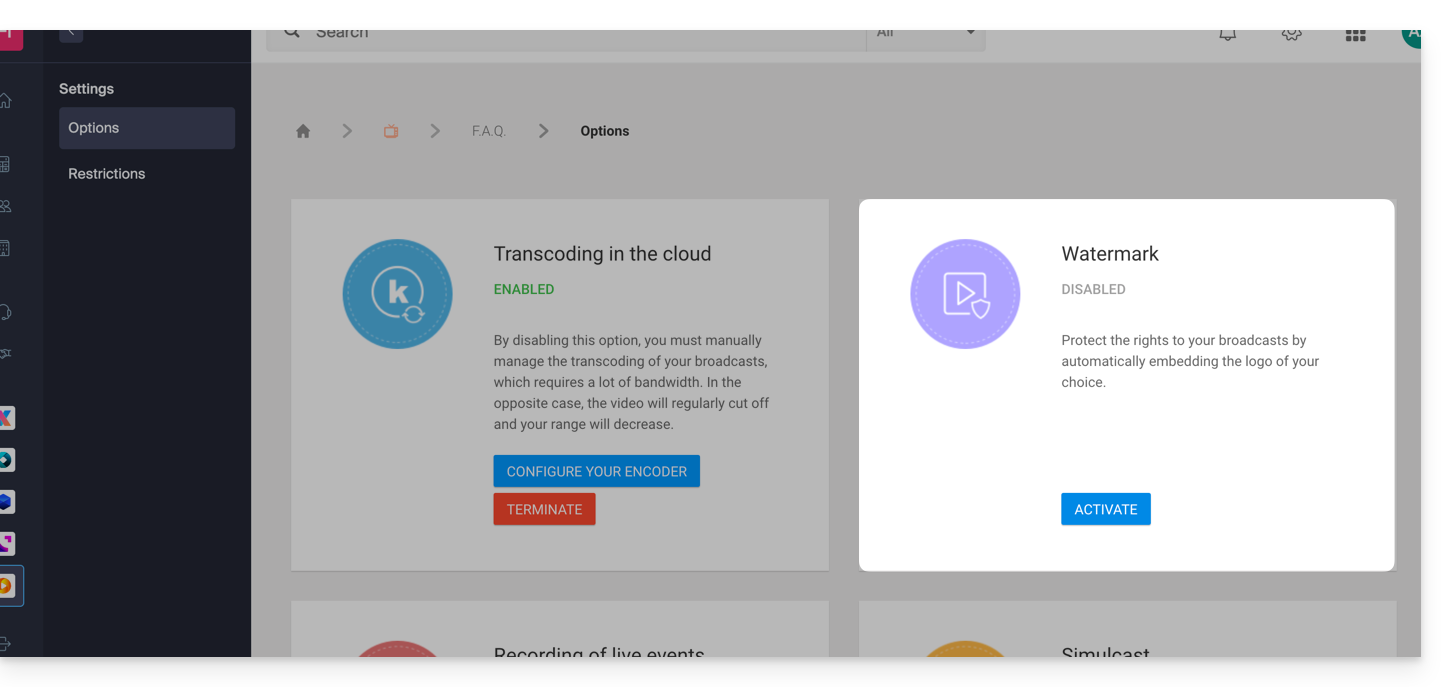
- Ative a opção Marca d'água:
- Adicione o logotipo desejado nos formatos
png,jpgougif(não animado).
Link para esta FAQ: https://faq.infomaniak.com/2268
Esta seção de perguntas frequentes foi útil?
Este guia explica como modificar a imagem de pré-visualização (miniatura) visível num leitor de vídeo em streaming Infomaniak, especialmente quando o fluxo é restrito.
Introdução
- Um fluxo de vídeo pode ser restrito:
- interrupção programada da transmissão (possibilidade de exibir um temporizador de contagem regressiva antes da retomada da transmissão),
- restrições geográficas ou outras restrições (bloqueio por IP, domínio(s), token, etc.).
Personalizar o reprodutor de streaming de vídeo
Para isso:
- Clique aqui para acessar o gerenciamento do seu produto no painel de controle Infomaniak (❓: ajuda).
- Clique diretamente no nome atribuído ao produto em questão.
- Clique em Utilizadores no menu lateral esquerdo.
- Clique no nome do reprodutor que deseja personalizar:

- Clique na aba (ou no menu suspenso) Miniaturas.
- Personalize as imagens de visualização desejadas:

- Salve suas alterações.
Link para esta FAQ: https://faq.infomaniak.com/2269
Esta seção de perguntas frequentes foi útil?
Este guia explica como gravar ou arquivar todas as suas transmissões de vídeo em streaming, o que pode ser útil para criar reprises de programas de TV ou rever vídeos gravados por câmeras de vigilância, por exemplo.
Gerenciar a gravação automática de transmissões ao vivo
Para ativar esta opção:
- Clique aqui para acessar o gerenciamento do seu produto no Manager Infomaniak (precisa de ajuda?).
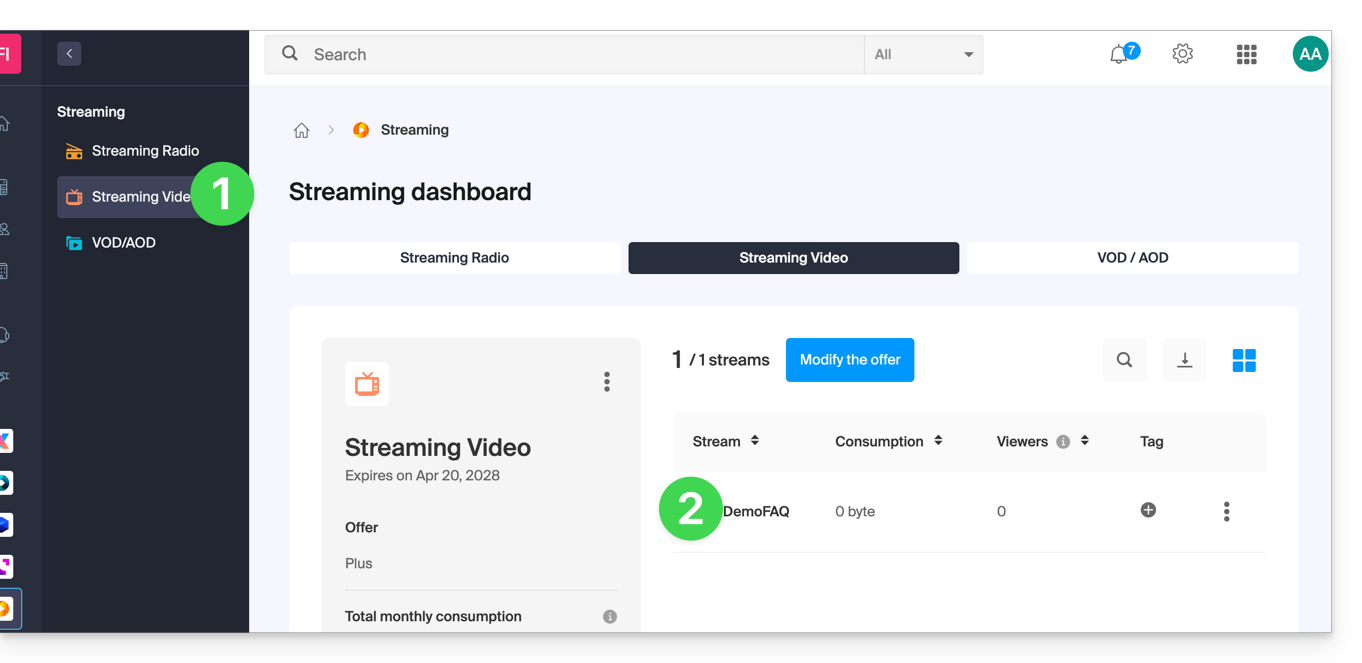
- Clique diretamente no nome atribuído ao produto em questão:
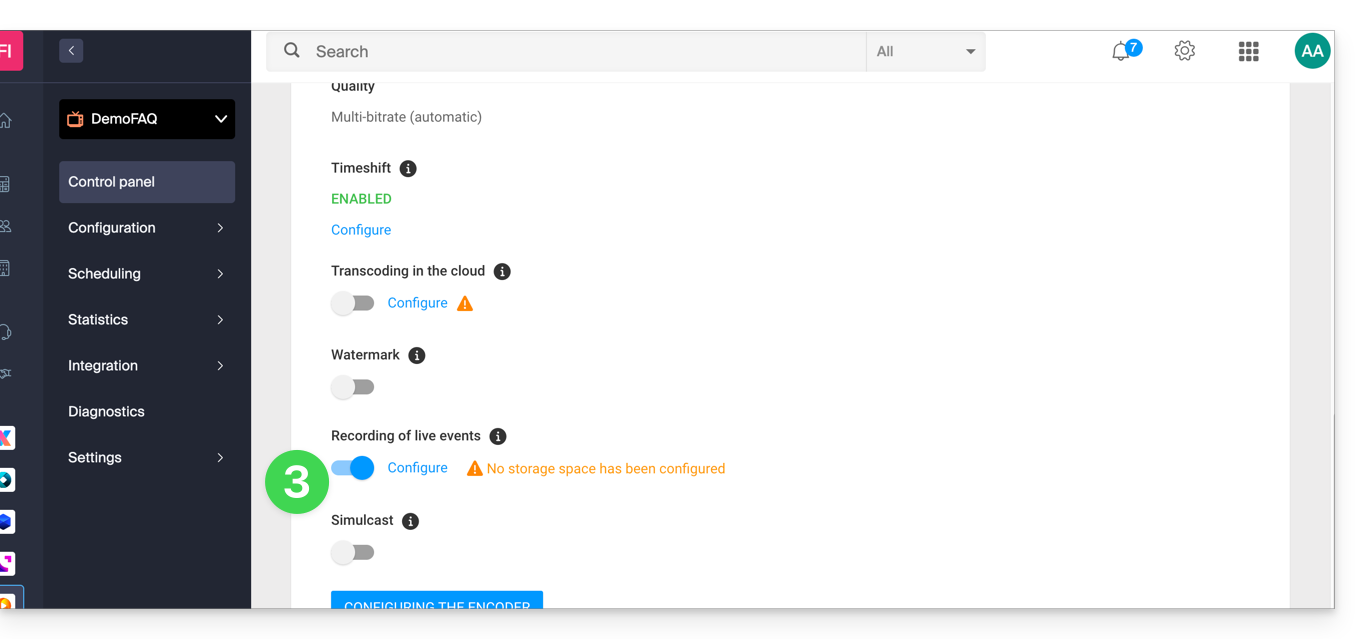
- Ative a gravação das transmissões ao vivo através do botão de alternância no painel de controle da transmissão:
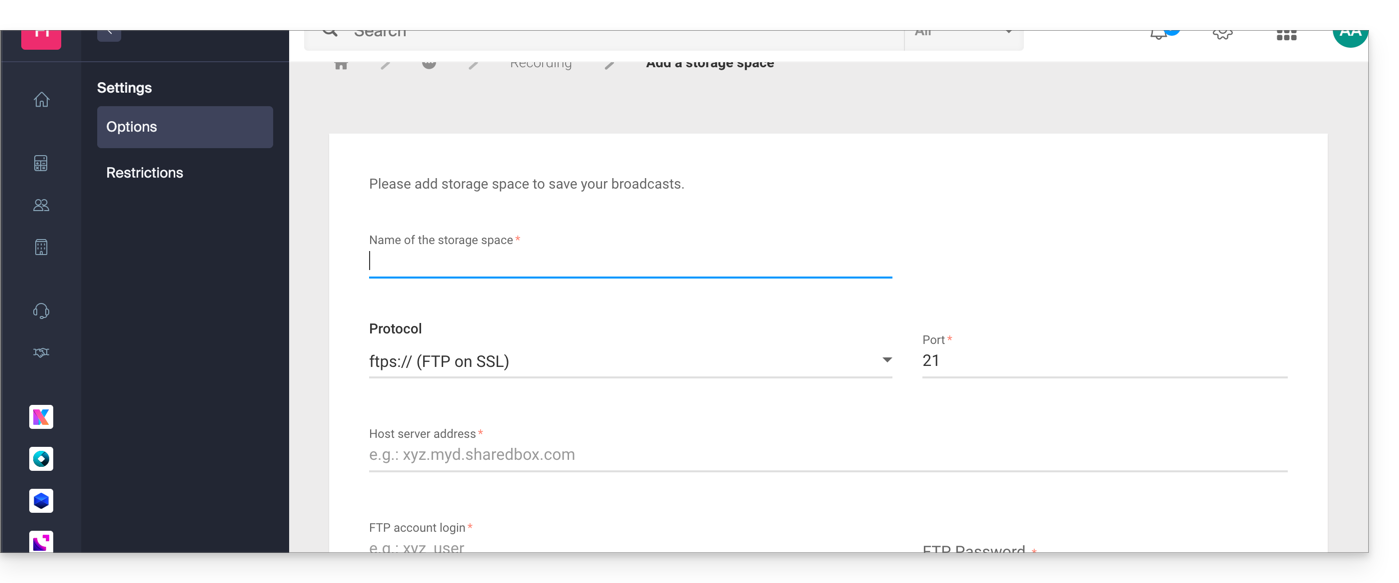
Após ativar esta funcionalidade e configurar a sua conexão FTP, o fluxo será automaticamente e continuamente registado a partir do momento em que for enviado para (ou obtido de) a plataforma Infomaniak.
Mantenha-se atento ao seu espaço FTP, pois este poderá ficar rapidamente saturado.
Se necessário, você também pode agendar gravações manualmente através da ferramenta de agendamento.
Como funcionam as gravações automáticas
Após ativar esta opção, um arquivo MP4 será gerado automaticamente após cada transmissão, o qual será transferido para o espaço FTP ou VOD configurado por você.
Informações importantes:
- Uma transmissão é definida como o período entre a conexão e a desconexão até o codificador de vídeo.
- Qualidade das gravações: no caso de um fluxo com várias taxas de bits, a qualidade original máxima será preservada.
- Limitação do tamanho dos arquivos: no caso de transmissão contínua, você tem a possibilidade de definir a duração máxima de cada arquivo MP4. Essa opção permite evitar a geração de arquivos muito grandes e garantir o registro de seus arquivos no espaço FTP ou VOD de sua escolha (e, uma vez que a duração seja atingida, o registro é interrompido automaticamente e enviado por FTP, e um novo registro é iniciado).
Personalização dos nomes dos registros
Para que possa identificar e classificar facilmente os seus arquivos, o nome dos registos pode ser personalizado de forma dinâmica através de parâmetros especificados entre chaves.
Exemplo:
template_{stream_id}_{date|format:YYYY-MM-dd_hh:mm:ss}_{fragment_id|from:1|prefix:fragment_(|suffix:)}.{extension}stream_id= representa o identificador do fluxo como uma cadeia de caracteres.date|format: ISO 8601 = data do dia do registo.time|format: ISO 8601 = hora do registro.datetime|format: ISO 8601 = data e hora do registro.fragment_id|from:number|prefix:string|suffix:string: = número do fragmento no caso em que um registo é dividido, com a possibilidade de adicionar um prefixo e/ou um sufixo.- Cada fragmento será incrementado, e "
from" permite indicar qual será o primeiro fragmento de referência.
- Cada fragmento será incrementado, e "
extension= extensão final do ficheiro.
Esses parâmetros e suas opções são opcionais, e a ordem em que são definidos é totalmente livre. Eles podem ser usados quantas vezes forem necessárias. Se você fornecer a mesma opção várias vezes, apenas a última será considerada. Qualquer opção não reconhecida será simplesmente ignorada.
Exemplo 1
Situação: você tem duas programações diárias, a primeira começa às 10h00 e a segunda às 20h05. Ao configurar a nomenclatura dos arquivos desta forma template_{date|format:hh:mm:ss}, você obterá os seguintes nomes de arquivo:
Para o dia 5 de dezembro de 2019:
- A primeira gravação, às 10h00, terá o nome:
template-10:00:00.mp4 - A segunda gravação, às 20h05, terá o nome:
template-20:05:00.mp4
Para o dia 6 de dezembro de 2019:
- O primeiro registo, às 10h00, terá o nome:
template-10:00:00.mp4
O registo do dia anterior com o mesmo nome será substituído por este. - A segunda gravação, às 20h05, terá o nome:
template-20:05:00.mp4
A gravação do dia anterior com o mesmo nome será substituída por esta. - etc.
Essa lógica pode ser particularmente útil para ter um sistema de gravação em loop, por exemplo, para um sistema de videovigilância. O usuário poderá recuperar o vídeo apenas quando necessário, evitando assim o armazenamento de um número potencialmente infinito de vídeos, o que poderia levar à saturação do espaço FTP.
Exemplo 2
Situação: desta vez, você terá um registro contínuo, 24 horas por dia, 7 dias por semana, com uma limitação na duração dos arquivos, definida em 360 minutos. Ao configurar a nomenclatura dos arquivos desta forma template_{date|format:YYYY-MM-dd}_{fragment_id|from:1|prefix:fragment_(|suffix:)}.{extension}, você obterá os seguintes nomes de arquivo:
- O primeiro arquivo do dia, às 0h00, terá o nome:
template_2019-02-05.mp4 - O segundo arquivo do dia, às 6h00, terá o nome:
template_2019-02-05_fragment(1).mp4 - O terceiro arquivo do dia, ao meio-dia (12h00), terá o nome:
template_2019-02-05_fragment(2).mp4 - O quarto ficheiro do dia, às 18h00, terá o seguinte nome:
template_2019-02-05_fragment(3).mp4
Ao configurar a nomenclatura dos ficheiros desta forma template_{date|format:YYYY-MM-dd}_{fragment_id|from:0|prefix:fragment_(|suffix:)}.{extension}, obterá os seguintes nomes:
- O primeiro ficheiro do dia, às 0h00, terá o nome:
template_2019-02-05_fragment(0).mp4 - O segundo ficheiro do dia, às 6h00, terá o nome:
template_2019-02-05_fragment(1).mp4 - O terceiro arquivo do dia, às 12h00, terá o nome:
template_2019-02-05_fragment(2).mp4 - O quarto arquivo do dia, às 18h00, terá o nome:
template_2019-02-05_fragment(3).mp4
Link para esta FAQ: https://faq.infomaniak.com/2270
Esta seção de perguntas frequentes foi útil?
Este guia explica como transmitir um vídeo ao vivo simultaneamente na plataforma de streaming da Infomaniak e na plataforma Facebook Live.
Pré-requisitos
- Ativar a opção Simulcast:
- Clique aqui para acessar o gerenciamento do seu produto no Manager Infomaniak (precisa de ajuda?).
- Clique diretamente no nome atribuído ao produto em questão.
- Clique em Configurações no menu lateral esquerdo.
- Clique em Opções no menu lateral esquerdo.
- Assine a opção Simulcast clicando no botão ATIVAR.
Transmitir um vídeo no Infomaniak e no Facebook
Para isso:
- Clique aqui para acessar o gerenciamento do seu produto no Manager Infomaniak (precisa de ajuda?).
- Clique diretamente no nome atribuído ao produto em questão.
- Clique em Configurações no menu lateral esquerdo.
- Clique em Opções no menu lateral esquerdo.
- Clique em Configurar na caixa Simulcast.
- Clique em Adicionar.
- Selecione Facebook Live.
- Escolha um nome para a transmissão simultânea e conecte-se à conta do Facebook que gerencia sua página.
- Aceite os termos e clique em Adicionar:

- A transmissão ao vivo no Facebook fica disponível após 30 segundos na página selecionada.
Em caso de problema
- Apesar do tipo de visibilidade definido nas opções do simulcast, por vezes, a configuração interna do Facebook pode sobrepor-se à escolha efetuada. Nesse caso, é necessário modificar o seguinte parâmetro nas opções do Facebook:

- Atenção: o fluxo será enviado diretamente para o Facebook no momento da adição. Se desejar agendar o simulcast:
- Desative a opção Ativar este simulcast no momento da adição de um simulcast.
- Utilize a ferramenta de agendamento para definir os horários desejados.
- A transmissão simultânea é interrompida automaticamente ao final da transmissão. Você tem duas opções para reiniciar a transmissão simultânea:
- Ativar a transmissão simultânea a partir da configuração desta opção (consulte o procedimento explicado acima).
- Agendar outro evento a partir da ferramenta de agendamento.
Link para esta FAQ: https://faq.infomaniak.com/2271
Esta seção de perguntas frequentes foi útil?
Este guia explica como transmitir um vídeo ao vivo simultaneamente na plataforma de streaming da Infomaniak e na plataforma YouTube Live.
Pré-requisitos
- Leia e aceite os termos de utilização do YouTube.
- A plataforma Infomaniak utiliza os serviços da API do YouTube apenas para criar e transmitir uma transmissão ao vivo no seu canal; ao utilizá-la, aceita os Termos de utilização da API do YouTube, bem como a Política de privacidade do Google.
- Ative a função “ao vivo” no YouTube (isso pode levar 24 horas).
- Ative a opção Simulcast:
- Clique aqui para acessar o gerenciamento do seu produto no Manager Infomaniak (precisa de ajuda?).
- Clique diretamente no nome atribuído ao produto em questão.
- Clique em Configurações no menu lateral esquerdo.
- Clique em Opções no menu lateral esquerdo.
- Assine a opção Simulcast clicando no botão ATIVAR.
Como publicar um vídeo no Infomaniak e no YouTube
Para isso:
- Clique aqui para acessar o gerenciamento do seu produto no Manager Infomaniak (precisa de ajuda?).
- Clique diretamente no nome atribuído ao produto em questão.
- Clique em Configurações no menu lateral esquerdo.
- Clique em Opções no menu lateral esquerdo.
- Clique em Configurar na caixa Simulcast.
- Clique em Adicionar.
- Escolha YouTube Live.
- Escolha um nome para a transmissão simultânea e conecte-se à conta Google que gere o seu canal do YouTube.
- Aceite os termos e clique em Adicionar:

- Clique aqui para abrir a página da transmissão ao vivo no YouTube.
Em caso de problema / Planeamento
- Atenção, o fluxo será enviado diretamente para o YouTube no momento da adição.
- Se desejar agendar a transmissão simultânea:
- Desative a opção Ativar esta transmissão simultânea no momento da adição de uma transmissão simultânea.
- Utilize a ferramenta de agendamento para definir os horários desejados:

- O seu fluxo de origem deve ter uma taxa de quadros definida (por vezes, este não é o caso com algumas câmaras IP).
- A transmissão simultânea é interrompida automaticamente ao final da transmissão; você tem duas opções para reiniciar a transmissão simultânea:
- Ativar a transmissão simultânea a partir da configuração desta opção (consulte o procedimento explicado acima).
- Agendar outro evento a partir da ferramenta de agendamento.
Link para esta FAQ: https://faq.infomaniak.com/2272
Esta seção de perguntas frequentes foi útil?
Este guia explica como impedir o acesso aos fluxos de Streaming de vídeo Infomaniak através de uma chave única (hash).
Introdução
- Este método oferece o melhor nível de proteção e permite, por exemplo, restringir as suas transmissões a um espaço de membros que exige autenticação.
- Como a forma de gerar este código é específica de cada site, será necessário implementar as funções PHP necessárias e adaptar o código de integração do seu leitor em conformidade.
Restringir o acesso às transmissões por chave única (hash)
Para tal:
- Clique aqui para aceder à gestão do seu produto no Manager Infomaniak (precisa de ajuda?).
- Clique diretamente no nome atribuído ao produto em questão.
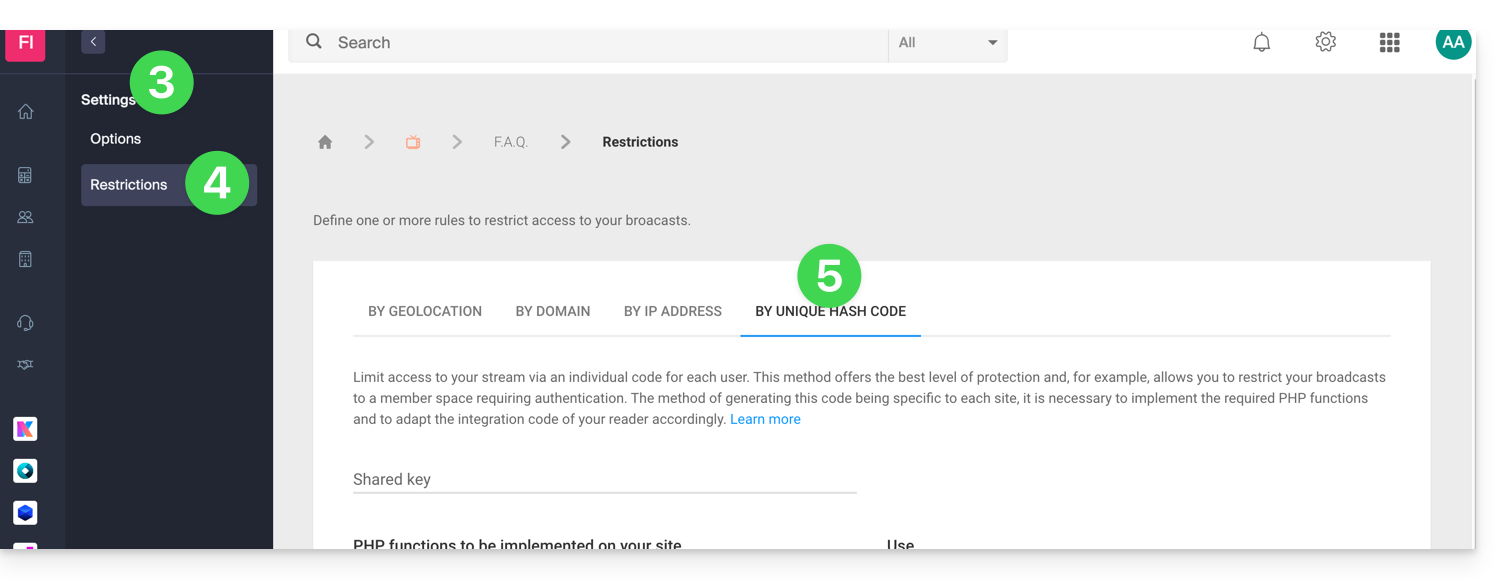
- Clique em Parâmetros no menu lateral esquerdo.
- Clique em Restrições no menu lateral esquerdo.
- Clique no separador (ou no elemento do menu suspenso) Restrição por hash único:
Funcionamento das restrições
Este método exige a recuperação de informações relacionadas com a configuração do seu fluxo e com o utilizador que se conecta.
Em primeiro lugar, é necessário criar uma senha (uma chave) no painel de controle Infomaniak. Assim que esta chave for adicionada, os espectadores conectados e aqueles que tentarem visualizar seu fluxo serão bloqueados instantaneamente (consulte este outro guia para personalizar a imagem de substituição exibida aos espectadores bloqueados).
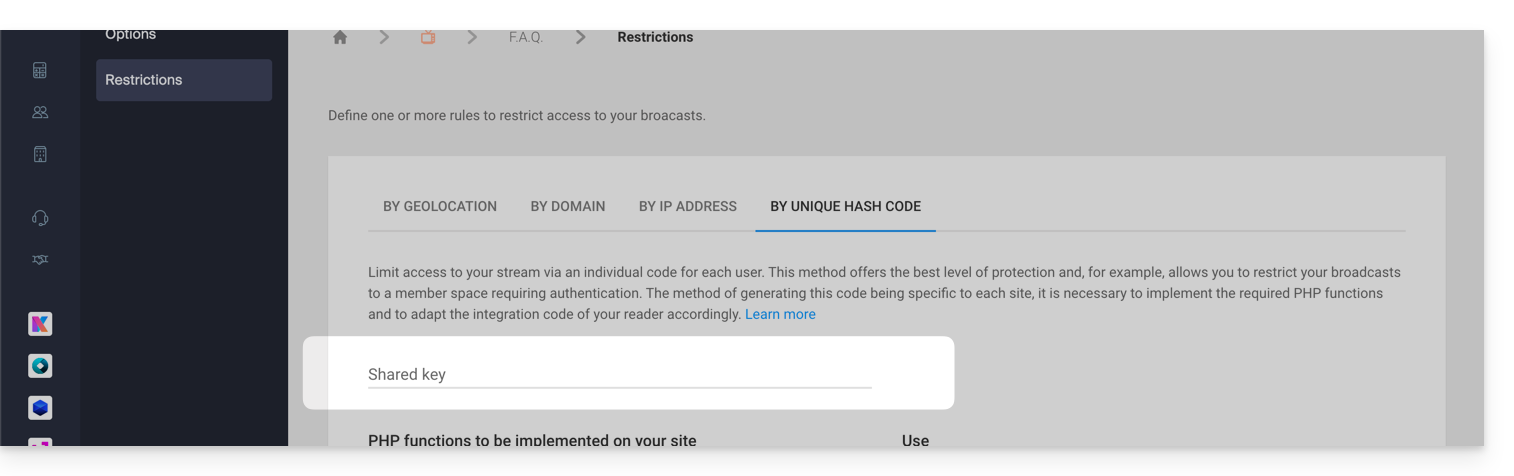
A seguir, o procedimento para autorizar o acesso ao seu fluxo:
- Crie um sistema de autenticação (por exemplo, uma área de membros).
- Utilize a senha configurada no painel de controle.
- Obtenha o endereço IP dos usuários, por exemplo, através de
$_SERVER["REMOTE_ADDR"]. - Obtenha o identificador do fluxo a ser acessado.
- Obtenha a data e a hora atuais (sem minutos e segundos).
Esses elementos serão, então, processados pelo código fornecido no painel de controle para gerar um token exclusivo para cada usuário, que será transmitido ao fluxo no momento do carregamento. A plataforma de streaming verificará a validade do hash para autorizar ou rejeitar a conexão.
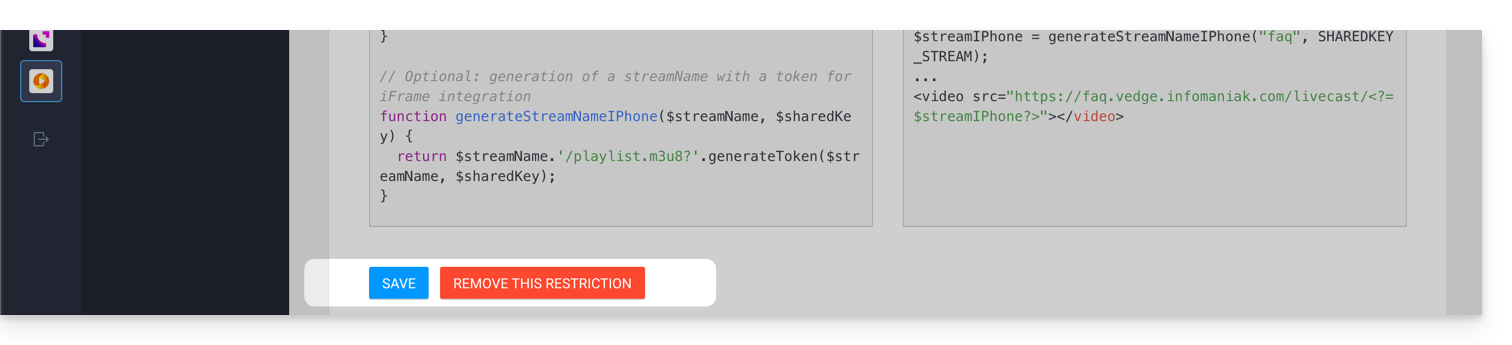
Observações importantes
- Para garantir a segurança do acesso ao fluxo, a validade de cada token é limitada no tempo.
- É importante desativar o cache nas páginas que permitem o acesso ao fluxo; caso contrário, se a geração do token for armazenada em cache, outros usuários tentarão se autenticar com o hash de outra pessoa, o que resultará na rejeição da conexão, mesmo que tenham permissão para acessar o fluxo.
Link para esta FAQ: https://faq.infomaniak.com/2273
Esta seção de perguntas frequentes foi útil?
Este guia explica as possíveis causas de qualquer latência que possa notar entre a fonte de um vídeo e a sua transmissão ao vivo através do serviço de Streaming de vídeo Infomaniak.
Disponibilidade no caso de...
... exibido no Gerenciador
Após conectar seu codificador aos servidores Infomaniak do tipo master, o fluxo pode passar por diversas transformações, especialmente no caso de uma transcodificação ou da adição de um logotipo como marca d'água. Nesses casos, o vídeo deve ser reencodificado em um ou mais formatos, o que exige um tempo de processamento que inevitavelmente afeta o resultado final.
... fluxo mono com taxa de bits fixa, sem reprocessamento
Neste caso, o fluxo fica disponível em apenas alguns segundos.
... fluxo transcodificado ou com marca d'água
Este processo requer cerca de 25 segundos para que o fluxo transformado fique visível nas diferentes qualidades.
... diferença entre a fonte e o conteúdo exibido aos utilizadores
Para evitar pequenas interrupções durante a reprodução, o leitor de vídeo armazena em buffer alguns segundos do vídeo. Assim, é possível verificar facilmente uma diferença de 30 a 60 segundos entre a fonte original e o fluxo exibido aos utilizadores.
Para reduzir ao máximo essa latência, a única maneira é ter um fluxo de taxa de bits única, sem transcodificação, sem marca d'água e com uma taxa de bits não muito alta, além de reduzir ao máximo o buffer na configuração do reprodutor. Dependendo das suas necessidades, é necessário encontrar um equilíbrio entre a instantaneidade da transmissão e os recursos que você deseja usar para melhorar a experiência dos seus espectadores e personalizar a identidade visual das suas transmissões ao vivo.
Link para esta FAQ: https://faq.infomaniak.com/2310
Esta seção de perguntas frequentes foi útil?