Base de conhecimento
1000 perguntas frequentes, 500 tutoriais e vídeos explicativos. Aqui, você encontra apenas soluções!
Este guia fornece instruções para criar uma infraestrutura de alta disponibilidade multi-datacenter com Jelastic Cloud.
Introdução
- O princípio de uma infraestrutura de alta disponibilidade multi-datacenter é replicar todos os elementos necessários (servidor web, servidor de banco de dados e balanceador de carga) em outro datacenter para garantir o funcionamento dos seus sites e aplicativos em caso de imprevistos (picos de carga, falha de hardware, falha de rede, etc.).
- As vantagens de uma infraestrutura de alta disponibilidade multi-datacenter são numerosas:
- Em caso de imprevisto em um servidor, outro servidor assume imediatamente o controle; seus sites e aplicativos permanecem acessíveis.
- Em caso de interrupção em um componente de um datacenter, a infraestrutura replicada no outro datacenter assume imediatamente o controle; seus sites e aplicativos permanecem acessíveis.
- Em caso de picos de carga significativos, o tráfego é distribuído entre as duas infraestruturas por meio de balanceadores de carga; seus sites e aplicativos permanecem acessíveis e rápidos.
Implementação de uma infraestrutura de alta disponibilidade com Jelastic Cloud
Para os fins deste exemplo, serão implementados 2 servidores web com 2 balanceadores de carga, cada um desses elementos sendo hospedado na Suíça em um data center diferente da Infomaniak.
Antes de prosseguir, faça login na interface de administração do seu servidor Jelastic Cloud:
- Clique aqui para acessar o gerenciamento do seu produto no Manager Infomaniak (precisa de ajuda?).
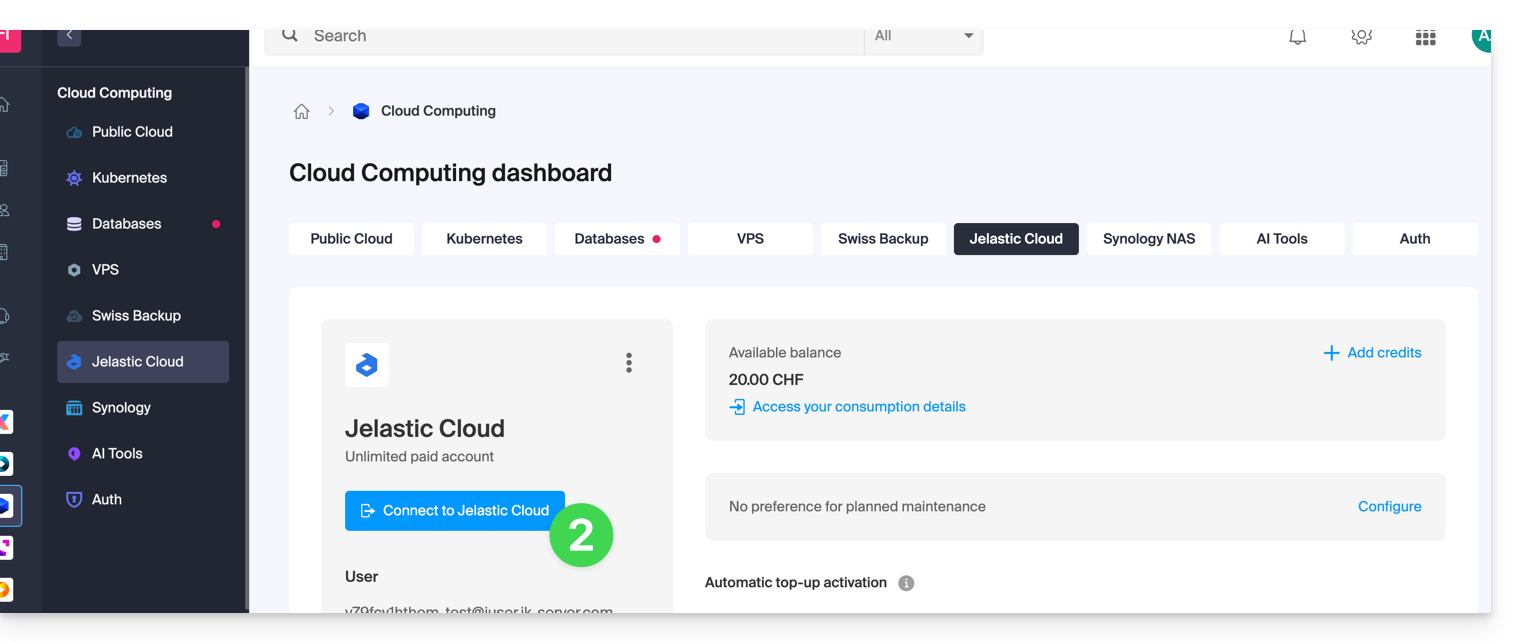
- Clique em Conectar-se ao Jelastic Cloud:
1. Criação dos servidores web
Um servidor web hospeda o conteúdo dos seus sites (os arquivos php, imagens, pdf, etc.).
Aqui estão as ações a serem realizadas para criar o primeiro servidor:
- Clique em Novo ambiente.
- Clique na aba PHP.
- Em App. Servidores, escolha, por exemplo, um servidor Apache.
- Ajuste os recursos do ambiente de acordo com as suas necessidades.
- Escolha Genève DC2 como localização do servidor.
- Renomeie o ambiente para que possa identificá-lo facilmente mais tarde (por exemplo, DC2-apache).
- Clique em Criar.
Em seguida, crie o segundo servidor web em outro datacenter:
- Clique em Novo ambiente.
- Clique na aba PHP.
- Em App. Servidores, escolha, por exemplo, um servidor Apache.
- Ajuste os recursos do ambiente de acordo com as suas necessidades.
- Escolha Genève DC3 como localização do servidor.
- Renomeie o ambiente para que possa identificá-lo facilmente no futuro (por exemplo, DC3-apache).
- Clique em Criar.
2. Criação dos balanceadores de carga
Um balanceador de carga permite distribuir a carga e o tráfego dos seus sites entre os seus servidores web.
Aqui estão as ações a serem realizadas para criar o primeiro servidor:
- Clique em Novo ambiente.
- Clique na aba PHP.
- Em Balanceamento de carga, escolha, por exemplo, um servidor NGINX.
- Ajuste os recursos do ambiente de acordo com suas necessidades.
- Escolha Genève DC2 como a localização do servidor.
- Renomeie o ambiente para que possa identificá-lo facilmente no futuro (por exemplo, DC2-nginx).
- Clique em Criar.
Em seguida, crie o segundo balanceador de carga em outro data center:
- Clique em Novo ambiente.
- Clique na aba PHP.
- Em Balanceamento de Carga, escolha, por exemplo, um servidor NGINX.
- Ajuste os recursos do ambiente de acordo com suas necessidades.
- Escolha Genève DC3 como a localização do servidor.
- Renomeie o ambiente para que possa identificá-lo facilmente mais tarde (por exemplo, DC3-nginx).
- Clique em Criar.
3. Configuração dos balanceadores de carga e do nome de domínio
Agora, basta indicar aos balanceadores de carga em quais servidores web eles devem distribuir o tráfego.
Comece criando o arquivo load-balancer.conf nos dois balanceadores de carga:
- Conecte-se via SSH ao servidor
DC2-nginxclicando no botão Web SSH do ambiente. - Abra o arquivo load-balancer.conf:
nano /etc/nginx/conf.d/load-balancer.conf. - Adapte o código do arquivo com a URL dos seus servidores web:
http {
upstream backend {
server apache-dc2.jcloud-ver-jpc.ik-server.com;
server apache-dc3.jcloud.ik-server.com;
}
server {
listen 80;
location / {
proxy_pass {{URL_4}}
}
}
}
- Repita estas 3 etapas para o servidor
DC3-nginx.
Em seguida, modifique o arquivo de configuração dos balanceadores de carga:
- Conecte-se via SSH ao servidor
DC2-nginxclicando no botão Web SSH do ambiente. - Crie o seguinte arquivo de configuração:
nano /etc/nginx/nginx.conf. - Adapte a URL do arquivo de configuração do servidor:
user nginx;
worker_processes auto;
worker_rlimit_nofile 2048;
load_module modules/ngx_stream_module.so;
#load_module modules/ngx_http_modsecurity_module.so;
error_log /var/log/nginx/error_log info;
events {
worker_connections 2048;
use epoll;
}
include /etc/nginx/conf.d/load-balancer.conf;
- Reinicie o serviço NGINX:
sudo /etc/init.d/nginx restart. - Repita estes quatro passos para o servidor
DC3-nginx.
Agora, é necessário indicar para quais servidores o tráfego do seu domínio deve ser redirecionado.
Antes disso,atribua um endereço IP público aos seus balanceadores de carga :
- Implemente o nó do servidor DC2-nginx.
- Passe o cursor sobre a linha IP público e clique no + que aparece à direita.
- Adicione um IPv4 público.
- Repita estes 3 passos para o servidor DC3-nginx.
Neste momento, só lhe resta crie dois registos A na zona DNS do seu nome de domínio com o IP público dos seus dois balanceadores de carga.
Para que as alterações sejam aplicadas rapidamente, recomenda-se configurar os registos A com um TTL de 5 minutos.
Neste exemplo, o domínio redireciona os seus visitantes para os balanceadores de carga, que, por sua vez, redirecionam o tráfego para os servidores web.
4. Teste da infraestrutura de alta disponibilidade
Para testar o bom funcionamento da sua infraestrutura, insira o seu nome de domínio num navegador web e tente desativar, um de cada vez, um elemento da sua infraestrutura (um dos dois balanceadores de carga, um dos dois servidores web). Se tudo estiver a funcionar corretamente, deverá continuar a ter acesso ao conteúdo alojado num dos dois servidores web.
Atenção: a replicação dos dados entre os servidores web ou os servidores de bases de dados deve ser configurada por si.
Link para esta FAQ: https://faq.infomaniak.com/2401
Esta seção de perguntas frequentes foi útil?
Este guia diz respeito à aplicação móvel kCheck (aplicação para smartphones ou tablets iOS/Android), criada para simplificar os procedimentos de verificação de identidade e reforçar a segurança da sua conta Infomaniak.
Introdução
- Por razões de segurança, para garantir a identidade da pessoa que efetua um pedido específico à Infomaniak, um procedimento de verificação de identidade pode ser ativado nos seguintes casos (lista não exaustiva):
- esquecimento da palavra-passe da conta Infomaniak (conta de utilizador)
- esquecimento do endereço de e-mail de acesso
- desativação da autenticação de dois fatores (2FA)
- desbloqueio de uma conta Infomaniak
- durante o primeiro pagamento de receitas para o produto Bilheteira
- durante a encomenda de um produto (suspeita de spam ou fraude, nome da marca, etc.)
- Esta aplicação permite-lhe transferir com segurança os elementos solicitados.
- A Infomaniak respeita a sua privacidade: as informações transmitidas através da aplicação kCheck serão guardadas até ao tratamento completo do seu pedido; em todos os casos, serão automaticamente eliminadas após 72 horas caso este pedido não seja tratado.
Iniciar a verificação de identidade
Pré-requisitos
- Um código QR ou um link fornecido pela Infomaniak.
- A aplicação móvel kCheck instalada no seu dispositivo iOS (iPhone, etc.) ou Android.
- Uma ligação à Internet no dispositivo móvel.
Pode então fazer verificar a sua identidade com o kCheck:
- Inicie o aplicativo kCheck no seu celular.
- Toque em Iniciar.
- Toque em Ler código QR.
- Aponte a câmera para o código QR fornecido.
- Insira o seu número de telefone.
- Digite o código de confirmação recebido.
- Autorize a geolocalização (obrigatório para continuar o processo).
- Selecione o tipo de documento de identificação que você possui (carteira de identidade ou passaporte).
- Siga as instruções para fotografar o seu documento de identificação.
- Tire uma selfie (sua) com o seu documento de identificação na mão, à sua frente.
Seus documentos serão então transmitidos de forma segura para o suporte da Infomaniak. Essas solicitações são tratadas com prioridade, com um tempo médio de resposta de 2 horas durante o horário de atendimento.
Se o seu pedido estiver bloqueado...
Por motivos de segurança, alguns pedidos podem ser bloqueados automaticamente.
No momento do seu pedido, um e-mail é enviado para o endereço de e-mail de login da sua conta Manager Infomaniak. Este e-mail contém o procedimento para desbloquear o seu pedido. Caso não o encontre, é possível reenviá-lo a partir do seu Manager, clicando em Reenviar o procedimento a partir da barra vermelha que informa sobre o bloqueio.
Pré-requisitos
- Abrir o e-mail contendo o procedimento de desbloqueio.
- O aplicativo móvel kCheck instalado no seu dispositivo iOS (iPhone, etc.) ou Android.
- Uma conexão de internet no dispositivo móvel.
Em seguida, pode iniciar o processo de desbloqueio com o kCheck:
- Abra a aplicação kCheck no seu telemóvel.
- Toque em Iniciar.
- Toque em Ler código QR.
- Leia o código QR presente no e-mail.
- Siga o processo de desbloqueio até ao fim.
Casos particulares
- Caso não haja qualquer ação da sua parte num prazo de 10 dias, o pedido será automaticamente cancelado e o pagamento será integralmente reembolsado no método de pagamento utilizado.
- Caso não tenha um dispositivo móvel para seguir este processo, contacte o suporte da Infomaniak.
Link para esta FAQ: https://faq.infomaniak.com/2418
Esta seção de perguntas frequentes foi útil?
Este guia detalha como fazer o backup dos dados dos seus diretórios e nós Jelastic Cloud através do protocolo OpenStack Swift no Swiss Backup, a solução de backup em uma nuvem suíça independente.
Introdução
- Para fazer o backup dos dados, uma extensão para Virtuozzo (Jelastic Cloud) está disponível nos complementos do nó.
- Saiba mais sobre a extensão (complemento) no Github.
Configurar a extensão Swiss Backup no Jelastic Cloud
Pré-requisitos
- Utilizar Jelastic Cloud (pelo menos um ambiente Jelastic deve estar ativo com a extensão instalada para que as suas cópias de segurança sejam visíveis).
- Ter um espaço Swiss Backup da Infomaniak com uma quota de dispositivo disponível (mínimo 1) para uma cópia de segurança na nuvem.
- Adicionar 1 dispositivo do tipo Nuvem para obter as configurações OpenStack Swift.
Para adicionar a extensão útil ao Swiss Backup no Jelastic Cloud:
- Conecte-se ao Painel de Controle do Jelastic Cloud do seu servidor.
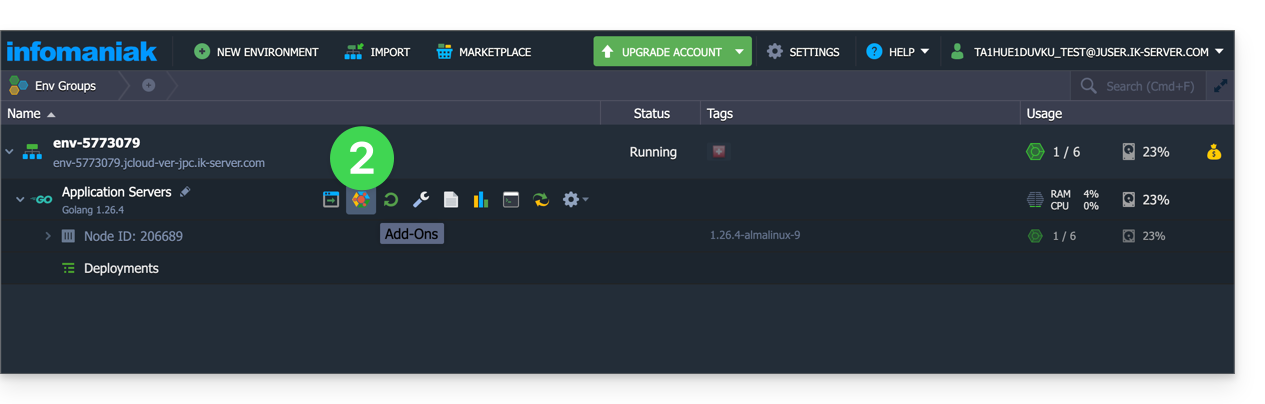
- Acesse a seção de complementos do nó:
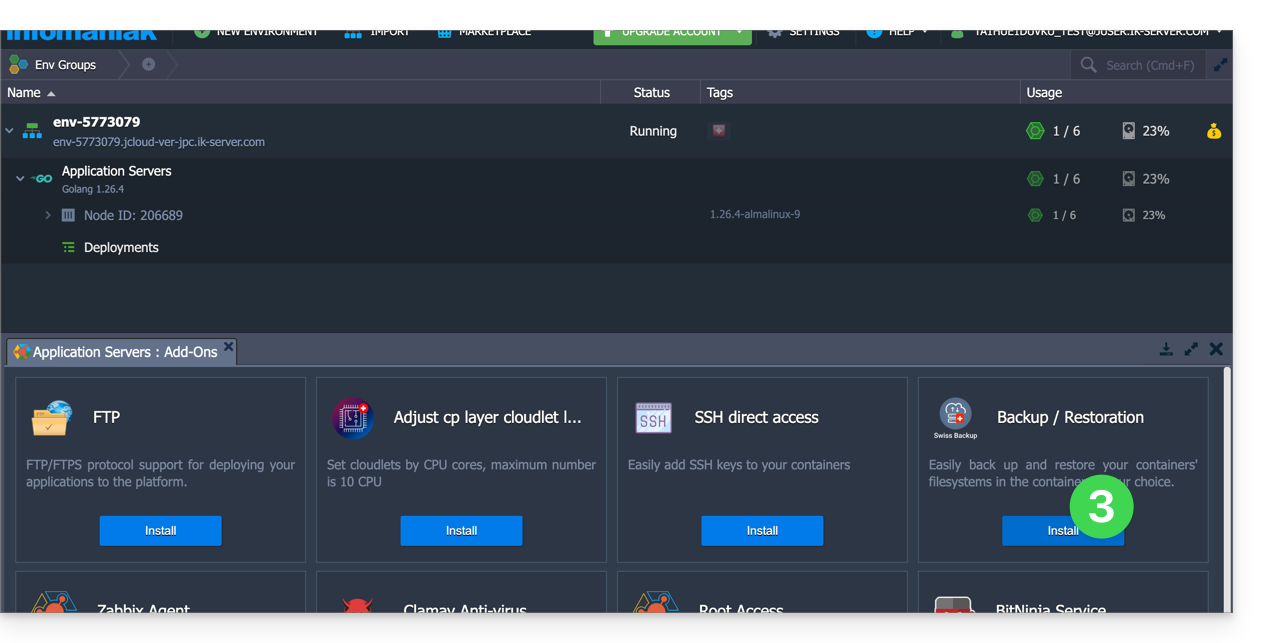
- Procure e instale a extensão Backup / Restauração:
Existem dois tipos de cópias de segurança possíveis, detalhados abaixo:
- Faça cópias de segurança de pastas específicas.
- Crie um instantâneo de um nó inteiro.
Fazer backup de pastas específicas
Para fazer o backup de diretórios específicos:
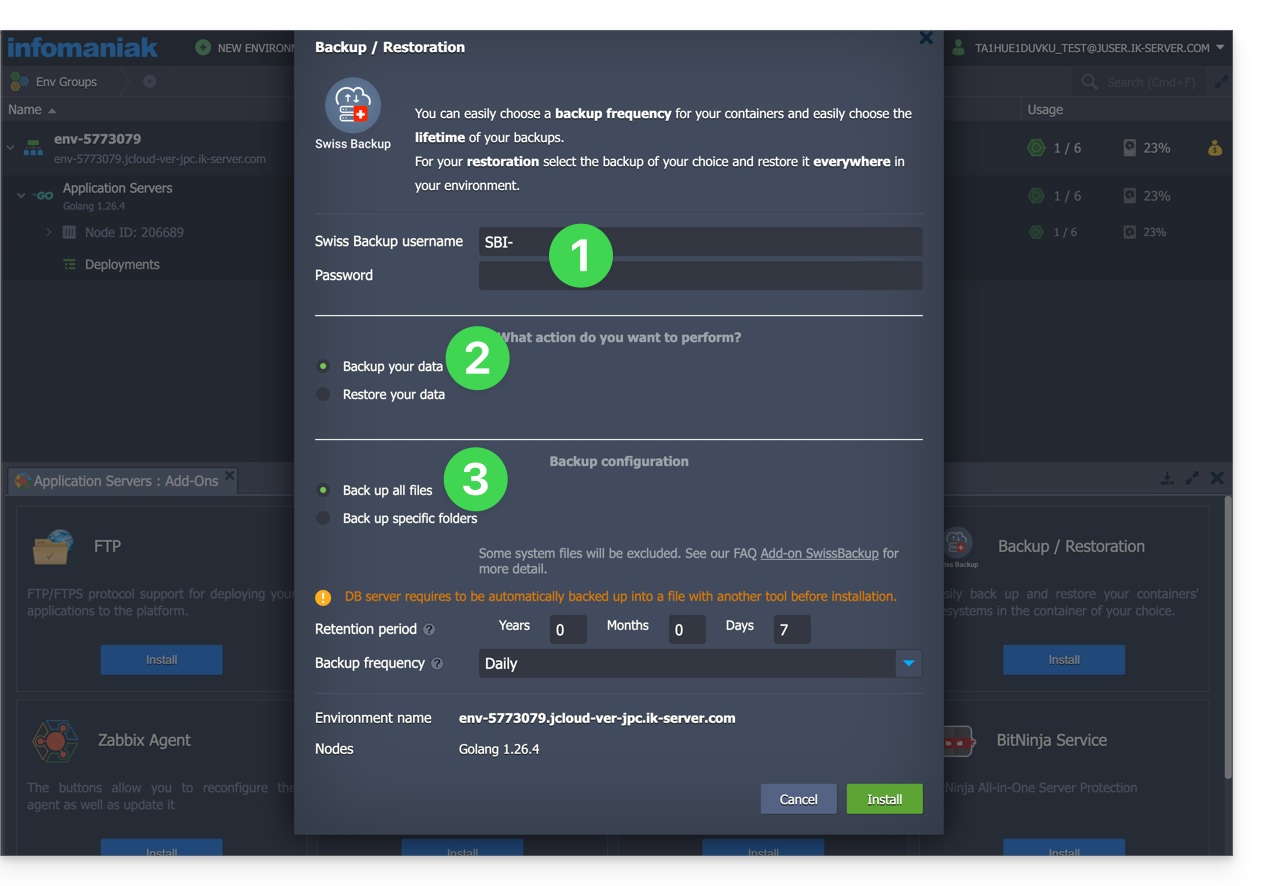
- Insira o nome de usuário e a senha de acordo com as informações específicas do seu dispositivo.
- Marque a opção Fazer backup dos seus dados.
- Marque a opção Fazer backup de pastas específicas
- Indique o caminho absoluto das pastas a serem copiadas no campo Pastas a serem copiadas; é possível especificar várias pastas separando cada caminho por uma vírgula, por exemplo:
/root/admin/, /home/user1/, /jelastic/containers/(neste exemplo, 3 pastas foram especificadas)…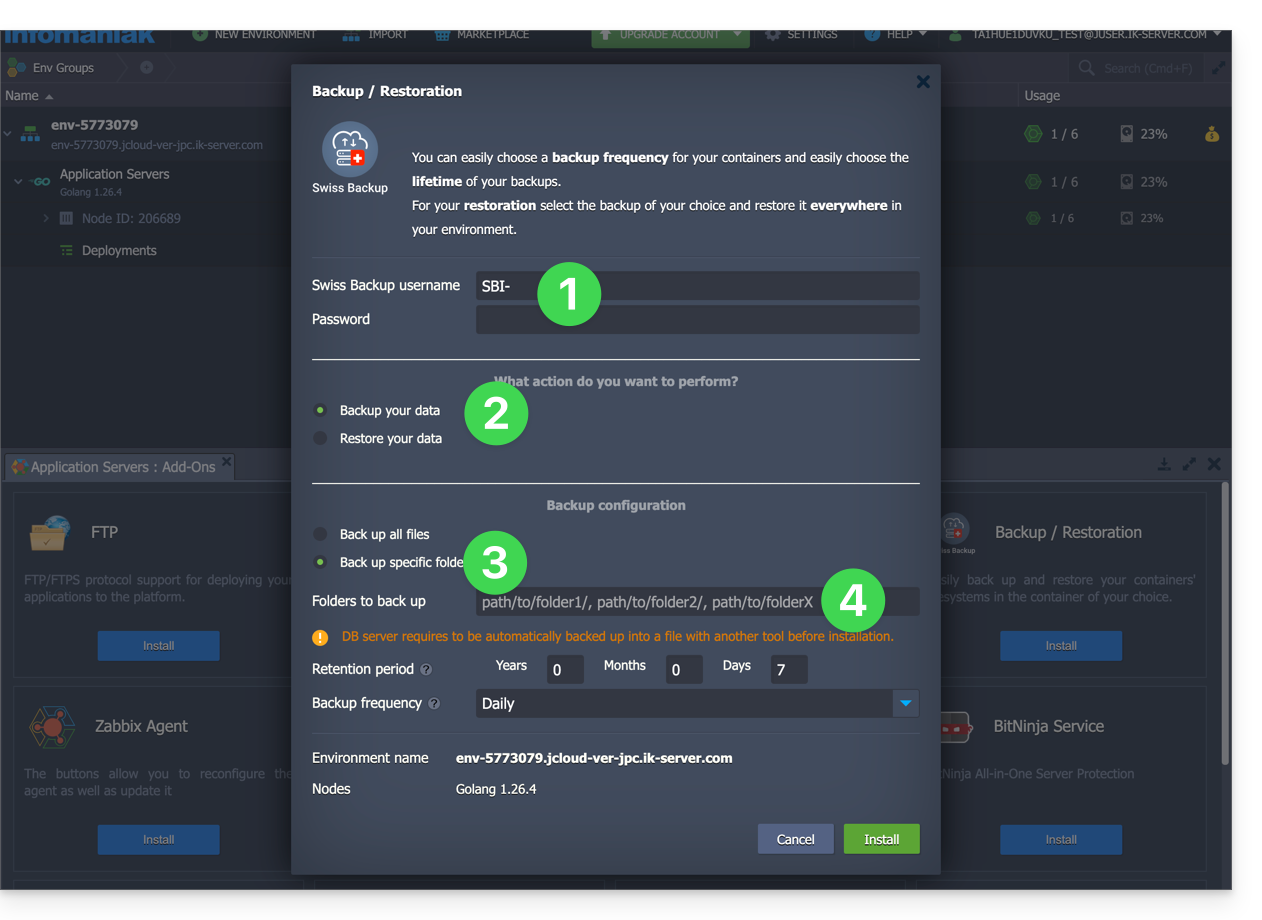
Em seguida, defina a frequência das cópias de segurança (veja abaixo).
Fazer backup de um nó inteiro
Para fazer o backup de um nó inteiro:
- Insira o nome de usuário e a senha do seu dispositivo Swift no Swiss Backup.
- Marque a opção Fazer backup dos seus dados.
- Marque a opção Fazer backup de todos os arquivos para salvar todo o sistema de arquivos de um nó; alguns arquivos são automaticamente excluídos:
- as pastas
/dev,/proc,/sys,/run - os sistemas de arquivos que não estão montados como parte da partição raiz, incluindo os sistemas de arquivos virtuais
- as pastas
Em seguida, defina a frequência dos backups.
Definir a frequência e a política de retenção das cópias de segurança
Existem duas opções disponíveis para efetuar a cópia de segurança:
- diariamente (às 20h UTC)
- a cada hora (no início da hora, por exemplo, às 13h, às 14h, etc.)
Pode definir a duração da retenção das suas cópias de segurança em anos, meses, dias e horas. Para manter as suas cópias de segurança indefinidamente, basta definir os parâmetros para 0.
Por exemplo, se efetuar cópias de segurança a cada hora e definir uma política de retenção de 1 ano, 2 meses, 4 dias, 2 horas, isso significa que cada cópia de segurança estará disponível durante um período de 1 ano, 2 meses, 4 dias, 2 horas (= 10322 cópias de segurança). Note que a eliminação das cópias de segurança é efetuada todos os domingos às 22h30 (UTC).
Atenção: não defina todos os parâmetros como 0, pois backups permanentes podem causar falhas no processo de backup.
Limites recomendados:
- Ano: 1
- Mês: 12
- Dias: 99
Para uma cópia de segurança horária (a cada hora), recomenda-se um período máximo de retenção de um mês. Ultrapassando este valor, algumas cópias de segurança poderão falhar.
Restaurar cópias de segurança
Restaurar dados de um nó
- Aceda ao Painel de Controlo Jelastic do seu servidor.
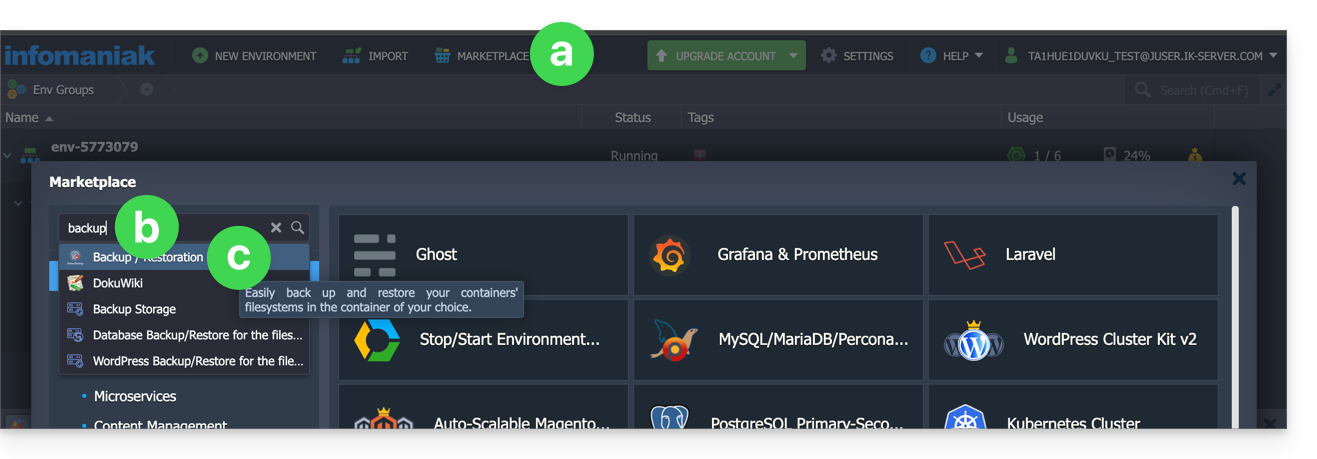
- Provavelmente, terá de reinstalar (reiniciar) o complemento a partir da Marketplace:
- Clique em Marketplace.
- Pesquise por “backup”…
- Clique no complemento "Backup / Restauração":
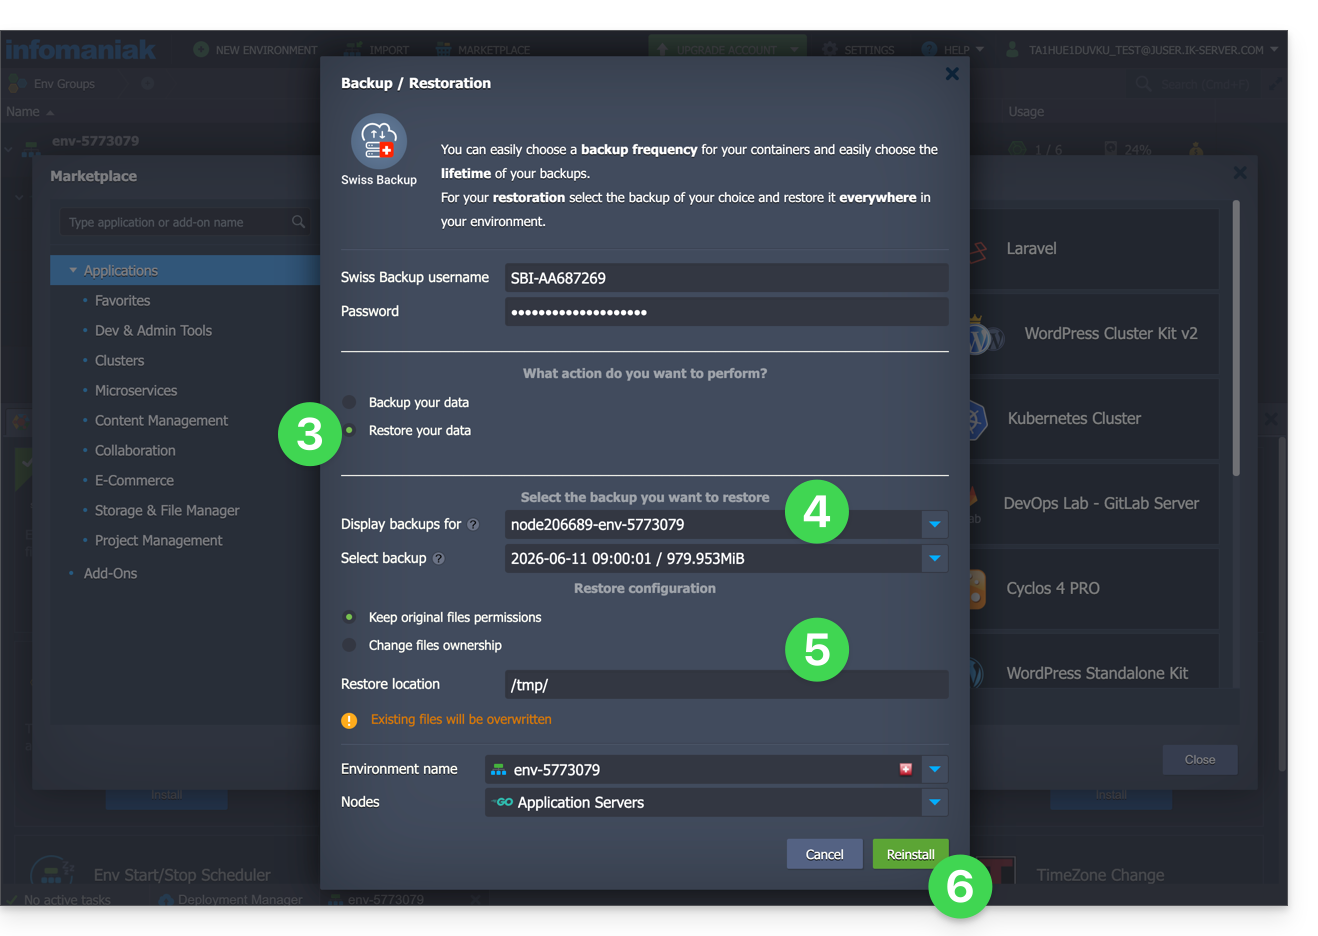
- Depois de adicionar a extensão e inserir o nome de usuário e a senha do seu dispositivo Swift no Swiss Backup, marque a opção Restaurar seus dados.
- Selecione o nó que contém o backup a ser restaurado.
- Selecione o backup a ser restaurado e a pasta de destino.
- Clique no botão Restaurar:
Restaurar pastas específicas de um snapshot (CLI)
Cada cópia de segurança corresponde a um ID único. Pode incluir e excluir pastas dos seus snapshots durante uma restauração. Para ver os seus snapshots:
. /home/.config/swissbackup/openrc.shrestic snapshots
- Use
--excludee--includepara restringir a restauração a um subconjunto de arquivos no snapshot; por exemplo, para restaurar um único arquivo:restore 79766175 --target /tmp/restore-work --include /work/foo
Existem variantes que não diferenciam maiúsculas de minúsculas de --exclude e --include, chamadas --iexclude e --iinclude. Essas opções se comportam da mesma maneira, mas ignoram a diferença entre maiúsculas e minúsculas nos caminhos.
Modificar a configuração da cópia de segurança
Para tal:
- Faça login no Painel de Controle Jelastic do seu servidor.
- Depois de adicionar a extensão e inserir o nome de usuário e a senha do seu dispositivo Swift no Swiss Backup, modifique a configuração conforme desejado.
O agendamento das cópias de segurança é definido por um cron job e as cópias de segurança são realizadas com a ferramenta restic.
Para modificar manualmente o agendamento das cópias de segurança (linha de comando), como utilizador root, execute o comando crontab -l para visualizar os horários atuais:
- a linha que contém
retention-all.shcorresponde à tarefa de cópia de segurança - a linha que contém
purge.shcorresponde à tarefa de retenção das cópias de segurança
Exemplo:

Modifique a programação usando o comando crontab -e.
Pode modificar a linha que contém o script retention-all.sh ou retention.sh, estes scripts correspondem ao lançamento das suas cópias de segurança. Atenção: os cron jobs foram concebidos para não causar problemas entre as cópias de segurança e as eliminações múltiplas. Tenha atenção ao tempo necessário para as cópias de segurança e as eliminações…
- Saiba mais sobre os cron jobs: crontab.guru
- Saiba mais sobre o restic: restic.net
Excluir manualmente cópias de segurança (CLI)
Para isso:
- Carregue o arquivo de configuração:
. /home/.config/swissbackup/openrc.sh - Exiba as cópias de segurança disponíveis:
restic snapshots - Elimine a cópia de segurança desejada:
restic forget IdBackup --prune - Remova todas as cópias de segurança de um arquivo, exceto a mais recente:
restic forget --tag folders --keep-last 1 --prune

Remover a programação da cópia de segurança
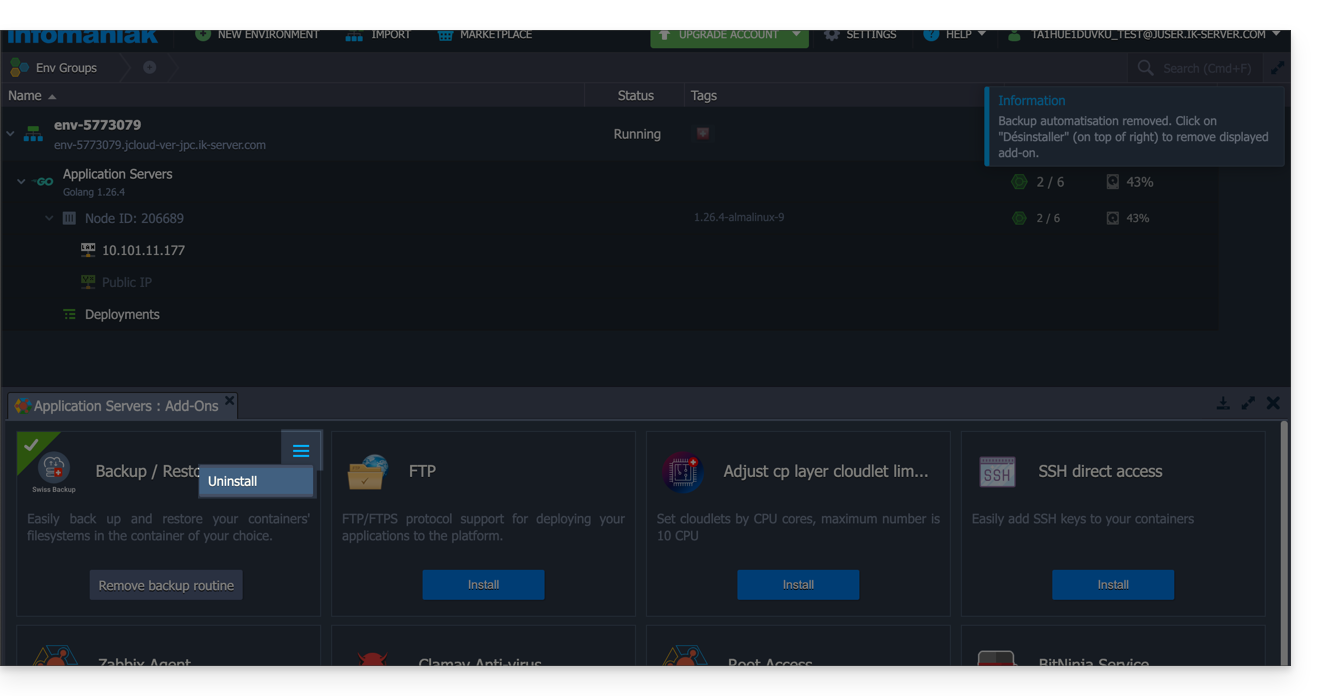
Este botão permite remover a programação da sua cópia de segurança: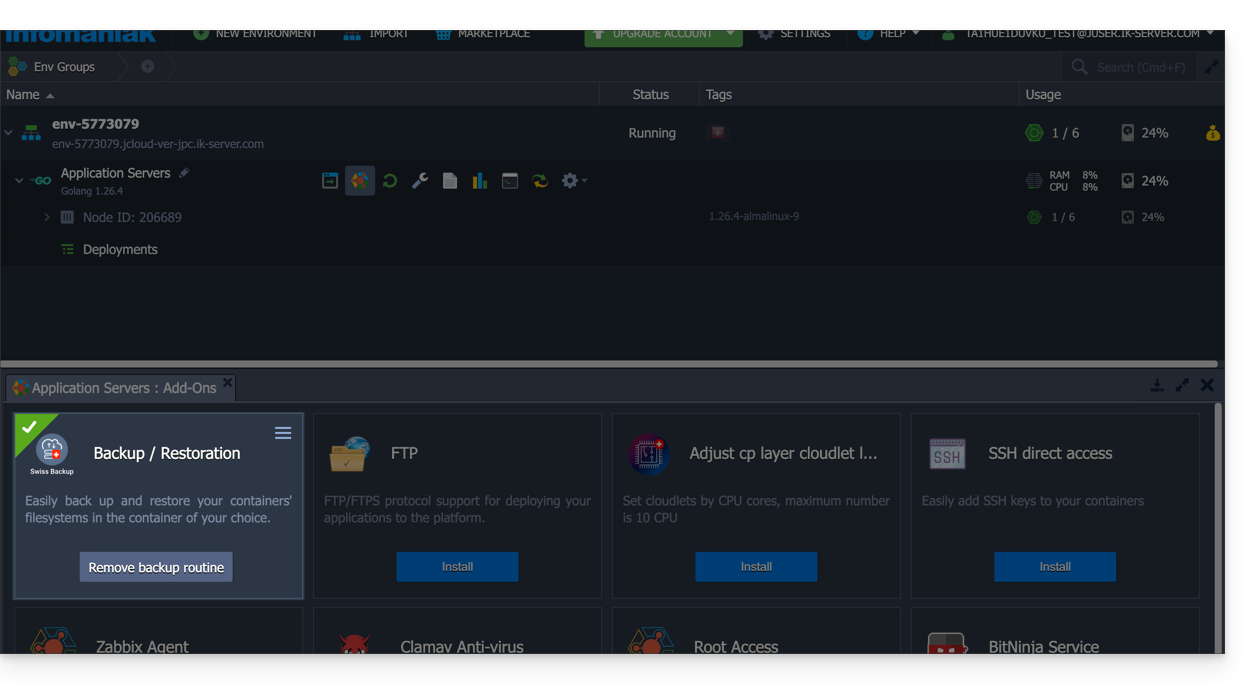
Desinstalar a extensão Swiss Backup
É necessário remover a programação da cópia de segurança (consulte acima) antes de poder remover a extensão Swiss Backup:
Link para esta FAQ: https://faq.infomaniak.com/2420
Esta seção de perguntas frequentes foi útil?
Este guia explica como personalizar o(s) período(s) durante o(s) qual(is) a Infomaniak poderá realizar manutenções para aprimorar os seus serviços (novas funcionalidades, correções, etc.).
Introdução
- Este recurso está disponível apenas para:
- Servidores Cloud
- VPS Cloud / VPS Lite
- Jelastic Cloud
- Caso não indique o contrário, as manutenções programadas são geralmente efetuadas pela Infomaniak entre as 22h e as 6h da manhã.
Modificar o período de manutenção programada
Para isso:
- Clique aqui para acessar o serviço para o qual deseja agendar as manutenções no Gerenciador Infomaniak (precisa de ajuda?).
- Clique diretamente no nome atribuído ao produto em questão.
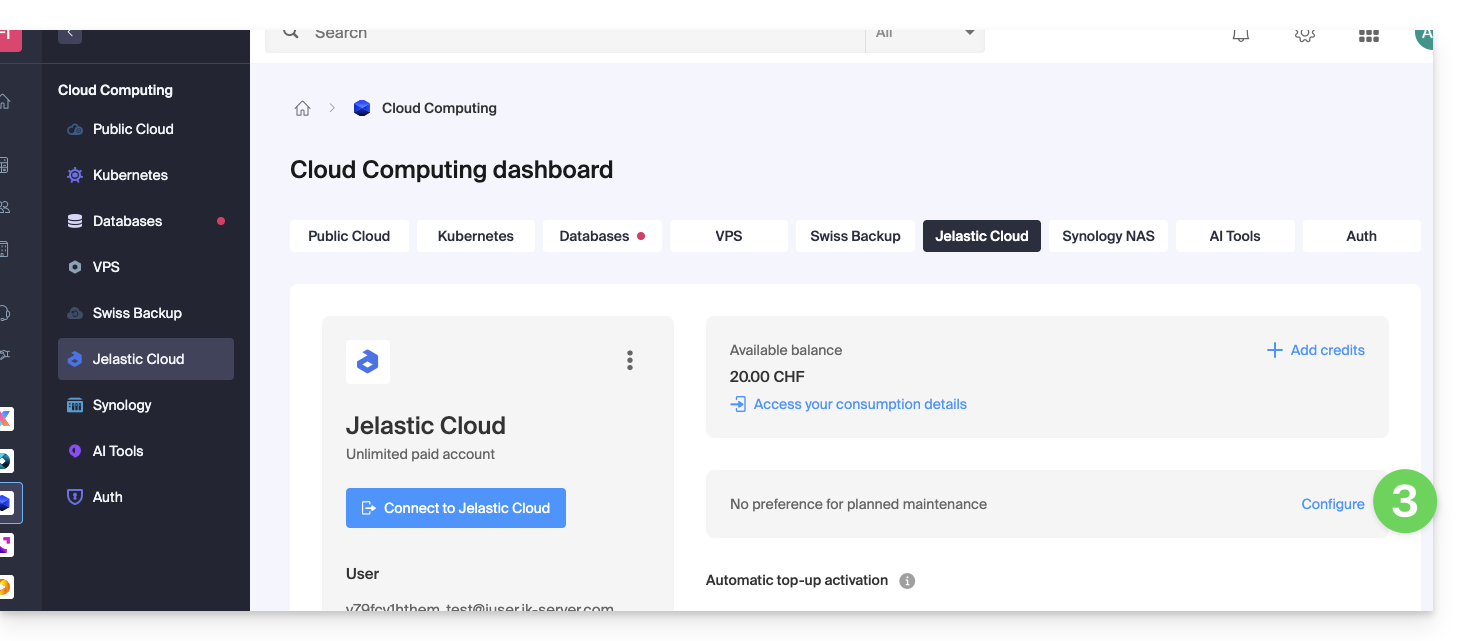
- Clique em Manutenções programadas no menu lateral esquerdo ou na página central, dependendo do serviço em questão (abaixo, Jelastic):
- O mesmo princípio se aplica a um VPS:
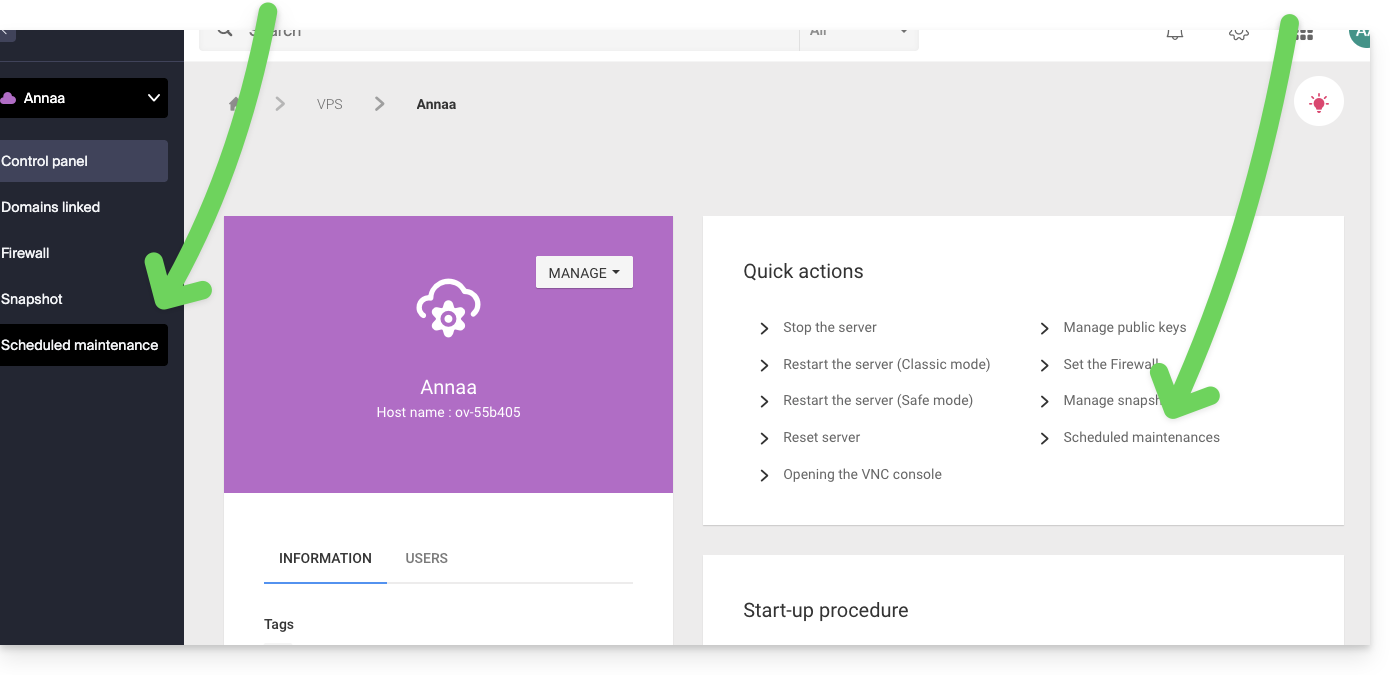
- O mesmo princípio se aplica a um VPS:
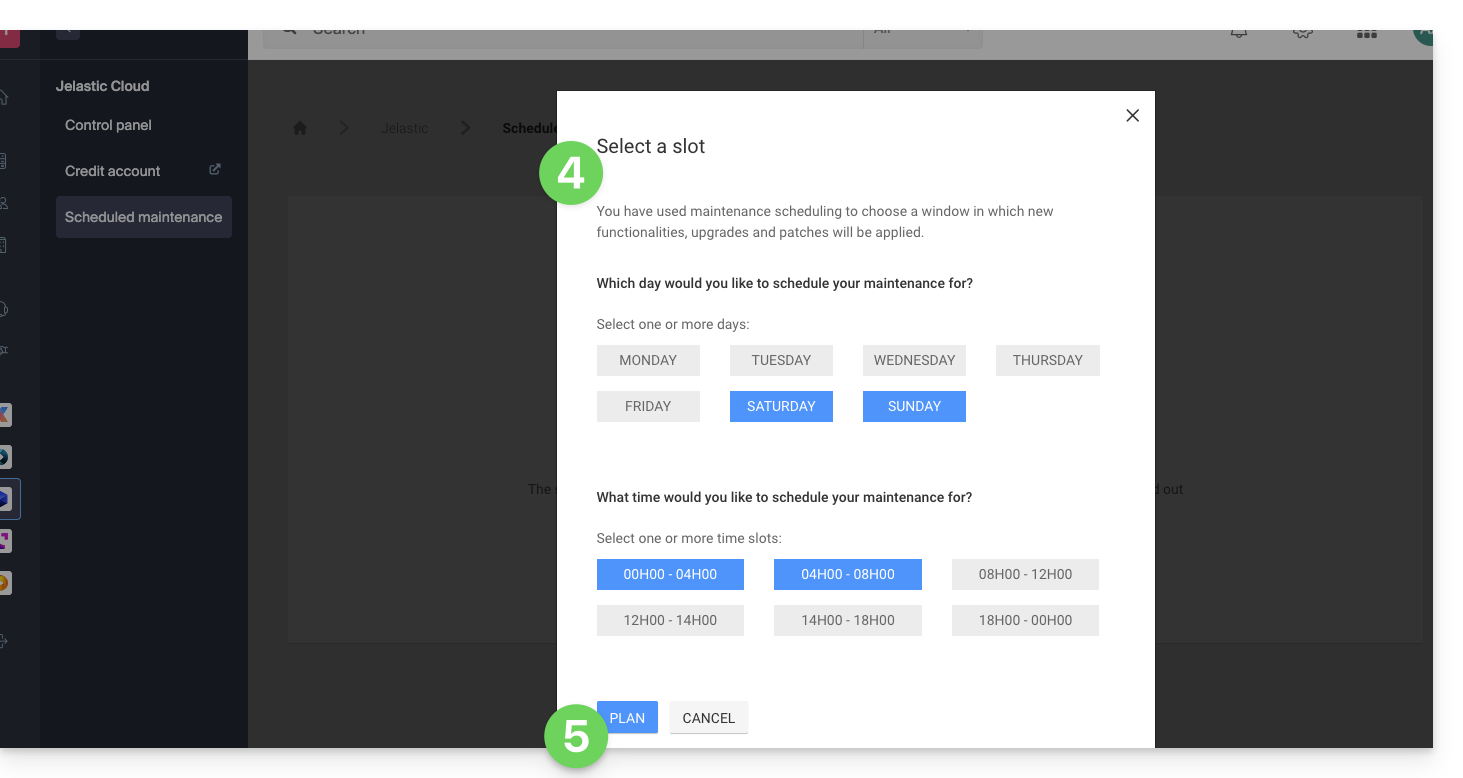
- Clique nos botões para definir, em azul, um período de intervenção preferencial.
- Valide clicando no botão na parte inferior:
Link para esta FAQ: https://faq.infomaniak.com/2424
Esta seção de perguntas frequentes foi útil?
Este guia detalha como transferir um ambiente Jelastic Cloud Infomaniak de uma conta para outra; você também pode consultar a documentação Jelastic oficial (disponível apenas em inglês).
Pré-requisitos
- Um ambiente pode ser transferido de qualquer tipo de conta Jelastic Cloud (teste, versão beta, desativada, etc.); no entanto, é imprescindível que o destinatário da transferência possua uma conta paga.
- Verificar também se a conta de destino não atingiu:
- o número máximo de cloudlets por contêiner
- o número máximo de nós de computação disponíveis para um ambiente
- o número máximo de ambientes na conta
- Utilizar o endereço de e-mail do usuário da conta de destino, que pode ser encontrado na seção "Usuário" no painel de controle Jelastic da conta de destino:

Procedimento de transferência
Para efetuar a transferência:
- Aceda à sua plataforma Jelastic Cloud (vai sair do painel de controlo Infomaniak).
- Clique no botão Definições ao lado do ambiente que pretende transferir:

- No menu Configurações, selecione a opção Alterar proprietário.
- Indique o endereço de e-mail da conta de destino e clique em Enviar:

- Se a conta de destino existir e corresponder aos critérios de transferência, uma notificação indicando o envio da solicitação será exibida.
- Um ícone será exibido em frente ao ambiente a ser transferido enquanto a solicitação de transferência não for aceita pelo novo proprietário.
- Após a aceitação do pedido de transferência, o ambiente é removido da sua conta.
É possível cancelar o processo de transferência no menu Configurações, Alterar proprietário, cancelar o pedido de transferência.
Assim que a transferência for concluída,você poderá cancelar o produto Jelastic da sua conta, todos os créditos ainda disponíveis no momento do cancelamento serão automaticamente transferidos para sua conta pré-paga Infomaniak.
Link para esta FAQ: https://faq.infomaniak.com/2453
Esta seção de perguntas frequentes foi útil?