Base de conhecimento
1000 perguntas frequentes, 500 tutoriais e vídeos explicativos. Aqui, você encontra apenas soluções!
Este guia detalha a funcionalidade Auto DJ do serviço de Rádio Online da Infomaniak, que permite gerar uma rádio ao vivo 24 horas por dia a partir do seu próprio conteúdo de áudio (músicas, programas, podcasts, vinhetas, etc.) previamente carregado no seu espaço de armazenamento.
Introdução
- O Auto DJ utiliza os arquivos armazenados no seu espaço AOD (Audio on Demand) Infomaniak para criar um fluxo linear.
- Você pode usar o mesmo espaço para suas necessidades de armazenamento de arquivos sob demanda.
- Você organiza seus arquivos de mídia, cria suas playlists e programa a sua reprodução por meio de uma interface de calendário intuitiva.
- Isso permite manter uma transmissão contínua sem a necessidade de um codificador ativo permanentemente.
Ativar o Auto DJ
Pré-requisitos
- Ter, no mínimo, o direito de gerir o serviço VOD/AOD “autodj” e o Streaming Radio em questão (ou ser Administrador / Responsável legal dentro da Organização).
- Para poder gerir o Auto DJ através da API, o token criado para gerir a rádio deve incluir os seguintes escopos:
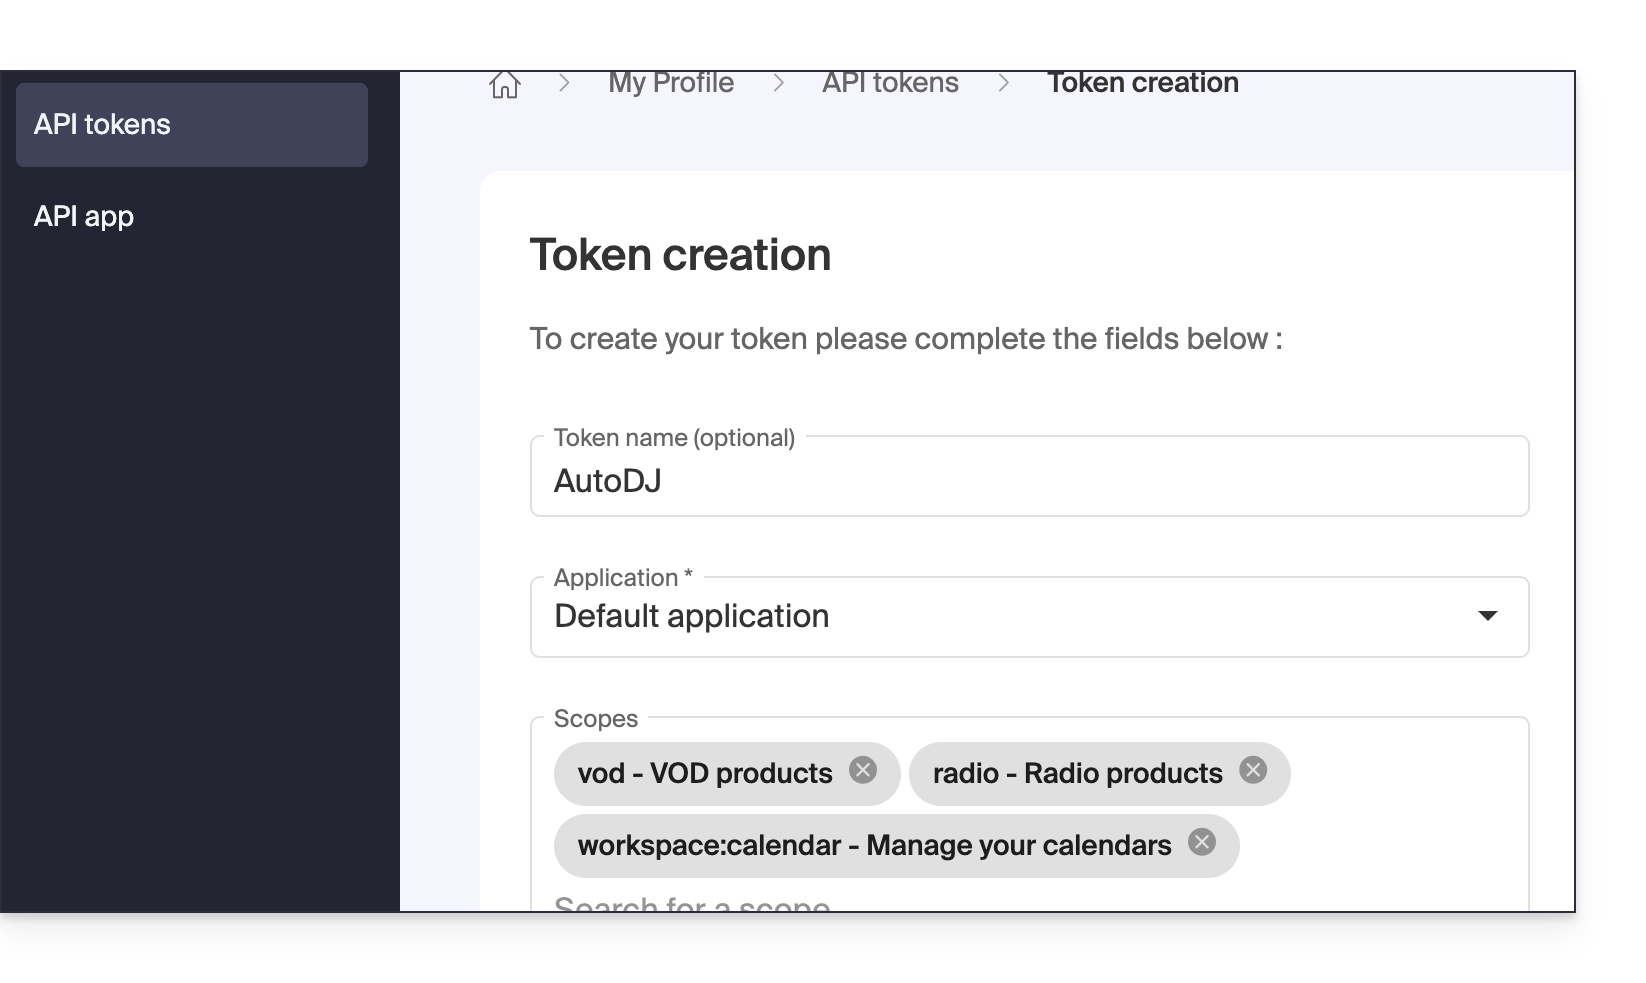
vodradioworkspace:calendar
Para ativar e iniciar o Auto DJ:
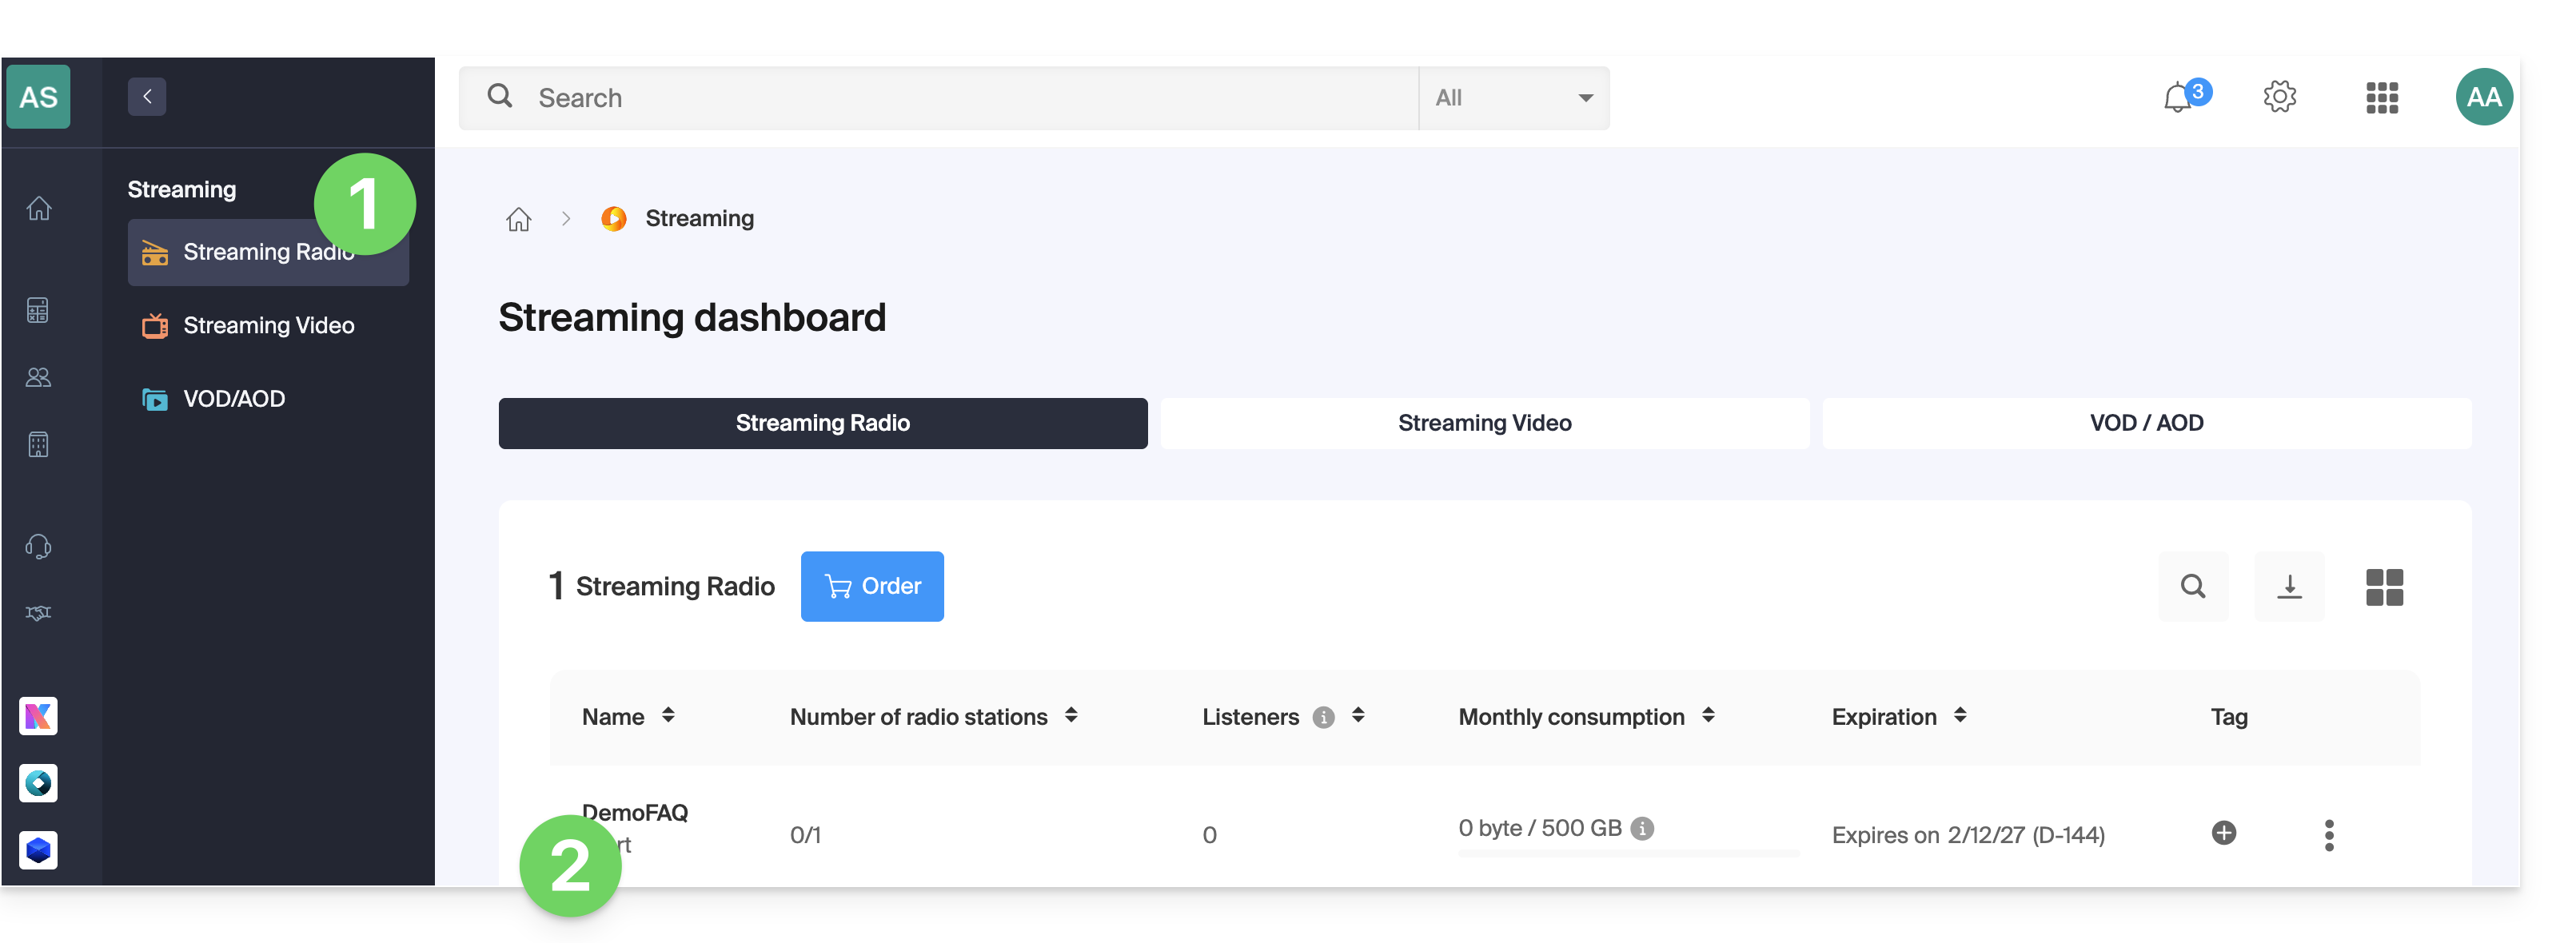
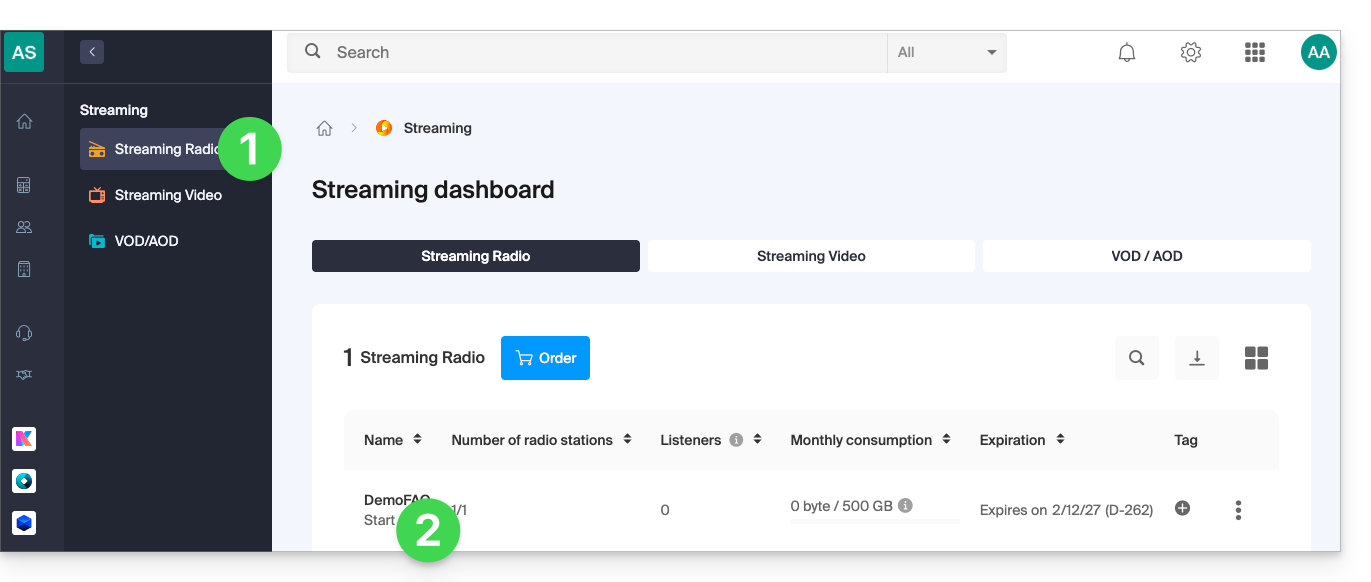
- Clique aqui para acessar o gerenciamento da sua Rádio Online no Gerenciador Infomaniak (precisa de ajuda?).
- Clique diretamente no nome atribuído à Rádio Online em questão:
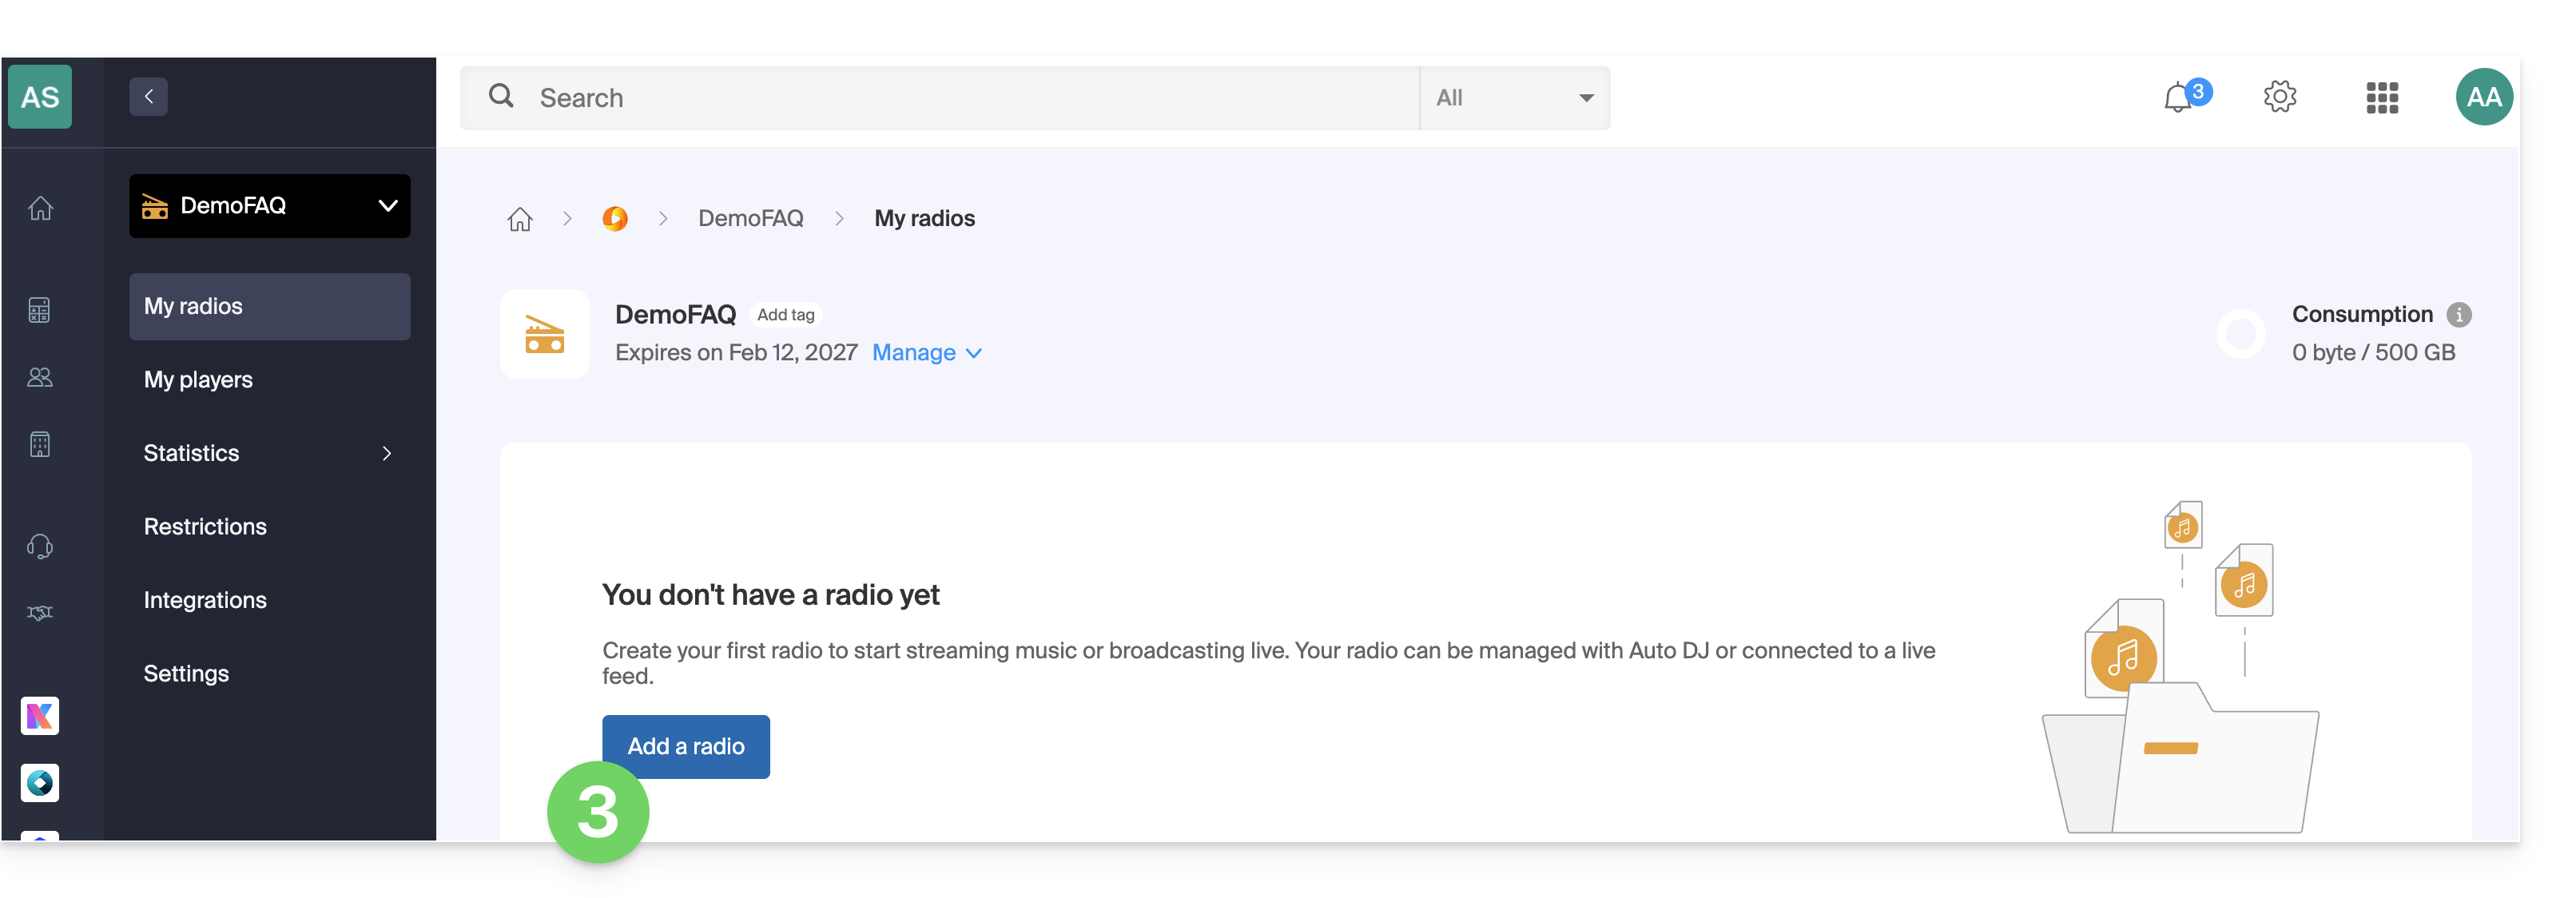
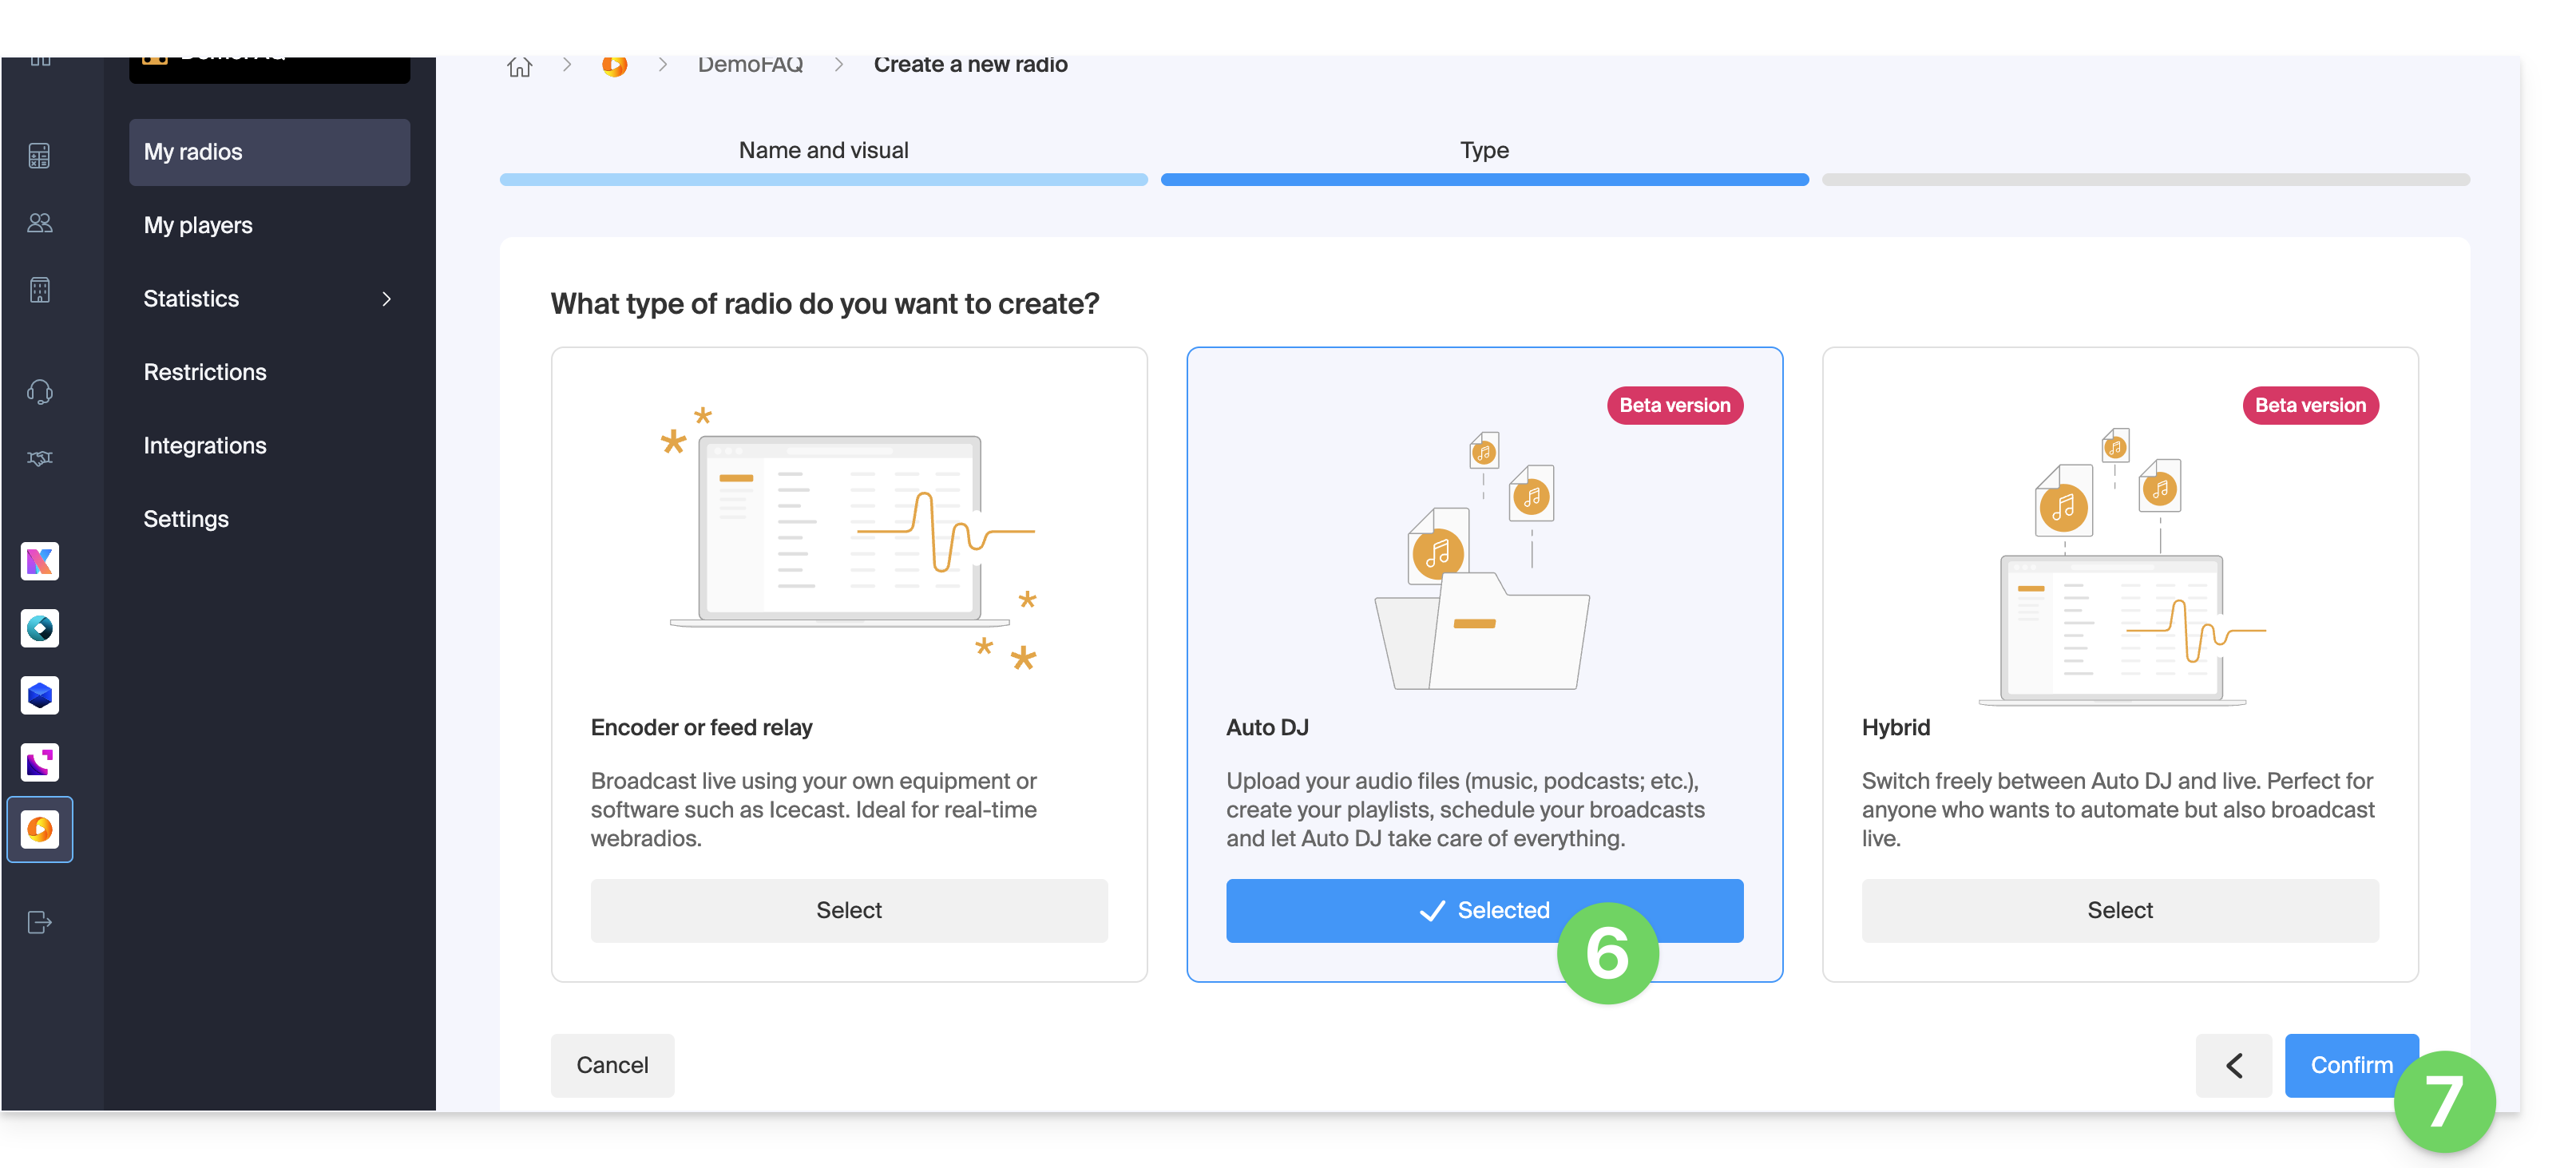
- Se já tiver uma rádio configurada, clique no nome dela e avance para o passo 8. Caso contrário, adicione uma nova rádio:
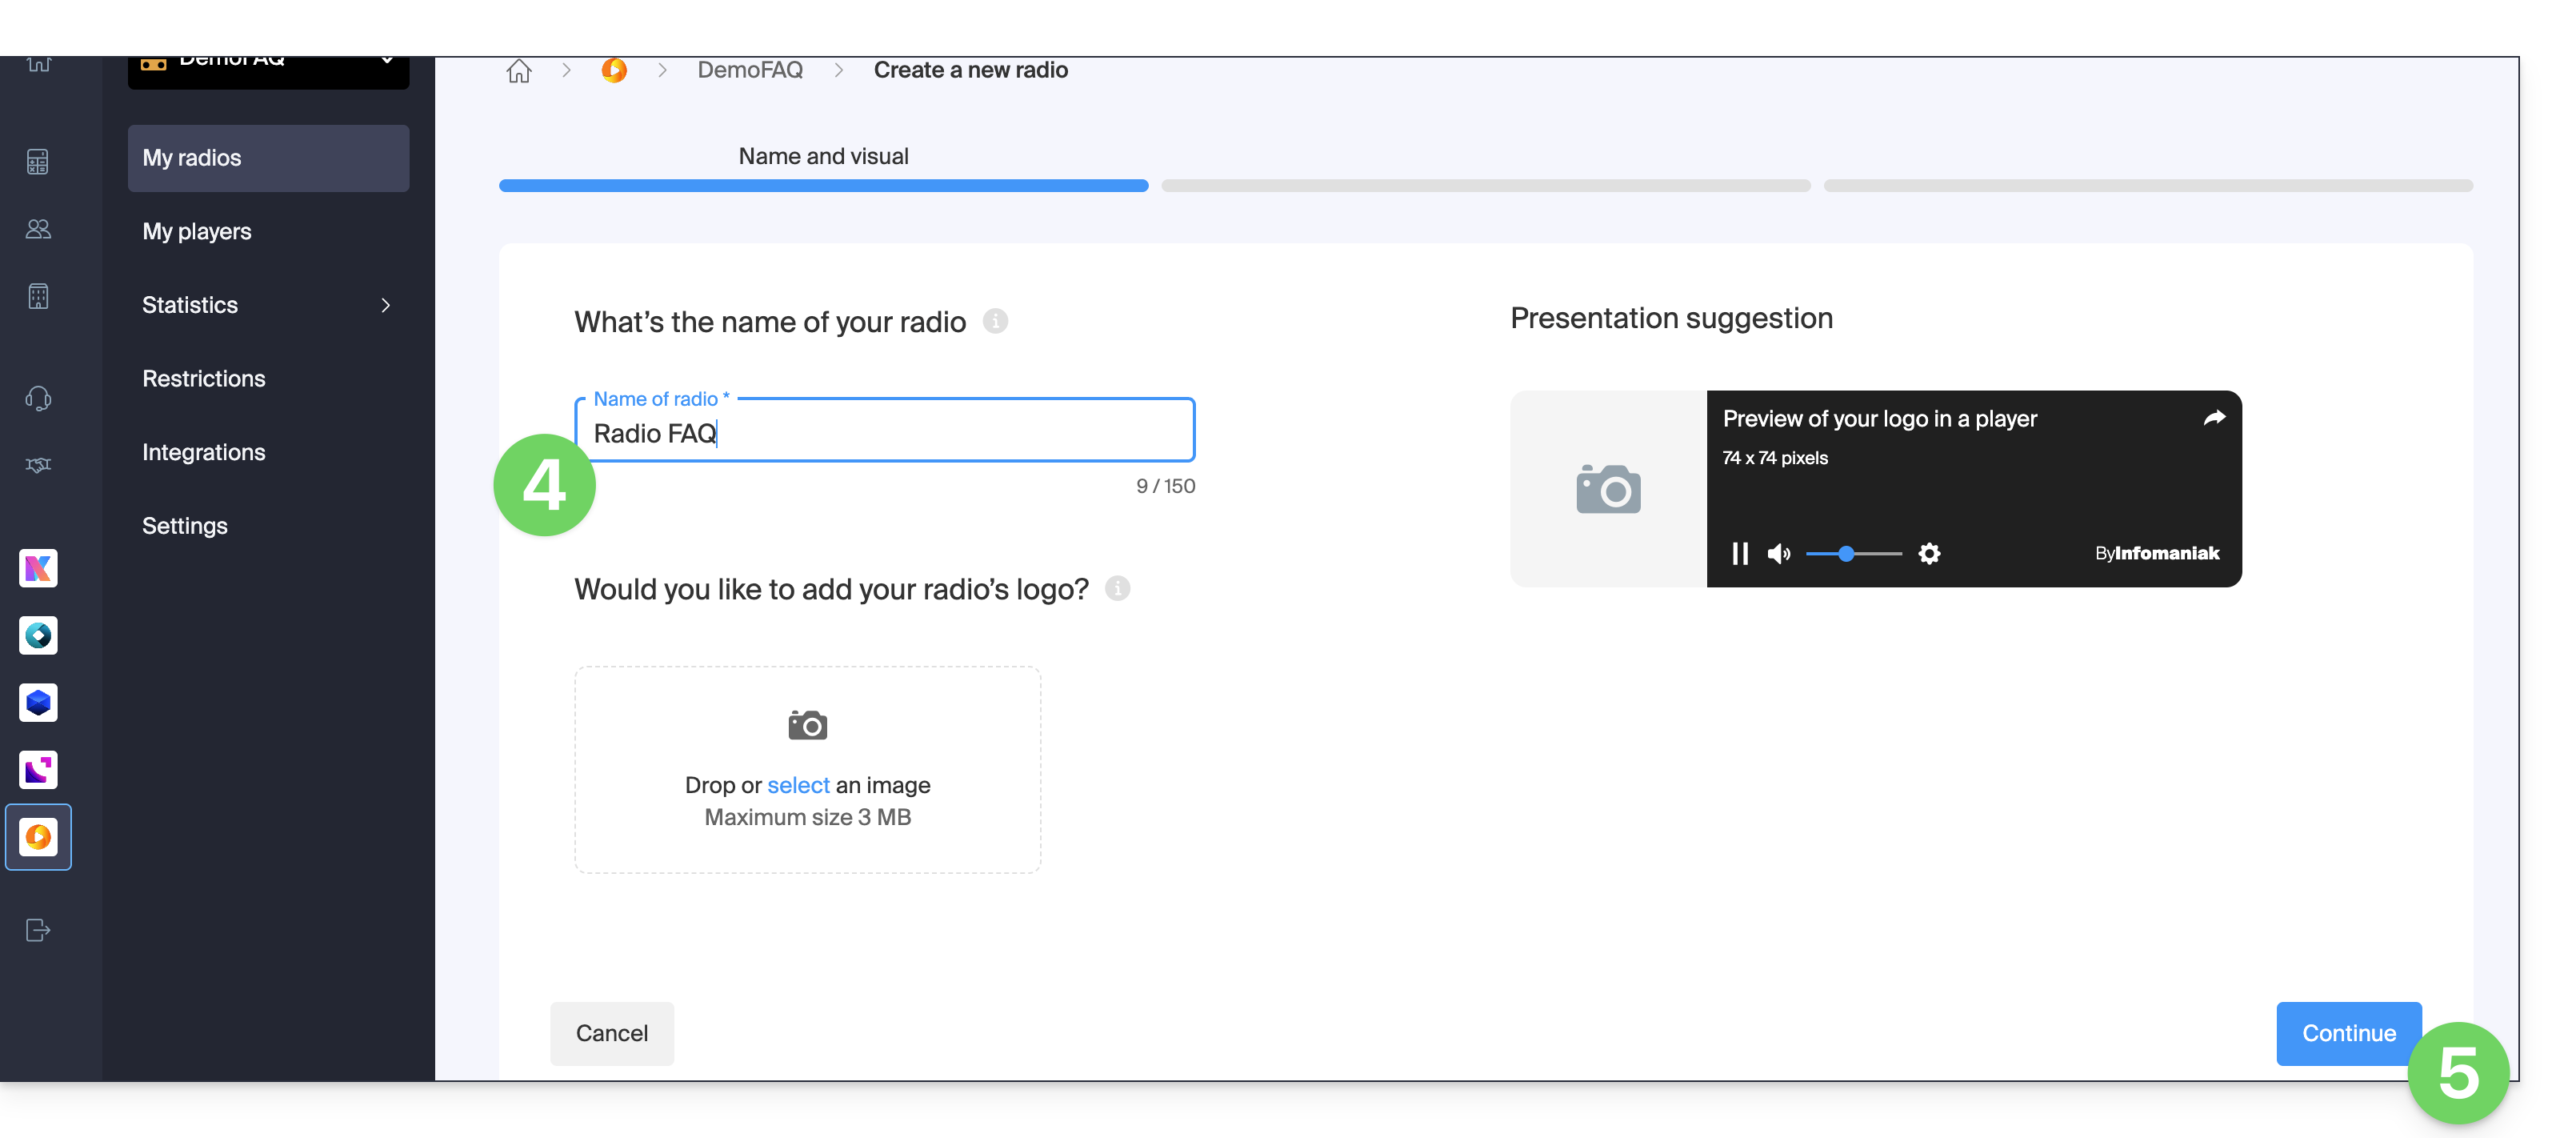
- Atribua um nome à rádio e, se desejar, adicione uma imagem.
- Clique em Continuar:
- Selecione DJ automático.
- Clique para Confirmar e ir para a etapa 11:
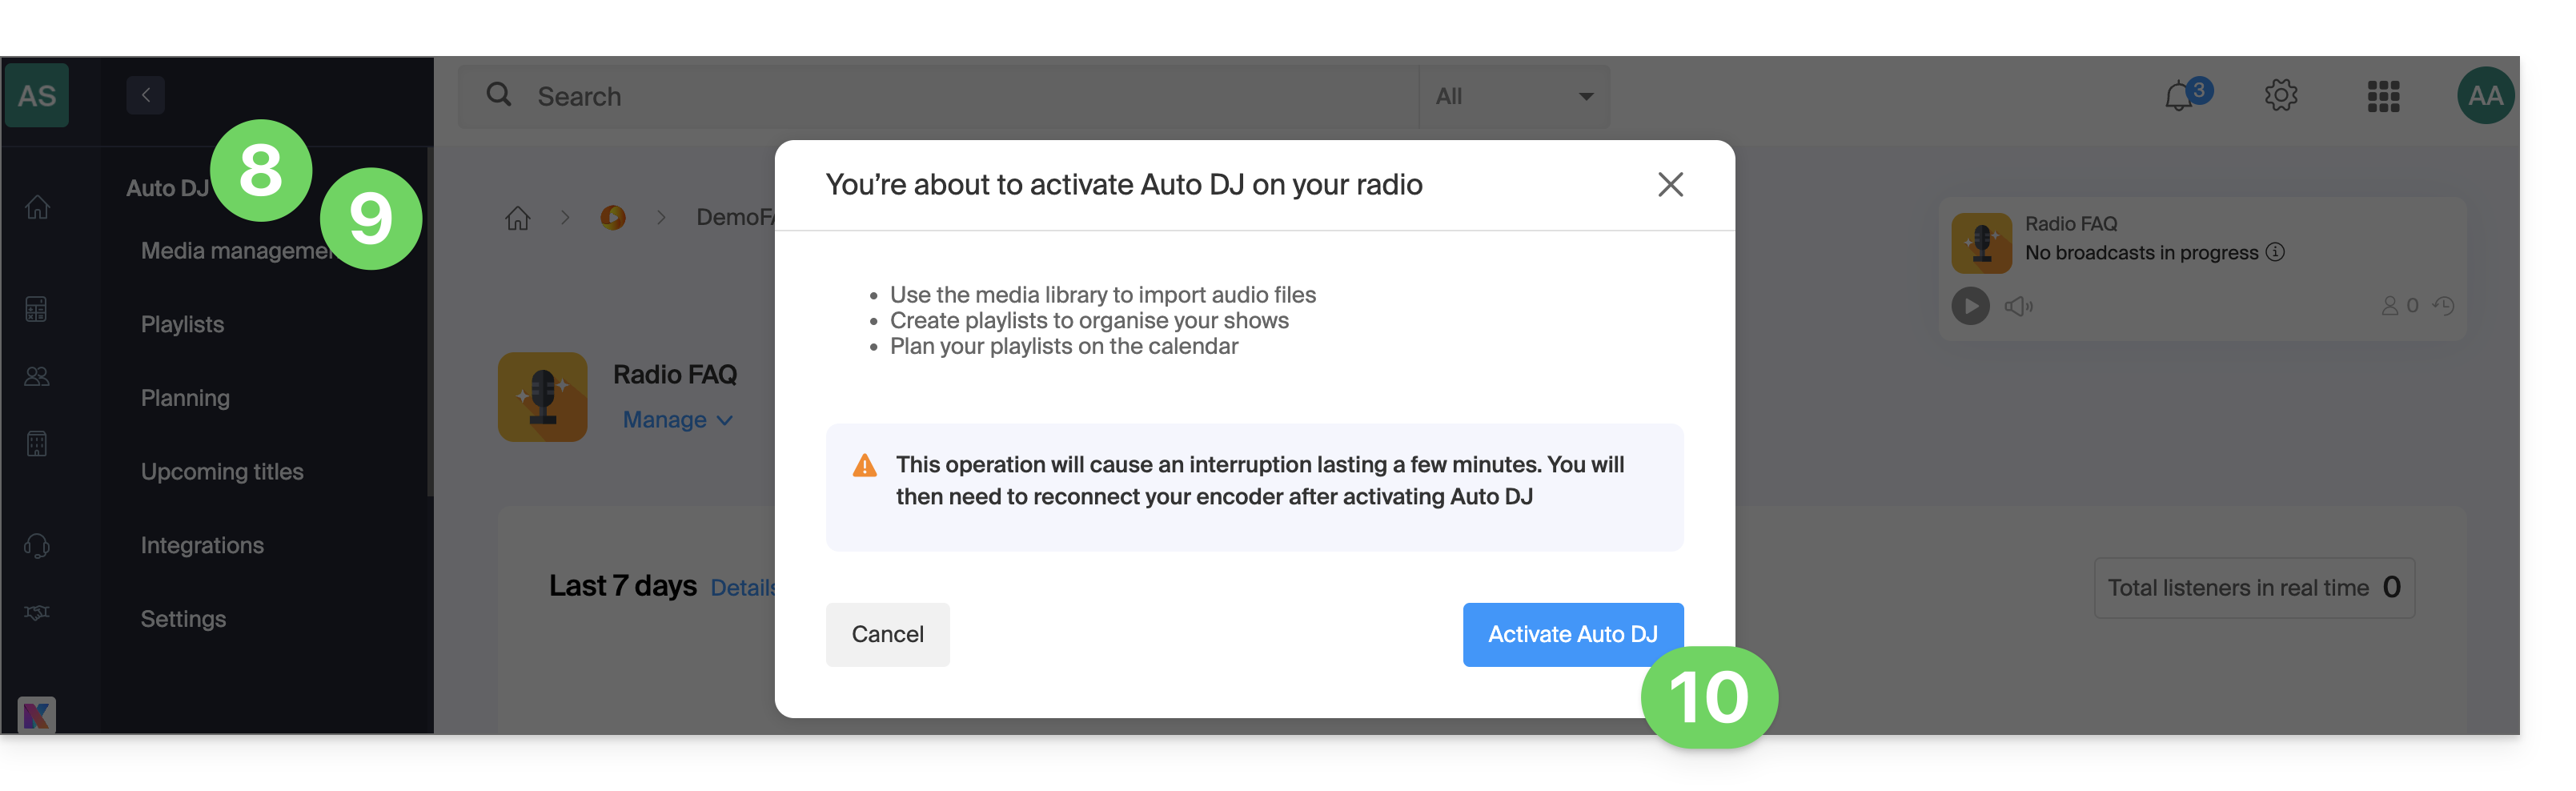
- Clique em Auto DJ no menu lateral esquerdo.
- Clique em Gerenciamento de mídia no menu lateral esquerdo.
- Leia os avisos e clique para ativar o Auto DJ:
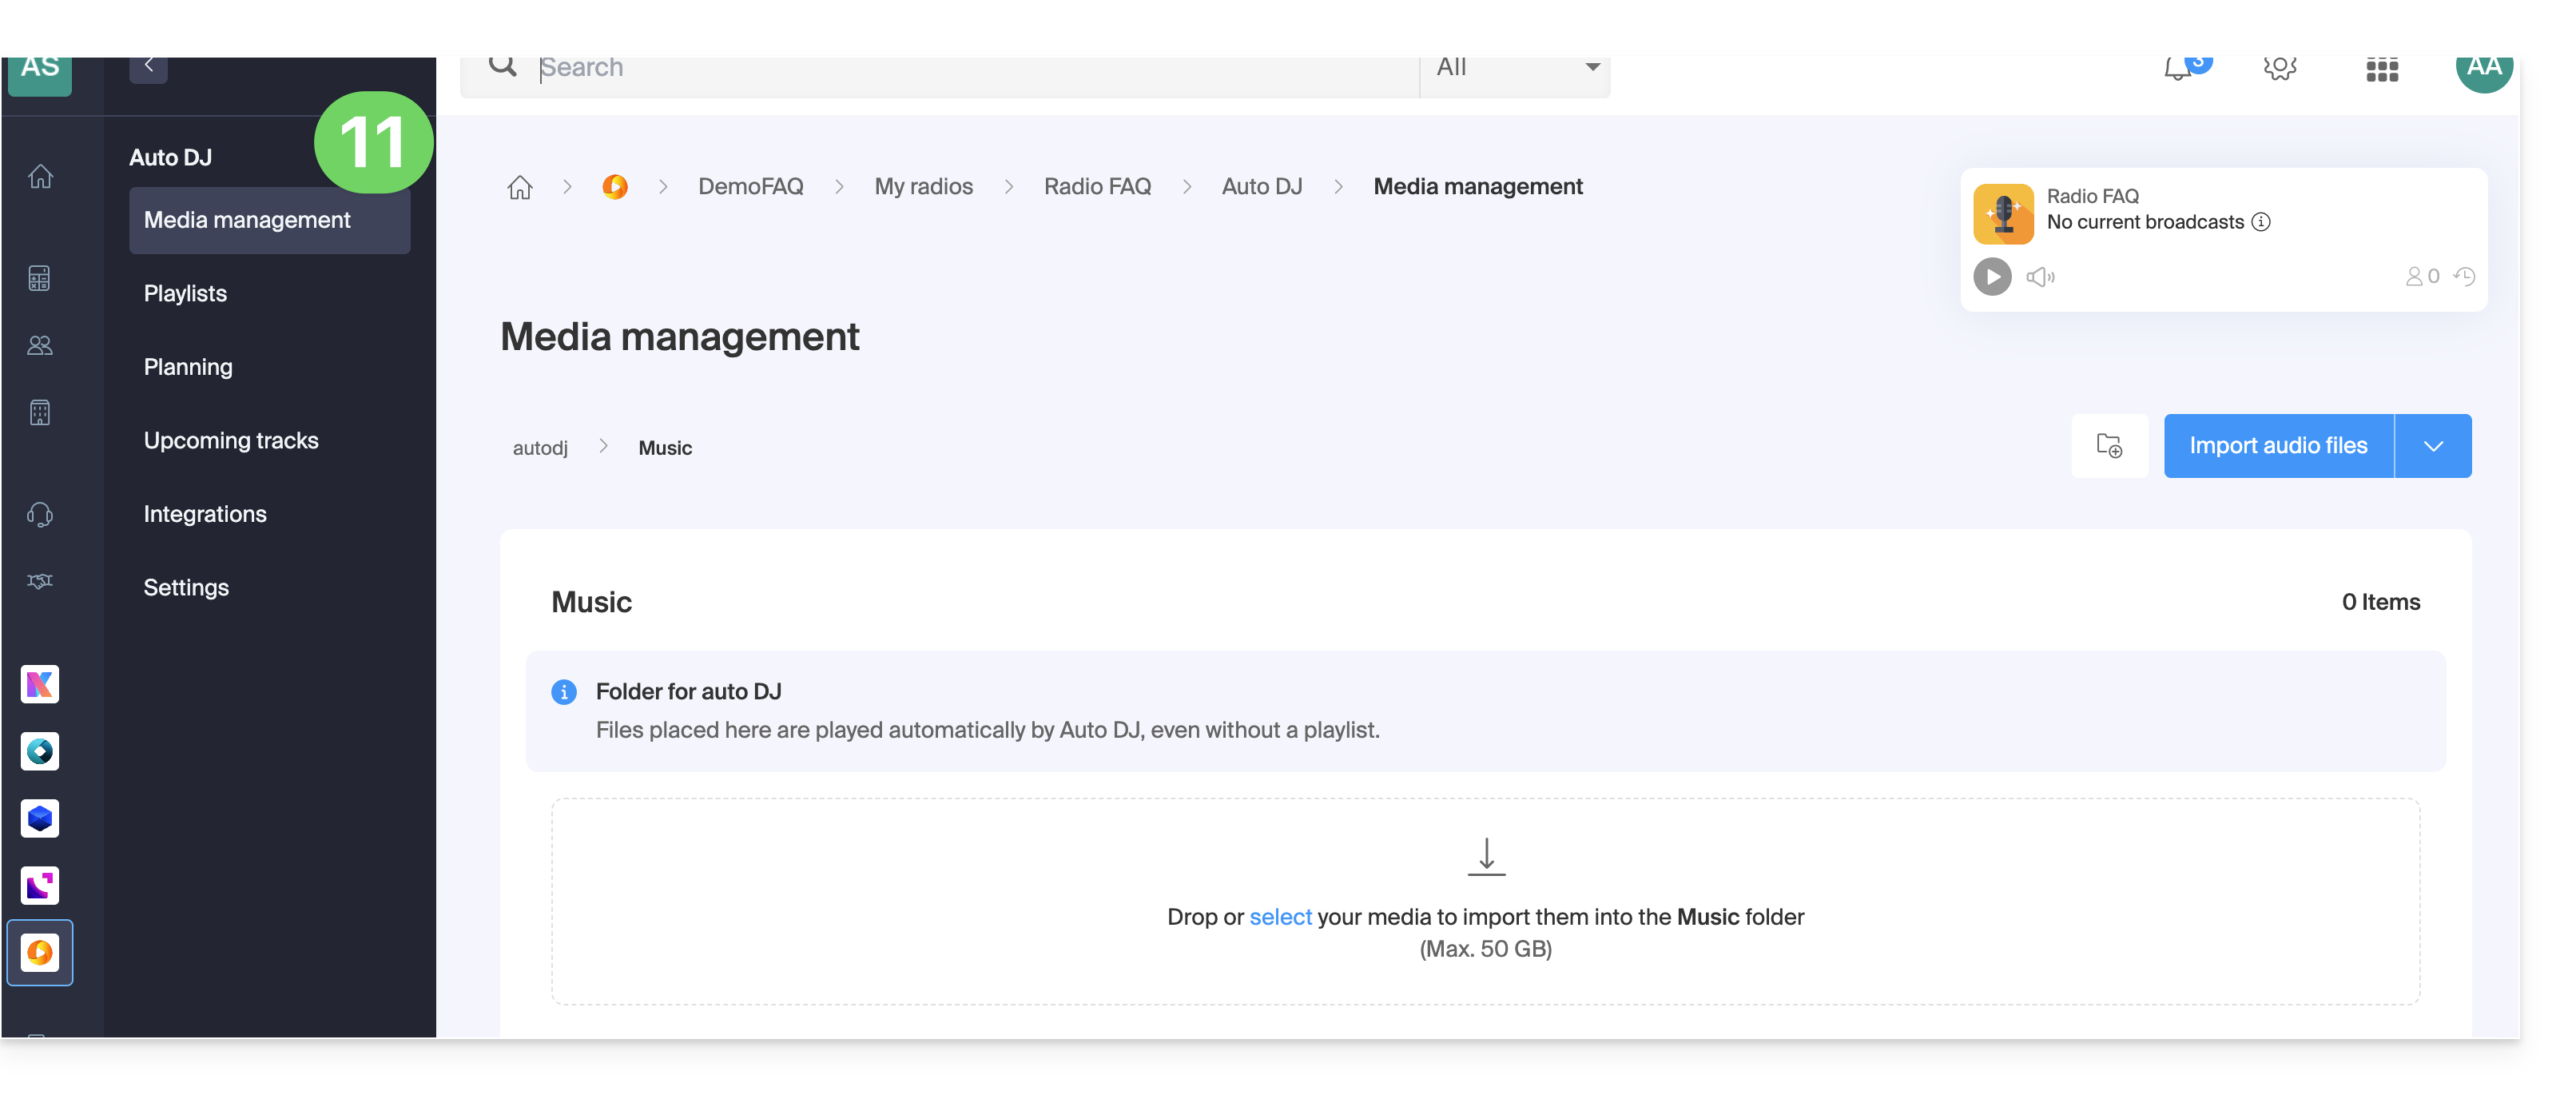
- Selecione o espaço AOD a ser usado, caso possua vários.
- Pronto, o Auto DJ está ativado e conectado ao espaço AOD para seus arquivos de áudio:
Consulte este outro guia para organizar e transmitir seus arquivos de áudio.
Link para esta FAQ: https://faq.infomaniak.com/185
Esta seção de perguntas frequentes foi útil?
Um reprodutor (ou seja, um leitor de fluxos de áudio) é indispensável para as suas rádios do Streaming Radio Infomaniak quando pretende transmiti-las aos seus ouvintes e utilizadores da internet.
Pré-requisitos
- Adicione pelo menos 1 rádio e 1 fluxo de áudio.
Criar um reprodutor de áudio
Para criar um reprodutor e disponibilizar o fluxo de áudio aos seus utilizadores:
- Clique aqui para aceder à gestão do seu produto no Manager Infomaniak (precisa de ajuda?).
- Clique diretamente no nome atribuído ao produto em questão:
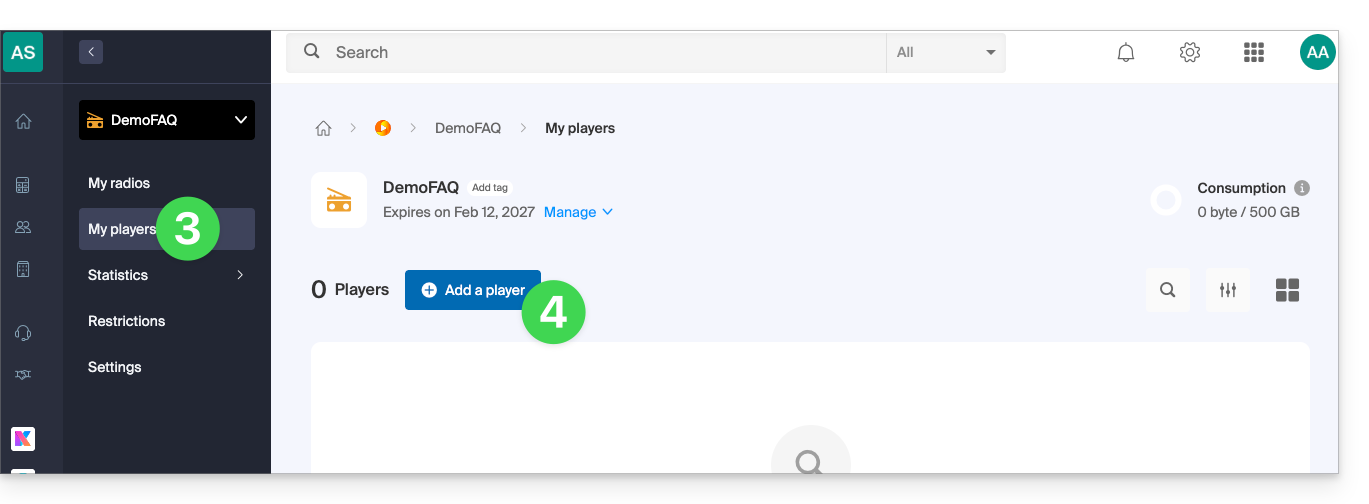
- Clique em Meus players no menu lateral esquerdo.
- Clique no botão azul para adicionar um reprodutor de áudio:
- Em seguida, poderá escolher entre:
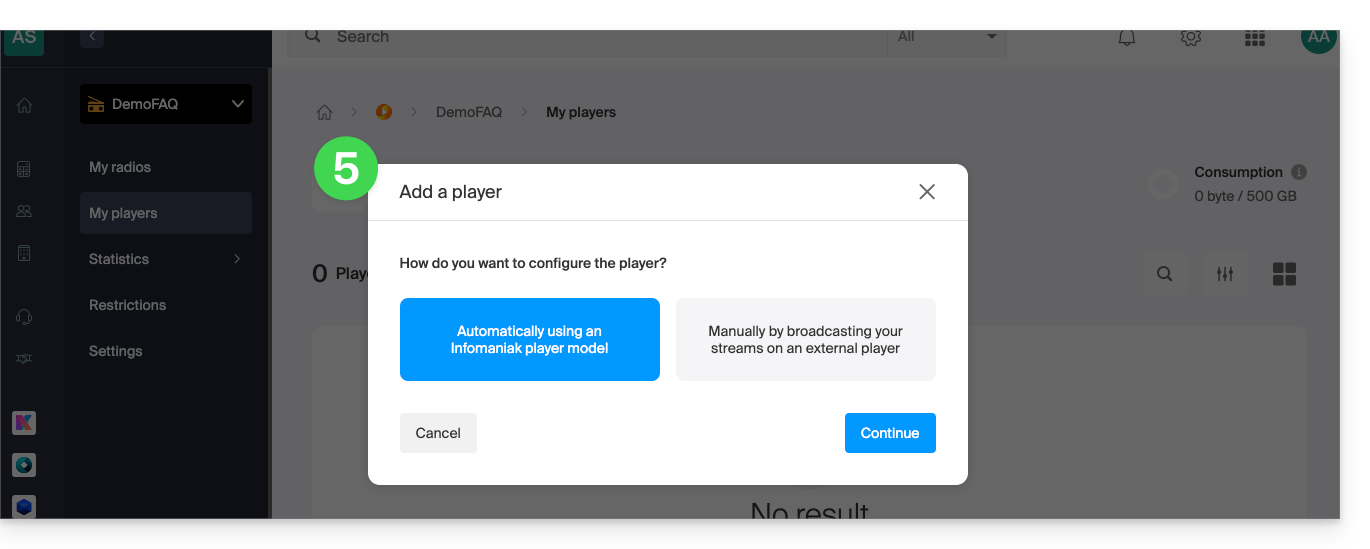
- a configuração automática
- utilizar as informações/URL que lhe serão fornecidas para navegador, reprodutor/aplicação externa/Android ou iOS, caso tenha o seu próprio reprodutor ou aplicação…
Consulte este outro guia sobre a configuração adicional dos reprodutores de rádio: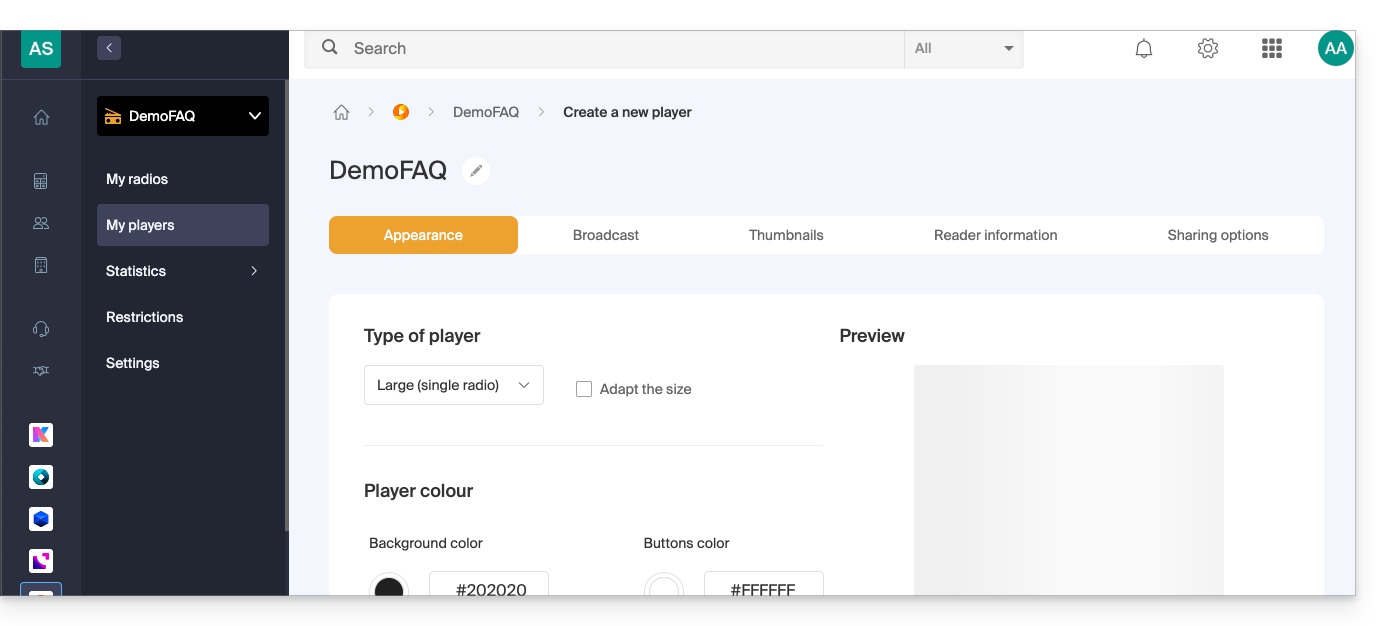
Link para esta FAQ: https://faq.infomaniak.com/1325
Esta seção de perguntas frequentes foi útil?
SpacialAudio SAM Cast é compatível com a oferta de Streaming de Rádio da Infomaniak.
Link para esta FAQ: https://faq.infomaniak.com/1330
Esta seção de perguntas frequentes foi útil?
Este guia explica como remover um fluxo de áudio do seu Streaming de Rádio, sem eliminar o produto por completo.
Remover uma rádio
Para aceder ao serviço de Streaming e remover um dos fluxos:
- Clique aqui para aceder à gestão do seu produto no Manager Infomaniak (precisa de ajuda?).
- Clique diretamente no nome atribuído ao produto em questão:
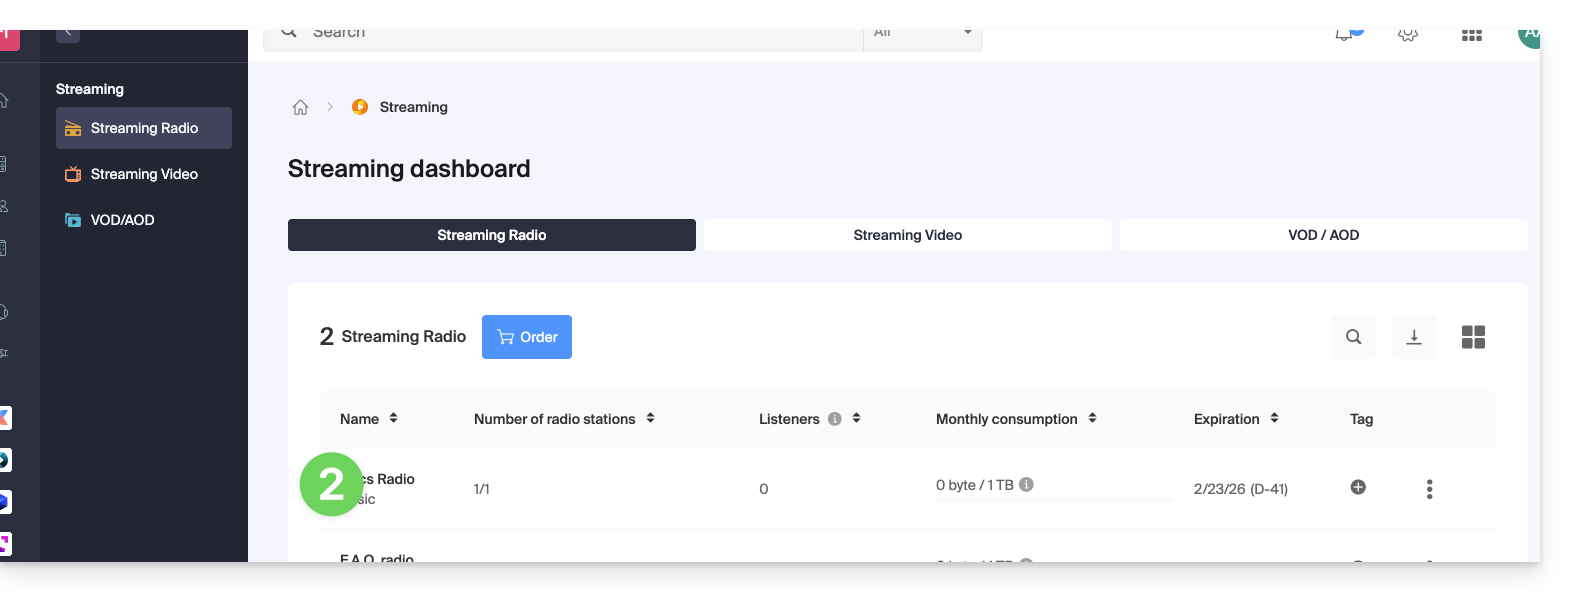
- Clique no nome da rádio em questão:
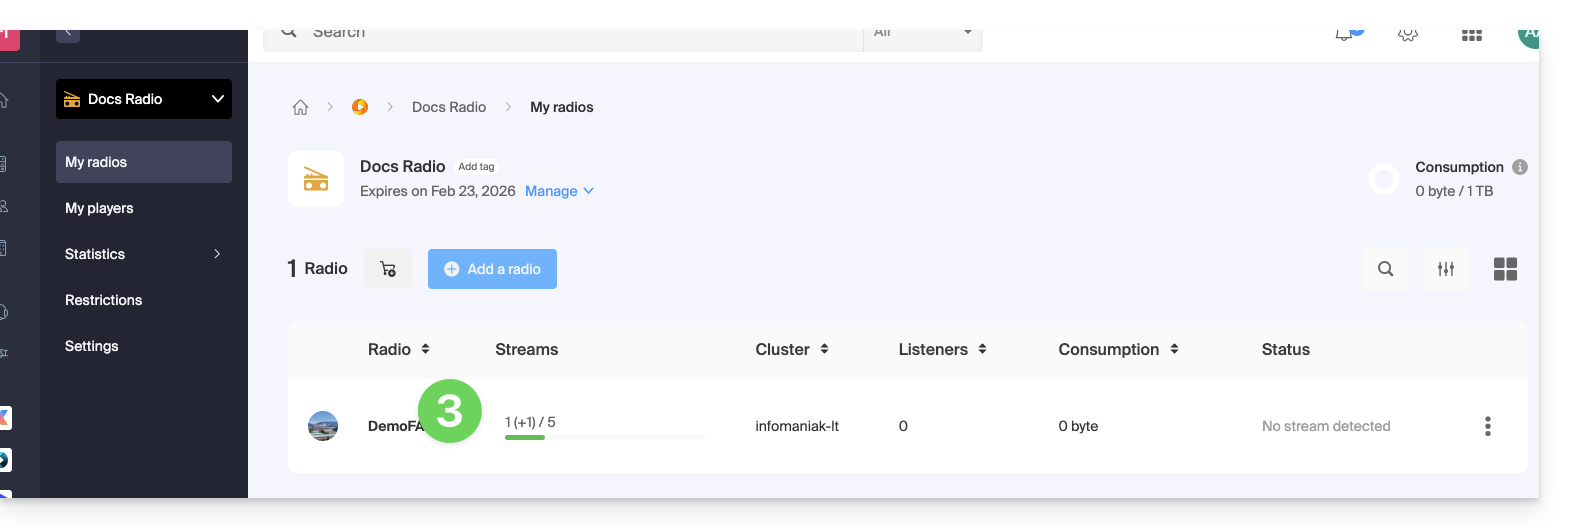
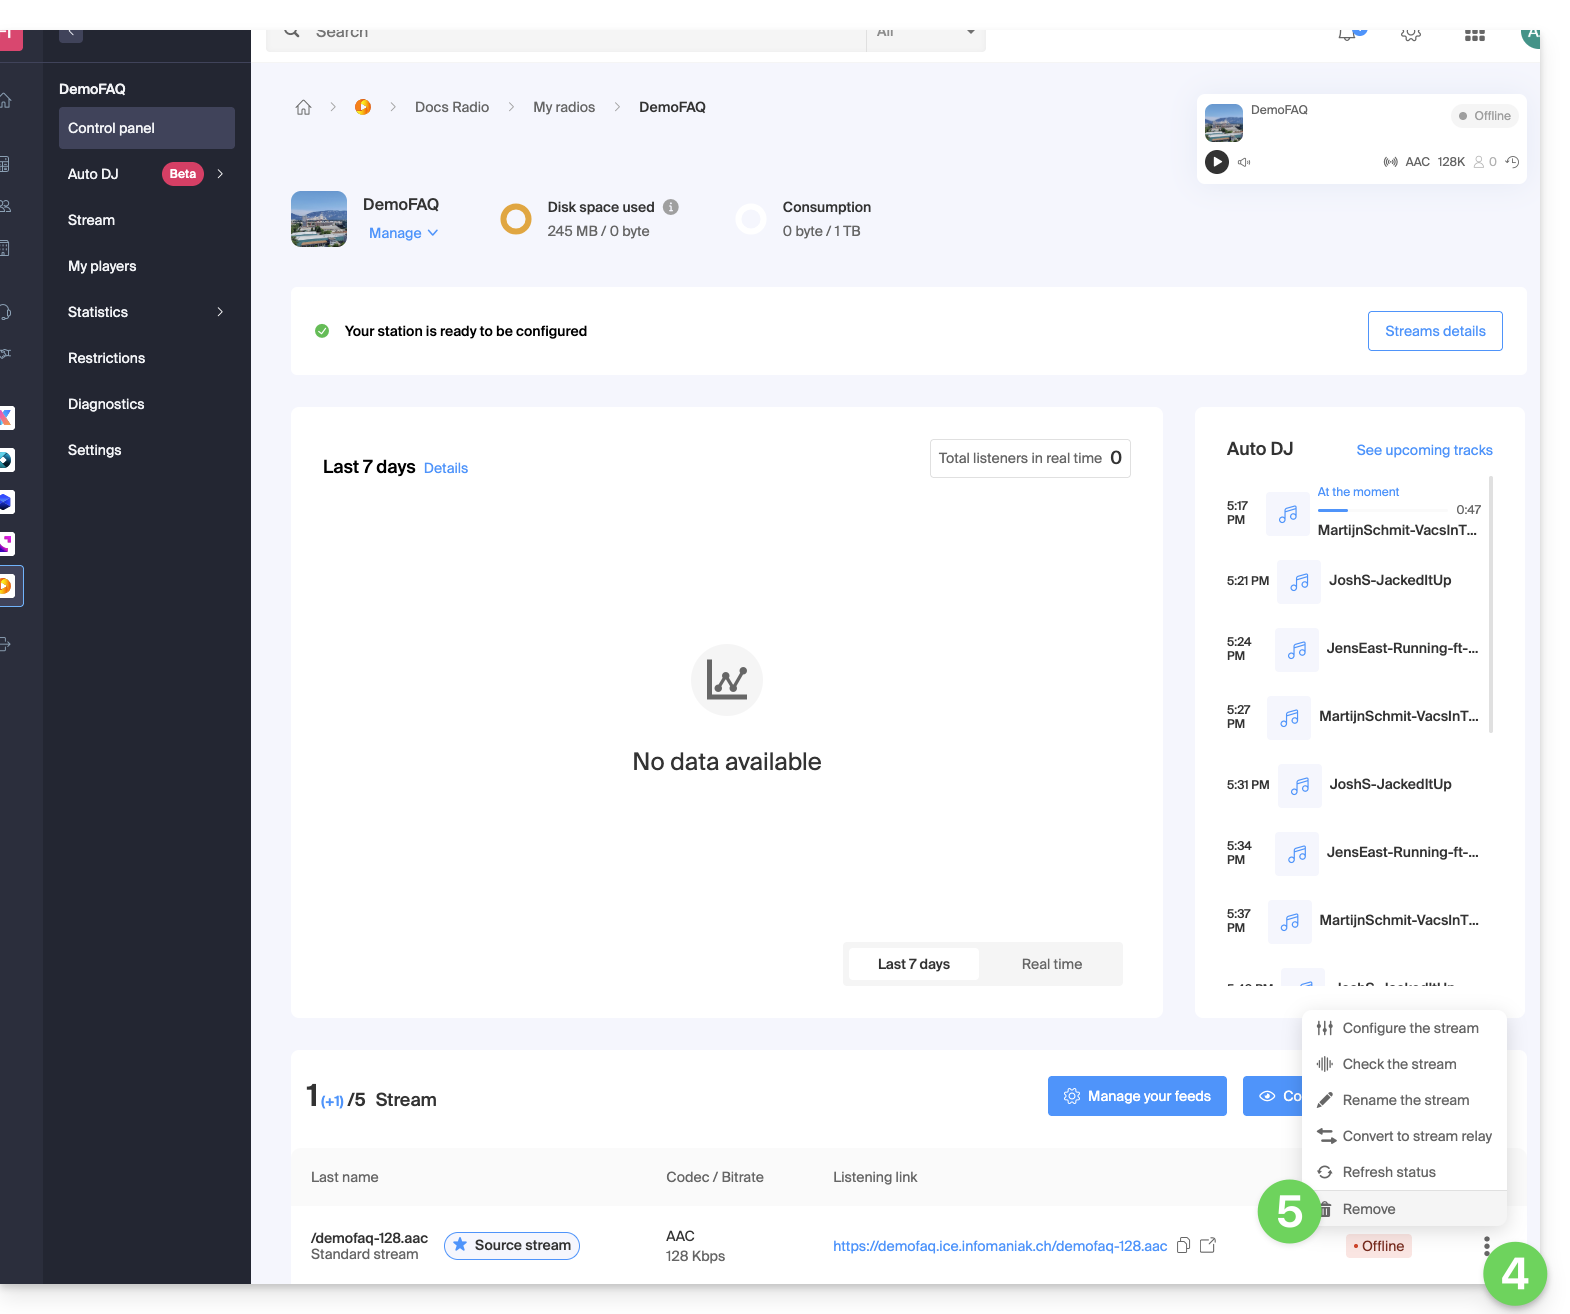
- Clique no menu de ação ⋮ localizado à direita do elemento em questão.
- Clique em Eliminar:
- Introduza o nome da rádio para confirmar a eliminação.
Link para esta FAQ: https://faq.infomaniak.com/1343
Esta seção de perguntas frequentes foi útil?
Este guia explica como obter e configurar notificações quando o(s) fluxo(s) de Rádio Online sofrer(em) uma interrupção (curta e/ou longa).
Introdução
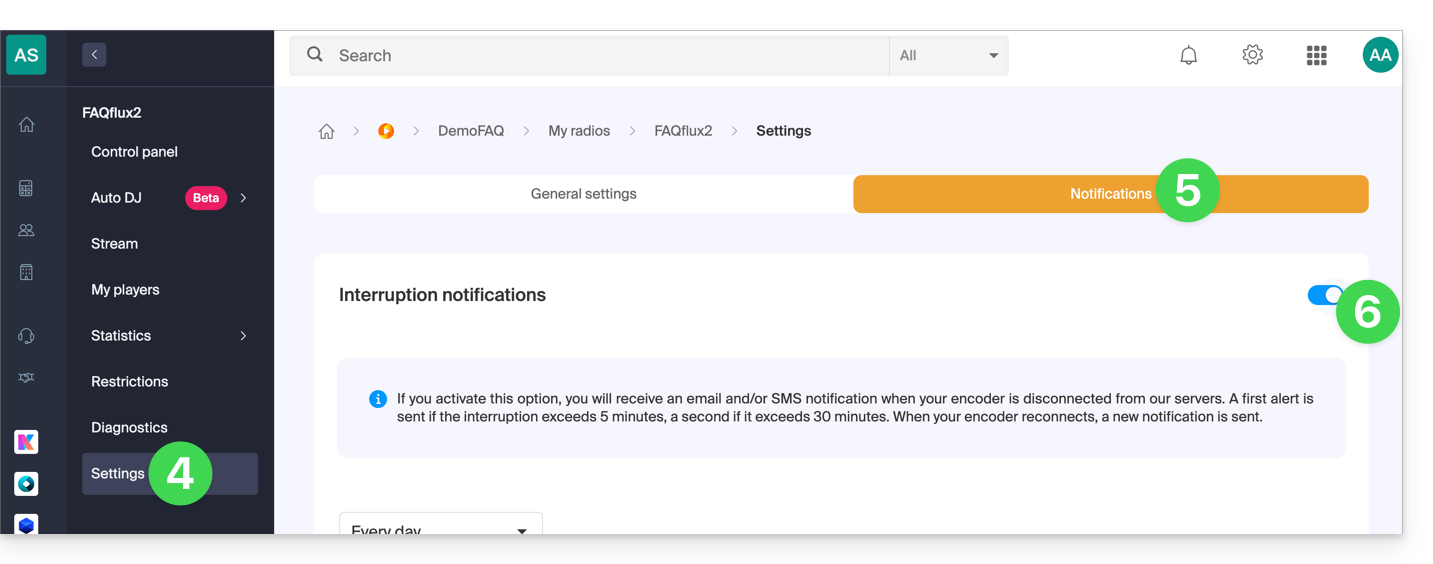
- A cada minuto, um script verifica as interrupções e envia um e-mail e cria um evento somente se a interrupção durar pelo menos 5 minutos.
- Ele reenvia um e-mail se a interrupção durar mais de 30 minutos.
- Se o serviço for restabelecido e um alerta tiver sido enviado, um e-mail de confirmação de restabelecimento será enviado.
- Todas as interrupções são registradas e armazenadas por 30 dias, mas você não será notificado em caso de interrupções menores.
- Para saber mais sobre as possíveis causas dessas interrupções, consulte este outro guia.
- Todas as interrupções são registadas pelo sistema e podem ser visualizadas nos registos de eventos do painel de controlo.
Aviso por e-mail
Para configurar as notificações:
- Clique aqui para acessar o gerenciamento do seu produto no painel de controle Infomaniak (precisa de ajuda?).
- Clique diretamente no nome atribuído ao produto em questão:
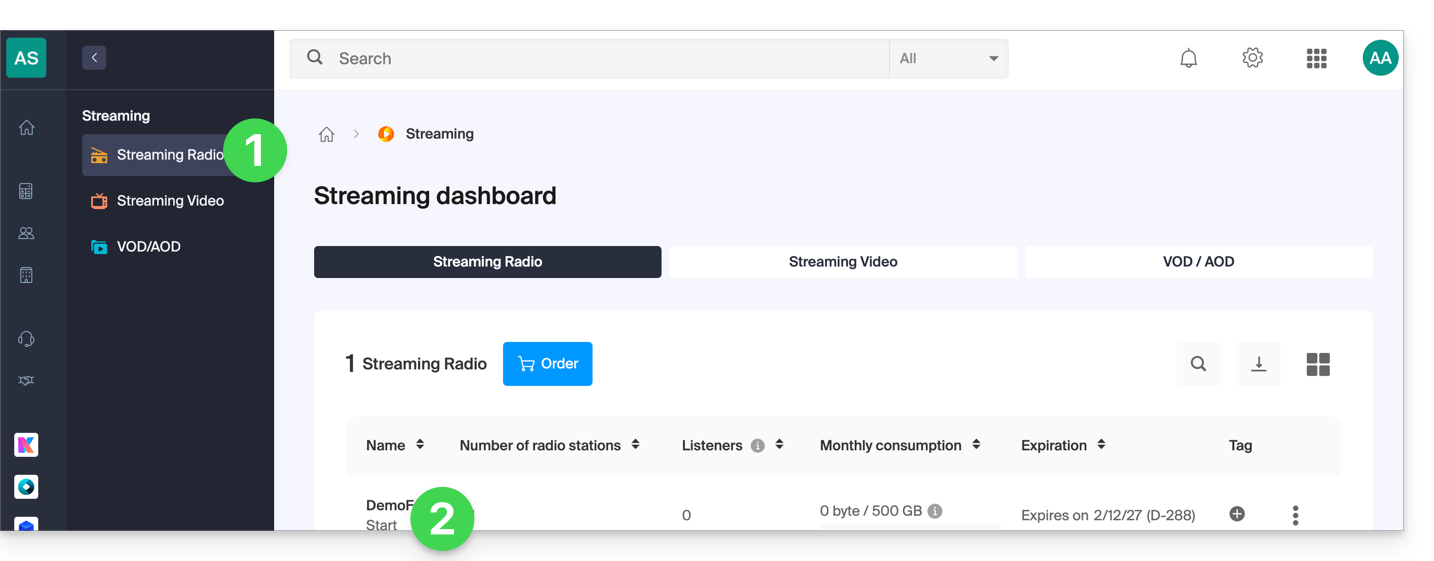
- Clique no nome do fluxo de áudio em questão:
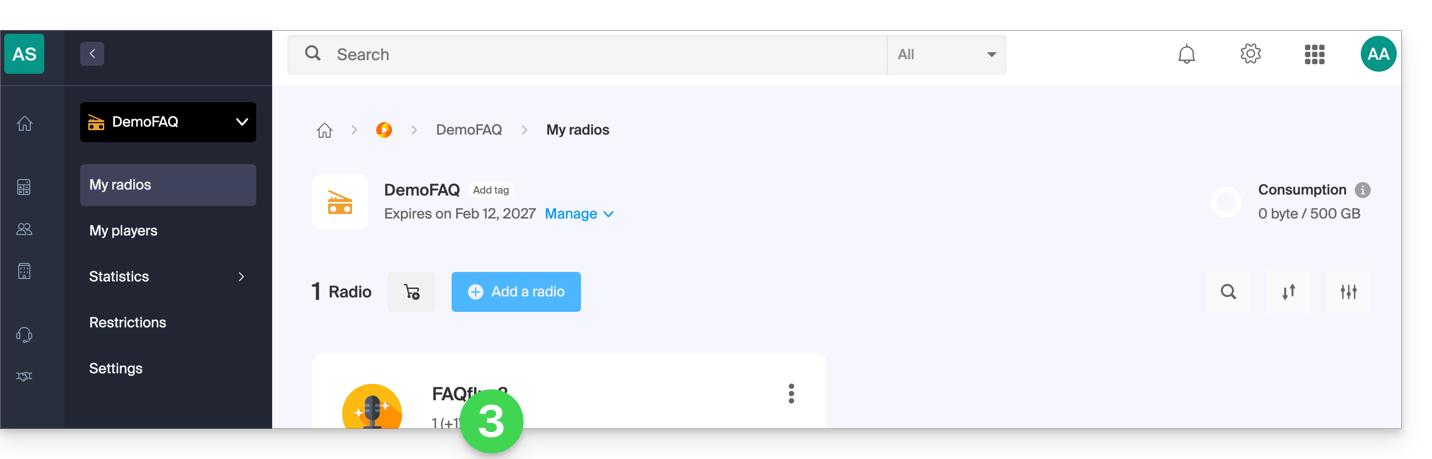
- Clique em Configurações no menu lateral esquerdo.
- Clique na aba Notificações.
- Ative as notificações com o botão de alternância:
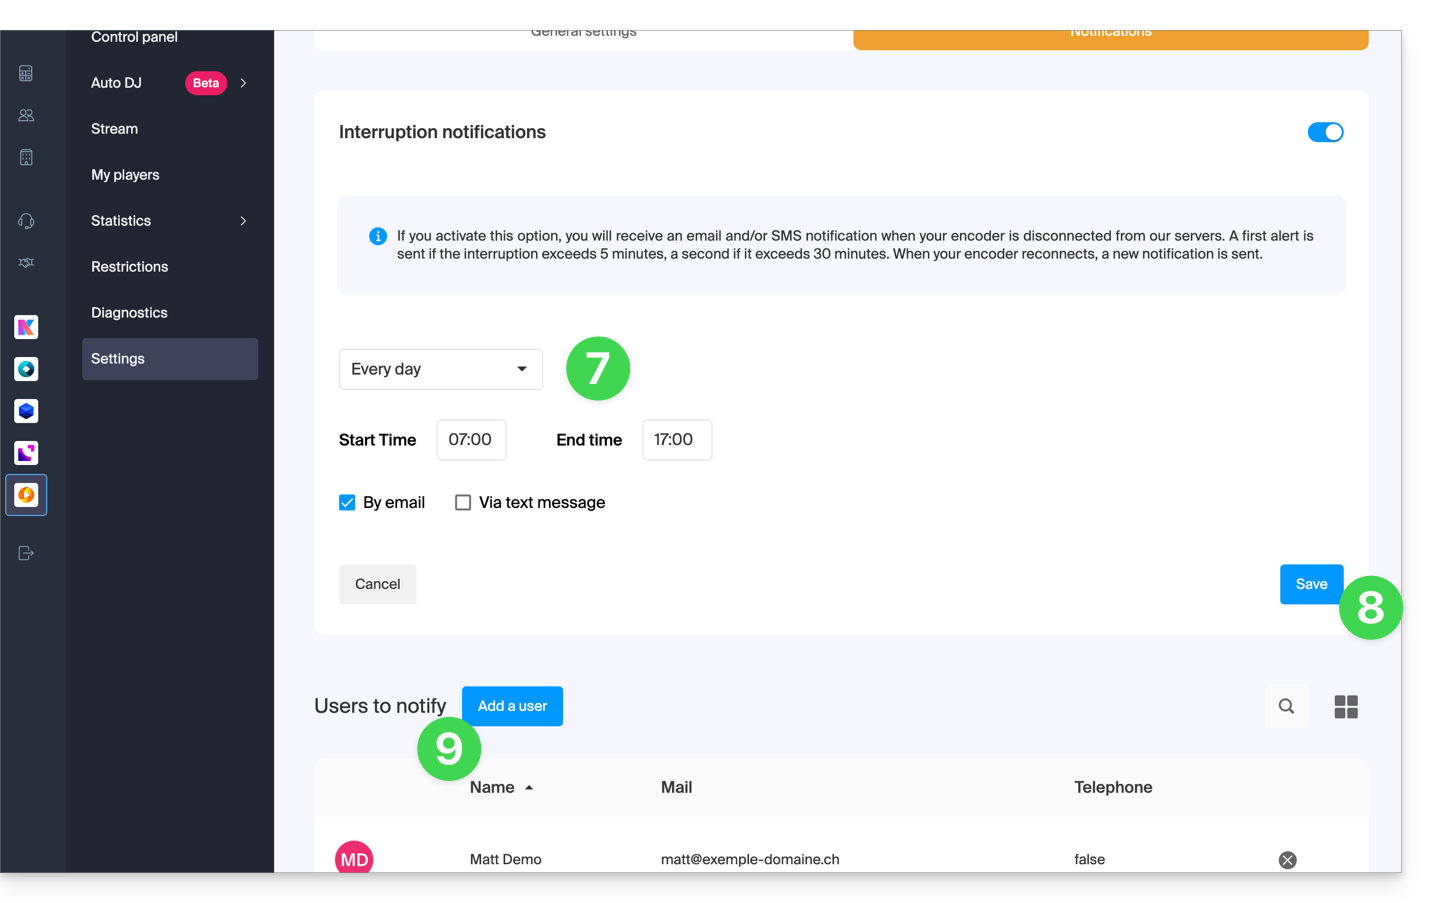
- Configure os horários de monitorização (dias da semana / horas).
- Guarde as suas alterações.
- Adicione os utilizadores da Organização que devem ser notificados por e-mail ou por SMS (de acordo com as configurações acima):
Link para esta FAQ: https://faq.infomaniak.com/1345
Esta seção de perguntas frequentes foi útil?
Este guia explica como transmitir os metadados para o fluxo de rádio enviado a partir do seu codificador de Streaming de rádio.
Utilizar a URL disponível
Basta fazer uma requisição GET para uma URL do tipo:
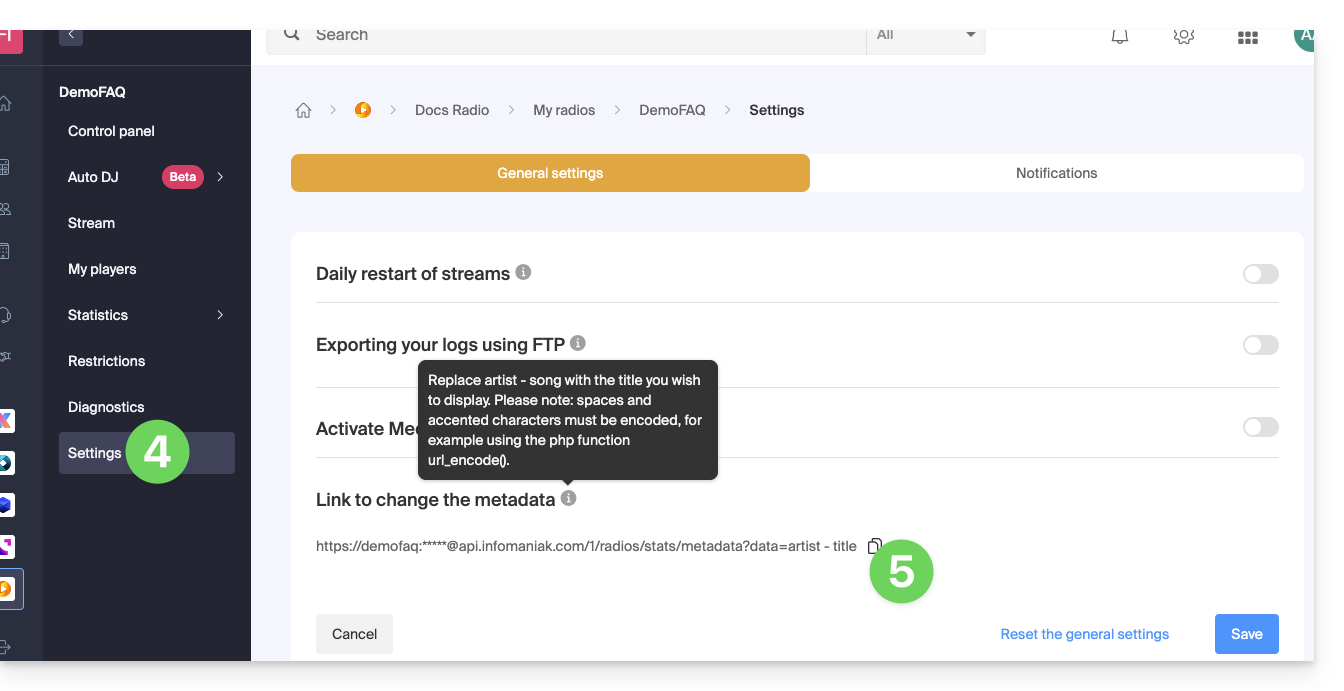
https://[flux]:[password]@api.infomaniak.com/1/radios/stats/metadata?data=artist - título
O URL completo está disponível na interface de administração:
- Clique aqui para acessar o gerenciamento do seu produto no Manager Infomaniak (precisa de ajuda?).
- Clique diretamente no nome atribuído ao produto em questão.
- Clique no nome do fluxo de áudio em questão.
- Clique em Configurações no menu lateral esquerdo.
- Clique no botão para copiar o link dos metadados:
Saiba mais
Para os desenvolvedores que criarem um reprodutor, existem bibliotecas que podem procurar as informações transmitidas e exibi-las, pois os dados são transmitidos no fluxo de dados. A outra possibilidade é recuperar as informações do fluxo no próprio servidor.
Link para esta FAQ: https://faq.infomaniak.com/1357
Esta seção de perguntas frequentes foi útil?
Este guia permite que você utilize rapidamente as funções essenciais do Streaming de Rádio Infomaniak (ou transmissão de áudio, streaming de áudio ao vivo… diferentes designações utilizadas para descrever a mesma tecnologia: o envio de conteúdo em «direto» ou com um pequeno atraso, permitindo a reprodução à medida que é transmitido).
Configurar os fluxos de rádio
- Adicionar um fluxo de rádio
- Adicionar um retransmissor de fluxo de áudio
- Adicionar um fluxo de áudio de reserva
- Configurar um codificador (exemplo com a aplicação Butt)
- Criar um reprodutor de áudio para transmitir o fluxo
- Excluir um fluxo
Para saber mais…
- Usar o Auto DJ
- Proteger um fluxo MP3/AAC ou HLS com uma chave única
- Proteger um fluxo de áudio por restrição GeoIP
- Consultar as estatísticas de reprodução
- Exportar os registos do Streaming de Rádio por FTP
- Exportar os logs para ACPM (França)
- Exportar os logs para Mediapulse (Suíça)
- Resolver um problema de transmissão
- Transferir o produto completo | Transferir fluxos
Tem alguma dúvida ou sugestão?
- Em caso de problema, consulte a base de conhecimento antes de entrar em contato com o suporte.
- Clique aqui para partilhar uma opinião ou sugestão sobre um produto Infomaniak.
Link para esta FAQ: https://faq.infomaniak.com/1373
Esta seção de perguntas frequentes foi útil?
Este guia aborda as estatísticas de audiência do Streaming Radio, que permitem consultar todas as informações sobre os ouvintes e os diferentes públicos dos seus fluxos de rádio.
Introdução
- Consulte este outro guia se desejar processar os logs brutos por conta própria.
Aceder às estatísticas de reprodução
Para aceder a estas informações:
- Clique aqui para aceder à gestão do seu produto no Manager Infomaniak (precisa de ajuda?).
- Clique diretamente no nome atribuído ao produto em questão.
- Clique em Estatísticas no menu lateral esquerdo:
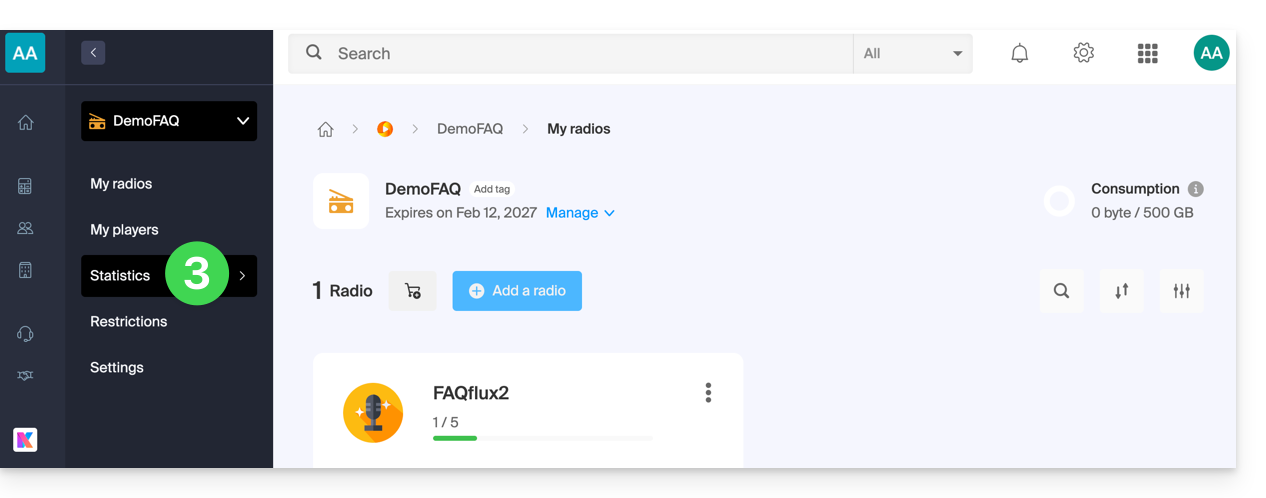
- Clique em os diferentes menus no menu lateral esquerdo:
Visão geral

Público em tempo real
- Consulte este outro guia sobre o assunto.
Ouvintes

Tempo de audição

Consumo

Geolocalização

- A exportação para o formato
.csvé possível:
- A exportação para o formato
Reprodutores

Link para esta FAQ: https://faq.infomaniak.com/1408
Esta seção de perguntas frequentes foi útil?
Este guia explica como especificar um fluxo de áudio de reserva no Streaming de rádio Infomaniak.
Assim, se o seu fluxo principal ficar indisponível, o fluxo de reserva assumirá automaticamente a transmissão.
Criar um fluxo de reserva
Para aceder ao serviço de Streaming de rádio:
- Clique aqui para aceder à gestão do seu produto no Manager Infomaniak (precisa de ajuda?).
- Clique diretamente no nome atribuído ao produto em questão:
- Clique no nome da rádio em questão:
- Clique no botão para gerir os seus fluxos:
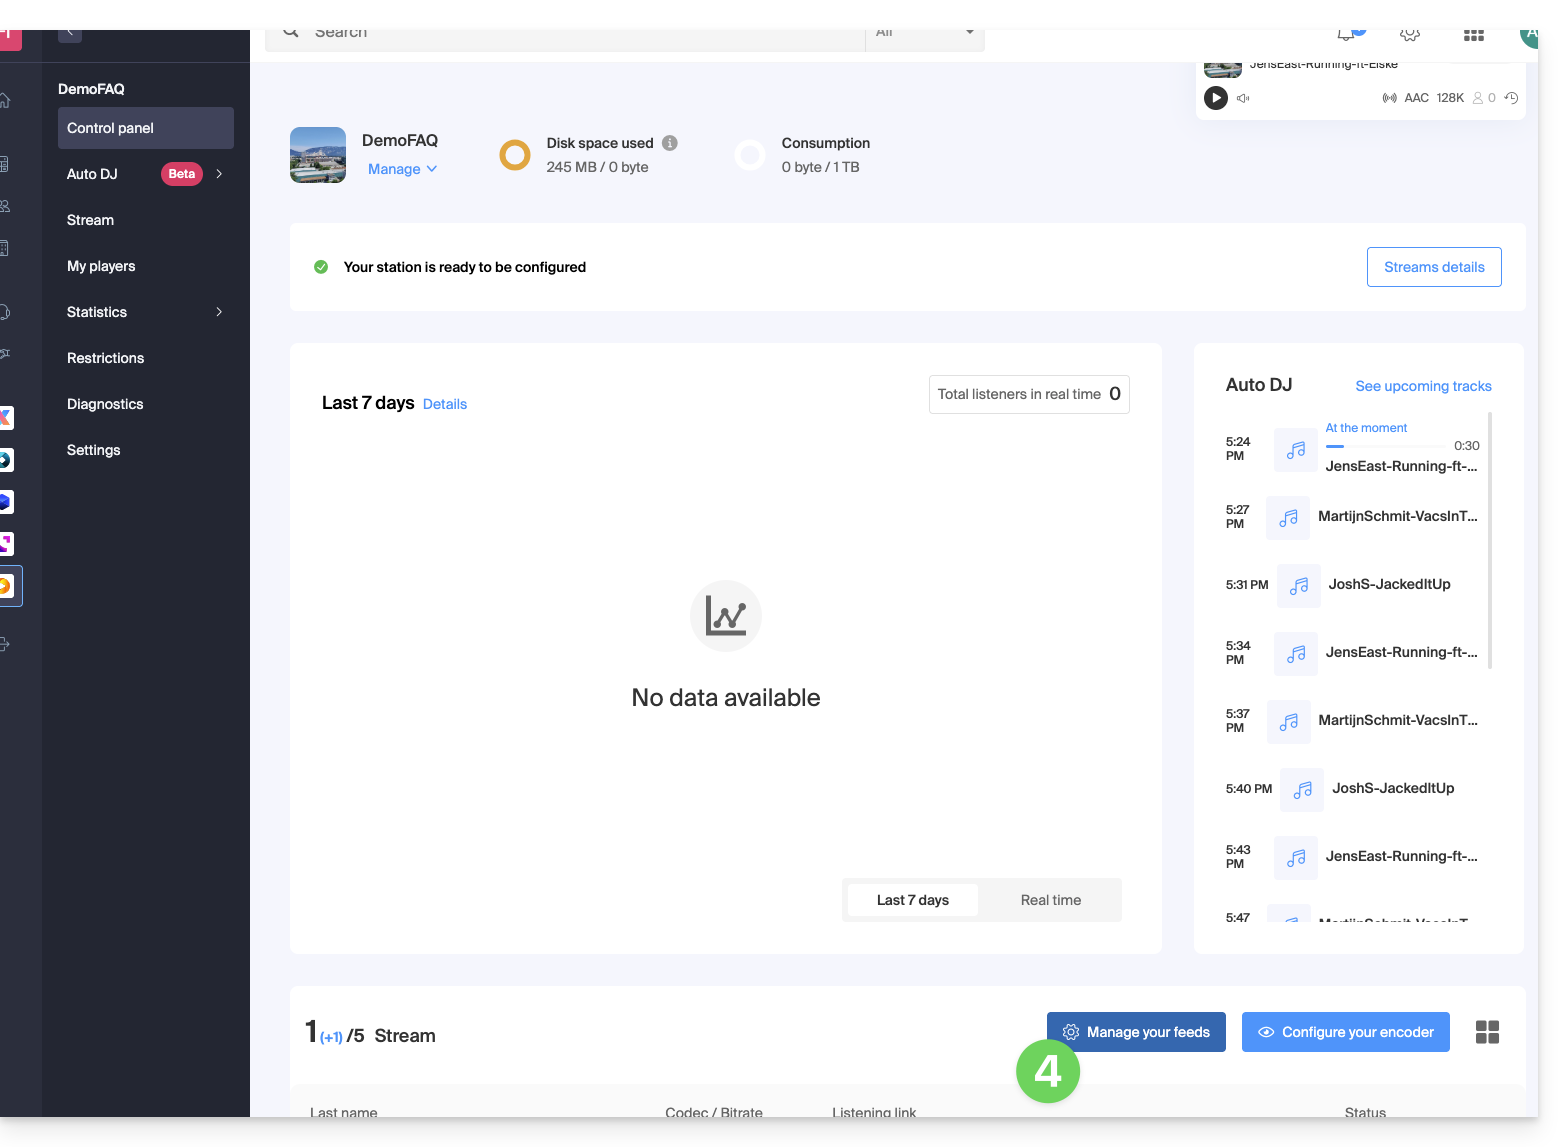
- Faça uma das seguintes opções:
- Adicionar um fluxo para criar um novo fluxo e associar-lhe um fluxo de reserva,
- Configurar um fluxo existente para ativar a opção:
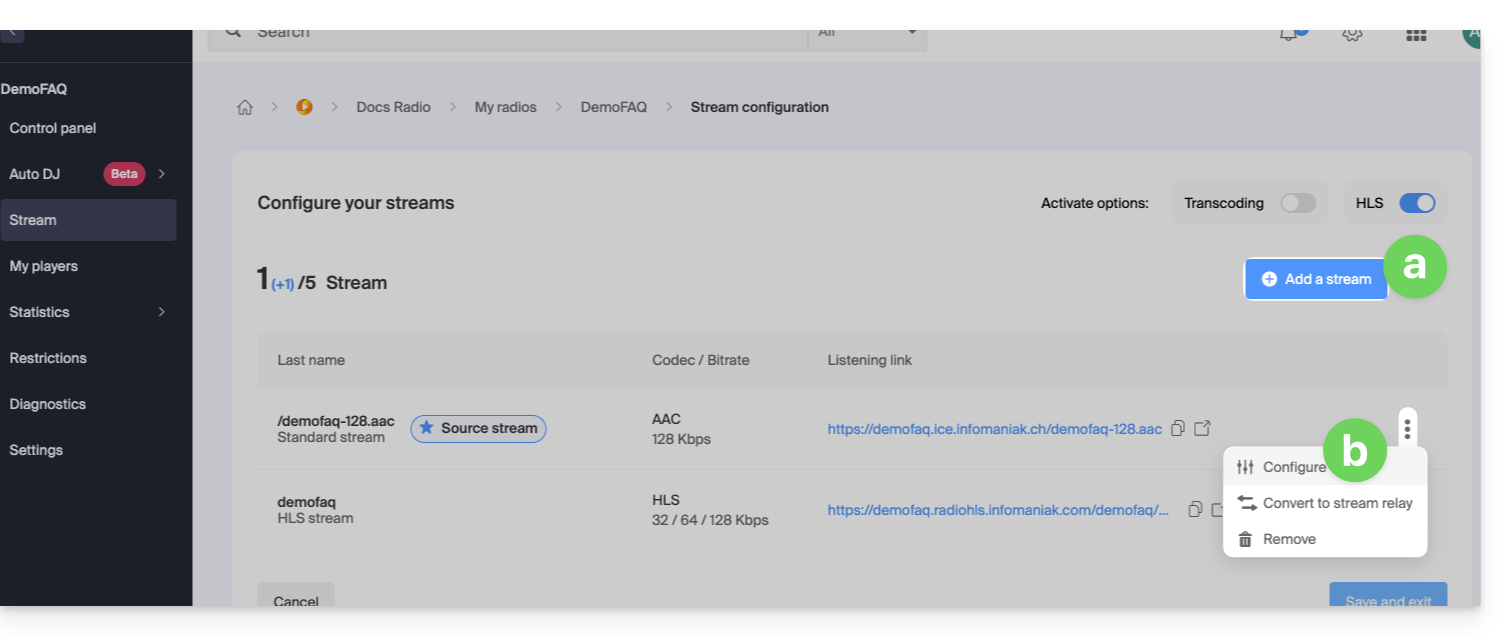
- Clique no botão de alternância (toggle switch) para ativar o fluxo de reserva no seu fluxo:
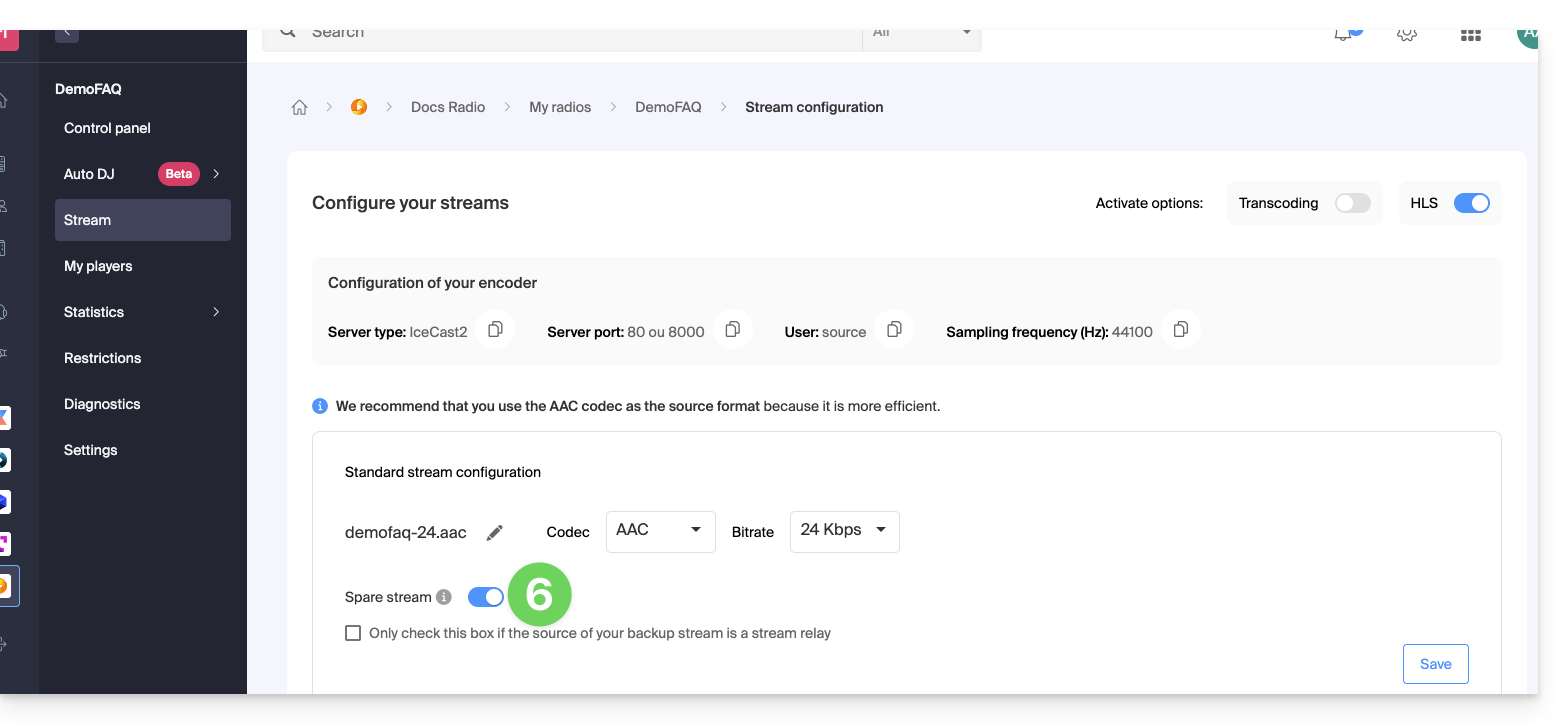
- Copie as informações disponíveis para configurar o seu codificador de reserva.
- Registe a ativação do fluxo de reserva no canto inferior direito da página.
- No mesmo local, pode definir o fluxo de reserva como um relé de fluxo, para inserir manualmente os parâmetros correspondentes ao fluxo de áudio de reserva:
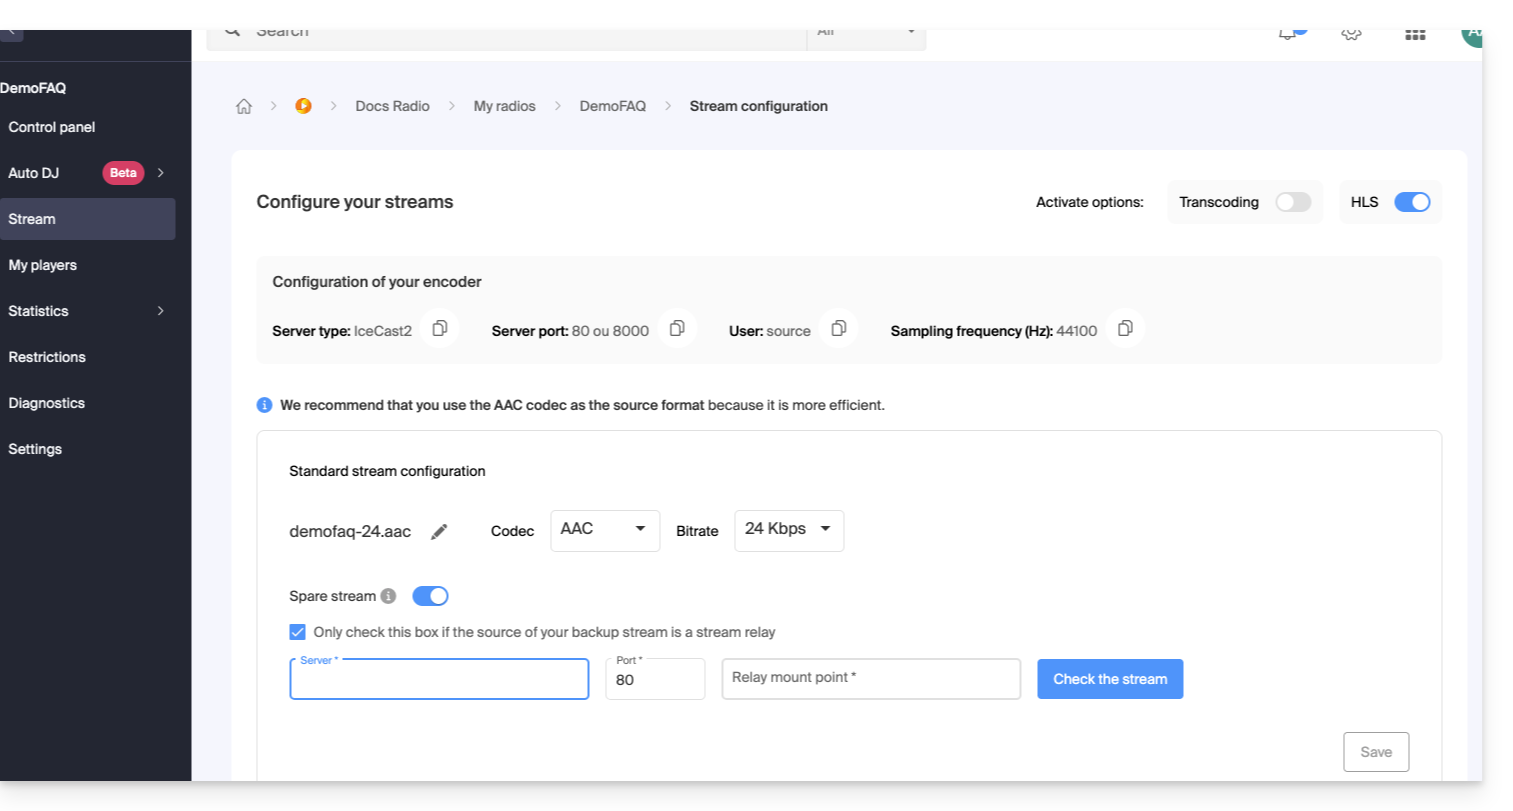
- No mesmo local, pode definir o fluxo de reserva como um relé de fluxo, para inserir manualmente os parâmetros correspondentes ao fluxo de áudio de reserva:
Registe as novas informações no canto inferior direito da página.
Link para esta FAQ: https://faq.infomaniak.com/1456
Esta seção de perguntas frequentes foi útil?
Este guia explica como vincular um fluxo adicionado no seu Streaming Radio Infomaniak à sua instalação, que irá transmitir o conteúdo desejado.
Introdução
- De modo geral, a Infomaniak é compatível com todos os softwares indicados aqui: https://www.icecast.org/apps/, mas nem todos permitem a transmissão AAC, por exemplo.
- Um exemplo de configuração é fornecido abaixo para a aplicação gratuita e multiplataforma Butt.
- Consulte as informações sobre o Edcast (versão autônoma) / SpacialAudio SAM Cast… Também existe (sem guia) StreamDiffusion / MB Recaster…
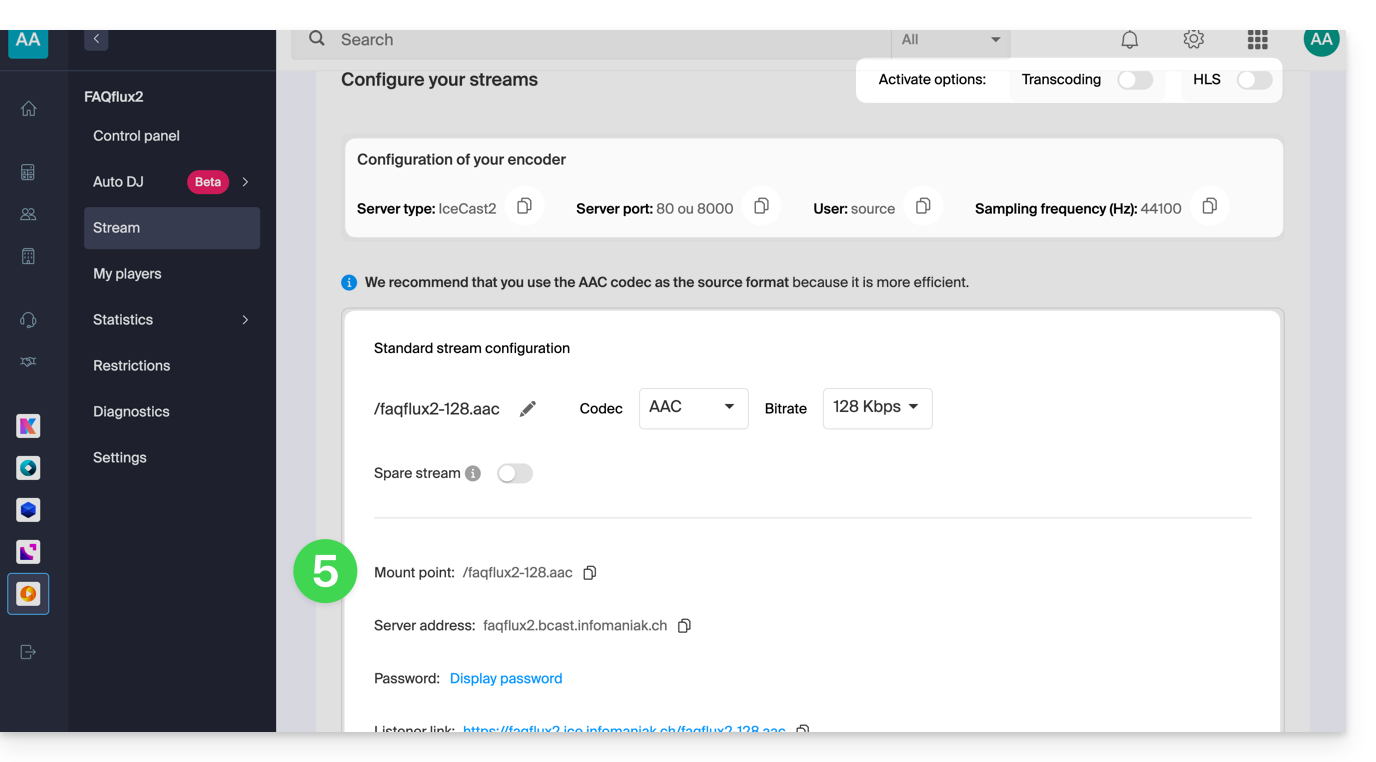
Obter as informações de login
Para encontrar as informações necessárias para configurar o seu codificador:
- Clique aqui para aceder à gestão do seu produto no Manager Infomaniak (precisa de ajuda?).
- Clique diretamente no nome atribuído ao produto em questão:
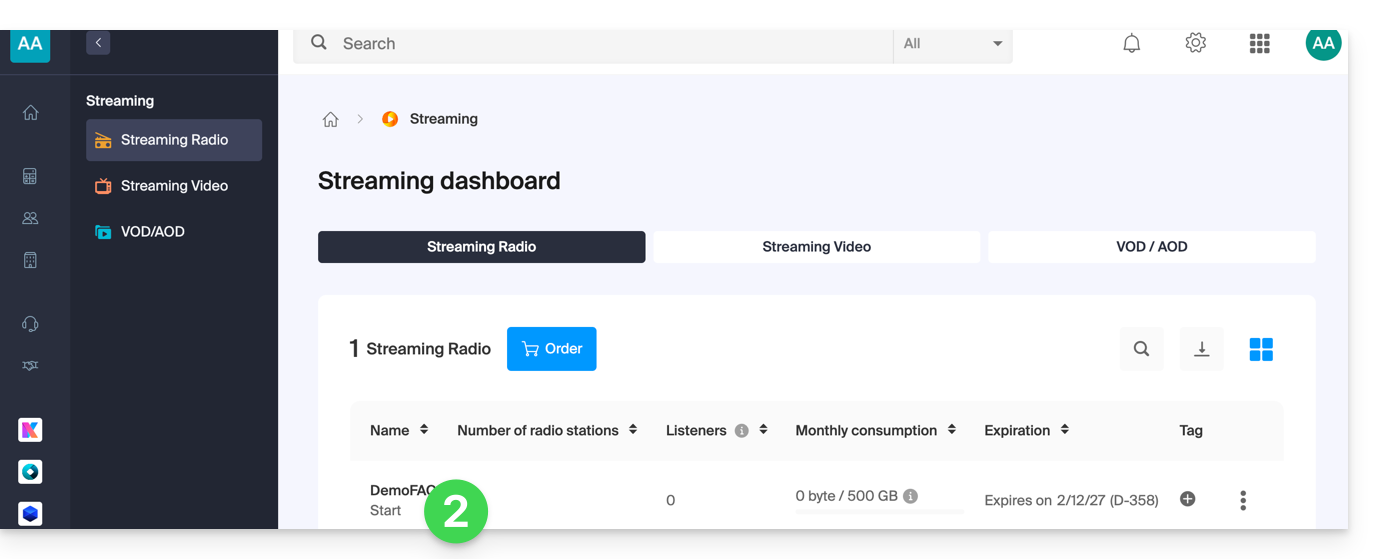
- Clique no nome da rádio em questão:
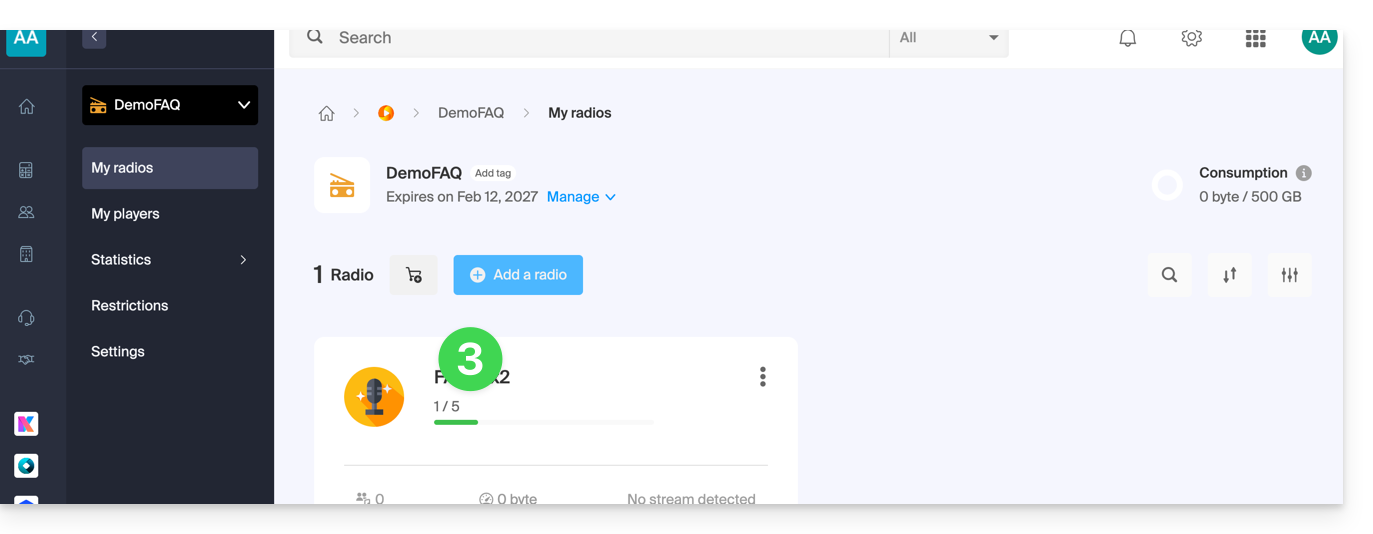
- Clique no nome do fluxo de áudio em questão para ver os detalhes:
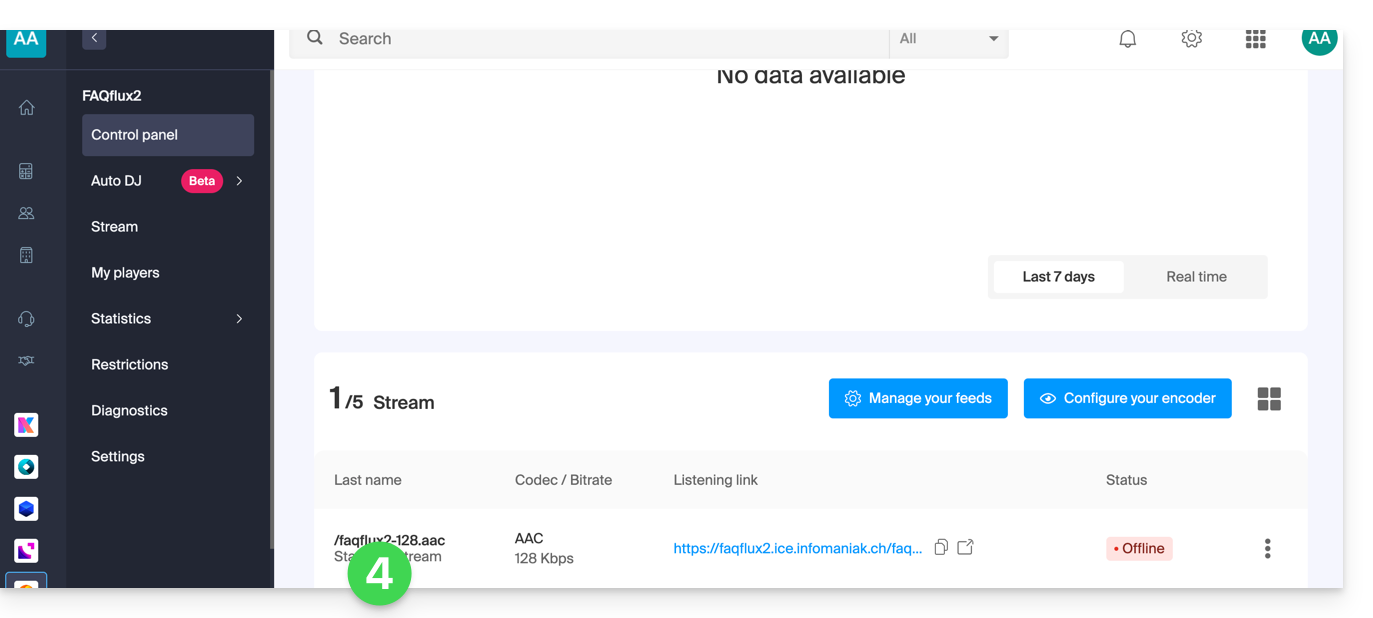
- As informações úteis são exibidas na página:
Exemplo de configuração de codificador
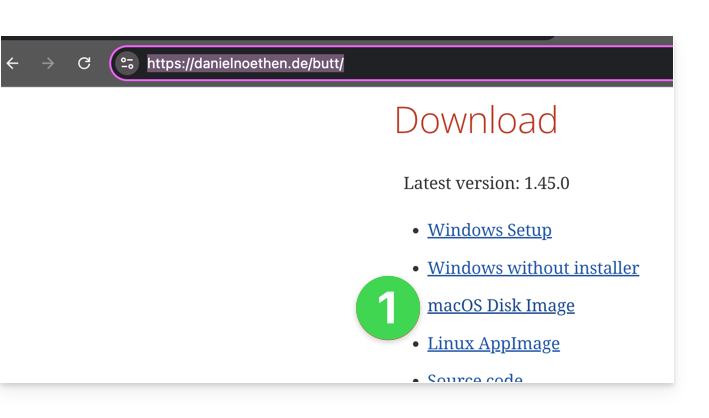
Você deseja transmitir conteúdo de áudio a partir de um computador. Conforme especificado na introdução acima, existem várias soluções de software. Exemplo com a ferramenta Butt, disponível, entre outras, no macOS:
- Faça o download do Butt:
- Abra o aplicativo baixado no seu computador.
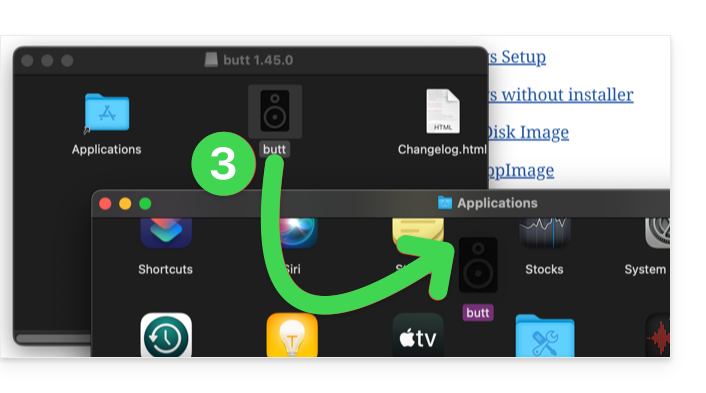
- Instale o aplicativo:
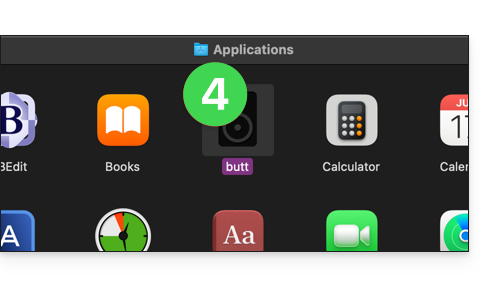
- Inicie o aplicativo para usá-lo:
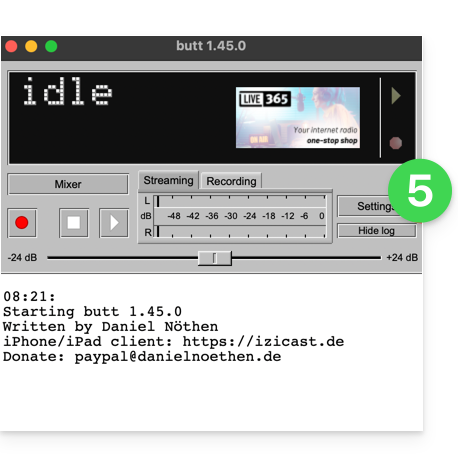
- Clique em Configurações:
- Clique em Adicionar servidor:
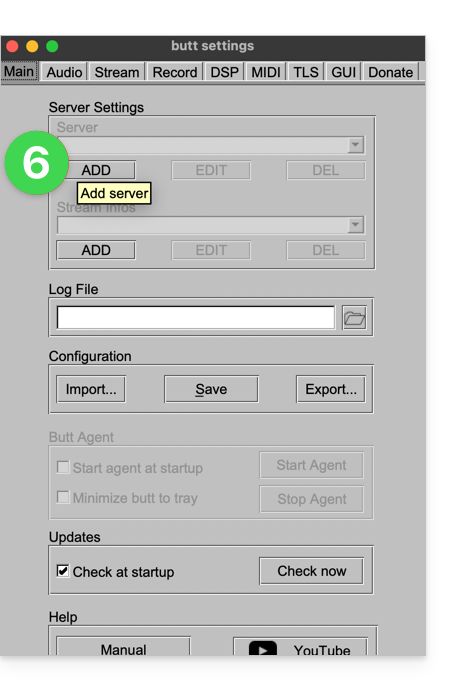
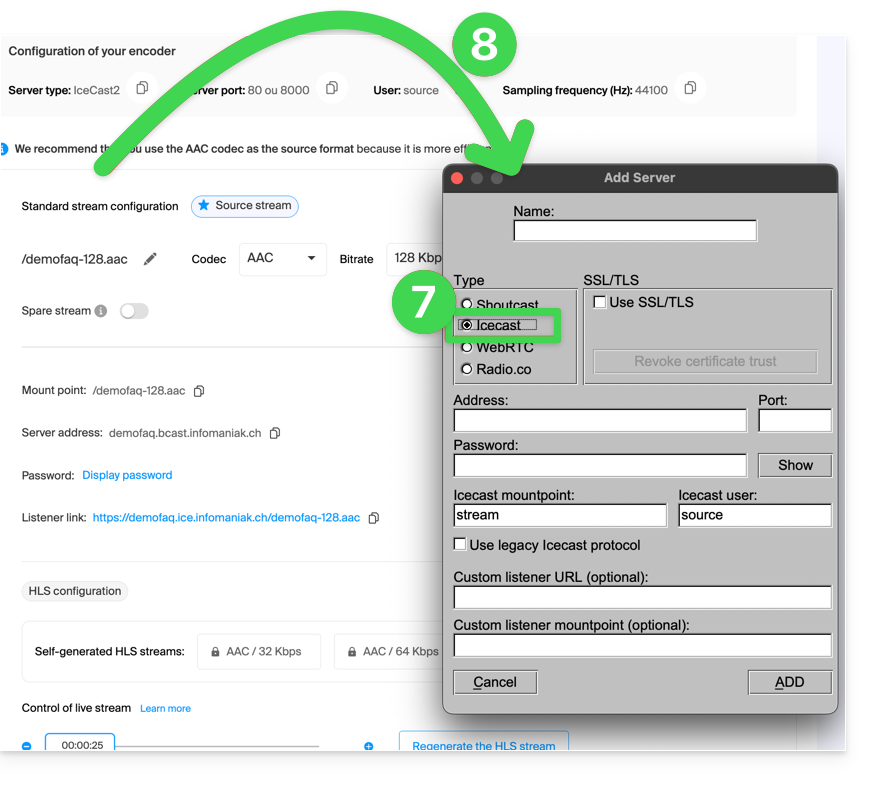
- Selecione o tipo Icecast.
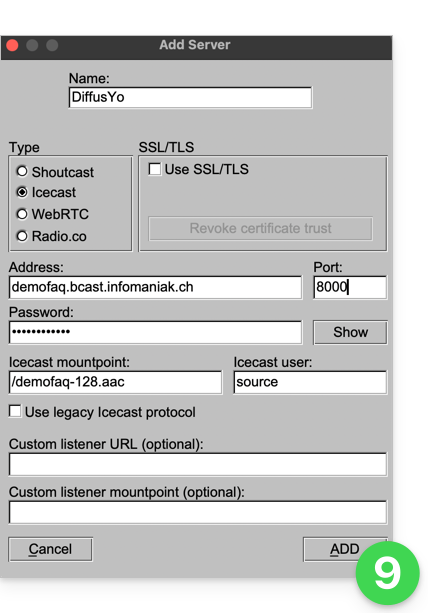
- Copie as informações do seu fluxo para o codificador (para a senha, você precisará primeiro inserir sua senha de login no Gerenciador e, em seguida, a senha do fluxo poderá ser copiada (e visualizada com o ícone de olho):
- Valide as suas configurações clicando em Adicionar no canto inferior direito:
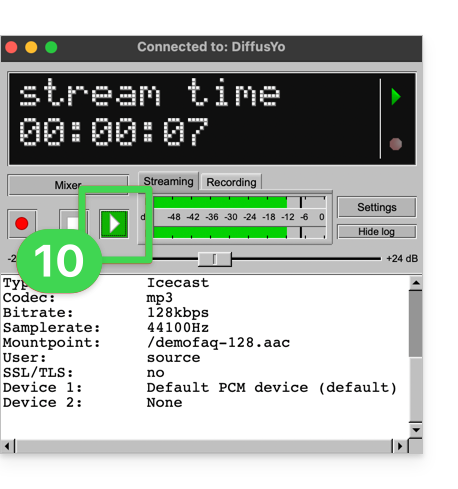
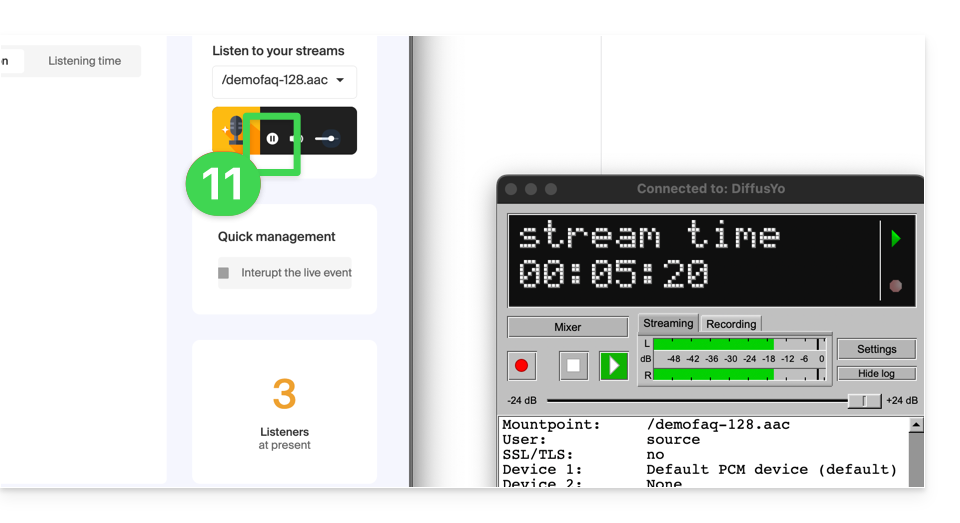
- Feche as configurações e clique no botão Reproduzir para iniciar a transmissão:
- Você pode ouvir a transmissão do seu fluxo diretamente do painel de controle Infomaniak, iniciando o reprodutor de demonstração:
Link para esta FAQ: https://faq.infomaniak.com/1466
Esta seção de perguntas frequentes foi útil?
Este guia explica como interpretar as estatísticas de audiência do serviço de rádio online da Infomaniak, compreender a distribuição do seu público (distinguir as audições reais do tráfego automatizado), os métodos de contagem de ouvintes e diagnosticar anomalias de conexão.
Introdução
- A análise detalhada de um pico de tráfego é realizada ao baixar os arquivos de conexão através dos registros FTP.
- Para bloquear um agregador não autorizado ou conexões indesejadas, você pode usar as restrições de IP / GeoIP.
Contagem de ouvintes, agregadores e detecção de robôs
Tipos de ouvintes e duração da audição
Um ouvinte é qualquer pessoa ou robô que inicia a reprodução do fluxo por pelo menos 1 segundo. Os ouvintes não únicos contabilizam a totalidade dessas sessões. Por outro lado, os ouvintes únicos são contabilizados por endereço IP distinto. Por exemplo, duas pessoas conectadas à mesma rede Wi-Fi, ouvindo o rádio em dispositivos separados, contam como um único ouvinte único, mas como dois ouvintes não únicos.
O filtro de audiência superior ou igual a 30 segundos mede as sessões que excedem essa duração. Esse valor qualifica os ouvintes reais que dedicam tempo para ouvir o conteúdo, permitindo excluir os simples testes de conexão ou as aberturas rápidas.
Impacto dos agregadores e comportamento dos robôs
Um aumento repentino no tráfego geralmente provém de um agregador de webrádio ou de robôs. Os agregadores permitem que sua rádio seja transmitida para seu público, compartilhando frequentemente o mesmo endereço IP, o que gera um volume de ouvintes não únicos muito superior ao número de ouvintes únicos. Por outro lado, os robôs quase nunca acessam a partir de endereços IP diferentes, raramente excedem 30 segundos de audição e modificam muito pouco seu agente de usuário (user-agent).
Análise de audiência e verificação nos logs FTP
Na página Estatísticas da audiência, pode isolar o tráfego legítimo ao exibir apenas os utilizadores únicos + audiência >= 30 segundos, o que elimina os picos artificiais. Para confirmar a presença de robôs, descarregue os seus logs de acesso por FTP: um endereço IP ou um user-agent ausentes nos logs antes do pico e que aparecem centenas ou milhares de vezes num dia indicam um comportamento automatizado. No entanto, verifique se estes endereços IP correspondem a plataformas conhecidas, como o site da rádio ou um agregador de renome, como o Radio Garden.
Interrupções na transmissão e discrepâncias entre as ferramentas de medição
Origem das interrupções e falhas
As falhas e os aumentos anormais de conexões podem ter origem em vários níveis da rede:
- A montante, uma interrupção pode resultar do sinal transmitido pelo rádio, de um problema no servidor de codificação ou de uma instabilidade na linha de Internet de transmissão.
- No centro da cadeia, podem ocorrer incidentes que afetam os servidores Icecast.
- A jusante, a causa reside frequentemente no lado do ouvinte, nomeadamente em caso de largura de banda insuficiente, saturação das linhas locais ou interrupção da sua ligação à Internet.
Em caso de instabilidade na transmissão, é muito útil consultar as estatísticas de audiência em tempo real. Observe que é impossível investigar incidentes ocorridos há várias semanas ou meses.
Diferenças na contagem entre as ferramentas de medição
Estas estatísticas de audiência são bastante específicas: o uso de três ferramentas de análise diferentes resultará sistematicamente em três resultados distintos. As diferenças observadas entre as suas estatísticas Infomaniak e as de organizações como a NetMetrix (WEMF) explicam-se por métodos de cálculo diferentes, sendo que a NetMetrix baseia as suas medições diretamente nos eventos do próprio reprodutor, o que redefine a noção de utilizador único.
Link para esta FAQ: https://faq.infomaniak.com/1486
Esta seção de perguntas frequentes foi útil?
Este guia explica como modificar uma oferta de Rádio Online, por exemplo, para aumentar o limite máximo de consumo mensal ou a qualidade da transmissão (taxa de bits máxima).
Modificar a oferta existente
Para modificar as suas rádios existentes:
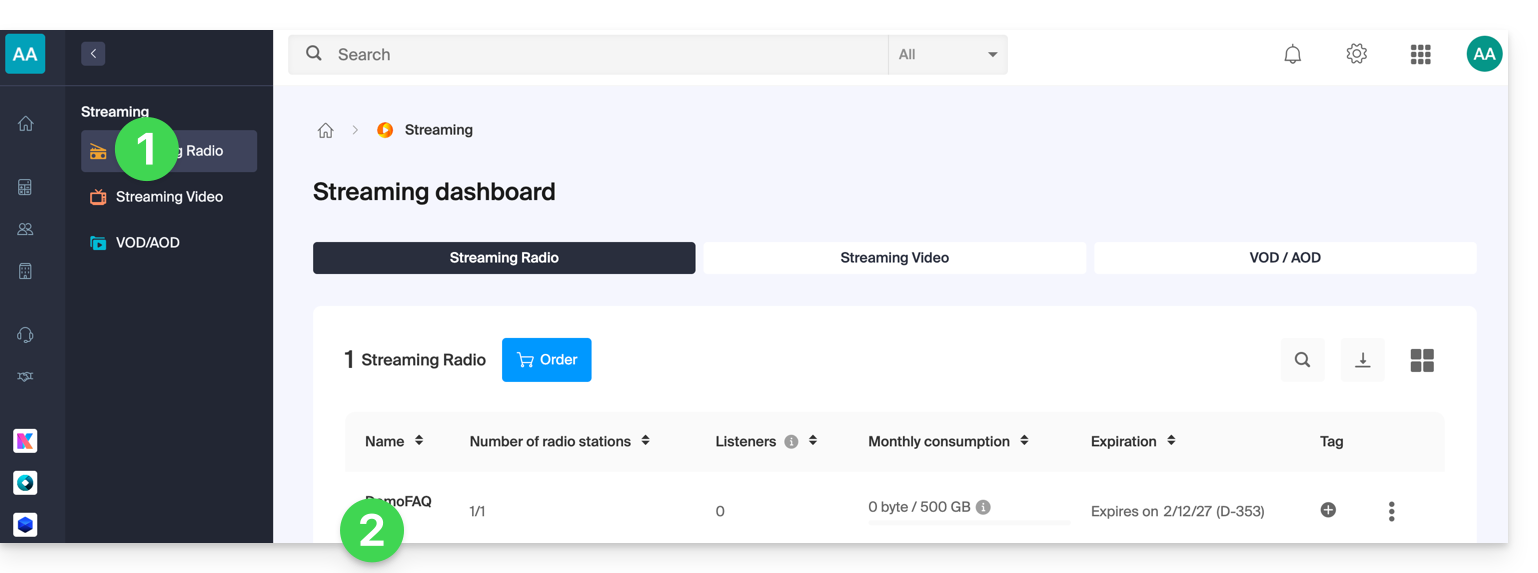
- Clique aqui para acessar o gerenciamento do seu produto no painel de controle Infomaniak (precisa de ajuda?).
- Clique diretamente no nome atribuído ao produto em questão:
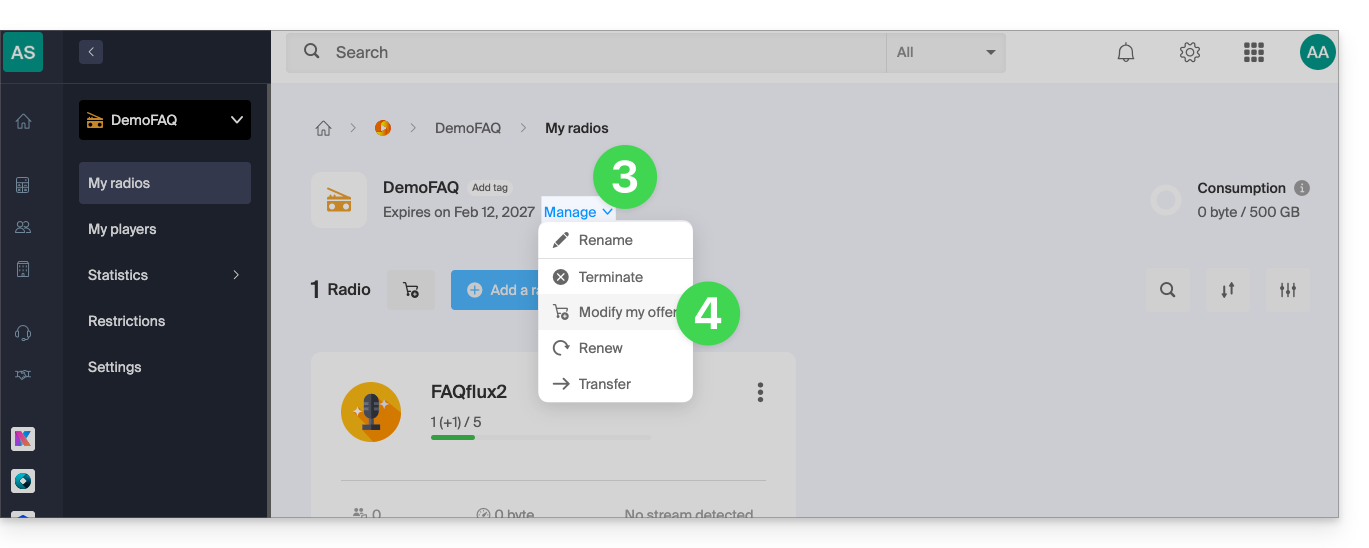
- Clique no ícone de seta para baixo para gerenciar o produto.
- Clique em Modificar a oferta no menu suspenso:
- Navegue pelas setas, se necessário, e escolha a nova oferta que melhor se adapta às suas necessidades:
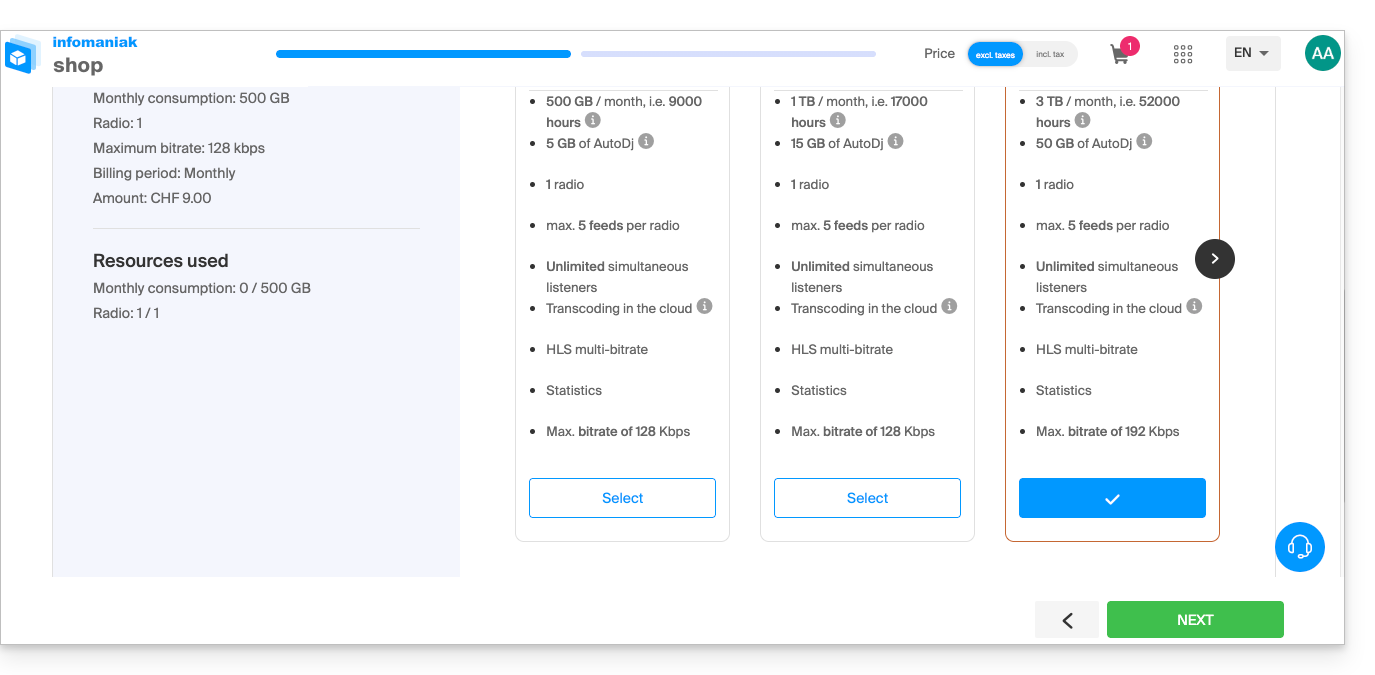
A alteração é efetuada após o pagamento, sendo calculado um valor proporcional ao tempo restante até à data de vencimento inicial.
Link para esta FAQ: https://faq.infomaniak.com/1566
Esta seção de perguntas frequentes foi útil?
Este guia explica como manter o controle sobre seus fluxos de Streaming de Rádio, ativando a proteção por IP ou geolocalização, para decidir, por exemplo, se um ouvinte específico pode ou não ouvir sua rádio.
Introdução
- Você pode proteger um fluxo MP3/AAC ou HLS independentemente (o mesmo vale para a proteção por token).
- A ativação da restrição implica uma alteração na configuração do fluxo, que pode levar alguns minutos para ser replicada nos servidores.
Proteger um fluxo de áudio por GeoIP
Para fazer isso, basta ir para as configurações de restrições e ativar a proteção no fluxo que você deseja proteger:
- Clique aqui para acessar o gerenciamento do seu produto no Manager Infomaniak (precisa de ajuda?).
- Clique diretamente no nome atribuído ao produto em questão:
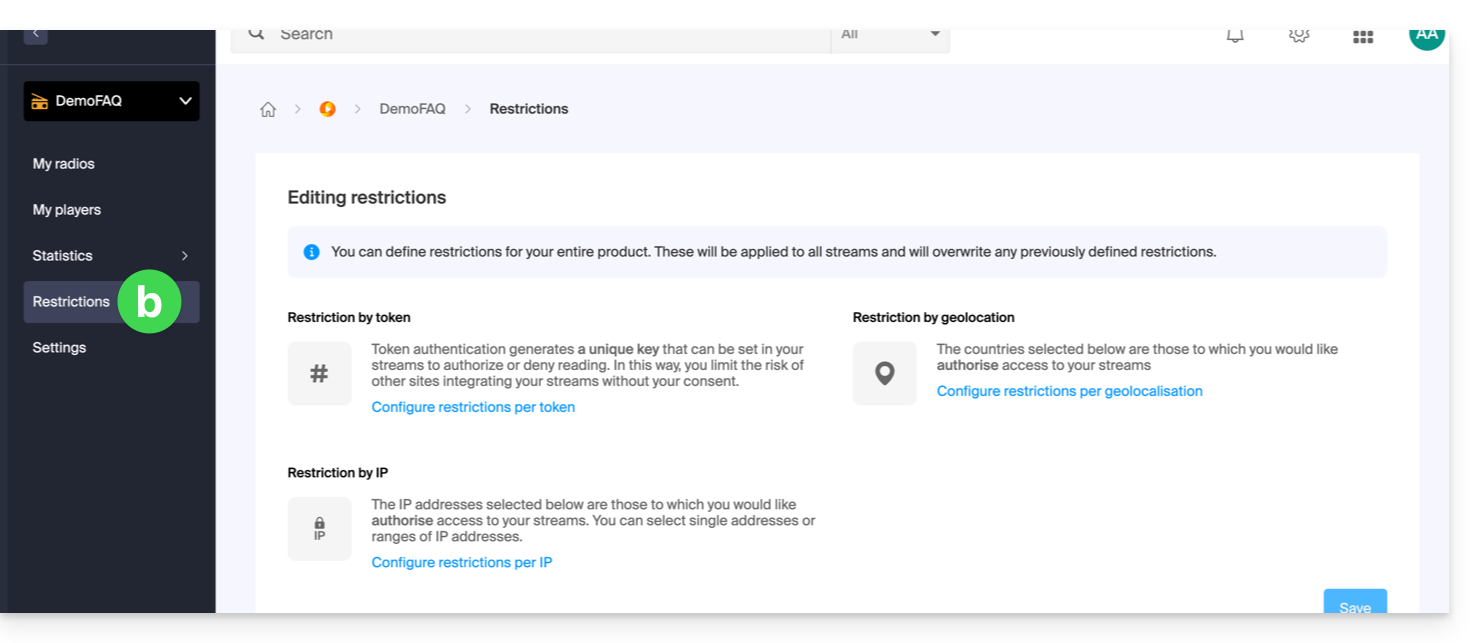
- Clique:
- no nome da rádio:
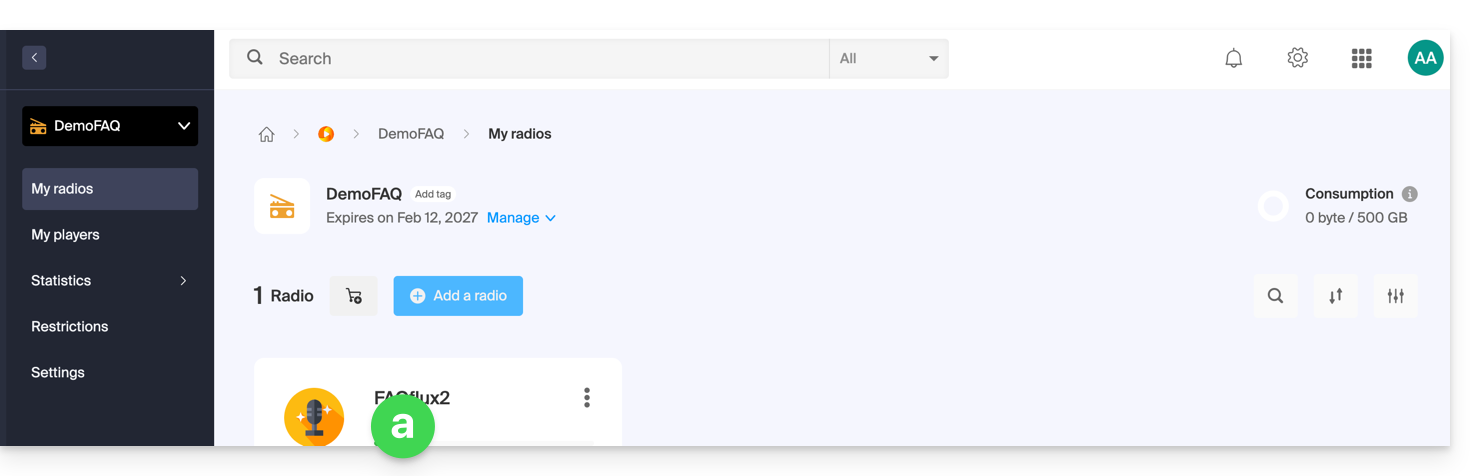
- ou em Restrições no menu lateral esquerdo para aplicar restrições a todo o produto:
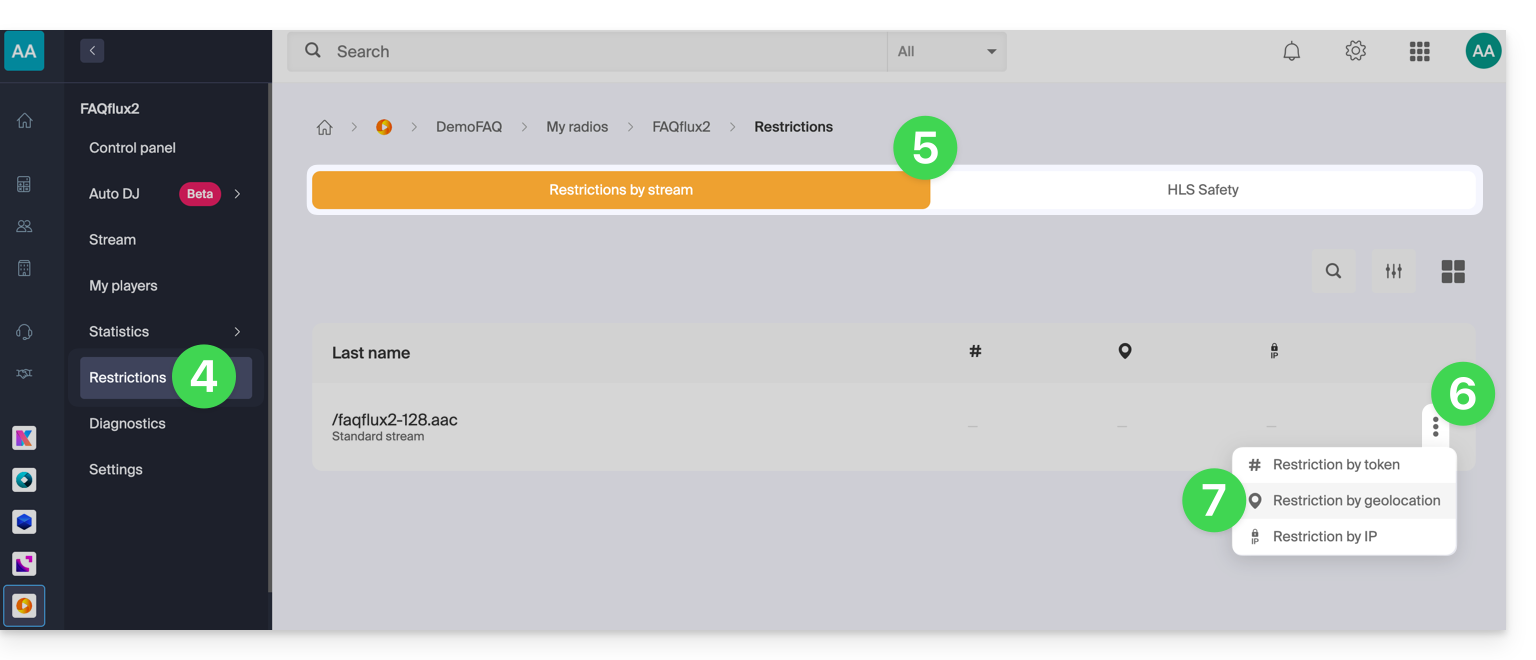
- no nome da rádio:
- Ao selecionar
aacima, clique em Restrições no menu lateral esquerdo. - Se necessário, escolha HLS.
- Clique no menu de ação ⋮ localizado à direita do item em questão.
- Clique em Restrição por geolocalização:
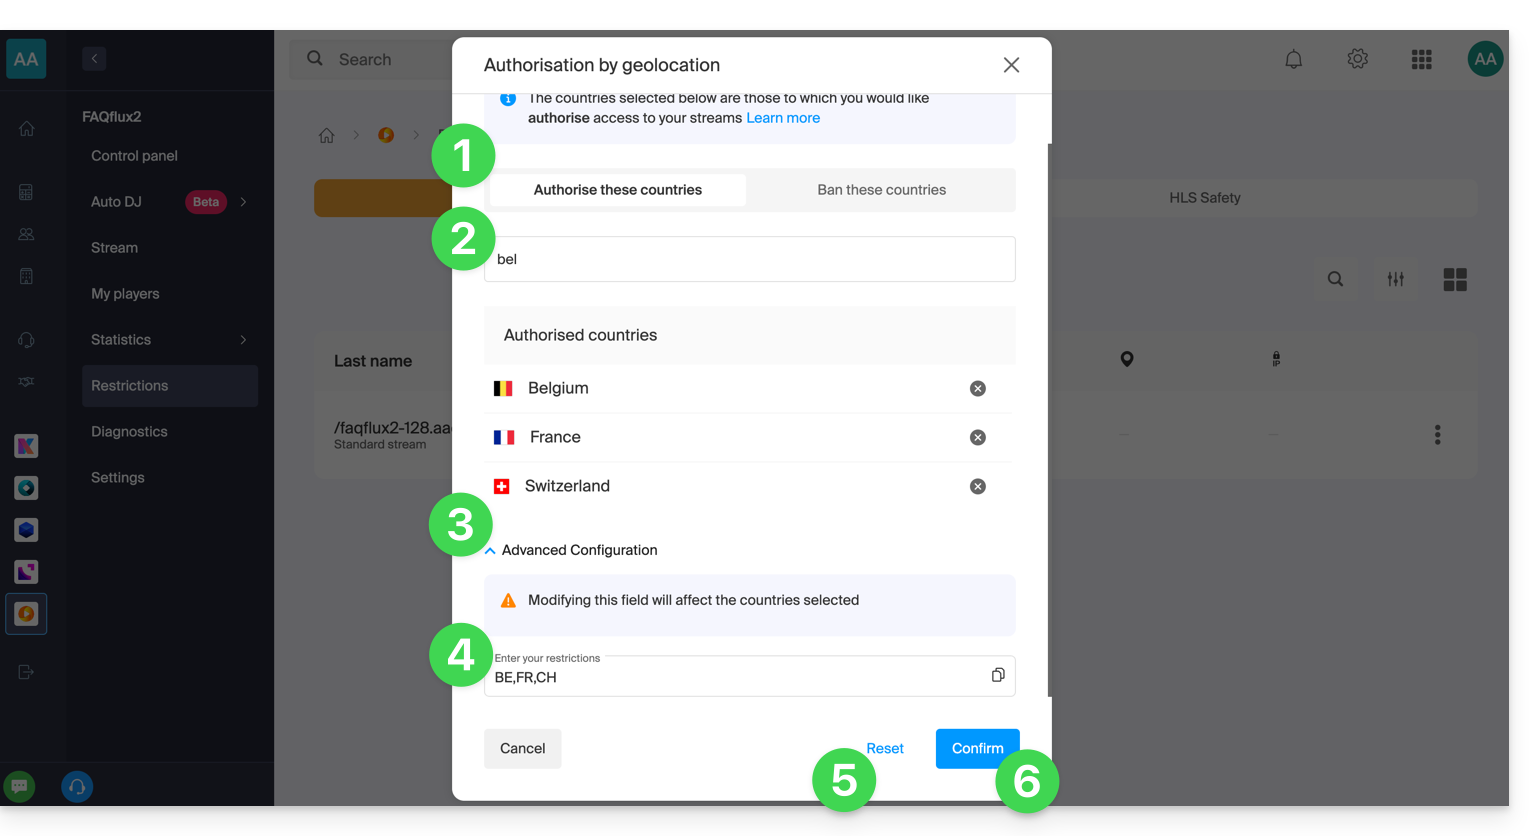
Em seguida, configure as restrições:
- Escolha se os países listados serão os permitidos ou proibidos.
- Procure um país para adicioná-lo à lista.
- Ative a configuração avançada, se necessário.
- Copie ou cole uma lista de países (útil para restringir outros fluxos com um simples copiar e colar).
- Clique para remover todos os países listados na página.
- Clique no botão azul para salvar:
Proteger um fluxo de áudio por IP
Você tem a opção de definir um IP ou uma faixa de IPs como uma lista de IPs permitidos ou proibidos de acessar um fluxo.
No caso em que você especificar apenas um critério de IP permitido, é imperativo que uma restrição geográfica esteja em vigor. Neste caso de uso, o objetivo é, por exemplo, proibir um país, mas permitir que uma pessoa desse país consuma o fluxo: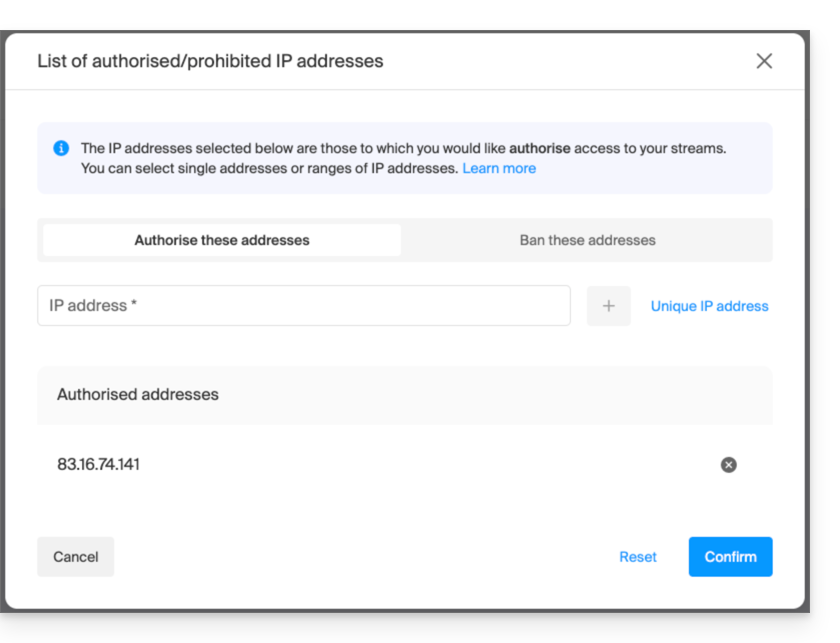
Caso deseje bloquear o acesso para todos e permitir apenas um ou mais endereços IP, você deve bloquear explicitamente o intervalo 0.0.0.0 → 255.255.255.255 (intervalo de endereços global) e, ao mesmo tempo, permitir o(s) endereço(s) IP para os quais deseja conceder acesso: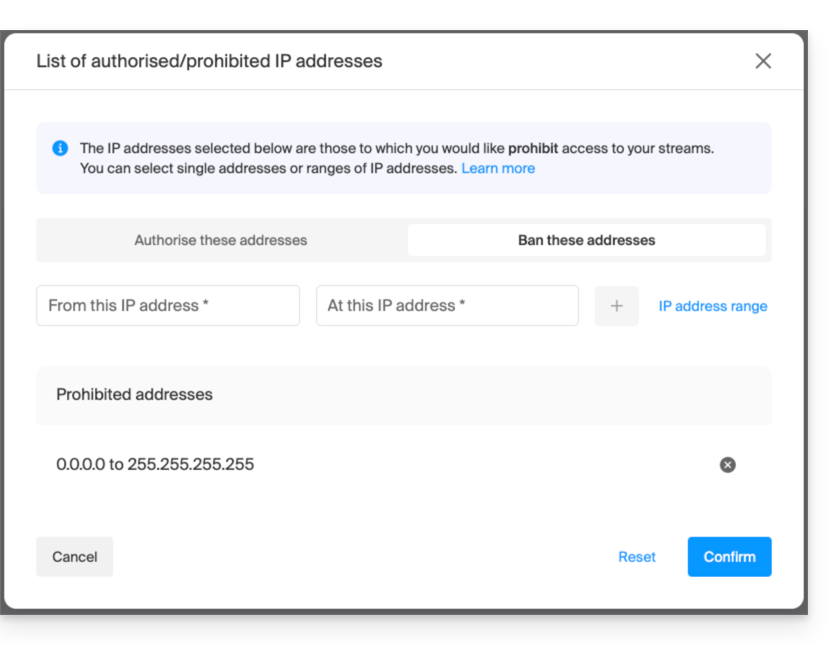
Link para esta FAQ: https://faq.infomaniak.com/1588
Esta seção de perguntas frequentes foi útil?
Este guia explica como criar um retransmissor de fluxo no Streaming Radio Infomaniak.
Criar um retransmissor de fluxo
Pré-requisitos
- Em primeiro lugar, para criar um fluxo padrão, você precisa de um codificador de rádio.
- Os parâmetros de configuração fornecidos no final do processo de criação do fluxo permitem que você configure seu codificador.
- Após realizar essa operação, o fluxo será enviado do seu codificador para os servidores da Infomaniak.
- Em seguida, você tem a opção de especificar o retransmissor de um fluxo qualquer (por exemplo, uma webrádio).
- Nesse caso, a Infomaniak não recebe mais a rádio por meio de um codificador conectado ao servidor principal, mas retransmite o fluxo que é transmitido por outro servidor.
- Se você criar essa retransmissão de fluxo, seu fluxo já estará disponível e acessível por meio de um endereço de host (nome de domínio ou endereço IP).
- Este endereço deverá ser especificado no painel de controle para que os servidores da Infomaniak possam recuperar seu fluxo.
- No mesmo local, você pode ativar a opção de fluxo de backup.
- Assim, se o seu fluxo principal se tornar indisponível, o fluxo de backup assumirá automaticamente o controle.
Para acessar o serviço de streaming de rádio:
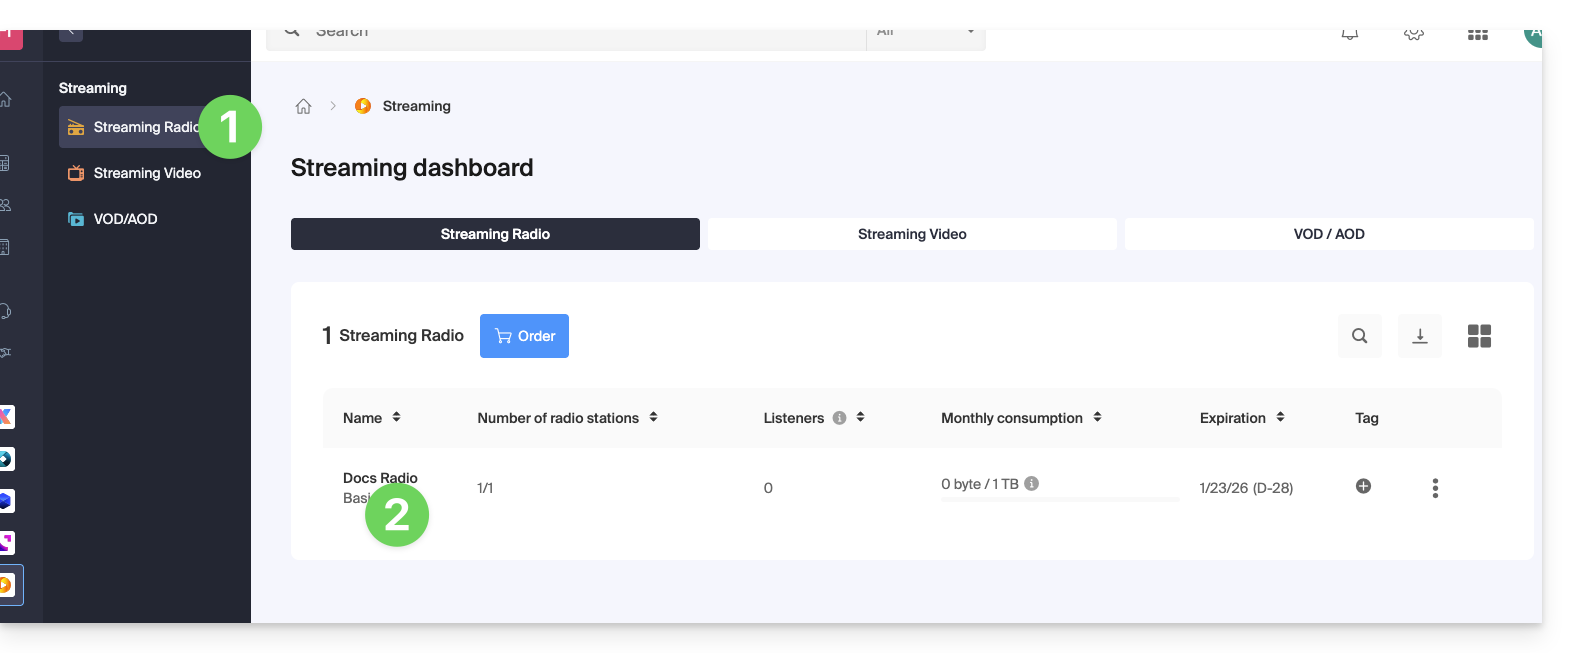
- Clique aqui para acessar o gerenciamento do seu produto no Manager Infomaniak (precisa de ajuda?).
- Clique diretamente no nome atribuído ao produto em questão:
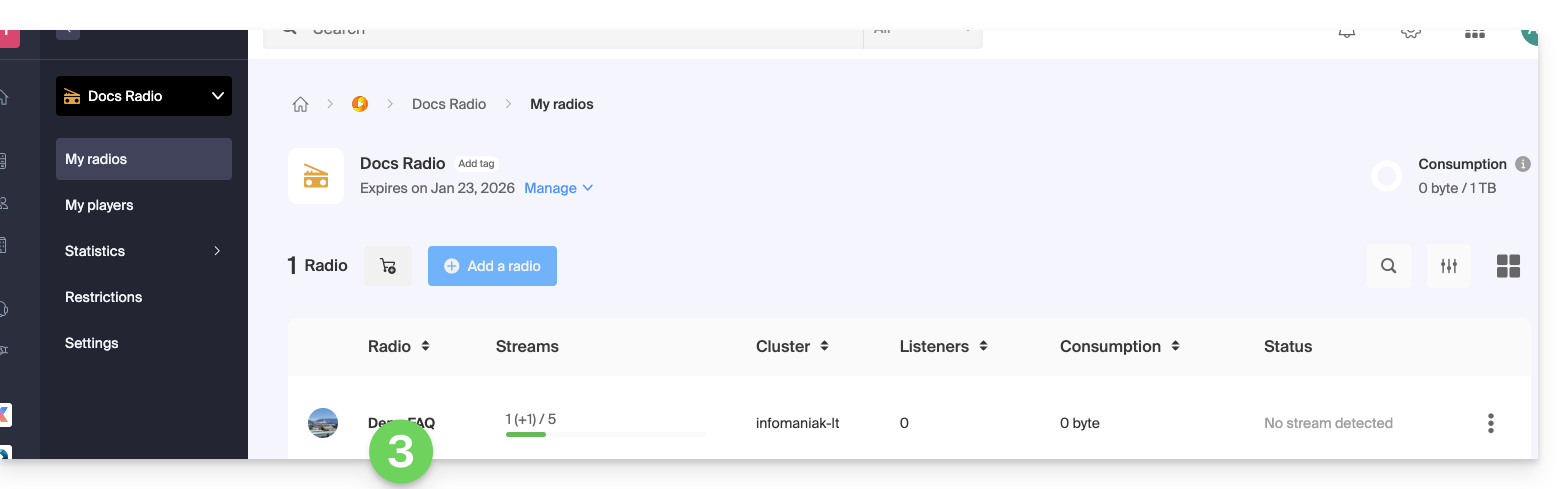
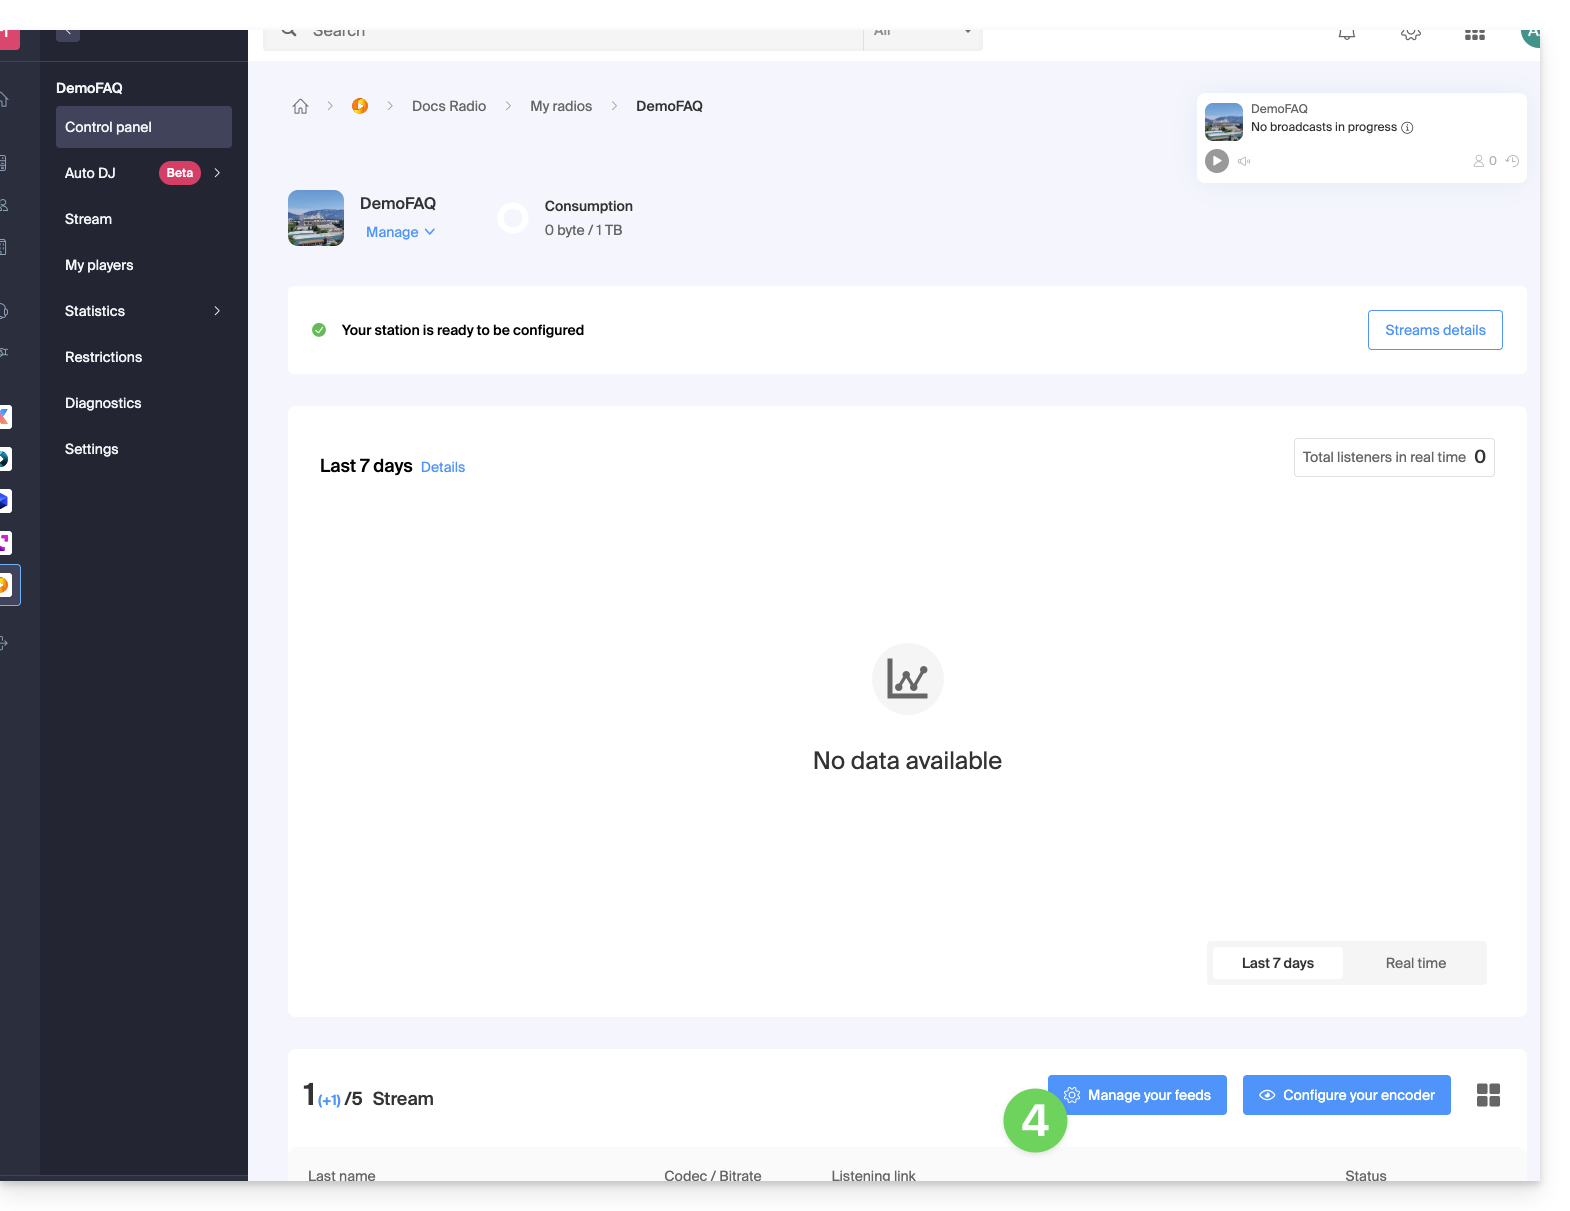
- Clique, em seguida, no nome da rádio:
- Clique no botão Configurar fluxos:
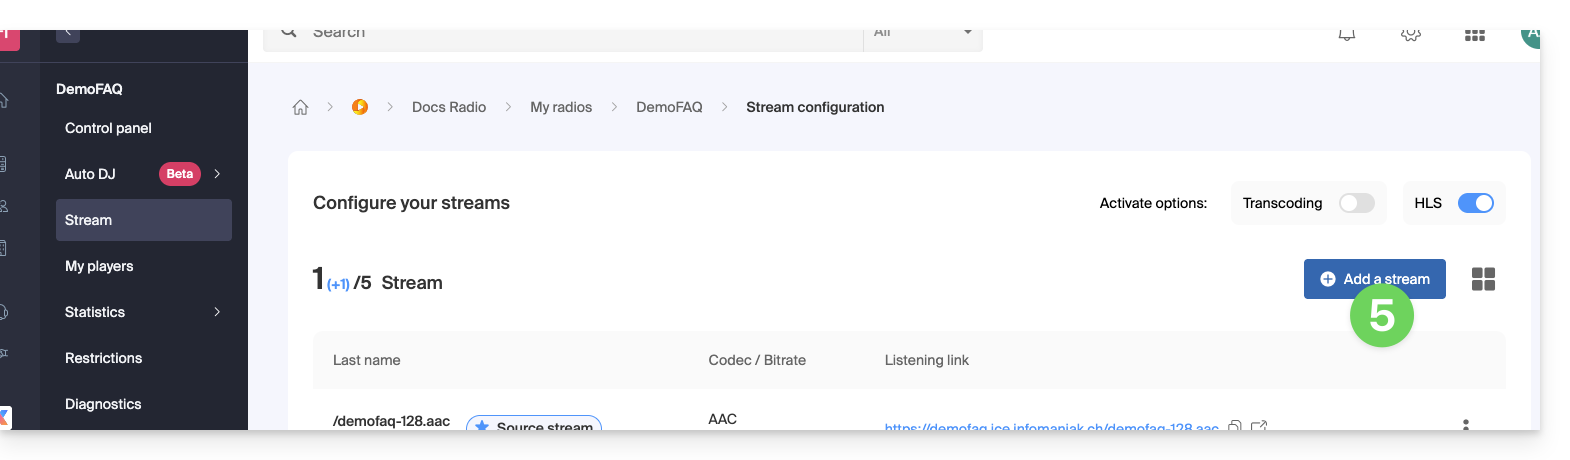
- Clique no botão Adicionar um fluxo:
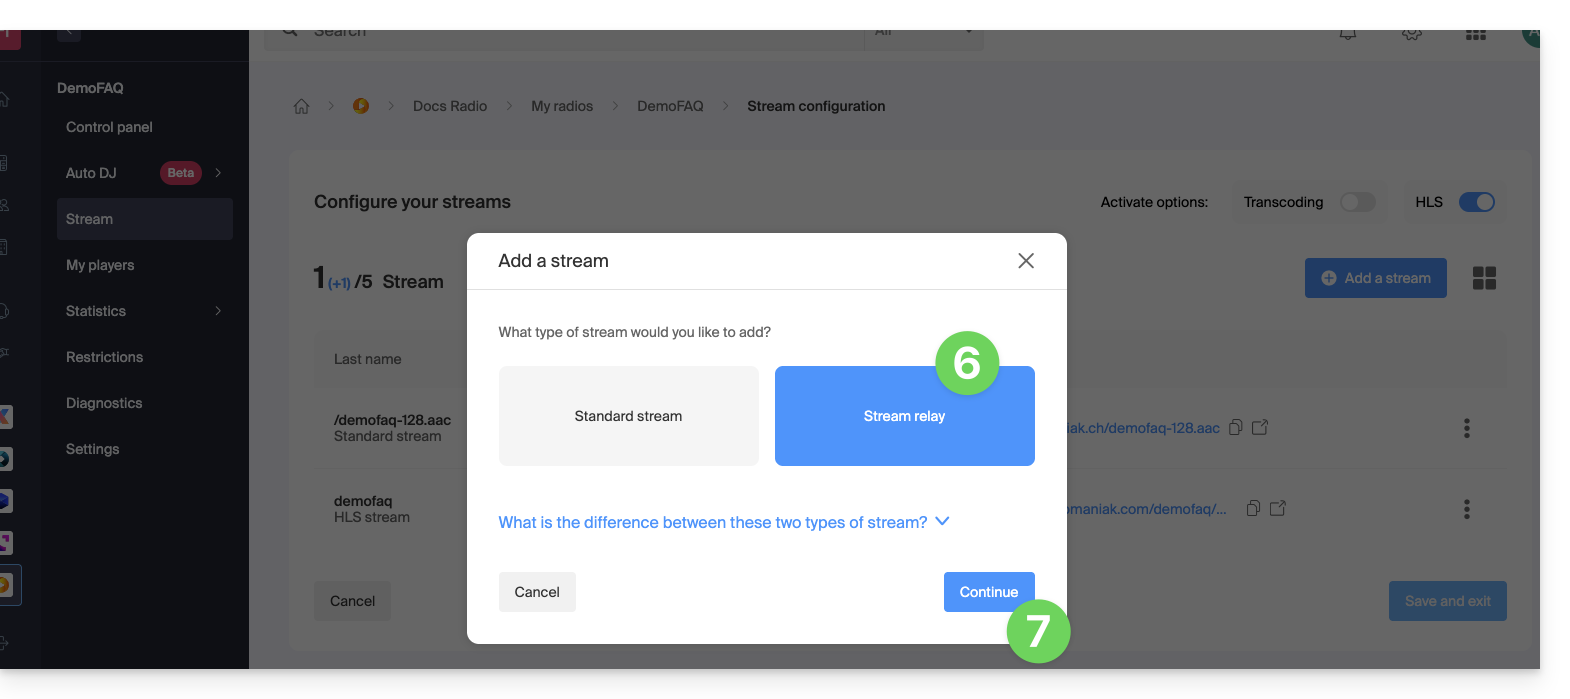
- Selecione Encaminhamento de e-mails.
- Clique no botão Continuar:
A configuração requer 3 campos:
- nome do servidor
- porta
- ponto de montagem
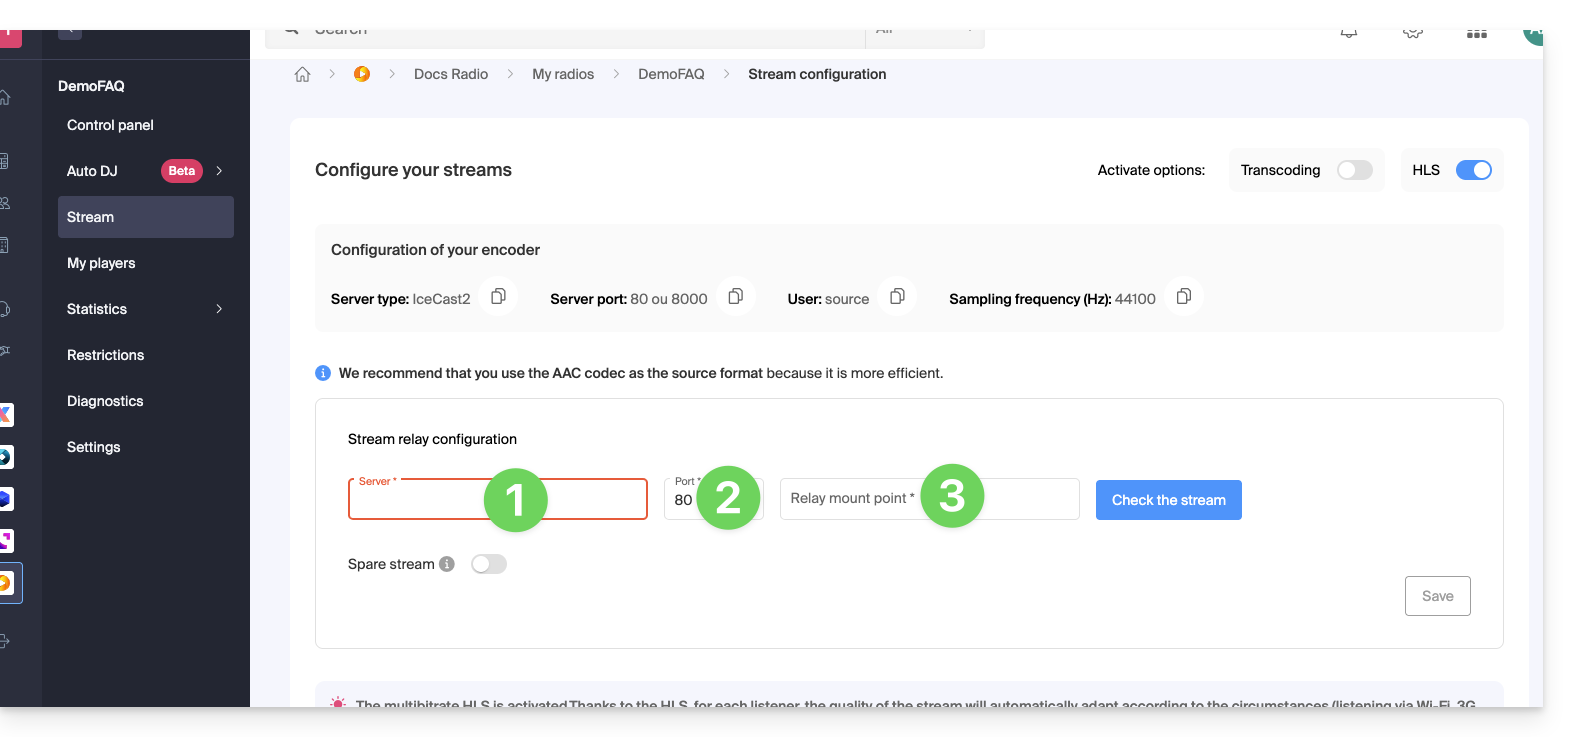
Se o fluxo que você precisa transmitir for composto da seguinte forma: http://server.com:82/music.mp3, então indique:
server.com82/music.mp3
Dito isto, em alguns casos, o campo de ponto de montagem pode estar vazio e a extensão pode não ser necessária. Se não houver porta na URL com http, basta colocar "80".
Clique no botão azul para validar o fluxo e, em seguida, clique em Salvar no canto inferior direito.
Você também pode adicionar um fluxo de backup como um fluxo de reserva se ativar essa opção ao adicionar um fluxo padrão: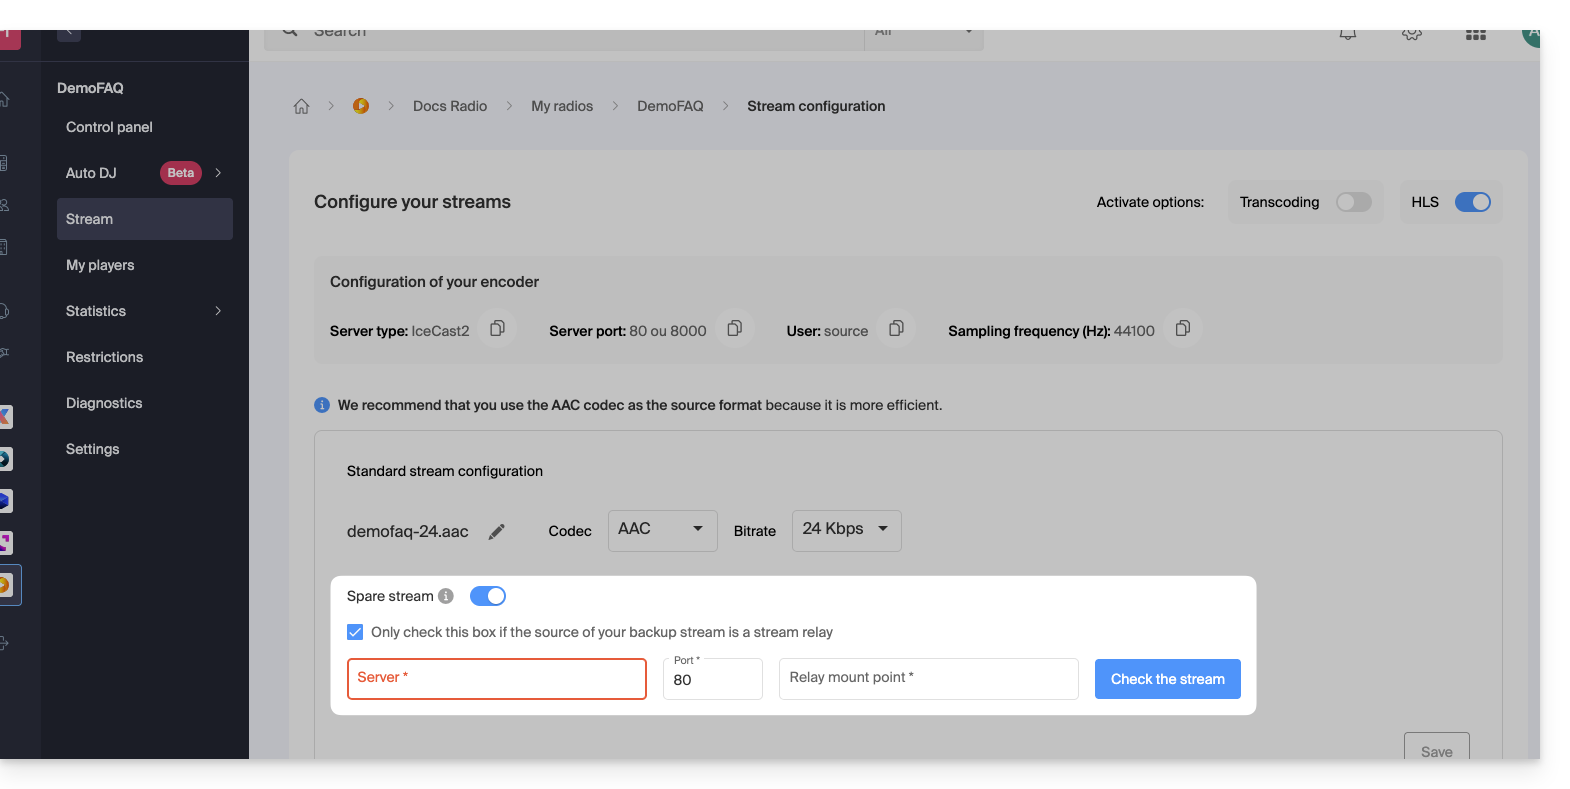
Link para esta FAQ: https://faq.infomaniak.com/1658
Esta seção de perguntas frequentes foi útil?
Este guia explica como evitar que uma Rádio Online solicite uma senha ao conectar-se ao fluxo de áudio.
Fluxos restritos
Se a proteção de um fluxo estiver ativada e o token não for gerado ou for gerado incorretamente, a solicitação de senha será exibida. O mesmo ocorre para os usuários que não atendem aos critérios de restrição geográfica que podem ter sido ativados no fluxo.
Mais raro: uma falha
O servidor de receção é o servidor ao qual o seu codificador se conecta para transmitir o seu fluxo. Os servidores de transmissão conectam-se ao servidor de receção e transmitem o seu fluxo para os ouvintes. Se o servidor de receção falhar, outro servidor de reserva assume o controlo. Esta arquitetura permite garantir a transmissão de milhares de fluxos para dezenas de milhares de ouvintes, minimizando as falhas.
Em caso de falha, a Infomaniak é automaticamente notificada e fará todos os esforços para restabelecer a situação o mais rapidamente possível. Se necessário, a Infomaniak enviará a todos os seus clientes de rádio um e-mail com informações sobre as causas da falha.
A falha de um único servidor de transmissão resulta na desconexão de milhares de ouvintes simultaneamente, que tentam então reconectar-se. Isso causa uma sobrecarga e leva à exibição de um pedido de senha para os ouvintes. É então necessário tentar uma nova conexão cerca de trinta segundos depois.
Geralmente, a situação volta ao normal após alguns minutos.
Link para esta FAQ: https://faq.infomaniak.com/1690
Esta seção de perguntas frequentes foi útil?
Este guia permite realizar um diagnóstico do seu Rádio Online para identificar a origem de eventuais problemas, causas de desconexão, etc.
Introdução
- Se estiver a transmitir a sua rádio FM, verifique se a placa de captura está a funcionar corretamente.
- Se estiver a transmitir uma webrádio, certifique-se de que o seu software de transmissão está a funcionar corretamente.
- Tenha atenção à carga da CPU no seu computador: certifique-se de que não está sobrecarregada, garantindo que tem memória suficiente se estiver a realizar outras operações além da codificação de um fluxo AAC, que exige muita memória.
- Pode ser que a sua linha de fibra ótica/ADSL não consiga mais acompanhar os dados enviados para o servidor.
- Você deve ter uma taxa de upload mínima equivalente ao total dos fluxos enviados para o servidor (por exemplo, uma rádio que envia um fluxo em 128 kbps + um fluxo em 48 kbps, o que dá 130 + 50 = 180 kbps no mínimo).
- Geralmente, as rádios dedicam uma linha exclusivamente à transmissão dos fluxos de áudio para evitar qualquer saturação da largura de banda em caso de envio simultâneo, como o envio de um e-mail grande com um anexo. Esta precaução garante que o upload não monopolize a largura de banda, o que poderia causar interrupções na transmissão dos fluxos de áudio durante a reprodução.
- O seu provedor de serviços de Internet (ISP) também pode gerar uma interrupção na linha, mesmo que pequena, o que terá como efeito interromper o fluxo da rádio.
- Se o seu codificador estiver configurado para enviar metadados para os servidores por meio de um arquivo de texto hospedado em outro provedor, e este último sofrer interrupções, o fluxo também pode ser afetado!
Analisar as estatísticas recentes
As estatísticas permitem consultar eventuais interrupções no fluxo. Para aceder a estas informações:
- Clique aqui para acessar o gerenciamento do seu produto no painel de controle Infomaniak (precisa de ajuda?).
- Clique diretamente no nome atribuído ao produto em questão:
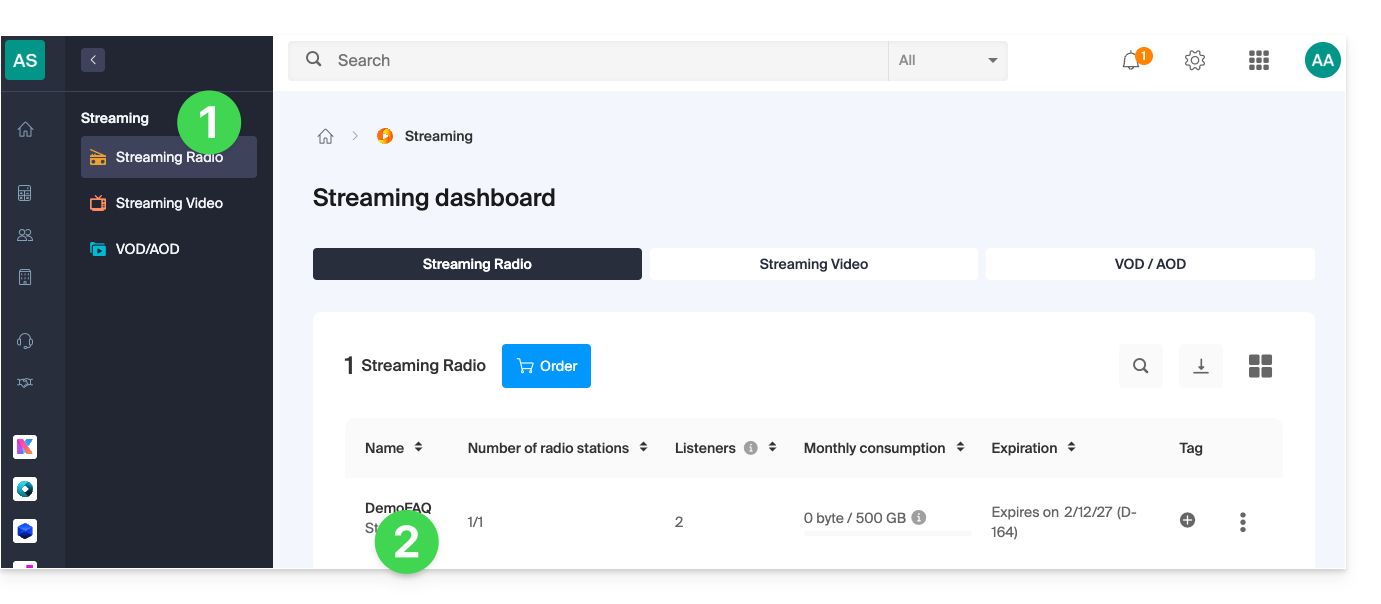
- Clique em Estatísticas no menu lateral esquerdo:
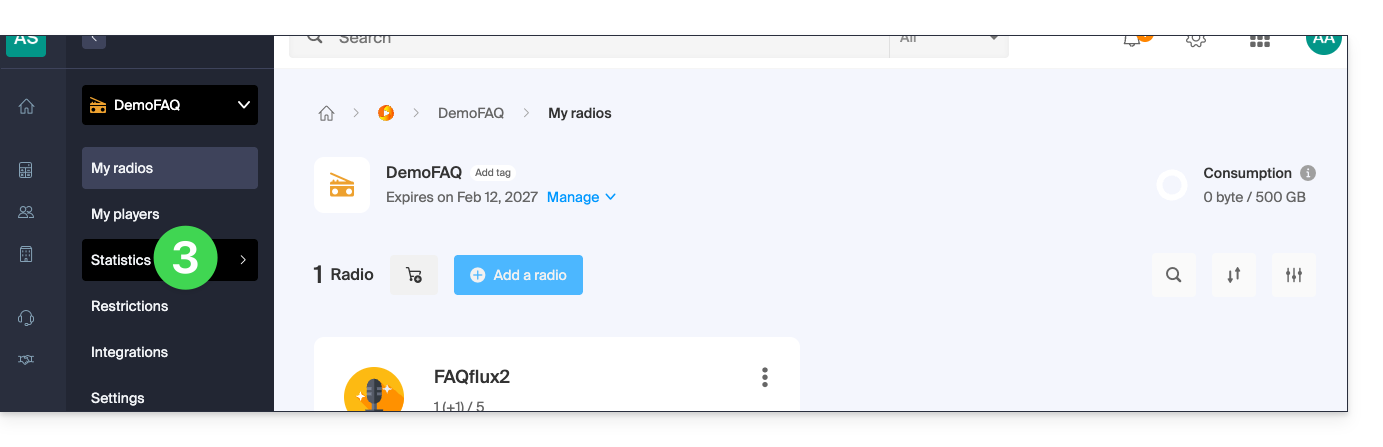
- As estatísticas são detalhadas neste outro guia.
Verificar o bom funcionamento dos elementos
A página de diagnóstico de rádio permite aceder a diversas informações. Para aceder a estes diagnósticos:
- Clique aqui para aceder à gestão do seu produto no Manager Infomaniak (precisa de ajuda?).
- Clique diretamente no nome atribuído ao produto em questão:
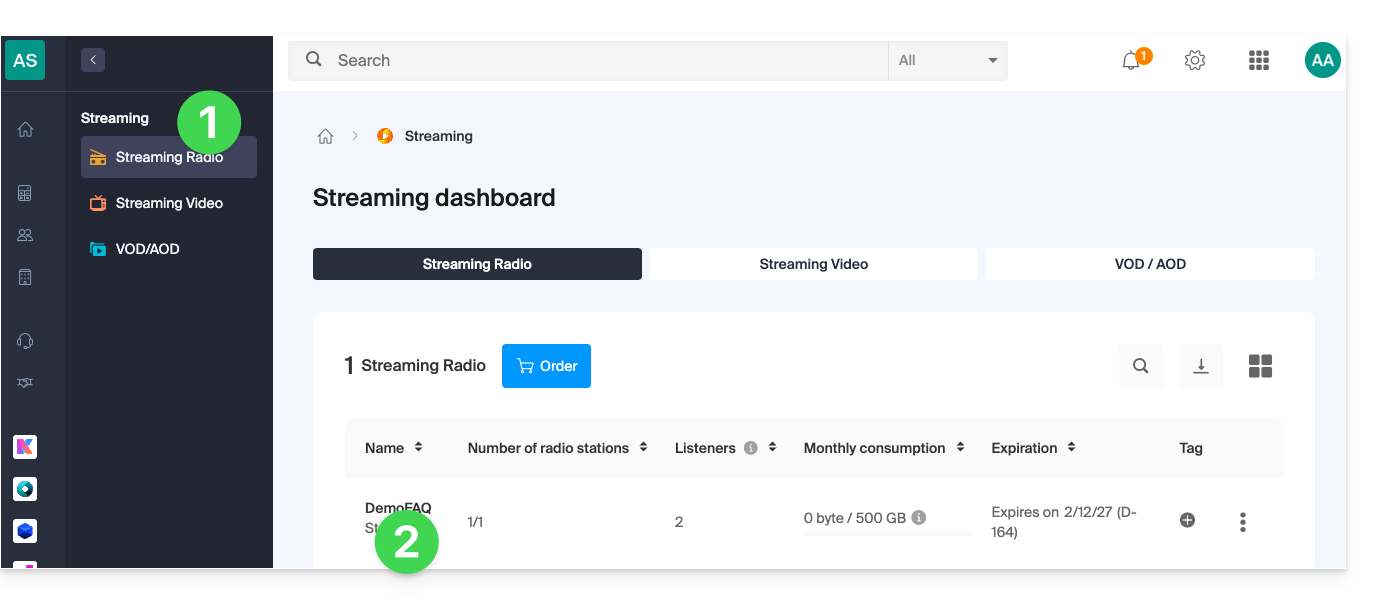
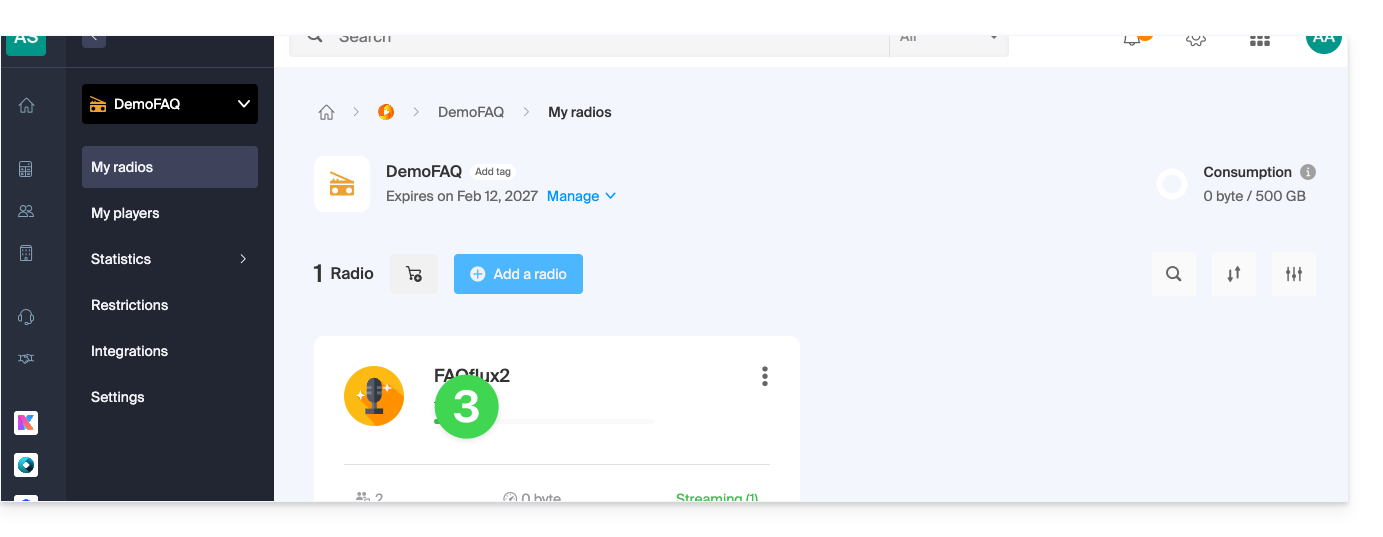
- Clique no nome do fluxo de áudio em questão:
- Clique em Diagnósticos no menu lateral esquerdo:
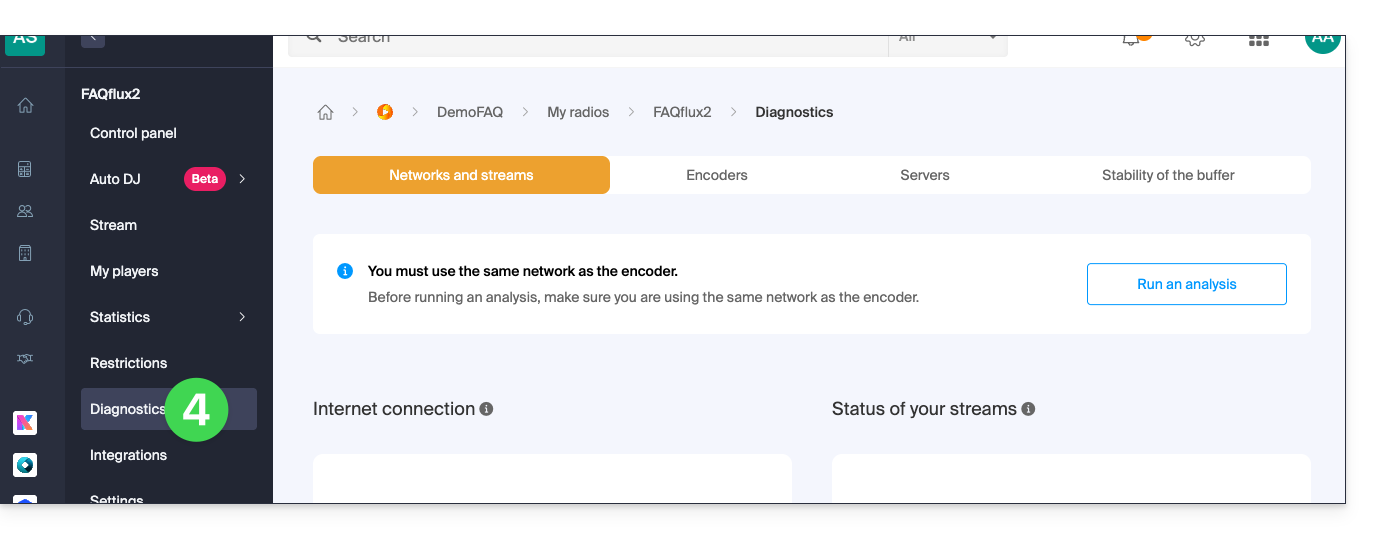
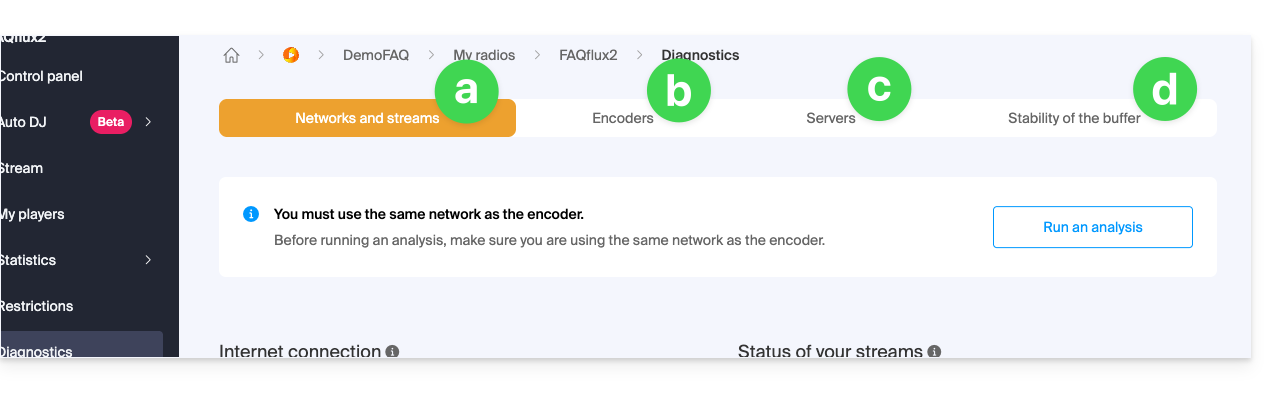
- A aba Rede e fluxos permite testar a conexão entre o seu servidor e a infraestrutura da Infomaniak.
- A aba Codificadores exibe um histórico das conexões dos codificadores para analisar se os fluxos estavam operacionais.
- A aba Servidores informa sobre o estado geral da infraestrutura de rede, para verificar o bom funcionamento dos servidores de receção e de transmissão.
- Note que, em caso de interrupção geral dos fluxos de transmissão, a Infomaniak é notificada e intervém imediatamente.
- A aba Estabilidade do buffer é detalhada neste outro guia.
Link para esta FAQ: https://faq.infomaniak.com/1691
Esta seção de perguntas frequentes foi útil?
Este guia fornece informações sobre as taxas de bits de áudio do serviço de rádio online da Infomaniak.
Testar a taxa de bits de áudio
O teste de conexão disponível no seu painel de controle avalia a ligação entre o seu servidor (aquele a partir do qual você codifica seus fluxos) e as instalações da Infomaniak localizadas em Genebra, na Suíça.
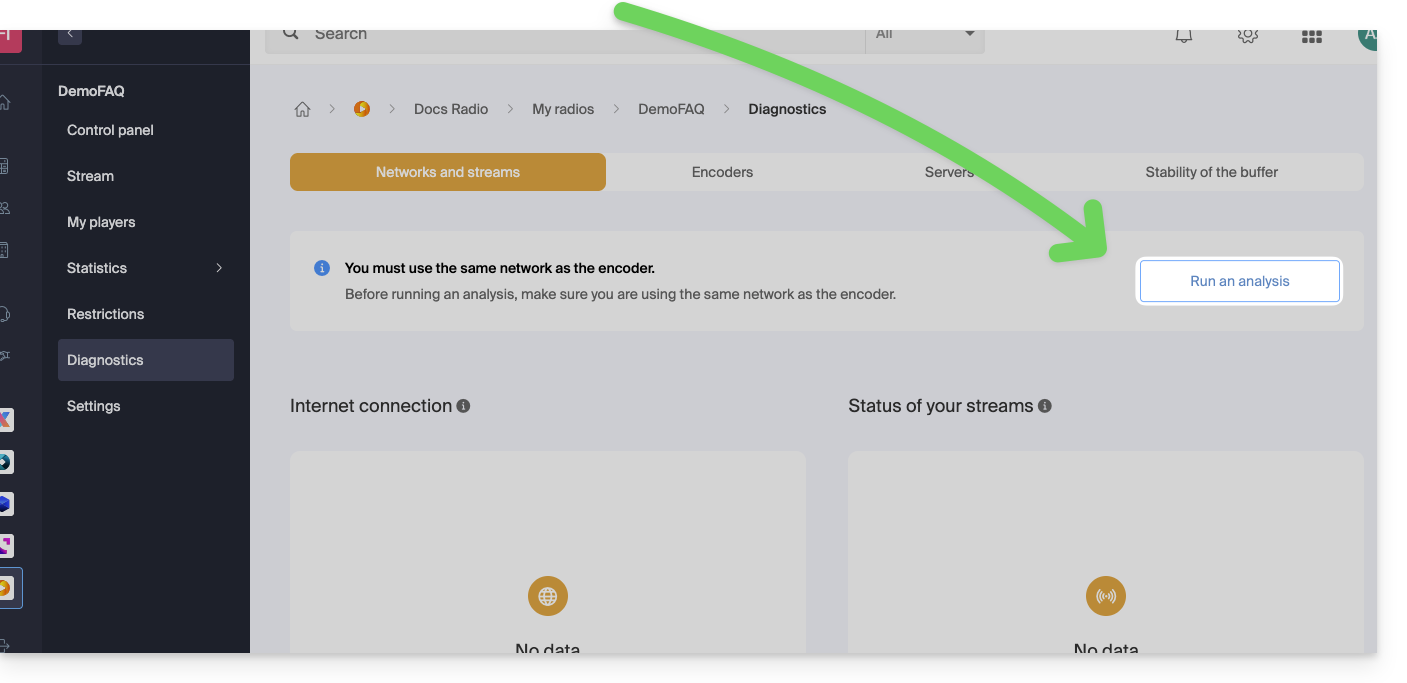
Ele mede o tempo necessário para enviar ou receber dados, bem como o tempo de resposta. Essas medições podem variar dependendo do tráfego da rede. O teste determina a taxa de transferência necessária, levando em consideração a taxa de transferência disponível. No entanto, se outras transferências de dados estiverem em andamento, a taxa de transferência medida pode ser inferior à taxa de transferência teórica da sua linha.
Em caso de dúvida, anote os resultados do teste em diferentes momentos do dia, bem como os detalhes técnicos da sua conexão e o número de computadores que compartilham a linha.
Para transmitir uma rádio sem interrupções, é necessária uma conexão de Internet de qualidade e uma taxa de transferência suficiente. A taxa de transferência deve sempre garantir uma margem de largura de banda livre. Se a sua conexão for compartilhada entre a rádio e outros dispositivos, a qualidade da transmissão pode ser afetada.
Geralmente, uma conexão ADSL padrão é suficiente, mas para uma transmissão ininterrupta, recomenda-se dedicar uma conexão à sua rádio e alugar outra para outros usos. Você também pode solicitar ao seu provedor de acesso que verifique a qualidade da linha e meça a largura de banda real.
Para detectar possíveis saturações temporárias da sua linha, execute um teste de buffer de longa duração.
Link para esta FAQ: https://faq.infomaniak.com/1694
Esta seção de perguntas frequentes foi útil?
Este guia aborda o buffer e a latência do Streaming de Rádio. Embora a latência seja inevitável, o gerenciamento adequado dos buffers permite otimizar suas transmissões, minimizando as interrupções.
Introdução
- O buffer, ou memória-tampão, é uma pequena área de memória que deve ser preenchida antes que o reprodutor comece a reproduzir a música da sua transmissão de áudio ao vivo. Corresponde a alguns segundos de som. Ele foi projetado para proporcionar uma experiência de audição mais agradável, evitando que pequenas interrupções no fluxo sejam audíveis, o que resultaria em um som interrompido e desagradável.
- Os servidores de recepção e transmissão também possuem buffers; a transmissão em tempo real nunca é instantânea devido a vários fatores técnicos:
- A latência de 3 a 4 segundos entre a geração do som e sua recepção é normal.
- Os reprodutores sempre armazenam em buffer um mínimo de 1 a 2 segundos antes de iniciar a reprodução.
- O Icecast usa, por padrão, um buffer de 64K bytes, o que equivale a cerca de 4 segundos de transmissão em mp3 128k.
- Os clientes de codificação também possuem buffers para evitar interrupções.
- Diminuir o tamanho dos buffers pode reduzir a latência, mas essa prática é arriscada.
- Como as conexões de Internet não garantem uma taxa de transferência constante, buffers menores podem causar interrupções.
Analisar a estabilidade do buffer
O diagnóstico disponível no seu painel de controlo mostra a quantidade de memória ocupada pelo buffer a cada segundo. Se o fluxo estiver a funcionar corretamente, os valores devem ser estáveis: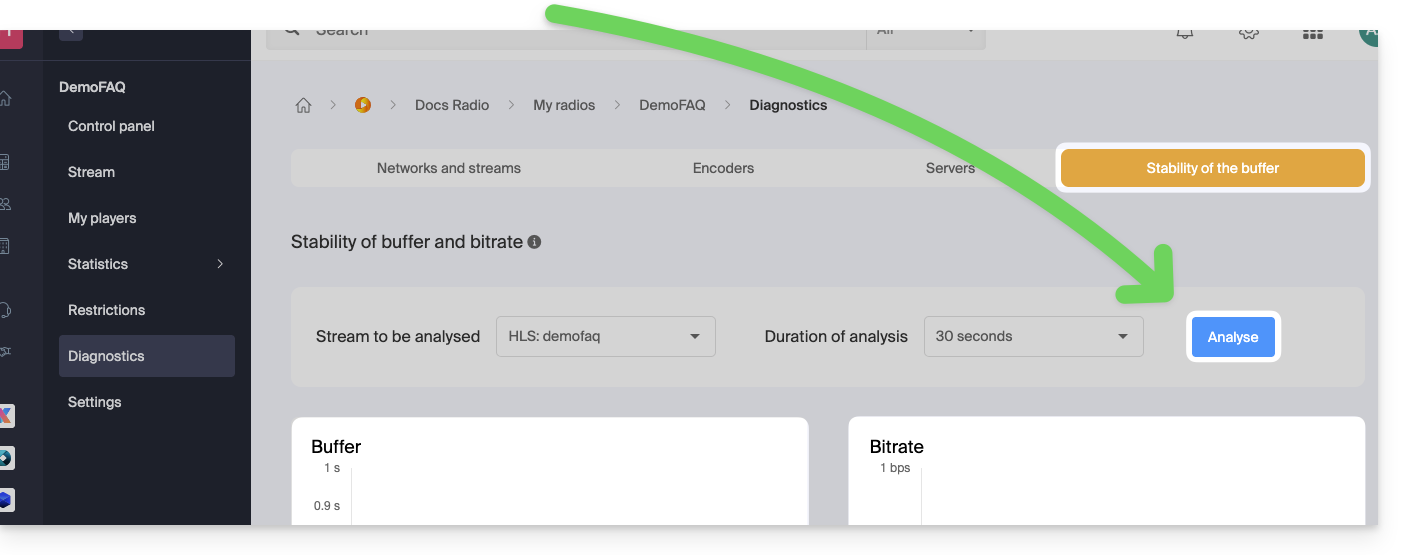
Um buffer instável é um sinal de má qualidade da conexão ou de saturação da linha. Consulte este outro guia se estiver procurando soluções.
Este teste também é útil para ajudar a detectar as saturações temporárias de uma linha de Internet. Se o buffer for, por vezes, estável e, por vezes, instável, pode ser um sinal de que alguns utilizadores que partilham a linha de Internet a saturam ocasionalmente, causando interrupções no seu fluxo.
Para verificar esta hipótese, realize um teste de longa duração do buffer durante os horários de pico de utilização das suas instalações e observe eventuais perturbações.
Link para esta FAQ: https://faq.infomaniak.com/1695
Esta seção de perguntas frequentes foi útil?
Este guia detalha as possibilidades de monetização das transmissões de Rádio Online e a gestão da publicidade para os seus canais.
Ativar a publicidade para a Rádio Online
Pré-requisitos
- Entre em contato com um dos 2 parceiros de publicidade autorizados:
- Após a formalização do contrato, certifique-se de que a agência selecionada informa a Infomaniak sobre a ativação efetiva, se necessário.
- Esta etapa permitirá prosseguir com a migração dos fluxos para o cluster correspondente.
Em seguida, poderá gerir os anúncios pre-roll e/ou mid-roll diretamente na plataforma da agência de publicidade, de forma totalmente autónoma.
Tipos de inserções publicitárias
O tipo de publicidade chamado in-stream pre-roll consiste em exibir um anúncio imediatamente antes do início da transmissão de áudio ao vivo. Na prática, o anúncio é reproduzido automaticamente no momento em que o ouvinte clica no botão Reproduzir, antes de iniciar a transmissão ao vivo.
O pre-roll difere do jingle: o primeiro é um anúncio, enquanto o segundo faz parte da identidade sonora ou da programação da estação.
Por fim, o mid-roll – ou seja, a inserção de anúncios entre dois segmentos de programas – corresponde ao modo de funcionamento padrão proposto pelos dois parceiros mencionados acima.
É importante notar que o post-roll (anúncio exibido após o conteúdo) não é aplicável no contexto de uma transmissão ao vivo, uma vez que esta não possui um fim determinado.
Condições técnicas
Ao integrar anúncios in-stream pre-roll em um fluxo de rádio ao vivo, é imperativo garantir a perfeita correspondência dos parâmetros de áudio entre o anúncio e o fluxo principal:
- A taxa de bits e a frequência de amostragem devem ser idênticas para evitar interrupções, latência ou dessincronização durante a transição entre o anúncio e a transmissão ao vivo.
- Este requisito garante uma transmissão fluida e estável, condição essencial para manter a qualidade do áudio e a continuidade do serviço em tempo real.
Link para esta FAQ: https://faq.infomaniak.com/1831
Esta seção de perguntas frequentes foi útil?
Este guia trata das informações de audiência do Rádio Online que podem ser exportadas para a ACPM (antiga OJD Numérique).
Introdução
- A ACPM, Aliança para os Números da Imprensa e dos Meios de Comunicação, é uma organização independente na França, que certifica os dados relativos à distribuição, audiência e frequência dos meios de comunicação.
- Esses dados, reconhecidos como referência oficial, apoiam os agentes do mercado de mídia e publicidade na análise, comparação e estruturação de suas estratégias.
- Sob a supervisão de seus órgãos, compostos por profissionais da área de mídia, a ACPM garante transparência, independência e rigor metodológico; assegura certificações confiáveis e alinhadas com as evoluções do setor de mídia.
- Consulte também este outro guia sobre um serviço semelhante, mas destinado à Suíça.
Gerenciar a certificação ACPM
Pré-requisitos
- A organização responsável pelo serviço de streaming deve ter um endereço na França.
- Para ativar a certificação ACPM, entre em contato com o serviço por e-mail:
equipe-ojdnumerique@acpm.fr. - Após estabelecer o contrato com eles, entre em contato com o suporte da Infomaniake forneça as informações relativas ao seu contrato ACPM e Infomaniak.
Para gerenciar a ativação ou desativação do serviço:
- Clique aqui para acessar o gerenciamento do seu produto no painel de controle Infomaniak (precisa de ajuda?).
- Clique diretamente no nome atribuído ao produto em questão.
- Clique no nome do fluxo de áudio em questão.
- Clique em Configurações no menu lateral esquerdo.
- Ative ou desative a exportação dos logs para o ACPM com o botão de alternância:

Link para esta FAQ: https://faq.infomaniak.com/1851
Esta seção de perguntas frequentes foi útil?