Base de conhecimento
1000 perguntas frequentes, 500 tutoriais e vídeos explicativos. Aqui, você encontra apenas soluções!
Este guia explica como configurar corretamente um fluxo no Streaming de rádio Infomaniak.
Configurar a transmissão de um fluxo de rádio
Para acessar o serviço de streaming de rádio:
- Clique aqui para acessar o gerenciamento do seu produto no Manager Infomaniak (precisa de ajuda?).
- Clique diretamente no nome atribuído ao produto em questão.
- Clique no nome da rádio.
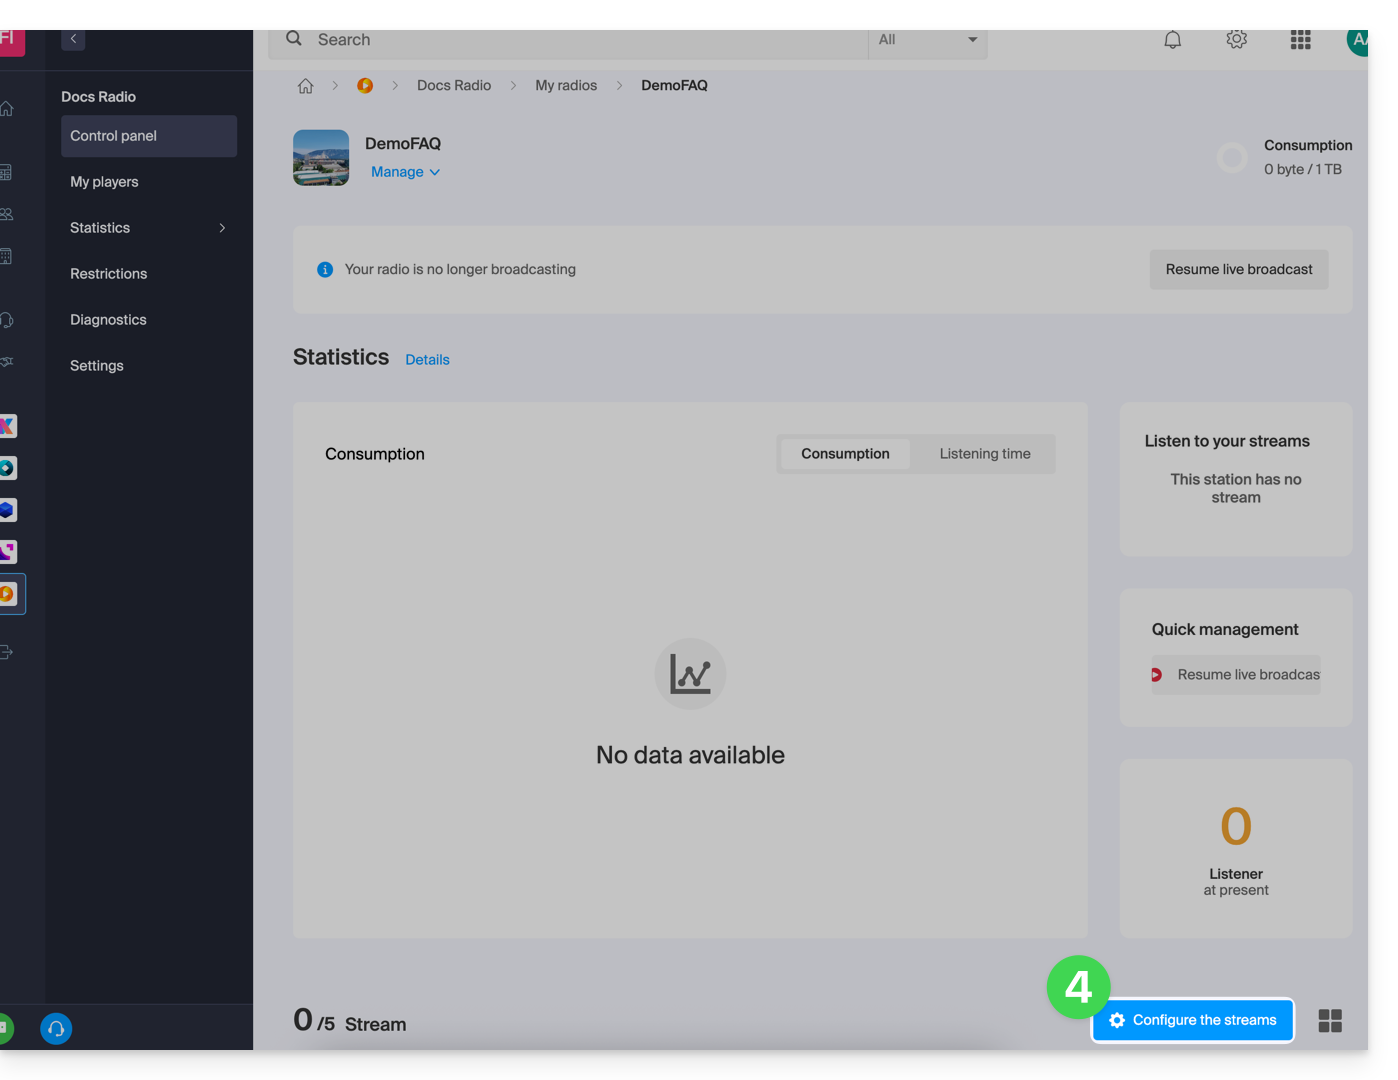
- Clique no botão Configurar fluxos:
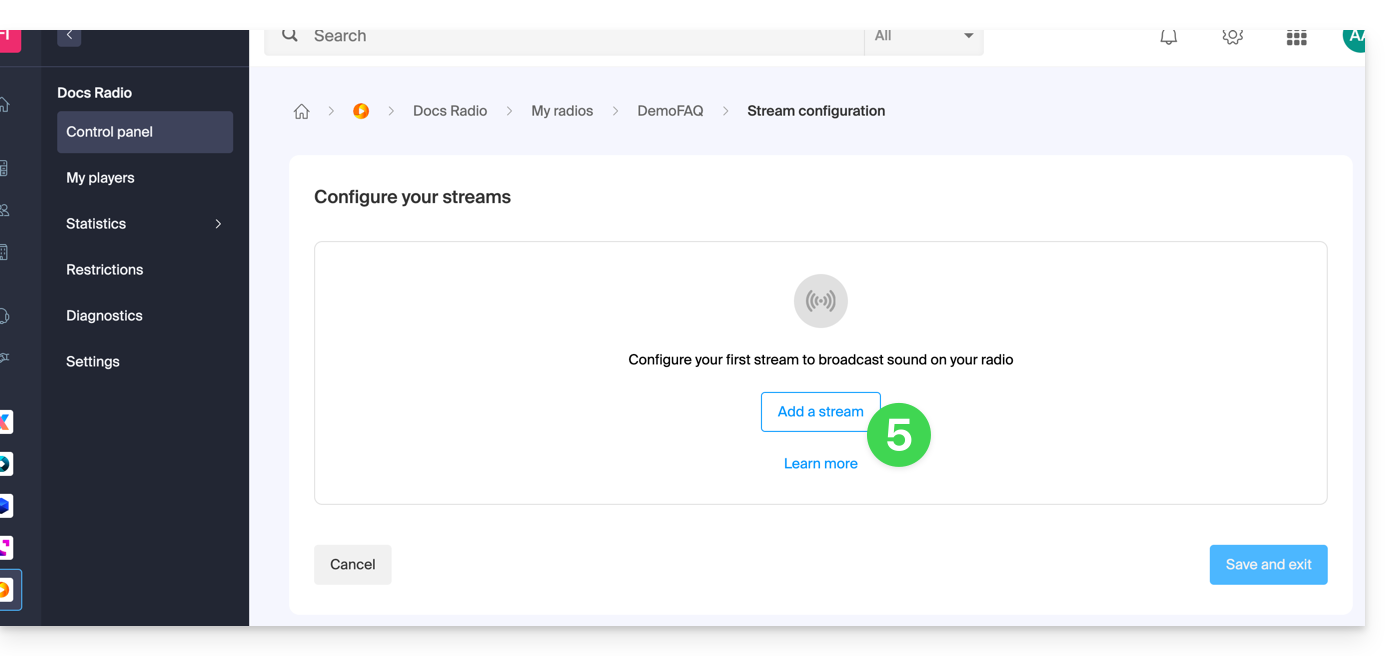
- Clique no botão Adicionar um fluxo:
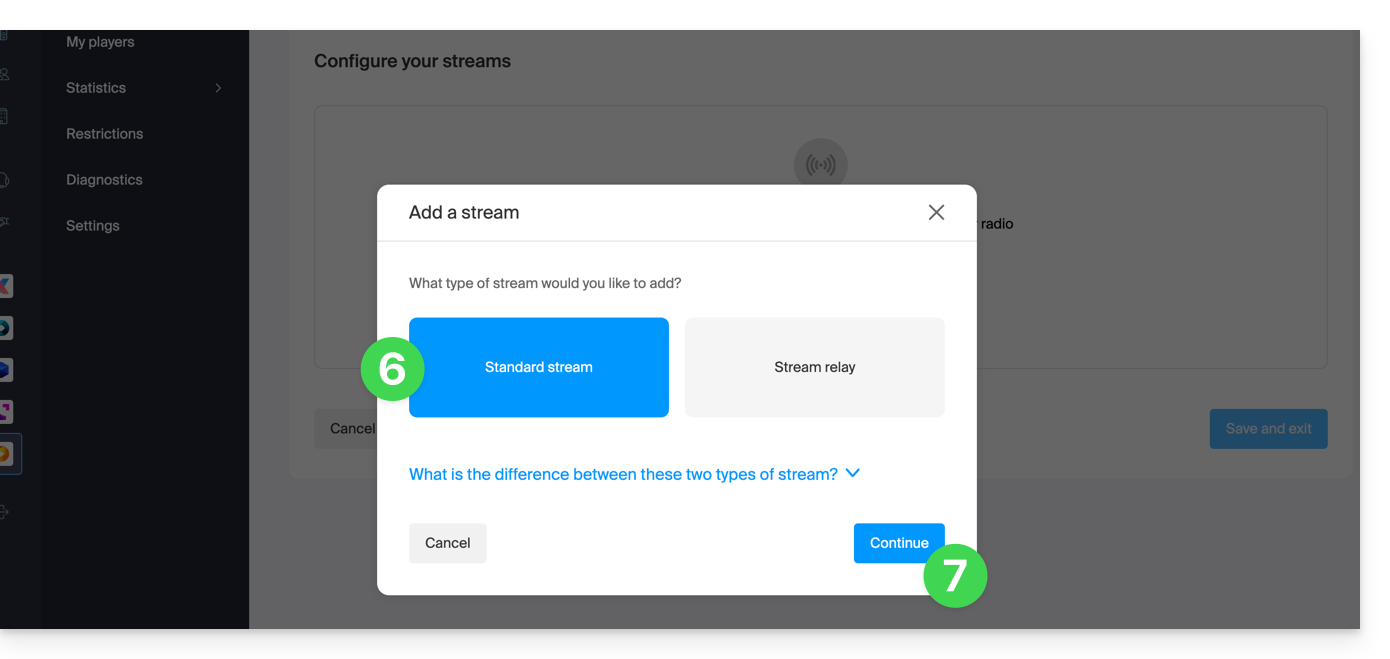
- Adicionar um feed padrão (consulte este outro guia sobre os servidores de feed).
- Clique no botão para Continuar:
- Escolha as opções desejadas, incluindo a possibilidade de ativar o HLS, que não será contabilizado no número total de fluxos.
- Configure a qualidade desejada e consulte este outro guia se precisar de informações sobre o tipo de fluxo.
- Ajuste o tamanho do buffer, se necessário (e não se esqueça de guardar as alterações, se for o caso).
- Clique no botão para Guardar e sair:
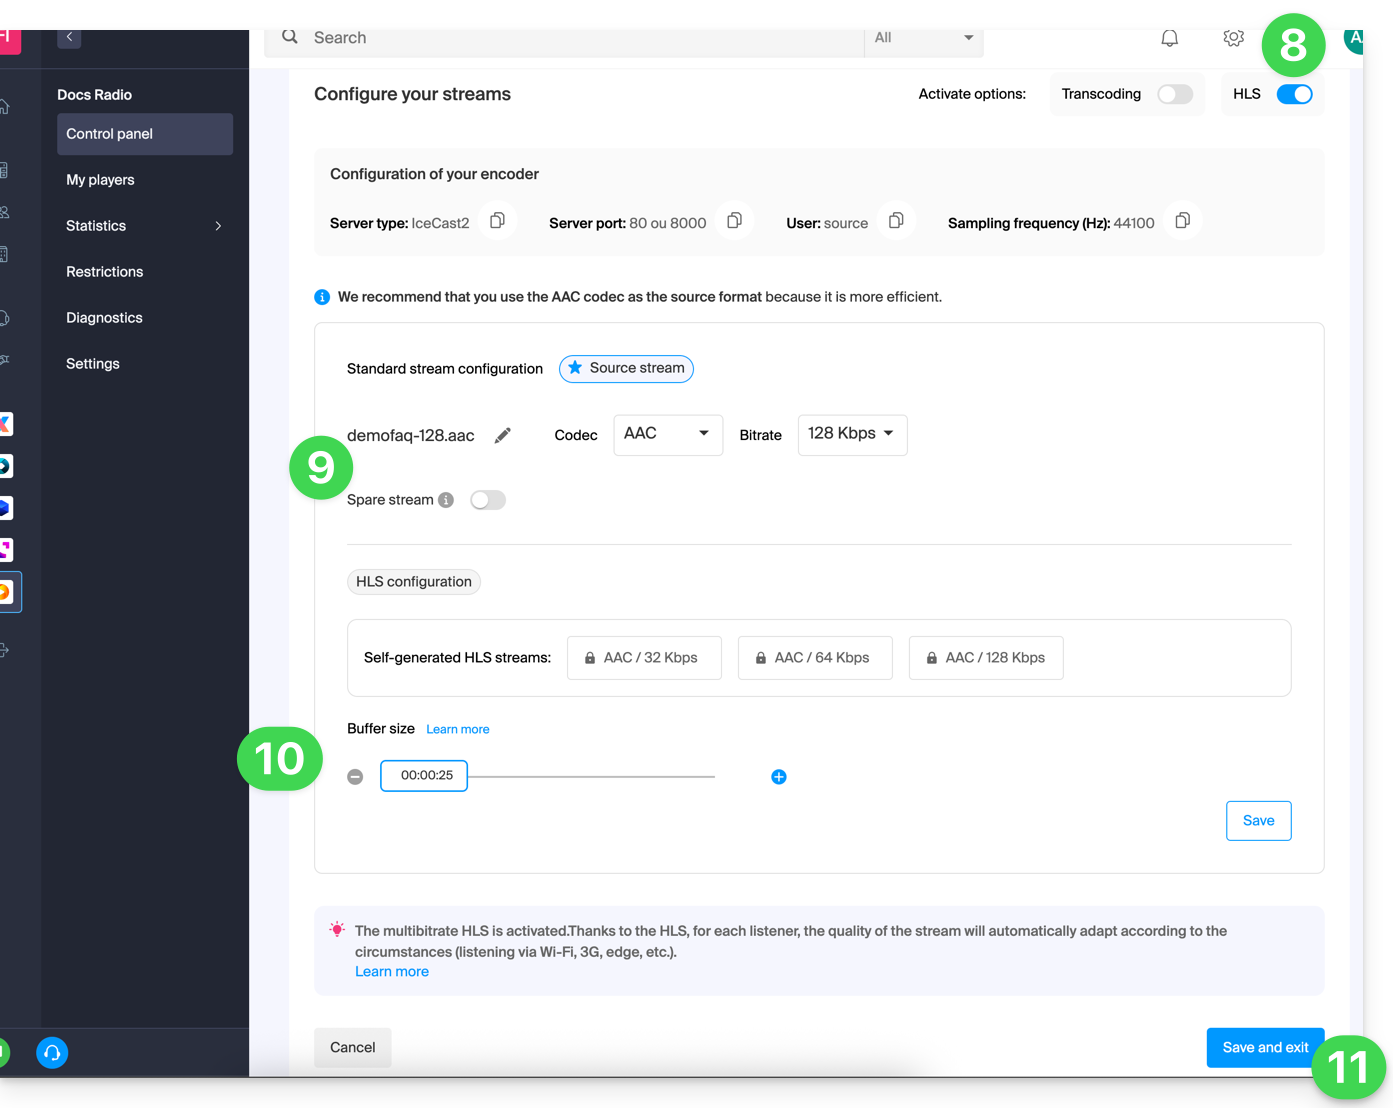
Agora pode configurar uma aplicação com as definições obtidas no final deste processo.
Link para esta FAQ: https://faq.infomaniak.com/2213
Esta seção de perguntas frequentes foi útil?
Este guia trata das informações de audiência do Rádio Online que podem ser exportadas para o Mediapulse.
Introdução
- Mediapulse, uma organização independente na Suíça, mede a audiência de rádio, televisão e plataformas online.
- Esses dados, reconhecidos como referência oficial, ajudam o mercado de mídia e publicidade a analisar, comparar e estruturar suas atividades.
- Sob a supervisão do DETEC, através da OFCOM, a Mediapulse garante transparência, independência e rigor científico; assegura medições fiáveis e adaptadas à evolução dos meios de comunicação.
- É possível exportar os seus registos de rádio para este serviço.
- Consulte também este outro guia sobre um serviço semelhante, mas destinado à França.
Gerenciar a certificação Mediapulse
Pré-requisitos
- A organização na qual o serviço de streaming está inserido deve estar estabelecida com um endereço na Suíça.
- Para ativar a certificação Mediapulse, entre em contato com este serviço por e-mail:
info@mediapulse.ch. - Após estabelecer o contrato com eles,entre em contato com o suporte da Infomaniakindicando as informações relativas ao seu contrato Mediapulse e Infomaniak.
Para gerenciar a ativação ou desativação do serviço:
- Clique aqui para acessar o gerenciamento do seu produto no Manager Infomaniak (precisa de ajuda?).
- Clique diretamente no nome atribuído ao produto em questão.
- Clique no nome do fluxo de áudio em questão.
- Clique em Configurações no menu lateral esquerdo.
- Ative ou desative a exportação dos logs para o Mediapulse com o botão de alternância:

Link para esta FAQ: https://faq.infomaniak.com/2482
Esta seção de perguntas frequentes foi útil?
Este guia explica como transferir os fluxos de áudio presentes em uma de suas Rádios Online Infomaniak para uma de suas outras rádios, que estejam na mesma Organização.
Consulte este outro guia para transferir todos os fluxos de uma Rádio Online para um novo proprietário.
Transferir os fluxos de áudio
Para isso:
- Clique aqui para acessar o gerenciamento do seu produto no Manager Infomaniak (precisa de ajuda?).
- Clique diretamente no nome atribuído ao produto em questão.
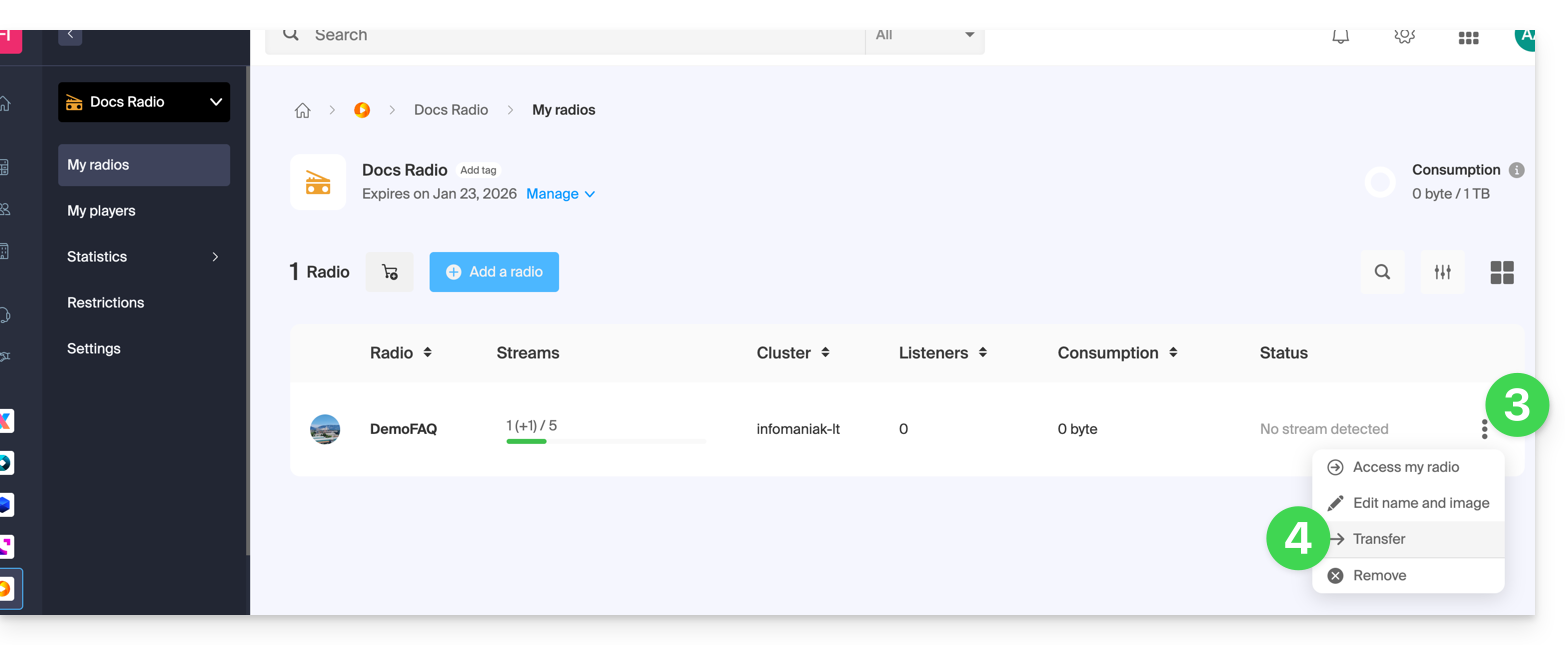
- Clique em o menu de ações ⋮ localizado à direita do elemento em questão.
- Escolha Transferir:
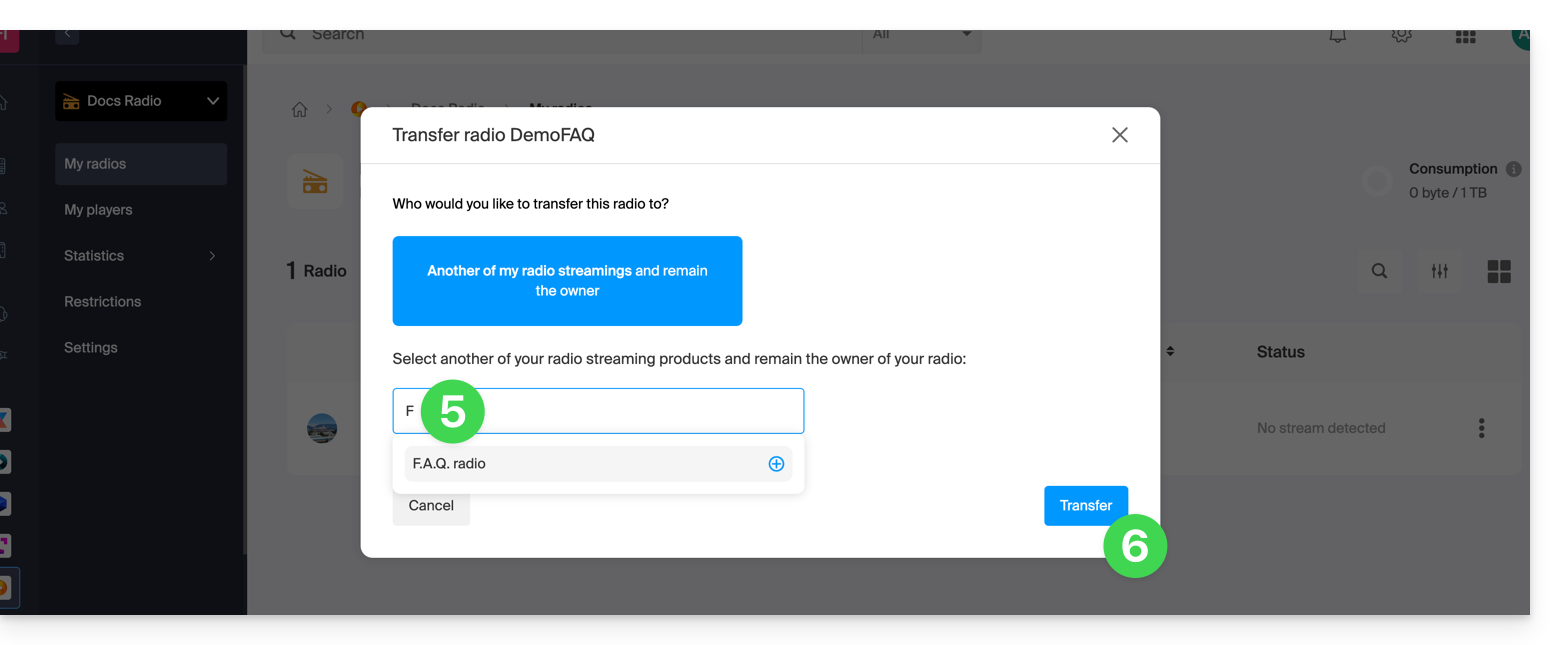
- Procure e valide o nome da outra estação de rádio que você possui na mesma Organização.
- Valide a transferência:
Atualize as páginas do painel de controle, se necessário, para atualizar as informações exibidas.
Link para esta FAQ: https://faq.infomaniak.com/2513
Esta seção de perguntas frequentes foi útil?
Este guia aborda o controle ao vivo (timeshift), que permite aos seus ouvintes pausar, retroceder e, em seguida, retornar à transmissão ao vivo dos seus fluxos HLS, com uma profundidade de retrocesso de até 2 horas.
Introdução
- Ao contrário do Timeshift Streaming de Vídeo, não existe uma ferramenta de agendamento relacionada ao lado do Rádio.
- A reprodução/retrocesso está desativada por padrão no Player para que você tenha controle sobre a exposição ao público.
Oferecer o controle ao vivo aos ouvintes
Pré-requisitos
- Criar ou editar um fluxo HLS no seu produto Streaming de Rádio.
Em seguida:
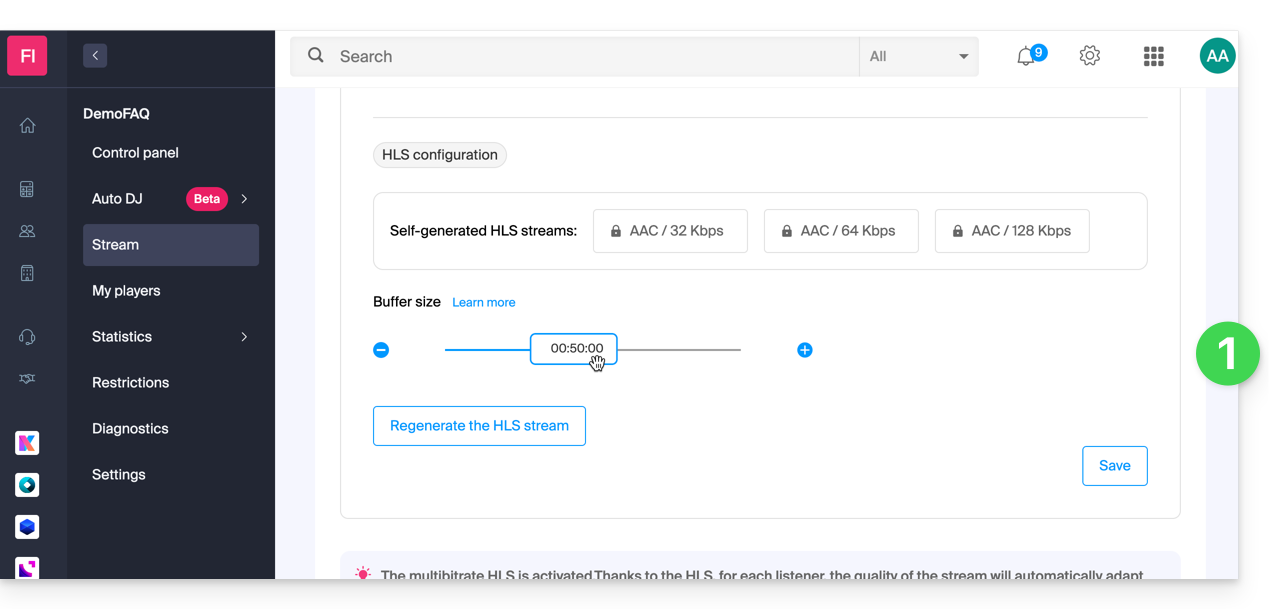
- Ao criar (ou modificar) um fluxo HLS, defina o Buffer entre 00:00:25 e 02:00:00. Este valor, entre 25 segundos e 2 horas, corresponde à duração máxima durante a qual os ouvintes podem retroceder e pausar a transmissão ao vivo, antes de retornar à transmissão ao vivo. Ele determina a profundidade do controle ao vivo. Exemplos:
- 00:00:25 → 05:00: tolerância mínima para pausas curtas.
- 10:00 → 30:00: ideal para formatos de notícias/talk.
- 30:00 → 02:00:00: conforto máximo para programas de música e eventos.
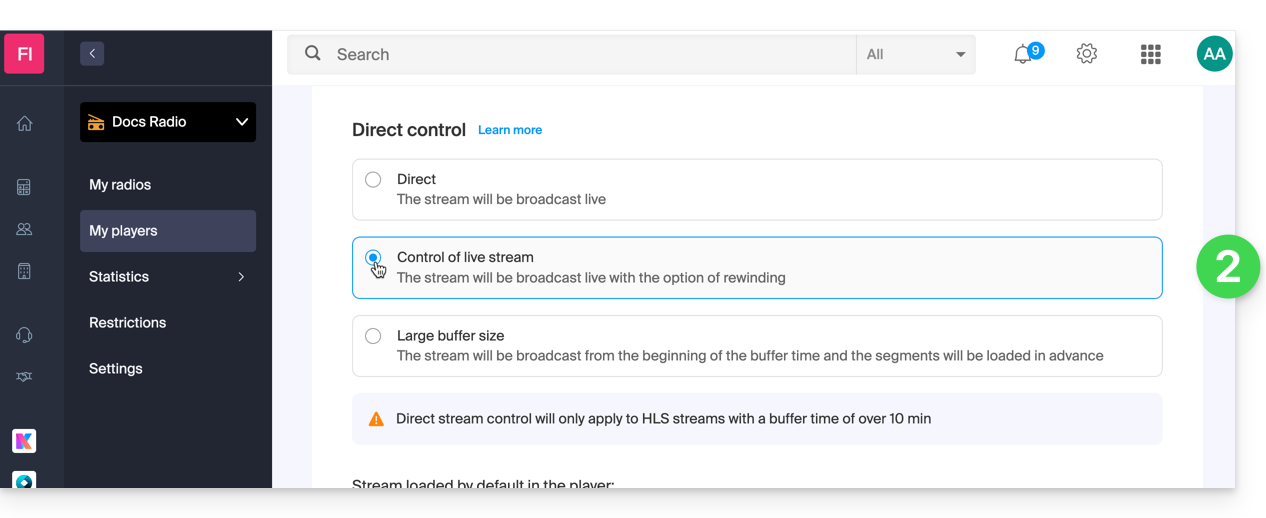
- Ativar a função de retomar a reprodução no seu reprodutor (consulte este outro guia) se desejar disponibilizá-la aos ouvintes (desativada por padrão):
Link para esta FAQ: https://faq.infomaniak.com/2789
Esta seção de perguntas frequentes foi útil?
Este guia apresenta o HLS, que segmenta o seu áudio para uma transmissão HTTP confiável, compatível e altamente distribuível, ideal para públicos móveis e grandes audiências.
O que é HLS?
HLS (HTTP Live Streaming) é um protocolo de transmissão em fluxo que divide o áudio em pequenos segmentos de alguns segundos e publica um manifesto .m3u8 listando esses segmentos. O reprodutor baixa esses segmentos via HTTP/HTTPS (portas 80/443), o que facilita o armazenamento em cache, a retomada após interrupção e a distribuição em larga escala.
No seu serviço de Streaming de Rádio, a ativação do HLS adiciona um fluxo adicional dedicado. Ele possui sua própria URL de reprodução (manifesto HLS) e pode ser selecionado e priorizado no reprodutor Infomaniak. O fluxo HLS coexiste com seus fluxos existentes (por exemplo, MP3/AAC), sem interrupção do serviço.
Vantagens para um fluxo de rádio
- Compatibilidade alargada: suporte nativo em iOS/iPadOS (Safari) e amplo suporte através de leitores HTML5 modernos e aplicações de terceiros.
- Escalabilidade e desempenho: distribuição via HTTP(S), facilmente distribuível por CDN e caches; melhor escalabilidade do que um fluxo contínuo único.
- Robustez: em caso de pequenas interrupções, o leitor pode recuperar os segmentos seguintes e retomar rapidamente; menos suscetível a perdas momentâneas.
- Atravessa firewalls: funciona nas portas 80/443, sendo geralmente mais bem aceito por firewalls e proxies corporativos do que alguns fluxos “ICY”.
- HTTPS simplificado: entrega segura sem plugins ou protocolos exóticos.
- Adaptação de taxa de bits (ABR): quando várias variantes são oferecidas, o reprodutor pode alternar automaticamente de acordo com a qualidade da rede, a fim de limitar interrupções em dispositivos móveis.
- Flexibilidade de integração: uma porta de escuta distinta permite expor o HLS como fluxo principal, secundário ou de backup no seu reprodutor.
Particularidades e pontos de atenção
- Latência: o HLS adiciona uma latência geralmente da ordem de algumas dezenas de segundos (relacionada com o tamanho dos segmentos e o buffering). Isso é normal para este protocolo.
- Leitor compatível necessário: utilize o player Infomaniak ou um leitor/SDK web que suporte os manifestos
.m3u8. - Ambiente heterogêneo: alguns receptores de hardware mais antigos (rádios web, rádios de carro IP) aceitam apenas fluxos MP3/Icecast; mantenha as URLs históricas em paralelo.
- ABR condicional: a adaptação da taxa de bits só é eficaz se vários perfis forem publicados; caso contrário, o fluxo HLS continua a funcionar com uma única qualidade.
Link para esta FAQ: https://faq.infomaniak.com/2791
Esta seção de perguntas frequentes foi útil?
Este guia explica como manter o controle sobre seus fluxos de rádio online MP3/AAC ou HLS, ativando a proteção por chave única (token), para decidir, por exemplo, se um ouvinte pode ou não ouvir sua rádio.
Introdução
- A cada conexão, você fará uma solicitação à API Infomaniak, que retornará um token exclusivo com uma duração de vida limitada e configurável.
- Este token autorizará qualquer pessoa que o possua a acessar o fluxo durante esse período.
- Você pode proteger um fluxo MP3/AAC ou HLS independentemente um do outro (o mesmo vale para a geolocalização).
- A ativação da restrição implica uma alteração na configuração do fluxo, o que pode levar alguns minutos para ser replicado nos servidores.
Proteger um fluxo de áudio com uma chave única
Para isso, basta ir para as configurações de restrições e ativar a proteção por token no fluxo que deseja proteger:
- Clique aqui para acessar o gerenciamento do seu produto no painel de controle Infomaniak (precisa de ajuda?).
- Clique diretamente no nome atribuído ao produto em questão:
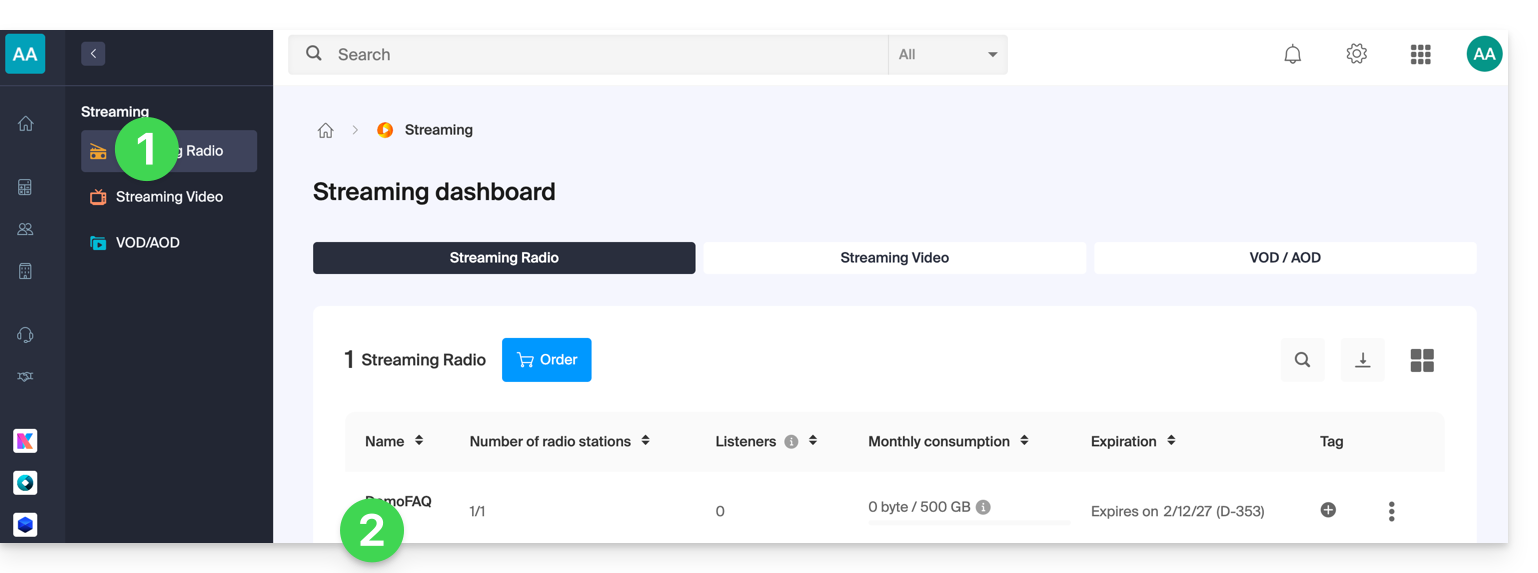
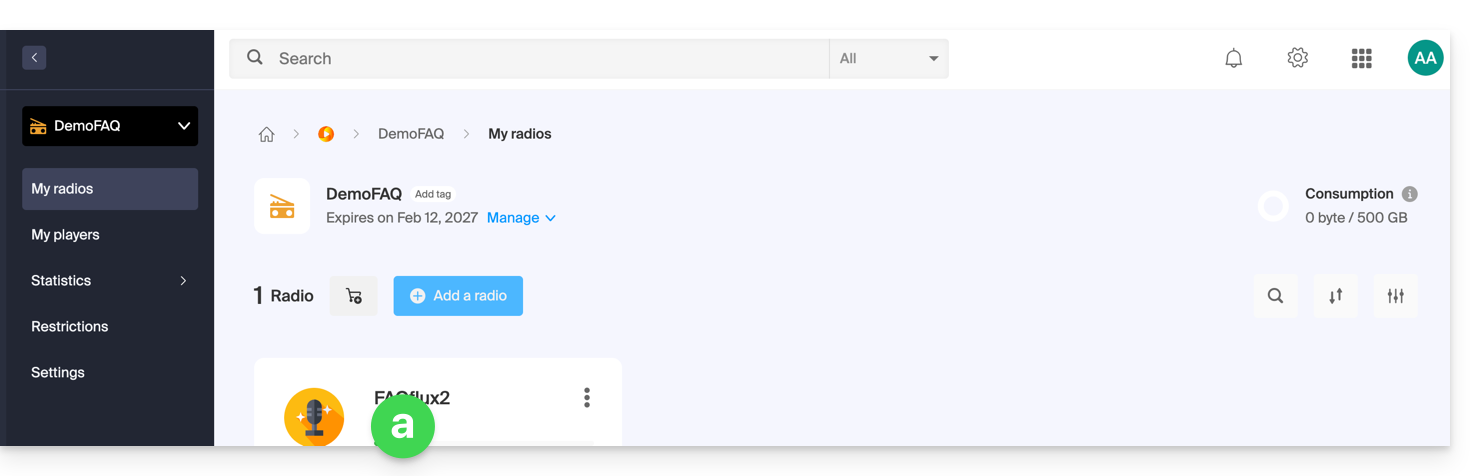
- Clique em:
- no nome da rádio:
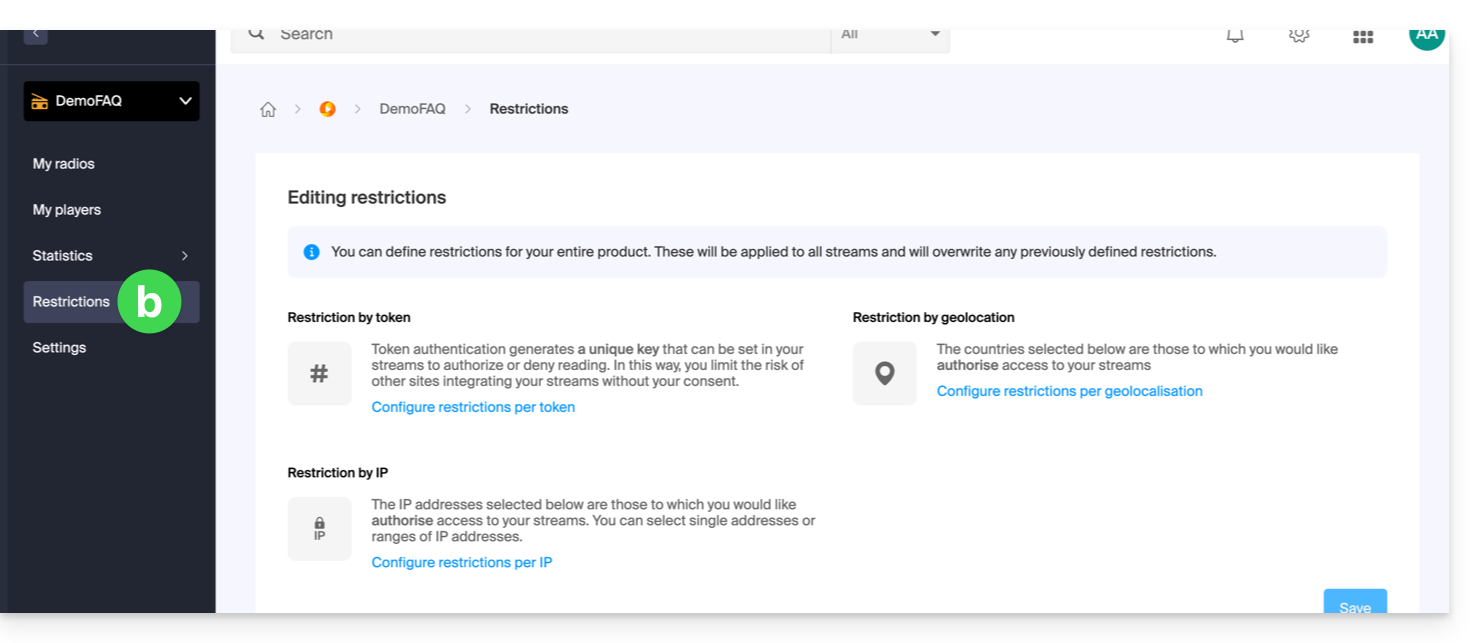
- ou em Restrições no menu lateral esquerdo para aplicar restrições a todo o produto:
- no nome da rádio:
- Ao selecionar
aacima, clique em Restrições no menu lateral esquerdo. - Se necessário, escolha HLS.
- Clique no menu de ação ⋮ localizado à direita do elemento em questão.
- Clique em Restrição por token:
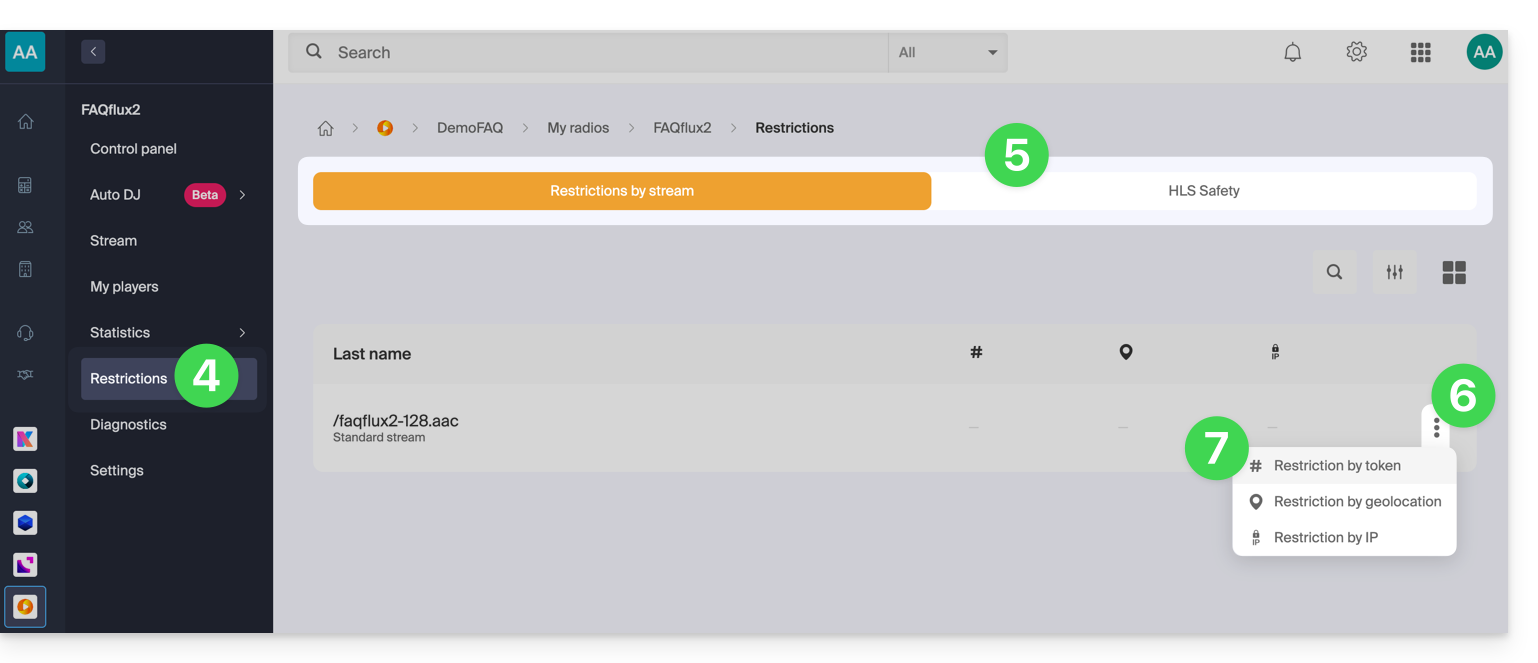
Em seguida, ative a proteção.
Atenção: ao ativar esta opção, o acesso ao fluxo será bloqueado instantaneamente para novas conexões.Adapte os seus reprodutores para que considerem a restrição, conforme ilustrado no exemplo abaixo: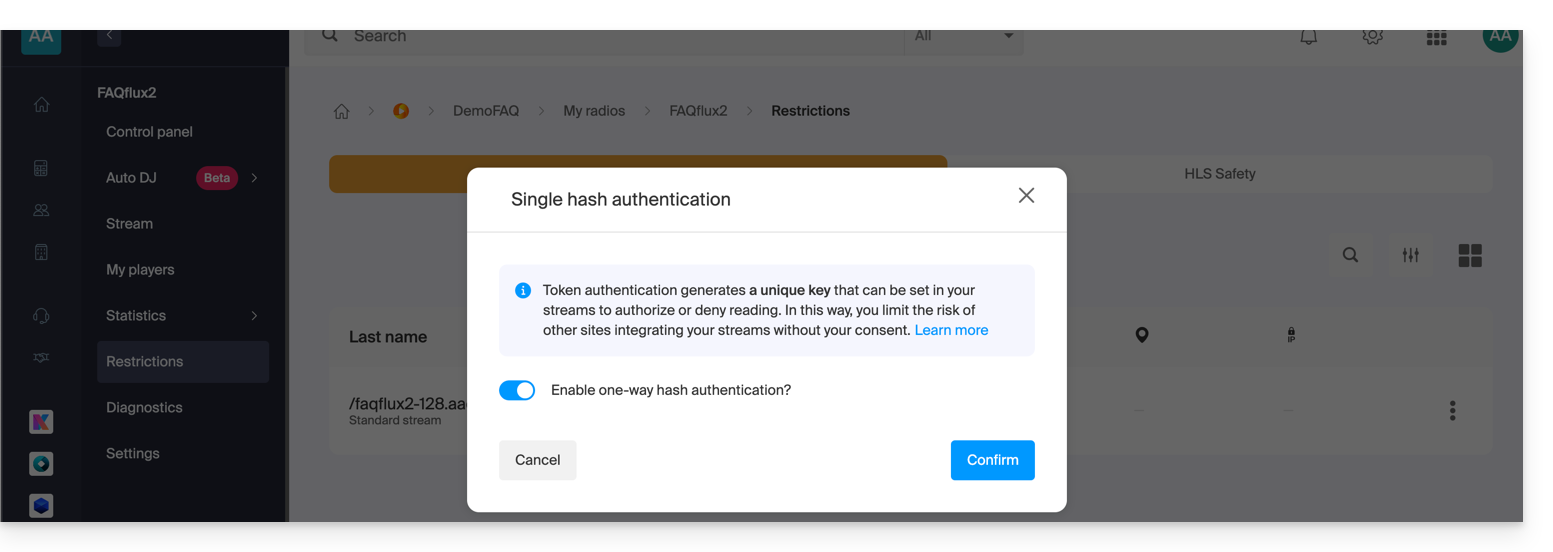
Criar um token de API Radio
Para ter acesso à API Radio, você deve primeiro autenticar-se usando um token de aplicação. Esta etapa só precisa ser realizada uma vez. Para criar este token de aplicação, consulte este outro guia.
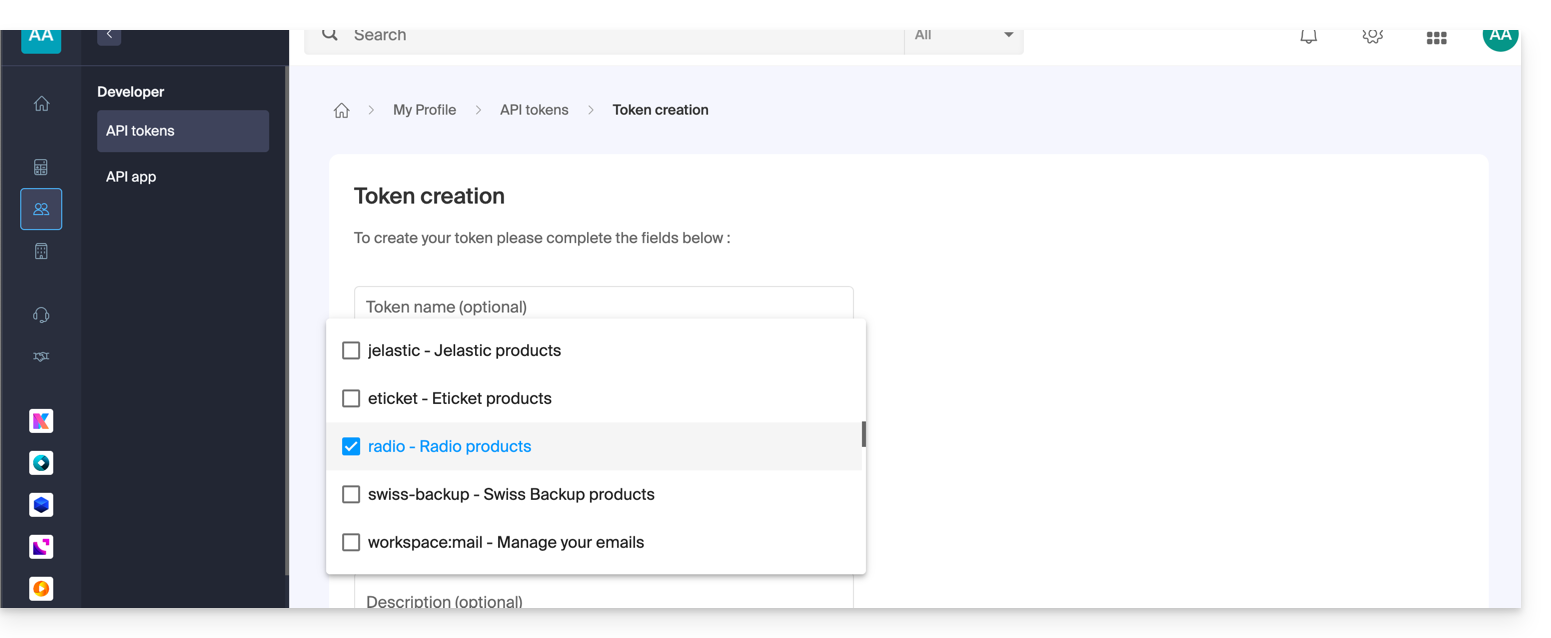
O escopo é radio e a duração é ilimitada para evitar a necessidade de regenerar um código regularmente. Depois de gerar o token, copie-o para colá-lo no exemplo abaixo.
Exemplo de utilização em linguagem PHP
Para MP3/AAC ou HLS, o código pode ser praticamente o mesmo, sendo apenas a URL chamada no POST que muda na sua forma.
Cole abaixo o token gerado no lugar daquele que está indicado:
if (!defined('API_TOKEN')) {
     define('API_TOKEN', 'AYF5lSh3c7Xy5974Fs12RTkTThujT-L9R4Xk2ZfGyP6sV7QqJ1oC3jD8nFtKzIxUeMw5oNzR6');
}
/**
 * Fonction générique pour executer des requêtes cURL
 *
 * @param string $method Méthode HTTP (GET, POST, PUT, etc...)
 * @param string $url Url de l'api a requêter
 * @param array $headers Liste des en-têtes HTTP (l'autorisation doit être passée ici avec un ['Authorization: Bearer ']
 * @param array $payload Un tableau contenant les données pour créer un token
 * @return mixed
 */

function request(string $method, string $url, array $headers = [], array $payload = []): mixed{
    // prepare options array
    $opts = [
        CURLOPT_HTTPHEADER => $headers,
        CURLOPT_RETURNTRANSFER => true,
        CURLOPT_URL => $url,
        CURLOPT_CUSTOMREQUEST => strtoupper($method),
    ];

    // add payload if relevant
    if ($payload && $method !== 'GET') {
        $opts[CURLOPT_POSTFIELDS] = json_encode($payload);
    }
    $ch = curl_init();
    curl_setopt_array($ch, $opts);
    $result = curl_exec($ch);
    if(curl_errno($ch)){
        throw new Exception(curl_error($ch));
    }
    $data = json_decode($result, true);
    if ($data['result'] === 'error') {
        throw new Exception($data['error']['description'] ?? 'an error occured');

    }
    return $data['data'];
}
Vamos criar o token. A URL para criar o token é estruturada da seguinte forma:
- Para um fluxo MP3 / AAC
POST {{URL_11}}Exemplo para proteger https://newradiotest.ice.infomaniak.ch/newradiotest-128.aac: a rota será: https://api.infomaniak.com/1/radios/acl/streams/newradiotest-128.aac/token
- Para um fluxo HLS
POST {{URL_14}}Exemplo para proteger https://myradiostream.radiohls.infomaniak.com/myradiostream/manifest.m3u8, o endereço será: https://api.infomaniak.com/1/radios/acl/hls_streams/myradiostream/token
Exemplo no caso de MP3/AAC, lembre-se de ajustar:
$token = request(
    'POST',
   '{{URL_17}}',
    // en-tête d'authorization
    [
        'Authorization: Bearer ' . API_TOKEN,
        'Content-Type: application/json',
    ],
    /**
     * payload pour créer le token, vous pouvez passer les valeurs suivantes
     * window     | 300               | optionnel | durée de validité du token (default: 5 minutes)
     */

    [
        'window' => 3600, // 1h validity
    ]
);
É importante notar que, se este código for gerado no momento do carregamento da página, o utilizador terá “window” segundos para iniciar a reprodução do fluxo. Após esse período, o token expirará e o fluxo não poderá ser iniciado, a menos que a página seja recarregada. Dependendo das suas necessidades e do seu caso de uso, será necessário ajustar este período da melhor forma possível.
Também será necessário substituir abaixo a URL de reprodução do seu fluxo, no lugar daquela indicada, mantendo o parâmetro $token no final. Por fim, exibimos o reprodutor (aqui, uma simples tag html5, mas podemos adicionar qualquer camada adicional, passando o token nos parâmetros $_GET da URL).
$streamUrl = "{{URL_18}}";
echo "<audio controls=""><source src="$streamUrl"></audio>";
Link para esta FAQ: https://faq.infomaniak.com/2792
Esta seção de perguntas frequentes foi útil?
Este guia aborda as estatísticas do Rádio Online, que permitem, entre outras coisas, verificar possíveis interrupções no fluxo.
Analisar as estatísticas recentes
Para aceder a esta informação:
- Clique aqui para aceder à gestão do seu produto no Manager Infomaniak (precisa de ajuda?).
- Clique diretamente no nome atribuído ao produto em questão:
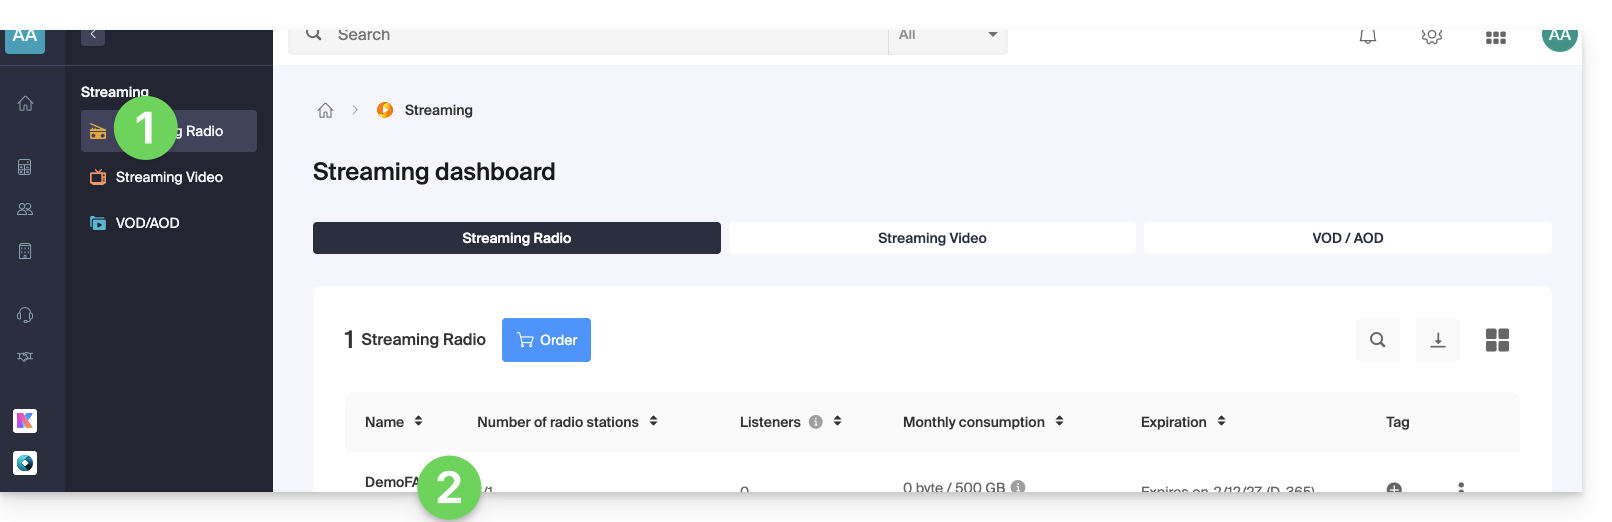
- Clique em Estatísticas no menu lateral esquerdo:
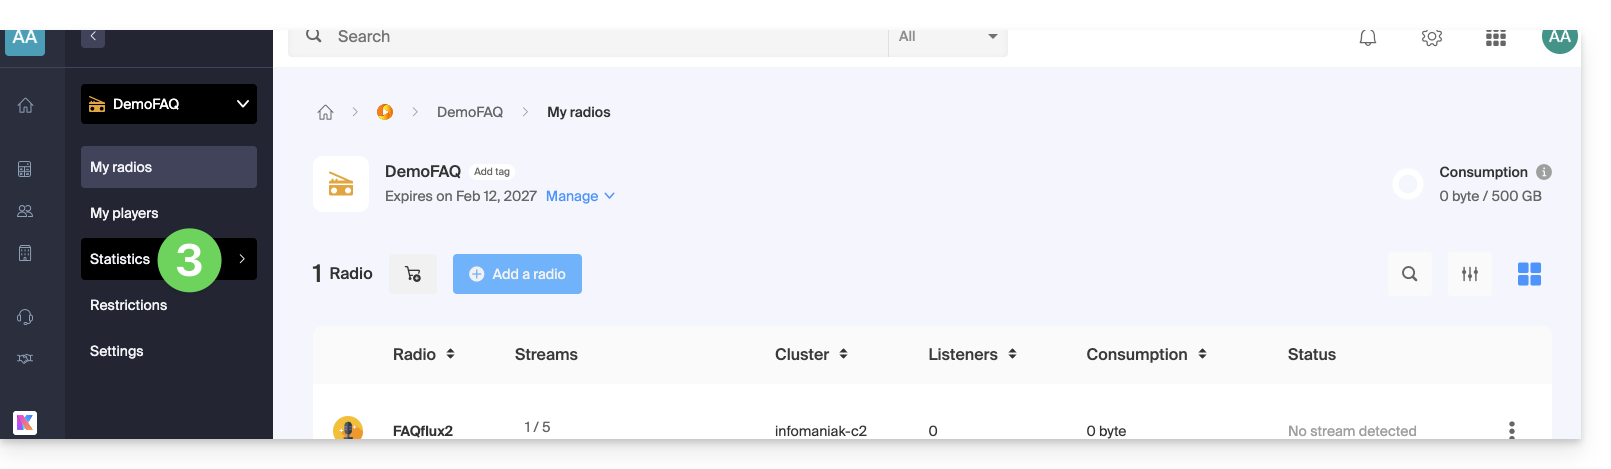
- Clique em Público em tempo real no menu lateral esquerdo.
- Escolha uma data para carregar o gráfico correspondente.
- Passe o cursor sobre as interrupções indicadas por cores para obter mais informações:
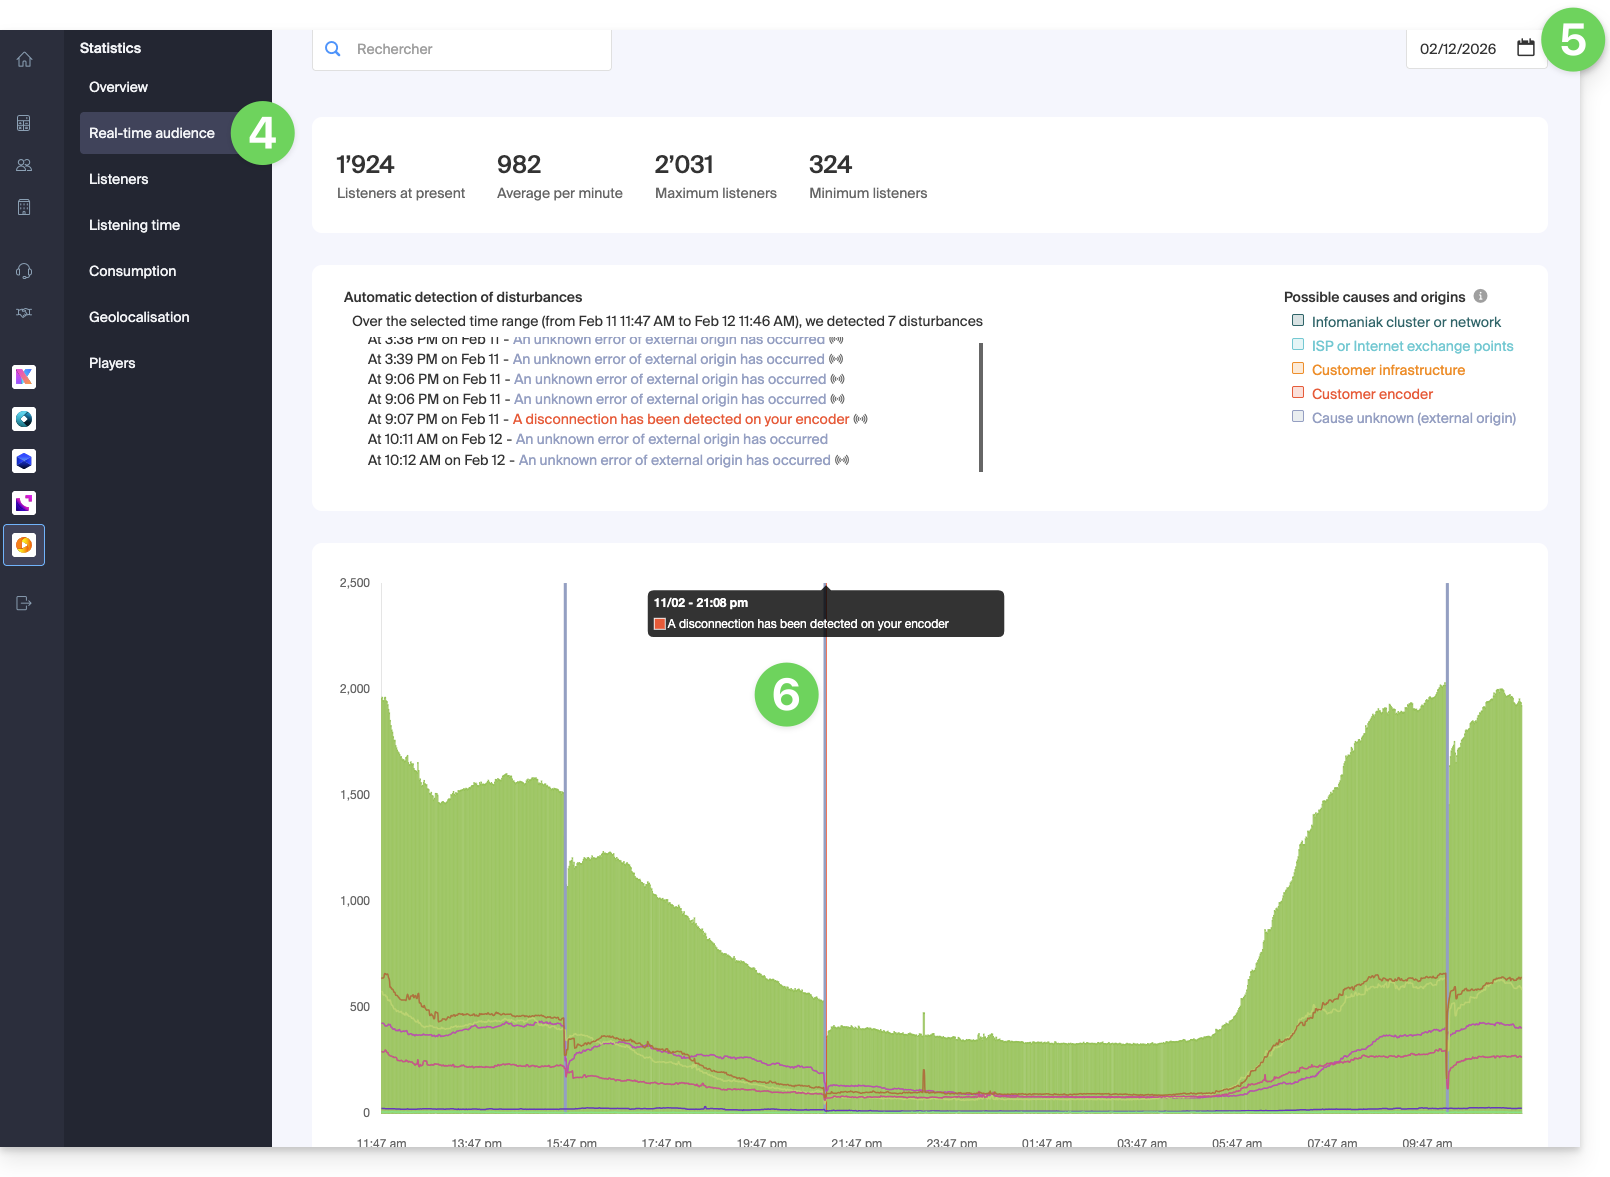
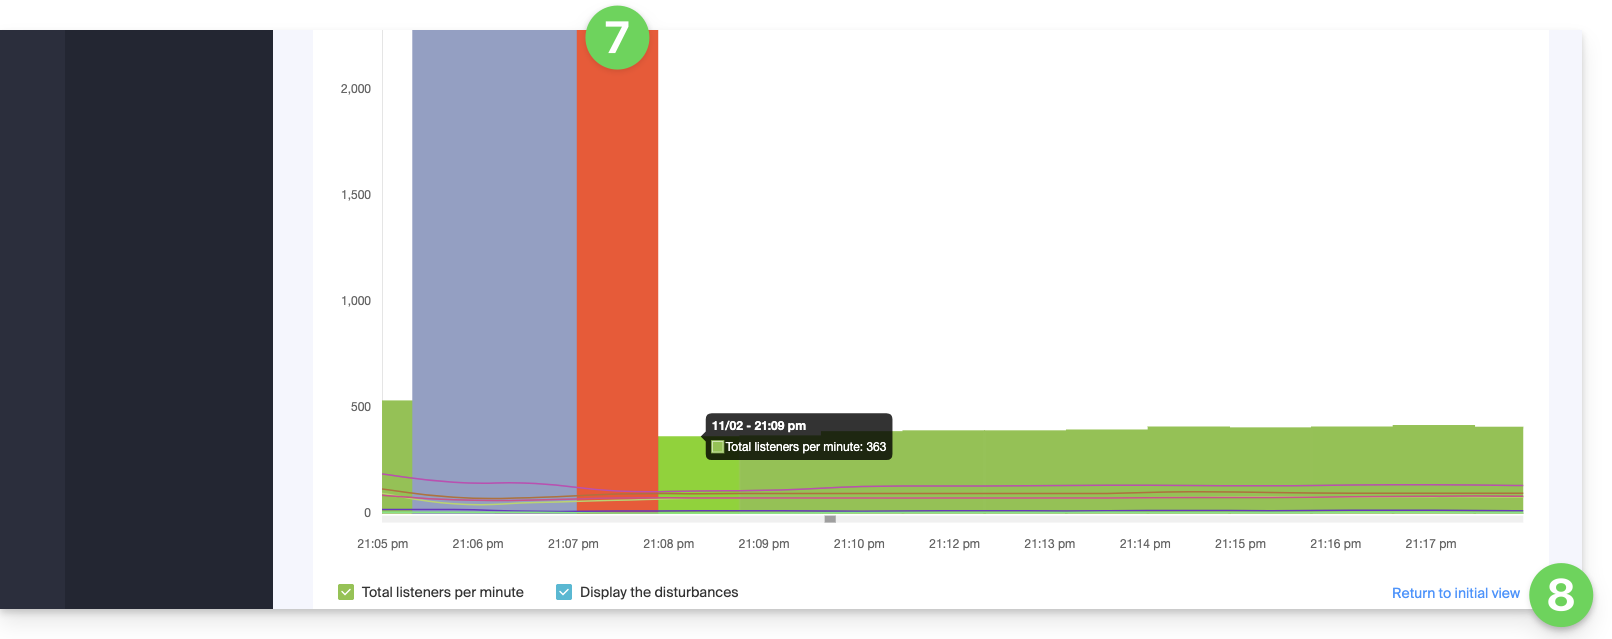
- Aproxime o gráfico com a roda do mouse ou selecionando o período.
- Você pode retornar à visualização inicial clicando no canto inferior direito:
Link para esta FAQ: https://faq.infomaniak.com/2884
Esta seção de perguntas frequentes foi útil?
Este guia detalha a configuração de um reprodutor para o seu Streaming de Rádio Infomaniak.
Pré-requisitos
Configurar as opções do reprodutor Infomaniak
Depois de vincular o seu fluxo ao seu reprodutor e de o seu reprodutor ser criado:
- Clique aqui para acessar o gerenciamento do seu produto no Manager Infomaniak (precisa de ajuda?).
- Clique diretamente no nome atribuído ao produto em questão.
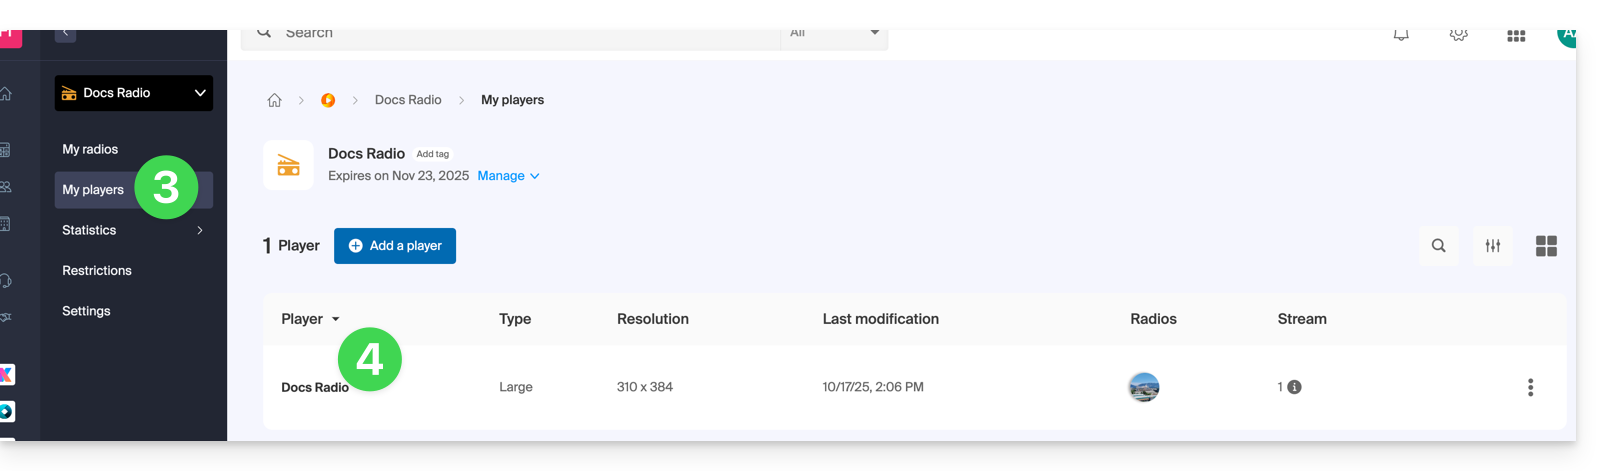
- Clique em Meus reprodutores no menu lateral esquerdo.
- Clique no nome do reprodutor a ser configurado (ou adicione um novo reprodutor clicando no botão acima):
1. Guia Aparência
É aqui que pode escolher o tamanho do reprodutor (grande, médio, mini ou reprodutor de várias rádios) e a sua percentagem de exibição.
Pode personalizar as cores do fundo, dos botões e do texto: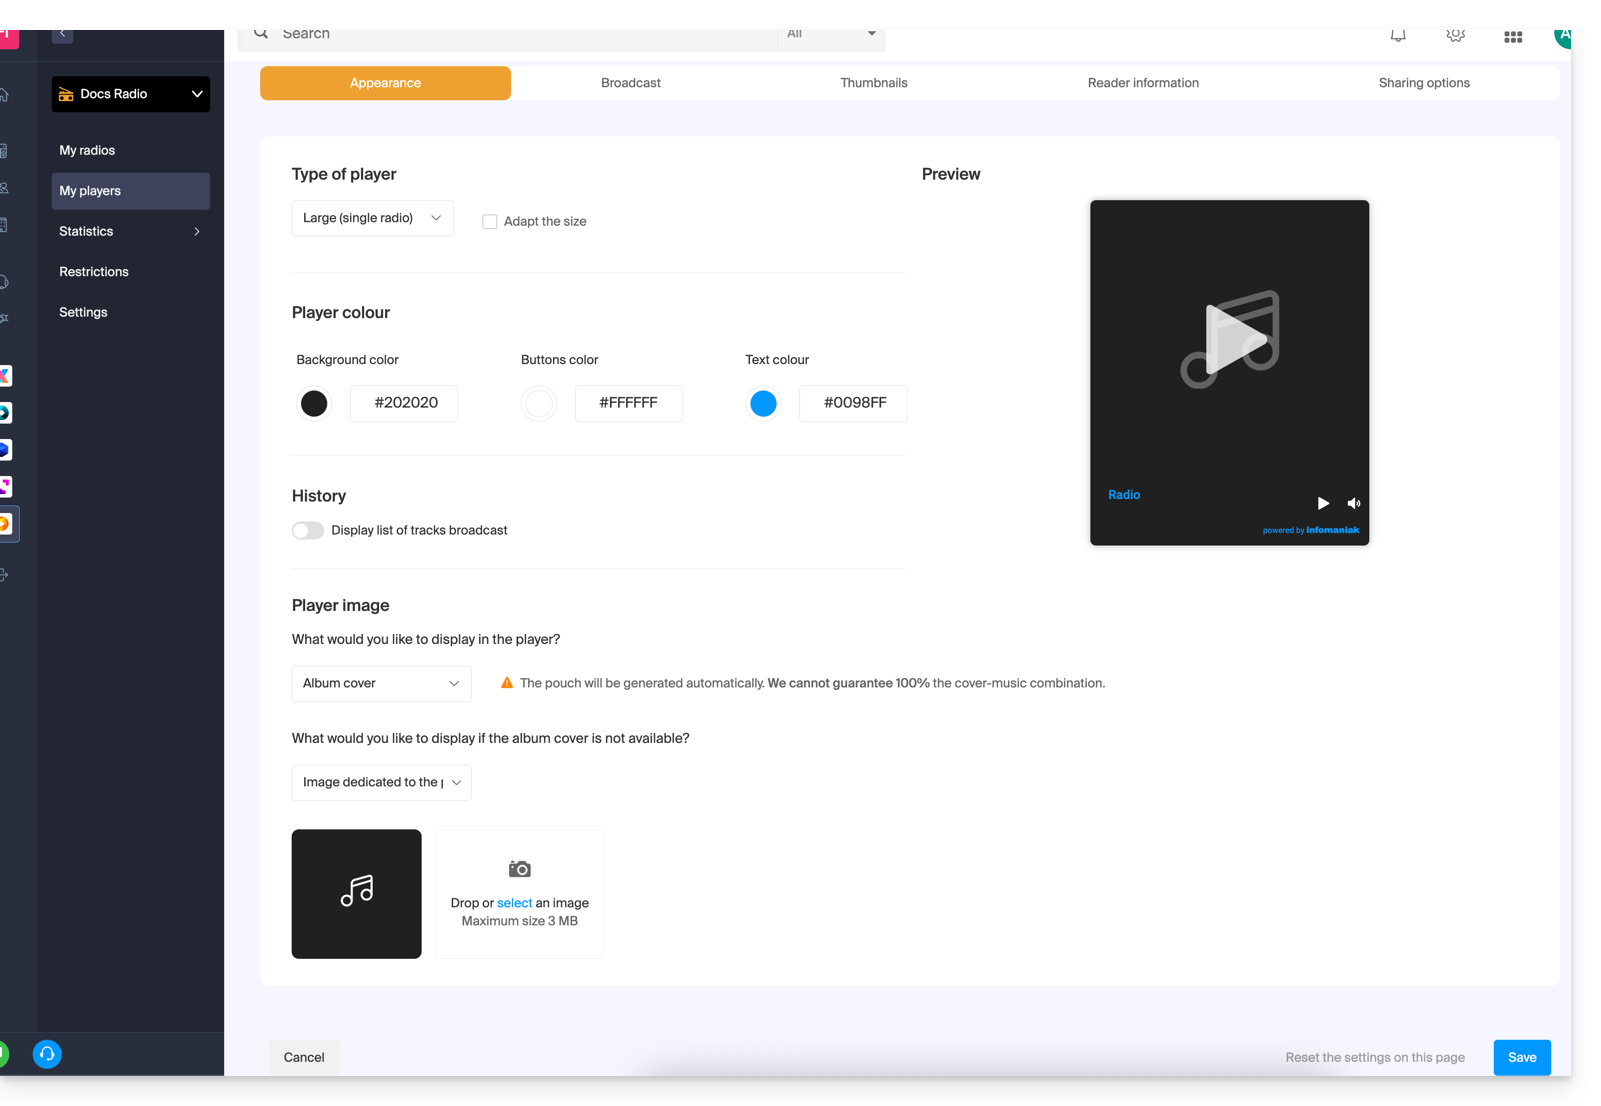
Um botão de alternância permite ativar ou desativar a exibição das faixas reproduzidas, com ou sem os seus horários de reprodução:
- Consulte os detalhes sobre este assunto no final deste guia.
O reprodutor pode exibir:
- uma ilustração que representa a capa do álbum ou uma imagem de substituição, caso não esteja disponível,
- uma imagem estática (3 MB máx.),
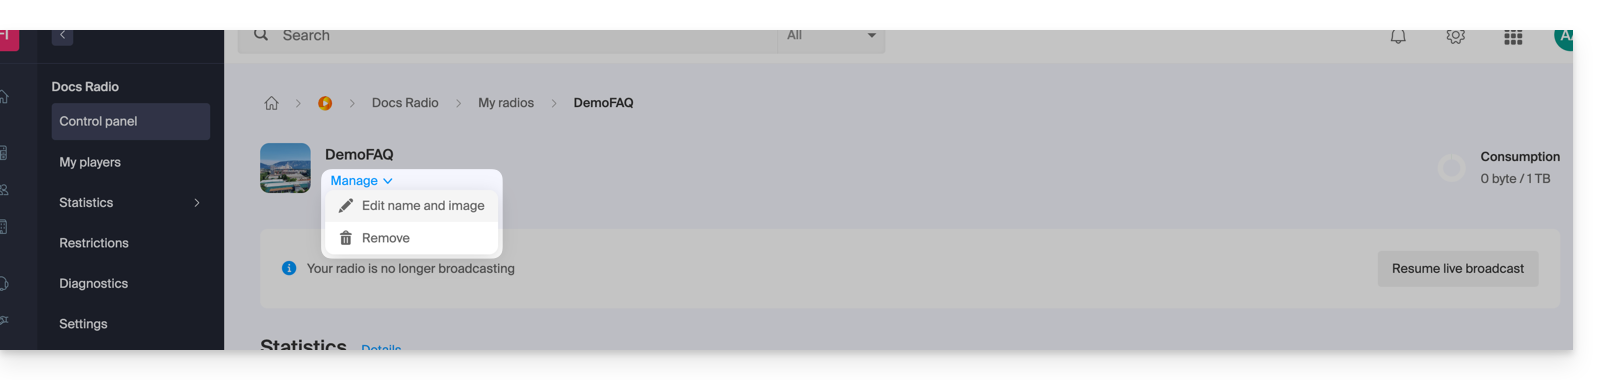
- o logotipo da sua rádio, que pode personalizar aqui:
- uma visualização do espectro de áudio (Espectrograma/Espectro).
2. Separador Transmissão
É aqui que pode associar os seus fluxos de rádio (HLS ou não) ao seu reprodutor que está a configurar.
Consulte este outro guia sobre as opções disponíveis para a gestão da transmissão em direto: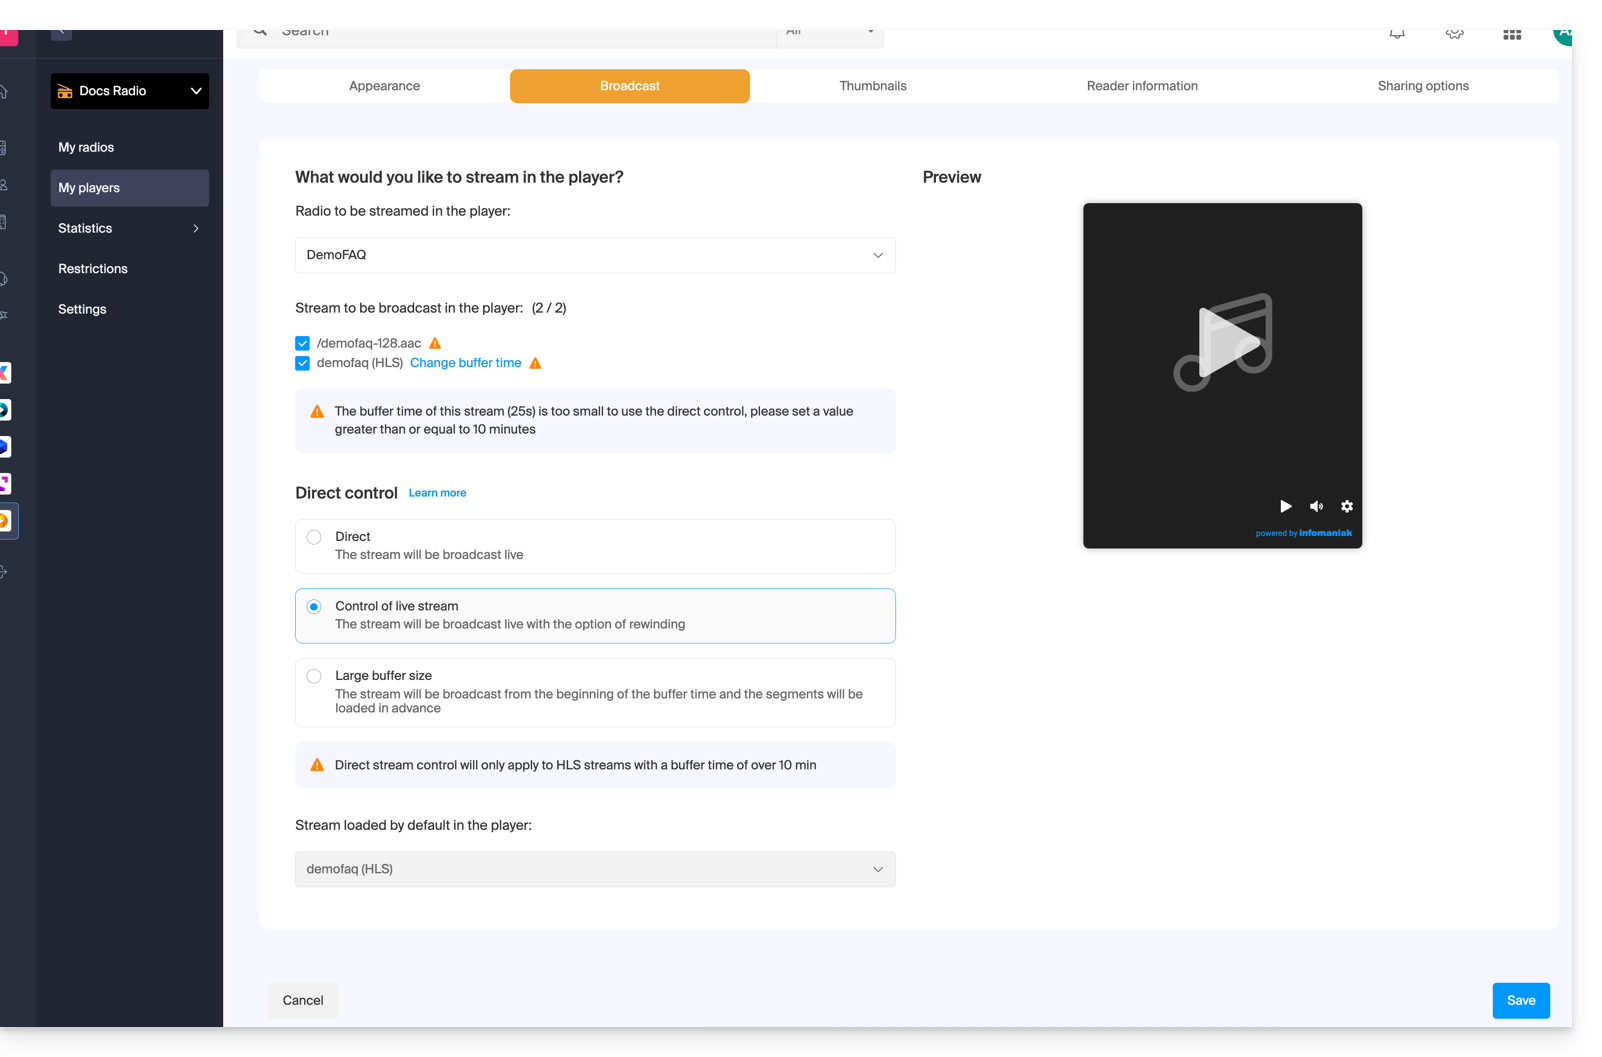
3. Separador Miniaturas (pré-visualização da mídia)
É aqui que pode alterar a imagem de pré-visualização (miniatura) visível no reprodutor do ouvinte quando a mídia está a carregar ou indisponível/restrita: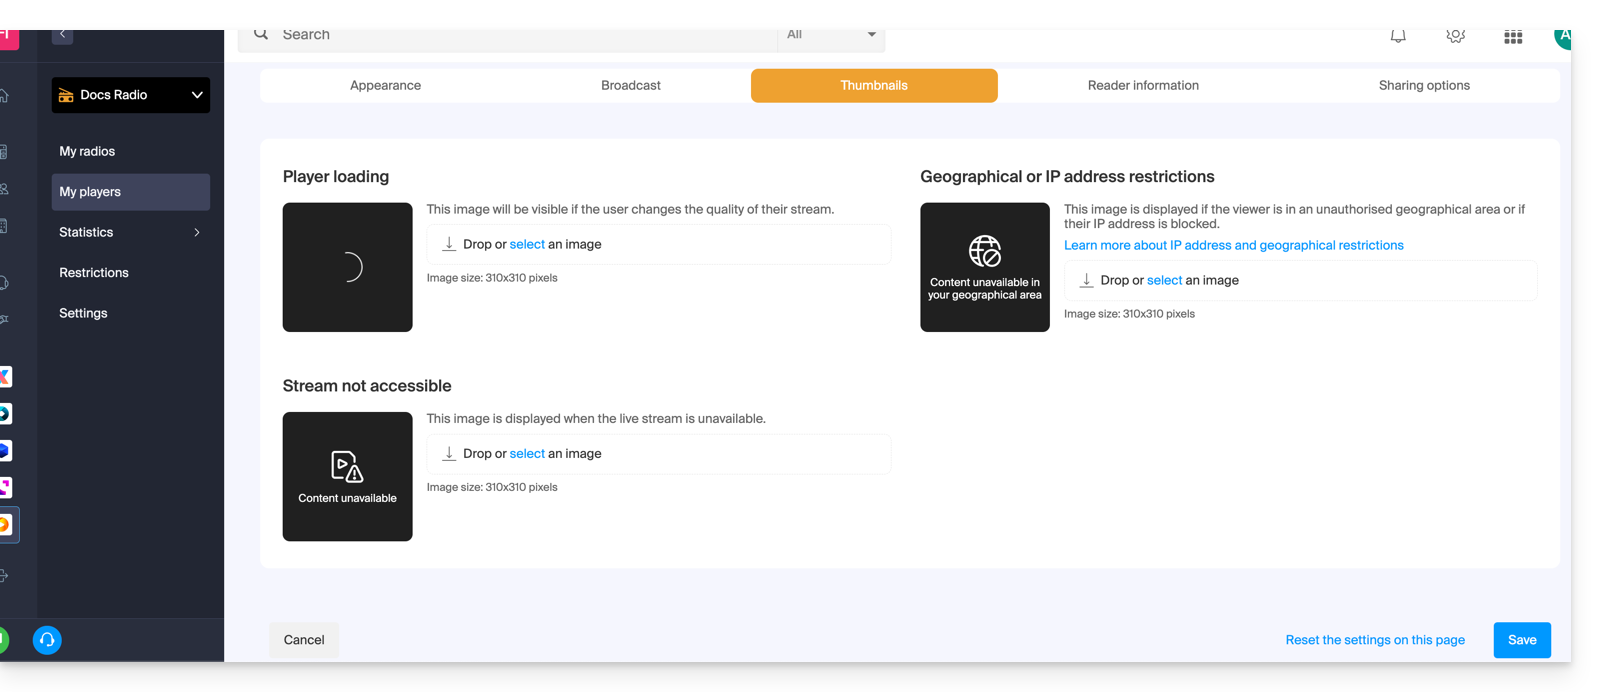
4. Separador Informações do reprodutor
É aqui que pode dar um nome ao seu reprodutor e decidir se quer mostrar ou ocultar: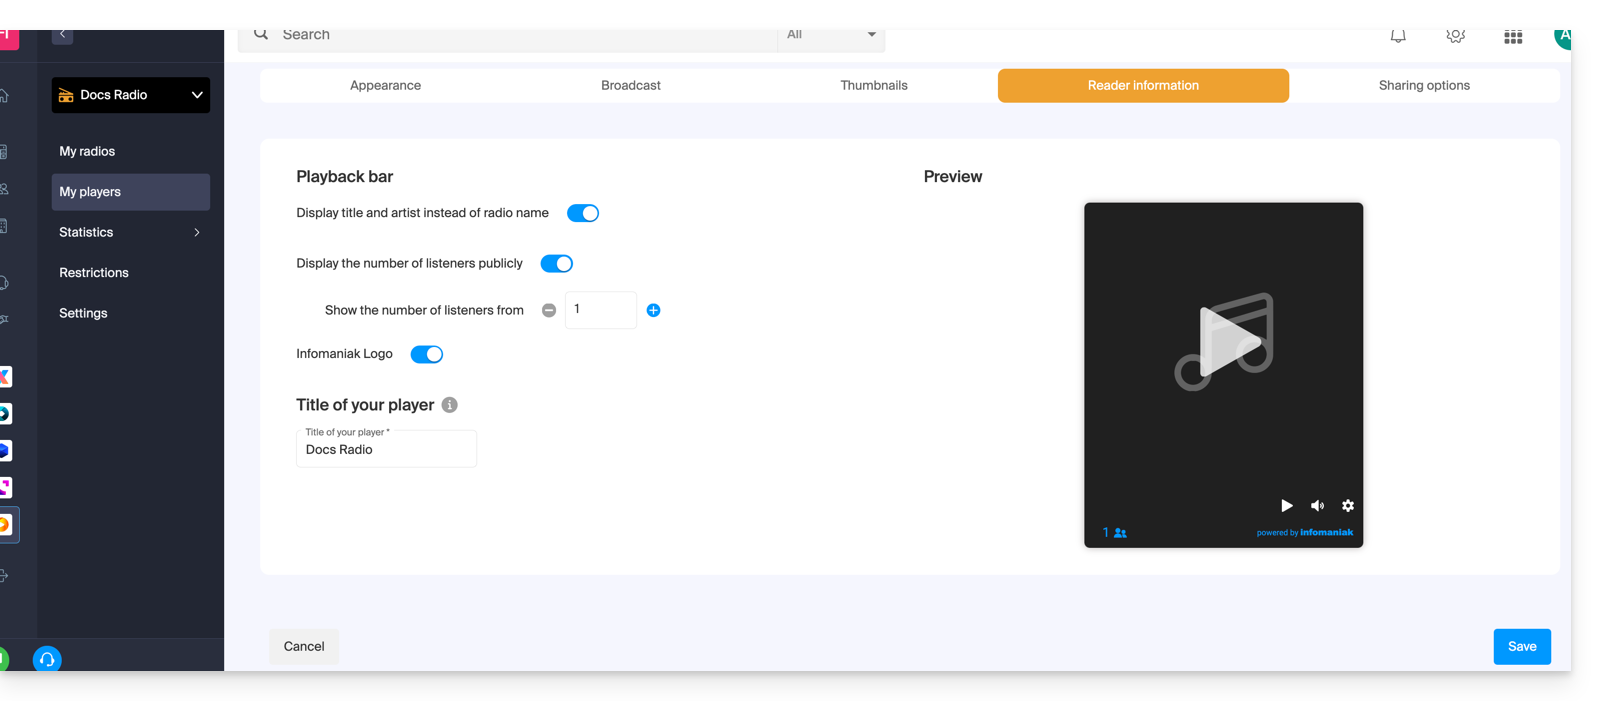
- o título e o artista em vez do nome da rádio,
- o número de ouvintes,
- o logótipo da Infomaniak.
5. Separador Opções de partilha
Um botão de alternância (toggle switch) permite ativar ou desativar certos serviços, como o Facebook: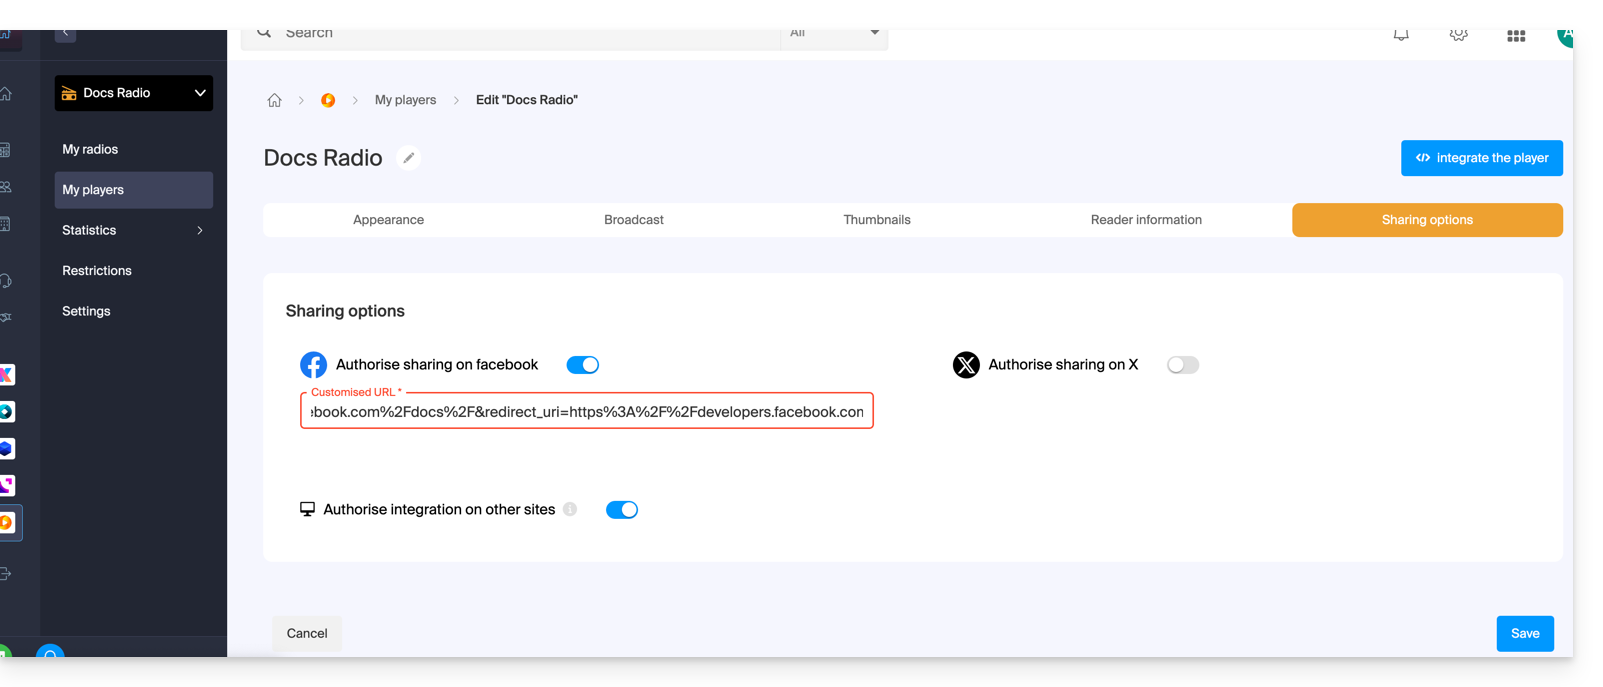
Uma vez ativado, um botão de compartilhamento para esses serviços será visível no seu Player: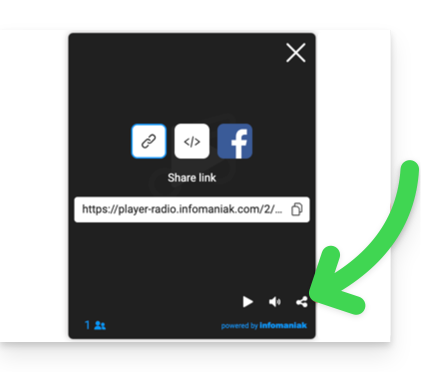
Detalhes do histórico de transmissão (guia #1)
O histórico de transmissão permite ouvir novamente as músicas transmitidas (entre 1 e 40), caso o seu fluxo seja do tipo HLS (você poderá então definir um buffer que varia de 25 segundos a 2 horas):
A funcionalidade de retroceder e ouvir novamente não está ativada por padrão: ela permanece opcional, a fim de respeitar as restrições de alguns países ou rádios. Uma vez ativada, o administrador da rádio pode escolher quais fluxos estarão disponíveis para transmissão (consulte a guia #2 acima), enquanto o ouvinte pode selecionar a qualidade do áudio no Player:
Position & intégration de l'historique de diffusion
A lista pode ser consultada das seguintes formas:
- diretamente abaixo do Player,
- no Player,
- ou em uma janela separada na integração do seu site…
De fato, é possível exibir o histórico em uma segunda iframe, distinta da do Player principal. Exemplo de URL para o Player:https://player-radio.infomaniak.com/2/prod/super/7cbaa24a-3510-47a4-b41e-b99218bfd507
E para o histórico arquivado:
https://player-radio.infomaniak.com/2/prod/history
As duas iframes devem ser integradas na mesma página e comunicam entre si para atualizar o histórico ou iniciar uma faixa que já foi transmitida.
Um segundo modo de integração permite exibir um histórico autônomo, sem a iframe principal. Basta adicionar o ID do Player à URL:
Link para esta FAQ: https://faq.infomaniak.com/2888
Esta seção de perguntas frequentes foi útil?