Base de connaissances
1 000 FAQ, 500 tutoriels et vidéos explicatives. Ici, il n'y a que des solutions !
Importer les photos Google vers kDrive
Ce guide explique comment exporter vos photos depuis Google Photos (https://photos.google.com/) puis les importer dans kDrive Infomaniak.
1. Exporter vos photos Google
Pour récupérer sur votre ordinateur les photos stockées dans Google Photos, utilisez Google Takeout. Ce service permet notamment d'exporter tous les éléments ou de sélectionner uniquement certains albums si vous préférez procéder par étapes:
- Connectez-vous à Google Takeout.
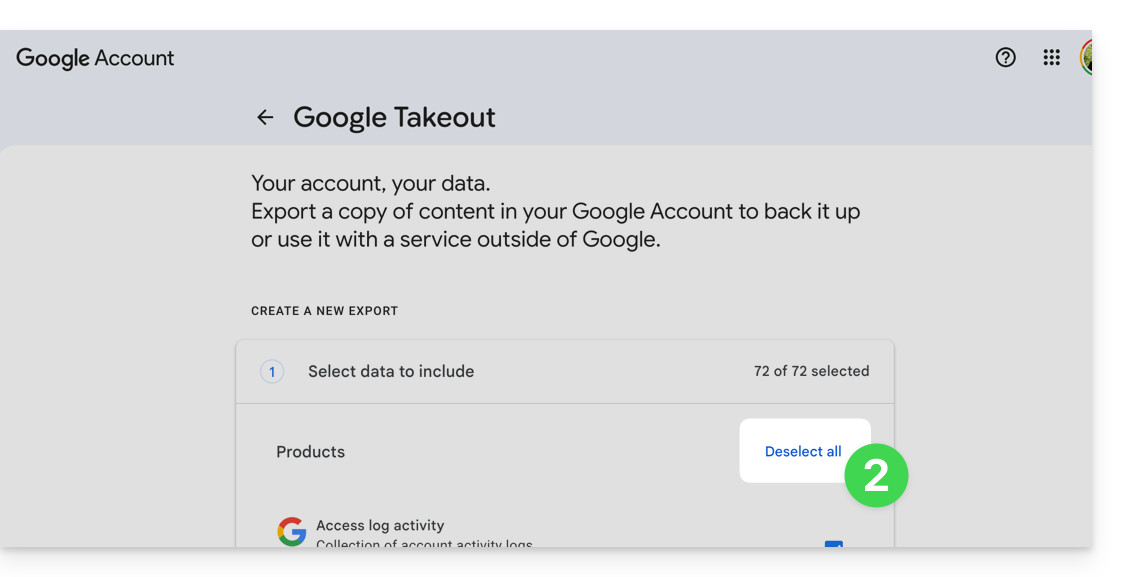
- Désélectionnez tous les produits pour ne conserver que Google Photos:
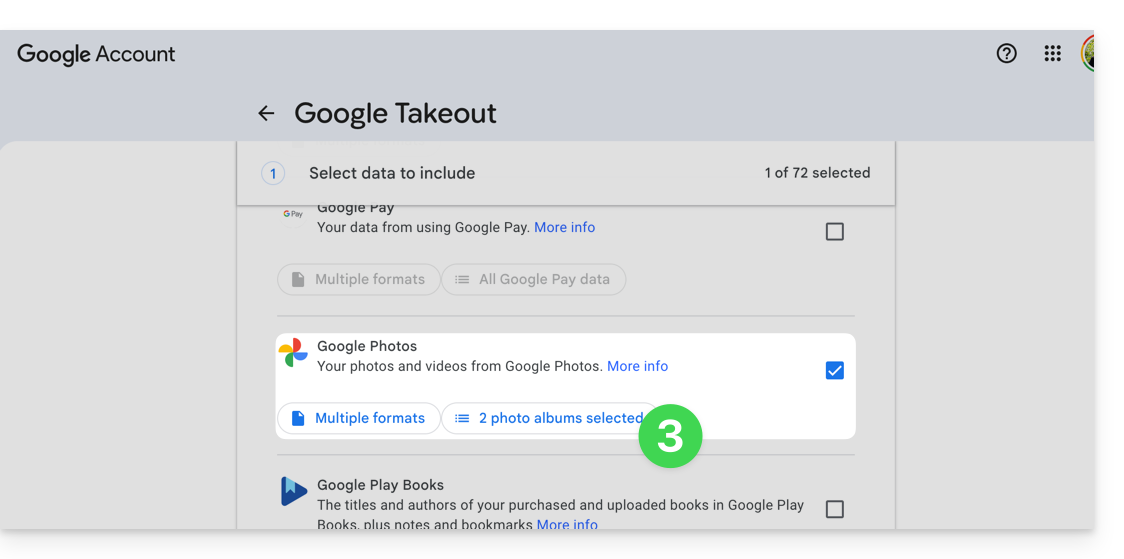
- Si nécessaire, désélectionnez les albums à ne pas exporter:
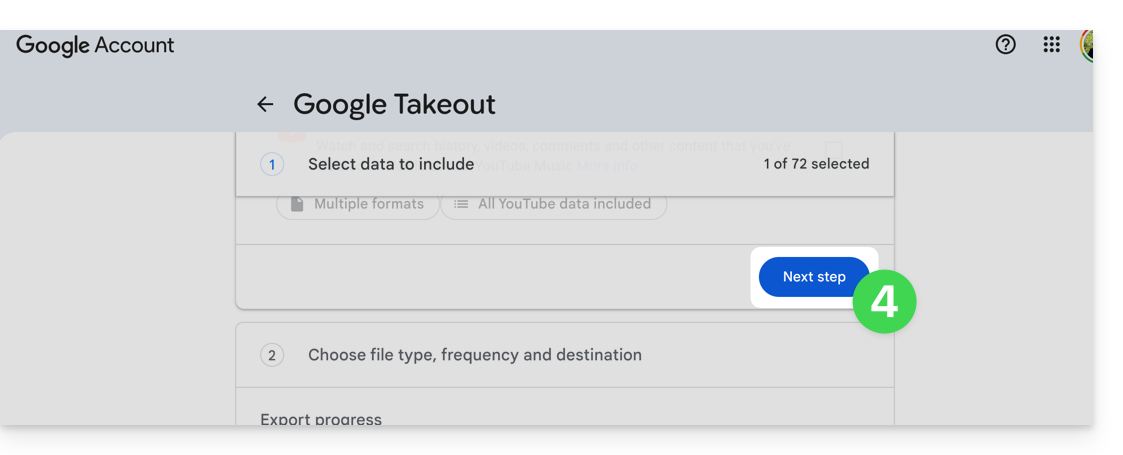
- Passez à l'étape suivante en bas de page:
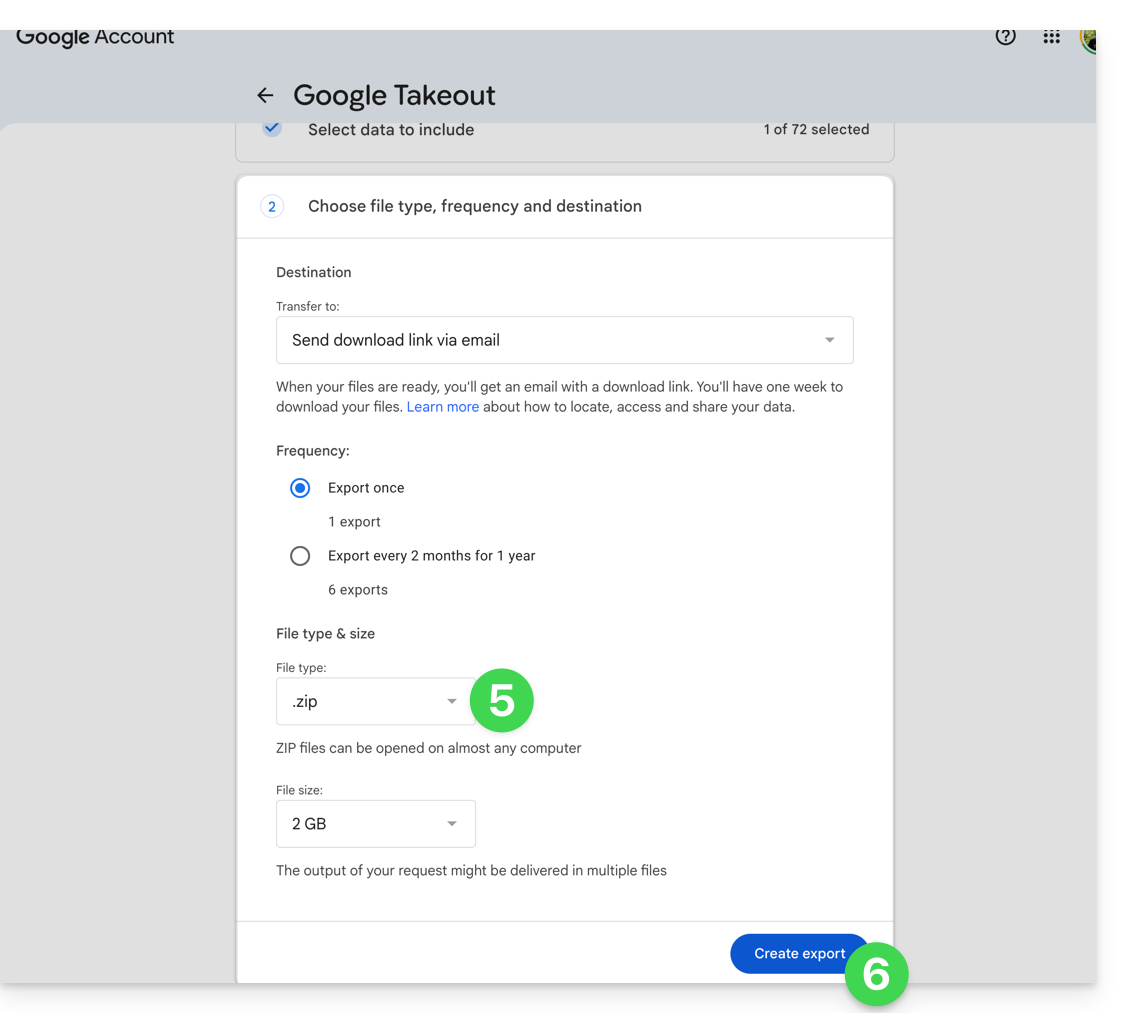
- Configurez l'export au format ZIP.
- Cliquez sur le bouton Créer une exportation pour démarrer l'export:
- Patientez jusqu'à la réception de l'e-mail contenant les liens de téléchargement. Selon le volume de données, la préparation de l'export peut prendre plusieurs heures, voire plusieurs jours.
- Téléchargez les archives ZIP, puis décompressez-les sur votre ordinateur:
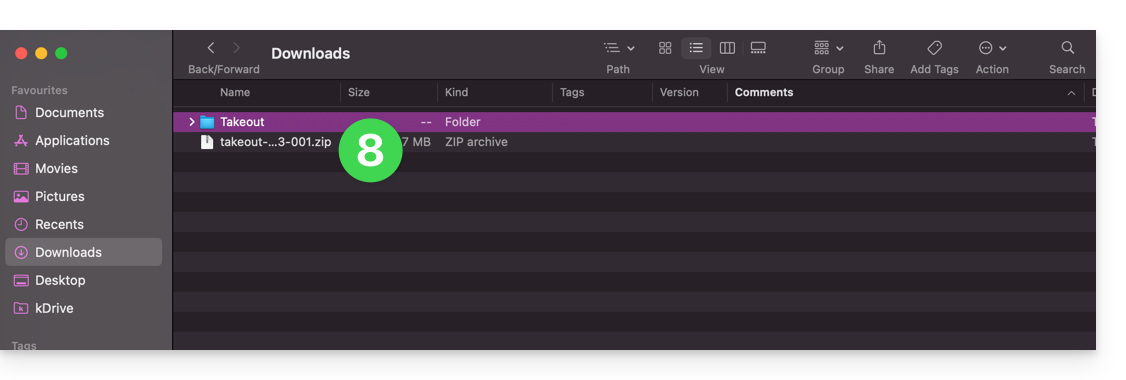
- Regroupez si nécessaire les dossiers exportés avant de les importer dans kDrive.
2. Corriger les dates des fichiers exportés
Lors d'un export, les dates système des fichiers peuvent être remplacées par la date d'exportation au lieu de la date originale de prise de vue. Si l'ordre chronologique des photos n'est pas correct après l'export, vous pouvez corriger ces dates avant l'import dans kDrive.
Avant d'exécuter un script, travaillez sur une copie de vos fichiers exportés. Ne supprimez pas les fichiers .json fournis par Google Takeout avant le traitement: ils peuvent contenir la date originale lorsqu'elle n'est pas disponible dans les métadonnées EXIF du fichier.
Les scripts ci-dessous recherchent une date dans cet ordre: métadonnées du fichier, fichier JSON Google Takeout associé, puis date présente dans le nom du fichier. Les fichiers sans date exploitable sont listés dans un fichier DateError.txt créé sur le bureau. Les fichiers corrigés sont listés dans DateFound.txt.
Pour limiter les risques de blocage sur les très gros exports, traitez les fichiers par lots de quelques milliers d'éléments.
Corriger les dates sur macOS
- Téléchargez puis installez ExifTool depuis https://exiftool.org/index.html en choisissant le paquet macOS.
- Ouvrez l'application Terminal depuis le dossier Applications > Utilitaires.
- Copiez-collez entièrement le bloc ci-dessous dans Terminal, puis validez si nécessaire avec la touche Entrée.
- Sélectionnez le dossier contenant les fichiers exportés depuis Google Takeout.
- Laissez le traitement se terminer, puis consultez les fichiers
DateFound.txtetDateError.txtcréés sur le bureau.
Le script à copier-coller entièrement:
/bin/bash <<'BASH'
#!/bin/bash
set -u

ROOT="$(osascript -e 'POSIX path of (choose folder with prompt "Select the folder containing the files to update")')" || exit 0

DESKTOP="$HOME/Desktop"
LOG_FOUND="$DESKTOP/DateFound.txt"
LOG_ERROR="$DESKTOP/DateError.txt"
: > "$LOG_FOUND"
: > "$LOG_ERROR"

find_exiftool() {
    if command -v exiftool >/dev/null 2>&1; then
        command -v exiftool
        return 0
    fi
    if [ -x "/usr/local/bin/exiftool" ]; then
        printf '%s\n' "/usr/local/bin/exiftool"
        return 0
    fi
    if [ -x "/opt/homebrew/bin/exiftool" ]; then
        printf '%s\n' "/opt/homebrew/bin/exiftool"
        return 0
    fi
    return 1
}

EXIFTOOL="$(find_exiftool)" || {
    printf '%s\n' "ExifTool not found. Install it, then run the script again." >> "$LOG_ERROR"
    printf '%s\n' "ExifTool not found. Check DateError.txt on the desktop."
    exit 1
}

if [ ! -d "$ROOT" ]; then
    printf 'Invalid folder: %s\n' "$ROOT" >> "$LOG_ERROR"
    printf '%s\n' "Invalid folder. Check DateError.txt on the desktop."
    exit 1
fi

get_exif_date() {
    "$EXIFTOOL" -s3 -d "%Y:%m:%d %H:%M:%S" -DateTimeOriginal -CreateDate -MediaCreateDate -TrackCreateDate -CreationDate -ModifyDate -- "$1" 2>/dev/null | awk '/^[0-9]{4}:[0-9]{2}:[0-9]{2} [0-9]{2}:[0-9]{2}:[0-9]{2}/ { print substr($0, 1, 19); exit }'
}

get_json_date() {
    local file="$1"
    local json=""
    if [ -f "$file.json" ]; then
        json="$file.json"
    elif [ -f "${file%.*}.json" ]; then
        json="${file%.*}.json"
    fi
    [ -z "$json" ] && return 1

    /usr/bin/perl -MTime::Piece -0777 -ne 'if (/"photoTakenTime"\s*:\s*\{.*?"timestamp"\s*:\s*"([0-9]+)"/s || /"creationTime"\s*:\s*\{.*?"timestamp"\s*:\s*"([0-9]+)"/s) { print localtime($1)->strftime("%Y:%m:%d %H:%M:%S"); }' "$json"
}

get_name_date() {
    local name
    name="$(basename "$1")"
    if [[ "$name" =~ ([12][0-9]{3})[-_]?([01][0-9])[-_]?([0-3][0-9])([_\ -]?([0-2][0-9])[-_\.]?([0-5][0-9])[-_\.]?([0-5][0-9]))? ]]; then
        local year="${BASH_REMATCH[1]}"
        local month="${BASH_REMATCH[2]}"
        local day="${BASH_REMATCH[3]}"
        local hour="12"
        local minute="00"
        local second="00"
        if [ -n "${BASH_REMATCH[5]:-}" ]; then
            hour="${BASH_REMATCH[5]}"
            minute="${BASH_REMATCH[6]}"
            second="${BASH_REMATCH[7]}"
        fi
        printf '%s:%s:%s %s:%s:%s\n' "$year" "$month" "$day" "$hour" "$minute" "$second"
        return 0
    fi
    return 1
}

is_valid_date() {
    date -j -f "%Y:%m:%d %H:%M:%S" "$1" "+%Y:%m:%d %H:%M:%S" >/dev/null 2>&1
}

to_touch_date() {
    printf '%s' "$1" | sed -E 's/^([0-9]{4}):([0-9]{2}):([0-9]{2}) ([0-9]{2}):([0-9]{2}):([0-9]{2})$/\1\2\3\4\5.\6/'
}

write_metadata() {
    local file="$1"
    local date_value="$2"
    "$EXIFTOOL" -overwrite_original "-DateTimeOriginal=$date_value" "-CreateDate=$date_value" "-ModifyDate=$date_value" -- "$file" >/dev/null 2>&1 || true
}

process_file() {
    local file="$1"
    local date_value=""
    local source=""

    date_value="$(get_exif_date "$file")"
    if [ -n "$date_value" ]; then
        source="EXIF"
    else
        date_value="$(get_json_date "$file")"
        if [ -n "$date_value" ]; then
            source="Google Takeout JSON"
        else
            date_value="$(get_name_date "$file")"
            if [ -n "$date_value" ]; then
                source="file name"
            fi
        fi
    fi

    if [ -n "$date_value" ] && is_valid_date "$date_value"; then
        local touch_value
        touch_value="$(to_touch_date "$date_value")"
        if [ "$source" != "EXIF" ]; then
            write_metadata "$file" "$date_value"
        fi
        if touch -t "$touch_value" "$file" 2>/dev/null; then
            printf '%s | %s | %s\n' "$source" "$date_value" "$file" >> "$LOG_FOUND"
        else
            printf 'Unable to update file date: %s\n' "$file" >> "$LOG_ERROR"
        fi
    else
        printf 'No valid date found: %s\n' "$file" >> "$LOG_ERROR"
    fi
}

while IFS= read -r -d '' file; do
    case "$file" in
        *.json|*_original) continue ;;
    esac
    process_file "$file"
done < <(find "$ROOT" -type f -print0)

printf '%s\n' "Done. Check DateFound.txt and DateError.txt on the desktop."
BASH
Corriger les dates sur Windows
- Téléchargez ExifTool depuis https://exiftool.org/index.html en choisissant l'exécutable Windows.
- Placez-le dans un dossier accessible, par exemple
C:\ExifTool. - Renommez le fichier
exiftool(-k).exeenexiftool.exe. - Vérifiez que le chemin complet est bien
C:\ExifTool\exiftool.exe.- Si vous placez ExifTool ailleurs, modifiez la première ligne de configuration du script ci-dessous.
- Copiez-collez le script ci-dessous dans le Bloc-notes.
- Enregistrez le fichier avec l'extension
.ps1, par exempleUpdateExifDates.ps1. - Cliquez droit sur le fichier
.ps1, puis exécutez-le avec PowerShell. - Sélectionnez le dossier contenant les fichiers exportés depuis Google Takeout.
- Laissez le traitement se terminer, puis consultez les fichiers
DateFound.txtetDateError.txtcréés sur le bureau.
Si PowerShell bloque l'exécution du script, ouvrez PowerShell et exécutez la commande Set-ExecutionPolicy RemoteSigned -Scope CurrentUser, puis confirmez la modification lorsque Windows le demande.
Le script à copier-coller entièrement:
# === Configuration ===
$ExifToolPath = "C:\ExifTool\exiftool.exe"
$Desktop = [Environment]::GetFolderPath("Desktop")
$LogFound = Join-Path $Desktop "DateFound.txt"
$LogError = Join-Path $Desktop "DateError.txt"
Set-Content -Path $LogFound -Value ""
Set-Content -Path $LogError -Value ""

if (-not (Test-Path -LiteralPath $ExifToolPath)) {
    Add-Content -Path $LogError -Value "ExifTool not found: $ExifToolPath"
    Write-Host "ExifTool not found. Check the path in the script."
    exit
}

# === Folder selection dialog ===
Add-Type -AssemblyName System.Windows.Forms
$FolderBrowser = New-Object System.Windows.Forms.FolderBrowserDialog
$FolderBrowser.Description = "Select the folder to process"
if ($FolderBrowser.ShowDialog() -ne [System.Windows.Forms.DialogResult]::OK) { exit }
$Folder = $FolderBrowser.SelectedPath

function Get-DateFromExif {
    param ([string]$FilePath)

    $Tags = @("DateTimeOriginal", "CreateDate", "MediaCreateDate", "TrackCreateDate", "CreationDate", "ModifyDate")
    foreach ($Tag in $Tags) {
        $Value = (& $ExifToolPath "-$Tag" -s3 -d "%Y:%m:%d %H:%M:%S" -- "$FilePath" 2>$null | Select-Object -First 1)
        if ($Value -match '^(\d{4}):(\d{2}):(\d{2}) (\d{2}):(\d{2}):(\d{2})') {
            try {
                return [datetime]::ParseExact($Matches[0], "yyyy:MM:dd HH:mm:ss", [Globalization.CultureInfo]::InvariantCulture)
            } catch {}
        }
    }
    return $null
}

function Get-DateFromJson {
    param ([string]$FilePath)

    $JsonPaths = @("$FilePath.json", [System.IO.Path]::ChangeExtension($FilePath, ".json")) | Select-Object -Unique
    foreach ($JsonPath in $JsonPaths) {
        if (Test-Path -LiteralPath $JsonPath) {
            try {
                $Json = Get-Content -LiteralPath $JsonPath -Raw -ErrorAction Stop | ConvertFrom-Json -ErrorAction Stop
                $Timestamp = $null
                if ($Json.photoTakenTime -and $Json.photoTakenTime.timestamp) {
                    $Timestamp = [int64]$Json.photoTakenTime.timestamp
                } elseif ($Json.creationTime -and $Json.creationTime.timestamp) {
                    $Timestamp = [int64]$Json.creationTime.timestamp
                }

                if ($null -ne $Timestamp) {
                    return ([DateTimeOffset]::FromUnixTimeSeconds($Timestamp)).LocalDateTime
                }
            } catch {}
        }
    }
    return $null
}

function Get-DateFromFileName {
    param ([string]$FileName)

    if ($FileName -match '([12]\d{3})[-_]?(0[1-9]|1[0-2])[-_]?(0[1-9]|[12]\d|3[01])(?:[ _-]?([01]\d|2[0-3])[-_.]?([0-5]\d)[-_.]?([0-5]\d))?') {
        $Year = $Matches[1]
        $Month = $Matches[2]
        $Day = $Matches[3]
        $Hour = "12"
        $Minute = "00"
        $Second = "00"

        if ($Matches[4]) {
            $Hour = $Matches[4]
            $Minute = $Matches[5]
            $Second = $Matches[6]
        }

        $DateString = "$Year$Month$Day$Hour$Minute$Second"
        try {
            return [datetime]::ParseExact($DateString, "yyyyMMddHHmmss", [Globalization.CultureInfo]::InvariantCulture)
        } catch {}
    }
    return $null
}

function Write-Metadata {
    param (
        [string]$FilePath,
        [datetime]$DateValue
    )

    $ExifDate = $DateValue.ToString("yyyy:MM:dd HH:mm:ss", [Globalization.CultureInfo]::InvariantCulture)
    & $ExifToolPath -overwrite_original "-DateTimeOriginal=$ExifDate" "-CreateDate=$ExifDate" "-ModifyDate=$ExifDate" -- "$FilePath" 2>$null | Out-Null
}

function Set-FileDates {
    param (
        [string]$FilePath,
        [datetime]$DateValue
    )

    [System.IO.File]::SetCreationTime($FilePath, $DateValue)
    [System.IO.File]::SetLastWriteTime($FilePath, $DateValue)
    [System.IO.File]::SetLastAccessTime($FilePath, $DateValue)
}

Get-ChildItem -LiteralPath $Folder -Recurse -File | Where-Object {
    $_.Extension -ne ".json" -and $_.Name -notlike "*_original"
} | ForEach-Object {
    $File = $_
    $FilePath = $File.FullName
    $DateValue = Get-DateFromExif -FilePath $FilePath
    $Source = "EXIF"

    if (-not $DateValue) {
        $DateValue = Get-DateFromJson -FilePath $FilePath
        $Source = "Google Takeout JSON"
    }

    if (-not $DateValue) {
        $DateValue = Get-DateFromFileName -FileName $File.Name
        $Source = "file name"
    }

    if ($DateValue) {
        try {
            if ($Source -ne "EXIF") {
                Write-Metadata -FilePath $FilePath -DateValue $DateValue
            }
            Set-FileDates -FilePath $FilePath -DateValue $DateValue
            Add-Content -Path $LogFound -Value "$Source | $($DateValue.ToString('yyyy-MM-dd HH:mm:ss')) | $FilePath"
        } catch {
            Add-Content -Path $LogError -Value "Unable to update file date: $FilePath"
        }
    } else {
        Add-Content -Path $LogError -Value "No valid date found: $FilePath"
    }
}

[System.Windows.Forms.MessageBox]::Show("Done. Check DateFound.txt and DateError.txt on the desktop.")
3. Importer les photos sur kDrive
Ne modifiez pas vos mots de passe tant que l'importation ou la synchronisation n'est pas terminée.
Une fois vos fichiers prêts, vous pouvez les importer depuis l'app Web kDrive si leur nombre et votre connexion Internet permettent un envoi depuis le navigateur:
- Accédez à l'app Web kDrive Infomaniak.
- Ouvrez l'emplacement dans lequel les photos doivent être importées.
- Cliquez sur le bouton Nouveau en haut à gauche.
- Cliquez sur Importer un dossier.
- Sélectionnez le dossier contenant vos photos sur votre ordinateur.
- Patientez jusqu'à la fin de l'importation. Le journal d'activité s'affiche en bas à droite:
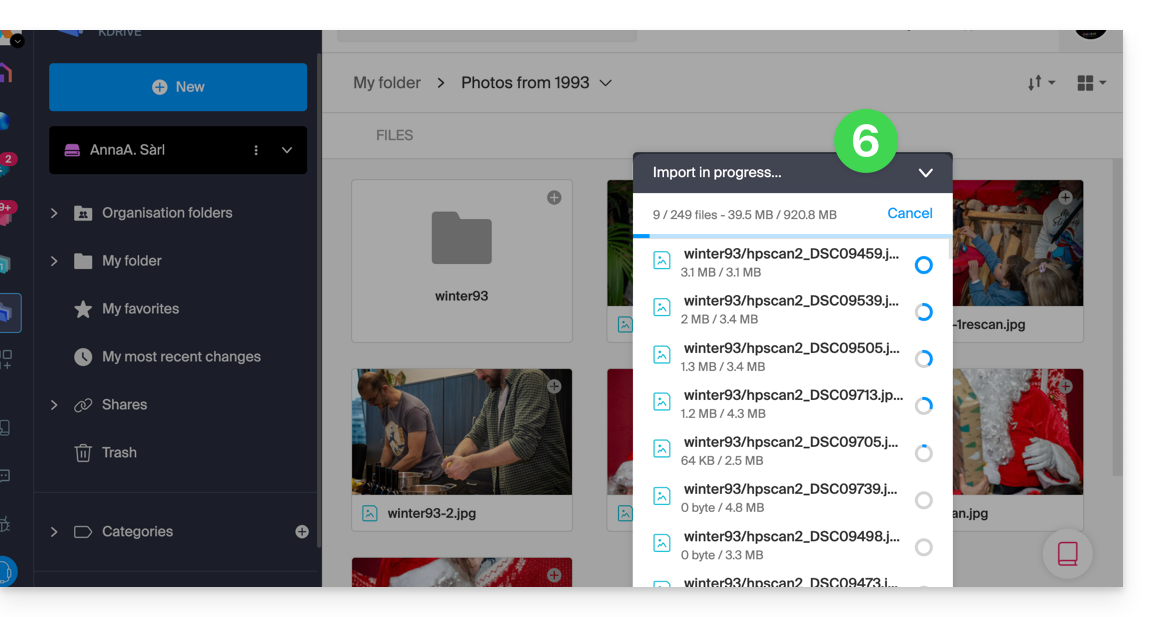
Si vous utilisez l'app desktop kDrive, vous pouvez aussi placer le dossier contenant vos photos dans l'arborescence de votre dossier kDrive sur l'ordinateur. La synchronisation démarre alors automatiquement et les fichiers sont envoyés sur les serveurs Infomaniak.
4. Accéder aux photos depuis vos appareils
Une fois l'importation ou la synchronisation terminée, vos photos sont accessibles depuis les appareils connectés à votre kDrive.
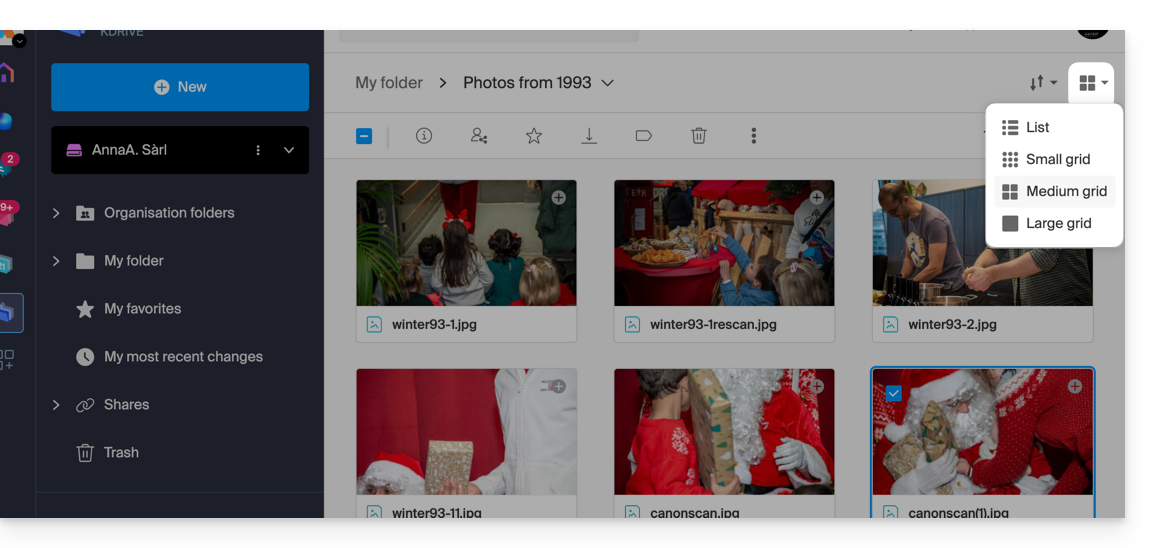
- Dans l'app Web kDrive, vous pouvez modifier l'affichage afin d'agrandir les miniatures et de parcourir plus facilement vos photos:
Lien vers cette FAQ: https://faq.infomaniak.com/2540
Cette FAQ a été utile?