Base de conhecimento
1000 perguntas frequentes, 500 tutoriais e vídeos explicativos. Aqui, você encontra apenas soluções!
Este guia explica como descarregar ou exportar um certificado SSL a partir do painel de controlo Infomaniak.
Introdução
- O download do certificado gera um arquivo no formato
.zip. - O arquivo contém os arquivos
.keye.crt(bem como_windows.pfxe.protected.key, dependendo do tipo de certificado):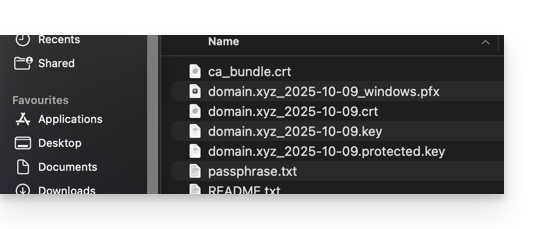
- Recomenda-se armazenar este certificado e a sua chave privada num local seguro, pois esta última poderá permitir o acesso aos seus dados encriptados.
Exportar ou descarregar um certificado SSL
Para aceder à gestão dos seus certificados:
- Clique aqui para aceder à gestão do seu produto no painel de controlo Infomaniak (precisa de ajuda?):
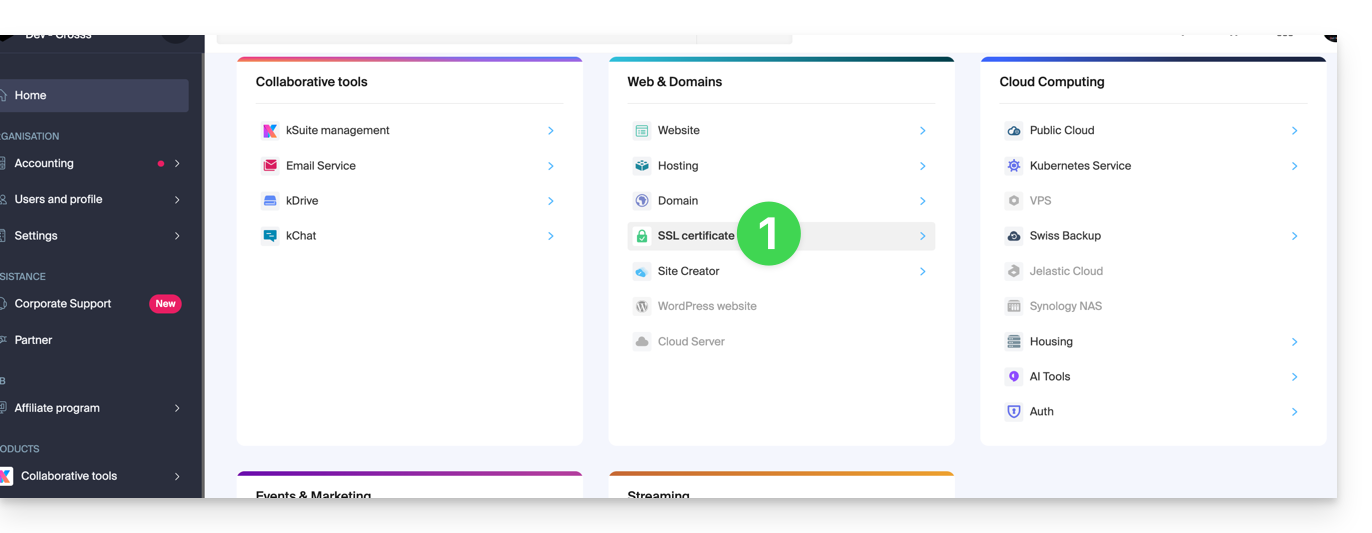
- Filtre os tipos de certificado, se necessário, clicando no ícone correspondente.
- Visualize os diferentes tipos de certificados, como Let's Encrypt, Sectigo DV & EV...
- Adicione os certificados que devem ser exibidos.
- Aplique os filtros:
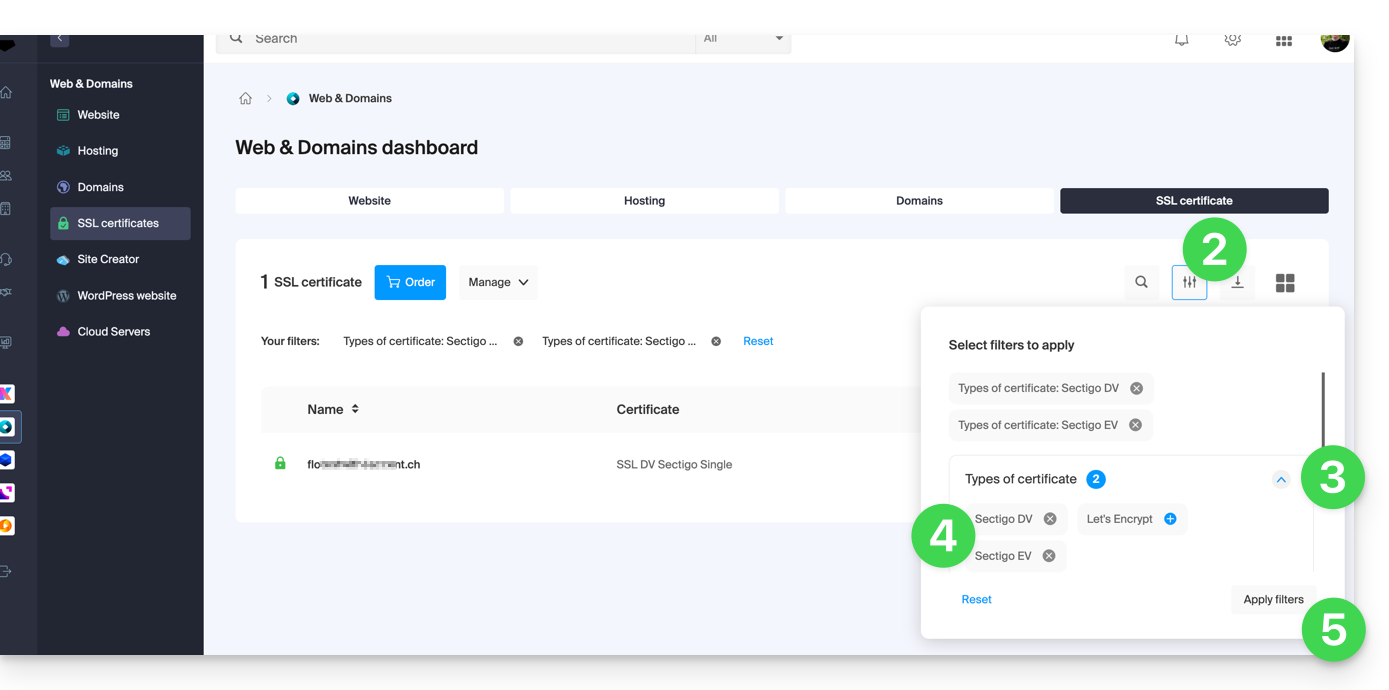
- A tabela exibe apenas os tipos de certificados que você selecionou.
Exportar um certificado Let's Encrypt
- Clique diretamente no nome atribuído ao certificado Let's Encrypt na lista:
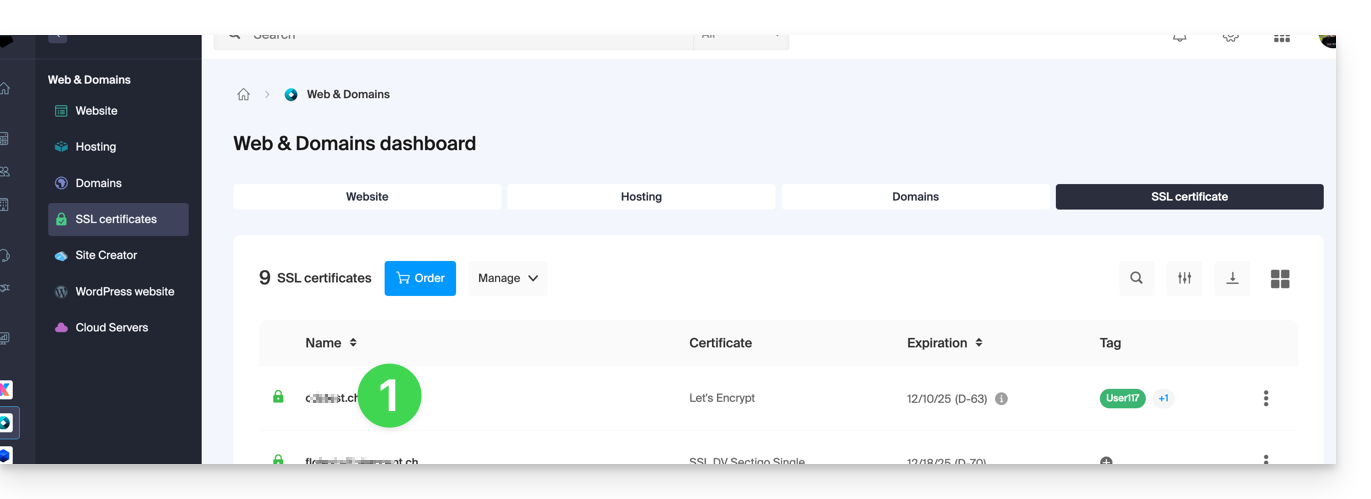
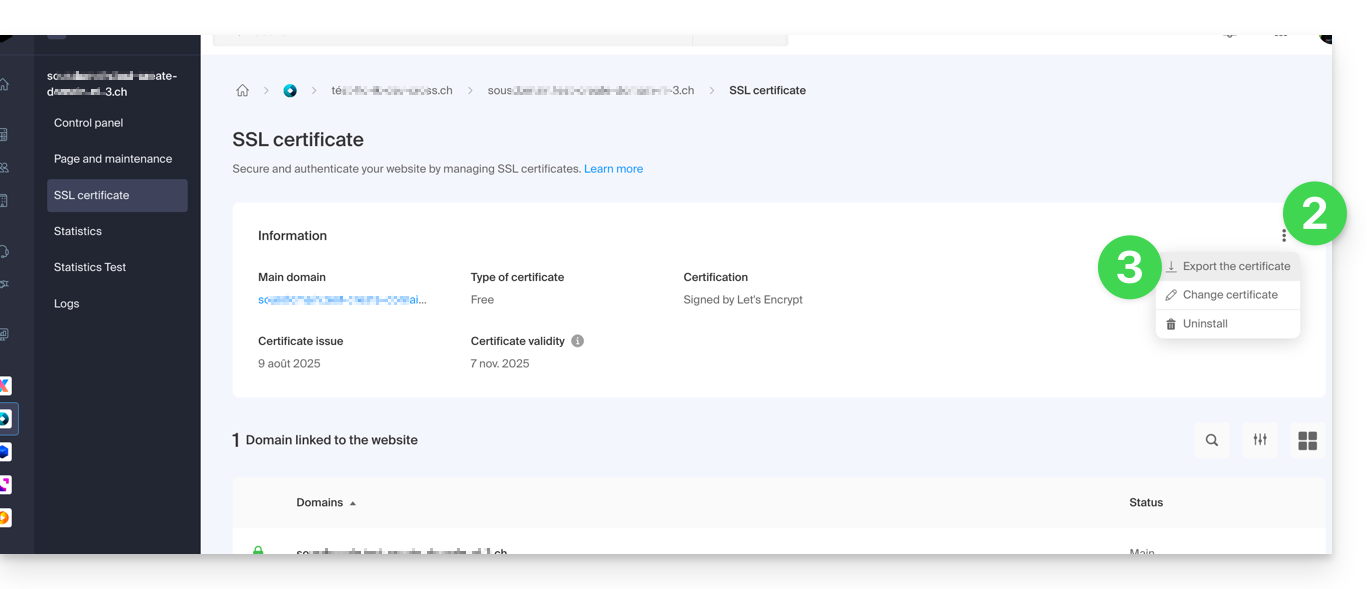
- Clique no menu de ação ⋮ à direita do item correspondente na tabela que é exibida.
- Selecione Exportar certificado e siga as instruções para baixar o arquivo para o seu dispositivo:
Exportar um certificado Sectigo
- Clique diretamente no nome atribuído ao certificado na lista de certificados.
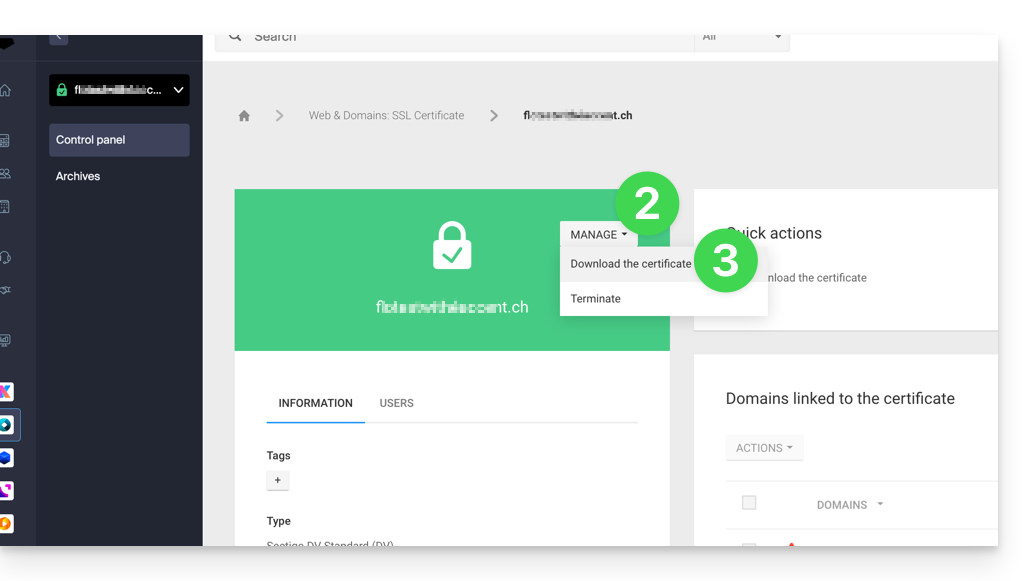
- Clique no botão Gerenciar.
- Clique em Descarregar o certificado e siga as instruções para descarregar o arquivo no seu dispositivo:
Link para esta FAQ: https://faq.infomaniak.com/1034
Esta seção de perguntas frequentes foi útil?
Este guia explica como adicionar ou modificar um ou mais registos do tipo CAAna zona DNS (de um nome de domínio) gerenciada no Painel de Controle Infomaniak.
Introdução
- Um registo CAA permite especificar uma autoridade de certificação autorizada a emitir certificados para um domínio.
Adicionar um CAA
Para gerenciar este tipo de registro em uma zona DNS:
- Clique aqui para acessar o gerenciamento de domínios no seu Painel de Controle Infomaniak (❓: ajuda).
- Clique em o nome do domínio em questão.
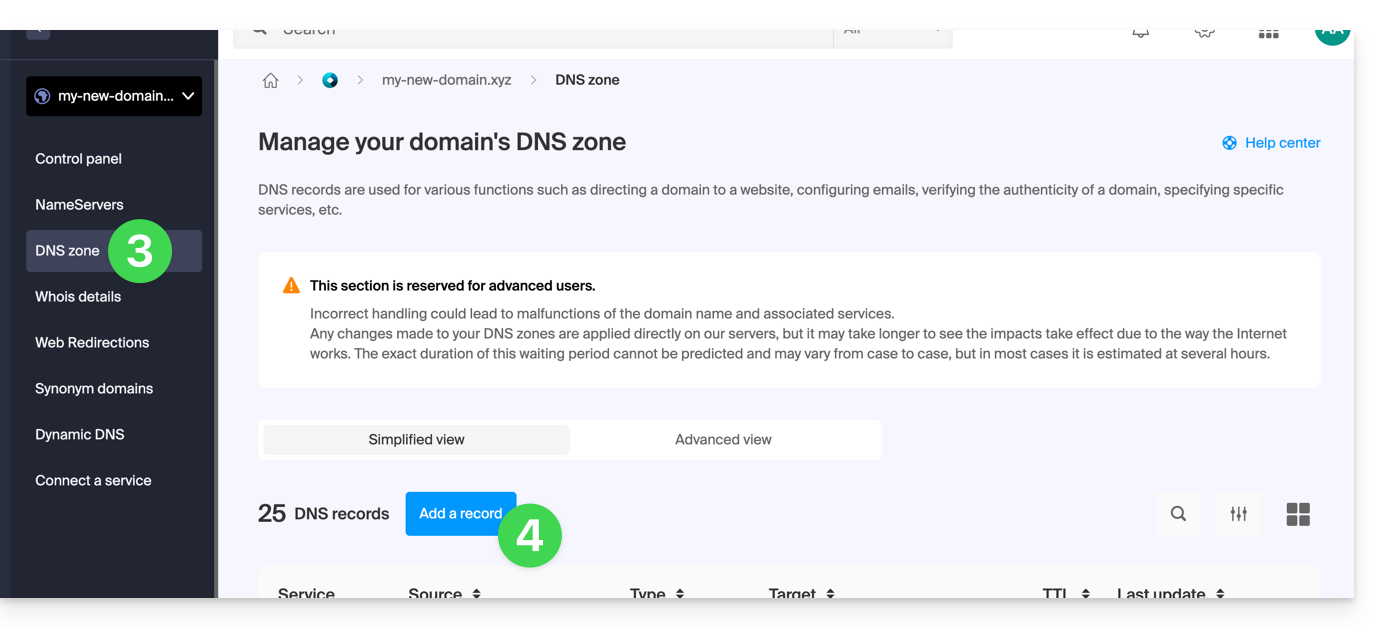
- Clique em Zona DNS no menu lateral esquerdo.
- Clique no botão para adicionar um registo:
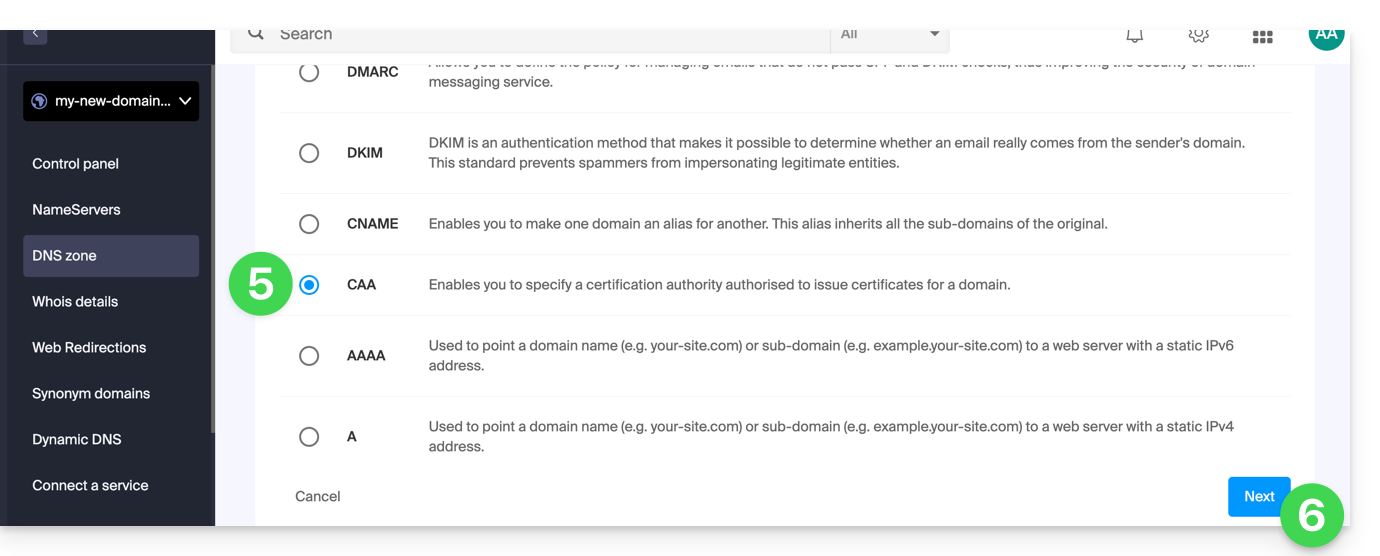
- Clique no botão de rádio CAA para adicionar um registo.
- Clique no botão Seguinte:
- Insira os valores do CAA necessários para a sua zona DNS: se pretende validar um certificado SSL, consulte as informações abaixo.
- Salve suas informações clicando no botão na parte inferior da página.
Adicionar um CAA para validar um certificado SSL…
… Sectigo
No caso da validação de um certificado SSL Sectigo, siga o guia genérico, mas insira especificamente os seguintes dados:
- Selecione “Emitido para autoridade de certificação”.
- Insira o sinalizador/flag:
0. - Especifique
sectigo.com.
… Let's Encrypt
No caso da validação de um certificado SSL Let's Encrypt, siga o guia genérico, mas insira especificamente os seguintes dados:
- Escolha “Emitido para uma autoridade de certificação”.
- Insira o sinalizador/flag:
0. - Especifique
letsencrypt.org.
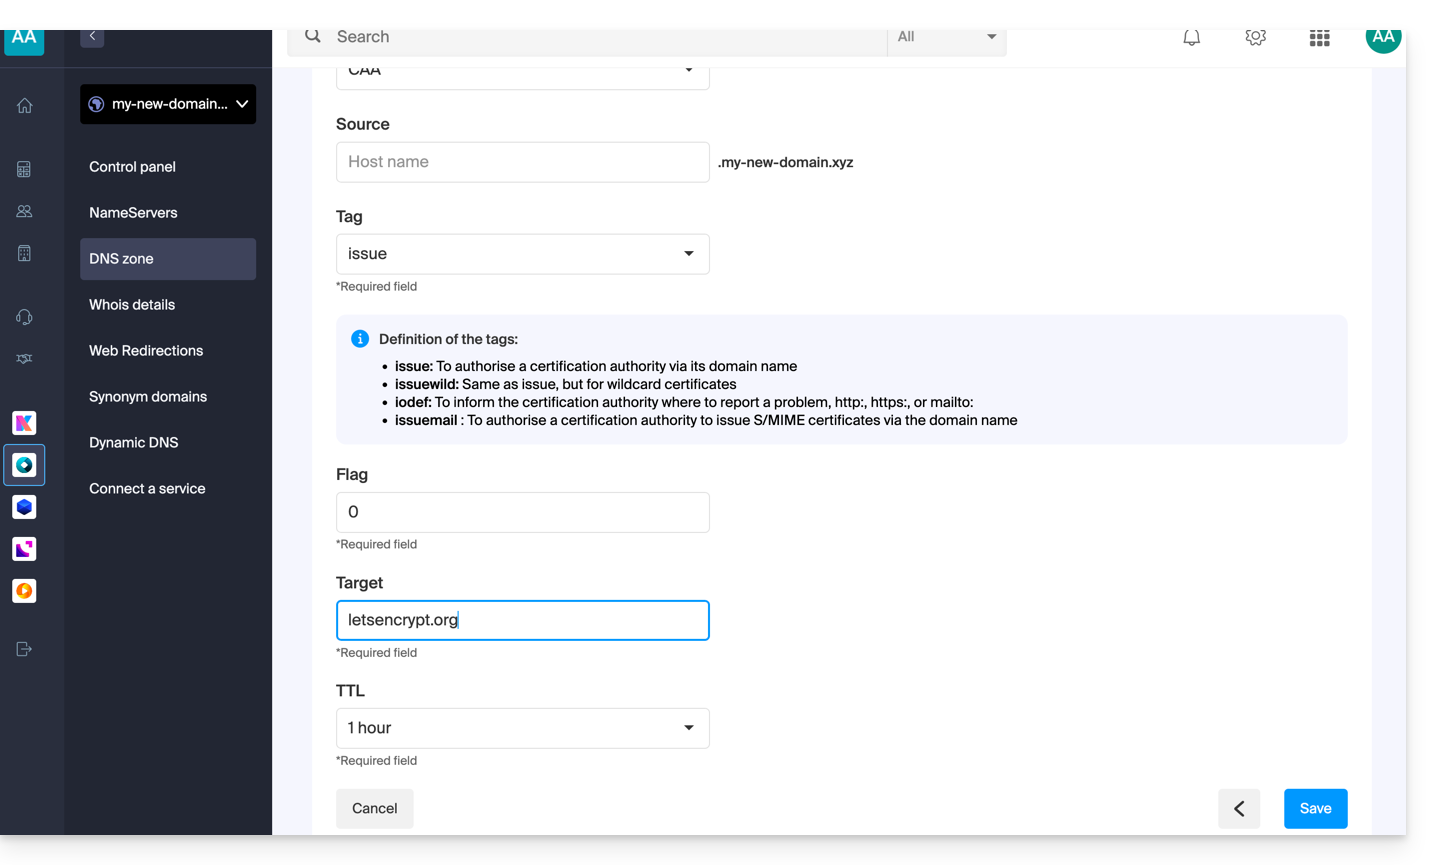
Link para esta FAQ: https://faq.infomaniak.com/1394
Esta seção de perguntas frequentes foi útil?
Este guia explica como interpretar corretamente as informações detalhadas fornecidas pelo Qualys SSL Labs (https://www.ssllabs.com/ssltest/), que, por vezes, podem parecer técnicas ou alarmantes sem o contexto adequado.
Introdução
- O Qualys SSL Labs é uma ferramenta de análise amplamente utilizada para avaliar a configuração SSL/TLS de sites.
- Os avisos em seus relatórios são, muitas vezes, apenas detalhes técnicos sem impacto na segurança ou no SEO do site.
Múltiplos certificados nos relatórios do SSL Labs
Quando o SSL Labs analisa um site, pode exibir vários certificados numerados (certificado nº 1, certificado nº 2, etc.). Isso ocorre por vários motivos:
- Certificado principal (#1): O certificado apresentado quando o SNI (Indicação do Nome do Servidor) é utilizado.
- O SNI é uma extensão TLS que permite que um servidor hospede vários certificados SSL para diferentes domínios no mesmo endereço IP. Quando um navegador se conecta, ele indica o nome de domínio ao qual deseja se conectar.
- Certificado secundário (#2): O certificado apresentado quando o SNI não é utilizado ou durante uma conexão direta por IP.
Uma indicação "No SNI" no certificado nº 2 não é um erro. Significa simplesmente que o SSL Labs testou o que acontece quando um cliente se conecta sem fornecer informações SNI. Neste caso:
- O servidor fornece um certificado de reserva (geralmente um certificado genérico ou de visualização).
- Esta situação afeta apenas clientes com sistemas muito antigos que não suportam o SNI.
- Os navegadores modernos utilizam todos o SNI e, portanto, receberão o certificado nº 1.
Problemas na cadeia de certificados
"Problemas na cadeia: Ordem incorreta, certificados extras, contém certificado raiz"
Esses avisos não significam necessariamente que o certificado esteja defeituoso:
Ordem incorreta: Os certificados intermediários não estão apresentados na ordem ideal.Certificados adicionais: São incluídos certificados adicionais desnecessários.Contém certificado raiz: O certificado raiz está incluído na cadeia.
O protocolo TLS permite omitir o certificado raiz, pois este normalmente já está presente nos repositórios de certificados dos navegadores. Incluí-lo não é um erro, mas sim uma redundância.
“Nomes alternativos incompatíveis”
Para o certificado de backup (#2), o aviso "MISMATCH" é normal porque:
- Este certificado foi criado para outro domínio (
preview.infomaniak.website). - É exibido apenas quando o SNI não está em uso.
- O navegador que recebe este certificado o identificará como não correspondente ao domínio solicitado, mas isso não afeta as conexões normais com o SNI.
Em relação a preocupações com SEO:
- O Google e outros motores de busca utilizam navegadores modernos que suportam o SNI.
- Eles recebem o certificado nº 1, que é válido para o seu domínio.
- Os avisos relativos ao certificado nº 2 não têm impacto no SEO.
- Apenas problemas com o certificado principal (#1) poderiam afetar o SEO.
Esta configuração é perfeitamente adequada para uma hospedagem compartilhada, onde vários sites compartilham a mesma infraestrutura, com um certificado de pré-visualização servindo como uma solução de contingência.
Link para esta FAQ: https://faq.infomaniak.com/1569
Esta seção de perguntas frequentes foi útil?
Este guia explica como gerar e renovar automaticamente um certificado wildcard através de um desafio DNS, utilizando o Certbot e o plugin dns-infomaniak.
1. Instalação das ferramentas
Instale o certbot e sua extensão (❓: ajuda). Selecione a guia Wildcard, isso evitará o erro plugin does not appear to be installed.
2. Preparação da API Infomaniak
Para automatizar o processo, gere um token de API (❓: ajuda). Pesquise por "dns" e marque obrigatoriamente os dois escopos dns:read e dns:write: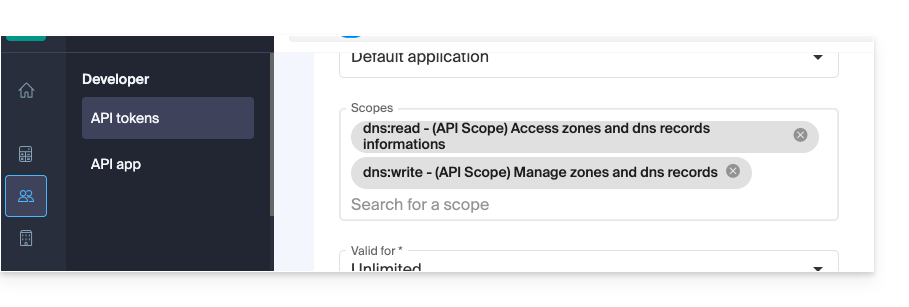
Estas permissões são necessárias para que o Certbot possa ler as suas zonas DNS e criar/eliminar o registo TXT de validação.
3. Geração manual inicial e validação
Inicie a primeira geração do certificado:
certbot certonly --manual \
-d *.example.com \
--preferred-challenges dns-01 \
--server {{URL_3}}
Em seguida, acesse o Painel de Controle e crie o registro TXT solicitado (Nome: _acme-challenge, Valor: o valor fornecido pelo Certbot) para comprovar que você é o proprietário do domínio (❓: ajuda).
4. Scripts de automação
Crie o script de autenticação /root/infomaniak-auth.sh:
#!/bin/bash

# API Token for Infomaniak
INFOMANIAK_API_TOKEN="YOUR_API_TOKEN_HERE"

# Update DNS record via Infomaniak API plugin
/usr/bin/certbot \
  --authenticator dns-infomaniak \
  --server {{URL_6}} \
  -d "$CERTBOT_DOMAIN" \
  --agree-tos
Crie o script de limpeza /root/infomaniak-clean.sh:
#!/bin/bash

# Optional: Cleanup operations after challenge
exit 0
Torne estes dois scripts executáveis:
chmod +x /root/infomaniak-auth.sh /root/infomaniak-clean.sh
5. Configuração da renovação automática
Edite ou crie o arquivo de configuração /etc/letsencrypt/renewal/example.com.conf:
cert = /etc/letsencrypt/live/example.com/cert.pem
privkey = /etc/letsencrypt/live/example.com/privkey.pem
chain = /etc/letsencrypt/live/example.com/chain.pem
fullchain = /etc/letsencrypt/live/example.com/fullchain.pem

[renewalparams]
authenticator = manual
manual_auth_hook = /root/infomaniak-auth.sh
manual_cleanup_hook = /root/infomaniak-clean.sh
server = {{URL_7}}
pref_challs = dns-01
account = YOUR_ACCOUNT_ID
key_type = rsa
6. Teste e Automatização (Cron)
Verifique se tudo está funcionando corretamente com uma simulação de renovação:
certbot renew --dry-runSe o teste for bem-sucedido, adicione esta tarefa Cron para automatizar a renovação (aqui, uma verificação a cada 30 dias):
0 0 */30 * * /usr/bin/certbot renew --quiet --config /etc/letsencrypt/renewal/example.com.confLink para esta FAQ: https://faq.infomaniak.com/1708
Esta seção de perguntas frequentes foi útil?
Este guia explica como…
- … gerar um
CSRe uma chave privada para solicitar um certificado de terceiros a uma autoridade de certificação (CA), - … importe este certificado para o seu site na Infomaniak, utilizando o
CRTobtido junto daCA.
Introdução
- Embora a Infomaniak ofereça todos os certificados SSL de que você possa precisar…
- certificados gratuitos Let's Encrypt para sites pessoais (possível apenas com sites hospedados na Infomaniak),
- certificados DV da Sectigo para sites profissionais/pessoais que não estão registados no registo comercial,
- certificados EV da Sectigo para empresas registadas no registo comercial,
- … também é possível instalar um certificado SSL obtido em outro lugar (certificado intermediário de uma entidade certificadora à sua escolha), certificados personalizados ou autoassinados.
1. Gerar um CSR (Certificate Signing Request)
Um CSR (Certificate Signing Request ou Pedido de Assinatura de Certificado) é um arquivo codificado que contém as informações necessárias para solicitar um certificado SSL/TLS.
Ela deve ser gerada do seu lado, para garantir que a chave privada permaneça sob seu controle, utilizando, por exemplo, o OpenSSL.
Adapte e execute o seguinte comando a partir de uma aplicação do tipo Terminal (interface de linha de comando, CLI / Command Line Interface) no seu dispositivo:
openssl req -utf8 -nodes -sha256 -newkey rsa:2048 -keyout domain.xyz.key -out domain.xyz.csr -addext "subjectAltName = DNS:domain.xyz, DNS:www.domain.xyz"
Explicações
newkey rsa:2048: Gera uma nova chave RSA de 2048 bits.keyout domain.xyz.key: Especifica o arquivo onde a chave privada será salva.out domain.xyz.csr: Especifica o arquivo onde a CSR será armazenada.addext “subjectAltName = ...”: Adiciona domínios adicionais através da extensãoSAN (Subject Alternative Name), necessário para incluir todos os domínios desejados no certificado (o domínio principal domain.xyz + qualquer outro domínio ou subdomínio associado, como www.domain.xyz).
Após a geração, pode verificar o conteúdo do CSR com o seguinte comando:
openssl req -in domain.xyz.csr -noout -textIsso permite verificar se todos os domínios listados em subjectAltName estão corretamente incluídos.
Após gerar a CSR, você pode enviá-la à autoridade de certificação (CA) para obter seu certificado SSL/TLS.
2. Importar o certificado externo
Após a validação, a CA emite um certificado (domain.xyz.crt) e, por vezes, um certificado intermediário (ca_bundle.crt).
Para aceder à gestão dos certificados SSL:
- Clique aqui para aceder à gestão de alojamentos e sites no seu Painel de controlo Infomaniak (❓: ajuda).
- Clique em o nome do site em questão.
- Clique em Certificados SSL no menu lateral esquerdo.
- Clique no botão azul Instalar certificado:
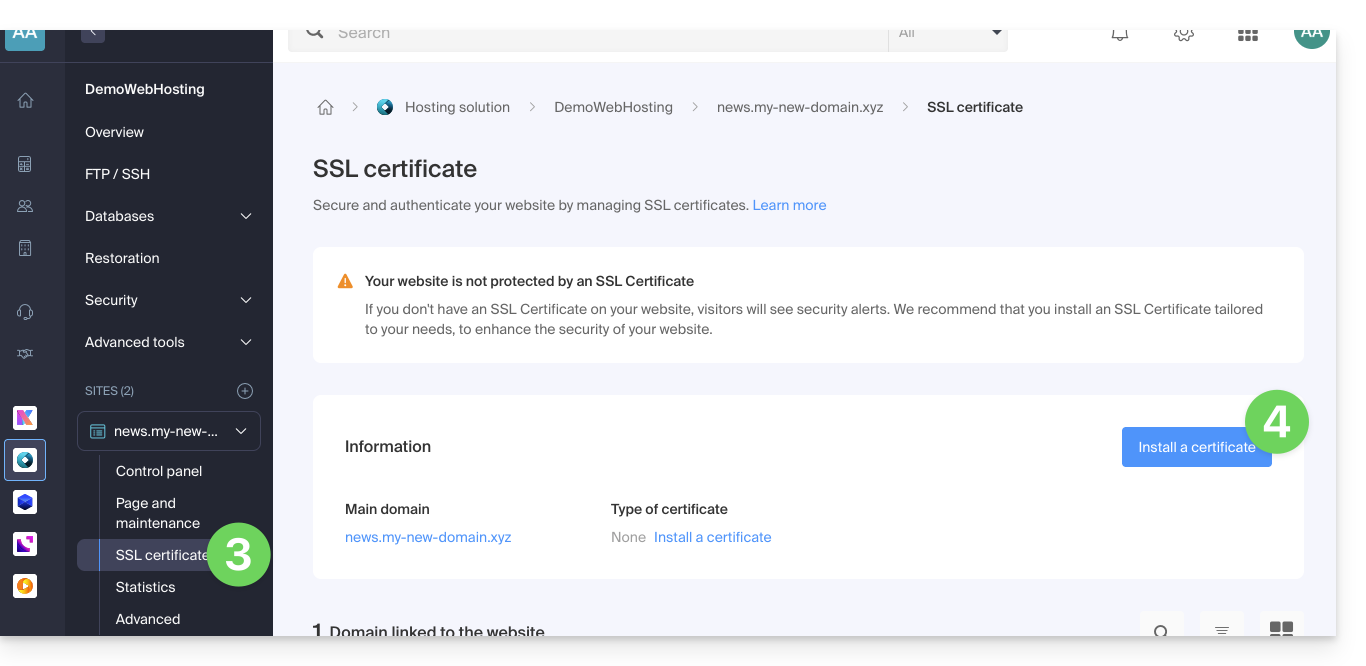
- Escolha o certificado personalizado.
- Clique no botão Seguinte:
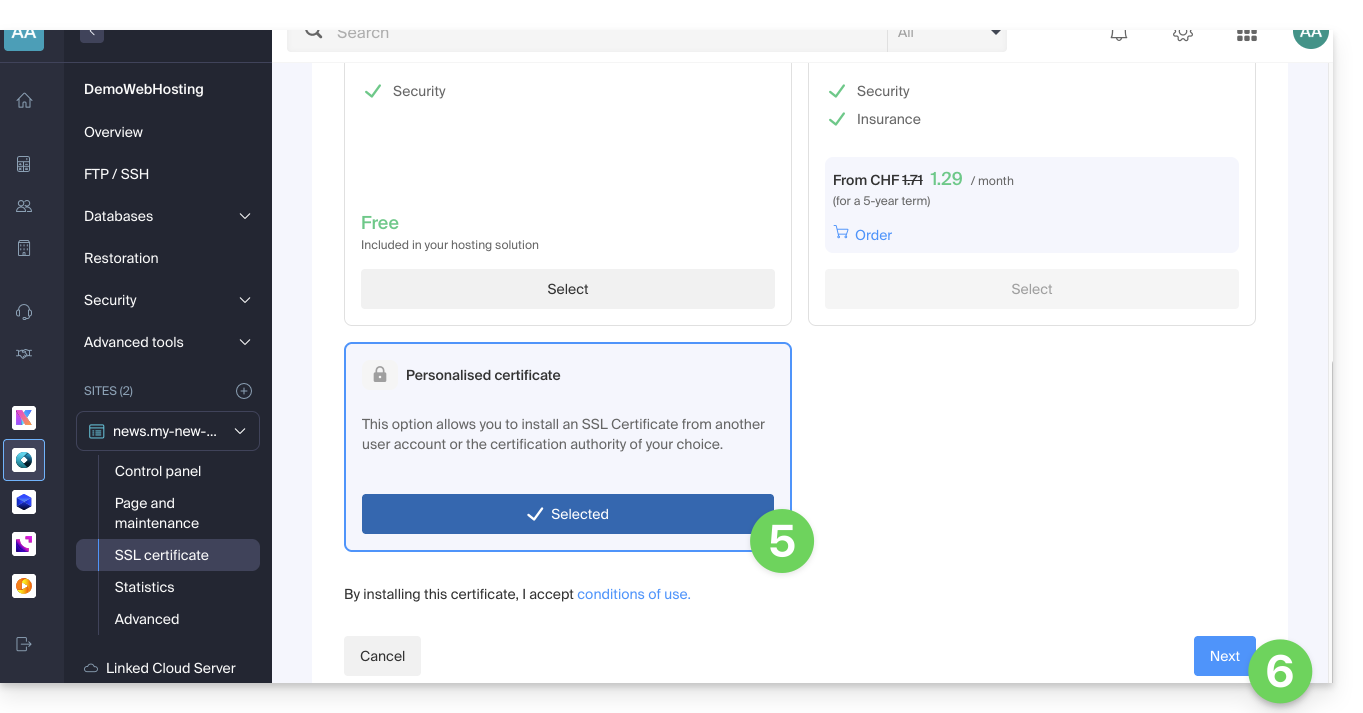
- Importe o seu certificado e a chave privada, seja importando os ficheiros
.crte.key, seja copiando e colando. - Clique em Concluir:
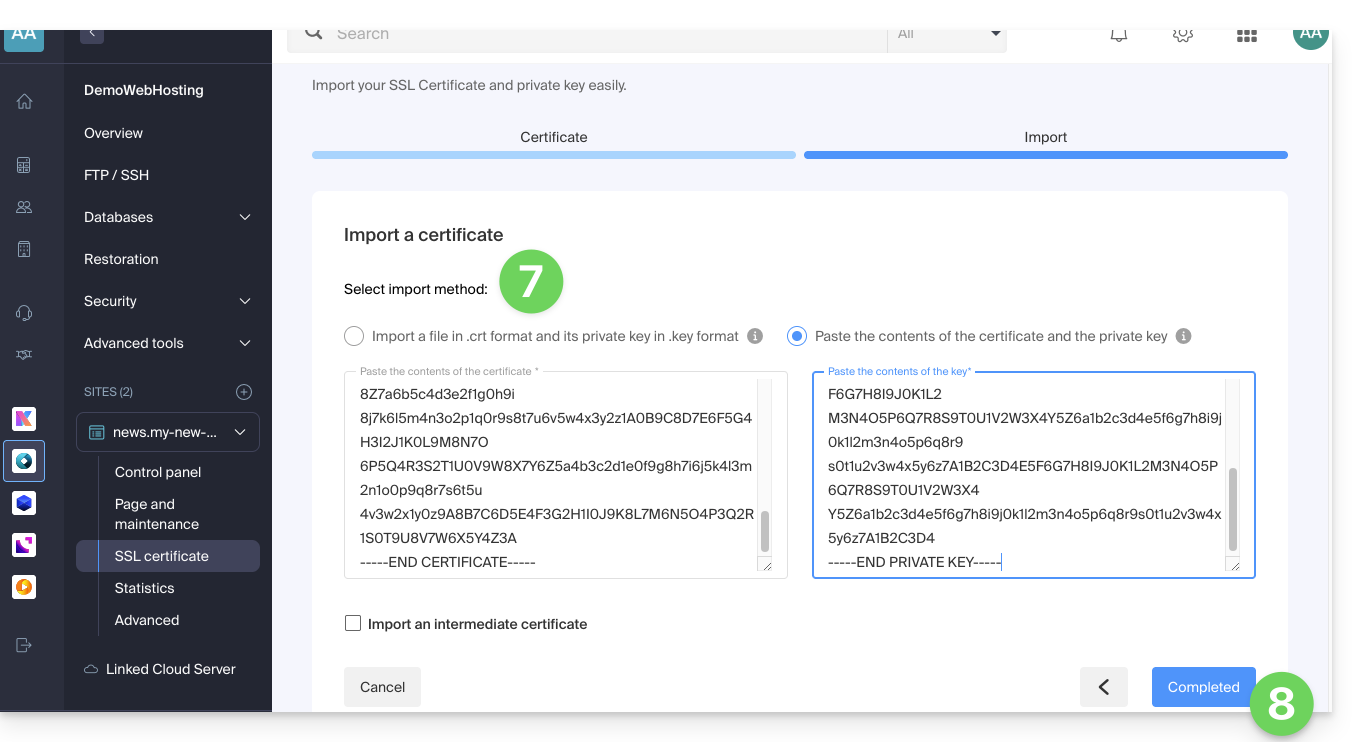
Comando alternativo para gerar um certificado autoassinado (opcional)
Se desejar um certificado local apenas para testes ou sem passar por uma CA (não recomendado para produção), pode usar este comando:
openssl req -x509 -nodes -days 365 -newkey rsa:2048 -keyout domain.xyz.key -out domain.xyz.crt -addext “subjectAltName = DNS:domain.xyz, DNS:www.domain.xyz”Isso gera tanto um certificado autoassinado (domain.xyz.crt) quanto uma chave privada (domain.xyz.key). No entanto, os certificados autoassinados não são reconhecidos como válidos por navegadores ou sistemas públicos. Eles são adequados apenas para ambientes internos ou de desenvolvimento.
Importar um certificado intermediário
Ao adicionar um certificado SSL personalizado, é possível importar o certificado intermediário (através da importação do arquivo .crt ou copiando e colando os dados fornecidos pela entidade certificadora):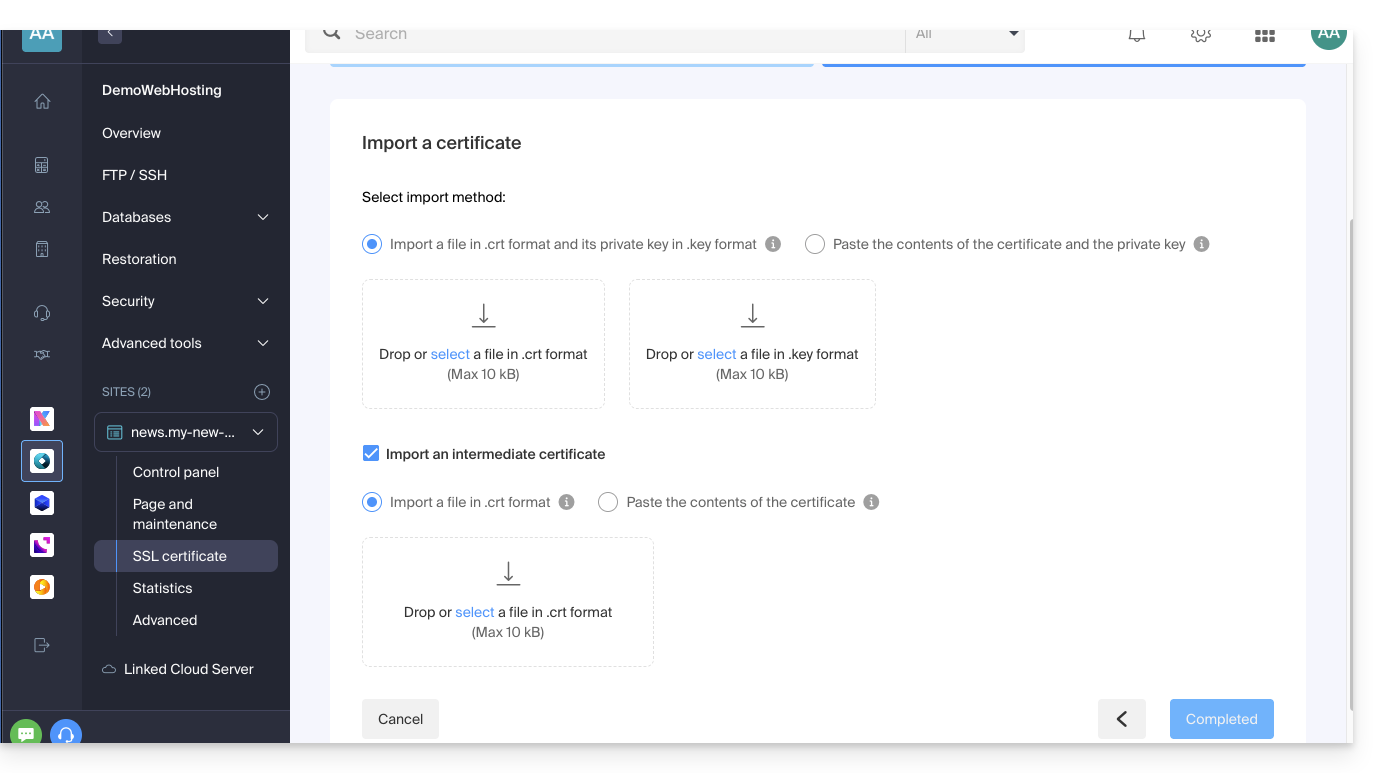
Link para esta FAQ: https://faq.infomaniak.com/2027
Esta seção de perguntas frequentes foi útil?
Este guia explica como gerar uma solicitação de certificado (CSR) para um nome de domínio e todos os seus subdomínios com um Serviço de Hospedagem Web (excluindo a hospedagem gratuita do tipo Starter), permitindo assim criptografar a conexão com o seu nome de domínio e todos os seus subdomínios por meio de um certificado SSL único.
Introdução
- A configuração permite ter um “site principal” e um “site de backup”; para que isso funcione sem conflitos, certifique-se de que o curinga e seus subdomínios específicos não se sobreponham no mesmo serviço de hospedagem web:
- Nível DNS: a prioridade é natural: se um subdomínio específico existir (ex:
prive.domain.xyz), ele será o solicitado; caso contrário, a solicitação será redirecionada para o curinga (*.domain.xyz). - Nível Servidor: é necessário ter atenção: se o curinga e o subdomínio específico estiverem no mesmo servidor, a implementação de software (Apache) decidirá; o Apache processa as solicitações de acordo com a ordem de avaliação dos arquivos de configuração.
- O risco: se o curinga for avaliado primeiro, ele “capturará” todo o tráfego, tornando seu subdomínio específico inacessível, mesmo que ele exista.
- Portanto, não coloque o curinga no mesmo serviço de hospedagem que um subdomínio mais específico que o sobreponha.
- Nível DNS: a prioridade é natural: se um subdomínio específico existir (ex:
Configurar um certificado Wildcard
1. Adicionar um domínio alias com asterisco *
Para adicionar um alias do tipo * ao seu site:
- Clique aqui para acessar o gerenciamento de hospedagens e sites no seu Painel de Controle Infomaniak (❓: ajuda).
- Clique em o nome do site em questão.
- Em seguida, clique na seta para baixo para expandir a seção Domínios deste site.
- Clique no botão Adicionar domínio:
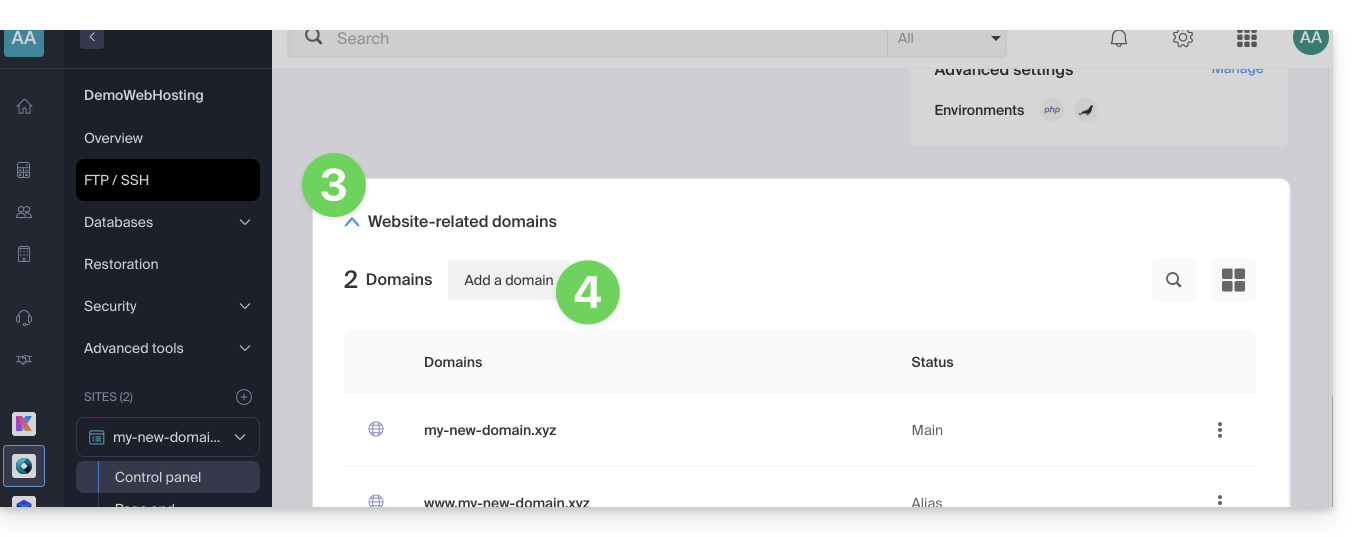
- Insira o nome do domínio a ser adicionado no seguinte formato:
*.domain.xyz(o asterisco é obrigatório, seguido de um ponto e, em seguida, o nome do domínio do site, que, neste exemplo, é domain.xyz)
- Clique no botão Confirmar para concluir o processo:
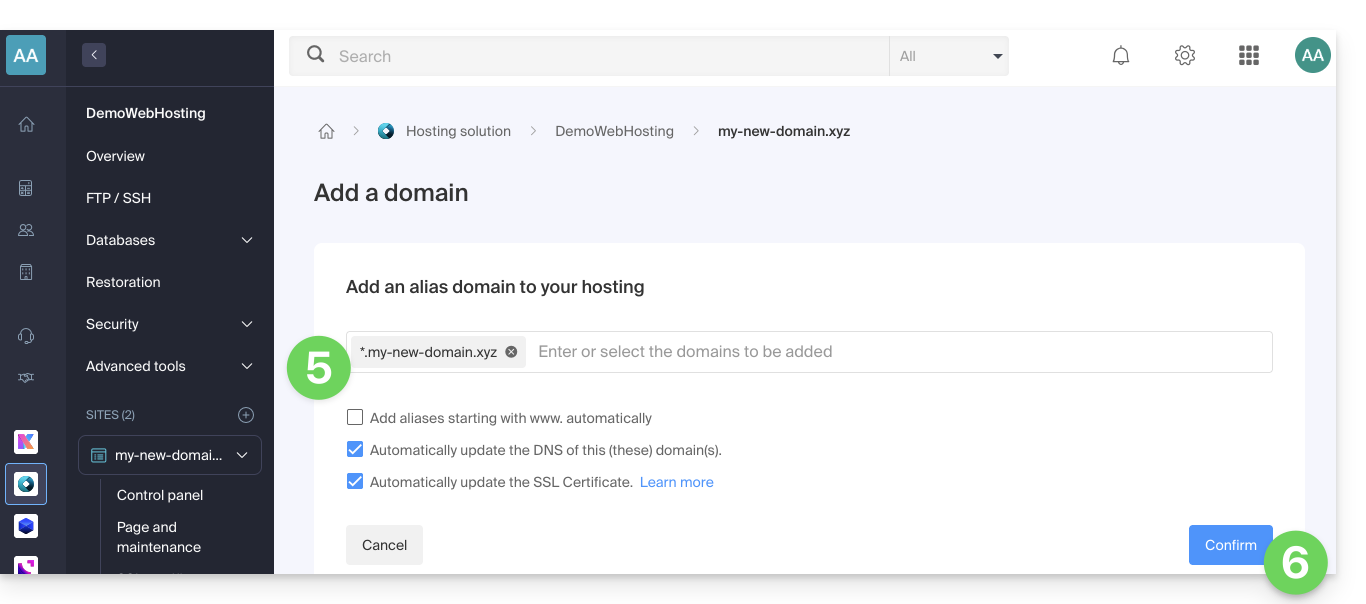
2. Instalar ou atualizar um certificado SSL
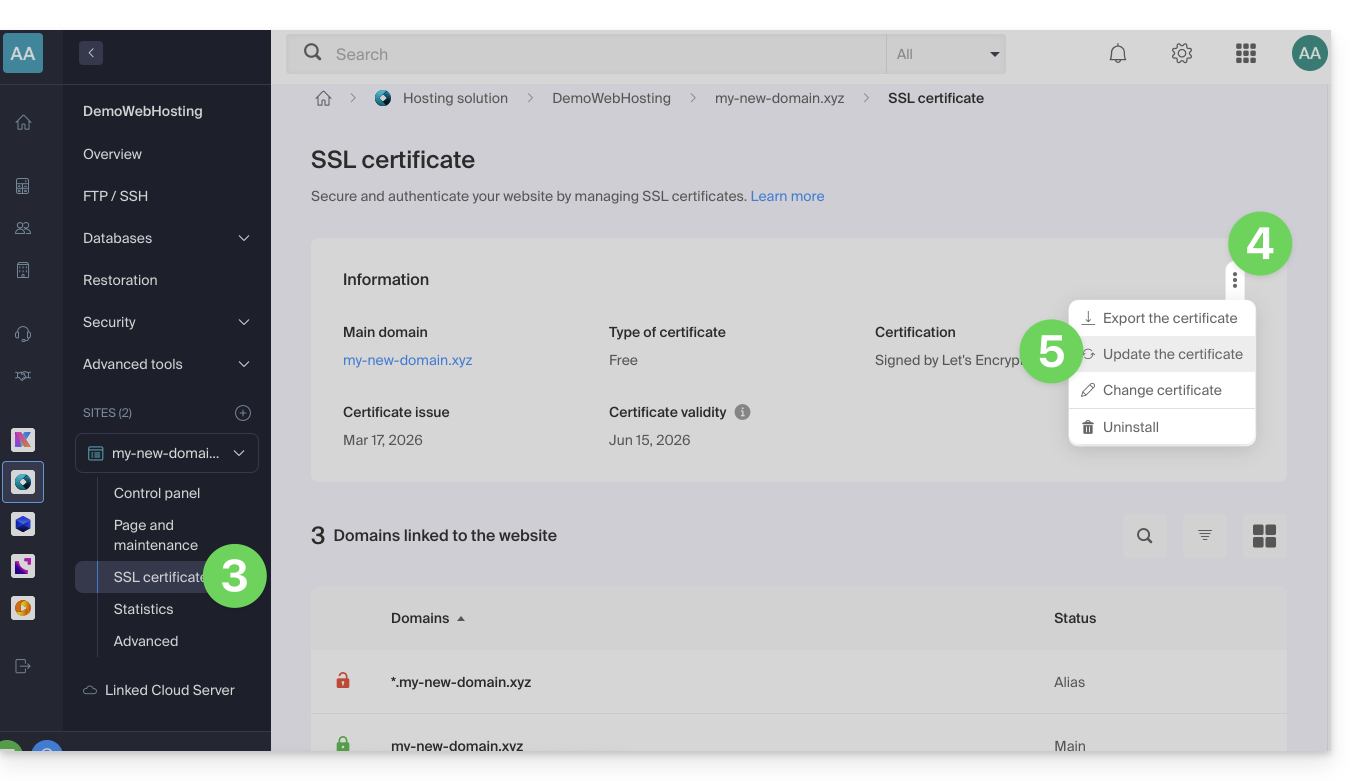
Exemplo de atualização do certificado existente para incluir o subdomínio * curinga:
- Clique aqui para acessar o gerenciamento de hospedagens e sites no seu Painel de Controle Infomaniak (❓: ajuda).
- Clique em o nome do site em questão.
- Clique em Certificado SSL no menu lateral esquerdo.
- Clique no menu de ações ⋮, localizado à direita.
- Clique em Atualizar certificado:
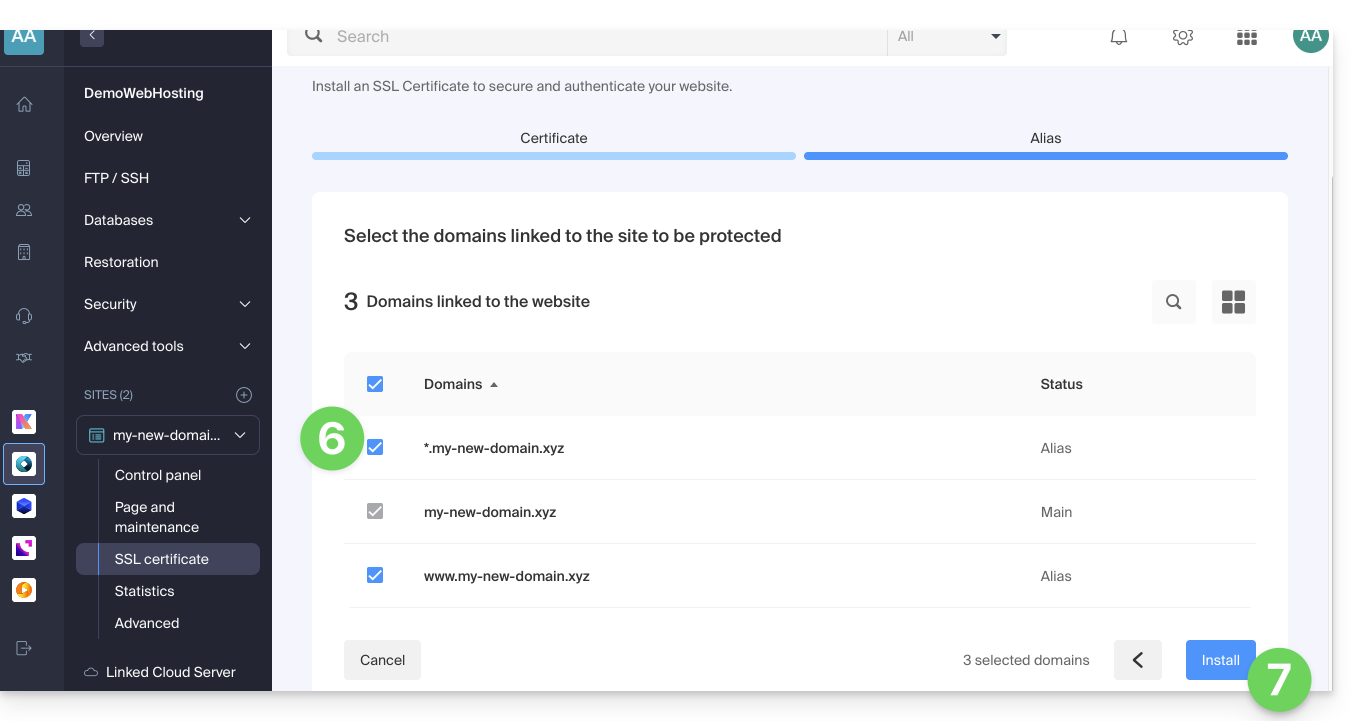
- Certifique-se de que o subdomínio recém-adicionado esteja selecionado.
- Clique no botão Instalar na parte inferior:
- Aguarde enquanto a criação ou atualização é realizada.
Link para esta FAQ: https://faq.infomaniak.com/2096
Esta seção de perguntas frequentes foi útil?
Este guia explica como instalar um certificado SSL gratuito do Let's Encrypt em um site hospedado pela Infomaniak.
Introdução
- Após a instalação do certificado, o seu site estará acessível em
httpehttps…- Se necessário, redirecione automaticamente todos os seus visitantes para o site https seguro (❓: ajuda).
- Se desejar incluir um nome de domínio alternativo recentemente adicionado ao seu site que já possuía um certificado, será necessário atualizá-lo (❓: ajuda).
- Para múltiplos subdomínios, consulte este outro guia.
- O Let's Encrypt limita a instalação de certificados (❓: ajuda) a:
- 100 subdomínios
- 20 certificados por 7 dias por domínio registado
- 5 tentativas infrutíferas por conta por nome de host por hora
Instalar um certificado SSL gratuito em um site
Pré-requisitos
- Para que a instalação seja possível, os DNS do nome de domínio devem estar corretamente configurados para apontar para o site em questão (❓: ajuda).
- Se uma alteração tiver sido feita recentemente neste ponto, algumas operações podem não funcionar imediatamente.
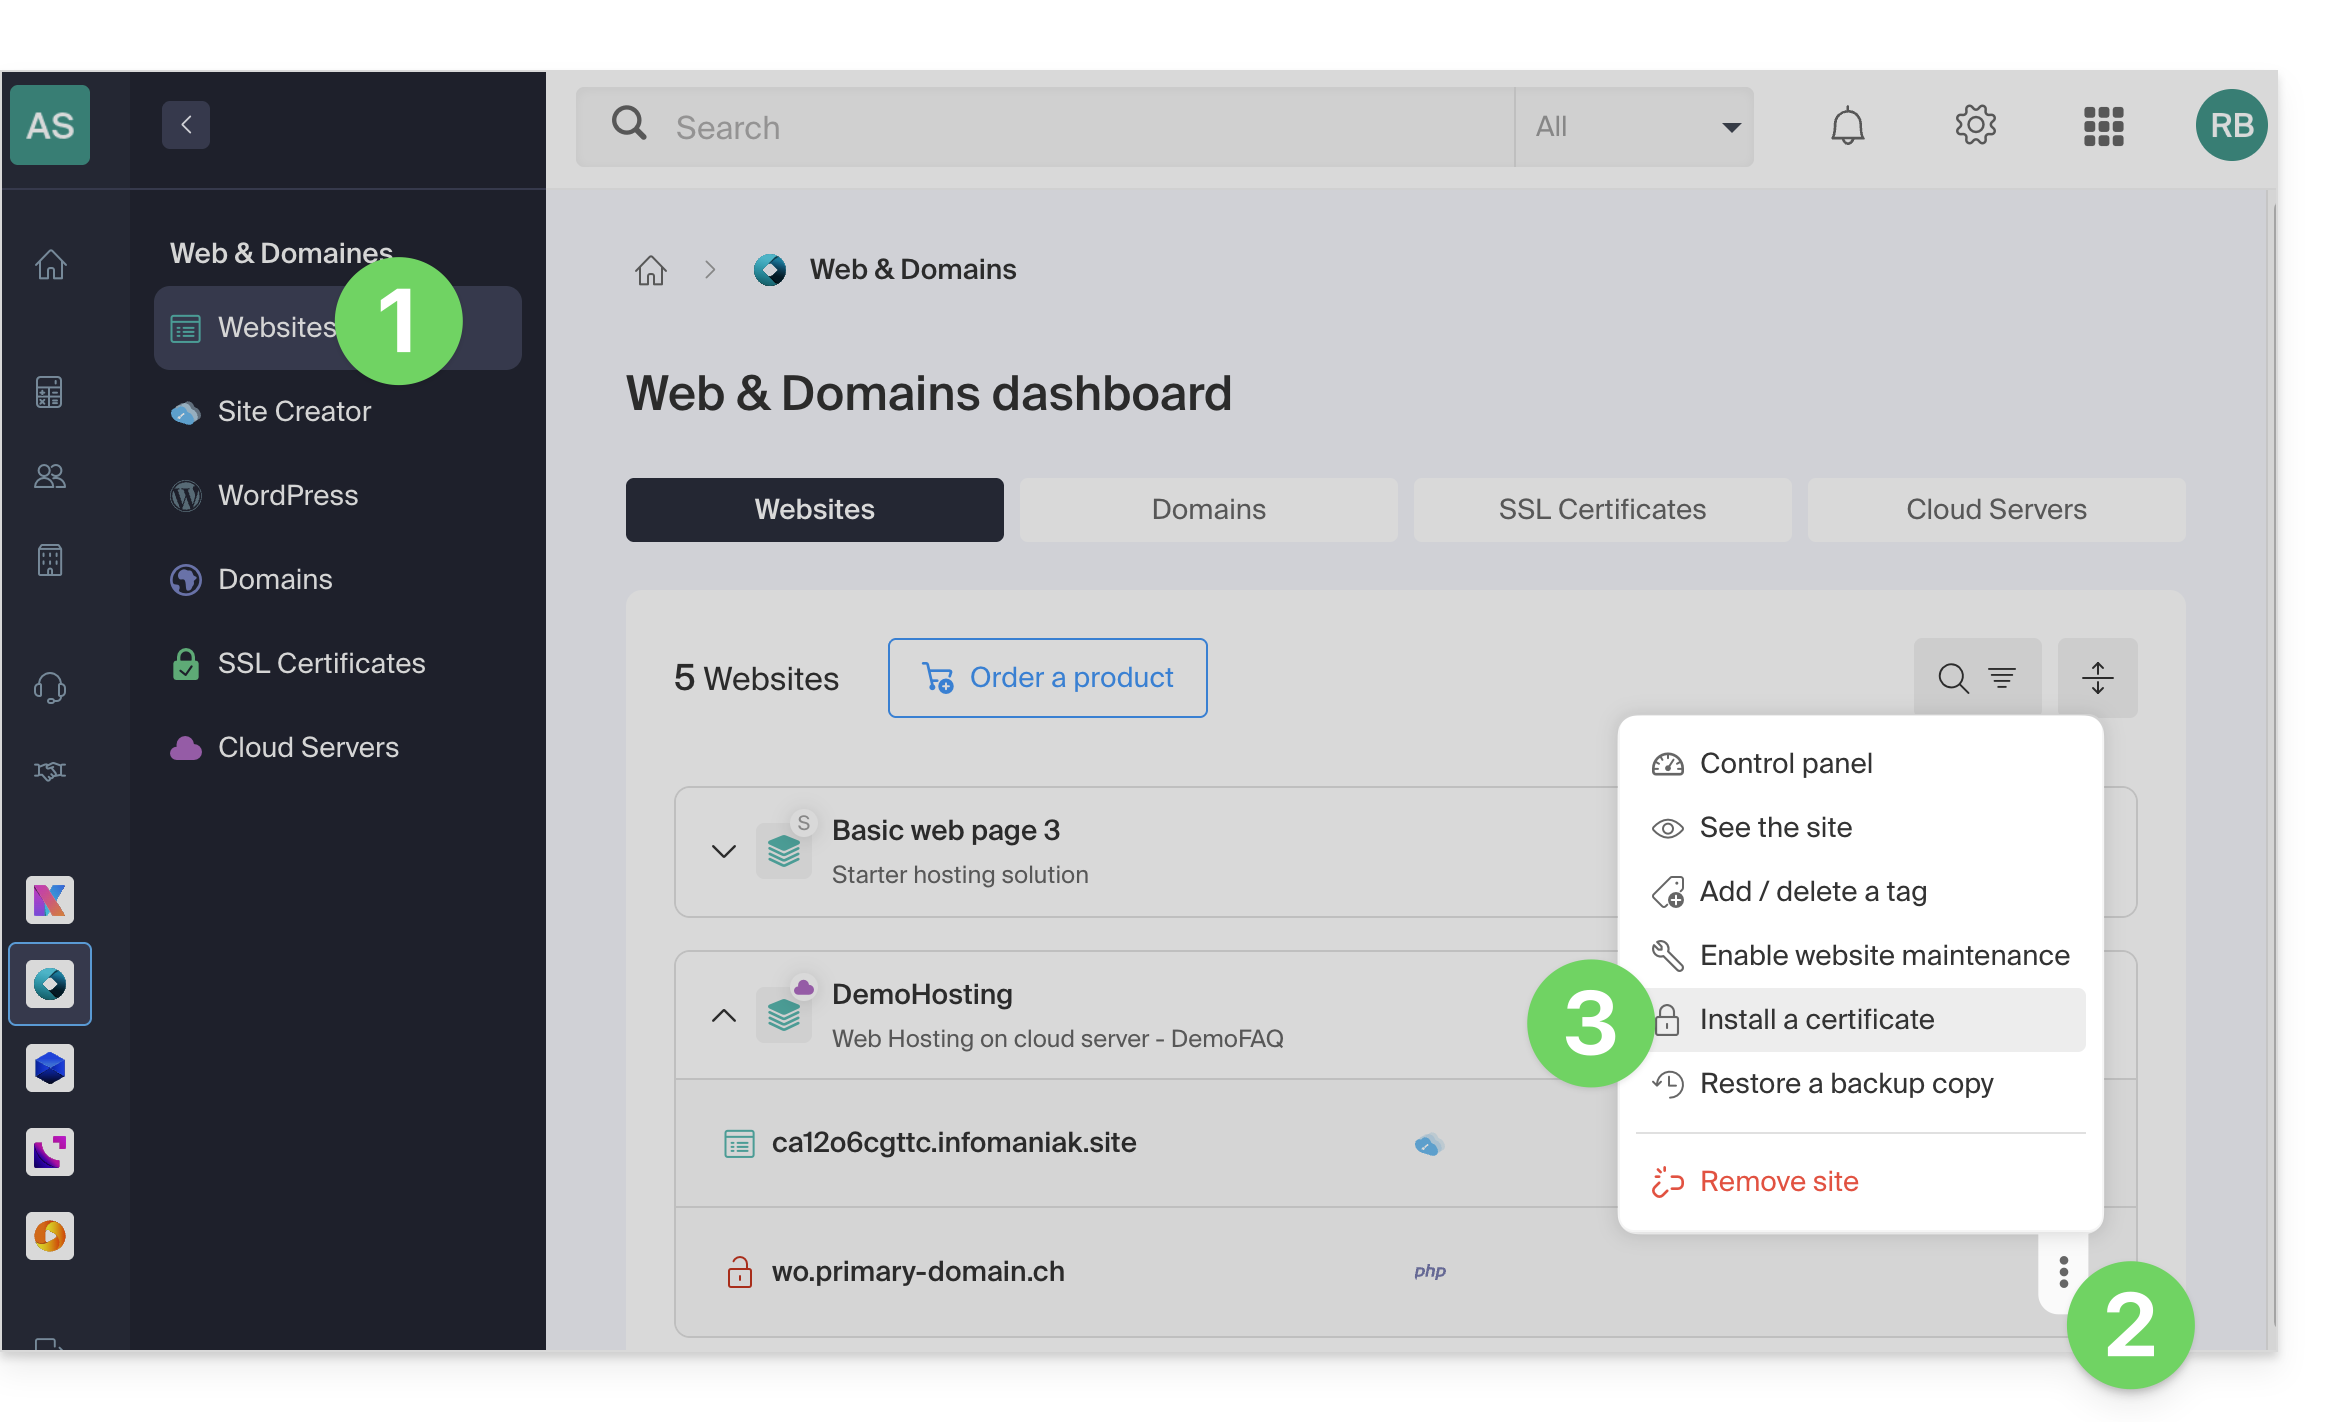
Para acessar os sites e instalar um certificado SSL:
- Clique aqui para acessar o gerenciamento de hospedagens e sites no seu Painel de Controle Infomaniak (❓: ajuda).
- Clique no menu de ações ⋮ localizado à direita do site em questão.
- Clique em Instalar um certificado:
- Escolha o certificado gratuito:
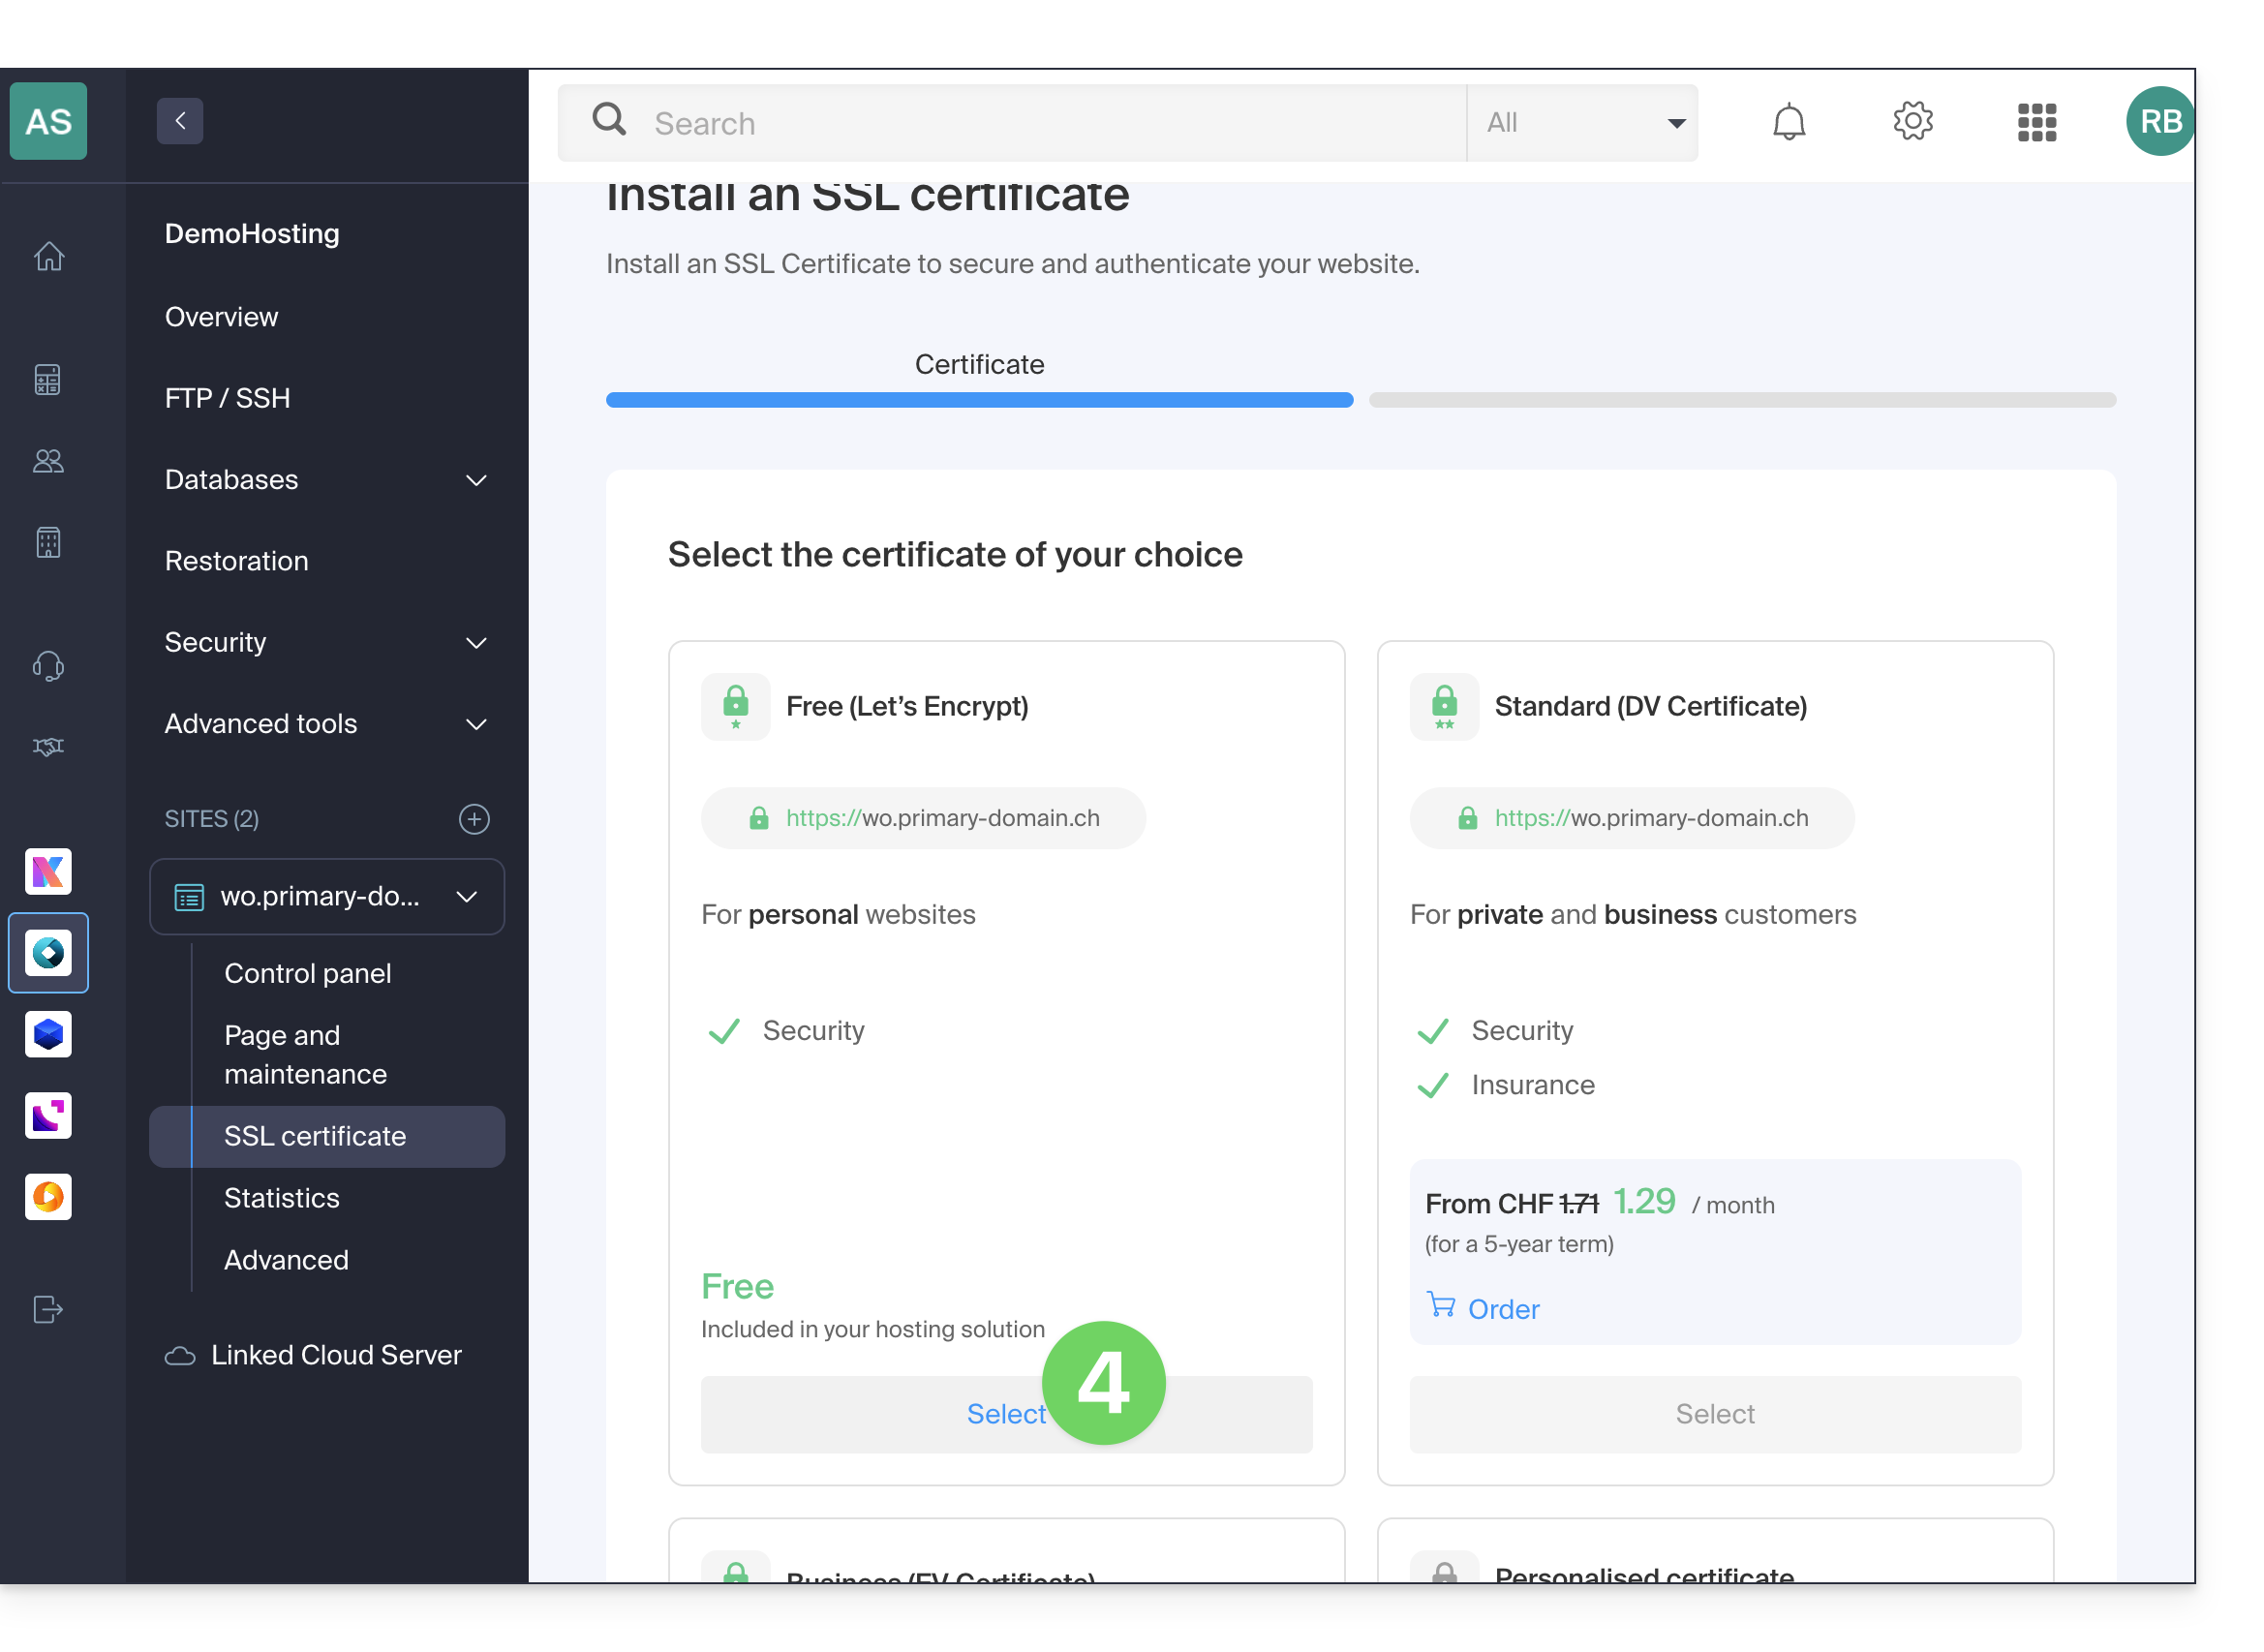
- Clique no botão Seguinte na parte inferior da página.
- Verifique ou selecione os domínios relevantes.
- Clique no botão Instalar:
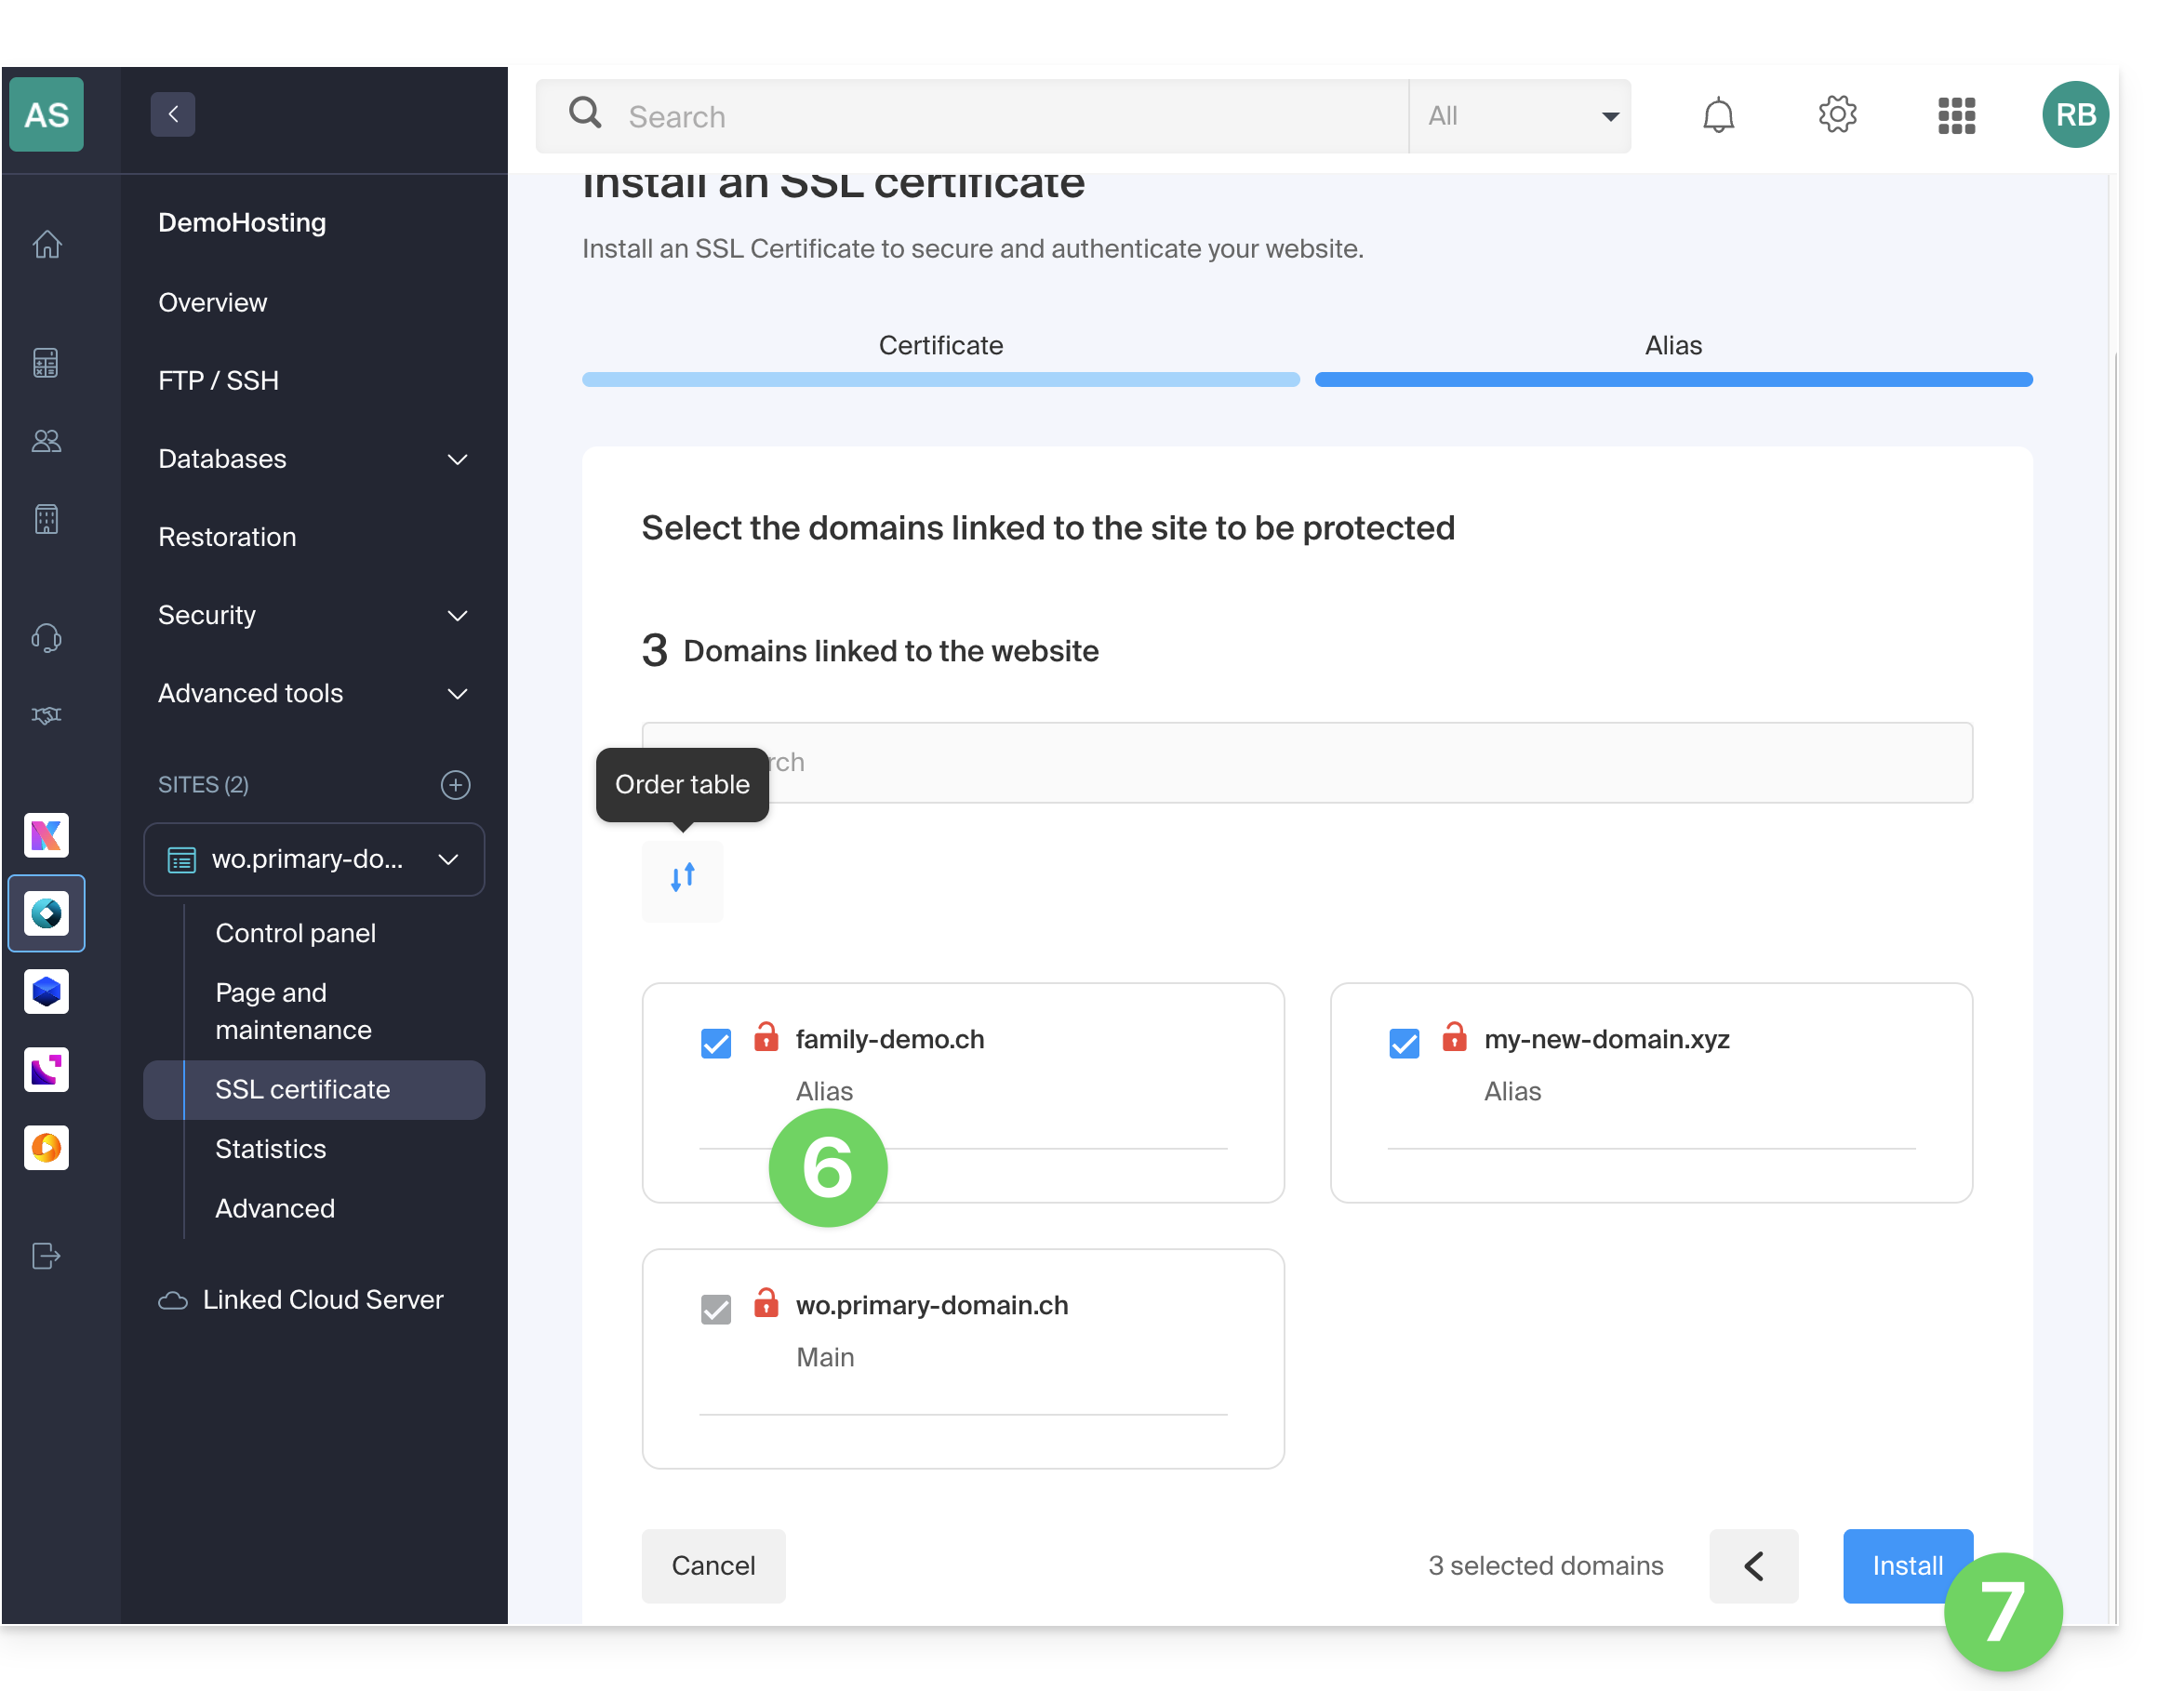
- Aguarde alguns minutos até que o certificado seja emitido no site.
Consulte este outro guia se encontrar erros SSL e este outro guia especificamente se estiver a usar o Cloudflare.
Link para esta FAQ: https://faq.infomaniak.com/2130
Esta seção de perguntas frequentes foi útil?
Este guia sugere soluções para resolver problemas comuns e erros frequentes que podem ocorrer quando você tenta exibir seu site em https após ativar um certificado SSL.
Um navegador como Brave, Chrome, Edge, Firefox, Opera, Safari… exibe automaticamente a versão http do site quando você tenta acessá-lo em https
Recomenda-se que execute as seguintes ações:
- Limpe o cache das suas aplicações ou do seu site.
- Verifique se as páginas e os scripts do site não contêm redirecionamentos para a versão
httpdo site. - Verifique se o arquivo
.htaccessdo site não contém redirecionamentos para a versãohttpdo site. - Defina o endereço
httpsdo site como o padrão:
O site não é exibido corretamente (imagens ausentes, folhas de estilo não suportadas, etc.) ou exibe um aviso na barra de endereço.
Recomenda-se realizar as seguintes ações:
- Limpe o cache das suas aplicações ou do seu site.
- Verifique se as páginas e os scripts não apontam para recursos externos em
http; o site whynopadlock.com pode ajudá-lo a identificar os elementos não seguros do seu site. - Consulte também este outro guia sobre o assunto.
"Esta página da Web apresenta um ciclo de redirecionamento", "ERR_TOO_MANY_REDIRECTS"
Se o seu navegador exibir este erro, recomenda-se que execute as seguintes ações:
- Se o site funcionar com uma aplicação web como o WordPress ou o Joomla, desative as extensões uma a uma para identificar qual está a causar o problema.
- Verifique se as páginas e os scripts do site não contêm redirecionamentos para a versão http do site.
- Tente desativar o HSTS.
- Se o Prestashop for utilizado, é necessário ativar o SSL em todas as páginas:
- Adicione o seu domínio SSL:
- Aceda a Preferências > SEO e URLs.
- Na secção "URL da loja", introduza o endereço do seu site no campo "Domínio SSL" (sem o
https://, apenaswww.domain.xyz).
- Ative o SSL:
- Aceda a Preferências > Definições gerais.
- No topo da página, clique em "Clique aqui para usar o protocolo HTTPS antes de ativar o modo SSL."
- Uma nova página será aberta com o seu site na versão segura HTTPS.
- Force o uso do SSL em todo o site:
- Volte a Preferências > Definições gerais.
- Defina a opção "Ativar SSL" como SIM.
- Defina também "Forçar o uso de SSL para todas as páginas" como SIM.
- Adicione o seu domínio SSL:
Um certificado SSL antigo é exibido – limpe o cache SSL
Os navegadores armazenam em cache os certificados SSL para acelerar a navegação. Normalmente, isso não é um problema. No entanto, ao desenvolver páginas para o seu site ou ao instalar um novo certificado, o estado SSL do navegador pode ser um obstáculo. Por exemplo, você pode não ver o ícone do cadeado na barra de endereço do navegador após instalar um novo certificado SSL.
A primeira coisa a fazer neste caso é garantir que o domínio aponta para o endereço IP do servidor (registros A e AAAA) e, se ainda assim o certificado SSL incorreto for exibido, limpe o cache SSL:
- Chrome: vá para as Configurações e clique em Configurações. Clique em Mostrar configurações avançadas. Em Rede, clique em Alterar configurações de proxy. A caixa de diálogo Propriedades da Internet será exibida. Clique na guia Conteúdo. Clique em Limpar estado SSL e, em seguida, clique em OK. Consulte outras dicas em este outro guia.
- Firefox: aceda a Histórico. Clique em Apagar histórico recente e, em seguida, selecione Ligações ativas e clique em Apagar agora.
Perda da formatação CSS
Se o site for exibido sem o estilo CSS, analise o carregamento das páginas com a Console do navegador. Pode haver erros de conteúdo misto relacionados aos seus estilos .css, que precisarão ser resolvidos para que sejam carregados corretamente novamente.
Cloudflare
Se você utiliza o Cloudflare, consulte este outro guia sobre o assunto.
Link para esta FAQ: https://faq.infomaniak.com/2131
Esta seção de perguntas frequentes foi útil?
Este guia explica como desinstalar um Certificado SSL, independentemente do seu tipo, que foi instalado inicialmente através do painel de controlo Infomaniak. Se o seu certificado for do tipo pago e pretender cancelar a subscrição em vez de desinstalá-lo, consulte este outro guia.
Remover um certificado SSL
Para desinstalar um certificado Infomaniak:
- Clique aqui para acessar o gerenciamento do seu certificado SSL no Manager Infomaniak (precisa de ajuda?).
- Clique diretamente no nome atribuído ao produto em questão:
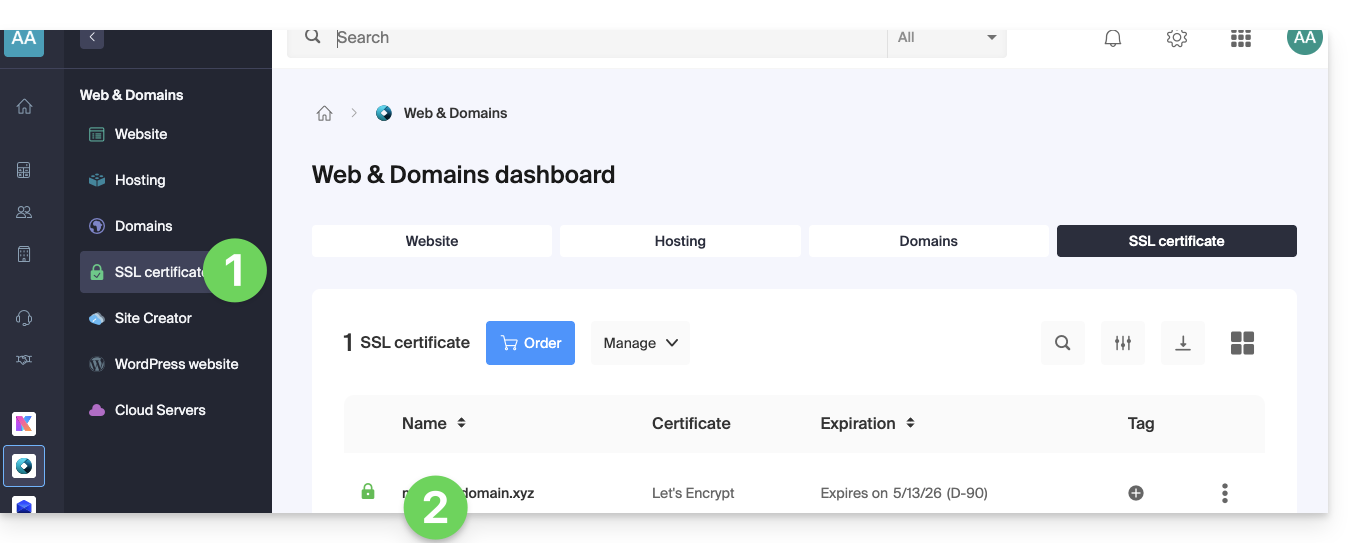
- Clique no menu de ações ⋮ localizado à direita do item em questão.
- Clique em Desinstalar:
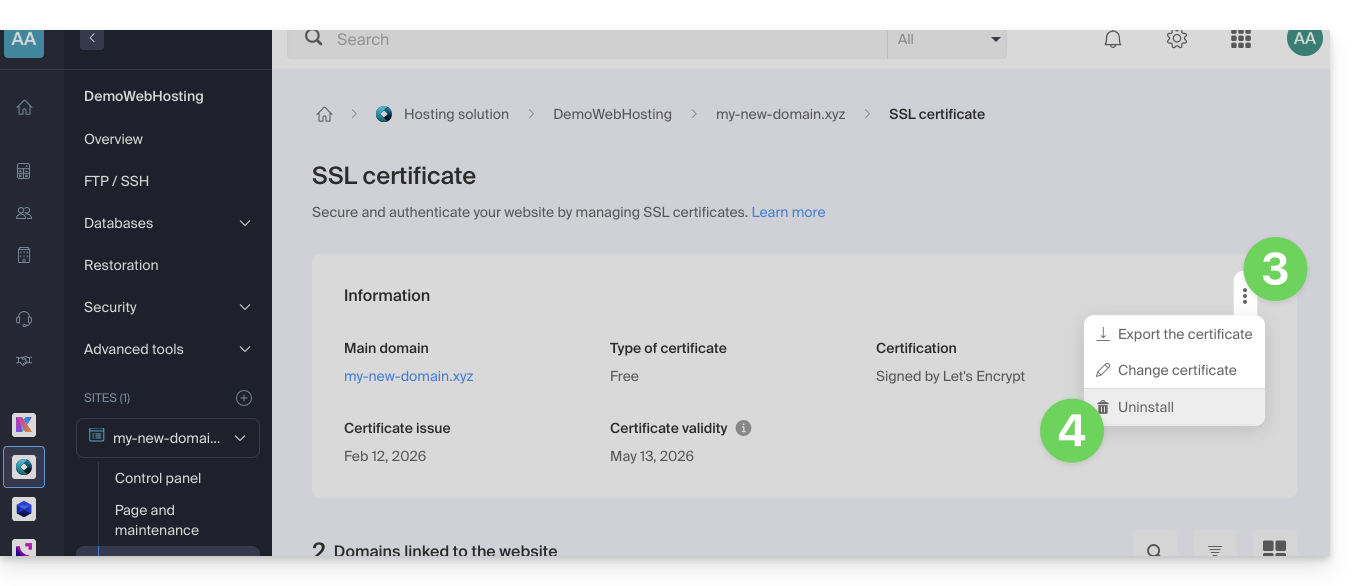
- Confirme a desinstalação do certificado.
Link para esta FAQ: https://faq.infomaniak.com/2250
Esta seção de perguntas frequentes foi útil?
Este guia detalha as condições e o procedimento para obter um certificado SSL EV da Sectigo através da Infomaniak.
Introdução
- Os certificados SSL com validação estendida (EV) são exclusivamente para organizações, empresas e entidades legalmente registradas junto a uma autoridade governamental reconhecida (como um registro comercial).
- Os certificados DV da Sectigo e da Let's Encrypt não estão sujeitos a esta restrição.
- Comparar os certificados SSL disponíveis
- Em caso de dificuldades durante a validação de um certificado DV ou EV, consulte este outro guia.
Procedimento de validação dos certificados EV
A obtenção de um certificado SSL EV pode levar até 24 horas e depende da exatidão das informações fornecidas pelo cliente.
Este processo de validação deve ser repetido a cada nova emissão (consulte este outro guia para obter mais detalhes). O pedido de nova emissão é transmitido automaticamente à Sectigo.a partir de 15 dias antes da data de expiração do certificado (com uma nova tentativa diária, se necessário), independentemente da duração da assinatura do produto.
1. Verificação dos dados da empresa
Os dados incluídos no certificado devem ser previamente verificados junto de uma fonte independente:
- Razão social (nome legal) ou nome comercial
- Forma jurídica
- Endereço físico da sede
- Código postal
- Région / Canton / Département
- País / Código do país
Pontos de atenção:
- A razão social deve corresponder escrupulosamente àquela inscrita no registo comercial; o pedido só poderá ser processado se o nome estiver oficialmente registado.
- Apenas o nome legal ou o nome da marca seguido do nome legal entre parênteses é permitido [ex: Nome comercial (Nome legal)]. Para entidades sem razão social distinta, o nome comercial pode ser utilizado.
- O uso de uma simples caixa postal é proibido; é necessário um endereço físico.
Tendo em conta estes requisitos, por vezes é necessário apresentar um novo pedido com dados corrigidos no CSR. A Infomaniak poderá também solicitar a sua aprovação para alterar as informações transmitidas durante o pedido.
2. Verificação dos dados no diretório WHOIS
O diretório WHOIS lista as informações do proprietário de um nome de domínio. Esses dados devem corresponder obrigatoriamente às informações fornecidas durante o pedido do certificado SSL EV.
Para atualizar as informações WHOIS de um domínio:
- Se o seu domínio é gerido pela Infomaniak, consulte este outro guia.
- Se o seu domínio for gerido por outro fornecedor, contacte o seu registrador atual.
3. Assinatura do contrato e validação final
Após a finalização do pedido do certificado EV, a pessoa de contato designada receberá um e-mail da autoridade de certificação Sectigo contendo os seguintes documentos:
- O formulário de pedido de certificado
- O contrato de adesão
Estes documentos são preenchidos previamente. A validação é efetuada online através de um código de verificação transmitido oralmente por um sistema de chamada automatizado da Sectigo (geralmente a partir do número holandês +31 88 775 77 77).
A chamada é efetuada para o número de telefone oficialmente registado no registo comercial.
Cada pedido de certificado é sujeito a uma validação telefónica, incluindo renovações e reemissões de certificados multidomínio.
Para qualquer questão relacionada com o processo de validação, por favor contacte diretamente a Sectigo.
4. Verificação do domínio (apenas sites externos)
Esta etapa confirma que você tem controle sobre o domínio em questão (caso ele não esteja hospedado na Infomaniak — os domínios que apontam para sites hospedados na Infomaniak são validados automaticamente).
Cada domínio ou subdomínio deve ser aprovado individualmente, seguindo um dos métodos descritos neste outro guia.
Link para esta FAQ: https://faq.infomaniak.com/2303
Esta seção de perguntas frequentes foi útil?
Este guia detalha as condições e o procedimento para utilizar um certificado Sectigo Infomaniak num site alojado noutro local, junto de um fornecedor de alojamento terceirizado.
Introdução
- Você tem a possibilidade de usufruir das tarifas vantajosas da Infomaniak para seus certificados SSL, mesmo gerenciando seus sites em outro provedor de hospedagem.
Instalar um certificado Sectigo
Devido aos diferentes fornecedores, a instalação do seu certificado não será automática:
1. Obter o CSR
Exporte o arquivo de configuração CSR do seu provedor de hospedagem e insira-o no formulário de pedido do seu certificado na Infomaniak.
2. Confirmar a propriedade do domínio
Valide os domínios incluídos no certificado através de um dos seguintes métodos:
- Insira um código de validação recebido em um dos seguintes endereços de e-mail (o endereço de e-mail completo deve existir no domínio a ser validado, por exemplo, “
domain.xyz”):- admin@domain.xyz
- administrator@domain.xyz
- hostmaster@domain.xyz
- postmaster@domain.xyz
- webmaster@domain.xyz
- Criação de um registo CNAME único nos DNS do domínio.
- Ficheiro txt de validação a carregar via FTP no seu site.
Link para esta FAQ: https://faq.infomaniak.com/2305
Esta seção de perguntas frequentes foi útil?
Este guia explica as principais diferenças entre um certificado EV e um certificado DV.
Certificados SSL EV: para empresas
O certificado SSL EV da Sectigo só pode ser emitido para empresas registradas em um cadastro oficial.
Ele garante o mais alto nível de confiança para seus clientes e oferece vantagens exclusivas, além de incluir os benefícios de um certificado DV:
- cadeias na barra de navegação
- selo de site seguro dinâmico
- validação do seu nome de domínio
- autenticação manual das informações de contato e da identidade da sua empresa
- garantia de até 1.750.000 dólares para os utilizadores finais
- suporte 7/7
A ativação de um certificado SSL EV pode demorar até 24 horas e exigirá ações da sua parte.
Certificados SSL DV: para empresas e particulares
O certificado DV da Sectigo está disponível para pessoas físicas e jurídicas. Ele não inclui alguns dos benefícios mencionados acima, mas oferece vantagens adicionais em comparação com os certificados SSL gratuitos do Let's Encrypt:
- selo de site seguro dinâmico
- validação do seu nome de domínio
- garantia de até 10.000 dólares para usuários finais
- suporte 7/7
A ativação de um certificado SSL DV é imediata.
E os certificados Let's Encrypt?
Um certificado gratuito do Let's Encrypt garante o mesmo nível de criptografia que um certificado EV ou DV. No entanto, os certificados do Let's Encrypt não oferecem os seguintes benefícios:
- validação manual das informações de contato e da autenticidade da sua empresa (EV)
- garantia para os usuários finais em caso de fraude (EV/DV)
- suporte em caso de dúvidas
Em resumo, os certificados do Let's Encrypt garantem a criptografia das comunicações entre seus usuários e seu site, mas não asseguram aos usuários da internet que eles estão em um site legítimo cuja identidade foi autenticada por uma autoridade de certificação.
Link para esta FAQ: https://faq.infomaniak.com/2306
Esta seção de perguntas frequentes foi útil?
A garantia Sectigo é um compromisso financeiro da Sectigo, a Autoridade de Certificação (AC), com o objetivo de proteger o usuário final.
Ela se aplica somente se o usuário sofrer uma perda financeira devido a um erro de validação da Sectigo durante a emissão do certificado.
Não cobre as falhas de segurança do seu servidor nem as configurações incorretas que você possa ter feito.
Quanto maior for o nível de validação (DV < OV < EV), maior será, geralmente, o valor da garantia Sectigo.
Link para esta FAQ: https://faq.infomaniak.com/2307
Esta seção de perguntas frequentes foi útil?
Obrigado por escolher a Infomaniak para proteger seus sites com um certificado SSL EV ou DV da Sectigo.
Principais guias SSL
Um certificado SSL protege todas as comunicações entre o servidor e os visitantes, exibe um cadeado e adiciona o https ao site:
- Encomendar um certificado SSL EV da Sectigo
- Entenda a validade e a renovação dos certificados SSL EV e DV
- Resolva um problema de bloqueio de validação da Sectigo
- Entenda a diferença entre um certificado EV e um certificado DV
- Usar um certificado Sectigo em um site externo (outro provedor de hospedagem)
- Entenda a garantia Sectigo dos Certificados SSL
- Resolver um problema relacionado a SSL/https
- Instalar um certificado SSL gratuito Let's Encrypt em um site
- Instalar um certificado SSL "wildcard" gratuito
- Desinstalar um certificado SSL
- Atualizar um certificado SSL Let's Encrypt (por exemplo, após adicionar/remover aliases)
Ajuda adicional
Link para esta FAQ: https://faq.infomaniak.com/2312
Esta seção de perguntas frequentes foi útil?
Este guia explica como adicionar um selo de confiança dinâmico em um site seguro com um certificado SSL da Sectigo.
Introdução
- A Infomaniak, enquanto provedor de hospedagem, oferece certificados SSL para proteger os sites dos seus clientes.
- A Sectigo (anteriormente conhecida como Comodo) é um fornecedor de certificados SSL reconhecido que oferece diferentes níveis de segurança.
- O "selo de confiança dinâmico", ou "Selo de Confiança Sectigo" / "Logotipo de Confiança Sectigo", é um elemento visual que os proprietários de sites podem exibir em suas páginas para indicar aos visitantes que a conexão é segura, um sinal de confiança que informa os usuários de que as transações e o intercâmbio de informações realizadas no site são criptografados e protegidos por um certificado SSL emitido pela Sectigo.
- Ao utilizar um certificado SSL da Sectigo e exibir o selo de confiança dinâmico, um site hospedado na Infomaniak beneficia não apenas da segurança no intercâmbio de dados, mas também de um aumento da confiança dos usuários, o que é essencial no comércio eletrônico e para a proteção de informações pessoais.
Adicionar um selo de confiança
Veja como funciona um selo de confiança dinâmico:
- Validação: para obter esse selo, o proprietário do site deve primeiro obter um certificado SSL válido da Sectigo, o que requer um processo de validação. Dependendo do nível do certificado escolhido (Validação de Domínio – DV, Validação de Organização – OV ou Validação Estendida – EV), essa validação pode ser mais ou menos aprofundada.
- Instalação: após obter e instalar o certificado SSL no servidor web da Infomaniak, o site poderá estabelecer conexões seguras via HTTPS.
- Exibição do selo: Sectigo fornece um código HTML ou um script que o proprietário do site pode integrar ao seu site; este código permite exibir o selo de confiança dinâmico da Sectigo.
- Atualização: o selo é frequentemente atualizado em tempo real para refletir a situação atual do certificado SSL; se o certificado expirar ou for revogado, o selo também refletirá isso, alertando os visitantes sobre o fato de o site não estar mais seguro.
O selo de confiança é composto por uma imagem e um código HTML.Este último funciona apenas se um certificado Sectigo estiver instalado no site e, nesse caso, gera um logotipo interativo que exibe os dados do certificado.
Salve uma das imagens abaixo
Clique com o botão direito do mouse na imagem que deseja salvar e, em seguida, clique em Salvar imagem como...
- Pequeno

- Médio

- Grande

Carregar a imagem no seu site
Envie a imagem para o seu servidor web (via FTP ou o seu CMS) e anote o URL de acesso a essa imagem para a próxima etapa (por exemplo, https://domain.xyz/wp-content/uploads/sectigo.png).
Obtenha o código para integrar nas suas páginas
Insira o endereço completo da sua imagem na página https://www.trustlogo.com/install/index2.html para verificar se a imagem está acessível.
Clique no botão Continuar na mesma página para obter os dois códigos que devem ser copiados e colados no cabeçalho da sua(s) página(s) web:

Importante:
- No código,
CL1corresponde a um certificado SSLDV; substituaCL1porSC5para um certificado SSL do tipoEV.
Link para esta FAQ: https://faq.infomaniak.com/2338
Esta seção de perguntas frequentes foi útil?
Este guia detalha as regras de validade dos certificados SSL EV e DV, de acordo com as últimas diretrizes do setor de segurança cibernética.
Duração da validade dos certificados SSL
Impulsionado pelo CA/B Forum (que reúne os principais atores da Web, como Apple, Google e Mozilla) e com o objetivo de reforçar a segurança global das comunicações, o período máximo de validade dos certificados SSL foi reduzido.A partir de meados de março de 2026, qualquer novo certificado emitido pela Sectigo terá um período máximo de validade de 200 dias (aproximadamente 6 meses)., contra 397 dias anteriormente.
Esclarecimento sobre a interface: a data exibida no cartão do seu produto na interface Infomaniak refere-se à data de validade do certificado SSL técnico em vigor, e não à data de validade do seu produto (assinatura).
Esta redução do ciclo de vida dos certificados visa limitar os riscos relacionados com a pirataria e garantir que as informações de identificação das empresas sejam verificadas com mais frequência. Esta alteração não afeta o preço nem a duração do contrato do seu produto.
Os certificados SSL Let's Encrypt não são afetados por esta alteração (a Infomaniak gere automaticamente a sua renovação). Os certificados emitidos antes da alteração permanecem válidos até à sua data de expiração inicial.
Processo de reemissão e renovação
Para antecipar o vencimento do certificado, o pedido de a renovação é automaticamente submetida à Sectigo 15 dias antes da data de expiração do certificado. Uma nova tentativa é realizada diariamente, se necessário.
Para finalizar a emissão do novo certificado, é imprescindível repetir as etapas de validação necessárias, de acordo com o tipo de certificado.
Certificados SSL DV da Sectigo
Para os certificados SSL DV (Validação de Domínio), a reemissão automática é acompanhada de uma verificação do domínio.
- Se o seu site estiver hospedado na Infomaniak: a revalidação e a instalação do novo certificado são totalmente transparentes e automáticas.
- Se o seu site estiver hospedado fora da Infomaniak:terá de validar o domínio e efetuar a reinstalação manual do certificado no seu servidor a cada renovação.
Certificados SSL EV da Sectigo
Devido ao seu nível de segurança superior, os certificados SSL EV (Validação Estendida) exigem que repetir todas as etapas de validação da empresa a cada renovação (a cada 6 meses), independentemente da duração da assinatura escolhida.
- Este procedimento envolve a validação dos dados administrativos e uma chamada telefônica de confirmação (conforme descrito em este outro guia).
- Assim como nos certificados DV, uma reinstalação manual é imprescindível se o certificado for utilizado em um servidor externo à Infomaniak.
Link para esta FAQ: https://faq.infomaniak.com/2470
Esta seção de perguntas frequentes foi útil?
Este guia explica como resolver um problema de instalação de certificado SSL (Let's Encrypt ou Sectigo) se você estiver usando o Cloudflare com regras de segurança rigorosas, como filtragem por país ou endereços IP.
Ajustar as configurações de SSL / geobloqueio
Quando um certificado SSL é solicitado através da Infomaniak (Let's Encrypt gratuito ou Sectigo), a autoridade de certificação deve verificar se você é o proprietário do domínio. Essa verificação pode ser feita por HTTP (através de arquivos especiais colocados no seu site), DNS ou e-mail:
- Let's Encrypt utiliza
/.well-known/acme-challenge/. - Sectigo geralmente utiliza
/.well-known/pki-validation/(ou DNS/e-mail, dependendo da opção escolhida).
Se essas verificações falharem (por exemplo, porque o Cloudflare bloqueia o acesso), o certificado não poderá ser emitido ou renovado. Além disso, o Let's Encrypt não verifica mais apenas a partir de um único local. Há algum tempo (e ainda mais desde março de 2024), ele realiza suas verificações a partir de vários países simultaneamente – incluindo novos países como a Suécia ou Singapura. Consequentemente, se um desses países estiver bloqueado pelas suas configurações do Cloudflare, a solicitação do certificado poderá falhar, mesmo que todo o resto esteja configurado corretamente.
O pior é que, mesmo que tente criar uma exceção apenas para o endereço do desafio (.well-known/acme-challenge), isso pode não funcionar com algumas regras do Cloudflare. De fato, as regras de bloqueio por país ou por endereço IP são aplicadas antes de qualquer exceção baseada em caminhos de URL.
Ajustar o modo SSL/TLS
No Cloudflare, utilize o modo Full ou Full (strict). Esses modos toleram temporariamente um certificado expirado ou autoassinado, enquanto a validação é concluída: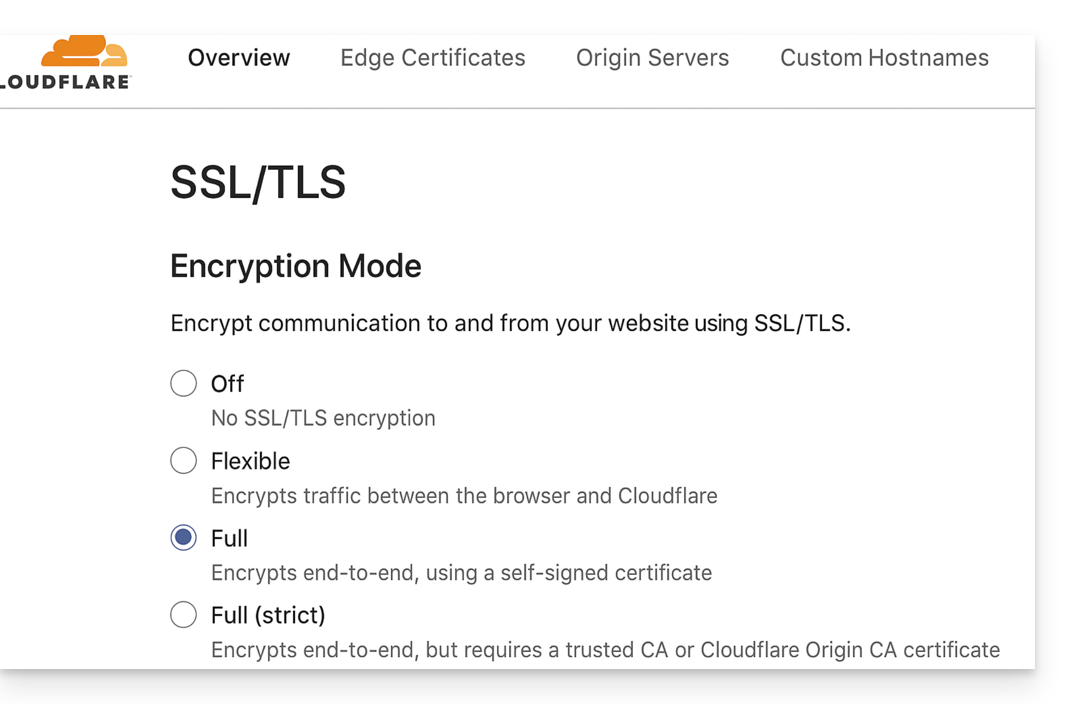
Permitir os caminhos de validação
Evite as "Regras de Acesso por IP" que bloqueiam e prefira as "Regras Personalizadas" que autorizam sem restrições os seguintes caminhos:
/.well-known/acme-challenge/(Let's Encrypt)/.well-known/pki-validation/(Sectigo)
Desativar temporariamente o bloqueio geográfico
Se necessário, desative temporariamente o bloqueio geográfico ou por endereço IP durante o processo de validação e, em seguida, reative suas proteções após a emissão ou renovação do certificado.
Link para esta FAQ: https://faq.infomaniak.com/2517
Esta seção de perguntas frequentes foi útil?
Este guia explica como adicionar dois Certificados SSL EV ou DV diferentes no mesmo site.
Introdução
- Como não é possível instalar dois certificados SSL no mesmo site, é necessário criar dois sites idênticos.
Criação do segundo site
Pré-requisitos
- Remova quaisquer nomes de domínio alias do seu site.
Para acessar a hospedagem web e adicionar um site:
- Clique aqui para acessar o gerenciamento do seu produto no Manager Infomaniak (precisa de ajuda?).
- Clique diretamente no nome atribuído ao produto em questão.
- Clique no botão Adicionar um site:
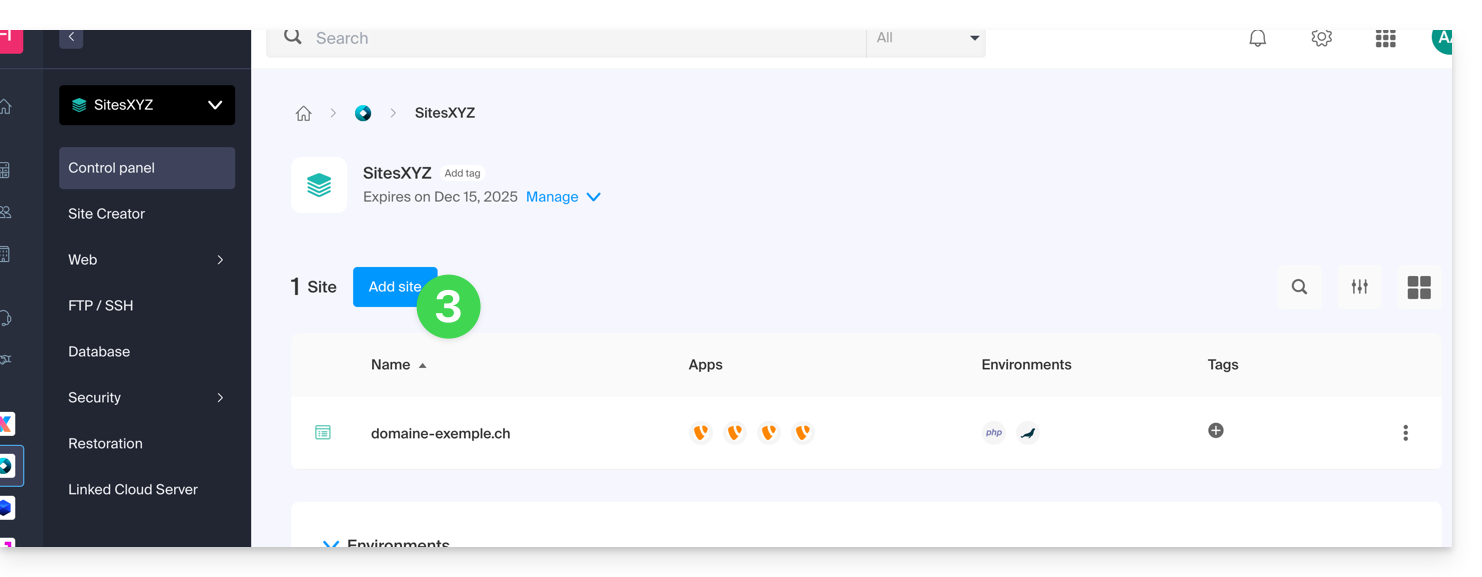
- Continue sem instalar nenhuma ferramenta:
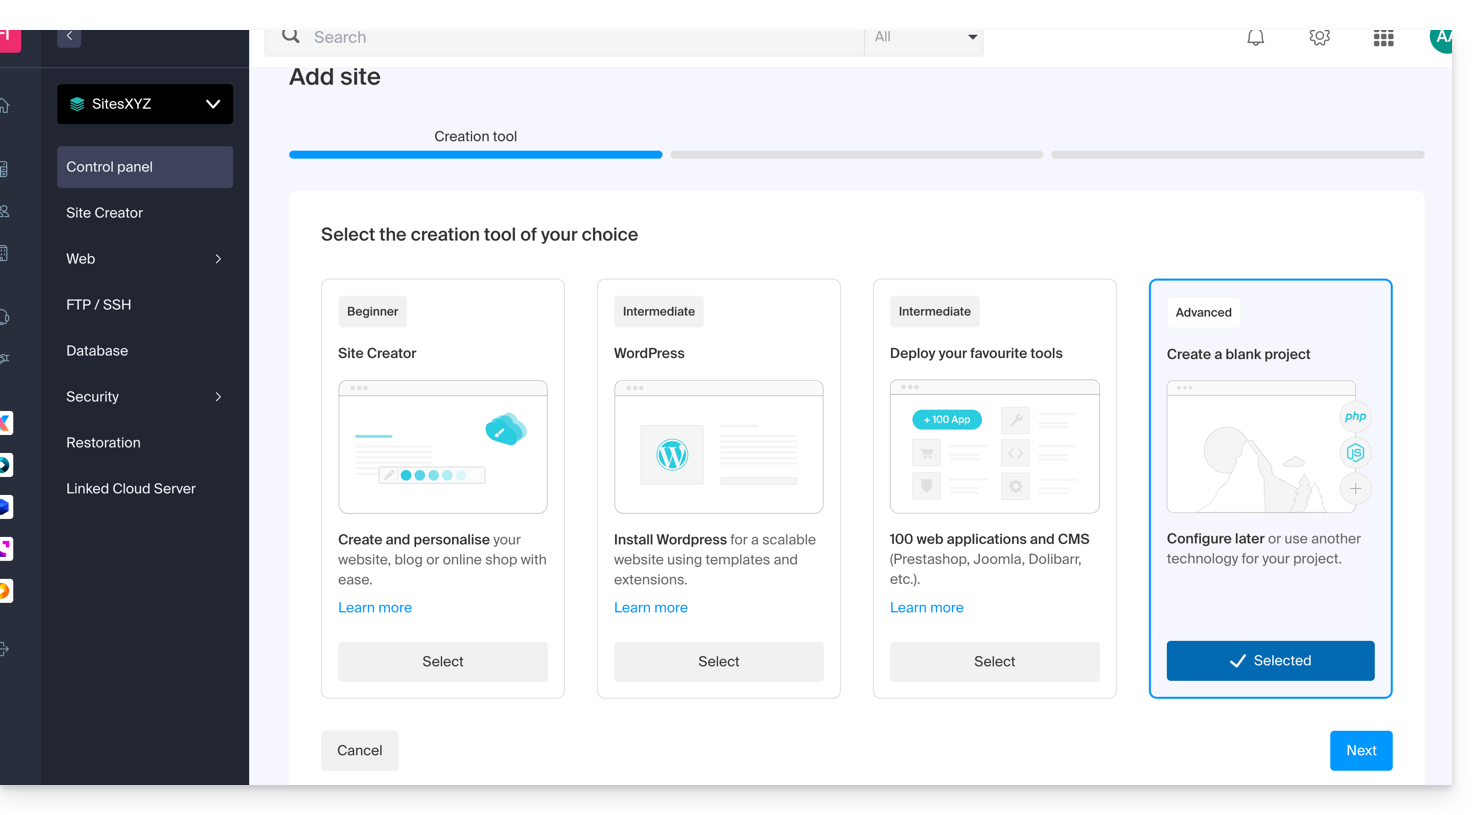
- Clique em Apache e escolha a mesma versão de PHP do site principal:
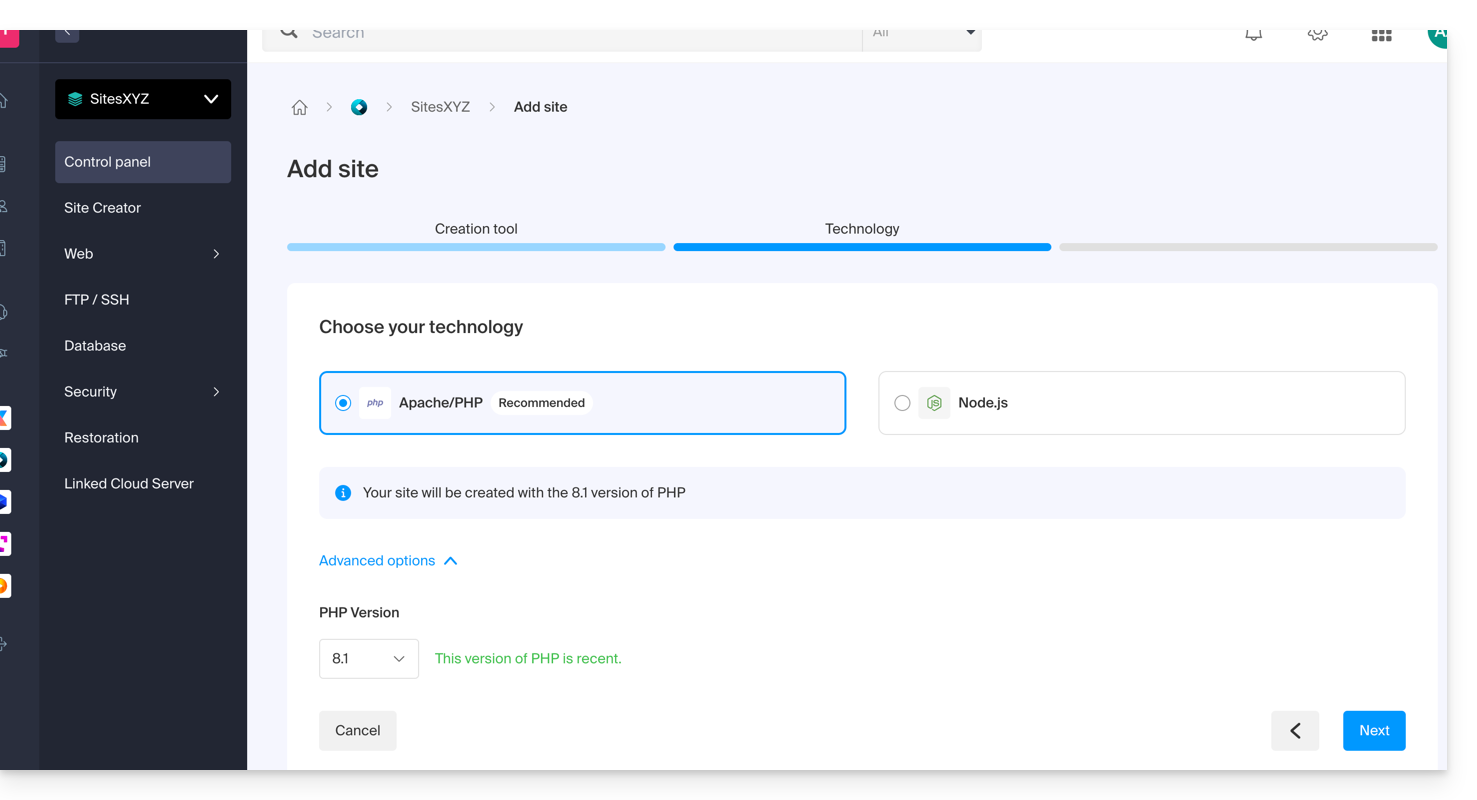
- Escolha entre usar um nome de domínio ou um subdomínio.
- Indique o nome do domínio ou do subdomínio.
- Clique em Opções avançadas.
- Ative (ou não) o certificado SSL Let's Encrypt para o futuro site.
- Marque a caixa Definir o local manualmente.
- Escolha o mesmo local que o do site principal:
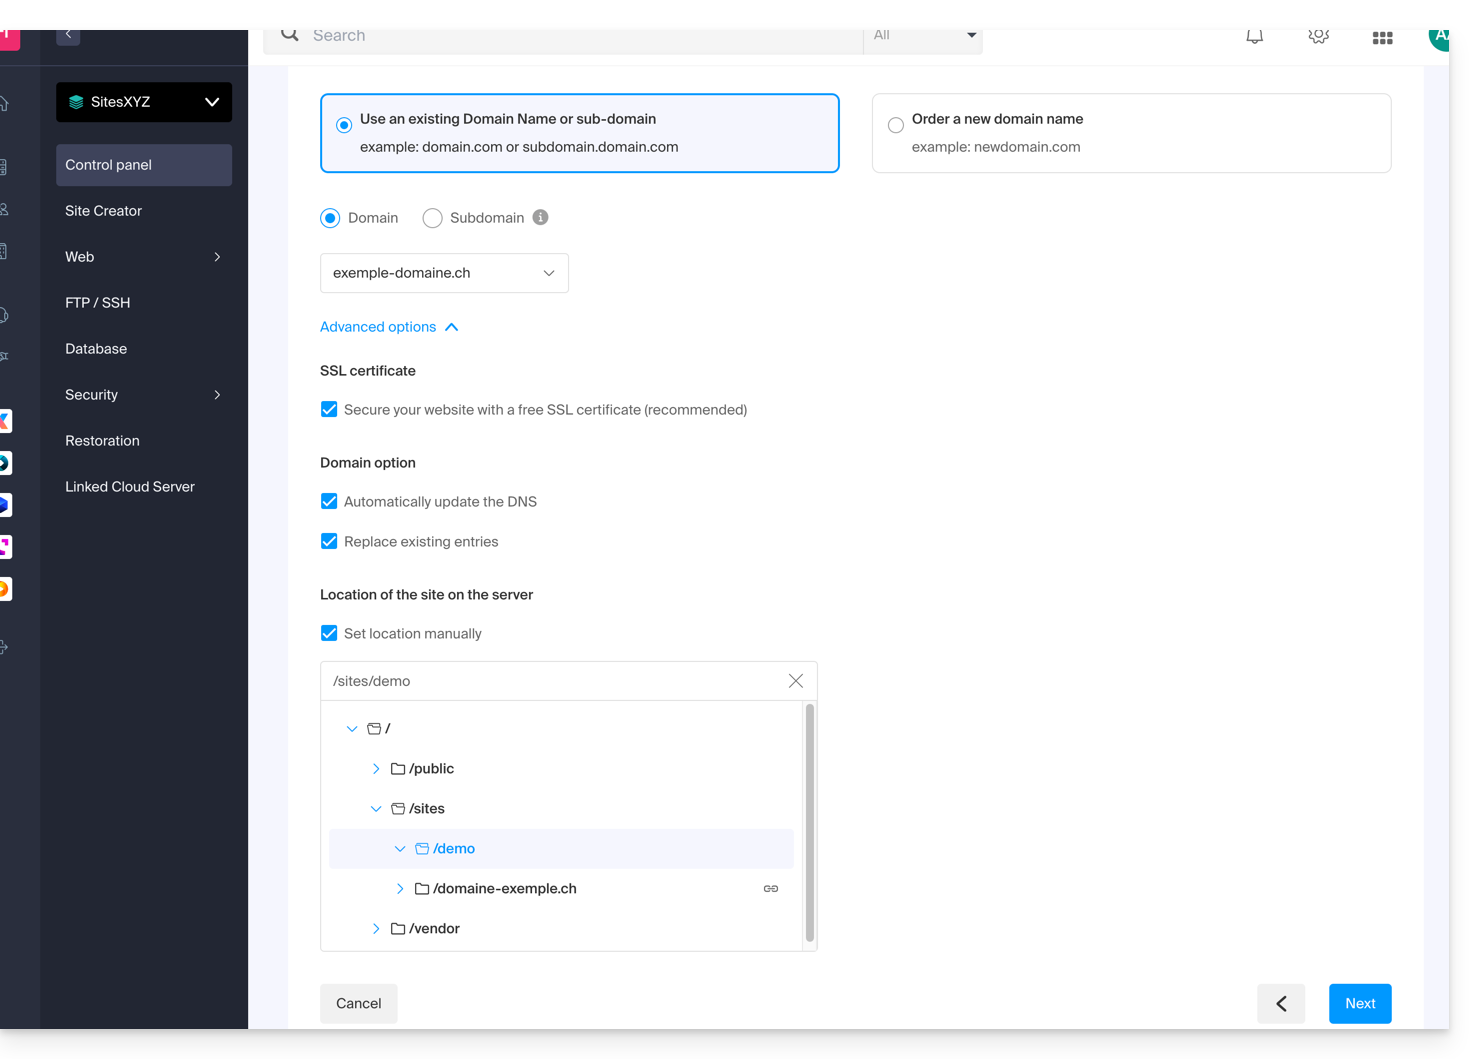
- Clique no botão azul Seguinte para iniciar a criação do site.
Instalar o certificado SSL
Depois que o segundo site for criado (qualquer adição/modificação de DNS pode levar até 48 horas para ser propagada (❓: ajuda), você poderá instalar um certificado SSL (se optou por não instalar o certificado no passo 9 acima).
Para acessar a gestão do site:
- Clique aqui para acessar o gerenciamento do seu produto no Manager Infomaniak (precisa de ajuda?).
- Clique diretamente no nome atribuído ao produto em questão.
- Clique em Certificados SSL no menu lateral esquerdo.
- Clique no botão azul Instalar um certificado SSL e siga o procedimento.
Link para esta FAQ: https://faq.infomaniak.com/2522
Esta seção de perguntas frequentes foi útil?
Este guia é para você se estiver tendo problemas com um certificado SSL Sectigo do tipo DV ou EV.
Alteração da Sectigo (junho de 2025)
Desde junho de 2025, a Sectigo utiliza uma nova infraestrutura de validação chamada MPIC, que realiza as verificações necessárias para a emissão de certificados SSL (incluindo EV e OV) a partir de servidores localizados em todo o mundo, e não apenas nos Estados Unidos.
Um challenge é um método utilizado pela autoridade de certificação para verificar se o solicitante controla efetivamente o domínio. Isso pode ser feito por meio de uma solicitação HTTP, um registro DNS ou um e-mail. Para os certificados EV e OV, este challenge é combinado com verificações sobre a identidade da organização.
Com este novo método, os pedidos de validação podem originar-se de qualquer país ou provedor de acesso. Se o seu site ou servidor utilizar regras de geobloqueio, um firewall de aplicação (WAF) ou um serviço como o Cloudflare com restrições de acesso por país ou ASN, estas verificações poderão ser bloqueadas, causando uma falha na validação.
Mesmo que a Sectigo fale principalmente sobre certificados OV e EV, esta evolução também pode afetar indiretamente os certificados DV, uma vez que a validação de domínio ainda depende da possibilidade de aceder aos recursos necessários.
⚠️ Para evitar problemas, recomenda-se desativar temporariamente quaisquer restrições geográficas ou filtros de rede durante a validação do certificado.
Link para esta FAQ: https://faq.infomaniak.com/2790
Esta seção de perguntas frequentes foi útil?
Este guia ajuda a diagnosticar e resolver o erro "A sua ligação não é segura" (ou NET::ERR_CERT_AUTHORITY_INVALID). Este alerta de segurança pode afetar tanto os visitantes de um site quanto os seus administradores.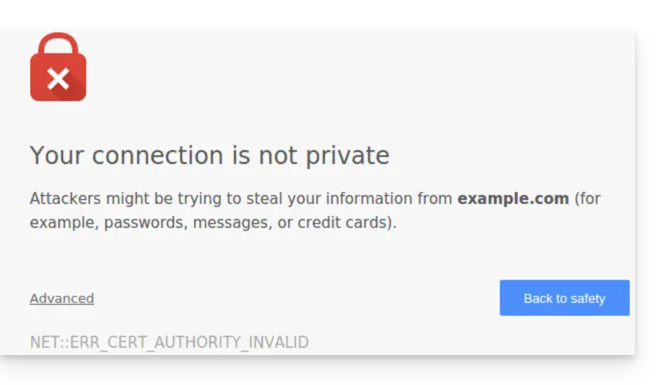
Introdução
- Este alerta é um mecanismo de proteção do seu navegador.
- Ele indica que uma conexão segura não pôde ser estabelecida com o servidor por um dos seguintes motivos:
- O site não possui um certificado de segurança SSL/TLS.
- O certificado instalado está expirado ou configurado incorretamente.
- A conexão entre o seu dispositivo e o servidor está sendo interceptada ou interrompida.
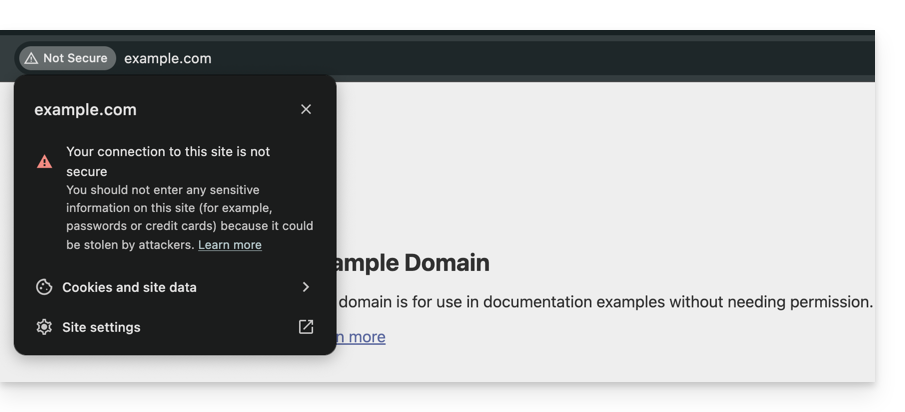
- Atenção: em um site que apresentar este erro, os dados que você inserir (senhas, números de cartão) não serão criptografados e poderão ser interceptados por terceiros.
Soluções para os visitantes
Se você encontrar este erro em um site que não gerencia, o problema pode, por vezes, estar relacionado à sua própria configuração. Verifique os seguintes pontos:
- Verifique a hora do seu dispositivo: se o seu computador ou smartphone não estiver com a data/hora correta, a validação do certificado falhará.
- Teste na navegação privada: se o erro desaparecer, limpe o cache e os cookies do seu navegador.
- Verifique sua rede: evite redes Wi-Fi públicas que podem forçar seus próprios portais de conexão.
- Antivírus e Firewall: alguns softwares de segurança analisam as conexões HTTPS e podem causar falsos positivos.
Soluções para proprietários de sites na Infomaniak
Se você for o administrador do site, deverá garantir que o seu certificado SSL esteja ativo e válido para cobrir todos os seus nomes de domínio.
1. O certificado SSL está instalado?
Se o seu site ainda estiver em HTTP, você precisa gerar um certificado (gratuito através do Let's Encrypt ou pago). Consulte os certificados disponíveis na Infomaniak.
Importante: se você adicionou aliases (nomes de domínio secundários) ao seu site após a instalação do SSL, você deve atualizar o certificado para que ele os inclua.
2. Verificar a validade e o prazo de validade
Na Infomaniak, os certificados são renovados automaticamente, mas, por vezes, pode ocorrer um bloqueio técnico. Para verificar o estado do seu certificado:
- Clique aqui para acessar o gerenciamento de seus certificados no Manager (precisa de ajuda?).
- Verifique o status e a data de validade no painel:

3. Forçar o HTTPS e corrigir o "Conteúdo Misto"
Se o seu certificado for válido, mas o erro persistir (ou se o cadeado não estiver verde), é possível que o seu site ainda esteja carregando elementos (imagens, scripts) via HTTP. Para corrigir isso, consulte este outro guia.
Link para esta FAQ: https://faq.infomaniak.com/2833
Esta seção de perguntas frequentes foi útil?